Embed Size (px)
Citation preview

CAUTIONNEVER unhook the battery CABLE to test the output of the alternator. This will damage your REGULATOR
AMP LOAD. Make a list of all the electrical equipment used on your race car. Write down the amp load for each part and Total it. This is your amp load. If exceeds 105 amps, you will require a higher output alternator. please call tech support for unit upgrade or exchange.
If the alternator is being tested on a Dyno or any other type of engine tester, the alternator MUST BE connected to a good battery (12.6 Volts) in order to take the “load”. Otherwise, the alternator belt should be taken off in order to avoid any type of alternator rotor rotation.
Wire and Cable Gauge. You must have at least 4 AWG Gauge cable with terminals and connector rated to a minimum of 130 Amps. USE THE SUPPLIED Terminal to connect to alternator Positive side of your cable. If you need a new terminal call RPI at 912-25-9505.
MAKE SURE that your electrical system has a “NOISE FILTER” next to your ignition box. If not, get one from MSD, Part # 8830, follow their installation instructions. This filter will protect your alternator regulator from any “spikes” generated by the ignition system.
Every time you are going racing and before you start your race car, check the battery voltage. If below 12.50 VDC, you must charge your battery with an external battery charger. Make sure battery is capable of holding charge. If battery is below 12.4 VDC you must replace the battery with a new one.
Make sure the alternator has good air back clearance. The regulator and rectifier are cooled by the internal rear fan which “vacuums” air from the rear and pull’s it thru the parts, exhausting the hot air thru the sides. Blow off any debri after each race.
Make sure “Master Switch” stays off when electrical system is not in use.
Have questions. ASK, call tech support. 912-25-9505
Alternator Output TerminalTO POSITIVE
MSD Part # 8830
20148, 20149 Installation Instruction. 4/15/11 Page 1 of 3
NEGATIVE THRU BRACKET TO ENGINE BLOCK
Your unit comes with a serial number, which allows us to track the date of manufacture, unit specifications and service records. This number appears on the side of the alternator. Please use this number as a reference for any type of service and/or questions.
Race Proven Inc. Alternator Output Cable Installation
Use Included Lug Roush-Yates Part # 11005A
To connect the 4AWG Cable

Alternator Warranty StatementDuring the applicable warranty period of ONE YEAR after purchase, any 20148 alternator which fails due to defect in materials or workmanship shall be repaired or replaced at Race Proven Inc
discretion without charge. In the event of a return the alternator must be shipped FOB Race Proven Inc, 2255 Industrial Blvd, Waycross, GA 31503 within the applicable warranty period. The applicable warranty period for this Race Proven Inc. alternator is outlined below in the Warranty
Period section. The warranty period for any repaired alternators or replacement alternators will be only the remaining portions of the original limited warranty.
A Return Material Authorization (RMA) number must be obtained from the Company’sCustomer Service department before returning any Products by calling 912-285-9505.The Company shall have no liability under this warranty for problems or defects directly
or indirectly caused by misuse of the Product, alteration of the Product (includingremoval of any warning labels), accidents, improper installation, application, operation or
improper repair of the Product.THIS WARRANTY REPRESENTS THE ENTIRE WARRANTY OF THE COMPANY.
ALL OTHER WARRANTIES EXPRESS OR IMPLIED, ORAL OR WRITTEN,INCLUDING, BUT NOT LIMITED TO, THE WARRANTIES OF MERCHANTABILITY AND FITNESS FOR A PARTICULAR PURPOSE ARE HEREBY
DISCLAIMED.THE LIABILITY OF THE COMPANY, AT ITS SOLE OPTION, UNDER THIS
WARRANTY IS EXPRESSLY LIMITED TO THE REPLACEMENT OR REPAIR OFTHE DEFECTIVE PART THEREOF. IN NO EVENT SHALL THE COMPANY BE LIABLE OR
RESPONSIBLE FOR SPECIAL, INCIDENTAL, OR CONSEQUENTIAL DAMAGES OF ANY KIND OR CHARACTER, NOR SHALL ITS LIABILITY EVER EXCEED THE PURCHASE
PRICE PAID TO RACE PROVEN INC. FOR SUCH DEFECTIVE PRODUCT.This warranty is not transferable and may only be enforced by the original purchaser.
Claims under this warranty must be submitted to Race Proven Inc. within fifteen (15) days of discovery of any suspected product defect.
YOU MUST REGISTER YOUR ALTERNATOR BY MAILLING A COPY OF YOUR INVOICE INCLUDING THE ALTERNATOR SERIAL NUMBER TO:
Race Proven Inc.2255 Industrial Blvd.Waycross, GA 31503
Alternator Output Cable Installation 20148, 20149 Installation Instruction. 4/15/11 Page 2 of 3 Race Proven Inc.
1 2 3
4 5
Lug installation to 4AWG CableRoush-Yates
Part # 11005A
M6x8Set Screw
Make a mark 5/8” over cable
insulation
Cut & remove cable insulation
Insert cable to lug. Make sure to leave a 0.050” gap
between insulation and lug
Hold lug on vise. Torque to 65 Inch/lbs. Do a “Cable Pull Test”
ensure cable doesn’t move.
Purchase Additional Lugs atwww.roushyatesparts.com
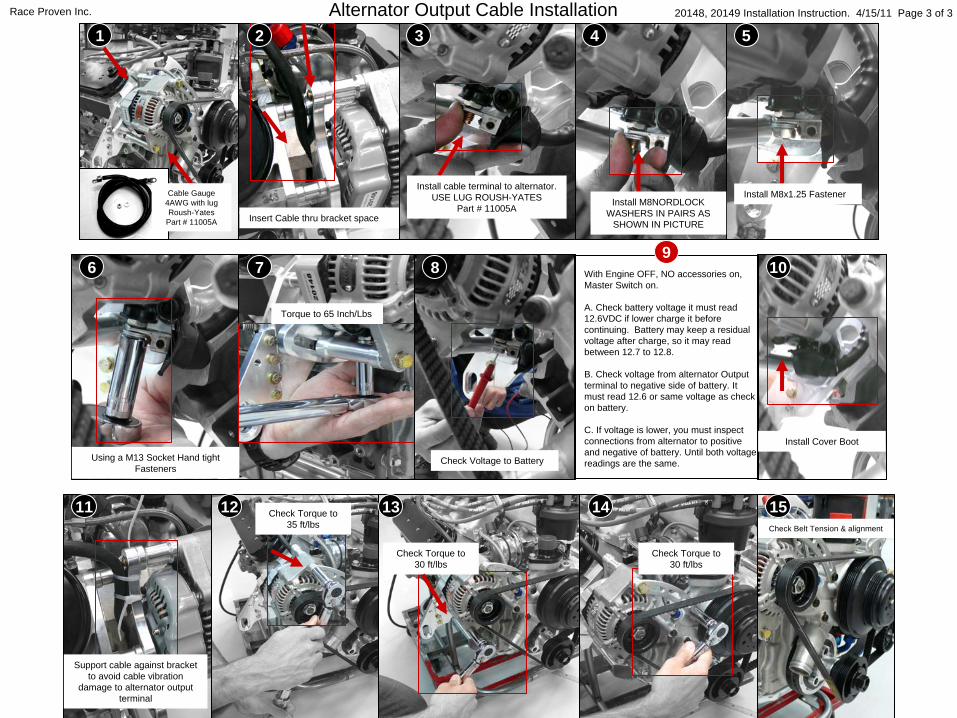
With Engine OFF, NO accessories on, Master Switch on.
A. Check battery voltage it must read 12.6VDC if lower charge it before continuing. Battery may keep a residual voltage after charge, so it may read between 12.7 to 12.8.
B. Check voltage from alternator Output terminal to negative side of battery. It must read 12.6 or same voltage as check on battery.
C. If voltage is lower, you must inspect connections from alternator to positive and negative of battery. Until both voltage readings are the same.
1 2 3 4 5
6 7 89
10
1211 1413 15
Alternator Output Cable Installation
Insert Cable thru bracket space
Cable Gauge 4AWG with lug Roush-Yates
Part # 11005A
Install M8NORDLOCK WASHERS IN PAIRS AS
SHOWN IN PICTURE
Install cable terminal to alternator.USE LUG ROUSH-YATES
Part # 11005AInstall M8x1.25 Fastener
Using a M13 Socket Hand tight Fasteners
Torque to 65 Inch/Lbs
20148, 20149 Installation Instruction. 4/15/11 Page 3 of 3
Support cable against bracket to avoid cable vibration
damage to alternator output terminal
Check Torque to 35 ft/lbs
Check Torque to 30 ft/lbs
Check Torque to 30 ft/lbs
Check Belt Tension & alignment
Race Proven Inc.
Check Voltage to Battery
Install Cover Boot