Embed Size (px)
Citation preview

Amazon MemoryDB for RedisDeveloper Guide

Amazon MemoryDB for Redis Developer Guide
Amazon MemoryDB for Redis: Developer GuideCopyright © Amazon Web Services, Inc. and/or its affiliates. All rights reserved.
Amazon's trademarks and trade dress may not be used in connection with any product or service that is notAmazon's, in any manner that is likely to cause confusion among customers, or in any manner that disparages ordiscredits Amazon. All other trademarks not owned by Amazon are the property of their respective owners, who mayor may not be affiliated with, connected to, or sponsored by Amazon.

Amazon MemoryDB for Redis Developer Guide
Table of ContentsWhat is MemoryDB for Redis? ... . . . . . . . . . . . . . . . . . . . . . . . . . . . . . . . . . . . . . . . . . . . . . . . . . . . . . . . . . . . . . . . . . . . . . . . . . . . . . . . . . . . . . . . . . . . . . . . . . . . . . . . . . . 1
Features of MemoryDB .... . . . . . . . . . . . . . . . . . . . . . . . . . . . . . . . . . . . . . . . . . . . . . . . . . . . . . . . . . . . . . . . . . . . . . . . . . . . . . . . . . . . . . . . . . . . . . . . . . . . . . . . . . . . 1MemoryDB core components .... . . . . . . . . . . . . . . . . . . . . . . . . . . . . . . . . . . . . . . . . . . . . . . . . . . . . . . . . . . . . . . . . . . . . . . . . . . . . . . . . . . . . . . . . . . . . . . . . . . . 2
Clusters ... . . . . . . . . . . . . . . . . . . . . . . . . . . . . . . . . . . . . . . . . . . . . . . . . . . . . . . . . . . . . . . . . . . . . . . . . . . . . . . . . . . . . . . . . . . . . . . . . . . . . . . . . . . . . . . . . . . . . . . . . . . 2Nodes .... . . . . . . . . . . . . . . . . . . . . . . . . . . . . . . . . . . . . . . . . . . . . . . . . . . . . . . . . . . . . . . . . . . . . . . . . . . . . . . . . . . . . . . . . . . . . . . . . . . . . . . . . . . . . . . . . . . . . . . . . . . . 3Shards .... . . . . . . . . . . . . . . . . . . . . . . . . . . . . . . . . . . . . . . . . . . . . . . . . . . . . . . . . . . . . . . . . . . . . . . . . . . . . . . . . . . . . . . . . . . . . . . . . . . . . . . . . . . . . . . . . . . . . . . . . . . 3Parameter groups .... . . . . . . . . . . . . . . . . . . . . . . . . . . . . . . . . . . . . . . . . . . . . . . . . . . . . . . . . . . . . . . . . . . . . . . . . . . . . . . . . . . . . . . . . . . . . . . . . . . . . . . . . . . 3Subnet groups .... . . . . . . . . . . . . . . . . . . . . . . . . . . . . . . . . . . . . . . . . . . . . . . . . . . . . . . . . . . . . . . . . . . . . . . . . . . . . . . . . . . . . . . . . . . . . . . . . . . . . . . . . . . . . . . . 4Access control lists ... . . . . . . . . . . . . . . . . . . . . . . . . . . . . . . . . . . . . . . . . . . . . . . . . . . . . . . . . . . . . . . . . . . . . . . . . . . . . . . . . . . . . . . . . . . . . . . . . . . . . . . . . . . 4Users ... . . . . . . . . . . . . . . . . . . . . . . . . . . . . . . . . . . . . . . . . . . . . . . . . . . . . . . . . . . . . . . . . . . . . . . . . . . . . . . . . . . . . . . . . . . . . . . . . . . . . . . . . . . . . . . . . . . . . . . . . . . . . . 4
Related services .... . . . . . . . . . . . . . . . . . . . . . . . . . . . . . . . . . . . . . . . . . . . . . . . . . . . . . . . . . . . . . . . . . . . . . . . . . . . . . . . . . . . . . . . . . . . . . . . . . . . . . . . . . . . . . . . . . . . . . 4Choosing Regions and Availability Zones .... . . . . . . . . . . . . . . . . . . . . . . . . . . . . . . . . . . . . . . . . . . . . . . . . . . . . . . . . . . . . . . . . . . . . . . . . . . . . . . . . . . . 4
Locating your nodes .... . . . . . . . . . . . . . . . . . . . . . . . . . . . . . . . . . . . . . . . . . . . . . . . . . . . . . . . . . . . . . . . . . . . . . . . . . . . . . . . . . . . . . . . . . . . . . . . . . . . . . . . 6Supported Regions & endpoints ... . . . . . . . . . . . . . . . . . . . . . . . . . . . . . . . . . . . . . . . . . . . . . . . . . . . . . . . . . . . . . . . . . . . . . . . . . . . . . . . . . . . . . . . . 7
Accessing MemoryDB .... . . . . . . . . . . . . . . . . . . . . . . . . . . . . . . . . . . . . . . . . . . . . . . . . . . . . . . . . . . . . . . . . . . . . . . . . . . . . . . . . . . . . . . . . . . . . . . . . . . . . . . . . . . . . . . 8MemoryDB security ... . . . . . . . . . . . . . . . . . . . . . . . . . . . . . . . . . . . . . . . . . . . . . . . . . . . . . . . . . . . . . . . . . . . . . . . . . . . . . . . . . . . . . . . . . . . . . . . . . . . . . . . . . . . . . . . . . 9
Before you begin .... . . . . . . . . . . . . . . . . . . . . . . . . . . . . . . . . . . . . . . . . . . . . . . . . . . . . . . . . . . . . . . . . . . . . . . . . . . . . . . . . . . . . . . . . . . . . . . . . . . . . . . . . . . . . . . . . . . . . . . . . . . 10Sign up for AWS .... . . . . . . . . . . . . . . . . . . . . . . . . . . . . . . . . . . . . . . . . . . . . . . . . . . . . . . . . . . . . . . . . . . . . . . . . . . . . . . . . . . . . . . . . . . . . . . . . . . . . . . . . . . . . . . . . . . 10Create an IAM user ... . . . . . . . . . . . . . . . . . . . . . . . . . . . . . . . . . . . . . . . . . . . . . . . . . . . . . . . . . . . . . . . . . . . . . . . . . . . . . . . . . . . . . . . . . . . . . . . . . . . . . . . . . . . . . . . . 10
Getting started with MemoryDB .... . . . . . . . . . . . . . . . . . . . . . . . . . . . . . . . . . . . . . . . . . . . . . . . . . . . . . . . . . . . . . . . . . . . . . . . . . . . . . . . . . . . . . . . . . . . . . . . . . . . . . 12Setting up .... . . . . . . . . . . . . . . . . . . . . . . . . . . . . . . . . . . . . . . . . . . . . . . . . . . . . . . . . . . . . . . . . . . . . . . . . . . . . . . . . . . . . . . . . . . . . . . . . . . . . . . . . . . . . . . . . . . . . . . . . . . . 12
Getting an AWS Access Key .... . . . . . . . . . . . . . . . . . . . . . . . . . . . . . . . . . . . . . . . . . . . . . . . . . . . . . . . . . . . . . . . . . . . . . . . . . . . . . . . . . . . . . . . . . . . 12Configuring Your Credentials ... . . . . . . . . . . . . . . . . . . . . . . . . . . . . . . . . . . . . . . . . . . . . . . . . . . . . . . . . . . . . . . . . . . . . . . . . . . . . . . . . . . . . . . . . . . 13Downloading and Configuring the AWS CLI ... . . . . . . . . . . . . . . . . . . . . . . . . . . . . . . . . . . . . . . . . . . . . . . . . . . . . . . . . . . . . . . . . . . . . . . 13Set up your permissions (new MemoryDB users only) ... . . . . . . . . . . . . . . . . . . . . . . . . . . . . . . . . . . . . . . . . . . . . . . . . . . . . . . . . . 13
Step 1: Create a cluster ... . . . . . . . . . . . . . . . . . . . . . . . . . . . . . . . . . . . . . . . . . . . . . . . . . . . . . . . . . . . . . . . . . . . . . . . . . . . . . . . . . . . . . . . . . . . . . . . . . . . . . . . . . . 14Creating a MemoryDB cluster ... . . . . . . . . . . . . . . . . . . . . . . . . . . . . . . . . . . . . . . . . . . . . . . . . . . . . . . . . . . . . . . . . . . . . . . . . . . . . . . . . . . . . . . . . . 14
Step 2: Authorize access to the cluster ... . . . . . . . . . . . . . . . . . . . . . . . . . . . . . . . . . . . . . . . . . . . . . . . . . . . . . . . . . . . . . . . . . . . . . . . . . . . . . . . . . . . . . 19Step 3: Connect to the cluster ... . . . . . . . . . . . . . . . . . . . . . . . . . . . . . . . . . . . . . . . . . . . . . . . . . . . . . . . . . . . . . . . . . . . . . . . . . . . . . . . . . . . . . . . . . . . . . . . . 21
Find your cluster endpoint ... . . . . . . . . . . . . . . . . . . . . . . . . . . . . . . . . . . . . . . . . . . . . . . . . . . . . . . . . . . . . . . . . . . . . . . . . . . . . . . . . . . . . . . . . . . . . . 21Connect to a MemoryDB cluster (Linux) ... . . . . . . . . . . . . . . . . . . . . . . . . . . . . . . . . . . . . . . . . . . . . . . . . . . . . . . . . . . . . . . . . . . . . . . . . . . . 21
Step 4: Deleting a cluster ... . . . . . . . . . . . . . . . . . . . . . . . . . . . . . . . . . . . . . . . . . . . . . . . . . . . . . . . . . . . . . . . . . . . . . . . . . . . . . . . . . . . . . . . . . . . . . . . . . . . . . . . 22Where do I go from here? .... . . . . . . . . . . . . . . . . . . . . . . . . . . . . . . . . . . . . . . . . . . . . . . . . . . . . . . . . . . . . . . . . . . . . . . . . . . . . . . . . . . . . . . . . . . . . . . . . . . . . . 23
Managing nodes .... . . . . . . . . . . . . . . . . . . . . . . . . . . . . . . . . . . . . . . . . . . . . . . . . . . . . . . . . . . . . . . . . . . . . . . . . . . . . . . . . . . . . . . . . . . . . . . . . . . . . . . . . . . . . . . . . . . . . . . . . . . . 24MemoryDB nodes and shards .... . . . . . . . . . . . . . . . . . . . . . . . . . . . . . . . . . . . . . . . . . . . . . . . . . . . . . . . . . . . . . . . . . . . . . . . . . . . . . . . . . . . . . . . . . . . . . . . . . 24Supported node types .... . . . . . . . . . . . . . . . . . . . . . . . . . . . . . . . . . . . . . . . . . . . . . . . . . . . . . . . . . . . . . . . . . . . . . . . . . . . . . . . . . . . . . . . . . . . . . . . . . . . . . . . . . . 25Replacing nodes .... . . . . . . . . . . . . . . . . . . . . . . . . . . . . . . . . . . . . . . . . . . . . . . . . . . . . . . . . . . . . . . . . . . . . . . . . . . . . . . . . . . . . . . . . . . . . . . . . . . . . . . . . . . . . . . . . . . . 26
Managing clusters ... . . . . . . . . . . . . . . . . . . . . . . . . . . . . . . . . . . . . . . . . . . . . . . . . . . . . . . . . . . . . . . . . . . . . . . . . . . . . . . . . . . . . . . . . . . . . . . . . . . . . . . . . . . . . . . . . . . . . . . . . . 27Preparing a cluster ... . . . . . . . . . . . . . . . . . . . . . . . . . . . . . . . . . . . . . . . . . . . . . . . . . . . . . . . . . . . . . . . . . . . . . . . . . . . . . . . . . . . . . . . . . . . . . . . . . . . . . . . . . . . . . . . . 28
Determining your requirements .... . . . . . . . . . . . . . . . . . . . . . . . . . . . . . . . . . . . . . . . . . . . . . . . . . . . . . . . . . . . . . . . . . . . . . . . . . . . . . . . . . . . . . . 28Viewing a cluster's details ... . . . . . . . . . . . . . . . . . . . . . . . . . . . . . . . . . . . . . . . . . . . . . . . . . . . . . . . . . . . . . . . . . . . . . . . . . . . . . . . . . . . . . . . . . . . . . . . . . . . . . . 30Modifying a cluster ... . . . . . . . . . . . . . . . . . . . . . . . . . . . . . . . . . . . . . . . . . . . . . . . . . . . . . . . . . . . . . . . . . . . . . . . . . . . . . . . . . . . . . . . . . . . . . . . . . . . . . . . . . . . . . . . . 33Adding / Removing nodes from a cluster ... . . . . . . . . . . . . . . . . . . . . . . . . . . . . . . . . . . . . . . . . . . . . . . . . . . . . . . . . . . . . . . . . . . . . . . . . . . . . . . . . . . 35Accessing your cluster .. . . . . . . . . . . . . . . . . . . . . . . . . . . . . . . . . . . . . . . . . . . . . . . . . . . . . . . . . . . . . . . . . . . . . . . . . . . . . . . . . . . . . . . . . . . . . . . . . . . . . . . . . . . . . 37
Grant access to your cluster ... . . . . . . . . . . . . . . . . . . . . . . . . . . . . . . . . . . . . . . . . . . . . . . . . . . . . . . . . . . . . . . . . . . . . . . . . . . . . . . . . . . . . . . . . . . . . 37Accessing MemoryDB from outside AWS ..... . . . . . . . . . . . . . . . . . . . . . . . . . . . . . . . . . . . . . . . . . . . . . . . . . . . . . . . . . . . . . . . . . . . . . . . . 38
Finding connection endpoints ... . . . . . . . . . . . . . . . . . . . . . . . . . . . . . . . . . . . . . . . . . . . . . . . . . . . . . . . . . . . . . . . . . . . . . . . . . . . . . . . . . . . . . . . . . . . . . . . . . 42Shards .... . . . . . . . . . . . . . . . . . . . . . . . . . . . . . . . . . . . . . . . . . . . . . . . . . . . . . . . . . . . . . . . . . . . . . . . . . . . . . . . . . . . . . . . . . . . . . . . . . . . . . . . . . . . . . . . . . . . . . . . . . . . . . . . . 44
Finding a shard's name .... . . . . . . . . . . . . . . . . . . . . . . . . . . . . . . . . . . . . . . . . . . . . . . . . . . . . . . . . . . . . . . . . . . . . . . . . . . . . . . . . . . . . . . . . . . . . . . . . . 44Managing your MemoryDB implementation .... . . . . . . . . . . . . . . . . . . . . . . . . . . . . . . . . . . . . . . . . . . . . . . . . . . . . . . . . . . . . . . . . . . . . . . . . . . . . . . . . . . . . . 47
Engine versions and upgrading .... . . . . . . . . . . . . . . . . . . . . . . . . . . . . . . . . . . . . . . . . . . . . . . . . . . . . . . . . . . . . . . . . . . . . . . . . . . . . . . . . . . . . . . . . . . . . . . 47Supported Redis versions .... . . . . . . . . . . . . . . . . . . . . . . . . . . . . . . . . . . . . . . . . . . . . . . . . . . . . . . . . . . . . . . . . . . . . . . . . . . . . . . . . . . . . . . . . . . . . . . 48Upgrading engine versions .... . . . . . . . . . . . . . . . . . . . . . . . . . . . . . . . . . . . . . . . . . . . . . . . . . . . . . . . . . . . . . . . . . . . . . . . . . . . . . . . . . . . . . . . . . . . . 49
Tagging your MemoryDB resources .... . . . . . . . . . . . . . . . . . . . . . . . . . . . . . . . . . . . . . . . . . . . . . . . . . . . . . . . . . . . . . . . . . . . . . . . . . . . . . . . . . . . . . . . . . 50
iii

Amazon MemoryDB for Redis Developer Guide
Monitoring costs with tags .... . . . . . . . . . . . . . . . . . . . . . . . . . . . . . . . . . . . . . . . . . . . . . . . . . . . . . . . . . . . . . . . . . . . . . . . . . . . . . . . . . . . . . . . . . . . . 53Managing tags using the AWS CLI ... . . . . . . . . . . . . . . . . . . . . . . . . . . . . . . . . . . . . . . . . . . . . . . . . . . . . . . . . . . . . . . . . . . . . . . . . . . . . . . . . . . . 54Managing tags using the MemoryDB API ... . . . . . . . . . . . . . . . . . . . . . . . . . . . . . . . . . . . . . . . . . . . . . . . . . . . . . . . . . . . . . . . . . . . . . . . . . . 56
Managing maintenance .... . . . . . . . . . . . . . . . . . . . . . . . . . . . . . . . . . . . . . . . . . . . . . . . . . . . . . . . . . . . . . . . . . . . . . . . . . . . . . . . . . . . . . . . . . . . . . . . . . . . . . . . . . 58Best practices .... . . . . . . . . . . . . . . . . . . . . . . . . . . . . . . . . . . . . . . . . . . . . . . . . . . . . . . . . . . . . . . . . . . . . . . . . . . . . . . . . . . . . . . . . . . . . . . . . . . . . . . . . . . . . . . . . . . . . . . 59
Restricted Redis Commands .... . . . . . . . . . . . . . . . . . . . . . . . . . . . . . . . . . . . . . . . . . . . . . . . . . . . . . . . . . . . . . . . . . . . . . . . . . . . . . . . . . . . . . . . . . . . 60Resilience .... . . . . . . . . . . . . . . . . . . . . . . . . . . . . . . . . . . . . . . . . . . . . . . . . . . . . . . . . . . . . . . . . . . . . . . . . . . . . . . . . . . . . . . . . . . . . . . . . . . . . . . . . . . . . . . . . . . . . 61Best practices: Online cluster resizing .... . . . . . . . . . . . . . . . . . . . . . . . . . . . . . . . . . . . . . . . . . . . . . . . . . . . . . . . . . . . . . . . . . . . . . . . . . . . . . 62
Understanding MemoryDB replication .... . . . . . . . . . . . . . . . . . . . . . . . . . . . . . . . . . . . . . . . . . . . . . . . . . . . . . . . . . . . . . . . . . . . . . . . . . . . . . . . . . . . . . 62Consistency .... . . . . . . . . . . . . . . . . . . . . . . . . . . . . . . . . . . . . . . . . . . . . . . . . . . . . . . . . . . . . . . . . . . . . . . . . . . . . . . . . . . . . . . . . . . . . . . . . . . . . . . . . . . . . . . . . . 63Replication in a cluster ... . . . . . . . . . . . . . . . . . . . . . . . . . . . . . . . . . . . . . . . . . . . . . . . . . . . . . . . . . . . . . . . . . . . . . . . . . . . . . . . . . . . . . . . . . . . . . . . . . . . 63Minimizing downtime with Multi-AZ .... . . . . . . . . . . . . . . . . . . . . . . . . . . . . . . . . . . . . . . . . . . . . . . . . . . . . . . . . . . . . . . . . . . . . . . . . . . . . . . . 64Changing the number of replicas .... . . . . . . . . . . . . . . . . . . . . . . . . . . . . . . . . . . . . . . . . . . . . . . . . . . . . . . . . . . . . . . . . . . . . . . . . . . . . . . . . . . . 70
Snapshot and restore .... . . . . . . . . . . . . . . . . . . . . . . . . . . . . . . . . . . . . . . . . . . . . . . . . . . . . . . . . . . . . . . . . . . . . . . . . . . . . . . . . . . . . . . . . . . . . . . . . . . . . . . . . . . . . 78Constraints ... . . . . . . . . . . . . . . . . . . . . . . . . . . . . . . . . . . . . . . . . . . . . . . . . . . . . . . . . . . . . . . . . . . . . . . . . . . . . . . . . . . . . . . . . . . . . . . . . . . . . . . . . . . . . . . . . . . . 78Costs ... . . . . . . . . . . . . . . . . . . . . . . . . . . . . . . . . . . . . . . . . . . . . . . . . . . . . . . . . . . . . . . . . . . . . . . . . . . . . . . . . . . . . . . . . . . . . . . . . . . . . . . . . . . . . . . . . . . . . . . . . . . . 78Scheduling automatic snapshots .... . . . . . . . . . . . . . . . . . . . . . . . . . . . . . . . . . . . . . . . . . . . . . . . . . . . . . . . . . . . . . . . . . . . . . . . . . . . . . . . . . . . . 79Making manual snapshots .... . . . . . . . . . . . . . . . . . . . . . . . . . . . . . . . . . . . . . . . . . . . . . . . . . . . . . . . . . . . . . . . . . . . . . . . . . . . . . . . . . . . . . . . . . . . . . 80Creating a final snapshot .... . . . . . . . . . . . . . . . . . . . . . . . . . . . . . . . . . . . . . . . . . . . . . . . . . . . . . . . . . . . . . . . . . . . . . . . . . . . . . . . . . . . . . . . . . . . . . . 82Describing snapshots .... . . . . . . . . . . . . . . . . . . . . . . . . . . . . . . . . . . . . . . . . . . . . . . . . . . . . . . . . . . . . . . . . . . . . . . . . . . . . . . . . . . . . . . . . . . . . . . . . . . . . 84Copying a snapshot .... . . . . . . . . . . . . . . . . . . . . . . . . . . . . . . . . . . . . . . . . . . . . . . . . . . . . . . . . . . . . . . . . . . . . . . . . . . . . . . . . . . . . . . . . . . . . . . . . . . . . . . 86Exporting a snapshot .... . . . . . . . . . . . . . . . . . . . . . . . . . . . . . . . . . . . . . . . . . . . . . . . . . . . . . . . . . . . . . . . . . . . . . . . . . . . . . . . . . . . . . . . . . . . . . . . . . . . . 88Restoring from a snapshot .... . . . . . . . . . . . . . . . . . . . . . . . . . . . . . . . . . . . . . . . . . . . . . . . . . . . . . . . . . . . . . . . . . . . . . . . . . . . . . . . . . . . . . . . . . . . . 94Seeding a cluster with a snapshot .... . . . . . . . . . . . . . . . . . . . . . . . . . . . . . . . . . . . . . . . . . . . . . . . . . . . . . . . . . . . . . . . . . . . . . . . . . . . . . . . . . . 97Tagging snapshots .... . . . . . . . . . . . . . . . . . . . . . . . . . . . . . . . . . . . . . . . . . . . . . . . . . . . . . . . . . . . . . . . . . . . . . . . . . . . . . . . . . . . . . . . . . . . . . . . . . . . . . . 101Deleting a snapshot .... . . . . . . . . . . . . . . . . . . . . . . . . . . . . . . . . . . . . . . . . . . . . . . . . . . . . . . . . . . . . . . . . . . . . . . . . . . . . . . . . . . . . . . . . . . . . . . . . . . . . 102
Scaling .... . . . . . . . . . . . . . . . . . . . . . . . . . . . . . . . . . . . . . . . . . . . . . . . . . . . . . . . . . . . . . . . . . . . . . . . . . . . . . . . . . . . . . . . . . . . . . . . . . . . . . . . . . . . . . . . . . . . . . . . . . . . . . . 103Scaling MemoryDB clusters ... . . . . . . . . . . . . . . . . . . . . . . . . . . . . . . . . . . . . . . . . . . . . . . . . . . . . . . . . . . . . . . . . . . . . . . . . . . . . . . . . . . . . . . . . . . . 104
Configuring engine parameters using parameter groups .... . . . . . . . . . . . . . . . . . . . . . . . . . . . . . . . . . . . . . . . . . . . . . . . . . . . . . . . . . . 118Parameter management .... . . . . . . . . . . . . . . . . . . . . . . . . . . . . . . . . . . . . . . . . . . . . . . . . . . . . . . . . . . . . . . . . . . . . . . . . . . . . . . . . . . . . . . . . . . . . . . 119Parameter group tiers ... . . . . . . . . . . . . . . . . . . . . . . . . . . . . . . . . . . . . . . . . . . . . . . . . . . . . . . . . . . . . . . . . . . . . . . . . . . . . . . . . . . . . . . . . . . . . . . . . . . 120Creating a parameter group .... . . . . . . . . . . . . . . . . . . . . . . . . . . . . . . . . . . . . . . . . . . . . . . . . . . . . . . . . . . . . . . . . . . . . . . . . . . . . . . . . . . . . . . . . . 120Listing parameter groups by name .... . . . . . . . . . . . . . . . . . . . . . . . . . . . . . . . . . . . . . . . . . . . . . . . . . . . . . . . . . . . . . . . . . . . . . . . . . . . . . . . 124Listing a parameter group's values .... . . . . . . . . . . . . . . . . . . . . . . . . . . . . . . . . . . . . . . . . . . . . . . . . . . . . . . . . . . . . . . . . . . . . . . . . . . . . . . . . 128Modifying a parameter group .... . . . . . . . . . . . . . . . . . . . . . . . . . . . . . . . . . . . . . . . . . . . . . . . . . . . . . . . . . . . . . . . . . . . . . . . . . . . . . . . . . . . . . . 128Deleting a parameter group .... . . . . . . . . . . . . . . . . . . . . . . . . . . . . . . . . . . . . . . . . . . . . . . . . . . . . . . . . . . . . . . . . . . . . . . . . . . . . . . . . . . . . . . . . . 131Redis specific parameters ... . . . . . . . . . . . . . . . . . . . . . . . . . . . . . . . . . . . . . . . . . . . . . . . . . . . . . . . . . . . . . . . . . . . . . . . . . . . . . . . . . . . . . . . . . . . . . 133
Security ... . . . . . . . . . . . . . . . . . . . . . . . . . . . . . . . . . . . . . . . . . . . . . . . . . . . . . . . . . . . . . . . . . . . . . . . . . . . . . . . . . . . . . . . . . . . . . . . . . . . . . . . . . . . . . . . . . . . . . . . . . . . . . . . . . . . . . . 140Data protection .... . . . . . . . . . . . . . . . . . . . . . . . . . . . . . . . . . . . . . . . . . . . . . . . . . . . . . . . . . . . . . . . . . . . . . . . . . . . . . . . . . . . . . . . . . . . . . . . . . . . . . . . . . . . . . . . . . . 140
Data security in MemoryDB for Redis ... . . . . . . . . . . . . . . . . . . . . . . . . . . . . . . . . . . . . . . . . . . . . . . . . . . . . . . . . . . . . . . . . . . . . . . . . . . . . . 141At-Rest Encryption .... . . . . . . . . . . . . . . . . . . . . . . . . . . . . . . . . . . . . . . . . . . . . . . . . . . . . . . . . . . . . . . . . . . . . . . . . . . . . . . . . . . . . . . . . . . . . . . . . . . . . . . 142In-transit encryption (TLS) ... . . . . . . . . . . . . . . . . . . . . . . . . . . . . . . . . . . . . . . . . . . . . . . . . . . . . . . . . . . . . . . . . . . . . . . . . . . . . . . . . . . . . . . . . . . . . 143Authenticating users with ACLs .... . . . . . . . . . . . . . . . . . . . . . . . . . . . . . . . . . . . . . . . . . . . . . . . . . . . . . . . . . . . . . . . . . . . . . . . . . . . . . . . . . . . . 144
Identity and access management .... . . . . . . . . . . . . . . . . . . . . . . . . . . . . . . . . . . . . . . . . . . . . . . . . . . . . . . . . . . . . . . . . . . . . . . . . . . . . . . . . . . . . . . . . . . 153Authentication .... . . . . . . . . . . . . . . . . . . . . . . . . . . . . . . . . . . . . . . . . . . . . . . . . . . . . . . . . . . . . . . . . . . . . . . . . . . . . . . . . . . . . . . . . . . . . . . . . . . . . . . . . . . . 153Access control ... . . . . . . . . . . . . . . . . . . . . . . . . . . . . . . . . . . . . . . . . . . . . . . . . . . . . . . . . . . . . . . . . . . . . . . . . . . . . . . . . . . . . . . . . . . . . . . . . . . . . . . . . . . . . . 154Overview of managing access .... . . . . . . . . . . . . . . . . . . . . . . . . . . . . . . . . . . . . . . . . . . . . . . . . . . . . . . . . . . . . . . . . . . . . . . . . . . . . . . . . . . . . . . 155
Logging and monitoring .... . . . . . . . . . . . . . . . . . . . . . . . . . . . . . . . . . . . . . . . . . . . . . . . . . . . . . . . . . . . . . . . . . . . . . . . . . . . . . . . . . . . . . . . . . . . . . . . . . . . . . . 174Monitoring with CloudWatch .... . . . . . . . . . . . . . . . . . . . . . . . . . . . . . . . . . . . . . . . . . . . . . . . . . . . . . . . . . . . . . . . . . . . . . . . . . . . . . . . . . . . . . . . . 174Monitoring events .... . . . . . . . . . . . . . . . . . . . . . . . . . . . . . . . . . . . . . . . . . . . . . . . . . . . . . . . . . . . . . . . . . . . . . . . . . . . . . . . . . . . . . . . . . . . . . . . . . . . . . . 185Logging MemoryDB for Redis API calls with AWS CloudTrail .. . . . . . . . . . . . . . . . . . . . . . . . . . . . . . . . . . . . . . . . . . . . . . . . 193
Infrastructure security ... . . . . . . . . . . . . . . . . . . . . . . . . . . . . . . . . . . . . . . . . . . . . . . . . . . . . . . . . . . . . . . . . . . . . . . . . . . . . . . . . . . . . . . . . . . . . . . . . . . . . . . . . . . 197Internetwork traffic privacy .... . . . . . . . . . . . . . . . . . . . . . . . . . . . . . . . . . . . . . . . . . . . . . . . . . . . . . . . . . . . . . . . . . . . . . . . . . . . . . . . . . . . . . . . . . . . . . . . . . . 198
Subnets and subnet groups .... . . . . . . . . . . . . . . . . . . . . . . . . . . . . . . . . . . . . . . . . . . . . . . . . . . . . . . . . . . . . . . . . . . . . . . . . . . . . . . . . . . . . . . . . . 198MemoryDB and Amazon VPC .... . . . . . . . . . . . . . . . . . . . . . . . . . . . . . . . . . . . . . . . . . . . . . . . . . . . . . . . . . . . . . . . . . . . . . . . . . . . . . . . . . . . . . . . 206
Service updates .... . . . . . . . . . . . . . . . . . . . . . . . . . . . . . . . . . . . . . . . . . . . . . . . . . . . . . . . . . . . . . . . . . . . . . . . . . . . . . . . . . . . . . . . . . . . . . . . . . . . . . . . . . . . . . . . . . . 216Managing the service updates .... . . . . . . . . . . . . . . . . . . . . . . . . . . . . . . . . . . . . . . . . . . . . . . . . . . . . . . . . . . . . . . . . . . . . . . . . . . . . . . . . . . . . . . 216
iv

Amazon MemoryDB for Redis Developer Guide
Reference .... . . . . . . . . . . . . . . . . . . . . . . . . . . . . . . . . . . . . . . . . . . . . . . . . . . . . . . . . . . . . . . . . . . . . . . . . . . . . . . . . . . . . . . . . . . . . . . . . . . . . . . . . . . . . . . . . . . . . . . . . . . . . . . . . . . 218Using the MemoryDB API ... . . . . . . . . . . . . . . . . . . . . . . . . . . . . . . . . . . . . . . . . . . . . . . . . . . . . . . . . . . . . . . . . . . . . . . . . . . . . . . . . . . . . . . . . . . . . . . . . . . . . . 219
Using the query API ... . . . . . . . . . . . . . . . . . . . . . . . . . . . . . . . . . . . . . . . . . . . . . . . . . . . . . . . . . . . . . . . . . . . . . . . . . . . . . . . . . . . . . . . . . . . . . . . . . . . . . 219Available libraries ... . . . . . . . . . . . . . . . . . . . . . . . . . . . . . . . . . . . . . . . . . . . . . . . . . . . . . . . . . . . . . . . . . . . . . . . . . . . . . . . . . . . . . . . . . . . . . . . . . . . . . . . . 221Troubleshooting applications .... . . . . . . . . . . . . . . . . . . . . . . . . . . . . . . . . . . . . . . . . . . . . . . . . . . . . . . . . . . . . . . . . . . . . . . . . . . . . . . . . . . . . . . . 221
Quotas .... . . . . . . . . . . . . . . . . . . . . . . . . . . . . . . . . . . . . . . . . . . . . . . . . . . . . . . . . . . . . . . . . . . . . . . . . . . . . . . . . . . . . . . . . . . . . . . . . . . . . . . . . . . . . . . . . . . . . . . . . . . . . . . . . . . . . . . 223Document history .... . . . . . . . . . . . . . . . . . . . . . . . . . . . . . . . . . . . . . . . . . . . . . . . . . . . . . . . . . . . . . . . . . . . . . . . . . . . . . . . . . . . . . . . . . . . . . . . . . . . . . . . . . . . . . . . . . . . . . . . 224
v

Amazon MemoryDB for Redis Developer GuideFeatures of MemoryDB
What is MemoryDB for Redis?MemoryDB for Redis is a durable, in-memory database service that delivers ultra-fast performance. It ispurpose-built for modern applications with microservices architectures.
MemoryDB is compatible with Redis, a popular open source data store, enabling you to quickly buildapplications using the same flexible and friendly Redis data structures, APIs, and commands that theyalready use today. With MemoryDB, all of your data is stored in memory, which enables you to achievemicrosecond read and single-digit millisecond write latency and high throughput. MemoryDB also storesdata durably across multiple Availability Zones (AZs) using a Multi-AZ transactional log to enable fastfailover, database recovery, and node restarts.
Delivering both in-memory performance and Multi-AZ durability, MemoryDB can be used as a high-performance primary database for your microservices applications, eliminating the need to separatelymanage both a cache and durable database.
Topics• Features of MemoryDB (p. 1)• MemoryDB core components (p. 2)• Related services (p. 4)• Choosing Regions and Availability Zones (p. 4)• Accessing MemoryDB (p. 8)• MemoryDB security (p. 9)
Features of MemoryDBMemoryDB for Redis is a durable, in-memory database service that delivers ultra-fast performance.Features of MemoryDB include:
• Strong consistency for primary nodes and guaranteed eventual consistency for replica nodes. For moreinformation, see Consistency (p. 63).
• Microsecond read and single-digit millisecond write latencies with up to 160 million TPS per cluster.• Flexible and friendly Redis data structures and APIs. Easily build new applications or migrate existing
Redis applications with almost no modification.• Data durability using a Multi-AZ transactional log providing fast database recovery and restart.• Multi-AZ availability with automatic failover, and detection of and recovery from node failures.• Easily scale horizontally by adding and removing nodes or vertically by moving to larger or smaller
node types. You can scale write throughput by adding shards and scale read throughput by addingreplicas.
• Read-after-write consistency for primary nodes and guaranteed eventual consistency for replica nodes.• MemoryDB supports encryption in transit, encryption at rest and authentication of users via
Authenticating users with Access Control Lists (ACLs) (p. 144).• Automatic snapshots in Amazon S3 with retention for up to 35 days.• Support for up to 500 nodes and more than 100 TB of storage per cluster (with 1 replica per shard).• Encryption in-transit with TLS and encryption at-rest with AWS KMS keys.• User authentication and authorization with Redis Authenticating users with Access Control Lists
(ACLs) (p. 144).
1
Amazon MemoryDB for Redis Developer GuideMemoryDB core components
• Support for AWS Graviton2 instance types.• Integration with other AWS services such as CloudWatch, Amazon VPC, CloudTrail, and Amazon SNS
for monitoring, security, and notifications.• Fully-managed software patching and upgrades.• AWS Identity and Access Management (IAM) integration and tag-based access control for management
APIs.
MemoryDB core componentsFollowing, you can find an overview of the major components of a MemoryDB deployment.
Topics• Clusters (p. 2)• Nodes (p. 3)• Shards (p. 3)• Parameter groups (p. 3)• Subnet Groups (p. 4)• Access Control Lists (p. 4)• Users (p. 4)
ClustersA cluster is a collection of one or more nodes serving a single dataset. A MemoryDB dataset ispartitioned into shards, and each shard has a primary node and up to 5 optional replica nodes. A primarynode serves read and write requests, while a replica only serves read requests. A primary node canfailover to a replica node, promoting that replica to the new primary node for that shard. MemoryDBruns Redis as its database engine, and when you create a cluster, you specify the Redis version foryour cluster. You can create and modify a cluster using the AWS CLI, the MemoryDB API, or the AWSManagement Console.
Each MemoryDB cluster runs a Redis engine version. Each Redis engine version has its own supportedfeatures. Additionally, each Redis engine version has a set of parameters in a parameter group thatcontrol the behavior of the clusters that it manages.
The computation and memory capacity of a cluster is determined by its node type. You can select thenode type that best meets your needs. If your needs change over time, you can change node types. Forinformation, see Supported node types (p. 25).
NoteFor pricing information on MemoryDB node types, see MemoryDB pricing.
You run a cluster on a virtual private cloud (VPC) using the Amazon Virtual Private Cloud (Amazon VPC)service. When you use a VPC, you have control over your virtual networking environment. You can chooseyour own IP address range, create subnets, and configure routing and access control lists. MemoryDBmanages snapshots, software patching, automatic failure detection, and recovery. There's no additionalcost to run your cluster in a VPC. For more information on using Amazon VPC with MemoryDB, seeMemoryDB and Amazon VPC (p. 206).
Many MemoryDB operations are targeted at clusters:
• Creating a cluster• Modifying a cluster
2

Amazon MemoryDB for Redis Developer GuideNodes
• Taking snapshots of a cluster• Deleting a cluster• Viewing the elements in a cluster• Adding or removing cost allocation tags to and from a cluster
For more detailed information, see the following related topics:
• Managing clusters (p. 27) and Managing nodes (p. 24)
Information about clusters, nodes, and related operations.• Resilience in MemoryDB for Redis (p. 61)
Information about improving the fault tolerance of your clusters.
NodesA node is the smallest building block of a MemoryDB deployment and runs using an Amazon EC2instance. Each node runs the Redis version that was chosen when you created your cluster. A nodebelongs to a shard which belongs to a cluster.
Each node runs an instance of the engine at the version chosen when you created your cluster. Ifnecessary, you can scale the nodes in a cluster up or down to a different type. For more information, seeScaling (p. 103).
Every node within a cluster is the same node type. Multiple types of nodes are supported, each withvarying amounts of memory. For a list of supported node types, see Supported node types (p. 25).
For more information on nodes, see Managing nodes (p. 24).
ShardsA shard is a grouping of one to 6 nodes, with one serving as the primary write node and the other 5serving as read replicas. A MemoryDB cluster always has at least one shard.
MemoryDB clusters can have up to 500 shards, with your data partitioned across the shards. Forexample, you can choose to configure a 500 node cluster that ranges between 83 shards (one primaryand 5 replicas per shard) and 500 shards (single primary and no replicas). Make sure there are enoughavailable IP addresses to accommodate the increase. Common pitfalls include the subnets in the subnetgroup have too small a CIDR range or the subnets are shared and heavily used by other clusters.
A multiple node shard implements replication by having one read/write primary node and 1–5 replicanodes. For more information, see Understanding MemoryDB replication (p. 62).
For more information on shards, see Working with shards (p. 44).
Parameter groupsParameter groups are an easy way to manage runtime settings for Redis on your cluster. Parametersare used to control memory usage, item sizes, and more. A MemoryDB parameter group is a namedcollection of engine-specific parameters that you can apply to a cluster, and all of the nodes in thatcluster are configured in exactly the same way.
For more detailed information on MemoryDB parameter groups, see Configuring engine parametersusing parameter groups (p. 118).
3

Amazon MemoryDB for Redis Developer GuideSubnet groups
Subnet GroupsA subnet group is a collection of subnets (typically private) that you can designate for your clustersrunning in an Amazon Virtual Private Cloud (VPC) environment.
When you create a cluster in an Amazon VPC, you can specify a subnet group or use the default oneprovided. MemoryDB uses that subnet group to choose a subnet and IP addresses within that subnet toassociate with your nodes.
For more detailed information on MemoryDB subnet groups, see Subnets and subnet groups (p. 198).
Access Control ListsAn Access control list is a collection of one or more users. Access strings follow the Redis ACL rules toauthorize user access to Redis commands and data.
For more detailed information on MemoryDB Access Control Lists, see Authenticating users with AccessControl Lists (ACLs) (p. 144).
UsersA user has a user name and password, and is used to access data and issue commands on yourMemoryDB cluster. A user is a member of an Access Control List (ACL), which you can use to determinepermissions for that user on MemoryDB clusters. For more information, see Authenticating users withAccess Control Lists (ACLs) (p. 144)
Related servicesElastiCache for Redis
When deciding whether to use MemoryDB for Redis or ElastiCache for Redis consider the followingcomparisons:
• MemoryDB for Redis is a durable, in-memory database for workloads that require an ultra-fast,primary database. You should consider using MemoryDB if your workload requires a durable databasethat provides ultra-fast performance (microsecond read and single-digit millisecond write latency).MemoryDB may also be a good fit for your use case if you want to build an application using Redisdata structures and APIs with a primary, durable database. Finally, you should consider usingMemoryDB to simplify your application architecture and lower costs by replacing usage of a databasewith a cache for durability and performance.
• ElastiCache for Redis is a service that is commonly used to cache data from other databases and datastores using Redis. You should consider ElastiCache for Redis for caching workloads where you want toaccelerate data access with your existing primary database or data store (microsecond read and writeperformance). You should also consider ElastiCache for Redis for use cases where you want to use theRedis data structures and APIs to access data stored in a primary database or data store.
Choosing Regions and Availability ZonesAWS Cloud computing resources are housed in highly available data center facilities. To provideadditional scalability and reliability, these data center facilities are located in different physical locations.These locations are categorized by regions and Availability Zones.
4

Amazon MemoryDB for Redis Developer GuideChoosing Regions and Availability Zones
AWS Regions are large and widely dispersed into separate geographic locations. Availability Zonesare distinct locations within an AWS Region that are engineered to be isolated from failures in otherAvailability Zones. They provide inexpensive, low-latency network connectivity to other AvailabilityZones in the same AWS Region.
ImportantEach region is completely independent. Any MemoryDB activity you initiate (for example,creating clusters) runs only in your current default region.
To create or work with a cluster in a specific region, use the corresponding regional service endpoint. Forservice endpoints, see Supported Regions & endpoints (p. 7).
5

Amazon MemoryDB for Redis Developer GuideLocating your nodes
Locating your nodesAny cluster that has at least one replica must be spread across AZs. The only way you can locateeverything within a single AZ is with a cluster comprised of single-node shards.
By locating the nodes in different AZs, MemoryDB eliminates the chance that a failure, such as a poweroutage, in one AZ will cause loss of availability.
• Creating a MemoryDB cluster (p. 14)• Modifying a MemoryDB cluster (p. 33)
6

Amazon MemoryDB for Redis Developer GuideSupported Regions & endpoints
Supported Regions & endpointsMemoryDB for Redis is available in multiple AWS Regions. This means that you can launch MemoryDBclusters in locations that meet your requirements. For example, you can launch in the AWS Region closestto your customers, or launch in a particular AWS Region to meet certain legal requirements.
By default, the AWS SDKs, AWS CLI, MemoryDB API, and MemoryDB console reference the US-East (N.Virginia) Region. As MemoryDB expands availability to new regions, new endpoints for these regions arealso available to use in your HTTP requests, the AWS SDKs, AWS CLI, and the console.
Each Region is designed to be completely isolated from the other Regions. Within each region aremultiple Availability Zones (AZ). By launching your nodes in different AZs you achieve the greatestpossible fault tolerance. For more information on regions and Availability Zones, see Choosing Regionsand Availability Zones (p. 4) at the beginning of this topic.
Regions where MemoryDB is supported
Region Name/Region Endpoint Protocol
US East (Ohio) Region
us-east-2
memory-db.us-east-2.amazonaws.com
HTTPS
US East (N. Virginia)Region
us-east-1
memory-db.us-east-1.amazonaws.com
HTTPS
US West (N. California)Region
us-west-1
memory-db.us-west-1.amazonaws.com
HTTPS
US West (Oregon)Region
us-west-2
memory-db.us-west-2.amazonaws.com
HTTPS
Canada (Central) Region
ca-central-1
memory-db.ca-central-1.amazonaws.com
HTTPS
Asia Pacific (HongKong) Region
ap-east-1
memory-db.ap-eastl-1.amazonaws.com
HTTPS
Asia Pacific (Mumbai)Region
ap-south-1
memory-db.ap-south-1.amazonaws.com
HTTPS
Asia Pacific (Tokyo)Region
ap-northeast-1
memory-db.ap-northeast-1.amazonaws.com
HTTPS
Asia Pacific (Seoul)Region
ap-northeast-2
memory-db.ap-northeast-2.amazonaws.com
HTTPS
7

Amazon MemoryDB for Redis Developer GuideAccessing MemoryDB
Region Name/Region Endpoint Protocol
Asia Pacific (Singapore)Region
ap-southeast-1
memory-db.ap-southeast-1.amazonaws.com
HTTPS
Asia Pacific (Sydney)Region
ap-southeast-2
memory-db.ap-southeast-2.amazonaws.com
HTTPS
Europe (Frankfurt)Region
eu-central-1
memory-db.eu-central-1.amazonaws.com
HTTPS
Europe (Ireland) Region
eu-west-1
memory-db.eu-west-1.amazonaws.com
HTTPS
Europe (London) Region
eu-west-2
memory-db.eu-west-2.amazonaws.com
HTTPS
Europe (Stockholm)Region
eu-north-1
memory-db.eu-north-1.amazonaws.com
HTTPS
South America (SãoPaulo) Region
sa-east-1
memory-db.sa-east-1.amazonaws.com
HTTPS
For a table of AWS products and services by region, see Products and services by Region.
Accessing MemoryDBEach MemoryDB cluster endpoint contains an address and a port. This cluster endpoint supports theRedis Cluster protocol to allow clients to discover the specific roles, ip addresses and slots for each nodein the cluster. When a primary node fails and a replica is promoted in its place, you can connect to clusterendpoint to discover the new primary using Redis Cluster protocol.
You need to connect to the cluster endpoint to discover node endpoints using cluster nodes or clusterslots command. After discovering the right node for a key, you can connect directly to the node for read/write requests. A Redis client can use the cluster endpoint to automatically connect to the correct node.
To troubleshoot specific nodes in a cluster, you can also use node-specific endpoints, but these are notnecessary for normal usage.
To find a cluster's endpoint, see the following:
• Finding the Endpoint for a MemoryDB Cluster (AWS CLI) (p. 43)• Finding the Endpoint for a MemoryDB Cluster (MemoryDB API) (p. 44)
For connecting to nodes or clusters, see Connecting to MemoryDB nodes using redis-cli (p. 21).
8

Amazon MemoryDB for Redis Developer GuideMemoryDB security
MemoryDB securitySecurity for MemoryDB is managed at three levels:
• To control who can perform management actions on MemoryDB clusters and nodes, you use AWSIdentity and Access Management (IAM). When you connect to AWS using IAM credentials, your AWSaccount must have IAM policies that grant the permissions required to perform operations. For moreinformation, see Identity and access management in MemoryDB for Redis (p. 153)
• To control access levels to clusters, you create users with specified permissions and assign them tothe Access Control Lists (ACL). The ACL, in turn, is then associated with one or more clusters. For moreinformation, see Authenticating users with Access Control Lists (ACLs) (p. 144).
• MemoryDB clusters must be created in a virtual private cloud (VPC) based on the Amazon VPC service.To control which devices and Amazon EC2 instances can open connections to the endpoint and portof the node for MemoryDB clusters in a VPC, you use a VPC security group. You can make theseendpoint and port connections using Transport Layer Security (TLS)/Secure Sockets Layer (SSL). Inaddition, firewall rules at your company can control whether devices running at your company canopen connections to a MemoryDB cluster. For more information on VPCs, see MemoryDB and AmazonVPC (p. 206).
For information about configuring security, see Security in MemoryDB for Redis (p. 140).
9

Amazon MemoryDB for Redis Developer GuideSign up for AWS
Before you beginIf you haven't already done so, the following topics describe one-time actions you must take to startusing MemoryDB for Redis.
Topics• Sign up for AWS (p. 10)• Create an IAM user (p. 10)
Sign up for AWSIf you do not have an AWS account, complete the following steps to create one.
To sign up for an AWS account
1. Open https://portal.aws.amazon.com/billing/signup.2. Follow the online instructions.
Part of the sign-up procedure involves receiving a phone call and entering a verification code on thephone keypad.
Create an IAM userTo create an administrator user for yourself and add the user to an administrators group(console)
1. Sign in to the IAM console as the account owner by choosing Root user and entering your AWSaccount email address. On the next page, enter your password.
NoteWe strongly recommend that you adhere to the best practice of using the AdministratorIAM user that follows and securely lock away the root user credentials. Sign in as the rootuser only to perform a few account and service management tasks.
2. In the navigation pane, choose Users and then choose Add user.3. For User name, enter Administrator.4. Select the check box next to AWS Management Console access. Then select Custom password, and
then enter your new password in the text box.5. (Optional) By default, AWS requires the new user to create a new password when first signing in. You
can clear the check box next to User must create a new password at next sign-in to allow the newuser to reset their password after they sign in.
6. Choose Next: Permissions.7. Under Set permissions, choose Add user to group.8. Choose Create group.9. In the Create group dialog box, for Group name enter Administrators.10. Choose Filter policies, and then select AWS managed - job function to filter the table contents.11. In the policy list, select the check box for AdministratorAccess. Then choose Create group.
10

Amazon MemoryDB for Redis Developer GuideCreate an IAM user
NoteYou must activate IAM user and role access to Billing before you can use theAdministratorAccess permissions to access the AWS Billing and Cost Managementconsole. To do this, follow the instructions in step 1 of the tutorial about delegating accessto the billing console.
12. Back in the list of groups, select the check box for your new group. Choose Refresh if necessary tosee the group in the list.
13. Choose Next: Tags.14. (Optional) Add metadata to the user by attaching tags as key-value pairs. For more information
about using tags in IAM, see Tagging IAM entities in the IAM User Guide.15. Choose Next: Review to see the list of group memberships to be added to the new user. When you
are ready to proceed, choose Create user.
You can use this same process to create more groups and users and to give your users access to your AWSaccount resources. To learn about using policies that restrict user permissions to specific AWS resources,see Access management and Example policies.
Once you have done the preceding, you can find more information on setting up permissions andaccess specific to MemoryDB, see Overview of managing access permissions to your MemoryDBresources (p. 155).
11

Amazon MemoryDB for Redis Developer GuideSetting up
Getting started with MemoryDBThis exercise leads you through the steps to create, grant access to, connect to, and finally delete aMemoryDB cluster using the MemoryDB Management Console.
Topics• Setting up (p. 12)• Step 1: Create a cluster (p. 14)• Step 2: Authorize access to the cluster (p. 19)• Step 3: Connect to the cluster (p. 21)• Step 4: Deleting a cluster (p. 22)• Where do I go from here? (p. 23)
Setting upFollowing, you can find topics that describe the one-time actions you must take to start usingMemoryDB.
Topics• Getting an AWS Access Key (p. 12)• Configuring Your Credentials (p. 13)• Downloading and Configuring the AWS CLI (p. 13)• Set up your permissions (new MemoryDB users only) (p. 13)
Getting an AWS Access KeyBefore you can access MemoryDB programmatically or through the AWS Command Line Interface (AWSCLI), you must have an AWS access key. You don't need an access key if you plan to use the MemoryDBconsole only. Access keys consist of an access key ID and secret access key, which are used to signprogrammatic requests that you make to AWS. If you don't have access keys, you can create them fromthe AWS Management Console. As a best practice, do not use the AWS account root user access keysfor any task where it's not required. Instead, create a new administrator IAM user with access keys foryourself. The only time that you can view or download the secret access key is when you create the keys.You cannot recover them later. However, you can create new access keys at any time. You must also havepermissions to perform the required IAM actions. For more information, see Permissions Required toAccess IAM Resources in the IAM User Guide.
To create access keys for an IAM user
1. Sign in to the AWS Management Console and open the IAM console at https://console.aws.amazon.com/iam/.
2. In the left navigation pane, choose Users.3. Choose the name of the user whose access keys you want to create, and then choose the Security
credentials tab.4. In the Access keys section, choose Create access key.5. To view the new access key pair, choose Show. You will not have access to the secret access key again
after this page closes. Your credentials will look something like this:
12

Amazon MemoryDB for Redis Developer GuideConfiguring Your Credentials
• Access key ID: AKIAIOSFODNN7EXAMPLE• Secret access key: wJalrXUtnFEMI/K7MDENG/bPxRfiCYEXAMPLEKEY
6. To download the key pair, choose Download .csv file. Store the keys in a secure location. You willnot have access to the secret access key again after this page closes.
7. Keep the keys confidential in order to protect your AWS account and never email them. Do not sharethem outside your organization, even if an inquiry appears to come from Amazon or Amazon.com.No one who legitimately represents Amazon will ever ask you for your secret key.
8. After you download the .csv file, choose Close. When you create an access key, the key pair is activeby default, and you can use the pair right away.
Related topics:
• What is IAM in the IAM User Guide.• AWS Security Credentials in AWS General Reference.
Configuring Your CredentialsBefore you can access MemoryDB programmatically or through the AWS CLI, you must configure yourcredentials to enable authorization for your applications.
There are several ways to do this. For example, you can manually create the credentials file to store youraccess key ID and secret access key. You also can use the aws configure command of the AWS CLIto automatically create the file. Alternatively, you can use environment variables. For more informationabout configuring your credentials, see the programming-specific AWS SDK developer guide at Tools toBuild on AWS.
Downloading and Configuring the AWS CLIThe AWS CLI is available at http://aws.amazon.com/cli. It runs on Windows, MacOS and Linux. After youdownload the AWS CLI, follow these steps to install and configure it:
1. Go to the AWS Command Line Interface User Guide.2. Follow the instructions for Installing the AWS CLI and Configuring the AWS CLI.
Set up your permissions (new MemoryDB users only)MemoryDB for Redis creates and uses service-linked roles to provision resources and access other AWSresources and services on your behalf. For MemoryDB to create a service-linked role for you, use theAWS-managed policy named AmazonMemoryDBFullAccess. This role comes preprovisioned withpermission that the service requires to create a service-linked role on your behalf.
You might decide not to use the default policy and instead to use a custom-managed policy. In this case,make sure that you have either permissions to call iam:createServiceLinkedRole or that you havecreated the MemoryDB service-linked role.
For more information, see the following:
• Creating a New Policy (IAM)• AWS-managed (predefined) policies for MemoryDB for Redis (p. 172)• Using Service-Linked Roles for Amazon MemoryDB for Redis (p. 163)
13

Amazon MemoryDB for Redis Developer GuideStep 1: Create a cluster
Step 1: Create a clusterBefore creating a cluster for production use, you obviously need to consider how you will configure thecluster to meet your business needs. Those issues are addressed in the Preparing a cluster (p. 28)section. For the purposes of this Getting Started exercise, you can accept the default configuration valueswhere they apply.
The cluster you create will be live, and not running in a sandbox. You will incur the standard MemoryDBusage fees for the instance until you delete it. The total charges will be minimal (typically less than adollar) if you complete the exercise described here in one sitting and delete your cluster when you arefinished. For more information about MemoryDB usage rates, see MemoryDB.
Your cluster is launched in a virtual private cloud (VPC) based on the Amazon VPC service.
Creating a MemoryDB clusterThe following examples show how to create a cluster using the AWS Management Console, AWS CLI andMemoryDB API.
Creating a cluster (Console)
To create a cluster using the MemoryDB console
1. Sign in to the AWS Management Console and open the MemoryDB for Redis console at https://console.aws.amazon.com/memorydb/.
2. Choose Clusters In the left navigation pane and then choose Create cluster.3. Complete the Cluster info section.
a. In Name, enter a name for your cluster.
Cluster naming constraints are as follows:
• Must contain 1–40 alphanumeric characters or hyphens.• Must begin with a letter.• Can't contain two consecutive hyphens.• Can't end with a hyphen.
b. In the Description box, enter a description for this cluster.4. Complete the Subnet groups section:
• For Subnet groups, create a new subnet group or choose an existing one from the available listthat you want to apply to this cluster. If you are creating a new one:
• Enter a Name• Enter a Description• If you enabled Multi-AZ, the subnet group must contain at least two subnets that reside in
different availability zones. For more information, see Subnets and subnet groups (p. 198).• If you are creating a new subnet group and do not have an existing VPC, you will be asked to
create a VPC. For more information, see What is Amazon VPC? in the Amazon VPC User Guide.5. Complete the Cluster settings section:
a. For Redis version compatibility, accept the default 6.2.b. For Port, accept the default Redis port of 6379 or, if you have a reason to use a different port,
enter the port number..c. For Parameter group, accept the default.memorydb-redis6 parameter group.
14
Amazon MemoryDB for Redis Developer GuideCreating a MemoryDB cluster
Parameter groups control the runtime parameters of your cluster. For more information onparameter groups, see Redis specific parameters (p. 133).
d. For Node type, choose a value for the node type (along with its associated memory size) thatyou want.
e. For Number of shards, choose the number of shards that you want for this cluster. For higheravailability of your clusters, we recommend that you add at least 2 shards.
You can change the number of shards in your cluster dynamically. For more information, seeScaling MemoryDB clusters (p. 104).
f. For Replicas per shard, choose the number of read replica nodes that you want in each shard.
The following restrictions exist:
• If you have Multi-AZ enabled, make sure that you have at least one replica per shard.
• The number of replicas is the same for each shard when creating the cluster using theconsole.
g. Choose Next
h. Complete the Advanced settings section:
i. For Security groups, choose the security groups that you want for this cluster. A securitygroup acts as a firewall to control network access to your cluster. You can use the defaultsecurity group for your VPC or create a new one.
For more information on security groups, see Security groups for your VPC in the AmazonVPC User Guide.
ii. To encrypt your data, you have the following options:
• Encryption at rest – Enables encryption of data stored on disk. For more information, seeEncryption at Rest.
NoteYou have the option to supply an encryption key other than default by choosingCustomer Managed AWS-owned KMS key and choosing the key.
• Encryption in-transit – Enables encryption of data on the wire. If you select noencryption, then an open Access control list called “open access” will be created with adefault user. For more information, see Authenticating users with Access Control Lists(ACLs) (p. 144).
iii. For Snapshot, optionally specify a snapshot retention period and a snapshot window. Bydefault, Enable automatic snapshots is pre-selected.
iv. For Maintenance window optionally specify a maintenance window. The maintenancewindow is the time, generally an hour in length, each week when MemoryDB schedulessystem maintenance for your cluster. You can allow MemoryDB to choose the day andtime for your maintenance window (No preference), or you can choose the day, time,and duration yourself (Specify maintenance window). If you choose Specify maintenancewindow from the lists, choose the Start day, Start time, and Duration (in hours) for yourmaintenance window. All times are UCT times.
For more information, see Managing maintenance (p. 58).
v. For Notifications, choose an existing Amazon Simple Notification Service (Amazon SNS)topic, or choose Manual ARN input and enter the topic's Amazon Resource Name (ARN).Amazon SNS allows you to push notifications to Internet-connected smart devices. Thedefault is to disable notifications. For more information, see https://aws.amazon.com/sns/.
vi. For Tags, you can optionally apply tags to search and filter your clusters or track your AWScosts.
15

Amazon MemoryDB for Redis Developer GuideCreating a MemoryDB cluster
i. Review all your entries and choices, then make any needed corrections. When you're ready,choose Create cluster to launch your cluster, or Cancel to cancel the operation.
As soon as your cluster's status is available, you can grant EC2 access to it, connect to it, and beginusing it. For more information, see Step 2: Authorize access to the cluster (p. 19)
ImportantAs soon as your cluster becomes available, you're billed for each hour or partial hour thatthe cluster is active, even if you're not actively using it. To stop incurring charges for thiscluster, you must delete it. See Step 4: Deleting a cluster (p. 22).
16

Amazon MemoryDB for Redis Developer GuideCreating a MemoryDB cluster
Creating a cluster (AWS CLI)
To create a cluster using the AWS CLI, see create-cluster. The following is an example:
For Linux, macOS, or Unix:
aws memorydb create-cluster \ --cluster-name my-cluster \ --node-type db.r6g.large \ --acl-name my-acl \ --subnet-group my-sg
For Windows:
aws memorydb create-cluster ^ --cluster-name my-cluster ^ --node-type db.r6g.large ^ --acl-name my-acl ^ --subnet-group my-sg
You should get the following JSON response:
{ "Cluster": { "Name": "my-cluster", "Status": "creating", "NumberOfShards": 1, "AvailabilityMode": "MultiAZ", "ClusterEndpoint": { "Port": 6379 }, "NodeType": "db.r6g.large", "EngineVersion": "6.2", "EnginePatchVersion": "6.2.4", "ParameterGroupName": "default.memorydb-redis6", "ParameterGroupStatus": "in-sync", "SubnetGroupName": "my-sg", "TLSEnabled": true, "ARN": "arn:aws:memorydb:us-east-1:xxxxxxxxxxxxxx:cluster/my-cluster", "SnapshotRetentionLimit": 0, "MaintenanceWindow": "wed:03:00-wed:04:00", "SnapshotWindow": "04:30-05:30", "ACLName": "my-acl", "AutoMinorVersionUpgrade": true }}
You can begin using the cluster once its status changes to available.
ImportantAs soon as your cluster becomes available, you're billed for each hour or partial hour that thecluster is active, even if you're not actively using it. To stop incurring charges for this cluster, youmust delete it. See Step 4: Deleting a cluster (p. 22).
Creating a cluster (MemoryDB API)
To create a cluster using the MemoryDB API, use the CreateCluster action.
17

Amazon MemoryDB for Redis Developer GuideCreating a MemoryDB cluster
ImportantAs soon as your cluster becomes available, you're billed for each hour or partial hour that thecluster is active, even if you're not using it. To stop incurring charges for this cluster, you mustdelete it. See Step 4: Deleting a cluster (p. 22).
18

Amazon MemoryDB for Redis Developer GuideStep 2: Authorize access to the cluster
Step 2: Authorize access to the clusterThis section assumes that you are familiar with launching and connecting to Amazon EC2 instances. Formore information, see the Amazon EC2 Getting Started Guide.
All MemoryDB clusters are designed to be accessed from an Amazon EC2 instance. The most commonscenario is to access a MemoryDB cluster from an Amazon EC2 instance in the same Amazon VirtualPrivate Cloud (Amazon VPC), which will be the case for this exercise.
Before you can connect to a cluster from an EC2 instance, you must authorize the EC2 instance to accessthe cluster.
The most common use case is when an application deployed on an EC2 instance needs to connect to acluster in the same VPC. The simplest way to manage access between EC2 instances and clusters in thesame VPC is to do the following:
1. Create a VPC security group for your cluster. This security group can be used to restrict access to theclusters. For example, you can create a custom rule for this security group that allows TCP accessusing the port you assigned to the cluster when you created it and an IP address you will use toaccess the cluster.
The default port for MemoryDB clusters is 6379.
2. Create a VPC security group for your EC2 instances (web and application servers). This security groupcan, if needed, allow access to the EC2 instance from the Internet via the VPC's routing table. Forexample, you can set rules on this security group to allow TCP access to the EC2 instance over port22.
3. Create custom rules in the security group for your cluster that allow connections from the securitygroup you created for your EC2 instances. This would allow any member of the security group toaccess the clusters.
To create a rule in a VPC security group that allows connections from another security group
1. Sign in to the AWS Management Console and open the Amazon VPC console at https://console.aws.amazon.com/vpc.
2. In the left navigation pane, choose Security Groups.
3. Select or create a security group that you will use for your clusters. Under Inbound Rules, selectEdit Inbound Rules and then select Add Rule. This security group will allow access to members ofanother security group.
4. From Type choose Custom TCP Rule.
a. For Port Range, specify the port you used when you created your cluster.
The default port for MemoryDB clusters is 6379.
b. In the Source box, start typing the ID of the security group. From the list select the securitygroup you will use for your Amazon EC2 instances.
5. Choose Save when you finish.
19

Amazon MemoryDB for Redis Developer GuideStep 2: Authorize access to the cluster
Once you have enabled access, you are now ready to connect to the cluster, as discussed in the nextsection.
For information on accessing your MemoryDB cluster from a different Amazon VPC, a different AWSRegion, or even your corporate network, see the following:
• Access Patterns for Accessing a MemoryDB Cluster in an Amazon VPC (p. 209)• Accessing MemoryDB resources from outside AWS (p. 38)
20
Amazon MemoryDB for Redis Developer GuideStep 3: Connect to the cluster
Step 3: Connect to the clusterBefore you continue, complete Step 2: Authorize access to the cluster (p. 19).
This section assumes that you've created an Amazon EC2 instance and can connect to it. For instructionson how to do this, see the Amazon EC2 Getting Started Guide.
An Amazon EC2 instance can connect to a cluster only if you have authorized it to do so.
Find your cluster endpointWhen your cluster is in the available state and you've authorized access to it, you can log in to anAmazon EC2 instance and connect to the cluster. To do so, you must first determine the endpoint.
To further explore how to find your endpoints, see the following:
• Finding the Endpoint for a MemoryDB Cluster (AWS CLI) (p. 43)• Finding the Endpoint for a MemoryDB Cluster (MemoryDB API) (p. 44)
Connect to a MemoryDB cluster (Linux)Now that you have the endpoint you need, you can log in to an EC2 instance and connect to the cluster.In the following example, you use the cli utility to connect to a cluster. The latest version of cli alsosupports SSL/TLS for connecting encryption/authentication enabled clusters.
Connecting to MemoryDB nodes using redis-cli
To access data from MemoryDB nodes, you use clients that work with Secure Socket Layer (SSL). You canalso use redis-cli with TLS/SSL on Amazon Linux and Amazon Linux 2.
To use redis-cli to connect to a MemoryDB cluster on Amazon Linux 2 or Amazon Linux
1. Download and compile the redis-cli utility. This utility is included in the Redis software distribution.2. At the command prompt of your EC2 instance, type the following commands:
Amazon Linux 2
$ sudo yum -y install openssl-devel gcc$ wget http://download.redis.io/redis-stable.tar.gz$ tar xvzf redis-stable.tar.gz$ cd redis-stable$ make distclean$ make redis-cli BUILD_TLS=yes$ sudo install -m 755 src/redis-cli /usr/local/bin/
Amazon Linux
$ sudo yum install gcc jemalloc-devel openssl-devel tcl tcl-devel clang wget$ wget http://download.redis.io/redis-stable.tar.gz$ tar xvzf redis-stable.tar.gz$ cd redis-stable$ make redis-cli CC=clang BUILD_TLS=yes$ sudo install -m 755 src/redis-cli /usr/local/bin/
21

Amazon MemoryDB for Redis Developer GuideStep 4: Deleting a cluster
3. After this, it is recommended that you run the optional make-test command.4. At the command prompt of your EC2 instance, type the following command, substituting the
endpoint of your cluster and port for what is shown in this example.
redis-cli -h Cluster Endpoint --tls -p 6379
Step 4: Deleting a clusterAs long as a cluster is in the available state, you are being charged for it, whether or not you are activelyusing it. To stop incurring charges, delete the cluster.
WarningWhen you delete a MemoryDB cluster, your manual snapshots are retained. You can also createa final snapshot before the cluster is deleted. Automatic snapshots are not retained. For moreinformation, see Snapshot and restore (p. 78).
Using the AWS Management ConsoleThe following procedure deletes a single cluster from your deployment. To delete multiple clusters,repeat the procedure for each cluster that you want to delete. You do not need to wait for one cluster tofinish deleting before starting the procedure to delete another cluster.
To delete a cluster
1. Sign in to the AWS Management Console and open the MemoryDB for Redis console at https://console.aws.amazon.com/memorydb/.
2. To choose the cluster to delete, choose the radio button next to the cluster's name from the list ofclusters. In this case, the name of the cluster you created at Step 1: Create a cluster (p. 14).
3. For Actions, choose Delete.4. First choose whether to create a snapshot of the cluster before deleting it and then enter delete in
the confirmation box and Delete to delete the cluster, or choose Cancel to keep the cluster.
If you chose Delete, the status of the cluster changes to deleting.
As soon as your cluster is no longer listed in the list of clusters, you stop incurring charges for it.
Using the AWS CLIThe following code deletes the cluster my-cluster. In this case, substitute my-cluster with the nameof the cluster you created at Step 1: Create a cluster (p. 14).
aws memorydb delete-cluster --cluster-name my-cluster
The delete-cluster CLI operation only deletes one cluster. To delete multiple clusters, call delete-cluster for each cluster that you want to delete. You do not need to wait for one cluster to finishdeleting before deleting another.
For Linux, macOS, or Unix:
aws memorydb delete-cluster \ --cluster-name my-cluster \ --region us-east-1
22
Amazon MemoryDB for Redis Developer GuideWhere do I go from here?
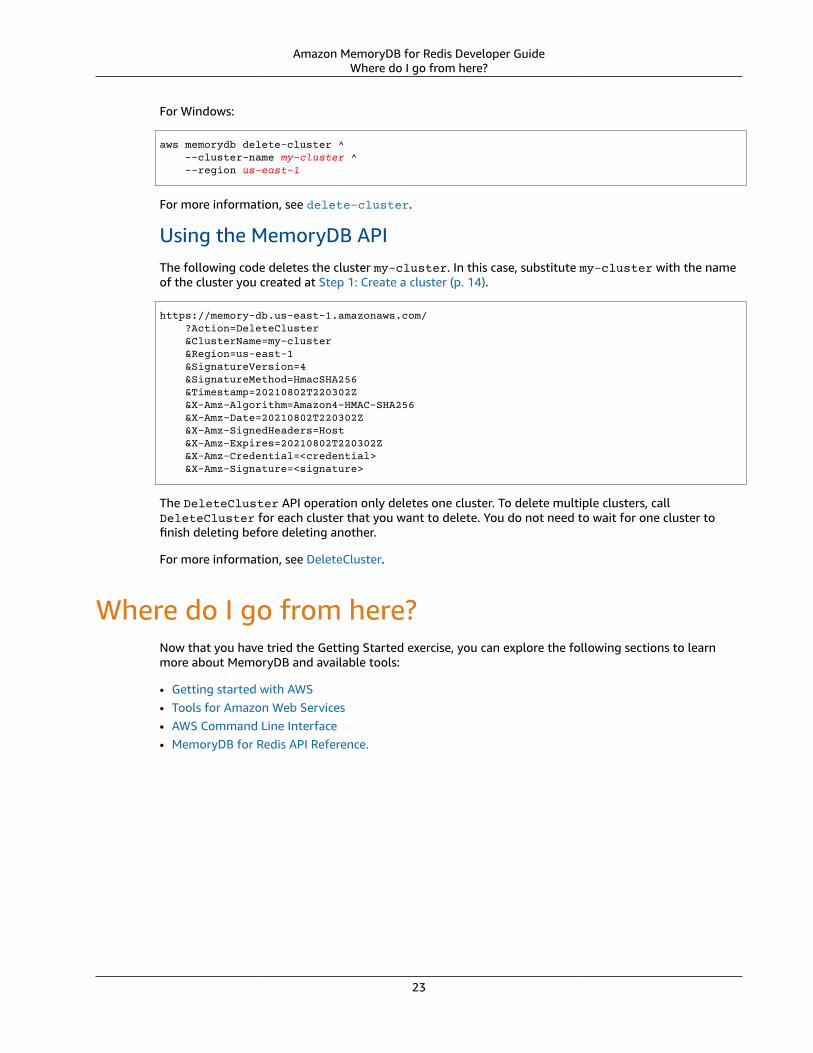
For Windows:
aws memorydb delete-cluster ^ --cluster-name my-cluster ^ --region us-east-1
For more information, see delete-cluster.
Using the MemoryDB APIThe following code deletes the cluster my-cluster. In this case, substitute my-cluster with the nameof the cluster you created at Step 1: Create a cluster (p. 14).
https://memory-db.us-east-1.amazonaws.com/ ?Action=DeleteCluster &ClusterName=my-cluster &Region=us-east-1 &SignatureVersion=4 &SignatureMethod=HmacSHA256 &Timestamp=20210802T220302Z &X-Amz-Algorithm=Amazon4-HMAC-SHA256 &X-Amz-Date=20210802T220302Z &X-Amz-SignedHeaders=Host &X-Amz-Expires=20210802T220302Z &X-Amz-Credential=<credential> &X-Amz-Signature=<signature>
The DeleteCluster API operation only deletes one cluster. To delete multiple clusters, callDeleteCluster for each cluster that you want to delete. You do not need to wait for one cluster tofinish deleting before deleting another.
For more information, see DeleteCluster.
Where do I go from here?Now that you have tried the Getting Started exercise, you can explore the following sections to learnmore about MemoryDB and available tools:
• Getting started with AWS• Tools for Amazon Web Services• AWS Command Line Interface• MemoryDB for Redis API Reference.
23

Amazon MemoryDB for Redis Developer GuideMemoryDB nodes and shards
Managing nodesA node is the smallest building block of a MemoryDB for Redis deployment. A node belongs to a shardwhich belongs to a cluster. Each node runs the engine version that was chosen when the cluster wascreated or last modified. Each node has its own Domain Name Service (DNS) name and port. Multipletypes of MemoryDB nodes are supported, each with varying amounts of associated memory andcomputational power.
Topics• MemoryDB nodes and shards (p. 24)• Supported node types (p. 25)• Replacing nodes (p. 26)
Some important operations involving nodes are the following:
• Adding / Removing nodes from a cluster (p. 35)• Scaling (p. 103)• Finding connection endpoints (p. 42)
MemoryDB nodes and shardsA shard is a hierarchical arrangement of nodes, each wrapped in a cluster. Shards support replication.Within a shard, one node functions as the read/write primary node. All the other nodes in a shardfunction as read-only replicas of the primary node. MemoryDB supports multiple shards within a cluster.This support enables partitioning of your data in a MemoryDB cluster.
MemoryDB supports replication via shards. The API operation DescribeClusters lists the shards with themember nodes, the node names, endpoints and also other information.
After a MemoryDB cluster is created, it can be altered (scaled in or out). For more information, seeScaling (p. 103) and Replacing nodes (p. 26).
When you create a new cluster, you can seed it with data from the old cluster so it doesn't start outempty. Doing this can be helpful if you need change your node type, engine version or migrate fromAmazon ElastiCache for Redis. For more information, see Making manual snapshots (p. 80) andRestoring from a snapshot (p. 94).
24

Amazon MemoryDB for Redis Developer GuideSupported node types
Supported node typesMemoryDB supports the following node types.
• General purpose
Current generation:
NodetypevCPUs Memory (GiB) Network performance
db.t4g.small2 1.37 Up to 5 gigabit
db.t4g.medium2 3.09 Up to 5 gigabit
• Memory optimized
Current generation:
NodetypevCPUs Memory (GiB) Network performance
db.r6g.large2 13.07 Up to 10 gigabit
db.r6g.xlarge4 26.32 Up to 10 gigabit
db.r6g.2xlarge8 52.82 Up to 10 gigabit
db.r6g.4xlarge16 105.81 Up to 10 gigabit
db.r6g.8xlarge32 209.55 12 gigabit
db.r6g.12xlarge48 317.77 20 gigabit
db.r6g.16xlarge64 419.10 25 gigabit
All node types are created in a virtual private cloud (VPC).
25
Amazon MemoryDB for Redis Developer GuideReplacing nodes
Replacing nodesMemoryDB frequently upgrades its fleet with patches and upgrades, usually seamlessly. However,from time to time we need to relaunch your MemoryDB nodes to apply mandatory OS updates to theunderlying host. These replacements are required to apply upgrades that strengthen security, reliability,and operational performance.
You have the option to manage these replacements yourself at any time before the scheduled nodereplacement window. When you manage a replacement yourself, your instance receives the OS updatewhen you relaunch the node and your scheduled node replacement is canceled. You might continue toreceive alerts indicating that the node replacement is to take place. If you've already manually mitigatedthe need for the maintenance, you can ignore these alerts.
NoteReplacement nodes automatically generated by MemoryDB for Redis may have different IPaddresses. You are responsible for reviewing your application configuration to ensure that yournodes are associated with the appropriate IP addresses.
The following list identifies actions you can take when MemoryDB schedules one of your nodes forreplacement:
MemoryDB node replacement options
• Do nothing – If you do nothing, MemoryDB replaces the node as scheduled.
If the node is a member of a Multi-AZ cluster, MemoryDB provides improved availability duringpatching, updates, and other maintenance-related node replacements.
Replacement completes while the cluster serves incoming write requests.• Change your maintenance window – For scheduled maintenance events, you receive an email or a
notification event from MemoryDB. In these cases, if you change your maintenance window before thescheduled replacement time, your node now is replaced at the new time. For more information, seeModifying a MemoryDB cluster (p. 33).
NoteThe ability to change your replacement window by moving your maintenance window is onlyavailable when the MemoryDB notification includes a maintenance window. If the notificationdoes not include a maintenance window, you cannot change your replacement window.
For example, let's say it's Thursday, November 9, at 15:00 and the next maintenance window is Friday,November 10, at 17:00. Following are three scenarios with their outcomes:• You change your maintenance window to Fridays at 16:00, after the current date and time and
before the next scheduled maintenance window. The node is replaced on Friday, November 10, at16:00.
• You change your maintenance window to Saturday at 16:00, after the current date and time andafter the next scheduled maintenance window. The node is replaced on Saturday, November 11, at16:00.
• You change your maintenance window to Wednesday at 16:00, earlier in the week than the currentdate and time. The node is replaced next Wednesday, November 15, at 16:00.
For instructions, see Managing maintenance (p. 58).
26

Amazon MemoryDB for Redis Developer Guide
Managing clustersMost MemoryDB operations are performed at the cluster level. You can set up a cluster with a specificnumber of nodes and a parameter group that controls the properties for each node. All nodes withina cluster are designed to be of the same node type and have the same parameter and security groupsettings.
Every cluster must have a cluster identifier. The cluster identifier is a customer-supplied name for thecluster. This identifier specifies a particular cluster when interacting with the MemoryDB API and AWSCLI commands. The cluster identifier must be unique for that customer in an AWS Region.
MemoryDB clusters are designed to be accessed using an Amazon EC2 instance. You can only launchyour MemoryDB cluster in a virtual private cloud (VPC) based on the Amazon VPC service, but you canaccess it from outside AWS. For more information, see Accessing MemoryDB resources from outsideAWS (p. 38).
27
Amazon MemoryDB for Redis Developer GuidePreparing a cluster
Preparing a clusterFollowing, you can find instructions on creating a cluster using the MemoryDB console, the AWS CLI, orthe MemoryDB API.
Whenever you create a cluster, it is a good idea to do some preparatory work so you won't need toupgrade or make changes right away.
Topics• Determining your requirements (p. 28)
Determining your requirementsPreparation
Knowing the answers to the following questions helps make creating your cluster go smoother:
• Make sure to create a subnet group in the same VPC before you start creating a cluster. Alternatively,you can use the default subnet group provided. For more information, see Subnets and subnetgroups (p. 198).
MemoryDB is designed to be accessed from within AWS using Amazon EC2. However, if you launchin a VPC based on Amazon VPC, you can provide access from outside AWS. For more information, seeAccessing MemoryDB resources from outside AWS (p. 38).
• Do you need to customize any parameter values?
If you do, create a custom parameter group. For more information, see Creating a parametergroup (p. 120).
• Do you need to create a VPC security group?
For more information, see Security in Your VPC.• How do you intend to implement fault tolerance?
For more information, see Mitigating Failures (p. 61).
Topics• Memory and processor requirements (p. 28)• MemoryDB cluster configuration (p. 28)• Scaling requirements (p. 29)• Access requirements (p. 29)• Region and Availability Zones (p. 29)
Memory and processor requirementsThe basic building block of MemoryDB for Redis is the node. Nodes are configured in shards to formclusters. When determining the node type to use for your cluster, take the cluster’s node configurationand the amount of data you have to store into consideration.
MemoryDB cluster configurationMemoryDB clusters are comprised of from 1 to 500 shards. The data in a MemoryDB cluster ispartitioned across the shards in the cluster. Your application connects with a MemoryDB cluster using a
28

Amazon MemoryDB for Redis Developer GuideDetermining your requirements
network address called an Endpoint. In addition to the node endpoints, the MemoryDB cluster itself hasan endpoint called the cluster endpoint. Your application can use this endpoint to read from or write tothe cluster, leaving the determination of which node to read from or write to up to MemoryDB.
Scaling requirementsAll clusters can be scaled up a larger node type. When you scale up a MemoryDB cluster, you can do itonline so the cluster remains available or you can seed a new cluster from a snapshot and avoid havingthe new cluster start out empty.
For more information, see Scaling (p. 103) in this guide.
Access requirementsBy design, MemoryDB clusters are accessed from Amazon EC2 instances. Network access to a MemoryDBcluster is limited to the user account that created the cluster. Therefore, before you can access a clusterfrom an Amazon EC2 instance, you must authorize ingress to the cluster. For detailed instructions, seeStep 2: Authorize access to the cluster (p. 19) in this guide.
Region and Availability ZonesBy locating your MemoryDB clusters in an AWS Region close to your application you can reduce latency.If your cluster has multiple nodes, locating your nodes in different Availability Zones can reduce theimpact of failures on your cluster.
For more information, see the following:
• Choosing Regions and Availability Zones (p. 4)• Mitigating Failures (p. 61)
29

Amazon MemoryDB for Redis Developer GuideViewing a cluster's details
Viewing a cluster's detailsYou can view detail information about one or more clusters using the MemoryDB console, AWS CLI, orMemoryDB API.
Viewing details for a MemoryDB cluster (Console)The following procedure details how to view the details of a MemoryDB cluster using the MemoryDBconsole.
1. Sign in to the AWS Management Console and open the MemoryDB for Redis console at https://console.aws.amazon.com/memorydb/.
2. To see details of a cluster, choose the radio button to the left of the cluster's name and then chooseView details. You can also click directly on the cluster to view the cluster details page.
The Cluster details page displays details about the cluster, including the cluster endpoint. You canview more details using the multiple tabs available in the Cluster details page.
3. Choose the Shards and nodes tab to see a listing of the cluster's shards and the number of nodes ineach shard.
4. To view specific information on a node, expand the shard in the table below. Alternatively you canalso search for the shard using the search box.
Doing this displays information about each node, including its Availability Zone, slots/keyspaces andstatus.
5. Choose the Metrics tab to monitor their respective processes, such as CPU Utilization and EngineCPU Utilization. For more information, see Metrics for MemoryDB (p. 175).
6. Choose the Network and security tab to see details of the subnet group and security groups.
a. In Subnet group, you can see the subnet group's name, a link to the VPC that subnet belongs toand the subnet group's Amazon Resource Name (ARN).
b. In Security groups, you can see the security group ID, name and description.7. Choose the Maintenace and snapshot tab to see details of the snapshot settings.
a. In Snapshot, you can see whether Automated Snapshots are enabled, the snapshot retentionperiod and the snapshot window.
b. In Snapshots, you will see a list of any snapshots to this cluster, including the snapshot name,size, number of shards and status.
For more information, see Snapshot and restore (p. 78).8. Choose the Maintenace and snapshot tab to see details of the Maintenance Window, along
with any pending ACL, Resharding or Service updates. For more information, see Managingmaintenance (p. 58).
9. Choose the Service Updates tab to see details of the any service updates that are applicable to thiscluster. For more information, see Service updates in MemoryDB for Redis (p. 216).
10. Choose the Tags tab to see details of any resource or cost-allocation tags that are associated withthis cluster. For more information, see Tagging snapshots (p. 101).
Viewing a cluster's details (AWS CLI)You can view the details for a cluster using the AWS CLI describe-clusters command. If the --cluster-name parameter is omitted, details for multiple clusters, up to --max-results, are returned.
30

Amazon MemoryDB for Redis Developer GuideViewing a cluster's details
If the --cluster-name parameter is included, details for the specified cluster are returned. You canlimit the number of records returned with the --max-results parameter.
The following code lists the details for my-cluster.
aws memorydb describe-clusters --cluster-name my-cluster
The following code list the details for up to 25 clusters.
aws memorydb describe-clusters --max-results 25
Example
For Linux, macOS, or Unix:
aws memorydb describe-clusters \ --cluster-name my-cluster \ --show-shard-details
For Windows:
aws memorydb describe-clusters ^ --cluster-name my-cluster ^ --show-shard-details
The following JSON output shows the response:
{ "Clusters": [ { "Name": "my-cluster", "Description": "my cluster", "Status": "available", "NumberOfShards": 1, "Shards": [ { "Name": "0001", "Status": "available", "Slots": "0-16383", "Nodes": [ { "Name": "my-cluster-0001-001", "Status": "available", "AvailabilityZone": "us-east-1a", "CreateTime": 1629230643.961, "Endpoint": { "Address": "my-cluster-0001-001.my-cluster.abcdef.memorydb.us-east-1.amazonaws.com", "Port": 6379 } }, { "Name": "my-cluster-0001-002", "Status": "available", "CreateTime": 1629230644.025, "Endpoint": { "Address": "my-cluster-0001-002.my-cluster.abcdef.memorydb.us-east-1.amazonaws.com", "Port": 6379 }
31

Amazon MemoryDB for Redis Developer GuideViewing a cluster's details
} ], "NumberOfNodes": 2 } ], "ClusterEndpoint": { "Address": "clustercfg.my-cluster.abcdef.memorydb.us-east-1.amazonaws.com", "Port": 6379 }, "NodeType": "db.r6g.large", "EngineVersion": "6.2", "EnginePatchVersion": "6.2.4", "ParameterGroupName": "default.memorydb-redis6", "ParameterGroupStatus": "in-sync", "SubnetGroupName": "default", "TLSEnabled": true, "ARN": "arn:aws:memorydb:us-east-1:000000000:cluster/my-cluster", "SnapshotRetentionLimit": 0, "MaintenanceWindow": "sat:06:30-sat:07:30", "SnapshotWindow": "04:00-05:00", "ACLName": "open-access", "AutoMinorVersionUpgrade": true }
For more information, see the AWS CLI for MemoryDB topic describe-clusters.
Viewing a cluster's details (MemoryDB API)You can view the details for a cluster using the MemoryDB API DescribeClusters action. If theClusterName parameter is included, details for the specified cluster are returned. If the ClusterNameparameter is omitted, details for up to MaxResults (default 100) clusters are returned. The value forMaxResults cannot be less than 20 or greater than 100.
The following code lists the details for my-cluster.
https://memory-db.us-east-1.amazonaws.com/ ?Action=DescribeClusters &ClusterName=my-cluster &Version=2021-01-01 &SignatureVersion=4 &SignatureMethod=HmacSHA256 &Timestamp=20210802T192317Z &X-Amz-Credential=<credential>
The following code list the details for up to 25 clusters.
https://memory-db.us-east-1.amazonaws.com/ ?Action=DescribeClusters &MaxResults=25 &Version=2021-02-02 &SignatureVersion=4 &SignatureMethod=HmacSHA256 &Timestamp=20210802T192317Z &X-Amz-Credential=<credential>
For more information, see the MemoryDB API reference topic DescribeClusters.
32

Amazon MemoryDB for Redis Developer GuideModifying a cluster
Modifying a MemoryDB clusterIn addition to adding or removing nodes from a cluster, there can be times where you need to makeother changes to an existing cluster, such as adding a security group, changing the maintenance windowor a parameter group.
We recommend that you have your maintenance window fall at the time of lowest usage. Thus it mightneed modification from time to time.
When you change a cluster's parameters, the change is applied to the cluster immediately. This is truewhether you change the cluster's parameter group itself or a parameter value within the cluster'sparameter group.
You can also update your clusters' engine version. For example, you can select a new engine minorversion and MemoryDB will start updating your cluster immediately. For more information, seeUpgrading engine versions (p. 49).
Using the AWS Management Console
To modify a cluster
1. Sign in to the AWS Management Console and open the MemoryDB for Redis console at https://console.aws.amazon.com/memorydb/.
2. From the list in the upper-right corner, choose the AWS Region where the cluster that you want tomodify is located.
3. From the left navigation, go to Clusters. From Clusters detail, select the cluster using the radiobutton and go to Actions and then Modify.
4. The Modify page appears.5. In the Modify window, make the modifications that you want. Options include:
• Description• Subnet groups• VPC Security Group(s)• Node type• Redis version compatibility• Enable Automatic snapshots• Snapshot Retention Period• Snapshot Window• Maintenance window• Topic for SNS Notification
6. Choose Save changes.
You can also go to the Cluster details page and click on modify to make modifications to the cluster. Ifyou want to modify specific sections of the cluster, you can go to the respective tab in the Cluster detailspage and click Modify.
Using the AWS CLIYou can modify an existing cluster using the AWS CLI update-cluster operation. To modify a cluster'sconfiguration value, specify the cluster's ID, the parameter to change and the parameter's new value. Thefollowing example changes the maintenance window for a cluster named my-cluster and applies thechange immediately.
33

Amazon MemoryDB for Redis Developer GuideModifying a cluster
For Linux, macOS, or Unix:
aws memorydb update-cluster \ --cluster-name my-cluster \ --preferred-maintenance-window sun:23:00-mon:02:00
For Windows:
aws memorydb update-cluster ^ --cluster-name my-cluster ^ --preferred-maintenance-window sun:23:00-mon:02:00
For more information, see update-cluster in the AWS CLI Command Reference.
Using the MemoryDB APIYou can modify an existing cluster using the MemoryDB API UpdateCluster operation. To modify acluster's configuration value, specify the cluster's ID, the parameter to change and the parameter's newvalue. The following example changes the maintenance window for a cluster named my-cluster andapplies the change immediately.
https://memory-db.us-east-1.amazonaws.com/ ?Action=UpdateCluster &ClusterName=my-cluster &PreferredMaintenanceWindow=sun:23:00-mon:02:00 &SignatureVersion=4 &SignatureMethod=HmacSHA256 &Timestamp=20210801T220302Z &X-Amz-Algorithm=Amazon4-HMAC-SHA256 &X-Amz-Date=20210802T220302Z &X-Amz-SignedHeaders=Host &X-Amz-Expires=20210801T220302Z &X-Amz-Credential=<credential> &X-Amz-Signature=<signature>
34

Amazon MemoryDB for Redis Developer GuideAdding / Removing nodes from a cluster
Adding / Removing nodes from a clusterYou can add or remove nodes from a cluster using the AWS Management Console, the AWS CLI, or theMemoryDB API.
Using the AWS Management Console
1. Sign in to the AWS Management Console and open the MemoryDB for Redis console at https://console.aws.amazon.com/memorydb/.
2. From the list of clusters, choose the cluster name from which you want to add or remove a node.
3. Under the Shards and nodes tab, choose Add/Delete nodes
4. In New number of nodes, enter the the number of nodes you want.
5. Choose Confirm.
ImportantIf you set the number of nodes to 1, you will no longer be Multi-AZ enabled. You can also tochoose to enable Auto failover.
Using the AWS CLI1. Identify the names of the nodes that you want to remove. For more information, see Viewing a
cluster's details (p. 30).
2. Use the update-cluster CLI operation with a list of the nodes to remove, as in the followingexample.
To remove nodes from a cluster using the command-line interface, use the command update-cluster with the following parameters:
• --cluster-name The ID of the cluster that you want to remove nodes from.
• --replica-configuration – Allows you to set the number of replicas:
• ReplicaCount – Set this property to specify the number of replica nodes you want.
• --region Specifies the AWS Region of the cluster that you want to remove nodes from.
For Linux, macOS, or Unix:
aws memorydb update-cluster \ --cluster-name my-cluster \ --replica-configuration \ ReplicaCount=1 \ --region us-east-1
For Windows:
aws memorydb update-cluster ^ --cluster-name my-cluster ^ --replica-configuration ^ ReplicaCount=1 ^ --region us-east-1
For more information, see the AWS CLI topics update-cluster.
35

Amazon MemoryDB for Redis Developer GuideAdding / Removing nodes from a cluster
Using the MemoryDB APITo remove nodes using the MemoryDB API, call the UpdateCluster API operation with the clustername and a list of nodes to remove, as shown:
• ClusterName The ID of the cluster that you want to remove nodes from.• ReplicaConfiguration – Allows you to set the number of replicas:
• ReplicaCount – Set this property to specify the number of replica nodes you want.• Region Specifies the AWS Region of the cluster that you want to remove a node from.
For more information, see UpdateCluster.
36

Amazon MemoryDB for Redis Developer GuideAccessing your cluster
Accessing your clusterYour MemoryDB for Redis instances are designed to be accessed through an Amazon EC2 instance.
You can access your MemoryDB node from an Amazon EC2 instance in the same Amazon VPC. Or, byusing VPC peering, you can access your MemoryDB node from an Amazon EC2 in a different AmazonVPC.
Topics• Grant access to your cluster (p. 37)• Accessing MemoryDB resources from outside AWS (p. 38)
Grant access to your clusterYou can connect to your MemoryDB cluster only from an Amazon EC2 instance that is running in thesame Amazon VPC. In this case, you will need to grant network ingress to the cluster.
To grant network ingress from an Amazon VPC security group to a cluster
1. Sign in to the AWS Management Console and open the Amazon EC2 console at https://console.aws.amazon.com/ec2/.
2. In the left navigation pane, under Network & Security, choose Security Groups.3. From the list of security groups, choose the security group for your Amazon VPC. Unless you created
a security group for MemoryDB use, this security group will be named default.4. Choose the Inbound tab, and then do the following:
a. Choose Edit.b. Choose Add rule.c. In the Type column, choose Custom TCP rule.d. In the Port range box, type the port number for your cluster node. This number must be the
same one that you specified when you launched the cluster. The default port for Redis is 6379.e. In the Source box, choose Anywhere which has the port range (0.0.0.0/0) so that any Amazon
EC2 instance that you launch within your Amazon VPC can connect to your MemoryDB nodes.
ImportantOpening up the MemoryDB cluster to 0.0.0.0/0 does not expose the cluster to theInternet because it has no public IP address and therefore cannot be accessed fromoutside the VPC. However, the default security group may be applied to other AmazonEC2 instances in the customer’s account, and those instances may have a public IPaddress. If they happen to be running something on the default port, then that servicecould be exposed unintentionally. Therefore, we recommend creating a VPC SecurityGroup that will be used exclusively by MemoryDB. For more information, see CustomSecurity Groups.
f. Choose Save.
When you launch an Amazon EC2 instance into your Amazon VPC, that instance will be able to connectto your MemoryDB cluster.
37

Amazon MemoryDB for Redis Developer GuideAccessing MemoryDB from outside AWS
Accessing MemoryDB resources from outside AWSMemoryDB is a service designed to be used internally to your VPC. External access is discouraged due tothe latency of Internet traffic and security concerns. However, if external access to MemoryDB is requiredfor test or development purposes, it can be done through a VPN.
Using the AWS Client VPN, you allow external access to your MemoryDB nodes with the followingbenefits:
• Restricted access to approved users or authentication keys;
• Encrypted traffic between the VPN Client and the AWS VPN endpoint;
• Limited access to specific subnets or nodes;
• Easy revocation of access from users or authentication keys;
• Audit connections;
The following procedures demonstrate how to:
Topics
• Create a certificate authority (p. 38)
• Configuring AWS client VPN components (p. 39)
• Configure the VPN client (p. 41)
Create a certificate authority
It is possible to create a Certificate Authority (CA) using different techniques or tools. We suggest theeasy-rsa utility, provided by the OpenVPN project. Regardless of the option you choose, make sure tokeep the keys secure. The following procedure downloads the easy-rsa scripts, creates the CertificateAuthority and the keys to authenticate the first VPN client:
• To create the initial certificates, open a terminal and do the following:
• git clone https://github.com/OpenVPN/easy-rsa
• cd easy-rsa
• ./easyrsa3/easyrsa init-pki
• ./easyrsa3/easyrsa build-ca nopass
• ./easyrsa3/easyrsa build-server-full server nopass
• ./easyrsa3/easyrsa build-client-full client1.domain.tld nopass
A pki subdirectory containing the certificates will be created under easy-rsa.
• Submit the server certificate to the AWS Certificate manager (ACM):
• On the ACM console, select Certificate Manager.
• Select Import Certificate.
• Enter the public key certificate available in the easy-rsa/pki/issued/server.crt file in theCertificate body field.
• Paste the private key available in the easy-rsa/pki/private/server.key in the Certificateprivate key field. Make sure to select all the lines between BEGIN AND END PRIVATE KEY(including the BEGIN and END lines).
• Paste the CA public key available on the easy-rsa/pki/ca.crt file in the Certificate chain field.
• Select Review and import.
• Select Import.
38
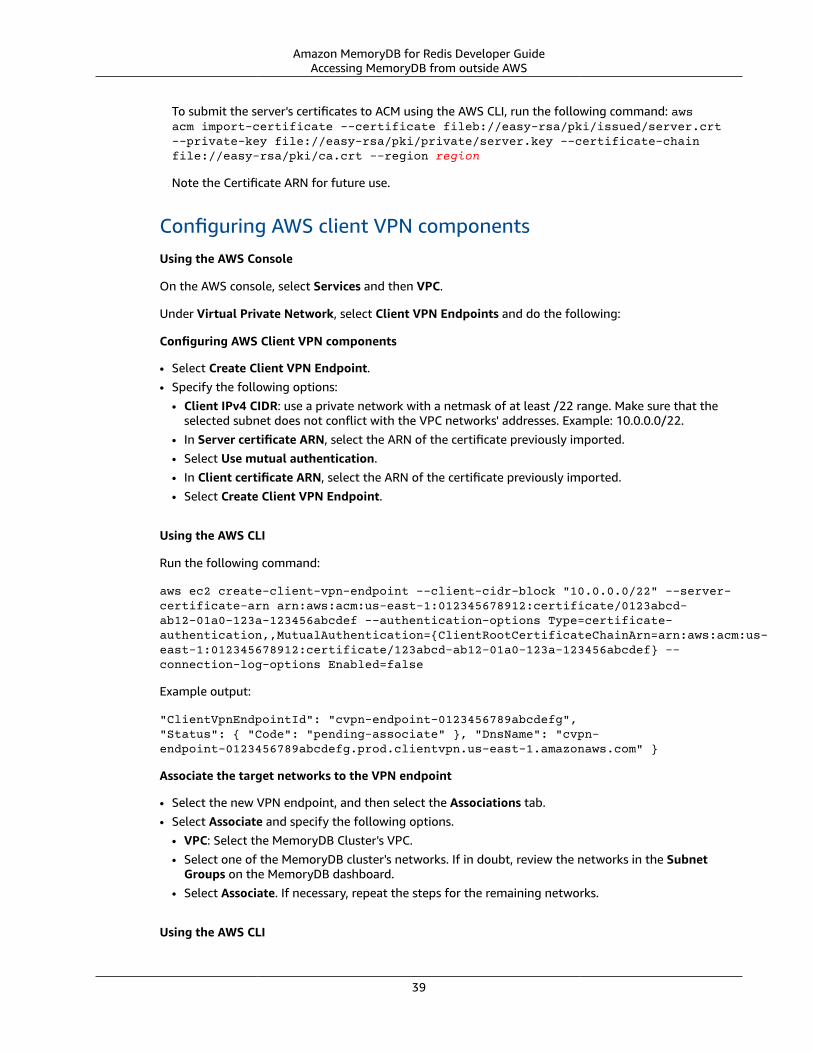
Amazon MemoryDB for Redis Developer GuideAccessing MemoryDB from outside AWS
To submit the server's certificates to ACM using the AWS CLI, run the following command: awsacm import-certificate --certificate fileb://easy-rsa/pki/issued/server.crt--private-key file://easy-rsa/pki/private/server.key --certificate-chainfile://easy-rsa/pki/ca.crt --region region
Note the Certificate ARN for future use.
Configuring AWS client VPN componentsUsing the AWS Console
On the AWS console, select Services and then VPC.
Under Virtual Private Network, select Client VPN Endpoints and do the following:
Configuring AWS Client VPN components
• Select Create Client VPN Endpoint.• Specify the following options:
• Client IPv4 CIDR: use a private network with a netmask of at least /22 range. Make sure that theselected subnet does not conflict with the VPC networks' addresses. Example: 10.0.0.0/22.
• In Server certificate ARN, select the ARN of the certificate previously imported.• Select Use mutual authentication.• In Client certificate ARN, select the ARN of the certificate previously imported.• Select Create Client VPN Endpoint.
Using the AWS CLI
Run the following command:
aws ec2 create-client-vpn-endpoint --client-cidr-block "10.0.0.0/22" --server-certificate-arn arn:aws:acm:us-east-1:012345678912:certificate/0123abcd-ab12-01a0-123a-123456abcdef --authentication-options Type=certificate-authentication,,MutualAuthentication={ClientRootCertificateChainArn=arn:aws:acm:us-east-1:012345678912:certificate/123abcd-ab12-01a0-123a-123456abcdef} --connection-log-options Enabled=false
Example output:
"ClientVpnEndpointId": "cvpn-endpoint-0123456789abcdefg","Status": { "Code": "pending-associate" }, "DnsName": "cvpn-endpoint-0123456789abcdefg.prod.clientvpn.us-east-1.amazonaws.com" }
Associate the target networks to the VPN endpoint
• Select the new VPN endpoint, and then select the Associations tab.• Select Associate and specify the following options.
• VPC: Select the MemoryDB Cluster's VPC.• Select one of the MemoryDB cluster's networks. If in doubt, review the networks in the Subnet
Groups on the MemoryDB dashboard.• Select Associate. If necessary, repeat the steps for the remaining networks.
Using the AWS CLI
39

Amazon MemoryDB for Redis Developer GuideAccessing MemoryDB from outside AWS
Run the following command:
aws ec2 associate-client-vpn-target-network --client-vpn-endpoint-id cvpn-endpoint-0123456789abcdefg --subnet-id subnet-0123456789abdcdef
Example output:
"Status": { "Code": "associating" }, "AssociationId": "cvpn-assoc-0123456789abdcdef" }
Review the VPN security group
The VPN Enpoint will automatically adopt the VPC's default security group. Check the inbound andoutbound rules and confirm if the security group allows the traffic from the VPN network (defined on theVPN Endpoint settings) to the MemoryDB networks on the service ports (by default, 6379 for Redis).
If you need to change the security group assigned to the VPN Endpoint, proceed as follows:
• Select the current security group.• Select Apply Security Group.• Select the new Security Group.
Using the AWS CLI
Run the following command:
aws ec2 apply-security-groups-to-client-vpn-target-network --client-vpn-endpoint-id cvpn-endpoint-0123456789abcdefga --vpc-id vpc-0123456789abdcdef --security-group-ids sg-0123456789abdcdef
Example output:
"SecurityGroupIds": [ "sg-0123456789abdcdef" ] }
NoteThe MemoryDB security group also needs to allow traffic coming from the VPN clients. Theclients' addresses will be masked with the VPN Endpoint address, according to the VPC Network.Therefore, consider the VPC network (not the VPN Clients' network) when creating the inboundrule on the MemoryDB security group.
Authorize the VPN access to the destination networks
On the Authorization tab, select Authorize Ingress and specify the following:
• Destination network to enable access: Either use 0.0.0.0/0 to allow access to any network (includingthe Internet) or restrict the the MemoryDB networks/hosts.
• Under Grant access to:, select Allow access to all users.• Select Add Authorization Rules.
Using the AWS CLI
Run the following command:
aws ec2 authorize-client-vpn-ingress --client-vpn-endpoint-id cvpn-endpoint-0123456789abcdefg --target-network-cidr 0.0.0.0/0 --authorize-all-groups
Example output:
40

Amazon MemoryDB for Redis Developer GuideAccessing MemoryDB from outside AWS
{ "Status": { "Code": "authorizing" } }
Allowing access to the Internet from the VPN clients
If you need to browse the Internet through the VPN, you need to create an additional route. Select theRoute Table tab and then select Create Route:
• Route destination: 0.0.0.0/0• Target VPC Subnet ID: Select one of the associated subnets with access to the Internet.• Select Create Route.
Using the AWS CLI
Run the following command:
aws ec2 create-client-vpn-route --client-vpn-endpoint-id cvpn-endpoint-0123456789abcdefg --destination-cidr-block 0.0.0.0/0 --target-vpc-subnet-id subnet-0123456789abdcdef
Example output:
{ "Status": { "Code": "creating" } }
Configure the VPN clientOn the AWS Client VPN Dashboard, select the VPN endpoint recently created and select DownloadClient Configuration. Copy the configuration file, and the files easy-rsa/pki/issued/client1.domain.tld.crt and easy-rsa/pki/private/client1.domain.tld.key. Edit theconfiguration file and change or add the following parameters:
• cert: add a new line with the parameter cert pointing to the client1.domain.tld.crt file. Use thefull path to the file. Example: cert /home/user/.cert/client1.domain.tld.crt
• cert: key: add a new line with the parameter key pointing to the client1.domain.tld.key file. Usethe full path to the file. Example: key /home/user/.cert/client1.domain.tld.key
Establish the VPN connection with the command: sudo openvpn --config downloaded-client-config.ovpn
Revoking access
If you need to invalidate the access from a particular client key, the key needs to be revoked in the CA.Then submit the revocation list to AWS Client VPN.
Revoking the key with easy-rsa:
• cd easy-rsa
• ./easyrsa3/easyrsa revoke client1.domain.tld
• Enter "yes" to continue, or any other input to abort.
Continue with revocation: `yes` ... * `./easyrsa3/easyrsa gen-crl
• An updated CRL has been created. CRL file: /home/user/easy-rsa/pki/crl.pem
Importing the revocation list to the AWS Client VPN:
• On the AWS Management Console, select Services and then VPC.• Select Client VPN Endpoints.
41

Amazon MemoryDB for Redis Developer GuideFinding connection endpoints
• Select the Client VPN Endpoint and then select Actions -> Import Client Certificate CRL.• Paste the contents of the crl.pem file.
Using the AWS CLI
Run the following command:
aws ec2 import-client-vpn-client-certificate-revocation-list --certificate-revocation-list file://./easy-rsa/pki/crl.pem --client-vpn-endpoint-id cvpn-endpoint-0123456789abcdefg
Example output:
Example output: { "Return": true }
Finding connection endpointsYour application connects to your cluster using the endpoint. An endpoint is a cluster's unique address.Use the cluster's Cluster Endpoint for all operations.
The following sections guide you through discovering the endpoint you'll need.
42

Amazon MemoryDB for Redis Developer GuideFinding connection endpoints
Finding the Endpoint for a MemoryDB Cluster (AWS CLI)You can use the describe-clusters command to discover the endpoint for a cluster. The commandreturns the cluster's endpoint.
The following operation retrieves the endpoint, which in this example is represented as a sample, for thecluster mycluster.
It returns the following JSON response:
aws memorydb describe-clusters \ --cluster-name mycluster
For Windows:
aws memorydb describe-clusters ^ --cluster-name mycluster
{ "Clusters": [ { "Name": "my-cluster", "Status": "available", "NumberOfShards": 1, "ClusterEndpoint": { "Address": "clustercfg.my-cluster.xxxxxx.memorydb.us-east-1.amazonaws.com", "Port": 6379 }, "NodeType": "db.r6g.large", "EngineVersion": "6.2", "EnginePatchVersion": "6.2.4", "ParameterGroupName": "default.memorydb-redis6", "ParameterGroupStatus": "in-sync", "SubnetGroupName": "my-sg", "TLSEnabled": true, "ARN": "arn:aws:memorydb:us-east-1:zzzexamplearn:cluster/my-cluster", "SnapshotRetentionLimit": 0, "MaintenanceWindow": "wed:03:00-wed:04:00", "SnapshotWindow": "04:30-05:30", "ACLName": "my-acl", "AutoMinorVersionUpgrade": true } ]}
For more information, see describe-clusters.
43

Amazon MemoryDB for Redis Developer GuideShards
Finding the Endpoint for a MemoryDB Cluster (MemoryDB API)You can use the MemoryDB for Redis API to discover the endpoint of a cluster.
Finding the Endpoint for a MemoryDB Cluster (MemoryDB API)
You can use the MemoryDB API to discover the endpoint for a cluster with the DescribeClustersaction. The action returns the cluster's endpoint.
The following operation retrieves the cluster endpoint for the cluster mycluster.
https://memory-db.us-east-1.amazonaws.com/ ?Action=DescribeClusters &ClusterName=mycluster &SignatureVersion=4 &SignatureMethod=HmacSHA256 &Timestamp=20210802T192317Z &Version=2021-01-01 &X-Amz-Credential=<credential>
For more information, see DescribeClusters.
Working with shardsA shard is a collection of one to 6 nodes. You can create a cluster with higher number of shards andlower number of replicas totaling up to 500 nodes per cluster. This cluster configuration can rangefrom 500 shards and 0 replicas to 100 shards and 5 replicas, which is the maximum number of replicasallowed. The cluster's data is partitioned across the cluster's shards. If there is more than one node in ashard, the shard implements replication with one node being the read/write primary node and the othernodes read-only replica nodes.
When you create a MemoryDB cluster using the AWS Management Console, you specify the numberof shards in the cluster and the number of nodes in the shards. For more information, see Creating aMemoryDB cluster (p. 14).
Each node in a shard has the same compute, storage and memory specifications. The MemoryDB APIlets you control cluster-wide attributes, such as the number of nodes, security settings, and systemmaintenance windows.
For more information, see Offline resharding and shard rebalancing for MemoryDB (p. 104) and Onlineresharding and shard rebalancing for MemoryDB (p. 105).
Finding a shard's nameYou can find a shard's name using the AWS Management Console, the AWS CLI or the MemoryDB API.
Using the AWS Management Console
The following procedure uses the AWS Management Console to find a MemoryDB's cluster's shardnames.
1. Sign in to the AWS Management Console and open the MemoryDB for Redis console at https://console.aws.amazon.com/memorydb/.
2. On the left navigation pane, choose Clusters.
44

Amazon MemoryDB for Redis Developer GuideFinding a shard's name
3. Choose the cluster under Name whose shard names you want to find.4. Under the Shards and nodes tab, view the list of shards under Name. You can also expand each one
to view details of their nodes.
Using the AWS CLI
To find shard (shard) names for MemoryDB clusters use the AWS CLI operation describe-clusterswith the following optional parameter.
• --cluster-name—An optional parameter which when used limits the output to the details of thespecified cluster. If this parameter is omitted, the details of up to 100 clusters is returned.
• --show-shard-details—Returns details of the shards, including their names.
This command returns the details for my-cluster.
For Linux, macOS, or Unix:
aws memorydb describe-clusters \ --cluster-name my-cluster --show-shard-details
For Windows:
aws memorydb describe-clusters ^ --cluster-name my-cluster --show-shard-details
It returns the following JSON response:
Line breaks are added for ease of reading.
{ "Clusters": [ { "Name": "my-cluster", "Status": "available", "NumberOfShards": 1, "Shards": [ { "Name": "0001", "Status": "available", "Slots": "0-16383", "Nodes": [ { "Name": "my-cluster-0001-001", "Status": "available", "AvailabilityZone": "us-east-1a", "CreateTime": "2021-08-21T20:22:12.405000-07:00", "Endpoint": { "Address": "clustercfg.my-cluster.xxxxx.memorydb.us-east-1.amazonaws.com", "Port": 6379 } }, { "Name": "my-cluster-0001-002",
45

Amazon MemoryDB for Redis Developer GuideFinding a shard's name
"Status": "available", "AvailabilityZone": "us-east-1b", "CreateTime": "2021-08-21T20:22:12.405000-07:00", "Endpoint": { "Address": "clustercfg.my-cluster.xxxxx.memorydb.us-east-1.amazonaws.com", "Port": 6379 } } ], "NumberOfNodes": 2 } ], "ClusterEndpoint": { "Address": "clustercfg.my-cluster.xxxxx.memorydb.us-east-1.amazonaws.com", "Port": 6379 }, "NodeType": "db.r6g.large", "EngineVersion": "6.2", "EnginePatchVersion": "6.2.4", "ParameterGroupName": "default.memorydb-redis6", "ParameterGroupStatus": "in-sync", "SubnetGroupName": "my-sg", "TLSEnabled": true, "ARN": "arn:aws:memorydb:us-east-1:xxxxxexamplearn:cluster/my-cluster", "SnapshotRetentionLimit": 0, "MaintenanceWindow": "wed:03:00-wed:04:00", "SnapshotWindow": "04:30-05:30", "ACLName": "my-acl", "AutoMinorVersionUpgrade": true } ]}
Using the MemoryDB API
To find shard ids for MemoryDB clusters use the API operation DescribeClusters with the followingoptional parameter.
• ClusterName—An optional parameter which when used limits the output to the details of thespecified cluster. If this parameter is omitted, the details of up to 100 clusters is returned.
• ShowShardDetails—Returns details of the shards, including their names.
Example
This command returns the details for my-cluster.
For Linux, macOS, or Unix:
https://memory-db.us-east-1.amazonaws.com/ ?Action=DescribeClusters &ClusterName=sample-cluster &ShowShardDetails=true &Version=2021-01-01 &SignatureVersion=4 &SignatureMethod=HmacSHA256 &Timestamp=20210802T192317Z &X-Amz-Credential=<credential>
46

Amazon MemoryDB for Redis Developer GuideEngine versions and upgrading
Managing your MemoryDBimplementation
In this section, you can find details about how to manage the various components of your MemoryDBimplementation.
Topics• Engine versions and upgrading (p. 47)• Tagging your MemoryDB resources (p. 50)• Managing maintenance (p. 58)• Best practices (p. 59)• Understanding MemoryDB replication (p. 62)• Snapshot and restore (p. 78)• Scaling (p. 103)• Configuring engine parameters using parameter groups (p. 118)
Engine versions and upgradingThis section covers the supported Redis engine versions and how to upgrade.
Topics• Supported Redis versions (p. 48)• Upgrading engine versions (p. 49)
47

Amazon MemoryDB for Redis Developer GuideSupported Redis versions
Supported Redis versionsRedis version 6.2 (enhanced)MemoryDB introduces the next version of the Redis engine, which includes Authenticating users withAccess Control Lists (ACLs) (p. 144), automatic version upgrade support, client-side caching andsignificant operational improvements.
With Redis 6, MemoryDB will offer a single version for each Redis OSS minor release, rather than offeringmultiple patch versions. This is designed to minimize confusion and ambiguity on having to choosefrom multiple minor versions. MemoryDB will also automatically manage the minor and patch versionof your running clusters, ensuring improved performance and enhanced security. This will be handledthrough standard customer-notification channels via a service update campaign. For more information,see Service updates in MemoryDB for Redis (p. 216).
If you do not specify the engine version during creation, MemoryDB will automatically select thepreferred Redis version for you. On the other hand, if you specify the engine version by using 6.2,MemoryDB will automatically invoke the preferred patch version of Redis 6.2 that is available.
For example, when you create a cluster, you set the --engine-version parameter to 6.2. The clusterwill be launched with the current available preferred patch version at the creation time. Any request witha full engine version value will be rejected, an exception will be thrown and the process will fail.
When calling the DescribeEngineVersions API, the EngineVersion parameter value will be set to6.2 and the actual full engine version will be returned in the EnginePatchVersion field.
For more information on the Redis 6.2 release, see Redis 6.2 Release Notes at Redis on GitHub.
48

Amazon MemoryDB for Redis Developer GuideUpgrading engine versions
Upgrading engine versionsMemoryDB by default automatically manages the patch version of your running clusters throughservice updates. You can additionally opt out from auto minor version upgrade if you set theAutoMinorVersionUpgrade property of your clusters to false. However, you can not opt out from autopatch version upgrade.
You can control if and when the protocol-compliant software powering your cluster is upgraded to newversions that are supported by MemoryDB before auto upgrade starts. This level of control enables youto maintain compatibility with specific versions, test new versions with your application before deployingin production, and perform version upgrades on your own terms and timelines.
You can initiate engine version upgrades to your cluster in the following ways:
• By updating it and specifying a new engine version. For more information, see Modifying a MemoryDBcluster (p. 33).
• Applying the service update for the corresponding engine version. For more information, see Serviceupdates in MemoryDB for Redis (p. 216).
Note the following:
• You can upgrade to a newer engine version, but you can't downgrade to an older engine version. If youwant to use an older engine version, you must delete the existing cluster and create it anew with theolder engine version.
• Engine version management is designed so that you can have as much control as possible over howpatching occurs. However, MemoryDB reserves the right to patch your cluster on your behalf in theunlikely event of a critical security vulnerability in the system or software.
• MemoryDB will offer a single version for each Redis OSS minor release, rather than offering multiplepatch versions. This is designed to minimize confusion and ambiguity on having to choose frommultiple versions. MemoryDB will also automatically manage the minor and patch version of yourrunning clusters, ensuring improved performance and enhanced security. This will be handled throughstandard customer-notification channels via a service update campaign. For more information, seeService updates in MemoryDB for Redis (p. 216).
• You can upgrade your cluster version with minimal downtime. The cluster is available for reads duringthe entire upgrade and is available for writes for most of the upgrade duration, except during thefailover operation which lasts a few seconds.
• We recommend that you perform engine upgrades during periods of low incoming write traffic.
Clusters with multiple shards are processed and patched as follows:• Only one upgrade operation is performed per shard at any time.• In each shard, all replicas are processed before the primary is processed. If there are fewer replicas in
a shard, the primary in that shard might be processed before the replicas in other shards are finishedprocessing.
• Across all the shards, primary nodes are processed in series. Only one primary node is upgraded at atime.
How to upgrade engine versionsYou initiate version upgrades to your cluster by modifying it using the MemoryDB console, the AWS CLI,or the MemoryDB API and specifying a newer engine version. For more information, see the followingtopics.
• Using the AWS Management Console (p. 33)• Using the AWS CLI (p. 33)
49

Amazon MemoryDB for Redis Developer GuideTagging your MemoryDB resources
• Using the MemoryDB API (p. 34)
Resolving blocked Redis engine upgradesAs shown in the following table, your Redis engine upgrade operation is blocked if you have a pendingscale up operation.
Pending operations Blocked operations
Scale up Immediate engine upgrade
Engine upgrade Immediate scale up
Immediate scale upScale up and engine upgrade
Immediate engine upgrade
Tagging your MemoryDB resourcesTo help you manage your clusters and other MemoryDB resources, you can assign your own metadata toeach resource in the form of tags. Tags enable you to categorize your AWS resources in different ways,for example, by purpose, owner, or environment. This is useful when you have many resources of thesame type—you can quickly identify a specific resource based on the tags that you've assigned to it. Thistopic describes tags and shows you how to create them.
WarningAs a best practice, we recommend that you do not include sensitive data in your tags.
Tag basicsA tag is a label that you assign to an AWS resource. Each tag consists of a key and an optional value, bothof which you define. Tags enable you to categorize your AWS resources in different ways, for example, bypurpose or owner. For example, you could define a set of tags for your account's MemoryDB clusters thathelps you track each cluster's owner and user group.
We recommend that you devise a set of tag keys that meets your needs for each resource type. Usinga consistent set of tag keys makes it easier for you to manage your resources. You can search and filterthe resources based on the tags you add. For more information about how to implement an effectiveresource tagging strategy, see the AWS whitepaper Tagging Best Practices.
Tags don't have any semantic meaning to MemoryDB and are interpreted strictly as a string ofcharacters. Also, tags are not automatically assigned to your resources. You can edit tag keys and values,and you can remove tags from a resource at any time. You can set the value of a tag to null. If you adda tag that has the same key as an existing tag on that resource, the new value overwrites the old value. Ifyou delete a resource, any tags for the resource are also deleted.
You can work with tags using the AWS Management Console, the AWS CLI, and the MemoryDB API.
If you're using IAM, you can control which users in your AWS account have permission to create, edit, ordelete tags. For more information, see Resource-level permissions (p. 162).
Resources you can tagYou can tag most MemoryDB resources that already exist in your account. The table below lists theresources that support tagging. If you're using the AWS Management Console, you can apply tags toresources by using the Tag Editor. Some resource screens enable you to specify tags for a resource when
50
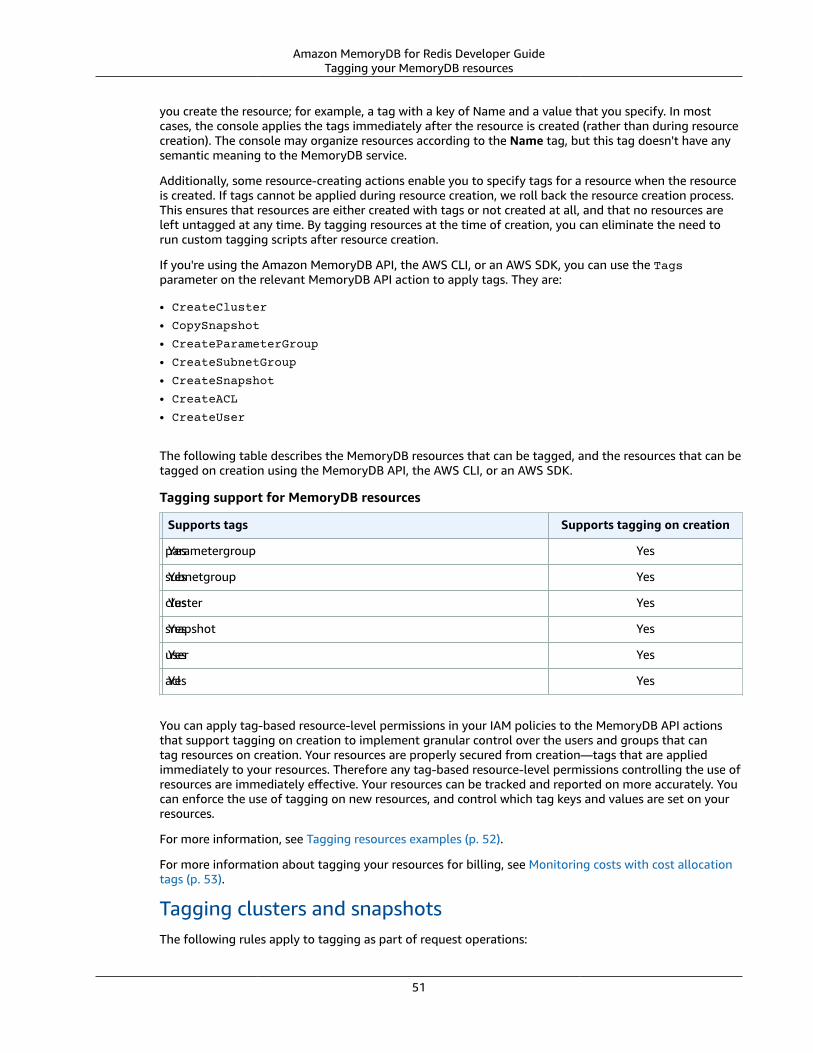
Amazon MemoryDB for Redis Developer GuideTagging your MemoryDB resources
you create the resource; for example, a tag with a key of Name and a value that you specify. In mostcases, the console applies the tags immediately after the resource is created (rather than during resourcecreation). The console may organize resources according to the Name tag, but this tag doesn't have anysemantic meaning to the MemoryDB service.
Additionally, some resource-creating actions enable you to specify tags for a resource when the resourceis created. If tags cannot be applied during resource creation, we roll back the resource creation process.This ensures that resources are either created with tags or not created at all, and that no resources areleft untagged at any time. By tagging resources at the time of creation, you can eliminate the need torun custom tagging scripts after resource creation.
If you're using the Amazon MemoryDB API, the AWS CLI, or an AWS SDK, you can use the Tagsparameter on the relevant MemoryDB API action to apply tags. They are:
• CreateCluster
• CopySnapshot
• CreateParameterGroup
• CreateSubnetGroup
• CreateSnapshot
• CreateACL
• CreateUser
The following table describes the MemoryDB resources that can be tagged, and the resources that can betagged on creation using the MemoryDB API, the AWS CLI, or an AWS SDK.
Tagging support for MemoryDB resources
ResourceSupports tags Supports tagging on creation
parametergroupYes Yes
subnetgroupYes Yes
clusterYes Yes
snapshotYes Yes
userYes Yes
aclYes Yes
You can apply tag-based resource-level permissions in your IAM policies to the MemoryDB API actionsthat support tagging on creation to implement granular control over the users and groups that cantag resources on creation. Your resources are properly secured from creation—tags that are appliedimmediately to your resources. Therefore any tag-based resource-level permissions controlling the use ofresources are immediately effective. Your resources can be tracked and reported on more accurately. Youcan enforce the use of tagging on new resources, and control which tag keys and values are set on yourresources.
For more information, see Tagging resources examples (p. 52).
For more information about tagging your resources for billing, see Monitoring costs with cost allocationtags (p. 53).
Tagging clusters and snapshotsThe following rules apply to tagging as part of request operations:
51

Amazon MemoryDB for Redis Developer GuideTagging your MemoryDB resources
• CreateCluster :• If the --cluster-name is supplied:
If tags are included in the request, the cluster will be tagged.• If the --snapshot-name is supplied:
If tags are included in the request, the cluster will be tagged only with those tags. If no tags areincluded in the request, the snapshot tags will be added to the cluster.
• CreateSnapshot :• If the --cluster-name is supplied:
If tags are included in the request, only the request tags will be added to the snapshot. If no tags areincluded in the request, the cluster tags will be added to the snapshot.
• For automatic snapshots:
Tags will propagate from the cluster tags.• CopySnapshot :
If tags are included in the request, only the request tags will be added to the snapshot. If no tags areincluded in the request, the source snapshot tags will be added to the copied snapshot.
• TagResource and UntagResource :
Tags will be added/removed from the resource.
Tag restrictionsThe following basic restrictions apply to tags:
• Maximum number of tags per resource – 50• For each resource, each tag key must be unique, and each tag key can have only one value.• Maximum key length – 128 Unicode characters in UTF-8.• Maximum value length – 256 Unicode characters in UTF-8.• Although MemoryDB allows for any character in its tags, other services can be restrictive. The allowed
characters across services are: letters, numbers, and spaces representable in UTF-8, and the followingcharacters: + - = . _ : / @
• Tag keys and values are case-sensitive.• The aws: prefix is reserved for AWS use. If a tag has a tag key with this prefix, then you can't edit or
delete the tag's key or value. Tags with the aws: prefix do not count against your tags per resourcelimit.
You can't terminate, stop, or delete a resource based solely on its tags; you must specify the resourceidentifier. For example, to delete snapshots that you tagged with a tag key called DeleteMe, youmust use the DeleteSnapshot action with the resource identifiers of the snapshots, such assnap-1234567890abcdef0.
For more information on MemoryDB resources you can tag, see Resources you can tag (p. 50).
Tagging resources examples• Adding tags to a cluster.
aws memorydb tag-resource \--resource-arn arn:aws:memorydb:us-east-1:111111222233:cluster/my-cluster \
52

Amazon MemoryDB for Redis Developer GuideMonitoring costs with tags
--tags Key="project",Value="XYZ" Key="memorydb",Value="Service"
• Creating a cluster using tags.
aws memorydb create-cluster \--cluster-name testing-tags \--description cluster-test \--subnet-group-name test \--node-type db.r6g.large \--acl-name open-access \--tags Key="project",Value="XYZ" Key="memorydb",Value="Service"
• Creating a Snapshot with tags.
For this case, if you add tags on request, even if the cluster contains tags, the snapshot will receiveonly the request tags.
aws memorydb create-snapshot \--cluster-name testing-tags \--snapshot-name bkp-testing-tags-mycluster \--tags Key="work",Value="foo"
Monitoring costs with cost allocation tagsWhen you add cost allocation tags to your resources in MemoryDB for Redis, you can track costs bygrouping expenses on your invoices by resource tag values.
A MemoryDB cost allocation tag is a key-value pair that you define and associate with a MemoryDBresource. The key and value are case-sensitive. You can use a tag key to define a category, and the tagvalue can be an item in that category. For example, you might define a tag key of CostCenter and a tagvalue of 10010, indicating that the resource is assigned to the 10010 cost center. You can also use tagsto designate resources as being used for test or production by using a key such as Environment andvalues such as test or production. We recommend that you use a consistent set of tag keys to make iteasier to track costs associated with your resources.
Use cost allocation tags to organize your AWS bill to reflect your own cost structure. To do this, sign upto get your AWS account bill with tag key values included. Then, to see the cost of combined resources,organize your billing information according to resources with the same tag key values. For example, youcan tag several resources with a specific application name, and then organize your billing information tosee the total cost of that application across several services.
You can also combine tags to track costs at a greater level of detail. For example, to track your servicecosts by region you might use the tag keys Service and Region. On one resource you might have thevalues MemoryDB and Asia Pacific (Singapore), and on another resource the values MemoryDBand Europe (Frankfurt). You can then see your total MemoryDB costs broken out by region. Formore information, see Use Cost Allocation Tags in the AWS Billing and Cost Management User Guide.
You can add MemoryDB cost allocation tags to MemoryDB clusters. When you add, list, modify, copy, orremove a tag, the operation is applied only to the specified cluster.
Characteristics of MemoryDB cost allocation tags
• Cost allocation tags are applied to MemoryDB resources which are specified in CLI and API operationsas an ARN. The resource-type will be a "cluster".
ARN Format: arn:aws:memorydb:<region>:<customer-id>:<resource-type>/<resource-name>
53

Amazon MemoryDB for Redis Developer GuideManaging tags using the AWS CLI
Sample ARN: arn:aws:memorydb:us-east-1:1234567890:cluster/my-cluster• The tag key is the required name of the tag. The key's string value can be from 1 to 128 Unicode
characters long and cannot be prefixed with aws:. The string can contain only the set of Unicodeletters, digits, blank spaces, underscores ( _ ), periods ( . ), colons ( : ), backslashes ( \ ), equal signs ( = ),plus signs ( + ), hyphens ( - ), or at signs ( @ ).
• The tag value is the optional value of the tag. The value's string value can be from 1 to 256 Unicodecharacters in length and cannot be prefixed with aws:. The string can contain only the set of Unicodeletters, digits, blank spaces, underscores ( _ ), periods ( . ), colons ( : ), backslashes ( \ ), equal signs ( = ),plus signs ( + ), hyphens ( - ), or at signs ( @ ).
• A MemoryDB resource can have a maximum of 50 tags.• Values do not have to be unique in a tag set. For example, you can have a tag set where the keysService and Application both have the value MemoryDB.
AWS does not apply any semantic meaning to your tags. Tags are interpreted strictly as character strings.AWS does not automatically set any tags on any MemoryDB resource.
Managing your cost allocation tags using the AWS CLIYou can use the AWS CLI to add, modify, or remove cost allocation tags.
Sample arn: arn:aws:memorydb:us-east-1:1234567890:cluster/my-cluster
Topics• Listing tags using the AWS CLI (p. 54)• Adding tags using the AWS CLI (p. 55)• Modifying tags using the AWS CLI (p. 56)• Removing tags using the AWS CLI (p. 56)
Listing tags using the AWS CLIYou can use the AWS CLI to list tags on an existing MemoryDB resource by using the list-tags operation.
The following code uses the AWS CLI to list the tags on the MemoryDB cluster my-cluster in region us-east-1.
For Linux, macOS, or Unix:
aws memorydb list-tags \ --resource-arn arn:aws:memorydb:us-east-1:0123456789:cluster/my-cluster
For Windows:
aws memorydb list-tags ^ --resource-arn arn:aws:memorydb:us-east-1:0123456789:cluster/my-cluster
Output from this operation will look something like the following, a list of all the tags on the resource.
{ "TagList": [ { "Value": "10110",
54

Amazon MemoryDB for Redis Developer GuideManaging tags using the AWS CLI
"Key": "CostCenter" }, { "Value": "EC2", "Key": "Service" } ]}
If there are no tags on the resource, the output will be an empty TagList.
{ "TagList": []}
For more information, see the AWS CLI for MemoryDB list-tags.
Adding tags using the AWS CLIYou can use the AWS CLI to add tags to an existing MemoryDB resource by using the tag-resource CLIoperation. If the tag key does not exist on the resource, the key and value are added to the resource. Ifthe key already exists on the resource, the value associated with that key is updated to the new value.
The following code uses the AWS CLI to add the keys Service and Region with the values memorydband us-east-1 respectively to the cluster my-cluster in region us-east-1.
For Linux, macOS, or Unix:
aws memorydb tag-resource \ --resource-arn arn:aws:memorydb:us-east-1:0123456789:cluster/my-cluster \ --tags Key=Service,Value=memorydb \ Key=Region,Value=us-east-1
For Windows:
aws memorydb tag-resource ^ --resource-arn arn:aws:memorydb:us-east-1:0123456789:cluster/my-cluster ^ --tags Key=Service,Value=memorydb ^ Key=Region,Value=us-east-1
Output from this operation will look something like the following, a list of all the tags on the resourcefollowing the operation.
{ "TagList": [ { "Value": "memorydb", "Key": "Service" }, { "Value": "us-east-1", "Key": "Region" } ]}
For more information, see the AWS CLI for MemoryDB tag-resource.
55

Amazon MemoryDB for Redis Developer GuideManaging tags using the MemoryDB API
You can also use the AWS CLI to add tags to a cluster when you create a new cluster by using theoperation create-cluster.
Modifying tags using the AWS CLIYou can use the AWS CLI to modify the tags on a MemoryDB cluster.
To modify tags:
• Use tag-resource to either add a new tag and value or to change the value associated with an existingtag.
• Use untag-resource to remove specified tags from the resource.
Output from either operation will be a list of tags and their values on the specified cluster.
Removing tags using the AWS CLIYou can use the AWS CLI to remove tags from an existing from a MemoryDB cluster by using the untag-resource operation.
The following code uses the AWS CLI to remove the tags with the keys Service and Region from thecluster my-cluster in the us-east-1 region.
For Linux, macOS, or Unix:
aws memorydb untag-resource \ --resource-arn arn:aws:memorydb:us-east-1:0123456789:cluster/my-cluster \ --tag-keys Region Service
For Windows:
aws memorydb untag-resource ^ --resource-arn arn:aws:memorydb:us-east-1:0123456789:cluster/my-cluster ^ --tag-keys Region Service
Output from this operation will look something like the following, a list of all the tags on the resourcefollowing the operation.
{ "TagList": []}
For more information, see the AWS CLI for MemoryDB untag-resource.
Managing your cost allocation tags using theMemoryDB APIYou can use the MemoryDB API to add, modify, or remove cost allocation tags.
Cost allocation tags are applied to MemoryDB for clusters. The cluster to be tagged is specified using anARN (Amazon Resource Name).
Sample arn: arn:aws:memorydb:us-east-1:1234567890:cluster/my-cluster
Topics
56

Amazon MemoryDB for Redis Developer GuideManaging tags using the MemoryDB API
• Listing tags using the MemoryDB API (p. 57)• Adding tags using the MemoryDB API (p. 57)• Modifying tags using the MemoryDB API (p. 57)• Removing tags using the MemoryDB API (p. 58)
Listing tags using the MemoryDB APIYou can use the MemoryDB API to list tags on an existing resource by using the ListTags operation.
The following code uses the MemoryDB API to list the tags on the resource my-cluster in the us-east-1region.
https://memory-db.us-east-1.amazonaws.com/ ?Action=ListTags &ResourceArn=arn:aws:memorydb:us-east-1:0123456789:cluster/my-cluster &SignatureVersion=4 &SignatureMethod=HmacSHA256 &Version=2021-01-01 &Timestamp=20210802T192317Z &X-Amz-Credential=<credential>
Adding tags using the MemoryDB APIYou can use the MemoryDB API to add tags to an existing MemoryDB cluster by using the TagResourceoperation. If the tag key does not exist on the resource, the key and value are added to the resource. Ifthe key already exists on the resource, the value associated with that key is updated to the new value.
The following code uses the MemoryDB API to add the keys Service and Region with the valuesmemorydb and us-east-1 respectively to the resource my-cluster in the us-east-1 region.
https://memory-db.us-east-1.amazonaws.com/ ?Action=TagResource &ResourceArn=arn:aws:memorydb:us-east-1:0123456789:cluster/my-cluster &SignatureVersion=4 &SignatureMethod=HmacSHA256 &Tags.member.1.Key=Service &Tags.member.1.Value=memorydb &Tags.member.2.Key=Region &Tags.member.2.Value=us-east-1 &Version=2021-01-01 &Timestamp=20210802T192317Z &X-Amz-Credential=<credential>
For more information, see TagResource.
Modifying tags using the MemoryDB APIYou can use the MemoryDB API to modify the tags on a MemoryDB cluster.
To modify the value of a tag:
• Use TagResource operation to either add a new tag and value or to change the value of an existing tag.• Use UntagResource to remove tags from the resource.
Output from either operation will be a list of tags and their values on the specified resource.
57

Amazon MemoryDB for Redis Developer GuideManaging maintenance
Removing tags using the MemoryDB APIYou can use the MemoryDB API to remove tags from an existing MemoryDB cluster by using theUntagResource operation.
The following code uses the MemoryDB API to remove the tags with the keys Service and Region fromthe cluster my-cluster in region us-east-1.
https://memory-db.us-east-1.amazonaws.com/ ?Action=UntagResource &ResourceArn=arn:aws:memorydb:us-east-1:0123456789:cluster/my-cluster &SignatureVersion=4 &SignatureMethod=HmacSHA256 &TagKeys.member.1=Service &TagKeys.member.2=Region &Version=2021-01-01 &Timestamp=20210802T192317Z &X-Amz-Credential=<credential>
Managing maintenanceEvery cluster has a weekly maintenance window during which any system changes are applied. If youdon't specify a preferred maintenance window when you create or modify a cluster, MemoryDB assigns a60-minute maintenance window within your region's maintenance window on a randomly chosen day ofthe week.
The 60-minute maintenance window is chosen at random from an 8-hour block of time per region. Thefollowing table lists the time blocks for each region from which the default maintenance windows areassigned. You may choose a preferred maintenance window outside the region's maintenance windowblock.
Region Code Region Name Region Maintenance Window
ap-south-1 Asia Pacific (Mumbai) Region 17:30–1:30 UTC
eu-west-1 Europe (Ireland) Region 22:00–06:00 UTC
sa-east-1 South America (São Paulo) Region 22:00–06:00 UTC
us-east-1 US East (N. Virginia) Region 03:00–11:00 UTC
Changing your Cluster's Maintenance Window
The maintenance window should fall at the time of lowest usage and thus might need modification fromtime to time. You can modify your cluster to specify a time range of up to 24 hours in duration duringwhich any maintenance activities you have requested should occur. Any deferred or pending clustermodifications you requested occur during this time.
More information
For information on your maintenance window and node replacement, see the following:
• Replacing nodes (p. 26)—Managing node replacement
• Modifying a MemoryDB cluster (p. 33)—Changing a cluster's maintenance window
58

Amazon MemoryDB for Redis Developer GuideBest practices
Best practicesFollowing, you can find recommended best practices for MemoryDB for Redis. Following these improvesyour cluster's performance and reliability.
Topics• Restricted Redis Commands (p. 60)• Resilience in MemoryDB for Redis (p. 61)• Best practices: Online cluster resizing (p. 62)
59

Amazon MemoryDB for Redis Developer GuideRestricted Redis Commands
Restricted Redis CommandsTo deliver a managed service experience, MemoryDB restricts access to certain commands that requireadvanced privileges. The following commands are unavailable:
• acl deluser
• acl load
• acl save
• acl setuser
• bgrewriteaof
• bgsave
• cluster addslot
• cluster delslot
• cluster setslot
• config
• debug
• migrate
• module
• psync
• replicaof
• save
• shutdown
• slaveof
• sync
60

Amazon MemoryDB for Redis Developer GuideResilience
Resilience in MemoryDB for RedisThe AWS global infrastructure is built around AWS Regions and Availability Zones. AWS Regions providemultiple physically separated and isolated Availability Zones, which are connected with low-latency,high-throughput, and highly redundant networking. With Availability Zones, you can design and operateapplications and databases that automatically fail over between Availability Zones without interruption.Availability Zones are more highly available, fault tolerant, and scalable than traditional single ormultiple data center infrastructures.
For more information about AWS Regions and Availability Zones, see AWS Global Infrastructure.
In addition to the AWS global infrastructure, MemoryDB for Redis offers several features to help supportyour data resiliency and snapshot needs.
Topics• Mitigating Failures (p. 61)
Mitigating FailuresWhen planning your MemoryDB for Redis implementation, you should plan so that failures have aminimal impact upon your application and data. The topics in this section cover approaches you can taketo protect your application and data from failures.
Mitigating Failures: MemoryDB clusters
A MemoryDB cluster is comprised of a single primary node which your application can both readfrom and write to, and from 0 to 5 read-only replica nodes. However, we highly recommend to use atleast 1 replica for high availability. Whenever data is written to the primary node it is persisted to thetransaction log and asynchronously updated on the replica nodes.
When a read replica fails
1. MemoryDB detects the failed replica.2. MemoryDB takes the failed node offline.3. MemoryDB launches and provisions a replacement node in the same AZ.4. The new node synchronizes with the transaction log.
During this time your application can continue reading and writing using the other nodes.
MemoryDB Multi-AZ
If Multi-AZ is activated on your MemoryDB clusters, a failed primary will be detected and replacedautomatically.
1. MemoryDB detects the primary node failure.2. MemoryDB fails over to a replica after ensuring it is consistent with the failed primary.3. MemoryDB spins up a replica in the failed primary's AZ.4. The new node syncs with the transaction log.
Failing over to a replica node is generally faster than creating and provisioning a new primary node. Thismeans your application can resume writing to your primary node sooner.
For more information, see Minimizing downtime in MemoryDB with Multi-AZ (p. 64).
61

Amazon MemoryDB for Redis Developer GuideBest practices: Online cluster resizing
Best practices: Online cluster resizingResharding involves adding and removing shards or nodes to your cluster and redistributing key spaces.As a result, multiple things have an impact on the resharding operation, such as the load on the cluster,memory utilization, and overall size of data. For the best experience, we recommend that you followoverall cluster best practices for uniform workload pattern distribution. In addition, we recommendtaking the following steps.
Before initiating resharding, we recommend the following:
• Test your application – Test your application behavior during resharding in a staging environment ifpossible.
• Get early notification for scaling issues – Resharding is a compute-intensive operation. Because ofthis, we recommend keeping CPU utilization under 80 percent on multicore instances and less than 50percent on single core instances during resharding. Monitor MemoryDB metrics and initiate reshardingbefore your application starts observing scaling issues. Useful metrics to track are CPUUtilization,NetworkBytesIn, NetworkBytesOut, CurrConnections, NewConnections, FreeableMemory,SwapUsage, and BytesUsedForMemoryDB.
• Ensure sufficient free memory is available before scaling in – If you're scaling in, ensure that freememory available on the shards to be retained is at least 1.5 times the memory used on the shardsyou plan to remove.
• Initiate resharding during off-peak hours – This practice helps to reduce the latency and throughputimpact on the client during the resharding operation. It also helps to complete resharding faster asmore resources can be used for slot redistribution.
• Review client timeout behavior – Some clients might observe higher latency during online clusterresizing. Configuring your client library with a higher timeout can help by giving the system time toconnect even under higher load conditions on server. In some cases, you might open a large numberof connections to the server. In these cases, consider adding exponential backoff to reconnect logic.Doing this can help prevent a burst of new connections hitting the server at the same time.
During resharding, we recommend the following:
• Avoid expensive commands – Avoid running any computationally and I/O intensive operations, suchas the KEYS and SMEMBERS commands. We suggest this approach because these operations increasethe load on the cluster and have an impact on the performance of the cluster. Instead, use the SCANand SSCAN commands.
• Follow Lua best practices – Avoid long running Lua scripts, and always declare keys used in Luascripts up front. We recommend this approach to determine that the Lua script is not using cross slotcommands. Ensure that the keys used in Lua scripts belong to the same slot.
After resharding, note the following:
• Scale-in might be partially successful if insufficient memory is available on target shards. If such aresult occurs, review available memory and retry the operation, if necessary.
• Slots with large items are not migrated. In particular, slots with items larger than 256 MB post-serialization are not migrated.
• FLUSHALL and FLUSHDB commands are not supported inside Lua scripts during a reshardingoperation.
Understanding MemoryDB replicationMemoryDB implements replication with data partitioned across up to 500 shards.
62

Amazon MemoryDB for Redis Developer GuideConsistency
Each shard in a cluster has a single read/write primary node and up to 5 read-only replica nodes. Eachprimary node can sustain up to 100 MB/s. You can create a cluster with higher number of shards andlower number of replicas totaling up to 500 nodes per cluster. This cluster configuration can rangefrom 500 shards and 0 replicas to 100 shards and 5 replicas, which is the maximum number of replicasallowed.
ConsistencyIn MemoryDB, primary nodes are strongly consistent. Successful write operations are durably stored in adistributed Multi-AZ transactional logs before returning to clients. Read operations on primaries alwaysreturn the most up-to-date data reflecting the effects from all prior successful write operations. Suchstrong consistency is preserved across primary failovers.
In MemoryDB, replica nodes are eventually consistent. Read operations from replicas (using READONLYcommand) might not always reflect the effects of the most recent successful write operations, withlag metrics published to CloudWatch. However, read operations from a single replica are sequentiallyconsistent. Successful write operations take effect on each replica in the same order they were executedon the primary.
Replication in a clusterEach read replica in a shard maintains a copy of the data from the shard's primary node. Asynchronousreplication mechanisms using the transaction logs are used to keep the read replicas synchronizedwith the primary. Applications can read from any node in the cluster. Applications can write onlyto the primary nodes. Read replicas enhance read scalability. Since MemoryDB stores the data indurable transaction logs, there is no risk that data will be lost. Data is partitioned across the shards in aMemoryDB cluster.
Applications use the MemoryDB cluster's cluster endpoint to connect with the nodes in the cluster. Formore information, see Finding connection endpoints (p. 42).
MemoryDB clusters are regional and can contain nodes only from one Region. To improve faulttolerance, you must provision primaries and read replicas across multiple Availability Zones within thatregion.
Using replication, which provides you with Multi-AZ, is strongly recommended for all MemoryDB clusters.For more information, see Minimizing downtime in MemoryDB with Multi-AZ (p. 64).
63

Amazon MemoryDB for Redis Developer GuideMinimizing downtime with Multi-AZ
Minimizing downtime in MemoryDB with Multi-AZThere are a number of instances where MemoryDB may need to replace a primary node; these includecertain types of planned maintenance and the unlikely event of a primary node or Availability Zonefailure.
The response to node failure depends on which node has failed. However, in all cases, MemoryDBensures that no data is lost during node replacements or failover. For example, if a replica fails, thefailed node is replaced and data is synced from the transaction log. If the primary node fails, a failover istriggered to a consistent replica which ensures no data is lost during failover. The writes are now servedfrom the new primary node. The old primary node is then replaced and synced from the transaction log.
If a primary node fails on a single node shard (no replicas), MemoryDB stops accepting writes until theprimary node is replaced and synced from the transaction log.
Node replacement may result in some downtime for the cluster, but if Multi-AZ is active, the downtimeis minimized. The role of primary node will automatically fail over to one of the replicas. There is noneed to create and provision a new primary node, because MemoryDB will handle this transparently.This failover and replica promotion ensure that you can resume writing to the new primary as soon aspromotion is complete.
In case of planned node replacements initiated due to maintenance updates or service updates, be awarethe planned node replacements complete while the cluster serves incoming write requests.
Multi-AZ on your MemoryDB clusters improves your fault tolerance. This is true particularly in caseswhere your cluster's primary nodes become unreachable or fail for any reason. Multi-AZ on MemoryDBclusters requires each shard to have more than one node, and is automatically enabled.
Topics• Failure scenarios with Multi-AZ responses (p. 64)• Testing automatic failover (p. 67)
Failure scenarios with Multi-AZ responsesIf Multi-AZ is active, a failed primary node fails over to an available replica. The replica is automaticallysynchronized with the transaction log and becomes primary, which is much faster than creating andreprovisioning a new primary node. This process usually takes just a few seconds until you can write tothe cluster again.
When Multi-AZ is active, MemoryDB continually monitors the state of the primary node. If the primarynode fails, one of the following actions is performed depending on the type of failure.
Topics• Failure scenarios when only the primary node fails (p. 64)• Failure scenarios when the primary node and some replicas fail (p. 65)• Failure scenarios when the entire cluster fails (p. 65)
Failure scenarios when only the primary node fails
If only the primary node fails, a replica will automatically become primary. A replacement replica is thencreated and provisioned in the same Availability Zone as the failed primary.
When only the primary node fails, MemoryDB Multi-AZ does the following:
1. The failed primary node is taken offline.
64

Amazon MemoryDB for Redis Developer GuideMinimizing downtime with Multi-AZ
2. An up-to-date replica automatically become primary.
Writes can resume as soon as the failover process is complete, typically just a few seconds.3. A replacement replica is launched and provisioned.
The replacement replica is launched in the Availability Zone that the failed primary node was in sothat the distribution of nodes is maintained.
4. The replica syncs with the transaction log.
For information about finding the endpoints of a cluster, see the following topics:
• Finding the Endpoint for a MemoryDB Cluster (MemoryDB API) (p. 44)
Failure scenarios when the primary node and some replicas fail
If the primary and at least one replica fails, an up-to-date replica is promoted to primary cluster. Newreplicas are also created and provisioned in the same Availability Zones as the failed nodes.
When the primary node and some replicas fail, MemoryDB Multi-AZ does the following:
1. The failed primary node and failed replicas are taken offline.2. An available replica will become the primary node.
Writes can resume as soon as the failover is complete, typically just a few seconds.3. Replacement replicas are created and provisioned.
The replacement replicas are created in the Availability Zones of the failed nodes so that thedistribution of nodes is maintained.
4. All nodes sync with the transaction log.
For information about finding the endpoints of a cluster, see the following topics:
• Finding the Endpoint for a MemoryDB Cluster (AWS CLI) (p. 43)• Finding the Endpoint for a MemoryDB Cluster (MemoryDB API) (p. 44)
Failure scenarios when the entire cluster fails
If everything fails, all the nodes are recreated and provisioned in the same Availability Zones as theoriginal nodes.
There is no data loss in this scenario as the data was persisted in the transaction log.
When the entire cluster fails, MemoryDB Multi-AZ does the following:
1. The failed primary node and replicas are taken offline.2. A replacement primary node is created and provisioned, syncing with the transaction log.3. Replacement replicas are created and provisioned, syncing with the transaction log.
The replacements are created in the Availability Zones of the failed nodes so that the distribution ofnodes is maintained.
65

Amazon MemoryDB for Redis Developer GuideMinimizing downtime with Multi-AZ
For information about finding the endpoints of a cluster, see the following topics:
• Finding the Endpoint for a MemoryDB Cluster (AWS CLI) (p. 43)• Finding the Endpoint for a MemoryDB Cluster (MemoryDB API) (p. 44)
66

Amazon MemoryDB for Redis Developer GuideMinimizing downtime with Multi-AZ
Testing automatic failoverYou can test automatic failover using the MemoryDB console, the AWS CLI, and the MemoryDB API.
When testing, note the following:
• You can use this operation up to five times in any rolling 24-hour period per cluster.• If you call this operation on shards in different clusters, you can make the calls concurrently.• In some cases, you might call this operation multiple times on different shards in the same MemoryDB
cluster. In such cases, the first node replacement must complete before a subsequent call can be made.• To determine whether the node replacement is complete, check events using the MemoryDB
for Redis console, the AWS CLI, or the MemoryDB API. Look for the following events related toFailoverShard, listed here in order of likely occurrence:1. cluster message: FailoverShard API called for shard <shard-id>2. cluster message: Failover from primary node <primary-node-id> to replica node
<node-id> completed
3. cluster message: Recovering nodes <node-id>4. cluster message: Finished recovery for nodes <node-id>
For more information, see the following:• DescribeEvents in the MemoryDB API Reference
• This API is designed for testing the behavior of your application in case of MemoryDB failover. It isnot designed to be an operational tool for initiating a failover to address an issue with the cluster.Moreover, in certain conditions such as large-scale operational events, AWS may block this API.
Topics• Testing automatic failover using the AWS Management Console (p. 67)• Testing automatic failover using the AWS CLI (p. 68)• Testing automatic failover using the MemoryDB API (p. 69)
Testing automatic failover using the AWS Management Console
Use the following procedure to test automatic failover with the console.
1. Sign in to the AWS Management Console and open the MemoryDB for Redis console at https://console.aws.amazon.com/memorydb/.
2. Choose the radio button to the left of the cluster you want to test. This cluster must have at leastone replica node.
3. In the Details area, confirm that this cluster is Multi-AZ enabled. If the cluster isn't Multi-AZ enabled,either choose a different cluster or modify this cluster to enable Multi-AZ. For more information, seeModifying a MemoryDB cluster (p. 33).
4. Choose the cluster's name.5. On the Shards and nodes page, for the shard on which you want to test failover, choose the shard's
name.6. For the node, choose Failover Primary.7. Choose Continue to fail over the primary, or Cancel to cancel the operation and not fail over the
primary node.
During the failover process, the console continues to show the node's status as available. To trackthe progress of your failover test, choose Events from the console navigation pane. On the Events
67

Amazon MemoryDB for Redis Developer GuideMinimizing downtime with Multi-AZ
tab, watch for events that indicate your failover has started (FailoverShard API called) andcompleted (Recovery completed).
Testing automatic failover using the AWS CLI
You can test automatic failover on any Multi-AZ enabled cluster using the AWS CLI operation failover-shard.
Parameters
• --cluster-name – Required. The cluster that is to be tested.• --shard-name – Required. The name of the shard you want to test automatic failover on. You can
test a maximum of five shards in a rolling 24-hour period.
The following example uses the AWS CLI to call failover-shard on the shard 0001 in the MemoryDBcluster my-cluster.
For Linux, macOS, or Unix:
aws memorydb failover-shard \ --cluster-name my-cluster \ --shard-name 0001
For Windows:
aws memorydb failover-shard ^ --cluster-name my-cluster ^ --shard-name 0001
To track the progress of your failover, use the AWS CLI describe-events operation.
It will return the following JSON response:
{ "Events": [ { "SourceName": "my-cluster", "SourceType": "cluster", "Message": "Failover to replica node my-cluster-0001-002 completed", "Date": "2021-08-22T12:39:37.568000-07:00" }, { "SourceName": "my-cluster", "SourceType": "cluster", "Message": "Starting failover for shard 0001", "Date": "2021-08-22T12:39:10.173000-07:00" } ]}
For more information, see the following:
• failover-shard• describe-events
68

Amazon MemoryDB for Redis Developer GuideMinimizing downtime with Multi-AZ
Testing automatic failover using the MemoryDB API
The following example calls FailoverShard on the shard 0003 in the cluster memorydb00.
Example Testing automatic failover
https://memory-db.us-east-1.amazonaws.com/ ?Action=FailoverShard &ShardName=0003 &ClusterName=memorydb00 &Version=2021-01-01 &SignatureVersion=4 &SignatureMethod=HmacSHA256 &Timestamp=20210801T192317Z &X-Amz-Credential=<credential>
To track the progress of your failover, use the MemoryDB DescribeEvents API operation.
For more information, see the following:
• FailoverShard• DescribeEvents
69

Amazon MemoryDB for Redis Developer GuideChanging the number of replicas
Changing the number of replicasYou can dynamically increase or decrease the number of read replicas in your MemoryDB cluster usingthe AWS Management Console, the AWS CLI, or the MemoryDB API. All shards must have the samenumber of replicas.
70

Amazon MemoryDB for Redis Developer GuideChanging the number of replicas
Increasing the number of replicas in a clusterYou can increase the number of replicas in a MemoryDB cluster up to a maximum of five per shard. Youcan do so using the AWS Management Console, the AWS CLI, or the MemoryDB API.
Topics• Using the AWS Management Console (p. 71)• Using the AWS CLI (p. 71)• Using the MemoryDB API (p. 73)
Using the AWS Management Console
To increase the number of replicas in a MemoryDB cluster (console), see Adding / Removing nodes froma cluster (p. 35).
Using the AWS CLI
To increase the number of replicas in a MemoryDB cluster, use the update-cluster command with thefollowing parameters:
• --cluster-name – Required. Identifies which cluster you want to increase the number of replicas in.• --replica-configuration – Required. Allows you to set the number of replicas. To increase the
replica count, set the ReplicaCount property to the number of replicas that you want in this shard atthe end of this operation.
Example
The following example increases the number of replicas in the cluster my-cluster to 2.
For Linux, macOS, or Unix:
aws memorydb update-cluster \ --cluster-name my-cluster \ --replica-configuration \ ReplicaCount=2
For Windows:
aws memorydb update-cluster ^ --cluster-name my-cluster ^ --replica-configuration ^ ReplicaCount=2
It returns the following JSON response:
{ "Cluster": { "Name": "my-cluster", "Status": "updating", "NumberOfShards": 1, "ClusterEndpoint": { "Address": "clustercfg.my-cluster.xxxxx.memorydb.us-east-1.amazonaws.com", "Port": 6379 }, "NodeType": "db.r6g.large", "EngineVersion": "6.2",
71
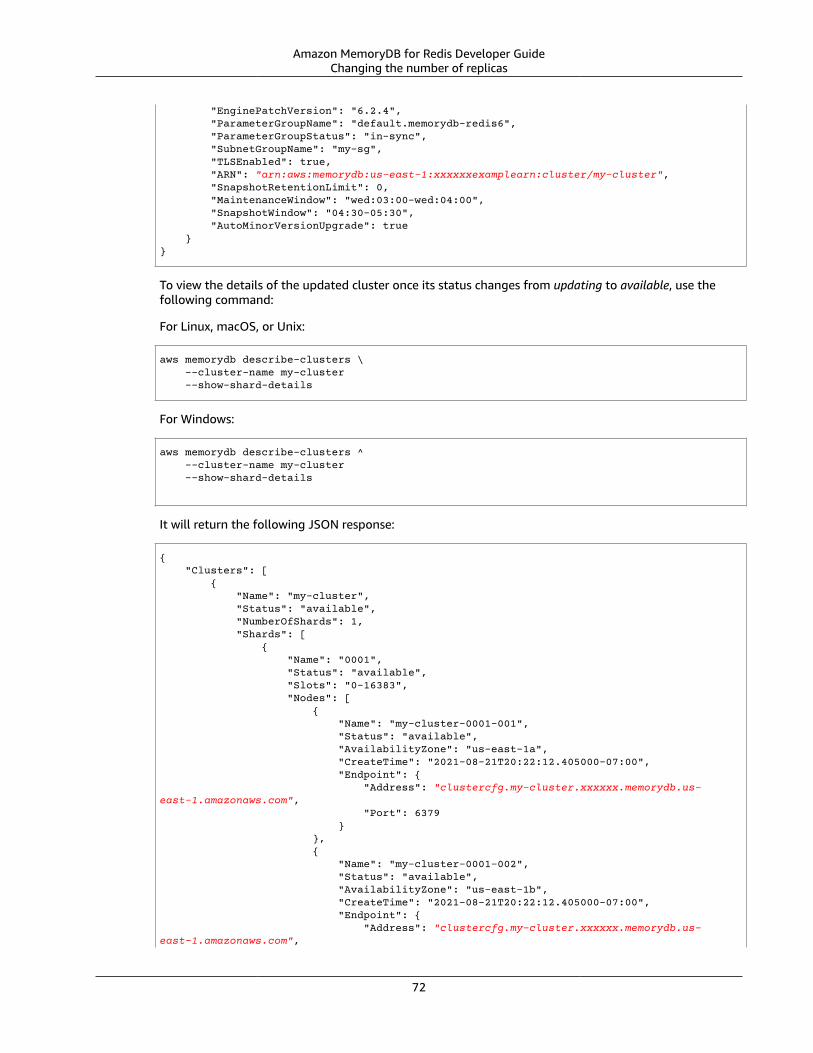
Amazon MemoryDB for Redis Developer GuideChanging the number of replicas
"EnginePatchVersion": "6.2.4", "ParameterGroupName": "default.memorydb-redis6", "ParameterGroupStatus": "in-sync", "SubnetGroupName": "my-sg", "TLSEnabled": true, "ARN": "arn:aws:memorydb:us-east-1:xxxxxxexamplearn:cluster/my-cluster", "SnapshotRetentionLimit": 0, "MaintenanceWindow": "wed:03:00-wed:04:00", "SnapshotWindow": "04:30-05:30", "AutoMinorVersionUpgrade": true }}
To view the details of the updated cluster once its status changes from updating to available, use thefollowing command:
For Linux, macOS, or Unix:
aws memorydb describe-clusters \ --cluster-name my-cluster --show-shard-details
For Windows:
aws memorydb describe-clusters ^ --cluster-name my-cluster --show-shard-details
It will return the following JSON response:
{ "Clusters": [ { "Name": "my-cluster", "Status": "available", "NumberOfShards": 1, "Shards": [ { "Name": "0001", "Status": "available", "Slots": "0-16383", "Nodes": [ { "Name": "my-cluster-0001-001", "Status": "available", "AvailabilityZone": "us-east-1a", "CreateTime": "2021-08-21T20:22:12.405000-07:00", "Endpoint": { "Address": "clustercfg.my-cluster.xxxxxx.memorydb.us-east-1.amazonaws.com", "Port": 6379 } }, { "Name": "my-cluster-0001-002", "Status": "available", "AvailabilityZone": "us-east-1b", "CreateTime": "2021-08-21T20:22:12.405000-07:00", "Endpoint": { "Address": "clustercfg.my-cluster.xxxxxx.memorydb.us-east-1.amazonaws.com",
72

Amazon MemoryDB for Redis Developer GuideChanging the number of replicas
"Port": 6379 } }, { "Name": "my-cluster-0001-003", "Status": "available", "AvailabilityZone": "us-east-1a", "CreateTime": "2021-08-22T12:59:31.844000-07:00", "Endpoint": { "Address": "clustercfg.my-cluster.xxxxxx.memorydb.us-east-1.amazonaws.com", "Port": 6379 } } ], "NumberOfNodes": 3 } ], "ClusterEndpoint": { "Address": "clustercfg.my-cluster.xxxxxx.memorydb.us-east-1.amazonaws.com", "Port": 6379 }, "NodeType": "db.r6g.large", "EngineVersion": "6.2", "EnginePatchVersion": "6.2.4", "ParameterGroupName": "default.memorydb-redis6", "ParameterGroupStatus": "in-sync", "SubnetGroupName": "my-sg", "TLSEnabled": true, "ARN": "arn:aws:memorydb:us-east-1:xxxxxxexamplearn:cluster/my-cluster", "SnapshotRetentionLimit": 0, "MaintenanceWindow": "wed:03:00-wed:04:00", "SnapshotWindow": "04:30-05:30", "ACLName": "my-acl", "AutoMinorVersionUpgrade": true } ]}
For more information about increasing the number of replicas using the CLI, see update-cluster in theAWS CLI Command Reference.
Using the MemoryDB API
To increase the number of replicas in a MemoryDB shard, use the UpdateCluster action with thefollowing parameters:
• ClusterName – Required. Identifies which cluster you want to increase the number of replicas in.
• ReplicaConfiguration – Required. Allows you to set the number of replicas. To increase the replicacount, set the ReplicaCount property to the number of replicas that you want in this shard at theend of this operation.
Example
The following example increases the number of replicas in the cluster sample-cluster to three. Whenthe example is finished, there are three replicas in each shard. This number applies whether this is aMemoryDB cluster with a single shard or a MemoryDB cluster with multiple shards.
https://memory-db.us-east-1.amazonaws.com/ ?Action=UpdateCluster
73

Amazon MemoryDB for Redis Developer GuideChanging the number of replicas
&ReplicaConfiguration.ReplicaCount=3 &ClusterName=sample-cluster &Version=2021-01-01 &SignatureVersion=4 &SignatureMethod=HmacSHA256 &Timestamp=20210802T192317Z &X-Amz-Credential=<credential>
For more information about increasing the number of replicas using the API, see UpdateCluster.
74

Amazon MemoryDB for Redis Developer GuideChanging the number of replicas
Decreasing the number of replicas in a clusterYou can decrease the number of replicas in a cluster for MemoryDB. You can decrease the number ofreplicas to zero, but you can't failover to a replica if your primary node fails.
You can use the AWS Management Console, the AWS CLI or the MemoryDB API to decrease the numberof replicas in a cluster.
Topics• Using the AWS Management Console (p. 75)• Using the AWS CLI (p. 75)• Using the MemoryDB API (p. 77)
Using the AWS Management Console
To decrease the number of replicas in a MemoryDB cluster (console), see Adding / Removing nodes froma cluster (p. 35).
Using the AWS CLI
To decrease the number of replicas in a MemoryDB cluster, use the update-cluster command with thefollowing parameters:
• --cluster-name – Required. Identifies which cluster you want to decrease the number of replicas in.• --replica-configuration – Required.
ReplicaCount – Set this property to specify the number of replica nodes you want.
Example
The following example uses --replica-configuration to decrease the number of replicas in thecluster my-cluster to the value specified.
For Linux, macOS, or Unix:
aws memorydb update-cluster \ --cluster-name my-cluster \ --replica-configuration \ ReplicaCount=1
For Windows:
aws memorydb update-cluster ^ --cluster-name my-cluster ^ --replica-configuration ^ ReplicaCount=1 ^
It will return the following JSON response:
{ "Cluster": { "Name": "my-cluster", "Status": "updating", "NumberOfShards": 1, "ClusterEndpoint": {
75

Amazon MemoryDB for Redis Developer GuideChanging the number of replicas
"Address": "clustercfg.my-cluster.xxxxxx.memorydb.us-east-1.amazonaws.com", "Port": 6379 }, "NodeType": "db.r6g.large", "EngineVersion": "6.2", "EnginePatchVersion": "6.2.4", "ParameterGroupName": "default.memorydb-redis6", "ParameterGroupStatus": "in-sync", "SubnetGroupName": "my-sg", "TLSEnabled": true, "ARN": "arn:aws:memorydb:us-east-1:xxxxxxexamplearn:cluster/my-cluster", "SnapshotRetentionLimit": 0, "MaintenanceWindow": "wed:03:00-wed:04:00", "SnapshotWindow": "04:30-05:30", "AutoMinorVersionUpgrade": true }}
To view the details of the updated cluster once its status changes from updating to available, use thefollowing command:
For Linux, macOS, or Unix:
aws memorydb describe-clusters \ --cluster-name my-cluster --show-shard-details
For Windows:
aws memorydb describe-clusters ^ --cluster-name my-cluster --show-shard-details
It will return the following JSON response:
{ "Clusters": [ { "Name": "my-cluster", "Status": "available", "NumberOfShards": 1, "Shards": [ { "Name": "0001", "Status": "available", "Slots": "0-16383", "Nodes": [ { "Name": "my-cluster-0001-001", "Status": "available", "AvailabilityZone": "us-east-1a", "CreateTime": "2021-08-21T20:22:12.405000-07:00", "Endpoint": { "Address": "clustercfg.my-cluster.xxxxxx.memorydb.us-east-1.amazonaws.com", "Port": 6379 } }, { "Name": "my-cluster-0001-002", "Status": "available",
76

Amazon MemoryDB for Redis Developer GuideChanging the number of replicas
"AvailabilityZone": "us-east-1b", "CreateTime": "2021-08-21T20:22:12.405000-07:00", "Endpoint": { "Address": "clustercfg.my-cluster.xxxxxx.memorydb.us-east-1.amazonaws.com", "Port": 6379 } } ], "NumberOfNodes": 2 } ], "ClusterEndpoint": { "Address": "clustercfg.my-cluster.xxxxxx.memorydb.us-east-1.amazonaws.com", "Port": 6379 }, "NodeType": "db.r6g.large", "EngineVersion": "6.2", "EnginePatchVersion": "6.2.4", "ParameterGroupName": "default.memorydb-redis6", "ParameterGroupStatus": "in-sync", "SubnetGroupName": "my-sg", "TLSEnabled": true, "ARN": "arn:aws:memorydb:us-east-1:xxxxxxexamplearn:cluster/my-cluster", "SnapshotRetentionLimit": 0, "MaintenanceWindow": "wed:03:00-wed:04:00", "SnapshotWindow": "04:30-05:30", "ACLName": "my-acl", "AutoMinorVersionUpgrade": true } ]}
For more information about decreasing the number of replicas using the CLI, see update-cluster in theAWS CLI Command Reference.
Using the MemoryDB API
To decrease the number of replicas in a MemoryDB cluster, use the UpdateCluster action with thefollowing parameters:
• ClusterName – Required. Identifies which cluster you want to decrease the number of replicas in.• ReplicaConfiguration – Required. Allows you to set the number of replicas.
ReplicaCount – Set this property to specify the number of replica nodes you want.
Example
The following example uses ReplicaCount to decrease the number of replicas in the cluster sample-cluster to one. When the example is finished, there is one replica in each shard. This number applieswhether this is a MemoryDB cluster with a single shard or a MemoryDB cluster with multiple shards.
https://memory-db.us-east-1.amazonaws.com/ ?Action=UpdateCluster &ReplicaConfiguration.ReplicaCount=1 &ClusterName=sample-cluster &Version=2021-01-01 &SignatureVersion=4 &SignatureMethod=HmacSHA256 &Timestamp=20210802T192317Z &X-Amz-Credential=<credential>
77
Amazon MemoryDB for Redis Developer GuideSnapshot and restore
For more information about decreasing the number of replicas using the API, see UpdateCluster.
Snapshot and restoreMemoryDB for Redis clusters automatically back up data to a Multi-AZ transactional log, but you canchoose to create point-in-time snapshots of a cluster either periodically or on-demand. These snapshotscan be used to recreate a cluster at a previous point or to seed a brand new cluster. The snapshotconsists of the cluster's metadata, along with all of the data in the cluster. All snapshots are writtento Amazon Simple Storage Service (Amazon S3), which provides durable storage. At any time, you canrestore your data by creating a new MemoryDB cluster and populating it with data from a snapshot. WithMemoryDB, you can manage snapshots using the AWS Management Console, the AWS Command LineInterface (AWS CLI), and the MemoryDB API.
Topics• Snapshot constraints (p. 78)• Snapshot costs (p. 78)• Scheduling automatic snapshots (p. 79)• Making manual snapshots (p. 80)• Creating a final snapshot (p. 82)• Describing snapshots (p. 84)• Copying a snapshot (p. 86)• Exporting a snapshot (p. 88)• Restoring from a snapshot (p. 94)• Seeding a new cluster with an externally created snapshot (p. 97)• Tagging snapshots (p. 101)• Deleting a snapshot (p. 102)
Snapshot constraintsConsider the following constraints when planning or making snapshots:
• For MemoryDB clusters, snapshot and restore are available for all supported node types.• During any contiguous 24-hour period, you can create no more than 20 manual snapshots per cluster.• MemoryDB only supports taking snapshots on the cluster level. MemoryDB doesn't support taking
snapshots at the shard or node level.• During the snapshot process, you can't run any other API or CLI operations on the cluster.• If you delete a cluster and request a final snapshot, MemoryDB always takes the snapshot from the
primary nodes. This ensures that you capture the very latest data before the cluster is deleted.
Snapshot costsUsing MemoryDB, you can store one snapshot for each active MemoryDB cluster free of charge. Storagespace for additional snapshots is charged at a rate of $0.085/GB per month for all AWS Regions. Thereare no data transfer fees for creating a snapshot, or for restoring data from a snapshot to a MemoryDBcluster.
78

Amazon MemoryDB for Redis Developer GuideScheduling automatic snapshots
Scheduling automatic snapshotsFor any MemoryDB cluster, you can enable automatic snapshots. When automatic snapshots are enabled,MemoryDB creates a snapshot of the cluster on a daily basis. There is no impact on the cluster and thechange is immediate. For more information, see Restoring from a snapshot (p. 94).
When you schedule automatic snapshots, you should plan the following settings:
• Snapshot window – A period during each day when MemoryDB begins creating a snapshot. Theminimum length for the snapshot window is 60 minutes. You can set the snapshot window for anytime when it's most convenient for you, or for a time of day that avoids doing snapshots duringparticularly high-utilization periods.
If you don't specify a snapshot window, MemoryDB assigns one automatically.• Snapshot retention limit – The number of days the snapshot is retained in Amazon S3. For example, if
you set the retention limit to 5, then a snapshot taken today is retained for 5 days. When the retentionlimit expires, the snapshot is automatically deleted.
The maximum snapshot retention limit is 35 days. If the snapshot retention limit is set to 0, automaticsnapshots are disabled for the cluster. MemoryDB data is still fully durable even with automaticsnapshotting disabled.
You can enable or disable automatic snapshots when creating a MemoryDB cluster using the MemoryDBconsole, the AWS CLI, or the MemoryDB API. You can enable automatic snapshots when you create aMemoryDB cluster by checking the Enable Automatic Backups box in the Snapshots section. For moreinformation, Creating a MemoryDB cluster (p. 14).
79

Amazon MemoryDB for Redis Developer GuideMaking manual snapshots
Making manual snapshotsIn addition to automatic snapshots, you can create a manual snapshot at any time. Unlike automaticsnapshots, which are automatically deleted after a specified retention period, manual snapshots donot have a retention period after which they are automatically deleted. You must manually delete anymanual snapshot. Even if you delete a cluster or node, any manual snapshots from that cluster or nodeare retained. If you no longer want to keep a manual snapshot, you must explicitly delete it yourself.
Manual snapshots are useful for testing and archiving. For example, suppose that you've developeda set of baseline data for testing purposes. You can create a manual snapshot of the data and restoreit whenever you want. After you test an application that modifies the data, you can reset the data bycreating a new cluster and restoring from your baseline snapshot. When the cluster is ready, you can testyour applications against the baseline data again—and repeat this process as often as needed.
In addition to directly creating a manual snapshot, you can create a manual snapshot in one of thefollowing ways:
• Copying a snapshot (p. 86) – It does not matter whether the source snapshot was createdautomatically or manually.
• Creating a final snapshot (p. 82) – Create a snapshot immediately before deleting a cluster.
Other topics of importance
• Snapshot constraints (p. 78)• Snapshot costs (p. 78)
You can create a manual snapshot of a node using the AWS Management Console, the AWS CLI, or theMemoryDB API.
Creating a manual snapshot (Console)
To create a snapshot of a cluster (console)
1. Sign in to the AWS Management Console and open the MemoryDB for Redis console at https://console.aws.amazon.com/memorydb/.
2. from the left navigation pane, choose Clusters.
The MemoryDB clusters screen appears.3. choose the radio button to the left of the name of the MemoryDB cluster you want to back up.4. Choose Actions and then Take snapshot.5. In the Snapshot window, type in a name for your snapshot in the Snapshot Name box. We
recommend that the name indicate which cluster was backed up and the date and time the snapshotwas made.
Cluster naming constraints are as follows:
• Must contain 1–40 alphanumeric characters or hyphens.• Must begin with a letter.• Can't contain two consecutive hyphens.• Can't end with a hyphen.
6. Under Encryption, choose whether to use a default encryption key or a customer managed key. Formore information, see In-transit encryption (TLS) in MemoryDB (p. 143).
7. Under Tags, optionally add tags to search and filter your snapshots or track your AWS costs.
80

Amazon MemoryDB for Redis Developer GuideMaking manual snapshots
8. Choose Take snapshot.
The status of the cluster changes to snapshotting. When the status returns to available the snapshotis complete.
Creating a manual snapshot (AWS CLI)
To create a manual snapshot of a cluster using the AWS CLI, use the create-snapshot AWS CLIoperation with the following parameters:
• --cluster-name – Name of the MemoryDB cluster to use as the source for the snapshot. Use thisparameter when backing up a MemoryDB cluster.
Cluster naming constraints are as follows:• Must contain 1–40 alphanumeric characters or hyphens.• Must begin with a letter.• Can't contain two consecutive hyphens.• Can't end with a hyphen.
• --snapshot-name – Name of the snapshot to be created.
Related topics
For more information, see create-snapshot in the AWS CLI Command Reference.
Creating a manual snapshot (MemoryDB API)
To create a manual snapshot of a cluster using the MemoryDB API, use the CreateSnapshotMemoryDB API operation with the following parameters:
• ClusterName – Name of the MemoryDB cluster to use as the source for the snapshot. Use thisparameter when backing up a MemoryDB cluster.
Cluster naming constraints are as follows:• Must contain 1–40 alphanumeric characters or hyphens.• Must begin with a letter.• Can't contain two consecutive hyphens.• Can't end with a hyphen.
• SnapshotName – Name of the snapshot to be created.
Related topics
For more information, see CreateSnapshot.
81

Amazon MemoryDB for Redis Developer GuideCreating a final snapshot
Creating a final snapshotYou can create a final snapshot using the MemoryDB console, the AWS CLI, or the MemoryDB API.
Creating a final snapshot (Console)
You can create a final snapshot when you delete a MemoryDB cluster using the MemoryDB console.
To create a final snapshot when deleting a MemoryDB cluster, on the delete page, choose Yes and givethe snapshot a name at Step 4: Deleting a cluster (p. 22).
Creating a final snapshot (AWS CLI)
You can create a final snapshot when deleting a MemoryDB cluster using the AWS CLI.
When deleting a MemoryDB cluster
To create a final snapshot when deleting a cluster, use the delete-cluster AWS CLI operation, withthe following parameters:
• --cluster-name – Name of the cluster being deleted.• --final-snapshot-name – Name of the final snapshot.
The following code takes the final snapshot bkup-20210515-final when deleting the clustermyCluster.
For Linux, macOS, or Unix:
aws memorydb delete-cluster \ --cluster-name myCluster \ --final-snapshot-name bkup-20210515-final
For Windows:
aws memorydb delete-cluster ^ --cluster-name myCluster ^ --final-snapshot-name bkup-20210515-final
For more information, see delete-cluster in the AWS CLI Command Reference.
Creating a final snapshot (MemoryDB API)
You can create a final snapshot when deleting a MemoryDB cluster using the MemoryDB API.
When deleting a MemoryDB cluster
To create a final snapshot, use the DeleteCluster MemoryDB API operation with the followingparameters.
• ClusterName – Name of the cluster being deleted.• FinalSnapshotName – Name of the snapshot.
The following MemoryDB API operation creates the snapshot bkup-20210515-final when deletingthe cluster myCluster.
https://memory-db.us-east-1.amazonaws.com/
82

Amazon MemoryDB for Redis Developer GuideCreating a final snapshot
?Action=DeleteCluster &ClusterName=myCluster &FinalSnapshotName=bkup-20210515-final &Version=2021-01-01 &SignatureVersion=4 &SignatureMethod=HmacSHA256 &Timestamp=20210515T192317Z &X-Amz-Credential=<credential>
For more information, see DeleteCluster.
83

Amazon MemoryDB for Redis Developer GuideDescribing snapshots
Describing snapshotsThe following procedures show you how to display a list of your snapshots. If you desire, you can alsoview the details of a particular snapshot.
Describing snapshots (Console)
To display snapshots using the AWS Management Console
1. Log into the console2. from the left navigation pane, choose Snapshots.3. Use the search to filter on manual, automatic, or all snapshots.4. To see the details of a particular snapshot, choose the radio button to the left of the snapshot's
name. Choose Actions and then View details.5. Optionally, in the View details page, you can perform additional snapshot actions like copy, restore
or delete. You can also add tags to the snapshot
Describing snapshots (AWS CLI)
To display a list of snapshots and optionally details about a specific snapshot, use the describe-snapshots CLI operation.
Examples
The following operation uses the parameter --max-results to list up to 20 snapshots associated withyour account. Omitting the parameter --max-results lists up to 50 snapshots.
aws memorydb describe-snapshots --max-results 20
The following operation uses the parameter --cluster-name to list only the snapshots associated withthe cluster my-cluster.
aws memorydb describe-snapshots --cluster-name my-cluster
The following operation uses the parameter --snapshot-name to display the details of the snapshotmy-snapshot.
aws memorydb describe-snapshots --snapshot-name my-snapshot
For more information, see describe-snapshots.
Describing snapshots (MemoryDB API)
To display a list of snapshots, use the DescribeSnapshots operation.
Examples
The following operation uses the parameter MaxResults to list up to 20 snapshots associated with youraccount. Omitting the parameter MaxResults lists up to 50 snapshots.
https://memory-db.us-east-1.amazonaws.com/ ?Action=DescribeSnapshots &MaxResults=20 &SignatureMethod=HmacSHA256
84

Amazon MemoryDB for Redis Developer GuideDescribing snapshots
&SignatureVersion=4 &Timestamp=20210801T220302Z &Version=2021-01-01 &X-Amz-Algorithm=Amazon4-HMAC-SHA256 &X-Amz-Date=20210801T220302Z &X-Amz-SignedHeaders=Host &X-Amz-Expires=20210801T220302Z &X-Amz-Credential=<credential> &X-Amz-Signature=<signature>
The following operation uses the parameter ClusterName to list all snapshots associated with thecluster MyCluster.
https://memory-db.us-east-1.amazonaws.com/ ?Action=DescribeSnapshots &ClusterName=MyCluster &SignatureMethod=HmacSHA256 &SignatureVersion=4 &Timestamp=20210801T220302Z &Version=2021-01-01 &X-Amz-Algorithm=Amazon4-HMAC-SHA256 &X-Amz-Date=20210801T220302Z &X-Amz-SignedHeaders=Host &X-Amz-Expires=20210801T220302Z &X-Amz-Credential=<credential> &X-Amz-Signature=<signature>
The following operation uses the parameter SnapshotName to display the details for the snapshotMyBackup.
https://memory-db.us-east-1.amazonaws.com/ ?Action=DescribeSnapshots &SignatureMethod=HmacSHA256 &SignatureVersion=4 &SnapshotName=MyBackup &Timestamp=20210801T220302Z &Version=2021-01-01 &X-Amz-Algorithm=Amazon4-HMAC-SHA256 &X-Amz-Date=20210801T220302Z &X-Amz-SignedHeaders=Host &X-Amz-Expires=20210801T220302Z &X-Amz-Credential=<credential> &X-Amz-Signature=<signature>
For more information, see DescribeSnapshots.
85

Amazon MemoryDB for Redis Developer GuideCopying a snapshot
Copying a snapshotYou can make a copy of any snapshot, whether it was created automatically or manually. When copyinga snapshot, the same KMS encryption key as the source is used for the target unless specificallyoverridden. You can also export your snapshot so you can access it from outside MemoryDB. Forguidance on exporting your snapshot, see Exporting a snapshot (p. 88).
The following procedures show you how to copy a snapshot.
Copying a snapshot (Console)
To copy a snapshot (console)
1. Sign in to the AWS Management Console and open the MemoryDB for Redis console at https://console.aws.amazon.com/memorydb/.
2. To see a list of your snapshots, from the left navigation pane choose Snapshots.3. From the list of snapshots, choose the radio button to the left of the name of the snapshot you want
to copy.4. Choose Actions and then choose Copy.5. In the Copy snapshot page, do the following:
a. In the New snapshot name box, type a name for your new snapshot.b. Leave the optional Target S3 Bucket box blank. This field should only be used to export your
snapshot and requires special S3 permissions. For information on exporting a snapshot, seeExporting a snapshot (p. 88).
c. Choose whether to use the default AWS KMS encryption key or a use a custom key. For moreinformation, see In-transit encryption (TLS) in MemoryDB (p. 143).
d. Optionally, you can also add tags to the snapshot copy.e. Choose Copy.
Copying a snapshot (AWS CLI)
To copy a snapshot, use the copy-snapshot operation.
Parameters
• --source-snapshot-name – Name of the snapshot to be copied.• --target-snapshot-name – Name of the snapshot's copy.• --target-bucket – Reserved for exporting a snapshot. Do not use this parameter when making a
copy of a snapshot. For more information, see Exporting a snapshot (p. 88).
The following example makes a copy of an automatic snapshot.
For Linux, macOS, or Unix:
aws memorydb copy-snapshot \ --source-snapshot-name automatic.my-primary-2021-03-27-03-15 \ --target-snapshot-name my-snapshot-copy
For Windows:
aws memorydb copy-snapshot ^ --source-snapshot-name automatic.my-primary-2021-03-27-03-15 ^
86
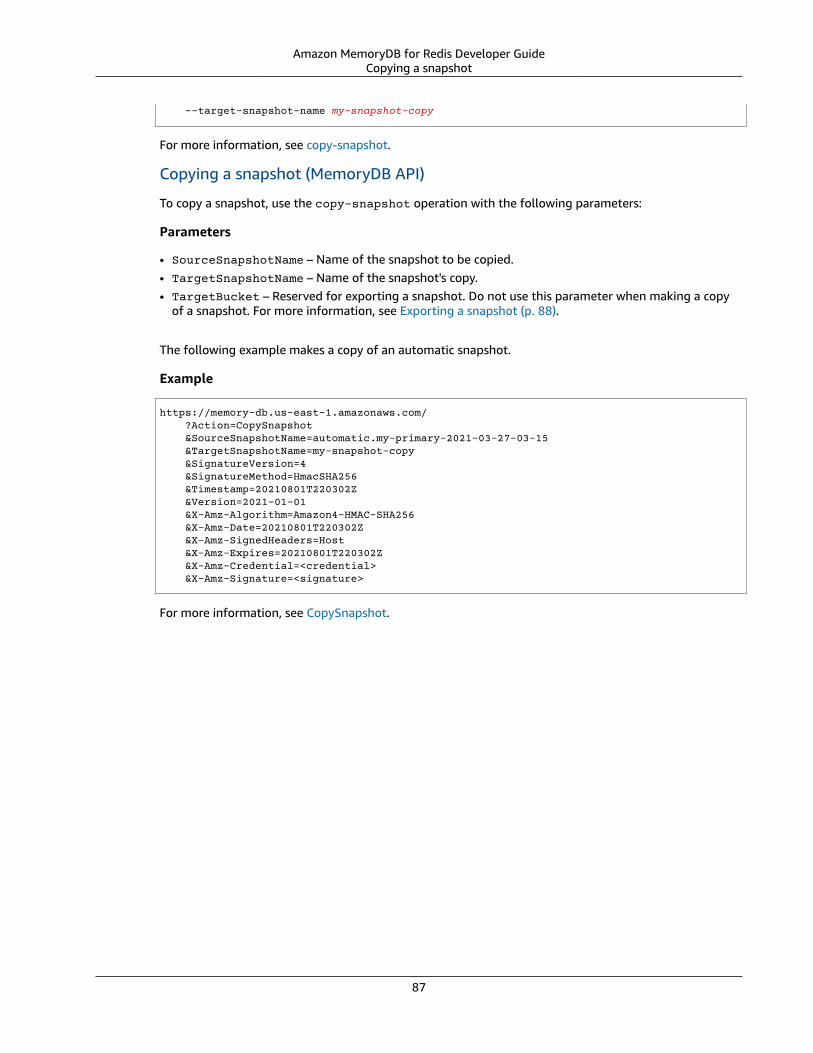
Amazon MemoryDB for Redis Developer GuideCopying a snapshot
--target-snapshot-name my-snapshot-copy
For more information, see copy-snapshot.
Copying a snapshot (MemoryDB API)
To copy a snapshot, use the copy-snapshot operation with the following parameters:
Parameters
• SourceSnapshotName – Name of the snapshot to be copied.• TargetSnapshotName – Name of the snapshot's copy.• TargetBucket – Reserved for exporting a snapshot. Do not use this parameter when making a copy
of a snapshot. For more information, see Exporting a snapshot (p. 88).
The following example makes a copy of an automatic snapshot.
Example
https://memory-db.us-east-1.amazonaws.com/ ?Action=CopySnapshot &SourceSnapshotName=automatic.my-primary-2021-03-27-03-15 &TargetSnapshotName=my-snapshot-copy &SignatureVersion=4 &SignatureMethod=HmacSHA256 &Timestamp=20210801T220302Z &Version=2021-01-01 &X-Amz-Algorithm=Amazon4-HMAC-SHA256 &X-Amz-Date=20210801T220302Z &X-Amz-SignedHeaders=Host &X-Amz-Expires=20210801T220302Z &X-Amz-Credential=<credential> &X-Amz-Signature=<signature>
For more information, see CopySnapshot.
87
Amazon MemoryDB for Redis Developer GuideExporting a snapshot
Exporting a snapshotMemoryDB for Redis supports exporting your MemoryDB snapshot to an Amazon Simple StorageService (Amazon S3) bucket, which gives you access to it from outside MemoryDB. Exported MemoryDBsnapshots are fully-compliant with open-source Redis and can be loaded with the appropriate Redisversion or tooling. You can export a snapshot using the MemoryDB console, the AWS CLI, or theMemoryDB API.
Exporting a snapshot can be helpful if you need to launch a cluster in another AWS Region. Youcan export your data in one AWS Region, copy the .rdb file to the new AWS Region, and then usethat .rdb file to seed the new cluster instead of waiting for the new cluster to populate through use.For information about seeding a new cluster, see Seeding a new cluster with an externally createdsnapshot (p. 97). Another reason you might want to export your cluster's data is to use the .rdb file foroffline processing.
ImportantThe MemoryDB snapshot and the Amazon S3 bucket that you want to copy it to must be in thesame AWS Region.Though snapshots copied to an Amazon S3 bucket are encrypted, we strongly recommendthat you do not grant others access to the Amazon S3 bucket where you want to store yoursnapshots.
Before you can export a snapshot to an Amazon S3 bucket, you must have an Amazon S3 bucket in thesame AWS Region as the snapshot. Grant MemoryDB access to the bucket. The first two steps show youhow to do this.
WarningThe following scenarios expose your data in ways that you might not want:
• When another person has access to the Amazon S3 bucket that you exported yoursnapshot to.
To control access to your snapshots, only allow access to the Amazon S3 bucket to thosewhom you want to access your data. For information about managing access to an Amazon S3bucket, see Managing access in the Amazon S3 Developer Guide.
• When another person has permissions to use the CopySnapshot API operation.
Users or groups that have permissions to use the CopySnapshot API operation can createtheir own Amazon S3 buckets and copy snapshots to them. To control access to yoursnapshots, use an AWS Identity and Access Management (IAM) policy to control who has theability to use the CopySnapshot API. For more information about using IAM to control theuse of MemoryDB API operations, see Identity and access management in MemoryDB forRedis (p. 153) in the MemoryDB User Guide.
Topics
• Step 1: Create an Amazon S3 bucket (p. 88)
• Step 2: Grant MemoryDB access to your Amazon S3 bucket (p. 89)
• Step 3: Export a MemoryDB snapshot (p. 90)
Step 1: Create an Amazon S3 bucket
The following procedure uses the Amazon S3 console to create an Amazon S3 bucket where you exportand store your MemoryDB snapshot.
88

Amazon MemoryDB for Redis Developer GuideExporting a snapshot
To create an Amazon S3 bucket
1. Sign in to the AWS Management Console and open the Amazon S3 console at https://console.aws.amazon.com/s3/.
2. Choose Create Bucket.3. In Create a Bucket - Select a Bucket Name and Region, do the following:
a. In Bucket Name, type a name for your Amazon S3 bucket.b. From the Region list, choose an AWS Region for your Amazon S3 bucket. This AWS Region must
be the same AWS Region as the MemoryDB snapshot you want to export.c. Choose Create.
For more information about creating an Amazon S3 bucket, see Creating a bucket in the Amazon SimpleStorage Service User Guide.
Step 2: Grant MemoryDB access to your Amazon S3 bucketAWS Regions introduced before March 20, 2019, are enabled by default. You can begin working in theseAWS Regions immediately. Regions introduced after March 20, 2019 are disabled by default. You mustenable, or opt in, to these Regions before you can use them, as described in Managing AWS regions.
Grant MemoryDB access to your S3 Bucket in an AWS Region
To create the proper permissions on an Amazon S3 bucket in an AWS Region, take the following steps.
To grant MemoryDB access to an S3 bucket
1. Sign in to the AWS Management Console and open the Amazon S3 console at https://console.aws.amazon.com/s3/.
2. Choose the name of the Amazon S3 bucket that you want to copy the snapshot to. This should bethe S3 bucket that you created in Step 1: Create an Amazon S3 bucket (p. 88).
3. Choose the Permissions tab. and under Permissions, choose Bucket policy.4. Update the policy to grant MemoryDB required permissions to perform operations:
• Add [ "Service" : "region-full-name.memorydb-snapshot.amazonaws.com" ] toPrincipal.
• Add the following permissions required for exporting a snapshot to the Amazon S3 bucket.• "s3:PutObject"
• "s3:GetObject"
• "s3:ListBucket"
• "s3:GetBucketAcl"
• "s3:ListMultipartUploadParts"
• "s3:ListBucketMultipartUploads"
The following is an example of what the updated policy might look like.
{ "Version": "2012-10-17", "Id": "Policy15397346", "Statement": [ { "Sid": "Stmt15399483", "Effect": "Allow",
89

Amazon MemoryDB for Redis Developer GuideExporting a snapshot
"Principal": { "Service": "aws-region.memorydb-snapshot.amazonaws.com" }, "Action": [ "s3:PutObject", "s3:GetObject", "s3:ListBucket", "s3:GetBucketAcl", "s3:ListMultipartUploadParts", "s3:ListBucketMultipartUploads" ], "Resource": [ "arn:aws:s3:::example-bucket", "arn:aws:s3:::example-bucket/*" ] } ]}
Step 3: Export a MemoryDB snapshotNow you've created your S3 bucket and granted MemoryDB permissions to access it. Next, you can usethe MemoryDB console, the AWS CLI, or the MemoryDB API to export your snapshot to it. The followingassumes that you have the following additional S3 specific IAM permissions.
{ "Version": "2012-10-17", "Statement": [{ "Effect": "Allow", "Action": [ "s3:GetBucketLocation", "s3:ListAllMyBuckets", "s3:PutObject", "s3:GetObject", "s3:DeleteObject", "s3:ListBucket" ], "Resource": "arn:aws:s3:::*" }]}
Exporting a MemoryDB snapshot (Console)
The following process uses the MemoryDB console to export a snapshot to an Amazon S3 bucket so thatyou can access it from outside MemoryDB. The Amazon S3 bucket must be in the same AWS Region asthe MemoryDB snapshot.
To export a MemoryDB snapshot to an Amazon S3 bucket
1. Sign in to the AWS Management Console and open the MemoryDB for Redis console at https://console.aws.amazon.com/memorydb/.
2. To see a list of your snapshots, from the left navigation pane choose Snapshots.
3. From the list of snapshots, choose the radio button to the left of the name of the snapshot you wantto export.
4. Choose Copy.
5. In Create a Copy of the Backup?, do the following:
a. In New snapshot name box, type a name for your new snapshot.
90

Amazon MemoryDB for Redis Developer GuideExporting a snapshot
The name must be between 1 and 1,000 characters and able to be UTF-8 encoded.
MemoryDB adds a shard identifier and .rdb to the value that you enter here. For example, ifyou enter my-exported-snapshot, MemoryDB creates my-exported-snapshot-0001.rdb.
b. From the Target S3 Location list, choose the name of the Amazon S3 bucket that you wantto copy your snapshot to (the bucket that you created in Step 1: Create an Amazon S3bucket (p. 88)).
The Target S3 Location must be an Amazon S3 bucket in the snapshot's AWS Region with thefollowing permissions for the export process to succeed.
• Object access – Read and Write.• Permissions access – Read.
For more information, see Step 2: Grant MemoryDB access to your Amazon S3 bucket (p. 89).c. Choose Copy.
NoteIf your S3 bucket does not have the permissions needed for MemoryDB to export a snapshot toit, you receive one of the following error messages. Return to Step 2: Grant MemoryDB accessto your Amazon S3 bucket (p. 89) to add the permissions specified and retry exporting yoursnapshot.
• MemoryDB has not been granted READ permissions %s on the S3 Bucket.
Solution: Add Read permissions on the bucket.• MemoryDB has not been granted WRITE permissions %s on the S3 Bucket.
Solution: Add Write permissions on the bucket.• MemoryDB has not been granted READ_ACP permissions %s on the S3 Bucket.
Solution: Add Read for Permissions access on the bucket.
If you want to copy your snapshot to another AWS Region, use Amazon S3 to copy it. For moreinformation, see Copying objects in the Amazon Simple Storage Service User Guide.
Exporting a MemoryDB snapshot (AWS CLI)
Export the snapshot to an Amazon S3 bucket using the copy-snapshot CLI operation with thefollowing parameters:
Parameters
• --source-snapshot-name – Name of the snapshot to be copied.• --target-snapshot-name – Name of the snapshot's copy.
The name must be between 1 and 1,000 characters and able to be UTF-8 encoded.
MemoryDB adds a shard identifier and .rdb to the value you enter here. For example, if you enter my-exported-snapshot, MemoryDB creates my-exported-snapshot-0001.rdb.
• --target-bucket – Name of the Amazon S3 bucket where you want to export the snapshot. A copyof the snapshot is made in the specified bucket.
The --target-bucket must be an Amazon S3 bucket in the snapshot's AWS Region with thefollowing permissions for the export process to succeed.
91

Amazon MemoryDB for Redis Developer GuideExporting a snapshot
• Object access – Read and Write.• Permissions access – Read.
For more information, see Step 2: Grant MemoryDB access to your Amazon S3 bucket (p. 89).
The following operation copies a snapshot to my-s3-bucket.
For Linux, macOS, or Unix:
aws memorydb copy-snapshot \ --source-snapshot-name automatic.my-primary-2021-06-27-03-15 \ --target-snapshot-name my-exported-snapshot \ --target-bucket my-s3-bucket
For Windows:
aws memorydb copy-snapshot ^ --source-snapshot-name automatic.my-primary-2021-06-27-03-15 ^ --target-snapshot-name my-exported-snapshot ^ --target-bucket my-s3-bucket
NoteIf your S3 bucket does not have the permissions needed for MemoryDB to export a snapshot toit, you receive one of the following error messages. Return to Step 2: Grant MemoryDB accessto your Amazon S3 bucket (p. 89) to add the permissions specified and retry exporting yoursnapshot.
• MemoryDB has not been granted READ permissions %s on the S3 Bucket.
Solution: Add Read permissions on the bucket.• MemoryDB has not been granted WRITE permissions %s on the S3 Bucket.
Solution: Add Write permissions on the bucket.• MemoryDB has not been granted READ_ACP permissions %s on the S3 Bucket.
Solution: Add Read for Permissions access on the bucket.
For more information, see copy-snapshot in the AWS CLI Command Reference.
If you want to copy your snapshot to another AWS Region, use Amazon S3 copy. For more information,see Copying objects in the Amazon Simple Storage Service User Guide.
Exporting a MemoryDB snapshot (MemoryDB API)
Export the snapshot to an Amazon S3 bucket using the CopySnapshot API operation with theseparameters.
Parameters
• SourceSnapshotName – Name of the snapshot to be copied.• TargetSnapshotName – Name of the snapshot's copy.
The name must be between 1 and 1,000 characters and able to be UTF-8 encoded.
MemoryDB adds a shard identifier and .rdb to the value that you enter here. For example, if you entermy-exported-snapshot, you get my-exported-snapshot-0001.rdb.
92

Amazon MemoryDB for Redis Developer GuideExporting a snapshot
• TargetBucket – Name of the Amazon S3 bucket where you want to export the snapshot. A copy ofthe snapshot is made in the specified bucket.
The TargetBucket must be an Amazon S3 bucket in the snapshot's AWS Region with the followingpermissions for the export process to succeed.• Object access – Read and Write.• Permissions access – Read.
For more information, see Step 2: Grant MemoryDB access to your Amazon S3 bucket (p. 89).
The following example makes a copy of an automatic snapshot to the Amazon S3 bucket my-s3-bucket.
Example
https://memory-db.us-east-1.amazonaws.com/ ?Action=CopySnapshot &SourceSnapshotName=automatic.my-primary-2021-06-27-03-15 &TargetBucket=my-s3-bucket &TargetSnapshotName=my-snapshot-copy &SignatureVersion=4 &SignatureMethod=HmacSHA256 &Timestamp=20210801T220302Z &Version=2021-01-01 &X-Amz-Algorithm=Amazon4-HMAC-SHA256 &X-Amz-Date=20210801T220302Z &X-Amz-SignedHeaders=Host &X-Amz-Expires=20210801T220302Z &X-Amz-Credential=<credential> &X-Amz-Signature=<signature>
NoteIf your S3 bucket does not have the permissions needed for MemoryDB to export a snapshot toit, you receive one of the following error messages. Return to Step 2: Grant MemoryDB accessto your Amazon S3 bucket (p. 89) to add the permissions specified and retry exporting yoursnapshot.
• MemoryDB has not been granted READ permissions %s on the S3 Bucket.
Solution: Add Read permissions on the bucket.• MemoryDB has not been granted WRITE permissions %s on the S3 Bucket.
Solution: Add Write permissions on the bucket.• MemoryDB has not been granted READ_ACP permissions %s on the S3 Bucket.
Solution: Add Read for Permissions access on the bucket.
For more information, see CopySnapshot.
If you want to copy your snapshot to another AWS Region, use Amazon S3 copy to copy the exportedsnapshot to the Amazon S3 bucket in another AWS Region. For more information, see Copying objects inthe Amazon Simple Storage Service User Guide.
93

Amazon MemoryDB for Redis Developer GuideRestoring from a snapshot
Restoring from a snapshotYou can restore the data from a MemoryDB or ElastiCache for Redis .rdb snapshot file to a new cluster atany time.
The MemoryDB for Redis restore process supports the following:
• Migrating from one or more .rdb snapshot files you created from ElastiCache for Redis to a MemoryDBcluster.
The .rdb files must be put in S3 to perform the restore.• Specifying a number of shards in the new cluster that is different from the number of shards in the
cluster that was used to create the snapshot file.• Specifying a different node type for the new cluster—larger or smaller. If scaling to a smaller node
type, be sure that the new node type has sufficient memory for your data and Redis overhead.• Configuring the slots of the new MemoryDB cluster differently than in the cluster that was used to
create the snapshot file.
Important
• MemoryDB clusters do not support multiple databases. Therefore, when restoring toMemoryDB your restore fails if the .rdb file references more than one database.
Whether you make any changes when restoring a cluster from a snapshot is governed by choices thatyou make. You make these choices in the Restore Cluster page when using the MemoryDB console torestore. You make these choices by setting parameter values when using the AWS CLI or MemoryDB APIto restore.
During the restore operation, MemoryDB creates the new cluster, and then populates it with data fromthe snapshot file. When this process is complete, the cluster is warmed up and ready to accept requests.
ImportantBefore you proceed, be sure you have created a snapshot of the cluster you want to restorefrom. For more information, see Making manual snapshots (p. 80).If you want to restore from an externally created snapshot, see Seeding a new cluster with anexternally created snapshot (p. 97).
The following procedures show you how to restore a snapshot to a new cluster using the MemoryDBconsole, the AWS CLI, or the MemoryDB API.
Restoring from a snapshot (Console)
To restore a snapshot to a new cluster (console)
1. Sign in to the AWS Management Console and open the MemoryDB for Redis console at https://console.aws.amazon.com/memorydb/.
2. On the navigation pane, choose Snapshots.3. In the list of snapshots, choose button next to the name of the snapshot name you want to restore
from.4. Choose Actions and then choose Restore5. Under Cluster configuration, enter the following:
a. Cluster name – Required. The name of the new cluster.b. Description – Optional. The description of the new cluster.
6. Complete the Subnet groups section:
94

Amazon MemoryDB for Redis Developer GuideRestoring from a snapshot
• For Subnet groups, create a new subnet group or choose an existing one from the available listthat you want to apply to this cluster. If you are creating a new one:
• Enter a Name
• Enter a Description
• If you enabled Multi-AZ, the subnet group must contain at least two subnets that reside indifferent availability zones. For more information, see Subnets and subnet groups (p. 198).
• If you are creating a new subnet group and do not have an existing VPC, you will be asked tocreate a VPC. For more information, see What is Amazon VPC? in the Amazon VPC User Guide.
7. Complete the Cluster settings section:
a. For Redis version compatibility, accept the default 6.0.
b. For Port, accept the default Redis port of 6379 or, if you have a reason to use a different port,enter the port number..
c. For Parameter group, accept the default.memorydb-redis6 parameter group.
Parameter groups control the runtime parameters of your cluster. For more information onparameter groups, see Redis specific parameters (p. 133).
d. For Node type, choose a value for the node type (along with its associated memory size) thatyou want.
e. For Number of shards, choose the number of shards that you want for this cluster.
You can change the number of shards in your cluster dynamically. For more information, seeScaling MemoryDB clusters (p. 104).
f. For Replicas per shard, choose the number of read replica nodes that you want in each shard.
The following restrictions exist;.
• If you have Multi-AZ enabled, make sure that you have at least one replica per shard.
• The number of replicas is the same for each shard when creating the cluster using theconsole.
g. Choose Next
h. Complete the Advanced settings section:
i. For Security groups, choose the security groups that you want for this cluster. A securitygroup acts as a firewall to control network access to your cluster. You can use the defaultsecurity group for your VPC or create a new one.
For more information on security groups, see Security groups for your VPC in the AmazonVPC User Guide.
ii. Data is encrypted in the following ways:
• Encryption at rest – Enables encryption of data stored on disk. For more information, seeEncryption at Rest.
NoteYou have the option to supply a different encryption key by choosing CustomerManaged AWS KMS key and choosing the key.
• Encryption in-transit – Enables encryption of data on the wire. This is enabled bydefault. For more information, see encryption in transit.
If you select no encryption, then an open Access control list called “open access” will becreated with a default user. For more information, see Authenticating users with AccessControl Lists (ACLs) (p. 144).
95

Amazon MemoryDB for Redis Developer GuideRestoring from a snapshot
iii. For Snapshot optionally specify a snapshot retention period and a snapshot window. Bydefault, the Enable automatic snapshots is selected.
iv. For Maintenance window optionally specify a maintenance window. The maintenancewindow is the time, generally an hour in length, each week when MemoryDB schedulessystem maintenance for your cluster. You can allow MemoryDB to choose the day andtime for your maintenance window (No preference), or you can choose the day, time,and duration yourself (Specify maintenance window). If you choose Specify maintenancewindow from the lists, choose the Start day, Start time, and Duration (in hours) for yourmaintenance window. All times are UCT times.
For more information, see Managing maintenance (p. 58).v. For Notifications, choose an existing Amazon Simple Notification Service (Amazon SNS)
topic, or choose Manual ARN input and enter the topic's Amazon Resource Name (ARN).Amazon SNS allows you to push notifications to Internet-connected smart devices. Thedefault is to disable notifications. For more information, see https://aws.amazon.com/sns/.
i. For Tags, you can optionally apply tags to search and filter your clusters or track your AWScosts.
j. Review all your entries and choices, then make any needed corrections. When you're ready,choose Create cluster to launch your cluster, or Cancel to cancel the operation.
As soon as your cluster's status is available, you can grant EC2 access to it, connect to it, and beginusing it. For more information, see Step 2: Authorize access to the cluster (p. 19) and Step 3: Connectto the cluster (p. 21).
ImportantAs soon as your cluster becomes available, you're billed for each hour or partial hour thatthe cluster is active, even if you're not actively using it. To stop incurring charges for thiscluster, you must delete it. See Step 4: Deleting a cluster (p. 22).
Restoring from a snapshot (AWS CLI)
When using either the create-cluster operation, be sure to include the parameter --snapshot-name or --snapshot-arns to seed the new cluster with the data from the snapshot.
For more information, see the following:
• Creating a cluster (AWS CLI) (p. 17) in the MemoryDB User Guide.• create-cluster in the AWS CLI Command Reference.
Restoring from a snapshot (MemoryDB API)
You can restore a MemoryDB snapshot using the MemoryDB API operation CreateCluster.
When using the CreateCluster operation, be sure to include the parameter SnapshotName orSnapshotArns to seed the new cluster with the data from the snapshot.
For more information, see the following:
• Creating a cluster (MemoryDB API) (p. 17) in the MemoryDB User Guide.• CreateCluster in the MemoryDB API Reference.
96

Amazon MemoryDB for Redis Developer GuideSeeding a cluster with a snapshot
Seeding a new cluster with an externally createdsnapshotWhen you create a new MemoryDB cluster, you can seed it with data from a Redis .rdb snapshot file.
To seed a new MemoryDB cluster from a MemoryDB snapshot or ElastiCache for Redis snapshot, seeRestoring from a snapshot (p. 94).
When you use a Redis .rdb file to seed a new MemoryDB cluster, you can do the following:
• Specify a number of shards in the new cluster. This number can be different from the number ofshards in the cluster that was used to create the snapshot file.
• Specify a different node type for the new cluster—larger or smaller than that used in the cluster thatmade the snapshot. If you scale to a smaller node type, be sure that the new node type has sufficientmemory for your data and Redis overhead.
Important
• You must ensure that your snapshot data doesn't exceed the resources of the node.
If the snapshot is too large, the resulting cluster has a status of restore-failed. If thishappens, you must delete the cluster and start over.
For a complete listing of node types and specifications, see MemoryDB node-type specificparameters (p. 138).
• You can encrypt a Redis .rdb file with Amazon S3 server-side encryption (SSE-S3) only. Formore information, see Protecting data using server-side encryption.
Step 1: Create redis snapshot on external cluster
To create the snapshot to seed your MemoryDB cluster
1. Connect to your existing Redis instance.
2. Run either the Redis BGSAVE or SAVE operation to create a snapshot. Note where your .rdb file islocated.
BGSAVE is asynchronous and does not block other clients while processing. For more information,see BGSAVE at the Redis website.
SAVE is synchronous and blocks other processes until finished. For more information, see SAVE atthe Redis website.
For additional information on creating a snapshot, see Redis persistence at the Redis website.
Step 2: Create an Amazon S3 bucket and folder
When you have created the snapshot file, you need to upload it to a folder within an Amazon S3 bucket.To do that, you must first have an Amazon S3 bucket and folder within that bucket. If you already havean Amazon S3 bucket and folder with the appropriate permissions, you can skip to Step 3: Upload yoursnapshot to Amazon S3 (p. 98).
97

Amazon MemoryDB for Redis Developer GuideSeeding a cluster with a snapshot
To create an Amazon S3 bucket
1. Sign in to the AWS Management Console and open the Amazon S3 console at https://console.aws.amazon.com/s3/.
2. Follow the instructions for creating an Amazon S3 bucket in Creating a bucket in the Amazon SimpleStorage Service User Guide.
The name of your Amazon S3 bucket must be DNS-compliant. Otherwise, MemoryDB can't accessyour backup file. The rules for DNS compliance are:
• Names must be at least 3 and no more than 63 characters long.
• Names must be a series of one or more labels separated by a period (.) where each label:
• Starts with a lowercase letter or a number.
• Ends with a lowercase letter or a number.
• Contains only lowercase letters, numbers, and dashes.
• Names can't be formatted as an IP address (for example, 192.0.2.0).
We strongly recommend that you create your Amazon S3 bucket in the same AWS Region as yournew MemoryDB cluster. This approach makes sure that the highest data transfer speed whenMemoryDB reads your .rdb file from Amazon S3.
NoteTo keep your data as secure as possible, make the permissions on your Amazon S3 bucket asrestrictive as you can. At the same time, the permissions still need to allow the bucket andits contents to be used to seed your new MemoryDB cluster.
To add a folder to an Amazon S3 bucket
1. Sign in to the AWS Management Console and open the Amazon S3 console at https://console.aws.amazon.com/s3/.
2. Choose the name of the bucket to upload your .rdb file to.
3. Choose Create folder.
4. Enter a name for your new folder.
5. Choose Save.
Make note of both the bucket name and the folder name.
Step 3: Upload your snapshot to Amazon S3Now, upload the .rdb file that you created in Step 1: Create redis snapshot on external cluster (p. 97).You upload it to the Amazon S3 bucket and folder that you created in Step 2: Create an Amazon S3bucket and folder (p. 97). For more information on this task, see Uploading objects. Between steps 2and 3, choose the name of the folder you created .
To upload your .rdb file to an Amazon S3 folder
1. Sign in to the AWS Management Console and open the Amazon S3 console at https://console.aws.amazon.com/s3/.
2. Choose the name of the Amazon S3 bucket you created in Step 2.
3. Choose the name of the folder you created in Step 2.
4. Choose Upload.
5. Choose Add files.
98

Amazon MemoryDB for Redis Developer GuideSeeding a cluster with a snapshot
6. Browse to find the file or files you want to upload, then choose the file or files. To choose multiplefiles, hold down the Ctrl key while choosing each file name.
7. Choose Open.8. Confirm the correct file or files are listed in the Upload page, and then choose Upload.
Note the path to your .rdb file. For example, if your bucket name is myBucket and the path ismyFolder/redis.rdb, enter myBucket/myFolder/redis.rdb. You need this path to seed the newcluster with the data in this snapshot.
For additional information, see Bucket naming rules in the Amazon Simple Storage Service User Guide.
Step 4: Grant MemoryDB read access to the .rdb fileAWS Regions introduced before March 20, 2019, are enabled by default. You can begin working in theseAWS Regions immediately. Regions introduced after March 20, 2019 are disabled by default. You mustenable, or opt in, to these Regions before you can use them, as described in Managing AWS regions.
Grant MemoryDB read access to the .rdb file
To grant MemoryDB read access to the snapshot file
1. Sign in to the AWS Management Console and open the Amazon S3 console at https://console.aws.amazon.com/s3/.
2. Choose the name of the S3 bucket that contains your .rdb file.3. Choose the name of the folder that contains your .rdb file.4. Choose the name of your .rdb snapshot file. The name of the selected file appears above the tabs at
the top of the page.
5. Choose the Permissions tab.6. Under Permissions, choose Bucket policy.7. Update the policy to grant MemoryDB required permissions to perform operations:
• Add [ "Service" : "region-full-name.memorydb-snapshot.amazonaws.com" ] toPrincipal.
• Add the following permissions required for exporting a snapshot to the Amazon S3 bucket:• "s3:GetObject"
• "s3:ListBucket"
• "s3:GetBucketAcl"
The following is an example of what the updated policy might look like.
{ "Version": "2012-10-17", "Id": "Policy15397346", "Statement": [ { "Sid": "Stmt15399483",
99

Amazon MemoryDB for Redis Developer GuideSeeding a cluster with a snapshot
"Effect": "Allow", "Principal": { "Service": "us-east-1.memorydb-snapshot.amazonaws.com" }, "Action": [ "s3:GetObject", "s3:ListBucket", "s3:GetBucketAcl" ], "Resource": [ "arn:aws:s3:::example-bucket", "arn:aws:s3:::example-bucket/snapshot1.rdb", "arn:aws:s3:::example-bucket/snapshot2.rdb" ] } ]}
Step 5: Seed the MemoryDB cluster with the .rdb file dataNow you are ready to create a MemoryDB cluster and seed it with the data from the .rdb file. To createthe cluster, follow the directions at Creating a MemoryDB cluster (p. 14).
The method you use to tell MemoryDB where to find the Redis snapshot you uploaded to Amazon S3depends on the method you use to create the cluster:
Seed the MemoryDB cluster with the .rdb file data
• Using the MemoryDB console
After you choose the Redis engine, expand the Advanced Redis settings section and locate Importdata to cluster. In the Seed RDB file S3 location box, type in the Amazon S3 path for the files(s). Ifyou have multiple .rdb files, type in the path for each file in a comma separated list. The Amazon S3path looks something like myBucket/myFolder/myBackupFilename.rdb.
• Using the AWS CLI
If you use the create-cluster or the create-cluster operation, use the parameter--snapshot-arns to specify a fully qualified ARN for each .rdb file. For example,arn:aws:s3:::myBucket/myFolder/myBackupFilename.rdb. The ARN must resolve to thesnapshot files you stored in Amazon S3.
• Using the MemoryDB API
If you use the CreateCluster or the CreateCluster MemoryDB API operation, use theparameter SnapshotArns to specify a fully qualified ARN for each .rdb file. For example,arn:aws:s3:::myBucket/myFolder/myBackupFilename.rdb. The ARN must resolve to thesnapshot files you stored in Amazon S3.
During the process of creating your cluster, the data in your snapshot is written to the cluster. You canmonitor the progress by viewing the MemoryDB event messages. To do this, see the MemoryDB consoleand choose Events. You can also use the AWS MemoryDB command line interface or MemoryDB API toobtain event messages.
100

Amazon MemoryDB for Redis Developer GuideTagging snapshots
Tagging snapshotsYou can assign your own metadata to each snapshot in the form of tags. Tags enable you to categorizeyour snapshots in different ways, for example, by purpose, owner, or environment. This is useful whenyou have many resources of the same type—you can quickly identify a specific resource based on thetags that you've assigned to it. For more information, see Resources you can tag (p. 50).
Cost allocation tags are a means of tracking your costs across multiple AWS services by grouping yourexpenses on invoices by tag values. To learn more about cost allocation tags, see Use cost allocation tags.
Using the MemoryDB console, the AWS CLI, or MemoryDB API you can add, list, modify, remove, or copycost allocation tags on your snapshots. For more information, see Monitoring costs with cost allocationtags (p. 53).
101

Amazon MemoryDB for Redis Developer GuideDeleting a snapshot
Deleting a snapshotAn automatic snapshot is automatically deleted when its retention limit expires. If you delete a cluster,all of its automatic snapshots are also deleted.
MemoryDB provides a deletion API operation that lets you delete a snapshot at any time, regardless ofwhether the snapshot was created automatically or manually. Because manual snapshots don't have aretention limit, manual deletion is the only way to remove them.
You can delete a snapshot using the MemoryDB console, the AWS CLI, or the MemoryDB API.
Deleting a snapshot (Console)
The following procedure deletes a snapshot using the MemoryDB console.
To delete a snapshot
1. Sign in to the AWS Management Console and open the MemoryDB for Redis console at https://console.aws.amazon.com/memorydb/.
2. In the left navigation pane, choose Snapshots.
The Snapshots screen appears with a list of your snapshots.3. Choose the radio button to the left of the name of the snapshot you want to delete.4. Choose Actions and then choose Delete.5. If you want to delete this snapshot, enter delete in the text box and then choose Delete. To cancel
the delete, choose Cancel. The status changes to deleting.
Deleting a snapshot (AWS CLI)
Use the delete-snapshot AWS CLI operation with the following parameter to delete a snapshot.
• --snapshot-name – Name of the snapshot to be deleted.
The following code deletes the snapshot myBackup.
aws memorydb delete-snapshot --snapshot-name myBackup
For more information, see delete-snapshot in the AWS CLI Command Reference.
Deleting a snapshot (MemoryDB API)
Use the DeleteSnapshot API operation with the following parameter to delete a snapshot.
• SnapshotName – Name of the snapshot to be deleted.
The following code deletes the snapshot myBackup.
https://memory-db.us-east-1.amazonaws.com/ ?Action=DeleteSnapshot &SignatureVersion=4 &SignatureMethod=HmacSHA256 &SnapshotName=myBackup &Timestamp=20210802T192317Z &Version=2021-01-01
102
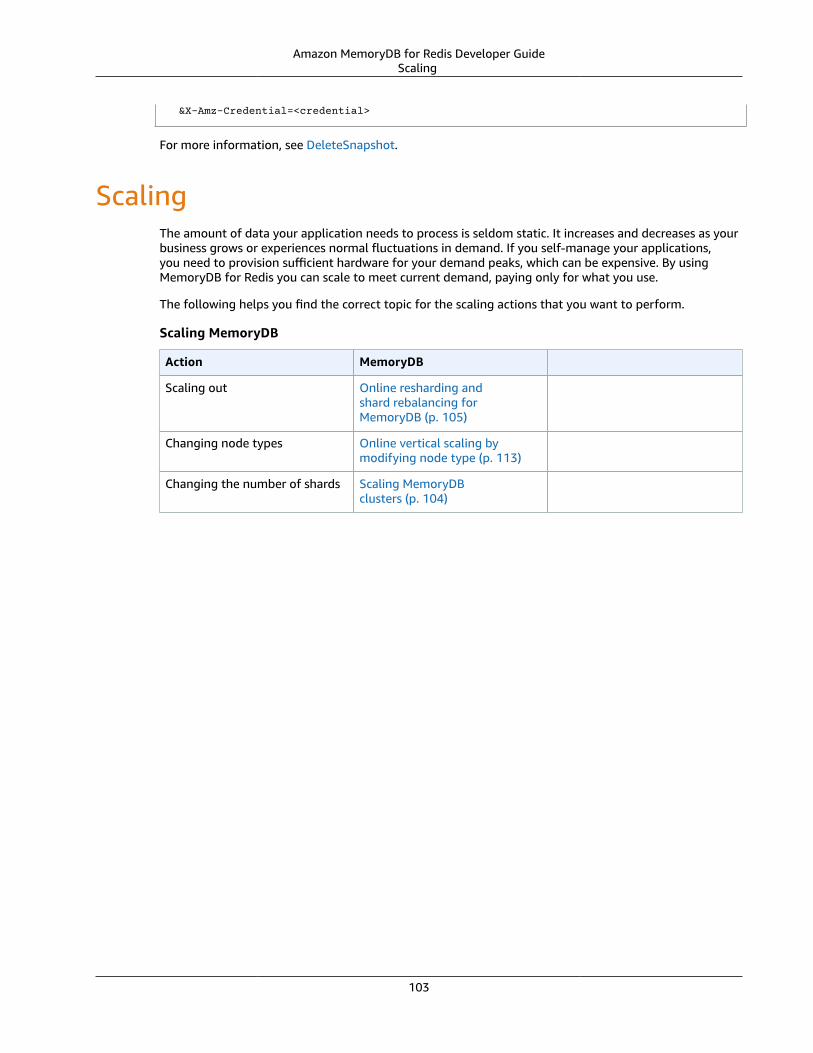
Amazon MemoryDB for Redis Developer GuideScaling
&X-Amz-Credential=<credential>
For more information, see DeleteSnapshot.
ScalingThe amount of data your application needs to process is seldom static. It increases and decreases as yourbusiness grows or experiences normal fluctuations in demand. If you self-manage your applications,you need to provision sufficient hardware for your demand peaks, which can be expensive. By usingMemoryDB for Redis you can scale to meet current demand, paying only for what you use.
The following helps you find the correct topic for the scaling actions that you want to perform.
Scaling MemoryDB
Action MemoryDB
Scaling out Online resharding andshard rebalancing forMemoryDB (p. 105)
Changing node types Online vertical scaling bymodifying node type (p. 113)
Changing the number of shards Scaling MemoryDBclusters (p. 104)
103

Amazon MemoryDB for Redis Developer GuideScaling MemoryDB clusters
Scaling MemoryDB clustersAs demand on your clusters changes, you might decide to improve performance or reduce costs bychanging the number of shards in your MemoryDB cluster. We recommend using online horizontalscaling to do so, because it allows your cluster to continue serving requests during the scaling process.
Conditions under which you might decide to rescale your cluster include the following:
• Memory pressure:
If the nodes in your cluster are under memory pressure, you might decide to scale out so that you havemore resources to better store data and serve requests.
You can determine whether your nodes are under memory pressure by monitoring the followingmetrics: FreeableMemory, SwapUsage, and BytesUsedForMemoryDB.
• CPU or network bottleneck:
If latency/throughput issues are plaguing your cluster, you might need to scale out to resolve theissues.
You can monitor your latency and throughput levels by monitoring the following metrics:CPUUtilization, NetworkBytesIn, NetworkBytesOut, CurrConnections, and NewConnections.
• Your cluster is over-scaled:
Current demand on your cluster is such that scaling in doesn't hurt performance and reduces yourcosts.
You can monitor your cluster's use to determine whether or not you can safely scale in usingthe following metrics: FreeableMemory, SwapUsage, BytesUsedForMemoryDB, CPUUtilization,NetworkBytesIn, NetworkBytesOut, CurrConnections, and NewConnections.
Performance Impact of Scaling
When you scale using the offline process, your cluster is offline for a significant portion of the processand thus unable to serve requests. When you scale using the online method, because scaling is acompute-intensive operation, there is some degradation in performance, nevertheless, your clustercontinues to serve requests throughout the scaling operation. How much degradation you experiencedepends upon your normal CPU utilization and your data.
There are two ways to scale your MemoryDB cluster; horizontal and vertical scaling.
• Horizontal scaling allows you to change the number of shards in the cluster by adding or removingshards. The online resharding process allows scaling in/out while the cluster continues servingincoming requests.
• Vertical Scaling - Change the node type to resize the cluster. The online vertical scaling allows scalingup/down while the cluster continues serving incoming requests.
If you are reducing the size and memory capacity of the cluster, by either scaling in or scaling down,ensure that the new configuration has sufficient memory for your data and Redis overhead.
Offline resharding and shard rebalancing for MemoryDBThe main advantage you get from offline shard reconfiguration is that you can do more than merely addor remove shards from your cluster. When you reshard offline, in addition to changing the number ofshards in your cluster, you can do the following:
• Change the node type of your cluster.
104

Amazon MemoryDB for Redis Developer GuideScaling MemoryDB clusters
• Upgrade to a newer engine version.
The main disadvantage of offline shard reconfiguration is that your cluster is offline beginning with therestore portion of the process and continuing until you update the endpoints in your application. Thelength of time that your cluster is offline varies with the amount of data in your cluster.
To reconfigure your shards MemoryDB cluster offline
1. Create a manual snapshot of your existing MemoryDB cluster. For more information, see Makingmanual snapshots (p. 80).
2. Create a new cluster by restoring from the snapshot. For more information, see Restoring from asnapshot (p. 94).
3. Update the endpoints in your application to the new cluster's endpoints. For more information, seeFinding connection endpoints (p. 42).
Online resharding and shard rebalancing for MemoryDBBy using online resharding and shard rebalancing with MemoryDB, you can scale your MemoryDBdynamically with no downtime. This approach means that your cluster can continue to serve requestseven while scaling or rebalancing is in process.
You can do the following:
• Scale out – Increase read and write capacity by adding shards to your MemoryDB cluster.
If you add one or more shards to your cluster, the number of nodes in each new shard is the same asthe number of nodes in the smallest of the existing shards.
• Scale in – Reduce read and write capacity, and thereby costs, by removing shards from your MemoryDBcluster.
Currently, the following limitations apply to MemoryDB online resharding:
• There are limitations with slots or keyspaces and large items:
If any of the keys in a shard contain a large item, that key isn't migrated to a new shard when scalingout or rebalancing. This functionality can result in unbalanced shards.
If any of the keys in a shard contain a large item (items greater than 256 MB after serialization), thatshard isn't deleted when scaling in. This functionality can result in some shards not being deleted.
• When scaling out, the number of nodes in any new shards equals the number of nodes in the existingshards.
For more information, see Best practices: Online cluster resizing (p. 62).
You can horizontally scale or rebalance your MemoryDB clusters using the AWS Management Console,the AWS CLI, and the MemoryDB API.
Adding shards with online resharding
You can add shards to your MemoryDB cluster using the AWS Management Console, AWS CLI, orMemoryDB API.
Adding shards (Console)
You can use the AWS Management Console to add one or more shards to your MemoryDB cluster. Thefollowing procedure describes the process.
105

Amazon MemoryDB for Redis Developer GuideScaling MemoryDB clusters
1. Sign in to the AWS Management Console and open the MemoryDB for Redis console at https://console.aws.amazon.com/memorydb/.
2. From the list of clusters, choose the cluster name from which you want to add a shard.
3. Under the Shards and nodes tab, choose Add/Delete shards
4. In New number of shards, enter the the number of shards you want.
5. Choose Confirm to keep the changes or Cancel to discard.
Adding shards (AWS CLI)
The following process describes how to reconfigure the shards in your MemoryDB cluster by addingshards using the AWS CLI.
Use the following parameters with update-cluster.
Parameters
• --cluster-name – Required. Specifies which cluster (cluster) the shard reconfiguration operation isto be performed on.
• --shard-configuration – Required. Allows you to set the number of shards.
• ShardCount – Set this property to specify the number of shards you want.
Example
The following example modifies the number of shards in the cluster my-cluster to 2.
For Linux, macOS, or Unix:
aws memorydb update-cluster \ --cluster-name my-cluster \ --shard-configuration \ ShardCount=2
For Windows:
aws memorydb update-cluster ^ --cluster-name my-cluster ^ --shard-configuration ^ ShardCount=2
It returns the following JSON response:
{ "Cluster": { "Name": "my-cluster", "Status": "updating", "NumberOfShards": 2, "AvailabilityMode": "MultiAZ", "ClusterEndpoint": { "Address": "clustercfg.my-cluster.xxxxxx.memorydb.us-east-1.amazonaws.com", "Port": 6379 }, "NodeType": "db.r6g.large", "EngineVersion": "6.2", "EnginePatchVersion": "6.2.4",
106

Amazon MemoryDB for Redis Developer GuideScaling MemoryDB clusters
"ParameterGroupName": "default.memorydb-redis6", "ParameterGroupStatus": "in-sync", "SubnetGroupName": "my-sg", "TLSEnabled": true, "ARN": "arn:aws:memorydb:us-east-1:xxxxxxexamplearn:cluster/my-cluster", "SnapshotRetentionLimit": 0, "MaintenanceWindow": "wed:03:00-wed:04:00", "SnapshotWindow": "04:30-05:30", "AutoMinorVersionUpgrade": true }}
To view the details of the updated cluster once its status changes from updating to available, use thefollowing command:
For Linux, macOS, or Unix:
aws memorydb describe-clusters \ --cluster-name my-cluster --show-shard-details
For Windows:
aws memorydb describe-clusters ^ --cluster-name my-cluster --show-shard-details
It will return the following JSON response:
{ "Clusters": [ { "Name": "my-cluster", "Status": "available", "NumberOfShards": 2, "Shards": [ { "Name": "0001", "Status": "available", "Slots": "0-8191", "Nodes": [ { "Name": "my-cluster-0001-001", "Status": "available", "AvailabilityZone": "us-east-1a", "CreateTime": "2021-08-21T20:22:12.405000-07:00", "Endpoint": { "Address": "clustercfg.my-cluster.xxxxxx.memorydb.us-east-1.amazonaws.com", "Port": 6379 } }, { "Name": "my-cluster-0001-002", "Status": "available", "AvailabilityZone": "us-east-1b", "CreateTime": "2021-08-21T20:22:12.405000-07:00", "Endpoint": { "Address": "clustercfg.my-cluster.xxxxxx.memorydb.us-east-1.amazonaws.com", "Port": 6379
107

Amazon MemoryDB for Redis Developer GuideScaling MemoryDB clusters
} } ], "NumberOfNodes": 2 }, { "Name": "0002", "Status": "available", "Slots": "8192-16383", "Nodes": [ { "Name": "my-cluster-0002-001", "Status": "available", "AvailabilityZone": "us-east-1b", "CreateTime": "2021-08-22T14:26:18.693000-07:00", "Endpoint": { "Address": "clustercfg.my-cluster.xxxxxx.memorydb.us-east-1.amazonaws.com", "Port": 6379 } }, { "Name": "my-cluster-0002-002", "Status": "available", "AvailabilityZone": "us-east-1a", "CreateTime": "2021-08-22T14:26:18.765000-07:00", "Endpoint": { "Address": "clustercfg.my-cluster.xxxxxx.memorydb.us-east-1.amazonaws.com", "Port": 6379 } } ], "NumberOfNodes": 2 } ], "ClusterEndpoint": { "Address": "clustercfg.my-cluster.xxxxxx.memorydb.us-east-1.amazonaws.com", "Port": 6379 }, "NodeType": "db.r6g.large", "EngineVersion": "6.2", "EnginePatchVersion": "6.2.4", "ParameterGroupName": "default.memorydb-redis6", "ParameterGroupStatus": "in-sync", "SubnetGroupName": "my-sg", "TLSEnabled": true, "ARN": "arn:aws:memorydb:us-east-1:xxxxxxexamplearn:cluster/my-cluster", "SnapshotRetentionLimit": 0, "MaintenanceWindow": "wed:03:00-wed:04:00", "SnapshotWindow": "04:30-05:30", "ACLName": "my-acl", "AutoMinorVersionUpgrade": true } ]}
For more information, see update-cluster in the AWS CLI Command Reference.
Adding shards (MemoryDB API)
You can use the MemoryDB API to reconfigure the shards in your MemoryDB cluster online by using theUpdateCluster operation.
Use the following parameters with UpdateCluster.
108

Amazon MemoryDB for Redis Developer GuideScaling MemoryDB clusters
Parameters
• ClusterName – Required. Specifies which cluster the shard reconfiguration operation is to beperformed on.
• ShardConfiguration – Required. Allows you to set the number of shards.
• ShardCount – Set this property to specify the number of shards you want.
For more information, see UpdateCluster.
Removing shards with online resharding
You can remove shards from your MemoryDB cluster using the AWS Management Console, AWS CLI, orMemoryDB API.
Removing shards (Console)
The following process describes how to reconfigure the shards in your MemoryDB cluster by removingshards using the AWS Management Console.
ImportantBefore removing shards from your cluster, MemoryDB makes sure that all your data will fit in theremaining shards. If the data will fit, shards are deleted from the cluster as requested. If the datawon't fit in the remaining shards, the process is terminated and the cluster is left with the sameshard configuration as before the request was made.
You can use the AWS Management Console to remove one or more shards from your MemoryDB cluster.You cannot remove all the shards in a cluster. Instead, you must delete the cluster. For more information,see Step 4: Deleting a cluster (p. 22). The following procedure describes the process for removing one ormore shards.
1. Sign in to the AWS Management Console and open the MemoryDB for Redis console at https://console.aws.amazon.com/memorydb/.
2. From the list of clusters, choose the cluster name from which you want to remove a shard.
3. Under the Shards and nodes tab, choose Add/Delete shards
4. In New number of shards, enter the the number of shards you want (with a minimum of 1).
5. Choose Confirm to keep the changes or Cancel to discard.
Removing shards (AWS CLI)
The following process describes how to reconfigure the shards in your MemoryDB cluster by removingshards using the AWS CLI.
ImportantBefore removing shards from your cluster, MemoryDB makes sure that all your data will fit in theremaining shards. If the data will fit, shards are deleted from the cluster as requested and theirkeyspaces mapped into the remaining shards. If the data will not fit in the remaining shards,the process is terminated and the cluster is left with the same shard configuration as before therequest was made.
You can use the AWS CLI to remove one or more shards from your MemoryDB cluster. You cannotremove all the shards in a cluster. Instead, you must delete the cluster. For more information, see Step 4:Deleting a cluster (p. 22).
Use the following parameters with update-cluster.
109
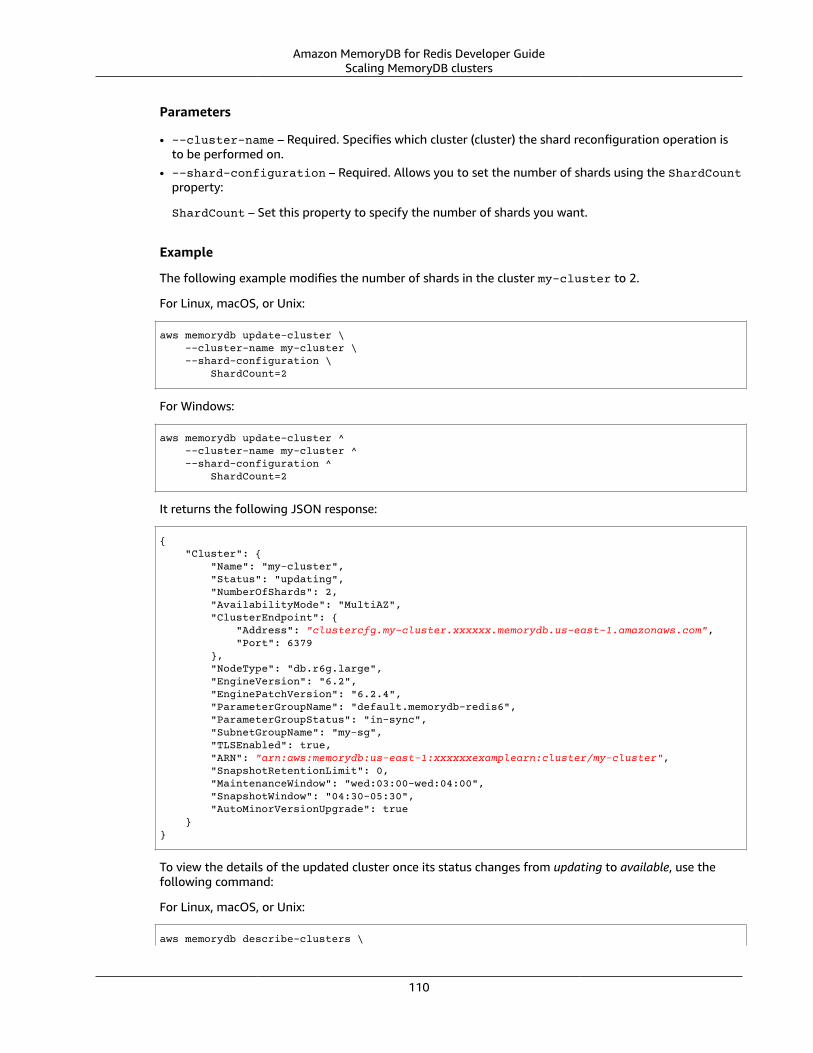
Amazon MemoryDB for Redis Developer GuideScaling MemoryDB clusters
Parameters
• --cluster-name – Required. Specifies which cluster (cluster) the shard reconfiguration operation isto be performed on.
• --shard-configuration – Required. Allows you to set the number of shards using the ShardCountproperty:
ShardCount – Set this property to specify the number of shards you want.
Example
The following example modifies the number of shards in the cluster my-cluster to 2.
For Linux, macOS, or Unix:
aws memorydb update-cluster \ --cluster-name my-cluster \ --shard-configuration \ ShardCount=2
For Windows:
aws memorydb update-cluster ^ --cluster-name my-cluster ^ --shard-configuration ^ ShardCount=2
It returns the following JSON response:
{ "Cluster": { "Name": "my-cluster", "Status": "updating", "NumberOfShards": 2, "AvailabilityMode": "MultiAZ", "ClusterEndpoint": { "Address": "clustercfg.my-cluster.xxxxxx.memorydb.us-east-1.amazonaws.com", "Port": 6379 }, "NodeType": "db.r6g.large", "EngineVersion": "6.2", "EnginePatchVersion": "6.2.4", "ParameterGroupName": "default.memorydb-redis6", "ParameterGroupStatus": "in-sync", "SubnetGroupName": "my-sg", "TLSEnabled": true, "ARN": "arn:aws:memorydb:us-east-1:xxxxxxexamplearn:cluster/my-cluster", "SnapshotRetentionLimit": 0, "MaintenanceWindow": "wed:03:00-wed:04:00", "SnapshotWindow": "04:30-05:30", "AutoMinorVersionUpgrade": true }}
To view the details of the updated cluster once its status changes from updating to available, use thefollowing command:
For Linux, macOS, or Unix:
aws memorydb describe-clusters \
110

Amazon MemoryDB for Redis Developer GuideScaling MemoryDB clusters
--cluster-name my-cluster --show-shard-details
For Windows:
aws memorydb describe-clusters ^ --cluster-name my-cluster --show-shard-details
It will return the following JSON response:
{ "Clusters": [ { "Name": "my-cluster", "Status": "available", "NumberOfShards": 2, "Shards": [ { "Name": "0001", "Status": "available", "Slots": "0-8191", "Nodes": [ { "Name": "my-cluster-0001-001", "Status": "available", "AvailabilityZone": "us-east-1a", "CreateTime": "2021-08-21T20:22:12.405000-07:00", "Endpoint": { "Address": "clustercfg.my-cluster.xxxxxx.memorydb.us-east-1.amazonaws.com", "Port": 6379 } }, { "Name": "my-cluster-0001-002", "Status": "available", "AvailabilityZone": "us-east-1b", "CreateTime": "2021-08-21T20:22:12.405000-07:00", "Endpoint": { "Address": "clustercfg.my-cluster.xxxxxx.memorydb.us-east-1.amazonaws.com", "Port": 6379 } } ], "NumberOfNodes": 2 }, { "Name": "0002", "Status": "available", "Slots": "8192-16383", "Nodes": [ { "Name": "my-cluster-0002-001", "Status": "available", "AvailabilityZone": "us-east-1b", "CreateTime": "2021-08-22T14:26:18.693000-07:00", "Endpoint": { "Address": "clustercfg.my-cluster.xxxxxx.memorydb.us-east-1.amazonaws.com", "Port": 6379 }
111
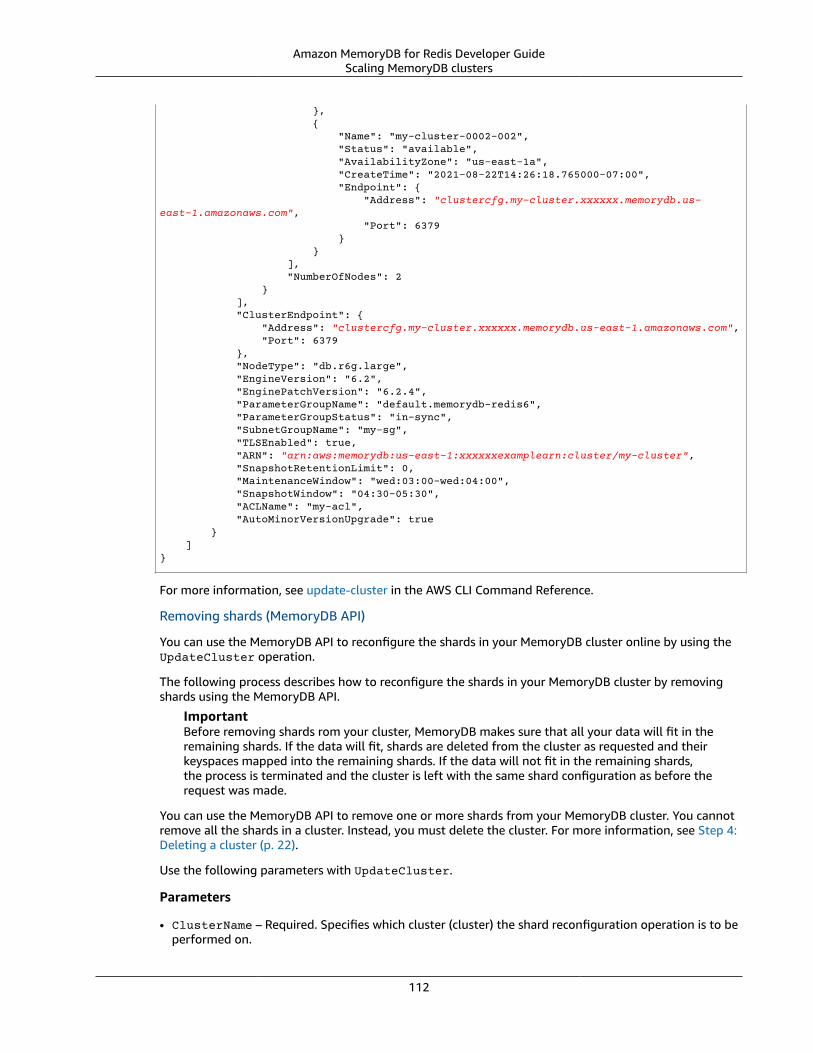
Amazon MemoryDB for Redis Developer GuideScaling MemoryDB clusters
}, { "Name": "my-cluster-0002-002", "Status": "available", "AvailabilityZone": "us-east-1a", "CreateTime": "2021-08-22T14:26:18.765000-07:00", "Endpoint": { "Address": "clustercfg.my-cluster.xxxxxx.memorydb.us-east-1.amazonaws.com", "Port": 6379 } } ], "NumberOfNodes": 2 } ], "ClusterEndpoint": { "Address": "clustercfg.my-cluster.xxxxxx.memorydb.us-east-1.amazonaws.com", "Port": 6379 }, "NodeType": "db.r6g.large", "EngineVersion": "6.2", "EnginePatchVersion": "6.2.4", "ParameterGroupName": "default.memorydb-redis6", "ParameterGroupStatus": "in-sync", "SubnetGroupName": "my-sg", "TLSEnabled": true, "ARN": "arn:aws:memorydb:us-east-1:xxxxxxexamplearn:cluster/my-cluster", "SnapshotRetentionLimit": 0, "MaintenanceWindow": "wed:03:00-wed:04:00", "SnapshotWindow": "04:30-05:30", "ACLName": "my-acl", "AutoMinorVersionUpgrade": true } ]}
For more information, see update-cluster in the AWS CLI Command Reference.
Removing shards (MemoryDB API)
You can use the MemoryDB API to reconfigure the shards in your MemoryDB cluster online by using theUpdateCluster operation.
The following process describes how to reconfigure the shards in your MemoryDB cluster by removingshards using the MemoryDB API.
ImportantBefore removing shards rom your cluster, MemoryDB makes sure that all your data will fit in theremaining shards. If the data will fit, shards are deleted from the cluster as requested and theirkeyspaces mapped into the remaining shards. If the data will not fit in the remaining shards,the process is terminated and the cluster is left with the same shard configuration as before therequest was made.
You can use the MemoryDB API to remove one or more shards from your MemoryDB cluster. You cannotremove all the shards in a cluster. Instead, you must delete the cluster. For more information, see Step 4:Deleting a cluster (p. 22).
Use the following parameters with UpdateCluster.
Parameters
• ClusterName – Required. Specifies which cluster (cluster) the shard reconfiguration operation is to beperformed on.
112

Amazon MemoryDB for Redis Developer GuideScaling MemoryDB clusters
• ShardConfiguration – Required. Allows you to set the number of shards using the ShardCountproperty:
ShardCount – Set this property to specify the number of shards you want.
Online vertical scaling by modifying node typeBy using online vertical scaling with MemoryDB, you can scale your cluster dynamically with minimaldowntime. This allows your cluster to serve requests even while scaling.
You can do the following:
• Scale up – Increase read and write capacity by adjusting the node type of your MemoryDB cluster touse a larger node type.
MemoryDB dynamically resizes your cluster while remaining online and serving requests.• Scale down – Reduce read and write capacity by adjusting the node type down to use a smaller node.
Again, MemoryDB dynamically resizes your cluster while remaining online and serving requests. In thiscase, you reduce costs by downsizing the node.
NoteThe scale up and scale down processes rely on creating clusters with newly selected node typesand synchronizing the new nodes with the previous ones. To ensure a smooth scale up/downflow, do the following:
• While the vertical scaling process is designed to remain fully online, it does rely onsynchronizing data between the old node and the new node. We recommend that you initiatescale up/down during hours when you expect data traffic to be at its minimum.
• Test your application behavior during scaling in a staging environment, if possible.
Online scaling up
Topics• Scaling up MemoryDB clusters (Console) (p. 113)• Scaling up MemoryDB clusters (AWS CLI) (p. 114)• Scaling up MemoryDB clusters (MemoryDB API) (p. 115)
Scaling up MemoryDB clusters (Console)
The following procedure describes how to scale up a MemoryDB cluster using the AWS ManagementConsole. During this process, your MemoryDB cluster will continue to serve requests with minimaldowntime.
To scale up a cluster (console)
1. Sign in to the AWS Management Console and open the MemoryDB for Redis console at https://console.aws.amazon.com/memorydb/.
2. From the list of clusters, choose the cluster.3. Choose Actions and then choose Modify.4. In the Modify Cluster dialog:
• Choose the node type you want to scale to from the Node type list. To scale up, select a nodetype larger than your existing node.
113

Amazon MemoryDB for Redis Developer GuideScaling MemoryDB clusters
5. Choose Save changes.
The cluster's status changes to modifying. When the status changes to available, the modification iscomplete and you can begin using the new cluster.
Scaling up MemoryDB clusters (AWS CLI)
The following procedure describes how to scale up a MemoryDB cluster using the AWS CLI. During thisprocess, your MemoryDB cluster will continue to serve requests with minimal downtime.
To scale up a MemoryDB cluster (AWS CLI)
1. Determine the node types you can scale up to by running the AWS CLI list-allowed-node-type-updates command with the following parameter.
For Linux, macOS, or Unix:
aws memorydb list-allowed-node-type-updates \ --cluster-name my-cluster-name
For Windows:
aws memorydb list-allowed-node-type-updates ^ --cluster-name my-cluster-name
Output from the above command looks something like this (JSON format).
{ "ScaleUpNodeTypes": [ "db.r6g.2xlarge", "db.r6g.large" ], "ScaleDownNodeTypes": [ "db.r6g.large" ], }
For more information, see list-allowed-node-type-updates in the AWS CLI Reference.
2. Modify your cluster to scale up to the new, larger node type, using the AWS CLI update-clustercommand and the following parameters.
• --cluster-name – The name of the cluster you are scaling up to.
• --node-type – The new node type you want to scale the cluster. This value must be one of thenode types returned by the list-allowed-node-type-updates command in step 1.
For Linux, macOS, or Unix:
aws memorydb update-cluster \ --cluster-name my-cluster \ --node-type db.r6g.2xlarge
For Windows:
aws memorydb update-cluster ^ --cluster-name my-cluster ^
114

Amazon MemoryDB for Redis Developer GuideScaling MemoryDB clusters
--node-type db.r6g.2xlarge ^
For more information, see update-cluster.
Scaling up MemoryDB clusters (MemoryDB API)
The following process scales your cluster from its current node type to a new, larger node type usingthe MemoryDB API. During this process, MemoryDB updates the DNS entries so they point to the newnodes. You can scale auto-failover enabled clusters while the cluster continues to stay online and serveincoming requests.
The amount of time it takes to scale up to a larger node type varies, depending upon your node type andthe amount of data in your current cluster.
To scale up a MemoryDB cluster (MemoryDB API)
1. Determine which node types you can scale up to using the MemoryDB APIListAllowedNodeTypeUpdates action with the following parameter.
• ClusterName – the name of the cluster. Use this parameter to describe a specific cluster ratherthan all clusters.
https://memory-db.us-east-1.amazonaws.com/ ?Action=ListAllowedNodeTypeUpdates &ClusterName=MyCluster &Version=2021-01-01 &SignatureVersion=4 &SignatureMethod=HmacSHA256 &Timestamp=20210802T192317Z &X-Amz-Credential=<credential>
For more information, see ListAllowedNodeTypeUpdates in the MemoryDB for Redis API Reference.
2. Scale your current cluster up to the new node type using the UpdateCluster MemoryDB API actionand with the following parameters.
• ClusterName – the name of the cluster.
• NodeType – the new, larger node type of the clusters in this cluster. This value must be one of theinstance types returned by the ListAllowedNodeTypeUpdates action in step 1.
https://memory-db.us-east-1.amazonaws.com/ ?Action=UpdateCluster &NodeType=db.r6g.2xlarge &ClusterName=myCluster &SignatureVersion=4 &SignatureMethod=HmacSHA256 &Timestamp=20210801T220302Z &Version=2021-01-01 &X-Amz-Algorithm=Amazon4-HMAC-SHA256 &X-Amz-Date=20210801T220302Z &X-Amz-SignedHeaders=Host &X-Amz-Expires=20210801T220302Z &X-Amz-Credential=<credential> &X-Amz-Signature=<signature>
For more information, see UpdateCluster.
115

Amazon MemoryDB for Redis Developer GuideScaling MemoryDB clusters
Online scaling down
Topics
• Scaling down MemoryDB clusters (Console) (p. 116)
• Scaling down MemoryDB clusters (AWS CLI) (p. 116)
• Scaling down MemoryDB clusters (MemoryDB API) (p. 117)
Scaling down MemoryDB clusters (Console)
The following procedure describes how to scale down a MemoryDB cluster using the AWS ManagementConsole. During this process, your MemoryDB cluster will continue to serve requests with minimaldowntime.
To scale down a MemoryDB cluster (console)
1. Sign in to the AWS Management Console and open the MemoryDB for Redis console at https://console.aws.amazon.com/memorydb/.
2. From the list of clusters, choose your preferred cluster.
3. Choose Actions and then choose Modify.
4. In the Modify Cluster dialog:
• Choose the node type you want to scale to from the Node type list. To scale down, select anode type smaller than your existing node. Note that not all node types are available to scaledown to.
5. Choose Save changes.
The cluster's status changes to modifying. When the status changes to available, the modification iscomplete and you can begin using the new cluster.
Scaling down MemoryDB clusters (AWS CLI)
The following procedure describes how to scale down a MemoryDB cluster using the AWS CLI. During thisprocess, your MemoryDB cluster will continue to serve requests with minimal downtime.
To scale down a MemoryDB cluster (AWS CLI)
1. Determine the node types you can scale down to by running the AWS CLI list-allowed-node-type-updates command with the following parameter.
For Linux, macOS, or Unix:
aws memorydb list-allowed-node-type-updates \ --cluster-name my-cluster-name
For Windows:
aws memorydb list-allowed-node-type-updates ^ --cluster-name my-cluster-name
Output from the above command looks something like this (JSON format).
{ "ScaleUpNodeTypes": [
116

Amazon MemoryDB for Redis Developer GuideScaling MemoryDB clusters
"db.r6g.2xlarge", "db.r6g.large" ], "ScaleDownNodeTypes": [ "db.r6g.large" ], }
For more information, see list-allowed-node-type-updates.
2. Modify your cluster to scale down to the new, smaller node type, using the update-clustercommand and the following parameters.
• --cluster-name – The name of the cluster you are scaling down to.
• --node-type – The new node type you want to scale the cluster. This value must be one of thenode types returned by the list-allowed-node-type-updates command in step 1.
For Linux, macOS, or Unix:
aws memorydb update-cluster \ --cluster-name my-cluster \ --node-type db.r6g.large
For Windows:
aws memorydb update-cluster ^ --cluster-name my-cluster ^ --node-type db.r6g.large
For more information, see update-cluster.
Scaling down MemoryDB clusters (MemoryDB API)
The following process scales your cluster from its current node type to a new, smaller node type usingthe MemoryDB API. During this process, your MemoryDB cluster will continue to serve requests withminimal downtime.
The amount of time it takes to scale down to a smaller node type varies, depending upon your node typeand the amount of data in your current cluster.
Scaling down (MemoryDB API)
1. Determine which node types you can scale down to using the ListAllowedNodeTypeUpdates API withthe following parameter:
• ClusterName – the name of the cluster. Use this parameter to describe a specific cluster ratherthan all clusters.
https://memory-db.us-east-1.amazonaws.com/ ?Action=ListAllowedNodeTypeUpdates &ClusterName=MyCluster &Version=2021-01-01 &SignatureVersion=4 &SignatureMethod=HmacSHA256 &Timestamp=20210802T192317Z &X-Amz-Credential=<credential>
117

Amazon MemoryDB for Redis Developer GuideConfiguring engine parameters using parameter groups
2. Scale your current cluster down to the new node type using the UpdateCluster API with thefollowing parameters.
• ClusterName – the name of the cluster.• NodeType – the new, smaller node type of the clusters in this cluster. This value must be one of
the instance types returned by the ListAllowedNodeTypeUpdates action in step 1.
https://memory-db.us-east-1.amazonaws.com/ ?Action=UpdateCluster &NodeType=db.r6g.2xlarge &ClusterName=myReplGroup &SignatureVersion=4 &SignatureMethod=HmacSHA256 &Timestamp=20210801T220302Z &Version=2021-01-01 &X-Amz-Algorithm=Amazon4-HMAC-SHA256 &X-Amz-Date=20210801T220302Z &X-Amz-SignedHeaders=Host &X-Amz-Expires=20210801T220302Z &X-Amz-Credential=<credential> &X-Amz-Signature=<signature>
Configuring engine parameters using parametergroups
MemoryDB for Redis uses parameters to control the runtime properties of your nodes and clusters.Generally, newer engine versions include additional parameters to support the newer functionality. Fortables of parameters, see Redis specific parameters (p. 133).
As you would expect, some parameter values, such as maxmemory, are determined by the engine andnode type. For a table of these parameter values by node type, see MemoryDB node-type specificparameters (p. 138).
Topics• Parameter management (p. 119)• Parameter group tiers (p. 120)• Creating a parameter group (p. 120)• Listing parameter groups by name (p. 124)• Listing a parameter group's values (p. 128)• Modifying a parameter group (p. 128)• Deleting a parameter group (p. 131)• Redis specific parameters (p. 133)
118

Amazon MemoryDB for Redis Developer GuideParameter management
Parameter managementParameters are grouped together into named parameter groups for easier parameter management. Aparameter group represents a combination of specific values for the parameters that are passed to theengine software during startup. These values determine how the engine processes on each node behaveat runtime. The parameter values on a specific parameter group apply to all nodes that are associatedwith the group, regardless of which cluster they belong to.
To fine-tune your cluster's performance, you can modify some parameter values or change the cluster'sparameter group.
• You cannot modify or delete the default parameter groups. If you need custom parameter values, youmust create a custom parameter group.
• The parameter group family and the cluster you're assigning it to must be compatible. For example, ifyour cluster is running Redis version 6, you can only use parameter groups, default or custom, from thememorydb_redis6 family.
• When you change a cluster's parameters, the change is applied to the cluster immediately. This is truewhether you change the cluster's parameter group itself or a parameter value within the cluster'sparameter group.
119

Amazon MemoryDB for Redis Developer GuideParameter group tiers
Parameter group tiersMemoryDB for Redis parameter group tiers
Global Default
The top-level root parameter group for all MemoryDB for Redis customers in the region.
The global default parameter group:
• Is reserved for MemoryDB and not available to the customer.
Customer Default
A copy of the Global Default parameter group which is created for the customer's use.
The Customer Default parameter group:
• Is created and owned by MemoryDB.• Is available to the customer for use as a parameter group for any clusters running an engine version
supported by this parameter group.• Cannot be edited by the customer.
Customer Owned
A copy of the Customer Default parameter group. A Customer Owned parameter group is createdwhenever the customer creates a parameter group.
The Customer Owned parameter group:
• Is created and owned by the customer.• Can be assigned to any of the customer's compatible clusters.• Can be modified by the customer to create a custom parameter group.
Not all parameter values can be modified. For more information, see Redis specificparameters (p. 133).
Creating a parameter groupYou need to create a new parameter group if there is one or more parameter values that you wantchanged from the default values. You can create a parameter group using the MemoryDB console, theAWS CLI, or the MemoryDB API.
Creating a parameter group (Console)The following procedure shows how to create a parameter group using the MemoryDB console.
To create a parameter group using the MemoryDB console
1. Sign in to the AWS Management Console and open the MemoryDB for Redis console at https://console.aws.amazon.com/memorydb/.
2. To see a list of all available parameter groups, in the left hand navigation pane choose ParameterGroups.
3. To create a parameter group, choose Create parameter group.
120

Amazon MemoryDB for Redis Developer GuideCreating a parameter group
The Create parameter group page appears.
4. In the Name box, type in a unique name for this parameter group.
When creating a cluster or modifying a cluster's parameter group, you will choose the parametergroup by its name. Therefore, we recommend that the name be informative and somehow identifythe parameter group's family.
Parameter group naming constraints are as follows:
• Must begin with an ASCII letter.
• Can only contain ASCII letters, digits, and hyphens.
• Must be 1–255 characters long.
• Can't contain two consecutive hyphens.
• Can't end with a hyphen.
5. In the Description box, type in a description for the parameter group.
6. In the Redis version compatibility box, choose an engine version that this parameter groupcorresponds to.
7. In the Tags, optionally add tags to search and filter your parameter groups or track your AWS costs.
8. To create the parameter group, choose Create.
To terminate the process without creating the parameter group, choose Cancel.9. When the parameter group is created, it will have the family's default values. To change the default
values you must modify the parameter group. For more information, see Modifying a parametergroup (p. 128).
Creating a parameter group (AWS CLI)To create a parameter group using the AWS CLI, use the command create-parameter-group withthese parameters.
• --parameter-group-name — The name of the parameter group.
Parameter group naming constraints are as follows:
• Must begin with an ASCII letter.
• Can only contain ASCII letters, digits, and hyphens.
• Must be 1–255 characters long.
• Can't contain two consecutive hyphens.
• Can't end with a hyphen.
• --family — The engine and version family for the parameter group.
• --description — A user supplied description for the parameter group.
Example
The following example creates a parameter group named myRedis6x using the memorydb_redis6 familyas the template.
For Linux, macOS, or Unix:
aws memorydb create-parameter-group \ --parameter-group-name myRedis6x \ --family memorydb_redis6 \
121

Amazon MemoryDB for Redis Developer GuideCreating a parameter group
--description "My first parameter group"
For Windows:
aws memorydb create-parameter-group ^ --parameter-group-name myRedis6x ^ --family memorydb_redis6 ^ --description "My first parameter group"
The output from this command should look something like this.
{ "ParameterGroup": { "Name": "myRedis6x", "Family": "memorydb_redis6", "Description": "My first parameter group", "ARN": "arn:aws:memorydb:us-east-1:012345678912:parametergroup/myredis6x" }}
When the parameter group is created, it will have the family's default values. To change the defaultvalues you must modify the parameter group. For more information, see Modifying a parametergroup (p. 128).
For more information, see create-parameter-group.
Creating a parameter group (MemoryDB API)To create a parameter group using the MemoryDB API, use the CreateParameterGroup action withthese parameters.
• ParameterGroupName — The name of the parameter group.
Parameter group naming constraints are as follows:• Must begin with an ASCII letter.• Can only contain ASCII letters, digits, and hyphens.• Must be 1–255 characters long.• Can't contain two consecutive hyphens.• Can't end with a hyphen.
• Family — The engine and version family for the parameter group. For example, memorydb_redis6.• Description — A user supplied description for the parameter group.
Example
The following example creates a parameter group named myRedis6x using the memorydb_redis6 familyas the template.
https://memory-db.us-east-1.amazonaws.com/ ?Action=CreateParameterGroup &Family=memorydb_redis6 &ParameterGroupName=myRedis6x &Description=My%20first%20parameter%20group &SignatureVersion=4 &SignatureMethod=HmacSHA256 &Timestamp=20210802T192317Z &Version=2021-01-01
122

Amazon MemoryDB for Redis Developer GuideCreating a parameter group
&X-Amz-Credential=<credential>
The response from this action should look something like this.
<CreateParameterGroupResponse xmlns="http://memory-db.us-east-1.amazonaws.com/doc/2021-01-01/"> <CreateParameterGroupResult> <ParameterGroup> <Name>myRedis6x</Name> <Family>memorydb_redis6</Family> <Description>My first parameter group</Description> <ARN>arn:aws:memorydb:us-east-1:012345678912:parametergroup/myredis6x</ARN> </ParameterGroup> </CreateParameterGroupResult> <ResponseMetadata> <RequestId>d8465952-af48-11e0-8d36-859edca6f4b8</RequestId> </ResponseMetadata></CreateParameterGroupResponse>
When the parameter group is created, it will have the family's default values. To change the defaultvalues you must modify the parameter group. For more information, see Modifying a parametergroup (p. 128).
For more information, see CreateParameterGroup.
123

Amazon MemoryDB for Redis Developer GuideListing parameter groups by name
Listing parameter groups by nameYou can list the parameter groups using the MemoryDB console, the AWS CLI, or the MemoryDB API.
Listing parameter groups by name (Console)The following procedure shows how to view a list of the parameter groups using the MemoryDB console.
To list parameter groups using the MemoryDB console
1. Sign in to the AWS Management Console and open the MemoryDB for Redis console at https://console.aws.amazon.com/memorydb/.
2. To see a list of all available parameter groups, in the left hand navigation pane choose ParameterGroups.
Listing parameter groups by name (AWS CLI)To generate a list of parameter groups using the AWS CLI, use the command describe-parameter-groups. If you provide a parameter group's name, only that parameter group will be listed. If you do notprovide a parameter group's name, up to --max-results parameter groups will be listed. In either case,the parameter group's name, family, and description are listed.
Example
The following sample code lists the parameter group myRedis6x.
For Linux, macOS, or Unix:
aws memorydb describe-parameter-groups \ --parameter-group-name myRedis6x
For Windows:
aws memorydb describe-parameter-groups ^ --parameter-group-name myRedis6x
The output of this command will look something like this, listing the name, family, and description forthe parameter group.
{ "ParameterGroups": [ { "Name": "myRedis6x", "Family": "memorydb_redis6", "Description": "My first parameter group", "ARN": "arn:aws:memorydb:us-east-1:012345678912:parametergroup/myredis6x" } ]}
Example
The following sample code lists the parameter group myRedis6x for parameter groups running on Redisengine version 5.0.6 onwards.
For Linux, macOS, or Unix:
124

Amazon MemoryDB for Redis Developer GuideListing parameter groups by name
aws memorydb describe-parameter-groups \ --parameter-group-name myRedis6x
For Windows:
aws memorydb describe-parameter-groups ^ --parameter-group-name myRedis6x
The output of this command will look something like this, listing the name, family and description forthe parameter group.
{ "ParameterGroups": [ { "Name": "myRedis6x", "Family": "memorydb_redis6", "Description": "My first parameter group", "ARN": "arn:aws:memorydb:us-east-1:012345678912:parametergroup/myredis6x" } ]}
Example
The following sample code lists up to 20 parameter groups.
aws memorydb describe-parameter-groups --max-results 20
The JSON output of this command will look something like this, listing the name, family and descriptionfor each parameter group.
{ "ParameterGroups": [ { "ParameterGroupName": "default.memorydb-redis6", "Family": "memorydb_redis6", "Description": "Default parameter group for memorydb_redis6", "ARN": "arn:aws:memorydb:us-east-1:012345678912:parametergroup/default.memorydb-redis6" }, ... ]}
For more information, see describe-parameter-groups.
Listing parameter groups by name (MemoryDB API)To generate a list of parameter groups using the MemoryDB API, use the DescribeParameterGroupsaction. If you provide a parameter group's name, only that parameter group will be listed. If you do notprovide a parameter group's name, up to MaxResults parameter groups will be listed. In either case, theparameter group's name, family, and description are listed.
Example
The following sample code lists up to 20 parameter groups.
125

Amazon MemoryDB for Redis Developer GuideListing parameter groups by name
https://memory-db.us-east-1.amazonaws.com/ ?Action=DescribeParameterGroups &MaxResults=20 &SignatureVersion=4 &SignatureMethod=HmacSHA256 &Timestamp=20210802T192317Z &Version=2021-01-01 &X-Amz-Credential=<credential>
The response from this action will look something like this, listing the name, family and description inthe case of memorydb_redis6, for each parameter group.
<DescribeParameterGroupsResponse xmlns="http://memory-db.us-east-1.amazonaws.com/doc/2021-01-01/"> <DescribeParameterGroupsResult> <ParameterGroups> <ParameterGroup> <Name>myRedis6x</Name> <Family>memorydb_redis6</Family> <Description>My custom Redis 6 parameter group</Description> <ARN>arn:aws:memorydb:us-east-1:012345678912:parametergroup/myredis6x</ARN> </ParameterGroup> <ParameterGroup> <Name>default.memorydb-redis6</Name> <Family>memorydb_redis6</Family> <Description>Default parameter group for memorydb_redis6</Description> <ARN>arn:aws:memorydb:us-east-1:012345678912:parametergroup/default.memorydb-redis6</ARN> </ParameterGroup> </ParameterGroups> </DescribeParameterGroupsResult> <ResponseMetadata> <RequestId>3540cc3d-af48-11e0-97f9-279771c4477e</RequestId> </ResponseMetadata></DescribeParameterGroupsResponse>
Example
The following sample code lists the parameter group myRedis6x.
https://memory-db.us-east-1.amazonaws.com/ ?Action=DescribeParameterGroups &ParameterGroupName=myRedis6x &SignatureVersion=4 &SignatureMethod=HmacSHA256 &Timestamp=20210802T192317Z &Version=2021-01-01 &X-Amz-Credential=<credential>
The response from this action will look something like this, listing the name, family, and description.
<DescribeParameterGroupsResponse xmlns="http://memory-db.us-east-1.amazonaws.com/doc/2021-01-01/"> <DescribeParameterGroupsResult> <ParameterGroups> <ParameterGroup> <Name>myRedis6x</Name> <Family>memorydb_redis6</Family> <Description>My custom Redis 6 parameter group</Description> <ARN>arn:aws:memorydb:us-east-1:012345678912:parametergroup/myredis6x</ARN> </ParameterGroup>
126

Amazon MemoryDB for Redis Developer GuideListing parameter groups by name
</ParameterGroups> </DescribeParameterGroupsResult> <ResponseMetadata> <RequestId>3540cc3d-af48-11e0-97f9-279771c4477e</RequestId> </ResponseMetadata></DescribeParameterGroupsResponse>
For more information, see DescribeParameterGroups.
127

Amazon MemoryDB for Redis Developer GuideListing a parameter group's values
Listing a parameter group's valuesYou can list the parameters and their values for a parameter group using the MemoryDB console, theAWS CLI, or the MemoryDB API.
Listing a parameter group's values (Console)The following procedure shows how to list the parameters and their values for a parameter group usingthe MemoryDB console.
To list a parameter group's parameters and their values using the MemoryDB console
1. Sign in to the AWS Management Console and open the MemoryDB for Redis console at https://console.aws.amazon.com/memorydb/.
2. To see a list of all available parameter groups, in the left hand navigation pane choose ParameterGroups.
3. Choose the parameter group for which you want to list the parameters and values by choosing name(not the box next to it) of the parameter group's name.
The parameters and their values will be listed at the bottom of the screen. Due to the number ofparameters, you may have to scroll up and down to find the parameter you're interested in.
Listing a parameter group's values (AWS CLI)To list a parameter group's parameters and their values using the AWS CLI, use the commanddescribe-parameters.
Example
The following sample code list all the parameters and their values for the parameter group myRedis6x.
For Linux, macOS, or Unix:
aws memorydb describe-parameters \ --parameter-group-name myRedis6x
For Windows:
aws memorydb describe-parameters ^ --parameter-group-name myRedis6x
For more information, see describe-parameters.
Listing a parameter group's values (MemoryDB API)To list a parameter group's parameters and their values using the MemoryDB API, use theDescribeParameters action.
For more information, see DescribeParameters.
Modifying a parameter groupImportantYou cannot modify any default parameter group.
128

Amazon MemoryDB for Redis Developer GuideModifying a parameter group
You can modify some parameter values in a parameter group. These parameter values are applied toclusters associated with the parameter group. For more information on when a parameter value changeis applied to a parameter group, see Redis specific parameters (p. 133).
Modifying a parameter group (Console)The following procedure shows how to change the parameter's value using the MemoryDB console. Youwould use the same procedure to change the value of any parameter.
To change a parameter's value using the MemoryDB console
1. Sign in to the AWS Management Console and open the MemoryDB for Redis console at https://console.aws.amazon.com/memorydb/.
2. To see a list of all available parameter groups, in the left hand navigation pane choose ParameterGroups.
3. Choose the parameter group you want to modify by choosing the radio button to the left of theparameter group's name.
Choose Actions and then View details. Alternatively, you can also choose the parameter groupname to go to the details page.
4. To modify the parameter, choose Edit. All the editable parameters will be enabled to be edited. Youmay have to move across pages to find the parameter you want to change. Alternatively, you cansearch for the parameter by name, value or type in the search box.
5. Make any necessary parameter modifications.6. To save your changes, choose Save changes.7. If you modified parameter values across number of pages, you can review all the changes by
choosing Preview changes. To confirm the changes, choose Save changes. To make moremodifications, choose back.
8. The Parameter details page also gives you the option to reset to default values. To reset to defaultvalues, choose Reset to defaults. Checkboxes will appear on the left side of all the parameters. Youcan select the ones you want to reset and choose Proceed to reset to confirm.
Choose confirm to confirm the reset action on the dialogue box.9. The parameter details page allows you to set the number of parameters you want to see on each
page. Use the cogwheel on the right side to make those changes. You can also enable/disable thecolumns you want on the details page. These changes last through the session of the console.
To find the name of the parameter you changed, see Redis specific parameters (p. 133).
Modifying a parameter group (AWS CLI)To change a parameter's value using the AWS CLI, use the command update-parameter-group.
To find the name and permitted values of the parameter you want to change, see Redis specificparameters (p. 133)
For more information, see update-parameter-group.
Modifying a parameter group (MemoryDB API)To change a parameter group's parameter values using the MemoryDB API, use theUpdateParameterGroup action.
To find the name and permitted values of the parameter you want to change, see Redis specificparameters (p. 133)
129

Amazon MemoryDB for Redis Developer GuideModifying a parameter group
For more information, see UpdateParameterGroup.
130

Amazon MemoryDB for Redis Developer GuideDeleting a parameter group
Deleting a parameter groupYou can delete a custom parameter group using the MemoryDB console, the AWS CLI, or the MemoryDBAPI.
You cannot delete a parameter group if it is associated with any clusters. Nor can you delete any of thedefault parameter groups.
Deleting a parameter group (Console)The following procedure shows how to delete a parameter group using the MemoryDB console.
To delete a parameter group using the MemoryDB console
1. Sign in to the AWS Management Console and open the MemoryDB for Redis console at https://console.aws.amazon.com/memorydb/.
2. To see a list of all available parameter groups, in the left hand navigation pane choose ParameterGroups.
3. Choose the parameter groups you want to delete by choosing the radio button to the left of theparameter group's name.
Choose Actions and then choose Delete.4. The Delete Parameter Groups confirmation screen will appear.5. To delete the parameter groups enter Delete in the confirmation text box.
To keep the parameter groups, choose Cancel.
Deleting a parameter group (AWS CLI)To delete a parameter group using the AWS CLI, use the command delete-parameter-group. For theparameter group to delete, the parameter group specified by --parameter-group-name cannot haveany clusters associated with it, nor can it be a default parameter group.
The following sample code deletes the myRedis6x parameter group.
Example
For Linux, macOS, or Unix:
aws memorydb delete-parameter-group \ --parameter-group-name myRedis6x
For Windows:
aws memorydb delete-parameter-group ^ --parameter-group-name myRedis6x
For more information, see delete-parameter-group.
Deleting a parameter group (MemoryDB API)To delete a parameter group using the MemoryDB API, use the DeleteParameterGroup action. For theparameter group to delete, the parameter group specified by ParameterGroupName cannot have anyclusters associated with it, nor can it be a default parameter group.
131

Amazon MemoryDB for Redis Developer GuideDeleting a parameter group
Example
The following sample code deletes the myRedis6x parameter group.
https://memory-db.us-east-1.amazonaws.com/ ?Action=DeleteParameterGroup &ParameterGroupName=myRedis6x &SignatureVersion=4 &SignatureMethod=HmacSHA256 &Timestamp=20210802T192317Z &Version=2021-01-01 &X-Amz-Credential=<credential>
For more information, see DeleteParameterGroup.
132

Amazon MemoryDB for Redis Developer GuideRedis specific parameters
Redis specific parametersIf you do not specify a parameter group for your Redis cluster, then a default parameter groupappropriate to your engine version will be used. You can't change the values of any parameters in thedefault parameter group. However, you can create a custom parameter group and assign it to yourcluster at any time as long as the values of conditionally modifiable parameters are the same in bothparameter groups. For more information, see Creating a parameter group (p. 120).
Topics• Redis 6 parameters (p. 133)• MemoryDB node-type specific parameters (p. 138)
Redis 6 parametersParameter group family: memorydb_redis6
Parameters added in Redis 6 are as follows.
Name Details Description
maxmemory-policy
Type: STRING
Permitted values: volatile-lru,allkeys-lru,volatile-lfu,allkeys-lfu,volatile-random,allkeys-random,volatile-ttl,noeviction
Default: noeviction
The eviction policy for keys when maximummemory usage is reached.
For more information, see Using Redis as an LRUcache Using Redis as an LRU cache.
list-compress-depth
Type: INTEGER
Permitted values: 0-
Default: 0
Compress depth is the number of quicklist ziplistnodes from each side of the list to exclude fromcompression. The head and tail of the list arealways uncompressed for fast push and popoperations. Settings are:
• 0: Disable all compression.• 1: Start compressing with the 1st node in from
the head and tail.
[head]->node->node->...->node->[tail]
All nodes except [head] and [tail] compress.• 2: Start compressing with the 2nd node in from
the head and tail.
[head]->[next]->node->node->...->node->[prev]->[tail]
[head], [next], [prev], [tail] do not compress. Allother nodes compress.
• Etc.
hll-sparse-max-bytes
Type: INTEGER
Permitted values: 1-16000
HyperLogLog sparse representation bytes limit.The limit includes the 16 byte header. When aHyperLogLog using the sparse representation
133

Amazon MemoryDB for Redis Developer GuideRedis specific parameters
Name Details Description
Default: 3000 crosses this limit, it is converted into the denserepresentation.
A value greater than 16000 is not recommended,because at that point the dense representation ismore memory efficient.
We recommend a value of about 3000 to havethe benefits of the space-efficient encodingwithout slowing down PFADD too much, which isO(N) with the sparse encoding. The value can beraised to ~10000 when CPU is not a concern, butspace is, and the data set is composed of manyHyperLogLogs with cardinality in the 0 - 15000range.
lfu-log-factor
Type: INTEGER
Permitted values: 1-
Default: 10
The log factor for incrementing key counter forLFU eviction policy.
lfu-decay-time
Type: INTEGER
Permitted values: 0-
Default: 1
The amount of time in minutes to decrement thekey counter for LFU eviction policy.
active-defrag-max-scan-fields
Type: INTEGER
Permitted values: 1-1000000
Default: 1000
Maximum number of set/hash/zset/list fields thatwill be processed from the main dictionary scanduring active defragmentation.
active-defrag-threshold-upper
Type: INTEGER
Permitted values: 1-100
Default: 100
Maximum percentage of fragmentation at whichwe use maximum effort.
client-output-buffer-limit-pubsub-hard-limit
Type: INTEGER
Permitted values: 0-
Default: 33554432
For Redis publish/subscribe clients: If a client'soutput buffer reaches the specified number ofbytes, the client will be disconnected.
client-output-buffer-limit-pubsub-soft-limit
Type: INTEGER
Permitted values: 0-
Default: 8388608
For Redis publish/subscribe clients: If a client'soutput buffer reaches the specified number ofbytes, the client will be disconnected, but onlyif this condition persists for client-output-buffer-limit-pubsub-soft-seconds.
134

Amazon MemoryDB for Redis Developer GuideRedis specific parameters
Name Details Description
client-output-buffer-limit-pubsub-soft-seconds
Type: INTEGER
Permitted values: 0-
Default: 60
For Redis publish/subscribe clients: If a client'soutput buffer remains at client-output-buffer-limit-pubsub-soft-limit bytes forlonger than this number of seconds, the client willbe disconnected.
timeout Type: INTEGER
Permitted values: 0,20-
Default: 0
The number of seconds a node waits beforetiming out. Values are:
• 0 – never disconnect an idle client.• 1-19 – invalid values.• >=20 – the number of seconds a node waits
before disconnecting an idle client.
notify-keyspace-events
Type: STRING
Permitted values: NULL
Default: NULL
The keyspace events for Redis to notify Pub/Sub clients about. By default all notifications aredisabled.
maxmemory-samples
Type: INTEGER
Permitted values: 1-
Default: 3
For least-recently-used (LRU) and time-to-live (TTL) calculations, this parameterrepresents the sample size of keys to check. Bydefault, Redis chooses 3 keys and uses the onethat was used least recently.
slowlog-max-len
Type: INTEGER
Permitted values: 0-
Default: 128
The maximum length of the Redis Slow Log. Thereis no limit to this length. Just be aware that it willconsume memory. You can reclaim memory usedby the slow log with SLOWLOG RESET.
activerehashingType: STRING
Permitted values: yes,no
Default: yes
The main hash table is rehashed ten times persecond; each rehash operation consumes 1millisecond of CPU time.
This value is set when you create the parametergroup. When assigning a new parameter group toa cluster, this value must be the same in both theold and new parameter groups.
client-output-buffer-limit-normal-hard-limit
Type: INTEGER
Permitted values: 0-
Default: 0
If a client's output buffer reaches the specifiednumber of bytes, the client will be disconnected.The default is zero (no hard limit).
client-output-buffer-limit-normal-soft-limit
Type: INTEGER
Permitted values: 0-
Default: 0
If a client's output buffer reaches the specifiednumber of bytes, the client will be disconnected,but only if this condition persists for client-output-buffer-limit-normal-soft-seconds. The default is zero (no soft limit).
135

Amazon MemoryDB for Redis Developer GuideRedis specific parameters
Name Details Description
client-output-buffer-limit-normal-soft-seconds
Type: INTEGER
Permitted values: 0-
Default: 0
If a client's output buffer remains at client-output-buffer-limit-normal-soft-limitbytes for longer than this number of seconds, theclient will be disconnected. The default is zero (notime limit).
tcp-keepalive
Type: INTEGER
Permitted values: 0-
Default: 300
If this is set to a nonzero value (N), node clientsare polled every N seconds to ensure that they arestill connected. With the default setting of 0, nosuch polling occurs.
active-defrag-cycle-min
Type: INTEGER
Permitted values: 1-75
Default: 5
Minimal effort for defrag in CPU percentage.
stream-node-max-bytes
Type: INTEGER
Permitted values: 0-
Default: 4096
The stream data structure is a radix tree of nodesthat encode multiple items inside. Use thisconfiguration to specify the maximum size of asingle node in radix tree in Bytes. If set to 0, thesize of the tree node is unlimited.
stream-node-max-entries
Type: INTEGER
Permitted values: 0-
Default: 100
The stream data structure is a radix tree of nodesthat encode multiple items inside. Use thisconfiguration to specify the maximum number ofitems a single node can contain before switchingto a new node when appending new streamentries. If set to 0, the number of items in the treenode is unlimited.
lazyfree-lazy-eviction
Type: STRING
Permitted values: yes,no
Default: no
Perform an asynchronous delete on evictions.
active-defrag-ignore-bytes
Type: INTEGER
Permitted values: 1048576-
Default: 104857600
Minimum amount of fragmentation waste to startactive defrag.
lazyfree-lazy-expire
Type: STRING
Permitted values: yes,no
Default: no
Perform an asynchronous delete on expired keys.
active-defrag-threshold-lower
Type: INTEGER
Permitted values: 1-100
Default: 10
Minimum percentage of fragmentation to startactive defrag.
136
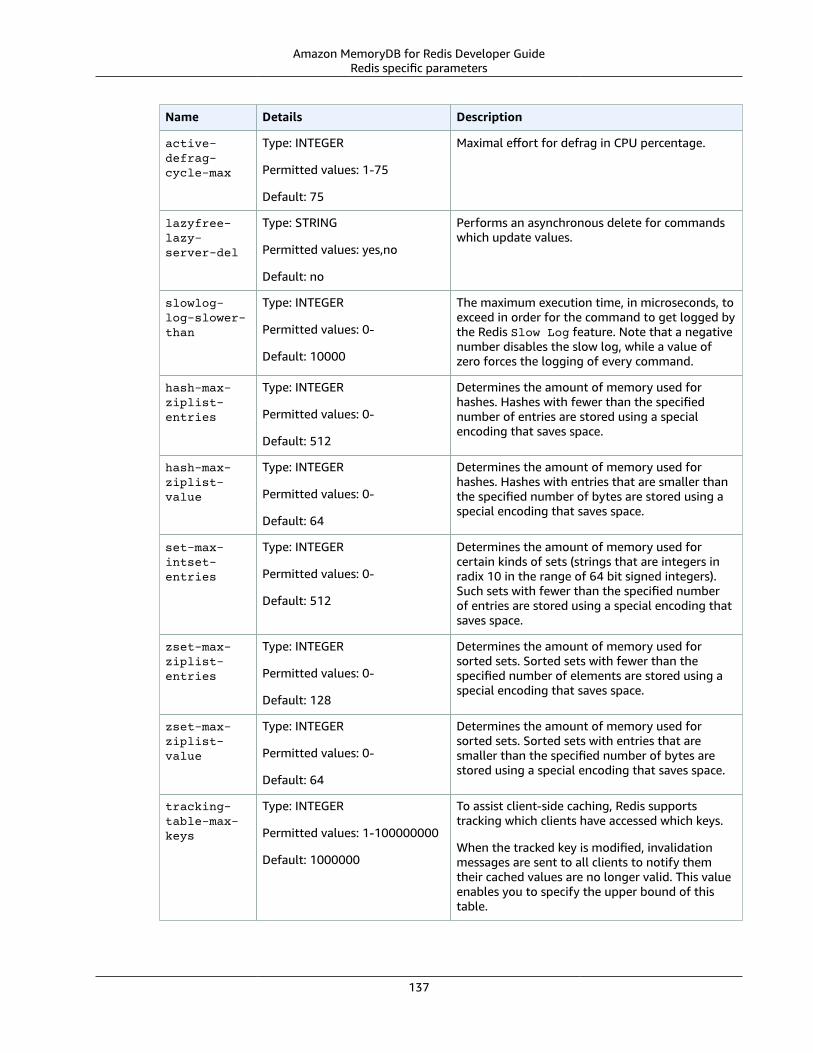
Amazon MemoryDB for Redis Developer GuideRedis specific parameters
Name Details Description
active-defrag-cycle-max
Type: INTEGER
Permitted values: 1-75
Default: 75
Maximal effort for defrag in CPU percentage.
lazyfree-lazy-server-del
Type: STRING
Permitted values: yes,no
Default: no
Performs an asynchronous delete for commandswhich update values.
slowlog-log-slower-than
Type: INTEGER
Permitted values: 0-
Default: 10000
The maximum execution time, in microseconds, toexceed in order for the command to get logged bythe Redis Slow Log feature. Note that a negativenumber disables the slow log, while a value ofzero forces the logging of every command.
hash-max-ziplist-entries
Type: INTEGER
Permitted values: 0-
Default: 512
Determines the amount of memory used forhashes. Hashes with fewer than the specifiednumber of entries are stored using a specialencoding that saves space.
hash-max-ziplist-value
Type: INTEGER
Permitted values: 0-
Default: 64
Determines the amount of memory used forhashes. Hashes with entries that are smaller thanthe specified number of bytes are stored using aspecial encoding that saves space.
set-max-intset-entries
Type: INTEGER
Permitted values: 0-
Default: 512
Determines the amount of memory used forcertain kinds of sets (strings that are integers inradix 10 in the range of 64 bit signed integers).Such sets with fewer than the specified numberof entries are stored using a special encoding thatsaves space.
zset-max-ziplist-entries
Type: INTEGER
Permitted values: 0-
Default: 128
Determines the amount of memory used forsorted sets. Sorted sets with fewer than thespecified number of elements are stored using aspecial encoding that saves space.
zset-max-ziplist-value
Type: INTEGER
Permitted values: 0-
Default: 64
Determines the amount of memory used forsorted sets. Sorted sets with entries that aresmaller than the specified number of bytes arestored using a special encoding that saves space.
tracking-table-max-keys
Type: INTEGER
Permitted values: 1-100000000
Default: 1000000
To assist client-side caching, Redis supportstracking which clients have accessed which keys.
When the tracked key is modified, invalidationmessages are sent to all clients to notify themtheir cached values are no longer valid. This valueenables you to specify the upper bound of thistable.
137

Amazon MemoryDB for Redis Developer GuideRedis specific parameters
Name Details Description
acllog-max-len
Type: INTEGER
Permitted values: 1-10000
Default: 128
The maximum number of entries in the ACL Log.
active-expire-effort
Type: INTEGER
Permitted values: 1-10
Default: 1
Redis deletes keys that have exceeded theirtime to live by two mechanisms. In one, a key isaccessed and is found to be expired. In the other,a periodic job samples keys and causes those thathave exceeded their time to live to expire. Thisparameter defines the amount of effort that Redisuses to expire items in the periodic job.
The default value of 1 tries to avoid having morethan 10 percent of expired keys still in memory.It also tries to avoid consuming more than 25percent of total memory and to add latency tothe system. You can increase this value up to10 to increase the amount of effort spent onexpiring keys. The tradeoff is higher CPU andpotentially higher latency. We recommend a valueof 1 unless you are seeing high memory usageand can tolerate an increase in CPU utilization.
lazyfree-lazy-user-del
Type: STRING
Permitted values: yes,no
Default: no
Specifies whether the default behavior of DELcommand acts the same as UNLINK.
activedefrag Type: STRING
Permitted values: yes,no
Default: no
Enabled active memory defragmentation.
MemoryDB node-type specific parameters
Although most parameters have a single value, some parameters have different values depending on thenode type used. The following table shows the default value for the maxmemory for each node type. Thevalue of maxmemory is the maximum number of bytes available to you for use, data and other uses, onthe node.
Node type Maxmemory
db.r6g.large 14037181030
db.r6g.xlarge 28261849702
db.r6g.2xlarge 56711183565
db.r6g.4xlarge 113609865216
db.r6g.8xlarge 225000375228
138

Amazon MemoryDB for Redis Developer GuideRedis specific parameters
Node type Maxmemory
db.r6g.12xlarge 341206346547
db.r6g.16xlarge 450000750456
db.t4g.small 1471026299
db.t4g.medium 3317862236
NoteAll MemoryDB instance types must be created in an Amazon Virtual Private Cloud VPC.
139

Amazon MemoryDB for Redis Developer GuideData protection
Security in MemoryDB for RedisCloud security at AWS is the highest priority. As an AWS customer, you benefit from a data center andnetwork architecture that is built to meet the requirements of the most security-sensitive organizations.
Security is a shared responsibility between AWS and you. The shared responsibility model describes thisas security of the cloud and security in the cloud:
• Security of the cloud – AWS is responsible for protecting the infrastructure that runs AWS services inthe AWS Cloud. AWS also provides you with services that you can use securely. Third-party auditorsregularly test and verify the effectiveness of our security as part of the AWS Compliance Programs.To learn about the compliance programs that apply to MemoryDB, see AWS Services in Scope byCompliance Program.
• Security in the cloud – Your responsibility is determined by the AWS service that you use. You are alsoresponsible for other factors including the sensitivity of your data, your company’s requirements, andapplicable laws and regulations
This documentation helps you understand how to apply the shared responsibility model when usingMemoryDB for Redis. It shows you how to configure MemoryDB to meet your security and complianceobjectives. You also learn how to use other AWS services that help you to monitor and secure yourMemoryDB resources.
Contents• Data protection in MemoryDB for Redis (p. 140)• Identity and access management in MemoryDB for Redis (p. 153)• Logging and monitoring (p. 174)• Infrastructure security in Amazon MemoryDB for Redis (p. 197)• Internetwork traffic privacy (p. 198)• Service updates in MemoryDB for Redis (p. 216)
Data protection in MemoryDB for RedisThe AWS shared responsibility model applies to data protection in . As described in this model, AWS isresponsible for protecting the global infrastructure that runs all of the AWS Cloud. You are responsiblefor maintaining control over your content that is hosted on this infrastructure. This content includes thesecurity configuration and management tasks for the AWS services that you use. For more informationabout data privacy, see the Data Privacy FAQ. For information about data protection in Europe, see theAWS Shared Responsibility Model and GDPR blog post on the AWS Security Blog.
For data protection purposes, we recommend that you protect AWS account credentials and set upindividual user accounts with AWS Identity and Access Management (IAM). That way each user is givenonly the permissions necessary to fulfill their job duties. We also recommend that you secure your datain the following ways:
• Use multi-factor authentication (MFA) with each account.• Use SSL/TLS to communicate with AWS resources. We recommend TLS 1.2 or later.• Set up API and user activity logging with AWS CloudTrail.• Use AWS encryption solutions, along with all default security controls within AWS services.
140

Amazon MemoryDB for Redis Developer GuideData security in MemoryDB for Redis
• Use advanced managed security services such as Amazon Macie, which assists in discovering andsecuring personal data that is stored in Amazon S3.
• If you require FIPS 140-2 validated cryptographic modules when accessing AWS through a commandline interface or an API, use a FIPS endpoint. For more information about the available FIPS endpoints,see Federal Information Processing Standard (FIPS) 140-2.
We strongly recommend that you never put confidential or sensitive information, such as yourcustomers' email addresses, into tags or free-form fields such as a Name field. This includes when youwork with or other AWS services using the console, API, AWS CLI, or AWS SDKs. Any data that you enterinto tags or free-form fields used for names may be used for billing or diagnostic logs. If you provide aURL to an external server, we strongly recommend that you do not include credentials information in theURL to validate your request to that server.
Data security in MemoryDB for RedisTo help keep your data secure, MemoryDB for Redis and Amazon EC2 provide mechanisms to guardagainst unauthorized access of your data on the server.
MemoryDB also provides encryption features for data on clusters:
• In-transit encryption encrypts your data whenever it is moving from one place to another, such asbetween nodes in your cluster or between your cluster and your application.
• At-rest encryption encrypts the transaction log and your on-disk data during snapshot operations.
You can also use Authenticating users with Access Control Lists (ACLs) (p. 144) to control user access toyour clusters.
Topics• At-Rest Encryption in MemoryDB (p. 142)• In-transit encryption (TLS) in MemoryDB (p. 143)• Authenticating users with Access Control Lists (ACLs) (p. 144)
141

Amazon MemoryDB for Redis Developer GuideAt-Rest Encryption
At-Rest Encryption in MemoryDBTo help keep your data secure, MemoryDB for Redis and Amazon S3 provide different ways to restrictaccess to data in your clusters. For more information, see MemoryDB and Amazon VPC (p. 206) andIdentity and access management in MemoryDB for Redis (p. 153).
MemoryDB at-rest encryption is always enabled to increase data security by encrypting persistent data. Itencrypts the following aspects:
• Data in the transaction log
• Disk during sync, snapshot and swap operations
• Snapshots stored in Amazon S3
MemoryDB offers default (service managed) encryption at rest, as well as ability to use your ownsymmetric customer managed customer root keys in AWS Key Management Service (KMS).
For information on encryption in transit, see In-transit encryption (TLS) in MemoryDB (p. 143)
Topics
• Using Customer Managed Keys from AWS KMS (p. 142)
• See Also (p. 143)
Using Customer Managed Keys from AWS KMS
MemoryDB supports symmetric customer managed root keys (KMS key) for encryption at rest. Customer-managed KMS keys are encryption keys that you create, own and manage in your AWS account. For moreinformation, see Customer Root Keys in the AWS Key Management Service Developer Guide. The keys mustbe created in AWS KMS before they can be used with MemoryDB.
To learn how to create AWS KMS root keys, see Creating Keys in the AWS Key Management ServiceDeveloper Guide.
MemoryDB allows you to integrate with AWS KMS. For more information, see Using Grants in the AWSKey Management Service Developer Guide. No customer action is needed to enable MemoryDB integrationwith AWS KMS.
The kms:ViaService condition key limits use of an AWS KMS key to requests from specified AWSservices. To use kms:ViaService with MemoryDB, include both ViaService names in the condition keyvalue: memorydb.amazon_region.amazonaws.com. For more information, see kms:ViaService.
You can use AWS CloudTrail to track the requests that MemoryDB for Redis sends to AWS KeyManagement Service on your behalf. All API calls to AWS Key Management Service related to customermanaged keys have corresponding CloudTrail logs. You can also see the grants that MemoryDB createsby calling the ListGrants KMS API call.
Once a cluster is encrypted using a customer managed key, all snapshots for the cluster are encrypted asfollows:
• Automatic daily snapshots are encrypted using the customer managed key associated with the cluster.
• Final snapshot created when cluster is deleted, is also encrypted using the customer managed keyassociated with the cluster.
• Manually created snapshots are encrypted by default to use the KMS key associated with the cluster.You may override this by choosing another customer managed key.
142
Amazon MemoryDB for Redis Developer GuideIn-transit encryption (TLS)
• Copying a snapshot defaults to using customer managed key associated with the source snapshot. Youmay override this by choosing another customer managed key.
Note
• Customer managed keys cannot be used when exporting snapshots to your selected AmazonS3 bucket. However, all snapshots exported to Amazon S3 are encrypted using Server sideencryption. You may choose to copy the snapshot file to a new S3 object and encrypt usinga customer managed KMS key, copy the file to another S3 bucket that is set up with defaultencryption using a KMS key or change an encryption option in the file itself.
• You can also use customer managed keys to encrypt manually-created snapshots that donot use customer managed keys for encryption. With this option, the snapshot file storedin Amazon S3 is encrypted using a KMS key, even though the data is not encrypted on theoriginal cluster.
Restoring from a snapshot allows you to choose from available encryption options, similar toencryption choices available when creating a new cluster.
• If you delete the key or disable the key and revoke grants for the key that you used to encrypt acluster, the cluster becomes irrecoverable. In other words, it cannot be modified or recovered after ahardware failure. AWS KMS deletes root keys only after a waiting period of at least seven days. Afterthe key is deleted, you can use a different customer managed key to create a snapshot for archivalpurposes.
• Automatic key rotation preserves the properties of your AWS KMS root keys, so the rotation has noeffect on your ability to access your MemoryDB data. Encrypted MemoryDB clusters don't supportmanual key rotation, which involves creating a new root key and updating any references to the oldkey. To learn more, see Rotating Customer root Keys in the AWS Key Management Service DeveloperGuide.
• Encrypting a MemoryDB cluster using KMS key requires one grant per cluster. This grant is usedthroughout the lifespan of the cluster. Additionally, one grant per snapshot is used during snapshotcreation. This grant is retired once the snapshot is created.
• For more information on AWS KMS grants and limits, see Quotas in the AWS Key Management ServiceDeveloper Guide.
See Also• In-transit encryption (TLS) in MemoryDB (p. 143)
• MemoryDB and Amazon VPC (p. 206)
• Identity and access management in MemoryDB for Redis (p. 153)
In-transit encryption (TLS) in MemoryDBTo help keep your data secure, MemoryDB for Redis and Amazon EC2 provide mechanisms to guardagainst unauthorized access of your data on the server. By providing in-transit encryption capability,MemoryDB gives you a tool you can use to help protect your data when it is moving from one location toanother. For example, you might move data from a primary node to a read replica node within a cluster,or between your cluster and your application.
Topics
• In-transit encryption overview (p. 144)
• See also (p. 144)
143
Amazon MemoryDB for Redis Developer GuideAuthenticating users with ACLs
In-transit encryption overview
MemoryDB for Redis in-transit encryption is a feature that increases the security of your data at its mostvulnerable points—when it is in transit from one location to another.
MemoryDB in-transit encryption implements the following features:
• Encrypted connections—both the server and client connections are Secure Socket Layer (SSL)encrypted.
• Encrypted replication—data moving between a primary node and replica nodes is encrypted.
• Server authentication—clients can authenticate that they are connecting to the right server.
For more information on connecting to MemoryDB clusters, see Connecting to MemoryDB nodes usingredis-cli (p. 21).
See also• At-Rest Encryption in MemoryDB (p. 142)
• Authenticating Users with Access Control Lists (ACLs)
• MemoryDB and Amazon VPC (p. 206)
• Identity and access management in MemoryDB for Redis (p. 153)
Authenticating users with Access Control Lists (ACLs)You can authenticate users with Access control lists (ACLs).
ACLs enable you to control cluster access by grouping users. These Access control lists are designed as away to organize access to clusters.
With ACLs, you create users and assign them specific permissions by using an access string, asdescribed in the next section. You assign the users to Access control lists aligned with a specific role(administrators, human resources) that are then deployed to one or more MemoryDB clusters. By doingthis, you can establish security boundaries between clients using the same MemoryDB cluster or clustersand prevent clients from accessing each other’s data.
ACLs are designed to support the introduction of Redis ACL in Redis 6. When you use ACLs with yourMemoryDB cluster, there are some limitations:
• You can't specify passwords in an access string. You set passwords with CreateUser or UpdateUser calls.
• For user rights, you pass on and off as a part of the access string. If neither is specified in the accessstring, the user is assigned off and doesn't have access rights to the cluster.
• You can't use forbidden commands. If you specify a forbidden command, an exception will be thrown.For a list of those commands, see Restricted Redis Commands (p. 60).
• You can't use the reset command as a part of an access string. You specify passwords with APIparameters, and MemoryDB manages passwords. Thus, you can't use reset because it would removeall passwords for a user.
• Redis 6 introduces the ACL LIST command. This command returns a list of users along with the ACLrules applied to each user. MemoryDB supports the ACL LIST command, but does not include supportfor password hashes as Redis does. With MemoryDB, you can use the DescribeUsers operation to getsimilar information, including the rules contained within the access string. However, DescribeUsersdoesn't retrieve a user password.
144

Amazon MemoryDB for Redis Developer GuideAuthenticating users with ACLs
Other read-only commands supported by MemoryDB include ACL WHOAMI, ACL USERS, and ACL CAT.MemoryDB doesn't support any other write-based ACL commands.
Using ACLs with MemoryDB is described in more detail following.
Topics• Specifying Permissions Using an Access String (p. 145)• Applying ACLs to a cluster for MemoryDB (p. 145)
Specifying Permissions Using an Access StringTo specify permissions to a MemoryDB cluster, you create an access string and assign it to a user, usingeither the AWS CLI or AWS Management Console.
Access strings are defined as a list of space-delimited rules which are applied on the user. They definewhich commands a user can execute and which keys a user can operate on. In order to execute acommand, a user must have access to the command being executed and all keys being accessed by thecommand. Rules are applied from left to right cumulatively, and a simpler string may be used instead ofthe one provided if there is redundancies in the string provided.
For information about the syntax of the ACL rules, see ACL.
In the following example, the access string represents an active user with access to all available keys andcommands.
on ~* &* +@all
The access string syntax is broken down as follows:
• on – The user is an active user.• ~* – Access is given to all available keys.• +@all – Access is given to all available commands.
The preceding settings are the least restrictive. You can modify these settings to make them moresecure.
In the following example, the access string represents a user with access restricted to read access on keysthat start with “app::” keyspace
on ~app::* -@all +@read
You can refine these permissions further by listing commands the user has access to:
+command1 – The user's access to commands is limited to command1.
+@category – The user's access is limited to a category of commands.
For information on assigning an access string to a user, see Creating Users and Access Control Lists withthe Console and CLI (p. 146).
If you are migrating an existing workload to MemoryDB, you can retrieve the access string by calling ACLLIST, excluding the user and any password hashes.
Applying ACLs to a cluster for MemoryDBTo use MemoryDB ACLs, you take the following steps:
145

Amazon MemoryDB for Redis Developer GuideAuthenticating users with ACLs
1. Create one or more users.
2. Create an ACL and add users to the list.
3. Assign the ACL to a cluster.
These steps are described in detail following.
Topics
• Creating Users and Access Control Lists with the Console and CLI (p. 146)
• Managing Access Control Lists with the Console and CLI (p. 149)
• Assigning Access control lists to clusters (p. 152)
Creating Users and Access Control Lists with the Console and CLI
The user information for ACLs users is a user name, and optionally a password and an access string. Theaccess string provides the permission level on keys and commands. The name is unique to the user and iswhat is passed to the engine.
Make sure that the user permissions you provide make sense with the intended purpose of the ACL. Forexample, if you create an ACL called Administrators, any user you add to that group should have itsaccess string set to full access to keys and commands. For users in an e-commerce ACL, you might settheir access strings to read-only access.
MemoryDB automatically configures a default user per account with a user name "default". It will notbe associated with any cluster unless explicity added to an ACL. You can't modify or delete this user. Thisuser is intended for compatibility with the default behavior of previous Redis versions and has an accessstring that permits it to call all commands and access all keys.
An immutable “open-access” ACL will be created for every account which contains the default user. Thisis the only ACL the default user can be a member of. When you create a cluster, you must select an ACLto associate with the cluster. While you do have the option to apply the "open-access" ACL with thedefault user, we highly recommend creating an ACL with users that have permissions restricted to theirbusiness needs.
Clusters that do not have TLS enabled must use the "open-access" ACL to provide open authentication.
ACLs can be created with no users. An empty ACL would have no access to a cluster and can only beassociated with TLS-enabled clusters.
When creating a user, you can set up to two passwords. When you modify a password, any existingconnections to clusters are maintained.
In particular, be aware of these user password constraints when using ACLs for MemoryDB:
• Passwords must be 16–128 printable characters.
• The following nonalphanumeric characters are not allowed: , "" / @.
Managing Users with the Console and CLI
Creating a user (Console)
To create users on the console
1. Sign in to the AWS Management Console and open the MemoryDB for Redis console at https://console.aws.amazon.com/memorydb/.
146

Amazon MemoryDB for Redis Developer GuideAuthenticating users with ACLs
2. On the left navigation pane, choose Users.
3. Choose Create user
4. On the Create user page, enter a Name.
Cluster naming constraints are as follows:
• Must contain 1–40 alphanumeric characters or hyphens.
• Must begin with a letter.
• Can't contain two consecutive hyphens.
• Can't end with a hyphen.
5. Under Passwords, you can enter up to two passwords.
6. Under Access string, enter an access string. The access string sets the permission level for what keysand commands the user is allowed.
7. For Tags, you can optionally apply tags to search and filter your users or track your AWS costs.
8. Choose Create.
Creating a user using the AWS CLI
To create a user by using the CLI
• Use the create-user command to create a user.
For Linux, macOS, or Unix:
aws memorydb create-user \ --user-name user-name-1 \ --access-string "~objects:* ~items:* ~public:*" \ --authentication-mode \ Passwords="abc",Type=password
For Windows:
aws memorydb create-user ^ --user-name user-name-1 ^ --access-string "~objects:* ~items:* ~public:*" ^ --authentication-mode \ Passwords="abc",Type=password
Modifying a user (Console)
To modify users on the console
1. Sign in to the AWS Management Console and open the MemoryDB for Redis console at https://console.aws.amazon.com/memorydb/.
2. On the left navigation pane, choose Users.
3. Choose the radio button next to the user you want to modify and then choose Actions->Modify
4. If you want to modify a password, choose the Modify passwords radio button. Note that if you havetwo passwords, you must enter both when modifying one of them.
5. If you are updating the access string, enter the new one.
6. Choose Modify.
147

Amazon MemoryDB for Redis Developer GuideAuthenticating users with ACLs
Modifying a user using AWS CLI
To modify a user by using the CLI
1. Use the update-user command to modify a user.2. When a user is modified, the Access control lists associated with the user are updated, along with
any clusters associated with the ACL. All existing connections are maintained. The following areexamples.
For Linux, macOS, or Unix:
aws memorydb update-user \ --user-name user-name-1 \ --access-string "~objects:* ~items:* ~public:*"
For Windows:
aws memorydb update-user ^ --user-name user-name-1 ^ --access-string "~objects:* ~items:* ~public:*"
Viewing user details (Console)
To view user details on the console
1. Sign in to the AWS Management Console and open the MemoryDB for Redis console at https://console.aws.amazon.com/memorydb/.
2. On the left navigation pane, choose Users.3. Choose the user under User name or use the search box to find the user.4. Under User settings you can review the user's access string, password count, status and Amazon
Resource Name (ARN).5. Under Access control lists (ACL) you can review the ACL the user belongs to.6. Under Tags you can review any tags associated with the user.
Viewing user details using the AWS CLI
Use the describe-users command to view details of a user.
aws memorydb describe-users \ --user-name my-user-name
Deleting a user (Console)
To delete users on the console
1. Sign in to the AWS Management Console and open the MemoryDB for Redis console at https://console.aws.amazon.com/memorydb/.
2. On the left navigation pane, choose Users.3. Choose the radio button next to the user you want to modify and then choose Actions->Delete4. To confirm, enter delete in the confirmation text box and then choose Delete.5. To cancel, choose Cancel.
148

Amazon MemoryDB for Redis Developer GuideAuthenticating users with ACLs
Deleting a user using the AWS CLI
To delete a user by using the CLI
• Use the delete-user command to delete a user.
The user account is deleted and removed from any Access control lists to which it belongs. Thefollowing is an example.
For Linux, macOS, or Unix:
aws memorydb delete-user \ --user-name user-name-2
For Windows:
aws memorydb delete-user ^ --user-name user-name-2
Managing Access Control Lists with the Console and CLI
You can create Access control lists to organize and control access of users to one or more clusters, asshown following.
Use the following procedure to manage Access control lists using the console.
Creating an Access Control List (ACL) (Console)
To create an Access control list using the console
1. Sign in to the AWS Management Console and open the MemoryDB for Redis console at https://console.aws.amazon.com/memorydb/.
2. On left navigation pane, choose Access control lists (ACL).3. Choose Create ACL.
4. On the Create access control list (ACL) page, enter an ACL name.
Cluster naming constraints are as follows:
• Must contain 1–40 alphanumeric characters or hyphens.
• Must begin with a letter.
• Can't contain two consecutive hyphens.
• Can't end with a hyphen.
5. Under Selected users do one of the following:
a. Create a new user by choosing Create userb. Add users by choosing Manage and then selecting users from the Manage users dialog and then
selecting Choose.
6. For Tags, you can optionally apply tags to search and filter your ACLs or track your AWS costs.
7. Choose Create.
Creating an Access Control List (ACL) using the AWS CLI
Use the following procedures to create an Access control list using the CLI.
149

Amazon MemoryDB for Redis Developer GuideAuthenticating users with ACLs
To create a new ACL and add a user by using the CLI
• Use the create-acl command to create an ACL.
For Linux, macOS, or Unix:
aws memorydb create-acl \ --acl-name "new-acl-1" \ --user-names "user-name-1" "user-name-2"
For Windows:
aws memorydb create-acl ^ --acl-name "new-acl-1" ^ --user-names "user-name-1" "user-name-2"
Modifying an Access Control List (ACL) (console)
To modify an Access control lists using the console
1. Sign in to the AWS Management Console and open the MemoryDB for Redis console at https://console.aws.amazon.com/memorydb/.
2. On left navigation pane, choose Access control lists (ACL).3. Choose the ACL you wish to modify and then choose Modify4. On the Modify page, under Selected users do one of the following:
a. Create a new user by choosing Create user to add to the ACL.
b. Add or remove users by choosing Manage and then selecting or de-selecting users from theManage users dialog and then selecting Choose.
5. On the Create access control list (ACL) page, enter an ACL name.
Cluster naming constraints are as follows:
• Must contain 1–40 alphanumeric characters or hyphens.
• Must begin with a letter.
• Can't contain two consecutive hyphens.
• Can't end with a hyphen.
6. Under Selected users do one of the following:
a. Create a new user by choosing Create userb. Add users by choosing Manage and then selecting users from the Manage users dialog and then
selecting Choose.
7. Choose Modify to save your changes or Cancel to discard them.
Modifying an Access Control List (ACL) using the AWS CLI
To modify a ACL by adding new users or removing current members by using the CLI
• Use the update-acl command to modfy an ACL.
For Linux, macOS, or Unix:
aws memorydb update-acl --acl-name new-acl-1 \
150

Amazon MemoryDB for Redis Developer GuideAuthenticating users with ACLs
--user-names-to-add user-name-3 \--user-names-to-remove user-name-2
For Windows:
aws memorydb update-acl --acl-name new-acl-1 ^--user-names-to-add user-name-3 ^--user-names-to-remove user-name-2
NoteAny open connections belonging to a user removed from an ACL are ended by this command.
Viewing Access Control List (ACL) details (Console)
To view ACL details on the console
1. Sign in to the AWS Management Console and open the MemoryDB for Redis console at https://console.aws.amazon.com/memorydb/.
2. On the left navigation pane, choose Access control lists (ACL).3. Choose the ACL under ACL name or use the search box to find the ACL.4. Under Users you can review list of users associated with the ACL.5. Under Associated clusters you can review the cluster the ACL belongs to.6. Under Tags you can review any tags associated with the ACL.
Viewing Access Control Lists (ACL) using the AWS CLI
Use the describe-acls command to view details of an ACL.
aws memorydb describe-acls \ --acl-name test-group
Deleting an Access Control List (ACL) (console)
To delete Access control lists using the console
1. Sign in to the AWS Management Console and open the MemoryDB for Redis console at https://console.aws.amazon.com/memorydb/.
2. On left navigation pane, choose Access control lists (ACL).3. Choose the ACL you wish to modify and then choose Delete4. On the Delete page, enter delete in the confirmation box and choose Delete or Cancel to avoid
deleting the ACL.
The ACL itself, not the users belonging to the group, is deleted.
Deleting an Access Control List (ACL) using the AWS CLI
To delete an ACL by using the CLI
• Use the delete-acl command to delete an ACL.
For Linux, macOS, or Unix:
aws memorydb delete-acl /
151

Amazon MemoryDB for Redis Developer GuideAuthenticating users with ACLs
--acl-name
For Windows:
aws memorydb delete-acl ^ --acl-name
The preceding examples return the following response.
aws memorydb delete-acl --acl-name "new-acl-1"{ "ACLName": "new-acl-1", "Status": "deleting", "EngineVersion": "6.2", "UserNames": [ "user-name-1", "user-name-3" ], "clusters": [], "ARN":"arn:aws:memorydb:us-east-1:493071037918:acl/new-acl-1"}
Assigning Access control lists to clusters
After you have created an ACL and added users, the final step in implementing ACLs is assigning the ACLto a cluster.
Assigning Access control lists to clusters Using the Console
To add an ACL to a cluster using the AWS Management Console, see Creating a MemoryDB cluster (p. 14).
Assigning Access control lists to clusters Using the AWS CLI
The following AWS CLI operation creates a cluster with encryption in transit (TLS) enabled and the acl-name parameter with the value my-acl-name. Replace the subnet group subnet-group with a subnetgroup that exists.
Key Parameters
• --engine-version – Must be 6.2.• --tls-enabled – Used for authentication and for associating an ACL.• --acl-name – This value provides Access control lists comprised of users with specified access
permissions for the cluster.
For Linux, macOS, or Unix:
aws memorydb create-cluster \ --cluster-name "new-cluster" \ --description "new-cluster" \ --engine-version "6.2" \ --node-type db.r6g.large \ --tls-enabled \ --acl-name "new-acl-1" \ --subnet-group-name "subnet-group"
For Windows:
152

Amazon MemoryDB for Redis Developer GuideIdentity and access management
aws memorydb create-cluster ^ --cluster-name "new-cluster" ^ --cluster-description "new-cluster" ^ --engine-version "6.2" ^ --node-type db.r6g.large ^ --tls-enabled ^ --acl-name "new-acl-1" ^ --subnet-group-name "subnet-group"
The following AWS CLI operation modifies a cluster with encryption in transit (TLS) enabled and the acl-name parameter with the value new-acl-2.
For Linux, macOS, or Unix:
aws memorydb update-cluster \ --cluster-name cluster-1 \ --acl-name "new-acl-2"
For Windows:
aws memorydb update-cluster ^ --cluster-name cluster-1 ^ --acl-name "new-acl-2"
Identity and access management in MemoryDB forRedis
Access to MemoryDB for Redis requires credentials that AWS can use to authenticate your requests.Those credentials must have permissions to access AWS resources, such as a MemoryDB cluster or anAmazon Elastic Compute Cloud (Amazon EC2) instance. The following sections provide details on howyou can use AWS Identity and Access Management (IAM) and MemoryDB to help secure your resources bycontrolling who can access them.
• Authentication (p. 153)• Access control (p. 154)
AuthenticationYou can access AWS as any of the following types of identities:
• AWS account root user – When you first create an AWS account, you begin with a single sign-inidentity that has complete access to all AWS services and resources in the account. This identity iscalled the AWS account root user and is accessed by signing in with the email address and passwordthat you used to create the account. We strongly recommend that you do not use the root user foryour everyday tasks, even the administrative ones. Instead, adhere to the best practice of using theroot user only to create your first IAM user. Then securely lock away the root user credentials and usethem to perform only a few account and service management tasks.
• IAM user – An IAM user is an identity within your AWS account that has specific custom permissions(for example, permissions to create a cluster in MemoryDB). You can use an IAM user name andpassword to sign in to secure AWS webpages like the AWS Management Console, AWS DiscussionForums, or the AWS Support Center.
153

Amazon MemoryDB for Redis Developer GuideAccess control
In addition to a user name and password, you can also generate access keys for each user. You canuse these keys when you access AWS services programmatically, either through one of the severalSDKs or by using the AWS Command Line Interface (CLI). The SDK and CLI tools use the access keysto cryptographically sign your request. If you don’t use AWS tools, you must sign the request yourself.MemoryDB supports Signature Version 4, a protocol for authenticating inbound API requests. For moreinformation about authenticating requests, see Signature Version 4 signing process in the AWS GeneralReference.
• IAM role – An IAM role is an IAM identity that you can create in your account that has specific
permissions. An IAM role is similar to an IAM user in that it is an AWS identity with permissions policiesthat determine what the identity can and cannot do in AWS. However, instead of being uniquelyassociated with one person, a role is intended to be assumable by anyone who needs it. Also, a roledoes not have standard long-term credentials such as a password or access keys associated with it.Instead, when you assume a role, it provides you with temporary security credentials for your rolesession. IAM roles with temporary credentials are useful in the following situations:
• Federated user access – Instead of creating an IAM user, you can use existing identities from AWS
Directory Service, your enterprise user directory, or a web identity provider. These are known asfederated users. AWS assigns a role to a federated user when access is requested through an identityprovider. For more information about federated users, see Federated users and roles in the IAM UserGuide.
• AWS service access – A service role is an IAM role that a service assumes to perform actions on your
behalf. An IAM administrator can create, modify, and delete a service role from within IAM. For moreinformation, see Creating a role to delegate permissions to an AWS service in the IAM User Guide.
• Applications running on Amazon EC2 – You can use an IAM role to manage temporary credentials
for applications that are running on an EC2 instance and making AWS CLI or AWS API requests. Thisis preferable to storing access keys within the EC2 instance. To assign an AWS role to an EC2 instanceand make it available to all of its applications, you create an instance profile that is attached tothe instance. An instance profile contains the role and enables programs that are running on theEC2 instance to get temporary credentials. For more information, see Using an IAM role to grantpermissions to applications running on Amazon EC2 instances in the IAM User Guide.
Access controlYou can have valid credentials to authenticate your requests, but unless you have permissions you cannotcreate or access MemoryDB for Redis resources. For example, you must have permissions to create aMemoryDB cluster.
The following sections describe how to manage permissions for MemoryDB for Redis. We recommendthat you read the overview first.
• Overview of managing access permissions to your MemoryDB resources (p. 155)• Using identity-based policies (IAM policies) for MemoryDB for Redis (p. 159)
154

Amazon MemoryDB for Redis Developer GuideOverview of managing access
Overview of managing access permissions to yourMemoryDB resourcesEvery AWS resource is owned by an AWS account, and permissions to create or access a resource aregoverned by permissions policies. An account administrator can attach permissions policies to IAMidentities (that is, users, groups, and roles). In addition, MemoryDB for Redis also supports attachingpermissions policies to resources.
NoteAn account administrator (or administrator user) is a user with administrator privileges. For moreinformation, see IAM Best Practices in the IAM User Guide.
When granting permissions, you decide who is getting the permissions. You also decide the resourcesthey get permissions for and the specific actions that you want to allow on those resources.
Topics
• MemoryDB for Redis resources and operations (p. 155)
• Understanding resource ownership (p. 156)
• Managing access to resources (p. 156)
• Using identity-based policies (IAM policies) for MemoryDB for Redis (p. 159)
• Resource-level permissions (p. 162)
• Using Service-Linked Roles for Amazon MemoryDB for Redis (p. 163)
• AWS managed policies for MemoryDB for Redis (p. 170)
• MemoryDB API permissions: Actions, resources, and conditions reference (p. 174)
MemoryDB for Redis resources and operations
In MemoryDB for Redis, the primary resource is a cluster.
These resources have unique Amazon Resource Names (ARNs) associated with them as shown following.
NoteFor resource-level permissions to be effective, the resource name on the ARN string should belower case.
Resource type ARN format
User arn:aws:memorydb:us-east-1:123456789012:user/user1
Access Control List (ACL) arn:aws:memorydb:us-east-1:123456789012:acl/myacl
Cluster arn:aws:memorydb:us-east-1:123456789012:cluster/my-cluster
Snapshot arn:aws:memorydb:us-east-1:123456789012:snapshot/my-snapshot
Parameter group arn:aws:memorydb:us-east-1:123456789012:parametergroup/my-parameter-group
155

Amazon MemoryDB for Redis Developer GuideOverview of managing access
Resource type ARN format
Subnet group arn:aws:memorydb:us-east-1:123456789012:subnetgroup/my-subnet-group
MemoryDB provides a set of operations to work with MemoryDB resources. For a list of availableoperations, see MemoryDB for Redis Actions.
Understanding resource ownershipA resource owner is the AWS account that created the resource. That is, the resource owner is the AWSaccount of the principal entity that authenticates the request that creates the resource. A principal entitycan be the root account, an IAM user, or an IAM role. The following examples illustrate how this works:
• Suppose that you use the root account credentials of your AWS account to create a cluster. In this case,your AWS account is the owner of the resource. In MemoryDB, the resource is the cluster.
• Suppose that you create an IAM user in your AWS account and grant permissions to create a clusterto that user. In this case, the user can create a cluster. However, your AWS account, to which the userbelongs, owns the cluster resource.
• Suppose that you create an IAM role in your AWS account with permissions to create a cluster. Inthis case, anyone who can assume the role can create a cluster. Your AWS account, to which the rolebelongs, owns the cluster resource.
Managing access to resourcesA permissions policy describes who has access to what. The following section explains the availableoptions for creating permissions policies.
NoteThis section discusses using IAM in the context of MemoryDB for Redis. It doesn't providedetailed information about the IAM service. For complete IAM documentation, see What Is IAM?in the IAM User Guide. For information about IAM policy syntax and descriptions, see AWS IAMPolicy Reference in the IAM User Guide.
Policies attached to an IAM identity are referred to as identity-based policies (IAM policies). Policiesattached to a resource are referred to as resource-based policies.
Topics• Identity-based policies (IAM policies) (p. 156)• Specifying policy elements: Actions, effects, resources, and principals (p. 157)• Specifying conditions in a policy (p. 158)
Identity-based policies (IAM policies)
You can attach policies to IAM identities. For example, you can do the following:
• Attach a permissions policy to a user or a group in your account – An account administrator canuse a permissions policy that is associated with a particular user to grant permissions. In this case, thepermissions are for that user to create a MemoryDB resource, such as a cluster, parameter group, orsecurity group.
• Attach a permissions policy to a role (grant cross-account permissions) – You can attach anidentity-based permissions policy to an IAM role to grant cross-account permissions. For example,
156

Amazon MemoryDB for Redis Developer GuideOverview of managing access
the administrator in Account A can create a role to grant cross-account permissions to another AWSaccount (for example, Account B) or an AWS service as follows:
1. Account A administrator creates an IAM role and attaches a permissions policy to the role thatgrants permissions on resources in Account A.
2. Account A administrator attaches a trust policy to the role identifying Account B as the principalwho can assume the role.
3. Account B administrator can then delegate permissions to assume the role to any users in AccountB. Doing this allows users in Account B to create or access resources in Account A. In some cases, youmight want to grant an AWS service permissions to assume the role. To support this approach, theprincipal in the trust policy can also be an AWS service principal.
For more information about using IAM to delegate permissions, see Access Management in the IAMUser Guide.
The following is an example policy that allows a user to perform the DescribeClusters action foryour AWS account. MemoryDB also supports identifying specific resources using the resource ARNs forAPI actions. (This approach is also referred to as resource-level permissions).
{ "Version": "2012-10-17", "Statement": [{ "Sid": "DescribeClusters", "Effect": "Allow", "Action": [ "memorydb:DescribeClusters"], "Resource": resource-arn } ]}
For more information about using identity-based policies with MemoryDB, see Using identity-basedpolicies (IAM policies) for MemoryDB for Redis (p. 159). For more information about users, groups,roles, and permissions, see Identities (Users, Groups, and Roles in the IAM User Guide.
Specifying policy elements: Actions, effects, resources, and principals
For each MemoryDB for Redis resource (see MemoryDB for Redis resources and operations (p. 155)),the service defines a set of API operations (see Actions). To grant permissions for these API operations,MemoryDB defines a set of actions that you can specify in a policy. For example, for the MemoryDBcluster resource, the following actions are defined: CreateCluster, DeleteCluster, andDescribeClusters. Performing an API operation can require permissions for more than one action.
The following are the most basic policy elements:
• Resource – In a policy, you use an Amazon Resource Name (ARN) to identify the resource to which thepolicy applies. For more information, see MemoryDB for Redis resources and operations (p. 155).
• Action – You use action keywords to identify resource operations that you want to allow or deny. Forexample, depending on the specified Effect, the memorydb:CreateCluster permission allows ordenies the user permissions to perform the MemoryDB for Redis CreateCluster operation.
• Effect – You specify the effect when the user requests the specific action—this can be either allowor deny. If you don't explicitly grant access to (allow) a resource, access is implicitly denied. You canalso explicitly deny access to a resource. For example, you might do this to make sure that a user can'taccess a resource, even if a different policy grants access.
• Principal – In identity-based policies (IAM policies), the user that the policy is attached to is theimplicit principal. For resource-based policies, you specify the user, account, service, or other entitythat you want to receive permissions (applies to resource-based policies only).
157

Amazon MemoryDB for Redis Developer GuideOverview of managing access
To learn more about IAM policy syntax and descriptions, see AWS IAM Policy Reference in the IAM UserGuide.
For a table showing all of the MemoryDB for Redis API actions, see MemoryDB API permissions: Actions,resources, and conditions reference (p. 174).
Specifying conditions in a policy
When you grant permissions, you can use the IAM policy language to specify the conditions when apolicy should take effect. For example, you might want a policy to be applied only after a specific date.For more information about specifying conditions in a policy language, see Condition in the IAM UserGuide.
158
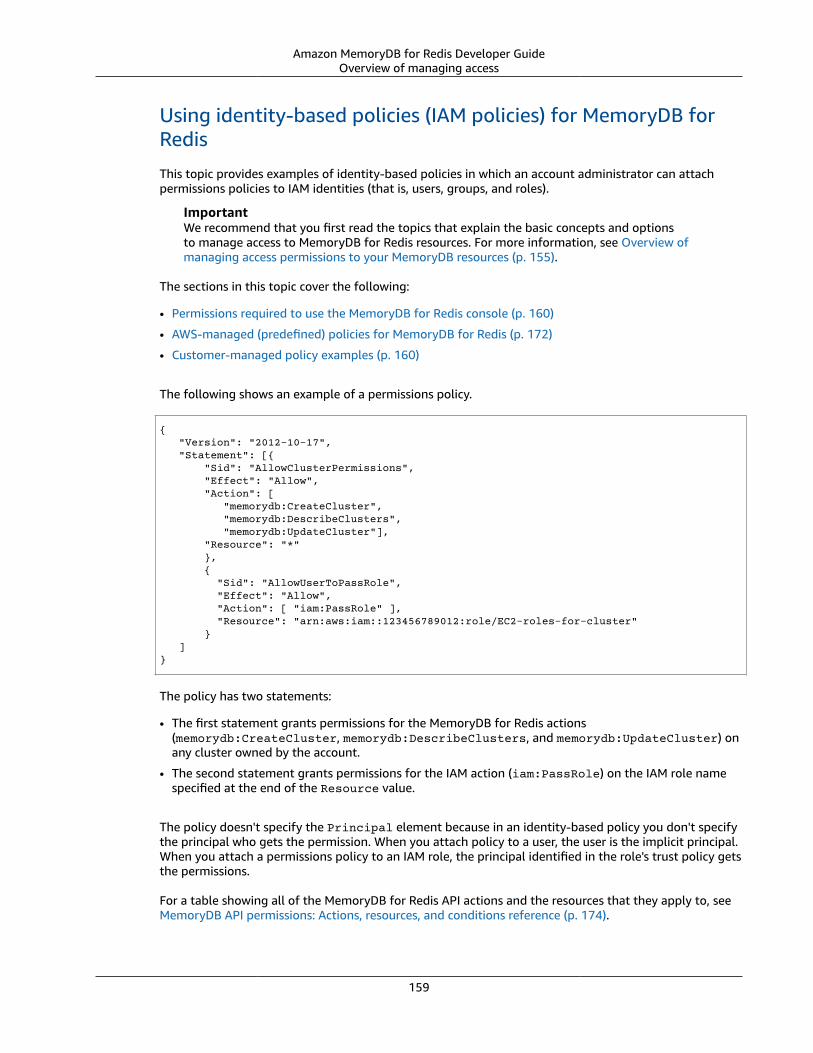
Amazon MemoryDB for Redis Developer GuideOverview of managing access
Using identity-based policies (IAM policies) for MemoryDB forRedis
This topic provides examples of identity-based policies in which an account administrator can attachpermissions policies to IAM identities (that is, users, groups, and roles).
ImportantWe recommend that you first read the topics that explain the basic concepts and optionsto manage access to MemoryDB for Redis resources. For more information, see Overview ofmanaging access permissions to your MemoryDB resources (p. 155).
The sections in this topic cover the following:
• Permissions required to use the MemoryDB for Redis console (p. 160)
• AWS-managed (predefined) policies for MemoryDB for Redis (p. 172)
• Customer-managed policy examples (p. 160)
The following shows an example of a permissions policy.
{ "Version": "2012-10-17", "Statement": [{ "Sid": "AllowClusterPermissions", "Effect": "Allow", "Action": [ "memorydb:CreateCluster", "memorydb:DescribeClusters", "memorydb:UpdateCluster"], "Resource": "*" }, { "Sid": "AllowUserToPassRole", "Effect": "Allow", "Action": [ "iam:PassRole" ], "Resource": "arn:aws:iam::123456789012:role/EC2-roles-for-cluster" } ]}
The policy has two statements:
• The first statement grants permissions for the MemoryDB for Redis actions(memorydb:CreateCluster, memorydb:DescribeClusters, and memorydb:UpdateCluster) onany cluster owned by the account.
• The second statement grants permissions for the IAM action (iam:PassRole) on the IAM role namespecified at the end of the Resource value.
The policy doesn't specify the Principal element because in an identity-based policy you don't specifythe principal who gets the permission. When you attach policy to a user, the user is the implicit principal.When you attach a permissions policy to an IAM role, the principal identified in the role's trust policy getsthe permissions.
For a table showing all of the MemoryDB for Redis API actions and the resources that they apply to, seeMemoryDB API permissions: Actions, resources, and conditions reference (p. 174).
159

Amazon MemoryDB for Redis Developer GuideOverview of managing access
Permissions required to use the MemoryDB for Redis console
The permissions reference table lists the MemoryDB for Redis API operations and shows the requiredpermissions for each operation. For more information about MemoryDB API operations, see MemoryDBAPI permissions: Actions, resources, and conditions reference (p. 174).
To use the MemoryDB for Redis console, first grant permissions for additional actions as shown in thefollowing permissions policy.
{ "Version": "2012-10-17", "Statement": [{ "Sid": "MinPermsForMemDBConsole", "Effect": "Allow", "Action": [ "memorydb:Describe*", "memorydb:List*", "ec2:DescribeAvailabilityZones", "ec2:DescribeVpcs", "ec2:DescribeAccountAttributes", "ec2:DescribeSecurityGroups", "cloudwatch:GetMetricStatistics", "cloudwatch:DescribeAlarms", "s3:ListAllMyBuckets", "sns:ListTopics", "sns:ListSubscriptions" ], "Resource": "*" } ]}
The MemoryDB console needs these additional permissions for the following reasons:
• Permissions for the MemoryDB actions enable the console to display MemoryDB resources in theaccount.
• The console needs permissions for the ec2 actions to query Amazon EC2 so it can display AvailabilityZones, VPCs, security groups, and account attributes.
• The permissions for cloudwatch actions enable the console to retrieve Amazon CloudWatch metricsand alarms, and display them in the console.
• The permissions for sns actions enable the console to retrieve Amazon Simple Notification Service(Amazon SNS) topics and subscriptions, and display them in the console.
Customer-managed policy examples
If you are not using a default policy and choose to use a custom-managed policy, ensure one of twothings. Either you should have permissions to call iam:createServiceLinkedRole (for moreinformation, see Example 4: Allow a user to call IAM CreateServiceLinkedRole API (p. 162)). Or youshould have created a MemoryDB service-linked role.
When combined with the minimum permissions needed to use the MemoryDB for Redis console, theexample policies in this section grant additional permissions. The examples are also relevant to the AWSSDKs and the AWS CLI. For more information about what permissions are needed to use the MemoryDBconsole, see Permissions required to use the MemoryDB for Redis console (p. 160).
For instructions on setting up IAM users and groups, see Creating Your First IAM User and AdministratorsGroup in the IAM User Guide.
ImportantAlways test your IAM policies thoroughly before using them in production. Some MemoryDBactions that appear simple can require other actions to support them when you are using the
160

Amazon MemoryDB for Redis Developer GuideOverview of managing access
MemoryDB console. For example, memorydb:CreateCluster grants permissions to createMemoryDB clusters. However, to perform this operation, the MemoryDB console uses a numberof Describe and List actions to populate console lists.
Examples
• Example 1: Allow a user read-only access to MemoryDB resources (p. 161)
• Example 2: Allow a user to perform common MemoryDB system administrator tasks (p. 161)
• Example 3: Allow a user to access all MemoryDB API actions (p. 161)
• Example 4: Allow a user to call IAM CreateServiceLinkedRole API (p. 162)
Example 1: Allow a user read-only access to MemoryDB resources
The following policy grants permissions for MemoryDB actions that allow a user to list resources.Typically, you attach this type of permissions policy to a managers group.
{ "Version": "2012-10-17", "Statement":[{ "Sid": "MemDBUnrestricted", "Effect":"Allow", "Action": [ "memorydb:Describe*", "memorydb:List*"], "Resource":"*" } ]}
Example 2: Allow a user to perform common MemoryDB system administrator tasks
Common system administrator tasks include modifying clusters, parameters, and parameter groups.A system administrator may also want to get information about the MemoryDB events. The followingpolicy grants a user permissions to perform MemoryDB actions for these common system administratortasks. Typically, you attach this type of permissions policy to the system administrators group.
{ "Version": "2012-10-17", "Statement":[{ "Sid": "MDBAllowSpecific", "Effect":"Allow", "Action":[ "memorydb:UpdateCluster", "memorydb:DescribeClusters", "memorydb:DescribeEvents", "memorydb:UpdateParameterGroup", "memorydb:DescribeParameterGroups", "memorydb:DescribeParameters", "memorydb:ResetParameterGroup",], "Resource":"*" } ]}
Example 3: Allow a user to access all MemoryDB API actions
The following policy allows a user to access all MemoryDB actions. We recommend that you grant thistype of permissions policy only to an administrator user.
161

Amazon MemoryDB for Redis Developer GuideOverview of managing access
{ "Version": "2012-10-17", "Statement":[{ "Sid": "MDBAllowAll", "Effect":"Allow", "Action":[ "memorydb:*" ], "Resource":"*" } ]}
Example 4: Allow a user to call IAM CreateServiceLinkedRole API
The following policy allows user to call the IAM CreateServiceLinkedRole API. We recommend thatyou grant this type of permissions policy to the user who invokes mutative MemoryDB operations.
{ "Version":"2012-10-17", "Statement":[ { "Sid":"CreateSLRAllows", "Effect":"Allow", "Action":[ "iam:CreateServiceLinkedRole" ], "Resource":"*", "Condition":{ "StringLike":{ "iam:AWSServiceName":"memorydb.amazonaws.com" } } } ]}
Resource-level permissionsYou can restrict the scope of permissions by specifying resources in an IAM policy. Many AWS CLI APIactions support a resource type that varies depending on the behavior of the action. Every IAM policystatement grants permission to an action that's performed on a resource. When the action doesn't act ona named resource, or when you grant permission to perform the action on all resources, the value of theresource in the policy is a wildcard (*). For many API actions, you can restrict the resources that a user canmodify by specifying the Amazon Resource Name (ARN) of a resource, or an ARN pattern that matchesmultiple resources. To restrict permissions by resource, specify the resource by ARN.
MemoryDB Resource ARN Format
NoteFor resource-level permissions to be effective, the resource name on the ARN string should belower case.
• User – arn:aws:memorydb:us-east-1:123456789012:user/user1
• ACL – arn:aws:memorydb:us-east-1:123456789012:acl/my-acl
• Cluster – arn:aws:memorydb:us-east-1:123456789012:cluster/my-cluster
• Snapshot – arn:aws:memorydb:us-east-1:123456789012:snapshot/my-snapshot
• Parameter group – arn:aws:memorydb:us-east-1:123456789012:parametergroup/my-parameter-group
162

Amazon MemoryDB for Redis Developer GuideOverview of managing access
• Subnet group – arn:aws:memorydb:us-east-1:123456789012:subnetgroup/my-subnet-group
Examples• Example 1: Allow a user full access to specific MemoryDB resource types (p. 163)• Example 2: Deny a user access to a cluster. (p. 163)
Example 1: Allow a user full access to specific MemoryDB resource types
The following policy explicitly allows the specified account-id full access to all resources of typesubnet group, security group and cluster.
{ "Sid": "Example1", "Effect": "Allow", "Action": "memorydb:*", "Resource": [ "arn:aws:memorydb:us-east-1:account-id:subnetgroup/*", "arn:aws:memorydb:us-east-1:account-id:securitygroup/*", "arn:aws:memorydb:us-east-1:account-id:cluster/*" ]}
Example 2: Deny a user access to a cluster.
The following example explicitly denies the specified account-id access to a particular cluster.
{ "Sid": "Example2", "Effect": "Deny", "Action": "memorydb:*", "Resource": [ "arn:aws:memorydb:us-east-1:account-id:cluster/name" ]}
Using Service-Linked Roles for Amazon MemoryDB for RedisAmazon MemoryDB for Redis uses AWS Identity and Access Management (IAM) service-linked roles. Aservice-linked role is a unique type of IAM role that is linked directly to an AWS service, such as AmazonMemoryDB for Redis. Amazon MemoryDB for Redis service-linked roles are predefined by AmazonMemoryDB for Redis. They include all the permissions that the service requires to call AWS services onbehalf of your clusters.
A service-linked role makes setting up Amazon MemoryDB for Redis easier because you don’t have tomanually add the necessary permissions. The roles already exist within your AWS account but are linkedto Amazon MemoryDB for Redis use cases and have predefined permissions. Only Amazon MemoryDBfor Redis can assume these roles, and only these roles can use the predefined permissions policy.You can delete the roles only after first deleting their related resources. This protects your AmazonMemoryDB for Redis resources because you can't inadvertently remove necessary permissions to accessthe resources.
For information about other services that support service-linked roles, see AWS Services That Work withIAM and look for the services that have Yes in the Service-Linked Role column. Choose a Yes with a linkto view the service-linked role documentation for that service.
Contents
163

Amazon MemoryDB for Redis Developer GuideOverview of managing access
• Service-Linked Role Permissions for Amazon MemoryDB for Redis (p. 164)
• Creating a Service-Linked Role (IAM) (p. 166)
• Creating a Service-Linked Role (IAM Console) (p. 166)
• Creating a Service-Linked Role (IAM CLI) (p. 166)
• Creating a Service-Linked Role (IAM API) (p. 166)
• Editing the Description of a Service-Linked Role for Amazon MemoryDB for Redis (p. 167)
• Editing a Service-Linked Role Description (IAM Console) (p. 167)
• Editing a Service-Linked Role Description (IAM CLI) (p. 167)
• Editing a Service-Linked Role Description (IAM API) (p. 167)
• Deleting a Service-Linked Role for Amazon MemoryDB for Redis (p. 168)
• Cleaning Up a Service-Linked Role (p. 168)
• Deleting a Service-Linked Role (IAM Console) (p. 168)
• Deleting a Service-Linked Role (IAM CLI) (p. 169)
• Deleting a Service-Linked Role (IAM API) (p. 169)
Service-Linked Role Permissions for Amazon MemoryDB for Redis
Amazon MemoryDB for Redis uses the service-linked role named AWSServiceRoleForMemoryDB –This policy allows MemoryDB to manage AWS resources on your behalf as necessary for managing yourclusters.
The AWSServiceRoleForMemoryDB service-linked role permissions policy allows Amazon MemoryDB forRedis to complete the following actions on the specified resources:
{ "Version": "2012-10-17", "Statement": [ { "Effect": "Allow", "Action": [ "ec2:CreateTags" ], "Resource": "arn:aws:ec2:*:*:network-interface/*", "Condition": { "StringEquals": { "ec2:CreateAction": "CreateNetworkInterface" }, "ForAllValues:StringEquals": { "aws:TagKeys": [ "AmazonMemoryDBManaged" ] } } }, { "Effect": "Allow", "Action": [ "ec2:CreateNetworkInterface" ], "Resource": [ "arn:aws:ec2:*:*:network-interface/*", "arn:aws:ec2:*:*:subnet/*", "arn:aws:ec2:*:*:security-group/*" ] }, { "Effect": "Allow",
164

Amazon MemoryDB for Redis Developer GuideOverview of managing access
"Action": [ "ec2:DeleteNetworkInterface", "ec2:ModifyNetworkInterfaceAttribute" ], "Resource": "arn:aws:ec2:*:*:network-interface/*", "Condition": { "StringEquals": { "ec2:ResourceTag/AmazonMemoryDBManaged": "true" } } }, { "Effect": "Allow", "Action": [ "ec2:DeleteNetworkInterface", "ec2:ModifyNetworkInterfaceAttribute" ], "Resource": "arn:aws:ec2:*:*:security-group/*" }, { "Effect": "Allow", "Action": [ "ec2:DescribeSecurityGroups", "ec2:DescribeNetworkInterfaces", "ec2:DescribeAvailabilityZones", "ec2:DescribeSubnets", "ec2:DescribeVpcs" ], "Resource": "*" }, { "Effect": "Allow", "Action": [ "cloudwatch:PutMetricData" ], "Resource": "*", "Condition": { "StringEquals": { "cloudwatch:namespace": "AWS/MemoryDB" } } } ] }
For more information, see AWS managed policy: MemoryDBServiceRolePolicy (p. 170).
To allow an IAM entity to create AWSServiceRoleForMemoryDB service-linked roles
Add the following policy statement to the permissions for that IAM entity:
{ "Effect": "Allow", "Action": [ "iam:CreateServiceLinkedRole", "iam:PutRolePolicy" ], "Resource": "arn:aws:iam::*:role/aws-service-role/memorydb.amazonaws.com/AWSServiceRoleForMemoryDB*", "Condition": {"StringLike": {"iam:AWSServiceName": "memorydb.amazonaws.com"}}}
To allow an IAM entity to delete AWSServiceRoleForMemoryDB service-linked roles
165

Amazon MemoryDB for Redis Developer GuideOverview of managing access
Add the following policy statement to the permissions for that IAM entity:
{ "Effect": "Allow", "Action": [ "iam:DeleteServiceLinkedRole", "iam:GetServiceLinkedRoleDeletionStatus" ], "Resource": "arn:aws:iam::*:role/aws-service-role/memorydb.amazonaws.com/AWSServiceRoleForMemoryDB*", "Condition": {"StringLike": {"iam:AWSServiceName": "memorydb.amazonaws.com"}}}
Alternatively, you can use an AWS managed policy to provide full access to Amazon MemoryDB for Redis.
Creating a Service-Linked Role (IAM)
You can create a service-linked role using the IAM console, CLI, or API.
Creating a Service-Linked Role (IAM Console)
You can use the IAM console to create a service-linked role.
To create a service-linked role (console)
1. Sign in to the AWS Management Console and open the IAM console at https://console.aws.amazon.com/iam/.
2. In the left navigation pane of the IAM console, choose Roles. Then choose Create new role.
3. Under Select type of trusted entity choose AWS Service.
4. Under Or select a service to view its use cases, choose MemoryDB.
5. Choose Next: Permissions.
6. Under Policy name, note that the AmazonMemoryDBServiceRolePolicy is required for this role.Choose Next:Tags.
7. Note that tags are not supported for Service-Linked roles. Choose Next:Review.
8. (Optional) For Role description, edit the description for the new service-linked role.
9. Review the role and then choose Create role.
Creating a Service-Linked Role (IAM CLI)
You can use IAM operations from the AWS Command Line Interface to create a service-linked role. Thisrole can include the trust policy and inline policies that the service needs to assume the role.
To create a service-linked role (CLI)
Use the following operation:
$ aws iam create-service-linked-role --aws-service-name memorydb.amazonaws.com
Creating a Service-Linked Role (IAM API)
You can use the IAM API to create a service-linked role. This role can contain the trust policy and inlinepolicies that the service needs to assume the role.
To create a service-linked role (API)
166

Amazon MemoryDB for Redis Developer GuideOverview of managing access
Use the CreateServiceLinkedRole API call. In the request, specify a service name ofmemorydb.amazonaws.com.
Editing the Description of a Service-Linked Role for Amazon MemoryDB forRedis
Amazon MemoryDB for Redis does not allow you to edit the AWSServiceRoleForMemoryDB service-linked role. After you create a service-linked role, you cannot change the name of the role becausevarious entities might reference the role. However, you can edit the description of the role using IAM.
Editing a Service-Linked Role Description (IAM Console)
You can use the IAM console to edit a service-linked role description.
To edit the description of a service-linked role (console)
1. In the left navigation pane of the IAM console, choose Roles.2. Choose the name of the role to modify.3. To the far right of Role description, choose Edit.4. Enter a new description in the box and choose Save.
Editing a Service-Linked Role Description (IAM CLI)
You can use IAM operations from the AWS Command Line Interface to edit a service-linked roledescription.
To change the description of a service-linked role (CLI)
1. (Optional) To view the current description for a role, use the AWS CLI for IAM operation get-role.
Example
$ aws iam get-role --role-name AWSServiceRoleForMemoryDB
Use the role name, not the ARN, to refer to roles with the CLI operations. For example, if a role hasthe following ARN: arn:aws:iam::123456789012:role/myrole, refer to the role as myrole.
2. To update a service-linked role's description, use the AWS CLI for IAM operation update-role-description.
For Linux, macOS, or Unix:
$ aws iam update-role-description \ --role-name AWSServiceRoleForMemoryDB \ --description "new description"
For Windows:
$ aws iam update-role-description ^ --role-name AWSServiceRoleForMemoryDB ^ --description "new description"
Editing a Service-Linked Role Description (IAM API)
You can use the IAM API to edit a service-linked role description.
167

Amazon MemoryDB for Redis Developer GuideOverview of managing access
To change the description of a service-linked role (API)
1. (Optional) To view the current description for a role, use the IAM API operation GetRole.
Example
https://iam.amazonaws.com/ ?Action=GetRole &RoleName=AWSServiceRoleForMemoryDB &Version=2010-05-08 &AUTHPARAMS
2. To update a role's description, use the IAM API operation UpdateRoleDescription.
Example
https://iam.amazonaws.com/ ?Action=UpdateRoleDescription &RoleName=AWSServiceRoleForMemoryDB &Version=2010-05-08 &Description="New description"
Deleting a Service-Linked Role for Amazon MemoryDB for Redis
If you no longer need to use a feature or service that requires a service-linked role, we recommendthat you delete that role. That way you don’t have an unused entity that is not actively monitored ormaintained. However, you must clean up your service-linked role before you can delete it.
Amazon MemoryDB for Redis does not delete the service-linked role for you.
Cleaning Up a Service-Linked Role
Before you can use IAM to delete a service-linked role, first confirm that the role has no resources(clusters s) associated with it.
To check whether the service-linked role has an active session in the IAM console
1. Sign in to the AWS Management Console and open the IAM console at https://console.aws.amazon.com/iam/.
2. In the left navigation pane of the IAM console, choose Roles. Then choose the name (not the checkbox) of the AWSServiceRoleForMemoryDB role.
3. On the Summary page for the selected role, choose the Access Advisor tab.4. On the Access Advisor tab, review recent activity for the service-linked role.
To delete Amazon MemoryDB for Redis resources that require AWSServiceRoleForMemoryDB(console)
• To delete a cluster, see the following:• Using the AWS Management Console (p. 22)• Using the AWS CLI (p. 22)• Using the MemoryDB API (p. 23)
Deleting a Service-Linked Role (IAM Console)
You can use the IAM console to delete a service-linked role.
168

Amazon MemoryDB for Redis Developer GuideOverview of managing access
To delete a service-linked role (console)
1. Sign in to the AWS Management Console and open the IAM console at https://console.aws.amazon.com/iam/.
2. In the left navigation pane of the IAM console, choose Roles. Then select the check box next to therole name that you want to delete, not the name or row itself.
3. For Role actions at the top of the page, choose Delete role.4. In the confirmation page, review the service last accessed data, which shows when each of the
selected roles last accessed an AWS service. This helps you to confirm whether the role is currentlyactive. If you want to proceed, choose Yes, Delete to submit the service-linked role for deletion.
5. Watch the IAM console notifications to monitor the progress of the service-linked role deletion.Because the IAM service-linked role deletion is asynchronous, after you submit the role for deletion,the deletion task can succeed or fail. If the task fails, you can choose View details or View Resourcesfrom the notifications to learn why the deletion failed.
Deleting a Service-Linked Role (IAM CLI)
You can use IAM operations from the AWS Command Line Interface to delete a service-linked role.
To delete a service-linked role (CLI)
1. If you don't know the name of the service-linked role that you want to delete, enter the followingcommand. This command lists the roles and their Amazon Resource Names (ARNs) in your account.
$ aws iam get-role --role-name role-name
Use the role name, not the ARN, to refer to roles with the CLI operations. For example, if a role hasthe ARN arn:aws:iam::123456789012:role/myrole, you refer to the role as myrole.
2. Because a service-linked role cannot be deleted if it is being used or has associated resources, youmust submit a deletion request. That request can be denied if these conditions are not met. Youmust capture the deletion-task-id from the response to check the status of the deletion task.Enter the following to submit a service-linked role deletion request.
$ aws iam delete-service-linked-role --role-name role-name
3. Enter the following to check the status of the deletion task.
$ aws iam get-service-linked-role-deletion-status --deletion-task-id deletion-task-id
The status of the deletion task can be NOT_STARTED, IN_PROGRESS, SUCCEEDED, or FAILED. If thedeletion fails, the call returns the reason that it failed so that you can troubleshoot.
Deleting a Service-Linked Role (IAM API)
You can use the IAM API to delete a service-linked role.
To delete a service-linked role (API)
1. To submit a deletion request for a service-linked roll, call DeleteServiceLinkedRole. In the request,specify a role name.
Because a service-linked role cannot be deleted if it is being used or has associated resources, youmust submit a deletion request. That request can be denied if these conditions are not met. Youmust capture the DeletionTaskId from the response to check the status of the deletion task.
169

Amazon MemoryDB for Redis Developer GuideOverview of managing access
2. To check the status of the deletion, call GetServiceLinkedRoleDeletionStatus. In the request, specifythe DeletionTaskId.
The status of the deletion task can be NOT_STARTED, IN_PROGRESS, SUCCEEDED, or FAILED. If thedeletion fails, the call returns the reason that it failed so that you can troubleshoot.
AWS managed policies for MemoryDB for Redis
To add permissions to users, groups, and roles, it is easier to use AWS managed policies than to writepolicies yourself. It takes time and expertise to create IAM customer managed policies that provide yourteam with only the permissions they need. To get started quickly, you can use our AWS managed policies.These policies cover common use cases and are available in your AWS account. For more informationabout AWS managed policies, see AWS managed policies in the IAM User Guide.
AWS services maintain and update AWS managed policies. You can't change the permissions in AWSmanaged policies. Services occasionally add additional permissions to an AWS managed policy tosupport new features. This type of update affects all identities (users, groups, and roles) where the policyis attached. Services are most likely to update an AWS managed policy when a new feature is launchedor when new operations become available. Services do not remove permissions from an AWS managedpolicy, so policy updates won't break your existing permissions.
Additionally, AWS supports managed policies for job functions that span multiple services. For example,the ReadOnlyAccess AWS managed policy provides read-only access to all AWS services and resources.When a service launches a new feature, AWS adds read-only permissions for new operations andresources. For a list and descriptions of job function policies, see AWS managed policies for job functionsin the IAM User Guide.
AWS managed policy: MemoryDBServiceRolePolicy
You cannot attach the MemoryDBServiceRolePolicy AWS managed policy to identities in your account.This policy is part of the AWS MemoryDB service-linked role. This role allows the service to managenetwork interfaces and security groups in your account.
MemoryDB uses the permissions in this policy to manage EC2 security groups and network interfaces.This is required to manage MemoryDB clusters.
Permissions details
This policy includes the following permissions.
{ "Version": "2012-10-17", "Statement": [ { "Effect": "Allow", "Action": [ "ec2:CreateTags"
170

Amazon MemoryDB for Redis Developer GuideOverview of managing access
], "Resource": "arn:aws:ec2:*:*:network-interface/*", "Condition": { "StringEquals": { "ec2:CreateAction": "CreateNetworkInterface" }, "ForAllValues:StringEquals": { "aws:TagKeys": [ "AmazonMemoryDBManaged" ] } } }, { "Effect": "Allow", "Action": [ "ec2:CreateNetworkInterface" ], "Resource": [ "arn:aws:ec2:*:*:network-interface/*", "arn:aws:ec2:*:*:subnet/*", "arn:aws:ec2:*:*:security-group/*" ] }, { "Effect": "Allow", "Action": [ "ec2:DeleteNetworkInterface", "ec2:ModifyNetworkInterfaceAttribute" ], "Resource": "arn:aws:ec2:*:*:network-interface/*", "Condition": { "StringEquals": { "ec2:ResourceTag/AmazonMemoryDBManaged": "true" } } }, { "Effect": "Allow", "Action": [ "ec2:DeleteNetworkInterface", "ec2:ModifyNetworkInterfaceAttribute" ], "Resource": "arn:aws:ec2:*:*:security-group/*" }, { "Effect": "Allow", "Action": [ "ec2:DescribeSecurityGroups", "ec2:DescribeNetworkInterfaces", "ec2:DescribeAvailabilityZones", "ec2:DescribeSubnets", "ec2:DescribeVpcs" ], "Resource": "*" }, { "Effect": "Allow", "Action": [ "cloudwatch:PutMetricData" ], "Resource": "*", "Condition": { "StringEquals": { "cloudwatch:namespace": "AWS/MemoryDB" }
171

Amazon MemoryDB for Redis Developer GuideOverview of managing access
} } ] }
AWS-managed (predefined) policies for MemoryDB for Redis
AWS addresses many common use cases by providing standalone IAM policies that are created andadministered by AWS. Managed policies grant necessary permissions for common use cases so you canavoid having to investigate what permissions are needed. For more information, see AWS ManagedPolicies in the IAM User Guide.
The following AWS managed policies, which you can attach to users in your account, are specific toMemoryDB:
AmazonMemoryDBReadOnlyAccess
You can attach the AmazonMemoryDBReadOnlyAccess policy to your IAM identities. This policy grantsadministrative permissions that allow read-only access to all MemoryDB resources.
AmazonMemoryDBReadOnlyAccess - Grants read-only access to MemoryDB for Redis resources.
{ "Version": "2012-10-17", "Statement": [{ "Effect": "Allow", "Action": [ "memorydb:Describe*", "memorydb:List*" ], "Resource": "*" }]}
AmazonMemoryDBFullAccess
You can attach the AmazonMemoryDBFullAccess policy to your IAM identities. This policy grantsadministrative permissions that allow full access to all MemoryDB resources.
AmazonMemoryDBFullAccess - Grants full access to MemoryDB for Redis resources.
{ "Version": "2012-10-17", "Statement": [{ "Effect": "Allow", "Action": "memorydb:*", "Resource": "*" }, { "Effect": "Allow", "Action": "iam:CreateServiceLinkedRole", "Resource": "arn:aws:iam::*:role/aws-service-role/memorydb.amazonaws.com/AWSServiceRoleForMemoryDB", "Condition": { "StringLike": { "iam:AWSServiceName": "memorydb.amazonaws.com" } } } ]}
172
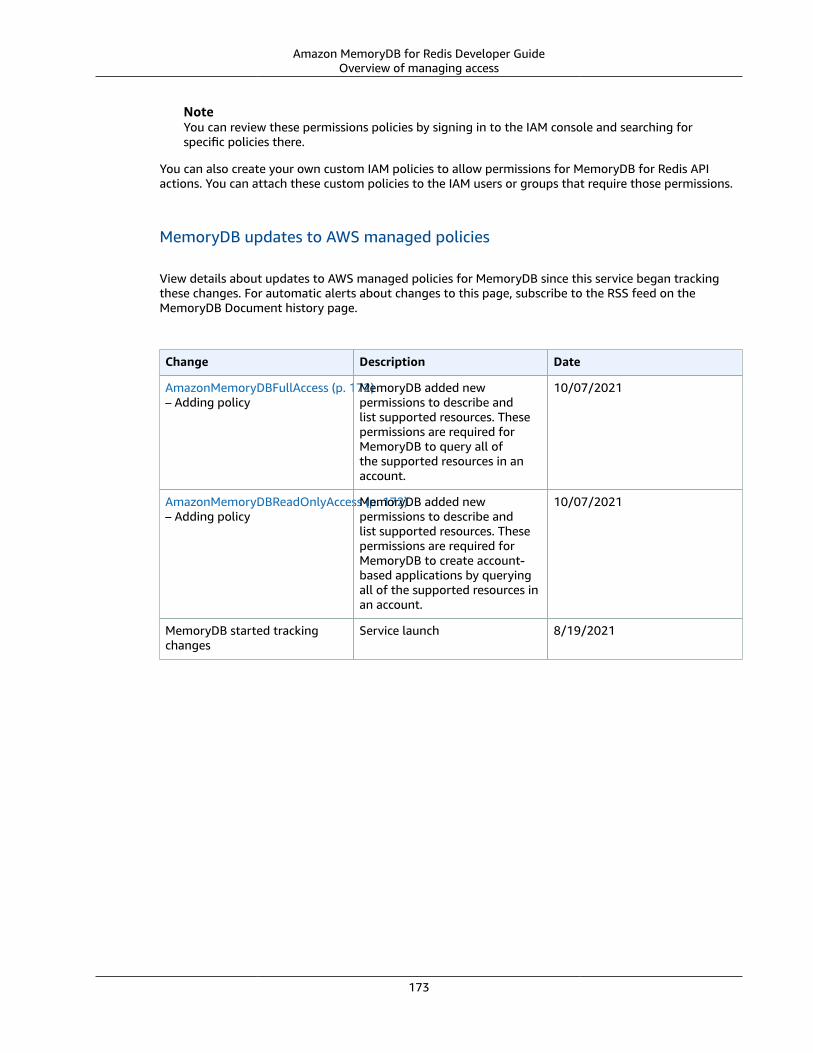
Amazon MemoryDB for Redis Developer GuideOverview of managing access
NoteYou can review these permissions policies by signing in to the IAM console and searching forspecific policies there.
You can also create your own custom IAM policies to allow permissions for MemoryDB for Redis APIactions. You can attach these custom policies to the IAM users or groups that require those permissions.
MemoryDB updates to AWS managed policies
View details about updates to AWS managed policies for MemoryDB since this service began trackingthese changes. For automatic alerts about changes to this page, subscribe to the RSS feed on theMemoryDB Document history page.
Change Description Date
AmazonMemoryDBFullAccess (p. 172)– Adding policy
MemoryDB added newpermissions to describe andlist supported resources. Thesepermissions are required forMemoryDB to query all ofthe supported resources in anaccount.
10/07/2021
AmazonMemoryDBReadOnlyAccess (p. 172)– Adding policy
MemoryDB added newpermissions to describe andlist supported resources. Thesepermissions are required forMemoryDB to create account-based applications by queryingall of the supported resources inan account.
10/07/2021
MemoryDB started trackingchanges
Service launch 8/19/2021
173

Amazon MemoryDB for Redis Developer GuideLogging and monitoring
MemoryDB API permissions: Actions, resources, and conditionsreferenceWhen you set up access control (p. 154) and write permissions policies to attach to an IAM policy (eitheridentity-based or resource-based), use the following table as a reference. The table lists each MemoryDBfor Redis API operation and the corresponding actions for which you can grant permissions to performthe action. You specify the actions in the policy's Action field, and you specify a resource value in thepolicy's Resource field. Unless indicated otherwise, the resource is required. Some fields include both arequired resource and optional resources. When there is no resource ARN, the resource in the policy is awildcard (*).
NoteTo specify an action, use the memorydb: prefix followed by the API operation name (forexample, memorydb:DescribeClusters).
Logging and monitoringMonitoring is an important part of maintaining the reliability, availability, and performance ofMemoryDB for Redis and your other AWS solutions. AWS provides the following monitoring tools towatch MemoryDB, report when something is wrong, and take automatic actions when appropriate:
• Amazon CloudWatch monitors your AWS resources and the applications you run on AWS in real time.You can collect and track metrics, create customized dashboards, and set alarms that notify you ortake actions when a specified metric reaches a threshold that you specify. For example, you can haveCloudWatch track CPU usage or other metrics of your Amazon EC2 instances and automatically launchnew instances when needed. For more information, see the Amazon CloudWatch User Guide.
• Amazon CloudWatch Logs enables you to monitor, store, and access your log files from Amazon EC2instances, CloudTrail, and other sources. CloudWatch Logs can monitor information in the log filesand notify you when certain thresholds are met. You can also archive your log data in highly durablestorage. For more information, see the Amazon CloudWatch Logs User Guide.
• AWS CloudTrail captures API calls and related events made by or on behalf of your AWS accountand delivers the log files to an Amazon S3 bucket that you specify. You can identify which usersand accounts called AWS, the source IP address from which the calls were made, and when the callsoccurred. For more information, see the AWS CloudTrail User Guide.
Monitoring MemoryDB for Redis with AmazonCloudWatchYou can monitor MemoryDB for Redis using CloudWatch, which collects raw data and processes it intoreadable, near real-time metrics. These statistics are kept for 15 months, so that you can access historicalinformation and gain a better perspective on how your web application or service is performing. Youcan also set alarms that watch for certain thresholds, and send notifications or take actions when thosethresholds are met. For more information, see the Amazon CloudWatch User Guide.
The following sections list the metrics and dimensions for MemoryDB.
Topics• Host-Level Metrics (p. 175)• Metrics for MemoryDB (p. 175)• Which Metrics Should I Monitor? (p. 181)• Choosing Metric Statistics and Periods (p. 183)• Monitoring CloudWatch metrics (p. 183)
174
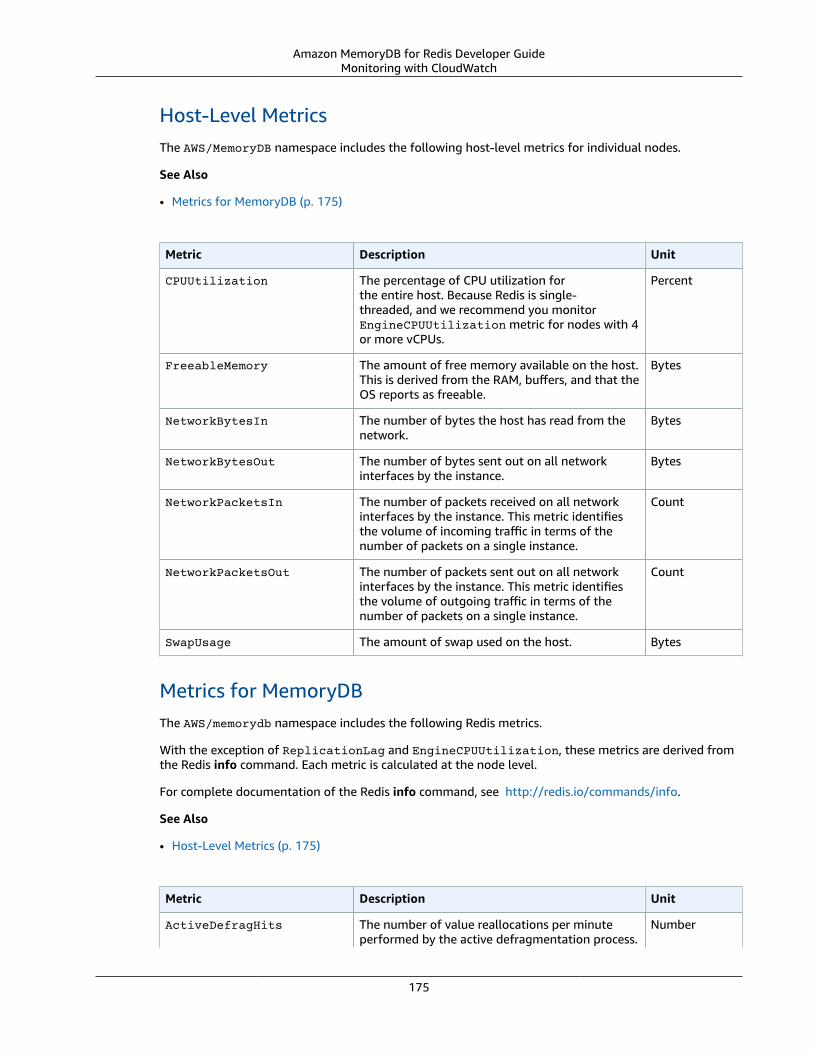
Amazon MemoryDB for Redis Developer GuideMonitoring with CloudWatch
Host-Level MetricsThe AWS/MemoryDB namespace includes the following host-level metrics for individual nodes.
See Also
• Metrics for MemoryDB (p. 175)
Metric Description Unit
CPUUtilization The percentage of CPU utilization forthe entire host. Because Redis is single-threaded, and we recommend you monitorEngineCPUUtilization metric for nodes with 4or more vCPUs.
Percent
FreeableMemory The amount of free memory available on the host.This is derived from the RAM, buffers, and that theOS reports as freeable.
Bytes
NetworkBytesIn The number of bytes the host has read from thenetwork.
Bytes
NetworkBytesOut The number of bytes sent out on all networkinterfaces by the instance.
Bytes
NetworkPacketsIn The number of packets received on all networkinterfaces by the instance. This metric identifiesthe volume of incoming traffic in terms of thenumber of packets on a single instance.
Count
NetworkPacketsOut The number of packets sent out on all networkinterfaces by the instance. This metric identifiesthe volume of outgoing traffic in terms of thenumber of packets on a single instance.
Count
SwapUsage The amount of swap used on the host. Bytes
Metrics for MemoryDBThe AWS/memorydb namespace includes the following Redis metrics.
With the exception of ReplicationLag and EngineCPUUtilization, these metrics are derived fromthe Redis info command. Each metric is calculated at the node level.
For complete documentation of the Redis info command, see http://redis.io/commands/info.
See Also
• Host-Level Metrics (p. 175)
Metric Description Unit
ActiveDefragHits The number of value reallocations per minuteperformed by the active defragmentation process.
Number
175
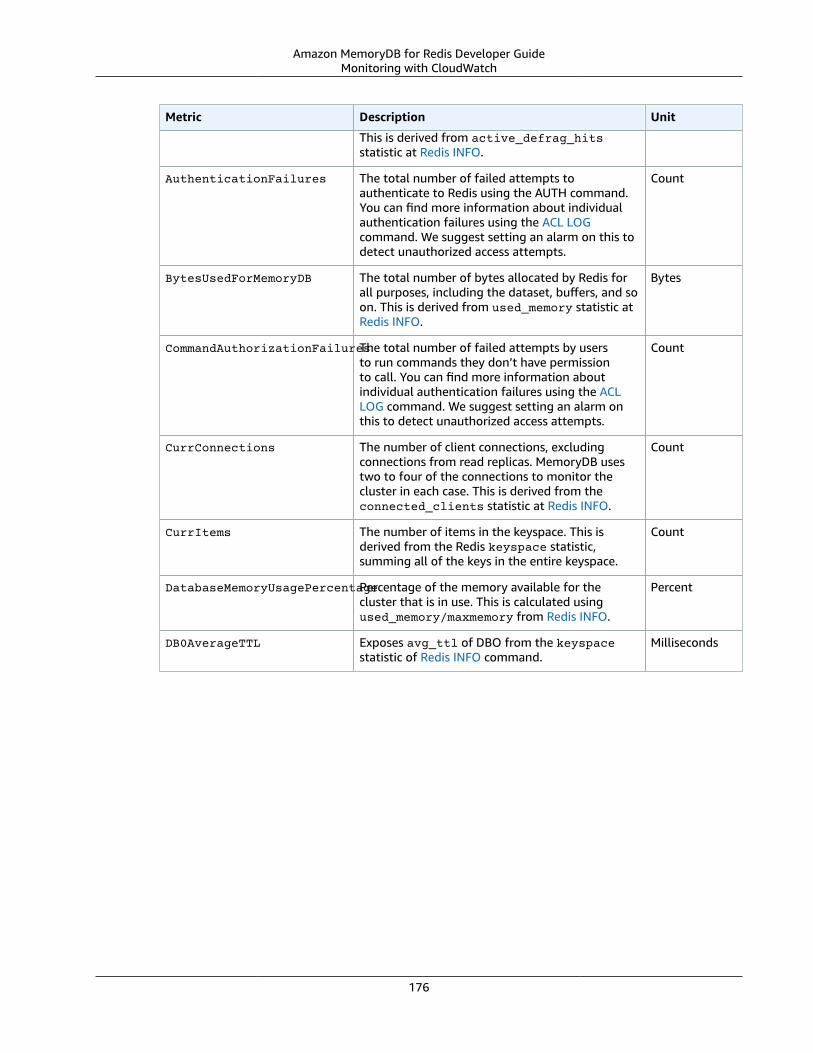
Amazon MemoryDB for Redis Developer GuideMonitoring with CloudWatch
Metric Description Unit
This is derived from active_defrag_hitsstatistic at Redis INFO.
AuthenticationFailures The total number of failed attempts toauthenticate to Redis using the AUTH command.You can find more information about individualauthentication failures using the ACL LOGcommand. We suggest setting an alarm on this todetect unauthorized access attempts.
Count
BytesUsedForMemoryDB The total number of bytes allocated by Redis forall purposes, including the dataset, buffers, and soon. This is derived from used_memory statistic atRedis INFO.
Bytes
CommandAuthorizationFailuresThe total number of failed attempts by usersto run commands they don’t have permissionto call. You can find more information aboutindividual authentication failures using the ACLLOG command. We suggest setting an alarm onthis to detect unauthorized access attempts.
Count
CurrConnections The number of client connections, excludingconnections from read replicas. MemoryDB usestwo to four of the connections to monitor thecluster in each case. This is derived from theconnected_clients statistic at Redis INFO.
Count
CurrItems The number of items in the keyspace. This isderived from the Redis keyspace statistic,summing all of the keys in the entire keyspace.
Count
DatabaseMemoryUsagePercentagePercentage of the memory available for thecluster that is in use. This is calculated usingused_memory/maxmemory from Redis INFO.
Percent
DB0AverageTTL Exposes avg_ttl of DBO from the keyspacestatistic of Redis INFO command.
Milliseconds
176

Amazon MemoryDB for Redis Developer GuideMonitoring with CloudWatch
Metric Description Unit
EngineCPUUtilization Provides CPU utilization of the Redis enginethread. Because Redis is single-threaded, you canuse this metric to analyze the load of the Redisprocess itself. The EngineCPUUtilizationmetric provides a more precise visibility of theRedis process. You can use it in conjunction withthe CPUUtilization metric. CPUUtilizationexposes CPU utilization for the server instanceas a whole, including other operating systemand management processes. For larger nodetypes with four vCPUs or more, use theEngineCPUUtilization metric to monitor andset thresholds for scaling.
NoteOn a MemoryDB host, backgroundprocesses monitor the host to providea managed database experience.These background processes can takeup a significant portion of the CPUworkload. This is not significant onlarger hosts with more than two vCPUs.But it can affect smaller hosts with2vCPUs or fewer. If you only monitorthe EngineCPUUtilization metric,you will be unaware of situations wherethe host is overloaded with both highCPU usage from Redis and high CPUusage from the background monitoringprocesses. Therefore, we recommendmonitoring the CPUUtilization metricfor hosts with two vCPUs or less.
Percent
Evictions The number of keys that have been evicted dueto the maxmemory limit. This is derived from theevicted_keys statistic at Redis INFO.
Count
IsPrimary Indicates whether the node is primary node ofcurrent shard. The metric can be either 0 (notprimary) or 1 (primary).
Count
KeyAuthorizationFailures The total number of failed attempts by usersto access keys they don’t have permission toaccess. You can find more information aboutindividual authentication failures using the ACLLOG command. We suggest setting an alarm onthis to detect unauthorized access attempts.
Count
KeyspaceHits The number of successful read-only key lookupsin the main dictionary. This is derived fromkeyspace_hits statistic at Redis INFO.
Count
KeyspaceMisses The number of unsuccessful read-only keylookups in the main dictionary. This is derivedfrom keyspace_misses statistic at Redis INFO.
Count
177

Amazon MemoryDB for Redis Developer GuideMonitoring with CloudWatch
Metric Description Unit
KeysTracked The number of keys being tracked by Redis keytracking as a percentage of tracking-table-max-keys. Key tracking is used to aid client-side caching and notifies clients when keys aremodified.
Count
MaxReplicationThroughput The maximum observed replication throughputduring the last measurement cycle.
Bytes persecond
MemoryFragmentationRatio Indicates the efficiency in the allocationof memory of the Redis engine. Certainthresholds signify different behaviors. Therecommended value is to have fragmentationabove 1.0. This is calculated from themem_fragmentation_ratio statistic ofRedis INFO.
Number
NewConnections The total number of connections thathave been accepted by the server duringthis period. This is derived from thetotal_connections_received statistic atRedis INFO.
Count
PrimaryLinkHealthStatus This status has two values: 0 or 1. The value 0indicates that data in the MemoryDB primarynode is not in sync with Redis on EC2. The value of1 indicates that the data is in sync.
Boolean
Reclaimed The total number of key expiration events. This isderived from the expired_keys statistic at RedisINFO.
Count
ReplicationBytes For nodes in a replicated configuration,ReplicationBytes reports the number ofbytes that the primary is sending to all of itsreplicas. This metric is representative of thewrite load on the cluster. This is derived from themaster_repl_offset statistic at Redis INFO.
Bytes
ReplicationDelayedWriteCommandsNumber of commands that were delayed due toexceeding the maximum replication throughput.
Count
ReplicationLag This metric is only applicable for a node runningas a read replica. It represents how far behind, inseconds, the replica is in applying changes fromthe primary node.
Seconds
The following are aggregations of certain kinds of commands, derived from info commandstats. Thecommandstats section provides statistics based on the command type, including the number of calls.
For a full list of available commands, see redis commands in the Redis documentation.
Metric Description Unit
EvalBasedCmds The total number of commands for eval-basedcommands. This is derived from the Redis
Count
178

Amazon MemoryDB for Redis Developer GuideMonitoring with CloudWatch
Metric Description Unit
commandstats statistic. This is derived from theRedis commandstats statistic by summing eval,evalsha.
GeoSpatialBasedCmds The total number of commands for geospatial-based commands. This is derived from theRedis commandstats statistic. It's derived bysumming all of the geo type of commands:geoadd, geodist, geohash, geopos, georadius,and georadiusbymember.
Count
GetTypeCmds The total number of read-only type commands.This is derived from the Redis commandstatsstatistic by summing all of the read-only typecommands (get, hget, scard, lrange, and so on.)
Count
HashBasedCmds The total number of commands that arehash-based. This is derived from the Rediscommandstats statistic by summing all of thecommands that act upon one or more hashes(hget, hkeys, hvals, hdel, and so on).
Count
HyperLogLogBasedCmds The total number of HyperLogLog-basedcommands. This is derived from the Rediscommandstats statistic by summing all of the pftype of commands (pfadd, pfcount, pfmerge, andso on.).
Count
KeyBasedCmds The total number of commands that arekey-based. This is derived from the Rediscommandstats statistic by summing all of thecommands that act upon one or more keys acrossmultiple data structures (del, expire, rename, andso on.).
Count
ListBasedCmds The total number of commands that arelist-based. This is derived from the Rediscommandstats statistic by summing all ofthe commands that act upon one or more lists(lindex, lrange, lpush, ltrim, and so on).
Count
PubSubBasedCmds The total number of commands for pub/subfunctionality. This is derived from the Rediscommandstatsstatistics by summing all ofthe commands used for pub/sub functionality:psubscribe, publish, pubsub, punsubscribe,subscribe, and unsubscribe.
Count
SetBasedCmds The total number of commands that areset-based. This is derived from the Rediscommandstats statistic by summing all of thecommands that act upon one or more sets (scard,sdiff, sadd, sunion, and so on).
Count
179

Amazon MemoryDB for Redis Developer GuideMonitoring with CloudWatch
Metric Description Unit
SetTypeCmds The total number of write types of commands.This is derived from the Redis commandstatsstatistic by summing all of the mutative types ofcommands that operate on data (set, hset, sadd,lpop, and so on.)
Count
SortedSetBasedCmds The total number of commands that are sortedset-based. This is derived from the Rediscommandstats statistic by summing all of thecommands that act upon one or more sorted sets(zcount, zrange, zrank, zadd, and so on).
Count
StringBasedCmds The total number of commands that arestring-based. This is derived from the Rediscommandstats statistic by summing all of thecommands that act upon one or more strings(strlen, setex, setrange, and so on).
Count
StreamBasedCmds The total number of commands that arestream-based. This is derived from the Rediscommandstats statistic by summing all of thecommands that act upon one or more streamsdata types (xrange, xlen, xadd, xdel, and so on).
Count
180

Amazon MemoryDB for Redis Developer GuideMonitoring with CloudWatch
Which Metrics Should I Monitor?The following CloudWatch metrics offer good insight into MemoryDB performance. In most cases, werecommend that you set CloudWatch alarms for these metrics so that you can take corrective actionbefore performance issues occur.
Metrics to Monitor• CPUUtilization (p. 181)• EngineCPUUtilization (p. 181)• SwapUsage (p. 181)• Evictions (p. 182)• CurrConnections (p. 182)• Memory (p. 182)• Network (p. 182)• Replication (p. 182)
CPUUtilization
This is a host-level metric reported as a percentage. For more information, see Host-LevelMetrics (p. 175).
For smaller node types with 2vCPUs or less, use the CPUUtilization metric to monitor yourworkload.
Generally speaking, we suggest you set your threshold at 90% of your available CPU. Because Redisis single-threaded, the actual threshold value should be calculated as a fraction of the node's totalcapacity. For example, suppose you are using a node type that has two cores. In this case, the thresholdfor CPUUtilization would be 90/2, or 45%. To find the number of cores (vCPUs) your node type has, seeMemoryDB Pricing.
You will need to determine your own threshold, based on the number of cores in the node that you areusing. If you exceed this threshold, and your main workload is from read requests, scale your cluster outby adding read replicas. If the main workload is from write requests, we recommend that you add moreshards to distribute the write workload across more primary nodes.
TipInstead of using the Host-Level metric CPUUtilization, you might be able to use the Redismetric EngineCPUUtilization, which reports the percentage of usage on the Redis enginecore. To see if this metric is available on your nodes and for more information, see Metrics forMemoryDB.
For larger node types with 4vCPUs or more, you may want to use the EngineCPUUtilization metric,which reports the percentage of usage on the Redis engine core. To see if this metric is available on yournodes and for more information, see Metrics for MemoryDB.
EngineCPUUtilization
For larger node types with 4vCPUs or more, you may want to use the EngineCPUUtilization metric,which reports the percentage of usage on the Redis engine core. To see if this metric is available on yournodes and for more information, see Metrics for MemoryDB.
SwapUsage
This is a host-level metric reported in bytes. For more information, see Host-Level Metrics (p. 175).
This metric should not exceed 50 MB.
181

Amazon MemoryDB for Redis Developer GuideMonitoring with CloudWatch
Evictions
This is a engine metric. We recommend that you determine your own alarm threshold for this metricbased on your application needs.
CurrConnections
This is a engine metric. We recommend that you determine your own alarm threshold for this metricbased on your application needs.
An increasing number of CurrConnections might indicate a problem with your application; you will needto investigate the application behavior to address this issue.
Memory
Memory is a core aspect of Redis. Understanding the memory utilization of your cluster is necessary toavoid data loss and accommodate future growth of your dataset. Statistics about the memory utilizationof a node are available in the memory section of the Redis INFO command.
Network
One of the determining factors for the network bandwidth capacity of your cluster is the node type youhave selected. For more information about the network capacity of your node, see Amazon MemoryDBpricing.
Replication
The volume of data being replicated is visible via the ReplicationBytes metric. You can monitorMaxReplicationThroughput against the replication capacity throughput. It is recommended to addmore shards when reaching the maximum replication capacity throughput.
ReplicationDelayedWriteCommands can also indicate if the workload is exceeding themaximum replication capacity throughput. For more information about replication in MemoryDB, seeUnderstanding MemoryDB replication
182

Amazon MemoryDB for Redis Developer GuideMonitoring with CloudWatch
Choosing Metric Statistics and PeriodsWhile CloudWatch will allow you to choose any statistic and period for each metric, not all combinationswill be useful. For example, the Average, Minimum, and Maximum statistics for CPUUtilization are useful,but the Sum statistic is not.
All MemoryDB samples are published for a 60 second duration for each individual node. For any 60second period, a node metric will only contain a single sample.
Monitoring CloudWatch metricsMemoryDB and CloudWatch are integrated so you can gather a variety of metrics. You can monitor thesemetrics using CloudWatch.
NoteThe following examples require the CloudWatch command line tools. For more informationabout CloudWatch and to download the developer tools, see the CloudWatch product page.
The following procedures show you how to use CloudWatch to gather storage space statistics for ancluster for the past hour.
NoteThe StartTime and EndTime values supplied in the examples following are for illustrativepurposes. Make sure to substitute appropriate start and end time values for your nodes.
For information on MemoryDB limits, see AWS service limits for MemoryDB.
Monitoring CloudWatch metrics (Console)
To gather CPU utilization statistics for a cluster
1. Sign in to the AWS Management Console and open the MemoryDB for Redis console at https://console.aws.amazon.com/memorydb/.
2. Select the nodes you want to view metrics for.
NoteSelecting more than 20 nodes disables viewing metrics on the console.
a. On the Clusters page of the AWS Management Console, click the name of one or more clusters.
The detail page for the cluster appears.
b. Click the Nodes tab at the top of the window.
c. On the Nodes tab of the detail window, select the nodes that you want to view metrics for.
A list of available CloudWatch Metrics appears at the bottom of the console window.
d. Click on the CPU Utilization metric.
The CloudWatch console will open, displaying your selected metrics. You can use the Statisticand Period drop-down list boxes and Time Range tab to change the metrics being displayed.
Monitoring CloudWatch metrics using the CloudWatch CLI
To gather CPU utilization statistics for a cluster
• Use the CloudWatch command aws cloudwatch get-metric-statistics with the following parameters(note that the start and end times are shown as examples only; you will need to substitute your ownappropriate start and end times):
183

Amazon MemoryDB for Redis Developer GuideMonitoring with CloudWatch
For Linux, macOS, or Unix:
aws cloudwatch get-metric-statistics CPUUtilization \ --dimensions=ClusterName=mycluster,NodeId=0002" \ --statistics=Average \ --namespace="AWS/MemoryDB" \ --start-time 2013-07-05T00:00:00 \ --end-time 2013-07-06T00:00:00 \ --period=60
For Windows:
mon-get-stats CPUUtilization ^ --dimensions=ClusterName=mycluster,NodeId=0002" ^ --statistics=Average ^ --namespace="AWS/MemoryDB" ^ --start-time 2013-07-05T00:00:00 ^ --end-time 2013-07-06T00:00:00 ^ --period=60
Monitoring CloudWatch metrics using the CloudWatch API
To gather CPU utilization statistics for a cluster
• Call the CloudWatch API GetMetricStatistics with the following parameters (note that the startand end times are shown as examples only; you will need to substitute your own appropriate startand end times):
• Statistics.member.1=Average
• Namespace=AWS/MemoryDB
• StartTime=2013-07-05T00:00:00
• EndTime=2013-07-06T00:00:00
• Period=60
• MeasureName=CPUUtilization
• Dimensions=ClusterName=mycluster,NodeId=0002
Example
http://monitoring.amazonaws.com/ ?SignatureVersion=4 &Action=GetMetricStatistics &Version=2014-12-01 &StartTime=2013-07-16T00:00:00 &EndTime=2013-07-16T00:02:00 &Period=60 &Statistics.member.1=Average &Dimensions.member.1="ClusterName=mycluster" &Dimensions.member.2="NodeId=0002" &Namespace=Amazon/memorydb &MeasureName=CPUUtilization &Timestamp=2013-07-07T17%3A48%3A21.746Z &AWS;AccessKeyId=<&AWS; Access Key ID> &Signature=<Signature>
184

Amazon MemoryDB for Redis Developer GuideMonitoring events
Monitoring MemoryDB for Redis eventsWhen significant events happen for a cluster, MemoryDB sends notification to a specific Amazon SNStopic. Examples include a failure to add a node, success in adding a node, the modification of a securitygroup, and others. By monitoring for key events, you can know the current state of your clusters and,depending upon the event, be able to take corrective action.
Topics• Managing MemoryDB Amazon SNS notifications (p. 185)• Viewing MemoryDB events (p. 188)• Event Notifications and Amazon SNS (p. 190)
Managing MemoryDB Amazon SNS notificationsYou can configure MemoryDB to send notifications for important cluster events using Amazon SimpleNotification Service (Amazon SNS). In these examples, you will configure a cluster with the AmazonResource Name (ARN) of an Amazon SNS topic to receive notifications.
NoteThis topic assumes that you've signed up for Amazon SNS and have set up and subscribed toan Amazon SNS topic. For information on how to do this, see the Amazon Simple NotificationService Developer Guide.
Adding an Amazon SNS topic
The following sections show you how to add an Amazon SNS topic using the AWS Console, the AWS CLI,or the MemoryDB API.
Adding an Amazon SNS topic (Console)
The following procedure shows you how to add an Amazon SNS topic for a cluster.
NoteThis process can also be used to modify the Amazon SNS topic.
To add or modify an Amazon SNS topic for a cluster (Console)
1. Sign in to the AWS Management Console and open the MemoryDB for Redis console at https://console.aws.amazon.com/memorydb/.
2. In Clusters, choose the cluster for which you want to add or modify an Amazon SNS topic ARN.3. Choose Modify.4. In Modify Cluster under Topic for SNS Notification, choose the SNS topic you want to add, or
choose Manual ARN input and type the ARN of the Amazon SNS topic.5. Choose Modify.
Adding an Amazon SNS topic (AWS CLI)
To add or modify an Amazon SNS topic for a cluster, use the AWS CLI command update-cluster.
The following code example adds an Amazon SNS topic arn to my-cluster.
For Linux, macOS, or Unix:
aws memorydb update-cluster \ --cluster-name my-cluster \
185
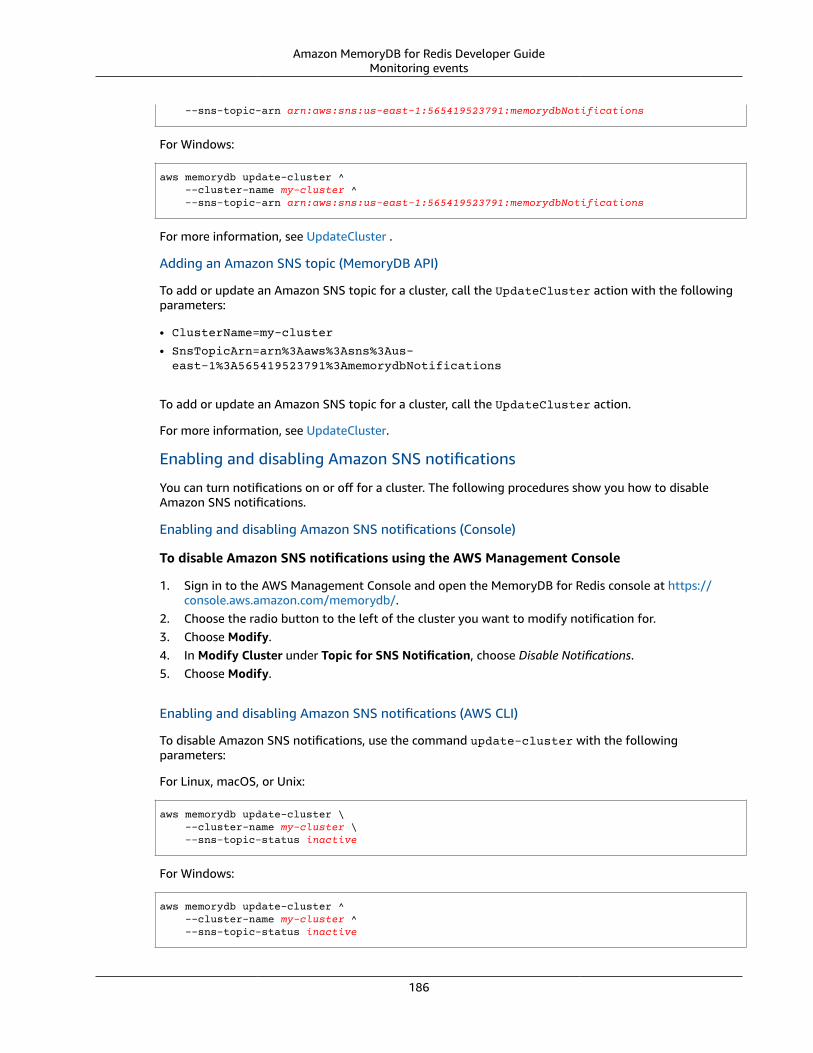
Amazon MemoryDB for Redis Developer GuideMonitoring events
--sns-topic-arn arn:aws:sns:us-east-1:565419523791:memorydbNotifications
For Windows:
aws memorydb update-cluster ^ --cluster-name my-cluster ^ --sns-topic-arn arn:aws:sns:us-east-1:565419523791:memorydbNotifications
For more information, see UpdateCluster .
Adding an Amazon SNS topic (MemoryDB API)
To add or update an Amazon SNS topic for a cluster, call the UpdateCluster action with the followingparameters:
• ClusterName=my-cluster
• SnsTopicArn=arn%3Aaws%3Asns%3Aus-east-1%3A565419523791%3AmemorydbNotifications
To add or update an Amazon SNS topic for a cluster, call the UpdateCluster action.
For more information, see UpdateCluster.
Enabling and disabling Amazon SNS notifications
You can turn notifications on or off for a cluster. The following procedures show you how to disableAmazon SNS notifications.
Enabling and disabling Amazon SNS notifications (Console)
To disable Amazon SNS notifications using the AWS Management Console
1. Sign in to the AWS Management Console and open the MemoryDB for Redis console at https://console.aws.amazon.com/memorydb/.
2. Choose the radio button to the left of the cluster you want to modify notification for.3. Choose Modify.4. In Modify Cluster under Topic for SNS Notification, choose Disable Notifications.5. Choose Modify.
Enabling and disabling Amazon SNS notifications (AWS CLI)
To disable Amazon SNS notifications, use the command update-cluster with the followingparameters:
For Linux, macOS, or Unix:
aws memorydb update-cluster \ --cluster-name my-cluster \ --sns-topic-status inactive
For Windows:
aws memorydb update-cluster ^ --cluster-name my-cluster ^ --sns-topic-status inactive
186

Amazon MemoryDB for Redis Developer GuideMonitoring events
Enabling and disabling Amazon SNS notifications (MemoryDB API)
To disable Amazon SNS notifications, call the UpdateCluster action with the following parameters:
• ClusterName=my-cluster
• SnsTopicStatus=inactive
This call returns output similar to the following:
Example
https://memory-db.us-east-1.amazonaws.com/ ?Action=UpdateCluster &ClusterName=my-cluster &SnsTopicStatus=inactive &Version=2021-01-01 &SignatureVersion=4 &SignatureMethod=HmacSHA256 &Timestamp=20210801T220302Z &X-Amz-Algorithm=Amazon4-HMAC-SHA256 &X-Amz-Date=20210801T220302Z &X-Amz-SignedHeaders=Host &X-Amz-Expires=20210801T220302Z &X-Amz-Credential=<credential> &X-Amz-Signature=<signature>
187

Amazon MemoryDB for Redis Developer GuideMonitoring events
Viewing MemoryDB eventsMemoryDB logs events that relate to your clusters, security groups, and parameter groups. Thisinformation includes the date and time of the event, the source name and source type of the event, anda description of the event. You can easily retrieve events from the log using the MemoryDB console, theAWS CLI describe-events command, or the MemoryDB API action DescribeEvents.
The following procedures show you how to view all MemoryDB events for the past 24 hours (1440minutes).
Viewing MemoryDB events (Console)
The following procedure displays events using the MemoryDB console.
To view events using the MemoryDB console
1. Sign in to the AWS Management Console and open the MemoryDB for Redis console at https://console.aws.amazon.com/memorydb/.
2. In the left navigation pane, choose Events.
The Events screen appears listing all available events. Each row of the list represents one event anddisplays the event source, the event type (such as cluster, parameter-group, acl, security-group orsubnet group), the GMT time of the event, and the description of the event.
Using the Filter you can specify whether you want to see all events, or just events of a specific typein the event list.
Viewing MemoryDB events (AWS CLI)
To generate a list of MemoryDB events using the AWS CLI, use the command describe-events. Youcan use optional parameters to control the type of events listed, the time frame of the events listed, themaximum number of events to list, and more.
The following code lists up to 40 cluster events.
aws memorydb describe-events --source-type cluster --max-results 40
The following code lists all events for the past 24 hours (1440 minutes).
aws memorydb describe-events --duration 1440
The output from the describe-events command looks something like this.
{ "Events": [ { "Date": "2021-03-29T22:17:37.781Z", "Message": "Added node 0001 in Availability Zone us-east-1a", "SourceName": "memorydb01", "SourceType": "cluster" }, { "Date": "2021-03-29T22:17:37.769Z", "Message": "cluster created", "SourceName": "memorydb01", "SourceType": "cluster"
188

Amazon MemoryDB for Redis Developer GuideMonitoring events
} ]}
For more information, such as available parameters and permitted parameter values, see describe-events.
Viewing MemoryDB events (MemoryDB API)
To generate a list of MemoryDB events using the MemoryDB API, use the DescribeEvents action. Youcan use optional parameters to control the type of events listed, the time frame of the events listed, themaximum number of events to list, and more.
The following code lists the 40 most recent -cluster events.
https://memory-db.us-east-1.amazonaws.com/ ?Action=DescribeEvents &MaxResults=40 &SignatureVersion=4 &SignatureMethod=HmacSHA256 &SourceType=cluster &Timestamp=20210802T192317Z &Version=2021-01-01 &X-Amz-Credential=<credential>
The following code lists the cluster events for the past 24 hours (1440 minutes).
https://memory-db.us-east-1.amazonaws.com/ ?Action=DescribeEvents &Duration=1440 &SignatureVersion=4 &SignatureMethod=HmacSHA256 &SourceType=cluster &Timestamp=20210802T192317Z &Version=2021-01-01 &X-Amz-Credential=<credential>
The above actions should produce output similar to the following.
<DescribeEventsResponse xmlns="http://memory-db.us-east-1.amazonaws.com/doc/2021-01-01/"> <DescribeEventsResult> <Events> <Event> <Message>cluster created</Message> <SourceType>cluster</SourceType> <Date>2021-08-02T18:22:18.202Z</Date> <SourceName>my-memorydb-primary</SourceName> </Event> (...output omitted...) </Events> </DescribeEventsResult> <ResponseMetadata> <RequestId>e21c81b4-b9cd-11e3-8a16-7978bb24ffdf</RequestId> </ResponseMetadata> </DescribeEventsResponse>
For more information, such as available parameters and permitted parameter values, seeDescribeEvents.
189

Amazon MemoryDB for Redis Developer GuideMonitoring events
Event Notifications and Amazon SNSMemoryDB can publish messages using Amazon Simple Notification Service (SNS) when significantevents happen on a cluster. This feature can be used to refresh the server-lists on client machinesconnected to individual node endpoints of a cluster.
NoteFor more information on Amazon Simple Notification Service (SNS), including information onpricing and links to the Amazon SNS documentation, see the Amazon SNS product page.
Notifications are published to a specified Amazon SNS topic. The following are requirements fornotifications:
• Only one topic can be configured for MemoryDB notifications.
• The AWS account that owns the Amazon SNS topic must be the same account that owns the cluster onwhich notifications are enabled.
MemoryDB Events
The following MemoryDB events trigger Amazon SNS notifications:
Event Name Message Description
MemoryDB:AddNodeComplete "Modified number ofnodes from %d to %d"
A node has been added to thecluster and is ready for use.
MemoryDB:AddNodeFailed dueto insufficient free IP addresses
"Failed to modify numberof nodes from %d to %ddue to insufficient freeIP addresses"
A node could not be addedbecause there are not enoughavailable IP addresses.
MemoryDB:ClusterParametersChanged"Updated parameter groupfor the cluster"
In case of create, also send"Updated to use aParameterGroup %s"
One or more cluster parametershave been changed.
MemoryDB:ClusterProvisioningComplete"Cluster created." The provisioning of a cluster iscompleted, and the nodes in thecluster are ready to use.
MemoryDB:ClusterProvisioningFaileddue to incompatible networkstate
"Failed to createcluster due toincompatible networkstate. %s"
An attempt was made to launcha new cluster into a nonexistentvirtual private cloud (VPC).
MemoryDB:ClusterRestoreFailed "Restore from %s failedfor node %s. %s"
MemoryDB was unable topopulate the cluster with Redissnapshot data. This could bedue to a nonexistent snapshotfile in Amazon S3, or incorrectpermissions on that file. If youdescribe the cluster, the statuswill be restore-failed. Youwill need to delete the clusterand start over.
190

Amazon MemoryDB for Redis Developer GuideMonitoring events
Event Name Message Description
For more information,see Seeding a new clusterwith an externally createdsnapshot (p. 97).
MemoryDB:ClusterScalingComplete"Succeeded applyingmodification to nodetype to %s."
Scale up for cluster completedsuccessfully.
MemoryDB:ClusterScalingFailed "Failed applyingmodification to nodetype to %s."
Scale-up operation on clusterfailed.
MemoryDB:ClusterSecurityGroupModified"Modified security groupfor cluster."
One of the following events hasoccurred:
• The list of security groupsauthorized for the cluster hasbeen modified.
• One or more new EC2 securitygroups have been authorizedon any of the security groupsassociated with the cluster.
• One or more EC2 securitygroups have been revokedfrom any of the securitygroups associated with thecluster.
MemoryDB:NodeReplaceStarted "Recovering node %s" MemoryDB has detected thatthe host running a node isdegraded or unreachable andhas started replacing the node.
NoteThe DNS entry for thereplaced node is notchanged.
In most instances, you do notneed to refresh the server-listfor your clients when this eventoccurs. However, some clientlibraries may stop using thenode even after MemoryDB hasreplaced the node; in this case,the application should refreshthe server-list when this eventoccurs.
191

Amazon MemoryDB for Redis Developer GuideMonitoring events
Event Name Message Description
MemoryDB:NodeReplaceComplete "Finished recovery fornode %s"
MemoryDB has detected thatthe host running a node isdegraded or unreachable andhas completed replacing thenode.
NoteThe DNS entry for thereplaced node is notchanged.
In most instances, you do notneed to refresh the server-listfor your clients when this eventoccurs. However, some clientlibraries may stop using thenode even after MemoryDB hasreplaced the node; in this case,the application should refreshthe server-list when this eventoccurs.
MemoryDB:CreateClusterComplete"Cluster created" The cluster was successfullycreated.
MemoryDB:CreateClusterFailed "Failed to createcluster due tounsuccessful creationof its node(s)." and"Deleting all nodesbelonging to thiscluster."
The cluster was not created.
MemoryDB:DeleteClusterComplete"Cluster deleted." The deletion of a cluster and allassociated nodes has completed.
MemoryDB:FailoverComplete "Failover to replicanode %s completed"
Failover over to a replica nodewas successful.
MemoryDB:NodeReplacementCanceled"The replacement of node%s which was scheduledduring the maintenancewindow from start time:%s, end time: %s hasbeen canceled"
A node in your cluster that wasscheduled for replacementis no longer scheduled forreplacement.
MemoryDB:NodeReplacementRescheduled"The replacement inmaintenance window fornode %s has been re-scheduled from previousstart time: %s, previousend time: %s to newstart time: %s, new endtime: %s"
A node in your cluster previouslyscheduled for replacementhas been rescheduled forreplacement during the newwindow described in thenotification.
For information on what actionsyou can take, see Replacingnodes (p. 26).
192
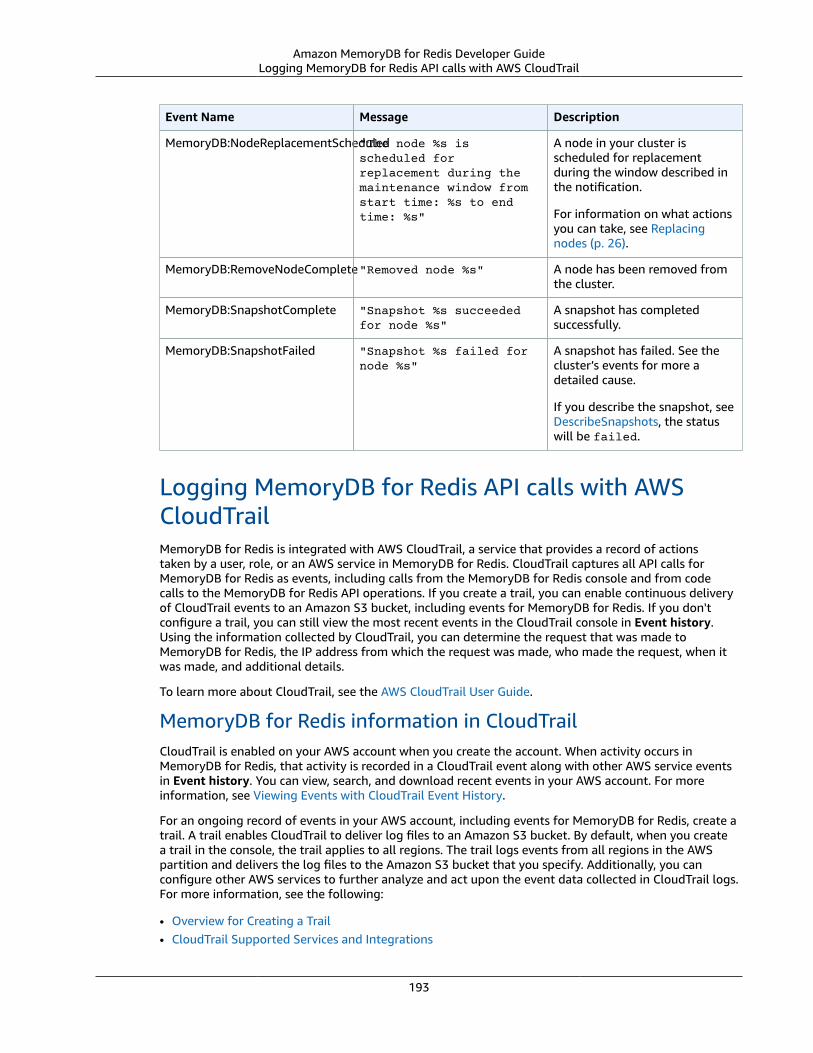
Amazon MemoryDB for Redis Developer GuideLogging MemoryDB for Redis API calls with AWS CloudTrail
Event Name Message Description
MemoryDB:NodeReplacementScheduled"The node %s isscheduled forreplacement during themaintenance window fromstart time: %s to endtime: %s"
A node in your cluster isscheduled for replacementduring the window described inthe notification.
For information on what actionsyou can take, see Replacingnodes (p. 26).
MemoryDB:RemoveNodeComplete"Removed node %s" A node has been removed fromthe cluster.
MemoryDB:SnapshotComplete "Snapshot %s succeededfor node %s"
A snapshot has completedsuccessfully.
MemoryDB:SnapshotFailed "Snapshot %s failed fornode %s"
A snapshot has failed. See thecluster’s events for more adetailed cause.
If you describe the snapshot, seeDescribeSnapshots, the statuswill be failed.
Logging MemoryDB for Redis API calls with AWSCloudTrailMemoryDB for Redis is integrated with AWS CloudTrail, a service that provides a record of actionstaken by a user, role, or an AWS service in MemoryDB for Redis. CloudTrail captures all API calls forMemoryDB for Redis as events, including calls from the MemoryDB for Redis console and from codecalls to the MemoryDB for Redis API operations. If you create a trail, you can enable continuous deliveryof CloudTrail events to an Amazon S3 bucket, including events for MemoryDB for Redis. If you don'tconfigure a trail, you can still view the most recent events in the CloudTrail console in Event history.Using the information collected by CloudTrail, you can determine the request that was made toMemoryDB for Redis, the IP address from which the request was made, who made the request, when itwas made, and additional details.
To learn more about CloudTrail, see the AWS CloudTrail User Guide.
MemoryDB for Redis information in CloudTrailCloudTrail is enabled on your AWS account when you create the account. When activity occurs inMemoryDB for Redis, that activity is recorded in a CloudTrail event along with other AWS service eventsin Event history. You can view, search, and download recent events in your AWS account. For moreinformation, see Viewing Events with CloudTrail Event History.
For an ongoing record of events in your AWS account, including events for MemoryDB for Redis, create atrail. A trail enables CloudTrail to deliver log files to an Amazon S3 bucket. By default, when you createa trail in the console, the trail applies to all regions. The trail logs events from all regions in the AWSpartition and delivers the log files to the Amazon S3 bucket that you specify. Additionally, you canconfigure other AWS services to further analyze and act upon the event data collected in CloudTrail logs.For more information, see the following:
• Overview for Creating a Trail• CloudTrail Supported Services and Integrations
193
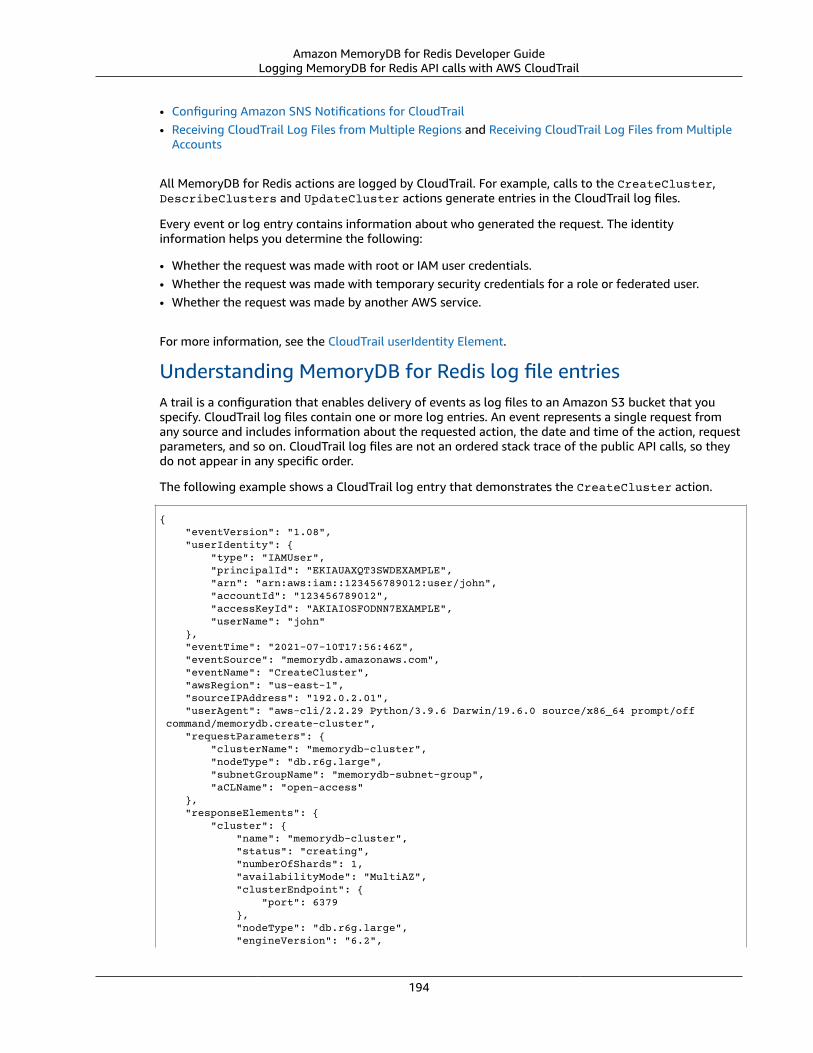
Amazon MemoryDB for Redis Developer GuideLogging MemoryDB for Redis API calls with AWS CloudTrail
• Configuring Amazon SNS Notifications for CloudTrail• Receiving CloudTrail Log Files from Multiple Regions and Receiving CloudTrail Log Files from Multiple
Accounts
All MemoryDB for Redis actions are logged by CloudTrail. For example, calls to the CreateCluster,DescribeClusters and UpdateCluster actions generate entries in the CloudTrail log files.
Every event or log entry contains information about who generated the request. The identityinformation helps you determine the following:
• Whether the request was made with root or IAM user credentials.• Whether the request was made with temporary security credentials for a role or federated user.• Whether the request was made by another AWS service.
For more information, see the CloudTrail userIdentity Element.
Understanding MemoryDB for Redis log file entriesA trail is a configuration that enables delivery of events as log files to an Amazon S3 bucket that youspecify. CloudTrail log files contain one or more log entries. An event represents a single request fromany source and includes information about the requested action, the date and time of the action, requestparameters, and so on. CloudTrail log files are not an ordered stack trace of the public API calls, so theydo not appear in any specific order.
The following example shows a CloudTrail log entry that demonstrates the CreateCluster action.
{ "eventVersion": "1.08", "userIdentity": { "type": "IAMUser", "principalId": "EKIAUAXQT3SWDEXAMPLE", "arn": "arn:aws:iam::123456789012:user/john", "accountId": "123456789012", "accessKeyId": "AKIAIOSFODNN7EXAMPLE", "userName": "john" }, "eventTime": "2021-07-10T17:56:46Z", "eventSource": "memorydb.amazonaws.com", "eventName": "CreateCluster", "awsRegion": "us-east-1", "sourceIPAddress": "192.0.2.01", "userAgent": "aws-cli/2.2.29 Python/3.9.6 Darwin/19.6.0 source/x86_64 prompt/off command/memorydb.create-cluster", "requestParameters": { "clusterName": "memorydb-cluster", "nodeType": "db.r6g.large", "subnetGroupName": "memorydb-subnet-group", "aCLName": "open-access" }, "responseElements": { "cluster": { "name": "memorydb-cluster", "status": "creating", "numberOfShards": 1, "availabilityMode": "MultiAZ", "clusterEndpoint": { "port": 6379 }, "nodeType": "db.r6g.large", "engineVersion": "6.2",
194

Amazon MemoryDB for Redis Developer GuideLogging MemoryDB for Redis API calls with AWS CloudTrail
"enginePatchVersion": "6.2.4", "parameterGroupName": "default.memorydb-redis6", "parameterGroupStatus": "in-sync", "subnetGroupName": "memorydb-subnet-group", "tLSEnabled": true, "aRN": "arn:aws:memorydb:us-east-1:123456789012:cluster/memorydb-cluster", "snapshotRetentionLimit": 0, "maintenanceWindow": "tue:06:30-tue:07:30", "snapshotWindow": "09:00-10:00", "aCLName": "open-access", "autoMinorVersionUpgrade": true } }, "requestID": "506fc951-9ae2-42bb-872c-98028dc8ed11", "eventID": "2ecf3dc3-c931-4df0-a2b3-be90b596697e", "readOnly": false, "eventType": "AwsApiCall", "managementEvent": true, "recipientAccountId": "123456789012", "eventCategory": "Management"}
The following example shows a CloudTrail log entry that demonstrates the DescribeClustersaction. Note that for all MemoryDB for Redis Describe and List calls (Describe* and List*), theresponseElements section is removed and appears as null.
{ "eventVersion": "1.08", "userIdentity": { "type": "IAMUser", "principalId": "EKIAUAXQT3SWDEXAMPLE", "arn": "arn:aws:iam::123456789012:user/john", "accountId": "123456789012", "accessKeyId": "AKIAIOSFODNN7EXAMPLE", "userName": "john" }, "eventTime": "2021-07-10T18:39:51Z", "eventSource": "memorydb.amazonaws.com", "eventName": "DescribeClusters", "awsRegion": "us-east-1", "sourceIPAddress": "192.0.2.01", "userAgent": "aws-cli/2.2.29 Python/3.9.6 Darwin/19.6.0 source/x86_64 prompt/off command/memorydb.describe-clusters", "requestParameters": { "maxResults": 50, "showShardDetails": true }, "responseElements": null, "requestID": "5e831993-52bb-494d-9bba-338a117c2389", "eventID": "32a3dc0a-31c8-4218-b889-1a6310b7dd50", "readOnly": true, "eventType": "AwsApiCall", "managementEvent": true, "recipientAccountId": "123456789012", "eventCategory": "Management"}
The following example shows a CloudTrail log entry that records an UpdateCluster action.
{ "eventVersion": "1.08", "userIdentity": { "type": "IAMUser",
195

Amazon MemoryDB for Redis Developer GuideLogging MemoryDB for Redis API calls with AWS CloudTrail
"principalId": "EKIAUAXQT3SWDEXAMPLE", "arn": "arn:aws:iam::123456789012:user/john", "accountId": "123456789012", "accessKeyId": "AKIAIOSFODNN7EXAMPLE", "userName": "john" }, "eventTime": "2021-07-10T19:23:20Z", "eventSource": "memorydb.amazonaws.com", "eventName": "UpdateCluster", "awsRegion": "us-east-1", "sourceIPAddress": "192.0.2.01", "userAgent": "aws-cli/2.2.29 Python/3.9.6 Darwin/19.6.0 source/x86_64 prompt/off command/memorydb.update-cluster", "requestParameters": { "clusterName": "memorydb-cluster", "snapshotWindow": "04:00-05:00", "shardConfiguration": { "shardCount": 2 } }, "responseElements": { "cluster": { "name": "memorydb-cluster", "status": "updating", "numberOfShards": 2, "availabilityMode": "MultiAZ", "clusterEndpoint": { "address": "clustercfg.memorydb-cluster.cde8da.memorydb.us-east-1.amazonaws.com", "port": 6379 }, "nodeType": "db.r6g.large", "engineVersion": "6.2", "enginePatchVersion": "6.2.4", "parameterGroupName": "default.memorydb-redis6", "parameterGroupStatus": "in-sync", "subnetGroupName": "memorydb-subnet-group", "tLSEnabled": true, "aRN": "arn:aws:memorydb:us-east-1:123456789012:cluster/memorydb-cluster", "snapshotRetentionLimit": 0, "maintenanceWindow": "tue:06:30-tue:07:30", "snapshotWindow": "04:00-05:00", "autoMinorVersionUpgrade": true } }, "requestID": "dad021ce-d161-4365-8085-574133afab54", "eventID": "e0120f85-ab7e-4ad4-ae78-43ba15dee3d8", "readOnly": false, "eventType": "AwsApiCall", "managementEvent": true, "recipientAccountId": "123456789012", "eventCategory": "Management"}
The following example shows a CloudTrail log entry that demonstrates the CreateUser action.Note that for MemoryDB for Redis calls that contain sensitive data, that data will be redacted in thecorresponding CloudTrail event as shown in the requestParameters section below.
{ "eventVersion": "1.08", "userIdentity": { "type": "IAMUser", "principalId": "EKIAUAXQT3SWDEXAMPLE", "arn": "arn:aws:iam::123456789012:user/john",
196

Amazon MemoryDB for Redis Developer GuideInfrastructure security
"accountId": "123456789012", "accessKeyId": "AKIAIOSFODNN7EXAMPLE", "userName": "john" }, "eventTime": "2021-07-10T19:56:13Z", "eventSource": "memorydb.amazonaws.com", "eventName": "CreateUser", "awsRegion": "us-east-1", "sourceIPAddress": "192.0.2.01", "userAgent": "aws-cli/2.2.29 Python/3.9.6 Darwin/19.6.0 source/x86_64 prompt/off command/memorydb.create-user", "requestParameters": { "userName": "memorydb-user", "authenticationMode": { "type": "password", "passwords": [ "HIDDEN_DUE_TO_SECURITY_REASONS" ] }, "accessString": "~* &* -@all +@read" }, "responseElements": { "user": { "name": "memorydb-user", "status": "active", "accessString": "off ~* &* -@all +@read", "aCLNames": [], "minimumEngineVersion": "6.2", "authentication": { "type": "password", "passwordCount": 1 }, "aRN": "arn:aws:memorydb:us-east-1:123456789012:user/memorydb-user" } }, "requestID": "ae288b5e-80ab-4ff8-989a-5ee5c67cd193", "eventID": "ed096e3e-16f1-4a23-866c-0baa6ec769f6", "readOnly": false, "eventType": "AwsApiCall", "managementEvent": true, "recipientAccountId": "123456789012", "eventCategory": "Management"}
Infrastructure security in Amazon MemoryDB forRedis
As a managed service, MemoryDB is protected by the AWS global network security procedures that aredescribed in the Amazon Web Services: Overview of Security Processes whitepaper.
You use AWS published API calls to access MemoryDB through the network. Clients must supportTransport Layer Security (TLS) 1.0 or later. We recommend TLS 1.2 or later. Clients must also supportcipher suites with perfect forward secrecy (PFS) such as Ephemeral Diffie-Hellman (DHE) or Elliptic CurveEphemeral Diffie-Hellman (ECDHE). Most modern systems such as Java 7 and later support these modes.
Additionally, requests must be signed using an access key ID and a secret access key that is associatedwith an IAM principal. Or you can use the AWS Security Token Service (AWS STS) to generate temporarysecurity credentials to sign requests.
197

Amazon MemoryDB for Redis Developer GuideInternetwork traffic privacy
Internetwork traffic privacyMemoryDB for Redis uses the following techniques to secure your data and protect it from unauthorizedaccess:
• MemoryDB and Amazon VPC (p. 206) explains the type of security group you need for yourinstallation.
• Identity and access management in MemoryDB for Redis (p. 153) for granting and limiting actions ofusers, groups, and roles.
Subnets and subnet groupsA subnet group is a collection of subnets (typically private) that you can designate for your clustersrunning in an Amazon Virtual Private Cloud (VPC) environment.
When you create a cluster in an Amazon VPC, you can specify a subnet group or use the default oneprovided. MemoryDB uses that subnet group to choose a subnet and IP addresses within that subnet toassociate with your nodes.
This section covers how to create and leverage subnets and subnet groups to manage access to yourMemoryDB resources.
For more information about subnet group usage in an Amazon VPC environment, see Step 2: Authorizeaccess to the cluster (p. 19).
Topics• Creating a subnet group (p. 199)• Updating a subnet group (p. 201)• Viewing subnet group details (p. 202)• Deleting a subnet group (p. 205)
198

Amazon MemoryDB for Redis Developer GuideSubnets and subnet groups
Creating a subnet groupWhen you create a new subnet group, note the number of available IP addresses. If the subnet has veryfew free IP addresses, you might be constrained as to how many more nodes you can add to the cluster.To resolve this issue, you can assign one or more subnets to a subnet group so that you have a sufficientnumber of IP addresses in your cluster's Availability Zone. After that, you can add more nodes to yourcluster.
The following procedures show you how to create a subnet group called mysubnetgroup (console), theAWS CLI, and the MemoryDB API.
Creating a subnet group (Console)
The following procedure shows how to create a subnet group (console).
To create a subnet group (Console)
1. Sign in to the AWS Management Console, and open the MemoryDB console at https://console.aws.amazon.com/memorydb/.
2. In the left navigation pane, choose Subnet Groups.3. Choose Create Subnet Group.4. In the Create Subnet Group page, do the following:
a. In the Name box, type a name for your subnet group.
Cluster naming constraints are as follows:
• Must contain 1–40 alphanumeric characters or hyphens.• Must begin with a letter.• Can't contain two consecutive hyphens.• Can't end with a hyphen.
b. In the Description box, type a description for your subnet group.c. In the VPC ID box, choose the Amazon VPC that you created. If you have not created one,
choose the Create VPC button and follow the steps to create one.d. In Selected subnets, choose the Availability Zone and ID of your private subnet, and then
choose Choose.5. For Tags, you can optionally apply tags to search and filter your subnets or track your AWS costs.6. When all the settings are as you want them, choose Create.7. In the confirmation message that appears, choose Close.
Your new subnet group appears in the Subnet Groups list of the MemoryDB console. At the bottom ofthe window you can choose the subnet group to see details, such as all of the subnets associated withthis group.
Creating a subnet group (AWS CLI)
At a command prompt, use the command create-subnet-group to create a subnet group.
For Linux, macOS, or Unix:
aws memorydb create-subnet-group \ --subnet-group-name mysubnetgroup \ --description "Testing" \ --subnet-ids subnet-53df9c3a
199

Amazon MemoryDB for Redis Developer GuideSubnets and subnet groups
For Windows:
aws memorydb create-subnet-group ^ --subnet-group-name mysubnetgroup ^ --description "Testing" ^ --subnet-ids subnet-53df9c3a
This command should produce output similar to the following:
{ "SubnetGroup": { "Subnets": [ { "Identifier": "subnet-53df9c3a", "AvailabilityZone": { "Name": "us-east-1a" } } ], "VpcId": "vpc-3cfaef47", "Name": "mysubnetgroup", "ARN": "arn:aws:memorydb:us-east-1:012345678912:subnetgroup/mysubnetgroup", "Description": "Testing" } }
For more information, see the AWS CLI topic create-subnet-group.
Creating a subnet group (MemoryDB API)
Using the MemoryDB API, call CreateSubnetGroup with the following parameters:
• SubnetGroupName=mysubnetgroup
• Description=Testing
• SubnetIds.member.1=subnet-53df9c3a
200

Amazon MemoryDB for Redis Developer GuideSubnets and subnet groups
Updating a subnet groupYou can update a subnet group's description, or modify the list of subnet IDs associated with the subnetgroup. You cannot delete a subnet ID from a subnet group if a cluster is currently using that subnet.
The following procedures show you how to update a subnet group.
Updating subnet groups (Console)
To update a subnet group
1. Sign in to the AWS Management Console and open the MemoryDB for Redis console at https://console.aws.amazon.com/memorydb/.
2. In the left navigation pane, choose Subnet Groups.3. In the list of subnet groups, choose the one you want to modify.4. Name, VPCId and Description fields are not modifiable.5. In the Selected subnets section click Manage to make any changes to the Availability Zones you
need for the subnets. To save your changes, choose Save.
Updating subnet groups (AWS CLI)
At a command prompt, use the command update-subnet-group to update a subnet group.
For Linux, macOS, or Unix:
aws memorydb update-subnet-group \ --subnet-group-name mysubnetgroup \ --description "New description" \ --subnet-ids "subnet-42df9c3a" "subnet-48fc21a9"
For Windows:
aws memorydb update-subnet-group ^ --subnet-group-name mysubnetgroup ^ --description "New description" ^ --subnet-ids "subnet-42df9c3a" "subnet-48fc21a9"
This command should produce output similar to the following:
{ "SubnetGroup": { "VpcId": "vpc-73cd3c17", "Description": "New description", "Subnets": [ { "Identifier": "subnet-42dcf93a", "AvailabilityZone": { "Name": "us-east-1a" } }, { "Identifier": "subnet-48fc12a9", "AvailabilityZone": { "Name": "us-east-1a" } } ],
201

Amazon MemoryDB for Redis Developer GuideSubnets and subnet groups
"Name": "mysubnetgroup", "ARN": "arn:aws:memorydb:us-east-1:012345678912:subnetgroup/mysubnetgroup", }}
For more information, see the AWS CLI topic update-subnet-group.
Updating subnet groups (MemoryDB API)
Using the MemoryDB API, call UpdateSubnetGroup with the following parameters:
• SubnetGroupName=mysubnetgroup
• Any other parameters whose values you want to change. This example uses Description=New%20description to change the description of the subnet group.
Example
https://memory-db.us-east-1.amazonaws.com/ ?Action=UpdateSubnetGroup &Description=New%20description &SubnetGroupName=mysubnetgroup &SubnetIds.member.1=subnet-42df9c3a &SubnetIds.member.2=subnet-48fc21a9 &SignatureMethod=HmacSHA256 &SignatureVersion=4 &Timestamp=20141201T220302Z &Version=2014-12-01 &X-Amz-Algorithm=Amazon4-HMAC-SHA256 &X-Amz-Credential=<credential> &X-Amz-Date=20141201T220302Z &X-Amz-Expires=20141201T220302Z &X-Amz-Signature=<signature> &X-Amz-SignedHeaders=Host
NoteWhen you create a new subnet group, take note the number of available IP addresses. If thesubnet has very few free IP addresses, you might be constrained as to how many more nodesyou can add to the cluster. To resolve this issue, you can assign one or more subnets to a subnetgroup so that you have a sufficient number of IP addresses in your cluster's Availability Zone.After that, you can add more nodes to your cluster.
Viewing subnet group detailsThe following procedures show you how to view details a subnet group.
Viewing details of subnet groups (console)
To view details of a subnet group (Console)
1. Sign in to the AWS Management Console and open the MemoryDB for Redis console at https://console.aws.amazon.com/memorydb/.
2. In the left navigation pane, choose Subnet Groups.3. On the Subnet groups page, choose the subnet group under Name or enter the subnet group's
name in the search bar.4. On the Subnet groups page, choose the subnet group under Name or enter the subnet group's
name in the search bar.
202

Amazon MemoryDB for Redis Developer GuideSubnets and subnet groups
5. Under Subnet group settings you can view the name,description, VPC ID and Amazon ResourceName (ARN) of the subnet group.
6. Under Subnets you can view the Availability Zones, Subnet IDs and CIDR blocks of the subnet group
7. Under Tags you can view any tags associated with the subnet group.
Viewing subnet groups details (AWS CLI)
At a command prompt, use the command describe-subnet-groups to view a specified subnetgroup's details.
For Linux, macOS, or Unix:
aws memorydb describe-subnet-groups \ --subnet-group-name mysubnetgroup
For Windows:
aws memorydb describe-subnet-groups ^ --subnet-group-name mysubnetgroup
This command should produce output similar to the following:
{ "subnetgroups": [ { "Subnets": [ { "Identifier": "subnet-060cae3464095de6e", "AvailabilityZone": { "Name": "us-east-1a" } }, { "Identifier": "subnet-049d11d4aa78700c3", "AvailabilityZone": { "Name": "us-east-1c" } }, { "Identifier": "subnet-0389d4c4157c1edb4", "AvailabilityZone": { "Name": "us-east-1d" } } ], "VpcId": "vpc-036a8150d4300bcf2", "Name": "mysubnetgroup", "ARN": "arn:aws:memorydb:us-east-1:53791xzzz7620:subnetgroup/mysubnetgroup", "Description": "test" } ]}
To view details on all subnet groups, use the same command but without specifying a subnet groupname.
aws memorydb describe-subnet-groups
203

Amazon MemoryDB for Redis Developer GuideSubnets and subnet groups
For more information, see the AWS CLI topic describe-subnet-groups.
Viewing subnet groups (MemoryDB API)
Using the MemoryDB API, call DescribeSubnetGroups with the following parameters:
SubnetGroupName=mysubnetgroup
Example
https://memory-db.us-east-1.amazonaws.com/ ?Action=UpdateSubnetGroup &Description=New%20description &SubnetGroupName=mysubnetgroup &SubnetIds.member.1=subnet-42df9c3a &SubnetIds.member.2=subnet-48fc21a9 &SignatureMethod=HmacSHA256 &SignatureVersion=4 &Timestamp=20211801T220302Z &Version=2021-01-01 &X-Amz-Algorithm=Amazon4-HMAC-SHA256 &X-Amz-Credential=<credential> &X-Amz-Date=20210801T220302Z &X-Amz-Expires=20210801T220302Z &X-Amz-Signature=<signature> &X-Amz-SignedHeaders=Host
204

Amazon MemoryDB for Redis Developer GuideSubnets and subnet groups
Deleting a subnet groupIf you decide that you no longer need your subnet group, you can delete it. You cannot delete a subnetgroup if it is currently in use by a cluster. You also cannot delete a subnet group on a cluster with Multi-AZ enabled if doing so leaves that cluster with fewer than two subnets. You must first uncheck Multi-AZand then delete the subnet.
The following procedures show you how to delete a subnet group.
Deleting a subnet group (Console)
To delete a subnet group
1. Sign in to the AWS Management Console and open the MemoryDB for Redis console at https://console.aws.amazon.com/memorydb/.
2. In the left navigation pane, choose Subnet Groups.3. In the list of subnet groups, choose the one you want to delete, choose Actions and then choose
Delete.
NoteYou cannot delete a default subnet group or one that is associated with any clusters.
4. The Delete Subnet Groups confirmation screen will appear.5. To delete the subnet group, enter delete in the confirmation text box. To keep the subnet group,
choose Cancel.
Deleting a subnet group (AWS CLI)
Using the AWS CLI, call the command delete-subnet-group with the following parameter:
• --subnet-group-name mysubnetgroup
For Linux, macOS, or Unix:
aws memorydb delete-subnet-group \ --subnet-group-name mysubnetgroup
For Windows:
aws memorydb delete-subnet-group ^ --subnet-group-name mysubnetgroup
For more information, see the AWS CLI topic delete-subnet-group.
Deleting a subnet group (MemoryDB API)
Using the MemoryDB API, call DeleteSubnetGroup with the following parameter:
• SubnetGroupName=mysubnetgroup
Example
https://memory-db.us-east-1.amazonaws.com/ ?Action=DeleteSubnetGroup &SubnetGroupName=mysubnetgroup
205
Amazon MemoryDB for Redis Developer GuideMemoryDB and Amazon VPC
&SignatureMethod=HmacSHA256 &SignatureVersion=4 &Timestamp=20210801T220302Z &Version=2021-01-01 &X-Amz-Algorithm=Amazon4-HMAC-SHA256 &X-Amz-Credential=<credential> &X-Amz-Date=20210801T220302Z &X-Amz-Expires=20210801T220302Z &X-Amz-Signature=<signature> &X-Amz-SignedHeaders=Host
This command produces no output.
For more information, see the MemoryDB API topic DeleteSubnetGroup.
MemoryDB and Amazon VPCThe Amazon Virtual Private Cloud (Amazon VPC) service defines a virtual network that closely resemblesa traditional data center. When you configure a virtual private cloud (VPC) with Amazon VPC, you canselect its IP address range, create subnets, and configure route tables, network gateways, and securitysettings. You can also add a cluster to the virtual network, and control access to the cluster by usingAmazon VPC security groups.
This section explains how to manually configure a MemoryDB cluster in a VPC. This information isintended for users who want a deeper understanding of how MemoryDB and Amazon VPC worktogether.
Topics• Understanding MemoryDB and VPCs (p. 207)• Access Patterns for Accessing a MemoryDB Cluster in an Amazon VPC (p. 209)• Creating a Virtual Private Cloud (VPC) (p. 214)
206

Amazon MemoryDB for Redis Developer GuideMemoryDB and Amazon VPC
Understanding MemoryDB and VPCsMemoryDB is fully integrated with Amazon VPC. For MemoryDB users, this means the following:
• MemoryDB always launches your cluster in a VPC.• If you're new to AWS, a default VPC will be created for you automatically.• If you have a default VPC and don't specify a subnet when you launch a cluster, the cluster launches
into your default Amazon VPC.
For more information, see Detecting Your Supported Platforms and Whether You Have a Default VPC.
With Amazon VPC, you can create a virtual network in the AWS Cloud that closely resembles a traditionaldata center. You can configure your VPC, including selecting its IP address range, creating subnets, andconfiguring route tables, network gateways, and security settings.
MemoryDB manages software upgrades, patching, failure detection, and recovery.
Overview of MemoryDB in a VPC
A VPC is an isolated portion of the AWS Cloud that is assigned its own block of IP addresses.
An internet gateway connects your VPC directly to the internet and provides access to otherAWS resources such as Amazon Simple Storage Service (Amazon S3) that are running outsideyour VPC.
An Amazon VPC subnet is a segment of the IP address range of a VPC where you can isolateAWS resources according to your security and operational needs.
A routing table in your VPC directs network traffic between the subnet and the internet. TheAmazon VPC has an implied router.
An Amazon VPC security group controls inbound and outbound traffic for your MemoryDBclusters and Amazon EC2 instances.
You can launch a MemoryDB cluster in the subnet. The nodes have private IP addresses fromthe subnet's range of addresses.
You can also launch Amazon EC2 instances in the subnet. Each Amazon EC2 instance has aprivate IP address from the subnet's range of addresses. The Amazon EC2 instance can connectto any node in the same subnet.
For an Amazon EC2 instance in your VPC to be reachable from the internet, you need to assigna static, public address called a Elastic IP address to the instance.
Prerequisites
To create a MemoryDB cluster within a VPC, your VPC must meet the following requirements:
• Your VPC must allow nondedicated Amazon EC2 instances. You cannot use MemoryDB in a VPC that isconfigured for dedicated instance tenancy.
• A subnet group must be defined for your VPC. MemoryDB uses that subnet group to select a subnetand IP addresses within that subnet to associate with your nodes.
• A security group must be defined for your VPC, or you can use the default provided.• CIDR blocks for each subnet must be large enough to provide spare IP addresses for MemoryDB to use
during maintenance activities.
207

Amazon MemoryDB for Redis Developer GuideMemoryDB and Amazon VPC
Routing and security
You can configure routing in your VPC to control where traffic flows (for example, to the internetgateway or virtual private gateway). With an internet gateway, your VPC has direct access to other AWSresources that are not running in your VPC. If you choose to have only a virtual private gateway with aconnection to your organization's local network, you can route your internet-bound traffic over the VPNand use local security policies and firewall to control egress. In that case, you incur additional bandwidthcharges when you access AWS resources over the internet.
You can use Amazon VPC security groups to help secure the MemoryDB clusters and Amazon EC2instances in your Amazon VPC. Security groups act like a firewall at the instance level, not the subnetlevel.
NoteWe strongly recommend that you use DNS names to connect to your nodes, as the underlying IPaddress can change over time.
Amazon VPC documentation
Amazon VPC has its own set of documentation to describe how to create and use your Amazon VPC. Thefollowing table shows where to find information in the Amazon VPC guides.
Description Documentation
How to get started using Amazon VPC Getting started with Amazon VPC
How to use Amazon VPC through the AWSManagement Console
Amazon VPC User Guide
Complete descriptions of all the Amazon VPCcommands
Amazon EC2 Command Line Reference (theAmazon VPC commands are found in the AmazonEC2 reference)
Complete descriptions of the Amazon VPC APIoperations, data types, and errors
Amazon EC2 API Reference (the Amazon VPCAPI operations are found in the Amazon EC2reference)
Information for the network administrator whoneeds to configure the gateway at your end of anoptional IPsec VPN connection
What is AWS Site-to-Site VPN?
For more detailed information about Amazon Virtual Private Cloud, see Amazon Virtual Private Cloud.
208

Amazon MemoryDB for Redis Developer GuideMemoryDB and Amazon VPC
Access Patterns for Accessing a MemoryDB Cluster in an AmazonVPC
MemoryDB for Redis supports the following scenarios for accessing a cluster in an Amazon VPC:
Contents
• Accessing a MemoryDB Cluster when it and the Amazon EC2 Instance are in the Same AmazonVPC (p. 209)
• Accessing a MemoryDB Cluster when it and the Amazon EC2 Instance are in Different AmazonVPCs (p. 210)
• Accessing a MemoryDB Cluster when it and the Amazon EC2 Instance are in DifferentAmazon VPCs in the Same Region (p. 210)
• Using Transit Gateway (p. 211)
• Accessing a MemoryDB Cluster when it and the Amazon EC2 Instance are in DifferentAmazon VPCs in Different Regions (p. 211)
• Using Transit VPC (p. 211)
• Accessing a MemoryDB Cluster from an Application Running in a Customer's Data Center (p. 212)
• Accessing a MemoryDB Cluster from an Application Running in a Customer's Data CenterUsing VPN Connectivity (p. 212)
• Accessing a MemoryDB Cluster from an Application Running in a Customer's Data CenterUsing Direct Connect (p. 212)
Accessing a MemoryDB Cluster when it and the Amazon EC2 Instance are in theSame Amazon VPC
The most common use case is when an application deployed on an EC2 instance needs to connect to acluster in the same VPC.
The simplest way to manage access between EC2 instances and clusters in the same VPC is to do thefollowing:
1. Create a VPC security group for your cluster. This security group can be used to restrict access to theclusters. For example, you can create a custom rule for this security group that allows TCP accessusing the port you assigned to the cluster when you created it and an IP address you will use toaccess the cluster.
The default port for MemoryDB clusters is 6379.
2. Create a VPC security group for your EC2 instances (web and application servers). This security groupcan, if needed, allow access to the EC2 instance from the Internet via the VPC's routing table. Forexample, you can set rules on this security group to allow TCP access to the EC2 instance over port22.
3. Create custom rules in the security group for your cluster that allow connections from the securitygroup you created for your EC2 instances. This would allow any member of the security group toaccess the clusters.
To create a rule in a VPC security group that allows connections from another security group
1. Sign in to the AWS Management Console and open the Amazon VPC console at https://console.aws.amazon.com/vpc.
2. In the left navigation pane, choose Security Groups.
209

Amazon MemoryDB for Redis Developer GuideMemoryDB and Amazon VPC
3. Select or create a security group that you will use for your clusters. Under Inbound Rules, selectEdit Inbound Rules and then select Add Rule. This security group will allow access to members ofanother security group.
4. From Type choose Custom TCP Rule.
a. For Port Range, specify the port you used when you created your cluster.
The default port for MemoryDB clusters is 6379.b. In the Source box, start typing the ID of the security group. From the list select the security
group you will use for your Amazon EC2 instances.5. Choose Save when you finish.
Accessing a MemoryDB Cluster when it and the Amazon EC2 Instance are inDifferent Amazon VPCs
When your cluster is in a different VPC from the EC2 instance you are using to access it, there are severalways to access the cluster. If the cluster and EC2 instance are in different VPCs but in the same region,you can use VPC peering. If the cluster and the EC2 instance are in different regions, you can create VPNconnectivity between regions.
Topics• Accessing a MemoryDB Cluster when it and the Amazon EC2 Instance are in Different Amazon VPCs
in the Same Region (p. 210)• Accessing a MemoryDB Cluster when it and the Amazon EC2 Instance are in Different Amazon VPCs
in Different Regions (p. 211)
Accessing a MemoryDB Cluster when it and the Amazon EC2 Instance are in Different AmazonVPCs in the Same Region
Cluster accessed by an Amazon EC2 instance in a different Amazon VPC within the same Region - VPCPeering Connection
A VPC peering connection is a networking connection between two VPCs that enables you to route trafficbetween them using private IP addresses. Instances in either VPC can communicate with each otheras if they are within the same network. You can create a VPC peering connection between your ownAmazon VPCs, or with an Amazon VPC in another AWS account within a single region. To learn moreabout Amazon VPC peering, see the VPC documentation.
To access a cluster in a different Amazon VPC over peering
1. Make sure that the two VPCs do not have an overlapping IP range or you will not be able to peerthem.
210
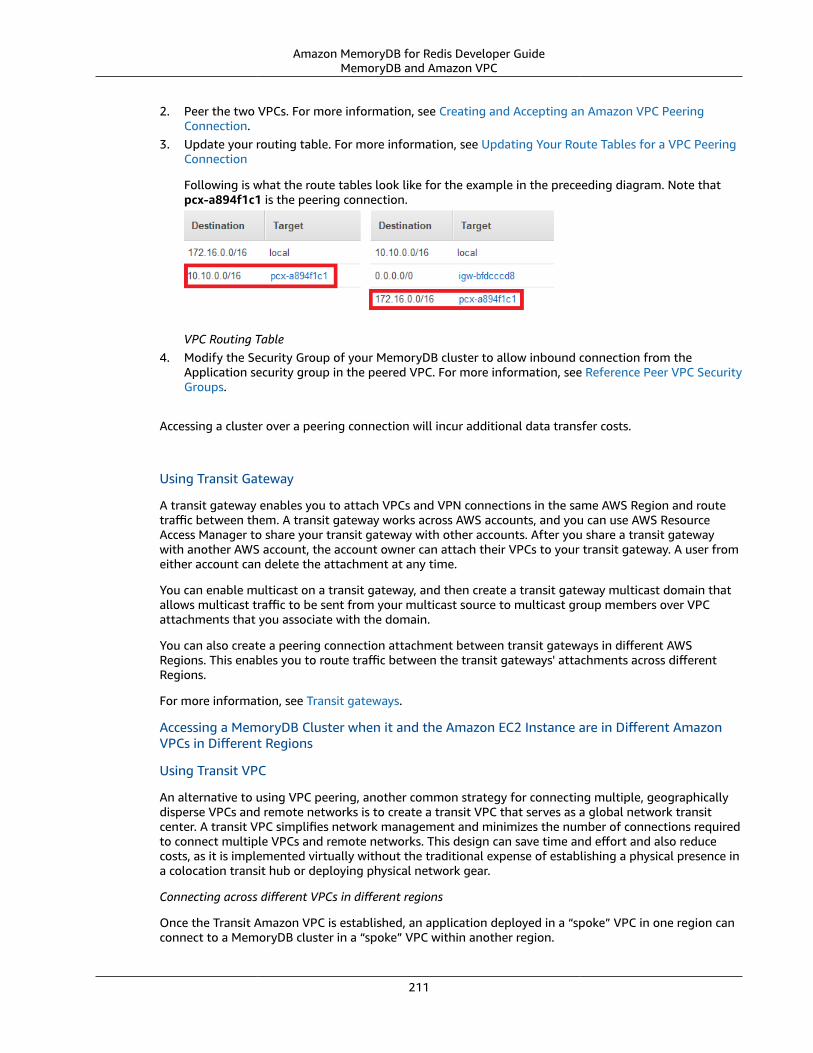
Amazon MemoryDB for Redis Developer GuideMemoryDB and Amazon VPC
2. Peer the two VPCs. For more information, see Creating and Accepting an Amazon VPC PeeringConnection.
3. Update your routing table. For more information, see Updating Your Route Tables for a VPC PeeringConnection
Following is what the route tables look like for the example in the preceeding diagram. Note thatpcx-a894f1c1 is the peering connection.
VPC Routing Table4. Modify the Security Group of your MemoryDB cluster to allow inbound connection from the
Application security group in the peered VPC. For more information, see Reference Peer VPC SecurityGroups.
Accessing a cluster over a peering connection will incur additional data transfer costs.
Using Transit Gateway
A transit gateway enables you to attach VPCs and VPN connections in the same AWS Region and routetraffic between them. A transit gateway works across AWS accounts, and you can use AWS ResourceAccess Manager to share your transit gateway with other accounts. After you share a transit gatewaywith another AWS account, the account owner can attach their VPCs to your transit gateway. A user fromeither account can delete the attachment at any time.
You can enable multicast on a transit gateway, and then create a transit gateway multicast domain thatallows multicast traffic to be sent from your multicast source to multicast group members over VPCattachments that you associate with the domain.
You can also create a peering connection attachment between transit gateways in different AWSRegions. This enables you to route traffic between the transit gateways' attachments across differentRegions.
For more information, see Transit gateways.
Accessing a MemoryDB Cluster when it and the Amazon EC2 Instance are in Different AmazonVPCs in Different Regions
Using Transit VPC
An alternative to using VPC peering, another common strategy for connecting multiple, geographicallydisperse VPCs and remote networks is to create a transit VPC that serves as a global network transitcenter. A transit VPC simplifies network management and minimizes the number of connections requiredto connect multiple VPCs and remote networks. This design can save time and effort and also reducecosts, as it is implemented virtually without the traditional expense of establishing a physical presence ina colocation transit hub or deploying physical network gear.
Connecting across different VPCs in different regions
Once the Transit Amazon VPC is established, an application deployed in a “spoke” VPC in one region canconnect to a MemoryDB cluster in a “spoke” VPC within another region.
211

Amazon MemoryDB for Redis Developer GuideMemoryDB and Amazon VPC
To access a cluster in a different VPC within a different AWS Region
1. Deploy a Transit VPC Solution. For more information, see, AWSTransit Gateway.
2. Update the VPC routing tables in the App and VPCs to route traffic through the VGW (Virtual PrivateGateway) and the VPN Appliance. In case of Dynamic Routing with Border Gateway Protocol (BGP)your routes may be automatically propagated.
3. Modify the Security Group of your MemoryDB cluster to allow inbound connection from theApplication instances IP range. Note that you will not be able to reference the application serverSecurity Group in this scenario.
Accessing a cluster across regions will introduce networking latencies and additional cross-region datatransfer costs.
Accessing a MemoryDB Cluster from an Application Running in a Customer'sData Center
Another possible scenario is a Hybrid architecture where clients or applications in the customer’s datacenter may need to access a MemoryDB Cluster in the VPC. This scenario is also supported providingthere is connectivity between the customers’ VPC and the data center either through VPN or DirectConnect.
Topics
• Accessing a MemoryDB Cluster from an Application Running in a Customer's Data Center Using VPNConnectivity (p. 212)
• Accessing a MemoryDB Cluster from an Application Running in a Customer's Data Center Using DirectConnect (p. 212)
Accessing a MemoryDB Cluster from an Application Running in a Customer's Data Center UsingVPN Connectivity
Connecting to MemoryDB from your data center via a VPN
To access a cluster in a VPC from on-prem application over VPN connection
1. Establish VPN Connectivity by adding a hardware Virtual Private Gateway to your VPC. For moreinformation, see Adding a Hardware Virtual Private Gateway to Your VPC.
2. Update the VPC routing table for the subnet where your MemoryDB cluster is deployed to allowtraffic from your on-premises application server. In case of Dynamic Routing with BGP your routesmay be automatically propagated.
3. Modify the Security Group of your MemoryDB cluster to allow inbound connection from the on-premises application servers.
Accessing a cluster over a VPN connection will introduce networking latencies and additional datatransfer costs.
Accessing a MemoryDB Cluster from an Application Running in a Customer's Data Center UsingDirect Connect
Connecting to MemoryDB from your data center via Direct Connect
212

Amazon MemoryDB for Redis Developer GuideMemoryDB and Amazon VPC
To access a MemoryDB cluster from an application running in your network using DirectConnect
1. Establish Direct Connect connectivity. For more information, see, Getting Started with AWS DirectConnect.
2. Modify the Security Group of your MemoryDB cluster to allow inbound connection from the on-premises application servers.
Accessing a cluster over DX connection may introduce networking latencies and additional data transfercharges.
213

Amazon MemoryDB for Redis Developer GuideMemoryDB and Amazon VPC
Creating a Virtual Private Cloud (VPC)
In this example, you create a virtual private cloud (VPC) based on the Amazon VPC service with a privatesubnet for each Availability Zone.
Creating a VPC (Console)
To create a MemoryDB cluster inside a VPC
1. Sign in to the AWS Management Console, and open the Amazon VPC console at https://console.aws.amazon.com/vpc/.
2. Create a new VPC by using the Amazon Virtual Private Cloud wizard:
a. In the left navigation pane, choose VPC Dashboard.
b. Choose Start VPC Wizard.
c. In the Amazon VPC wizard, choose VPC with Public and Private Subnets, and then chooseNext.
d. On the VPC with Public and Private Subnets page, keep the default options, and then chooseCreate VPC.
e. In the confirmation message that appears, choose Close.
3. Confirm that there are two subnets in your VPC, a public subnet and a private subnet. These subnetsare created automatically.
a. In the left navigation pane, choose Subnets.
b. In the list of subnets, find the two subnets that are in your VPC, as shown following.
The public subnet will have one fewer available IP address, because the wizard creates anAmazon EC2 NAT instance and an IP address (for which Amazon EC2 rates apply) for outboundcommunication to the internet from your private subnet.
TipMake a note of your two subnet identifiers, and which is public and private. You will needthis information later when you launch your clusters and add an Amazon EC2 instance toyour VPC.
4. Create an Amazon VPC security group. You will use this group for your cluster and your Amazon EC2instance.
a. In the left navigation pane of the AWS Management Console, choose Security Groups.
b. Choose Create Security Group.
c. Enter a name and a description for your security group in the corresponding boxes. For VPC,choose the identifier for your VPC.
214

Amazon MemoryDB for Redis Developer GuideMemoryDB and Amazon VPC
d. When the settings are as you want them, choose Yes, Create.5. Define a network ingress rule for your security group. This rule will allow you to connect to your
Amazon EC2 instance using Secure Shell (SSH).
a. In the left navigation pane, choose Security Groups.b. Find your security group in the list, and then choose it.c. Under Security Group, choose the Inbound tab. In the Create a new rule box, choose SSH, and
then choose Add Rule.
Set the following values for your new inbound rule to allow HTTP access:
• Type: HTTP• Source: 0.0.0.0/0
d. Set the following values for your new inbound rule to allow HTTP access:
• Type: HTTP• Source: 0.0.0.0/0
Choose Apply Rule Changes.
Now you are ready to create a subnet group and launch a cluster in your VPC.
215

Amazon MemoryDB for Redis Developer GuideService updates
Service updates in MemoryDB for RedisMemoryDB for Redis automatically monitors your fleet of clusters and nodes to apply service updatesas they become available. Typically, you set up a predefined maintenance window so that MemoryDBcan apply these updates. However, in some cases you might find this approach too rigid and likely toconstrain your business flows.
With service updates, you control when and which updates are applied. You can also monitor theprogress of these updates to your selected MemoryDB cluster in real time.
Managing the service updatesMemoryDB service updates are released on a regular basis. If you have one or more qualifying clustersfor those service updates, you receive notifications through email, SNS, the Personal Health Dashboard(PHD), and Amazon CloudWatch events when the updates are released. The updates are also displayedon the Service Updates page on the MemoryDB console. By using this dashboard, you can view all theservice updates and their status for your MemoryDB fleet.
You control when to apply an update before an auto-update starts. We strongly recommend that youapply any updates of type security-update as soon as possible to ensure that your MemoryDB are alwaysup-to-date with current security patches.
The following sections explore these options in detail.
Topics• Applying the service updates (p. 216)
Applying the service updatesYou can start applying the service updates to your fleet from the time that the updates have anavailable status. Service updates are cumulative. In other words, any updates that you haven't appliedyet are included with your latest update.
If a service update has auto-update enabled, you can choose to not take any action when it becomesavailable. MemoryDB will schedule to apply the update during your clusters' maintenance window afterthe Auto-update start date. You will receive related notifications for each stage of the update.
NoteYou can apply only those service updates that have an available or scheduled status.
For more information about reviewing and applying any service-specific updates to applicableMemoryDB clusters, see Applying the service updates using the console (p. 216).
When a new service update is available for one or more of your MemoryDB clusters, you can use theMemoryDB console, API, or AWS CLI to apply the update. The following sections explain the options thatyou can use to apply updates.
Applying the service updates using the console
To view the list of available service updates, along with other information, go to the Service Updatespage in the console.
1. Sign in to the AWS Management Console and open the MemoryDB for Redis console at https://console.aws.amazon.com/memorydb/.
2. On the navigation pane, choose Service Updates.
216

Amazon MemoryDB for Redis Developer GuideManaging the service updates
Under Service update details you can view the following:
• Service update name: The unique name of the service update• Update description: Detailed information about the service update• Auto-update start date: If this attribute is set, MemoryDB will start scheduling your clusters to be
auto-updated in the appropriate maintenance windows after this date. You will receive notificationsin advance on the exact scheduled maintenance window, which might not be the immediate one afterthe Auto-update start date. You can still apply the update to your clusters any time you choose. If theattribute is not set, the service update is not auto-update enabled and MemoryDB will not update yourclusters automatically.
In the Cluster update status section, you can view a list of clusters where the service update has notbeen applied or has just been applied recently. For each cluster, you can view the following:
• Cluster name: The name of the cluster• Nodes updated: The ratio of individual nodes within a specific cluster that were updated or remain
available for the specific service update.• Update Type: The type of the service update, which is one of security-update or engine-update• Status: The status of the service update on the cluster, which is one of the following:
• available: The update is available for the requisite cluster.• in-progres: The update is being applied to this cluster.• scheduled: The update date has been scheduled.• complete: The update has been successfully applied. Cluster with a complete status will be displayed
for 7 days after its completion.
If you chose any or all of the clusters with the available or scheduled status, and then chose Applynow, the update will start being applied on those clusters.
Applying the service updates using the AWS CLI
After you receive notification that service updates are available, you can inspect and apply them usingthe AWS CLI:
• To retrieve a description of the service updates that are available, run the following command:
aws memorydb describe-service-updates --status available
For more information, see describe-service-updates.• To apply a service update on a list of clusters, run the following command:
aws memorydb batch-update-cluster --service-updateServiceUpdateNameToApply=sample-service-update --cluster-names cluster-1cluster2
For more information, see batch-update-cluster.
217
Amazon MemoryDB for Redis Developer Guide
ReferenceThe topics in this section cover working with the MemoryDB API and the MemoryDB section of the AWSCLI. Also included in this section are common error messages and service notifications.
• Using the MemoryDB API (p. 219)• MemoryDB API Reference• MemoryDB section of the AWS CLI Reference
218

Amazon MemoryDB for Redis Developer GuideUsing the MemoryDB API
Using the MemoryDB APIThis section provides task-oriented descriptions of how to use and implement MemoryDB operations. Fora complete description of these operations, see the MemoryDB API Reference.
Topics
• Using the query API (p. 219)
• Available libraries (p. 221)
• Troubleshooting applications (p. 221)
Using the query API
Query parameters
HTTP Query-based requests are HTTP requests that use the HTTP verb GET or POST and a Queryparameter named Action.
Each Query request must include some common parameters to handle authentication and selection ofan action.
Some operations take lists of parameters. These lists are specified using the param.n notation. Values ofn are integers starting from 1.
Query request authentication
You can only send Query requests over HTTPS and you must include a signature in every Query request.This section describes how to create the signature. The method described in the following procedure isknown as signature version 4.
The following are the basic steps used to authenticate requests to AWS. This assumes you are registeredwith AWS and have an Access Key ID and Secret Access Key.
Query authentication process
1. The sender constructs a request to AWS.
2. The sender calculates the request signature, a Keyed-Hashing for Hash-based MessageAuthentication Code (HMAC) with a SHA-1 hash function, as defined in the next section of this topic.
3. The sender of the request sends the request data, the signature, and Access Key ID (the key-identifierof the Secret Access Key used) to AWS.
4. AWS uses the Access Key ID to look up the Secret Access Key.
5. AWS generates a signature from the request data and the Secret Access Key using the samealgorithm used to calculate the signature in the request.
6. If the signatures match, the request is considered to be authentic. If the comparison fails, therequest is discarded, and AWS returns an error response.
NoteIf a request contains a Timestamp parameter, the signature calculated for the request expires15 minutes after its value.If a request contains an Expires parameter, the signature expires at the time specified by theExpires parameter.
219

Amazon MemoryDB for Redis Developer GuideUsing the query API
To calculate the request signature
1. Create the canonicalized query string that you need later in this procedure:
a. Sort the UTF-8 query string components by parameter name with natural byte ordering.The parameters can come from the GET URI or from the POST body (when Content-Type isapplication/x-www-form-urlencoded).
b. URL encode the parameter name and values according to the following rules:
i. Do not URL encode any of the unreserved characters that RFC 3986 defines. Theseunreserved characters are A-Z, a-z, 0-9, hyphen ( - ), underscore ( _ ), period ( . ), and tilde( ~ ).
ii. Percent encode all other characters with %XY, where X and Y are hex characters 0-9 anduppercase A-F.
iii. Percent encode extended UTF-8 characters in the form %XY%ZA....iv. Percent encode the space character as %20 (and not +, as common encoding schemes do).
c. Separate the encoded parameter names from their encoded values with the equals sign ( = )(ASCII character 61), even if the parameter value is empty.
d. Separate the name-value pairs with an ampersand ( & ) (ASCII code 38).2. Create the string to sign according to the following pseudo-grammar (the "\n" represents an ASCII
newline).
StringToSign = HTTPVerb + "\n" +ValueOfHostHeaderInLowercase + "\n" +HTTPRequestURI + "\n" +CanonicalizedQueryString <from the preceding step>
The HTTPRequestURI component is the HTTP absolute path component of the URI up to, but notincluding, the query string. If the HTTPRequestURI is empty, use a forward slash ( / ).
3. Calculate an RFC 2104-compliant HMAC with the string you just created, your Secret Access Key asthe key, and SHA256 or SHA1 as the hash algorithm.
For more information, see https://www.ietf.org/rfc/rfc2104.txt.4. Convert the resulting value to base64.5. Include the value as the value of the Signature parameter in the request.
For example, the following is a sample request (linebreaks added for clarity).
https://memory-db.us-east-1.amazonaws.com/ ?Action=DescribeClusters &ClusterName=myCluster &SignatureMethod=HmacSHA256 &SignatureVersion=4 &Version=2021-01-01
For the preceding query string, you would calculate the HMAC signature over the following string.
GET\n memory-db.amazonaws.com\n Action=DescribeClusters &ClusterName=myCluster &SignatureMethod=HmacSHA256 &SignatureVersion=4
220

Amazon MemoryDB for Redis Developer GuideAvailable libraries
&Version=2021-01-01 &X-Amz-Algorithm=Amazon4-HMAC-SHA256 &X-Amz-Credential=AKIADQKE4SARGYLE%2F20140523%2Fus-east-1%2Fmemorydb%2Faws4_request &X-Amz-Date=20210801T223649Z &X-Amz-SignedHeaders=content-type%3Bhost%3Buser-agent%3Bx-amz-content-sha256%3Bx-amz-date content-type: host:memory-db.us-east-1.amazonaws.com user-agent:ServicesAPICommand_Client x-amz-content-sha256: x-amz-date:
The result is the following signed request.
https://memory-db.us-east-1.amazonaws.com/ ?Action=DescribeClusters &ClusterName=myCluster &SignatureMethod=HmacSHA256 &SignatureVersion=4 &Version=2021-01-01 &X-Amz-Algorithm=Amazon4-HMAC-SHA256 &X-Amz-Credential=AKIADQKE4SARGYLE/20141201/us-east-1/memorydb/aws4_request &X-Amz-Date=20210801T223649Z &X-Amz-SignedHeaders=content-type;host;user-agent;x-amz-content-sha256;x-amz-date &X-Amz-Signature=2877960fced9040b41b4feaca835fd5cfeb9264f768e6a0236c9143f915ffa56
For detailed information on the signing process and calculating the request signature, see the topicSignature Version 4 signing process and its subtopics.
Available librariesAWS provides software development kits (SDKs) for software developers who prefer to build applicationsusing language-specific APIs instead of the Query API. These SDKs provide basic functions (not includedin the APIs), such as request authentication, request retries, and error handling so that it is easier to getstarted. SDKs and additional resources are available for the following programming languages:
• Java
• Windows and .NET
• PHP
• Python
• Ruby
For information about other languages, see Sample code & libraries.
Troubleshooting applicationsMemoryDB provides specific and descriptive errors to help you troubleshoot problems while interactingwith the MemoryDB API.
Retrieving errorsTypically, you want your application to check whether a request generated an error before you spend anytime processing results. The easiest way to find out if an error occurred is to look for an Error node inthe response from the MemoryDB API.
221

Amazon MemoryDB for Redis Developer GuideTroubleshooting applications
XPath syntax provides a simple way to search for the presence of an Error node, as well as an easy wayto retrieve the error code and message. The following code snippet uses Perl and the XML::XPath moduleto determine if an error occurred during a request. If an error occurred, the code prints the first errorcode and message in the response.
use XML::XPath; my $xp = XML::XPath->new(xml =>$response); if ( $xp->find("//Error") ) {print "There was an error processing your request:\n", " Error code: ",$xp->findvalue("//Error[1]/Code"), "\n", " ",$xp->findvalue("//Error[1]/Message"), "\n\n"; }
Troubleshooting tipsWe recommend the following processes to diagnose and resolve problems with the MemoryDB API.
• Verify that MemoryDB is running correctly.
To do this, simply open a browser window and submit a query request to the MemoryDB service(such as https://memory-db.us-east-1.amazonaws.com). A MissingAuthenticationTokenException orUnknownOperationException confirms that the service is available and responding to requests.
• Check the structure of your request.
Each MemoryDB operation has a reference page in the MemoryDB API Reference. Double-check thatyou are using parameters correctly. To give you ideas regarding what might be wrong, look at thesample requests or user scenarios to see if those examples are doing similar operations.
• Check the forum.
MemoryDB has a discussion forum where you can search for solutions to problems others haveexperienced along the way. To view the forum, see
https://forums.aws.amazon.com/ .
222

Amazon MemoryDB for Redis Developer Guide
Quotas for Amazon MemoryDB forRedis
Your AWS account has default quotas, formerly referred to as limits, for each AWS service. Unlessotherwise noted, each quota is Region-specific. You can request increases for some quotas, and otherquotas cannot be increased.
To request a quota increase, see Requesting a Quota Increase in the Service Quotas User Guide. If thequota is not yet available in Service Quotas, use the limit increase form.
Your AWS account has the following quotas related to MemoryDB.
Resource Default
Nodes per Region 300
Nodes per cluster per instance type 90
Nodes per shard 6
Parameter groups per Region 150
Subnet groups per Region 150
Subnets per subnet group 20
223

Amazon MemoryDB for Redis Developer Guide
Document history for the MemoryDBUser Guide
The following table describes the documentation releases for MemoryDB.
update-history-change update-history-description update-history-date
Initial release (p. 224) Initial release of the MemoryDBUser Guide. For moreinformation, see What isMemoryDB?
August 19, 2021
224