Embed Size (px)
Citation preview
1
AMD SP5100 Dot Hill SATA RAID Users Manual V100
2
Table of Contents Section 1 – Dot Hill Firmware Overview Firmware Overview Page 3 Firmware Option Rom/Firmware Overview Page 3 Firmware Menus Page 4
• Initialize Disks Menu Page 5 • Create Array Page 7 • Delete Array Page 9 • View Disk Details Page 10 • View Array Details Page 11 • Rescan all Channels Page 12 • Controller Options Page 12 • Continue to Boot Page 13
Section 2 – Installing the RAIDCore Management Software Installing Windows Management Suite Page 14 Management Suite with Drivers vs. Management Suite Page 16 RAIDCore Licensing Overview Page 20 Activation Key Page 21 Trial License Page 22 Section 3 – Using the RAIDCore Management Software How to replace a failed drive in a RAID 1 array Page 23 How to replace a failed drive in a RAID 5 array Page 31 Frequently Asked Questions Page 39

3
Section 1: Dot Hill Firmware Overview The RAID controller must be enabled in the BIOS before it can be used. The RAID controller setting is located in the BIOS under the Chipset tab > Southbridge Chipset Configuration. The following options must be set: OnChip SATA Channel: [Enabled] OnChip SATA Type: [RAID]
The RAID firmware will load during POST once these settings have been changed. Firmware and Option ROM Information A Firmware and Option ROM will eventually require an update as Dot Hill makes improvements to the solution. This update process is done by TYAN directly and would not require any interaction on your part. However, there will be times that a support agent will ask you what specific firmware version is present on your motherboard. It is not a given that every motherboard released will all have the same exact version over its life cycle. You can find the particular version of the Dot Hill Option ROM during the POST process.
4
Firmware Menus The main screen of the firmware is entered by pressing <CTRL + R> as the screen on the previous page is displayed during POST. The main screen allows you to: • Initialize Disks • Create Arrays • Delete Arrays • Swap Two Arrays • View Disk Details • View Array Details • Rescan All Channels • Controller Options • Continue to Boot
5
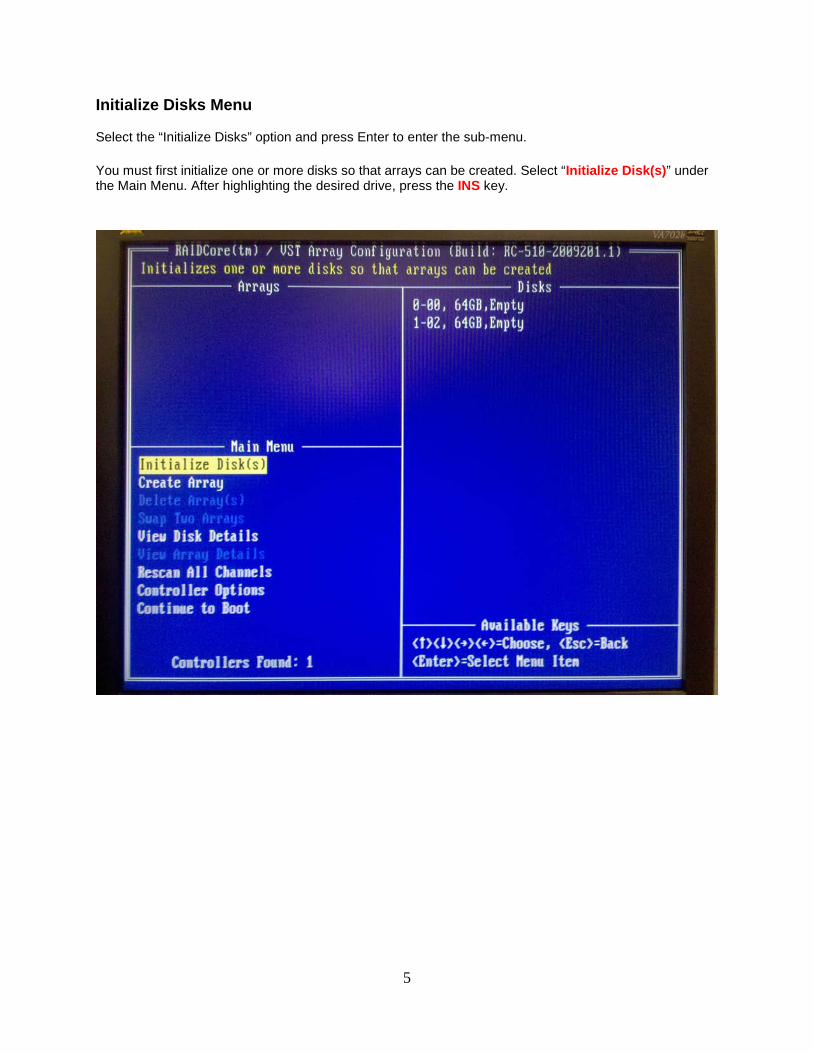
Initialize Disks Menu Select the “Initialize Disks” option and press Enter to enter the sub-menu. You must first initialize one or more disks so that arrays can be created. Select “Initialize Disk(s)” under the Main Menu. After highlighting the desired drive, press the INS key.
6
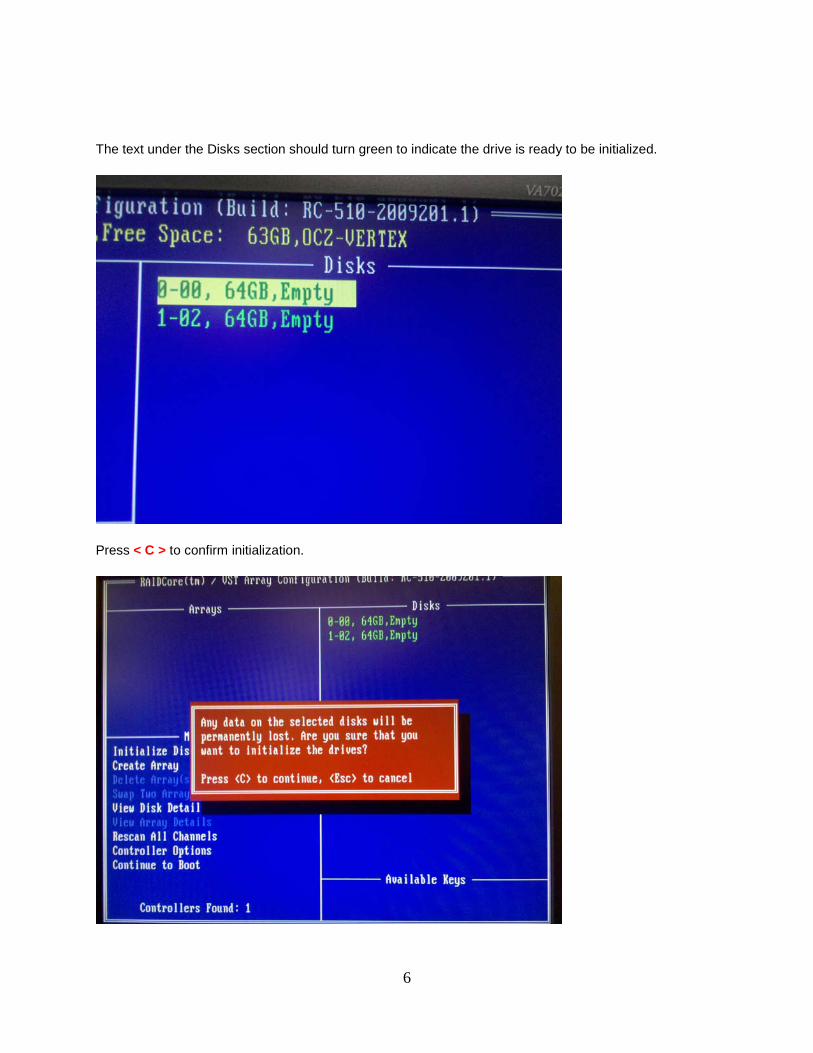
The text under the Disks section should turn green to indicate the drive is ready to be initialized.
Press < C > to confirm initialization.

7
Create Array Menu Select the “Create Array” option and press ENTER to enter the sub-menu. This sub-menu allows you to create an array. After you have initialized your disks, they are ready to be added in a RAID array. Highlight the desired drive(s) you wish to add to a RAID array and press the INS key to select it. Press the ENTER key when finished.
You will be asked which RAID level to create. Select the desired RAID level and press ENTER.

8
The firmware will state the size of your array. Verify this is correct, and then press ENTER to continue.
You are able to choose between three different options: Read/Write, Read Only, or None. Select the desired option, and then press ENTER to continue. Press <C> to confirm RAID creation.
9
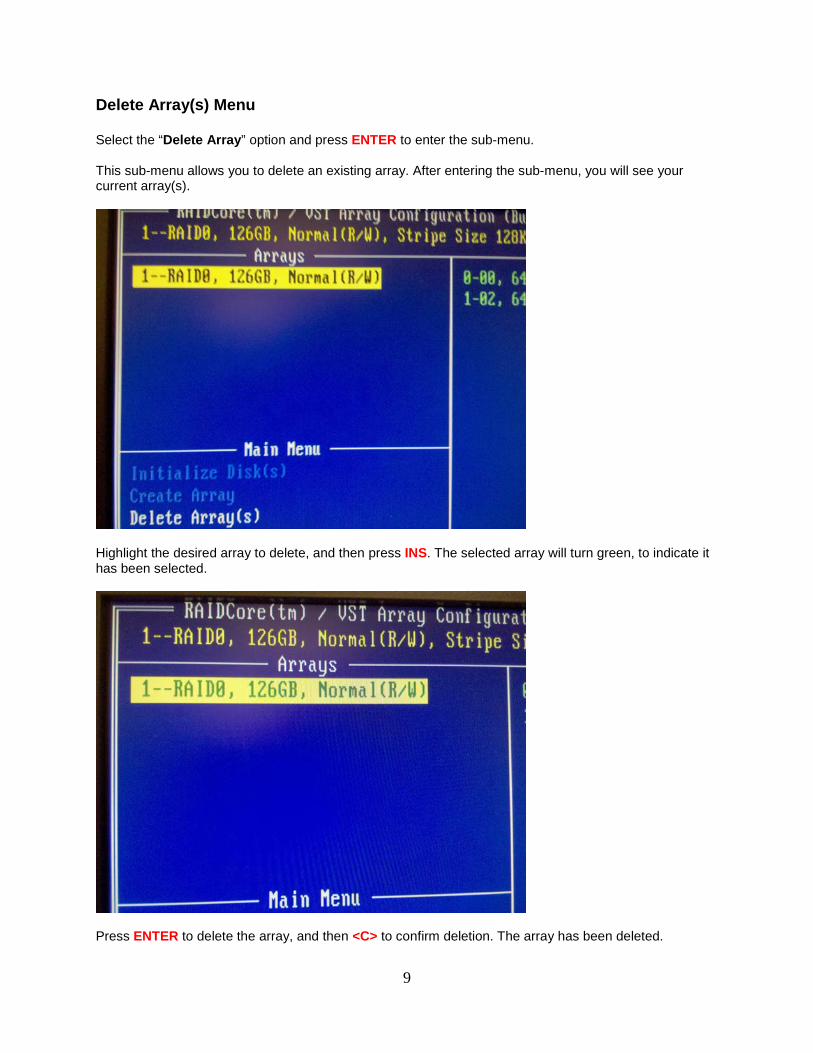
Delete Array(s) Menu Select the “Delete Array” option and press ENTER to enter the sub-menu. This sub-menu allows you to delete an existing array. After entering the sub-menu, you will see your current array(s).
Highlight the desired array to delete, and then press INS. The selected array will turn green, to indicate it has been selected.
Press ENTER to delete the array, and then <C> to confirm deletion. The array has been deleted.

10
View Disk Details Select the “View Disk Details” option and press ENTER to enter the sub-menu. This sub-menu allows you to view details of the individual drives in your array. You cannot make any changes to your array here.

11
View Array Details Select the “View Array Details” option and press ENTER to enter the sub-menu. This sub-menu allows you to view the details of each existing array on the controller. No changes to your array can be made here.

12
Rescan All Channels Select the “Rescan All Channels” option and press ENTER to enter the sub-menu. This option allows you to rescan all channels on the motherboard for any hardware changes. This option is used when adding or removing drives to the machine.
Controller Options Select the “Controller Options” option and press ENTER to enter the sub-menu.

13
Continue to Boot
Choose this option once you are finished configuring your array(s). The firmware will save all changes and proceed to boot to your operating system installation disk or hard drive.
14
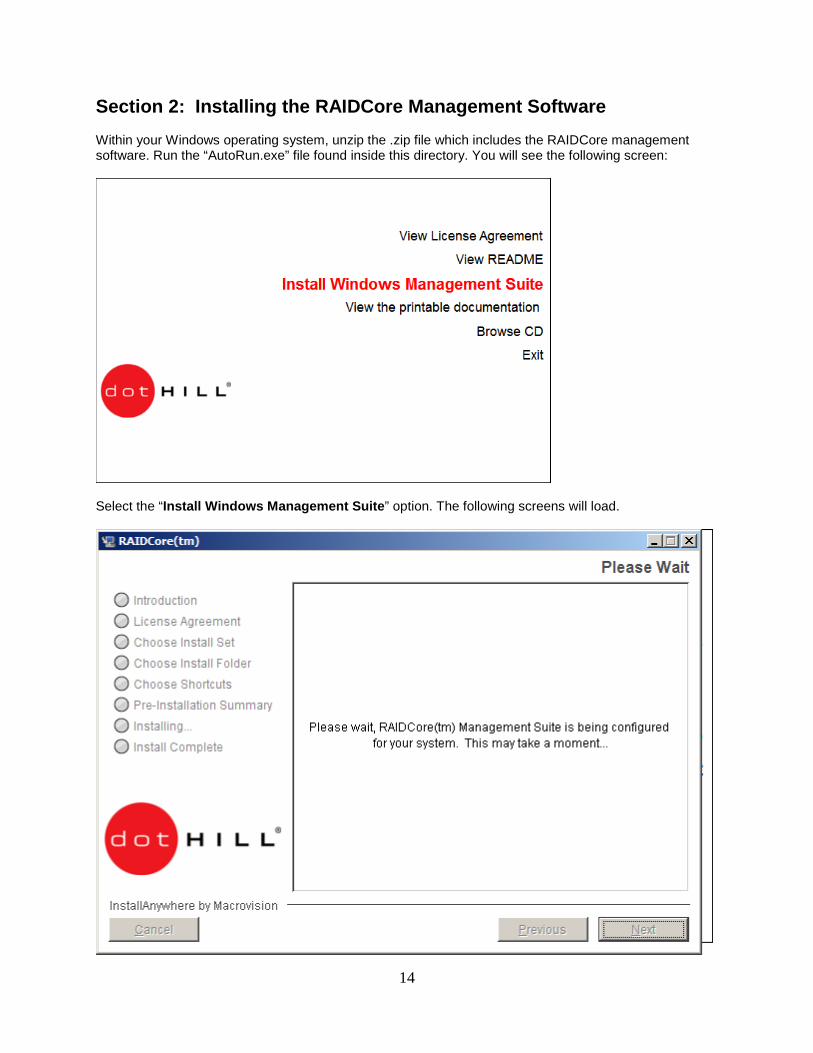
Section 2: Installing the RAIDCore Management Software Within your Windows operating system, unzip the .zip file which includes the RAIDCore management software. Run the “AutoRun.exe” file found inside this directory. You will see the following screen:
Select the “Install Windows Management Suite” option. The following screens will load.
15
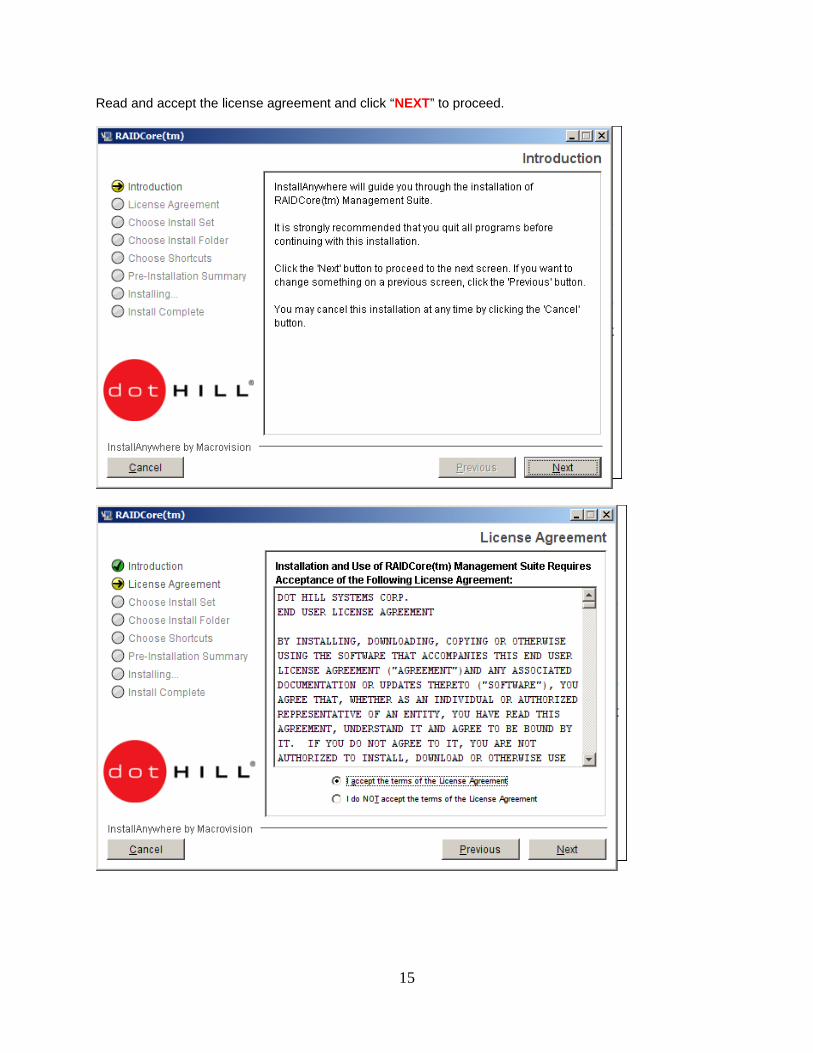
Read and accept the license agreement and click “NEXT” to proceed.
16
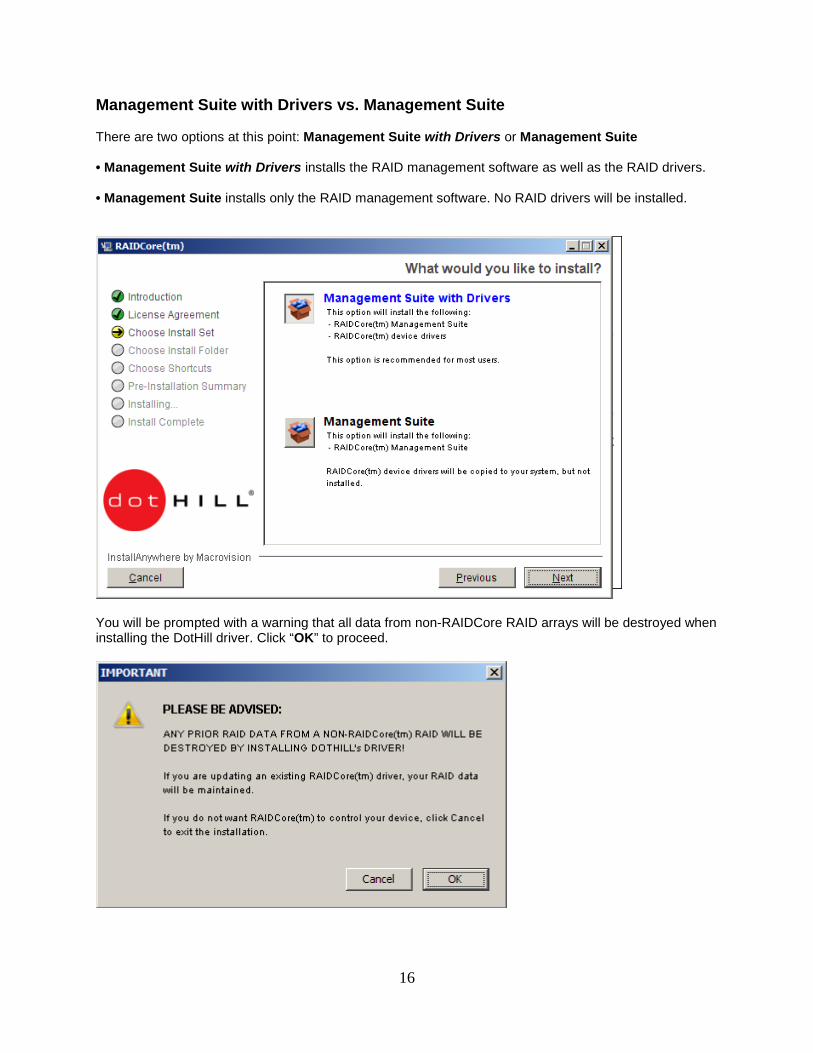
Management Suite with Drivers vs. Management Suite There are two options at this point: Management Suite with Drivers or Management Suite • Management Suite with Drivers installs the RAID management software as well as the RAID drivers. • Management Suite installs only the RAID management software. No RAID drivers will be installed.
You will be prompted with a warning that all data from non-RAIDCore RAID arrays will be destroyed when installing the DotHill driver. Click “OK” to proceed.
17
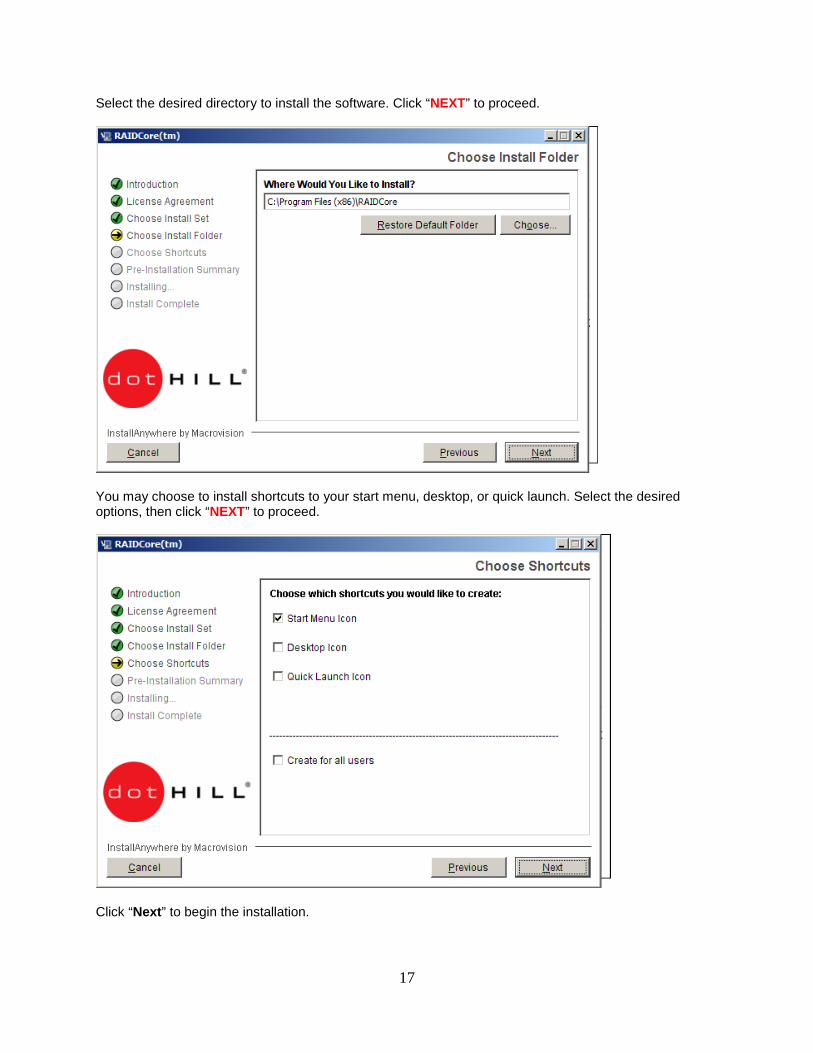
Select the desired directory to install the software. Click “NEXT” to proceed.
You may choose to install shortcuts to your start menu, desktop, or quick launch. Select the desired options, then click “NEXT” to proceed.
Click “Next” to begin the installation.
18
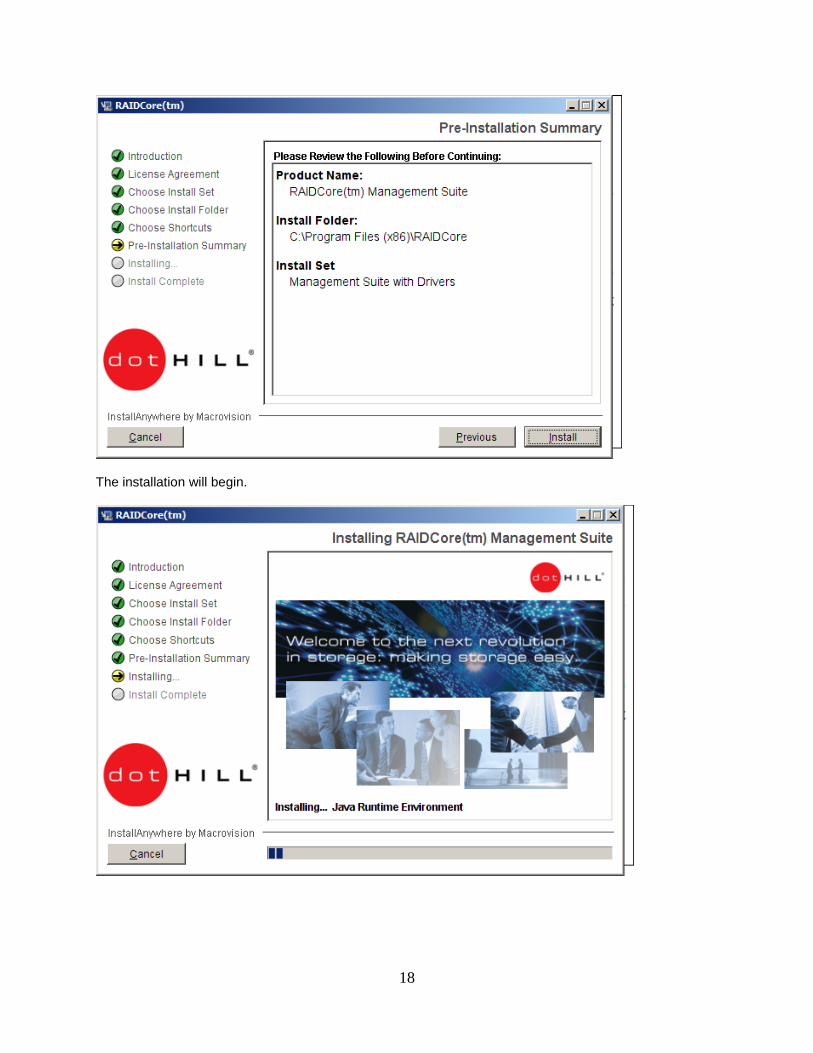
The installation will begin.

19
If you selected “Management Suite with drivers”, you will be prompted once again to install the RAID drivers to the operating system. Click “Install” to proceed.

20
RAIDCore Licensing Overview The AMD SP5100 Chipset with DotHill SATA RAID based motherboard(s) ships with a 30-day trial license that can be activated only once on any given system and expires 30 days after the activation. The trial license is included with the RAIDCore installation and does not need an Internet connection to be activated.
Activation Keys are keyed to the motherboards unique serial number. Activation keys are unique for each system and cannot be used to upgrade alternate motherboards.
RAIDCore Licensing Features
• Programmatic Internet-based Online Activation: This is done via connection to the Dot Hill license server at install time or later (requires an activation ID).
NOTE: Activation can only be done once for a given client system and activation ID. Any subsequent activation request involves Dot Hill technical support. Minor license issues due to hardware changes can be handled via repair (see below). Activation can also be completed after the installation through the GUI or command line tools.
• License Event Notifications: Uses standard RAIDCore event mechanisms (bc_service.log, bc_popup, GUI, e-mail if configured), consistent with other RAIDCore events.
• License Validation Check: A license validation check is done to ensure a valid license. A successful license check results in a heartbeat message to the RAIDCore driver.
NOTE: RAIDCore Event Service <bc_service.exe> must be running during the license validation check. • RAIDCore heartbeat verification checks every hour to make sure that the services are running. If
the heartbeat message is missing, the driver generates a warning event after an hour, and reduces performance after another hour. Performance is restored immediately if a valid license check message is received.
• License validation check will cause a significant reduction in RAIDCore performance after a grace period, if the check fails or shows an expired license. The grace period varies depending on circumstances.
• RAIDCore event notification will send a periodic reminder during the grace period (once a day) and more frequent notification after the grace period has elapsed (twice a day).
• RAIDCore License View and Repair Operations: RAIDCore license view and repair operations are provided for validated licenses via the GUI or command line tools. A repair might be required when the client machine hardware changes. A license check will detect the need to repair and alert the user.
• The bcadm --license or bcadm -L command: Allows the user to view current license information or change the licensing level.

21
Activation Key An Activation Key is required to use the Dot Hill RAID software for more than 30 days. The activation key is included with both the S8005 and S8212 motherboards. Each activation key is unique and tied directly to the specific serial # of the motherboard.
Below is an example of where you can find the Activation key for your specific motherboard: If you are unable to locate your Activation Key then you will need to contact your vendor whom you purchased the motherboard from directly.

22
Trial License If no Activation Key is entered, you can still setup a full RAID solution for 30-days. After the 30-day trial, the RAID array will still be accessible, however the RAID performance will be diminished significantly. The RAIDCore software will also no longer be functional after the 30-day trial.
The installation is now complete. You may choose to reboot now or later.

23
Section 3: Using the RAIDCore Management Software How to replace a failed drive in a RAID 1 array: Note: This procedure only applies when there is no I/O from the time the failed disk was removed to the time the new disk was inserted. Physically remove the failed hard drive from the machine. The RAIDConsole will display a pop-up indicating that a drive was removed and a rescan is required. The rescan will remove the drive from the configuration. Click on RESCAN.
After the Rescan completes you will see the RAID-1 array as critical in the array view, you will also see that the pulled drive was removed from the disk list.
24
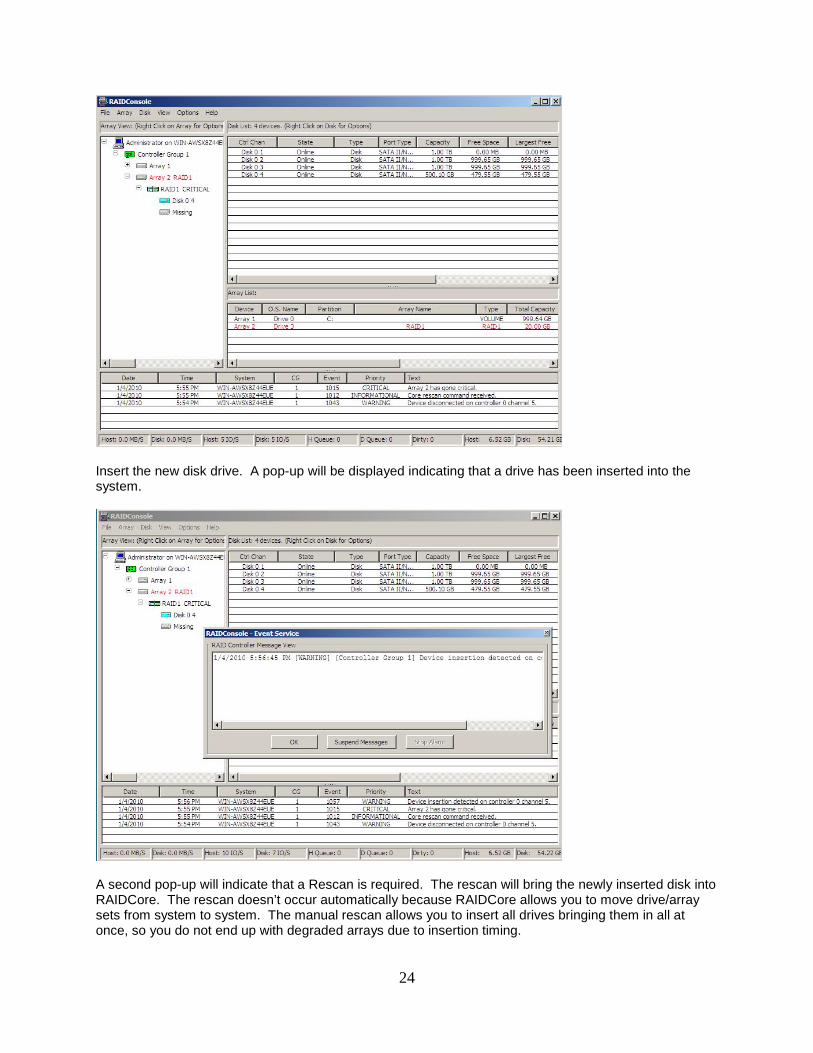
Insert the new disk drive. A pop-up will be displayed indicating that a drive has been inserted into the system.
A second pop-up will indicate that a Rescan is required. The rescan will bring the newly inserted disk into RAIDCore. The rescan doesn’t occur automatically because RAIDCore allows you to move drive/array sets from system to system. The manual rescan allows you to insert all drives bringing them in all at once, so you do not end up with degraded arrays due to insertion timing.
25
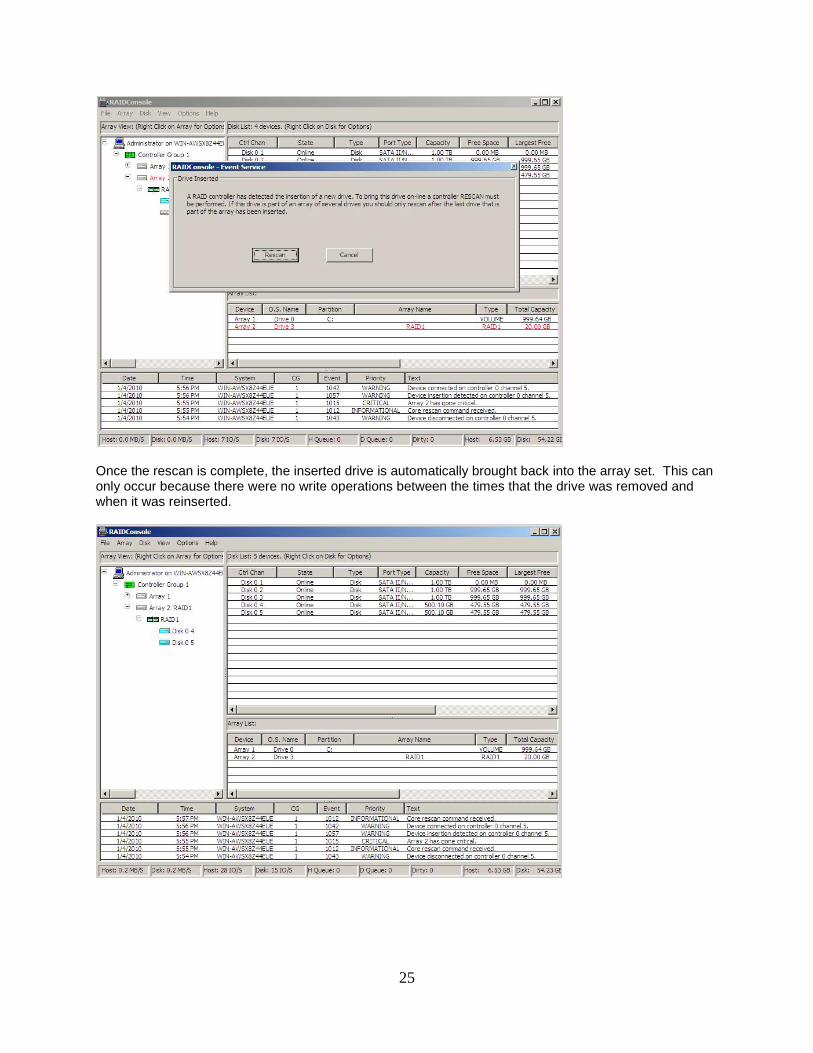
Once the rescan is complete, the inserted drive is automatically brought back into the array set. This can only occur because there were no write operations between the times that the drive was removed and when it was reinserted.

26
How to replace a failed drive in a RAID 1 array: Note: This procedure only applies when I/O occurs from the time the failed disk was removed to the time the new disk was inserted. Pull one of the drives that make up the RAID-1 array. A pop-up will be displayed indicating that a drive was removed and a rescan is required. Click on Rescan.
27
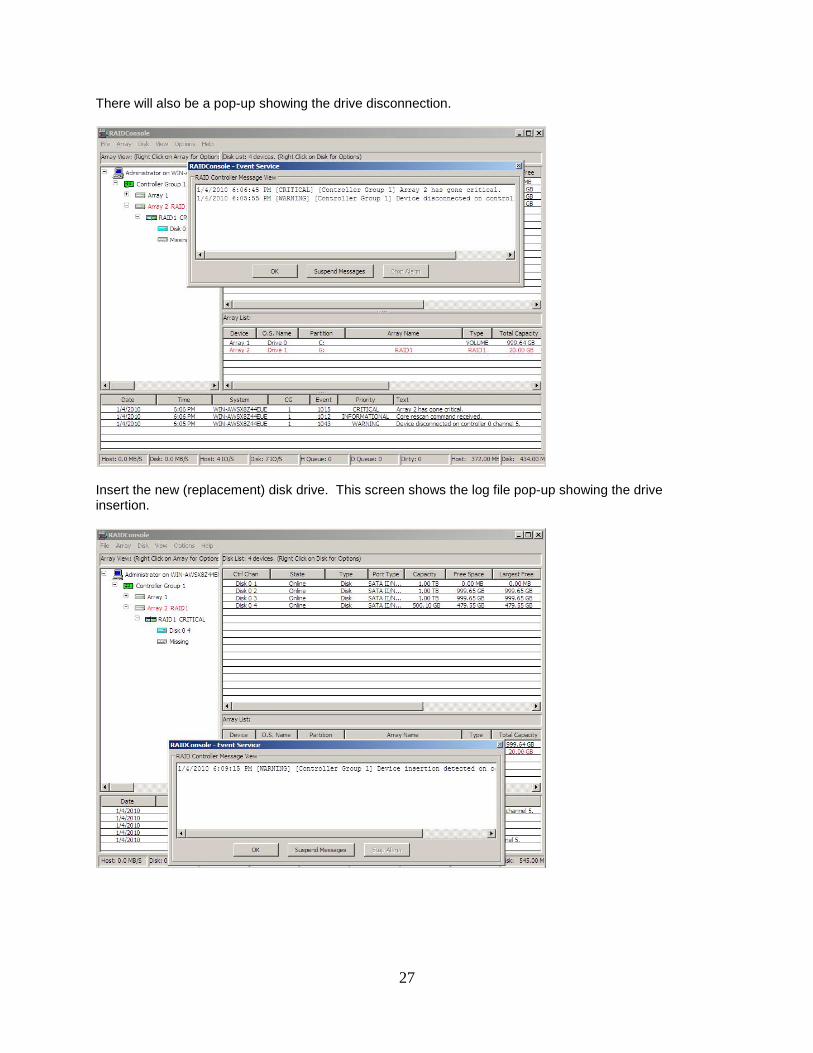
There will also be a pop-up showing the drive disconnection.
Insert the new (replacement) disk drive. This screen shows the log file pop-up showing the drive insertion.
28
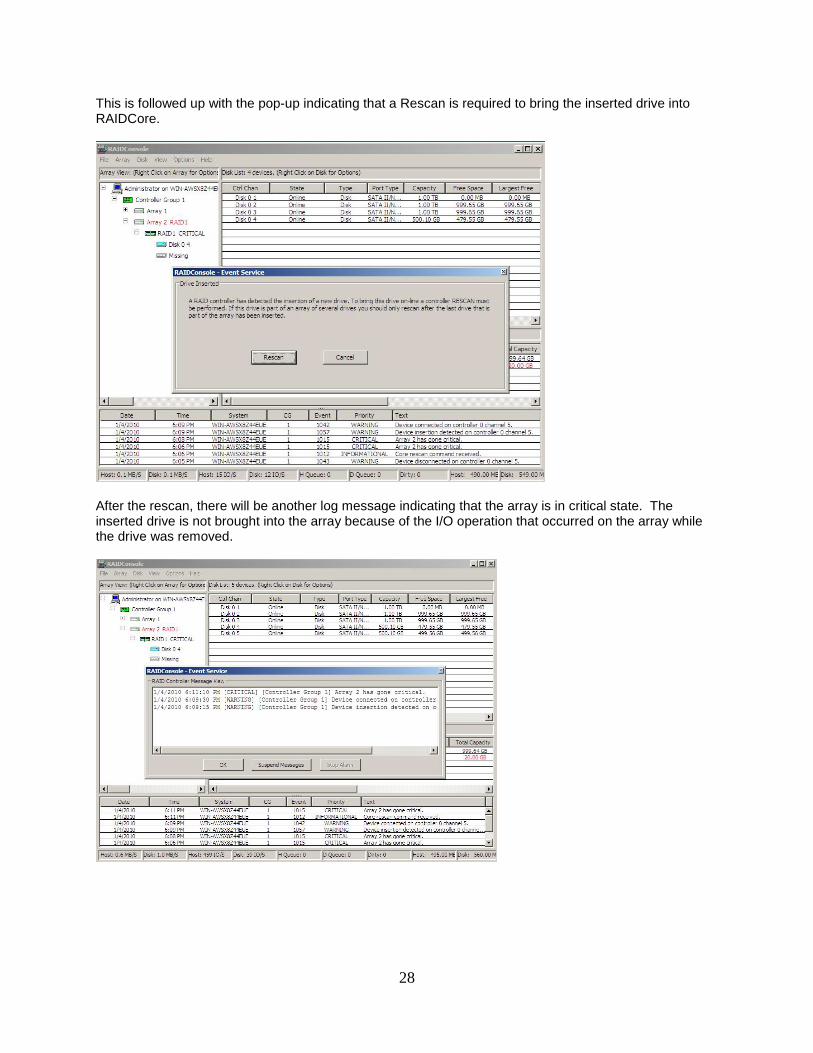
This is followed up with the pop-up indicating that a Rescan is required to bring the inserted drive into RAIDCore.
After the rescan, there will be another log message indicating that the array is in critical state. The inserted drive is not brought into the array because of the I/O operation that occurred on the array while the drive was removed.

29
The array is critical and the re-inserted drive is shown in the Disk List. To rebuild the array first click on the array in the Array list to highlight it. Next, right click on the re-inserted disk in the Disk List. This will bring up the options screen that will allow you to assign the disk as either a Global or Dedicated spare. Select one of the spare options then click on OK. The rebuild will start within a few seconds.
When the rebuild begins there will be a pop-up indicating that the rebuild task has resumed. The messages always say resumed regardless of if the rebuild is being initiated for the first time or being resumed after being paused by command or a rescan operation.
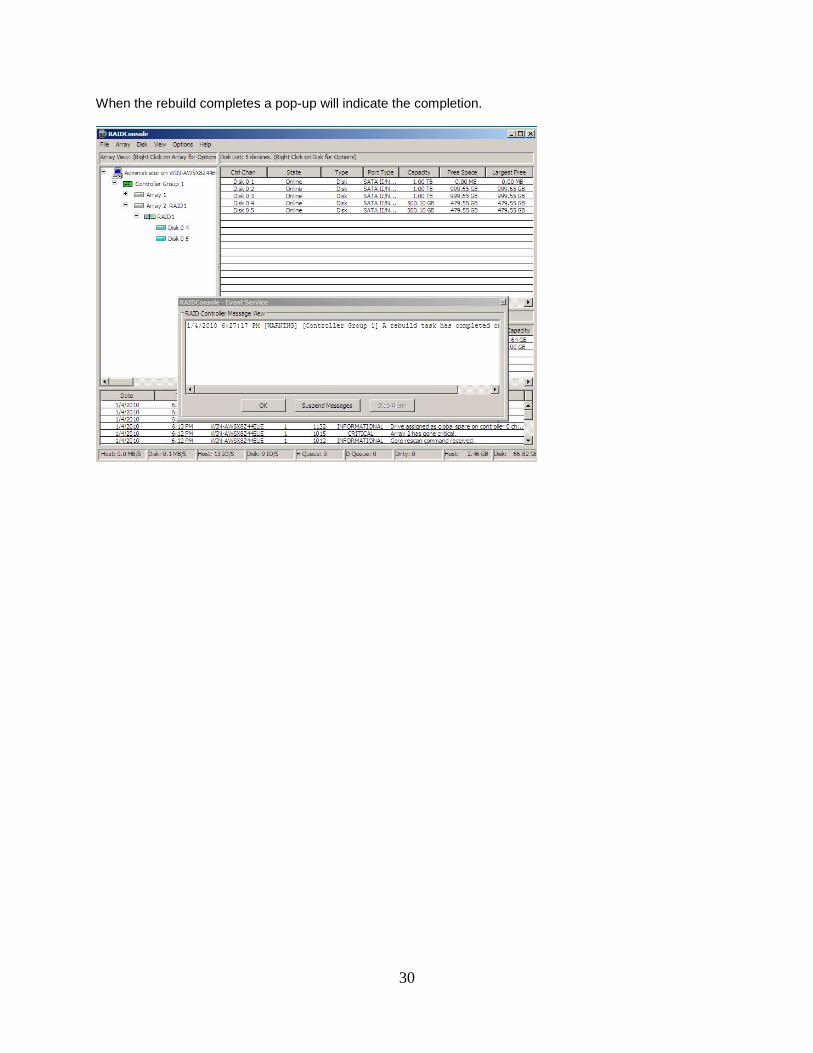
30
When the rebuild completes a pop-up will indicate the completion.
31
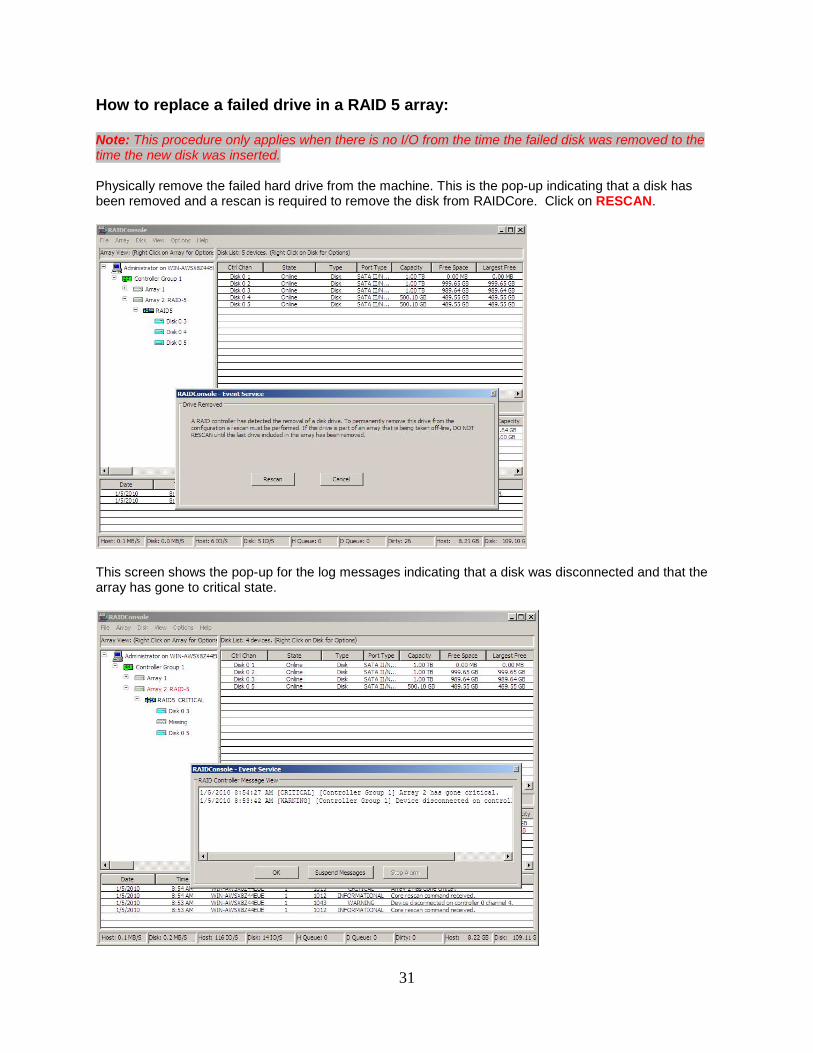
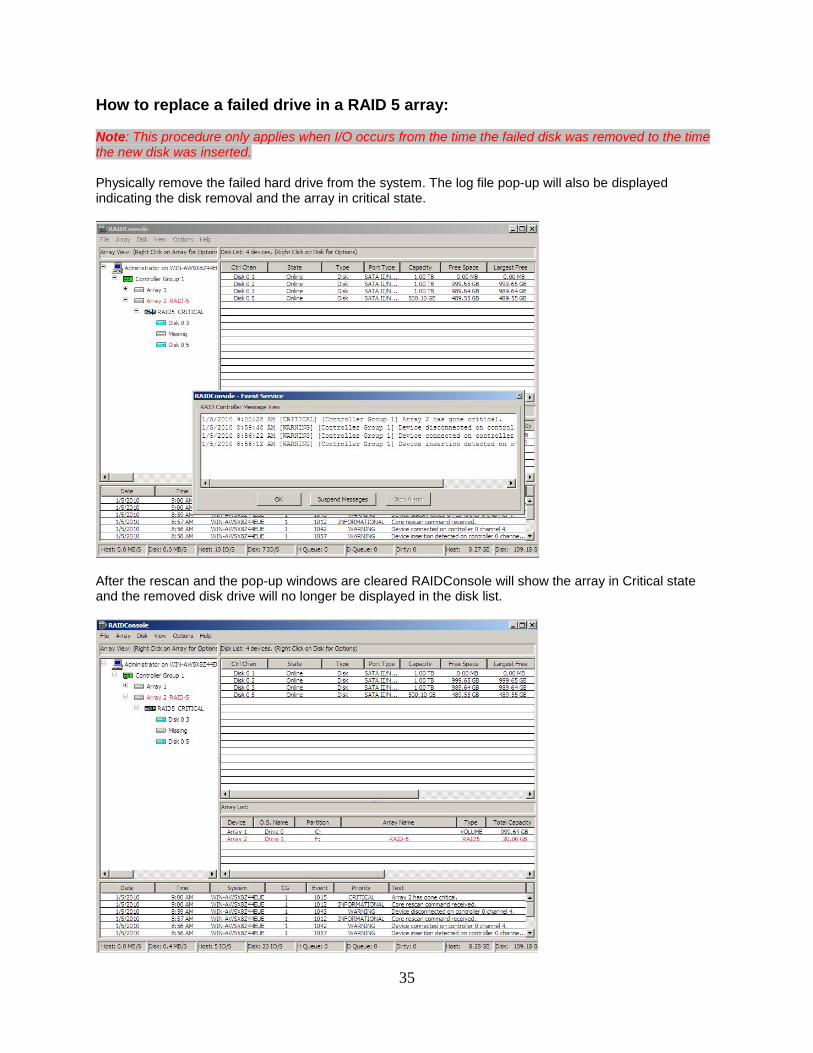
How to replace a failed drive in a RAID 5 array: Note: This procedure only applies when there is no I/O from the time the failed disk was removed to the time the new disk was inserted. Physically remove the failed hard drive from the machine. This is the pop-up indicating that a disk has been removed and a rescan is required to remove the disk from RAIDCore. Click on RESCAN.
This screen shows the pop-up for the log messages indicating that a disk was disconnected and that the array has gone to critical state.
32
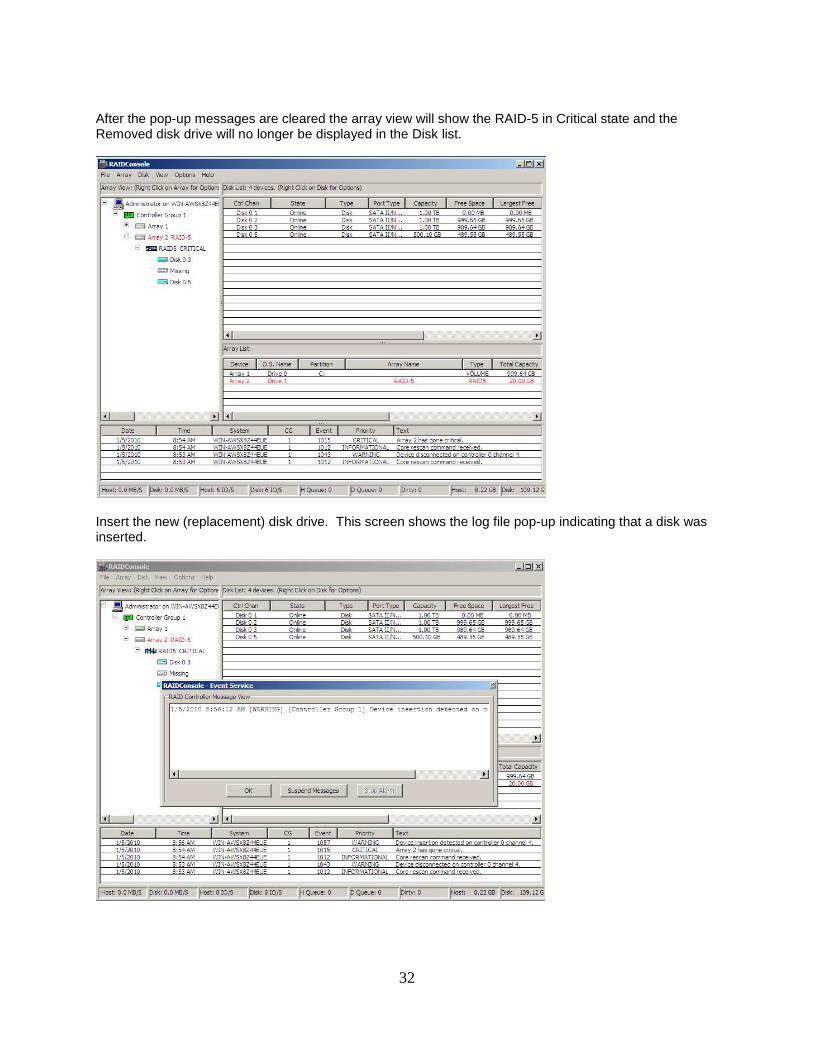
After the pop-up messages are cleared the array view will show the RAID-5 in Critical state and the Removed disk drive will no longer be displayed in the Disk list.
Insert the new (replacement) disk drive. This screen shows the log file pop-up indicating that a disk was inserted.
33
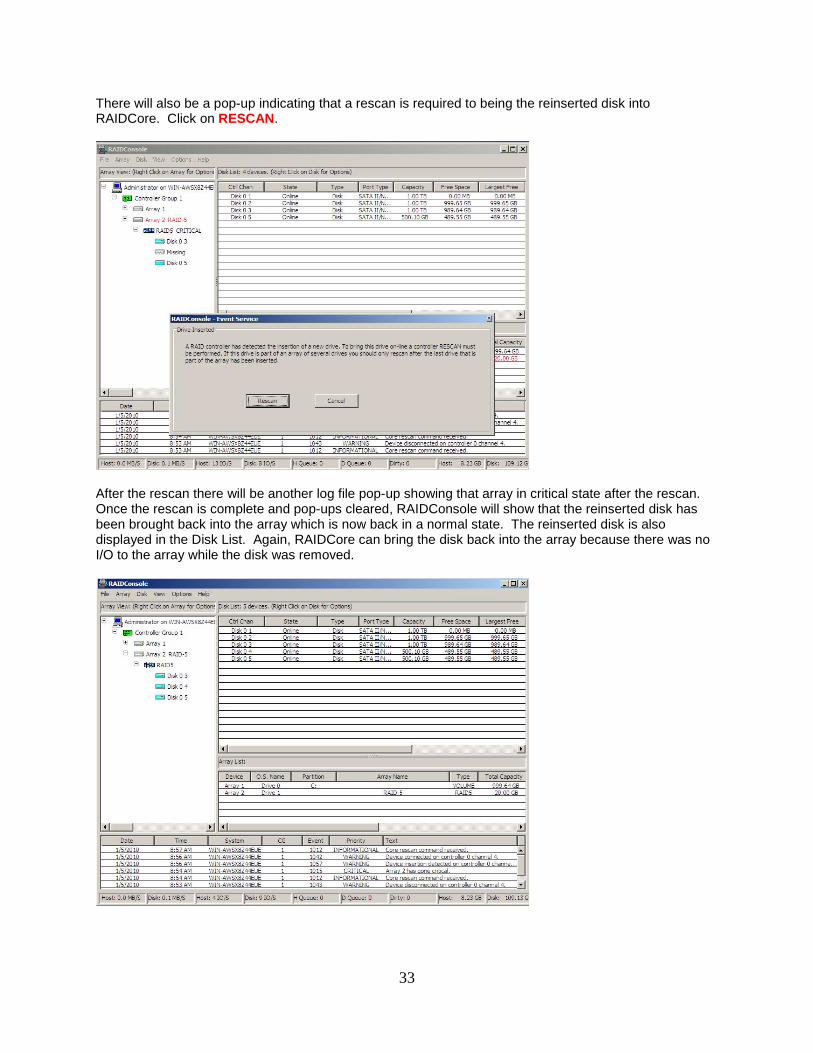
There will also be a pop-up indicating that a rescan is required to being the reinserted disk into RAIDCore. Click on RESCAN.
After the rescan there will be another log file pop-up showing that array in critical state after the rescan. Once the rescan is complete and pop-ups cleared, RAIDConsole will show that the reinserted disk has been brought back into the array which is now back in a normal state. The reinserted disk is also displayed in the Disk List. Again, RAIDCore can bring the disk back into the array because there was no I/O to the array while the disk was removed.

34
You can then return to the disk management window to reassign a drive letter to the array. All files previously loaded on to the file system are now accessible.
35
How to replace a failed drive in a RAID 5 array: Note: This procedure only applies when I/O occurs from the time the failed disk was removed to the time the new disk was inserted. Physically remove the failed hard drive from the system. The log file pop-up will also be displayed indicating the disk removal and the array in critical state.
After the rescan and the pop-up windows are cleared RAIDConsole will show the array in Critical state and the removed disk drive will no longer be displayed in the disk list.

36
Insert the new (replacement) disk drive. A log file pop-up will indicate that a disk insertion occurred. Click on OK.
A second pop-up indicating that a rescan is required to bring the disk in to RAIDCore is displayed. Click on RESCAN.
37
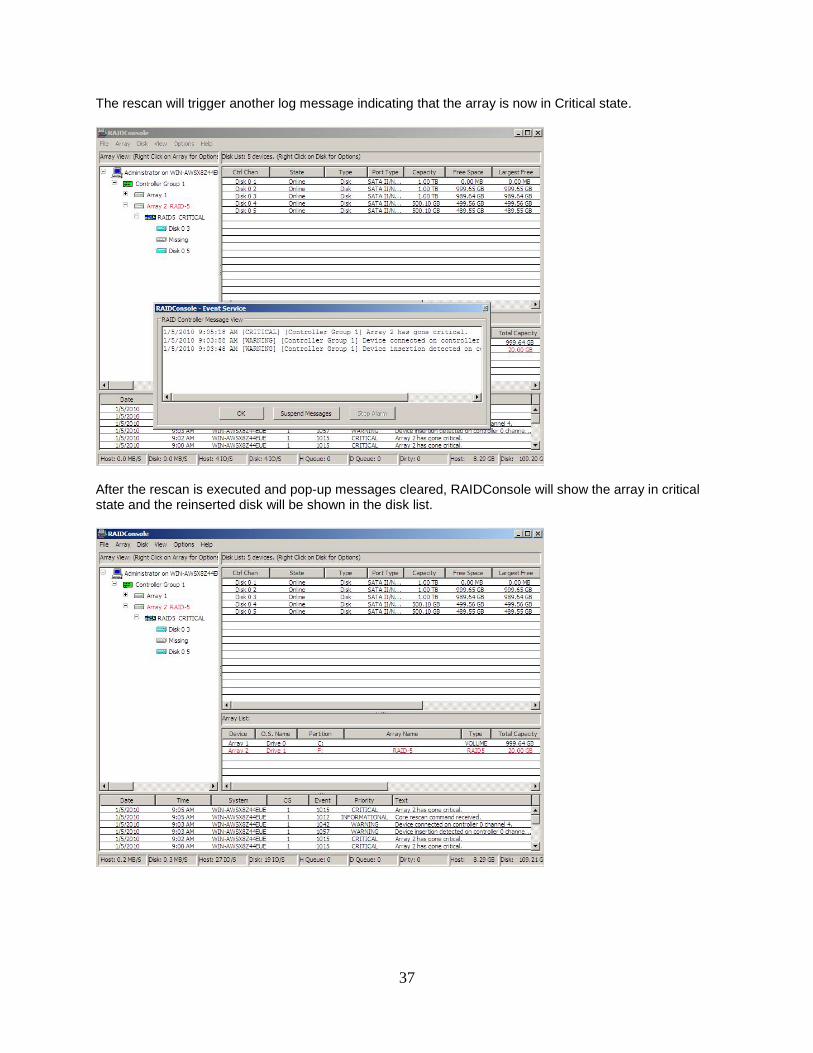
The rescan will trigger another log message indicating that the array is now in Critical state.
After the rescan is executed and pop-up messages cleared, RAIDConsole will show the array in critical state and the reinserted disk will be shown in the disk list.

38
To initiate the rebuild operation click on the critical array in the Array List to highlight it then right click on the reinserted disk in the Disk List to bring up the options menu. Select Assign as Global or Dedicated Spare then click on OK.
A log file pop-up will be displayed indicating the rebuild operation had begun (resumed). When complete another log file pop-up message will be displayed indicating the rebuild operation has completed.

39
Frequently Asked Question (FAQ) If I mistakenly get a 30-day trial license, how do I recover? When no license key has been applied to a host system, the default is a 30-day trial. Re-apply the license key provided as for some reason it may not have taken if previously applied. If there is still a problem, contact the Dot Hill System Administrator to repair the original key, re-distribute and re-apply to the target host system. How do I replace a “tainted” key? Contact the Dot Hill System Administrator to repair the original key, re-distribute and re-apply to the target host system. What tools are available for license key inquiry? To view the license level using the RAIDConsole GUI, From the Options drop-down menu, select License. Right-click on the Controller Group. Choose Properties and click the License button The panel will display the license level (i.e., RAIDCore Basic) and license type (e.g., permanent or trial) To view current license information using the CLI, use the bcadm --license or bcadm -L command. bcadm --license --swl-view bcadm –L –sv What if a customer/integrator reinstalls the operating system? If a customer has reinstalled a host’s operating system (for example, due to a system crash), the trusted storage on the host will be lost. Activation will need to be reconfigured by re-applying the activation key for that host. What if a customer/integrator replaces the motherboard? If a customer has replaced the system motherboard, activation will need to be reconfigured by re-applying the activation key for that host. What if a customer/integrator replaces a disk drive? If the disk being replaced is not the boot drive, then no further action is required (i.e., the activation id does not have to be re-applied). If the drive being replaced is the OS boot drive, then the OS will have to be re-installed and the activation id for that host re-applied. How do I upgrade from one level of RAIDCore to another? TYAN only offers the RAIDCore Basic solution for use on their motherboards. Dot Hill currently does not offer any upgrade option available to change from RAIDCore Basic to any other Dot Hill RAIDCore solution.


![Time, Tense and Aspect Rajat Kumar Mohanty rkm[at]cse[dot]iitb[dot]ac[dot]in km[at]cse[dot]iitb[dot]ac[dot]in Centre for Indian Language Technology Department](https://img.pdfslide.net/doc/110x75/56649ea45503460f94ba8e34/time-tense-and-aspect-rajat-kumar-mohanty-rkmatcsedotiitbdotacdotin.jpg)