Embed Size (px)
Citation preview
AMS Advantage® HRM
Getting Started GuideRelease 3.9
This document contains information proprietary to CGI Technologies and Solutions Inc. Unauthorized reproduction or disclosure of this information in whole or in part is prohibited.
The AMS Advantage® Financial suite of products (AMS Advantage® Financial, AMS Advantage® Procurement, AMS Advantage® Fixed Assets, AMS Advantage® Inventory, and AMS Advantage® Treasury Accounting), AMS Advantage® Administration, and AMS Advantage® HR are trademarks of CGI Technologies and Solutions Inc.
Due to the nature of this material, numerous hardware and software products are mentioned by name. In most, if not all, cases, the companies that manufacture the products claim these product names as trademarks. It is not our intention to claim these names or trademarks as our own.
Copyright © 2001, 2011, CGI Technologies and Solutions Inc. All Rights Reserved.
Table of Contents Overview.......................................................................................................................................... 1
Home Page Navigation.................................................................................................................... 2
Primary Navigation Panel ............................................................................................................ 2
Secondary Navigation Panel........................................................................................................ 2
Jump to Action ................................................................................................................................. 4
Home Page Windows ...................................................................................................................... 5
Workspace Pages............................................................................................................................ 6
Defining a Workspace Page ........................................................................................................ 6
Favorites .......................................................................................................................................... 8
AMS Advantage Email................................................................................................................... 10
Alerts.............................................................................................................................................. 11
Broadcasts..................................................................................................................................... 13
Worklist .......................................................................................................................................... 15
Worklist ...................................................................................................................................... 15
Searching the Worklist ............................................................................................................... 16
Valid Actions for Worklist ........................................................................................................... 16
Workflow Role Manager Worklist............................................................................................... 18
Searching the Manager Worklist ............................................................................................ 18
Releasing Work Items ............................................................................................................ 19
Returning to the Worklist ........................................................................................................ 19
Forms............................................................................................................................................. 20
History............................................................................................................................................ 21
Change Password Page................................................................................................................ 22
Change Password Hint Page ........................................................................................................ 23
Common Business Tasks.............................................................................................................. 24
Log In and Log Out .................................................................................................................... 24
Change Password after Password Reset .................................................................................. 24
Define Your Home Page ............................................................................................................ 24
Manage Workspaces ................................................................................................................. 26
Add an Existing Workspace ................................................................................................... 26
iii
AMS Advantage HRM - Getting Started User Guide
iv
Add a Custom Workspace...................................................................................................... 27
Create a Business Area ......................................................................................................... 28
Create a Business Function ................................................................................................... 29
Create a Business Function Item ........................................................................................... 30
Manage Favorites ...................................................................................................................... 31
Add a Page to Favorites......................................................................................................... 31
Modify a Favorites Name ....................................................................................................... 31
Delete a Page from Favorites................................................................................................. 32
Manage Passwords ................................................................................................................... 32
Change User Password ......................................................................................................... 33
Change Password Hint........................................................................................................... 33
Reset Your Password............................................................................................................. 33
Advantage Search Functionality.................................................................................................... 35
Wildcard Search Examples........................................................................................................ 35
Pop-up Blockers ............................................................................................................................ 36
Overview AMS Advantage ® HRM is a comprehensive fully integrated Human Resource and payroll solution that meets the unique requirements of state and local governments, school systems, colleges and universities. AMS Advantage ® HRM supports the full spectrum of human resource and payroll management - from the application, to hiring, to contract, retroactive, and reserve pay processing payroll, to multi-cycle paycheck generation, to benefits issues and more. The Advantage ® HRM system can be fully integrated with the AMS Advantage ® Financial and AMS Advantage ® Procurement systems in order to provide a complete administrative solution that streamlines budgeting and payments for benefits providers, taxes, and more.
AMS Advantage uses a Web interface to display the following different types of application pages:
• Documents – Used to record HR events (for example, employee evaluations or payroll deductions). Documents are viewed and maintained through the Document Catalog, which displays recent activity for documents and provides access to all documents in the system. Please refer to the Documents User Guide for more information.
• Activity folders - Used to access various pages associated with similar activities. It is analogous to an actual folder in which many different pages are kept - sparing you from keeping track of numerous individual pages. Please refer to the Page/Table User Guide for more information.
• Inquiries – Used to display summary and detailed information from system-maintained tables. These pages are for viewing and generally cannot be used to modify data (for example, Leave Balance Inquiry). Please refer to the Page/Table User Guide for more information.
• Reference Tables – User-maintained tables that can be updated by users who have appropriate security authorization, and system-maintained tables that are updated by the system through document updates or offline processes. Please refer to the Page/Table User Guide for more information.
Understanding the above distinctions is important because it makes it easier for you to search for a particular type of page.
The Getting Started User Guide provides information on the features of AMS Advantage that are not specific to documents, activity folders, tables, or inquiries.
1
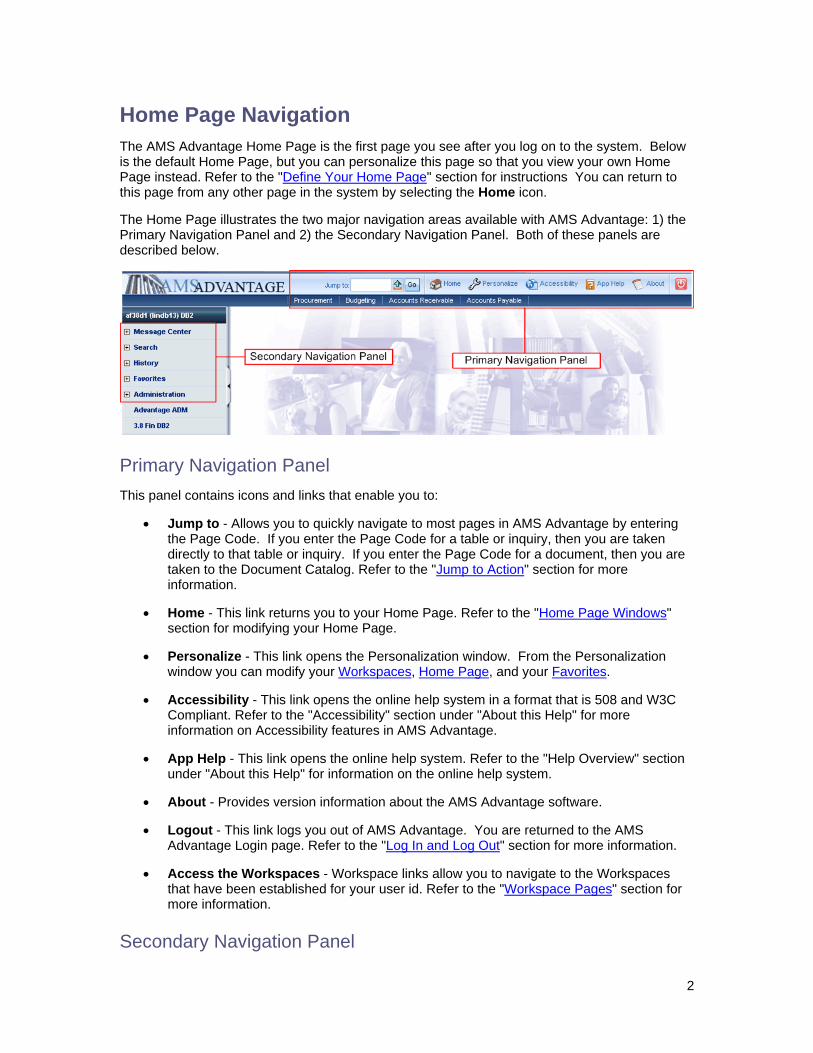
Home Page Navigation The AMS Advantage Home Page is the first page you see after you log on to the system. Below is the default Home Page, but you can personalize this page so that you view your own Home Page instead. Refer to the "Define Your Home Page" section for instructions You can return to this page from any other page in the system by selecting the Home icon.
The Home Page illustrates the two major navigation areas available with AMS Advantage: 1) the Primary Navigation Panel and 2) the Secondary Navigation Panel. Both of these panels are described below.
Primary Navigation Panel This panel contains icons and links that enable you to:
• Jump to - Allows you to quickly navigate to most pages in AMS Advantage by entering the Page Code. If you enter the Page Code for a table or inquiry, then you are taken directly to that table or inquiry. If you enter the Page Code for a document, then you are taken to the Document Catalog. Refer to the "Jump to Action" section for more information.
• Home - This link returns you to your Home Page. Refer to the "Home Page Windows" section for modifying your Home Page.
• Personalize - This link opens the Personalization window. From the Personalization window you can modify your Workspaces, Home Page, and your Favorites.
• Accessibility - This link opens the online help system in a format that is 508 and W3C Compliant. Refer to the "Accessibility" section under "About this Help" for more information on Accessibility features in AMS Advantage.
• App Help - This link opens the online help system. Refer to the "Help Overview" section under "About this Help" for information on the online help system.
• About - Provides version information about the AMS Advantage software.
• Logout - This link logs you out of AMS Advantage. You are returned to the AMS Advantage Login page. Refer to the "Log In and Log Out" section for more information.
• Access the Workspaces - Workspace links allow you to navigate to the Workspaces that have been established for your user id. Refer to the "Workspace Pages" section for more information.
Secondary Navigation Panel
2

Home Page Navigation
3
Unlike the primary navigation panel's icons and links, which remain static, the menus that appear in the secondary navigation panel change, depending on what type of page you are on. For most pages (for example, the Home Page, table pages, inquiry pages, and search pages), you see menus in this panel that enable you to access the following:
• Message Center - Allows you to check your email, view system messages, access your worklist, and view Forms. Refer to the following sections for more information: AMS Advantage Email, Alerts, Broadcasts, Worklist, and Forms.
• Search - Allows you to access various search pages:
• Page Search - Allows you to search for documents, tables, and inquiries. Refer to the Page/Table User Guide for more information.
• Document Catalog - Allows you to search for and create documents. Refer to the Documents User Guide for more information.
• Report Search - Allows you to search for and open any Report in AMS Advantage HRM.
• History - Allows you to return to previously accessed pages within an AMS Advantage session. Refer to the "History" section for more information.
• Favorites - Allows you to quickly access pages that you have added to your Favorites list. Refer to the "Favorites" section for more information.
• Administration - Based on site implementation, allows you to change your password and password hint. Refer to the "Change Password Page" and "Change Password Hint Page" sections for more information.
For most document pages, the Secondary Navigation Panel changes to a Document Navigator that allows you to navigate through the document. For multi-table pages, the Secondary Navigation Panel allows you to navigate within the multi-table page. For the pages used to personalize AMS Advantage HRM, the Secondary Navigation Panel allows you to maintain your workspaces, home page, favorites listing, and/or a list of links to items that you can personalize.
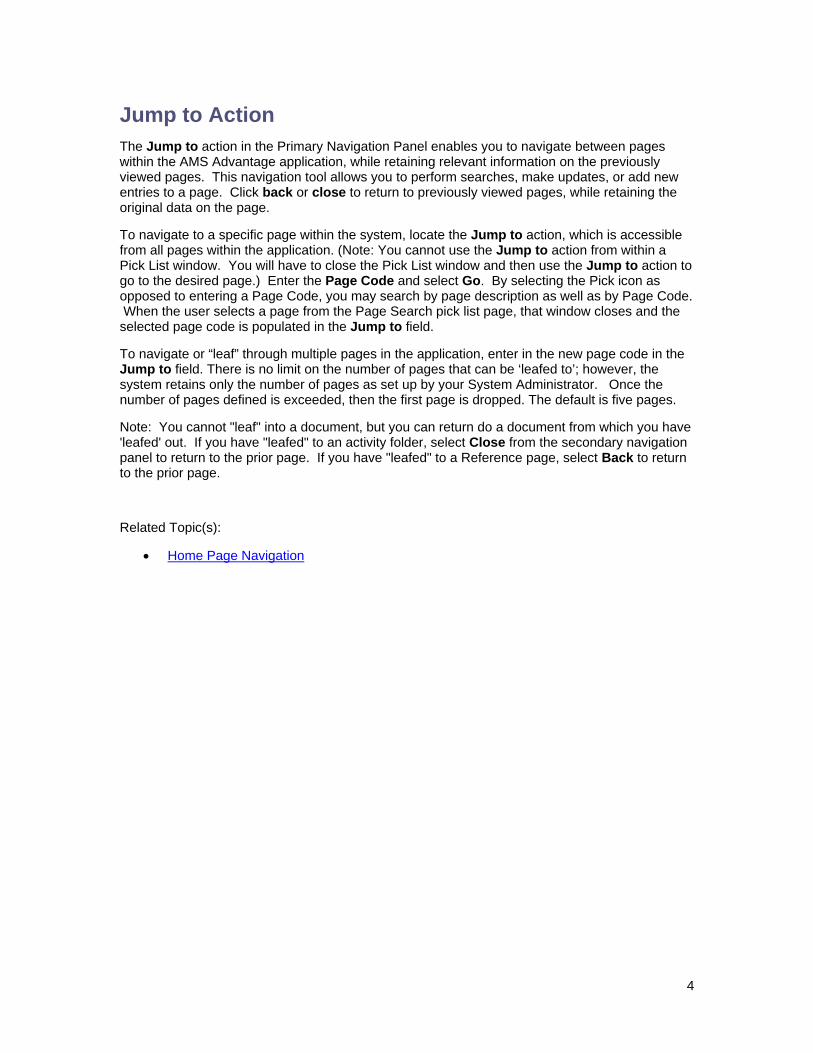
Jump to Action The Jump to action in the Primary Navigation Panel enables you to navigate between pages within the AMS Advantage application, while retaining relevant information on the previously viewed pages. This navigation tool allows you to perform searches, make updates, or add new entries to a page. Click back or close to return to previously viewed pages, while retaining the original data on the page.
To navigate to a specific page within the system, locate the Jump to action, which is accessible from all pages within the application. (Note: You cannot use the Jump to action from within a Pick List window. You will have to close the Pick List window and then use the Jump to action to go to the desired page.) Enter the Page Code and select Go. By selecting the Pick icon as opposed to entering a Page Code, you may search by page description as well as by Page Code. When the user selects a page from the Page Search pick list page, that window closes and the selected page code is populated in the Jump to field.
To navigate or “leaf” through multiple pages in the application, enter in the new page code in the Jump to field. There is no limit on the number of pages that can be ‘leafed to’; however, the system retains only the number of pages as set up by your System Administrator. Once the number of pages defined is exceeded, then the first page is dropped. The default is five pages.
Note: You cannot "leaf" into a document, but you can return do a document from which you have 'leafed' out. If you have "leafed" to an activity folder, select Close from the secondary navigation panel to return to the prior page. If you have "leafed" to a Reference page, select Back to return to the prior page.
Related Topic(s):
• Home Page Navigation
4
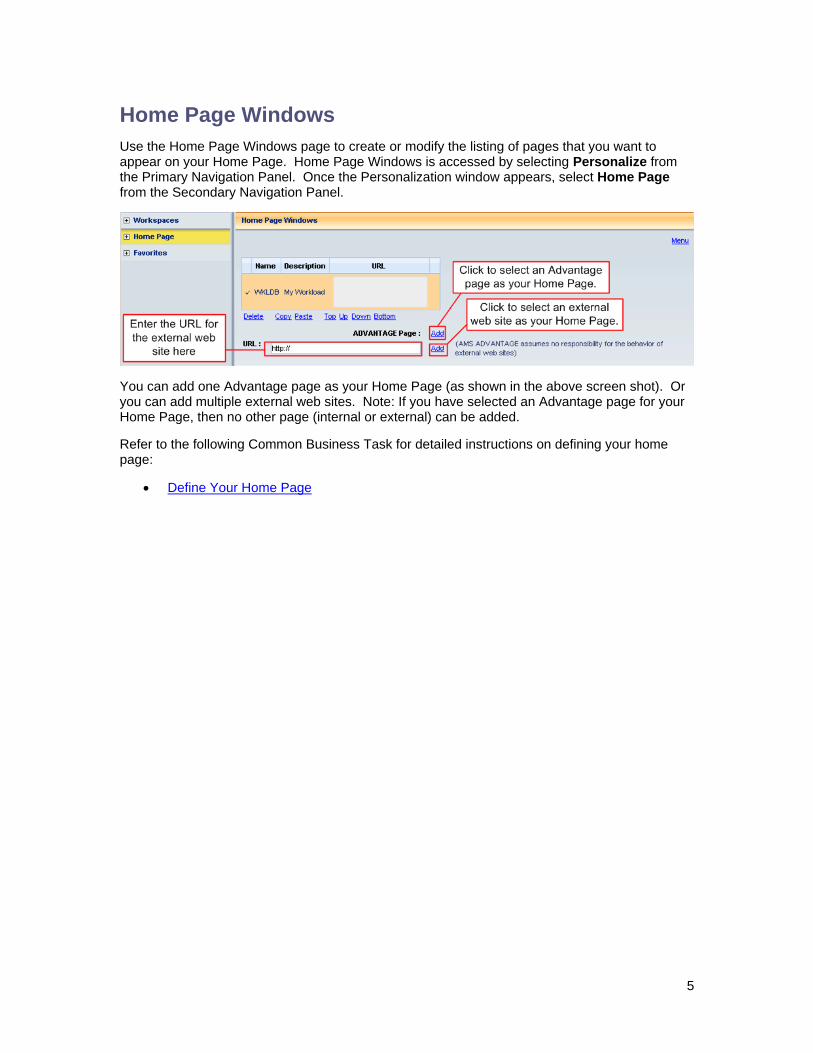
Home Page Windows Use the Home Page Windows page to create or modify the listing of pages that you want to appear on your Home Page. Home Page Windows is accessed by selecting Personalize from the Primary Navigation Panel. Once the Personalization window appears, select Home Page from the Secondary Navigation Panel.
You can add one Advantage page as your Home Page (as shown in the above screen shot). Or you can add multiple external web sites. Note: If you have selected an Advantage page for your Home Page, then no other page (internal or external) can be added.
Refer to the following Common Business Task for detailed instructions on defining your home page:
• Define Your Home Page
5

Workspace Pages Within AMS Advantage there are two series of pages related to workspaces: The first set of pages enables you to define your workspaces, business areas, business functions, and business function items. The second set is the series of pages you or your site has set up for you to access within your workspace(s). The pages illustrated below are for customized, personal workspaces; however the concepts are the same for the workspaces that sites create for users.
To access the pages below, select Personalize from the Primary Navigation Panel. Once the Personalization window appears, select Workspaces from the Secondary Navigation Panel.
Defining a Workspace Page Using the page illustrated below, you can rearrange, remove, and insert the shortcuts (workspaces) you use. If your site has not already set up workspaces for you, you must add your workspace(s) before you can use this functionality. Note that changes you make to your workspaces do not take effect until you have logged out and then logged back on. For detailed instructions on managing workspaces, please refer to the “Manage Workspaces” section in this user guide.
• Unused Workspaces - The workspaces listed here are currently inactive (that is, they do not appear in the primary navigation bar); however, they are available for use through this page and you can add them to the In-Use area at any time.
• System Workspaces and Workgroup Workspaces - These two areas hold site specific workspaces, one for the workspaces defined for the System Workgroup and one for the workspaces defined for the workgroup(s) of which you are a member.
• Workspace Hierarchy - The Workspace hierarchy is provided below. The examples provided are taken from the above screen shot as shown in the Secondary Navigation Panel
• Workspace (Time and Leave)
6
Workspace Pages
7
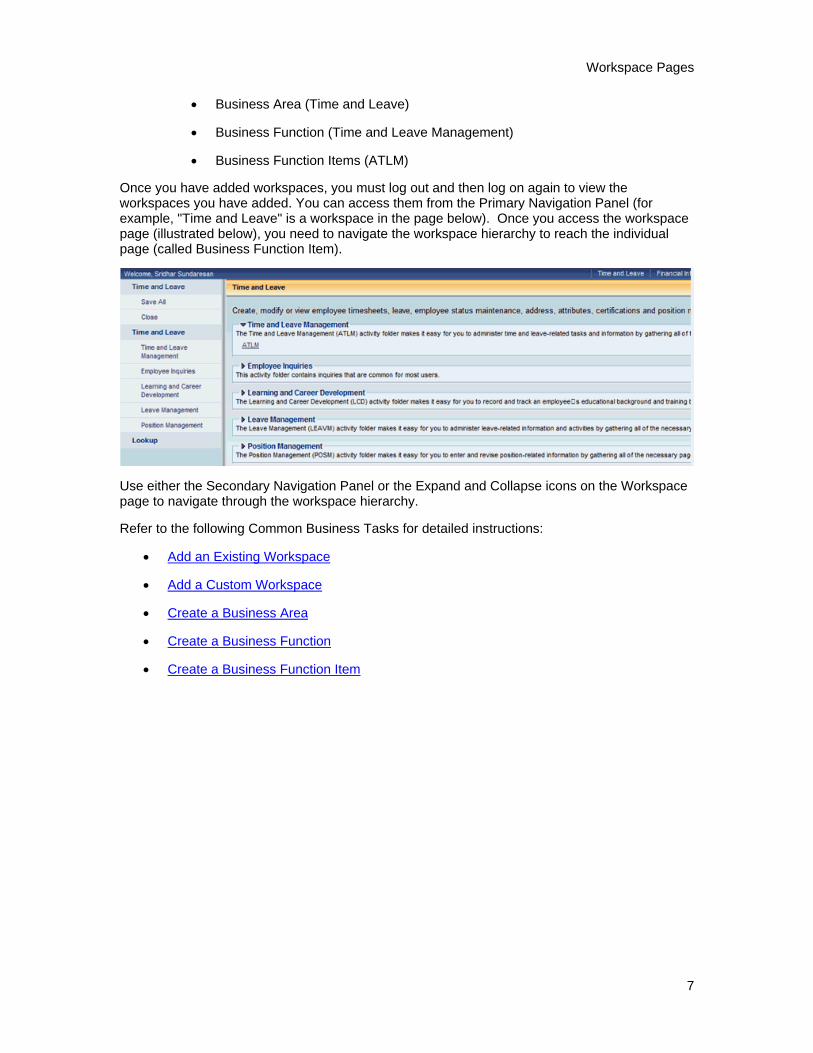
• Business Area (Time and Leave)
• Business Function (Time and Leave Management)
• Business Function Items (ATLM)
Once you have added workspaces, you must log out and then log on again to view the workspaces you have added. You can access them from the Primary Navigation Panel (for example, "Time and Leave" is a workspace in the page below). Once you access the workspace page (illustrated below), you need to navigate the workspace hierarchy to reach the individual page (called Business Function Item).
Use either the Secondary Navigation Panel or the Expand and Collapse icons on the Workspace page to navigate through the workspace hierarchy.
Refer to the following Common Business Tasks for detailed instructions:
• Add an Existing Workspace
• Add a Custom Workspace
• Create a Business Area
• Create a Business Function
• Create a Business Function Item
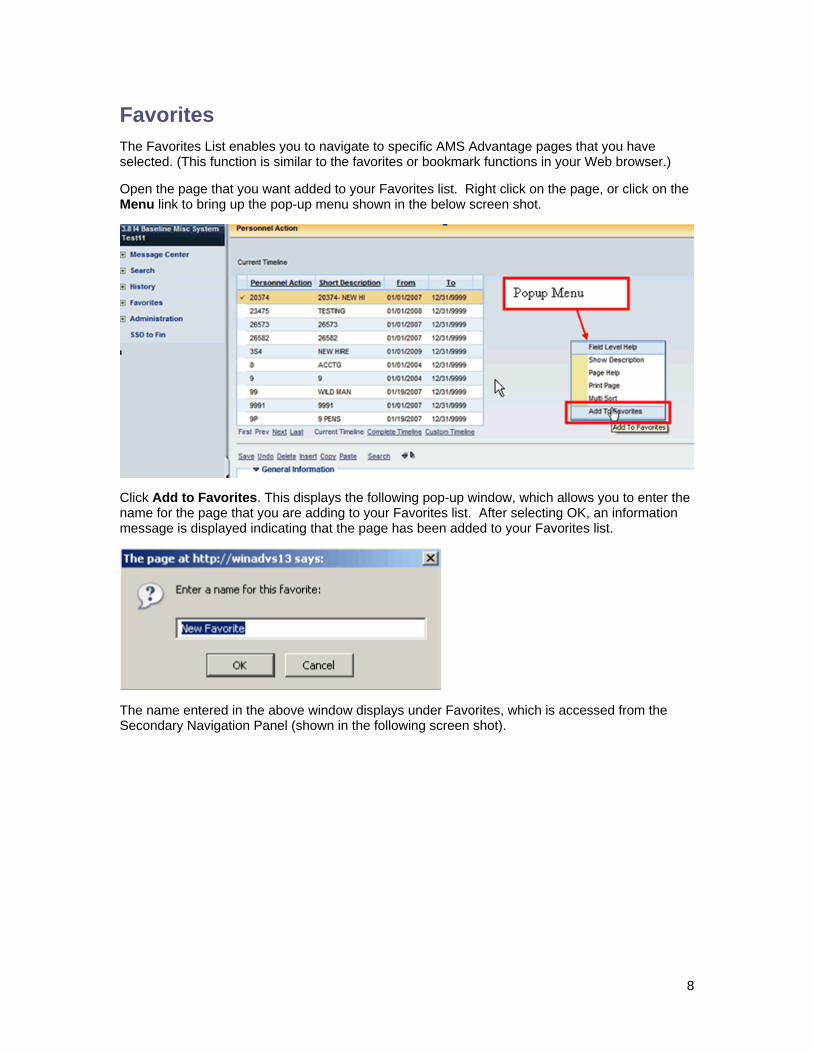
Favorites The Favorites List enables you to navigate to specific AMS Advantage pages that you have selected. (This function is similar to the favorites or bookmark functions in your Web browser.)
Open the page that you want added to your Favorites list. Right click on the page, or click on the Menu link to bring up the pop-up menu shown in the below screen shot.
Click Add to Favorites. This displays the following pop-up window, which allows you to enter the name for the page that you are adding to your Favorites list. After selecting OK, an information message is displayed indicating that the page has been added to your Favorites list.
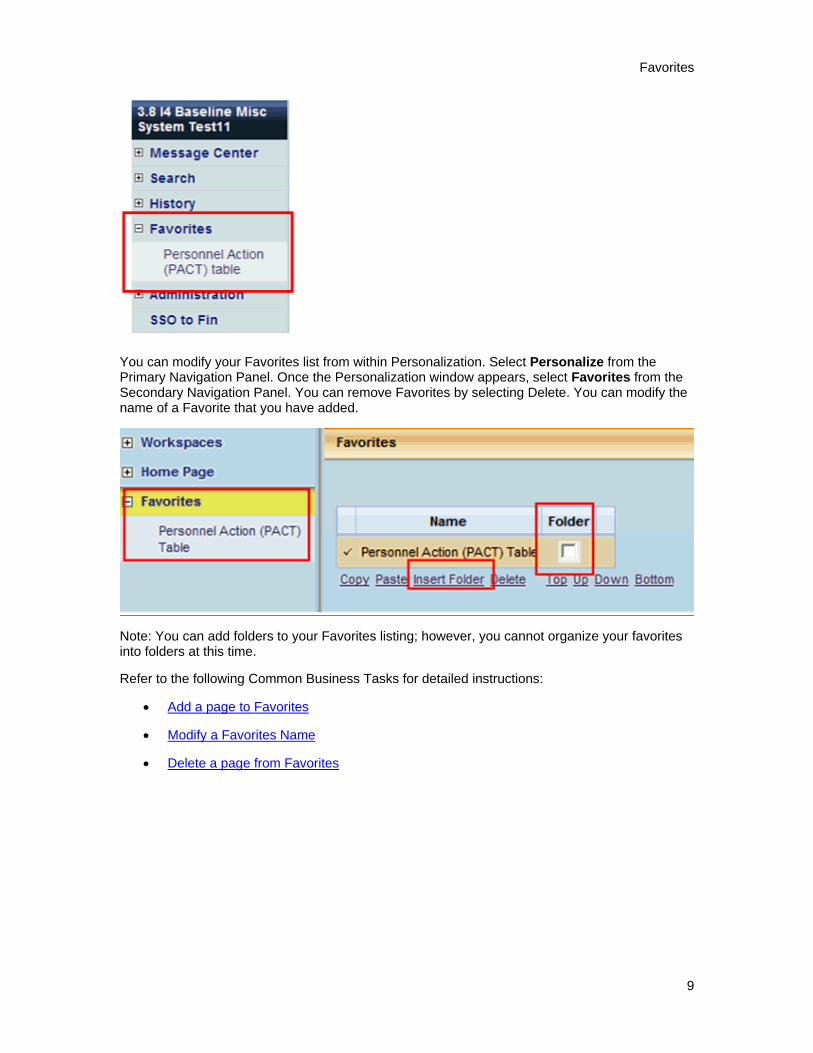
The name entered in the above window displays under Favorites, which is accessed from the Secondary Navigation Panel (shown in the following screen shot).
8
Favorites
9
You can modify your Favorites list from within Personalization. Select Personalize from the Primary Navigation Panel. Once the Personalization window appears, select Favorites from the Secondary Navigation Panel. You can remove Favorites by selecting Delete. You can modify the name of a Favorite that you have added.
Note: You can add folders to your Favorites listing; however, you cannot organize your favorites into folders at this time.
Refer to the following Common Business Tasks for detailed instructions:
• Add a page to Favorites
• Modify a Favorites Name
• Delete a page from Favorites
AMS Advantage Email The email function in AMS Advantage is used as a standard email messaging system, but also as part of the workflow system. You can communicate with outside entities, such as external vendors or agencies using the email function. In addition, you can send an email to notify other users and groups of certain workflow tasks, or to manually route specific AMS Advantage documents and tables around to other users and groups.
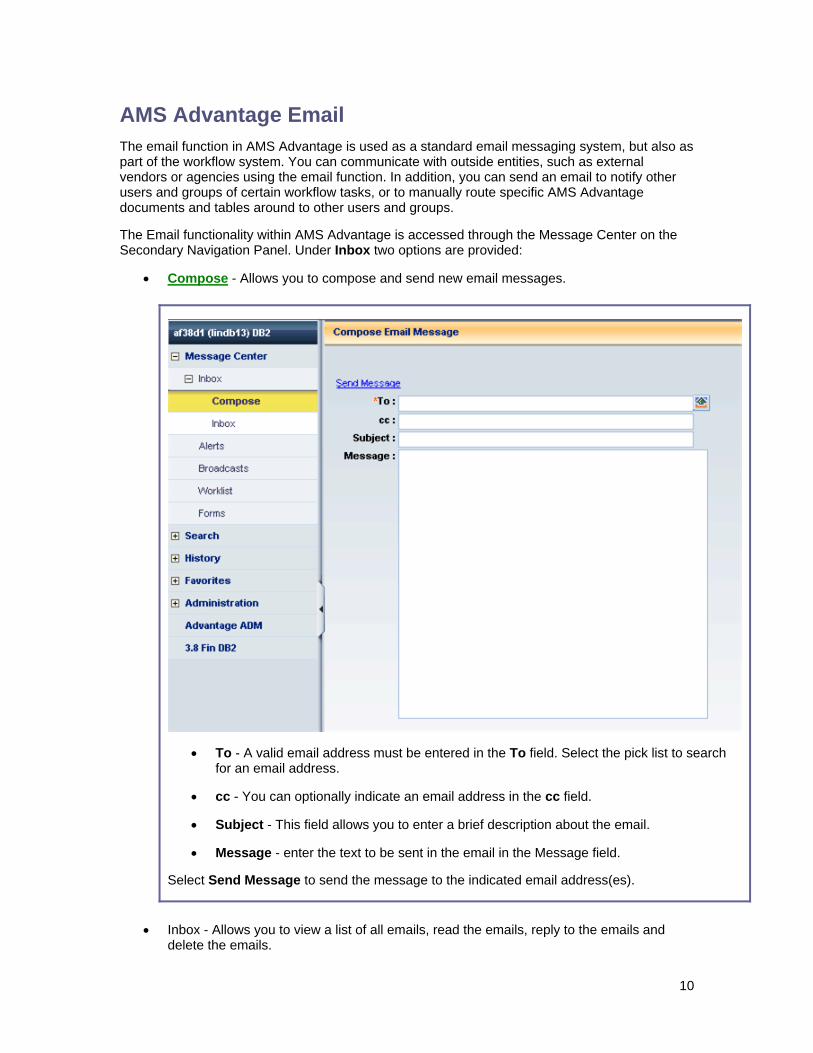
The Email functionality within AMS Advantage is accessed through the Message Center on the Secondary Navigation Panel. Under Inbox two options are provided:
• Compose - Allows you to compose and send new email messages.
• To - A valid email address must be entered in the To field. Select the pick list to search for an email address.
• cc - You can optionally indicate an email address in the cc field.
• Subject - This field allows you to enter a brief description about the email.
• Message - enter the text to be sent in the email in the Message field.
Select Send Message to send the message to the indicated email address(es).
• Inbox - Allows you to view a list of all emails, read the emails, reply to the emails and delete the emails.
10
Alerts Alerts are messages targeted at specific users or groups. Users are notified of new Alerts via a pop-up window when they log into the application and at preset intervals while actively online. The Active Alert Interval (ACTIVE_ALERT_INTERVAL) parameter on the Application Parameters (APPCTRL) table, set up by System Administrators, indicates the number of minutes that should elapse before an Active Alert check looks for new messages.
• If only new Alerts are found for the user, then the following message appears: “You have new alert message(s)! Click OK to view the message(s) or Cancel to return to current page.”
• If new Alerts and new Broadcast messages are found for the user, then the following message appears: “You have new alert and broadcast message(s)! Click OK to view the messages or Cancel to return to current page.”
The default action for both pop-up windows is OK. If you manually close the window, then Cancel is assumed. You will need to manually check the new messages later by navigating to Message Center > Alerts from the Secondary Navigation Panel. If the listing of Alerts is too long to be displayed in its entirety, use the navigational links (that is, First, Prev, Next, and Last) to move through the listing. To delete an alert, select the Delete link.
If you select the OK button from the “new message” pop-up window, then you are taken to the New Alert Broadcast (ACTVALRT) page. The New Alert Broadcast page displays new alerts/broadcasts that are available to the user in their Advantage Message Center. An alert/broadcast message is considered new if the user has not viewed the alert or broadcast message through the Message Center, or was not previously notified via the “new message” pop-up window. The New Alert Broadcast page displays the new alerts/broadcast messages in a grid format, sorted by date and time with the most recent message first. The Message Type indicates whether the line being displayed is for an Alert or for a Broadcast message. You can click on the Back link to return to the previous page that you were viewing in the application. If the listing of Alerts/Broadcast messages is too long to be displayed in its entirety, use the navigational links (that is, First, Prev, Next, and Last) to move through the listing. The New Alert Broadcast (ACTVALRT) page is only available via the pop-up window, you cannot use page search or the Jump to action to access this page directly.
Special Notes on the “new message” pop-up window:
• If the same user has multiple sessions open at the same time (for example, a user logs into the application at different workstations at the same time), and the user receives a new alert/broadcast – the user will only get the pop-up once by one of the sessions.
• If a user has multiple sessions open at the same time it is possible that they will receive a new alert/broadcast pop-up in one application while navigating to the Message Center in another instance of the application. In this case they may be presented with an alert/broadcast in the first application that they have just viewed in the second application.
• The Active Alert Interval (ACTIVE_ALERT_INTERVAL) parameter on the Application Parameter Control (APPCTRL) table defines the interval in minutes that is used to determine how often to trigger the Active Alert check. The Active Alert Interval parameter represents the number of minutes that should elapse before an Active Alert check should look for new messages.
• The parameter value for this entry must have a positive integer value and is delivered with a value of 1.
11
AMS Advantage HRM - Getting Started User Guide
12
• If this parameter entry is missing or contains invalid data the Active Alerts process will assume a value of 1.
• If a site decides that it does not want to take advantage of this enhancement they can set the Active Alert Interval parameter value to 99999. The Active Alert Process will still be triggered upon login to the system but will not be periodically triggered during the online session.
• It is important to note that the Active Alert check will not be automatically triggered as soon as the interval has been satisfied. The process is instead triggered only when there is a server request. Each time there is a server request and the interval has been satisfied the Active Alert check is triggered. With that in mind this parameter actually represents the minimum time in minutes between Active Alert checks for new alert/broadcast message(s).
• Please note that updates to this parameter will not take effect until the application is bounced.
Broadcasts Broadcast messages notify all users of system broadcast messages. You are notified by a “New Broadcast” if there is a system broadcast message that needs to be viewed (for example, “AMS Advantage HRM will be coming down for maintenance at 6:00pm. All users must log out of the system by 6:00pm.”) You are notified of new Broadcasts via a pop-up window at login and at preset intervals during an active online session. The Active Alert Interval (ACTIVE_ALERT_INTERVAL) parameter on the Application Parameters (APPCTRL) table, set up by System Administrators, indicates the number of minutes that should elapse before an Active Alert check looks for new messages.
• If only new Broadcasts are found, then the following message appears: “You have new broadcast message(s)! Click OK to view the message(s) or Cancel to return to current page.”
• If new Alerts and new Broadcast messages are found for the user, then the following message appears: “You have new alert and broadcast message(s)! Click OK to view the messages or Cancel to return to current page.”
The default action for both pop-up windows is OK. If you manually close the window, then Cancel is assumed. You will need to manually check the new messages later by navigating to Message Center > Broadcasts from the Secondary Navigation Panel. If the listing of Broadcast messages is too long to be displayed in its entirety, use the navigational links (that is, First, Prev, Next, and Last) to move through the listing. To delete a broadcast, select the Delete link.
If you select the OK button from the “new message” pop-up window, then you are taken to the New Alert Broadcast (ACTVALRT) page. The New Alert Broadcast page displays new alerts/broadcasts that are available to the user in their Advantage Message Center. An alert/broadcast message is considered new if the user has not viewed the alert or broadcast message through the Message Center, or was not previously notified via the “new message” pop-up window. The New Alert Broadcast page displays the new alerts/broadcast messages in a grid format, sorted by date and time with the most recent message first. The Message Type indicates whether the line being displayed is for an Alert or for a Broadcast message. You can click on the Back link to return to the previous page that you were viewing in the application. If the listing of Alert/Broadcast messages is too long to be displayed in its entirety, use the navigational links (that is, First, Prev, Next, and Last) to move through the listing. The New Alert Broadcast (ACTVALRT) page is only available via the pop-up window, you cannot use page search or the Jump to action to access this page directly.
Special Notes on the “new message” pop-up window:
• If the same user has multiple sessions open at the same time (for example, a user logs into the application at different workstations at the same time), and the user receives a new alert/broadcast – the user will only get the popup once by one of the sessions.
• If a user has multiple sessions open at the same time it is possible that they will receive a new alert/broadcast pop-up in one application while navigating to the Message Center in another instance of the application. In this case they may be presented with an alert/broadcast in the first application that they have just viewed in the second application.
• The Active Alert Interval (ACTIVE_ALERT_INTERVAL) parameter on the Application Parameter Control (APPCTRL) table defines the interval in minutes that is used to determine how often to trigger the Active Alert check. The Active Alert Interval parameter represents the number of minutes that should elapse before an Active Alert check should look for new messages.
13
AMS Advantage HRM - Getting Started User Guide
14
• The parameter value for this entry must have a positive integer value and is delivered with a value of 1.
• If this parameter entry is missing or contains invalid data the Active Alerts process will assume a value of 1.
• If a site decides that it does not want to take advantage of this enhancement they can set the Active Alert Interval parameter value to 99999. The Active Alert Process will still be triggered upon login to the system but will not be periodically triggered during the online session.
• It is important to note that the Active Alert check will not be automatically triggered as soon as the interval has been satisfied. The process is instead triggered only when there is a server request. Each time there is a server request and the interval has been satisfied the Active Alert check is triggered. With that in mind this parameter actually represents the minimum time in minutes between Active Alert checks for new alert/broadcast message(s).
• Please note that updates to this parameter will not take effect until the application is bounced.
Worklist
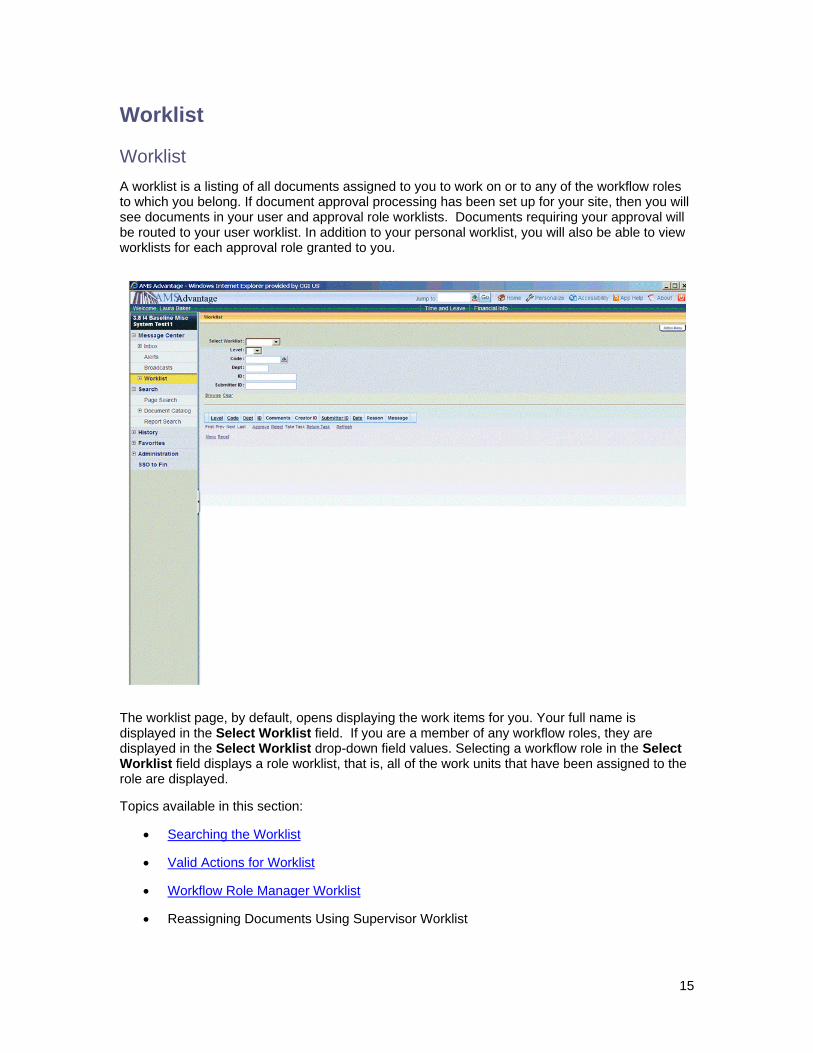
Worklist A worklist is a listing of all documents assigned to you to work on or to any of the workflow roles to which you belong. If document approval processing has been set up for your site, then you will see documents in your user and approval role worklists. Documents requiring your approval will be routed to your user worklist. In addition to your personal worklist, you will also be able to view worklists for each approval role granted to you.
The worklist page, by default, opens displaying the work items for you. Your full name is displayed in the Select Worklist field. If you are a member of any workflow roles, they are displayed in the Select Worklist drop-down field values. Selecting a workflow role in the Select Worklist field displays a role worklist, that is, all of the work units that have been assigned to the role are displayed.
Topics available in this section:
• Searching the Worklist
• Valid Actions for Worklist
• Workflow Role Manager Worklist
• Reassigning Documents Using Supervisor Worklist
15
AMS Advantage HRM - Getting Started User Guide
Searching the Worklist The worklist page allows for searching. You may search by:
• Level – Search the worklist by approval levels. Approval levels may range from 0 to 15.
• Code – Search the worklist by Document Code. For example, you may search for MISC documents.
• Dept - Search the worklist by Department. All work units belonging to the entered Department are displayed.
• ID – Search by Document Identifier.
• Submitted ID - Search by the User ID of the person that submitted the document.
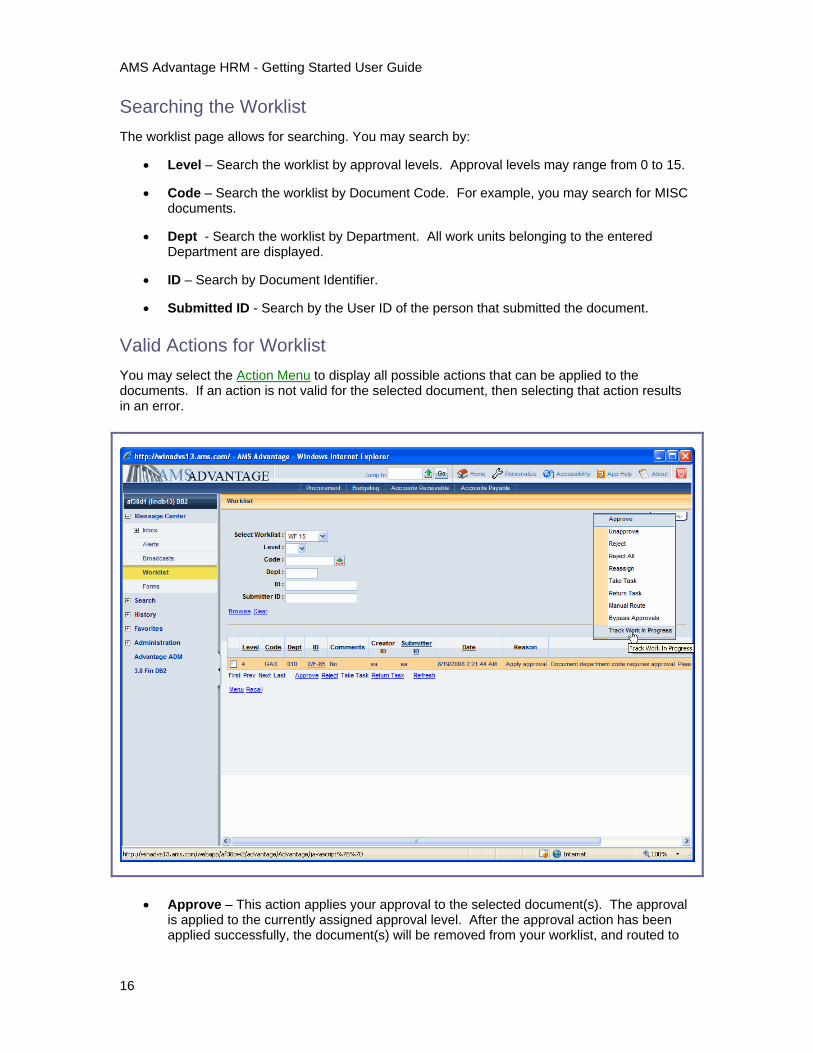
Valid Actions for Worklist You may select the Action Menu to display all possible actions that can be applied to the documents. If an action is not valid for the selected document, then selecting that action results in an error.
• Approve – This action applies your approval to the selected document(s). The approval is applied to the currently assigned approval level. After the approval action has been applied successfully, the document(s) will be removed from your worklist, and routed to
16

Worklist
the next user or role worklist, if required. Approve action can be applied from inside the document or from the worklist.
• Unapprove – This action will remove a previously applied approval from the selected document. It allows you to “take back” your applied approvals. This action is applied to the currently assigned approval level. Unapprove action can be applied from inside the document or from the worklist. You may apply an Unapprove action only on a document on which a Reject action has occurred, as opposed to Reject, which can be applied on a document at any approval level. Furthermore, Unapprove can only be applied on a document when the routing Reason is to “Confirm or remove approval”.
• Reject – This action is used to indicate that you do not want to approve the currently assigned approval level on the selected document. The document will then be routed back to the approver that previously approved the document. The document could also be routed back to the Draft phase if this is the first approval routing. A Reject action can be applied at any approval level and by any approver, as opposed to Unapprove, which can only be applied on a document on which a Reject action has been applied.
• Reject All – This action is used to indicate that you do not want to approve the currently assigned approval level on the selected document and want to remove the document from approval processing. Applying this action will reject your and all other approval levels and will route the document back to the submitter for corrections. Reject All action can be applied from inside the document or from the worklist.
• Reassign – This action allows you to assign the work unit to another user. Selecting Action Menu > Reassign will display the User Information page. You may select a user by selecting a row from the grid followed by selecting the Select hyperlink. This will remove the work unit from your worklist and add the work unit to the selected user’s worklist as opposed to Manual Route, which will keep the work unit in your worklist while also adding it to the selected user’s worklist.
• Take Task – This action allows you to “take” a work unit from the role worklist. The document will be added to your worklist for you to work on. Take Task action will be enabled only for a workflow role worklist.
• Return Task – This action allows you to “return” a work unit from your worklist to the approval role worklist from where it may be taken by another user. Return Task action will be enabled only for a user worklist.
• Manual Route – This action allows you to route the work unit to another user’s worklist. The work unit will be added to the routed user’s worklist. However, the routed work unit will continue to exist in your worklist also, as opposed to Reassign, which will route the work unit to another user’s worklist and remove the work unit from your worklist.
• Bypass Approvals – This action allows the document to be processed to final without needing to go through the approval process. Bypass Approvals action can be applied from inside the document or from the worklist.
• Track Work in Progress – This action allows you to view the workflow status of a document. The TWIP page displays all past, current, and future routings for the selected document. You will also be able to view the approval log for the selected document from the TWIP page. The TWIP page may be accessed from within the document or from the worklist.
The following actions are provided as links on the Worklist page, and are not provided in the Action Menu.
• Refresh – You may refresh the worklist at any time by selecting the Refresh link.
17
AMS Advantage HRM - Getting Started User Guide
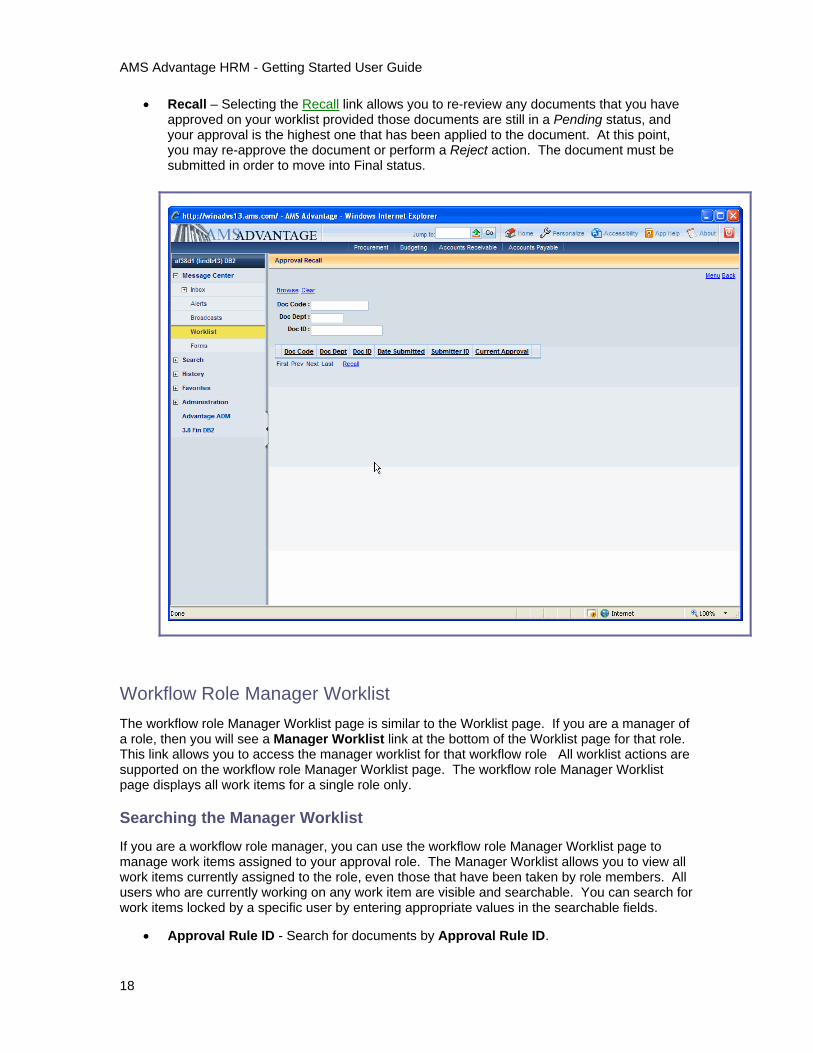
• Recall – Selecting the Recall link allows you to re-review any documents that you have approved on your worklist provided those documents are still in a Pending status, and your approval is the highest one that has been applied to the document. At this point, you may re-approve the document or perform a Reject action. The document must be submitted in order to move into Final status.
Workflow Role Manager Worklist The workflow role Manager Worklist page is similar to the Worklist page. If you are a manager of a role, then you will see a Manager Worklist link at the bottom of the Worklist page for that role. This link allows you to access the manager worklist for that workflow role All worklist actions are supported on the workflow role Manager Worklist page. The workflow role Manager Worklist page displays all work items for a single role only.
Searching the Manager Worklist
If you are a workflow role manager, you can use the workflow role Manager Worklist page to manage work items assigned to your approval role. The Manager Worklist allows you to view all work items currently assigned to the role, even those that have been taken by role members. All users who are currently working on any work item are visible and searchable. You can search for work items locked by a specific user by entering appropriate values in the searchable fields.
• Approval Rule ID - Search for documents by Approval Rule ID.
18
Worklist
19
• Lock User ID - Search for documents locked by a particular user.
• Assignee - Search for documents by the name of the person to which has been assigned through workflow.
• Code - Search for documents by Document Code.
• Level - Search for documents with a specific approval level.
Releasing Work Items
Work items originally assigned to a workflow role and then taken by a user may become dormant in that user’s worklist. For example, if a user takes a task but does not complete it before going on vacation, then that work item though assigned to a user is not being worked on. No other users can work on it as it has been taken by the absent user to work on. A worklist manager may return the work item by:
1. Select Action Item > Return Task. Result: The task will be returned to the role worklist for reassignment.
2. Directly apply approval actions to a work item in a user’s worklist. For example, as the manager of an approval role, you may select Action Item > Approve which will apply the approval action to the work item resulting in its release.
Note: The Supervisor Worklist (SUPWKLST) page in Advantage HRM can also be used to return a document that has been taken by a user to the role worklist where it can be reassigned, or to reassign a document to another user. Refer to Reassigning Documents Using Supervisor Worklist for more information.
Returning to the Worklist
Select the Back to Role Worklist link on the Manager Worklist page. This link returns you to the original Worklist page for the role.
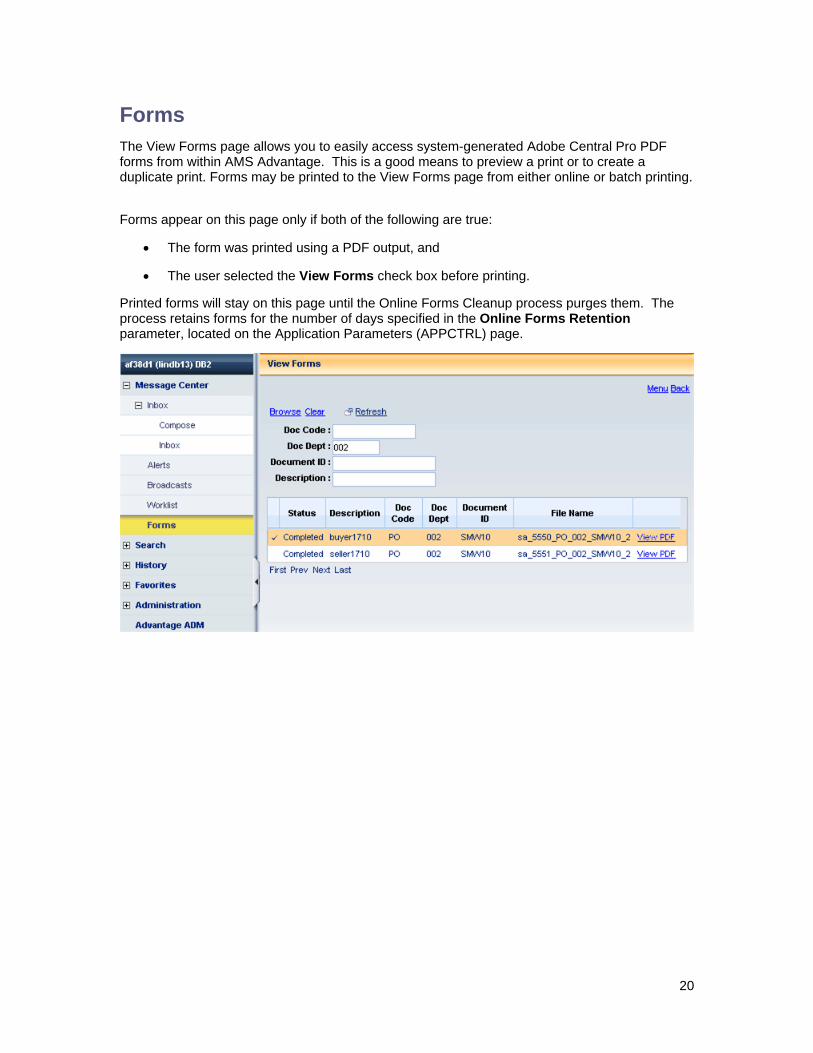
Forms The View Forms page allows you to easily access system-generated Adobe Central Pro PDF forms from within AMS Advantage. This is a good means to preview a print or to create a duplicate print. Forms may be printed to the View Forms page from either online or batch printing.
Forms appear on this page only if both of the following are true:
• The form was printed using a PDF output, and
• The user selected the View Forms check box before printing.
Printed forms will stay on this page until the Online Forms Cleanup process purges them. The process retains forms for the number of days specified in the Online Forms Retention parameter, located on the Application Parameters (APPCTRL) page.
20
History AMS Advantage HRM keeps track of the pages you have accessed in the course of your session. To return to a previous page, select History and then the page name from the Secondary Navigation Panel. (NOTE: Under the History option, the pages are listed in the order in which you accessed them, with the most recent page listed first.)
The History option on the Secondary Navigation Panel stays open once you have selected it. To refresh the listing of pages in the History folder, click on the expand/collapse icon twice. Clicking the icon the first time collapses the History folder. Clicking the icon a second time refreshes the list of items in the History folder.
21
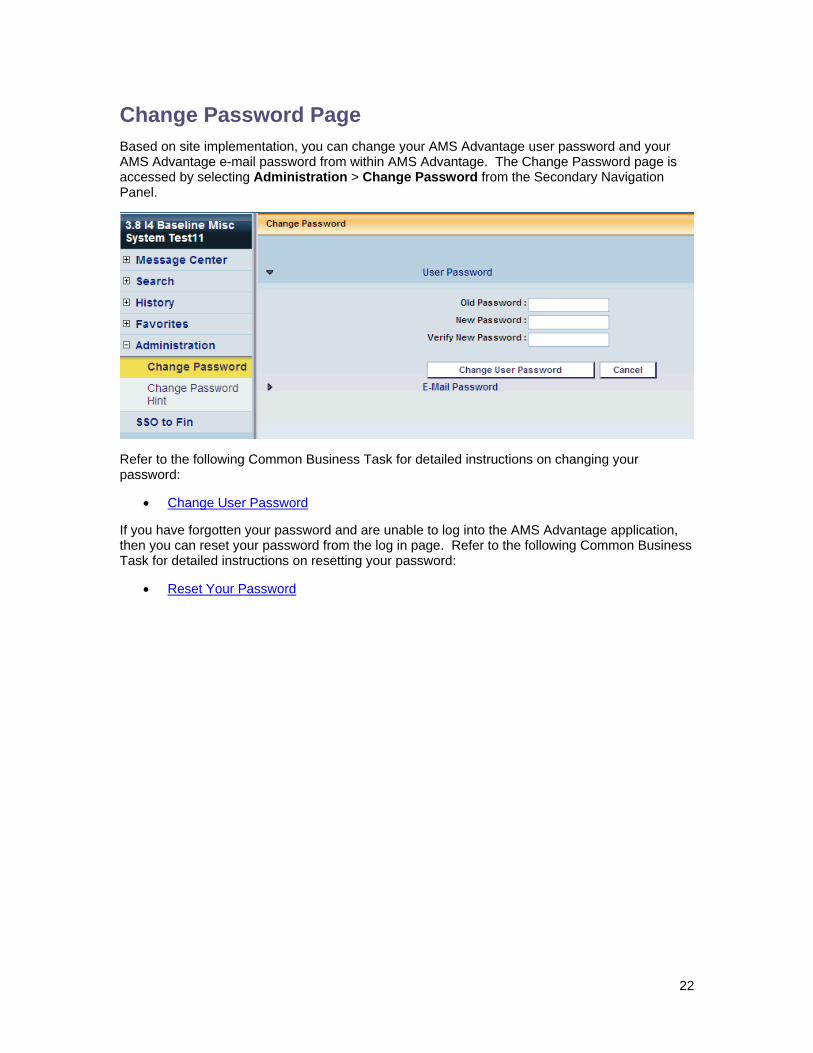
Change Password Page Based on site implementation, you can change your AMS Advantage user password and your AMS Advantage e-mail password from within AMS Advantage. The Change Password page is accessed by selecting Administration > Change Password from the Secondary Navigation Panel.
Refer to the following Common Business Task for detailed instructions on changing your password:
• Change User Password
If you have forgotten your password and are unable to log into the AMS Advantage application, then you can reset your password from the log in page. Refer to the following Common Business Task for detailed instructions on resetting your password:
• Reset Your Password
22

Change Password Hint Page Based on site implementation, you can change your AMS Advantage Password Hint from within AMS Advantage. The Change Password Hint page is accessed by selecting Administration > Change Password Hint from the Secondary Navigation Panel.
To be able to reset your password, you must enter your password hint information. This information is then used to validate you during the password reset process. The password hint feature consists of a password hint question and a reply. You will select the password hint question from a predefined set of questions. You may set the reply to be anything that you want it to be.
NOTE: The password hint question and reply are used for validation and therefore must be treated like passwords.
Refer to the following Common Business Task for detailed instructions on changing your Password Hint:
• Change Password Hint
If you have forgotten your password and are unable to log into the AMS Advantage application, then you can reset your password from the log in page. Refer to the following Common Business Task for detailed instructions on resetting your password:
• Reset Your Password
23
Common Business Tasks This section addresses step by step instruction for the common business tasks to:
• Log In and Log Out
• Define Your Home Page
• Manage Workspaces
• Manage Favorites
• Manage Passwords
Log In and Log Out
Refer to the "Home Page Navigation" section for additional information on navigating the home page.
To log in to an AMS Advantage application, perform these steps:
1. Open an Internet browser window.
2. Type in your site's specific URL for AMS Advantage HRM in the Web Site Address field and press Enter. Result: The AMS Advantage HRM login window appears.
3. Enter your User Id in the User Id field.
4. Enter your password in the Password field.
5. Note: Some sites may also have a field for entering a server name.
6. Select Login. Result: The AMS Advantage HRM home page appears.
Note: The login page can be bypassed when accessing AMS Advantage through a third-party portal.
To log out of an AMS Advantage application, perform the following step:
1. Select the Logout icon, , located in the Primary Navigation Panel.
To add an AMS Advantage application as a Favorite using Microsoft Internet Explorer, perform these steps:
1. Navigate to the AMS Advantage Login page.
2. Click the Add AMS Advantage to your Favorites link.
24
Common Business Tasks
3. The Name field will default for you, or you can change it.
4. You can add it to the main level of your Favorites, or place it within a folder that you have created.
5. Select OK to add the AMS Advantage Login page to your Favorites.
To add an AMS Advantage application as a Bookmark using Mozilla Firefox, perform these steps
1. Navigate to the AMS Advantage Login page.
2. Press the CTRL key and the D key at the same time.
3. The Name field will default for you, or you can change it.
4. You can add it to the main level of your Bookmarks, or place it within a folder that you have created.
5. Select OK to add the AMS Advantage Login page to your Bookmarks.
Change Password after Password Reset After you have reset your password using the instructions in the "Reset Your Password" section, you will receive a randomly generated password by the system in your email. After you log into AMS Advantage HRM using that password you will be asked to change your password.
To change your password after it has been reset, perform these steps:
1. Use the password you received in your email to login to the Advantage application after a password reset. Result: The Password Expired page appears. NOTE: Your old password will no longer be valid.
2. Enter your user name in the User Name field.
3. Enter your password, the password you received in the email after resetting your password, in the Old Password field.
4. Enter a new password in both the New Password field and the Confirm New Password field.
5. Select the Login button. Result: The AMS Advantage HRM home page appears.
Define Your Home Page
Refer to the "Home Page Windows" section for additional information.
To define an internal AMS Advantage page as your Home Page, perform these steps:
1. Select Personalize from the Primary Navigation Panel. Result: You are taken to the
25
AMS Advantage HRM - Getting Started User Guide
Personalize AMS Advantage window.
2. Select Home Page from the Secondary Navigation Panel.
3. Select the Add link next to ADVANTAGE Page.
4. Click the Select link next to the Advantage page that you want as your Home Page. You can enter search criteria to narrow the listing of pages. Result: You are taken back to Home Page Windows, and the page you selected is indicated in the grid.
5. Close the Personalize AMS Advantage window.
6. To view the newly added page as your Home Page, you must log out and then log back in. Refer to the "Log In and Log Out" section for more information.
Note: You can only select ONE Advantage page for your Home Page. If an Advantage page is selected, then you cannot select external pages either.
To define an external website as your Home Page, perform these steps:
1. Select Personalize from the Primary Navigation Panel. Result: You are taken to the Personalize AMS Advantage window.
2. Select Home Page from the Secondary Navigation Panel.
3. Enter the web address for the external site in the URL: field.
4. Select the Add link next to URL field to add the URL to your Home Page list in the grid.
5. Repeat the steps to add additional external websites to your home page.
6. To view the newly website as your Home Page, you must log out and then log back in. Refer to the "Log In and Log Out" section for more information.
Note: If an Advantage page is selected, then you cannot select external pages.
Manage Workspaces The following tasks are provided for managing your Workspaces in AMS Advantage:
• Add an Existing Workspace
• Add a Custom Workspace
• Create a Business Area
• Create a Business Function
• Create a Business Function Item
Add an Existing Workspace
26
Common Business Tasks
Refer to the "Workspace Pages" section for additional information.
To add an existing workspace, perform these steps:
1. Select Personalize from the Primary Navigation Panel. Result: You are taken to the Personalize AMS Advantage window.
2. Select Workspaces from the Secondary Navigation Panel.
3. Move to one of the listings of workspaces (that is, Unused Workspaces, System Workspaces, or Workgroup Workspaces), and select the workspace you want to add.
4. Select the Copy link below the listing.
5. Move to the In-Use Workspace area.
6. Select the Paste link below the In-Use Workspace grid. Result: The workspace now appears in the In-Use Workspace grid.
7. To view the newly added workspace, you must log out and then log back in. Refer to the "Log In and Log Out" section for more information.
Note: To view the newly added workspace, you must log out and then log back in. Refer to the "Log In and Log Out" section for more information.
Add a Custom Workspace
Refer to the "Workspace Pages" section for additional information.
In addition to the workspaces your site has created for you, you can create your own custom workspaces. When you create your own workspace, you need to create the following items in the workspace hierarchy: Workspace, Business Area, Business Function, and Business Function Item. Each of these steps are detailed in separate tasks. This task covers the first step, creating the Workspace.
To create a custom workspace, perform these steps:
1. Select Personalize from the Primary Navigation Panel. Result: You are taken to the Personalize AMS Advantage window.
2. Select Workspaces from the Secondary Navigation Panel.
3. Move to the In-Use Workspaces area.
4. Add a new workspace by selecting the Insert link below the grid. Result: A new workspace is added to the grid with the default name of "New Workspace."
5. In the Secondary Navigation Panel click on the plus (+) sign next to Workspaces. Result: A new workspace listing (with the default name of "New Workspace") appears in the secondary navigation panel.
6. Select New Workspace in the Secondary Navigation Panel. Result: The properties
27

AMS Advantage HRM - Getting Started User Guide
page for that workspace appears on the right.
7. Enter a new name for the workspace in the Name field. If needed, enter a description in the Description field as well.
8. Select Save.
9. In the Secondary Navigation Panel, click on the minus (-) sign next to Workspaces. Result: The Workspaces listing is collapsed.
10. In the Secondary Navigation Panel click on the plus (+) sign next to Workspaces. Result: The new workspace that you added appears with the new name you entered in Step 7.
11. Refer to the "Create a Business Area" task to continue creating your custom workspace.
Note: To view the newly added workspace, you must log out and then log back in. Refer to the "Log In and Log Out" section for more information.
Create a Business Area
Refer to the "Workspace Pages" section for additional information.
This task assumes that you have already added a workspace using the steps in the "Add an Existing Workspace" or "Add a Custom Workspace" sections.
To create a Business Area for a Workspace, perform these steps:
1. Select Personalize from the Primary Navigation Panel. Result: You are taken to the Personalize AMS Advantage window.
2. In the Secondary Navigation Panel click on the plus (+) sign next to Workspaces. Result: The Workspaces listing is expanded.
3. Select the workspace from the Secondary Navigation Panel that you want to contain the new Business Area. Result: The properties page for that workspace appears on the right.
4. Add a new Business Area by selecting Insert under the Business Areas grid. Result: A new business area is added to the grid with the default name of "New Business Area."
5. In the Secondary Navigation Panel click on the plus (+) sign next to the workspace that contains the new business area. Result: A new business area listing (with the default name of "New Business Area") appears in the Secondary Navigation Panel.
6. Select New Business Area in the Secondary Navigation Panel. Result: The properties page for that business area appears on the right.
7. Enter a new name for the business area in the Name field. If needed, enter a description in the Description field as well.
8. Select Save.
9. In the Secondary Navigation Panel, click on the minus (-) sign next to the workspace
28
Common Business Tasks
that contains the new business area. Result: The listing for that workspace is collapsed.
10. In the Secondary Navigation Panel click on the plus (+) sign next to the workspace that contains the new business area. Result: The new business area that you added appears with the new name you entered in Step 7.
11. Refer to the "Create a Business Function" task to continue creating your custom workspace.
Note: To view the newly added business area, you must log out and then log back in. Refer to the "Log In and Log Out" section for more information.
Create a Business Function
Refer to the "Workspace Pages" section for additional information.
This task assumes that you have already added a business area using the "Create a Business Area" task.
To create a Business Function within a Business Area, perform these steps:
1. Select Personalize from the Primary Navigation Panel. Result: You are taken to the Personalize AMS Advantage window.
2. In the Secondary Navigation Panel click on the plus (+) sign next to Workspaces. Result: The Workspaces listing is expanded.
3. In the Secondary Navigation Panel click on the plus (+) sign next to the workspace that you want to contain the new Business Function. Result: The selected workspace listing is expanded showing all available business areas.
4. Select the business area from the Secondary Navigation Panel that you want to contain the new Business Function. Result: The properties page for that business area appears on the right.
5. Add a new Business Function by selecting Insert under the Business Functions grid. Result: A new business function is added to the grid with the default name of "New Business Function."
6. In the Secondary Navigation Panel click on the plus (+) sign next to the business area that contains the new business function. Result: A new business function listing (with the default name of "New Business Function") appears in the Secondary Navigation Panel.
7. Select New Business Function in the Secondary Navigation Panel. Result: The properties page for that business function appears on the right.
8. Enter a new name for the business function in the Name field. If needed, enter a description in the Description field as well.
9. Select Save.
10. In the Secondary Navigation Panel, click on the minus (-) sign next to the business area that contains the new business function. Result: The listing for that business area
29
AMS Advantage HRM - Getting Started User Guide
is collapsed.
11. In the Secondary Navigation Panel click on the plus (+) sign next to the business area that contains the new business function. Result: The new business function that you added appears with the new name you entered in Step 8.
12. Refer to the "Create a Business Function Item" task to continue creating your custom workspace.
Note: To view the newly added business function, you must log out and then log back in. Refer to the "Log In and Log Out" section for more information.
Create a Business Function Item
Refer to the "Workspace Pages" section for additional information.
This task assumes that you have already added a business function using the "Create a Business Function" task.
To create a Business Function Item within a Business Function, perform these steps:
1. Select Personalize from the Primary Navigation Panel. Result: You are taken to the Personalize AMS Advantage window.
2. In the Secondary Navigation Panel click on the plus (+) sign next to Workspaces. Result: The Workspaces listing is expanded.
3. In the Secondary Navigation Panel click on the plus (+) sign next to the workspace that you want to contain the new Business Function Item. Result: The selected workspace listing is expanded showing all available business areas.
4. In the Secondary Navigation Panel click on the plus (+) sign next to the business area that you want to contain the new Business Function Item. Result: The selected business area listing is expanded showing all available business functions.
5. Select the business function from the Secondary Navigation Panel that you want to contain the new Business Function Item. Result: The properties page for that business function appears on the right.
6. Add a new Business Function Item by selecting Insert under the Business Function Items grid. Result: You are taken to a new page to choose an Advantage page.
7. Click the Select link next to the page that you want added as the new business function item. Result: A new business function item is added to the grid with the default name of "New Page." The Page Type and Page Code are populated based on your selection.
8. In the Secondary Navigation Panel click on the plus (+) sign next to the business function that contains the new business function item. Result: A new business function item listing (with the default name of "New Page") appears in the Secondary Navigation Panel.
9. Select New Page in the Secondary Navigation Panel. Result: The properties page for
30
Common Business Tasks
that business function item appears on the right.
10. Enter a new name for the business function item in the Name field.
11. Select Save.
12. In the Secondary Navigation Panel, click on the minus (-) sign next to the business function that contains the new business function item. Result: The listing for that business function is collapsed.
13. In the Secondary Navigation Panel click on the plus (+) sign next to the business function that contains the new business function item. Result: The new business function item that you added appears with the new name you entered in Step 10.
Note: To view the newly added business function item, you must log out and then log back in. Refer to the "Log In and Log Out" section for more information.
Manage Favorites The following tasks are provided for managing your Favorites list in AMS Advantage:
• Add a Page to Favorites
• Modify a Favorites Name
• Delete a Page from Favorites
Refer to the "Favorites" section in this user guide for more information.
Add a Page to Favorites
Refer to the "Favorites" section for additional information.
To add a page to your Favorites listing, perform these steps:
1. Navigate to the page that you want added to your Favorites listing.
2. Click your right mouse button on the page. Result: A pop-up menu appears.
3. Click Add to Favorites from the pop-up menu.
4. Enter the name that you want displayed under Favorites for this page.
5. Select OK.
6. A message appears indicating that the favorite was successfully added.
7. In the Secondary Navigation Panel click on the plus (+) sign next to Favorites. Result: The Favorites listing is expanded. The page you added to Favorites listing appears.
Modify a Favorites Name
31

AMS Advantage HRM - Getting Started User Guide
Refer to the "Favorites" section for additional information.
To modify the name for one of your Favorites, perform these steps:
1. Select Personalize from the Primary Navigation Panel. Result: You are taken to the Personalize AMS Advantage window.
2. In the Secondary Navigation Panel click on the plus (+) sign next to Favorites. Result: The Favorites listing is expanded.
3. In the Secondary Navigation Panel, select the Favorites listing that you want to modify.
4. Enter the new name for the Favorites listing in the Name field.
5. Close out of the Personalize AMS Advantage window.
6. In the Secondary Navigation Panel click the plus (+) sign next to Favorites. The new name you entered will appear for your Favorites listing that you modified. Note: If the Favorites listing was already expanded, then you must click the minus (-) sign to collapse the Favorites listing and then click the plus (+) sign. This will refresh the listing.
Delete a Page from Favorites
Refer to the "Favorites" section for additional information.
To delete a page from your Favorites listing, perform these steps:
1. Select Personalize from the Primary Navigation Panel. Result: You are taken to the Personalize AMS Advantage window.
2. In the Secondary Navigation Panel click Favorites. Result: The Favorites page appears on the right listing all pages that appear under your Favorites listing in Advantage.
3. Select the row in the grid that contains the page that you want removed from your Favorites listing.
4. Click Delete. Result: The page is removed from the grid.
5. Close out of the Personalize AMS Advantage window.
6. In the Secondary Navigation Panel click the plus (+) sign next to Favorites. The page that you deleted no longer appears under Favorites. Note: If the Favorites listing was already expanded, then you must click the minus (-) sign to collapse the Favorites listing and then click the plus (+) sign. This will refresh the listing.
Manage Passwords The following tasks are provided for managing your passwords in AMS Advantage:
32
Common Business Tasks
• Change User Password
• Change Password Hint
• Reset Your Password
• Change Password after Password Reset
Refer to the "Change Password Page" section and the "Change Password Hint Page" section in this user guide for more information.
Change User Password
If you are logged into an AMS Advantage application, you can change your password by performing these steps:
1. Select Administration > Change Password from the Secondary Navigation Panel. Result: The Change Password page appears.
2. In the User Password section, enter your existing password in the Old Password field.
3. In the User Password section, enter a new password in the New Password and Verify New Password fields.
4. Select the Change User Password button. Result: If the password is changed successfully, then an informational message appears indicating that your user password was successfully changed.
Note: If you are not logged into an AMS Advantage application, and you need to reset your password, then refer to the "Reset Your Password" section.
Change Password Hint
The Change Password Hint page will only be available if your site permits password resetting.
To change your password hint, perform these steps:
1. Select Administration > Change Password Hint from the Secondary Navigation Panel. Result: The Change Password Hint page appears.
2. Select a Password Hint from the existing list of password hints.
3. Enter your current password in the Password field.
4. Enter your reply in both the Reply field and the Verify Reply field.
5. Select the Change Password Hint button.
Reset Your Password
If your site permits password reset, then you will see a Forgot Your Password? link on the AMS Advantage Login page.
To reset your password, perform these steps:
33
AMS Advantage HRM - Getting Started User Guide
34
1. Select the Forgot Your Password? link on the login page. Result: The Password Reset User Verification page appears.
2. Enter your user name in the User Name field. The user name should match the user name you use when logging in to AMS Advantage. NOTE: You will not be able to reset your password if the user name information is incorrect.
3. Select the Continue button. Result: The Password Reset page appears.
4. The password hint question you selected during the Change Password Hint process will be visible on the page. Enter your reply in the Password Hint Reply field. The reply entered must match the reply you entered as part of the password hint information on the Change Password Hint page.
5. Select the Reset Password button. Result: A message indicating that your password has been emailed to you will be displayed. NOTE: You will see an error message if either the reply entered by you was incorrect, that is it did not match the reply you had entered as part of the password hint information, or you do not have an email address on record.
6. Select Exit from the Primary Navigation Panel to exit the password reset process.
Refer to the "Change Password after Password Reset" section for further instructions.
Advantage Search Functionality The Search functionality is provided on many pages throughout Advantage. The Search functionality supports the following:
• Text can be typed in upper or lower case. All text will automatically be converted to upper case.
• Wildcard characters can be used to assist with searching. The applicable wildcard characters are: asterisk (*), colon (:), greater than sign (>), greater than or equal to sign (>=), less than sign (<), and less than or equal to sign (<=).
• Commas can be used to provide multiple search criteria. For example, type MISC, ESMT in the Code field on the Document Catalog to view all documents that have a Document Code of MISC or ESMT
• When searching for data that contains commas, enclose the search criteria with single quotes. For example, type 'Construction, Inc.', in the Vendor Legal Name search field to view the Construction, Inc. vendor record.
Wildcard Search Examples Provided below are the applicable wildcard characters that can be used to search within Advantage.
• asterisk (*) - For example, you can type *employee* in the Description field on Page Search and all pages that have Employee in their Description will be returned.
• Colon (:) - For example, type 1/1/2004 : 1/15/2004 in the Create Date field on the Document Catalog to view all documents created on or after 1/1/2004 and on or before 1/15/2004.
• greater than sign (>) - For example, type >1/14/2002 in the Create Date field on the Document Catalog to view all documents created after January 14, 2002.
• greater than or equal to sign (>=) - For example, type >=1/14/2002 in the Create Date field on the Document Catalog to view all documents created on or after January 14, 2002.
• less than sign (<) - For example, type <200 in the Fund field on the Fund table to view all funds that are less than 200. Everyone whose cash balance less than
• less than or equal to sign (<=) - For example, type <=1000 in the Available Cash Balance search field on the Cash Balance table to view all funds that have an available cash balance less than $1000.00.
35

Pop-up Blockers There are Browsers and Browser helper programs/toolbars that have a function to block Pop-Up ads. However, some pop-up blocking programs cannot distinguish between a pop-up ad and a useful new window. Please be aware that the AMS Advantage application uses “new browser windows” to display the following types of information: online documentation, error messages, Personalize window, and Job Manager. If the user is using a pop-up ad blocker program and these AMS Advantage windows do not display, then the User’s pop-up blocker program will need to be disabled while using the AMS Advantage application.
36