Embed Size (px)
Citation preview
Alternative Manual: Pulsor 1 and 2 Page � of �1 19
An 'Alternative Manual'
for the
Pulsor 1 and 2
Monophonic Synthesisers by
Amazing Noises
Updated for the Isotonik Studios package
in February 2019 by
Martin Russhttps://blog.synthesizerwriter.com
V2.01 February 2019
© 2019 Martin Russ
Only Amazing Noises
and Isotonik Studioscan distribute this version.
V2.01 � Martin Russ
Alternative Manual: Pulsor 1 and 2 Page � of �2 19
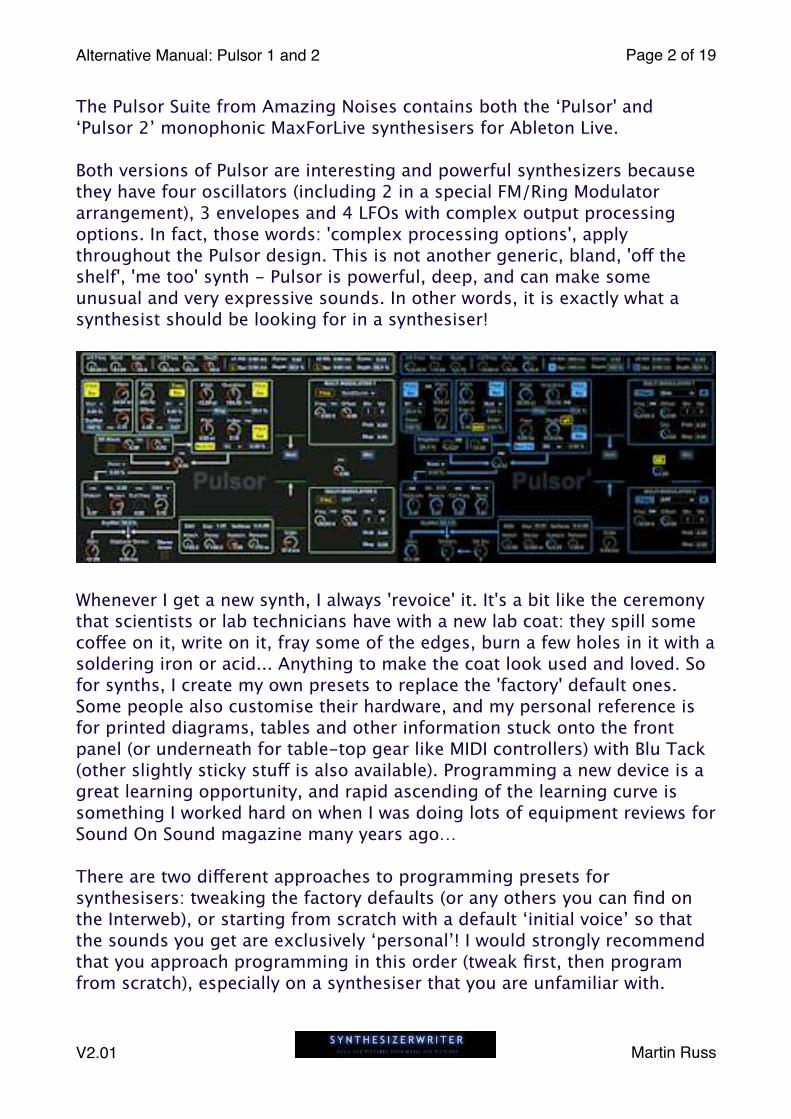
The Pulsor Suite from Amazing Noises contains both the ‘Pulsor' and ‘Pulsor 2’ monophonic MaxForLive synthesisers for Ableton Live.
Both versions of Pulsor are interesting and powerful synthesizers because they have four oscillators (including 2 in a special FM/Ring Modulator arrangement), 3 envelopes and 4 LFOs with complex output processing options. In fact, those words: 'complex processing options', apply throughout the Pulsor design. This is not another generic, bland, 'off the shelf', 'me too' synth - Pulsor is powerful, deep, and can make some unusual and very expressive sounds. In other words, it is exactly what a synthesist should be looking for in a synthesiser!
�
Whenever I get a new synth, I always 'revoice' it. It's a bit like the ceremony that scientists or lab technicians have with a new lab coat: they spill some coffee on it, write on it, fray some of the edges, burn a few holes in it with a soldering iron or acid... Anything to make the coat look used and loved. So for synths, I create my own presets to replace the 'factory' default ones. Some people also customise their hardware, and my personal reference is for printed diagrams, tables and other information stuck onto the front panel (or underneath for table-top gear like MIDI controllers) with Blu Tack (other slightly sticky stuff is also available). Programming a new device is a great learning opportunity, and rapid ascending of the learning curve is something I worked hard on when I was doing lots of equipment reviews for Sound On Sound magazine many years ago…
There are two different approaches to programming presets for synthesisers: tweaking the factory defaults (or any others you can find on the Interweb), or starting from scratch with a default ‘initial voice’ so that the sounds you get are exclusively ‘personal’! I would strongly recommend that you approach programming in this order (tweak first, then program from scratch), especially on a synthesiser that you are unfamiliar with.
V2.01 � Martin Russ
Alternative Manual: Pulsor 1 and 2 Page � of �3 19
Examining how a preset works can be a good way of learning a lot about how the synthesiser itself works, but it needs to be approached in a methodical way. Counter-intuitively, my usual way of working is to start at the output, and work my way backwards from there. This has the advantage that the first thing you do is to examine any effects that might be applied, and removing reverb is a very good way to make listening closely to the synthesiser’s raw sound easier when programming. Reverb (or other audio effects) can be very useful in producing the final sound, but when you are learning about a synthesiser, then the raw ‘unprocessed’ sound is definitely what you should be listening to.
The default or ‘Factory’ presets in many synthesisers are often designed to sound good in isolation, rather than as part of a mix. (Applying EQ to ‘pad’ sounds can often open up a mix by restricting the pad to only part of the sound spectrum, for example) Effects like reverb provide instant ‘ear appeal’, but they can hide all sorts of unwanted artefacts (like clicks and inconsistencies in envelopes, for instance) that you don’t want to have to fix when you hear them later in a nearly finished mix. So the first action of anyone who wants to program sounds in order to learn about how a synthesizer makes sounds should be to turn off any effects!
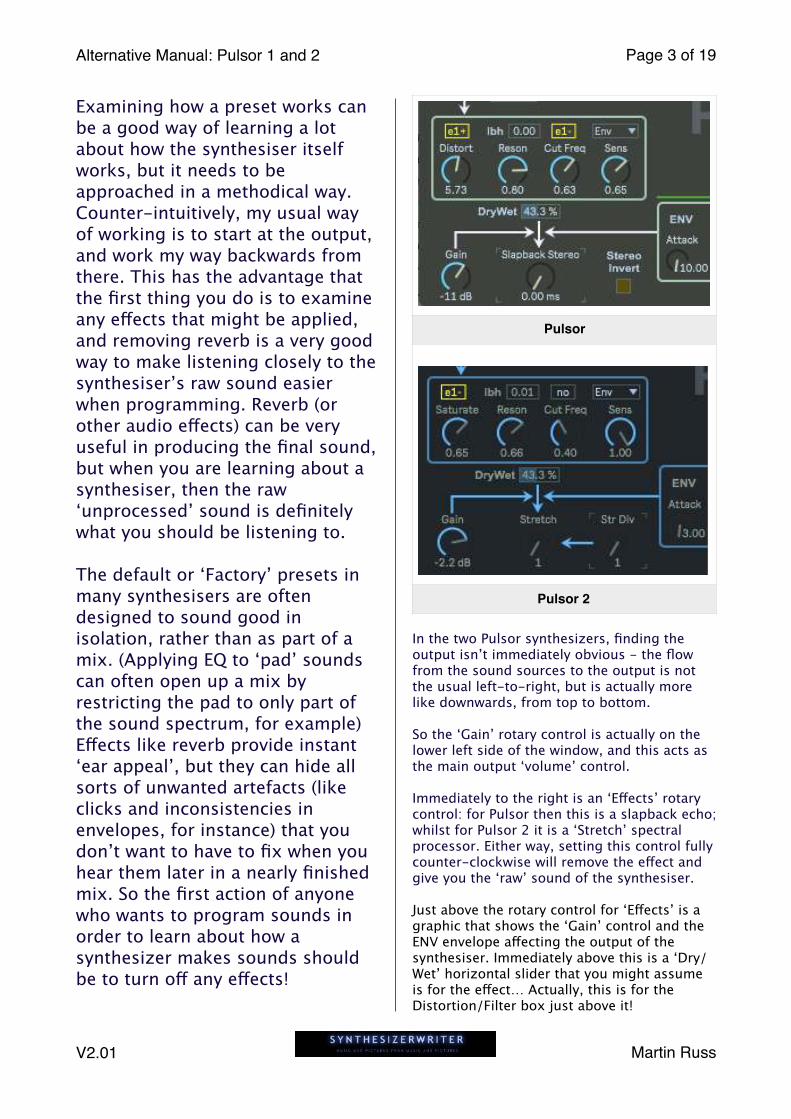
In the two Pulsor synthesizers, finding the output isn’t immediately obvious - the flow from the sound sources to the output is not the usual left-to-right, but is actually more like downwards, from top to bottom.
So the ‘Gain’ rotary control is actually on the lower left side of the window, and this acts as the main output ‘volume’ control.
Immediately to the right is an ‘Effects’ rotary control: for Pulsor then this is a slapback echo; whilst for Pulsor 2 it is a ‘Stretch’ spectral processor. Either way, setting this control fully counter-clockwise will remove the effect and give you the ‘raw’ sound of the synthesiser.
Just above the rotary control for ‘Effects’ is a graphic that shows the ‘Gain’ control and the ENV envelope affecting the output of the synthesiser. Immediately above this is a ‘Dry/Wet’ horizontal slider that you might assume is for the effect… Actually, this is for the Distortion/Filter box just above it!
Pulsor
Pulsor 2
�
�
V2.01 � Martin Russ
Alternative Manual: Pulsor 1 and 2 Page � of �4 19
Anyway, after producing more than 100 new 'presets' for each of the Pulsor synths, I was pretty familiar with how they work, although there is still plenty of scope for further exploration. Now one of the things I remember from before the Internet, when people used FTP sites to exchange information, was the 'alternative manual'. Not a replacement for the real user manual, but an attempt to provide additional detail and clarifications from people who had some experience, whilst also intended to make things easier for newbies. The rest of this ‘alternative’ manual is what I learned about the Pulsors:
Programming model
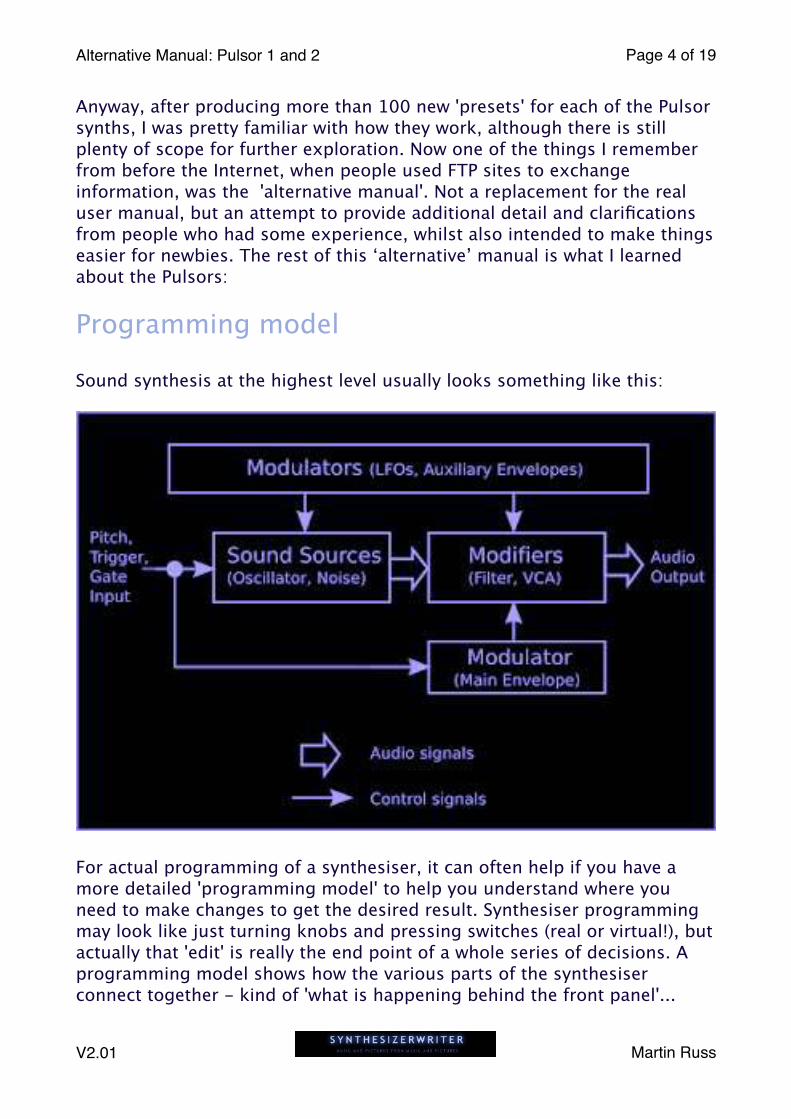
Sound synthesis at the highest level usually looks something like this:
�
For actual programming of a synthesiser, it can often help if you have a more detailed 'programming model' to help you understand where youneed to make changes to get the desired result. Synthesiser programming may look like just turning knobs and pressing switches (real or virtual!), but actually that 'edit' is really the end point of a whole series of decisions. A programming model shows how the various parts of the synthesiser connect together - kind of 'what is happening behind the front panel'...
V2.01 � Martin Russ
Alternative Manual: Pulsor 1 and 2 Page � of �5 19
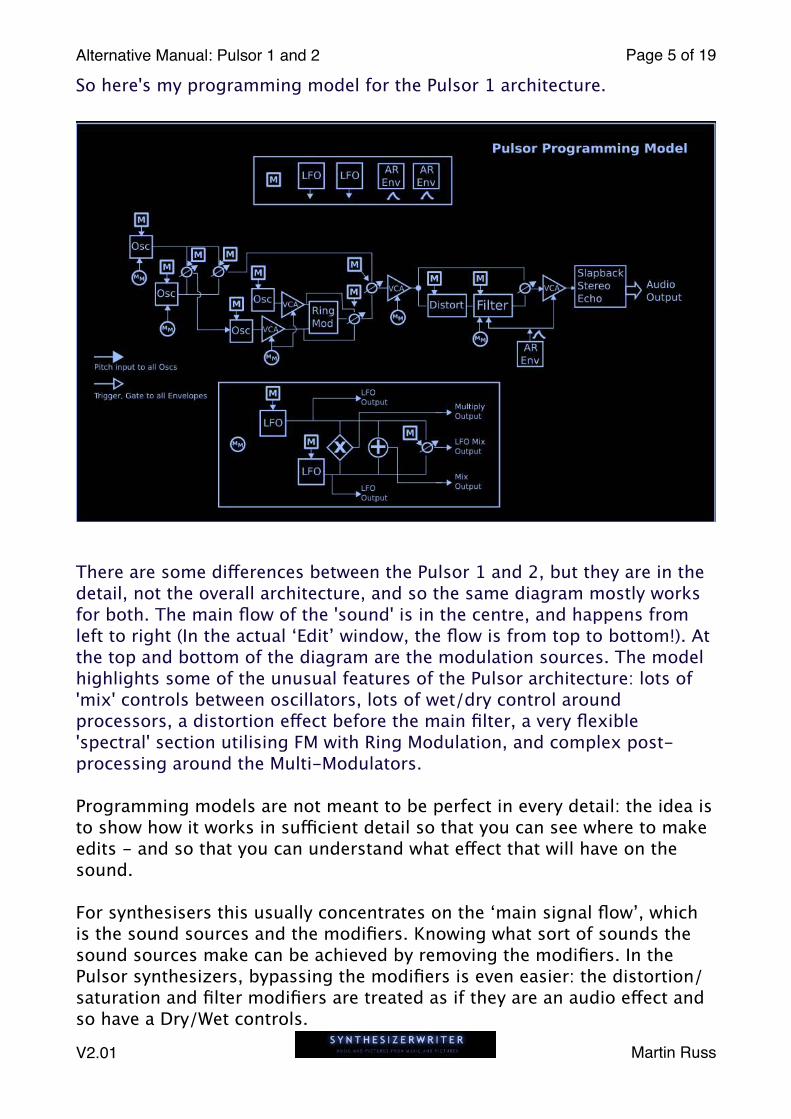
So here's my programming model for the Pulsor 1 architecture.
There are some differences between the Pulsor 1 and 2, but they are in the detail, not the overall architecture, and so the same diagram mostly works for both. The main flow of the 'sound' is in the centre, and happens from left to right (In the actual ‘Edit’ window, the flow is from top to bottom!). At the top and bottom of the diagram are the modulation sources. The model highlights some of the unusual features of the Pulsor architecture: lots of 'mix' controls between oscillators, lots of wet/dry control around processors, a distortion effect before the main filter, a very flexible 'spectral' section utilising FM with Ring Modulation, and complex post-processing around the Multi-Modulators.
Programming models are not meant to be perfect in every detail: the idea is to show how it works in sufficient detail so that you can see where to make edits - and so that you can understand what effect that will have on the sound.
For synthesisers this usually concentrates on the ‘main signal flow’, which is the sound sources and the modifiers. Knowing what sort of sounds the sound sources make can be achieved by removing the modifiers. In the Pulsor synthesizers, bypassing the modifiers is even easier: the distortion/saturation and filter modifiers are treated as if they are an audio effect and so have a Dry/Wet controls.
V2.01 � Martin Russ
Alternative Manual: Pulsor 1 and 2 Page � of �6 19
�
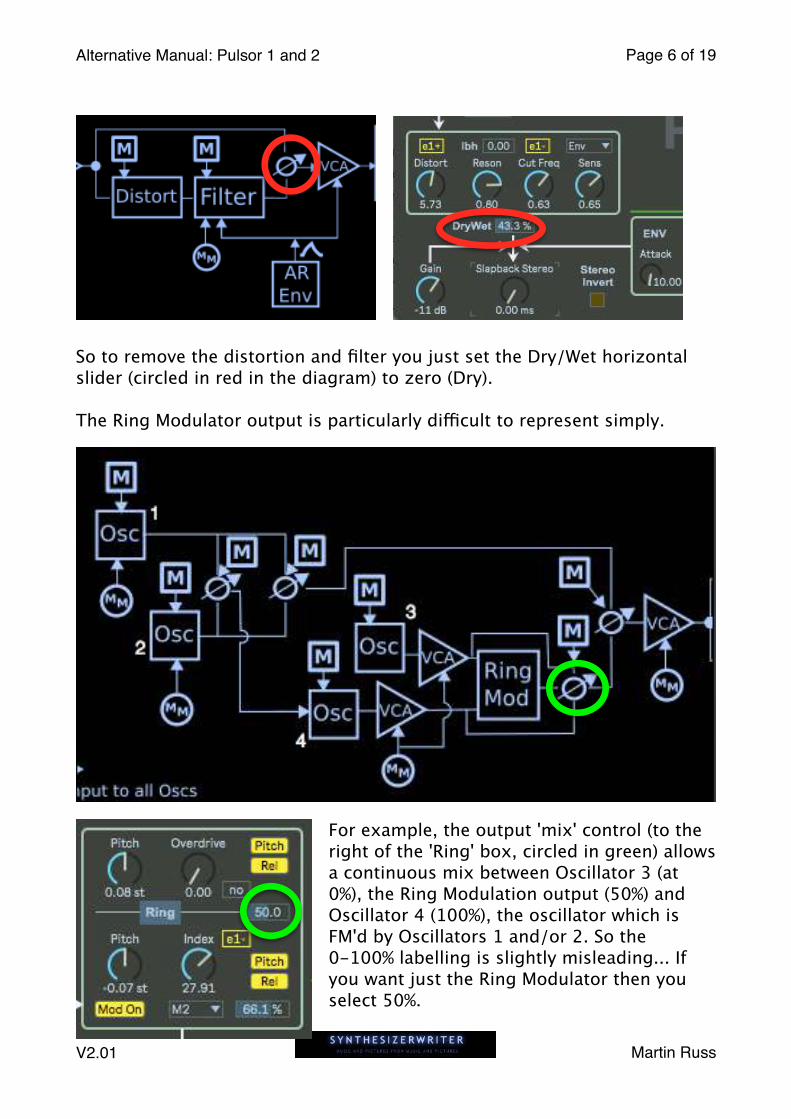
So to remove the distortion and filter you just set the Dry/Wet horizontal slider (circled in red in the diagram) to zero (Dry).
The Ring Modulator output is particularly difficult to represent simply.
For example, the output 'mix' control (to the right of the 'Ring' box, circled in green) allows a continuous mix between Oscillator 3 (at 0%), the Ring Modulation output (50%) and Oscillator 4 (100%), the oscillator which is FM'd by Oscillators 1 and/or 2. So the 0-100% labelling is slightly misleading... If you want just the Ring Modulator then you select 50%.
V2.01 � Martin Russ
Alternative Manual: Pulsor 1 and 2 Page � of �7 19
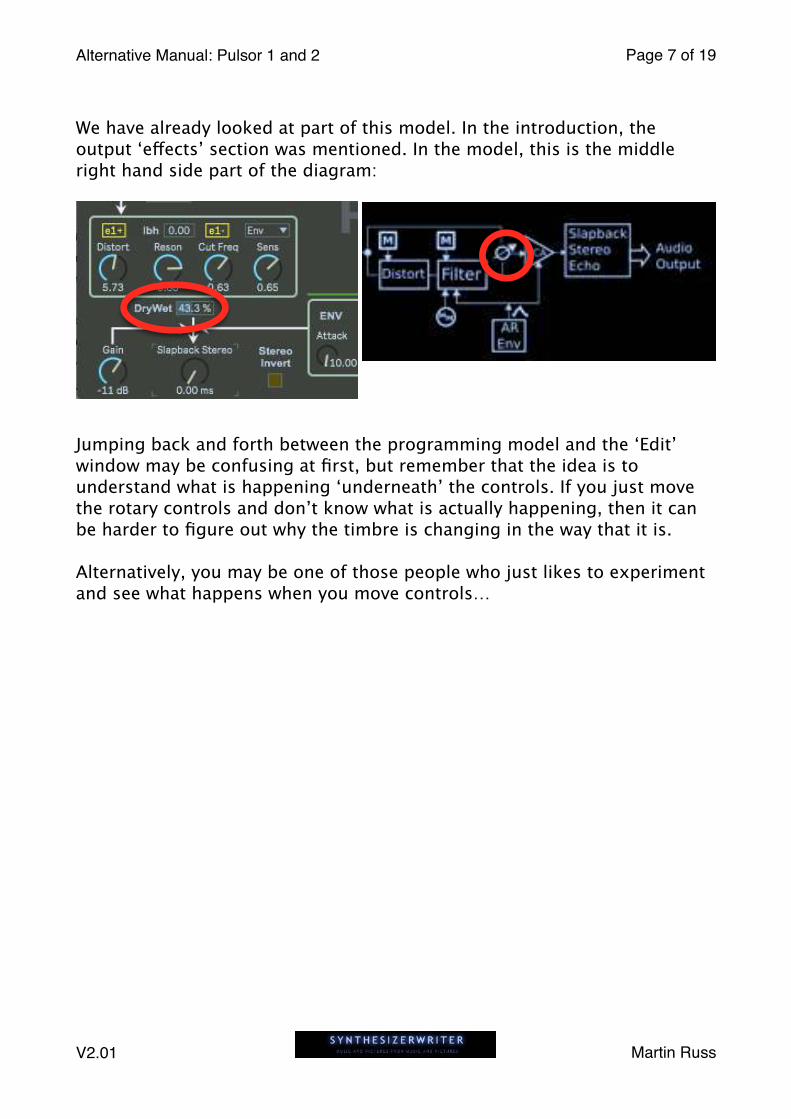
We have already looked at part of this model. In the introduction, the output ‘effects’ section was mentioned. In the model, this is the middle right hand side part of the diagram:
�
Jumping back and forth between the programming model and the ‘Edit’ window may be confusing at first, but remember that the idea is to understand what is happening ‘underneath’ the controls. If you just move the rotary controls and don’t know what is actually happening, then it can be harder to figure out why the timbre is changing in the way that it is.
Alternatively, you may be one of those people who just likes to experiment and see what happens when you move controls…
V2.01 � Martin Russ
Alternative Manual: Pulsor 1 and 2 Page � of �8 19
User interface
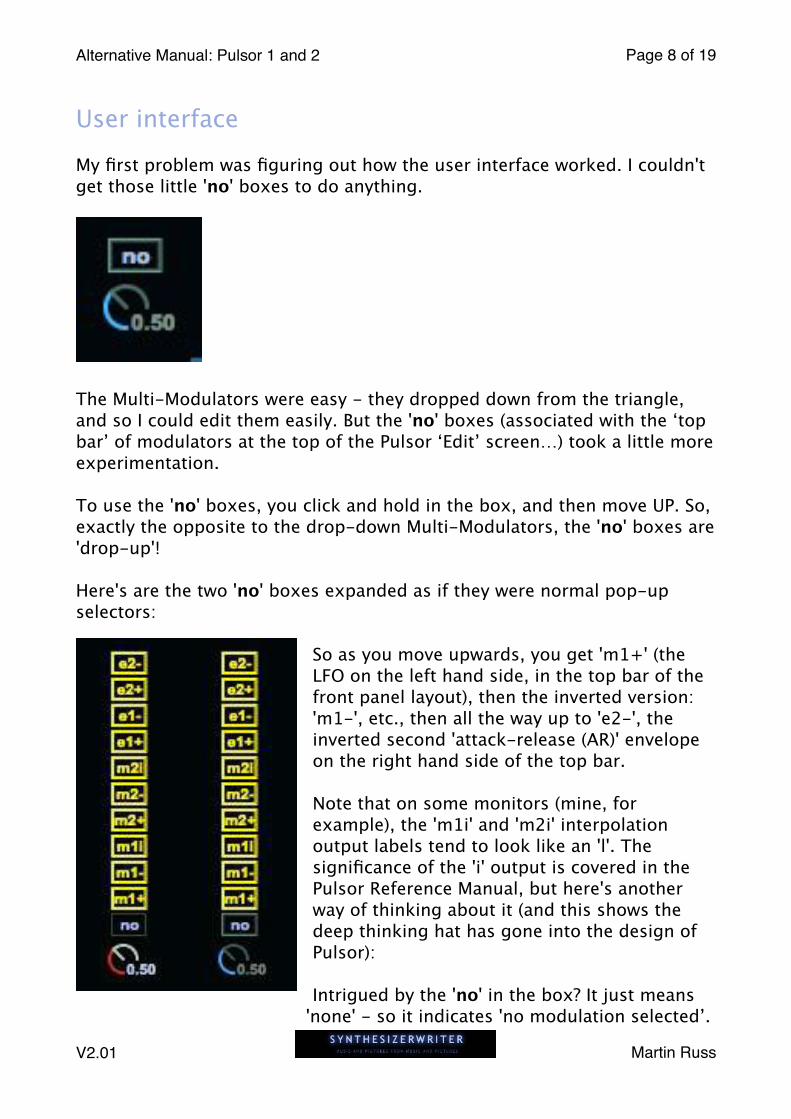
My first problem was figuring out how the user interface worked. I couldn't get those little 'no' boxes to do anything.
�
The Multi-Modulators were easy - they dropped down from the triangle, and so I could edit them easily. But the 'no' boxes (associated with the ‘top bar’ of modulators at the top of the Pulsor ‘Edit’ screen…) took a little more experimentation.
To use the 'no' boxes, you click and hold in the box, and then move UP. So, exactly the opposite to the drop-down Multi-Modulators, the 'no' boxes are 'drop-up'!
Here's are the two 'no' boxes expanded as if they were normal pop-up selectors:
So as you move upwards, you get 'm1+' (the LFO on the left hand side, in the top bar of the front panel layout), then the inverted version: 'm1-', etc., then all the way up to 'e2-', the inverted second 'attack-release (AR)' envelope on the right hand side of the top bar.
Note that on some monitors (mine, for example), the 'm1i' and 'm2i' interpolation output labels tend to look like an 'l'. The significance of the 'i' output is covered in the Pulsor Reference Manual, but here's another way of thinking about it (and this shows the deep thinking hat has gone into the design of Pulsor):
Intrigued by the 'no' in the box? It just means 'none' - so it indicates 'no modulation selected’.
V2.01 � Martin Russ
Alternative Manual: Pulsor 1 and 2 Page � of �9 19
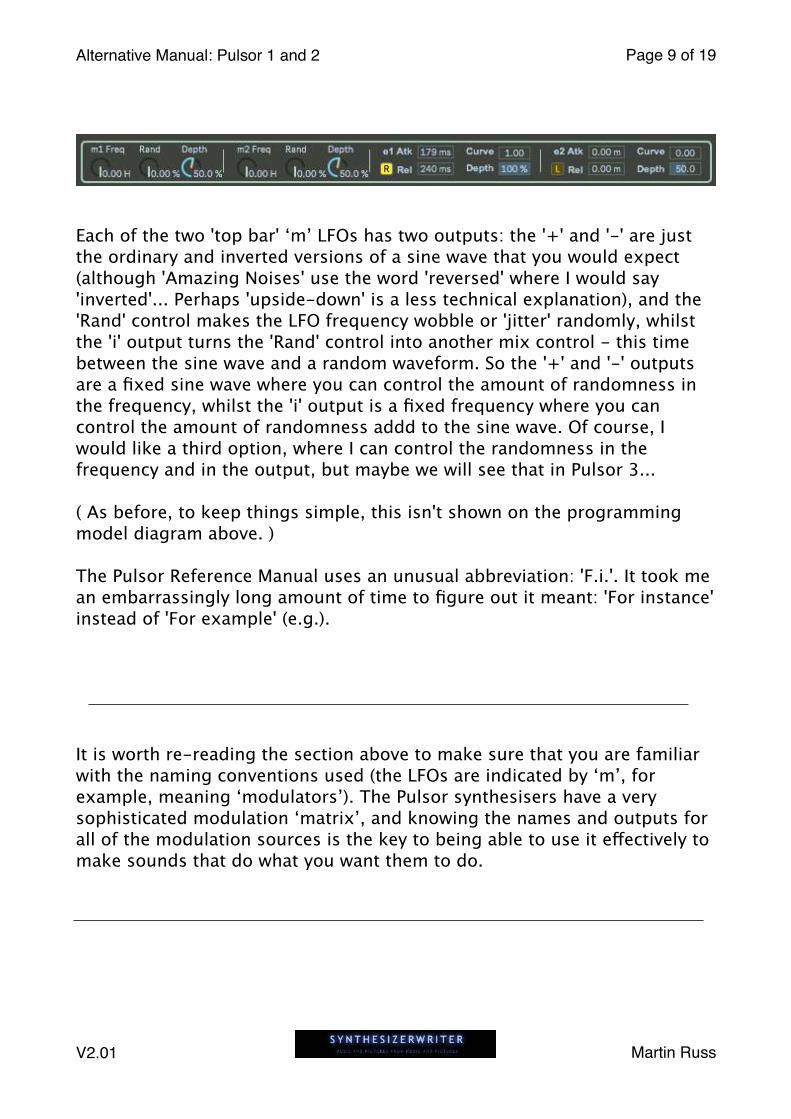
Each of the two 'top bar' ‘m’ LFOs has two outputs: the '+' and '-' are just the ordinary and inverted versions of a sine wave that you would expect (although 'Amazing Noises' use the word 'reversed' where I would say 'inverted'... Perhaps 'upside-down' is a less technical explanation), and the 'Rand' control makes the LFO frequency wobble or 'jitter' randomly, whilst the 'i' output turns the 'Rand' control into another mix control - this time between the sine wave and a random waveform. So the '+' and '-' outputs are a fixed sine wave where you can control the amount of randomness in the frequency, whilst the 'i' output is a fixed frequency where you can control the amount of randomness addd to the sine wave. Of course, I would like a third option, where I can control the randomness in the frequency and in the output, but maybe we will see that in Pulsor 3...
( As before, to keep things simple, this isn't shown on the programming model diagram above. )
The Pulsor Reference Manual uses an unusual abbreviation: 'F.i.'. It took me an embarrassingly long amount of time to figure out it meant: 'For instance' instead of 'For example' (e.g.).
It is worth re-reading the section above to make sure that you are familiar with the naming conventions used (the LFOs are indicated by ‘m’, for example, meaning ‘modulators’). The Pulsor synthesisers have a very sophisticated modulation ‘matrix’, and knowing the names and outputs for all of the modulation sources is the key to being able to use it effectively to make sounds that do what you want them to do.
V2.01 � Martin Russ
Alternative Manual: Pulsor 1 and 2 Page � of �10 19
Spectral Control
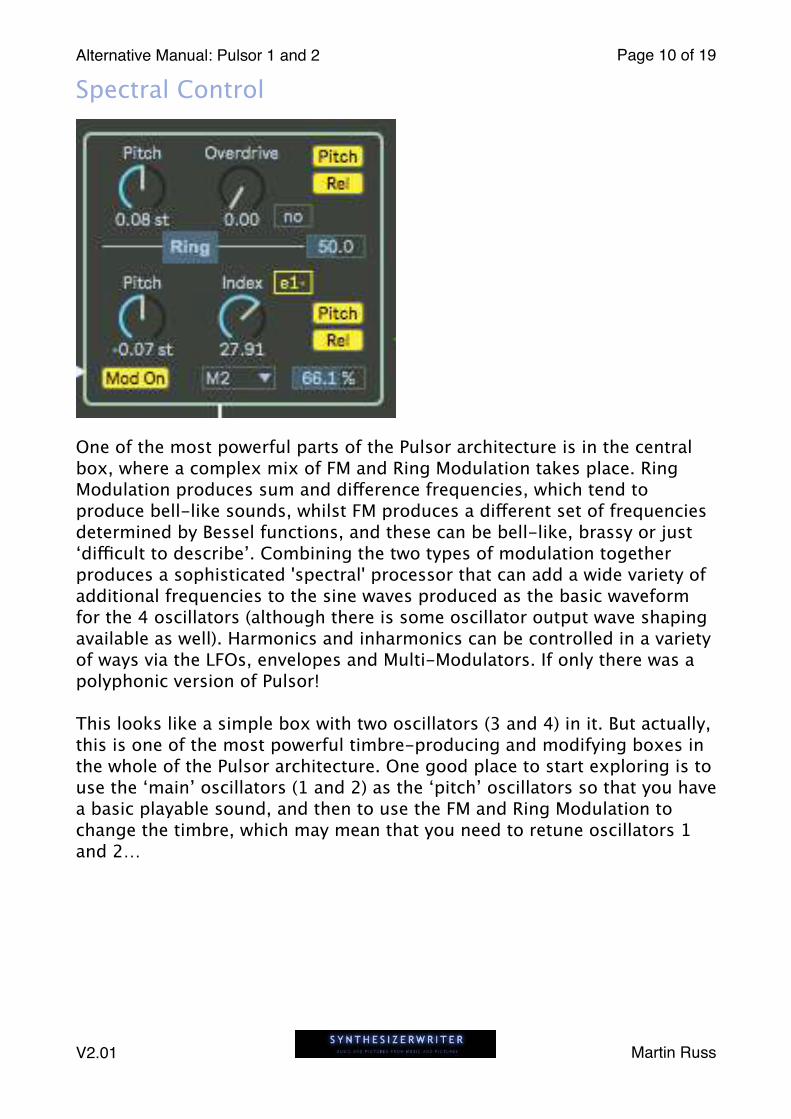
One of the most powerful parts of the Pulsor architecture is in the central box, where a complex mix of FM and Ring Modulation takes place. Ring Modulation produces sum and difference frequencies, which tend to produce bell-like sounds, whilst FM produces a different set of frequencies determined by Bessel functions, and these can be bell-like, brassy or just ‘difficult to describe’. Combining the two types of modulation together produces a sophisticated 'spectral' processor that can add a wide variety of additional frequencies to the sine waves produced as the basic waveform for the 4 oscillators (although there is some oscillator output wave shaping available as well). Harmonics and inharmonics can be controlled in a variety of ways via the LFOs, envelopes and Multi-Modulators. If only there was a polyphonic version of Pulsor!
This looks like a simple box with two oscillators (3 and 4) in it. But actually, this is one of the most powerful timbre-producing and modifying boxes in the whole of the Pulsor architecture. One good place to start exploring is to use the ‘main’ oscillators (1 and 2) as the ‘pitch’ oscillators so that you have a basic playable sound, and then to use the FM and Ring Modulation to change the timbre, which may mean that you need to retune oscillators 1 and 2…
V2.01 � Martin Russ
Alternative Manual: Pulsor 1 and 2 Page � of �11 19
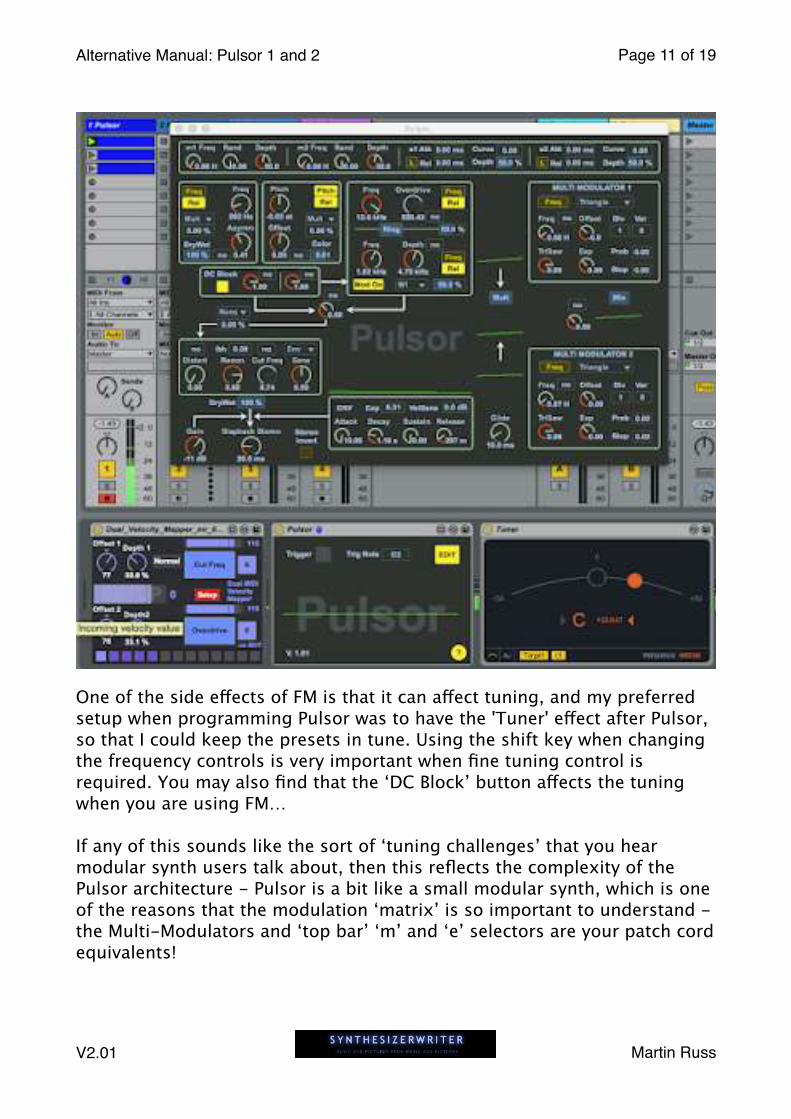
One of the side effects of FM is that it can affect tuning, and my preferred setup when programming Pulsor was to have the 'Tuner' effect after Pulsor, so that I could keep the presets in tune. Using the shift key when changing the frequency controls is very important when fine tuning control is required. You may also find that the ‘DC Block’ button affects the tuning when you are using FM…
If any of this sounds like the sort of ‘tuning challenges’ that you hear modular synth users talk about, then this reflects the complexity of the Pulsor architecture - Pulsor is a bit like a small modular synth, which is one of the reasons that the modulation ‘matrix’ is so important to understand - the Multi-Modulators and ‘top bar’ ‘m’ and ‘e’ selectors are your patch cord equivalents!
V2.01 � Martin Russ
Alternative Manual: Pulsor 1 and 2 Page � of �12 19
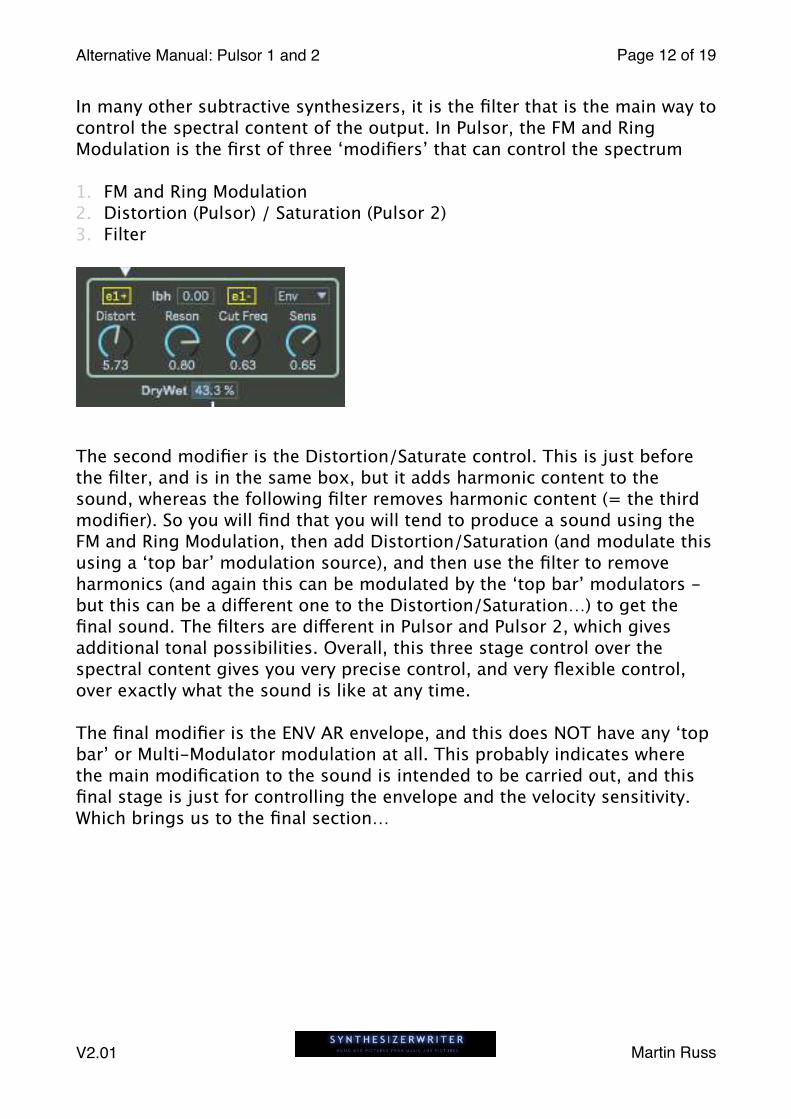
In many other subtractive synthesizers, it is the filter that is the main way to control the spectral content of the output. In Pulsor, the FM and Ring Modulation is the first of three ‘modifiers’ that can control the spectrum
1. FM and Ring Modulation
2. Distortion (Pulsor) / Saturation (Pulsor 2)
3. Filter
The second modifier is the Distortion/Saturate control. This is just before the filter, and is in the same box, but it adds harmonic content to the sound, whereas the following filter removes harmonic content (= the third modifier). So you will find that you will tend to produce a sound using the FM and Ring Modulation, then add Distortion/Saturation (and modulate this using a ‘top bar’ modulation source), and then use the filter to remove harmonics (and again this can be modulated by the ‘top bar’ modulators - but this can be a different one to the Distortion/Saturation…) to get the final sound. The filters are different in Pulsor and Pulsor 2, which gives additional tonal possibilities. Overall, this three stage control over the spectral content gives you very precise control, and very flexible control, over exactly what the sound is like at any time.
The final modifier is the ENV AR envelope, and this does NOT have any ‘top bar’ or Multi-Modulator modulation at all. This probably indicates where the main modification to the sound is intended to be carried out, and this final stage is just for controlling the envelope and the velocity sensitivity. Which brings us to the final section…
V2.01 � Martin Russ
Alternative Manual: Pulsor 1 and 2 Page � of �13 19
Dynamics Control
With all of the available control over the spectral content of the output, there is one area where Pulsor needs a little help, and this is dynamics/velocity control. The only dynamics control is the main AR envelope, where MIDI velocity can control the volume of the output over a 40 dB range.
Now, having been raised on Mini Moogs, where the keyboard is not velocity sensitive, I have maybe over-compensated in some of my programming by adding too much velocity sensitivity (e.g. some of my FM sounds for the Yamaha DX7 and SY99), but with polyphonic keyboards I do like being able to control the expression whilst playing with two hands, even though it means that I fall into the 'rigid' keyboard player syndrome. On a mono synth, then one hand for playing and the other for mod wheel or cutoff frequency (etc.) is okay, and does look good on stage - but in a DAW, then the ease of use of velocity is often much better than other controllers, and so velocity control is a natural choice to control expression.
There isn't enough space here to go into the details of how you program velocity-controlled expression into a synth. Just changing one parameter with velocity is the baseline, and there are lots of possibilities above that, which is one of the reasons that I like FM!
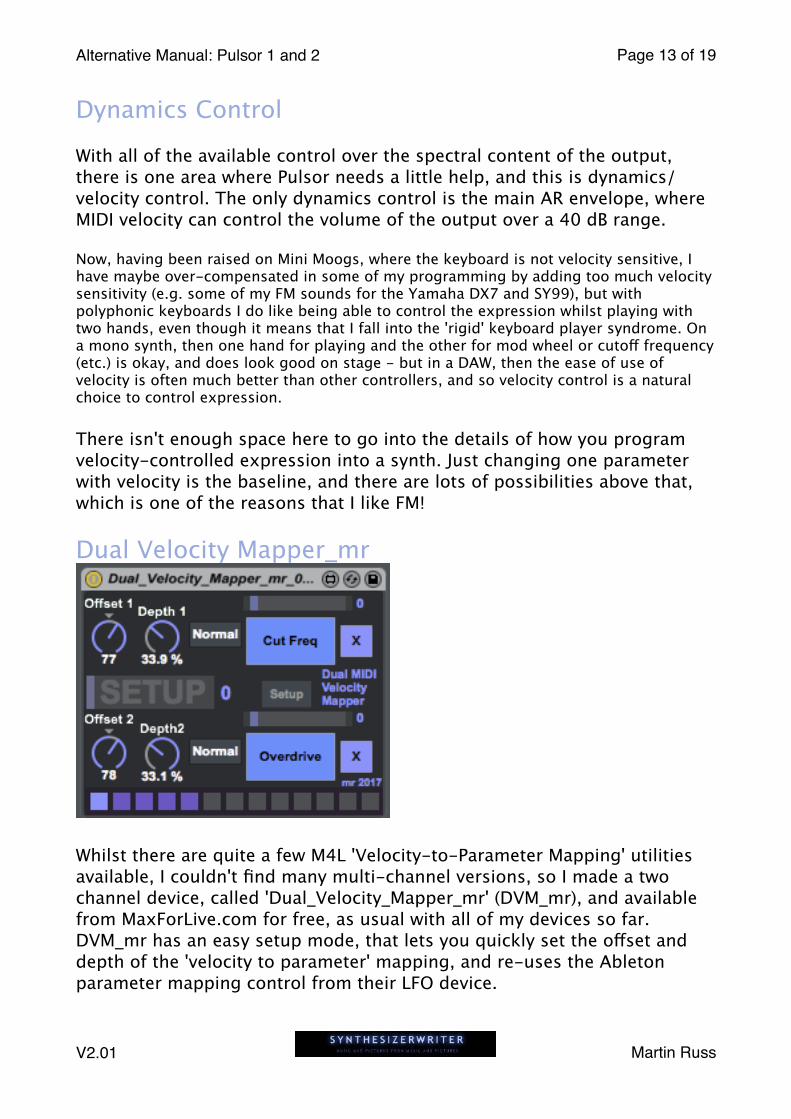
Dual Velocity Mapper_mr
�
Whilst there are quite a few M4L 'Velocity-to-Parameter Mapping' utilities available, I couldn't find many multi-channel versions, so I made a two channel device, called 'Dual_Velocity_Mapper_mr' (DVM_mr), and available from MaxForLive.com for free, as usual with all of my devices so far. DVM_mr has an easy setup mode, that lets you quickly set the offset and depth of the 'velocity to parameter' mapping, and re-uses the Ableton parameter mapping control from their LFO device.
V2.01 � Martin Russ
Alternative Manual: Pulsor 1 and 2 Page � of �14 19
To use DVM_mr, you click on the 'Setup' button (in between the two big blue buttons near the centre) and then map each of the blue buttons to a parameter inside the synth you want to control. You then move the mouse from left to right and this causes notes to be generated at different velocities, so that you can see and hear the effect of the velocity changes on the parameters. Moving the mouse up and down (on the screen, forwards and backwards from the mouse-viewpoint!) changes the pitch of the notes. This speeds up the setup phase quite a lot, and makes it quick and easy to map velocity to two parameters. To clear the mapping, you just click on the 'X' buttons. The 'Invert' button inverts (turns 'upside-down') the MIDI velocity, so that higher velocities produces lower values.
In a blog full of hints and tips, the mapped parameters shown in the DVM_mr screenshot might be a useful starting point of further exploration…
V2.01 � Martin Russ
Alternative Manual: Pulsor 1 and 2 Page � of �15 19
Working backwards, then forwards… (Pulsor)
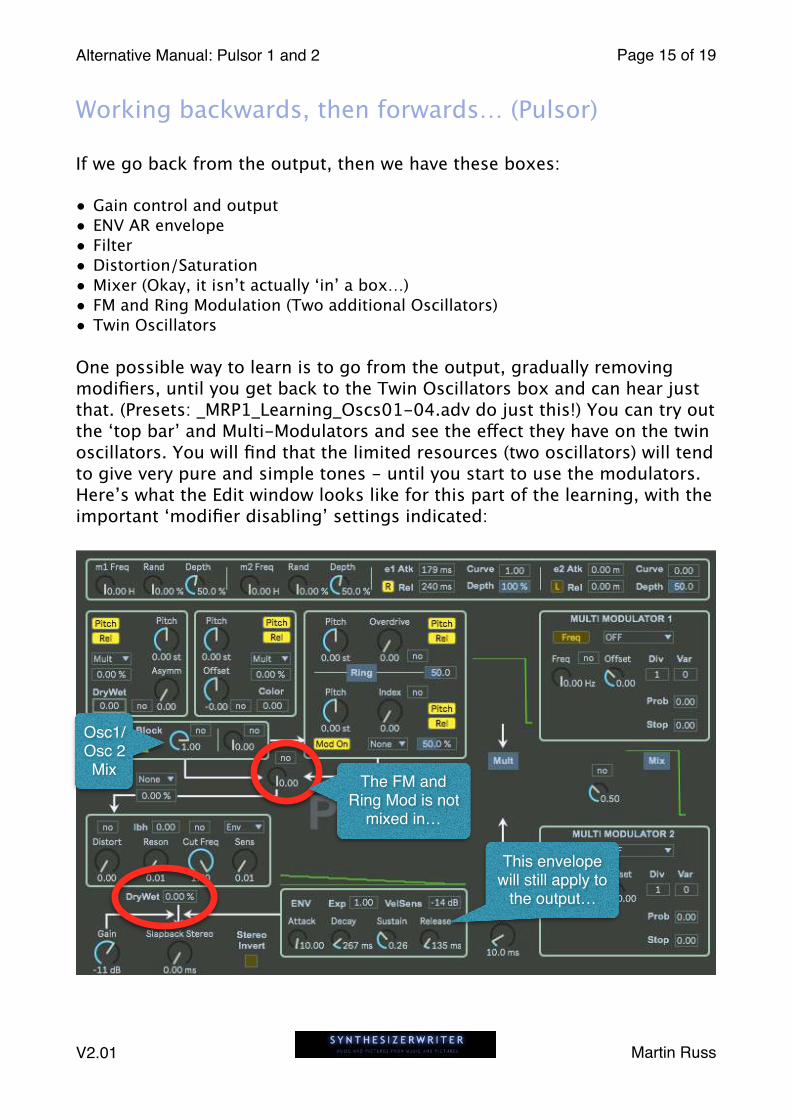
If we go back from the output, then we have these boxes:
• Gain control and output
• ENV AR envelope
• Filter
• Distortion/Saturation
• Mixer (Okay, it isn’t actually ‘in’ a box…)
• FM and Ring Modulation (Two additional Oscillators)
• Twin Oscillators
One possible way to learn is to go from the output, gradually removing modifiers, until you get back to the Twin Oscillators box and can hear just that. (Presets: _MRP1_Learning_Oscs01-04.adv do just this!) You can try out the ‘top bar’ and Multi-Modulators and see the effect they have on the twin oscillators. You will find that the limited resources (two oscillators) will tend to give very pure and simple tones - until you start to use the modulators. Here’s what the Edit window looks like for this part of the learning, with the important ‘modifier disabling’ settings indicated:
V2.01 � Martin Russ
This envelope will still apply to
the output…
The FM and Ring Mod is not
mixed in…
Osc1/Osc 2 Mix
Alternative Manual: Pulsor 1 and 2 Page � of �16 19
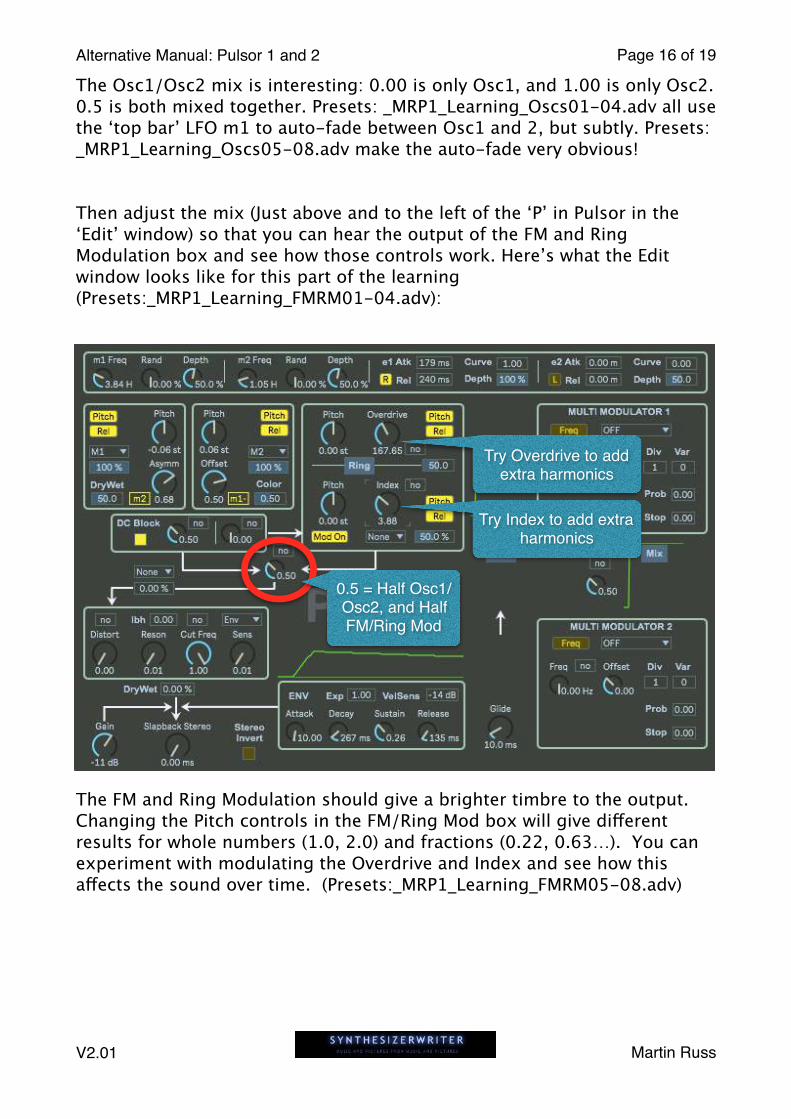
The Osc1/Osc2 mix is interesting: 0.00 is only Osc1, and 1.00 is only Osc2. 0.5 is both mixed together. Presets: _MRP1_Learning_Oscs01-04.adv all use the ‘top bar’ LFO m1 to auto-fade between Osc1 and 2, but subtly. Presets: _MRP1_Learning_Oscs05-08.adv make the auto-fade very obvious!
Then adjust the mix (Just above and to the left of the ‘P’ in Pulsor in the ‘Edit’ window) so that you can hear the output of the FM and Ring Modulation box and see how those controls work. Here’s what the Edit window looks like for this part of the learning (Presets:_MRP1_Learning_FMRM01-04.adv):
The FM and Ring Modulation should give a brighter timbre to the output. Changing the Pitch controls in the FM/Ring Mod box will give different results for whole numbers (1.0, 2.0) and fractions (0.22, 0.63…). You can experiment with modulating the Overdrive and Index and see how this affects the sound over time. (Presets:_MRP1_Learning_FMRM05-08.adv)
V2.01 � Martin Russ
0.5 = Half Osc1/Osc2, and Half FM/Ring Mod
Try Overdrive to add extra harmonics
Try Index to add extra harmonics
Alternative Manual: Pulsor 1 and 2 Page � of �17 19
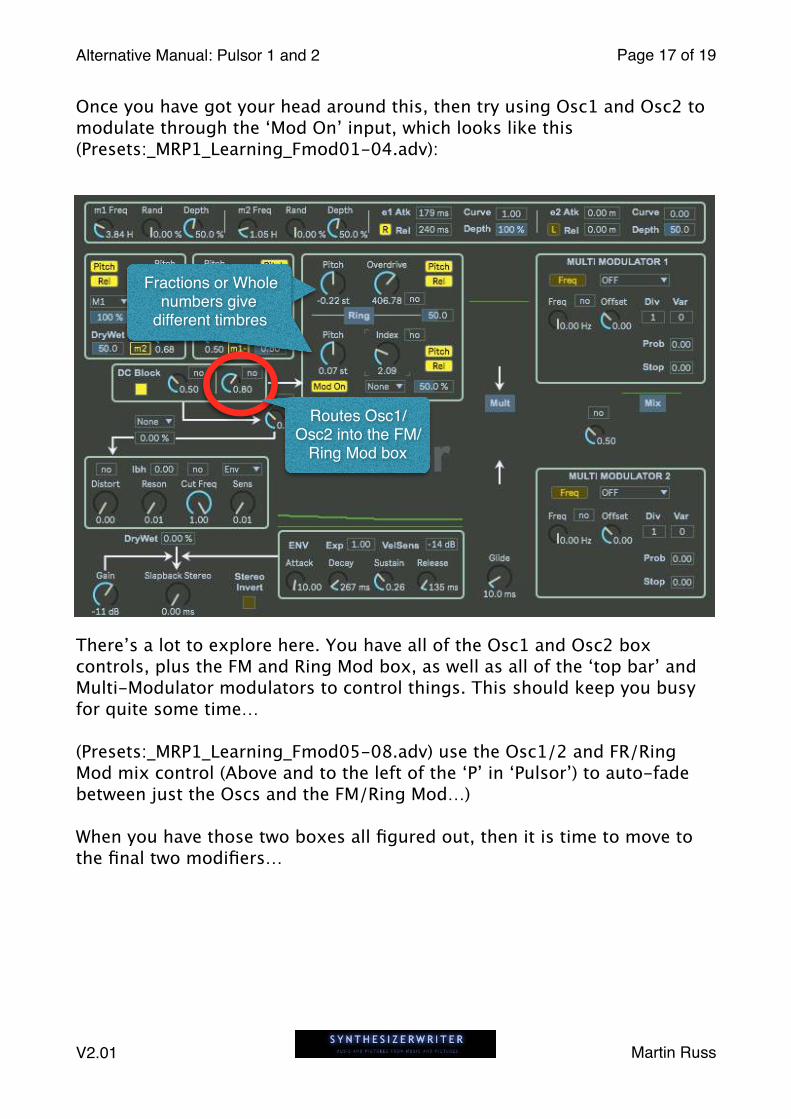
Once you have got your head around this, then try using Osc1 and Osc2 to modulate through the ‘Mod On’ input, which looks like this (Presets:_MRP1_Learning_Fmod01-04.adv):
There’s a lot to explore here. You have all of the Osc1 and Osc2 box controls, plus the FM and Ring Mod box, as well as all of the ‘top bar’ and Multi-Modulator modulators to control things. This should keep you busy for quite some time…
(Presets:_MRP1_Learning_Fmod05-08.adv) use the Osc1/2 and FR/Ring Mod mix control (Above and to the left of the ‘P’ in ‘Pulsor’) to auto-fade between just the Oscs and the FM/Ring Mod…)
When you have those two boxes all figured out, then it is time to move to the final two modifiers…
V2.01 � Martin Russ
Routes Osc1/Osc2 into the FM/
Ring Mod box
Fractions or Whole numbers give
different timbres
Alternative Manual: Pulsor 1 and 2 Page � of �18 19
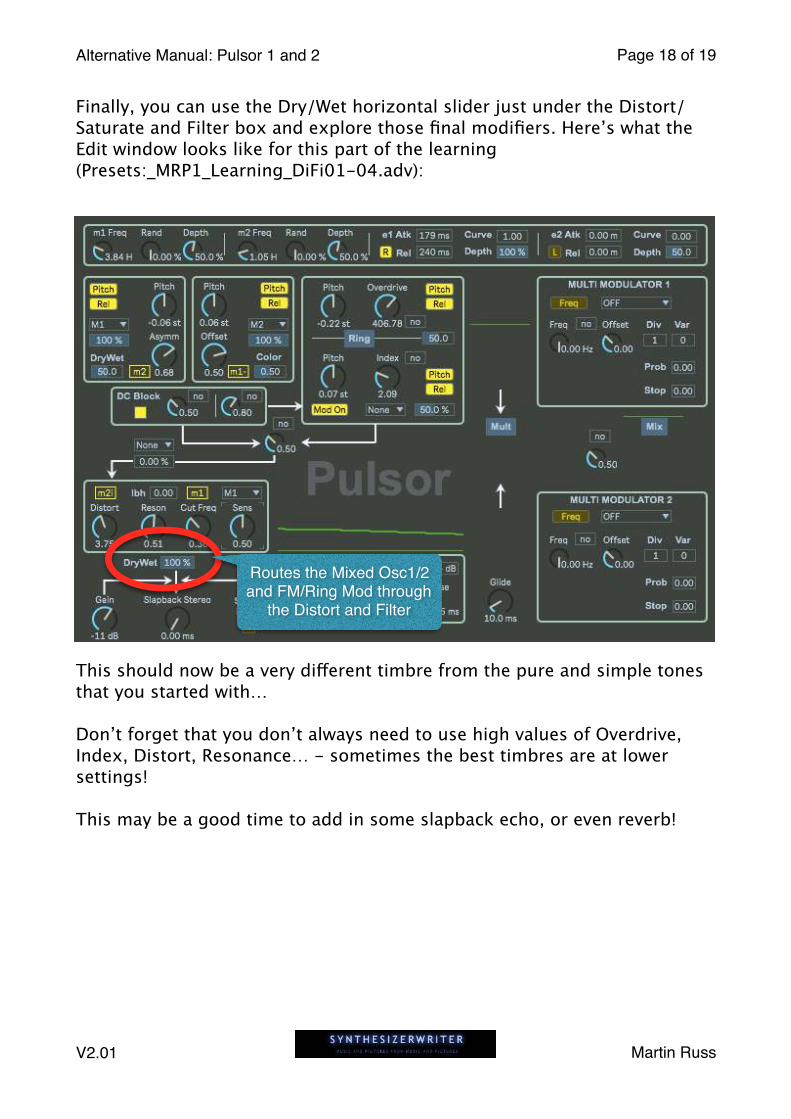
Finally, you can use the Dry/Wet horizontal slider just under the Distort/Saturate and Filter box and explore those final modifiers. Here’s what the Edit window looks like for this part of the learning (Presets:_MRP1_Learning_DiFi01-04.adv):
This should now be a very different timbre from the pure and simple tones that you started with…
Don’t forget that you don’t always need to use high values of Overdrive, Index, Distort, Resonance… - sometimes the best timbres are at lower settings!
This may be a good time to add in some slapback echo, or even reverb!
V2.01 � Martin Russ
Routes the Mixed Osc1/2 and FM/Ring Mod through
the Distort and Filter
Alternative Manual: Pulsor 1 and 2 Page � of �19 19
Thanks for reading this Alternative Manual for the Pulsor synthesisers. There really is a huge space to explore inside them - drive them with a sequence or an arpeggio and a lot of the timbres will sound like they came from big expensive modulars! (DiFi04 is one example) For live performance there is quite a lot of precedence for having ‘set-dressing’ modular racks just to impress the audience.
I hope you enjoy making sounds using them!
Martin RussSynthesizerwriterhttps://blog.synthesizerwriter.com
V2.01 � Martin Russ