Embed Size (px)
Citation preview

ibm.com/redbooks
Migrating to WebSphere V5.0An End-to-End Migration GuideMigration strategy and planning
Development environment migration
Test and production environment migration
Front cover
Seong Steve YuBarry Searle
Dana DuffieldWayne Beaton
Tom AlcottRadhika Iyer
David DhuyvetterSharad Cocasse
Jack Snyder

Migrating to WebSphere V5.0An End-to-End Migration Guide
April 2003
International Technical Support Organization
SG24-6910-01
© Copyright International Business Machines Corporation 2002 2003. All rights reserved.Note to U.S. Government Users Restricted Rights -- Use, duplication or disclosure restricted by GSA ADPSchedule Contract with IBM Corp.
Second Edition (April 2003)
This edition applies to:� WebSphere Studio Application Developer V5.0 Early Availability (EA) � WebSphere Application Server V5.0 Base and Network Deployment packages � VisualAge for Java V3.5� WebSphere Studio Classic V3.5� WebSphere Studio Application Developer V4.0� WebSphere Application Server V3.5 Standard Edition and Advanced Edition� WebSphere Application Server V4.0 Advanced Single Server Edition and Advanced Edition
Note: Before using this information and the product it supports, read the information in “Notices” on page xi.
Contents
Notices . . . . . . . . . . . . . . . . . . . . . . . . . . . . . . . . . . . . . . . . . . . . . . . . . . . . . . . xiTrademarks . . . . . . . . . . . . . . . . . . . . . . . . . . . . . . . . . . . . . . . . . . . . . . . . . . . xii
Preface . . . . . . . . . . . . . . . . . . . . . . . . . . . . . . . . . . . . . . . . . . . . . . . . . . . . . . xiiiThe team that wrote this redbook. . . . . . . . . . . . . . . . . . . . . . . . . . . . . . . . . . . xivBecome a published author . . . . . . . . . . . . . . . . . . . . . . . . . . . . . . . . . . . . . . . xviComments welcome. . . . . . . . . . . . . . . . . . . . . . . . . . . . . . . . . . . . . . . . . . . . xvii
Summary of changes . . . . . . . . . . . . . . . . . . . . . . . . . . . . . . . . . . . . . . . . . . . xixApril 2003, Second Edition . . . . . . . . . . . . . . . . . . . . . . . . . . . . . . . . . . . . . . . . xix
Chapter 1. Introduction . . . . . . . . . . . . . . . . . . . . . . . . . . . . . . . . . . . . . . . . . . 11.1 Objectives . . . . . . . . . . . . . . . . . . . . . . . . . . . . . . . . . . . . . . . . . . . . . . . . . . 21.2 How this book is organized . . . . . . . . . . . . . . . . . . . . . . . . . . . . . . . . . . . . . 2
1.2.1 WebSphere Application Server migration paths . . . . . . . . . . . . . . . . . 41.2.2 Application API migration . . . . . . . . . . . . . . . . . . . . . . . . . . . . . . . . . . 51.2.3 J2EE applications . . . . . . . . . . . . . . . . . . . . . . . . . . . . . . . . . . . . . . . . 61.2.4 Java technologies . . . . . . . . . . . . . . . . . . . . . . . . . . . . . . . . . . . . . . . . 8
1.3 WebSphere V5 architecture primer . . . . . . . . . . . . . . . . . . . . . . . . . . . . . . . 91.3.1 V5.0 architecture terminology . . . . . . . . . . . . . . . . . . . . . . . . . . . . . . . 91.3.2 Application server . . . . . . . . . . . . . . . . . . . . . . . . . . . . . . . . . . . . . . . 121.3.3 Nodes and node agents . . . . . . . . . . . . . . . . . . . . . . . . . . . . . . . . . . 131.3.4 Deployment manager . . . . . . . . . . . . . . . . . . . . . . . . . . . . . . . . . . . . 141.3.5 Cells and clusters . . . . . . . . . . . . . . . . . . . . . . . . . . . . . . . . . . . . . . . 15
1.4 Quick reference guide . . . . . . . . . . . . . . . . . . . . . . . . . . . . . . . . . . . . . . . . 171.4.1 Upgrade product prerequisites to support versions . . . . . . . . . . . . . 171.4.2 Migrate to IBM WebSphere Application Server Version 5.0 . . . . . . . 171.4.3 Migrate administrative configurations . . . . . . . . . . . . . . . . . . . . . . . . 181.4.4 Migrate application code and scripts to new API levels . . . . . . . . . . 181.4.5 Redeploy applications on Version 5.0. . . . . . . . . . . . . . . . . . . . . . . . 19
Chapter 2. Migrating strategy and planning . . . . . . . . . . . . . . . . . . . . . . . . 212.1 Introduction . . . . . . . . . . . . . . . . . . . . . . . . . . . . . . . . . . . . . . . . . . . . . . . . 22
2.1.1 The evolution of J2EE . . . . . . . . . . . . . . . . . . . . . . . . . . . . . . . . . . . . 222.1.2 Migration as a form of change. . . . . . . . . . . . . . . . . . . . . . . . . . . . . . 232.1.3 Elements of migration . . . . . . . . . . . . . . . . . . . . . . . . . . . . . . . . . . . . 23
2.2 Migration strategy . . . . . . . . . . . . . . . . . . . . . . . . . . . . . . . . . . . . . . . . . . . 282.2.1 Divide and conquer . . . . . . . . . . . . . . . . . . . . . . . . . . . . . . . . . . . . . . 282.2.2 Vertical-slice migration . . . . . . . . . . . . . . . . . . . . . . . . . . . . . . . . . . . 29
© Copyright IBM Corp. 2002 2003. All rights reserved. iii

2.2.3 Dump and chase . . . . . . . . . . . . . . . . . . . . . . . . . . . . . . . . . . . . . . . . 302.2.4 Run, right, fast, small . . . . . . . . . . . . . . . . . . . . . . . . . . . . . . . . . . . . 312.2.5 Before you migrate . . . . . . . . . . . . . . . . . . . . . . . . . . . . . . . . . . . . . . 36
2.3 Migration scenarios . . . . . . . . . . . . . . . . . . . . . . . . . . . . . . . . . . . . . . . . . . 382.3.1 Scenario 1: Single application, single server, one machine . . . . . . . 392.3.2 Scenario 2: Single application, single server, two machines . . . . . . 402.3.3 Scenario 3: Multiple applications on a single server . . . . . . . . . . . . . 412.3.4 Scenario 4: Single application on multiple servers . . . . . . . . . . . . . . 412.3.5 Scenario 5: Multiple applications on multiple servers (horizontal) . . 462.3.6 Scenario 6: Multiple applications on multiple servers (vertical). . . . . 522.3.7 Multiple tiers . . . . . . . . . . . . . . . . . . . . . . . . . . . . . . . . . . . . . . . . . . . 57
2.4 Migrating from Version 3.5 to 5.0 . . . . . . . . . . . . . . . . . . . . . . . . . . . . . . . 652.4.1 Development environment . . . . . . . . . . . . . . . . . . . . . . . . . . . . . . . . 652.4.2 Code organization . . . . . . . . . . . . . . . . . . . . . . . . . . . . . . . . . . . . . . . 652.4.3 VisualAge for Java features . . . . . . . . . . . . . . . . . . . . . . . . . . . . . . . 672.4.4 Source code management . . . . . . . . . . . . . . . . . . . . . . . . . . . . . . . . 702.4.5 Build process. . . . . . . . . . . . . . . . . . . . . . . . . . . . . . . . . . . . . . . . . . . 712.4.6 Interoperability. . . . . . . . . . . . . . . . . . . . . . . . . . . . . . . . . . . . . . . . . . 712.4.7 Administration . . . . . . . . . . . . . . . . . . . . . . . . . . . . . . . . . . . . . . . . . . 71
2.5 Migrating from Version 4.0 to 5.0 . . . . . . . . . . . . . . . . . . . . . . . . . . . . . . . 722.5.1 Development environment and code organization . . . . . . . . . . . . . . 722.5.2 Interoperability. . . . . . . . . . . . . . . . . . . . . . . . . . . . . . . . . . . . . . . . . . 722.5.3 Administration . . . . . . . . . . . . . . . . . . . . . . . . . . . . . . . . . . . . . . . . . . 73
2.6 Migration plan . . . . . . . . . . . . . . . . . . . . . . . . . . . . . . . . . . . . . . . . . . . . . . 732.6.1 Documentation . . . . . . . . . . . . . . . . . . . . . . . . . . . . . . . . . . . . . . . . . 76
2.7 Summary . . . . . . . . . . . . . . . . . . . . . . . . . . . . . . . . . . . . . . . . . . . . . . . . . . 78
Chapter 3. Development tool migration (GA) . . . . . . . . . . . . . . . . . . . . . . . 813.1 Important updates to Version 5 product . . . . . . . . . . . . . . . . . . . . . . . . . . 833.2 Targeting WebSphere Application Server V4.0.x versus V5.0 . . . . . . . . . 833.3 Migrating from WebSphere Studio Application Developer V4.0.x . . . . . . . 84
3.3.1 Differences between WebSphere Studio Application Developer Version 4.0.x and Version 5 . . . . . . . . . . . . . . . . . . . . . . . . . . . . . . . . . . . . . . 84
3.3.2 WebSphere Application Server changes and Servlet/JSP conversion tools . . . . . . . . . . . . . . . . . . . . . . . . . . . . . . . . . . . . . . . . . . . . . . . . . 85
3.3.3 Internal changes from Version 4.0.3 . . . . . . . . . . . . . . . . . . . . . . . . . 863.3.4 Migrating projects using a software configuration management (SCM)
system . . . . . . . . . . . . . . . . . . . . . . . . . . . . . . . . . . . . . . . . . . . . . . . 893.3.5 Migrating by exporting and importing your projects . . . . . . . . . . . . . 923.3.6 Migrating projects using an existing Version 4.0.x workspace . . . . . 923.3.7 Migrating J2EE project structures and/or J2EE specification levels . 95
3.4 Migrating from WebSphere Studio Application Developer Version 5 Early Availability or Beta versions . . . . . . . . . . . . . . . . . . . . . . . . . . . . . . . . . . . 96
iv Migrating to WebSphere V5.0: An End-to-End Migration Guide
3.5 Migrating from WebSphere Studio “Classic” to WebSphere Studio Application Developer . . . . . . . . . . . . . . . . . . . . . . . . . . . . . . . . . . . . . . . . . . . . . . . . . 96
3.5.1 Creating a new single-server stage for migration . . . . . . . . . . . . . . . 973.5.2 Creating a Web configuration descriptor file . . . . . . . . . . . . . . . . . . . 983.5.3 Exporting a migration JAR file. . . . . . . . . . . . . . . . . . . . . . . . . . . . . . 983.5.4 Importing the migration JAR file into WebSphere Studio Application
Developer . . . . . . . . . . . . . . . . . . . . . . . . . . . . . . . . . . . . . . . . . . . . . 993.5.5 Testing your migrated application on a test server . . . . . . . . . . . . . 100
3.6 Migrating from VisualAge for Java to WebSphere Studio Application Developer . . . . . . . . . . . . . . . . . . . . . . . . . . . . . . . . . . . . . . . . . . . . . . . . 100
3.6.1 Differences between VisualAge for Java and WebSphere Studio Application Developer. . . . . . . . . . . . . . . . . . . . . . . . . . . . . . . . . . . 101
3.6.2 Team support in WebSphere Studio Application Developer . . . . . . 1023.6.3 Migrating from VisualAge for Java . . . . . . . . . . . . . . . . . . . . . . . . . 102
3.7 Migrating from WebSphere Studio Application Devloper (Linux) . . . . . . 1083.8 Migrating enterprise beans from VisualAge for Java to WebSphere Studio
Application Developer. . . . . . . . . . . . . . . . . . . . . . . . . . . . . . . . . . . . . . . 1083.8.1 VisualAge for Java EJB Export Tool (migrating map/schema from EJB
1.0 to EJB 1.1) . . . . . . . . . . . . . . . . . . . . . . . . . . . . . . . . . . . . . . . . 1093.8.2 VisualAge for Java Version 3.5.3 EJB 1.0 JARs versus VisualAge for
Java Version 4.0 EJB 1.1 JARs . . . . . . . . . . . . . . . . . . . . . . . . . . . 1103.8.3 Moving multiple VisualAge for Java EJB groups into WebSphere Studio
Application Developer EJB projects . . . . . . . . . . . . . . . . . . . . . . . . 1113.8.4 Migrating your enterprise beans . . . . . . . . . . . . . . . . . . . . . . . . . . . 1113.8.5 Known problems and workarounds. . . . . . . . . . . . . . . . . . . . . . . . . 1133.8.6 Locating EJB information . . . . . . . . . . . . . . . . . . . . . . . . . . . . . . . . 1143.8.7 Migrating EJB access beans. . . . . . . . . . . . . . . . . . . . . . . . . . . . . . 1153.8.8 Migrating custom finder helpers . . . . . . . . . . . . . . . . . . . . . . . . . . . 115
3.9 Migrating from EJB 1.0 to EJB 1.1 or to EJB 2.0 . . . . . . . . . . . . . . . . . . 1163.9.1 Migrating code from EJB 1.0 to EJB 1.1 . . . . . . . . . . . . . . . . . . . . . 1163.9.2 Converting projects from EJB 1.x to EJB 2.0 . . . . . . . . . . . . . . . . . 1183.9.3 Migrating code from EJB 1.x to EJB 2.0 . . . . . . . . . . . . . . . . . . . . . 118
3.10 Migrating from VisualAge for Java Visual Composition Editor to Visual Editor for Java. . . . . . . . . . . . . . . . . . . . . . . . . . . . . . . . . . . . . . . . . . . . . . . . . . 120
3.10.1 Saving enhanced design-time metadata from VisualAge for Java 1203.10.2 Completing the migration (importing into WebSphere Studio) . . . 121
3.11 Converting from VisualAge for Java Persistence Builder to EJB 2.0 . . 1213.12 Build setup (library JARs, dependent project JARs, Ant builds) . . . . . . 125
3.12.1 Java library JARs and third-party external JARs. . . . . . . . . . . . . . 1253.12.2 Optimizing multi-project builds using dependent project JARs . . . 1273.12.3 Automated production builds using Ant. . . . . . . . . . . . . . . . . . . . . 128
3.13 Further reading . . . . . . . . . . . . . . . . . . . . . . . . . . . . . . . . . . . . . . . . . . . 128
Contents v
Chapter 4. Development tool migration (EA) . . . . . . . . . . . . . . . . . . . . . . 1334.1 Important updates to Version 5 product and migration documentation . . 134
4.1.1 eFix to WebSphere Studio Application Developer V5 EA . . . . . . . . 1354.1.2 Migration guide updates . . . . . . . . . . . . . . . . . . . . . . . . . . . . . . . . . 138
4.2 Targeting WebSphere Application Server V4.0.x versus V5.0 . . . . . . . . 1404.3 Migrating from WebSphere Studio Application Developer V4.0.x . . . . . . 141
4.3.1 Differences between WebSphere Studio Application Developer Version 4.0.x and Version 5 . . . . . . . . . . . . . . . . . . . . . . . . . . . . . . . . . . . . . 142
4.3.2 WebSphere Application Server changes and Servlet/JSP conversion tools . . . . . . . . . . . . . . . . . . . . . . . . . . . . . . . . . . . . . . . . . . . . . . . . 143
4.3.3 Internal changes from Version 4.0.3 . . . . . . . . . . . . . . . . . . . . . . . . 1434.3.4 Migrating projects using a software configuration management (SCM)
system . . . . . . . . . . . . . . . . . . . . . . . . . . . . . . . . . . . . . . . . . . . . . . 1474.3.5 Migrating by exporting and importing your projects . . . . . . . . . . . . 1504.3.6 Migrating projects using an existing Version 4.0.x workspace . . . . 1504.3.7 Migrating J2EE project structures and/or J2EE specification levels 153
4.4 Migrating from WebSphere Studio Application Developer V5 Beta . . . . 1534.5 Migrating from WebSphere Studio “Classic” to WebSphere Studio Application
Developer . . . . . . . . . . . . . . . . . . . . . . . . . . . . . . . . . . . . . . . . . . . . . . . . 1544.5.1 Creating a new single-server stage for migration . . . . . . . . . . . . . . 1554.5.2 Creating a Web configuration descriptor file . . . . . . . . . . . . . . . . . . 1554.5.3 Exporting a migration JAR file. . . . . . . . . . . . . . . . . . . . . . . . . . . . . 1564.5.4 Importing the migration JAR file into WebSphere Studio Application
Developer . . . . . . . . . . . . . . . . . . . . . . . . . . . . . . . . . . . . . . . . . . . . 1564.5.5 Testing your migrated application on a test server . . . . . . . . . . . . . 157
4.6 Migrating from VisualAge for Java to WebSphere Studio Application Developer . . . . . . . . . . . . . . . . . . . . . . . . . . . . . . . . . . . . . . . . . . . . . . . . 157
4.6.1 Differences between VisualAge for Java and WebSphere Studio Application Developer. . . . . . . . . . . . . . . . . . . . . . . . . . . . . . . . . . . 158
4.6.2 Team support in WebSphere Studio Application Developer . . . . . . 1594.6.3 Migrating from VisualAge for Java . . . . . . . . . . . . . . . . . . . . . . . . . 159
4.7 Migrating enterprise beans from VisualAge for Java to WebSphere Studio Application Developer. . . . . . . . . . . . . . . . . . . . . . . . . . . . . . . . . . . . . . . 165
4.7.1 VisualAge for Java EJB Export Tool (migrating map/schema from EJB 1.0 to EJB 1.1) . . . . . . . . . . . . . . . . . . . . . . . . . . . . . . . . . . . . . . . . 165
4.7.2 VisualAge for Java Version 3.5.3 EJB 1.0 JARs versus VisualAge for Java Version 4.0 EJB 1.1 JARs . . . . . . . . . . . . . . . . . . . . . . . . . . . 166
4.7.3 Moving multiple VisualAge for Java EJB groups into WebSphere Studio Application Developer EJB projects . . . . . . . . . . . . . . . . . . . . . . . . 167
4.7.4 Migrating your enterprise beans . . . . . . . . . . . . . . . . . . . . . . . . . . . 1684.7.5 Known problems and workarounds. . . . . . . . . . . . . . . . . . . . . . . . . 1704.7.6 Locating EJB information . . . . . . . . . . . . . . . . . . . . . . . . . . . . . . . . 1704.7.7 Migrating EJB access beans. . . . . . . . . . . . . . . . . . . . . . . . . . . . . . 171
vi Migrating to WebSphere V5.0: An End-to-End Migration Guide
4.7.8 Migrating custom finder helpers . . . . . . . . . . . . . . . . . . . . . . . . . . . 1724.8 Migrating from EJB 1.0 to EJB 1.1 or to EJB 2.0 . . . . . . . . . . . . . . . . . . 172
4.8.1 Migrating code from EJB 1.0 to EJB 1.1 . . . . . . . . . . . . . . . . . . . . . 1724.8.2 Converting projects from EJB 1.x to EJB 2.0 . . . . . . . . . . . . . . . . . 1744.8.3 Migrating code from EJB 1.x to EJB 2.0 . . . . . . . . . . . . . . . . . . . . . 175
4.9 Migrating from VisualAge for Java Visual Composition Editor to Visual Editor for Java. . . . . . . . . . . . . . . . . . . . . . . . . . . . . . . . . . . . . . . . . . . . . . . . . . 176
4.9.1 Saving enhanced design-time metadata from VisualAge for Java . 1764.9.2 Completing the migration (importing into WebSphere Studio) . . . . 177
4.10 Converting from VisualAge for Java Persistence Builder to EJB 2.0 . . 1774.11 Build setup (library JARs, dependent project JARs, Ant builds) . . . . . . 178
4.11.1 Java library JARs and third-party external JARs. . . . . . . . . . . . . . 1784.11.2 Optimizing multi-project builds using dependent project JARs . . . 1814.11.3 Automated production builds using Ant. . . . . . . . . . . . . . . . . . . . . 181
4.12 Further reading . . . . . . . . . . . . . . . . . . . . . . . . . . . . . . . . . . . . . . . . . . . 181
Chapter 5. HTTP Server Plug-in . . . . . . . . . . . . . . . . . . . . . . . . . . . . . . . . . 1855.1 V3.5 HTTP Server options . . . . . . . . . . . . . . . . . . . . . . . . . . . . . . . . . . . 186
5.1.1 OSE. . . . . . . . . . . . . . . . . . . . . . . . . . . . . . . . . . . . . . . . . . . . . . . . . 1865.1.2 Servlet Redirector . . . . . . . . . . . . . . . . . . . . . . . . . . . . . . . . . . . . . . 1875.1.3 OSE plug-in to V5.0 plug-in mapping . . . . . . . . . . . . . . . . . . . . . . . 1875.1.4 V4.0 HTTP Server options . . . . . . . . . . . . . . . . . . . . . . . . . . . . . . . 1875.1.5 V4.0 HTTP Server Plug-in to V5.0 plug-in mapping . . . . . . . . . . . . 187
5.2 Generation of the V5.0 plug-in configuration. . . . . . . . . . . . . . . . . . . . . . 1905.3 Apache/IBM HTTP Server migration . . . . . . . . . . . . . . . . . . . . . . . . . . . . 1915.4 iPlanet/Sun migration . . . . . . . . . . . . . . . . . . . . . . . . . . . . . . . . . . . . . . . 1925.5 Domino™ migration. . . . . . . . . . . . . . . . . . . . . . . . . . . . . . . . . . . . . . . . . 1935.6 IIS migration . . . . . . . . . . . . . . . . . . . . . . . . . . . . . . . . . . . . . . . . . . . . . . 195
Chapter 6. WebSphere system management . . . . . . . . . . . . . . . . . . . . . . 1976.1 WebSphere Administrative Consoles . . . . . . . . . . . . . . . . . . . . . . . . . . . 198
6.1.1 Version 3.5 GUI/Administrative Console . . . . . . . . . . . . . . . . . . . . . 1986.1.2 Version 4.0 GUI/Administrative Console . . . . . . . . . . . . . . . . . . . . . 1996.1.3 Version 5.0 GUI/Administrative Console . . . . . . . . . . . . . . . . . . . . . 2006.1.4 Common Administrative Actions . . . . . . . . . . . . . . . . . . . . . . . . . . . 203
6.2 Current usage of XMLConfig and wscp. . . . . . . . . . . . . . . . . . . . . . . . . . 2046.3 wsadmin primer . . . . . . . . . . . . . . . . . . . . . . . . . . . . . . . . . . . . . . . . . . . . 206
6.3.1 Background on BSF, JMX, and WebSphere scripting . . . . . . . . . . 2076.3.2 wsadmin command syntax and usage . . . . . . . . . . . . . . . . . . . . . . 2116.3.3 WebSphere objects available to scripts . . . . . . . . . . . . . . . . . . . . . 2146.3.4 Script Launcher . . . . . . . . . . . . . . . . . . . . . . . . . . . . . . . . . . . . . . . . 2216.3.5 Properties used by scripting . . . . . . . . . . . . . . . . . . . . . . . . . . . . . . 2216.3.6 Profiles . . . . . . . . . . . . . . . . . . . . . . . . . . . . . . . . . . . . . . . . . . . . . . 223
Contents vii

6.3.7 Using templates . . . . . . . . . . . . . . . . . . . . . . . . . . . . . . . . . . . . . . . 2246.3.8 Modifying attributes . . . . . . . . . . . . . . . . . . . . . . . . . . . . . . . . . . . . . 225
6.4 Migration mapping. . . . . . . . . . . . . . . . . . . . . . . . . . . . . . . . . . . . . . . . . . 2266.4.1 Migration steps . . . . . . . . . . . . . . . . . . . . . . . . . . . . . . . . . . . . . . . . 2266.4.2 Classification of scripts . . . . . . . . . . . . . . . . . . . . . . . . . . . . . . . . . . 2286.4.3 Migration from V3.5 to V5.0 . . . . . . . . . . . . . . . . . . . . . . . . . . . . . . 2286.4.4 Migration from V4.0 to V5.0 . . . . . . . . . . . . . . . . . . . . . . . . . . . . . . 230
Chapter 7. Migration assistants . . . . . . . . . . . . . . . . . . . . . . . . . . . . . . . . . 2457.1 Development assistants . . . . . . . . . . . . . . . . . . . . . . . . . . . . . . . . . . . . . 246
7.1.1 MigrateWC - JSP and Servlet migration assistant . . . . . . . . . . . . . 2467.1.2 ejbdeploy - deploying EJBs. . . . . . . . . . . . . . . . . . . . . . . . . . . . . . . 2507.1.3 earconvert - J2EE application conversion . . . . . . . . . . . . . . . . . . . . 2527.1.4 mb2mdb - JMS listener application conversion. . . . . . . . . . . . . . . . 2537.1.5 CACT - Class API checker tool introduction . . . . . . . . . . . . . . . . . . 254
7.2 System administration migration assistants . . . . . . . . . . . . . . . . . . . . . . 2567.2.1 ClientUpgrade . . . . . . . . . . . . . . . . . . . . . . . . . . . . . . . . . . . . . . . . . 2567.2.2 WASPreUpgrade. . . . . . . . . . . . . . . . . . . . . . . . . . . . . . . . . . . . . . . 2577.2.3 WASPostUpgrade . . . . . . . . . . . . . . . . . . . . . . . . . . . . . . . . . . . . . . 259
Chapter 8. WebSphere system configuration and runtime migration . . 2638.1 General information . . . . . . . . . . . . . . . . . . . . . . . . . . . . . . . . . . . . . . . . . 264
8.1.1 Supported versions . . . . . . . . . . . . . . . . . . . . . . . . . . . . . . . . . . . . . 2648.1.2 OS upgrade scenarios . . . . . . . . . . . . . . . . . . . . . . . . . . . . . . . . . . 264
8.2 Migration steps . . . . . . . . . . . . . . . . . . . . . . . . . . . . . . . . . . . . . . . . . . . . 2658.2.1 Planning for migration . . . . . . . . . . . . . . . . . . . . . . . . . . . . . . . . . . . 2658.2.2 Updating the prerequisites . . . . . . . . . . . . . . . . . . . . . . . . . . . . . . . 2688.2.3 Installation and migration . . . . . . . . . . . . . . . . . . . . . . . . . . . . . . . . 2688.2.4 After migration . . . . . . . . . . . . . . . . . . . . . . . . . . . . . . . . . . . . . . . . . 2688.2.5 Client JAR upgrade . . . . . . . . . . . . . . . . . . . . . . . . . . . . . . . . . . . . . 269
8.3 WebSphere Application Server V5.0 migration scenario . . . . . . . . . . . . 2698.3.1 Mapping details . . . . . . . . . . . . . . . . . . . . . . . . . . . . . . . . . . . . . . . . 2698.3.2 WebSphere Application Server V3.5 to V5.0 migration . . . . . . . . . 2728.3.3 WebSphere Application Server V4.0 to V5.0 migration . . . . . . . . . 275
8.4 Test and integration/production environment . . . . . . . . . . . . . . . . . . . . . 2768.4.1 Coexistence . . . . . . . . . . . . . . . . . . . . . . . . . . . . . . . . . . . . . . . . . . 2778.4.2 Interoperability. . . . . . . . . . . . . . . . . . . . . . . . . . . . . . . . . . . . . . . . . 2788.4.3 Migration of the network . . . . . . . . . . . . . . . . . . . . . . . . . . . . . . . . . 2828.4.4 Network Deployment migration . . . . . . . . . . . . . . . . . . . . . . . . . . . . 284
Chapter 9. Development environment migration examples (GA) . . . . . . 2879.1 Migrating from WebSphere 3.5 Development Environment to WebSphere
Studio 5.0 . . . . . . . . . . . . . . . . . . . . . . . . . . . . . . . . . . . . . . . . . . . . . . . . 2889.1.1 Example: VisualAge for Java JSP/Servlet sample (LeapYear) . . . . 288
viii Migrating to WebSphere V5.0: An End-to-End Migration Guide
9.1.2 Example: Enterprise beans, VCE, and database samples (HelloWorld session bean and Increment enterprise bean) . . . . . . . . . . . . . . . . 292
9.1.3 Example: WebSphere Studio “Classic” Version 4.0 Web application (YourCo) . . . . . . . . . . . . . . . . . . . . . . . . . . . . . . . . . . . . . . . . . . . . . 298
9.1.4 Example: Migrating VisualAge for Java JSP/Servlet samples example to EJB 2.0 . . . . . . . . . . . . . . . . . . . . . . . . . . . . . . . . . . . . . . . . . . . . . . 301
9.2 Migrating from WebSphere Studio 4.0 WebSphere Studio 5.0 . . . . . . . . 3089.2.1 Example: Migrating YourBank using the Export/Import method . . . 3099.2.2 Example: Migrating YourBank using the CVS method . . . . . . . . . . 3119.2.3 Example: Running YourBank in WebSphere Version 5.0 Test
Environment . . . . . . . . . . . . . . . . . . . . . . . . . . . . . . . . . . . . . . . . . . 3169.2.4 Example: Migrating YourBank to J2EE 1.3 . . . . . . . . . . . . . . . . . . . 318
Chapter 10. Development environment migration examples (EA) . . . . . 32310.1 Migrating from WebSphere 3.5 Development Environment to WebSphere
Studio 5.0 . . . . . . . . . . . . . . . . . . . . . . . . . . . . . . . . . . . . . . . . . . . . . . . . 32410.1.1 Example: VisualAge for Java JSP/Servlet sample (LeapYear) . . . 32410.1.2 Example: Enterprise beans, VCE, and database samples (HelloWorld
session bean and Increment enterprise bean) . . . . . . . . . . . . . . . . 32710.1.3 Example: WebSphere Studio “Classic” Version 4.0 Web application
(YourCo) . . . . . . . . . . . . . . . . . . . . . . . . . . . . . . . . . . . . . . . . . . . . . 33310.1.4 Example: Migrating VisualAge for Java JSP/Servlet samples example
to EJB 2.0 . . . . . . . . . . . . . . . . . . . . . . . . . . . . . . . . . . . . . . . . . . . . 33710.2 Migrating from WebSphere Studio 4.0 WebSphere Studio 5.0 . . . . . . . 344
10.2.1 Example: Migrating YourBank using the Export/Import method . . 34510.2.2 Example: Migrating YourBank using the CVS method . . . . . . . . . 34810.2.3 Example: Running YourBank in WebSphere Version 5.0 Test
Environment . . . . . . . . . . . . . . . . . . . . . . . . . . . . . . . . . . . . . . . . . . 35310.2.4 Example: Migrating YourBank to J2EE 1.3 . . . . . . . . . . . . . . . . . . 355
Chapter 11. System and runtime migration examples. . . . . . . . . . . . . . . 36111.1 Migrating the WebSphere runtime to V5.0 . . . . . . . . . . . . . . . . . . . . . . 362
11.1.1 Example: V3.5 to V5.0 manual migration . . . . . . . . . . . . . . . . . . . 36311.1.2 Example: V4.0 to V5.0 manual migration . . . . . . . . . . . . . . . . . . . 38111.1.3 Example: V3.5/V4.0 to V5.0 automated migration . . . . . . . . . . . . 383
11.2 Interoperability and coexistence between V3.5/V4.0 and V5.0 . . . . . . . 39111.2.1 Example: V3.5 and V5.0 interoperability . . . . . . . . . . . . . . . . . . . . 39111.2.2 Example: V4.0 and V5.0 interoperability . . . . . . . . . . . . . . . . . . . . 39811.2.3 Example: V3.5/V4.0 and V5.0 coexistence . . . . . . . . . . . . . . . . . . 399
Appendix A. wsadmin.properties file sample . . . . . . . . . . . . . . . . . . . . . . 405
Appendix B. Comparing WebSphere Application Server versions . . . . 409
Contents ix

Appendix C. Installing the Big3 application . . . . . . . . . . . . . . . . . . . . . . . 413Deploying the Big3 application in WebSphere V3.5 . . . . . . . . . . . . . . . . . . . . 414Deploying the Big3 Application in WebSphere V4.0 . . . . . . . . . . . . . . . . . . . 420
Appendix D. Additional material . . . . . . . . . . . . . . . . . . . . . . . . . . . . . . . . 423Locating the Web material . . . . . . . . . . . . . . . . . . . . . . . . . . . . . . . . . . . . . . . 423Using the Web material . . . . . . . . . . . . . . . . . . . . . . . . . . . . . . . . . . . . . . . . . 424
System requirements for downloading the Web material . . . . . . . . . . . . . 424How to use the Web material . . . . . . . . . . . . . . . . . . . . . . . . . . . . . . . . . . 424
Related publications . . . . . . . . . . . . . . . . . . . . . . . . . . . . . . . . . . . . . . . . . . 425IBM Redbooks . . . . . . . . . . . . . . . . . . . . . . . . . . . . . . . . . . . . . . . . . . . . . . . . 425
Other resources . . . . . . . . . . . . . . . . . . . . . . . . . . . . . . . . . . . . . . . . . . . . 425Referenced Web sites . . . . . . . . . . . . . . . . . . . . . . . . . . . . . . . . . . . . . . . . . . 427How to get IBM Redbooks . . . . . . . . . . . . . . . . . . . . . . . . . . . . . . . . . . . . . . . 431
IBM Redbooks collections. . . . . . . . . . . . . . . . . . . . . . . . . . . . . . . . . . . . . 431
Index . . . . . . . . . . . . . . . . . . . . . . . . . . . . . . . . . . . . . . . . . . . . . . . . . . . . . . . 433
x Migrating to WebSphere V5.0: An End-to-End Migration Guide
Notices
This information was developed for products and services offered in the U.S.A.
IBM may not offer the products, services, or features discussed in this document in other countries. Consult your local IBM representative for information on the products and services currently available in your area. Any reference to an IBM product, program, or service is not intended to state or imply that only that IBM product, program, or service may be used. Any functionally equivalent product, program, or service that does not infringe any IBM intellectual property right may be used instead. However, it is the user's responsibility to evaluate and verify the operation of any non-IBM product, program, or service.
IBM may have patents or pending patent applications covering subject matter described in this document. The furnishing of this document does not give you any license to these patents. You can send license inquiries, in writing, to: IBM Director of Licensing, IBM Corporation, North Castle Drive Armonk, NY 10504-1785 U.S.A.
The following paragraph does not apply to the United Kingdom or any other country where such provisions are inconsistent with local law: INTERNATIONAL BUSINESS MACHINES CORPORATION PROVIDES THIS PUBLICATION "AS IS" WITHOUT WARRANTY OF ANY KIND, EITHER EXPRESS OR IMPLIED, INCLUDING, BUT NOT LIMITED TO, THE IMPLIED WARRANTIES OF NON-INFRINGEMENT, MERCHANTABILITY OR FITNESS FOR A PARTICULAR PURPOSE. Some states do not allow disclaimer of express or implied warranties in certain transactions, therefore, this statement may not apply to you.
This information could include technical inaccuracies or typographical errors. Changes are periodically made to the information herein; these changes will be incorporated in new editions of the publication. IBM may make improvements and/or changes in the product(s) and/or the program(s) described in this publication at any time without notice.
Any references in this information to non-IBM Web sites are provided for convenience only and do not in any manner serve as an endorsement of those Web sites. The materials at those Web sites are not part of the materials for this IBM product and use of those Web sites is at your own risk.
IBM may use or distribute any of the information you supply in any way it believes appropriate without incurring any obligation to you.
Information concerning non-IBM products was obtained from the suppliers of those products, their published announcements or other publicly available sources. IBM has not tested those products and cannot confirm the accuracy of performance, compatibility or any other claims related to non-IBM products. Questions on the capabilities of non-IBM products should be addressed to the suppliers of those products.
This information contains examples of data and reports used in daily business operations. To illustrate them as completely as possible, the examples include the names of individuals, companies, brands, and products. All of these names are fictitious and any similarity to the names and addresses used by an actual business enterprise is entirely coincidental.
COPYRIGHT LICENSE: This information contains sample application programs in source language, which illustrates programming techniques on various operating platforms. You may copy, modify, and distribute these sample programs in any form without payment to IBM, for the purposes of developing, using, marketing or distributing application programs conforming to the application programming interface for the operating platform for which the sample programs are written. These examples have not been thoroughly tested under all conditions. IBM, therefore, cannot guarantee or imply reliability, serviceability, or function of these programs. You may copy, modify, and distribute these sample programs in any form without payment to IBM for the purposes of developing, using, marketing, or distributing application programs conforming to IBM's application programming interfaces.
© Copyright IBM Corp. 2002 2003. All rights reserved. xi
TrademarksThe following terms are trademarks of the International Business Machines Corporation in the United States, other countries, or both:
iSeries™z/OS™zSeries™AIX®Domino™DB2®Everyplace™
HotMedia®IBM®ibm.com®OS/390®Passport Advantage®Redbooks™Redbooks (logo)™
RS/6000®S/390®System/390®TXSeries®VisualAge®WebSphere®
The following terms are trademarks of other companies:
ActionMedia, LANDesk, MMX, Pentium and ProShare are trademarks of Intel Corporation in the United States, other countries, or both.
Microsoft, Windows, Windows NT, and the Windows logo are trademarks of Microsoft Corporation in the United States, other countries, or both.
Java and all Java-based trademarks and logos are trademarks or registered trademarks of Sun Microsystems, Inc. in the United States, other countries, or both.
C-bus is a trademark of Corollary, Inc. in the United States, other countries, or both.
UNIX is a registered trademark of The Open Group in the United States and other countries.
SET, SET Secure Electronic Transaction, and the SET Logo are trademarks owned by SET Secure Electronic Transaction LLC.
Other company, product, and service names may be trademarks or service marks of others.
xii Migrating to WebSphere V5.0: An End-to-End Migration Guide
Preface
“The creation of this Migration Guide has been a result of tremendous input from customers requesting guidance on migrating their WebSphere® development environment, including applications, integration, and test and production environments. This guide has been compiled using the collective experience of many experts who have supported thousands of installations and migrations.”
Betsy MatthewDirector, WebSphere Customer Support
This IBM® Redbook has been written to assist in the end-to-end migration of WebSphere Application Server installation. The end-to-end migration path includes the migration of the development environment, the test/integration environment, and the production environment using software engineering methodologies. This guide presents the best practices in migration strategy and planning, migration tools, and practical migration examples.
The development environment migration topics include migration from VisualAge® for Java and WebSphere Studio “Classic” to WebSphere Studio Application Developer V5 as well as API migration tools. Step-by-step instructions for many practical migration examples are provided. This migration guide was written and tested with the WebSphere Studio Application Developer V5.0 Early Availability (EA) edition.
The WebSphere Application Server migration paths include Version 3.5 to Version 5.0 and Version 4.0 to Version 5.0. The WebSphere Versions 3.5 and 4.0 Single Server Edition and Advanced Edition are mapped to Version 5.0 Base package and Network Deployment package respectively. The WebSphere system and configuration migration topics include the WebSphere system migration, HTTP Server Plug-in migration, migration of XMLConfig and WebSphere to wsadmin scripts, and migration examples using coexistence and interoperability.
This guide was written specifically for the WebSphere Application Server on the distributed platforms. This guide does not cover the migration of WebSphere Enterprise edition, WebSphere Express, WebSphere for OS/390®, WebSphere for zSeries™, WebSphere for iSeries™, or the migration of other vendor's application servers. Some of these topics are covered in other migration guides, listed in “Related publications” on page 425.
© Copyright IBM Corp. 2002 2003. All rights reserved. xiii
The team that wrote this redbookThis redbook was produced by a team of specialists from around the world working at the International Technical Support Organization, Raleigh Center.
Seong (Steve) Yu is an Advisory Software Engineer on the WebSphere Beta and Customer Care team, IBM Software Group, in Austin. He has been with IBM for 20 years, the last three years with the WebSphere product. Steve was the project leader of this migration guide project. He developed the original design and the prototype migration tool for JSP and Servlet migration. Steve holds a B.S. degree in Mathematics-Computer Science from U.C.L.A., an M.S. in Computer Science degree from CSU, California, and is currently pursuing a Ph.D. in Computer Science at NSU, Ft. Lauderdale. His current research interests include autonomic computing, machine learning, and multiagent systems.
Barry Searle is the Migration Team Leader for WebSphere Studio Application Developer. He is a professional engineer who has worked at the IBM Toronto Lab for over 10 years on various application development tools. Prior to that he had many years of industry experience developing command and control systems and leading complex communications development projects. He has a BASc degree in Electrical Engineering from the University of British Columbia, and a Master’s degree in Computer Systems from Carleton University. He has published many papers on how to exploit the features of WebSphere Studio Application Developer.
Dana Duffield is the Migration and Interoperability Architect for WebSphere Application Server in IBM Rochester. He is a software engineer who has worked at the IBM Rochester Lab for over 20 years on various development projects. He holds a Bachelor of Science degree in Computer Science from the University of Illinois, Champagne-Urbana. He has significant experience in object-oriented and distributed system development in architecture, development and leadership positions. Prior to that he worked at Bell Laboratories in Naperville, Illinois.
Wayne Beaton is a Senior Software Consultant with IBM Software Services for WebSphere, part of the IBM Software Group in Toronto, Canada. Wayne's diverse role ranges from the WebSphere skills transfer and migration programs to general consulting.
Tom Alcott is an advisory I/T specialist in the United States. He has been a member of the WorldWide WebSphere Technical Sales Support team since its inception. Before he started working with WebSphere, he was a systems engineer for the IBM Transarc Lab supporting TXSeries®. His background includes over 20 years of application design and development on both
xiv Migrating to WebSphere V5.0: An End-to-End Migration Guide
mainframe-based and distributed systems. He has written and presented extensively on a number of WebSphere runtime and security issues.
Radhika Iyer is a software engineer for the IBM Software Group in Austin. She has over four years of experience in Java development and J2EE technology. Radhika has been supporting WebSphere software for the last two years. She holds a Bachelor's degree in Mathematics from the University of Mumbai, India. Her areas of expertise include Java programming, WebSphere Application Server development, testing, and troubleshooting, etc. Before joining IBM, she developed Java applications for Wipro, India.
David Dhuyvetter is a Software Engineer in IBM San Diego. He has seven years of experience in transaction processing systems. David holds a Bachelor of Arts degree in Philosophy from California State University, Long Beach and a Master of Science degree in Computer Science from California State Polytechnic University, Pomona.
Sharad Cocasse is a Staff Software Engineer on the WebSphere Execution Team in Rochester. His experience includes over four years of writing object-oriented applications and developing/delivering WebSphere education to customers and IBM field technical personnel. Most recently, he has been directly helping customers succeed with their use of the WebSphere Application Server. He has assisted customers with WebSphere-based proofs-of-concept and has provided advanced technical support for mission-critical WebSphere deployments. He has also coauthored a number of WebSphere-related publications. Sharad holds a Master’s degree in Electrical Engineering from the University of Alabama.
John (Jack) Snyder is a Senior I/T Architect in IBM Pittsburgh. He has over 30 years of experience in computer systems and the engineering field of mining and computer systems. Jack holds B.S., M.S., and Ph.D. degrees in engineering. His areas of expertise include WebSphere Application Server, Java, and process control.
Contributing authors:
Richard Kaskan is a Software Engineer in the IBM Software Group in Austin. He has worked in the WebSphere Development system management area.
Ken Klingensmith is a Senior IT Consultant in the United States. He has been a member of the Worldwide WebSphere Technical Sales Support team since its inception in late 1998. Before he started working with WebSphere, Ken was a Senior Systems Engineer for the IBM Transarc Lab, supporting TXSeries for the Western Region, South America, and Asia Pacific. Ken has both a bachelor of science and a doctorate in physical chemistry. His background includes over 14 years of application design, development and project management on both
Preface xv
mainframe-based and distributed systems across a wide variety of industries and platforms. He has written and lectured extensively on WebSphere Application Server since the product's first launch at the beginning of 1999, and continues to work on the product.
Technical reviewers:
Rob High is the WebSphere Chief Architect and Distinguished Engineer, IBM Austin.
Leigh Williamson is a Senior Software Architect in IBM Austin. He has 20 years of experience in the software engineering field. Leigh holds a Master’s degree in Software Engineering from the University of Texas at Austin. His areas of expertise include distributed systems and systems management. He has written extensively on Java Management Extensions (JMX) and Software Systems Management, including authoring Java and JMX, Building Manageable Systems, published by Addison Wesley.
Srinivas Hasti is an Advisory Software Engineer in WebSphere Development in IBM Raleigh. He has four years of experience in middleware technologies. Srinivas holds a Master’s degree in Computer Science.
Lavena Chan is a software engineer in IBM Austin. She has five years of experience in the middleware field. She holds an MBA degree from the University of Texas in Austin. Her areas of expertise include install, GUI, and scripting programming.
Alex Gregor, Senior Software Engineer, Manager of WebSphere Customer Programs, IBM Austin, provided management support for this redbook project.
John ByrdGail Christensen Linda RobinsonInternational Technical Support Organization, Raleigh
Become a published authorJoin us for a two- to six-week residency program! Help write an IBM Redbook dealing with specific products or solutions, while getting hands-on experience with leading-edge technologies. You'll team with IBM technical professionals, Business Partners and/or customers.
xvi Migrating to WebSphere V5.0: An End-to-End Migration Guide
Your efforts will help increase product acceptance and customer satisfaction. As a bonus, you'll develop a network of contacts in IBM development labs, and increase your productivity and marketability.
Find out more about the residency program, browse the residency index, and apply online at:
ibm.com/redbooks/residencies.html
Comments welcomeYour comments are important to us!
We want our Redbooks™ to be as helpful as possible. Send us your comments about this or other Redbooks in one of the following ways:
� Use the online Contact us review redbook form found at:
ibm.com/redbooks
� Send your comments in an Internet note to:
� Mail your comments to:
IBM Corporation, International Technical Support OrganizationDept. HZ8 Building 662P.O. Box 12195Research Triangle Park, NC 27709-2195
Preface xvii

xviii Migrating to WebSphere V5.0: An End-to-End Migration Guide
Summary of changes
This section describes the technical changes made in this edition of the book from the previous edition. This edition may also include minor corrections and editorial changes that are not identified.
April 2003, Second EditionThis revision reflects the addition, deletion, or modification of new and changed information described below.
New information� Two new chapters have been added for the General Availability (GA) release
of WebSphere Application Developer Version 5:
– Chapter 3, “Development tool migration (GA)” on page 81 has been changed from the EA release as follows:
• Added migration instructions for Early Availability release in 3.4, “Migrating from WebSphere Studio Application Developer Version 5 Early Availability or Beta versions” on page 96
• Changed instructions in 3.9.3, “Migrating code from EJB 1.x to EJB 2.0” on page 118”
• Changed instructions in 3.11, “Converting from VisualAge for Java Persistence Builder to EJB 2.0” on page 121
– Chapter 9, “Development environment migration examples (GA)” on page 287 has been changed from the EA release as follows:
• Changed instructions in 9.1.4, “Example: Migrating VisualAge for Java JSP/Servlet samples example to EJB 2.0” on page 301
• Changed instructions for step 5, migrating code from EJB 1.1 to EJB 2.0, in 9.2.4, “Example: Migrating YourBank to J2EE 1.3” on page 318
Changed information� Two chapters from the first edition were based on the Early Availability (EA)
release of WebSphere Application Developer Version 5, and remain in this edition as well:
– Chapter 4, “Development tool migration (EA)” on page 133
© Copyright IBM Corp. 2002 2003. All rights reserved. xix

– Chapter 10, “Development environment migration examples (EA)” on page 323
xx Migrating to WebSphere V5.0: An End-to-End Migration Guide
Chapter 1. Introduction
This chapter describes the objectives, the focus, and the intended audience of this book. We outline the structure of a Java 2 Platform, Enterprise Edition (J2EE) application, and the WebSphere Application Server V5.0 architecture and topologies.
1
© Copyright IBM Corp. 2002 2003. All rights reserved. 1
1.1 ObjectivesThe new IBM WebSphere Application Server V5.0 complies with Java 2 Platform Enterprise Edition (J2EE) 1.3 specifications. WebSphere V4.0 complies with J2EE 1.2 specifications, while WebSphere V3.5 did not fully comply with J2EE specifications. As the J2EE specification continues to evolve, IBM will continue to support the future versions.
Migration and upgrades are a way of life. Our recommendation is to make the applications more adaptable. This migration guide will assist in the migration efforts with best practices.
The two major objectives are:
� To document best practices for a migration effort� Provide advice in producing more adaptable applications
1.2 How this book is organizedThis migration guide is intended for use by developers and system administrators to assist in their migration effort.
The focus of this migration guide is WebSphere Application Server version-to-version migration including WebSphere application development tools.
The migration path covers development, test/integration, and production environments using software-engineering methodologies as shown in Figure 1-1 on page 3.
Section 1.2.1, “WebSphere Application Server migration paths” on page 4 describes the WebSphere Application Server migration paths:
� WebSphere V3.5.3+ (SE & AE) to V5.0 (base & ND)� WebSphere V4.0.2+ (AEs & AE) to V5.0 (base & ND)
We also cover the migration of WebSphere Application Server V4.0.x JMS listener to use message-driven beans (MDB).
Tip: For other migration projects outside the focus of this migration guide, please refer to “Related publications” on page 425.
Note: Migrations from V3.5.1+ and V4.0+ are supported.
2 Migrating to WebSphere V5.0: An End-to-End Migration Guide

Section 1.2.2, “Application API migration” on page 5 discusses the application API migration.
� JSP, Servlet, EJB spec level migration� - JMS listener to MDB migration� - EAR file conversion� - XMLConfig and wscp conversion
Section 1.3, “WebSphere V5 architecture primer” on page 9 introduces the WebSphere V5.0 architecture and server configurations.
Figure 1-1 Migration of development, test/integration, and production environments using software engineering methodologies
Chapter 2, “Migrating strategy and planning” on page 21 presents the software engineering methodologies as best practices in migration strategy and planning. A staged migration strategy using coexistence and interoperability is also discussed.
Chapter 3, “Development tool migration (GA)” on page 81 presents the WebSphere development tools migration paths:
� VisualAge for Java V3.5.x to WebSphere Studio Application Development V5.0
� WebSphere Studio Classic V3.5.x to WebSphere Studio Application Development V5.0
� WebSphere Studio Application Development V4.0 to V5.0
Scripts Scripts
Development Environment
ToolJSP
Servlet
EJB
JSP
Servlet
EJB
Test/Integration Environment
...
config
JSP
Servlet
EJB
DB
DB
Production Environment
...
config
JSP
Servlet
EJB
DB
DB
Chapter 1. Introduction 3
Chapter 5, “HTTP Server Plug-in” on page 185 discusses the HTTP Server Plug-in migration.
Chapter 6, “WebSphere system management” on page 197 discusses WebSphere system management migration and WebSphere command-line and admin tools migration.
Chapter 7, “Migration assistants” on page 245 discusses stand-alone migration tools and assistants.
Chapter 8, “WebSphere system configuration and runtime migration” on page 263 discusses the WebSphere Application Server migration.
Chapter 9, “Development environment migration examples (GA)” on page 287 presents development environment migration examples.
Chapter 11, “System and runtime migration examples” on page 361 presents WebSphere system configuration and runtime migration examples.
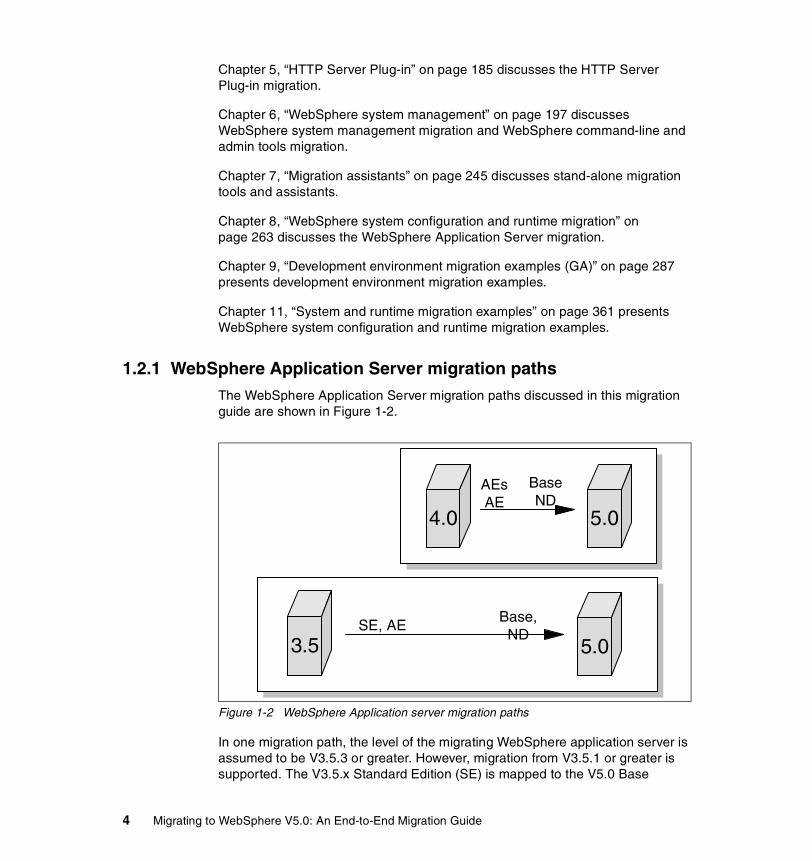
1.2.1 WebSphere Application Server migration pathsThe WebSphere Application Server migration paths discussed in this migration guide are shown in Figure 1-2.
Figure 1-2 WebSphere Application server migration paths
In one migration path, the level of the migrating WebSphere application server is assumed to be V3.5.3 or greater. However, migration from V3.5.1 or greater is supported. The V3.5.x Standard Edition (SE) is mapped to the V5.0 Base
3.5 5.0SE, AE
4.0 5.0
AEs AE
Base ND
Base, ND
4 Migrating to WebSphere V5.0: An End-to-End Migration Guide
product. The V3.5.x Advanced Edition (AE) is mapped to the V5.0 Network Deployment (ND) product. The lower portion of Figure 1-2 on page 4 shows this migration path.
In the second migration path, the level of the migrating WebSphere application server is assumed to be V4.0.2 or greater. However, migration from V4.0+ is supported. The V4.0.x Advanced Single Server Edition (AEs) is mapped to the V5.0 Base product. The V4.0.x Advanced Edition (AE) is mapped to the V5.0 Network Deployment (ND) product. The upper portion of Figure 1-2 on page 4 shows this migration path.
Additionally, a migration path of WebSphere application server V4.0.x JMS listener to WebSphere application server V5.0 message-driven beans (MDB) is discussed.
1.2.2 Application API migrationMigrations involving the following APIs are discussed in this redbook.
JSP/ServletThe MigrateWC tool, described in 7.2, “System administration migration assistants” on page 256, may be used to assist in the migration of JSP and Servlet source application code. The Class API checker tool (CACT), discussed in 7.1.5, “CACT - Class API checker tool introduction” on page 254, may be used to analyze compiled code for API deprecation.
EJBMigration of source code from EJB 1.x to 2.0 is discussed in 3.9, “Migrating from EJB 1.0 to EJB 1.1 or to EJB 2.0” on page 116. The EJBDeploy tool, discussed in 7.1.2, “ejbdeploy - deploying EJBs” on page 250 assists in EJB 1.0 to 1.1 conversions. The Class API checker tool (CACT), discussed in 7.1.5, “CACT - Class API checker tool introduction” on page 254, may be used to analyze compiled code for API deprecation.
JMS listener to message-driven beans (MDB)Section 7.1.4, “mb2mdb - JMS listener application conversion” on page 253 describes the mb2mdb tool that assists in migration of the WebSphere Enterprise Edition V4.0 JMS listener application to use EJB 2.0 message-driven beans (MDB) in WebSphere V5.0.
Chapter 1. Introduction 5

EAR file conversion7.1.3, “earconvert - J2EE application conversion” on page 252 describes the earconvert tool that assists in the conversion of a J2EE 1.2 application to a J2EE 1.3 application.
XMLConfig and wscp conversionSystem management and command-line tools migration is discussed in Chapter 7, “Migration assistants” on page 245. wsadmin is the scripting program in WebSphere V5.0.
1.2.3 J2EE applicationsJ2EE applications have many parts, as shown in Figure 1-3 on page 7. This is a typical four-tier application in WebSphere Application Server.
6 Migrating to WebSphere V5.0: An End-to-End Migration Guide
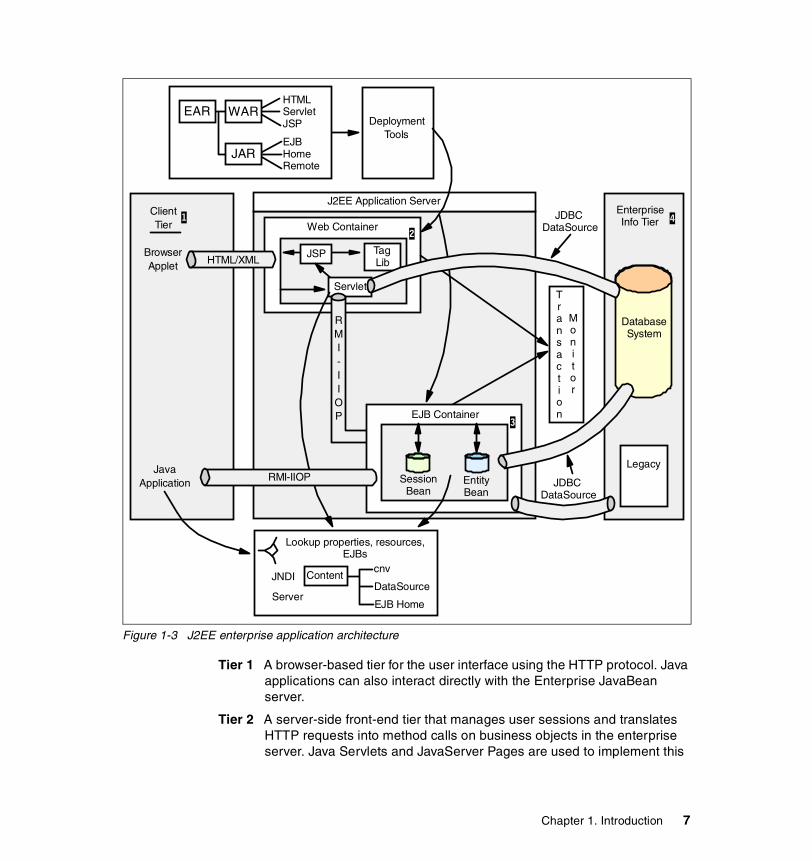
Figure 1-3 J2EE enterprise application architecture
Tier 1 A browser-based tier for the user interface using the HTTP protocol. Java applications can also interact directly with the Enterprise JavaBean server.
Tier 2 A server-side front-end tier that manages user sessions and translates HTTP requests into method calls on business objects in the enterprise server. Java Servlets and JavaServer Pages are used to implement this
DeploymentTools
HTMLServletJSP
EJBHomeRemote
EAR WAR
JAR
ClientTier
1
BrowserApplet HTML/XML
J2EE Application Server
Web Container
TagLib
2
JSP
Servlet
RMI-IIOP EJB Container
SessionBean
EntityBean
DatabaseSystem
3
EnterpriseInfo Tier 4JDBC
DataSource
Transaction
Monitor
JDBC DataSource
Legacy
Lookup properties, resources,EJBs
JNDI
Server
cnv
DataSource
EJB Home
Content
JavaApplication RMI-IIOP
Chapter 1. Introduction 7
component in conjunction with a traditional Web server. One or more firewalls (not shown) are typically present for system security.
Tier 3 An object-oriented business logic tier implemented using Enterprise JavaBeans. The Enterprise JavaBeans are mapped onto the underlying database and legacy systems. Multiple Enterprise JavaBeans servers may be interconnected, both locally and remotely, to form complex distributed object-oriented systems. These servers support distributed transactions to maintain data integrity across remote databases.
Tier 4 A back-end database tier, sometimes including legacy systems. J2EE uses the concept of containers to separate application business logic from server-provided services such as security, database mapping, transactions, load balancing, and network communications. There are four kinds of containers - applet, application, Web, and EJB. The user’s application implements just the business logic. The vendor-provided J2EE server's containers handle all other services. Application components are organized into EAR files, which are deployed into containers using deployment descriptors and deployment tools.
1.2.4 Java technologiesThe J2EE 1.2 and 1.3 specification depends on a collection of other Java technologies. Table 1-1 on page 9 lists these technologies, along with their minimally required specification levels. Compliant products may actually support later versions of these technologies. Note that Java 2 Platform, Standard Edition (J2SE) includes JDBC Core and Java IDL in both J2SE 1.2 and 1.3. As you can see, both J2SE and EJB have major upgrades in J2EE 1.3. Looking ahead even further to J2EE 1.4, expect to find support for Web services, and possibly client-side deployment - Java API for XML Messaging (JAXM and JAX-RPC), and Java Network Launching Protocol (JNLP), respectively. A J2EE application must support the minimal release level for each technology. Moreover, J2EE restricts the way in which some of its dependent technologies can be used. For example, even though threads are a part of the J2SE technology, the EJB specification prohibits spawning user threads in EJBs. Although violating one of these restrictions may not cause a problem on your current server, it is not legal and is likely to cause future migration problems.
8 Migrating to WebSphere V5.0: An End-to-End Migration Guide
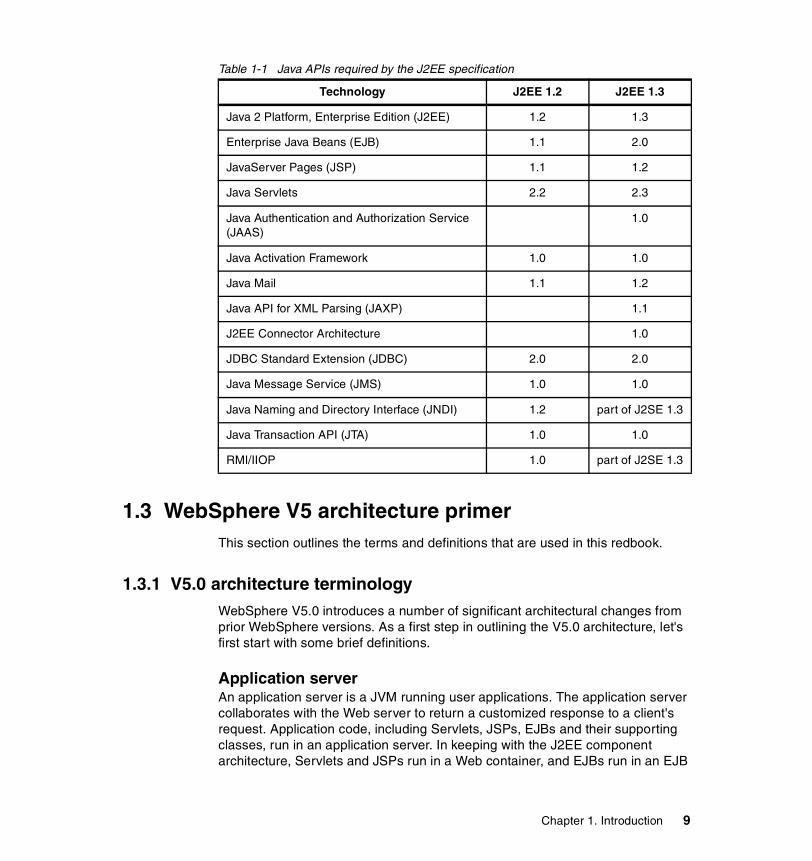
Table 1-1 Java APIs required by the J2EE specification
1.3 WebSphere V5 architecture primerThis section outlines the terms and definitions that are used in this redbook.
1.3.1 V5.0 architecture terminologyWebSphere V5.0 introduces a number of significant architectural changes from prior WebSphere versions. As a first step in outlining the V5.0 architecture, let's first start with some brief definitions.
Application serverAn application server is a JVM running user applications. The application server collaborates with the Web server to return a customized response to a client's request. Application code, including Servlets, JSPs, EJBs and their supporting classes, run in an application server. In keeping with the J2EE component architecture, Servlets and JSPs run in a Web container, and EJBs run in an EJB
Technology J2EE 1.2 J2EE 1.3
Java 2 Platform, Enterprise Edition (J2EE) 1.2 1.3
Enterprise Java Beans (EJB) 1.1 2.0
JavaServer Pages (JSP) 1.1 1.2
Java Servlets 2.2 2.3
Java Authentication and Authorization Service (JAAS)
1.0
Java Activation Framework 1.0 1.0
Java Mail 1.1 1.2
Java API for XML Parsing (JAXP) 1.1
J2EE Connector Architecture 1.0
JDBC Standard Extension (JDBC) 2.0 2.0
Java Message Service (JMS) 1.0 1.0
Java Naming and Directory Interface (JNDI) 1.2 part of J2SE 1.3
Java Transaction API (JTA) 1.0 1.0
RMI/IIOP 1.0 part of J2SE 1.3
Chapter 1. Introduction 9
container. You can define multiple application servers, each running in its own Java Virtual Machine (JVM).
NodeA node is a logical grouping of managed servers. A node usually corresponds to a physical computer system with a distinct IP host address. Node names usually are identical to the host name for the computer.
Node agentNode agents are administrative agents that monitor application servers on a host system and route administrative requests to servers. A node agent manages all WebSphere Application Server servers on a node. The node agent represents the node in the management cell.
Deployment managerDeployment manager is an administrative process that provides a centralized management view for all nodes in a cell, as well as the management of clusters and workload balancing of application servers across one or several nodes.
CellCells are arbitrary, logical groupings of one or more nodes in a WebSphere Application Server distributed network. A cell is a configuration concept, a way for administrators to logically associate nodes with one another. Administrators define the nodes that make up a cell according to whatever criteria make sense in their organizational environments.
ClusterClusters are a set of servers that are managed together and participate in workload management. The servers that are members of a cluster may be on different host machines, as opposed to the servers that are part of the same node and must be located on the same host machine.
Before discussing this runtime architecture in depth, it may be helpful to refer to the chart below.
Table 1-2 Mapping of WebSphere Application Server editions
V3.0 V4.0 V5.0
N/A WebSphere Application Server Advanced Single Server Edition (AEs)
WebSphere Application Server
10 Migrating to WebSphere V5.0: An End-to-End Migration Guide

As depicted in Table 1-2 on page 10, WebSphere Application Server Network Deployment (ND) is the V5.0 analog to WebSphere V4.0 Advanced Edition. WebSphere Application Server-ND adds clustering and workload management (WLM) capability to WebSphere Application Server V5.0. WebSphere Application Server-ND relies on two additional processes, the node agent and the deployment manager, to synchronize and manage multiple application servers running in a V5.0 cell. While not exactly equivalent to the V3.x and V4.0 Administration Server (adminserver) in WebSphere Application Server-ND V5.0, the node agent and deployment manager provide many of the same functions provided by the adminserver. The deployment manager controls the other machines in the cell, and the node agent provides a local process on each machine for control of the processes on that node.
The major V5.0 runtime components are depicted in Figure 1-4 on page 12.
N/A WebSphere Application Server-Advanced Developer Edition (AEd)
WebSphere Application Server for Developers
WebSphere Application Server Advanced Edition (AE)
WebSphere Application Server Advanced Edition (AE)
WebSphere Application Server Network Deployment (ND)
WebSphere Application Server Enterprise Edition (EE)
WebSphere Application Server Enterprise Edition (EE)
WebSphere Application Server Enterprise
WebSphere Application Server EE for zSeries
WebSphere Application Server for z/OS™ and S/390®
WebSphere Application Server for z/OS
V3.0 V4.0 V5.0
Chapter 1. Introduction 11
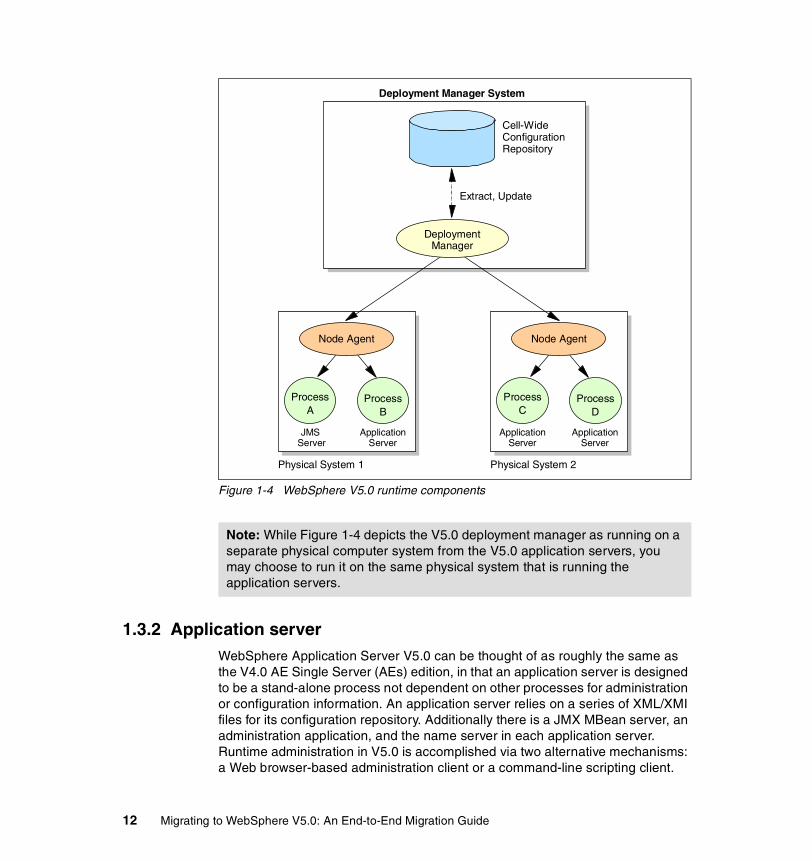
Figure 1-4 WebSphere V5.0 runtime components
1.3.2 Application serverWebSphere Application Server V5.0 can be thought of as roughly the same as the V4.0 AE Single Server (AEs) edition, in that an application server is designed to be a stand-alone process not dependent on other processes for administration or configuration information. An application server relies on a series of XML/XMI files for its configuration repository. Additionally there is a JMX MBean server, an administration application, and the name server in each application server. Runtime administration in V5.0 is accomplished via two alternative mechanisms: a Web browser-based administration client or a command-line scripting client.
Note: While Figure 1-4 depicts the V5.0 deployment manager as running on a separate physical computer system from the V5.0 application servers, you may choose to run it on the same physical system that is running the application servers.
ProcessC
Application Server
ProcessD
Application Server
Physical System 2
Node Agent
ProcessA
JMS Server
ProcessB
Application Server
Physical System 1
Node Agent
Deployment Manager System
Cell-Wide Configuration Repository
Extract, Update
Deployment Manager
12 Migrating to WebSphere V5.0: An End-to-End Migration Guide

Both of these administration clients are discussed in further detail in Chapter 6, “WebSphere system management” on page 197. The architecture for WebSphere Application Server V5.0 is depicted in Figure 1-5.
Figure 1-5 WebSphere Application Server V5.0 architecture
1.3.3 Nodes and node agentsEach computer in a WebSphere V5 cell is known as a node. And on each node there is a node agent that serves as an intermediary between the managed servers on the node and the deployment manager that oversees the entire cell, allowing for control of the managed servers on that node.
The node agent is a server process running several administrative applications. The first is a NodeSync component. This component exchanges information with the deployment manager, and creates a local copy of all the configuration files that the deployment manager sends it. Node agents request updates for their local configuration files from the deployment manager at regular intervals. The node agent also includes logic used to monitor and manage processes (servers) on the local node.
The architecture and components for a node running a node agent and an application server are shown in Figure 1-6 on page 14.
J2EE Runtime
CustomerApps
Admin Console
Workspace
Applications
Application Server JVM
MasterRepository
LocalPer-User
Workspace
User/Runtime MBeans
Config Service
Application Install
File Browser
Config Repository
Admin Service(JMX)
Admin UI
Scripting Client
Chapter 1. Introduction 13
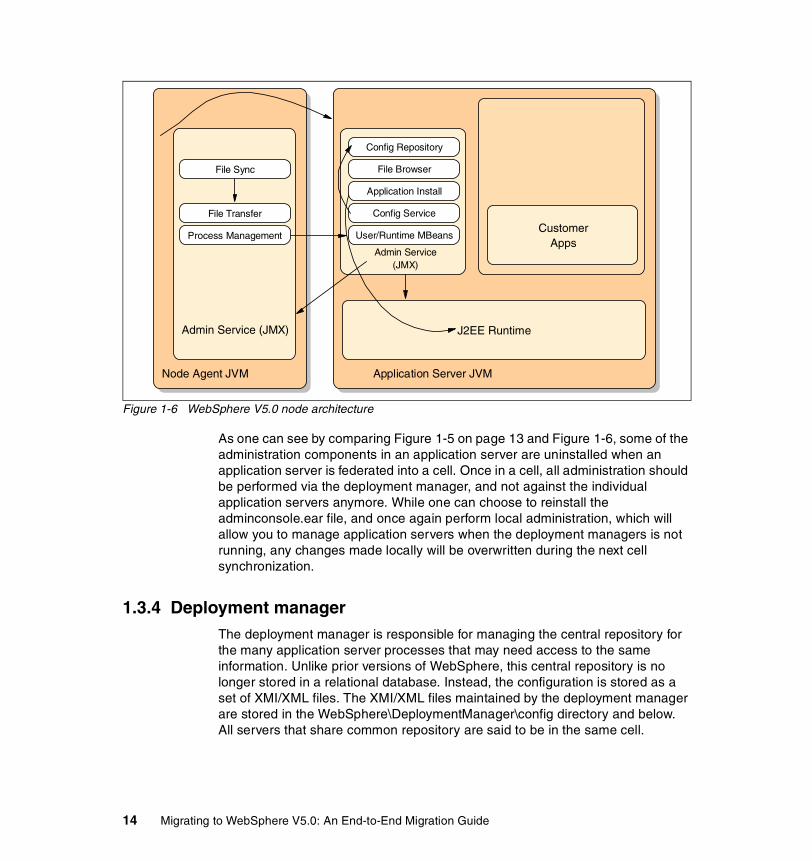
Figure 1-6 WebSphere V5.0 node architecture
As one can see by comparing Figure 1-5 on page 13 and Figure 1-6, some of the administration components in an application server are uninstalled when an application server is federated into a cell. Once in a cell, all administration should be performed via the deployment manager, and not against the individual application servers anymore. While one can choose to reinstall the adminconsole.ear file, and once again perform local administration, which will allow you to manage application servers when the deployment managers is not running, any changes made locally will be overwritten during the next cell synchronization.
1.3.4 Deployment managerThe deployment manager is responsible for managing the central repository for the many application server processes that may need access to the same information. Unlike prior versions of WebSphere, this central repository is no longer stored in a relational database. Instead, the configuration is stored as a set of XMI/XML files. The XMI/XML files maintained by the deployment manager are stored in the WebSphere\DeploymentManager\config directory and below. All servers that share common repository are said to be in the same cell.
J2EE Runtime
CustomerApps
Application Server JVM
Admin Service(JMX)
File Transfer
Admin Service (JMX)
Node Agent JVM
User/Runtime MBeans
Config Service
Application Install
File Browser
Config Repository
Process Management
File Sync
14 Migrating to WebSphere V5.0: An End-to-End Migration Guide

The deployment manager node is a node that contains only a WebSphere Application Server Network Deployment server process. The deployment manager process runs on the Network Deployment node and communicates with independent node agents, running in each node in the cell as lightweight (partial J2EE environment) JVM processes. Node agents coordinate such administrative operations as configuration synchronization. The deployment manager finds the node agents by way of a configurable discovery address, a port and protocol dedicated to letting WebSphere processes find each other.
The administrative application that runs in the deployment manager has some function not available in an application server, including the ability to view the entire cell topology. As noted previously, application servers in V5.0 are designed to run when the deployment manager is not running. When the deployment manager is brought online, it coordinates with the node agent and application servers on each node. The architectural components comprising the deployment manager are depicted in Figure 1-7.
Figure 1-7 Deployment manager architectural components
1.3.5 Cells and clustersA cell is the logical entity where you can find configurations for various objects in your distributed WebSphere environment. A cell is a set of nodes. A cell also contains clusters, each of which is a set of servers under workload management
LocalPer-User
Workspace
J2EE Runtime
File TransferApplication
Admin Console
Workspace
Applications
Deployment Manager JVM
File Transfer/Sync
Config Service
Application Install
File Browser
Config Repository
Admin Service(JMX)
MasterRepository
Admin UI
Scripting Client
Chapter 1. Introduction 15
(WLM). A cell is comparable to a WebSphere Application Server Version 4 administrative domain.
A V5.0 WebSphere cell maintains the configurations pertaining to:
� Physical hosts on which application servers are installed
� Application servers and other components that comprise the runtime
� Applications installed on application servers
� Resources providing support to applications, such as JDBCTM drivers and data sources for data access
� Security
The deployment manager for a cell retains master configuration files for each server on each node in the cell. Each node also has its own local copies of these configuration files. Any changes to a local node or server configuration file are temporary, if the server belongs to the cell. As noted previously, the local configuration is overwritten during the cell synchronization. Changes at the cell level to server and node configuration files are permanent. Synchronization occurs at designated intervals or when certain events occur, such as when a server starts.
Clusters are the equivalent of WebSphere Application Server Version 4 server groups. A cell can have no clusters, one cluster, or multiple clusters. Vertical clusters have servers on the same node under workload management. Horizontal clusters have servers on multiple nodes under workload management. Workload management routes application requests based on server weight, to provide better distribution.
Several application servers can run on a single machine, but there is no requirement that they all be in the same cluster. Clustering is a logical grouping, not a physical one. All members of a cluster are independent application servers. The only requirement is that they are identical in the applications configured to run in each server. When you create a cluster, you make copies of an existing application server configuration template. The template will most likely be an application server that you have previously configured. You are offered the option of making that server a member of the cluster. It is recommended that you keep that server available only as a template, because the only way to remove a cluster member is to delete it. Keeping the original intact allows you to re-use that configuration to rebuild.
16 Migrating to WebSphere V5.0: An End-to-End Migration Guide

1.4 Quick reference guideMigration focuses on leveraging the existing environment and applications and changing them to be compatible with the current product version, instead of starting from the beginning. Migration to IBM WebSphere Application Server Version 5.0 includes five basic activities:
� Upgrade product prerequisites to support versions� Migrate to IBM WebSphere Application Server Version 5.0� Migrate administrative configurations� Migrate application code and scripts to new API levels� Redeploy applications on Version 5.0
The following sections provide a quick reference to what you will need to migrate from either V3.5x or V4.x to V5.0, without having to meticulously search through the entire Table of Contents or read whole sections to find what is needed.
1.4.1 Upgrade product prerequisites to support versionsAs the product version changes, its prerequisites or co-requisites also change. It is probably necessary to update your database, Web server, JDK version, other software, and possibly your hardware. Here’s where to find the prerequisites:
� WebSphere V5.0 prerequisites
http://www.ibm.com/software/webservers/appserv/doc/latest/prereq.html
� J2EE 1.3 prerequisites (see Table 1-1 on page 9)
http://java.sun.com/j2ee/compatibility.html
� Java 1.3 prerequisites
http://java.sun.com/j2se/1.3/
� API prerequisites (see 1.2.2, “Application API migration” on page 5, 7.1.5, “CACT - Class API checker tool introduction” on page 254, and Appendix B, “Comparing WebSphere Application Server versions” on page 409)
1.4.2 Migrate to IBM WebSphere Application Server Version 5.0
In most cases, migration programs are available to ease the transition. However, some manual preparation may be necessary. Programmatic support for migration from Version 2.0x and Version 3.02x is not provided. See the following sections:
� Migrating from Version 3.5x to Version 5.0 (see 8.3.2, “WebSphere Application Server V3.5 to V5.0 migration” on page 272, 9.1, “Migrating from
Chapter 1. Introduction 17
WebSphere 3.5 Development Environment to WebSphere Studio 5.0” on page 288, and 11.1, “Migrating the WebSphere runtime to V5.0” on page 362)
� Migrating from Version 4.0x to Version 5.0 (see 8.3.3, “WebSphere Application Server V4.0 to V5.0 migration” on page 275 and 11.2, “Interoperability and coexistence between V3.5/V4.0 and V5.0” on page 391)
1.4.3 Migrate administrative configurationsIf your company has been using a previous product version, the system administrator has probably fine-tuned various application and server settings for the environment. It is important to have a strategy for migrating these settings with maximum efficiency and minimal loss. See the following sections:
� Strategy and planning for migrating V4.0 to V5.0 (see 2.5, “Migrating from Version 4.0 to 5.0” on page 72)
� Strategy and planning for migrating V3.5 to V5.0 (see 2.4, “Migrating from Version 3.5 to 5.0” on page 65)
1.4.4 Migrate application code and scripts to new API levels
� Application code (see 1.2.2, “Application API migration” on page 5)
� Development tools
– WebSphere Studio Application Developer (see Chapter 3, “Development tool migration (GA)” on page 81)
– VisualAge for Java (see 2.5.2, “Interoperability” on page 72, 3.6, “Migrating from VisualAge for Java to WebSphere Studio Application Developer” on page 100, and 3.10, “Migrating from VisualAge for Java Visual Composition Editor to Visual Editor for Java” on page 120)
– WebSphere Studio “Classic” (see 3.5, “Migrating from WebSphere Studio “Classic” to WebSphere Studio Application Developer” on page 96)
� Command-line scripts
– XMLConfig (see 6.2, “Current usage of XMLConfig and wscp” on page 204, 6.4.1, “Migration steps” on page 226, and 6.4.3, “Migration from V3.5 to V5.0” on page 228)
– wscp (see 6.2, “Current usage of XMLConfig and wscp” on page 204, 6.4.1, “Migration steps” on page 226, 6.4.2, “Classification of scripts” on page 228, and 6.4.4, “Migration from V4.0 to V5.0” on page 230)
– wsadmin (see 6.3, “wsadmin primer” on page 206, and Appendix A, “wsadmin.properties file sample” on page 405)
18 Migrating to WebSphere V5.0: An End-to-End Migration Guide
1.4.5 Redeploy applications on Version 5.0Before you begin, be sure to read Chapter 7, “Migration assistants” on page 245, Chapter 8, “WebSphere system configuration and runtime migration” on page 263, and Chapter 11, “System and runtime migration examples” on page 361. These three chapters give you the basics of WebSphere Application Server V5.0 and associated migration assistants. In particular, see the following:
� WebSphere V3.5 to V5.0 examples (see 11.1.1, “Example: V3.5 to V5.0 manual migration” on page 363 and 11.1.3, “Example: V3.5/V4.0 to V5.0 automated migration” on page 383)
� WebSphere V4.0 to V5.0 examples (see 11.1.2, “Example: V4.0 to V5.0 manual migration” on page 381 and 11.1.3, “Example: V3.5/V4.0 to V5.0 automated migration” on page 383)
Note: Support for several APIs has been removed in V5.0.
Chapter 1. Introduction 19

20 Migrating to WebSphere V5.0: An End-to-End Migration Guide
Chapter 2. Migrating strategy and planning
This chapter covers the best practices in migration strategies and planning. Six migration scenarios are described and their advantages and disadvantages are discussed.
2
© Copyright IBM Corp. 2002 2003. All rights reserved. 21
2.1 IntroductionChange is a part of enterprise application ownership. As business requirements change, new features are added to the application. As performance requirements change, additional hardware may be added or existing hardware reconfigured. As new technologies evolve, applications are adapted to make use them. Of all the forms of inevitable change, migration to a new version of WebSphere Application Server is one of the easiest to predict: a new major version appears every 18-24 months. Migration to future versions of WebSphere Application Server should be a part of your business plan.
The mechanical aspects of migration are relatively easy to complete. Upgrading individual server instances can be accomplished in a matter of hours or even minutes (preceded by hours of planning). A complete migration plan must include necessary upgrades to application code and individual application servers, but that plan must also consider business requirements; during the migration, service cannot be negatively impacted in any significant way. That is, business must continue during the migration.
Migration to a new version of WebSphere Application Server will have an impact on several aspects of your business. Your WebSphere applications are far more than just application code; along with the application code, there are development environments, build processes, runtime environments and other aspects that must be considered. It is important to consider:
� Application code� Development environment (including source code management)� Build processes� Testing� Runtime environments� Deployment processes� Education and training
2.1.1 The evolution of J2EEJava 2 Enterprise Edition (J2EE) is an umbrella specification that defines many aspects of how an enterprise application is built using Java. As a specification, J2EE is not complete. New technologies continue to evolve to provide new functionality. Despite best efforts, specifications will always lag behind implementation. As long as there is a requirement to do something that is defined outside of the specification, new technologies will be created. Much of the development of the current J2EE specification has occurred this way. New technologies are created and then retrofitted into the specification.
22 Migrating to WebSphere V5.0: An End-to-End Migration Guide
As J2EE continues to evolve and encompass more technologies, the standardization process will start to make migration much easier. Even with non-standard technologies, the design patterns called Model-View-Controller (MVC) go a long way toward reducing the cost of change (since MVC separates code into areas of responsibility).
You need a strategy for taking advantage of proprietary services while reducing the cost of changing your solution later. Designing for change is a key element in that strategy.
2.1.2 Migration as a form of changeMigration is a way of life. Application servers continue to evolve to support ever-increasing functionality. To make use of new functionality, applications and processes have to evolve as well. Anything that you can do to reduce the cost of change is going to save money over the long haul. Investing time to do it right now saves time (and money) later.
Software development methodologies such as “Extreme Programming”, described in Extreme Programming Explained: Embrace Change, by Kent Beck, are designed around a philosophy of ongoing change. Extreme programming practices, including such things as “refactoring” and unit testing, help to improve the overall quality of your application code while insulating you against the effects of change.
Consider migration when developing your runtime configuration. Use of server affinity (the same server handles all requests from a given user), for example, can make mixing and matching different versions of WebSphere Application Server as part of a migration process generally easier (see 2.3, “Migration scenarios” on page 38). Plan to keep up-to-date with new releases and fixpacks of all involved software. Little changes will be easier to make than large ones. It is important to have a strategy for quickly testing and implementing these changes as they occur.
2.1.3 Elements of migration
Migration involves more than just application code. At the end of the migration process, the migrated application needs to run on a production environment, the
Note: Migration planning and scheduling are major elements in the migration process. However, the discussion of this portion has been deferred to later sections. The reader may, if desired, preview 2.1.1, “The evolution of J2EE” on page 22 and 2.6, “Migration plan” on page 73 and return here.
Chapter 2. Migrating strategy and planning 23
application needs to be built and deployed, and developers need to be productive with the new development environment. Every migration plan needs to include these elements.
Development environmentDevelopment environments change over time. When WebSphere Application Server Version 4.0 was introduced, so was a new version of WebSphere Studio. WebSphere Studio is a major change in development environments and some time should be taken to ensure that developers are familiar with the changes.
WebSphere Studio represents a major change for developers already familiar with VisualAge for Java. The paradigm for code management has changed and it will take some time for developers to become comfortable with those changes. Between Version 4.0 and 5.0, WebSphere Studio has undergone some changes, but at its core remains the same. Developers already familiar with Version 4.0 should become familiar with the changes relatively quickly.
Development environments are composed of more than just an integrated development environment (IDE). Other tools, including a source code management solution, are also an important part. Any tools you are using must be reviewed as part of the migration effort. In some cases, new versions or complete replacements may be required.
The development environment as it exists on developer workstations is not generally the complete development environment. Other aspects of development, including test servers, developer process and practices, and methodologies should also be considered as part of the migration effort.
Application codeThe application code itself may not be seriously impacted by the migration process. Applications that make use of technologies covered by the J2EE standards tend to migrate with relatively little change. In some cases, deprecated APIs must be replaced with newer ones.
Build and deploymentThe introduction of a standard packaging process using Enterprise Archive (EAR) files with J2EE 1.2 goes a long way toward standardizing the way that Java applications are packaged. In general, build processes that exist for
Note: WebSphere Studio does not support the source code management tools built into VisualAge for Java. As part of a tools migration from VisualAge for Java to WebSphere Studio, some effort must be taken to select an alternative.
24 Migrating to WebSphere V5.0: An End-to-End Migration Guide

WebSphere Application Server Version 4.0 should migrate with a small number of changes. It is likely that Version 3.5 build processes will require more drastic changes.
As part of the migration, these processes must be reviewed and evolved.
Runtime environmentsEven the most brilliantly written code will not run without a properly configured application server to run. Setting up the production/testing environments is a key requirement for success. Of course, the configuration of the production environment can be quite complex. Starting from scratch, installation and configuration of a WebSphere runtime environment can take several weeks. Upgrading a production environment that must stay live during the process can take longer.
Installation of a single WebSphere Application Server node is a relatively easy chore that can be reasonably completed in about a day. Installing a more complex collection of nodes featuring load-balancing and failover can take considerably longer. Don't kid yourself into believing that a reasonably complex installation can be effected over the weekend. A proper migration strategy is required.
Given that migrating the runtime infrastructure will likely take some time, an alternative approach that interferes with the running system as little as possible is needed. There are a number of ways to upgrade a running system. The right approach depends on some factors:
� How much downtime is acceptable?� How much additional hardware can you purchase?� How is the existing environment configured?� Does the existing environment provide load-balancing support?� Does the existing environment provide failover support?
An obvious approach to migrating your runtime environment is to simply build the WebSphere environment and “flip the switch”. That is, replace your entire existing environment with a WebSphere Application Server. This works well for small configurations; for larger configurations, the cost of duplicating a large amount of expensive hardware can be prohibitive.
Use the migration of a system test environment to learn the ropes and make mistakes. Based on the lessons learned through this migration, formulate a plan to effect the entire migration and test that plan against the QA environment. If it is possible migrate your configuration as vertical slices, measure the time required to migrate a single slice and use that information to estimate the entire effort.
Chapter 2. Migrating strategy and planning 25
By starting with a system test environment and then moving into your quality assurance environment, you can formulate and evolve an effective plan and mitigate the risks of migrating your live production environment.
Some runtime migration scenarios are presented in 2.3, “Migration scenarios” on page 38.
TestingTesting cannot be overlooked as a fundamental part of the migration process. Subtle changes can be introduced with new versions and testing is your best bet to discover problems with the code. No doubt you have existing test practices in place; in most cases, existing test practices can be used with little or no
Note: Corporate WebSphere environment
In general, it is recommended that several environments be configured as part of your corporate WebSphere environment. At a minimum, you should have at least one of each of the following:
� The production environment is what is used by the end user. This environment generally has very strict availability requirements and is scaled to support your entire user base.
� The pre-production environment is used to test the overall correctness of both the runtime and the application. It is a scaled down version of your production environment with the same level of complexity. That is, the pre-production environment is configured similar to the production environment (same configuration of firewalls, load balancers, back-end systems, etc.), but on a smaller scale (it may contain fewer nodes, for example). Before changes are made in production, they are made to the pre-production environment. This environment can withstand generally longer periods of down time, which makes it an appropriate environment to test your migration plan.
� A number of system test environments may be configured, depending on your specific needs and budget constraints. System test environments are used by the administration staff to test patches and configuration changes before they are adopted by the pre-production and production environments. Software developers might use a system test environment to test their code in an environment that closely resembles the production environment. Performance testers might use a system test environment to do their work as well. A system test environment is generally configured to reflect the complexity of the production environment on the smallest possible scale. As such, a system test environment is relatively inexpensive to build and maintain.
26 Migrating to WebSphere V5.0: An End-to-End Migration Guide
modification. Testing for a migration effort can generally be executed in much the same way as for any new release of your application.
Implementations of specifications may introduce clarifications of older versions. Clarifications can translate into subtle changes in behavior that should be tested. A full regression test of application code may be in order as part of a migration to ensure that subtle changes have not introduced errors into your application. The specifications are often the best source of information about changes that have occurred.
EducationThe education and training that your people require to work with WebSphere Application Server depends on the nature of the competitive product that WebSphere is displacing. There are a number of different skill sets to consider. In particular:
� J2EE architecture and coding� WebSphere tools� WebSphere Application Server installation and configuration� WebSphere deployment
WebSphere Application Server Version 5.0 is J2EE 1.3 compliant. If you're moving from Version 3.5 of WebSphere Application Server, your developers will likely already be competent Java developers but will benefit from J2EE instruction. If your developers are already familiar with J2EE, perhaps through experience with WebSphere Application Server Version 4.0, they may still benefit from technology training.
With the new version of WebSphere Application Server comes new development tools. WebSphere Studio Application Developer (Studio) has changed somewhat between Versions 4.0 and 5.0. Studio is quite different from VisualAge for Java. Developers familiar with older development environments will likely benefit from some amount of tools training.
The infrastructure and operations staff are the people who install, configure, and keep the WebSphere production environment running. It is assumed that existing infrastructure staff members are familiar with fundamental administrative issues and the operating systems on which their systems run, and have practical experience managing the day-to-day operations of a Web site. Infrastructure people need to learn how to install, configure, and maintain a WebSphere Application Server production environment. The administration model has changed significantly enough between past versions and Version 5.0 that administrative staff would benefit from training in that area.
In any case, it is best that specific needs be assessed against actual skills and that any gaps be filled. This may be a good opportunity to assess skills and fill
Chapter 2. Migrating strategy and planning 27
any other skill gaps before moving forward. The amount of training you need depends very much on your goals. If you're planning to get outside help for the migration, you may be able to forgo some or all of the training for the time being.
2.2 Migration strategyThe migration strategies discussed below include:
� Divide and conquer� Vertical slice � Dump and chase� Run, right, fast, small
Planning the migration is introduced in 2.2.5, “Before you migrate” on page 36 and discussed in more depth in 2.6, “Migration plan” on page 73.
2.2.1 Divide and conquerDivide and conquer is a classic computer science strategy that applies well to migrations. The practice is to divide a problem into parts so that a large problem can be solved as a collection of small problems. In some cases, the total amount of work is actually larger with this sort of strategy, but the overall risk is lower.
In some cases, dividing the problem is relatively easy to do. There's little point in updating the runtime environment before the application code has been updated to run on the new version. Larger-grained divisions are relatively easy to identify. It's the smaller grained divisions that take some work.
In this spirit, large monolithic applications present an interesting migration challenge. The entire application must, in general, be migrated before any part of it can be introduced into the runtime environment. As a strategy moves forward, a single large application might be divided into several smaller ones to make future migrations easier (this may also make ongoing application development easier).
Where possible, focus on single bits. If migrating, for example, from WebSphere Application Server Version 3.5 and Oracle to Version 5.0 and DB2®, consider migrating Oracle to DB2 first and then to the new version of WebSphere Application Server. Similarly, avoid attempting to add behavior/functionality as part of a migration. It is generally better to migrate the existing application as-is and then add new behavior later.
28 Migrating to WebSphere V5.0: An End-to-End Migration Guide
2.2.2 Vertical-slice migrationA vertical slice, roughly analogous to a use case, cuts vertically through your application as shown in Figure 2-1 on page 30. Applications tend to have a number of different paths through their functionality. These paths generally flow through the various layers of your application. A vertical slice is one path through your application; a vertical slice tends to touch each layer of your application. In the best case, a vertical slice also touches most (or all) technologies employed by your application.
An example vertical slice might start with the user submitting a request (via their browser) to the application server. Your application's Servlet intercepts that request and processes it. As part of the processing, your Servlet might validate the provided data, do some conversion, and then forward the request onto an EJB for processing. The EJB then takes the request and does some additional processing before it interacts with the database. The result of the database interaction and processing is then packaged up and returned to the Servlet. The Servlet takes the response and turns it into something that a JSP can understand (possibly putting some data into request attributes) before forwarding to a JSP. The JSP renders a page of HTML, which is returned to the browser.
Chapter 2. Migrating strategy and planning 29
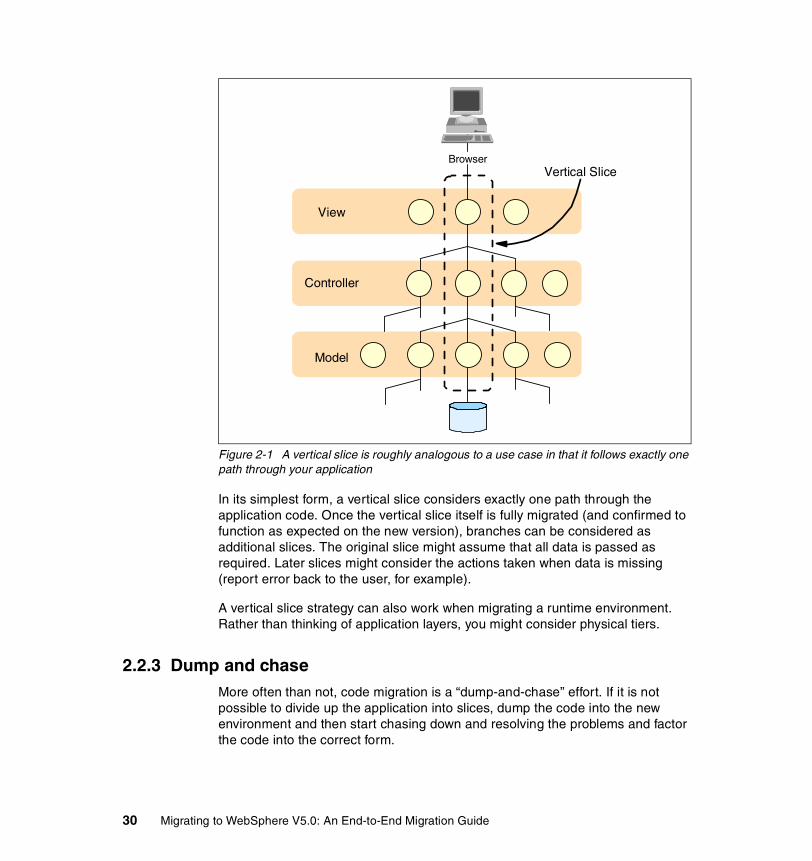
Figure 2-1 A vertical slice is roughly analogous to a use case in that it follows exactly one path through your application
In its simplest form, a vertical slice considers exactly one path through the application code. Once the vertical slice itself is fully migrated (and confirmed to function as expected on the new version), branches can be considered as additional slices. The original slice might assume that all data is passed as required. Later slices might consider the actions taken when data is missing (report error back to the user, for example).
A vertical slice strategy can also work when migrating a runtime environment. Rather than thinking of application layers, you might consider physical tiers.
2.2.3 Dump and chaseMore often than not, code migration is a “dump-and-chase” effort. If it is not possible to divide up the application into slices, dump the code into the new environment and then start chasing down and resolving the problems and factor the code into the correct form.
View
Controller
Model
Vertical SliceBrowser
30 Migrating to WebSphere V5.0: An End-to-End Migration Guide
Most code migration efforts tend to employ a dump-and-chase strategy, especially when tight coupling makes identifying a vertical slice difficult. WebSphere Studio Application Developer is the tool of choice for implementing this kind of strategy.
WebSphere Studio Application Developer is the most important tool for migrations to WebSphere Application Server 5.0. The validation features in this product do an excellent job of guiding you through the changes that need to be made to the Java code, JSPs, deployment descriptors, and other artifacts (including such things as XML validation). WebSphere Studio Application Developer includes a test environment that is well-paired with the development environment, which provides great debugging support.
In a code migration sense, dump and chase is effected by dumping the existing code into WebSphere Studio Application Developer and chasing and fixing the problems that are reported by the tool. With help from the debugger, this strategy is extended into the initial testing phases. There is an element of dump and chase in any migration strategy. At some level, some amount of code must be brought into the development environment and cleared of problems. The big difference is that a pure dump and chase effort tends to involve a huge amount of code; it is also generally difficult to test anything until everything is fixed.
Be sure to do a lot of testing to make sure that nothing is missed.
2.2.4 Run, right, fast, small“Make it run, make it run right, make it run fast” is a well-known mantra in incremental development circles. This style of incremental development has a positive effect on morale. For the developer, having something that runs makes further development generally easier. For management, having something run early gives confidence that success is inevitable. This three-step philosophy for incremental development applies to a migration effort.
Note: Dump and chase is a hockey strategy that is quite popular in North America. In hockey, the ice is divided into zones. When on an attack, a team will often send the puck over the blue line into their opponent's zone. From there, the offensive players on the team cross into the zone and try to make a play. Some may argue that maintaining control by carrying the puck over the blue line into the zone is a more refined approach. However, the dump and chase strategy has been demonstrated to work very effectively. In keeping with the metaphor, vertical-slice migration would be like carrying the puck over the blue line.
Chapter 2. Migrating strategy and planning 31
In the first step, get your application running on WebSphere Application Server Version 5.0 in the shortest time possible with the smallest number of changes possible. This should be a relatively short-term process with the effect of demonstrating that success is inevitable. During the second step, refactor your application to work out bugs, make use of best practices and conform to the J2EE specification. The main purpose of this step is to improve the overall quality of the application and make the application more resilient to future change. With the application running right, the final stage in code migration is to optimize the code as required.
Doing the code migration incrementally provides a lot of value. While making your application code run, you may uncover problems not discovered during the design and code review. By discovering these problems early, you have a better chance of finding time to solve them or changing your priorities to accommodate them. Another advantage of incremental migration is that you can decide whether or not to back off the migration (perhaps to wait for a later version of a technology, or even to rewrite from scratch).
Get it runningThe real danger in this step is in trying to do too much. The best approach is to get your application running on WebSphere Application Server Version 5.0 with the minimal number of changes possible. That is, stick to making the existing application run in WebSphere Application Server; avoid making significant design changes to the application.
Divide and conquer is an excellent strategy to adopt in this stage. If the application is well-written, then it should be relatively easy to modify and test the parts as necessary. Even if the application is not well-written, it should be possible to employ some form of divide and conquer strategy. An enterprise application can be very complex with numerous interacting streams of functionality. These streams of functionality can be divided into vertical slices of the application. Start with one feature and migrate it completely. Additional features should be added incrementally with testing done along the way.
While doing the migration, test cases should be migrated along with the code. If no test cases exist, consider creating them. Creating test cases, especially for existing code, is very helpful in making the purpose of individual features clearer. These test cases will also be very helpful later when updating or upgrading the application code.
This effort is very similar to that of any application development effort:
� Understand the requirements
� Understand the existing design
� Develop a unit testing plan
32 Migrating to WebSphere V5.0: An End-to-End Migration Guide
� Implement unit tests on existing implementation
� Select a vertical slice of the application, modify as necessary, test and deploy to IBM WebSphere Application Server
� Repeat
Extreme Programming Explained: Embrace Change, by Kent Beck, has lots to say about the development process. Fortunately, extreme practices usually work well in this context. A minimum set of recommended practices that can be followed includes:
� Work on the important features first� Tackle hard problems early� Do one thing at a time� Do the simplest thing that can possibly work� Test, test, test� Release often� Divide and conquer
There are a lot of reasons to migrate important features first.
� Migrating important features first helps the decision makers to feel more at ease with the process to see their key features implemented in a timely manner.
� In the end, if something has to slip, it's good to know that the important stuff is done.
� It is very likely that the hard problems are somehow related to the most important features.
� The hard problems will take the longest amount of time to implement.
� Hard problems are also very difficult to estimate, so taking care of them first can give you a little more time if you need it later.
Best practices suggestions� Do one thing at a time
Choose one piece of functionality, and migrate it. It is far easier to migrate, test, and integrate one small piece than to attempt to do the same with a larger set of functionality. Do the simplest thing that can possibly work (don't try to anticipate problems you're not sure you have; the code should be as simple as can be, but no simpler). Try to resist fixing architectural flaws at this stage. Get the migrated code to work and leave it at that. You should revisit the architecture in the refactoring stage.
Chapter 2. Migrating strategy and planning 33
� Test, test, test and test some more
Before you migrate the existing code, make sure it works as expected on your current version of WebSphere Application Server. If you know how it works on that platform and you have results from test cases to prove it, you can prove that your migrated code functions as expected. These test cases will also be very valuable later when it comes time to reevaluate the architecture. Run your test cases frequently -- they will save you grief.
� Release often
Make WebSphere Application Server Version 5.0 running on the deployment operating system (and hardware) available to the developers. The migrated application should be tested on the deployment test server periodically. There may be subtle differences between the development and deployment platforms. Attempt to determine any problems associated with these differences early.
� Divide and conquer
During this effort, use a divide-and-conquer approach at all levels of granularity. Sure, you can divide the entire application into vertical slices, but each of those slices can likely be divided as well (and then divided again). For example, you may consider a slice of the application that uses the typical Model-View-Controller pattern:
a. Write your test code for the model b. Confirm the results of your tests on the competitive application serverc. Migrate the model coded. Confirm that the migrated code functions as expected e. Write tests for the Servlets and JSPs f. Confirm the results of your tests on the competitive application server g. Migrate the Servlets and JSPs h. Confirm that the migrated code functions as expected i. Integrate with the collective migration effortj. Repeat
SummaryIt is worth stating again that this effort should focus on getting the existing code to run in WebSphere Application Server with the smallest number of changes possible. Salvage as much of the existing code as possible. Unit tests should exist before the application development process begins. Unit tests may evolve during the migration process.
Get it running rightRefactoring, as described in Refactoring: Improving the Design of Existing Code, by Martin Fowler, is a process of modifying code to improve quality without necessarily adding new behavior. In general, refactoring should be part of the
34 Migrating to WebSphere V5.0: An End-to-End Migration Guide
normal development process (in fact, some amount of refactoring should naturally occur during the Code Migration stage). It is during this stage that the major surgery takes place.
Major surgery can take many forms. The application's architecture should be reviewed and updated. The Model-View-Controller (MVC) architecture is a well-known and generally accepted architecture. The work you do here to take advantage of such established practices will pay off in the long run. Maintenance will be easier, as will migration to future versions of WebSphere Application Server. Even if you're currently using MVC, this stage presents an opportunity to ensure that you're doing it right. By adopting standards, you can mitigate the migration pain you're feeling now on future efforts.
On a smaller scale, application of best practices can yield significant improvements in robustness, scalability and performance. For example, existing JDBC code that depends on DriverManager or proprietary connection pooling solutions can be updated to make use of data sources. “Classic” Servlets that generate HTML output can be updated to make use of JSPs. EJBs might be updated to actually make use of EJB features. Old workarounds can be updated (or removed completely) to take advantage of standard features.
Having good unit tests in place makes refactoring a lot easier. Unit test allow you to make changes with confidence; if a change breaks something, that will be revealed by the tests. If you don't have unit tests, it might be a good idea to start introducing them at this stage (if you didn't get around to it in the Get It Running stage, for example). You don't have to go crazy and build thousands of tests providing full coverage; as you make changes, make tests. Over time, the number of tests will increase providing broader coverage. Testing, like refactoring, should be a natural part of the development process. Consider investing some time in a good unit testing tool such as JUnit (found at http://www.junit.org).
Get it running fastBy this point, the application code should be running right. That is, the application is a WebSphere application and the fact that a migration has taken place is no longer relevant. The skills required at this stage are no different from the skills required for any WebSphere application.
Make it smallThe final stage of “run, right, fast, small” is to reduce the code volume to be as small as possible. Assuming that enhancements and migration will be a part of life as you move forward, anything that you can do to make future changes (and migration) easier will save time and money.
Chapter 2. Migrating strategy and planning 35
By reducing the code to the smallest size possible, you may be able to work out complexity and bulk. By reducing these factors, the code will be easier to maintain.
2.2.5 Before you migrateThere are several activities that can (and should) be undertaken at the beginning of a migration effort. The assessment of migration complexity is a very important step that should not be skipped, because it can be used to set the stage for the steps that follow.
Pre-migration activities include:
� Assessment� Education� Installation of new development environment� Installation of a system test environment� Research� Code preparation� Plan
AssessmentThe main goal of an assessment is to determine what the overall effort will be to complete the migration (assessment should really part of any effort). As part of an assessment, all the pieces involved in enterprise application ownership should be reviewed. This includes such things as the development and production environments, but also includes such things as the skills of the people involved (see 2.1.3, “Elements of migration” on page 23).
As projects evolve, very often many details are lost. An assessment presents an opportunity to discover these lost details. The product of an assessment should be a template for a plan to move forward within a migration effort. The template should document:
� An appropriate high-level migration strategy� An estimate of overall migration effort� Problem areas� Risk factors and unknowns� Use of proprietary or third-party technologies� Required education
Education Education takes many forms. Classroom training is an obvious way to get education for a large number of people. Mentoring is another very effective learning mechanism.
36 Migrating to WebSphere V5.0: An End-to-End Migration Guide
Installation of a new development environmentBefore application code can be modified, a suitable development environment must be installed. For WebSphere Application Server Version 5.0, WebSphere Studio Application Developer is the development environment of choice.
There are several editions of WebSphere Studio; selection of an appropriate edition is crucial to provide the features you require. Some research prior to the migration will save time in the long run.
If you're migrating from VisualAge for Java to WebSphere Studio, you will likely have to spend some time researching, installing and configuring source code management tools.
Installation/upgrade of system test environmentsInstallation of a system test environment is a useful activity for your systems administration staff to learn the nuances of the new version of WebSphere Application Server.
Such environments are also useful for the application developers for testing purposes.
ResearchResearch is typically part of every migration assessment effort. Your applications may make use of code libraries provided by a third party. Confirmation that these libraries will function in WebSphere Application Server Version 5.0 is required. New versions of these libraries may exist. In any case, the third-party vendor may be required to provide some kind of certification that these libraries will function in the new environment.
Other kinds of research may also be required.
Code preparationCoding practices can have a direct impact on the complexity of migration. Code that is generally easier to understand is generally easier to modify. Layered architectures are a huge win when change is required.
Refactoring describes a discipline of code development with which code is constantly changed into simpler forms. As a matter of practice (regardless of your chosen software development methodology), refactoring improves overall code quality.
As part of the refactoring discipline, code that is not used should be removed. This simple act can reduce the effort considerably because it reduces the amount of code that needs to be considered as part of the migration effort. The
Chapter 2. Migrating strategy and planning 37
ethic of removing what you don't use can be extended to the runtime environment. Unused resources, such as data sources, should be removed as a matter of general practice.
More pragmatically, new versions of WebSphere Application Server tend to support more recent versions of specifications. In anticipation of an upcoming migration, you can update existing code to conform to the most recent version. WebSphere Application Server Version 3.5 supports multiple versions of the JSP and Servlet specification. In anticipation of a migration, you might consider updating to the most recent version while still running on Version 3.5.
PlanMigration plans should be flexible. As part of the assessment, you can document risks and unknowns. Assume that additional unknowns will make themselves known during the migration process.
Any migration plan should include lots of time for testing and remediation. A common mistake is to leave time for testing but no time for fixing problems that testing may uncover.
2.3 Migration scenariosThere are many ways to configure WebSphere Application Server. For any given configuration, there can be many ways to migrate. Presented here are some high-level scenarios for migration of some common configurations. These scenarios are intended to provide the basis for your migration effort. Later chapters discuss specific details of actually effecting these scenarios.
These six scenarios represent ideal configurations. Some variation or combination of these scenarios may be necessary to match your specific requirements. Each scenario is described and then followed with a discussion of the relative merits. Your selection of an appropriate scenario should consider these merits and balance your business requirements (availability, capacity, etc.) with technical issues.
Selection of a scenario is an important step in the migration process. Before you attempt to effect any migration, however, the steps should be tested on a non-critical system (your production environment would be a very bad place to start).
38 Migrating to WebSphere V5.0: An End-to-End Migration Guide
2.3.1 Scenario 1: Single application, single server, one machine
In general, it is not possible to migrate a single server configuration without interrupting service for at least a short period of time. Applications that run on a single server tend not to have high-availability requirements; if they did, then some kind of redundancy would likely be included.
Assuming that all goes well with the migration of a single server, downtime should be at least several hours. Without introducing additional hardware, there is a danger that, in the event of error, it will be difficult to undo the migration.
The upgrade process is simple. Before any runtime migration can be attempted, the existing application must be upgraded. After the application has been thoroughly tested and has been certified ready to run on WebSphere Application Server Version 5.0, the runtime migration can begin. The application server is taken out of service, the application server software itself is updated (along with updates to other related software), the upgraded application is installed and the new setup is tested. Once testing has been completed and all problems have been remediated, the server is re-introduced.
ProsThis is a very simple upgrade path and no additional hardware required.
ConsExtended downtime may be required. A limited amount of downtime must be assumed to actually effect the migration itself. It is strongly advised that additional time be budgeted for testing and remediation.
It is difficult to back out of the migration if difficulties arise. It is possible to keep multiple versions of WebSphere Application Server installed on a single server; if the previous version is kept on the machine, it is a relatively easy task to bring it back into service. However, as part of the installation of WebSphere Application Server Version 5.0, new versions of related software may be required. It may be
Note: These scenarios represent conceptual paths through a migration process. A collection of application servers may or may not be organized into domains. Scenarios involving multiple servers make no distinction between physical and logical representations of nodes. In scenarios 4, 5, and 6, the number of servers shown in the examples is not significant; these scenarios can be expanded as required.
These scenarios apply equally to any combination of WebSphere Application Server versions (even though Versions 4.0 and 5.0 are indicated throughout).
Chapter 2. Migrating strategy and planning 39
necessary, for example, to install a different version of your HTTP server and database. Even if new versions of this software are compatible with the old version of WebSphere Application Server, additional configuration will likely be needed to bring that older version back into service.
CommentsWhile not required, consider adding additional hardware, which will add failover capability, increase capacity and make ongoing maintenance generally easier.
2.3.2 Scenario 2: Single application, single server, two machines
This scenario is very similar to scenario 1, with the exception that additional hardware is introduced. Additional hardware will dramatically reduce the amount of downtime required to effect the migration of the runtime environment.
In this scenario, a second server is acquired, WebSphere Studio Application Developer Version 5.0 (and other required software) is installed, and your application is loaded. The new server is then thoroughly tested and necessary remediation is effected. When ready, the old server is taken out of service and replaced with the new one. A common mechanism for effecting this switch is to simply swap IP addresses so that the new machine assumes the IP address (and incoming traffic) of the old machine. Since no two machines can share an IP address, the old machine must be shut down.
Depending on your network configuration, alternative solutions may be possible.
ProsIt is easy to back out an upgrade. A new server can be tested before the switch. If some unexpected problem occurs after the switch, the configuration can be switched back to the original.
A relatively small amount of down time is required. A few minutes of downtime is inescapable as one machine is taken out of service and replaced by another. Again, depending on your network configuration, other options may reduce the required downtime even further.
ConsAdditional hardware is required.
CommentsConsider keeping any new hardware that is obtained to provide failover capacity.
40 Migrating to WebSphere V5.0: An End-to-End Migration Guide
2.3.3 Scenario 3: Multiple applications on a single serverInstall WebSphere Application Server Version 5.0 on the machine so that old and new versions are running simultaneously. (See “Coexistence” on page 266 and “Example: V3.5/V4.0 and V5.0 coexistence” on page 399.) As applications are updated, they are migrated to run on the new version of WebSphere Application Server and the HTTP Server Plug-in is modified to direct traffic to the appropriate instance.
As applications are migrated, some parameters may need to be tuned. Heap size JVM arguments, for example, may be modified as part of this process. As an application is moved off the older version of WebSphere Application Server, that version will require less memory to run and the new version will require more.
ProsIt is relatively easy to back out. Should problems occur, the HTTP servers can be reconfigured to direct the traffic intended for the errant application to the older version.
ConsAdditional resources (RAM, disk, CPU) may be required to support two versions of WebSphere Application Server concurrently.
Some downtime will be required as part of the installation process. Downtime can be reduced by introducing additional hardware (similar to scenario 2).
Some downtime will be required as HTTP Server Plug-ins are reconfigured to redirect traffic.
CommentsIf the code for all applications is upgraded prior to runtime migration, see scenarios 1 and 2.
2.3.4 Scenario 4: Single application on multiple serversIn this scenario, a single application is hosted on a collection of application servers. That single application has a single context root and, by extension, a single URI (see scenarios 5 and 6 if multiple applications are deployed).
If multiple servers are in use, then there is very likely some kind of high-availability requirement. Based on this understanding, this scenario assumes that the application must remain operational during the migration process. That is, some number of application servers must always remain active.
Chapter 2. Migrating strategy and planning 41
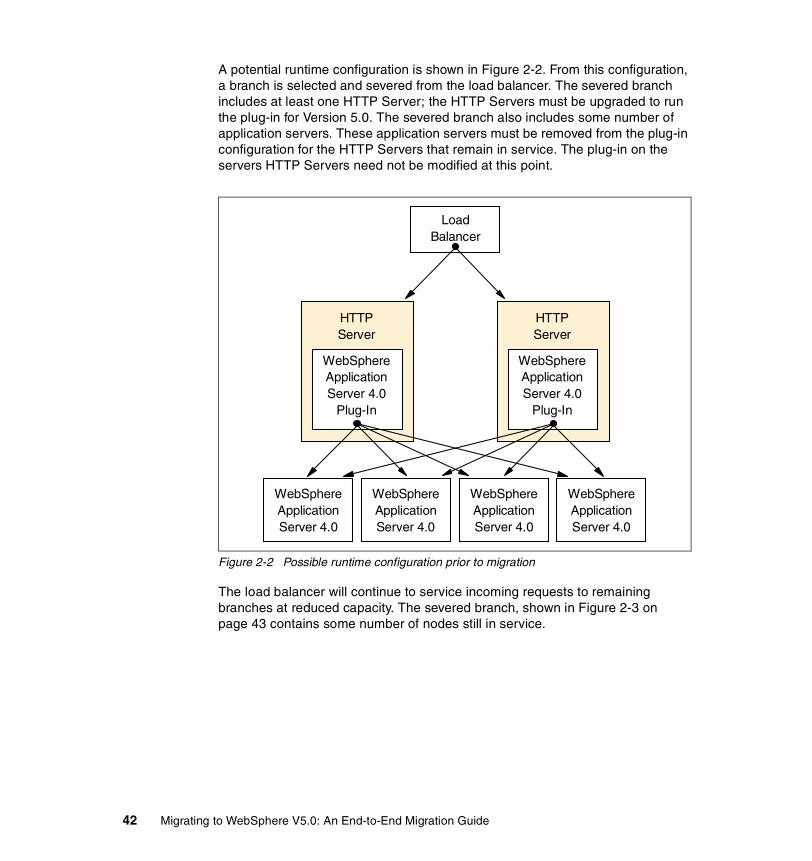
A potential runtime configuration is shown in Figure 2-2. From this configuration, a branch is selected and severed from the load balancer. The severed branch includes at least one HTTP Server; the HTTP Servers must be upgraded to run the plug-in for Version 5.0. The severed branch also includes some number of application servers. These application servers must be removed from the plug-in configuration for the HTTP Servers that remain in service. The plug-in on the servers HTTP Servers need not be modified at this point.
Figure 2-2 Possible runtime configuration prior to migration
The load balancer will continue to service incoming requests to remaining branches at reduced capacity. The severed branch, shown in Figure 2-3 on page 43 contains some number of nodes still in service.
HTTPServer
WebSphereApplicationServer 4.0
Plug-In
WebSphereApplicationServer 4.0
WebSphereApplicationServer 4.0
HTTPServer
WebSphereApplicationServer 4.0
Plug-In
WebSphereApplicationServer 4.0
WebSphereApplicationServer 4.0
LoadBalancer
42 Migrating to WebSphere V5.0: An End-to-End Migration Guide
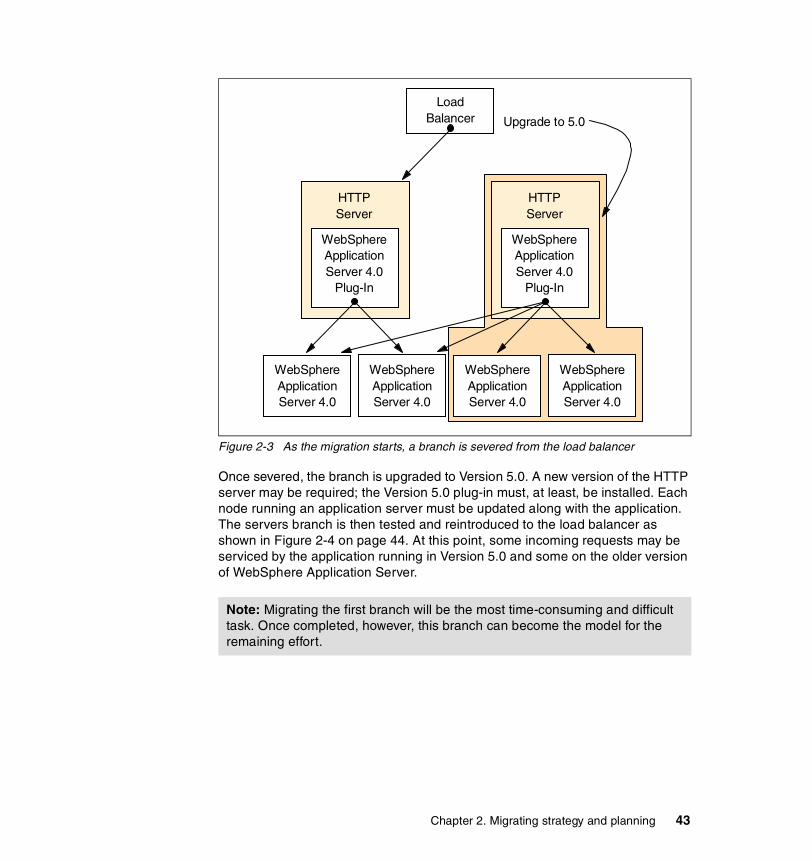
Figure 2-3 As the migration starts, a branch is severed from the load balancer
Once severed, the branch is upgraded to Version 5.0. A new version of the HTTP server may be required; the Version 5.0 plug-in must, at least, be installed. Each node running an application server must be updated along with the application. The servers branch is then tested and reintroduced to the load balancer as shown in Figure 2-4 on page 44. At this point, some incoming requests may be serviced by the application running in Version 5.0 and some on the older version of WebSphere Application Server.
Note: Migrating the first branch will be the most time-consuming and difficult task. Once completed, however, this branch can become the model for the remaining effort.
HTTPServer
WebSphereApplicationServer 4.0
Plug-In
WebSphereApplicationServer 4.0
WebSphereApplicationServer 4.0
HTTPServer
WebSphereApplicationServer 4.0
Plug-In
WebSphereApplicationServer 4.0
WebSphereApplicationServer 4.0
LoadBalancer Upgrade to 5.0
Chapter 2. Migrating strategy and planning 43
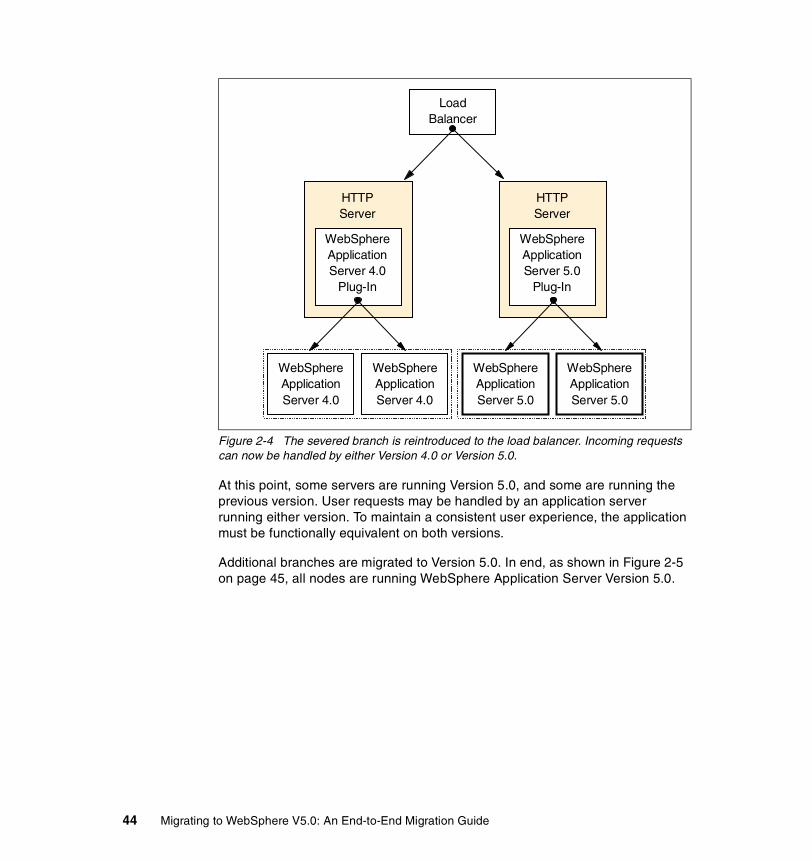
Figure 2-4 The severed branch is reintroduced to the load balancer. Incoming requests can now be handled by either Version 4.0 or Version 5.0.
At this point, some servers are running Version 5.0, and some are running the previous version. User requests may be handled by an application server running either version. To maintain a consistent user experience, the application must be functionally equivalent on both versions.
Additional branches are migrated to Version 5.0. In end, as shown in Figure 2-5 on page 45, all nodes are running WebSphere Application Server Version 5.0.
HTTPServer
WebSphereApplicationServer 4.0
Plug-In
WebSphereApplicationServer 4.0
WebSphereApplicationServer 4.0
HTTPServer
WebSphereApplicationServer 5.0
Plug-In
WebSphereApplicationServer 5.0
WebSphereApplicationServer 5.0
LoadBalancer
44 Migrating to WebSphere V5.0: An End-to-End Migration Guide
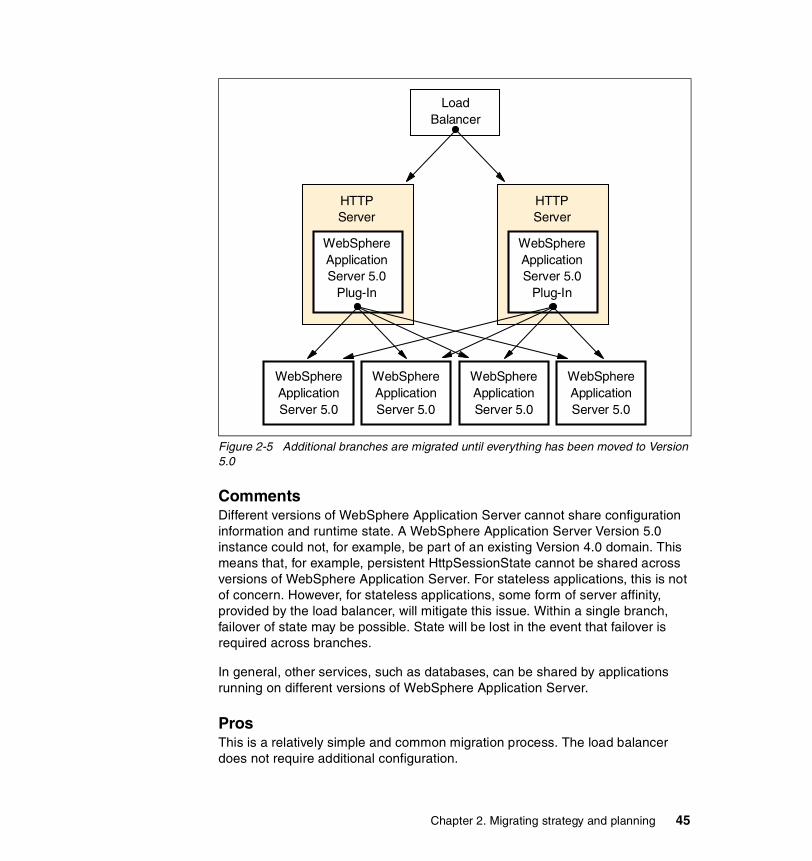
Figure 2-5 Additional branches are migrated until everything has been moved to Version 5.0
CommentsDifferent versions of WebSphere Application Server cannot share configuration information and runtime state. A WebSphere Application Server Version 5.0 instance could not, for example, be part of an existing Version 4.0 domain. This means that, for example, persistent HttpSessionState cannot be shared across versions of WebSphere Application Server. For stateless applications, this is not of concern. However, for stateless applications, some form of server affinity, provided by the load balancer, will mitigate this issue. Within a single branch, failover of state may be possible. State will be lost in the event that failover is required across branches.
In general, other services, such as databases, can be shared by applications running on different versions of WebSphere Application Server.
ProsThis is a relatively simple and common migration process. The load balancer does not require additional configuration.
HTTPServer
WebSphereApplicationServer 5.0
Plug-In
WebSphereApplicationServer 5.0
WebSphereApplicationServer 5.0
HTTPServer
WebSphereApplicationServer 5.0
Plug-In
WebSphereApplicationServer 5.0
WebSphereApplicationServer 5.0
LoadBalancer
Chapter 2. Migrating strategy and planning 45
Each component is relatively simple. Each HTTP Server is configured with exactly one WebSphere Application Server plug-in. Each physical node contains one instance of WebSphere Application Server. Fewer parts and simple configuration means that there are fewer things that can break.
ConsDepending on the number of nodes that are involved, there may be a situation where adequate failover support cannot be provided. In Figure 2-3 on page 43, a single HTTP server is left in service while the other is upgraded. Care should be taken to ensure that adequate capacity is available during the migration process. As a general rule, a minimum of three of everything is desired to support high-availability requirements.
A single large application may take time to migrate to the new platform. Application code must remain functionally equivalent on all branches to ensure a consistent user experience. If the application needs to be changed during the migration process, it must be changed (and consistently maintained). Moving forward, consider factoring a single large application into many smaller ones. Smaller applications will take less time to migrate in the future.
2.3.5 Scenario 5: Multiple applications on multiple servers (horizontal)
In this scenario, we start with a collection of application servers that host multiple applications, each with its own context root and URI. The application server instances are homogenous -- they each host the same set of applications. The applications are each migrated independently; each migrated application is ready for deployment at a different time. When the first application (app1 in this example) is ready to be deployed on Version 5.0, a portion of the servers is selected and migrated to the 5.0 runtime. The number of servers migrated depends on the capacity required by the application. In this example, the migrated application consumes half of the available capacity, so half of the available servers are migrated to the 5.0 environment to support the application.
A potential runtime configuration is shown in Figure 2-6 on page 47.
46 Migrating to WebSphere V5.0: An End-to-End Migration Guide
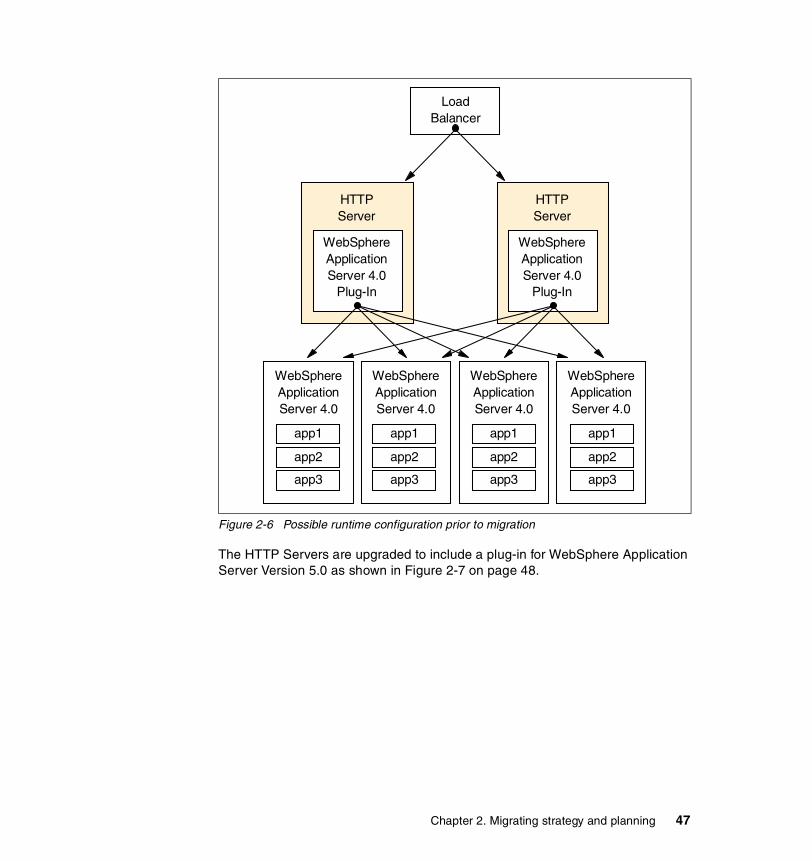
Figure 2-6 Possible runtime configuration prior to migration
The HTTP Servers are upgraded to include a plug-in for WebSphere Application Server Version 5.0 as shown in Figure 2-7 on page 48.
HTTPServer
WebSphereApplicationServer 4.0
Plug-In
WebSphereApplicationServer 4.0
WebSphereApplicationServer 4.0
HTTPServer
WebSphereApplicationServer 4.0
Plug-In
WebSphereApplicationServer 4.0
WebSphereApplicationServer 4.0
LoadBalancer
app1
app2
app3
app1
app2
app3
app1
app2
app3
app1
app2
app3
Chapter 2. Migrating strategy and planning 47
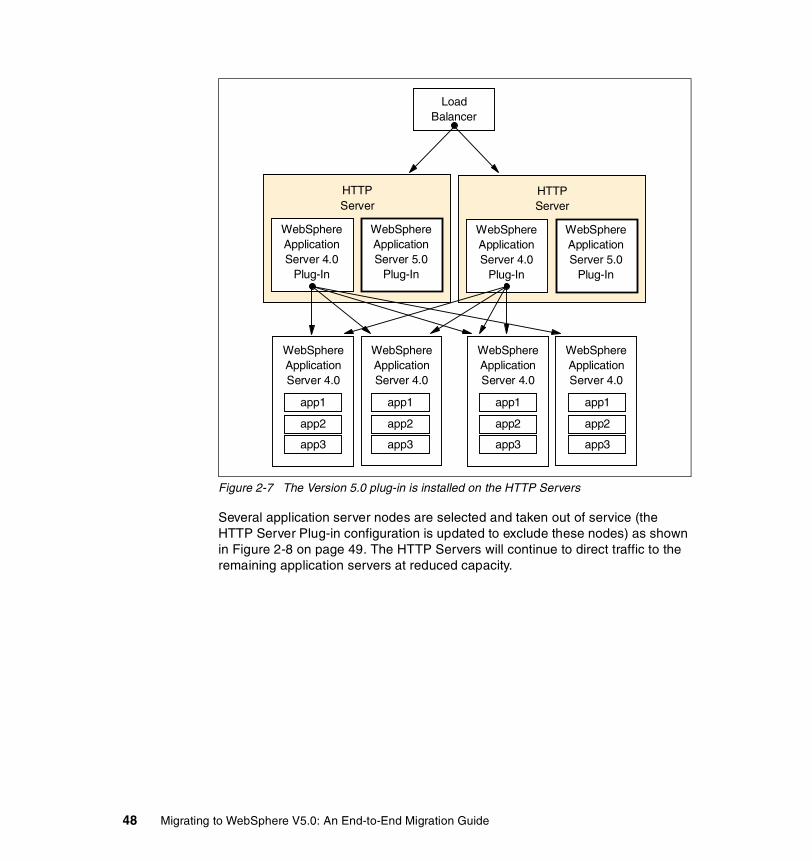
Figure 2-7 The Version 5.0 plug-in is installed on the HTTP Servers
Several application server nodes are selected and taken out of service (the HTTP Server Plug-in configuration is updated to exclude these nodes) as shown in Figure 2-8 on page 49. The HTTP Servers will continue to direct traffic to the remaining application servers at reduced capacity.
HTTPServer
WebSphereApplicationServer 4.0
WebSphereApplicationServer 4.0
WebSphereApplicationServer 4.0
Plug-In
LoadBalancer
app1
app2
app3
app1
app2
app3
WebSphereApplicationServer 4.0
WebSphereApplicationServer 4.0
app1
app2
app3
app1
app2
app3
WebSphereApplicationServer 5.0
Plug-In
HTTPServer
WebSphereApplicationServer 4.0
Plug-In
WebSphereApplicationServer 5.0
Plug-In
48 Migrating to WebSphere V5.0: An End-to-End Migration Guide
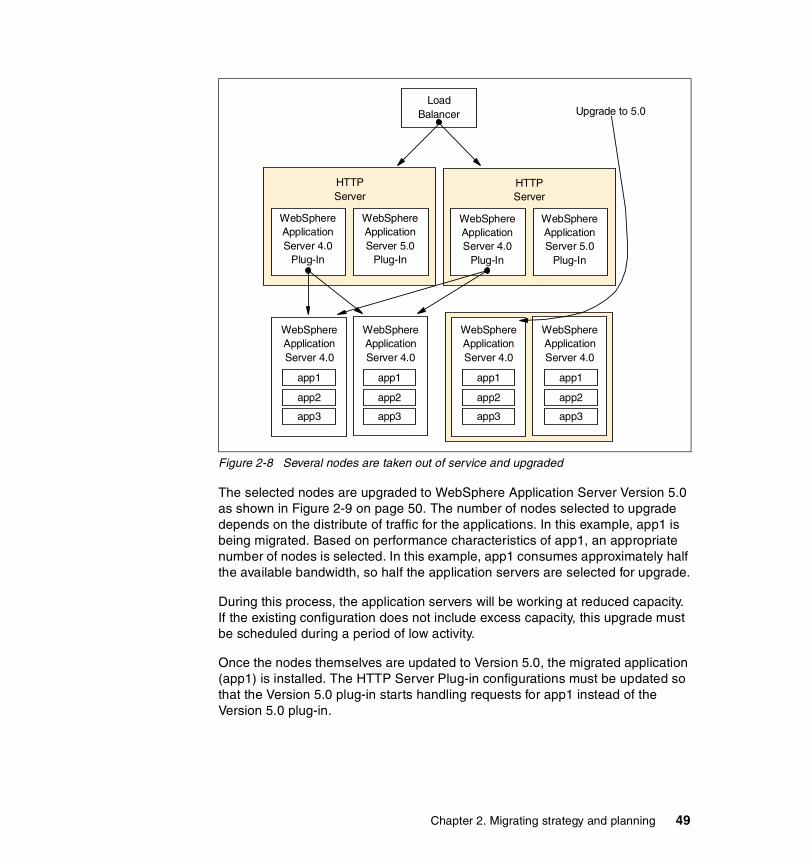
Figure 2-8 Several nodes are taken out of service and upgraded
The selected nodes are upgraded to WebSphere Application Server Version 5.0 as shown in Figure 2-9 on page 50. The number of nodes selected to upgrade depends on the distribute of traffic for the applications. In this example, app1 is being migrated. Based on performance characteristics of app1, an appropriate number of nodes is selected. In this example, app1 consumes approximately half the available bandwidth, so half the application servers are selected for upgrade.
During this process, the application servers will be working at reduced capacity. If the existing configuration does not include excess capacity, this upgrade must be scheduled during a period of low activity.
Once the nodes themselves are updated to Version 5.0, the migrated application (app1) is installed. The HTTP Server Plug-in configurations must be updated so that the Version 5.0 plug-in starts handling requests for app1 instead of the Version 5.0 plug-in.
HTTPServer
WebSphereApplicationServer 4.0
WebSphereApplicationServer 4.0
WebSphereApplicationServer 4.0
Plug-In
LoadBalancer
app1
app2
app3
app1
app2
app3
WebSphereApplicationServer 4.0
WebSphereApplicationServer 4.0
app1
app2
app3
app1
app2
app3
WebSphereApplicationServer 5.0
Plug-In
HTTPServer
WebSphereApplicationServer 4.0
Plug-In
WebSphereApplicationServer 5.0
Plug-In
Upgrade to 5.0
Chapter 2. Migrating strategy and planning 49
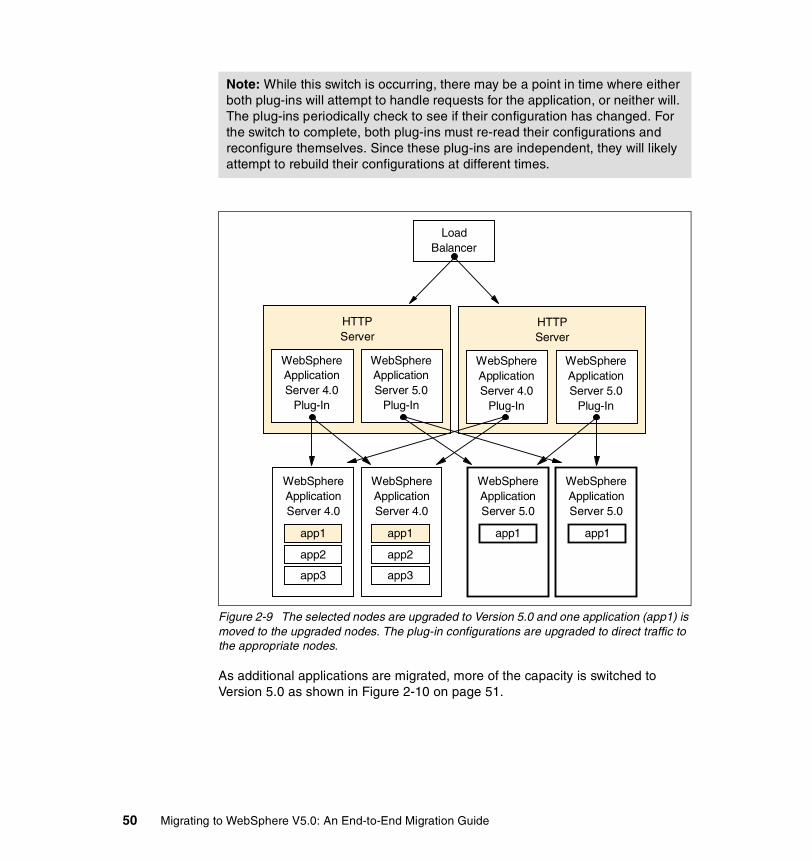
Figure 2-9 The selected nodes are upgraded to Version 5.0 and one application (app1) is moved to the upgraded nodes. The plug-in configurations are upgraded to direct traffic to the appropriate nodes.
As additional applications are migrated, more of the capacity is switched to Version 5.0 as shown in Figure 2-10 on page 51.
Note: While this switch is occurring, there may be a point in time where either both plug-ins will attempt to handle requests for the application, or neither will. The plug-ins periodically check to see if their configuration has changed. For the switch to complete, both plug-ins must re-read their configurations and reconfigure themselves. Since these plug-ins are independent, they will likely attempt to rebuild their configurations at different times.
HTTPServer
WebSphereApplicationServer 4.0
WebSphereApplicationServer 4.0
WebSphereApplicationServer 4.0
Plug-In
LoadBalancer
app1
app2
app3
app1
app2
app3
WebSphereApplicationServer 5.0
WebSphereApplicationServer 5.0
app1 app1
WebSphereApplicationServer 5.0
Plug-In
HTTPServer
WebSphereApplicationServer 4.0
Plug-In
WebSphereApplicationServer 5.0
Plug-In
50 Migrating to WebSphere V5.0: An End-to-End Migration Guide
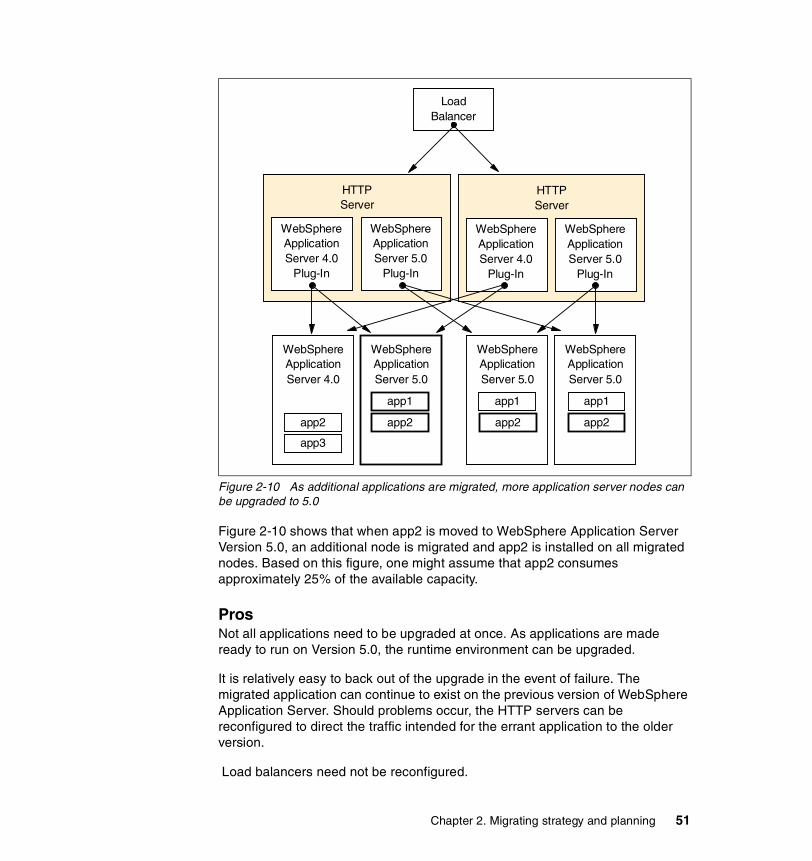
Figure 2-10 As additional applications are migrated, more application server nodes can be upgraded to 5.0
Figure 2-10 shows that when app2 is moved to WebSphere Application Server Version 5.0, an additional node is migrated and app2 is installed on all migrated nodes. Based on this figure, one might assume that app2 consumes approximately 25% of the available capacity.
ProsNot all applications need to be upgraded at once. As applications are made ready to run on Version 5.0, the runtime environment can be upgraded.
It is relatively easy to back out of the upgrade in the event of failure. The migrated application can continue to exist on the previous version of WebSphere Application Server. Should problems occur, the HTTP servers can be reconfigured to direct the traffic intended for the errant application to the older version.
Load balancers need not be reconfigured.
HTTPServer
WebSphereApplicationServer 4.0
WebSphereApplicationServer 5.0
WebSphereApplicationServer 4.0
Plug-In
LoadBalancer
app2
app3
app1
app2
WebSphereApplicationServer 5.0
WebSphereApplicationServer 5.0
app1 app1
WebSphereApplicationServer 5.0
Plug-In
HTTPServer
WebSphereApplicationServer 4.0
Plug-In
WebSphereApplicationServer 5.0
Plug-In
app2app2
Chapter 2. Migrating strategy and planning 51

ConsMultiple applications running on a single server permits the applications to share capacity. As servers are taken off the previous version of WebSphere Application Server and converted to Version 5.0, the applications that run on those servers will not be able to share capacity with servers still running Version 4.0. This is particularly true for the first and last applications to migrate.
It may also be the case where the first (or last) applications require a relatively small number of servers; if a small number (for example, one) of servers is migrated to Version 5.0 to support a single small application, additional hardware may be required to provide failover support. Figure 2-10 on page 51 shows a case where a single node is running a previous version of WebSphere Application Server; in this case, that server becomes a single point of failure. To provide more reliable service, additional hardware may be required until that final application is migrated.
There are no automatic mechanisms for sharing information across different versions of WebSphere.
2.3.6 Scenario 6: Multiple applications on multiple servers (vertical)
In this scenario two versions of WebSphere Application Server are installed on each machine.
A possible initial configuration is shown in Figure 2-11 on page 53.
52 Migrating to WebSphere V5.0: An End-to-End Migration Guide
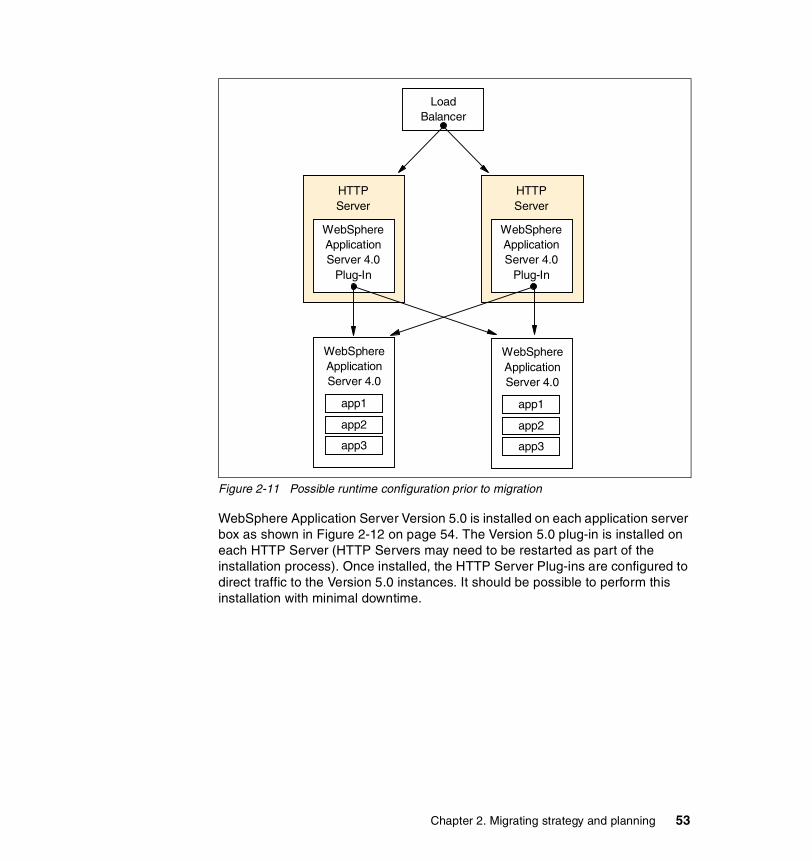
Figure 2-11 Possible runtime configuration prior to migration
WebSphere Application Server Version 5.0 is installed on each application server box as shown in Figure 2-12 on page 54. The Version 5.0 plug-in is installed on each HTTP Server (HTTP Servers may need to be restarted as part of the installation process). Once installed, the HTTP Server Plug-ins are configured to direct traffic to the Version 5.0 instances. It should be possible to perform this installation with minimal downtime.
HTTPServer
WebSphereApplicationServer 4.0
Plug-In
HTTPServer
WebSphereApplicationServer 4.0
Plug-In
LoadBalancer
WebSphereApplicationServer 4.0
app1
app2
app3
WebSphereApplicationServer 4.0
app1
app2
app3
Chapter 2. Migrating strategy and planning 53
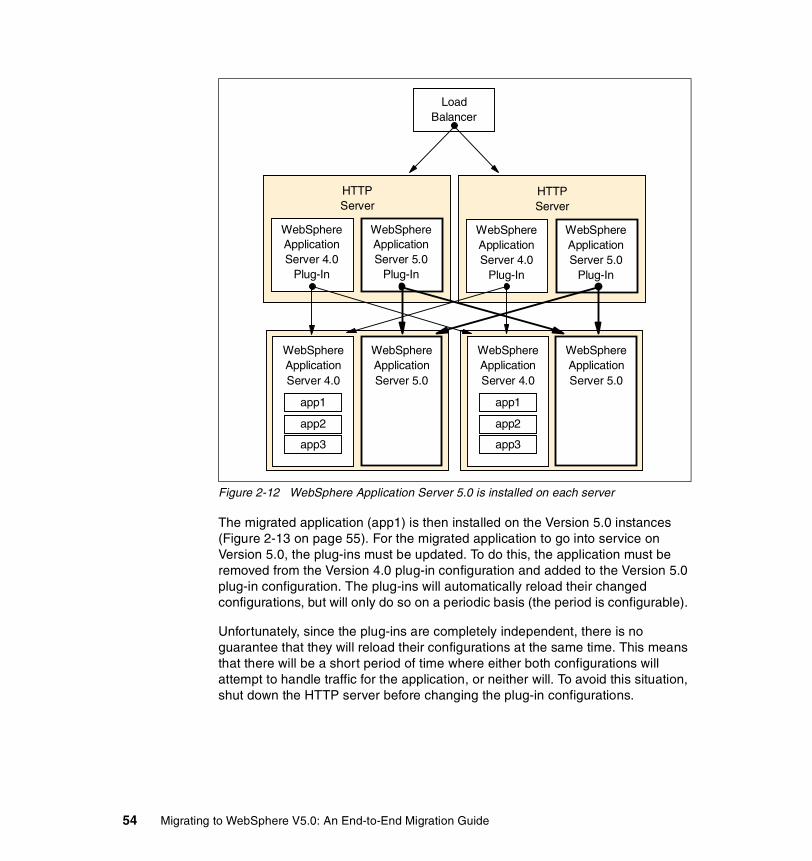
Figure 2-12 WebSphere Application Server 5.0 is installed on each server
The migrated application (app1) is then installed on the Version 5.0 instances (Figure 2-13 on page 55). For the migrated application to go into service on Version 5.0, the plug-ins must be updated. To do this, the application must be removed from the Version 4.0 plug-in configuration and added to the Version 5.0 plug-in configuration. The plug-ins will automatically reload their changed configurations, but will only do so on a periodic basis (the period is configurable).
Unfortunately, since the plug-ins are completely independent, there is no guarantee that they will reload their configurations at the same time. This means that there will be a short period of time where either both configurations will attempt to handle traffic for the application, or neither will. To avoid this situation, shut down the HTTP server before changing the plug-in configurations.
HTTPServer
WebSphereApplicationServer 4.0
WebSphereApplicationServer 5.0
WebSphereApplicationServer 4.0
Plug-In
LoadBalancer
app1
app2
app3
WebSphereApplicationServer 4.0
WebSphereApplicationServer 5.0
app1
app2
app3
WebSphereApplicationServer 5.0
Plug-In
HTTPServer
WebSphereApplicationServer 4.0
Plug-In
WebSphereApplicationServer 5.0
Plug-In
54 Migrating to WebSphere V5.0: An End-to-End Migration Guide

Figure 2-13 Migrated applications are moved from previous version of WebSphere Application Server to Version 5.0
As additional applications are migrated, the process can be repeated as shown in Figure 2-14 on page 56.
HTTPServer
WebSphereApplicationServer 4.0
WebSphereApplicationServer 5.0
WebSphereApplicationServer 4.0
Plug-In
LoadBalancer
WebSphereApplicationServer 4.0
WebSphereApplicationServer 5.0
WebSphereApplicationServer 5.0
Plug-In
HTTPServer
WebSphereApplicationServer 4.0
Plug-In
WebSphereApplicationServer 5.0
Plug-In
app2
app3
app1app1
app2
app3
app1app1
Chapter 2. Migrating strategy and planning 55
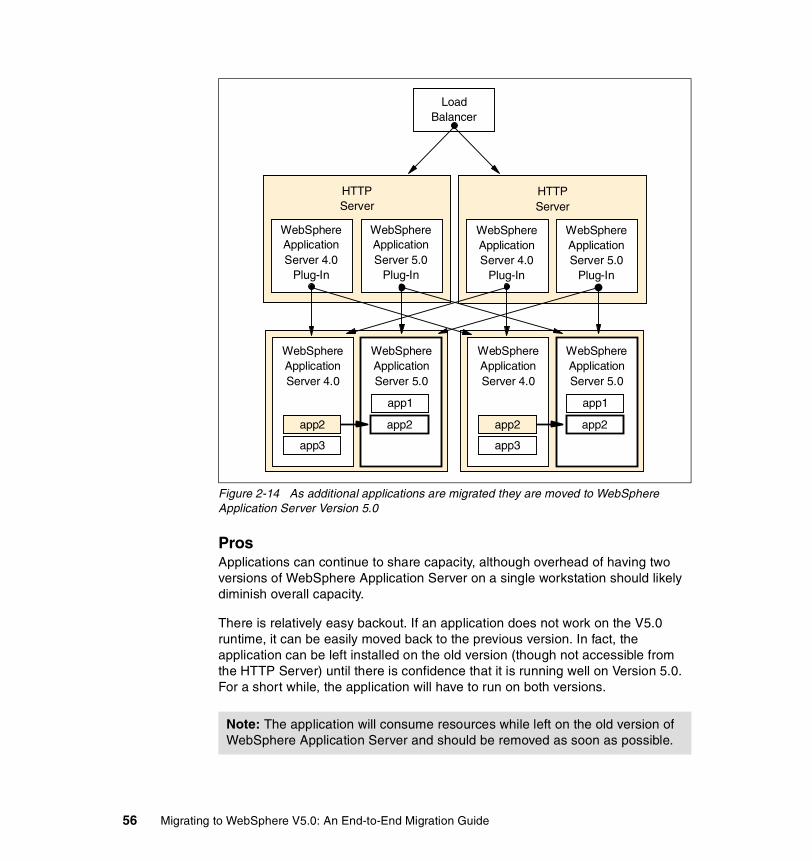
Figure 2-14 As additional applications are migrated they are moved to WebSphere Application Server Version 5.0
ProsApplications can continue to share capacity, although overhead of having two versions of WebSphere Application Server on a single workstation should likely diminish overall capacity.
There is relatively easy backout. If an application does not work on the V5.0 runtime, it can be easily moved back to the previous version. In fact, the application can be left installed on the old version (though not accessible from the HTTP Server) until there is confidence that it is running well on Version 5.0. For a short while, the application will have to run on both versions.
Note: The application will consume resources while left on the old version of WebSphere Application Server and should be removed as soon as possible.
HTTPServer
WebSphereApplicationServer 4.0
WebSphereApplicationServer 5.0
WebSphereApplicationServer 4.0
Plug-In
LoadBalancer
WebSphereApplicationServer 4.0
WebSphereApplicationServer 5.0
WebSphereApplicationServer 5.0
Plug-In
HTTPServer
WebSphereApplicationServer 4.0
Plug-In
WebSphereApplicationServer 5.0
Plug-In
app3
app1
app2app2
app3
app1
app2app2
56 Migrating to WebSphere V5.0: An End-to-End Migration Guide

ConsThis scenario may require additional resources (CPU, RAM, disk) to mitigate the effects of reduced capacity due to multiple installed versions of WebSphere Application Server. Before moving forward with this scenario, it should be thoroughly tested on system test hardware to confirm that adequate resources are available.
Care must be taken to avoid conflicts between the two versions running concurrently. Ports, for example, cannot be shared by both versions.
2.3.7 Multiple tiersMultiple tiers can be migrated simultaneously or, in some cases, separately. Interoperability options exist that permit application servers to communicate between versions using HTTP and IIOP protocols (other protocols may function as well). The two scenarios presented here can be used in parallel or in addition to the scenarios previously discussed.
HTTP is a stateless, stable communication protocol. If HTTP is used to communicate between tiers (perhaps in conjunction with SOAP), migration of individual tiers can be relatively easy. To ensure that independent migration is possible, the application should not change the way it communicates when it is upgraded to Version 5.0.
Figure 2-15 on page 58 shows a possible configuration using HTTP as a communication mechanism between tiers. A load balancer is introduced between the tiers to distribute traffic across the application servers in the business logic tier (WebSphere does not provide any automatic distribution of HTTP requests as it does with IIOP).
Chapter 2. Migrating strategy and planning 57
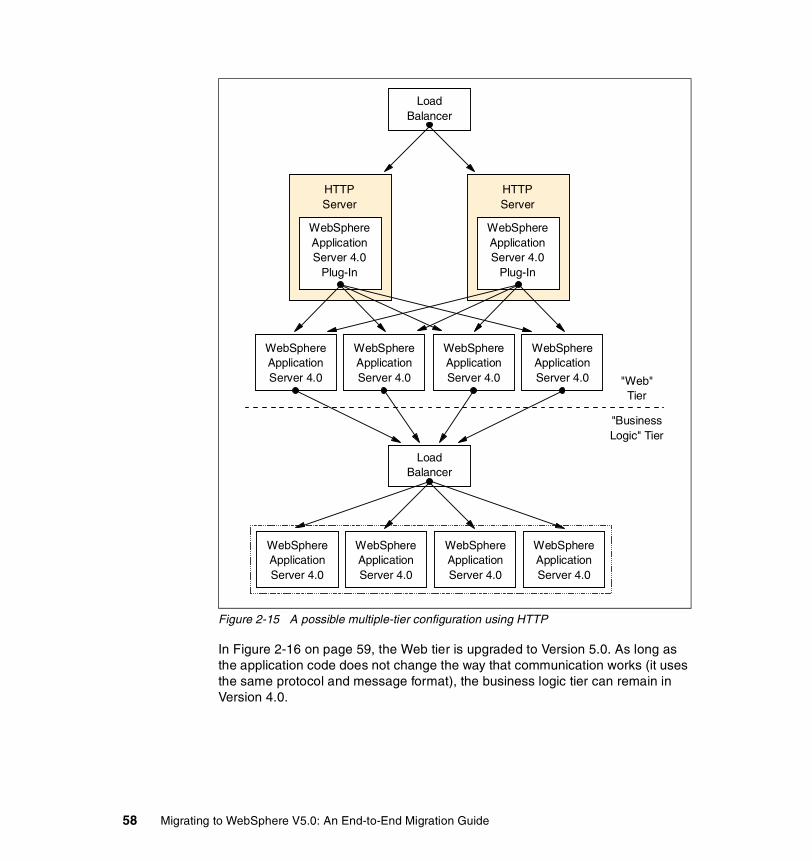
Figure 2-15 A possible multiple-tier configuration using HTTP
In Figure 2-16 on page 59, the Web tier is upgraded to Version 5.0. As long as the application code does not change the way that communication works (it uses the same protocol and message format), the business logic tier can remain in Version 4.0.
HTTPServer
WebSphereApplicationServer 4.0
Plug-In
HTTPServer
WebSphereApplicationServer 4.0
Plug-In
LoadBalancer
WebSphereApplicationServer 4.0
WebSphereApplicationServer 4.0
WebSphereApplicationServer 4.0
WebSphereApplicationServer 4.0
LoadBalancer
WebSphereApplicationServer 4.0
WebSphereApplicationServer 4.0
WebSphereApplicationServer 4.0
WebSphereApplicationServer 4.0
"Web"Tier
"BusinessLogic" Tier
58 Migrating to WebSphere V5.0: An End-to-End Migration Guide
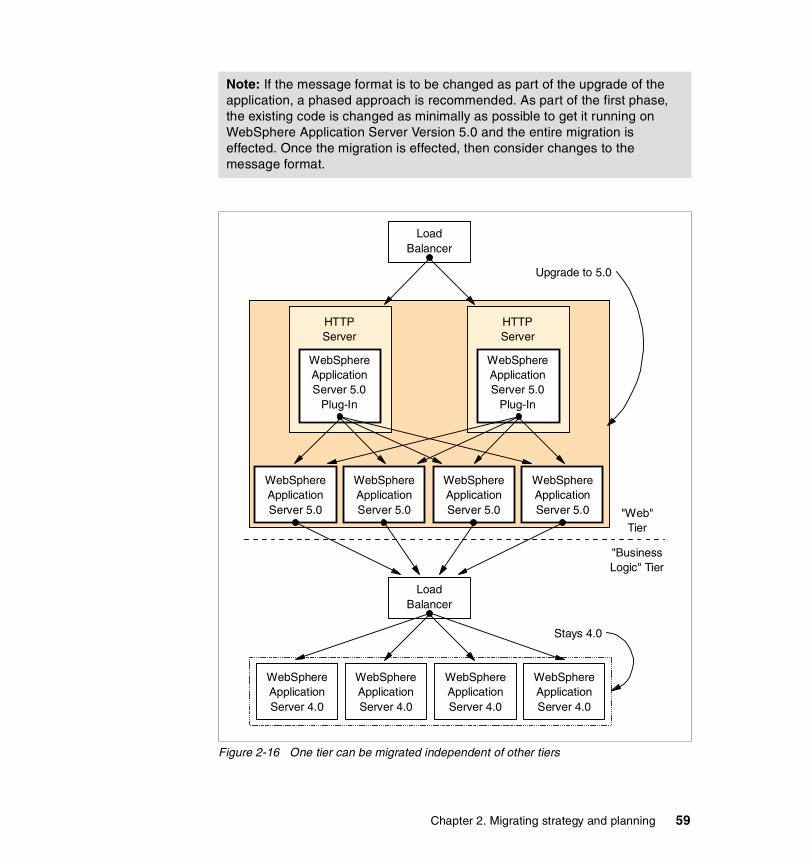
Figure 2-16 One tier can be migrated independent of other tiers
Note: If the message format is to be changed as part of the upgrade of the application, a phased approach is recommended. As part of the first phase, the existing code is changed as minimally as possible to get it running on WebSphere Application Server Version 5.0 and the entire migration is effected. Once the migration is effected, then consider changes to the message format.
HTTPServer
WebSphereApplicationServer 5.0
Plug-In
HTTPServer
WebSphereApplicationServer 5.0
Plug-In
LoadBalancer
WebSphereApplicationServer 5.0
WebSphereApplicationServer 5.0
WebSphereApplicationServer 5.0
WebSphereApplicationServer 5.0
LoadBalancer
WebSphereApplicationServer 4.0
WebSphereApplicationServer 4.0
WebSphereApplicationServer 4.0
WebSphereApplicationServer 4.0
"Web"Tier
"BusinessLogic" Tier
Upgrade to 5.0
Stays 4.0
Chapter 2. Migrating strategy and planning 59

With the Web tier migrated, the business logic tier can be considered. As shown in Figure 2-17 on page 61, the business logic tier can be migrated using an appropriate migration scenario (in this case, scenario 4). It is possible for a single load balancer to distribute HTTP traffic across application servers running different versions of WebSphere Application Server.
It is not strictly required that one tier migration be completely effected before another is started. However, by considering the tiers separately -- reducing the number of variables -- the risk is mitigated.
60 Migrating to WebSphere V5.0: An End-to-End Migration Guide
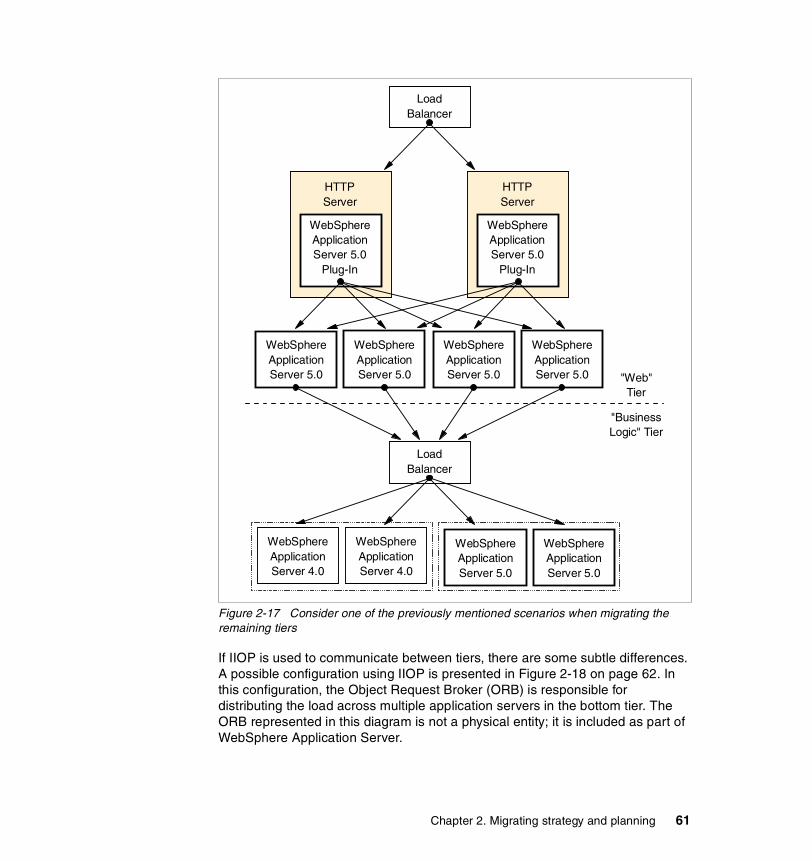
Figure 2-17 Consider one of the previously mentioned scenarios when migrating the remaining tiers
If IIOP is used to communicate between tiers, there are some subtle differences. A possible configuration using IIOP is presented in Figure 2-18 on page 62. In this configuration, the Object Request Broker (ORB) is responsible for distributing the load across multiple application servers in the bottom tier. The ORB represented in this diagram is not a physical entity; it is included as part of WebSphere Application Server.
HTTPServer
WebSphereApplicationServer 5.0
Plug-In
HTTPServer
WebSphereApplicationServer 5.0
Plug-In
LoadBalancer
WebSphereApplicationServer 5.0
WebSphereApplicationServer 5.0
WebSphereApplicationServer 5.0
WebSphereApplicationServer 5.0
LoadBalancer
WebSphereApplicationServer 4.0
WebSphereApplicationServer 4.0
WebSphereApplicationServer 5.0
WebSphereApplicationServer 5.0
"Web"Tier
"BusinessLogic" Tier
Chapter 2. Migrating strategy and planning 61
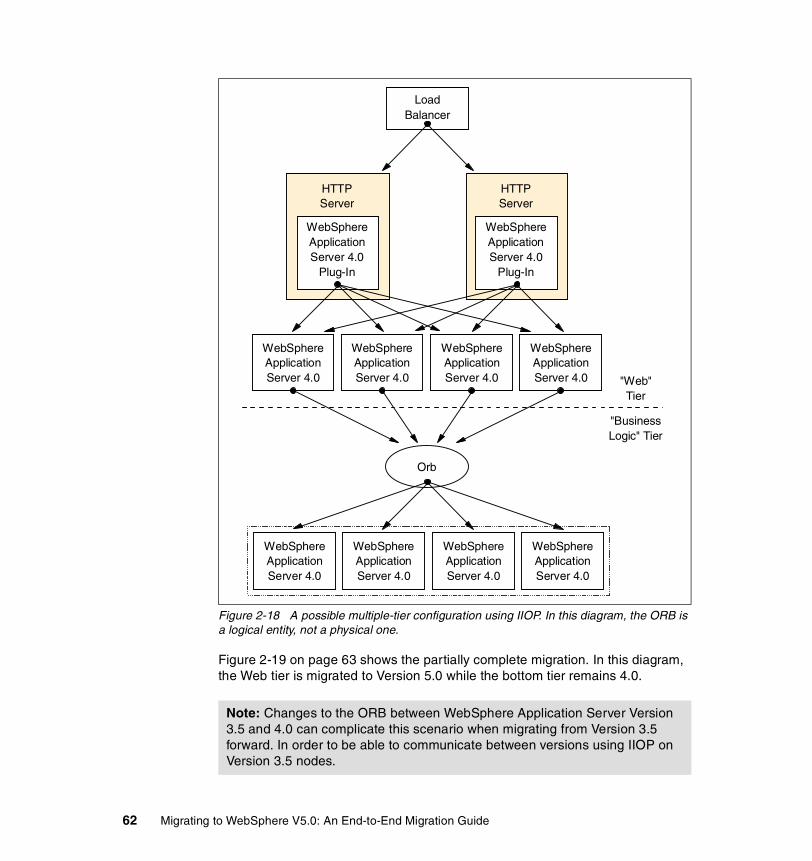
Figure 2-18 A possible multiple-tier configuration using IIOP. In this diagram, the ORB is a logical entity, not a physical one.
Figure 2-19 on page 63 shows the partially complete migration. In this diagram, the Web tier is migrated to Version 5.0 while the bottom tier remains 4.0.
Note: Changes to the ORB between WebSphere Application Server Version 3.5 and 4.0 can complicate this scenario when migrating from Version 3.5 forward. In order to be able to communicate between versions using IIOP on Version 3.5 nodes.
Orb
HTTPServer
WebSphereApplicationServer 4.0
Plug-In
HTTPServer
WebSphereApplicationServer 4.0
Plug-In
LoadBalancer
WebSphereApplicationServer 4.0
WebSphereApplicationServer 4.0
WebSphereApplicationServer 4.0
WebSphereApplicationServer 4.0 "Web"
Tier
"BusinessLogic" Tier
WebSphereApplicationServer 4.0
WebSphereApplicationServer 4.0
WebSphereApplicationServer 4.0
WebSphereApplicationServer 4.0
62 Migrating to WebSphere V5.0: An End-to-End Migration Guide
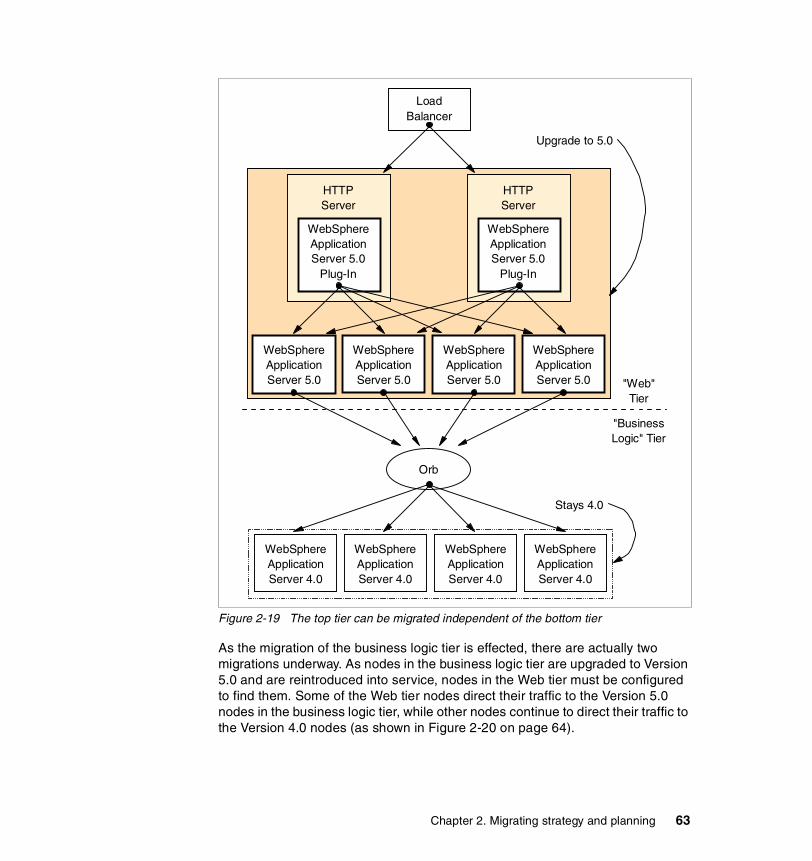
Figure 2-19 The top tier can be migrated independent of the bottom tier
As the migration of the business logic tier is effected, there are actually two migrations underway. As nodes in the business logic tier are upgraded to Version 5.0 and are reintroduced into service, nodes in the Web tier must be configured to find them. Some of the Web tier nodes direct their traffic to the Version 5.0 nodes in the business logic tier, while other nodes continue to direct their traffic to the Version 4.0 nodes (as shown in Figure 2-20 on page 64).
Upgrade to 5.0
Orb
HTTPServer
WebSphereApplicationServer 5.0
Plug-In
HTTPServer
WebSphereApplicationServer 5.0
Plug-In
LoadBalancer
WebSphereApplicationServer 5.0
WebSphereApplicationServer 5.0
WebSphereApplicationServer 5.0
WebSphereApplicationServer 5.0 "Web"
Tier
"BusinessLogic" Tier
WebSphereApplicationServer 4.0
WebSphereApplicationServer 4.0
WebSphereApplicationServer 4.0
WebSphereApplicationServer 4.0
Stays 4.0
Chapter 2. Migrating strategy and planning 63
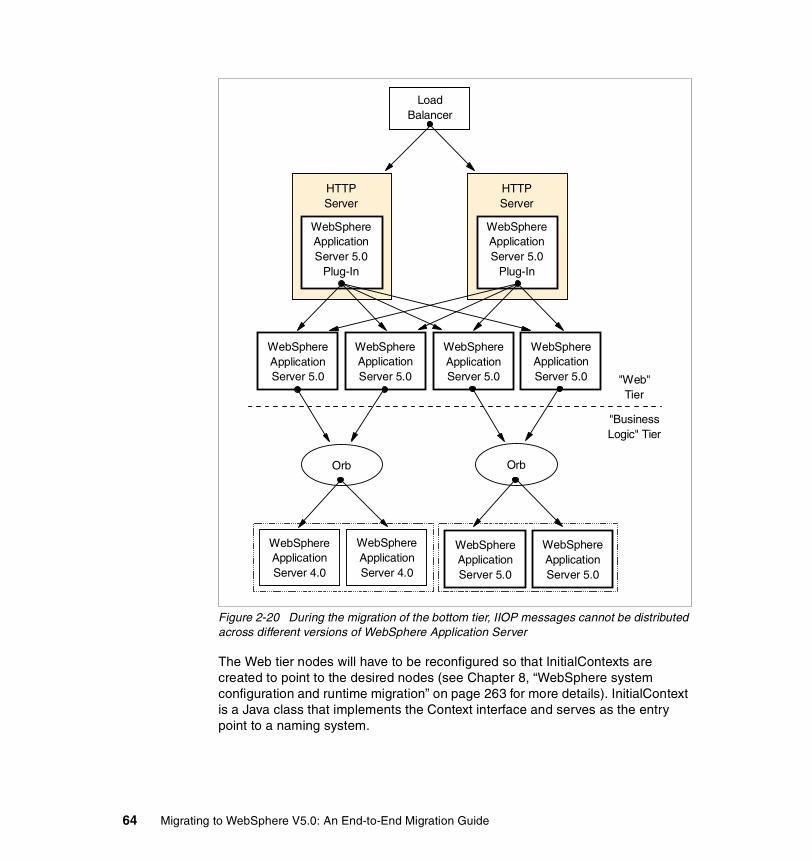
Figure 2-20 During the migration of the bottom tier, IIOP messages cannot be distributed across different versions of WebSphere Application Server
The Web tier nodes will have to be reconfigured so that InitialContexts are created to point to the desired nodes (see Chapter 8, “WebSphere system configuration and runtime migration” on page 263 for more details). InitialContext is a Java class that implements the Context interface and serves as the entry point to a naming system.
Orb
HTTPServer
WebSphereApplicationServer 5.0
Plug-In
HTTPServer
WebSphereApplicationServer 5.0
Plug-In
LoadBalancer
WebSphereApplicationServer 5.0
WebSphereApplicationServer 5.0
WebSphereApplicationServer 5.0
WebSphereApplicationServer 5.0 "Web"
Tier
"BusinessLogic" Tier
WebSphereApplicationServer 4.0
WebSphereApplicationServer 4.0
WebSphereApplicationServer 5.0
WebSphereApplicationServer 5.0
Orb
64 Migrating to WebSphere V5.0: An End-to-End Migration Guide
2.4 Migrating from Version 3.5 to 5.0Migration from WebSphere Application Server Version 3.5 to Version 5.0 involves a number of changes. VisualAge for Java is replaced by WebSphere Studio Application Developer, which will likely have a large impact on your development environment and many of your existing practices. The administration model is changed with Version 5.0, as is the way that you interact with the application server. At the root of many of these changes is the evolution of the J2EE specification.
In general, the development environment must be migrated first. Moving code from VisualAge for Java into WebSphere Studio will very likely be a time-consuming process.
2.4.1 Development environmentWebSphere Application Server Version 4.0 introduced an entirely new development environment. WebSphere Studio Application Developer (“Studio”, or “WebSphere Studio” for short) is the development tool of choice for application development on WebSphere Application Server Version 4.0 and beyond.
For established VisualAge for Java developers, the changes will take some time to assimilate. The VisualAge for Java team repository concept is replaced by support for third-party source code management tools. The browser-based paradigm of VisualAge is replaced with a file-based paradigm. In VisualAge for Java, code is managed as collection of projects, packages, types, and methods. With Studio, everything is a file.
2.4.2 Code organizationWebSphere Application Server Version 3.5 and VisualAge for Java predate J2EE 1.2. One of the major inclusions with that version of J2EE was the standardized packaging concept. Prior to J2EE 1.2, proprietary solutions were standard.
VisualAge for Java projects can hold every part of an application, including EJBs, Servlets, and Java classes (an example of such a project is shown in Figure 2-21 on page 66). These projects can be packaged up and deployed on WebSphere Application Server Version 3.5 as a single JAR file.
Chapter 2. Migrating strategy and planning 65
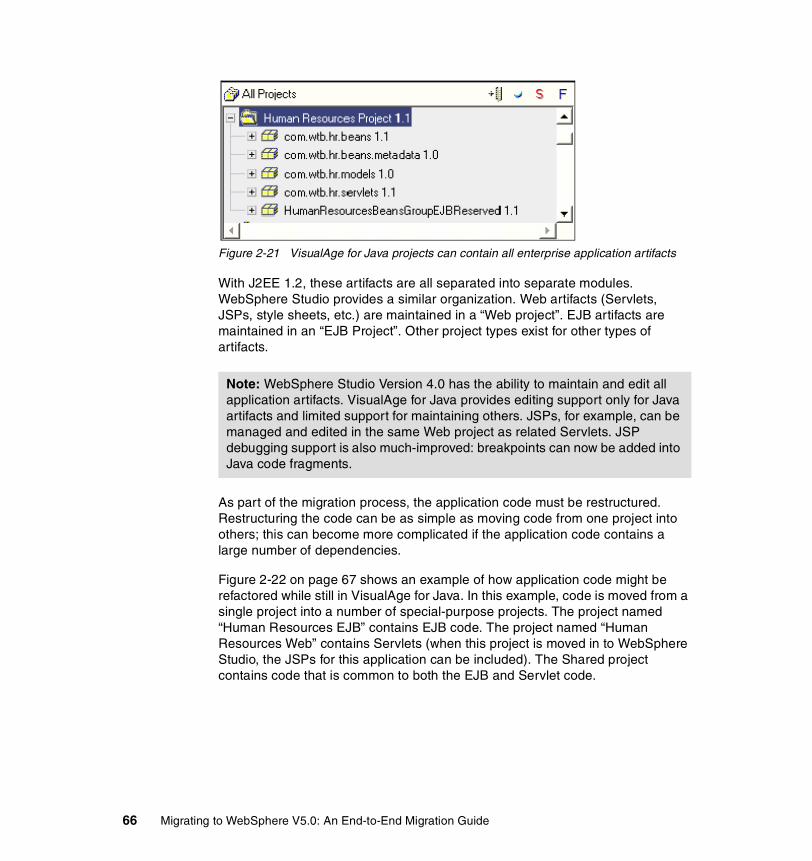
Figure 2-21 VisualAge for Java projects can contain all enterprise application artifacts
With J2EE 1.2, these artifacts are all separated into separate modules. WebSphere Studio provides a similar organization. Web artifacts (Servlets, JSPs, style sheets, etc.) are maintained in a “Web project”. EJB artifacts are maintained in an “EJB Project”. Other project types exist for other types of artifacts.
As part of the migration process, the application code must be restructured. Restructuring the code can be as simple as moving code from one project into others; this can become more complicated if the application code contains a large number of dependencies.
Figure 2-22 on page 67 shows an example of how application code might be refactored while still in VisualAge for Java. In this example, code is moved from a single project into a number of special-purpose projects. The project named “Human Resources EJB” contains EJB code. The project named “Human Resources Web” contains Servlets (when this project is moved in to WebSphere Studio, the JSPs for this application can be included). The Shared project contains code that is common to both the EJB and Servlet code.
Note: WebSphere Studio Version 4.0 has the ability to maintain and edit all application artifacts. VisualAge for Java provides editing support only for Java artifacts and limited support for maintaining others. JSPs, for example, can be managed and edited in the same Web project as related Servlets. JSP debugging support is also much-improved: breakpoints can now be added into Java code fragments.
66 Migrating to WebSphere V5.0: An End-to-End Migration Guide
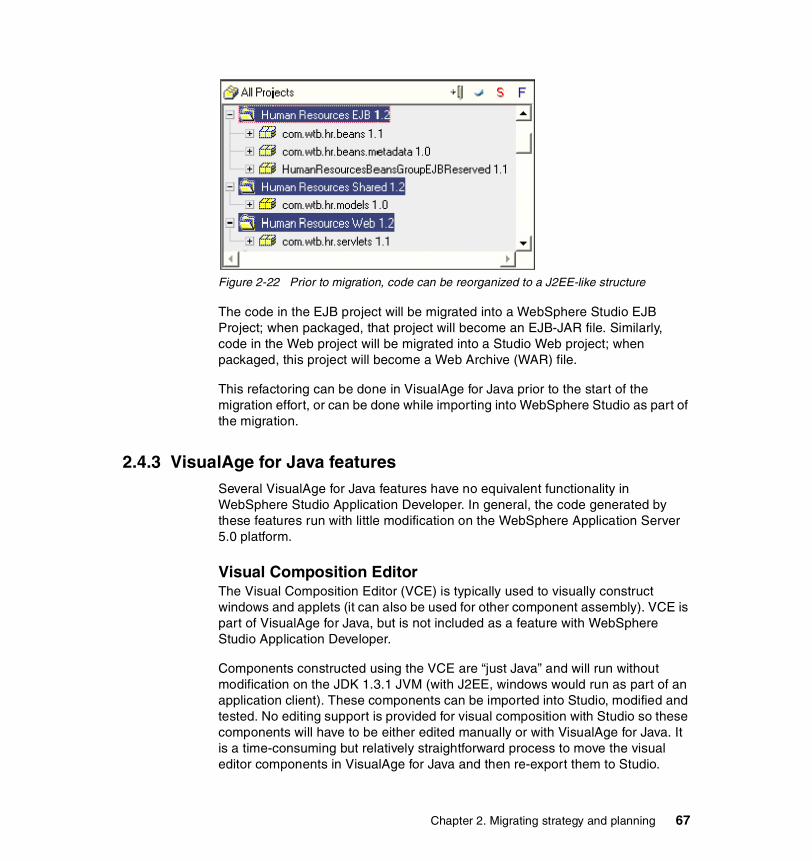
Figure 2-22 Prior to migration, code can be reorganized to a J2EE-like structure
The code in the EJB project will be migrated into a WebSphere Studio EJB Project; when packaged, that project will become an EJB-JAR file. Similarly, code in the Web project will be migrated into a Studio Web project; when packaged, this project will become a Web Archive (WAR) file.
This refactoring can be done in VisualAge for Java prior to the start of the migration effort, or can be done while importing into WebSphere Studio as part of the migration.
2.4.3 VisualAge for Java featuresSeveral VisualAge for Java features have no equivalent functionality in WebSphere Studio Application Developer. In general, the code generated by these features run with little modification on the WebSphere Application Server 5.0 platform.
Visual Composition EditorThe Visual Composition Editor (VCE) is typically used to visually construct windows and applets (it can also be used for other component assembly). VCE is part of VisualAge for Java, but is not included as a feature with WebSphere Studio Application Developer.
Components constructed using the VCE are “just Java” and will run without modification on the JDK 1.3.1 JVM (with J2EE, windows would run as part of an application client). These components can be imported into Studio, modified and tested. No editing support is provided for visual composition with Studio so these components will have to be either edited manually or with VisualAge for Java. It is a time-consuming but relatively straightforward process to move the visual editor components in VisualAge for Java and then re-export them to Studio.
Chapter 2. Migrating strategy and planning 67
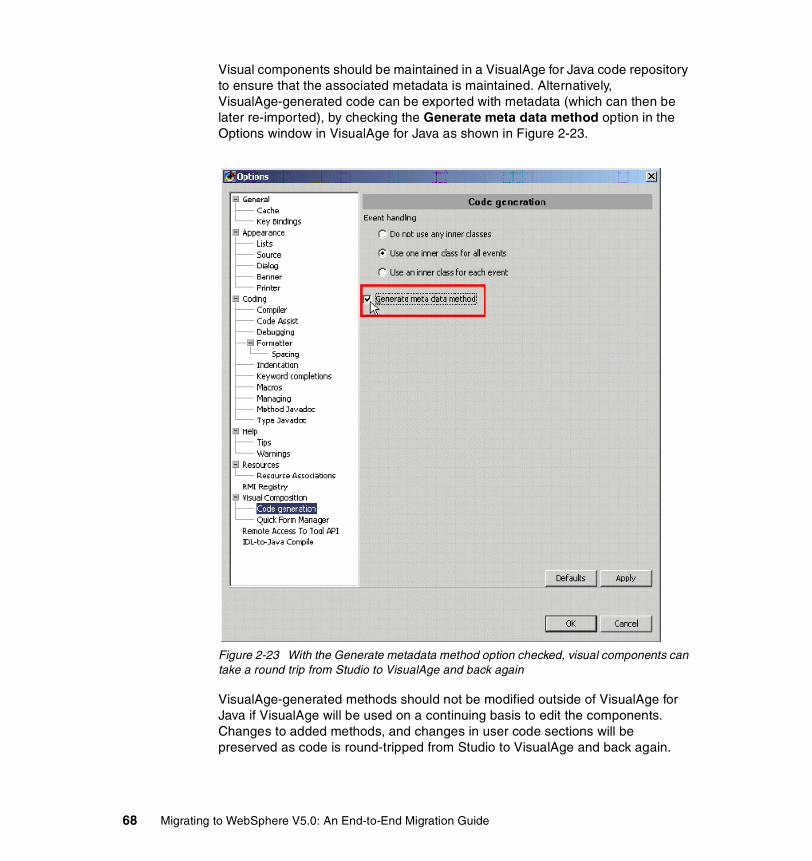
Visual components should be maintained in a VisualAge for Java code repository to ensure that the associated metadata is maintained. Alternatively, VisualAge-generated code can be exported with metadata (which can then be later re-imported), by checking the Generate meta data method option in the Options window in VisualAge for Java as shown in Figure 2-23.
Figure 2-23 With the Generate metadata method option checked, visual components can take a round trip from Studio to VisualAge and back again
VisualAge-generated methods should not be modified outside of VisualAge for Java if VisualAge will be used on a continuing basis to edit the components. Changes to added methods, and changes in user code sections will be preserved as code is round-tripped from Studio to VisualAge and back again.
68 Migrating to WebSphere V5.0: An End-to-End Migration Guide
WebSphere Studio Application Developer Version 5.0 includes a window builder. That builder is concerned exclusively with layout and does not include any concept of connections between visual components. VisualAge-generated window code can be imported into WebSphere Studio and edited. Once edited, however, it cannot be returned to VisualAge for Java.
Data access beansThe Data Access Bean Builder generates lightweight Java classes that are database-aware. VisualAge for Java-generated data access beans will run on the WebSphere Application Server 5.0 (and 4.0) platform. However, there is no editing support for these components in Studio.
VisualAge for Java can be used to edit these components, which can then be re-exported into Studio for further development.
Enterprise Access BuildersEnterprise Access Builder (EAB) provides access for applications connecting to enterprise systems. EAB-generated code will run on the WebSphere Application Server 5.0 (and 4.0) platform. However, there is no support to edit EAB-generated components in Studio.
VisualAge for Java can be used to edit these components, which can then be re-exported into Studio for further development.
EAB has been phased out in favor of the Java Connector Architecture (JCA). Support for building JCA components is provided with WebSphere Studio Application Developer Integration Edition.
VisualAge Persistence BuilderThe VisualAge Persistence Builder (VAP) builds robust systems of database-aware Java classes based on the EJB 1.0 specification. VAP-generated classes will run on the WebSphere Application Server 5.0 (and 4.0) platform with little modification. There is no support to edit VAP-generated components in Studio.
Due to differences in supported versions of the EJB specification, VAP-generated components must have a getHomeHandle() method added to the generated “home” interface, as follows:
public javax.ejb.EJBHome getHomeHandle() {return null;}
This method can exist in VisualAge for Java; this change need only be made once and maintained with the VAP-generated code. The VAP-generated code
Chapter 2. Migrating strategy and planning 69
does not run in an EJB container; the code only makes use of the interfaces defined by EJB.
VisualAge for Java can be used to edit these components, which can then be re-exported into Studio for further development.
VAP-generated code should be migrated to EJB 2.0 container-managed entity beans with local interfaces.
2.4.4 Source code managementVisualAge for Java employs a proprietary team development tool commonly referred to as Team Server or “Envy”. With the introduction of WebSphere Studio Application Developer, support for Team Server is discontinued in favor of integration with existing third-party source code management solutions.
Out of the box, WebSphere Studio Application Developer provides support for the open-source Concurrent Versioning System (CVS), Rational's ClearCase and Merant's PVCS. Since WebSphere Studio Application Developer is based on the open-source Eclipse framework (Version 2.0), any plug-in provided for Eclipse by other source code management tool vendors should also work in Studio.
Perhaps one of the greater benefits of the new source code management model is that all application artifacts (not just classes and methods) are managed using the same set of tools. With WebSphere Studio Application Developer, everything is simply a file. JSP and GIF files are stored using the same mechanisms as are classes (JAVA files) and server configurations (XML files).
As part of the migration a new source code management solution must be researched and implemented. Existing source code must be extracted from the VisualAge for Java code repository and checked into the chosen tool. Perhaps the easiest way to extract the code is to simply export it from VisualAge for Java (either as a JAR file with source or into the file system) and then import it into Studio. Extracting more complete version histories will be a time-consuming, primarily mechanical process.
Assume that it will take some time for developers to get familiar with the new source code management paradigm. Besides mechanical processes that might be different, the way that the tool is used is fundamentally different. Developers may take time, for example, to get used to the fact that files are now the fundamental unit and not the method, as it is with VisualAge for Java.
70 Migrating to WebSphere V5.0: An End-to-End Migration Guide
2.4.5 Build processIf you're migrating from Version 3.5 to 5.0, you'll notice a lot of changes in the way that applications are packaged. With Version 3.5 (and before), the burden of responsibility is placed on the administrators to deploy and configure the various components of an enterprise applications. With Version 5.0, the issues of packaging and deployment are far better defined by the J2EE specification through the use of EAR files. The introduction of EAR files often has a significant impact on the build and deployment processes.
EAR files are complete application archives. Inside an EAR file are modules that provide parts of the functionality for an application. An EJB Module contains Enterprise JavaBeans, and a Web Module contains Servlets and JSPs. Within each module (and the EAR) are deployment descriptors that define how all the pieces fit together (and include such things as JNDI names for EJBs).
The open source community has evolved a standard J2EE build tool named Ant, which has very quickly become the de facto standard for defining and executing automated builds for J2EE applications. Ant includes integration with a number of source code management tools, along with tools for managing, modifying and assembling J2EE modules. WebSphere Studio Application Developer is equipped to manage and run Ant scripts. In short, Ant is strongly recommended for WebSphere development.
Many organizations using WebSphere Application Server 3.5 have no formal automated build process. This is a great opportunity to introduce an automated build process as part of the migration.
2.4.6 InteroperabilityThere are a number of interoperability options supported between Versions 3.5 and 5.0 of WebSphere Application Server. For more information about interoperability, see Chapter 8, “WebSphere system configuration and runtime migration” on page 263.
2.4.7 AdministrationPartially as a result of J2EE standardization of packaging, the administration process also changes. With Version 3.5, much configuration information now specified in deployment descriptors had to be manually (or through scripts) provided by administrators. In this regard, deployment on Version 5.0 of an application can be little more than dropping an EAR file on the application server.
Chapter 2. Migrating strategy and planning 71

With WebSphere Application Server Version 5.0, the administration model has completely changed. Existing deployment and configuration scripts will have to be recreated as part of the migration. Existing skills will also have to be updated.
2.5 Migrating from Version 4.0 to 5.0J2EE 1.3 is backwards compatible with J2EE 1.2. This means that application code written for the WebSphere Application Server Version 4.0 platform should run without modification on WebSphere Application Server Version 5.0.
Since WebSphere Application Server Version 5.0 will run Version 4.0 applications, it is possible that the production environment can be migrated prior to the development. Of course, in order to make use of new features, the development environment must be migrated.
2.5.1 Development environment and code organizationIt is possible to switch to the Version 5.0 development environment, WebSphere Studio Application Developer (“Studio”) Version 5.0, before switching the runtime environment. Studio Version 5.0 provides full support for developing the Version 4.0 application, and includes a WebSphere Application Server Version 4.0 unit test environment.
Some subtle changes have occurred in the way that application code is structured in J2EE projects. In particular, the directory structure for Web projects has changed. In general, however, physically moving code from a previous version of Studio into Version 5.0 is a relatively simple task. Existing code can be imported directly from the source code management tool, or can be moved using enterprise archive (EAR) files. For the latter, code is exported from Studio Version 4.0 (with source) and then imported into Studio Version 5.0. As part of the import process, Studio will make sure that the various artifacts are assembled correctly.
More information on migrating source from Studio Version 4.0 to Version 5.0 is presented in Chapter 3, “Development tool migration (GA)” on page 81.
2.5.2 InteroperabilityThere are a number of interoperability options supported between Versions 4.0 and 5.0 of WebSphere Application Server. For more information about interoperability, see Chapter 8, “WebSphere system configuration and runtime migration” on page 263.
72 Migrating to WebSphere V5.0: An End-to-End Migration Guide
2.5.3 AdministrationWith WebSphere Application Server Version 5.0, the administration model has completely changed. Existing deployment and configuration scripts will have to be recreated as part of the migration. Existing skills will also have to be updated.
2.6 Migration planA migration plan must consider all the actives that are part of a migration. These activities can be collected as part of an assessment effort. Task areas include:
� Assessment� Education� Changes to the build process� Modifications to the development environment� Modification of application code� Migration of System Test environment� Changes to existing deployment and configuration processes� Changes to the pre-production and production environments� Testing
AssessmentBefore any migration is attempted, the effort should be assessed. The amount of time required to assess an application depends on a number of factors. The most significant factors are complexity of the application and the runtime configuration. Assessing the migration complexity for a single application running on a simple runtime configurations will likely take a day or two. A more complex application running in a complex runtime configuration involving a number of firewalls and other considerations will require more time to assess. In general, allow the assessment times as follows:
� One day to assess each application� One to two days to assess the runtime environment� One day to assess build and deploy processes and for general education� Two to three days to assess documentation discoveries
EducationThere are two separate streams for education, since Java development and application server administration are typically handled by different groups of people.
For Java developers, education may require the following topics:
� J2EE (relevant changes to the base technologies, packaging)� WebSphere Studio Application Developer
Chapter 2. Migrating strategy and planning 73
� Source code management� Apache Ant
Obviously, developers familiar with WebSphere Application Server Version 4.0 already have experience with J2EE. Java developers who are not formally familiar with J2EE will likely have some experience with the based technologies, including such things as Servlets, JSPs, and EJBs. Subtle changes occur in these specifications between versions; those changes should be discussed as part of the education.
When migrating from WebSphere Application Server Version 3.5, assume that classroom education will take at least a week or less than a week for developers already familiar with Version 4.0. Expect that developers will require at least a few weeks of “soak time” to become familiar with the new environment and return to full productivity.
Administration staff will benefit from specific WebSphere Application Server administration training. Expect that the formal education should take approximately a week and should be followed up with several weeks of soak time to adapt the knowledge learned in the classroom to your requirements.
As part of the assessment, a more complete picture of education requirements can be developed.
Development environmentSome research may be required to handle any special considerations, for example are you using any special tools? You must determine if the special tools work with WebSphere V5.0. If not, replacements must be found.
WebSphere Studio Application Developer will be only part of your WebSphere Application Server Version 5.0 development environment. A development environment is also composed of source code management (SCM) tools, test servers, databases and other systems. These must all be considered as part of the migration of the development environment.
Developers should not be expected to be 100% productive immediately. They will require some time to acquaint themselves with the changes.
Note: Consider sending all your people for all training. It is helpful for your developers to have some understanding of the issues faced by administrators and vice versa.
74 Migrating to WebSphere V5.0: An End-to-End Migration Guide

BuildComing from Version 3.5, a new build process will almost certainly be required. Apache Ant is a popular choice. A number of template Ant scripts exist that can be leveraged as part of this process. In any case, Ant skills must either be imported or developed.
Application codeStandard iterative development practices can be followed. You may choose to have a special migration team do the work or have the general development population involved in migration.
System test environmentAdministration staff should acquaint themselves with the new version as soon as possible. A system test environment is a good place to start. Assume that this will take at least two weeks.
Deployment and configurationWith the adoption of J2EE 1.3 management APIs, the scripting languages that manipulate WebSphere Application Server have changed with Version 5.0. Existing scripts must be updated. Estimate several days (depending on how many scripts you currently use) to migrate existing scripts to the new format.
Pre-production and productionFor many organizations, the pre-production environment is almost as important as the production environment. This makes this environment an ideal testing ground for your runtime migration plan. During migration, treat the pre-production environment as if it were a production environment. If possible, employ existing load testing tools and strategy to keep the system active during the migration.
As part of your plan, consider breaking the migration of these environments into explicit stages. When effecting the migration of these runtime environments, it is typically the first branch that is the most time consuming. Allow for extra time during this stage to handle unforeseen trouble and permit extra time for testing and remediation.
The duration of this part of the migration is difficult to estimate without first doing a complete assessment.
TestingAlways include lots of time for testing as part of any migration plan.
Chapter 2. Migrating strategy and planning 75
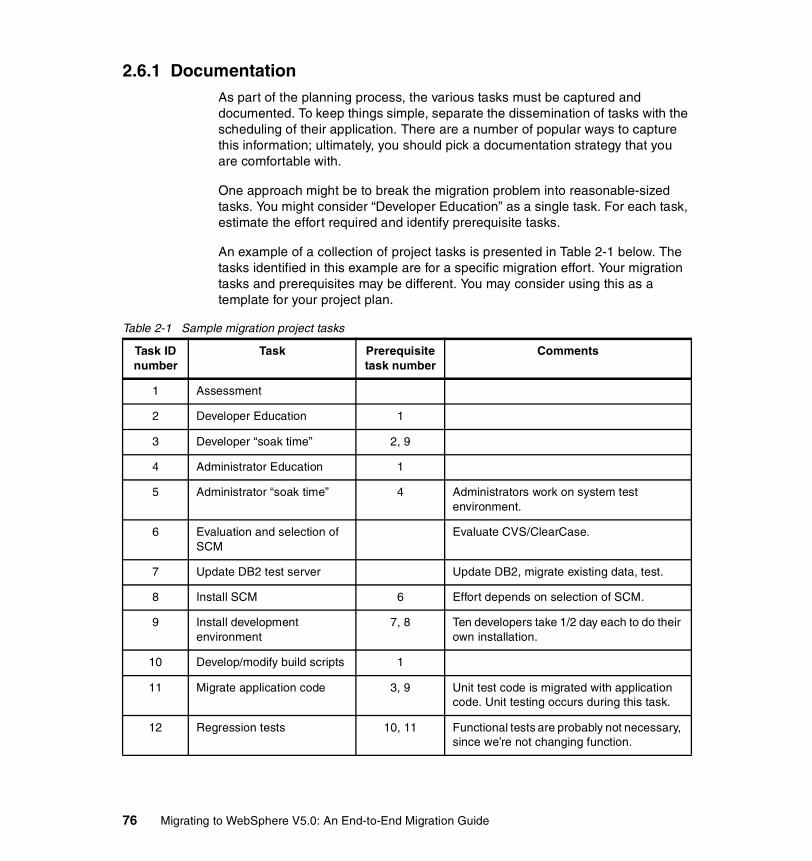
2.6.1 DocumentationAs part of the planning process, the various tasks must be captured and documented. To keep things simple, separate the dissemination of tasks with the scheduling of their application. There are a number of popular ways to capture this information; ultimately, you should pick a documentation strategy that you are comfortable with.
One approach might be to break the migration problem into reasonable-sized tasks. You might consider “Developer Education” as a single task. For each task, estimate the effort required and identify prerequisite tasks.
An example of a collection of project tasks is presented in Table 2-1 below. The tasks identified in this example are for a specific migration effort. Your migration tasks and prerequisites may be different. You may consider using this as a template for your project plan.
Table 2-1 Sample migration project tasks
Task ID number
Task Prerequisite task number
Comments
1 Assessment
2 Developer Education 1
3 Developer “soak time” 2, 9
4 Administrator Education 1
5 Administrator “soak time” 4 Administrators work on system test environment.
6 Evaluation and selection of SCM
Evaluate CVS/ClearCase.
7 Update DB2 test server Update DB2, migrate existing data, test.
8 Install SCM 6 Effort depends on selection of SCM.
9 Install development environment
7, 8 Ten developers take 1/2 day each to do their own installation.
10 Develop/modify build scripts 1
11 Migrate application code 3, 9 Unit test code is migrated with application code. Unit testing occurs during this task.
12 Regression tests 10, 11 Functional tests are probably not necessary, since we’re not changing function.
76 Migrating to WebSphere V5.0: An End-to-End Migration Guide

This task list stops short of tasking the rollout into the production environment. With the migration tasks identified, the next step is to estimate the time required to complete each task. As part of a more robust task list, the number of resources required to complete a task is a useful inclusion.
The captured task information can be used to generate a schedule. The captured prerequisites will help you to organize the tasks, apply dates, and allocate resources for the migration effort. There are a number of very good software packages available to assist in this regard.
SchedulingScheduling is a matter of stringing these tasks together (this is where software can be helpful). Many of these tasks can be completed in parallel, which can make scheduling a difficult chore. Figure 2-24 on page 78 shows an example of a very high-level migration schedule.
13 Deployment scripts 1 Existing deployment and configuration scripts are updated. Don’t have too many of these.
14 Update preproduction DB2 Update, migrate existing data, test.
15 Preproduction migration phase I
5,12,14 First branch is migrated.
16 Testing phase I 15 Spend a lot of time testing to make sure this works before going to production.
17 Preproduction migration phase II
16 Second branch is migrated.
18 Testing phase II 17
19 Preproduction migration Phase II
18 Remaining servers are migrated.
20 Testing 19 Make sure this really works before going to production.
Task ID number
Task Prerequisite task number
Comments
Chapter 2. Migrating strategy and planning 77
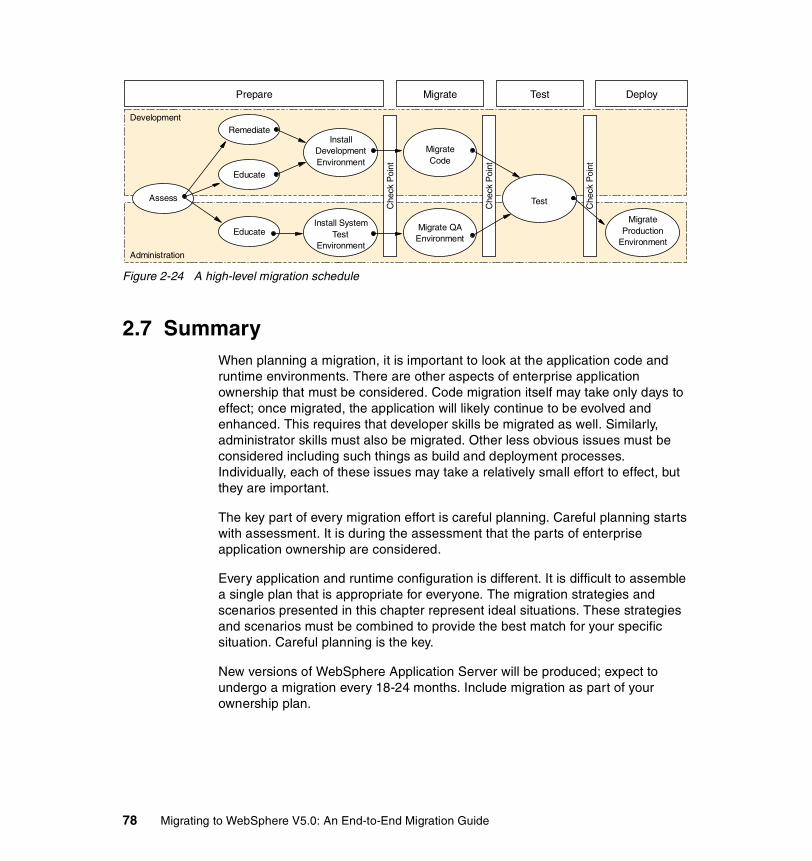
Figure 2-24 A high-level migration schedule
2.7 SummaryWhen planning a migration, it is important to look at the application code and runtime environments. There are other aspects of enterprise application ownership that must be considered. Code migration itself may take only days to effect; once migrated, the application will likely continue to be evolved and enhanced. This requires that developer skills be migrated as well. Similarly, administrator skills must also be migrated. Other less obvious issues must be considered including such things as build and deployment processes. Individually, each of these issues may take a relatively small effort to effect, but they are important.
The key part of every migration effort is careful planning. Careful planning starts with assessment. It is during the assessment that the parts of enterprise application ownership are considered.
Every application and runtime configuration is different. It is difficult to assemble a single plan that is appropriate for everyone. The migration strategies and scenarios presented in this chapter represent ideal situations. These strategies and scenarios must be combined to provide the best match for your specific situation. Careful planning is the key.
New versions of WebSphere Application Server will be produced; expect to undergo a migration every 18-24 months. Include migration as part of your ownership plan.
Administration
Remediate
Migrate QAEnvironment
MigrateCode
MigrateProduction
Environment
Install SystemTest
Environment
InstallDevelopmentEnvironment
Educate
Educate
TestAssess
Development
Che
ck P
oint
Che
ck P
oint
Che
ck P
oint
Prepare Migrate Test Deploy
78 Migrating to WebSphere V5.0: An End-to-End Migration Guide
Further reading� Extreme Programming Explained: Embrace Change, by Kent Beck, published
by Addison-Wesley, 1999
� Refactoring: Improving the Design of Existing Code, by Martin Fowler, published by Addison-Wesley, 1999
Chapter 2. Migrating strategy and planning 79
80 Migrating to WebSphere V5.0: An End-to-End Migration Guide
Chapter 3. Development tool migration (GA)
This chapter discusses the migration of VisualAge for Java, WebSphere Studio “Classic” or WebSphere Studio Application Developer Version 4.0.x, or WebSphere Studio Application Developer Version 5 Beta to WebSphere Studio Application Developer Version 5.0 General Availability (GA) Edition.
Thechapter is organized into the following sections:
� Targeting WebSphere Application Server V4.0.x versus V5.0
� Migrating from WebSphere Studio Application Developer V4.0.x
� Migrating from WebSphere Studio Application Developer Version 5 Early Availability or Beta versions
� Migrating from WebSphere Studio “Classic” to WebSphere Studio Application Developer
� Migrating from VisualAge for Java to WebSphere Studio Application Developer
� Migrating from WebSphere Studio Application Devloper (Linux)
� Migrating enterprise beans from VisualAge for Java to WebSphere Studio Application Developer
� Migrating from EJB 1.0 to EJB 1.1 or to EJB 2.0
3
© Copyright IBM Corp. 2002 2003. All rights reserved. 81
� Migrating from VisualAge for Java Visual Composition Editor to Visual Editor for Java
� Converting from VisualAge for Java Persistence Builder to EJB 2.0
� Build setup (library JARs, dependent project JARs, Ant builds)
Downloads and information for new WebSphere Studio development products (WebSphere Studio Application Developer and WebSphere Studio Site Developer) may be found at:
http://www.ibm.com/Websphere/developer/zones/studio/transition.html
The IBM WebSphere Studio Application Developer V5.0 supports both the WebSphere Application Server V4.0 and V5.0 test environments. The new Application Developer V5.0 product is more stable and provides more functions than its predecessor Application Developer V4.0 product. In light of these advantages, the Application Developer V5.0 product is recommended for use in development of applications for both V4.0 and V5.0 WebSphere Application Servers.
Information about using IBM WebSphere Studio Application Developer can be found in the Getting Started guide and the online help. Read the installation guide prior to installing WebSphere Studio Application Developer. After you have successfully installed WebSphere Studio Application Developer, read the Getting Started guide and complete the Getting Started tutorials. The tutorials will introduce you to Application Developer, Java development, and Web services. After you have completed the tutorials, read this guide to migrate your resources into WebSphere Studio Application Developer.
In this version of WebSphere Studio Application Developer Version 5, you can migrate code from VisualAge for Java, or WebSphere Studio “Classic” or WebSphere Studio Application Developer Version 4.0.x or WebSphere Studio Application Developer Version 5 Beta.
If you wish to migrate previously developed applications from an IBM WebSphere Application Server Standard Edition environment to the WebSphere Application Server - Express environment, refer to Migrating Applications from WebSphere Application Server Standard Edition to WebSphere Application Server-Express V5 at http://www.ibm.com/redbooks/redpapers/abstracts/redp3618.html.
This chapter uses Windows conventions throughout. In most instances, the Windows convention can apply to Linux as well. For example, "WS_Installdir\" in Windows is equivalent to "WS_Installdir/" in Linux.
82 Migrating to WebSphere V5.0: An End-to-End Migration Guide

3.1 Important updates to Version 5 product
Some information may have changed since the Version 5 product CD images and/or electronic distribution images were generated. For the very latest information updates to the Version 5 product, refer to the Developer Domain Application Developer Web page at http://www.ibm.com/websphere/developer/zones/studio/appdev/. Click Information on Specific Versions -> Version 5 -> Important Updates.
3.2 Targeting WebSphere Application Server V4.0.x versus V5.0
One of the significant features of WebSphere Studio Application Developer Version 5 is that it can target both WebSphere Application Server Version 4.0.x and/or Version 5. This redbook focuses on getting application programs migrated into the WebSphere Studio Application Developer Version 5 tool, and not on differences in administration, operation, or features/functions between the two WebSphere Application Server versions. So, where this redbook has examples with instructions on configuring and running the internal WebSphere Test Environment (an embedded non-production copy of the WebSphere Application Server), it contains instructions for WebSphere Application Server Version 4. WebSphere Application Server Version 5 is very similar, but there are slight differences in configuring data sources, and so on, and there is full online documentation available. There is also a WebSphere Application Server - Express test environment (the only test environment included in the WebSphere Application Server - Express development product), which is essentially equivalent to WebSphere Application Server Version 5 but without support for EJBs.
For information on differences between WebSphere Application Server Version 4 and Version 5 functions, please refer to the WebSphere Application Server Version 5 online InfoCenter documentation. Most applications developed and tested on WebSphere Application Server Version 4 will run unchanged on Version 5. However, if the application uses newer specification level features/functions (J2EE 1.3, Servlet 2.3, JavaServer Pages (JSP) 1.2, Enterprise JavaBeans (EJB) 2.0, Web J2EE 1.3, and so on) then that application will only work on WebSphere Application Server Version 5.
Note that some wizards in WebSphere Studio Application Developer create J2EE projects or resources, and they default to J2EE 1.3. To change the default to J2EE 1.2, select Window -> Preferences -> J2EE Preference -> Select the highest J2EE version to be used -> 1.2.
Chapter 3. Development tool migration (GA) 83
3.3 Migrating from WebSphere Studio Application Developer V4.0.x
This section covers migrating from WebSphere Studio Application Developer Version 4.0.x to Version 5.0.
There are two supported methods that you can use to migrate your projects from WebSphere Studio Application Developer Version 4.0.x to Version 5:
� Using a software configuration management (SCM) system such as Concurrent Versioning System (CVS) or Rational ClearCase. This is the recommended method.
� Exporting your projects from Version 4.0.x and then importing them to this edition. This method migrates everything except project build path information.
Using your existing Version 4.0.x workspace is not supported for reasons explained later.
Note that migrating from Version 4 to Version 5 does not automatically change the project J2EE level, since Version 5 can still build and deploy to WebSphere Application Server Version 4. Changing the J2EE level of Web projects is simply a matter of selecting the project in the Navigator view and clicking Properties -> Web -> J2EE Level.
Changing an EJB project level is more involved. Refer to 3.9, “Migrating from EJB 1.0 to EJB 1.1 or to EJB 2.0” on page 116. To migrate to a new J2EE Enterprise Application Level, just create a new EAR project and then open the META-INF -> Application.xml deployment descriptor editor, select the modules, and then select Add -> myModules.
3.3.1 Differences between WebSphere Studio Application Developer Version 4.0.x and Version 5
The following is a partial list of enhancements since Version 4.0.x:
� WebSphere Studio Application Developer Version 5 can generate code for either WebSphere Application Server Version 4.0.x or Version 5, and includes both WebSphere Application Server Version 4.0.3 and Version 5 Test Environments.
84 Migrating to WebSphere V5.0: An End-to-End Migration Guide

� The enterprise applications archives (EARs) J2EE level has changed from 1.2 to 1.3 for WebSphere Application Server Version 5 projects.
– J2EE 1.2 EARs will run on either WebSphere Application Server Version 4.0.x or WebSphere Application Server Version 5.
� The Enterprise Java Beans (EJB) specification level has changed from 1.1 to 2.0 for WebSphere Application Server Version 5 EARs.
– EJB 1.1 projects are still supported, and may be part of either WebSphere Application Server Version 4.0.x J2EE 1.2 EARs or Version 5 J2EE 1.3 EARs.
� The Web applications (WARs) J2EE level has changed from 1.2 to 1.3 for WebSphere Application Server Version 5 projects.
– The JSP level has changed from 1.1 to 1.2 and the Servlet level has changed from 2.2 to 2.3.
– J2EE 1.2 Web projects (WARs) are still supported, and may be part of either WebSphere Application Server Version 4.0.x J2EE 1.2 EARs or Version 5 J2EE 1.3 EARs.
� In Version 5, you can create static Web projects as well as J2EE Web projects. In a static Web project you will only be able to create content served by a traditional HTTP server (HTML, JavaScript, images, text, and so on).
� The underlying workbench, which is based on the Eclipse open-source project, has changed from Version 1.0 to Version 2.0:
– There is a new and much improved Java builder
– There is a new and much improved VCM interface for SCM vendors
� Page Designer “Classic” and Page Designer are both available. For more information, see 3.3.3, “Internal changes from Version 4.0.3” on page 86.
3.3.2 WebSphere Application Server changes and Servlet/JSP conversion tools
� The WebSphere Application Server InfoCenter has information on the differences between WebSphere Application Server Version 3.5 and 4.0. This is found at http://www.ibm.com/software/webservers/appserv/doc/v40/aes/infocenter/was/03.html.
� For the tools to help convert your application, go to the WebSphere Application Server downloads page at http://www14.software.ibm.com/webapp/download/product.jsp?s=p&id=TDUN-49EVRT&type=s&dt=DIAGNOSTIC+TOOL.
Chapter 3. Development tool migration (GA) 85

– MigrateWC takes a .91 or 1.0 JSP and converts it to a 1.1 JSP. It also takes a 2.1 Servlet and converts it to a 2.2 Servlet.
– XMLconvert converts XML configuration files from Release 3.02.x or Release 3.5.x to Release 4.0 format.
3.3.3 Internal changes from Version 4.0.3The following sections describe the differences between WebSphere Studio Application Developer V4.0.3 and V5.0.
Version 5 Web WARs are source location incompatible with Version 4.0.3
Because of the WebSphere Studio Application Developer internal changes described in the two Web sections below, a Version 5 J2EE 1.2 Web WAR, when exported with Java source, will import into WebSphere Studio Application Developer Version 4 but will not build (even though it is at the same J2EE 1.2 runtime level). The source folders will be in the Version 5 structure, and must be manually moved to the old Version 4 structure location before building. The WAR still executes correctly on WebSphere Application Server Version 4 (since it ignores any embedded source); it is only a development tool difference.
WebSphere Studio Application Developer EJB 1.1 project structures
The EJB 1.1 (J2EE 1.2) internal project structure in WebSphere Studio Application Developer Version 5 is different from what it was for WebSphere Studio Application Developer Version 4.0.x. This difference is not related to J2EE 1.2 versus J2EE 1.3, but rather is a tool usability change.
The default in Version 5 for new EJB 1.1 projects is to have the resulting compiled binary classes in the same \ejbmodule directory(s) as the source. However, the old Version 4.0.x structure (with source directory(s) under \ejbModule and the compiled binary classes in the \bin directory) is retained in Version 5 for EJB 1.1 projects originally created in Version 4.0.x and then saved into an SCM repository and then reloaded into Version 5.
Note that if a Version 4.0.x EJB 1.1 project is exported as an EJB JAR and then imported into a new Version 5 EJB 1.1 project, it will have the new common source/binary structure. If that same Version 4.0.x EJB 1.1 project is saved into an SCM repository and then loaded into Version 5, it will retain the old separate source/binary structure (to avoid having to restructure the SCM directories and to avoid having to change automated build scripts). Either structure will build correctly in Version 5.
86 Migrating to WebSphere V5.0: An End-to-End Migration Guide

WebSphere Studio Application Developer Web project structures
The internal Web project structure in WebSphere Studio Application Developer Version 5 is different from what it was for WebSphere Studio Application Developer Version 4.0.x. This difference is not related to J2EE 1.2 versus J2EE 1.3, but rather is a tool usability change.
In Version 4, Web projects were J2EE Web projects by default and they appeared in the Navigator view with a source folder and a webApplication folder. In Version 5, if you create a J2EE Web project, then it will appear with a Java Source folder instead of a source folder and a Web Content folder instead of a webApplication folder.
However, if a Version 4 Web project is saved into an SCM repository and then loaded into Version 5, it will retain the old structure with the source and webApplication folders. Either structure will build correctly in Version 5.
Static versus J2EE Web projectsIn Version 5, you can create static as well as J2EE Web projects.
Page Designer “Classic”WebSphere Studio Application Developer Version 5, on both Windows and Linux, contains a new Page Designer (implemented in Java). The Windows version of WebSphere Studio Application Developer (not the Linux version) also includes Page Designer "Classic" as an optionally installable component. On Windows, if you wish to have Page Designer "Classic" bound to HTML/JSP as the default editor, then install Page Designer "Classic" and change your workbench preference.
To install Page Designer “Classic”:
1. If you have a running workbench, exit it before starting the installation.
2. Go to the directory WS_Installdir/bin (where WS_Installdir is the directory where WebSphere Studio Application Developer is installed) and run pdclassic.exe.
3. When you then restart the workbench, you will see an Updates window. Click Yes.
Note: If this is the first time the workbench has ever been started (if it has never been run since the product was initially installed), then you will not see the Updates window nor the Configuration Changes window.
Chapter 3. Development tool migration (GA) 87
4. A Configuration Changes window opens. Select the check box within the Detected changes field that includes Page Designer Classic (5.0.1).
5. Click Finish. The Install/Update window opens.
6. Click Yes. The workbench will restart to make the changes effective.
To change the default HTML/JSP editor:
1. Select Window -> Preferences -> Workbench -> File Associations.
2. In the File types field, select *.html or *.jsp or both, or whatever you would like to assign to Page Designer “Classic”.
3. In the Associated editors field, select Page Designer Classic and click Default.
If you do not want to change the default to become Page Designer “Classic”, you can still select an HTML or JSP file, click it, and then select Open With -> Page Designer Classic.
Page Designer enhancementsPage Designer now has some enhancements that are not in Page Designer “Classic”:
� XHTML is supported for PvC application development
� HTML/JSP tag attribute can be viewed/edited in the attributes view
� Link to Servlet available in some windows
� Moving and copying of table within page by dragging and dropping
� Enhanced JSP tag visualization within Design Page
� Enhanced tag library palette within window to insert custom JSP tags
� CSS Preview window in CSS Designer to preview the applied CSS effect
� HTML/JSP thumbnail view
Page Designer “Classic” versus Page Designer functionsPage Designer “Classic” has some HTML editing functions that are not in the current Page Designer:
� JSP extensions for Design-time Control, Dynamic Elements, Author Time Visual
� WebSphere enhancements (Dynamic Table Extensions for DB navigation, Table alternating coloring)
� Dynamic HTML support of rollover effect, event/action
� Script editing (JavaScript or VBScript) in Design View or JSP Scriptlet library
88 Migrating to WebSphere V5.0: An End-to-End Migration Guide
� Tag Checker, Accessibility Checker
� WebSphere Transcoding Publisher annotation support
� Insertion of ActiveX controls
� Image pasting with logo/photo frame creation
� Page editing assist for ruler or various wizards for component insertion
� URL editor, heading editor, Table of Contents generation
� WYSIWYG View Bi-Directional (BiDi) language support
� Color gallery prepared by professional designers
HTML and JSP distinctions� In Version 4.0.x, HTML files and JSP files were treated identically by Page
Designer. For example, you could have JSP tags in an HTML file. This is no longer true: in this release, there is a distinction between JSP and HTML files, so you can no longer have JSP tags in an HTML file.
� The previous distinction affects encoding of non-English JSP files. In versions prior to this version, HTML encoding rules were used, even for JSP files, to determine the encoding named in a file. That is, the content type attribute of the META tag was used to determine the encoding named in <META http-equiv="Content-Type" content="text/html; charset=UTF-8">. In this version, this was changed to use JSP encoding rules to determine the encoding named in a JSP file. That is, the page directive of the JSP file is used to determine the encoding named in <%@page contentType="text/html;charset=UTF-8"%>. For HTML files, encoding is unchanged from previous versions.
3.3.4 Migrating projects using a software configuration management (SCM) system
The next sections discuss the migration of projects that use a software configuration management system, such as CVS, ClearCase, and others.
Migrating projects using CVS or Rational ClearCaseThis is the recommended way to move workspaces from Version 4.0.x to WebSphere Studio Application Developer Version 5. This is the only method that migrates all of your information, including project build path information.
1. As a backup precaution, save all your Version 4 projects into your SCM repository. Then commit (release) any pending changes.
2. Still working in Version 4, save your work again into a new Version 5 branch (stream). This is the branch that you will use when working with Version 5.
Chapter 3. Development tool migration (GA) 89
3. Install Version 5.
4. Close WebSphere Studio Application Developer Version 4 and start WebSphere Studio Application Developer Version 5.
5. Click Windows -> Preferences -> Workbench and uncheck Perform build automatically to avoid build errors as individual dependent projects are loaded.
6. For CVS: Load all of the projects that you want to work with from the SCM repository into WebSphere Studio Application Developer Version 5.
7. For ClearCase: Use a clean Version 5 workspace, then for each project to be loaded, select File -> Import -> Existing WebSphere Studio 4.x ClearCase Project into Workspace.
8. Click Windows -> Preferences -> Workbench and check Perform build automatically to restore your settings.
9. Do a full rebuild (click Project -> Rebuild All), and save the resulting projects back into your repository in your new Version 5 stream. (Do not mix these resources with your ongoing Version 4 stream.)
Post migration considerations:
� Version 4 CVS files were stored as binary (no CarriageReturn/LineFeed translations). If you work in a mixed (DOS/Windows plus UNIX/Linux) platform environment, you might wish to now mark source files as text (by clicking Team -> CVS -> Change ASCII/Binary Property) and resave them in CVS.
� Version 4 Web projects from a CVS repository require that you prune empty directories. Click Window -> Preferences -> Team -> CVS -> Prune empty
Tip: In Version 4, the workspace directory was located in the installation directory, by default. In Version 5, this default has changed to a directory called workspace in the My Documents directory. If you wish to override the location where you work is stored, use the -data option on the wsappdev.exe command when you start the workbench.
Do not use -data to point to an existing Version 4 workspace, since that is a different unsupported approach to migrate. (For more information, refer to 3.3.6, “Migrating projects using an existing Version 4.0.x workspace” on page 92.)
Note: These projects are now Version 5 projects and cannot be used by WebSphere Studio Application Developer Version 4.0.x
90 Migrating to WebSphere V5.0: An End-to-End Migration Guide
directories setting (the default is that it is enabled). If it is not disabled, and you load a Web project with an empty source folder (such as the MyHomePage Web example), then you will get the following errors at check-in:
The project was not built since it is involved in a cycle or has classpath problems.Missing required source folder: /MyHomePageExample403/source.
� For Web projects saved and loaded from a ClearCase repository, you need to have a file checked out before you can open it in the editor. If it is not checked out, you receive an error activating this view. (Null pointer exceptions in logs for Page Designer notify the user of known problems and ways to avoid them.) With web.xml editor, editing a web.xml file you need to have web.xml, ibm-web-bnd.xml, and ibm.web-ext.xmi checked out. (There are indications that you need these files to be checked out on the status line, which states that they are read only, but it is easily missed.)
� If your projects have circular dependencies, Version 5 reports a build error. Click Window -> Preferences -> Java -> Compiler, select the Other tab, and clear the Stop building when an invalid class path is detected check box.
� The .vcm_meta (or .cc_meta) files could now be deleted from the Version 5 project because they are not used by Version 5 (it uses a new .project file instead) and because you are using a new repository branch (stream) for these Version 5 projects. Note that these files are still needed in the ongoing Version 4 branch (stream).
Post-migration removal of EAR and server configuration absolute path references
Version 4 EAR application.xml files and Server Configuration files contained absolute path references. After you have migrated them into Version 5, you need to open them with their editor (which will automatically change their old absolute path references into new relative references).
1. For each EAR project, in a Navigator view, right-click META-INF/application.xml -> Open with -> Deployment Descriptor Editor.
a. A window pops up with the message: “The absolute path of one or more modules has changed since the last time this Application was saved..... Would you like to autocorrect?”
b. Click Yes.
c. Save and then close the editor window.
Chapter 3. Development tool migration (GA) 91

2. For each server configuration, in the Server Perspective, Server Configuration View window, right-click the server and click Open.
a. You will get a similar autocorrect window.
b. Click Yes.
c. Save and then close the editor window.
Migrating projects using other SCMsThere are other SCM vendors who provide SCM plug-ins for WebSphere Studio Application Developer. Browse the list of vendors at http://www.ibm.com/software/ad/studioappdev/partners/scm.html. As part of their Ready for WebSphere Studio Software validation (see http://www.developer.ibm.com/websphere/ready.html), all SCM vendors who provide a Version 4 plug-in will have ensured that the migration steps in “Migrating projects using CVS or Rational ClearCase” on page 89 also work for their systems.
3.3.5 Migrating by exporting and importing your projects1. In WebSphere Studio Application Developer Version 4.0.x, export your
projects to a WAR file, an EAR file, or a JAR file (click File -> Export).
2. In WebSphere Studio Application Developer Version 5, import your WAR file, an EAR file, or a JAR file (click File -> Import).
3.3.6 Migrating projects using an existing Version 4.0.x workspaceThis approach is partially supported, and will result in an incomplete migration. User interface settings, debug settings, and most preferences are all lost. Project names, project source files, and project Java build path (class path) are retained, but nothing else is guaranteed. This approach should only be used if no supported SCM system is being used and if it is critical to retain project build path information, which is lost when you import projects that were exported from Version 4. You can use the existing Version 4.0.x workspace by doing the following:
1. Commit (release) any pending changes to the repository.
2. Close all perspectives and shut down WebSphere Studio Application Developer Version 4.
Note: This is not a full migration since no project build path information is maintained.
92 Migrating to WebSphere V5.0: An End-to-End Migration Guide

3. Back up the contents of workspace_directory, where workspace_directory is the fully qualified directory name that contains the Version 4.0.x workspace. By default, the Version 4.0.x workspace subdirectory is located in the same directory where the product is installed. You will need this backup if you ever want to work with WebSphere Studio Application Developer Version 4.0.x again. Once you have pointed to a Version 4.0.x workspace from a Version 5 IDE, you can no longer go back to using that workspace in WebSphere Studio Application Developer Version 4.0.x.
4. Install WebSphere Studio Application Developer Version 5.
5. When you start WebSphere Studio Application Developer Version 5 with a Version 4.0.x workspace from a command prompt, use the -data option to specify a fully qualified path to the Version 4.0.x workspace directory on the wsappdev.exe command. This will cause an upgrade of the .metadata information.
6. When prompted to confirm that you wish to convert to the new user interface format, click OK.
7. Before doing any rebuilds or validating any projects that are in the workspace, select all of the projects in the Navigator view within the Resource perspective and then select Refresh from the pop-up menu. This will ensure that all files are synchronized with their appropriate metadata.
8. Open any closed projects (see “Known problems and limitations” on page 94).
9. Verify your class path variables (see “Known problems and limitations” on page 94).
10.Some builders and validators have been added, removed, or modified in Version 5. To ensure that the correct errors and warnings are shown, you must rebuild all the projects by selecting Project -> Rebuild All, and then select Run Validation for each Java project.
11.Some user preferences might be maintained, but many others will not be. Check your preference settings in Version 5 to be sure that they are as you want them.
Post-migration removal of EAR and server configuration absolute path references
Version 4 EAR application.xml files and server configuration files contained absolute path references. After you have migrated them into Version 5, you need to open them with their editor (which will automatically change their old absolute path references into new relative references).
1. For each EAR project, in a Navigator view, right-click META-INF/application.xml -> Open with -> Deployment Descriptor Editor.
Chapter 3. Development tool migration (GA) 93
a. A window pops up with the message: “The absolute path of one or more modules has changed since the last time this Application was saved..... Would you like to autocorrect?”
b. Click Yes.
c. Save and then close the editor window.
2. For each Server configuration, in a Server Perspective, Server Configuration View, right-click the server and click Open.
a. You will get a similar autocorrect window.
b. Click Yes.
c. Save and then close the editor window.
Known problems and limitationsThe following problems may occur if you attempt to migrate by opening a Version 4.0 workspace in WebSphere Studio Application Developer Version 5.
Incorrect value in the JRE_LIB class path variableTo reset your JRE_LIB class path variable to a valid location, follow these steps. Do this even if the value seemed correct when you first open the Preferences window.
1. Select Window -> Preferences -> Java -> Installed JREs.
2. In the list, select the check box for the default JRE location that you wish your JRE_LIB set to.
3. Choose Edit, and then click OK to close the Edit JRE window.
If you do not do this, the value for JRE_LIB might be incorrect, causing many build errors in Java files.
As a general check, verify the value of all your other class path variables.
For previously SCM shared projects, the Team menu contains Share Project
Team support has changed significantly between Eclipse 1.0 and 2.0. The method of sharing projects with the repository has changed as well.
� If you select Team -> Share Project, a wizard will guide you through the migration process. When you are finished, your project will be shared and the Synchronize view will open. You will see conflicting changes on every file. This is because of changes in the way sync information is stored between Eclipse 1.0 and 2.0.
94 Migrating to WebSphere V5.0: An End-to-End Migration Guide
� If you do not have any outgoing changes (which you should not have if you committed all your outgoing changes before upgrading as recommended above), then you can simply select the project in the Synchronize view and select Override and Update which will load the current contents from the server.
� If you do have outgoing changes, you can pull down the triangle menu in the Synchronize view and select Compare File Contents. After some work, the Synchronize view will show you only the files that are actually different. You can then use the Synchronize view to resolve these conflicts.
Projects created outside the workspace directoryBy default, projects are created in the workspace directory. If you overrode the default to create projects elsewhere, open all of your projects now before closing the workbench. This will allow the .project file for that project to be written in the proper location. Failure to open a closed project whose directory is outside of the workspace will result in a project that masks the actual project, with only a .project file existing within it.
JSP breakpoints must be resetYou will need to remove any JSP breakpoints that you have, and reset them within the migrated Version 5 workspace.
3.3.7 Migrating J2EE project structures and/or J2EE specification levels
As mentioned above, the EJB project and Web project internal structures are different between WebSphere Studio Application Developer Version 4 and Version 5. New projects in Version 5 will always use the new internal structure. Although the old Version 4 structures will continue to work in Version 5, you can optionally convert any J2EE EAR or EJB or WAR project to the new structure by:
1. Right-clicking the project2. Selecting Migrate -> J2EE Project Structure
If your project is under source control, then save the restructured project in your SCM.
Chapter 3. Development tool migration (GA) 95

Note that this changes the internal WebSphere Studio Application Developer project structures into the new Version 5 internal structure, but it does not convert the J2EE level of that project.
If you wish to convert an existing project (either in the old Version 4 structure or the new Version 5 structure) into the new J2EE specification level (which will also automatically convert any old projects into the new Version 5 structure), then:
1. Right-click the project2. Select Migrate -> J2EE Migration Wizard
Note that this changes the project J2EE level, but does not change any code. EJB beans are not migrated to EJB 2.0, and Servlet and/or JSP code is not changed (that is left to the developer).
3.4 Migrating from WebSphere Studio Application Developer Version 5 Early Availability or Beta versions
WebSphere Studio Application Developer Version 5 Beta was a limited availability beta, and the WebSphere Studio Application Developer Version 5 Early Availability was available to the Passport Advantage® subscribers.
No migration is required. The Version 5 Early Availability or the Version 5 Beta workspaces may be used (or shared) directly with Version 5 General Availability. The Version 5 Early Availability or the Version 5 Beta projects in Software Configuration Management (SCM) systems (CVS or ClearCase) may be used (or shared) directly with Version 5 Early Availability.
3.5 Migrating from WebSphere Studio “Classic” to WebSphere Studio Application Developer
This section documents how to migrate from WebSphere Studio Version 4.0 (both Advanced and Professional Edition) to the WebSphere Studio Application Developer. Migrating from WebSphere Studio “Classic” Version 4.0 to WebSphere Studio Application Developer Version 5.0 involves the following steps:
1. Create a new single-server stage for migration.
2. Create a Web configuration descriptor file.
3. Export a migration JAR file.
96 Migrating to WebSphere V5.0: An End-to-End Migration Guide
4. Import the migration JAR file into WebSphere Studio Application Developer.
5. Set up your server and test your migrated application.
The advanced publishing feature (mapping files to publishing stages) and the Page Detailer feature (analysis of Web pages) of WebSphere Studio “Classic” is not available in WebSphere Studio Application Developer. Some other features from the Version 4.0.x CD media pack are also no longer available, for example the Page Detailer feature for analysis of Web pages, the HotMedia® feature for rich media types, the Voice XML editor (moved to WebSphere Everyplace™ Toolkit and Portal Toolkit), and the DataBaseWizard for pervasive devices.
You should be aware of the following limitations before you migrate any of your WebSphere Studio data:
� WebSphere Studio Application Developer uses an XML-based SQL editor, so your .sql files cannot be used in it.
� Project publishing information and stage information cannot be migrated.
� WebSphere Studio server configuration information cannot be migrated.
� Version control information cannot be migrated.
During the migration process outlined below, WebSphere Studio creates a JAR file that contains all of your project files, publishable and source, for a single server. All the files visible in the Publishing view for the default server will be packaged into the JAR file. You can then import the JAR file into WebSphere Studio Application Developer.
When you migrate existing projects, all the project publishing information and the stage information are lost during the migration. If your stage has multiple servers, only files published to the default server are kept. Therefore, for the purpose of migration, you will create a new stage that has only one server.
3.5.1 Creating a new single-server stage for migrationIf you have more than one server in your current stage, create a new stage called Migration with only one server by following these steps:
1. Click Project -> Customize Publishing Stages.
2. Type Migration in the Stage name field.
Note: The following instructions are for migrating from WebSphere Studio Version 4.0. If you want to migrate from an earlier version of WebSphere Studio, you should migrate to WebSphere Studio 4.0 first, then migrate to WebSphere Studio Application Developer.
Chapter 3. Development tool migration (GA) 97
3. Click Add.
4. Click OK.
5. Click Project -> Publishing Stage and select Migration from the list of available stages.
6. While in the publishing view, click Insert -> Server.
7. Type a server name, such as localhost.
8. Changing the server or changing the publication stage does not propagate the Servlet mapping information for WebSphere Application Server Version 4.0. Go to the Publishing view, and, for each Servlet, click Properties -> Publishing -> Servlet Mapping and then copy the actual Servlet mapping.
3.5.2 Creating a Web configuration descriptor file1. While in the project file view, click Project -> Create Web Configuration
Descriptor File.
2. Select all required Servlets.
3. Select all required Tag Library Descriptor (TLD) files.
4. Click Create.
The default Web configuration descriptor file name is serverName_web.xml, localhost_web.xml in this scenario. Unless you specified a different location, the .xml file is saved in the WEB-INF directory.
3.5.3 Exporting a migration JAR file1. While in the project file view, select the server named localhost and click
Properties -> Publishing -> WebApp Web Path and enter a Web path (context root), such as myWebPath. This will also be used as the WebSphere Studio Application Developer project name.
2. While in the project file view, select Project -> Create Migration File.
3. Verify that localhost is the selected server.
4. Verify that localhost_web.xml is the selected Web configuration descriptor file.
5. Click OK.
6. The default JAR file name is serverName.jar, localhost.jar for this scenario. Rename the file if desired.
7. Save the JAR file.
98 Migrating to WebSphere V5.0: An End-to-End Migration Guide
3.5.4 Importing the migration JAR file into WebSphere Studio Application Developer
1. Start WebSphere Studio Application Developer.
2. Create a Web project (File -> New -> Project -> Web Project).
3. In the Project name field, type the name of your Web project. This should be the same name you specified in step 1 in 3.5.3, “Exporting a migration JAR file” on page 98.
4. Specify the name of a new or existing EAR project that will contain the new Web project for purposes of deployment.
5. In the Context Root field, type the Webapp Web Path name you specified when you created the migration JAR file in WebSphere Studio. Click Finish.
6. In the Navigator view, select the Web project you just created.
7. Import the JAR file.
a. Click File -> Import.
b. Select the WAR file and click Next. You must import the JAR file using the WAR file option; otherwise it will not work properly.
c. Enter the path to localhost.jar in the WAR File field or click Browse to search for it. (You can only browse for a WAR name, not a JAR name.)
d. Select the Web project that you created. The Context Root field is automatically populated with the value you specified earlier.
e. Select the EAR project you created earlier.
f. Click Finish. WebSphere Studio Application Developer unpacks localhost.jar.
8. You may have several unresolved references or missing import files. These will appear in the Tasks view. To fix this, you must change the Java build path for the Web project:
a. Right-click the project and click Properties -> Java Build Path.
b. Click the Libraries tab. Click Add External JARs.
c. Import any JARs that you need from the following directories:
i. plugins/com.ibm.etools.websphere.runtime/lib
ii. plugins/com.ibm.etools.websphere.tools/runtime
9. In the Navigator view, right-click the project and select Rebuild Project.
Chapter 3. Development tool migration (GA) 99
3.5.5 Testing your migrated application on a test serverYou are now ready to test your application. To test it on the default test server:
1. Right-click the EAR project2. Select Run on Server
To test your application on other server runtime environments, refer to the online help for the Server Tools feature.
3.6 Migrating from VisualAge for Java to WebSphere Studio Application Developer
This section documents how to migrate from VisualAge for Java Professional Edition or VisualAge for Java Enterprise Edition to WebSphere Studio Application Developer. Migrating from VisualAge for Java to WebSphere Studio Application Developer involves the following steps, which are explained in more detail later in this section:
1. Export your Java files and project resource files from VisualAge for Java.
2. Start WebSphere Studio Application Developer and create new projects to contain your code.
3. Import your Java and project resource files into WebSphere Studio Application Developer.
4. Use the web.xml editor to ensure that any Servlets are correctly defined (Web project only).
5. Migrate your VisualAge for Java project and workspace build and execution settings.
6. Set up your server and test your migrated application(s).
7. Deploy your applications from WebSphere Studio Application Developer to WebSphere Application Server.
8. Share the WebSphere Studio Application Developer project settings between multiple developers (post-migration).
The instructions given in this section are for migrating from VisualAge for Java Version 3.5.3 or 4.0 for Windows. If you want to migrate from an earlier version of VisualAge for Java to WebSphere Studio Application Developer, you should first migrate from your earlier version of VisualAge for Java to Version 4.0 for Windows (if you have enterprise beans) or Version 3.5.3 or 4.0 for Windows (without enterprise beans), before migrating to WebSphere Studio Application Developer. Version 4.0 includes a special tool (the EJB Export Tool) for exporting
100 Migrating to WebSphere V5.0: An End-to-End Migration Guide
enterprise beans, which you need in order to migrate EJB applications to WebSphere Studio Application Developer. All other data can be migrated from either Version 3.5.3 or Version 4.0.
3.6.1 Differences between VisualAge for Java and WebSphere Studio Application Developer
The following is a partial list of changes from VisualAge for Java:
� The Enterprise Java Beans (EJB) specification level has changed from 1.0 to 1.1 (EJB 2.0 is also supported for applications that will be deployed to WebSphere Application Server Version 5).
� For Web applications, the JSP level remains at 1.1 (1.2 for WebSphere Application Server Version 5 applications).
� For Web applications, the Servlet level remains at 2.2 (2.3 for WebSphere Application Server Version 5 applications).
� The level of the Java 2 platform that is supported has changed from 1.2 to 1.3. (The compiler can target 1.4 code generation, but the WebSphere Application Server runtime environment is still 1.3.)
� The Visual Composition Editor has been replaced by the Visual Editor for Java.
� VisualAge for Java version control and the propriety source code repository have been replaced by support for software configuration management (SCM) plug-ins.
� The VisualAge for Java Tools API has been replaced by the WebSphere Studio Workbench plug-in architecture.
� The VisualAge for Java XML tools have been replaced by WebSphere Studio Application Developer XML tools.
Note: [Windows] Instantiations, Inc., an IBM Business Partner, distributes a product called CodePro Studio that provides productivity enhancements to VisualAge for Java and WebSphere Studio Application Developer, including migration and co-existence facilities. To help VisualAge for Java customers begin their migration, Instantiations is offering a free, unlimited-use VisualAge for Java to WebSphere Studio Application Developer export facility as part of their time-limited evaluation copy of CodePro Studio. You can download the evaluation copy from http://www.instantiations.com/vaj-migrate. For further information on Instantiation's advanced migration and co-existence support including full bi-directional export/import of files, creation of export/import sets, project synchronization, and task automation, refer to the Instantiations, Inc. Web site at http://www.instantiations.com/codepro/ws.
Chapter 3. Development tool migration (GA) 101

� The VisualAge for Java project concept has been replaced by multiple types of WebSphere Studio Application Developer projects.
� Convertors in VisualAge for Java EJB AccessBeans (not Data AccessBeans) are not available in WebSphere Studio Application Developer EJB AccessBeans. Use EJB convertors/composers in the underlying EJBs instead. For more information about EJB convertors/composers, refer to the online help documentation.
3.6.2 Team support in WebSphere Studio Application DeveloperFor information on team support in WebSphere Studio Application Developer, refer to http://www.ibm.com/websphere/developer/library/techarticles/ 0108_karasiuk/0108_karasiuk.html.
There is also information in the Installation guide and online help about team support in WebSphere Studio Application Developer.
3.6.3 Migrating from VisualAge for JavaThe following steps outline how to migrate from VisualAge for Java:
1. Migrate enterprise beans from VisualAge for Java to WebSphere Studio Application Developer.
2. Export your Java files and project resource files from VisualAge for Java.
3. Start WebSphere Studio Application Developer and create new projects to contain your code.
4. Import your Java and project resource files into WebSphere Studio Application Developer.
5. Use the web.xml editor to ensure that any Servlets are correctly defined (Web project only).
6. Migrate your project and workspace settings.
7. Set up your server and test your migrated application(s).
8. Deploy your applications from WebSphere Studio Application Developer to WebSphere Application Server.
9. Share the WebSphere Studio Application Developer project settings between multiple developers (post-migration).
102 Migrating to WebSphere V5.0: An End-to-End Migration Guide
Exporting your Java files and project resource files from VisualAge for Java
There is no support for the bulk migration of versioned projects and resources from the VisualAge for Java repository. You can only migrate projects and resources that are in your VisualAge for Java workspace. If you want to migrate a versioned copy of a project or resource into WebSphere Studio Application Developer, you must bring it into your VisualAge for Java workspace and then migrate it.
Export your projects to a JAR file by following these steps:
1. If the projects that you want to export are not currently in your VisualAge for Java workspace, add them to the workspace now.
2. In the VisualAge for Java Workbench window, select your project(s), right-click, and click Export.
3. Select the Jar file radio button and click Next.
4. Specify the name of the JAR file.
5. Select the .java check box to export your Java files and the resources check box to export your resource files.
6. Fill in the other fields as required. Refer to the VisualAge for Java online help for more information on how to perform this task.
Starting WebSphere Studio Application Developer and creating new projects to contain your code
Start WebSphere Studio Application Developer, then create the appropriate projects. The following is a set of general migration guidelines to help you decide which kind of WebSphere Studio Application Developer project you should import your files into:
� If your code is part of a Web application, you should import the code into a Web project:
– Import all Java files into the Web project source directory (the proper hierarchy based on their package statements will automatically be created by WebSphere Studio Application Developer)
– Import all resource files into the Web project webApplication directory.
Note: If your project contains more than one kind of data (for example, enterprise beans and Java source code files), you should split up your data into different JARs based on their type.
Chapter 3. Development tool migration (GA) 103

� If your code is straight Java (for example, an application that will run stand-alone), you should import the code into a Java project.
� If your code is enterprise beans, you should import the code into an EJB project.
Importing your Java and resource files into WebSphere Studio Application Developer
1. Open WebSphere Studio Application Developer and switch to the Resource perspective.
2. Click File -> Import -> the zip file. Click Next.
3. Browse to the appropriate JAR file.
4. Select the files you want to import and the project or folder you want to contain your files.
Using the web.xml editor to ensure that Servlets are correctly defined (Web project only)
If your application uses Servlets, then you need to define the Servlet-URL mappings in the web.xml file. Follow these steps:
1. In the Web perspective, open the web.xml file, which is located in the webApplication/WEB-INF subdirectory of your Web project.
2. Click the Servlets tab.
3. Click Add, and select the Servlet radio button.
4. Type the Servlet name and click OK.
Note: The preceding is only a general set of guidelines to help you decide which kind of WebSphere Studio Application Developer projects you should use. We recommend that you read the WebSphere Studio Application Developer online help and become familiar with the different kinds of WebSphere Studio Application Developer projects before you create any projects or import any code.
Note: When you import your files into WebSphere Studio Application Developer, you should ensure that they go in the appropriate directory. We recommend that you read the WebSphere Studio Application Developer online help and become familiar with the different kinds of WebSphere Studio Application Developer projects before importing your code. This will help you determine which folders should contain which kind of code.
104 Migrating to WebSphere V5.0: An End-to-End Migration Guide
5. Click Browse to change the Servlet class value to the appropriate package name.
6. (Optional) The display name is a short name used to identify the Servlet. In the Display name field, type a short name for the Servlet.
7. A URL mapping defines a Servlet and a URL pattern. Click the Add button located next to the URL mappings field, then type the name of the URL mapping.
8. Save the changes (File -> Save web.xml) and close the web.xml file.
Migrating project and workspace settingsYou must record the following VisualAge for Java settings and set them up in WebSphere Studio Application Developer:
� Project class path � Resource associations � Code formatting � EJB server configuration � WebSphere Test Environment configuration � Java files and project resource files
Project class path In VisualAge for Java, you set your project class path in the Resources pages of the Options window (click Window -> Options -> Resources). After you have migrated your projects into WebSphere Studio Application Developer, you can set up your project's class path in the project's Properties window. Right-click the project and select Properties -> Java Build Path. Click the Libraries tab. You can also set class path variables in the Preferences window (click Window -> Preferences -> Java -> Classpath Variables.)
Resource associations If you set up an association between a file type and an executable, you can open a file that sits outside the workbench from within it.
In VisualAge for Java, you set up your resource associations in the Options window (click Window -> Options -> Resources -> Resource Associations). After you have migrated your resource files to WebSphere Studio Application Developer, you can set up your resource associations using the Preferences window (click Window -> Preferences -> Workbench -> File Editors).
Code formatter In VisualAge for Java, you set up your code formatting options in the Formatter page of the Options window (click Window -> Options -> Coding -> Formatter). After you have migrated your code to WebSphere Studio Application Developer,
Chapter 3. Development tool migration (GA) 105

you can set up your code formatting in the Preferences window (click Window -> Preferences -> Java -> Code Formatter).
EJB server configuration In VisualAge for Java, you set up your EJB server configuration in the Properties window for the EJB server. In the EJB page, select EJB -> Open To -> Server Configuration. Select the server, right-click it, and click Properties. After you have migrated your enterprise beans to WebSphere Studio Application Developer, you can set up your server configuration in the Server Configuration view. In the Server perspective, open the Server Configuration view. Right-click the server and click Open. Click the Data source tab.
WebSphere Unit Test Environment configuration In VisualAge for Java, your WebSphere Unit Test Environment and WebSphere Application Server runtime settings are in various property files in the directory VisualAgeInstalldir\ide\project_resources\IBM WebSphere Test Environment\properties, where VisualAgeInstalldir is your product installation directory.
If, for example, you have enabled URL rewriting in the session.xml property file by changing the property to true (<url-rewriting-enabled>true</url-rewriting-enabled>) you can configure this property in the WebSphere Studio Application Developer Version 4.0 Test Environment. In the Server perspective, open the Server Configuration view, right-click the server you want to work with and click Open. Click the Web tab and select the Enable URL rewrite check box.
Java files and project resource files The property file default.servlet_engine contains the <root-uri> context root of the VisualAge for Java Web application(s). When creating a Web project in WebSphere Studio Application Developer the Create a Web Project window contains a Context root field for this data.
� [Windows]: Web application settings in files such as VisualAge\ide\project_resources\IBM WebSphere Test Environment\hosts\default_host\default_app\servlets\default_app.webapp that you have customized yourself should be migrated to your__Web_project\webApplication\WEB-INF\web.xml file in WebSphere Studio Application Developer. For example, if you have changed Servlet names and Servlet paths in the default_app.webapp file, you would make the corresponding changes in your web.xml file.
� [Linux]: Web application settings in files such as VisualAge\ide\project_resources\IBM WebSphere Test Environment\hosts\default_host\default_app\servlets\default_app.webapp that you have customized yourself should be migrated to
106 Migrating to WebSphere V5.0: An End-to-End Migration Guide

your_WebSphere_Studio__Web_project/webApplication/WEB-INF/web.xml file in WebSphere Studio Application Developer. For example, if you have modified Servlet names and Servlet paths in the default_app.webapp file, you would make the corresponding changes in your web.xml file.
Setting up your WebSphere V4 test environment and testing your migrated application(s)
If the application is a Java project, then you just use the normal WebSphere Studio Application Developer Run or Debug support for Java projects to test it.
If the application uses WebSphere Application Server (Web projects and EJB projects do), then test it using the built-in WebSphere Application Server. This requires that a default test server be created and started. For an EJB project, right-click the EJB project and select Run on Server to run the EJB Test Client. For a Web project, right-click the main HTML page and select Run on Server to launch the Web browser.
For information on testing other types of projects, refer to the online help.
Deploying your applications from WebSphere Studio Application Developer to remote WebSphere Application Server
If you are using the WebSphere Application Server as your runtime environment, deploy your application using the Server Tools feature of WebSphere Studio Application Developer.
Sharing WebSphere Studio Application Developer project settings between multiple developers (post-migration)
WebSphere Studio Application Developer projects (and their associated settings) can be shared between developers. To do this, save a project into the WebSphere Studio Application Developer software configuration management (SCM) server, then extract it onto another team member on the WebSphere Studio Application Developer.
Chapter 3. Development tool migration (GA) 107
3.7 Migrating from WebSphere Studio Application Devloper (Linux)
Migration from the preview version to the WebSphere Studio Application Developer for Linux Version 4.0.3 is not supported. See the Installation Guide for instructions on uninstalling the preview version. However, you should be able to use your preview workspace directory with WebSphere Studio Application Developer for Linux Version 4.0.3. If you receive an error message when starting the workbench for the first time, try exiting the workbench and then restarting it to correct the problem.
Any Java beans you generated from an XML DTD file (Document Type Definition) using XML Tooling in the preview version of WebSphere Studio Application Developer must be regenerated in order to compile and run in this version of WebSphere Studio Application Developer.
3.8 Migrating enterprise beans from VisualAge for Java to WebSphere Studio Application Developer
This section provides instructions on how to migrate your VisualAge for Java enterprise beans to WebSphere Studio Application Developer. Migrating VisualAge for Java enterprise beans to WebSphere Studio Application Developer involves the following steps:
1. Export VisualAge for Java enterprise beans as a 1.1 JAR using the VisualAge for Java EJB Export tool.
2. Import the EJB 1.1 JAR WebSphere Studio Application Developer.
3. Generate deploy code and data source binding information.
4. Create a server configuration and instance.
5. Add data source information to your configuration.
6. Test the enterprise beans with the new EJB test client.
This section also contains information about:
� Items migrated
� Code changes due to EJB 1.0 specification versus EJB 1.1 specification
� VisualAge for Java Version 3.5.3 EJB 1.0 JARs versus VisualAge for Java Version 4.0 EJB 1.1 JARs
108 Migrating to WebSphere V5.0: An End-to-End Migration Guide

� Moving multiple VisualAge for Java EJB groups into WebSphere Studio Application Developer EJB projects
3.8.1 VisualAge for Java EJB Export Tool (migrating map/schema from EJB 1.0 to EJB 1.1)
VisualAge for Java Version 4.0 includes a special tool (the EJB Export Tool) for migrating enterprise beans. Therefore, all enterprise beans must be migrated from that version to WebSphere Studio Application Developer. Note that the tool migrates VisualAge for Java EJB 1.0 map/schema metadata into EJB 1.1 map/schema XML files, but does not change the code in any way (it is still EJB 1.0 code).
There is an Export tool for EJB 1.1 fixpack (be sure to get the latest Version 4.1.5 or later), available from the VisualAge Developer's Domain (see http://www7.software.ibm.com/vad.nsf/Data/Document4624) which fixes certain defects with the tool. One defect the fixpack fixes is a problem the EJB tool has if a group has relationships with two or more ForeignKeys mapping to the same two or more tables. Refer to the fixpack's Readme file for more information about the defects the fixpack fixes.
Items migratedThe following items are migrated when you migrate your enterprise beans:
� Entity beans (CMP, BMP) � Session beans (both stateful and stateless) � Finder helpers (method and where custom finders) � Inheritance (with multi-levels) � Associations � Mappings and schemas � Deployment and control descriptions
Note: It is recommended that all of your database tables contain a table qualifier prior to exporting using the VisualAge for Java Version 4.0 EJB Export Tool. Most databases require a table to have a qualifier, and the WebSphere Studio Application Developer workbench does not handle empty qualifiers when one is expected for the database vendor.
Chapter 3. Development tool migration (GA) 109
3.8.2 VisualAge for Java Version 3.5.3 EJB 1.0 JARs versus VisualAge for Java Version 4.0 EJB 1.1 JARs
In VisualAge for Java Version 3.5.3 you can generate an undeployed EJB 1.0 JAR, or generate a deployed EJB 1.0 JAR (with deployment code, stubs, tie code, and so on). You can import the EJB 1.0 JAR into the WebSphere Application Server Version 4.0 Application Assembly Tool AAT) and use that to generate deployment and control descriptors and to run the EJB Deploy Tool to generate deploy code, stubs, and so on into an EJB 1.1 format JAR (enterprise applications archives). The net result of the previous steps is that you can have a deployed JAR that can be run in WebSphere Application Server Version 4.0, and hence can also be run in WebSphere Studio Application Developer (since its WebSphere Test Environment is a WebSphere Application Server Version 4.0 server). However, runtime execution does not imply ongoing development capability.
You can include the previously generated Java code into the corresponding EJB JARs and import that into WebSphere Studio Application Developer, and WebSphere Studio Application Developer would parse and understand the EJB session support, security information, finder information, and assembly descriptor (const methods, and so on). However, extensions (class inheritance and ForeignKey associations) and the map and schema information are all lost. They can only be retained if you use the VisualAge for Java Version 4.0 EJB Export Tool, to create an EJB 1.1 JAR containing the map and schema XML information and extension XML information. As well, the names of generated stub classes are different in 1.0 from 1.1 enterprise beans. The net result is that neither an EJB 1.0 JAR nor an EJB Deploy Tool EJB 1.1 JAR retains the basic design metadata to allow them to be used for ongoing development in WebSphere Studio Application Developer.
The VisualAge for Java Version 4.0 EJB Export Tool produces an EJB 1.1 JAR that contains all the EJB design metadata, including the map and schema information and the extensions (class inheritance and ForeignKey associations), so that you can immediately continue to develop within WebSphere Studio Application Developer and regenerate deployment code anytime it is required. This is the only supported method of migrating VisualAge for Java enterprise beans into WebSphere Studio Application Developer, and the use of the VisualAge for Java Version 4.0 EJB Export Tool is the only method that will work for ongoing EJB development within WebSphere Studio Application Developer.
110 Migrating to WebSphere V5.0: An End-to-End Migration Guide
3.8.3 Moving multiple VisualAge for Java EJB groups into WebSphere Studio Application Developer EJB projects
In VisualAge for Java, you may have multiple EJB groups, with each group being used for intragroup inheritance or associations. Typically, you would export each VisualAge for Java EJB group (using the VisualAge for Java 4.0 EJB Export tool) into a matching JAR, and then import that JAR into a matching WebSphere Studio Application Developer EJB project.
WebSphere Studio Application Developer EJB projects correspond to EJB modules. Where intragroup inheritance or associations are not required, you may wish to keep the EJB groups as separate EJB projects - you can close individual projects and hence keep the overall memory requirements down. WebSphere Studio Application Developer has the concept of enterprise-level grouping, using WAR and EAR files, so several EJB groups can be logically combined that way, and then deployed as if they were a single unit.
If you import multiple EJB groups into the same EJB project, then any XML in them may not be correctly merged (the last imported group overwrites).
3.8.4 Migrating your enterprise beansTo migrate your enterprise beans, do the following steps:
1. Export them as a 1.1 JAR using the VisualAge for Java Version 4.0 EJB Export tool:
a. In VisualAge for Java Version 4.0, add the “Export Tool for Enterprise Java Beans 1.1” feature to the workspace.
b. In the EJB page of the Workbench, right-click the EJB group that you want to export, and click Export -> EJB 1.1 JAR.
c. Fill in the fields as necessary (ensure that the .java check box is selected), select your database, and click Finish.
2. Import them into WebSphere Studio Application Developer:
a. In WebSphere Studio Application Developer, create a new EJB 1.2 project and a new enterprise applications archives project. You will automatically be switched to the J2EE perspective.
b. Select File -> Import -> EJB JAR file. Click Next, then select your JAR file, your EJB project, and your EAR file. Click Finish.
c. If you have any errors (they will be listed in the Tasks view), refer to 3.8.5, “Known problems and workarounds” on page 113 to troubleshoot them.
Chapter 3. Development tool migration (GA) 111

d. After you have imported your EJB files, follow the instructions in 3.8.6, “Locating EJB information” on page 114 to help you find out where to find your EJB and method properties, your schemas, maps, and so on.
3. Generate deploy code and data source binding information:
a. In the J2EE Hierarchy view, expand the EJB Modules folder and select the newly imported EJB JAR.
b. From the EJB JAR's pop-up menu, click Generate -> Deploy and RMIC Code. Select to generate code for all your beans.
c. From the EJB JAR's pop-up menu, click Open With -> EJB Deployment Descriptor.
d. In the EJB deployment descriptor, select the Overview tab.
e. Select your EJB JAR, and type the WebSphere binding JNDI name and the Data Source Binding JNDI name. Record this data source name, since you will use it later when you configure your data source in the test server instance.
f. Save your changes and close the EJB deployment descriptor.
4. Create a WebSphere Studio Application Developer server configuration for your test server, if you do not already have one:
a. Switch to the Server perspective.
b. Click File -> New -> Server Project.
c. In the Project name field, type ServerTest. Click Finish.
d. In the Navigator view, select ServerTest. From its pop-up menu, click New -> Server Instance and Configuration.
e. Type the name of the server, for example, MyServer, and select ServerTest from the Folder list.
f. In the Server instance type field, expand WebSphere Version 4.0 and select Test Environment. In the Template field, click None.
g. Click Next. Specify a server port number of 8080.
h. Click Finish.
A new server configuration and instance will be created.
5. Add data source information to your server configuration:
a. In the Server Configuration view, expand Server Configurations and select your server.
b. Right-click it and from your pop-up menu, click Open.
c. Select the Data source tab.
112 Migrating to WebSphere V5.0: An End-to-End Migration Guide

d. In the JDBC Driver List, select the appropriate database driver (for example, Db2JdbcDriver if you are using DB2) and click Edit.
e. Verify that the Class path field contains the correct path to db2java.zip. Click OK.
f. If you are not using DB2, add a new driver. Ensure that you use the J2EE JDBC driver that the Database vendor provides.
g. Select your JDBC driver, and click the Add button that is to the right of the Data source field.
h. In the Add a data source window, type a data source name. In the JNDI name field, type the same name you used in step e on page 112. Enter the name of your database and click OK.
i. Save your changes.
6. Test the enterprise beans with the new EJB test client:
a. In the Server Configuration view, expand Server Configurations and select your server. Right-click it, and click Add Project. Select the EAR project that contains your EJB module.
b. In the Servers view, select your server instance. Right-click it and from its pop-up menu, click Start.
c. The project will be published and the server will start. After a few moments, click the Console tab to view the console window. You should see a message saying the Default Server is open for e-business. Scroll through the console to verify the EJB JAR has been started.
d. In the J2EE Hierarchy view, expand the EJB Modules folder, select the enterprise bean that you want to test, right-click it, and click Run on server.
3.8.5 Known problems and workaroundsThe following are known problems and ways to work around them:
� When migrating the method finder helpers, the finder helper interfaces will disappear, because they have moved into an XML description file. This will generate a problem, since your finder helper object usually implements this interface; the implementation must be removed.
� If you use inheritance in your enterprise beans, and you have built your own custom finders, they may break, since the mapping of fields in the generated code is different in WebSphere Studio Application Developer. To fix this, go to the EJSCMPxxxxxx generated class, find the select statement generated for the findbyPrimaryKey, and use it as a template.
Chapter 3. Development tool migration (GA) 113
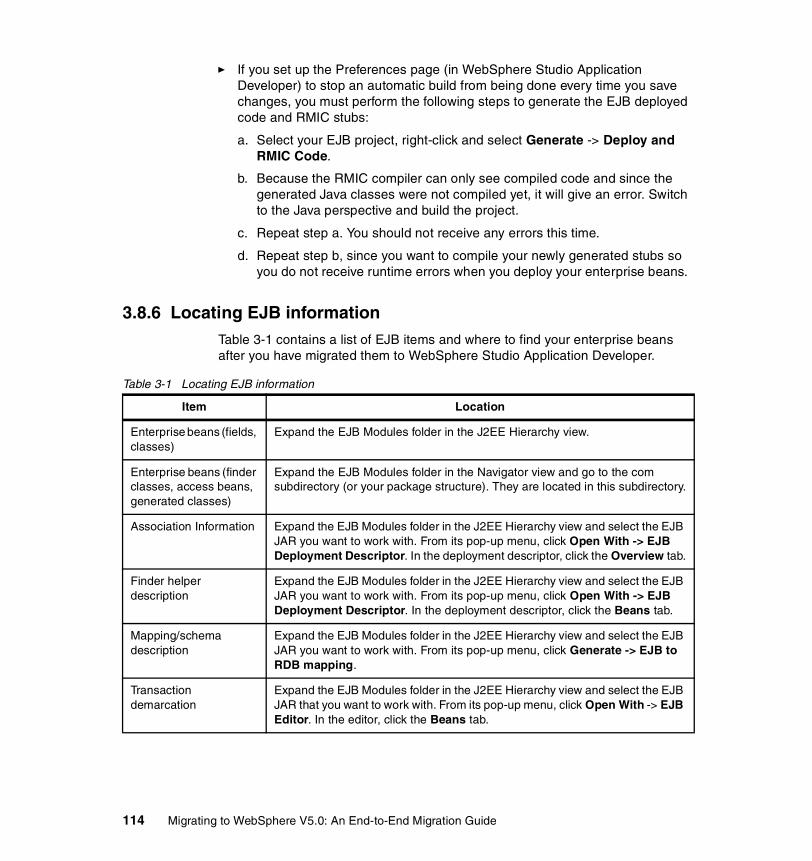
� If you set up the Preferences page (in WebSphere Studio Application Developer) to stop an automatic build from being done every time you save changes, you must perform the following steps to generate the EJB deployed code and RMIC stubs:
a. Select your EJB project, right-click and select Generate -> Deploy and RMIC Code.
b. Because the RMIC compiler can only see compiled code and since the generated Java classes were not compiled yet, it will give an error. Switch to the Java perspective and build the project.
c. Repeat step a. You should not receive any errors this time.
d. Repeat step b, since you want to compile your newly generated stubs so you do not receive runtime errors when you deploy your enterprise beans.
3.8.6 Locating EJB informationTable 3-1 contains a list of EJB items and where to find your enterprise beans after you have migrated them to WebSphere Studio Application Developer.
Table 3-1 Locating EJB information
Item Location
Enterprise beans (fields, classes)
Expand the EJB Modules folder in the J2EE Hierarchy view.
Enterprise beans (finder classes, access beans, generated classes)
Expand the EJB Modules folder in the Navigator view and go to the com subdirectory (or your package structure). They are located in this subdirectory.
Association Information Expand the EJB Modules folder in the J2EE Hierarchy view and select the EJB JAR you want to work with. From its pop-up menu, click Open With -> EJB Deployment Descriptor. In the deployment descriptor, click the Overview tab.
Finder helper description
Expand the EJB Modules folder in the J2EE Hierarchy view and select the EJB JAR you want to work with. From its pop-up menu, click Open With -> EJB Deployment Descriptor. In the deployment descriptor, click the Beans tab.
Mapping/schema description
Expand the EJB Modules folder in the J2EE Hierarchy view and select the EJB JAR you want to work with. From its pop-up menu, click Generate -> EJB to RDB mapping.
Transaction demarcation
Expand the EJB Modules folder in the J2EE Hierarchy view and select the EJB JAR that you want to work with. From its pop-up menu, click Open With -> EJB Editor. In the editor, click the Beans tab.
114 Migrating to WebSphere V5.0: An End-to-End Migration Guide
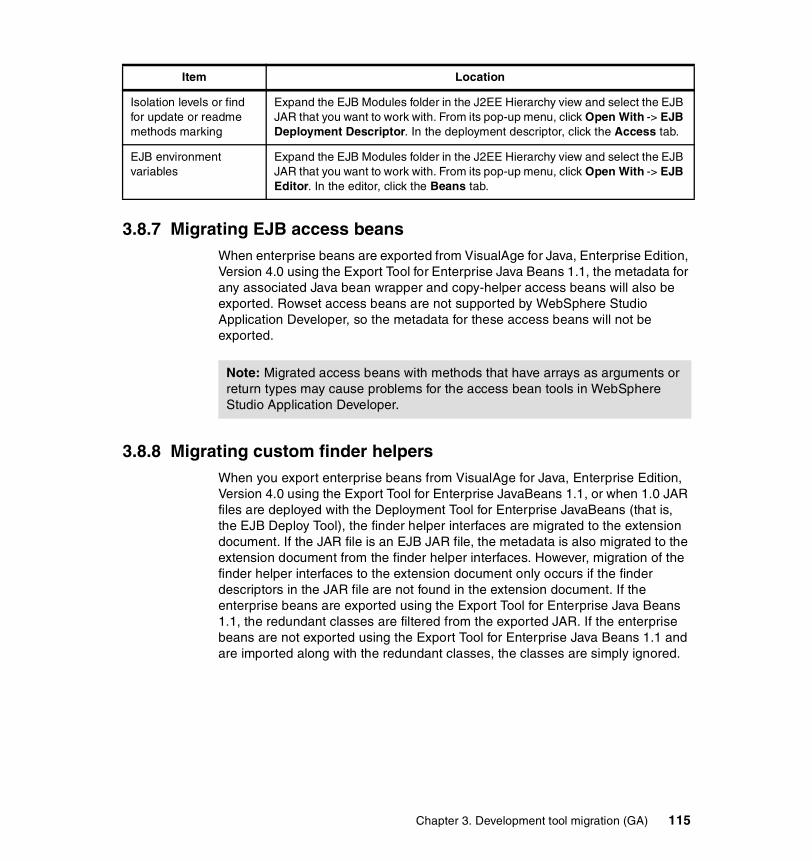
3.8.7 Migrating EJB access beansWhen enterprise beans are exported from VisualAge for Java, Enterprise Edition, Version 4.0 using the Export Tool for Enterprise Java Beans 1.1, the metadata for any associated Java bean wrapper and copy-helper access beans will also be exported. Rowset access beans are not supported by WebSphere Studio Application Developer, so the metadata for these access beans will not be exported.
3.8.8 Migrating custom finder helpersWhen you export enterprise beans from VisualAge for Java, Enterprise Edition, Version 4.0 using the Export Tool for Enterprise JavaBeans 1.1, or when 1.0 JAR files are deployed with the Deployment Tool for Enterprise JavaBeans (that is, the EJB Deploy Tool), the finder helper interfaces are migrated to the extension document. If the JAR file is an EJB JAR file, the metadata is also migrated to the extension document from the finder helper interfaces. However, migration of the finder helper interfaces to the extension document only occurs if the finder descriptors in the JAR file are not found in the extension document. If the enterprise beans are exported using the Export Tool for Enterprise Java Beans 1.1, the redundant classes are filtered from the exported JAR. If the enterprise beans are not exported using the Export Tool for Enterprise Java Beans 1.1 and are imported along with the redundant classes, the classes are simply ignored.
Isolation levels or find for update or readme methods marking
Expand the EJB Modules folder in the J2EE Hierarchy view and select the EJB JAR that you want to work with. From its pop-up menu, click Open With -> EJB Deployment Descriptor. In the deployment descriptor, click the Access tab.
EJB environment variables
Expand the EJB Modules folder in the J2EE Hierarchy view and select the EJB JAR that you want to work with. From its pop-up menu, click Open With -> EJB Editor. In the editor, click the Beans tab.
Item Location
Note: Migrated access beans with methods that have arrays as arguments or return types may cause problems for the access bean tools in WebSphere Studio Application Developer.
Chapter 3. Development tool migration (GA) 115
3.9 Migrating from EJB 1.0 to EJB 1.1 or to EJB 2.0This section provides instructions on how to migrate your enterprise beans from EJB 1.0 to EJB 1.1 or to EJB 2.0. The main steps are:
� Migrating code from EJB 1.0 to EJB 1.1 � Converting projects from EJB 1.x to EJB 2.0 � Migrating code from EJB 1.x to EJB 2.0
3.9.1 Migrating code from EJB 1.0 to EJB 1.1If you are migrating EJB 1.0 code to WebSphere Studio Application Developer, there are some EJB 1.1 specification changes that may affect your code. You may see some of the following validation errors or warnings due to EJB 1.1 changes:
� An enterprise bean cannot use the javax.jts.UserTransaction interface. Use the new javax.transaction.UserTransaction interface instead.
� An entity bean cannot use the UserTransaction interface. This is not allowed in 1.1.
� An entity bean must define FinderException in their throws clause of finder methods.
� An enterprise bean cannot throw a java.rmi.RemoteException. It can throw a javax.ejb.EJBException instead. But RemoteException must still be defined in EJB home and remote interfaces (as required by RMI).
� You cannot use the finalize method.
� java.security.Identity is deprecated.
� Enterprise bean methods getCallerIdentity() and isCallerInRole(Identity) are deprecated. Use getCallerPrincipal() and isCallerinRole(String roleName) instead.
� getEnvironment is deprecated. Open ejb_jar.xml with EJB deployment descriptor, Beans tab, and view environment variables (such as TARGET_HOME_NAME)
String homeName=aLink.getEntityContext().getEnvironment().getProperty("TARGET_HOME_NAME");if (homeName == null) homeName = "TARGET_HOME_NAME";
becomes:
Context env = (Context)(new InitialContext()).lookup("java:comp/env");String homeName = (String)env.lookup("ejb10-properties/TARGET_HOME_NAME");
116 Migrating to WebSphere V5.0: An End-to-End Migration Guide
� CMP enterprise beans ejbCreate(...) methods should return the bean's primary key class (instead of void).
� New HomeHandle interface, and EJBHome interface requires new getHomeHandle() method:
public javax.ejb.HomeHandle getHomeHandle() { return null; }
You should consider enhancements to match EJB 1.1 changes such as:
� Entity bean primary keys can now be java.lang.String objects.
� Entity bean finder methods should define FinderException in their throws clause.
� Entity bean finder methods return java.util.Collection.
� Check the format of your JNDI names (and local namespaces are now supported).
� There are now security roles, and isolation levels are now defined at the method level (they were defined at the EJB level for EJB 1.0).
You should review the EJB 1.1 changes in general to see what other application changes are appropriate. For detailed information, refer to the following publications and Web sites:
� Enterprise Java Beans Specification, Version 1.1, available at http://java.sun.com/products/ejb/docs.html (see Section 1.3, “Application compatibility”).
� The IBM WebSphere InfoCenter, found at http://www.ibm.com/software/webservers/appserv/doc/v40/aes/infocenter/index.html. Refer to the following sections:
– Transitioning to Version 4.0 (Click Application Server AE ->Migration -> Transitioning to Version 4.0 and read the “Role-based security” section)
– Migrating to supported EJB specifications (Click Application Server AE -> Migration -> 3.3 Migrating APIs and specifications -> 3.3.1 Migrating to supported EJB specifications)
– Migrating from Version 3.x (Click Application Server AE ->Migration -> 3.2 Migrating from previous products versions -> 3.2.2 Migrating from Version 3.x)
� WebSphere Version 4 Application Development Handbook, SG24-6134, available at http://www.redbooks.ibm.com/pubs/pdfs/redbooks/sg246134.pdf (See the section “Migrating 1.0 EJBs to 1.1 EJBs” on pages 267-268).
Chapter 3. Development tool migration (GA) 117
� Programming J2EE APIs with WebSphere Advanced, SG24-6124, available at http://www.redbooks.ibm.com/pubs/pdfs/redbooks/sg246124.pdf (See the section on “EJB 1.1 code changes” on pages 113-114).
� EJB Development with VisualAge for Java for WebSphere Application Server, SG24-6144, available at http://www.redbooks.ibm.com/pubs/pdfs/redbooks/sg246144.pdf (See Appendix B).
3.9.2 Converting projects from EJB 1.x to EJB 2.0You can migrate your existing EJB 1.1 project to an EJB 2.0 project, or you can keep both by creating a new EJB 2.0 project and then importing the existing EJB 1.1 project JAR file into it, as follows:
� Right-click the 1.1 project and select Migrate -> J2EE Migration Wizard.
� Or, export the existing 1.1 project as an EJB JAR, create a new 2.0 project, and then select File -> Import -> EJB JAR.
3.9.3 Migrating code from EJB 1.x to EJB 2.0EJB 2.0 beans are supported only in an EJB 2.0 project (although a 2.0 project also supports 1.1 beans).
1. For any CMP 1.x bean, replace each CMP field with abstract getXXX and setXXX methods. (Then the bean class needs to be abstract.)
2. For any CMP, create an abstract getXXX and setXXX method for the primary key.
3. For any CMP 1.x finder, create an EJBQL (EJB Query Language) for each finder.
Note: EJB Query Language has the following limitations in WebSphere Studio Application Developer Version 5:
� EJB Query Language queries involving EJBs with keys made up of relationships to other EJBs will appear as invalid and cause errors at deployment time.
� The IBM EJB Query Language support extends the EJB 2.0 spec in various ways, including relaxing some restrictions, adding support for more DB2 functions, and so on. If portability across various vendor databases or EJB
Note: Although the project is an EJB 2.0 project, the existing (or imported) EJB 1.1 Container Managed Persistence (CMP) beans remain EJB 1.1 beans. That is, the CMP beans are not converted to EJB 2.0.
118 Migrating to WebSphere V5.0: An End-to-End Migration Guide
deployment tools is a concern, then care should be taken to write all EJB Query Language queries strictly according to instructions described in Chapter 11 of the EJB 2.0 specification.
4. For any CMP 1.x finder, return java.util.Collection instead of java.util.Enumeration.
5. For any CMP 1.x bean, change all occurrences of this.field = value to setField(value) in ejbCreate() and elsewhere throughout the code.
6. Update your exception handling (rollback behavior) for non-application exceptions:
– Throw javax.ejb.EJBException instead of java.rmi.RemoteException to report non-application exceptions.
– In EJB 2.0 and 1.1, all non-application exceptions thrown by the instance result in the rollback of the transaction in which the instance executed, and in discarding the instance.
– In EJB 1.0, the container would not roll back a transaction and discard the instance if the instance threw the java.rmi.RemoteException.
7. Update your Exception handling (rollback behavior) for application exceptions:
– In EJB 2.0 and 1.1, an application exception does not cause the container to automatically roll back a transaction.
– In EJB 1.1, the container performs the rollback only if the instance have invoked the setRollbackOnly() method on its EJBContext object.
– In EJB 1.0, the container was required to roll back a transaction when an application exception was passed through a transaction boundary started by the container.
8. Update any CMP setting of application-specific default values to be inside ejbCreate (not using global variables, since EJB 1.1 containers set all fields to generic default values before calling ejbCreate, which will overwrite any previous application-specific defaults). This approach will also work for EJB 1.0 CMPs.
Important Note: In Application Developer Version 5, there is a J2EE Migration wizard to migrate the EJB beans within an EJB 2.0 project from 1.x into 2.0 (you cannot just migrate individually selected beans). It will perform migration steps #1 to #2 above, but not perform steps #3 to #7.
� It will also migrate EJB 1.1 (proprietary) relationships into EJB 2.0 (standard) relationships, plus other benefits.
� It will also maintain EJB inheritance.
Chapter 3. Development tool migration (GA) 119
To access the J2EE Migration wizard, right-click the EJB project and then select Migrate -> J2EE Migration Wizard. For more information about the different wizard options, press F1 while in the J2EE Migration wizard.
3.10 Migrating from VisualAge for Java Visual Composition Editor to Visual Editor for Java
This section provides instructions on how to migrate applications created in the Visual Composition Editor feature of VisualAge for Java to the Visual Editor for Java within WebSphere Studio Application Developer:
� Saving enhanced design-time metadata from VisualAge for Java � Completing the migration (importing into WebSphere Studio)
3.10.1 Saving enhanced design-time metadata from VisualAge for Java
This step is optional but is highly recommended (especially if your application has any connections) for the following reasons:
� VisualAge for Java did not save information about the placement of top-level beans (that is, beans that are not contained inside other beans) on the free-form surface. By contrast, WebSphere Studio always saves this information as a comment on the line of code that declares the bean and restores the bean to that position on the canvas every time you open the Visual Editor. You have the option to save this design-time information in VisualAge for Java before migration. If you do not save it, when you first open your .java files in the new Visual Editor for Java, the editor calculates a default position for top-level beans (also known as free-form parts), which you can easily change by means of a drag-and-drop operation.
� Although the new Visual Editor for Java in WebSphere Studio Application Developer does not support connection design, an equivalent function may be added in the future. (Note: This is not a product commitment; it is just preparation for a future possibility.)
To save the enhanced metadata information prior to migration:
1. Go to the VisualAge for Java Developer Domain found at http://www7.software.ibm.com/vad.nsf/data/document4293 and download the Visual Composition Editor Code Generation/Export Feature.
2. Following the tool readme, add the tool into VisualAge for Java and then stop and restart VisualAge for Java.
120 Migrating to WebSphere V5.0: An End-to-End Migration Guide
3. Version the current application code into the VisualAge for Java repository (so you can return to this version in case of any ongoing VisualAge for Java development).
4. For each of your graphical applications within VisualAge for Java, select one or more of the graphical programs (typically XxxxxView), right-click, and then do the following:
a. Click VCE Code Generation/Export, and be sure the Export to a directory after code regeneration option is selected.
b. Leave Directory as the selected export destination, and click Next.
c. Select your target directory, unselecting the .class option and selecting the .java option (since you want the source code), and then click Finish.
d. Optionally, reload your VisualAge for Java code with its previous version (right-click and then select Replace with -> Previous edition).
3.10.2 Completing the migration (importing into WebSphere Studio)Your classes are now ready to be imported into WebSphere Studio. Refer to 3.6, “Migrating from VisualAge for Java to WebSphere Studio Application Developer” on page 100. Once your previous Visual Composition Editor source programs have been imported into WebSphere Studio Application Developer, you can maintain them in the Visual Editor for Java.
3.11 Converting from VisualAge for Java Persistence Builder to EJB 2.0
This section provides an overview of how to convert your VisualAge for Java Persistence Builder applications to EJB 2.0 in WebSphere Studio Application Developer Version 5.0.
Note: Complete details are found in an article posted on the WebSphere Developers Domain, which has a link from the WebSphere Studio Application Developer Transitions Web page at http://www.ibm.com/websphere/developer/zones/studio/transition.html.
Chapter 3. Development tool migration (GA) 121
Do the following steps:
1. Migrate and export the Persistence Builder Model as an EJB 1.1 JAR:
a. Use the VisualAge for Java 4.0 tool to migrate the Persistence Builder Model into an EJB 1.0 Group (click OnlineHelp -> Tasks -> Adding Persistence -> Migrating Persistence Builder Model to EJB)
b. Use VisualAge for Java EJB 1.1 Export Wizard to export an EJB 1.1 JAR
2. Import EJB 1.1 JAR into EJB 1.1 project, convert to EJB 2.0 project:
a. Import an EJB 1.1 JAR into WebSphere Studio Application Developer EJB 1.1 project.
b. For each bean within your EJB 1.1 project, set your read-only access intents (Read, or Update) and isolation levels (Repeatable read, or Read committed, or Read uncommitted, or Serializable). These are not exported out of VisualAge for Java and must be manually set.
i. For each EJB project, right-click Open with -> EJB Deployment Descriptor Editor and open the Access tab.
ii. Click Access Intent for Entities 1.x -> Add, or Edit, or Remove (as appropriate)
iii. Click Isolation Level -> Add, or Edit, or Remove (as appropriate)
3. (Optional) Convert the client application and get the server running, all at the EJB 1.1 level:
See details in step 6 on page 123, "Convert Persistence Builder client application into EJB client application".
4. Convert to EJB 2.0 project:
Convert EJB 1.1 project into EJB 2.0 project by selecting your EJB project, then right-clicking File -> Migrate -> J2EE Migration Wizard.
5. Convert EJB 1.1 code to EJB 2.0 and set application profile declarations:
a. Use the J2EE (EJB Bean) Migration wizard to convert from 1.x CMPs into 1.1 CMPs into 2.0 CMPs.
Note: EJB 2.0 primarily provides server-side performance improvements. You should be able to get your Persistence Builder application converted and running using EJB 1.1 if you wish (and this might be a nice project stepping-stone before undertaking the EJB 2.0 conversion in order to achieve the performance enhancements). Alternatively, you can convert your server-side code to EJB 2.0 first, and then get your client and overall application running.
122 Migrating to WebSphere V5.0: An End-to-End Migration Guide
i. Refer to 3.9.3, “Migrating code from EJB 1.x to EJB 2.0” on page 118 for additional (manual) changes.
ii. This will also migrate your access intents from Entity 1.x to Entity 2.x format
iii. This will also migrate any 1.1 (proprietary) relationships into 2.0 (standard) relationships using local interfaces.
This also migrates any relationship accessor access intents. Client code (including existing session beans) will have to change to match the new method signatures.
b. Manually adjust your access intents
i. Entity 2.x access intents are more powerful (Optimistic/Pessimistic Read/Update, Pessimistic Update Exclusive, and so on).
If you an optimistic type (wsOptimisticUpdate or wsOptimisticRead), then you can also select the Read Ahead Hint check box. This adds the ability to Preload (ReadAhead) related enterprise beans across relationships in a single query.
ii. For each bean within your EJB 2.0 project, adjust your migrated access intents.
For each EJB project, right-click Open with -> EJB Deployment Descriptor Editor and open the Access tab.
Then click Access Intent for Entities 2.x -> Add, or Edit, or Remove (as appropriate).
6. Convert a Persistence Builder client application into an EJB client application:
Important note: Persistence Builder provides the ability to create stand-alone applications (as well as distributed applications). There is no facility for stand-alone EJB applications. The distributed alternatives are:
– Install a WebSphere Application Server and run everything on one machine.
– Install the WebSphere Application Server "light server" to provide the client-side environment to access remote servers.
– Do not use EJBs at all (use JDBC, or the new database access beans for rowset JDBC access, or other approaches).
Additional note: Persistence Builder provided Visual Composition Editor (VCE) palette items for visually building client applications. There are no corresponding components within Application Developer. Alternatives are:
– Convert the client-side Java program by removing the use of the Persistence Builder visual components.
Chapter 3. Development tool migration (GA) 123

– Convert the client-side Java program into a Web browser-based program accessing server-side Servlets.
a. Use session beans to abstract layer(s) of business logic above entity beans:
• Refer to "Rules and Patterns for Session Facades" found at http://www.ibm.com/websphere/developer/library/techarticles/0106_brown/sessionfacades.html.
• If your Persistence Builder applications used the recommended Persistence Builder "TaskWrapper pattern" (see http://www7b.software.ibm.com/vadd-bin/httpdl?1/vadc/techarticle/0010_lanuti.pdf), then your application Servlets and JSPs do not directly use the business objects nor associated transactions. Instead all persistence and transaction exceptions are encapsulated and the data flowing into and out of the TaskWrapper is typically only serializable objects. Such a TaskWrapper application should convert fairly easily into EJBs plus session beans.
• The session beans now control transaction demarcation. They use EJB Container Managed Persistence (CMPs) with container managed transactions ('TRANSACTION_REQUIRED').
No rollbacks are available to the client calling the session bean, so they must have recover logic.
Manually convert any Persistence Builder ConflictResolution code into EJB TransactionRolledBack exception handling.
• Where Persistence Builder provided nested transactions, clients now would use multiple session beans with REQUIRES_NEW and with recovert/compensation logic in case of errors.
• Important reference: "WebSphere Application Server, Development Best Practices for Performance and Scalability", found at http://www.ibm.com/software/webservers/appserv/ws_bestpractices.pdf.
b. Manually convert Persistence Builder business logic from persistence builder model to use new session beans:
• Persistence Builder clients used to use MyobjectImpl implementation classes. New (converted) EJB clients (or more typically their new application session beans) will now use the EJB MyObject classes (remote interface, and hence indirectly the MyobjectBean object).
• If the developer had any business methods in the previous implementation classes, then they need to be copied into the new EJB bean (and promoted to the remote interface), including any required exception handling.
124 Migrating to WebSphere V5.0: An End-to-End Migration Guide

c. Manually convert from Persistence Builder Lite Collections to EJB 2.0 Dependent Values.
• Alternatively, single-value finders can return a single field - which may be suitable in some cases.
• Alternatively, a session bean can directly use JDBC - which may be suitable in some cases.
3.12 Build setup (library JARs, dependent project JARs, Ant builds)
This section covers the following migration topics:
� Java library JARs and third-party external JARs � Optimizing multi-project builds using dependent project JARs � Automated production builds using Ant
3.12.1 Java library JARs and third-party external JARsFor detailed explanations of what is involved, see the article on J2EE Class Loading found at http://www.ibm.com/websphere/developer/library/techarticles/0112_deboer/deboer.html (J2EE modules and class paths) and on developing J2EE utility JARs, found at http://www.ibm.com/websphere/developer/library/techarticles/0112_deboer/deboer2.html (Java JARs in J2EE modules). These provide excellent technical background and advice.
Recommended way to use a third-party JAR within a Web project
The recommended way to use a third-party JAR file within a Web project is to import it (keeping it as a JAR file) into the library folder of your Web project. This is the only J2EE-defined, portable way to use a JAR file, and will ensure that you do not have to make any changes when deploying to another server.
To use an external JAR file in a single Web project, follow the steps below. If you need to use the JAR file in an EJB project or in multiple Web projects, follow the steps in “Recommended way to use a third-party JAR for use with multiple EJB or Web projects” on page 126 instead.
1. Select File -> Import -> File System (not Zip file) in order to ensure that the JAR file is not expanded when it is imported. Click Next.
Chapter 3. Development tool migration (GA) 125

2. Click Browse and locate the JAR file directory.
3. Import it into your WebProject/webApplication/WEB-INF/lib folder, where WebProject is the name of your Web project.
4. Click Finish. The JAR file will be automatically added to the Java build path, and no further changes are required at runtime.
Recommended way to use a third-party JAR for use with multiple EJB or Web projects
The recommended way to use a third-party JAR file with two or more EJB or Web projects is to import it (keeping it as a JAR file) into your Enterprise Application (EAR) project. This is the only J2EE-defined, portable way to use a JAR file, and will ensure that you do not have to make any changes when deploying to another server.
To use an external JAR file with multiple EJB or Web EJB projects, follow the steps below. If you only need to use the JAR file in a single Web project, follow the steps in the previous section.
1. Select File -> Import -> File System (not Zip file) in order to ensure that the JAR file is not expanded when it is imported. Click Next.
2. Click Browse and locate the JAR file directory.
3. Import the JAR file into the Enterprise Application project that contains the EJB or Web projects.
4. Click Finish. The JAR file will automatically be added to the Java build path, and no further changes are required at runtime.
5. Follow the steps in the next section to add the JAR to the module dependencies of the Web or EJB project.
References between Web projects and other EJB projectsIf you have a Web or EJB project that depends on another EJB project, you must take the following steps to make sure that the project will be visible at runtime:
1. Select the Web or EJB project, right-click it, and select Edit Module Dependencies from its pop-up menu.
2. Select the JARs or EJB projects that the project requires at runtime.
3. Click Finish.
This changes the Web or EJB project manifest file to contain an explicit reference to the required EJB project. It also modifies the Java build path to include the references to EJB and Web projects. Using this technique, the WebSphere
126 Migrating to WebSphere V5.0: An End-to-End Migration Guide

Application Server does not need any specific setting for module visibility (deprecated).
Alternative way to use external JAR files (global build and server classpath)
You may also leave the JAR file outside of WebSphere Studio Application Developer and add it to both the Java build path and the server instance's class path. This is not recommended, because your application will not be easily portable. When you move to a different server, you will always have to update the server's class path. As well, you need to ensure that your class files do not conflict with other versions of similar class files already on the server classpath (and needed by the server or its other applications). If you do decide to take this approach, do the following:
1. Add the external JAR file to the Java build class path of the project that requires the JAR file.
a. Select the project, right-click it, and select Properties from its pop-up menu.
b. Click Java Build Path.
c. Click the Libraries tab.
d. Click Add External JARs. Select the JAR file, and click Open.
e. Click OK.
2. Add the external JAR file to the server instance's class path:
a. Open the Server Configuration view, and expand the Server folder.
b. Select the server instance that the project is deployed on. Right-click it and click Open.
c. Click the Paths tab.
d. Within ws.ext.dirs, click Add External JARs. Select the JAR file, and click Open. Note that ws.ext.dirs is used for application JAR files, and the CLASSPATH is used for server JAR files.
e. Close the server instance and save your changes.
3.12.2 Optimizing multi-project builds using dependent project JARsWebSphere Studio Application Developer's powerful autobuild feature can slow down build performance during complex, multiproject builds. There are a number of ways to control these autobuilds (dependent files, active and inactive projects, and projects in source or JAR format) but these options can get quite complicated. For an explanation of the options and how to optimize your build
Chapter 3. Development tool migration (GA) 127
performance, see the WebSphere Developer Domain article “Optimizing complex builds in WebSphere Studio Application Developer” found at http://www.ibm.com/websphere/developer/library/techarticles/0204_searle/searle.html.
3.12.3 Automated production builds using AntYou can use Ant with WebSphere Studio Application Developer to automate your production builds. The WebSphere Developer Domain article “Using Ant with WebSphere Studio Application Developer” found at http://www.ibm.com/websphere/developer/library/techarticles/0203_searle/searle1.html explains the following things:
– What is Ant?
– How to run Ant both inside and outside WebSphere Studio Application Developer
– How to use Ant for production builds of J2EE elements (EJBs, WARs, EARs, and so on)
– How to extend Ant with new WebSphere Studio Application Developer build tasks
3.13 Further readingUp-to-date information on migration and other topics is available at http://www.ibm.com/websphere/developer/zones/studio/transition.html
If you wish to migrate previously developed applications from an IBM WebSphere Application Server Standard Edition environment to WebSphere Application Server - Express environment, refer to Migrating Applications from WebSphere Application Server Standard Edition to WebSphere Application Server-Express V5 at http://www.ibm.com/redbooks/redpapers/abstracts/redp3618.html.
The following publications and Web pages provide general information that you may find helpful when working with WebSphere Studio Application Developer:
� Enterprise JavaBeans Specification, Version 1.1: http://java.sun.com/products/ejb/docs.html
� Enterprise JavaBeans Specification, Version 2.0: ftp://128.11.159.146/pub/ejb/947q9tbb/ejb-2_0-fr2-spec.pdf
� JSR-000053 Java Servlet 2.3 and JavaServer Pages 1.2 Specifications: http://java.sun.com/aboutJava/communityprocess/first/jsr053/index.html
128 Migrating to WebSphere V5.0: An End-to-End Migration Guide

� The IBM WebSphere Application Server Version 4 InfoCenter: http://www.ibm.com/software/webservers/appserv/doc/v40/aes/infocenter/index.html
� WebSphere Version 4 Application Development Handbook: http://www.redbooks.ibm.com/pubs/pdfs/redbooks/sg246134.pdf
� Programming J2EE APIs with WebSphere Advanced: http://www.redbooks.ibm.com/pubs/pdfs/redbooks/sg246124.pdf
� EJB Development with VisualAge for Java for WebSphere Application Server: http://www.redbooks.ibm.com/pubs/pdfs/redbooks/sg246144.pdf
� WebSphere Application Server Version 3.5 to 4.x - Migration Hints & Tips: http://www7b.software.ibm.com/wsdd/library/techarticles/0208_wright/wright.html
� WebSphere Studio Application Developer Service Portal: http://www.ibm.com/software/ad/studioappdev/support/
� WebSphere Studio Application Developer Frequently Asked Questions (FAQ): http://www.ibm.com/support/search.wss?rs=457&tc=SSBRLP&dc=D800
� WebSphere Application Server Service Portal: http://www.ibm.com/software/software/webservers/appserv/support.html
� WebSphere Application Server Frequently Asked Questions (FAQ): http://www.ibm.com/support/search.wss?rs=180&tc=SSEQTP&dc=D800
Further reading that may be of interest:
� An article on using Ant with WebSphere Studio Application Developer (including J2EE project builds/exports): http://www.ibm.com/websphere/developer/library/techarticles/0203_searle/searle1.html
� An article on optimizing complex builds in WebSphere Studio Application Developer: http://www.ibm.com/websphere/developer/library/techarticles/0204_searle/searle.html
� An article on J2EE class loading (J2EE modules and class paths) in WebSphere Studio Application Developer: http://www.ibm.com/websphere/developer/library/techarticles/0112_deboer/deboer.html
� An article on developing J2EE utility JARs (Java JARs in J2EE modules) in WebSphere Studio Application Developer: http://www.ibm.com/websphere/developer/library/techarticles/0112_deboer/deboer2.html
Chapter 3. Development tool migration (GA) 129
� An article on team support in WebSphere Studio Application Developer: http://www.ibm.com/websphere/developer/library/techarticles/ 0108_karasiuk/ 0108_karasiuk.html
� An article on migrating Enterprise Access Builder components from VisualAge for Java to WebSphere Studio Application Developer: http://www.ibm.com/websphere/developer/techjournal/0201_minocha/minocha.html
� An article on EJB application design using the Session Facade to talk to CMPs http://www.ibm.com/websphere/developer/library/techarticles/ 0106_brown/sessionfacades.html
� An article on WebSphere Application Server Best Practices: http://www.ibm.com/software/webservers/appserv/ws_bestpractices.pdf
� An article on WebSphere Best Practices zone: http://www.ibm.com/websphere/developer/zones/bp/
� WebSphere Developer Domain main Web page: http://www.ibm.com/websphere/developer
� WebSphere Developer Domain technical articles: http://www.ibm.com/websphere/developer/techjournal/
� Information about the WebSphere Studio family, and the features and directions of WebSphere Studio Application Developer: http://www.ibm.com/websphere/developer/zones/studio/transition.html
� IBM WebSphere Studio family of development tools: http://www.ibm.com/websphere/developer/library/techarticles/0108_studio/studio_beta.html
� External Application Developer newsgroup: news://news.software.ibm.com/ibm.software.websphere.studio.application-site-developer
� External workBench (Eclipse) newsgroup: news://news.software.ibm.com/ibm.software.websphere.studio.workbench
� External WebSphere Application Server newsgroup: news://news.software.ibm.com/ibm.software.websphere.application-server
� An article on deploying a J2EE application from WebSphere Studio Application Developer to WebSphere Application Server: http://www.software.ibm.com/vad.nsf/Data/Document3584
� Application Developer software configuration management (source code management) vendors: http://www.ibm.com/software/ad/studioappdev/partners/scm.html
130 Migrating to WebSphere V5.0: An End-to-End Migration Guide
� Migrating applications to Application Developer from competitors’ development tools: http://www.ibm.com/websphere/developer/zones/studio/migration.html
� Migrating VisualCafé WebLogic applications to Application Developer (still deploying to WebLogic): http://www.ibm.com/websphere/developer/library/techarticles/0209_searle/searle1.html
� Eclipse.org: http://www.eclipse.org
� WebSphere Developer Domain Plugin Central: http://www.ibm.com/websphere/developer/downloads/plugin/
� Eclipse workbench plug-ins (not part of Eclipse.org): http://www.eclipse-workbench.com/jsp/plugins.jsp
� Eclipse plug-ins (not part of Eclipse.org): http://www.eclipse-plugins.2y.net/eclipse/plugins.jsp
Chapter 3. Development tool migration (GA) 131

132 Migrating to WebSphere V5.0: An End-to-End Migration Guide
Chapter 4. Development tool migration (EA)
This chapter discusses the migration of VisualAge for Java, or WebSphere Studio “Classic” or WebSphere Studio Application Developer Version 4.0.x. or WebSphere Studio Application Developer Version 5 Beta to WebSphere Studio Application Developer Version 5.0 Early Availability (EA) Edition. To subscribe to the EA edition, please contact your IBM representative.
This chapter is organized into the following sections:
� Important updates to Version 5 product and migration documentation
� Targeting WebSphere Application Server Version 4.0.x versus Version 5
� Migrate from WebSphere Studio Application Developer Version 4.0.x
� Migrate from WebSphere Studio Application Developer Version 5 Beta
� Migrate from WebSphere Studio “Classic” to WebSphere Studio Application Developer
� Migrate from VisualAge for Java to WebSphere Studio Application Developer
� Migrate enterprise beans from VisualAge for Java to WebSphere Studio Application Developer
� Migrate from EJB 1.0 to EJB 1.1 or to EJB 2.0
4
© Copyright IBM Corp. 2002 2003. All rights reserved. 133
� Migrate from VisualAge for Java Visual Composition Editor to Visual Editor for Java
� Convert from VisualAge for Java Persistence Builder to EJB 2.0
� Build setup (library JARs, dependent project JARs, Ant builds)
Downloads and information for new WebSphere Studio development products (WebSphere Studio Application Developer and WebSphere Studio Site Developer) may be found at:
http://www.ibm.com/Websphere/developer/zones/studio/transition.html
The IBM WebSphere Studio Application Developer V5.0 supports both the WebSphere Application Server V4.0 and V5.0 test environments. The new Application Developer V5.0 product is more stable and provides more functions than its predecessor Application Developer V4.0 product. In light of these advantages, the Application Developer V5.0 product is recommended for use in development of applications for both V4.0 and V5.0 WebSphere Application Servers.
Information about using IBM WebSphere Studio Application Developer can be found in the Getting Started guide and the online help. Read the installation guide prior to installing WebSphere Studio Application Developer. After you have successfully installed WebSphere Studio Application Developer, read the Getting Started guide and complete the Getting Started tutorials. The tutorials will introduce you to the workbench, Java development, and Web services. After you have completed the tutorials, read this guide to migrate your resources into WebSphere Studio Application Developer.
In this version of WebSphere Studio Application Developer Version 5, you can migrate code from VisualAge for Java, or WebSphere Studio “Classic” or WebSphere Studio Application Developer Version 4.0.x. or WebSphere Studio Application Developer Version 5 Beta.
4.1 Important updates to Version 5 product and migration documentation
Some information may have changed since the Version 5 product CD images and/or electronic distribution images were generated. For the very latest information updates to the Version 5 product, refer to the Developer Domain Application Developer Web page at http://www.ibm.com/websphere/developer/zones/studio/appdev/. Click Information on Specific Versions -> Version 5 -> Important Updates.
134 Migrating to WebSphere V5.0: An End-to-End Migration Guide
4.1.1 eFix to WebSphere Studio Application Developer V5 EAThe following eFixes became available for the WebSphere Studio Application Developer V5 EA product at the time of writing this redbook. The eFixes are available at URL http://www3.software.ibm.com/ibmdl/pub/software/ websphere/studiotools/wsadea/. The information on using the Update Manager is included in the following sections.
JR17565: Circular dependencies messages and performanceThis is the fix for WebSphere Studio Application Developer V5.0 EA APAR JR17565. It contains the following changes:
� Change circular dependency errors to warnings� Performance improvement building projects with complex dependencies
Installation steps1. Start the EA GM driver.
2. Select Help -> Software Updates -> Update Manager.
3. Right-click in the Feature Updates view and choose New -> Site Bookmark.
4. Give the site a name such as EA_Fixes (it's not important which name you choose).
5. In the URL field, put http://www3.software.ibm.com/ibmdl/pub/software/websphere/studiotools/wsadea/ and then select Finish.
6. Expand the newly created site bookmark and expand all the interactors until you get to WebSphere Studio Application Developer V5.0 EA APAR JR17565 1.0.0.
7. Select it and you should see details about the fix in the Preview view.
8. Click the Install button in the Preview view. The rest should be straightforward.
Chapter 4. Development tool migration (EA) 135
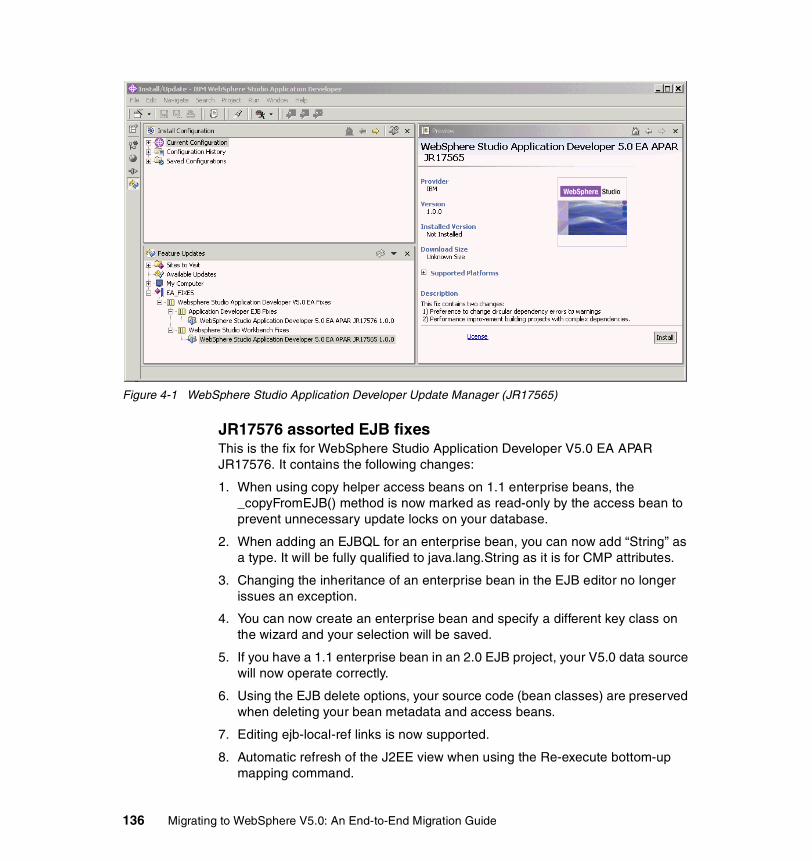
Figure 4-1 WebSphere Studio Application Developer Update Manager (JR17565)
JR17576 assorted EJB fixesThis is the fix for WebSphere Studio Application Developer V5.0 EA APAR JR17576. It contains the following changes:
1. When using copy helper access beans on 1.1 enterprise beans, the _copyFromEJB() method is now marked as read-only by the access bean to prevent unnecessary update locks on your database.
2. When adding an EJBQL for an enterprise bean, you can now add “String” as a type. It will be fully qualified to java.lang.String as it is for CMP attributes.
3. Changing the inheritance of an enterprise bean in the EJB editor no longer issues an exception.
4. You can now create an enterprise bean and specify a different key class on the wizard and your selection will be saved.
5. If you have a 1.1 enterprise bean in an 2.0 EJB project, your V5.0 data source will now operate correctly.
6. Using the EJB delete options, your source code (bean classes) are preserved when deleting your bean metadata and access beans.
7. Editing ejb-local-ref links is now supported.
8. Automatic refresh of the J2EE view when using the Re-execute bottom-up mapping command.
136 Migrating to WebSphere V5.0: An End-to-End Migration Guide
9. Meet-in-the-middle mapping support added for self-referencing tables.
10.Implements a fix for data source fields in 1.1 CMPs and JARs in a 2.0 EJB project. These were removed since they were invalid. The migration action will also migrate from a 1.1 CMP data source to a CMPConnection Factory binding at both the EJB 2.0 JAR level and the bean level if necessary.
Installation steps1. Start the EA GM driver.
2. Select Help -> Software Updates -> Update Manager.
3. Right-click in the Feature Updates view and choose New -> Site Bookmark.
4. Give the site a name such as EA_Fixes (it's not important which name you choose).
5. In the URL field, put http://www3.software.ibm.com/ibmdl/pub/software/websphere/studiotools/wsadea/ and then select Finish.
6. Expand the newly created site bookmark and expand all the interactors until you get to WSAD V5.0 EA APAR JR17576 1.0.0.
7. Select it and you should see details about the fix in the Preview view.
8. Click the Install button in the Preview view. The rest should be straightforward.
Chapter 4. Development tool migration (EA) 137
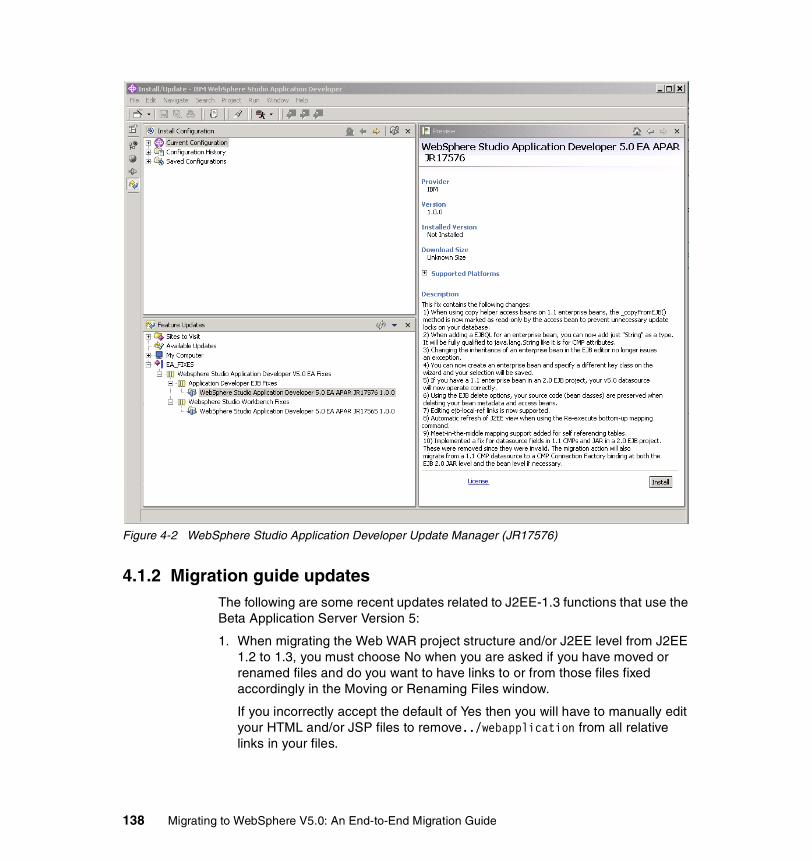
Figure 4-2 WebSphere Studio Application Developer Update Manager (JR17576)
4.1.2 Migration guide updatesThe following are some recent updates related to J2EE-1.3 functions that use the Beta Application Server Version 5:
1. When migrating the Web WAR project structure and/or J2EE level from J2EE 1.2 to 1.3, you must choose No when you are asked if you have moved or renamed files and do you want to have links to or from those files fixed accordingly in the Moving or Renaming Files window.
If you incorrectly accept the default of Yes then you will have to manually edit your HTML and/or JSP files to remove../webapplication from all relative links in your files.
138 Migrating to WebSphere V5.0: An End-to-End Migration Guide
2. If you migrate an EJB 1.1 project to an EJB 2.0 project, you must regenerate RMIC and Deploy code even if the EJBs are left as 1.1 EJBs (since the entire EJB 2.0 project now runs as a J2EE-1.3 module inside a J2EE-1.3 container on the Application Server).
If you do not regenerate the RMIC and Deploy code, you will get runtime errors.
3. If a J2EE-1.3 EJB project contains Container Managed Persistence (CMP) beans, then that project must be configured to use only Application Server Version-5 data sources, even if some or all of the CMPs are only EJB-1.1 beans.
– In a J2EE 1.2 application (EAR), all JDBC applications, Servlets 2.2, or EJB (must be 1.x) beans must use an Application Server Version 4 data source.
– In a J2EE 1.3 application all EJB 1.1 modules (which can only contain EJB 1.x beans) must use Application Server Version 4 data sources.
– In a J2EE 1.3 application all JDBC applications, or Servlet 2.3, or EJB 2.0 Modules (which may have CMP Version 2.0 and/or 1.x) must use Application Server Version 5 data sources.
– If you incorrectly configure an Application Server Version 4 data source, then at runtime there is no “Resource Reference” for this data source (required by the J2EE-1.3 container) and you will get the runtime error:
68c343ee ConnectionFac W J2CA0122I: Resource reference jdbc/YourBank could not be located, so default values of the following are used: [Resource-ref settings] res-auth:1 (APPLICATION), res-isolation-level:0 (TRANSACTION_NONE), res-sharing-scope:false (UNSHAREABLE), res-resolution-control:999 (undefined).
4. If you run a J2EE-1.3 Enterprise Application (EAR) that contains an EJB 2.0 JAR containing an EJB 1.1 CMP, then you must specify the CMP Factory JNDI name for such CMPs. Select the EJB project and open the ejbModule\META-INF\ejb-jar.xml file with the Deployment Descriptor editor. In the Beans tab, select your 1.1 CMP bean, and in the WebSphere Bindings section in the CMP Factory JNDI Name field, enter the data source JNDI name.
You could also use the Default JNDI-CMP Connection Factory binding on the Overview page to set a default Connection Factory used by all beans in the project (Note that this only applies to 1.x beans, not 2.x beans as shown in the editor text).
Chapter 4. Development tool migration (EA) 139
If they are not specified, then the following runtime exception occurs when you try to access the CMP:
51496130 TransactionIm E WTRN0062E: An illegal attempt to use multiple resources that have only one-phase capability has occurred within a global transaction.
5. If you run a J2EE-1.3 Enterprise Application (EAR) that contains a EJB 2.0 JAR containing a mix of both EJB 1.1 CMP and EJB 2.0 CMP, then you will need to download an eFix for Application Developer to support this. Refer to the eFix Web site at http://www14.software.ibm.com/webapp/download/product.jsp?type=s&id=SPA-524G3S
6. If you configure an Application Server Version 5 data source (for CMP EJBs), the default (the first item in the pull-down field) Datasource Helper is com.ibm.websphere.rsadapter.DB2390DataStoreHelper. As the “390” implies, this helper class is only valid for System/390®. You must select com.ibm.websphere.rsadapter.DB2DataStoreHelper from the pull-down choices for the data source to work in Windows.
If you incorrectly accept the System/390 default and try to start a Windows Application Server, you will get an exception:
com.ibm.websphere.cpi.CPIException: COM.ibm.db2.jdbc.DB2Exception: [IBM][CLI Driver][DB2/NT] SQL0104N An unexpected token "KEEP UPDATE LOCKS" was found following "? FOR UPDATE WITH RS". Expected tokens may include "(space)". SQLSTATE=42601"
4.2 Targeting WebSphere Application Server V4.0.x versus V5.0
One of the significant features of WebSphere Studio Application Developer Version 5 is that it can target both WebSphere Application Server Version 4.0.x and/or Version 5. This Migration Guide focuses on getting application programs migrated into WebSphere Studio Application Developer Version 5 tool, and not on differences in administration, operation, or features/functions between the two WebSphere Application Server versions. So, where this guide has examples with instructions on configuring and running the internal WebSphere Test Environment (an embedded non-production copy of the WebSphere Application Server), it contains instructions for WebSphere Application Server Version 4. WebSphere Application Server Version 5 is very similar, but there are slight differences in configuring data sources, and so on, and there is full online documentation available.
140 Migrating to WebSphere V5.0: An End-to-End Migration Guide

For information on differences between WebSphere Application Server Version 4 and Version 5 functions, please refer to the WebSphere Application Server Version 5 online InfoCenter documentation. Most applications developed and tested on WebSphere Application Server Version 4 will run unchanged on Version 5. However, if the application uses newer specification level features/functions (J2EE 1.3, Servlet 2.3, JavaServer Pages (JSP) 1.2, Enterprise JavaBeans (EJB) 2.0, Web J2EE 1.3, and so on) then that application will only work on WebSphere Application Server Version 5.
Note that some wizards in WebSphere Studio Application Developer create J2EE projects or resources, and they default to J2EE 1.3. To change the default to J2EE 1.2, select Window -> Preferences -> J2EE Preference -> Select the highest J2EE version to be used -> 1.2.
4.3 Migrating from WebSphere Studio Application Developer V4.0.x
This section covers migrating from WebSphere Studio Application Developer Version 4.0.x to Version 5.0.
There are two supported methods that you can use to migrate your projects from WebSphere Studio Application Developer Version 4.0.x to Version 5:
� Using a software configuration management (SCM) system such as Concurrent Versioning System (CVS) or Rational ClearCase. This is the recommended method.
� Exporting your projects from Version 4.0.x and then importing them to this edition. This method migrates everything except project build path information.
Using your existing Version 4.0.x workspace is not supported for reasons explained later.
Note that migrating from Version 4 to Version 5 does not automatically change the project J2EE level, since Version 5 can still build and deploy to WebSphere Application Server Version 4. Changing the J2EE level of Web projects is simply a matter of selecting the project in the Navigator view and clicking Properties -> Web -> J2EE Level.
Changing an EJB project level is more involved. Refer to 4.8, “Migrating from EJB 1.0 to EJB 1.1 or to EJB 2.0” on page 172. To migrate to a new J2EE Enterprise Application Level, just create a new EAR project and then open the META-INF ->
Chapter 4. Development tool migration (EA) 141
Application.xml deployment descriptor editor, select the modules, and then select Add -> myModules.
4.3.1 Differences between WebSphere Studio Application Developer Version 4.0.x and Version 5
The following is a partial list of enhancements since Version 4.0.x:
� WebSphere Studio Application Developer Version 5 can generate code for either WebSphere Application Server Version 4.0.x or Version 5, and includes both WebSphere Application Server Version 4.0.3 and Version 5 Test Environments.
� The enterprise applications archives (EARs) J2EE level has changed from 1.2 to 1.3 for WebSphere Application Server Version 5 projects.
– J2EE 1.2 EARs will run on either WebSphere Application Server Version 4.0.x or WebSphere Application Server Version 5.
� The Enterprise Java Beans (EJB) specification level has changed from 1.1 to 2.0 for WebSphere Application Server Version 5 EARs.
– EJB 1.1 projects are still supported, and may be part of either WebSphere Application Server Version 4.0.x J2EE 1.2 EARs or Version 5 J2EE 1.3 EARs.
� The Web applications (WARs) J2EE level has changed from 1.2 to 1.3 for WebSphere Application Server Version 5 projects.
– The JSP level has changed from 1.1 to 1.2 and the Servlet level has changed from 2.2 to 2.3.
– J2EE 1.2 Web projects (WARs) are still supported, and may be part of either WebSphere Application Server Version 4.0.x J2EE 1.2 EARs or Version 5 J2EE 1.3 EARs.
� In Version 5, you can create static Web projects as well as J2EE Web projects. In a static Web project you will only be able to create content served by a traditional HTTP server (HTML, JavaScript, images, text, and so on).
� The underlying workbench, which is based on the Eclipse open-source project, has changed from Version 1.0 to Version 2.0.
– There is a new and much improved Java builder
– There is a new and much improved VCM interface for SCM vendors
� Page Designer “Classic” and Page Designer are both available. For more information, see 4.3.3, “Internal changes from Version 4.0.3” on page 143.
142 Migrating to WebSphere V5.0: An End-to-End Migration Guide
4.3.2 WebSphere Application Server changes and Servlet/JSP conversion tools
� The WebSphere Application Server InfoCenter http://www.ibm.com/software/webservers/appserv/doc/v40/aes/infocenter/index.html has information on the differences between WebSphere Application Server Version 3.5 and 4.0 http://www.ibm.com/software/webservers/appserv/doc/v40/aes/infocenter/was/03.html.
� For the tools to help convert your application, go to the WebSphere Application Server downloads page at http://www14.software.ibm.com/webapp/download/product.jsp?s=p&id=TDUN-49EVRT&type=s&dt=DIAGNOSTIC+TOOL
– MigrateWC takes a .91 or 1.0 JSP and converts it to a 1.1 JSP. It also takes a 2.1 Servlet and converts it to a 2.2 Servlet.
– XMLconvert converts XML configuration files from Release 3.02.x or Release 3.5.x to Release 4.0 format.
4.3.3 Internal changes from Version 4.0.3The following sections describe the differences between WebSphere Studio Application Developer V4.0.3 and V5.0.
Circular project dependencies will not build by defaultIf your projects have circular dependencies, Version 5 reports a build error. Click Window -> Preferences -> Java -> Compiler, select the Other tab, and clear the Stop building when an invalid class path is detected check box. Note that this will no longer cause the build to stop, but there will still be one or more build circular dependency errors shown on the Task view (even when the build otherwise is successful).
Version 5 Web WARs are source location incompatible with Version 4.0.3
Because of the WebSphere Studio Application Developer internal changes described in the two Web sections below, a Version 5 J2EE 1.2 Web WAR, when exported with Java source, will import into WebSphere Studio Application Developer Version 4 but will not build (even though it is at the same J2EE 1.2
Note: The eFix for this problem is available. Refer to “JR17565: Circular dependencies messages and performance” on page 135.
Chapter 4. Development tool migration (EA) 143
runtime level). The source folders will be in the Version 5 structure, and must be manually moved to the old Version 4 structure location before building. The WAR still executes correctly on WebSphere Application Server Version 4 (since it ignores any embedded source); it is only a development tool difference.
WebSphere Studio Application Developer EJB 1.1 project structures
The EJB 1.1 (J2EE 1.2) internal project structure in WebSphere Studio Application Developer Version 5 is different from what it was for WebSphere Studio Application Developer Version 4.0.x. This difference is not related to J2EE 1.2 versus J2EE 1.3, but rather is a tool usability change.
The default in Version 5 for new EJB 1.1 projects is to have the resulting compiled binary classes in the same \ejbmodule directory(s) as the source. However, the old Version 4.0.x structure (with source directory(s) under \ejbModule and the compiled binary classes in the \bin directory) is retained in Version 5 for EJB 1.1 projects originally created in Version 4.0.x and then saved into an SCM repository and then reloaded into Version 5.
Note that if a Version 4.0.x EJB 1.1 project is exported as an EJB JAR and then imported into a new Version 5 EJB 1.1 project, it will have the new common source/binary structure. If that same Version 4.0.x EJB 1.1 project is saved into an SCM repository and then loaded into Version 5, it will retain the old separate source/binary structure (to avoid having to restructure the SCM directories and to avoid having to change automated build scripts). Either structure will build correctly in Version 5.
WebSphere Studio Application Developer Web project structures
The internal Web project structure in WebSphere Studio Application Developer Version 5 is different from what it was for WebSphere Studio Application Developer Version 4.0.x. This difference is not related to J2EE 1.2 versus J2EE 1.3, but rather is a tool usability change.
In Version 4, Web projects were J2EE Web projects by default and they appeared in the Navigator view with a source folder and a webApplication folder. In Version 5, if you create a J2EE Web project, then it will appear with a Java Source folder instead of a source folder and a Web Content folder instead of a webApplication folder.
However, if a Version 4 Web project is saved into an SCM repository and then loaded into Version 5, it will retain the old structure with the source and webApplication folders. Either structure will build correctly in Version 5.
144 Migrating to WebSphere V5.0: An End-to-End Migration Guide
Static versus J2EE Web projectsIn Version 5, you can create static as well as J2EE Web projects.
Page Designer “Classic”WebSphere Studio Application Developer Version 4 shipped Page Designer “Classic”. Version 5 contains a new Page Designer, (which is the default) but also includes Page Designer “Classic” as an optionally installable component. If you wish to have Page Designer “Classic” bound to HTML/JSP as the default editor, then install Page Designer “Classic” and change your workbench preference.
To install Page Designer “Classic”:
1. If you have a running workbench, exit it before starting the installation.
2. Go to the directory WS_Installdir/bin and run pdclassic.exe (where WS_Installdir is the directory where WebSphere Studio Application Developer is installed).
3. When you then restart the workbench, you will see an Updates window. Click Yes.
4. A Configuration Changes window opens. Select the check box within the Detected changes field that includes Page Designer Classic (5.0.0).
5. Click Finish. The Install/Update window opens.
6. Click Yes. The workbench will restart to make the changes effective.
To change the default HTML/JSP editor:
1. Select Window -> Preferences -> Workbench -> File Associations.
2. In the File types field, select *.html/or *.jsp or both, or whatever you would like to assign to Page Designer “Classic”.
3. In the Associated editors field, select Page Designer Classic and click Default.
If you do not want to change the default to become Page Designer “Classic”, you can still select an HTML or JSP file, click it, and then select Open With -> Page Designer Classic.
Note: If this is the first time the workbench has ever been started (if it has never been run since the product was initially installed), then you will not see the Updates window nor the Configuration Changes window.
Chapter 4. Development tool migration (EA) 145
Page Designer enhancementsPage Designer now has some enhancements that are not in Page Designer “Classic”:
� XHTML is supported for PvC application development
� HTML/JSP tag attribute can be viewed/edited in the attributes view
� Link to Servlet available in some windows
� Moving and copying of table within page by dragging and dropping
� Enhanced JSP tag visualization within Design Page
� Enhanced tag library palette within window to insert custom JSP tags
� CSS Preview window in CSS Designer to preview the applied CSS effect
� HTML/JSP thumbnail view
Page Designer “Classic” versus Page Designer functionsPage Designer “Classic” has some HTML editing functions that are not in the current Page Designer:
� JSP extensions for Design-time Control, Dynamic Elements, Author Time Visual
� WebSphere enhancements (Dynamic Table Extensions for DB navigation, Table alternating coloring)
� Dynamic HTML support of rollover effect, event/action
� Script editing (JavaScript or VBScript) in Design View or JSP Scriptlet library
� Tag Checker, Accessibility Checker
� WebSphere Transcoding Publisher annotation support
� Insertion of ActiveX controls
� Image pasting with logo/photo frame creation
� Page editing assist for ruler or various wizards for component insertion
� URL editor, heading editor, Table of Contents generation
� WYSIWYG View Bi-Directional (BiDi) language support
� Color gallery prepared by professional designers
HTML and JSP distinctions� In Version 4.0.x, HTML files and JSP files were treated identically by Page
Designer. For example, you could have JSP tags in an HTML file. This is no longer true: in this release, there is a distinction between JSP and HTML files, so you can no longer have JSP tags in an HTML file.
146 Migrating to WebSphere V5.0: An End-to-End Migration Guide

� The previous distinction affects encoding of non-English JSP files. In versions prior to this version, HTML encoding rules were used, even for JSP files, to determine the encoding named in a file. That is, the content type attribute of the META tag was used to determine the encoding named in <META http-equiv="Content-Type" content="text/html; charset=UTF-8">. In this version, this was changed to use JSP encoding rules to determine the encoding named in a JSP file. That is, the page directive of the JSP file is used to determine the encoding named in <%@page contentType="text/html;charset=UTF-8"%>. For HTML files, encoding is unchanged from previous versions.
4.3.4 Migrating projects using a software configuration management (SCM) system
The next sections discuss the migration of projects that use a software configuration management system, such as CVS, ClearCase, and others.
Migrating projects using CVS or Rational ClearCaseThis is the recommended way to move workspaces from Version 4.0.x to WebSphere Studio Application Developer Version 5. This is the only method that migrates all of your information, including project build path information.
1. As a backup precaution, save all your Version 4 projects into your SCM repository. Then commit (release) any pending changes.
2. Still working in Version 4, save your work again into a new Version 5 branch (stream). This is the branch that you will use when working with Version 5.
3. Install Version 5.
4. Close WebSphere Studio Application Developer Version 4 and start WebSphere Studio Application Developer Version 5.
Tip: In Version 4, the workspace directory was located in the installation directory, by default. In Version 5, this default has changed to a directory called workspace in the My Documents directory. If you wish to override the location where you work is stored, use the -data option on the wsappdev.exe command when you start the workbench.
Note: Do not use -data to point to an existing Version 4 workspace since that is a different unsupported approach to migrate. (For more information, refer to 4.3.6, “Migrating projects using an existing Version 4.0.x workspace” on page 150.)
Chapter 4. Development tool migration (EA) 147

5. Click Windows -> Preferences -> Workbench and uncheck Perform build automatically to avoid build errors as individual dependent projects are loaded.
6. For CVS: Load all of the projects that you want to work with from the SCM repository into WebSphere Studio Application Developer Version 5.
7. For ClearCase: Use a clean Version 5 workspace, then for each project to be loaded, select File -> Import -> Existing WebSphere Studio 4.x ClearCase Project into Workspace.
8. Click Windows -> Preferences -> Workbench and check Perform build automatically to restore your settings.
9. Do a full rebuild (click Project -> Rebuild All), and save the resulting projects back into your repository in your new Version 5 stream. (Do not mix these resources with your ongoing Version 4 stream.)
Post migration considerations:
� Version 4 CVS files were stored as binary (no CarriageReturn/LineFeed translations). If you work in a mixed (DOS/Windows plus UNIX/Linux) platform environment, you might wish to now mark source files as text (by clicking Team -> CVS -> Change ASCII/Binary Property) and resave them in CVS.
� Version 4 Web projects from a CVS repository require that you prune empty directories. Click Window -> Preferences -> Team -> CVS -> Prune empty directories setting (the default is that it is enabled). If it is not disabled, and you load a Web project with an empty source folder (such as the MyHomePage Web example), then you will get the following errors at check-in:
The project was not built since it is involved in a cycle or has classpath problems.Missing required source folder: /MyHomePageExample403/source.
� For Web projects saved and loaded from a ClearCase repository, you need to have a file checked out before you can open it in the editor. If it is not checked out, you receive an error activating this view. (Null pointer exceptions in logs for Page Designer notify the user of known problems and ways to avoid them.) With web.xml editor, editing a web.xml file you need to have web.xml, ibm-web-bnd.xml, and ibm.web-ext.xmi checked out. (There are indications that you need these files to be checked out on the status line, which states that they are read only, but it is easily missed.)
Note: These projects are now Version 5 projects and cannot be used by WebSphere Studio Application Developer Version 4.0.x
148 Migrating to WebSphere V5.0: An End-to-End Migration Guide
� If your projects have circular dependencies, Version 5 reports a build error. Click Window -> Preferences -> Java -> Compiler, select the Other tab, and clear the Stop building when an invalid class path is detected check box.
� The .vcm_meta (or .cc_meta) files could now be deleted from the Version 5 project because they are not used by Version 5 (it uses a new .project file instead) and because you are using a new repository branch (stream) for these Version 5 projects. Note that these files are still needed in the ongoing Version 4 branch (stream).
Post-migration removal of EAR and server configuration absolute path references
Version 4 EAR application.xml files and Server Configuration files contained absolute path references. After you have migrated them into Version 5, you need to open them with their editor (which will automatically change their old absolute path references into new relative references).
1. For each EAR project, in a Navigator view, right-click META-INF/application.xml -> Open with -> Deployment Descriptor Editor.
a. A window pops up with the message: “The absolute path of one or more modules has changed since the last time this Application was saved..... Would you like to autocorrect?”
b. Click Yes.
c. Save and then close the editor window.
2. For each server configuration, in the Server Perspective, Server Configuration View window, right-click the server and click Open.
a. You will get a similar autocorrect window.
b. Click Yes.
c. Save and then close the editor window.
Migrating projects using other SCMsThere are other SCM vendors who provide SCM plug-ins for WebSphere Studio Application Developer. Browse the list of vendors at http://www.ibm.com/software/ad/studioappdev/partners/scm.html. As part of their Ready for WebSphere Studio Software validation (see http://www.developer.ibm.com/websphere/ready.html), all SCM vendors who provide a Version 4 plug-in will have ensured that the migration steps in “Migrating projects using CVS or Rational ClearCase” on page 147 also work for their systems.
Chapter 4. Development tool migration (EA) 149
4.3.5 Migrating by exporting and importing your projects1. In WebSphere Studio Application Developer Version 4.0.x, export your
projects to a WAR file, an EAR file, or a JAR file (click File -> Export).
2. In WebSphere Studio Application Developer Version 5, import your WAR file, an EAR file, or a JAR file (click File -> Import).
4.3.6 Migrating projects using an existing Version 4.0.x workspaceThis approach is unsupported, and will result in an incomplete migration. User interface settings, debug settings, and most preferences are all lost. Project names, project source files, and project Java build path (class path) are retained, but nothing else is guaranteed. This approach should only be used if no supported SCM system is being used and if it is critical to retain project build path information, which is lost when you import projects that were exported from Version 4. You can use the existing Version 4.0.x workspace by doing the following:
1. Commit (release) any pending changes to the repository.
2. Close all perspectives and shut down WebSphere Studio Application Developer Version 4.
3. Back up the contents of workspace_directory, where workspace_directory is the fully qualified directory name that contains the Version 4.0.x workspace. By default, the Version 4.0.x workspace subdirectory is located in the same directory where the product is installed. You will need this backup if you ever want to work with WebSphere Studio Application Developer Version 4.0.x again. Once you have pointed to a Version 4.0.x workspace from a Version 5 IDE, you can no longer go back to using that workspace in WebSphere Studio Application Developer Version 4.0.x.
4. Install WebSphere Studio Application Developer Version 5.
5. When you start WebSphere Studio Application Developer Version 5 with a Version 4.0.x workspace from a command prompt, use the -data option to specify a fully qualified path to the Version 4.0.x workspace directory on the wsappdev.exe command. This will cause an upgrade of the .metadata information.
6. When prompted to confirm that you wish to convert to the new user interface format, click OK.
7. Before doing any rebuilds or validating any projects that are in the workspace, select all of the projects in the Navigator view within the Resource perspective
Note: This is not a full migration since no project build path information is maintained.
150 Migrating to WebSphere V5.0: An End-to-End Migration Guide

and then select Refresh from the pop-up menu. This will ensure that all files are synchronized with their appropriate metadata.
8. Open any closed projects (see “Known problems and limitations” on page 151).
9. Verify your class path variables (see “Known problems and limitations” on page 151).
10.Some builders and validators have been added, removed, or modified in Version 5. To ensure that the correct errors and warnings are shown, you must rebuild all the projects by selecting Project -> Rebuild All, and then select Run Validation for each Java project.
11.Some user preferences might be maintained, but many others will not be. Check your preference settings in Version 5 to be sure that they are as you want them.
Post-migration removal of EAR and server configuration absolute path references
Version 4 EAR application.xml files and server configuration files contained absolute path references. After you have migrated them into Version 5, you need to open them with their editor (which will automatically change their old absolute path references into new relative references).
1. For each EAR project, in a Navigator view, right-click META-INF/application.xml -> Open with -> Deployment Descriptor Editor.
a. A window pops up with the message: “The absolute path of one or more modules has changed since the last time this Application was saved..... Would you like to autocorrect?”
b. Click Yes.
c. Save and then close the editor window.
2. For each Server configuration, in a Server Perspective, Server Configuration View, right-click the server and click Open.
a. You will get a similar autocorrect window.
b. Click Yes.
c. Save and then close the editor window.
Known problems and limitationsThe following problems may occur if you attempt to migrate by opening a Version 4.0 workspace in WebSphere Studio Application Developer Version 5.
Chapter 4. Development tool migration (EA) 151
Incorrect value in the JRE_LIB class path variableTo reset your JRE_LIB class path variable to a valid location, follow these steps. Do this even if the value seemed correct when you first open the Preferences window.
1. Select Window -> Preferences -> Java -> Installed JREs.
2. In the list, select the check box for the default JRE location that you wish your JRE_LIB set to.
3. Choose Edit, and then click OK to close the Edit JRE window.
If you do not do this, the value for JRE_LIB might be incorrect, causing many build errors in Java files.
As a general check, verify the value of all your other class path variables.
For previously SCM shared projects, the Team menu contains Share Project
Team support has changed significantly between Eclipse 1.0 and 2.0. The method of sharing projects with the repository has changed as well.
� If you select Team -> Share Project, a wizard will guide you through the migration process. When you are finished, your project will be shared and the Synchronize view will open. You will see conflicting changes on every file. This is because of changes in the way sync information is stored between Eclipse 1.0 and 2.0.
� If you do not have any outgoing changes (which you should not have if you committed all your outgoing changes before upgrading as recommended above), then you can simply select the project in the Synchronize view and select Override and Update which will load the current contents from the server.
� If you do have outgoing changes, you can pull down the triangle menu in the Synchronize view and select Compare File Contents. After some work, the Synchronize view will show you only the files that are actually different. You can then use the Synchronize view to resolve these conflicts.
Projects created outside the workspace directoryBy default, projects are created in the workspace directory. If you overrode the default to create projects elsewhere, open all of your projects now before closing the workbench. This will allow the .project file for that project to be written in the proper location. Failure to open a closed project whose directory is outside of the workspace will result in a project that masks the actual project, with only a .project file existing within it.
152 Migrating to WebSphere V5.0: An End-to-End Migration Guide
JSP breakpoints must be resetYou will need to remove any JSP breakpoints that you have, and reset them within the migrated Version 5 workspace.
4.3.7 Migrating J2EE project structures and/or J2EE specification levels
As mentioned above, the EJB project and Web project internal structures are different between WebSphere Studio Application Developer Version 4 and Version 5. New projects in Version 5 will always use the new internal structure. Although the old Version 4 structures will continue to work in Version 5, you can optionally convert any J2EE EAR or EJB or WAR project to the new structure by:
1. Right-clicking the project2. Selecting Migrate -> J2EE Project Structure
If your project is under source control, then save the restructured project in your SCM.
Note that this changes the internal WebSphere Studio Application Developer project structures into the new Version 5 internal structure, but it does not convert the J2EE level of that project.
If you wish to convert an existing project (either in the old Version 4 structure or the new Version 5 structure) into the new J2EE specification level (which will also automatically convert any old projects into the new Version 5 structure), then:
1. Right-click the project2. Select Migrate -> J2EE Version 1.2 to 1.3
Note that this changes the project J2EE level, but does not change any code. EJB beans are not migrated to EJB 2.0, and Servlet and/or JSP code is not changed (that is left to the developer).
4.4 Migrating from WebSphere Studio Application Developer V5 Beta
WebSphere Studio Application Developer Version 5 Beta was a limited availability beta. No migration is required. Version 5 Beta workspaces may be used (or shared) directly with Version 5 Early Availability. Version 5 Beta projects in Software Configuration Management (SCM) systems (CVS or ClearCase) may be used (or shared) directly with Version 5 Early Availability.
Chapter 4. Development tool migration (EA) 153
4.5 Migrating from WebSphere Studio “Classic” to WebSphere Studio Application Developer
This section documents how to migrate from WebSphere Studio Version 4.0 (both Advanced and Professional Edition) to the WebSphere Studio Application Developer. Migrating from WebSphere Studio “Classic” Version 4.0 to WebSphere Studio Application Developer Version 5.0 involves the following steps:
1. Create a new single-server stage for migration.
2. Create a Web configuration descriptor file.
3. Export a migration JAR file.
4. Import the migration JAR file into WebSphere Studio Application Developer.
5. Set up your server and test your migrated application.
The advanced publishing feature (mapping files to publishing stages) and the Page Detailer feature (analysis of Web pages) of WebSphere Studio “Classic” is not available in WebSphere Studio Application Developer. Some other features from the Version 4.0.x CD media pack are also no longer available, for example the Page Detailer feature for analysis of Web pages, the HotMedia feature for rich media types, the Voice XML editor (moved to WebSphere Everyplace Toolkit and Portal Toolkit), and the DataBaseWizard for pervasive devices.
You should be aware of the following limitations before you migrate any of your WebSphere Studio data:
� WebSphere Studio Application Developer uses an XML-based SQL editor, so your .sql files cannot be used in it.
� Project publishing information and stage information cannot be migrated.
� WebSphere Studio server configuration information cannot be migrated.
� Version control information cannot be migrated.
During the migration process outlined below, WebSphere Studio creates a JAR file that contains all of your project files, publishable and source, for a single server. All the files visible in the Publishing view for the default server will be
Note: The following instructions are for migrating from WebSphere Studio Version 4.0. If you want to migrate from an earlier version of WebSphere Studio, you should migrate to WebSphere Studio 4.0 first, then migrate to WebSphere Studio Application Developer.
154 Migrating to WebSphere V5.0: An End-to-End Migration Guide
packaged into the JAR file. You can then import the JAR file into WebSphere Studio Application Developer.
When you migrate existing projects, all the project publishing information and the stage information are lost during the migration. If your stage has multiple servers, only files published to the default server are kept. Therefore, for the purpose of migration, you will create a new stage that has only one server.
4.5.1 Creating a new single-server stage for migrationIf you have more than one server in your current stage, create a new stage called Migration with only one server by following these steps:
1. Click Project -> Customize Publishing Stages.
2. Type Migration in the Stage name field.
3. Click Add.
4. Click OK.
5. Click Project -> Publishing Stage and select Migration from the list of available stages.
6. While in the publishing view, click Insert -> Server.
7. Type a server name, such as localhost.
8. Changing the server or changing the publication stage does not propagate the Servlet mapping information for WebSphere Application Server Version 4.0. Go to the Publishing view, and, for each Servlet, click Properties -> Publishing -> Servlet Mapping and then copy the actual Servlet mapping.
4.5.2 Creating a Web configuration descriptor file1. While in the project file view, click Project -> Create Web Configuration
Descriptor File.
2. Select all required Servlets.
3. Select all required Tag Library Descriptor (TLD) files.
4. Click Create.
The default Web configuration descriptor file name is serverName_web.xml, localhost_web.xml in this scenario. Unless you specified a different location, the .xml file is saved in the WEB-INF directory.
Chapter 4. Development tool migration (EA) 155
4.5.3 Exporting a migration JAR file1. While in the project file view, select the server named localhost and click
Properties -> Publishing -> WebApp Web Path and enter a Web path (context root), such as myWebPath. This will also be used as the WebSphere Studio Application Developer project name.
2. While in the project file view, select Project -> Create Migration File.
3. Verify that localhost is the selected server.
4. Verify that localhost_web.xml is the selected Web configuration descriptor file.
5. Click OK.
6. The default JAR file name is serverName.jar, localhost.jar for this scenario. Rename the file if desired.
7. Save the JAR file.
4.5.4 Importing the migration JAR file into WebSphere Studio Application Developer
1. Start WebSphere Studio Application Developer.
2. Create a Web project (File -> New -> Project -> Web Project).
3. In the Project name field, type the name of your Web project. This should be the same name you specified in step 1 in 4.5.3, “Exporting a migration JAR file” on page 156.
4. Specify the name of a new or existing EAR project that will contain the new Web project for purposes of deployment.
5. In the Context Root field, type the Webapp Web Path name you specified when you created the migration JAR file in WebSphere Studio. Click Finish.
6. In the Navigator view, select the Web project you just created.
7. Import the JAR file.
a. Click File -> Import.
b. Select the WAR file and click Next. You must import the JAR file using the WAR file option; otherwise it will not work properly.
c. Enter the path to localhost.jar in the WAR File field or click Browse to search for it. (You can only browse for a WAR name, not a JAR name.)
d. Select the Web project that you created. The Context Root field is automatically populated with the value you specified earlier.
e. Select the EAR project you created earlier.
156 Migrating to WebSphere V5.0: An End-to-End Migration Guide

f. Click Finish. WebSphere Studio Application Developer unpacks localhost.jar.
8. You may have several unresolved references or missing import files. These will appear in the Tasks view. To fix this, you must change the Java build path for the Web project:
a. Right-click the project and click Properties -> Java Build Path.
b. Click the Libraries tab. Click Add External JARs.
c. Import any JARs that you need from the following directories:
i. plugins/com.ibm.etools.websphere.runtime/lib
ii. plugins/com.ibm.etools.websphere.tools/runtime
9. In the Navigator view, right-click the project and select Rebuild Project.
4.5.5 Testing your migrated application on a test serverYou are now ready to test your application. To test it on the default test server:
1. Right-click the EAR project2. Select Run on Server
To test your application on other server runtime environments, refer to the online help for the Server Tools feature.
4.6 Migrating from VisualAge for Java to WebSphere Studio Application Developer
This section documents how to migrate from VisualAge for Java Professional Edition or VisualAge for Java Enterprise Edition to WebSphere Studio Application Developer. Migrating from VisualAge for Java to WebSphere Studio Application Developer involves the following steps, which are explained in more detail later in this section:
1. Export your Java files and project resource files from VisualAge for Java.
2. Start WebSphere Studio Application Developer and create new projects to contain your code.
3. Import your Java and project resource files into WebSphere Studio Application Developer.
4. Use the web.xml editor to ensure that any Servlets are correctly defined (Web project only).
Chapter 4. Development tool migration (EA) 157

5. Migrate your VisualAge for Java project and workspace build and execution settings.
6. Set up your server and test your migrated application(s).
7. Deploy your applications from WebSphere Studio Application Developer to WebSphere Application Server.
8. Share the WebSphere Studio Application Developer project settings between multiple developers (post-migration).
The instructions given in this section are for migrating from VisualAge for Java Version 3.5.3 or 4.0 for Windows. If you want to migrate from an earlier version of VisualAge for Java to WebSphere Studio Application Developer, you should first migrate from your earlier version of VisualAge for Java to Version 4.0 for Windows (if you have enterprise beans) or Version 3.5.3 or 4.0 for Windows (without enterprise beans), before migrating to WebSphere Studio Application Developer. Version 4.0 includes a special tool (the EJB Export Tool) for exporting enterprise beans, which you need in order to migrate EJB applications to WebSphere Studio Application Developer. All other data can be migrated from either Version 3.5.3 or Version 4.0.
4.6.1 Differences between VisualAge for Java and WebSphere Studio Application Developer
The following is a partial list of changes from VisualAge for Java:
� The Enterprise Java Beans (EJB) specification level has changed from 1.0 to 1.1 (EJB 2.0 is also supported for applications that will be deployed to WebSphere Application Server Version 5).
� For Web applications, the JSP level remains at 1.1 (1.2 for WebSphere Application Server Version 5 applications).
Note: Instantiations, Inc., an IBM Business Partner, distributes a product called CodePro Studio that provides productivity enhancements to VisualAge for Java and WebSphere Studio Application Developer, including migration and co-existence facilities. To help VisualAge for Java customers begin their migration, Instantiations is offering a free, unlimited use VisualAge for Java to WebSphere Studio Application Developer export facility as part of their time-limited evaluation copy of CodePro Studio. You can download the evaluation copy from http://www.instantiations.com/vaj-migrate. For further information on Instantiation's advanced migration and co-existence support including full bi-directional export/import of files, creation of export/import sets, project synchronization and task automation, refer to the Instantiations, Inc. Web site at http://www.instantiations.com/codepro/ws.
158 Migrating to WebSphere V5.0: An End-to-End Migration Guide

� For Web applications, the Servlet level remains at 2.2 (2.3 for WebSphere Application Server Version 5 applications).
� The level of the Java 2 platform that is supported has changed from 1.2 to 1.3. (The compiler can target 1.4 code generation, but the WebSphere Application Server runtime environment is still 1.3.)
� The Visual Composition Editor has been replaced by the Visual Editor for Java.
� VisualAge for Java version control and the propriety source code repository have been replaced by support for software configuration management (SCM) plug-ins.
� The VisualAge for Java Tools API has been replaced by the WebSphere Studio Workbench plug-in architecture.
� The VisualAge for Java XML tools have been replaced by WebSphere Studio Application Developer XML tools.
� The VisualAge for Java project concept has been replaced by multiple types of WebSphere Studio Application Developer projects.
� Convertors in VisualAge for Java EJB AccessBeans (not Data AccessBeans) are not available in WebSphere Studio Application Developer EJB AccessBeans. Use EJB convertors/composers in the underlying EJBs instead. For more information about EJB convertors/composers, refer to the online help documentation.
4.6.2 Team support in WebSphere Studio Application DeveloperFor information on team support in WebSphere Studio Application Developer, refer to http://www.ibm.com/websphere/developer/library/techarticles/ 0108_karasiuk/0108_karasiuk.html.
There is also information in the Installation guide and online help about team support in WebSphere Studio Application Developer.
4.6.3 Migrating from VisualAge for JavaThe following steps outline how to migrate from VisualAge for Java:
1. Migrate enterprise beans from VisualAge for Java to WebSphere Studio Application Developer.
2. Export your Java files and project resource files from VisualAge for Java.
3. Start WebSphere Studio Application Developer and create new projects to contain your code.
Chapter 4. Development tool migration (EA) 159
4. Import your Java and project resource files into WebSphere Studio Application Developer.
5. Use the web.xml editor to ensure that any Servlets are correctly defined (Web project only).
6. Migrate your project and workspace settings.
7. Set up your server and test your migrated application(s).
8. Deploy your applications from WebSphere Studio Application Developer to WebSphere Application Server.
9. Share the WebSphere Studio Application Developer project settings between multiple developers (post-migration).
Exporting your Java files and project resource files from VisualAge for Java
There is no support for the bulk migration of versioned projects and resources from the VisualAge for Java repository. You can only migrate projects and resources that are in your VisualAge for Java workspace. If you want to migrate a versioned copy of a project or resource into WebSphere Studio Application Developer, you must bring it into your VisualAge for Java workspace and then migrate it.
Export your projects to a JAR file by following these steps:
1. If the projects that you want to export are not currently in your VisualAge for Java workspace, add them to the workspace now.
2. In the VisualAge for Java Workbench window, select your project(s), right-click, and click Export.
3. Select the Jar file radio button and click Next.
4. Specify the name of the JAR file.
5. Select the .java check box to export your Java files and the resources check box to export your resource files.
6. Fill in the other fields as required. Refer to the VisualAge for Java online help for more information on how to perform this task.
Note: If your project contains more than one kind of data (for example, enterprise beans and Java source code files), you should split up your data into different JARs based on their type.
160 Migrating to WebSphere V5.0: An End-to-End Migration Guide

Starting WebSphere Studio Application Developer and creating new projects to contain your code
Start WebSphere Studio Application Developer, then create the appropriate projects. The following is a set of general migration guidelines to help you decide which kind of WebSphere Studio Application Developer project you should import your files into:
� If your code is part of a Web application, you should import the code into a Web project:
– Import all Java files into the Web project source directory (the proper hierarchy based on their package statements will automatically be created by WebSphere Studio Application Developer)
– Import all resource files into the Web project webApplication directory.
� If your code is straight Java (for example, an application that will run stand-alone), you should import the code into a Java project.
� If your code is enterprise beans, you should import the code into an EJB project.
Importing your Java and resource files into WebSphere Studio Application Developer
1. Open WebSphere Studio Application Developer and switch to the Resource perspective.
2. Click File -> Import -> the zip file. Click Next.
3. Browse to the appropriate JAR file.
4. Select the files you want to import and the project or folder you want to contain your files.
Note: The preceding is only a general set of guidelines to help you decide which kind of WebSphere Studio Application Developer projects you should use. We recommend that you read the WebSphere Studio Application Developer online help and become familiar with the different kinds of WebSphere Studio Application Developer projects before you create any projects or import any code.
Chapter 4. Development tool migration (EA) 161
Using the web.xml editor to ensure that Servlets are correctly defined (Web project only)
If your application uses Servlets, then you need to define the Servlet-URL mappings in the web.xml file. Follow these steps:
1. In the Web perspective, open the web.xml file, which is located in the webApplication/WEB-INF subdirectory of your Web project.
2. Click the Servlets tab.
3. Click Add, and select the Servlet radio button.
4. Type the Servlet name and click OK.
5. Click Browse to change the Servlet class value to the appropriate package name.
6. (Optional) The display name is a short name used to identify the Servlet. In the Display name field, type a short name for the Servlet.
7. A URL mapping defines a Servlet and a URL pattern. Click the Add button located next to the URL mappings field, then type the name of the URL mapping.
8. Save the changes (File -> Save web.xml) and close the web.xml file.
Migrating project and workspace settingsYou must record the following VisualAge for Java settings and set them up in WebSphere Studio Application Developer:
� Project class path � Resource associations � Code formatting � EJB server configuration � WebSphere Test Environment configuration � Java files and project resource files
Project class path In VisualAge for Java, you set your project class path in the Resources pages of the Options window (click Window -> Options -> Resources). After you have
Note: When you import your files into WebSphere Studio Application Developer, you should ensure that they go in the appropriate directory. We recommend that you read the WebSphere Studio Application Developer online help and become familiar with the different kinds of WebSphere Studio Application Developer projects before importing your code. This will help you determine which folders should contain which kind of code.
162 Migrating to WebSphere V5.0: An End-to-End Migration Guide

migrated your projects into WebSphere Studio Application Developer, you can set up your project's class path in the project's Properties window. Right-click the project and select Properties -> Java Build Path. Click the Libraries tab. You can also set class path variables in the Preferences window (click Window -> Preferences -> Java -> Classpath Variables.)
Resource associations If you set up an association between a file type and an executable, you can open a file that sits outside the workbench from within it.
In VisualAge for Java, you set up your resource associations in the Options window (click Window -> Options -> Resources -> Resource Associations). After you have migrated your resource files to WebSphere Studio Application Developer, you can set up your resource associations using the Preferences window (click Window -> Preferences -> Workbench -> File Editors).
Code formatter In VisualAge for Java, you set up your code formatting options in the Formatter page of the Options window (click Window -> Options -> Coding -> Formatter). After you have migrated your code to WebSphere Studio Application Developer, you can set up your code formatting in the Preferences window (click Window -> Preferences -> Java -> Code Formatter).
EJB server configuration In VisualAge for Java, you set up your EJB server configuration in the Properties window for the EJB server. In the EJB page, select EJB -> Open To -> Server Configuration. Select the server, right-click it, and click Properties. After you have migrated your enterprise beans to WebSphere Studio Application Developer, you can set up your server configuration in the Server Configuration view. In the Server perspective, open the Server Configuration view. Right-click the server and click Open. Click the Data source tab.
WebSphere Unit Test Environment configuration In VisualAge for Java, your WebSphere Unit Test Environment and WebSphere Application Server runtime settings are in various property files in the directory VisualAgeInstalldir\ide\project_resources\IBM WebSphere Test Environment\properties, where VisualAgeInstalldir is your product installation directory.
If, for example, you have enabled URL rewriting in the session.xml property file by changing the property to true (<url-rewriting-enabled>true</url-rewriting-enabled>) you can configure this property in the WebSphere Studio Application Developer Version 4.0 Test Environment. In the Server perspective, open the Server Configuration view,
Chapter 4. Development tool migration (EA) 163

right-click the server you want to work with and click Open. Click the Web tab and select the Enable URL rewrite check box.
Java files and project resource files The property file default.servlet_engine contains the <root-uri> context root of the VisualAge for Java Web application(s). When creating a Web project in WebSphere Studio Application Developer the Create a Web Project window contains a Context root field for this data.
Web application settings in files such as VisualAge\ide\project_resources\IBM WebSphere Test Environment\hosts\default_host\default_app\servlets\default_app.webapp that you have customized yourself should be migrated to your__Web_project\webApplication\WEB-INF\web.xml file in WebSphere Studio Application Developer. For example, if you have changed Servlet names and Servlet paths in the default_app.webapp file, you would make the corresponding changes in your web.xml file.
Setting up your WebSphere V4 test environment and testing your migrated application(s)
If the application is a Java project, then you just use the normal WebSphere Studio Application Developer Run or Debug support for Java projects to test it.
If the application uses WebSphere Application Server (Web projects and EJB projects do), then test it using the built-in WebSphere Application Server. This requires that a default test server be created and started. For an EJB project, right-click the EJB project and select Run on Server to run the EJB Test Client. For a Web project, right-click the main HTML page and select Run on Server to launch the Web browser.
For information on testing other types of projects, refer to the online help.
Deploying your applications from WebSphere Studio Application Developer to remote WebSphere Application Server
If you are using the WebSphere Application Server as your runtime environment, deploy your application using the Server Tools feature of WebSphere Studio Application Developer.
164 Migrating to WebSphere V5.0: An End-to-End Migration Guide

Sharing WebSphere Studio Application Developer project settings between multiple developers (post-migration)
WebSphere Studio Application Developer projects (and their associated settings) can be shared between developers. To do this, save a project into the WebSphere Studio Application Developer software configuration management (SCM) server, then extract it onto another team member on the WebSphere Studio Application Developer.
4.7 Migrating enterprise beans from VisualAge for Java to WebSphere Studio Application Developer
This section provides instructions on how to migrate your VisualAge for Java enterprise beans to WebSphere Studio Application Developer. Migrating VisualAge for Java enterprise beans to WebSphere Studio Application Developer involves the following steps:
1. Export VisualAge for Java enterprise beans as a 1.1 JAR using the VisualAge for Java EJB Export tool.
2. Import the EJB 1.1 JAR WebSphere Studio Application Developer.
3. Generate deploy code and data source binding information.
4. Create a server configuration and instance.
5. Add data source information to your configuration.
6. Test the enterprise beans with the new EJB test client.
This section also contains information about:
� Items migrated
� Code changes due to EJB 1.0 specification versus EJB 1.1 specification
� VisualAge for Java Version 3.5.3 EJB 1.0 JARs versus VisualAge for Java Version 4.0 EJB 1.1 JARs
� Moving multiple VisualAge for Java EJB groups into WebSphere Studio Application Developer EJB projects
4.7.1 VisualAge for Java EJB Export Tool (migrating map/schema from EJB 1.0 to EJB 1.1)
VisualAge for Java Version 4.0 includes a special tool (the EJB Export Tool) for migrating enterprise beans. Therefore, all enterprise beans must be migrated
Chapter 4. Development tool migration (EA) 165
from that version to WebSphere Studio Application Developer. Note that the tool migrates VisualAge for Java EJB 1.0 map/schema metadata into EJB 1.1 map/schema XML files, but does not change the code in any way (it is still EJB 1.0 code).
There is an Export tool for EJB 1.1 fixpack (be sure to get the latest Version 4.1.5 or later), available from the VisualAge Developer's Domain (see http://www7.software.ibm.com/vad.nsf/Data/Document4624) which fixes certain defects with the tool. One defect the fixpack fixes is a problem the EJB tool has if a group has relationships with two or more ForeignKeys mapping to the same two or more tables. Refer to the fixpack's Readme file for more information about the defects the fixpack fixes.
Items migratedThe following items are migrated when you migrate your enterprise beans:
� Entity beans (CMP, BMP) � Session beans (both stateful and stateless) � Finder helpers (method and where custom finders) � Inheritance (with multi-levels) � Associations � Mappings and schemas � Deployment and control descriptions
4.7.2 VisualAge for Java Version 3.5.3 EJB 1.0 JARs versus VisualAge for Java Version 4.0 EJB 1.1 JARs
In VisualAge for Java Version 3.5.3 you can generate an undeployed EJB 1.0 JAR, or generate a deployed EJB 1.0 JAR (with deployment code, stubs, tie code, and so on). You can import the EJB 1.0 JAR into the WebSphere Application Server Version 4.0 Application Assembly Tool AAT) and use that to generate deployment and control descriptors and to run the EJB Deploy Tool to generate deploy code, stubs, and so on into an EJB 1.1 format JAR (enterprise applications archives). The net result of the previous steps is that you can have a deployed JAR that can be run in WebSphere Application Server Version 4.0, and hence can also be run in WebSphere Studio Application Developer (since its WebSphere Test Environment is a WebSphere Application Server Version 4.0
Note: It is recommended that all of your database tables contain a table qualifier prior to exporting using the VisualAge for Java Version 4.0 EJB Export Tool. Most databases require a table to have a qualifier, and the WebSphere Studio Application Developer workbench does not handle empty qualifiers when one is expected for the database vendor.
166 Migrating to WebSphere V5.0: An End-to-End Migration Guide
server). However, runtime execution does not imply ongoing development capability.
You can include the previously generated Java code into the corresponding EJB JARs and import that into WebSphere Studio Application Developer, and WebSphere Studio Application Developer would parse and understand the EJB session support, security information, finder information, and assembly descriptor (const methods, and so on). However, extensions (class inheritance and ForeignKey associations) and the map and schema information are all lost. They can only be retained if you use the VisualAge for Java Version 4.0 EJB Export Tool, to create an EJB 1.1 JAR containing the map and schema XML information and extension XML information. As well, the names of generated stub classes are different in 1.0 from 1.1 enterprise beans. The net result is that neither an EJB 1.0 JAR nor an EJB Deploy Tool EJB 1.1 JAR retains the basic design metadata to allow them to be used for ongoing development in WebSphere Studio Application Developer.
The VisualAge for Java Version 4.0 EJB Export Tool produces an EJB 1.1 JAR that contains all the EJB design metadata, including the map and schema information and the extensions (class inheritance and ForeignKey associations), so that you can immediately continue to develop within WebSphere Studio Application Developer and regenerate deployment code anytime it is required. This is the only supported method of migrating VisualAge for Java enterprise beans into WebSphere Studio Application Developer, and the use of the VisualAge for Java Version 4.0 EJB Export Tool is the only method that will work for ongoing EJB development within WebSphere Studio Application Developer.
4.7.3 Moving multiple VisualAge for Java EJB groups into WebSphere Studio Application Developer EJB projects
In VisualAge for Java, you may have multiple EJB groups, with each group being used for intragroup inheritance or associations. Typically, you would export each VisualAge for Java EJB group (using the VisualAge for Java 4.0 EJB Export tool) into a matching JAR, and then import that JAR into a matching WebSphere Studio Application Developer EJB project.
WebSphere Studio Application Developer EJB projects correspond to EJB modules. Where intragroup inheritance or associations are not required, you may wish to keep the EJB groups as separate EJB projects - you can close individual projects and hence keep the overall memory requirements down. WebSphere Studio Application Developer has the concept of enterprise-level grouping, using WAR and EAR files, so several EJB groups can be logically combined that way, and then deployed as if they were a single unit.
Chapter 4. Development tool migration (EA) 167

If you import multiple EJB groups into the same EJB project, then any XML in them may not be correctly merged (the last imported group overwrites).
4.7.4 Migrating your enterprise beansTo migrate your enterprise beans, do the following steps:
1. Export them as a 1.1 JAR using the VisualAge for Java Version 4.0 EJB Export tool:
a. In VisualAge for Java Version 4.0, add the “Export Tool for Enterprise Java Beans 1.1” feature to the workspace.
b. In the EJB page of the Workbench, right-click the EJB group that you want to export, and click Export -> EJB 1.1 JAR.
c. Fill in the fields as necessary (ensure that the .java check box is selected), select your database, and click Finish.
2. Import them into WebSphere Studio Application Developer:
a. In WebSphere Studio Application Developer, create a new EJB 1.2 project and a new enterprise applications archives project. You will automatically be switched to the J2EE perspective.
b. Select File -> Import -> EJB JAR file. Click Next, then select your JAR file, your EJB project, and your EAR file. Click Finish.
c. If you have any errors (they will be listed in the Tasks view), refer to 4.7.5, “Known problems and workarounds” on page 170 to troubleshoot them.
d. After you have imported your EJB files, follow the instructions in 4.7.6, “Locating EJB information” on page 170 to help you find out where to find your EJB and method properties, your schemas, maps, and so on.
3. Generate deploy code and data source binding information:
a. In the J2EE Hierarchy view, expand the EJB Modules folder and select the newly imported EJB JAR.
b. From the EJB JAR's pop-up menu, click Generate -> Deploy and RMIC Code. Select to generate code for all your beans.
c. From the EJB JAR's pop-up menu, click Open With -> EJB Deployment Descriptor.
d. In the EJB deployment descriptor, select the Overview tab.
e. Select your EJB JAR, and type the WebSphere binding JNDI name and the Data Source Binding JNDI name. Record this data source name, since you will use it later when you configure your data source in the test server instance.
f. Save your changes and close the EJB deployment descriptor.
168 Migrating to WebSphere V5.0: An End-to-End Migration Guide

4. Create a WebSphere Studio Application Developer server configuration for your test server, if you do not already have one:
a. Switch to the Server perspective.
b. Click File -> New -> Server Project.
c. In the Project name field, type ServerTest. Click Finish.
d. In the Navigator view, select ServerTest. From its pop-up menu, click New -> Server Instance and Configuration.
e. Type the name of the server, for example, MyServer, and select ServerTest from the Folder list.
f. In the Server instance type field, expand WebSphere Version 4.0 and select Test Environment. In the Template field, click None.
g. Click Next. Specify a server port number of 8080.
h. Click Finish.
A new server configuration and instance will be created.
5. Add data source information to your server configuration:
a. In the Server Configuration view, expand Server Configurations and select your server.
b. Right-click it and from your pop-up menu, click Open.
c. Select the Data source tab.
d. In the JDBC Driver List, select the appropriate database driver (for example, Db2JdbcDriver if you are using DB2) and click Edit.
e. Verify that the Class path field contains the correct path to db2java.zip. Click OK.
f. If you are not using DB2, add a new driver. Ensure that you use the J2EE JDBC driver that the Database vendor provides.
g. Select your JDBC driver, and click the Add button that is to the right of the Data source field.
h. In the Add a data source window, type a data source name. In the JNDI name field, type the same name you used in step e on page 168. Enter the name of your database and click OK.
i. Save your changes.
6. Test the enterprise beans with the new EJB test client:
a. In the Server Configuration view, expand Server Configurations and select your server. Right-click it, and click Add Project. Select the EAR project that contains your EJB module.
Chapter 4. Development tool migration (EA) 169

b. In the Servers view, select your server instance. Right-click it and from its pop-up menu, click Start.
c. The project will be published and the server will start. After a few moments, click the Console tab to view the console window. You should see a message saying the Default Server is open for e-business. Scroll through the console to verify the EJB JAR has been started.
d. In the J2EE Hierarchy view, expand the EJB Modules folder, select the enterprise bean that you want to test, right-click it, and click Run on server.
4.7.5 Known problems and workaroundsThe following are known problems and ways to work around them:
� When migrating the method finder helpers, the finder helper interfaces will disappear, because they have moved into an XML description file. This will generate a problem, since your finder helper object usually implements this interface; the implementation must be removed.
� If you use inheritance in your enterprise beans, and you have built your own custom finders, they may break, since the mapping of fields in the generated code is different in WebSphere Studio Application Developer. To fix this, go to the EJSCMPxxxxxx generated class, find the select statement generated for the findbyPrimaryKey, and use it as a template.
� If you set up the Preferences page (in WebSphere Studio Application Developer) to stop an automatic build from being done every time you save changes, you must perform the following steps to generate the EJB deployed code and RMIC stubs:
a. Select your EJB project, right-click and select Generate -> Deploy and RMIC Code.
b. Because the RMIC compiler can only see compiled code and since the generated Java classes were not compiled yet, it will give an error. Switch to the Java perspective and build the project.
c. Repeat step a. You should not receive any errors this time.
d. Repeat step b, since you want to compile your newly generated stubs so you do not receive runtime errors when you deploy your enterprise beans.
4.7.6 Locating EJB informationTable 4-1 on page 171 contains a list of EJB items and where to find your enterprise beans after you have migrated them to WebSphere Studio Application Developer.
170 Migrating to WebSphere V5.0: An End-to-End Migration Guide
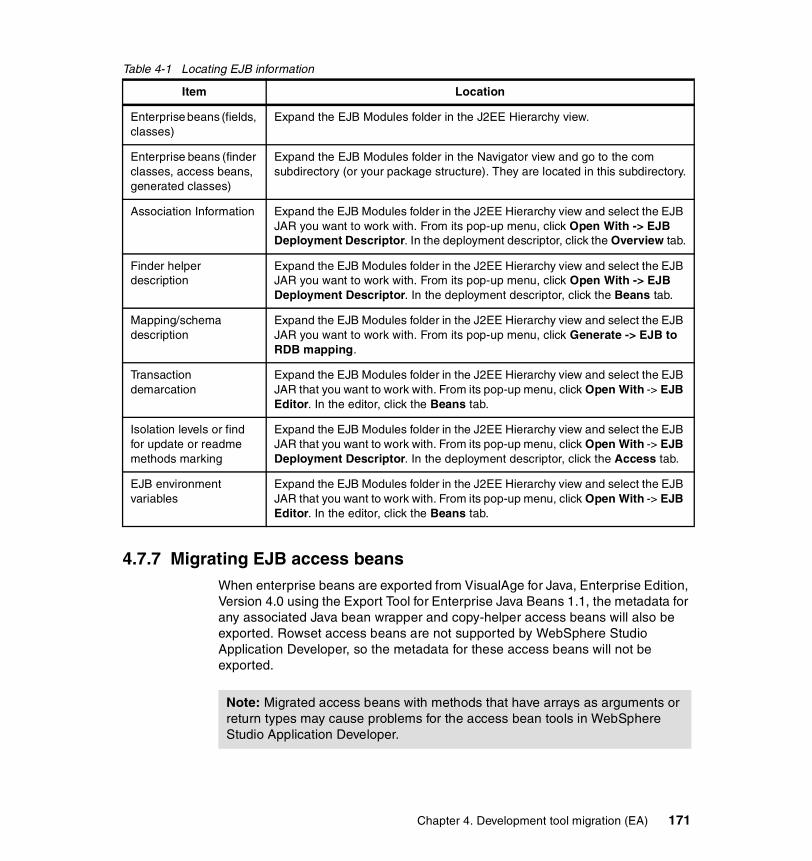
Table 4-1 Locating EJB information
4.7.7 Migrating EJB access beansWhen enterprise beans are exported from VisualAge for Java, Enterprise Edition, Version 4.0 using the Export Tool for Enterprise Java Beans 1.1, the metadata for any associated Java bean wrapper and copy-helper access beans will also be exported. Rowset access beans are not supported by WebSphere Studio Application Developer, so the metadata for these access beans will not be exported.
Item Location
Enterprise beans (fields, classes)
Expand the EJB Modules folder in the J2EE Hierarchy view.
Enterprise beans (finder classes, access beans, generated classes)
Expand the EJB Modules folder in the Navigator view and go to the com subdirectory (or your package structure). They are located in this subdirectory.
Association Information Expand the EJB Modules folder in the J2EE Hierarchy view and select the EJB JAR you want to work with. From its pop-up menu, click Open With -> EJB Deployment Descriptor. In the deployment descriptor, click the Overview tab.
Finder helper description
Expand the EJB Modules folder in the J2EE Hierarchy view and select the EJB JAR you want to work with. From its pop-up menu, click Open With -> EJB Deployment Descriptor. In the deployment descriptor, click the Beans tab.
Mapping/schema description
Expand the EJB Modules folder in the J2EE Hierarchy view and select the EJB JAR you want to work with. From its pop-up menu, click Generate -> EJB to RDB mapping.
Transaction demarcation
Expand the EJB Modules folder in the J2EE Hierarchy view and select the EJB JAR that you want to work with. From its pop-up menu, click Open With -> EJB Editor. In the editor, click the Beans tab.
Isolation levels or find for update or readme methods marking
Expand the EJB Modules folder in the J2EE Hierarchy view and select the EJB JAR that you want to work with. From its pop-up menu, click Open With -> EJB Deployment Descriptor. In the deployment descriptor, click the Access tab.
EJB environment variables
Expand the EJB Modules folder in the J2EE Hierarchy view and select the EJB JAR that you want to work with. From its pop-up menu, click Open With -> EJB Editor. In the editor, click the Beans tab.
Note: Migrated access beans with methods that have arrays as arguments or return types may cause problems for the access bean tools in WebSphere Studio Application Developer.
Chapter 4. Development tool migration (EA) 171

4.7.8 Migrating custom finder helpersWhen you export enterprise beans from VisualAge for Java, Enterprise Edition, Version 4.0 using the Export Tool for Enterprise JavaBeans 1.1, or when 1.0 JAR files are deployed with the Deployment Tool for Enterprise JavaBeans (that is, the EJB Deploy Tool), the finder helper interfaces are migrated to the extension document. If the JAR file is an EJB JAR file, the metadata is also migrated to the extension document from the finder helper interfaces. However, migration of the finder helper interfaces to the extension document only occurs if the finder descriptors in the JAR file are not found in the extension document. If the enterprise beans are exported using the Export Tool for Enterprise Java Beans 1.1, the redundant classes are filtered from the exported JAR. If the enterprise beans are not exported using the Export Tool for Enterprise Java Beans 1.1 and are imported along with the redundant classes, the classes are simply ignored.
4.8 Migrating from EJB 1.0 to EJB 1.1 or to EJB 2.0This section provides instructions on how to migrate your enterprise beans from EJB 1.0 to EJB 1.1 or to EJB 2.0. The main steps are:
� Migrating code from EJB 1.0 to EJB 1.1 � Converting projects from EJB 1.x to EJB 2.0 � Migrating code from EJB 1.x to EJB 2.0
4.8.1 Migrating code from EJB 1.0 to EJB 1.1If you are migrating EJB 1.0 code to WebSphere Studio Application Developer, there are some EJB 1.1 specification changes that may affect your code. You may see some of the following validation errors or warnings due to EJB 1.1 changes:
� An enterprise bean cannot use the javax.jts.UserTransaction interface. Use the new javax.transaction.UserTransaction interface instead.
� An entity bean cannot use the UserTransaction interface. This is not allowed in 1.1.
� An entity bean must define FinderException in their throws clause of finder methods.
� An enterprise bean cannot throw a java.rmi.RemoteException. It can throw a javax.ejb.EJBException instead. But RemoteException must still be defined in EJB home and remote interfaces (as required by RMI).
� You cannot use the finalize method.
� java.security.Identity is deprecated.
172 Migrating to WebSphere V5.0: An End-to-End Migration Guide
� Enterprise bean methods getCallerIdentity() and isCallerInRole(Identity) are deprecated. Use getCallerPrincipal() and isCallerinRole(String roleName) instead.
� getEnvironment is deprecated. Open ejb_jar.xml with EJB deployment descriptor, Beans tab, and view environment variables (such as TARGET_HOME_NAME)
String homeName=aLink.getEntityContext().getEnvironment().getProperty("TARGET_HOME_NAME");if (homeName == null) homeName = "TARGET_HOME_NAME";
becomes:
Context env = (Context)(new InitialContext()).lookup("java:comp/env");String homeName = (String)env.lookup("ejb10-properties/TARGET_HOME_NAME");
� CMP enterprise beans ejbCreate(...) methods should return the bean's primary key class (instead of void).
� New HomeHandle interface, and EJBHome interface requires new getHomeHandle() method:
public javax.ejb.HomeHandle getHomeHandle() { return null; }
You should consider enhancements to match EJB 1.1 changes such as:
� Entity bean primary keys can now be java.lang.String objects.
� Entity bean finder methods should define FinderException in their throws clause.
� Entity bean finder methods return java.util.Collection.
� Check the format of your JNDI names (and local namespaces are now supported).
� There are now security roles, and isolation levels are now defined at the method level (they were defined at the EJB level for EJB 1.0).
You should review the EJB 1.1 changes in general to see what other application changes are appropriate. For detailed information, refer to the following publications and Web sites:
� Enterprise Java Beans Specification, Version 1.1, available at http://java.sun.com/products/ejb/docs.html (see Section 1.3, “Application compatibility”).
Chapter 4. Development tool migration (EA) 173
� The IBM WebSphere InfoCenter, found at http://www.ibm.com/software/webservers/appserv/doc/v40/aes/infocenter/index.html. Refer to the following sections:
– Transitioning to Version 4.0 (Click Application Server AE ->Migration -> Transitioning to Version 4.0 and read the “Role-based security” section)
– Migrating to supported EJB specifications (Click Application Server AE -> Migration -> 3.3 Migrating APIs and specifications -> 3.3.1 Migrating to supported EJB specifications)
– Migrating from Version 3.x (Click Application Server AE ->Migration -> 3.2 Migrating from previous products versions -> 3.2.2 Migrating from Version 3.x)
� WebSphere Version 4 Application Development Handbook, SG24-6134, available at http://www.redbooks.ibm.com/pubs/pdfs/redbooks/sg246134.pdf (See the section “Migrating 1.0 EJBs to 1.1 EJBs” on pages 267-268).
� Programming J2EE APIs with WebSphere Advanced, SG24-6124, available at http://www.redbooks.ibm.com/pubs/pdfs/redbooks/sg246124.pdf (See the section on “EJB 1.1 code changes” on pages 113-114).
� EJB Development with VisualAge for Java for WebSphere Application Server, SG24-6144, available at http://www.redbooks.ibm.com/pubs/pdfs/redbooks/sg246144.pdf (See Appendix B).
4.8.2 Converting projects from EJB 1.x to EJB 2.0You can migrate your existing EJB 1.1 project to an EJB 2.0 project, or you can keep both by creating a new EJB 2.0 project and then import the existing EJB 1.1 project JAR file into it, as follows:
� Right-click the 1.1 project and select Migrate -> J2EE version 1.2 to 1.3.
� Or, export the existing 1.1 project as an EJB JAR, create a new 2.0 project, and then select File -> Import -> EJB JAR.
Note: Although the project is an EJB 2.0 project, the existing (or imported) EJB 1.1 Container Managed Persistence (CMP) beans remain EJB 1.1 beans. That is, the CMP beans are not converted to EJB 2.0.
174 Migrating to WebSphere V5.0: An End-to-End Migration Guide
4.8.3 Migrating code from EJB 1.x to EJB 2.0EJB 2.0 beans are supported only in an EJB 2.0 project (although a 2.0 project also supports 1.1 beans).
1. For any CMP 1.x bean, replace each CMP field with abstract getXXX and setXXX methods. (Then the bean class needs to be abstract.)
2. For any CMP 1.x bean, change all occurrences of this.field = value to setField(value) in ejbCreate() and elsewhere throughout the code.
3. For any CMP, create an abstract getXXX and setXXX method for the primary key.
4. For any CMP 1.x finder, create an EJBQL (EJB Query Language) for each finder.
5. For any CMP 1.x finder, return java.util.Collection instead of java.util.Enumeration.
6. Update your exception handling (rollback behavior) for non-application exceptions:
– Throw javax.ejb.EJBException instead of java.rmi.RemoteException to report non-application exceptions.
– In EJB 2.0 and 1.1, all non-application exceptions thrown by the instance result in the rollback of the transaction in which the instance executed, and in discarding the instance.
– In EJB 1.0, the container would not roll back a transaction and discard the instance if the instance threw the java.rmi.RemoteException.
7. Update your Exception handling (rollback behavior) for application exceptions:
– In EJB 2.0 and 1.1, an application exception does not cause the container to automatically roll back a transaction.
– In EJB 1.1, the container performs the rollback only if the instance have invoked the setRollbackOnly() method on its EJBContext object.
– In EJB 1.0, the container was required to roll back a transaction when an application exception was passed through a transaction boundary started by the container.
Chapter 4. Development tool migration (EA) 175
4.9 Migrating from VisualAge for Java Visual Composition Editor to Visual Editor for Java
This section provides instructions on how to migrate applications created in the Visual Composition Editor feature of VisualAge for Java to the Visual Editor for Java within WebSphere Studio Application Developer:
� Saving enhanced design-time metadata from VisualAge for Java � Completing the migration (importing into WebSphere Studio)
4.9.1 Saving enhanced design-time metadata from VisualAge for Java
This step is optional but is highly recommended (especially if your application has any connections) for the following reasons:
� VisualAge for Java did not save information about the placement of top-level beans (that is, beans that are not contained inside other beans) on the free-form surface. By contrast, WebSphere Studio always saves this information as a comment on the line of code that declares the bean and restores the bean to that position on the canvas every time you open the Visual Editor. You have the option to save this design-time information in VisualAge for Java before migration. If you do not save it, when you first open your .java files in the new Visual Editor for Java, the editor calculates a default position for top-level beans (also known as free-form parts), which you can easily change by means of a drag-and-drop operation.
� Although the new Visual Editor for Java in WebSphere Studio Application Developer does not support connection design, an equivalent function may be added in the future. (Note: This is not a product commitment; it is just preparation for a future possibility.)
To save the enhanced metadata information prior to migration:
1. Go to the VisualAge for Java Developer Domain found at http://www7.software.ibm.com/vad.nsf/data/document4293 and download the Visual Composition Editor Code Generation/Export Feature.
2. Following the tool readme, add the tool into VisualAge for Java and then stop and restart VisualAge for Java.
3. Version the current application code into the VisualAge for Java repository (so you can return to this version in case of any ongoing VisualAge for Java development).
176 Migrating to WebSphere V5.0: An End-to-End Migration Guide

4. For each of your graphical applications within VisualAge for Java, select one or more of the graphical programs (typically XxxxxView), right-click, and then do the following:
a. Click VCE Code Generation/Export, and be sure the Export to a directory after code regeneration option is selected.
b. Leave Directory as the selected export destination, and click Next.
c. Select your target directory, unselecting the .class option and selecting the .java option (since you want the source code), and then click Finish.
d. Optionally, reload your VisualAge for Java code with its previous version (right-click and then select Replace with -> Previous edition).
4.9.2 Completing the migration (importing into WebSphere Studio)Your classes are now ready to be imported into WebSphere Studio. Refer to 4.6, “Migrating from VisualAge for Java to WebSphere Studio Application Developer” on page 157. Once your previous Visual Composition Editor source programs have been imported into WebSphere Studio Application Developer, you can maintain them in the Visual Editor for Java.
4.10 Converting from VisualAge for Java Persistence Builder to EJB 2.0
This section provides an overview of how to convert your VisualAge for Java Persistence Builder applications to EJB 2.0 in WebSphere Studio Application Developer Version 5.0.
Do the following steps:
1. Migrate and export the Persistence Builder Model as an EJB 1.1 JAR:
a. Use the VisualAge for Java 4.0 tool to migrate the Persistence Builder Model into an EJB 1.0 Group (click OnlineHelp -> Tasks -> Adding Persistence -> Migrating Persistence Builder Model to EJB)
Note: Complete details are found in an article posted on WebSphere Developers Domain and with a link from the WebSphere Studio Application Developer Transitions Web page http://www.ibm.com/websphere/developer/zones/studio/transition.html.
This article will not be available until the GA product ships.
Chapter 4. Development tool migration (EA) 177

b. Use VisualAge for Java EJB 1.1 Export Wizard to export an EJB 1.1 JAR
2. Import EJB 1.1 JAR into EJB 1.1 project, convert to EJB 2.0 project:
a. Import an EJB 1.1 JAR into WebSphere Studio Application Developer EJB 1.1 project.
b. Convert an EJB 1.1 project into an EJB 2.0 project by selecting your EJB project, then right-clicking File -> Migrate -> J2EE Version 1.2 to 1.3.
3. Convert EJB 1.1 code to EJB 2.0 and set application profile declarations:
a. Manually convert from 1.x CMPs into 1.1 CMPs into 2.0 CMPs (refer to4.8.3, “Migrating code from EJB 1.x to EJB 2.0” on page 175).
b. Manually set declarative application profiles for Isolation/ReadAhead/Inheritance and so on.
4. Convert Persistence Builder client application into EJB client application:
a. Use session beans to abstract layer(s) of business logic above Entity Beans
b. Manually convert Persistence Builder business logic from persistence builder model to use new session beans
4.11 Build setup (library JARs, dependent project JARs, Ant builds)
This section covers the following migration topics:
� Java library JARs and third-party external JARs � Optimizing multi-project builds using dependent project JARs � Automated production builds using Ant
4.11.1 Java library JARs and third-party external JARsFor detailed explanations of what is involved, see the article on J2EE Class Loading found at http://www.ibm.com/websphere/developer/library/techarticles/0112_deboer/deboer.html (J2EE modules and class paths) and on developing J2EE utility JARs, found at http://www.ibm.com/websphere/developer/library/techarticles/0112_deboer/deboer2.html (Java JARs in J2EE modules). These provide excellent technical background and advice.
178 Migrating to WebSphere V5.0: An End-to-End Migration Guide
Recommended way to use a third-party JAR within a Web project
The recommended way to use a third-party JAR file within a Web project is to import it (keeping it as a JAR file) into the library folder of your Web project. This is the only J2EE-defined, portable way to use a JAR file, and will ensure that you do not have to make any changes when deploying to another server.
To use an external JAR file in a single Web project, follow the steps below. If you need to use the JAR file in an EJB project or in multiple Web projects, follow the steps in “Recommended way to use a third-party JAR for use with multiple EJB or Web projects” on page 179 instead.
1. Select File -> Import -> File System (not Zip file) in order to ensure that the JAR file is not expanded when it is imported. Click Next.
2. Click Browse and locate the JAR file directory.
3. Import it into your WebProject/webApplication/WEB-INF/lib folder, where WebProject is the name of your Web project.
4. Click Finish. The JAR file will be automatically added to the Java build path, and no further changes are required at runtime.
Recommended way to use a third-party JAR for use with multiple EJB or Web projects
The recommended way to use a third-party JAR file with two or more EJB or Web projects is to import it (keeping it as a JAR file) into your Enterprise Application (EAR) project. This is the only J2EE-defined, portable way to use a JAR file, and will ensure that you do not have to make any changes when deploying to another server.
To use an external JAR file with multiple EJB or Web EJB projects, follow the steps below. If you only need to use the JAR file in a single Web project, follow the steps in the previous section.
1. Select File -> Import -> File System (not Zip file) in order to ensure that the JAR file is not expanded when it is imported. Click Next.
2. Click Browse and locate the JAR file directory.
3. Import the JAR file into the Enterprise Application project that contains the EJB or Web projects.
4. Click Finish. The JAR file will automatically be added to the Java build path, and no further changes are required at runtime.
5. Follow the steps in the next section to add the JAR to the module dependencies of the Web or EJB project.
Chapter 4. Development tool migration (EA) 179
References between Web projects and other EJB projectsIf you have a Web or EJB project that depends on another EJB project, you must take the following steps to make sure that the project will be visible at runtime:
1. Select the Web or EJB project, right-click it, and select Edit Module Dependencies from its pop-up menu.
2. Select the JARs or EJB projects that the project requires at runtime.
3. Click Finish.
This changes the Web or EJB project manifest file to contain an explicit reference to the required EJB project. It also modifies the Java build path to include the references to EJB and Web projects. Using this technique, the WebSphere Application Server does not need any specific setting for module visibility (deprecated).
Alternative way to use external JAR files (global build and server classpath)
You may also leave the JAR file outside of WebSphere Studio Application Developer and add it to both the Java build path and the server instance's class path. This is not recommended, because your application will not be easily portable. When you move to a different server, you will always have to update the server's class path. As well, you need to ensure that your class files do not conflict with other versions of similar class files already on the server classpath (and needed by the server or its other applications). If you do decide to take this approach, do the following:
1. Add the external JAR file to the Java build class path of the project that requires the JAR file.
a. Select the project, right-click it, and select Properties from its pop-up menu.
b. Click Java Build Path.
c. Click the Libraries tab.
d. Click Add External JARs. Select the JAR file, and click Open.
e. Click OK.
2. Add the external JAR file to the server instance's class path:
a. Open the Server Configuration view, and expand the Server folder.
b. Select the server instance that the project is deployed on. Right-click it and click Open.
c. Click the Paths tab.
180 Migrating to WebSphere V5.0: An End-to-End Migration Guide
d. Within ws.ext.dirs, click Add External JARs. Select the JAR file, and click Open. Note that ws.ext.dirs is used for application JAR files, and the CLASSPATH is used for server JAR files.
e. Close the server instance and save your changes.
4.11.2 Optimizing multi-project builds using dependent project JARsWebSphere Studio Application Developer's powerful autobuild feature can slow down build performance during complex, multiproject builds. There are a number of ways to control these autobuilds (dependent files, active and inactive projects, and projects in source or JAR format) but these options can get quite complicated. For an explanation of the options and how to optimize your build performance, see the WebSphere Developer Domain article “Optimizing complex builds in WebSphere Studio Application Developer” found at http://www.ibm.com/websphere/developer/library/techarticles/0204_searle/searle.html.
4.11.3 Automated production builds using AntYou can use Ant with WebSphere Studio Application Developer to automate your production builds. The WebSphere Developer Domain article “Using Ant with WebSphere Studio Application Developer” found at http://www.ibm.com/websphere/developer/library/techarticles/0203_searle/searle1.html explains the following things:
– What is Ant?
– How to run Ant both inside and outside WebSphere Studio Application Developer
– How to use Ant for production builds of J2EE elements (EJBs, WARs, EARs, and so on)
– How to extend Ant with new WebSphere Studio Application Developer build tasks
4.12 Further readingUp-to-date information on migration and other topics is available at http://www.ibm.com/websphere/developer/zones/studio/transition.html
The following publications and Web pages provide general information which you may find helpful when working with WebSphere Studio Application Developer:
� Enterprise JavaBeans Specification, Version 1.1: http://java.sun.com/products/ejb/docs.html
Chapter 4. Development tool migration (EA) 181
� Enterprise JavaBeans Specification, Version 2.0: ftp://128.11.159.146/pub/ejb/947q9tbb/ejb-2_0-fr2-spec.pdf
� JSR-000053 Java Servlet 2.3 and JavaServer Pages 1.2 Specifications: http://java.sun.com/aboutJava/communityprocess/first/jsr053/index.html
� The IBM WebSphere Application Server Version 4 InfoCenter: http://www.ibm.com/software/webservers/appserv/doc/v40/aes/infocenter/index.html
� WebSphere Version 4 Application Development Handbook: http://www.redbooks.ibm.com/pubs/pdfs/redbooks/sg246134.pdf
� Programming J2EE APIs with WebSphere Advanced: http://www.redbooks.ibm.com/pubs/pdfs/redbooks/sg246124.pdf
� EJB Development with VisualAge for Java for WebSphere Application Server: http://www.redbooks.ibm.com/pubs/pdfs/redbooks/sg246144.pdf
� WebSphere Application Server Version 3.5 to 4.x - Migration Hints & Tips: http://www7b.software.ibm.com/wsdd/library/techarticles/0208_wright/wright.html
Further reading which may be of interest:
� An article on using Ant with WebSphere Studio Application Developer (including J2EE project builds/exports): http://www.ibm.com/websphere/developer/library/techarticles/0203_searle/searle1.html
� An article on optimizing complex builds in WebSphere Studio Application Developer: http://www.ibm.com/websphere/developer/library/techarticles/0204_searle/searle.html
� An article on J2EE class loading (J2EE modules and class paths) in WebSphere Studio Application Developer: http://www.ibm.com/websphere/developer/library/techarticles/0112_deboer/deboer.html
� An article on developing J2EE utility JARs (Java JARs in J2EE modules) in WebSphere Studio Application Developer: http://www.ibm.com/websphere/developer/library/techarticles/0112_deboer/deboer2.html
� An article on team support in WebSphere Studio Application Developer: http://www.ibm.com/websphere/developer/library/techarticles/ 0108_karasiuk/ 0108_karasiuk.html
� An article on migrating Enterprise Access Builder components from VisualAge for Java to WebSphere Studio Application Developer:
182 Migrating to WebSphere V5.0: An End-to-End Migration Guide
http://www.ibm.com/websphere/developer/techjournal/0201_minocha/minocha.html
� An article on EJB application design using the Session Facade to talk to CMPs http://www.ibm.com/websphere/developer/library/techarticles/ 0106_brown/sessionfacades.html
� An article on WebSphere Application Server Best Practices: http://www.ibm.com/software/webservers/appserv/ws_bestpractices.pdf
� An article on WebSphere Best Practices zone: http://www.ibm.com/websphere/developer/zones/bp/
� WebSphere Developer Domain main Web page: http://www.ibm.com/websphere/developer
� WebSphere Developer Domain technical articles: http://www.ibm.com/websphere/developer/techjournal/
� Information about the WebSphere Studio family, and the features and directions of WebSphere Studio Application Developer: http://www.ibm.com/websphere/developer/zones/studio/transition.html
� IBM WebSphere Studio family of development tools: http://www.ibm.com/websphere/developer/library/techarticles/0108_studio/studio_beta.html
� External Application Developer newsgroup: news://news.software.ibm.com/ibm.software.websphere.studio.application-site-developer
� External workBench (Eclipse) newsgroup: news://news.software.ibm.com/ibm.software.websphere.studio.workbench
� External WebSphere Application Server newsgroup: news://news.software.ibm.com/ibm.software.websphere.application-server
� An article on deploying a J2EE application from WebSphere Studio Application Developer to WebSphere Application Server: http://www.software.ibm.com/vad.nsf/Data/Document3584
� Application Developer software configuration management (source code management) vendors: http://www.ibm.com/software/ad/studioappdev/partners/scm.html
� Migrating applications to Application Developer from competitors’ development tools: http://www.ibm.com/websphere/developer/zones/studio/migration.html
� Migrating VisualCafé WebLogic applications to Application Developer (still deploying to WebLogic): http://www.ibm.com/websphere/developer/library/techarticles/0209_searle/searle1.html
Chapter 4. Development tool migration (EA) 183
� Eclipse.org: http://www.eclipse.org
� WebSphere Developer Domain Plugin Central: http://www.ibm.com/websphere/developer/downloads/plugin/
� Eclipse workbench plug-ins (not part of Eclipse.org): http://www.eclipse-workbench.com/jsp/plugins.jsp
� Eclipse plug-ins (not part of Eclipse.org): http://www.eclipse-plugins.2y.net/eclipse/plugins.jsp
184 Migrating to WebSphere V5.0: An End-to-End Migration Guide
Chapter 5. HTTP Server Plug-in
This chapter discusses the migration of HTTP Server Plug-in from WebSphere V3.5 to V5.0 and from V4.0 to V5.0.
In WebSphere V5.0, an HTTP Transport is used for communication between the HTTP Server Plug-in and the Web Container. This is much different from the options offered in V3.5. It is the same as in V4.0, although the configuration file plugin-cfg.xml employed in V5.0 differs from its V4.0 counterpart. Fortunately, the generation of the configuration file is a relatively easy task once application servers have been defined and applications installed in the application servers.
It is possible to run the Version 3.x OSE plug-in and the Version 4.0 HTTP Server Plug-in in the same Web server installation.The V5.0 HTTP plug-in will support both the V5.0 server and the V4.0 server. The V4.0 plugin-cfg.xml will need to be merged into the V5.0 plugin-cfg.xml file manually. (Note that both V5.0 HTTP plug-in and V4.0 HTTP plug-in cannot run on the same Web server because the DLLs have the same name.) This enables you to keep a cluster of Version 3.x machines or Version 4.0 machines in production as you migrate servers from Version 3.x or Version 4.0 to V5.0. This is illustrated in Figure 5-1 on page 186. The instructions for incremental migration vary by Web server product and by platform. In all cases, however, the URI for a machine must be unique in the routing rules for the plug-in. For example, you can't have /servlet/* defined in both the V3.5 OSE properties file and the V4.0/V5.0 HTTP configuration file. If there is duplication, operating behavior will be erratic.
5
© Copyright IBM Corp. 2002 2003. All rights reserved. 185
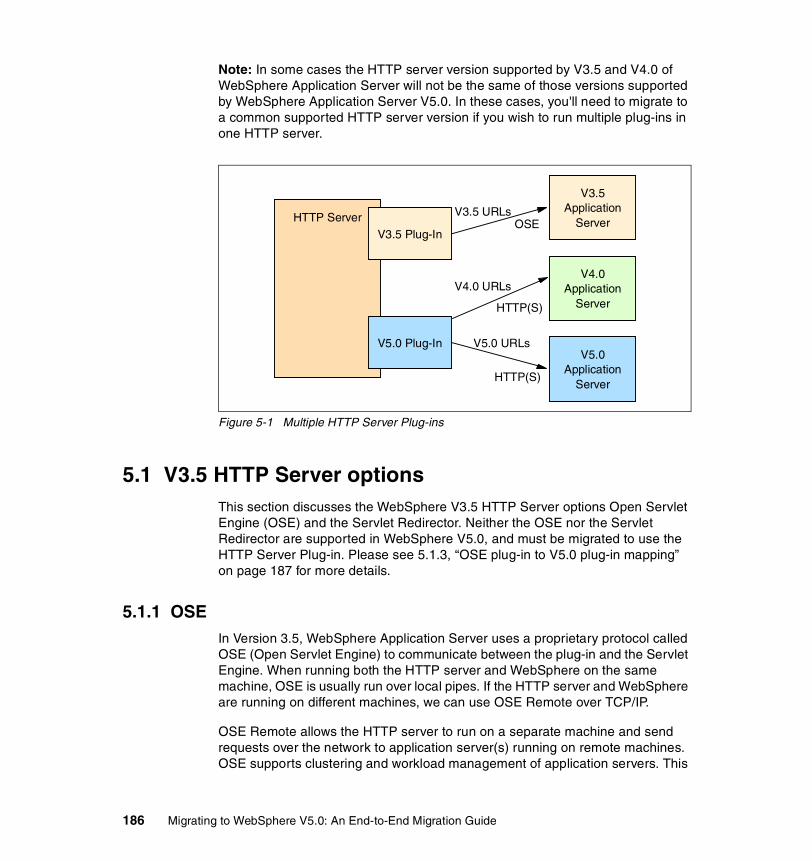
Note: In some cases the HTTP server version supported by V3.5 and V4.0 of WebSphere Application Server will not be the same of those versions supported by WebSphere Application Server V5.0. In these cases, you'll need to migrate to a common supported HTTP server version if you wish to run multiple plug-ins in one HTTP server.
Figure 5-1 Multiple HTTP Server Plug-ins
5.1 V3.5 HTTP Server optionsThis section discusses the WebSphere V3.5 HTTP Server options Open Servlet Engine (OSE) and the Servlet Redirector. Neither the OSE nor the Servlet Redirector are supported in WebSphere V5.0, and must be migrated to use the HTTP Server Plug-in. Please see 5.1.3, “OSE plug-in to V5.0 plug-in mapping” on page 187 for more details.
5.1.1 OSEIn Version 3.5, WebSphere Application Server uses a proprietary protocol called OSE (Open Servlet Engine) to communicate between the plug-in and the Servlet Engine. When running both the HTTP server and WebSphere on the same machine, OSE is usually run over local pipes. If the HTTP server and WebSphere are running on different machines, we can use OSE Remote over TCP/IP.
OSE Remote allows the HTTP server to run on a separate machine and send requests over the network to application server(s) running on remote machines. OSE supports clustering and workload management of application servers. This
HTTP Server V3.5 URLsOSE
V4.0 URLs
V5.0 URLs
HTTP(S)
V3.5 Plug-In
V5.0 Plug-In
V3.5Application
Server
V4.0Application
Server
V5.0Application
ServerHTTP(S)
186 Migrating to WebSphere V5.0: An End-to-End Migration Guide
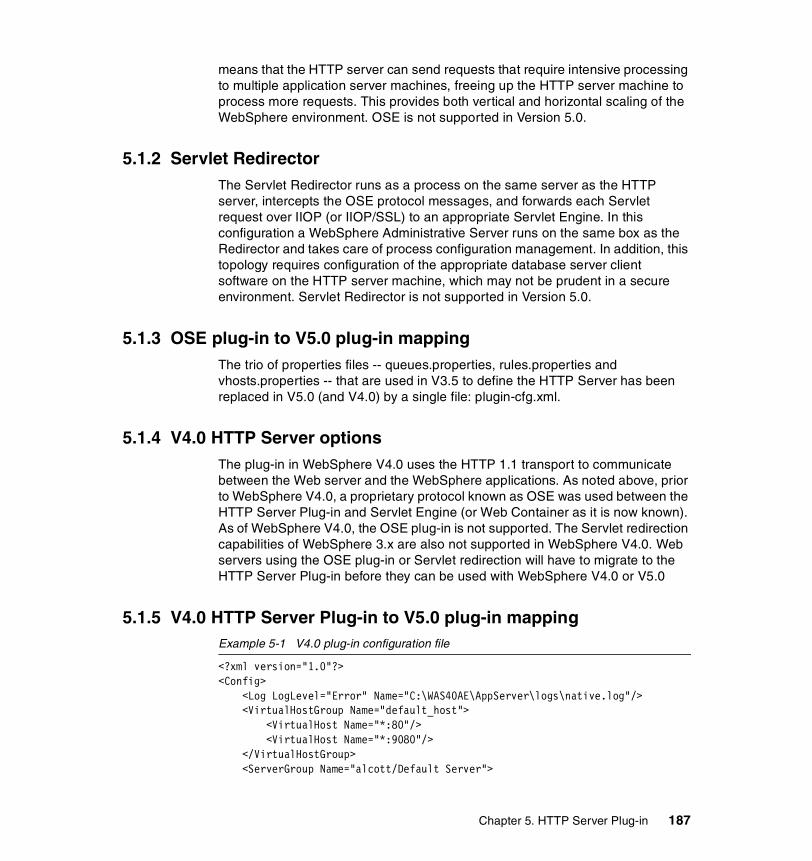
means that the HTTP server can send requests that require intensive processing to multiple application server machines, freeing up the HTTP server machine to process more requests. This provides both vertical and horizontal scaling of the WebSphere environment. OSE is not supported in Version 5.0.
5.1.2 Servlet RedirectorThe Servlet Redirector runs as a process on the same server as the HTTP server, intercepts the OSE protocol messages, and forwards each Servlet request over IIOP (or IIOP/SSL) to an appropriate Servlet Engine. In this configuration a WebSphere Administrative Server runs on the same box as the Redirector and takes care of process configuration management. In addition, this topology requires configuration of the appropriate database server client software on the HTTP server machine, which may not be prudent in a secure environment. Servlet Redirector is not supported in Version 5.0.
5.1.3 OSE plug-in to V5.0 plug-in mappingThe trio of properties files -- queues.properties, rules.properties and vhosts.properties -- that are used in V3.5 to define the HTTP Server has been replaced in V5.0 (and V4.0) by a single file: plugin-cfg.xml.
5.1.4 V4.0 HTTP Server optionsThe plug-in in WebSphere V4.0 uses the HTTP 1.1 transport to communicate between the Web server and the WebSphere applications. As noted above, prior to WebSphere V4.0, a proprietary protocol known as OSE was used between the HTTP Server Plug-in and Servlet Engine (or Web Container as it is now known). As of WebSphere V4.0, the OSE plug-in is not supported. The Servlet redirection capabilities of WebSphere 3.x are also not supported in WebSphere V4.0. Web servers using the OSE plug-in or Servlet redirection will have to migrate to the HTTP Server Plug-in before they can be used with WebSphere V4.0 or V5.0
5.1.5 V4.0 HTTP Server Plug-in to V5.0 plug-in mappingExample 5-1 V4.0 plug-in configuration file
<?xml version="1.0"?><Config> <Log LogLevel="Error" Name="C:\WAS40AE\AppServer\logs\native.log"/> <VirtualHostGroup Name="default_host"> <VirtualHost Name="*:80"/> <VirtualHost Name="*:9080"/> </VirtualHostGroup> <ServerGroup Name="alcott/Default Server">
Chapter 5. HTTP Server Plug-in 187
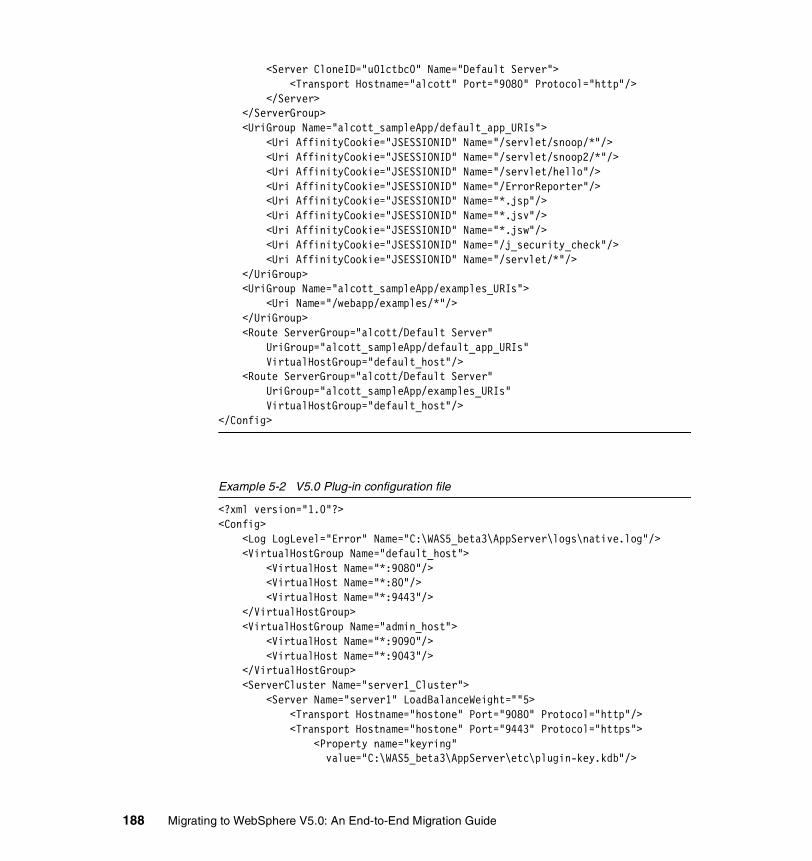
<Server CloneID="u01ctbc0" Name="Default Server"> <Transport Hostname="alcott" Port="9080" Protocol="http"/> </Server> </ServerGroup> <UriGroup Name="alcott_sampleApp/default_app_URIs"> <Uri AffinityCookie="JSESSIONID" Name="/servlet/snoop/*"/> <Uri AffinityCookie="JSESSIONID" Name="/servlet/snoop2/*"/> <Uri AffinityCookie="JSESSIONID" Name="/servlet/hello"/> <Uri AffinityCookie="JSESSIONID" Name="/ErrorReporter"/> <Uri AffinityCookie="JSESSIONID" Name="*.jsp"/> <Uri AffinityCookie="JSESSIONID" Name="*.jsv"/> <Uri AffinityCookie="JSESSIONID" Name="*.jsw"/> <Uri AffinityCookie="JSESSIONID" Name="/j_security_check"/> <Uri AffinityCookie="JSESSIONID" Name="/servlet/*"/> </UriGroup> <UriGroup Name="alcott_sampleApp/examples_URIs"> <Uri Name="/webapp/examples/*"/> </UriGroup>
<Route ServerGroup="alcott/Default Server" UriGroup="alcott_sampleApp/default_app_URIs"
VirtualHostGroup="default_host"/><Route ServerGroup="alcott/Default Server"
UriGroup="alcott_sampleApp/examples_URIs"VirtualHostGroup="default_host"/>
</Config>
Example 5-2 V5.0 Plug-in configuration file
<?xml version="1.0"?><Config> <Log LogLevel="Error" Name="C:\WAS5_beta3\AppServer\logs\native.log"/> <VirtualHostGroup Name="default_host"> <VirtualHost Name="*:9080"/> <VirtualHost Name="*:80"/> <VirtualHost Name="*:9443"/> </VirtualHostGroup> <VirtualHostGroup Name="admin_host"> <VirtualHost Name="*:9090"/> <VirtualHost Name="*:9043"/> </VirtualHostGroup> <ServerCluster Name="server1_Cluster"> <Server Name="server1" LoadBalanceWeight=""5> <Transport Hostname="hostone" Port="9080" Protocol="http"/> <Transport Hostname="hostone" Port="9443" Protocol="https"> <Property name="keyring"
value="C:\WAS5_beta3\AppServer\etc\plugin-key.kdb"/>
188 Migrating to WebSphere V5.0: An End-to-End Migration Guide
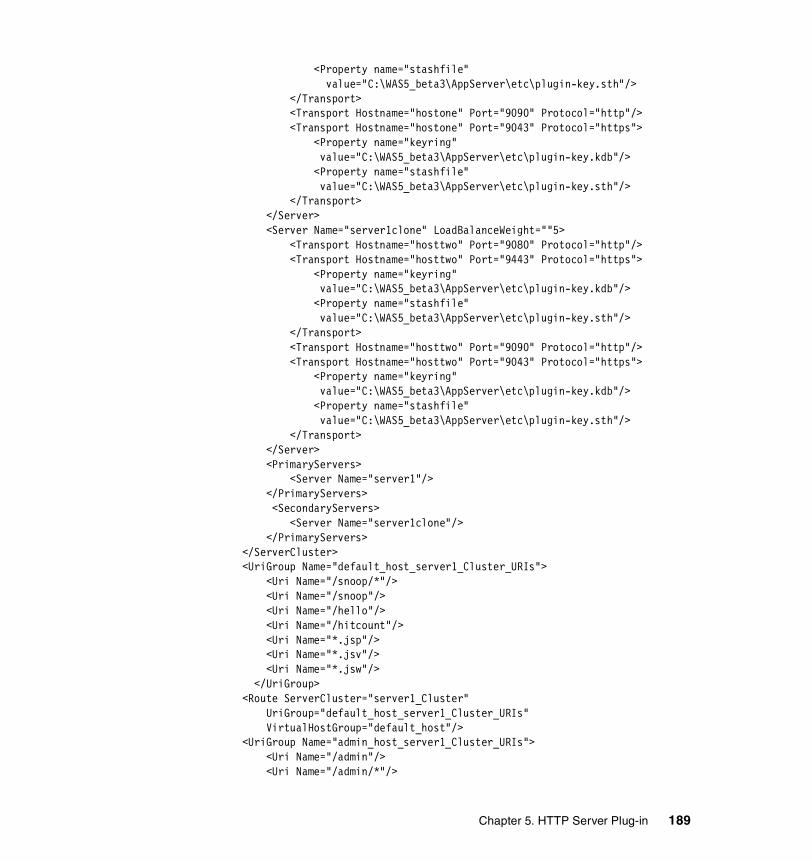
<Property name="stashfile" value="C:\WAS5_beta3\AppServer\etc\plugin-key.sth"/>
</Transport> <Transport Hostname="hostone" Port="9090" Protocol="http"/> <Transport Hostname="hostone" Port="9043" Protocol="https"> <Property name="keyring"
value="C:\WAS5_beta3\AppServer\etc\plugin-key.kdb"/> <Property name="stashfile"
value="C:\WAS5_beta3\AppServer\etc\plugin-key.sth"/> </Transport> </Server>
<Server Name="server1clone" LoadBalanceWeight=""5> <Transport Hostname="hosttwo" Port="9080" Protocol="http"/> <Transport Hostname="hosttwo" Port="9443" Protocol="https"> <Property name="keyring"
value="C:\WAS5_beta3\AppServer\etc\plugin-key.kdb"/> <Property name="stashfile"
value="C:\WAS5_beta3\AppServer\etc\plugin-key.sth"/> </Transport> <Transport Hostname="hosttwo" Port="9090" Protocol="http"/> <Transport Hostname="hosttwo" Port="9043" Protocol="https"> <Property name="keyring"
value="C:\WAS5_beta3\AppServer\etc\plugin-key.kdb"/> <Property name="stashfile"
value="C:\WAS5_beta3\AppServer\etc\plugin-key.sth"/> </Transport> </Server> <PrimaryServers> <Server Name="server1"/> </PrimaryServers> <SecondaryServers> <Server Name="server1clone"/> </PrimaryServers> </ServerCluster> <UriGroup Name="default_host_server1_Cluster_URIs"> <Uri Name="/snoop/*"/> <Uri Name="/snoop"/> <Uri Name="/hello"/> <Uri Name="/hitcount"/> <Uri Name="*.jsp"/> <Uri Name="*.jsv"/> <Uri Name="*.jsw"/> </UriGroup> <Route ServerCluster="server1_Cluster" UriGroup="default_host_server1_Cluster_URIs"
VirtualHostGroup="default_host"/> <UriGroup Name="admin_host_server1_Cluster_URIs"> <Uri Name="/admin"/> <Uri Name="/admin/*"/>
Chapter 5. HTTP Server Plug-in 189

</UriGroup> <Route ServerCluster="server1_Cluster" UriGroup="admin_host_server1_Cluster_URIs"
VirtualHostGroup="admin_host"/></Config>
As can be seen by examining the two files, they have much in common, but there are some significant differences:
1. The V4.0 “ServerGroup” has been replaced in V5.0 by a “ServerCluster”.
2. In V5.0, primary servers and secondary servers can be defined for a cluster. When defined, the requests will be directed only to primary servers applying WorkLoad Management (WLM). Requests will go to the secondary server only when all the servers in the primary server list are down. If there are multiple servers in secondary list, then all requests will be routed to the first live server in that list and there will be no load balancing in the secondary list. When the plug-in configuration is generated using GenPluginCfg.bat, the generated plugin-cfg.xml contains only the primary list. Secondary list definitions using the admin console didn't make it into V5.0. Therefore, a user will need to manually edit the generated plugin-cfg.xml file to define the secondary servers.
3. In V5.0 a property for “LoadBalanceWeight” is used to specify weighting for load distribution. The weights are calculated as a ratio of LoadBalanceWeight divided-by the sum of all the LoadBalanceWeights specified for each server in the cluster. In Example 5-2 on page 188, both servers have a LoadBalanceWeight of 5, so each will receive 50% of the requests (5/10).
5.2 Generation of the V5.0 plug-in configurationWhile there are several mechanisms for generation of the HTTP server plug-in configuration file, the primary one is the use of the GenPluginCfg script, which is located in the <wasroot>\bin directory. This script replaces its V3.5 counterpart, OSERemoteCfg, as well as the V4.0 script by the same name.
The use of GenPluginCfg is demonstrated in Example 5-3. In the first invocation no additional arguments are provided, so a list of required and optional arguments is displayed.
Example 5-3 GenPluginCfg file
C:\WAS50\AppServer\bin>genplugincfg
Note: A number of the V5.0 URI mappings were omitted for brevity.
190 Migrating to WebSphere V5.0: An End-to-End Migration Guide
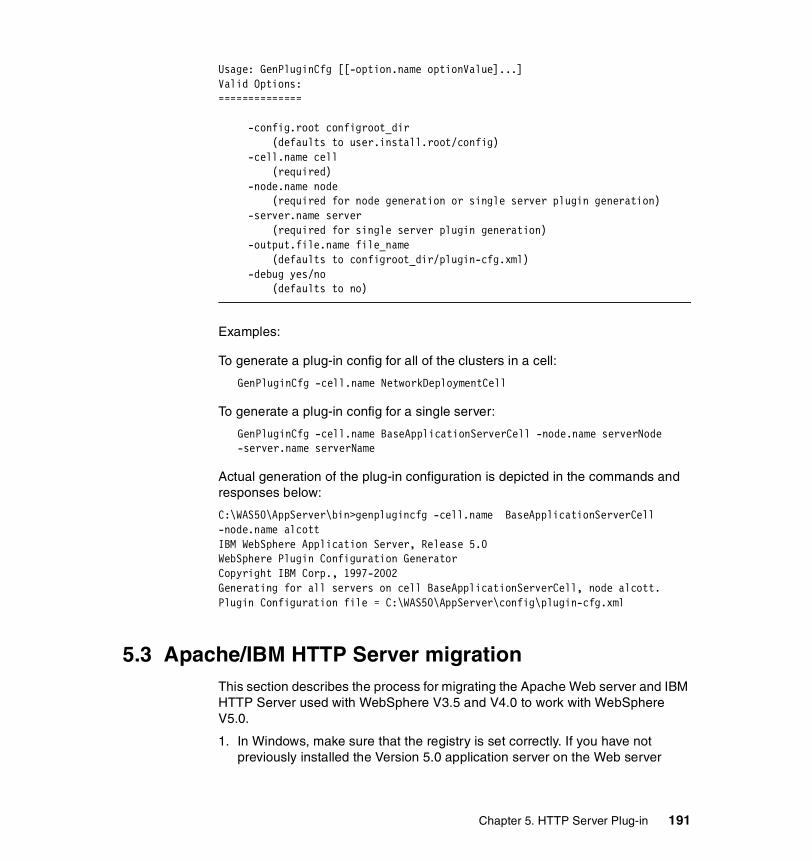
Usage: GenPluginCfg [[-option.name optionValue]...]Valid Options:==============
-config.root configroot_dir (defaults to user.install.root/config) -cell.name cell (required) -node.name node (required for node generation or single server plugin generation) -server.name server (required for single server plugin generation) -output.file.name file_name (defaults to configroot_dir/plugin-cfg.xml) -debug yes/no (defaults to no)
Examples:
To generate a plug-in config for all of the clusters in a cell:
GenPluginCfg -cell.name NetworkDeploymentCell
To generate a plug-in config for a single server:
GenPluginCfg -cell.name BaseApplicationServerCell -node.name serverNode -server.name serverName
Actual generation of the plug-in configuration is depicted in the commands and responses below:
C:\WAS50\AppServer\bin>genplugincfg -cell.name BaseApplicationServerCell -node.name alcottIBM WebSphere Application Server, Release 5.0WebSphere Plugin Configuration GeneratorCopyright IBM Corp., 1997-2002Generating for all servers on cell BaseApplicationServerCell, node alcott.Plugin Configuration file = C:\WAS50\AppServer\config\plugin-cfg.xml
5.3 Apache/IBM HTTP Server migrationThis section describes the process for migrating the Apache Web server and IBM HTTP Server used with WebSphere V3.5 and V4.0 to work with WebSphere V5.0.
1. In Windows, make sure that the registry is set correctly. If you have not previously installed the Version 5.0 application server on the Web server
Chapter 5. HTTP Server Plug-in 191
machine, add a key called 5.0 to WebSphere Application Server and then add the Plugin Config variable to the key for the Web server plug-in to load.
2. Move the appropriate files from the bin directory of a Version 5.0 application server installation.
– In Windows, move mod_ibm_app_server_http.dll and plugin_common.dll
– In UNIX, move mod_ibm_app_server_http.so(sl)
3. To the httpd.conf file, add the lines for configuring the Version 5.0 Web server plug-in. This is specified by the LoadModule and WebSpherePluginCfg directives.
– LoadModule ibm_app_server_http_module <wasroot>/bin/mod_ibm_app_server_http.dll
– WebSpherePluginConfig "<wasroot>config/plugin-cfg.xml
4. Regenerate the plug-in configuration file on the application server machine after you have the machine migrated. Be sure the host name attributes of the transports are set to the host name or IP address of the machine on which the application server is running.
5. Move the plug-in configuration file into the Web server installation so that it is in the location specified by the WebSpherePluginConfig directive in the httpd.conf file.
6. Restart the Web server; you should be able to access applications that run on Version 3.x or Version 4.0 application server clusters or V5.0 application server cells.
7. As you migrate machines to Version 5.0, you must regenerate the Web server plug-in configuration after migration and move the plug-in configuration file to the Web server installation. You should also remove the machine from the V3.5 OSE or V4.0 HTTP files by either manually editing them or removing the machine from the Version 3.x or V4.0 instances and then regenerating the OSE property files.
5.4 iPlanet/Sun migrationThis section describes the process of migrating the Sun Microsoft iPlanet Web server used with WebSphere V3.5 and V4.0 to work with WebSphere V5.0.
1. In Windows make sure that the registry is set correctly. If you have not previously installed the Version 5.0 application server on the Web server machine, add a key called 5.0 to WebSphere Application Server and then add the Plugin Config variable to the key for the Web server plug-in to load.
192 Migrating to WebSphere V5.0: An End-to-End Migration Guide
2. Move the appropriate files from the bin directory of a Version 5.0 application server installation.
3. In Windows, move ns41_http.dll and plugin_common.dll.
4. In UNIX, move libns41_http.so(sl).
5. To manually configure the HTTP server plug-in:
– Add the following two directives to the magnus.conf file:
Init fn="load-modules" funcs="as_init,as_handler,as_term" shlib="<wasroot>/ns41_http.dll"
Init fn="as_init" bootstrap.properties="<wasroot>/config/plugin-cfg.xml
– Add the following directive to the obj.conf file:
Service fn="as_handler"
6. Regenerate the plug-in configuration file on the application server machine after you have the machine migrated. Be sure the host name attributes of the transports are set to the host name or IP address of the machine on which the application server is running.
7. Move the plug-in configuration file into the Web server installation so that it is in the location specified by the bootstrap.properties variable for the Init directive in the obj.conf file for iPlanet 4.x or the Init directive in the magnus.conf file for iPlanet 6.x.
8. Restart the Web server. You should be able to access applications that run on Version 3.x or Version 4.0 application server clusters or V5.0 application server cells.
9. As you migrate machines to Version 5.0, you must regenerate the Web server plug-in configuration after migration and move the plug-in configuration file to the Web server installation. You should also remove the machine from the V3.5 OSE or V4.0 HTTP files by either manually editing the files or removing the machine from the Version 3.x or V4.0 instances and then regenerating the OSE property files.
5.5 Domino™ migrationThis section describes the process of migrating the Domino Web server used with WebSphere V3.5 and V4.0 to work with WebSphere V5.0.
1. In Windows make sure that the registry is set correctly. If you have not previously installed the Version 5.0 application server on the Web server machine, add a key called 5.0 to WebSphere Application Server and then add the Plugin Config variable to the key for the Web server plug-in to load. The
Chapter 5. HTTP Server Plug-in 193

complete instructions for this can be found in the instructions for manually configuring the Web server plug-in.
2. Move the appropriate files from the bin directory of a Version 5.0 application server installation.
– In Windows, move domino5_http.dll and plugin_common.dll
– In UNIX, move libdomino5_http.a(so,sl)
3. Follow these steps for manually configuring the Version 5.0 Web server plug-in:
a. Start up the Domino server.
b. Access the following /webadmin.nsf through your Web browser (for example http://myserver .ibm.com/webadmin.nsf). It should prompt you for a password. You need to give the short name for the Administrator and the Administrator password. The short name is usually the first letter of the first name and the last name (for example, Joe Smith becomes jsmith).
c. Click the Configuration link on the left-hand side of the page.
d. Click the Servers link at the top left center of the page.
e. Double-click the server you want to work with WebSphere.
f. Click Edit Server at the top left of the center window.
g. Click Internet Protocols in the middle of the page.
h. In the DSAPI section in the middle right of the page, add the path to the Domino plug-in. The plug-in gets installed in the WebSphere bin directory.
i. Click Save and Close in the upper left hand corner of the center window.
j. Add the variable Plugin Config to the registry by navigating to HKEY_LOCAL_MACHINE -> SOFTWARE -> IBM -> WebSphere Application Server -> 5.0. Set the value for this variable to the location of the plugin-cfg.xml file.
k. Restart the Domino Server.
l. When the server is starting up, you should see something similar to the following:
02/12/2001 03:05:09 PM JVM: Java Virtual Machine initialized.WebSphere DSAPI filter loaded02/12/2001 03:05:10 PM HTTP Web Server started
4. Regenerate the plug-in configuration file on the application server machine after you have the machine migrated. Be sure the host name attributes of the transports are set to the host name or IP address of the machine on which the application server is running.
194 Migrating to WebSphere V5.0: An End-to-End Migration Guide

5. Move the plug-in configuration file into the Web server installation so that it is in the location specified by the Plugin Config variable that you added to the registry.
6. Restart the Web server. You should be able to access applications that run on Version 3.x or Version 4.0 application server clusters or V5.0 application server cells.
7. As you migrate machines to Version 5.0, you must regenerate the Web server plug-in configuration after migration and move the plug-in configuration file to the Web server installation. You should also remove the machine from the V3.5 OSE or V4.0 HTTP files by either manually editing the files or removing the machine from the Version 3.x or V4.0 instances and then regenerating the OSE property files.
5.6 IIS migrationThis section describes the process of migrating the IIS Web server used with WebSphere V3.5 and V4.0 to work with WebSphere V5.0.
1. Make sure that the Windows registry is set correctly. If you have not previously installed the Version 5.0 application server on the Web server machine, add a key called 5.0 to WebSphere Application Server and then add the Plugin Config variable to the key for the Web server plug-in to load. The complete instructions for this are found in Step 3 below.
2. Move the files iisWASPlugin_http.dll and plugin_common.dll from the bin directory of a Version 5.0 application server installation.
3. Follow these steps for manually configuring the Version 5.0 Web server plug-in:
a. Start the Internet Service Manager application.
b. Create a new Virtual Directory for the Web site instance you want to work with WebSphere. To do this with default installation, expand the tree on the left, right-click Default Web Site and select New -> Virtual Directory. This will bring up the wizard for adding a Virtual Directory.
i. In the Alias to be used to Access Virtual Directory field, type sePlugins.
ii. In the field Enter the physical path of the directory containing the content you want to publish, click Browse and navigate to the WebSphere bin directory.
iii. To define access permissions you want to set for this directory, check the Allow Execute Access checkbox.
iv. Click Finish and a virtual directory titled “sePlugins” should be added to your default Web site.
Chapter 5. HTTP Server Plug-in 195

c. Add the ISAPI filter into the IIS configuration. Right-click the host name in the tree on the left and select Properties.
i. On the Internet Information Services tab, select Master Properties -> WWW Service and click the Edit button.
ii. The WWW Service Master Properties window pops up. Click the ISAPI Filters tab.
iii. Click the Add button. This brings up the Filter Properties window.
iv. In the Filter Name field, type iisWASPlugin.
v. In the Executable field, click the Browse button, go into WebSphere bin directory, and select iisWASPlugin_http.dll.
vi. Click the OK button until all open windows are closed.
d. Add the variable Plugin Config to the registry by navigating to HKEY_LOCAL_MACHINE -> SOFTWARE -> IBM -> WebSphere Application Server -> 5.0. Set the value for this variable to the location of the plugin-cfg.xml file.
4. Regenerate the plug-in configuration file on the application server machine after you have the machine migrated. Be sure the host name attributes of the transports are set to the host name or IP address of the machine on which the application server is running.
5. Move the plug-in configuration file into the Web server installation so that it is in the location specified by the Plugin Config variable that you added to the registry.
6. Restart the Web server. You should be able to access applications that run on Version 3.x or Version 4.0 application server clusters or V5.0 application server cells.
7. As you migrate machines to Version 5.0, you must regenerate the Web server plug-in configuration after migration and move the plug-in configuration file to the Web server installation. You should also remove the machine from the V3.5 OSE or V4.0 HTTP files by either manually editing the files or removing the machine from the Version 3.x or V4.0 instances and then regenerating the OSE property files.
196 Migrating to WebSphere V5.0: An End-to-End Migration Guide
Chapter 6. WebSphere system management
This chapter is a primer on the new WebSphere V5.0 admin scripting tool called wsadmin, to assist in the migration of wscp to wsadmin scripts. The differences between WebSphere V3.5, V4.0, and V5.0 Administrative Consoles are briefly examined.
The changes in architecture in WebSphere V5.0 have resulted in changes to the systems management tools, both GUI and command-line, from the tools that were available for this purpose in V3.5 and V4.0.
Replacing the Java GUI (the Administrative Console) in prior versions is a browser-based GUI, similar in some respects to the browser client in V4.0 WebSphere Advanced Single Server (AEs), although the use and navigation has changed from V4.0 AEs.
The wsadmin scripting tool is very similar to wscp, the difference being the conformance to the Bean Scripting Framework (BSF), which allows a variety of scripting languages to be used for the purpose of administration. Note that initially in this version of WebSphere, only Jacl is supported. Another difference from wscp is that wsadmin is a JMX client program, while wscp is an EJB client program. The objects and grammar of wsadmin are considerably different from wscp.
6
© Copyright IBM Corp. 2002 2003. All rights reserved. 197

This chapter provides a migration path for most of the common configuration and administrative tasks in WebSphere. It starts with a description of the major differences in the GUI from prior versions, followed by common tasks executed using the GUI, XMLConfig, and wscp. The wsadmin tool is considered with the migration focus in mind. The final part of the chapter explains the migration and details that are involved in accomplishing the tasks with the wsadmin tool. Please refer to the WebSphere V5.0 InfoCenter for more detailed information on wsadmin.
6.1 WebSphere Administrative ConsolesThis section begins by showing the V3.5 and V4.0 Administrative Consoles. Next, we compare the V5.0 Administrative Console with the V3.5 and V4.0 Administrative Consoles.
6.1.1 Version 3.5 GUI/Administrative ConsoleThe Version 3.5 Administrative Console is shown in Figure 6-1 on page 199. In V3.5, the left-hand side of the console is a topology view of all the objects comprising both the WebSphere runtime and the components of all the applications running in WebSphere. Administration is accomplished by highlighting an object, then changing the settings for the object on the right-hand side of the console. For example in Figure 6-1 on page 199, the Default Server is highlighted in the left pane; in the right pane you can do the following:
� Change the name of the server � Specify command-line settings such as Java heap size as depicted� Specify file locations for stdout and stderr
In a similar fashion you could highlight one of the other objects, such as the Servlet Engine, EJB Container, Session Manager, etc., and modify attributes associated with each of these objects.
198 Migrating to WebSphere V5.0: An End-to-End Migration Guide

Figure 6-1 WebSphere Application Server V3.5 Administrative Console
6.1.2 Version 4.0 GUI/Administrative ConsoleThe Version 4.0 Administrative Console is shown in Figure 6-2 on page 200. As is the case with V3.5, the left-hand side of the V4.0 console is a topology view, and you highlight the object in order to change the configuration of that object on the right-hand side. Unlike V3.5, and in keeping with the J2EE separation of roles and responsibilities in V4.0, the application components are not depicted, only the application name as well as its underlying EJB and/or Web Modules. Individual application components such as Servlets and JSPs are not depicted. Assembly of an application and its specific components takes place in the Application Assembly Tool (AAT), not in the Administrative Console. Further the administration of runtime components is changed from V3.5. Unlike V3.5, the only runtime object depicted on the left side is an application server. The administration of the Web Container (Servlet Engine in V3.5), EJB Container, Session Manager, etc. are all accomplished by selecting the appropriate service for the application server, as opposed to selecting an object in the application server hierarchy.
Chapter 6. WebSphere system management 199
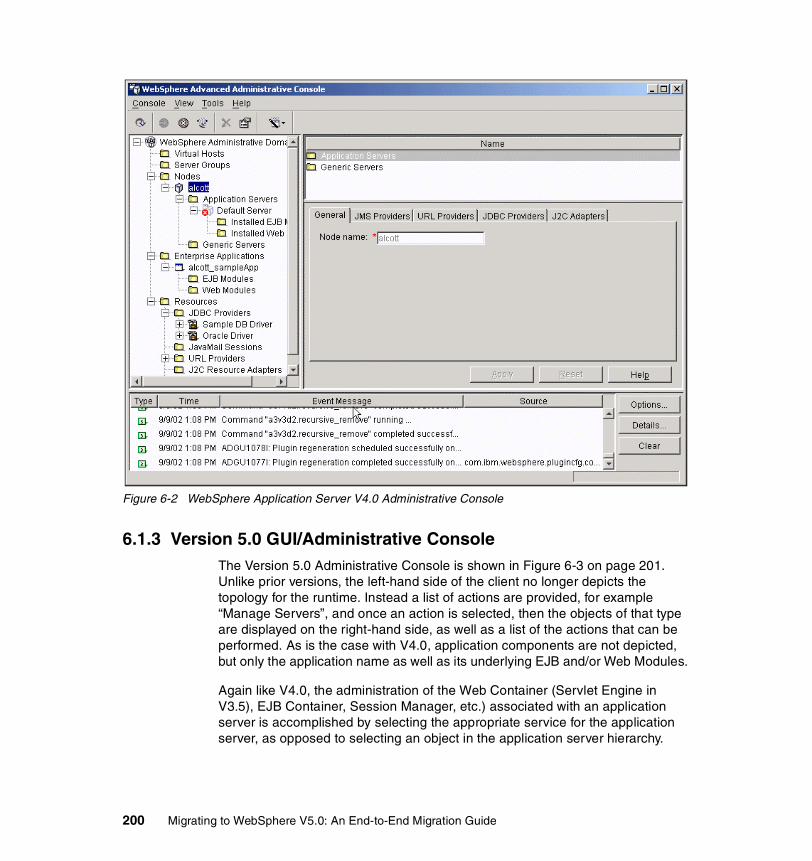
Figure 6-2 WebSphere Application Server V4.0 Administrative Console
6.1.3 Version 5.0 GUI/Administrative ConsoleThe Version 5.0 Administrative Console is shown in Figure 6-3 on page 201. Unlike prior versions, the left-hand side of the client no longer depicts the topology for the runtime. Instead a list of actions are provided, for example “Manage Servers”, and once an action is selected, then the objects of that type are displayed on the right-hand side, as well as a list of the actions that can be performed. As is the case with V4.0, application components are not depicted, but only the application name as well as its underlying EJB and/or Web Modules.
Again like V4.0, the administration of the Web Container (Servlet Engine in V3.5), EJB Container, Session Manager, etc.) associated with an application server is accomplished by selecting the appropriate service for the application server, as opposed to selecting an object in the application server hierarchy.
200 Migrating to WebSphere V5.0: An End-to-End Migration Guide

Figure 6-3 WebSphere Application Server V5.0 Base Administrative Console
As noted previously, one major difference in the V5.0 Administrative Console from prior versions is the fact that the administrative application that runs in the deployment manager has some function not available in WebSphere Application Server, including the ability to view the entire cell topology. As a result, the view in the Administrative Console differs between the WebSphere Application Server Base (“Base”) and WebSphere Application Server Network Deployment (ND). Some of these differences are apparent by comparing Figure 6-3 (Base) and Figure 6-4 on page 202 (ND).
Chapter 6. WebSphere system management 201
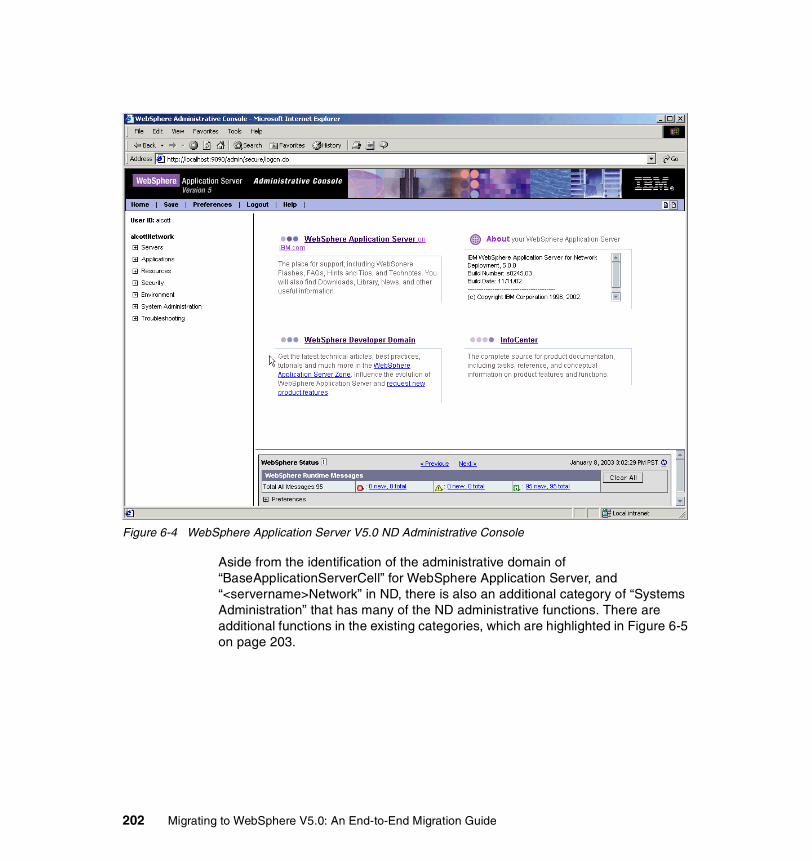
Figure 6-4 WebSphere Application Server V5.0 ND Administrative Console
Aside from the identification of the administrative domain of “BaseApplicationServerCell” for WebSphere Application Server, and “<servername>Network” in ND, there is also an additional category of “Systems Administration” that has many of the ND administrative functions. There are additional functions in the existing categories, which are highlighted in Figure 6-5 on page 203.
202 Migrating to WebSphere V5.0: An End-to-End Migration Guide
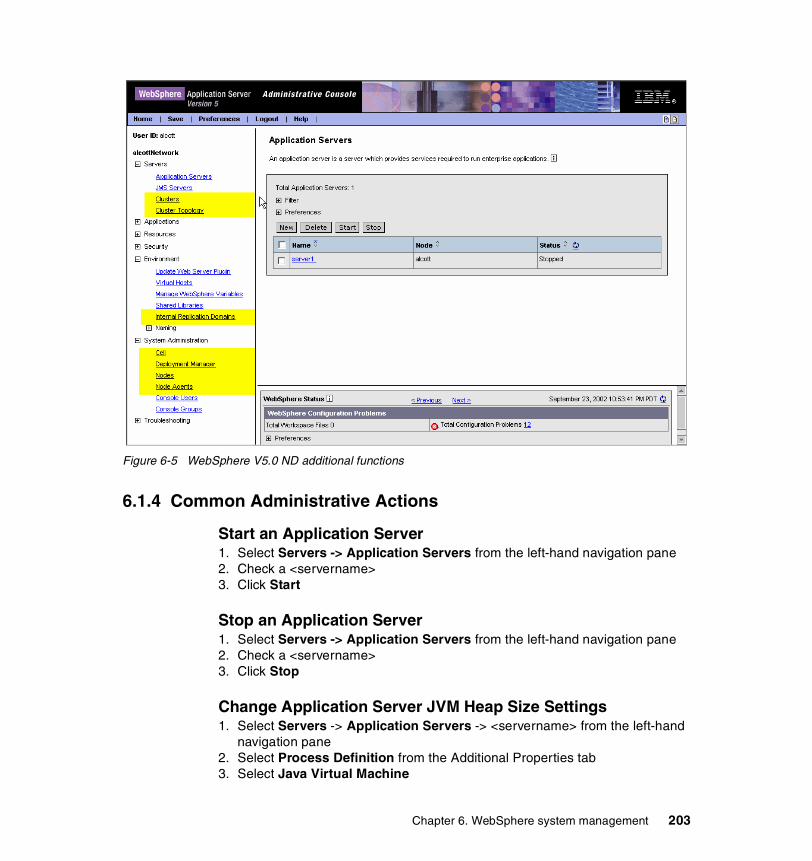
Figure 6-5 WebSphere V5.0 ND additional functions
6.1.4 Common Administrative Actions
Start an Application Server1. Select Servers -> Application Servers from the left-hand navigation pane2. Check a <servername>3. Click Start
Stop an Application Server1. Select Servers -> Application Servers from the left-hand navigation pane2. Check a <servername>3. Click Stop
Change Application Server JVM Heap Size Settings1. Select Servers -> Application Servers -> <servername> from the left-hand
navigation pane2. Select Process Definition from the Additional Properties tab 3. Select Java Virtual Machine
Chapter 6. WebSphere system management 203
4. Specify Initial Heap Size or Maximum Heap Size (or other settings) as desired
5. Click Apply -> Save -> Save
Change Application Server Log Location 1. Select Servers -> Application Servers -> <servername> from the left-hand
navigation pane2. Select Logging and Tracing from the Additional Properties tab 3. Select Process Logs 4. Specify Stdout File Name or Stderr File Name as desired5. Click Apply -> Save -> Save
Enable/Change Application Server Tracing 1. Select Servers -> Application Servers -> <servername> from the left-hand
navigation pane2. Select Logging and Tracing from the Additional Properties tab 3. Select Diagnostic Trace 4. Click Modify in the Trace Specification field of the General Properties window5. Select either the Components or Groups tab from the pop-up window6. Select a component (for example, com.ibm.ejs.cm.*)7. Select a trace level (for example, All enabled)8. Select Apply -> Close -> Save -> Save
Update the HTTP server plug-in configuration file1. Select Environment from the left-hand navigation pane 2. Select Update web server plugin configuration 3. Click OK and wait for message indicating that the plug-in was updated
6.2 Current usage of XMLConfig and wscpBoth XMLConfig and wscp are used to make changes to the WebSphere configuration environment by performing certain common tasks. These tools do not make an explicit differentiation between configuration and runtime objects, even though the objects themselves were treated differently. In WebSphere V5.0, there is a very clear difference between objects that are persistent as part of the WebSphere configuration, and the transient objects that are part of runtime. They are accessed through separate interfaces and have different sets of attributes and operations available on them. This will become clearer in the subsequent sections, but it is essential to mention them here so they can be classified accordingly.
204 Migrating to WebSphere V5.0: An End-to-End Migration Guide
The common tasks can be grouped into the following main categories:
� Server administration� Application management� Administration of configured objects� Cluster administration� Other tasks
Server administration � Start an application server� Stop an application server� Create a new application server� Remove an application server� Connect to remote servers
Application management � Web application - install, uninstall, list� Enterprise application - install, uninstall, start, stop, list� Servlet Engine - create, remove, list� EJB Container - create, remove, list� Data source - create, remove, list� Servlet - Add, remove, list� EJB - Add, remove, list
Administration of runtime objects� Query runtime objects� Change the attribute values of runtime objects
Administration of configured objects� Initialization of objects� Modify attributes of application servers, enterprise applications, and other
configured objects� List attributes of configured objects� Display help� List actions available on configured objects - application servers, enterprise
applications, etc.
Cluster administration� Create a new clone� Modify an existing clone� Remove a clone� Associate/disassociate clone
Chapter 6. WebSphere system management 205
Other tasks� Enable/disable security� Set trace� Import/export� Regenerate plug-in� Install JDBC drivers� Monitor performance � Manipulate JNDI contexts� Ping nodes and application servers for current status� Test connections to data sources� Manage the Java Messaging Service
Most of the tasks listed above will be covered in the following sections. We also explain the different ways commands can be invoked and the parameters that go with them.
6.3 wsadmin primerThe admin scripting program for 5.0 is named wsadmin. The wsadmin scripting tool can be executed in several modes. It can take a single command-line instruction or an entire program written in scripting language from a file, and there is an interactive mode.
There are several configuration files for V5.0, as opposed to the single configuration file in WebSphere V4.0. These are arranged in a set of cascading directories. Briefly, there are directories for cell, node, and server level configuration documents. Each directory may contain several documents related to different parts of the system. For example, the node level directory typically contains a document that defines the resources available on the node (resources.xml) and a document that defines the variable substitution values to use for processes on that node (variables.xml).
WebSphere Application Server 5.0 system management separates administrative functions into two categories: functions that deal with the configuration of WebSphere installations, and functions that deal with currently running objects in WebSphere installations.
This division means that scripts need to deal with two completely separate categories of objects: the persistent elements of the WebSphere configuration and the transient objects that are currently running. The WebSphere V5.0 scripting support makes functions available to locate the configuration object that corresponds to a live, running object. The reverse is also true: you can locate the live, running object corresponding to a given configuration object, except that objects that exist in the configuration are not necessarily currently running.
206 Migrating to WebSphere V5.0: An End-to-End Migration Guide
6.3.1 Background on BSF, JMX, and WebSphere scriptingThis section provides an overview of Bean Scripting Framework (BSF), Java Management Extensions (JMX), and the WebSphere scripting command (wsadmin).
Bean Scripting FrameworkThe Bean Scripting Framework (BSF) is a framework that allows Java applications to incorporate scripting easily, without any scripting language dependencies. Scripting languages such as Netscape Rhino (JavaScript), VBScript, Perl, Tcl, Python, NetREXX and REXX can be used to add to the application's function.
The WebSphere 5.0 admin scripting program wsadmin is a BSF application that registers WebSphere admin objects with BSF so that these objects can be manipulated by scripts. The admin objects that are registered with BSF are client proxies for JMX MBeans.
JMX MBeansIn WebSphere V5.0, administration and application management is based on Java Management Extensions (JMX). JMX enables querying of configuration settings and changing them during runtime. JMX can be used to load, initialize, change and monitor an application and its distributed components.
The JMX architecture introduces three layers:
� Instrumentation layer� Agent layer� Distributed Services layer
More details about JMX itself can be obtained from the JMX Specification (JSR003), found at http://jcp.org/en/jsr/detail?id=3.
What is a JMX MBean?The Java Management Extension (JMX) Specification defines an MBean as follows:
“An MBean is a Java object that implements a specific interface and conforms to certain design patterns. These requirements formalize the representation of the resource's management interface in the MBean. The management interface of a resource is the set of all necessary information and controls that a management application needs to operate on the resource.”
Chapter 6. WebSphere system management 207
In other words, an MBean can be any Java object that is modified to support the interfaces specified by the JMX specification. MBeans can be standard, dynamic, open or model.
� Standard MBeans provide a static interface that conforms to existing design models.
� Dynamic MBeans expose their interface to the JMX Agent at runtime using metadata.
� Open MBeans are dynamic MBeans that use predefined Java data types for better manageability.
� Model MBeans are generic and configurable MBeans provided with the installation.
What are JMX MBeans used for?An MBean is a link between the managed resource and the JMX framework. All resources and services that the application wants to manage can be implemented as MBeans. MBeans are managed from the JMX agent by setting attributes and invoking other operational methods defined in the specific MBean interface. The JMX agent consists of an MBeanServer, with additional services for aggregating the MBeans. An MBeanServer is a registry of MBeans that needs to be visible to management applications. MBeans are registered with the MBeanServer with a unique JMX ObjectName.
MBeans can also generate and propagate notification events to other components. MBeans are easy to implement; hence existing objects can easily be changed to produce standard MBeans or wrapped as dynamic MBeans.
All WebSphere 5.0 runtime components and services are made publicly available through the MBeans management interface. All MBeans supplied with the WebSphere 5.0 product are implemented as Model MBeans.
How can I add JMX Mbeans to the system?JMX MBeans can be added to WebSphere 5.0 in a variety of ways:
� Obtain a reference to the JMX MBeanServer running in every WebSphere 5.0 process and call its registerMBean method.
� Obtain a reference to the WebSphere 5.0 AdminService interface and call its registerMBean method.
� Define an XML MBean Descriptor file that follows the syntax defined by the MbeanDescriptor.dtd, and call the WebSphere 5.0 MBeanFactory's activateMBean method to load the MBean from the descriptor file.
� Define a CustomService that also implements the WebSphere 5.0 JMXManageable interface.
208 Migrating to WebSphere V5.0: An End-to-End Migration Guide
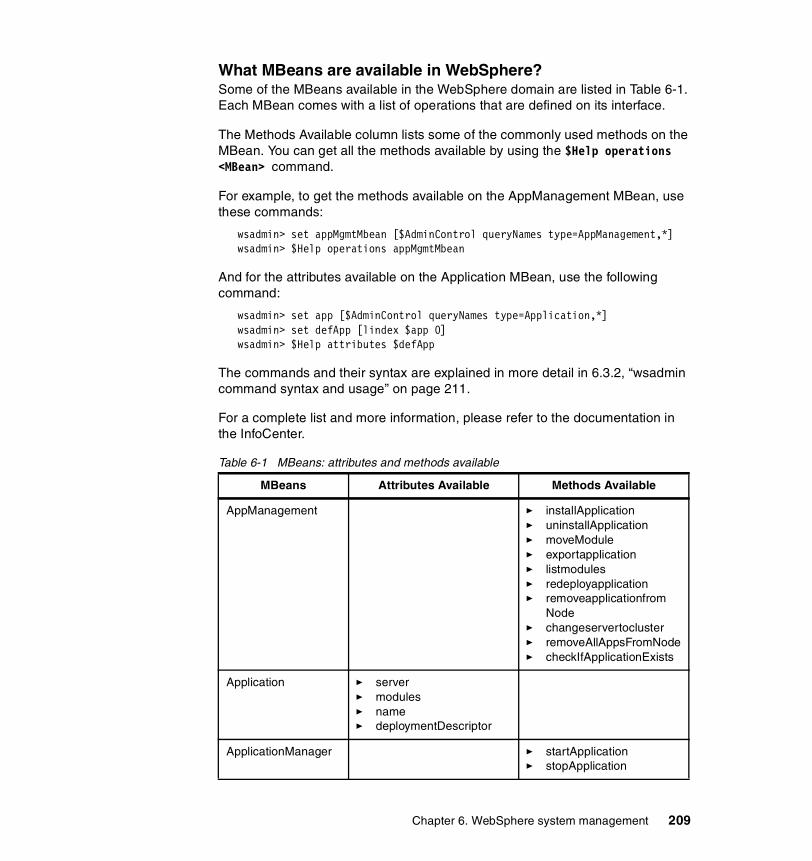
What MBeans are available in WebSphere?Some of the MBeans available in the WebSphere domain are listed in Table 6-1. Each MBean comes with a list of operations that are defined on its interface.
The Methods Available column lists some of the commonly used methods on the MBean. You can get all the methods available by using the $Help operations <MBean> command.
For example, to get the methods available on the AppManagement MBean, use these commands:
wsadmin> set appMgmtMbean [$AdminControl queryNames type=AppManagement,*]wsadmin> $Help operations appMgmtMbean
And for the attributes available on the Application MBean, use the following command:
wsadmin> set app [$AdminControl queryNames type=Application,*]wsadmin> set defApp [lindex $app 0]wsadmin> $Help attributes $defApp
The commands and their syntax are explained in more detail in 6.3.2, “wsadmin command syntax and usage” on page 211.
For a complete list and more information, please refer to the documentation in the InfoCenter.
Table 6-1 MBeans: attributes and methods available
MBeans Attributes Available Methods Available
AppManagement � installApplication� uninstallApplication� moveModule� exportapplication� listmodules� redeployapplication� removeapplicationfrom
Node� changeservertocluster� removeAllAppsFromNode� checkIfApplicationExists
Application � server� modules� name� deploymentDescriptor
ApplicationManager � startApplication� stopApplication
Chapter 6. WebSphere system management 209
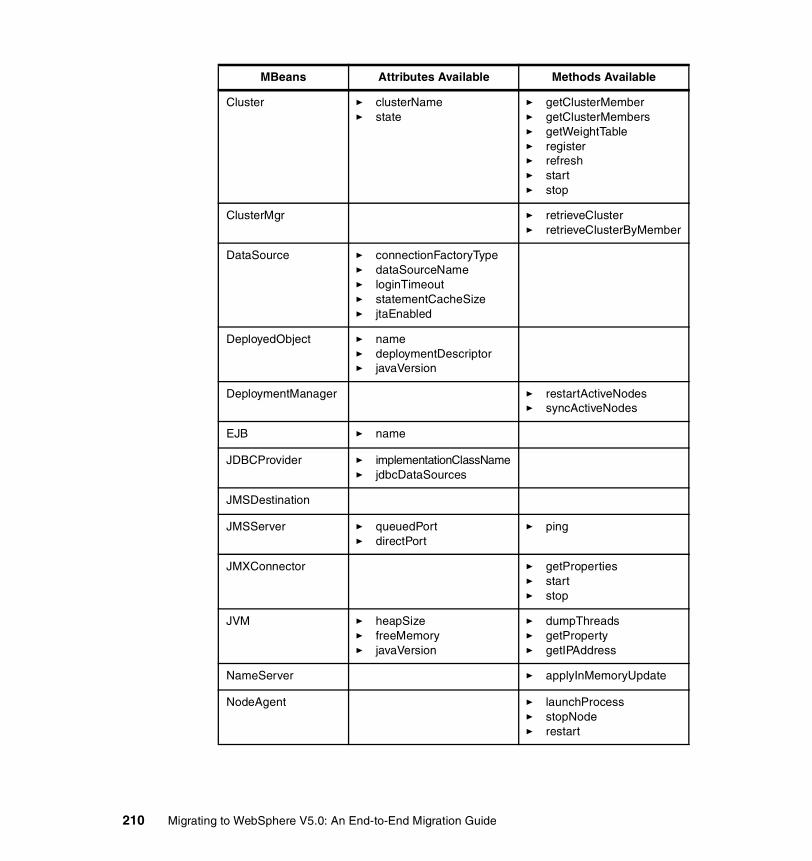
Cluster � clusterName� state
� getClusterMember� getClusterMembers� getWeightTable� register� refresh� start� stop
ClusterMgr � retrieveCluster� retrieveClusterByMember
DataSource � connectionFactoryType� dataSourceName� loginTimeout� statementCacheSize� jtaEnabled
DeployedObject � name� deploymentDescriptor� javaVersion
DeploymentManager � restartActiveNodes� syncActiveNodes
EJB � name
JDBCProvider � implementationClassName� jdbcDataSources
JMSDestination
JMSServer � queuedPort� directPort
� ping
JMXConnector � getProperties� start� stop
JVM � heapSize� freeMemory� javaVersion
� dumpThreads� getProperty� getIPAddress
NameServer � applyInMemoryUpdate
NodeAgent � launchProcess� stopNode� restart
MBeans Attributes Available Methods Available
210 Migrating to WebSphere V5.0: An End-to-End Migration Guide

6.3.2 wsadmin command syntax and usageWith WebSphere, wsadmin can be invoked with wsadmin.bat (Windows) and wsadmin.sh (UNIX).
Example 6-1 Command-line invocation syntax for wsadmin
wsadmin [ -h(elp) ] [ -? ] [ -c <command> ] [ -f <script_file_name>]
SecurityAdmin � generateKeys� exportKeys� importKeys� getUsers� getGroups� checkPassword� importLTPAKeys� exportLTPAKeys
Server � name� pid� cellName� deployedObjects� nodeName� processType� resources� state� platformName� platformVersion
� getComponentVersion� getEFixVersion� stop� stopImmediate� getProductVersion� getExtensionVersion
ThreadPool � name� maximumSize� minimumSize� growable
Transaction � setGlobalTranName� getStatus� finish
WAS40DataSource � databaseName� defaultUser
WebContainer � startTransports� stopTransports� restartWebApplication
MBeans Attributes Available Methods Available
Chapter 6. WebSphere system management 211
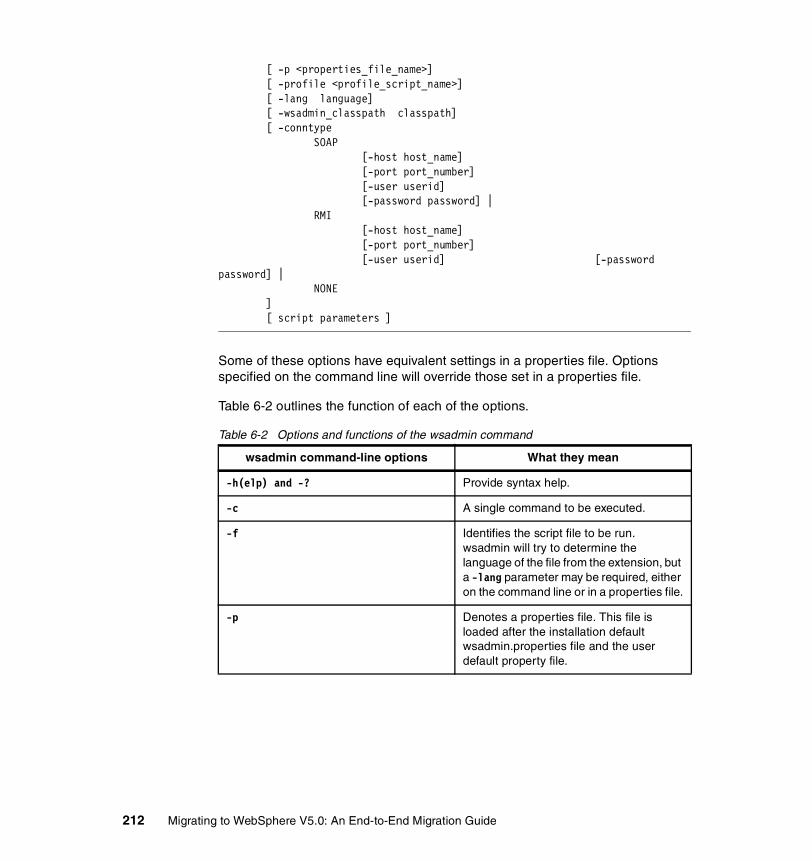
[ -p <properties_file_name>] [ -profile <profile_script_name>] [ -lang language] [ -wsadmin_classpath classpath] [ -conntype SOAP [-host host_name] [-port port_number] [-user userid] [-password password] | RMI [-host host_name] [-port port_number] [-user userid] [-password password] | NONE ] [ script parameters ]
Some of these options have equivalent settings in a properties file. Options specified on the command line will override those set in a properties file.
Table 6-2 outlines the function of each of the options.
Table 6-2 Options and functions of the wsadmin command
wsadmin command-line options What they mean
-h(elp) and -? Provide syntax help.
-c A single command to be executed.
-f Identifies the script file to be run. wsadmin will try to determine the language of the file from the extension, but a -lang parameter may be required, either on the command line or in a properties file.
-p Denotes a properties file. This file is loaded after the installation default wsadmin.properties file and the user default property file.
212 Migrating to WebSphere V5.0: An End-to-End Migration Guide
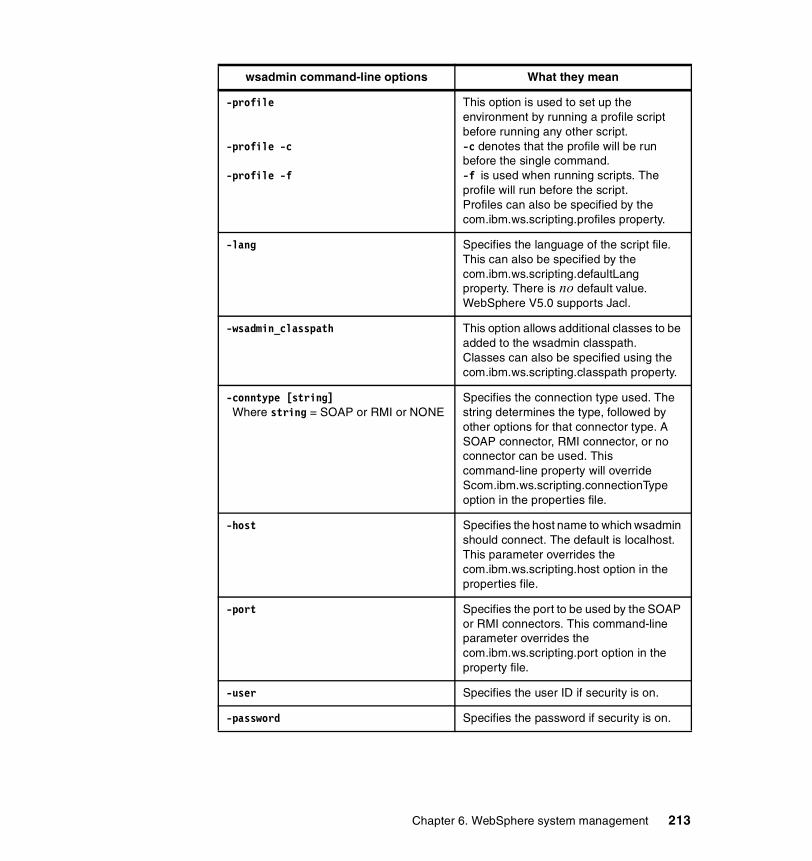
-profile
-profile -c
-profile -f
This option is used to set up the environment by running a profile script before running any other script.-c denotes that the profile will be run before the single command.-f is used when running scripts. The profile will run before the script.Profiles can also be specified by the com.ibm.ws.scripting.profiles property.
-lang Specifies the language of the script file. This can also be specified by the com.ibm.ws.scripting.defaultLang property. There is no default value. WebSphere V5.0 supports Jacl.
-wsadmin_classpath This option allows additional classes to be added to the wsadmin classpath.Classes can also be specified using the com.ibm.ws.scripting.classpath property.
-conntype [string] Where string = SOAP or RMI or NONE
Specifies the connection type used. The string determines the type, followed by other options for that connector type. A SOAP connector, RMI connector, or no connector can be used. This command-line property will override Scom.ibm.ws.scripting.connectionType option in the properties file.
-host Specifies the host name to which wsadmin should connect. The default is localhost. This parameter overrides the com.ibm.ws.scripting.host option in the properties file.
-port Specifies the port to be used by the SOAP or RMI connectors. This command-line parameter overrides the com.ibm.ws.scripting.port option in the property file.
-user Specifies the user ID if security is on.
-password Specifies the password if security is on.
wsadmin command-line options What they mean
Chapter 6. WebSphere system management 213
Example command invocations:
� wsadmin brings up a command shell using Simple Object Access Protocol (SOAP) as the connection type to the local host if there is a default language defined in a properties file. If there is no default language, this invocation is in error.
� wsadmin -f test1.jacl -profile setup.jacl -conntype SOAP -host mymachine sets up a SOAP connection to the “mymachine” host at the port specified by com.ibm.ws.scripting.port in the wsadmin.properties file. Then this example invocation runs the setup.jacl Jacl script, and finally the test1.jacl Jacl script.
� wsadmin -lang javascript -profile mystuff.jacl -p /usr/bob/Custom.properties sets up a connection to the default host (as specified in the Custom.properties properties file), runs the mystuff.jacl Jacl script file, then brings up command shell in which the user can invoke JavaScript commands.
6.3.3 WebSphere objects available to scriptsAdminControl, AdminConfig, and AdminApp are described in this section. Each of these objects has commands that you can use to perform administrative tasks with the WebSphere scripting tool (wsadmin).
AdminControlThe AdminControl object is used to invoke all operational commands that deal with live, running objects in the WebSphere servers. Methods on the AdminControl object can be invoked directly using parameters specified by JMX or by using strings for parameters. The AdminControl object also supports some utility methods for tracing, reconnecting with a server, and data type conversion.
Note: Supported properties are listed in 6.3.5, “Properties used by scripting” on page 221. Several -p options can be specified on the command line, and they are included in the order given.
Any options other than those specified here are passed to the script as parameters. This is what is indicated by script parameters in Example 6-1 on page 211. In Jacl, these parameters are available in a list called “argv,” and the number of parameters is given by the variable “argc.”
214 Migrating to WebSphere V5.0: An End-to-End Migration Guide
CommandsSome of the main commands available on the AdminControl object are listed below. For a more complete list, refer to the InfoCenter. To list operations available, invoke help on the AdminControl object as follows:
wsadmin> $Help AdminControl
� completeObjectName is a convenient method that creates a string representation of a complete ObjectName based on a fragment. It does not communicate with the server to find a matching ObjectName. If it finds several MBeans that match the fragment, it returns the first one. For example:
wsadmin> set serverON [$AdminControl completeObjectName node=mynode,type=Server,*]
� getAttributes returns all the attributes for the object name passed. For example:
wsadmin> set objNameString [$AdminControl completeObjectName WebSphere:type=Server,*] wsadmin> $AdminControl getAttributes $objNameString "cellName nodeName"
� getCell returns the cell that we are connected to. For example:
wsadmin> $AdminControl getCell
� getNode returns the node we are connected to. For example:
wsadmin> $AdminControl getNode
� getPropertiesForDataSource gets a list of properties on the data source from the DataSourceCfgHelper Mbean. For example:
wsadmin> set ds [lindex [$AdminConfig list DataSource] 0] wsadmin> $AdminControl getPropertiesForDataSource $ds
� invoke invokes the object operation by conforming the parameter list to the signature. For example:
wsadmin> set objNameString [$AdminControl completeObjectName WebSphere:type=Server,*] wsadmin> $AdminControl invoke $objNameString stop
� invoke invokes the object operation using the parameter list that you supply. The signature generates automatically. The types of parameters are supplied by examining the MBeanInfo that the MBean supplies. For example:
wsadmin> set objNameString [$AdminControl completeObjectName WebSphere:type=Server,*] wsadmin> $AdminControl invoke $objNameString appendTraceString com.ibm.*=all=enabled
Chapter 6. WebSphere system management 215
� invoke invokes the object operation by conforming the parameter list to the signature. For example:
wsadmin> set objNameString [$AdminControl completeObjectName WebSphere:type=TraceServer,*] wsadmin> $AdminControl invoke $objNameString appendTraceString com.ibm.*=all=enabled java.lang.String
� invoke_jmx invokes the object operation by conforming the parameter list to the signature. For example:
wsadmin> set objNameString [$AdminControl completeObjectName WebSphere:type=TraceService,*] wsadmin> set objName [java::new javax.management.ObjectName $objNameString] wsadmin> set parms [java::new {java.lang.Object[]} 1 com.ibm.ejs.sm.*=all=disabled] wsadmin> set signature [java::new {java.lang.String[]} 1 java.lang.String] wsadmin> $AdminControl invoke_jmx $objName appendTraceString $parms $signature
� isRegistered returns TRUE or 1, if the object is registered on the server. For example:
wsadmin> set objectNameString [$AdminControl completeObjectName WebSphere:type=Server,*] wsadmin> $AdminControl isRegistered $objectNameString
� queryNames returns a string that lists all ObjectNames based on the name template. For example:
wsadmin> $AdminControl queryNames WebSphere:type=Server,*
� setAttribute sets the attribute value to the string specified. For example:
wsadmin> set objNameString [$AdminControl completeObjectName WebSphere:type=TraceService,*] wsadmin> $AdminControl setAttribute $objNameString traceSpecification com.ibm.*=all=disabled
� startServer starts the specified server on the specified node. For example:
wsadmin> $AdminControl startServer server1 mynode
� stopServer stops the specified server on the specified node. For example:
wsadmin> $AdminControl stopServer server1 mynode
� testConnection tests a data source connection. For example:
wsadmin> set datasource1 [lindex [$AdminConfig list DataSource] 0] wsadmin> $AdminControl testConnection $datasource1 {{user userName} {password password_value}}
� trace sets the trace specification. For example:
wsadmin> $AdminControl trace com.ibm.ws.scripting.*=all=enabled
216 Migrating to WebSphere V5.0: An End-to-End Migration Guide
AdminConfig The AdminConfig is used to call configuration commands to make configuration changes to WebSphere. Configuration objects are named using a convention that uses a combination of the “display name” for the object and its configuration ID. An example of such an object name is:
Db2JdbcProvider(cells/testcell/nodes/testnode/resources.xml#JDBCProvider_1)
The display name comes first, followed by the configuration ID in parentheses. Since the config ID part of the name is completely unambiguous, a user can always use it without the prepended display name in any command that requires a config object name. That is, the following two commands are equivalent and would both accomplish the same thing:
show("Db2JdbcProvider(cells/testcell/nodes/testnode/resources.xml#JDBCProvider_1)")
show("(cells/testcell/nodes/testnode/resources.xml#JDBCProvider_1)")
The types command returns a list of the possible top-level types that can be manipulated by AdminConfig.
Also, to invoke AdminApp functions, the scripting process need not be connected to the server. So if you want to call certain operations in a local mode, you need to specify -conntype NONE when using wsadmin.
Examples of commands that can be invoked on the AdminConfig object are as follows. This is not an exhaustive list; refer to the InfoCenter for more information.
� types returns a list of config object types that can be manipulated. For example:
wsadmin> $AdminConfig types
� list [objectType] returns a list of objects of the specified type. For example:
wsadmin> $AdminConfig list Server
� listTemplates returns a list of all template object of the specified type. For example:
wsadmin> $AdminConfig listTemplates JDBCProvider
� attributes returns a list of the top-level attributes for the specified type, displayed as name and type. For example:
wsadmin> $AdminConfig attributes ApplicationServer
Chapter 6. WebSphere system management 217
� parents returns a list of object types that can be the parent of the specified object. For example:
wsadmin> $AdminConfig parents JDBCProvider
� defaults returns a table of attributes, their types and their default values, for a specified object type. For example:
wsadmin>$AdminConfig defaults TuningParams
� showall returns all the attributes of the specified object. For example:
wsadmin> set ds [$AdminConfig getid /DataSource:PLANTSDB/]]wsadmin> $AdminConfig showall $ds
� modify changes the specified object attributes. For example (Jacl):
wsadmin> set db1 [$AdminConfig getid /DataSource:PLANTSDB/]wsadmin>$AdminConfig modify $db1 {{statementCacheSize 100}}
� create [type(string)] [ParentId(string)] [attributes (string)] creates an object of the specified type, with the given parent and with the attributes specified. For example:
wsadmin>set jdbc1 [$AdminConfig getid /JDBCProvider:jdbc1/]wsadmin>$AdminConfig create DataSource $jdbc1 {{name db1}}
� createUsingTemplates [type(string)] [parentId(string)] [attributes(string)] [templateId (string)] creates an object of the specified type, with the given parent using the template specified. For example:
wsadmin>set node [$AdminConfig getid /Node:mynode/]wsadmin>set templatel [$AdminConfig listTemplates JDBCProvider "DB2 JDBC Provider (XA)"]wsadmin>$AdminConfig createUsingTemplate JDBCProvider $node {{name newdriver}} $templ
� remove removes the specified object from the WebSphere configuration. For example (Jacl):
wsadmin>set qq [$AdminConfig getid /WASQueueConnectionFactory:wasq1/]wsadmin>$AdminConfig remove $qq
� save saves the workspace contents to the configuration repository. Unless save is invoked, no changes to the configuration are permanent. For example:
wsadmin>$AdminConfig save
� queryChanges returns a list of changed files in the temporary workspace. For example (Jacl):
wsadmin>$AdminConfig queryChanges
218 Migrating to WebSphere V5.0: An End-to-End Migration Guide

� createClusterMember creates a new Server object on the node specified, given the configuration ID of an existing ServerCluster. For example:
wsadmin>set clid [$AdminConfig getid /ServerCluster:mycluster/]wsadmin>set nodeid [$AdminConfig getid /Node:mynode/]wsadmin>set template [$AdminConfig listTemplates ClusterMember]wsadmin>$AdminConfig createClusterMember $clid $nodeid {{memberName newMem1} {weight 5}} $template
� installResourceAdapter creates a J2CResourceAdapter object on the current node, given a RAR file and a list of options. For example (Jacl):
wsadmin>$AdminConfig installResourceAdapter c:/mystuff/mine.rar mynode {-rar.desc "My rar file"}
� getid Returns the configuration ID of an object. For example:
$AdminConfig getid /Cell:testcell/Node:testNode/JDBCProvider:Db2JdbcDriver/
AdminApp AdminApp is used to install, modify, and otherwise administer applications. It interacts with the WebSphere application management to make the application inquiries and changes. This includes installing and uninstalling applications, listing/moving modules, exporting, etc.
Also, to invoke AdminApp functions, the scripting process need not be connected to the server. So if you want to call certain operations in a local mode, you need to specify -connt. For example:
� wsadmin.bat -conntype NONE [if using interactive mode]
� wsadmin.bat -conntype NONE -c "$Help help" (using -c option)
� wsadmin.bat -conntype NONE -f test.jacl (if running the test.jacl script)
The following operations can be invoked on the AdminApp. Again, for a complete list, use the help option on AdminApp or refer to the InfoCenter.
� install [earfile] <options> installs the application in a non-interactive mode, given the fully qualified file name. If this information is not enough to install the application, the command fails. For example (Jacl):
wsadmin>$AdminApp install c:/WebSphere/AppServer/temp/tutorial/Big3App.ear
� installInteractive [earfile] <options> installs the application in an interactive mode with the specified EAR file. In this mode, the scripting process prompts for information for each task. If you have existing information, you can either accept it or override it. For example (Jacl):
wsadmin>$AdminApp installInteractive c:/WebSphere/AppServer/temp/tutorial/Big3App.ear
Chapter 6. WebSphere system management 219
� options returns a list of options available for EAR files. For example (Jacl):
wsadmin>$AdminApp options
� listModules [applicationName] lists the modules in the specified application. For example (Jacl):
wsadmin>$AdminApp listModules ivtApp
� Export [applicationName] [fileName] exports the given application to a file specified. For example (Jacl):
wsadmin>$AdminApp export "My App" /usr/me/myapp.ear
� exportDDL [appName][directoryName] extracts the DDL from the application to the directory specified. For example (Jacl):
wsadmin>$AdminApp exportDDL "My App" /usr/me/DDL
� uninstall [appName][options] uninstalls the specified application. For example (Jacl):
wsadmin>$AdminApp uninstall myapp
There are many install options available with the AdminApp object, including the following:
� noPreCompileJSPs� dataSourceFor10CMPBeans� dataSourceFor20CMPBeans� mapModulesToServers� mapEJBRefToEJB� mapResRefToEJB� mapRolesToUsers� appName� cell� deployejb� deployejb.dbtype� node� nodeployejb� verbose� help
The Help object is used for general help, as well as to obtain dynamic online information about the MBeans that are running. It is mostly used to aid in writing and running scripts with AdminControl, and has methods such as attributes, operations, AdminConfig, and AdminControl.
220 Migrating to WebSphere V5.0: An End-to-End Migration Guide
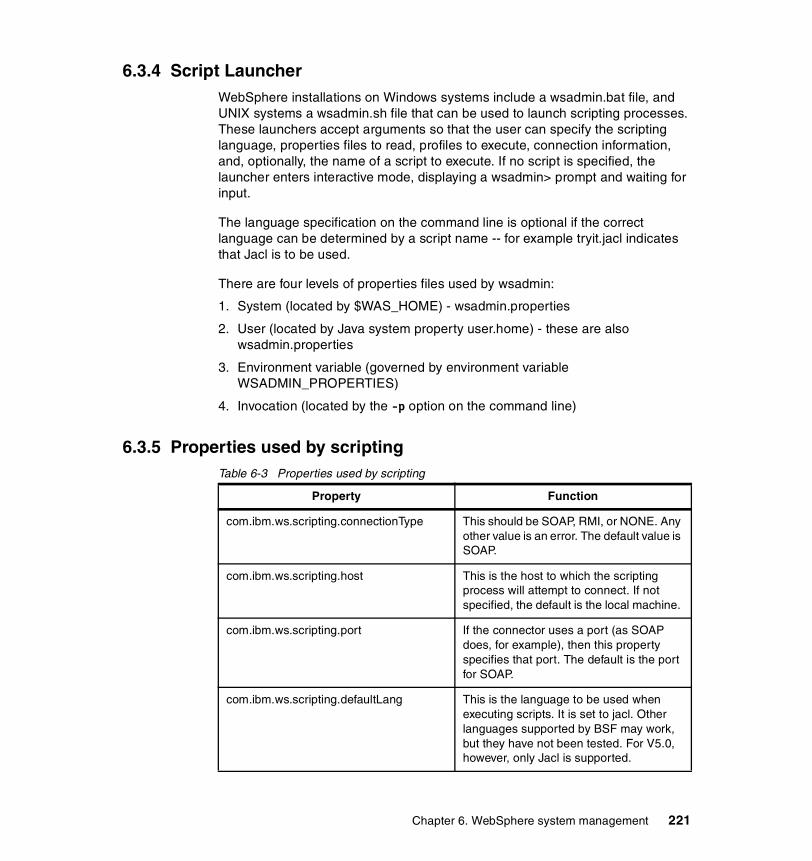
6.3.4 Script Launcher WebSphere installations on Windows systems include a wsadmin.bat file, and UNIX systems a wsadmin.sh file that can be used to launch scripting processes. These launchers accept arguments so that the user can specify the scripting language, properties files to read, profiles to execute, connection information, and, optionally, the name of a script to execute. If no script is specified, the launcher enters interactive mode, displaying a wsadmin> prompt and waiting for input.
The language specification on the command line is optional if the correct language can be determined by a script name -- for example tryit.jacl indicates that Jacl is to be used.
There are four levels of properties files used by wsadmin:
1. System (located by $WAS_HOME) - wsadmin.properties
2. User (located by Java system property user.home) - these are also wsadmin.properties
3. Environment variable (governed by environment variable WSADMIN_PROPERTIES)
4. Invocation (located by the -p option on the command line)
6.3.5 Properties used by scriptingTable 6-3 Properties used by scripting
Property Function
com.ibm.ws.scripting.connectionType This should be SOAP, RMI, or NONE. Any other value is an error. The default value is SOAP.
com.ibm.ws.scripting.host This is the host to which the scripting process will attempt to connect. If not specified, the default is the local machine.
com.ibm.ws.scripting.port If the connector uses a port (as SOAP does, for example), then this property specifies that port. The default is the port for SOAP.
com.ibm.ws.scripting.defaultLang This is the language to be used when executing scripts. It is set to jacl. Other languages supported by BSF may work, but they have not been tested. For V5.0, however, only Jacl is supported.
Chapter 6. WebSphere system management 221
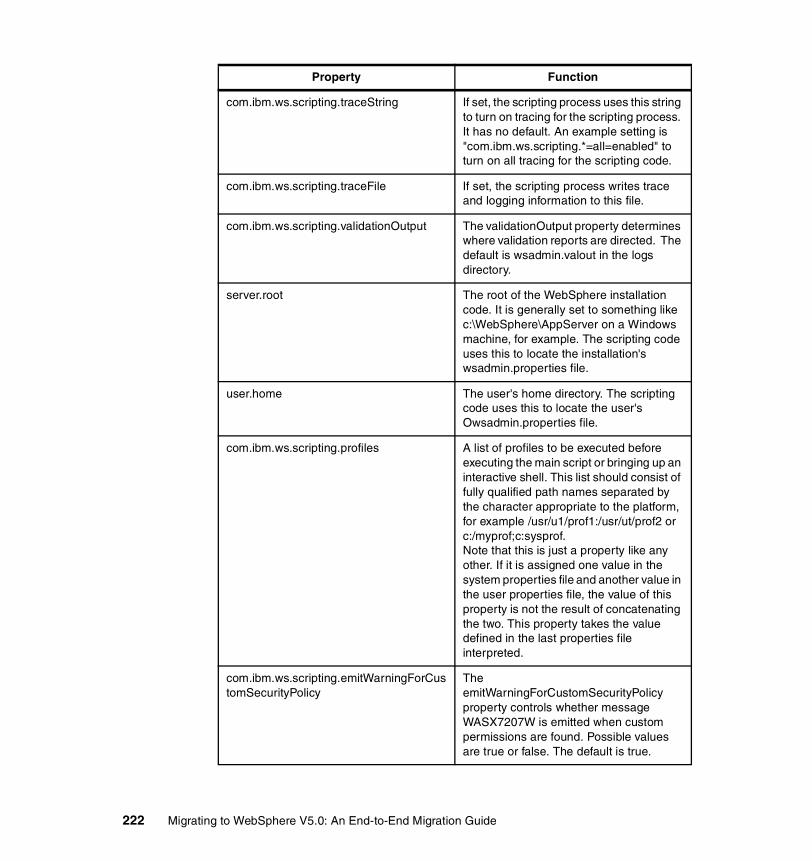
com.ibm.ws.scripting.traceString If set, the scripting process uses this string to turn on tracing for the scripting process. It has no default. An example setting is "com.ibm.ws.scripting.*=all=enabled" to turn on all tracing for the scripting code.
com.ibm.ws.scripting.traceFile If set, the scripting process writes trace and logging information to this file.
com.ibm.ws.scripting.validationOutput The validationOutput property determines where validation reports are directed. The default is wsadmin.valout in the logs directory.
server.root The root of the WebSphere installation code. It is generally set to something like c:\WebSphere\AppServer on a Windows machine, for example. The scripting code uses this to locate the installation's wsadmin.properties file.
user.home The user's home directory. The scripting code uses this to locate the user's Owsadmin.properties file.
com.ibm.ws.scripting.profiles A list of profiles to be executed before executing the main script or bringing up an interactive shell. This list should consist of fully qualified path names separated by the character appropriate to the platform, for example /usr/u1/prof1:/usr/ut/prof2 or c:/myprof;c:sysprof.Note that this is just a property like any other. If it is assigned one value in the system properties file and another value in the user properties file, the value of this property is not the result of concatenating the two. This property takes the value defined in the last properties file interpreted.
com.ibm.ws.scripting.emitWarningForCustomSecurityPolicy
The emitWarningForCustomSecurityPolicy property controls whether message WASX7207W is emitted when custom permissions are found. Possible values are true or false. The default is true.
Property Function
222 Migrating to WebSphere V5.0: An End-to-End Migration Guide

6.3.6 ProfilesA profile is a script that is run before the other scripts specified to set up the environment for the scripts to follow.
The -profile option on the wsadmin command allows the user to specify one or more profiles to be run when the scripting process starts.
A scripting process can be started like this:
wsadmin -f doit.jacl -profile myprof.jacl
In this case, the process runs the doit.jacl script after executing the myprof.jacl profile. In this way, doit.jacl can make use of anything set up by myprof.jacl. Any number of -profile options may be specified, and they execute in the order they appear on the command line. A property in the wsadmin.properties file can specify a list of profiles to be run.
com.ibm.ws.scripting.tempdir The tempdir property determines what directory to use for temporary files when installing applications. The default is that the JVM decides. This is java.io.tmpdir.
com.ibm.ws.scripting.validationLevel The validationLevel property determines what level of validation to use when configuration changes are made from the scripting interface. Possible values are NONE, LOW, MEDIUM, HIGH, or HIGHEST. The default is HIGHEST.
com.ibm.ws.scripting.crossDocumentValidationEnabled
The crossDocumentValidationEnabled property determines whether the validation mechanism examines other documents when changes are made to one document. Possible values are true or false. The default is true.
com.ibm.ws.scripting.classpath The classpath property is appended to the list of paths to search for classes and resources. There is no default value.
com.ibm.ws.scripting.wsadminprops Set to the value of the WSADMIN_PROPERTIES environment variable. Points to a properties file that is loaded after the system and user _wsadmin.properties files.
Property Function
Chapter 6. WebSphere system management 223
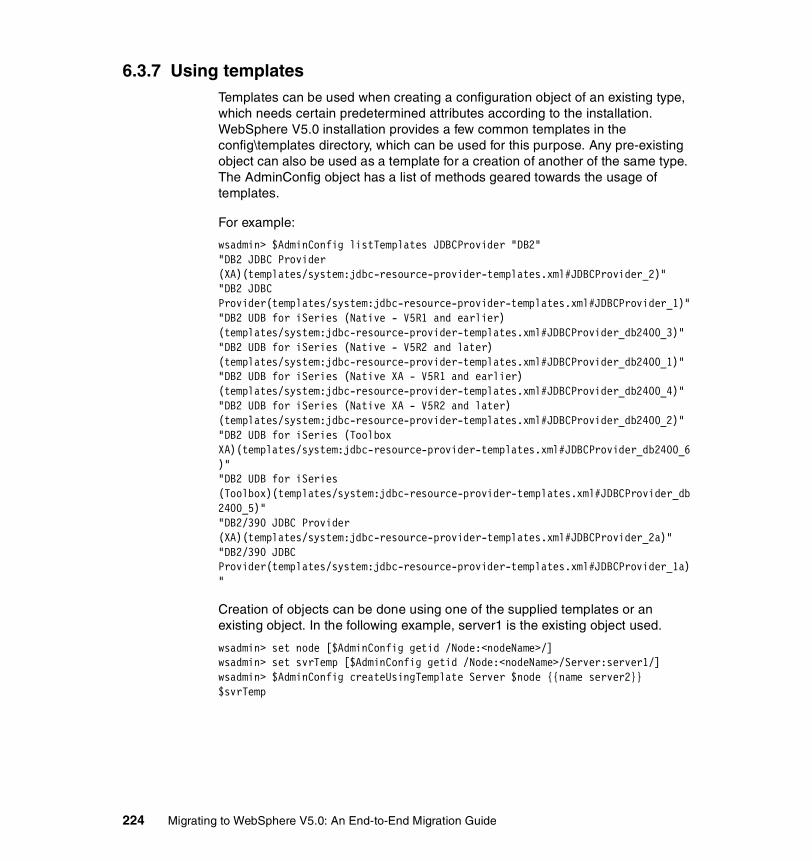
6.3.7 Using templatesTemplates can be used when creating a configuration object of an existing type, which needs certain predetermined attributes according to the installation. WebSphere V5.0 installation provides a few common templates in the config\templates directory, which can be used for this purpose. Any pre-existing object can also be used as a template for a creation of another of the same type. The AdminConfig object has a list of methods geared towards the usage of templates.
For example:
wsadmin> $AdminConfig listTemplates JDBCProvider "DB2""DB2 JDBC Provider (XA)(templates/system:jdbc-resource-provider-templates.xml#JDBCProvider_2)""DB2 JDBC Provider(templates/system:jdbc-resource-provider-templates.xml#JDBCProvider_1)""DB2 UDB for iSeries (Native - V5R1 and earlier) (templates/system:jdbc-resource-provider-templates.xml#JDBCProvider_db2400_3)""DB2 UDB for iSeries (Native - V5R2 and later) (templates/system:jdbc-resource-provider-templates.xml#JDBCProvider_db2400_1)""DB2 UDB for iSeries (Native XA - V5R1 and earlier) (templates/system:jdbc-resource-provider-templates.xml#JDBCProvider_db2400_4)""DB2 UDB for iSeries (Native XA - V5R2 and later) (templates/system:jdbc-resource-provider-templates.xml#JDBCProvider_db2400_2)""DB2 UDB for iSeries (Toolbox XA)(templates/system:jdbc-resource-provider-templates.xml#JDBCProvider_db2400_6)""DB2 UDB for iSeries (Toolbox)(templates/system:jdbc-resource-provider-templates.xml#JDBCProvider_db2400_5)""DB2/390 JDBC Provider (XA)(templates/system:jdbc-resource-provider-templates.xml#JDBCProvider_2a)""DB2/390 JDBC Provider(templates/system:jdbc-resource-provider-templates.xml#JDBCProvider_1a)"
Creation of objects can be done using one of the supplied templates or an existing object. In the following example, server1 is the existing object used.
wsadmin> set node [$AdminConfig getid /Node:<nodeName>/]wsadmin> set svrTemp [$AdminConfig getid /Node:<nodeName>/Server:server1/]wsadmin> $AdminConfig createUsingTemplate Server $node {{name server2}} $svrTemp
224 Migrating to WebSphere V5.0: An End-to-End Migration Guide
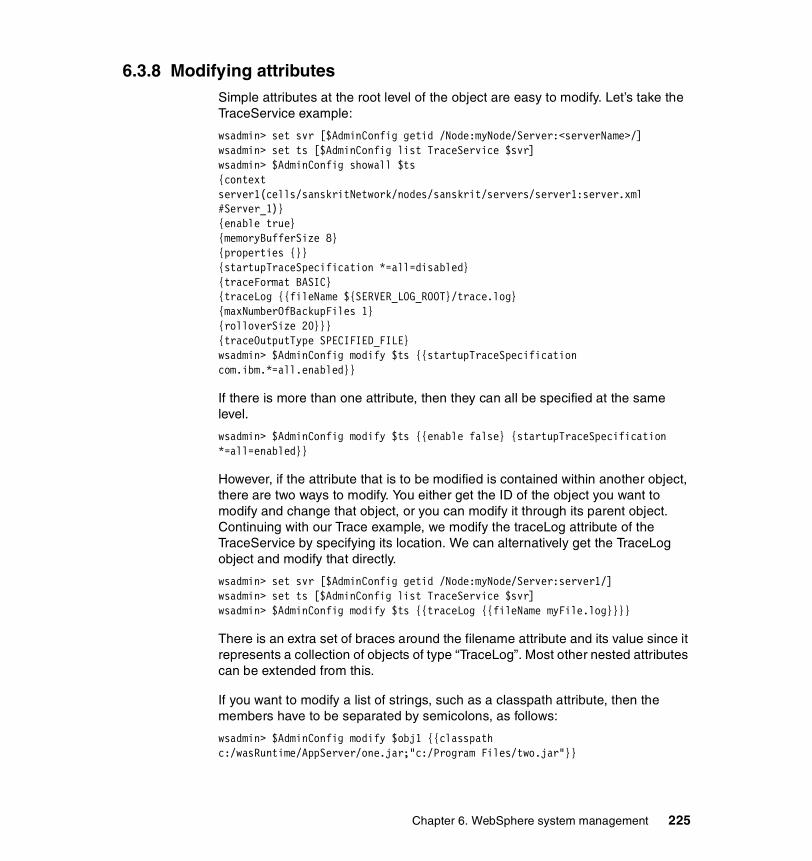
6.3.8 Modifying attributesSimple attributes at the root level of the object are easy to modify. Let’s take the TraceService example:
wsadmin> set svr [$AdminConfig getid /Node:myNode/Server:<serverName>/]wsadmin> set ts [$AdminConfig list TraceService $svr]wsadmin> $AdminConfig showall $ts{context server1(cells/sanskritNetwork/nodes/sanskrit/servers/server1:server.xml#Server_1)}{enable true}{memoryBufferSize 8}{properties {}}{startupTraceSpecification *=all=disabled}{traceFormat BASIC}{traceLog {{fileName ${SERVER_LOG_ROOT}/trace.log}{maxNumberOfBackupFiles 1}{rolloverSize 20}}}{traceOutputType SPECIFIED_FILE}wsadmin> $AdminConfig modify $ts {{startupTraceSpecification com.ibm.*=all.enabled}}
If there is more than one attribute, then they can all be specified at the same level.
wsadmin> $AdminConfig modify $ts {{enable false} {startupTraceSpecification *=all=enabled}}
However, if the attribute that is to be modified is contained within another object, there are two ways to modify. You either get the ID of the object you want to modify and change that object, or you can modify it through its parent object. Continuing with our Trace example, we modify the traceLog attribute of the TraceService by specifying its location. We can alternatively get the TraceLog object and modify that directly.
wsadmin> set svr [$AdminConfig getid /Node:myNode/Server:server1/]wsadmin> set ts [$AdminConfig list TraceService $svr]wsadmin> $AdminConfig modify $ts {{traceLog {{fileName myFile.log}}}}
There is an extra set of braces around the filename attribute and its value since it represents a collection of objects of type “TraceLog”. Most other nested attributes can be extended from this.
If you want to modify a list of strings, such as a classpath attribute, then the members have to be separated by semicolons, as follows:
wsadmin> $AdminConfig modify $obj1 {{classpath c:/wasRuntime/AppServer/one.jar;"c:/Program Files/two.jar"}}
Chapter 6. WebSphere system management 225

And finally, if you are writing a script and expect values to be passed in, then to set them, you will have to use the list command. In the following example, an alternate Trace File is passed in to be set for the trace log. The commands to set it would be:
wsadmin> set maxBackup 5wsadmin> set file "c:/was/server1/myfile.log"wsadmin> set svr [$AdminConfig getid /Node:<nodeName>/Server:<svrName>/]wsadmin> set ts [$AdminConfig list TraceService $svr]wsadmin> set tracelog [$AdminConfig list TraceLog $ts]wsadmin> $AdminConfig modify $tracelog [list [list filename $file] [list maxNumberOfBackupFiles 5]]
6.4 Migration mappingThis section discusses the migration process. Specifics for migrating WebSphere V3.5 to v5.0 and V4.0 to V5.0 are included.
6.4.1 Migration stepswscp scripts based on the earlier versions of WebSphere must be manually migrated to wsadmin, since the administrative objects and their use are very different. Since many customers rely on sophisticated Tcl scripts that not only extend the base wscp commands but incorporate numerous administrative actions and objects, automated migration of these scripts would require that any tool properly locate and convert all of the possible wscp elements and customer extensions, while maintaining the same logical function. Unfortunately, it was determined that an automated tool that could correctly perform all the above noted conversions was not feasible. The good news is that wsadmin can do all that wscp and xmlConfig did, and more. The following steps help to streamline migration of scripts further:
1. Isolate the wscp or XMLConfig commands in your scripts.
2. Separate them into configuration and operational commands.
This paves the way for better understanding of the wsadmin commands, since in WebSphere V5.0, there is a very clear distinction between runtime and configuration objects.
Configuration commands include:
– Create, modify, show, showAll, install, uninstall, list, remove– CreateClone, removeClone– All Security configuration – All Security Role assignments
226 Migrating to WebSphere V5.0: An End-to-End Migration Guide
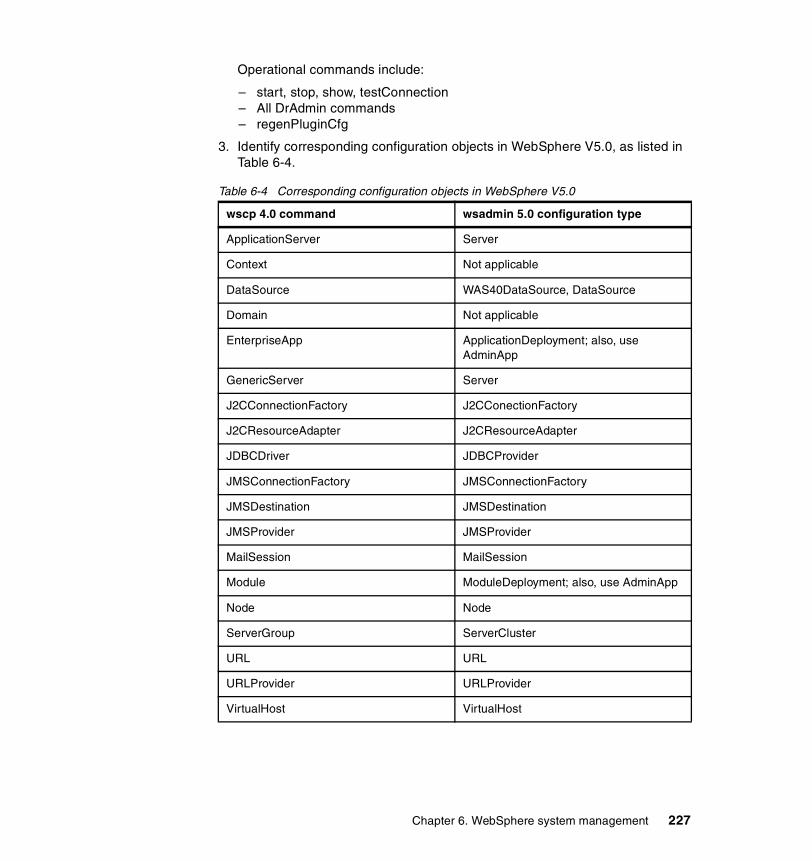
Operational commands include:
– start, stop, show, testConnection– All DrAdmin commands– regenPluginCfg
3. Identify corresponding configuration objects in WebSphere V5.0, as listed in Table 6-4.
Table 6-4 Corresponding configuration objects in WebSphere V5.0
wscp 4.0 command wsadmin 5.0 configuration type
ApplicationServer Server
Context Not applicable
DataSource WAS40DataSource, DataSource
Domain Not applicable
EnterpriseApp ApplicationDeployment; also, use AdminApp
GenericServer Server
J2CConnectionFactory J2CConectionFactory
J2CResourceAdapter J2CResourceAdapter
JDBCDriver JDBCProvider
JMSConnectionFactory JMSConnectionFactory
JMSDestination JMSDestination
JMSProvider JMSProvider
MailSession MailSession
Module ModuleDeployment; also, use AdminApp
Node Node
ServerGroup ServerCluster
URL URL
URLProvider URLProvider
VirtualHost VirtualHost
Chapter 6. WebSphere system management 227
4. Identify wsadmin attribute names
Attribute names have changed in wsadmin from the previous versions. These, however, are easy to map using the help functions. Get a list of the attributes that are used in the scripts and map them to the new names.
5. Convert Application Install commands
Use AdminApp installInteractive to complete one install. Then you can use the wsadmin.traceout log file to construct an install command for your script. The message WASX7278I will point to all the data.
6. Convert operational commands
Use the information in 6.4.3, “Migration from V3.5 to V5.0” on page 228 and 6.4.4, “Migration from V4.0 to V5.0” on page 230 for specific version mappings. A number of common tasks have been provided as examples. These should help in finding the right operation map.
6.4.2 Classification of scripts Classification of existing scripts is necessary to separate the functions and address them as a group. Scripts can be classified in several ways. One way is to classify them on the basis of the tasks they perform, as we have grouped the existing scenarios in 6.3, “wsadmin primer” on page 206. We will continue to use that classification and provide the migration instructions.
The following two subsections deal with these classified groups and the tasks they contain. In migrating from V4.0 to V5.0, each task is dealt with both in terms of wscp and the wsadmin equivalent. If you are attempting to migrate directly from V3.5 to V5.0 (having weighed the pros and cons), then the next section deals with the tasks and migration specifics.
6.4.3 Migration from V3.5 to V5.0When migrating from WebSphere Application Server V3.5.x to WebSphere Application Server V5.0, there are several changes that one has to keep in mind. Since there is a huge difference in the J2EE versions, bringing with it changes to how applications are packaged, please refer to the InfoCenter for background and other major version changes. This section concentrates on objects that no longer exist in their current form. Also, 6.2, “Current usage of XMLConfig and wscp” on page 204 has several examples of most of the common administrative tasks. Please refer to the InfoCenter for more details.
Change in existing objectsThe following objects will not be supported in WebSphere V5.0 scripting interface. They do have equivalent objects or have been repackaged into WAR or
228 Migrating to WebSphere V5.0: An End-to-End Migration Guide
EAR objects. Hence individual components of an application do not have to be installed separately. They can be started or stopped using the corresponding application using AdminApp. For more information on AdminApp and its functions, please refer to 6.4.4, “Migration from V4.0 to V5.0” on page 230.
� EnterpriseBean� Servlet� ServletEngine� ServletRedirector� SessionManager� WebApplication� WebResource� UserProfile
Also the Model object is now functionally equivalent to an ServerCluster object with the wsadmin scripting tool. And only ApplicationServer objects can be part of clusters.
Changes in wscp and XMLConfig commandswscp commands in WebSphere v3.5 were very few, although most of them were very similar to those retained in V4.0. The Scripting tool in WebSphere V5.0 is called wsadmin. It allows for equivalent and additional functions. 6.4.4, “Migration from V4.0 to V5.0” on page 230 covers the wsadmin tool and the migration of most tasks accomplished with the help of wscp. Please refer to it for equivalent commands in V5.0. The various commands are grouped by tasks for ease of readability.
XMLConfig was used in Versions 3.5 and 4.0 to export the configuration data from the admin repository into platform-independent XML files. It was extremely useful to perform several changes to the repository with a single file. The most common function, however, was to export/import configuration.
In WebSphere V5.0, all configuration data is stored in XML files. There is no admin repository. Hence the need for migration to an equivalent tool does not exist. Any changes or copies can be obtained directly from the XML files available. Instead of one main configuration file, there are several smaller files at the cell, node, and server levels. Each level contains files that have data pertaining to that specific level. Each server (including the NodeAgent) has a server.xml file associated with it. All resources (for example, JDBCDrivers, JMSProviders, MailProvider, ResourceAdapter, etc.) are listed in a separate resources.xml. And there is also a virtualhosts.xml file containing details of the virtual hosts defined.
Chapter 6. WebSphere system management 229
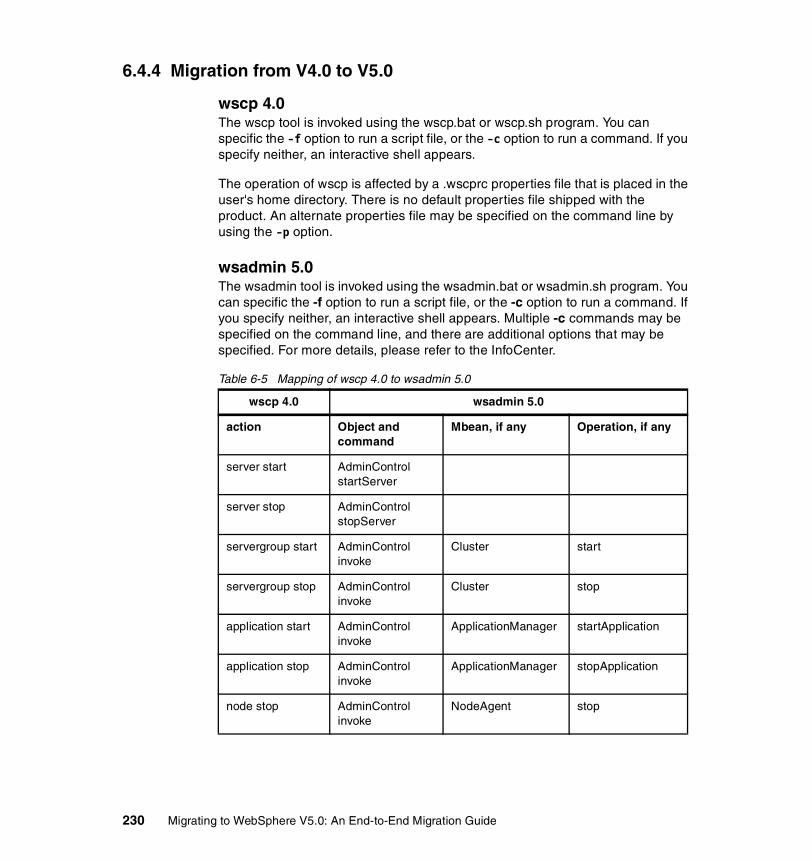
6.4.4 Migration from V4.0 to V5.0
wscp 4.0The wscp tool is invoked using the wscp.bat or wscp.sh program. You can specific the -f option to run a script file, or the -c option to run a command. If you specify neither, an interactive shell appears.
The operation of wscp is affected by a .wscprc properties file that is placed in the user's home directory. There is no default properties file shipped with the product. An alternate properties file may be specified on the command line by using the -p option.
wsadmin 5.0The wsadmin tool is invoked using the wsadmin.bat or wsadmin.sh program. You can specific the -f option to run a script file, or the -c option to run a command. If you specify neither, an interactive shell appears. Multiple -c commands may be specified on the command line, and there are additional options that may be specified. For more details, please refer to the InfoCenter.
Table 6-5 Mapping of wscp 4.0 to wsadmin 5.0
wscp 4.0 wsadmin 5.0
action Object and command
Mbean, if any Operation, if any
server start AdminControlstartServer
server stop AdminControlstopServer
servergroup start AdminControl invoke
Cluster start
servergroup stop AdminControl invoke
Cluster stop
application start AdminControl invoke
ApplicationManager startApplication
application stop AdminControl invoke
ApplicationManager stopApplication
node stop AdminControl invoke
NodeAgent stop
230 Migrating to WebSphere V5.0: An End-to-End Migration Guide
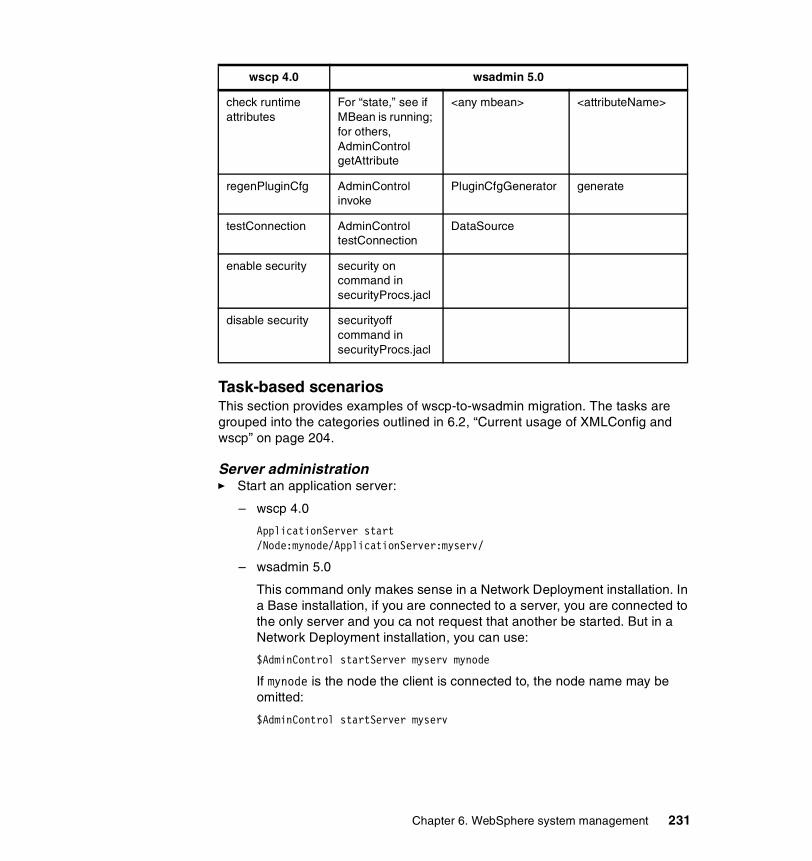
Task-based scenariosThis section provides examples of wscp-to-wsadmin migration. The tasks are grouped into the categories outlined in 6.2, “Current usage of XMLConfig and wscp” on page 204.
Server administration � Start an application server:
– wscp 4.0
ApplicationServer start/Node:mynode/ApplicationServer:myserv/
– wsadmin 5.0
This command only makes sense in a Network Deployment installation. In a Base installation, if you are connected to a server, you are connected to the only server and you ca not request that another be started. But in a Network Deployment installation, you can use:
$AdminControl startServer myserv mynode
If mynode is the node the client is connected to, the node name may be omitted:
$AdminControl startServer myserv
check runtime attributes
For “state,” see if MBean is running; for others, AdminControl getAttribute
<any mbean> <attributeName>
regenPluginCfg AdminControl invoke
PluginCfgGenerator generate
testConnection AdminControl testConnection
DataSource
enable security security on command in securityProcs.jacl
disable security securityoff command in securityProcs.jacl
wscp 4.0 wsadmin 5.0
Chapter 6. WebSphere system management 231
� Stop an application server:
This is an operational command. wscp 4.0 requires that you know the hierarchical name of the application server in question -- the node name and server name. You need the same information in 5.0, and you also need to understand that what you are stopping is an object called a “Server,” not an “ApplicationServer.” Servers represent logical processes on many platforms (for example Windows and AIX®) and are the entities that are stopped and started. ApplicationServers are contained within Servers.
– wscp 4.0
ApplicationServer stop {/Node:mynode/ApplicationServer:Default Server/}
– wsadmin 5.0
There is more than one way to stop a server in V5.0 using wsadmin. The simplest method is by using the stopServer command on the AdminControl object:
$AdminControl stopServer server1 mynode
If mynode is the node the client is connected to, the node name may be omitted:
$AdminControl stopServer server1
� Create a new application server:
This is a configuration command. wscp 4.0 requires that you know the hierarchical name of the application server in question -- the node name and server name. You need the same information in 5.0, and you also need to understand that what you are creating is an object called a “Server,” not an “ApplicationServer.”
– wscp 4.0
ApplicationServer create /Node:mynode/ApplicationServer:myserv/ -attribute {{Stdout myfile.out}}
– wsadmin 5.0
This can be done in a single command in wsadmin, but it is clearer to show it as two. Server objects are contained within nodes. The 4.0 ApplicationServer attribute called “Stdout” is replaced by the “fileName” attribute embedded within the “outputStreamRedirect” attribute of the Server.
wsadmin>set node [$AdminConfig getid /Node:mynode/]wsadmin>$AdminConfig create Server $node {{name myserv} {outputStreamRedirect {{fileName myfile.out}}}}]
232 Migrating to WebSphere V5.0: An End-to-End Migration Guide
wsadmin>$AdminConfig save
� Remove an application server:
This is a configuration command.
– wscp 4.0
ApplicationServer remove /Node:mynode/ApplicationServer:myserv/
– wsadmin 5.0
This can be done in a single command in wsadmin, but it is clearer to show it as two.
wsadmin>set serv [$AdminConfig getid /Node:mynode/Server:myserv/]
wsadmin>$AdminConfig remove $servwsadmin>$AdminConfig save
� Connect to remote server:
– wscp 4.0
Set the wscp.host name in the default.wscprc file:
wscp.hostname = myhost
– wsadmin 5.0
Launch the scripting program by passing in the host parameter:
wsadmin -host myhost.austin.ibm.com
Application management � Enterprise Application - install:
In 4.0, wscp scripts used the EnterpriseApp and Module commands to install and uninstall applications. WebSphere 5.0 wsadmin scripts will use the AdminApp command to perform similar configuration actions.
– wscp 4.0
The EnterpriseApp install command has complex syntax, so we build up some pieces of the command beforehand:
• construct -modvirtualhosts option
wscp> set modhost1 [list mtcomps.war default_host]wscp> set modhosts [list $modhost1]
• construct -resourcereferences option
wscp> set resref1 [list mtcomps.war::mail/MailSession9 mail/DefaultMailSession]
Chapter 6. WebSphere system management 233
wscp> set resref2 [list deplmtest.jar::MailEJBObject::mail/MailSession9 mail/DefaultMailSession]
wscp> set resrefs [list $resref1 $resref2]
• invoke install
wscp> EnterpriseApp install /Node:mynode/ c:/WebSphere/AppServer/installableApps/jmsample.ear -appname MailSampleApp -defappserver /Node:$mynode/ApplicationServer:myserv/ -modvirtualhosts $modhosts -resourcereferences $resrefs
– wsadmin 5.0
As with 4.0, the application install commands can have very involved syntax. The command sequence given below accomplishes approximately the same thing as the 4.0 commands above, but there are simpler ways to do this.
• construct -MapWebModToVH option
wsadmin> set modtovh1 [list "JavaMail Sample WebApp" mtcomps.war,WEB-INF/web.xml default_host]
wsadmin> set modtovh [list $modtovh1]
• construct -MapResRefToEJB option
wsadmin> set resreftoejb1 [list deplmtest.jar MailEJBObject deplmtest.jar,META-INF/ejb-jar.xml mail/MailSession9 javax.mail.Session mail/DefaultMailSession]
wsadmin> set resreftoejb2 [list "JavaMail Sample WebApp" "" mtcomps.war,WEB-INF/web.xml mail/MailSession9 javax.mail.Session mail/bozo]
wsadmin> set resreftoejb [list $resreftoejb1 $resreftoejb2]
• Construct attribute string
wsadmin> set attrs [list -MapWebModToVH $modtovh -MapResRefToEJB $resreftoejb -node mynode -server myserv -appname MailSampleApp]
# invoke installwsadmin> $AdminApp install c:/WebSphere/AppServer/installableApps/jmsample.ear $attrs
234 Migrating to WebSphere V5.0: An End-to-End Migration Guide
• Install default/standard applications
The standard EAR files that ship with the product can be installed (in the of federation of the node into a cell, where the apps have to be installed specifically) as follows:
$AdminApp install \"c:/<WAS_HOME>/samples/lib/TechnologySamples/TechnologySamples.ear\" {-appname TechnologySamples -cell node1Network -node node1 -usedefaultbindings"
The Help utility can be used to get more information for the above commands. In this case, there are other commands that offer more information about the options. The AdminApp taskInfo and options commands are particular helpful in listing all the options and information about them. You can also use the AdminApp installInteractive command (with the same options as the install command) to be prompted for each option and step through the install, setting your values. This command with all its options is logged in the wsadmin.traceout file in the logs directory, under message WASX7278I.
� Enterprise Application - uninstall:
– wscp 4.0
wscp> EnterpriseApp remove {/EnterpriseApp:Sample Application/}
– wsadmin 5.0
wsadmin> $AdminApp uninstall TechnologySamples
� Enterprise Application - edit:
– wscp 4.0
wscp> EnterpriseApp modify {/EnterpriseApp:Trade Sample/} -attribute {{Name changedName}}
– wsadmin 5.0
wsadmin> $AdminApp edit DefaultApplication {-BindJndiForEJBNonMessageBinding {{"Increment Enterprise Java Bean" "Increment" "Increment.jar,META-INF/ejb-jar.xml" "Increment1"}}}
While testing, it is easier to use editInteractive and get a list of the options and the variables that can be changed. Then use those with the edit command in your scripts. In the above command, -BindJndiForEJBNonMessageBinding is the option we are using to change the JNDI name of the ejb Increment, with the URI Increment.jar,META-INF/ejb.jar.xml.
Chapter 6. WebSphere system management 235

Administration of runtime objects - query, changeThis change is temporary and will revert back to the old setting in the event of server stoppage. To permanently change it, the configured object has to be changed. However, this setting can be used to get trace outputs.
wsadmin> set trace [lindex [$AdminControl queryNames type=TraceService,*],0]wsadmin> $AdminControl setAttribute $trace traceSpecification com.ibm.*=all=enabled
Administration of configured objects� Modifying attributes of application servers, enterprise applications, and other
configured objects:
– wscp 4.0
wscp> ApplicationServer modify /Node:dev-pc/ApplicationServer:myServer/ \-attribute {{PingInterval 120}}
– wsadmin 5.0
wsadmin> set trace [$AdminConfig getid /TraceServer:/wsadmin> $AdminConfig modify trace {{startupTraceSpecification=com.ibm.ws.*=all=enabled}}wsadmin> $AdminConfig save
The change in the configuration will be seen only when the server is restarted.
If you made changes and do not want to save them, then you can call the reset command:
wsadmin> $AdminConfig reset
There are some other useful commands such as:
wsadmin> $AdminConfig hasChanges -
This can be invoked before a save to check for changes to the configuration.
wsadmin> $AdminConfig setSaveMode rollbackOnConflict -
This is called to set the save mode.
Refer to the InfoCenter for more details on these commands.
� List the configured server groups:
This is a configuration command in 5.0.
– wscp 4.0
ServerGroup list
You could put the result of this command into a Jacl list and invoke other operations such as show or modify on the members of the list.
236 Migrating to WebSphere V5.0: An End-to-End Migration Guide
– wsadmin 5.0
Again, in 5.0 there are server clusters instead of server groups.
$AdminConfig list ServerCluster
Again, you can put the result of this command into a Jacl list and invoke other config commands such as show or modify on the members of the list. In order to invoke operational commands such as stop, you need to do a little more work:
• Get config ID of the cluster of interest
set myclust [$AdminConfig getid /ServerCluster:mycluster/]
• The name returned can be used to get the ObjectName of the running Cluster MBean:
set runningCluster = [$AdminConfig getObjectName $myclust]
At this point, “runningCluster” will have the object name for the running instance of the ServerCluster (or it will be empty if it is not running). This object name can be used for control purposes:
$AdminControl invoke $runningCluster stop
� Display help:
– wscp 4.0
To obtain general help:
wscp> help
To obtain help on a particular object:
wscp> object_type help
or:
wscp> ApplicationServer help
– wsadmin 5.0
Displaying general help is done using the $Help object:
wsadmin>$Help help
This will list all the options available. In general “attributes” and “operations” when passing in an Mbean are the most useful. To get the Mbean associated, you have to use the following command:
wsadmin>$AdminControl queryNames type=Server,*
� List actions available on configured objects:
– wscp 4.0
Here, with any object, you can get help by specifying:
"<objName> help operations"
Chapter 6. WebSphere system management 237
wscp> ApplicationServer help operations
– wsadmin 5.0
Since we are dealing with configured objects here, the wsadmin object to be used is AdminConfig.
$AdminConfig attributes Server
Cluster administration� Create a server group:
WebSphere 4.0 server groups are no more; we now have server clusters in their place. The members of a cluster are not “clones” so much as they are servers with identical application configurations.
– wscp 4.0
This example assumes that there already exists an application server named “as1” that is to be used as the first clone in a server group.
wscp>ServerGroup create /ServerGroup:sg1/ -baseInstance /Node:mynode/ApplicationServer:as1/-serverGroupAttrs {{EJBServerAttributes {{SelectionPolicy roundrobin}}}}
– wsadmin 5.0
wsadmin>set serverid [$AdminConfig getid /Node:mynode/Server:as1/]wsadmin>$AdminConfig convertToCluster $serverid MyCluster
� Clone a ServerGroup:
– wscp 4.0
wscp>ServerGroup clone /ServerGroup:sg1/ -cloneAttrs {{Name newServer}} -node /Node:mynode/
– wsadmin 5.0
The following three commands could be combined into a single nested command, but it is more clear to show them as three separate commands. The first gets the cluster ID, the second gets the node ID, and the last command creates a new member of an existing cluster.
wsadmin>set mycluster [$AdminConfig getid /ServerCluster:mycluster/]
wsadmin>set mynode [$AdminConfig getid /Node:mynode/]
wsadmin>$AdminConfig createClusterMember $mycluster $mynode {{memberName newServer}}
238 Migrating to WebSphere V5.0: An End-to-End Migration Guide
� Start a ServerGroup:
This is an operational command.
– wscp 4.0
ServerGroup start /ServerGroup:cluster1/
– wsadmin 5.0
Again, these two commands could be combined into one. We look up the Cluster MBean, then invoke start on it:
wsadmin>set cl1 [$AdminControl completeObjectName type=Cluster,name=cluster1,*]
wsadmin>$AdminControl invoke $cl1 start
It is possible that there is no running MBean for cluster1 if the cluster has not been loaded first. If this is the case, use the ClusterMgr MBean to retrieve the cluster by:
wsadmin>set clustermgr [$AdminControl completeObjectName type=ClusterMgr,*]
wsadmin>$AdminControl invoke $clustermgr retrieveCluster cluster1
� Stop a ServerGroup
This is an operational command.
– wscp 4.0
wscp>ServerGroup stop /ServerGroup:cluster1/
– wsadmin 5.0
Again, these two commands could be combined into one. We look up the Cluster MBean, then invoke start on it:
wsadmin>set cl1 [$AdminControl completeObjectName type=Cluster,name=cluster1,*]wsadmin>$AdminControl invoke $cl1 stop
� Remove a clone:
There is no command for removing a server from a cluster, once it has been added to one. You will have to delete the server.
Other tasks� Setting the Trace specification:
– wscp 4.0
wscp> DrAdmin remote <portno> -setTrace com.ibm.ejs.*=all=enabled
Chapter 6. WebSphere system management 239
– wsadmin 5.0
There are two ways to set tracing with wsadmin in WebSphere V5.0. One takes immediate effect, but is temporary and is set on the runtime, using AdminControl.
wsadmin> set ts [$AdminControl queryNames type=TraceService,node=<nodeName>,process=<serverName>,*]wsadmin> $AdminControl setAttribute $ts traceSpecification com.ibm.*=all=enabled
However if you want your change to persist, then you will have to change the configuration by using AdminConfig.
wsadmin> set svr [$AdminConfig getid /Node:<nodeName>/Server:<serverName>/]wsadmin> set ts [$AdminConfig list TraceService $svr]wsadmin> $AdminConfig modify $ts {{startupTraceSpecification com.ibm.*=all=enabled}}
There is also a way to change the TraceLog specifications:
wsadmin> set svr [$AdminConfig getid /Node:<nodeName>/Server:<serverName>/]wsadmin> set ts [$AdminConfig list TraceService $svr]wsadmin> set trlog [$AdminConfig list TraceLog $ts]wsadmin> $AdminConfig modify $trlog {{fileName myFile.log} {maxNumberOfBackupFiles 10} {rolloverSize 2}}
� Enable security:
– wscp 4.0
wscp>SecurityConfig setAuthenticationMechanism LOCALOS -userid {me secret} wscp>SecurityConfig enableSecurity
– wsadmin 5.0
V5.0 ships a profile that is referenced in the default wsadmin.properties file so that it runs by default. This is securityProcs.jacl, and it implements various security configuration functions. As of this writing, it only supports two functions: securityon and securityoff.
securityon [user [password]]
This turns on local security. If a user name is supplied, it is set in the security config. If both a user name and password are supplied, the securityon function checks the validity of the user/password combination, and fails the function if they are not valid.
240 Migrating to WebSphere V5.0: An End-to-End Migration Guide

So the equivalent 5.0 command is:
securityon userName pwd
� Disable local OS security:
– wscp 4.0
SecurityConfig disableSecurity
– wsadmin 5.0
V5.0 ships a profile that referenced in the default wsadmin.properties file so that it runs by default. This is securityProcs.jacl, and it implements various security configuration functions. It only supports two functions: securityon and securityoff.
securityoff
� Install JDBCDrivers:
– wscp 4.0
wscp>JDBCDriver create /JDBCDriver:mydriver/ -attribute {{ImplClass COM.ibm.db2.jdbc.DB2ConnectionPoolDataSource}}wscp>JDBCDriver install /JDBCDriver:mydriver/ -node /Node:mynode/ -jarFile c:/SQLLIB/java/db2java.zip
– wsadmin 5.0
There is no separate install step in WebSphere 5.0. The JAR file name required in the V4.0 install step is replaced by the “classpath” attribute on the 5.0 JDBCProvider object.
In WebSphere 5.0, resources can exist at the server, node, or cell level of the configuration. The 5.0 equivalent of providing the “node” in the 4.0 JDBCDriver install command is that we create our 5.0 JDBCProvider at the “node” level.
wsadmin>set node [$AdminConfig getid /Node:mynode/]
wsadmin>$AdminConfig create JDBCProvider $node {{classpath c:/SQLLIB/java/db2java.zip} {implementationClassName COM.ibm.db2.jdbc.DB2ConnectionPoolDataSource} {name mydriver}}
� Ping node and AppServers for current status:
– wscp 4.0
The point of this task is generally to determine if a given server is running:
wscp>set servers [ApplicationServer list]wscp>foreach server $servers { set result ApplicationServer show $server -attribute {CurrentState} puts "state for server $server: $result"
Chapter 6. WebSphere system management 241
}
– wsadmin 5.0
This task is a little more involved in WebSphere 5.0 because configuration and control commands are separated. When we get a list of all the servers in the first statement of the code shown below, we are getting a list of all the servers defined in the configuration. This is just configuration data; we cannot interrogate the configuration data to find out what servers are running, because the config data only contains configuration information. The running state of a server is not configuration information. So for each server defined, we ask for the ObjectName of any running instance of the server. If the server is not running, nothing is returned from the getObjectName command on the AdminConfig object. If the server is running, we ask for its “state” attribute. This may appear superfluous; if the Mbean is there, the server is running and the state should be STARTED. It is possible, however, for the “state” to be something other than STARTED -- say “STOPPING” for example.
set servers [$AdminConfig list Server]foreach server $servers { set objName [$AdminConfig getObjectName $server] if {[llength $objName] == 0} { puts "server $server is not running" } else { set result [$AdminControl getAttribute $objName state] puts "state for server $server: $result" }}
� Test connections to data sources:
WebSphere 4.0 introduced a means for testing the connection to a DataSource object; this function is available in WebSphere 5.0 as well.
– wscp 4.0
wscp>set myds /JDBCDriver:mydriver/DataSource:myds/ wscp>DataSource testConnection $myds
– wsadmin 5.0
In WebSphere 5.0, the testConnection command is part of the AdminControl object, because it is an operational command. But this particular operational command takes a configuration ID as an argument, so we invoke the getid command on the AdminConfig object to get it:
wsadmin>set myds [$AdminConfig getid /JDBCProvider:mydriver/DataSource:myds/]wsadmin>$AdminControl testConnection $myds
242 Migrating to WebSphere V5.0: An End-to-End Migration Guide

In many cases, a user ID and password (or other properties) will be required to complete the test connection. If this is the case, you'll get message WASX7216E describing the missing properties:
WASX7216E: 2 attributes required for testConnection are missing: "[user, password]"To complete this operation, please supply the missing attributes as an option, following this example: {{user user_val} {password password_val}}
In this case, you'll need to issue the commands as follows:
set myds [$AdminConfig getid /JDBCProvider:mydriver/DataSource:myds/]$AdminControl testConnection $myds {{user myuser} {password secret}}
� Regenerate the plug-in configuration:
– wscp 4.0
wscp> Node regenPluginCfg /Node:myNode/
– wsadmin 5.0
wsadmin>set cfg [$AdminControl queryNames type=PluginCfgGenerator,*]wsadmin>$AdminControl invoke $cfg generate "C:/was50/WebSphere/AppServer C:/was50/WebSphere/AppServer/config node1Network node1 server1 genPlugin.txt"
Chapter 6. WebSphere system management 243

244 Migrating to WebSphere V5.0: An End-to-End Migration Guide
Chapter 7. Migration assistants
This chapter describes stand-alone migration tools. It discusses tools used during the development cycle and tools that can be used to migrate system configuration and applications.
This chapter covers a set of migration assistants that can be used during different parts of the migration cycle. The first section describes a set of tools that can be used during the development cycle. These tools can be used to augment functionality of a typical Integrated Development Environment (IDE).
The second section describes tools that are shipped with the WebSphere Application Server that can be used for migration of system configuration and applications from a previous version of WebSphere to the current one.
7
© Copyright IBM Corp. 2002 2003. All rights reserved. 245
7.1 Development assistantsThis chapter covers a variety of tools not described in other chapters. These tools are primarily useful during the development cycle. Some of these tasks can best be performed using the WebSphere Application Development tool or another IDE.
The tools described in this chapter are provided as an alternative if an IDE is not being used or if the described capability is not provided by the IDE. Some of these tools can be used in converting source code, while others can be used to convert EAR files or check API usage. Read the descriptions carefully to understand the appropriate usage of the tools.
These tools include:
MigrateWC For JSP and Servlet source code conversion
ejbdeploy For EJB 1.0 -> 1.1 conversion
earconvert To convert a J2EE 1.2 EAR file to a J2EE 1.3 EAR file
mb2mdb WebSphere Enterprise Edition 4.0 JMS listener application to use message-driven beans
CACT Class API checker tool, checks for supported API levels in applications
7.1.1 MigrateWC - JSP and Servlet migration assistantThe JSP and Servlet specification levels that are supported depend on the version of WebSphere. For example, JSP 0.91 and 1.0 are supported on WebSphere Version 3.5, but are no longer supported on WebSphere 5.0. Applications that use these unsupported specification levels must be converted to the supported specification levels.
The purpose of the MigrateWC tool is to assist in conversion of these Web Components (WC), JSPs and Servlets, coded at specification levels of previous WebSphere versions. MigrateWC will take JSP .91 or 1.0 applications and convert them to JSP 1.1. MigrateWC will also take a Servlet 2.1 application and convert it to Servlet 2.2. All resulting modifications are written out to a new file, and the original source file is unchanged.
Note that JSP 1.1 and Servlet 2.2 specifications are the supported level for the J2EE 1.2 specification. J2EE 1.3 applications require JSP 1.2 and Servlet 2.3 specification levels. WebSphere 5.0 supports applications that are written to either J2EE 1.2 or J2EE 1.3 specifications.
246 Migrating to WebSphere V5.0: An End-to-End Migration Guide
Furthermore, JSP 1.1 is a pure subset of JSP 1.2 and Servlet 2.2 is a pure subset of Servlet 2.3. Therefore, any application that is written to JSP 1.1 and Servlet 2.2 levels can be part of either a J2EE 1.2 or a J2EE 1.3 application.
Where to find itThe MigrateWC tool can be found on the WebSphere Developer Domain downloadable tools Web site at http://www-3.ibm.com/software/.
Enter MigrateWC in the search field and press Enter.
How to run itJDK 1.2 or 1.3 must already be installed on your system before you run this tool. After downloading the tool from the WebSphere Developer Domain Web site, unzip it into a directory where you would like to run the command.
The command can be run two different ways: either by specifying a particular JSP or Servlet source file or a directory name. If a directory is specified, then all JSP and Servlet files will be converted in that directory:
migratewc < JSP|Servlet|Directory >< -skipTags <tag!tag...>]|-onlyTags <tag!tag...>]>
When working with JSPs, you have the option to choose the tags that you would like migrated. The way to specify this is either with the optional [-skipTags <tag!tag...>] or [-onlyTags <tag!tag...>] attributes. When using -skipTags, all tags will be migrated except for the tag list you supplied. When using -onlyTags, only the tags in the tag list you specified will be migrated. Notice “!” is used as the tag separator when multiple tags are to be included or ignored. You may only use one of these attributes at a time.
ResultsWhen you migrate a Servlet, another file will be created with the same name with an extension of .new (for example snoopServlet.java becomes snoopServlet.java.new). This .new file contains the converted code. Each line that has been changed is noted with:
"<<:>Made code changes!->"
with an optional comment. If there are no comments then it is likely that changes were made without problems, although as with any code there are unforeseeable circumstances that could cause the conversion to be incorrect. It is recommended that you verify the conversion by comparing the execution results of the original code with the converted code.
If errors occurred during the conversion, then a log file will be created with the same name as the original file (for example, snoopServlet.log). If this occurs, use the contents of the log file as a guide to fix the problems that were logged.
Chapter 7. Migration assistants 247
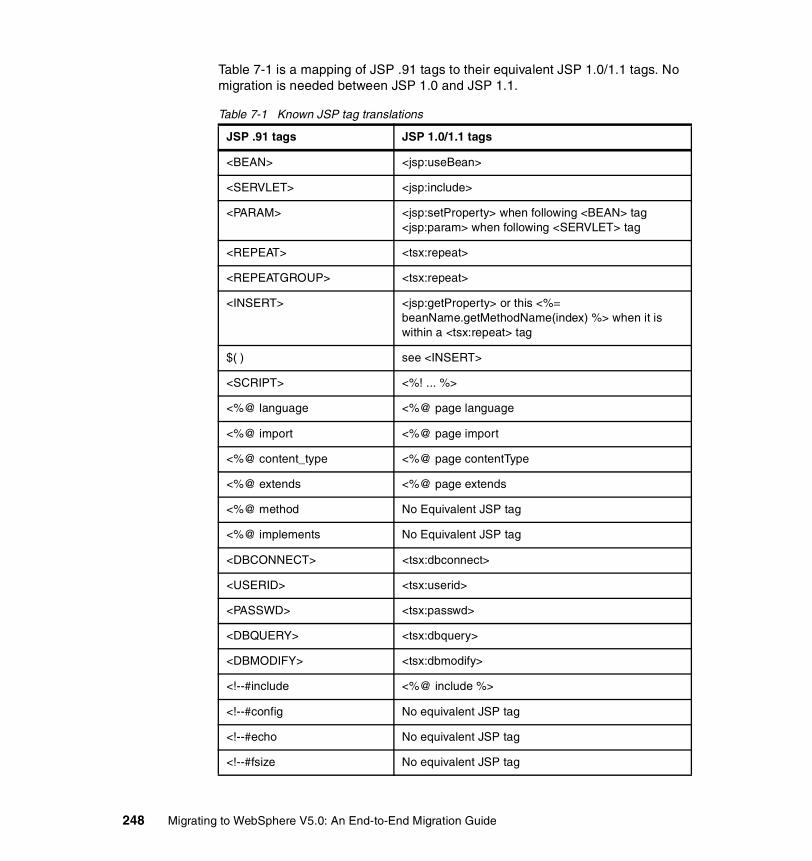
Table 7-1 is a mapping of JSP .91 tags to their equivalent JSP 1.0/1.1 tags. No migration is needed between JSP 1.0 and JSP 1.1.
Table 7-1 Known JSP tag translations
JSP .91 tags JSP 1.0/1.1 tags
<BEAN> <jsp:useBean>
<SERVLET> <jsp:include>
<PARAM> <jsp:setProperty> when following <BEAN> tag <jsp:param> when following <SERVLET> tag
<REPEAT> <tsx:repeat>
<REPEATGROUP> <tsx:repeat>
<INSERT> <jsp:getProperty> or this <%= beanName.getMethodName(index) %> when it is within a <tsx:repeat> tag
$( ) see <INSERT>
<SCRIPT> <%! ... %>
<%@ language <%@ page language
<%@ import <%@ page import
<%@ content_type <%@ page contentType
<%@ extends <%@ page extends
<%@ method No Equivalent JSP tag
<%@ implements No Equivalent JSP tag
<DBCONNECT> <tsx:dbconnect>
<USERID> <tsx:userid>
<PASSWD> <tsx:passwd>
<DBQUERY> <tsx:dbquery>
<DBMODIFY> <tsx:dbmodify>
<!--#include <%@ include %>
<!--#config No equivalent JSP tag
<!--#echo No equivalent JSP tag
<!--#fsize No equivalent JSP tag
248 Migrating to WebSphere V5.0: An End-to-End Migration Guide
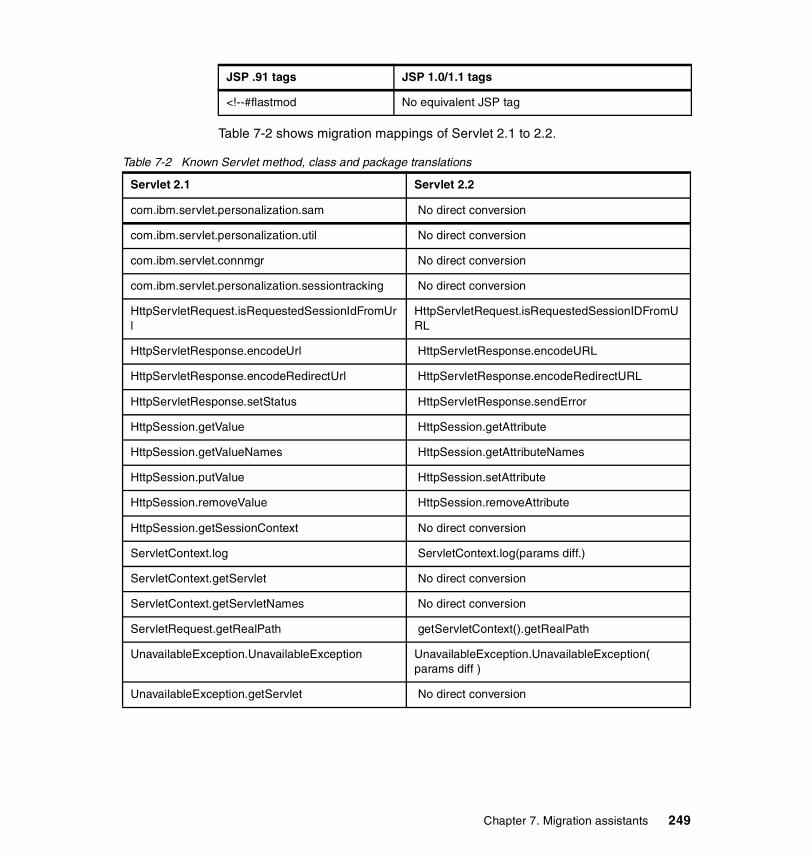
Table 7-2 shows migration mappings of Servlet 2.1 to 2.2.
Table 7-2 Known Servlet method, class and package translations
<!--#flastmod No equivalent JSP tag
JSP .91 tags JSP 1.0/1.1 tags
Servlet 2.1 Servlet 2.2
com.ibm.servlet.personalization.sam No direct conversion
com.ibm.servlet.personalization.util No direct conversion
com.ibm.servlet.connmgr No direct conversion
com.ibm.servlet.personalization.sessiontracking No direct conversion
HttpServletRequest.isRequestedSessionIdFromUrl
HttpServletRequest.isRequestedSessionIDFromURL
HttpServletResponse.encodeUrl HttpServletResponse.encodeURL
HttpServletResponse.encodeRedirectUrl HttpServletResponse.encodeRedirectURL
HttpServletResponse.setStatus HttpServletResponse.sendError
HttpSession.getValue HttpSession.getAttribute
HttpSession.getValueNames HttpSession.getAttributeNames
HttpSession.putValue HttpSession.setAttribute
HttpSession.removeValue HttpSession.removeAttribute
HttpSession.getSessionContext No direct conversion
ServletContext.log ServletContext.log(params diff.)
ServletContext.getServlet No direct conversion
ServletContext.getServletNames No direct conversion
ServletRequest.getRealPath getServletContext().getRealPath
UnavailableException.UnavailableException UnavailableException.UnavailableException( params diff )
UnavailableException.getServlet No direct conversion
Chapter 7. Migration assistants 249

7.1.2 ejbdeploy - deploying EJBsBefore installing your application in WebSphere Application Server, you must generate deployment code for the application. This step is required for EJB modules and for any J2EE EAR files that contain EJB modules. If the EAR has been previously deployed using VisualAge for Java, then the actual deployment step should be done there as well using the export facility. This is because the mapping information is dependent on whether the deployment step was done via VisualAge for Java or the WebSphere administration interfaces.
You can generate code for deployment by either using the Application Assembly Tool or by using the Deployment Tool for Enterprise Java Beans (ejbdeploy) from a command prompt. The ejbdeploy tool can also be used to assist in the conversion from EJB 1.0 to EJB 1.1 for WebSphere V3.5 applications. When ejbdeploy is executed on a 1.0 level of EJB. It also generates a detailed report on what interfaces need to be changed to convert the EJB to the 1.1 level.
This tool is used on the actual EAR file itself and the scope of its changes are limited to deploying an EJB 1.0 bean to run as a EJB 1.1 bean. It does not change source code or supported EJB specification level. Those changes will require a full development cycle of source code changes, test, and deployment.
Where to find itThe ejbdeploy tool can be found in the /bin directory of the WebSphere 5.0 installed directory.
How to run itThere are many parameters for ejbdeploy. See the WebSphere Version 5.0 InfoCenter for a complete description of the command. The ones most pertinent to this scenario include:
Syntax: ejbdeploy inputEar workingDirectory outputEar [options]Options:-dbvendor DBTYPE Set the database vendor type, to one of:DB2UDB_V71 DB2UDB_V72DB2UDBOS390_V6 DB2UDBOS390_V7 DB2UDBISERIESCLOUDSCAPE_V50 SQL92 SQL99INFORMIX_V73 INFORMIX_V92 INFORMIX_V93MSSQLSERVER_V7 MSSQLSERVER_2000ORACLE_V8 ORACLE_V9ISYBASE_V1192 SYBASE_V1200 SYBASE_V1250-35 Use the WebSphere 3.5 top-down mapping rules
The -dbvendor option is particular to the database type appropriate for the application. The -35 option is required for this scenario to match the same mapping rules as were used in WebSphere 3.5 version.
250 Migrating to WebSphere V5.0: An End-to-End Migration Guide
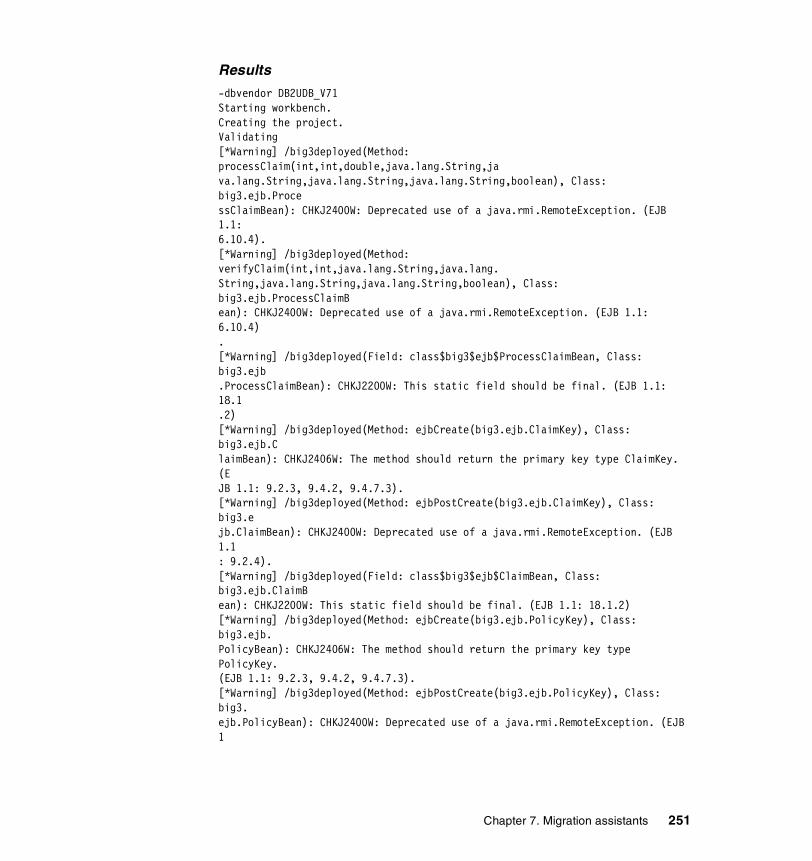
Results
-dbvendor DB2UDB_V71Starting workbench.Creating the project.Validating[*Warning] /big3deployed(Method: processClaim(int,int,double,java.lang.String,java.lang.String,java.lang.String,java.lang.String,boolean), Class: big3.ejb.ProcessClaimBean): CHKJ2400W: Deprecated use of a java.rmi.RemoteException. (EJB 1.1:6.10.4).[*Warning] /big3deployed(Method: verifyClaim(int,int,java.lang.String,java.lang.String,java.lang.String,java.lang.String,boolean), Class: big3.ejb.ProcessClaimBean): CHKJ2400W: Deprecated use of a java.rmi.RemoteException. (EJB 1.1: 6.10.4).[*Warning] /big3deployed(Field: class$big3$ejb$ProcessClaimBean, Class: big3.ejb.ProcessClaimBean): CHKJ2200W: This static field should be final. (EJB 1.1: 18.1.2)[*Warning] /big3deployed(Method: ejbCreate(big3.ejb.ClaimKey), Class: big3.ejb.ClaimBean): CHKJ2406W: The method should return the primary key type ClaimKey. (EJB 1.1: 9.2.3, 9.4.2, 9.4.7.3).[*Warning] /big3deployed(Method: ejbPostCreate(big3.ejb.ClaimKey), Class: big3.ejb.ClaimBean): CHKJ2400W: Deprecated use of a java.rmi.RemoteException. (EJB 1.1: 9.2.4).[*Warning] /big3deployed(Field: class$big3$ejb$ClaimBean, Class: big3.ejb.ClaimBean): CHKJ2200W: This static field should be final. (EJB 1.1: 18.1.2)[*Warning] /big3deployed(Method: ejbCreate(big3.ejb.PolicyKey), Class: big3.ejb.PolicyBean): CHKJ2406W: The method should return the primary key type PolicyKey.(EJB 1.1: 9.2.3, 9.4.2, 9.4.7.3).[*Warning] /big3deployed(Method: ejbPostCreate(big3.ejb.PolicyKey), Class: big3.ejb.PolicyBean): CHKJ2400W: Deprecated use of a java.rmi.RemoteException. (EJB 1
Chapter 7. Migration assistants 251
7.1.3 earconvert - J2EE application conversionWebSphere Version 5.0 supports both J2EE 1.2 and J2EE 1.3 applications. This is especially useful when migrating from WebSphere Version 4.0 since those J2EE 1.2 applications, for the most part, will run unchanged on WebSphere Version 5.0. However, at some point in time you may want to use capabilities that are available for J2EE 1.3 applications. J2EE 1.3 artifacts cannot be used in J2EE 1.2 applications. However, the reverse is true.
This earconvert utility is useful for this situation since it can be used to convert an existing J2EE 1.2 EAR file into a J2EE 1.3 EAR file. This tool is used on the actual EAR file itself and the scope of its changes are limited to changing the deployment information required to upgrade the EAR file to J2EE 1.3. It does not change source code or supported JSP, Servlets, or EJB specification level. Those changes will require a full development cycle of source code changes, test, and deployment.
The EAR conversion utility does not do a full migration of a J2EE 1.2 EAR file. In order to add newer 1.3 modules to an existing Version 1.2 application, the conversion utility only modifies the header in the application.xml file within the EAR file. Prior to conversion, the header indicates that you are working with a Version 1.2 application. After conversion, the header will indicate the Version 1.3 application, and thereby will allow you to add newer modules. The J2EE versions of the modules within the application will stay intact and those modules will not be changed or modified by the conversion utility.
Where to find itThe earconvert tool can be found in the /bin directory of the WebSphere 5.0 installed directory.
How to run itThere are two ways a user can convert their J2EE 1.2 EAR file to a J2EE 1.3 EAR file. The first way is through the command-line utility earconvert. This will take two parameters (the old EAR file name followed by the new EAR file name). Both parameters will need to be inside quotation marks to allow for path names with spaces.
The second way is through the AAT. Open up the old J2EE 1.2 EAR file. From the File menu, select Convert EAR. This option will only be available if the user has opened up a J2EE 1.2 EAR file.
ResultsThe user can now add new 1.3 modules. After modification, the user will be prompted to save the new application. Choose either Save, SaveAs, or Exit. The old J2EE 1.2 EAR file will be kept intact.
252 Migrating to WebSphere V5.0: An End-to-End Migration Guide
7.1.4 mb2mdb - JMS listener application conversionUse this tool to migrate a J2EE EAR file that uses message beans with the JMS listener from WebSphere Application Server Version 4.0 to use EJB 2.0 message-driven beans. This uses a command-line utility, mb2mdb, that takes as its input either a deployed MessageBean.jar module or a deployed J2EE EAR file that contains a message bean, along with the JMS listener configuration XML file that defines the WebSphere Version 4.0 message beans.
Where to find itThe tool can be found in the /bin directory of the WebSphere 5.0 installed directory.
How to run itmb2mdb inputMB.jar-ear jmsListenerConfig.xml workingDirectory outputMDB.jar/ear <options>
Where:
� inputMB.jar-ear is the name of the deployed WebSphere Application Server 4.0 JAR or EAR file
� jmsListenerConfig.xml is the name of the XML configuration file used to configure the JMS listeners.
� workingDirectory is the name of a new or existing directory. By default, the tool clears the working directory after it has completed. If you want to preserve the contents of the working directory, you must specify the -keep option.
� outputMDB.jar/ear is the name of the output JAR or EAR file for the migrated message-driven bean options
Optional parameters that you can use to control the mb2mdb utility are:
� -keep prevents the tool from clearing out the working directory after completion.
� -verbose causes the tool to display informational messages about the progress of the migration and its parameters.
� -map listenerHome=bindingHome provides a mechanism to map between the JNDIHomeName specified for a listener in the JMS listener configuration XML file and the default binding home name specified in the inputMB.jar-ear file. If the jmsListenerConfig.xml file contains a deployed EJB home JNDI name that is different from the default binding within the inputMB.jar/ear, use this option to map between the two names. This enables you to install the output JAR or EAR file for the message-driven bean into an application server and bind the bean with a different JNDIHomeName than is specified in the bean's bindings.xmi.
Chapter 7. Migration assistants 253

ResultsThe result of this task is a new JAR or EAR file for a message-driven bean that can then be deployed directly into a WebSphere Version 5.0 application server. To successfully install the JAR or EAR file, you need to bind the message-driven bean against a listener port defined to the message listener service of the application server. You need to have used the WebSphere Administrative Console to define the listener port, which defines the JMS connection factory and destination that a message-driven bean bound to it listens on.
For more information about installing and configuring a JAR or EAR file for a message-driven bean, see “Deploying an enterprise application to use message-driven beans” in the WebSphere Version 5.0 InfoCenter.
7.1.5 CACT - Class API checker tool introductionWhen upgrading WebSphere versions, a necessary task is to determine whether applications must be changed due to APIs that are no longer supported on the new version. This can be a tedious, time-consuming and error-prone task. CACT is a tool that can be used to make the transition easier. CACT analyzes compiled Java Servlets and EJBs ( .class files) and provides information on any Servlet or EJB code that is deprecated in WebSphere 4.0 or WebSphere 5.0.
You can analyze a single class file as well as multiple class files in a given JAR file. CACT reads a JAR file (or a single class file), decompiles every class file in it, detects deprecated or unsupported APIs, and prints out details of each occurrence of the API. You can also customize CACT by adding additional API deprecation rules.
Where to find itThe CACT tool can be found on the WebSphere Developer Domain downloadable tools Web site at http://www-3.ibm.com/software/.
Enter CACT in the search field and press Enter.
How to run itJDK 1.2 or 1.3 must already be installed on your system before you run this tool. After downloading the tool from the WebSphere Developer Domain Web site, unzip it into a directory where you would like to run the command.
You also will have to provide a value for <CACT_HOME>, the directory where you've installed CACT in the cact.bat or cact.sh file. Look for a line similar to this:
SET CACT_HOME=c:\cact
Update the cact.bat or cact.sh file with the installation directory for CACT.
254 Migrating to WebSphere V5.0: An End-to-End Migration Guide
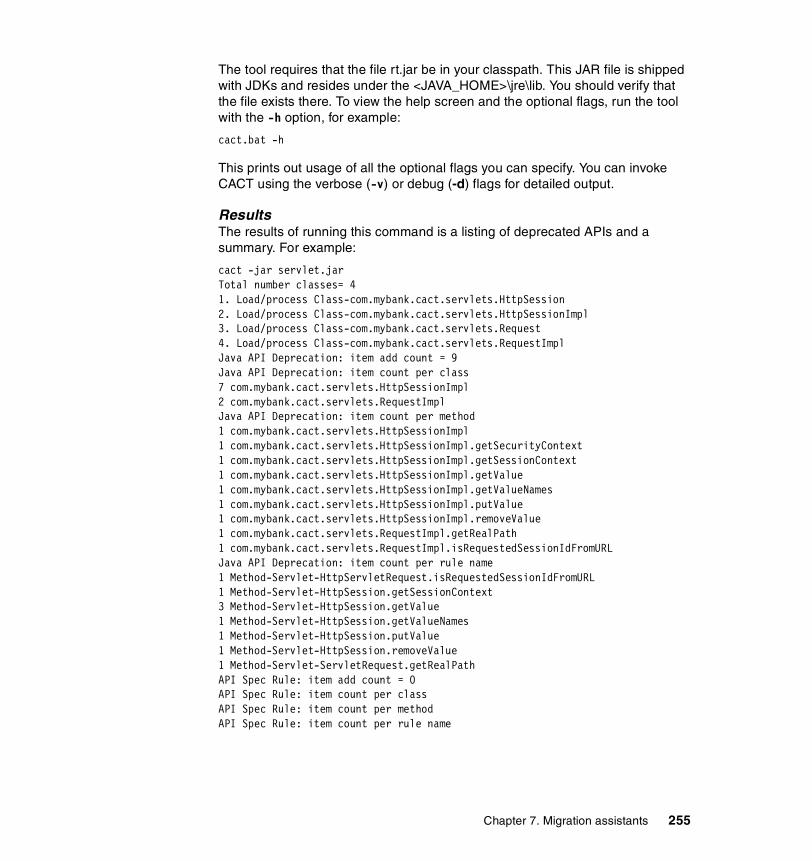
The tool requires that the file rt.jar be in your classpath. This JAR file is shipped with JDKs and resides under the <JAVA_HOME>\jre\lib. You should verify that the file exists there. To view the help screen and the optional flags, run the tool with the -h option, for example:
cact.bat -h
This prints out usage of all the optional flags you can specify. You can invoke CACT using the verbose (-v) or debug (-d) flags for detailed output.
ResultsThe results of running this command is a listing of deprecated APIs and a summary. For example:
cact -jar servlet.jarTotal number classes= 41. Load/process Class-com.mybank.cact.servlets.HttpSession2. Load/process Class-com.mybank.cact.servlets.HttpSessionImpl3. Load/process Class-com.mybank.cact.servlets.Request4. Load/process Class-com.mybank.cact.servlets.RequestImplJava API Deprecation: item add count = 9Java API Deprecation: item count per class7 com.mybank.cact.servlets.HttpSessionImpl2 com.mybank.cact.servlets.RequestImplJava API Deprecation: item count per method1 com.mybank.cact.servlets.HttpSessionImpl1 com.mybank.cact.servlets.HttpSessionImpl.getSecurityContext1 com.mybank.cact.servlets.HttpSessionImpl.getSessionContext1 com.mybank.cact.servlets.HttpSessionImpl.getValue1 com.mybank.cact.servlets.HttpSessionImpl.getValueNames1 com.mybank.cact.servlets.HttpSessionImpl.putValue1 com.mybank.cact.servlets.HttpSessionImpl.removeValue1 com.mybank.cact.servlets.RequestImpl.getRealPath1 com.mybank.cact.servlets.RequestImpl.isRequestedSessionIdFromURLJava API Deprecation: item count per rule name1 Method-Servlet-HttpServletRequest.isRequestedSessionIdFromURL1 Method-Servlet-HttpSession.getSessionContext3 Method-Servlet-HttpSession.getValue1 Method-Servlet-HttpSession.getValueNames1 Method-Servlet-HttpSession.putValue1 Method-Servlet-HttpSession.removeValue1 Method-Servlet-ServletRequest.getRealPathAPI Spec Rule: item add count = 0API Spec Rule: item count per classAPI Spec Rule: item count per methodAPI Spec Rule: item count per rule name
Chapter 7. Migration assistants 255

7.2 System administration migration assistantsThis section describes tools that are shipped with the WebSphere Application Server that can be used for migration of system configuration and applications from a previous version of WebSphere to the current one.
7.2.1 ClientUpgradeJ2EE EAR files may exist on the client or server that have client JARs contained in them that have J2EE resources within those JARs. These resources need to be updated to be WebSphere 5.0 resources. The ClientUpgrade utility can be run on these J2EE EAR files to perform this upgrade.
This command is not run automatically as part of the installation process because the location of the J2EE EAR file is not in a predetermined location. The customer must run this tool against their J2EE EAR files themselves.
Note that copies of client JARs are not made in the J2EE EAR file. If the J2EE EAR file needs to be used with WebSphere 4.0 as well as with WebSphere 5.0, then it is necessary to make a copy of the J2EE EAR file before using ClientUpgrade.
Where to find itThe tool can be found in the /bin directory of the WebSphere 5.0 installed directory.
How to run itClientUpgrade EAR_file [-clientJar client_jar ] [-traceString trace_spec [-traceFile
file_name ]]
Where:
� EAR_file is the fully qualified path to the EAR file that contains client JAR files to process.
� -clientJar specifies a JAR file for processing. If not specified, the program transforms all client JAR files in the EAR file.
� -traceString -traceFile gathers trace information for IBM service personnel. Specify a trace_spec of "*=all=enabled" (with quotation marks) to gather all trace information.
ResultsThe J2EE resources in the J2EE EAR files are upgraded.
IBM WebSphere Application Server, Release 5.0Product Upgrade client migration tool, Version 1.0
256 Migrating to WebSphere V5.0: An End-to-End Migration Guide

Copyright IBM Corp., 1997-2002
MIGR0912I: Running client JAR migration on clientapp.jar.
MIGR0287I: Created configuration file C:\DOCUME~1\ADMINI~1\LOCALS~1\Temp\WSTMPCC48727.tmp\clientapp.jar\META-INF\client-resource.xmi successfully.MIGR0223I: Adding JDBCProvider entry jdbc:provider:name to the model.MIGR0260W: JDBC Driver jdbc:provider:name has been added to the configuration but its classpath parameter may need to be updated if the database prerequisite has changed.MIGR0223I: Adding URLProvider entry url:provider:name to the model.MIGR0223I: Adding MailProvider entry Built-in Mail Provider to the model.MIGR0223I: Adding JMSProvider entry jms:provider:name to the model.
7.2.2 WASPreUpgrade There are two tools that are shipped with the WebSphere application server runtime that are used in conjunction with each other to migrate the administration configuration from a previous version of WebSphere to WebSphere Version 5.0. The overall migration process is to back up the current configuration and necessary files, install the Version 5 product, and import the configuration from the previous version into WebSphere Version 5.0. The installation wizard can call them or you can call them manually.
The WASPreUpgrade tool is used to save the configuration from the previous version of WebSphere into a backup directory. This backup directory is later used by the WASPostUpgrade tool to import this configuration into WebSphere Version 5.0. The WASPreUpgrade tool provides the status both to the screen and to log files in the backup directory. ASCII log file names start with the text WASPreUpgrade and include a date timestamp.
The following files are saved in the backup directory:
� For Version 3.5.x
– bin – classes – deployableEJBs (Advanced Edition only) – deployedEJBs (Advanced Edition only) – hosts – properties – servlets
� For Version 4.x
– bin – classes
Chapter 7. Migration assistants 257
– config (Version 4.0.x Advanced Single Server Edition only) – installableApps – installedApps – installedConnectors (Version 4.x Advanced Edition only) – properties
The WASPreUpgrade tool saves selected files from the Version 3.5.x and Version 4.x /bin directory. It also exports the existing application server configuration from the repository. If you are migrating Version 3.5.x or Version 4.x Advanced Edition, the administrative server of the existing environment must be running.
Where to find itThe tool can be found in the /bin directory of the WebSphere 5.0 installed directory.
How to run itWASPreUpgrade backupDirectory currentWASDirectory
[-adminNodeName administrationNodeName ] [-nameServiceHost host_name [-nameServicePort port_number ]] [-import xmiDataFile ] [-traceString trace_spec [-traceFile file_name ]]
The first two arguments are required and positional. The third argument is required and positional only when upgrading from WebSphere Application Server Version 3.5.x or Advanced Edition 4.0.
Supported parameters include:
� backupDirectory
Required name of the directory in which the WASPreUpgrade tool stores the saved configuration and files, and from which the WASPostUpgrade tool reads the configuration and files. The WASPreUpgrade tool creates this directory if it does not already exist.
� currentWASDirectory
Required name of the installation root directory for the current Version 3.5.x or Version 4.x installation. This can be either WebSphere Application Server Standard Edition Version 3.5.x, WebSphere Application Server Advanced Edition Version 3.5.x, or any form of WebSphere Application Server Version 4.0.x.
� -adminNodeName
The name of the node containing the administrative server for the currently installed product. The value of this argument must match the node name given in the topology tree on the Topology tab of the Administrative Console
258 Migrating to WebSphere V5.0: An End-to-End Migration Guide
for the currently installed product. The WASPreUpgrade tool calls the XMLConfig tool using this parameter. This is a required parameter only when upgrading from WebSphere Application Server Version 3.5.x or Advanced Edition 4.0.
� -nameServiceHost -nameServicePort
When specified, the WASPreUpgrade tool passes these optional parameters to the XMLConfig tool. Use them to override the default host name and port number used by the XMLConfig tool.
� -import
The name of the XML Metadata Interchange (XMI) configuration file to process. This is optional when upgrading from WebSphere Application Server Advanced Single Server Edition or Advanced Edition, Version 4.0 because the program uses the Version 4.0 config\server-cfg.xml file by default. When migrating from a WebSphere Application Server Advanced Edition, Version 4.0.x configuration that uses anything other than the default server-cfg.xml file, you must use the -import option along with the path to the configuration file. You also must use the -import and path option when running WASPostUpgrade, to point to the non-default xml configuration file in the directory created by WASPreUpgrade.
� -traceString -traceFile
Optional parameters to gather trace information for IBM service personnel. Specify a trace_spec of "*=all=enabled" (with quotation marks) to gather all trace information.
ResultsThe backup directory is created if necessary and the required files are saved. The output of the tool is shown on the command line and saved in a uniquely named file in the backup directory.
7.2.3 WASPostUpgradeThere are two tools that are shipped with the WebSphere Application Server runtime that are used in conjunction with each other to migrate the administration configuration from a previous version of WebSphere to WebSphere Version 5.0. The overall migration process is to back up the current configuration and necessary files, install the Version 5 product, and import the configuration from the previous version into WebSphere Version 5.0. The installation wizard can call them or you can call them manually.
The WASPostUpgrade tool imports the Version 3.5.x or Version 4.x configuration data. This tool uses information created by the WASPreUpgrade tool to restore the previous Version 3.5.x or Version 4.x configuration to a Version 5 installation.
Chapter 7. Migration assistants 259
Because the Version 5 product adheres to the J2EE programming model and Version 3.5.x does not, significant changes are required to apply the Version 3.x configuration to a Version 5.0 installation.
This tool can be run multiple times with different configuration files to incrementally update the Version 5.0 configuration.
Where to find itThe tool can be found in the /bin directory of the WebSphere 5.0 installed directory.
How to run itWASPostUpgrade backupDirectory [-import xmi_data_file] [-cellName cell_name] [-nodeName node_name] [-serverName server_name] [-webModuleAdditionalClasspath classpath] [-documentRootLimit number] [[-traceString trace_spec [-traceFile file_name]] [-substitute "key1=value1[;key2=value2;[...]]"]
The first argument is required. Supported parameters include:
� backupDirectory
The required name of the directory in which the WASPreUpgrade tool stores the saved configuration and files, and from which the WASPostUpgrade tool reads the configuration and files. The WASPreUpgrade tool creates this directory if it does not already exist.
� -import
An optional name of the XML Metadata Interchange (XMI) configuration file to process. Specify the WebSphere Application Server Advanced Single Server Edition 4.0 configuration file or an XML configuration data file that the XMLConfig tool created. When migrating from a WebSphere Application Server Advanced Single Server Edition Version 4.0.x configuration that uses anything other than the default server-cfg.xml file, you must use the -import option along with the path to the non-default XML configuration file in the directory created by WASPreUpgrade. If not specified, the program uses the default XML configuration file (websphere_backup.xml for Version 3.5.x, or server-cfg.xml for Version 4.0) in the backup directory.
� -cellName
An optional parameter to specify the cell name for the program to update. If not specified, the program inspects the configuration for cell names. When one cell name exists, the program uses it. Otherwise, it returns an error.
260 Migrating to WebSphere V5.0: An End-to-End Migration Guide

� -nodeName
An optional parameter to specify the node name for the program to update. If not specified, the program inspects the configuration for node names. When one node name exists, the program uses it. Otherwise, it returns an error.
� -webModuleAdditionalClasspath
An optional parameter to specify the path or the path and file names of specific directories or files that you do not want copied into the WAR file. Instead, the program adds the paths and files to the Web Module's extension (ibm-web-ext.xmi) additionalClassPath attribute.
� -documentRootLimit
Use this optional parameter to specify the limit of the number of files that the program copies from the document-root field of web-application. It is only applicable to Version 3.5.x upgrades. If not specified, the default is 300.
� -traceString -traceFile
Optional parameters to gather trace information for IBM service personnel. Specify a trace_spec of "*=all=enabled" (with quotation marks) to gather all trace information.
� -substitute
An optional argument passed to the XMLConfig tool. Specify values for security variables to be substituted (for example, -substitute "NODE_NAME=admin_node;APP_SERVER=default_server"). In the input XML data file, each key should appear as $key$ for substitution. This argument substitutes any occurrence of $NODE_NAME$ with admin_node and $APP_SERVER$ with default_server in the input XML file.
If the substitution string contains semicolons, use $semiColon$ to separate it from the ";" delimiter. On UNIX platforms, be sure to add an escape character to each dollar sign ($) within the substitution string (for example, \$semiColon\$).
This parameter is applicable for configurations saved from Versions 3.5.x and 4.0.x Advanced Edition.
ResultsThe existing Version 5.0 configuration is updated with the configuration from the previous version. The existing configuration is modified and added; it is not replaced. Copies of individual Version 5.0 configuration files are made during the processing. These files can be used to restore the previous configuration if required.
Analyze the WASPostUpgrade log for detailed information about the migrated configuration. The J2EE programming model specifies an architecture for how
Chapter 7. Migration assistants 261

applications are created and deployed. Because applications in Version 3.5.x do not have the same architecture, the WASPostUpgrade tool recreates applications. It creates all migrated Web resources and enterprise beans in J2EE EAR files. It maps all enterprise applications from the Version 3.5.x installation into J2EE EAR files with the same name, deployed in the same server.
262 Migrating to WebSphere V5.0: An End-to-End Migration Guide
Chapter 8. WebSphere system configuration and runtime migration
This chapter describes the migration of the WebSphere system configuration from Versions 3.5.x or 4.0.x to Version 5.0. The support provided by the tools shipped with the WebSphere runtime as well as an introduction to the changes to application programming interfaces (APIs) are described.
Migrating is an activity in which you take advantage of existing materials. Migration tasks and tools help you upgrade the product and its prerequisites, reuse existing application components when feasible, and transfer administrative configurations from your past version to the newest one.
8
© Copyright IBM Corp. 2002 2003. All rights reserved. 263
8.1 General informationThis section provides information that is applicable to all migration scenarios.
8.1.1 Supported versions IBM provides a set of migration tools for migrating administrative configurations:
� WebSphere Application Server Standard Edition 3.5.1 and later� WebSphere Application Server Advanced Edition 3.5.1 and later� WebSphere Application Server Advanced Edition Single Server 4.0 and later� WebSphere Application Server Advanced Edition 4.0 and later� WebSphere Application Server Extended Edition 4.0 and later
To:
� WebSphere Application Server, Version 5� WebSphere Application Server Network Deployment, Version 5� WebSphere Application Server Enterprise, Version 5
8.1.2 OS upgrade scenariosThis section describes the migration process from WebSphere V3.5 and V4.0 when the current operating system level does not meet WebSphere V5.0 prerequisites.
Note: The specified directory on the installation disk must be used in the following steps.
A directory on the installation disk has been provided that can be used for this situation.
1. Run WASPreUpgrade.[bat|sh] from the disk1\migration\bin directory.
In order to have the disk1\migration\bin\WASPreUpgrade execute properly, you may need to copy the disk1\migration\bin directory to disk. Then edit the setupCmdLine.[bat|sh] file and change the following:
– $(was.install.root) to be the fully qualified path to the disk1\migration directory.
– $(java.install.root) to be the fully qualified path to the disk1\jdk\java directory.
– Save the file and now execute the disk1\migation\bin\WASPreUpgrade command.
2. Uninstall WebSphere Application Server Version 3.5.x or Version 4.0.x.
264 Migrating to WebSphere V5.0: An End-to-End Migration Guide
3. Upgrade the operating system to the level required by WebSphere V5.0.
4. Install WebSphere Application Server Version 5.0.
5. Run the WASPostUpgrade command from the installed WAS_HOME/bin directory.
8.2 Migration stepsThis section discusses the migration steps. Begin by planning for the migration. System management and administration have undergone major changes in WebSphere V5.0 and require additional planning. You also need to decide between coexistence and interoperability. The prerequisites must be met. A detailed discussion of these topics follows.
8.2.1 Planning for migrationThere are many planning steps required for setting up a new e-business network. These steps are not discussed here because this book focuses on migration to Version 5.0 from a previous version of WebSphere. See the WebSphere Version 5.0 InfoCenter planning section for more information on setting up a complete network.
In general, the existing network and topologies that are already in place are still applicable to the Version 5.0 configuration. There are a few additional capabilities that should be considered.
Systems management administrationThe systems management administration and packaging are considerably different for Version 5.0. The Administrative Console is browser-based instead of a Java program. Also, WebSphere Application Server Network Deployment is required to provide equivalent multi-node functionality of a WebSphere Version 3.5 or 4.0 domain.
Additional planning is required for those environments that will include WebSphere Application Server Network Deployment. A determination will need to be made where to install WebSphere Application Server Network Deployment. If WebSphere Application Server Network Deployment will be installed on a machine that also has WebSphere Application Server, then planning for appropriate hardware prerequisites (such as memory and CPU capacity) will need to be done. If WebSphere Application Server Network Deployment will be installed on a new machine, then it must be determined where to include it in the network and whether to include migration as part of its installation.
Chapter 8. WebSphere system configuration and runtime migration 265
CoexistencePlanning is also required to determine whether you have an existing version of WebSphere Application Server installed on the machine where you plan to install your Version 5 product. If you have a previous version, you must plan whether to copy the configuration and applications of the previous version to the new version. Migration does not uninstall the previous version.
You can still run the previous version. You must decide whether to let Version 5 coexist with the earlier version.
There are four combinations of migration and coexistence that you can select:
� Migrate only � Coexist only � Migrate and coexist � Neither migrate nor coexist
If you neither migrate nor coexist with an earlier version of WebSphere Application Server, you are choosing to ignore the previous installation. In such a case, you can run only one version at a time.
Automated migration support is part of the installation program. The installation program detects previously installed versions and presents a coexistence option. A window will be displayed during the Installation process to assist with port conflict resolution for the default server.
Coexistence is described more fully in 8.4, “Test and integration/production environment” on page 276.
InteroperabilityInteroperability provides a mechanism to run nodes in a mixed version environment. This enables incremental version upgrade because domains can be upgraded independently and still interoperate with one another, allowing domains to be migrated incrementally. The base support is provided for Version 3.5.3 and later as well as Version 4.0 and later to Version 5.0. See Figure 8-1 on page 267.
266 Migrating to WebSphere V5.0: An End-to-End Migration Guide

Figure 8-1 WebSphere interoperability model
This includes applications that are transactional and secure. The primary applications that use these characteristics are typically either Servlets or pure Java applications driving EJBs. EJB workload balance support from Version 3.x to Version 4.0.x is provided with Version 3.5.6 and later. EJB workload balance support across domains is provided starting with V3.5.4 and later with the appropriate eFixes.
Planning for hardware prerequisites (such as memory and CPU capacity) may need to be done to effectively use this support.
Interoperability is described more fully in 8.4, “Test and integration/production environment” on page 276.
Tier3Data Server
Tier2Business Logic
Tier1Presentation Logic
WebServers
Tier1 Java Clients
Tier1 Java Clients
Tier0 Browsers
R5.0
R5.0
R3.5
R4.0 R4.0
R5.0
R5.0 R5.0
R3.5 R3.5
R5.0
R4.0
Cell A
Domain B
Chapter 8. WebSphere system configuration and runtime migration 267
8.2.2 Updating the prerequisitesThe next step is to update the software prerequisites. The most recent information on the supported operating system levels and software prerequisites can be found at:
http://www-3.ibm.com/software/webservers/appserv/doc/latest/prereq.html
The installation program will also verify the software prerequisites during installation.
8.2.3 Installation and migrationAutomated migration support is part of the installation program. The installation program detects previously installed versions, collects information about how you want the migrated installation to look, and exports the current administrative configuration. After this completes, the wizard runs the second phase, which converts the backed-up administrative configuration into the new Version 5 configuration.
When you start the installation program, it automatically detects previously installed versions of the product and displays them in a list. If the installation program supports migration from a selected version, the Perform migration check box appears above the list.
The installation program prompts you for the following information:
� Backup directory � Currently installed WebSphere Application Server directory � Name of administrative node (default is the computer name)
The installation program calls WASPreUpgrade, which backs up the earlier version but does not uninstall it, and exports the current configuration. Then the installation program calls WASPostUpgrade, which migrates it to the new installation and displays the migration log file.
You can also choose to not migrate during the installation step and do it manually later using the WASPreUpgrade and WASPostUpgrade commands.
8.2.4 After migrationIt is always a good idea to review the results of migration by reviewing the migration logs in the backup and Version 5.0 logs directory. Some of the configuration may need to be modified based on the results of the migration.
268 Migrating to WebSphere V5.0: An End-to-End Migration Guide
8.2.5 Client JAR upgrade If you have J2EE EAR files from Version 4.0, you will need to update them to Version 5.0. Update J2EE resources in client JAR files to the new resource format with the ClientUpgrade tool. J2EE EAR files might exist on the client, if the client has client JAR files with J2EE resources.
8.3 WebSphere Application Server V5.0 migration scenario
This section covers a basic migration scenario involving a single machine. One typical example of this is a development environment on a single machine. Another example would be one of the nodes that will become part of a cell of a WebSphere Application Server Network Deployment environment. The characteristics are the same whichever configuration is involved.
8.3.1 Mapping detailsThe following mappings are done when migrating from Version 3.5.x and Version 4.0.x to Version 5.0.
Directories stdin, stdout, and stderr; passivation directory and working directory
Because the typical location for these directories might include Version 3.5.x or Version 4.0 installation directories and the location might be different in the new Version 5.0 installation, these values are ignored.
Command line parametersCommand line parameters are converted as appropriate to JVM settings in the server process definition. In general, the settings are mapped directly. There are some cases where the mapping cannot be done directly. Specifically, the Version 5.0 process now owns multiple servers, whereas servers owned a process in Version 3.5 and 4.0. Because of this change, the memory heap size settings will not be migrated, since the sizes that worked well in prior releases may not work well given this new structure
Bootstrap port In Versions 3.5 and 4.0, the default server port for the naming service was 900. It is changed in Version 5.0 to 2809. If the prior version was configured for a bootstrap port something other than 900, then that value for the server1 name server will be used. Otherwise it will left at the current setting (default 2809).
Chapter 8. WebSphere system configuration and runtime migration 269

Cluster membersCluster members will be created in the WebSphere Application Server migration but they will not be able to be run until that node is federated into a WebSphere Application Server Network Deployment cell. These servers are configured differently than stand-alone servers and must be run as part of a cluster.
Default ServerThe name of the default server in Version 5.0 is “server1”. All objects owned by “Default Server” in prior versions will be mapped onto server1.
Enterprise applications for Cluster members During migration, J2EE EAR files will not be deployed for servers that are members of clusters. These J2EE EAR files must be deployed on the cluster in the WebSphere Application Server Network Deployment installation.
JDBC drivers and data sources Version 5.0 significantly redefines JDBC and data source objects. The migration tools map these objects to the new configuration using predecessor settings as input variables. The data source that is used is the WebSphere 4.x data source that uses the WebSphere old Connection Manager architecture.
Migration after federationMigration of a WebSphere Application Server node will not be allowed after a node has been federated into a WebSphere Application Server Network Deployment cell. This is because the master copy of the configuration does not exist on the node but is in the deployment manager.
Name bindings The naming structure has changed in Version 5.0. This makes the EJB references that were valid in previous versions no longer work in Version 5.0. However, a name binding can be added to map the old name into the new name in Version 5.0.
The Administrative Console is the easiest way to create these name bindings. Use the name of the Version 3.5.x or 4.0.x EJB references as both the name of the binding and the JNDI name in the Version 5.0 name space.
Node nameA Version 3.5.x and a Version 4.x repository can contain more than one node name and its associated children. The WASPostUpgrade tool processes only those objects and children that match the node that is being migrated. This determination is made by checking the names of nodes in configuration files with node name of the machine that is being migrated.
270 Migrating to WebSphere V5.0: An End-to-End Migration Guide
PageList Servlet The configuration of the PageList Servlet has been changed in Version 5.0. The direct use of the Servlet has been deprecated. The PageList Servlet function is still available but is configured as part of the Servlet extension configuration in the WAR file. All references will be updated to the Servlet configuration supported in Version 5.0.
Properties files and classes filesFiles from these directories in the prior version are not copied into the Version 5.0 configuration. The properties files are not compatible between versions and the classes directory may also contain incompatible files. These will need to be handled on an individual basis to move into the Version 5.0 configuration.
SamplesSamples from previous versions are not migrated to the Version 5.0 environment. The equivalent samples from Version 5.0 should be used instead.
SecurityIf a was.policy file exists in the 5.0 properties directory, it will be added to J2EE EAR files as they are being migrated. This is done by the wsadmin command that is called during the migration processing.
Global Security using LTPA authentication mechanisms configured in 3.5.x and 4.0.x will be migrated to WebSphere Application Server and WebSphere Application Server Network Deployment. However, if Global Security has been enabled in 3.5.x or 4.0.x, it will be disabled during migration. Before Global Security using an LTPA authentication mechanism can be enabled in V5.0, keys must be generated. To enable security using the migrated LTPA authentication mechanism in V5.0, keys can be generated using the system’s Administrative Console. After the keys have been generated, Global Security can be enabled.
Global Security using the local operating system authentication mechanisms configured in 3.5.x and 4.0.x will be migrated to WebSphere Application Server Network Deployment. However, if Global Security has been enabled in 3.5.x or 4.0.x, it will be disabled during migration. Since the SWAM authentication mechanism is not supported by WebSphere Application Server Network Deployment and replaces the local operating system authentication mechanism, during migration the LTPA authentication mechanism in V5.0 will be set as the active authentication mechanism. Before security can be enabled, the LTPA authentication mechanism in 5.0 must be configured using the system’s Administrative Console.
Servlet package name changesThe package that contains the DefaultErrorReporter, SimpleFileServlet, and InvokerServlet is changed for Version 5. In Versions 3.5.x and 4.0.x, the Servlets
Chapter 8. WebSphere system configuration and runtime migration 271

were in com.ibm.servlet.engine.webapp. In Version 5, the Servlets are in com.ibm.ws.webcontainer.servlet.
Transport portsAll ports will be migrated. Additional warnings will be logged if the port is already defined in the configuration. The user will need to resolve the port conflicts if servers with port conflicts will need to be run at the same time.
Web modulesA change was made in the Web container behavior that was required by J2EE that involves the setting of content type. If a Servlet writer does not set the content type, it is no longer defaulted by the Web container and it is returned as “null”. This can cause some browsers to incorrectly display the resulting tags sent by the Web container. Migration sets the autoResponseEncoding IBM extension to TRUE for Web modules, while migrating J2EE EAR files to prevent this problem from occurring.
8.3.2 WebSphere Application Server V3.5 to V5.0 migrationThe migration tools assist in the transition from Version 3.5.x to Version 5.0 by migrating system configurations and creating J2EE artifacts, including J2EE security roles mapping. The migration tools create initial J2EE EAR files based on Version 3.5.x configurations. However, because of the significant change in application structures, plan to carefully test and fine-tune migrated applications using development and deployment tools to determine exactly how the applications function in Version 5.0.
Analyze the WASPostUpgrade log for detailed information about migrated enterprise beans. The J2EE programming model specifies an architecture for how applications are created and deployed. Because applications in Version 3.5.x do not have the same architecture, the WASPostUpgrade tool recreates applications. It creates all migrated Web resources and enterprise beans in J2EE EAR files. It maps all Version 3.5.x enterprise applications from the installation into J2EE EAR files with the same name, deployed in the same server.
The WASPostUpgrade tool maps Web resources and enterprise beans that are not included in a Version 3.5.x enterprise application into a default J2EE EAR file that includes the name of the server. The tool maps Web applications to J2EE WAR files. The tool deploys enterprise beans as EJB 1.1 beans in J2EE JAR files. The tool combines resources in a J2EE EAR file and deploys it in the Version 5 configuration. There are some differences between the EJB 1.0 and EJB 1.1 specifications, but in most cases, EJB 1.0 beans can run successfully as EJB 1.1 beans.
272 Migrating to WebSphere V5.0: An End-to-End Migration Guide

Mapping details specific to Version 3.5 datasources.xmlYou can use a Version 3.5.x datasources.xml file to augment data source configuration settings. Version 3.5.x stores the file in the properties directory. The migration tools migrate an existing datasources.xml file by merging properties in the file into the data source and JDBC driver configuration.
J2EE EAR files The Version 3.5.x enterprise application entries are optional. They are most often used to organize sets of objects together for Security definitions. The ejb and web-application portions of the Version 3.5.x enterprise application point to their respective entries in other portions of the XML file.
Each Version 3.5.x enterprise application is processed to create a J2EE EAR file with the same name. The ejb and web-application entries are used as pointers to the definitions of ejb and web-applications. The details of these entries are then used to build a J2EE EAR file.
For ejbs, the jar-file definition is used to find the JARs to redeploy and add to the J2EE EAR file.
The web-application document-root entries are used to find the resources used within the web-application (HTML, JSP, etc.) These files are copied to the WAR file within the J2EE EAR file. The web-application classpath entries are used to find Servlets and JARs files that are copied to the WAR file within the J2EE EAR file.
J2EE EAR files are created during the migration from Version 3.5.x. These are created as J2EE 1.2 compatible EAR files and contain EJB 1.1, Servlet 2.2 and JSP 1.1 level modules. This provides the most straightforward compatibility and enables interoperability with previous WebSphere versions.
Enterprise beansVersion 3.5 supported only the EJB 1.0 components specification level. Version 5 supports EJB 1.1 components and 2.0 components. However, many EJB 1.0 beans can be successfully deployed as EJB 1.1 beans. The migration tools redeploy enterprise beans automatically as part of the application migration phase. Check the WASPostUpgrade log for details of the deployment of these enterprise beans. Make any necessary changes and redeploy if required.
You should specify only one back-end datastore vendor per JAR file. If there are enterprise beans that use different back ends, package them into separate JAR files.
Chapter 8. WebSphere system configuration and runtime migration 273
J2EE securityThe security authorization model in Version 3.5.x is based on the notion of enterprise application and Method Groups. The cross product of the Version 3.5.x enterprise application and the method groups is a WebSphere permission. J2EE specifies an authorization model based on roles. To convert from the WebSphere permission model in Version 3.5.x to the role-based authorization model in Version 5.0, a one-to-one mapping from a WebSphere permission to a new role under that application is created. Therefore, for each V3.5.x enterprise application and each method group in Version 3.5.x, a role is created in Version 5.0 and is contained in the J2EE application's deployment descriptor. The authorized subjects for each role are contained in an authorization table found in the J2EE application's binding.
J2EE specifies an authorization model based on roles. WebSphere interprets the role to mean a set of permissions to access a resource. In the case of an EJB method invocation, the permission to access the method on a particular bean is specified by a method permission. This method permission is associated with one or more roles in the deployment descriptor in the bean JAR file.
In the case of accessing Web resources, the permission to access a Web URI and invoke a HTTP method on that URI is specified in terms of Web resource collections and security constraints in J2EE. The security constraints and Web resource collections can be found in the deployment descriptor of the Web application's WAR file.
JSP levelsVersion 5.0 runs JSP 1.0 and 1.1 objects as JSP 1.2, which is its sole supported JSP level.
Servlet RedirectorVersion 5 does not support Servlet Redirector. The migration tools ignore these objects.
Servlet package name changes when migrating from Version 3.5.x to Version 5
If the 3.5.x configuration defines the SimpleFileServlet, the Servlet is not migrated. The migration tools set, the FileServingEnabled attribute to TRUE in the Web module ibm-web-ext.xmi file.
If the 3.5.x configuration defines the InvokerServlet, the Servlet is not migrated. The migration tools set the ServeServletsByClassnameEnabled attribute to TRUE in the Web module ibm-web-ext.xml file.
274 Migrating to WebSphere V5.0: An End-to-End Migration Guide
If the 3.5.x configuration defines the DefaultErrorReporter Servlet, the Servlet is migrated into the Web module web.xml file. Migration uses the new package to set the class name.
Transports The default transport type of the Servlet Engine in Version 3.5.x is Open Servlet Engine (OSE). Because Version 5.0 no longer supports OSE transport, the migration tools map these transports to HTTP transports, using the same port assignments. You must manually add VirtualHost alias entries for each port.
Integration of generated EAR files into WebSphere Studio Application Developer
The J2EE EAR files that are generated during this migration can be imported into WebSphere Studio Application Developer and used as a skeleton towards development of a J2EE EAR file for Version 5.0. Although the generated J2EE EAR file may be complete, it may also contain too many files or insufficient files. It is highly recommended that these J2EE EAR be completed using a full development cycle.
8.3.3 WebSphere Application Server V4.0 to V5.0 migrationThis support is much less complicated than moving from Version 3. This is because the Version 4.0.x configuration is already at J2EE 1.2 level and Version 5.0 is at J2EE 1.3 level.
Mapping detailsThe following sections describe the mapping between WebSphere V4.0 and V5.0.
Enterprise beansNo redeployment is required when moving EJB 1.1 JARs from Version 4.0.
You should specify only one back-end datastore vendor per JAR file. If there are enterprise beans that use different back ends, package them into separate JAR files.
JSP precompilingIn Version 4.0.x, the classes generated from JSPs are in a package based on the directory structure of the WAR. Any JSP at the top of the context root is in the unnamed package, and JSPs in subdirectories of the root are in packages named after the subdirectories. In Version 5.0, the classes generated from JSPs are all in the package org.apache.jsp. Therefore, the class files are not compatible between versions.
Chapter 8. WebSphere system configuration and runtime migration 275
When migrating an J2EE EAR file from 4.0.x to 5.0, the JSPs need to be recompiled so that the class files are regenerated into the correct packages. The migration tools provide this support by using the -preCompileJSPs option of wsadmin tool during the installation of the J2EE EAR file.
Any Version 4.0.x J2EE EAR file being moved manually to Version 5.0 will need to be installed using the same option.
J2EE securityThere are two locations in Version 4.0.x that security can be applied to J2EE EAR files. Any information that was applied in the repository has precedence over information stored in the J2EE EAR file bindings. The information in the repository is migrated to the J2EE EAR file during the migration processing.
Servlet package name changes when migrating from Version 4.0 to Version 5
If the Version 4.0 Web module web.xml file defines the SimpleFileServlet, the migration tools update the class name to reflect the Version 5.0 package. The tools also set the FileServingEnabled attribute to TRUE.
If the Version 4.0.x Web module web.xml file defines the InvokerServlet, the migration tools update the class name to reflect the Version 5.0 package. The tools also set the ServeServletsByClassnameEnabled attribute to TRUE.
If the Version 4.0.x Web module web.xml file defines the DefaultErrorReporter, the migration tools update the class name to reflect the Version 5.0 package.
8.4 Test and integration/production environmentThis section discusses information on migration that is unique to the test and integration/production environment. In general, these migrations should be done carefully in order to prevent downtime and ensure quality.
The migration process must be established and carefully repeated, starting on a stand-alone machine, and progressing through established test, QA, integration and production environments.
Planning the process includes determining if coexistence and interoperability will be involved in the configurations (as previously described) and making the subsequent plans.
In general the steps are:
1. Back up the existing system
276 Migrating to WebSphere V5.0: An End-to-End Migration Guide
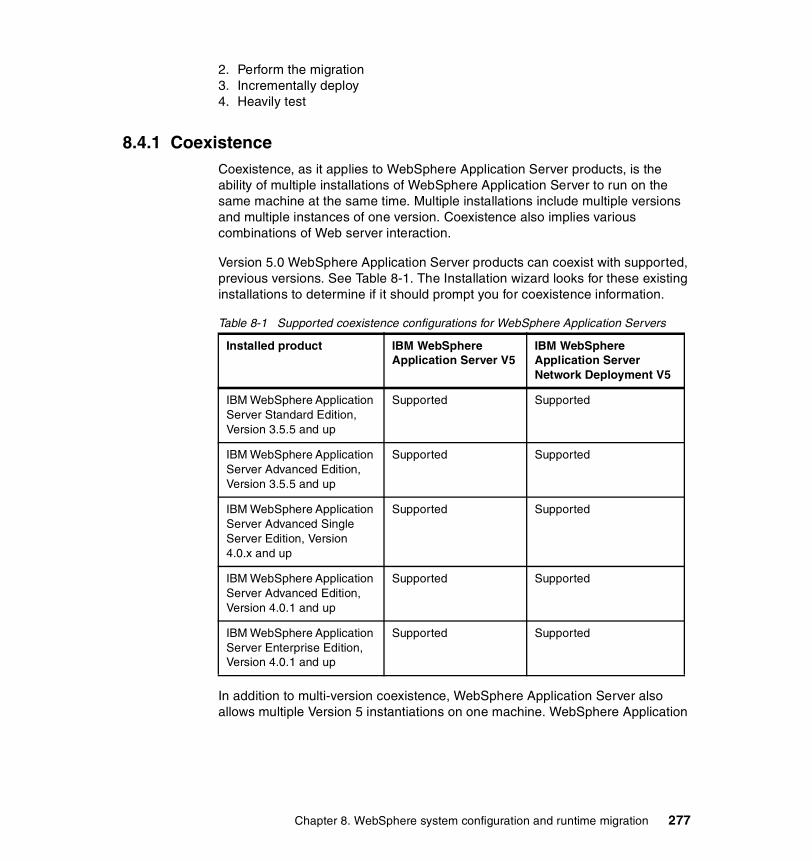
2. Perform the migration3. Incrementally deploy 4. Heavily test
8.4.1 CoexistenceCoexistence, as it applies to WebSphere Application Server products, is the ability of multiple installations of WebSphere Application Server to run on the same machine at the same time. Multiple installations include multiple versions and multiple instances of one version. Coexistence also implies various combinations of Web server interaction.
Version 5.0 WebSphere Application Server products can coexist with supported, previous versions. See Table 8-1. The Installation wizard looks for these existing installations to determine if it should prompt you for coexistence information.
Table 8-1 Supported coexistence configurations for WebSphere Application Servers
In addition to multi-version coexistence, WebSphere Application Server also allows multiple Version 5 instantiations on one machine. WebSphere Application
Installed product IBM WebSphere Application Server V5
IBM WebSphere Application Server Network Deployment V5
IBM WebSphere Application Server Standard Edition, Version 3.5.5 and up
Supported Supported
IBM WebSphere Application Server Advanced Edition, Version 3.5.5 and up
Supported Supported
IBM WebSphere Application Server Advanced Single Server Edition, Version 4.0.x and up
Supported Supported
IBM WebSphere Application Server Advanced Edition, Version 4.0.1 and up
Supported Supported
IBM WebSphere Application Server Enterprise Edition, Version 4.0.1 and up
Supported Supported
Chapter 8. WebSphere system configuration and runtime migration 277
Server also provides Web server options when there are coexisting application servers on a machine:
� Single Web server for coexisting, multi-version application servers on one machine
� Single Web server for multiple instances of IBM WebSphere Application Server, Version 5
� Separate Web servers for each application server instance, when running multiple instances of IBM WebSphere Application Server, Version 5.0
8.4.2 InteroperabilityWebSphere Application Server, Version 5 is generally interoperable with WebSphere Application Server Versions 3.5.x and 4.0.x. However, there are specific requirements you should address for each version. Make the following changes to allow interoperability between versions.
The most important factor to understand for EJB interoperability is the EJB interoperability that is supported for the same EJB object implemented at different EJB specification levels across different WebSphere versions:
� The EJB 1.1 bean will interoperate with the EJB 1.0 bean � The EJB 1.1 bean will interoperate with the EJB 1.1 bean � The EJB 1.1 bean will not interoperate with the EJB 2.0 bean in all cases
The EJB 1.1 specification guarantees interoperability with EJB 1.0. However, the EJB 2.0 specification does not have a similar guarantee with EJB 1.1. There are a few changes in the EJB 2.0 specification that are worth understanding for the interoperability scenarios:
� Attributes are no longer public on CMP beans and they are encapsulated by getter and setter methods
� Additional Home methods can be specified
� Finder methods return Collections instead of just Enumerations
� Local interfaces are supported
Given these changes, there are two ways to provide interoperability between EJB 1.1 and EJB 2.0 beans:
� Interoperability between different EJB 1.1 and EJB 2.0 versions of the same EJB bean can be achieved if the EJB 2.0 version of the bean is remotable and the interface is a pure superset of the EJB 1.1 version of the bean. This can be done by applying the EJB 2.0 requirement of hiding of attributes via getters and setters to the EJB 1.1 version of the bean. The EJB 2.0 version of the bean can provide more interfaces, such as new Home interfaces, but as
278 Migrating to WebSphere V5.0: An End-to-End Migration Guide
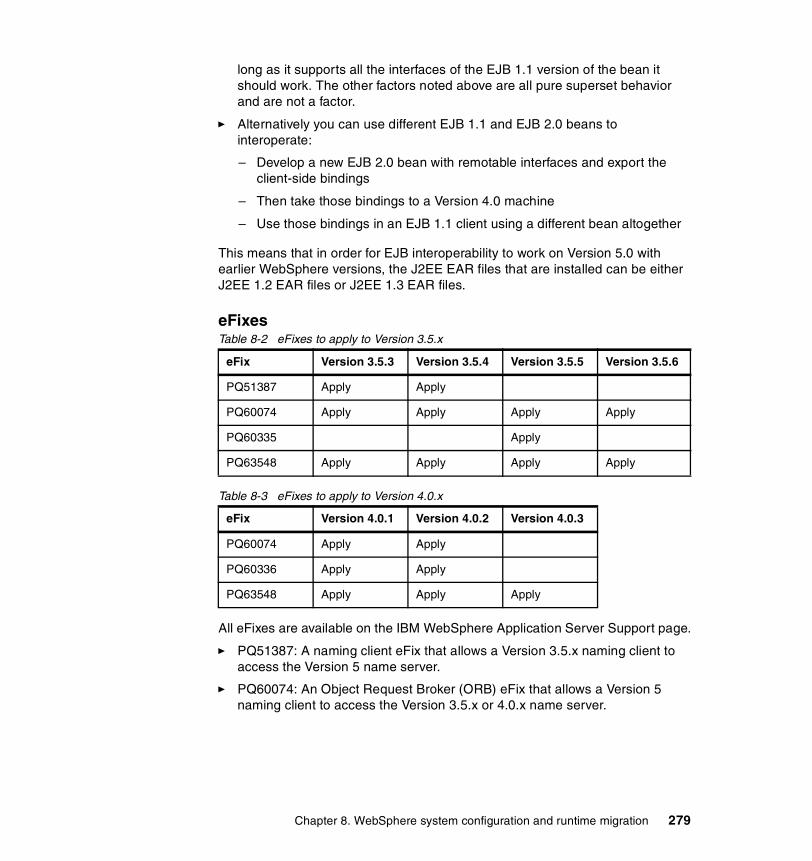
long as it supports all the interfaces of the EJB 1.1 version of the bean it should work. The other factors noted above are all pure superset behavior and are not a factor.
� Alternatively you can use different EJB 1.1 and EJB 2.0 beans to interoperate:
– Develop a new EJB 2.0 bean with remotable interfaces and export the client-side bindings
– Then take those bindings to a Version 4.0 machine
– Use those bindings in an EJB 1.1 client using a different bean altogether
This means that in order for EJB interoperability to work on Version 5.0 with earlier WebSphere versions, the J2EE EAR files that are installed can be either J2EE 1.2 EAR files or J2EE 1.3 EAR files.
eFixesTable 8-2 eFixes to apply to Version 3.5.x
Table 8-3 eFixes to apply to Version 4.0.x
All eFixes are available on the IBM WebSphere Application Server Support page.
� PQ51387: A naming client eFix that allows a Version 3.5.x naming client to access the Version 5 name server.
� PQ60074: An Object Request Broker (ORB) eFix that allows a Version 5 naming client to access the Version 3.5.x or 4.0.x name server.
eFix Version 3.5.3 Version 3.5.4 Version 3.5.5 Version 3.5.6
PQ51387 Apply Apply
PQ60074 Apply Apply Apply Apply
PQ60335 Apply
PQ63548 Apply Apply Apply Apply
eFix Version 4.0.1 Version 4.0.2 Version 4.0.3
PQ60074 Apply Apply
PQ60336 Apply Apply
PQ63548 Apply Apply Apply
Chapter 8. WebSphere system configuration and runtime migration 279
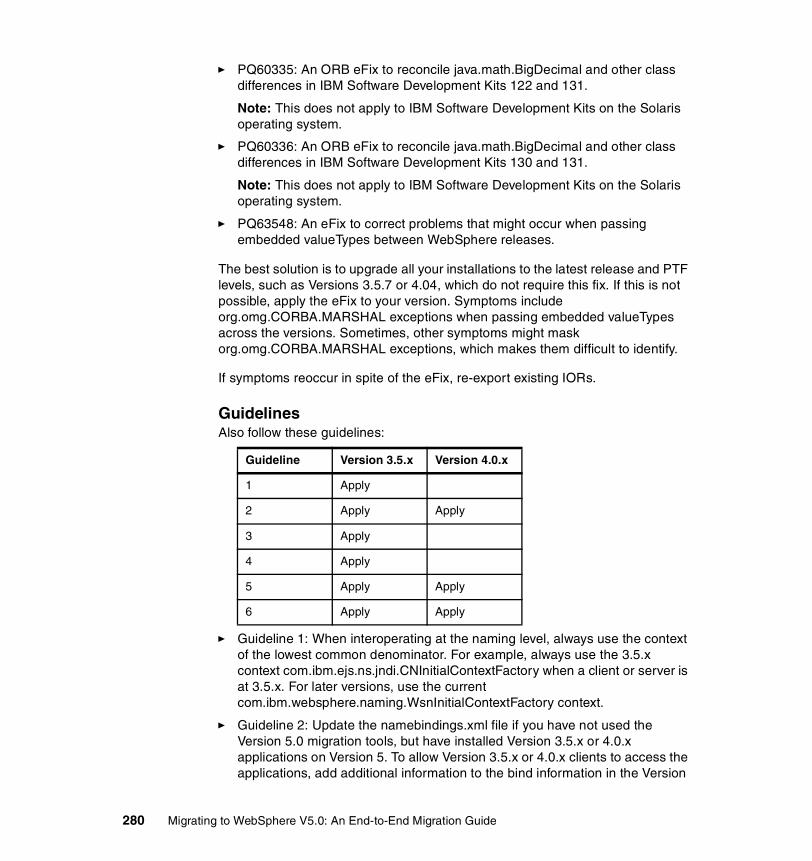
� PQ60335: An ORB eFix to reconcile java.math.BigDecimal and other class differences in IBM Software Development Kits 122 and 131.
Note: This does not apply to IBM Software Development Kits on the Solaris operating system.
� PQ60336: An ORB eFix to reconcile java.math.BigDecimal and other class differences in IBM Software Development Kits 130 and 131.
Note: This does not apply to IBM Software Development Kits on the Solaris operating system.
� PQ63548: An eFix to correct problems that might occur when passing embedded valueTypes between WebSphere releases.
The best solution is to upgrade all your installations to the latest release and PTF levels, such as Versions 3.5.7 or 4.04, which do not require this fix. If this is not possible, apply the eFix to your version. Symptoms include org.omg.CORBA.MARSHAL exceptions when passing embedded valueTypes across the versions. Sometimes, other symptoms might mask org.omg.CORBA.MARSHAL exceptions, which makes them difficult to identify.
If symptoms reoccur in spite of the eFix, re-export existing IORs.
GuidelinesAlso follow these guidelines:
� Guideline 1: When interoperating at the naming level, always use the context of the lowest common denominator. For example, always use the 3.5.x context com.ibm.ejs.ns.jndi.CNInitialContextFactory when a client or server is at 3.5.x. For later versions, use the current com.ibm.websphere.naming.WsnInitialContextFactory context.
� Guideline 2: Update the namebindings.xml file if you have not used the Version 5.0 migration tools, but have installed Version 3.5.x or 4.0.x applications on Version 5. To allow Version 3.5.x or 4.0.x clients to access the applications, add additional information to the bind information in the Version
Guideline Version 3.5.x Version 4.0.x
1 Apply
2 Apply Apply
3 Apply
4 Apply
5 Apply Apply
6 Apply Apply
280 Migrating to WebSphere V5.0: An End-to-End Migration Guide

5.0 name space. Add the information to the namebindings.xml configuration file at the cell level. For Version 4.0x clients you can use “java:/comp” to find 5.0 EJBs but Version 3.5.x clients cannot.
� Guideline 3: Ensure that programs that perform a JNDI lookup of the UserTransaction interface use an InitialContext that resolves to a local implementation of the interface. Also ensure that such programs use a JNDI location appropriate for the EJB version.
Prior to the EJB 1.1 specification, the JNDI location of the UserTransaction interface was not specified. Earlier versions up to and including Version 3.5.x do not use the EJB 1.1 specification. They bind the UserTransaction interface to a JNDI location of jta/usertransaction. Version 4.0.x and later releases bind the UserTransaction interface at the location defined by EJB 1.1, which is java:comp/UserTransaction.
Version 5.0.x no longer provides the earlier jta/usertransaction binding within Web and EJB containers to applications at a J2EE level of 1.3 or later, to enforce use of the newer UserTransaction interface. For example, EJB 2.0 applications can use only the java:comp/UserTransaction location.
� Guideline 4: Be aware of limitations when calling WorkLoad Management (WLM)-enabled Enterprise beans.
Some clients cannot call WLM-enabled EJBs on remote clusters, when there is a local WLM-enabled EJB of the same name. If there is a cluster local to the client with the same EJB as the remote cluster that the client is trying to call, the client ends up talking to the local cluster. The following table lists supported combinations of clients calling WLM-enabled EJBs on remote application servers.
� Guideline 5: Be aware of Administrative Console limitations.
You cannot use the administrative interfaces for Version 5.0 to administer a Version 3.5.x or 4.0.x administrative server. Likewise, you cannot use a Version 3.5.x or Version 4.0.x Administrative Console to administer a Version 5.0 environment. If you use the Administrative Console on a remote machine to administer Version 3.5.x or 4.0.x WebSphere domains, migrating any of the nodes or domains to Version 5.0 renders the remote administration console ineffective for administering any Version 5.0 environment.
All clients Server Supported
3.5.6 5 Yes
4.02, 4.03 5 Yes
5 3.5.x No
5 4.02, 4.03 Yes
Chapter 8. WebSphere system configuration and runtime migration 281
� Guideline 6: For security connections, you must use SSLv3 when interoperating with 3.5.x. CSIv2 cannot be used, because 3.5.x/4.0.x does not support that option.
This information is dynamic and might be augmented by information in technical articles that are available on the WebSphere Developer Domain. Be sure to check the site for the latest information.
There is also more information in the InfoCenter regarding details of EJB container interoperability that should be reviewed for some scenarios.
8.4.3 Migration of the networkIn most cases WebSphere Application Server Network Deployment will be involved as part of this migration.
The typical case will be migration of the current Version 3.5.x and 4.0.x nodes into WebSphere Application Server nodes. The WebSphere Application Server Network Deployment node can either be on the same machine as one of the WebSphere Application Server or on a separate machine.
The order of migration of WebSphere Application Server and WebSphere Application Server Network Deployment is not critical. Any of these nodes can be migrated in any order. What is important is to migrate all WebSphere Application Server nodes before adding them to the WebSphere Application Server Network Deployment cell. Once a node has been added to a cell its primary configuration is kept in the cell manager and a copy of the configuration is on the WebSphere Application Server node. The migration tools will report an error if they are attempted to be used on a node that has already been added to a cell. If migration is desired then the node can be removed from the cell, migrated and then added again.
There are two different philosophies that should be considered depending on whether Version 3.5.x or Version 4.0.x was previously installed. This is due to the difference in compatibility that Versions 3.5.x and 4.0.x have with Version 5.0.
If Version 4.0.x was previously installed, then each of the nodes can be migrated directly using the migration tools on each node. If Version 3.5.x was previously installed it is recommended that you migrate one machine that is representative of the nodes in that configuration. Then do the necessary development and testing to ensure a good migration has occurred for that node. Then use that node as a basis for propagating the similar configuration to all nodes within the cell. Use the capabilities of the WebSphere Application Server Network Deployment product to perform this migration.
282 Migrating to WebSphere V5.0: An End-to-End Migration Guide
Migrating WebSphere Application Server Advanced Edition to IBM WebSphere Application Server Network Deployment, Version 5 requires migrating all nodes in the collection to IBM WebSphere Application Server, Version 5. Your current configuration from a previously installed version contains one or more node configurations, one for each node in the repository. You have a choice. You can either install Network Deployment in one of two ways:
� On one of the nodes where you are installing and migrating applications to IBM WebSphere Application Server, Version 5. This maps the single domain with multiple nodes to a single Version 5 cell with the same number of nodes. Network Deployment is on one of the nodes. This provides a configuration that is equivalent to the previously installed version.
� On an additional machine that does not have IBM WebSphere Application Server, Version 5.
This maps the single domain with multiple nodes to a single Version 5 cell with the same number of nodes, but with Network Deployment on an additional node.
You can vary the order in which you migrate these nodes. This task describes the most direct method.
1. Perform a typical or custom IBM WebSphere Application Server, Version 5 installation on all nodes in the repository.
2. Migrate each node to IBM WebSphere Application Server, Version 5. You must migrate each IBM WebSphere Application Server, Version 5 node you intend to add to the Network Deployment configuration.
3. Install Network Deployment.
a. If you install Network Deployment on an IBM WebSphere Application Server, Version 5 node that you migrated:
i. If the previous version is still installed and running, select the migration option during the installation.
ii. If the previous version is no longer installed, perform a manual migration against the WASPreUpgrade backup directory on this or another node migrated from the previous domain. Issue this command from the bin directory of the ND_install_root.
b. If you install Network Deployment on a machine that did not have an earlier version of WebSphere Application Server, perform a manual migration against the WASPreUpgrade backup directory on another node that you migrated from the previous domain. Issue this command from the bin directory of the ND_install_root
4. Start the Deployment Manager on the Network Deployment node.
Chapter 8. WebSphere system configuration and runtime migration 283
5. On the system that has Network Deployment installed, use the Administrative Console to add each IBM WebSphere Application Server, Version 5 node to the Network Deployment configuration.
– Use the Network Deployment Administrative Console to add each node to the Network Deployment cell.
– Install any clustered applications on the appropriate cluster, using either the Administrative Console or the wsadmin command. The deployment manager automatically propagates J2EE EAR files to application server nodes in the cluster.
After federating an IBM WebSphere Application Server, Version 5 node into the Network Deployment cell, the configuration repository for the cell contains the master copy of the node configuration. From that point on, the deployment manager maintains the permanent configuration for each node in the cell. Changes you make with the Network Deployment Administrative Console update the configuration files stored in the master repository for the Network Deployment cell. You should not make configuration changes on an IBM WebSphere Application Server, Version 5 node directly, because such changes will be overwritten the next time the node configuration is synchronized with the master configuration for the cell.
8.4.4 Network Deployment migrationSupport is also provided for migration to WebSphere Application Server Network Deployment. Although this is a new product in Version 5.0, there is equivalent data that can be migrated into the WebSphere Application Server Network Deployment as part of the overall migration scenario.
If WebSphere Application Server Network Deployment is configured on the same node as a WebSphere Application Server node, then the same backup directory can be used for both migrations. If the WebSphere Application Server Network Deployment is installed on a node that did not previously have Version 3.5.x or 4.0.x, then a backup from one of the other nodes in the domain can be used. This is because the objects migrated at this level are at the domain level. None exist at the node level of the configuration.
These include:
� VirtualHosts� Security� Models/Clones and ServerGroups/members
284 Migrating to WebSphere V5.0: An End-to-End Migration Guide

Migrating V3.5 models and clones to V5.0 clusters
Version 3.5.x models and clones are redefined in Version 5 as clusters. Application servers are the only objects supported as models and cluster members in Version 5. This is a significant difference from Version 3.5.x, in which many objects could be models and clones. All models and clones relating to application servers are mapped to clusters in Version 5.0.
During the migration of all other objects that were previously cloneable, special mapping occurs. All clones are treated as simple objects and are mapped as if they were not cluster members. Models that are not application server models are ignored and not mapped.
Migrating V4.0 server groups to V5.0 clusters
Version 4.0 server groups are converted to Version 5 clusters. When migrating a server group, the server group name is used to define the cluster name and the members of the server group become members of that cluster.
Chapter 8. WebSphere system configuration and runtime migration 285

286 Migrating to WebSphere V5.0: An End-to-End Migration Guide

Chapter 9. Development environment migration examples (GA)
This chapter provides the practical migration examples of migrating development environment. The chapter is organized into following sections:
� Migrating from WebSphere V3.5 development environment
– VisualAge for Java JSP/servlet sample (LeapYear)
– VisualAge for Java EJB, VCE, and database samples (HelloWorld session bean and Increment enterprise bean)
– WebSphere Studio “Classic” Web application sample (YourCo)
– Migration from EJB 1.x to EJB 2.0 (HelloWorld session bean and Increment enterprise bean)
� Migrating from WebSphere Studio Application Developer V4.0 to V5.0
– Migrating YourBank using the Export/Import method
– Migrating YourBank using the CVS method - Running YourBank in WebSphere Version 5.0 Test Environment
– Migrating YourBank to J2EE 1.3
The examples in this chapter illustrate the migration techniques described in this redbook.
9
© Copyright IBM Corp. 2002 2003. All rights reserved. 287
9.1 Migrating from WebSphere 3.5 Development Environment to WebSphere Studio 5.0
The IBM development toolset for WebSphere 3.5 is composed of VisualAge for Java and WebSphere Studio “Classic.” It is possible to develop java applications exclusively in VisualAge for Java, Web applications exclusively in WebSphere Studio “Classic”, and more complex applications using both tools. The WebSphere Test Environment for WebSphere 3.5 is hosted in VisualAge for Java Enterprise Edition.
The development tool for WebSphere 5.0, WebSphere Studio Application Developer 5.0, is not a direct upgrade to either VisualAge for Java or WebSphere Studio “Classic.” It can be installed on the same machine as the existing development tools without removing the older tools.
9.1.1 Example: VisualAge for Java JSP/Servlet sample (LeapYear)This is the FindTheLeapYears sample provided with VisualAge for Java Version 4.0. Information about it can be found in the VisualAge for Java online help (click Samples -> JSP/Servlet Development Environment).
Migration steps Follow these steps to migrate the sample from VisualAge for Java to WebSphere Studio Application Developer:
1. Export your files from VisualAge for Java:
a. Open VisualAge for Java.
b. Select the IBM JSP Examples project.
c. Right-click the project and select Export. Select the Directory radio button and click Next.
d. Type the name of the directory you want to export the files to.
e. Clear the .class check box. You do not need to export these files, because you will rebuild the project in WebSphere Studio Application Developer and re-create these files.
f. Select the .java check box and click Details. Select only the LeapYear files and click OK.
g. Select the Resource check box and click Details.
h. Select LeapYearInput.html and LeapYearResults.jsp, which are located in the directory IBM WebSphere Test Environment\hosts\default_host\default_app\web\JSP\sample3.
288 Migrating to WebSphere V5.0: An End-to-End Migration Guide

i. Click OK.
j. Clear the Create Manifest file check box (you do not need to create a manifest file).
k. Click Finish.
l. Close VisualAge for Java.
2. Create a new WebSphere Studio Application Developer Web project:
a. Start WebSphere Studio Application Developer.
b. Create a new Web project called LeapYear (click File -> New -> Project -> Web -> WebProject).
c. Ensure that J2EE Web project is selected, and then click Next.
d. Select New.
e. Change the Enterprise Application project name to LeapYearEAR and select J2EE level 1.2. You could put the Web project into any existing Enterprise Application (EAR) project, but for this example, you will put it in LeapYearEAR.
f. Leave LeapYearEAR in the Context root field.
g. Click Finish.
3. Import the Java and project resource files into the WebSphere Studio Application Developer project:
Import the Java source files into the LeapYear project source directory by following these steps:
a. In the Web perspective, expand LeapYear and select the Java source directory.
b. Click File -> Import -> File system and click Next. Browse to the directory you exported your files to and click OK.
c. You only want to import the Java source files into the Java source directory, so, in the Import window, expand your export directory and select only the com subdirectory (it contains the three Java source files).
d. Windows: Click Finish. This creates LeapYear\Java source\com\ibm\ivj\wte\samples\leapyear\LeapYearXXXX.java files. Java files are automatically compiled into LeapYear\webContent\WEB-INF\classes.
e. Linux: Click Finish. This creates LeapYear/source/com/ibm/ivj/wte/samples/leapyear/LeapYearXXXX.java files. Java files are automatically compiled into LeapYear/webContent/WEB-INF/classes.
Chapter 9. Development environment migration examples (GA) 289

4. Import the resource files into the LeapYear project under the webContent directory by following these steps:
a. In the current Web perspective, expand the LeapYear project and select the webContent directory.
b. Select File -> Import -> File system and click Next. Browse to the directory you exported your files to, expand your export directory to the sample3 subdirectory, then click OK.
c. You only want to import the resource files into the webContent directory, so, in the Import window, select the sample3 subdirectory, which contains the .jsp and .html files.
d. Click Finish. The files are imported into the webContent directory.
5. Define any Servlets and make any restructured application changes:
a. You now need to create a Servlet. Select the LeapYear project and expand it (click Leap Year -> webContent -> WEB-INF) to the web.xml file. Open the web.xml file.
b. Click the Servlets tab at the bottom of the page.
c. Click Add.
d. Ensure that the Servlet radio button is selected.
e. Select the class LeapYear, then click OK.
f. Select URL Mapping -> Add, then type LeapYear.
g. Save the changes (click File -> Save web.xml) and close the web.xml file.
6. You now need to make any application changes due to the slightly changed source/application structure:
a. There will be two errors listed in the Tasks view. One is in LeapYearInput.html and one is in LeapYearResults.jsp.
b. Open the LeapYearResults.jsp file. Replace /JSP/index.html with LeapYearInput.html.
c. Open the LeapYearInput.html file. Replace /servlet/com.ibm.ivj.wte.samples.leapyear.LeapYear with LeapYear.
d. Save your changes and close the LeapYearResults.jsp and LeapYearInput.html files.
e. To avoid a runtime error, open the LeapYear.java file, which is located in the following subdirectory:
Windows: source\com\ibm\ivj\wte\samples\leapyear
Linux: source/com/ibm/ivj/wte/samples/leapyear
290 Migrating to WebSphere V5.0: An End-to-End Migration Guide

f. Go to line 119 and change getRequestDispatcher from “/JSP/Sample3/LeapYearResults.jsp” to “LeapYearResults.jsp”
g. Save your changes and close LeapYear.java.
At this point the sample has been migrated into WebSphere Studio Application Developer. All that remains is to create a WebSphere Studio Application Developer server project and test the sample in the WebSphere Test Environment.
7. Create a WebSphere Studio Application Developer server project:
a. Click File -> New -> Project -> Server -> Server Project. Click Next. In the Project name field, type newServer and click Finish. You will automatically be switched to the Server perspective.
b. Right-click newServer and click New -> Server Instance and Configuration.
c. In the Server name field, type WSTestEnv. In the Server instance type field, select WebSphere V4.0 Test Environment. Click Finish.
Now, you need to specify your EAR project to the server configuration:
a. In the Server Configuration view, click Server Configurations -> WSTestEnv.
b. Right-click it and click Add project -> LeapYearEAR.
8. Test the migrated LeapYear application:
a. Select the LeapYearInput.html file.
b. Right-click the HTML file, and from its pop-up menu, click Run on Server and select WSTestEnv.
c. Wait while the server starts. Click the Console tab in the Servers view and watch the Console until the message Server Default Server open for e-business appears.
d. When a browser opens, type 2001 in the Start Year field, then click Submit.
e. The Console view shows the message LeapYear:init. Wait until you see the list of leap years, then select WSTestEnv in the Servers view. Right-click it and click Stop.
Chapter 9. Development environment migration examples (GA) 291
9.1.2 Example: Enterprise beans, VCE, and database samples (HelloWorld session bean and Increment enterprise bean)
You will work with two EJB Development samples: Hello World and Increment. To access these samples open the online help, and select Samples -> EJB Development.
You must work with VisualAge for Java Version 4.0 for this example.
You do not have to migrate these samples together. If you are not currently working with DB2, you may not wish to migrate Increment. In this case, you can ignore any steps that apply to the Increment sample only.
Before you begin:
� Be sure the application runs in VisualAge for Java (that is, the DB2 setup for the Increment sample is complete).
� Be sure to stop the VisualAge for Java WebSphere Test Environment EJB server and Persistent Name Server (so they will not conflict with WebSphere Studio Application Developer).
Migration steps Follow these steps to migrate the samples from VisualAge for Java to WebSphere Studio Application Developer:
1. Export the client Java source from VisualAge for Java:
a. Start VisualAge for Java Version 4.0.
b. Select the IBM EJB Samples project
c. Right-click the project and click Export.
d. Select the Directory radio button and click Next.
e. Type the name of the directory you want to export your files to.
f. Clear the .class check box. (You will rebuild the .class files in WebSphere Studio Application Developer to ensure that you have successfully migrated the samples.)
g. Select the .java check box. Click Details and clear the IBM EJB Samples check box.
h. Select the HelloClient and IncrementClient check boxes and click OK.
i. Clear the .resource check box (unless you want the DB2 .clp setup scripts).
j. Click Finish.
292 Migrating to WebSphere V5.0: An End-to-End Migration Guide

2. Export the EJB group from VisualAge for Java into an EJB 1.1 JAR:
a. Open the map browser to load the map for IBM EJB samples.
b. Click the EJB tab. In the Enterprise Beans pane, right-click IBMEJBSamples and click Export -> EJB 1.1 JAR.
c. Select a directory to export your JAR file to.
d. In the JAR file field, type the name of the JAR file you want to create.
e. In the Select a target database list, select DB2 for NT, V7.1.
f. Select the .class check box. (You will rebuild the files in WebSphere Studio Application Developer as a verification of the migration, but this must be selected in order to proceed.)
g. Select the .java check box. (You need the four HelloWorld and the five Increment EJB files.)
h. Click Finish.
i. If you were running the samples, then stop the VisualAge for Java Persistent Name Server, EJB server, and WebSphere Test Environment.
j. (Optional) Exit VisualAge for Java.
3. Create a new WebSphere Studio Application Developer EJB project:
Note: This section is optional. If you do not have an EJB and EAR project, they will automatically be created when you import the EJB 1.1 JAR file.
a. Start WebSphere Studio Application Developer.
b. Create a new EJB project (click File -> New -> Project -> EJB -> EJB Project -> Create 1.1 -> Next).
c. In the Project name field, type EJBSamples.
d. Select EAR new.
e. In the EAR project name field, type EJBSamplesEAR. Click Finish. You could put this EJB project into any existing Enterprise Application (EAR) project you currently have, but for this example, create a new EAR project called EJBSamplesEAR.
f. The new projects are created and appear in the J2EE perspective.
4. Import the EJB 1.1 JAR file into WebSphere Studio Application Developer EJB project:
a. Click File -> Import -> EJB JAR file. Click Next.
b. In the EJB JAR file field, browse for the location of the EJB 1.1 JAR you created.
c. In the EJB Project field, select EJBSamples.
Chapter 9. Development environment migration examples (GA) 293
d. In the Enterprise Application project name field, select EJBSamplesEAR. Click Finish.
e. You will receive four or five EJB 1.1 warnings. You can ignore them.
5. Generate and deploy RMIC stub and tie code:
a. In the J2EE perspective, expand the EJB Modules folder, and select IBMEJBSamples.
b. Right-click it and click Generate -> RMIC and Deploy Code.
c. Select the Hello World and Increment beans. Click Finish.
6. Specify the data source binding information:
a. In the J2EE Perspective, expand EJB Modules and select IBMEJBSamples.
b. Right-click the module and select Open With -> EJB Deployment Descriptor.
c. In the EJB deployment descriptor, click the Overview tab.
d. Select IBMEJBSamples, and type jdbc/sampledb in the DataSource JNDI name field.
e. If necessary, type a default user ID and password.
f. Close the EJB deployment descriptor (you will prompted to save your changes).
7. Create a new WebSphere Studio Application Developer project:
a. Create a new Java project (click File -> New -> Project -> Java -> Java Project).
b. In the Project name field, type EJBClients. Click Next.
c. Click the Projects tab. Select the EJBSamples check box.
d. Click Finish.
8. Import the Java code into a Java project:
a. In the Java perspective, open the Navigator view (click Window -> Show view -> Navigator).
b. In the Navigator view, click the EJBClients project.
c. Select File -> Import -> File system and click Next. Browse to the directory that you exported your client code to.
d. Expand your export directory and find your files (they will be in a subdirectory under com). Select the folders that contain your HelloClient and Increment Client files.
e. Click Finish.
294 Migrating to WebSphere V5.0: An End-to-End Migration Guide
f. There will be two errors in the Tasks view (if you did not add the EJBSamples project to the class path, you will have several errors). One occurs because references to javax.ejb.CreateException, which can be found in j2ee.jar, exist. The other occurs because of a reference to com.ibm.ivj.ejb.runtime.AbstractSessionAccessBean, which can be found in ivjejb35.jar.
g. Select EJBClients and right-click it. Click Properties -> Java Build Path.
h. If you did not link to the EJBSamples project, select the Projects tab and select the EJBSamples check box. There should now only be two errors left.
i. Click the Libraries tab and click Add External JARs.
j. Windows: Browse to the WS_Installdir\aes_v4\lib directory, where WS_Installdir is your product installation directory.
Linux: Browse to the /opt/wsappdev/plugins/com.ibm.etools.websphere.runtime/lib directory.
k. Select the j2ee.jar file. Click Open, and then click Add External JARs.
l. Windows: Browse to the WS_Installdir\aes_v4\lib directory.
Linux: Browse to the /opt/wsappdev/plugins/com.ibm.etools.websphere.runtime/lib directory.
m. Select the ivjejb35.jar file. Click Open, then click OK.
n. There should now be no errors in the Tasks view, except the EJB 1.1 warnings.
At this point, the samples have now been migrated into WebSphere Studio Application Developer. All that remains is to test them in the WebSphere Test Environment.
9. Create a WebSphere Studio Application Developer server project:
a. Click File -> New -> Project -> Server -> Server Project and click Next. In the Project name field, type EJBServer and click Finish.
b. The Server perspective will automatically open. In the Navigator view, select EJBServer and right-click it.
c. Click New -> Server Instance and Configuration.
d. In the Server name field, type MyEJBServer. In the Server instance type field, click WebSphere V4.0 Test Environment, and then click Finish.
10.Specify your data source, your EAR project, and then start the server:
a. In the Server Configuration view, expand Server Configurations and select MyEJBServer.
b. Right-click it, and from your pop-up menu, click Open.
Chapter 9. Development environment migration examples (GA) 295
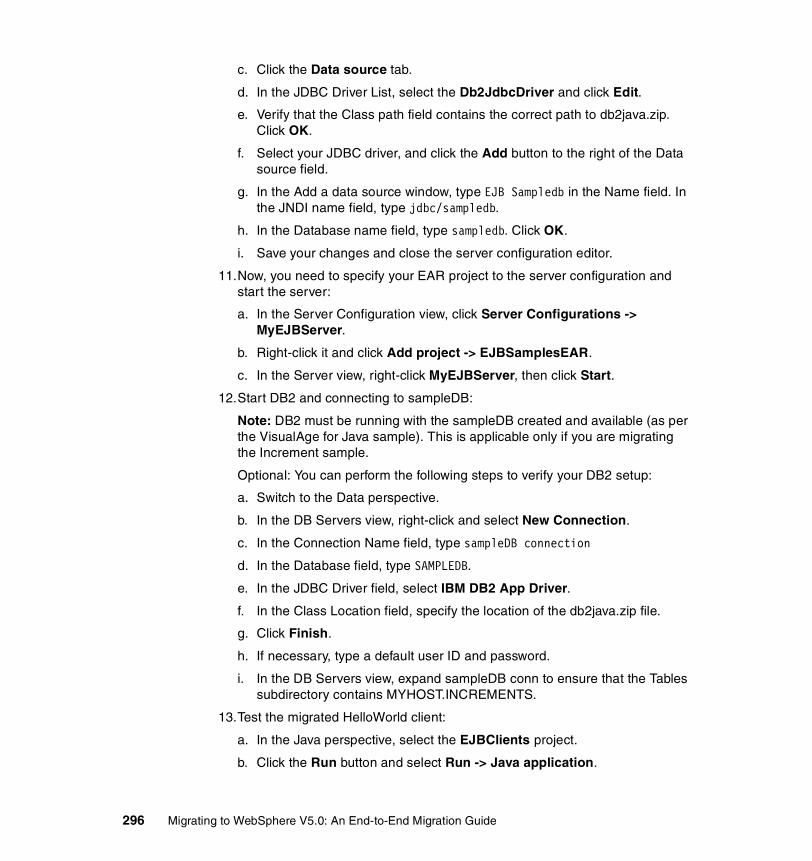
c. Click the Data source tab.
d. In the JDBC Driver List, select the Db2JdbcDriver and click Edit.
e. Verify that the Class path field contains the correct path to db2java.zip. Click OK.
f. Select your JDBC driver, and click the Add button to the right of the Data source field.
g. In the Add a data source window, type EJB Sampledb in the Name field. In the JNDI name field, type jdbc/sampledb.
h. In the Database name field, type sampledb. Click OK.
i. Save your changes and close the server configuration editor.
11.Now, you need to specify your EAR project to the server configuration and start the server:
a. In the Server Configuration view, click Server Configurations -> MyEJBServer.
b. Right-click it and click Add project -> EJBSamplesEAR.
c. In the Server view, right-click MyEJBServer, then click Start.
12.Start DB2 and connecting to sampleDB:
Note: DB2 must be running with the sampleDB created and available (as per the VisualAge for Java sample). This is applicable only if you are migrating the Increment sample.
Optional: You can perform the following steps to verify your DB2 setup:
a. Switch to the Data perspective.
b. In the DB Servers view, right-click and select New Connection.
c. In the Connection Name field, type sampleDB connection
d. In the Database field, type SAMPLEDB.
e. In the JDBC Driver field, select IBM DB2 App Driver.
f. In the Class Location field, specify the location of the db2java.zip file.
g. Click Finish.
h. If necessary, type a default user ID and password.
i. In the DB Servers view, expand sampleDB conn to ensure that the Tables subdirectory contains MYHOST.INCREMENTS.
13.Test the migrated HelloWorld client:
a. In the Java perspective, select the EJBClients project.
b. Click the Run button and select Run -> Java application.
296 Migrating to WebSphere V5.0: An End-to-End Migration Guide
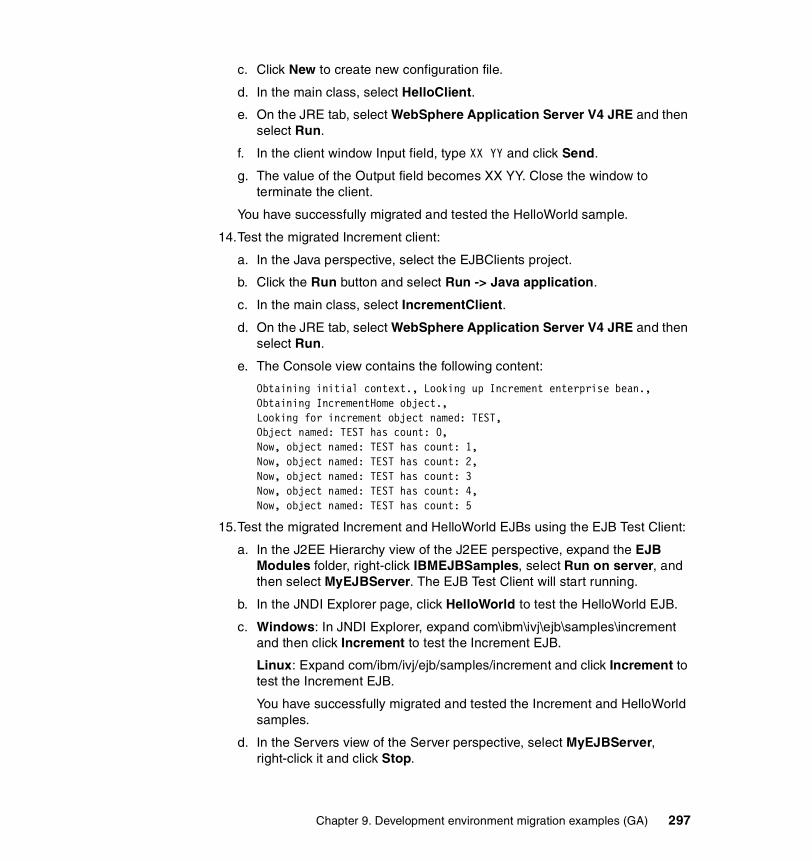
c. Click New to create new configuration file.
d. In the main class, select HelloClient.
e. On the JRE tab, select WebSphere Application Server V4 JRE and then select Run.
f. In the client window Input field, type XX YY and click Send.
g. The value of the Output field becomes XX YY. Close the window to terminate the client.
You have successfully migrated and tested the HelloWorld sample.
14.Test the migrated Increment client:
a. In the Java perspective, select the EJBClients project.
b. Click the Run button and select Run -> Java application.
c. In the main class, select IncrementClient.
d. On the JRE tab, select WebSphere Application Server V4 JRE and then select Run.
e. The Console view contains the following content:
Obtaining initial context., Looking up Increment enterprise bean.,Obtaining IncrementHome object.,Looking for increment object named: TEST,Object named: TEST has count: 0,Now, object named: TEST has count: 1,Now, object named: TEST has count: 2,Now, object named: TEST has count: 3Now, object named: TEST has count: 4,Now, object named: TEST has count: 5
15.Test the migrated Increment and HelloWorld EJBs using the EJB Test Client:
a. In the J2EE Hierarchy view of the J2EE perspective, expand the EJB Modules folder, right-click IBMEJBSamples, select Run on server, and then select MyEJBServer. The EJB Test Client will start running.
b. In the JNDI Explorer page, click HelloWorld to test the HelloWorld EJB.
c. Windows: In JNDI Explorer, expand com\ibm\ivj\ejb\samples\increment and then click Increment to test the Increment EJB.
Linux: Expand com/ibm/ivj/ejb/samples/increment and click Increment to test the Increment EJB.
You have successfully migrated and tested the Increment and HelloWorld samples.
d. In the Servers view of the Server perspective, select MyEJBServer, right-click it and click Stop.
Chapter 9. Development environment migration examples (GA) 297
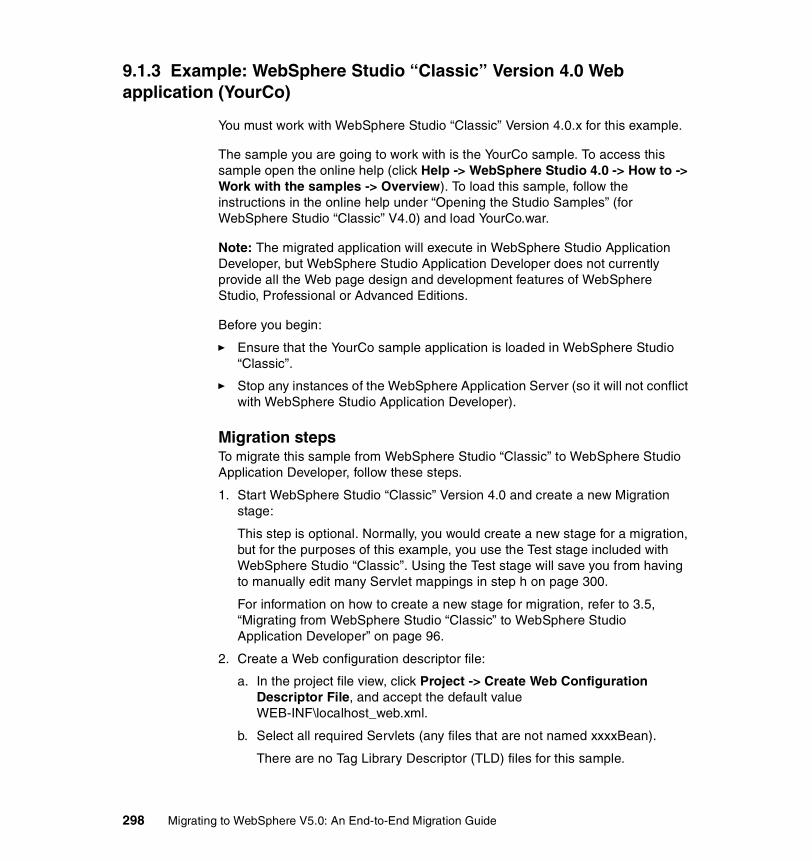
9.1.3 Example: WebSphere Studio “Classic” Version 4.0 Web application (YourCo)
You must work with WebSphere Studio “Classic” Version 4.0.x for this example.
The sample you are going to work with is the YourCo sample. To access this sample open the online help (click Help -> WebSphere Studio 4.0 -> How to -> Work with the samples -> Overview). To load this sample, follow the instructions in the online help under “Opening the Studio Samples” (for WebSphere Studio “Classic” V4.0) and load YourCo.war.
Note: The migrated application will execute in WebSphere Studio Application Developer, but WebSphere Studio Application Developer does not currently provide all the Web page design and development features of WebSphere Studio, Professional or Advanced Editions.
Before you begin:
� Ensure that the YourCo sample application is loaded in WebSphere Studio “Classic”.
� Stop any instances of the WebSphere Application Server (so it will not conflict with WebSphere Studio Application Developer).
Migration steps To migrate this sample from WebSphere Studio “Classic” to WebSphere Studio Application Developer, follow these steps.
1. Start WebSphere Studio “Classic” Version 4.0 and create a new Migration stage:
This step is optional. Normally, you would create a new stage for a migration, but for the purposes of this example, you use the Test stage included with WebSphere Studio “Classic”. Using the Test stage will save you from having to manually edit many Servlet mappings in step h on page 300.
For information on how to create a new stage for migration, refer to 3.5, “Migrating from WebSphere Studio “Classic” to WebSphere Studio Application Developer” on page 96.
2. Create a Web configuration descriptor file:
a. In the project file view, click Project -> Create Web Configuration Descriptor File, and accept the default value WEB-INF\localhost_web.xml.
b. Select all required Servlets (any files that are not named xxxxBean).
There are no Tag Library Descriptor (TLD) files for this sample.
298 Migrating to WebSphere V5.0: An End-to-End Migration Guide
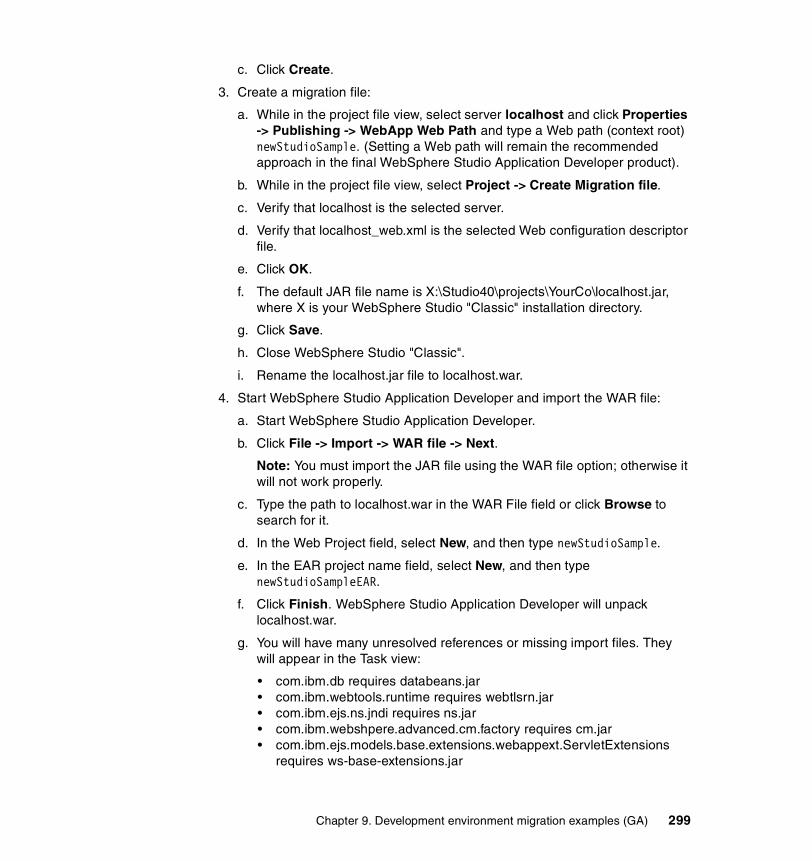
c. Click Create.
3. Create a migration file:
a. While in the project file view, select server localhost and click Properties -> Publishing -> WebApp Web Path and type a Web path (context root) newStudioSample. (Setting a Web path will remain the recommended approach in the final WebSphere Studio Application Developer product).
b. While in the project file view, select Project -> Create Migration file.
c. Verify that localhost is the selected server.
d. Verify that localhost_web.xml is the selected Web configuration descriptor file.
e. Click OK.
f. The default JAR file name is X:\Studio40\projects\YourCo\localhost.jar, where X is your WebSphere Studio "Classic" installation directory.
g. Click Save.
h. Close WebSphere Studio "Classic".
i. Rename the localhost.jar file to localhost.war.
4. Start WebSphere Studio Application Developer and import the WAR file:
a. Start WebSphere Studio Application Developer.
b. Click File -> Import -> WAR file -> Next.
Note: You must import the JAR file using the WAR file option; otherwise it will not work properly.
c. Type the path to localhost.war in the WAR File field or click Browse to search for it.
d. In the Web Project field, select New, and then type newStudioSample.
e. In the EAR project name field, select New, and then type newStudioSampleEAR.
f. Click Finish. WebSphere Studio Application Developer will unpack localhost.war.
g. You will have many unresolved references or missing import files. They will appear in the Task view:
• com.ibm.db requires databeans.jar• com.ibm.webtools.runtime requires webtlsrn.jar• com.ibm.ejs.ns.jndi requires ns.jar• com.ibm.webshpere.advanced.cm.factory requires cm.jar• com.ibm.ejs.models.base.extensions.webappext.ServletExtensions
requires ws-base-extensions.jar
Chapter 9. Development environment migration examples (GA) 299
To fix this, you must modify the Java build path for the Web project:
i. Right-click the project and click Properties -> Java Build Path.
ii. Click the Libraries tab. Click Add External JARs.
iii. Import the following JAR files: databeans.jar, webtlsrn.jar, ns.jar, cm.jar, and ws-base-extensions.jar from the MyInstall\runtimes\aes_v4\lib directory.
iv. Twenty-four warnings will remain. You do not need to deal with them.
h. Right-click the newStudioSample project and click Rebuild Project.
5. Create a WebSphere Studio Application Developer server project:
At this point the sample has been migrated into WebSphere Studio Application Developer. All that remains is to create a WebSphere Studio Application Developer Server project and test the sample in the WebSphere Test Environment.
a. Switch to the Server perspective.
b. Click File -> New -> Project -> Server -> Server Project. Click Next. In the Project name field, type newServer and click Finish.
c. In the Navigator view, right-click newServer and click New -> Server and Server Configuration.
d. In the Server name field, type WSTestEnv. In the Server instance type field, select WebSphere V4.0 Test Environment. Click Finish.
e. (Optional) Right-click newStudioSample project, select Properties -> Server Preference -> Always run on the following server, select WSTestEnv, then click Apply -> OK. (This step is only necessary if you have other servers.)
6. Now, you need to specify your EAR project to the server configuration:
a. In the Server Configuration view, click Server Configurations -> WSTestEnv.
b. Right-click it and click Add -> newStudioSampleEAR.
7. Test the migrated YourCo application:
a. Select the YourCoIntro.html file, which is located in the webContent\StudioSamples\YourCo directory in your newStudioSample project.
b. Right-click YourCoIntro.html, and from its pop-up menu, click Run on Server, and then select WSTestEnv.
c. Wait while the server starts. Click the Console tab in the Servers view and watch the Console until the message Server Default Server open for e-business appears.
300 Migrating to WebSphere V5.0: An End-to-End Migration Guide
d. If you have not already run this sample in WebSphere Studio “Classic”, then you need to configure the database by clicking Database Configuration.
e. When a browser opens, scroll down and click Run This Sample.
f. Wait until the Welcome window appears, then click Employee Center.
Note: The first time you run this application, you will receive the following errors in the Console page: DataSource not found. Try to construct a new datasource name: jdbc/yourco DataSource not found. Try to construct a new datasource name: jdbc/studio. These errors are self-correcting. You can ignore them.
g. When you are done, close the browser window and the Web Browser view, then in the Server Control Panel right-click WSTestEnv and click Stop.
h. (Optional) Close WebSphere Studio Application Developer.
9.1.4 Example: Migrating VisualAge for Java JSP/Servlet samples example to EJB 2.0
This example migrates the VisualAge for Java JSP/Servlet samples example (see 9.1.1, “Example: VisualAge for Java JSP/Servlet sample (LeapYear)” on page 288) from EJB 1.x to EJB 2.0. Note that this example requires that you have completed the migration steps in 9.1.2, “Example: Enterprise beans, VCE, and database samples (HelloWorld session bean and Increment enterprise bean)” on page 292 and that you have DB2 set up and running for that sample.
Migration steps1. Create a new EJB 2.0 project and Enterprise Application 1.3 project:
a. Select File -> New -> EJB Project -> Create EJB 2.0 project, and then click Next.
b. In the EJB Project Name field, type ejbSamplesV2.
c. Select the new EAR project.
d. In the EAR Project Name field, type ejbSamplesV2EAR, and then click Finish.
2. Import the VisualAge for Java EJB 1.1 JAR into EJB 2.0 project:
Import the VisualAge for Java EJB 1.1 JAR file in 9.1.2, “Example: Enterprise beans, VCE, and database samples (HelloWorld session bean and Increment enterprise bean)” on page 292 to an EJB 2.0 project.
a. Click File -> Import -> EJB JAR file and then click Next.
Chapter 9. Development environment migration examples (GA) 301
b. In the EJB JAR file field, browse for the location of the EJB 1.1 JAR that you created from VisualAge for Java.
c. Select the existing EJB project.
d. In the existing EJB Project name, select EJBSamplesV2.
e. Click Finish.
f. You will be asked if you wish to overwrite META-INF/MANIFEST.MF. Click Yes.
g. You will receive four EJB 1.1 warnings. They will be fixed in the next section.
3. To change the EJB module display name to make it different from your previous EJB 1.1 module name, follow these steps:
a. In the Navigator view, expand EJBSamplesV2 -> ejbModule -> META-INF and double-click to open ejb-jar.xml with the EJB Deployment Descriptor Editor.
b. In the Overview tab, change the display name to IBMEJBSamples-V2.
c. Save and close the EJB Deployment Descriptor Editor window.
4. Migrate code from EJB 1.0 to EJB 1.1:
a. Edit IncrementBean.java ejbCreate() line 57 to throw javax.ejb.EJBException instead of java.rmi.RemoteException.
b. Edit IncrementBean.java ejbCreate() line 57 to return IncrementKey instead of void.
c. Edit IncrementBean.java ejbCreate() to add “return null;” as new last line 61.
d. Edit IncrementBean.java to add new lines 63 to 65 implementing a new ejbPostCreate() method:
public void ejbPostCreate(IncrementKey argPrimaryKey)throws javax.ejb.CreateException, javax.ejb.EJBException {
}
e. Save and close IncrementBean.java (all of the previous IncrementBean warnings should go away).
f. Edit HelloWorldBean.java ejbCreate() line 23 to throw javax.ejb.EJBException instead of java.rmi.RemoteException.
g. Save and close HelloWorldBean.java (the previous HelloWorldBean warnings should go away).
5. Migrate code from EJB 1.1 to EJB 2.0:
Note: The bean migration to EJB 2.0 is not required, since EJB 1.1 beans work correctly in an EJB 2.0 project. However, there is a tool to assist in
302 Migrating to WebSphere V5.0: An End-to-End Migration Guide

migrating EJB 1.x beans into EJB 2.0. To use the J2EE Migration wizard, right-click the EJB project and then select Migrate -> J2EE Migration Wizard. For more information about the different wizard options, press F1 while in the J2EE Migration wizard.
The steps below outline the general approach should you choose to undertake this yourself:
a. Use the J2EE Migration wizard to do this initial bean migration from 1.1 to 2.0.
b. Open IncrementBean.java with the Java Editor:
i. In the ejbCreate method, comment out the primaryKey operation and add a set invocation (line 60, new line 61)
// primaryKey = argPrimaryKey.primaryKey; setPrimaryKey(argPrimaryKey.primaryKey);
ii. Modify the increment method to get/increment/set the count field:
public int increment() {// return ++count; int c = getCount(); c += 1; setCount(c); return c;
}
iii. Save and close the Java Editor window for IncrementBean.java.
6. Generate and deploy RMIC stub and tie code:
a. In the J2EE perspective, J2EE Hierarchy view, expand the EJB Modules folder, and select IBMEJBSamples-V2 (or in the J2EE perspective, Navigator view, select the ejbSamplesV2 project).
b. Right-click it and then click Generate -> RMIC and Deploy Code.
c. Select the Hello World and Increment beans.
d. Click Finish.
7. Specify the data source binding information:
a. In the J2EE Perspective, J2EE Hierarchy view, expand EJB Modules and select IBMEJBSamples-V2 (or in the J2EE perspective, Navigator view, select the ejbSamplesV2 project META-INF/ejb-jar.xml).
b. Right-click the module and select Open With -> EJB Deployment Descriptor.
c. In the EJB deployment descriptor, click the Overview tab.
Chapter 9. Development environment migration examples (GA) 303
d. In the JNDI Default Data Source Binding section, type jdbc/sampledb in the DataSource JNDI name field. (If necessary, type a default user ID and password.)
e. In the EJB deployment descriptor editor, click the Beans tab.
f. Select the Increment bean.
g. In WebSphere Binding section, type com/ibm/ivj/ejb/samples/increment/Increment in the JNDI name field. In the Datasource Binding section, type jdbc/sampledb in the DataSource JNDI name field. (If necessary, type a default user ID and password.)
h. Select the HelloWorld bean.
i. In WebSphere Binding section, type HelloWorld in the JNDI name field.
j. In the Datasource Binding section, type jdbc/sampledb in the DataSource JNDI name field. (If necessary, type a default user ID and password.)
k. Save and close the EJB Deployment Descriptor Editor.
8. Create a new WebSphere Studio Application Developer Java client project:
a. Create a new Java project (click File -> New -> Project -> Java -> Java Project).
b. In the Project name field, type EJBSamplesClientsV2. Click Next.
c. Click the Projects tab. Select the EJBSamples-V2 check box.
d. Click Finish.
9. Import the Java code into the Java project:
a. In the Java perspective, open the Navigator view (click Perspective -> Show view -> Navigator).
b. In the Navigator view, click the EJBSamplesClientsV2 project.
c. Select File -> Import -> File system and click Next. Browse to the directory that you exported your VisualAge for Java client code to.
d. Expand your export directory and find your files (they will be in a subdirectory under com). Select the folders that contain your HelloClient and Increment Client files by selecting com.
e. In the Destination folder field, type EJBSamplesClientsV2/src (or browse to that folder).
f. Click Finish.
g. There will be two errors in the Tasks view (if you did not add the EJBSamplesV2 project to the classpath, you will have several errors). One occurs because references to javax.ejb.CreateException, which can be found in j2ee.jar, exist.
304 Migrating to WebSphere V5.0: An End-to-End Migration Guide

h. Select EJBSamplesClientsV2 and right-click it. Click Properties -> Java Build Path.
i. If you did not link to the EJBSamplesV2 project, select the Projects tab and select the EJBSamplesV2 check box. There should now only be two errors left.
j. Click the Libraries tab, click Add Variable, then select WAS_50_PLUGINDIR.
k. Click Extend the expand lib then select the j2ee.jar file. Click OK, then click OK again. There are still two errors in the Tasks view (a new one due to com.ibm.ivj.ejb.runtime.AbstractSessionAccessBean, which can be found in ivjejb35.jar).
l. Click Properties -> Java Build Path -> Libraries to add the ivjejb35.jar file.
m. There should now be no errors in the Tasks view.
At this point the samples have now been migrated into WebSphere Studio Application Developer. All that remains is to test them in the WebSphere Test Environment.
10.Create a server project with an WebSphere Application Server Version 5:
a. If you have not previously created a server project, click File -> New -> Project -> Server -> Server Project and then click Next.
b. In the Project name field, type MyEJBServerV5 and then click Finish.
c. The Server perspective will automatically open. In the Navigator view, select MyEJBServerV5 and right-click it.
d. Click New -> Server and Server Configuration.
e. In the Server name field, type MyEJBServerV5.
f. In the Server instance type field, expand WebSphere V5.0, select Test Environment, and then click Finish.
11.Specify your data source, your EAR project, and then start the server:
a. In the Server Configuration view, expand Server Configurations, and select MyEJBServerV5.
b. Right-click it, and from your pop-up menu, click Open.
c. Click the Data source tab.
d. Beside the JDBC provider list, click Add.
i. In the Name field, type Db2JdbcDriver
ii. In the Description field, retain DB2 JDBC Provider.
Chapter 9. Development environment migration examples (GA) 305
iii. In the Implementation class field, retain COM.ibm.db2.jdbc.DB2ConnectionPoolDataSource (note the uppercase COM).
iv. In the Class path field, retain {DB2_JDBC_DRIVER_PATH}\db2java.zip.
v. Leave Native Path blank.
vi. Click Finish.
e. Select this new Db2JdbcDriver in the JDBC Provider List.
f. Beside the Data source defined In JDBC driver selected above list, click Add.
i. Select Version 5.0 data source
ii. In the Name field, type ejb samples
iii. In the JNDI name field, type jdbc/sampledb
iv. In the DataSource Helper Class Name field, retain com.ibm.websphere.rsadapter.DB2DataStoreHelper
v. Select Use This DataSource In Container Manager Persistence (CMP)
vi. Click Finish
g. Select this new EJB samples in the Data source defined list.
h. Beside the Resource properties defined in the data source selected above list, click Add.
i. In the Name field, retain databaseName (note the upper case N).
ii. In the Type field, retain java.lang.String
iii. In the Value field, change to SAMPLEDB. Edit and then type SAMPLEDB. Do not select the Required check box. Click OK.
i. Save your changes and close the server configuration editor.
12.Specify your EAR project to the server configuration and start the server:
a. In the Server Configuration view, click Server Configurations -> MyEJBServerV5.
b. Right-click it and then click Add project -> EJBSamplesV2EAR.
c. (Optional) In the Navigator view, right-click ejbSamplesV2 project, select Properties -> Server Preference -> Always run on the following server -> WSTestEnv -> Apply -> OK. (This step is only necessary if you have other servers.)
d. In the Server view, right-click MyEJBServerV5, and then click Start.
306 Migrating to WebSphere V5.0: An End-to-End Migration Guide
13.Test the migrated HelloWorld client:
a. In the Java perspective, select the EJBSamplesClientsV2 project.
b. Click the Run triangle (pull-down) and select Run -> Java Application -> New.
c. In the Name field, type HelloWorldV2onV5.
d. In the Main tab, leave Project as ejbSamplesClientsV2.
e. Beside Main class, click Search, select HelloWorldClient, and then click Apply.
f. In the JRE tab, click Add, leave JRE Type as Standard VM. For JRE Name type V5 JRE. For JRE Home, browse to X:\MyInstall\runtimes\java\jre, click OK -> Apply ->Run.
g. Surprise - you get a server error, class not found com.ibm.ejs.ns.jndi.CNInitialContextFactory (found in namingclient.jar). You need to go back to the EJBSamplesClientsV2 project and click Properties -> Java Build Path -> Libraries again to add the namingclient.jar file.
h. Click the Run triangle (pull-down), and select Run -> Java Application -> HelloWorldV2onV5 -> Run.
i. In the client window Input field, type XX YY and then click Send. The value of the Output field becomes XX YY.
j. Close the window to terminate the client.
You have successfully migrated and tested the HelloWorld sample.
14.Test the migrated Increment client:
a. In the Java perspective, select the EJBSamplesClientsV2 project.
b. Click the Run triangle (pull-down), and select Run -> Java Application -> New.
c. In the Name field, type Increment2onV5
d. In the Main tab, leave Project as ejbSamplesClientsV2
e. Beside Main class, click Search, select IncrementClient, click Apply.
f. In the JRE tab, click the Run triangle (pull-down), select V5 JRE, click Apply, and then click Run.
g. Select IncrementClient and select Finish. The Console view contains the following content:
Obtaining initial context., Looking up Increment enterprise bean.,Obtaining IncrementHome object., Looking for increment object named: TEST,Object named: TEST has count: 0, Now, object named: TEST has count: 1,Now, object named: TEST has count: 2, Now, object named: TEST has count: 3
Chapter 9. Development environment migration examples (GA) 307

Now, object named: TEST has count: 4, Now, object named: TEST has count: 5
15.Test the migrated Increment and HelloWorld EJBs using the EJB Test Client:
a. In the J2EE Hierarchy view of the J2EE perspective, expand the EJB Modules folder, right-click IBMEJBSamplesV2, and select Run on server. The EJB Test Client will start running.
b. In the JNDI Explorer page, click HelloWorld to test the HelloWorld EJB.
c. In the JNDI Explorer page, expand com\ibm\ivj\ejb\samples\increment and click Increment to test the Increment EJB.
You have successfully migrated and tested the Increment and HelloWorld samples.
d. In the Servers view of the Server perspective, select MyEJBServerV5, right-click it, and then click Stop. In the Processes view, select all the terminated processes, right-click them, and then select Remove all Terminated.
9.2 Migrating from WebSphere Studio 4.0 WebSphere Studio 5.0
The migration examples in this section all start with the YourBank Application installed in WebSphere Studio Application Developer 4.0. This is a sample application that can be downloaded from the WebSphere Developer Domain at http://www7b.boulder.ibm.com/wsdd/library/presents/AppDevTraining.html.
In addition to importing and configuring the YourBank Enterprise Application into a project named YourBankEAR in WebSphere Studio 4.0, the required tables have been created in a DB2 database called BankData. See the documentation that comes with the YourBank training for instructions on creating the database.
The example in 9.2.2, “Example: Migrating YourBank using the CVS method” on page 311 assumes that a Servers project has been created in WebSphere Studio 4.0, and a Server and Server Configuration named WebSphere 4.0 Test has been appropriately configured for the application.
For all the examples in this section, WebSphere Studio 5.0 can be installed on the same system as WebSphere Studio 4.0, or on a different system. If WebSphere Studio 5.0 is co-installed with WebSphere Studio 4.0, it should be installed in a different directory.
The WebSphere Studio 5.0 install does not remove WebSphere Studio 4.0, so to replace WebSphere Studio 4.0 with WebSphere Studio 5.0 (using the same
308 Migrating to WebSphere V5.0: An End-to-End Migration Guide

installation directory), you must uninstall WebSphere Studio 4.0 before installing WebSphere Studio 5.0
9.2.1 Example: Migrating YourBank using the Export/Import methodUsing this method, WebSphere Studio Application Developer Versions 4.0 and 5.0 may be installed on the same node or on separate nodes. If the versions are installed on separate nodes, one file per enterprise application must be moved from the machine where Version 4.0 resides to the machine where Version 5.0 resides.
Note: This is not a full migration since no project build path information is maintained, and server definitions and configurations are not migrated.
Migration steps1. To export the application from WebSphere Studio 4.0, start WebSphere
Studio Application Developer Version 4.0 and perform the following steps:
a. Select File -> Export
b. Select the EAR file and click Next.
c. Select YourBankEAR as the resource to export.
d. Type C:\YourBankMigration.ear as the export destination.
e. Select Export source files in the Options section.
f. Click Finish.
g. Close WebSphere Studio Application Developer Version 4.0.
2. Import the Application to WebSphere Studio 5.0
a. Move C:\YourBankMigration.ear to the system where WebSphere Studio Application Developer Version 5.0 is installed. and start WebSphere Studio Application Developer Version 5.0.
b. Select File -> Import
c. Select EAR file and click Next.
d. Type C:\YourBankMigration.ear as the name of the EAR file to import.
e. Type YourBankEAR as the Project name.
f. Click Finish to import the EAR.
3. When the import completes, you will notice that YourBankWebServicesModule has multiple errors. This is because the Java Build Path information from WebSphere Studio Application Developer 4.0 was not migrated.
Chapter 9. Development environment migration examples (GA) 309

a. If you are not already in the J2EE Perspective, switch to the J2EE perspective by selecting Window -> Open Perspective -> Other and then selecting J2EE and clicking OK.
b. In the J2EE Navigator view, right-click YourBankWebServicesModule and select Properties.
c. Select the Java Build Path and click the Libraries tab.
d. Click the Add Variable button, select SOAPJAR and click OK.
e. Click the Add Variable button, select XERCESJAR and click OK.
f. Click OK to close the Properties window.
There should no longer be any errors in the Task List.
4. Configure the WebSphere Version 4 Test Environment
The migrated application will be tested in the WebSphere 4.0 Test Environment. The Test Environment must be created and configured manually.
a. Switch to the Server perspective.
b. Select File -> New -> Server Project.
c. Type Servers in as the Project name and click Finish.
d. Select File -> New -> Server and Server Configuration.
e. Type WebSphere 4.0 Test as the Server name.
f. Select Servers as the folder.
g. In the Server type, select WebSphere Version 4.0 -> Test Environment.
h. Click Finish.
5. The data source for the EJB must be defined in the Server Configuration. The following instructions assume that the application uses a DB2 Database named BankData on the same node where WebSphere Studio Application Developer is running:
a. In the Server Configuration view, expand the Servers folder and double-click WebSphere 4.0 Test.
b. In the WebSphere 4.0 Test editor, click the Data source tab.
c. In the JDBC driver list, select Db2JdbcDriver.
d. Click the Add button next to the Data source defined in the JDBC driver box.
e. Type YourBank for the name.
f. Type jdbc/YourBank for the JNDI name.
g. Type BankData for the Database name.
310 Migrating to WebSphere V5.0: An End-to-End Migration Guide

h. Type in the appropriate values for the default user ID and default user password.
i. Click OK.
j. Close the WebSphere 4.0 Test editor and save your changes.
6. Test the applications:
The application must be configured to run on the newly configured server and then the application can be tested.
a. In the Server Configuration view, right-click WebSphere 4.0 Test, select Add -> YourBankEAR.
b. In the Servers view, right-click WebSphere 4.0 Test and select Publish. When the publishing completes, click OK.
c. In the Servers view, right-click WebSphere 4.0 Test and select Start.
d. Watch the console for the message: Server Default Server open for e-business.
e. To test the Web Module (and the underlying EJBs) go to http://localhost:8080/YourBankWebModule/.
f. To test the Web Service Module (and the underlying EJBs) go to http://localhost:8080/YourBankWebServicesModule/sample/Transfer/TestClient.jsp
g. In the Servers view, right-click WebSphere 4.0 Test and select Stop.
9.2.2 Example: Migrating YourBank using the CVS methodMigrating projects using an SCM is the easiest way to get the complete project migrated between versions. This method can be used to migrate not only enterprise applications, EJB projects, and Web projects, but also Server projects.
It is important to use a full-featured CVS server. CVSNT in particular might not be robust enough to support this process.
This example is an alternative to the example shown in 9.2.1, “Example: Migrating YourBank using the Export/Import method” on page 309. The result of this procedure should be the same as that example.
Migration steps1. Add the application into CVS:
a. Start WebSphere Studio Application Developer Version 4.0.
b. Switch to the J2EE perspective.
c. In the Navigator view, expand YourBankWebModule.
Chapter 9. Development environment migration examples (GA) 311
d. Right-click the source folder and select New -> Other.
e. Select Simple -> File and click Next.
f. Name the file “keep” and click Finish.
g. Close the keep editor. Notice that the keep file also is found by expanding YourBankWebModule -> webApplication -> WEB-INF -> classes. This will ensure that the classes directory will not get pruned, because it only contains empty directories. The classes directory will be needed when the project is checked out in WebSphere Studio 5.0.
h. Select YourBankWebServicesModule -> source and create a keep file there.
i. Create a file named .cvsignore in YourBankEJBModule. The file should contain a single line with the word “bin”. This will keep the bin directory from being checked into CVS.
j. Switch to the Team perspective.
k. Right-click the Repositories view and select New -> CVS Repository Location.
l. Leave the Connection type as pserver. Type in the appropriate user name, host name, and repository path for your CVS server and click Finish.
m. When prompted for a password, type in the CVS pserver password for the user name specified.
n. In the Navigator view, select the Servers, YourBankEAR, YourBankEJBModule, YourBankWebModule, and YourBankWebServicesModule projects.
o. Right-click the selected projects, and select Team -> Synchronize with Stream
p. For each project, select the repository that you just defined and the stream HEAD. Click OK.
q. In the Synchronize view, right-click each project and select Release.
r. Type in a release comment for each and click OK.
s. Close WebSphere Studio Application Developer 4.0.
2. Update file attributes in CVS (optional)
WebSphere Studio 4.0 saves all files in CVS as binary (CVS option -kb). WebSphere Studio 5.0 has the ability to save files in CVS in both binary and text formats. The formats of individual files can be changed from within WebSphere Studio 5.0, but the bulk conversion of all text files in a project is probably better suited to a script using CVS admin to make the change.
312 Migrating to WebSphere V5.0: An End-to-End Migration Guide

If the file attributes are changed at this time, all occurrences of the following files should have their attribute changed to text:
.vcm_meta
.modulemaps*.xml*.xmiMANIFEST.MF.serverPreference.classpath*.java*.mapxmi*.ddl*.tblxmi*.schxmi*.dbxmi.websettings*.html*.css*.jsp*.isd*.wsdl*.wsi
If the file attributes are converted at a later time, all developers will have to delete the local copies of the projects with changed files and repeat the checkout from CVS at that time.
This example does not include changing the file attributes in CVS. The local CVS administrator should be able to determine the correct procedure to make the change.
3. Create a branch
Creating a branch in the CVS stream will allow the old version to the project to be maintained with WebSphere Studio 4.0, while new development is done with WebSphere Studio 5.0.
a. Open WebSphere Studio Application Developer 5.0.
b. Select Window -> Open Perspective -> Other.
c. Select CVS Repository Exploring and click OK.
d. Right-click the CVS Repositories view and select New -> Repository Location.
e. Fill in the information for your CVS repository.
f. Click Finish.
g. In the CVS Repositories view, expand the repository that you just created.
Chapter 9. Development environment migration examples (GA) 313

h. Right-click Branches and select Define Branch Tag.
i. Enter the name WSAD4 and click OK.
j. Expand the HEAD stream and select the Servers, YourBankEAR, YourBankEJBModule, YourBankWebModule, and YourBankWebServicesModule projects.
k. Right-click the selected projects and select Tag with Existing.
l. Expand the Branches, select WSAD4 and click OK.
This technique keeps the new development (in WebSphere Studio 5.0) in the HEAD stream, while maintenance of old code can still be performed in WebSphere Studio 4.0 on the WSAD4 branch.
All development workstations that will be used to perform maintenance on the old application in WebSphere Studio 4.0 should delete the projects from their workspace and check them back out from the WSAD4 stream.
4. Check out the projects:
a. Select Window -> Preferences -> Workbench and clear the Perform build automatically check box.
b. Click OK.
c. In the CVS Repositories view, expand the HEAD stream.
d. Select the Servers, YourBankEAR, YourBankEJBModule, YourBankWebModule, and YourBankWebServicesModule projects. Make sure that these projects are not selected under the WSAD4 branch.
e. Right-click the selected projects and select Check out as project.
5. Make changes to the checked-out projects:
a. Switch to the J2EE perspective.
b. In the J2EE Hierarchy, expand Enterprise Applications and double-click YourBankEAR.
c. When prompted, click Yes to allow the paths in the file to be auto corrected.
d. Close and save the Application Deployment Descriptor.
6. Building the projects as they are would result in two PARSER_ERRORS because two Web Service WSDL files use absolute paths for import tags. The absolute paths used are only valid when the application is installed and running in the test environment. This can be addressed by changing the imports to use relative paths:
a. In the J2EE Navigator view, expand YourBankWebServicesModule -> webApplication -> wsdl.
314 Migrating to WebSphere V5.0: An End-to-End Migration Guide

b. Double-click Transfer-service.wsdl.
c. In the Transfer-service.wsdl editor, select Definitions -> Import.
d. Change the value of the location to Transfer-binding.wsdl.
e. Press Enter before you close the editor so the change will be recognized.
f. Close the Transfer-service.wsdl editor and save the changes.
g. Double-click webservicesHelper-service.wsdl.
h. In the webservicesHelper-service.wsdl editor, select Definitions -> Import.
i. Change the value of the location to webServicesHelper-binding.wsdl.
j. Press Enter before you close the editor so the change will be recognized.
k. Close the webservicesHelper-service.wsdl editor and save the changes.
7. Build the projects:
a. Select Project -> Rebuild all. This should resolve all errors in the Task List. There will still be a number of warning and informational messages.
b. Select Window -> Preferences -> Workbench and check the Perform build automatically check box.
c. Click OK. This will result in several errors in the Task List. These errors will be addressed in the next section.
8. Configure the WebSphere Version 4 Test Environment:
The migrated application will be tested in the WebSphere 4.0 Test Environment that was migrated from WebSphere Studio 4.0.
a. Switch to the Server perspective.
b. In the Server Configuration view, expand the Servers folder and double-click WebSphere 4.0 Test.
c. When prompted, click Yes to allow the editor to fix project entries automatically.
d. When prompted, click Yes to allow the editor to fix paths automatically.
e. Close and save the WebSphere 4.0 Test editor.
f. In the Server Configuration view, expand the Servers folder and WebSphere 4.0 Test.
g. Right-click YourBankEAR and select Remove.
h. Right-click WebSphere 4.0 Test under the Servers folder and select Add -> YourBankEAR.
9. Test the application:
Chapter 9. Development environment migration examples (GA) 315
a. In the Servers view, right-click WebSphere 4.0 Test and select Publish.
b. When publishing completes, click OK.
c. In the Servers view, right-click WebSphere 4.0 Test and select Start.
d. Watch the console for the message: Server Default Server open for e-business.
e. To test the Web Module (and the underlying EJBs) go to http://localhost:8080/YourBankWebModule/.
f. To test the Web Service Module (and the underlying EJBs) go to http://localhost:8080/YourBankWebServicesModule/sample/Transfer/TestClient.jsp.
g. In the Servers view, right-click WebSphere 4.0 Test and select Stop.
10.Check the updated projects into CVS:
a. Switch to the Resource perspective and expand all the project folders in the Navigator view.
b. In each project, right-click .vcm_meta, select Delete and click Yes to confirm.
c. In the Navigator view, select the Servers, YourBankEAR, YourBankEJBModule, YourBankWebModule, and YourBankWebServicesModule projects.
d. Right-click the selected projects and select Team -> Synchronize with Repository.
e. In the Synchronize view, right-click each project and select Commit.
f. When you are prompted to add resources to version control, click Yes.
g. When prompted for a commit comment, type one in and click OK.
The migration to WebSphere Studio 5.0 is complete.
9.2.3 Example: Running YourBank in WebSphere Version 5.0 Test Environment
This example assumes that the YourBank Application has already been migrated to WebSphere Studio 5.0 using either the Export/Import method or the CVS method.
Migration steps1. Create a WebSphere 5.0 server:
a. Switch to the Server perspective.
316 Migrating to WebSphere V5.0: An End-to-End Migration Guide
b. Select File -> New -> Server and Server configuration.
c. Type in the server name WebSphere 5.0 Test.
d. Make sure the folder Servers is selected.
e. Select server type. Click WebSphere Version 5.0 -> Test Environment.
f. Click Finish.
2. Configure the server:
a. In the Server Configuration view, double-click WebSphere 5.0 Test under Servers.
b. Open the Data source tab of the WebSphere 5.0 Test editor.
c. Click the Add button next to JDBC Providers.
d. Select IBM DB2 for the Database type and DB2 JDBC Provider for the JDBC Provider Type.
e. Click Next.
f. Type the name DB2 Non-XA.
g. Click Finish.
h. Click Add next to the data sources defined in the JDBC Provider.
i. Select DB2 JDBC Provider for the type of provider.
j. Select Version 4.0 data source for the data source type and click Next.
k. Type YourBank for the name.
l. Type jdbc/YourBank for the JNDI name.
m. Type BankData for the database name.
n. Type in the appropriate values for the default user ID and default user password.
o. Click Finish.
p. Close the WebSphere 5.0 Test editor and save your changes.
q. Right-click the WebSphere 5.0 Test Server in the Server Configuration view and select Add -> YourBank.
3. Update the Web Service application:
The Web Service Project uses some Java Helper classes in which the server's URL is hard coded. These need to be updated to run on the new server, which listens on port 9080 instead of 8080.
a. Switch to the J2EE perspective
b. In the J2EE Navigator view, select YourBankWebServiceModule -> source -> proxy.soap -> webServicesHelperProxy.java.
Chapter 9. Development environment migration examples (GA) 317
c. Change stringURL from http://localhost:8080/... to http://localhost:9080/...
d. Close and save webServicesHelperProxy.java.
e. Update the stringURL in proxy.soap.com.ibm.yourbank.ws.webServicesHelperProxy.java and proxy.soap.com.ibm.yourbank.ejb.TransferProxy.java.
f. Open YourBankWebServiceModule -> webApplication -> dds.xml.
g. Expand root -> isd:service -> isd:provider and the second isd:option.
h. Change the ContextProviderURL from iiop://localhost:900 to iiop://localhost.
i. Close the dds.xml editor and save the changes.
j. Expand the wsdl directory.
k. Edit Transfer-service.wsdl and webServicesHelper-service.wsdl. Change all instances of http://localhost:8080 to http://localhost:9080.
4. Test the application.
a. Switch to the Server perspective.
b. Right-click WAS 5.0 Test in the Servers view and select Publish.
c. When Publishing completes click OK.
d. Right-click WAS 5.0 Test in the Servers view and select Start.
e. Watch the console for the message Server server1 open for e-business.
f. To test the Web Module (and the underlying EJBs) go to http://localhost:9080/YourBankWebModule/.
g. To test the Web Service Module (and the underlying EJBs) go to http://localhost:9080/YourBankWebServicesModule/sample/Transfer/TestClient.jsp.
h. In the Servers view, right-click WAS 5.0 Test, and select Stop.
9.2.4 Example: Migrating YourBank to J2EE 1.3The previous examples show how to bring the YourBank application into WebSphere Studio 5.0 and test it on the WebSphere Test Environment Versions 4.0 and 5.0. Even when it is running on WebSphere 5.0, however, it is running as a J2EE 1.2 application. This example shows how to migrate the YourBank application to J2EE 1.3 and test it on the WebSphere Test Environment 5.0.
The instructions in this section assume that you have already migrated the YourBank application to WebSphere Studio 5.0 using either the export/import
318 Migrating to WebSphere V5.0: An End-to-End Migration Guide
method or the CVS method and have configured it to run on the WebSphere 5.0 Test Environment.
Migration steps1. Migrate YourBankEAR to J2EE 1.3:
a. Switch to the J2EE perspective.
b. In the J2EE Navigator, right-click YourBankEAR and select Migrate -> J2EE Migration Wizard.
c. On the Migration wizard welcome page, click Next.
d. On the Enterprise Application page, leave both boxes checked and click Next.
e. On the EJB Module Migration page, check the Migrate CMP 1.x Beans to CMP 2.x Beans box (the Add local client views box will be checked automatically).
f. Click Finish.
g. When prompted to repair server configurations, click OK.
h. When the migration is complete, click OK.
2. Finish migrating the Account bean to EJB 2.0:
The automatic migration of the Account EJB from EJB 1.x to EJB 2.x removed the fields that were used in EJB 1.x for CMP attributes and created the methods used in EJB 2.x to access and modify CMP attributes. However, it did not update any user code that directly referenced the old fields. These changes must be made by hand.
a. In the J2EE Hierarchy view, select EJB Modules -> YourBankEJBModule.
b. Double-click AccountBean to launch the Java editor.
c. Replace all direct references to the persistent fields with references to the getters and setters. For example, change:
public float add(float amount) {balance += amount;return balance;
}
to
public float add(float amount) {setBalance(getBalance() + amount);return getBalance();
}
d. Close and save the AccountBean.java editor.
Chapter 9. Development environment migration examples (GA) 319

e. In the J2EE Heirarchy view, right-click EJB Modules -> YourBankEJBModule and select Generate -> Deploy and RMIC Code.
f. Select both Account and Transfer and click OK.
3. Configure the test server:
a. Switch to the Server perspective.
b. In the Server Configuration view, select Servers and double-click WebSphere 5.0 Test.
c. Open the Data source tab.
d. In the JDBC Provider list, click DB2 Non-XA.
e. Highlight the YourBank data source and click Remove.
f. Click Add next to the data sources defined in the JDBC Provider.
g. Select Version 5.0 Data Source and click Next.
h. Type YourBank for the name.
i. Type jdbc/YourBank for the JNDI name.
j. Check the Use this data source in container managed persistence box.
k. Click Next.
l. Click databaseName in Resource Properties and type in the value BankData.
m. Click Finish.
n. Click Add next to Resource properties defined for the data source.
o. Add a property name: user and a type: java.lang.String, and set the value to the appropriate database user.
p. Click OK.
q. Add a String property named password and set the value appropriately.
r. Close the WebSphere 5.0 Test editor and save your changes.
s. In the Server Configuration view, expand Servers -> WebSphere 5.0 Test.
t. Right-click the WebSphere 5.0 Test Server Configuration in the Server Configuration view and select Add -> YourBankEAR.
4. Test the Web application.
a. Switch to the Server perspective.
b. Right-click WebSphere 5.0 Test in the Servers view and select Publish.
c. When publishing completes, click OK.
320 Migrating to WebSphere V5.0: An End-to-End Migration Guide
d. Right-click WebSphere 5.0 Test in the Servers view and select Start.
e. Watch the console for the message Server server1 open for e-business.
f. To test the Web Module (and the underlying EJBs), go to http://localhost:9080/YourBankWebModule/.
g. To test the Web Service Module (and the underlying EJBs), go to http://localhost:9080/YourBankWebServicesModule/sample/Transfer/TestClient.jsp.
h. In the Servers view, right-click WAS 5.0 Test and select Stop.
Chapter 9. Development environment migration examples (GA) 321

322 Migrating to WebSphere V5.0: An End-to-End Migration Guide
Chapter 10. Development environment migration examples (EA)
This chapter provides the practical migration examples of migrating development environment. The chapter is organized into following sections:
� Migrating from WebSphere V3.5 development environment
– VisualAge for Java JSP/servlet sample (LeapYear)
– VisualAge for Java EJB, VCE, and database samples (HelloWorld session bean and Increment enterprise bean)
– WebSphere Studio “Classic” Web application sample (YourCo)
– Migration from EJB 1.x to EJB 2.0 (HelloWorld session bean and Increment enterprise bean)
� Migrating from WebSphere Studio Application Developer V4.0 to V5.0
– Migrating YourBank using the Export/Import method
– Migrating YourBank using the CVS method - Running YourBank in WebSphere Version 5.0 Test Environment
– Migrating YourBank to J2EE 1.3
The examples in this chapter illustrate the migration techniques described in this redbook.
10
© Copyright IBM Corp. 2002 2003. All rights reserved. 323

10.1 Migrating from WebSphere 3.5 Development Environment to WebSphere Studio 5.0
The IBM development toolset for WebSphere 3.5 is composed of VisualAge for Java and WebSphere Studio “Classic.” It is possible to develop java applications exclusively in VisualAge for Java, Web applications exclusively in WebSphere Studio “Classic”, and more complex applications using both tools. The WebSphere Test Environment for WebSphere 3.5 is hosted in VisualAge for Java Enterprise Edition.
The development tool for WebSphere 5.0, WebSphere Studio Application Developer 5.0, is not a direct upgrade to either VisualAge for Java or WebSphere Studio “Classic.” It can be installed on the same machine as the existing development tools without removing the older tools.
10.1.1 Example: VisualAge for Java JSP/Servlet sample (LeapYear)This is the FindTheLeapYears sample provided with VisualAge for Java Version 4.0. Information about it can be found in the VisualAge for Java online help (click Samples -> JSP/Servlet Development Environment).
Migration steps Follow these steps to migrate the sample from VisualAge for Java to WebSphere Studio Application Developer:
1. Export your files from VisualAge for Java:
a. Open VisualAge for Java.
b. Select the IBM JSP Examples project.
c. Right-click the project and select Export. Select the Directory radio button and click Next.
d. Type the name of the directory you want to export the files to.
e. Clear the .class check box. You do not need to export these files, because you will rebuild the project in WebSphere Studio Application Developer and re-create these files.
f. Select the .java check box and click Details. Select only the LeapYear files and click OK.
g. Select the Resource check box and click Details.
h. Select LeapYearInput.html and LeapYearResults.jsp, which are located in the directory IBM WebSphere Test Environment\hosts\default_host\default_app\web\JSP\sample3.
324 Migrating to WebSphere V5.0: An End-to-End Migration Guide

i. Click OK.
j. Clear the Create Manifest file check box (you do not need to create a manifest file).
k. Click Finish.
l. Close VisualAge for Java.
2. Create a new WebSphere Studio Application Developer Web project:
a. Start WebSphere Studio Application Developer.
b. Create a new Web project called LeapYear (click File -> New -> Project -> Web -> WebProject).
c. Ensure that J2EE Web project is selected, and then click Next.
d. Select New.
e. Change the Enterprise Application project name to LeapYearEAR and select J2EE level 1.2. You could put the Web project into any existing Enterprise Application (EAR) project, but for this example, you will put it in LeapYearEAR.
f. Leave LeapYearEAR in the Context root field.
g. Click Finish.
3. Import the Java and project resource files into the WebSphere Studio Application Developer project:
Import the Java source files into the LeapYear project source directory by following these steps:
a. In the Web perspective, expand LeapYear and select the Java source directory.
b. Click File -> Import -> File system and click Next. Browse to the directory you exported your files to and click OK.
c. You only want to import the Java source files into the Java source directory, so, in the Import window, expand your export directory and select only the com subdirectory (it contains the three Java source files).
d. Click Finish. This creates LeapYear\Java source\com\ibm\ivj\wte\samples\leapyear\LeapYearXXXX.java files. Java files are automatically compiled into LeapYear\webContent\WEB-INF\classes.
4. Import the resource files into the LeapYear project under the webContent directory by following these steps:
a. In the current Web perspective, expand the LeapYear project and select the webContent directory.
Chapter 10. Development environment migration examples (EA) 325
b. Select File -> Import -> File system and click Next. Browse to the directory you exported your files to, expand your export directory to the sample3 subdirectory, then click OK.
c. You only want to import the resource files into the webContent directory, so, in the Import window, select the sample3 subdirectory, which contains the .jsp and .html files.
d. Click Finish. The files are imported into the webContent directory.
5. Define any Servlets and make any restructured application changes:
a. You now need to create a Servlet. Select the LeapYear project and expand it (click Leap Year -> webContent -> WEB-INF) to the web.xml file. Open the web.xml file.
b. Click the Servlets tab at the bottom of the page.
c. Click Add.
d. Ensure that the Servlet radio button is selected.
e. Select the class LeapYear, then click OK.
f. Select URL Mapping -> Add, then type LeapYear.
g. Save the changes (click File -> Save web.xml) and close the web.xml file.
6. You now need to make any application changes due to the slightly changed source/application structure:
a. There will be two errors listed in the Tasks view. One is in LeapYearInput.html and one is in LeapYearResults.jsp.
b. Open the LeapYearResults.jsp file. Replace /JSP/index.html with LeapYearInput.html.
c. Open the LeapYearInput.html file. Replace /servlet/com.ibm.ivj.wte.samples.leapyear.LeapYear with LeapYear.
d. Save your changes and close the LeapYearResults.jsp and LeapYearInput.html files.
e. To avoid a runtime error, open the LeapYear.java file, which is located in the source\com\ibm\ivj\wte\samples\leapyear subdirectory.
f. Go to line 119 and change getRequestDispatcher from “/JSP/Sample3/LeapYearResults.jsp” to “LeapYearResults.jsp”
g. Save your changes and close LeapYear.java.
At this point the sample has been migrated into WebSphere Studio Application Developer. All that remains is to create a WebSphere Studio Application Developer server project and test the sample in the WebSphere Test Environment.
326 Migrating to WebSphere V5.0: An End-to-End Migration Guide
7. Create a WebSphere Studio Application Developer server project:
a. Click File -> New -> Project -> Server -> Server Project. Click Next. In the Project name field, type newServer and click Finish. You will automatically be switched to the Server perspective.
b. Right-click newServer and click New -> Server Instance and Configuration.
c. In the Server name field, type WSTestEnv. In the Server instance type field, select WebSphere V4.0 Test Environment. Click Finish.
Now, you need to specify your EAR project to the server configuration:
a. In the Server Configuration view, click Server Configurations -> WSTestEnv.
b. Right-click it and click Add project -> LeapYearEAR.
8. Test the migrated LeapYear application:
a. Select the LeapYearInput.html file.
b. Right-click the HTML file, and from its pop-up menu, click Run on Server and select WSTestEnv.
c. Wait while the server starts. Click the Console tab in the Servers view and watch the Console until the message Server Default Server open for e-business appears.
d. When a browser opens, type 2001 in the Start Year field, then click Submit.
e. The Console view shows the message LeapYear:init. Wait until you see the list of leap years, then select WSTestEnv in the Servers view. Right-click it and click Stop.
10.1.2 Example: Enterprise beans, VCE, and database samples (HelloWorld session bean and Increment enterprise bean)
You will work with two EJB Development samples: Hello World and Increment. To access these samples open the online help, and select Samples -> EJB Development.
You must work with VisualAge for Java Version 4.0 for this example.
You do not have to migrate these samples together. If you are not currently working with DB2, you may not wish to migrate Increment. In this case, you can ignore any steps that apply to the Increment sample only.
Chapter 10. Development environment migration examples (EA) 327
Before you begin:
� Be sure the application runs in VisualAge for Java (that is, the DB2 setup for the Increment sample is complete).
� Be sure to stop the VisualAge for Java WebSphere Test Environment EJB server and Persistent Name Server (so they will not conflict with WebSphere Studio Application Developer).
Migration steps Follow these steps to migrate the samples from VisualAge for Java to WebSphere Studio Application Developer:
1. Export the client Java source from VisualAge for Java:
a. Start VisualAge for Java Version 4.0.
b. Select the IBM EJB Samples project
c. Right-click the project and click Export.
d. Select the Directory radio button and click Next.
e. Type the name of the directory you want to export your files to.
f. Clear the .class check box. (You will rebuild the .class files in WebSphere Studio Application Developer to ensure that you have successfully migrated the samples.)
g. Select the .java check box. Click Details and clear the IBM EJB Samples check box.
h. Select the HelloClient and IncrementClient check boxes and click OK.
i. Clear the .resource check box (unless you want the DB2 .clp setup scripts).
j. Click Finish.
2. Export the EJB group from VisualAge for Java into an EJB 1.1 JAR:
a. Open the map browser to load the map for IBM EJB samples.
b. Click the EJB tab. In the Enterprise Beans pane, right-click IBMEJBSamples and click Export -> EJB 1.1 JAR.
c. Select a directory to export your JAR file to.
d. In the JAR file field, type the name of the JAR file you want to create.
e. In the Select a target database list, select DB2 for NT, V7.1.
f. Select the .class check box. (You will rebuild the files in WebSphere Studio Application Developer as a verification of the migration, but this must be selected in order to proceed.)
328 Migrating to WebSphere V5.0: An End-to-End Migration Guide
g. Select the .java check box. (You need the four HelloWorld and the five Increment EJB files.)
h. Click Finish.
i. If you were running the samples, then stop the VisualAge for Java Persistent Name Server, EJB server, and WebSphere Test Environment.
j. (Optional) Exit VisualAge for Java.
3. Create a new WebSphere Studio Application Developer EJB project:
Note: This section is optional. If you do not have an EJB and EAR project, they will automatically be created when you import the EJB 1.1 JAR file.
a. Start WebSphere Studio Application Developer.
b. Create a new EJB project (click File -> New -> Project -> EJB -> EJB Project -> Create 1.1 -> Next).
c. In the Project name field, type EJBSamples.
d. Select EAR new.
e. In the EAR project name field, type EJBSamplesEAR. Click Finish. You could put this EJB project into any existing Enterprise Application (EAR) project you currently have, but for this example, create a new EAR project called EJBSamplesEAR.
f. The new projects are created and appear in the J2EE perspective.
4. Import the EJB 1.1 JAR file into WebSphere Studio Application Developer EJB project:
a. Click File -> Import -> EJB JAR file. Click Next.
b. In the EJB JAR file field, browse for the location of the EJB 1.1 JAR you created.
c. In the EJB Project field, select EJBSamples.
d. In the Enterprise Application project name field, select EJBSamplesEAR. Click Finish.
e. You will receive four or five EJB 1.1 warnings. You can ignore them.
5. Generate and deploy RMIC stub and tie code:
a. In the J2EE perspective, expand the EJB Modules folder, and select IBMEJBSamples.
b. Right-click it and click Generate -> RMIC and Deploy Code.
c. Select the Hello World and Increment beans. Click Finish.
6. Specify the data source binding information:
Chapter 10. Development environment migration examples (EA) 329
a. In the J2EE Perspective, expand EJB Modules and select IBMEJBSamples.
b. Right-click the module and select Open With -> EJB Deployment Descriptor.
c. In the EJB deployment descriptor, click the Overview tab.
d. Select IBMEJBSamples, and type jdbc/sampledb in the DataSource JNDI name field.
e. If necessary, type a default user ID and password.
f. Close the EJB deployment descriptor (you will prompted to save your changes).
7. Create a new WebSphere Studio Application Developer project:
a. Create a new Java project (click File -> New -> Project -> Java -> Java Project).
b. In the Project name field, type EJBClients. Click Next.
c. Click the Projects tab. Select the EJBSamples check box.
d. Click Finish.
8. Import the Java code into a Java project:
a. In the Java perspective, open the Navigator view (click Window -> Show view -> Navigator).
b. In the Navigator view, click the EJBClients project.
c. Select File -> Import -> File system and click Next. Browse to the directory that you exported your client code to.
d. Expand your export directory and find your files (they will be in a subdirectory under com). Select the folders that contain your HelloClient and Increment Client files.
e. Click Finish.
f. There will be two errors in the Tasks view (if you did not add the EJBSamples project to the class path, you will have several errors). One occurs because references to javax.ejb.CreateException, which can be found in j2ee.jar, exist. The other occurs because of a reference to com.ibm.ivj.ejb.runtime.AbstractSessionAccessBean, which can be found in ivjejb35.jar.
g. Select EJBClients and right-click it. Click Properties -> Java Build Path.
h. If you did not link to the EJBSamples project, select the Projects tab and select the EJBSamples check box. There should now only be two errors left.
330 Migrating to WebSphere V5.0: An End-to-End Migration Guide

i. Click the Libraries tab and click Add External JARs.
j. Browse to the WS_Installdir\aes_v4\lib directory, where WS_Installdir is your product installation directory.
k. Select the j2ee.jar file. Click Open, and then click Add External JARs.
l. Browse to the WS_Installdir\aes_v4\lib directory.
m. Select the ivjejb35.jar file. Click Open, then click OK.
n. There should now be no errors in the Tasks view, except the EJB 1.1 warnings.
At this point, the samples have now been migrated into WebSphere Studio Application Developer. All that remains is to test them in the WebSphere Test Environment.
9. Create a WebSphere Studio Application Developer server project:
a. Click File -> New -> Project -> Server -> Server Project and click Next. In the Project name field, type EJBServer and click Finish.
b. The Server perspective will automatically open. In the Navigator view, select EJBServer and right-click it.
c. Click New -> Server Instance and Configuration.
d. In the Server name field, type MyEJBServer. In the Server instance type field, click WebSphere V4.0 Test Environment, and then click Finish.
10.Specify your data source, your EAR project, and then start the server:
a. In the Server Configuration view, expand Server Configurations and select MyEJBServer.
b. Right-click it, and from your pop-up menu, click Open.
c. Click the Data source tab.
d. In the JDBC Driver List, select the Db2JdbcDriver and click Edit.
e. Verify that the Class path field contains the correct path to db2java.zip. Click OK.
f. Select your JDBC driver, and click the Add button to the right of the Data source field.
g. In the Add a data source window, type EJB Sampledb in the Name field. In the JNDI name field, type jdbc/sampledb.
h. In the Database name field, type sampledb. Click OK.
i. Save your changes and close the server configuration editor.
11.Now, you need to specify your EAR project to the server configuration and start the server:
Chapter 10. Development environment migration examples (EA) 331
a. In the Server Configuration view, click Server Configurations -> MyEJBServer.
b. Right-click it and click Add project -> EJBSamplesEAR.
c. In the Server view, right-click MyEJBServer, then click Start.
12.Start DB2 and connecting to sampleDB:
Note: DB2 must be running with the sampleDB created and available (as per the VisualAge for Java sample). This is applicable only if you are migrating the Increment sample.
Optional: You can perform the following steps to verify your DB2 setup:
a. Switch to the Data perspective.
b. In the DB Servers view, right-click and select New Connection.
c. In the Connection Name field, type sampleDB connection
d. In the Database field, type SAMPLEDB.
e. In the JDBC Driver field, select IBM DB2 App Driver.
f. In the Class Location field, specify the location of the db2java.zip file.
g. Click Finish.
h. If necessary, type a default user ID and password.
i. In the DB Servers view, expand sampleDB conn to ensure that the Tables subdirectory contains MYHOST.INCREMENTS.
13.Test the migrated HelloWorld client:
a. In the Java perspective, select the EJBClients project.
b. Click the Run button and select Run -> Java application.
c. Click New to create new configuration file.
d. In the main class, select HelloClient.
e. On the JRE tab, select WebSphere Application Server V4 JRE and then select Run.
f. In the client window Input field, type XX YY and click Send.
g. The value of the Output field becomes XX YY. Close the window to terminate the client.
You have successfully migrated and tested the HelloWorld sample.
14.Test the migrated Increment client:
a. In the Java perspective, select the EJBClients project.
b. Click the Run button and select Run -> Java application.
332 Migrating to WebSphere V5.0: An End-to-End Migration Guide

c. In the main class, select IncrementClient.
d. On the JRE tab, select WebSphere Application Server V4 JRE and then select Run.
e. The Console view contains the following content:
Obtaining initial context., Looking up Increment enterprise bean.,Obtaining IncrementHome object.,Looking for increment object named: TEST,Object named: TEST has count: 0,Now, object named: TEST has count: 1,Now, object named: TEST has count: 2,Now, object named: TEST has count: 3Now, object named: TEST has count: 4,Now, object named: TEST has count: 5
15.Test the migrated Increment and HelloWorld EJBs using the EJB Test Client:
a. In the J2EE Hierarchy view of the J2EE perspective, expand the EJB Modules folder, right-click IBMEJBSamples, select Run on server, and then select MyEJBServer. The EJB Test Client will start running.
b. In the JNDI Explorer page, click HelloWorld to test the HelloWorld EJB.
c. In JNDI Explorer, expand com\ibm\ivj\ejb\samples\increment and then click Increment to test the Increment EJB.
You have successfully migrated and tested the Increment and HelloWorld samples.
d. In the Servers view of the Server perspective, select MyEJBServer, right-click it and click Stop.
10.1.3 Example: WebSphere Studio “Classic” Version 4.0 Web application (YourCo)
You must work with WebSphere Studio “Classic” Version 4.0.x for this example.
The sample you are going to work with is the YourCo sample. To access this sample open the online help (click Help -> WebSphere Studio 4.0 -> How to -> Work with the samples -> Overview). To load this sample, follow the instructions in the online help under “Opening the Studio Samples” (for WebSphere Studio “Classic” V4.0) and load YourCo.war.
Note: The migrated application will execute in WebSphere Studio Application Developer, but WebSphere Studio Application Developer does not currently provide all the Web page design and development features of WebSphere Studio, Professional or Advanced Editions.
Chapter 10. Development environment migration examples (EA) 333

Before you begin:
� Ensure that the YourCo sample application is loaded in WebSphere Studio “Classic”.
� Stop any instances of the WebSphere Application Server (so it will not conflict with WebSphere Studio Application Developer).
Migration steps To migrate this sample from WebSphere Studio “Classic” to WebSphere Studio Application Developer, follow these steps.
1. Start WebSphere Studio “Classic” Version 4.0 and create a new Migration stage:
This step is optional. Normally, you would create a new stage for a migration, but for the purposes of this example, you use the Test stage included with WebSphere Studio “Classic”. Using the Test stage will save you from having to manually edit many Servlet mappings in step h on page 335.
For information on how to create a new stage for migration, refer to 3.5, “Migrating from WebSphere Studio “Classic” to WebSphere Studio Application Developer” on page 96.
2. Create a Web configuration descriptor file:
a. In the project file view, click Project -> Create Web Configuration Descriptor File, and accept the default value WEB-INF\localhost_web.xml.
b. Select all required Servlets (any files that are not named xxxxBean).
There are no Tag Library Descriptor (TLD) files for this sample.
c. Click Create.
3. Create a migration file:
a. While in the project file view, select server localhost and click Properties -> Publishing -> WebApp Web Path and type a Web path (context root) newStudioSample. (Setting a Web path will remain the recommended approach in the final WebSphere Studio Application Developer product).
b. While in the project file view, select Project -> Create Migration file.
c. Verify that localhost is the selected server.
d. Verify that localhost_web.xml is the selected Web configuration descriptor file.
e. Click OK.
f. The default JAR file name is X:\Studio40\projects\YourCo\localhost.jar, where X is your WebSphere Studio "Classic" installation directory.
334 Migrating to WebSphere V5.0: An End-to-End Migration Guide

g. Click Save.
h. Close WebSphere Studio "Classic".
i. Rename the localhost.jar file to localhost.war.
4. Start WebSphere Studio Application Developer and import the WAR file:
a. Start WebSphere Studio Application Developer.
b. Click File -> Import -> WAR file -> Next.
Note: You must import the JAR file using the WAR file option; otherwise it will not work properly.
c. Type the path to localhost.war in the WAR File field or click Browse to search for it.
d. In the Web Project field, select New, and then type newStudioSample.
e. In the EAR project name field, select New, and then type newStudioSampleEAR.
f. Click Finish. WebSphere Studio Application Developer will unpack localhost.war.
g. You will have many unresolved references or missing import files. They will appear in the Task view:
• com.ibm.db requires databeans.jar• com.ibm.webtools.runtime requires webtlsrn.jar• com.ibm.ejs.ns.jndi requires ns.jar• com.ibm.webshpere.advanced.cm.factory requires cm.jar• com.ibm.ejs.models.base.extensions.webappext.ServletExtensions
requires ws-base-extensions.jar
To fix this, you must modify the Java build path for the Web project:
i. Right-click the project and click Properties -> Java Build Path.
ii. Click the Libraries tab. Click Add External JARs.
iii. Import the following JAR files: databeans.jar, webtlsrn.jar, ns.jar, cm.jar, and ws-base-extensions.jar from the MyInstall\runtimes\aes_v4\lib directory.
iv. Twenty-four warnings will remain. You do not need to deal with them.
h. Right-click the newStudioSample project and click Rebuild Project.
5. Create a WebSphere Studio Application Developer server project:
At this point the sample has been migrated into WebSphere Studio Application Developer. All that remains is to create a WebSphere Studio
Chapter 10. Development environment migration examples (EA) 335
Application Developer Server project and test the sample in the WebSphere Test Environment.
a. Switch to the Server perspective.
b. Click File -> New -> Project -> Server -> Server Project. Click Next. In the Project name field, type newServer and click Finish.
c. In the Navigator view, right-click newServer and click New -> Server and Server Configuration.
d. In the Server name field, type WSTestEnv. In the Server instance type field, select WebSphere V4.0 Test Environment. Click Finish.
e. (Optional) Right-click newStudioSample project, select Properties -> Server Preference -> Always run on the following server, select WSTestEnv, then click Apply -> OK. (This step is only necessary if you have other servers.)
6. Now, you need to specify your EAR project to the server configuration:
a. In the Server Configuration view, click Server Configurations -> WSTestEnv.
b. Right-click it and click Add -> newStudioSampleEAR.
7. Test the migrated YourCo application:
a. Select the YourCoIntro.html file, which is located in the webContent\StudioSamples\YourCo directory in your newStudioSample project.
b. Right-click YourCoIntro.html, and from its pop-up menu, click Run on Server, and then select WSTestEnv.
c. Wait while the server starts. Click the Console tab in the Servers view and watch the Console until the message Server Default Server open for e-business appears.
d. If you have not already run this sample in WebSphere Studio “Classic”, then you need to configure the database by clicking Database Configuration.
e. When a browser opens, scroll down and click Run This Sample.
f. Wait until the Welcome window appears, then click Employee Center.
Note: The first time you run this application, you will receive the following errors in the Console page: DataSource not found. Try to construct a new datasource name: jdbc/yourco DataSource not found. Try to construct a new datasource name: jdbc/studio. These errors are self-correcting. You can ignore them.
336 Migrating to WebSphere V5.0: An End-to-End Migration Guide
g. When you are done, close the browser window and the Web Browser view, then in the Server Control Panel right-click WSTestEnv and click Stop.
h. (Optional) Close WebSphere Studio Application Developer.
10.1.4 Example: Migrating VisualAge for Java JSP/Servlet samples example to EJB 2.0
This example migrates the VisualAge for Java JSP/Servlet samples example (see 10.1.1, “Example: VisualAge for Java JSP/Servlet sample (LeapYear)” on page 324) from EJB 1.x to EJB 2.0. Note that this example requires that you have completed the migration steps in 10.1.2, “Example: Enterprise beans, VCE, and database samples (HelloWorld session bean and Increment enterprise bean)” on page 327 and that you have DB2 set up and running for that sample.
Migration steps1. Create a new EJB 2.0 project and Enterprise Application 1.3 project:
a. Select File -> New -> EJB Project -> Create EJB 2.0 project, and then click Next.
b. In the EJB Project Name field, type ejbSamplesV2.
c. Select the new EAR project.
d. In the EAR Project Name field, type ejbSamplesV2EAR, and then click Finish.
2. Import the VisualAge for Java EJB 1.1 JAR into EJB 2.0 project:
Import the VisualAge for Java EJB 1.1 JAR file in 10.1.2, “Example: Enterprise beans, VCE, and database samples (HelloWorld session bean and Increment enterprise bean)” on page 327 to an EJB 2.0 project.
a. Click File -> Import -> EJB JAR file and then click Next.
b. In the EJB JAR file field, browse for the location of the EJB 1.1 JAR that you created from VisualAge for Java.
c. Select the existing EJB project.
d. In the existing EJB Project name, select EJBSamplesV2.
e. Click Finish.
f. You will be asked if you wish to overwrite META-INF/MANIFEST.MF. Click Yes.
g. You will receive four EJB 1.1 warnings. They will be fixed in the next section.
Chapter 10. Development environment migration examples (EA) 337
3. To change the EJB module display name to make it different from your previous EJB 1.1 module name, follow these steps:
a. In the Navigator view, expand EJBSamplesV2 -> ejbModule -> META-INF and double-click to open ejb-jar.xml with the EJB Deployment Descriptor Editor.
b. In the Overview tab, change the display name to IBMEJBSamples-V2.
c. Save and close the EJB Deployment Descriptor Editor window.
4. Migrate code from EJB 1.0 to EJB 1.1:
a. Edit IncrementBean.java ejbCreate() line 57 to throw javax.ejb.EJBException instead of java.rmi.RemoteException.
b. Edit IncrementBean.java ejbCreate() line 57 to return IncrementKey instead of void.
c. Edit IncrementBean.java ejbCreate() to add “return null;” as new last line 61.
d. Edit IncrementBean.java to add new lines 63 to 65 implementing a new ejbPostCreate() method:
public void ejbPostCreate(IncrementKey argPrimaryKey)throws javax.ejb.CreateException, javax.ejb.EJBException {
}
e. Save and close IncrementBean.java (all of the previous IncrementBean warnings should go away).
f. Edit HelloWorldBean.java ejbCreate() line 23 to throw javax.ejb.EJBException instead of java.rmi.RemoteException.
g. Save and close HelloWorldBean.java (the previous HelloWorldBean warnings should go away).
5. Migrate code from EJB 1.1 to EJB 2.0:
Note: The current EA version does not provide a tool for EJB 1.x to 2.0 code migration. Remember that bean migration to EJB 2.0 is not required, since EJB 1.1 beans work correctly in an EJB 2.0 project. It is possible, sometime after the EA version ships, that there might be a downloadable techPreview, which provides a tool to assist in migrating EJB 1.x beans into EJB 2.0. Go to the eFix Web page at http://www14.software.ibm.com/webapp/download/product.jsp?type=s&id=SPAT-524G3S.
Although there currently is no tool for migrating EJB code, the following steps outline the general approach should you choose to undertake this yourself:
a. Open the ejb-jar.xml source with the XML Editor:
338 Migrating to WebSphere V5.0: An End-to-End Migration Guide

i. Change the bean <cmp-version level from 1.x to 2.x:
<cmp-version2.x</cmp-version
ii. Follow this with a new <abstract-schema-name definition (not used, but required for EJBQL):
<abstract-schema-nameincrementAbstractSchemaName</abstract-schema-name
iii. Save and close the XMP Editor window.
b. Open IncrementBean.java with the Java Editor:
i. Add abstract to the class definition (line 10):
public abstract class IncrementBean implements EntityBean {
ii. Comment out field definitions count and primaryKey (lines 11 and 13):
// public int count;private javax.ejb.EntityContext entityContext = null;
// public java.lang.String primaryKey;
iii. Add abstract Getter and Setter methods for count and primaryKey:
public abstract java.lang.String getPrimaryKey();public abstract void setPrimaryKey(java.lang.String
newPrimaryKey);public abstract int getCount();public abstract void setCount(int i);
// public void setCount(int newValue) {// this.count = newValue//}
iv. In the ejbCreate method, comment out the primaryKey operation and add a set invocation (line 60, new line 61:
// primaryKey = argPrimaryKey.primaryKey; setPrimaryKey(argPrimaryKey.primaryKey);
v. Modify increment method to get/increment/set the count field:
public int increment() {// return ++count; int c = getCount(); c += 1; setCount(c); return c;
}
vi. Save and close the Java Editor window for IncrementBean.java.
6. Generate and deploy RMIC stub and tie code:
Chapter 10. Development environment migration examples (EA) 339
a. In the J2EE perspective, J2EE Hierarchy view, expand the EJB Modules folder, and select IBMEJBSamples-V2 (or in the J2EE perspective, Navigator view, select the ejbSamplesV2 project).
b. Right-click it and then click Generate -> RMIC and Deploy Code.
c. Select the Hello World and Increment beans.
d. Click Finish.
7. Specify the data source binding information:
a. In the J2EE Perspective, J2EE Hierarchy view, expand EJB Modules and select IBMEJBSamples-V2 (or in the J2EE perspective, Navigator view, select the ejbSamplesV2 project META-INF/ejb-jar.xml).
b. Right-click the module and select Open With -> EJB Deployment Descriptor.
c. In the EJB deployment descriptor, click the Overview tab.
d. In the JNDI Default Data Source Binding section, type jdbc/sampledb in the DataSource JNDI name field. (If necessary, type a default user ID and password.)
e. In the EJB deployment descriptor editor, click the Beans tab.
f. Select the Increment bean.
g. In WebSphere Binding section, type com/ibm/ivj/ejb/samples/increment/Increment in the JNDI name field. In the Datasource Binding section, type jdbc/sampledb in the DataSource JNDI name field. (If necessary, type a default user ID and password.)
h. Select the HelloWorld bean.
i. In WebSphere Binding section, type HelloWorld in the JNDI name field.
j. In the Datasource Binding section, type jdbc/sampledb in the DataSource JNDI name field. (If necessary, type a default user ID and password.)
k. Save and close the EJB Deployment Descriptor Editor.
8. Create a new WebSphere Studio Application Developer Java client project:
a. Create a new Java project (click File -> New -> Project -> Java -> Java Project).
b. In the Project name field, type EJBSamplesClientsV2. Click Next.
c. Click the Projects tab. Select the EJBSamples-V2 check box.
d. Click Finish.
9. Import the Java code into the Java project:
a. In the Java perspective, open the Navigator view (click Perspective -> Show view -> Navigator).
340 Migrating to WebSphere V5.0: An End-to-End Migration Guide
b. In the Navigator view, click the EJBSamplesClientsV2 project.
c. Select File -> Import -> File system and click Next. Browse to the directory that you exported your VisualAge for Java client code to.
d. Expand your export directory and find your files (they will be in a subdirectory under com). Select the folders that contain your HelloClient and Increment Client files by selecting com.
e. In the Destination folder field, type EJBSamplesClientsV2/src (or browse to that folder).
f. Click Finish.
g. There will be two errors in the Tasks view (if you did not add the EJBSamplesV2 project to the classpath, you will have several errors). One occurs because references to javax.ejb.CreateException, which can be found in j2ee.jar, exist.
h. Select EJBSamplesClientsV2 and right-click it. Click Properties -> Java Build Path.
i. If you did not link to the EJBSamplesV2 project, select the Projects tab and select the EJBSamplesV2 check box. There should now only be two errors left.
j. Click the Libraries tab, click Add Variable, then select WAS_50_PLUGINDIR.
k. Click Extend the expand lib then select the j2ee.jar file. Click OK, then click OK again. There are still two errors in the Tasks view (a new one due to com.ibm.ivj.ejb.runtime.AbstractSessionAccessBean, which can be found in ivjejb35.jar).
l. Click Properties -> Java Build Path -> Libraries to add the ivjejb35.jar file.
m. There should now be no errors in the Tasks view.
At this point the samples have now been migrated into WebSphere Studio Application Developer. All that remains is to test them in the WebSphere Test Environment.
10.Create a server project with an WebSphere Application Server Version 5:
a. If you have not previously created a server project, click File -> New -> Project -> Server -> Server Project and then click Next.
b. In the Project name field, type MyEJBServerV5 and then click Finish.
c. The Server perspective will automatically open. In the Navigator view, select MyEJBServerV5 and right-click it.
d. Click New -> Server and Server Configuration.
Chapter 10. Development environment migration examples (EA) 341
e. In the Server name field, type MyEJBServerV5.
f. In the Server instance type field, expand WebSphere V5.0, select Test Environment, and then click Finish.
11.Specify your data source, your EAR project, and then start the server:
a. In the Server Configuration view, expand Server Configurations, and select MyEJBServerV5.
b. Right-click it, and from your pop-up menu, click Open.
c. Click the Data source tab.
d. Beside the JDBC provider list, click Add.
i. In the Name field, type Db2JdbcDriver
ii. In the Description field, retain DB2 JDBC Provider.
iii. In the Implementation class field, retain COM.ibm.db2.jdbc.DB2ConnectionPoolDataSource (note the uppercase COM).
iv. In the Class path field, retain {DB2_JDBC_DRIVER_PATH}\db2java.zip.
v. Leave Native Path blank.
vi. Click Finish.
e. Select this new Db2JdbcDriver in the JDBC Provider List.
f. Beside the Data source defined In JDBC driver selected above list, click Add.
i. Select Version 5.0 data source.
ii. In the Name field, type ejb samples
iii. In the JNDI name field, type jdbc/sampledb
iv. In the DataSource Helper Class Name field, retain com.ibm.websphere.rsadapter.DB2DataStoreHelper
v. Select Use This DataSource In Container Manager Persistence (CMP)
vi. Click Finish.
g. Select this new EJB samples in the Data source defined list.
h. Beside the Resource properties defined in the data source selected above list, click Add.
i. In the Name field, retain databaseName (note the upper case N).
ii. In the Type field, retain java.lang.String
342 Migrating to WebSphere V5.0: An End-to-End Migration Guide
iii. In the Value field, change to SAMPLEDB. Edit and then type SAMPLEDB. Do not select the Required check box. Click OK.
i. Save your changes and close the server configuration editor.
12.Specify your EAR project to the server configuration and start the server:
a. In the Server Configuration view, click Server Configurations -> MyEJBServerV5.
b. Right-click it and then click Add project -> EJBSamplesV2EAR.
c. (Optional) In the Navigator view, right-click ejbSamplesV2 project, select Properties -> Server Preference -> Always run on the following server -> WSTestEnv -> Apply -> OK. (This step is only necessary if you have other servers.)
d. In the Server view, right-click MyEJBServerV5, and then click Start.
13.Test the migrated HelloWorld client:
a. In the Java perspective, select the EJBSamplesClientsV2 project.
b. Click the Run triangle (pull-down) and select Run -> Java Application -> New.
c. In the Name field, type HelloWorldV2onV5.
d. In the Main tab, leave Project as ejbSamplesClientsV2.
e. Beside Main class, click Search, select HelloWorldClient, and then click Apply.
f. In the JRE tab, click Add, leave JRE Type as Standard VM. For JRE Name type V5 JRE. For JRE Home, browse to X:\MyInstall\runtimes\java\jre, click OK -> Apply ->Run.
g. Surprise - you get a server error, class not found com.ibm.ejs.ns.jndi.CNInitialContextFactory (found in namingclient.jar). You need to go back to the EJBSamplesClientsV2 project and click Properties -> Java Build Path -> Libraries again to add the namingclient.jar file.
h. Click the Run triangle (pull-down), and select Run -> Java Application -> HelloWorldV2onV5 -> Run.
i. In the client window Input field, type XX YY and then click Send. The value of the Output field becomes XX YY.
j. Close the window to terminate the client.
You have successfully migrated and tested the HelloWorld sample.
14.Test the migrated Increment client:
a. In the Java perspective, select the EJBSamplesClientsV2 project.
Chapter 10. Development environment migration examples (EA) 343
b. Click the Run triangle (pull-down), and select Run -> Java Application -> New.
c. In the Name field, type Increment2onV5
d. In the Main tab, leave Project as ejbSamplesClientsV2
e. Beside Main class, click Search, select IncrementClient, click Apply.
f. In the JRE tab, click the Run triangle (pull-down), select V5 JRE, click Apply, and then click Run.
g. Select IncrementClient and select Finish. The Console view contains the following content:
Obtaining initial context., Looking up Increment enterprise bean.,Obtaining IncrementHome object., Looking for increment object named: TEST,Object named: TEST has count: 0, Now, object named: TEST has count: 1,Now, object named: TEST has count: 2, Now, object named: TEST has count: 3Now, object named: TEST has count: 4, Now, object named: TEST has count: 5
15.Test the migrated Increment and HelloWorld EJBs using the EJB Test Client:
a. In the J2EE Hierarchy view of the J2EE perspective, expand the EJB Modules folder, right-click IBMEJBSamplesV2, and select Run on server. The EJB Test Client will start running.
b. In the JNDI Explorer page, click HelloWorld to test the HelloWorld EJB.
c. In the JNDI Explorer page, expand com\ibm\ivj\ejb\samples\increment and click Increment to test the Increment EJB.
You have successfully migrated and tested the Increment and HelloWorld samples.
d. In the Servers view of the Server perspective, select MyEJBServerV5, right-click it, and then click Stop. In the Processes view, select all the terminated processes, right-click them, and then select Remove all Terminated.
10.2 Migrating from WebSphere Studio 4.0 WebSphere Studio 5.0
The migration examples in this section all start with the YourBank Application installed in WebSphere Studio Application Developer 4.0. This is a sample application that can be downloaded from the WebSphere Developer Domain at http://www7b.boulder.ibm.com/wsdd/library/presents/AppDevTraining.html.
In addition to importing and configuring the YourBank Enterprise Application into a project named YourBankEAR in WebSphere Studio 4.0, the required tables
344 Migrating to WebSphere V5.0: An End-to-End Migration Guide
have been created in a DB2 database called BankData. See the documentation that comes with the YourBank training for instructions on creating the database.
The example in 10.2.2, “Example: Migrating YourBank using the CVS method” on page 348 assumes that a Servers project has been created in WebSphere Studio 4.0, and a Server and Server Configuration named WebSphere 4.0 Test has been appropriately configured for the application.
For all the examples in this section, WebSphere Studio 5.0 can be installed on the same system as WebSphere Studio 4.0, or on a different system. If WebSphere Studio 5.0 is co-installed with WebSphere Studio 4.0, it should be installed in a different directory.
The WebSphere Studio 5.0 install does not remove WebSphere Studio 4.0, so to replace WebSphere Studio 4.0 with WebSphere Studio 5.0 (using the same installation directory), you must uninstall WebSphere Studio 4.0 before installing WebSphere Studio 5.0
10.2.1 Example: Migrating YourBank using the Export/Import methodUsing this method, WebSphere Studio Application Developer Versions 4.0 and 5.0 may be installed on the same node or on separate nodes. If the versions are installed on separate nodes, one file per enterprise application must be moved from the machine where Version 4.0 resides to the machine where Version 5.0 resides.
Note: This is not a full migration since no project build path information is maintained, and server definitions and configurations are not migrated.
Migration steps1. To export the application from WebSphere Studio 4.0, start WebSphere
Studio Application Developer Version 4.0 and perform the following steps:
a. Select File -> Export
b. Select the EAR file and click Next.
c. Select YourBankEAR as the resource to export.
d. Type C:\YourBankMigration.ear as the export destination.
e. Select Export source files in the Options section.
f. Click Finish.
g. Close WebSphere Studio Application Developer Version 4.0.
2. Import the Application to WebSphere Studio 5.0
Chapter 10. Development environment migration examples (EA) 345

a. Move C:\YourBankMigration.ear to the system where WebSphere Studio Application Developer Version 5.0 is installed. and start WebSphere Studio Application Developer Version 5.0.
b. Select File -> Import
c. Select EAR file and click Next.
d. Type C:\YourBankMigration.ear as the name of the EAR file to import.
e. Type YourBankEAR as the Project name.
f. Click Finish to import the EAR.
3. When the import completes, you will notice that YourBankWebServicesModule has multiple errors. This is because the Java Build Path information from WebSphere Studio Application Developer 4.0 was not migrated.
a. If you are not already in the J2EE Perspective, switch to the J2EE perspective by selecting Window -> Open Perspective -> Other and then selecting J2EE and clicking OK.
b. In the J2EE Navigator view, right-click YourBankWebServicesModule and select Properties.
c. Select the Java Build Path and click the Libraries tab.
d. Click the Add Variable button, select SOAPJAR and click OK.
e. Click the Add Variable button, select XERCESJAR and click OK.
f. Click OK to close the Properties window.
There should no longer be any errors in the Task List.
4. Configure the WebSphere Version 4 Test Environment
The migrated application will be tested in the WebSphere 4.0 Test Environment. The Test Environment must be created and configured manually.
a. Switch to the Server perspective.
b. Select File -> New -> Server Project.
c. Type Servers in as the Project name and click Finish.
d. Select File -> New -> Server and Server Configuration.
e. Type WebSphere 4.0 Test as the Server name.
f. Select Servers as the folder.
g. In the Server type, select WebSphere Version 4.0 -> Test Environment.
h. Click Finish.
346 Migrating to WebSphere V5.0: An End-to-End Migration Guide

5. The data source for the EJB must be defined in the Server Configuration. The following instructions assume that the application uses a DB2 Database named BankData on the same node where WebSphere Studio Application Developer is running:
a. In the Server Configuration view, expand Server Configurations and double-click WebSphere 4.0 Test.
b. In the WebSphere 4.0 Test editor, click the Data source tab.
c. In the JDBC driver list, select Db2JdbcDriver.
d. Click the Add button next to the Data source defined in the JDBC driver box.
e. Type YourBank for the name.
f. Type jdbc/YourBank for the JNDI name.
g. Type BankData for the Database name.
h. Type in the appropriate values for the default user ID and default user password.
i. Click OK.
j. Close the WebSphere 4.0 Test editor and save your changes.
6. Test the applications:
The application must be configured to run on the newly configured server and then the application can be tested.
a. In the Server Configuration view, right-click WebSphere 4.0 Test, select Add -> YourBankEAR.
b. In the Servers view, right-click WebSphere 4.0 Test and select Publish. When the publishing completes, click OK.
c. In the Servers view, right-click WebSphere 4.0 Test and select Start.
d. Watch the console for the message: Server Default Server open for e-business.
e. To test the Web Module (and the underlying EJBs) go to http://localhost:8080/YourBankWebModule/.
f. To test the Web Service Module (and the underlying EJBs) go to http://localhost:8080/YourBankWebServicesModule/sample/Transfer/TestClient.jsp
g. In the Servers view, right-click WebSphere 4.0 Test and select Stop.
Chapter 10. Development environment migration examples (EA) 347

10.2.2 Example: Migrating YourBank using the CVS methodMigrating projects using an SCM is the easiest way to get the complete project migrated between versions. This method can be used to migrate not only enterprise applications, EJB projects, and Web projects, but also Server projects.
It is important to use a full-featured CVS server. CVSNT in particular might not be robust enough to support this process.
This example is an alternative to the example shown in 10.2.1, “Example: Migrating YourBank using the Export/Import method” on page 345. The result of this procedure should be the same as that example.
Migration steps1. Add the application into CVS:
a. Start WebSphere Studio Application Developer Version 4.0.
b. Switch to the J2EE perspective.
c. In the Navigator view, expand YourBankWebModule.
d. Right-click the source folder and select New -> Other.
e. Select Simple -> File and click Next.
f. Name the file “keep” and click Finish.
g. Close the keep editor. Notice that the keep file also is found by expanding YourBankWebModule -> webApplication -> WEB-INF -> classes. This will ensure that the classes directory will not get pruned because it only contains empty directories. The classes directory will be needed when the project is checked out in WebSphere Studio 5.0.
h. Select YourBankWebServicesModule -> source and create a keep file there..
i. Create a file named .cvsignore in YourBankEJBModule. The file should contain a single line with the word “bin”. This will keep the bin directory from being checked into CVS.
j. Switch to the Team perspective.
k. Right-click the Repositories view and select New -> CVS Repository Location.
l. Leave the Connection type as pserver. Type in the appropriate user name, host name and repository path for your CVS server and click Finish.
m. When prompted for a password, type in the CVS pserver password for the user name specified.
348 Migrating to WebSphere V5.0: An End-to-End Migration Guide
n. In the Navigator view, select the Servers, YourBankEAR, YourBankEJBModule, YourBankWebModule, and YourBankWebServicesModule projects.
o. Right-click the selected projects, and select Team -> Synchronize with Stream
p. For each project, select the repository that you just defined and the stream HEAD. Click OK.
q. In the Synchronize view, right-click each project and select Release.
r. Type in a release comment for each and click OK.
s. Close WebSphere Studio Application Developer 4.0.
2. Update file attributes in CVS (optional)
WebSphere Studio 4.0 saves all files in CVS as binary (CVS option -kb). WebSphere Studio 5.0 has the ability to save files in CVS in both binary and text formats. The formats of individual files can be changed from within WebSphere Studio 5.0, but the bulk conversion of all text files in a project is probably better suited to a script using CVS admin to make the change.
If the file attributes are changed at this time, all occurrences of the following files should have their attribute changed to text:
.vcm_meta
.modulemaps*.xml*.xmiMANIFEST.MF.serverPreference.classpath*.java*.mapxmi*.ddl*.tblxmi*.schxmi*.dbxmi.websettings*.html*.css*.jsp*.isd*.wsdl*.wsi
If the file attributes are converted at a later time, all developers will have to delete the local copies of the projects with changed files and repeat the checkout from CVS at that time.
Chapter 10. Development environment migration examples (EA) 349
This example does not include changing the file attributes in CVS. The local CVS administrator should be able to determine the correct procedure to make the change.
3. Create a branch
Creating a branch in the CVS stream will allow the old version to the project to be maintained with WebSphere Studio 4.0, while new development is done with WebSphere Studio 5.0.
a. Open WebSphere Studio Application Developer 5.0.
b. Select Window -> Open Perspective -> Other.
c. Select CVS Repository Exploring and click OK.
d. Right-click the CVS Repositories view and select New -> Repository Location.
e. Fill in the information for your CVS repository.
f. Click Finish.
g. In the CVS Repositories view, expand the repository that you just created
h. Right-click Branches and select Define Branch Tag.
i. Enter the name WSAD4 and click OK.
j. Expand the HEAD stream and select the Servers, YourBankEAR, YourBankEJBModule, YourBankWebModule, and YourBankWebServicesModule projects.
k. Right-click the selected projects and select Tag with Existing.
l. Expand the Branches, select WSAD4 and click OK.
This technique keeps the new development (in WebSphere Studio 5.0) in the HEAD stream, while maintenance of old code can still be performed in WebSphere Studio 4.0 on the WSAD4 branch.
All development workstations that will be used to perform maintenance on the old application in WebSphere Studio 4.0 should delete the projects from their workspace and check them back out from the WSAD4 stream.
4. Check out the projects:
a. Select Window -> Preferences -> Workbench and clear the Perform build automatically check box.
b. Click OK.
c. In the CVS Repositories view, expand the HEAD stream.
d. Select the Servers, YourBankEAR, YourBankEJBModule, YourBankWebModule, and YourBankWebServicesModule projects. Make sure that these projects are not selected under the WSAD4 branch.
350 Migrating to WebSphere V5.0: An End-to-End Migration Guide
e. Right-click the selected projects and select Check out as project.
5. Make changes to the checked-out projects:
a. Switch to the J2EE perspective.
b. In the J2EE Hierarchy, expand Enterprise Applications and double-click YourBankEAR.
c. When prompted, click Yes to allow the paths in the file to be auto corrected.
d. Close and save the Application Deployment Descriptor.
6. Building the projects as they are would result in two PARSER_ERRORS because two Web Service WSDL files use absolute paths for import tags. The absolute paths used are only valid when the application is installed and running in the test environment. This can be addressed by changing the imports to use relative paths:
a. In the J2EE Navigator view, expand YourBankWebServicesModule -> webApplication -> wsdl.
b. Double-click Transfer-service.wsdl.
c. In the Transfer-service.wsdl editor, select Definitions -> Import.
d. Change the value of the location to Transfer-binding.wsdl.
e. Press Enter before you close the editor so the change will be recognized.
f. Close the Transfer-service.wsdl editor and save the changes.
g. Double-click webservicesHelper-service.wsdl.
h. In the webservicesHelper-service.wsdl editor, select Definitions -> Import.
i. Change the value of the location to webServicesHelper-binding.wsdl.
j. Press Enter before you close the editor so the change will be recognized.
k. Close the webservicesHelper-service.wsdl editor and save the changes.
7. Build the projects:
a. Select Project -> Rebuild all. This should resolve all errors in the Task List. There will still be a number of warning and informational messages.
b. Select Window -> Preferences -> Workbench and check the Perform build automatically check box.
c. Click OK. This will result in several errors in the Task List. These errors will be addressed in the next section.
Chapter 10. Development environment migration examples (EA) 351
8. Configure the WebSphere Version 4 Test Environment:
The migrated application will be tested in the WebSphere 4.0 Test Environment that was migrated from WebSphere Studio 4.0.
a. Switch to the Server perspective.
b. In the Server Configuration view, expand Server Configurations and double-click WebSphere 4.0 Test.
c. When prompted, click Yes to allow the editor to fix project entries automatically.
d. When prompted, click Yes to allow the editor to fix paths automatically.
e. Close and save the WebSphere 4.0 Test editor.
f. In the Server Configuration view, expand Server Configurations and WebSphere 4.0 Test.
g. Right-click YourBankEAR and select Remove.
h. Right-click WebSphere 4.0 Test under Server Configurations and select Add -> YourBankEAR.
9. Test the application:
a. In the Servers view, right-click WebSphere 4.0 Test and select Publish.
b. When publishing completes, click OK.
c. In the Servers view, right-click WebSphere 4.0 Test and select Start.
d. Watch the console for the message: Server Default Server open for e-business.
e. To test the Web Module (and the underlying EJBs) go to http://localhost:8080/YourBankWebModule/.
f. To test the Web Service Module (and the underlying EJBs) go to http://localhost:8080/YourBankWebServicesModule/sample/Transfer/TestClient.jsp.
g. In the Servers view, right-click WebSphere 4.0 Test and select Stop.
10.Check the updated projects into CVS:
a. Switch to the Resource perspective and expand all the project folders in the Navigator view.
b. In each project, right-click .vcm_meta, select Delete and click Yes to confirm.
c. In the Navigator view, select the Servers, YourBankEAR, YourBankEJBModule, YourBankWebModule, and YourBankWebServicesModule projects.
352 Migrating to WebSphere V5.0: An End-to-End Migration Guide
d. Right-click the selected projects and select Team -> Synchronize with Repository.
e. In the Synchronize view, right-click each project and select Commit.
f. When you are prompted to add resources to version control, click Yes.
g. When prompted for a commit comment, type one in and click OK.
The migration to WebSphere Studio 5.0 is complete.
10.2.3 Example: Running YourBank in WebSphere Version 5.0 Test Environment
This example assumes that the YourBank Application has already been migrated to WebSphere Studio 5.0 using either the Export/Import method or the CVS method.
Migration steps1. Create a WebSphere 5.0 server:
a. Switch to the Server perspective.
b. Select File -> New -> Server and Server configuration.
c. Type in the server name WebSphere 5.0 Test.
d. Make sure the folder Servers is selected.
e. Select server type. Click WebSphere Version 5.0 -> Test Environment.
f. Click Finish.
2. Configure the server:
a. In the Server Configuration view, double-click WebSphere 5.0 Test under Server Configurations.
b. Click the Data source tab of the WebSphere 5.0 Test editor.
c. Click the Add button next to JDBC Providers.
d. Select IBM DB2 for the Database type and DB2 JDBC Provider for the JDBC Provider Type.
e. Click Next.
f. Type the name DB2 Non-XA.
g. Click Finish.
h. Click Add next to the data sources defined in the JDBC Provider.
i. Select Version 4.0 data source and click Next.
Chapter 10. Development environment migration examples (EA) 353

j. Type YourBank for the name.
k. Type jdbc/YourBank for the JNDI name.
l. Type BankData for the database name.
m. Type in the appropriate values for the default user ID and default user password.
n. Click Finish.
o. Close the WebSphere 5.0 Test editor and save your changes.
p. Right-click the WebSphere 5.0 Test Server Configuration in the Server Configuration view and select Add -> YourBankEAR.
3. Update the Web Service application:
The Web Service Project uses some Java Helper classes in which the server's URL is hard coded. These need to be updated to run on the new server, which listens on port 9080 instead of 8080.
a. Switch to the J2EE perspective
b. In the J2EE Navigator view, open YourBankWebServiceModule -> source -> proxy.soap -> webServicesHelperProxy.java.
c. Change stringURL from http://localhost:8080/... to http://localhost:9080/...
d. Close and save webServicesHelperProxy.java.
e. Update the stringURL in proxy.soap.com.ibm.yourbank.ws.webServicesHelperProxy.java and proxy.soap.com.ibm.yourbank.ejb.TransferProxy.java.
f. Open YourBankWebServiceModule -> webApplication -> dds.xml.
g. Expand root -> isd:service -> isd:provider and the second isd:option.
h. Change the ContextProviderURL from iiop://localhost:900 to iiop://localhost.
i. Close the dds.xml editor and save the changes.
j. Expand the wsdl directory.
k. Edit Transfer-service.wsdl and webServicesHelper-service.wsdl. Change all instances of http://localhost:8080 to http://localhost:9080.
4. Test the application.
a. Switch to the Server perspective.
b. Right-click WAS 5.0 Test in the Servers view and select Publish.
c. When Publishing completes click OK.
d. Right-click WAS 5.0 Test in the Servers view and select Start.
354 Migrating to WebSphere V5.0: An End-to-End Migration Guide
e. Watch the console for the message Server server1 open for e-business.
f. To test the Web Module (and the underlying EJBs) go to http://localhost:9080/YourBankWebModule/.
g. To test the Web Service Module (and the underlying EJBs) go to http://localhost:9080/YourBankWebServicesModule/sample/Transfer/TestClient.jsp.
h. In the Servers view, right-click WAS 5.0 Test, and select Stop.
10.2.4 Example: Migrating YourBank to J2EE 1.3The previous examples show how to bring the YourBank application into WebSphere Studio 5.0 and test it on the WebSphere Test Environment Versions 4.0 and 5.0. Even when it is running on WebSphere 5.0, however, it is running as a J2EE 1.2 application. This example shows how to migrate the YourBank application to J2EE 1.3 and test it on the WebSphere Test Environment 5.0.
The instructions in this section assume that you have already migrated the YourBank application to WebSphere Studio 5.0 using either the export/import method or the CVS method and have configured it to run on the WebSphere 5.0 Test Environment.
Migration steps1. Migrate YourBankEAR to J2EE 1.3:
a. Switch to the J2EE perspective.
b. In the J2EE Navigator, right-click YourBankEAR and select Migrate -> J2EE Version 1.2 to 1.3.
c. When prompted to confirm the migration, click OK.
d. When prompted to repair the server configuration, click OK.
e. When the migration completes, click OK.
2. Migrate YourBankEJBModule to J2EE 1.3:
a. Switch to the J2EE perspective.
b. In the J2EE Navigator, expand EJBModules -> YourBankEJBModule and double-click Account.
c. Highlight Account under Beans and click Remove.
d. Clear all check boxes except Delete Deployed Code and click OK.
e. Close the EJB Deployment Descriptor editor and save your changes.
Chapter 10. Development environment migration examples (EA) 355
f. In the J2EE Navigator, right-click YourBankEJBModule and select Migrate -> J2EE Version 1.2 to 1.3.
g. When prompted to confirm the migration, click OK
h. When the migration completes, click OK
3. Migrate the Account bean definition to EJB 2.0:
There are no code changes to migrate session beans to EJB 2.0, so the Transfer bean was automatically migrated to EJB 2.0 when the project was migrated to J2EE 1.3. The Account bean, however, was left as an EJB 1.1 bean. It must be migrated to EJB 2.0.
a. In the J2EE Hierarchy, expand EJBModules -> YourBankEJBModule and double-click Account.
b. In the EJB Deployment Descriptor editor, highlight Account under Beans and click Remove.
c. Clear all check boxes except Delete Bean Only and click OK.
d. Click Add under Beans.
e. Select Entity bean with container managed persistence (CMP) fields and CMP 2.0 Bean.
f. Type the bean name: Account.
g. Select the Default package: com.ibm.yourbank.ejb and click Next.
h. Un-check Local client view and check Remote client view.
i. Change the EJB binding name to ejb/Account.
j. Click Finish.
k. In the Beans tab of the EJB Deployment Descriptor editor, in the WebSphere Bindings section, type in the CMP Container Factory JNDI Name: jdbc/YourBank.
l. Close and save the EJB Deployment Descriptor editor.
4. Migrate the Account bean code to EJB 2.0:
a. In the J2EE Hierarchy view, expand EJB Modules -> YourBankEJBModule.
b. Right-click Account and select New -> CMP Field.
c. Enter the Name: type and the Type: int.
d. Un-check all boxes and click OK.
e. Add the following CMP fields:
i. balance (float)
ii. accountOwner (String)
356 Migrating to WebSphere V5.0: An End-to-End Migration Guide
f. Double-click AccountBean to launch the Java editor to make the rest of the changes.
g. Delete the field definitions for accountNumber, type, balance and accountOwner.
h. Add the following declarations:
public abstract long getAccountNumber();public abstract void setAccountNumber(long acctNum);
i. Replace all direct references to the persistent fields with references to the getters and setters. For example, in ejbCreate, change:
this.accountNumber = accountNumber;
to
setAccountNumber(accountNumber);
j. Close and save the AccountBean.java editor.
5. Update the mapping and generate code:
a. In the J2EE Hierarchy expand YourBankEJBModule -> Maps -> DB2 UDB V7.1 and double-click BankData.
b. In the Map.mapxmi editor, select Account in the Enterprise Beans pane and ACCOUNT in the Tables pane.
c. Right-click either Account, and select Match by Name.
d. Close the Map.mapxmi editor and save your changes.
e. In the J2EE Hierarchy view, right-click YourBankEJBModule and select Generate -> RMIC and Deploy Code.
f. Select both beans and click Finish.
6. Migrate YourBankWebModule and YourBankWebServicesModule to J2EE 1.3:
a. In the J2EE Navigator, right-click YourBankWebModule and select Migrate -> J2EE Version 1.2 to 1.3.
b. When prompted to confirm the migration, click OK.
c. When prompted to update links to moved or renamed files, click No.
d. When the migration completes, click OK.
e. In the J2EE Navigator, right-click YourBankWebServicesModule and select Migrate -> J2EE Version 1.2 to 1.3.
f. When prompted to confirm the migration, click OK.
g. When prompted to update links to moved or renamed files, click No.
h. When the migration completes, click OK.
Chapter 10. Development environment migration examples (EA) 357
7. Configure the test server:
a. Switch to the Server perspective.
b. In the Server Configuration view, double-click WebSphere 5.0 Test under Server Configurations.
c. Click the Data source tab.
d. Highlight the YourBank data source and click Remove.
e. Click Add next to the data sources defined in the JDBC Provider.
f. Select Version 5.0 Data Source and click Next.
g. Type YourBank for the name.
h. Type jdbc/YourBank for the JNDI name.
i. Check the Use this data source in container managed persistence box.
j. Click Next.
k. Click databaseName in Resource Properties and type in the Value: BankData.
l. Click Finish.
m. Click Add next to Resource properties defined for the data source.
n. Add a property name: user and a type: String, and set the value to the appropriate database user.
o. Click OK.
p. Add a String property named password and set the value appropriately.
q. Close the WebSphere 5.0 Test editor and save your changes.
r. In the Server Configuration view, expand Server Configurations -> WebSphere 5.0 Test.
s. Right-click the WebSphere 5.0 Test Server Configuration in the Server Configuration view and select Add -> YourBank1.3EAR.
8. Test the Web application.
a. Switch to the Server perspective.
b. Right-click WebSphere 5.0 Test in the Servers view and select Publish.
c. When publishing completes, click OK.
d. Right-click WebSphere 5.0 Test in the Servers view and select Start.
e. Watch the console for the message Server server1 open for e-business.
358 Migrating to WebSphere V5.0: An End-to-End Migration Guide

f. To test the Web Module (and the underlying EJBs) go to http://localhost:9080/YourBankWebModule/.
g. To test the Web Service Module (and the underlying EJBs) go to http://localhost:9080/YourBankWebServicesModule/sample/Transfer/TestClient.jsp.
h. In the Servers view, right-click WAS 5.0 Test and select Stop.
Chapter 10. Development environment migration examples (EA) 359

360 Migrating to WebSphere V5.0: An End-to-End Migration Guide

Chapter 11. System and runtime migration examples
This chapter provides practical examples of migrating the WebSphere test/production runtime environments.
The chapter is organized into the following sections:
� Migrating the WebSphere runtime to V5.0
– V3.5 to V5.0 manual migration– V4.0 to V5.0 manual migration– V3.5 / V4.0 to V5.0 automated migration
� Interoperability and coexistence of V3.5 and V5.0, and V4.0 and V5.0
– V3.5 and V5.0 interoperability– V4.0 and V5.0 interoperability– V3.5 and V5.0, V4.0 and V5.0 coexistence
The WebSphere runtime migration examples include incremental migration using coexistence and interoperability features.
11
© Copyright IBM Corp. 2002 2003. All rights reserved. 361
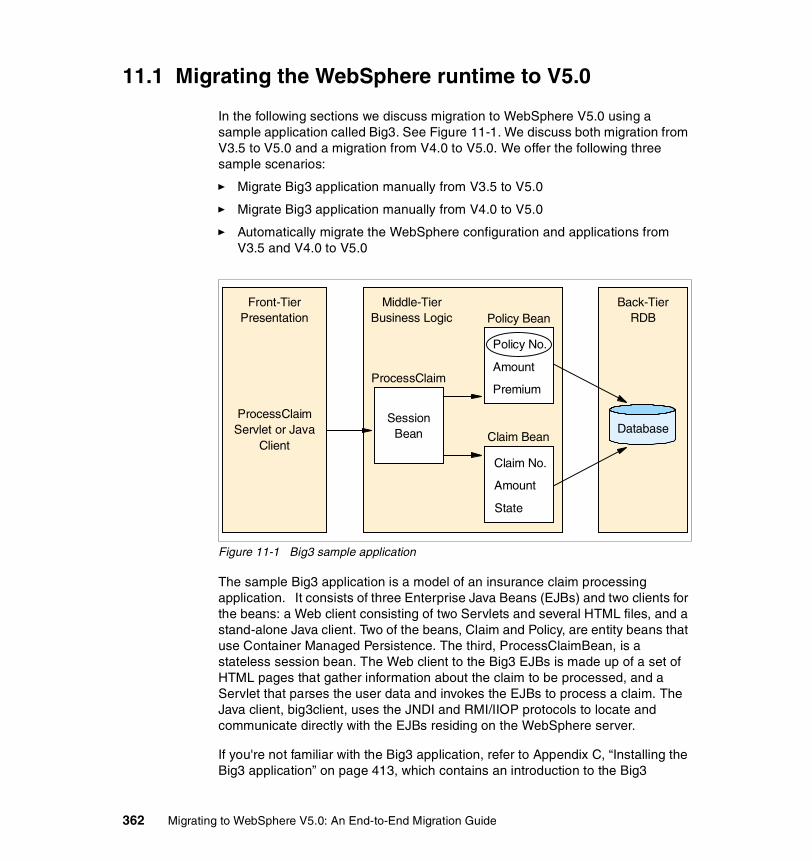
11.1 Migrating the WebSphere runtime to V5.0
In the following sections we discuss migration to WebSphere V5.0 using a sample application called Big3. See Figure 11-1. We discuss both migration from V3.5 to V5.0 and a migration from V4.0 to V5.0. We offer the following three sample scenarios:
� Migrate Big3 application manually from V3.5 to V5.0
� Migrate Big3 application manually from V4.0 to V5.0
� Automatically migrate the WebSphere configuration and applications from V3.5 and V4.0 to V5.0
Figure 11-1 Big3 sample application
The sample Big3 application is a model of an insurance claim processing application. It consists of three Enterprise Java Beans (EJBs) and two clients for the beans: a Web client consisting of two Servlets and several HTML files, and a stand-alone Java client. Two of the beans, Claim and Policy, are entity beans that use Container Managed Persistence. The third, ProcessClaimBean, is a stateless session bean. The Web client to the Big3 EJBs is made up of a set of HTML pages that gather information about the claim to be processed, and a Servlet that parses the user data and invokes the EJBs to process a claim. The Java client, big3client, uses the JNDI and RMI/IIOP protocols to locate and communicate directly with the EJBs residing on the WebSphere server.
If you're not familiar with the Big3 application, refer to Appendix C, “Installing the Big3 application” on page 413, which contains an introduction to the Big3
Middle-TierBusiness Logic
ProcessClaim
SessionBean
Back-TierRDBPolicy Bean
Policy No.
Amount
Premium
Claim No.
Amount
State
Claim BeanDatabase
Front-TierPresentation
ProcessClaimServlet or Java
Client
362 Migrating to WebSphere V5.0: An End-to-End Migration Guide
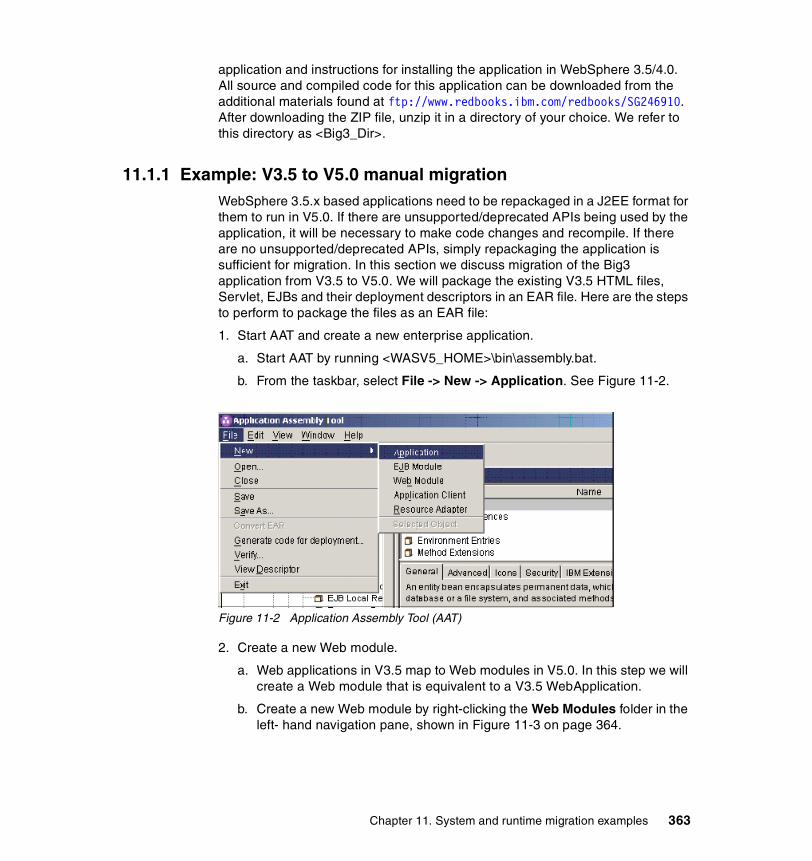
application and instructions for installing the application in WebSphere 3.5/4.0. All source and compiled code for this application can be downloaded from the additional materials found at ftp://www.redbooks.ibm.com/redbooks/SG246910. After downloading the ZIP file, unzip it in a directory of your choice. We refer to this directory as <Big3_Dir>.
11.1.1 Example: V3.5 to V5.0 manual migration WebSphere 3.5.x based applications need to be repackaged in a J2EE format for them to run in V5.0. If there are unsupported/deprecated APIs being used by the application, it will be necessary to make code changes and recompile. If there are no unsupported/deprecated APIs, simply repackaging the application is sufficient for migration. In this section we discuss migration of the Big3 application from V3.5 to V5.0. We will package the existing V3.5 HTML files, Servlet, EJBs and their deployment descriptors in an EAR file. Here are the steps to perform to package the files as an EAR file:
1. Start AAT and create a new enterprise application.
a. Start AAT by running <WASV5_HOME>\bin\assembly.bat.
b. From the taskbar, select File -> New -> Application. See Figure 11-2.
Figure 11-2 Application Assembly Tool (AAT)
2. Create a new Web module.
a. Web applications in V3.5 map to Web modules in V5.0. In this step we will create a Web module that is equivalent to a V3.5 WebApplication.
b. Create a new Web module by right-clicking the Web Modules folder in the left- hand navigation pane, shown in Figure 11-3 on page 364.
Chapter 11. System and runtime migration examples 363

Figure 11-3 Application Assembly Tool - create Web module
c. Give the Web module a name of your choice, for example Big3.war as shown in Figure 11-4 on page 365.
364 Migrating to WebSphere V5.0: An End-to-End Migration Guide
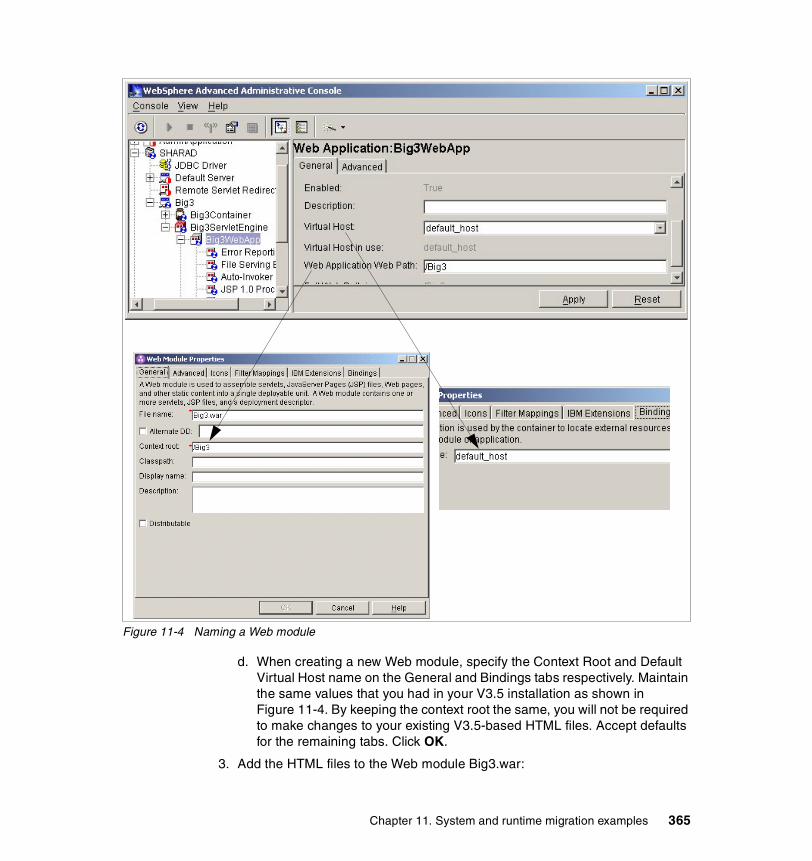
Figure 11-4 Naming a Web module
d. When creating a new Web module, specify the Context Root and Default Virtual Host name on the General and Bindings tabs respectively. Maintain the same values that you had in your V3.5 installation as shown in Figure 11-4. By keeping the context root the same, you will not be required to make changes to your existing V3.5-based HTML files. Accept defaults for the remaining tabs. Click OK.
3. Add the HTML files to the Web module Big3.war:
Chapter 11. System and runtime migration examples 365
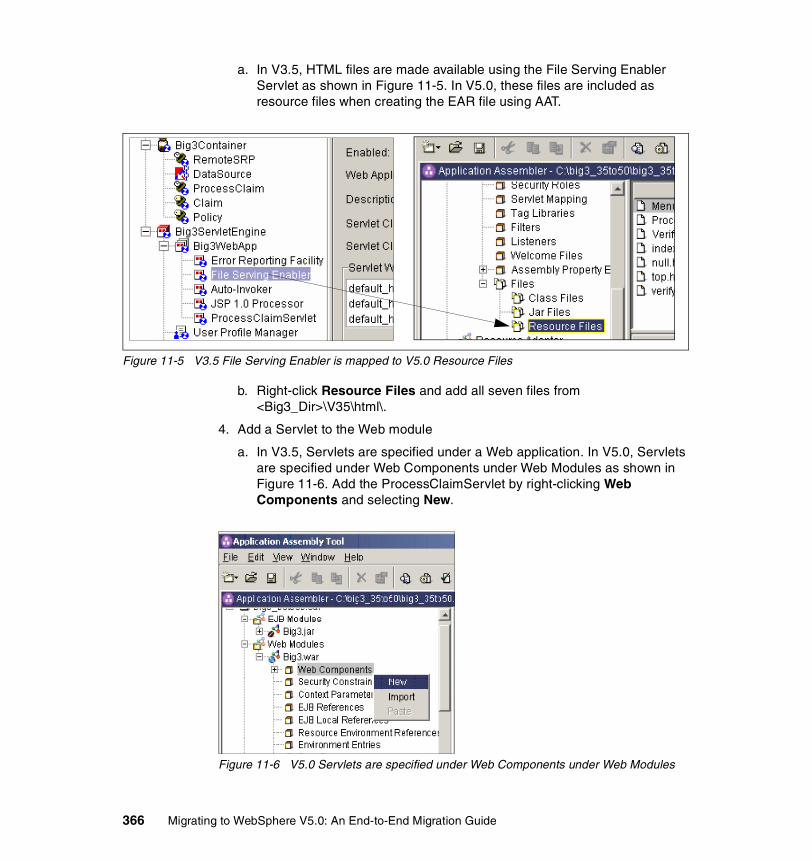
a. In V3.5, HTML files are made available using the File Serving Enabler Servlet as shown in Figure 11-5. In V5.0, these files are included as resource files when creating the EAR file using AAT.
Figure 11-5 V3.5 File Serving Enabler is mapped to V5.0 Resource Files
b. Right-click Resource Files and add all seven files from <Big3_Dir>\V35\html\.
4. Add a Servlet to the Web module
a. In V3.5, Servlets are specified under a Web application. In V5.0, Servlets are specified under Web Components under Web Modules as shown in Figure 11-6. Add the ProcessClaimServlet by right-clicking Web Components and selecting New.
Figure 11-6 V5.0 Servlets are specified under Web Components under Web Modules
366 Migrating to WebSphere V5.0: An End-to-End Migration Guide

b. Specify the component name as ProcessClaimServlet and enable the Component Type Servlet radio button.
Figure 11-7 Specifying the component name of the new Web component
c. In order to specify the class for ProcessClaimServlet, click Browse, as shown in Figure 11-8.
Figure 11-8 Select file for class name window
d. On the Select file for Class name window, click Browse to specify the Root Directory or Archive and select the directory <Big3_Dir>\V35.
Note: In the Root Directory or Archive field, do not specify the Servlet class file. Specify the directory containing the Big3 folder. Then navigate to the Servlet in the left-hand pane as shown in Figure 11-8. Click OK.
5. Provide Servlet mapping
Chapter 11. System and runtime migration examples 367
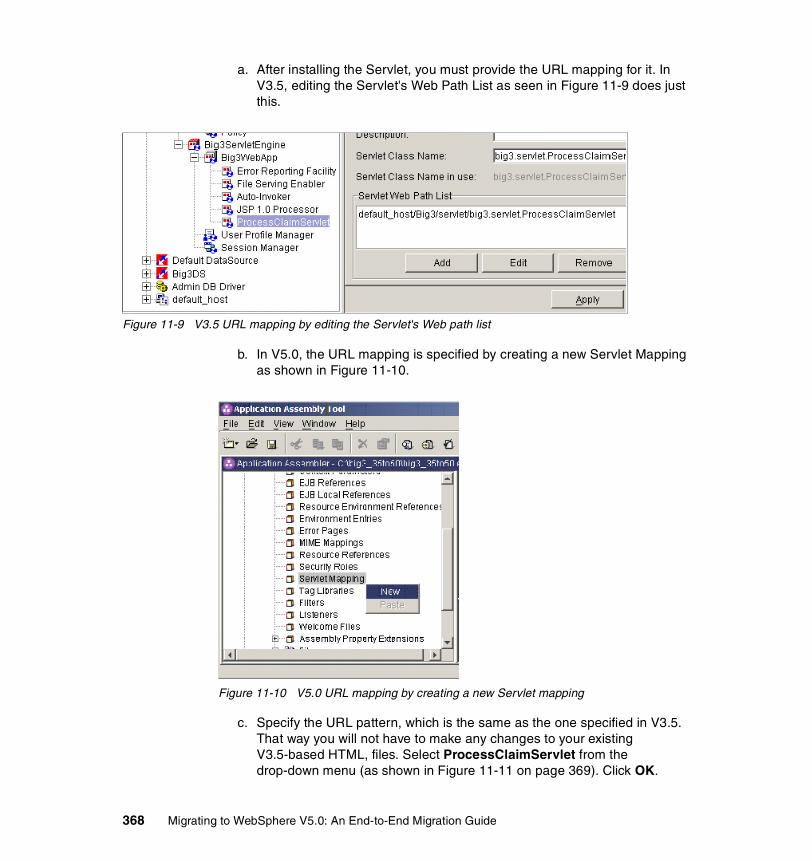
a. After installing the Servlet, you must provide the URL mapping for it. In V3.5, editing the Servlet's Web Path List as seen in Figure 11-9 does just this.
Figure 11-9 V3.5 URL mapping by editing the Servlet's Web path list
b. In V5.0, the URL mapping is specified by creating a new Servlet Mapping as shown in Figure 11-10.
Figure 11-10 V5.0 URL mapping by creating a new Servlet mapping
c. Specify the URL pattern, which is the same as the one specified in V3.5. That way you will not have to make any changes to your existing V3.5-based HTML, files. Select ProcessClaimServlet from the drop-down menu (as shown in Figure 11-11 on page 369). Click OK.
368 Migrating to WebSphere V5.0: An End-to-End Migration Guide

Figure 11-11 Specifying URL pattern and selecting Servlet
6. Create an EJB module
a. Right-click EJB Modules and create a new EJB module. Give it a name of your choice, such as Big3.jar (see Figure 11-12).
Figure 11-12 Creating new EJB module
b. Click CMP Resource Bindings tab and specify the JNDI name as Big3DS (see Figure 11-13).
Figure 11-13 Specifying JNDI name
c. Click OK.
7. In this EJB module, we create three EJBs: one session bean and two entity beans. Create the session bean as follows:
a. In AAT's navigation pane, expand the EJB Module Big3.jar. Right-click Session Beans and create a new session bean.
Chapter 11. System and runtime migration examples 369
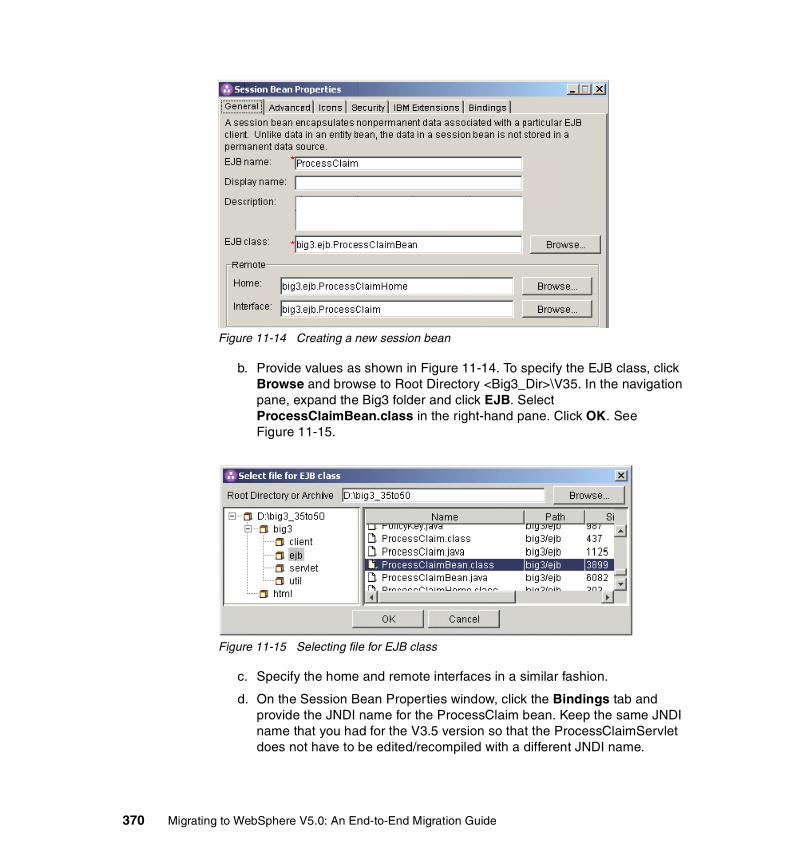
Figure 11-14 Creating a new session bean
b. Provide values as shown in Figure 11-14. To specify the EJB class, click Browse and browse to Root Directory <Big3_Dir>\V35. In the navigation pane, expand the Big3 folder and click EJB. Select ProcessClaimBean.class in the right-hand pane. Click OK. See Figure 11-15.
Figure 11-15 Selecting file for EJB class
c. Specify the home and remote interfaces in a similar fashion.
d. On the Session Bean Properties window, click the Bindings tab and provide the JNDI name for the ProcessClaim bean. Keep the same JNDI name that you had for the V3.5 version so that the ProcessClaimServlet does not have to be edited/recompiled with a different JNDI name.
370 Migrating to WebSphere V5.0: An End-to-End Migration Guide
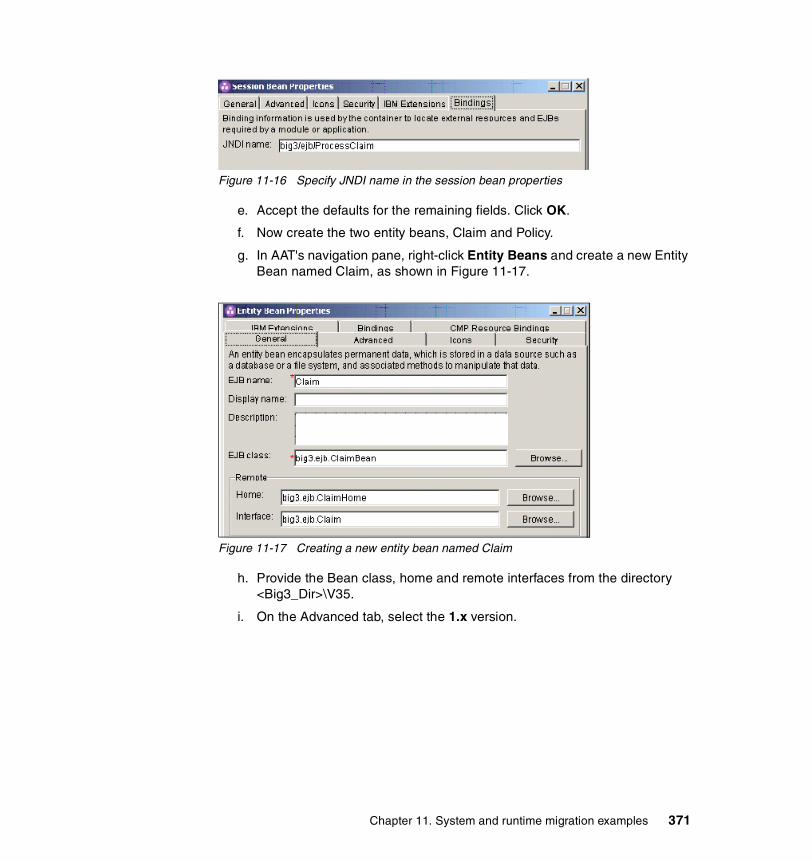
Figure 11-16 Specify JNDI name in the session bean properties
e. Accept the defaults for the remaining fields. Click OK.
f. Now create the two entity beans, Claim and Policy.
g. In AAT's navigation pane, right-click Entity Beans and create a new Entity Bean named Claim, as shown in Figure 11-17.
Figure 11-17 Creating a new entity bean named Claim
h. Provide the Bean class, home and remote interfaces from the directory <Big3_Dir>\V35.
i. On the Advanced tab, select the 1.x version.
Chapter 11. System and runtime migration examples 371
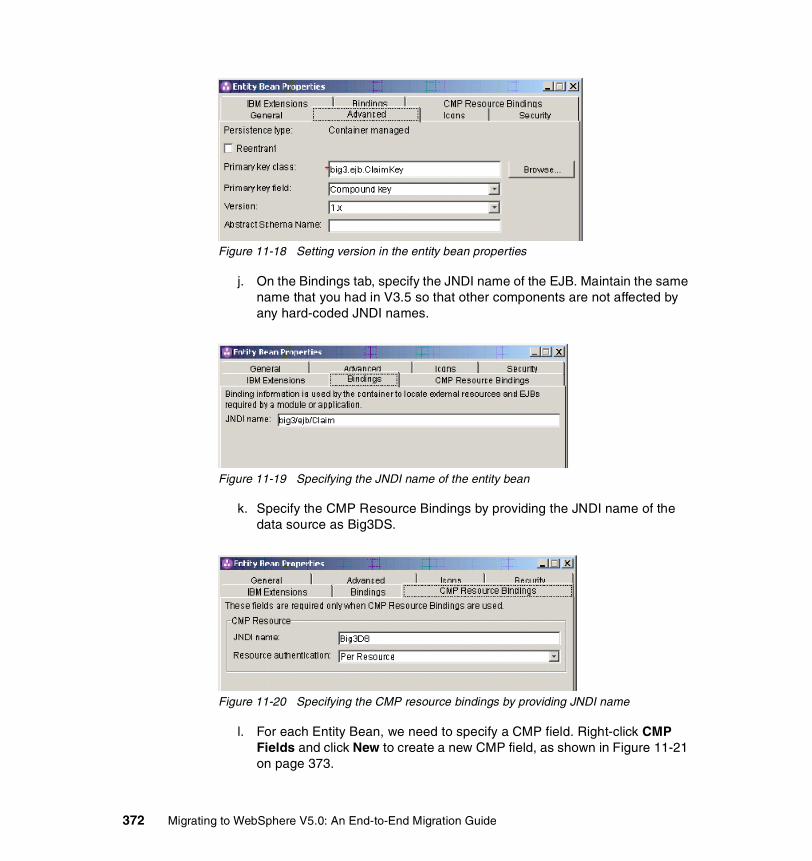
Figure 11-18 Setting version in the entity bean properties
j. On the Bindings tab, specify the JNDI name of the EJB. Maintain the same name that you had in V3.5 so that other components are not affected by any hard-coded JNDI names.
Figure 11-19 Specifying the JNDI name of the entity bean
k. Specify the CMP Resource Bindings by providing the JNDI name of the data source as Big3DS.
Figure 11-20 Specifying the CMP resource bindings by providing JNDI name
l. For each Entity Bean, we need to specify a CMP field. Right-click CMP Fields and click New to create a new CMP field, as shown in Figure 11-21 on page 373.
372 Migrating to WebSphere V5.0: An End-to-End Migration Guide
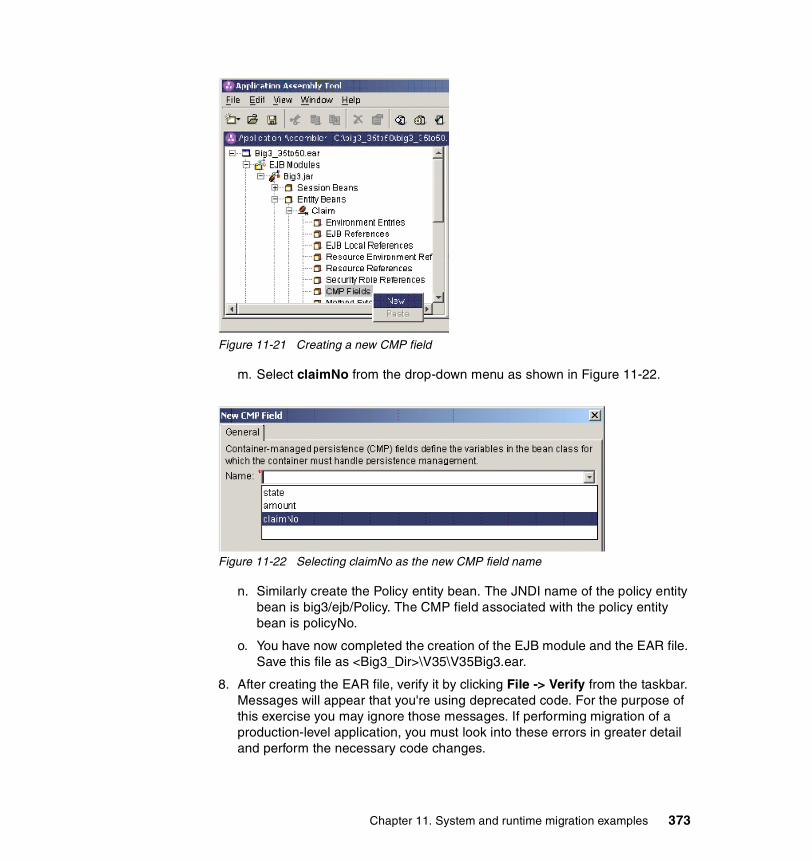
Figure 11-21 Creating a new CMP field
m. Select claimNo from the drop-down menu as shown in Figure 11-22.
Figure 11-22 Selecting claimNo as the new CMP field name
n. Similarly create the Policy entity bean. The JNDI name of the policy entity bean is big3/ejb/Policy. The CMP field associated with the policy entity bean is policyNo.
o. You have now completed the creation of the EJB module and the EAR file. Save this file as <Big3_Dir>\V35\V35Big3.ear.
8. After creating the EAR file, verify it by clicking File -> Verify from the taskbar. Messages will appear that you're using deprecated code. For the purpose of this exercise you may ignore those messages. If performing migration of a production-level application, you must look into these errors in greater detail and perform the necessary code changes.
Chapter 11. System and runtime migration examples 373
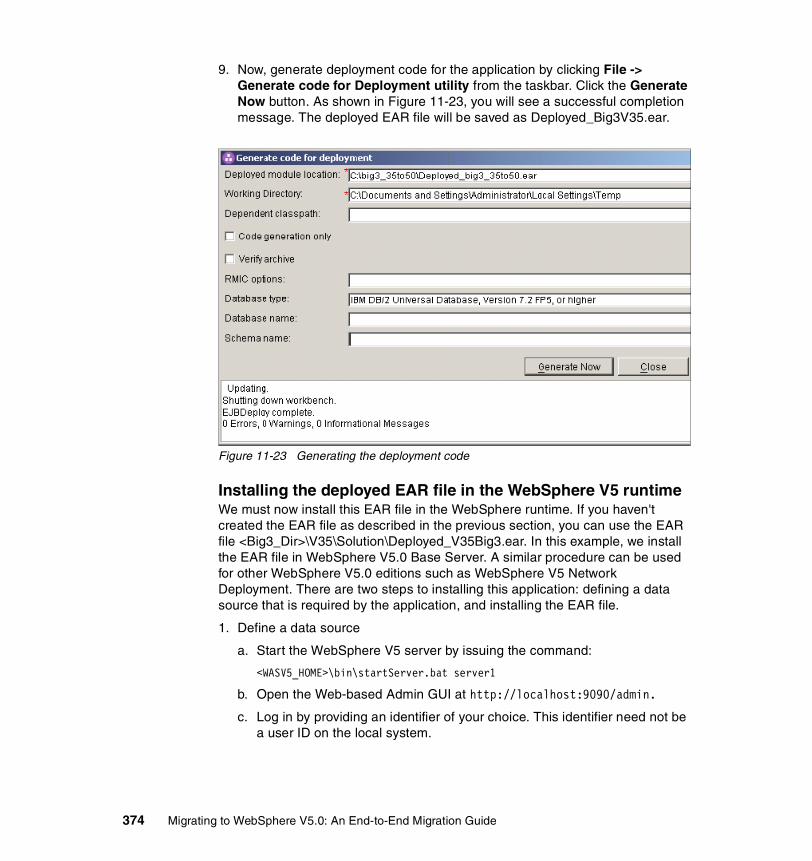
9. Now, generate deployment code for the application by clicking File -> Generate code for Deployment utility from the taskbar. Click the Generate Now button. As shown in Figure 11-23, you will see a successful completion message. The deployed EAR file will be saved as Deployed_Big3V35.ear.
Figure 11-23 Generating the deployment code
Installing the deployed EAR file in the WebSphere V5 runtimeWe must now install this EAR file in the WebSphere runtime. If you haven't created the EAR file as described in the previous section, you can use the EAR file <Big3_Dir>\V35\Solution\Deployed_V35Big3.ear. In this example, we install the EAR file in WebSphere V5.0 Base Server. A similar procedure can be used for other WebSphere V5.0 editions such as WebSphere V5 Network Deployment. There are two steps to installing this application: defining a data source that is required by the application, and installing the EAR file.
1. Define a data source
a. Start the WebSphere V5 server by issuing the command:
<WASV5_HOME>\bin\startServer.bat server1
b. Open the Web-based Admin GUI at http://localhost:9090/admin.
c. Log in by providing an identifier of your choice. This identifier need not be a user ID on the local system.
374 Migrating to WebSphere V5.0: An End-to-End Migration Guide

Figure 11-24 WebSphere V5.0 Administrative Console
d. From the navigation pane on the left, click Resources -> JDBC Providers.
e. Create a new JDBC Provider by clicking the New button and provide the location of the database driver in the Classpath field. The database used in this sample is DB2 and hence we provide the location of the file db2java.zip in the Classpath field. Click Apply.
f. In the same window, scroll down to see the data source links under Additional Properties. We shall create a new data source by clicking the Data Sources link.
Note: Do not select the Data Sources (Version 4) link. If you try to use a Version 4 data source with an EAR file that has an EJB 2.0 module it will not work. Even though your EJB classes are at EJB 1.x level, your EJB module is at EJB 2.0 level.
g. To create a new data source, click New and provide values as shown in Figure 11-25 on page 376.
Chapter 11. System and runtime migration examples 375
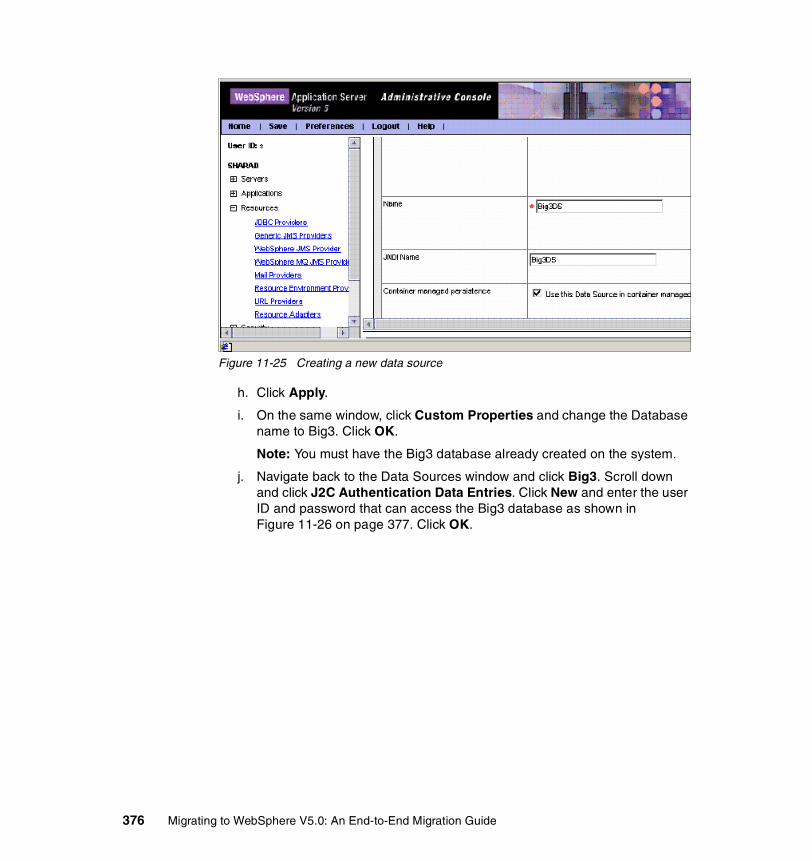
Figure 11-25 Creating a new data source
h. Click Apply.
i. On the same window, click Custom Properties and change the Database name to Big3. Click OK.
Note: You must have the Big3 database already created on the system.
j. Navigate back to the Data Sources window and click Big3. Scroll down and click J2C Authentication Data Entries. Click New and enter the user ID and password that can access the Big3 database as shown in Figure 11-26 on page 377. Click OK.
376 Migrating to WebSphere V5.0: An End-to-End Migration Guide
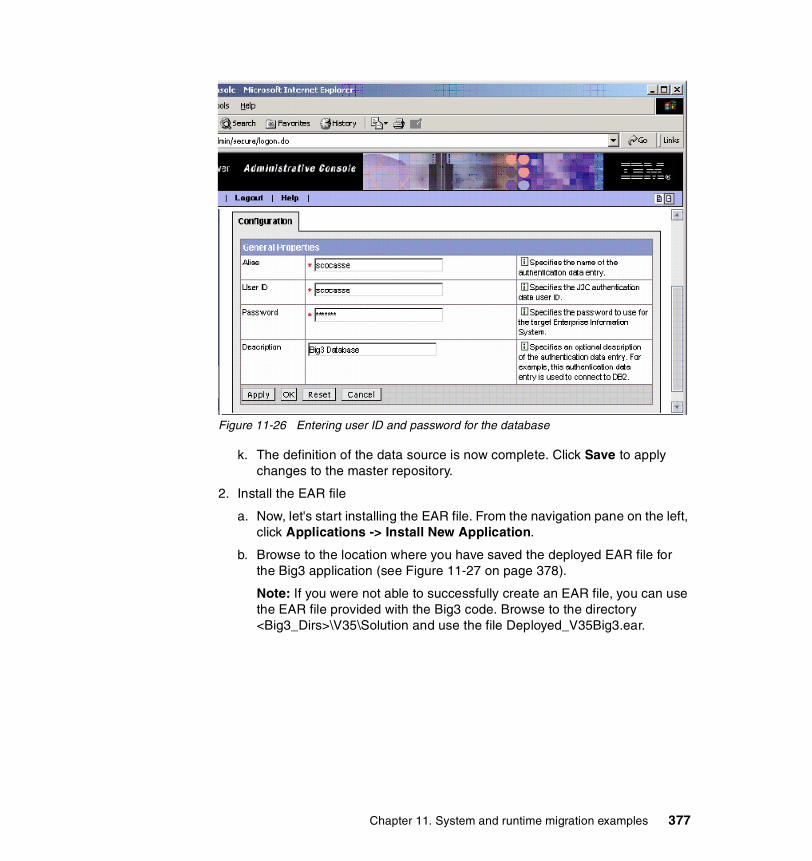
Figure 11-26 Entering user ID and password for the database
k. The definition of the data source is now complete. Click Save to apply changes to the master repository.
2. Install the EAR file
a. Now, let's start installing the EAR file. From the navigation pane on the left, click Applications -> Install New Application.
b. Browse to the location where you have saved the deployed EAR file for the Big3 application (see Figure 11-27 on page 378).
Note: If you were not able to successfully create an EAR file, you can use the EAR file provided with the Big3 code. Browse to the directory <Big3_Dirs>\V35\Solution and use the file Deployed_V35Big3.ear.
Chapter 11. System and runtime migration examples 377

Figure 11-27 Browse to the location of the saved EAR file
c. Click Next.
d. Accept all the defaults on the You can choose to generate default bindings and mappings window. Click Next.
i. On the Step 1 window, accept the defaults and click Next.
ii. On the Step 2 window, accept the default JNDI names and click Next.
iii. On the Step 3 window, provide the JNDI name of the data source as shown in Figure 11-28 on page 379. Leave the User Name field blank. Click Next.
378 Migrating to WebSphere V5.0: An End-to-End Migration Guide

Figure 11-28 Provide JNDI name of the data source
iv. On the Step 4 window, shown in Figure 11-29, select the JNDI name Big3DS_CMP from the drop-down box, check the boxes for Claim and Policy beans, and click Apply. Click Next.
Figure 11-29 Select JNDI name from drop-down box and check boxes for both EJBs
Chapter 11. System and runtime migration examples 379

v. On the Step 5 window, accept the default. Click Next.
vi. On the Step 6 window, accept the default. Click Next.
vii. On the Step 7 window, accept the default. Click Next.
viii.On the Step 8 window, click Finish.
e. The application will now install. After successful installation you will the see a window as shown in Figure 11-30.
Figure 11-30 Successful installation message
f. Save your configuration by clicking Save to Master Configuration. Click Save on the subsequent window.
g. Your Big3 application is now installed on WebSphere V5.
3. Start the Big3 application
a. Using the navigation pane on the left, start the Big3 application. Click Applications -> Enterprise Applications. Check the box next to Big3V35.ear and click Start. After successfully starting the application, open a Web browser and go to http://localhost:9080/Big3/index.html.
Note: For the sake of simplicity, we're using port 9080, which is the internal HTTP transport in WebSphere. Alternatively, you can also use your Web Server to front this application.
b. You will see the Big3 application window. On the Enter Claim Data window, click Submit with the default values. You will see a message indicating the successful processing of a claim.
This completes the manual migration of the Big3 application from WebSphere 3.5 to WebSphere 5.0.
380 Migrating to WebSphere V5.0: An End-to-End Migration Guide
11.1.2 Example: V4.0 to V5.0 manual migrationMigrating an application from V4.0 to V5.0 is fairly straightforward. As we saw in the previous sections, a V3.5 to V5.0 migration involves packaging the application as an EAR file. In V4.0 the application is already packaged as an EAR file and therefore it's just a matter of taking the EAR file based on V4.0 and deploying it in V5.0.
In this section, we install a V4.0-based EAR file in V5.0. This EAR file is the Big3 application. More information about the Big3 application and how to install it in V4.0 is provided in Appendix C, “Installing the Big3 application” on page 413.
Here are the steps you need to follow in order to migrate the Big3 application from V4.0 into V5.0:
1. Start the V5.0 Application Server:
<WASV5_HOME>\startServer.bat server1
2. Create a WebSphere 4.0 data source:
a. Go to http://localhost:9090/admin and log in to the WebGUI using a login identifier of your choice.
b. Click Resources -> JDBC Providers -> Sample DB Driver.
c. Scroll to the bottom of the Sample DB Driver configuration page and click Data Sources (Version 4).
Note: We are required to use a WebSphere V4 compliant data source because we're installing a V4.0 compliant EAR file.
d. Create a new data source by clicking New and provide values as shown in Figure 11-31 on page 382.
Chapter 11. System and runtime migration examples 381
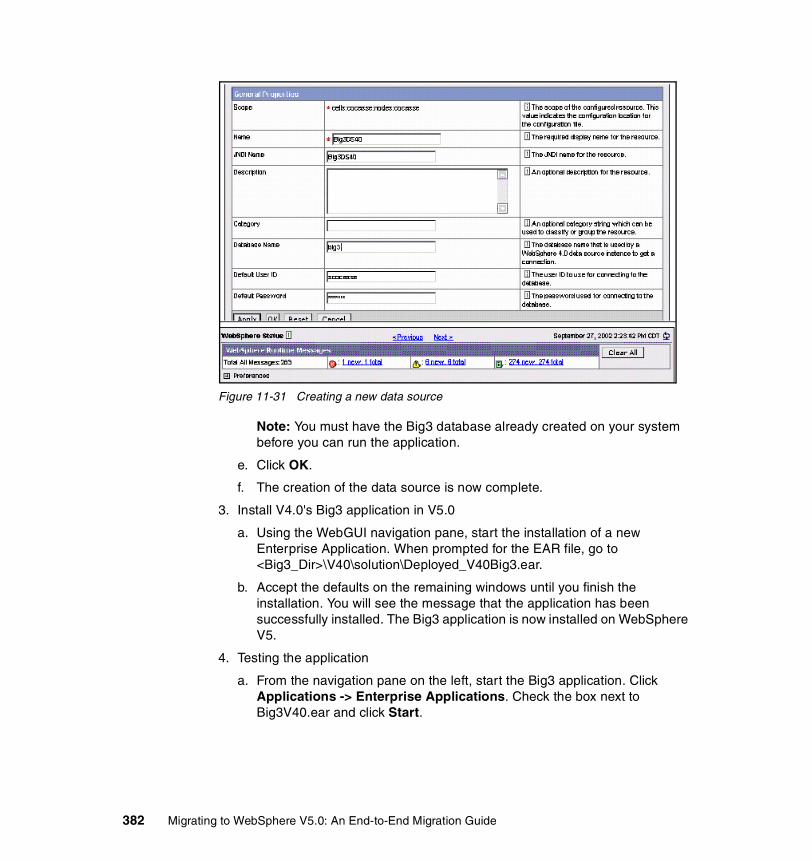
Figure 11-31 Creating a new data source
Note: You must have the Big3 database already created on your system before you can run the application.
e. Click OK.
f. The creation of the data source is now complete.
3. Install V4.0's Big3 application in V5.0
a. Using the WebGUI navigation pane, start the installation of a new Enterprise Application. When prompted for the EAR file, go to <Big3_Dir>\V40\solution\Deployed_V40Big3.ear.
b. Accept the defaults on the remaining windows until you finish the installation. You will see the message that the application has been successfully installed. The Big3 application is now installed on WebSphere V5.
4. Testing the application
a. From the navigation pane on the left, start the Big3 application. Click Applications -> Enterprise Applications. Check the box next to Big3V40.ear and click Start.
382 Migrating to WebSphere V5.0: An End-to-End Migration Guide

b. After a successful start of the application, go to http://localhost:9080/Big3/index.html.
Note: For the sake of simplicity, we're using port 9080, which is the internal HTTP transport in WebSphere. Alternatively, you can also use your Web Server to front this application.
c. You will see the Big3 application window. On the Enter Claim Data window, click Submit with the default values. You will see a message indicating the successful processing of a claim.
This completes the manual migration of the Big3 application from WebSphere 4.0 to WebSphere 5.0.
11.1.3 Example: V3.5/V4.0 to V5.0 automated migrationAutomated migration of V4.0 to V5.0 is accomplished using the migration utility in V5.0. This migration utility assists with V3.5 to V5.0 migration and also a V4.0 to V5.0 migration. Regardless of which WebSphere version you wish to migrate from, V3.5 or V4.0, the procedure to invoke this migration utility is very similar. This section explains the procedure of invoking the migration utility for a V3.5 to V5.0 migration. Follow the same steps that are described in this section for a V4.0 to V5.0 migration. Just be aware that when asked for V3.5 specific information, you need to provide the equivalent V4.0 information to the migration utility. You can use the sample Big3 application to demonstrate usage of the migration utility. Installation instructions for Big3 are provided in Appendix C, “Installing the Big3 application” on page 413.
In the previous sections, we manually migrated a sample V3.5/V4.0 application to WebSphere V5.0. In this section we will perform an automated migration of a WebSphere V3.5 node to V5.0. This automated migration utility can migrate multiple applications from V3.5/V4.0 to V5.0. In addition, it will also migrate information about the WebSphere configuration from V3.5/V4.0 to 5.0. During this migration, the existing V3.5/V4.0 configuration will be read using the XMLConfig -import utility. If migrating from V3.5, all applications deployed on that node will be automatically packaged as EAR files and then installed in the WebSphere V5.0 runtime. The EAR files thus generated will be at the J2EE 1.2 level and the data sources used by these EAR files will be WebSphere 4.0 compliant data sources.
Figure 11-32 on page 384 shows a sample WebSphere 3.5 domain with the sample Big3 user application installed. The Big3 application consists of three EJBs (therefore the name), two Servlets, and seven HTML files. The Big3 server uses a database represented by the data source Big3DS. More information about the Big3 application and its installation in WebSphere V3.5 can be found in Appendix C, “Installing the Big3 application” on page 413.
Chapter 11. System and runtime migration examples 383

Figure 11-32 WebSphere V3.5 Administrative Console with sample Big3 application installed
The objects that we migrating to V5.0 are:
� The application configuration: EJBs, Servlets, HTML defined for the File Serving Enabler
� The application files: servlets.jar, deployed EJBs.jar, and all the HTML directories
� WebSphere objects: Data Source, DB driver, AppServer, Servlet Engine, WebApp and EJB Container
To perform this migration, we use the migration utility that is shipped with V5.0. This utility comprises of two scripts:
� WASPreUpgrade� WASPostUpgrade
These scripts are provided in the <WASV5_HOME>\bin directory. WASPreUpgrade reads the V3.5 configuration and saves it into a backup directory and then WASPostUpgrade reads that configuration into V5.0 runtime. Using these two scripts you can automatically:
� Package the V3.5 application files such as the Servlet JAR files, the EJB JAR files and the HTML files in a V5.0 compliant EAR file.
� Create the deployment descriptor for the EJBs and the Servlets based on the serialized deployment descriptor and the information in the repository.
384 Migrating to WebSphere V5.0: An End-to-End Migration Guide
� Install this repackaged version of the application in WebSphere 5.0. This repackaged application should be ready to run in WebSphere 5.0 (there may be some deprecated APIs that need to be fixed, but it will still work).
� Migrate the WebSphere domain configuration from V3.5 to V5.0.
The scripts WASPreUpgrade and WASPostUpgrade can be invoked in two ways:
� Automatically via the V5 installation GUI � Manually by typing them on a command line
Automated migration using the migration GUIFirst, let's discuss the migration via the installation GUI. With the help of the installation GUI, the tasks of running the scripts can be automated by using the Migrate option in the WebSphere installation GUI. The WebSphere migration utility is a part of the WebSphere V5.0 install program. Before you start the V5.0 install program, start the Administrative Server of the existing V3.5 installation. This is needed because an XMLConfig -export of the V3.5 environment will be done during the automated migration process.
Start the WebSphere V5.0 install as you normally would. The installation program will guide you through the V5.0 install process and then prompt you with the window shown in Figure 11-33 on page 386.
Note: If you are using the migration utility to migrate from WebSphere 4.0, the EAR file from V4.0 is used as in WebSphere V5. Redeployment will not take place.
Chapter 11. System and runtime migration examples 385
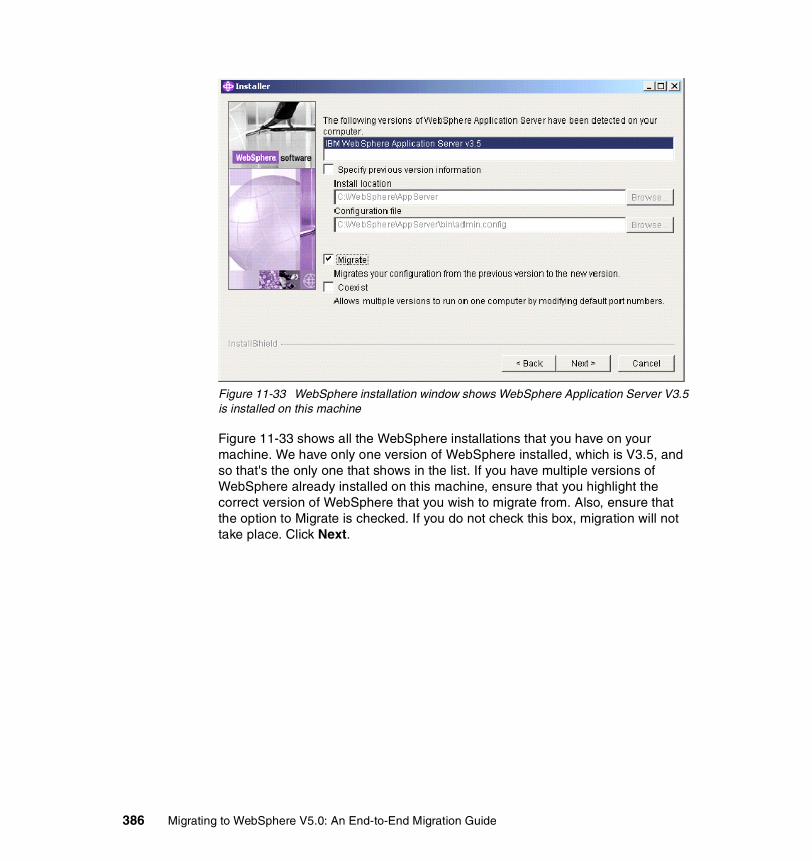
Figure 11-33 WebSphere installation window shows WebSphere Application Server V3.5 is installed on this machine
Figure 11-33 shows all the WebSphere installations that you have on your machine. We have only one version of WebSphere installed, which is V3.5, and so that's the only one that shows in the list. If you have multiple versions of WebSphere already installed on this machine, ensure that you highlight the correct version of WebSphere that you wish to migrate from. Also, ensure that the option to Migrate is checked. If you do not check this box, migration will not take place. Click Next.
386 Migrating to WebSphere V5.0: An End-to-End Migration Guide
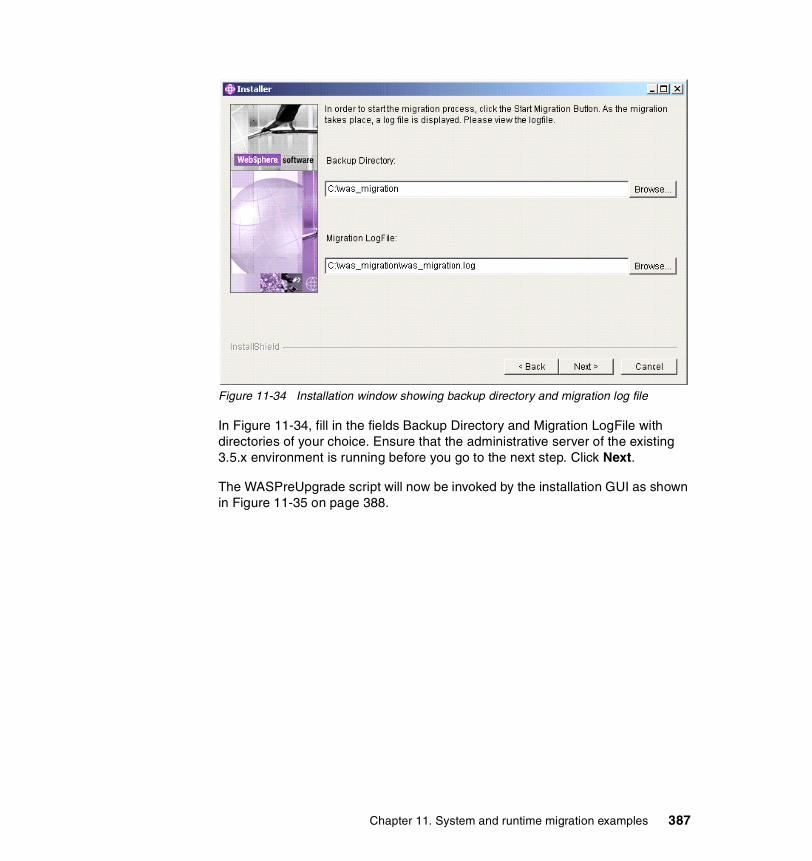
Figure 11-34 Installation window showing backup directory and migration log file
In Figure 11-34, fill in the fields Backup Directory and Migration LogFile with directories of your choice. Ensure that the administrative server of the existing 3.5.x environment is running before you go to the next step. Click Next.
The WASPreUpgrade script will now be invoked by the installation GUI as shown in Figure 11-35 on page 388.
Chapter 11. System and runtime migration examples 387

Figure 11-35 WASPreUpgrade run results
Your V3.5 configuration will be read and backed up in the backup directory that was specified in an earlier step. This backup directory will contain all files from the directories deployableEJBs, deployedEJBs, hosts, properties and Servlets in the existing Version 3.5.x configuration. The WASPreUpgrade tool saves selected files from the V3.5 /bin directory as well. It also exports the existing V3.5 application server configuration from the repository. After successful completion of the WASPreUpgrade task, keep clicking Next and you see the invocation of the WASPostUpgrade utility as seen in Figure 11-36 on page 389.
388 Migrating to WebSphere V5.0: An End-to-End Migration Guide
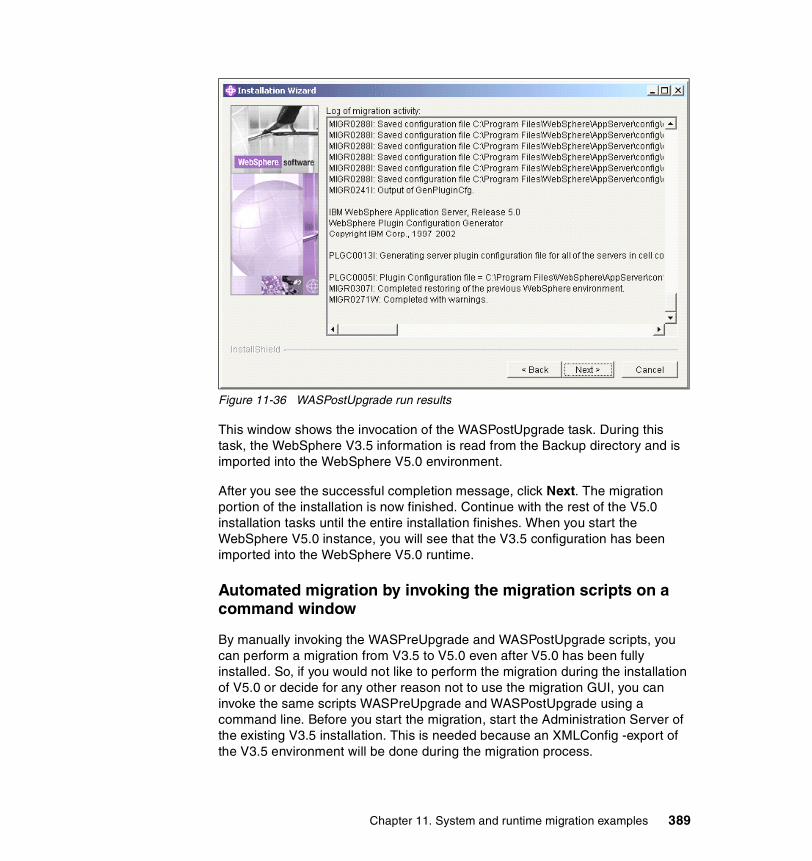
Figure 11-36 WASPostUpgrade run results
This window shows the invocation of the WASPostUpgrade task. During this task, the WebSphere V3.5 information is read from the Backup directory and is imported into the WebSphere V5.0 environment.
After you see the successful completion message, click Next. The migration portion of the installation is now finished. Continue with the rest of the V5.0 installation tasks until the entire installation finishes. When you start the WebSphere V5.0 instance, you will see that the V3.5 configuration has been imported into the WebSphere V5.0 runtime.
Automated migration by invoking the migration scripts on a command window
By manually invoking the WASPreUpgrade and WASPostUpgrade scripts, you can perform a migration from V3.5 to V5.0 even after V5.0 has been fully installed. So, if you would not like to perform the migration during the installation of V5.0 or decide for any other reason not to use the migration GUI, you can invoke the same scripts WASPreUpgrade and WASPostUpgrade using a command line. Before you start the migration, start the Administration Server of the existing V3.5 installation. This is needed because an XMLConfig -export of the V3.5 environment will be done during the migration process.
Chapter 11. System and runtime migration examples 389

The format of running the WASPreUpgrade script is:
<WASV5_HOME>\bin\WASPreUpgrade.bat <backupDirectoryName> <currentWebSphereDirectory> <administrationNodeName>[-import <xml data file>][-nameServiceHost <host name> [ -nameServicePort <port number> ]][-traceString <trace spec> [-traceFile <file name>]]
Run the command as shown below:
C:\Program Files\WebSphere\AppServer\bin>WASPreUpgrade.bat c:\websphere_backup c:\WebSphere\AppServer cocasse
Where:
� C:\websphere_backup is currently a non-existent directory where the V3.5 configuration will be backed up.
� C:\WebSphere\AppServer is the installation directory of WebSphere V3.5.
� cocasse is the host name of the system.
After your current V3.5 configuration has been backed up, you will see a successful completion message.
Next, run the WASPostUpgrade command. The format of the command is:
<WASV5_HOME>\bin\WASPostUpgrade.bat <backupDirectoryName> [-import <xml data file>] [-cellName <cell name>][-nodeName <node name>] [-webModuleAdditionalClasspath < classpath > ][-documentRootLimit < number >] [-substitute <"key1=value1[;key2=value2;[...]]">][-transportSeed < HTTP transport starting block >] [-traceString <trace spec> [-traceFile <file name>]]}
Run the WASPostUpgrade command as follows:
C:\Program Files\WebSphere\AppServer\bin>WASPostUpgrade c:\websphere_backup
Where C:\websphere_backup is the backup directory specified in the WASPreUpgrade script.
Running this utility may take several minutes because during this task, a new EAR file will be created and EJBs will be deployed to run in V5.0, and so on.
Note: If migrating from WebSphere 4.0, provide the installation directory of WebSphere 4.0.
390 Migrating to WebSphere V5.0: An End-to-End Migration Guide

After successful completion of WASPostUpgrade, you can move the EJB and Web modules to an application server of your choice. Move Big3.jar and Big3.war to application server “server1”. Start the enterprise application.
To test the migrated application, go to http://localhost:9080/Big3/index.html. Accept the default values and click Submit. You will see a message indicating an error. The error message states that access to the database has failed because the table EJB.POLICYBEANTBL cannot be found. We know that the table name is POLICY and not EJB.POLICYBEANTBL, but the migration utility assumes the schema name to be “EJB” and appends “BEANTBL” to the table name, thus causing the failure. This will happen when you try to migrate any EJBs that were originally deployed in WebSphere V3.5 using VisualAge for Java's EJB Deployment feature. The EJBs in the Big3 application had also been deployed using VisualAge for Java.
In order to rectify this problem, these EJBs will have to be redeployed using tools other than VisualAge for Java, such as AAT or WebSphere Studio Application Developer. In this example we will not be redeploying these EJBs. Please refer to previous sections of this chapter for instructions on using AAT for deploying EJBs.
The scenario that we've discussed above is a single node, single application server scenario and does not explain the single node, multiple application servers topology. Multiple application servers can also be migrated in a similar fashion as shown in the single node, single application server scenario. Each new application server in V3.5 will become a new application server in the V5.0 installation.
11.2 Interoperability and coexistence between V3.5/V4.0 and V5.0
In this section we discuss interoperability and coexistence of WebSphere V3.5 and V5.0, V4.0 and V5.0. We offer the following three sample scenarios:
� Interoperating objects in a V3.5 runtime with objects in V5.0 runtime
� Interoperating objects in a V4.0 runtime with objects in V5.0 runtime
� Co-existing V3.5 and V5.0, V4.0 and V5.0 servers at an HTTP transport level
11.2.1 Example: V3.5 and V5.0 interoperabilityWebSphere V3.5 with FP6 can interoperate with WebSphere V5.0. Ensure that you've installed FP6 on your V3.5 installation before proceeding with the
Chapter 11. System and runtime migration examples 391

samples in this section. The FP level of your V3.5 installation can be found in <WAS35_HOME>\properties\com\ibm\websphere\product.xml.
The following two interoperability scenarios are discussed in this section:
� A Servlet running in V3.5.6 and invoking a Session EJB in V5.0
� A stand-alone Java client using WebSphere V3.5.6's code to invoke a Session EJB in V5.0
The above migration scenarios can have the variations shown in Table 11-1.
Table 11-1 Interoperability scenarios
Client Server Notes
V3.5.6 client (Servlet/session bean or stand-alone Java client)
EJB 1.0 in an EJB 1.1 module
An EJB 1.1 module is one that's been developed by WebSphere V4's AAT. The WebSphere V5.0 migration utilities (WASPreUpgrade and WASPostUpgrade) also generate an EJB 1.1 module. From an interoperability standpoint, this is a supported configuration. In this section, a sample is provided for this configuration.
V3.5.6 client (Servlet/session bean or stand-alone Java client)
EJB 1.1 in an EJB 1.1 module
An EJB 1.1 module is one that's been developed by WebSphere V4's AAT. The WebSphere V5.0 migration utilities (WASPreUpgrade and WASPostUpgrade) generate an EJB 1.1 module. This interoperability scenario is a supported configuration.
V3.5.6 client(Servlet/session bean or Java client)
EJB 1.x in an EJB 2.0 module
An EJB 2.0 module is created using WebSphere V5.0's AAT. This scenario is not supported.
392 Migrating to WebSphere V5.0: An End-to-End Migration Guide
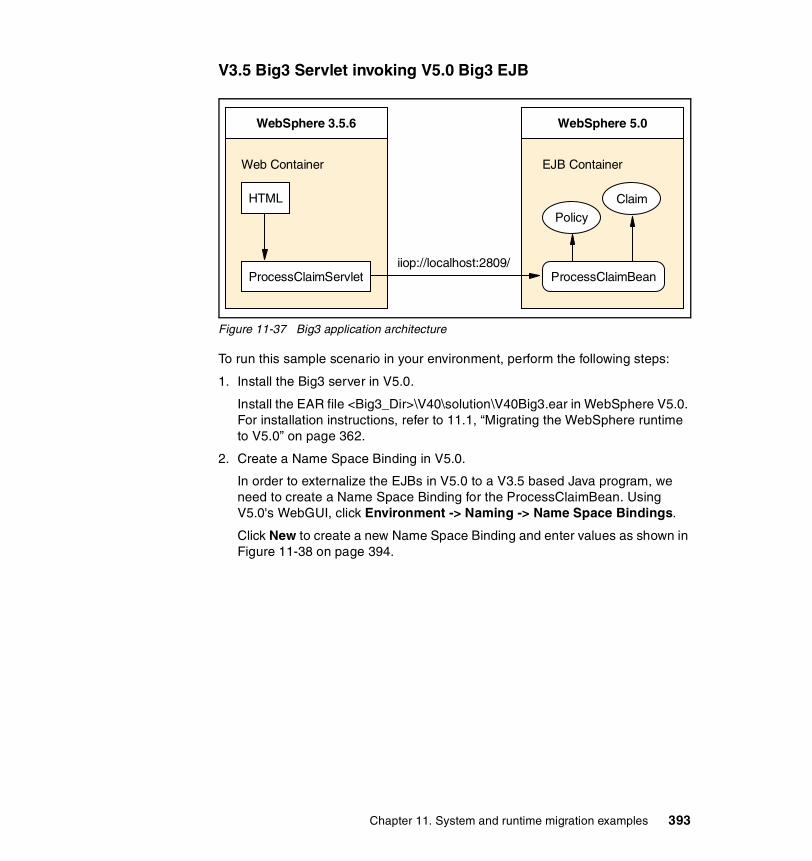
V3.5 Big3 Servlet invoking V5.0 Big3 EJB
Figure 11-37 Big3 application architecture
To run this sample scenario in your environment, perform the following steps:
1. Install the Big3 server in V5.0.
Install the EAR file <Big3_Dir>\V40\solution\V40Big3.ear in WebSphere V5.0. For installation instructions, refer to 11.1, “Migrating the WebSphere runtime to V5.0” on page 362.
2. Create a Name Space Binding in V5.0.
In order to externalize the EJBs in V5.0 to a V3.5 based Java program, we need to create a Name Space Binding for the ProcessClaimBean. Using V5.0's WebGUI, click Environment -> Naming -> Name Space Bindings.
Click New to create a new Name Space Binding and enter values as shown in Figure 11-38 on page 394.
WebSphere 3.5.6
Web Container
HTML
iiop://localhost:2809/
WebSphere 5.0
EJB Container
Policy
Claim
ProcessClaimBeanProcessClaimServlet
Chapter 11. System and runtime migration examples 393
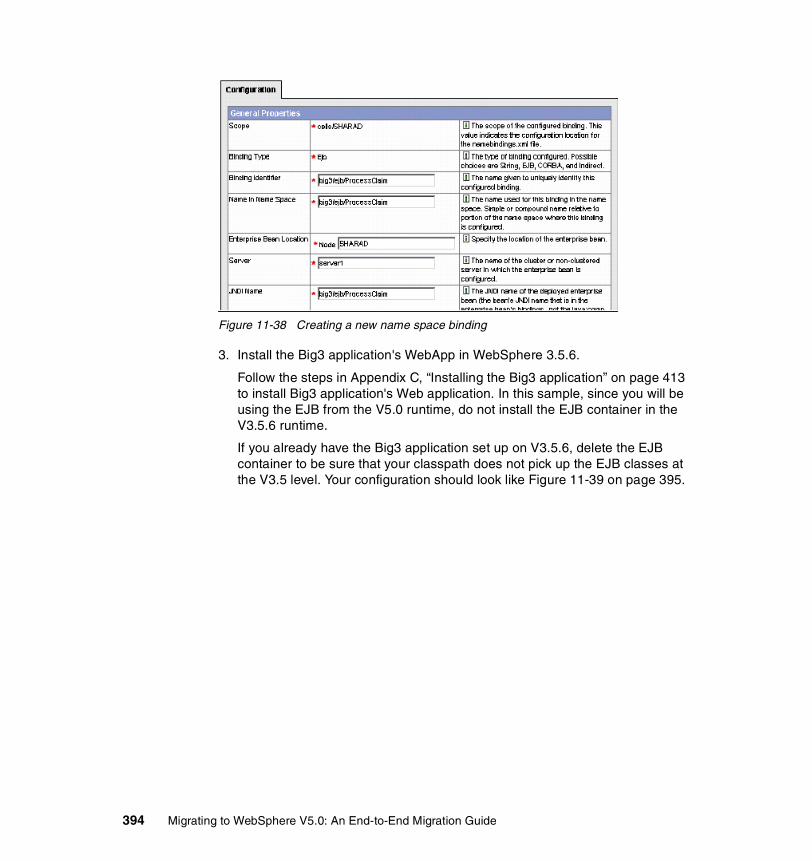
Figure 11-38 Creating a new name space binding
3. Install the Big3 application's WebApp in WebSphere 3.5.6.
Follow the steps in Appendix C, “Installing the Big3 application” on page 413 to install Big3 application's Web application. In this sample, since you will be using the EJB from the V5.0 runtime, do not install the EJB container in the V3.5.6 runtime.
If you already have the Big3 application set up on V3.5.6, delete the EJB container to be sure that your classpath does not pick up the EJB classes at the V3.5 level. Your configuration should look like Figure 11-39 on page 395.
394 Migrating to WebSphere V5.0: An End-to-End Migration Guide

Figure 11-39 V3.5 advanced Administrative Console showing the installed Big3 application
4. Update the classpath of Big3 server to point to Deployed EJBs in V5.0.
Add <WASV5_HOME>\installedApps\<node>\V40Big3.ear\Big3.jar to the Big3 AppServer's classpath as shown in Figure 11-40.
Figure 11-40 Updating the Big3 server classpath to include V5.0 deployed EJBs
Chapter 11. System and runtime migration examples 395
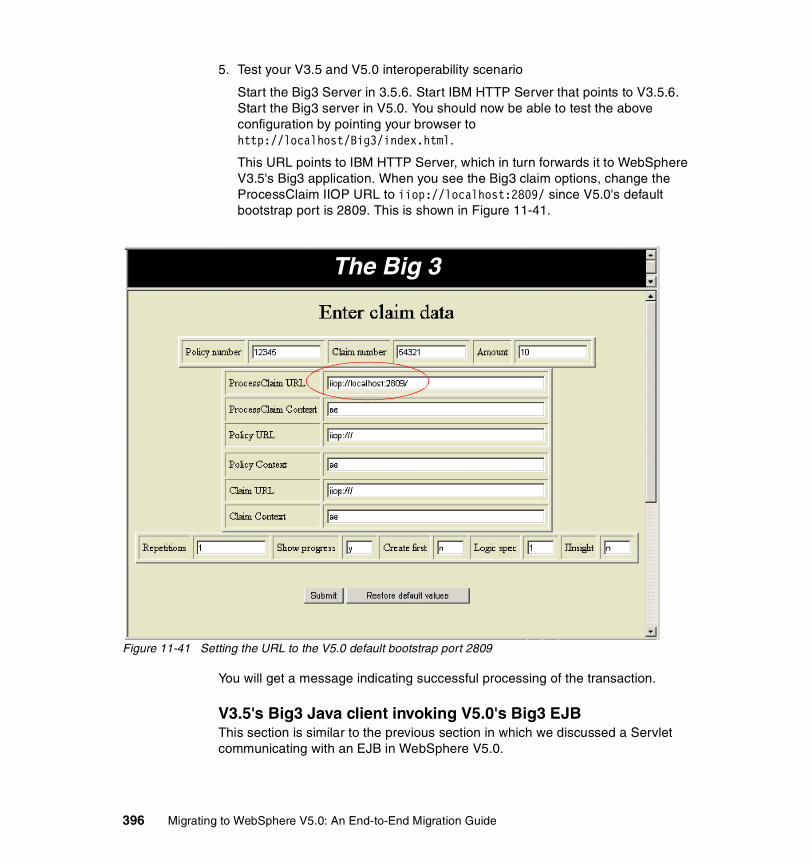
5. Test your V3.5 and V5.0 interoperability scenario
Start the Big3 Server in 3.5.6. Start IBM HTTP Server that points to V3.5.6. Start the Big3 server in V5.0. You should now be able to test the above configuration by pointing your browser to http://localhost/Big3/index.html.
This URL points to IBM HTTP Server, which in turn forwards it to WebSphere V3.5's Big3 application. When you see the Big3 claim options, change the ProcessClaim IIOP URL to iiop://localhost:2809/ since V5.0's default bootstrap port is 2809. This is shown in Figure 11-41.
Figure 11-41 Setting the URL to the V5.0 default bootstrap port 2809
You will get a message indicating successful processing of the transaction.
V3.5's Big3 Java client invoking V5.0's Big3 EJBThis section is similar to the previous section in which we discussed a Servlet communicating with an EJB in WebSphere V5.0.
The Big 3
396 Migrating to WebSphere V5.0: An End-to-End Migration Guide
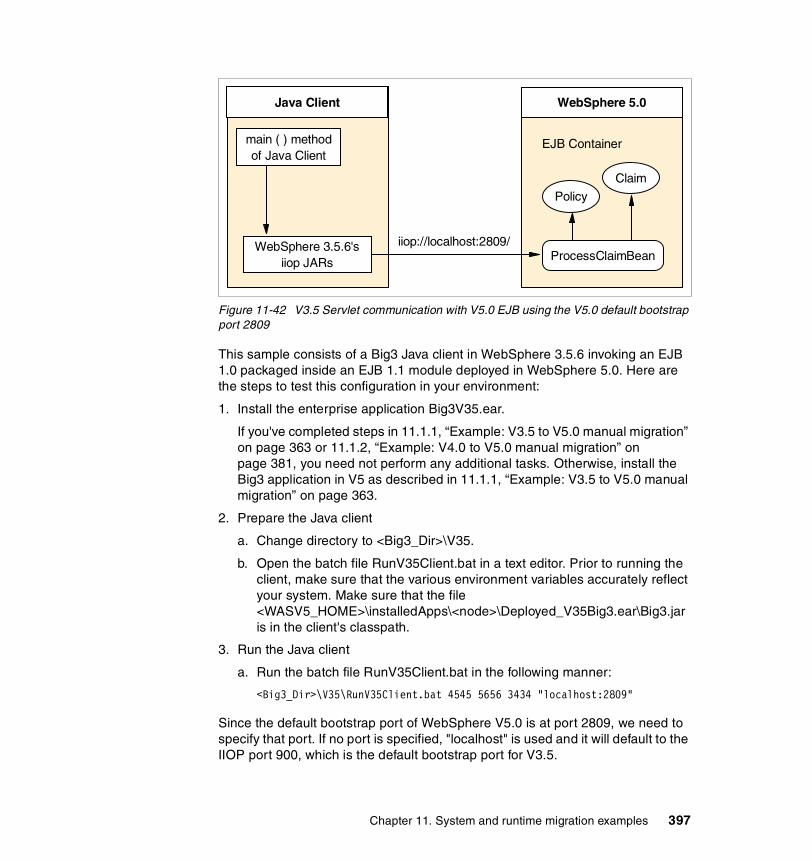
Figure 11-42 V3.5 Servlet communication with V5.0 EJB using the V5.0 default bootstrap port 2809
This sample consists of a Big3 Java client in WebSphere 3.5.6 invoking an EJB 1.0 packaged inside an EJB 1.1 module deployed in WebSphere 5.0. Here are the steps to test this configuration in your environment:
1. Install the enterprise application Big3V35.ear.
If you've completed steps in 11.1.1, “Example: V3.5 to V5.0 manual migration” on page 363 or 11.1.2, “Example: V4.0 to V5.0 manual migration” on page 381, you need not perform any additional tasks. Otherwise, install the Big3 application in V5 as described in 11.1.1, “Example: V3.5 to V5.0 manual migration” on page 363.
2. Prepare the Java client
a. Change directory to <Big3_Dir>\V35.
b. Open the batch file RunV35Client.bat in a text editor. Prior to running the client, make sure that the various environment variables accurately reflect your system. Make sure that the file <WASV5_HOME>\installedApps\<node>\Deployed_V35Big3.ear\Big3.jar is in the client's classpath.
3. Run the Java client
a. Run the batch file RunV35Client.bat in the following manner:
<Big3_Dir>\V35\RunV35Client.bat 4545 5656 3434 "localhost:2809"
Since the default bootstrap port of WebSphere V5.0 is at port 2809, we need to specify that port. If no port is specified, "localhost" is used and it will default to the IIOP port 900, which is the default bootstrap port for V3.5.
Java Client
iiop://localhost:2809/
WebSphere 5.0
EJB Container
Policy
Claim
ProcessClaimBeanWebSphere 3.5.6's
iiop JARs
main ( ) methodof Java Client
Chapter 11. System and runtime migration examples 397

You will see a message indicating that the transaction was successful. This completes the interoperability samples for WebSphere V3.5 and V5.0.
11.2.2 Example: V4.0 and V5.0 interoperabilityConceptually, 4.0 and 5.0 interoperability is same as V4.0 to V5.0 interoperability. Therefore the steps to implement V4.0 and V5.0 interoperability are similar to V3.5 and V5.0 steps.
V3.5 Big3 Servlet invoking V5.0 Big3 EJB1. Install the Big3 application in your WebSphere V5 runtime and update the
Name Space Bindings. Refer to Steps 1 and 2 of “V3.5 Big3 Servlet invoking V5.0 Big3 EJB” on page 393 for instructions.
2. Install the Big3 application your WebSphere 4.0 runtime. Refer to Appendix C, “Installing the Big3 application” on page 413 for instructions.
3. Configure your Web Server to load the WebSphere 4.0 plug-in. Go to http://localhost/Big3/index.html and update the ProcessClaim URL field as shown in Figure 11-43.
Figure 11-43 Configuring Web server to load the WebSphere V4.0 plug-in
2809 is the default bootstrap port of WebSphere V5.0. Click Submit. You will see a message indicating successful completion of the transaction.
398 Migrating to WebSphere V5.0: An End-to-End Migration Guide

V4.0's Big3 Java client invoking a V5.0's Big3 EJBTo demonstrate interoperability between V4.0 and V5.0, we can use a stand-alone Java client instead of a Servlet. This stand-alone Java client will use WebSphere 4.0 JAR files for IIOP connectivity.
1. Install the enterprise application Big3V40.ear. If you've already done that in previous steps, you need not perform any additional tasks. Otherwise install the Big3 application in V5 as described in 11.1.1, “Example: V3.5 to V5.0 manual migration” on page 363.
2. Update the Name Space Bindings are discussed in 11.2.1, “Example: V3.5 and V5.0 interoperability” on page 391.
3. Prepare the Java client
a. Change directory to <Big3_Dir>\V40.
b. Open the batch file RunV40Client.bat in a text editor. Prior to running the client, make sure that the various environment variables accurately reflect your system. Make sure that the file <WASV5_HOME>\installedApps\<node>\Deployed_V40Big3.ear\Big3.jar is in the client's classpath.
4. Run the Java client
a. Run the batch file RunV35Client.bat as follows:
<Big3_Dir>\V40\RunV40Client.bat 4545 5656 3434 "localhost:2809"
Since the default bootstrap port of WebSphere V5.0 is at port 2809, we need to specify that port. If no port is specified, “localhost” is used and it will default to the IIOP port 900 which is the default bootstrap port for V3.5.
You will see a message indicating that the transaction was successful. This completes the interoperability samples for WebSphere V4.0 and V5.0.
11.2.3 Example: V3.5/V4.0 and V5.0 coexistenceA typical production environment consists of multiple WebSphere domains and multiple nodes within each domain. Sometimes, it becomes necessary that these WebSphere installations are migrated in phases, instead of all at the same time. Incremental migration offers the following benefits:
� Fewer resources are needed at any given time. For example, it would require fewer resources to migrate five machines at any given time as compared to 50 machines. Although some of these tasks can be automated, there is still a great deal of manual intervention required when migrating production machines.
Chapter 11. System and runtime migration examples 399
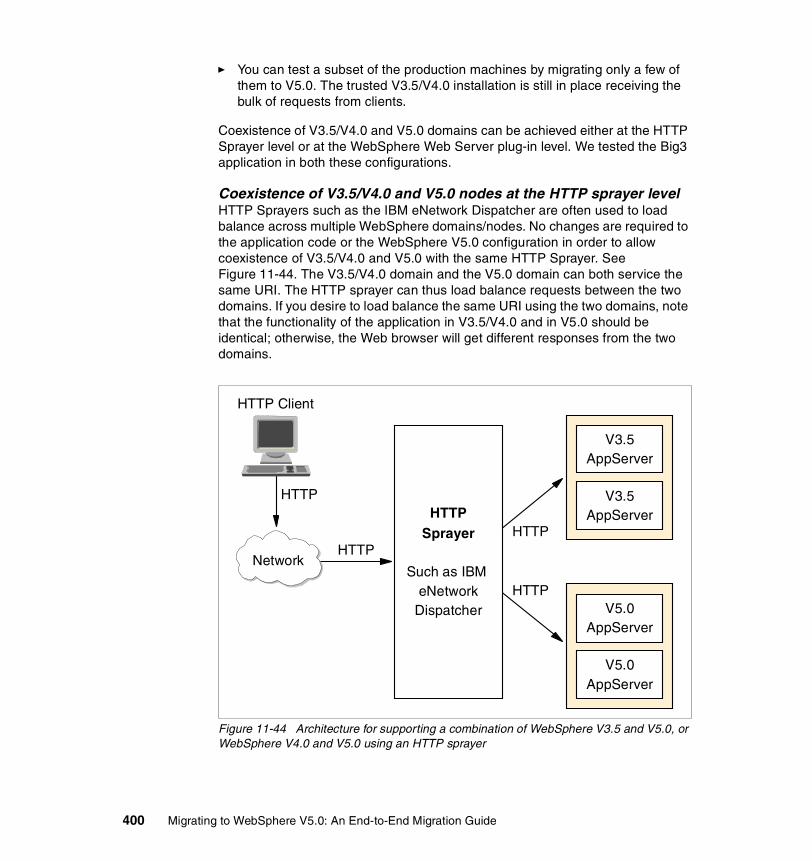
� You can test a subset of the production machines by migrating only a few of them to V5.0. The trusted V3.5/V4.0 installation is still in place receiving the bulk of requests from clients.
Coexistence of V3.5/V4.0 and V5.0 domains can be achieved either at the HTTP Sprayer level or at the WebSphere Web Server plug-in level. We tested the Big3 application in both these configurations.
Coexistence of V3.5/V4.0 and V5.0 nodes at the HTTP sprayer levelHTTP Sprayers such as the IBM eNetwork Dispatcher are often used to load balance across multiple WebSphere domains/nodes. No changes are required to the application code or the WebSphere V5.0 configuration in order to allow coexistence of V3.5/V4.0 and V5.0 with the same HTTP Sprayer. See Figure 11-44. The V3.5/V4.0 domain and the V5.0 domain can both service the same URI. The HTTP sprayer can thus load balance requests between the two domains. If you desire to load balance the same URI using the two domains, note that the functionality of the application in V3.5/V4.0 and in V5.0 should be identical; otherwise, the Web browser will get different responses from the two domains.
Figure 11-44 Architecture for supporting a combination of WebSphere V3.5 and V5.0, or WebSphere V4.0 and V5.0 using an HTTP sprayer
HTTP Client
V3.5AppServer
V3.5AppServer
V5.0AppServer
V5.0AppServer
HTTP
HTTP
HTTP
HTTPHTTP
Sprayer
Such as IBM eNetwork
Dispatcher
Network
400 Migrating to WebSphere V5.0: An End-to-End Migration Guide
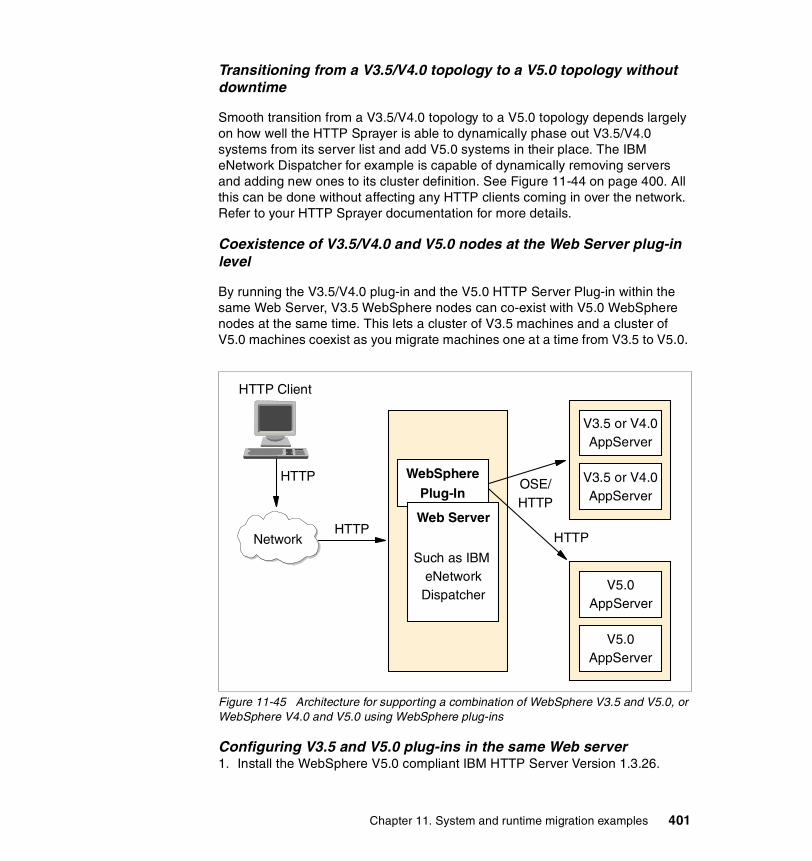
Transitioning from a V3.5/V4.0 topology to a V5.0 topology without downtime
Smooth transition from a V3.5/V4.0 topology to a V5.0 topology depends largely on how well the HTTP Sprayer is able to dynamically phase out V3.5/V4.0 systems from its server list and add V5.0 systems in their place. The IBM eNetwork Dispatcher for example is capable of dynamically removing servers and adding new ones to its cluster definition. See Figure 11-44 on page 400. All this can be done without affecting any HTTP clients coming in over the network. Refer to your HTTP Sprayer documentation for more details.
Coexistence of V3.5/V4.0 and V5.0 nodes at the Web Server plug-in level
By running the V3.5/V4.0 plug-in and the V5.0 HTTP Server Plug-in within the same Web Server, V3.5 WebSphere nodes can co-exist with V5.0 WebSphere nodes at the same time. This lets a cluster of V3.5 machines and a cluster of V5.0 machines coexist as you migrate machines one at a time from V3.5 to V5.0.
Figure 11-45 Architecture for supporting a combination of WebSphere V3.5 and V5.0, or WebSphere V4.0 and V5.0 using WebSphere plug-ins
Configuring V3.5 and V5.0 plug-ins in the same Web server1. Install the WebSphere V5.0 compliant IBM HTTP Server Version 1.3.26.
HTTP Client
V3.5 or V4.0AppServer
V3.5 or V4.0AppServer
V5.0AppServer
V5.0AppServer
HTTP
HTTPHTTP
OSE/HTTP
Network
WebSpherePlug-In
Web Server
Such as IBM eNetwork
Dispatcher
Chapter 11. System and runtime migration examples 401

2. Ensure that the IBM HTTP Server machine has V3.5 and well as V5.0 plug-ins installed.
3. Open <IHS_HOME>\conf\httpd.conf in a text editor and configure both plug-ins as in the following example.
Configuring V4.0 and V5.0 plug-ins in the same Web server1. Install the WebSphere V5.0 compliant IBM HTTP Server Version 1.3.26.
2. Ensure that the V5.0 HTTP Server Plug-in is installed.
Note: The V4.0 HTTP Server Plug-in and V5.0 HTTP Server Plug-in cannot co-exist on the same Web server because the two DLLs have the same name.
3. Open both V5.0 and V4.0 plugin-cfg.xml files and manually merge the V4.0 plugin-cfg.xml file into the V5.0 plugin-cfg.xml file.
4. Ensure that the V5.0 httpd.conf file in <IHS_HOME>\conf directory has the correct information as shown in the example below.
The limitation in the above configuration is that we cannot have the same URI being serviced by both WebSphere versions. For example, if both WebSpheres have the same URI configured in their plug-ins, we will see duplication of URIs and the operating behavior will be erratic.
# Plugin for WebSphere V5.0LoadModule ibm_app_server_http_module "C:\Program Files\WebSphere\AppServer/bin/mod_ibm_app_server_http.dll"WebSpherePluginConfig "C:\Program Files\WebSphere\AppServer/config/plugin-cfg.xml"
# Plugin for WebSphere V3.5LoadModule ibm_app_server_module D:/WebSphere/AppServer35/bin/mod_ibm_app_server.dllAlias /IBMWebAS/ "D:/WebSphere/AppServer35/web/"NcfAppServerConfig BootFile D:\WEBSPH~1\APPSER~1\properties\bootstrap.properties
# Plugin for WebSphere V5.0LoadModule ibm_app_server_http_module "C:\Program Files\WebSphere\AppServer/bin/mod_ibm_app_server_http.dll"WebSpherePluginConfig "C:\Program Files\WebSphere\AppServer/config/plugin-cfg.xml"
402 Migrating to WebSphere V5.0: An End-to-End Migration Guide

This incremental migration strategy works well when we break down the V5.0 and V3.5 domains by Web applications, so that they do not have a URI overlap, otherwise whichever URI loaded last will service the request. This cannot be used to load balance the same URI in an environment that has a combination of V3.5 and V5.0, but instead can be used to service independent Web applications in a V3.5 and V5.0 hybrid environment.
Chapter 11. System and runtime migration examples 403

404 Migrating to WebSphere V5.0: An End-to-End Migration Guide
Appendix A. wsadmin.properties file sample
#-------------------------------------------------------------------------
# Properties file for scripting client# Base App Server version#------------------------------------------------------------------------- # #-------------------------------------------------------------------------# The connectionType determines what connector is used. # It can be SOAP or RMI.# The default is SOAP.#-------------------------------------------------------------------------com.ibm.ws.scripting.connectionType=SOAP#com.ibm.ws.scripting.connectionType=RMI
#-------------------------------------------------------------------------# The port property determines what port is used when attempting# a connection. # The default SOAP port for a single-server installation is 8880 #-------------------------------------------------------------------------com.ibm.ws.scripting.port=8880#com.ibm.ws.scripting.port=2809
#-------------------------------------------------------------------------# The host property determines what host is used when attempting# a connection.
A
© Copyright IBM Corp. 2002 2003. All rights reserved. 405
# There is no default value; localhost is assumed if no value is given.#-------------------------------------------------------------------------#com.ibm.ws.scripting.host=
#-------------------------------------------------------------------------# The defaultLang property determines what scripting language to use. # Jacl is the sole supported language #-------------------------------------------------------------------------com.ibm.ws.scripting.defaultLang=jacl
#-------------------------------------------------------------------------# The traceFile property determines where trace and logging# output are directed. If more than one user will be using# wsadmin simultaneously, different traceFile properties should# be set in user properties files. # The default is that all tracing and logging go to the console;# it is recommended that a value be specified here. # If the file name contains DBCS characters, use unicode format such as \uxxxx, where xxxx is a number#-------------------------------------------------------------------------com.ibm.ws.scripting.traceFile=C:/WebSphere/AppServer/logs/wsadmin.traceout
#-------------------------------------------------------------------------# The validationOutput property determines where validation # reports are directed. If more than one user will be using# wsadmin simultaneously, different validationOutput properties should# be set in user properties files. # The default is wsadmin.valout in the current directory. # If the file name contains DBCS characters, use unicode format such as \uxxxx, where xxxx is a number#-------------------------------------------------------------------------#com.ibm.ws.scripting.validationOutput=
#-------------------------------------------------------------------------# The traceString property governs the trace in effect for# the scripting client process. # The default is no tracing. #-------------------------------------------------------------------------com.ibm.ws.scripting.traceString=com.ibm.*=all=enabled
#------------------------------------------------------------------------- # The profiles property is a list of profiles to be run before # running user commands, scripts, or an interactive shell. # securityProcs is included here by default to make security# configuration easier. #-------------------------------------------------------------------------com.ibm.ws.scripting.profiles=C:/WebSphere/AppServer/bin/securityProcs.jacl
#-------------------------------------------------------------------------
406 Migrating to WebSphere V5.0: An End-to-End Migration Guide

# The emitWarningForCustomSecurityPolicy property controls whether# message WASX7207W is emitted when custom permissions are found.# Possible values are: true, false # The default is "true"#-------------------------------------------------------------------------# com.ibm.ws.scripting.emitWarningForCustomSecurityPolicy=true
#-------------------------------------------------------------------------# The tempdir property determines what directory to use for temporary# files when installing applications. # The default is that the JVM decides -- this is java.io.tmpdir#-------------------------------------------------------------------------#com.ibm.ws.scripting.tempdir=
#-------------------------------------------------------------------------# The validationLevel property determines what level of validation to # use when configuration changes are made from the scripting interface.# Possible values are: NONE, LOW, MEDIUM, HIGH, HIGHEST # The default is HIGHEST #-------------------------------------------------------------------------#com.ibm.ws.scripting.validationLevel=
#-------------------------------------------------------------------------# The crossDocumentValidationEnabled property determines whether the validation# mechanism examines other documents when changes are made to one document. # Possible values are: true, false # The default is true #-------------------------------------------------------------------------#com.ibm.ws.scripting.crossDocumentValidationEnabled=
#-------------------------------------------------------------------------# The classpath property is appended to the list of paths to search for# classes and resources.# There is no default value.#-------------------------------------------------------------------------#com.ibm.ws.scripting.classpath=
The com.ibm.ws.scripting.traceFile and com.ibm.ws.scripting.validationOutput properties specify the names of output files. If an installation intends to have several users running wsadmin scripts on the same machine at the same time, this property should be defined in the user default properties file.
Appendix A. wsadmin.properties file sample 407

408 Migrating to WebSphere V5.0: An End-to-End Migration Guide
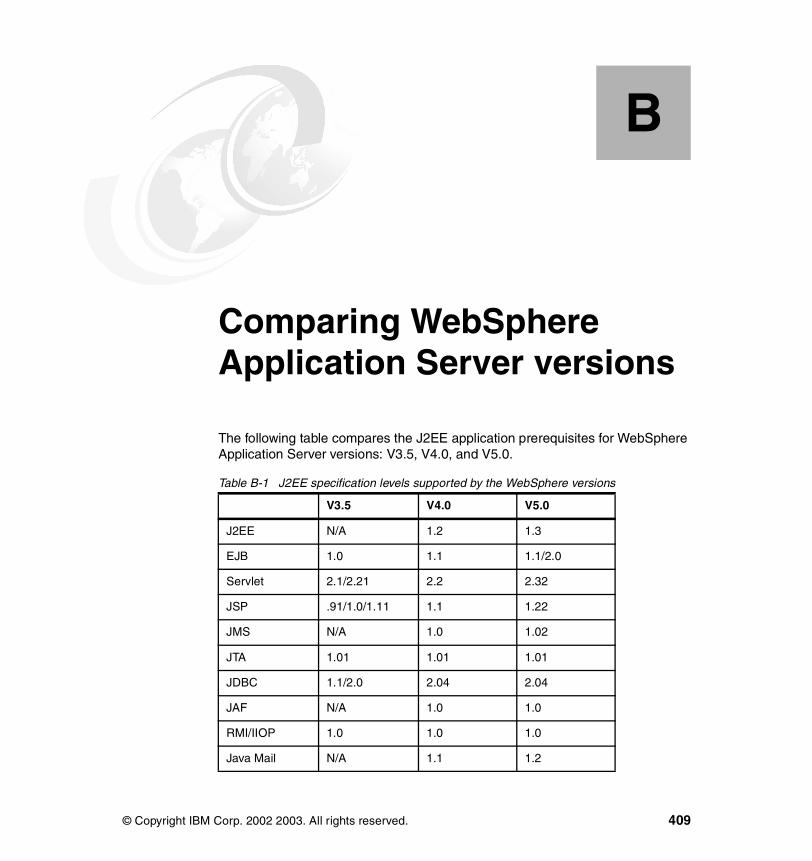
Appendix B. Comparing WebSphere Application Server versions
The following table compares the J2EE application prerequisites for WebSphere Application Server versions: V3.5, V4.0, and V5.0.
Table B-1 J2EE specification levels supported by the WebSphere versions
B
V3.5 V4.0 V5.0
J2EE N/A 1.2 1.3
EJB 1.0 1.1 1.1/2.0
Servlet 2.1/2.21 2.2 2.32
JSP .91/1.0/1.11 1.1 1.22
JMS N/A 1.0 1.02
JTA 1.01 1.01 1.01
JDBC 1.1/2.0 2.04 2.04
JAF N/A 1.0 1.0
RMI/IIOP 1.0 1.0 1.0
Java Mail N/A 1.1 1.2
© Copyright IBM Corp. 2002 2003. All rights reserved. 409
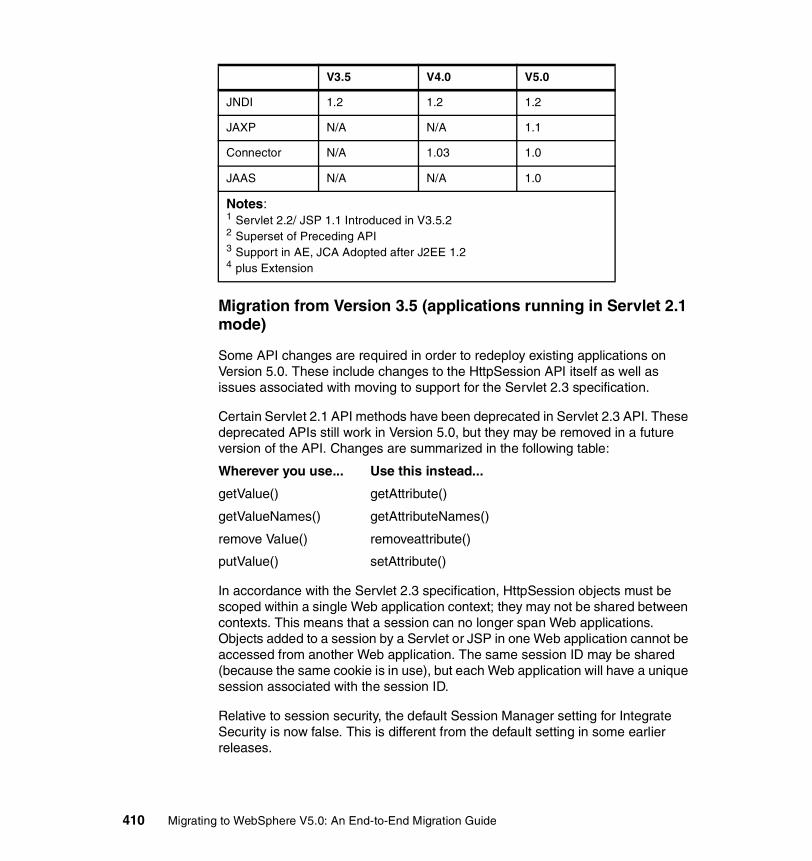
Migration from Version 3.5 (applications running in Servlet 2.1 mode)
Some API changes are required in order to redeploy existing applications on Version 5.0. These include changes to the HttpSession API itself as well as issues associated with moving to support for the Servlet 2.3 specification.
Certain Servlet 2.1 API methods have been deprecated in Servlet 2.3 API. These deprecated APIs still work in Version 5.0, but they may be removed in a future version of the API. Changes are summarized in the following table:
Wherever you use... Use this instead...
getValue() getAttribute()
getValueNames() getAttributeNames()
remove Value() removeattribute()
putValue() setAttribute()
In accordance with the Servlet 2.3 specification, HttpSession objects must be scoped within a single Web application context; they may not be shared between contexts. This means that a session can no longer span Web applications. Objects added to a session by a Servlet or JSP in one Web application cannot be accessed from another Web application. The same session ID may be shared (because the same cookie is in use), but each Web application will have a unique session associated with the session ID.
Relative to session security, the default Session Manager setting for Integrate Security is now false. This is different from the default setting in some earlier releases.
JNDI 1.2 1.2 1.2
JAXP N/A N/A 1.1
Connector N/A 1.03 1.0
JAAS N/A N/A 1.0
Notes:1 Servlet 2.2/ JSP 1.1 Introduced in V3.5.22 Superset of Preceding API3 Support in AE, JCA Adopted after J2EE 1.24 plus Extension
V3.5 V4.0 V5.0
410 Migrating to WebSphere V5.0: An End-to-End Migration Guide

In V3.5, JSPs that contained the usebean tag with scope set to session did not always work properly when session persistence was enabled. Specifically, the JSP writer needed to write a scriplet to explicitly set the attribute (that is, call setAttribute()) if it was changed as part of JSP processing. Two new features in Version 5.0 help address this problem:
� You can set dosetattribute to true on the JSP InitParameter. � You can set the Write Contents option to Write all.
The differences between the two solutions are summarized in the following table:
If session persistence is enabled and a class reload for the Web application occurs, the sessions associated with the Web application are maintained in the persistent store and will be available after the reload.
Some of these differences might impact how you choose to track and manage sessions.
Table B-2 Summary matrix for migrating applications to WebSphere V5.0
dosattribute set to true Write Contents option set to Write
all
Applies to JSP Servlet or JSP
Configured at
JSP enabler application server
Action Assures that JSP session-scoped beans setAttribute()
All session data(changed or unchanged)
external location
Functional area
Support in 3.5.x or 4.x
version
Must migrate
from Version 3.5.x?
Must migrate
from Version
4.x?
Details
Enterprise Beans
EJB 1.0 Yes Not applicable
Many EJB 1.0 applications can run unchanged in Version 5.0 although some changes may be required or recommended.
EJB 1.1 Not applicable
No Full support for EJB 1.1 is provided.
JDBC JDBC Yes Not applicable
Many applications can run unchanged in Version 5 although some changes may be required or recommended.
Appendix B. Comparing WebSphere Application Server versions 411
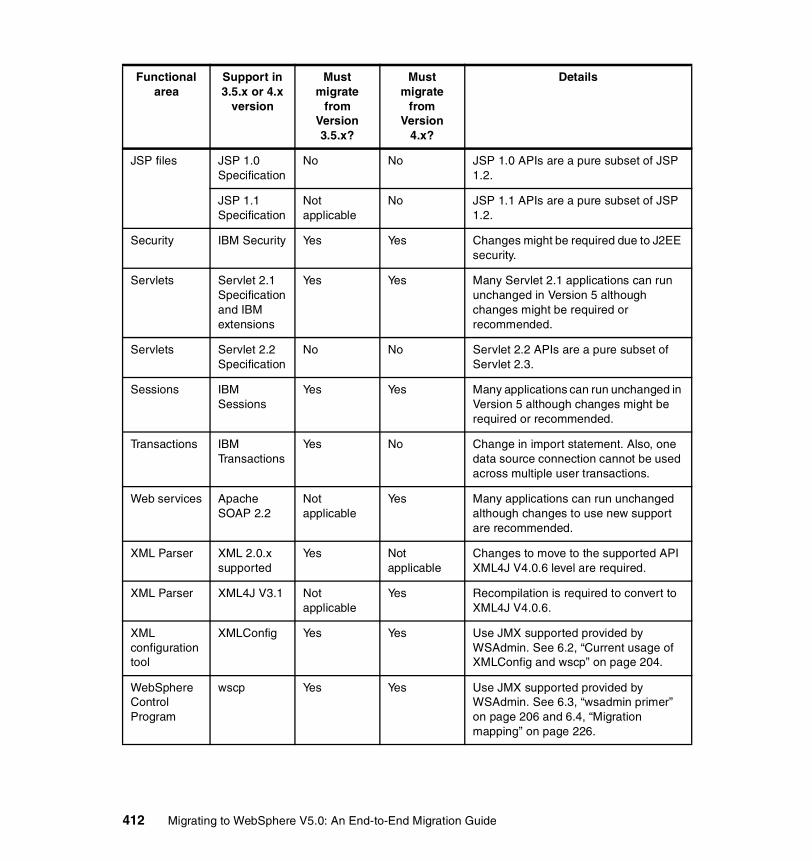
JSP files JSP 1.0 Specification
No No JSP 1.0 APIs are a pure subset of JSP 1.2.
JSP 1.1 Specification
Not applicable
No JSP 1.1 APIs are a pure subset of JSP 1.2.
Security IBM Security Yes Yes Changes might be required due to J2EE security.
Servlets Servlet 2.1 Specification and IBM extensions
Yes Yes Many Servlet 2.1 applications can run unchanged in Version 5 although changes might be required or recommended.
Servlets Servlet 2.2 Specification
No No Servlet 2.2 APIs are a pure subset of Servlet 2.3.
Sessions IBM Sessions
Yes Yes Many applications can run unchanged in Version 5 although changes might be required or recommended.
Transactions IBM Transactions
Yes No Change in import statement. Also, one data source connection cannot be used across multiple user transactions.
Web services Apache SOAP 2.2
Not applicable
Yes Many applications can run unchanged although changes to use new support are recommended.
XML Parser XML 2.0.x supported
Yes Not applicable
Changes to move to the supported API XML4J V4.0.6 level are required.
XML Parser XML4J V3.1 Not applicable
Yes Recompilation is required to convert to XML4J V4.0.6.
XML configuration tool
XMLConfig Yes Yes Use JMX supported provided by WSAdmin. See 6.2, “Current usage of XMLConfig and wscp” on page 204.
WebSphere Control Program
wscp Yes Yes Use JMX supported provided by WSAdmin. See 6.3, “wsadmin primer” on page 206 and 6.4, “Migration mapping” on page 226.
Functional area
Support in 3.5.x or 4.x
version
Must migrate
from Version 3.5.x?
Must migrate
from Version
4.x?
Details
412 Migrating to WebSphere V5.0: An End-to-End Migration Guide

Appendix C. Installing the Big3 application
This appendix contains instructions for installing the Big3 application in WebSphere V3.5 and WebSphere V4.0.
The Big3 Application is a model of an insurance claim processing application. It consists of three Enterprise Java Beans (EJBs) and two clients for the beans: a Web client consisting of two Servlets and several HTML files, and a stand-alone Java client. Two of the beans, Claim and Policy, are entity beans that use Container Managed Persistence. The third, PolicyClaimBean, is a stateless session bean. See Figure C-1 on page 414.
The Web client to the Big3 EJBs is made up of a set of HTML pages that gather information about the claim to be processed, and two Servlets: one that parses the EJBs and invokes the EJBs to process a claim, and another that verifies claim information. The Servlets are in the Big3Servlets JAR file. The Administrative Console is used to create a Web application (Big3WebApp) to place these resources in.
The Java client, big3client, uses the JNDI and RMI/IIOP protocols to locate and communicate directly with the EJBs residing on WebSphere server. The Java client is used to test the deployment of Big3 EJBs.
Ready-to-deploy code is provided for installing this sample in WebSphere V3.5.
C
© Copyright IBM Corp. 2002 2003. All rights reserved. 413
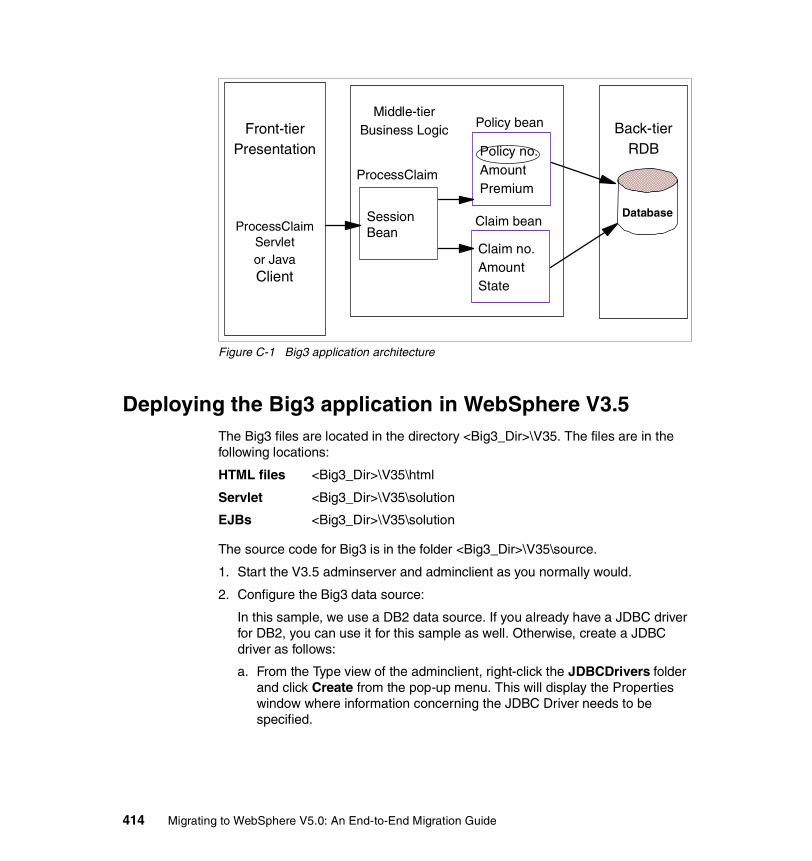
Figure C-1 Big3 application architecture
Deploying the Big3 application in WebSphere V3.5The Big3 files are located in the directory <Big3_Dir>\V35. The files are in the following locations:
HTML files <Big3_Dir>\V35\html
Servlet <Big3_Dir>\V35\solution
EJBs <Big3_Dir>\V35\solution
The source code for Big3 is in the folder <Big3_Dir>\V35\source.
1. Start the V3.5 adminserver and adminclient as you normally would.
2. Configure the Big3 data source:
In this sample, we use a DB2 data source. If you already have a JDBC driver for DB2, you can use it for this sample as well. Otherwise, create a JDBC driver as follows:
a. From the Type view of the adminclient, right-click the JDBCDrivers folder and click Create from the pop-up menu. This will display the Properties window where information concerning the JDBC Driver needs to be specified.
Back-tierRDB
Front-tierPresentation
ProcessClaim Servletor Java Client
Session Bean
Policy no.AmountPremium
Claim no.AmountState
Database
Policy bean
Claim bean
Middle-tierBusiness Logic
ProcessClaim
414 Migrating to WebSphere V5.0: An End-to-End Migration Guide
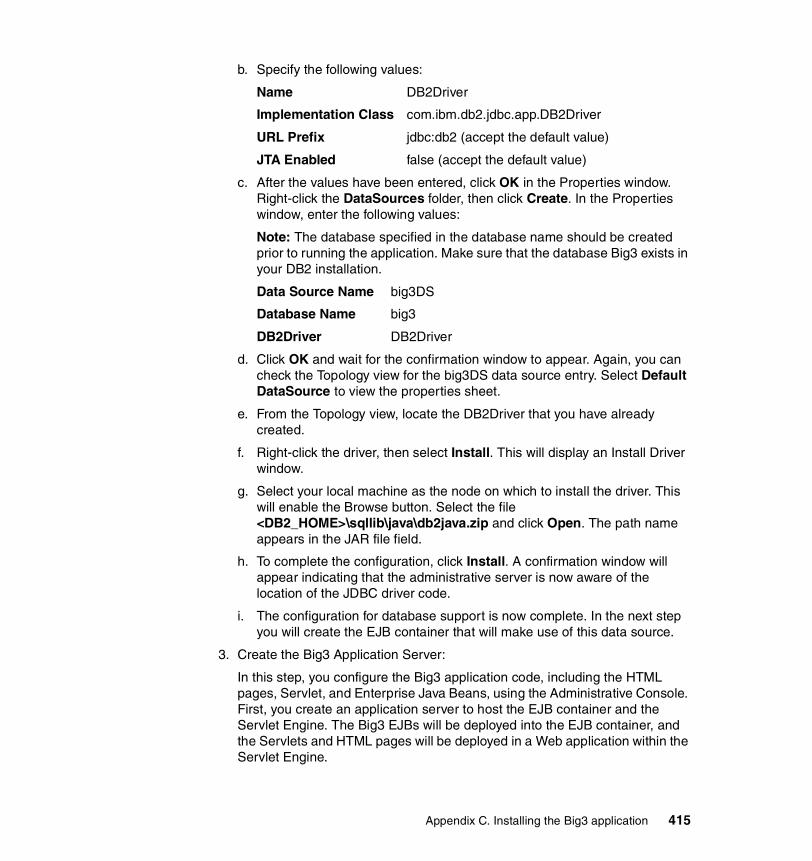
b. Specify the following values:
Name DB2Driver
Implementation Class com.ibm.db2.jdbc.app.DB2Driver
URL Prefix jdbc:db2 (accept the default value)
JTA Enabled false (accept the default value)
c. After the values have been entered, click OK in the Properties window. Right-click the DataSources folder, then click Create. In the Properties window, enter the following values:
Note: The database specified in the database name should be created prior to running the application. Make sure that the database Big3 exists in your DB2 installation.
Data Source Name big3DS
Database Name big3
DB2Driver DB2Driver
d. Click OK and wait for the confirmation window to appear. Again, you can check the Topology view for the big3DS data source entry. Select Default DataSource to view the properties sheet.
e. From the Topology view, locate the DB2Driver that you have already created.
f. Right-click the driver, then select Install. This will display an Install Driver window.
g. Select your local machine as the node on which to install the driver. This will enable the Browse button. Select the file <DB2_HOME>\sqllib\java\db2java.zip and click Open. The path name appears in the JAR file field.
h. To complete the configuration, click Install. A confirmation window will appear indicating that the administrative server is now aware of the location of the JDBC driver code.
i. The configuration for database support is now complete. In the next step you will create the EJB container that will make use of this data source.
3. Create the Big3 Application Server:
In this step, you configure the Big3 application code, including the HTML pages, Servlet, and Enterprise Java Beans, using the Administrative Console. First, you create an application server to host the EJB container and the Servlet Engine. The Big3 EJBs will be deployed into the EJB container, and the Servlets and HTML pages will be deployed in a Web application within the Servlet Engine.
Appendix C. Installing the Big3 application 415
The Administrative Console provides wizards that allow for the configuration and customization of all these objects. The wizards are located on the toolbar. Click the magic wand icon to display the list of task wizards. Alternatively, you can click the Console menu and select Tasks from the drop-down menu.
a. To create an application, select Create Application Server from the list of tasks. An explanation of the task will appear in the content pane.
b. When the wizard starts, select the Enterprise Beans and Web Applications checkboxes and click Next.
c. If you do not select any choices, an application server without any resources will be created. These resources can be added later. However, we will add them now. Selecting Enterprise Beans allows for the configuration of a container and enterprise beans. The Web Applications option allows for the configuration of a Servlet Engine, a Web application and a Servlet.
d. The next window allows you to configure the properties of application server. Under the General view, these settings are grouped under the title of EJBServer Properties. Specify the following values:
Application Server Name Big3
Standard output <WAS35_HOME>\logs\Big3.out
Standard error <WAS35_HOME>\logs\Big3.err
e. Click Next.
f. The next window lets you specify whether the application should be started automatically after the configuration is complete. Select Do not start the server automatically after creating it and click Next.
g. Specify the node on which the application server will reside. Select the node and click Next.
4. Install the EJBs:
You are now ready to deploy the enterprise beans for the Big3Server to manage.
a. Click Browse. The browse window displays the <WAS35_HOME>\deployedEJBs directory.
b. Select the file <Big3_Dir>\V35\solution\big3deployed.jar. Click Select. Select Yes to confirm you want to deploy all of the EJBs and deploy the JAR file.
c. Click Next. This will bring up the page to configure a container. Do the following:
i. On the General tab, set the EJBContainer Name as Big3Container.
416 Migrating to WebSphere V5.0: An End-to-End Migration Guide
ii. On the DataSource tab, click the Change button and select the Big3DS data source. Click OK. Fill in the user ID and password that can access the DB.
5. Configure the virtual host:
Click Next to select a virtual host. This window allows you to use an existing virtual host or create a new one. Select default_host.
6. Configure the Servlet Engine:
a. Click Next to configure a Servlet Engine. On this window you can specify a name for the Servlet Engine. For the Servlet Engine name, enter Big3ServletEngine.
b. Click Next to specify the Web Application properties. Use the following settings:
Web Application Name Big3WebApp
Virtual Host default_host (accept default)
Web Application Web Path /Big3
c. Click the Advanced tab and make note of the Document Root path. You will need this later. Click Next to configure the default Servlets for the Web Application. Make sure the Enable File Servlet checkbox and the Enable JSP 1.0 radio button are selected. Click Finish.
d. When the task is complete, a message will be displayed stating the CreateServer task completed successfully. Click OK.
7. Configure the File Serving Enabler:
a. From the Topology view, select Big3Server -> Big3ServletEngine -> Big3WebApp -> File Serving Enabler. The properties for the File Serving Enabler will be displayed in the content pane.
b. In the Servlet Web Path List, highlight the entry for default_host/Big3 and click Remove.
c. In the Servlet Web Path List, click Add.
d. The Virtual Host field displays default_host. The Servlet Path starts with /Big3. Edit the Web Path and make it /Big3/*.html. This will ensure that all of the following HTML files are accessible.
• index.html• top.html• MenuFrame.html• null.html• ProcessClaim.html• VerifyClaim.html• verify.html
Appendix C. Installing the Big3 application 417
e. Click Apply.
8. Configure the ProcessClaimServlet:
a. From the Wizards menu, select the Add a Servlet wizard. This will display the first page of the task.
b. You are asked “Do you want to select an existing Servlet JAR file or Directory that contains Servlet classes?” Select No. Click Next.
c. This window lets you select an application into which to add the Servlet. Expand the tree until the entry for Big3WebApp appears. Select it and click Next.
d. This task has a feature that lets you pick out the type of Servlet. On this window select Create User Defined Servlet to choose the latter configuration option. Click Next.
e. The physical location of the Servlet and the WebSphere alias are specified on this display. Use the following values:
Servlet Name ProcessClaimServlet
Servlet Class Name big3.servlet.ProcessClaimServlet
f. Click Add and fill in Servlet Web Path: servlet/big3.servlet.ProcessClaimServlet
Note: The ProcessClaim.html form's action must match the Servlet Web Path. The default_host/Big3/ is automatically prepended to the Servlet Web Path by the wizard.
g. Click Finish. Look for the confirmation window indicating success. Locate the new entry in the Topology view. Under what WebSphere resource does it appear?
9. Placing the files:
Now you must move the Servlets and the HTML files into the WebSphere document root and Servlets directories:
a. Make a directory in <WAS35_HOME>\hosts\default_host\ called Big3WebApp.
b. Make a directory in <WAS35_HOME>\hosts\default_host\Big3WebApp\web.
c. Make a directory in <WAS35_HOME>\hosts\default_host\Big3WebApp\servlets.
d. Copy all the HTML files from <Big3_Dir>\V35\html to the Web directory you just created.
e. Copy the file servlets JAR file from <Big3_Dir>\V35\solution to the Servlets directory you just created.
418 Migrating to WebSphere V5.0: An End-to-End Migration Guide
10.Adding aliases to the default_host:
a. In the Topology view, select default_host.
b. In the property sheet for the default_host, click the Advanced tab and scroll to the Host Aliases list. Add the fully qualified host name for your machine to the list. Click Apply. As you can see, there are entries for localhost, your AIX machine short name, your IP address, and now, the fully qualified name. This makes your application more accessible, enabling the use of any of these forms of address from the Web browser and Java client applications.
11.Testing the Big3 application:
a. From the Topology view, select Big3Server. Click Start in the toolbar (the green arrow) or right-click Big3Server and select Start. Wait for the Big3Server and its components to start. This will be indicated by a confirmation message.
b. View the Data source tab for the two entity EJBs. Note that the Create Table checkbox is no longer checked.
c. Go to http://<fully_qualified_machine_name>/Big3/index.html. The main page of the Big3 Web application will appear.
d. These static pages are served up by the WebSphere Administrative Server. This shows that the File Serving Enabler has been configured correctly. Click Submit on the form in the content pane. This sends the request back to WebSphere, which passes it to the ProcessClaimServlet. The Servlet invokes the enterprise beans to complete the processing. The beans use the database connections specified for the Big3EJBContainer and store information in the database. When all the transactions are completed successfully, a message showing the response time is sent back to the browser. In the event of failure, an error message indicating the failing component is returned.
e. To test the EJBs using the Java client, open an MS DOS window on the Windows NT machine and change to the C:\big3 directory. Check the GetClientClassPath.bat file and make sure that the WAS_HOME is set up correctly.
f. Execute the following command to run the Big3Client:
RunClient <policy_number> <claim_number> <amount_of_claim> <AIX_Machine_name>
Replace the parameters in <> with values. (For example: RunClient 1234 5678 10 XX where XX is your machine name.)
g. At the completion of the test, check the database for new records.
This completes the Big3 installation on V3.5.6.
Appendix C. Installing the Big3 application 419
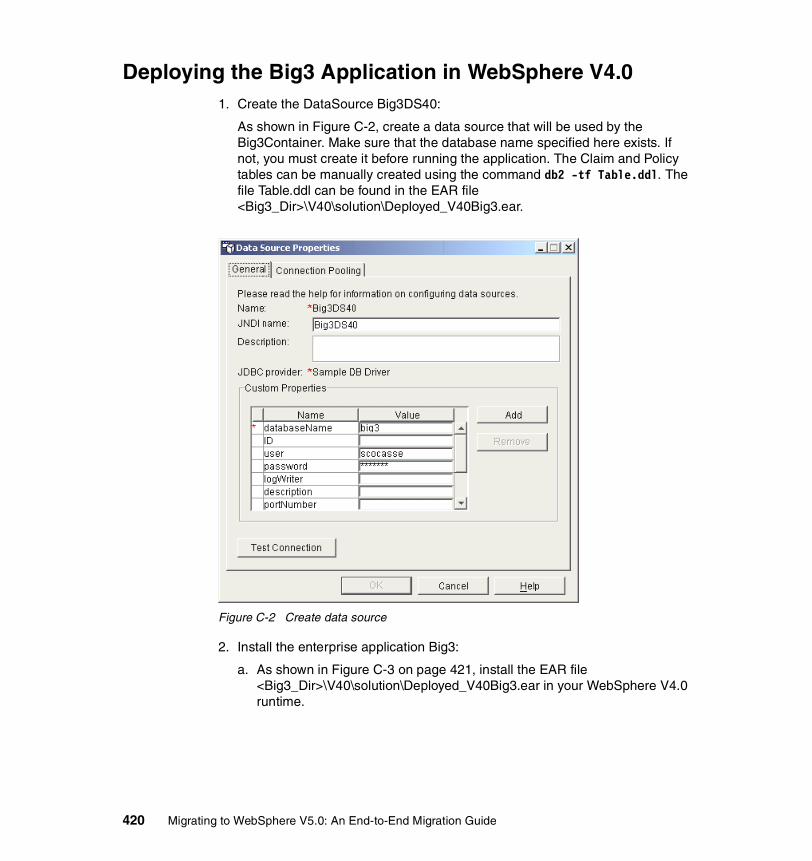
Deploying the Big3 Application in WebSphere V4.01. Create the DataSource Big3DS40:
As shown in Figure C-2, create a data source that will be used by the Big3Container. Make sure that the database name specified here exists. If not, you must create it before running the application. The Claim and Policy tables can be manually created using the command db2 -tf Table.ddl. The file Table.ddl can be found in the EAR file <Big3_Dir>\V40\solution\Deployed_V40Big3.ear.
Figure C-2 Create data source
2. Install the enterprise application Big3:
a. As shown in Figure C-3 on page 421, install the EAR file <Big3_Dir>\V40\solution\Deployed_V40Big3.ear in your WebSphere V4.0 runtime.
420 Migrating to WebSphere V5.0: An End-to-End Migration Guide

Figure C-3 Installing EAR file
b. Accept all the defaults on the subsequent window.
When asked if you would like to generate deployment code for this application, select No, because the deployment code has already been generated using AAT.
3. Test your application:
a. Go to http://localhost:9080/Big3/index.html.
On the ProcessClaim window, click Submit with the default values. A message will appear indicating that the transaction was successful.
This completes the installation of the Big3 application in WebSphere V4.0.
Appendix C. Installing the Big3 application 421

422 Migrating to WebSphere V5.0: An End-to-End Migration Guide

Appendix D. Additional material
This redbook refers to additional material that can be downloaded from the Internet as described below.
Locating the Web materialThe Web material associated with this redbook is available in softcopy on the Internet from the IBM Redbooks Web server. Point your Web browser to:
ftp://www.redbooks.ibm.com/redbooks/SG246910
Alternatively, you can go to the IBM Redbooks Web site at
ibm.com/redbooks
Select the Additional materials and open the directory that corresponds with the redbook form number, SG246910.
D
© Copyright IBM Corp. 2002 2003. All rights reserved. 423
Using the Web materialThe additional Web material that accompanies this redbook includes the following files:
File name DescriptionSG246910.zip Big3 application used in Chapter 11, “System and runtime
migration examples” on page 361
System requirements for downloading the Web materialThe following system configuration is recommended:
Hard disk space: 3 MB minimum
Operating System: Windows/UNIX
Processor: Equal or better than Pentium 500 MHz or RS/6000® 375 MHz, Sparc workstation 440 MHz
Memory: 512 MB RAM or greater
How to use the Web materialCreate a subdirectory (folder) on your workstation, and unzip the contents of the Web material zip file into this folder.
424 Migrating to WebSphere V5.0: An End-to-End Migration Guide

Related publications
The publications listed in this section are considered particularly suitable for a more detailed discussion of the topics covered in this redbook.
IBM RedbooksFor information on ordering these publications, see “How to get IBM Redbooks” on page 431.
� WebSphere Studio Application Developer Programming Guide, SG24-6585
� EJB Development with VisualAge for Java for WebSphere Application Server, SG24-6144 (see Appendix B)
� WebSphere Version 4 Application Development Handbook, SG24-6134, (See the section “Migrating 1.0 EJBs to 1.1 EJBs” on pages 267-268)
� Programming J2EE APIs with WebSphere Advanced, SG24-6124 (See the section on “EJB 1.1 code changes” on pages 113-114)
Other redbook migration guides� Migrating WebSphere Applications to z/OS, SG24-6521
� Migrating WebLogic Applications to WebSphere Advanced Edition V4, SG24-6179
� Migrating WebLogic Applications to WebSphere Advanced Edition, SG24-5956
� Migrating WebLogic Applications to WebSphere V5, REDP0448
Other resourcesThese publications are also relevant as further information sources:
� Enterprise Java Beans Specification, Version 1.1, available at http://java.sun.com/products/ejb/docs.html (see Section 1.3, Application compatibility).
© Copyright IBM Corp. 2002 2003. All rights reserved. 425

� The IBM WebSphere InfoCenter, found at http://www.ibm.com/software/webservers/appserv/doc/v40/aes/infocenter/index.html. Refer to the following sections:
– Transitioning to Version 4.0 (Click Application Server AE ->Migration -> Transitioning to Version 4.0 and read the Role-based security section.)
– Migrating to supported EJB specifications (Click Application Server AE -> Migration -> 3.3 Migrating APIs and specifications -> 3.3.1 Migrating to supported EJB specifications.)
– Migrating from Version 3.x (Click Application Server AE ->Migration -> 3.2 Migrating from previous products versions -> 3.2.2 Migrating from Version 3.x.)
� Extreme Programming Explained: Embrace Change, by Kent Beck, published by Addison-Wesley, 1999
� Refactoring: Improving the Design of Existing Code, by Martin Fowler, published by Addison-Wesley, 1999
WebSphere Studio Application Developer Migration� WebSphere Studio Application Developer V5 Migration Guide
� WebGain VisualCafé to WebSphere Studio Application Developer V5, IBM document, in progress
Migration Planning and Assessment� “Migrating to IBM WebSphere Application Server -- Part 1: Designing
Software for Change”, by W. Beaton (2001a) IBM WebSphere Developer Technical Journal, found at http://www7b.boulder.ibm.com/wsdd/techjournal/0107_beaton/beaton.html
� “Migrating to IBM WebSphere Application Server -- Part 2: Stages of Migration”, by W. Beaton (2001b), IBM WebSphere Developer Technical Journal, found at http://www7b.boulder.ibm.com/wsdd/techjournal/0110_beaton/beaton.html
� “Migrating to IBM WebSphere Application Server -- Part 3: Migration Assessment”, by W. Beaton (2001c), IBM WebSphere Developer Technical Journal, found at http://www7b.boulder.ibm.com/wsdd/techjournal/0205_beaton/beaton.html
426 Migrating to WebSphere V5.0: An End-to-End Migration Guide426 Migrating to WebSphere V5.0: An End-to-End Migration Guide
VisualAge for Java, WebSphere Studio Application Developer� VAJ coexistence with WSAD, by B Searle and E McKay (2002), found at
http://www7b.software.ibm.com/wsdd/library/techarticles/0110_searle/searle.html
� WebSphere Studio Application Developer Migration Guide, by B Searle, (2002a), Third Edition, found at the IBM WebSphere Developer Domain: http://www7b.software.ibm.com/wsdd/library/techarticles/ 0110_wsad_mig/migration_ga.html
Referenced Web sitesThese Web sites are also relevant as further information sources:
� WebSphere for iSeries migration: http://www-1.ibm.com/servers/eserver/iseries/software/websphere/wsappserver/
� IBM download site for WebSphere Studio Application Developer trial version and product purchase: http://www7b.software.ibm.com/wsdd/zones/studio/transition.html
� Enterprise JavaBeans Specification, Version 1.1: http://java.sun.com/products/ejb/docs.html
� Enterprise JavaBeans Specification, Version 2.0: ftp://128.11.159.146/pub/ejb/947q9tbb/ejb-2_0-fr2-spec.pdf
� JSR-000053 Java Servlet 2.3 and JavaServer Pages 1.2 Specifications: http://java.sun.com/aboutJava/communityprocess/first/jsr053/index.html
� The IBM WebSphere Application Server Version 4 InfoCenter: http://www.ibm.com/software/webservers/appserv/doc/v40/aes/infocenter/index.html
� WebSphere Version 4 Application Development Handbook: http://www.redbooks.ibm.com/pubs/pdfs/redbooks/sg246134.pdf
� Programming J2EE APIs with WebSphere Advanced: http://www.redbooks.ibm.com/pubs/pdfs/redbooks/sg246124.pdf
� EJB Development with VisualAge for Java for WebSphere Application Server: http://www.redbooks.ibm.com/pubs/pdfs/redbooks/sg246144.pdf
� WebSphere Application Server Version 3.5 to 4.x - Migration Hints & Tips: http://www7b.software.ibm.com/wsdd/library/techarticles/0208_wright/wright.html
Related publications 427
� JMX Specification (JSR003):http://jcp.org/en/jsr/detail?id=3
� An article on using Ant with WebSphere Studio Application Developer (including J2EE project builds/exports): http://www.ibm.com/websphere/developer/library/techarticles/0203_searle/searle1.html
� An article on optimizing complex builds in WebSphere Studio Application Developer: http://www.ibm.com/websphere/developer/library/techarticles/0204_searle/searle.html
� An article on J2EE class loading (J2EE modules and class paths) in WebSphere Studio Application Developer: http://www.ibm.com/websphere/developer/library/techarticles/0112_deboer/deboer.html
� An article on developing J2EE utility JARs (Java JARs in J2EE modules) in WebSphere Studio Application Developer: http://www.ibm.com/websphere/developer/library/techarticles/0112_deboer/deboer2.html
� An article on team support in WebSphere Studio Application Developer: http://www.ibm.com/websphere/developer/library/techarticles/ 0108_karasiuk/ 0108_karasiuk.html
� An article on migrating Enterprise Access Builder components from VisualAge for Java to WebSphere Studio Application Developer: http://www.ibm.com/websphere/developer/techjournal/0201_minocha/minocha.html
� An article on EJB application design using the Session Facade to talk to CMPs: http://www.ibm.com/websphere/developer/library/techarticles/ 0106_brown/sessionfacades.html
� An article on WebSphere Application Server Best Practices: http://www.ibm.com/software/webservers/appserv/ws_bestpractices.pdf
� An article on WebSphere Best Practices zone: http://www.ibm.com/websphere/developer/zones/bp/
� WebSphere Developer Domain main Web page: http://www.ibm.com/websphere/developer
� WebSphere Developer Domain technical articles: http://www.ibm.com/websphere/developer/techjournal/
� Information about the WebSphere Studio family, and the features and directions of WebSphere Studio Application Developer: http://www.ibm.com/websphere/developer/zones/studio/transition.html
428 Migrating to WebSphere V5.0: An End-to-End Migration Guide428 Migrating to WebSphere V5.0: An End-to-End Migration Guide

� IBM WebSphere Studio family of development tools: http://www.ibm.com/websphere/developer/library/techarticles/0108_studio/studio_beta.html
� External Application Developer newsgroup: news://news.software.ibm.com/ibm.software.websphere.studio.application-site-developer
� External workBench (Eclipse) newsgroup: news://news.software.ibm.com/ibm.software.websphere.studio.workbench
� External WebSphere Application Server newsgroup: news://news.software.ibm.com/ibm.software.websphere.application-server
� An article on deploying a J2EE application from WebSphere Studio Application Developer to WebSphere Application Server: http://www.software.ibm.com/vad.nsf/Data/Document3584
� Application Developer Software Configuration Management (Source Code Management) vendors: http://www.ibm.com/software/ad/studioappdev/partners/scm.html
� Migrating applications to Application Developer from competitors’ development tools: http://www.ibm.com/websphere/developer/zones/studio/migration.html
� Migrating VisualCafé WebLogic applications to Application Developer (still deploying to WebLogic): http://www.ibm.com/websphere/developer/library/techarticles/0209_searle/searle1.html
� Eclipse.org: http://www.eclipse.org
� WebSphere Developer Domain Plugin Central: http://www.ibm.com/websphere/developer/downloads/plugin/
� Eclipse workbench plug-ins (not part of Eclipse.org): http://www.eclipse-workbench.com/jsp/plugins.jsp
� Eclipse plug-ins (not part of Eclipse.org): http://www.eclipse-plugins.2y.net/eclipse/plugins.jsp
� WebSphere V5.0 prerequisites:http://www.ibm.com/software/webservers/appserv/doc/latest/prereq.html
� J2EE 1.3 prerequisites:http://java.sun.com/j2ee/compatibility.html
� Java 1.3 prerequisites:http://java.sun.com/j2se/1.3/
� JUnit testing tool: http://www.junit.org
Related publications 429
� Ready for WebSphere Studio Software validation: http://www.developer.ibm.com/websphere/ready.html
� Developer Domain Application Developer Web page: http://www.ibm.com/websphere/developer/zones/studio/appdev/
� eFix for Application Developer Web site: http://www14.software.ibm.com/webapp/download/product.jsp?type=s&id=SPA-524G3S
� The WebSphere Application Server InfoCenter: http://www.ibm.com/software/webservers/appserv/doc/v40/aes/infocenter/index.html
� Differences between WebSphere Application Server Version 3.5 and 4.0: http://www.ibm.com/software/webservers/appserv/doc/v40/aes/infocenter/was/03.html and http://www.ibm.com/software/webservers/betas/common/doc/migration.pdf
� VisualAge for Java to WebSphere Studio Application Developer export facility: http://www.instantiations.com/vaj-migrate
� Instantiations, Inc. Web site:http://www.instantiations.com/codepro/ws.
� EJB 1.1 Export Tool: http://www7.software.ibm.com/vad.nsf/Data/Document4624
� Visual Composition Editor Code Generation/Export Feature:http://www7.software.ibm.com/vad.nsf/data/document4293
� WebSphere Developer Domain downloadable tools Web site: http://www-3.ibm.com/software/
� Latest updates and prereqs for WebSphere Application Server: http://www-3.ibm.com/software/webservers/appserv/doc/latest/prereq.html
� YourBank Application installed in WebSphere Studio Application Developer 4.0, downloadable from the WebSphere Developer Domain at http://www7b.boulder.ibm.com/wsdd/library/presents/AppDevTraining.html
Other migration guides� WebSphere for iSeries migration:
http://www-1.ibm.com/servers/eserver/iseries/software/websphere/wsappserver/
430 Migrating to WebSphere V5.0: An End-to-End Migration Guide430 Migrating to WebSphere V5.0: An End-to-End Migration Guide
� WebSphere Application Server Version 3.5 to 4.x - Migration Hints & Tips: http://www7b.software.ibm.com/wsdd/library/techarticles/0208_wright/wright.html
How to get IBM RedbooksYou can order hardcopy Redbooks, as well as view, download, or search for Redbooks at the following Web site:
ibm.com/redbooks
You can also download additional materials (code samples or diskette/CD-ROM images) from that site.
IBM Redbooks collectionsRedbooks are also available on CD-ROMs. Click the CD-ROMs button on the Redbooks Web site for information about all the CD-ROMs offered, as well as updates and formats.
Related publications 431

432 Migrating to WebSphere V5.0: An End-to-End Migration Guide432 Migrating to WebSphere V5.0: An End-to-End Migration Guide
Index
Numerics2809 269900 269
AAAT 199, 252, 363, 366, 391AdminApp
Export 220exportDDL 220install 219installInteractive 219listModules 220options 220uninstall 220
AdminConfigattributes 217create 218createClusterMember 219createUsingTemplates 218defaults 218getid 219installResourceAdapter 219listTemplates 217modify 218parents 218queryChanges 218remove 218save 218showall 218types 217
AdminControlcompleteObjectName 215getAttributes 215getCell 215getNode 215getPropertiesForDataSource 215invoke 215invoke_jmx 216isRegistered 216queryNames 216setAttribute 216startServer 216stopServer 216
© Copyright IBM Corp. 2002 2003. All rights reserved.
testConnection 216trace 216
Administration - other tasksDisable local OS security 241Enable security 240Install JDBCDrivers 241Ping node and AppServers for current status 241Regenerate the plug-in configuration 243Setting the Trace specification 239Test connections to data sources 242
Administration of configured objectsDisplay help 237List actions available on configured objects 237List the configured server groups 236Modifying attributes of application server 236Modifying attributes of enterprise applications 236
Administration of runtime objects 236Administrative Console
Base vs ND 201limitations 281V3.5 198V4.0 199V5.0 200
Ant 71, 128, 181API 246Application code 24Application management
Enterprise Application - edit 235Enterprise Application - install 233Enterprise Application - uninstall 235
application server 9, 12authentication 271Automated migration support 266autoResponseEncoding 272
BBean Scripting Framework (BSF) 207Before you migrate
assessment 36code preparation 37education 36
433
installation of a new development environment 37installation/upgrade of system test environments 37plan 38research 37
best practices suggestions 33Big3 sample application 362BSF 207Build and deployment 24build process
Ant 71, 128, 181
CCACT 254cell 10, 15Circular project dependencies 143Class API checker tool 254ClearCase 90, 96, 148, 153ClientUpgrade 256, 269cluster 10, 16, 285Cluster administration
Clone a ServerGroup 238Create a server group 238Remove a clone 239Start a ServerGroup 239Stop a ServerGroup 239
CMP 117–118, 139, 173–175CMP Resource Bindings 372coexistence 265–266, 276–277, 391, 400com.ibm.ejs.ns.jndi.CNInitialContextFactory 280com.ibm.servlet.engine.webapp 272com.ibm.websphere.naming.WsnInitialContextFac-tory 280com.ibm.ws.webcontainer.servlet 272Concurrent Versioning System (CVS) 70, 84, 141configuration 268configuration repository 284Connection Manager 270Container Managed Persistence (CMP) 139content type 272context root 275convert EAR files 246convert J2EE 1.2 EAR to J2EE 1.3 EAR 252converting source code 246Corporate WebSphere environment 26CSIv2 282CVS 70, 84, 90, 96, 141, 148, 153
DData Access Bean Builder 69data source configuration 273datasources.xml 273Default Server 270DefaultErrorReporter 271, 275–276deploying EJBs 250deployment manager 10, 15, 270development environment 22, 24, 27, 31, 37, 65, 72, 74, 245, 269, 287, 323Development tool migration 81, 133downloadable tools Web site 247Downloads
WebSphere Studio Application Developer V5 updates 83, 134WebSphere Studio development products 82, 134
EEAR 8, 71–72, 246, 250, 252–253, 256, 272–273, 275–276, 279earconvert 252education and training 27eFixes 279EJB 1.0 109–110, 119, 166–167, 175EJB 1.1 119, 175EJB 2.0 119, 175EJB Export Tool 109, 165EJB-1.1 beans 139ejbdeploy 250EJBException 119, 175EJBQL 118, 175embedded valueTypes 280ensure quality 276Enterprise Access Builder (EAB) 69enterprise application 273Express test environment 83
Ffederate 270, 284FileServingEnabled attribute 274, 276
GGenPluginCfg 190getters 278Global Security 271guideline 103, 161, 280
434 Migrating to WebSphere V5.0: An End-to-End Migration Guide
HHome interface 278HTML 273HTML and JSP distinctions 89, 146HTTP 57, 187HTTP Server Plugin migration
Apache/IBM HTTP Server 191Domino migration 193IIS 195iPlanet/Sun 192
HTTP Server Plugin V3.5OSE plug-in 185OSERemoteCfg 190queues.properties 187rules.properties 187Servlet Redirector 187vhosts.properties 187
HTTP Server Plugin V4.0plugin-cfg.xml 187
HTTP Server Plugin V5.0GenPluginCfg 190plugin-cfg.xml 187
HTTP transports 275httpd.conf 192
IIBM Software Development Kits 122 and 131 280ibm-web-ext.xmi 274IDE 246IIOP 57, 61, 187incremental version upgrade 266InitialContext 281installation program 268installing the Big3 application 413integration 276interoperability 57, 71, 265–266, 276, 278–279, 282, 391–392, 396, 398–399InvokerServlet 271, 274, 276
JJ2EE 1.2 246J2EE 1.3 246J2EE build tool 71JAR 273Java 1.3 prerequisites 17Java Management Extensions (JMX) 207java.math.BigDecimal 280java:⁄comp 281
java:comp⁄UserTransaction 281JDBC driver 273JMS listener application conversion 253JMX 207JNDI 413JNDI lookup 281JNDI name
-BindJndiForEJBNonMessageBinding 235change 235specifying 372
JSP 273, 275JSP .91 tags
$‹ › 248<DBCONNECT> 248<DBMODIFY> 248<DBQUERY> 248<INSERT> 248<PARAM> 248<PASSWD> 248<REPEAT> 248<REPEATGROUP> 248<SCRIPT> 248<SERVLET> 248<USERID> 248
JSP .91 to JSP 1.1 conversion 246JSP 1.0⁄1.1 tags
<jsp:getProperty> 248<jsp:include> 248<jsp:param> 248<jsp:setProperty> 248<tsx:dbconnect> 248<tsx:dbmodify> 248<tsx:dbquery> 248<tsx:passwd> 248<tsx:repeat> 248<tsx:userid> 248
JSP 1.1 246JSP 1.2 246jta⁄usertransaction binding 281
Lload balancer 42–43, 45load distribution 190LoadBalanceWeight 190LTPA 271
MMapping
Index 435
Bootstrap port 269Cluster members 270Command line parameters 269Default Server 270Directories 269enterprise applications for cluster members 270JDBC drivers and data sources 270JSP .91 to JSP 1.0⁄1.1 248Migration after federation 270Name bindings 270Node name 270OSE plug-in to V5.0 plug-in 187PageList Servlet 271Properties files and classes files 271Samples 271Security 271Servlet 2.1 to 2.2 249Servlet package name changes 271Transport ports 272V4.0 HTTP plug-in to V5.0 plug-in 187Web modules 272WebSphere Application Server editions 10wscp 4.0 to wsadmin 5.0 230
master copy 284master repository 284mb2mdb 253MBeans
Application 209Application Manager 209AppManagement 209Cluster 210ClusterMgr 210DeployedObject 210DeploymentManager 210EJB 210How can I add to system? 208How to list all the methods 209How to list the attributes 209JDBCProvider 210JMSDestination 210JMSServer 210JMXConnector 210JVM 210NameServer 210NodeAgent 210SecurityAdmin 211Server 211ThreadPool 211Transaction 211
WAS40DataSource 211WebContainer 211What is it used for? 208What is it? 207
memory heap size 269migrate EJB1.1 project to EJB 2.0 project 118, 174MigrateWC 86, 143, 246migrating Big3 application from V3.5 to V5.0 363migrating Big3 application from V4.0 to V5.0 381Migrating code from EJB 1.0 to EJB 1.1 116, 172Migrating EJB 1.x to EJB 2.0 118, 175Migrating from Version 3.5 to 5.0 65
clones to clusters 285Enterprise beans 273Integration of generated EAR files into Web-Sphere Studio Application Developer 275J2EE EAR files 273J2EE security 274JSP levels 274OS upgrade scenarios 264Servlet package name changes 274Servlet Redirector 274Transports 275Version 3.5 datasources.xml 273XMLConfig and wscp 228
Migrating from Version 4.0 to 5.0 72Enterprise beans 275J2EE security 276JSP precompiling 275server groups to clusters 285Servlet package name changes 276wscp 230
Migrating from WebSphere Studio Application De-veloper Version 4.0.x to Version 5.0 84, 141Migration guide updates 135migration of a single server 39Migration plan
Assessment 73Build 75Deployment and configuration 75Development environment 74Documentation 76Education 73Pre-production and production 75Scheduling 77System test environment 75Testing 75
Migration scenariosMultiple applications on a single server 41
436 Migrating to WebSphere V5.0: An End-to-End Migration Guide
Multiple applications on multiple servers (hori-zontal migration) 46Multiple applications on multiple servers (vertical migration) 52Single application on a single server with one machine 39Single application on a single server with two machines 40Single application on multiple servers 41
migration steps 265migration strategies
divide and conquer 28dump-and-chase 30run, right, fast, small 31vertical slice, 29
minimal downtime 53mod_ibm_app_server_http.dll 192mod_ibm_app_server_http.so‹sl› 192Multiple installations 277multiple instances 277multiple servers 41Multiple tiers 57multiple versions 277
Nname binding 270namebindings.xml 280naming client 279naming service 269Network Deployment 265, 269node 10, 13node agent 10, 13node configuration 284
OObject Request Broker 279Object Request Broker (ORB) 61AdminConfig
list 217one-to-one mapping 274Open Servlet Engine 186, 275ORB 61, 279org.omg.CORBA.MARSHAL exceptions 280OSE 186–187, 275OSE plug-in 185, 187OSERemoteCfg 190
PPage Designer
enhancements 88, 146versus Page Designer Classic 88, 146
Page Designer Classic 87, 145versus Page Designer functions 88, 146
Persistence Builder 121, 177persistent HttpSessionState 45Planning 276plugin_common.dll 192plugin-cfg.xml 187, 190PQ51387 279PQ60074 279PQ60335 280PQ60336 280PQ63548 280precedence 276-preCompileJSPs option 276pre-production environment 26Prerequisites
API prerequisites 17J2EE 1.3 prerequisites 17Java 1.3 prerequisites 17most recent operating system levels and soft-ware ‹website› 268WebSphere V5.0 prerequisites 17
prevent downtime 276primary servers 190production environment 23, 25–27, 36, 72, 75, 77, 276, 399production/testing environments 25
QQA 276
RRational ClearCase 84, 141Redbooks Web site 431
Contact us xviirepository 276RMI⁄IIOP 413role-based authorization 274Runtime environments 25
SSCM 96, 153SCM plug-ins 92, 149
Index 437
SCM repository 87, 144secondary servers 190Security 284security connections 282Server administration
Connect to remote server 233Create a new application server 232Remove an application server 233Start an application server 231Stop an application server 232
server1 270ServerCluster 190ServerGroup 190ServeServletsByClassnameEnabled attribute 274, 276Servlet 2.1 to Servlet 2.2 conversion 246Servlet 2.2 246Servlet 2.3 246Servlet Redirector 187setters 278SimpleFileServlet 271, 274, 276snoopServlet.java 247snoopServlet.java.new 247snoopServlet.log 247SOAP 57software configuration management (SCM) 84, 141software prerequisites 268SSI
<!-- config 248<!-- echo 248<!-- flastmod 249<!-- fsize 248<!-- include 248
SSLv3 282stand-alone machine 276stand-alone migration tools 245stateless applications 45Static versus J2EE Web projects 87, 145supported coexistence configurations 277SWAM 271synchronize 284system test environments 26
TTCP/IP 186Team Server 70Team support 94, 152template for project plan 76
test 276test and integration⁄production environment 276testing 26tools 246
UUserTransaction 281
VV5.0 architecture terminology
application server 9Cell 9Cluster 9Deployment manager 9Node 9Node agent 9
VirtualHost 275, 284Visual Composition Editor (VCE) 67VisualAge for Java
Code formatter 105, 163EJB Export Tool 109, 165EJB server configuration 106, 163Java files and project resource files 106, 164Persistence Builder 121, 177Project class path 105, 162Resource associations 105, 163
VisualAge Persistence Builder (VAP) 69
WWAR 273, 275was.policy 271WASPostUpgrade 259, 265, 268, 270, 272, 384WASPreUpgrade 257, 264, 268, 384Web module 276, 363Web project 87, 144web.xml 275–276web-application 273WebSphere Application Server
changes 85, 143editions 10Servlet/JSP conversion tools 85, 143Version 4.0x versus Version 5 83, 140
WebSphere Developer Domain 247WebSphere scripting command See wsadminWebSphere Studio Application Developer
Code formatter 105, 163EJB 1.1 project structures 86, 144
438 Migrating to WebSphere V5.0: An End-to-End Migration Guide
EJB server configuration 106, 163Java files and project resource files 106, 164Project class path 105, 162Resource associations 105, 163testing your migrated application 107, 164Web project structures 87, 144
WebSphere V5.0 prerequisites 17WebSphere Version 4.0.3
changes from 86, 143WLM 190, 281WorkLoad Management 190, 281wsadmin
AdminApp 219AdminConfig 217AdminControl 214command syntax 211connectionType 405-conntype 212-conntype NONE 217Examples 214script parameters 212securityoff 241securityon 240wsadmin.properties 405
wscpApplicationServer 231–232DrAdmin 239EnterpriseApp 235help 237JDBCDriver 241Node 243SecurityConfig 240ServerGroup 236set 233wscp.hostname 233
XXMLConfig 229, 385XMLconvert 86, 143
Index 439

440 Migrating to WebSphere V5.0: An End-to-End Migration Guide
(0.5” spine)0.475”<
->0.875”250 <
-> 459 pages
Migrating to W
ebSphere V5.0: An End-to-End Migration Guide


®
SG24-6910-01 ISBN 0738453382
INTERNATIONAL TECHNICALSUPPORTORGANIZATION
BUILDING TECHNICALINFORMATION BASED ONPRACTICAL EXPERIENCE
IBM Redbooks are developed by the IBM International Technical Support Organization. Experts from IBM, Customers and Partners from around the world create timely technical information based on realistic scenarios. Specific recommendations are provided to help you implement IT solutions more effectively in your environment.
For more information:ibm.com/redbooks
Migrating to WebSphere V5.0An End-to-End Migration GuideMigration strategy and planning
Development environment migration
Test and production environment migration
This IBM Redbook will assist you in the end-to-end migration of a WebSphere Application Server installation. The end-to-end migration path includes the migration of the development environment, test/integration environment, and production environment using software-engineering methodologies. This guide presents the best practices in migration strategy and planning, migration tools, and practical migration examples.
The development environment migration topics include migration from VisualAge for Java and WebSphere Studio “Classic” to WebSphere Studio Application Developer V5 as well as API migration tools. Step-by-step instructions for many practical migration examples are provided.
This guide was written and tested with the WebSphere Studio Application Developer V5.0 Early Availability (EA) edition.
The WebSphere Application Server migration paths include Version 3.5 to Version 5.0 and Version 4.0 to Version 5.0. The WebSphere Versions 3.5 and 4.0 Single-Server Edition and Advanced Edition are mapped to Version 5.0 Base package and Network Deployment package respectively. The WebSphere system and configuration migration topics include the WebSphere system migration, HTTP Server Plug-in migration, migration of XMLConfig and wscp to wsadmin scripts, and migration examples using coexistence and interoperability.
Back cover