Embed Size (px)
Citation preview
ANC-100e User Manual
ANC-100e Ethernet to Data Highway Plus Adapter
User Manual
About ANC-100e
The ANC-100e allows you to connect a computer on an Ethernet network to a DH+ network and communicate with various DH+ enabled devices such as Allen Bradley’s PLC5, SLC5/04, SLC5/05, ControlLogix series and other devices which might support Allen Bradley DH+ network connectivity. ANC-100e is designed to work utilizing the Ethernet/IP network driver available in most industrial communication software suites, such as Allen Bradley RSLinx Classic/Gateway/Enterprise and alike. And its auto-configuration features provide a quick and easy connection, as cable polarity, node number and baud rate can be auto-detected and auto-configured. For more information on properly configuring your software suite of choice to work with ANC-100e, please see the corresponding chapter of this manual.

ANC-100e Ethernet to DH+ Adapter User Manual 2
©Automation Networks & Solutions LLC. 2016
Table of contents
ANC-100E ETHERNET TO DATA HIGHWAY PLUS ADAPTER USER MANUAL .......................................................................... 1
ABOUT ANC-100E ...................................................................... 1 TABLE OF CONTENTS ................................................................... 2
NETWORK ADAPTER CONFIGURATION .......................................... 3 USING ANC-100E ....................................................................... 6
Connections .........................................................................................6 LED Diagnostics ...................................................................................6 Accessing ANC-100e User Interface ....................................................7
CONFIGURATION AND INTERFACE ................................................. 9 Device Settings ....................................................................................9
Automatic DH+ node assignment:........................................................................ 9 Automatic DH+ Baud Rate detection ................................................................... 9 Automatic Polarity detection................................................................................. 9
Main Configuration Window ..................................................................9 Device Password ................................................................................ 10 Firmware Upgrade .............................................................................. 10 Statistics ............................................................................................. 14 HMI…………………………………………………………………………..15 Language ........................................................................................... 16
RESET TO DEFAULT FACTORY SETTINGS .................................... 16 DEVICE TECHNICAL SPECIFICATIONS .......................................... 17

ANC-100e Ethernet to DH+ Adapter User Manual 3
©Automation Networks & Solutions LLC. 2016
Network Adapter Configuration
IMPORTANT: Before proceeding, make sure that the unit is connected to your Ethernet network or a free Ethernet port on your computer.
If you have changed the IP address of the ANC-100e device, please use that address for the following procedure. The default IP settings programmed into the device at the factory are:
IP Address: 192.168.0.230 Mask: 255.255.255.0 Default Gateway: 192.168.0.1
It is required to configure your PC’s network adapter to use a static IP address the first time the device is used, in order to access the ANC-100e web configuration interface.
If you happen to be using the same network parameters that match the default configuration of the device and the default device IP address is not used on your network by any other IP enabled device, please skip this step.
1. Open Window’s Control Panel 2. Click on “Network and Internet”
3. Click on “Network and Sharing Center”
4. Click on “Change adapter settings”

ANC-100e Ethernet to DH+ Adapter User Manual 4
©Automation Networks & Solutions LLC. 2016
5. Right click on the corresponding network adapter 6. Click on “Properties”
7. From the list of items, select “Internet Protocol Version 4 (TCP/IPv4)” 8. Click “Properties” button
9. Select the option “Use the following IP address” 10. Configure the adapter to use following settings:
IP address: 192.168.0.1 Subnet Mask: 255.255.255.0 Default Gateway: 192.168.0.1
11. “DNS server” settings blank 12. Click “OK” button

ANC-100e Ethernet to DH+ Adapter User Manual 5
©Automation Networks & Solutions LLC. 2016
13. Click “OK” button to close “Local Area Connection” properties window

ANC-100e Ethernet to DH+ Adapter User Manual 6
©Automation Networks & Solutions LLC. 2016
Using ANC-100e
Power and protection
Device requires 9…24 V DC power supply and consumes, depends of the voltage from 94mA at 9V to 35mA at 24V. Device has a diode protection against wrong power wiring polarity.
All device inputs (power, DH+, Ethernet) are TVS protected from spikes and transients.
Connect the power supply + and – wires to the appropriate connection points on the power connector supplied with the device. Please reference the figure on the left for proper wiring.
System grounding in most cases is not necessary but may be useful for protection against high power spikes.
Connections
To connect ANC-100e device to your existing DH+ network or directly to another DH+ device, please use one of the connectors included with the product.
1. Connect the DH+ cable to the ANC-100e left most and right most terminals of the Phoenix
3 pin connector leaving the middle pin not connected. The polarity of blue and clear cables does not matter
2. Connect ANC-100e to the Ethernet network or a free Ethernet port on the computer or a free Ethernet port on a network hub/switch
3. The “Ethernet” LED light should blink intermittently for a moment 4. The “DH+” light will blink every 3 seconds indicating that the device is connected and
associated to a DH+ network
Due to ANC-100e unique DH+ Polarity Detection feature, the way the individual conductors (1/2) are connected does not matter, since upon startup, ANC-100e will AutoDetect and configure itself to use the correct polarity for communication regardless of the DH+ cable polarity.
LED Diagnostics
ANC-100e is equipped with three LEDs used for visual status and diagnostic display.
LED labeled “Ethernet” indicates the data exchange between the ANC-100e and the user PC or any device on the Ethernet network. When the device sends/receives a packet to/from the PC/Ethernet Network, this LED blinks indicating packet exchange.
LED labeled “Diag” indicated the current status of the ANC-100e device on the DH+ network:
• “LED Solid Red” indicates that the device is not currently associated on a DH+ network.
• “LED Solid Green” indicates that the device is associated on the DH+ network

ANC-100e Ethernet to DH+ Adapter User Manual 7
©Automation Networks & Solutions LLC. 2016
LED labeled “DH+” indicates the current status of the DH+ network:
• “LED Off” indicates that there is no application level traffic coming into or out of the device.
• “LED blinks without any particular pattern of Green and Yellow” indicates that the device is associated with the DH+ network and there is ongoing communication taking place with other nodes on the network. Packet transmission causes Yellow LED to blink, packet reception is indicated by a Green blink.
Accessing ANC-100e User Interface
IMPORTANT: Before proceeding, check that your PC’s Network adapter is configured to match ANC- 100e IP settings. Also make sure the unit is connected to your computer or Ethernet network.
In case the previously configured IP settings were forgotten or lost and connection to the device cannot be established anymore, please perform the factory reset described in chapter “Reset to Default Factory Settings” of this manual.
1. Open any web browser and enter the ANC-120e IP address in the address bar. Default IP
address of the device is set to “192.168.0.230” 2. Press “Enter” key
3. Enter the username and password in the corresponding fields. By default, the username is set to “admin” and password to “password”
4. Click “OK” button.
5. If you entered the correct login credentials, you will be presented with the main configuration
window.

ANC-100e Ethernet to DH+ Adapter User Manual 8
©Automation Networks & Solutions LLC. 2016

ANC-100e Ethernet to DH+ Adapter User Manual 9
©Automation Networks & Solutions LLC. 2016
Configuration Interface
Device Settings
ANC-100e comes with several unique and innovative features designed to maximize the efficiency of the device usage under different scenarios.
Automatic DH+ node assignment: When “Auto” is selected in the “DH+ Node” drop down menu, ANC-100e will scan the DH+ network it is currently connected to, and will assign itself a free, unused node on the network to be used for all further communication. This unique feature is very convenient when the user needs to communicate with different DH+ devices on different networks, and allows simple usage without the need to reconfigure the device using the web interface.
Automatic DH+ Baud Rate detection: When “Auto” is selected in the “DH+ Baud Rate” drop down menu, ANC-100e will scan the DH+ network it is currently connected to, and will automatically detect and configure itself to use the correct network Baud Rate. This unique feature is very convenient when the user needs to communicate with different DH+ devices moving between different networks, and allows simple usage without the need to reconfigure the device using the web interface.
Automatic Polarity detection This unique feature allows connecting a DH+ cable without worrying about correct cable polarity.
Main Configuration Window
The following information is displayed in the main configuration window:
• “Fw Version:” field displays the current Firmware version of the device
• “Serial #:” field displays the unique serial number of the device
• “DHCP” field allows the user to enable a DHCP client on the device to obtain dynamic IP address from a DHCP server on the Ethernet network, instead of using static IP parameters specified by the user
• “IP address:” field displays the current IP address of the device, and allows the user to modify it is desired
• “IP Mask:” field displays the current network mask of the device, and allows the user to modify it if desired
• “IP Gateway:” field displays the current default gateway configured on the device, and allows the user to modify it if desired
• “DH+ Node:” drop down menu displays the current DH+ node settings for the device, and allows the user to change it if desired. By default, device is set to automatic DH+ node assignment; please see the description of this feature at the beginning of this chapter
• “DH+ Baud Rate:” drop down menu displays the current DH+ network speed the device is configured to use, and allows the user to change it if desired. By default, device is set to automatic DH+ speed detection; please see the description of this feature at the beginning of this chapter

ANC-100e Ethernet to DH+ Adapter User Manual 10
©Automation Networks & Solutions LLC. 2016
1. Select the desired settings on the main configuration page 2. Press the “Apply” button 3. The device will reboot automatically and new settings will take effect
IMPORTANT: ANC-100e IP address/mask settings must match the IP settings of your particular network.
Device Password
IMPORTANT: It is strongly recommended to change the default device password to something else than the default value to prevent unauthorized access and reconfiguration of the device.
To change the default web interface login password, please follow the steps below:
1. Type in the current password of the device into the “Current Password:” field. The default
password is set to “password” from the factory 2. Type in the desired new password into the “New Password:” field 3. Type in the same new password into the “Confirm Password:” field 4. Click on “Apply” button 5. The device will reboot automatically and the new password will take effect
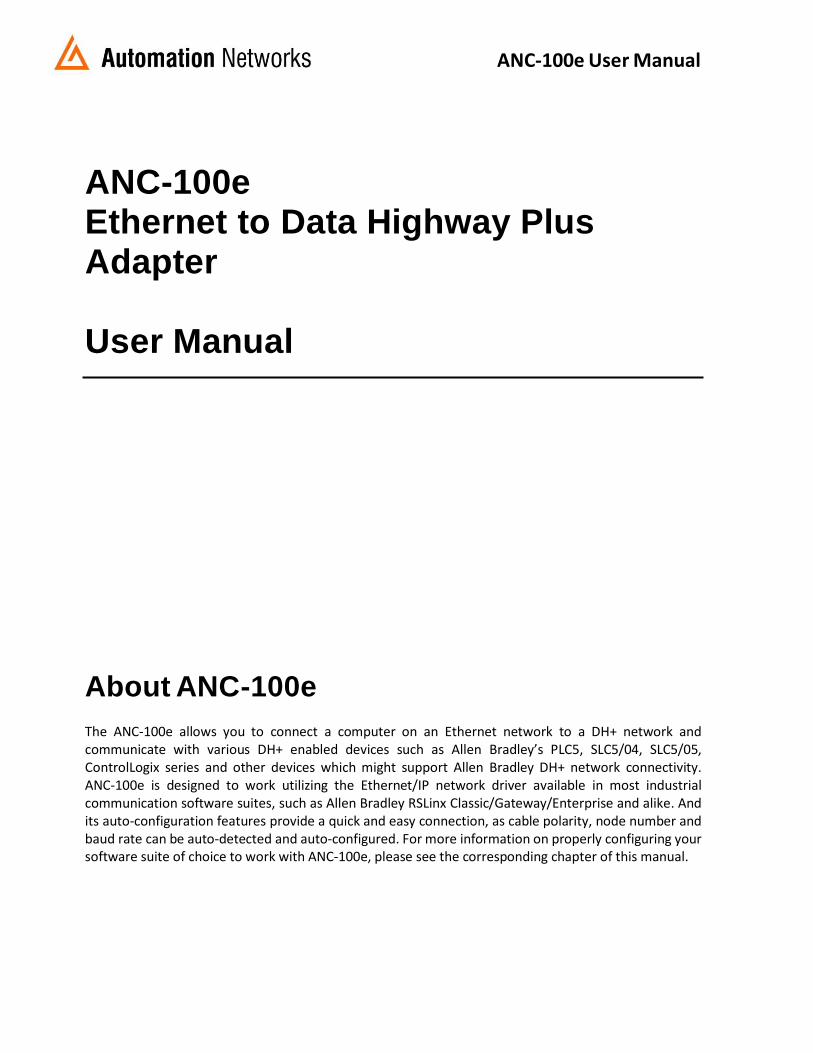
Firmware Upgrade
IMPORTANT: Only upgrade the firmware with the firmware image provided by Automation Networks & Solutions LLC. support staff and only when it is necessary to do so.
Make sure that the unit is disconnected from the DH+ network by unplugging the cable from the unit before proceeding with the firmware upgrade.
1. Open any web browser and enter the ANC-100e IP address in the address bar, default IP
address of the device is set to “192.168.0.230” 2. Enter the username and password and click “OK” button. If you have changed password (see
above), use new one. Default username is set to “admin” and password is set to “password”

ANC-100e Ethernet to DH+ Adapter User Manual 11
©Automation Networks & Solutions LLC. 2016
3. If you entered the correct login credentials, you will be presented with the main configuration window
4. Navigate to the “Upgrade Firmware” tab
5. Click on the “Upgrade” button 6. The following dialog will appear...
7. Wait 5 seconds for the device to reboot and press “OK” button 8. Device will enter the FW upgrade mode and the following page will be displayed in your
browser window:
ANC-100e Ethernet to DH+ Adapter User Manual 12
©Automation Networks & Solutions LLC. 2016
9. If the valid firmware image already programmed, ANC-100e detects it and informs the used by displaying “Software Detected” label
10. Enter the same current password 11. Click on the “Erase” button to erase the currently programmed firmware. This step is
mandatory before programming a new firmware into the device 12. Wait for the device to erase the internal memory and show the following confirmation page:
13. Click on the “Return” button to return to the previous screen. IMPORTANT: Do not use the web browser Back button to navigate between pages
14. You will notice that the device confirms that there is no valid firmware image anymore with the label “NO Application SW Preset”
15. Click on the “Browse” button and select the firmware upgrade file provided to you by our support staff
16. Click on the “Upload” button to start the FW upgrade process 17. Wait for the confirmation page to display the result of the upgrade operation:
18. Wait 10 seconds and press the “Return” button to access the device configuration interface
• Firmware upgrades will ensure that all the currently configured device settings are preserved and there is no need to reconfigure the device after the firmware upgrade.
ANC-100e Ethernet to DH+ Adapter User Manual 13
©Automation Networks & Solutions LLC. 2016
In case where the user might have entered the firmware upgrade mode accidently, please press the “Reboot” button and the device will reboot into the normal operating mode.

ANC-100e Ethernet to DH+ Adapter User Manual 14
©Automation Networks & Solutions LLC. 2016
Statistics
Statistics screen provides a real time statistics data about the health of the device and the network it is operating on. This screen also provides the status of the devices that are connect to the DH+ network.

ANC-100e Ethernet to DH+ Adapter User Manual 15
©Automation Networks & Solutions LLC. 2016
HMI
HMI screen enables you to use an IP address to communicate to a specific DH+ node directly. The HMi is used to enable PanelViews or other devices in an ethernet network to communicate with DH+ nodes when they do not have the ability to use DH+ addresses. Here is an example of configuration.
For this example: ANC-100e IP address = 192.168.0.230
SLC5/04*1 DH+ node = 03 PANELVIEW PLUS 6*2 will use IP address = 192.168.0.229 IP address assigned to SLC5/04 = 192.168.0.231
*1 If your SLC or PLC is in node 0 please use 00 in the HMI configuration. * 2 Always assign an IP address that is not being used in the network.

ANC-100e Ethernet to DH+ Adapter User Manual 16
©Automation Networks & Solutions LLC. 2016
1. Turn ON the first row in the ANC-100e’s “HMI” tab in the web interface
2. Enter an IP address that is not being used (keep in mind that it has to be in the same network the ANC-100e is) and enter the DH+ node of the device that you are connecting to
3. You can repeat steps 1 and 2 for each row to communicate with up to 5 DH+ devices if necessary, using a different IP address in each row Click “Apply” and wait for the unit to reboot (5 seconds)
PanelView will be able to communicate to each IP address directly, and the ANC- 100e will forward the packets to the specified DH+ node
4. In the Panel View configuration, you must add a PLC or SLC device from the “Ethernet SLC
devices” or “Ethernet PLC devices” folders, depending on what is the target on the DH+ network.
1
2

ANC-100e Ethernet to DH+ Adapter User Manual 17
©Automation Networks & Solutions LLC. 2016
Language
Language tab offers English or Spanish language for the web interface. Changing the current web interface language does not require a device reboot.
Reset to Default Factory Settings:
To reset the device to factory default settings:
1. Power on the device and wait approximately 5 seconds 2. Use a paper clip or similar to press and hold the reset button located under the little hole
below the “DH+” LED indicator light 3. Release the button when the tree LEDs light up 4. Device will reboot restoring its factory default settings
IMPORTANT: Factory default settings for the device are:
IP address 192.168.0.230 Network Mask 255.255.255.0
Default Gateway 192.168.0.1
DHCP Off
DH+ node AUTO DH+ speed AUTO
Interface Language English
Username admin Password password

ANC-100e Ethernet to DH+ Adapter User Manual 18
©Automation Networks & Solutions LLC. 2016
Device Technical Specifications:
Ports:
1 RJ45 10/100 Mbps Ethernet port 1 3-pin Terminal 5.08mm DH+ network connector 1 3-pin power connector
Ethernet Communication Speeds:
10/100 Mbps, Half/Full duplex
DH+ Communication Speeds:
57.6Kb, 115.2 Kb, 230.4Kb
Enclosure rating:
Meets IP30 standard, Flame retardant UL-94 HB ABS plastic
External power supply:
9V … 24V DC
Current consumption:
94mA (9V) … 35mA (24V)
Isolation voltage:
400V (continuous), tested at 2000V for 60 s
Typical Power Consumption:
0.9 W
Maximum Power Consumption:
1.0 W
Operating Temperature:
-40 to +85⁰ C
Storage Temperature:
-40 to+100⁰ C
Humidity:
0 to 98%
Dimensions:
86 x 57 x 27 mm

ANC-100e Ethernet to DH+ Adapter User Manual 19
©Automation Networks & Solutions LLC. 2016
Mounting: Desktop or DIN-rail mounting
Automation Networks and Solutions LLC http://automation-networks.com [email protected]


![BUK9K89-100E - Nexperia · 2017. 4. 20. · BUK9K89-100E nowKokue]676@UQ16PllkuDcNpkopokgoh Nexperia BUK9K89-100E Dual N-channel TrenchMOS logic level FET All information provided](https://img.pdfslide.net/doc/110x75/613ee498c500cf75ab362def/buk9k89-100e-nexperia-2017-4-20-buk9k89-100e-inowkokuei676iuq16ipllikudcnpikopokgoh.jpg)