Embed Size (px)
DESCRIPTION
Android Eclipse Phonegap Tutorial
Citation preview
1
Name: Class : Roll Number : Subject : Wireless Mobile
Technology
Experiment : 01
Aim : To study how to set up and configure Phonegap
Signature Grade
2
Aim : To study how to set up and configure Phonegap
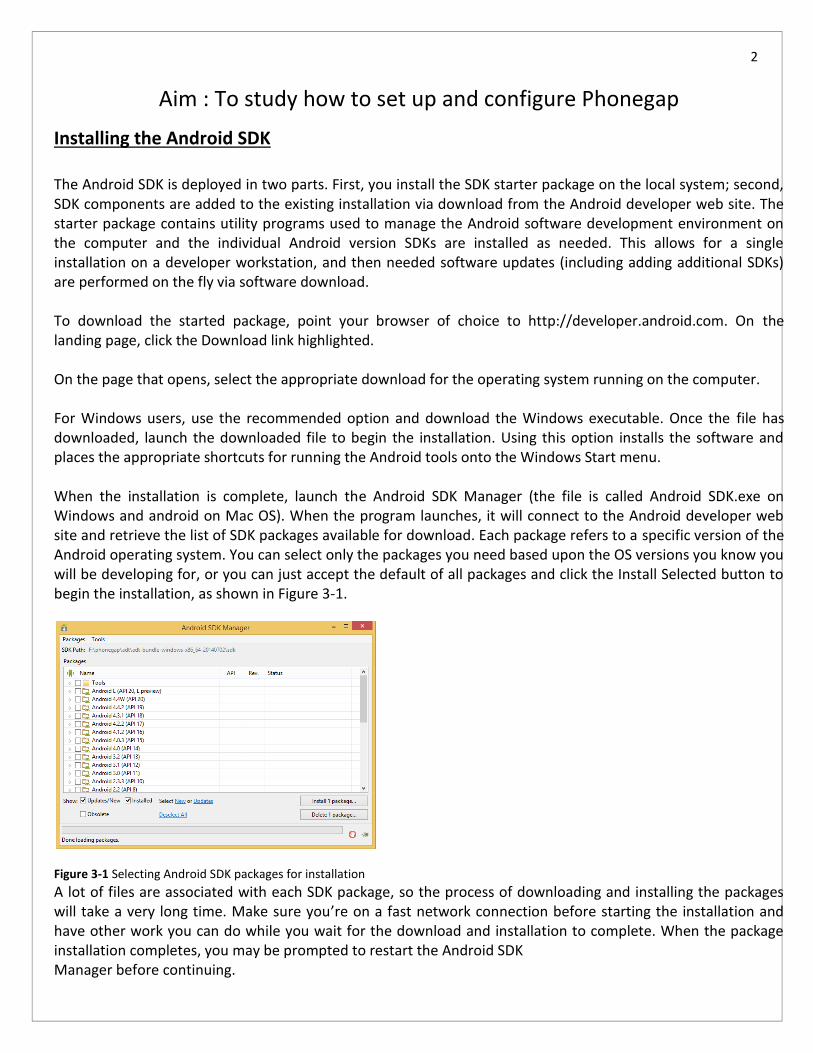
Installing the Android SDK The Android SDK is deployed in two parts. First, you install the SDK starter package on the local system; second, SDK components are added to the existing installation via download from the Android developer web site. The starter package contains utility programs used to manage the Android software development environment on the computer and the individual Android version SDKs are installed as needed. This allows for a single installation on a developer workstation, and then needed software updates (including adding additional SDKs) are performed on the fly via software download. To download the started package, point your browser of choice to http://developer.android.com. On the landing page, click the Download link highlighted. On the page that opens, select the appropriate download for the operating system running on the computer. For Windows users, use the recommended option and download the Windows executable. Once the file has downloaded, launch the downloaded file to begin the installation. Using this option installs the software and places the appropriate shortcuts for running the Android tools onto the Windows Start menu. When the installation is complete, launch the Android SDK Manager (the file is called Android SDK.exe on Windows and android on Mac OS). When the program launches, it will connect to the Android developer web site and retrieve the list of SDK packages available for download. Each package refers to a specific version of the Android operating system. You can select only the packages you need based upon the OS versions you know you will be developing for, or you can just accept the default of all packages and click the Install Selected button to begin the installation, as shown in Figure 3-1.
Figure 3-1 Selecting Android SDK packages for installation
A lot of files are associated with each SDK package, so the process of downloading and installing the packages will take a very long time. Make sure you’re on a fast network connection before starting the installation and have other work you can do while you wait for the download and installation to complete. When the package installation completes, you may be prompted to restart the Android SDK Manager before continuing.
3
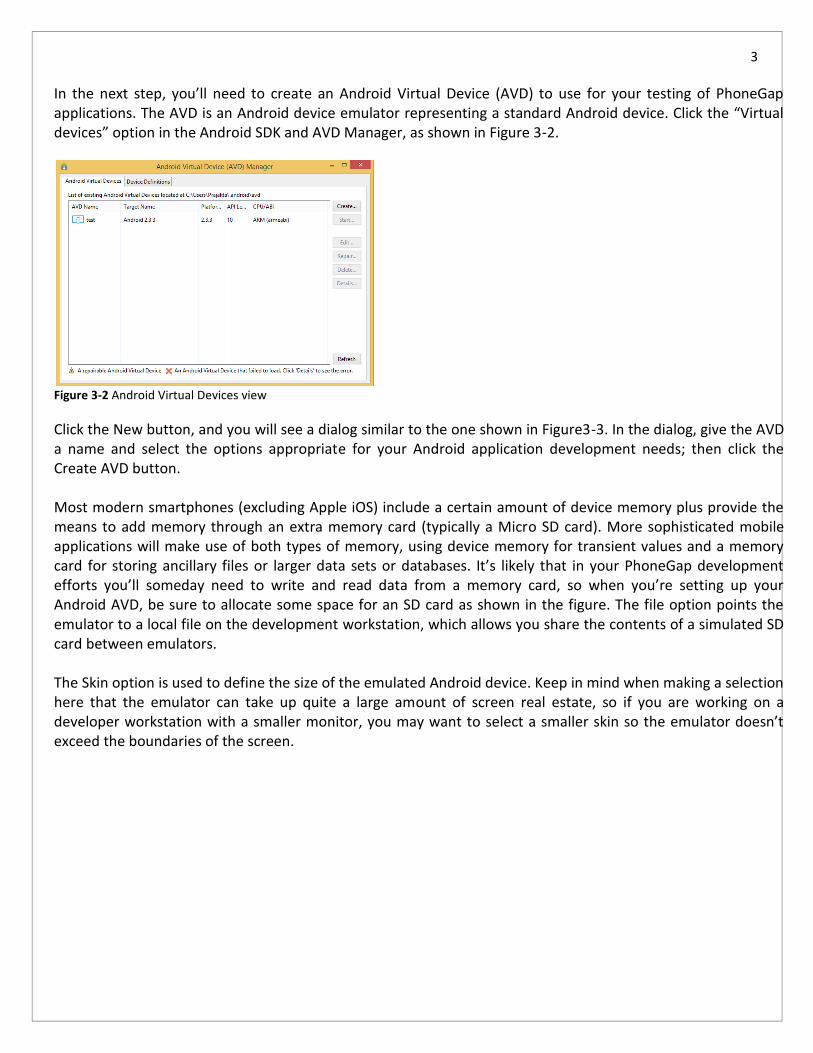
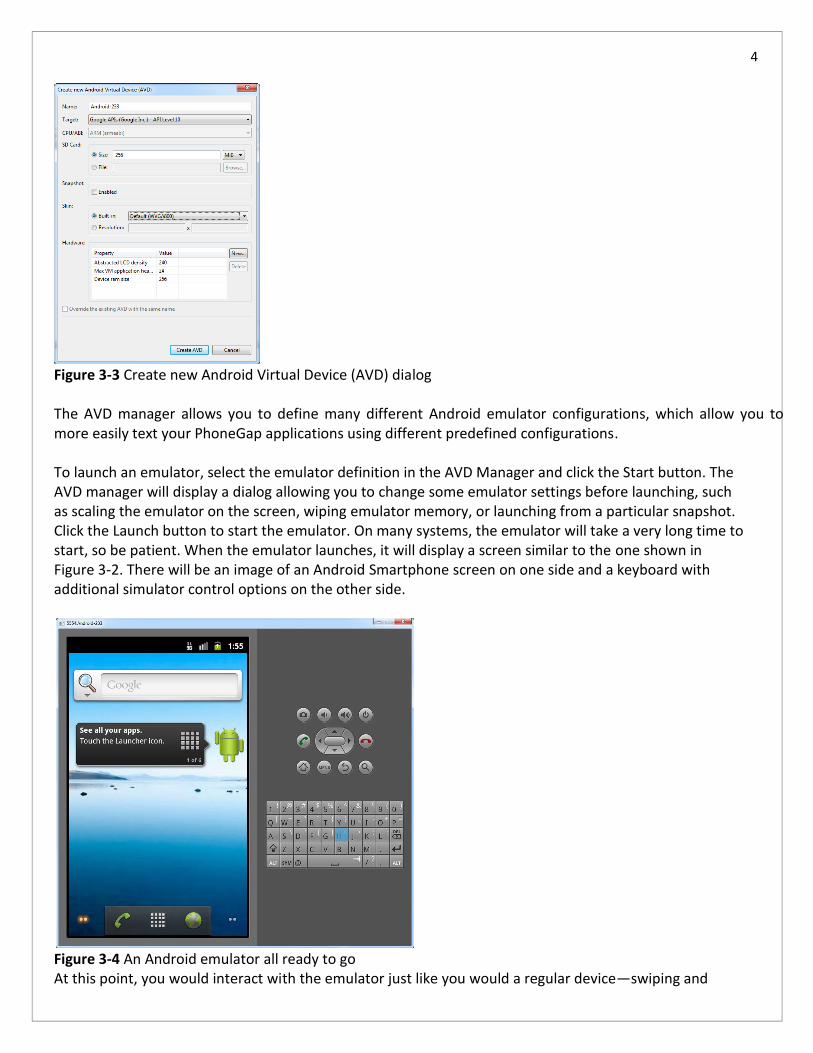
In the next step, you’ll need to create an Android Virtual Device (AVD) to use for your testing of PhoneGap applications. The AVD is an Android device emulator representing a standard Android device. Click the “Virtual devices” option in the Android SDK and AVD Manager, as shown in Figure 3-2.
Figure 3-2 Android Virtual Devices view
Click the New button, and you will see a dialog similar to the one shown in Figure3-3. In the dialog, give the AVD a name and select the options appropriate for your Android application development needs; then click the Create AVD button. Most modern smartphones (excluding Apple iOS) include a certain amount of device memory plus provide the means to add memory through an extra memory card (typically a Micro SD card). More sophisticated mobile applications will make use of both types of memory, using device memory for transient values and a memory card for storing ancillary files or larger data sets or databases. It’s likely that in your PhoneGap development efforts you’ll someday need to write and read data from a memory card, so when you’re setting up your Android AVD, be sure to allocate some space for an SD card as shown in the figure. The file option points the emulator to a local file on the development workstation, which allows you share the contents of a simulated SD card between emulators. The Skin option is used to define the size of the emulated Android device. Keep in mind when making a selection here that the emulator can take up quite a large amount of screen real estate, so if you are working on a developer workstation with a smaller monitor, you may want to select a smaller skin so the emulator doesn’t exceed the boundaries of the screen.
4
Figure 3-3 Create new Android Virtual Device (AVD) dialog The AVD manager allows you to define many different Android emulator configurations, which allow you to more easily text your PhoneGap applications using different predefined configurations. To launch an emulator, select the emulator definition in the AVD Manager and click the Start button. The AVD manager will display a dialog allowing you to change some emulator settings before launching, such as scaling the emulator on the screen, wiping emulator memory, or launching from a particular snapshot. Click the Launch button to start the emulator. On many systems, the emulator will take a very long time to start, so be patient. When the emulator launches, it will display a screen similar to the one shown in Figure 3-2. There will be an image of an Android Smartphone screen on one side and a keyboard with additional simulator control options on the other side.
Figure 3-4 An Android emulator all ready to go At this point, you would interact with the emulator just like you would a regular device—swiping and
5
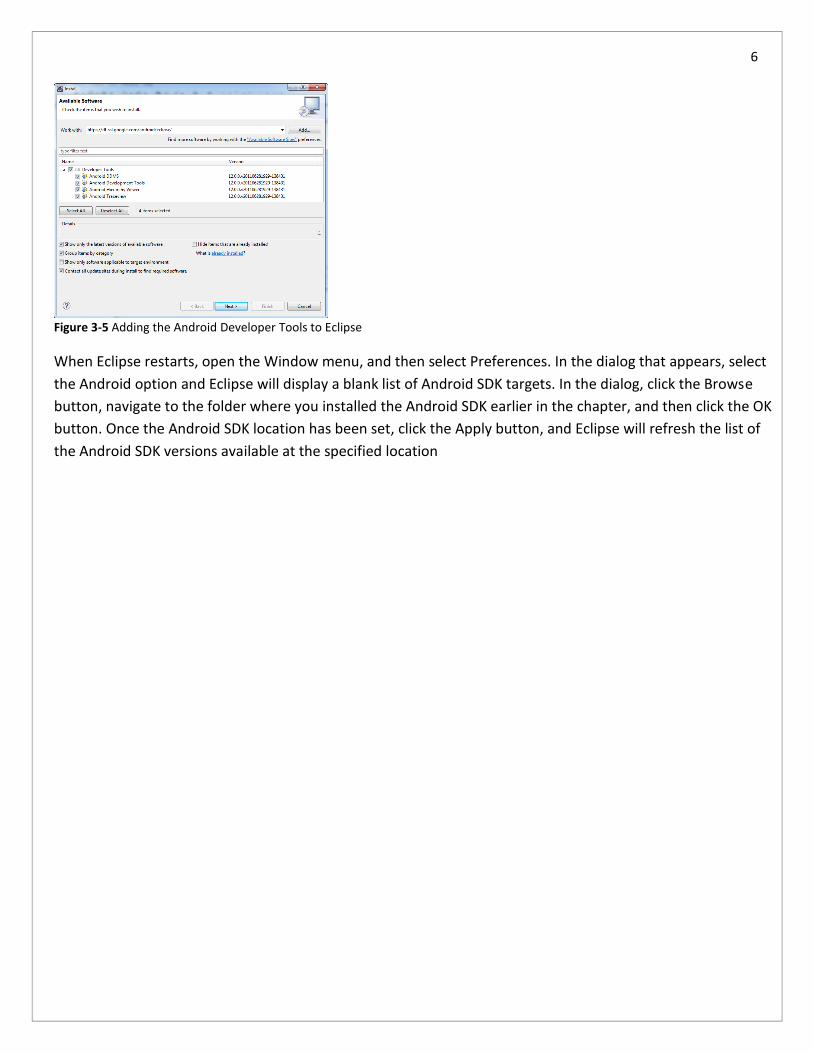
clicking, launching applications, and more. Eclipse Development Environment Configuration Google provides an Eclipse plug-in that simplifies the development of Android applications. Eclipse (www.eclipse.org) is a free, popular, open source integrated development environment (IDE) that’s used primarily for Java and web development but supports many other options as well. There are several editions of Eclipse, each addressing a particular type of development or a particular suite of tools. Google’s tools support multiple editions of Eclipse and currently (although subject to change) support Eclipse 3.5 (Galileo) or greater. Since PhoneGap projects consist of both native and web technologies, I recommend installing the Eclipse IDE for Java EE Developers, which includes the Java development tools needed for Android development and the appropriate web content editors needed for PhoneGap web application development. Point your browser of choice to www.eclipse.org/downloads/, and select the appropriate download for your developer workstation. A subset of options for Windows computers, the page should automatically detect Macintosh or Linux computers and display the appropriate options for the current OS. If not, simply select the OS from the drop-down list at the top of the download list to change to an appropriate list of downloads.Be sure to select the appropriate download bit-depth for the operating system you are running. For example, select the 32-bit version of the download if your development system is running a 32-bit OS, even if the system processor is 64-bit. Once the Eclipse files have been downloaded, extract the downloaded files to the appropriate folder (your choice, as appropriate for the target OS) on your system’s hard drive and create the appropriate application shortcut needed to launch the Eclipse executable (eclipse.exe for Windows and eclipse for Macintosh OS). Next you’ll need to install the Eclipse plug-in for Android development. Launch Eclipse and open the Eclipse Workbench. Open the Help menu, and then select Install New Software. Eclipse will display an installation wizard similar to the one shown in Figure 3-5, although the wizard page initially displayed will not have any of the data shown in the figure. Populate the “Work with” field with https://dl-ssl.google.com/android/eclipse/ and press Enter. Eclipse will connect to the Android software downloads site (represented by the URL you entered) and download information about the available options. If you encounter a problem doing this, make sure you used an https instead of http when typing in the server URL. When the list of options appears in the dialog, place a check next to the Developer Tools option (which will accept all options) and click the Next button. Follow through the remaining options in the installation wizard including accepting the Android license agreement to complete the installation. During installation, Eclipse will prompt you to trust the software you are installing and will ask to restart Eclipse at the end of the installation process.
6
Figure 3-5 Adding the Android Developer Tools to Eclipse
When Eclipse restarts, open the Window menu, and then select Preferences. In the dialog that appears, select
the Android option and Eclipse will display a blank list of Android SDK targets. In the dialog, click the Browse
button, navigate to the folder where you installed the Android SDK earlier in the chapter, and then click the OK
button. Once the Android SDK location has been set, click the Apply button, and Eclipse will refresh the list of
the Android SDK versions available at the specified location

7
Name: Class : Roll Number : Subject : Wireless Mobile
Technology
Experiment : 02
Aim : To write a program for displaying Hello World using Phonegap
Signature Grade
8
Aim : To write a program for displaying Hello World using Phonegap
Any Androrid application program written using Phonegap contains its code in index.html file i.e. application will execute everything that is included in this file. It has usual HTML, javascript code. Code has used different tags and methods to make the code run.
Tags: 1. <meta> :
These tags define the content type for the application and viewport settings. The viewport settings tell the web browser how to scale the content on the screen. The content-type setting is a standard HTML setting.
2. <script> : This loads the PhoneGap API library and makes the PhoneGap APIs available to the program.
Functions: 1. init () :
This function is called at the load event i.e. as soon as the application is loaded. It has an event listener. The document.addEventListener() method attaches an event handler to the document. In the example it is given as , document.addEventListener("deviceready", onDeviceReady, false); Here document.eventListener has 3 parameters.
event: name of the listerner. It could be anything.
function: name of the function to be called by this listener.
useCapture : A Boolean value that specifies whether the event should be executed in the capturing or in the bubbling phase.
2. onDeviceReady() :
As mentioned in addEventListener method this function will be called. It has a method document.getElementById(). In the example it is used as, document.getElementById("abc").innerHTML = "Hello , world." The method returns the value of the element whose ID is provided as the parameter.
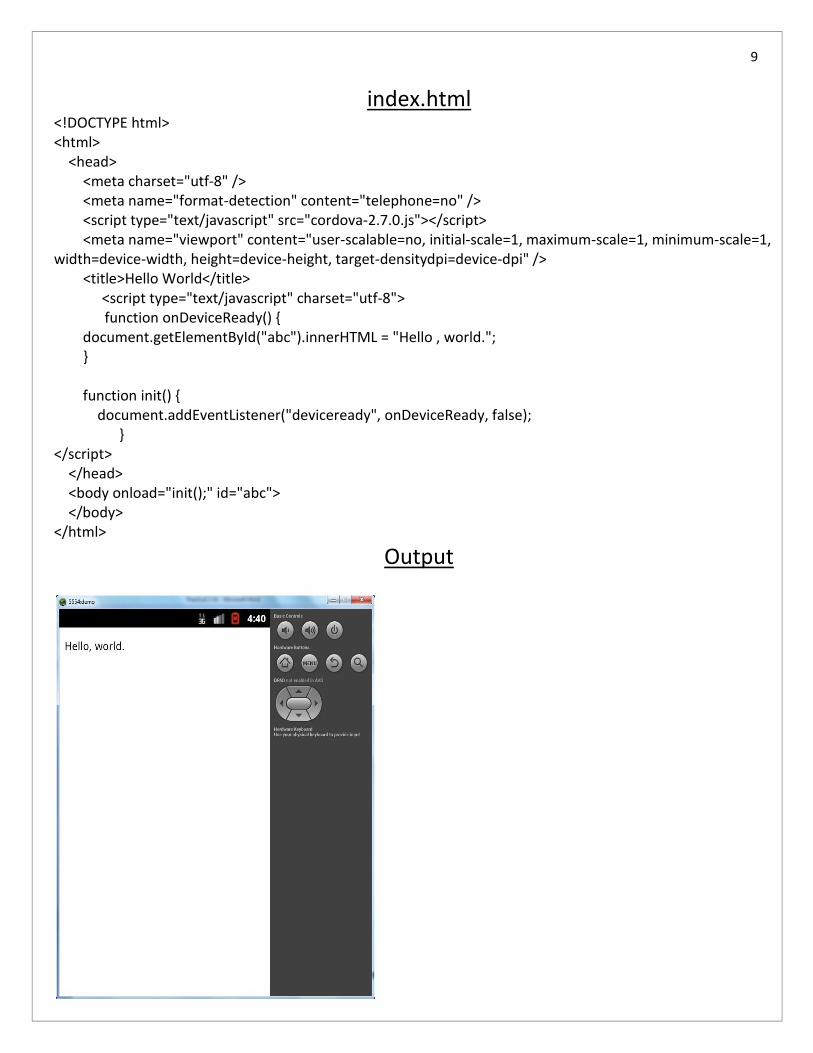
9
index.html <!DOCTYPE html> <html> <head> <meta charset="utf-8" /> <meta name="format-detection" content="telephone=no" /> <script type="text/javascript" src="cordova-2.7.0.js"></script> <meta name="viewport" content="user-scalable=no, initial-scale=1, maximum-scale=1, minimum-scale=1, width=device-width, height=device-height, target-densitydpi=device-dpi" /> <title>Hello World</title> <script type="text/javascript" charset="utf-8"> function onDeviceReady() { document.getElementById("abc").innerHTML = "Hello , world."; } function init() { document.addEventListener("deviceready", onDeviceReady, false); } </script> </head> <body onload="init();" id="abc"> </body> </html>
Output

10
Name: Class : Roll Number : Subject : Wireless Mobile
Technology
Experiment : 03
Aim : To write a program for displaying the phone information using Phonegap
Signature Grade
11
Aim : To write a program for displaying the phone information using Phonegap
Information of a phone can be obtained using the device object. It provides details about the hardware as well as about the software such as, name, version of android, version of cordova, platform on which device is working i.e operating system, its unique identifier etc. Device
The device object describes the device's hardware and software.
Properties
device.name: device.name returns the name of the device's model or product. This value is set by the
device manufacturer and may be different across versions of the same product.
device.name is deprecated as of version 2.3.0, use device.model instead
device.cordova: device.cordova returns the version of Cordova running on the device.
device.platform: Get the device's operating system name.
device.uuid(Universally Unique Identifier): The details of how a UUID is generated are determined by the
device manufacturer and specific to the device's platform or model.
device.version: Get the operating system version.
device.model
Permissions and plugin
We need to add permission as to allow the application to access the information of the device. It is added in the AndroidManifest.xml document. [ app/AndroidManifest.xml] <uses-permission android:name="android.permission.READ_PHONE_STATE" />
Also a plugin is added in config.xml file as, <plugin name="Device" value="org.apache.cordova.Device" /> [app/res/xml/config.xml]
12
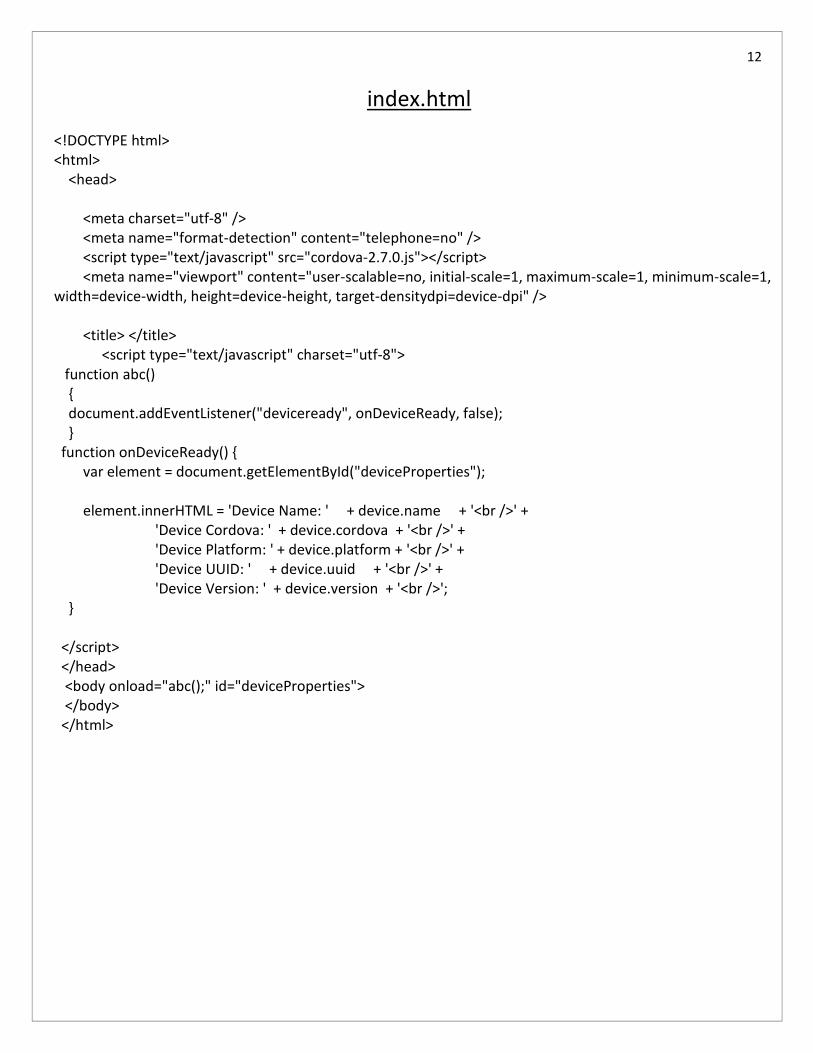
index.html
<!DOCTYPE html> <html> <head> <meta charset="utf-8" /> <meta name="format-detection" content="telephone=no" /> <script type="text/javascript" src="cordova-2.7.0.js"></script> <meta name="viewport" content="user-scalable=no, initial-scale=1, maximum-scale=1, minimum-scale=1, width=device-width, height=device-height, target-densitydpi=device-dpi" /> <title> </title> <script type="text/javascript" charset="utf-8"> function abc() { document.addEventListener("deviceready", onDeviceReady, false); } function onDeviceReady() { var element = document.getElementById("deviceProperties"); element.innerHTML = 'Device Name: ' + device.name + '<br />' + 'Device Cordova: ' + device.cordova + '<br />' + 'Device Platform: ' + device.platform + '<br />' + 'Device UUID: ' + device.uuid + '<br />' + 'Device Version: ' + device.version + '<br />'; } </script> </head> <body onload="abc();" id="deviceProperties"> </body> </html>
13
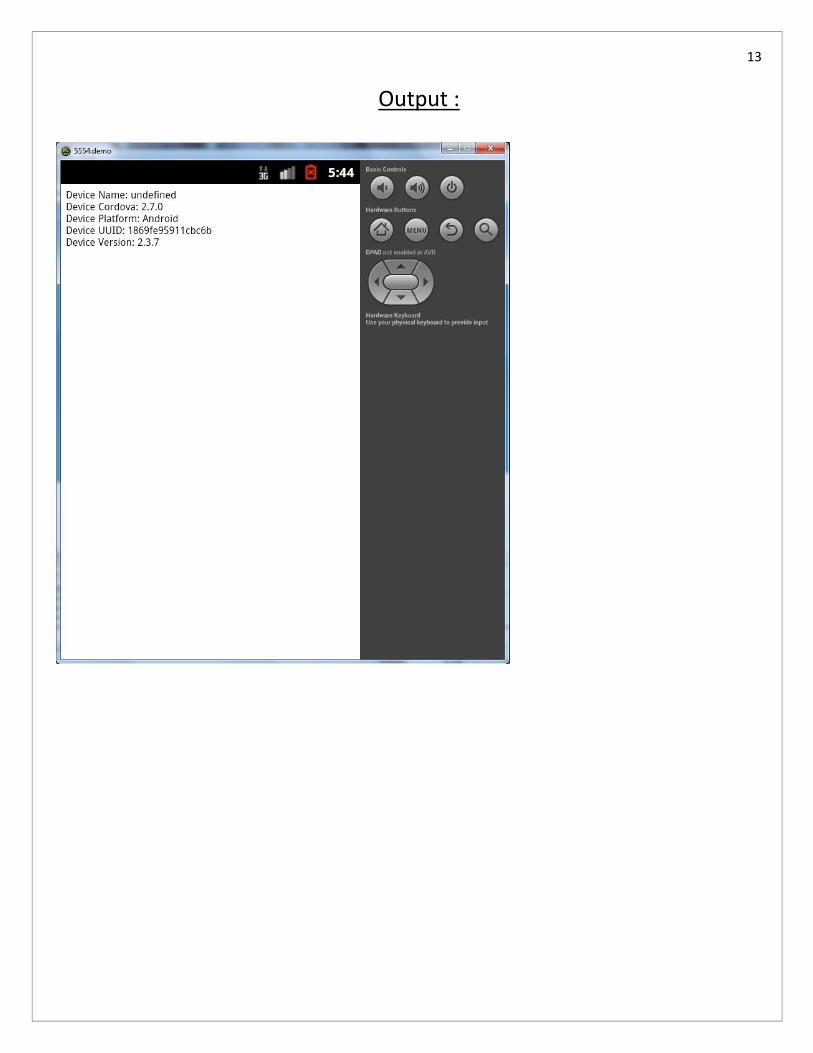
Output :
14
Name: Class : Roll Number : Subject : Wireless Mobile
Technology
Experiment : 04
Aim : To write a program for finding the connection information using Phonegap
Signature Grade
15
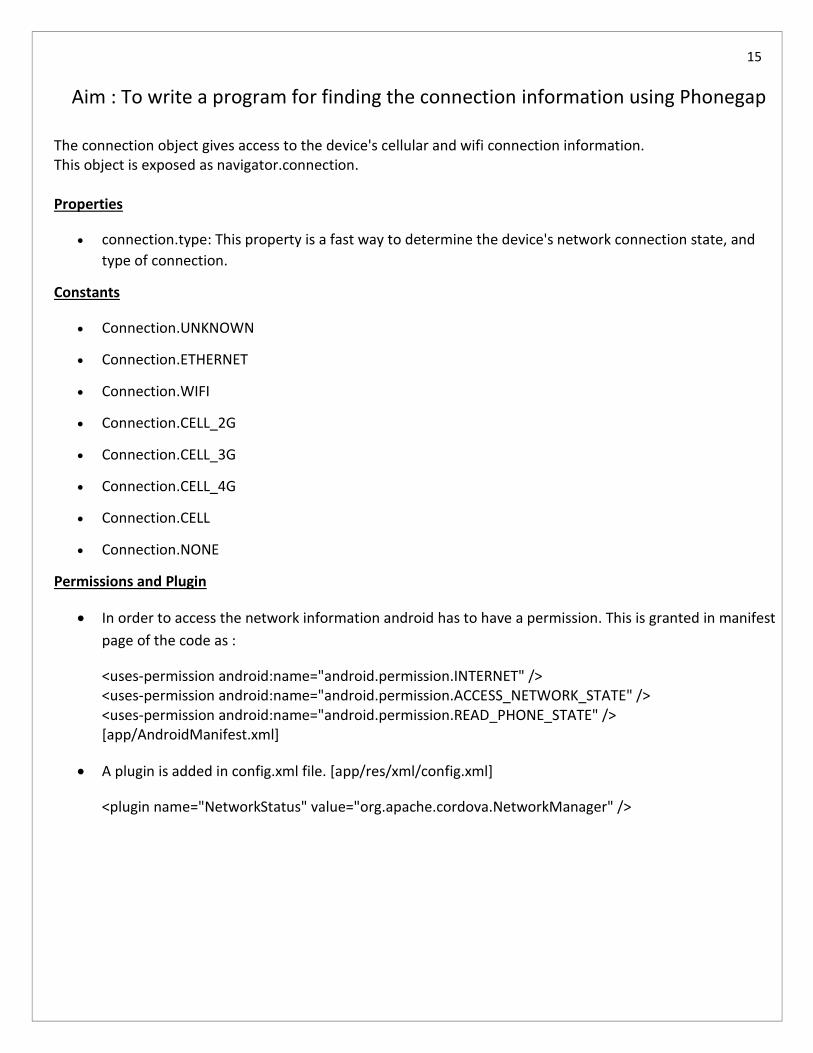
Aim : To write a program for finding the connection information using Phonegap
The connection object gives access to the device's cellular and wifi connection information. This object is exposed as navigator.connection. Properties
connection.type: This property is a fast way to determine the device's network connection state, and
type of connection.
Constants
Connection.UNKNOWN
Connection.ETHERNET
Connection.WIFI
Connection.CELL_2G
Connection.CELL_3G
Connection.CELL_4G
Connection.CELL
Connection.NONE
Permissions and Plugin
In order to access the network information android has to have a permission. This is granted in manifest
page of the code as :
<uses-permission android:name="android.permission.INTERNET" /> <uses-permission android:name="android.permission.ACCESS_NETWORK_STATE" /> <uses-permission android:name="android.permission.READ_PHONE_STATE" /> [app/AndroidManifest.xml]
A plugin is added in config.xml file. [app/res/xml/config.xml]
<plugin name="NetworkStatus" value="org.apache.cordova.NetworkManager" />
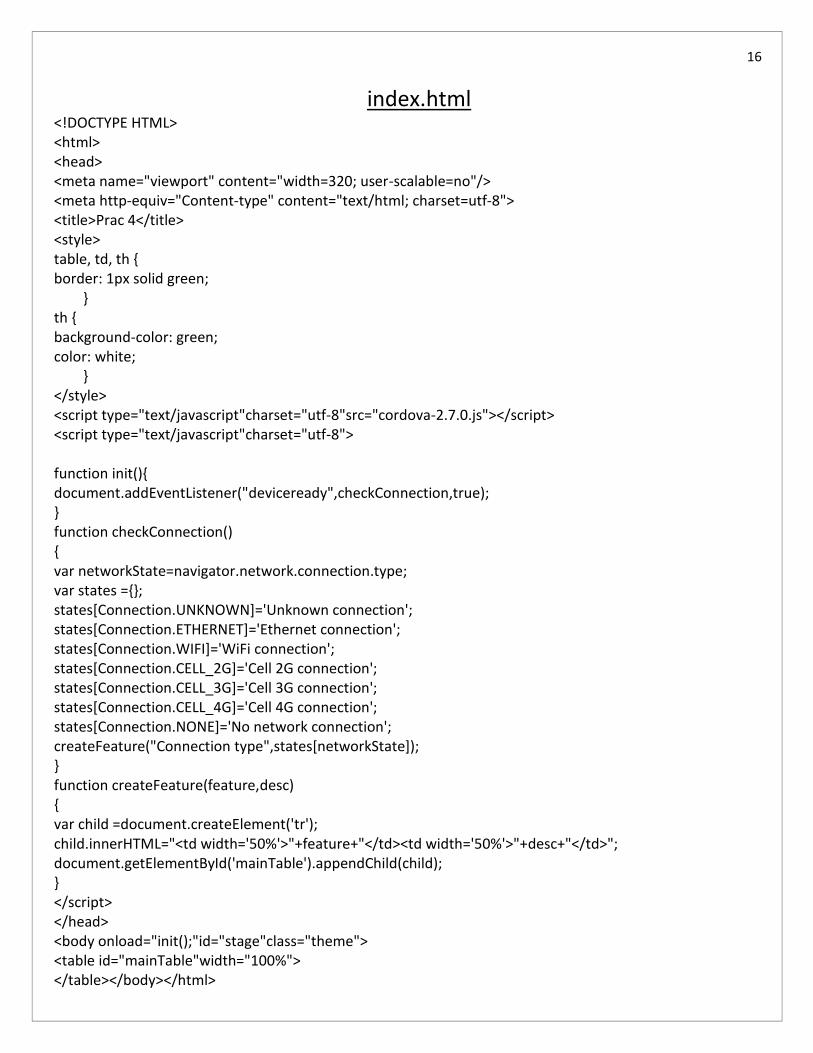
16
index.html <!DOCTYPE HTML> <html> <head> <meta name="viewport" content="width=320; user-scalable=no"/> <meta http-equiv="Content-type" content="text/html; charset=utf-8"> <title>Prac 4</title> <style> table, td, th { border: 1px solid green; } th { background-color: green; color: white; } </style> <script type="text/javascript"charset="utf-8"src="cordova-2.7.0.js"></script> <script type="text/javascript"charset="utf-8"> function init(){ document.addEventListener("deviceready",checkConnection,true); } function checkConnection() { var networkState=navigator.network.connection.type; var states ={}; states[Connection.UNKNOWN]='Unknown connection'; states[Connection.ETHERNET]='Ethernet connection'; states[Connection.WIFI]='WiFi connection'; states[Connection.CELL_2G]='Cell 2G connection'; states[Connection.CELL_3G]='Cell 3G connection'; states[Connection.CELL_4G]='Cell 4G connection'; states[Connection.NONE]='No network connection'; createFeature("Connection type",states[networkState]); } function createFeature(feature,desc) { var child =document.createElement('tr'); child.innerHTML="<td width='50%'>"+feature+"</td><td width='50%'>"+desc+"</td>"; document.getElementById('mainTable').appendChild(child); } </script> </head> <body onload="init();"id="stage"class="theme"> <table id="mainTable"width="100%"> </table></body></html>
17
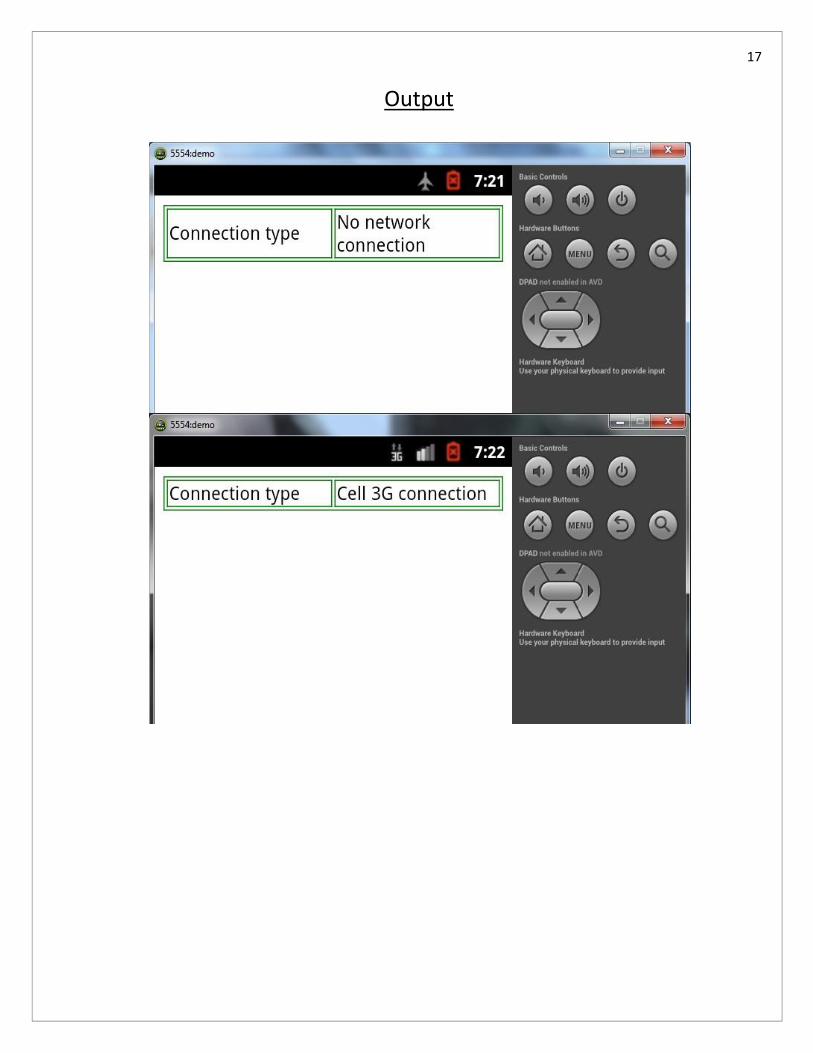
Output
18
Name: Class : Roll Number : Subject : Wireless Mobile
Technology
Experiment : 05
Aim : To write a program for creating a contact using Phonegap
Signature Grade
19
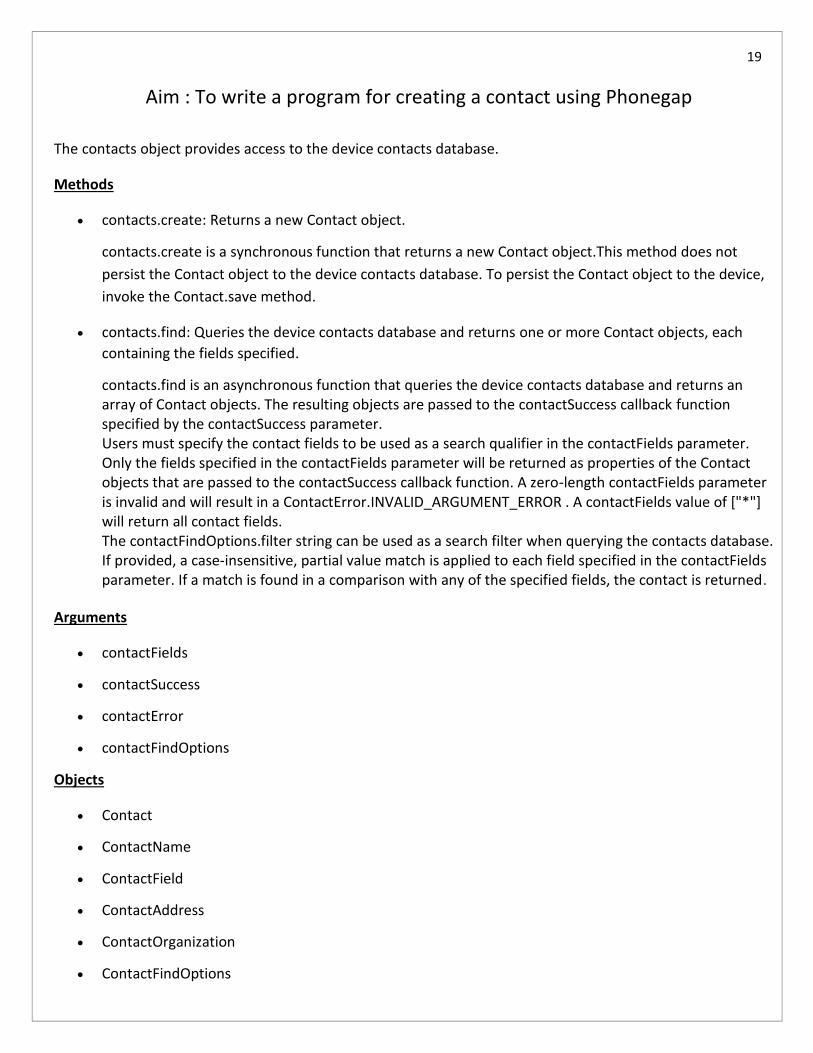
Aim : To write a program for creating a contact using Phonegap
The contacts object provides access to the device contacts database.
Methods
contacts.create: Returns a new Contact object.
contacts.create is a synchronous function that returns a new Contact object.This method does not
persist the Contact object to the device contacts database. To persist the Contact object to the device,
invoke the Contact.save method.
contacts.find: Queries the device contacts database and returns one or more Contact objects, each
containing the fields specified.
contacts.find is an asynchronous function that queries the device contacts database and returns an array of Contact objects. The resulting objects are passed to the contactSuccess callback function specified by the contactSuccess parameter. Users must specify the contact fields to be used as a search qualifier in the contactFields parameter. Only the fields specified in the contactFields parameter will be returned as properties of the Contact objects that are passed to the contactSuccess callback function. A zero-length contactFields parameter is invalid and will result in a ContactError.INVALID_ARGUMENT_ERROR . A contactFields value of ["*"] will return all contact fields. The contactFindOptions.filter string can be used as a search filter when querying the contacts database. If provided, a case-insensitive, partial value match is applied to each field specified in the contactFields parameter. If a match is found in a comparison with any of the specified fields, the contact is returned.
Arguments
contactFields
contactSuccess
contactError
contactFindOptions
Objects
Contact
ContactName
ContactField
ContactAddress
ContactOrganization
ContactFindOptions
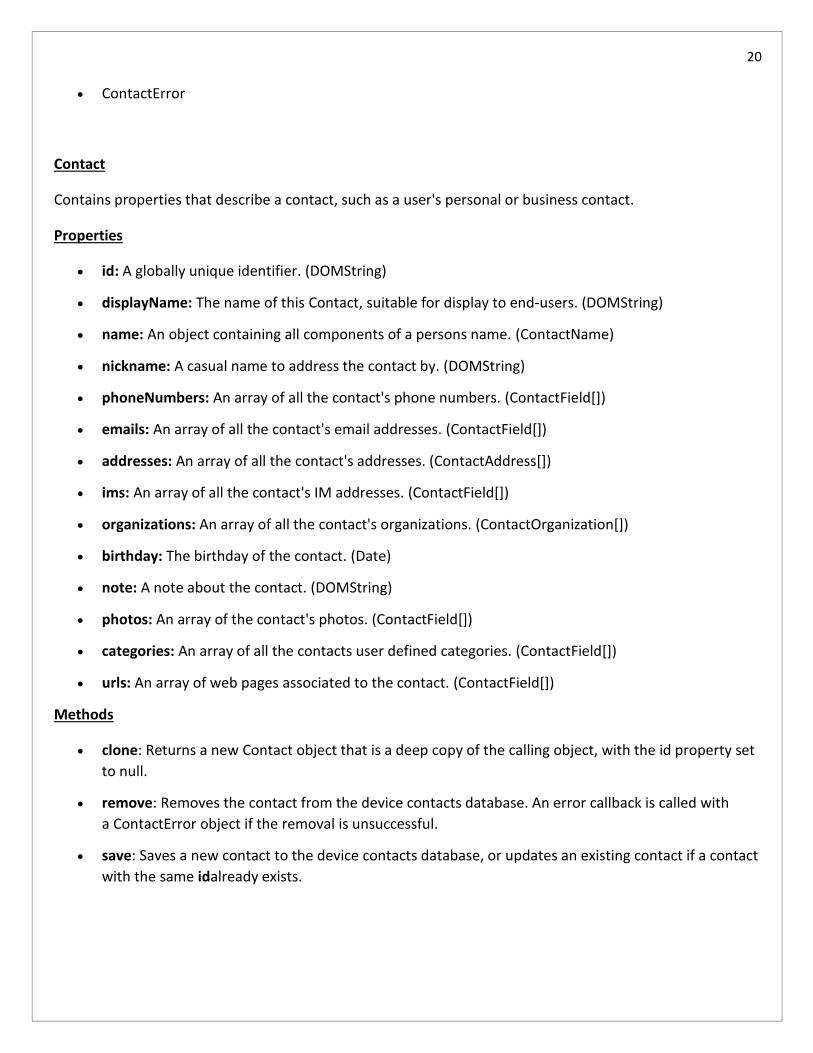
20
ContactError
Contact
Contains properties that describe a contact, such as a user's personal or business contact.
Properties
id: A globally unique identifier. (DOMString)
displayName: The name of this Contact, suitable for display to end-users. (DOMString)
name: An object containing all components of a persons name. (ContactName)
nickname: A casual name to address the contact by. (DOMString)
phoneNumbers: An array of all the contact's phone numbers. (ContactField[])
emails: An array of all the contact's email addresses. (ContactField[])
addresses: An array of all the contact's addresses. (ContactAddress[])
ims: An array of all the contact's IM addresses. (ContactField[])
organizations: An array of all the contact's organizations. (ContactOrganization[])
birthday: The birthday of the contact. (Date)
note: A note about the contact. (DOMString)
photos: An array of the contact's photos. (ContactField[])
categories: An array of all the contacts user defined categories. (ContactField[])
urls: An array of web pages associated to the contact. (ContactField[])
Methods
clone: Returns a new Contact object that is a deep copy of the calling object, with the id property set
to null.
remove: Removes the contact from the device contacts database. An error callback is called with
a ContactError object if the removal is unsuccessful.
save: Saves a new contact to the device contacts database, or updates an existing contact if a contact
with the same idalready exists.
21
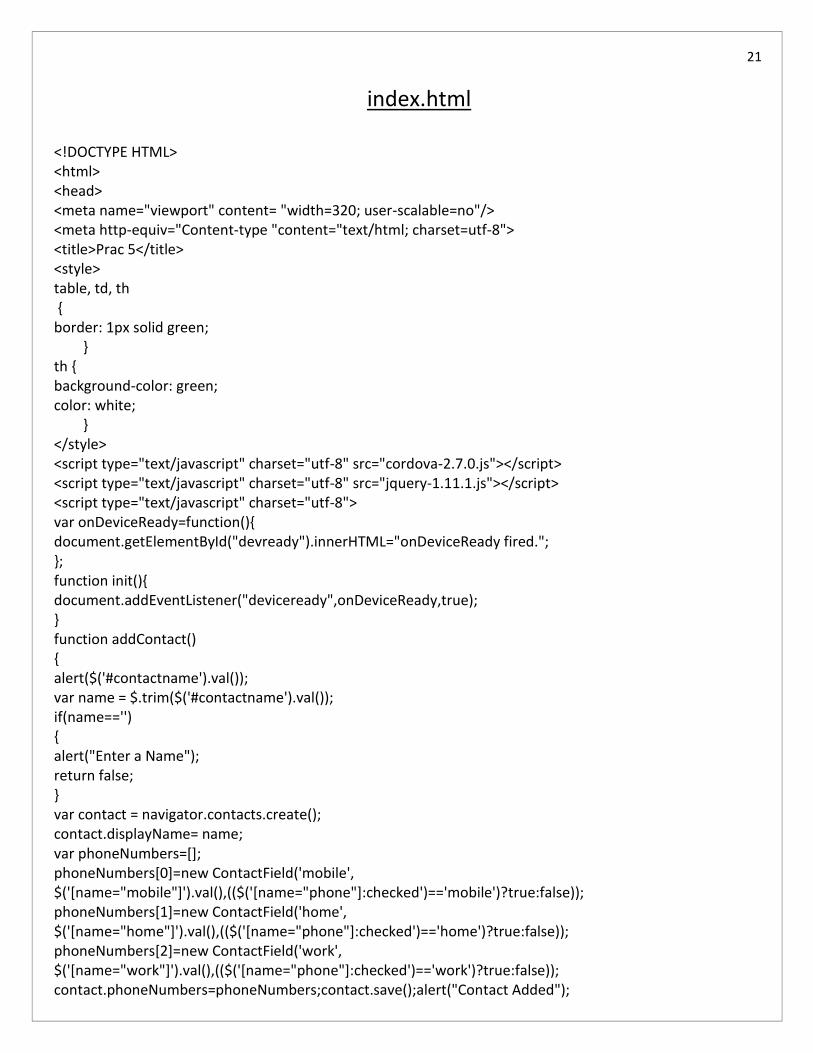
index.html <!DOCTYPE HTML> <html> <head> <meta name="viewport" content= "width=320; user-scalable=no"/> <meta http-equiv="Content-type "content="text/html; charset=utf-8"> <title>Prac 5</title> <style> table, td, th { border: 1px solid green; } th { background-color: green; color: white; } </style> <script type="text/javascript" charset="utf-8" src="cordova-2.7.0.js"></script> <script type="text/javascript" charset="utf-8" src="jquery-1.11.1.js"></script> <script type="text/javascript" charset="utf-8"> var onDeviceReady=function(){ document.getElementById("devready").innerHTML="onDeviceReady fired."; }; function init(){ document.addEventListener("deviceready",onDeviceReady,true); } function addContact() { alert($('#contactname').val()); var name = $.trim($('#contactname').val()); if(name=='') { alert("Enter a Name"); return false; } var contact = navigator.contacts.create(); contact.displayName= name; var phoneNumbers=[]; phoneNumbers[0]=new ContactField('mobile', $('[name="mobile"]').val(),(($('[name="phone"]:checked')=='mobile')?true:false)); phoneNumbers[1]=new ContactField('home', $('[name="home"]').val(),(($('[name="phone"]:checked')=='home')?true:false)); phoneNumbers[2]=new ContactField('work', $('[name="work"]').val(),(($('[name="phone"]:checked')=='work')?true:false)); contact.phoneNumbers=phoneNumbers;contact.save();alert("Contact Added");
22
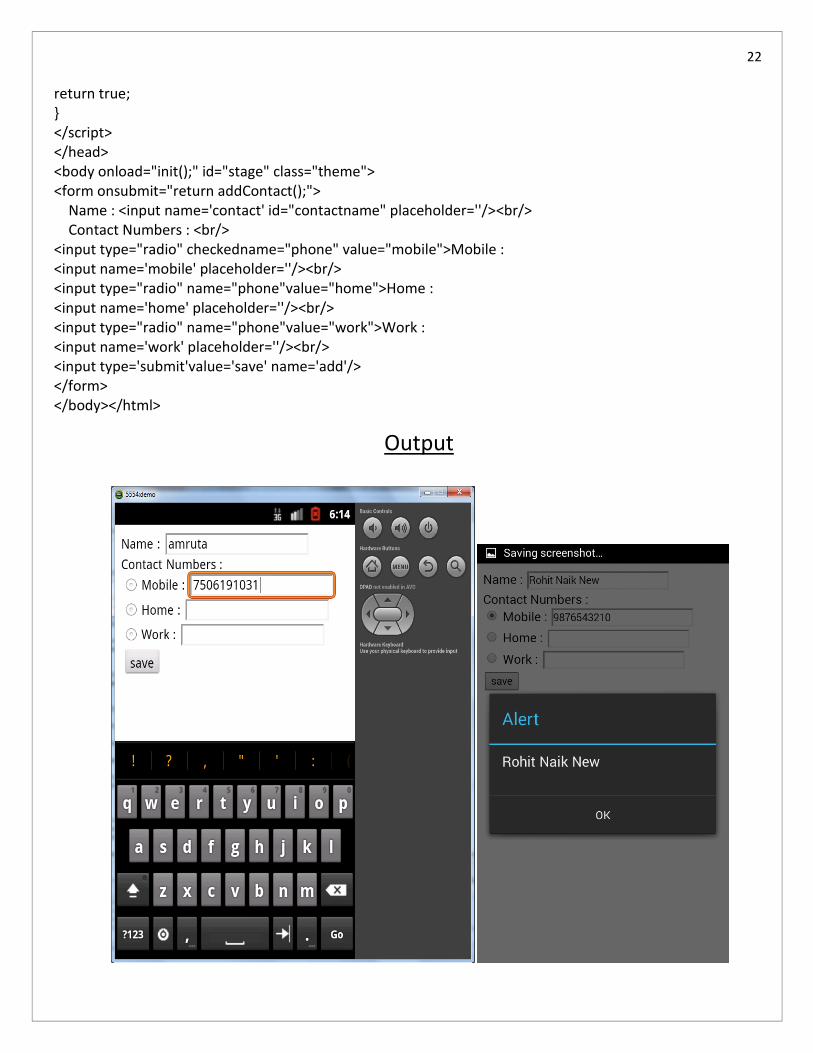
return true; } </script> </head> <body onload="init();" id="stage" class="theme"> <form onsubmit="return addContact();"> Name : <input name='contact' id="contactname" placeholder=''/><br/> Contact Numbers : <br/> <input type="radio" checkedname="phone" value="mobile">Mobile : <input name='mobile' placeholder=''/><br/> <input type="radio" name="phone"value="home">Home : <input name='home' placeholder=''/><br/> <input type="radio" name="phone"value="work">Work : <input name='work' placeholder=''/><br/> <input type='submit'value='save' name='add'/> </form> </body></html>
Output
23
Name: Class : Roll Number : Subject : Wireless Mobile
Technology
Experiment : 06
Aim : To write a program for searching and displaying a contact using Phonegap
Signature Grade
24
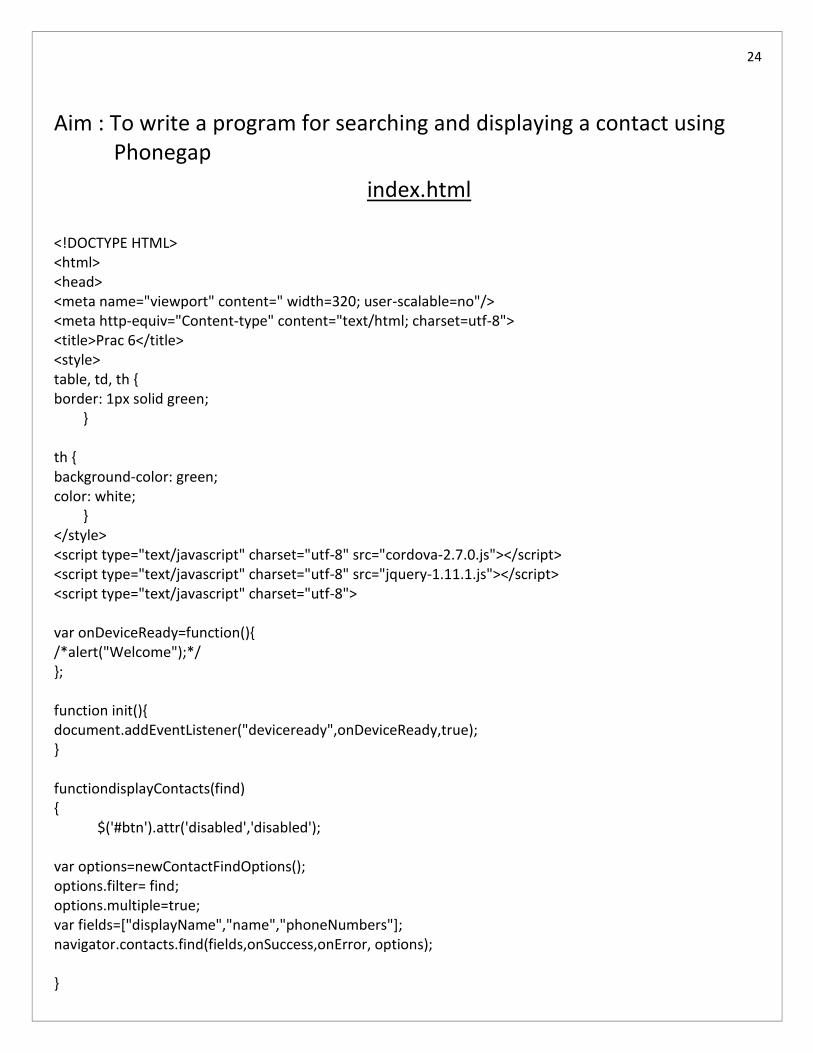
Aim : To write a program for searching and displaying a contact using Phonegap
index.html
<!DOCTYPE HTML> <html> <head> <meta name="viewport" content=" width=320; user-scalable=no"/> <meta http-equiv="Content-type" content="text/html; charset=utf-8"> <title>Prac 6</title> <style> table, td, th { border: 1px solid green; } th { background-color: green; color: white; } </style> <script type="text/javascript" charset="utf-8" src="cordova-2.7.0.js"></script> <script type="text/javascript" charset="utf-8" src="jquery-1.11.1.js"></script> <script type="text/javascript" charset="utf-8"> var onDeviceReady=function(){ /*alert("Welcome");*/ }; function init(){ document.addEventListener("deviceready",onDeviceReady,true); } functiondisplayContacts(find) { $('#btn').attr('disabled','disabled'); var options=newContactFindOptions(); options.filter= find; options.multiple=true; var fields=["displayName","name","phoneNumbers"]; navigator.contacts.find(fields,onSuccess,onError, options); }
25
function onError(contactError){ alert('onError!'); } function onSuccess(contacts) { $("#found").text("Found : "+contacts.length); $("#tableclear").html(""); for(vari=0;i<contacts.length;i++) { var pre = numb =""; pre= contacts[i].displayName; if(contacts[i].phoneNumbers!=null) { for(var j=0; j<contacts[i].phoneNumbers.length; j++) { numb+="<i>"+contacts[i].phoneNumbers[j].type +"</i> <a href='tel:"+contacts[i].phoneNumbers[j].value+"'>"+ contacts[i].phoneNumbers[j].value +"</a><br/>"; } } else numb="---"; createRow(pre,numb); } $('#btn').removeAttr('disabled'); } function createRow(key,desc) { var child ="<tr><td>"+key+"</td><td>"+desc+"</td></tr>"; prev= $("#tableclear").html(); $("#tableclear").html(prev+ child); } function callme() { var input = $("#target").val(); displayContacts(input); } </script> </head>
26
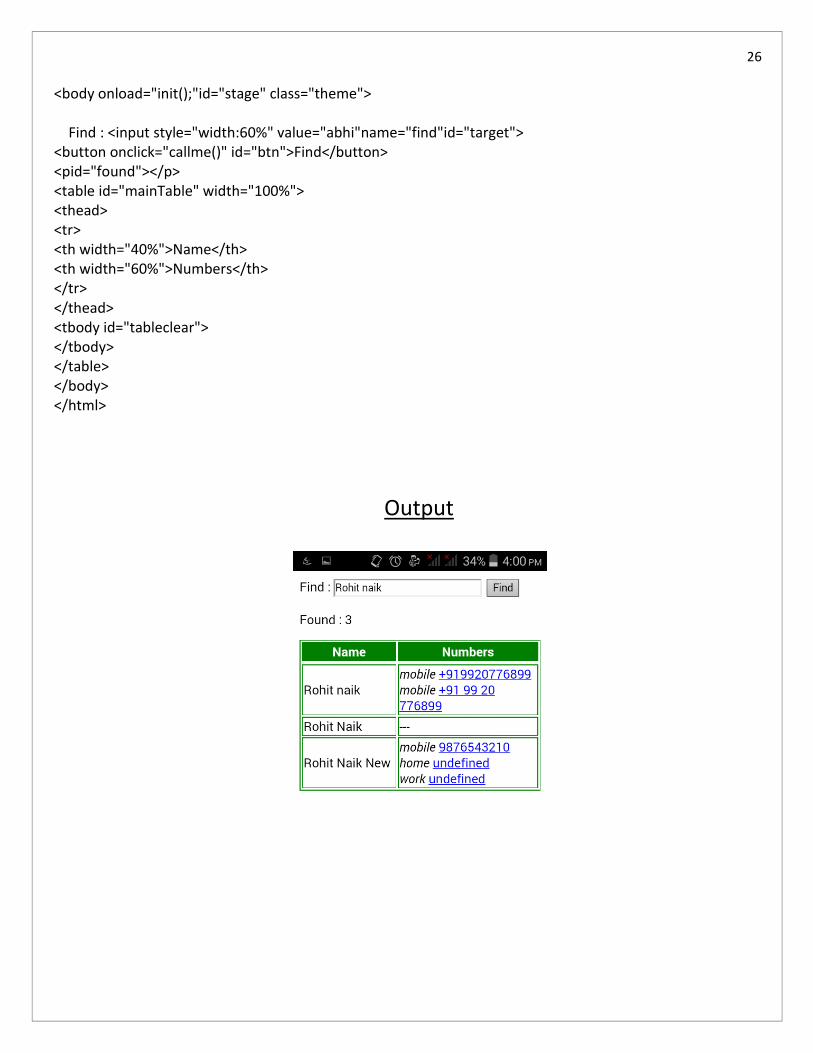
<body onload="init();"id="stage" class="theme"> Find : <input style="width:60%" value="abhi"name="find"id="target"> <button onclick="callme()" id="btn">Find</button> <pid="found"></p> <table id="mainTable" width="100%"> <thead> <tr> <th width="40%">Name</th> <th width="60%">Numbers</th> </tr> </thead> <tbody id="tableclear"> </tbody> </table> </body> </html>
Output

27
Name: Class : Roll Number : Subject : Wireless Mobile
Technology
Experiment : 07
Aim : To write a program for getting various notifications using Phonegap
Signature Grade
28
Aim : To write a program for getting various notifications using Phonegap
The PhoneGap Notification API provides methods that allow an application to provide feedback to a user visually (through pop-up alerts) and through tactile or audible feedback. The methods supported by this API are as follows: • notification.alert • notification.confirm • notification.beep • notification.vibrate
Visual Alerts (Alert and Confirm) The alert and confirm methods are each essentially extended versions of the standard JavaScript alert function. The JavaScript alert method, which works just fine in PhoneGap applications, takes a single parameter, which is the text of the message displayed on the screen, as shown in the following example: alert("You clicked the Click Me button."); This code generates the pop-up dialog.
The PhoneGap alert and confirm functions allow a program to control not only the message being displayed but also the title associated with the pop-up dialog, the text displayed on the dialog’s button(s), and the function that’s executed when the user clicks a button in the pop-up. The difference between alert and confirm is the number of buttons displayed in the dialog; alert displays a single button, and confirm can display one or more buttons. The following is an example of how to call the PhoneGap alert function: navigator.notification.alert(message_text, callback_function,"title", "button_text"); The parameters passed to the function are described here: • message_text: The message text that appears between the title and the button. • callback_function: The function that is executed when the user clicks the button on the dialog. • title: (Optional.) The text that appears on the top of the pop-up dialog. • button_text: (Optional.) The text that appears on the button. If no value is provided, it will default to OK. The following code shows an example of how to use the PhoneGap alert method: navigator.notification.alert("Message", onDoAlert,"Sample Alert", "Click Me!"); This will generate the pop-up dialog and execute the onDoAlert function after the user clicks the button. To skip executing a function when the user clicks the button, simply pass in a null for the function name, as shown in the following example: navigator.notification.alert("Message", null,"Sample Alert", "Click Me!"); The confirm function operates exactly the same as alert; the only difference is in the button_text parameter passed to the function. Instead of a single text value, confirm expects a comma-separated list of values, as shown here: navigator.notification.confirm(message_text, callback_function, "title", "button_text_array"); If no button values are provided, the function will default to using OK and Cancel.The following code
29
will generate the pop-up dialog and execute the onDoConfirm function after the user clicks either of the buttons:
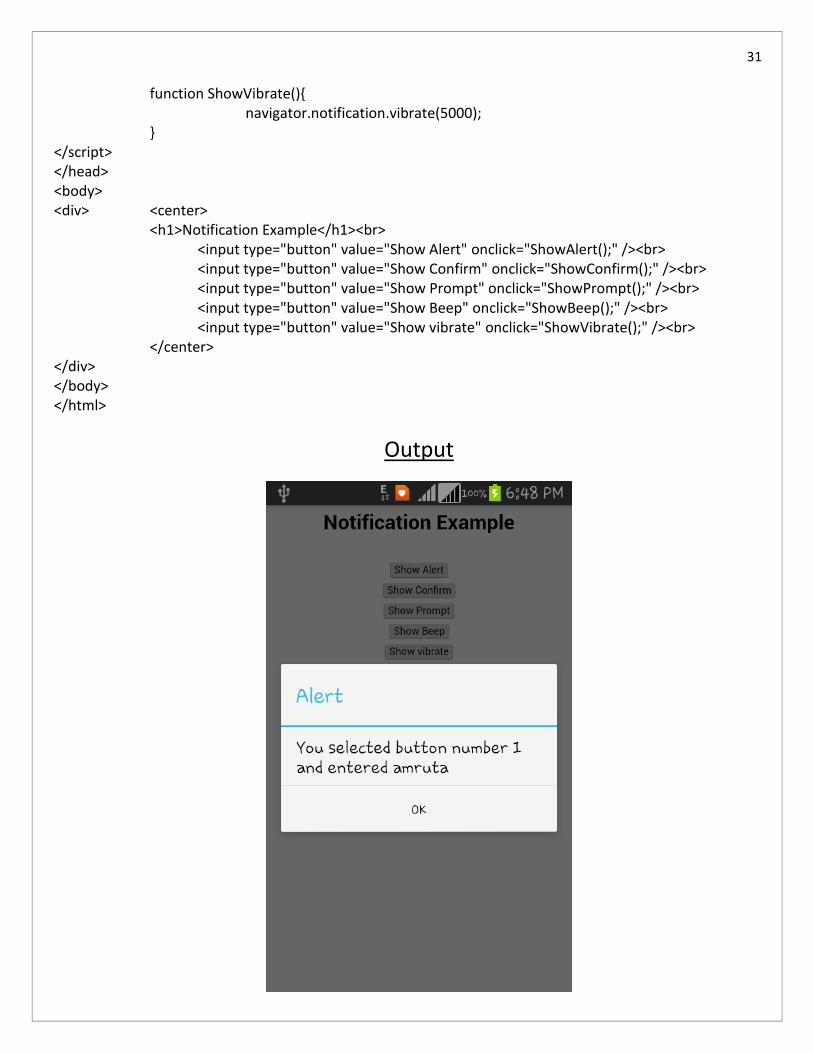
navigator.notification.confirm("Message", onDoConfirm,"Sample Confirmation", "Yes, No"); When the onDoConfirm function is called by confirm, it passes in a button variable that represents the number of the button clicked by the application user. As shown in the following example, a value of 1 is assigned to the first button, 2 to the second, and so on: function onDoConfirm(btnNum) { if(btnNum == "1") { alert("Thanks for saying yes!"); } else { alert("Too bad, you said no."); }} Beep To play the mobile device’s default beep tone, execute the following code: navigator.notification.beep(beepCount); The beepCount parameter is a numeric value that defines the number of times the beep should play. Vibrate To cause the mobile device to vibrate, execute the following code: navigator.notification.vibrate(vibeDuration); The vibeDuration parameter is a numeric value that refers to the number of milliseconds the device should vibrate. A value of 1000 equals one second, 500 is half a second, and so on. To make an application vibrate, pause, and then vibrate again, you will have to manually call vibrate several times and force the required wait between calls; there is no repeat value that can be passed to the vibrate function.
30
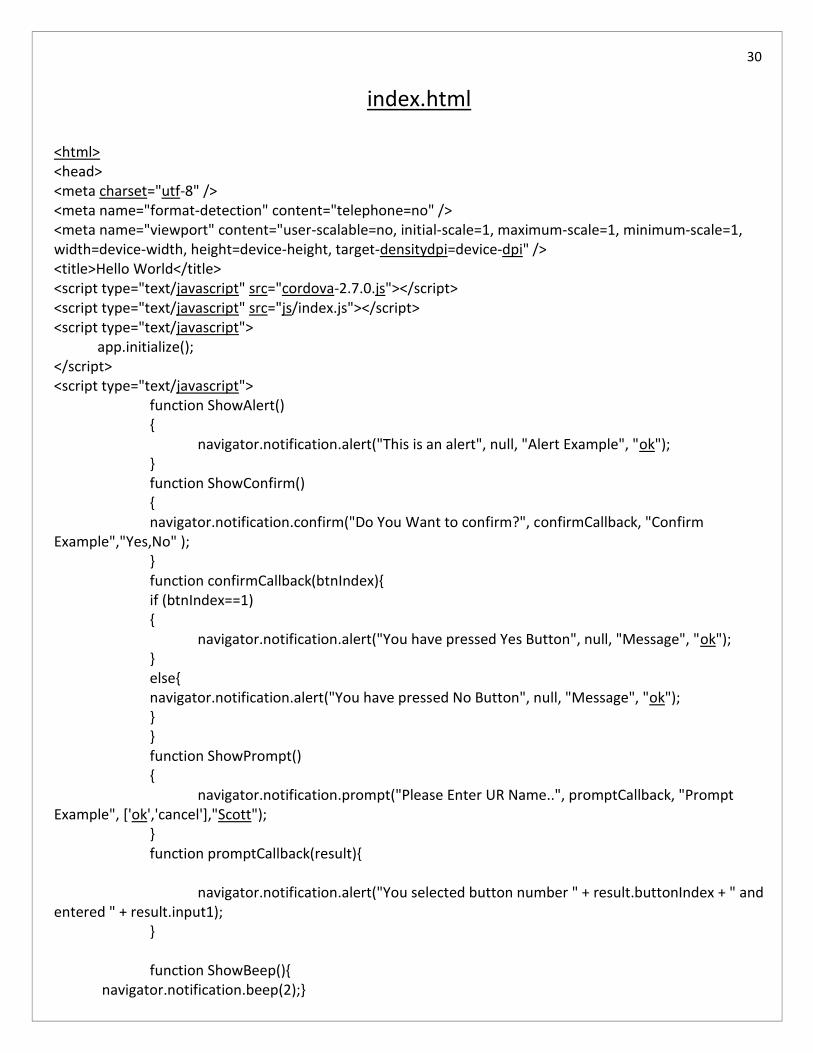
index.html
<html> <head> <meta charset="utf-8" /> <meta name="format-detection" content="telephone=no" /> <meta name="viewport" content="user-scalable=no, initial-scale=1, maximum-scale=1, minimum-scale=1, width=device-width, height=device-height, target-densitydpi=device-dpi" /> <title>Hello World</title> <script type="text/javascript" src="cordova-2.7.0.js"></script> <script type="text/javascript" src="js/index.js"></script> <script type="text/javascript"> app.initialize(); </script> <script type="text/javascript"> function ShowAlert() { navigator.notification.alert("This is an alert", null, "Alert Example", "ok"); } function ShowConfirm() { navigator.notification.confirm("Do You Want to confirm?", confirmCallback, "Confirm Example","Yes,No" ); } function confirmCallback(btnIndex){ if (btnIndex==1) { navigator.notification.alert("You have pressed Yes Button", null, "Message", "ok"); } else{ navigator.notification.alert("You have pressed No Button", null, "Message", "ok"); } } function ShowPrompt() { navigator.notification.prompt("Please Enter UR Name..", promptCallback, "Prompt Example", ['ok','cancel'],"Scott"); } function promptCallback(result){ navigator.notification.alert("You selected button number " + result.buttonIndex + " and entered " + result.input1); } function ShowBeep(){ navigator.notification.beep(2);}
31
function ShowVibrate(){ navigator.notification.vibrate(5000); } </script> </head> <body> <div> <center> <h1>Notification Example</h1><br> <input type="button" value="Show Alert" onclick="ShowAlert();" /><br> <input type="button" value="Show Confirm" onclick="ShowConfirm();" /><br> <input type="button" value="Show Prompt" onclick="ShowPrompt();" /><br> <input type="button" value="Show Beep" onclick="ShowBeep();" /><br> <input type="button" value="Show vibrate" onclick="ShowVibrate();" /><br> </center> </div> </body> </html>
Output
32
Name: Class : Roll Number : Subject : Wireless Mobile
Technology
Experiment : 08
Aim : To write a program for accelerometer static demo using Phonegap
Signature Grade
33
Aim : To write a program for accelerometer static demo using Phonegap
Accelerometer API allows a PhoneGap application to determine a device’s orientation in a three-dimensional space (using X, Y, and Z coordinates). The current PhoneGap API documentation claims that the values returned by the accelerometer indicate the changes in a device’s motion through space, but in testing what the accelerometer returns are values that define the device’s actual orientation in a three-dimensional space.
If the accelerometer were actually measuring motion through space, then the accelerometer API would return no information when the device is stationary, which is not the case.
For example, on an Android device, with the device lying flat on a tabletop, the accelerometer will return approximately the following values: X:0, Y:0, Z:10. As the device is flipped so it’s standing on its left edge, the values will adjust to approximately X:10, Y:0, Z:0.
If you instead move the device so it’s standing on its bottom edge, the values will adjust to approximately X:0, Y:10, Z:0. Standing the device on its top edge will result in approximate accelerometer values of X:0, Y:-10, Z:0.
An application uses these values to determine how a user is holding the device and is most useful for games and interactive applications.
34
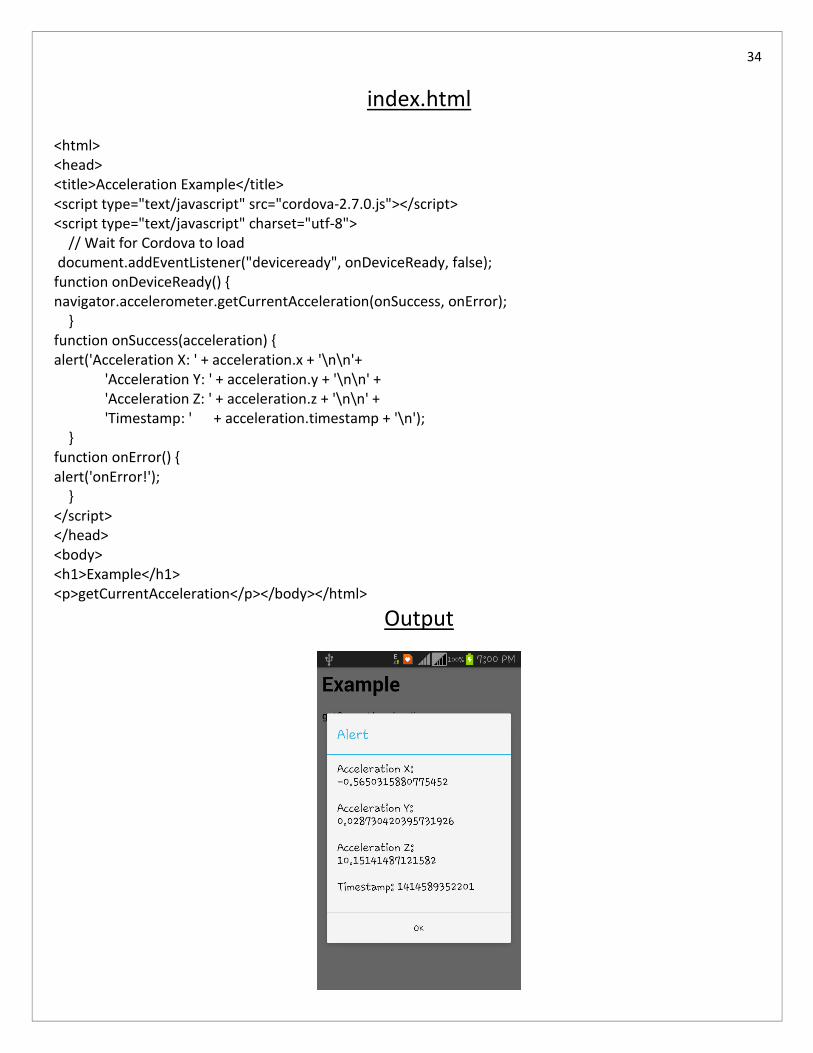
index.html <html> <head> <title>Acceleration Example</title> <script type="text/javascript" src="cordova-2.7.0.js"></script> <script type="text/javascript" charset="utf-8"> // Wait for Cordova to load document.addEventListener("deviceready", onDeviceReady, false); function onDeviceReady() { navigator.accelerometer.getCurrentAcceleration(onSuccess, onError); } function onSuccess(acceleration) { alert('Acceleration X: ' + acceleration.x + '\n\n'+ 'Acceleration Y: ' + acceleration.y + '\n\n' + 'Acceleration Z: ' + acceleration.z + '\n\n' + 'Timestamp: ' + acceleration.timestamp + '\n'); } function onError() { alert('onError!'); } </script> </head> <body> <h1>Example</h1> <p>getCurrentAcceleration</p></body></html>
Output
35
Name: Class : Roll Number : Subject : Wireless Mobile
Technology
Experiment : 09
Aim : To write a program for accelerometer watch demo using Phonegap
Signature Grade
36
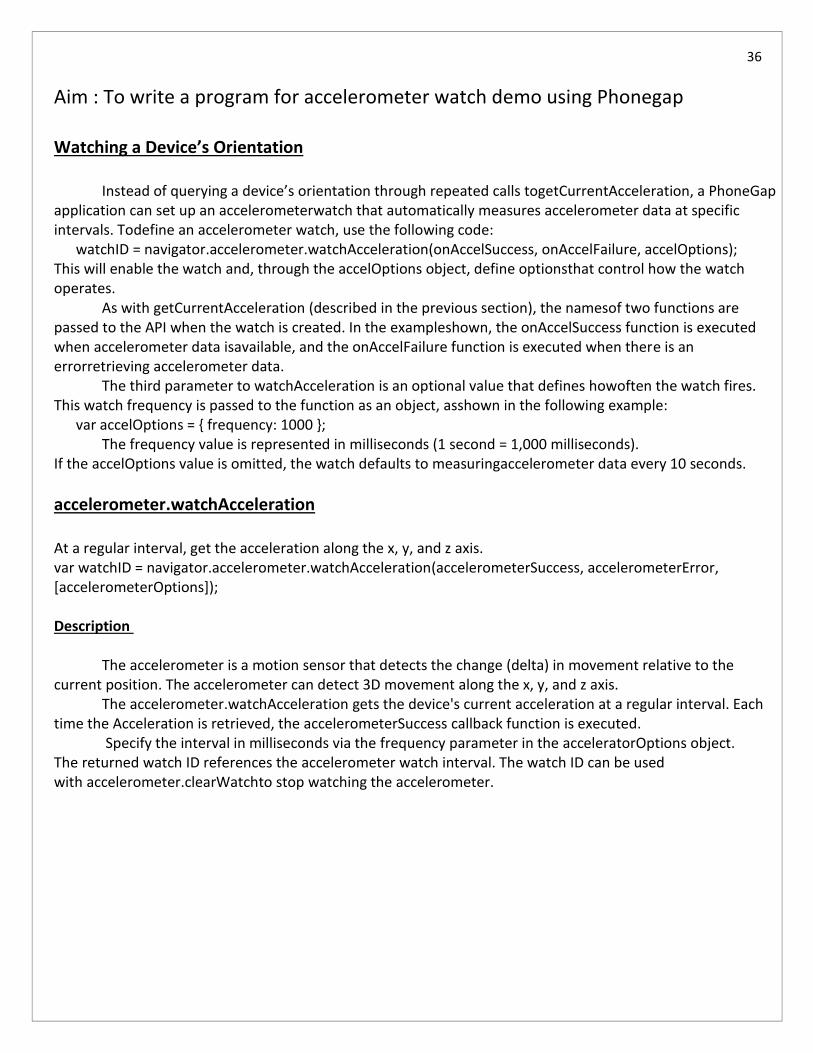
Aim : To write a program for accelerometer watch demo using Phonegap Watching a Device’s Orientation
Instead of querying a device’s orientation through repeated calls togetCurrentAcceleration, a PhoneGap application can set up an accelerometerwatch that automatically measures accelerometer data at specific intervals. Todefine an accelerometer watch, use the following code: watchID = navigator.accelerometer.watchAcceleration(onAccelSuccess, onAccelFailure, accelOptions); This will enable the watch and, through the accelOptions object, define optionsthat control how the watch operates.
As with getCurrentAcceleration (described in the previous section), the namesof two functions are passed to the API when the watch is created. In the exampleshown, the onAccelSuccess function is executed when accelerometer data isavailable, and the onAccelFailure function is executed when there is an errorretrieving accelerometer data.
The third parameter to watchAcceleration is an optional value that defines howoften the watch fires. This watch frequency is passed to the function as an object, asshown in the following example: var accelOptions = { frequency: 1000 };
The frequency value is represented in milliseconds (1 second = 1,000 milliseconds). If the accelOptions value is omitted, the watch defaults to measuringaccelerometer data every 10 seconds.
accelerometer.watchAcceleration At a regular interval, get the acceleration along the x, y, and z axis. var watchID = navigator.accelerometer.watchAcceleration(accelerometerSuccess, accelerometerError, [accelerometerOptions]); Description
The accelerometer is a motion sensor that detects the change (delta) in movement relative to the current position. The accelerometer can detect 3D movement along the x, y, and z axis.
The accelerometer.watchAcceleration gets the device's current acceleration at a regular interval. Each time the Acceleration is retrieved, the accelerometerSuccess callback function is executed.
Specify the interval in milliseconds via the frequency parameter in the acceleratorOptions object. The returned watch ID references the accelerometer watch interval. The watch ID can be used with accelerometer.clearWatchto stop watching the accelerometer.
37
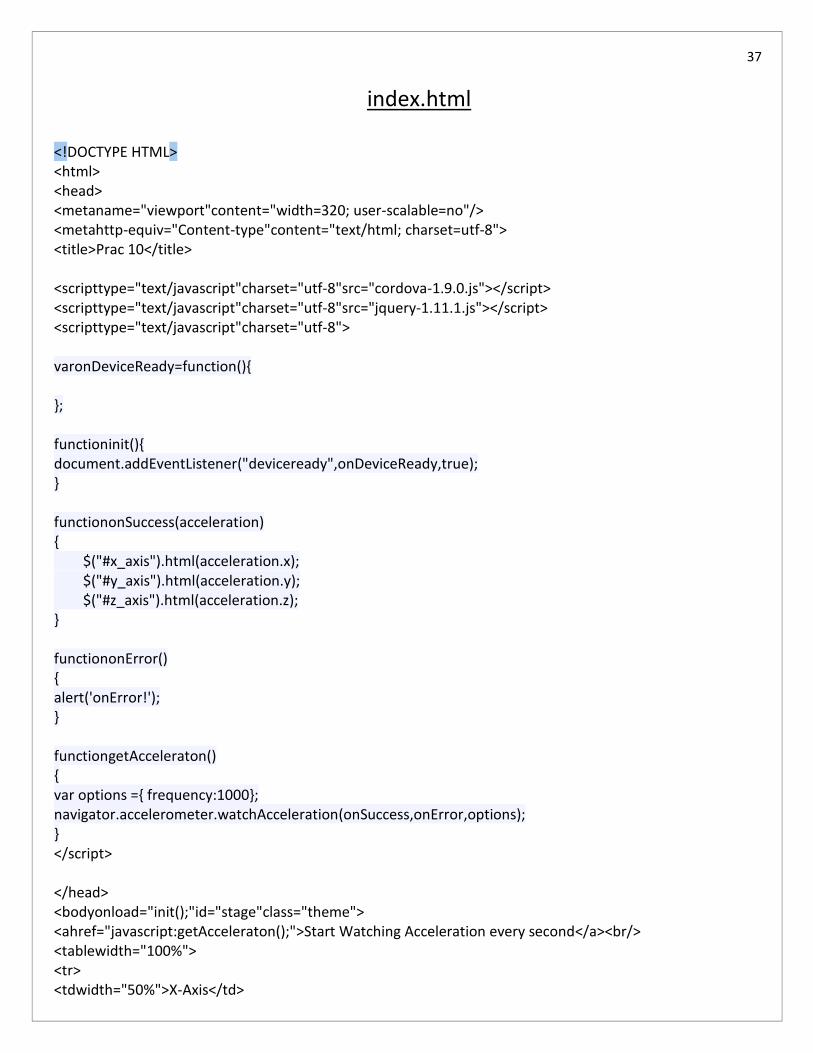
index.html
<!DOCTYPE HTML> <html> <head> <metaname="viewport"content="width=320; user-scalable=no"/> <metahttp-equiv="Content-type"content="text/html; charset=utf-8"> <title>Prac 10</title> <scripttype="text/javascript"charset="utf-8"src="cordova-1.9.0.js"></script> <scripttype="text/javascript"charset="utf-8"src="jquery-1.11.1.js"></script> <scripttype="text/javascript"charset="utf-8"> varonDeviceReady=function(){ }; functioninit(){ document.addEventListener("deviceready",onDeviceReady,true); } functiononSuccess(acceleration) { $("#x_axis").html(acceleration.x); $("#y_axis").html(acceleration.y); $("#z_axis").html(acceleration.z); } functiononError() { alert('onError!'); } functiongetAcceleraton() { var options ={ frequency:1000}; navigator.accelerometer.watchAcceleration(onSuccess,onError,options); } </script> </head> <bodyonload="init();"id="stage"class="theme"> <ahref="javascript:getAcceleraton();">Start Watching Acceleration every second</a><br/> <tablewidth="100%"> <tr> <tdwidth="50%">X-Axis</td>
38
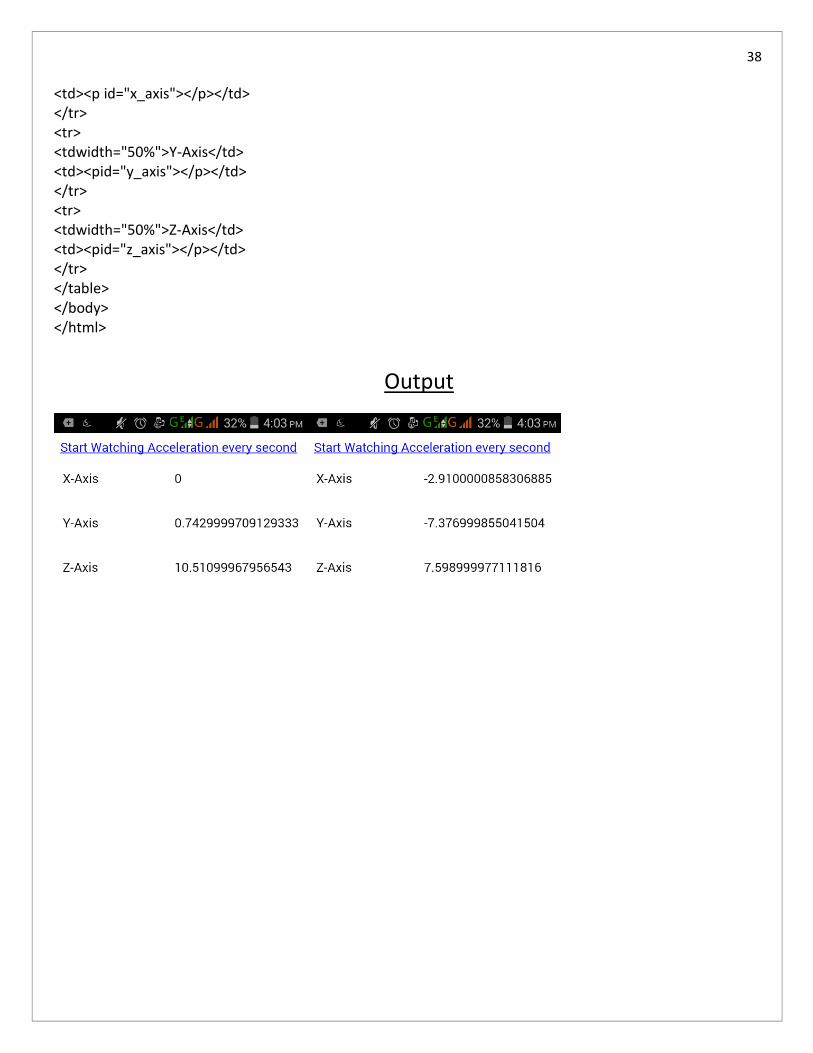
<td><p id="x_axis"></p></td> </tr> <tr> <tdwidth="50%">Y-Axis</td> <td><pid="y_axis"></p></td> </tr> <tr> <tdwidth="50%">Z-Axis</td> <td><pid="z_axis"></p></td> </tr> </table> </body> </html>
Output
39
Name: Class : Roll Number : Subject : Wireless Mobile
Technology
Experiment : 10
Aim : To write a program for application status event using Phonegap
Signature Grade
40
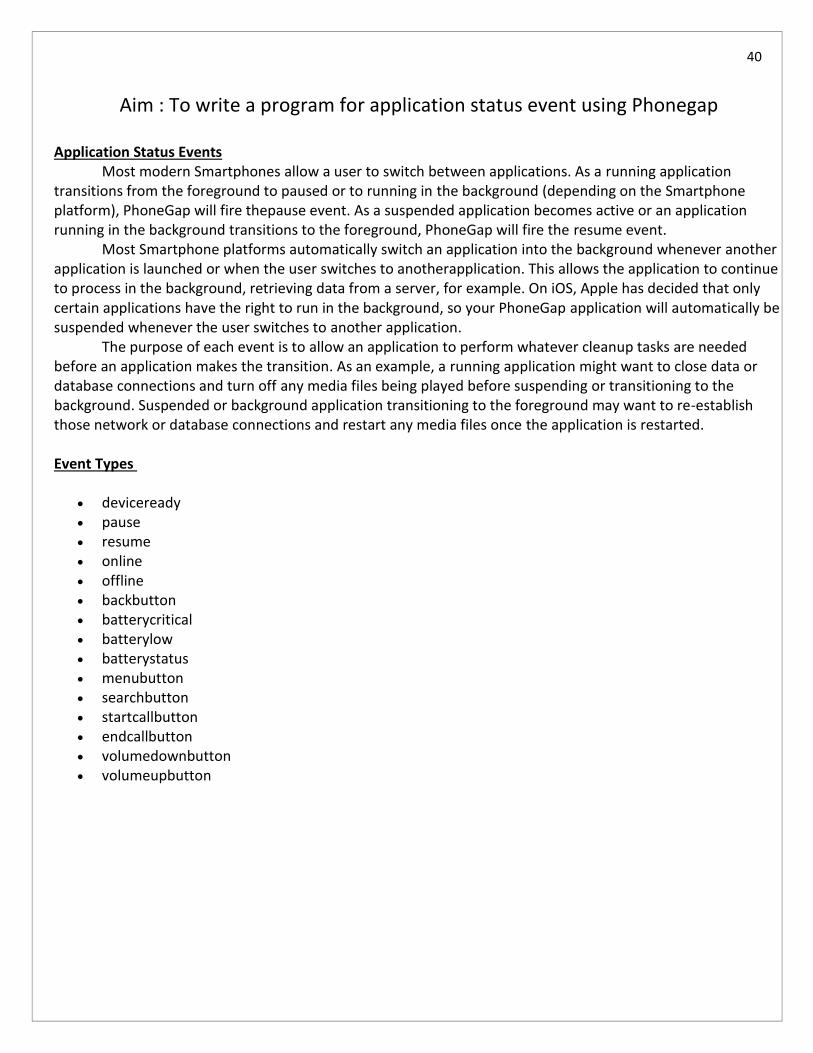
Aim : To write a program for application status event using Phonegap Application Status Events
Most modern Smartphones allow a user to switch between applications. As a running application transitions from the foreground to paused or to running in the background (depending on the Smartphone platform), PhoneGap will fire thepause event. As a suspended application becomes active or an application running in the background transitions to the foreground, PhoneGap will fire the resume event.
Most Smartphone platforms automatically switch an application into the background whenever another application is launched or when the user switches to anotherapplication. This allows the application to continue to process in the background, retrieving data from a server, for example. On iOS, Apple has decided that only certain applications have the right to run in the background, so your PhoneGap application will automatically be suspended whenever the user switches to another application.
The purpose of each event is to allow an application to perform whatever cleanup tasks are needed before an application makes the transition. As an example, a running application might want to close data or database connections and turn off any media files being played before suspending or transitioning to the background. Suspended or background application transitioning to the foreground may want to re-establish those network or database connections and restart any media files once the application is restarted. Event Types
deviceready pause resume online offline backbutton batterycritical batterylow batterystatus menubutton searchbutton startcallbutton endcallbutton volumedownbutton volumeupbutton
41
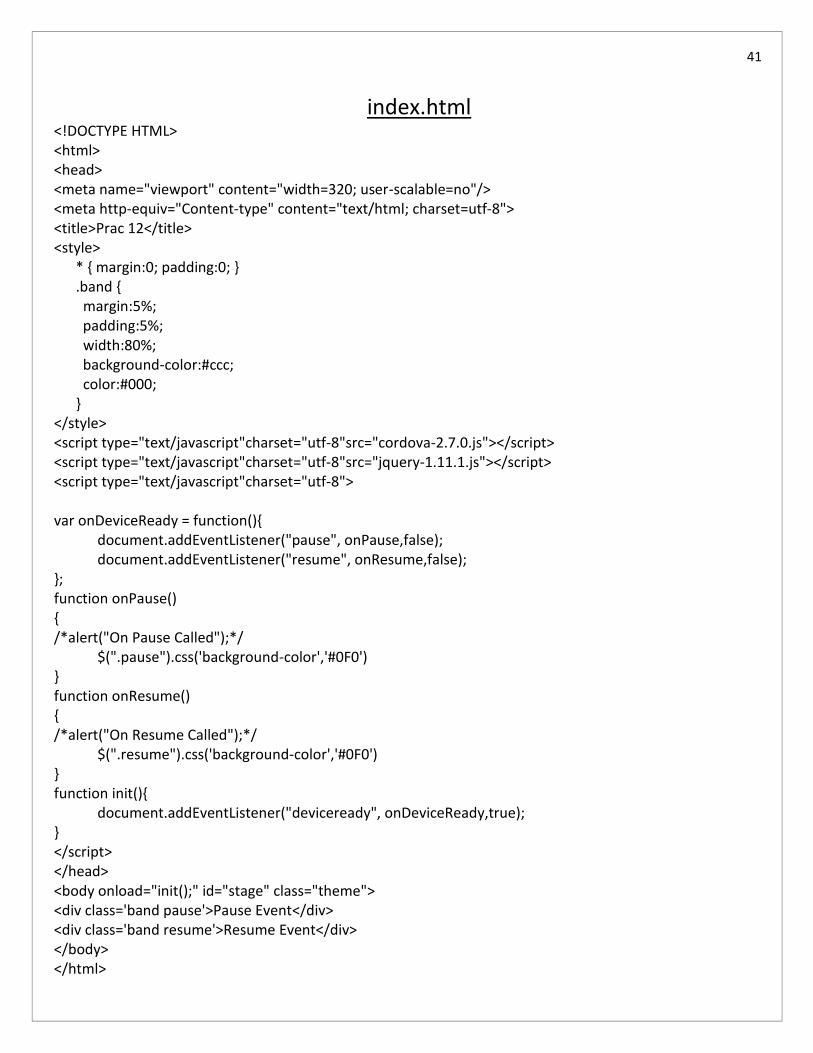
index.html <!DOCTYPE HTML> <html> <head> <meta name="viewport" content="width=320; user-scalable=no"/> <meta http-equiv="Content-type" content="text/html; charset=utf-8"> <title>Prac 12</title> <style> * { margin:0; padding:0; } .band { margin:5%; padding:5%; width:80%; background-color:#ccc; color:#000; } </style> <script type="text/javascript"charset="utf-8"src="cordova-2.7.0.js"></script> <script type="text/javascript"charset="utf-8"src="jquery-1.11.1.js"></script> <script type="text/javascript"charset="utf-8"> var onDeviceReady = function(){ document.addEventListener("pause", onPause,false); document.addEventListener("resume", onResume,false); }; function onPause() { /*alert("On Pause Called");*/ $(".pause").css('background-color','#0F0') } function onResume() { /*alert("On Resume Called");*/ $(".resume").css('background-color','#0F0') } function init(){ document.addEventListener("deviceready", onDeviceReady,true); } </script> </head> <body onload="init();" id="stage" class="theme"> <div class='band pause'>Pause Event</div> <div class='band resume'>Resume Event</div> </body> </html>
42
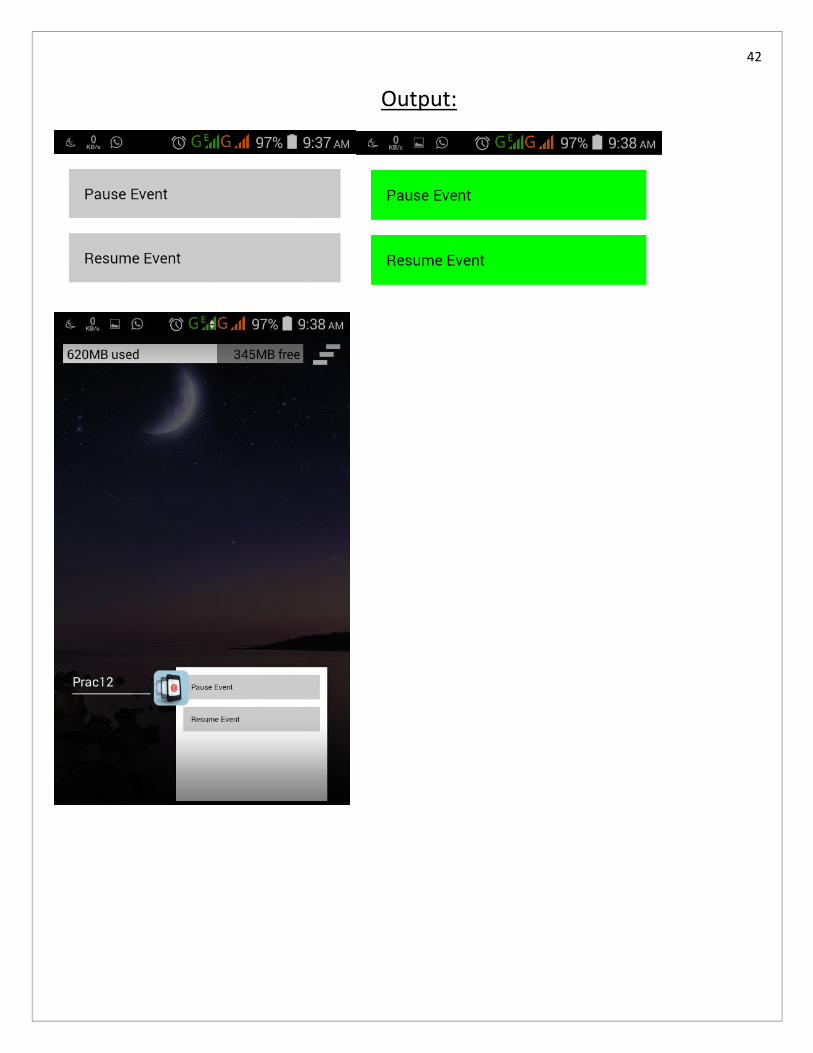
Output:
43
Name: Class : Roll Number : Subject : Wireless Mobile
Technology
Experiment : 11
Aim : To write a program for network status event using Phonegap
Signature Grade
44
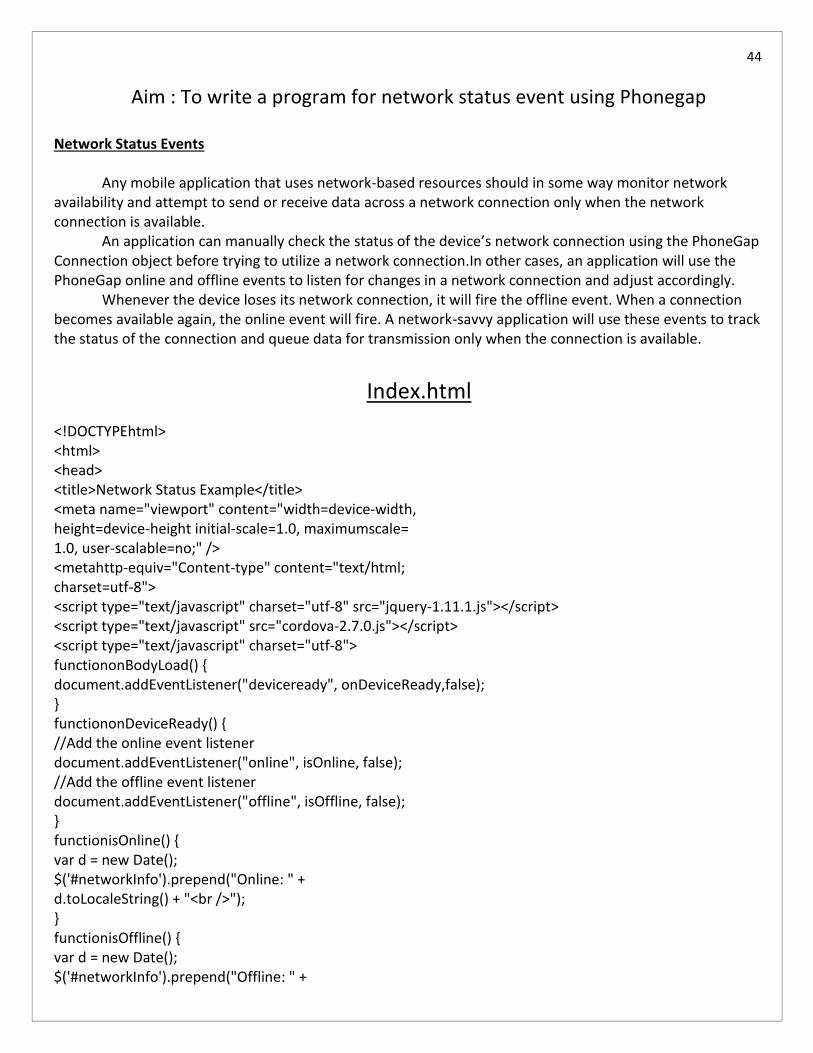
Aim : To write a program for network status event using Phonegap
Network Status Events
Any mobile application that uses network-based resources should in some way monitor network availability and attempt to send or receive data across a network connection only when the network connection is available.
An application can manually check the status of the device’s network connection using the PhoneGap Connection object before trying to utilize a network connection.In other cases, an application will use the PhoneGap online and offline events to listen for changes in a network connection and adjust accordingly.
Whenever the device loses its network connection, it will fire the offline event. When a connection becomes available again, the online event will fire. A network-savvy application will use these events to track the status of the connection and queue data for transmission only when the connection is available.
Index.html
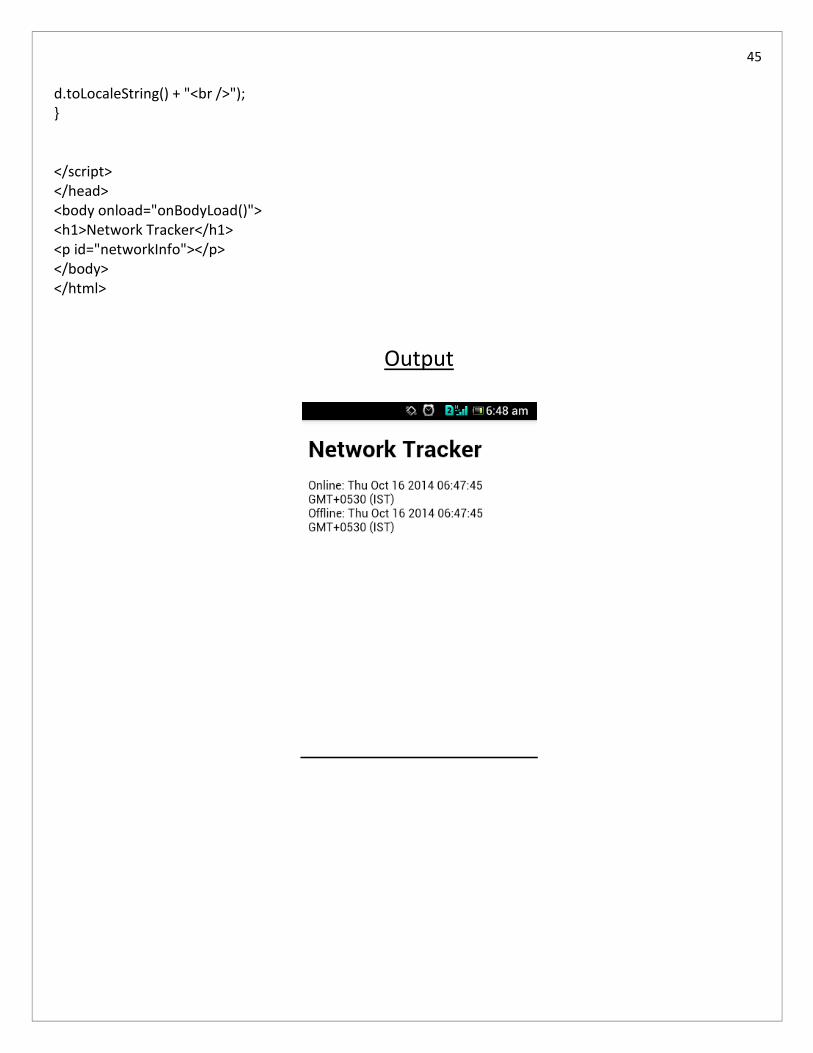
<!DOCTYPEhtml> <html> <head> <title>Network Status Example</title> <meta name="viewport" content="width=device-width, height=device-height initial-scale=1.0, maximumscale= 1.0, user-scalable=no;" /> <metahttp-equiv="Content-type" content="text/html; charset=utf-8"> <script type="text/javascript" charset="utf-8" src="jquery-1.11.1.js"></script> <script type="text/javascript" src="cordova-2.7.0.js"></script> <script type="text/javascript" charset="utf-8"> functiononBodyLoad() { document.addEventListener("deviceready", onDeviceReady,false); } functiononDeviceReady() { //Add the online event listener document.addEventListener("online", isOnline, false); //Add the offline event listener document.addEventListener("offline", isOffline, false); } functionisOnline() { var d = new Date(); $('#networkInfo').prepend("Online: " + d.toLocaleString() + "<br />"); } functionisOffline() { var d = new Date(); $('#networkInfo').prepend("Offline: " +
45
d.toLocaleString() + "<br />"); } </script> </head> <body onload="onBodyLoad()"> <h1>Network Tracker</h1> <p id="networkInfo"></p> </body> </html>
Output
46
Name: Class : Roll Number : Subject : Wireless Mobile
Technology
Experiment : 12
Aim : To write a program for button event using Phonegap
Signature Grade
47
Aim : To write a program for button event using Phonegap
Smartphones typical use physical buttons to allow users to interact more directly with the OS. iOS devices have only a single button (not counting the volume buttons),one that depending on how it’s used, either allows the user to return to the OS home screen or opens a list of paused applications.
Android and BlackBerry devices, on the other hand, offer the user several buttons and are therefore simpler for more advanced users to operate. To allow for PhoneGap applications to respond to these buttons, PhoneGap will fire the following events whenever the corresponding buttons are pressed:
• backbutton: Fires when the user presses the back button on a device. This is typically the Escape button on
Android and BlackBerry devices; iOSdevices do not have a back button.
• menubutton: Fires when the user presses the device’s menu button. iOSdevices do not have a menu button.
• searchbutton: Fires when the user presses the dedicated search button on an Android device.
• startcallbutton: Fires when a BlackBerry user presses the dedicated start call button (located to the left of the
BlackBerry menu button).
• endcallbutton: Fires when a BlackBerry user presses the dedicated end call button (located to the right of the
BlackBerry escape button).
• volumedownbutton: Fires when a BlackBerry user presses the device’s volume down button.
• volumeupbutton: Fires when a BlackBerry user presses the device’s volumeup button.
To respond to these buttons, simply implement the appropriate event listeners and write the code that
executes when the button is pressed.
As you can see from the list, many of the events are device specific; even though volume up and down buttons are available on most smartphones, event listeners are for some reason available only in BlackBerry PhoneGap applications. It’s rare in this day in age, with Android and iOS devices much more popular than Black-berry, for BlackBerry to receive more attention than other platforms when it comes to framework features.
It’s important to note that when a PhoneGap application overrides one of these buttons by registering an event listener for the button, the default behavior of the button no longer applies while the listener is in place. For example, on most devices, pressing the escape button causes the application to return to a previous screen or exit the application if on the main screen. When the escape button is overridden (by creating a backbuttonevent listener) as shown in the following code, pressing the escape button causes only the code specified in the onBackButtonfunction to execute. document.addEventListener("backbutton", onBackButton, false); If you want the application to exhibit default behavior when one of the overridden buttons is pressed, then you’ll have to implement the code to do so in your application. Using the previous code as an example, the onBackButton function might first do any cleanup required by the application and then call thenavigator.app.exitApp() function, as shown here: functiononBackButton() { //Do whatever you need to do before closing the application
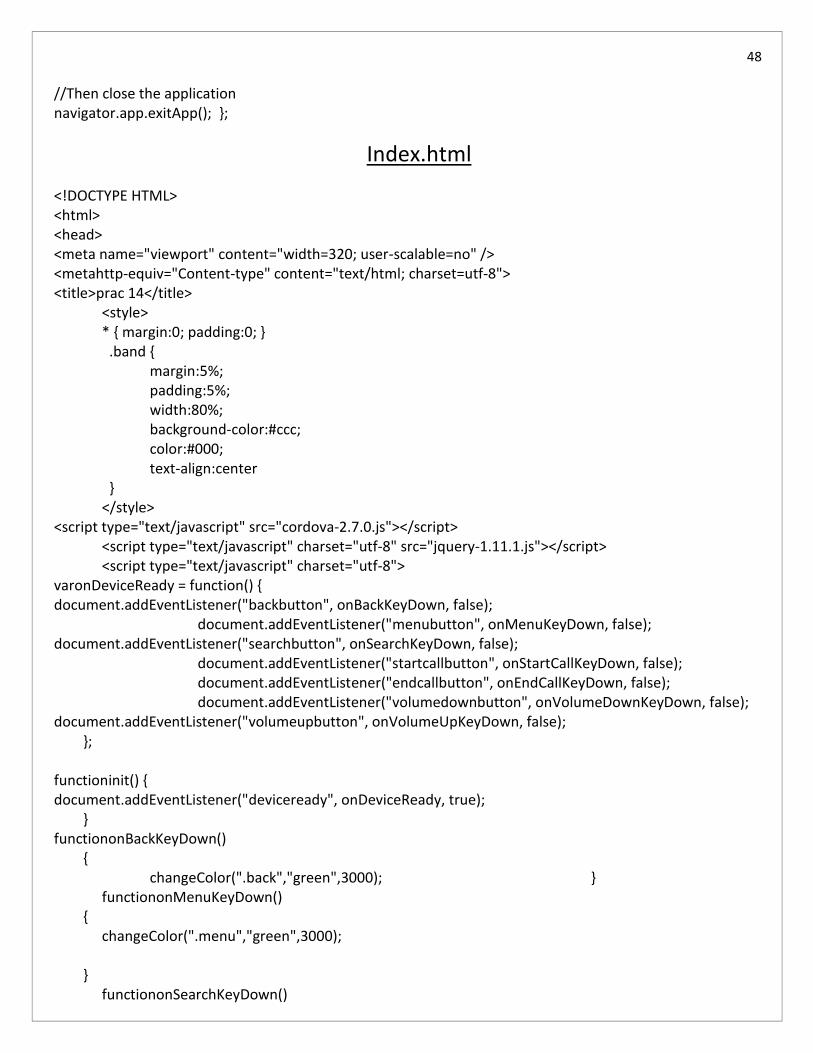
48
//Then close the application navigator.app.exitApp(); };
Index.html
<!DOCTYPE HTML> <html> <head> <meta name="viewport" content="width=320; user-scalable=no" /> <metahttp-equiv="Content-type" content="text/html; charset=utf-8"> <title>prac 14</title> <style> * { margin:0; padding:0; } .band { margin:5%; padding:5%; width:80%; background-color:#ccc; color:#000; text-align:center } </style> <script type="text/javascript" src="cordova-2.7.0.js"></script> <script type="text/javascript" charset="utf-8" src="jquery-1.11.1.js"></script> <script type="text/javascript" charset="utf-8"> varonDeviceReady = function() { document.addEventListener("backbutton", onBackKeyDown, false); document.addEventListener("menubutton", onMenuKeyDown, false); document.addEventListener("searchbutton", onSearchKeyDown, false); document.addEventListener("startcallbutton", onStartCallKeyDown, false); document.addEventListener("endcallbutton", onEndCallKeyDown, false); document.addEventListener("volumedownbutton", onVolumeDownKeyDown, false); document.addEventListener("volumeupbutton", onVolumeUpKeyDown, false); }; functioninit() { document.addEventListener("deviceready", onDeviceReady, true); } functiononBackKeyDown() {
changeColor(".back","green",3000); } functiononMenuKeyDown() { changeColor(".menu","green",3000); } functiononSearchKeyDown()
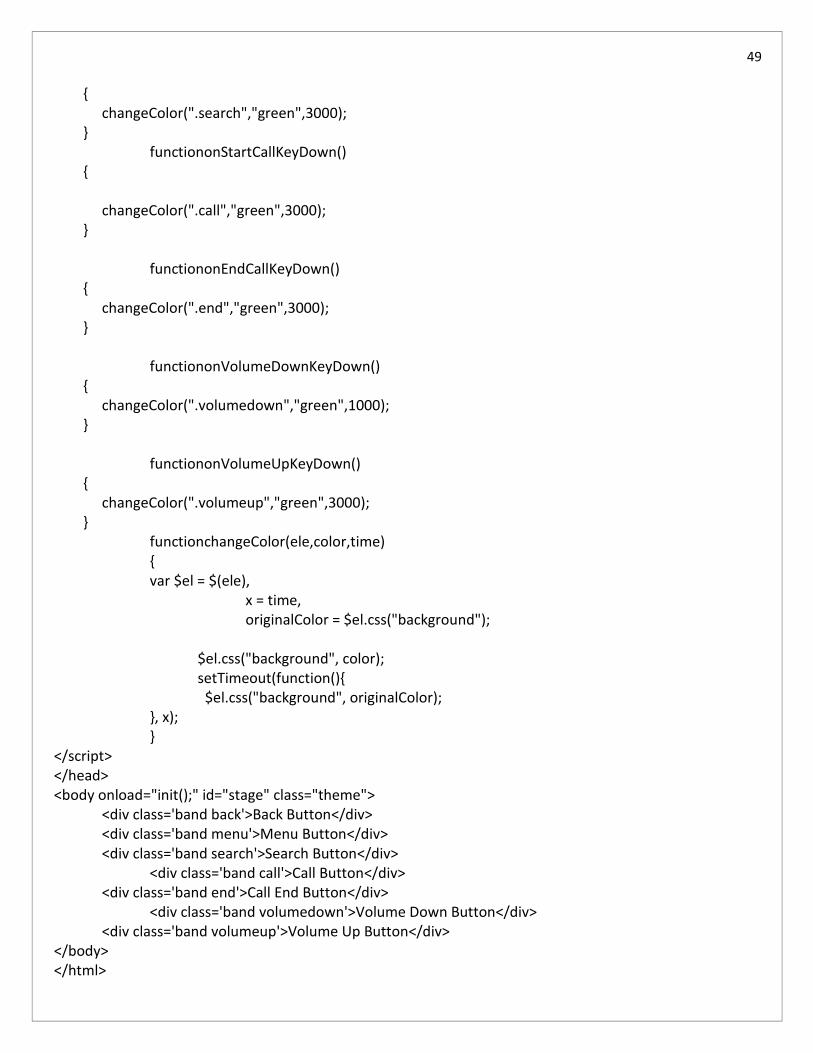
49
{ changeColor(".search","green",3000); } functiononStartCallKeyDown() { changeColor(".call","green",3000); } functiononEndCallKeyDown() { changeColor(".end","green",3000); } functiononVolumeDownKeyDown() { changeColor(".volumedown","green",1000); } functiononVolumeUpKeyDown() { changeColor(".volumeup","green",3000); } functionchangeColor(ele,color,time) { var $el = $(ele), x = time, originalColor = $el.css("background"); $el.css("background", color); setTimeout(function(){ $el.css("background", originalColor); }, x); } </script> </head> <body onload="init();" id="stage" class="theme"> <div class='band back'>Back Button</div> <div class='band menu'>Menu Button</div> <div class='band search'>Search Button</div> <div class='band call'>Call Button</div> <div class='band end'>Call End Button</div> <div class='band volumedown'>Volume Down Button</div> <div class='band volumeup'>Volume Up Button</div> </body> </html>
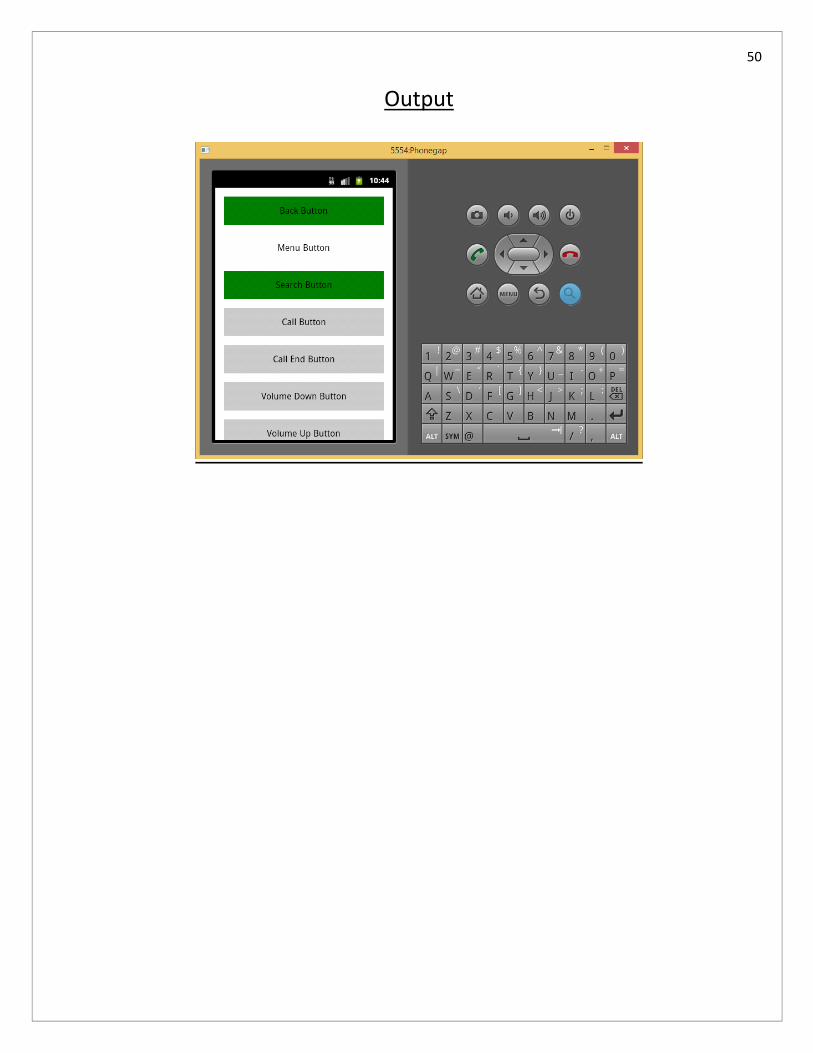
50
Output

51
Name: Class : Roll Number : Subject : Wireless Mobile
Technology
Experiment : 13
Aim : To write a program to get file system information using Phonegap
Signature Grade
52
Aim : To write a program to get file system information using Phonegap
index.html
<!DOCTYPE HTML> <html> <head> <metaname="viewport"content="width=320; user-scalable=no"/> <metahttp-equiv="Content-type"content="text/html; charset=utf-8"> <title>Prac 15</title> <scripttype="text/javascript"charset="utf-8"src="cordova-1.9.0.js"></script> <scripttype="text/javascript"charset="utf-8"src="jquery-1.11.1.js"></script> <linkrel="stylesheet"type="text/css"href="style.css"/> <linkrel="stylesheet"type="text/css"href="font-awesome.min.css"/> <scripttype="text/javascript"charset="utf-8"> function init() { document.addEventListener("deviceready", onDeviceReady,true); } function getList(Path,url) { window.requestFileSystem(LocalFileSystem.PERSISTENT,0,function(fileSystem){ fileSystem.root.getDirectory(Path,{ create:true },function(directory){ var lines = $.trim(url).split("/"); var withoutLastLine = lines.slice(0,-1).join("/"); var lines = $.trim(withoutLastLine).split(fileSystem.root.name); var withoutll = lines[1]; if(withoutll==''|| withoutll=='/.'||typeof withoutll ==='undefined') withoutll ='.'; else withoutll ='.'+withoutll; $(".back").attr("href","javascript:getList('"+withoutll+"');"); var directoryReader = directory.createReader(); directoryReader.readEntries(function(entries){ var i , temp =''; $("#path").html(Path); $("#fileSystem").html("");
53
for(i=0; i<entries.length; i++){ if(entries[i].isDirectory ==true) { temp +="<li class='dir'><a href='javascript:getList("+'"'+entries[i].name+'" , "'+entries[i].toURI()+'"'+");'>"+entries[i].name+"</a></li>"; } else { temp +="<li class='file'><a href='"+entries[i].toURI()+"'>"+entries[i].name+"</a></li>"; } } $("#fileSystem").append(temp); /* var lines = $.trim(Path).split("/"); var withoutLastLine = lines.slice(0, -1).join("/"); $(".back").attr("href", javascript:getList(withoutLastLine)); */ },function(error){ alert(error.code); }); }); },function(error){ alert("can't even get the file system: "+ error.code); }); } function onDeviceReady() { getList("."); } </script> </head> <bodyonload="init();"id="stage"class="theme"> <ahref="javascript:getList('.');"class='home fa fa-home right'style="font-size:2em;"></a> <ahref="javascript:getList('../');"class='back fa fa-backward left'style="font-size:2em;"></a> <divclass='clear'></div> <pid="path"></p> <divclass='clear'></div> <ulid="fileSystem"> </ul> </body> </html>
54
style.css
li { list-style:none; font-size:1em; } li:before{ font-family: 'FontAwesome'; margin:0 5px 0 -10px; font-size:1em; } li.dir:before{ content: '\f07b'; color: #f00; } li.file:before{ content: '\f15b'; color: #000; } .home,.back { font-size:5em; text-decoration:none;} .left{ float:left; }.right{ float:right; }.clear{ clear:both;}
55
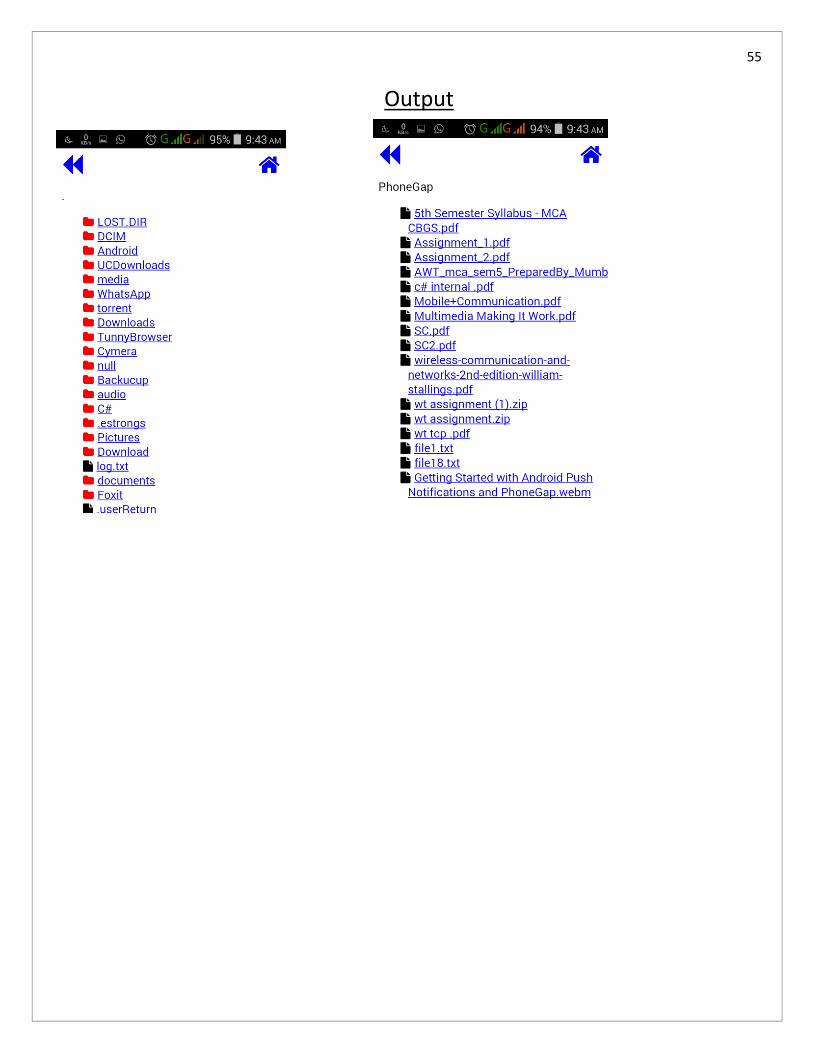
Output

56
Name: Class : Roll Number : Subject : Wireless Mobile
Technology
Experiment : 14
Aim : To write a program to writing information into the file using Phonegap
Signature Grade
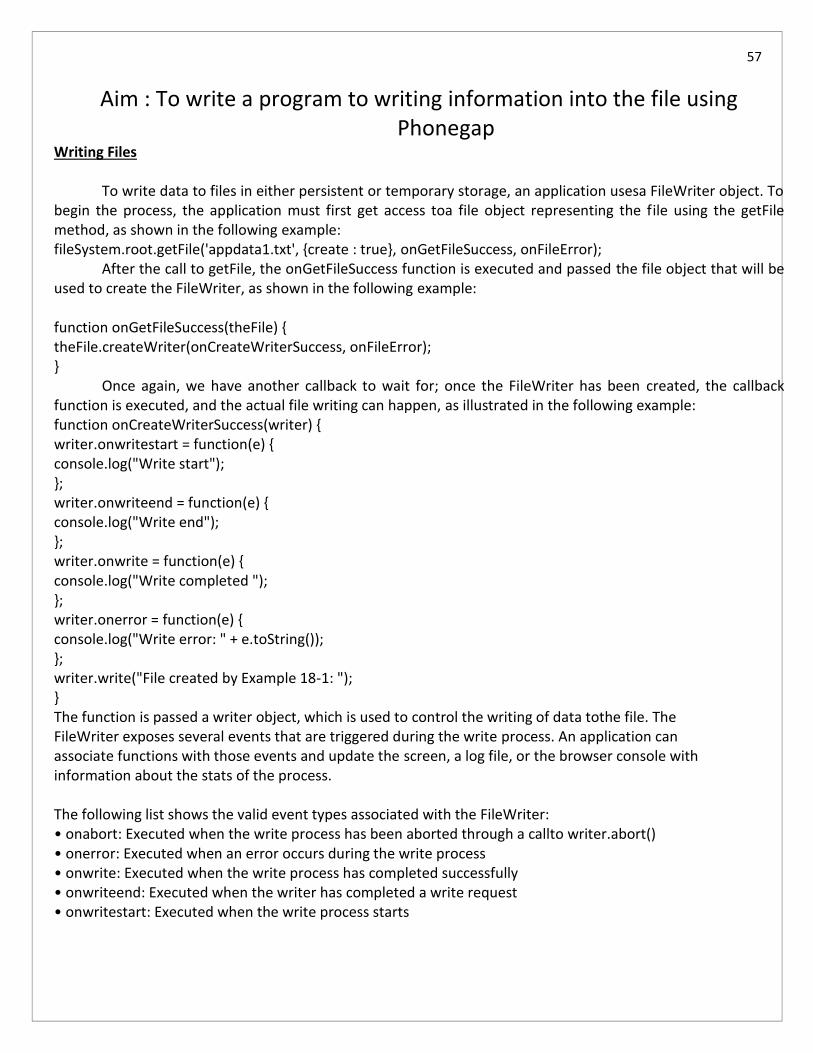
57
Aim : To write a program to writing information into the file using Phonegap
Writing Files
To write data to files in either persistent or temporary storage, an application usesa FileWriter object. To begin the process, the application must first get access toa file object representing the file using the getFile method, as shown in the following example: fileSystem.root.getFile('appdata1.txt', {create : true}, onGetFileSuccess, onFileError);
After the call to getFile, the onGetFileSuccess function is executed and passed the file object that will be used to create the FileWriter, as shown in the following example:
function onGetFileSuccess(theFile) { theFile.createWriter(onCreateWriterSuccess, onFileError); }
Once again, we have another callback to wait for; once the FileWriter has been created, the callback function is executed, and the actual file writing can happen, as illustrated in the following example: function onCreateWriterSuccess(writer) { writer.onwritestart = function(e) { console.log("Write start"); }; writer.onwriteend = function(e) { console.log("Write end"); }; writer.onwrite = function(e) { console.log("Write completed "); }; writer.onerror = function(e) { console.log("Write error: " + e.toString()); }; writer.write("File created by Example 18-1: "); } The function is passed a writer object, which is used to control the writing of data tothe file. The FileWriter exposes several events that are triggered during the write process. An application can associate functions with those events and update the screen, a log file, or the browser console with information about the stats of the process. The following list shows the valid event types associated with the FileWriter: • onabort: Executed when the write process has been aborted through a callto writer.abort() • onerror: Executed when an error occurs during the write process • onwrite: Executed when the write process has completed successfully • onwriteend: Executed when the writer has completed a write request • onwritestart: Executed when the write process starts
58
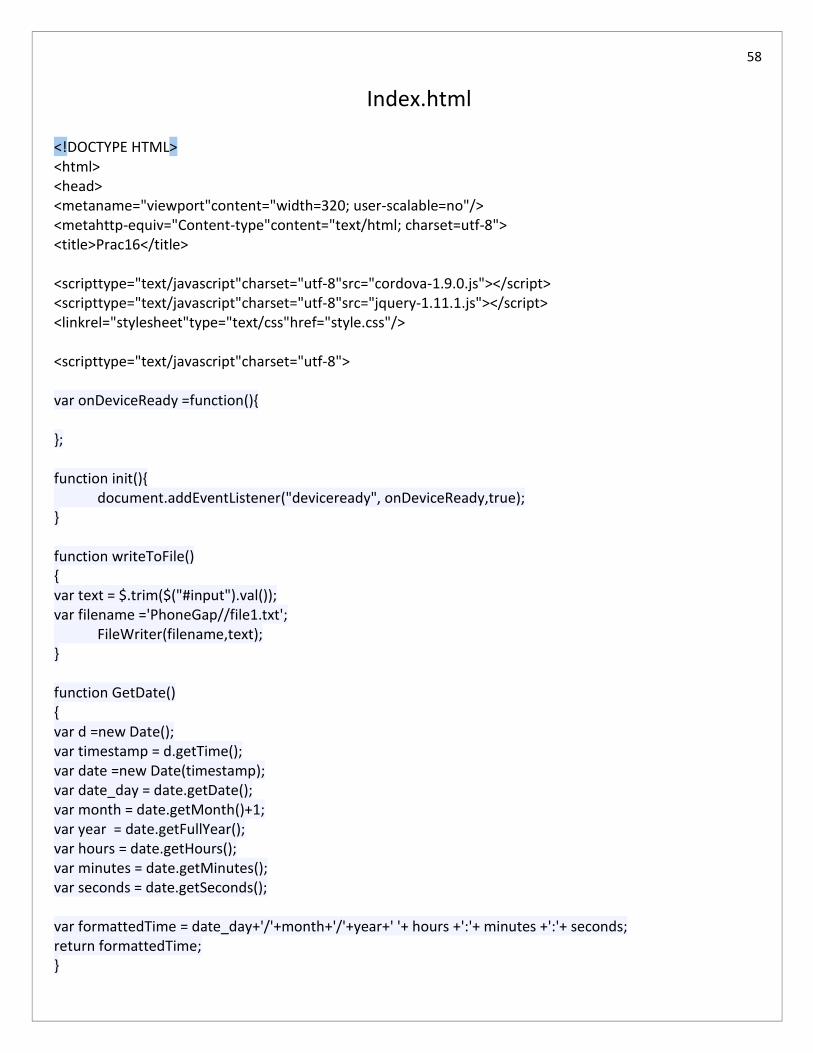
Index.html
<!DOCTYPE HTML> <html> <head> <metaname="viewport"content="width=320; user-scalable=no"/> <metahttp-equiv="Content-type"content="text/html; charset=utf-8"> <title>Prac16</title> <scripttype="text/javascript"charset="utf-8"src="cordova-1.9.0.js"></script> <scripttype="text/javascript"charset="utf-8"src="jquery-1.11.1.js"></script> <linkrel="stylesheet"type="text/css"href="style.css"/> <scripttype="text/javascript"charset="utf-8"> var onDeviceReady =function(){ }; function init(){ document.addEventListener("deviceready", onDeviceReady,true); } function writeToFile() { var text = $.trim($("#input").val()); var filename ='PhoneGap//file1.txt'; FileWriter(filename,text); } function GetDate() { var d =new Date(); var timestamp = d.getTime(); var date =new Date(timestamp); var date_day = date.getDate(); var month = date.getMonth()+1; var year = date.getFullYear(); var hours = date.getHours(); var minutes = date.getMinutes(); var seconds = date.getSeconds(); var formattedTime = date_day+'/'+month+'/'+year+' '+ hours +':'+ minutes +':'+ seconds; return formattedTime; }
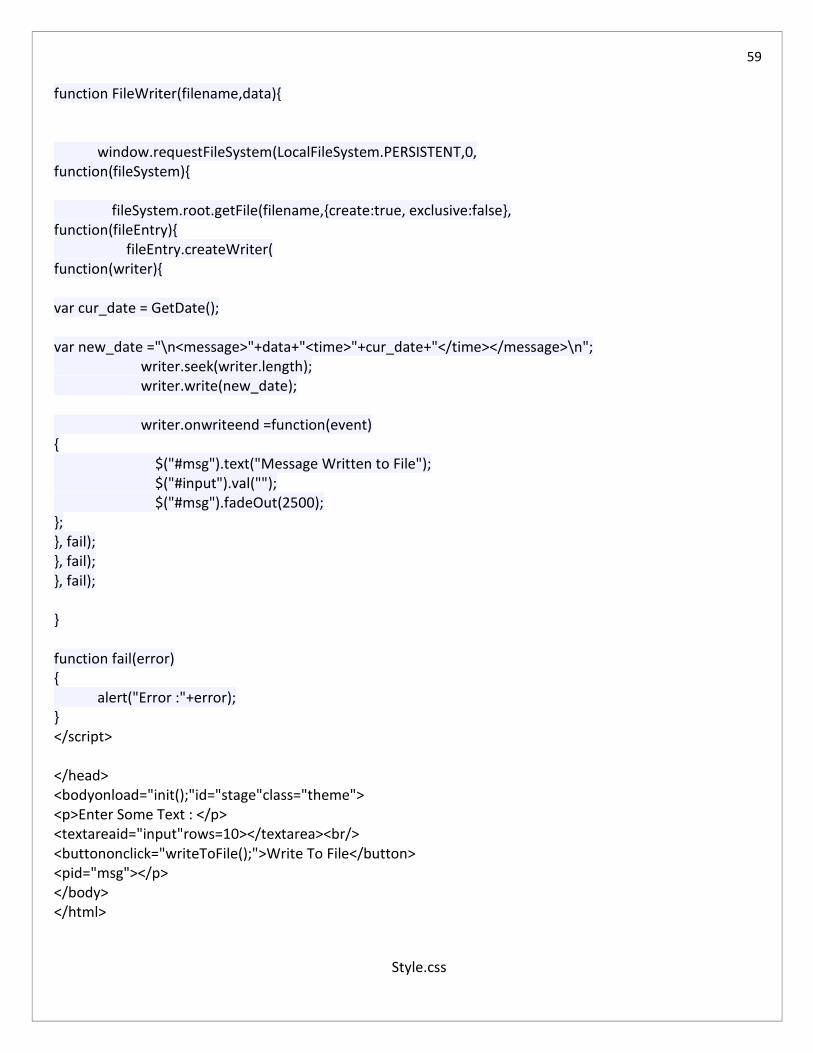
59
function FileWriter(filename,data){ window.requestFileSystem(LocalFileSystem.PERSISTENT,0, function(fileSystem){ fileSystem.root.getFile(filename,{create:true, exclusive:false}, function(fileEntry){ fileEntry.createWriter( function(writer){ var cur_date = GetDate(); var new_date ="\n<message>"+data+"<time>"+cur_date+"</time></message>\n"; writer.seek(writer.length); writer.write(new_date); writer.onwriteend =function(event) { $("#msg").text("Message Written to File"); $("#input").val(""); $("#msg").fadeOut(2500); }; }, fail); }, fail); }, fail); } function fail(error) { alert("Error :"+error); } </script> </head> <bodyonload="init();"id="stage"class="theme"> <p>Enter Some Text : </p> <textareaid="input"rows=10></textarea><br/> <buttononclick="writeToFile();">Write To File</button> <pid="msg"></p> </body> </html>
Style.css

60
.left{ float:left; } .right{ float:right; } .clear{ clear:both;} textarea { width:92%; margin:2%; padding:2%; } #msg{ color:#006411; }
Output
61
Name: Class : Roll Number : Subject : Wireless Mobile
Technology
Experiment : 15
Aim : To write a program to reading information from the file using Phonegap
Signature Grade
62
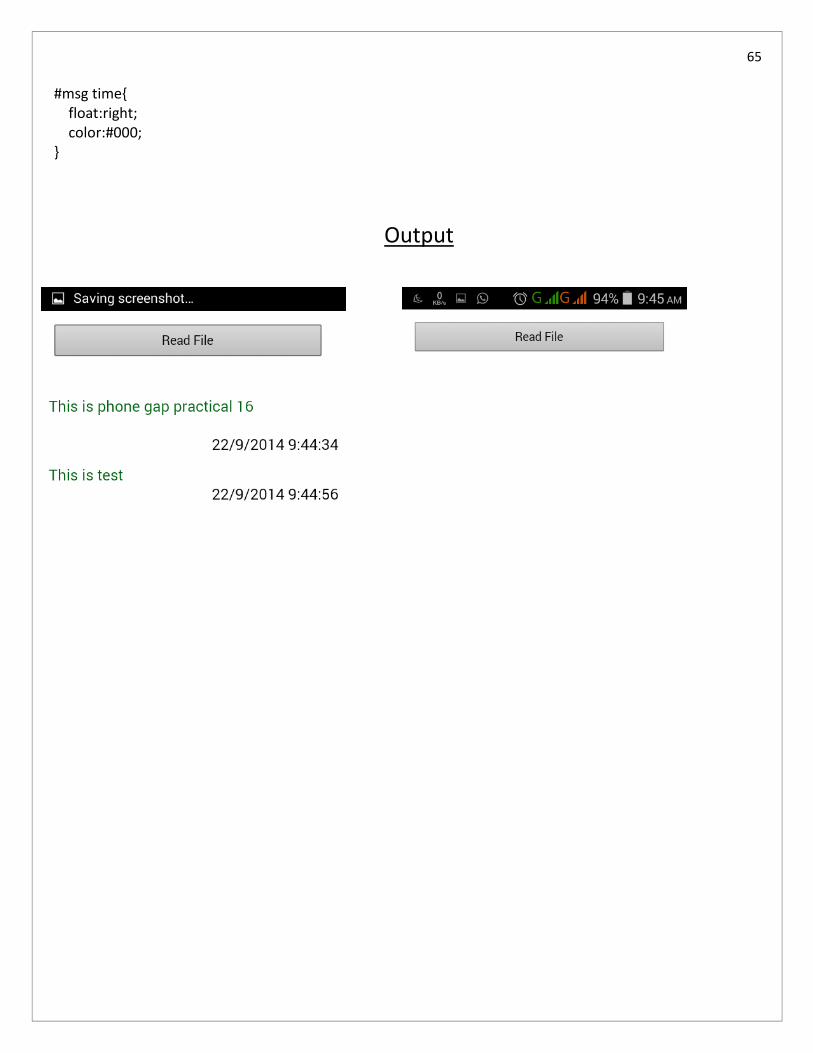
Aim : To write a program to reading information from the file using Phonegap
Reading Files
The process to read content from files is very similar to what was demonstrated inthe previous section. To read files, an application uses a FileReaderobject. Tobegin the process, the application must first get access to a file object representingthe file using the getFilemethod, as shown in the following example: theFileSystem.root.getFile('appdata1.txt', {create : false},onGetFileSuccess, onFileError);
If the application already has a handle to a file entry object pointing to the file, itcan use the following code: theEntry.file(onGetFileSuccess, onFileError); In the onGetFileSuccesscallback function, the application creates theFileReaderobject and then uses it to read the file, as shown in the followingexample: functiononGetFileSuccess(file) { var reader = new FileReader(); reader.onloadend = function(e) { console.log("Read end"); alert(e.target.result); }; reader.onloadstart = function(e) { console.log("Read start"); }; reader.onloaderror = function(e) { console.log("Read error: " + e.target.error.code); }; reader.readAsText(file); } As with the FileWriter, the FileReaderobject exposes several events that aretriggered during the read process. An application can associate functions withthose events and update the screen, a log file, or the browser console with informationabout the stats of the process. The following list shows the valid event typesassociated with the FileReader: • onabort: Executed when the read process has been aborted through a callto reader.abort() • onerror: Executed when an error occurs during the read process • onload: Executed when the read has completed successfully • onloadend: Executed when the reader has completed the read request • onloadstart: Executed when the read process starts In this example, the contents of the file are read as text using a call toreader.readAsText(). Once the read has completed, the value stored ine.target.resultcontains the contents of the file. The FileReaderalso supportsthe readAsDataURLmethod, which reads the file and returns the file’s data as a base64-encoded data URL.retrievinga large file’s contents as raw data may overload the device’s JavaScript processor andcrash a PhoneGap application.
63
Index.html
<!DOCTYPE HTML> <html> <head> <metaname="viewport"content="width=320; user-scalable=no"/> <metahttp-equiv="Content-type"content="text/html; charset=utf-8"> <title>Prac17</title> <scripttype="text/javascript"charset="utf-8"src="cordova-1.9.0.js"></script> <scripttype="text/javascript"charset="utf-8"src="jquery-1.11.1.js"></script> <linkrel="stylesheet"type="text/css"href="style.css"/> <scripttype="text/javascript"charset="utf-8"> var onDeviceReady =function(){ }; function init(){ document.addEventListener("deviceready", onDeviceReady,true); } function ReadFromFile() { //alert("Read From File"); var filename ='PhoneGap//file1.txt'; FileReader_pg(filename); } function FileReader_pg(filename){ //alert("File Read"); window.requestFileSystem(LocalFileSystem.PERSISTENT,0, function(fileSystem){ //alert("fileSystem"); fileSystem.root.getFile(filename,{create:true, exclusive:false}, function(fileEntry){ //alert("fileEntry"); fileEntry.file( function(file){ //alert("file"); var reader =new FileReader(); reader.onloadend =function(evt){ //alert("File Read");
64
$("#msg").html(evt.target.result); }; reader.readAsText(file); }, fail); }, fail); }, fail); } function fail(error) { //alert("Error :"+error); } </script> </head> <bodyonload="init();"id="stage"class="theme"> <buttononclick="ReadFromFile();">Read File</button> <divid="msg"></div> </body> </html>
Style.css
.left{ float:left; } .right{ float:right; } .clear{ clear:both;} button { width:92%; margin:2%; padding:2%; } #msg message{ color:#006411; width:100%; padding:1em 0; display:block; } #msg time:before,#msg time:after,#msg message:before{ content: '\A'; white-space:pre; }
65
#msg time{ float:right; color:#000; }
Output
66
Name: Class : Roll Number : Subject : Wireless Mobile
Technology
Experiment : 16
Aim : To write a program for complete file application using Phonegap
Signature Grade

67
Aim : To write a program for complete file application using Phonegap
Deleting Files or Directories : To remove a file from local storage, an application must first obtain a FileEntryor DirectoryEntry object
pointing to the file or directory and then can call thefollowing code to delete it: theEntry.remove(onRemoveFileSuccess, onFileError); function onRemoveFileSuccess(entry) { var msgText = "Successfully removed " + entry.name; console.log(msgText); alert(msgText); }
When deleting a directory, the directory must be empty or the remove operation will fail. To remove a directory that contains files, use the removeRecursivelymethod, which will empty the directory before removing it.
In my testing of the sample application, I was able to successfully remove files, but the application would call the onFileError function and return aFileError.INVALID_MODIFICATION_ERR error code. In Bryce’s testing on an Android device, it worked without error, so there’s likely a bug somewhere that needs to be addressed. Copying Files or Directories:
To copy a file or directory, an application must first obtain a FileEntry or DirectoryEntry object pointing to the file or directory and then call the following code to copy it to a new location: entry.copyTo(parentEntry, newName, onSuccessFunction,onErrorFunction);
The parentEntry parameter refers to the directory where the file or directory willbe copied. Directory copies are recursive, so the process will copy the directory as well as the contents of the directory. The newName parameter defines the name for the file or directory in the destination directory. This parameter is optional; if you don’t include it, the file or directory’s current name will be used. This parameter is required if copying a file to the same directory. The onSuccessFunction and onErrorFunction used here are the same as you’ve seen in many other examples; the onSuccesFunction is the function that is executed when the copy process completes, and the onErrorFunction is the function that is executed when an error occurs during the copy process.
The standard limitations you would expect from any file action apply here. When copying a file or directory to the same directory (essentially renaming it), you must supply a new name for the file or directory; otherwise, the copy process will fail. Also, you cannot copy a directory inside itself. Moving Files or Directories :
To move a file or directory, an application must first obtain a FileEntry orDirectoryEntry object pointing to the file or directory and then call the followingcode to move the file to a new location: theEntry.moveTo(parentEntry, newName, onSuccessFunction,onErrorFunction);
The parentEntry parameter refers to the directory where the file or directory will be moved. Directory moves are recursive, so the process will move the directory as well as the contents of the directory.
The newName parameter defines the name for the file or directory in the destination directory. This parameter is optional, if you don’t include it, the file or directory’s current name will be used. This parameter is required if you are moving a file to the same directory, which is essentially renaming the file.
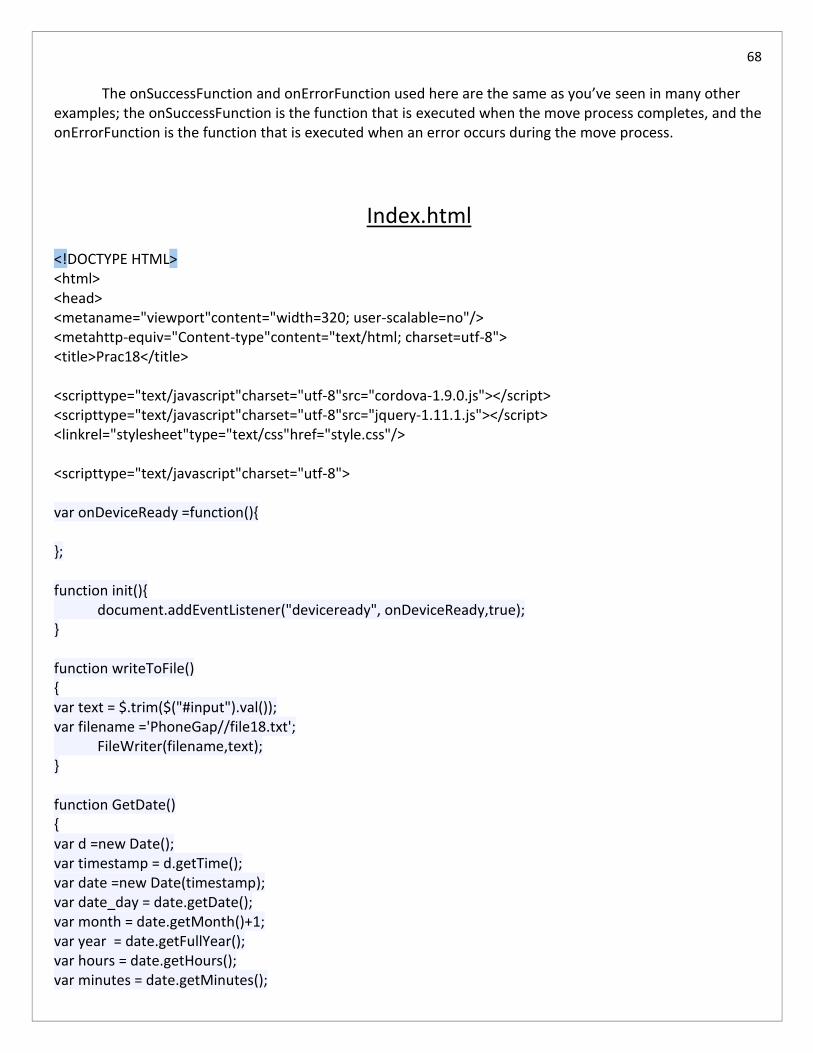
68
The onSuccessFunction and onErrorFunction used here are the same as you’ve seen in many other examples; the onSuccessFunction is the function that is executed when the move process completes, and the onErrorFunction is the function that is executed when an error occurs during the move process.
Index.html
<!DOCTYPE HTML> <html> <head> <metaname="viewport"content="width=320; user-scalable=no"/> <metahttp-equiv="Content-type"content="text/html; charset=utf-8"> <title>Prac18</title> <scripttype="text/javascript"charset="utf-8"src="cordova-1.9.0.js"></script> <scripttype="text/javascript"charset="utf-8"src="jquery-1.11.1.js"></script> <linkrel="stylesheet"type="text/css"href="style.css"/> <scripttype="text/javascript"charset="utf-8"> var onDeviceReady =function(){ }; function init(){ document.addEventListener("deviceready", onDeviceReady,true); } function writeToFile() { var text = $.trim($("#input").val()); var filename ='PhoneGap//file18.txt'; FileWriter(filename,text); } function GetDate() { var d =new Date(); var timestamp = d.getTime(); var date =new Date(timestamp); var date_day = date.getDate(); var month = date.getMonth()+1; var year = date.getFullYear(); var hours = date.getHours(); var minutes = date.getMinutes();

69
var seconds = date.getSeconds(); var formattedTime = date_day+'/'+month+'/'+year+' '+ hours +':'+ minutes +':'+ seconds; return formattedTime; } function FileWriter(filename,data){ window.requestFileSystem(LocalFileSystem.PERSISTENT,0, function(fileSystem){ fileSystem.root.getFile(filename,{create:true, exclusive:false}, function(fileEntry){ fileEntry.createWriter( function(writer){ var cur_date = GetDate(); var new_date ="\n<message>"+data+"<time>"+cur_date+"</time></message>\n"; writer.seek(writer.length); writer.write(new_date); writer.onwriteend =function(event) { $("#msg").text("Message Written to File"); $("#input").val(""); $("#msg").fadeOut(2500); ReadFromFile(); }; }, fail); }, fail); }, fail); } function ReadFromFile() { //alert("Read From File"); var filename ='PhoneGap//file18.txt'; FileReader_pg(filename); } function FileReader_pg(filename){ //alert("File Read"); window.requestFileSystem(LocalFileSystem.PERSISTENT,0, function(fileSystem){ //alert("fileSystem"); fileSystem.root.getFile(filename,{create:true, exclusive:false}, function(fileEntry){ //alert("fileEntry");
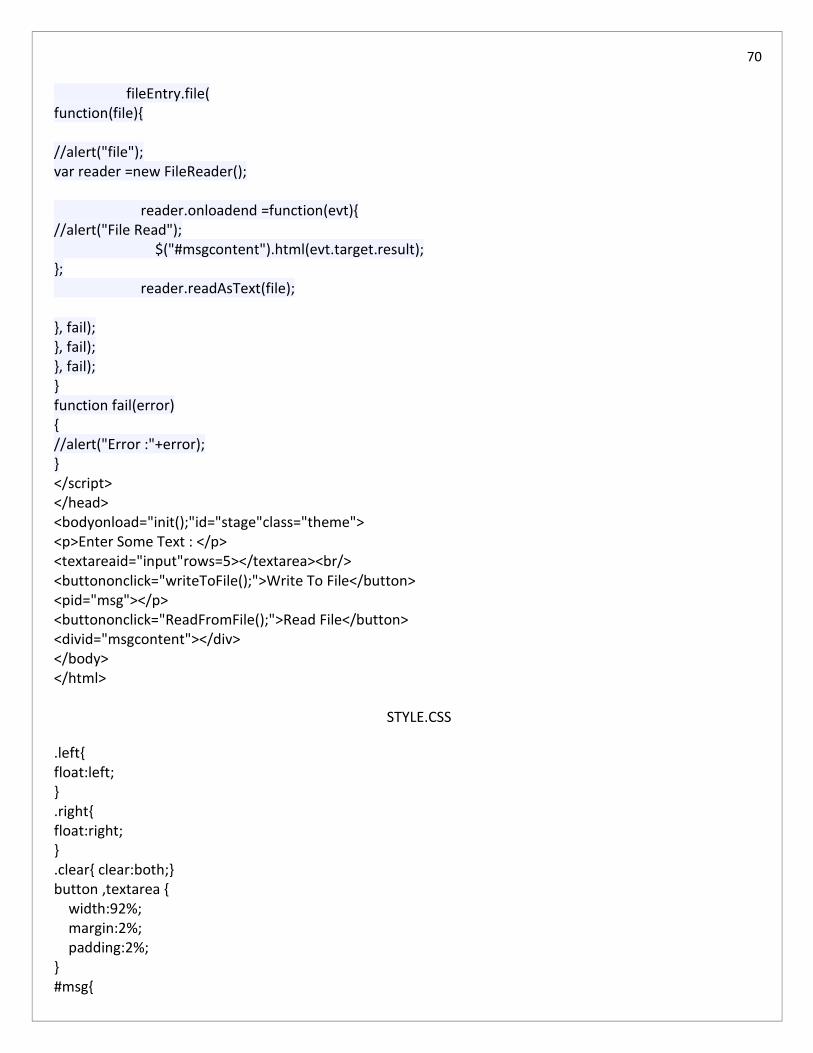
70
fileEntry.file( function(file){ //alert("file"); var reader =new FileReader(); reader.onloadend =function(evt){ //alert("File Read"); $("#msgcontent").html(evt.target.result); }; reader.readAsText(file); }, fail); }, fail); }, fail); } function fail(error) { //alert("Error :"+error); } </script> </head> <bodyonload="init();"id="stage"class="theme"> <p>Enter Some Text : </p> <textareaid="input"rows=5></textarea><br/> <buttononclick="writeToFile();">Write To File</button> <pid="msg"></p> <buttononclick="ReadFromFile();">Read File</button> <divid="msgcontent"></div> </body> </html>
STYLE.CSS
.left{ float:left; } .right{ float:right; } .clear{ clear:both;} button ,textarea { width:92%; margin:2%; padding:2%; } #msg{
71
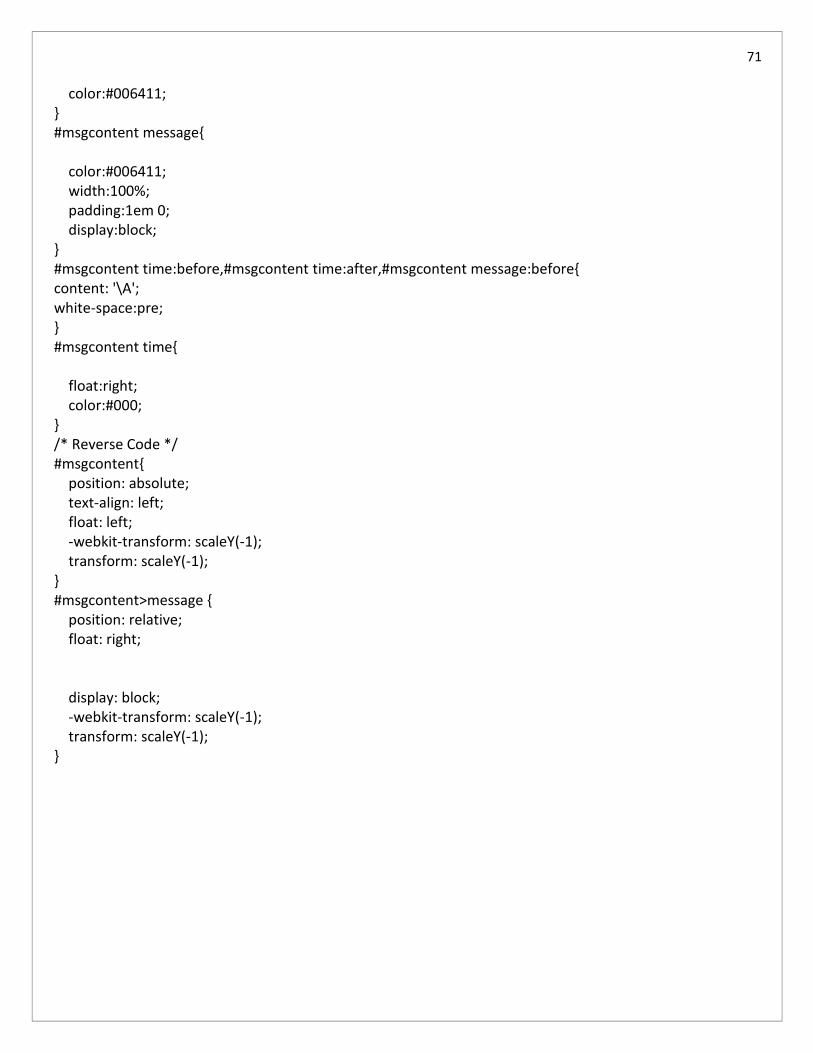
color:#006411; } #msgcontent message{ color:#006411; width:100%; padding:1em 0; display:block; } #msgcontent time:before,#msgcontent time:after,#msgcontent message:before{ content: '\A'; white-space:pre; } #msgcontent time{ float:right; color:#000; } /* Reverse Code */ #msgcontent{ position: absolute; text-align: left; float: left; -webkit-transform: scaleY(-1); transform: scaleY(-1); } #msgcontent>message { position: relative; float: right; display: block; -webkit-transform: scaleY(-1); transform: scaleY(-1); }
72
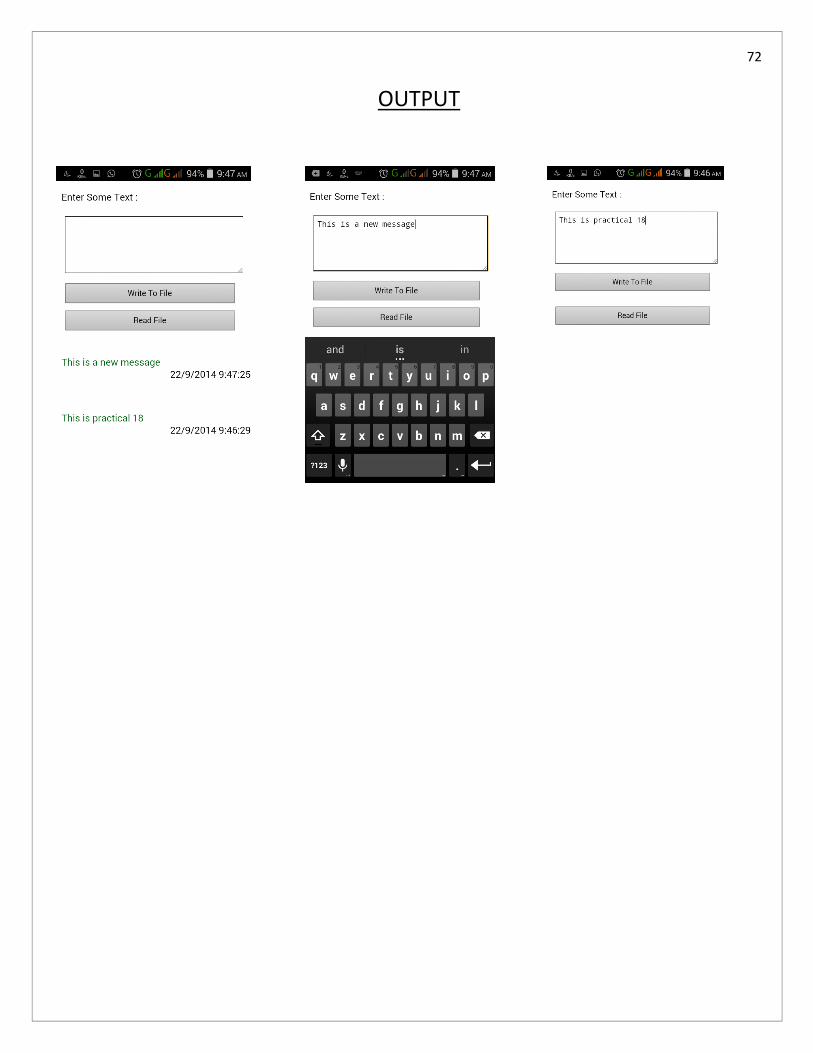
OUTPUT
73
Name: Class : Roll Number : Subject : Wireless Mobile
Technology
Experiment : 17
Aim : To write a program to SQLite Database to insert and retrieve records Phonegap
Signature Grade
74
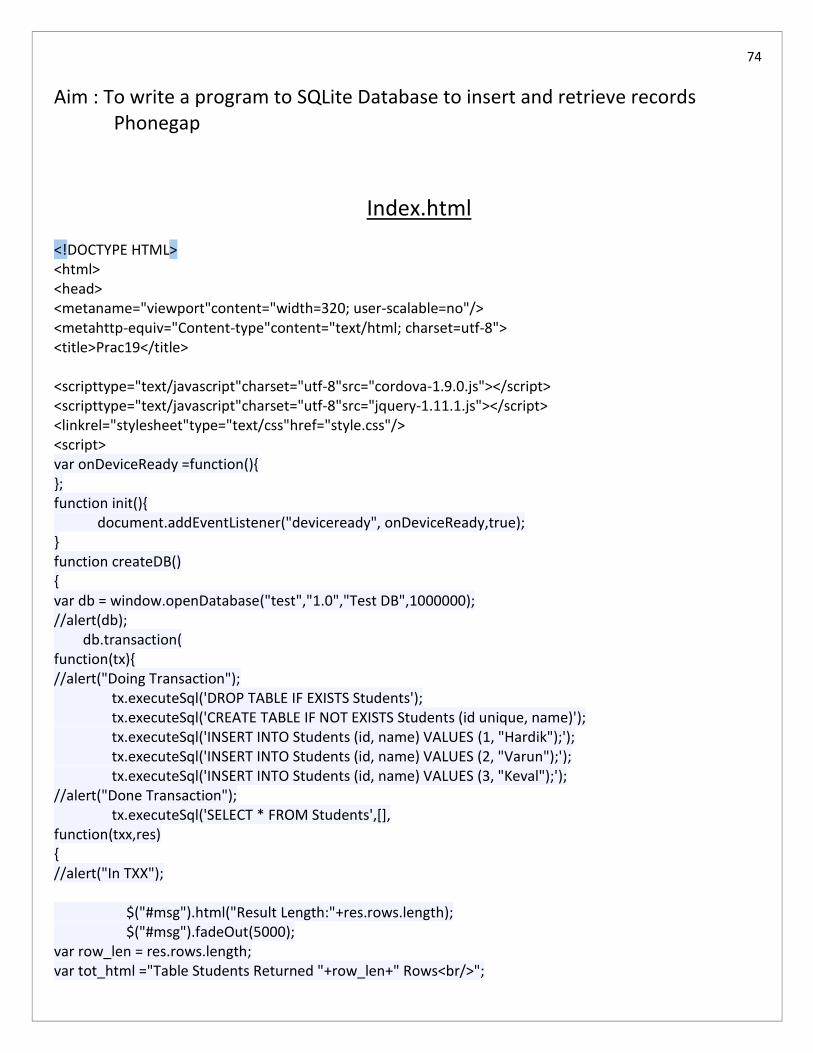
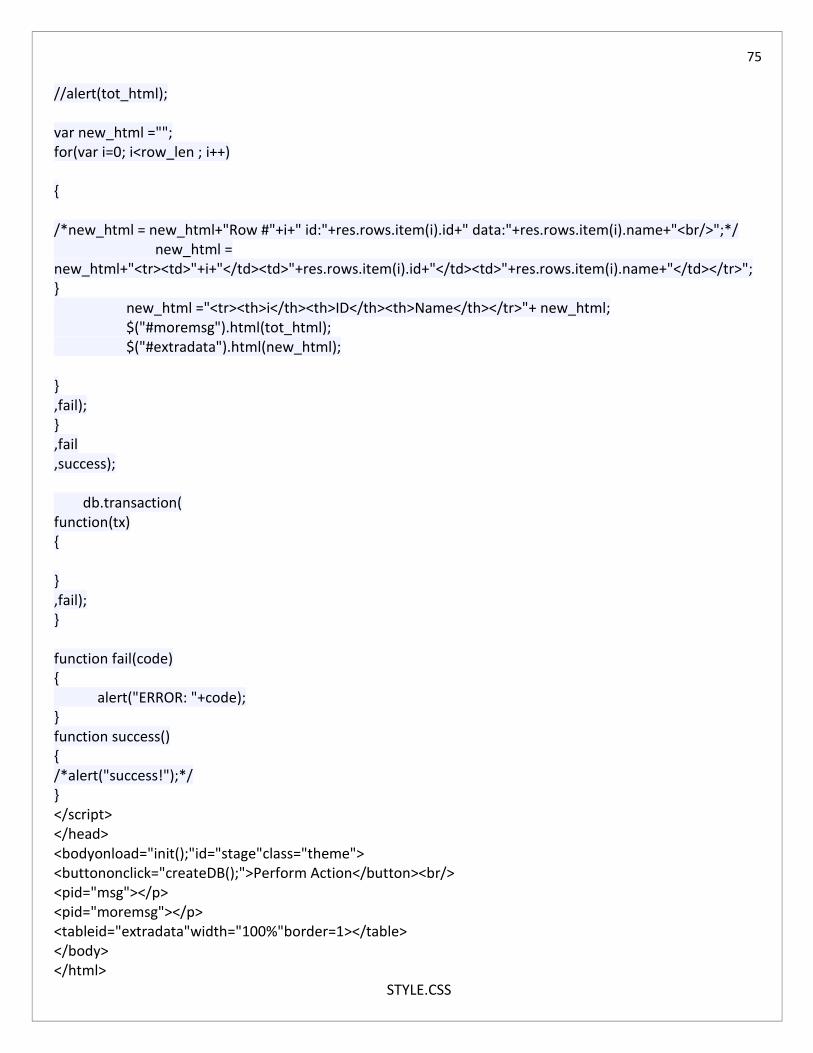
Aim : To write a program to SQLite Database to insert and retrieve records Phonegap
Index.html
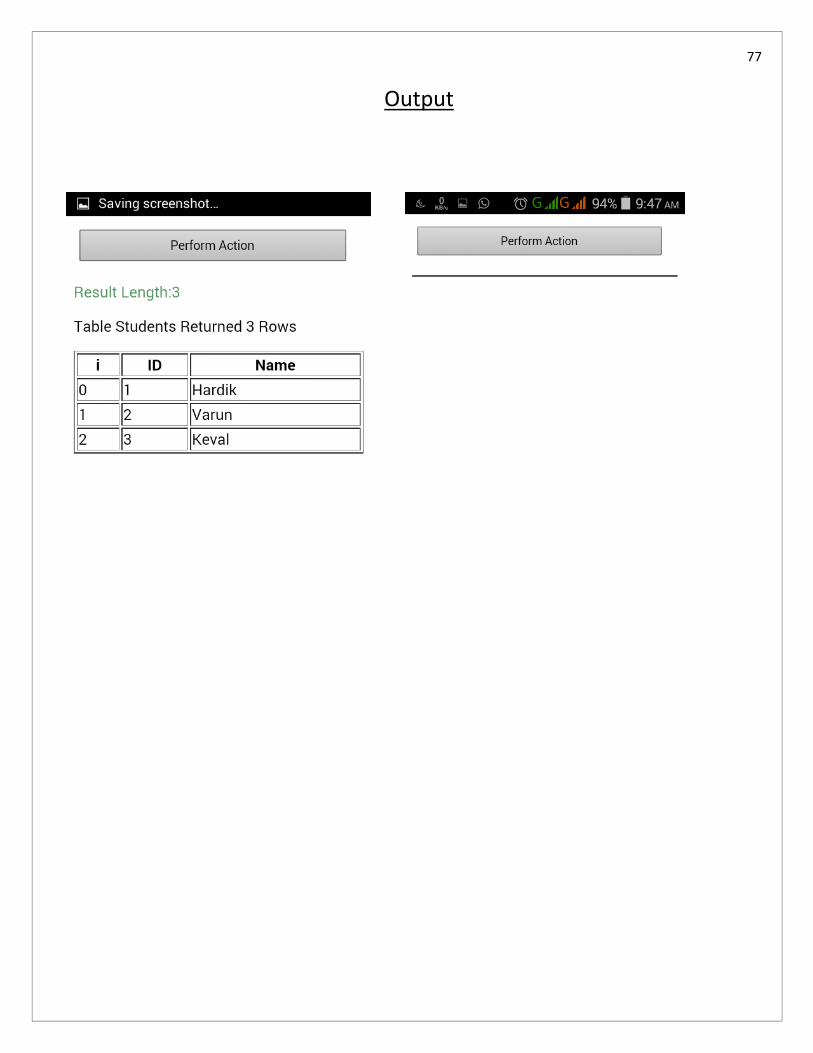
<!DOCTYPE HTML> <html> <head> <metaname="viewport"content="width=320; user-scalable=no"/> <metahttp-equiv="Content-type"content="text/html; charset=utf-8"> <title>Prac19</title> <scripttype="text/javascript"charset="utf-8"src="cordova-1.9.0.js"></script> <scripttype="text/javascript"charset="utf-8"src="jquery-1.11.1.js"></script> <linkrel="stylesheet"type="text/css"href="style.css"/> <script> var onDeviceReady =function(){ }; function init(){ document.addEventListener("deviceready", onDeviceReady,true); } function createDB() { var db = window.openDatabase("test","1.0","Test DB",1000000); //alert(db); db.transaction( function(tx){ //alert("Doing Transaction"); tx.executeSql('DROP TABLE IF EXISTS Students'); tx.executeSql('CREATE TABLE IF NOT EXISTS Students (id unique, name)'); tx.executeSql('INSERT INTO Students (id, name) VALUES (1, "Hardik");'); tx.executeSql('INSERT INTO Students (id, name) VALUES (2, "Varun");'); tx.executeSql('INSERT INTO Students (id, name) VALUES (3, "Keval");'); //alert("Done Transaction"); tx.executeSql('SELECT * FROM Students',[], function(txx,res) { //alert("In TXX"); $("#msg").html("Result Length:"+res.rows.length); $("#msg").fadeOut(5000); var row_len = res.rows.length; var tot_html ="Table Students Returned "+row_len+" Rows<br/>";
75
//alert(tot_html); var new_html =""; for(var i=0; i<row_len ; i++) { /*new_html = new_html+"Row #"+i+" id:"+res.rows.item(i).id+" data:"+res.rows.item(i).name+"<br/>";*/ new_html = new_html+"<tr><td>"+i+"</td><td>"+res.rows.item(i).id+"</td><td>"+res.rows.item(i).name+"</td></tr>"; } new_html ="<tr><th>i</th><th>ID</th><th>Name</th></tr>"+ new_html; $("#moremsg").html(tot_html); $("#extradata").html(new_html); } ,fail); } ,fail ,success); db.transaction( function(tx) { } ,fail); } function fail(code) { alert("ERROR: "+code); } function success() { /*alert("success!");*/ } </script> </head> <bodyonload="init();"id="stage"class="theme"> <buttononclick="createDB();">Perform Action</button><br/> <pid="msg"></p> <pid="moremsg"></p> <tableid="extradata"width="100%"border=1></table> </body> </html>
STYLE.CSS
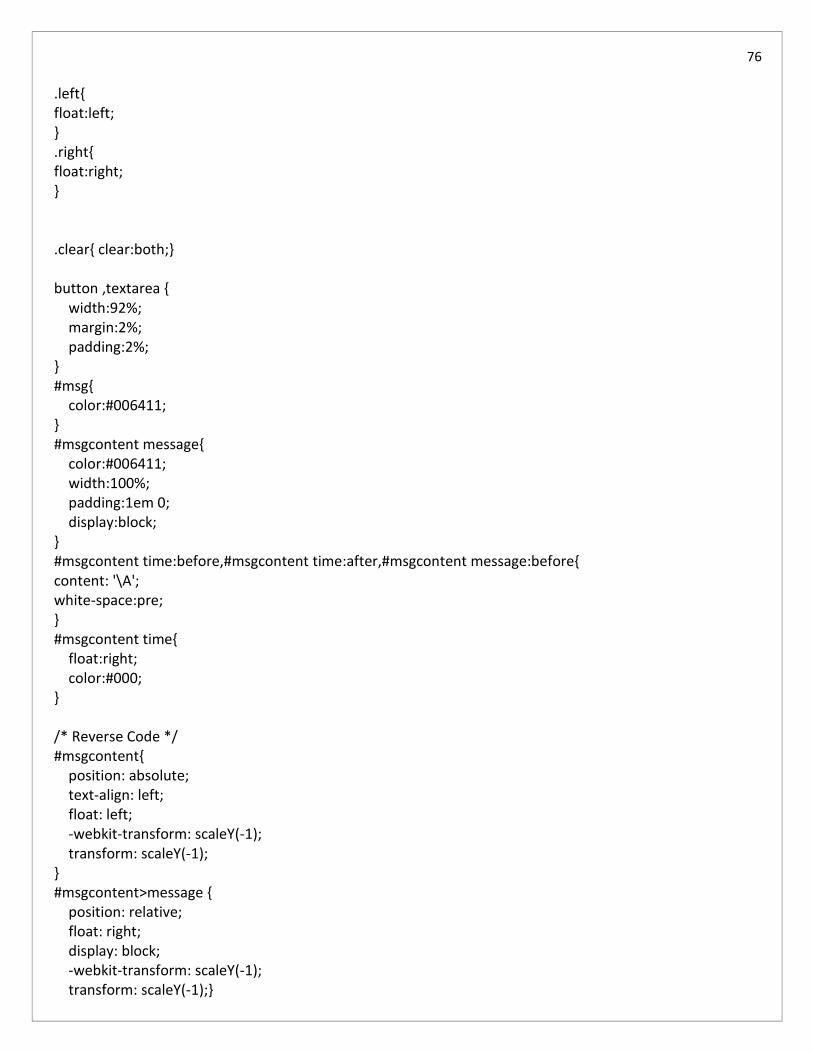
76
.left{ float:left; } .right{ float:right; } .clear{ clear:both;} button ,textarea { width:92%; margin:2%; padding:2%; } #msg{ color:#006411; } #msgcontent message{ color:#006411; width:100%; padding:1em 0; display:block; } #msgcontent time:before,#msgcontent time:after,#msgcontent message:before{ content: '\A'; white-space:pre; } #msgcontent time{ float:right; color:#000; } /* Reverse Code */ #msgcontent{ position: absolute; text-align: left; float: left; -webkit-transform: scaleY(-1); transform: scaleY(-1); } #msgcontent>message { position: relative; float: right; display: block; -webkit-transform: scaleY(-1); transform: scaleY(-1);}
77
Output