Embed Size (px)
Citation preview
1
Animal
Brent J. Martin, D.V.M., DACLAM May 2007
Surgical Guidance

2
3
Table of Contents Introduction 5
Surgeon Issues 7-10 Surgery Training 7 Surgeon Prep 7
Capping and masking 7 Surgical scrub 7 Gowning 8 Gloving 8 Skin Disinfectants 10
Animal Issues 11-24 Animal Care 11 Maintaining body temperature 12 Animal Prep 13
Pre-op exam 13 Clipping 13 Scrub 14 Draping 14
Records 14 Animal Identification 14 Cage card notation 14
Surgical Record 15 Monitoring records 15 Post-procedural records 15 Analgesic drug use 15 Animal Disposition 15
Example Surgery Record 16 Example Post-procedural Record 17 Example Longterm Monitoring 18 Example Terminal Procedure 19
4
Anesthesia Monitoring Methods 20 Drug Calculations 21 Drug Dilutions 21 Expiration Dates 21 Scavenging 22 Common Drug Doses 23
Facility and Materials Issues 25-38 Rodent Surgical Facility 25 Suture 25
Removal 25 Technique 26 Patterns 26 Instrument Tie 27 Needles 28 Knots 28 Materials 29
Controlled Drugs 30 Sharps Management 32 Packs of Sterile Supplies 32 Pack Wrap Pattern 33 Opening Packs 34 Operating Room or Area Conduct 34 Surface and Area Disinfectants 34 Sterile Field 35 Sterilizing Methods 35 Autoclaving 35 Chemical Sterilization 36 Hot Bead Sterilizers 36 Sterilization Quality Control 37 Hard Surface Disinfectants 38
Contents
5
The following materials are a compilation of information regarding surgery on animals. This information has been gathered and is being distributed to assist with humane and compliant animal research surgery. Persons conducting animal surgery have a tremendous diversity of training and education. This can vary from veterinarians who may possess legally recognized Board-certification in animal surgery to graduate students with no prior surgical education and limited practical experience with animals. Surgery encompasses complex topics with many facets of specialized knowledge such as normal physiology, physiology of anesthetized animals, wound healing, surgical instrument care and use, sterile technique, pharmacology of anesthetic drugs, animal behavior, among others. It is neither legally nor practically required for persons conducting research surgical procedures to be experts in these many topics but knowledge is always useful in improving the ability to conduct any procedure. And while the enclosed information is not (and can never be) all-inclusive or the penultimate answer to every surgery issue, it is a useful overview that contains key bits of information that some performing surgery can use to improve their techniques. All surgical programs must be inspected semi-annually by the Institutional Animal Care and Use Committee (IACUC). The topics covered in this document, as well as the information in IACUC-approved protocol forms and the Information Manual for Investigators Using Animals, will be the focus of those inspections.
Introduction

6
7
Surgery Training Persons performing
research animal surgery must be trained in humane conduct of surgery. The IACUC-required training videotapes provide some training. Additional didactic training is provided by this document and the Information Manual for Investigators Using Animals. However, training specific to the surgical procedure must be attained. Skilled personnel in the lab should provide this specific training. As a general guide, training of new surgeons (and experienced surgeons when learning a new technique) should address v a r i o u s s k i l l s e t s i n d e p e n d e n t l y . I t i s r e c o m m e n d e d t h a t experience with regional a n a t o m y , i n s t r u m e n t handling, the basic surgical technique and even sterile techniques be practiced on dead animals. Such practice does not require IACUC approval as long as the animal subjects were euthanized for other reasons. DLAM/ACP can provide carcasses for this use. Further practical experience should be gained with the intended anesthetic technique prior to
its use during an actual experiment. It is often useful to anesthetize animals, pract ice the surgical p rocedures and then euthanize them without gathering experimental data or allowing the animals to recover from the anesthesia. This allows the trainee to concentrate on animal welfare while skill-building.
Laboratories conducting
research surgery need to maintain records of training specific to the personnel doing the surgery. This is best accomplished under a written plan describing how personnel conducting surgery are prepared for the task.
Surgeon Prep Capping and masking
Technically, a surgical
cap is not required for rat and mouse surgery. However, they are standard surgical attire in other realms because hair is a significant source of loose particulates and contamination. Hair bonnets are recommended as a readily provided reduction in contamination risk. At the least, long hair needs to be bound so that it can not touch the surgical site.
Surgical masks are required for all survival surgery. These should be worn over both mouth and nose. Problems with glasses becoming fogged can usually be solved by applying tape over the bridge of the nose (or purchasing masks with adhesive strips for this purpose).
Surgical scrub
Hand-washing is used to
reduce the bacterial load on the surgeon. This is important even though sterile surgical gloves are worn. Ideally this should involve a scrub with a hand brush over
Surgeon Issues
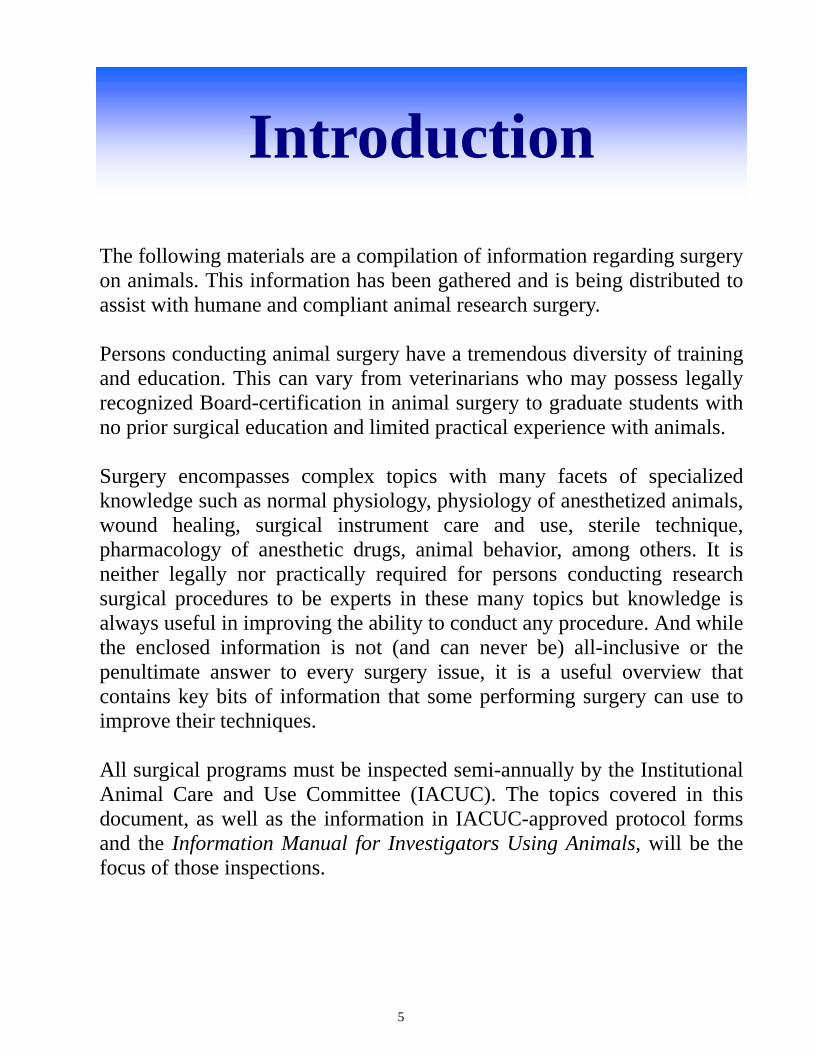
The above pictures are of sim-ple models that can be used to train entry-level personnel in basic surgical techniques. Some experience with basic skills greatly simplifies further work with animals.
8
all surfaces of the fingers, hands and arms using an antiseptic cleanser such as povidone iodine (betadine) or chlorhexidine gluconate (nolvasan) surgical scrub solutions (Table 1, page 10). For surgery involving rats and mice, a simple hand-washing with soap is sufficient.
Gowning
C o v e r i n g s u r g i c a l
personnel with sterile wear is standard practice to reduce particulate contamination. Properly donning sterile wear requires exacting technique to preserve the sterility of the outer surfaces. A similar but less stringent concept needs to be followed with surgeon preparation for rat and mouse surgery. It is acceptable to wear a clean, nonsterile laboratory coat or "scrub top" over street clothes.
Gloving Sterile surgical gloves must be worn for all survival surgery. Gloves must be donned properly so that their sterility is not
compromised as they are put on. The standard technique for gloving is described.
Any contact by the gloves with non-sterile surfaces renders the gloves contaminated. Avoiding such contact is particularly challenging in rat and mouse surgery where aseptic techniques are minimally used (as compared to standard surgical technology). In the rodent case, the vast majority of the environment is not rendered sterile leaving many opportunities for contamination and thus requiring careful consideration of methods to avoid the contamination.
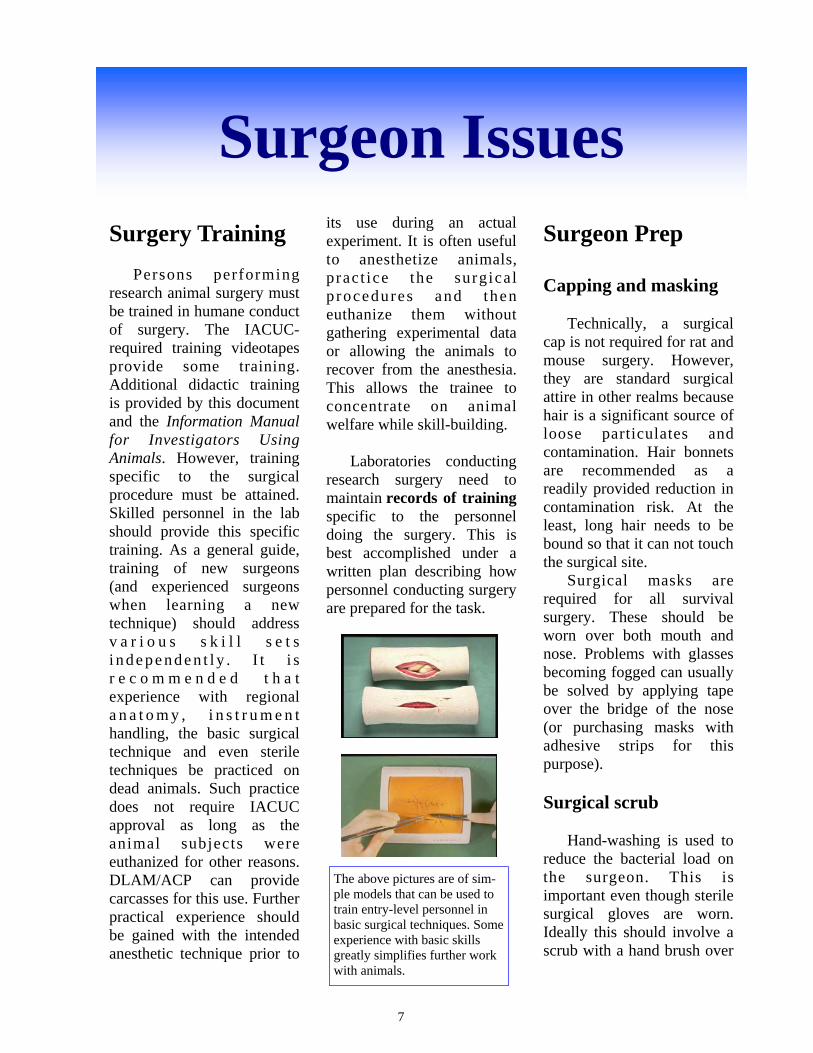
The proper technique for putting on sterile gloves while avoiding contamination of them is demonstrated in the following figures.
The sterile glove pack is opened without contacting the gloves.
The glove for the dominant hand (generally the right hand) is lifted by the folded cuff using the other hand. The dominant hand is inserted as best as can be done. The cuff is left folded.
9
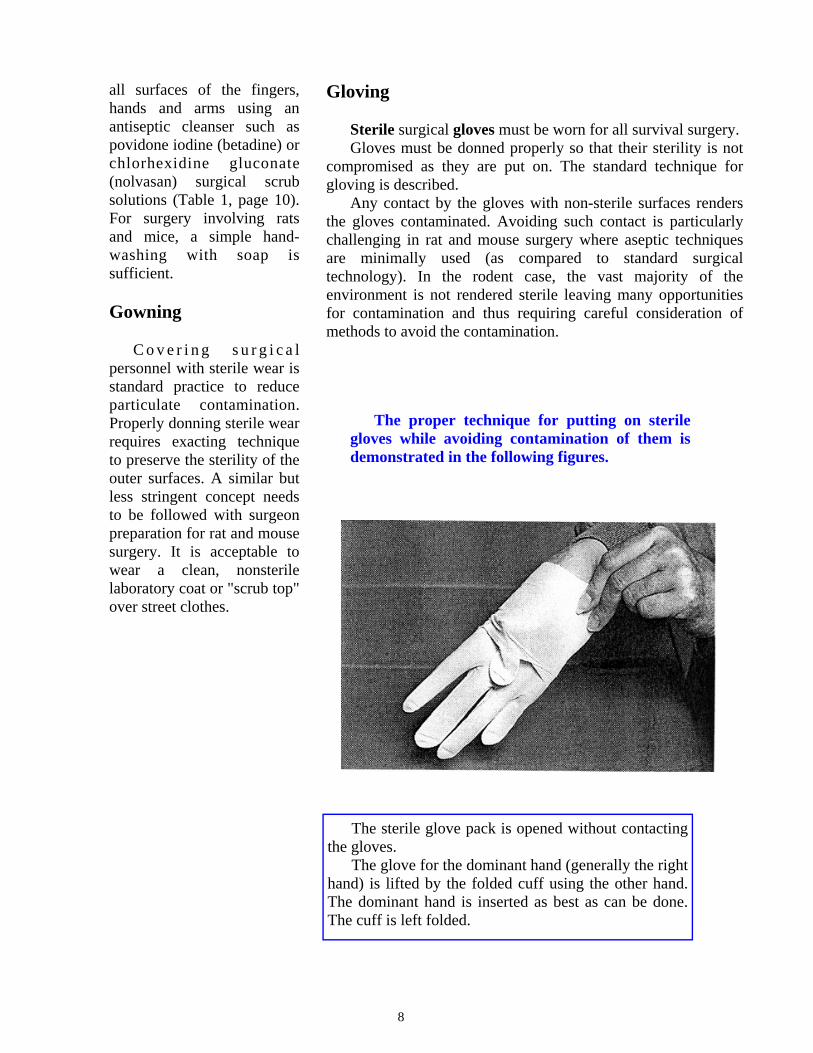
The second glove is then lifted by sliding the sterile gloved fingers of the dominant hand under the glove fold.
The "weak" hand is inserted fully into that second glove.
With the fingers of the dominant hand remaining under the glove fold, the cuff is unfolded over the wrist or gown sleeve.
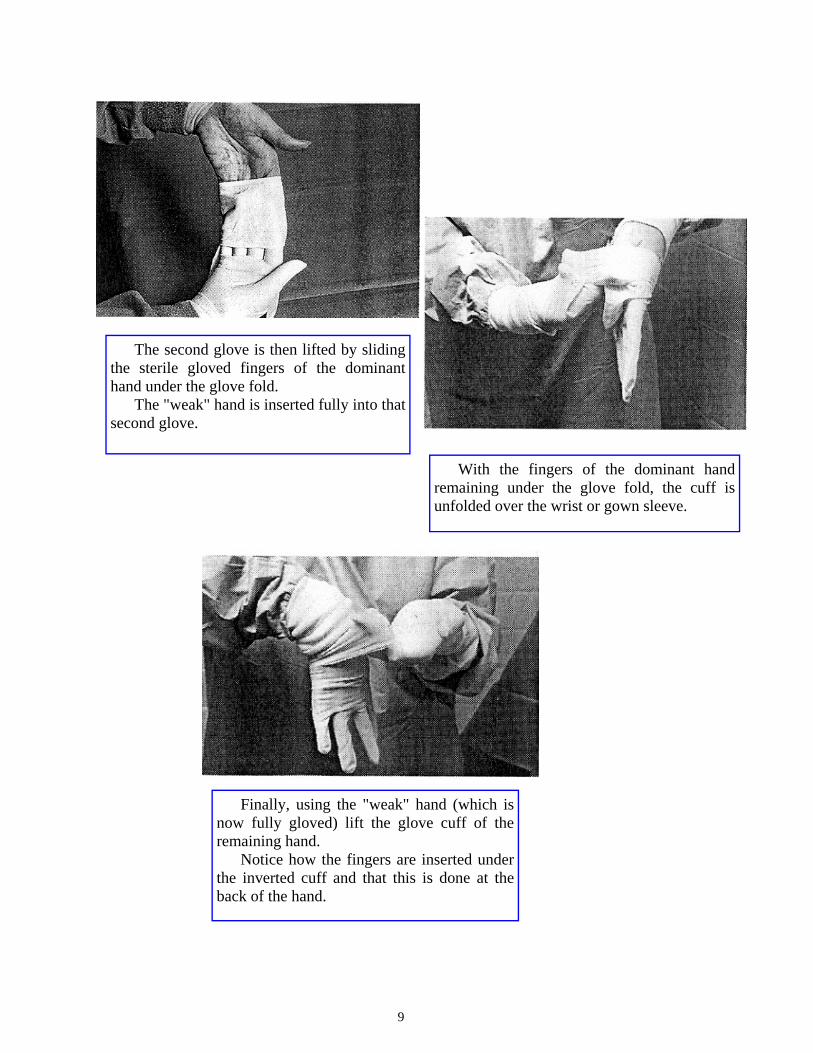
Finally, using the "weak" hand (which is now fully gloved) lift the glove cuff of the remaining hand.
Notice how the fingers are inserted under the inverted cuff and that this is done at the back of the hand.
10
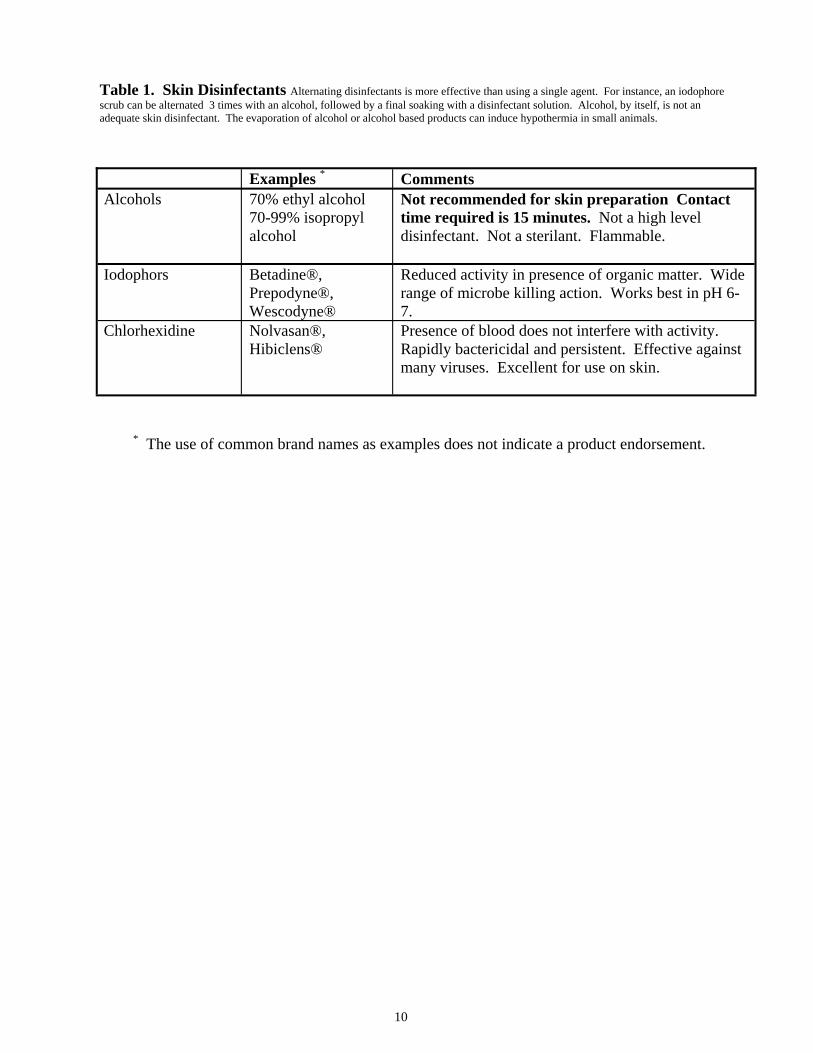
* The use of common brand names as examples does not indicate a product endorsement.
Table 1. Skin Disinfectants Alternating disinfectants is more effective than using a single agent. For instance, an iodophore scrub can be alternated 3 times with an alcohol, followed by a final soaking with a disinfectant solution. Alcohol, by itself, is not an adequate skin disinfectant. The evaporation of alcohol or alcohol based products can induce hypothermia in small animals.
Examples * Comments Alcohols 70% ethyl alcohol
70-99% isopropyl alcohol
Not recommended for skin preparation Contact time required is 15 minutes. Not a high level disinfectant. Not a sterilant. Flammable.
Iodophors Betadine®, Prepodyne®, Wescodyne®
Reduced activity in presence of organic matter. Wide range of microbe killing action. Works best in pH 6-7.
Chlorhexidine Nolvasan®, Hibiclens®
Presence of blood does not interfere with activity. Rapidly bactericidal and persistent. Effective against many viruses. Excellent for use on skin.
11
Animal Care Anesthetized animals do
not voluntarily blink their eyes. This can cause drying and damage. Injury to eyes is very painful and this can be avoided by place lubricating ophthalmic ointment (such as Lacrilube or Tearfair) in the anesthetized animal's eyes.
Animals lose body fluid
when anesthetized just as they do when awake. The fluid loss can actually be higher due to evaporative loss through surgical wounds, blood loss as a surg ica l consequence , increased urine production induced by some anesthetic drugs and respiratory system drying if compressed gases are used. For a typical short research surgical procedure, this fluid loss is small and can be ignored as the animal rapidly recovers and re-hydrates itself. For longer procedures, fluid replacement can significantly improve surgical recovery and outcome. A one-time injection of fluid (1.0 ml for adult mice and 6-10 ml for the average rat) can be administered. The best route is subcutaneous and the best fluid to use is Lactated
Ringers Solution (sterile, for injection). Slight warming of the fluid (and certainly not below room temperature) is i m p o r t a n t t o a v o i d contributing to low body temperature problems. Fluids can also be administered in small amounts over time. T h i s i s p a r t i c u l a r l y advantageous for long proce-dures when maintenance of s t ab le phys io logy i s desirable. Lactated Ringers Solution is often a good choice and administration of 5-10 ml/kg/hr is a good rule-of-thumb.
P o s t o p e r a t i ve c a r e
p r o g r a m s s h o u l d b e considered and designed before commencing any experimental procedure. The following minimal essential components should be routinely incorporated into postoperative management of animals:
1. The animal should be
kept warm by the use of heating pads, blankets or lamps, and, if animal size permits, body temperature should be monitored and recorded until it returns to normal.
2. Animals recovering
from anesthesia should be
rotated from side to side every 15 minutes until they are able to maintain sternal recumbancy. They should not be left unattended until they have recovered consciousness.
3. Hydration should be
assessed on a daily basis and f l u i d r e p l a c e m e n t administered at a volume of 60-80 ml/day/kg body weight for animals which are not e a t i n g a n d d r i n k i n g postoperatively. In small laboratory animals, fluids may be given parenterally, either subcutaneously or intraperitoneally. Lactated Ringers Solution or an equivalent should be utilized. Fluids should be warmed prior to administration to rodents.
4. Adequate nutrition is
necessary in the healing animal patient. Caloric replacement should be instituted for animals that have not resumed eating by the second postoperative day. Caloric replacement may r e q u i r e s u p p l e m e n t a l feedings using specialized dietary formulations and feeding methods.
5. The incision must be
examined daily for evidence
Animal Issues
12
of wound dehiscence or infect ion unti l i t is c o m p l e t e l y h e a l e d . Nonabsorbable sutures or wound clips should be r e m o v e d 7 - 1 0 d a y s postoperatively.
6. Analgesics should be
utilized in animals which demonstrate pain-related behavior, e.g. guarding of the incision, reluctance to move, anorexia, absence of normal behavior patterns, etc.
Maintaining body temperature
Normal body temperature
is a critical factor in successful surgery. Body temperature is fundamental to normal physiologic function (critical to research results); it greatly impacts the animal's interaction with anesthetic drugs (critical to recovery). Body temperature of anesthetized, small animals drops precipitously. Anesthetic drugs cause hypothermia by directly depressing the central nervous system and hence its temperature management. They also stop heat generat ion related to muscular action which i n d i r e c t l y c a u s e s hypothermia. Anesthesia also blocks heat retention mechanisms such as blood vessel constriction through direct pharmacological effects. The smaller the
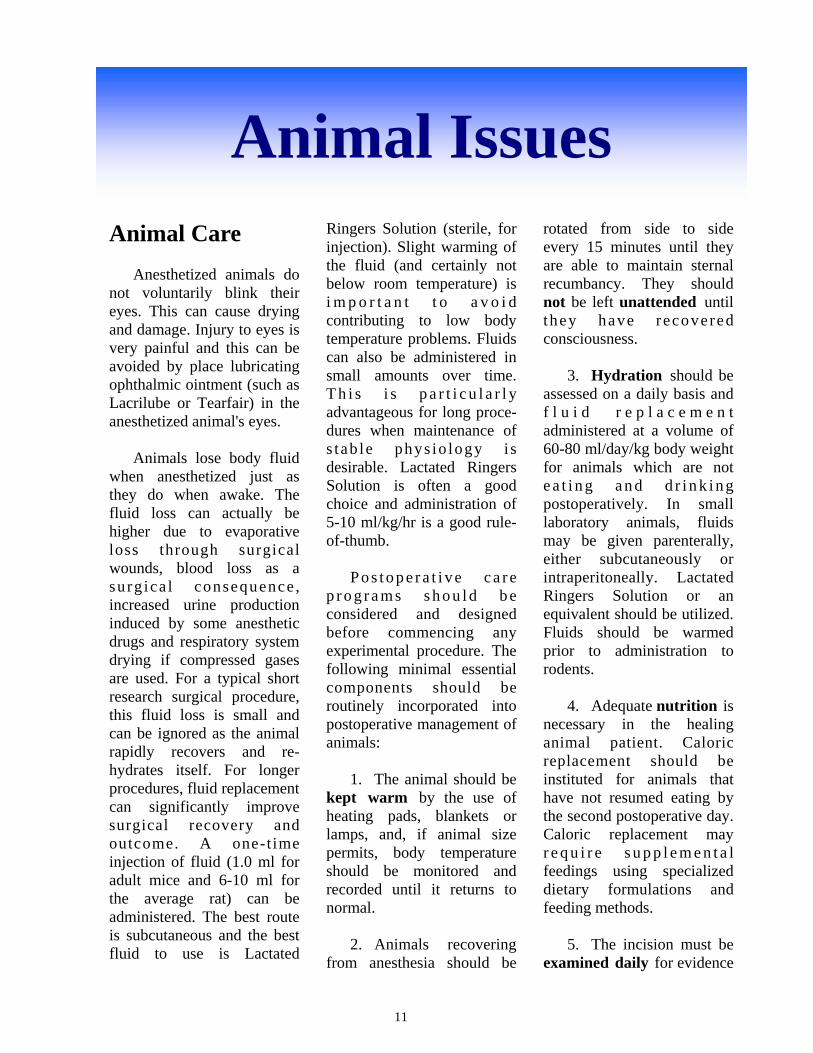
compared to povidone iodine (betadine) or chlorhexidine g l u c o n a t e ( n o l v a s a n ) antiseptic products, anyway. Insulation from conductive surfaces is essential. The simple use of clean materials (such as blue laboratory pads or sheets of plastic) under the animal can contribute significantly and can be wholly sufficient for short surgical procedures. "Bubble wrap", the common packing material, is a good insulator, disposable, fairly easily cleaned and generally available "free" as a by-product of shipping after dis-i n f e c t i o n . I n o t h e r circumstances, an active heat source is needed to prevent dangerously low body temperature. The finest systems involve circulating warm water pads placed under the animal. These can even be thermostatically
animal, the more severe and rapid the temperature drop (due to a disproportionately high body surface area). These "unavoidable" causes of temperature decreases are exacerbated by our use of highly sanitizable materials such as laboratory bench tops and stainless steel surgical tables. These materials conduct heat away from the body. Alcohol, when used as a pre-surgical skin scrub, c o n t r i b u t e s t h r o u g h evaporative heat loss. Heat is lost through surgical wounds; this can be particularly severe when a body cavity is opened.
As can be seen, many factors are working to decrease body temperature and these must be counter-acted for successful surgery. Alcohol can be avoided in a pre-surgical skin scrub. Alcohol is ineffective as
An anesthetized rat wrapped in "bubble wrap" and clipped for sur-gery. Note the hole cut through the bubble wrap to define the surgi-cal field.
13
adjusted by actual body temperature feedback. Lower t e c h s y s t e m s i n v o l v e commercially available gel-slabs that are designed for high thermal stability. Once warmed, these maintain the same temperature for long periods. Even a latex glove filled with warm water and placed next to the animal can be helpful. Care must be taken with these lower tech systems. Not only do anesthetized animals fail to maintain their own temperature, they do not react when over-heated. Since skin temperature control m e c h a n i s m s a r e "anesthetized", animals can be burned by temperatures lower than would normally cause burns. For this reason, electric "heating pads" available in stores should not be used.
For surgery conducted in the HSC DLAM facility, DLAM has incubating cham-bers that can be used to warm post-operative animals.
Animal Prep Pre-op exam
Anesthesia is a near-death
experience challenging the animal. Even minor surgery p l a c e s s i g n i f i c a n t physiological demands on the animal to heal and recover. Most animals must be significantly ill before their problem is readily obvious as they have adapted in conditions where illness leads to predation. These facts taken
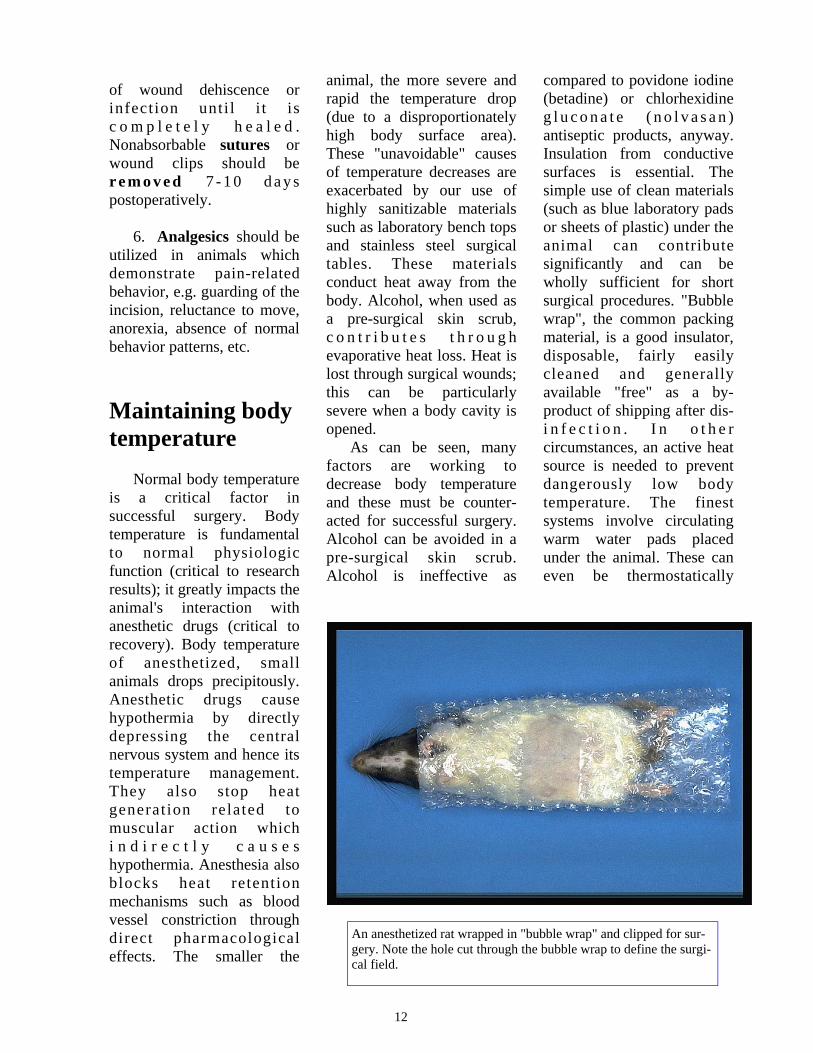
Clipping Skin and hair can not be
sterilized and represent significant threats of infection to the surgical site. Hair needs to be clipped from surgical site to reduce this threat. As a guideline, the hair should be removed at least 2 cm in each direction from the intended incision site (in rodents). Some specialized circumstances may justify smaller clipped areas. Larger areas improve the surgeon's ability to work in the area without contamination.
The animal should be clipped in a work area at some distance (several feet or more) from the surgery "table" as clipping creates loose hair and other particulate contamination that you do not want near the surgical wound.
with the moral and legal obligations for humane animal use require that consideration be made regarding the appropriateness of the animal for the intended su rge ry . Fo r typ ica l laboratory-bred rodents, this examination can be limited to a close look at the animal. This examination should include: whether the animal has the proper specification (sex, strain, age, size, etc.); whether its behavior is normal in terms of its interaction with cage mates and the researcher; whether it has other indications of ill-health (nasal or ocular discharges, wounds, tumors, noisy breathing, etc.). Animals out-of-the-ordinary are not appropriate for surgery (nor for the intended research).
The withholding of food is not necessary in rodents unless specifically mandated by the protocol or surgical procedure. Due to the high metabolic rate of rodents, food should not be withheld longer than overnight. Water should NOT be withheld unless required by the protocol.
Clipping the hair from an anesthetized rat's abdomen.
14
Scrub Skin is heavily populated
with bacteria and can not be sterilized. It is standard surgical practice to wash the skin immediately before surgery to reduce the bacterial numbers. Physical cleaning with mild hand soap (by using damp, soapy gauze) i s somet imes necessary for visibly dirty areas. Typically, a pre-operative skin "scrub" involves 2-3 cycles of cleaning with an antiseptic specifically designed for skin cleansing. Commercial products such as povidone iod ine (be t ad ine ) o r chlorhexidine gluconate (nolvasan) are readily available as surgical scrubs. See Table 1 for information on skin disinfectants. Gauze wetted with these is used to lightly rub the surgical site, starting at the intended incision site and moving progress ively outward toward the borders of the clipped area. This is usually done as ever-widening concentric circles, spiraling outward. Thus, the fresh, least-contaminated piece of gauze is first used at the incision site and then progressively used farther from the incision site as it's contamination increases. After reaching the edge of the clipped area, the gauze is discarded (and never moved back to the central scrubbed area). This cycle is repeated, preferably twice more.
Draping As noted previously, skin
and hair can not be sterilized and are contaminated with bacteria. Being in close proximity to the surgical wound, these areas are a significant risk as a source of c o n t a mi n a t i o n . I t i s essentially impossible to maintain glove, suture and instrument sterility unless a barrier is used to cover the contaminated areas. Surgical drape material should be autoclaved for this purpose. Either a hole can be cut in the material to provide access to the surgery site or several small pieces may be distributed around the area. Small pieces of drape material can be provided free by DLAM (HSC). Although not ideal due to its porosity, sterile gauze is acceptable for draping rats and mice.
Draping the body does reduce visibility of the a n i m a l a n d t h e r e b y complicates anesthet ic monitoring. On the positive side, pinching tails and feet and assessing muscle tone can be done using the drape as a sterility barrier (with the surgeon's side being sterile and the animal's side being contaminated) as these tests are done. Careful draping to maintain visibility of the head, and even the chest when possible, should be done to provide the needed anesthetic monitoring. Clear d r a p e m a t e r i a l s a r e commercially available and can provide the best option.
Records
Animal Identification It is a long-standing
IACUC policy that animals on which surgery is p e r f o r m e d m u s t b e individually identified. For rodents, this means an i d e n t i f y i n g n u m b e r developed by the researchers. This number needs to be used on all records relating to that animal. It is generally s u f f i c i e n t f o r t h i s identification to be applied to the cage card (rather than actually marking or tagging the animal's body).
Cage card notation
The laboratory-derived
i n d i v i d u a l a n i m a l identification number needs to be written on the animal's cage card.
Some notation of animal
use needs to be made on the animal's cage card. These can be extremely brief (e.g 1/17/07 bled or 12/1/06 n e p h r e c t o m y ) . T h e s e notations are very important to overall animal care. It allows everyone with access to the animal to have information necessary to judge the conditions that they see. This allows situation-specific handling with improved animal welfare and research.
15
Surgical Record
Monitoring records A. Record: (multiple
rodents done at the same time may share a record)
1. Minimum record - date done, surgeon identified, preoperative check, all pre-anesthetic and anesthetic drug given (including supplemental doses) on volume basis, duration of procedure, unusual events (death, procedural problems, etc.)
2. R e t e n t i o n - maintained for 6 months for rats and mice (non-USDA species); life of animal or 1 year (whichever is greater) for hamsters (and other USDA rodents)
Post-procedural records
1. Record: (can be a
continuation of the anesthesia record)
Minimum record - date procedure done, surgeon identified, duration of p r o c e d u r e , p e r i o d i c observations, unusual events (death, procedural problems, etc.)
R e t e n t i o n - maintained for 6 months for rats and mice (non-USDA species); life of animal or 1 year (whichever is greater) for hamsters (and other USDA rodents)
2. M o n i t o r i n g a n d
observations: P o s t - a n e s t h e s i a
monitoring should be similar to anesthesia monitoring (see page 20) with additional assessment of pain, need and use of analgesia, use of supplemental heat, and every 15 minute turning of animal (side to side to improve respiration and bolster recovery)
Daily checks need to assess condition of the procedure site (redness, swelling, apposition, etc.), eating/drinking/defecation, weight loss, movement and response to people and other a n i m a l s . N o t e t h a t abnormality to any of these things should first be interpreted as the need for analgesia. Sutures need to be removed at 7-10 days.
3. Frequency of checks: When recovering
from anesthesia - at least every 15 minutes until moving, at least hourly until returned to the housing loca-tion (not to exceed 12 hours outside the housing room)
After recovery from anesthesia - at least twice-a-day checks for first 3 days and then daily checks for days 4-7 days
Analgesic drug use
The provision for analge-
sia is critical. Analgesic drug use described in an IACUC approved protocol must be administered as described unless altered by the UT vet-erinarian based on clinical need.
Use of the analgesic drugs must be recorded in the surgical record. As the analgesic drug used is often standard for at least the initial treatments, a "check-off" sys-tem in the record can be de-veloped.
Animal Disposition
It is long-standing IA-
CUC policy that the surgical record indicate the final ani-mal disposition.
Example Records
The following pages contain examples of surgi-cal record forms. These are examples that are actually in use by some UT investi-gators for following rodent surgery. The UT veterinar-ian can provide WORD versions of these files if you would like to incorpo-rate their use into surgical programs. These forms may be modified to con-form to individual lab need. Entirely different forms may also be used as long as they provide the necessary records.
16
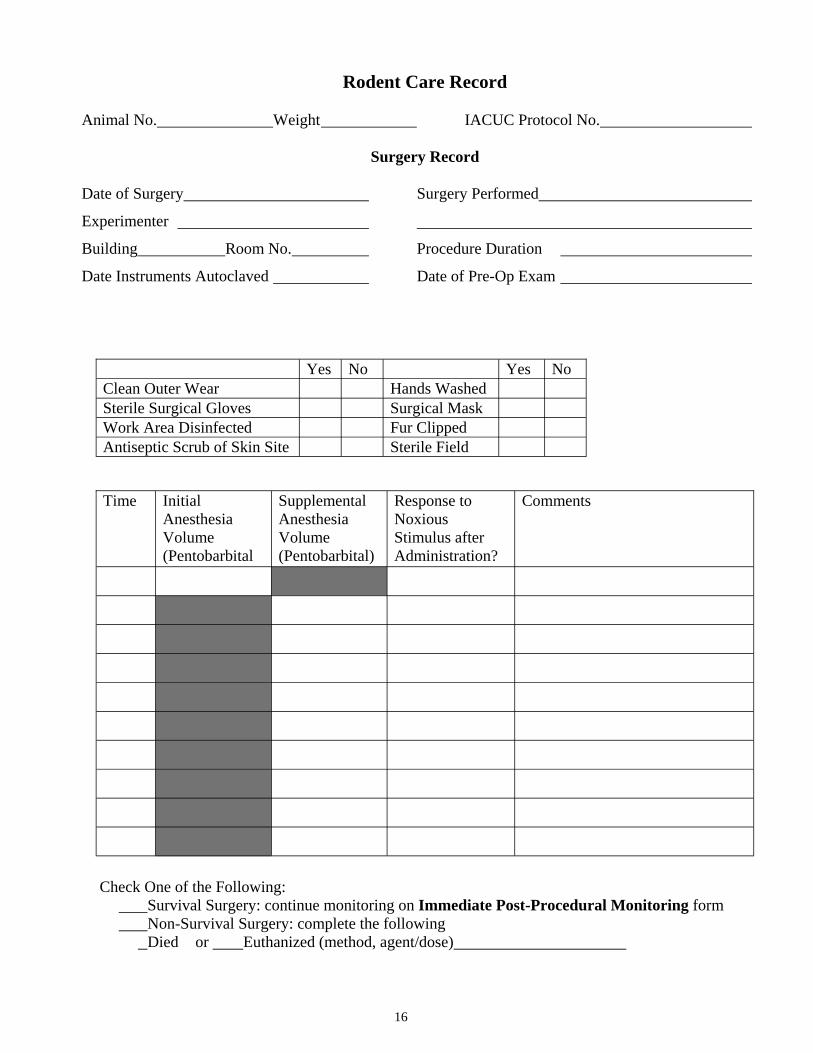
Check One of the Following: Survival Surgery: continue monitoring on Immediate Post-Procedural Monitoring form Non-Survival Surgery: complete the following
Died or Euthanized (method, agent/dose)
Rodent Care Record Animal No. Weight IACUC Protocol No.
Surgery Record Date of Surgery Surgery Performed
Experimenter
Building Room No. Procedure Duration
Date Instruments Autoclaved Date of Pre-Op Exam
Yes No Yes No Clean Outer Wear Hands Washed Sterile Surgical Gloves Surgical Mask Work Area Disinfected Fur Clipped Antiseptic Scrub of Skin Site Sterile Field
Time Initial Anesthesia Volume (Pentobarbital
Supplemental Anesthesia Volume (Pentobarbital)
Response to Noxious Stimulus after Administration?
Comments
17
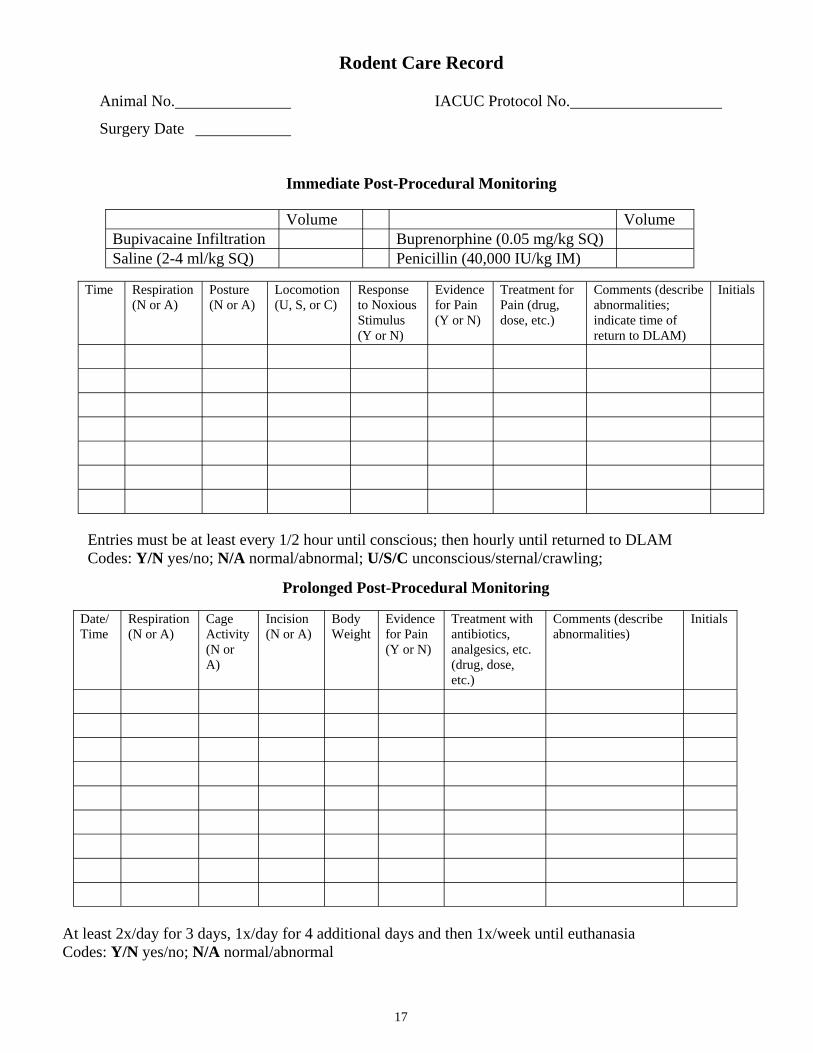
Rodent Care Record Animal No. IACUC Protocol No.
Surgery Date
Immediate Post-Procedural Monitoring
Entries must be at least every 1/2 hour until conscious; then hourly until returned to DLAM Codes: Y/N yes/no; N/A normal/abnormal; U/S/C unconscious/sternal/crawling;
Volume Volume Bupivacaine Infiltration Buprenorphine (0.05 mg/kg SQ) Saline (2-4 ml/kg SQ) Penicillin (40,000 IU/kg IM)
Time Respiration (N or A)
Posture (N or A)
Locomotion (U, S, or C)
Response to Noxious Stimulus (Y or N)
Evidence for Pain (Y or N)
Treatment for Pain (drug, dose, etc.)
Comments (describe abnormalities; indicate time of return to DLAM)
Initials
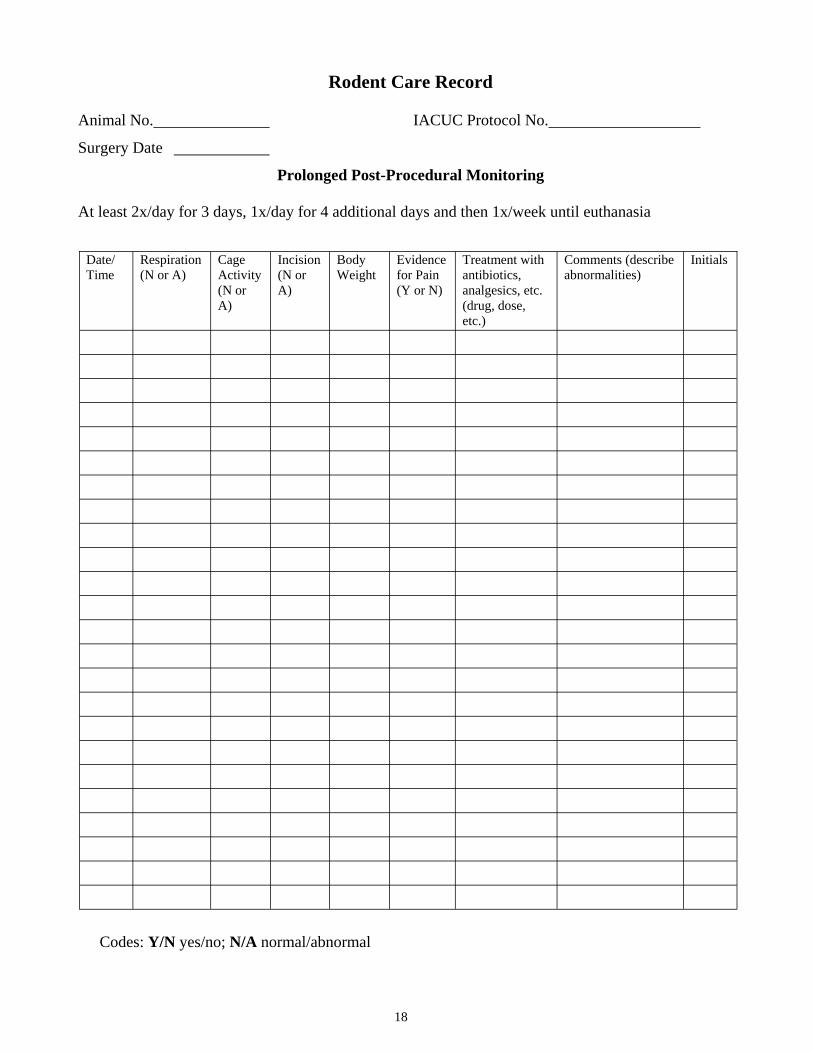
At least 2x/day for 3 days, 1x/day for 4 additional days and then 1x/week until euthanasia Codes: Y/N yes/no; N/A normal/abnormal
Prolonged Post-Procedural Monitoring
Date/Time
Respiration (N or A)
Cage Activity (N or A)
Incision (N or A)
Body Weight
Evidence for Pain (Y or N)
Treatment with antibiotics, analgesics, etc. (drug, dose, etc.)
Comments (describe abnormalities)
Initials
18
Rodent Care Record Animal No. IACUC Protocol No.
Surgery Date
Prolonged Post-Procedural Monitoring At least 2x/day for 3 days, 1x/day for 4 additional days and then 1x/week until euthanasia
Date/Time
Respiration (N or A)
Cage Activity (N or A)
Incision (N or A)
Body Weight
Evidence for Pain (Y or N)
Treatment with antibiotics, analgesics, etc. (drug, dose, etc.)
Comments (describe abnormalities)
Initials
Codes: Y/N yes/no; N/A normal/abnormal
19
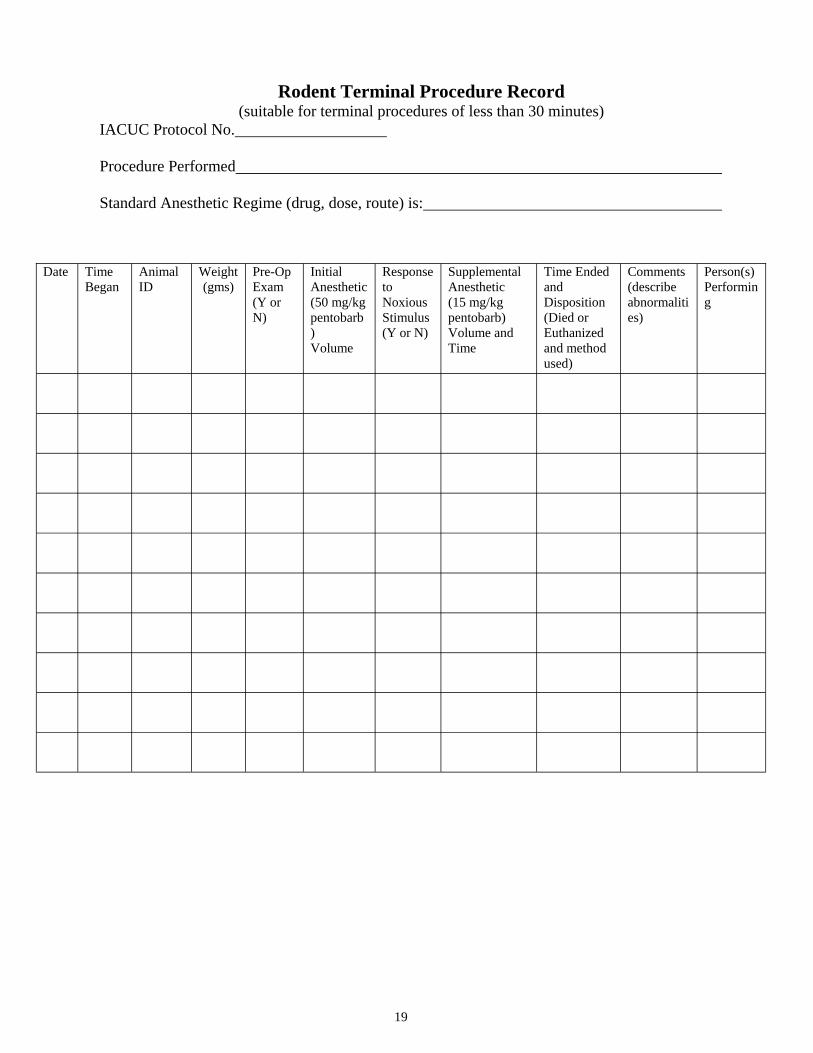
Rodent Terminal Procedure Record (suitable for terminal procedures of less than 30 minutes)
IACUC Protocol No. Procedure Performed Standard Anesthetic Regime (drug, dose, route) is:
Date Time Began
Animal ID
Weight (gms)
Pre-Op Exam (Y or N)
Initial Anesthetic (50 mg/kg pentobarb) Volume
Response to Noxious Stimulus (Y or N)
Supplemental Anesthetic (15 mg/kg pentobarb) Volume and Time
Time Ended and Disposition (Died or Euthanized and method used)
Comments (describe abnormalities)
Person(s) Performing
20
animal's response to these parameters at all times and the parameters need to be actively assessed every 15-20 minutes (longer intervals are acceptable if no painful manipulations are being done and experience has shown that the anesthetic regime should be stable; the interval still should not exceed about 30 minutes).
1. Respiration: depth
and character of spontaneous breathing and response to stimulation
2. Corneal /Palpebra l reflexes: strength, speed and presence of a blink reflex when the eyelids, eye lashes or edge of the eye is touched; a rapid response or one after which the eye is maintained shut indicates insufficient anesthesia; not terribly reliable in rodents and rabbits
Anesthesia Monitoring Methods
Evaluation of the animal
during surgery is critical. Monitoring of anesthetic depth is usually of first importance. Unfortunately, techniques for monitoring anesthetic depth vary somewhat with the agent used. A quiet animal that does not move when a painful stimulus is applied is the most certain indicator of a d e q u a t e a n e s t h e s i a , however, the zone between quiet and too quiet is very narrow in rodents.
At least 2 of the following parameters must be c h e c k e d r e g u l a r l y ("Regularly" means that the surgeon and anyone assisting need to be aware of the
but can augment other assessments
3. Ear twitch response: especially in guinea pigs and r abb i t s ; p r e sence o f vocal iza t ion or head m o v e m e n t i n d i c a t e s insufficient anesthesia; ear movement should be followed up with additional assessments
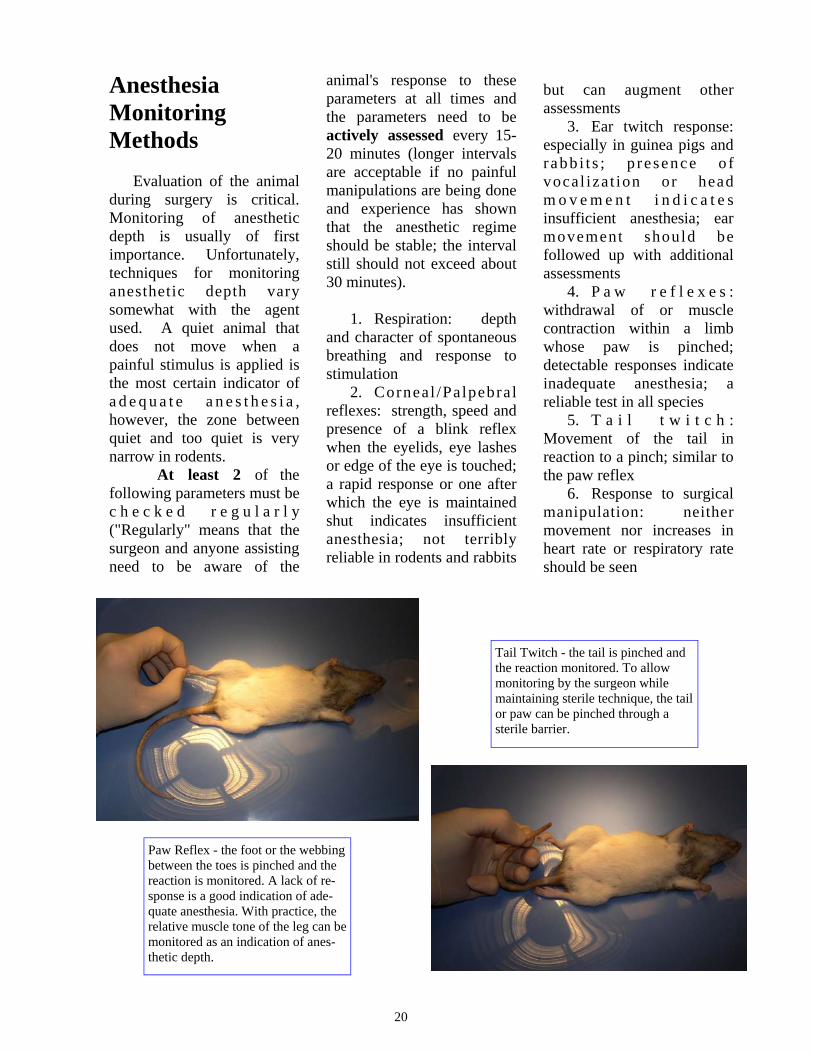
4. P a w r e f l e x e s : withdrawal of or muscle contraction within a limb whose paw is pinched; detectable responses indicate inadequate anesthesia; a reliable test in all species
5. T a i l t w i t c h : Movement of the tail in reaction to a pinch; similar to the paw reflex
6. Response to surgical manipulation: neither movement nor increases in heart rate or respiratory rate should be seen
Tail Twitch - the tail is pinched and the reaction monitored. To allow monitoring by the surgeon while maintaining sterile technique, the tail or paw can be pinched through a sterile barrier.
Paw Reflex - the foot or the webbing between the toes is pinched and the reaction is monitored. A lack of re-sponse is a good indication of ade-quate anesthesia. With practice, the relative muscle tone of the leg can be monitored as an indication of anes-thetic depth.
21
Drug calculations I have seen several
examples of drug dosage miscalculations leading to both clinical and regulatory problems.
a. Most commonly,
liquid drug formulations are used in small research animals. Therefore, drug preparat ions must be c o n v e r t e d f r o m a c o n c e n t r a t i o n t o a n appropriate volume for the specific animal. The basic outline of doing this is thus:
(X kg body weight) x (Y
mg drug/kg body weight) = Z mg drug required for that animal
(Z mg drug required) x (1
ml of preparation/A mg drug [i.e. the inverse of the drug concentration]) = B ml preparation to supply Z mg drug
The "B" ml is the required volume to inject.
b. Drug preparations are
sometimes combined by the user to form a convenient drug mixture (e.g., ketamine plus xylazine). While there are a few "classic" drug combinations with which this practice works, combining drugs should not be done. Many drug preparations are incompatible leading to ineffective or dangerous mixtures. Also note that when mixed, the drug concentration of each drug is
changed through dilution. For instance:
If 2 mls of xylazine (20
mg/ml) are added to 8 ml of ketamine (100 mg/ml), the drug concentrations in the new mixture are 4 and 80 mg/ml, respectively (40 mg xylazine/10 ml total and 800 mg ketamine/10 ml total). T h e s e n e w d r u g concentrations need to be used when calculating a volume for injection rather t h a n t h e o r i g i n a l concentrations.
Drug dilutions
Most drug preparations
available were not designed for animals weighing under 1 kg as is typical for research animals. Diluting the preparations is often required fo r accura te dos ing . Pharmaceutical preparations are formulated, in part, for storage stability and in vivo absorption. Dilution of the preparations can upset those characteristics. It is not possible to determine with confidence how to balance these conflicting problems. Generally, preparations s h o u l d b e d i l u t e d immediately before use rather than diluted and stored (stored dilutions must be c o m p l e t e l y l a b e l e d ) . Generally, sterile saline for injection can be safely used as a diluent. Dilution should be in multiples of 10 to minimize mathematical calculation errors.
Expiration Dates A l l c o m m e r c i a l l y
available pharmaceutical preparat ions have an accepted useful shelf life. This is printed on the conta iner . Whi le the product's usefulness would generally be expected to extend beyond that date, the actual performance of the drug would be unknown. Introducing uncontrolled unknowns is rarely an acceptable practice of research conduct. From an animal research regulatory standpoint, expired drugs can sometimes be used in the context of a research procedure that terminates the animal within that drug use session. Expired drugs must be physically separated from in-date drugs and be boldly marked as expired.
Note however, that drugs used for anesthesia or analgesia may not be used beyond their expiration date under any circumstances.
Expiration Dates on two bottles of pharmaceuticals
22
Scavenging Scavenging refers to
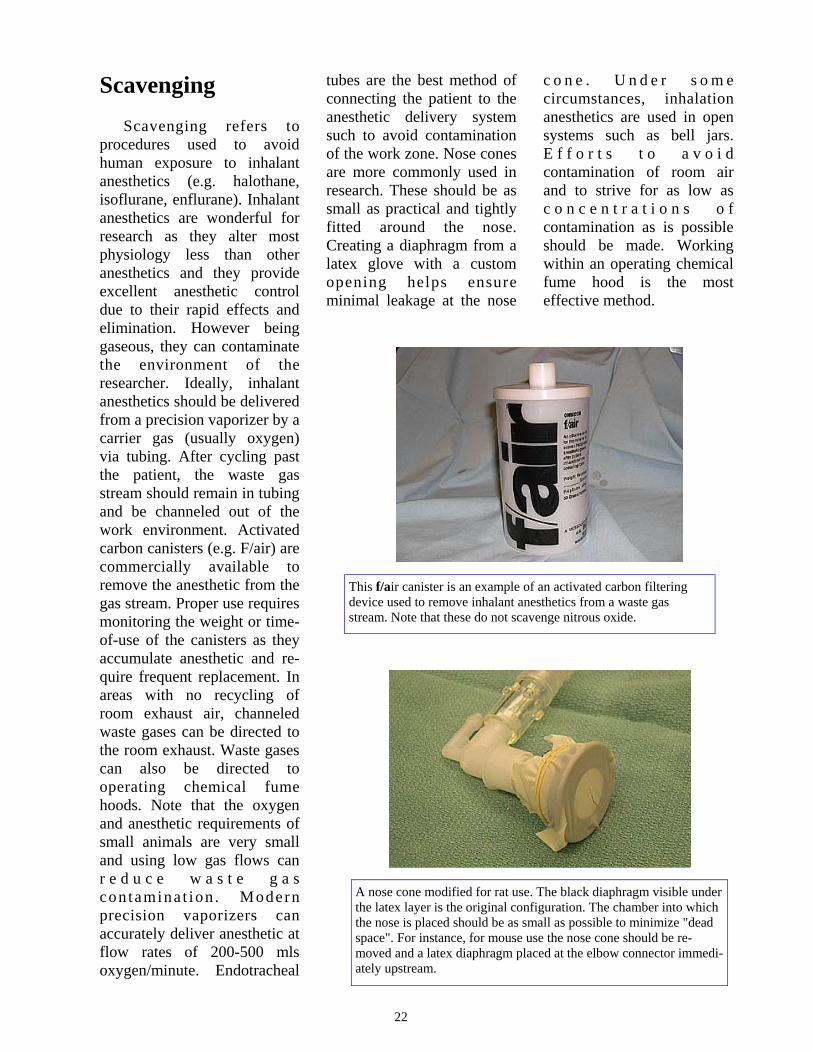
procedures used to avoid human exposure to inhalant anesthetics (e.g. halothane, isoflurane, enflurane). Inhalant anesthetics are wonderful for research as they alter most physiology less than other anesthetics and they provide excellent anesthetic control due to their rapid effects and elimination. However being gaseous, they can contaminate the environment of the researcher. Ideally, inhalant anesthetics should be delivered from a precision vaporizer by a carrier gas (usually oxygen) via tubing. After cycling past the patient, the waste gas stream should remain in tubing and be channeled out of the work environment. Activated carbon canisters (e.g. F/air) are commercially available to remove the anesthetic from the gas stream. Proper use requires monitoring the weight or time-of-use of the canisters as they accumulate anesthetic and re-quire frequent replacement. In areas with no recycling of room exhaust air, channeled waste gases can be directed to the room exhaust. Waste gases can also be directed to operating chemical fume hoods. Note that the oxygen and anesthetic requirements of small animals are very small and using low gas flows can r e d u c e w a s t e g a s con tamina t ion . Modern precision vaporizers can accurately deliver anesthetic at flow rates of 200-500 mls oxygen/minute. Endotracheal
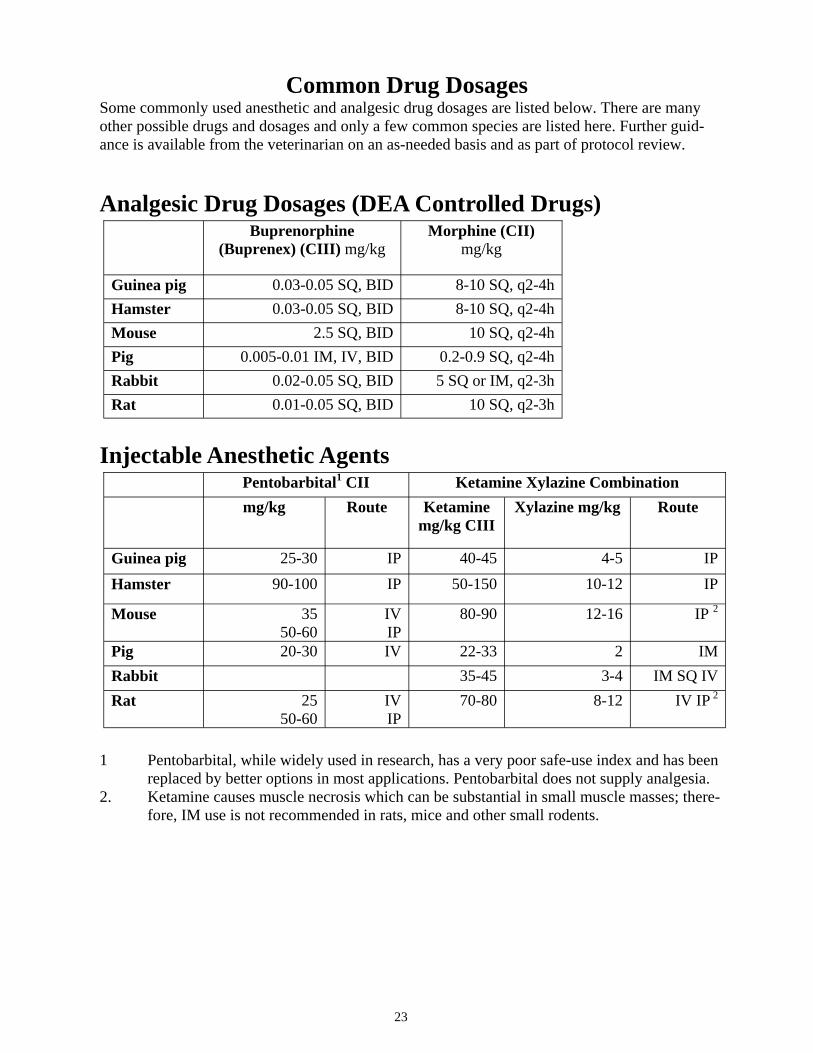
tubes are the best method of connecting the patient to the anesthetic delivery system such to avoid contamination of the work zone. Nose cones are more commonly used in research. These should be as small as practical and tightly fitted around the nose. Creating a diaphragm from a latex glove with a custom opening helps ensure minimal leakage at the nose
c o n e . U n d e r s o m e circumstances, inhalation anesthetics are used in open systems such as bell jars. E f f o r t s t o a v o i d contamination of room air and to strive for as low as c o n c e n t r a t i o n s o f contamination as is possible should be made. Working within an operating chemical fume hood is the most effective method.
A nose cone modified for rat use. The black diaphragm visible under the latex layer is the original configuration. The chamber into which the nose is placed should be as small as possible to minimize "dead space". For instance, for mouse use the nose cone should be re-moved and a latex diaphragm placed at the elbow connector immedi-ately upstream.
This f/air canister is an example of an activated carbon filtering device used to remove inhalant anesthetics from a waste gas stream. Note that these do not scavenge nitrous oxide.
23
Common Drug Dosages Some commonly used anesthetic and analgesic drug dosages are listed below. There are many other possible drugs and dosages and only a few common species are listed here. Further guid-ance is available from the veterinarian on an as-needed basis and as part of protocol review.
Analgesic Drug Dosages (DEA Controlled Drugs)
Injectable Anesthetic Agents
1 Pentobarbital, while widely used in research, has a very poor safe-use index and has been
replaced by better options in most applications. Pentobarbital does not supply analgesia. 2. Ketamine causes muscle necrosis which can be substantial in small muscle masses; there-
fore, IM use is not recommended in rats, mice and other small rodents.
Buprenorphine (Buprenex) (CIII) mg/kg
Morphine (CII) mg/kg
Guinea pig 0.03-0.05 SQ, BID 8-10 SQ, q2-4h Hamster 0.03-0.05 SQ, BID 8-10 SQ, q2-4h Mouse 2.5 SQ, BID 10 SQ, q2-4h Pig 0.005-0.01 IM, IV, BID 0.2-0.9 SQ, q2-4h Rabbit 0.02-0.05 SQ, BID 5 SQ or IM, q2-3h Rat 0.01-0.05 SQ, BID 10 SQ, q2-3h
Pentobarbital1 CII Ketamine Xylazine Combination mg/kg Route Ketamine
mg/kg CIII Xylazine mg/kg Route
Guinea pig 25-30 IP 40-45 4-5 IP Hamster 90-100 IP 50-150 10-12 IP
Mouse 35 50-60
IV IP
80-90 12-16 IP 2
Pig 20-30 IV 22-33 2 IM Rabbit 35-45 3-4 IM SQ IV Rat 25
50-60 IV IP
70-80 8-12 IV IP 2
24
Analgesic and Hypnotic/Sedative Drug Dosages1
1. All dosages are in the format: amount in mg/kg, route of administration, frequency of ad-ministration. 2. Xylazine is not normally used repeatedly. Tranquilizer and Anticholinergic Drug Dosages1
1. All dosages are in the format: amount in mg/kg, route of administration 2. Many rabbits produce a serum atropinase rendering atropine ineffective; glycopyrrolate can be used at 0.05-0.1 mg/kg SQ, IM
Carprofen Flunixin (Banamine) Acetamino-phen (Tylenol)
Xylazine 2
Guinea pig 3-5 IP
Hamster 5-10 IP
Mouse 2.5 SQ, SID 300 PO, BID 5-10 IP
Pig 2-4 IV, SQ, SID 2-2.2 IV, SQ, SID or BID
6-8 IM
Rabbit 1.5 PO, BID 1.0 SQ or IM, SID 2 times
20 PO, BID 1-3 IM
Rat 5.0 SQ, SID 2 times
2.5 SQ or IM, SID 3 times
100-300 PO, q4h
2-5 IM
Acepromazine Maleate Diazepam (Valium) Atropine Sulfate
Mouse 2.0-5.0 IP 5.0 IP 0.02-0.05 SQ, IM, IV Rabbit 1.0-2.0 SQ, IM 1.0-2.0 IM, IV 0.1-3.0 SQ, IM, IV2
Rat 1.0-2.0 IM 2.5-4.0 IP 0.02-0.05 SQ, IM, IV Pig 0.05-0.2 IM, IV 0.5-1.5 IM, IV 0.05-0.4 SQ, IM, IV
Hamster 5.0 IP 0.02-0.05 SQ, IM, IV Guinea pig 5.0 IP 0.02-0.05 SQ, IM, IV
25
Rodent Surgical Facility
The location of the area
used for major rodent surgery must be approved by the vet-erinarian according to IA-CUC standards and should be located in a portion of the laboratory that is not heavily traveled. The surgical "table" must be constructed of a material that can be disinfected using appropriate agents (see attached Table 5 page 38) or that can be heat sterilized. The area immediately surrounding the surgery should be disinfected prior to surgery to decrease dust borne contamination.
Surgical instruments,
g l o v e s a n d o t h e r paraphernalia may be used on more than one animal. Any item used on multiple animals must be carefully cleaned and disinfected between. Alternating two or more sets of instruments is one way to allow time for instruments to sit in a disinfectant or sterilant
solution for more than just a few minutes.
A recovering animal
should be watched very closely until securely in sternal recumbency, and able to move around without plugging its nostrils with bedding. Some rodents left overnight on pads or paper bedding will eat that bedding.
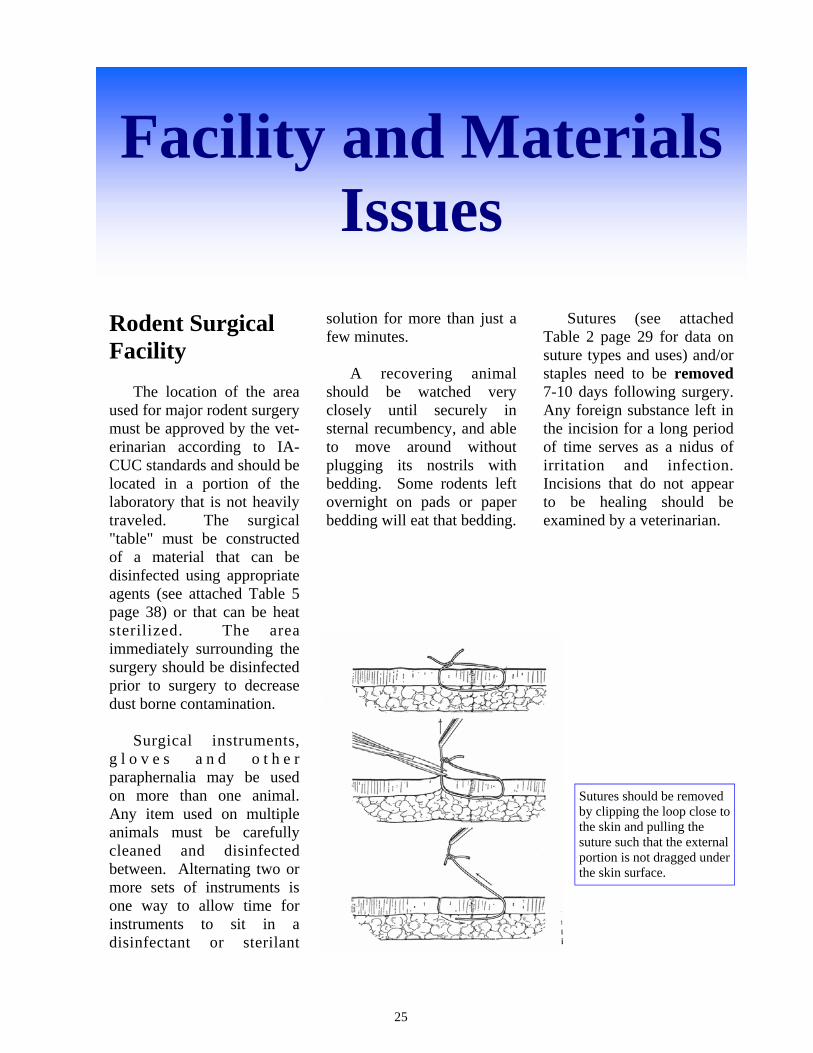
Sutures (see attached Table 2 page 29 for data on suture types and uses) and/or staples need to be removed 7-10 days following surgery. Any foreign substance left in the incision for a long period of time serves as a nidus of irritation and infection. Incisions that do not appear to be healing should be examined by a veterinarian.
Facility and Materials Issues
Sutures should be removed by clipping the loop close to the skin and pulling the suture such that the external portion is not dragged under the skin surface.
26
Suture Technique
Skin sutures should be placed such that they lightly draw the
skin edges together. Normal post-operative swelling will lead to irritation if the sutures are placed too tightly. Unnecessary pain, removal or contamination by the animal may result.
The most easily performed knotting technique is the instrument tie. The technique must be followed exactly to ensure that the resulting knot is a square knot and not an inferior knot, such as a "granny knot".
Patterns There are many methods
for apposition of surgical wounds. These methods often h a v e c h a r a c t e r i s t i c s specialized for certain circumstances (maintain apposition under tension, create water or gas tight seals, etc.). Surgical textbooks are widely available for learning t h e s e t e c h n i q u e s f o r specialized situations.
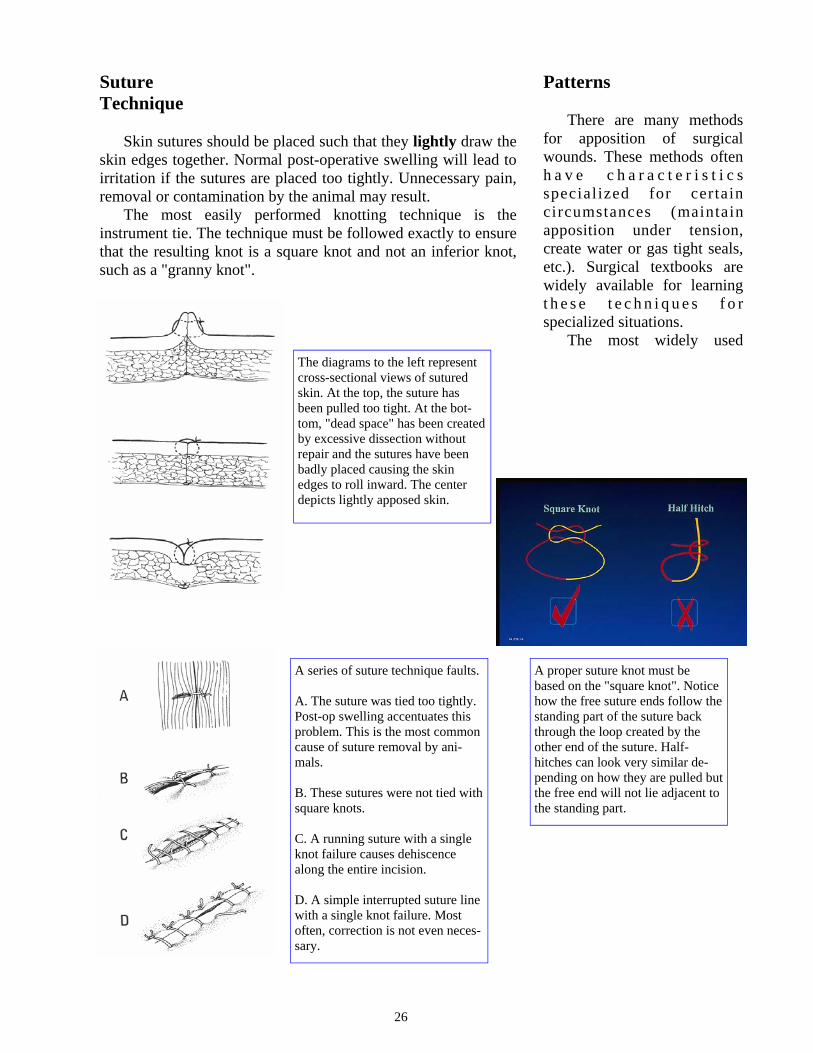
The most widely used The diagrams to the left represent cross-sectional views of sutured skin. At the top, the suture has been pulled too tight. At the bot-tom, "dead space" has been created by excessive dissection without repair and the sutures have been badly placed causing the skin edges to roll inward. The center depicts lightly apposed skin.
A series of suture technique faults. A. The suture was tied too tightly. Post-op swelling accentuates this problem. This is the most common cause of suture removal by ani-mals. B. These sutures were not tied with square knots. C. A running suture with a single knot failure causes dehiscence along the entire incision. D. A simple interrupted suture line with a single knot failure. Most often, correction is not even neces-sary.
A proper suture knot must be based on the "square knot". Notice how the free suture ends follow the standing part of the suture back through the loop created by the other end of the suture. Half-hitches can look very similar de-pending on how they are pulled but the free end will not lie adjacent to the standing part.
27
suture pattern is called simple interrupted. This is a knotted loop spanning the incision line.
Under some circumstances, a continuous (or "running") suture pattern is used. These have long runs of suture repeatedly crossing the inci-sion line without knots. These patterns can be used for apposition but should not be used for critical strength situations such as at the body wall or skin. Animals do not "understand" the purpose of sutures and they do not respect the suture's role in holding t h e m t o g e t h e r . S i n c e continuous patterns have few knots, failures anywhere along the run leads to catastrophic failure of the entire suture line.
The knots used when suturing are critical regardless of the suture pattern or material used. A weak or inappropriate knot will come untied or damage the suture such that it is weakened. Some suture materials demonstrating high friction, such as silk, will hold a bad knot long enough to get the animal out of surgery only to fail later. The desired knot is a square knot. Close examination is sometimes required to differentiate square knots from inferior "granny" knots or half-hitches.
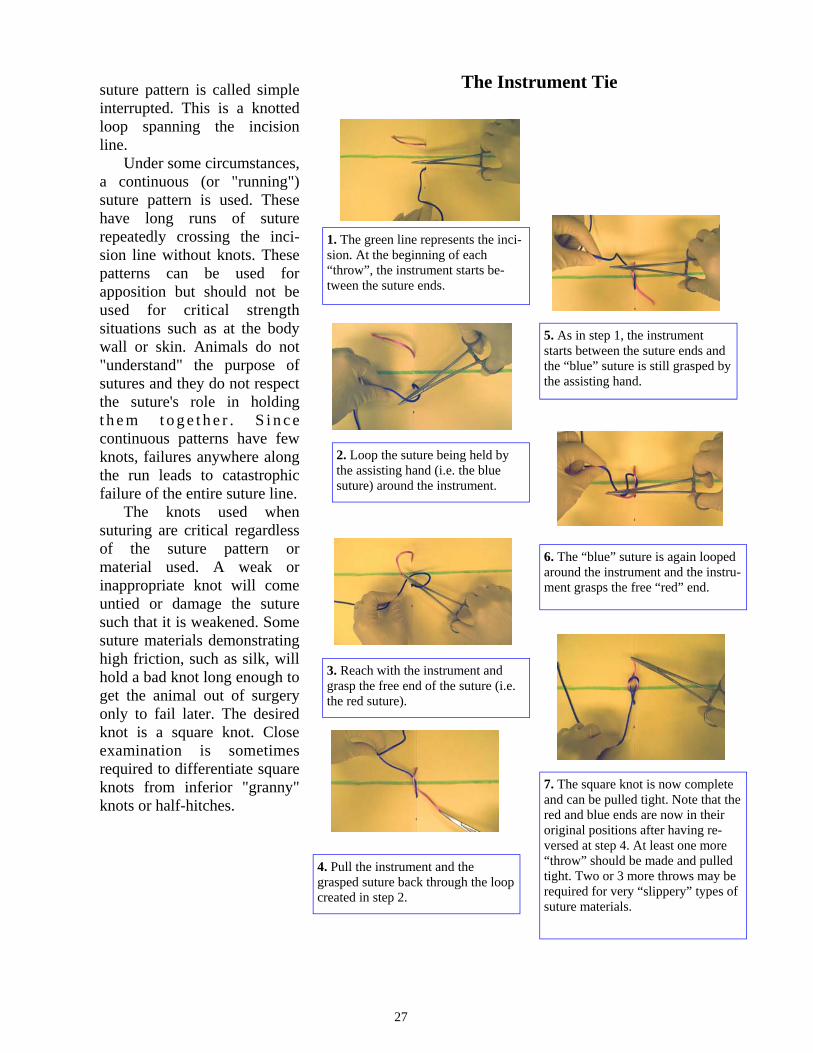
1. The green line represents the inci-sion. At the beginning of each “throw”, the instrument starts be-tween the suture ends.
The Instrument Tie
2. Loop the suture being held by the assisting hand (i.e. the blue suture) around the instrument.
3. Reach with the instrument and grasp the free end of the suture (i.e. the red suture).
4. Pull the instrument and the grasped suture back through the loop created in step 2.
5. As in step 1, the instrument starts between the suture ends and the “blue” suture is still grasped by the assisting hand.
6. The “blue” suture is again looped around the instrument and the instru-ment grasps the free “red” end.
7. The square knot is now complete and can be pulled tight. Note that the red and blue ends are now in their original positions after having re-versed at step 4. At least one more “throw” should be made and pulled tight. Two or 3 more throws may be required for very “slippery” types of suture materials.
28
Needles Sutures come with many
types of needles. "Swaged end" needles are most widely available and quite desirable ("eyeless" in the diagram to the right). The needle is integral to the suture thread making it easier to handle, easier to penetrate through tissue and creating less damage to tissue. The 2 main needle tips are "taper" and "cutting" points. Cutting needles are usually only needed for skin. Taper needles can often be forced through skin of small animals although this is not their intended use. Grasping the needle between the point and midway back helps maintain control and avoid bending the needle. Needles come in a variety of shapes. The curved shapes can impact the ease of directing the needle through tissues.
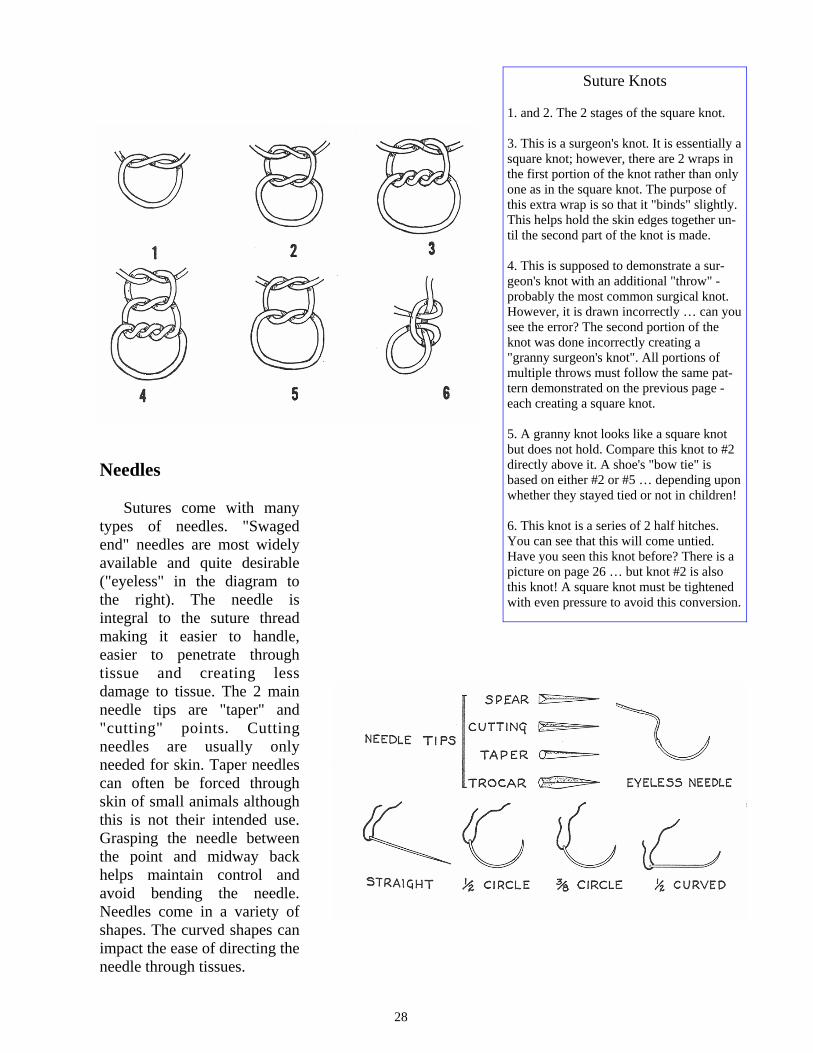
Suture Knots 1. and 2. The 2 stages of the square knot. 3. This is a surgeon's knot. It is essentially a square knot; however, there are 2 wraps in the first portion of the knot rather than only one as in the square knot. The purpose of this extra wrap is so that it "binds" slightly. This helps hold the skin edges together un-til the second part of the knot is made. 4. This is supposed to demonstrate a sur-geon's knot with an additional "throw" - probably the most common surgical knot. However, it is drawn incorrectly … can you see the error? The second portion of the knot was done incorrectly creating a "granny surgeon's knot". All portions of multiple throws must follow the same pat-tern demonstrated on the previous page - each creating a square knot. 5. A granny knot looks like a square knot but does not hold. Compare this knot to #2 directly above it. A shoe's "bow tie" is based on either #2 or #5 … depending upon whether they stayed tied or not in children! 6. This knot is a series of 2 half hitches. You can see that this will come untied. Have you seen this knot before? There is a picture on page 26 … but knot #2 is also this knot! A square knot must be tightened with even pressure to avoid this conversion.
29
* The use of common brand names as examples does not indicate a product endorsement. Suture gauge selection: Use the smallest gauge suture material that will perform adequately. Cutting and reverse cutting needles: Provide edges that will cut through dense, difficult to penetrate tissue, such as skin. Non-cutting, taper point or round needles: Have no edges to cut through tissue; used primarily for suturing easily torn tissues such as peritoneum or intestine.
Suture * Characteristics and Frequent Uses
Vicryl®, Dexon® Absorbable; 60-90 days. Ligate or suture tissues where an absorbable suture is desirable.
PDS® or Maxon® Absorbable; 6 months. Ligate or suture tissues especially where an absorbable suture and extended wound support is desirable
Prolene® Nonabsorbable. Inert. Nylon Nonabsorbable. Inert. General closure. Silk Nonabsorbable. (Caution: Tissue reactive and may wick microorganisms
into the wound). Silk is very easy to use and knot. Silk is not acceptable for suturing animal skin.
Chromic Gut Absorbable. Versatile material. Causes mild inflammation, but is absorbed more rapidly than synthetics. Chromic gut is not acceptable for suturing skin.
Stainless Steel Wound Clips, Staples
Nonabsorbable. Requires instrument for removal from skin.
Table 2. Suture Selection
Materials Many suture materials are
available. The accompanying table (Table 2) gives an overview of some of them and their characteristics. Animals do not "respect" suture lines; they do not protect them from contamination; they do not report problems. Suture materials need to be chosen with these facts in mind. Silk suture, which has a wonderful "hand" and knots well, is unacceptable for animal skin as it wicks and holds contamination. Many types of synthetic suture materials are somewhat stiff and require good knotting technique (see suture knotting technique).
30
Controlled drugs Most anesthetic and
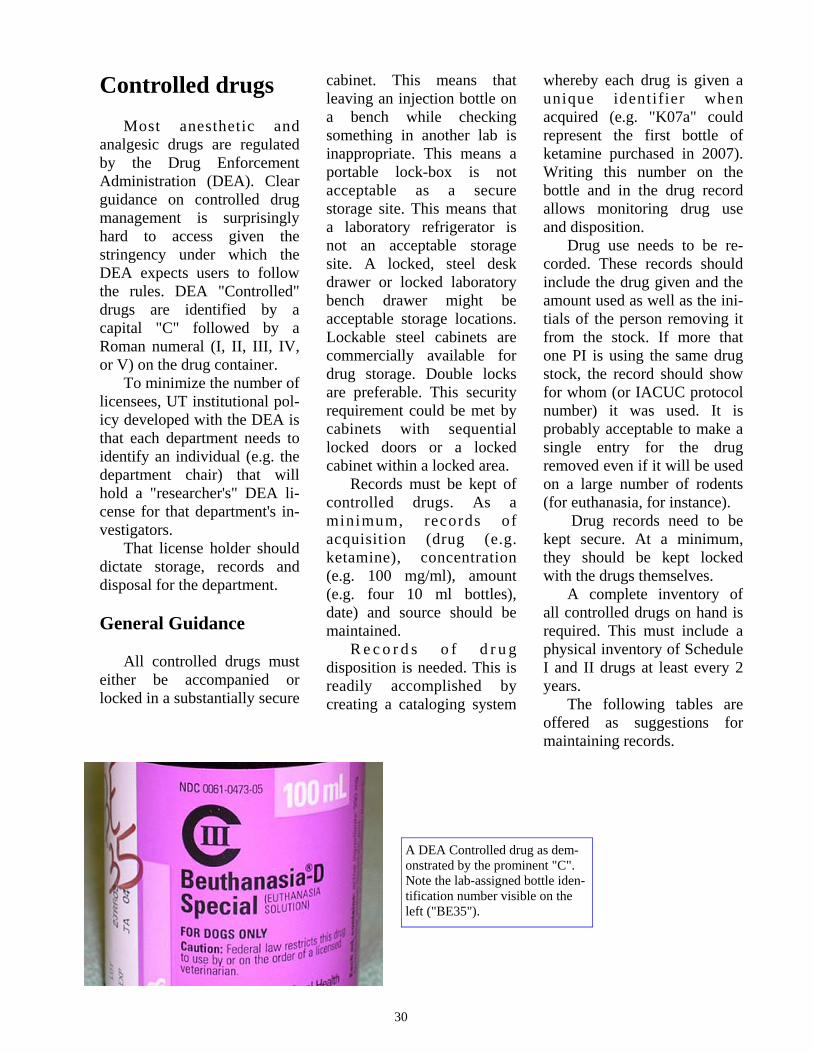
analgesic drugs are regulated by the Drug Enforcement Administration (DEA). Clear guidance on controlled drug management is surprisingly hard to access given the stringency under which the DEA expects users to follow the rules. DEA "Controlled" drugs are identified by a capital "C" followed by a Roman numeral (I, II, III, IV, or V) on the drug container.
To minimize the number of licensees, UT institutional pol-icy developed with the DEA is that each department needs to identify an individual (e.g. the department chair) that will hold a "researcher's" DEA li-cense for that department's in-vestigators.
That license holder should dictate storage, records and disposal for the department.
General Guidance
All controlled drugs must
either be accompanied or locked in a substantially secure
cabinet. This means that leaving an injection bottle on a bench while checking something in another lab is inappropriate. This means a portable lock-box is not acceptable as a secure storage site. This means that a laboratory refrigerator is not an acceptable storage site. A locked, steel desk drawer or locked laboratory bench drawer might be acceptable storage locations. Lockable steel cabinets are commercially available for drug storage. Double locks are preferable. This security requirement could be met by cabinets with sequential locked doors or a locked cabinet within a locked area.
Records must be kept of controlled drugs. As a minimum, records of acquisition (drug (e.g. ketamine), concentration (e.g. 100 mg/ml), amount (e.g. four 10 ml bottles), date) and source should be maintained.
R e c o r d s o f d r u g disposition is needed. This is readily accomplished by creating a cataloging system
whereby each drug is given a unique identifier when acquired (e.g. "K07a" could represent the first bottle of ketamine purchased in 2007). Writing this number on the bottle and in the drug record allows monitoring drug use and disposition.
Drug use needs to be re-corded. These records should include the drug given and the amount used as well as the ini-tials of the person removing it from the stock. If more that one PI is using the same drug stock, the record should show for whom (or IACUC protocol number) it was used. It is probably acceptable to make a single entry for the drug removed even if it will be used on a large number of rodents (for euthanasia, for instance).
Drug records need to be kept secure. At a minimum, they should be kept locked with the drugs themselves.
A complete inventory of all controlled drugs on hand is required. This must include a physical inventory of Schedule I and II drugs at least every 2 years.
The following tables are offered as suggestions for maintaining records.
A DEA Controlled drug as dem-onstrated by the prominent "C". Note the lab-assigned bottle iden-tification number visible on the left ("BE35").
31
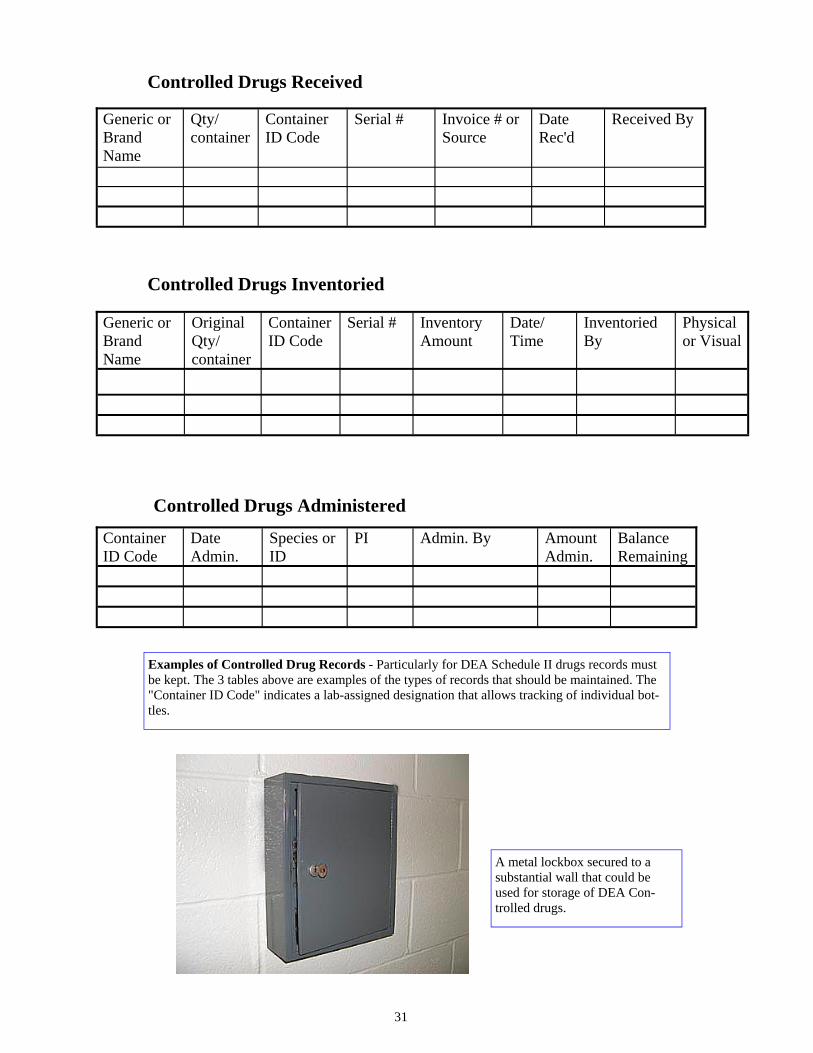
Controlled Drugs Received
Generic or Brand Name
Qty/ container
Container ID Code
Serial # Invoice # or Source
Date Rec'd
Received By
Generic or Brand Name
Original Qty/ container
Container ID Code
Serial # Inventory Amount
Date/ Time
Inventoried By
Physical or Visual
Container ID Code
Date Admin.
Species or ID
PI Admin. By Amount Admin.
Balance Remaining
A metal lockbox secured to a substantial wall that could be used for storage of DEA Con-trolled drugs.
Examples of Controlled Drug Records - Particularly for DEA Schedule II drugs records must be kept. The 3 tables above are examples of the types of records that should be maintained. The "Container ID Code" indicates a lab-assigned designation that allows tracking of individual bot-tles.
Controlled Drugs Inventoried
Controlled Drugs Administered
32
Sharps Management
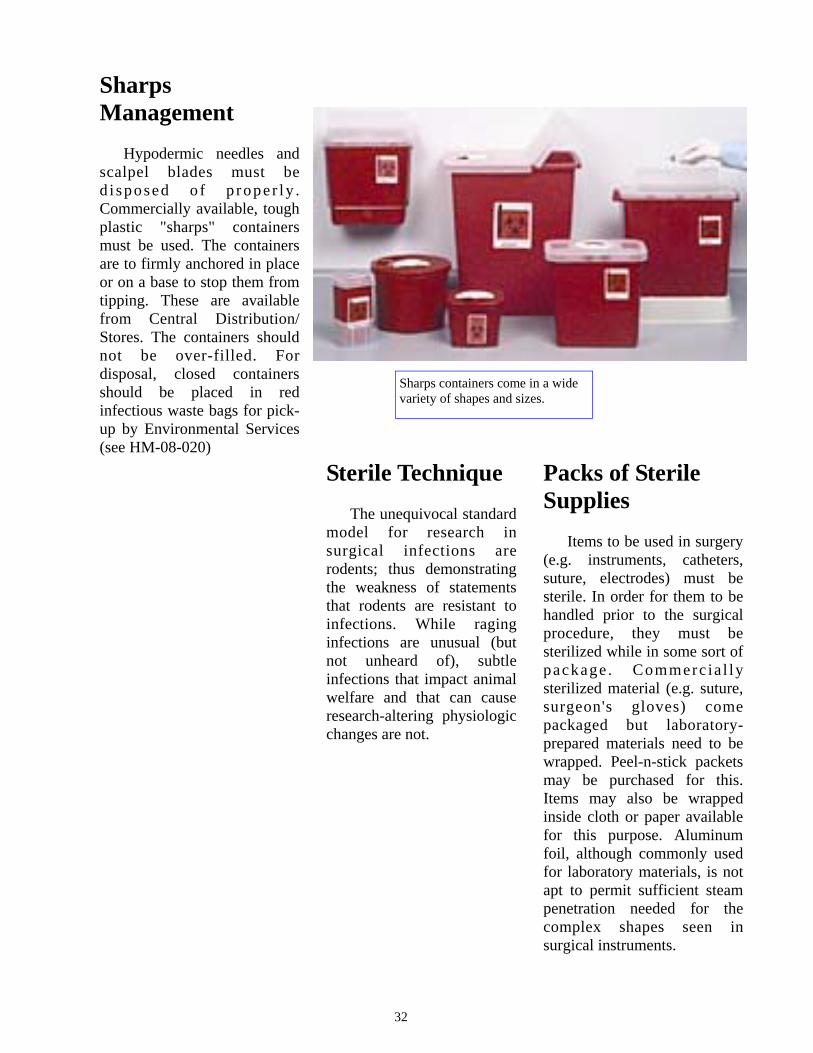
Hypodermic needles and
scalpel blades must be d i sposed o f p rope r ly . Commercially available, tough plastic "sharps" containers must be used. The containers are to firmly anchored in place or on a base to stop them from tipping. These are available from Central Distribution/Stores. The containers should not be over-filled. For disposal, closed containers should be placed in red infectious waste bags for pick-up by Environmental Services (see HM-08-020)
Sterile Technique The unequivocal standard
model for research in surgical infections are rodents; thus demonstrating the weakness of statements that rodents are resistant to infections. While raging infections are unusual (but not unheard of), subtle infections that impact animal welfare and that can cause research-altering physiologic changes are not.
Packs of Sterile Supplies
Items to be used in surgery
(e.g. instruments, catheters, suture, electrodes) must be sterile. In order for them to be handled prior to the surgical procedure, they must be sterilized while in some sort of package . Commerc ia l ly sterilized material (e.g. suture, surgeon's gloves) come packaged but laboratory-prepared materials need to be wrapped. Peel-n-stick packets may be purchased for this. Items may also be wrapped inside cloth or paper available for this purpose. Aluminum foil, although commonly used for laboratory materials, is not apt to permit sufficient steam penetration needed for the complex shapes seen in surgical instruments.
Sharps containers come in a wide variety of shapes and sizes.

33
Pack wrap pattern A s i mp l e s t a n da r d
technique exists for producing a wrapping of sterilized items such that they are protected from contamination until used yet are easily opened without being contaminated in the process. This is referred to as an "envelope wrap" or a pack wrap.
1. The items to be sterilized are placed in the center of the wrapping material oriented flat side to the material's corner. One corner is folded over the pack and then the tip is reflected back towards the fold. (Steps 1 and 2).
2. The 2 adjoining corners
of the wrapping material are folded and then reflected in the same way. (Steps 3, 4, and 5)
3. The final corner (which
is opposite the first corner) is folded over the pack as before except that it is tucked under the previous flaps (including the original corner's tip) rather than being reflected. The tip of this last corner should be left visible and available to open the packet. (Steps 6 and 7)
4. A piece of autoclave
indicator tape should be placed across the final fold to help hold it closed and as a visual r e m i n d e r r e g a r d i n g autoclaving. (Step 8)
The tape should be dated
when autoclaved and use to monitor "expiration"; not to exceed 6 months.
1. Instrument tray on the blue fabric pack wrap. Note “corner-on” orien-tation.
2. The “far” corner is drawn over the instruments and doubled back to form a tab.
3. One of the sides is then drawn up and doubled back, leaving a tab.
4. The other side is then brought over the pack and again, doubled back to form a tab.
5. At the completion of step 4.
6. The pack has been rotated clock-wise and the last corner is being folded over the pack.
7. The last corner is tucked into the pocket formed by the other 3 flaps. This completes the pack and cre-ates a package resembling an enve-lope. Note the tip of the final tag sticking out of the package. This creates a handle for opening the pack using sterile technique.
8. Add autoclave tape to secure.
34
Opening Packs Packs of materials that
have been sterilized need to be opened such that their contents do not become contaminated.
Packs wrapped using the "envelope" wrap described elsewhere are designed with this in mind. The corners of the wrapping material that were reflected are used to grasp and pull each fold away from the wrapped objects.
Commercially packaged items usually have 2 flaps that peel the packet open when pulled in opposite directions. The flaps can be used as a barrier between hands and the internal sterile contents as the flaps are peeled back.
Many commercially sterilized items (such as suture) have inner packages. These inner packages are sterile and can be directly grasped by a person wearing sterile gloves. In the absence of a non-sterile assistant to present items, the contents of packages can be allowed to fall into a sterile field as they are opened.
Operating Room or Area Conduct
The art and science of
maintaining sterility in an operating area has been developed over many d e c a d e s . W h i l e t h e s t r i n g e n c y o f t h e s e techniques is not applied to surgery on rats and mice, the basic principles have practical application in performing the best research possible. Some of these basic principles are:
Avoid unnecessary air turbulence (e.g. people walking nearby)
Maintain awareness of what objects and areas are sterile
Keep all barrier materials dry (avoid "strike-through" in which bacteria from an under lying non-s ter i le surface are pulled through a barrier by capillary motion)
Do not lean over, reach over or touch non-sterile areas
Allow nothing to extend below the operating tabletop and then return to the "sterile" area
Never turn your back to sterile field
Keep arms above table level
Surface and Area Disinfectants
Disinfecting surfaces -
Prior to and after the completion of all surgical procedures, all organic debris should be removed and work surfaces cleaned. The surfaces should then be disinfected (See Table 5 on page 38). We recommend covering the work surface with clean plastic backed absorbant paper or an equivalent covering for each procedure. Devices or equipment (i.e., animal r e s t r a i n i n g d e v i c e s , monitoring equipment , stereotaxic devices, etc.) that will be required in the surgical field should be disinfected as described above. The above practices are performed in order to r e d u c e o r e l i m i n a t e po ten t i a l l y i n fe c t ious organisms and the substrates on which they grow.
35
Sterile Field Use of sterile technique
for surgery requires an available sterile work area or "sterile field". This area is needed to protect sterile m a t e r i a l s f r o m con tamina t ion . As a minimum, this will consist of draping of the animal adjacent to the incision and an area of the worktable for placing sterile instruments, suture, and etc. The pack wrap used to cover i n s t r u m e n t s d u r i n g autoclaving is an excellent and convenient material for creating a sterile field on the worktable.
steam heat for sterilization; it is the preferred sterilization method. Materials that can not be autoclaved can often be sterilized by chemical baths. This method is slow and it is difficult to maintain sterility until the material is used. It is acceptable to use the same instruments for multiple rodent surgeries at a single setting, although this is not preferred. If the same instruments are used on multiple animals, sterilization of the working ends should be conducted between animals. This is best accomplished through use of a hot-bead sterilizer.
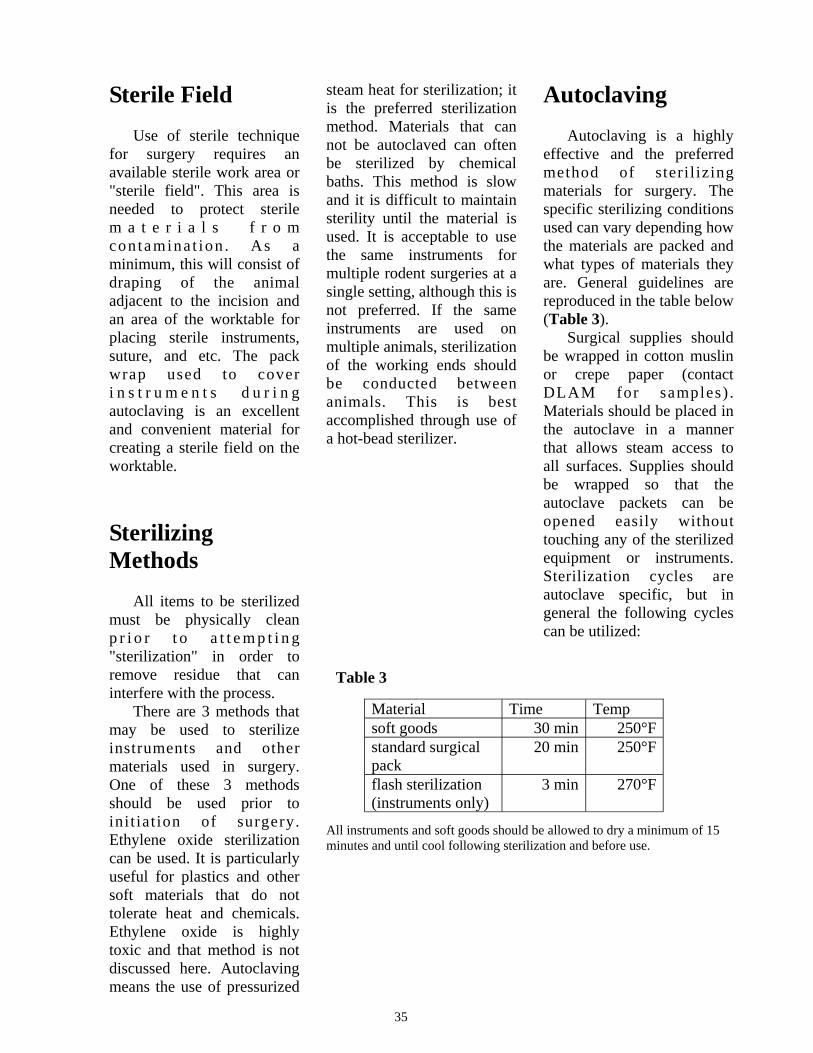
Autoclaving Autoclaving is a highly
effective and the preferred method of steri l izing materials for surgery. The specific sterilizing conditions used can vary depending how the materials are packed and what types of materials they are. General guidelines are reproduced in the table below (Table 3).
Surgical supplies should be wrapped in cotton muslin or crepe paper (contact DLAM for samples) . Materials should be placed in the autoclave in a manner that allows steam access to all surfaces. Supplies should be wrapped so that the autoclave packets can be opened easily without touching any of the sterilized equipment or instruments. Sterilization cycles are autoclave specific, but in general the following cycles can be utilized:
Sterilizing Methods
All items to be sterilized
must be physically clean p r i o r t o a t t e m p t i n g "sterilization" in order to remove residue that can interfere with the process.
There are 3 methods that may be used to sterilize instruments and other materials used in surgery. One of these 3 methods should be used prior to init iat ion of surgery. Ethylene oxide sterilization can be used. It is particularly useful for plastics and other soft materials that do not tolerate heat and chemicals. Ethylene oxide is highly toxic and that method is not discussed here. Autoclaving means the use of pressurized
All instruments and soft goods should be allowed to dry a minimum of 15 minutes and until cool following sterilization and before use.
Table 3
Material Time Temp soft goods 30 min 250°F standard surgical pack
20 min 250°F
flash sterilization (instruments only)
3 min 270°F
36
Chemical Sterilization
Some chemicals will
sterilize materials used for surgery. Common laboratory disinfectants, such as alcohol, w i l l n o t . C h e m i c a l sterilization for surgery must use chemicals classified as "sterilants" (a defined FDA d e s i g n a t i o n ) . T h e s e chemicals must be used in the form and for the contact periods described in the manufacturer's directions for s t e r i l i za t ion . As the chemicals are generally harmful to tissue, removal of t h e c h e m i c a l w h i l e maintaining sterility must be accomplished.
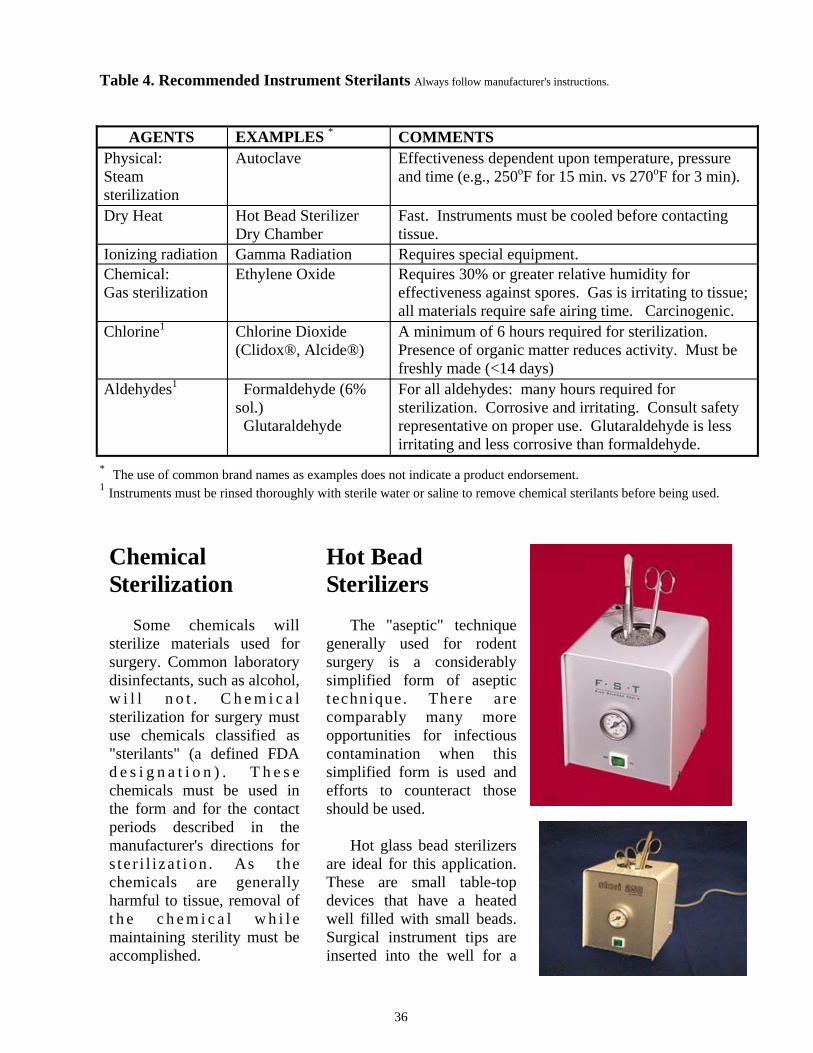
Hot Bead Sterilizers
The "aseptic" technique
generally used for rodent surgery is a considerably simplified form of aseptic technique . There are comparably many more opportunities for infectious contamination when this simplified form is used and efforts to counteract those should be used.
Hot glass bead sterilizers
are ideal for this application. These are small table-top devices that have a heated well filled with small beads. Surgical instrument tips are inserted into the well for a
Table 4. Recommended Instrument Sterilants Always follow manufacturer's instructions.
AGENTS EXAMPLES * COMMENTS Physical: Steam sterilization
Autoclave Effectiveness dependent upon temperature, pressure and time (e.g., 250oF for 15 min. vs 270oF for 3 min).
Dry Heat Hot Bead Sterilizer Dry Chamber
Fast. Instruments must be cooled before contacting tissue.
Ionizing radiation Gamma Radiation Requires special equipment. Chemical: Gas sterilization
Ethylene Oxide
Requires 30% or greater relative humidity for effectiveness against spores. Gas is irritating to tissue; all materials require safe airing time. Carcinogenic.
Chlorine1 Chlorine Dioxide (Clidox®, Alcide®)
A minimum of 6 hours required for sterilization. Presence of organic matter reduces activity. Must be freshly made (<14 days)
Aldehydes1 Formaldehyde (6% sol.) Glutaraldehyde
For all aldehydes: many hours required for sterilization. Corrosive and irritating. Consult safety representative on proper use. Glutaraldehyde is less irritating and less corrosive than formaldehyde.
* The use of common brand names as examples does not indicate a product endorsement. 1 Instruments must be rinsed thoroughly with sterile water or saline to remove chemical sterilants before being used.
37
Sterilization Quality Control
U s e o f " g e n e r a l "
sterilizing guidelines can not ensure that sterilization is actually effective as variables impact the process. Such things as the size of the packs and the number of packs placed in the autoclave chamber will effect steam penetration and the time r e q u i r e d t o a c h i e v e sterilization. Monitoring efficacy of sterilization is needed to account for these variables.
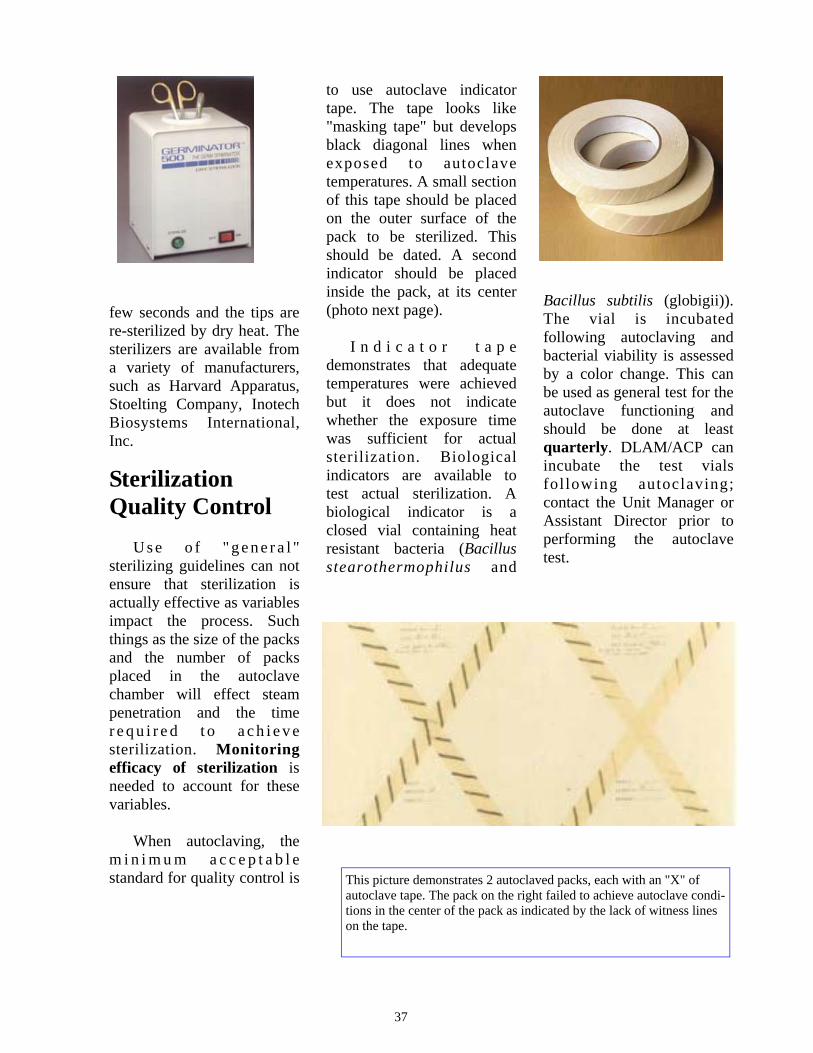
When autoclaving, the
m i n i m u m a c c e p t a b l e standard for quality control is
to use autoclave indicator tape. The tape looks like "masking tape" but develops black diagonal lines when exposed to autoclave temperatures. A small section of this tape should be placed on the outer surface of the pack to be sterilized. This should be dated. A second indicator should be placed inside the pack, at its center (photo next page).
I n d i c a t o r t a p e
demonstrates that adequate temperatures were achieved but it does not indicate whether the exposure time was sufficient for actual sterilization. Biological indicators are available to test actual sterilization. A biological indicator is a closed vial containing heat resistant bacteria (Bacillus stearothermophilus and
Bacillus subtilis (globigii)). The vial is incubated following autoclaving and bacterial viability is assessed by a color change. This can be used as general test for the autoclave functioning and should be done at least quarterly. DLAM/ACP can incubate the test vials following autoclaving; contact the Unit Manager or Assistant Director prior to performing the autoclave test.
few seconds and the tips are re-sterilized by dry heat. The sterilizers are available from a variety of manufacturers, such as Harvard Apparatus, Stoelting Company, Inotech Biosystems International, Inc.
This picture demonstrates 2 autoclaved packs, each with an "X" of autoclave tape. The pack on the right failed to achieve autoclave condi-tions in the center of the pack as indicated by the lack of witness lines on the tape.
38
* The use of common brand names as examples does not indicate a product endorsement.
Table 5. Recommended Hard Surface Disinfectants (e.g., tabletops, equipment) Always follow manufacturer's instructions.
Name Examples * COMMENTS
Alcohols 70% ethyl alcohol 70% - 99% isopropyl alcohol
Contact time required is 15 minutes. Contaminated surfaces take longer to disinfect. Remove gross contamination before using. Inexpensive. Flammable.
Quaternary Ammonium
TBQ®, NPD®, Cetylcide®
Rapidly inactivated by organic matter. Compounds may support growth of gram negative bacteria.
Chlorine Sodium hypochlorite (Clorox ® 10% solution) Chlorine dioxide (Clidox®, Alcide®)
Corrosive. Presence of organic matter reduces activity. Chlorine dioxide must be fresh ( <14 Days old ); kills vegetative organisms within 3 minutes of contact.
Aldehydes Glutaraldehyde (Cidex®, Cide Wipes®)
Rapidly disinfects surfaces. Toxic. Exposure limits have been set by OSHA.
Phenolics Lysol® Less affected by organic material than other disinfectants.
Chlorhexidine
Nolvasan®, Hibiclens®
Presence of blood does not interfere with activity. Rapidly bactericidal and persistent. Effective against many viruses.
Acids (peracetic/ acetic acids with hydrogen peroxide)
Spor Klenz® Fast acting sterilant or disinfectant
Autoclave indicators are available specifically for placement inside instrument packs. As with the example pictured here, there are areas for documentation as well as a marker of autoclaving. The blue square on the left will appear black if adequate sterilization conditions were present. In absence of a specific indicator, regular autoclave tape can be placed inside the pack.


![Minimally invasive non-surgical vs. surgical approach for ...dictable [12]. More recently, minimally invasive surgical therapy (MIST), modified minimally invasive surgical therapy](https://img.pdfslide.net/doc/110x75/5eddda76ad6a402d6669115c/minimally-invasive-non-surgical-vs-surgical-approach-for-dictable-12-more.jpg)