Embed Size (px)
Citation preview
SAP BUSINESS NETWORK, STANDARD ACCOUNT
ENABLEMENT
SUPPLIER GUIDE
May 2021
Public information:
Sourced from SAP Ariba user guides
2
CONTENTS
Introduction
Important Instructions
Section 1: How to create an SAP Business Network, Standard Account without a Purchase Order
email ……….……………..6
Section 2: How to create an SAP Business Network, Standard Account from a Purchase Order
interactive email ………....13
Section 3: How to create an invoice without a Purchase Order…………………………………………………20
Section 4: How to create an invoice from a purchase order……………………………............................36
Section 5: Notification preference update……………………………………………………………………………..50
Section 6: Default Comment (Optional)…………………………………………………………………………………53
Section 7: Help & Support…………………………………………………………………………………………………..56
3
INTRODUCTION
ANZ is enabling SAP Business Network, Standard Account at zero cost to Suppliers that will result in timely
payment of your invoices.
What’s changing?
Today you send your invoices to our scanning centre [email protected] to be processed and/or
to the ANZ requestor directly. We then enter the invoice into our purchasing system (SAP Ariba) and send it to
ANZ requestor for approval before authorising it for payment. Each hand off can take several days.
The new invoice payment process facilitates electronic transactions for both purchase orders and invoicing via
SAP Ariba. Invoices are sent directly to the ANZ requestor for payment approval with no manual hand-offs.
What are the benefits?
Once you register for an Ariba Network Standard account and we establish a trading relationship with you; you
can access:
Electronic purchase orders sent to you direct from SAP Ariba via email
The ability to submit invoices via the web portal to be sent directly to ANZ (no need to send to the scanning
centre first)
Visibility of your invoice status
All of the above will result in timely invoice payment process for you with no lost invoices or delays obtaining
offline approval.
4
IMPORTANT INFORMATION
You will receive a confirmation email once registration is completed. Please make a note of your Ariba Network ID. It is a unique ID associated with your account and will be required for future communications
with SAP Ariba and ANZ. Please share this ID with ANZ to set up the trading relationship (one-time activity!)
You have to enable invoice status notification in your account once registration is completed
You can see all the transactions on the home dashboard. However, you can access all your orders and invoices by retaining the interactive email notifications
To change an email ID, you need to contact ANZ Buy and Pay help desk. This is to ensure there are no impacts to the transactions caused by a redundant email ID in the system
We recommend that where possible, you use a generic email ID instead of individual email ID to receive
purchase orders/notifications. This means that if an individual leaves your organisation, you can continue
to see any historic transactions associated with an account.
A valid ABN or Tax ID is required to process your invoice. Please ensure you enter the correct tax ID details when completing the Supplier tax ID field
You must also enter a valid email ID of ANZ requestor who ordered your services while creating invoices online
If you do not add any currency with the unit price, Ariba will use AUD as a default. Please ensure to add
a particular currency code in the unit price field in which you want to invoice if the currency is not AUD

5
You must enter a detailed description of the services or goods that has been provided to ANZ in the `description ‘field before submitting invoices online. An incomplete description can add to delays in
processing.
You have an option to set default comments to include terms and conditions, bank account details and remittance advices. Refer to section 6 for details
You have an option to add attachments. If you opt to attach a pdf version of your tax invoice, please make sure the total value of the online invoice matches with the total value appearing on the pdf version prior
you submit an online invoice. A mismatch in the value can add to delays in processing. AUD currency has
default precision of 2 decimal places on Ariba Network
It is advisable to create additional user access for your SAP Business Network account in order to have
back-ups and manage any changes such as staff movements. Please refer the below link which guides
you to create additional profiles: https://help.sap.com/viewer/a9191d5943bd4cc48b0cec67e197dc8e/cloud/en-
US/de0e79a2f0181014a315e86dcd799f92.html
Please contact [email protected] for any assistance or queries on your SAP Ariba Standard Network Account

6
SECTION 1: HOW TO CREATE AN SAP BUSINESS NETWORK, STANDARD ACCOUNT
WITHOUT A PURCHASE ORDER EMAIL
Step 1: Open the following URL and click on “Register Now”. URL: http://supplier.ariba.com

7
Step 2: Fill out your company information.

8

9
Step 3: Fill out your account information.
Step 4: Read and accept the “Terms of Use” and “SAP Ariba Privacy Statement”. Click on Create account
This is a new field “Business role” needs to be filled out by choosing the most relevant one from the available list, Account Receivables is chosen for testing/demo purpose in this case

10
Step 5: You will need to confirm your email address using an activation link sent to your email address. If you haven’t received an email after waiting for few minutes, you can resend it from
this page. If you have already received the email, you can close this browser.

11
Step 6: Please click on the Confirm email in the email to complete the registration process.
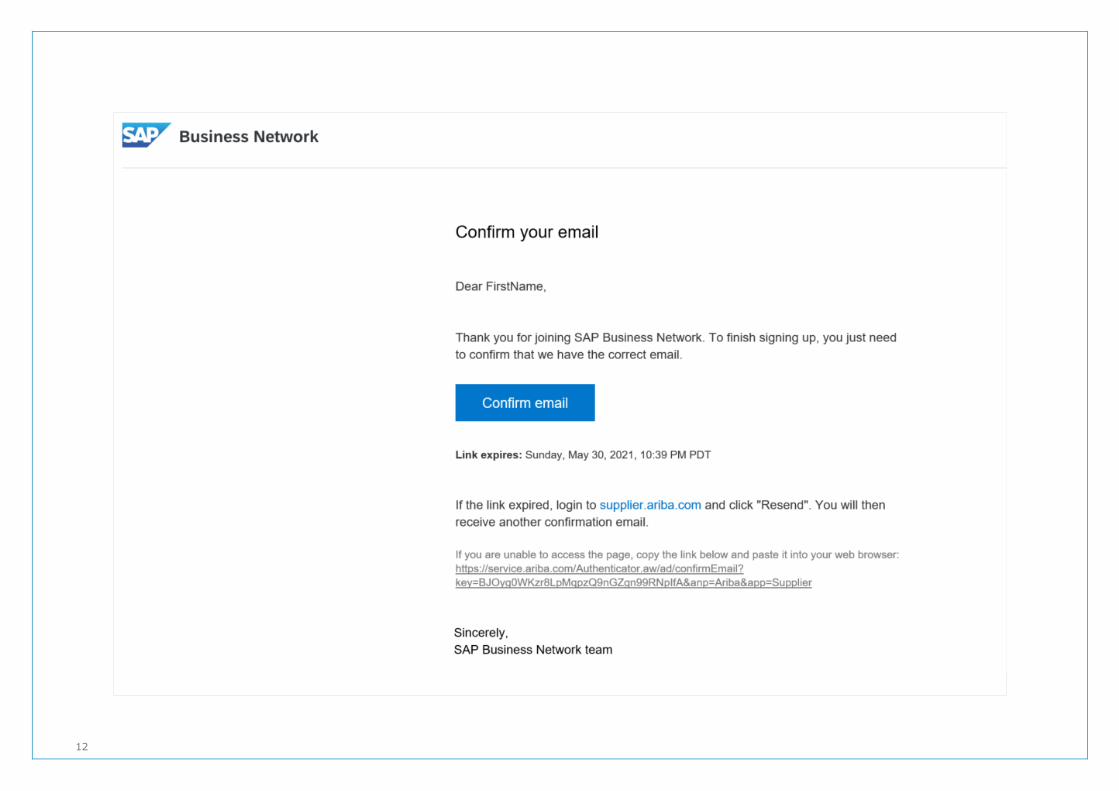
12

13
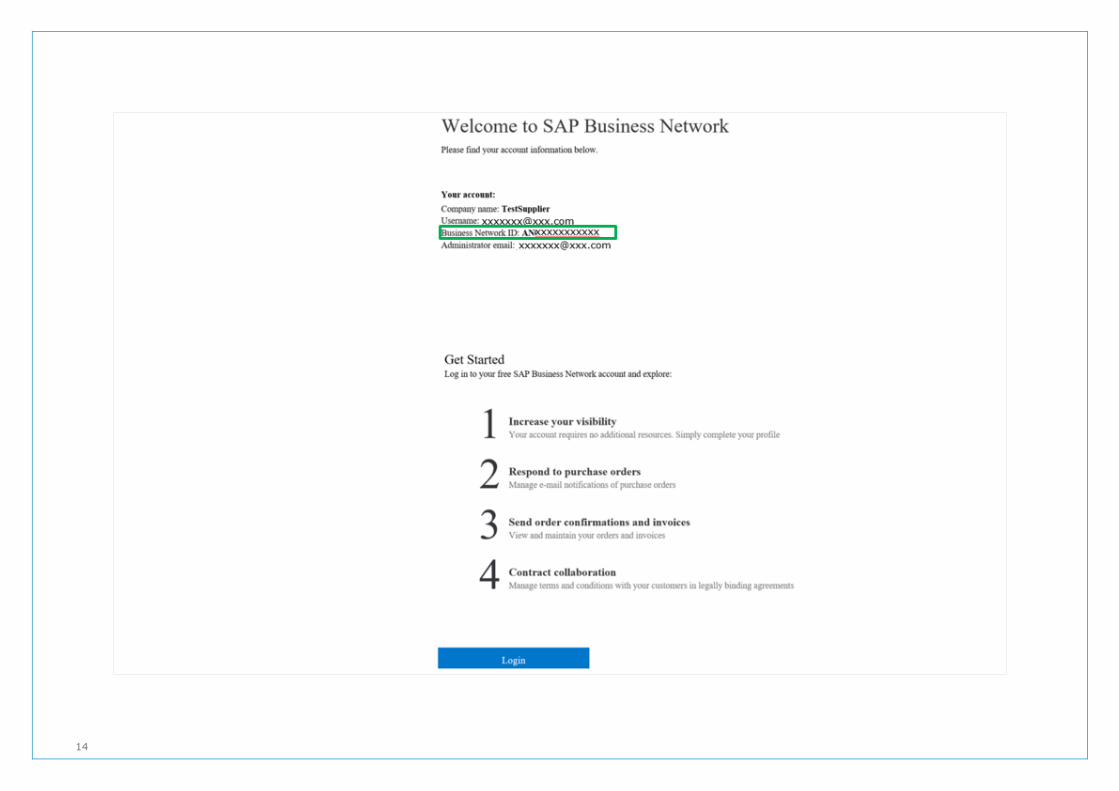
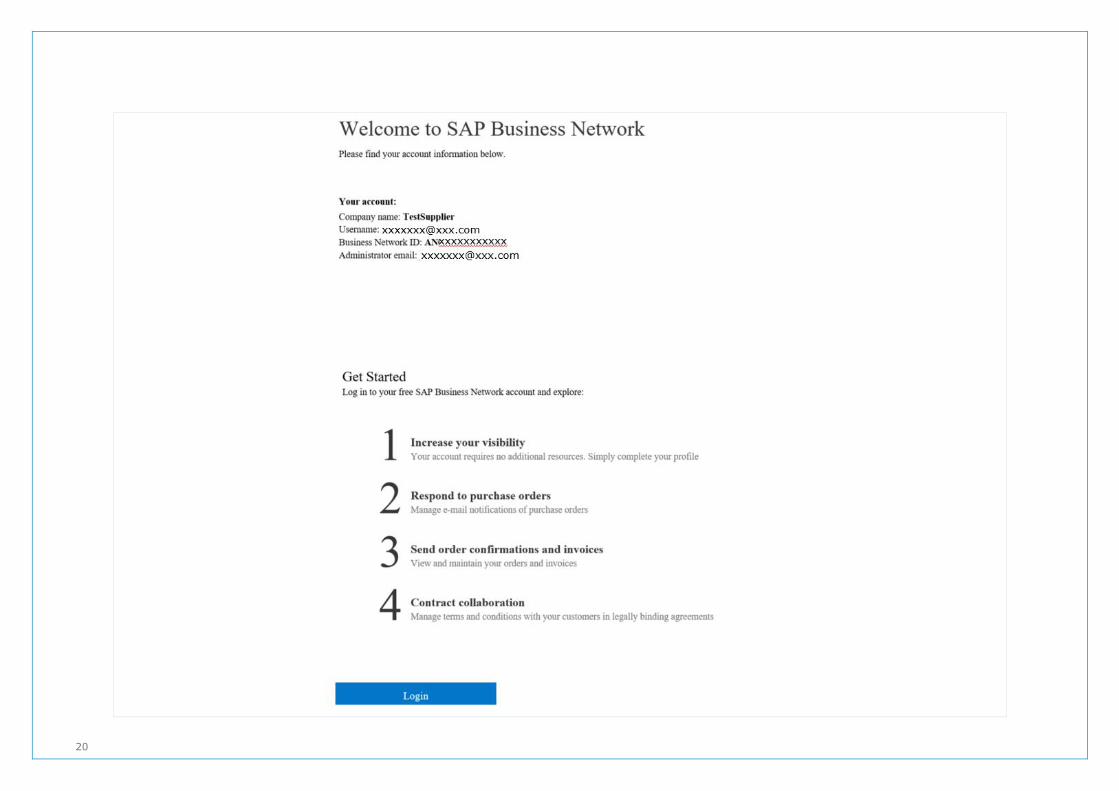
Step 7: After successful registration, you will receive a registration confirmation email. Please note down the Ariba Network ID and send it to ANZ. It will be required to create the trading relationship between ANZ and your company on the Ariba Network.
14
15
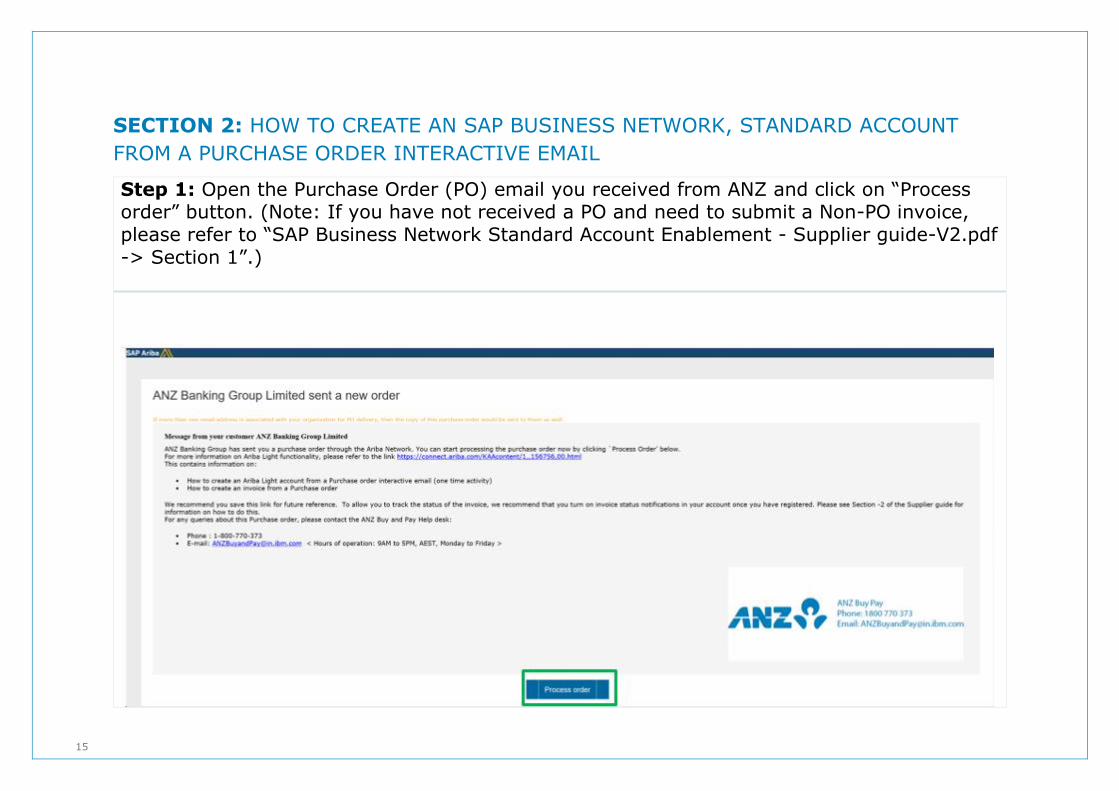
SECTION 2: HOW TO CREATE AN SAP BUSINESS NETWORK, STANDARD ACCOUNT
FROM A PURCHASE ORDER INTERACTIVE EMAIL
Step 1: Open the Purchase Order (PO) email you received from ANZ and click on “Process order” button. (Note: If you have not received a PO and need to submit a Non-PO invoice, please refer to “SAP Business Network Standard Account Enablement - Supplier guide-V2.pdf
-> Section 1”.)

16
Step 2: If you have not created an Ariba Network account before, please click on “ Register one now”
Step 3: Fill in your company information
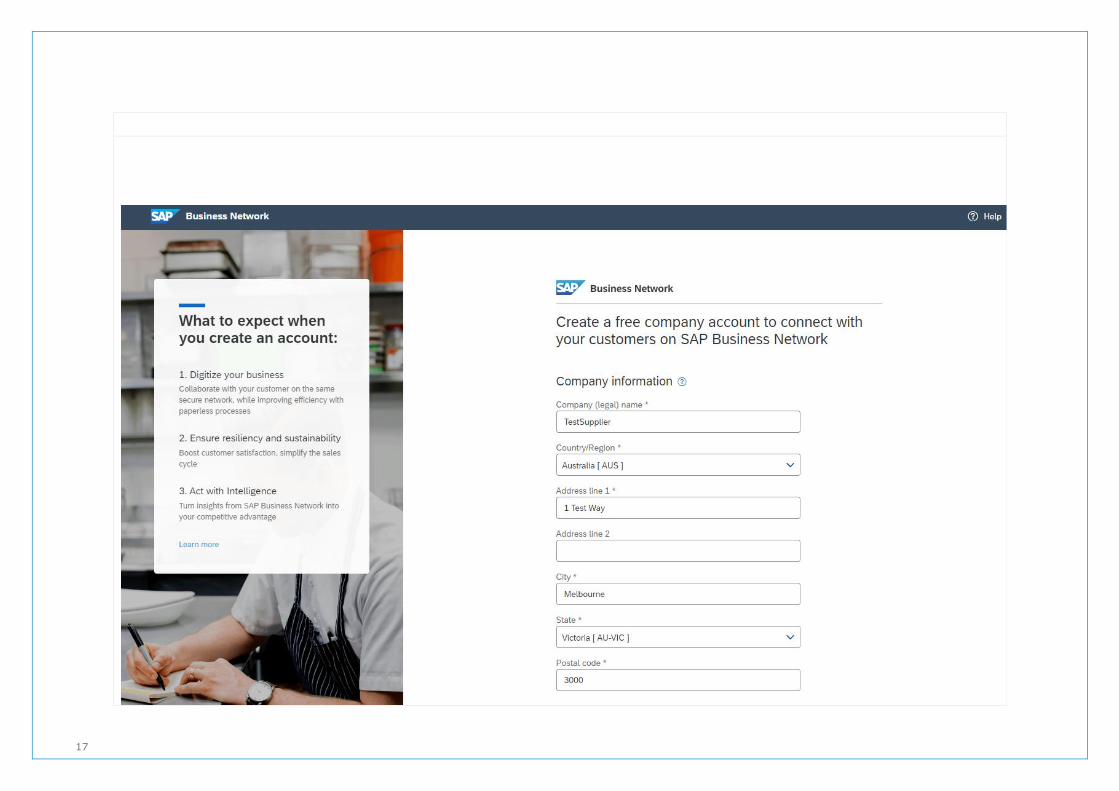
17

18
Step 4: Fill in your account information.
Step 5: Read and accept the “Terms of Use” and “SAP Ariba Privacy Policy”, and then click on “” Create account

19
Step 6: You will receive a registration confirmation email. Please note down the Ariba Network ID and send it to ANZ. It is a unique ID associated with your account.
20
21
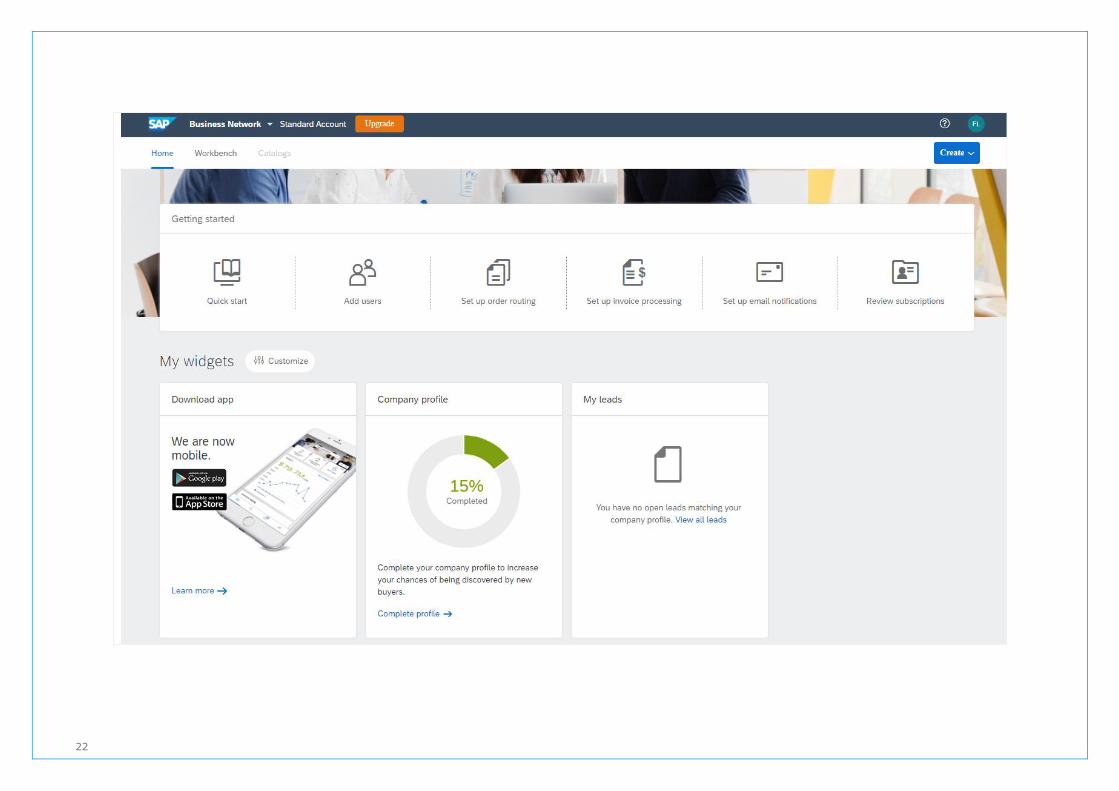
Step 7: You can now log into your account using following URL, and the user name and password you set-up during registration. URL: http://supplier.ariba.com Once you log in, your dashboard will look like following.
Important: There will be a message (Upgrade) on top of the page. Please note if you upgrade
to “Full-use”(Enterprise Account) account, you will need to pay subscription and transaction
fees to SAP Ariba.
22
23
SECTION 3: HOW TO CREATE AN INVOICE WITHOUT A PURCHASE ORDER
Step 1: Before you are able to submit a Non-PO Invoice to ANZ using your Ariba Standard account, you must provide the Ariba Network ID (ANID) to ANZ and you must get a confirmation from ANZ stating that your trading relationship has been established.
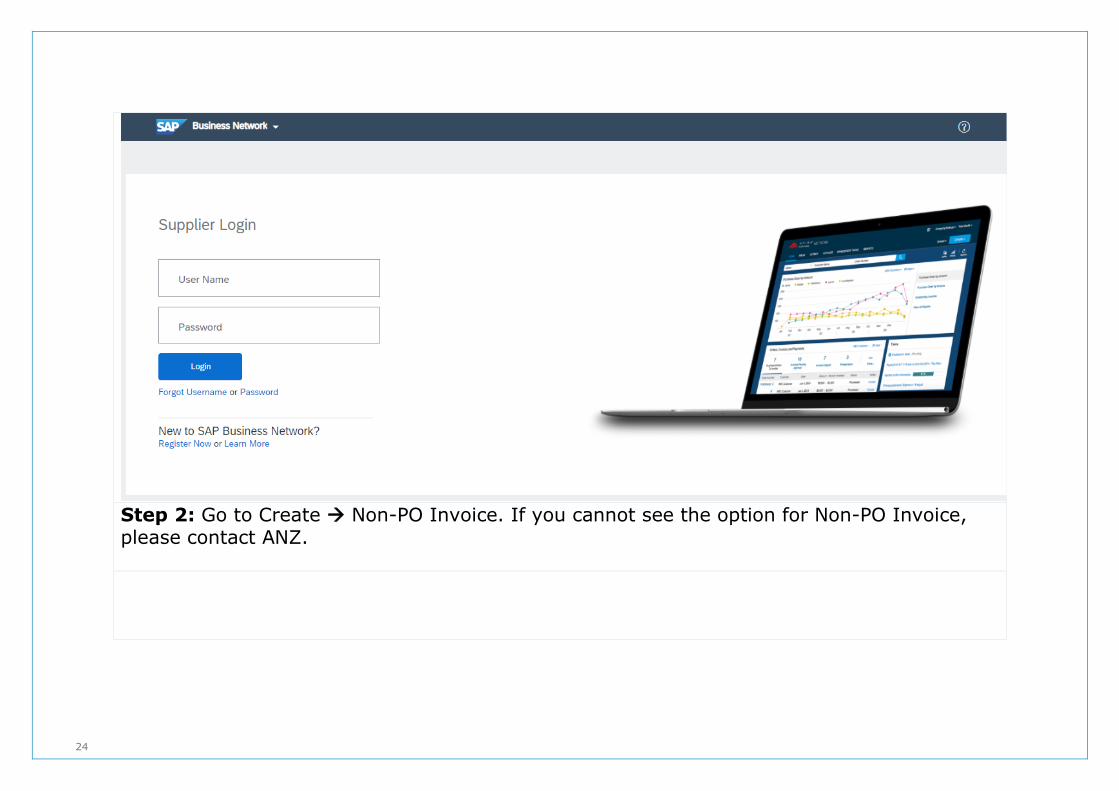
To create a Non-PO invoice, please go to http://suppliers.ariba.com and log in with your user name and password.
24
Step 2: Go to Create Non-PO Invoice. If you cannot see the option for Non-PO Invoice, please contact ANZ.

25

26
Step 3: Choose “ANZ Banking Group Limited” as customer, select “Standard Invoice” and click on Next.
Step 4: Please enter the invoice number and a valid ABN or Tax ID.

27
Important: A valid ABN or Tax ID is required to process your invoice.
Step 5: You must enter the Sales Order# from your internal ordering system. If visible, please select “Line level tax”. Then, please fill out any relevant information.

28
Step 6: You must enter the email address of the ANZ person to whom you are sending the invoice. Your invoice will be rejected if the email address is invalid or not associated with an active staff member at ANZ.

29
Step 7: In the line items section, click on “Add” and choose the relevant option: Material: if this invoice is for goods which you sold to ANZ. General Service: if this invoice is for a service which you provided to ANZ.

30
Labour Service: if it is a s contingent labour or contractors.
Step 8: Enter the details in the fields provided.
No. – Serial number of the lines. Part# - The part number (SKU or similar code) Description – The description of the goods or service you provided to ANZ Quantity – Quantity of the goods or services
Unit – Unit of measure. SAP Ariba accepts ISO Unit of measurements. If you are unsure, please use EA (each).
Unit price – Price per unit

31
Step 9: To add tax for the line item, select the check box (1), select the relevant tax code (2) and click on “Add to included Lines” (3).
Please ensure you
provide a detailed
description of services
or goods be provided
Ariba considers AUD by
default. Please ensure to
add a particular currency
code if it is not AUD

32
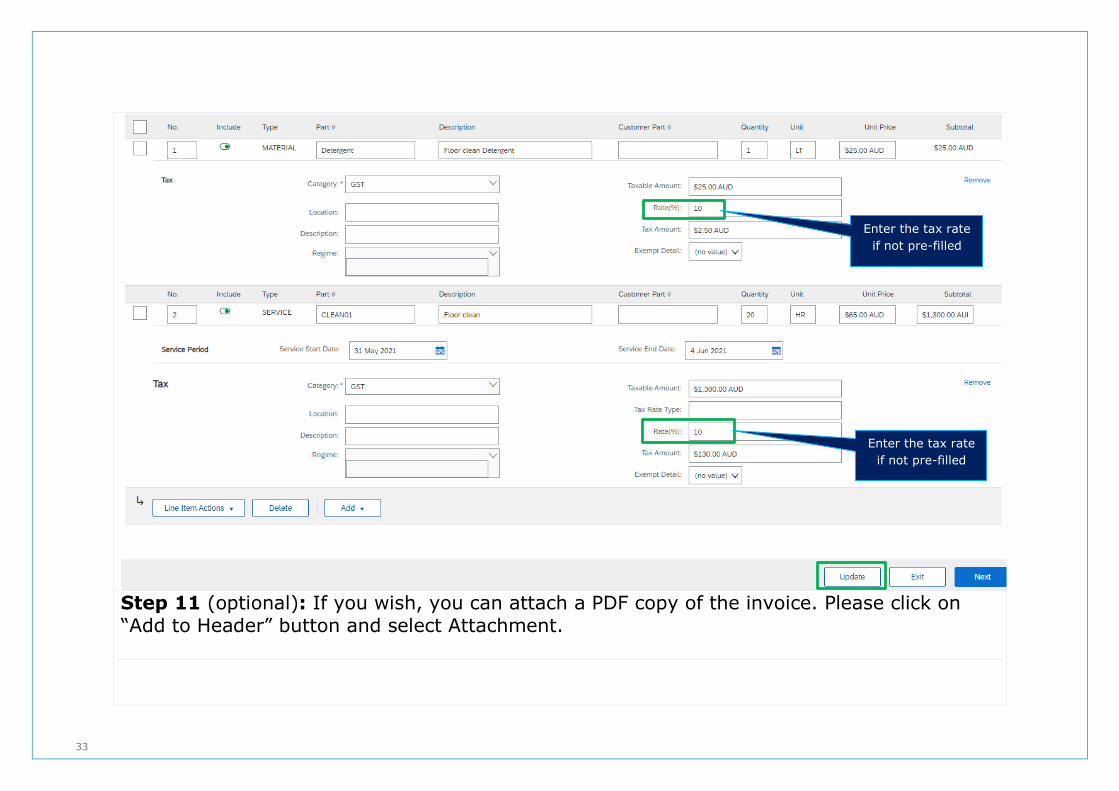
Step 10: Enter tax rate and click on “Update”. The system will calculate the tax amount. If there are multiple services and materials with different tax rates on the same invoice this can be updated creating multiple tax lines with different tax rates 0% and 10%
1
2
3
33
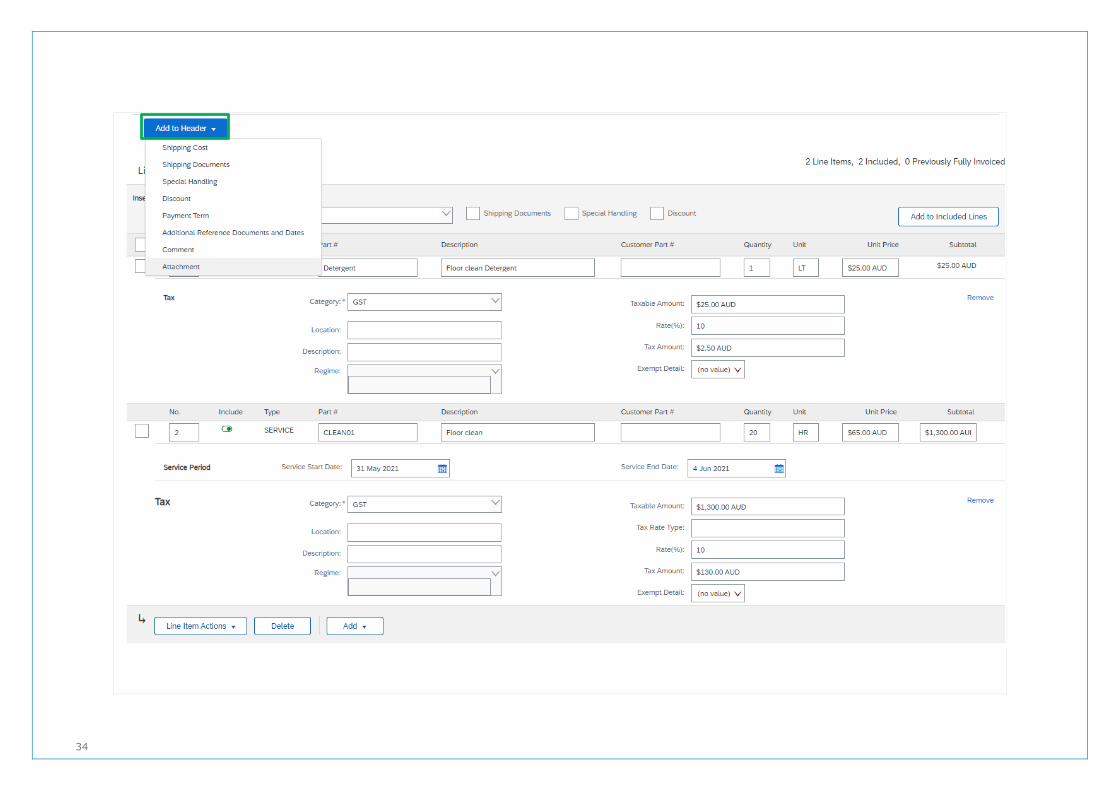
Step 11 (optional): If you wish, you can attach a PDF copy of the invoice. Please click on “Add to Header” button and select Attachment.
Enter the tax rate
if not pre-filled
Enter the tax rate
if not pre-filled
34
35
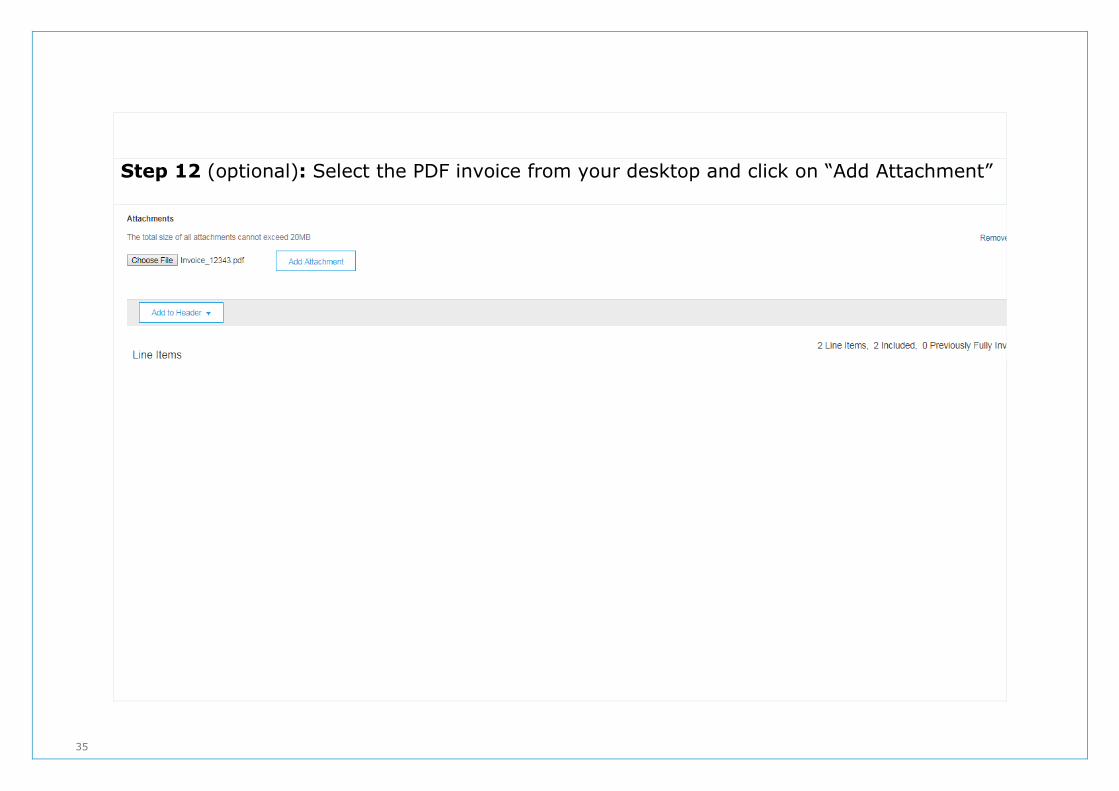
Step 12 (optional): Select the PDF invoice from your desktop and click on “Add Attachment”
36
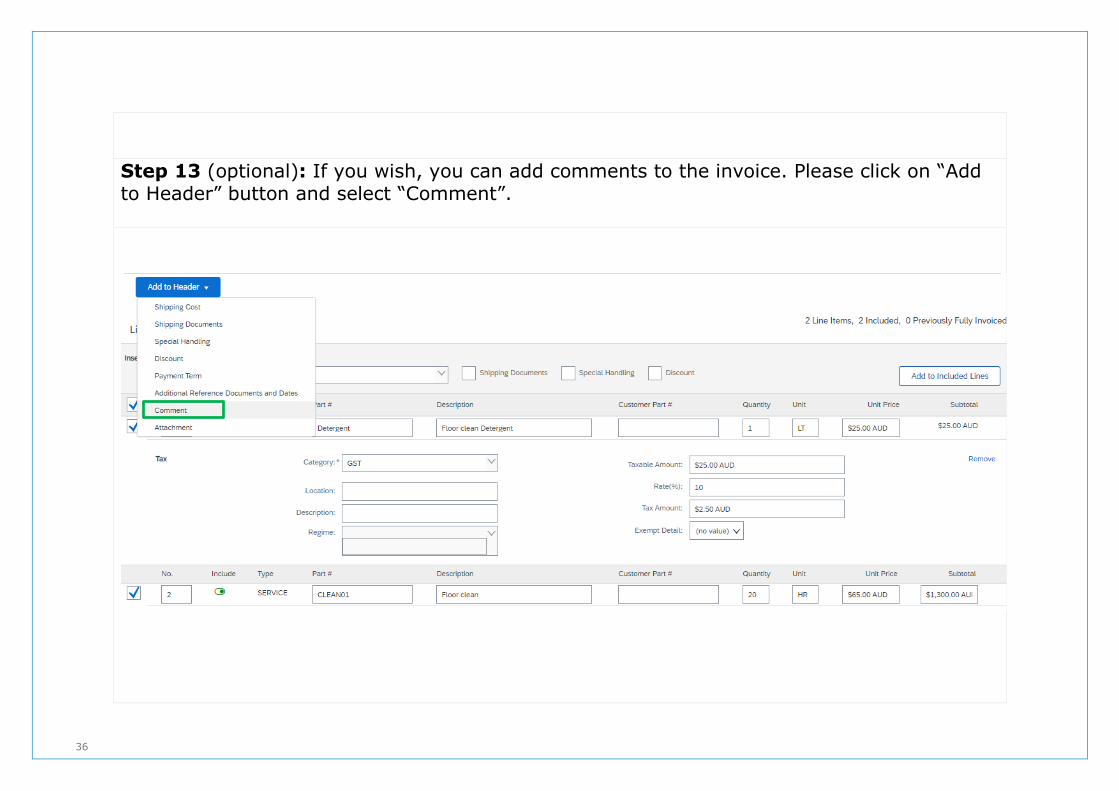
Step 13 (optional): If you wish, you can add comments to the invoice. Please click on “Add to Header” button and select “Comment”.

37
Step 14 (optional): Enter your comment in the Comments box.
You could use this box to update
information such as remittance advice
email ID, bank account details etc.
Alternatively, you could update all of
the comments under default
comments- refer section 6 for further
details
38
Step 15: Click on Next, review the invoice and submit.

39
Step 16: You will receive an email after successful submission of the invoice.
40

41

42
SECTION 4: HOW TO CREATE AN INVOICE FROM A PURCHASE ORDER
Step 1: Open the Purchase Order (PO) email you received from ANZ and click on “Process order” button. (Note: If you haven’t received a PO and need to submit a Non-PO invoice. Refer to the Non PO invoice creation guide)

43
Step 2: Log into Ariba Network using the user name and password you set-up during registration.
44
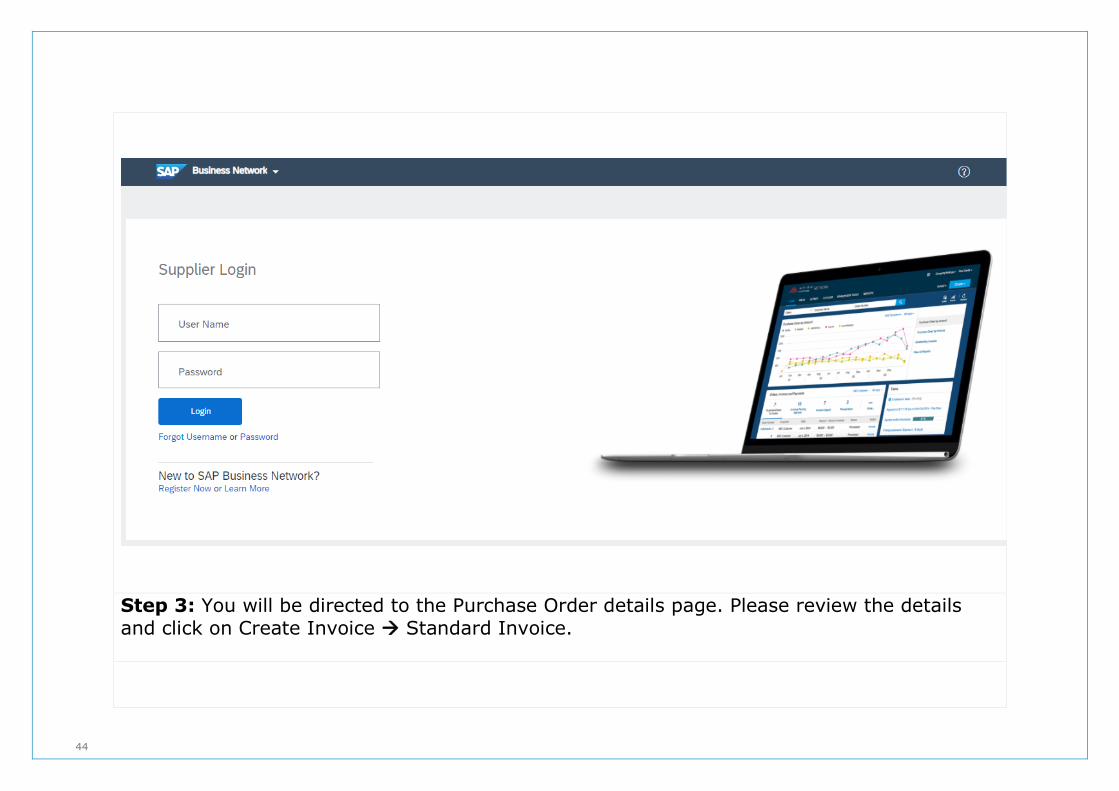
Step 3: You will be directed to the Purchase Order details page. Please review the details and click on Create Invoice Standard Invoice.
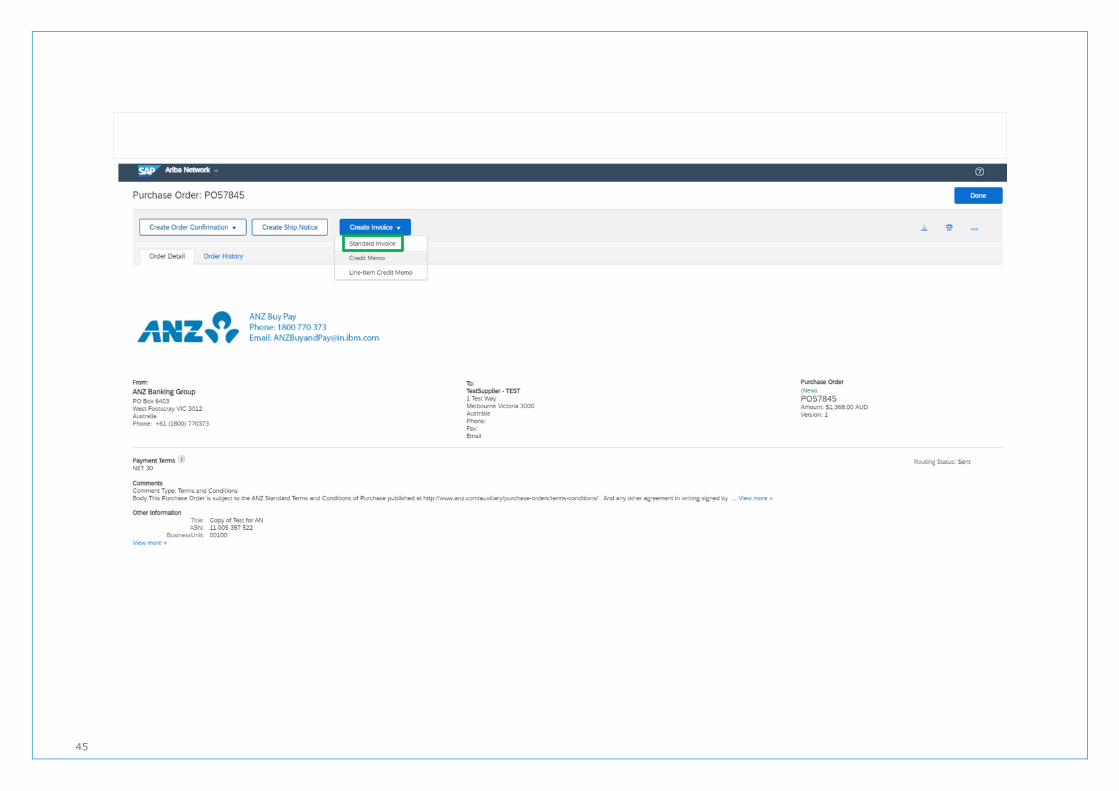
45

46
Step 4: Please enter the invoice number and a valid ABN or Tax ID. Important: A valid ABN or Tax ID is required to process your invoice.
Please enter valid ABN
or Tax ID

47
Step 5: If available, please select “Line level tax”. Then, enter all other relevant information.

48
Step 6: In the line item section, you can exclude a line item from your invoice if there are multiple lines on the PO. You can also change the quantity of the line item if required.
49
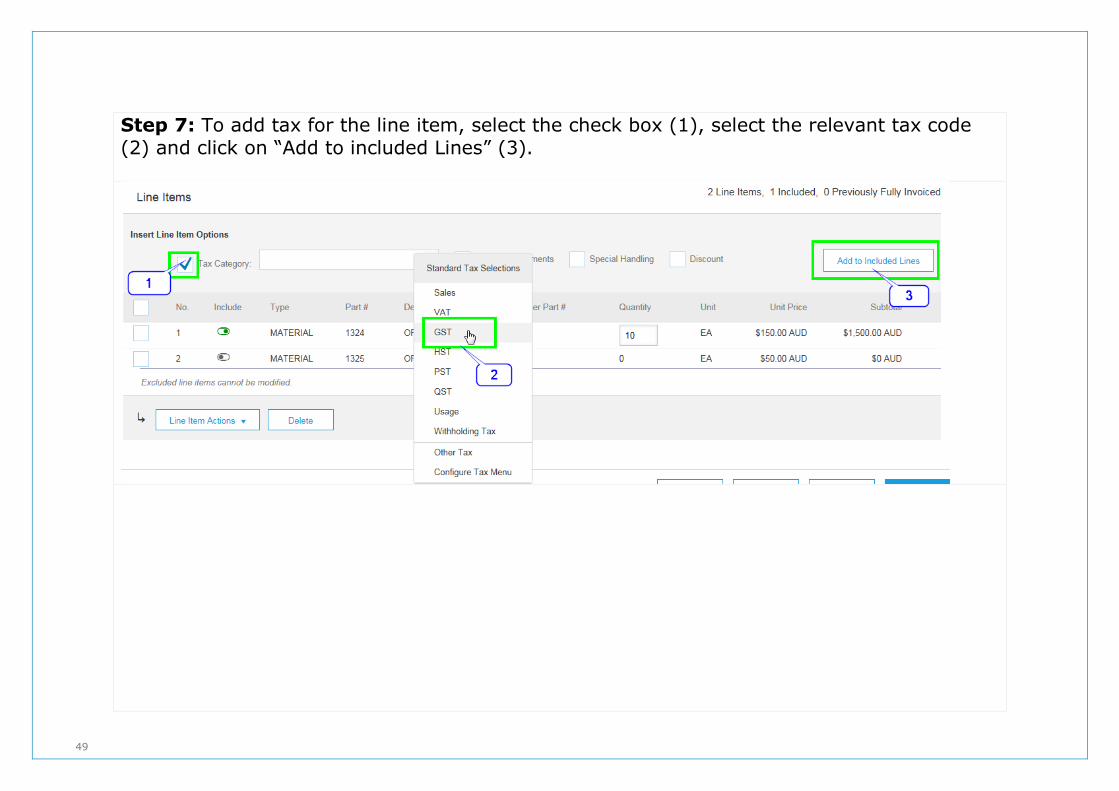
Step 7: To add tax for the line item, select the check box (1), select the relevant tax code (2) and click on “Add to included Lines” (3).
50
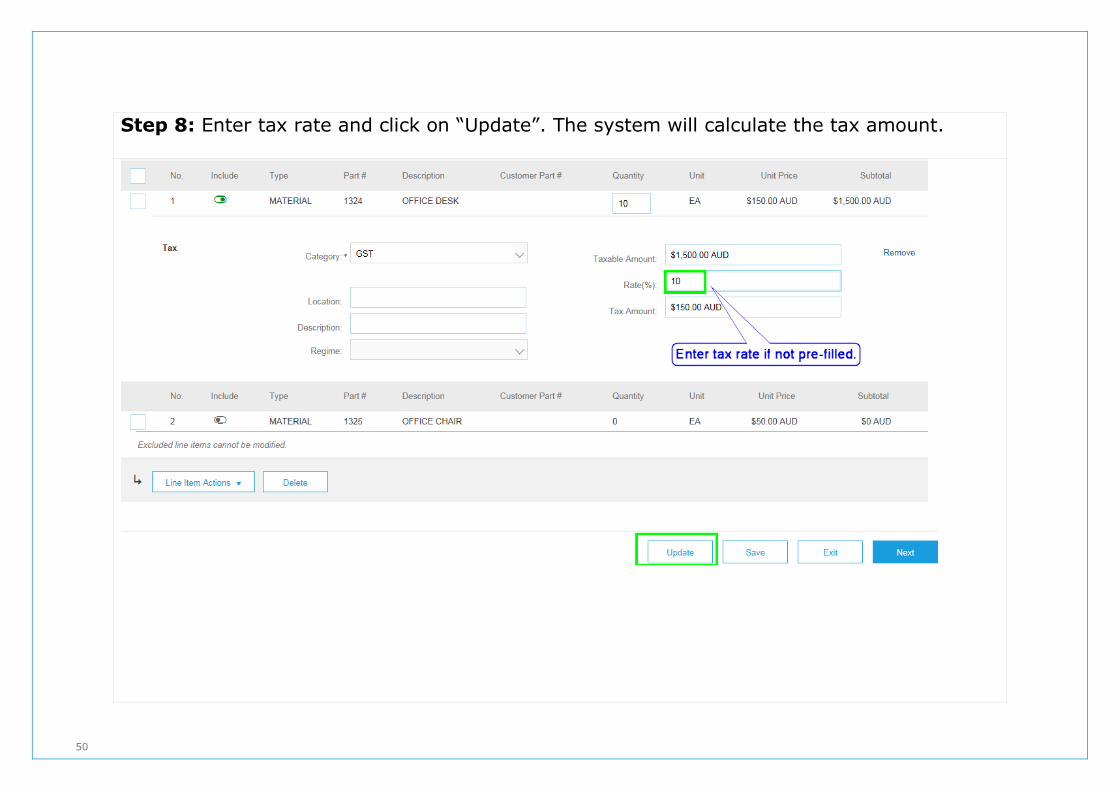
Step 8: Enter tax rate and click on “Update”. The system will calculate the tax amount.

51
Step 9 (optional): If you wish, you can attach a PDF copy of the invoice. Please click on “Add to Header” button and select “Attachment”.
52
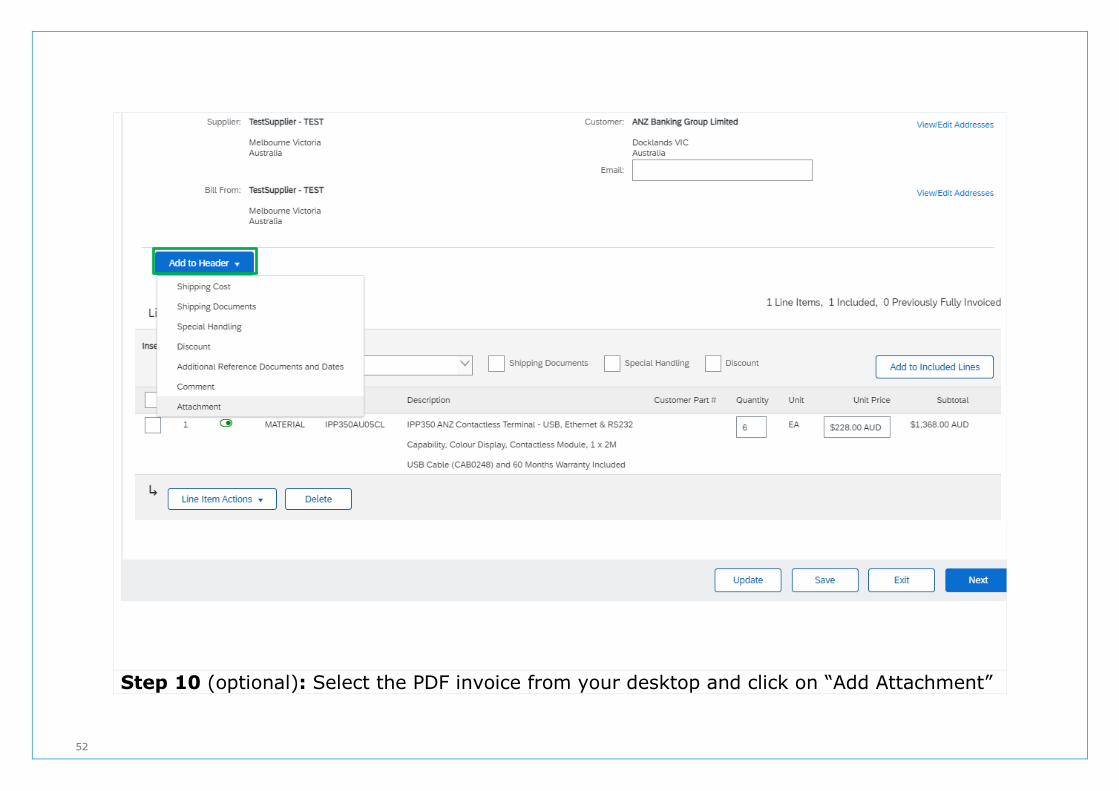
Step 10 (optional): Select the PDF invoice from your desktop and click on “Add Attachment”
53
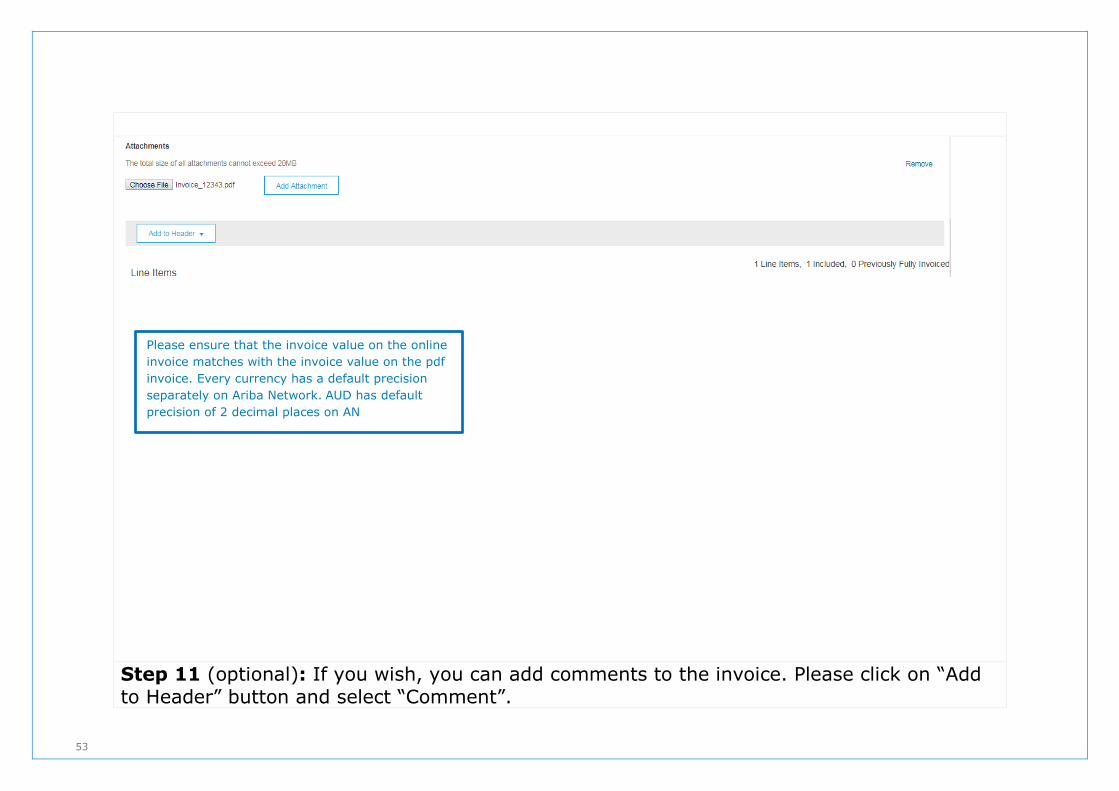
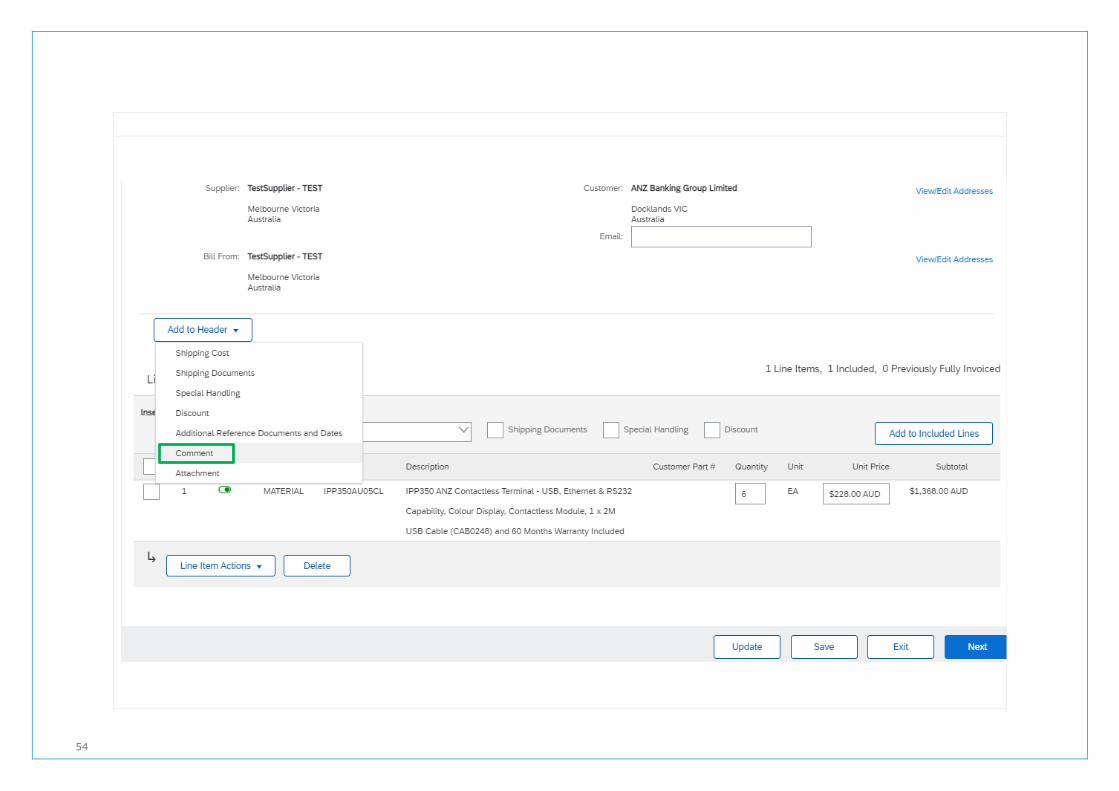
Step 11 (optional): If you wish, you can add comments to the invoice. Please click on “Add to Header” button and select “Comment”.
Please ensure that the invoice value on the online
invoice matches with the invoice value on the pdf
invoice. Every currency has a default precision
separately on Ariba Network. AUD has default
precision of 2 decimal places on AN
54

55
Step 12 (optional): Enter your comment in the Comments box.
You could use this box to update
information such as remittance advice email
ID, bank account details etc. Alternatively,
you could update all of the comments under
default comments- refer section 6 for
further details
56
Step 13: Click on Next, review the invoice and submit.

57

58
59
Step 14: You will receive an email after successful submission of the invoice.

60

61
SECTION 5: NOTIFICATION PREFERENCE UPDATE
You can choose to start or stop a certain kind of notification sent out from SAP Ariba. To update your notification preference, log into http://supplier.ariba.com and go to Your login initial on the far right of the screen -> Settings -> Notifications

62
Review and update your notification preferences. You can choose a different email addresses
to be assigned to receive different email notifications.

63
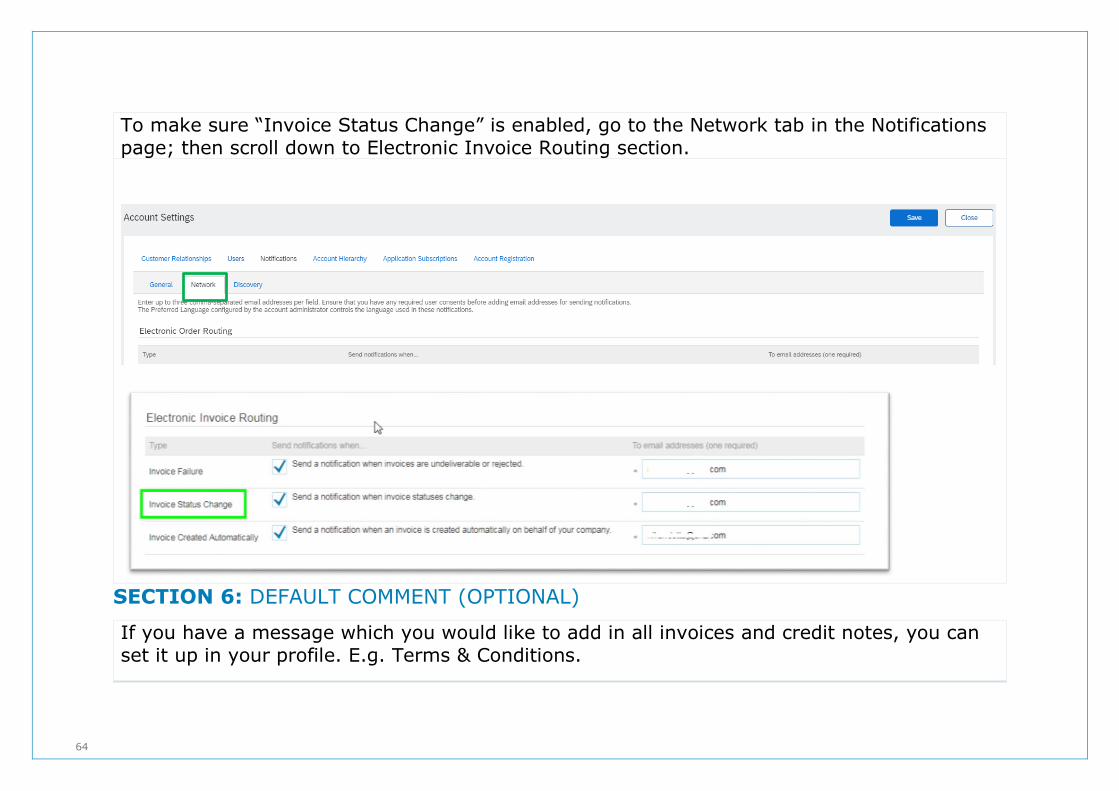
In particular, ANZ recommends that you enable “Invoice Status Change” notifications so you receive notifications when your invoices are approved or rejected by ANZ.
64
To make sure “Invoice Status Change” is enabled, go to the Network tab in the Notifications page; then scroll down to Electronic Invoice Routing section.
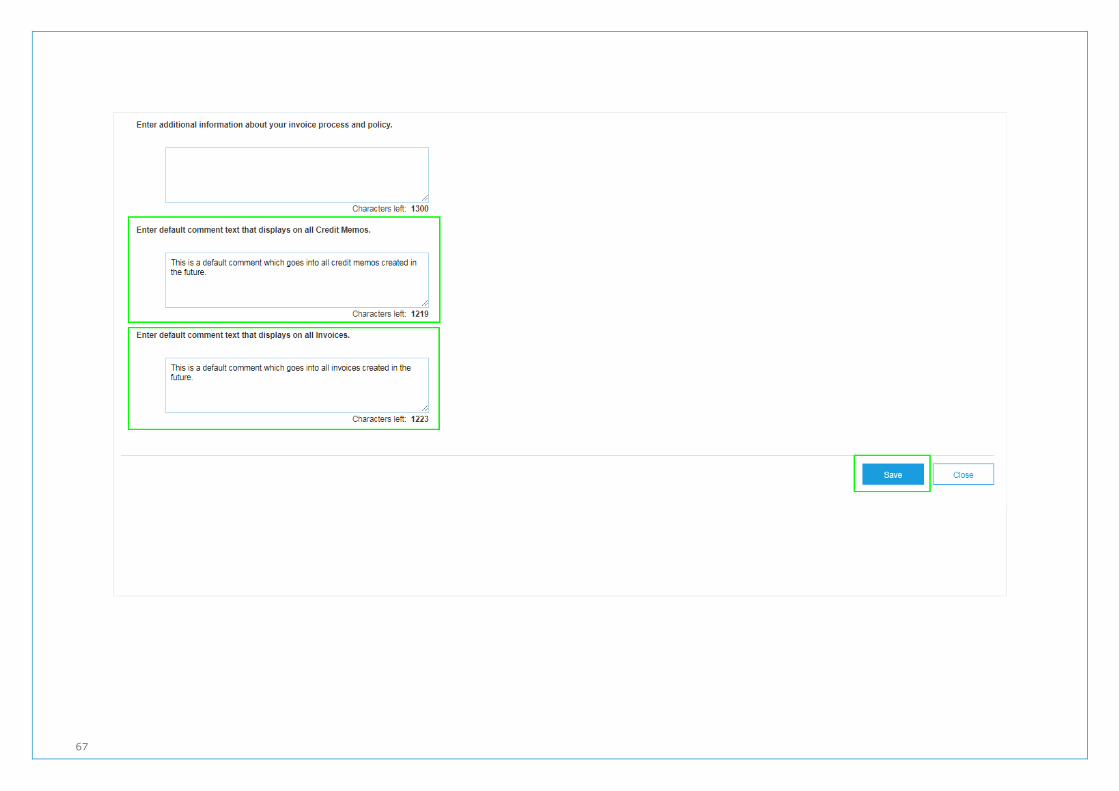
SECTION 6: DEFAULT COMMENT (OPTIONAL)
If you have a message which you would like to add in all invoices and credit notes, you can set it up in your profile. E.g. Terms & Conditions.

65
Step 1: To update your notification preference, log into http://supplier.ariba.com and go to Settings Electronic Invoice Routing (under Network Settings section)
Step 2: You will land into Network Setting page and Electronic Invoice Routing tab. Scroll down to the bottom.

66
Step 3: Enter your message in one or both boxes highlighted below. Then, click on Save
67

68
SECTION 7: HELP & SUPPORT
Further Learning: You can access SAP Ariba’s learning videos and tutorials from your account.
Log into http://supplier.ariba.com and go to Help by clicking on icon on the top right
Search for the topic you need help with.

69
You can also refer to the Supplier Information Portal (SIP). Link to SIP: https://connect.ariba.com/KAAcontent/1,,156756,00.html
Please save this link
as a bookmark

70
Technical Support: SAP Ariba provides email support for technical issues related to Ariba Standard supplier. To contact SAP Ariba, please log into your account and click on “Support” in the Help Centre.

71
A new window will open. Go to Contact us, search for “Report a technical issue” in “Start here to find your answer” box

72

73

74
Scroll past the search result and follow guided instructions to continue with “Yes” or “No”
Support Available Contact
Technical issue in your Ariba Network
account while o Creating invoice o Viewing Purchase Order
Any other account related queries
Refer to Technical Support in “Section 7: Help
& Support”. Note: Suppliers will have to upgrade to full account if they need premium services like SAP Ariba on-call support

75
Ariba trouble shooting after your invoice is submitted
o Invoice rejections o Invoice tracking, invoice processing o Remittance Advice
ANZ Buy and Pay Help desk E-mail: [email protected]
Hours of operation: 9AM to 5PM, AEST Monday to Friday
ANZ Purchasing and Invoicing process Refer to Supplier on-boarding guide published on anz.com http://www.anz.com/about-us/corporate-sustainability/supply-chain/