Embed Size (px)
Citation preview

“Materialing” Photoshop Plugin User Guide
Materialing Photoshop Plugin is a free productionready tool that allows you to paint with entire materials using the comfort of the familiar photoshop environment. Under such a simple premise hides an extremely robust toolset that can address a lot of inefficiencies across all CG industries. The core pillar of Materialing is complete nondestructiveness and ease of reuse. The plugin empowers You to create extremely reusable material presets and layer them for production of your unique assets. The material layer masks are always there which gives you an option to replace a material layer at any given time while keeping the mask and automatically updating all the textures that compose a complex next gen material. On top of that the parent material keeps track of all the assets that ever used it and if at any point in production you decide to update your source material preset the changes can automatically be propagated across all the usecases. And like that wasn’t enough you are free to tweak your material presets in your unique assets .PSD(albedo hue shift for example) and your changes will be saved even if you choose to reimport or update your material preset. Materialing aims to make reuse easy enough that people actually do it. The other key pillar of Materialing is to minimize interface or tool presence whenever possible. I do believe that the best interface is the one you don’t even have to see. That’s why we allow your file organization to do most of the work for you. Nothing limiting though. The files are set up in a very easytounderstand way where you’re free to build up on top of our base in any way convenient for you.

Materialing workflow is split between creating source material presets:
And painting with those presets to create “unique” assets:
Let’s use creation of a base material as the simplest case example:

Creating a Material Preset
In order to function Materialing needs one thing only an “Export” group inside your file. This group is made to inform the tool of the maps you want saved out and it is automatically created upon first running Materialing and read every time you bring it up again.(ignore Global Group for now)
You specify what types of maps you are going to be producing simply by creating a group inside of Export with “< ”(don’t forget the space) before the name. Materialing uses only the first letter of the name as a .tga texture postfix, so no two names should start with the same letter. If you want to save a map out with alpha channel just put an “*” at the end of the map name and Materialing will save out the map with whatever is in the Alpha channel of your .PSD. The insides of the groups can be anything you want. All the good old photoshop flexibility to create your tiled base material! Once you’re done with your source material just bring up Materialing and hit “Save”(or even better use the appropriate hotkey for 1 button solution)

Your maps are going to be automatically saved in the location of your working .PSD with the first letter of the map type as a suffix:
In order for materialing to be able to import a material successfully it has to occupy a single individual folder. And that’s it. It will automatically read most common image formats, ignoring .PSDs so you can store your source files with your final maps. You are free to build the hierarchy of your material library by just organizing your folders it couldn’t be simpler: Propagation: Every unique asset that uses any material preset automatically retains the connection to the parent material via a simple text file stored in the material preset folder. If you happen to change a material preset half way through development all you have to do is hit “Propagate” and every asset that has ever used this material preset will have it’s textures updated(provided their address didn’t change).

Creating a Unique Asset
But say you finally want to build an asset using Materialing. Here’s how you do it: 1)Bring up Materialing Interface and it will automatically set up the file for you. “Global” folder is where you’re going to put your global AO, Normal, Decals and all kinds of assetspecific detail. And “Export” is just going to specify the types of maps to export and hold those final collapsed maps for you. No need to put anything there, although you’re free if you want to. 2)Hit “Import” button on the interface or use a hotkey. It will bring up the Material Import Dialog. Then just choose the folder with the material to import. Materialing will automatically tile the material to fit your document size. 3)Bring as many more materials in as you want 4)Blend the material layers using masks for the final result 5)Hit “Collapse” and then “Save” or use a 1click hotkey 6)Import in game and enjoy If you want to change the material type for some part of the mesh just import a new material and copy the mask from the layer you want to replace. Then just delete the old group.

Installing Materialing Photoshop Plugin
To install Materialing Photoshop Plugin just drop the Materialing Alpha folder into your Photoshop/Presets/Scripts/ folder If your setup is like mine just use this address: C:\Program Files\Adobe\Adobe Photoshop CS5 (64 Bit)\Presets\Scripts From now on the scripts will be available in the Scripts menu inside of Photoshop:

To setup hotkey, which is quite crucial for a convenient pipeline, please hit “Ctrl+Alt+Shift+K” for the hotkeys menu:
Then just scroll down till you find materialing and use whatever hotkey make most sense for you. IMPORTANT: In an ideal scenario you need to bring up Materialing interface only to set it up. “Materialing_Save”,“Materialing_Propogate” and “Materialing_Import” are one click scripts that can be hotkeyed to make your experience with Materialing completely hassle free. “Materialing_Save” will collapse and save out all the necessary maps for you so all you need to do is just concentrate on painting.

TROUBLESHOOTING:
In order for Materialing to automatically read and store all your preferences correctly you need to have Administrator privileges when running Photoshop. Materialing only toggles group visibility inside your material sub groups, so if any of your maps are invisible inside of that group they are not going to be collapsed into the final map. This is made to give you full control over tweaking the material layers(change albedo hue for example) and to give you an option to have invisible layers in your material preset groups Manually creating groups and layers while having Materialing interface running has been known to crash Photoshop sometime. Materialing is meant to be out sight most of the time for most efficient use, so no point in keeping it open while doing manual work Trying to do stuff while Materialing is thinking can break the final result sometime If Materialing is not behaving usually closing the interface and opening it up again fixes it. Tested with Photoshop CS5 and CC
“Tile” function only tiles the source material in your material group while avoiding all other layers.
HINTS: If you adjusted just one map type(Albedo, Metallic, etc...) you can select it in the dropdown menu next to the “Collapse” button and it’s going to be the only updated next time you collapse. This can save you a lot of time especially when you’re propagating your material preset change across large quantities of assets. Materialing reads only first letter of your export maps(anything with “< ” in front of it). So if you’re feeling lazy putting custom map names into the Export folder feel free to just use on letter. Don’t forget to hotkey “Display Albedo”, “Display Roughness”, “Display Normal” and “Display Special”(I use F7F10). Display Special reveals the map type you specify in the dropdown list next to the display button.(to save preferences close down the interface) Materialing reads only first letter of your export maps(anything with “< ” in front of it). So if you’re feeling lazy putting custom map names into the Export folder feel free to just use on letter.

Try baking a version of your Curvature map using the normal map you get after overlaying your global asset normal with the micro noise of your material layers. That way will you will automatically have a selection mask for scratches and dirt that are also logical part of your assets micro noise. Bundled with Materialing comes my older d1vSave script set which has a UV script in it. It toggles visibility on a layer named “UV” so feel free to hotkey that too.
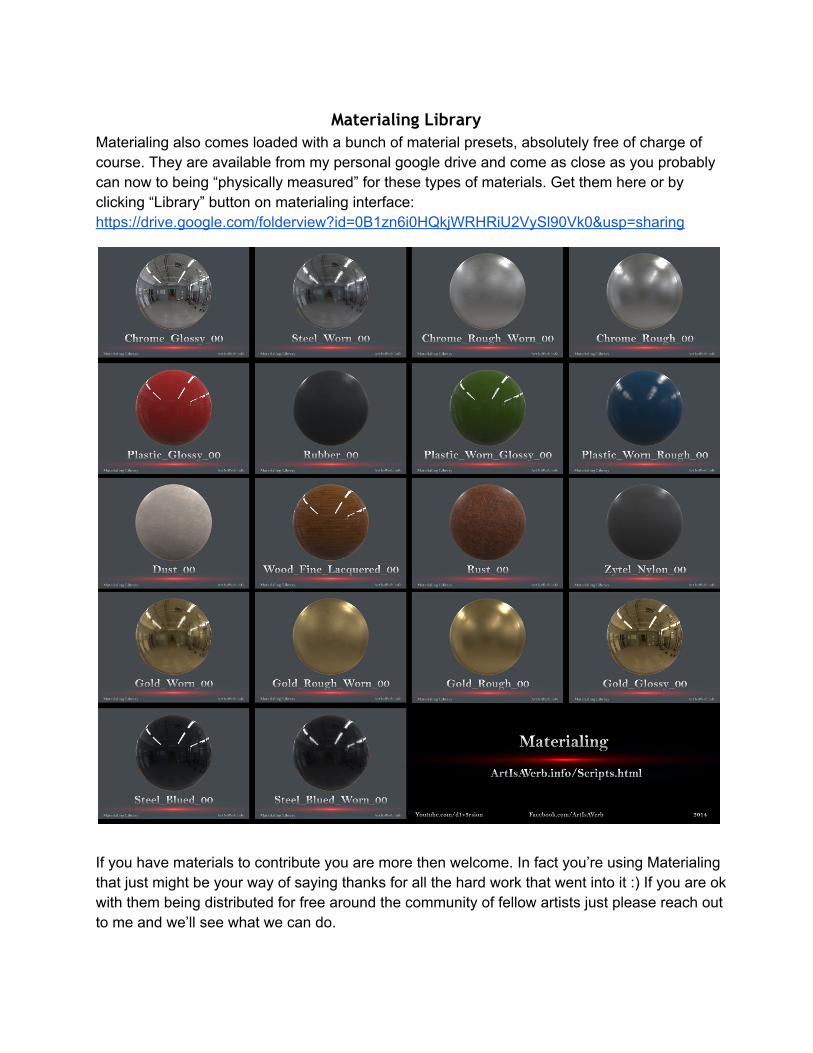
Materialing Library Materialing also comes loaded with a bunch of material presets, absolutely free of charge of course. They are available from my personal google drive and come as close as you probably can now to being “physically measured” for these types of materials. Get them here or by clicking “Library” button on materialing interface: https://drive.google.com/folderview?id=0B1zn6i0HQkjWRHRiU2VySl90Vk0&usp=sharing
If you have materials to contribute you are more then welcome. In fact you’re using Materialing that just might be your way of saying thanks for all the hard work that went into it :) If you are ok with them being distributed for free around the community of fellow artists just please reach out to me and we’ll see what we can do.

Outro I hope Materialing will save you a ton of time and will help bring some logic and structure to your next gen material production to empower all you awesome artists to worry more about art and less about silly production issues. Thank you for your time! :D>< Best wishes, Andrew Maximov http://ArtIsAVerb.info/ https://www.facebook.com/ArtIsAVerb https://www.youtube.com/d1v3rsion https://twitter.com/divers1ty
Version 0.137