Embed Size (px)
Citation preview

Apollo ProjectVersion 14
User Guide
Kanata Ontario bull CanadaSE I SMOLOGICAL INSTRUMENTS
copy 2009 Nanometrics Inc All Rights Reserved
Apollo Project User Guide
The information in this document has been carefully reviewed and is believed to be reliable for Apollo Project version 14 Nanometrics Inc reserves the right to make changes at any time without notice to improve the reliability and function of the product
No part of this publication may be reproduced stored in a retrieval system or transmitted in any form or by any means electronic mechanical photocopying recording or otherwise without the prior written permission of Nanometrics Inc
Nanometrics Inc250 Herzberg RoadKanata Ontario Canada K2K 2A1Tel +1 613-592-6776Fax +1 613-592-5929Email infonanometricscawwwnanometricsca
Part number 16106R5Release date 2009-03-24
Apollo Project User Guide16106R5 2009-03-24
iii
Document ConventionsEssential and Supplementary Information
WarningExplains a risk of irreversible damage to data software or equipment and provides recommendations for preventive action
CautionExplains a risk of damage to data software or equipment where recovery is likely to be troublesome and provides recommendations for preventive action
NoteProvides additional information related to the current text
TipExplains a best practice or provides helpful information related to the current text
ExampleProvides an example related to the current text
Text Conventionsbold text Identifies referenced elements in the graphical user interface (GUI)
(for example ldquoclick Cancel to discard the changesrdquo)italic text Identifies variables such as parameter names and value placeholders
(for example ldquoselect Configuration gt Sensor Namerdquo)courier text Identifies commands that must be entered exactly as shown
(for example ldquotype mkdir $APOLLO_LOCATIONconfigrdquo)
Document Conventions
iv Apollo Project User Guide16106R5 2009-03-24
Apollo Project User Guide16106R5 2009-03-24
v
ContentsDocument Conventions iiiList of Tables vii
Chapter 1 Getting Started11 About Apollo Project 112 Operating Requirements 2
121 Software Licence 2122 Client 2123 Server 2
Chapter 2 Installing and Starting Apollo Project21 Installing the Apollo Project Web Server 5
211 Uninstalling Apollo Project Web Server 622 Installing an Apollo Project Licence File 723 Starting the Apollo Project Web Server 824 Running Apollo Project Client 8
241 Troubleshooting Running Apollo Project Client 8242 Stopping the Apollo Project Web Server 9
25 Upgrading Apollo Project 9
Chapter 3 Retrieving Data31 Creating New Projects 1132 Creating a Station Table File 2233 Configuring Apollo Project 2434 Managing Projects 26
341 Viewing Existing Projects 26342 Opening a Project 27343 Creating a Desktop Shortcut to a Project 27344 Closing a Project 27345 Copying a Project 28346 Deleting a Project 28
35 Running Projects 28351 Running a Project 29352 Stopping a Project 29353 Merging Project Data Files 29354 Running a Scheduled Archive Project 30
Contents
vi Apollo Project User Guide16106R5 2009-03-24
3541 Cancelling a Schedule 3036 Editing and Viewing the Settings of Projects 31
361 Editing Project Settings 31362 Viewing Project Settings 31
37 Monitoring Project Status 32371 Viewing an Overview of the Status of All Projects 32372 Viewing the Status of an Individual Project 33373 Monitoring the Status of a Running Project 34
3731 Status Colours 343732 Viewing the Retrieval Details for Each Channel Group 35
Appendix A Reference Information and ExamplesA1 Overview of Running Projects 37A2 Example Project Settings 38
A21 Example 1 One Time Project 38A22 Example 2 Controlled Source Project 39
A3 Example Deployment Scenarios 39A31 One Time 39A32 Scheduled Archive 39A33 Manual Archive 40A34 Field Archive 40A35 Media Harvesting 40A36 Trigger Downloading 41
A4 Shot File Formats for Controlled Source Projects 42A41 Creating a Shot File With Microsoft Office Excel 42A42 Creating a Shot File With OpenOfficeorg Calc 44A43 Creating a Comma-Separated Values Shot File 45
Appendix B Retrieving SOH Data from a Taurus Version 2xB1 Taurus Version 2x SOH Data Retrieved by Apollo Project 47B2 Retrieving SOH Data from a Taurus Version 2x Streaming to Apollo Server 48
B21 Streaming Data from a Taurus Version 2x to Apollo Server 48B22 Retrieving Taurus Version 2x Data from Apollo Server 49
Appendix C GlossaryC1 Glossary of Abbreviations and Terms 51C2 List of Unit Abbreviations and Symbols 54
About Nanometrics 55Contacting Nanometrics 55Contacting Technical Support 55
Contents
Apollo Project User Guide16106R5 2009-03-24
vii
Tables1-1 Requirements for an Apollo Project server running Windows 31-2 Requirements for an Apollo Project server running Linux 31-3 Requirements for an Apollo Project server running Mac OS X 32-1 Installation instructions 62-2 Uninstalling the Apollo Project Web server 62-3 Starting the Apollo Project Web server 83-1 Status colours 34C-1 Unit abbreviations and symbols 54
Contents
viii Apollo Project User Guide16106R5 2009-03-24
Apollo Project User Guide16106R5 2009-03-24
1
Chapter 1 Getting Started
About Apollo Project
Operating Requirements
11 About Apollo ProjectApollo Project is a Web application that conveniently retrieves time series and state of health data from any Nanometrics Store including those on Nanometrics instruments and those copied to network computers Available through any Web browser the client application provides options for you to define complex reusable data retrieval tasks called projects
Apollo Project has five project types
Archive projects retrieve data from sources that are continually updated such as a directory on a computer that has new data saved to it periodically or a multicast group of Nanometrics instruments that has different instruments active at different times You can schedule Archive projects to run automatically
One Time projects retrieve a single time segment of data
Controlled Source projects retrieve data specified as a set of shots
Triggers projects retrieve data specified by a trigger list in comma-separated value (CSV) format
Field Archive projects perform recurring data retrievals storing the time of the current retrieval on the Nanometrics instrument Using the time of the last retrieval Field Archive projects only retrieve the data accumulated since the last time the project was run on the instrument
Data for time series channel groups can be downloaded in MiniSEED SAC (binary format) Seisan or SEGY format depending on the project type Data for SOH channel groups is always downloaded in CSV format
Chapter 1 Getting Started
2 Apollo Project User Guide16106R5 2009-03-24
12 Operating RequirementsApollo Project has licensing client and server operating requirements These requirements are listed in Section 121 Section 122 and Section 123
121 Software LicenceIf you have ordered and received an Apollo Project software licence from Nanometrics install this file during the Apollo Project Web server installation or later using the Nanometrics Product Licence Installation Wizard See Section 22 ldquoInstalling an Apollo Project Licence Filerdquo on page 7 for licence installation instructions for Microsoftreg Windows Linux and Mac OSreg X server installations
The licence determines the number of projects you can save the number of time series channels you can select and the number of projects you can run concurrently Without a licence Apollo Project defaults to the unlicensed configuration This configuration allows you to save one project definition at a time for up to three time series channels from any combination of Stores
122 ClientThe client requirements for any platform are a Web browser with JavaScript enabled and IP access to the server Apollo Project version 14 has been tested with Microsoft Internet Explorer version 7 and Mozilla Firefox versions 2 and 3 Other browsers have not been fully tested with the client but may be used at your discretion
123 ServerRun the Apollo Project Web server on Windows Linux or Mac OS X For the
Windows operating requirements see Table 1-1 ldquoRequirements for an Apollo Project server running Windowsrdquo on page 3
Linux operating requirements see Table 1-2 ldquoRequirements for an Apollo Project server running Linuxrdquo on page 3
Mac OS X operating requirements see Table 1-3 ldquoRequirements for an Apollo Project server running Mac OS Xrdquo on page 3
Installing a licence file after creating a project in Apollo Project will result in the loss of that project It is recommended that you install your licence before running Apollo Project for the first time
Click the About button in the client application to view licence information
Chapter 1 Getting Started
Apollo Project User Guide16106R5 2009-03-24
3
Table 1-1 Requirements for an Apollo Project server running Windows
System component Requirement
Operating system Windows XP with Service Pack 3Memory 1GB RAM minimum
2GB RAM recommendedDisk space Required free disk space for every 3 time series channels of data
retrieved is approximately 2GB per month This is roughly twice as much space as the retrieved data occupies in a Store
Java Sun Java Runtime Environment (JRE) version 60Software licence Order a licence from Nanometrics if capabilities beyond that of the
unlicensed configuration are required (see Section 121 ldquoSoftware Licencerdquo on page 2)
Table 1-2 Requirements for an Apollo Project server running Linux
System component Requirement
Operating system Any distribution running a GNULinux kernel of version 24 or laterTested on Red Hat Linux 9 (kernel 2420-8)
Memory 512MB RAM minimum2GB RAM recommended
Disk space Required free disk space for every 3 time series channels of data retrieved is approximately 2GB per month This is roughly twice as much space as the retrieved data occupies in a Store
Java Sun Java Runtime Environment (JRE) version 60Software licence Order a licence from Nanometrics if capabilities beyond that of the
unlicensed configuration are required (see Section 121 ldquoSoftware Licencerdquo)
Table 1-3 Requirements for an Apollo Project server running Mac OS X
System component Requirement
Operating system Mac OS X (1052 and later)Memory 1GB RAM minimum
2GB RAM recommendedDisk space Required free disk space for every 3 time series channels of data
retrieved is approximately 2GB per month This is roughly twice as much space as the retrieved data occupies in a Store
Java Sun Java Runtime Environment (JRE) version 60
Notes on the JRE for Mac systems JRE version 60 must be manually downloaded and installedAfter installing the JRE it must be set as the default Java Virtual Machine (JVM)
Software licence Order a licence from Nanometrics if capabilities beyond that of the unlicensed configuration are required (see Section 121 ldquoSoftware Licencerdquo on page 2)
Chapter 1 Getting Started
4 Apollo Project User Guide16106R5 2009-03-24
Apollo Project User Guide16106R5 2009-03-24
5
Chapter 2 Installing and Starting Apollo Project
Installing the Apollo Project Web Server
Installing an Apollo Project Licence File
Starting the Apollo Project Web Server
Running Apollo Project Client
Upgrading Apollo Project
21 Installing the Apollo Project Web ServerThe Apollo Project Web server is installed on a single computer and after it is installed and running the client can run locally on the server or on any computer with a Web browser and network access to the server computer
All Stores must be accessible from the server hosting the Apollo Project Web server All output files are created on the server and its accessible file systems as described in Section 33 ldquoConfiguring Apollo Projectrdquo on page 24
To install the Apollo Project Web server on a server computer running Windows Linux or Mac OS X
1 Install a supported version of the Java Runtime Environment JRE version 60 or later
2 If you have received a licence file from Nanometrics ensure it is in a drive or network location that is accessible to the Apollo Project Setup Wizard
You can install and run Apollo Project without a licence file For details see Section 121 ldquoSoftware Licencerdquo on page 2 Should you require a licence after Apollo Project is installed you can install a licence using the Nanometrics Licence Installation Wizard See Section 22 ldquoInstalling an Apollo Project Licence Filerdquo on page 7
Chapter 2 Installing and Starting Apollo Project
6 Apollo Project User Guide16106R5 2009-03-24
3 Follow the instructions for your operating system in Table 2-1
211 Uninstalling Apollo Project Web ServerTable 2-2 provides instructions for uninstalling Apollo Project from the server computer for each of the supported operating systems
Table 2-1 Installation instructions
Operating System To install the Apollo Project Web server
Windows 1 Double-click ApolloProject_windows_x_x_xexe where x_x_x is the Apollo Project version number on the Apollo Project CD
2 Follow the steps of the installation wizard making changes to the default settings as required
Linux 1 Open a Terminal window and change the directory to the Apollo Project CD
2 Run the following as rootsh ApolloProject_unix_x_x_xsh (where x_x_x is the Apollo Project version number)
3 Follow the steps of the installation wizard making changes to the default settings as required
Mac OS X 1 Double-click the ApolloProject_macos_x_x_xdmg where x_x_x is the Apollo Project version number disc image on the Apollo Project CDThe disc image mounts as a new volume on your desktop and automatically displays its contents in a Finder window
2 Double-click the installation file Apollo Project Installer in the Finder window
3 Follow the steps of the installation wizard making changes to the default settings as required
Note After installing Apollo Project you can drag the disc image to the Trash to eject it and remove it from your desktop
If you are uninstalling a version of Apollo Project prior to version 13 refer to the version 12 user guide for instruction on uninstalling Apollo Project
Apollo Project Version 12 User Guide revision 16106R2 released on 2008-09-09
Table 2-2 Uninstalling the Apollo Project Web server
Operating System To uninstall the Apollo Project Web server
Windows Click Start gt All Programs gt Nanometrics gt Apollo Project gt Apollo Project Uninstaller
Linux 1 Open a Terminal window and change the directory to the Apollo Project directory The location of the Apollo Project directory was defined when you installed Apollo Project The default location is optnanometricsApolloProject
2 Run the following as root uninstall
Mac OS X 1 Open the Finder2 Click Applications under Places3 Double-click the Apollo Project folder 4 Double-click Apollo Project Uninstaller
Chapter 2 Installing and Starting Apollo Project
Apollo Project User Guide16106R5 2009-03-24
7
22 Installing an Apollo Project Licence FileIf you did not install a licence file during the installation of the Apollo Project Web server application you can install one at any time using the Nanometrics Product Licence Installation Wizard
A licence for Apollo Project is only required if capabilities beyond those of the unlicensed version are needed See Section 121 ldquoSoftware Licencerdquo on page 2 for descriptions of the licensed and unlicensed versions Contact Nanometrics to order a licence (see Contacting Nanometrics on page 55)
If you have obtained a licence file from Nanometrics use the following steps to install the file
Installing a licence file after creating a project in Apollo Project will result in the loss of that project It is recommended that you install your licence before running Apollo Project for the first time
Operating System To install an Apollo Project licence file
Windows 1 Ensure the licence file is in a drive or network location that is accessible to the licence installation wizard
2 Click Start gt All Programs gt Nanometrics gt Apollo Project gt NmxLicenceInstaller
3 Follow the steps in the license installation wizard to select and install the licence file
Linux 1 Ensure the licence file is in a drive or network location that is accessible to the licence installation wizard
2 Open a Terminal window and change the directory to the Apollo Project directory The location of the Apollo Project directory was defined when you installed Apollo Project The default location is optnanometricsApolloProject
3 Run the following NmxLicenceInstaller
Mac OS X 1 Ensure the licence file is in a drive or network location that is accessible to the licence installation wizard
2 Open the Finder3 Click Applications under Places4 Double-click the Apollo Project folder 5 Double-click NmxLicenceInstaller6 Follow the steps in the license installation wizard to select and install
the licence file
Chapter 2 Installing and Starting Apollo Project
8 Apollo Project User Guide16106R5 2009-03-24
23 Starting the Apollo Project Web ServerUse the procedures in Table 2-3 that correspond to your Apollo Server computerrsquos operating system to start the Apollo Project Web server application
24 Running Apollo Project ClientIf you are running the Apollo Project client on the computer where the server application is installed open a browser and go to
httplocalhostPort
Where localhost is the local computer and port is the port number configured during installation The default port number for Apollo Project is 8088
To run an Apollo Project client when the server application resides on a different computer open a browser and go to
httpServer computer name or IP addressPort
For example if the domain name of the server computer is ApolloProjectServer with an IP address of 192168220 and the default port number of 8088 is being used the URL for the client application in your browser will be
httpApolloProjectServer8088
ndash OR ndash
http1921682208088
241 Troubleshooting Running Apollo Project ClientIf you are having trouble opening the Apollo Project client in your Web browser try these suggestions
a) Ensure that the Apollo Project Web server application is running on the Apollo Project server computer See Section 23 ldquoStarting the Apollo Project Web Serverrdquo
Table 2-3 Starting the Apollo Project Web server
Operating System To start the Apollo Project Web server
Windows Click Start gt All Programs gt Nanometrics gt Apollo Project gt Apollo ProjectLinux 1 Open a Terminal window and change the directory to the Apollo
Project directory The location of the Apollo Project directory was defined when you installed Apollo Project The default location is optnanometricsApolloProject
2 Run the following ApolloProject
Mac OS X 1 Open the Finder2 Click Applications under Places3 Double-click the Apollo Project folder 4 Double-click Apollo Project to start the Web server
Chapter 2 Installing and Starting Apollo Project
Apollo Project User Guide16106R5 2009-03-24
9
b) Verify that the firewall on the server computer is not blocking the port number used to serve Web pages (by default the port number is 8088) To check the port number used open ApolloProjectvmoptions in the ApolloProject folder and note the number identified for the -Dserverport setting
242 Stopping the Apollo Project Web ServerThe Apollo Project client provides the means to stop the Apollo Project Web server application To stop the Apollo Project Web server
1 Open the Apollo Project client
2 Click the Shut down Apollo Project button
3 Click OK to confirm the Web server shutdown
25 Upgrading Apollo ProjectTo upgrade Apollo Project from a previous version
1 Uninstall the Apollo Project Web server application as per Section 211 ldquoUninstalling Apollo Project Web Serverrdquo on page 6
2 Install the new version of Apollo Project as per Section 21 ldquoInstalling the Apollo Project Web Serverrdquo on page 5
When you shut down the Apollo Project Web server all clients are disconnected from the server To restore connectivity start the Apollo Project Web server using the instructions in Section 23 ldquoStarting the Apollo Project Web Serverrdquo on page 8
During the upgrade process all downloaded data will remain intact however you will need to recreate your projects and settings in the new version of Apollo Project
For Windows and Linux installations if you are upgrading from an earlier version of Apollo Project that used Apache Tomcat it is strongly recommended that you uninstall Tomcat before installing the new version of Apollo Project
Refer to the version 12 user guide for instruction on uninstalling versions of Apollo Project prior to version 13
Apollo Project Version 12 User Guide revision 16106R2 released on 2008-09-09
If you are using a licensed version of Apollo Project you will need a new licence file when installing the upgrade If you have not received a new licence file contact Nanometrics (see Contacting Nanometrics on page 55)
Chapter 2 Installing and Starting Apollo Project
10 Apollo Project User Guide16106R5 2009-03-24
Apollo Project User Guide16106R5 2009-03-24
11
Chapter 3 Retrieving Data
Creating New Projects
Creating a Station Table File
Configuring Apollo Project
Managing Projects
Running Projects
Editing and Viewing the Settings of Projects
Monitoring Project Status
31 Creating New ProjectsYou can create multiple projects up to the number supported by the software licence (see Section 121 ldquoSoftware Licencerdquo on page 2)
When you create a new project you have to
bull Select data Stores
bull Specify a station table file
bull Select the channel groups you want to download data from
bull Specify when you want the project to run
bull Select the output format
bull Specify the output location
To create a new project
1 Click New on the Apollo Project Existing Projects page
2 Click a project type and enter a unique name in the Project Name box
3 Click OK
Chapter 3 Retrieving Data
12 Apollo Project User Guide16106R5 2009-03-24
4 Select one or more data Stores by performing the following steps
Store type DescriptionSteps
File A file Store specification defines a particular Store that resides on a file system accessible by the server running Apollo Project The file system can be a local or a networked file system (for example accessible via SMB or NFS)
1 Click the File tab2 Enter the full path and file name of a Store file3 Click Add
Apollo Project adds the specification to the Selected Specifications section of the Store Selection page and finds all related Store files and adds them as a single Store to the Selected Stores section
Directory A directory Store specification defines the set of Stores that reside in a particular directory hierarchy on a file system accessible by the server running Apollo Project A recursive search from the specified directory identifies all of the available Stores The file system can be a local or a networked file system (for example accessible via SMB or NFS)
1 Click the Directory tab2 Enter a directory path name
If you specify a root directory such as C it will take a long time for Apollo Project to find all of the Store files in that root directory
3 Click AddApollo Project adds the specification to the Selected Specifications section of the Store Selection page and finds and adds all Stores in the specified directory and its subdirectories to the Selected Stores section
IP Address An IP Address Store specification defines the Store of a single instrument (or an instance of Apollo Server) The specified IP address must be an IP address bound to the Ethernet interface of an instrument At the same time the instrument must be running in communications mode and be accessible from the server running Apollo Project
1 Click the IP Address tab2 Enter the IP address of an instrument3 Click Add
Apollo Project adds the specification to the Selected Specifications section of the Store Selection page and finds all Stores associated with the IP address and adds them to the Selected Stores section
Chapter 3 Retrieving Data
Apollo Project User Guide16106R5 2009-03-24
13
Discovery A discovery Store specification specifies the Stores of multiple instruments In this case a class D (multicast) IP address and port is specified It is assumed that the Store of any instrument in communications mode is accessible from the LAN of the Apollo Project server When Discovery is enabled for the specified IP address and port these attributes are included upon running the project
1 Click the Discovery tab2 Enter the multicast address and port number of a group of instruments
For example 224199711386776Multicast addresses range from 224000 through 239255255255
3 Click AddApollo Project adds the specification to the Selected Specifications section of the Store Selection page and finds all Stores associated with the multicast address and adds them to the Selected Stores section of the Store Selection page
Notes When multiple multicast groups are used for discovery the port number must differ from existing discovery port numbers by 2 for each discovery port number in use x there must be no other discovery port configured for use with a value of x or x+1For example the default discovery multicast group used by Taurus is 224199711386776 To add another multicast group you have to specify a different port number (which cannot be 6776 or 6777)
Recent Specs
Apollo Project keeps the 16 most recently defined Store specifications and groups them by category on the Recent Specs page
1 Click the Recent Specs tab2 Expand a specification category (File Directory IP Address or Discovery)
and select a specification3 Click Add
Apollo Project adds the specification to the Selected Specifications section of the Store Selection page and finds all Stores associated with the specification and adds them to the Selected Stores section
Each time a project is run Apollo Project generates a list of available Stores based on the selected Store specifications The actual Stores from which data is retrieved can vary on successive project runs For example a discovery Store specification might result in a different number of instruments being included depending on current access to the instruments
Remove a specification (and its associated Stores) by selecting it and clicking Remove Remove all specifications (and all Stores) by clicking Remove All You cannot remove individual Stores from a specification but you can add a different specification and select a different group of Stores Alternatively you can use channel group attributes filtering to select the channel groups that data is retrieved from
When copying a Store from an instrument to your local computer do not overwrite an existing Store Instead delete the existing Store or move it to a different folder on the computer Stores are made up of multiple volumes and if the new Store has fewer volumes than the old Store you could see some unpredictable results with Apollo Project
Store type DescriptionSteps
Chapter 3 Retrieving Data
14 Apollo Project User Guide16106R5 2009-03-24
5 Click the Channel Group Selection tab
6 If you defined a default station table file and want to use it for this project go to step 7
For more information see Section 32 ldquoCreating a Station Table Filerdquo on page 22
-OR-
Click Create Default Station Table to create a table for all of the currently selected Stores and discovered instruments for this project using the default settings for the network name location and channel names
The default settings for the network name location and channel names are defined in the Behaviour and Defaults dialog box For more information see Section 33 ldquoConfiguring Apollo Projectrdquo on page 24
-OR-
Enter the path and file name of a station table for this project
7 If you want to download all data from all available Stores verify that the Retrieve data from all channel groups (do not filter) check box is selected and go to step 12
-OR-
If you want to filter the data by specific channel groups and channel group attributes go to step 8
8 Clear the Retrieve data from all channel groups (do not filter) check box
9 Select the time series channel groups you want to download data from
A station table is used to assign names to all of the selected channel groups For more information see Section 32 ldquoCreating a Station Table Filerdquo on page 22
If new Stores are found after a station table file has been defined for a project (for example as a result of Discovery or a directory specification) the default channel group names are used in the output files and no filtering is applied to the channel groups
If the text ldquoSelected Time Series Channels x of xrdquo where x represents the number of channels is red you have selected more time series channels than your licence permits You must select a valid number of time series channels (for the unlicenced version of Apollo Project there is a maximum of three time series channels) before you can create your project
Chapter 3 Retrieving Data
Apollo Project User Guide16106R5 2009-03-24
15
10 Select the state of health (SOH) channel groups you want to download data from Each group has a predefined dataset
To view the SOH data retrieved from a Taurus version 2x see Appendix B ldquoRetrieving SOH Data from a Taurus Version 2xrdquo
Predefined SOH group SOH data
GPS Time Time (longsecs) (the number of seconds since 1970-01-01)Time (UTC) (time in yyyy-mm-dd hhmmssms format)DAC CountGPS Engine StatusGPS Last Update Time(s)GPS PDOPGPS Satellites Used (number of satellites used)GPS TDOP Lat (deg) (latitude in degrees)Long (deg) (longitude in degrees)Timing Error (ns)Timing Phase Lock (system clock phase lock)Timing Uncertainty (ns)
Note The values for Number of satellites used PDOP and TDOP are provided by the GPS receiver at the Last update time In order to see what time these values correspond to look at the Last update time When GPS is off these three parameters and the Last update time are not updated The last value displays until the next update arrives (after the GPS is turned on again)
GPS Satellites Time (longsecs) (the number of seconds since 1970-01-01)Time (UTC) (time in yyyy-mm-dd hhmmssms format)
For each satelliteGPS Satellite Acquisition FlagGPS Satellite Azimuth (microordm)GPS Satellite Elevation (microordm)GPS Satellite Last Update Time (ms)GPS Satellite PRN GPS Satellite Signal Level (AMU)
Environment Time (longsecs) (the number of seconds since 1970-01-01)Time (UTC) (time in yyyy-mm-dd hhmmssms format)External SOH Voltage 1 (V) (12-bit voltage input)External SOH Voltage 2 (V) (12-bit voltage input)External SOH Voltage 3 (V) (12-bit voltage input)External SOH Voltage 4 (V) (12-bit voltage input)Sensor SOH Voltage 1 (V)Sensor SOH Voltage 2 (V)Sensor SOH Voltage 3 (V)
Chapter 3 Retrieving Data
16 Apollo Project User Guide16106R5 2009-03-24
11 If required enter additional filter information as comma-delimited text into the Network Station Location Channel and Instrument boxes
You can use an asterisk ()to represent 1 or more characters
12 Review the selected channel groups and if required edit the channel group mappings in the selected channel groups area of the tab
Channel groups that do not have a mapping appear as blanks in the selected channel groups area of the tab Mapping information for these channel groups can be entered and saved in the station table file for future projects
You can edit the mappings at any time The changes are reflected in future runs of any project using that same station table file For more information see Section 32 ldquoCreating a Station Table Filerdquo on page 22
13 Click the Time Selection tab and follow the steps for the project type you selected
Instrument Time (longsecs) (the number of seconds since 1970-01-01)Time (UTC) (time in yyyy-mm-dd hhmmssms format)Controller Current (mA)Digitizer Current (mA)NMX Bus Current (mA) (external connector)Sensor Current (mA)Serial Port Current (mA)Supply Voltage (mV)Temperature (ordmC)
Look in the selected channel groups area of the tab (lower half of the tab) for examples of filter details you can enter in the Network Station Location Channel and Instrument ID filter boxes
The NetworkStationLocationChannel column of the table presents information in the format implied by the column title For instance in an entry of XXA099901BHE(1) XX represents the network(2) A0999 represents the station(3) 01 represents the location(4) BHE represents the channel
Look at the Instrument ID column of the table for an example of an instrument name and serial number such as taurus_0999
Only mappings that are applicable for the selected channel groups appear in the selected channel groups area of the tab
All times use the UTC time zone
Predefined SOH group SOH data
Chapter 3 Retrieving Data
Apollo Project User Guide16106R5 2009-03-24
17
Project type DescriptionSteps
Archive Archive projects attempt to retrieve data up to the current timeThe time ranges for which output files will be produced are driven from the file interval and are aligned to the project start time It is therefore unlikely that the ldquomost recentrdquo file interval will align with the current time Therefore the most recent range for which data retrieval is attempted will have a portion of its data retrieved and the remainder (for future retrieval) will be declared unavailable However when the project is run later (after the end of the particular time range) the unavailable data will normally be retrieved and the situation will likely repeat itself with the ldquonewrdquo last range to retrieveTo run an Archive project manually1 If required edit the start time for the project2 Click Manual3 Specify the file interval
For example if you specify 2 hours then one file is created every 2 hours If the duration for the project is one day then a total of 12 files will be created
4 After you have finished creating the project click Run Now on the Summary page to run the project
To schedule an Archive project to run automatically at a regular interval1 Click Regular Interval and select the interval 2 Specify the file interval
For example if you specify 2 hours then one file is created every 2 hours If the duration for the project is one day then a total of 12 files will be created
3 After you have finished creating the project click Start Schedule on the Summary page to start the schedule for the project and click OK twice The project will run according to the interval you specified after you start the schedule For example if you click Start Schedule on a Wednesday and you specified every 2 days as the interval then the project will run for the first time on Friday and every two days after that If the computer has been rebooted and the Apollo Project Web server has been restarted the project will run according to the interval you specified after the computer has rebooted For example if the computer reboots on a Wednesday and you specified every 2 days as the interval then the project will run for the next time on Friday and every two days after that
Note Archive projects that are defined as scheduled projects can also be run manually at any timeTo schedule an Archive project to run automatically on a weekly basis1 If required edit the start time for the project2 Click Weekly Schedule and select the time and days of the week 3 Specify the file interval
For example if you specify 2 hours then one file is created every 2 hours If the duration for the project is one day then a total of 12 files will be created
4 After you have finished creating the project click Start Schedule on the Summary page to start the schedule for the project and click OK twice After you have finished creating the project the project will run for the first time according to the project start time and then it will run on a weekly basis according to the times and days you specified
Note Archive projects that are defined as scheduled projects can also be run manually at any time
Chapter 3 Retrieving Data
18 Apollo Project User Guide16106R5 2009-03-24
One Time A One Time project retrieves a single time segmentTo specify the start and end times for a One Time project1 If required edit the start time for the project2 Click End Time and enter an end time
-OR-Click Duration and specify the duration of the project The duration is the length of the requested time segment
3 Specify the file intervalFor example if you specify 2 hours then one file is created every 2 hours If the duration for the project is one day then a total of 12 files will be created
4 After you have finished creating the project click Run Now on the Summary page to run the project
Controlled Source
A Controlled Source project retrieves data specified as a set of individually entered shots and outputs the data in SEGY format To specify shots using a shots file1 Click Browse select a shots file and click OK2 Click Submit
The list of shots is imported and displayed in the Shot List section on the Time Selection page
Note For more information see Section A4 ldquoShot File Formats for Controlled Source Projectsrdquo on page 42To manually define shots1 Enter a shot time2 If required enter the latitude longitude and elevation3 If required select the pre-shot time period4 Select the post-shot time period5 Click Add
The shot is added to the Shot List section on the Time Selection page Triggers A Triggers project uses a CSV-formatted trigger list to specify the data to be
retrieved for example a trigger file that has been downloaded from a Taurus to the local computerTo define triggers1 Click Browse select a CSV triggers file and click OK2 Click Submit
The list of triggers is imported and displayed in the Triggers section on the Time Selection page
3 Select the pre-trigger and post-trigger time periodsThe pre-trigger and post-trigger time periods are used for all of the triggers
Project type DescriptionSteps
Chapter 3 Retrieving Data
Apollo Project User Guide16106R5 2009-03-24
19
14 If you selected a Controlled Source as the project type in step 2 go to step 17
You do not have to select an output format for a Controlled Source project because the output format for a Controlled Source project is always SEGY one output file is generated for all instruments and the stations are sorted by StationNameNetworkName
-OR-
If you selected one of the other project types go to step 15 to select an output format
15 Click the Output Format tab
Field Archive A Field Archive project is used for recurring data retrievals that occur at specified intervals The time of the last retrieval is stored on the instrumentTo define the start time and file interval1 If required edit the start time for the project2 Specify the file interval
For example if you specify 2 hours then one file is created every 2 hours3 If you want partial files retrieved select the Include last interval even if
incomplete check box You should only select this option when the retrieval of partial files is more important than retrieving the data for the current interval during a future project run
Be careful when specifying the file interval For example retrieving many hours or days of data and specifying a file interval of seconds or minutes could result in the generation of many files This is not only very resource intensive but could result in a data management problem as well
Project type DescriptionSteps
Chapter 3 Retrieving Data
20 Apollo Project User Guide16106R5 2009-03-24
16 Perform the following steps to select an output format
Output format Steps
MiniSEED 1 Click MiniSEED2 Click Per channel group to generate one output file per channel group
You must add the channel token to the Subdirectories or Filename box on the Output Location tab when choosing Per channel group-OR-Click Per instrument to generate one output file per instrument-OR-Click All Instruments to generate one output file for all instruments
3 Select the Sort check box if you want the output data sorted by timeData is put in a Store in the order received and this order may not always be chronological To ensure that the data in the resulting SEED file is chronological select Sort
4 Select the data record sizeThe default record size is 512 B However not all SEED file readers will support this file size Determine what your SEED reader supports and select an appropriate value The options are 512 B 1024 B 2048 B and 4096 B Note that a smaller record size will result in quicker SEED file output
Note The number of output files is determined by the file interval that you set on the Time Selection page
SAC 1 Click SACYou must add the channel token to the Subdirectories or Filename box on the Output Location tab when choosing SAC as the output format
NotesThere are two types of SAC files binary and ASCII Apollo Project only outputs binary SAC filesOne output file per channel group is generated
SEGY 1 Click SEGY2 Click Per channel group to generate one output file per channel group
You must add the channel token to the Subdirectories or Filename box on the Output Location tab when choosing Per channel group-OR-Click Per instrument to generate one output file per instrument-OR-Click All Instruments to generate one output file for all instruments
3 Select the Sort check box if you want the stations sorted by StationNameNetworkName
NotesAll stations must have the same sample rateThe maximum number of samples per trace is 32767SEGY trace headers from discovered instruments will not have station location information
Chapter 3 Retrieving Data
Apollo Project User Guide16106R5 2009-03-24
21
17 Click the Output Location tab
18 If you defined a default base directory when you configured Apollo Project and want to use it for this project go to step 21
For more information see Section 33 ldquoConfiguring Apollo Projectrdquo on page 24
-OR-
Enter the valid absolute path of the base directory for the processed data subdirectories and files
If the base directory you entered does not exist click Create to create it
19 If you defined a default expression for subdirectories when you configured Apollo Project and want to use it for this project go to step 21
For more information see Section 33 ldquoConfiguring Apollo Projectrdquo on page 24
-OR-
Enter the expression used to define path names for subfolders under the base directory
You can enter tokens in any order including any additional characters that are valid for paths
Seisan 1 Click Seisan
NotesYou must have Seisan installed on your computer with a WAVEFORM_BASE and CONT_BASE line included for each station in the DATSEISANDEF file You must define a SEISAN_TOP environment variableOne output file per channel group is generated
Regardless of the output format selected SOH channel group data is always output in CSV format
The Base Directory is the root of all data retrieved for the project and can be defined at any location in the file system of the server running Apollo Project including a networked drive on a separate server If you want to create or use a directory on a computer on the network you have to enter the server and share name in a modified UNC format that is prefixed by an additional two backslashes For example the usual fileserver1storefiles must be written as fileserver1storefiles
Large amounts of data can be stored in this location You must ensure that adequate disk space is available
For deployments of Apollo Project where the clients are not running on the server it is recommended that the file system containing the base directory on the server be shared or exported as a networked file system
It is not recommended that you use the channel token in the subdirectories expression if the project includes more than one channel group per instrument (selected on the Channel Group Selection tab) and the output is not per channel group (selected on the Output Format tab)
Output format Steps
Chapter 3 Retrieving Data
22 Apollo Project User Guide16106R5 2009-03-24
20 If you defined a default expression for file names when you configured Apollo Project and want to use it for this project go to step 21
For more information see Section 33 ldquoConfiguring Apollo Projectrdquo on page 24
-OR-
Enter the expression used to define file names for the processed data files that are stored in the subfolders under the base directory
You can enter tokens in any order including any additional characters that are valid for file names
21 Click OK to save the new project
The new project is created and the Summary page is displayed
32 Creating a Station Table FileYou can create a mapping between a given instrumentchannel group (for example taurus_1234digitizertimeSeries1) and a corresponding network station location and channel name These mappings are stored in a station table file and the mapped channel group names are used in the output files
You can create a station table file and use it as the default for all projects or you can create a station table for individual projects
To create a station table file and set is as the default
1 Click the configuration button in the upper right corner
2 Specify the network name location and channel names on the Behaviour and Defaults dialog box and click OK to save the new settings
The settings you enter here are used as the channel names in the station table file You can edit these settings in step 8
For more information on configuring Apollo Project settings see Section 33 ldquoConfiguring Apollo Projectrdquo on page 24
3 Click New on the Apollo Project Existing Projects page
Do not use the channel token in the filename expression if the project includes more than one channel group per instrument (selected on the Channel Group Selection tab) and the output is not per channel group (selected on the Output Format tab)
The Sample Path shows an example of a file name generated using the values for the Base Directory Subdirectories and Filename settings
You can only edit the settings of a project before it has run for the first time or been scheduled (Archive project) If you want to edit the settings of a project after it has already run once or been scheduled you can copy the project (see Section 345 ldquoCopying a Projectrdquo on page 28) and then edit the settings for the copy
It is recommended that you create a station table file and set it as the default for all projects You can update the mappings in this file when new Stores are added or discovered
Chapter 3 Retrieving Data
Apollo Project User Guide16106R5 2009-03-24
23
4 Type Station Table in the Project Name box and click any project type
5 Click OK
6 Click the Store Selection tab and select as many Stores as possible
See step 4 of Section 31 ldquoCreating New Projectsrdquo for information on how to add specifications and select Stores
7 Click the Channel Group Selection tab and click Create Default Station Table
A station table file is created and the name of the file is displayed in the Station Table File Name box
8 Edit the station table channel group mappings in the selected channel groups area of the tab (lower half of the tab) as required
The NetworkStationLocationChannel names will appear in the output files If the Location is empty it is interpreted as the SEED default of two spaces
9 Click OK to close the project and finish creating the station table
10 Click the configuration button in the upper right corner
11 Enter the path and name of the station table file you just created in the Station Table File Name box on the Behaviour and Defaults dialog box
12 Click OK to save the new settings
The station table file you specified will be used as the default for all future projects You can open the Station Table project and edit the station table file if you need to add more Stores or change the mappings
For more information on configuring Apollo Project settings see Section 33 ldquoConfiguring Apollo Projectrdquo on page 24
Make a note of the path of the station table file because you will have to enter it on the Behaviour and Defaults dialog box to set it as the default for all projects
Valid characters for the network station location and channel in the NetworkStationLocationChannel box are upper case letters A to Z numbers 0 to 9 and spaces are also acceptable for the location
Chapter 3 Retrieving Data
24 Apollo Project User Guide16106R5 2009-03-24
33 Configuring Apollo ProjectYou can configure basic settings for Apollo Project and the default settings for new projects The changes you make to the project default settings only apply to new projects
To configure Apollo Project
1 Click the configuration button in the upper right corner
2 Edit the following settings
Setting Description
Log Verbosity The level of detail that is logged by Apollo ProjectThe default setting is Info
Log Location The default name of the Apollo Project log folder Maximum Number of Retrieval Attempts
The maximum number of single retrieval attempt made for all missing time segments on all channel groups every time a project is run Enter an integer from 0 through 1000 The default value is 8
Notes If the Taurus is busy when a retrieval attempt is made the number of remaining retrieval attempts is not decreased by one attemptYou can view the channel group details page to see if there are any remaining retrieval attempts for any channel groups (see Section 373 ldquoMonitoring the Status of a Running Projectrdquo on page 34)
Number Of Retries The number of times Apollo Project attempts to connect to a data source if there is a network connectivity problem Enter an integer from 0 through 1000 The default value is 3
Note Every time a project is run it starts with the maximum number of retries
Retry Interval (secs) The amount of time in seconds that Apollo Project waits before trying to connect to a data source againEnter an integer from 0 through 1000 The default value is 5
Station Table File Name The file name and location of the station table file that is used to assign station names to all of the selected channel groupsA station table is used to assign names to all of the selected channel groups For more information see Section 32 ldquoCreating a Station Table Filerdquo on page 22No station table file is specified by default
Chapter 3 Retrieving Data
Apollo Project User Guide16106R5 2009-03-24
25
Base Directory The folder name and location of the base directory for the processed data subfolders and files Enter any valid folder name and location including any additional characters that are valid for paths The default base directory name is ApolloProject
Notes The Base Directory is the root of all data retrieved for the project and can be defined at any location in the file system of the server running Apollo Project including a shared folder on a different computer If you want to create or use a folder on a computer on the network you have to enter the server and share name in a modified UNC format that is prefixed by an additional two backslashes For example the usual fileserver1storefiles must be written as fileserver1storefilesLarge amounts of data can be stored in this location You must ensure that adequate disk space is availableFor deployments of Apollo Project where the clients are not running on the server it is recommended that the file system containing the base directory on the server be shared or exported as a networked file system
Subdirectories The expression used to define path names for subfolders under the base directoryEnter tokens in any order including any additional characters that are valid for paths The default path name is as follows projectyearmonthday
Filename The expression used to define file names for the processed data files that are stored in the subfolders under the base directoryEnter tokens in any order including any additional characters that are valid for file names The default filename is as follows instrument_time
Sample Path An example of a file name generated using the values for the Base Directory Subdirectories and Filename settings
Network Name A standard network codeEnter any two upper case letters or numbers The default code is XX
Location A location within a stationEnter any two upper case letters numbers or spaces
The default location is two spaces for ldquononerdquo You must delete the two default spaces if you enter a new location value
Setting Description
Chapter 3 Retrieving Data
26 Apollo Project User Guide16106R5 2009-03-24
3 Click OK to save the new settings
34 Managing ProjectsYou can view open close copy and delete projects Also you can create convenient links to run your individual projects with desktop shortcuts
341 Viewing Existing Projects1 Click Projects in the Projects bar
2 View the projects listed on the Existing Projects page
The Existing Projects page shows a list of all projects and a status overview of each project For more information see Section 371 ldquoViewing an Overview of the Status of All Projectsrdquo on page 32
Channel 1 Name A channel codeEnter any three upper case letters or numbersThe default channel code is BHZ
Channel 2 Name A channel codeEnter any three upper case letters or numbersThe default channel code is BHN
Channel 3 Name A channel codeEnter any three upper case letters or numbersThe default channel code is BHE
Setting Description
Chapter 3 Retrieving Data
Apollo Project User Guide16106R5 2009-03-24
27
342 Opening a Project1 Click the project name under the Name column on the Existing Projects page
2 Click the Open Project button
343 Creating a Desktop Shortcut to a ProjectLaunching a project with a desktop shortcut will open Apollo Project to that project and run the project
Methods for creating desktop shortcuts to Web sites vary from browser to browser These procedures explain how to create desktop shortcuts to specific projects for both Mozilla Firefox 3 and Microsoft Internet Explorer 7 Desktop shortcuts to projects include the Apollo Project icon and are titled in the format Project Name ndash Apollo Project
In Firefox 3
1 Open the project you want to create a shortcut to in Firefox
2 Reduce the size of the Firefox window so that the desktop is visible
3 Drag the Site Identification Button onto the desktop
The Site Identification Button is located to the left of the Location Bar and displays the Apollo Project icon
In Internet Explorer 7
1 Open the project you want to create a shortcut to in Internet Explorer
2 Press ALT+F
3 Select Send gt Shortcut to Desktop
344 Closing a Project
1 Click the Close Project button in the Projects bar
Launching a desktop shortcut to a project automatically runs that project It is important to note that once a project is run its settings can no longer be edited It is recommended that desktop shortcuts only be created for Field Archive projects
Firefox is the recommended browser for Apollo Project
Chapter 3 Retrieving Data
28 Apollo Project User Guide16106R5 2009-03-24
345 Copying a Project
1 Select the project name under the Name column on the Existing Projects page
2 Click Copy
3 Enter a unique name for the new project and click OK
4 Click Edit and edit the settings as required
5 Click OK to save the project after you have finished editing the settings
346 Deleting a ProjectWhen you delete a project only files in the temporary folder are deleted All processed data files are not deleted
1 Click the project name under the Name column on the Existing Projects page
2 Click Delete
3 Click OK on the confirmation message
35 Running ProjectsFor all project types you can run a project manually at any time Archive projects can also be defined to run automatically on a schedule
If it is a scheduled Archive Project and the schedule is started click Cancel Schedule before you create a copy of it (If the schedule is not started the Start Schedule button is visible if the schedule is started the Cancel Schedule button replaces the Start Schedule button)
Apollo Project stores intermediate files in a temporary subdirectory of the Base Directory specified for the output location of a project These intermediate files correspond to the actual channel group data retrieved from the Stores referenced by the project If a project is deleted from Apollo Project these temporary files will be removed automatically
Disk space can also be reclaimed by removing these temporary files manually without deleting the project However if the project is run again the output files produced might be incomplete if previously retrieved data from these temporary files is required
For more information on what happens when a project runs see Section A1 ldquoOverview of Running Projectsrdquo on page 37
Chapter 3 Retrieving Data
Apollo Project User Guide16106R5 2009-03-24
29
351 Running a Project1 Open a project
2 Click Run Now on the Summary page to start the project
The project starts running and the Retrieval Status page is displayed
352 Stopping a Project1 Open a project
2 Click Cancel Run on the Summary page to stop the project
3 Click OK on the success message
353 Merging Project Data FilesYou have the option to merge all of the downloaded data for the stations and instruments into one file per interval for each project
1 Open a project
2 Click Merge
A single file is generated for each time period The time period is determined by the file interval you specified on the Time Selection page when you created the project For more information see step 13 of Section 31 ldquoCreating New Projectsrdquo on page 11
The original data files are not modified when you select the option to merge project data files
You can also click Run Now on the Retrieval Status page to start a project
For more information on what happens when a project runs see Section A1 ldquoOverview of Running Projectsrdquo on page 37
You can also click Cancel Run on the Retrieval Status page to stop a project
You cannot merge data from Archive projects and you cannot merge data in the Seisan format
You can also click Merge on the Retrieval Status page to merge the data from a project
Chapter 3 Retrieving Data
30 Apollo Project User Guide16106R5 2009-03-24
354 Running a Scheduled Archive Project1 Open a project
2 Click Start Schedule to start the project schedule
3 Click OK on the confirmation message
4 Click OK on the success message
For a project scheduled to run weekly the project will run for the first time according to the project start time and then it will run on a weekly basis according to the times and days you specified
For a project scheduled to run at a regular interval the project will run according the to interval you specified after you start the schedule For example if you click Start Schedule on a Wednesday and you specified every 2 days as the interval then the project will run for the first time on Friday and every two days after that
3541 Cancelling a Schedule
If you cancel a scheduled project before it runs for the first time you can edit the project settings
If you cancel a project that is currently running the current project runs to completion but subsequent project runs will not occur
1 Open a project
2 Click Cancel Schedule to cancel the project schedule
3 Click OK on the confirmation message
4 Click OK on the success message
You can also click Start Schedule on the Retrieval Status page to start the schedule of a project
You can restart the schedule by opening the project and clicking Start Schedule
You can also click Cancel Schedule on the Retrieval Status page to cancel the schedule of a project
Chapter 3 Retrieving Data
Apollo Project User Guide16106R5 2009-03-24
31
36 Editing and Viewing the Settings of ProjectsYou can edit the settings of a project before it has run After it has run you can view the settings
361 Editing Project Settings1 Open the project
2 Click Edit on the Summary page
3 Edit the settings as required
4 Click OK to save the changes
362 Viewing Project Settings1 Open the project
2 Click View on the Summary page
3 Click the tabs to view the settings
4 Click Cancel when you have finished viewing the settings
You can only edit the settings of a project before it has run for the first time or been scheduled (Archive project) If you want to edit the settings of a project after it has already run once or been scheduled you can copy the project (see Section 345 ldquoCopying a Projectrdquo on page 28) and then edit the settings for the copy
Settings For more information
Store Selection See step 4 of Section 31 ldquoCreating New ProjectsrdquoChannel Group Selection See step 5 to step 12 of Section 31 ldquoCreating New ProjectsrdquoTime Selection See step 13 of Section 31 ldquoCreating New ProjectsrdquoOutput Format See step 15 and step 16 of Section 31 ldquoCreating New ProjectsrdquoOutput Location See step 17 to step 20 of Section 31 ldquoCreating New Projectsrdquo
You can also click Edit on the Retrieval Status page to edit the settings of a project
You can also click View on the Retrieval Status page to edit the settings of a project
Chapter 3 Retrieving Data
32 Apollo Project User Guide16106R5 2009-03-24
37 Monitoring Project StatusYou can monitor the status of a project by viewing information on the Existing Projects Summary and Retrieval Status pages
371 Viewing an Overview of the Status of All ProjectsThe Existing Projects page is the default home page of Apollo Project You see this page when you first open Apollo Project or when you click Projects in the projects bar For more information see Section 341 ldquoViewing Existing Projectsrdquo on page 26
You can view the following information for all projects on the Existing Projects page
bull Name
bull Type
bull Current status
bull Last time the project run
bull Status of data retrieved
The Data Retrieved bars on the Existing Projects page show the overall status of the data retrieval For more information see Section 3731 ldquoStatus Coloursrdquo on page 34
Chapter 3 Retrieving Data
Apollo Project User Guide16106R5 2009-03-24
33
372 Viewing the Status of an Individual ProjectWhen you open a project a detailed summary of the project is shown on the Summary page For more information see Section 342 ldquoOpening a Projectrdquo on page 27
You can view the following information for each project on the Summary page
bull Date it was created
bull Date it was last modified
bull Current status
bull Last time it ran
bull Next time it will run
You can also view a summary of all of the settings you specified when you created the project (Store specifications selected Stores selected time series channel groups selected SOH channel groups start and end times number of files generated file interval and output format and locations)
All times are reported using the UTC time zone
Chapter 3 Retrieving Data
34 Apollo Project User Guide16106R5 2009-03-24
373 Monitoring the Status of a Running ProjectYou can view the data retrieval status of a project while it is running on the Retrieval Status page The Retrieval Status page is displayed automatically when you click Run Now to run a project You can also view this page by opening a project and clicking the Retrieval Status tab
The status for each channel group is expressed in the form of two numbers (for example 60100) and two bar graphs The first number is the percentage available of the total time requested (for example 60) and the second number is the percentage retrieved of the time available (for example 100) For more information on the bar graph status colours see Section 3731 ldquoStatus Coloursrdquo on page 34
You can also view retrieval details for each channel group listed on the Retrieval Status page For more information see Section 3732 ldquoViewing the Retrieval Details for Each Channel Grouprdquo on page 35
3731 Status Colours
The data retrieval status bars use the following status colours
The information that is displayed on the Retrieval Status page is updated continuously while a project is running
Table 3-1 Status colours
Colour Status
Green Apollo Project has retrieved the data
Yellow Apollo Project is attempting to retrieve available data from the Store
Red Data is available in the Store but Apollo Project has failed to retrieve it on this attempt Apollo Project will make additional attempts to retrieve the data up to the configured Maximum Number of Retrieval Attempts For information on how to set the Maximum Number of Retrieval Attempts setting see Section 31 ldquoCreating New Projectsrdquo on page 11
White Data for some portion of the requested time segment is not available in the Store For example there are gaps in the data or the retrieval request is for a future time segment
Chapter 3 Retrieving Data
Apollo Project User Guide16106R5 2009-03-24
35
3732 Viewing the Retrieval Details for Each Channel Group
You can view the retrieval status of each time segment for a channel group
1 Click a channel group name
2 Click the Channel Group Details button that is located to the right of the channel group name
The Remaining Retrieval Attempts column displays the number of times that Apollo Project will try to download each missing time segment for the channel group when the project is run again For information on how to set the Maximum Number of Retrieval Attempts setting see Section 33 ldquoConfiguring Apollo Projectrdquo on page 24
3 Click OK when you have finished viewing the details
Chapter 3 Retrieving Data
36 Apollo Project User Guide16106R5 2009-03-24
Apollo Project User Guide16106R5 2009-03-24
37
Appendix A Reference Information and Examples
Overview of Running Projects
Example Project Settings
Example Deployment Scenarios
Shot File Formats for Controlled Source Projects
A1 Overview of Running ProjectsWhen a project is run Apollo Project performs the following steps
1 The requested time ranges are identified
2 The channel groups for which data are to be retrieved are identified
3 The actual Stores specified by the Store specifications of the project are identified
For each identified Store the following steps are performed
1 A data availability analysis for the outstanding time ranges is performed These are for the ranges for which data has not already been retrieved The availability of the data is recorded for reference It is possible that a given Store was not present at the time the project was last run If this is the case then an attempt is made to retrieve all of the required time ranges of the project from the Store
2 If any data exists in the Store for any of the requested time ranges then a retrieval of this data is performed and the retrieved data is stored to local temporary files
3 If the number of retrieval attempts for a given time range exceeds a configurable threshold (see Section 33 ldquoConfiguring Apollo Projectrdquo on page 24) then the retrieval of data within the stated range is not attempted again
If any data was retrieved during the run of the project then the corresponding output files of the desired output format are generated and stored in the output location specified for the project
When running Apollo Project with Taurus version 2x the schedule for Archive projects must be greater than 5 minutes in duration Schedules that are less than 5 minutes can result in data that is missing or not downloaded
Appendix A Reference Information and Examples
38 Apollo Project User Guide16106R5 2009-03-24
It is possible that the requested data for a given channel group exists across multiple Stores If all of these Stores are included by the Store specifications for the project then Apollo Project assembles the requested data
When a project runs detailed information regarding the results of the retrieved data and processed data are available For more information see Section 37 ldquoMonitoring Project Statusrdquo on page 32
A2 Example Project Settings
A21 Example 1 One Time ProjectProject Name Project1
Project Type One Time
Channel groups selected for retrieval CASTN1OTBHZ (on taurus_1234)
Requested Time Range January 30 2008 1400 ndash 1500 UTC
File Interval 20 minutes
Output Location Base Directory disk2ApolloProjectOutputData
Output Location Subdirectories projectyearmonthday
Output Location Filenamestationnetwork_time
When the project is run successfully the following output files will be created on the server running Apollo Project
disk2ApolloProjectOutputDataProject120080130STN1CA_20080130_140000seed
disk2ApolloProjectOutputDataProject120080130STN1CA_20080130_142000seed
disk2ApolloProjectOutputDataProject120080130STN1CA_20080130_144000seed
Appendix A Reference Information and Examples
Apollo Project User Guide16106R5 2009-03-24
39
A22 Example 2 Controlled Source ProjectProject Name Project2
Project Type Controlled Source
Channel groups selected for retrieval CASTN1OTBHZ (on taurus_1234) CASTN1OTBHN (on taurus_1234)
Requested Shot Times January 30 2008 1400 UTC January 30 2008 1430 UTC
Pre Time 30 seconds
Post Time 30 seconds
Output Location Base Directory disk2ApolloProjectOutputData
Output Location Subdirectories projectyearmonthday
Output Location Filename timeformat
When the project is run successfully the following output files will be created on the server running Apollo Project
disk2ApolloProjectOutputDataProject22008013020080130_135930segysgy
disk2ApolloProjectOutputDataProject22008013020080130_142930segysgy
A3 Example Deployment Scenarios
A31 One TimeYou want to download three days of data from multiple instruments on the network save the data in MiniSEED format and create a file for every hour of data
A One Time project is the recommended solution The Store of each instrument can be made available to Apollo Project by creating a corresponding IP Address Store specification with the IP address of the instrument The requested time range can be specified along with a file interval of one hour Ensure that the instruments are configured to run in Communications mode
A32 Scheduled ArchiveYou want seismic data to be retrieved automatically from a group of instruments on the network every six hours The instruments are always accessible via an Ethernet connection
A scheduled Archive project is the recommended solution Use the Regular Interval scheduling option and set the interval to six hours
You can also run a scheduled Archive project at any time For example if the scheduled retrieval interval of a project is six hours and between intervals you want to retrieve the data three hours early you can run the project and approximately three additional hours of data would be accumulated About three hours later the project will run automatically and accumulate the remaining three hours of data
Appendix A Reference Information and Examples
40 Apollo Project User Guide16106R5 2009-03-24
A33 Manual ArchiveYou want to retrieve seismic data from a group of instruments but their respective Stores are only available for retrieval on occasion (no regular dependable schedule for retrieval from these Stores is possible)
A manually run Archive project is the recommended solution You can create the project and run it whenever any of the instruments are available for retrieval
A34 Field ArchiveYou want to collect data from a set of isolated instruments in the field at recurring intervals (for example twice per month)
A Field Archive project is the recommended solution You can create a Field Archive project and either add all instrument IP addresses to the list or use a Discovery specification The time for the last retrieval is stored on the instrument and all data is recovered from the last recovery time
A35 Media HarvestingYou want to collect the media from a set of instruments in the field at a regular interval (for example once per week) You also have to retrieve all of the seismic data on the media for subsequent analysis
An Archive project is the recommended solution Initially a directory is created on the file system of the server running Apollo Project A directory Store specification is created with this directory as the parent directory from which to search for Stores The content of each media instance in the weekrsquos collection is copied from a media reader to a subdirectory of the directory When the project is run all of the copied Stores are automatically available and the project accumulates data for each instrument
Due to the nature of media harvesting and the replacement procedure for this example data is always missing for the last period of output files for the current week This period corresponds to the time that the media was taken from the instrument and replaced with a new one The following week when the media is harvested again from the instruments in the field Apollo Project fills in the missing time for these files with the new Store data regardless of the media instance on which the data currently resides
You can only create and run Field Archive projects for Taurus version 30 or later
Appendix A Reference Information and Examples
Apollo Project User Guide16106R5 2009-03-24
41
A36 Trigger Downloading You have set up a network of five Tauruses around a hydro dam Each Taurus is accessible over an Ethernet connection and each is set to record data over the weekend You have set the period for data retrieval at 30 seconds before and five minutes after any seismic activity but the following procedure shows you why it is not necessary to view all of the data accumulated over the whole weekend
1 Select the Taurus at the site with the least environmental noise or determine the best site for generating triggers and designate this Taurus ldquoTaurus Ardquo for reference
You need to perform this task in advance More information about triggers can be found in the Taurus Portable Seismograph User Guide
2 Download the trigger file from ldquoTaurus Ardquo and review the file to verify the correct number of triggers
3 Follow these steps to create a new Triggers project
a) Click New on the Apollo Project Existing Projects page
b) Click Triggers as the project type and enter a unique name in the Project Name box
c) Click OK
d) Click the IP Address tab on the Store Selection tab
e) Enter the IP address of a Taurus
f) Click Add
g) Repeat step e until you have entered the IP addresses of all five of the Tauruses
Apollo Project adds the IP address specifications to the Selected Specifications section of the Store Selection page and finds all five Stores associated with the IP addresses and adds them to the Selected Stores section
h) Click the Channel Group Selection tab
i) Click Create Default Station Table to create a table for all of the currently selected Stores and discovered instruments
j) Review the selected channel groups and if required edit the mappings in the selected channel groups area of the tab (lower half of the tab)
k) Click the Time Selection tab
l) Click the Browse button
m)Select the trigger file that you downloaded in step 2 and click OK
n) Click Submit
The list of triggers is imported and displayed in the Triggers section on the Time Selection page
o) Enter a Pre Time of 30 seconds and a Post Time of 5 minutes
p) Click the Output Format tab
q) Click MiniSEED
r) Click All Instruments
s) Click the Output Location tab
Appendix A Reference Information and Examples
42 Apollo Project User Guide16106R5 2009-03-24
t) Enter the valid absolute path of the base directory for the processed data subfolders and files
u) Enter the expression used to define path names for subfolders under the base directory
v) Enter the expression used to define file names for the processed data files that are stored in the subfolders under the base directory
w) Click OK
4 Click the Run Now button on the Summary page
When the project has finished running the output folder you specified in step t will contain ten files Each output file will contain 5 minutes and 30 seconds of data from the five Tauruses
A4 Shot File Formats for Controlled Source ProjectsYou have two options for defining shots for a Controlled Source project manually defining shots or importing shots from a shot file
You can create shot files in one of following three file formats
Microsoft Office Excel (xls) ndash See Section A41 ldquoCreating a Shot File With Microsoft Office Excelrdquo on page 42
OpenOfficeorg Calc (ods) ndash See Section A42 ldquoCreating a Shot File With OpenOfficeorg Calcrdquo on page 44
Comma-Separated Values (csv) ndash See Section A43 ldquoCreating a Comma-Separated Values Shot Filerdquo on page 45
The Shot file templates are located in the docShotFileImport folder on the Apollo Project CD
A41 Creating a Shot File With Microsoft Office ExcelThe Microsoft Office Excel template for Apollo Project can be used with Microsoft Office Excel version 2003 or later
To create an Microsoft Office Excel based shot file
1 Double-click ShotFileTemplatexlt
A new Microsoft Office Excel file is created from the template and opens in the Microsoft Office Excel
2 Save the new spreadsheet as a Microsoft Office Excel document (xls)
3 Enter shot file data as specified in the Microsoft Office Excel spreadsheet
Only the decimal separator is supported for shot files Separators that denote the 3rd power of 10 (thousand) are not supported (for example 4500) The Microsoft Excel and OpenOffice templates reinforce these restrictions and are recommended for creating csv files
Appendix A Reference Information and Examples
Apollo Project User Guide16106R5 2009-03-24
43
You can enter data for multiple shot times
4 Click Save to save the file in Microsoft Office Excel format
5 Click File gt Save As and select CSV (Comma delimited) (csv) from the Save as type list
6 Click Save
7 Click OK on the message warning you that you are only saving the active sheet
8 Click Yes on the message warning you that file features might be incompatible with the csv format
9 Close Microsoft Office Excel
If you are using Microsoft Office Excel 2007 click the Microsoft Office Button and click Save As
Ensure that you save the file as a comma delimited file If the shot file is mistakenly saved in Microsoft Excel format (xls) the shot file will not work in Apollo Project
Appendix A Reference Information and Examples
44 Apollo Project User Guide16106R5 2009-03-24
A42 Creating a Shot File With OpenOfficeorg CalcThe OpenOffice template has been tested with OpenOfficeorg Calc version 23 Later versions of OpenOfficeorg Calc can be used at your discretion
To create a shot file based on the OpenOfficeorg Calc template
1 Double-click ShotFileTemplateots
A new OpenOffice spreadsheet is created from the template and opens in OpenOfficeorg Calc
2 Save the new spreadsheet as an OpenOffice Calc document (ods)
3 Enter the shot file data as specified in the OpenOffice spreadsheet
You can enter data for multiple shot times
4 Click Save to save the file in OpenOfficeorg Calc format
5 Click File gt Save As and select Text CSV (csv) from the Save as Type list
6 Select the Edit filter settings check box
7 Click Save
A warning message might appear that warns you that the document might contain formatting that cannot be saved in the csv format Click Yes on the warning message to save the file in csv format
The Export of text files window opens
8 Delete the double quotation marks () in the Text delimiter box and ensure that the Save cell content as shown check box is selected
9 Click OK to export the OpenOffice spreadsheet as a csv file
10 Click OK on the warning message
11 Close OpenOfficeorg Calc
Appendix A Reference Information and Examples
Apollo Project User Guide16106R5 2009-03-24
45
A43 Creating a Comma-Separated Values Shot FileYou can use any text editor to create a csv shot file
To create a csv shot file
1 Open ShotFileTemplatecsv in a text editor and save it with a different name
2 Format each line of the csv file as follows
Shot TimePre TimePost TimeLatitudeLongitudeElevation
For example
2008-08-28 103044090600000-6000004267
The format and units are as follows
3 Save the file as a csv formatted file
The csv shot file template is not compatible with Microsoft Office Excel Make sure that you do not double-click it and open it in Microsoft Office Excel
FormatUnits
Shot Time yyyy-mm-dd hhmmss
Pre Time seconds
Post Time seconds
Latitude degrees
Longitude degrees
Elevation meters
Appendix A Reference Information and Examples
46 Apollo Project User Guide16106R5 2009-03-24
Apollo Project User Guide16106R5 2009-03-24
47
Appendix B Retrieving SOH Data from a Taurus Version 2x
Taurus Version 2x SOH Data Retrieved by Apollo Project
Retrieving SOH Data from a Taurus Version 2x Streaming to Apollo Server
B1 Taurus Version 2x SOH Data Retrieved by Apollo Project This section presents the predefined datasets of SOH data Apollo Project will retrieve from a Taurus version 2x either through a direct connection or a stream to Apollo Server For instruction on retrieving streaming Taurus version 2x data from Apollo Server see Section B2 ldquoRetrieving SOH Data from a Taurus Version 2x Streaming to Apollo Serverrdquo on page 48
The order of the columns presented in the table below will differ when streaming Taurus version 2x SOH data from Apollo Server
Predefined SOH group SOH data
GPS Time Time (longsecs) (the number of seconds since 1970-01-01)Time (UTC) (time in yyyy-mm-dd hhmmssms format)Altitude (m)DAC CountError (ns) (time error)GPS Engine StatusLast Update Time(s)Lat (deg) (latitude in degrees)Long (deg) (longitude in degrees)NumSatellites (number of satellites used)PDOPPhaseLock (system clock phase lock)TDOPUncertainty (ns) (time uncertainty)
Note The values for Number of satellites used PDOP and TDOP are provided by the GPS receiver at the Last update time In order to see what time these values correspond to look at the Last update time When GPS is off these three parameters and the Last update time are not updated The last value displays until the next update arrives (after the GPS is turned on again)
Appendix B Retrieving SOH Data from a Taurus Version 2x
48 Apollo Project User Guide16106R5 2009-03-24
B2 Retrieving SOH Data from a Taurus Version 2x Streaming to Apollo ServerThis section provides instruction on configuring your Taurus version 2x to stream data to Apollo Server and instructions on how to use Apollo Project to retrieve this data from Apollo Server
B21 Streaming Data from a Taurus Version 2x to Apollo ServerUse the Taurus graphical user interface on either the Taurus display screen or through a Web browser to set up an NP stream from a Taurus version 2x to Apollo Server
1 Log in to the Taurus version 2x with either the tech or central user account
2 Select Advanced Configuration gt Communications gt NP Data Streaming
GPS Satellites Time (longsecs) (the number of seconds since 1970-01-01)Time (UTC) (time in yyyy-mm-dd hhmmssms format)
For each satelliteAcquisition FlagLast Update Time (ms)PRNSatellite Azimuth (microordm)Satellite Elevation (microordm)Signal Level (AMU)
Environment Time (longsecs) (the number of seconds since 1970-01-01)Time (UTC) (time in yyyy-mm-dd hhmmssms format)External SOH Voltage 1 (V) (12-bit voltage input) External SOH Voltage 2 (V) (12-bit voltage input) External SOH Voltage 3 (V) (12-bit voltage input) External SOH Voltage 4 (V) (12-bit voltage input) Sensor SOH Voltage 1 (V)Sensor SOH Voltage 2 (V)Sensor SOH Voltage 3 (V)
Instrument Time (longsecs) (the number of seconds since 1970-01-01)Time (UTC) (time in yyyy-mm-dd hhmmssms format)Controller Current (mA)Digitizer Current (mA)NMX Bus Current (mA) (external connector)Sensor Current (mA)Serial Port Current (mA)Supply Voltage (mV)Temperature (ordmC)
Predefined SOH group SOH data
Appendix B Retrieving SOH Data from a Taurus Version 2x
Apollo Project User Guide16106R5 2009-03-24
49
3 To have the Taurus stream both time series and SOH data to Apollo Server select both Stream Time Series and Stream SOH
-OR-
Select only Stream SOH if you only want to retrieve the SOH data from Apollo Server
4 Type the IP address for Apollo Server in the IP Address box
5 Type the port number Apollo Server uses to receive data in the Port box By default this is port number 32008
6 The Second IP Address and Second Port boxes are not necessary however cannot be left blank Type 127001 in the Second IP Address box and 32004 in the Second Port box
7 Type a value in the Maximum Throughput [bps] box if a limited data link is present between the Taurus and Apollo Server For instance if at some point the data link is limited to 9600 bps then this is the maximum throughput the link can allow If there are no throughput limitations set the value in this box to zero to disable the throughput limitation
8 Click Apply
9 Click Commit
B22 Retrieving Taurus Version 2x Data from Apollo ServerCreate a new project or use an existing project in Apollo Project to retrieve the Taurus version 2x data from Apollo Server For more information on creating or editing projects refer to Section 31 ldquoCreating New Projectsrdquo on page 11 and Section 36 ldquoEditing and Viewing the Settings of Projectsrdquo on page 31
When creating or editing the project
a) Add an IP address Store specification on the Store Selection tab (see step 4 in Section 31 ldquoCreating New Projectsrdquo) for Apollo Server including its client Web application port number Use the format
Apollo Server IP AddressApollo Server Client Web Application Port Number
b) Apply the appropriate filters on the Channel Group Selection tab to retrieve the desired channel groups from the Taurus version 2x See step 5 through step 12 in Section 31 ldquoCreating New Projectsrdquo for instruction on using the Channel Group Selection tab
Appendix B Retrieving SOH Data from a Taurus Version 2x
50 Apollo Project User Guide16106R5 2009-03-24
Apollo Project User Guide16106R5 2009-03-24
51
Appendix C Glossary
Glossary of Abbreviations and Terms
List of Unit Abbreviations and Symbols
C1 Glossary of Abbreviations and Terms
A
ASCIIAmerican Standard Code for Information Interchange
B
BHEBroad Band High Gain Seismometer East-West Orientation
Channel name based on the Global Seismological Network (GSN) standard
BHNBroad Band High Gain Seismometer North-South Orientation
Channel name based on the Global Seismological Network (GSN) standard
BHZBroad Band High Gain Seismometer Vertical Orientation
Channel name based on the Global Seismological Network (GSN) standard
Appendix C Glossary
52 Apollo Project User Guide16106R5 2009-03-24
C
CSVComma-Separated Values
D
DACDigital to Analog Converter
G
GPSGlobal Positioning System
J
JREJava Runtime Environment
JVMJava Virtual Machine
N
NFSNetwork File System
P
PDOPPosition Dilution of Precision
PRNPseudo-random Number
Appendix C Glossary
Apollo Project User Guide16106R5 2009-03-24
53
S
SACSeismic Analysis Code
An Apollo Project output file format that generates files that can be used by the SAC software (see http wwwirisedusoftwaresac)
SEEDStandard for the Exchange of Earthquake Data
SMBServer Message Block
SOHState of Health
T
TCPIPTransmission Control ProtocolInternet Protocol
TDOPTime Dilution of Precision
U
UNCUniform Naming Convention or Universal Naming Convention
URLUniform Resource Locator
UTCCoordinated Universal Time
Appendix C Glossary
54 Apollo Project User Guide16106R5 2009-03-24
C2 List of Unit Abbreviations and SymbolsTable C-1 provides a list of unit abbreviations and symbols commonly used in Nanometrics documentation
Table C-1 Unit abbreviations and symbols
Abbreviation or Symbol Definition Abbreviation
or Symbol Definition
deg degree lb pound
Oslash diameter m metre
micro micro ms metre per second
Ω ohm ms2 metre per second squared
A ampere mA milliampere
AC alternating current MB megabyte
b bit MΩ megaohm
B byte MHz megahertz
bps bits per second mi mile
C Celsius mL millilitre
cm centimetre mm millimetre
dB decibel ms millisecond
DC direct current MTU maximum transmission unit
F farad mV millivolt
ft foot mW milliwatt
g gram N Newton
g gravity nF nanofarad
GB gigabyte ns nanosecond
GHz gigahertz rad radian
Hz hertz rads radian per second
in inch s second
KB kilobyte sps samples per second
kg kilogram U rack unit
kHz kilohertz V volt
kΩ kiloohm Vpp Volts peak-to-peak
kW kilowatt W watt
L litre
Apollo Project User Guide16106R5 2009-03-24
55
About NanometricsNanometrics is a world leader in the development of precision instrumentation network technology and software applications for seismological and environmental studies Using Nanometrics technology our customers establish and grow research networks that are often located in extreme environments such as the frozen Arctic and Antarctic the arid deserts of the Middle East the jungles of South America and the depths of the worlds oceans Many of these are mission-critical national and regional networks that demand the highest possible data quality and availability
Nanometrics provides end-to-end solutions that include a growing portfolio of broadband and strong motion seismometers dataloggers and digitizers satellite ground station systems for remote site data collection and software applications for data and network analysis and management To support this portfolio Nanometrics also provides global systems engineering services for design installation and support of complete networks
Our head office research and development centre and production facility are located in the Kanata North Business Park of Ottawa the high-technology heart of Canadas capital region
Contacting NanometricsNanometrics Inc250 Herzberg RoadKanata Ontario Canada K2K 2A1Phone +1 613-592-6776Fax +1 613-592-5929Email infonanometricscaWeb wwwnanometricsca
Contacting Technical SupportIf you need technical support please submit a request on the Nanometrics technical support site or by email or fax Include a full explanation of the problem and related information such as log filesSupport site httpsupportnanometricsca
Email techsupportnanometricsca
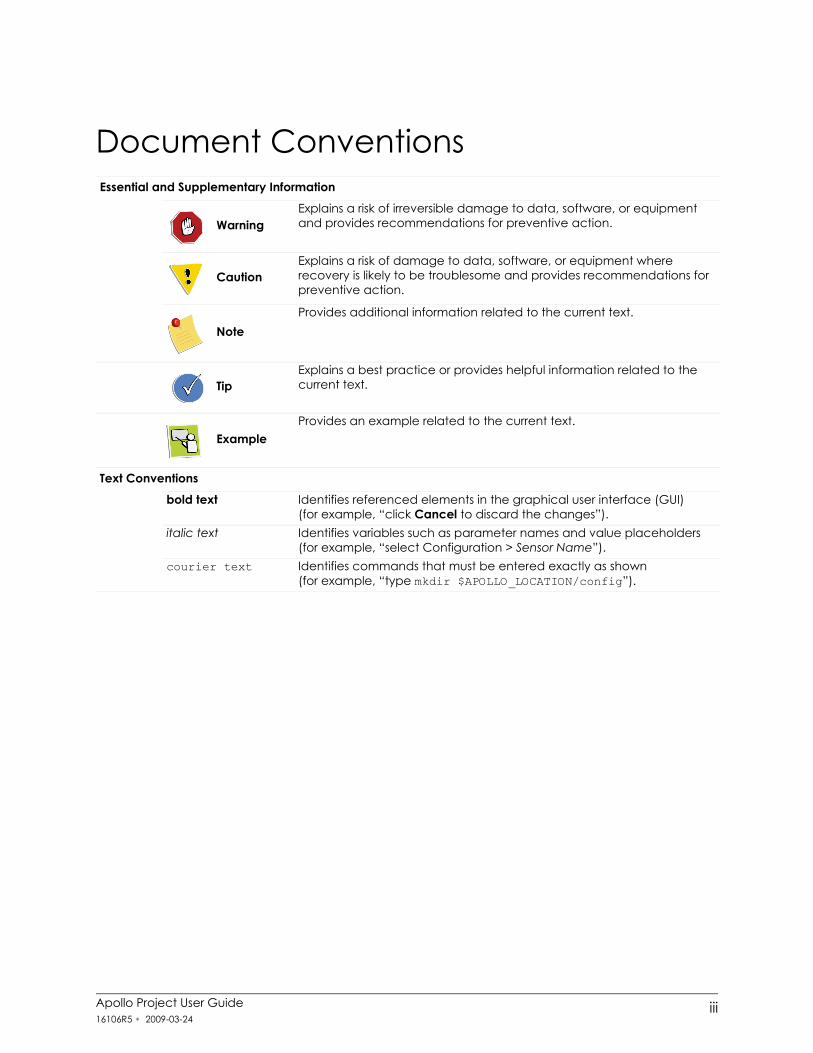
Apollo Project User Guide16106R5 2009-03-24
iii
Document ConventionsEssential and Supplementary Information
WarningExplains a risk of irreversible damage to data software or equipment and provides recommendations for preventive action
CautionExplains a risk of damage to data software or equipment where recovery is likely to be troublesome and provides recommendations for preventive action
NoteProvides additional information related to the current text
TipExplains a best practice or provides helpful information related to the current text
ExampleProvides an example related to the current text
Text Conventionsbold text Identifies referenced elements in the graphical user interface (GUI)
(for example ldquoclick Cancel to discard the changesrdquo)italic text Identifies variables such as parameter names and value placeholders
(for example ldquoselect Configuration gt Sensor Namerdquo)courier text Identifies commands that must be entered exactly as shown
(for example ldquotype mkdir $APOLLO_LOCATIONconfigrdquo)
Document Conventions
iv Apollo Project User Guide16106R5 2009-03-24
Apollo Project User Guide16106R5 2009-03-24
v
ContentsDocument Conventions iiiList of Tables vii
Chapter 1 Getting Started11 About Apollo Project 112 Operating Requirements 2
121 Software Licence 2122 Client 2123 Server 2
Chapter 2 Installing and Starting Apollo Project21 Installing the Apollo Project Web Server 5
211 Uninstalling Apollo Project Web Server 622 Installing an Apollo Project Licence File 723 Starting the Apollo Project Web Server 824 Running Apollo Project Client 8
241 Troubleshooting Running Apollo Project Client 8242 Stopping the Apollo Project Web Server 9
25 Upgrading Apollo Project 9
Chapter 3 Retrieving Data31 Creating New Projects 1132 Creating a Station Table File 2233 Configuring Apollo Project 2434 Managing Projects 26
341 Viewing Existing Projects 26342 Opening a Project 27343 Creating a Desktop Shortcut to a Project 27344 Closing a Project 27345 Copying a Project 28346 Deleting a Project 28
35 Running Projects 28351 Running a Project 29352 Stopping a Project 29353 Merging Project Data Files 29354 Running a Scheduled Archive Project 30
Contents
vi Apollo Project User Guide16106R5 2009-03-24
3541 Cancelling a Schedule 3036 Editing and Viewing the Settings of Projects 31
361 Editing Project Settings 31362 Viewing Project Settings 31
37 Monitoring Project Status 32371 Viewing an Overview of the Status of All Projects 32372 Viewing the Status of an Individual Project 33373 Monitoring the Status of a Running Project 34
3731 Status Colours 343732 Viewing the Retrieval Details for Each Channel Group 35
Appendix A Reference Information and ExamplesA1 Overview of Running Projects 37A2 Example Project Settings 38
A21 Example 1 One Time Project 38A22 Example 2 Controlled Source Project 39
A3 Example Deployment Scenarios 39A31 One Time 39A32 Scheduled Archive 39A33 Manual Archive 40A34 Field Archive 40A35 Media Harvesting 40A36 Trigger Downloading 41
A4 Shot File Formats for Controlled Source Projects 42A41 Creating a Shot File With Microsoft Office Excel 42A42 Creating a Shot File With OpenOfficeorg Calc 44A43 Creating a Comma-Separated Values Shot File 45
Appendix B Retrieving SOH Data from a Taurus Version 2xB1 Taurus Version 2x SOH Data Retrieved by Apollo Project 47B2 Retrieving SOH Data from a Taurus Version 2x Streaming to Apollo Server 48
B21 Streaming Data from a Taurus Version 2x to Apollo Server 48B22 Retrieving Taurus Version 2x Data from Apollo Server 49
Appendix C GlossaryC1 Glossary of Abbreviations and Terms 51C2 List of Unit Abbreviations and Symbols 54
About Nanometrics 55Contacting Nanometrics 55Contacting Technical Support 55
Contents
Apollo Project User Guide16106R5 2009-03-24
vii
Tables1-1 Requirements for an Apollo Project server running Windows 31-2 Requirements for an Apollo Project server running Linux 31-3 Requirements for an Apollo Project server running Mac OS X 32-1 Installation instructions 62-2 Uninstalling the Apollo Project Web server 62-3 Starting the Apollo Project Web server 83-1 Status colours 34C-1 Unit abbreviations and symbols 54
Contents
viii Apollo Project User Guide16106R5 2009-03-24
Apollo Project User Guide16106R5 2009-03-24
1
Chapter 1 Getting Started
About Apollo Project
Operating Requirements
11 About Apollo ProjectApollo Project is a Web application that conveniently retrieves time series and state of health data from any Nanometrics Store including those on Nanometrics instruments and those copied to network computers Available through any Web browser the client application provides options for you to define complex reusable data retrieval tasks called projects
Apollo Project has five project types
Archive projects retrieve data from sources that are continually updated such as a directory on a computer that has new data saved to it periodically or a multicast group of Nanometrics instruments that has different instruments active at different times You can schedule Archive projects to run automatically
One Time projects retrieve a single time segment of data
Controlled Source projects retrieve data specified as a set of shots
Triggers projects retrieve data specified by a trigger list in comma-separated value (CSV) format
Field Archive projects perform recurring data retrievals storing the time of the current retrieval on the Nanometrics instrument Using the time of the last retrieval Field Archive projects only retrieve the data accumulated since the last time the project was run on the instrument
Data for time series channel groups can be downloaded in MiniSEED SAC (binary format) Seisan or SEGY format depending on the project type Data for SOH channel groups is always downloaded in CSV format
Chapter 1 Getting Started
2 Apollo Project User Guide16106R5 2009-03-24
12 Operating RequirementsApollo Project has licensing client and server operating requirements These requirements are listed in Section 121 Section 122 and Section 123
121 Software LicenceIf you have ordered and received an Apollo Project software licence from Nanometrics install this file during the Apollo Project Web server installation or later using the Nanometrics Product Licence Installation Wizard See Section 22 ldquoInstalling an Apollo Project Licence Filerdquo on page 7 for licence installation instructions for Microsoftreg Windows Linux and Mac OSreg X server installations
The licence determines the number of projects you can save the number of time series channels you can select and the number of projects you can run concurrently Without a licence Apollo Project defaults to the unlicensed configuration This configuration allows you to save one project definition at a time for up to three time series channels from any combination of Stores
122 ClientThe client requirements for any platform are a Web browser with JavaScript enabled and IP access to the server Apollo Project version 14 has been tested with Microsoft Internet Explorer version 7 and Mozilla Firefox versions 2 and 3 Other browsers have not been fully tested with the client but may be used at your discretion
123 ServerRun the Apollo Project Web server on Windows Linux or Mac OS X For the
Windows operating requirements see Table 1-1 ldquoRequirements for an Apollo Project server running Windowsrdquo on page 3
Linux operating requirements see Table 1-2 ldquoRequirements for an Apollo Project server running Linuxrdquo on page 3
Mac OS X operating requirements see Table 1-3 ldquoRequirements for an Apollo Project server running Mac OS Xrdquo on page 3
Installing a licence file after creating a project in Apollo Project will result in the loss of that project It is recommended that you install your licence before running Apollo Project for the first time
Click the About button in the client application to view licence information
Chapter 1 Getting Started
Apollo Project User Guide16106R5 2009-03-24
3
Table 1-1 Requirements for an Apollo Project server running Windows
System component Requirement
Operating system Windows XP with Service Pack 3Memory 1GB RAM minimum
2GB RAM recommendedDisk space Required free disk space for every 3 time series channels of data
retrieved is approximately 2GB per month This is roughly twice as much space as the retrieved data occupies in a Store
Java Sun Java Runtime Environment (JRE) version 60Software licence Order a licence from Nanometrics if capabilities beyond that of the
unlicensed configuration are required (see Section 121 ldquoSoftware Licencerdquo on page 2)
Table 1-2 Requirements for an Apollo Project server running Linux
System component Requirement
Operating system Any distribution running a GNULinux kernel of version 24 or laterTested on Red Hat Linux 9 (kernel 2420-8)
Memory 512MB RAM minimum2GB RAM recommended
Disk space Required free disk space for every 3 time series channels of data retrieved is approximately 2GB per month This is roughly twice as much space as the retrieved data occupies in a Store
Java Sun Java Runtime Environment (JRE) version 60Software licence Order a licence from Nanometrics if capabilities beyond that of the
unlicensed configuration are required (see Section 121 ldquoSoftware Licencerdquo)
Table 1-3 Requirements for an Apollo Project server running Mac OS X
System component Requirement
Operating system Mac OS X (1052 and later)Memory 1GB RAM minimum
2GB RAM recommendedDisk space Required free disk space for every 3 time series channels of data
retrieved is approximately 2GB per month This is roughly twice as much space as the retrieved data occupies in a Store
Java Sun Java Runtime Environment (JRE) version 60
Notes on the JRE for Mac systems JRE version 60 must be manually downloaded and installedAfter installing the JRE it must be set as the default Java Virtual Machine (JVM)
Software licence Order a licence from Nanometrics if capabilities beyond that of the unlicensed configuration are required (see Section 121 ldquoSoftware Licencerdquo on page 2)
Chapter 1 Getting Started
4 Apollo Project User Guide16106R5 2009-03-24
Apollo Project User Guide16106R5 2009-03-24
5
Chapter 2 Installing and Starting Apollo Project
Installing the Apollo Project Web Server
Installing an Apollo Project Licence File
Starting the Apollo Project Web Server
Running Apollo Project Client
Upgrading Apollo Project
21 Installing the Apollo Project Web ServerThe Apollo Project Web server is installed on a single computer and after it is installed and running the client can run locally on the server or on any computer with a Web browser and network access to the server computer
All Stores must be accessible from the server hosting the Apollo Project Web server All output files are created on the server and its accessible file systems as described in Section 33 ldquoConfiguring Apollo Projectrdquo on page 24
To install the Apollo Project Web server on a server computer running Windows Linux or Mac OS X
1 Install a supported version of the Java Runtime Environment JRE version 60 or later
2 If you have received a licence file from Nanometrics ensure it is in a drive or network location that is accessible to the Apollo Project Setup Wizard
You can install and run Apollo Project without a licence file For details see Section 121 ldquoSoftware Licencerdquo on page 2 Should you require a licence after Apollo Project is installed you can install a licence using the Nanometrics Licence Installation Wizard See Section 22 ldquoInstalling an Apollo Project Licence Filerdquo on page 7
Chapter 2 Installing and Starting Apollo Project
6 Apollo Project User Guide16106R5 2009-03-24
3 Follow the instructions for your operating system in Table 2-1
211 Uninstalling Apollo Project Web ServerTable 2-2 provides instructions for uninstalling Apollo Project from the server computer for each of the supported operating systems
Table 2-1 Installation instructions
Operating System To install the Apollo Project Web server
Windows 1 Double-click ApolloProject_windows_x_x_xexe where x_x_x is the Apollo Project version number on the Apollo Project CD
2 Follow the steps of the installation wizard making changes to the default settings as required
Linux 1 Open a Terminal window and change the directory to the Apollo Project CD
2 Run the following as rootsh ApolloProject_unix_x_x_xsh (where x_x_x is the Apollo Project version number)
3 Follow the steps of the installation wizard making changes to the default settings as required
Mac OS X 1 Double-click the ApolloProject_macos_x_x_xdmg where x_x_x is the Apollo Project version number disc image on the Apollo Project CDThe disc image mounts as a new volume on your desktop and automatically displays its contents in a Finder window
2 Double-click the installation file Apollo Project Installer in the Finder window
3 Follow the steps of the installation wizard making changes to the default settings as required
Note After installing Apollo Project you can drag the disc image to the Trash to eject it and remove it from your desktop
If you are uninstalling a version of Apollo Project prior to version 13 refer to the version 12 user guide for instruction on uninstalling Apollo Project
Apollo Project Version 12 User Guide revision 16106R2 released on 2008-09-09
Table 2-2 Uninstalling the Apollo Project Web server
Operating System To uninstall the Apollo Project Web server
Windows Click Start gt All Programs gt Nanometrics gt Apollo Project gt Apollo Project Uninstaller
Linux 1 Open a Terminal window and change the directory to the Apollo Project directory The location of the Apollo Project directory was defined when you installed Apollo Project The default location is optnanometricsApolloProject
2 Run the following as root uninstall
Mac OS X 1 Open the Finder2 Click Applications under Places3 Double-click the Apollo Project folder 4 Double-click Apollo Project Uninstaller
Chapter 2 Installing and Starting Apollo Project
Apollo Project User Guide16106R5 2009-03-24
7
22 Installing an Apollo Project Licence FileIf you did not install a licence file during the installation of the Apollo Project Web server application you can install one at any time using the Nanometrics Product Licence Installation Wizard
A licence for Apollo Project is only required if capabilities beyond those of the unlicensed version are needed See Section 121 ldquoSoftware Licencerdquo on page 2 for descriptions of the licensed and unlicensed versions Contact Nanometrics to order a licence (see Contacting Nanometrics on page 55)
If you have obtained a licence file from Nanometrics use the following steps to install the file
Installing a licence file after creating a project in Apollo Project will result in the loss of that project It is recommended that you install your licence before running Apollo Project for the first time
Operating System To install an Apollo Project licence file
Windows 1 Ensure the licence file is in a drive or network location that is accessible to the licence installation wizard
2 Click Start gt All Programs gt Nanometrics gt Apollo Project gt NmxLicenceInstaller
3 Follow the steps in the license installation wizard to select and install the licence file
Linux 1 Ensure the licence file is in a drive or network location that is accessible to the licence installation wizard
2 Open a Terminal window and change the directory to the Apollo Project directory The location of the Apollo Project directory was defined when you installed Apollo Project The default location is optnanometricsApolloProject
3 Run the following NmxLicenceInstaller
Mac OS X 1 Ensure the licence file is in a drive or network location that is accessible to the licence installation wizard
2 Open the Finder3 Click Applications under Places4 Double-click the Apollo Project folder 5 Double-click NmxLicenceInstaller6 Follow the steps in the license installation wizard to select and install
the licence file
Chapter 2 Installing and Starting Apollo Project
8 Apollo Project User Guide16106R5 2009-03-24
23 Starting the Apollo Project Web ServerUse the procedures in Table 2-3 that correspond to your Apollo Server computerrsquos operating system to start the Apollo Project Web server application
24 Running Apollo Project ClientIf you are running the Apollo Project client on the computer where the server application is installed open a browser and go to
httplocalhostPort
Where localhost is the local computer and port is the port number configured during installation The default port number for Apollo Project is 8088
To run an Apollo Project client when the server application resides on a different computer open a browser and go to
httpServer computer name or IP addressPort
For example if the domain name of the server computer is ApolloProjectServer with an IP address of 192168220 and the default port number of 8088 is being used the URL for the client application in your browser will be
httpApolloProjectServer8088
ndash OR ndash
http1921682208088
241 Troubleshooting Running Apollo Project ClientIf you are having trouble opening the Apollo Project client in your Web browser try these suggestions
a) Ensure that the Apollo Project Web server application is running on the Apollo Project server computer See Section 23 ldquoStarting the Apollo Project Web Serverrdquo
Table 2-3 Starting the Apollo Project Web server
Operating System To start the Apollo Project Web server
Windows Click Start gt All Programs gt Nanometrics gt Apollo Project gt Apollo ProjectLinux 1 Open a Terminal window and change the directory to the Apollo
Project directory The location of the Apollo Project directory was defined when you installed Apollo Project The default location is optnanometricsApolloProject
2 Run the following ApolloProject
Mac OS X 1 Open the Finder2 Click Applications under Places3 Double-click the Apollo Project folder 4 Double-click Apollo Project to start the Web server
Chapter 2 Installing and Starting Apollo Project
Apollo Project User Guide16106R5 2009-03-24
9
b) Verify that the firewall on the server computer is not blocking the port number used to serve Web pages (by default the port number is 8088) To check the port number used open ApolloProjectvmoptions in the ApolloProject folder and note the number identified for the -Dserverport setting
242 Stopping the Apollo Project Web ServerThe Apollo Project client provides the means to stop the Apollo Project Web server application To stop the Apollo Project Web server
1 Open the Apollo Project client
2 Click the Shut down Apollo Project button
3 Click OK to confirm the Web server shutdown
25 Upgrading Apollo ProjectTo upgrade Apollo Project from a previous version
1 Uninstall the Apollo Project Web server application as per Section 211 ldquoUninstalling Apollo Project Web Serverrdquo on page 6
2 Install the new version of Apollo Project as per Section 21 ldquoInstalling the Apollo Project Web Serverrdquo on page 5
When you shut down the Apollo Project Web server all clients are disconnected from the server To restore connectivity start the Apollo Project Web server using the instructions in Section 23 ldquoStarting the Apollo Project Web Serverrdquo on page 8
During the upgrade process all downloaded data will remain intact however you will need to recreate your projects and settings in the new version of Apollo Project
For Windows and Linux installations if you are upgrading from an earlier version of Apollo Project that used Apache Tomcat it is strongly recommended that you uninstall Tomcat before installing the new version of Apollo Project
Refer to the version 12 user guide for instruction on uninstalling versions of Apollo Project prior to version 13
Apollo Project Version 12 User Guide revision 16106R2 released on 2008-09-09
If you are using a licensed version of Apollo Project you will need a new licence file when installing the upgrade If you have not received a new licence file contact Nanometrics (see Contacting Nanometrics on page 55)
Chapter 2 Installing and Starting Apollo Project
10 Apollo Project User Guide16106R5 2009-03-24
Apollo Project User Guide16106R5 2009-03-24
11
Chapter 3 Retrieving Data
Creating New Projects
Creating a Station Table File
Configuring Apollo Project
Managing Projects
Running Projects
Editing and Viewing the Settings of Projects
Monitoring Project Status
31 Creating New ProjectsYou can create multiple projects up to the number supported by the software licence (see Section 121 ldquoSoftware Licencerdquo on page 2)
When you create a new project you have to
bull Select data Stores
bull Specify a station table file
bull Select the channel groups you want to download data from
bull Specify when you want the project to run
bull Select the output format
bull Specify the output location
To create a new project
1 Click New on the Apollo Project Existing Projects page
2 Click a project type and enter a unique name in the Project Name box
3 Click OK
Chapter 3 Retrieving Data
12 Apollo Project User Guide16106R5 2009-03-24
4 Select one or more data Stores by performing the following steps
Store type DescriptionSteps
File A file Store specification defines a particular Store that resides on a file system accessible by the server running Apollo Project The file system can be a local or a networked file system (for example accessible via SMB or NFS)
1 Click the File tab2 Enter the full path and file name of a Store file3 Click Add
Apollo Project adds the specification to the Selected Specifications section of the Store Selection page and finds all related Store files and adds them as a single Store to the Selected Stores section
Directory A directory Store specification defines the set of Stores that reside in a particular directory hierarchy on a file system accessible by the server running Apollo Project A recursive search from the specified directory identifies all of the available Stores The file system can be a local or a networked file system (for example accessible via SMB or NFS)
1 Click the Directory tab2 Enter a directory path name
If you specify a root directory such as C it will take a long time for Apollo Project to find all of the Store files in that root directory
3 Click AddApollo Project adds the specification to the Selected Specifications section of the Store Selection page and finds and adds all Stores in the specified directory and its subdirectories to the Selected Stores section
IP Address An IP Address Store specification defines the Store of a single instrument (or an instance of Apollo Server) The specified IP address must be an IP address bound to the Ethernet interface of an instrument At the same time the instrument must be running in communications mode and be accessible from the server running Apollo Project
1 Click the IP Address tab2 Enter the IP address of an instrument3 Click Add
Apollo Project adds the specification to the Selected Specifications section of the Store Selection page and finds all Stores associated with the IP address and adds them to the Selected Stores section
Chapter 3 Retrieving Data
Apollo Project User Guide16106R5 2009-03-24
13
Discovery A discovery Store specification specifies the Stores of multiple instruments In this case a class D (multicast) IP address and port is specified It is assumed that the Store of any instrument in communications mode is accessible from the LAN of the Apollo Project server When Discovery is enabled for the specified IP address and port these attributes are included upon running the project
1 Click the Discovery tab2 Enter the multicast address and port number of a group of instruments
For example 224199711386776Multicast addresses range from 224000 through 239255255255
3 Click AddApollo Project adds the specification to the Selected Specifications section of the Store Selection page and finds all Stores associated with the multicast address and adds them to the Selected Stores section of the Store Selection page
Notes When multiple multicast groups are used for discovery the port number must differ from existing discovery port numbers by 2 for each discovery port number in use x there must be no other discovery port configured for use with a value of x or x+1For example the default discovery multicast group used by Taurus is 224199711386776 To add another multicast group you have to specify a different port number (which cannot be 6776 or 6777)
Recent Specs
Apollo Project keeps the 16 most recently defined Store specifications and groups them by category on the Recent Specs page
1 Click the Recent Specs tab2 Expand a specification category (File Directory IP Address or Discovery)
and select a specification3 Click Add
Apollo Project adds the specification to the Selected Specifications section of the Store Selection page and finds all Stores associated with the specification and adds them to the Selected Stores section
Each time a project is run Apollo Project generates a list of available Stores based on the selected Store specifications The actual Stores from which data is retrieved can vary on successive project runs For example a discovery Store specification might result in a different number of instruments being included depending on current access to the instruments
Remove a specification (and its associated Stores) by selecting it and clicking Remove Remove all specifications (and all Stores) by clicking Remove All You cannot remove individual Stores from a specification but you can add a different specification and select a different group of Stores Alternatively you can use channel group attributes filtering to select the channel groups that data is retrieved from
When copying a Store from an instrument to your local computer do not overwrite an existing Store Instead delete the existing Store or move it to a different folder on the computer Stores are made up of multiple volumes and if the new Store has fewer volumes than the old Store you could see some unpredictable results with Apollo Project
Store type DescriptionSteps
Chapter 3 Retrieving Data
14 Apollo Project User Guide16106R5 2009-03-24
5 Click the Channel Group Selection tab
6 If you defined a default station table file and want to use it for this project go to step 7
For more information see Section 32 ldquoCreating a Station Table Filerdquo on page 22
-OR-
Click Create Default Station Table to create a table for all of the currently selected Stores and discovered instruments for this project using the default settings for the network name location and channel names
The default settings for the network name location and channel names are defined in the Behaviour and Defaults dialog box For more information see Section 33 ldquoConfiguring Apollo Projectrdquo on page 24
-OR-
Enter the path and file name of a station table for this project
7 If you want to download all data from all available Stores verify that the Retrieve data from all channel groups (do not filter) check box is selected and go to step 12
-OR-
If you want to filter the data by specific channel groups and channel group attributes go to step 8
8 Clear the Retrieve data from all channel groups (do not filter) check box
9 Select the time series channel groups you want to download data from
A station table is used to assign names to all of the selected channel groups For more information see Section 32 ldquoCreating a Station Table Filerdquo on page 22
If new Stores are found after a station table file has been defined for a project (for example as a result of Discovery or a directory specification) the default channel group names are used in the output files and no filtering is applied to the channel groups
If the text ldquoSelected Time Series Channels x of xrdquo where x represents the number of channels is red you have selected more time series channels than your licence permits You must select a valid number of time series channels (for the unlicenced version of Apollo Project there is a maximum of three time series channels) before you can create your project
Chapter 3 Retrieving Data
Apollo Project User Guide16106R5 2009-03-24
15
10 Select the state of health (SOH) channel groups you want to download data from Each group has a predefined dataset
To view the SOH data retrieved from a Taurus version 2x see Appendix B ldquoRetrieving SOH Data from a Taurus Version 2xrdquo
Predefined SOH group SOH data
GPS Time Time (longsecs) (the number of seconds since 1970-01-01)Time (UTC) (time in yyyy-mm-dd hhmmssms format)DAC CountGPS Engine StatusGPS Last Update Time(s)GPS PDOPGPS Satellites Used (number of satellites used)GPS TDOP Lat (deg) (latitude in degrees)Long (deg) (longitude in degrees)Timing Error (ns)Timing Phase Lock (system clock phase lock)Timing Uncertainty (ns)
Note The values for Number of satellites used PDOP and TDOP are provided by the GPS receiver at the Last update time In order to see what time these values correspond to look at the Last update time When GPS is off these three parameters and the Last update time are not updated The last value displays until the next update arrives (after the GPS is turned on again)
GPS Satellites Time (longsecs) (the number of seconds since 1970-01-01)Time (UTC) (time in yyyy-mm-dd hhmmssms format)
For each satelliteGPS Satellite Acquisition FlagGPS Satellite Azimuth (microordm)GPS Satellite Elevation (microordm)GPS Satellite Last Update Time (ms)GPS Satellite PRN GPS Satellite Signal Level (AMU)
Environment Time (longsecs) (the number of seconds since 1970-01-01)Time (UTC) (time in yyyy-mm-dd hhmmssms format)External SOH Voltage 1 (V) (12-bit voltage input)External SOH Voltage 2 (V) (12-bit voltage input)External SOH Voltage 3 (V) (12-bit voltage input)External SOH Voltage 4 (V) (12-bit voltage input)Sensor SOH Voltage 1 (V)Sensor SOH Voltage 2 (V)Sensor SOH Voltage 3 (V)
Chapter 3 Retrieving Data
16 Apollo Project User Guide16106R5 2009-03-24
11 If required enter additional filter information as comma-delimited text into the Network Station Location Channel and Instrument boxes
You can use an asterisk ()to represent 1 or more characters
12 Review the selected channel groups and if required edit the channel group mappings in the selected channel groups area of the tab
Channel groups that do not have a mapping appear as blanks in the selected channel groups area of the tab Mapping information for these channel groups can be entered and saved in the station table file for future projects
You can edit the mappings at any time The changes are reflected in future runs of any project using that same station table file For more information see Section 32 ldquoCreating a Station Table Filerdquo on page 22
13 Click the Time Selection tab and follow the steps for the project type you selected
Instrument Time (longsecs) (the number of seconds since 1970-01-01)Time (UTC) (time in yyyy-mm-dd hhmmssms format)Controller Current (mA)Digitizer Current (mA)NMX Bus Current (mA) (external connector)Sensor Current (mA)Serial Port Current (mA)Supply Voltage (mV)Temperature (ordmC)
Look in the selected channel groups area of the tab (lower half of the tab) for examples of filter details you can enter in the Network Station Location Channel and Instrument ID filter boxes
The NetworkStationLocationChannel column of the table presents information in the format implied by the column title For instance in an entry of XXA099901BHE(1) XX represents the network(2) A0999 represents the station(3) 01 represents the location(4) BHE represents the channel
Look at the Instrument ID column of the table for an example of an instrument name and serial number such as taurus_0999
Only mappings that are applicable for the selected channel groups appear in the selected channel groups area of the tab
All times use the UTC time zone
Predefined SOH group SOH data
Chapter 3 Retrieving Data
Apollo Project User Guide16106R5 2009-03-24
17
Project type DescriptionSteps
Archive Archive projects attempt to retrieve data up to the current timeThe time ranges for which output files will be produced are driven from the file interval and are aligned to the project start time It is therefore unlikely that the ldquomost recentrdquo file interval will align with the current time Therefore the most recent range for which data retrieval is attempted will have a portion of its data retrieved and the remainder (for future retrieval) will be declared unavailable However when the project is run later (after the end of the particular time range) the unavailable data will normally be retrieved and the situation will likely repeat itself with the ldquonewrdquo last range to retrieveTo run an Archive project manually1 If required edit the start time for the project2 Click Manual3 Specify the file interval
For example if you specify 2 hours then one file is created every 2 hours If the duration for the project is one day then a total of 12 files will be created
4 After you have finished creating the project click Run Now on the Summary page to run the project
To schedule an Archive project to run automatically at a regular interval1 Click Regular Interval and select the interval 2 Specify the file interval
For example if you specify 2 hours then one file is created every 2 hours If the duration for the project is one day then a total of 12 files will be created
3 After you have finished creating the project click Start Schedule on the Summary page to start the schedule for the project and click OK twice The project will run according to the interval you specified after you start the schedule For example if you click Start Schedule on a Wednesday and you specified every 2 days as the interval then the project will run for the first time on Friday and every two days after that If the computer has been rebooted and the Apollo Project Web server has been restarted the project will run according to the interval you specified after the computer has rebooted For example if the computer reboots on a Wednesday and you specified every 2 days as the interval then the project will run for the next time on Friday and every two days after that
Note Archive projects that are defined as scheduled projects can also be run manually at any timeTo schedule an Archive project to run automatically on a weekly basis1 If required edit the start time for the project2 Click Weekly Schedule and select the time and days of the week 3 Specify the file interval
For example if you specify 2 hours then one file is created every 2 hours If the duration for the project is one day then a total of 12 files will be created
4 After you have finished creating the project click Start Schedule on the Summary page to start the schedule for the project and click OK twice After you have finished creating the project the project will run for the first time according to the project start time and then it will run on a weekly basis according to the times and days you specified
Note Archive projects that are defined as scheduled projects can also be run manually at any time
Chapter 3 Retrieving Data
18 Apollo Project User Guide16106R5 2009-03-24
One Time A One Time project retrieves a single time segmentTo specify the start and end times for a One Time project1 If required edit the start time for the project2 Click End Time and enter an end time
-OR-Click Duration and specify the duration of the project The duration is the length of the requested time segment
3 Specify the file intervalFor example if you specify 2 hours then one file is created every 2 hours If the duration for the project is one day then a total of 12 files will be created
4 After you have finished creating the project click Run Now on the Summary page to run the project
Controlled Source
A Controlled Source project retrieves data specified as a set of individually entered shots and outputs the data in SEGY format To specify shots using a shots file1 Click Browse select a shots file and click OK2 Click Submit
The list of shots is imported and displayed in the Shot List section on the Time Selection page
Note For more information see Section A4 ldquoShot File Formats for Controlled Source Projectsrdquo on page 42To manually define shots1 Enter a shot time2 If required enter the latitude longitude and elevation3 If required select the pre-shot time period4 Select the post-shot time period5 Click Add
The shot is added to the Shot List section on the Time Selection page Triggers A Triggers project uses a CSV-formatted trigger list to specify the data to be
retrieved for example a trigger file that has been downloaded from a Taurus to the local computerTo define triggers1 Click Browse select a CSV triggers file and click OK2 Click Submit
The list of triggers is imported and displayed in the Triggers section on the Time Selection page
3 Select the pre-trigger and post-trigger time periodsThe pre-trigger and post-trigger time periods are used for all of the triggers
Project type DescriptionSteps
Chapter 3 Retrieving Data
Apollo Project User Guide16106R5 2009-03-24
19
14 If you selected a Controlled Source as the project type in step 2 go to step 17
You do not have to select an output format for a Controlled Source project because the output format for a Controlled Source project is always SEGY one output file is generated for all instruments and the stations are sorted by StationNameNetworkName
-OR-
If you selected one of the other project types go to step 15 to select an output format
15 Click the Output Format tab
Field Archive A Field Archive project is used for recurring data retrievals that occur at specified intervals The time of the last retrieval is stored on the instrumentTo define the start time and file interval1 If required edit the start time for the project2 Specify the file interval
For example if you specify 2 hours then one file is created every 2 hours3 If you want partial files retrieved select the Include last interval even if
incomplete check box You should only select this option when the retrieval of partial files is more important than retrieving the data for the current interval during a future project run
Be careful when specifying the file interval For example retrieving many hours or days of data and specifying a file interval of seconds or minutes could result in the generation of many files This is not only very resource intensive but could result in a data management problem as well
Project type DescriptionSteps
Chapter 3 Retrieving Data
20 Apollo Project User Guide16106R5 2009-03-24
16 Perform the following steps to select an output format
Output format Steps
MiniSEED 1 Click MiniSEED2 Click Per channel group to generate one output file per channel group
You must add the channel token to the Subdirectories or Filename box on the Output Location tab when choosing Per channel group-OR-Click Per instrument to generate one output file per instrument-OR-Click All Instruments to generate one output file for all instruments
3 Select the Sort check box if you want the output data sorted by timeData is put in a Store in the order received and this order may not always be chronological To ensure that the data in the resulting SEED file is chronological select Sort
4 Select the data record sizeThe default record size is 512 B However not all SEED file readers will support this file size Determine what your SEED reader supports and select an appropriate value The options are 512 B 1024 B 2048 B and 4096 B Note that a smaller record size will result in quicker SEED file output
Note The number of output files is determined by the file interval that you set on the Time Selection page
SAC 1 Click SACYou must add the channel token to the Subdirectories or Filename box on the Output Location tab when choosing SAC as the output format
NotesThere are two types of SAC files binary and ASCII Apollo Project only outputs binary SAC filesOne output file per channel group is generated
SEGY 1 Click SEGY2 Click Per channel group to generate one output file per channel group
You must add the channel token to the Subdirectories or Filename box on the Output Location tab when choosing Per channel group-OR-Click Per instrument to generate one output file per instrument-OR-Click All Instruments to generate one output file for all instruments
3 Select the Sort check box if you want the stations sorted by StationNameNetworkName
NotesAll stations must have the same sample rateThe maximum number of samples per trace is 32767SEGY trace headers from discovered instruments will not have station location information
Chapter 3 Retrieving Data
Apollo Project User Guide16106R5 2009-03-24
21
17 Click the Output Location tab
18 If you defined a default base directory when you configured Apollo Project and want to use it for this project go to step 21
For more information see Section 33 ldquoConfiguring Apollo Projectrdquo on page 24
-OR-
Enter the valid absolute path of the base directory for the processed data subdirectories and files
If the base directory you entered does not exist click Create to create it
19 If you defined a default expression for subdirectories when you configured Apollo Project and want to use it for this project go to step 21
For more information see Section 33 ldquoConfiguring Apollo Projectrdquo on page 24
-OR-
Enter the expression used to define path names for subfolders under the base directory
You can enter tokens in any order including any additional characters that are valid for paths
Seisan 1 Click Seisan
NotesYou must have Seisan installed on your computer with a WAVEFORM_BASE and CONT_BASE line included for each station in the DATSEISANDEF file You must define a SEISAN_TOP environment variableOne output file per channel group is generated
Regardless of the output format selected SOH channel group data is always output in CSV format
The Base Directory is the root of all data retrieved for the project and can be defined at any location in the file system of the server running Apollo Project including a networked drive on a separate server If you want to create or use a directory on a computer on the network you have to enter the server and share name in a modified UNC format that is prefixed by an additional two backslashes For example the usual fileserver1storefiles must be written as fileserver1storefiles
Large amounts of data can be stored in this location You must ensure that adequate disk space is available
For deployments of Apollo Project where the clients are not running on the server it is recommended that the file system containing the base directory on the server be shared or exported as a networked file system
It is not recommended that you use the channel token in the subdirectories expression if the project includes more than one channel group per instrument (selected on the Channel Group Selection tab) and the output is not per channel group (selected on the Output Format tab)
Output format Steps
Chapter 3 Retrieving Data
22 Apollo Project User Guide16106R5 2009-03-24
20 If you defined a default expression for file names when you configured Apollo Project and want to use it for this project go to step 21
For more information see Section 33 ldquoConfiguring Apollo Projectrdquo on page 24
-OR-
Enter the expression used to define file names for the processed data files that are stored in the subfolders under the base directory
You can enter tokens in any order including any additional characters that are valid for file names
21 Click OK to save the new project
The new project is created and the Summary page is displayed
32 Creating a Station Table FileYou can create a mapping between a given instrumentchannel group (for example taurus_1234digitizertimeSeries1) and a corresponding network station location and channel name These mappings are stored in a station table file and the mapped channel group names are used in the output files
You can create a station table file and use it as the default for all projects or you can create a station table for individual projects
To create a station table file and set is as the default
1 Click the configuration button in the upper right corner
2 Specify the network name location and channel names on the Behaviour and Defaults dialog box and click OK to save the new settings
The settings you enter here are used as the channel names in the station table file You can edit these settings in step 8
For more information on configuring Apollo Project settings see Section 33 ldquoConfiguring Apollo Projectrdquo on page 24
3 Click New on the Apollo Project Existing Projects page
Do not use the channel token in the filename expression if the project includes more than one channel group per instrument (selected on the Channel Group Selection tab) and the output is not per channel group (selected on the Output Format tab)
The Sample Path shows an example of a file name generated using the values for the Base Directory Subdirectories and Filename settings
You can only edit the settings of a project before it has run for the first time or been scheduled (Archive project) If you want to edit the settings of a project after it has already run once or been scheduled you can copy the project (see Section 345 ldquoCopying a Projectrdquo on page 28) and then edit the settings for the copy
It is recommended that you create a station table file and set it as the default for all projects You can update the mappings in this file when new Stores are added or discovered
Chapter 3 Retrieving Data
Apollo Project User Guide16106R5 2009-03-24
23
4 Type Station Table in the Project Name box and click any project type
5 Click OK
6 Click the Store Selection tab and select as many Stores as possible
See step 4 of Section 31 ldquoCreating New Projectsrdquo for information on how to add specifications and select Stores
7 Click the Channel Group Selection tab and click Create Default Station Table
A station table file is created and the name of the file is displayed in the Station Table File Name box
8 Edit the station table channel group mappings in the selected channel groups area of the tab (lower half of the tab) as required
The NetworkStationLocationChannel names will appear in the output files If the Location is empty it is interpreted as the SEED default of two spaces
9 Click OK to close the project and finish creating the station table
10 Click the configuration button in the upper right corner
11 Enter the path and name of the station table file you just created in the Station Table File Name box on the Behaviour and Defaults dialog box
12 Click OK to save the new settings
The station table file you specified will be used as the default for all future projects You can open the Station Table project and edit the station table file if you need to add more Stores or change the mappings
For more information on configuring Apollo Project settings see Section 33 ldquoConfiguring Apollo Projectrdquo on page 24
Make a note of the path of the station table file because you will have to enter it on the Behaviour and Defaults dialog box to set it as the default for all projects
Valid characters for the network station location and channel in the NetworkStationLocationChannel box are upper case letters A to Z numbers 0 to 9 and spaces are also acceptable for the location
Chapter 3 Retrieving Data
24 Apollo Project User Guide16106R5 2009-03-24
33 Configuring Apollo ProjectYou can configure basic settings for Apollo Project and the default settings for new projects The changes you make to the project default settings only apply to new projects
To configure Apollo Project
1 Click the configuration button in the upper right corner
2 Edit the following settings
Setting Description
Log Verbosity The level of detail that is logged by Apollo ProjectThe default setting is Info
Log Location The default name of the Apollo Project log folder Maximum Number of Retrieval Attempts
The maximum number of single retrieval attempt made for all missing time segments on all channel groups every time a project is run Enter an integer from 0 through 1000 The default value is 8
Notes If the Taurus is busy when a retrieval attempt is made the number of remaining retrieval attempts is not decreased by one attemptYou can view the channel group details page to see if there are any remaining retrieval attempts for any channel groups (see Section 373 ldquoMonitoring the Status of a Running Projectrdquo on page 34)
Number Of Retries The number of times Apollo Project attempts to connect to a data source if there is a network connectivity problem Enter an integer from 0 through 1000 The default value is 3
Note Every time a project is run it starts with the maximum number of retries
Retry Interval (secs) The amount of time in seconds that Apollo Project waits before trying to connect to a data source againEnter an integer from 0 through 1000 The default value is 5
Station Table File Name The file name and location of the station table file that is used to assign station names to all of the selected channel groupsA station table is used to assign names to all of the selected channel groups For more information see Section 32 ldquoCreating a Station Table Filerdquo on page 22No station table file is specified by default
Chapter 3 Retrieving Data
Apollo Project User Guide16106R5 2009-03-24
25
Base Directory The folder name and location of the base directory for the processed data subfolders and files Enter any valid folder name and location including any additional characters that are valid for paths The default base directory name is ApolloProject
Notes The Base Directory is the root of all data retrieved for the project and can be defined at any location in the file system of the server running Apollo Project including a shared folder on a different computer If you want to create or use a folder on a computer on the network you have to enter the server and share name in a modified UNC format that is prefixed by an additional two backslashes For example the usual fileserver1storefiles must be written as fileserver1storefilesLarge amounts of data can be stored in this location You must ensure that adequate disk space is availableFor deployments of Apollo Project where the clients are not running on the server it is recommended that the file system containing the base directory on the server be shared or exported as a networked file system
Subdirectories The expression used to define path names for subfolders under the base directoryEnter tokens in any order including any additional characters that are valid for paths The default path name is as follows projectyearmonthday
Filename The expression used to define file names for the processed data files that are stored in the subfolders under the base directoryEnter tokens in any order including any additional characters that are valid for file names The default filename is as follows instrument_time
Sample Path An example of a file name generated using the values for the Base Directory Subdirectories and Filename settings
Network Name A standard network codeEnter any two upper case letters or numbers The default code is XX
Location A location within a stationEnter any two upper case letters numbers or spaces
The default location is two spaces for ldquononerdquo You must delete the two default spaces if you enter a new location value
Setting Description
Chapter 3 Retrieving Data
26 Apollo Project User Guide16106R5 2009-03-24
3 Click OK to save the new settings
34 Managing ProjectsYou can view open close copy and delete projects Also you can create convenient links to run your individual projects with desktop shortcuts
341 Viewing Existing Projects1 Click Projects in the Projects bar
2 View the projects listed on the Existing Projects page
The Existing Projects page shows a list of all projects and a status overview of each project For more information see Section 371 ldquoViewing an Overview of the Status of All Projectsrdquo on page 32
Channel 1 Name A channel codeEnter any three upper case letters or numbersThe default channel code is BHZ
Channel 2 Name A channel codeEnter any three upper case letters or numbersThe default channel code is BHN
Channel 3 Name A channel codeEnter any three upper case letters or numbersThe default channel code is BHE
Setting Description
Chapter 3 Retrieving Data
Apollo Project User Guide16106R5 2009-03-24
27
342 Opening a Project1 Click the project name under the Name column on the Existing Projects page
2 Click the Open Project button
343 Creating a Desktop Shortcut to a ProjectLaunching a project with a desktop shortcut will open Apollo Project to that project and run the project
Methods for creating desktop shortcuts to Web sites vary from browser to browser These procedures explain how to create desktop shortcuts to specific projects for both Mozilla Firefox 3 and Microsoft Internet Explorer 7 Desktop shortcuts to projects include the Apollo Project icon and are titled in the format Project Name ndash Apollo Project
In Firefox 3
1 Open the project you want to create a shortcut to in Firefox
2 Reduce the size of the Firefox window so that the desktop is visible
3 Drag the Site Identification Button onto the desktop
The Site Identification Button is located to the left of the Location Bar and displays the Apollo Project icon
In Internet Explorer 7
1 Open the project you want to create a shortcut to in Internet Explorer
2 Press ALT+F
3 Select Send gt Shortcut to Desktop
344 Closing a Project
1 Click the Close Project button in the Projects bar
Launching a desktop shortcut to a project automatically runs that project It is important to note that once a project is run its settings can no longer be edited It is recommended that desktop shortcuts only be created for Field Archive projects
Firefox is the recommended browser for Apollo Project
Chapter 3 Retrieving Data
28 Apollo Project User Guide16106R5 2009-03-24
345 Copying a Project
1 Select the project name under the Name column on the Existing Projects page
2 Click Copy
3 Enter a unique name for the new project and click OK
4 Click Edit and edit the settings as required
5 Click OK to save the project after you have finished editing the settings
346 Deleting a ProjectWhen you delete a project only files in the temporary folder are deleted All processed data files are not deleted
1 Click the project name under the Name column on the Existing Projects page
2 Click Delete
3 Click OK on the confirmation message
35 Running ProjectsFor all project types you can run a project manually at any time Archive projects can also be defined to run automatically on a schedule
If it is a scheduled Archive Project and the schedule is started click Cancel Schedule before you create a copy of it (If the schedule is not started the Start Schedule button is visible if the schedule is started the Cancel Schedule button replaces the Start Schedule button)
Apollo Project stores intermediate files in a temporary subdirectory of the Base Directory specified for the output location of a project These intermediate files correspond to the actual channel group data retrieved from the Stores referenced by the project If a project is deleted from Apollo Project these temporary files will be removed automatically
Disk space can also be reclaimed by removing these temporary files manually without deleting the project However if the project is run again the output files produced might be incomplete if previously retrieved data from these temporary files is required
For more information on what happens when a project runs see Section A1 ldquoOverview of Running Projectsrdquo on page 37
Chapter 3 Retrieving Data
Apollo Project User Guide16106R5 2009-03-24
29
351 Running a Project1 Open a project
2 Click Run Now on the Summary page to start the project
The project starts running and the Retrieval Status page is displayed
352 Stopping a Project1 Open a project
2 Click Cancel Run on the Summary page to stop the project
3 Click OK on the success message
353 Merging Project Data FilesYou have the option to merge all of the downloaded data for the stations and instruments into one file per interval for each project
1 Open a project
2 Click Merge
A single file is generated for each time period The time period is determined by the file interval you specified on the Time Selection page when you created the project For more information see step 13 of Section 31 ldquoCreating New Projectsrdquo on page 11
The original data files are not modified when you select the option to merge project data files
You can also click Run Now on the Retrieval Status page to start a project
For more information on what happens when a project runs see Section A1 ldquoOverview of Running Projectsrdquo on page 37
You can also click Cancel Run on the Retrieval Status page to stop a project
You cannot merge data from Archive projects and you cannot merge data in the Seisan format
You can also click Merge on the Retrieval Status page to merge the data from a project
Chapter 3 Retrieving Data
30 Apollo Project User Guide16106R5 2009-03-24
354 Running a Scheduled Archive Project1 Open a project
2 Click Start Schedule to start the project schedule
3 Click OK on the confirmation message
4 Click OK on the success message
For a project scheduled to run weekly the project will run for the first time according to the project start time and then it will run on a weekly basis according to the times and days you specified
For a project scheduled to run at a regular interval the project will run according the to interval you specified after you start the schedule For example if you click Start Schedule on a Wednesday and you specified every 2 days as the interval then the project will run for the first time on Friday and every two days after that
3541 Cancelling a Schedule
If you cancel a scheduled project before it runs for the first time you can edit the project settings
If you cancel a project that is currently running the current project runs to completion but subsequent project runs will not occur
1 Open a project
2 Click Cancel Schedule to cancel the project schedule
3 Click OK on the confirmation message
4 Click OK on the success message
You can also click Start Schedule on the Retrieval Status page to start the schedule of a project
You can restart the schedule by opening the project and clicking Start Schedule
You can also click Cancel Schedule on the Retrieval Status page to cancel the schedule of a project
Chapter 3 Retrieving Data
Apollo Project User Guide16106R5 2009-03-24
31
36 Editing and Viewing the Settings of ProjectsYou can edit the settings of a project before it has run After it has run you can view the settings
361 Editing Project Settings1 Open the project
2 Click Edit on the Summary page
3 Edit the settings as required
4 Click OK to save the changes
362 Viewing Project Settings1 Open the project
2 Click View on the Summary page
3 Click the tabs to view the settings
4 Click Cancel when you have finished viewing the settings
You can only edit the settings of a project before it has run for the first time or been scheduled (Archive project) If you want to edit the settings of a project after it has already run once or been scheduled you can copy the project (see Section 345 ldquoCopying a Projectrdquo on page 28) and then edit the settings for the copy
Settings For more information
Store Selection See step 4 of Section 31 ldquoCreating New ProjectsrdquoChannel Group Selection See step 5 to step 12 of Section 31 ldquoCreating New ProjectsrdquoTime Selection See step 13 of Section 31 ldquoCreating New ProjectsrdquoOutput Format See step 15 and step 16 of Section 31 ldquoCreating New ProjectsrdquoOutput Location See step 17 to step 20 of Section 31 ldquoCreating New Projectsrdquo
You can also click Edit on the Retrieval Status page to edit the settings of a project
You can also click View on the Retrieval Status page to edit the settings of a project
Chapter 3 Retrieving Data
32 Apollo Project User Guide16106R5 2009-03-24
37 Monitoring Project StatusYou can monitor the status of a project by viewing information on the Existing Projects Summary and Retrieval Status pages
371 Viewing an Overview of the Status of All ProjectsThe Existing Projects page is the default home page of Apollo Project You see this page when you first open Apollo Project or when you click Projects in the projects bar For more information see Section 341 ldquoViewing Existing Projectsrdquo on page 26
You can view the following information for all projects on the Existing Projects page
bull Name
bull Type
bull Current status
bull Last time the project run
bull Status of data retrieved
The Data Retrieved bars on the Existing Projects page show the overall status of the data retrieval For more information see Section 3731 ldquoStatus Coloursrdquo on page 34
Chapter 3 Retrieving Data
Apollo Project User Guide16106R5 2009-03-24
33
372 Viewing the Status of an Individual ProjectWhen you open a project a detailed summary of the project is shown on the Summary page For more information see Section 342 ldquoOpening a Projectrdquo on page 27
You can view the following information for each project on the Summary page
bull Date it was created
bull Date it was last modified
bull Current status
bull Last time it ran
bull Next time it will run
You can also view a summary of all of the settings you specified when you created the project (Store specifications selected Stores selected time series channel groups selected SOH channel groups start and end times number of files generated file interval and output format and locations)
All times are reported using the UTC time zone
Chapter 3 Retrieving Data
34 Apollo Project User Guide16106R5 2009-03-24
373 Monitoring the Status of a Running ProjectYou can view the data retrieval status of a project while it is running on the Retrieval Status page The Retrieval Status page is displayed automatically when you click Run Now to run a project You can also view this page by opening a project and clicking the Retrieval Status tab
The status for each channel group is expressed in the form of two numbers (for example 60100) and two bar graphs The first number is the percentage available of the total time requested (for example 60) and the second number is the percentage retrieved of the time available (for example 100) For more information on the bar graph status colours see Section 3731 ldquoStatus Coloursrdquo on page 34
You can also view retrieval details for each channel group listed on the Retrieval Status page For more information see Section 3732 ldquoViewing the Retrieval Details for Each Channel Grouprdquo on page 35
3731 Status Colours
The data retrieval status bars use the following status colours
The information that is displayed on the Retrieval Status page is updated continuously while a project is running
Table 3-1 Status colours
Colour Status
Green Apollo Project has retrieved the data
Yellow Apollo Project is attempting to retrieve available data from the Store
Red Data is available in the Store but Apollo Project has failed to retrieve it on this attempt Apollo Project will make additional attempts to retrieve the data up to the configured Maximum Number of Retrieval Attempts For information on how to set the Maximum Number of Retrieval Attempts setting see Section 31 ldquoCreating New Projectsrdquo on page 11
White Data for some portion of the requested time segment is not available in the Store For example there are gaps in the data or the retrieval request is for a future time segment
Chapter 3 Retrieving Data
Apollo Project User Guide16106R5 2009-03-24
35
3732 Viewing the Retrieval Details for Each Channel Group
You can view the retrieval status of each time segment for a channel group
1 Click a channel group name
2 Click the Channel Group Details button that is located to the right of the channel group name
The Remaining Retrieval Attempts column displays the number of times that Apollo Project will try to download each missing time segment for the channel group when the project is run again For information on how to set the Maximum Number of Retrieval Attempts setting see Section 33 ldquoConfiguring Apollo Projectrdquo on page 24
3 Click OK when you have finished viewing the details
Chapter 3 Retrieving Data
36 Apollo Project User Guide16106R5 2009-03-24
Apollo Project User Guide16106R5 2009-03-24
37
Appendix A Reference Information and Examples
Overview of Running Projects
Example Project Settings
Example Deployment Scenarios
Shot File Formats for Controlled Source Projects
A1 Overview of Running ProjectsWhen a project is run Apollo Project performs the following steps
1 The requested time ranges are identified
2 The channel groups for which data are to be retrieved are identified
3 The actual Stores specified by the Store specifications of the project are identified
For each identified Store the following steps are performed
1 A data availability analysis for the outstanding time ranges is performed These are for the ranges for which data has not already been retrieved The availability of the data is recorded for reference It is possible that a given Store was not present at the time the project was last run If this is the case then an attempt is made to retrieve all of the required time ranges of the project from the Store
2 If any data exists in the Store for any of the requested time ranges then a retrieval of this data is performed and the retrieved data is stored to local temporary files
3 If the number of retrieval attempts for a given time range exceeds a configurable threshold (see Section 33 ldquoConfiguring Apollo Projectrdquo on page 24) then the retrieval of data within the stated range is not attempted again
If any data was retrieved during the run of the project then the corresponding output files of the desired output format are generated and stored in the output location specified for the project
When running Apollo Project with Taurus version 2x the schedule for Archive projects must be greater than 5 minutes in duration Schedules that are less than 5 minutes can result in data that is missing or not downloaded
Appendix A Reference Information and Examples
38 Apollo Project User Guide16106R5 2009-03-24
It is possible that the requested data for a given channel group exists across multiple Stores If all of these Stores are included by the Store specifications for the project then Apollo Project assembles the requested data
When a project runs detailed information regarding the results of the retrieved data and processed data are available For more information see Section 37 ldquoMonitoring Project Statusrdquo on page 32
A2 Example Project Settings
A21 Example 1 One Time ProjectProject Name Project1
Project Type One Time
Channel groups selected for retrieval CASTN1OTBHZ (on taurus_1234)
Requested Time Range January 30 2008 1400 ndash 1500 UTC
File Interval 20 minutes
Output Location Base Directory disk2ApolloProjectOutputData
Output Location Subdirectories projectyearmonthday
Output Location Filenamestationnetwork_time
When the project is run successfully the following output files will be created on the server running Apollo Project
disk2ApolloProjectOutputDataProject120080130STN1CA_20080130_140000seed
disk2ApolloProjectOutputDataProject120080130STN1CA_20080130_142000seed
disk2ApolloProjectOutputDataProject120080130STN1CA_20080130_144000seed
Appendix A Reference Information and Examples
Apollo Project User Guide16106R5 2009-03-24
39
A22 Example 2 Controlled Source ProjectProject Name Project2
Project Type Controlled Source
Channel groups selected for retrieval CASTN1OTBHZ (on taurus_1234) CASTN1OTBHN (on taurus_1234)
Requested Shot Times January 30 2008 1400 UTC January 30 2008 1430 UTC
Pre Time 30 seconds
Post Time 30 seconds
Output Location Base Directory disk2ApolloProjectOutputData
Output Location Subdirectories projectyearmonthday
Output Location Filename timeformat
When the project is run successfully the following output files will be created on the server running Apollo Project
disk2ApolloProjectOutputDataProject22008013020080130_135930segysgy
disk2ApolloProjectOutputDataProject22008013020080130_142930segysgy
A3 Example Deployment Scenarios
A31 One TimeYou want to download three days of data from multiple instruments on the network save the data in MiniSEED format and create a file for every hour of data
A One Time project is the recommended solution The Store of each instrument can be made available to Apollo Project by creating a corresponding IP Address Store specification with the IP address of the instrument The requested time range can be specified along with a file interval of one hour Ensure that the instruments are configured to run in Communications mode
A32 Scheduled ArchiveYou want seismic data to be retrieved automatically from a group of instruments on the network every six hours The instruments are always accessible via an Ethernet connection
A scheduled Archive project is the recommended solution Use the Regular Interval scheduling option and set the interval to six hours
You can also run a scheduled Archive project at any time For example if the scheduled retrieval interval of a project is six hours and between intervals you want to retrieve the data three hours early you can run the project and approximately three additional hours of data would be accumulated About three hours later the project will run automatically and accumulate the remaining three hours of data
Appendix A Reference Information and Examples
40 Apollo Project User Guide16106R5 2009-03-24
A33 Manual ArchiveYou want to retrieve seismic data from a group of instruments but their respective Stores are only available for retrieval on occasion (no regular dependable schedule for retrieval from these Stores is possible)
A manually run Archive project is the recommended solution You can create the project and run it whenever any of the instruments are available for retrieval
A34 Field ArchiveYou want to collect data from a set of isolated instruments in the field at recurring intervals (for example twice per month)
A Field Archive project is the recommended solution You can create a Field Archive project and either add all instrument IP addresses to the list or use a Discovery specification The time for the last retrieval is stored on the instrument and all data is recovered from the last recovery time
A35 Media HarvestingYou want to collect the media from a set of instruments in the field at a regular interval (for example once per week) You also have to retrieve all of the seismic data on the media for subsequent analysis
An Archive project is the recommended solution Initially a directory is created on the file system of the server running Apollo Project A directory Store specification is created with this directory as the parent directory from which to search for Stores The content of each media instance in the weekrsquos collection is copied from a media reader to a subdirectory of the directory When the project is run all of the copied Stores are automatically available and the project accumulates data for each instrument
Due to the nature of media harvesting and the replacement procedure for this example data is always missing for the last period of output files for the current week This period corresponds to the time that the media was taken from the instrument and replaced with a new one The following week when the media is harvested again from the instruments in the field Apollo Project fills in the missing time for these files with the new Store data regardless of the media instance on which the data currently resides
You can only create and run Field Archive projects for Taurus version 30 or later
Appendix A Reference Information and Examples
Apollo Project User Guide16106R5 2009-03-24
41
A36 Trigger Downloading You have set up a network of five Tauruses around a hydro dam Each Taurus is accessible over an Ethernet connection and each is set to record data over the weekend You have set the period for data retrieval at 30 seconds before and five minutes after any seismic activity but the following procedure shows you why it is not necessary to view all of the data accumulated over the whole weekend
1 Select the Taurus at the site with the least environmental noise or determine the best site for generating triggers and designate this Taurus ldquoTaurus Ardquo for reference
You need to perform this task in advance More information about triggers can be found in the Taurus Portable Seismograph User Guide
2 Download the trigger file from ldquoTaurus Ardquo and review the file to verify the correct number of triggers
3 Follow these steps to create a new Triggers project
a) Click New on the Apollo Project Existing Projects page
b) Click Triggers as the project type and enter a unique name in the Project Name box
c) Click OK
d) Click the IP Address tab on the Store Selection tab
e) Enter the IP address of a Taurus
f) Click Add
g) Repeat step e until you have entered the IP addresses of all five of the Tauruses
Apollo Project adds the IP address specifications to the Selected Specifications section of the Store Selection page and finds all five Stores associated with the IP addresses and adds them to the Selected Stores section
h) Click the Channel Group Selection tab
i) Click Create Default Station Table to create a table for all of the currently selected Stores and discovered instruments
j) Review the selected channel groups and if required edit the mappings in the selected channel groups area of the tab (lower half of the tab)
k) Click the Time Selection tab
l) Click the Browse button
m)Select the trigger file that you downloaded in step 2 and click OK
n) Click Submit
The list of triggers is imported and displayed in the Triggers section on the Time Selection page
o) Enter a Pre Time of 30 seconds and a Post Time of 5 minutes
p) Click the Output Format tab
q) Click MiniSEED
r) Click All Instruments
s) Click the Output Location tab
Appendix A Reference Information and Examples
42 Apollo Project User Guide16106R5 2009-03-24
t) Enter the valid absolute path of the base directory for the processed data subfolders and files
u) Enter the expression used to define path names for subfolders under the base directory
v) Enter the expression used to define file names for the processed data files that are stored in the subfolders under the base directory
w) Click OK
4 Click the Run Now button on the Summary page
When the project has finished running the output folder you specified in step t will contain ten files Each output file will contain 5 minutes and 30 seconds of data from the five Tauruses
A4 Shot File Formats for Controlled Source ProjectsYou have two options for defining shots for a Controlled Source project manually defining shots or importing shots from a shot file
You can create shot files in one of following three file formats
Microsoft Office Excel (xls) ndash See Section A41 ldquoCreating a Shot File With Microsoft Office Excelrdquo on page 42
OpenOfficeorg Calc (ods) ndash See Section A42 ldquoCreating a Shot File With OpenOfficeorg Calcrdquo on page 44
Comma-Separated Values (csv) ndash See Section A43 ldquoCreating a Comma-Separated Values Shot Filerdquo on page 45
The Shot file templates are located in the docShotFileImport folder on the Apollo Project CD
A41 Creating a Shot File With Microsoft Office ExcelThe Microsoft Office Excel template for Apollo Project can be used with Microsoft Office Excel version 2003 or later
To create an Microsoft Office Excel based shot file
1 Double-click ShotFileTemplatexlt
A new Microsoft Office Excel file is created from the template and opens in the Microsoft Office Excel
2 Save the new spreadsheet as a Microsoft Office Excel document (xls)
3 Enter shot file data as specified in the Microsoft Office Excel spreadsheet
Only the decimal separator is supported for shot files Separators that denote the 3rd power of 10 (thousand) are not supported (for example 4500) The Microsoft Excel and OpenOffice templates reinforce these restrictions and are recommended for creating csv files
Appendix A Reference Information and Examples
Apollo Project User Guide16106R5 2009-03-24
43
You can enter data for multiple shot times
4 Click Save to save the file in Microsoft Office Excel format
5 Click File gt Save As and select CSV (Comma delimited) (csv) from the Save as type list
6 Click Save
7 Click OK on the message warning you that you are only saving the active sheet
8 Click Yes on the message warning you that file features might be incompatible with the csv format
9 Close Microsoft Office Excel
If you are using Microsoft Office Excel 2007 click the Microsoft Office Button and click Save As
Ensure that you save the file as a comma delimited file If the shot file is mistakenly saved in Microsoft Excel format (xls) the shot file will not work in Apollo Project
Appendix A Reference Information and Examples
44 Apollo Project User Guide16106R5 2009-03-24
A42 Creating a Shot File With OpenOfficeorg CalcThe OpenOffice template has been tested with OpenOfficeorg Calc version 23 Later versions of OpenOfficeorg Calc can be used at your discretion
To create a shot file based on the OpenOfficeorg Calc template
1 Double-click ShotFileTemplateots
A new OpenOffice spreadsheet is created from the template and opens in OpenOfficeorg Calc
2 Save the new spreadsheet as an OpenOffice Calc document (ods)
3 Enter the shot file data as specified in the OpenOffice spreadsheet
You can enter data for multiple shot times
4 Click Save to save the file in OpenOfficeorg Calc format
5 Click File gt Save As and select Text CSV (csv) from the Save as Type list
6 Select the Edit filter settings check box
7 Click Save
A warning message might appear that warns you that the document might contain formatting that cannot be saved in the csv format Click Yes on the warning message to save the file in csv format
The Export of text files window opens
8 Delete the double quotation marks () in the Text delimiter box and ensure that the Save cell content as shown check box is selected
9 Click OK to export the OpenOffice spreadsheet as a csv file
10 Click OK on the warning message
11 Close OpenOfficeorg Calc
Appendix A Reference Information and Examples
Apollo Project User Guide16106R5 2009-03-24
45
A43 Creating a Comma-Separated Values Shot FileYou can use any text editor to create a csv shot file
To create a csv shot file
1 Open ShotFileTemplatecsv in a text editor and save it with a different name
2 Format each line of the csv file as follows
Shot TimePre TimePost TimeLatitudeLongitudeElevation
For example
2008-08-28 103044090600000-6000004267
The format and units are as follows
3 Save the file as a csv formatted file
The csv shot file template is not compatible with Microsoft Office Excel Make sure that you do not double-click it and open it in Microsoft Office Excel
FormatUnits
Shot Time yyyy-mm-dd hhmmss
Pre Time seconds
Post Time seconds
Latitude degrees
Longitude degrees
Elevation meters
Appendix A Reference Information and Examples
46 Apollo Project User Guide16106R5 2009-03-24
Apollo Project User Guide16106R5 2009-03-24
47
Appendix B Retrieving SOH Data from a Taurus Version 2x
Taurus Version 2x SOH Data Retrieved by Apollo Project
Retrieving SOH Data from a Taurus Version 2x Streaming to Apollo Server
B1 Taurus Version 2x SOH Data Retrieved by Apollo Project This section presents the predefined datasets of SOH data Apollo Project will retrieve from a Taurus version 2x either through a direct connection or a stream to Apollo Server For instruction on retrieving streaming Taurus version 2x data from Apollo Server see Section B2 ldquoRetrieving SOH Data from a Taurus Version 2x Streaming to Apollo Serverrdquo on page 48
The order of the columns presented in the table below will differ when streaming Taurus version 2x SOH data from Apollo Server
Predefined SOH group SOH data
GPS Time Time (longsecs) (the number of seconds since 1970-01-01)Time (UTC) (time in yyyy-mm-dd hhmmssms format)Altitude (m)DAC CountError (ns) (time error)GPS Engine StatusLast Update Time(s)Lat (deg) (latitude in degrees)Long (deg) (longitude in degrees)NumSatellites (number of satellites used)PDOPPhaseLock (system clock phase lock)TDOPUncertainty (ns) (time uncertainty)
Note The values for Number of satellites used PDOP and TDOP are provided by the GPS receiver at the Last update time In order to see what time these values correspond to look at the Last update time When GPS is off these three parameters and the Last update time are not updated The last value displays until the next update arrives (after the GPS is turned on again)
Appendix B Retrieving SOH Data from a Taurus Version 2x
48 Apollo Project User Guide16106R5 2009-03-24
B2 Retrieving SOH Data from a Taurus Version 2x Streaming to Apollo ServerThis section provides instruction on configuring your Taurus version 2x to stream data to Apollo Server and instructions on how to use Apollo Project to retrieve this data from Apollo Server
B21 Streaming Data from a Taurus Version 2x to Apollo ServerUse the Taurus graphical user interface on either the Taurus display screen or through a Web browser to set up an NP stream from a Taurus version 2x to Apollo Server
1 Log in to the Taurus version 2x with either the tech or central user account
2 Select Advanced Configuration gt Communications gt NP Data Streaming
GPS Satellites Time (longsecs) (the number of seconds since 1970-01-01)Time (UTC) (time in yyyy-mm-dd hhmmssms format)
For each satelliteAcquisition FlagLast Update Time (ms)PRNSatellite Azimuth (microordm)Satellite Elevation (microordm)Signal Level (AMU)
Environment Time (longsecs) (the number of seconds since 1970-01-01)Time (UTC) (time in yyyy-mm-dd hhmmssms format)External SOH Voltage 1 (V) (12-bit voltage input) External SOH Voltage 2 (V) (12-bit voltage input) External SOH Voltage 3 (V) (12-bit voltage input) External SOH Voltage 4 (V) (12-bit voltage input) Sensor SOH Voltage 1 (V)Sensor SOH Voltage 2 (V)Sensor SOH Voltage 3 (V)
Instrument Time (longsecs) (the number of seconds since 1970-01-01)Time (UTC) (time in yyyy-mm-dd hhmmssms format)Controller Current (mA)Digitizer Current (mA)NMX Bus Current (mA) (external connector)Sensor Current (mA)Serial Port Current (mA)Supply Voltage (mV)Temperature (ordmC)
Predefined SOH group SOH data
Appendix B Retrieving SOH Data from a Taurus Version 2x
Apollo Project User Guide16106R5 2009-03-24
49
3 To have the Taurus stream both time series and SOH data to Apollo Server select both Stream Time Series and Stream SOH
-OR-
Select only Stream SOH if you only want to retrieve the SOH data from Apollo Server
4 Type the IP address for Apollo Server in the IP Address box
5 Type the port number Apollo Server uses to receive data in the Port box By default this is port number 32008
6 The Second IP Address and Second Port boxes are not necessary however cannot be left blank Type 127001 in the Second IP Address box and 32004 in the Second Port box
7 Type a value in the Maximum Throughput [bps] box if a limited data link is present between the Taurus and Apollo Server For instance if at some point the data link is limited to 9600 bps then this is the maximum throughput the link can allow If there are no throughput limitations set the value in this box to zero to disable the throughput limitation
8 Click Apply
9 Click Commit
B22 Retrieving Taurus Version 2x Data from Apollo ServerCreate a new project or use an existing project in Apollo Project to retrieve the Taurus version 2x data from Apollo Server For more information on creating or editing projects refer to Section 31 ldquoCreating New Projectsrdquo on page 11 and Section 36 ldquoEditing and Viewing the Settings of Projectsrdquo on page 31
When creating or editing the project
a) Add an IP address Store specification on the Store Selection tab (see step 4 in Section 31 ldquoCreating New Projectsrdquo) for Apollo Server including its client Web application port number Use the format
Apollo Server IP AddressApollo Server Client Web Application Port Number
b) Apply the appropriate filters on the Channel Group Selection tab to retrieve the desired channel groups from the Taurus version 2x See step 5 through step 12 in Section 31 ldquoCreating New Projectsrdquo for instruction on using the Channel Group Selection tab
Appendix B Retrieving SOH Data from a Taurus Version 2x
50 Apollo Project User Guide16106R5 2009-03-24
Apollo Project User Guide16106R5 2009-03-24
51
Appendix C Glossary
Glossary of Abbreviations and Terms
List of Unit Abbreviations and Symbols
C1 Glossary of Abbreviations and Terms
A
ASCIIAmerican Standard Code for Information Interchange
B
BHEBroad Band High Gain Seismometer East-West Orientation
Channel name based on the Global Seismological Network (GSN) standard
BHNBroad Band High Gain Seismometer North-South Orientation
Channel name based on the Global Seismological Network (GSN) standard
BHZBroad Band High Gain Seismometer Vertical Orientation
Channel name based on the Global Seismological Network (GSN) standard
Appendix C Glossary
52 Apollo Project User Guide16106R5 2009-03-24
C
CSVComma-Separated Values
D
DACDigital to Analog Converter
G
GPSGlobal Positioning System
J
JREJava Runtime Environment
JVMJava Virtual Machine
N
NFSNetwork File System
P
PDOPPosition Dilution of Precision
PRNPseudo-random Number
Appendix C Glossary
Apollo Project User Guide16106R5 2009-03-24
53
S
SACSeismic Analysis Code
An Apollo Project output file format that generates files that can be used by the SAC software (see http wwwirisedusoftwaresac)
SEEDStandard for the Exchange of Earthquake Data
SMBServer Message Block
SOHState of Health
T
TCPIPTransmission Control ProtocolInternet Protocol
TDOPTime Dilution of Precision
U
UNCUniform Naming Convention or Universal Naming Convention
URLUniform Resource Locator
UTCCoordinated Universal Time
Appendix C Glossary
54 Apollo Project User Guide16106R5 2009-03-24
C2 List of Unit Abbreviations and SymbolsTable C-1 provides a list of unit abbreviations and symbols commonly used in Nanometrics documentation
Table C-1 Unit abbreviations and symbols
Abbreviation or Symbol Definition Abbreviation
or Symbol Definition
deg degree lb pound
Oslash diameter m metre
micro micro ms metre per second
Ω ohm ms2 metre per second squared
A ampere mA milliampere
AC alternating current MB megabyte
b bit MΩ megaohm
B byte MHz megahertz
bps bits per second mi mile
C Celsius mL millilitre
cm centimetre mm millimetre
dB decibel ms millisecond
DC direct current MTU maximum transmission unit
F farad mV millivolt
ft foot mW milliwatt
g gram N Newton
g gravity nF nanofarad
GB gigabyte ns nanosecond
GHz gigahertz rad radian
Hz hertz rads radian per second
in inch s second
KB kilobyte sps samples per second
kg kilogram U rack unit
kHz kilohertz V volt
kΩ kiloohm Vpp Volts peak-to-peak
kW kilowatt W watt
L litre
Apollo Project User Guide16106R5 2009-03-24
55
About NanometricsNanometrics is a world leader in the development of precision instrumentation network technology and software applications for seismological and environmental studies Using Nanometrics technology our customers establish and grow research networks that are often located in extreme environments such as the frozen Arctic and Antarctic the arid deserts of the Middle East the jungles of South America and the depths of the worlds oceans Many of these are mission-critical national and regional networks that demand the highest possible data quality and availability
Nanometrics provides end-to-end solutions that include a growing portfolio of broadband and strong motion seismometers dataloggers and digitizers satellite ground station systems for remote site data collection and software applications for data and network analysis and management To support this portfolio Nanometrics also provides global systems engineering services for design installation and support of complete networks
Our head office research and development centre and production facility are located in the Kanata North Business Park of Ottawa the high-technology heart of Canadas capital region
Contacting NanometricsNanometrics Inc250 Herzberg RoadKanata Ontario Canada K2K 2A1Phone +1 613-592-6776Fax +1 613-592-5929Email infonanometricscaWeb wwwnanometricsca
Contacting Technical SupportIf you need technical support please submit a request on the Nanometrics technical support site or by email or fax Include a full explanation of the problem and related information such as log filesSupport site httpsupportnanometricsca
Email techsupportnanometricsca
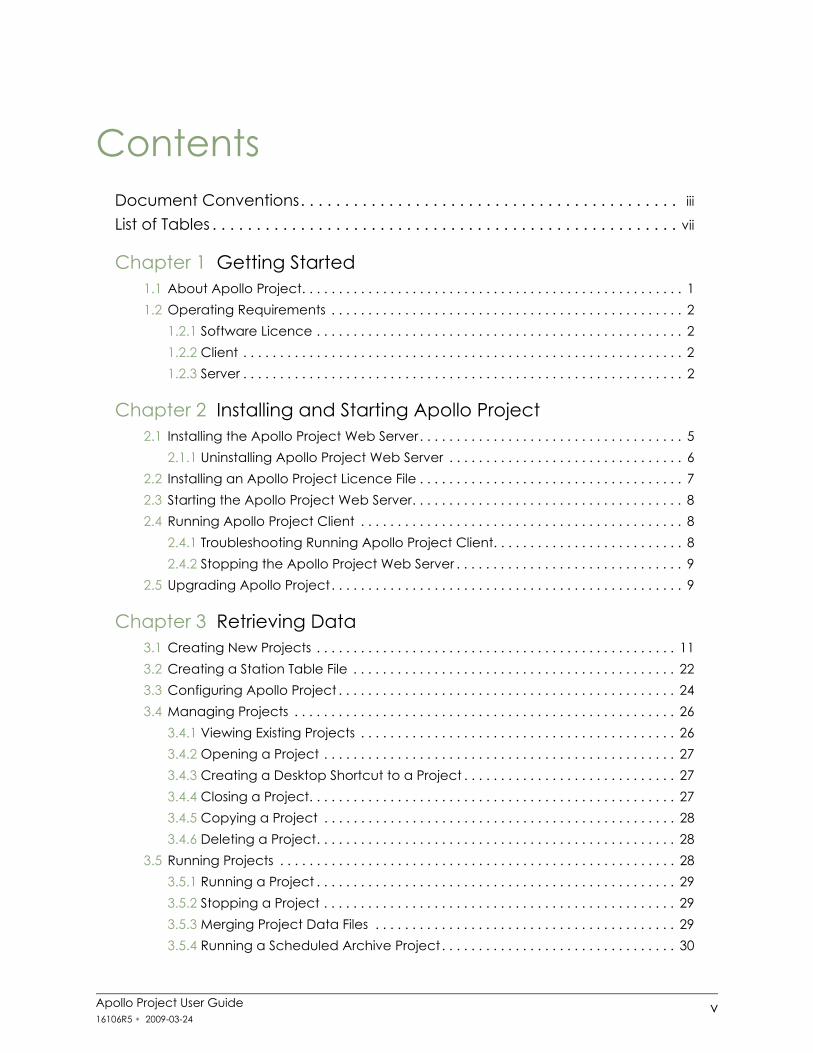
Apollo Project User Guide16106R5 2009-03-24
v
ContentsDocument Conventions iiiList of Tables vii
Chapter 1 Getting Started11 About Apollo Project 112 Operating Requirements 2
121 Software Licence 2122 Client 2123 Server 2
Chapter 2 Installing and Starting Apollo Project21 Installing the Apollo Project Web Server 5
211 Uninstalling Apollo Project Web Server 622 Installing an Apollo Project Licence File 723 Starting the Apollo Project Web Server 824 Running Apollo Project Client 8
241 Troubleshooting Running Apollo Project Client 8242 Stopping the Apollo Project Web Server 9
25 Upgrading Apollo Project 9
Chapter 3 Retrieving Data31 Creating New Projects 1132 Creating a Station Table File 2233 Configuring Apollo Project 2434 Managing Projects 26
341 Viewing Existing Projects 26342 Opening a Project 27343 Creating a Desktop Shortcut to a Project 27344 Closing a Project 27345 Copying a Project 28346 Deleting a Project 28
35 Running Projects 28351 Running a Project 29352 Stopping a Project 29353 Merging Project Data Files 29354 Running a Scheduled Archive Project 30
Contents
vi Apollo Project User Guide16106R5 2009-03-24
3541 Cancelling a Schedule 3036 Editing and Viewing the Settings of Projects 31
361 Editing Project Settings 31362 Viewing Project Settings 31
37 Monitoring Project Status 32371 Viewing an Overview of the Status of All Projects 32372 Viewing the Status of an Individual Project 33373 Monitoring the Status of a Running Project 34
3731 Status Colours 343732 Viewing the Retrieval Details for Each Channel Group 35
Appendix A Reference Information and ExamplesA1 Overview of Running Projects 37A2 Example Project Settings 38
A21 Example 1 One Time Project 38A22 Example 2 Controlled Source Project 39
A3 Example Deployment Scenarios 39A31 One Time 39A32 Scheduled Archive 39A33 Manual Archive 40A34 Field Archive 40A35 Media Harvesting 40A36 Trigger Downloading 41
A4 Shot File Formats for Controlled Source Projects 42A41 Creating a Shot File With Microsoft Office Excel 42A42 Creating a Shot File With OpenOfficeorg Calc 44A43 Creating a Comma-Separated Values Shot File 45
Appendix B Retrieving SOH Data from a Taurus Version 2xB1 Taurus Version 2x SOH Data Retrieved by Apollo Project 47B2 Retrieving SOH Data from a Taurus Version 2x Streaming to Apollo Server 48
B21 Streaming Data from a Taurus Version 2x to Apollo Server 48B22 Retrieving Taurus Version 2x Data from Apollo Server 49
Appendix C GlossaryC1 Glossary of Abbreviations and Terms 51C2 List of Unit Abbreviations and Symbols 54
About Nanometrics 55Contacting Nanometrics 55Contacting Technical Support 55
Contents
Apollo Project User Guide16106R5 2009-03-24
vii
Tables1-1 Requirements for an Apollo Project server running Windows 31-2 Requirements for an Apollo Project server running Linux 31-3 Requirements for an Apollo Project server running Mac OS X 32-1 Installation instructions 62-2 Uninstalling the Apollo Project Web server 62-3 Starting the Apollo Project Web server 83-1 Status colours 34C-1 Unit abbreviations and symbols 54
Contents
viii Apollo Project User Guide16106R5 2009-03-24
Apollo Project User Guide16106R5 2009-03-24
1
Chapter 1 Getting Started
About Apollo Project
Operating Requirements
11 About Apollo ProjectApollo Project is a Web application that conveniently retrieves time series and state of health data from any Nanometrics Store including those on Nanometrics instruments and those copied to network computers Available through any Web browser the client application provides options for you to define complex reusable data retrieval tasks called projects
Apollo Project has five project types
Archive projects retrieve data from sources that are continually updated such as a directory on a computer that has new data saved to it periodically or a multicast group of Nanometrics instruments that has different instruments active at different times You can schedule Archive projects to run automatically
One Time projects retrieve a single time segment of data
Controlled Source projects retrieve data specified as a set of shots
Triggers projects retrieve data specified by a trigger list in comma-separated value (CSV) format
Field Archive projects perform recurring data retrievals storing the time of the current retrieval on the Nanometrics instrument Using the time of the last retrieval Field Archive projects only retrieve the data accumulated since the last time the project was run on the instrument
Data for time series channel groups can be downloaded in MiniSEED SAC (binary format) Seisan or SEGY format depending on the project type Data for SOH channel groups is always downloaded in CSV format
Chapter 1 Getting Started
2 Apollo Project User Guide16106R5 2009-03-24
12 Operating RequirementsApollo Project has licensing client and server operating requirements These requirements are listed in Section 121 Section 122 and Section 123
121 Software LicenceIf you have ordered and received an Apollo Project software licence from Nanometrics install this file during the Apollo Project Web server installation or later using the Nanometrics Product Licence Installation Wizard See Section 22 ldquoInstalling an Apollo Project Licence Filerdquo on page 7 for licence installation instructions for Microsoftreg Windows Linux and Mac OSreg X server installations
The licence determines the number of projects you can save the number of time series channels you can select and the number of projects you can run concurrently Without a licence Apollo Project defaults to the unlicensed configuration This configuration allows you to save one project definition at a time for up to three time series channels from any combination of Stores
122 ClientThe client requirements for any platform are a Web browser with JavaScript enabled and IP access to the server Apollo Project version 14 has been tested with Microsoft Internet Explorer version 7 and Mozilla Firefox versions 2 and 3 Other browsers have not been fully tested with the client but may be used at your discretion
123 ServerRun the Apollo Project Web server on Windows Linux or Mac OS X For the
Windows operating requirements see Table 1-1 ldquoRequirements for an Apollo Project server running Windowsrdquo on page 3
Linux operating requirements see Table 1-2 ldquoRequirements for an Apollo Project server running Linuxrdquo on page 3
Mac OS X operating requirements see Table 1-3 ldquoRequirements for an Apollo Project server running Mac OS Xrdquo on page 3
Installing a licence file after creating a project in Apollo Project will result in the loss of that project It is recommended that you install your licence before running Apollo Project for the first time
Click the About button in the client application to view licence information
Chapter 1 Getting Started
Apollo Project User Guide16106R5 2009-03-24
3
Table 1-1 Requirements for an Apollo Project server running Windows
System component Requirement
Operating system Windows XP with Service Pack 3Memory 1GB RAM minimum
2GB RAM recommendedDisk space Required free disk space for every 3 time series channels of data
retrieved is approximately 2GB per month This is roughly twice as much space as the retrieved data occupies in a Store
Java Sun Java Runtime Environment (JRE) version 60Software licence Order a licence from Nanometrics if capabilities beyond that of the
unlicensed configuration are required (see Section 121 ldquoSoftware Licencerdquo on page 2)
Table 1-2 Requirements for an Apollo Project server running Linux
System component Requirement
Operating system Any distribution running a GNULinux kernel of version 24 or laterTested on Red Hat Linux 9 (kernel 2420-8)
Memory 512MB RAM minimum2GB RAM recommended
Disk space Required free disk space for every 3 time series channels of data retrieved is approximately 2GB per month This is roughly twice as much space as the retrieved data occupies in a Store
Java Sun Java Runtime Environment (JRE) version 60Software licence Order a licence from Nanometrics if capabilities beyond that of the
unlicensed configuration are required (see Section 121 ldquoSoftware Licencerdquo)
Table 1-3 Requirements for an Apollo Project server running Mac OS X
System component Requirement
Operating system Mac OS X (1052 and later)Memory 1GB RAM minimum
2GB RAM recommendedDisk space Required free disk space for every 3 time series channels of data
retrieved is approximately 2GB per month This is roughly twice as much space as the retrieved data occupies in a Store
Java Sun Java Runtime Environment (JRE) version 60
Notes on the JRE for Mac systems JRE version 60 must be manually downloaded and installedAfter installing the JRE it must be set as the default Java Virtual Machine (JVM)
Software licence Order a licence from Nanometrics if capabilities beyond that of the unlicensed configuration are required (see Section 121 ldquoSoftware Licencerdquo on page 2)
Chapter 1 Getting Started
4 Apollo Project User Guide16106R5 2009-03-24
Apollo Project User Guide16106R5 2009-03-24
5
Chapter 2 Installing and Starting Apollo Project
Installing the Apollo Project Web Server
Installing an Apollo Project Licence File
Starting the Apollo Project Web Server
Running Apollo Project Client
Upgrading Apollo Project
21 Installing the Apollo Project Web ServerThe Apollo Project Web server is installed on a single computer and after it is installed and running the client can run locally on the server or on any computer with a Web browser and network access to the server computer
All Stores must be accessible from the server hosting the Apollo Project Web server All output files are created on the server and its accessible file systems as described in Section 33 ldquoConfiguring Apollo Projectrdquo on page 24
To install the Apollo Project Web server on a server computer running Windows Linux or Mac OS X
1 Install a supported version of the Java Runtime Environment JRE version 60 or later
2 If you have received a licence file from Nanometrics ensure it is in a drive or network location that is accessible to the Apollo Project Setup Wizard
You can install and run Apollo Project without a licence file For details see Section 121 ldquoSoftware Licencerdquo on page 2 Should you require a licence after Apollo Project is installed you can install a licence using the Nanometrics Licence Installation Wizard See Section 22 ldquoInstalling an Apollo Project Licence Filerdquo on page 7
Chapter 2 Installing and Starting Apollo Project
6 Apollo Project User Guide16106R5 2009-03-24
3 Follow the instructions for your operating system in Table 2-1
211 Uninstalling Apollo Project Web ServerTable 2-2 provides instructions for uninstalling Apollo Project from the server computer for each of the supported operating systems
Table 2-1 Installation instructions
Operating System To install the Apollo Project Web server
Windows 1 Double-click ApolloProject_windows_x_x_xexe where x_x_x is the Apollo Project version number on the Apollo Project CD
2 Follow the steps of the installation wizard making changes to the default settings as required
Linux 1 Open a Terminal window and change the directory to the Apollo Project CD
2 Run the following as rootsh ApolloProject_unix_x_x_xsh (where x_x_x is the Apollo Project version number)
3 Follow the steps of the installation wizard making changes to the default settings as required
Mac OS X 1 Double-click the ApolloProject_macos_x_x_xdmg where x_x_x is the Apollo Project version number disc image on the Apollo Project CDThe disc image mounts as a new volume on your desktop and automatically displays its contents in a Finder window
2 Double-click the installation file Apollo Project Installer in the Finder window
3 Follow the steps of the installation wizard making changes to the default settings as required
Note After installing Apollo Project you can drag the disc image to the Trash to eject it and remove it from your desktop
If you are uninstalling a version of Apollo Project prior to version 13 refer to the version 12 user guide for instruction on uninstalling Apollo Project
Apollo Project Version 12 User Guide revision 16106R2 released on 2008-09-09
Table 2-2 Uninstalling the Apollo Project Web server
Operating System To uninstall the Apollo Project Web server
Windows Click Start gt All Programs gt Nanometrics gt Apollo Project gt Apollo Project Uninstaller
Linux 1 Open a Terminal window and change the directory to the Apollo Project directory The location of the Apollo Project directory was defined when you installed Apollo Project The default location is optnanometricsApolloProject
2 Run the following as root uninstall
Mac OS X 1 Open the Finder2 Click Applications under Places3 Double-click the Apollo Project folder 4 Double-click Apollo Project Uninstaller
Chapter 2 Installing and Starting Apollo Project
Apollo Project User Guide16106R5 2009-03-24
7
22 Installing an Apollo Project Licence FileIf you did not install a licence file during the installation of the Apollo Project Web server application you can install one at any time using the Nanometrics Product Licence Installation Wizard
A licence for Apollo Project is only required if capabilities beyond those of the unlicensed version are needed See Section 121 ldquoSoftware Licencerdquo on page 2 for descriptions of the licensed and unlicensed versions Contact Nanometrics to order a licence (see Contacting Nanometrics on page 55)
If you have obtained a licence file from Nanometrics use the following steps to install the file
Installing a licence file after creating a project in Apollo Project will result in the loss of that project It is recommended that you install your licence before running Apollo Project for the first time
Operating System To install an Apollo Project licence file
Windows 1 Ensure the licence file is in a drive or network location that is accessible to the licence installation wizard
2 Click Start gt All Programs gt Nanometrics gt Apollo Project gt NmxLicenceInstaller
3 Follow the steps in the license installation wizard to select and install the licence file
Linux 1 Ensure the licence file is in a drive or network location that is accessible to the licence installation wizard
2 Open a Terminal window and change the directory to the Apollo Project directory The location of the Apollo Project directory was defined when you installed Apollo Project The default location is optnanometricsApolloProject
3 Run the following NmxLicenceInstaller
Mac OS X 1 Ensure the licence file is in a drive or network location that is accessible to the licence installation wizard
2 Open the Finder3 Click Applications under Places4 Double-click the Apollo Project folder 5 Double-click NmxLicenceInstaller6 Follow the steps in the license installation wizard to select and install
the licence file
Chapter 2 Installing and Starting Apollo Project
8 Apollo Project User Guide16106R5 2009-03-24
23 Starting the Apollo Project Web ServerUse the procedures in Table 2-3 that correspond to your Apollo Server computerrsquos operating system to start the Apollo Project Web server application
24 Running Apollo Project ClientIf you are running the Apollo Project client on the computer where the server application is installed open a browser and go to
httplocalhostPort
Where localhost is the local computer and port is the port number configured during installation The default port number for Apollo Project is 8088
To run an Apollo Project client when the server application resides on a different computer open a browser and go to
httpServer computer name or IP addressPort
For example if the domain name of the server computer is ApolloProjectServer with an IP address of 192168220 and the default port number of 8088 is being used the URL for the client application in your browser will be
httpApolloProjectServer8088
ndash OR ndash
http1921682208088
241 Troubleshooting Running Apollo Project ClientIf you are having trouble opening the Apollo Project client in your Web browser try these suggestions
a) Ensure that the Apollo Project Web server application is running on the Apollo Project server computer See Section 23 ldquoStarting the Apollo Project Web Serverrdquo
Table 2-3 Starting the Apollo Project Web server
Operating System To start the Apollo Project Web server
Windows Click Start gt All Programs gt Nanometrics gt Apollo Project gt Apollo ProjectLinux 1 Open a Terminal window and change the directory to the Apollo
Project directory The location of the Apollo Project directory was defined when you installed Apollo Project The default location is optnanometricsApolloProject
2 Run the following ApolloProject
Mac OS X 1 Open the Finder2 Click Applications under Places3 Double-click the Apollo Project folder 4 Double-click Apollo Project to start the Web server
Chapter 2 Installing and Starting Apollo Project
Apollo Project User Guide16106R5 2009-03-24
9
b) Verify that the firewall on the server computer is not blocking the port number used to serve Web pages (by default the port number is 8088) To check the port number used open ApolloProjectvmoptions in the ApolloProject folder and note the number identified for the -Dserverport setting
242 Stopping the Apollo Project Web ServerThe Apollo Project client provides the means to stop the Apollo Project Web server application To stop the Apollo Project Web server
1 Open the Apollo Project client
2 Click the Shut down Apollo Project button
3 Click OK to confirm the Web server shutdown
25 Upgrading Apollo ProjectTo upgrade Apollo Project from a previous version
1 Uninstall the Apollo Project Web server application as per Section 211 ldquoUninstalling Apollo Project Web Serverrdquo on page 6
2 Install the new version of Apollo Project as per Section 21 ldquoInstalling the Apollo Project Web Serverrdquo on page 5
When you shut down the Apollo Project Web server all clients are disconnected from the server To restore connectivity start the Apollo Project Web server using the instructions in Section 23 ldquoStarting the Apollo Project Web Serverrdquo on page 8
During the upgrade process all downloaded data will remain intact however you will need to recreate your projects and settings in the new version of Apollo Project
For Windows and Linux installations if you are upgrading from an earlier version of Apollo Project that used Apache Tomcat it is strongly recommended that you uninstall Tomcat before installing the new version of Apollo Project
Refer to the version 12 user guide for instruction on uninstalling versions of Apollo Project prior to version 13
Apollo Project Version 12 User Guide revision 16106R2 released on 2008-09-09
If you are using a licensed version of Apollo Project you will need a new licence file when installing the upgrade If you have not received a new licence file contact Nanometrics (see Contacting Nanometrics on page 55)
Chapter 2 Installing and Starting Apollo Project
10 Apollo Project User Guide16106R5 2009-03-24
Apollo Project User Guide16106R5 2009-03-24
11
Chapter 3 Retrieving Data
Creating New Projects
Creating a Station Table File
Configuring Apollo Project
Managing Projects
Running Projects
Editing and Viewing the Settings of Projects
Monitoring Project Status
31 Creating New ProjectsYou can create multiple projects up to the number supported by the software licence (see Section 121 ldquoSoftware Licencerdquo on page 2)
When you create a new project you have to
bull Select data Stores
bull Specify a station table file
bull Select the channel groups you want to download data from
bull Specify when you want the project to run
bull Select the output format
bull Specify the output location
To create a new project
1 Click New on the Apollo Project Existing Projects page
2 Click a project type and enter a unique name in the Project Name box
3 Click OK
Chapter 3 Retrieving Data
12 Apollo Project User Guide16106R5 2009-03-24
4 Select one or more data Stores by performing the following steps
Store type DescriptionSteps
File A file Store specification defines a particular Store that resides on a file system accessible by the server running Apollo Project The file system can be a local or a networked file system (for example accessible via SMB or NFS)
1 Click the File tab2 Enter the full path and file name of a Store file3 Click Add
Apollo Project adds the specification to the Selected Specifications section of the Store Selection page and finds all related Store files and adds them as a single Store to the Selected Stores section
Directory A directory Store specification defines the set of Stores that reside in a particular directory hierarchy on a file system accessible by the server running Apollo Project A recursive search from the specified directory identifies all of the available Stores The file system can be a local or a networked file system (for example accessible via SMB or NFS)
1 Click the Directory tab2 Enter a directory path name
If you specify a root directory such as C it will take a long time for Apollo Project to find all of the Store files in that root directory
3 Click AddApollo Project adds the specification to the Selected Specifications section of the Store Selection page and finds and adds all Stores in the specified directory and its subdirectories to the Selected Stores section
IP Address An IP Address Store specification defines the Store of a single instrument (or an instance of Apollo Server) The specified IP address must be an IP address bound to the Ethernet interface of an instrument At the same time the instrument must be running in communications mode and be accessible from the server running Apollo Project
1 Click the IP Address tab2 Enter the IP address of an instrument3 Click Add
Apollo Project adds the specification to the Selected Specifications section of the Store Selection page and finds all Stores associated with the IP address and adds them to the Selected Stores section
Chapter 3 Retrieving Data
Apollo Project User Guide16106R5 2009-03-24
13
Discovery A discovery Store specification specifies the Stores of multiple instruments In this case a class D (multicast) IP address and port is specified It is assumed that the Store of any instrument in communications mode is accessible from the LAN of the Apollo Project server When Discovery is enabled for the specified IP address and port these attributes are included upon running the project
1 Click the Discovery tab2 Enter the multicast address and port number of a group of instruments
For example 224199711386776Multicast addresses range from 224000 through 239255255255
3 Click AddApollo Project adds the specification to the Selected Specifications section of the Store Selection page and finds all Stores associated with the multicast address and adds them to the Selected Stores section of the Store Selection page
Notes When multiple multicast groups are used for discovery the port number must differ from existing discovery port numbers by 2 for each discovery port number in use x there must be no other discovery port configured for use with a value of x or x+1For example the default discovery multicast group used by Taurus is 224199711386776 To add another multicast group you have to specify a different port number (which cannot be 6776 or 6777)
Recent Specs
Apollo Project keeps the 16 most recently defined Store specifications and groups them by category on the Recent Specs page
1 Click the Recent Specs tab2 Expand a specification category (File Directory IP Address or Discovery)
and select a specification3 Click Add
Apollo Project adds the specification to the Selected Specifications section of the Store Selection page and finds all Stores associated with the specification and adds them to the Selected Stores section
Each time a project is run Apollo Project generates a list of available Stores based on the selected Store specifications The actual Stores from which data is retrieved can vary on successive project runs For example a discovery Store specification might result in a different number of instruments being included depending on current access to the instruments
Remove a specification (and its associated Stores) by selecting it and clicking Remove Remove all specifications (and all Stores) by clicking Remove All You cannot remove individual Stores from a specification but you can add a different specification and select a different group of Stores Alternatively you can use channel group attributes filtering to select the channel groups that data is retrieved from
When copying a Store from an instrument to your local computer do not overwrite an existing Store Instead delete the existing Store or move it to a different folder on the computer Stores are made up of multiple volumes and if the new Store has fewer volumes than the old Store you could see some unpredictable results with Apollo Project
Store type DescriptionSteps
Chapter 3 Retrieving Data
14 Apollo Project User Guide16106R5 2009-03-24
5 Click the Channel Group Selection tab
6 If you defined a default station table file and want to use it for this project go to step 7
For more information see Section 32 ldquoCreating a Station Table Filerdquo on page 22
-OR-
Click Create Default Station Table to create a table for all of the currently selected Stores and discovered instruments for this project using the default settings for the network name location and channel names
The default settings for the network name location and channel names are defined in the Behaviour and Defaults dialog box For more information see Section 33 ldquoConfiguring Apollo Projectrdquo on page 24
-OR-
Enter the path and file name of a station table for this project
7 If you want to download all data from all available Stores verify that the Retrieve data from all channel groups (do not filter) check box is selected and go to step 12
-OR-
If you want to filter the data by specific channel groups and channel group attributes go to step 8
8 Clear the Retrieve data from all channel groups (do not filter) check box
9 Select the time series channel groups you want to download data from
A station table is used to assign names to all of the selected channel groups For more information see Section 32 ldquoCreating a Station Table Filerdquo on page 22
If new Stores are found after a station table file has been defined for a project (for example as a result of Discovery or a directory specification) the default channel group names are used in the output files and no filtering is applied to the channel groups
If the text ldquoSelected Time Series Channels x of xrdquo where x represents the number of channels is red you have selected more time series channels than your licence permits You must select a valid number of time series channels (for the unlicenced version of Apollo Project there is a maximum of three time series channels) before you can create your project
Chapter 3 Retrieving Data
Apollo Project User Guide16106R5 2009-03-24
15
10 Select the state of health (SOH) channel groups you want to download data from Each group has a predefined dataset
To view the SOH data retrieved from a Taurus version 2x see Appendix B ldquoRetrieving SOH Data from a Taurus Version 2xrdquo
Predefined SOH group SOH data
GPS Time Time (longsecs) (the number of seconds since 1970-01-01)Time (UTC) (time in yyyy-mm-dd hhmmssms format)DAC CountGPS Engine StatusGPS Last Update Time(s)GPS PDOPGPS Satellites Used (number of satellites used)GPS TDOP Lat (deg) (latitude in degrees)Long (deg) (longitude in degrees)Timing Error (ns)Timing Phase Lock (system clock phase lock)Timing Uncertainty (ns)
Note The values for Number of satellites used PDOP and TDOP are provided by the GPS receiver at the Last update time In order to see what time these values correspond to look at the Last update time When GPS is off these three parameters and the Last update time are not updated The last value displays until the next update arrives (after the GPS is turned on again)
GPS Satellites Time (longsecs) (the number of seconds since 1970-01-01)Time (UTC) (time in yyyy-mm-dd hhmmssms format)
For each satelliteGPS Satellite Acquisition FlagGPS Satellite Azimuth (microordm)GPS Satellite Elevation (microordm)GPS Satellite Last Update Time (ms)GPS Satellite PRN GPS Satellite Signal Level (AMU)
Environment Time (longsecs) (the number of seconds since 1970-01-01)Time (UTC) (time in yyyy-mm-dd hhmmssms format)External SOH Voltage 1 (V) (12-bit voltage input)External SOH Voltage 2 (V) (12-bit voltage input)External SOH Voltage 3 (V) (12-bit voltage input)External SOH Voltage 4 (V) (12-bit voltage input)Sensor SOH Voltage 1 (V)Sensor SOH Voltage 2 (V)Sensor SOH Voltage 3 (V)
Chapter 3 Retrieving Data
16 Apollo Project User Guide16106R5 2009-03-24
11 If required enter additional filter information as comma-delimited text into the Network Station Location Channel and Instrument boxes
You can use an asterisk ()to represent 1 or more characters
12 Review the selected channel groups and if required edit the channel group mappings in the selected channel groups area of the tab
Channel groups that do not have a mapping appear as blanks in the selected channel groups area of the tab Mapping information for these channel groups can be entered and saved in the station table file for future projects
You can edit the mappings at any time The changes are reflected in future runs of any project using that same station table file For more information see Section 32 ldquoCreating a Station Table Filerdquo on page 22
13 Click the Time Selection tab and follow the steps for the project type you selected
Instrument Time (longsecs) (the number of seconds since 1970-01-01)Time (UTC) (time in yyyy-mm-dd hhmmssms format)Controller Current (mA)Digitizer Current (mA)NMX Bus Current (mA) (external connector)Sensor Current (mA)Serial Port Current (mA)Supply Voltage (mV)Temperature (ordmC)
Look in the selected channel groups area of the tab (lower half of the tab) for examples of filter details you can enter in the Network Station Location Channel and Instrument ID filter boxes
The NetworkStationLocationChannel column of the table presents information in the format implied by the column title For instance in an entry of XXA099901BHE(1) XX represents the network(2) A0999 represents the station(3) 01 represents the location(4) BHE represents the channel
Look at the Instrument ID column of the table for an example of an instrument name and serial number such as taurus_0999
Only mappings that are applicable for the selected channel groups appear in the selected channel groups area of the tab
All times use the UTC time zone
Predefined SOH group SOH data
Chapter 3 Retrieving Data
Apollo Project User Guide16106R5 2009-03-24
17
Project type DescriptionSteps
Archive Archive projects attempt to retrieve data up to the current timeThe time ranges for which output files will be produced are driven from the file interval and are aligned to the project start time It is therefore unlikely that the ldquomost recentrdquo file interval will align with the current time Therefore the most recent range for which data retrieval is attempted will have a portion of its data retrieved and the remainder (for future retrieval) will be declared unavailable However when the project is run later (after the end of the particular time range) the unavailable data will normally be retrieved and the situation will likely repeat itself with the ldquonewrdquo last range to retrieveTo run an Archive project manually1 If required edit the start time for the project2 Click Manual3 Specify the file interval
For example if you specify 2 hours then one file is created every 2 hours If the duration for the project is one day then a total of 12 files will be created
4 After you have finished creating the project click Run Now on the Summary page to run the project
To schedule an Archive project to run automatically at a regular interval1 Click Regular Interval and select the interval 2 Specify the file interval
For example if you specify 2 hours then one file is created every 2 hours If the duration for the project is one day then a total of 12 files will be created
3 After you have finished creating the project click Start Schedule on the Summary page to start the schedule for the project and click OK twice The project will run according to the interval you specified after you start the schedule For example if you click Start Schedule on a Wednesday and you specified every 2 days as the interval then the project will run for the first time on Friday and every two days after that If the computer has been rebooted and the Apollo Project Web server has been restarted the project will run according to the interval you specified after the computer has rebooted For example if the computer reboots on a Wednesday and you specified every 2 days as the interval then the project will run for the next time on Friday and every two days after that
Note Archive projects that are defined as scheduled projects can also be run manually at any timeTo schedule an Archive project to run automatically on a weekly basis1 If required edit the start time for the project2 Click Weekly Schedule and select the time and days of the week 3 Specify the file interval
For example if you specify 2 hours then one file is created every 2 hours If the duration for the project is one day then a total of 12 files will be created
4 After you have finished creating the project click Start Schedule on the Summary page to start the schedule for the project and click OK twice After you have finished creating the project the project will run for the first time according to the project start time and then it will run on a weekly basis according to the times and days you specified
Note Archive projects that are defined as scheduled projects can also be run manually at any time
Chapter 3 Retrieving Data
18 Apollo Project User Guide16106R5 2009-03-24
One Time A One Time project retrieves a single time segmentTo specify the start and end times for a One Time project1 If required edit the start time for the project2 Click End Time and enter an end time
-OR-Click Duration and specify the duration of the project The duration is the length of the requested time segment
3 Specify the file intervalFor example if you specify 2 hours then one file is created every 2 hours If the duration for the project is one day then a total of 12 files will be created
4 After you have finished creating the project click Run Now on the Summary page to run the project
Controlled Source
A Controlled Source project retrieves data specified as a set of individually entered shots and outputs the data in SEGY format To specify shots using a shots file1 Click Browse select a shots file and click OK2 Click Submit
The list of shots is imported and displayed in the Shot List section on the Time Selection page
Note For more information see Section A4 ldquoShot File Formats for Controlled Source Projectsrdquo on page 42To manually define shots1 Enter a shot time2 If required enter the latitude longitude and elevation3 If required select the pre-shot time period4 Select the post-shot time period5 Click Add
The shot is added to the Shot List section on the Time Selection page Triggers A Triggers project uses a CSV-formatted trigger list to specify the data to be
retrieved for example a trigger file that has been downloaded from a Taurus to the local computerTo define triggers1 Click Browse select a CSV triggers file and click OK2 Click Submit
The list of triggers is imported and displayed in the Triggers section on the Time Selection page
3 Select the pre-trigger and post-trigger time periodsThe pre-trigger and post-trigger time periods are used for all of the triggers
Project type DescriptionSteps
Chapter 3 Retrieving Data
Apollo Project User Guide16106R5 2009-03-24
19
14 If you selected a Controlled Source as the project type in step 2 go to step 17
You do not have to select an output format for a Controlled Source project because the output format for a Controlled Source project is always SEGY one output file is generated for all instruments and the stations are sorted by StationNameNetworkName
-OR-
If you selected one of the other project types go to step 15 to select an output format
15 Click the Output Format tab
Field Archive A Field Archive project is used for recurring data retrievals that occur at specified intervals The time of the last retrieval is stored on the instrumentTo define the start time and file interval1 If required edit the start time for the project2 Specify the file interval
For example if you specify 2 hours then one file is created every 2 hours3 If you want partial files retrieved select the Include last interval even if
incomplete check box You should only select this option when the retrieval of partial files is more important than retrieving the data for the current interval during a future project run
Be careful when specifying the file interval For example retrieving many hours or days of data and specifying a file interval of seconds or minutes could result in the generation of many files This is not only very resource intensive but could result in a data management problem as well
Project type DescriptionSteps
Chapter 3 Retrieving Data
20 Apollo Project User Guide16106R5 2009-03-24
16 Perform the following steps to select an output format
Output format Steps
MiniSEED 1 Click MiniSEED2 Click Per channel group to generate one output file per channel group
You must add the channel token to the Subdirectories or Filename box on the Output Location tab when choosing Per channel group-OR-Click Per instrument to generate one output file per instrument-OR-Click All Instruments to generate one output file for all instruments
3 Select the Sort check box if you want the output data sorted by timeData is put in a Store in the order received and this order may not always be chronological To ensure that the data in the resulting SEED file is chronological select Sort
4 Select the data record sizeThe default record size is 512 B However not all SEED file readers will support this file size Determine what your SEED reader supports and select an appropriate value The options are 512 B 1024 B 2048 B and 4096 B Note that a smaller record size will result in quicker SEED file output
Note The number of output files is determined by the file interval that you set on the Time Selection page
SAC 1 Click SACYou must add the channel token to the Subdirectories or Filename box on the Output Location tab when choosing SAC as the output format
NotesThere are two types of SAC files binary and ASCII Apollo Project only outputs binary SAC filesOne output file per channel group is generated
SEGY 1 Click SEGY2 Click Per channel group to generate one output file per channel group
You must add the channel token to the Subdirectories or Filename box on the Output Location tab when choosing Per channel group-OR-Click Per instrument to generate one output file per instrument-OR-Click All Instruments to generate one output file for all instruments
3 Select the Sort check box if you want the stations sorted by StationNameNetworkName
NotesAll stations must have the same sample rateThe maximum number of samples per trace is 32767SEGY trace headers from discovered instruments will not have station location information
Chapter 3 Retrieving Data
Apollo Project User Guide16106R5 2009-03-24
21
17 Click the Output Location tab
18 If you defined a default base directory when you configured Apollo Project and want to use it for this project go to step 21
For more information see Section 33 ldquoConfiguring Apollo Projectrdquo on page 24
-OR-
Enter the valid absolute path of the base directory for the processed data subdirectories and files
If the base directory you entered does not exist click Create to create it
19 If you defined a default expression for subdirectories when you configured Apollo Project and want to use it for this project go to step 21
For more information see Section 33 ldquoConfiguring Apollo Projectrdquo on page 24
-OR-
Enter the expression used to define path names for subfolders under the base directory
You can enter tokens in any order including any additional characters that are valid for paths
Seisan 1 Click Seisan
NotesYou must have Seisan installed on your computer with a WAVEFORM_BASE and CONT_BASE line included for each station in the DATSEISANDEF file You must define a SEISAN_TOP environment variableOne output file per channel group is generated
Regardless of the output format selected SOH channel group data is always output in CSV format
The Base Directory is the root of all data retrieved for the project and can be defined at any location in the file system of the server running Apollo Project including a networked drive on a separate server If you want to create or use a directory on a computer on the network you have to enter the server and share name in a modified UNC format that is prefixed by an additional two backslashes For example the usual fileserver1storefiles must be written as fileserver1storefiles
Large amounts of data can be stored in this location You must ensure that adequate disk space is available
For deployments of Apollo Project where the clients are not running on the server it is recommended that the file system containing the base directory on the server be shared or exported as a networked file system
It is not recommended that you use the channel token in the subdirectories expression if the project includes more than one channel group per instrument (selected on the Channel Group Selection tab) and the output is not per channel group (selected on the Output Format tab)
Output format Steps
Chapter 3 Retrieving Data
22 Apollo Project User Guide16106R5 2009-03-24
20 If you defined a default expression for file names when you configured Apollo Project and want to use it for this project go to step 21
For more information see Section 33 ldquoConfiguring Apollo Projectrdquo on page 24
-OR-
Enter the expression used to define file names for the processed data files that are stored in the subfolders under the base directory
You can enter tokens in any order including any additional characters that are valid for file names
21 Click OK to save the new project
The new project is created and the Summary page is displayed
32 Creating a Station Table FileYou can create a mapping between a given instrumentchannel group (for example taurus_1234digitizertimeSeries1) and a corresponding network station location and channel name These mappings are stored in a station table file and the mapped channel group names are used in the output files
You can create a station table file and use it as the default for all projects or you can create a station table for individual projects
To create a station table file and set is as the default
1 Click the configuration button in the upper right corner
2 Specify the network name location and channel names on the Behaviour and Defaults dialog box and click OK to save the new settings
The settings you enter here are used as the channel names in the station table file You can edit these settings in step 8
For more information on configuring Apollo Project settings see Section 33 ldquoConfiguring Apollo Projectrdquo on page 24
3 Click New on the Apollo Project Existing Projects page
Do not use the channel token in the filename expression if the project includes more than one channel group per instrument (selected on the Channel Group Selection tab) and the output is not per channel group (selected on the Output Format tab)
The Sample Path shows an example of a file name generated using the values for the Base Directory Subdirectories and Filename settings
You can only edit the settings of a project before it has run for the first time or been scheduled (Archive project) If you want to edit the settings of a project after it has already run once or been scheduled you can copy the project (see Section 345 ldquoCopying a Projectrdquo on page 28) and then edit the settings for the copy
It is recommended that you create a station table file and set it as the default for all projects You can update the mappings in this file when new Stores are added or discovered
Chapter 3 Retrieving Data
Apollo Project User Guide16106R5 2009-03-24
23
4 Type Station Table in the Project Name box and click any project type
5 Click OK
6 Click the Store Selection tab and select as many Stores as possible
See step 4 of Section 31 ldquoCreating New Projectsrdquo for information on how to add specifications and select Stores
7 Click the Channel Group Selection tab and click Create Default Station Table
A station table file is created and the name of the file is displayed in the Station Table File Name box
8 Edit the station table channel group mappings in the selected channel groups area of the tab (lower half of the tab) as required
The NetworkStationLocationChannel names will appear in the output files If the Location is empty it is interpreted as the SEED default of two spaces
9 Click OK to close the project and finish creating the station table
10 Click the configuration button in the upper right corner
11 Enter the path and name of the station table file you just created in the Station Table File Name box on the Behaviour and Defaults dialog box
12 Click OK to save the new settings
The station table file you specified will be used as the default for all future projects You can open the Station Table project and edit the station table file if you need to add more Stores or change the mappings
For more information on configuring Apollo Project settings see Section 33 ldquoConfiguring Apollo Projectrdquo on page 24
Make a note of the path of the station table file because you will have to enter it on the Behaviour and Defaults dialog box to set it as the default for all projects
Valid characters for the network station location and channel in the NetworkStationLocationChannel box are upper case letters A to Z numbers 0 to 9 and spaces are also acceptable for the location
Chapter 3 Retrieving Data
24 Apollo Project User Guide16106R5 2009-03-24
33 Configuring Apollo ProjectYou can configure basic settings for Apollo Project and the default settings for new projects The changes you make to the project default settings only apply to new projects
To configure Apollo Project
1 Click the configuration button in the upper right corner
2 Edit the following settings
Setting Description
Log Verbosity The level of detail that is logged by Apollo ProjectThe default setting is Info
Log Location The default name of the Apollo Project log folder Maximum Number of Retrieval Attempts
The maximum number of single retrieval attempt made for all missing time segments on all channel groups every time a project is run Enter an integer from 0 through 1000 The default value is 8
Notes If the Taurus is busy when a retrieval attempt is made the number of remaining retrieval attempts is not decreased by one attemptYou can view the channel group details page to see if there are any remaining retrieval attempts for any channel groups (see Section 373 ldquoMonitoring the Status of a Running Projectrdquo on page 34)
Number Of Retries The number of times Apollo Project attempts to connect to a data source if there is a network connectivity problem Enter an integer from 0 through 1000 The default value is 3
Note Every time a project is run it starts with the maximum number of retries
Retry Interval (secs) The amount of time in seconds that Apollo Project waits before trying to connect to a data source againEnter an integer from 0 through 1000 The default value is 5
Station Table File Name The file name and location of the station table file that is used to assign station names to all of the selected channel groupsA station table is used to assign names to all of the selected channel groups For more information see Section 32 ldquoCreating a Station Table Filerdquo on page 22No station table file is specified by default
Chapter 3 Retrieving Data
Apollo Project User Guide16106R5 2009-03-24
25
Base Directory The folder name and location of the base directory for the processed data subfolders and files Enter any valid folder name and location including any additional characters that are valid for paths The default base directory name is ApolloProject
Notes The Base Directory is the root of all data retrieved for the project and can be defined at any location in the file system of the server running Apollo Project including a shared folder on a different computer If you want to create or use a folder on a computer on the network you have to enter the server and share name in a modified UNC format that is prefixed by an additional two backslashes For example the usual fileserver1storefiles must be written as fileserver1storefilesLarge amounts of data can be stored in this location You must ensure that adequate disk space is availableFor deployments of Apollo Project where the clients are not running on the server it is recommended that the file system containing the base directory on the server be shared or exported as a networked file system
Subdirectories The expression used to define path names for subfolders under the base directoryEnter tokens in any order including any additional characters that are valid for paths The default path name is as follows projectyearmonthday
Filename The expression used to define file names for the processed data files that are stored in the subfolders under the base directoryEnter tokens in any order including any additional characters that are valid for file names The default filename is as follows instrument_time
Sample Path An example of a file name generated using the values for the Base Directory Subdirectories and Filename settings
Network Name A standard network codeEnter any two upper case letters or numbers The default code is XX
Location A location within a stationEnter any two upper case letters numbers or spaces
The default location is two spaces for ldquononerdquo You must delete the two default spaces if you enter a new location value
Setting Description
Chapter 3 Retrieving Data
26 Apollo Project User Guide16106R5 2009-03-24
3 Click OK to save the new settings
34 Managing ProjectsYou can view open close copy and delete projects Also you can create convenient links to run your individual projects with desktop shortcuts
341 Viewing Existing Projects1 Click Projects in the Projects bar
2 View the projects listed on the Existing Projects page
The Existing Projects page shows a list of all projects and a status overview of each project For more information see Section 371 ldquoViewing an Overview of the Status of All Projectsrdquo on page 32
Channel 1 Name A channel codeEnter any three upper case letters or numbersThe default channel code is BHZ
Channel 2 Name A channel codeEnter any three upper case letters or numbersThe default channel code is BHN
Channel 3 Name A channel codeEnter any three upper case letters or numbersThe default channel code is BHE
Setting Description
Chapter 3 Retrieving Data
Apollo Project User Guide16106R5 2009-03-24
27
342 Opening a Project1 Click the project name under the Name column on the Existing Projects page
2 Click the Open Project button
343 Creating a Desktop Shortcut to a ProjectLaunching a project with a desktop shortcut will open Apollo Project to that project and run the project
Methods for creating desktop shortcuts to Web sites vary from browser to browser These procedures explain how to create desktop shortcuts to specific projects for both Mozilla Firefox 3 and Microsoft Internet Explorer 7 Desktop shortcuts to projects include the Apollo Project icon and are titled in the format Project Name ndash Apollo Project
In Firefox 3
1 Open the project you want to create a shortcut to in Firefox
2 Reduce the size of the Firefox window so that the desktop is visible
3 Drag the Site Identification Button onto the desktop
The Site Identification Button is located to the left of the Location Bar and displays the Apollo Project icon
In Internet Explorer 7
1 Open the project you want to create a shortcut to in Internet Explorer
2 Press ALT+F
3 Select Send gt Shortcut to Desktop
344 Closing a Project
1 Click the Close Project button in the Projects bar
Launching a desktop shortcut to a project automatically runs that project It is important to note that once a project is run its settings can no longer be edited It is recommended that desktop shortcuts only be created for Field Archive projects
Firefox is the recommended browser for Apollo Project
Chapter 3 Retrieving Data
28 Apollo Project User Guide16106R5 2009-03-24
345 Copying a Project
1 Select the project name under the Name column on the Existing Projects page
2 Click Copy
3 Enter a unique name for the new project and click OK
4 Click Edit and edit the settings as required
5 Click OK to save the project after you have finished editing the settings
346 Deleting a ProjectWhen you delete a project only files in the temporary folder are deleted All processed data files are not deleted
1 Click the project name under the Name column on the Existing Projects page
2 Click Delete
3 Click OK on the confirmation message
35 Running ProjectsFor all project types you can run a project manually at any time Archive projects can also be defined to run automatically on a schedule
If it is a scheduled Archive Project and the schedule is started click Cancel Schedule before you create a copy of it (If the schedule is not started the Start Schedule button is visible if the schedule is started the Cancel Schedule button replaces the Start Schedule button)
Apollo Project stores intermediate files in a temporary subdirectory of the Base Directory specified for the output location of a project These intermediate files correspond to the actual channel group data retrieved from the Stores referenced by the project If a project is deleted from Apollo Project these temporary files will be removed automatically
Disk space can also be reclaimed by removing these temporary files manually without deleting the project However if the project is run again the output files produced might be incomplete if previously retrieved data from these temporary files is required
For more information on what happens when a project runs see Section A1 ldquoOverview of Running Projectsrdquo on page 37
Chapter 3 Retrieving Data
Apollo Project User Guide16106R5 2009-03-24
29
351 Running a Project1 Open a project
2 Click Run Now on the Summary page to start the project
The project starts running and the Retrieval Status page is displayed
352 Stopping a Project1 Open a project
2 Click Cancel Run on the Summary page to stop the project
3 Click OK on the success message
353 Merging Project Data FilesYou have the option to merge all of the downloaded data for the stations and instruments into one file per interval for each project
1 Open a project
2 Click Merge
A single file is generated for each time period The time period is determined by the file interval you specified on the Time Selection page when you created the project For more information see step 13 of Section 31 ldquoCreating New Projectsrdquo on page 11
The original data files are not modified when you select the option to merge project data files
You can also click Run Now on the Retrieval Status page to start a project
For more information on what happens when a project runs see Section A1 ldquoOverview of Running Projectsrdquo on page 37
You can also click Cancel Run on the Retrieval Status page to stop a project
You cannot merge data from Archive projects and you cannot merge data in the Seisan format
You can also click Merge on the Retrieval Status page to merge the data from a project
Chapter 3 Retrieving Data
30 Apollo Project User Guide16106R5 2009-03-24
354 Running a Scheduled Archive Project1 Open a project
2 Click Start Schedule to start the project schedule
3 Click OK on the confirmation message
4 Click OK on the success message
For a project scheduled to run weekly the project will run for the first time according to the project start time and then it will run on a weekly basis according to the times and days you specified
For a project scheduled to run at a regular interval the project will run according the to interval you specified after you start the schedule For example if you click Start Schedule on a Wednesday and you specified every 2 days as the interval then the project will run for the first time on Friday and every two days after that
3541 Cancelling a Schedule
If you cancel a scheduled project before it runs for the first time you can edit the project settings
If you cancel a project that is currently running the current project runs to completion but subsequent project runs will not occur
1 Open a project
2 Click Cancel Schedule to cancel the project schedule
3 Click OK on the confirmation message
4 Click OK on the success message
You can also click Start Schedule on the Retrieval Status page to start the schedule of a project
You can restart the schedule by opening the project and clicking Start Schedule
You can also click Cancel Schedule on the Retrieval Status page to cancel the schedule of a project
Chapter 3 Retrieving Data
Apollo Project User Guide16106R5 2009-03-24
31
36 Editing and Viewing the Settings of ProjectsYou can edit the settings of a project before it has run After it has run you can view the settings
361 Editing Project Settings1 Open the project
2 Click Edit on the Summary page
3 Edit the settings as required
4 Click OK to save the changes
362 Viewing Project Settings1 Open the project
2 Click View on the Summary page
3 Click the tabs to view the settings
4 Click Cancel when you have finished viewing the settings
You can only edit the settings of a project before it has run for the first time or been scheduled (Archive project) If you want to edit the settings of a project after it has already run once or been scheduled you can copy the project (see Section 345 ldquoCopying a Projectrdquo on page 28) and then edit the settings for the copy
Settings For more information
Store Selection See step 4 of Section 31 ldquoCreating New ProjectsrdquoChannel Group Selection See step 5 to step 12 of Section 31 ldquoCreating New ProjectsrdquoTime Selection See step 13 of Section 31 ldquoCreating New ProjectsrdquoOutput Format See step 15 and step 16 of Section 31 ldquoCreating New ProjectsrdquoOutput Location See step 17 to step 20 of Section 31 ldquoCreating New Projectsrdquo
You can also click Edit on the Retrieval Status page to edit the settings of a project
You can also click View on the Retrieval Status page to edit the settings of a project
Chapter 3 Retrieving Data
32 Apollo Project User Guide16106R5 2009-03-24
37 Monitoring Project StatusYou can monitor the status of a project by viewing information on the Existing Projects Summary and Retrieval Status pages
371 Viewing an Overview of the Status of All ProjectsThe Existing Projects page is the default home page of Apollo Project You see this page when you first open Apollo Project or when you click Projects in the projects bar For more information see Section 341 ldquoViewing Existing Projectsrdquo on page 26
You can view the following information for all projects on the Existing Projects page
bull Name
bull Type
bull Current status
bull Last time the project run
bull Status of data retrieved
The Data Retrieved bars on the Existing Projects page show the overall status of the data retrieval For more information see Section 3731 ldquoStatus Coloursrdquo on page 34
Chapter 3 Retrieving Data
Apollo Project User Guide16106R5 2009-03-24
33
372 Viewing the Status of an Individual ProjectWhen you open a project a detailed summary of the project is shown on the Summary page For more information see Section 342 ldquoOpening a Projectrdquo on page 27
You can view the following information for each project on the Summary page
bull Date it was created
bull Date it was last modified
bull Current status
bull Last time it ran
bull Next time it will run
You can also view a summary of all of the settings you specified when you created the project (Store specifications selected Stores selected time series channel groups selected SOH channel groups start and end times number of files generated file interval and output format and locations)
All times are reported using the UTC time zone
Chapter 3 Retrieving Data
34 Apollo Project User Guide16106R5 2009-03-24
373 Monitoring the Status of a Running ProjectYou can view the data retrieval status of a project while it is running on the Retrieval Status page The Retrieval Status page is displayed automatically when you click Run Now to run a project You can also view this page by opening a project and clicking the Retrieval Status tab
The status for each channel group is expressed in the form of two numbers (for example 60100) and two bar graphs The first number is the percentage available of the total time requested (for example 60) and the second number is the percentage retrieved of the time available (for example 100) For more information on the bar graph status colours see Section 3731 ldquoStatus Coloursrdquo on page 34
You can also view retrieval details for each channel group listed on the Retrieval Status page For more information see Section 3732 ldquoViewing the Retrieval Details for Each Channel Grouprdquo on page 35
3731 Status Colours
The data retrieval status bars use the following status colours
The information that is displayed on the Retrieval Status page is updated continuously while a project is running
Table 3-1 Status colours
Colour Status
Green Apollo Project has retrieved the data
Yellow Apollo Project is attempting to retrieve available data from the Store
Red Data is available in the Store but Apollo Project has failed to retrieve it on this attempt Apollo Project will make additional attempts to retrieve the data up to the configured Maximum Number of Retrieval Attempts For information on how to set the Maximum Number of Retrieval Attempts setting see Section 31 ldquoCreating New Projectsrdquo on page 11
White Data for some portion of the requested time segment is not available in the Store For example there are gaps in the data or the retrieval request is for a future time segment
Chapter 3 Retrieving Data
Apollo Project User Guide16106R5 2009-03-24
35
3732 Viewing the Retrieval Details for Each Channel Group
You can view the retrieval status of each time segment for a channel group
1 Click a channel group name
2 Click the Channel Group Details button that is located to the right of the channel group name
The Remaining Retrieval Attempts column displays the number of times that Apollo Project will try to download each missing time segment for the channel group when the project is run again For information on how to set the Maximum Number of Retrieval Attempts setting see Section 33 ldquoConfiguring Apollo Projectrdquo on page 24
3 Click OK when you have finished viewing the details
Chapter 3 Retrieving Data
36 Apollo Project User Guide16106R5 2009-03-24
Apollo Project User Guide16106R5 2009-03-24
37
Appendix A Reference Information and Examples
Overview of Running Projects
Example Project Settings
Example Deployment Scenarios
Shot File Formats for Controlled Source Projects
A1 Overview of Running ProjectsWhen a project is run Apollo Project performs the following steps
1 The requested time ranges are identified
2 The channel groups for which data are to be retrieved are identified
3 The actual Stores specified by the Store specifications of the project are identified
For each identified Store the following steps are performed
1 A data availability analysis for the outstanding time ranges is performed These are for the ranges for which data has not already been retrieved The availability of the data is recorded for reference It is possible that a given Store was not present at the time the project was last run If this is the case then an attempt is made to retrieve all of the required time ranges of the project from the Store
2 If any data exists in the Store for any of the requested time ranges then a retrieval of this data is performed and the retrieved data is stored to local temporary files
3 If the number of retrieval attempts for a given time range exceeds a configurable threshold (see Section 33 ldquoConfiguring Apollo Projectrdquo on page 24) then the retrieval of data within the stated range is not attempted again
If any data was retrieved during the run of the project then the corresponding output files of the desired output format are generated and stored in the output location specified for the project
When running Apollo Project with Taurus version 2x the schedule for Archive projects must be greater than 5 minutes in duration Schedules that are less than 5 minutes can result in data that is missing or not downloaded
Appendix A Reference Information and Examples
38 Apollo Project User Guide16106R5 2009-03-24
It is possible that the requested data for a given channel group exists across multiple Stores If all of these Stores are included by the Store specifications for the project then Apollo Project assembles the requested data
When a project runs detailed information regarding the results of the retrieved data and processed data are available For more information see Section 37 ldquoMonitoring Project Statusrdquo on page 32
A2 Example Project Settings
A21 Example 1 One Time ProjectProject Name Project1
Project Type One Time
Channel groups selected for retrieval CASTN1OTBHZ (on taurus_1234)
Requested Time Range January 30 2008 1400 ndash 1500 UTC
File Interval 20 minutes
Output Location Base Directory disk2ApolloProjectOutputData
Output Location Subdirectories projectyearmonthday
Output Location Filenamestationnetwork_time
When the project is run successfully the following output files will be created on the server running Apollo Project
disk2ApolloProjectOutputDataProject120080130STN1CA_20080130_140000seed
disk2ApolloProjectOutputDataProject120080130STN1CA_20080130_142000seed
disk2ApolloProjectOutputDataProject120080130STN1CA_20080130_144000seed
Appendix A Reference Information and Examples
Apollo Project User Guide16106R5 2009-03-24
39
A22 Example 2 Controlled Source ProjectProject Name Project2
Project Type Controlled Source
Channel groups selected for retrieval CASTN1OTBHZ (on taurus_1234) CASTN1OTBHN (on taurus_1234)
Requested Shot Times January 30 2008 1400 UTC January 30 2008 1430 UTC
Pre Time 30 seconds
Post Time 30 seconds
Output Location Base Directory disk2ApolloProjectOutputData
Output Location Subdirectories projectyearmonthday
Output Location Filename timeformat
When the project is run successfully the following output files will be created on the server running Apollo Project
disk2ApolloProjectOutputDataProject22008013020080130_135930segysgy
disk2ApolloProjectOutputDataProject22008013020080130_142930segysgy
A3 Example Deployment Scenarios
A31 One TimeYou want to download three days of data from multiple instruments on the network save the data in MiniSEED format and create a file for every hour of data
A One Time project is the recommended solution The Store of each instrument can be made available to Apollo Project by creating a corresponding IP Address Store specification with the IP address of the instrument The requested time range can be specified along with a file interval of one hour Ensure that the instruments are configured to run in Communications mode
A32 Scheduled ArchiveYou want seismic data to be retrieved automatically from a group of instruments on the network every six hours The instruments are always accessible via an Ethernet connection
A scheduled Archive project is the recommended solution Use the Regular Interval scheduling option and set the interval to six hours
You can also run a scheduled Archive project at any time For example if the scheduled retrieval interval of a project is six hours and between intervals you want to retrieve the data three hours early you can run the project and approximately three additional hours of data would be accumulated About three hours later the project will run automatically and accumulate the remaining three hours of data
Appendix A Reference Information and Examples
40 Apollo Project User Guide16106R5 2009-03-24
A33 Manual ArchiveYou want to retrieve seismic data from a group of instruments but their respective Stores are only available for retrieval on occasion (no regular dependable schedule for retrieval from these Stores is possible)
A manually run Archive project is the recommended solution You can create the project and run it whenever any of the instruments are available for retrieval
A34 Field ArchiveYou want to collect data from a set of isolated instruments in the field at recurring intervals (for example twice per month)
A Field Archive project is the recommended solution You can create a Field Archive project and either add all instrument IP addresses to the list or use a Discovery specification The time for the last retrieval is stored on the instrument and all data is recovered from the last recovery time
A35 Media HarvestingYou want to collect the media from a set of instruments in the field at a regular interval (for example once per week) You also have to retrieve all of the seismic data on the media for subsequent analysis
An Archive project is the recommended solution Initially a directory is created on the file system of the server running Apollo Project A directory Store specification is created with this directory as the parent directory from which to search for Stores The content of each media instance in the weekrsquos collection is copied from a media reader to a subdirectory of the directory When the project is run all of the copied Stores are automatically available and the project accumulates data for each instrument
Due to the nature of media harvesting and the replacement procedure for this example data is always missing for the last period of output files for the current week This period corresponds to the time that the media was taken from the instrument and replaced with a new one The following week when the media is harvested again from the instruments in the field Apollo Project fills in the missing time for these files with the new Store data regardless of the media instance on which the data currently resides
You can only create and run Field Archive projects for Taurus version 30 or later
Appendix A Reference Information and Examples
Apollo Project User Guide16106R5 2009-03-24
41
A36 Trigger Downloading You have set up a network of five Tauruses around a hydro dam Each Taurus is accessible over an Ethernet connection and each is set to record data over the weekend You have set the period for data retrieval at 30 seconds before and five minutes after any seismic activity but the following procedure shows you why it is not necessary to view all of the data accumulated over the whole weekend
1 Select the Taurus at the site with the least environmental noise or determine the best site for generating triggers and designate this Taurus ldquoTaurus Ardquo for reference
You need to perform this task in advance More information about triggers can be found in the Taurus Portable Seismograph User Guide
2 Download the trigger file from ldquoTaurus Ardquo and review the file to verify the correct number of triggers
3 Follow these steps to create a new Triggers project
a) Click New on the Apollo Project Existing Projects page
b) Click Triggers as the project type and enter a unique name in the Project Name box
c) Click OK
d) Click the IP Address tab on the Store Selection tab
e) Enter the IP address of a Taurus
f) Click Add
g) Repeat step e until you have entered the IP addresses of all five of the Tauruses
Apollo Project adds the IP address specifications to the Selected Specifications section of the Store Selection page and finds all five Stores associated with the IP addresses and adds them to the Selected Stores section
h) Click the Channel Group Selection tab
i) Click Create Default Station Table to create a table for all of the currently selected Stores and discovered instruments
j) Review the selected channel groups and if required edit the mappings in the selected channel groups area of the tab (lower half of the tab)
k) Click the Time Selection tab
l) Click the Browse button
m)Select the trigger file that you downloaded in step 2 and click OK
n) Click Submit
The list of triggers is imported and displayed in the Triggers section on the Time Selection page
o) Enter a Pre Time of 30 seconds and a Post Time of 5 minutes
p) Click the Output Format tab
q) Click MiniSEED
r) Click All Instruments
s) Click the Output Location tab
Appendix A Reference Information and Examples
42 Apollo Project User Guide16106R5 2009-03-24
t) Enter the valid absolute path of the base directory for the processed data subfolders and files
u) Enter the expression used to define path names for subfolders under the base directory
v) Enter the expression used to define file names for the processed data files that are stored in the subfolders under the base directory
w) Click OK
4 Click the Run Now button on the Summary page
When the project has finished running the output folder you specified in step t will contain ten files Each output file will contain 5 minutes and 30 seconds of data from the five Tauruses
A4 Shot File Formats for Controlled Source ProjectsYou have two options for defining shots for a Controlled Source project manually defining shots or importing shots from a shot file
You can create shot files in one of following three file formats
Microsoft Office Excel (xls) ndash See Section A41 ldquoCreating a Shot File With Microsoft Office Excelrdquo on page 42
OpenOfficeorg Calc (ods) ndash See Section A42 ldquoCreating a Shot File With OpenOfficeorg Calcrdquo on page 44
Comma-Separated Values (csv) ndash See Section A43 ldquoCreating a Comma-Separated Values Shot Filerdquo on page 45
The Shot file templates are located in the docShotFileImport folder on the Apollo Project CD
A41 Creating a Shot File With Microsoft Office ExcelThe Microsoft Office Excel template for Apollo Project can be used with Microsoft Office Excel version 2003 or later
To create an Microsoft Office Excel based shot file
1 Double-click ShotFileTemplatexlt
A new Microsoft Office Excel file is created from the template and opens in the Microsoft Office Excel
2 Save the new spreadsheet as a Microsoft Office Excel document (xls)
3 Enter shot file data as specified in the Microsoft Office Excel spreadsheet
Only the decimal separator is supported for shot files Separators that denote the 3rd power of 10 (thousand) are not supported (for example 4500) The Microsoft Excel and OpenOffice templates reinforce these restrictions and are recommended for creating csv files
Appendix A Reference Information and Examples
Apollo Project User Guide16106R5 2009-03-24
43
You can enter data for multiple shot times
4 Click Save to save the file in Microsoft Office Excel format
5 Click File gt Save As and select CSV (Comma delimited) (csv) from the Save as type list
6 Click Save
7 Click OK on the message warning you that you are only saving the active sheet
8 Click Yes on the message warning you that file features might be incompatible with the csv format
9 Close Microsoft Office Excel
If you are using Microsoft Office Excel 2007 click the Microsoft Office Button and click Save As
Ensure that you save the file as a comma delimited file If the shot file is mistakenly saved in Microsoft Excel format (xls) the shot file will not work in Apollo Project
Appendix A Reference Information and Examples
44 Apollo Project User Guide16106R5 2009-03-24
A42 Creating a Shot File With OpenOfficeorg CalcThe OpenOffice template has been tested with OpenOfficeorg Calc version 23 Later versions of OpenOfficeorg Calc can be used at your discretion
To create a shot file based on the OpenOfficeorg Calc template
1 Double-click ShotFileTemplateots
A new OpenOffice spreadsheet is created from the template and opens in OpenOfficeorg Calc
2 Save the new spreadsheet as an OpenOffice Calc document (ods)
3 Enter the shot file data as specified in the OpenOffice spreadsheet
You can enter data for multiple shot times
4 Click Save to save the file in OpenOfficeorg Calc format
5 Click File gt Save As and select Text CSV (csv) from the Save as Type list
6 Select the Edit filter settings check box
7 Click Save
A warning message might appear that warns you that the document might contain formatting that cannot be saved in the csv format Click Yes on the warning message to save the file in csv format
The Export of text files window opens
8 Delete the double quotation marks () in the Text delimiter box and ensure that the Save cell content as shown check box is selected
9 Click OK to export the OpenOffice spreadsheet as a csv file
10 Click OK on the warning message
11 Close OpenOfficeorg Calc
Appendix A Reference Information and Examples
Apollo Project User Guide16106R5 2009-03-24
45
A43 Creating a Comma-Separated Values Shot FileYou can use any text editor to create a csv shot file
To create a csv shot file
1 Open ShotFileTemplatecsv in a text editor and save it with a different name
2 Format each line of the csv file as follows
Shot TimePre TimePost TimeLatitudeLongitudeElevation
For example
2008-08-28 103044090600000-6000004267
The format and units are as follows
3 Save the file as a csv formatted file
The csv shot file template is not compatible with Microsoft Office Excel Make sure that you do not double-click it and open it in Microsoft Office Excel
FormatUnits
Shot Time yyyy-mm-dd hhmmss
Pre Time seconds
Post Time seconds
Latitude degrees
Longitude degrees
Elevation meters
Appendix A Reference Information and Examples
46 Apollo Project User Guide16106R5 2009-03-24
Apollo Project User Guide16106R5 2009-03-24
47
Appendix B Retrieving SOH Data from a Taurus Version 2x
Taurus Version 2x SOH Data Retrieved by Apollo Project
Retrieving SOH Data from a Taurus Version 2x Streaming to Apollo Server
B1 Taurus Version 2x SOH Data Retrieved by Apollo Project This section presents the predefined datasets of SOH data Apollo Project will retrieve from a Taurus version 2x either through a direct connection or a stream to Apollo Server For instruction on retrieving streaming Taurus version 2x data from Apollo Server see Section B2 ldquoRetrieving SOH Data from a Taurus Version 2x Streaming to Apollo Serverrdquo on page 48
The order of the columns presented in the table below will differ when streaming Taurus version 2x SOH data from Apollo Server
Predefined SOH group SOH data
GPS Time Time (longsecs) (the number of seconds since 1970-01-01)Time (UTC) (time in yyyy-mm-dd hhmmssms format)Altitude (m)DAC CountError (ns) (time error)GPS Engine StatusLast Update Time(s)Lat (deg) (latitude in degrees)Long (deg) (longitude in degrees)NumSatellites (number of satellites used)PDOPPhaseLock (system clock phase lock)TDOPUncertainty (ns) (time uncertainty)
Note The values for Number of satellites used PDOP and TDOP are provided by the GPS receiver at the Last update time In order to see what time these values correspond to look at the Last update time When GPS is off these three parameters and the Last update time are not updated The last value displays until the next update arrives (after the GPS is turned on again)
Appendix B Retrieving SOH Data from a Taurus Version 2x
48 Apollo Project User Guide16106R5 2009-03-24
B2 Retrieving SOH Data from a Taurus Version 2x Streaming to Apollo ServerThis section provides instruction on configuring your Taurus version 2x to stream data to Apollo Server and instructions on how to use Apollo Project to retrieve this data from Apollo Server
B21 Streaming Data from a Taurus Version 2x to Apollo ServerUse the Taurus graphical user interface on either the Taurus display screen or through a Web browser to set up an NP stream from a Taurus version 2x to Apollo Server
1 Log in to the Taurus version 2x with either the tech or central user account
2 Select Advanced Configuration gt Communications gt NP Data Streaming
GPS Satellites Time (longsecs) (the number of seconds since 1970-01-01)Time (UTC) (time in yyyy-mm-dd hhmmssms format)
For each satelliteAcquisition FlagLast Update Time (ms)PRNSatellite Azimuth (microordm)Satellite Elevation (microordm)Signal Level (AMU)
Environment Time (longsecs) (the number of seconds since 1970-01-01)Time (UTC) (time in yyyy-mm-dd hhmmssms format)External SOH Voltage 1 (V) (12-bit voltage input) External SOH Voltage 2 (V) (12-bit voltage input) External SOH Voltage 3 (V) (12-bit voltage input) External SOH Voltage 4 (V) (12-bit voltage input) Sensor SOH Voltage 1 (V)Sensor SOH Voltage 2 (V)Sensor SOH Voltage 3 (V)
Instrument Time (longsecs) (the number of seconds since 1970-01-01)Time (UTC) (time in yyyy-mm-dd hhmmssms format)Controller Current (mA)Digitizer Current (mA)NMX Bus Current (mA) (external connector)Sensor Current (mA)Serial Port Current (mA)Supply Voltage (mV)Temperature (ordmC)
Predefined SOH group SOH data
Appendix B Retrieving SOH Data from a Taurus Version 2x
Apollo Project User Guide16106R5 2009-03-24
49
3 To have the Taurus stream both time series and SOH data to Apollo Server select both Stream Time Series and Stream SOH
-OR-
Select only Stream SOH if you only want to retrieve the SOH data from Apollo Server
4 Type the IP address for Apollo Server in the IP Address box
5 Type the port number Apollo Server uses to receive data in the Port box By default this is port number 32008
6 The Second IP Address and Second Port boxes are not necessary however cannot be left blank Type 127001 in the Second IP Address box and 32004 in the Second Port box
7 Type a value in the Maximum Throughput [bps] box if a limited data link is present between the Taurus and Apollo Server For instance if at some point the data link is limited to 9600 bps then this is the maximum throughput the link can allow If there are no throughput limitations set the value in this box to zero to disable the throughput limitation
8 Click Apply
9 Click Commit
B22 Retrieving Taurus Version 2x Data from Apollo ServerCreate a new project or use an existing project in Apollo Project to retrieve the Taurus version 2x data from Apollo Server For more information on creating or editing projects refer to Section 31 ldquoCreating New Projectsrdquo on page 11 and Section 36 ldquoEditing and Viewing the Settings of Projectsrdquo on page 31
When creating or editing the project
a) Add an IP address Store specification on the Store Selection tab (see step 4 in Section 31 ldquoCreating New Projectsrdquo) for Apollo Server including its client Web application port number Use the format
Apollo Server IP AddressApollo Server Client Web Application Port Number
b) Apply the appropriate filters on the Channel Group Selection tab to retrieve the desired channel groups from the Taurus version 2x See step 5 through step 12 in Section 31 ldquoCreating New Projectsrdquo for instruction on using the Channel Group Selection tab
Appendix B Retrieving SOH Data from a Taurus Version 2x
50 Apollo Project User Guide16106R5 2009-03-24
Apollo Project User Guide16106R5 2009-03-24
51
Appendix C Glossary
Glossary of Abbreviations and Terms
List of Unit Abbreviations and Symbols
C1 Glossary of Abbreviations and Terms
A
ASCIIAmerican Standard Code for Information Interchange
B
BHEBroad Band High Gain Seismometer East-West Orientation
Channel name based on the Global Seismological Network (GSN) standard
BHNBroad Band High Gain Seismometer North-South Orientation
Channel name based on the Global Seismological Network (GSN) standard
BHZBroad Band High Gain Seismometer Vertical Orientation
Channel name based on the Global Seismological Network (GSN) standard
Appendix C Glossary
52 Apollo Project User Guide16106R5 2009-03-24
C
CSVComma-Separated Values
D
DACDigital to Analog Converter
G
GPSGlobal Positioning System
J
JREJava Runtime Environment
JVMJava Virtual Machine
N
NFSNetwork File System
P
PDOPPosition Dilution of Precision
PRNPseudo-random Number
Appendix C Glossary
Apollo Project User Guide16106R5 2009-03-24
53
S
SACSeismic Analysis Code
An Apollo Project output file format that generates files that can be used by the SAC software (see http wwwirisedusoftwaresac)
SEEDStandard for the Exchange of Earthquake Data
SMBServer Message Block
SOHState of Health
T
TCPIPTransmission Control ProtocolInternet Protocol
TDOPTime Dilution of Precision
U
UNCUniform Naming Convention or Universal Naming Convention
URLUniform Resource Locator
UTCCoordinated Universal Time
Appendix C Glossary
54 Apollo Project User Guide16106R5 2009-03-24
C2 List of Unit Abbreviations and SymbolsTable C-1 provides a list of unit abbreviations and symbols commonly used in Nanometrics documentation
Table C-1 Unit abbreviations and symbols
Abbreviation or Symbol Definition Abbreviation
or Symbol Definition
deg degree lb pound
Oslash diameter m metre
micro micro ms metre per second
Ω ohm ms2 metre per second squared
A ampere mA milliampere
AC alternating current MB megabyte
b bit MΩ megaohm
B byte MHz megahertz
bps bits per second mi mile
C Celsius mL millilitre
cm centimetre mm millimetre
dB decibel ms millisecond
DC direct current MTU maximum transmission unit
F farad mV millivolt
ft foot mW milliwatt
g gram N Newton
g gravity nF nanofarad
GB gigabyte ns nanosecond
GHz gigahertz rad radian
Hz hertz rads radian per second
in inch s second
KB kilobyte sps samples per second
kg kilogram U rack unit
kHz kilohertz V volt
kΩ kiloohm Vpp Volts peak-to-peak
kW kilowatt W watt
L litre
Apollo Project User Guide16106R5 2009-03-24
55
About NanometricsNanometrics is a world leader in the development of precision instrumentation network technology and software applications for seismological and environmental studies Using Nanometrics technology our customers establish and grow research networks that are often located in extreme environments such as the frozen Arctic and Antarctic the arid deserts of the Middle East the jungles of South America and the depths of the worlds oceans Many of these are mission-critical national and regional networks that demand the highest possible data quality and availability
Nanometrics provides end-to-end solutions that include a growing portfolio of broadband and strong motion seismometers dataloggers and digitizers satellite ground station systems for remote site data collection and software applications for data and network analysis and management To support this portfolio Nanometrics also provides global systems engineering services for design installation and support of complete networks
Our head office research and development centre and production facility are located in the Kanata North Business Park of Ottawa the high-technology heart of Canadas capital region
Contacting NanometricsNanometrics Inc250 Herzberg RoadKanata Ontario Canada K2K 2A1Phone +1 613-592-6776Fax +1 613-592-5929Email infonanometricscaWeb wwwnanometricsca
Contacting Technical SupportIf you need technical support please submit a request on the Nanometrics technical support site or by email or fax Include a full explanation of the problem and related information such as log filesSupport site httpsupportnanometricsca
Email techsupportnanometricsca
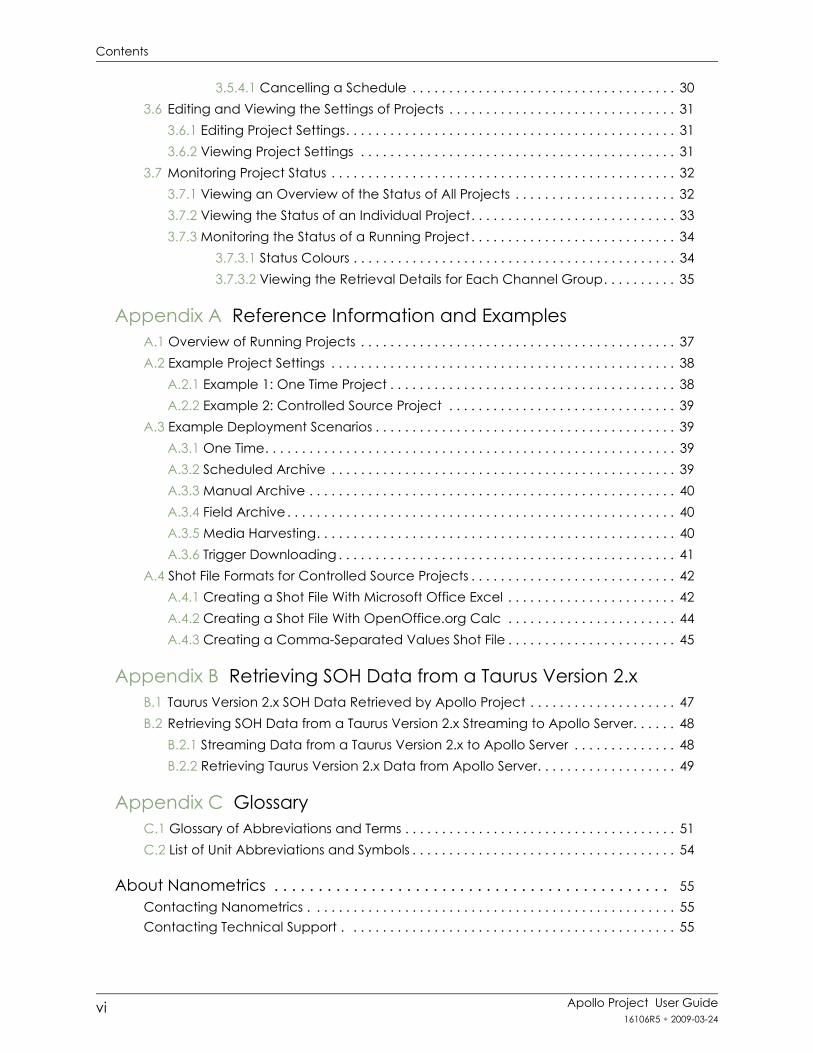
Contents
vi Apollo Project User Guide16106R5 2009-03-24
3541 Cancelling a Schedule 3036 Editing and Viewing the Settings of Projects 31
361 Editing Project Settings 31362 Viewing Project Settings 31
37 Monitoring Project Status 32371 Viewing an Overview of the Status of All Projects 32372 Viewing the Status of an Individual Project 33373 Monitoring the Status of a Running Project 34
3731 Status Colours 343732 Viewing the Retrieval Details for Each Channel Group 35
Appendix A Reference Information and ExamplesA1 Overview of Running Projects 37A2 Example Project Settings 38
A21 Example 1 One Time Project 38A22 Example 2 Controlled Source Project 39
A3 Example Deployment Scenarios 39A31 One Time 39A32 Scheduled Archive 39A33 Manual Archive 40A34 Field Archive 40A35 Media Harvesting 40A36 Trigger Downloading 41
A4 Shot File Formats for Controlled Source Projects 42A41 Creating a Shot File With Microsoft Office Excel 42A42 Creating a Shot File With OpenOfficeorg Calc 44A43 Creating a Comma-Separated Values Shot File 45
Appendix B Retrieving SOH Data from a Taurus Version 2xB1 Taurus Version 2x SOH Data Retrieved by Apollo Project 47B2 Retrieving SOH Data from a Taurus Version 2x Streaming to Apollo Server 48
B21 Streaming Data from a Taurus Version 2x to Apollo Server 48B22 Retrieving Taurus Version 2x Data from Apollo Server 49
Appendix C GlossaryC1 Glossary of Abbreviations and Terms 51C2 List of Unit Abbreviations and Symbols 54
About Nanometrics 55Contacting Nanometrics 55Contacting Technical Support 55
Contents
Apollo Project User Guide16106R5 2009-03-24
vii
Tables1-1 Requirements for an Apollo Project server running Windows 31-2 Requirements for an Apollo Project server running Linux 31-3 Requirements for an Apollo Project server running Mac OS X 32-1 Installation instructions 62-2 Uninstalling the Apollo Project Web server 62-3 Starting the Apollo Project Web server 83-1 Status colours 34C-1 Unit abbreviations and symbols 54
Contents
viii Apollo Project User Guide16106R5 2009-03-24
Apollo Project User Guide16106R5 2009-03-24
1
Chapter 1 Getting Started
About Apollo Project
Operating Requirements
11 About Apollo ProjectApollo Project is a Web application that conveniently retrieves time series and state of health data from any Nanometrics Store including those on Nanometrics instruments and those copied to network computers Available through any Web browser the client application provides options for you to define complex reusable data retrieval tasks called projects
Apollo Project has five project types
Archive projects retrieve data from sources that are continually updated such as a directory on a computer that has new data saved to it periodically or a multicast group of Nanometrics instruments that has different instruments active at different times You can schedule Archive projects to run automatically
One Time projects retrieve a single time segment of data
Controlled Source projects retrieve data specified as a set of shots
Triggers projects retrieve data specified by a trigger list in comma-separated value (CSV) format
Field Archive projects perform recurring data retrievals storing the time of the current retrieval on the Nanometrics instrument Using the time of the last retrieval Field Archive projects only retrieve the data accumulated since the last time the project was run on the instrument
Data for time series channel groups can be downloaded in MiniSEED SAC (binary format) Seisan or SEGY format depending on the project type Data for SOH channel groups is always downloaded in CSV format
Chapter 1 Getting Started
2 Apollo Project User Guide16106R5 2009-03-24
12 Operating RequirementsApollo Project has licensing client and server operating requirements These requirements are listed in Section 121 Section 122 and Section 123
121 Software LicenceIf you have ordered and received an Apollo Project software licence from Nanometrics install this file during the Apollo Project Web server installation or later using the Nanometrics Product Licence Installation Wizard See Section 22 ldquoInstalling an Apollo Project Licence Filerdquo on page 7 for licence installation instructions for Microsoftreg Windows Linux and Mac OSreg X server installations
The licence determines the number of projects you can save the number of time series channels you can select and the number of projects you can run concurrently Without a licence Apollo Project defaults to the unlicensed configuration This configuration allows you to save one project definition at a time for up to three time series channels from any combination of Stores
122 ClientThe client requirements for any platform are a Web browser with JavaScript enabled and IP access to the server Apollo Project version 14 has been tested with Microsoft Internet Explorer version 7 and Mozilla Firefox versions 2 and 3 Other browsers have not been fully tested with the client but may be used at your discretion
123 ServerRun the Apollo Project Web server on Windows Linux or Mac OS X For the
Windows operating requirements see Table 1-1 ldquoRequirements for an Apollo Project server running Windowsrdquo on page 3
Linux operating requirements see Table 1-2 ldquoRequirements for an Apollo Project server running Linuxrdquo on page 3
Mac OS X operating requirements see Table 1-3 ldquoRequirements for an Apollo Project server running Mac OS Xrdquo on page 3
Installing a licence file after creating a project in Apollo Project will result in the loss of that project It is recommended that you install your licence before running Apollo Project for the first time
Click the About button in the client application to view licence information
Chapter 1 Getting Started
Apollo Project User Guide16106R5 2009-03-24
3
Table 1-1 Requirements for an Apollo Project server running Windows
System component Requirement
Operating system Windows XP with Service Pack 3Memory 1GB RAM minimum
2GB RAM recommendedDisk space Required free disk space for every 3 time series channels of data
retrieved is approximately 2GB per month This is roughly twice as much space as the retrieved data occupies in a Store
Java Sun Java Runtime Environment (JRE) version 60Software licence Order a licence from Nanometrics if capabilities beyond that of the
unlicensed configuration are required (see Section 121 ldquoSoftware Licencerdquo on page 2)
Table 1-2 Requirements for an Apollo Project server running Linux
System component Requirement
Operating system Any distribution running a GNULinux kernel of version 24 or laterTested on Red Hat Linux 9 (kernel 2420-8)
Memory 512MB RAM minimum2GB RAM recommended
Disk space Required free disk space for every 3 time series channels of data retrieved is approximately 2GB per month This is roughly twice as much space as the retrieved data occupies in a Store
Java Sun Java Runtime Environment (JRE) version 60Software licence Order a licence from Nanometrics if capabilities beyond that of the
unlicensed configuration are required (see Section 121 ldquoSoftware Licencerdquo)
Table 1-3 Requirements for an Apollo Project server running Mac OS X
System component Requirement
Operating system Mac OS X (1052 and later)Memory 1GB RAM minimum
2GB RAM recommendedDisk space Required free disk space for every 3 time series channels of data
retrieved is approximately 2GB per month This is roughly twice as much space as the retrieved data occupies in a Store
Java Sun Java Runtime Environment (JRE) version 60
Notes on the JRE for Mac systems JRE version 60 must be manually downloaded and installedAfter installing the JRE it must be set as the default Java Virtual Machine (JVM)
Software licence Order a licence from Nanometrics if capabilities beyond that of the unlicensed configuration are required (see Section 121 ldquoSoftware Licencerdquo on page 2)
Chapter 1 Getting Started
4 Apollo Project User Guide16106R5 2009-03-24
Apollo Project User Guide16106R5 2009-03-24
5
Chapter 2 Installing and Starting Apollo Project
Installing the Apollo Project Web Server
Installing an Apollo Project Licence File
Starting the Apollo Project Web Server
Running Apollo Project Client
Upgrading Apollo Project
21 Installing the Apollo Project Web ServerThe Apollo Project Web server is installed on a single computer and after it is installed and running the client can run locally on the server or on any computer with a Web browser and network access to the server computer
All Stores must be accessible from the server hosting the Apollo Project Web server All output files are created on the server and its accessible file systems as described in Section 33 ldquoConfiguring Apollo Projectrdquo on page 24
To install the Apollo Project Web server on a server computer running Windows Linux or Mac OS X
1 Install a supported version of the Java Runtime Environment JRE version 60 or later
2 If you have received a licence file from Nanometrics ensure it is in a drive or network location that is accessible to the Apollo Project Setup Wizard
You can install and run Apollo Project without a licence file For details see Section 121 ldquoSoftware Licencerdquo on page 2 Should you require a licence after Apollo Project is installed you can install a licence using the Nanometrics Licence Installation Wizard See Section 22 ldquoInstalling an Apollo Project Licence Filerdquo on page 7
Chapter 2 Installing and Starting Apollo Project
6 Apollo Project User Guide16106R5 2009-03-24
3 Follow the instructions for your operating system in Table 2-1
211 Uninstalling Apollo Project Web ServerTable 2-2 provides instructions for uninstalling Apollo Project from the server computer for each of the supported operating systems
Table 2-1 Installation instructions
Operating System To install the Apollo Project Web server
Windows 1 Double-click ApolloProject_windows_x_x_xexe where x_x_x is the Apollo Project version number on the Apollo Project CD
2 Follow the steps of the installation wizard making changes to the default settings as required
Linux 1 Open a Terminal window and change the directory to the Apollo Project CD
2 Run the following as rootsh ApolloProject_unix_x_x_xsh (where x_x_x is the Apollo Project version number)
3 Follow the steps of the installation wizard making changes to the default settings as required
Mac OS X 1 Double-click the ApolloProject_macos_x_x_xdmg where x_x_x is the Apollo Project version number disc image on the Apollo Project CDThe disc image mounts as a new volume on your desktop and automatically displays its contents in a Finder window
2 Double-click the installation file Apollo Project Installer in the Finder window
3 Follow the steps of the installation wizard making changes to the default settings as required
Note After installing Apollo Project you can drag the disc image to the Trash to eject it and remove it from your desktop
If you are uninstalling a version of Apollo Project prior to version 13 refer to the version 12 user guide for instruction on uninstalling Apollo Project
Apollo Project Version 12 User Guide revision 16106R2 released on 2008-09-09
Table 2-2 Uninstalling the Apollo Project Web server
Operating System To uninstall the Apollo Project Web server
Windows Click Start gt All Programs gt Nanometrics gt Apollo Project gt Apollo Project Uninstaller
Linux 1 Open a Terminal window and change the directory to the Apollo Project directory The location of the Apollo Project directory was defined when you installed Apollo Project The default location is optnanometricsApolloProject
2 Run the following as root uninstall
Mac OS X 1 Open the Finder2 Click Applications under Places3 Double-click the Apollo Project folder 4 Double-click Apollo Project Uninstaller
Chapter 2 Installing and Starting Apollo Project
Apollo Project User Guide16106R5 2009-03-24
7
22 Installing an Apollo Project Licence FileIf you did not install a licence file during the installation of the Apollo Project Web server application you can install one at any time using the Nanometrics Product Licence Installation Wizard
A licence for Apollo Project is only required if capabilities beyond those of the unlicensed version are needed See Section 121 ldquoSoftware Licencerdquo on page 2 for descriptions of the licensed and unlicensed versions Contact Nanometrics to order a licence (see Contacting Nanometrics on page 55)
If you have obtained a licence file from Nanometrics use the following steps to install the file
Installing a licence file after creating a project in Apollo Project will result in the loss of that project It is recommended that you install your licence before running Apollo Project for the first time
Operating System To install an Apollo Project licence file
Windows 1 Ensure the licence file is in a drive or network location that is accessible to the licence installation wizard
2 Click Start gt All Programs gt Nanometrics gt Apollo Project gt NmxLicenceInstaller
3 Follow the steps in the license installation wizard to select and install the licence file
Linux 1 Ensure the licence file is in a drive or network location that is accessible to the licence installation wizard
2 Open a Terminal window and change the directory to the Apollo Project directory The location of the Apollo Project directory was defined when you installed Apollo Project The default location is optnanometricsApolloProject
3 Run the following NmxLicenceInstaller
Mac OS X 1 Ensure the licence file is in a drive or network location that is accessible to the licence installation wizard
2 Open the Finder3 Click Applications under Places4 Double-click the Apollo Project folder 5 Double-click NmxLicenceInstaller6 Follow the steps in the license installation wizard to select and install
the licence file
Chapter 2 Installing and Starting Apollo Project
8 Apollo Project User Guide16106R5 2009-03-24
23 Starting the Apollo Project Web ServerUse the procedures in Table 2-3 that correspond to your Apollo Server computerrsquos operating system to start the Apollo Project Web server application
24 Running Apollo Project ClientIf you are running the Apollo Project client on the computer where the server application is installed open a browser and go to
httplocalhostPort
Where localhost is the local computer and port is the port number configured during installation The default port number for Apollo Project is 8088
To run an Apollo Project client when the server application resides on a different computer open a browser and go to
httpServer computer name or IP addressPort
For example if the domain name of the server computer is ApolloProjectServer with an IP address of 192168220 and the default port number of 8088 is being used the URL for the client application in your browser will be
httpApolloProjectServer8088
ndash OR ndash
http1921682208088
241 Troubleshooting Running Apollo Project ClientIf you are having trouble opening the Apollo Project client in your Web browser try these suggestions
a) Ensure that the Apollo Project Web server application is running on the Apollo Project server computer See Section 23 ldquoStarting the Apollo Project Web Serverrdquo
Table 2-3 Starting the Apollo Project Web server
Operating System To start the Apollo Project Web server
Windows Click Start gt All Programs gt Nanometrics gt Apollo Project gt Apollo ProjectLinux 1 Open a Terminal window and change the directory to the Apollo
Project directory The location of the Apollo Project directory was defined when you installed Apollo Project The default location is optnanometricsApolloProject
2 Run the following ApolloProject
Mac OS X 1 Open the Finder2 Click Applications under Places3 Double-click the Apollo Project folder 4 Double-click Apollo Project to start the Web server
Chapter 2 Installing and Starting Apollo Project
Apollo Project User Guide16106R5 2009-03-24
9
b) Verify that the firewall on the server computer is not blocking the port number used to serve Web pages (by default the port number is 8088) To check the port number used open ApolloProjectvmoptions in the ApolloProject folder and note the number identified for the -Dserverport setting
242 Stopping the Apollo Project Web ServerThe Apollo Project client provides the means to stop the Apollo Project Web server application To stop the Apollo Project Web server
1 Open the Apollo Project client
2 Click the Shut down Apollo Project button
3 Click OK to confirm the Web server shutdown
25 Upgrading Apollo ProjectTo upgrade Apollo Project from a previous version
1 Uninstall the Apollo Project Web server application as per Section 211 ldquoUninstalling Apollo Project Web Serverrdquo on page 6
2 Install the new version of Apollo Project as per Section 21 ldquoInstalling the Apollo Project Web Serverrdquo on page 5
When you shut down the Apollo Project Web server all clients are disconnected from the server To restore connectivity start the Apollo Project Web server using the instructions in Section 23 ldquoStarting the Apollo Project Web Serverrdquo on page 8
During the upgrade process all downloaded data will remain intact however you will need to recreate your projects and settings in the new version of Apollo Project
For Windows and Linux installations if you are upgrading from an earlier version of Apollo Project that used Apache Tomcat it is strongly recommended that you uninstall Tomcat before installing the new version of Apollo Project
Refer to the version 12 user guide for instruction on uninstalling versions of Apollo Project prior to version 13
Apollo Project Version 12 User Guide revision 16106R2 released on 2008-09-09
If you are using a licensed version of Apollo Project you will need a new licence file when installing the upgrade If you have not received a new licence file contact Nanometrics (see Contacting Nanometrics on page 55)
Chapter 2 Installing and Starting Apollo Project
10 Apollo Project User Guide16106R5 2009-03-24
Apollo Project User Guide16106R5 2009-03-24
11
Chapter 3 Retrieving Data
Creating New Projects
Creating a Station Table File
Configuring Apollo Project
Managing Projects
Running Projects
Editing and Viewing the Settings of Projects
Monitoring Project Status
31 Creating New ProjectsYou can create multiple projects up to the number supported by the software licence (see Section 121 ldquoSoftware Licencerdquo on page 2)
When you create a new project you have to
bull Select data Stores
bull Specify a station table file
bull Select the channel groups you want to download data from
bull Specify when you want the project to run
bull Select the output format
bull Specify the output location
To create a new project
1 Click New on the Apollo Project Existing Projects page
2 Click a project type and enter a unique name in the Project Name box
3 Click OK
Chapter 3 Retrieving Data
12 Apollo Project User Guide16106R5 2009-03-24
4 Select one or more data Stores by performing the following steps
Store type DescriptionSteps
File A file Store specification defines a particular Store that resides on a file system accessible by the server running Apollo Project The file system can be a local or a networked file system (for example accessible via SMB or NFS)
1 Click the File tab2 Enter the full path and file name of a Store file3 Click Add
Apollo Project adds the specification to the Selected Specifications section of the Store Selection page and finds all related Store files and adds them as a single Store to the Selected Stores section
Directory A directory Store specification defines the set of Stores that reside in a particular directory hierarchy on a file system accessible by the server running Apollo Project A recursive search from the specified directory identifies all of the available Stores The file system can be a local or a networked file system (for example accessible via SMB or NFS)
1 Click the Directory tab2 Enter a directory path name
If you specify a root directory such as C it will take a long time for Apollo Project to find all of the Store files in that root directory
3 Click AddApollo Project adds the specification to the Selected Specifications section of the Store Selection page and finds and adds all Stores in the specified directory and its subdirectories to the Selected Stores section
IP Address An IP Address Store specification defines the Store of a single instrument (or an instance of Apollo Server) The specified IP address must be an IP address bound to the Ethernet interface of an instrument At the same time the instrument must be running in communications mode and be accessible from the server running Apollo Project
1 Click the IP Address tab2 Enter the IP address of an instrument3 Click Add
Apollo Project adds the specification to the Selected Specifications section of the Store Selection page and finds all Stores associated with the IP address and adds them to the Selected Stores section
Chapter 3 Retrieving Data
Apollo Project User Guide16106R5 2009-03-24
13
Discovery A discovery Store specification specifies the Stores of multiple instruments In this case a class D (multicast) IP address and port is specified It is assumed that the Store of any instrument in communications mode is accessible from the LAN of the Apollo Project server When Discovery is enabled for the specified IP address and port these attributes are included upon running the project
1 Click the Discovery tab2 Enter the multicast address and port number of a group of instruments
For example 224199711386776Multicast addresses range from 224000 through 239255255255
3 Click AddApollo Project adds the specification to the Selected Specifications section of the Store Selection page and finds all Stores associated with the multicast address and adds them to the Selected Stores section of the Store Selection page
Notes When multiple multicast groups are used for discovery the port number must differ from existing discovery port numbers by 2 for each discovery port number in use x there must be no other discovery port configured for use with a value of x or x+1For example the default discovery multicast group used by Taurus is 224199711386776 To add another multicast group you have to specify a different port number (which cannot be 6776 or 6777)
Recent Specs
Apollo Project keeps the 16 most recently defined Store specifications and groups them by category on the Recent Specs page
1 Click the Recent Specs tab2 Expand a specification category (File Directory IP Address or Discovery)
and select a specification3 Click Add
Apollo Project adds the specification to the Selected Specifications section of the Store Selection page and finds all Stores associated with the specification and adds them to the Selected Stores section
Each time a project is run Apollo Project generates a list of available Stores based on the selected Store specifications The actual Stores from which data is retrieved can vary on successive project runs For example a discovery Store specification might result in a different number of instruments being included depending on current access to the instruments
Remove a specification (and its associated Stores) by selecting it and clicking Remove Remove all specifications (and all Stores) by clicking Remove All You cannot remove individual Stores from a specification but you can add a different specification and select a different group of Stores Alternatively you can use channel group attributes filtering to select the channel groups that data is retrieved from
When copying a Store from an instrument to your local computer do not overwrite an existing Store Instead delete the existing Store or move it to a different folder on the computer Stores are made up of multiple volumes and if the new Store has fewer volumes than the old Store you could see some unpredictable results with Apollo Project
Store type DescriptionSteps
Chapter 3 Retrieving Data
14 Apollo Project User Guide16106R5 2009-03-24
5 Click the Channel Group Selection tab
6 If you defined a default station table file and want to use it for this project go to step 7
For more information see Section 32 ldquoCreating a Station Table Filerdquo on page 22
-OR-
Click Create Default Station Table to create a table for all of the currently selected Stores and discovered instruments for this project using the default settings for the network name location and channel names
The default settings for the network name location and channel names are defined in the Behaviour and Defaults dialog box For more information see Section 33 ldquoConfiguring Apollo Projectrdquo on page 24
-OR-
Enter the path and file name of a station table for this project
7 If you want to download all data from all available Stores verify that the Retrieve data from all channel groups (do not filter) check box is selected and go to step 12
-OR-
If you want to filter the data by specific channel groups and channel group attributes go to step 8
8 Clear the Retrieve data from all channel groups (do not filter) check box
9 Select the time series channel groups you want to download data from
A station table is used to assign names to all of the selected channel groups For more information see Section 32 ldquoCreating a Station Table Filerdquo on page 22
If new Stores are found after a station table file has been defined for a project (for example as a result of Discovery or a directory specification) the default channel group names are used in the output files and no filtering is applied to the channel groups
If the text ldquoSelected Time Series Channels x of xrdquo where x represents the number of channels is red you have selected more time series channels than your licence permits You must select a valid number of time series channels (for the unlicenced version of Apollo Project there is a maximum of three time series channels) before you can create your project
Chapter 3 Retrieving Data
Apollo Project User Guide16106R5 2009-03-24
15
10 Select the state of health (SOH) channel groups you want to download data from Each group has a predefined dataset
To view the SOH data retrieved from a Taurus version 2x see Appendix B ldquoRetrieving SOH Data from a Taurus Version 2xrdquo
Predefined SOH group SOH data
GPS Time Time (longsecs) (the number of seconds since 1970-01-01)Time (UTC) (time in yyyy-mm-dd hhmmssms format)DAC CountGPS Engine StatusGPS Last Update Time(s)GPS PDOPGPS Satellites Used (number of satellites used)GPS TDOP Lat (deg) (latitude in degrees)Long (deg) (longitude in degrees)Timing Error (ns)Timing Phase Lock (system clock phase lock)Timing Uncertainty (ns)
Note The values for Number of satellites used PDOP and TDOP are provided by the GPS receiver at the Last update time In order to see what time these values correspond to look at the Last update time When GPS is off these three parameters and the Last update time are not updated The last value displays until the next update arrives (after the GPS is turned on again)
GPS Satellites Time (longsecs) (the number of seconds since 1970-01-01)Time (UTC) (time in yyyy-mm-dd hhmmssms format)
For each satelliteGPS Satellite Acquisition FlagGPS Satellite Azimuth (microordm)GPS Satellite Elevation (microordm)GPS Satellite Last Update Time (ms)GPS Satellite PRN GPS Satellite Signal Level (AMU)
Environment Time (longsecs) (the number of seconds since 1970-01-01)Time (UTC) (time in yyyy-mm-dd hhmmssms format)External SOH Voltage 1 (V) (12-bit voltage input)External SOH Voltage 2 (V) (12-bit voltage input)External SOH Voltage 3 (V) (12-bit voltage input)External SOH Voltage 4 (V) (12-bit voltage input)Sensor SOH Voltage 1 (V)Sensor SOH Voltage 2 (V)Sensor SOH Voltage 3 (V)
Chapter 3 Retrieving Data
16 Apollo Project User Guide16106R5 2009-03-24
11 If required enter additional filter information as comma-delimited text into the Network Station Location Channel and Instrument boxes
You can use an asterisk ()to represent 1 or more characters
12 Review the selected channel groups and if required edit the channel group mappings in the selected channel groups area of the tab
Channel groups that do not have a mapping appear as blanks in the selected channel groups area of the tab Mapping information for these channel groups can be entered and saved in the station table file for future projects
You can edit the mappings at any time The changes are reflected in future runs of any project using that same station table file For more information see Section 32 ldquoCreating a Station Table Filerdquo on page 22
13 Click the Time Selection tab and follow the steps for the project type you selected
Instrument Time (longsecs) (the number of seconds since 1970-01-01)Time (UTC) (time in yyyy-mm-dd hhmmssms format)Controller Current (mA)Digitizer Current (mA)NMX Bus Current (mA) (external connector)Sensor Current (mA)Serial Port Current (mA)Supply Voltage (mV)Temperature (ordmC)
Look in the selected channel groups area of the tab (lower half of the tab) for examples of filter details you can enter in the Network Station Location Channel and Instrument ID filter boxes
The NetworkStationLocationChannel column of the table presents information in the format implied by the column title For instance in an entry of XXA099901BHE(1) XX represents the network(2) A0999 represents the station(3) 01 represents the location(4) BHE represents the channel
Look at the Instrument ID column of the table for an example of an instrument name and serial number such as taurus_0999
Only mappings that are applicable for the selected channel groups appear in the selected channel groups area of the tab
All times use the UTC time zone
Predefined SOH group SOH data
Chapter 3 Retrieving Data
Apollo Project User Guide16106R5 2009-03-24
17
Project type DescriptionSteps
Archive Archive projects attempt to retrieve data up to the current timeThe time ranges for which output files will be produced are driven from the file interval and are aligned to the project start time It is therefore unlikely that the ldquomost recentrdquo file interval will align with the current time Therefore the most recent range for which data retrieval is attempted will have a portion of its data retrieved and the remainder (for future retrieval) will be declared unavailable However when the project is run later (after the end of the particular time range) the unavailable data will normally be retrieved and the situation will likely repeat itself with the ldquonewrdquo last range to retrieveTo run an Archive project manually1 If required edit the start time for the project2 Click Manual3 Specify the file interval
For example if you specify 2 hours then one file is created every 2 hours If the duration for the project is one day then a total of 12 files will be created
4 After you have finished creating the project click Run Now on the Summary page to run the project
To schedule an Archive project to run automatically at a regular interval1 Click Regular Interval and select the interval 2 Specify the file interval
For example if you specify 2 hours then one file is created every 2 hours If the duration for the project is one day then a total of 12 files will be created
3 After you have finished creating the project click Start Schedule on the Summary page to start the schedule for the project and click OK twice The project will run according to the interval you specified after you start the schedule For example if you click Start Schedule on a Wednesday and you specified every 2 days as the interval then the project will run for the first time on Friday and every two days after that If the computer has been rebooted and the Apollo Project Web server has been restarted the project will run according to the interval you specified after the computer has rebooted For example if the computer reboots on a Wednesday and you specified every 2 days as the interval then the project will run for the next time on Friday and every two days after that
Note Archive projects that are defined as scheduled projects can also be run manually at any timeTo schedule an Archive project to run automatically on a weekly basis1 If required edit the start time for the project2 Click Weekly Schedule and select the time and days of the week 3 Specify the file interval
For example if you specify 2 hours then one file is created every 2 hours If the duration for the project is one day then a total of 12 files will be created
4 After you have finished creating the project click Start Schedule on the Summary page to start the schedule for the project and click OK twice After you have finished creating the project the project will run for the first time according to the project start time and then it will run on a weekly basis according to the times and days you specified
Note Archive projects that are defined as scheduled projects can also be run manually at any time
Chapter 3 Retrieving Data
18 Apollo Project User Guide16106R5 2009-03-24
One Time A One Time project retrieves a single time segmentTo specify the start and end times for a One Time project1 If required edit the start time for the project2 Click End Time and enter an end time
-OR-Click Duration and specify the duration of the project The duration is the length of the requested time segment
3 Specify the file intervalFor example if you specify 2 hours then one file is created every 2 hours If the duration for the project is one day then a total of 12 files will be created
4 After you have finished creating the project click Run Now on the Summary page to run the project
Controlled Source
A Controlled Source project retrieves data specified as a set of individually entered shots and outputs the data in SEGY format To specify shots using a shots file1 Click Browse select a shots file and click OK2 Click Submit
The list of shots is imported and displayed in the Shot List section on the Time Selection page
Note For more information see Section A4 ldquoShot File Formats for Controlled Source Projectsrdquo on page 42To manually define shots1 Enter a shot time2 If required enter the latitude longitude and elevation3 If required select the pre-shot time period4 Select the post-shot time period5 Click Add
The shot is added to the Shot List section on the Time Selection page Triggers A Triggers project uses a CSV-formatted trigger list to specify the data to be
retrieved for example a trigger file that has been downloaded from a Taurus to the local computerTo define triggers1 Click Browse select a CSV triggers file and click OK2 Click Submit
The list of triggers is imported and displayed in the Triggers section on the Time Selection page
3 Select the pre-trigger and post-trigger time periodsThe pre-trigger and post-trigger time periods are used for all of the triggers
Project type DescriptionSteps
Chapter 3 Retrieving Data
Apollo Project User Guide16106R5 2009-03-24
19
14 If you selected a Controlled Source as the project type in step 2 go to step 17
You do not have to select an output format for a Controlled Source project because the output format for a Controlled Source project is always SEGY one output file is generated for all instruments and the stations are sorted by StationNameNetworkName
-OR-
If you selected one of the other project types go to step 15 to select an output format
15 Click the Output Format tab
Field Archive A Field Archive project is used for recurring data retrievals that occur at specified intervals The time of the last retrieval is stored on the instrumentTo define the start time and file interval1 If required edit the start time for the project2 Specify the file interval
For example if you specify 2 hours then one file is created every 2 hours3 If you want partial files retrieved select the Include last interval even if
incomplete check box You should only select this option when the retrieval of partial files is more important than retrieving the data for the current interval during a future project run
Be careful when specifying the file interval For example retrieving many hours or days of data and specifying a file interval of seconds or minutes could result in the generation of many files This is not only very resource intensive but could result in a data management problem as well
Project type DescriptionSteps
Chapter 3 Retrieving Data
20 Apollo Project User Guide16106R5 2009-03-24
16 Perform the following steps to select an output format
Output format Steps
MiniSEED 1 Click MiniSEED2 Click Per channel group to generate one output file per channel group
You must add the channel token to the Subdirectories or Filename box on the Output Location tab when choosing Per channel group-OR-Click Per instrument to generate one output file per instrument-OR-Click All Instruments to generate one output file for all instruments
3 Select the Sort check box if you want the output data sorted by timeData is put in a Store in the order received and this order may not always be chronological To ensure that the data in the resulting SEED file is chronological select Sort
4 Select the data record sizeThe default record size is 512 B However not all SEED file readers will support this file size Determine what your SEED reader supports and select an appropriate value The options are 512 B 1024 B 2048 B and 4096 B Note that a smaller record size will result in quicker SEED file output
Note The number of output files is determined by the file interval that you set on the Time Selection page
SAC 1 Click SACYou must add the channel token to the Subdirectories or Filename box on the Output Location tab when choosing SAC as the output format
NotesThere are two types of SAC files binary and ASCII Apollo Project only outputs binary SAC filesOne output file per channel group is generated
SEGY 1 Click SEGY2 Click Per channel group to generate one output file per channel group
You must add the channel token to the Subdirectories or Filename box on the Output Location tab when choosing Per channel group-OR-Click Per instrument to generate one output file per instrument-OR-Click All Instruments to generate one output file for all instruments
3 Select the Sort check box if you want the stations sorted by StationNameNetworkName
NotesAll stations must have the same sample rateThe maximum number of samples per trace is 32767SEGY trace headers from discovered instruments will not have station location information
Chapter 3 Retrieving Data
Apollo Project User Guide16106R5 2009-03-24
21
17 Click the Output Location tab
18 If you defined a default base directory when you configured Apollo Project and want to use it for this project go to step 21
For more information see Section 33 ldquoConfiguring Apollo Projectrdquo on page 24
-OR-
Enter the valid absolute path of the base directory for the processed data subdirectories and files
If the base directory you entered does not exist click Create to create it
19 If you defined a default expression for subdirectories when you configured Apollo Project and want to use it for this project go to step 21
For more information see Section 33 ldquoConfiguring Apollo Projectrdquo on page 24
-OR-
Enter the expression used to define path names for subfolders under the base directory
You can enter tokens in any order including any additional characters that are valid for paths
Seisan 1 Click Seisan
NotesYou must have Seisan installed on your computer with a WAVEFORM_BASE and CONT_BASE line included for each station in the DATSEISANDEF file You must define a SEISAN_TOP environment variableOne output file per channel group is generated
Regardless of the output format selected SOH channel group data is always output in CSV format
The Base Directory is the root of all data retrieved for the project and can be defined at any location in the file system of the server running Apollo Project including a networked drive on a separate server If you want to create or use a directory on a computer on the network you have to enter the server and share name in a modified UNC format that is prefixed by an additional two backslashes For example the usual fileserver1storefiles must be written as fileserver1storefiles
Large amounts of data can be stored in this location You must ensure that adequate disk space is available
For deployments of Apollo Project where the clients are not running on the server it is recommended that the file system containing the base directory on the server be shared or exported as a networked file system
It is not recommended that you use the channel token in the subdirectories expression if the project includes more than one channel group per instrument (selected on the Channel Group Selection tab) and the output is not per channel group (selected on the Output Format tab)
Output format Steps
Chapter 3 Retrieving Data
22 Apollo Project User Guide16106R5 2009-03-24
20 If you defined a default expression for file names when you configured Apollo Project and want to use it for this project go to step 21
For more information see Section 33 ldquoConfiguring Apollo Projectrdquo on page 24
-OR-
Enter the expression used to define file names for the processed data files that are stored in the subfolders under the base directory
You can enter tokens in any order including any additional characters that are valid for file names
21 Click OK to save the new project
The new project is created and the Summary page is displayed
32 Creating a Station Table FileYou can create a mapping between a given instrumentchannel group (for example taurus_1234digitizertimeSeries1) and a corresponding network station location and channel name These mappings are stored in a station table file and the mapped channel group names are used in the output files
You can create a station table file and use it as the default for all projects or you can create a station table for individual projects
To create a station table file and set is as the default
1 Click the configuration button in the upper right corner
2 Specify the network name location and channel names on the Behaviour and Defaults dialog box and click OK to save the new settings
The settings you enter here are used as the channel names in the station table file You can edit these settings in step 8
For more information on configuring Apollo Project settings see Section 33 ldquoConfiguring Apollo Projectrdquo on page 24
3 Click New on the Apollo Project Existing Projects page
Do not use the channel token in the filename expression if the project includes more than one channel group per instrument (selected on the Channel Group Selection tab) and the output is not per channel group (selected on the Output Format tab)
The Sample Path shows an example of a file name generated using the values for the Base Directory Subdirectories and Filename settings
You can only edit the settings of a project before it has run for the first time or been scheduled (Archive project) If you want to edit the settings of a project after it has already run once or been scheduled you can copy the project (see Section 345 ldquoCopying a Projectrdquo on page 28) and then edit the settings for the copy
It is recommended that you create a station table file and set it as the default for all projects You can update the mappings in this file when new Stores are added or discovered
Chapter 3 Retrieving Data
Apollo Project User Guide16106R5 2009-03-24
23
4 Type Station Table in the Project Name box and click any project type
5 Click OK
6 Click the Store Selection tab and select as many Stores as possible
See step 4 of Section 31 ldquoCreating New Projectsrdquo for information on how to add specifications and select Stores
7 Click the Channel Group Selection tab and click Create Default Station Table
A station table file is created and the name of the file is displayed in the Station Table File Name box
8 Edit the station table channel group mappings in the selected channel groups area of the tab (lower half of the tab) as required
The NetworkStationLocationChannel names will appear in the output files If the Location is empty it is interpreted as the SEED default of two spaces
9 Click OK to close the project and finish creating the station table
10 Click the configuration button in the upper right corner
11 Enter the path and name of the station table file you just created in the Station Table File Name box on the Behaviour and Defaults dialog box
12 Click OK to save the new settings
The station table file you specified will be used as the default for all future projects You can open the Station Table project and edit the station table file if you need to add more Stores or change the mappings
For more information on configuring Apollo Project settings see Section 33 ldquoConfiguring Apollo Projectrdquo on page 24
Make a note of the path of the station table file because you will have to enter it on the Behaviour and Defaults dialog box to set it as the default for all projects
Valid characters for the network station location and channel in the NetworkStationLocationChannel box are upper case letters A to Z numbers 0 to 9 and spaces are also acceptable for the location
Chapter 3 Retrieving Data
24 Apollo Project User Guide16106R5 2009-03-24
33 Configuring Apollo ProjectYou can configure basic settings for Apollo Project and the default settings for new projects The changes you make to the project default settings only apply to new projects
To configure Apollo Project
1 Click the configuration button in the upper right corner
2 Edit the following settings
Setting Description
Log Verbosity The level of detail that is logged by Apollo ProjectThe default setting is Info
Log Location The default name of the Apollo Project log folder Maximum Number of Retrieval Attempts
The maximum number of single retrieval attempt made for all missing time segments on all channel groups every time a project is run Enter an integer from 0 through 1000 The default value is 8
Notes If the Taurus is busy when a retrieval attempt is made the number of remaining retrieval attempts is not decreased by one attemptYou can view the channel group details page to see if there are any remaining retrieval attempts for any channel groups (see Section 373 ldquoMonitoring the Status of a Running Projectrdquo on page 34)
Number Of Retries The number of times Apollo Project attempts to connect to a data source if there is a network connectivity problem Enter an integer from 0 through 1000 The default value is 3
Note Every time a project is run it starts with the maximum number of retries
Retry Interval (secs) The amount of time in seconds that Apollo Project waits before trying to connect to a data source againEnter an integer from 0 through 1000 The default value is 5
Station Table File Name The file name and location of the station table file that is used to assign station names to all of the selected channel groupsA station table is used to assign names to all of the selected channel groups For more information see Section 32 ldquoCreating a Station Table Filerdquo on page 22No station table file is specified by default
Chapter 3 Retrieving Data
Apollo Project User Guide16106R5 2009-03-24
25
Base Directory The folder name and location of the base directory for the processed data subfolders and files Enter any valid folder name and location including any additional characters that are valid for paths The default base directory name is ApolloProject
Notes The Base Directory is the root of all data retrieved for the project and can be defined at any location in the file system of the server running Apollo Project including a shared folder on a different computer If you want to create or use a folder on a computer on the network you have to enter the server and share name in a modified UNC format that is prefixed by an additional two backslashes For example the usual fileserver1storefiles must be written as fileserver1storefilesLarge amounts of data can be stored in this location You must ensure that adequate disk space is availableFor deployments of Apollo Project where the clients are not running on the server it is recommended that the file system containing the base directory on the server be shared or exported as a networked file system
Subdirectories The expression used to define path names for subfolders under the base directoryEnter tokens in any order including any additional characters that are valid for paths The default path name is as follows projectyearmonthday
Filename The expression used to define file names for the processed data files that are stored in the subfolders under the base directoryEnter tokens in any order including any additional characters that are valid for file names The default filename is as follows instrument_time
Sample Path An example of a file name generated using the values for the Base Directory Subdirectories and Filename settings
Network Name A standard network codeEnter any two upper case letters or numbers The default code is XX
Location A location within a stationEnter any two upper case letters numbers or spaces
The default location is two spaces for ldquononerdquo You must delete the two default spaces if you enter a new location value
Setting Description
Chapter 3 Retrieving Data
26 Apollo Project User Guide16106R5 2009-03-24
3 Click OK to save the new settings
34 Managing ProjectsYou can view open close copy and delete projects Also you can create convenient links to run your individual projects with desktop shortcuts
341 Viewing Existing Projects1 Click Projects in the Projects bar
2 View the projects listed on the Existing Projects page
The Existing Projects page shows a list of all projects and a status overview of each project For more information see Section 371 ldquoViewing an Overview of the Status of All Projectsrdquo on page 32
Channel 1 Name A channel codeEnter any three upper case letters or numbersThe default channel code is BHZ
Channel 2 Name A channel codeEnter any three upper case letters or numbersThe default channel code is BHN
Channel 3 Name A channel codeEnter any three upper case letters or numbersThe default channel code is BHE
Setting Description
Chapter 3 Retrieving Data
Apollo Project User Guide16106R5 2009-03-24
27
342 Opening a Project1 Click the project name under the Name column on the Existing Projects page
2 Click the Open Project button
343 Creating a Desktop Shortcut to a ProjectLaunching a project with a desktop shortcut will open Apollo Project to that project and run the project
Methods for creating desktop shortcuts to Web sites vary from browser to browser These procedures explain how to create desktop shortcuts to specific projects for both Mozilla Firefox 3 and Microsoft Internet Explorer 7 Desktop shortcuts to projects include the Apollo Project icon and are titled in the format Project Name ndash Apollo Project
In Firefox 3
1 Open the project you want to create a shortcut to in Firefox
2 Reduce the size of the Firefox window so that the desktop is visible
3 Drag the Site Identification Button onto the desktop
The Site Identification Button is located to the left of the Location Bar and displays the Apollo Project icon
In Internet Explorer 7
1 Open the project you want to create a shortcut to in Internet Explorer
2 Press ALT+F
3 Select Send gt Shortcut to Desktop
344 Closing a Project
1 Click the Close Project button in the Projects bar
Launching a desktop shortcut to a project automatically runs that project It is important to note that once a project is run its settings can no longer be edited It is recommended that desktop shortcuts only be created for Field Archive projects
Firefox is the recommended browser for Apollo Project
Chapter 3 Retrieving Data
28 Apollo Project User Guide16106R5 2009-03-24
345 Copying a Project
1 Select the project name under the Name column on the Existing Projects page
2 Click Copy
3 Enter a unique name for the new project and click OK
4 Click Edit and edit the settings as required
5 Click OK to save the project after you have finished editing the settings
346 Deleting a ProjectWhen you delete a project only files in the temporary folder are deleted All processed data files are not deleted
1 Click the project name under the Name column on the Existing Projects page
2 Click Delete
3 Click OK on the confirmation message
35 Running ProjectsFor all project types you can run a project manually at any time Archive projects can also be defined to run automatically on a schedule
If it is a scheduled Archive Project and the schedule is started click Cancel Schedule before you create a copy of it (If the schedule is not started the Start Schedule button is visible if the schedule is started the Cancel Schedule button replaces the Start Schedule button)
Apollo Project stores intermediate files in a temporary subdirectory of the Base Directory specified for the output location of a project These intermediate files correspond to the actual channel group data retrieved from the Stores referenced by the project If a project is deleted from Apollo Project these temporary files will be removed automatically
Disk space can also be reclaimed by removing these temporary files manually without deleting the project However if the project is run again the output files produced might be incomplete if previously retrieved data from these temporary files is required
For more information on what happens when a project runs see Section A1 ldquoOverview of Running Projectsrdquo on page 37
Chapter 3 Retrieving Data
Apollo Project User Guide16106R5 2009-03-24
29
351 Running a Project1 Open a project
2 Click Run Now on the Summary page to start the project
The project starts running and the Retrieval Status page is displayed
352 Stopping a Project1 Open a project
2 Click Cancel Run on the Summary page to stop the project
3 Click OK on the success message
353 Merging Project Data FilesYou have the option to merge all of the downloaded data for the stations and instruments into one file per interval for each project
1 Open a project
2 Click Merge
A single file is generated for each time period The time period is determined by the file interval you specified on the Time Selection page when you created the project For more information see step 13 of Section 31 ldquoCreating New Projectsrdquo on page 11
The original data files are not modified when you select the option to merge project data files
You can also click Run Now on the Retrieval Status page to start a project
For more information on what happens when a project runs see Section A1 ldquoOverview of Running Projectsrdquo on page 37
You can also click Cancel Run on the Retrieval Status page to stop a project
You cannot merge data from Archive projects and you cannot merge data in the Seisan format
You can also click Merge on the Retrieval Status page to merge the data from a project
Chapter 3 Retrieving Data
30 Apollo Project User Guide16106R5 2009-03-24
354 Running a Scheduled Archive Project1 Open a project
2 Click Start Schedule to start the project schedule
3 Click OK on the confirmation message
4 Click OK on the success message
For a project scheduled to run weekly the project will run for the first time according to the project start time and then it will run on a weekly basis according to the times and days you specified
For a project scheduled to run at a regular interval the project will run according the to interval you specified after you start the schedule For example if you click Start Schedule on a Wednesday and you specified every 2 days as the interval then the project will run for the first time on Friday and every two days after that
3541 Cancelling a Schedule
If you cancel a scheduled project before it runs for the first time you can edit the project settings
If you cancel a project that is currently running the current project runs to completion but subsequent project runs will not occur
1 Open a project
2 Click Cancel Schedule to cancel the project schedule
3 Click OK on the confirmation message
4 Click OK on the success message
You can also click Start Schedule on the Retrieval Status page to start the schedule of a project
You can restart the schedule by opening the project and clicking Start Schedule
You can also click Cancel Schedule on the Retrieval Status page to cancel the schedule of a project
Chapter 3 Retrieving Data
Apollo Project User Guide16106R5 2009-03-24
31
36 Editing and Viewing the Settings of ProjectsYou can edit the settings of a project before it has run After it has run you can view the settings
361 Editing Project Settings1 Open the project
2 Click Edit on the Summary page
3 Edit the settings as required
4 Click OK to save the changes
362 Viewing Project Settings1 Open the project
2 Click View on the Summary page
3 Click the tabs to view the settings
4 Click Cancel when you have finished viewing the settings
You can only edit the settings of a project before it has run for the first time or been scheduled (Archive project) If you want to edit the settings of a project after it has already run once or been scheduled you can copy the project (see Section 345 ldquoCopying a Projectrdquo on page 28) and then edit the settings for the copy
Settings For more information
Store Selection See step 4 of Section 31 ldquoCreating New ProjectsrdquoChannel Group Selection See step 5 to step 12 of Section 31 ldquoCreating New ProjectsrdquoTime Selection See step 13 of Section 31 ldquoCreating New ProjectsrdquoOutput Format See step 15 and step 16 of Section 31 ldquoCreating New ProjectsrdquoOutput Location See step 17 to step 20 of Section 31 ldquoCreating New Projectsrdquo
You can also click Edit on the Retrieval Status page to edit the settings of a project
You can also click View on the Retrieval Status page to edit the settings of a project
Chapter 3 Retrieving Data
32 Apollo Project User Guide16106R5 2009-03-24
37 Monitoring Project StatusYou can monitor the status of a project by viewing information on the Existing Projects Summary and Retrieval Status pages
371 Viewing an Overview of the Status of All ProjectsThe Existing Projects page is the default home page of Apollo Project You see this page when you first open Apollo Project or when you click Projects in the projects bar For more information see Section 341 ldquoViewing Existing Projectsrdquo on page 26
You can view the following information for all projects on the Existing Projects page
bull Name
bull Type
bull Current status
bull Last time the project run
bull Status of data retrieved
The Data Retrieved bars on the Existing Projects page show the overall status of the data retrieval For more information see Section 3731 ldquoStatus Coloursrdquo on page 34
Chapter 3 Retrieving Data
Apollo Project User Guide16106R5 2009-03-24
33
372 Viewing the Status of an Individual ProjectWhen you open a project a detailed summary of the project is shown on the Summary page For more information see Section 342 ldquoOpening a Projectrdquo on page 27
You can view the following information for each project on the Summary page
bull Date it was created
bull Date it was last modified
bull Current status
bull Last time it ran
bull Next time it will run
You can also view a summary of all of the settings you specified when you created the project (Store specifications selected Stores selected time series channel groups selected SOH channel groups start and end times number of files generated file interval and output format and locations)
All times are reported using the UTC time zone
Chapter 3 Retrieving Data
34 Apollo Project User Guide16106R5 2009-03-24
373 Monitoring the Status of a Running ProjectYou can view the data retrieval status of a project while it is running on the Retrieval Status page The Retrieval Status page is displayed automatically when you click Run Now to run a project You can also view this page by opening a project and clicking the Retrieval Status tab
The status for each channel group is expressed in the form of two numbers (for example 60100) and two bar graphs The first number is the percentage available of the total time requested (for example 60) and the second number is the percentage retrieved of the time available (for example 100) For more information on the bar graph status colours see Section 3731 ldquoStatus Coloursrdquo on page 34
You can also view retrieval details for each channel group listed on the Retrieval Status page For more information see Section 3732 ldquoViewing the Retrieval Details for Each Channel Grouprdquo on page 35
3731 Status Colours
The data retrieval status bars use the following status colours
The information that is displayed on the Retrieval Status page is updated continuously while a project is running
Table 3-1 Status colours
Colour Status
Green Apollo Project has retrieved the data
Yellow Apollo Project is attempting to retrieve available data from the Store
Red Data is available in the Store but Apollo Project has failed to retrieve it on this attempt Apollo Project will make additional attempts to retrieve the data up to the configured Maximum Number of Retrieval Attempts For information on how to set the Maximum Number of Retrieval Attempts setting see Section 31 ldquoCreating New Projectsrdquo on page 11
White Data for some portion of the requested time segment is not available in the Store For example there are gaps in the data or the retrieval request is for a future time segment
Chapter 3 Retrieving Data
Apollo Project User Guide16106R5 2009-03-24
35
3732 Viewing the Retrieval Details for Each Channel Group
You can view the retrieval status of each time segment for a channel group
1 Click a channel group name
2 Click the Channel Group Details button that is located to the right of the channel group name
The Remaining Retrieval Attempts column displays the number of times that Apollo Project will try to download each missing time segment for the channel group when the project is run again For information on how to set the Maximum Number of Retrieval Attempts setting see Section 33 ldquoConfiguring Apollo Projectrdquo on page 24
3 Click OK when you have finished viewing the details
Chapter 3 Retrieving Data
36 Apollo Project User Guide16106R5 2009-03-24
Apollo Project User Guide16106R5 2009-03-24
37
Appendix A Reference Information and Examples
Overview of Running Projects
Example Project Settings
Example Deployment Scenarios
Shot File Formats for Controlled Source Projects
A1 Overview of Running ProjectsWhen a project is run Apollo Project performs the following steps
1 The requested time ranges are identified
2 The channel groups for which data are to be retrieved are identified
3 The actual Stores specified by the Store specifications of the project are identified
For each identified Store the following steps are performed
1 A data availability analysis for the outstanding time ranges is performed These are for the ranges for which data has not already been retrieved The availability of the data is recorded for reference It is possible that a given Store was not present at the time the project was last run If this is the case then an attempt is made to retrieve all of the required time ranges of the project from the Store
2 If any data exists in the Store for any of the requested time ranges then a retrieval of this data is performed and the retrieved data is stored to local temporary files
3 If the number of retrieval attempts for a given time range exceeds a configurable threshold (see Section 33 ldquoConfiguring Apollo Projectrdquo on page 24) then the retrieval of data within the stated range is not attempted again
If any data was retrieved during the run of the project then the corresponding output files of the desired output format are generated and stored in the output location specified for the project
When running Apollo Project with Taurus version 2x the schedule for Archive projects must be greater than 5 minutes in duration Schedules that are less than 5 minutes can result in data that is missing or not downloaded
Appendix A Reference Information and Examples
38 Apollo Project User Guide16106R5 2009-03-24
It is possible that the requested data for a given channel group exists across multiple Stores If all of these Stores are included by the Store specifications for the project then Apollo Project assembles the requested data
When a project runs detailed information regarding the results of the retrieved data and processed data are available For more information see Section 37 ldquoMonitoring Project Statusrdquo on page 32
A2 Example Project Settings
A21 Example 1 One Time ProjectProject Name Project1
Project Type One Time
Channel groups selected for retrieval CASTN1OTBHZ (on taurus_1234)
Requested Time Range January 30 2008 1400 ndash 1500 UTC
File Interval 20 minutes
Output Location Base Directory disk2ApolloProjectOutputData
Output Location Subdirectories projectyearmonthday
Output Location Filenamestationnetwork_time
When the project is run successfully the following output files will be created on the server running Apollo Project
disk2ApolloProjectOutputDataProject120080130STN1CA_20080130_140000seed
disk2ApolloProjectOutputDataProject120080130STN1CA_20080130_142000seed
disk2ApolloProjectOutputDataProject120080130STN1CA_20080130_144000seed
Appendix A Reference Information and Examples
Apollo Project User Guide16106R5 2009-03-24
39
A22 Example 2 Controlled Source ProjectProject Name Project2
Project Type Controlled Source
Channel groups selected for retrieval CASTN1OTBHZ (on taurus_1234) CASTN1OTBHN (on taurus_1234)
Requested Shot Times January 30 2008 1400 UTC January 30 2008 1430 UTC
Pre Time 30 seconds
Post Time 30 seconds
Output Location Base Directory disk2ApolloProjectOutputData
Output Location Subdirectories projectyearmonthday
Output Location Filename timeformat
When the project is run successfully the following output files will be created on the server running Apollo Project
disk2ApolloProjectOutputDataProject22008013020080130_135930segysgy
disk2ApolloProjectOutputDataProject22008013020080130_142930segysgy
A3 Example Deployment Scenarios
A31 One TimeYou want to download three days of data from multiple instruments on the network save the data in MiniSEED format and create a file for every hour of data
A One Time project is the recommended solution The Store of each instrument can be made available to Apollo Project by creating a corresponding IP Address Store specification with the IP address of the instrument The requested time range can be specified along with a file interval of one hour Ensure that the instruments are configured to run in Communications mode
A32 Scheduled ArchiveYou want seismic data to be retrieved automatically from a group of instruments on the network every six hours The instruments are always accessible via an Ethernet connection
A scheduled Archive project is the recommended solution Use the Regular Interval scheduling option and set the interval to six hours
You can also run a scheduled Archive project at any time For example if the scheduled retrieval interval of a project is six hours and between intervals you want to retrieve the data three hours early you can run the project and approximately three additional hours of data would be accumulated About three hours later the project will run automatically and accumulate the remaining three hours of data
Appendix A Reference Information and Examples
40 Apollo Project User Guide16106R5 2009-03-24
A33 Manual ArchiveYou want to retrieve seismic data from a group of instruments but their respective Stores are only available for retrieval on occasion (no regular dependable schedule for retrieval from these Stores is possible)
A manually run Archive project is the recommended solution You can create the project and run it whenever any of the instruments are available for retrieval
A34 Field ArchiveYou want to collect data from a set of isolated instruments in the field at recurring intervals (for example twice per month)
A Field Archive project is the recommended solution You can create a Field Archive project and either add all instrument IP addresses to the list or use a Discovery specification The time for the last retrieval is stored on the instrument and all data is recovered from the last recovery time
A35 Media HarvestingYou want to collect the media from a set of instruments in the field at a regular interval (for example once per week) You also have to retrieve all of the seismic data on the media for subsequent analysis
An Archive project is the recommended solution Initially a directory is created on the file system of the server running Apollo Project A directory Store specification is created with this directory as the parent directory from which to search for Stores The content of each media instance in the weekrsquos collection is copied from a media reader to a subdirectory of the directory When the project is run all of the copied Stores are automatically available and the project accumulates data for each instrument
Due to the nature of media harvesting and the replacement procedure for this example data is always missing for the last period of output files for the current week This period corresponds to the time that the media was taken from the instrument and replaced with a new one The following week when the media is harvested again from the instruments in the field Apollo Project fills in the missing time for these files with the new Store data regardless of the media instance on which the data currently resides
You can only create and run Field Archive projects for Taurus version 30 or later
Appendix A Reference Information and Examples
Apollo Project User Guide16106R5 2009-03-24
41
A36 Trigger Downloading You have set up a network of five Tauruses around a hydro dam Each Taurus is accessible over an Ethernet connection and each is set to record data over the weekend You have set the period for data retrieval at 30 seconds before and five minutes after any seismic activity but the following procedure shows you why it is not necessary to view all of the data accumulated over the whole weekend
1 Select the Taurus at the site with the least environmental noise or determine the best site for generating triggers and designate this Taurus ldquoTaurus Ardquo for reference
You need to perform this task in advance More information about triggers can be found in the Taurus Portable Seismograph User Guide
2 Download the trigger file from ldquoTaurus Ardquo and review the file to verify the correct number of triggers
3 Follow these steps to create a new Triggers project
a) Click New on the Apollo Project Existing Projects page
b) Click Triggers as the project type and enter a unique name in the Project Name box
c) Click OK
d) Click the IP Address tab on the Store Selection tab
e) Enter the IP address of a Taurus
f) Click Add
g) Repeat step e until you have entered the IP addresses of all five of the Tauruses
Apollo Project adds the IP address specifications to the Selected Specifications section of the Store Selection page and finds all five Stores associated with the IP addresses and adds them to the Selected Stores section
h) Click the Channel Group Selection tab
i) Click Create Default Station Table to create a table for all of the currently selected Stores and discovered instruments
j) Review the selected channel groups and if required edit the mappings in the selected channel groups area of the tab (lower half of the tab)
k) Click the Time Selection tab
l) Click the Browse button
m)Select the trigger file that you downloaded in step 2 and click OK
n) Click Submit
The list of triggers is imported and displayed in the Triggers section on the Time Selection page
o) Enter a Pre Time of 30 seconds and a Post Time of 5 minutes
p) Click the Output Format tab
q) Click MiniSEED
r) Click All Instruments
s) Click the Output Location tab
Appendix A Reference Information and Examples
42 Apollo Project User Guide16106R5 2009-03-24
t) Enter the valid absolute path of the base directory for the processed data subfolders and files
u) Enter the expression used to define path names for subfolders under the base directory
v) Enter the expression used to define file names for the processed data files that are stored in the subfolders under the base directory
w) Click OK
4 Click the Run Now button on the Summary page
When the project has finished running the output folder you specified in step t will contain ten files Each output file will contain 5 minutes and 30 seconds of data from the five Tauruses
A4 Shot File Formats for Controlled Source ProjectsYou have two options for defining shots for a Controlled Source project manually defining shots or importing shots from a shot file
You can create shot files in one of following three file formats
Microsoft Office Excel (xls) ndash See Section A41 ldquoCreating a Shot File With Microsoft Office Excelrdquo on page 42
OpenOfficeorg Calc (ods) ndash See Section A42 ldquoCreating a Shot File With OpenOfficeorg Calcrdquo on page 44
Comma-Separated Values (csv) ndash See Section A43 ldquoCreating a Comma-Separated Values Shot Filerdquo on page 45
The Shot file templates are located in the docShotFileImport folder on the Apollo Project CD
A41 Creating a Shot File With Microsoft Office ExcelThe Microsoft Office Excel template for Apollo Project can be used with Microsoft Office Excel version 2003 or later
To create an Microsoft Office Excel based shot file
1 Double-click ShotFileTemplatexlt
A new Microsoft Office Excel file is created from the template and opens in the Microsoft Office Excel
2 Save the new spreadsheet as a Microsoft Office Excel document (xls)
3 Enter shot file data as specified in the Microsoft Office Excel spreadsheet
Only the decimal separator is supported for shot files Separators that denote the 3rd power of 10 (thousand) are not supported (for example 4500) The Microsoft Excel and OpenOffice templates reinforce these restrictions and are recommended for creating csv files
Appendix A Reference Information and Examples
Apollo Project User Guide16106R5 2009-03-24
43
You can enter data for multiple shot times
4 Click Save to save the file in Microsoft Office Excel format
5 Click File gt Save As and select CSV (Comma delimited) (csv) from the Save as type list
6 Click Save
7 Click OK on the message warning you that you are only saving the active sheet
8 Click Yes on the message warning you that file features might be incompatible with the csv format
9 Close Microsoft Office Excel
If you are using Microsoft Office Excel 2007 click the Microsoft Office Button and click Save As
Ensure that you save the file as a comma delimited file If the shot file is mistakenly saved in Microsoft Excel format (xls) the shot file will not work in Apollo Project
Appendix A Reference Information and Examples
44 Apollo Project User Guide16106R5 2009-03-24
A42 Creating a Shot File With OpenOfficeorg CalcThe OpenOffice template has been tested with OpenOfficeorg Calc version 23 Later versions of OpenOfficeorg Calc can be used at your discretion
To create a shot file based on the OpenOfficeorg Calc template
1 Double-click ShotFileTemplateots
A new OpenOffice spreadsheet is created from the template and opens in OpenOfficeorg Calc
2 Save the new spreadsheet as an OpenOffice Calc document (ods)
3 Enter the shot file data as specified in the OpenOffice spreadsheet
You can enter data for multiple shot times
4 Click Save to save the file in OpenOfficeorg Calc format
5 Click File gt Save As and select Text CSV (csv) from the Save as Type list
6 Select the Edit filter settings check box
7 Click Save
A warning message might appear that warns you that the document might contain formatting that cannot be saved in the csv format Click Yes on the warning message to save the file in csv format
The Export of text files window opens
8 Delete the double quotation marks () in the Text delimiter box and ensure that the Save cell content as shown check box is selected
9 Click OK to export the OpenOffice spreadsheet as a csv file
10 Click OK on the warning message
11 Close OpenOfficeorg Calc
Appendix A Reference Information and Examples
Apollo Project User Guide16106R5 2009-03-24
45
A43 Creating a Comma-Separated Values Shot FileYou can use any text editor to create a csv shot file
To create a csv shot file
1 Open ShotFileTemplatecsv in a text editor and save it with a different name
2 Format each line of the csv file as follows
Shot TimePre TimePost TimeLatitudeLongitudeElevation
For example
2008-08-28 103044090600000-6000004267
The format and units are as follows
3 Save the file as a csv formatted file
The csv shot file template is not compatible with Microsoft Office Excel Make sure that you do not double-click it and open it in Microsoft Office Excel
FormatUnits
Shot Time yyyy-mm-dd hhmmss
Pre Time seconds
Post Time seconds
Latitude degrees
Longitude degrees
Elevation meters
Appendix A Reference Information and Examples
46 Apollo Project User Guide16106R5 2009-03-24
Apollo Project User Guide16106R5 2009-03-24
47
Appendix B Retrieving SOH Data from a Taurus Version 2x
Taurus Version 2x SOH Data Retrieved by Apollo Project
Retrieving SOH Data from a Taurus Version 2x Streaming to Apollo Server
B1 Taurus Version 2x SOH Data Retrieved by Apollo Project This section presents the predefined datasets of SOH data Apollo Project will retrieve from a Taurus version 2x either through a direct connection or a stream to Apollo Server For instruction on retrieving streaming Taurus version 2x data from Apollo Server see Section B2 ldquoRetrieving SOH Data from a Taurus Version 2x Streaming to Apollo Serverrdquo on page 48
The order of the columns presented in the table below will differ when streaming Taurus version 2x SOH data from Apollo Server
Predefined SOH group SOH data
GPS Time Time (longsecs) (the number of seconds since 1970-01-01)Time (UTC) (time in yyyy-mm-dd hhmmssms format)Altitude (m)DAC CountError (ns) (time error)GPS Engine StatusLast Update Time(s)Lat (deg) (latitude in degrees)Long (deg) (longitude in degrees)NumSatellites (number of satellites used)PDOPPhaseLock (system clock phase lock)TDOPUncertainty (ns) (time uncertainty)
Note The values for Number of satellites used PDOP and TDOP are provided by the GPS receiver at the Last update time In order to see what time these values correspond to look at the Last update time When GPS is off these three parameters and the Last update time are not updated The last value displays until the next update arrives (after the GPS is turned on again)
Appendix B Retrieving SOH Data from a Taurus Version 2x
48 Apollo Project User Guide16106R5 2009-03-24
B2 Retrieving SOH Data from a Taurus Version 2x Streaming to Apollo ServerThis section provides instruction on configuring your Taurus version 2x to stream data to Apollo Server and instructions on how to use Apollo Project to retrieve this data from Apollo Server
B21 Streaming Data from a Taurus Version 2x to Apollo ServerUse the Taurus graphical user interface on either the Taurus display screen or through a Web browser to set up an NP stream from a Taurus version 2x to Apollo Server
1 Log in to the Taurus version 2x with either the tech or central user account
2 Select Advanced Configuration gt Communications gt NP Data Streaming
GPS Satellites Time (longsecs) (the number of seconds since 1970-01-01)Time (UTC) (time in yyyy-mm-dd hhmmssms format)
For each satelliteAcquisition FlagLast Update Time (ms)PRNSatellite Azimuth (microordm)Satellite Elevation (microordm)Signal Level (AMU)
Environment Time (longsecs) (the number of seconds since 1970-01-01)Time (UTC) (time in yyyy-mm-dd hhmmssms format)External SOH Voltage 1 (V) (12-bit voltage input) External SOH Voltage 2 (V) (12-bit voltage input) External SOH Voltage 3 (V) (12-bit voltage input) External SOH Voltage 4 (V) (12-bit voltage input) Sensor SOH Voltage 1 (V)Sensor SOH Voltage 2 (V)Sensor SOH Voltage 3 (V)
Instrument Time (longsecs) (the number of seconds since 1970-01-01)Time (UTC) (time in yyyy-mm-dd hhmmssms format)Controller Current (mA)Digitizer Current (mA)NMX Bus Current (mA) (external connector)Sensor Current (mA)Serial Port Current (mA)Supply Voltage (mV)Temperature (ordmC)
Predefined SOH group SOH data
Appendix B Retrieving SOH Data from a Taurus Version 2x
Apollo Project User Guide16106R5 2009-03-24
49
3 To have the Taurus stream both time series and SOH data to Apollo Server select both Stream Time Series and Stream SOH
-OR-
Select only Stream SOH if you only want to retrieve the SOH data from Apollo Server
4 Type the IP address for Apollo Server in the IP Address box
5 Type the port number Apollo Server uses to receive data in the Port box By default this is port number 32008
6 The Second IP Address and Second Port boxes are not necessary however cannot be left blank Type 127001 in the Second IP Address box and 32004 in the Second Port box
7 Type a value in the Maximum Throughput [bps] box if a limited data link is present between the Taurus and Apollo Server For instance if at some point the data link is limited to 9600 bps then this is the maximum throughput the link can allow If there are no throughput limitations set the value in this box to zero to disable the throughput limitation
8 Click Apply
9 Click Commit
B22 Retrieving Taurus Version 2x Data from Apollo ServerCreate a new project or use an existing project in Apollo Project to retrieve the Taurus version 2x data from Apollo Server For more information on creating or editing projects refer to Section 31 ldquoCreating New Projectsrdquo on page 11 and Section 36 ldquoEditing and Viewing the Settings of Projectsrdquo on page 31
When creating or editing the project
a) Add an IP address Store specification on the Store Selection tab (see step 4 in Section 31 ldquoCreating New Projectsrdquo) for Apollo Server including its client Web application port number Use the format
Apollo Server IP AddressApollo Server Client Web Application Port Number
b) Apply the appropriate filters on the Channel Group Selection tab to retrieve the desired channel groups from the Taurus version 2x See step 5 through step 12 in Section 31 ldquoCreating New Projectsrdquo for instruction on using the Channel Group Selection tab
Appendix B Retrieving SOH Data from a Taurus Version 2x
50 Apollo Project User Guide16106R5 2009-03-24
Apollo Project User Guide16106R5 2009-03-24
51
Appendix C Glossary
Glossary of Abbreviations and Terms
List of Unit Abbreviations and Symbols
C1 Glossary of Abbreviations and Terms
A
ASCIIAmerican Standard Code for Information Interchange
B
BHEBroad Band High Gain Seismometer East-West Orientation
Channel name based on the Global Seismological Network (GSN) standard
BHNBroad Band High Gain Seismometer North-South Orientation
Channel name based on the Global Seismological Network (GSN) standard
BHZBroad Band High Gain Seismometer Vertical Orientation
Channel name based on the Global Seismological Network (GSN) standard
Appendix C Glossary
52 Apollo Project User Guide16106R5 2009-03-24
C
CSVComma-Separated Values
D
DACDigital to Analog Converter
G
GPSGlobal Positioning System
J
JREJava Runtime Environment
JVMJava Virtual Machine
N
NFSNetwork File System
P
PDOPPosition Dilution of Precision
PRNPseudo-random Number
Appendix C Glossary
Apollo Project User Guide16106R5 2009-03-24
53
S
SACSeismic Analysis Code
An Apollo Project output file format that generates files that can be used by the SAC software (see http wwwirisedusoftwaresac)
SEEDStandard for the Exchange of Earthquake Data
SMBServer Message Block
SOHState of Health
T
TCPIPTransmission Control ProtocolInternet Protocol
TDOPTime Dilution of Precision
U
UNCUniform Naming Convention or Universal Naming Convention
URLUniform Resource Locator
UTCCoordinated Universal Time
Appendix C Glossary
54 Apollo Project User Guide16106R5 2009-03-24
C2 List of Unit Abbreviations and SymbolsTable C-1 provides a list of unit abbreviations and symbols commonly used in Nanometrics documentation
Table C-1 Unit abbreviations and symbols
Abbreviation or Symbol Definition Abbreviation
or Symbol Definition
deg degree lb pound
Oslash diameter m metre
micro micro ms metre per second
Ω ohm ms2 metre per second squared
A ampere mA milliampere
AC alternating current MB megabyte
b bit MΩ megaohm
B byte MHz megahertz
bps bits per second mi mile
C Celsius mL millilitre
cm centimetre mm millimetre
dB decibel ms millisecond
DC direct current MTU maximum transmission unit
F farad mV millivolt
ft foot mW milliwatt
g gram N Newton
g gravity nF nanofarad
GB gigabyte ns nanosecond
GHz gigahertz rad radian
Hz hertz rads radian per second
in inch s second
KB kilobyte sps samples per second
kg kilogram U rack unit
kHz kilohertz V volt
kΩ kiloohm Vpp Volts peak-to-peak
kW kilowatt W watt
L litre
Apollo Project User Guide16106R5 2009-03-24
55
About NanometricsNanometrics is a world leader in the development of precision instrumentation network technology and software applications for seismological and environmental studies Using Nanometrics technology our customers establish and grow research networks that are often located in extreme environments such as the frozen Arctic and Antarctic the arid deserts of the Middle East the jungles of South America and the depths of the worlds oceans Many of these are mission-critical national and regional networks that demand the highest possible data quality and availability
Nanometrics provides end-to-end solutions that include a growing portfolio of broadband and strong motion seismometers dataloggers and digitizers satellite ground station systems for remote site data collection and software applications for data and network analysis and management To support this portfolio Nanometrics also provides global systems engineering services for design installation and support of complete networks
Our head office research and development centre and production facility are located in the Kanata North Business Park of Ottawa the high-technology heart of Canadas capital region
Contacting NanometricsNanometrics Inc250 Herzberg RoadKanata Ontario Canada K2K 2A1Phone +1 613-592-6776Fax +1 613-592-5929Email infonanometricscaWeb wwwnanometricsca
Contacting Technical SupportIf you need technical support please submit a request on the Nanometrics technical support site or by email or fax Include a full explanation of the problem and related information such as log filesSupport site httpsupportnanometricsca
Email techsupportnanometricsca
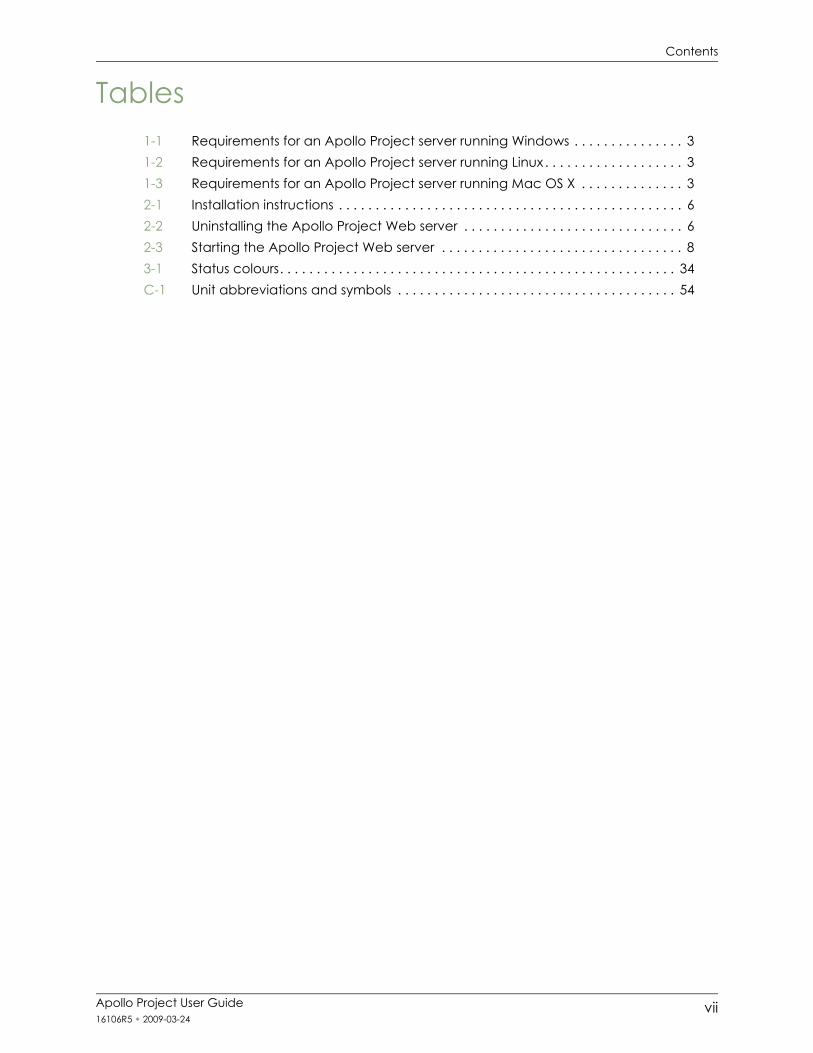
Contents
Apollo Project User Guide16106R5 2009-03-24
vii
Tables1-1 Requirements for an Apollo Project server running Windows 31-2 Requirements for an Apollo Project server running Linux 31-3 Requirements for an Apollo Project server running Mac OS X 32-1 Installation instructions 62-2 Uninstalling the Apollo Project Web server 62-3 Starting the Apollo Project Web server 83-1 Status colours 34C-1 Unit abbreviations and symbols 54
Contents
viii Apollo Project User Guide16106R5 2009-03-24
Apollo Project User Guide16106R5 2009-03-24
1
Chapter 1 Getting Started
About Apollo Project
Operating Requirements
11 About Apollo ProjectApollo Project is a Web application that conveniently retrieves time series and state of health data from any Nanometrics Store including those on Nanometrics instruments and those copied to network computers Available through any Web browser the client application provides options for you to define complex reusable data retrieval tasks called projects
Apollo Project has five project types
Archive projects retrieve data from sources that are continually updated such as a directory on a computer that has new data saved to it periodically or a multicast group of Nanometrics instruments that has different instruments active at different times You can schedule Archive projects to run automatically
One Time projects retrieve a single time segment of data
Controlled Source projects retrieve data specified as a set of shots
Triggers projects retrieve data specified by a trigger list in comma-separated value (CSV) format
Field Archive projects perform recurring data retrievals storing the time of the current retrieval on the Nanometrics instrument Using the time of the last retrieval Field Archive projects only retrieve the data accumulated since the last time the project was run on the instrument
Data for time series channel groups can be downloaded in MiniSEED SAC (binary format) Seisan or SEGY format depending on the project type Data for SOH channel groups is always downloaded in CSV format
Chapter 1 Getting Started
2 Apollo Project User Guide16106R5 2009-03-24
12 Operating RequirementsApollo Project has licensing client and server operating requirements These requirements are listed in Section 121 Section 122 and Section 123
121 Software LicenceIf you have ordered and received an Apollo Project software licence from Nanometrics install this file during the Apollo Project Web server installation or later using the Nanometrics Product Licence Installation Wizard See Section 22 ldquoInstalling an Apollo Project Licence Filerdquo on page 7 for licence installation instructions for Microsoftreg Windows Linux and Mac OSreg X server installations
The licence determines the number of projects you can save the number of time series channels you can select and the number of projects you can run concurrently Without a licence Apollo Project defaults to the unlicensed configuration This configuration allows you to save one project definition at a time for up to three time series channels from any combination of Stores
122 ClientThe client requirements for any platform are a Web browser with JavaScript enabled and IP access to the server Apollo Project version 14 has been tested with Microsoft Internet Explorer version 7 and Mozilla Firefox versions 2 and 3 Other browsers have not been fully tested with the client but may be used at your discretion
123 ServerRun the Apollo Project Web server on Windows Linux or Mac OS X For the
Windows operating requirements see Table 1-1 ldquoRequirements for an Apollo Project server running Windowsrdquo on page 3
Linux operating requirements see Table 1-2 ldquoRequirements for an Apollo Project server running Linuxrdquo on page 3
Mac OS X operating requirements see Table 1-3 ldquoRequirements for an Apollo Project server running Mac OS Xrdquo on page 3
Installing a licence file after creating a project in Apollo Project will result in the loss of that project It is recommended that you install your licence before running Apollo Project for the first time
Click the About button in the client application to view licence information
Chapter 1 Getting Started
Apollo Project User Guide16106R5 2009-03-24
3
Table 1-1 Requirements for an Apollo Project server running Windows
System component Requirement
Operating system Windows XP with Service Pack 3Memory 1GB RAM minimum
2GB RAM recommendedDisk space Required free disk space for every 3 time series channels of data
retrieved is approximately 2GB per month This is roughly twice as much space as the retrieved data occupies in a Store
Java Sun Java Runtime Environment (JRE) version 60Software licence Order a licence from Nanometrics if capabilities beyond that of the
unlicensed configuration are required (see Section 121 ldquoSoftware Licencerdquo on page 2)
Table 1-2 Requirements for an Apollo Project server running Linux
System component Requirement
Operating system Any distribution running a GNULinux kernel of version 24 or laterTested on Red Hat Linux 9 (kernel 2420-8)
Memory 512MB RAM minimum2GB RAM recommended
Disk space Required free disk space for every 3 time series channels of data retrieved is approximately 2GB per month This is roughly twice as much space as the retrieved data occupies in a Store
Java Sun Java Runtime Environment (JRE) version 60Software licence Order a licence from Nanometrics if capabilities beyond that of the
unlicensed configuration are required (see Section 121 ldquoSoftware Licencerdquo)
Table 1-3 Requirements for an Apollo Project server running Mac OS X
System component Requirement
Operating system Mac OS X (1052 and later)Memory 1GB RAM minimum
2GB RAM recommendedDisk space Required free disk space for every 3 time series channels of data
retrieved is approximately 2GB per month This is roughly twice as much space as the retrieved data occupies in a Store
Java Sun Java Runtime Environment (JRE) version 60
Notes on the JRE for Mac systems JRE version 60 must be manually downloaded and installedAfter installing the JRE it must be set as the default Java Virtual Machine (JVM)
Software licence Order a licence from Nanometrics if capabilities beyond that of the unlicensed configuration are required (see Section 121 ldquoSoftware Licencerdquo on page 2)
Chapter 1 Getting Started
4 Apollo Project User Guide16106R5 2009-03-24
Apollo Project User Guide16106R5 2009-03-24
5
Chapter 2 Installing and Starting Apollo Project
Installing the Apollo Project Web Server
Installing an Apollo Project Licence File
Starting the Apollo Project Web Server
Running Apollo Project Client
Upgrading Apollo Project
21 Installing the Apollo Project Web ServerThe Apollo Project Web server is installed on a single computer and after it is installed and running the client can run locally on the server or on any computer with a Web browser and network access to the server computer
All Stores must be accessible from the server hosting the Apollo Project Web server All output files are created on the server and its accessible file systems as described in Section 33 ldquoConfiguring Apollo Projectrdquo on page 24
To install the Apollo Project Web server on a server computer running Windows Linux or Mac OS X
1 Install a supported version of the Java Runtime Environment JRE version 60 or later
2 If you have received a licence file from Nanometrics ensure it is in a drive or network location that is accessible to the Apollo Project Setup Wizard
You can install and run Apollo Project without a licence file For details see Section 121 ldquoSoftware Licencerdquo on page 2 Should you require a licence after Apollo Project is installed you can install a licence using the Nanometrics Licence Installation Wizard See Section 22 ldquoInstalling an Apollo Project Licence Filerdquo on page 7
Chapter 2 Installing and Starting Apollo Project
6 Apollo Project User Guide16106R5 2009-03-24
3 Follow the instructions for your operating system in Table 2-1
211 Uninstalling Apollo Project Web ServerTable 2-2 provides instructions for uninstalling Apollo Project from the server computer for each of the supported operating systems
Table 2-1 Installation instructions
Operating System To install the Apollo Project Web server
Windows 1 Double-click ApolloProject_windows_x_x_xexe where x_x_x is the Apollo Project version number on the Apollo Project CD
2 Follow the steps of the installation wizard making changes to the default settings as required
Linux 1 Open a Terminal window and change the directory to the Apollo Project CD
2 Run the following as rootsh ApolloProject_unix_x_x_xsh (where x_x_x is the Apollo Project version number)
3 Follow the steps of the installation wizard making changes to the default settings as required
Mac OS X 1 Double-click the ApolloProject_macos_x_x_xdmg where x_x_x is the Apollo Project version number disc image on the Apollo Project CDThe disc image mounts as a new volume on your desktop and automatically displays its contents in a Finder window
2 Double-click the installation file Apollo Project Installer in the Finder window
3 Follow the steps of the installation wizard making changes to the default settings as required
Note After installing Apollo Project you can drag the disc image to the Trash to eject it and remove it from your desktop
If you are uninstalling a version of Apollo Project prior to version 13 refer to the version 12 user guide for instruction on uninstalling Apollo Project
Apollo Project Version 12 User Guide revision 16106R2 released on 2008-09-09
Table 2-2 Uninstalling the Apollo Project Web server
Operating System To uninstall the Apollo Project Web server
Windows Click Start gt All Programs gt Nanometrics gt Apollo Project gt Apollo Project Uninstaller
Linux 1 Open a Terminal window and change the directory to the Apollo Project directory The location of the Apollo Project directory was defined when you installed Apollo Project The default location is optnanometricsApolloProject
2 Run the following as root uninstall
Mac OS X 1 Open the Finder2 Click Applications under Places3 Double-click the Apollo Project folder 4 Double-click Apollo Project Uninstaller
Chapter 2 Installing and Starting Apollo Project
Apollo Project User Guide16106R5 2009-03-24
7
22 Installing an Apollo Project Licence FileIf you did not install a licence file during the installation of the Apollo Project Web server application you can install one at any time using the Nanometrics Product Licence Installation Wizard
A licence for Apollo Project is only required if capabilities beyond those of the unlicensed version are needed See Section 121 ldquoSoftware Licencerdquo on page 2 for descriptions of the licensed and unlicensed versions Contact Nanometrics to order a licence (see Contacting Nanometrics on page 55)
If you have obtained a licence file from Nanometrics use the following steps to install the file
Installing a licence file after creating a project in Apollo Project will result in the loss of that project It is recommended that you install your licence before running Apollo Project for the first time
Operating System To install an Apollo Project licence file
Windows 1 Ensure the licence file is in a drive or network location that is accessible to the licence installation wizard
2 Click Start gt All Programs gt Nanometrics gt Apollo Project gt NmxLicenceInstaller
3 Follow the steps in the license installation wizard to select and install the licence file
Linux 1 Ensure the licence file is in a drive or network location that is accessible to the licence installation wizard
2 Open a Terminal window and change the directory to the Apollo Project directory The location of the Apollo Project directory was defined when you installed Apollo Project The default location is optnanometricsApolloProject
3 Run the following NmxLicenceInstaller
Mac OS X 1 Ensure the licence file is in a drive or network location that is accessible to the licence installation wizard
2 Open the Finder3 Click Applications under Places4 Double-click the Apollo Project folder 5 Double-click NmxLicenceInstaller6 Follow the steps in the license installation wizard to select and install
the licence file
Chapter 2 Installing and Starting Apollo Project
8 Apollo Project User Guide16106R5 2009-03-24
23 Starting the Apollo Project Web ServerUse the procedures in Table 2-3 that correspond to your Apollo Server computerrsquos operating system to start the Apollo Project Web server application
24 Running Apollo Project ClientIf you are running the Apollo Project client on the computer where the server application is installed open a browser and go to
httplocalhostPort
Where localhost is the local computer and port is the port number configured during installation The default port number for Apollo Project is 8088
To run an Apollo Project client when the server application resides on a different computer open a browser and go to
httpServer computer name or IP addressPort
For example if the domain name of the server computer is ApolloProjectServer with an IP address of 192168220 and the default port number of 8088 is being used the URL for the client application in your browser will be
httpApolloProjectServer8088
ndash OR ndash
http1921682208088
241 Troubleshooting Running Apollo Project ClientIf you are having trouble opening the Apollo Project client in your Web browser try these suggestions
a) Ensure that the Apollo Project Web server application is running on the Apollo Project server computer See Section 23 ldquoStarting the Apollo Project Web Serverrdquo
Table 2-3 Starting the Apollo Project Web server
Operating System To start the Apollo Project Web server
Windows Click Start gt All Programs gt Nanometrics gt Apollo Project gt Apollo ProjectLinux 1 Open a Terminal window and change the directory to the Apollo
Project directory The location of the Apollo Project directory was defined when you installed Apollo Project The default location is optnanometricsApolloProject
2 Run the following ApolloProject
Mac OS X 1 Open the Finder2 Click Applications under Places3 Double-click the Apollo Project folder 4 Double-click Apollo Project to start the Web server
Chapter 2 Installing and Starting Apollo Project
Apollo Project User Guide16106R5 2009-03-24
9
b) Verify that the firewall on the server computer is not blocking the port number used to serve Web pages (by default the port number is 8088) To check the port number used open ApolloProjectvmoptions in the ApolloProject folder and note the number identified for the -Dserverport setting
242 Stopping the Apollo Project Web ServerThe Apollo Project client provides the means to stop the Apollo Project Web server application To stop the Apollo Project Web server
1 Open the Apollo Project client
2 Click the Shut down Apollo Project button
3 Click OK to confirm the Web server shutdown
25 Upgrading Apollo ProjectTo upgrade Apollo Project from a previous version
1 Uninstall the Apollo Project Web server application as per Section 211 ldquoUninstalling Apollo Project Web Serverrdquo on page 6
2 Install the new version of Apollo Project as per Section 21 ldquoInstalling the Apollo Project Web Serverrdquo on page 5
When you shut down the Apollo Project Web server all clients are disconnected from the server To restore connectivity start the Apollo Project Web server using the instructions in Section 23 ldquoStarting the Apollo Project Web Serverrdquo on page 8
During the upgrade process all downloaded data will remain intact however you will need to recreate your projects and settings in the new version of Apollo Project
For Windows and Linux installations if you are upgrading from an earlier version of Apollo Project that used Apache Tomcat it is strongly recommended that you uninstall Tomcat before installing the new version of Apollo Project
Refer to the version 12 user guide for instruction on uninstalling versions of Apollo Project prior to version 13
Apollo Project Version 12 User Guide revision 16106R2 released on 2008-09-09
If you are using a licensed version of Apollo Project you will need a new licence file when installing the upgrade If you have not received a new licence file contact Nanometrics (see Contacting Nanometrics on page 55)
Chapter 2 Installing and Starting Apollo Project
10 Apollo Project User Guide16106R5 2009-03-24
Apollo Project User Guide16106R5 2009-03-24
11
Chapter 3 Retrieving Data
Creating New Projects
Creating a Station Table File
Configuring Apollo Project
Managing Projects
Running Projects
Editing and Viewing the Settings of Projects
Monitoring Project Status
31 Creating New ProjectsYou can create multiple projects up to the number supported by the software licence (see Section 121 ldquoSoftware Licencerdquo on page 2)
When you create a new project you have to
bull Select data Stores
bull Specify a station table file
bull Select the channel groups you want to download data from
bull Specify when you want the project to run
bull Select the output format
bull Specify the output location
To create a new project
1 Click New on the Apollo Project Existing Projects page
2 Click a project type and enter a unique name in the Project Name box
3 Click OK
Chapter 3 Retrieving Data
12 Apollo Project User Guide16106R5 2009-03-24
4 Select one or more data Stores by performing the following steps
Store type DescriptionSteps
File A file Store specification defines a particular Store that resides on a file system accessible by the server running Apollo Project The file system can be a local or a networked file system (for example accessible via SMB or NFS)
1 Click the File tab2 Enter the full path and file name of a Store file3 Click Add
Apollo Project adds the specification to the Selected Specifications section of the Store Selection page and finds all related Store files and adds them as a single Store to the Selected Stores section
Directory A directory Store specification defines the set of Stores that reside in a particular directory hierarchy on a file system accessible by the server running Apollo Project A recursive search from the specified directory identifies all of the available Stores The file system can be a local or a networked file system (for example accessible via SMB or NFS)
1 Click the Directory tab2 Enter a directory path name
If you specify a root directory such as C it will take a long time for Apollo Project to find all of the Store files in that root directory
3 Click AddApollo Project adds the specification to the Selected Specifications section of the Store Selection page and finds and adds all Stores in the specified directory and its subdirectories to the Selected Stores section
IP Address An IP Address Store specification defines the Store of a single instrument (or an instance of Apollo Server) The specified IP address must be an IP address bound to the Ethernet interface of an instrument At the same time the instrument must be running in communications mode and be accessible from the server running Apollo Project
1 Click the IP Address tab2 Enter the IP address of an instrument3 Click Add
Apollo Project adds the specification to the Selected Specifications section of the Store Selection page and finds all Stores associated with the IP address and adds them to the Selected Stores section
Chapter 3 Retrieving Data
Apollo Project User Guide16106R5 2009-03-24
13
Discovery A discovery Store specification specifies the Stores of multiple instruments In this case a class D (multicast) IP address and port is specified It is assumed that the Store of any instrument in communications mode is accessible from the LAN of the Apollo Project server When Discovery is enabled for the specified IP address and port these attributes are included upon running the project
1 Click the Discovery tab2 Enter the multicast address and port number of a group of instruments
For example 224199711386776Multicast addresses range from 224000 through 239255255255
3 Click AddApollo Project adds the specification to the Selected Specifications section of the Store Selection page and finds all Stores associated with the multicast address and adds them to the Selected Stores section of the Store Selection page
Notes When multiple multicast groups are used for discovery the port number must differ from existing discovery port numbers by 2 for each discovery port number in use x there must be no other discovery port configured for use with a value of x or x+1For example the default discovery multicast group used by Taurus is 224199711386776 To add another multicast group you have to specify a different port number (which cannot be 6776 or 6777)
Recent Specs
Apollo Project keeps the 16 most recently defined Store specifications and groups them by category on the Recent Specs page
1 Click the Recent Specs tab2 Expand a specification category (File Directory IP Address or Discovery)
and select a specification3 Click Add
Apollo Project adds the specification to the Selected Specifications section of the Store Selection page and finds all Stores associated with the specification and adds them to the Selected Stores section
Each time a project is run Apollo Project generates a list of available Stores based on the selected Store specifications The actual Stores from which data is retrieved can vary on successive project runs For example a discovery Store specification might result in a different number of instruments being included depending on current access to the instruments
Remove a specification (and its associated Stores) by selecting it and clicking Remove Remove all specifications (and all Stores) by clicking Remove All You cannot remove individual Stores from a specification but you can add a different specification and select a different group of Stores Alternatively you can use channel group attributes filtering to select the channel groups that data is retrieved from
When copying a Store from an instrument to your local computer do not overwrite an existing Store Instead delete the existing Store or move it to a different folder on the computer Stores are made up of multiple volumes and if the new Store has fewer volumes than the old Store you could see some unpredictable results with Apollo Project
Store type DescriptionSteps
Chapter 3 Retrieving Data
14 Apollo Project User Guide16106R5 2009-03-24
5 Click the Channel Group Selection tab
6 If you defined a default station table file and want to use it for this project go to step 7
For more information see Section 32 ldquoCreating a Station Table Filerdquo on page 22
-OR-
Click Create Default Station Table to create a table for all of the currently selected Stores and discovered instruments for this project using the default settings for the network name location and channel names
The default settings for the network name location and channel names are defined in the Behaviour and Defaults dialog box For more information see Section 33 ldquoConfiguring Apollo Projectrdquo on page 24
-OR-
Enter the path and file name of a station table for this project
7 If you want to download all data from all available Stores verify that the Retrieve data from all channel groups (do not filter) check box is selected and go to step 12
-OR-
If you want to filter the data by specific channel groups and channel group attributes go to step 8
8 Clear the Retrieve data from all channel groups (do not filter) check box
9 Select the time series channel groups you want to download data from
A station table is used to assign names to all of the selected channel groups For more information see Section 32 ldquoCreating a Station Table Filerdquo on page 22
If new Stores are found after a station table file has been defined for a project (for example as a result of Discovery or a directory specification) the default channel group names are used in the output files and no filtering is applied to the channel groups
If the text ldquoSelected Time Series Channels x of xrdquo where x represents the number of channels is red you have selected more time series channels than your licence permits You must select a valid number of time series channels (for the unlicenced version of Apollo Project there is a maximum of three time series channels) before you can create your project
Chapter 3 Retrieving Data
Apollo Project User Guide16106R5 2009-03-24
15
10 Select the state of health (SOH) channel groups you want to download data from Each group has a predefined dataset
To view the SOH data retrieved from a Taurus version 2x see Appendix B ldquoRetrieving SOH Data from a Taurus Version 2xrdquo
Predefined SOH group SOH data
GPS Time Time (longsecs) (the number of seconds since 1970-01-01)Time (UTC) (time in yyyy-mm-dd hhmmssms format)DAC CountGPS Engine StatusGPS Last Update Time(s)GPS PDOPGPS Satellites Used (number of satellites used)GPS TDOP Lat (deg) (latitude in degrees)Long (deg) (longitude in degrees)Timing Error (ns)Timing Phase Lock (system clock phase lock)Timing Uncertainty (ns)
Note The values for Number of satellites used PDOP and TDOP are provided by the GPS receiver at the Last update time In order to see what time these values correspond to look at the Last update time When GPS is off these three parameters and the Last update time are not updated The last value displays until the next update arrives (after the GPS is turned on again)
GPS Satellites Time (longsecs) (the number of seconds since 1970-01-01)Time (UTC) (time in yyyy-mm-dd hhmmssms format)
For each satelliteGPS Satellite Acquisition FlagGPS Satellite Azimuth (microordm)GPS Satellite Elevation (microordm)GPS Satellite Last Update Time (ms)GPS Satellite PRN GPS Satellite Signal Level (AMU)
Environment Time (longsecs) (the number of seconds since 1970-01-01)Time (UTC) (time in yyyy-mm-dd hhmmssms format)External SOH Voltage 1 (V) (12-bit voltage input)External SOH Voltage 2 (V) (12-bit voltage input)External SOH Voltage 3 (V) (12-bit voltage input)External SOH Voltage 4 (V) (12-bit voltage input)Sensor SOH Voltage 1 (V)Sensor SOH Voltage 2 (V)Sensor SOH Voltage 3 (V)
Chapter 3 Retrieving Data
16 Apollo Project User Guide16106R5 2009-03-24
11 If required enter additional filter information as comma-delimited text into the Network Station Location Channel and Instrument boxes
You can use an asterisk ()to represent 1 or more characters
12 Review the selected channel groups and if required edit the channel group mappings in the selected channel groups area of the tab
Channel groups that do not have a mapping appear as blanks in the selected channel groups area of the tab Mapping information for these channel groups can be entered and saved in the station table file for future projects
You can edit the mappings at any time The changes are reflected in future runs of any project using that same station table file For more information see Section 32 ldquoCreating a Station Table Filerdquo on page 22
13 Click the Time Selection tab and follow the steps for the project type you selected
Instrument Time (longsecs) (the number of seconds since 1970-01-01)Time (UTC) (time in yyyy-mm-dd hhmmssms format)Controller Current (mA)Digitizer Current (mA)NMX Bus Current (mA) (external connector)Sensor Current (mA)Serial Port Current (mA)Supply Voltage (mV)Temperature (ordmC)
Look in the selected channel groups area of the tab (lower half of the tab) for examples of filter details you can enter in the Network Station Location Channel and Instrument ID filter boxes
The NetworkStationLocationChannel column of the table presents information in the format implied by the column title For instance in an entry of XXA099901BHE(1) XX represents the network(2) A0999 represents the station(3) 01 represents the location(4) BHE represents the channel
Look at the Instrument ID column of the table for an example of an instrument name and serial number such as taurus_0999
Only mappings that are applicable for the selected channel groups appear in the selected channel groups area of the tab
All times use the UTC time zone
Predefined SOH group SOH data
Chapter 3 Retrieving Data
Apollo Project User Guide16106R5 2009-03-24
17
Project type DescriptionSteps
Archive Archive projects attempt to retrieve data up to the current timeThe time ranges for which output files will be produced are driven from the file interval and are aligned to the project start time It is therefore unlikely that the ldquomost recentrdquo file interval will align with the current time Therefore the most recent range for which data retrieval is attempted will have a portion of its data retrieved and the remainder (for future retrieval) will be declared unavailable However when the project is run later (after the end of the particular time range) the unavailable data will normally be retrieved and the situation will likely repeat itself with the ldquonewrdquo last range to retrieveTo run an Archive project manually1 If required edit the start time for the project2 Click Manual3 Specify the file interval
For example if you specify 2 hours then one file is created every 2 hours If the duration for the project is one day then a total of 12 files will be created
4 After you have finished creating the project click Run Now on the Summary page to run the project
To schedule an Archive project to run automatically at a regular interval1 Click Regular Interval and select the interval 2 Specify the file interval
For example if you specify 2 hours then one file is created every 2 hours If the duration for the project is one day then a total of 12 files will be created
3 After you have finished creating the project click Start Schedule on the Summary page to start the schedule for the project and click OK twice The project will run according to the interval you specified after you start the schedule For example if you click Start Schedule on a Wednesday and you specified every 2 days as the interval then the project will run for the first time on Friday and every two days after that If the computer has been rebooted and the Apollo Project Web server has been restarted the project will run according to the interval you specified after the computer has rebooted For example if the computer reboots on a Wednesday and you specified every 2 days as the interval then the project will run for the next time on Friday and every two days after that
Note Archive projects that are defined as scheduled projects can also be run manually at any timeTo schedule an Archive project to run automatically on a weekly basis1 If required edit the start time for the project2 Click Weekly Schedule and select the time and days of the week 3 Specify the file interval
For example if you specify 2 hours then one file is created every 2 hours If the duration for the project is one day then a total of 12 files will be created
4 After you have finished creating the project click Start Schedule on the Summary page to start the schedule for the project and click OK twice After you have finished creating the project the project will run for the first time according to the project start time and then it will run on a weekly basis according to the times and days you specified
Note Archive projects that are defined as scheduled projects can also be run manually at any time
Chapter 3 Retrieving Data
18 Apollo Project User Guide16106R5 2009-03-24
One Time A One Time project retrieves a single time segmentTo specify the start and end times for a One Time project1 If required edit the start time for the project2 Click End Time and enter an end time
-OR-Click Duration and specify the duration of the project The duration is the length of the requested time segment
3 Specify the file intervalFor example if you specify 2 hours then one file is created every 2 hours If the duration for the project is one day then a total of 12 files will be created
4 After you have finished creating the project click Run Now on the Summary page to run the project
Controlled Source
A Controlled Source project retrieves data specified as a set of individually entered shots and outputs the data in SEGY format To specify shots using a shots file1 Click Browse select a shots file and click OK2 Click Submit
The list of shots is imported and displayed in the Shot List section on the Time Selection page
Note For more information see Section A4 ldquoShot File Formats for Controlled Source Projectsrdquo on page 42To manually define shots1 Enter a shot time2 If required enter the latitude longitude and elevation3 If required select the pre-shot time period4 Select the post-shot time period5 Click Add
The shot is added to the Shot List section on the Time Selection page Triggers A Triggers project uses a CSV-formatted trigger list to specify the data to be
retrieved for example a trigger file that has been downloaded from a Taurus to the local computerTo define triggers1 Click Browse select a CSV triggers file and click OK2 Click Submit
The list of triggers is imported and displayed in the Triggers section on the Time Selection page
3 Select the pre-trigger and post-trigger time periodsThe pre-trigger and post-trigger time periods are used for all of the triggers
Project type DescriptionSteps
Chapter 3 Retrieving Data
Apollo Project User Guide16106R5 2009-03-24
19
14 If you selected a Controlled Source as the project type in step 2 go to step 17
You do not have to select an output format for a Controlled Source project because the output format for a Controlled Source project is always SEGY one output file is generated for all instruments and the stations are sorted by StationNameNetworkName
-OR-
If you selected one of the other project types go to step 15 to select an output format
15 Click the Output Format tab
Field Archive A Field Archive project is used for recurring data retrievals that occur at specified intervals The time of the last retrieval is stored on the instrumentTo define the start time and file interval1 If required edit the start time for the project2 Specify the file interval
For example if you specify 2 hours then one file is created every 2 hours3 If you want partial files retrieved select the Include last interval even if
incomplete check box You should only select this option when the retrieval of partial files is more important than retrieving the data for the current interval during a future project run
Be careful when specifying the file interval For example retrieving many hours or days of data and specifying a file interval of seconds or minutes could result in the generation of many files This is not only very resource intensive but could result in a data management problem as well
Project type DescriptionSteps
Chapter 3 Retrieving Data
20 Apollo Project User Guide16106R5 2009-03-24
16 Perform the following steps to select an output format
Output format Steps
MiniSEED 1 Click MiniSEED2 Click Per channel group to generate one output file per channel group
You must add the channel token to the Subdirectories or Filename box on the Output Location tab when choosing Per channel group-OR-Click Per instrument to generate one output file per instrument-OR-Click All Instruments to generate one output file for all instruments
3 Select the Sort check box if you want the output data sorted by timeData is put in a Store in the order received and this order may not always be chronological To ensure that the data in the resulting SEED file is chronological select Sort
4 Select the data record sizeThe default record size is 512 B However not all SEED file readers will support this file size Determine what your SEED reader supports and select an appropriate value The options are 512 B 1024 B 2048 B and 4096 B Note that a smaller record size will result in quicker SEED file output
Note The number of output files is determined by the file interval that you set on the Time Selection page
SAC 1 Click SACYou must add the channel token to the Subdirectories or Filename box on the Output Location tab when choosing SAC as the output format
NotesThere are two types of SAC files binary and ASCII Apollo Project only outputs binary SAC filesOne output file per channel group is generated
SEGY 1 Click SEGY2 Click Per channel group to generate one output file per channel group
You must add the channel token to the Subdirectories or Filename box on the Output Location tab when choosing Per channel group-OR-Click Per instrument to generate one output file per instrument-OR-Click All Instruments to generate one output file for all instruments
3 Select the Sort check box if you want the stations sorted by StationNameNetworkName
NotesAll stations must have the same sample rateThe maximum number of samples per trace is 32767SEGY trace headers from discovered instruments will not have station location information
Chapter 3 Retrieving Data
Apollo Project User Guide16106R5 2009-03-24
21
17 Click the Output Location tab
18 If you defined a default base directory when you configured Apollo Project and want to use it for this project go to step 21
For more information see Section 33 ldquoConfiguring Apollo Projectrdquo on page 24
-OR-
Enter the valid absolute path of the base directory for the processed data subdirectories and files
If the base directory you entered does not exist click Create to create it
19 If you defined a default expression for subdirectories when you configured Apollo Project and want to use it for this project go to step 21
For more information see Section 33 ldquoConfiguring Apollo Projectrdquo on page 24
-OR-
Enter the expression used to define path names for subfolders under the base directory
You can enter tokens in any order including any additional characters that are valid for paths
Seisan 1 Click Seisan
NotesYou must have Seisan installed on your computer with a WAVEFORM_BASE and CONT_BASE line included for each station in the DATSEISANDEF file You must define a SEISAN_TOP environment variableOne output file per channel group is generated
Regardless of the output format selected SOH channel group data is always output in CSV format
The Base Directory is the root of all data retrieved for the project and can be defined at any location in the file system of the server running Apollo Project including a networked drive on a separate server If you want to create or use a directory on a computer on the network you have to enter the server and share name in a modified UNC format that is prefixed by an additional two backslashes For example the usual fileserver1storefiles must be written as fileserver1storefiles
Large amounts of data can be stored in this location You must ensure that adequate disk space is available
For deployments of Apollo Project where the clients are not running on the server it is recommended that the file system containing the base directory on the server be shared or exported as a networked file system
It is not recommended that you use the channel token in the subdirectories expression if the project includes more than one channel group per instrument (selected on the Channel Group Selection tab) and the output is not per channel group (selected on the Output Format tab)
Output format Steps
Chapter 3 Retrieving Data
22 Apollo Project User Guide16106R5 2009-03-24
20 If you defined a default expression for file names when you configured Apollo Project and want to use it for this project go to step 21
For more information see Section 33 ldquoConfiguring Apollo Projectrdquo on page 24
-OR-
Enter the expression used to define file names for the processed data files that are stored in the subfolders under the base directory
You can enter tokens in any order including any additional characters that are valid for file names
21 Click OK to save the new project
The new project is created and the Summary page is displayed
32 Creating a Station Table FileYou can create a mapping between a given instrumentchannel group (for example taurus_1234digitizertimeSeries1) and a corresponding network station location and channel name These mappings are stored in a station table file and the mapped channel group names are used in the output files
You can create a station table file and use it as the default for all projects or you can create a station table for individual projects
To create a station table file and set is as the default
1 Click the configuration button in the upper right corner
2 Specify the network name location and channel names on the Behaviour and Defaults dialog box and click OK to save the new settings
The settings you enter here are used as the channel names in the station table file You can edit these settings in step 8
For more information on configuring Apollo Project settings see Section 33 ldquoConfiguring Apollo Projectrdquo on page 24
3 Click New on the Apollo Project Existing Projects page
Do not use the channel token in the filename expression if the project includes more than one channel group per instrument (selected on the Channel Group Selection tab) and the output is not per channel group (selected on the Output Format tab)
The Sample Path shows an example of a file name generated using the values for the Base Directory Subdirectories and Filename settings
You can only edit the settings of a project before it has run for the first time or been scheduled (Archive project) If you want to edit the settings of a project after it has already run once or been scheduled you can copy the project (see Section 345 ldquoCopying a Projectrdquo on page 28) and then edit the settings for the copy
It is recommended that you create a station table file and set it as the default for all projects You can update the mappings in this file when new Stores are added or discovered
Chapter 3 Retrieving Data
Apollo Project User Guide16106R5 2009-03-24
23
4 Type Station Table in the Project Name box and click any project type
5 Click OK
6 Click the Store Selection tab and select as many Stores as possible
See step 4 of Section 31 ldquoCreating New Projectsrdquo for information on how to add specifications and select Stores
7 Click the Channel Group Selection tab and click Create Default Station Table
A station table file is created and the name of the file is displayed in the Station Table File Name box
8 Edit the station table channel group mappings in the selected channel groups area of the tab (lower half of the tab) as required
The NetworkStationLocationChannel names will appear in the output files If the Location is empty it is interpreted as the SEED default of two spaces
9 Click OK to close the project and finish creating the station table
10 Click the configuration button in the upper right corner
11 Enter the path and name of the station table file you just created in the Station Table File Name box on the Behaviour and Defaults dialog box
12 Click OK to save the new settings
The station table file you specified will be used as the default for all future projects You can open the Station Table project and edit the station table file if you need to add more Stores or change the mappings
For more information on configuring Apollo Project settings see Section 33 ldquoConfiguring Apollo Projectrdquo on page 24
Make a note of the path of the station table file because you will have to enter it on the Behaviour and Defaults dialog box to set it as the default for all projects
Valid characters for the network station location and channel in the NetworkStationLocationChannel box are upper case letters A to Z numbers 0 to 9 and spaces are also acceptable for the location
Chapter 3 Retrieving Data
24 Apollo Project User Guide16106R5 2009-03-24
33 Configuring Apollo ProjectYou can configure basic settings for Apollo Project and the default settings for new projects The changes you make to the project default settings only apply to new projects
To configure Apollo Project
1 Click the configuration button in the upper right corner
2 Edit the following settings
Setting Description
Log Verbosity The level of detail that is logged by Apollo ProjectThe default setting is Info
Log Location The default name of the Apollo Project log folder Maximum Number of Retrieval Attempts
The maximum number of single retrieval attempt made for all missing time segments on all channel groups every time a project is run Enter an integer from 0 through 1000 The default value is 8
Notes If the Taurus is busy when a retrieval attempt is made the number of remaining retrieval attempts is not decreased by one attemptYou can view the channel group details page to see if there are any remaining retrieval attempts for any channel groups (see Section 373 ldquoMonitoring the Status of a Running Projectrdquo on page 34)
Number Of Retries The number of times Apollo Project attempts to connect to a data source if there is a network connectivity problem Enter an integer from 0 through 1000 The default value is 3
Note Every time a project is run it starts with the maximum number of retries
Retry Interval (secs) The amount of time in seconds that Apollo Project waits before trying to connect to a data source againEnter an integer from 0 through 1000 The default value is 5
Station Table File Name The file name and location of the station table file that is used to assign station names to all of the selected channel groupsA station table is used to assign names to all of the selected channel groups For more information see Section 32 ldquoCreating a Station Table Filerdquo on page 22No station table file is specified by default
Chapter 3 Retrieving Data
Apollo Project User Guide16106R5 2009-03-24
25
Base Directory The folder name and location of the base directory for the processed data subfolders and files Enter any valid folder name and location including any additional characters that are valid for paths The default base directory name is ApolloProject
Notes The Base Directory is the root of all data retrieved for the project and can be defined at any location in the file system of the server running Apollo Project including a shared folder on a different computer If you want to create or use a folder on a computer on the network you have to enter the server and share name in a modified UNC format that is prefixed by an additional two backslashes For example the usual fileserver1storefiles must be written as fileserver1storefilesLarge amounts of data can be stored in this location You must ensure that adequate disk space is availableFor deployments of Apollo Project where the clients are not running on the server it is recommended that the file system containing the base directory on the server be shared or exported as a networked file system
Subdirectories The expression used to define path names for subfolders under the base directoryEnter tokens in any order including any additional characters that are valid for paths The default path name is as follows projectyearmonthday
Filename The expression used to define file names for the processed data files that are stored in the subfolders under the base directoryEnter tokens in any order including any additional characters that are valid for file names The default filename is as follows instrument_time
Sample Path An example of a file name generated using the values for the Base Directory Subdirectories and Filename settings
Network Name A standard network codeEnter any two upper case letters or numbers The default code is XX
Location A location within a stationEnter any two upper case letters numbers or spaces
The default location is two spaces for ldquononerdquo You must delete the two default spaces if you enter a new location value
Setting Description
Chapter 3 Retrieving Data
26 Apollo Project User Guide16106R5 2009-03-24
3 Click OK to save the new settings
34 Managing ProjectsYou can view open close copy and delete projects Also you can create convenient links to run your individual projects with desktop shortcuts
341 Viewing Existing Projects1 Click Projects in the Projects bar
2 View the projects listed on the Existing Projects page
The Existing Projects page shows a list of all projects and a status overview of each project For more information see Section 371 ldquoViewing an Overview of the Status of All Projectsrdquo on page 32
Channel 1 Name A channel codeEnter any three upper case letters or numbersThe default channel code is BHZ
Channel 2 Name A channel codeEnter any three upper case letters or numbersThe default channel code is BHN
Channel 3 Name A channel codeEnter any three upper case letters or numbersThe default channel code is BHE
Setting Description
Chapter 3 Retrieving Data
Apollo Project User Guide16106R5 2009-03-24
27
342 Opening a Project1 Click the project name under the Name column on the Existing Projects page
2 Click the Open Project button
343 Creating a Desktop Shortcut to a ProjectLaunching a project with a desktop shortcut will open Apollo Project to that project and run the project
Methods for creating desktop shortcuts to Web sites vary from browser to browser These procedures explain how to create desktop shortcuts to specific projects for both Mozilla Firefox 3 and Microsoft Internet Explorer 7 Desktop shortcuts to projects include the Apollo Project icon and are titled in the format Project Name ndash Apollo Project
In Firefox 3
1 Open the project you want to create a shortcut to in Firefox
2 Reduce the size of the Firefox window so that the desktop is visible
3 Drag the Site Identification Button onto the desktop
The Site Identification Button is located to the left of the Location Bar and displays the Apollo Project icon
In Internet Explorer 7
1 Open the project you want to create a shortcut to in Internet Explorer
2 Press ALT+F
3 Select Send gt Shortcut to Desktop
344 Closing a Project
1 Click the Close Project button in the Projects bar
Launching a desktop shortcut to a project automatically runs that project It is important to note that once a project is run its settings can no longer be edited It is recommended that desktop shortcuts only be created for Field Archive projects
Firefox is the recommended browser for Apollo Project
Chapter 3 Retrieving Data
28 Apollo Project User Guide16106R5 2009-03-24
345 Copying a Project
1 Select the project name under the Name column on the Existing Projects page
2 Click Copy
3 Enter a unique name for the new project and click OK
4 Click Edit and edit the settings as required
5 Click OK to save the project after you have finished editing the settings
346 Deleting a ProjectWhen you delete a project only files in the temporary folder are deleted All processed data files are not deleted
1 Click the project name under the Name column on the Existing Projects page
2 Click Delete
3 Click OK on the confirmation message
35 Running ProjectsFor all project types you can run a project manually at any time Archive projects can also be defined to run automatically on a schedule
If it is a scheduled Archive Project and the schedule is started click Cancel Schedule before you create a copy of it (If the schedule is not started the Start Schedule button is visible if the schedule is started the Cancel Schedule button replaces the Start Schedule button)
Apollo Project stores intermediate files in a temporary subdirectory of the Base Directory specified for the output location of a project These intermediate files correspond to the actual channel group data retrieved from the Stores referenced by the project If a project is deleted from Apollo Project these temporary files will be removed automatically
Disk space can also be reclaimed by removing these temporary files manually without deleting the project However if the project is run again the output files produced might be incomplete if previously retrieved data from these temporary files is required
For more information on what happens when a project runs see Section A1 ldquoOverview of Running Projectsrdquo on page 37
Chapter 3 Retrieving Data
Apollo Project User Guide16106R5 2009-03-24
29
351 Running a Project1 Open a project
2 Click Run Now on the Summary page to start the project
The project starts running and the Retrieval Status page is displayed
352 Stopping a Project1 Open a project
2 Click Cancel Run on the Summary page to stop the project
3 Click OK on the success message
353 Merging Project Data FilesYou have the option to merge all of the downloaded data for the stations and instruments into one file per interval for each project
1 Open a project
2 Click Merge
A single file is generated for each time period The time period is determined by the file interval you specified on the Time Selection page when you created the project For more information see step 13 of Section 31 ldquoCreating New Projectsrdquo on page 11
The original data files are not modified when you select the option to merge project data files
You can also click Run Now on the Retrieval Status page to start a project
For more information on what happens when a project runs see Section A1 ldquoOverview of Running Projectsrdquo on page 37
You can also click Cancel Run on the Retrieval Status page to stop a project
You cannot merge data from Archive projects and you cannot merge data in the Seisan format
You can also click Merge on the Retrieval Status page to merge the data from a project
Chapter 3 Retrieving Data
30 Apollo Project User Guide16106R5 2009-03-24
354 Running a Scheduled Archive Project1 Open a project
2 Click Start Schedule to start the project schedule
3 Click OK on the confirmation message
4 Click OK on the success message
For a project scheduled to run weekly the project will run for the first time according to the project start time and then it will run on a weekly basis according to the times and days you specified
For a project scheduled to run at a regular interval the project will run according the to interval you specified after you start the schedule For example if you click Start Schedule on a Wednesday and you specified every 2 days as the interval then the project will run for the first time on Friday and every two days after that
3541 Cancelling a Schedule
If you cancel a scheduled project before it runs for the first time you can edit the project settings
If you cancel a project that is currently running the current project runs to completion but subsequent project runs will not occur
1 Open a project
2 Click Cancel Schedule to cancel the project schedule
3 Click OK on the confirmation message
4 Click OK on the success message
You can also click Start Schedule on the Retrieval Status page to start the schedule of a project
You can restart the schedule by opening the project and clicking Start Schedule
You can also click Cancel Schedule on the Retrieval Status page to cancel the schedule of a project
Chapter 3 Retrieving Data
Apollo Project User Guide16106R5 2009-03-24
31
36 Editing and Viewing the Settings of ProjectsYou can edit the settings of a project before it has run After it has run you can view the settings
361 Editing Project Settings1 Open the project
2 Click Edit on the Summary page
3 Edit the settings as required
4 Click OK to save the changes
362 Viewing Project Settings1 Open the project
2 Click View on the Summary page
3 Click the tabs to view the settings
4 Click Cancel when you have finished viewing the settings
You can only edit the settings of a project before it has run for the first time or been scheduled (Archive project) If you want to edit the settings of a project after it has already run once or been scheduled you can copy the project (see Section 345 ldquoCopying a Projectrdquo on page 28) and then edit the settings for the copy
Settings For more information
Store Selection See step 4 of Section 31 ldquoCreating New ProjectsrdquoChannel Group Selection See step 5 to step 12 of Section 31 ldquoCreating New ProjectsrdquoTime Selection See step 13 of Section 31 ldquoCreating New ProjectsrdquoOutput Format See step 15 and step 16 of Section 31 ldquoCreating New ProjectsrdquoOutput Location See step 17 to step 20 of Section 31 ldquoCreating New Projectsrdquo
You can also click Edit on the Retrieval Status page to edit the settings of a project
You can also click View on the Retrieval Status page to edit the settings of a project
Chapter 3 Retrieving Data
32 Apollo Project User Guide16106R5 2009-03-24
37 Monitoring Project StatusYou can monitor the status of a project by viewing information on the Existing Projects Summary and Retrieval Status pages
371 Viewing an Overview of the Status of All ProjectsThe Existing Projects page is the default home page of Apollo Project You see this page when you first open Apollo Project or when you click Projects in the projects bar For more information see Section 341 ldquoViewing Existing Projectsrdquo on page 26
You can view the following information for all projects on the Existing Projects page
bull Name
bull Type
bull Current status
bull Last time the project run
bull Status of data retrieved
The Data Retrieved bars on the Existing Projects page show the overall status of the data retrieval For more information see Section 3731 ldquoStatus Coloursrdquo on page 34
Chapter 3 Retrieving Data
Apollo Project User Guide16106R5 2009-03-24
33
372 Viewing the Status of an Individual ProjectWhen you open a project a detailed summary of the project is shown on the Summary page For more information see Section 342 ldquoOpening a Projectrdquo on page 27
You can view the following information for each project on the Summary page
bull Date it was created
bull Date it was last modified
bull Current status
bull Last time it ran
bull Next time it will run
You can also view a summary of all of the settings you specified when you created the project (Store specifications selected Stores selected time series channel groups selected SOH channel groups start and end times number of files generated file interval and output format and locations)
All times are reported using the UTC time zone
Chapter 3 Retrieving Data
34 Apollo Project User Guide16106R5 2009-03-24
373 Monitoring the Status of a Running ProjectYou can view the data retrieval status of a project while it is running on the Retrieval Status page The Retrieval Status page is displayed automatically when you click Run Now to run a project You can also view this page by opening a project and clicking the Retrieval Status tab
The status for each channel group is expressed in the form of two numbers (for example 60100) and two bar graphs The first number is the percentage available of the total time requested (for example 60) and the second number is the percentage retrieved of the time available (for example 100) For more information on the bar graph status colours see Section 3731 ldquoStatus Coloursrdquo on page 34
You can also view retrieval details for each channel group listed on the Retrieval Status page For more information see Section 3732 ldquoViewing the Retrieval Details for Each Channel Grouprdquo on page 35
3731 Status Colours
The data retrieval status bars use the following status colours
The information that is displayed on the Retrieval Status page is updated continuously while a project is running
Table 3-1 Status colours
Colour Status
Green Apollo Project has retrieved the data
Yellow Apollo Project is attempting to retrieve available data from the Store
Red Data is available in the Store but Apollo Project has failed to retrieve it on this attempt Apollo Project will make additional attempts to retrieve the data up to the configured Maximum Number of Retrieval Attempts For information on how to set the Maximum Number of Retrieval Attempts setting see Section 31 ldquoCreating New Projectsrdquo on page 11
White Data for some portion of the requested time segment is not available in the Store For example there are gaps in the data or the retrieval request is for a future time segment
Chapter 3 Retrieving Data
Apollo Project User Guide16106R5 2009-03-24
35
3732 Viewing the Retrieval Details for Each Channel Group
You can view the retrieval status of each time segment for a channel group
1 Click a channel group name
2 Click the Channel Group Details button that is located to the right of the channel group name
The Remaining Retrieval Attempts column displays the number of times that Apollo Project will try to download each missing time segment for the channel group when the project is run again For information on how to set the Maximum Number of Retrieval Attempts setting see Section 33 ldquoConfiguring Apollo Projectrdquo on page 24
3 Click OK when you have finished viewing the details
Chapter 3 Retrieving Data
36 Apollo Project User Guide16106R5 2009-03-24
Apollo Project User Guide16106R5 2009-03-24
37
Appendix A Reference Information and Examples
Overview of Running Projects
Example Project Settings
Example Deployment Scenarios
Shot File Formats for Controlled Source Projects
A1 Overview of Running ProjectsWhen a project is run Apollo Project performs the following steps
1 The requested time ranges are identified
2 The channel groups for which data are to be retrieved are identified
3 The actual Stores specified by the Store specifications of the project are identified
For each identified Store the following steps are performed
1 A data availability analysis for the outstanding time ranges is performed These are for the ranges for which data has not already been retrieved The availability of the data is recorded for reference It is possible that a given Store was not present at the time the project was last run If this is the case then an attempt is made to retrieve all of the required time ranges of the project from the Store
2 If any data exists in the Store for any of the requested time ranges then a retrieval of this data is performed and the retrieved data is stored to local temporary files
3 If the number of retrieval attempts for a given time range exceeds a configurable threshold (see Section 33 ldquoConfiguring Apollo Projectrdquo on page 24) then the retrieval of data within the stated range is not attempted again
If any data was retrieved during the run of the project then the corresponding output files of the desired output format are generated and stored in the output location specified for the project
When running Apollo Project with Taurus version 2x the schedule for Archive projects must be greater than 5 minutes in duration Schedules that are less than 5 minutes can result in data that is missing or not downloaded
Appendix A Reference Information and Examples
38 Apollo Project User Guide16106R5 2009-03-24
It is possible that the requested data for a given channel group exists across multiple Stores If all of these Stores are included by the Store specifications for the project then Apollo Project assembles the requested data
When a project runs detailed information regarding the results of the retrieved data and processed data are available For more information see Section 37 ldquoMonitoring Project Statusrdquo on page 32
A2 Example Project Settings
A21 Example 1 One Time ProjectProject Name Project1
Project Type One Time
Channel groups selected for retrieval CASTN1OTBHZ (on taurus_1234)
Requested Time Range January 30 2008 1400 ndash 1500 UTC
File Interval 20 minutes
Output Location Base Directory disk2ApolloProjectOutputData
Output Location Subdirectories projectyearmonthday
Output Location Filenamestationnetwork_time
When the project is run successfully the following output files will be created on the server running Apollo Project
disk2ApolloProjectOutputDataProject120080130STN1CA_20080130_140000seed
disk2ApolloProjectOutputDataProject120080130STN1CA_20080130_142000seed
disk2ApolloProjectOutputDataProject120080130STN1CA_20080130_144000seed
Appendix A Reference Information and Examples
Apollo Project User Guide16106R5 2009-03-24
39
A22 Example 2 Controlled Source ProjectProject Name Project2
Project Type Controlled Source
Channel groups selected for retrieval CASTN1OTBHZ (on taurus_1234) CASTN1OTBHN (on taurus_1234)
Requested Shot Times January 30 2008 1400 UTC January 30 2008 1430 UTC
Pre Time 30 seconds
Post Time 30 seconds
Output Location Base Directory disk2ApolloProjectOutputData
Output Location Subdirectories projectyearmonthday
Output Location Filename timeformat
When the project is run successfully the following output files will be created on the server running Apollo Project
disk2ApolloProjectOutputDataProject22008013020080130_135930segysgy
disk2ApolloProjectOutputDataProject22008013020080130_142930segysgy
A3 Example Deployment Scenarios
A31 One TimeYou want to download three days of data from multiple instruments on the network save the data in MiniSEED format and create a file for every hour of data
A One Time project is the recommended solution The Store of each instrument can be made available to Apollo Project by creating a corresponding IP Address Store specification with the IP address of the instrument The requested time range can be specified along with a file interval of one hour Ensure that the instruments are configured to run in Communications mode
A32 Scheduled ArchiveYou want seismic data to be retrieved automatically from a group of instruments on the network every six hours The instruments are always accessible via an Ethernet connection
A scheduled Archive project is the recommended solution Use the Regular Interval scheduling option and set the interval to six hours
You can also run a scheduled Archive project at any time For example if the scheduled retrieval interval of a project is six hours and between intervals you want to retrieve the data three hours early you can run the project and approximately three additional hours of data would be accumulated About three hours later the project will run automatically and accumulate the remaining three hours of data
Appendix A Reference Information and Examples
40 Apollo Project User Guide16106R5 2009-03-24
A33 Manual ArchiveYou want to retrieve seismic data from a group of instruments but their respective Stores are only available for retrieval on occasion (no regular dependable schedule for retrieval from these Stores is possible)
A manually run Archive project is the recommended solution You can create the project and run it whenever any of the instruments are available for retrieval
A34 Field ArchiveYou want to collect data from a set of isolated instruments in the field at recurring intervals (for example twice per month)
A Field Archive project is the recommended solution You can create a Field Archive project and either add all instrument IP addresses to the list or use a Discovery specification The time for the last retrieval is stored on the instrument and all data is recovered from the last recovery time
A35 Media HarvestingYou want to collect the media from a set of instruments in the field at a regular interval (for example once per week) You also have to retrieve all of the seismic data on the media for subsequent analysis
An Archive project is the recommended solution Initially a directory is created on the file system of the server running Apollo Project A directory Store specification is created with this directory as the parent directory from which to search for Stores The content of each media instance in the weekrsquos collection is copied from a media reader to a subdirectory of the directory When the project is run all of the copied Stores are automatically available and the project accumulates data for each instrument
Due to the nature of media harvesting and the replacement procedure for this example data is always missing for the last period of output files for the current week This period corresponds to the time that the media was taken from the instrument and replaced with a new one The following week when the media is harvested again from the instruments in the field Apollo Project fills in the missing time for these files with the new Store data regardless of the media instance on which the data currently resides
You can only create and run Field Archive projects for Taurus version 30 or later
Appendix A Reference Information and Examples
Apollo Project User Guide16106R5 2009-03-24
41
A36 Trigger Downloading You have set up a network of five Tauruses around a hydro dam Each Taurus is accessible over an Ethernet connection and each is set to record data over the weekend You have set the period for data retrieval at 30 seconds before and five minutes after any seismic activity but the following procedure shows you why it is not necessary to view all of the data accumulated over the whole weekend
1 Select the Taurus at the site with the least environmental noise or determine the best site for generating triggers and designate this Taurus ldquoTaurus Ardquo for reference
You need to perform this task in advance More information about triggers can be found in the Taurus Portable Seismograph User Guide
2 Download the trigger file from ldquoTaurus Ardquo and review the file to verify the correct number of triggers
3 Follow these steps to create a new Triggers project
a) Click New on the Apollo Project Existing Projects page
b) Click Triggers as the project type and enter a unique name in the Project Name box
c) Click OK
d) Click the IP Address tab on the Store Selection tab
e) Enter the IP address of a Taurus
f) Click Add
g) Repeat step e until you have entered the IP addresses of all five of the Tauruses
Apollo Project adds the IP address specifications to the Selected Specifications section of the Store Selection page and finds all five Stores associated with the IP addresses and adds them to the Selected Stores section
h) Click the Channel Group Selection tab
i) Click Create Default Station Table to create a table for all of the currently selected Stores and discovered instruments
j) Review the selected channel groups and if required edit the mappings in the selected channel groups area of the tab (lower half of the tab)
k) Click the Time Selection tab
l) Click the Browse button
m)Select the trigger file that you downloaded in step 2 and click OK
n) Click Submit
The list of triggers is imported and displayed in the Triggers section on the Time Selection page
o) Enter a Pre Time of 30 seconds and a Post Time of 5 minutes
p) Click the Output Format tab
q) Click MiniSEED
r) Click All Instruments
s) Click the Output Location tab
Appendix A Reference Information and Examples
42 Apollo Project User Guide16106R5 2009-03-24
t) Enter the valid absolute path of the base directory for the processed data subfolders and files
u) Enter the expression used to define path names for subfolders under the base directory
v) Enter the expression used to define file names for the processed data files that are stored in the subfolders under the base directory
w) Click OK
4 Click the Run Now button on the Summary page
When the project has finished running the output folder you specified in step t will contain ten files Each output file will contain 5 minutes and 30 seconds of data from the five Tauruses
A4 Shot File Formats for Controlled Source ProjectsYou have two options for defining shots for a Controlled Source project manually defining shots or importing shots from a shot file
You can create shot files in one of following three file formats
Microsoft Office Excel (xls) ndash See Section A41 ldquoCreating a Shot File With Microsoft Office Excelrdquo on page 42
OpenOfficeorg Calc (ods) ndash See Section A42 ldquoCreating a Shot File With OpenOfficeorg Calcrdquo on page 44
Comma-Separated Values (csv) ndash See Section A43 ldquoCreating a Comma-Separated Values Shot Filerdquo on page 45
The Shot file templates are located in the docShotFileImport folder on the Apollo Project CD
A41 Creating a Shot File With Microsoft Office ExcelThe Microsoft Office Excel template for Apollo Project can be used with Microsoft Office Excel version 2003 or later
To create an Microsoft Office Excel based shot file
1 Double-click ShotFileTemplatexlt
A new Microsoft Office Excel file is created from the template and opens in the Microsoft Office Excel
2 Save the new spreadsheet as a Microsoft Office Excel document (xls)
3 Enter shot file data as specified in the Microsoft Office Excel spreadsheet
Only the decimal separator is supported for shot files Separators that denote the 3rd power of 10 (thousand) are not supported (for example 4500) The Microsoft Excel and OpenOffice templates reinforce these restrictions and are recommended for creating csv files
Appendix A Reference Information and Examples
Apollo Project User Guide16106R5 2009-03-24
43
You can enter data for multiple shot times
4 Click Save to save the file in Microsoft Office Excel format
5 Click File gt Save As and select CSV (Comma delimited) (csv) from the Save as type list
6 Click Save
7 Click OK on the message warning you that you are only saving the active sheet
8 Click Yes on the message warning you that file features might be incompatible with the csv format
9 Close Microsoft Office Excel
If you are using Microsoft Office Excel 2007 click the Microsoft Office Button and click Save As
Ensure that you save the file as a comma delimited file If the shot file is mistakenly saved in Microsoft Excel format (xls) the shot file will not work in Apollo Project
Appendix A Reference Information and Examples
44 Apollo Project User Guide16106R5 2009-03-24
A42 Creating a Shot File With OpenOfficeorg CalcThe OpenOffice template has been tested with OpenOfficeorg Calc version 23 Later versions of OpenOfficeorg Calc can be used at your discretion
To create a shot file based on the OpenOfficeorg Calc template
1 Double-click ShotFileTemplateots
A new OpenOffice spreadsheet is created from the template and opens in OpenOfficeorg Calc
2 Save the new spreadsheet as an OpenOffice Calc document (ods)
3 Enter the shot file data as specified in the OpenOffice spreadsheet
You can enter data for multiple shot times
4 Click Save to save the file in OpenOfficeorg Calc format
5 Click File gt Save As and select Text CSV (csv) from the Save as Type list
6 Select the Edit filter settings check box
7 Click Save
A warning message might appear that warns you that the document might contain formatting that cannot be saved in the csv format Click Yes on the warning message to save the file in csv format
The Export of text files window opens
8 Delete the double quotation marks () in the Text delimiter box and ensure that the Save cell content as shown check box is selected
9 Click OK to export the OpenOffice spreadsheet as a csv file
10 Click OK on the warning message
11 Close OpenOfficeorg Calc
Appendix A Reference Information and Examples
Apollo Project User Guide16106R5 2009-03-24
45
A43 Creating a Comma-Separated Values Shot FileYou can use any text editor to create a csv shot file
To create a csv shot file
1 Open ShotFileTemplatecsv in a text editor and save it with a different name
2 Format each line of the csv file as follows
Shot TimePre TimePost TimeLatitudeLongitudeElevation
For example
2008-08-28 103044090600000-6000004267
The format and units are as follows
3 Save the file as a csv formatted file
The csv shot file template is not compatible with Microsoft Office Excel Make sure that you do not double-click it and open it in Microsoft Office Excel
FormatUnits
Shot Time yyyy-mm-dd hhmmss
Pre Time seconds
Post Time seconds
Latitude degrees
Longitude degrees
Elevation meters
Appendix A Reference Information and Examples
46 Apollo Project User Guide16106R5 2009-03-24
Apollo Project User Guide16106R5 2009-03-24
47
Appendix B Retrieving SOH Data from a Taurus Version 2x
Taurus Version 2x SOH Data Retrieved by Apollo Project
Retrieving SOH Data from a Taurus Version 2x Streaming to Apollo Server
B1 Taurus Version 2x SOH Data Retrieved by Apollo Project This section presents the predefined datasets of SOH data Apollo Project will retrieve from a Taurus version 2x either through a direct connection or a stream to Apollo Server For instruction on retrieving streaming Taurus version 2x data from Apollo Server see Section B2 ldquoRetrieving SOH Data from a Taurus Version 2x Streaming to Apollo Serverrdquo on page 48
The order of the columns presented in the table below will differ when streaming Taurus version 2x SOH data from Apollo Server
Predefined SOH group SOH data
GPS Time Time (longsecs) (the number of seconds since 1970-01-01)Time (UTC) (time in yyyy-mm-dd hhmmssms format)Altitude (m)DAC CountError (ns) (time error)GPS Engine StatusLast Update Time(s)Lat (deg) (latitude in degrees)Long (deg) (longitude in degrees)NumSatellites (number of satellites used)PDOPPhaseLock (system clock phase lock)TDOPUncertainty (ns) (time uncertainty)
Note The values for Number of satellites used PDOP and TDOP are provided by the GPS receiver at the Last update time In order to see what time these values correspond to look at the Last update time When GPS is off these three parameters and the Last update time are not updated The last value displays until the next update arrives (after the GPS is turned on again)
Appendix B Retrieving SOH Data from a Taurus Version 2x
48 Apollo Project User Guide16106R5 2009-03-24
B2 Retrieving SOH Data from a Taurus Version 2x Streaming to Apollo ServerThis section provides instruction on configuring your Taurus version 2x to stream data to Apollo Server and instructions on how to use Apollo Project to retrieve this data from Apollo Server
B21 Streaming Data from a Taurus Version 2x to Apollo ServerUse the Taurus graphical user interface on either the Taurus display screen or through a Web browser to set up an NP stream from a Taurus version 2x to Apollo Server
1 Log in to the Taurus version 2x with either the tech or central user account
2 Select Advanced Configuration gt Communications gt NP Data Streaming
GPS Satellites Time (longsecs) (the number of seconds since 1970-01-01)Time (UTC) (time in yyyy-mm-dd hhmmssms format)
For each satelliteAcquisition FlagLast Update Time (ms)PRNSatellite Azimuth (microordm)Satellite Elevation (microordm)Signal Level (AMU)
Environment Time (longsecs) (the number of seconds since 1970-01-01)Time (UTC) (time in yyyy-mm-dd hhmmssms format)External SOH Voltage 1 (V) (12-bit voltage input) External SOH Voltage 2 (V) (12-bit voltage input) External SOH Voltage 3 (V) (12-bit voltage input) External SOH Voltage 4 (V) (12-bit voltage input) Sensor SOH Voltage 1 (V)Sensor SOH Voltage 2 (V)Sensor SOH Voltage 3 (V)
Instrument Time (longsecs) (the number of seconds since 1970-01-01)Time (UTC) (time in yyyy-mm-dd hhmmssms format)Controller Current (mA)Digitizer Current (mA)NMX Bus Current (mA) (external connector)Sensor Current (mA)Serial Port Current (mA)Supply Voltage (mV)Temperature (ordmC)
Predefined SOH group SOH data
Appendix B Retrieving SOH Data from a Taurus Version 2x
Apollo Project User Guide16106R5 2009-03-24
49
3 To have the Taurus stream both time series and SOH data to Apollo Server select both Stream Time Series and Stream SOH
-OR-
Select only Stream SOH if you only want to retrieve the SOH data from Apollo Server
4 Type the IP address for Apollo Server in the IP Address box
5 Type the port number Apollo Server uses to receive data in the Port box By default this is port number 32008
6 The Second IP Address and Second Port boxes are not necessary however cannot be left blank Type 127001 in the Second IP Address box and 32004 in the Second Port box
7 Type a value in the Maximum Throughput [bps] box if a limited data link is present between the Taurus and Apollo Server For instance if at some point the data link is limited to 9600 bps then this is the maximum throughput the link can allow If there are no throughput limitations set the value in this box to zero to disable the throughput limitation
8 Click Apply
9 Click Commit
B22 Retrieving Taurus Version 2x Data from Apollo ServerCreate a new project or use an existing project in Apollo Project to retrieve the Taurus version 2x data from Apollo Server For more information on creating or editing projects refer to Section 31 ldquoCreating New Projectsrdquo on page 11 and Section 36 ldquoEditing and Viewing the Settings of Projectsrdquo on page 31
When creating or editing the project
a) Add an IP address Store specification on the Store Selection tab (see step 4 in Section 31 ldquoCreating New Projectsrdquo) for Apollo Server including its client Web application port number Use the format
Apollo Server IP AddressApollo Server Client Web Application Port Number
b) Apply the appropriate filters on the Channel Group Selection tab to retrieve the desired channel groups from the Taurus version 2x See step 5 through step 12 in Section 31 ldquoCreating New Projectsrdquo for instruction on using the Channel Group Selection tab
Appendix B Retrieving SOH Data from a Taurus Version 2x
50 Apollo Project User Guide16106R5 2009-03-24
Apollo Project User Guide16106R5 2009-03-24
51
Appendix C Glossary
Glossary of Abbreviations and Terms
List of Unit Abbreviations and Symbols
C1 Glossary of Abbreviations and Terms
A
ASCIIAmerican Standard Code for Information Interchange
B
BHEBroad Band High Gain Seismometer East-West Orientation
Channel name based on the Global Seismological Network (GSN) standard
BHNBroad Band High Gain Seismometer North-South Orientation
Channel name based on the Global Seismological Network (GSN) standard
BHZBroad Band High Gain Seismometer Vertical Orientation
Channel name based on the Global Seismological Network (GSN) standard
Appendix C Glossary
52 Apollo Project User Guide16106R5 2009-03-24
C
CSVComma-Separated Values
D
DACDigital to Analog Converter
G
GPSGlobal Positioning System
J
JREJava Runtime Environment
JVMJava Virtual Machine
N
NFSNetwork File System
P
PDOPPosition Dilution of Precision
PRNPseudo-random Number
Appendix C Glossary
Apollo Project User Guide16106R5 2009-03-24
53
S
SACSeismic Analysis Code
An Apollo Project output file format that generates files that can be used by the SAC software (see http wwwirisedusoftwaresac)
SEEDStandard for the Exchange of Earthquake Data
SMBServer Message Block
SOHState of Health
T
TCPIPTransmission Control ProtocolInternet Protocol
TDOPTime Dilution of Precision
U
UNCUniform Naming Convention or Universal Naming Convention
URLUniform Resource Locator
UTCCoordinated Universal Time
Appendix C Glossary
54 Apollo Project User Guide16106R5 2009-03-24
C2 List of Unit Abbreviations and SymbolsTable C-1 provides a list of unit abbreviations and symbols commonly used in Nanometrics documentation
Table C-1 Unit abbreviations and symbols
Abbreviation or Symbol Definition Abbreviation
or Symbol Definition
deg degree lb pound
Oslash diameter m metre
micro micro ms metre per second
Ω ohm ms2 metre per second squared
A ampere mA milliampere
AC alternating current MB megabyte
b bit MΩ megaohm
B byte MHz megahertz
bps bits per second mi mile
C Celsius mL millilitre
cm centimetre mm millimetre
dB decibel ms millisecond
DC direct current MTU maximum transmission unit
F farad mV millivolt
ft foot mW milliwatt
g gram N Newton
g gravity nF nanofarad
GB gigabyte ns nanosecond
GHz gigahertz rad radian
Hz hertz rads radian per second
in inch s second
KB kilobyte sps samples per second
kg kilogram U rack unit
kHz kilohertz V volt
kΩ kiloohm Vpp Volts peak-to-peak
kW kilowatt W watt
L litre
Apollo Project User Guide16106R5 2009-03-24
55
About NanometricsNanometrics is a world leader in the development of precision instrumentation network technology and software applications for seismological and environmental studies Using Nanometrics technology our customers establish and grow research networks that are often located in extreme environments such as the frozen Arctic and Antarctic the arid deserts of the Middle East the jungles of South America and the depths of the worlds oceans Many of these are mission-critical national and regional networks that demand the highest possible data quality and availability
Nanometrics provides end-to-end solutions that include a growing portfolio of broadband and strong motion seismometers dataloggers and digitizers satellite ground station systems for remote site data collection and software applications for data and network analysis and management To support this portfolio Nanometrics also provides global systems engineering services for design installation and support of complete networks
Our head office research and development centre and production facility are located in the Kanata North Business Park of Ottawa the high-technology heart of Canadas capital region
Contacting NanometricsNanometrics Inc250 Herzberg RoadKanata Ontario Canada K2K 2A1Phone +1 613-592-6776Fax +1 613-592-5929Email infonanometricscaWeb wwwnanometricsca
Contacting Technical SupportIf you need technical support please submit a request on the Nanometrics technical support site or by email or fax Include a full explanation of the problem and related information such as log filesSupport site httpsupportnanometricsca
Email techsupportnanometricsca

Contents
viii Apollo Project User Guide16106R5 2009-03-24
Apollo Project User Guide16106R5 2009-03-24
1
Chapter 1 Getting Started
About Apollo Project
Operating Requirements
11 About Apollo ProjectApollo Project is a Web application that conveniently retrieves time series and state of health data from any Nanometrics Store including those on Nanometrics instruments and those copied to network computers Available through any Web browser the client application provides options for you to define complex reusable data retrieval tasks called projects
Apollo Project has five project types
Archive projects retrieve data from sources that are continually updated such as a directory on a computer that has new data saved to it periodically or a multicast group of Nanometrics instruments that has different instruments active at different times You can schedule Archive projects to run automatically
One Time projects retrieve a single time segment of data
Controlled Source projects retrieve data specified as a set of shots
Triggers projects retrieve data specified by a trigger list in comma-separated value (CSV) format
Field Archive projects perform recurring data retrievals storing the time of the current retrieval on the Nanometrics instrument Using the time of the last retrieval Field Archive projects only retrieve the data accumulated since the last time the project was run on the instrument
Data for time series channel groups can be downloaded in MiniSEED SAC (binary format) Seisan or SEGY format depending on the project type Data for SOH channel groups is always downloaded in CSV format
Chapter 1 Getting Started
2 Apollo Project User Guide16106R5 2009-03-24
12 Operating RequirementsApollo Project has licensing client and server operating requirements These requirements are listed in Section 121 Section 122 and Section 123
121 Software LicenceIf you have ordered and received an Apollo Project software licence from Nanometrics install this file during the Apollo Project Web server installation or later using the Nanometrics Product Licence Installation Wizard See Section 22 ldquoInstalling an Apollo Project Licence Filerdquo on page 7 for licence installation instructions for Microsoftreg Windows Linux and Mac OSreg X server installations
The licence determines the number of projects you can save the number of time series channels you can select and the number of projects you can run concurrently Without a licence Apollo Project defaults to the unlicensed configuration This configuration allows you to save one project definition at a time for up to three time series channels from any combination of Stores
122 ClientThe client requirements for any platform are a Web browser with JavaScript enabled and IP access to the server Apollo Project version 14 has been tested with Microsoft Internet Explorer version 7 and Mozilla Firefox versions 2 and 3 Other browsers have not been fully tested with the client but may be used at your discretion
123 ServerRun the Apollo Project Web server on Windows Linux or Mac OS X For the
Windows operating requirements see Table 1-1 ldquoRequirements for an Apollo Project server running Windowsrdquo on page 3
Linux operating requirements see Table 1-2 ldquoRequirements for an Apollo Project server running Linuxrdquo on page 3
Mac OS X operating requirements see Table 1-3 ldquoRequirements for an Apollo Project server running Mac OS Xrdquo on page 3
Installing a licence file after creating a project in Apollo Project will result in the loss of that project It is recommended that you install your licence before running Apollo Project for the first time
Click the About button in the client application to view licence information
Chapter 1 Getting Started
Apollo Project User Guide16106R5 2009-03-24
3
Table 1-1 Requirements for an Apollo Project server running Windows
System component Requirement
Operating system Windows XP with Service Pack 3Memory 1GB RAM minimum
2GB RAM recommendedDisk space Required free disk space for every 3 time series channels of data
retrieved is approximately 2GB per month This is roughly twice as much space as the retrieved data occupies in a Store
Java Sun Java Runtime Environment (JRE) version 60Software licence Order a licence from Nanometrics if capabilities beyond that of the
unlicensed configuration are required (see Section 121 ldquoSoftware Licencerdquo on page 2)
Table 1-2 Requirements for an Apollo Project server running Linux
System component Requirement
Operating system Any distribution running a GNULinux kernel of version 24 or laterTested on Red Hat Linux 9 (kernel 2420-8)
Memory 512MB RAM minimum2GB RAM recommended
Disk space Required free disk space for every 3 time series channels of data retrieved is approximately 2GB per month This is roughly twice as much space as the retrieved data occupies in a Store
Java Sun Java Runtime Environment (JRE) version 60Software licence Order a licence from Nanometrics if capabilities beyond that of the
unlicensed configuration are required (see Section 121 ldquoSoftware Licencerdquo)
Table 1-3 Requirements for an Apollo Project server running Mac OS X
System component Requirement
Operating system Mac OS X (1052 and later)Memory 1GB RAM minimum
2GB RAM recommendedDisk space Required free disk space for every 3 time series channels of data
retrieved is approximately 2GB per month This is roughly twice as much space as the retrieved data occupies in a Store
Java Sun Java Runtime Environment (JRE) version 60
Notes on the JRE for Mac systems JRE version 60 must be manually downloaded and installedAfter installing the JRE it must be set as the default Java Virtual Machine (JVM)
Software licence Order a licence from Nanometrics if capabilities beyond that of the unlicensed configuration are required (see Section 121 ldquoSoftware Licencerdquo on page 2)
Chapter 1 Getting Started
4 Apollo Project User Guide16106R5 2009-03-24
Apollo Project User Guide16106R5 2009-03-24
5
Chapter 2 Installing and Starting Apollo Project
Installing the Apollo Project Web Server
Installing an Apollo Project Licence File
Starting the Apollo Project Web Server
Running Apollo Project Client
Upgrading Apollo Project
21 Installing the Apollo Project Web ServerThe Apollo Project Web server is installed on a single computer and after it is installed and running the client can run locally on the server or on any computer with a Web browser and network access to the server computer
All Stores must be accessible from the server hosting the Apollo Project Web server All output files are created on the server and its accessible file systems as described in Section 33 ldquoConfiguring Apollo Projectrdquo on page 24
To install the Apollo Project Web server on a server computer running Windows Linux or Mac OS X
1 Install a supported version of the Java Runtime Environment JRE version 60 or later
2 If you have received a licence file from Nanometrics ensure it is in a drive or network location that is accessible to the Apollo Project Setup Wizard
You can install and run Apollo Project without a licence file For details see Section 121 ldquoSoftware Licencerdquo on page 2 Should you require a licence after Apollo Project is installed you can install a licence using the Nanometrics Licence Installation Wizard See Section 22 ldquoInstalling an Apollo Project Licence Filerdquo on page 7
Chapter 2 Installing and Starting Apollo Project
6 Apollo Project User Guide16106R5 2009-03-24
3 Follow the instructions for your operating system in Table 2-1
211 Uninstalling Apollo Project Web ServerTable 2-2 provides instructions for uninstalling Apollo Project from the server computer for each of the supported operating systems
Table 2-1 Installation instructions
Operating System To install the Apollo Project Web server
Windows 1 Double-click ApolloProject_windows_x_x_xexe where x_x_x is the Apollo Project version number on the Apollo Project CD
2 Follow the steps of the installation wizard making changes to the default settings as required
Linux 1 Open a Terminal window and change the directory to the Apollo Project CD
2 Run the following as rootsh ApolloProject_unix_x_x_xsh (where x_x_x is the Apollo Project version number)
3 Follow the steps of the installation wizard making changes to the default settings as required
Mac OS X 1 Double-click the ApolloProject_macos_x_x_xdmg where x_x_x is the Apollo Project version number disc image on the Apollo Project CDThe disc image mounts as a new volume on your desktop and automatically displays its contents in a Finder window
2 Double-click the installation file Apollo Project Installer in the Finder window
3 Follow the steps of the installation wizard making changes to the default settings as required
Note After installing Apollo Project you can drag the disc image to the Trash to eject it and remove it from your desktop
If you are uninstalling a version of Apollo Project prior to version 13 refer to the version 12 user guide for instruction on uninstalling Apollo Project
Apollo Project Version 12 User Guide revision 16106R2 released on 2008-09-09
Table 2-2 Uninstalling the Apollo Project Web server
Operating System To uninstall the Apollo Project Web server
Windows Click Start gt All Programs gt Nanometrics gt Apollo Project gt Apollo Project Uninstaller
Linux 1 Open a Terminal window and change the directory to the Apollo Project directory The location of the Apollo Project directory was defined when you installed Apollo Project The default location is optnanometricsApolloProject
2 Run the following as root uninstall
Mac OS X 1 Open the Finder2 Click Applications under Places3 Double-click the Apollo Project folder 4 Double-click Apollo Project Uninstaller
Chapter 2 Installing and Starting Apollo Project
Apollo Project User Guide16106R5 2009-03-24
7
22 Installing an Apollo Project Licence FileIf you did not install a licence file during the installation of the Apollo Project Web server application you can install one at any time using the Nanometrics Product Licence Installation Wizard
A licence for Apollo Project is only required if capabilities beyond those of the unlicensed version are needed See Section 121 ldquoSoftware Licencerdquo on page 2 for descriptions of the licensed and unlicensed versions Contact Nanometrics to order a licence (see Contacting Nanometrics on page 55)
If you have obtained a licence file from Nanometrics use the following steps to install the file
Installing a licence file after creating a project in Apollo Project will result in the loss of that project It is recommended that you install your licence before running Apollo Project for the first time
Operating System To install an Apollo Project licence file
Windows 1 Ensure the licence file is in a drive or network location that is accessible to the licence installation wizard
2 Click Start gt All Programs gt Nanometrics gt Apollo Project gt NmxLicenceInstaller
3 Follow the steps in the license installation wizard to select and install the licence file
Linux 1 Ensure the licence file is in a drive or network location that is accessible to the licence installation wizard
2 Open a Terminal window and change the directory to the Apollo Project directory The location of the Apollo Project directory was defined when you installed Apollo Project The default location is optnanometricsApolloProject
3 Run the following NmxLicenceInstaller
Mac OS X 1 Ensure the licence file is in a drive or network location that is accessible to the licence installation wizard
2 Open the Finder3 Click Applications under Places4 Double-click the Apollo Project folder 5 Double-click NmxLicenceInstaller6 Follow the steps in the license installation wizard to select and install
the licence file
Chapter 2 Installing and Starting Apollo Project
8 Apollo Project User Guide16106R5 2009-03-24
23 Starting the Apollo Project Web ServerUse the procedures in Table 2-3 that correspond to your Apollo Server computerrsquos operating system to start the Apollo Project Web server application
24 Running Apollo Project ClientIf you are running the Apollo Project client on the computer where the server application is installed open a browser and go to
httplocalhostPort
Where localhost is the local computer and port is the port number configured during installation The default port number for Apollo Project is 8088
To run an Apollo Project client when the server application resides on a different computer open a browser and go to
httpServer computer name or IP addressPort
For example if the domain name of the server computer is ApolloProjectServer with an IP address of 192168220 and the default port number of 8088 is being used the URL for the client application in your browser will be
httpApolloProjectServer8088
ndash OR ndash
http1921682208088
241 Troubleshooting Running Apollo Project ClientIf you are having trouble opening the Apollo Project client in your Web browser try these suggestions
a) Ensure that the Apollo Project Web server application is running on the Apollo Project server computer See Section 23 ldquoStarting the Apollo Project Web Serverrdquo
Table 2-3 Starting the Apollo Project Web server
Operating System To start the Apollo Project Web server
Windows Click Start gt All Programs gt Nanometrics gt Apollo Project gt Apollo ProjectLinux 1 Open a Terminal window and change the directory to the Apollo
Project directory The location of the Apollo Project directory was defined when you installed Apollo Project The default location is optnanometricsApolloProject
2 Run the following ApolloProject
Mac OS X 1 Open the Finder2 Click Applications under Places3 Double-click the Apollo Project folder 4 Double-click Apollo Project to start the Web server
Chapter 2 Installing and Starting Apollo Project
Apollo Project User Guide16106R5 2009-03-24
9
b) Verify that the firewall on the server computer is not blocking the port number used to serve Web pages (by default the port number is 8088) To check the port number used open ApolloProjectvmoptions in the ApolloProject folder and note the number identified for the -Dserverport setting
242 Stopping the Apollo Project Web ServerThe Apollo Project client provides the means to stop the Apollo Project Web server application To stop the Apollo Project Web server
1 Open the Apollo Project client
2 Click the Shut down Apollo Project button
3 Click OK to confirm the Web server shutdown
25 Upgrading Apollo ProjectTo upgrade Apollo Project from a previous version
1 Uninstall the Apollo Project Web server application as per Section 211 ldquoUninstalling Apollo Project Web Serverrdquo on page 6
2 Install the new version of Apollo Project as per Section 21 ldquoInstalling the Apollo Project Web Serverrdquo on page 5
When you shut down the Apollo Project Web server all clients are disconnected from the server To restore connectivity start the Apollo Project Web server using the instructions in Section 23 ldquoStarting the Apollo Project Web Serverrdquo on page 8
During the upgrade process all downloaded data will remain intact however you will need to recreate your projects and settings in the new version of Apollo Project
For Windows and Linux installations if you are upgrading from an earlier version of Apollo Project that used Apache Tomcat it is strongly recommended that you uninstall Tomcat before installing the new version of Apollo Project
Refer to the version 12 user guide for instruction on uninstalling versions of Apollo Project prior to version 13
Apollo Project Version 12 User Guide revision 16106R2 released on 2008-09-09
If you are using a licensed version of Apollo Project you will need a new licence file when installing the upgrade If you have not received a new licence file contact Nanometrics (see Contacting Nanometrics on page 55)
Chapter 2 Installing and Starting Apollo Project
10 Apollo Project User Guide16106R5 2009-03-24
Apollo Project User Guide16106R5 2009-03-24
11
Chapter 3 Retrieving Data
Creating New Projects
Creating a Station Table File
Configuring Apollo Project
Managing Projects
Running Projects
Editing and Viewing the Settings of Projects
Monitoring Project Status
31 Creating New ProjectsYou can create multiple projects up to the number supported by the software licence (see Section 121 ldquoSoftware Licencerdquo on page 2)
When you create a new project you have to
bull Select data Stores
bull Specify a station table file
bull Select the channel groups you want to download data from
bull Specify when you want the project to run
bull Select the output format
bull Specify the output location
To create a new project
1 Click New on the Apollo Project Existing Projects page
2 Click a project type and enter a unique name in the Project Name box
3 Click OK
Chapter 3 Retrieving Data
12 Apollo Project User Guide16106R5 2009-03-24
4 Select one or more data Stores by performing the following steps
Store type DescriptionSteps
File A file Store specification defines a particular Store that resides on a file system accessible by the server running Apollo Project The file system can be a local or a networked file system (for example accessible via SMB or NFS)
1 Click the File tab2 Enter the full path and file name of a Store file3 Click Add
Apollo Project adds the specification to the Selected Specifications section of the Store Selection page and finds all related Store files and adds them as a single Store to the Selected Stores section
Directory A directory Store specification defines the set of Stores that reside in a particular directory hierarchy on a file system accessible by the server running Apollo Project A recursive search from the specified directory identifies all of the available Stores The file system can be a local or a networked file system (for example accessible via SMB or NFS)
1 Click the Directory tab2 Enter a directory path name
If you specify a root directory such as C it will take a long time for Apollo Project to find all of the Store files in that root directory
3 Click AddApollo Project adds the specification to the Selected Specifications section of the Store Selection page and finds and adds all Stores in the specified directory and its subdirectories to the Selected Stores section
IP Address An IP Address Store specification defines the Store of a single instrument (or an instance of Apollo Server) The specified IP address must be an IP address bound to the Ethernet interface of an instrument At the same time the instrument must be running in communications mode and be accessible from the server running Apollo Project
1 Click the IP Address tab2 Enter the IP address of an instrument3 Click Add
Apollo Project adds the specification to the Selected Specifications section of the Store Selection page and finds all Stores associated with the IP address and adds them to the Selected Stores section
Chapter 3 Retrieving Data
Apollo Project User Guide16106R5 2009-03-24
13
Discovery A discovery Store specification specifies the Stores of multiple instruments In this case a class D (multicast) IP address and port is specified It is assumed that the Store of any instrument in communications mode is accessible from the LAN of the Apollo Project server When Discovery is enabled for the specified IP address and port these attributes are included upon running the project
1 Click the Discovery tab2 Enter the multicast address and port number of a group of instruments
For example 224199711386776Multicast addresses range from 224000 through 239255255255
3 Click AddApollo Project adds the specification to the Selected Specifications section of the Store Selection page and finds all Stores associated with the multicast address and adds them to the Selected Stores section of the Store Selection page
Notes When multiple multicast groups are used for discovery the port number must differ from existing discovery port numbers by 2 for each discovery port number in use x there must be no other discovery port configured for use with a value of x or x+1For example the default discovery multicast group used by Taurus is 224199711386776 To add another multicast group you have to specify a different port number (which cannot be 6776 or 6777)
Recent Specs
Apollo Project keeps the 16 most recently defined Store specifications and groups them by category on the Recent Specs page
1 Click the Recent Specs tab2 Expand a specification category (File Directory IP Address or Discovery)
and select a specification3 Click Add
Apollo Project adds the specification to the Selected Specifications section of the Store Selection page and finds all Stores associated with the specification and adds them to the Selected Stores section
Each time a project is run Apollo Project generates a list of available Stores based on the selected Store specifications The actual Stores from which data is retrieved can vary on successive project runs For example a discovery Store specification might result in a different number of instruments being included depending on current access to the instruments
Remove a specification (and its associated Stores) by selecting it and clicking Remove Remove all specifications (and all Stores) by clicking Remove All You cannot remove individual Stores from a specification but you can add a different specification and select a different group of Stores Alternatively you can use channel group attributes filtering to select the channel groups that data is retrieved from
When copying a Store from an instrument to your local computer do not overwrite an existing Store Instead delete the existing Store or move it to a different folder on the computer Stores are made up of multiple volumes and if the new Store has fewer volumes than the old Store you could see some unpredictable results with Apollo Project
Store type DescriptionSteps
Chapter 3 Retrieving Data
14 Apollo Project User Guide16106R5 2009-03-24
5 Click the Channel Group Selection tab
6 If you defined a default station table file and want to use it for this project go to step 7
For more information see Section 32 ldquoCreating a Station Table Filerdquo on page 22
-OR-
Click Create Default Station Table to create a table for all of the currently selected Stores and discovered instruments for this project using the default settings for the network name location and channel names
The default settings for the network name location and channel names are defined in the Behaviour and Defaults dialog box For more information see Section 33 ldquoConfiguring Apollo Projectrdquo on page 24
-OR-
Enter the path and file name of a station table for this project
7 If you want to download all data from all available Stores verify that the Retrieve data from all channel groups (do not filter) check box is selected and go to step 12
-OR-
If you want to filter the data by specific channel groups and channel group attributes go to step 8
8 Clear the Retrieve data from all channel groups (do not filter) check box
9 Select the time series channel groups you want to download data from
A station table is used to assign names to all of the selected channel groups For more information see Section 32 ldquoCreating a Station Table Filerdquo on page 22
If new Stores are found after a station table file has been defined for a project (for example as a result of Discovery or a directory specification) the default channel group names are used in the output files and no filtering is applied to the channel groups
If the text ldquoSelected Time Series Channels x of xrdquo where x represents the number of channels is red you have selected more time series channels than your licence permits You must select a valid number of time series channels (for the unlicenced version of Apollo Project there is a maximum of three time series channels) before you can create your project
Chapter 3 Retrieving Data
Apollo Project User Guide16106R5 2009-03-24
15
10 Select the state of health (SOH) channel groups you want to download data from Each group has a predefined dataset
To view the SOH data retrieved from a Taurus version 2x see Appendix B ldquoRetrieving SOH Data from a Taurus Version 2xrdquo
Predefined SOH group SOH data
GPS Time Time (longsecs) (the number of seconds since 1970-01-01)Time (UTC) (time in yyyy-mm-dd hhmmssms format)DAC CountGPS Engine StatusGPS Last Update Time(s)GPS PDOPGPS Satellites Used (number of satellites used)GPS TDOP Lat (deg) (latitude in degrees)Long (deg) (longitude in degrees)Timing Error (ns)Timing Phase Lock (system clock phase lock)Timing Uncertainty (ns)
Note The values for Number of satellites used PDOP and TDOP are provided by the GPS receiver at the Last update time In order to see what time these values correspond to look at the Last update time When GPS is off these three parameters and the Last update time are not updated The last value displays until the next update arrives (after the GPS is turned on again)
GPS Satellites Time (longsecs) (the number of seconds since 1970-01-01)Time (UTC) (time in yyyy-mm-dd hhmmssms format)
For each satelliteGPS Satellite Acquisition FlagGPS Satellite Azimuth (microordm)GPS Satellite Elevation (microordm)GPS Satellite Last Update Time (ms)GPS Satellite PRN GPS Satellite Signal Level (AMU)
Environment Time (longsecs) (the number of seconds since 1970-01-01)Time (UTC) (time in yyyy-mm-dd hhmmssms format)External SOH Voltage 1 (V) (12-bit voltage input)External SOH Voltage 2 (V) (12-bit voltage input)External SOH Voltage 3 (V) (12-bit voltage input)External SOH Voltage 4 (V) (12-bit voltage input)Sensor SOH Voltage 1 (V)Sensor SOH Voltage 2 (V)Sensor SOH Voltage 3 (V)
Chapter 3 Retrieving Data
16 Apollo Project User Guide16106R5 2009-03-24
11 If required enter additional filter information as comma-delimited text into the Network Station Location Channel and Instrument boxes
You can use an asterisk ()to represent 1 or more characters
12 Review the selected channel groups and if required edit the channel group mappings in the selected channel groups area of the tab
Channel groups that do not have a mapping appear as blanks in the selected channel groups area of the tab Mapping information for these channel groups can be entered and saved in the station table file for future projects
You can edit the mappings at any time The changes are reflected in future runs of any project using that same station table file For more information see Section 32 ldquoCreating a Station Table Filerdquo on page 22
13 Click the Time Selection tab and follow the steps for the project type you selected
Instrument Time (longsecs) (the number of seconds since 1970-01-01)Time (UTC) (time in yyyy-mm-dd hhmmssms format)Controller Current (mA)Digitizer Current (mA)NMX Bus Current (mA) (external connector)Sensor Current (mA)Serial Port Current (mA)Supply Voltage (mV)Temperature (ordmC)
Look in the selected channel groups area of the tab (lower half of the tab) for examples of filter details you can enter in the Network Station Location Channel and Instrument ID filter boxes
The NetworkStationLocationChannel column of the table presents information in the format implied by the column title For instance in an entry of XXA099901BHE(1) XX represents the network(2) A0999 represents the station(3) 01 represents the location(4) BHE represents the channel
Look at the Instrument ID column of the table for an example of an instrument name and serial number such as taurus_0999
Only mappings that are applicable for the selected channel groups appear in the selected channel groups area of the tab
All times use the UTC time zone
Predefined SOH group SOH data
Chapter 3 Retrieving Data
Apollo Project User Guide16106R5 2009-03-24
17
Project type DescriptionSteps
Archive Archive projects attempt to retrieve data up to the current timeThe time ranges for which output files will be produced are driven from the file interval and are aligned to the project start time It is therefore unlikely that the ldquomost recentrdquo file interval will align with the current time Therefore the most recent range for which data retrieval is attempted will have a portion of its data retrieved and the remainder (for future retrieval) will be declared unavailable However when the project is run later (after the end of the particular time range) the unavailable data will normally be retrieved and the situation will likely repeat itself with the ldquonewrdquo last range to retrieveTo run an Archive project manually1 If required edit the start time for the project2 Click Manual3 Specify the file interval
For example if you specify 2 hours then one file is created every 2 hours If the duration for the project is one day then a total of 12 files will be created
4 After you have finished creating the project click Run Now on the Summary page to run the project
To schedule an Archive project to run automatically at a regular interval1 Click Regular Interval and select the interval 2 Specify the file interval
For example if you specify 2 hours then one file is created every 2 hours If the duration for the project is one day then a total of 12 files will be created
3 After you have finished creating the project click Start Schedule on the Summary page to start the schedule for the project and click OK twice The project will run according to the interval you specified after you start the schedule For example if you click Start Schedule on a Wednesday and you specified every 2 days as the interval then the project will run for the first time on Friday and every two days after that If the computer has been rebooted and the Apollo Project Web server has been restarted the project will run according to the interval you specified after the computer has rebooted For example if the computer reboots on a Wednesday and you specified every 2 days as the interval then the project will run for the next time on Friday and every two days after that
Note Archive projects that are defined as scheduled projects can also be run manually at any timeTo schedule an Archive project to run automatically on a weekly basis1 If required edit the start time for the project2 Click Weekly Schedule and select the time and days of the week 3 Specify the file interval
For example if you specify 2 hours then one file is created every 2 hours If the duration for the project is one day then a total of 12 files will be created
4 After you have finished creating the project click Start Schedule on the Summary page to start the schedule for the project and click OK twice After you have finished creating the project the project will run for the first time according to the project start time and then it will run on a weekly basis according to the times and days you specified
Note Archive projects that are defined as scheduled projects can also be run manually at any time
Chapter 3 Retrieving Data
18 Apollo Project User Guide16106R5 2009-03-24
One Time A One Time project retrieves a single time segmentTo specify the start and end times for a One Time project1 If required edit the start time for the project2 Click End Time and enter an end time
-OR-Click Duration and specify the duration of the project The duration is the length of the requested time segment
3 Specify the file intervalFor example if you specify 2 hours then one file is created every 2 hours If the duration for the project is one day then a total of 12 files will be created
4 After you have finished creating the project click Run Now on the Summary page to run the project
Controlled Source
A Controlled Source project retrieves data specified as a set of individually entered shots and outputs the data in SEGY format To specify shots using a shots file1 Click Browse select a shots file and click OK2 Click Submit
The list of shots is imported and displayed in the Shot List section on the Time Selection page
Note For more information see Section A4 ldquoShot File Formats for Controlled Source Projectsrdquo on page 42To manually define shots1 Enter a shot time2 If required enter the latitude longitude and elevation3 If required select the pre-shot time period4 Select the post-shot time period5 Click Add
The shot is added to the Shot List section on the Time Selection page Triggers A Triggers project uses a CSV-formatted trigger list to specify the data to be
retrieved for example a trigger file that has been downloaded from a Taurus to the local computerTo define triggers1 Click Browse select a CSV triggers file and click OK2 Click Submit
The list of triggers is imported and displayed in the Triggers section on the Time Selection page
3 Select the pre-trigger and post-trigger time periodsThe pre-trigger and post-trigger time periods are used for all of the triggers
Project type DescriptionSteps
Chapter 3 Retrieving Data
Apollo Project User Guide16106R5 2009-03-24
19
14 If you selected a Controlled Source as the project type in step 2 go to step 17
You do not have to select an output format for a Controlled Source project because the output format for a Controlled Source project is always SEGY one output file is generated for all instruments and the stations are sorted by StationNameNetworkName
-OR-
If you selected one of the other project types go to step 15 to select an output format
15 Click the Output Format tab
Field Archive A Field Archive project is used for recurring data retrievals that occur at specified intervals The time of the last retrieval is stored on the instrumentTo define the start time and file interval1 If required edit the start time for the project2 Specify the file interval
For example if you specify 2 hours then one file is created every 2 hours3 If you want partial files retrieved select the Include last interval even if
incomplete check box You should only select this option when the retrieval of partial files is more important than retrieving the data for the current interval during a future project run
Be careful when specifying the file interval For example retrieving many hours or days of data and specifying a file interval of seconds or minutes could result in the generation of many files This is not only very resource intensive but could result in a data management problem as well
Project type DescriptionSteps
Chapter 3 Retrieving Data
20 Apollo Project User Guide16106R5 2009-03-24
16 Perform the following steps to select an output format
Output format Steps
MiniSEED 1 Click MiniSEED2 Click Per channel group to generate one output file per channel group
You must add the channel token to the Subdirectories or Filename box on the Output Location tab when choosing Per channel group-OR-Click Per instrument to generate one output file per instrument-OR-Click All Instruments to generate one output file for all instruments
3 Select the Sort check box if you want the output data sorted by timeData is put in a Store in the order received and this order may not always be chronological To ensure that the data in the resulting SEED file is chronological select Sort
4 Select the data record sizeThe default record size is 512 B However not all SEED file readers will support this file size Determine what your SEED reader supports and select an appropriate value The options are 512 B 1024 B 2048 B and 4096 B Note that a smaller record size will result in quicker SEED file output
Note The number of output files is determined by the file interval that you set on the Time Selection page
SAC 1 Click SACYou must add the channel token to the Subdirectories or Filename box on the Output Location tab when choosing SAC as the output format
NotesThere are two types of SAC files binary and ASCII Apollo Project only outputs binary SAC filesOne output file per channel group is generated
SEGY 1 Click SEGY2 Click Per channel group to generate one output file per channel group
You must add the channel token to the Subdirectories or Filename box on the Output Location tab when choosing Per channel group-OR-Click Per instrument to generate one output file per instrument-OR-Click All Instruments to generate one output file for all instruments
3 Select the Sort check box if you want the stations sorted by StationNameNetworkName
NotesAll stations must have the same sample rateThe maximum number of samples per trace is 32767SEGY trace headers from discovered instruments will not have station location information
Chapter 3 Retrieving Data
Apollo Project User Guide16106R5 2009-03-24
21
17 Click the Output Location tab
18 If you defined a default base directory when you configured Apollo Project and want to use it for this project go to step 21
For more information see Section 33 ldquoConfiguring Apollo Projectrdquo on page 24
-OR-
Enter the valid absolute path of the base directory for the processed data subdirectories and files
If the base directory you entered does not exist click Create to create it
19 If you defined a default expression for subdirectories when you configured Apollo Project and want to use it for this project go to step 21
For more information see Section 33 ldquoConfiguring Apollo Projectrdquo on page 24
-OR-
Enter the expression used to define path names for subfolders under the base directory
You can enter tokens in any order including any additional characters that are valid for paths
Seisan 1 Click Seisan
NotesYou must have Seisan installed on your computer with a WAVEFORM_BASE and CONT_BASE line included for each station in the DATSEISANDEF file You must define a SEISAN_TOP environment variableOne output file per channel group is generated
Regardless of the output format selected SOH channel group data is always output in CSV format
The Base Directory is the root of all data retrieved for the project and can be defined at any location in the file system of the server running Apollo Project including a networked drive on a separate server If you want to create or use a directory on a computer on the network you have to enter the server and share name in a modified UNC format that is prefixed by an additional two backslashes For example the usual fileserver1storefiles must be written as fileserver1storefiles
Large amounts of data can be stored in this location You must ensure that adequate disk space is available
For deployments of Apollo Project where the clients are not running on the server it is recommended that the file system containing the base directory on the server be shared or exported as a networked file system
It is not recommended that you use the channel token in the subdirectories expression if the project includes more than one channel group per instrument (selected on the Channel Group Selection tab) and the output is not per channel group (selected on the Output Format tab)
Output format Steps
Chapter 3 Retrieving Data
22 Apollo Project User Guide16106R5 2009-03-24
20 If you defined a default expression for file names when you configured Apollo Project and want to use it for this project go to step 21
For more information see Section 33 ldquoConfiguring Apollo Projectrdquo on page 24
-OR-
Enter the expression used to define file names for the processed data files that are stored in the subfolders under the base directory
You can enter tokens in any order including any additional characters that are valid for file names
21 Click OK to save the new project
The new project is created and the Summary page is displayed
32 Creating a Station Table FileYou can create a mapping between a given instrumentchannel group (for example taurus_1234digitizertimeSeries1) and a corresponding network station location and channel name These mappings are stored in a station table file and the mapped channel group names are used in the output files
You can create a station table file and use it as the default for all projects or you can create a station table for individual projects
To create a station table file and set is as the default
1 Click the configuration button in the upper right corner
2 Specify the network name location and channel names on the Behaviour and Defaults dialog box and click OK to save the new settings
The settings you enter here are used as the channel names in the station table file You can edit these settings in step 8
For more information on configuring Apollo Project settings see Section 33 ldquoConfiguring Apollo Projectrdquo on page 24
3 Click New on the Apollo Project Existing Projects page
Do not use the channel token in the filename expression if the project includes more than one channel group per instrument (selected on the Channel Group Selection tab) and the output is not per channel group (selected on the Output Format tab)
The Sample Path shows an example of a file name generated using the values for the Base Directory Subdirectories and Filename settings
You can only edit the settings of a project before it has run for the first time or been scheduled (Archive project) If you want to edit the settings of a project after it has already run once or been scheduled you can copy the project (see Section 345 ldquoCopying a Projectrdquo on page 28) and then edit the settings for the copy
It is recommended that you create a station table file and set it as the default for all projects You can update the mappings in this file when new Stores are added or discovered
Chapter 3 Retrieving Data
Apollo Project User Guide16106R5 2009-03-24
23
4 Type Station Table in the Project Name box and click any project type
5 Click OK
6 Click the Store Selection tab and select as many Stores as possible
See step 4 of Section 31 ldquoCreating New Projectsrdquo for information on how to add specifications and select Stores
7 Click the Channel Group Selection tab and click Create Default Station Table
A station table file is created and the name of the file is displayed in the Station Table File Name box
8 Edit the station table channel group mappings in the selected channel groups area of the tab (lower half of the tab) as required
The NetworkStationLocationChannel names will appear in the output files If the Location is empty it is interpreted as the SEED default of two spaces
9 Click OK to close the project and finish creating the station table
10 Click the configuration button in the upper right corner
11 Enter the path and name of the station table file you just created in the Station Table File Name box on the Behaviour and Defaults dialog box
12 Click OK to save the new settings
The station table file you specified will be used as the default for all future projects You can open the Station Table project and edit the station table file if you need to add more Stores or change the mappings
For more information on configuring Apollo Project settings see Section 33 ldquoConfiguring Apollo Projectrdquo on page 24
Make a note of the path of the station table file because you will have to enter it on the Behaviour and Defaults dialog box to set it as the default for all projects
Valid characters for the network station location and channel in the NetworkStationLocationChannel box are upper case letters A to Z numbers 0 to 9 and spaces are also acceptable for the location
Chapter 3 Retrieving Data
24 Apollo Project User Guide16106R5 2009-03-24
33 Configuring Apollo ProjectYou can configure basic settings for Apollo Project and the default settings for new projects The changes you make to the project default settings only apply to new projects
To configure Apollo Project
1 Click the configuration button in the upper right corner
2 Edit the following settings
Setting Description
Log Verbosity The level of detail that is logged by Apollo ProjectThe default setting is Info
Log Location The default name of the Apollo Project log folder Maximum Number of Retrieval Attempts
The maximum number of single retrieval attempt made for all missing time segments on all channel groups every time a project is run Enter an integer from 0 through 1000 The default value is 8
Notes If the Taurus is busy when a retrieval attempt is made the number of remaining retrieval attempts is not decreased by one attemptYou can view the channel group details page to see if there are any remaining retrieval attempts for any channel groups (see Section 373 ldquoMonitoring the Status of a Running Projectrdquo on page 34)
Number Of Retries The number of times Apollo Project attempts to connect to a data source if there is a network connectivity problem Enter an integer from 0 through 1000 The default value is 3
Note Every time a project is run it starts with the maximum number of retries
Retry Interval (secs) The amount of time in seconds that Apollo Project waits before trying to connect to a data source againEnter an integer from 0 through 1000 The default value is 5
Station Table File Name The file name and location of the station table file that is used to assign station names to all of the selected channel groupsA station table is used to assign names to all of the selected channel groups For more information see Section 32 ldquoCreating a Station Table Filerdquo on page 22No station table file is specified by default
Chapter 3 Retrieving Data
Apollo Project User Guide16106R5 2009-03-24
25
Base Directory The folder name and location of the base directory for the processed data subfolders and files Enter any valid folder name and location including any additional characters that are valid for paths The default base directory name is ApolloProject
Notes The Base Directory is the root of all data retrieved for the project and can be defined at any location in the file system of the server running Apollo Project including a shared folder on a different computer If you want to create or use a folder on a computer on the network you have to enter the server and share name in a modified UNC format that is prefixed by an additional two backslashes For example the usual fileserver1storefiles must be written as fileserver1storefilesLarge amounts of data can be stored in this location You must ensure that adequate disk space is availableFor deployments of Apollo Project where the clients are not running on the server it is recommended that the file system containing the base directory on the server be shared or exported as a networked file system
Subdirectories The expression used to define path names for subfolders under the base directoryEnter tokens in any order including any additional characters that are valid for paths The default path name is as follows projectyearmonthday
Filename The expression used to define file names for the processed data files that are stored in the subfolders under the base directoryEnter tokens in any order including any additional characters that are valid for file names The default filename is as follows instrument_time
Sample Path An example of a file name generated using the values for the Base Directory Subdirectories and Filename settings
Network Name A standard network codeEnter any two upper case letters or numbers The default code is XX
Location A location within a stationEnter any two upper case letters numbers or spaces
The default location is two spaces for ldquononerdquo You must delete the two default spaces if you enter a new location value
Setting Description
Chapter 3 Retrieving Data
26 Apollo Project User Guide16106R5 2009-03-24
3 Click OK to save the new settings
34 Managing ProjectsYou can view open close copy and delete projects Also you can create convenient links to run your individual projects with desktop shortcuts
341 Viewing Existing Projects1 Click Projects in the Projects bar
2 View the projects listed on the Existing Projects page
The Existing Projects page shows a list of all projects and a status overview of each project For more information see Section 371 ldquoViewing an Overview of the Status of All Projectsrdquo on page 32
Channel 1 Name A channel codeEnter any three upper case letters or numbersThe default channel code is BHZ
Channel 2 Name A channel codeEnter any three upper case letters or numbersThe default channel code is BHN
Channel 3 Name A channel codeEnter any three upper case letters or numbersThe default channel code is BHE
Setting Description
Chapter 3 Retrieving Data
Apollo Project User Guide16106R5 2009-03-24
27
342 Opening a Project1 Click the project name under the Name column on the Existing Projects page
2 Click the Open Project button
343 Creating a Desktop Shortcut to a ProjectLaunching a project with a desktop shortcut will open Apollo Project to that project and run the project
Methods for creating desktop shortcuts to Web sites vary from browser to browser These procedures explain how to create desktop shortcuts to specific projects for both Mozilla Firefox 3 and Microsoft Internet Explorer 7 Desktop shortcuts to projects include the Apollo Project icon and are titled in the format Project Name ndash Apollo Project
In Firefox 3
1 Open the project you want to create a shortcut to in Firefox
2 Reduce the size of the Firefox window so that the desktop is visible
3 Drag the Site Identification Button onto the desktop
The Site Identification Button is located to the left of the Location Bar and displays the Apollo Project icon
In Internet Explorer 7
1 Open the project you want to create a shortcut to in Internet Explorer
2 Press ALT+F
3 Select Send gt Shortcut to Desktop
344 Closing a Project
1 Click the Close Project button in the Projects bar
Launching a desktop shortcut to a project automatically runs that project It is important to note that once a project is run its settings can no longer be edited It is recommended that desktop shortcuts only be created for Field Archive projects
Firefox is the recommended browser for Apollo Project
Chapter 3 Retrieving Data
28 Apollo Project User Guide16106R5 2009-03-24
345 Copying a Project
1 Select the project name under the Name column on the Existing Projects page
2 Click Copy
3 Enter a unique name for the new project and click OK
4 Click Edit and edit the settings as required
5 Click OK to save the project after you have finished editing the settings
346 Deleting a ProjectWhen you delete a project only files in the temporary folder are deleted All processed data files are not deleted
1 Click the project name under the Name column on the Existing Projects page
2 Click Delete
3 Click OK on the confirmation message
35 Running ProjectsFor all project types you can run a project manually at any time Archive projects can also be defined to run automatically on a schedule
If it is a scheduled Archive Project and the schedule is started click Cancel Schedule before you create a copy of it (If the schedule is not started the Start Schedule button is visible if the schedule is started the Cancel Schedule button replaces the Start Schedule button)
Apollo Project stores intermediate files in a temporary subdirectory of the Base Directory specified for the output location of a project These intermediate files correspond to the actual channel group data retrieved from the Stores referenced by the project If a project is deleted from Apollo Project these temporary files will be removed automatically
Disk space can also be reclaimed by removing these temporary files manually without deleting the project However if the project is run again the output files produced might be incomplete if previously retrieved data from these temporary files is required
For more information on what happens when a project runs see Section A1 ldquoOverview of Running Projectsrdquo on page 37
Chapter 3 Retrieving Data
Apollo Project User Guide16106R5 2009-03-24
29
351 Running a Project1 Open a project
2 Click Run Now on the Summary page to start the project
The project starts running and the Retrieval Status page is displayed
352 Stopping a Project1 Open a project
2 Click Cancel Run on the Summary page to stop the project
3 Click OK on the success message
353 Merging Project Data FilesYou have the option to merge all of the downloaded data for the stations and instruments into one file per interval for each project
1 Open a project
2 Click Merge
A single file is generated for each time period The time period is determined by the file interval you specified on the Time Selection page when you created the project For more information see step 13 of Section 31 ldquoCreating New Projectsrdquo on page 11
The original data files are not modified when you select the option to merge project data files
You can also click Run Now on the Retrieval Status page to start a project
For more information on what happens when a project runs see Section A1 ldquoOverview of Running Projectsrdquo on page 37
You can also click Cancel Run on the Retrieval Status page to stop a project
You cannot merge data from Archive projects and you cannot merge data in the Seisan format
You can also click Merge on the Retrieval Status page to merge the data from a project
Chapter 3 Retrieving Data
30 Apollo Project User Guide16106R5 2009-03-24
354 Running a Scheduled Archive Project1 Open a project
2 Click Start Schedule to start the project schedule
3 Click OK on the confirmation message
4 Click OK on the success message
For a project scheduled to run weekly the project will run for the first time according to the project start time and then it will run on a weekly basis according to the times and days you specified
For a project scheduled to run at a regular interval the project will run according the to interval you specified after you start the schedule For example if you click Start Schedule on a Wednesday and you specified every 2 days as the interval then the project will run for the first time on Friday and every two days after that
3541 Cancelling a Schedule
If you cancel a scheduled project before it runs for the first time you can edit the project settings
If you cancel a project that is currently running the current project runs to completion but subsequent project runs will not occur
1 Open a project
2 Click Cancel Schedule to cancel the project schedule
3 Click OK on the confirmation message
4 Click OK on the success message
You can also click Start Schedule on the Retrieval Status page to start the schedule of a project
You can restart the schedule by opening the project and clicking Start Schedule
You can also click Cancel Schedule on the Retrieval Status page to cancel the schedule of a project
Chapter 3 Retrieving Data
Apollo Project User Guide16106R5 2009-03-24
31
36 Editing and Viewing the Settings of ProjectsYou can edit the settings of a project before it has run After it has run you can view the settings
361 Editing Project Settings1 Open the project
2 Click Edit on the Summary page
3 Edit the settings as required
4 Click OK to save the changes
362 Viewing Project Settings1 Open the project
2 Click View on the Summary page
3 Click the tabs to view the settings
4 Click Cancel when you have finished viewing the settings
You can only edit the settings of a project before it has run for the first time or been scheduled (Archive project) If you want to edit the settings of a project after it has already run once or been scheduled you can copy the project (see Section 345 ldquoCopying a Projectrdquo on page 28) and then edit the settings for the copy
Settings For more information
Store Selection See step 4 of Section 31 ldquoCreating New ProjectsrdquoChannel Group Selection See step 5 to step 12 of Section 31 ldquoCreating New ProjectsrdquoTime Selection See step 13 of Section 31 ldquoCreating New ProjectsrdquoOutput Format See step 15 and step 16 of Section 31 ldquoCreating New ProjectsrdquoOutput Location See step 17 to step 20 of Section 31 ldquoCreating New Projectsrdquo
You can also click Edit on the Retrieval Status page to edit the settings of a project
You can also click View on the Retrieval Status page to edit the settings of a project
Chapter 3 Retrieving Data
32 Apollo Project User Guide16106R5 2009-03-24
37 Monitoring Project StatusYou can monitor the status of a project by viewing information on the Existing Projects Summary and Retrieval Status pages
371 Viewing an Overview of the Status of All ProjectsThe Existing Projects page is the default home page of Apollo Project You see this page when you first open Apollo Project or when you click Projects in the projects bar For more information see Section 341 ldquoViewing Existing Projectsrdquo on page 26
You can view the following information for all projects on the Existing Projects page
bull Name
bull Type
bull Current status
bull Last time the project run
bull Status of data retrieved
The Data Retrieved bars on the Existing Projects page show the overall status of the data retrieval For more information see Section 3731 ldquoStatus Coloursrdquo on page 34
Chapter 3 Retrieving Data
Apollo Project User Guide16106R5 2009-03-24
33
372 Viewing the Status of an Individual ProjectWhen you open a project a detailed summary of the project is shown on the Summary page For more information see Section 342 ldquoOpening a Projectrdquo on page 27
You can view the following information for each project on the Summary page
bull Date it was created
bull Date it was last modified
bull Current status
bull Last time it ran
bull Next time it will run
You can also view a summary of all of the settings you specified when you created the project (Store specifications selected Stores selected time series channel groups selected SOH channel groups start and end times number of files generated file interval and output format and locations)
All times are reported using the UTC time zone
Chapter 3 Retrieving Data
34 Apollo Project User Guide16106R5 2009-03-24
373 Monitoring the Status of a Running ProjectYou can view the data retrieval status of a project while it is running on the Retrieval Status page The Retrieval Status page is displayed automatically when you click Run Now to run a project You can also view this page by opening a project and clicking the Retrieval Status tab
The status for each channel group is expressed in the form of two numbers (for example 60100) and two bar graphs The first number is the percentage available of the total time requested (for example 60) and the second number is the percentage retrieved of the time available (for example 100) For more information on the bar graph status colours see Section 3731 ldquoStatus Coloursrdquo on page 34
You can also view retrieval details for each channel group listed on the Retrieval Status page For more information see Section 3732 ldquoViewing the Retrieval Details for Each Channel Grouprdquo on page 35
3731 Status Colours
The data retrieval status bars use the following status colours
The information that is displayed on the Retrieval Status page is updated continuously while a project is running
Table 3-1 Status colours
Colour Status
Green Apollo Project has retrieved the data
Yellow Apollo Project is attempting to retrieve available data from the Store
Red Data is available in the Store but Apollo Project has failed to retrieve it on this attempt Apollo Project will make additional attempts to retrieve the data up to the configured Maximum Number of Retrieval Attempts For information on how to set the Maximum Number of Retrieval Attempts setting see Section 31 ldquoCreating New Projectsrdquo on page 11
White Data for some portion of the requested time segment is not available in the Store For example there are gaps in the data or the retrieval request is for a future time segment
Chapter 3 Retrieving Data
Apollo Project User Guide16106R5 2009-03-24
35
3732 Viewing the Retrieval Details for Each Channel Group
You can view the retrieval status of each time segment for a channel group
1 Click a channel group name
2 Click the Channel Group Details button that is located to the right of the channel group name
The Remaining Retrieval Attempts column displays the number of times that Apollo Project will try to download each missing time segment for the channel group when the project is run again For information on how to set the Maximum Number of Retrieval Attempts setting see Section 33 ldquoConfiguring Apollo Projectrdquo on page 24
3 Click OK when you have finished viewing the details
Chapter 3 Retrieving Data
36 Apollo Project User Guide16106R5 2009-03-24
Apollo Project User Guide16106R5 2009-03-24
37
Appendix A Reference Information and Examples
Overview of Running Projects
Example Project Settings
Example Deployment Scenarios
Shot File Formats for Controlled Source Projects
A1 Overview of Running ProjectsWhen a project is run Apollo Project performs the following steps
1 The requested time ranges are identified
2 The channel groups for which data are to be retrieved are identified
3 The actual Stores specified by the Store specifications of the project are identified
For each identified Store the following steps are performed
1 A data availability analysis for the outstanding time ranges is performed These are for the ranges for which data has not already been retrieved The availability of the data is recorded for reference It is possible that a given Store was not present at the time the project was last run If this is the case then an attempt is made to retrieve all of the required time ranges of the project from the Store
2 If any data exists in the Store for any of the requested time ranges then a retrieval of this data is performed and the retrieved data is stored to local temporary files
3 If the number of retrieval attempts for a given time range exceeds a configurable threshold (see Section 33 ldquoConfiguring Apollo Projectrdquo on page 24) then the retrieval of data within the stated range is not attempted again
If any data was retrieved during the run of the project then the corresponding output files of the desired output format are generated and stored in the output location specified for the project
When running Apollo Project with Taurus version 2x the schedule for Archive projects must be greater than 5 minutes in duration Schedules that are less than 5 minutes can result in data that is missing or not downloaded
Appendix A Reference Information and Examples
38 Apollo Project User Guide16106R5 2009-03-24
It is possible that the requested data for a given channel group exists across multiple Stores If all of these Stores are included by the Store specifications for the project then Apollo Project assembles the requested data
When a project runs detailed information regarding the results of the retrieved data and processed data are available For more information see Section 37 ldquoMonitoring Project Statusrdquo on page 32
A2 Example Project Settings
A21 Example 1 One Time ProjectProject Name Project1
Project Type One Time
Channel groups selected for retrieval CASTN1OTBHZ (on taurus_1234)
Requested Time Range January 30 2008 1400 ndash 1500 UTC
File Interval 20 minutes
Output Location Base Directory disk2ApolloProjectOutputData
Output Location Subdirectories projectyearmonthday
Output Location Filenamestationnetwork_time
When the project is run successfully the following output files will be created on the server running Apollo Project
disk2ApolloProjectOutputDataProject120080130STN1CA_20080130_140000seed
disk2ApolloProjectOutputDataProject120080130STN1CA_20080130_142000seed
disk2ApolloProjectOutputDataProject120080130STN1CA_20080130_144000seed
Appendix A Reference Information and Examples
Apollo Project User Guide16106R5 2009-03-24
39
A22 Example 2 Controlled Source ProjectProject Name Project2
Project Type Controlled Source
Channel groups selected for retrieval CASTN1OTBHZ (on taurus_1234) CASTN1OTBHN (on taurus_1234)
Requested Shot Times January 30 2008 1400 UTC January 30 2008 1430 UTC
Pre Time 30 seconds
Post Time 30 seconds
Output Location Base Directory disk2ApolloProjectOutputData
Output Location Subdirectories projectyearmonthday
Output Location Filename timeformat
When the project is run successfully the following output files will be created on the server running Apollo Project
disk2ApolloProjectOutputDataProject22008013020080130_135930segysgy
disk2ApolloProjectOutputDataProject22008013020080130_142930segysgy
A3 Example Deployment Scenarios
A31 One TimeYou want to download three days of data from multiple instruments on the network save the data in MiniSEED format and create a file for every hour of data
A One Time project is the recommended solution The Store of each instrument can be made available to Apollo Project by creating a corresponding IP Address Store specification with the IP address of the instrument The requested time range can be specified along with a file interval of one hour Ensure that the instruments are configured to run in Communications mode
A32 Scheduled ArchiveYou want seismic data to be retrieved automatically from a group of instruments on the network every six hours The instruments are always accessible via an Ethernet connection
A scheduled Archive project is the recommended solution Use the Regular Interval scheduling option and set the interval to six hours
You can also run a scheduled Archive project at any time For example if the scheduled retrieval interval of a project is six hours and between intervals you want to retrieve the data three hours early you can run the project and approximately three additional hours of data would be accumulated About three hours later the project will run automatically and accumulate the remaining three hours of data
Appendix A Reference Information and Examples
40 Apollo Project User Guide16106R5 2009-03-24
A33 Manual ArchiveYou want to retrieve seismic data from a group of instruments but their respective Stores are only available for retrieval on occasion (no regular dependable schedule for retrieval from these Stores is possible)
A manually run Archive project is the recommended solution You can create the project and run it whenever any of the instruments are available for retrieval
A34 Field ArchiveYou want to collect data from a set of isolated instruments in the field at recurring intervals (for example twice per month)
A Field Archive project is the recommended solution You can create a Field Archive project and either add all instrument IP addresses to the list or use a Discovery specification The time for the last retrieval is stored on the instrument and all data is recovered from the last recovery time
A35 Media HarvestingYou want to collect the media from a set of instruments in the field at a regular interval (for example once per week) You also have to retrieve all of the seismic data on the media for subsequent analysis
An Archive project is the recommended solution Initially a directory is created on the file system of the server running Apollo Project A directory Store specification is created with this directory as the parent directory from which to search for Stores The content of each media instance in the weekrsquos collection is copied from a media reader to a subdirectory of the directory When the project is run all of the copied Stores are automatically available and the project accumulates data for each instrument
Due to the nature of media harvesting and the replacement procedure for this example data is always missing for the last period of output files for the current week This period corresponds to the time that the media was taken from the instrument and replaced with a new one The following week when the media is harvested again from the instruments in the field Apollo Project fills in the missing time for these files with the new Store data regardless of the media instance on which the data currently resides
You can only create and run Field Archive projects for Taurus version 30 or later
Appendix A Reference Information and Examples
Apollo Project User Guide16106R5 2009-03-24
41
A36 Trigger Downloading You have set up a network of five Tauruses around a hydro dam Each Taurus is accessible over an Ethernet connection and each is set to record data over the weekend You have set the period for data retrieval at 30 seconds before and five minutes after any seismic activity but the following procedure shows you why it is not necessary to view all of the data accumulated over the whole weekend
1 Select the Taurus at the site with the least environmental noise or determine the best site for generating triggers and designate this Taurus ldquoTaurus Ardquo for reference
You need to perform this task in advance More information about triggers can be found in the Taurus Portable Seismograph User Guide
2 Download the trigger file from ldquoTaurus Ardquo and review the file to verify the correct number of triggers
3 Follow these steps to create a new Triggers project
a) Click New on the Apollo Project Existing Projects page
b) Click Triggers as the project type and enter a unique name in the Project Name box
c) Click OK
d) Click the IP Address tab on the Store Selection tab
e) Enter the IP address of a Taurus
f) Click Add
g) Repeat step e until you have entered the IP addresses of all five of the Tauruses
Apollo Project adds the IP address specifications to the Selected Specifications section of the Store Selection page and finds all five Stores associated with the IP addresses and adds them to the Selected Stores section
h) Click the Channel Group Selection tab
i) Click Create Default Station Table to create a table for all of the currently selected Stores and discovered instruments
j) Review the selected channel groups and if required edit the mappings in the selected channel groups area of the tab (lower half of the tab)
k) Click the Time Selection tab
l) Click the Browse button
m)Select the trigger file that you downloaded in step 2 and click OK
n) Click Submit
The list of triggers is imported and displayed in the Triggers section on the Time Selection page
o) Enter a Pre Time of 30 seconds and a Post Time of 5 minutes
p) Click the Output Format tab
q) Click MiniSEED
r) Click All Instruments
s) Click the Output Location tab
Appendix A Reference Information and Examples
42 Apollo Project User Guide16106R5 2009-03-24
t) Enter the valid absolute path of the base directory for the processed data subfolders and files
u) Enter the expression used to define path names for subfolders under the base directory
v) Enter the expression used to define file names for the processed data files that are stored in the subfolders under the base directory
w) Click OK
4 Click the Run Now button on the Summary page
When the project has finished running the output folder you specified in step t will contain ten files Each output file will contain 5 minutes and 30 seconds of data from the five Tauruses
A4 Shot File Formats for Controlled Source ProjectsYou have two options for defining shots for a Controlled Source project manually defining shots or importing shots from a shot file
You can create shot files in one of following three file formats
Microsoft Office Excel (xls) ndash See Section A41 ldquoCreating a Shot File With Microsoft Office Excelrdquo on page 42
OpenOfficeorg Calc (ods) ndash See Section A42 ldquoCreating a Shot File With OpenOfficeorg Calcrdquo on page 44
Comma-Separated Values (csv) ndash See Section A43 ldquoCreating a Comma-Separated Values Shot Filerdquo on page 45
The Shot file templates are located in the docShotFileImport folder on the Apollo Project CD
A41 Creating a Shot File With Microsoft Office ExcelThe Microsoft Office Excel template for Apollo Project can be used with Microsoft Office Excel version 2003 or later
To create an Microsoft Office Excel based shot file
1 Double-click ShotFileTemplatexlt
A new Microsoft Office Excel file is created from the template and opens in the Microsoft Office Excel
2 Save the new spreadsheet as a Microsoft Office Excel document (xls)
3 Enter shot file data as specified in the Microsoft Office Excel spreadsheet
Only the decimal separator is supported for shot files Separators that denote the 3rd power of 10 (thousand) are not supported (for example 4500) The Microsoft Excel and OpenOffice templates reinforce these restrictions and are recommended for creating csv files
Appendix A Reference Information and Examples
Apollo Project User Guide16106R5 2009-03-24
43
You can enter data for multiple shot times
4 Click Save to save the file in Microsoft Office Excel format
5 Click File gt Save As and select CSV (Comma delimited) (csv) from the Save as type list
6 Click Save
7 Click OK on the message warning you that you are only saving the active sheet
8 Click Yes on the message warning you that file features might be incompatible with the csv format
9 Close Microsoft Office Excel
If you are using Microsoft Office Excel 2007 click the Microsoft Office Button and click Save As
Ensure that you save the file as a comma delimited file If the shot file is mistakenly saved in Microsoft Excel format (xls) the shot file will not work in Apollo Project
Appendix A Reference Information and Examples
44 Apollo Project User Guide16106R5 2009-03-24
A42 Creating a Shot File With OpenOfficeorg CalcThe OpenOffice template has been tested with OpenOfficeorg Calc version 23 Later versions of OpenOfficeorg Calc can be used at your discretion
To create a shot file based on the OpenOfficeorg Calc template
1 Double-click ShotFileTemplateots
A new OpenOffice spreadsheet is created from the template and opens in OpenOfficeorg Calc
2 Save the new spreadsheet as an OpenOffice Calc document (ods)
3 Enter the shot file data as specified in the OpenOffice spreadsheet
You can enter data for multiple shot times
4 Click Save to save the file in OpenOfficeorg Calc format
5 Click File gt Save As and select Text CSV (csv) from the Save as Type list
6 Select the Edit filter settings check box
7 Click Save
A warning message might appear that warns you that the document might contain formatting that cannot be saved in the csv format Click Yes on the warning message to save the file in csv format
The Export of text files window opens
8 Delete the double quotation marks () in the Text delimiter box and ensure that the Save cell content as shown check box is selected
9 Click OK to export the OpenOffice spreadsheet as a csv file
10 Click OK on the warning message
11 Close OpenOfficeorg Calc
Appendix A Reference Information and Examples
Apollo Project User Guide16106R5 2009-03-24
45
A43 Creating a Comma-Separated Values Shot FileYou can use any text editor to create a csv shot file
To create a csv shot file
1 Open ShotFileTemplatecsv in a text editor and save it with a different name
2 Format each line of the csv file as follows
Shot TimePre TimePost TimeLatitudeLongitudeElevation
For example
2008-08-28 103044090600000-6000004267
The format and units are as follows
3 Save the file as a csv formatted file
The csv shot file template is not compatible with Microsoft Office Excel Make sure that you do not double-click it and open it in Microsoft Office Excel
FormatUnits
Shot Time yyyy-mm-dd hhmmss
Pre Time seconds
Post Time seconds
Latitude degrees
Longitude degrees
Elevation meters
Appendix A Reference Information and Examples
46 Apollo Project User Guide16106R5 2009-03-24
Apollo Project User Guide16106R5 2009-03-24
47
Appendix B Retrieving SOH Data from a Taurus Version 2x
Taurus Version 2x SOH Data Retrieved by Apollo Project
Retrieving SOH Data from a Taurus Version 2x Streaming to Apollo Server
B1 Taurus Version 2x SOH Data Retrieved by Apollo Project This section presents the predefined datasets of SOH data Apollo Project will retrieve from a Taurus version 2x either through a direct connection or a stream to Apollo Server For instruction on retrieving streaming Taurus version 2x data from Apollo Server see Section B2 ldquoRetrieving SOH Data from a Taurus Version 2x Streaming to Apollo Serverrdquo on page 48
The order of the columns presented in the table below will differ when streaming Taurus version 2x SOH data from Apollo Server
Predefined SOH group SOH data
GPS Time Time (longsecs) (the number of seconds since 1970-01-01)Time (UTC) (time in yyyy-mm-dd hhmmssms format)Altitude (m)DAC CountError (ns) (time error)GPS Engine StatusLast Update Time(s)Lat (deg) (latitude in degrees)Long (deg) (longitude in degrees)NumSatellites (number of satellites used)PDOPPhaseLock (system clock phase lock)TDOPUncertainty (ns) (time uncertainty)
Note The values for Number of satellites used PDOP and TDOP are provided by the GPS receiver at the Last update time In order to see what time these values correspond to look at the Last update time When GPS is off these three parameters and the Last update time are not updated The last value displays until the next update arrives (after the GPS is turned on again)
Appendix B Retrieving SOH Data from a Taurus Version 2x
48 Apollo Project User Guide16106R5 2009-03-24
B2 Retrieving SOH Data from a Taurus Version 2x Streaming to Apollo ServerThis section provides instruction on configuring your Taurus version 2x to stream data to Apollo Server and instructions on how to use Apollo Project to retrieve this data from Apollo Server
B21 Streaming Data from a Taurus Version 2x to Apollo ServerUse the Taurus graphical user interface on either the Taurus display screen or through a Web browser to set up an NP stream from a Taurus version 2x to Apollo Server
1 Log in to the Taurus version 2x with either the tech or central user account
2 Select Advanced Configuration gt Communications gt NP Data Streaming
GPS Satellites Time (longsecs) (the number of seconds since 1970-01-01)Time (UTC) (time in yyyy-mm-dd hhmmssms format)
For each satelliteAcquisition FlagLast Update Time (ms)PRNSatellite Azimuth (microordm)Satellite Elevation (microordm)Signal Level (AMU)
Environment Time (longsecs) (the number of seconds since 1970-01-01)Time (UTC) (time in yyyy-mm-dd hhmmssms format)External SOH Voltage 1 (V) (12-bit voltage input) External SOH Voltage 2 (V) (12-bit voltage input) External SOH Voltage 3 (V) (12-bit voltage input) External SOH Voltage 4 (V) (12-bit voltage input) Sensor SOH Voltage 1 (V)Sensor SOH Voltage 2 (V)Sensor SOH Voltage 3 (V)
Instrument Time (longsecs) (the number of seconds since 1970-01-01)Time (UTC) (time in yyyy-mm-dd hhmmssms format)Controller Current (mA)Digitizer Current (mA)NMX Bus Current (mA) (external connector)Sensor Current (mA)Serial Port Current (mA)Supply Voltage (mV)Temperature (ordmC)
Predefined SOH group SOH data
Appendix B Retrieving SOH Data from a Taurus Version 2x
Apollo Project User Guide16106R5 2009-03-24
49
3 To have the Taurus stream both time series and SOH data to Apollo Server select both Stream Time Series and Stream SOH
-OR-
Select only Stream SOH if you only want to retrieve the SOH data from Apollo Server
4 Type the IP address for Apollo Server in the IP Address box
5 Type the port number Apollo Server uses to receive data in the Port box By default this is port number 32008
6 The Second IP Address and Second Port boxes are not necessary however cannot be left blank Type 127001 in the Second IP Address box and 32004 in the Second Port box
7 Type a value in the Maximum Throughput [bps] box if a limited data link is present between the Taurus and Apollo Server For instance if at some point the data link is limited to 9600 bps then this is the maximum throughput the link can allow If there are no throughput limitations set the value in this box to zero to disable the throughput limitation
8 Click Apply
9 Click Commit
B22 Retrieving Taurus Version 2x Data from Apollo ServerCreate a new project or use an existing project in Apollo Project to retrieve the Taurus version 2x data from Apollo Server For more information on creating or editing projects refer to Section 31 ldquoCreating New Projectsrdquo on page 11 and Section 36 ldquoEditing and Viewing the Settings of Projectsrdquo on page 31
When creating or editing the project
a) Add an IP address Store specification on the Store Selection tab (see step 4 in Section 31 ldquoCreating New Projectsrdquo) for Apollo Server including its client Web application port number Use the format
Apollo Server IP AddressApollo Server Client Web Application Port Number
b) Apply the appropriate filters on the Channel Group Selection tab to retrieve the desired channel groups from the Taurus version 2x See step 5 through step 12 in Section 31 ldquoCreating New Projectsrdquo for instruction on using the Channel Group Selection tab
Appendix B Retrieving SOH Data from a Taurus Version 2x
50 Apollo Project User Guide16106R5 2009-03-24
Apollo Project User Guide16106R5 2009-03-24
51
Appendix C Glossary
Glossary of Abbreviations and Terms
List of Unit Abbreviations and Symbols
C1 Glossary of Abbreviations and Terms
A
ASCIIAmerican Standard Code for Information Interchange
B
BHEBroad Band High Gain Seismometer East-West Orientation
Channel name based on the Global Seismological Network (GSN) standard
BHNBroad Band High Gain Seismometer North-South Orientation
Channel name based on the Global Seismological Network (GSN) standard
BHZBroad Band High Gain Seismometer Vertical Orientation
Channel name based on the Global Seismological Network (GSN) standard
Appendix C Glossary
52 Apollo Project User Guide16106R5 2009-03-24
C
CSVComma-Separated Values
D
DACDigital to Analog Converter
G
GPSGlobal Positioning System
J
JREJava Runtime Environment
JVMJava Virtual Machine
N
NFSNetwork File System
P
PDOPPosition Dilution of Precision
PRNPseudo-random Number
Appendix C Glossary
Apollo Project User Guide16106R5 2009-03-24
53
S
SACSeismic Analysis Code
An Apollo Project output file format that generates files that can be used by the SAC software (see http wwwirisedusoftwaresac)
SEEDStandard for the Exchange of Earthquake Data
SMBServer Message Block
SOHState of Health
T
TCPIPTransmission Control ProtocolInternet Protocol
TDOPTime Dilution of Precision
U
UNCUniform Naming Convention or Universal Naming Convention
URLUniform Resource Locator
UTCCoordinated Universal Time
Appendix C Glossary
54 Apollo Project User Guide16106R5 2009-03-24
C2 List of Unit Abbreviations and SymbolsTable C-1 provides a list of unit abbreviations and symbols commonly used in Nanometrics documentation
Table C-1 Unit abbreviations and symbols
Abbreviation or Symbol Definition Abbreviation
or Symbol Definition
deg degree lb pound
Oslash diameter m metre
micro micro ms metre per second
Ω ohm ms2 metre per second squared
A ampere mA milliampere
AC alternating current MB megabyte
b bit MΩ megaohm
B byte MHz megahertz
bps bits per second mi mile
C Celsius mL millilitre
cm centimetre mm millimetre
dB decibel ms millisecond
DC direct current MTU maximum transmission unit
F farad mV millivolt
ft foot mW milliwatt
g gram N Newton
g gravity nF nanofarad
GB gigabyte ns nanosecond
GHz gigahertz rad radian
Hz hertz rads radian per second
in inch s second
KB kilobyte sps samples per second
kg kilogram U rack unit
kHz kilohertz V volt
kΩ kiloohm Vpp Volts peak-to-peak
kW kilowatt W watt
L litre
Apollo Project User Guide16106R5 2009-03-24
55
About NanometricsNanometrics is a world leader in the development of precision instrumentation network technology and software applications for seismological and environmental studies Using Nanometrics technology our customers establish and grow research networks that are often located in extreme environments such as the frozen Arctic and Antarctic the arid deserts of the Middle East the jungles of South America and the depths of the worlds oceans Many of these are mission-critical national and regional networks that demand the highest possible data quality and availability
Nanometrics provides end-to-end solutions that include a growing portfolio of broadband and strong motion seismometers dataloggers and digitizers satellite ground station systems for remote site data collection and software applications for data and network analysis and management To support this portfolio Nanometrics also provides global systems engineering services for design installation and support of complete networks
Our head office research and development centre and production facility are located in the Kanata North Business Park of Ottawa the high-technology heart of Canadas capital region
Contacting NanometricsNanometrics Inc250 Herzberg RoadKanata Ontario Canada K2K 2A1Phone +1 613-592-6776Fax +1 613-592-5929Email infonanometricscaWeb wwwnanometricsca
Contacting Technical SupportIf you need technical support please submit a request on the Nanometrics technical support site or by email or fax Include a full explanation of the problem and related information such as log filesSupport site httpsupportnanometricsca
Email techsupportnanometricsca
Apollo Project User Guide16106R5 2009-03-24
1
Chapter 1 Getting Started
About Apollo Project
Operating Requirements
11 About Apollo ProjectApollo Project is a Web application that conveniently retrieves time series and state of health data from any Nanometrics Store including those on Nanometrics instruments and those copied to network computers Available through any Web browser the client application provides options for you to define complex reusable data retrieval tasks called projects
Apollo Project has five project types
Archive projects retrieve data from sources that are continually updated such as a directory on a computer that has new data saved to it periodically or a multicast group of Nanometrics instruments that has different instruments active at different times You can schedule Archive projects to run automatically
One Time projects retrieve a single time segment of data
Controlled Source projects retrieve data specified as a set of shots
Triggers projects retrieve data specified by a trigger list in comma-separated value (CSV) format
Field Archive projects perform recurring data retrievals storing the time of the current retrieval on the Nanometrics instrument Using the time of the last retrieval Field Archive projects only retrieve the data accumulated since the last time the project was run on the instrument
Data for time series channel groups can be downloaded in MiniSEED SAC (binary format) Seisan or SEGY format depending on the project type Data for SOH channel groups is always downloaded in CSV format
Chapter 1 Getting Started
2 Apollo Project User Guide16106R5 2009-03-24
12 Operating RequirementsApollo Project has licensing client and server operating requirements These requirements are listed in Section 121 Section 122 and Section 123
121 Software LicenceIf you have ordered and received an Apollo Project software licence from Nanometrics install this file during the Apollo Project Web server installation or later using the Nanometrics Product Licence Installation Wizard See Section 22 ldquoInstalling an Apollo Project Licence Filerdquo on page 7 for licence installation instructions for Microsoftreg Windows Linux and Mac OSreg X server installations
The licence determines the number of projects you can save the number of time series channels you can select and the number of projects you can run concurrently Without a licence Apollo Project defaults to the unlicensed configuration This configuration allows you to save one project definition at a time for up to three time series channels from any combination of Stores
122 ClientThe client requirements for any platform are a Web browser with JavaScript enabled and IP access to the server Apollo Project version 14 has been tested with Microsoft Internet Explorer version 7 and Mozilla Firefox versions 2 and 3 Other browsers have not been fully tested with the client but may be used at your discretion
123 ServerRun the Apollo Project Web server on Windows Linux or Mac OS X For the
Windows operating requirements see Table 1-1 ldquoRequirements for an Apollo Project server running Windowsrdquo on page 3
Linux operating requirements see Table 1-2 ldquoRequirements for an Apollo Project server running Linuxrdquo on page 3
Mac OS X operating requirements see Table 1-3 ldquoRequirements for an Apollo Project server running Mac OS Xrdquo on page 3
Installing a licence file after creating a project in Apollo Project will result in the loss of that project It is recommended that you install your licence before running Apollo Project for the first time
Click the About button in the client application to view licence information
Chapter 1 Getting Started
Apollo Project User Guide16106R5 2009-03-24
3
Table 1-1 Requirements for an Apollo Project server running Windows
System component Requirement
Operating system Windows XP with Service Pack 3Memory 1GB RAM minimum
2GB RAM recommendedDisk space Required free disk space for every 3 time series channels of data
retrieved is approximately 2GB per month This is roughly twice as much space as the retrieved data occupies in a Store
Java Sun Java Runtime Environment (JRE) version 60Software licence Order a licence from Nanometrics if capabilities beyond that of the
unlicensed configuration are required (see Section 121 ldquoSoftware Licencerdquo on page 2)
Table 1-2 Requirements for an Apollo Project server running Linux
System component Requirement
Operating system Any distribution running a GNULinux kernel of version 24 or laterTested on Red Hat Linux 9 (kernel 2420-8)
Memory 512MB RAM minimum2GB RAM recommended
Disk space Required free disk space for every 3 time series channels of data retrieved is approximately 2GB per month This is roughly twice as much space as the retrieved data occupies in a Store
Java Sun Java Runtime Environment (JRE) version 60Software licence Order a licence from Nanometrics if capabilities beyond that of the
unlicensed configuration are required (see Section 121 ldquoSoftware Licencerdquo)
Table 1-3 Requirements for an Apollo Project server running Mac OS X
System component Requirement
Operating system Mac OS X (1052 and later)Memory 1GB RAM minimum
2GB RAM recommendedDisk space Required free disk space for every 3 time series channels of data
retrieved is approximately 2GB per month This is roughly twice as much space as the retrieved data occupies in a Store
Java Sun Java Runtime Environment (JRE) version 60
Notes on the JRE for Mac systems JRE version 60 must be manually downloaded and installedAfter installing the JRE it must be set as the default Java Virtual Machine (JVM)
Software licence Order a licence from Nanometrics if capabilities beyond that of the unlicensed configuration are required (see Section 121 ldquoSoftware Licencerdquo on page 2)
Chapter 1 Getting Started
4 Apollo Project User Guide16106R5 2009-03-24
Apollo Project User Guide16106R5 2009-03-24
5
Chapter 2 Installing and Starting Apollo Project
Installing the Apollo Project Web Server
Installing an Apollo Project Licence File
Starting the Apollo Project Web Server
Running Apollo Project Client
Upgrading Apollo Project
21 Installing the Apollo Project Web ServerThe Apollo Project Web server is installed on a single computer and after it is installed and running the client can run locally on the server or on any computer with a Web browser and network access to the server computer
All Stores must be accessible from the server hosting the Apollo Project Web server All output files are created on the server and its accessible file systems as described in Section 33 ldquoConfiguring Apollo Projectrdquo on page 24
To install the Apollo Project Web server on a server computer running Windows Linux or Mac OS X
1 Install a supported version of the Java Runtime Environment JRE version 60 or later
2 If you have received a licence file from Nanometrics ensure it is in a drive or network location that is accessible to the Apollo Project Setup Wizard
You can install and run Apollo Project without a licence file For details see Section 121 ldquoSoftware Licencerdquo on page 2 Should you require a licence after Apollo Project is installed you can install a licence using the Nanometrics Licence Installation Wizard See Section 22 ldquoInstalling an Apollo Project Licence Filerdquo on page 7
Chapter 2 Installing and Starting Apollo Project
6 Apollo Project User Guide16106R5 2009-03-24
3 Follow the instructions for your operating system in Table 2-1
211 Uninstalling Apollo Project Web ServerTable 2-2 provides instructions for uninstalling Apollo Project from the server computer for each of the supported operating systems
Table 2-1 Installation instructions
Operating System To install the Apollo Project Web server
Windows 1 Double-click ApolloProject_windows_x_x_xexe where x_x_x is the Apollo Project version number on the Apollo Project CD
2 Follow the steps of the installation wizard making changes to the default settings as required
Linux 1 Open a Terminal window and change the directory to the Apollo Project CD
2 Run the following as rootsh ApolloProject_unix_x_x_xsh (where x_x_x is the Apollo Project version number)
3 Follow the steps of the installation wizard making changes to the default settings as required
Mac OS X 1 Double-click the ApolloProject_macos_x_x_xdmg where x_x_x is the Apollo Project version number disc image on the Apollo Project CDThe disc image mounts as a new volume on your desktop and automatically displays its contents in a Finder window
2 Double-click the installation file Apollo Project Installer in the Finder window
3 Follow the steps of the installation wizard making changes to the default settings as required
Note After installing Apollo Project you can drag the disc image to the Trash to eject it and remove it from your desktop
If you are uninstalling a version of Apollo Project prior to version 13 refer to the version 12 user guide for instruction on uninstalling Apollo Project
Apollo Project Version 12 User Guide revision 16106R2 released on 2008-09-09
Table 2-2 Uninstalling the Apollo Project Web server
Operating System To uninstall the Apollo Project Web server
Windows Click Start gt All Programs gt Nanometrics gt Apollo Project gt Apollo Project Uninstaller
Linux 1 Open a Terminal window and change the directory to the Apollo Project directory The location of the Apollo Project directory was defined when you installed Apollo Project The default location is optnanometricsApolloProject
2 Run the following as root uninstall
Mac OS X 1 Open the Finder2 Click Applications under Places3 Double-click the Apollo Project folder 4 Double-click Apollo Project Uninstaller
Chapter 2 Installing and Starting Apollo Project
Apollo Project User Guide16106R5 2009-03-24
7
22 Installing an Apollo Project Licence FileIf you did not install a licence file during the installation of the Apollo Project Web server application you can install one at any time using the Nanometrics Product Licence Installation Wizard
A licence for Apollo Project is only required if capabilities beyond those of the unlicensed version are needed See Section 121 ldquoSoftware Licencerdquo on page 2 for descriptions of the licensed and unlicensed versions Contact Nanometrics to order a licence (see Contacting Nanometrics on page 55)
If you have obtained a licence file from Nanometrics use the following steps to install the file
Installing a licence file after creating a project in Apollo Project will result in the loss of that project It is recommended that you install your licence before running Apollo Project for the first time
Operating System To install an Apollo Project licence file
Windows 1 Ensure the licence file is in a drive or network location that is accessible to the licence installation wizard
2 Click Start gt All Programs gt Nanometrics gt Apollo Project gt NmxLicenceInstaller
3 Follow the steps in the license installation wizard to select and install the licence file
Linux 1 Ensure the licence file is in a drive or network location that is accessible to the licence installation wizard
2 Open a Terminal window and change the directory to the Apollo Project directory The location of the Apollo Project directory was defined when you installed Apollo Project The default location is optnanometricsApolloProject
3 Run the following NmxLicenceInstaller
Mac OS X 1 Ensure the licence file is in a drive or network location that is accessible to the licence installation wizard
2 Open the Finder3 Click Applications under Places4 Double-click the Apollo Project folder 5 Double-click NmxLicenceInstaller6 Follow the steps in the license installation wizard to select and install
the licence file
Chapter 2 Installing and Starting Apollo Project
8 Apollo Project User Guide16106R5 2009-03-24
23 Starting the Apollo Project Web ServerUse the procedures in Table 2-3 that correspond to your Apollo Server computerrsquos operating system to start the Apollo Project Web server application
24 Running Apollo Project ClientIf you are running the Apollo Project client on the computer where the server application is installed open a browser and go to
httplocalhostPort
Where localhost is the local computer and port is the port number configured during installation The default port number for Apollo Project is 8088
To run an Apollo Project client when the server application resides on a different computer open a browser and go to
httpServer computer name or IP addressPort
For example if the domain name of the server computer is ApolloProjectServer with an IP address of 192168220 and the default port number of 8088 is being used the URL for the client application in your browser will be
httpApolloProjectServer8088
ndash OR ndash
http1921682208088
241 Troubleshooting Running Apollo Project ClientIf you are having trouble opening the Apollo Project client in your Web browser try these suggestions
a) Ensure that the Apollo Project Web server application is running on the Apollo Project server computer See Section 23 ldquoStarting the Apollo Project Web Serverrdquo
Table 2-3 Starting the Apollo Project Web server
Operating System To start the Apollo Project Web server
Windows Click Start gt All Programs gt Nanometrics gt Apollo Project gt Apollo ProjectLinux 1 Open a Terminal window and change the directory to the Apollo
Project directory The location of the Apollo Project directory was defined when you installed Apollo Project The default location is optnanometricsApolloProject
2 Run the following ApolloProject
Mac OS X 1 Open the Finder2 Click Applications under Places3 Double-click the Apollo Project folder 4 Double-click Apollo Project to start the Web server
Chapter 2 Installing and Starting Apollo Project
Apollo Project User Guide16106R5 2009-03-24
9
b) Verify that the firewall on the server computer is not blocking the port number used to serve Web pages (by default the port number is 8088) To check the port number used open ApolloProjectvmoptions in the ApolloProject folder and note the number identified for the -Dserverport setting
242 Stopping the Apollo Project Web ServerThe Apollo Project client provides the means to stop the Apollo Project Web server application To stop the Apollo Project Web server
1 Open the Apollo Project client
2 Click the Shut down Apollo Project button
3 Click OK to confirm the Web server shutdown
25 Upgrading Apollo ProjectTo upgrade Apollo Project from a previous version
1 Uninstall the Apollo Project Web server application as per Section 211 ldquoUninstalling Apollo Project Web Serverrdquo on page 6
2 Install the new version of Apollo Project as per Section 21 ldquoInstalling the Apollo Project Web Serverrdquo on page 5
When you shut down the Apollo Project Web server all clients are disconnected from the server To restore connectivity start the Apollo Project Web server using the instructions in Section 23 ldquoStarting the Apollo Project Web Serverrdquo on page 8
During the upgrade process all downloaded data will remain intact however you will need to recreate your projects and settings in the new version of Apollo Project
For Windows and Linux installations if you are upgrading from an earlier version of Apollo Project that used Apache Tomcat it is strongly recommended that you uninstall Tomcat before installing the new version of Apollo Project
Refer to the version 12 user guide for instruction on uninstalling versions of Apollo Project prior to version 13
Apollo Project Version 12 User Guide revision 16106R2 released on 2008-09-09
If you are using a licensed version of Apollo Project you will need a new licence file when installing the upgrade If you have not received a new licence file contact Nanometrics (see Contacting Nanometrics on page 55)
Chapter 2 Installing and Starting Apollo Project
10 Apollo Project User Guide16106R5 2009-03-24
Apollo Project User Guide16106R5 2009-03-24
11
Chapter 3 Retrieving Data
Creating New Projects
Creating a Station Table File
Configuring Apollo Project
Managing Projects
Running Projects
Editing and Viewing the Settings of Projects
Monitoring Project Status
31 Creating New ProjectsYou can create multiple projects up to the number supported by the software licence (see Section 121 ldquoSoftware Licencerdquo on page 2)
When you create a new project you have to
bull Select data Stores
bull Specify a station table file
bull Select the channel groups you want to download data from
bull Specify when you want the project to run
bull Select the output format
bull Specify the output location
To create a new project
1 Click New on the Apollo Project Existing Projects page
2 Click a project type and enter a unique name in the Project Name box
3 Click OK
Chapter 3 Retrieving Data
12 Apollo Project User Guide16106R5 2009-03-24
4 Select one or more data Stores by performing the following steps
Store type DescriptionSteps
File A file Store specification defines a particular Store that resides on a file system accessible by the server running Apollo Project The file system can be a local or a networked file system (for example accessible via SMB or NFS)
1 Click the File tab2 Enter the full path and file name of a Store file3 Click Add
Apollo Project adds the specification to the Selected Specifications section of the Store Selection page and finds all related Store files and adds them as a single Store to the Selected Stores section
Directory A directory Store specification defines the set of Stores that reside in a particular directory hierarchy on a file system accessible by the server running Apollo Project A recursive search from the specified directory identifies all of the available Stores The file system can be a local or a networked file system (for example accessible via SMB or NFS)
1 Click the Directory tab2 Enter a directory path name
If you specify a root directory such as C it will take a long time for Apollo Project to find all of the Store files in that root directory
3 Click AddApollo Project adds the specification to the Selected Specifications section of the Store Selection page and finds and adds all Stores in the specified directory and its subdirectories to the Selected Stores section
IP Address An IP Address Store specification defines the Store of a single instrument (or an instance of Apollo Server) The specified IP address must be an IP address bound to the Ethernet interface of an instrument At the same time the instrument must be running in communications mode and be accessible from the server running Apollo Project
1 Click the IP Address tab2 Enter the IP address of an instrument3 Click Add
Apollo Project adds the specification to the Selected Specifications section of the Store Selection page and finds all Stores associated with the IP address and adds them to the Selected Stores section
Chapter 3 Retrieving Data
Apollo Project User Guide16106R5 2009-03-24
13
Discovery A discovery Store specification specifies the Stores of multiple instruments In this case a class D (multicast) IP address and port is specified It is assumed that the Store of any instrument in communications mode is accessible from the LAN of the Apollo Project server When Discovery is enabled for the specified IP address and port these attributes are included upon running the project
1 Click the Discovery tab2 Enter the multicast address and port number of a group of instruments
For example 224199711386776Multicast addresses range from 224000 through 239255255255
3 Click AddApollo Project adds the specification to the Selected Specifications section of the Store Selection page and finds all Stores associated with the multicast address and adds them to the Selected Stores section of the Store Selection page
Notes When multiple multicast groups are used for discovery the port number must differ from existing discovery port numbers by 2 for each discovery port number in use x there must be no other discovery port configured for use with a value of x or x+1For example the default discovery multicast group used by Taurus is 224199711386776 To add another multicast group you have to specify a different port number (which cannot be 6776 or 6777)
Recent Specs
Apollo Project keeps the 16 most recently defined Store specifications and groups them by category on the Recent Specs page
1 Click the Recent Specs tab2 Expand a specification category (File Directory IP Address or Discovery)
and select a specification3 Click Add
Apollo Project adds the specification to the Selected Specifications section of the Store Selection page and finds all Stores associated with the specification and adds them to the Selected Stores section
Each time a project is run Apollo Project generates a list of available Stores based on the selected Store specifications The actual Stores from which data is retrieved can vary on successive project runs For example a discovery Store specification might result in a different number of instruments being included depending on current access to the instruments
Remove a specification (and its associated Stores) by selecting it and clicking Remove Remove all specifications (and all Stores) by clicking Remove All You cannot remove individual Stores from a specification but you can add a different specification and select a different group of Stores Alternatively you can use channel group attributes filtering to select the channel groups that data is retrieved from
When copying a Store from an instrument to your local computer do not overwrite an existing Store Instead delete the existing Store or move it to a different folder on the computer Stores are made up of multiple volumes and if the new Store has fewer volumes than the old Store you could see some unpredictable results with Apollo Project
Store type DescriptionSteps
Chapter 3 Retrieving Data
14 Apollo Project User Guide16106R5 2009-03-24
5 Click the Channel Group Selection tab
6 If you defined a default station table file and want to use it for this project go to step 7
For more information see Section 32 ldquoCreating a Station Table Filerdquo on page 22
-OR-
Click Create Default Station Table to create a table for all of the currently selected Stores and discovered instruments for this project using the default settings for the network name location and channel names
The default settings for the network name location and channel names are defined in the Behaviour and Defaults dialog box For more information see Section 33 ldquoConfiguring Apollo Projectrdquo on page 24
-OR-
Enter the path and file name of a station table for this project
7 If you want to download all data from all available Stores verify that the Retrieve data from all channel groups (do not filter) check box is selected and go to step 12
-OR-
If you want to filter the data by specific channel groups and channel group attributes go to step 8
8 Clear the Retrieve data from all channel groups (do not filter) check box
9 Select the time series channel groups you want to download data from
A station table is used to assign names to all of the selected channel groups For more information see Section 32 ldquoCreating a Station Table Filerdquo on page 22
If new Stores are found after a station table file has been defined for a project (for example as a result of Discovery or a directory specification) the default channel group names are used in the output files and no filtering is applied to the channel groups
If the text ldquoSelected Time Series Channels x of xrdquo where x represents the number of channels is red you have selected more time series channels than your licence permits You must select a valid number of time series channels (for the unlicenced version of Apollo Project there is a maximum of three time series channels) before you can create your project
Chapter 3 Retrieving Data
Apollo Project User Guide16106R5 2009-03-24
15
10 Select the state of health (SOH) channel groups you want to download data from Each group has a predefined dataset
To view the SOH data retrieved from a Taurus version 2x see Appendix B ldquoRetrieving SOH Data from a Taurus Version 2xrdquo
Predefined SOH group SOH data
GPS Time Time (longsecs) (the number of seconds since 1970-01-01)Time (UTC) (time in yyyy-mm-dd hhmmssms format)DAC CountGPS Engine StatusGPS Last Update Time(s)GPS PDOPGPS Satellites Used (number of satellites used)GPS TDOP Lat (deg) (latitude in degrees)Long (deg) (longitude in degrees)Timing Error (ns)Timing Phase Lock (system clock phase lock)Timing Uncertainty (ns)
Note The values for Number of satellites used PDOP and TDOP are provided by the GPS receiver at the Last update time In order to see what time these values correspond to look at the Last update time When GPS is off these three parameters and the Last update time are not updated The last value displays until the next update arrives (after the GPS is turned on again)
GPS Satellites Time (longsecs) (the number of seconds since 1970-01-01)Time (UTC) (time in yyyy-mm-dd hhmmssms format)
For each satelliteGPS Satellite Acquisition FlagGPS Satellite Azimuth (microordm)GPS Satellite Elevation (microordm)GPS Satellite Last Update Time (ms)GPS Satellite PRN GPS Satellite Signal Level (AMU)
Environment Time (longsecs) (the number of seconds since 1970-01-01)Time (UTC) (time in yyyy-mm-dd hhmmssms format)External SOH Voltage 1 (V) (12-bit voltage input)External SOH Voltage 2 (V) (12-bit voltage input)External SOH Voltage 3 (V) (12-bit voltage input)External SOH Voltage 4 (V) (12-bit voltage input)Sensor SOH Voltage 1 (V)Sensor SOH Voltage 2 (V)Sensor SOH Voltage 3 (V)
Chapter 3 Retrieving Data
16 Apollo Project User Guide16106R5 2009-03-24
11 If required enter additional filter information as comma-delimited text into the Network Station Location Channel and Instrument boxes
You can use an asterisk ()to represent 1 or more characters
12 Review the selected channel groups and if required edit the channel group mappings in the selected channel groups area of the tab
Channel groups that do not have a mapping appear as blanks in the selected channel groups area of the tab Mapping information for these channel groups can be entered and saved in the station table file for future projects
You can edit the mappings at any time The changes are reflected in future runs of any project using that same station table file For more information see Section 32 ldquoCreating a Station Table Filerdquo on page 22
13 Click the Time Selection tab and follow the steps for the project type you selected
Instrument Time (longsecs) (the number of seconds since 1970-01-01)Time (UTC) (time in yyyy-mm-dd hhmmssms format)Controller Current (mA)Digitizer Current (mA)NMX Bus Current (mA) (external connector)Sensor Current (mA)Serial Port Current (mA)Supply Voltage (mV)Temperature (ordmC)
Look in the selected channel groups area of the tab (lower half of the tab) for examples of filter details you can enter in the Network Station Location Channel and Instrument ID filter boxes
The NetworkStationLocationChannel column of the table presents information in the format implied by the column title For instance in an entry of XXA099901BHE(1) XX represents the network(2) A0999 represents the station(3) 01 represents the location(4) BHE represents the channel
Look at the Instrument ID column of the table for an example of an instrument name and serial number such as taurus_0999
Only mappings that are applicable for the selected channel groups appear in the selected channel groups area of the tab
All times use the UTC time zone
Predefined SOH group SOH data
Chapter 3 Retrieving Data
Apollo Project User Guide16106R5 2009-03-24
17
Project type DescriptionSteps
Archive Archive projects attempt to retrieve data up to the current timeThe time ranges for which output files will be produced are driven from the file interval and are aligned to the project start time It is therefore unlikely that the ldquomost recentrdquo file interval will align with the current time Therefore the most recent range for which data retrieval is attempted will have a portion of its data retrieved and the remainder (for future retrieval) will be declared unavailable However when the project is run later (after the end of the particular time range) the unavailable data will normally be retrieved and the situation will likely repeat itself with the ldquonewrdquo last range to retrieveTo run an Archive project manually1 If required edit the start time for the project2 Click Manual3 Specify the file interval
For example if you specify 2 hours then one file is created every 2 hours If the duration for the project is one day then a total of 12 files will be created
4 After you have finished creating the project click Run Now on the Summary page to run the project
To schedule an Archive project to run automatically at a regular interval1 Click Regular Interval and select the interval 2 Specify the file interval
For example if you specify 2 hours then one file is created every 2 hours If the duration for the project is one day then a total of 12 files will be created
3 After you have finished creating the project click Start Schedule on the Summary page to start the schedule for the project and click OK twice The project will run according to the interval you specified after you start the schedule For example if you click Start Schedule on a Wednesday and you specified every 2 days as the interval then the project will run for the first time on Friday and every two days after that If the computer has been rebooted and the Apollo Project Web server has been restarted the project will run according to the interval you specified after the computer has rebooted For example if the computer reboots on a Wednesday and you specified every 2 days as the interval then the project will run for the next time on Friday and every two days after that
Note Archive projects that are defined as scheduled projects can also be run manually at any timeTo schedule an Archive project to run automatically on a weekly basis1 If required edit the start time for the project2 Click Weekly Schedule and select the time and days of the week 3 Specify the file interval
For example if you specify 2 hours then one file is created every 2 hours If the duration for the project is one day then a total of 12 files will be created
4 After you have finished creating the project click Start Schedule on the Summary page to start the schedule for the project and click OK twice After you have finished creating the project the project will run for the first time according to the project start time and then it will run on a weekly basis according to the times and days you specified
Note Archive projects that are defined as scheduled projects can also be run manually at any time
Chapter 3 Retrieving Data
18 Apollo Project User Guide16106R5 2009-03-24
One Time A One Time project retrieves a single time segmentTo specify the start and end times for a One Time project1 If required edit the start time for the project2 Click End Time and enter an end time
-OR-Click Duration and specify the duration of the project The duration is the length of the requested time segment
3 Specify the file intervalFor example if you specify 2 hours then one file is created every 2 hours If the duration for the project is one day then a total of 12 files will be created
4 After you have finished creating the project click Run Now on the Summary page to run the project
Controlled Source
A Controlled Source project retrieves data specified as a set of individually entered shots and outputs the data in SEGY format To specify shots using a shots file1 Click Browse select a shots file and click OK2 Click Submit
The list of shots is imported and displayed in the Shot List section on the Time Selection page
Note For more information see Section A4 ldquoShot File Formats for Controlled Source Projectsrdquo on page 42To manually define shots1 Enter a shot time2 If required enter the latitude longitude and elevation3 If required select the pre-shot time period4 Select the post-shot time period5 Click Add
The shot is added to the Shot List section on the Time Selection page Triggers A Triggers project uses a CSV-formatted trigger list to specify the data to be
retrieved for example a trigger file that has been downloaded from a Taurus to the local computerTo define triggers1 Click Browse select a CSV triggers file and click OK2 Click Submit
The list of triggers is imported and displayed in the Triggers section on the Time Selection page
3 Select the pre-trigger and post-trigger time periodsThe pre-trigger and post-trigger time periods are used for all of the triggers
Project type DescriptionSteps
Chapter 3 Retrieving Data
Apollo Project User Guide16106R5 2009-03-24
19
14 If you selected a Controlled Source as the project type in step 2 go to step 17
You do not have to select an output format for a Controlled Source project because the output format for a Controlled Source project is always SEGY one output file is generated for all instruments and the stations are sorted by StationNameNetworkName
-OR-
If you selected one of the other project types go to step 15 to select an output format
15 Click the Output Format tab
Field Archive A Field Archive project is used for recurring data retrievals that occur at specified intervals The time of the last retrieval is stored on the instrumentTo define the start time and file interval1 If required edit the start time for the project2 Specify the file interval
For example if you specify 2 hours then one file is created every 2 hours3 If you want partial files retrieved select the Include last interval even if
incomplete check box You should only select this option when the retrieval of partial files is more important than retrieving the data for the current interval during a future project run
Be careful when specifying the file interval For example retrieving many hours or days of data and specifying a file interval of seconds or minutes could result in the generation of many files This is not only very resource intensive but could result in a data management problem as well
Project type DescriptionSteps
Chapter 3 Retrieving Data
20 Apollo Project User Guide16106R5 2009-03-24
16 Perform the following steps to select an output format
Output format Steps
MiniSEED 1 Click MiniSEED2 Click Per channel group to generate one output file per channel group
You must add the channel token to the Subdirectories or Filename box on the Output Location tab when choosing Per channel group-OR-Click Per instrument to generate one output file per instrument-OR-Click All Instruments to generate one output file for all instruments
3 Select the Sort check box if you want the output data sorted by timeData is put in a Store in the order received and this order may not always be chronological To ensure that the data in the resulting SEED file is chronological select Sort
4 Select the data record sizeThe default record size is 512 B However not all SEED file readers will support this file size Determine what your SEED reader supports and select an appropriate value The options are 512 B 1024 B 2048 B and 4096 B Note that a smaller record size will result in quicker SEED file output
Note The number of output files is determined by the file interval that you set on the Time Selection page
SAC 1 Click SACYou must add the channel token to the Subdirectories or Filename box on the Output Location tab when choosing SAC as the output format
NotesThere are two types of SAC files binary and ASCII Apollo Project only outputs binary SAC filesOne output file per channel group is generated
SEGY 1 Click SEGY2 Click Per channel group to generate one output file per channel group
You must add the channel token to the Subdirectories or Filename box on the Output Location tab when choosing Per channel group-OR-Click Per instrument to generate one output file per instrument-OR-Click All Instruments to generate one output file for all instruments
3 Select the Sort check box if you want the stations sorted by StationNameNetworkName
NotesAll stations must have the same sample rateThe maximum number of samples per trace is 32767SEGY trace headers from discovered instruments will not have station location information
Chapter 3 Retrieving Data
Apollo Project User Guide16106R5 2009-03-24
21
17 Click the Output Location tab
18 If you defined a default base directory when you configured Apollo Project and want to use it for this project go to step 21
For more information see Section 33 ldquoConfiguring Apollo Projectrdquo on page 24
-OR-
Enter the valid absolute path of the base directory for the processed data subdirectories and files
If the base directory you entered does not exist click Create to create it
19 If you defined a default expression for subdirectories when you configured Apollo Project and want to use it for this project go to step 21
For more information see Section 33 ldquoConfiguring Apollo Projectrdquo on page 24
-OR-
Enter the expression used to define path names for subfolders under the base directory
You can enter tokens in any order including any additional characters that are valid for paths
Seisan 1 Click Seisan
NotesYou must have Seisan installed on your computer with a WAVEFORM_BASE and CONT_BASE line included for each station in the DATSEISANDEF file You must define a SEISAN_TOP environment variableOne output file per channel group is generated
Regardless of the output format selected SOH channel group data is always output in CSV format
The Base Directory is the root of all data retrieved for the project and can be defined at any location in the file system of the server running Apollo Project including a networked drive on a separate server If you want to create or use a directory on a computer on the network you have to enter the server and share name in a modified UNC format that is prefixed by an additional two backslashes For example the usual fileserver1storefiles must be written as fileserver1storefiles
Large amounts of data can be stored in this location You must ensure that adequate disk space is available
For deployments of Apollo Project where the clients are not running on the server it is recommended that the file system containing the base directory on the server be shared or exported as a networked file system
It is not recommended that you use the channel token in the subdirectories expression if the project includes more than one channel group per instrument (selected on the Channel Group Selection tab) and the output is not per channel group (selected on the Output Format tab)
Output format Steps
Chapter 3 Retrieving Data
22 Apollo Project User Guide16106R5 2009-03-24
20 If you defined a default expression for file names when you configured Apollo Project and want to use it for this project go to step 21
For more information see Section 33 ldquoConfiguring Apollo Projectrdquo on page 24
-OR-
Enter the expression used to define file names for the processed data files that are stored in the subfolders under the base directory
You can enter tokens in any order including any additional characters that are valid for file names
21 Click OK to save the new project
The new project is created and the Summary page is displayed
32 Creating a Station Table FileYou can create a mapping between a given instrumentchannel group (for example taurus_1234digitizertimeSeries1) and a corresponding network station location and channel name These mappings are stored in a station table file and the mapped channel group names are used in the output files
You can create a station table file and use it as the default for all projects or you can create a station table for individual projects
To create a station table file and set is as the default
1 Click the configuration button in the upper right corner
2 Specify the network name location and channel names on the Behaviour and Defaults dialog box and click OK to save the new settings
The settings you enter here are used as the channel names in the station table file You can edit these settings in step 8
For more information on configuring Apollo Project settings see Section 33 ldquoConfiguring Apollo Projectrdquo on page 24
3 Click New on the Apollo Project Existing Projects page
Do not use the channel token in the filename expression if the project includes more than one channel group per instrument (selected on the Channel Group Selection tab) and the output is not per channel group (selected on the Output Format tab)
The Sample Path shows an example of a file name generated using the values for the Base Directory Subdirectories and Filename settings
You can only edit the settings of a project before it has run for the first time or been scheduled (Archive project) If you want to edit the settings of a project after it has already run once or been scheduled you can copy the project (see Section 345 ldquoCopying a Projectrdquo on page 28) and then edit the settings for the copy
It is recommended that you create a station table file and set it as the default for all projects You can update the mappings in this file when new Stores are added or discovered
Chapter 3 Retrieving Data
Apollo Project User Guide16106R5 2009-03-24
23
4 Type Station Table in the Project Name box and click any project type
5 Click OK
6 Click the Store Selection tab and select as many Stores as possible
See step 4 of Section 31 ldquoCreating New Projectsrdquo for information on how to add specifications and select Stores
7 Click the Channel Group Selection tab and click Create Default Station Table
A station table file is created and the name of the file is displayed in the Station Table File Name box
8 Edit the station table channel group mappings in the selected channel groups area of the tab (lower half of the tab) as required
The NetworkStationLocationChannel names will appear in the output files If the Location is empty it is interpreted as the SEED default of two spaces
9 Click OK to close the project and finish creating the station table
10 Click the configuration button in the upper right corner
11 Enter the path and name of the station table file you just created in the Station Table File Name box on the Behaviour and Defaults dialog box
12 Click OK to save the new settings
The station table file you specified will be used as the default for all future projects You can open the Station Table project and edit the station table file if you need to add more Stores or change the mappings
For more information on configuring Apollo Project settings see Section 33 ldquoConfiguring Apollo Projectrdquo on page 24
Make a note of the path of the station table file because you will have to enter it on the Behaviour and Defaults dialog box to set it as the default for all projects
Valid characters for the network station location and channel in the NetworkStationLocationChannel box are upper case letters A to Z numbers 0 to 9 and spaces are also acceptable for the location
Chapter 3 Retrieving Data
24 Apollo Project User Guide16106R5 2009-03-24
33 Configuring Apollo ProjectYou can configure basic settings for Apollo Project and the default settings for new projects The changes you make to the project default settings only apply to new projects
To configure Apollo Project
1 Click the configuration button in the upper right corner
2 Edit the following settings
Setting Description
Log Verbosity The level of detail that is logged by Apollo ProjectThe default setting is Info
Log Location The default name of the Apollo Project log folder Maximum Number of Retrieval Attempts
The maximum number of single retrieval attempt made for all missing time segments on all channel groups every time a project is run Enter an integer from 0 through 1000 The default value is 8
Notes If the Taurus is busy when a retrieval attempt is made the number of remaining retrieval attempts is not decreased by one attemptYou can view the channel group details page to see if there are any remaining retrieval attempts for any channel groups (see Section 373 ldquoMonitoring the Status of a Running Projectrdquo on page 34)
Number Of Retries The number of times Apollo Project attempts to connect to a data source if there is a network connectivity problem Enter an integer from 0 through 1000 The default value is 3
Note Every time a project is run it starts with the maximum number of retries
Retry Interval (secs) The amount of time in seconds that Apollo Project waits before trying to connect to a data source againEnter an integer from 0 through 1000 The default value is 5
Station Table File Name The file name and location of the station table file that is used to assign station names to all of the selected channel groupsA station table is used to assign names to all of the selected channel groups For more information see Section 32 ldquoCreating a Station Table Filerdquo on page 22No station table file is specified by default
Chapter 3 Retrieving Data
Apollo Project User Guide16106R5 2009-03-24
25
Base Directory The folder name and location of the base directory for the processed data subfolders and files Enter any valid folder name and location including any additional characters that are valid for paths The default base directory name is ApolloProject
Notes The Base Directory is the root of all data retrieved for the project and can be defined at any location in the file system of the server running Apollo Project including a shared folder on a different computer If you want to create or use a folder on a computer on the network you have to enter the server and share name in a modified UNC format that is prefixed by an additional two backslashes For example the usual fileserver1storefiles must be written as fileserver1storefilesLarge amounts of data can be stored in this location You must ensure that adequate disk space is availableFor deployments of Apollo Project where the clients are not running on the server it is recommended that the file system containing the base directory on the server be shared or exported as a networked file system
Subdirectories The expression used to define path names for subfolders under the base directoryEnter tokens in any order including any additional characters that are valid for paths The default path name is as follows projectyearmonthday
Filename The expression used to define file names for the processed data files that are stored in the subfolders under the base directoryEnter tokens in any order including any additional characters that are valid for file names The default filename is as follows instrument_time
Sample Path An example of a file name generated using the values for the Base Directory Subdirectories and Filename settings
Network Name A standard network codeEnter any two upper case letters or numbers The default code is XX
Location A location within a stationEnter any two upper case letters numbers or spaces
The default location is two spaces for ldquononerdquo You must delete the two default spaces if you enter a new location value
Setting Description
Chapter 3 Retrieving Data
26 Apollo Project User Guide16106R5 2009-03-24
3 Click OK to save the new settings
34 Managing ProjectsYou can view open close copy and delete projects Also you can create convenient links to run your individual projects with desktop shortcuts
341 Viewing Existing Projects1 Click Projects in the Projects bar
2 View the projects listed on the Existing Projects page
The Existing Projects page shows a list of all projects and a status overview of each project For more information see Section 371 ldquoViewing an Overview of the Status of All Projectsrdquo on page 32
Channel 1 Name A channel codeEnter any three upper case letters or numbersThe default channel code is BHZ
Channel 2 Name A channel codeEnter any three upper case letters or numbersThe default channel code is BHN
Channel 3 Name A channel codeEnter any three upper case letters or numbersThe default channel code is BHE
Setting Description
Chapter 3 Retrieving Data
Apollo Project User Guide16106R5 2009-03-24
27
342 Opening a Project1 Click the project name under the Name column on the Existing Projects page
2 Click the Open Project button
343 Creating a Desktop Shortcut to a ProjectLaunching a project with a desktop shortcut will open Apollo Project to that project and run the project
Methods for creating desktop shortcuts to Web sites vary from browser to browser These procedures explain how to create desktop shortcuts to specific projects for both Mozilla Firefox 3 and Microsoft Internet Explorer 7 Desktop shortcuts to projects include the Apollo Project icon and are titled in the format Project Name ndash Apollo Project
In Firefox 3
1 Open the project you want to create a shortcut to in Firefox
2 Reduce the size of the Firefox window so that the desktop is visible
3 Drag the Site Identification Button onto the desktop
The Site Identification Button is located to the left of the Location Bar and displays the Apollo Project icon
In Internet Explorer 7
1 Open the project you want to create a shortcut to in Internet Explorer
2 Press ALT+F
3 Select Send gt Shortcut to Desktop
344 Closing a Project
1 Click the Close Project button in the Projects bar
Launching a desktop shortcut to a project automatically runs that project It is important to note that once a project is run its settings can no longer be edited It is recommended that desktop shortcuts only be created for Field Archive projects
Firefox is the recommended browser for Apollo Project
Chapter 3 Retrieving Data
28 Apollo Project User Guide16106R5 2009-03-24
345 Copying a Project
1 Select the project name under the Name column on the Existing Projects page
2 Click Copy
3 Enter a unique name for the new project and click OK
4 Click Edit and edit the settings as required
5 Click OK to save the project after you have finished editing the settings
346 Deleting a ProjectWhen you delete a project only files in the temporary folder are deleted All processed data files are not deleted
1 Click the project name under the Name column on the Existing Projects page
2 Click Delete
3 Click OK on the confirmation message
35 Running ProjectsFor all project types you can run a project manually at any time Archive projects can also be defined to run automatically on a schedule
If it is a scheduled Archive Project and the schedule is started click Cancel Schedule before you create a copy of it (If the schedule is not started the Start Schedule button is visible if the schedule is started the Cancel Schedule button replaces the Start Schedule button)
Apollo Project stores intermediate files in a temporary subdirectory of the Base Directory specified for the output location of a project These intermediate files correspond to the actual channel group data retrieved from the Stores referenced by the project If a project is deleted from Apollo Project these temporary files will be removed automatically
Disk space can also be reclaimed by removing these temporary files manually without deleting the project However if the project is run again the output files produced might be incomplete if previously retrieved data from these temporary files is required
For more information on what happens when a project runs see Section A1 ldquoOverview of Running Projectsrdquo on page 37
Chapter 3 Retrieving Data
Apollo Project User Guide16106R5 2009-03-24
29
351 Running a Project1 Open a project
2 Click Run Now on the Summary page to start the project
The project starts running and the Retrieval Status page is displayed
352 Stopping a Project1 Open a project
2 Click Cancel Run on the Summary page to stop the project
3 Click OK on the success message
353 Merging Project Data FilesYou have the option to merge all of the downloaded data for the stations and instruments into one file per interval for each project
1 Open a project
2 Click Merge
A single file is generated for each time period The time period is determined by the file interval you specified on the Time Selection page when you created the project For more information see step 13 of Section 31 ldquoCreating New Projectsrdquo on page 11
The original data files are not modified when you select the option to merge project data files
You can also click Run Now on the Retrieval Status page to start a project
For more information on what happens when a project runs see Section A1 ldquoOverview of Running Projectsrdquo on page 37
You can also click Cancel Run on the Retrieval Status page to stop a project
You cannot merge data from Archive projects and you cannot merge data in the Seisan format
You can also click Merge on the Retrieval Status page to merge the data from a project
Chapter 3 Retrieving Data
30 Apollo Project User Guide16106R5 2009-03-24
354 Running a Scheduled Archive Project1 Open a project
2 Click Start Schedule to start the project schedule
3 Click OK on the confirmation message
4 Click OK on the success message
For a project scheduled to run weekly the project will run for the first time according to the project start time and then it will run on a weekly basis according to the times and days you specified
For a project scheduled to run at a regular interval the project will run according the to interval you specified after you start the schedule For example if you click Start Schedule on a Wednesday and you specified every 2 days as the interval then the project will run for the first time on Friday and every two days after that
3541 Cancelling a Schedule
If you cancel a scheduled project before it runs for the first time you can edit the project settings
If you cancel a project that is currently running the current project runs to completion but subsequent project runs will not occur
1 Open a project
2 Click Cancel Schedule to cancel the project schedule
3 Click OK on the confirmation message
4 Click OK on the success message
You can also click Start Schedule on the Retrieval Status page to start the schedule of a project
You can restart the schedule by opening the project and clicking Start Schedule
You can also click Cancel Schedule on the Retrieval Status page to cancel the schedule of a project
Chapter 3 Retrieving Data
Apollo Project User Guide16106R5 2009-03-24
31
36 Editing and Viewing the Settings of ProjectsYou can edit the settings of a project before it has run After it has run you can view the settings
361 Editing Project Settings1 Open the project
2 Click Edit on the Summary page
3 Edit the settings as required
4 Click OK to save the changes
362 Viewing Project Settings1 Open the project
2 Click View on the Summary page
3 Click the tabs to view the settings
4 Click Cancel when you have finished viewing the settings
You can only edit the settings of a project before it has run for the first time or been scheduled (Archive project) If you want to edit the settings of a project after it has already run once or been scheduled you can copy the project (see Section 345 ldquoCopying a Projectrdquo on page 28) and then edit the settings for the copy
Settings For more information
Store Selection See step 4 of Section 31 ldquoCreating New ProjectsrdquoChannel Group Selection See step 5 to step 12 of Section 31 ldquoCreating New ProjectsrdquoTime Selection See step 13 of Section 31 ldquoCreating New ProjectsrdquoOutput Format See step 15 and step 16 of Section 31 ldquoCreating New ProjectsrdquoOutput Location See step 17 to step 20 of Section 31 ldquoCreating New Projectsrdquo
You can also click Edit on the Retrieval Status page to edit the settings of a project
You can also click View on the Retrieval Status page to edit the settings of a project
Chapter 3 Retrieving Data
32 Apollo Project User Guide16106R5 2009-03-24
37 Monitoring Project StatusYou can monitor the status of a project by viewing information on the Existing Projects Summary and Retrieval Status pages
371 Viewing an Overview of the Status of All ProjectsThe Existing Projects page is the default home page of Apollo Project You see this page when you first open Apollo Project or when you click Projects in the projects bar For more information see Section 341 ldquoViewing Existing Projectsrdquo on page 26
You can view the following information for all projects on the Existing Projects page
bull Name
bull Type
bull Current status
bull Last time the project run
bull Status of data retrieved
The Data Retrieved bars on the Existing Projects page show the overall status of the data retrieval For more information see Section 3731 ldquoStatus Coloursrdquo on page 34
Chapter 3 Retrieving Data
Apollo Project User Guide16106R5 2009-03-24
33
372 Viewing the Status of an Individual ProjectWhen you open a project a detailed summary of the project is shown on the Summary page For more information see Section 342 ldquoOpening a Projectrdquo on page 27
You can view the following information for each project on the Summary page
bull Date it was created
bull Date it was last modified
bull Current status
bull Last time it ran
bull Next time it will run
You can also view a summary of all of the settings you specified when you created the project (Store specifications selected Stores selected time series channel groups selected SOH channel groups start and end times number of files generated file interval and output format and locations)
All times are reported using the UTC time zone
Chapter 3 Retrieving Data
34 Apollo Project User Guide16106R5 2009-03-24
373 Monitoring the Status of a Running ProjectYou can view the data retrieval status of a project while it is running on the Retrieval Status page The Retrieval Status page is displayed automatically when you click Run Now to run a project You can also view this page by opening a project and clicking the Retrieval Status tab
The status for each channel group is expressed in the form of two numbers (for example 60100) and two bar graphs The first number is the percentage available of the total time requested (for example 60) and the second number is the percentage retrieved of the time available (for example 100) For more information on the bar graph status colours see Section 3731 ldquoStatus Coloursrdquo on page 34
You can also view retrieval details for each channel group listed on the Retrieval Status page For more information see Section 3732 ldquoViewing the Retrieval Details for Each Channel Grouprdquo on page 35
3731 Status Colours
The data retrieval status bars use the following status colours
The information that is displayed on the Retrieval Status page is updated continuously while a project is running
Table 3-1 Status colours
Colour Status
Green Apollo Project has retrieved the data
Yellow Apollo Project is attempting to retrieve available data from the Store
Red Data is available in the Store but Apollo Project has failed to retrieve it on this attempt Apollo Project will make additional attempts to retrieve the data up to the configured Maximum Number of Retrieval Attempts For information on how to set the Maximum Number of Retrieval Attempts setting see Section 31 ldquoCreating New Projectsrdquo on page 11
White Data for some portion of the requested time segment is not available in the Store For example there are gaps in the data or the retrieval request is for a future time segment
Chapter 3 Retrieving Data
Apollo Project User Guide16106R5 2009-03-24
35
3732 Viewing the Retrieval Details for Each Channel Group
You can view the retrieval status of each time segment for a channel group
1 Click a channel group name
2 Click the Channel Group Details button that is located to the right of the channel group name
The Remaining Retrieval Attempts column displays the number of times that Apollo Project will try to download each missing time segment for the channel group when the project is run again For information on how to set the Maximum Number of Retrieval Attempts setting see Section 33 ldquoConfiguring Apollo Projectrdquo on page 24
3 Click OK when you have finished viewing the details
Chapter 3 Retrieving Data
36 Apollo Project User Guide16106R5 2009-03-24
Apollo Project User Guide16106R5 2009-03-24
37
Appendix A Reference Information and Examples
Overview of Running Projects
Example Project Settings
Example Deployment Scenarios
Shot File Formats for Controlled Source Projects
A1 Overview of Running ProjectsWhen a project is run Apollo Project performs the following steps
1 The requested time ranges are identified
2 The channel groups for which data are to be retrieved are identified
3 The actual Stores specified by the Store specifications of the project are identified
For each identified Store the following steps are performed
1 A data availability analysis for the outstanding time ranges is performed These are for the ranges for which data has not already been retrieved The availability of the data is recorded for reference It is possible that a given Store was not present at the time the project was last run If this is the case then an attempt is made to retrieve all of the required time ranges of the project from the Store
2 If any data exists in the Store for any of the requested time ranges then a retrieval of this data is performed and the retrieved data is stored to local temporary files
3 If the number of retrieval attempts for a given time range exceeds a configurable threshold (see Section 33 ldquoConfiguring Apollo Projectrdquo on page 24) then the retrieval of data within the stated range is not attempted again
If any data was retrieved during the run of the project then the corresponding output files of the desired output format are generated and stored in the output location specified for the project
When running Apollo Project with Taurus version 2x the schedule for Archive projects must be greater than 5 minutes in duration Schedules that are less than 5 minutes can result in data that is missing or not downloaded
Appendix A Reference Information and Examples
38 Apollo Project User Guide16106R5 2009-03-24
It is possible that the requested data for a given channel group exists across multiple Stores If all of these Stores are included by the Store specifications for the project then Apollo Project assembles the requested data
When a project runs detailed information regarding the results of the retrieved data and processed data are available For more information see Section 37 ldquoMonitoring Project Statusrdquo on page 32
A2 Example Project Settings
A21 Example 1 One Time ProjectProject Name Project1
Project Type One Time
Channel groups selected for retrieval CASTN1OTBHZ (on taurus_1234)
Requested Time Range January 30 2008 1400 ndash 1500 UTC
File Interval 20 minutes
Output Location Base Directory disk2ApolloProjectOutputData
Output Location Subdirectories projectyearmonthday
Output Location Filenamestationnetwork_time
When the project is run successfully the following output files will be created on the server running Apollo Project
disk2ApolloProjectOutputDataProject120080130STN1CA_20080130_140000seed
disk2ApolloProjectOutputDataProject120080130STN1CA_20080130_142000seed
disk2ApolloProjectOutputDataProject120080130STN1CA_20080130_144000seed
Appendix A Reference Information and Examples
Apollo Project User Guide16106R5 2009-03-24
39
A22 Example 2 Controlled Source ProjectProject Name Project2
Project Type Controlled Source
Channel groups selected for retrieval CASTN1OTBHZ (on taurus_1234) CASTN1OTBHN (on taurus_1234)
Requested Shot Times January 30 2008 1400 UTC January 30 2008 1430 UTC
Pre Time 30 seconds
Post Time 30 seconds
Output Location Base Directory disk2ApolloProjectOutputData
Output Location Subdirectories projectyearmonthday
Output Location Filename timeformat
When the project is run successfully the following output files will be created on the server running Apollo Project
disk2ApolloProjectOutputDataProject22008013020080130_135930segysgy
disk2ApolloProjectOutputDataProject22008013020080130_142930segysgy
A3 Example Deployment Scenarios
A31 One TimeYou want to download three days of data from multiple instruments on the network save the data in MiniSEED format and create a file for every hour of data
A One Time project is the recommended solution The Store of each instrument can be made available to Apollo Project by creating a corresponding IP Address Store specification with the IP address of the instrument The requested time range can be specified along with a file interval of one hour Ensure that the instruments are configured to run in Communications mode
A32 Scheduled ArchiveYou want seismic data to be retrieved automatically from a group of instruments on the network every six hours The instruments are always accessible via an Ethernet connection
A scheduled Archive project is the recommended solution Use the Regular Interval scheduling option and set the interval to six hours
You can also run a scheduled Archive project at any time For example if the scheduled retrieval interval of a project is six hours and between intervals you want to retrieve the data three hours early you can run the project and approximately three additional hours of data would be accumulated About three hours later the project will run automatically and accumulate the remaining three hours of data
Appendix A Reference Information and Examples
40 Apollo Project User Guide16106R5 2009-03-24
A33 Manual ArchiveYou want to retrieve seismic data from a group of instruments but their respective Stores are only available for retrieval on occasion (no regular dependable schedule for retrieval from these Stores is possible)
A manually run Archive project is the recommended solution You can create the project and run it whenever any of the instruments are available for retrieval
A34 Field ArchiveYou want to collect data from a set of isolated instruments in the field at recurring intervals (for example twice per month)
A Field Archive project is the recommended solution You can create a Field Archive project and either add all instrument IP addresses to the list or use a Discovery specification The time for the last retrieval is stored on the instrument and all data is recovered from the last recovery time
A35 Media HarvestingYou want to collect the media from a set of instruments in the field at a regular interval (for example once per week) You also have to retrieve all of the seismic data on the media for subsequent analysis
An Archive project is the recommended solution Initially a directory is created on the file system of the server running Apollo Project A directory Store specification is created with this directory as the parent directory from which to search for Stores The content of each media instance in the weekrsquos collection is copied from a media reader to a subdirectory of the directory When the project is run all of the copied Stores are automatically available and the project accumulates data for each instrument
Due to the nature of media harvesting and the replacement procedure for this example data is always missing for the last period of output files for the current week This period corresponds to the time that the media was taken from the instrument and replaced with a new one The following week when the media is harvested again from the instruments in the field Apollo Project fills in the missing time for these files with the new Store data regardless of the media instance on which the data currently resides
You can only create and run Field Archive projects for Taurus version 30 or later
Appendix A Reference Information and Examples
Apollo Project User Guide16106R5 2009-03-24
41
A36 Trigger Downloading You have set up a network of five Tauruses around a hydro dam Each Taurus is accessible over an Ethernet connection and each is set to record data over the weekend You have set the period for data retrieval at 30 seconds before and five minutes after any seismic activity but the following procedure shows you why it is not necessary to view all of the data accumulated over the whole weekend
1 Select the Taurus at the site with the least environmental noise or determine the best site for generating triggers and designate this Taurus ldquoTaurus Ardquo for reference
You need to perform this task in advance More information about triggers can be found in the Taurus Portable Seismograph User Guide
2 Download the trigger file from ldquoTaurus Ardquo and review the file to verify the correct number of triggers
3 Follow these steps to create a new Triggers project
a) Click New on the Apollo Project Existing Projects page
b) Click Triggers as the project type and enter a unique name in the Project Name box
c) Click OK
d) Click the IP Address tab on the Store Selection tab
e) Enter the IP address of a Taurus
f) Click Add
g) Repeat step e until you have entered the IP addresses of all five of the Tauruses
Apollo Project adds the IP address specifications to the Selected Specifications section of the Store Selection page and finds all five Stores associated with the IP addresses and adds them to the Selected Stores section
h) Click the Channel Group Selection tab
i) Click Create Default Station Table to create a table for all of the currently selected Stores and discovered instruments
j) Review the selected channel groups and if required edit the mappings in the selected channel groups area of the tab (lower half of the tab)
k) Click the Time Selection tab
l) Click the Browse button
m)Select the trigger file that you downloaded in step 2 and click OK
n) Click Submit
The list of triggers is imported and displayed in the Triggers section on the Time Selection page
o) Enter a Pre Time of 30 seconds and a Post Time of 5 minutes
p) Click the Output Format tab
q) Click MiniSEED
r) Click All Instruments
s) Click the Output Location tab
Appendix A Reference Information and Examples
42 Apollo Project User Guide16106R5 2009-03-24
t) Enter the valid absolute path of the base directory for the processed data subfolders and files
u) Enter the expression used to define path names for subfolders under the base directory
v) Enter the expression used to define file names for the processed data files that are stored in the subfolders under the base directory
w) Click OK
4 Click the Run Now button on the Summary page
When the project has finished running the output folder you specified in step t will contain ten files Each output file will contain 5 minutes and 30 seconds of data from the five Tauruses
A4 Shot File Formats for Controlled Source ProjectsYou have two options for defining shots for a Controlled Source project manually defining shots or importing shots from a shot file
You can create shot files in one of following three file formats
Microsoft Office Excel (xls) ndash See Section A41 ldquoCreating a Shot File With Microsoft Office Excelrdquo on page 42
OpenOfficeorg Calc (ods) ndash See Section A42 ldquoCreating a Shot File With OpenOfficeorg Calcrdquo on page 44
Comma-Separated Values (csv) ndash See Section A43 ldquoCreating a Comma-Separated Values Shot Filerdquo on page 45
The Shot file templates are located in the docShotFileImport folder on the Apollo Project CD
A41 Creating a Shot File With Microsoft Office ExcelThe Microsoft Office Excel template for Apollo Project can be used with Microsoft Office Excel version 2003 or later
To create an Microsoft Office Excel based shot file
1 Double-click ShotFileTemplatexlt
A new Microsoft Office Excel file is created from the template and opens in the Microsoft Office Excel
2 Save the new spreadsheet as a Microsoft Office Excel document (xls)
3 Enter shot file data as specified in the Microsoft Office Excel spreadsheet
Only the decimal separator is supported for shot files Separators that denote the 3rd power of 10 (thousand) are not supported (for example 4500) The Microsoft Excel and OpenOffice templates reinforce these restrictions and are recommended for creating csv files
Appendix A Reference Information and Examples
Apollo Project User Guide16106R5 2009-03-24
43
You can enter data for multiple shot times
4 Click Save to save the file in Microsoft Office Excel format
5 Click File gt Save As and select CSV (Comma delimited) (csv) from the Save as type list
6 Click Save
7 Click OK on the message warning you that you are only saving the active sheet
8 Click Yes on the message warning you that file features might be incompatible with the csv format
9 Close Microsoft Office Excel
If you are using Microsoft Office Excel 2007 click the Microsoft Office Button and click Save As
Ensure that you save the file as a comma delimited file If the shot file is mistakenly saved in Microsoft Excel format (xls) the shot file will not work in Apollo Project
Appendix A Reference Information and Examples
44 Apollo Project User Guide16106R5 2009-03-24
A42 Creating a Shot File With OpenOfficeorg CalcThe OpenOffice template has been tested with OpenOfficeorg Calc version 23 Later versions of OpenOfficeorg Calc can be used at your discretion
To create a shot file based on the OpenOfficeorg Calc template
1 Double-click ShotFileTemplateots
A new OpenOffice spreadsheet is created from the template and opens in OpenOfficeorg Calc
2 Save the new spreadsheet as an OpenOffice Calc document (ods)
3 Enter the shot file data as specified in the OpenOffice spreadsheet
You can enter data for multiple shot times
4 Click Save to save the file in OpenOfficeorg Calc format
5 Click File gt Save As and select Text CSV (csv) from the Save as Type list
6 Select the Edit filter settings check box
7 Click Save
A warning message might appear that warns you that the document might contain formatting that cannot be saved in the csv format Click Yes on the warning message to save the file in csv format
The Export of text files window opens
8 Delete the double quotation marks () in the Text delimiter box and ensure that the Save cell content as shown check box is selected
9 Click OK to export the OpenOffice spreadsheet as a csv file
10 Click OK on the warning message
11 Close OpenOfficeorg Calc
Appendix A Reference Information and Examples
Apollo Project User Guide16106R5 2009-03-24
45
A43 Creating a Comma-Separated Values Shot FileYou can use any text editor to create a csv shot file
To create a csv shot file
1 Open ShotFileTemplatecsv in a text editor and save it with a different name
2 Format each line of the csv file as follows
Shot TimePre TimePost TimeLatitudeLongitudeElevation
For example
2008-08-28 103044090600000-6000004267
The format and units are as follows
3 Save the file as a csv formatted file
The csv shot file template is not compatible with Microsoft Office Excel Make sure that you do not double-click it and open it in Microsoft Office Excel
FormatUnits
Shot Time yyyy-mm-dd hhmmss
Pre Time seconds
Post Time seconds
Latitude degrees
Longitude degrees
Elevation meters
Appendix A Reference Information and Examples
46 Apollo Project User Guide16106R5 2009-03-24
Apollo Project User Guide16106R5 2009-03-24
47
Appendix B Retrieving SOH Data from a Taurus Version 2x
Taurus Version 2x SOH Data Retrieved by Apollo Project
Retrieving SOH Data from a Taurus Version 2x Streaming to Apollo Server
B1 Taurus Version 2x SOH Data Retrieved by Apollo Project This section presents the predefined datasets of SOH data Apollo Project will retrieve from a Taurus version 2x either through a direct connection or a stream to Apollo Server For instruction on retrieving streaming Taurus version 2x data from Apollo Server see Section B2 ldquoRetrieving SOH Data from a Taurus Version 2x Streaming to Apollo Serverrdquo on page 48
The order of the columns presented in the table below will differ when streaming Taurus version 2x SOH data from Apollo Server
Predefined SOH group SOH data
GPS Time Time (longsecs) (the number of seconds since 1970-01-01)Time (UTC) (time in yyyy-mm-dd hhmmssms format)Altitude (m)DAC CountError (ns) (time error)GPS Engine StatusLast Update Time(s)Lat (deg) (latitude in degrees)Long (deg) (longitude in degrees)NumSatellites (number of satellites used)PDOPPhaseLock (system clock phase lock)TDOPUncertainty (ns) (time uncertainty)
Note The values for Number of satellites used PDOP and TDOP are provided by the GPS receiver at the Last update time In order to see what time these values correspond to look at the Last update time When GPS is off these three parameters and the Last update time are not updated The last value displays until the next update arrives (after the GPS is turned on again)
Appendix B Retrieving SOH Data from a Taurus Version 2x
48 Apollo Project User Guide16106R5 2009-03-24
B2 Retrieving SOH Data from a Taurus Version 2x Streaming to Apollo ServerThis section provides instruction on configuring your Taurus version 2x to stream data to Apollo Server and instructions on how to use Apollo Project to retrieve this data from Apollo Server
B21 Streaming Data from a Taurus Version 2x to Apollo ServerUse the Taurus graphical user interface on either the Taurus display screen or through a Web browser to set up an NP stream from a Taurus version 2x to Apollo Server
1 Log in to the Taurus version 2x with either the tech or central user account
2 Select Advanced Configuration gt Communications gt NP Data Streaming
GPS Satellites Time (longsecs) (the number of seconds since 1970-01-01)Time (UTC) (time in yyyy-mm-dd hhmmssms format)
For each satelliteAcquisition FlagLast Update Time (ms)PRNSatellite Azimuth (microordm)Satellite Elevation (microordm)Signal Level (AMU)
Environment Time (longsecs) (the number of seconds since 1970-01-01)Time (UTC) (time in yyyy-mm-dd hhmmssms format)External SOH Voltage 1 (V) (12-bit voltage input) External SOH Voltage 2 (V) (12-bit voltage input) External SOH Voltage 3 (V) (12-bit voltage input) External SOH Voltage 4 (V) (12-bit voltage input) Sensor SOH Voltage 1 (V)Sensor SOH Voltage 2 (V)Sensor SOH Voltage 3 (V)
Instrument Time (longsecs) (the number of seconds since 1970-01-01)Time (UTC) (time in yyyy-mm-dd hhmmssms format)Controller Current (mA)Digitizer Current (mA)NMX Bus Current (mA) (external connector)Sensor Current (mA)Serial Port Current (mA)Supply Voltage (mV)Temperature (ordmC)
Predefined SOH group SOH data
Appendix B Retrieving SOH Data from a Taurus Version 2x
Apollo Project User Guide16106R5 2009-03-24
49
3 To have the Taurus stream both time series and SOH data to Apollo Server select both Stream Time Series and Stream SOH
-OR-
Select only Stream SOH if you only want to retrieve the SOH data from Apollo Server
4 Type the IP address for Apollo Server in the IP Address box
5 Type the port number Apollo Server uses to receive data in the Port box By default this is port number 32008
6 The Second IP Address and Second Port boxes are not necessary however cannot be left blank Type 127001 in the Second IP Address box and 32004 in the Second Port box
7 Type a value in the Maximum Throughput [bps] box if a limited data link is present between the Taurus and Apollo Server For instance if at some point the data link is limited to 9600 bps then this is the maximum throughput the link can allow If there are no throughput limitations set the value in this box to zero to disable the throughput limitation
8 Click Apply
9 Click Commit
B22 Retrieving Taurus Version 2x Data from Apollo ServerCreate a new project or use an existing project in Apollo Project to retrieve the Taurus version 2x data from Apollo Server For more information on creating or editing projects refer to Section 31 ldquoCreating New Projectsrdquo on page 11 and Section 36 ldquoEditing and Viewing the Settings of Projectsrdquo on page 31
When creating or editing the project
a) Add an IP address Store specification on the Store Selection tab (see step 4 in Section 31 ldquoCreating New Projectsrdquo) for Apollo Server including its client Web application port number Use the format
Apollo Server IP AddressApollo Server Client Web Application Port Number
b) Apply the appropriate filters on the Channel Group Selection tab to retrieve the desired channel groups from the Taurus version 2x See step 5 through step 12 in Section 31 ldquoCreating New Projectsrdquo for instruction on using the Channel Group Selection tab
Appendix B Retrieving SOH Data from a Taurus Version 2x
50 Apollo Project User Guide16106R5 2009-03-24
Apollo Project User Guide16106R5 2009-03-24
51
Appendix C Glossary
Glossary of Abbreviations and Terms
List of Unit Abbreviations and Symbols
C1 Glossary of Abbreviations and Terms
A
ASCIIAmerican Standard Code for Information Interchange
B
BHEBroad Band High Gain Seismometer East-West Orientation
Channel name based on the Global Seismological Network (GSN) standard
BHNBroad Band High Gain Seismometer North-South Orientation
Channel name based on the Global Seismological Network (GSN) standard
BHZBroad Band High Gain Seismometer Vertical Orientation
Channel name based on the Global Seismological Network (GSN) standard
Appendix C Glossary
52 Apollo Project User Guide16106R5 2009-03-24
C
CSVComma-Separated Values
D
DACDigital to Analog Converter
G
GPSGlobal Positioning System
J
JREJava Runtime Environment
JVMJava Virtual Machine
N
NFSNetwork File System
P
PDOPPosition Dilution of Precision
PRNPseudo-random Number
Appendix C Glossary
Apollo Project User Guide16106R5 2009-03-24
53
S
SACSeismic Analysis Code
An Apollo Project output file format that generates files that can be used by the SAC software (see http wwwirisedusoftwaresac)
SEEDStandard for the Exchange of Earthquake Data
SMBServer Message Block
SOHState of Health
T
TCPIPTransmission Control ProtocolInternet Protocol
TDOPTime Dilution of Precision
U
UNCUniform Naming Convention or Universal Naming Convention
URLUniform Resource Locator
UTCCoordinated Universal Time
Appendix C Glossary
54 Apollo Project User Guide16106R5 2009-03-24
C2 List of Unit Abbreviations and SymbolsTable C-1 provides a list of unit abbreviations and symbols commonly used in Nanometrics documentation
Table C-1 Unit abbreviations and symbols
Abbreviation or Symbol Definition Abbreviation
or Symbol Definition
deg degree lb pound
Oslash diameter m metre
micro micro ms metre per second
Ω ohm ms2 metre per second squared
A ampere mA milliampere
AC alternating current MB megabyte
b bit MΩ megaohm
B byte MHz megahertz
bps bits per second mi mile
C Celsius mL millilitre
cm centimetre mm millimetre
dB decibel ms millisecond
DC direct current MTU maximum transmission unit
F farad mV millivolt
ft foot mW milliwatt
g gram N Newton
g gravity nF nanofarad
GB gigabyte ns nanosecond
GHz gigahertz rad radian
Hz hertz rads radian per second
in inch s second
KB kilobyte sps samples per second
kg kilogram U rack unit
kHz kilohertz V volt
kΩ kiloohm Vpp Volts peak-to-peak
kW kilowatt W watt
L litre
Apollo Project User Guide16106R5 2009-03-24
55
About NanometricsNanometrics is a world leader in the development of precision instrumentation network technology and software applications for seismological and environmental studies Using Nanometrics technology our customers establish and grow research networks that are often located in extreme environments such as the frozen Arctic and Antarctic the arid deserts of the Middle East the jungles of South America and the depths of the worlds oceans Many of these are mission-critical national and regional networks that demand the highest possible data quality and availability
Nanometrics provides end-to-end solutions that include a growing portfolio of broadband and strong motion seismometers dataloggers and digitizers satellite ground station systems for remote site data collection and software applications for data and network analysis and management To support this portfolio Nanometrics also provides global systems engineering services for design installation and support of complete networks
Our head office research and development centre and production facility are located in the Kanata North Business Park of Ottawa the high-technology heart of Canadas capital region
Contacting NanometricsNanometrics Inc250 Herzberg RoadKanata Ontario Canada K2K 2A1Phone +1 613-592-6776Fax +1 613-592-5929Email infonanometricscaWeb wwwnanometricsca
Contacting Technical SupportIf you need technical support please submit a request on the Nanometrics technical support site or by email or fax Include a full explanation of the problem and related information such as log filesSupport site httpsupportnanometricsca
Email techsupportnanometricsca

Chapter 1 Getting Started
2 Apollo Project User Guide16106R5 2009-03-24
12 Operating RequirementsApollo Project has licensing client and server operating requirements These requirements are listed in Section 121 Section 122 and Section 123
121 Software LicenceIf you have ordered and received an Apollo Project software licence from Nanometrics install this file during the Apollo Project Web server installation or later using the Nanometrics Product Licence Installation Wizard See Section 22 ldquoInstalling an Apollo Project Licence Filerdquo on page 7 for licence installation instructions for Microsoftreg Windows Linux and Mac OSreg X server installations
The licence determines the number of projects you can save the number of time series channels you can select and the number of projects you can run concurrently Without a licence Apollo Project defaults to the unlicensed configuration This configuration allows you to save one project definition at a time for up to three time series channels from any combination of Stores
122 ClientThe client requirements for any platform are a Web browser with JavaScript enabled and IP access to the server Apollo Project version 14 has been tested with Microsoft Internet Explorer version 7 and Mozilla Firefox versions 2 and 3 Other browsers have not been fully tested with the client but may be used at your discretion
123 ServerRun the Apollo Project Web server on Windows Linux or Mac OS X For the
Windows operating requirements see Table 1-1 ldquoRequirements for an Apollo Project server running Windowsrdquo on page 3
Linux operating requirements see Table 1-2 ldquoRequirements for an Apollo Project server running Linuxrdquo on page 3
Mac OS X operating requirements see Table 1-3 ldquoRequirements for an Apollo Project server running Mac OS Xrdquo on page 3
Installing a licence file after creating a project in Apollo Project will result in the loss of that project It is recommended that you install your licence before running Apollo Project for the first time
Click the About button in the client application to view licence information
Chapter 1 Getting Started
Apollo Project User Guide16106R5 2009-03-24
3
Table 1-1 Requirements for an Apollo Project server running Windows
System component Requirement
Operating system Windows XP with Service Pack 3Memory 1GB RAM minimum
2GB RAM recommendedDisk space Required free disk space for every 3 time series channels of data
retrieved is approximately 2GB per month This is roughly twice as much space as the retrieved data occupies in a Store
Java Sun Java Runtime Environment (JRE) version 60Software licence Order a licence from Nanometrics if capabilities beyond that of the
unlicensed configuration are required (see Section 121 ldquoSoftware Licencerdquo on page 2)
Table 1-2 Requirements for an Apollo Project server running Linux
System component Requirement
Operating system Any distribution running a GNULinux kernel of version 24 or laterTested on Red Hat Linux 9 (kernel 2420-8)
Memory 512MB RAM minimum2GB RAM recommended
Disk space Required free disk space for every 3 time series channels of data retrieved is approximately 2GB per month This is roughly twice as much space as the retrieved data occupies in a Store
Java Sun Java Runtime Environment (JRE) version 60Software licence Order a licence from Nanometrics if capabilities beyond that of the
unlicensed configuration are required (see Section 121 ldquoSoftware Licencerdquo)
Table 1-3 Requirements for an Apollo Project server running Mac OS X
System component Requirement
Operating system Mac OS X (1052 and later)Memory 1GB RAM minimum
2GB RAM recommendedDisk space Required free disk space for every 3 time series channels of data
retrieved is approximately 2GB per month This is roughly twice as much space as the retrieved data occupies in a Store
Java Sun Java Runtime Environment (JRE) version 60
Notes on the JRE for Mac systems JRE version 60 must be manually downloaded and installedAfter installing the JRE it must be set as the default Java Virtual Machine (JVM)
Software licence Order a licence from Nanometrics if capabilities beyond that of the unlicensed configuration are required (see Section 121 ldquoSoftware Licencerdquo on page 2)
Chapter 1 Getting Started
4 Apollo Project User Guide16106R5 2009-03-24
Apollo Project User Guide16106R5 2009-03-24
5
Chapter 2 Installing and Starting Apollo Project
Installing the Apollo Project Web Server
Installing an Apollo Project Licence File
Starting the Apollo Project Web Server
Running Apollo Project Client
Upgrading Apollo Project
21 Installing the Apollo Project Web ServerThe Apollo Project Web server is installed on a single computer and after it is installed and running the client can run locally on the server or on any computer with a Web browser and network access to the server computer
All Stores must be accessible from the server hosting the Apollo Project Web server All output files are created on the server and its accessible file systems as described in Section 33 ldquoConfiguring Apollo Projectrdquo on page 24
To install the Apollo Project Web server on a server computer running Windows Linux or Mac OS X
1 Install a supported version of the Java Runtime Environment JRE version 60 or later
2 If you have received a licence file from Nanometrics ensure it is in a drive or network location that is accessible to the Apollo Project Setup Wizard
You can install and run Apollo Project without a licence file For details see Section 121 ldquoSoftware Licencerdquo on page 2 Should you require a licence after Apollo Project is installed you can install a licence using the Nanometrics Licence Installation Wizard See Section 22 ldquoInstalling an Apollo Project Licence Filerdquo on page 7
Chapter 2 Installing and Starting Apollo Project
6 Apollo Project User Guide16106R5 2009-03-24
3 Follow the instructions for your operating system in Table 2-1
211 Uninstalling Apollo Project Web ServerTable 2-2 provides instructions for uninstalling Apollo Project from the server computer for each of the supported operating systems
Table 2-1 Installation instructions
Operating System To install the Apollo Project Web server
Windows 1 Double-click ApolloProject_windows_x_x_xexe where x_x_x is the Apollo Project version number on the Apollo Project CD
2 Follow the steps of the installation wizard making changes to the default settings as required
Linux 1 Open a Terminal window and change the directory to the Apollo Project CD
2 Run the following as rootsh ApolloProject_unix_x_x_xsh (where x_x_x is the Apollo Project version number)
3 Follow the steps of the installation wizard making changes to the default settings as required
Mac OS X 1 Double-click the ApolloProject_macos_x_x_xdmg where x_x_x is the Apollo Project version number disc image on the Apollo Project CDThe disc image mounts as a new volume on your desktop and automatically displays its contents in a Finder window
2 Double-click the installation file Apollo Project Installer in the Finder window
3 Follow the steps of the installation wizard making changes to the default settings as required
Note After installing Apollo Project you can drag the disc image to the Trash to eject it and remove it from your desktop
If you are uninstalling a version of Apollo Project prior to version 13 refer to the version 12 user guide for instruction on uninstalling Apollo Project
Apollo Project Version 12 User Guide revision 16106R2 released on 2008-09-09
Table 2-2 Uninstalling the Apollo Project Web server
Operating System To uninstall the Apollo Project Web server
Windows Click Start gt All Programs gt Nanometrics gt Apollo Project gt Apollo Project Uninstaller
Linux 1 Open a Terminal window and change the directory to the Apollo Project directory The location of the Apollo Project directory was defined when you installed Apollo Project The default location is optnanometricsApolloProject
2 Run the following as root uninstall
Mac OS X 1 Open the Finder2 Click Applications under Places3 Double-click the Apollo Project folder 4 Double-click Apollo Project Uninstaller
Chapter 2 Installing and Starting Apollo Project
Apollo Project User Guide16106R5 2009-03-24
7
22 Installing an Apollo Project Licence FileIf you did not install a licence file during the installation of the Apollo Project Web server application you can install one at any time using the Nanometrics Product Licence Installation Wizard
A licence for Apollo Project is only required if capabilities beyond those of the unlicensed version are needed See Section 121 ldquoSoftware Licencerdquo on page 2 for descriptions of the licensed and unlicensed versions Contact Nanometrics to order a licence (see Contacting Nanometrics on page 55)
If you have obtained a licence file from Nanometrics use the following steps to install the file
Installing a licence file after creating a project in Apollo Project will result in the loss of that project It is recommended that you install your licence before running Apollo Project for the first time
Operating System To install an Apollo Project licence file
Windows 1 Ensure the licence file is in a drive or network location that is accessible to the licence installation wizard
2 Click Start gt All Programs gt Nanometrics gt Apollo Project gt NmxLicenceInstaller
3 Follow the steps in the license installation wizard to select and install the licence file
Linux 1 Ensure the licence file is in a drive or network location that is accessible to the licence installation wizard
2 Open a Terminal window and change the directory to the Apollo Project directory The location of the Apollo Project directory was defined when you installed Apollo Project The default location is optnanometricsApolloProject
3 Run the following NmxLicenceInstaller
Mac OS X 1 Ensure the licence file is in a drive or network location that is accessible to the licence installation wizard
2 Open the Finder3 Click Applications under Places4 Double-click the Apollo Project folder 5 Double-click NmxLicenceInstaller6 Follow the steps in the license installation wizard to select and install
the licence file
Chapter 2 Installing and Starting Apollo Project
8 Apollo Project User Guide16106R5 2009-03-24
23 Starting the Apollo Project Web ServerUse the procedures in Table 2-3 that correspond to your Apollo Server computerrsquos operating system to start the Apollo Project Web server application
24 Running Apollo Project ClientIf you are running the Apollo Project client on the computer where the server application is installed open a browser and go to
httplocalhostPort
Where localhost is the local computer and port is the port number configured during installation The default port number for Apollo Project is 8088
To run an Apollo Project client when the server application resides on a different computer open a browser and go to
httpServer computer name or IP addressPort
For example if the domain name of the server computer is ApolloProjectServer with an IP address of 192168220 and the default port number of 8088 is being used the URL for the client application in your browser will be
httpApolloProjectServer8088
ndash OR ndash
http1921682208088
241 Troubleshooting Running Apollo Project ClientIf you are having trouble opening the Apollo Project client in your Web browser try these suggestions
a) Ensure that the Apollo Project Web server application is running on the Apollo Project server computer See Section 23 ldquoStarting the Apollo Project Web Serverrdquo
Table 2-3 Starting the Apollo Project Web server
Operating System To start the Apollo Project Web server
Windows Click Start gt All Programs gt Nanometrics gt Apollo Project gt Apollo ProjectLinux 1 Open a Terminal window and change the directory to the Apollo
Project directory The location of the Apollo Project directory was defined when you installed Apollo Project The default location is optnanometricsApolloProject
2 Run the following ApolloProject
Mac OS X 1 Open the Finder2 Click Applications under Places3 Double-click the Apollo Project folder 4 Double-click Apollo Project to start the Web server
Chapter 2 Installing and Starting Apollo Project
Apollo Project User Guide16106R5 2009-03-24
9
b) Verify that the firewall on the server computer is not blocking the port number used to serve Web pages (by default the port number is 8088) To check the port number used open ApolloProjectvmoptions in the ApolloProject folder and note the number identified for the -Dserverport setting
242 Stopping the Apollo Project Web ServerThe Apollo Project client provides the means to stop the Apollo Project Web server application To stop the Apollo Project Web server
1 Open the Apollo Project client
2 Click the Shut down Apollo Project button
3 Click OK to confirm the Web server shutdown
25 Upgrading Apollo ProjectTo upgrade Apollo Project from a previous version
1 Uninstall the Apollo Project Web server application as per Section 211 ldquoUninstalling Apollo Project Web Serverrdquo on page 6
2 Install the new version of Apollo Project as per Section 21 ldquoInstalling the Apollo Project Web Serverrdquo on page 5
When you shut down the Apollo Project Web server all clients are disconnected from the server To restore connectivity start the Apollo Project Web server using the instructions in Section 23 ldquoStarting the Apollo Project Web Serverrdquo on page 8
During the upgrade process all downloaded data will remain intact however you will need to recreate your projects and settings in the new version of Apollo Project
For Windows and Linux installations if you are upgrading from an earlier version of Apollo Project that used Apache Tomcat it is strongly recommended that you uninstall Tomcat before installing the new version of Apollo Project
Refer to the version 12 user guide for instruction on uninstalling versions of Apollo Project prior to version 13
Apollo Project Version 12 User Guide revision 16106R2 released on 2008-09-09
If you are using a licensed version of Apollo Project you will need a new licence file when installing the upgrade If you have not received a new licence file contact Nanometrics (see Contacting Nanometrics on page 55)
Chapter 2 Installing and Starting Apollo Project
10 Apollo Project User Guide16106R5 2009-03-24
Apollo Project User Guide16106R5 2009-03-24
11
Chapter 3 Retrieving Data
Creating New Projects
Creating a Station Table File
Configuring Apollo Project
Managing Projects
Running Projects
Editing and Viewing the Settings of Projects
Monitoring Project Status
31 Creating New ProjectsYou can create multiple projects up to the number supported by the software licence (see Section 121 ldquoSoftware Licencerdquo on page 2)
When you create a new project you have to
bull Select data Stores
bull Specify a station table file
bull Select the channel groups you want to download data from
bull Specify when you want the project to run
bull Select the output format
bull Specify the output location
To create a new project
1 Click New on the Apollo Project Existing Projects page
2 Click a project type and enter a unique name in the Project Name box
3 Click OK
Chapter 3 Retrieving Data
12 Apollo Project User Guide16106R5 2009-03-24
4 Select one or more data Stores by performing the following steps
Store type DescriptionSteps
File A file Store specification defines a particular Store that resides on a file system accessible by the server running Apollo Project The file system can be a local or a networked file system (for example accessible via SMB or NFS)
1 Click the File tab2 Enter the full path and file name of a Store file3 Click Add
Apollo Project adds the specification to the Selected Specifications section of the Store Selection page and finds all related Store files and adds them as a single Store to the Selected Stores section
Directory A directory Store specification defines the set of Stores that reside in a particular directory hierarchy on a file system accessible by the server running Apollo Project A recursive search from the specified directory identifies all of the available Stores The file system can be a local or a networked file system (for example accessible via SMB or NFS)
1 Click the Directory tab2 Enter a directory path name
If you specify a root directory such as C it will take a long time for Apollo Project to find all of the Store files in that root directory
3 Click AddApollo Project adds the specification to the Selected Specifications section of the Store Selection page and finds and adds all Stores in the specified directory and its subdirectories to the Selected Stores section
IP Address An IP Address Store specification defines the Store of a single instrument (or an instance of Apollo Server) The specified IP address must be an IP address bound to the Ethernet interface of an instrument At the same time the instrument must be running in communications mode and be accessible from the server running Apollo Project
1 Click the IP Address tab2 Enter the IP address of an instrument3 Click Add
Apollo Project adds the specification to the Selected Specifications section of the Store Selection page and finds all Stores associated with the IP address and adds them to the Selected Stores section
Chapter 3 Retrieving Data
Apollo Project User Guide16106R5 2009-03-24
13
Discovery A discovery Store specification specifies the Stores of multiple instruments In this case a class D (multicast) IP address and port is specified It is assumed that the Store of any instrument in communications mode is accessible from the LAN of the Apollo Project server When Discovery is enabled for the specified IP address and port these attributes are included upon running the project
1 Click the Discovery tab2 Enter the multicast address and port number of a group of instruments
For example 224199711386776Multicast addresses range from 224000 through 239255255255
3 Click AddApollo Project adds the specification to the Selected Specifications section of the Store Selection page and finds all Stores associated with the multicast address and adds them to the Selected Stores section of the Store Selection page
Notes When multiple multicast groups are used for discovery the port number must differ from existing discovery port numbers by 2 for each discovery port number in use x there must be no other discovery port configured for use with a value of x or x+1For example the default discovery multicast group used by Taurus is 224199711386776 To add another multicast group you have to specify a different port number (which cannot be 6776 or 6777)
Recent Specs
Apollo Project keeps the 16 most recently defined Store specifications and groups them by category on the Recent Specs page
1 Click the Recent Specs tab2 Expand a specification category (File Directory IP Address or Discovery)
and select a specification3 Click Add
Apollo Project adds the specification to the Selected Specifications section of the Store Selection page and finds all Stores associated with the specification and adds them to the Selected Stores section
Each time a project is run Apollo Project generates a list of available Stores based on the selected Store specifications The actual Stores from which data is retrieved can vary on successive project runs For example a discovery Store specification might result in a different number of instruments being included depending on current access to the instruments
Remove a specification (and its associated Stores) by selecting it and clicking Remove Remove all specifications (and all Stores) by clicking Remove All You cannot remove individual Stores from a specification but you can add a different specification and select a different group of Stores Alternatively you can use channel group attributes filtering to select the channel groups that data is retrieved from
When copying a Store from an instrument to your local computer do not overwrite an existing Store Instead delete the existing Store or move it to a different folder on the computer Stores are made up of multiple volumes and if the new Store has fewer volumes than the old Store you could see some unpredictable results with Apollo Project
Store type DescriptionSteps
Chapter 3 Retrieving Data
14 Apollo Project User Guide16106R5 2009-03-24
5 Click the Channel Group Selection tab
6 If you defined a default station table file and want to use it for this project go to step 7
For more information see Section 32 ldquoCreating a Station Table Filerdquo on page 22
-OR-
Click Create Default Station Table to create a table for all of the currently selected Stores and discovered instruments for this project using the default settings for the network name location and channel names
The default settings for the network name location and channel names are defined in the Behaviour and Defaults dialog box For more information see Section 33 ldquoConfiguring Apollo Projectrdquo on page 24
-OR-
Enter the path and file name of a station table for this project
7 If you want to download all data from all available Stores verify that the Retrieve data from all channel groups (do not filter) check box is selected and go to step 12
-OR-
If you want to filter the data by specific channel groups and channel group attributes go to step 8
8 Clear the Retrieve data from all channel groups (do not filter) check box
9 Select the time series channel groups you want to download data from
A station table is used to assign names to all of the selected channel groups For more information see Section 32 ldquoCreating a Station Table Filerdquo on page 22
If new Stores are found after a station table file has been defined for a project (for example as a result of Discovery or a directory specification) the default channel group names are used in the output files and no filtering is applied to the channel groups
If the text ldquoSelected Time Series Channels x of xrdquo where x represents the number of channels is red you have selected more time series channels than your licence permits You must select a valid number of time series channels (for the unlicenced version of Apollo Project there is a maximum of three time series channels) before you can create your project
Chapter 3 Retrieving Data
Apollo Project User Guide16106R5 2009-03-24
15
10 Select the state of health (SOH) channel groups you want to download data from Each group has a predefined dataset
To view the SOH data retrieved from a Taurus version 2x see Appendix B ldquoRetrieving SOH Data from a Taurus Version 2xrdquo
Predefined SOH group SOH data
GPS Time Time (longsecs) (the number of seconds since 1970-01-01)Time (UTC) (time in yyyy-mm-dd hhmmssms format)DAC CountGPS Engine StatusGPS Last Update Time(s)GPS PDOPGPS Satellites Used (number of satellites used)GPS TDOP Lat (deg) (latitude in degrees)Long (deg) (longitude in degrees)Timing Error (ns)Timing Phase Lock (system clock phase lock)Timing Uncertainty (ns)
Note The values for Number of satellites used PDOP and TDOP are provided by the GPS receiver at the Last update time In order to see what time these values correspond to look at the Last update time When GPS is off these three parameters and the Last update time are not updated The last value displays until the next update arrives (after the GPS is turned on again)
GPS Satellites Time (longsecs) (the number of seconds since 1970-01-01)Time (UTC) (time in yyyy-mm-dd hhmmssms format)
For each satelliteGPS Satellite Acquisition FlagGPS Satellite Azimuth (microordm)GPS Satellite Elevation (microordm)GPS Satellite Last Update Time (ms)GPS Satellite PRN GPS Satellite Signal Level (AMU)
Environment Time (longsecs) (the number of seconds since 1970-01-01)Time (UTC) (time in yyyy-mm-dd hhmmssms format)External SOH Voltage 1 (V) (12-bit voltage input)External SOH Voltage 2 (V) (12-bit voltage input)External SOH Voltage 3 (V) (12-bit voltage input)External SOH Voltage 4 (V) (12-bit voltage input)Sensor SOH Voltage 1 (V)Sensor SOH Voltage 2 (V)Sensor SOH Voltage 3 (V)
Chapter 3 Retrieving Data
16 Apollo Project User Guide16106R5 2009-03-24
11 If required enter additional filter information as comma-delimited text into the Network Station Location Channel and Instrument boxes
You can use an asterisk ()to represent 1 or more characters
12 Review the selected channel groups and if required edit the channel group mappings in the selected channel groups area of the tab
Channel groups that do not have a mapping appear as blanks in the selected channel groups area of the tab Mapping information for these channel groups can be entered and saved in the station table file for future projects
You can edit the mappings at any time The changes are reflected in future runs of any project using that same station table file For more information see Section 32 ldquoCreating a Station Table Filerdquo on page 22
13 Click the Time Selection tab and follow the steps for the project type you selected
Instrument Time (longsecs) (the number of seconds since 1970-01-01)Time (UTC) (time in yyyy-mm-dd hhmmssms format)Controller Current (mA)Digitizer Current (mA)NMX Bus Current (mA) (external connector)Sensor Current (mA)Serial Port Current (mA)Supply Voltage (mV)Temperature (ordmC)
Look in the selected channel groups area of the tab (lower half of the tab) for examples of filter details you can enter in the Network Station Location Channel and Instrument ID filter boxes
The NetworkStationLocationChannel column of the table presents information in the format implied by the column title For instance in an entry of XXA099901BHE(1) XX represents the network(2) A0999 represents the station(3) 01 represents the location(4) BHE represents the channel
Look at the Instrument ID column of the table for an example of an instrument name and serial number such as taurus_0999
Only mappings that are applicable for the selected channel groups appear in the selected channel groups area of the tab
All times use the UTC time zone
Predefined SOH group SOH data
Chapter 3 Retrieving Data
Apollo Project User Guide16106R5 2009-03-24
17
Project type DescriptionSteps
Archive Archive projects attempt to retrieve data up to the current timeThe time ranges for which output files will be produced are driven from the file interval and are aligned to the project start time It is therefore unlikely that the ldquomost recentrdquo file interval will align with the current time Therefore the most recent range for which data retrieval is attempted will have a portion of its data retrieved and the remainder (for future retrieval) will be declared unavailable However when the project is run later (after the end of the particular time range) the unavailable data will normally be retrieved and the situation will likely repeat itself with the ldquonewrdquo last range to retrieveTo run an Archive project manually1 If required edit the start time for the project2 Click Manual3 Specify the file interval
For example if you specify 2 hours then one file is created every 2 hours If the duration for the project is one day then a total of 12 files will be created
4 After you have finished creating the project click Run Now on the Summary page to run the project
To schedule an Archive project to run automatically at a regular interval1 Click Regular Interval and select the interval 2 Specify the file interval
For example if you specify 2 hours then one file is created every 2 hours If the duration for the project is one day then a total of 12 files will be created
3 After you have finished creating the project click Start Schedule on the Summary page to start the schedule for the project and click OK twice The project will run according to the interval you specified after you start the schedule For example if you click Start Schedule on a Wednesday and you specified every 2 days as the interval then the project will run for the first time on Friday and every two days after that If the computer has been rebooted and the Apollo Project Web server has been restarted the project will run according to the interval you specified after the computer has rebooted For example if the computer reboots on a Wednesday and you specified every 2 days as the interval then the project will run for the next time on Friday and every two days after that
Note Archive projects that are defined as scheduled projects can also be run manually at any timeTo schedule an Archive project to run automatically on a weekly basis1 If required edit the start time for the project2 Click Weekly Schedule and select the time and days of the week 3 Specify the file interval
For example if you specify 2 hours then one file is created every 2 hours If the duration for the project is one day then a total of 12 files will be created
4 After you have finished creating the project click Start Schedule on the Summary page to start the schedule for the project and click OK twice After you have finished creating the project the project will run for the first time according to the project start time and then it will run on a weekly basis according to the times and days you specified
Note Archive projects that are defined as scheduled projects can also be run manually at any time
Chapter 3 Retrieving Data
18 Apollo Project User Guide16106R5 2009-03-24
One Time A One Time project retrieves a single time segmentTo specify the start and end times for a One Time project1 If required edit the start time for the project2 Click End Time and enter an end time
-OR-Click Duration and specify the duration of the project The duration is the length of the requested time segment
3 Specify the file intervalFor example if you specify 2 hours then one file is created every 2 hours If the duration for the project is one day then a total of 12 files will be created
4 After you have finished creating the project click Run Now on the Summary page to run the project
Controlled Source
A Controlled Source project retrieves data specified as a set of individually entered shots and outputs the data in SEGY format To specify shots using a shots file1 Click Browse select a shots file and click OK2 Click Submit
The list of shots is imported and displayed in the Shot List section on the Time Selection page
Note For more information see Section A4 ldquoShot File Formats for Controlled Source Projectsrdquo on page 42To manually define shots1 Enter a shot time2 If required enter the latitude longitude and elevation3 If required select the pre-shot time period4 Select the post-shot time period5 Click Add
The shot is added to the Shot List section on the Time Selection page Triggers A Triggers project uses a CSV-formatted trigger list to specify the data to be
retrieved for example a trigger file that has been downloaded from a Taurus to the local computerTo define triggers1 Click Browse select a CSV triggers file and click OK2 Click Submit
The list of triggers is imported and displayed in the Triggers section on the Time Selection page
3 Select the pre-trigger and post-trigger time periodsThe pre-trigger and post-trigger time periods are used for all of the triggers
Project type DescriptionSteps
Chapter 3 Retrieving Data
Apollo Project User Guide16106R5 2009-03-24
19
14 If you selected a Controlled Source as the project type in step 2 go to step 17
You do not have to select an output format for a Controlled Source project because the output format for a Controlled Source project is always SEGY one output file is generated for all instruments and the stations are sorted by StationNameNetworkName
-OR-
If you selected one of the other project types go to step 15 to select an output format
15 Click the Output Format tab
Field Archive A Field Archive project is used for recurring data retrievals that occur at specified intervals The time of the last retrieval is stored on the instrumentTo define the start time and file interval1 If required edit the start time for the project2 Specify the file interval
For example if you specify 2 hours then one file is created every 2 hours3 If you want partial files retrieved select the Include last interval even if
incomplete check box You should only select this option when the retrieval of partial files is more important than retrieving the data for the current interval during a future project run
Be careful when specifying the file interval For example retrieving many hours or days of data and specifying a file interval of seconds or minutes could result in the generation of many files This is not only very resource intensive but could result in a data management problem as well
Project type DescriptionSteps
Chapter 3 Retrieving Data
20 Apollo Project User Guide16106R5 2009-03-24
16 Perform the following steps to select an output format
Output format Steps
MiniSEED 1 Click MiniSEED2 Click Per channel group to generate one output file per channel group
You must add the channel token to the Subdirectories or Filename box on the Output Location tab when choosing Per channel group-OR-Click Per instrument to generate one output file per instrument-OR-Click All Instruments to generate one output file for all instruments
3 Select the Sort check box if you want the output data sorted by timeData is put in a Store in the order received and this order may not always be chronological To ensure that the data in the resulting SEED file is chronological select Sort
4 Select the data record sizeThe default record size is 512 B However not all SEED file readers will support this file size Determine what your SEED reader supports and select an appropriate value The options are 512 B 1024 B 2048 B and 4096 B Note that a smaller record size will result in quicker SEED file output
Note The number of output files is determined by the file interval that you set on the Time Selection page
SAC 1 Click SACYou must add the channel token to the Subdirectories or Filename box on the Output Location tab when choosing SAC as the output format
NotesThere are two types of SAC files binary and ASCII Apollo Project only outputs binary SAC filesOne output file per channel group is generated
SEGY 1 Click SEGY2 Click Per channel group to generate one output file per channel group
You must add the channel token to the Subdirectories or Filename box on the Output Location tab when choosing Per channel group-OR-Click Per instrument to generate one output file per instrument-OR-Click All Instruments to generate one output file for all instruments
3 Select the Sort check box if you want the stations sorted by StationNameNetworkName
NotesAll stations must have the same sample rateThe maximum number of samples per trace is 32767SEGY trace headers from discovered instruments will not have station location information
Chapter 3 Retrieving Data
Apollo Project User Guide16106R5 2009-03-24
21
17 Click the Output Location tab
18 If you defined a default base directory when you configured Apollo Project and want to use it for this project go to step 21
For more information see Section 33 ldquoConfiguring Apollo Projectrdquo on page 24
-OR-
Enter the valid absolute path of the base directory for the processed data subdirectories and files
If the base directory you entered does not exist click Create to create it
19 If you defined a default expression for subdirectories when you configured Apollo Project and want to use it for this project go to step 21
For more information see Section 33 ldquoConfiguring Apollo Projectrdquo on page 24
-OR-
Enter the expression used to define path names for subfolders under the base directory
You can enter tokens in any order including any additional characters that are valid for paths
Seisan 1 Click Seisan
NotesYou must have Seisan installed on your computer with a WAVEFORM_BASE and CONT_BASE line included for each station in the DATSEISANDEF file You must define a SEISAN_TOP environment variableOne output file per channel group is generated
Regardless of the output format selected SOH channel group data is always output in CSV format
The Base Directory is the root of all data retrieved for the project and can be defined at any location in the file system of the server running Apollo Project including a networked drive on a separate server If you want to create or use a directory on a computer on the network you have to enter the server and share name in a modified UNC format that is prefixed by an additional two backslashes For example the usual fileserver1storefiles must be written as fileserver1storefiles
Large amounts of data can be stored in this location You must ensure that adequate disk space is available
For deployments of Apollo Project where the clients are not running on the server it is recommended that the file system containing the base directory on the server be shared or exported as a networked file system
It is not recommended that you use the channel token in the subdirectories expression if the project includes more than one channel group per instrument (selected on the Channel Group Selection tab) and the output is not per channel group (selected on the Output Format tab)
Output format Steps
Chapter 3 Retrieving Data
22 Apollo Project User Guide16106R5 2009-03-24
20 If you defined a default expression for file names when you configured Apollo Project and want to use it for this project go to step 21
For more information see Section 33 ldquoConfiguring Apollo Projectrdquo on page 24
-OR-
Enter the expression used to define file names for the processed data files that are stored in the subfolders under the base directory
You can enter tokens in any order including any additional characters that are valid for file names
21 Click OK to save the new project
The new project is created and the Summary page is displayed
32 Creating a Station Table FileYou can create a mapping between a given instrumentchannel group (for example taurus_1234digitizertimeSeries1) and a corresponding network station location and channel name These mappings are stored in a station table file and the mapped channel group names are used in the output files
You can create a station table file and use it as the default for all projects or you can create a station table for individual projects
To create a station table file and set is as the default
1 Click the configuration button in the upper right corner
2 Specify the network name location and channel names on the Behaviour and Defaults dialog box and click OK to save the new settings
The settings you enter here are used as the channel names in the station table file You can edit these settings in step 8
For more information on configuring Apollo Project settings see Section 33 ldquoConfiguring Apollo Projectrdquo on page 24
3 Click New on the Apollo Project Existing Projects page
Do not use the channel token in the filename expression if the project includes more than one channel group per instrument (selected on the Channel Group Selection tab) and the output is not per channel group (selected on the Output Format tab)
The Sample Path shows an example of a file name generated using the values for the Base Directory Subdirectories and Filename settings
You can only edit the settings of a project before it has run for the first time or been scheduled (Archive project) If you want to edit the settings of a project after it has already run once or been scheduled you can copy the project (see Section 345 ldquoCopying a Projectrdquo on page 28) and then edit the settings for the copy
It is recommended that you create a station table file and set it as the default for all projects You can update the mappings in this file when new Stores are added or discovered
Chapter 3 Retrieving Data
Apollo Project User Guide16106R5 2009-03-24
23
4 Type Station Table in the Project Name box and click any project type
5 Click OK
6 Click the Store Selection tab and select as many Stores as possible
See step 4 of Section 31 ldquoCreating New Projectsrdquo for information on how to add specifications and select Stores
7 Click the Channel Group Selection tab and click Create Default Station Table
A station table file is created and the name of the file is displayed in the Station Table File Name box
8 Edit the station table channel group mappings in the selected channel groups area of the tab (lower half of the tab) as required
The NetworkStationLocationChannel names will appear in the output files If the Location is empty it is interpreted as the SEED default of two spaces
9 Click OK to close the project and finish creating the station table
10 Click the configuration button in the upper right corner
11 Enter the path and name of the station table file you just created in the Station Table File Name box on the Behaviour and Defaults dialog box
12 Click OK to save the new settings
The station table file you specified will be used as the default for all future projects You can open the Station Table project and edit the station table file if you need to add more Stores or change the mappings
For more information on configuring Apollo Project settings see Section 33 ldquoConfiguring Apollo Projectrdquo on page 24
Make a note of the path of the station table file because you will have to enter it on the Behaviour and Defaults dialog box to set it as the default for all projects
Valid characters for the network station location and channel in the NetworkStationLocationChannel box are upper case letters A to Z numbers 0 to 9 and spaces are also acceptable for the location
Chapter 3 Retrieving Data
24 Apollo Project User Guide16106R5 2009-03-24
33 Configuring Apollo ProjectYou can configure basic settings for Apollo Project and the default settings for new projects The changes you make to the project default settings only apply to new projects
To configure Apollo Project
1 Click the configuration button in the upper right corner
2 Edit the following settings
Setting Description
Log Verbosity The level of detail that is logged by Apollo ProjectThe default setting is Info
Log Location The default name of the Apollo Project log folder Maximum Number of Retrieval Attempts
The maximum number of single retrieval attempt made for all missing time segments on all channel groups every time a project is run Enter an integer from 0 through 1000 The default value is 8
Notes If the Taurus is busy when a retrieval attempt is made the number of remaining retrieval attempts is not decreased by one attemptYou can view the channel group details page to see if there are any remaining retrieval attempts for any channel groups (see Section 373 ldquoMonitoring the Status of a Running Projectrdquo on page 34)
Number Of Retries The number of times Apollo Project attempts to connect to a data source if there is a network connectivity problem Enter an integer from 0 through 1000 The default value is 3
Note Every time a project is run it starts with the maximum number of retries
Retry Interval (secs) The amount of time in seconds that Apollo Project waits before trying to connect to a data source againEnter an integer from 0 through 1000 The default value is 5
Station Table File Name The file name and location of the station table file that is used to assign station names to all of the selected channel groupsA station table is used to assign names to all of the selected channel groups For more information see Section 32 ldquoCreating a Station Table Filerdquo on page 22No station table file is specified by default
Chapter 3 Retrieving Data
Apollo Project User Guide16106R5 2009-03-24
25
Base Directory The folder name and location of the base directory for the processed data subfolders and files Enter any valid folder name and location including any additional characters that are valid for paths The default base directory name is ApolloProject
Notes The Base Directory is the root of all data retrieved for the project and can be defined at any location in the file system of the server running Apollo Project including a shared folder on a different computer If you want to create or use a folder on a computer on the network you have to enter the server and share name in a modified UNC format that is prefixed by an additional two backslashes For example the usual fileserver1storefiles must be written as fileserver1storefilesLarge amounts of data can be stored in this location You must ensure that adequate disk space is availableFor deployments of Apollo Project where the clients are not running on the server it is recommended that the file system containing the base directory on the server be shared or exported as a networked file system
Subdirectories The expression used to define path names for subfolders under the base directoryEnter tokens in any order including any additional characters that are valid for paths The default path name is as follows projectyearmonthday
Filename The expression used to define file names for the processed data files that are stored in the subfolders under the base directoryEnter tokens in any order including any additional characters that are valid for file names The default filename is as follows instrument_time
Sample Path An example of a file name generated using the values for the Base Directory Subdirectories and Filename settings
Network Name A standard network codeEnter any two upper case letters or numbers The default code is XX
Location A location within a stationEnter any two upper case letters numbers or spaces
The default location is two spaces for ldquononerdquo You must delete the two default spaces if you enter a new location value
Setting Description
Chapter 3 Retrieving Data
26 Apollo Project User Guide16106R5 2009-03-24
3 Click OK to save the new settings
34 Managing ProjectsYou can view open close copy and delete projects Also you can create convenient links to run your individual projects with desktop shortcuts
341 Viewing Existing Projects1 Click Projects in the Projects bar
2 View the projects listed on the Existing Projects page
The Existing Projects page shows a list of all projects and a status overview of each project For more information see Section 371 ldquoViewing an Overview of the Status of All Projectsrdquo on page 32
Channel 1 Name A channel codeEnter any three upper case letters or numbersThe default channel code is BHZ
Channel 2 Name A channel codeEnter any three upper case letters or numbersThe default channel code is BHN
Channel 3 Name A channel codeEnter any three upper case letters or numbersThe default channel code is BHE
Setting Description
Chapter 3 Retrieving Data
Apollo Project User Guide16106R5 2009-03-24
27
342 Opening a Project1 Click the project name under the Name column on the Existing Projects page
2 Click the Open Project button
343 Creating a Desktop Shortcut to a ProjectLaunching a project with a desktop shortcut will open Apollo Project to that project and run the project
Methods for creating desktop shortcuts to Web sites vary from browser to browser These procedures explain how to create desktop shortcuts to specific projects for both Mozilla Firefox 3 and Microsoft Internet Explorer 7 Desktop shortcuts to projects include the Apollo Project icon and are titled in the format Project Name ndash Apollo Project
In Firefox 3
1 Open the project you want to create a shortcut to in Firefox
2 Reduce the size of the Firefox window so that the desktop is visible
3 Drag the Site Identification Button onto the desktop
The Site Identification Button is located to the left of the Location Bar and displays the Apollo Project icon
In Internet Explorer 7
1 Open the project you want to create a shortcut to in Internet Explorer
2 Press ALT+F
3 Select Send gt Shortcut to Desktop
344 Closing a Project
1 Click the Close Project button in the Projects bar
Launching a desktop shortcut to a project automatically runs that project It is important to note that once a project is run its settings can no longer be edited It is recommended that desktop shortcuts only be created for Field Archive projects
Firefox is the recommended browser for Apollo Project
Chapter 3 Retrieving Data
28 Apollo Project User Guide16106R5 2009-03-24
345 Copying a Project
1 Select the project name under the Name column on the Existing Projects page
2 Click Copy
3 Enter a unique name for the new project and click OK
4 Click Edit and edit the settings as required
5 Click OK to save the project after you have finished editing the settings
346 Deleting a ProjectWhen you delete a project only files in the temporary folder are deleted All processed data files are not deleted
1 Click the project name under the Name column on the Existing Projects page
2 Click Delete
3 Click OK on the confirmation message
35 Running ProjectsFor all project types you can run a project manually at any time Archive projects can also be defined to run automatically on a schedule
If it is a scheduled Archive Project and the schedule is started click Cancel Schedule before you create a copy of it (If the schedule is not started the Start Schedule button is visible if the schedule is started the Cancel Schedule button replaces the Start Schedule button)
Apollo Project stores intermediate files in a temporary subdirectory of the Base Directory specified for the output location of a project These intermediate files correspond to the actual channel group data retrieved from the Stores referenced by the project If a project is deleted from Apollo Project these temporary files will be removed automatically
Disk space can also be reclaimed by removing these temporary files manually without deleting the project However if the project is run again the output files produced might be incomplete if previously retrieved data from these temporary files is required
For more information on what happens when a project runs see Section A1 ldquoOverview of Running Projectsrdquo on page 37
Chapter 3 Retrieving Data
Apollo Project User Guide16106R5 2009-03-24
29
351 Running a Project1 Open a project
2 Click Run Now on the Summary page to start the project
The project starts running and the Retrieval Status page is displayed
352 Stopping a Project1 Open a project
2 Click Cancel Run on the Summary page to stop the project
3 Click OK on the success message
353 Merging Project Data FilesYou have the option to merge all of the downloaded data for the stations and instruments into one file per interval for each project
1 Open a project
2 Click Merge
A single file is generated for each time period The time period is determined by the file interval you specified on the Time Selection page when you created the project For more information see step 13 of Section 31 ldquoCreating New Projectsrdquo on page 11
The original data files are not modified when you select the option to merge project data files
You can also click Run Now on the Retrieval Status page to start a project
For more information on what happens when a project runs see Section A1 ldquoOverview of Running Projectsrdquo on page 37
You can also click Cancel Run on the Retrieval Status page to stop a project
You cannot merge data from Archive projects and you cannot merge data in the Seisan format
You can also click Merge on the Retrieval Status page to merge the data from a project
Chapter 3 Retrieving Data
30 Apollo Project User Guide16106R5 2009-03-24
354 Running a Scheduled Archive Project1 Open a project
2 Click Start Schedule to start the project schedule
3 Click OK on the confirmation message
4 Click OK on the success message
For a project scheduled to run weekly the project will run for the first time according to the project start time and then it will run on a weekly basis according to the times and days you specified
For a project scheduled to run at a regular interval the project will run according the to interval you specified after you start the schedule For example if you click Start Schedule on a Wednesday and you specified every 2 days as the interval then the project will run for the first time on Friday and every two days after that
3541 Cancelling a Schedule
If you cancel a scheduled project before it runs for the first time you can edit the project settings
If you cancel a project that is currently running the current project runs to completion but subsequent project runs will not occur
1 Open a project
2 Click Cancel Schedule to cancel the project schedule
3 Click OK on the confirmation message
4 Click OK on the success message
You can also click Start Schedule on the Retrieval Status page to start the schedule of a project
You can restart the schedule by opening the project and clicking Start Schedule
You can also click Cancel Schedule on the Retrieval Status page to cancel the schedule of a project
Chapter 3 Retrieving Data
Apollo Project User Guide16106R5 2009-03-24
31
36 Editing and Viewing the Settings of ProjectsYou can edit the settings of a project before it has run After it has run you can view the settings
361 Editing Project Settings1 Open the project
2 Click Edit on the Summary page
3 Edit the settings as required
4 Click OK to save the changes
362 Viewing Project Settings1 Open the project
2 Click View on the Summary page
3 Click the tabs to view the settings
4 Click Cancel when you have finished viewing the settings
You can only edit the settings of a project before it has run for the first time or been scheduled (Archive project) If you want to edit the settings of a project after it has already run once or been scheduled you can copy the project (see Section 345 ldquoCopying a Projectrdquo on page 28) and then edit the settings for the copy
Settings For more information
Store Selection See step 4 of Section 31 ldquoCreating New ProjectsrdquoChannel Group Selection See step 5 to step 12 of Section 31 ldquoCreating New ProjectsrdquoTime Selection See step 13 of Section 31 ldquoCreating New ProjectsrdquoOutput Format See step 15 and step 16 of Section 31 ldquoCreating New ProjectsrdquoOutput Location See step 17 to step 20 of Section 31 ldquoCreating New Projectsrdquo
You can also click Edit on the Retrieval Status page to edit the settings of a project
You can also click View on the Retrieval Status page to edit the settings of a project
Chapter 3 Retrieving Data
32 Apollo Project User Guide16106R5 2009-03-24
37 Monitoring Project StatusYou can monitor the status of a project by viewing information on the Existing Projects Summary and Retrieval Status pages
371 Viewing an Overview of the Status of All ProjectsThe Existing Projects page is the default home page of Apollo Project You see this page when you first open Apollo Project or when you click Projects in the projects bar For more information see Section 341 ldquoViewing Existing Projectsrdquo on page 26
You can view the following information for all projects on the Existing Projects page
bull Name
bull Type
bull Current status
bull Last time the project run
bull Status of data retrieved
The Data Retrieved bars on the Existing Projects page show the overall status of the data retrieval For more information see Section 3731 ldquoStatus Coloursrdquo on page 34
Chapter 3 Retrieving Data
Apollo Project User Guide16106R5 2009-03-24
33
372 Viewing the Status of an Individual ProjectWhen you open a project a detailed summary of the project is shown on the Summary page For more information see Section 342 ldquoOpening a Projectrdquo on page 27
You can view the following information for each project on the Summary page
bull Date it was created
bull Date it was last modified
bull Current status
bull Last time it ran
bull Next time it will run
You can also view a summary of all of the settings you specified when you created the project (Store specifications selected Stores selected time series channel groups selected SOH channel groups start and end times number of files generated file interval and output format and locations)
All times are reported using the UTC time zone
Chapter 3 Retrieving Data
34 Apollo Project User Guide16106R5 2009-03-24
373 Monitoring the Status of a Running ProjectYou can view the data retrieval status of a project while it is running on the Retrieval Status page The Retrieval Status page is displayed automatically when you click Run Now to run a project You can also view this page by opening a project and clicking the Retrieval Status tab
The status for each channel group is expressed in the form of two numbers (for example 60100) and two bar graphs The first number is the percentage available of the total time requested (for example 60) and the second number is the percentage retrieved of the time available (for example 100) For more information on the bar graph status colours see Section 3731 ldquoStatus Coloursrdquo on page 34
You can also view retrieval details for each channel group listed on the Retrieval Status page For more information see Section 3732 ldquoViewing the Retrieval Details for Each Channel Grouprdquo on page 35
3731 Status Colours
The data retrieval status bars use the following status colours
The information that is displayed on the Retrieval Status page is updated continuously while a project is running
Table 3-1 Status colours
Colour Status
Green Apollo Project has retrieved the data
Yellow Apollo Project is attempting to retrieve available data from the Store
Red Data is available in the Store but Apollo Project has failed to retrieve it on this attempt Apollo Project will make additional attempts to retrieve the data up to the configured Maximum Number of Retrieval Attempts For information on how to set the Maximum Number of Retrieval Attempts setting see Section 31 ldquoCreating New Projectsrdquo on page 11
White Data for some portion of the requested time segment is not available in the Store For example there are gaps in the data or the retrieval request is for a future time segment
Chapter 3 Retrieving Data
Apollo Project User Guide16106R5 2009-03-24
35
3732 Viewing the Retrieval Details for Each Channel Group
You can view the retrieval status of each time segment for a channel group
1 Click a channel group name
2 Click the Channel Group Details button that is located to the right of the channel group name
The Remaining Retrieval Attempts column displays the number of times that Apollo Project will try to download each missing time segment for the channel group when the project is run again For information on how to set the Maximum Number of Retrieval Attempts setting see Section 33 ldquoConfiguring Apollo Projectrdquo on page 24
3 Click OK when you have finished viewing the details
Chapter 3 Retrieving Data
36 Apollo Project User Guide16106R5 2009-03-24
Apollo Project User Guide16106R5 2009-03-24
37
Appendix A Reference Information and Examples
Overview of Running Projects
Example Project Settings
Example Deployment Scenarios
Shot File Formats for Controlled Source Projects
A1 Overview of Running ProjectsWhen a project is run Apollo Project performs the following steps
1 The requested time ranges are identified
2 The channel groups for which data are to be retrieved are identified
3 The actual Stores specified by the Store specifications of the project are identified
For each identified Store the following steps are performed
1 A data availability analysis for the outstanding time ranges is performed These are for the ranges for which data has not already been retrieved The availability of the data is recorded for reference It is possible that a given Store was not present at the time the project was last run If this is the case then an attempt is made to retrieve all of the required time ranges of the project from the Store
2 If any data exists in the Store for any of the requested time ranges then a retrieval of this data is performed and the retrieved data is stored to local temporary files
3 If the number of retrieval attempts for a given time range exceeds a configurable threshold (see Section 33 ldquoConfiguring Apollo Projectrdquo on page 24) then the retrieval of data within the stated range is not attempted again
If any data was retrieved during the run of the project then the corresponding output files of the desired output format are generated and stored in the output location specified for the project
When running Apollo Project with Taurus version 2x the schedule for Archive projects must be greater than 5 minutes in duration Schedules that are less than 5 minutes can result in data that is missing or not downloaded
Appendix A Reference Information and Examples
38 Apollo Project User Guide16106R5 2009-03-24
It is possible that the requested data for a given channel group exists across multiple Stores If all of these Stores are included by the Store specifications for the project then Apollo Project assembles the requested data
When a project runs detailed information regarding the results of the retrieved data and processed data are available For more information see Section 37 ldquoMonitoring Project Statusrdquo on page 32
A2 Example Project Settings
A21 Example 1 One Time ProjectProject Name Project1
Project Type One Time
Channel groups selected for retrieval CASTN1OTBHZ (on taurus_1234)
Requested Time Range January 30 2008 1400 ndash 1500 UTC
File Interval 20 minutes
Output Location Base Directory disk2ApolloProjectOutputData
Output Location Subdirectories projectyearmonthday
Output Location Filenamestationnetwork_time
When the project is run successfully the following output files will be created on the server running Apollo Project
disk2ApolloProjectOutputDataProject120080130STN1CA_20080130_140000seed
disk2ApolloProjectOutputDataProject120080130STN1CA_20080130_142000seed
disk2ApolloProjectOutputDataProject120080130STN1CA_20080130_144000seed
Appendix A Reference Information and Examples
Apollo Project User Guide16106R5 2009-03-24
39
A22 Example 2 Controlled Source ProjectProject Name Project2
Project Type Controlled Source
Channel groups selected for retrieval CASTN1OTBHZ (on taurus_1234) CASTN1OTBHN (on taurus_1234)
Requested Shot Times January 30 2008 1400 UTC January 30 2008 1430 UTC
Pre Time 30 seconds
Post Time 30 seconds
Output Location Base Directory disk2ApolloProjectOutputData
Output Location Subdirectories projectyearmonthday
Output Location Filename timeformat
When the project is run successfully the following output files will be created on the server running Apollo Project
disk2ApolloProjectOutputDataProject22008013020080130_135930segysgy
disk2ApolloProjectOutputDataProject22008013020080130_142930segysgy
A3 Example Deployment Scenarios
A31 One TimeYou want to download three days of data from multiple instruments on the network save the data in MiniSEED format and create a file for every hour of data
A One Time project is the recommended solution The Store of each instrument can be made available to Apollo Project by creating a corresponding IP Address Store specification with the IP address of the instrument The requested time range can be specified along with a file interval of one hour Ensure that the instruments are configured to run in Communications mode
A32 Scheduled ArchiveYou want seismic data to be retrieved automatically from a group of instruments on the network every six hours The instruments are always accessible via an Ethernet connection
A scheduled Archive project is the recommended solution Use the Regular Interval scheduling option and set the interval to six hours
You can also run a scheduled Archive project at any time For example if the scheduled retrieval interval of a project is six hours and between intervals you want to retrieve the data three hours early you can run the project and approximately three additional hours of data would be accumulated About three hours later the project will run automatically and accumulate the remaining three hours of data
Appendix A Reference Information and Examples
40 Apollo Project User Guide16106R5 2009-03-24
A33 Manual ArchiveYou want to retrieve seismic data from a group of instruments but their respective Stores are only available for retrieval on occasion (no regular dependable schedule for retrieval from these Stores is possible)
A manually run Archive project is the recommended solution You can create the project and run it whenever any of the instruments are available for retrieval
A34 Field ArchiveYou want to collect data from a set of isolated instruments in the field at recurring intervals (for example twice per month)
A Field Archive project is the recommended solution You can create a Field Archive project and either add all instrument IP addresses to the list or use a Discovery specification The time for the last retrieval is stored on the instrument and all data is recovered from the last recovery time
A35 Media HarvestingYou want to collect the media from a set of instruments in the field at a regular interval (for example once per week) You also have to retrieve all of the seismic data on the media for subsequent analysis
An Archive project is the recommended solution Initially a directory is created on the file system of the server running Apollo Project A directory Store specification is created with this directory as the parent directory from which to search for Stores The content of each media instance in the weekrsquos collection is copied from a media reader to a subdirectory of the directory When the project is run all of the copied Stores are automatically available and the project accumulates data for each instrument
Due to the nature of media harvesting and the replacement procedure for this example data is always missing for the last period of output files for the current week This period corresponds to the time that the media was taken from the instrument and replaced with a new one The following week when the media is harvested again from the instruments in the field Apollo Project fills in the missing time for these files with the new Store data regardless of the media instance on which the data currently resides
You can only create and run Field Archive projects for Taurus version 30 or later
Appendix A Reference Information and Examples
Apollo Project User Guide16106R5 2009-03-24
41
A36 Trigger Downloading You have set up a network of five Tauruses around a hydro dam Each Taurus is accessible over an Ethernet connection and each is set to record data over the weekend You have set the period for data retrieval at 30 seconds before and five minutes after any seismic activity but the following procedure shows you why it is not necessary to view all of the data accumulated over the whole weekend
1 Select the Taurus at the site with the least environmental noise or determine the best site for generating triggers and designate this Taurus ldquoTaurus Ardquo for reference
You need to perform this task in advance More information about triggers can be found in the Taurus Portable Seismograph User Guide
2 Download the trigger file from ldquoTaurus Ardquo and review the file to verify the correct number of triggers
3 Follow these steps to create a new Triggers project
a) Click New on the Apollo Project Existing Projects page
b) Click Triggers as the project type and enter a unique name in the Project Name box
c) Click OK
d) Click the IP Address tab on the Store Selection tab
e) Enter the IP address of a Taurus
f) Click Add
g) Repeat step e until you have entered the IP addresses of all five of the Tauruses
Apollo Project adds the IP address specifications to the Selected Specifications section of the Store Selection page and finds all five Stores associated with the IP addresses and adds them to the Selected Stores section
h) Click the Channel Group Selection tab
i) Click Create Default Station Table to create a table for all of the currently selected Stores and discovered instruments
j) Review the selected channel groups and if required edit the mappings in the selected channel groups area of the tab (lower half of the tab)
k) Click the Time Selection tab
l) Click the Browse button
m)Select the trigger file that you downloaded in step 2 and click OK
n) Click Submit
The list of triggers is imported and displayed in the Triggers section on the Time Selection page
o) Enter a Pre Time of 30 seconds and a Post Time of 5 minutes
p) Click the Output Format tab
q) Click MiniSEED
r) Click All Instruments
s) Click the Output Location tab
Appendix A Reference Information and Examples
42 Apollo Project User Guide16106R5 2009-03-24
t) Enter the valid absolute path of the base directory for the processed data subfolders and files
u) Enter the expression used to define path names for subfolders under the base directory
v) Enter the expression used to define file names for the processed data files that are stored in the subfolders under the base directory
w) Click OK
4 Click the Run Now button on the Summary page
When the project has finished running the output folder you specified in step t will contain ten files Each output file will contain 5 minutes and 30 seconds of data from the five Tauruses
A4 Shot File Formats for Controlled Source ProjectsYou have two options for defining shots for a Controlled Source project manually defining shots or importing shots from a shot file
You can create shot files in one of following three file formats
Microsoft Office Excel (xls) ndash See Section A41 ldquoCreating a Shot File With Microsoft Office Excelrdquo on page 42
OpenOfficeorg Calc (ods) ndash See Section A42 ldquoCreating a Shot File With OpenOfficeorg Calcrdquo on page 44
Comma-Separated Values (csv) ndash See Section A43 ldquoCreating a Comma-Separated Values Shot Filerdquo on page 45
The Shot file templates are located in the docShotFileImport folder on the Apollo Project CD
A41 Creating a Shot File With Microsoft Office ExcelThe Microsoft Office Excel template for Apollo Project can be used with Microsoft Office Excel version 2003 or later
To create an Microsoft Office Excel based shot file
1 Double-click ShotFileTemplatexlt
A new Microsoft Office Excel file is created from the template and opens in the Microsoft Office Excel
2 Save the new spreadsheet as a Microsoft Office Excel document (xls)
3 Enter shot file data as specified in the Microsoft Office Excel spreadsheet
Only the decimal separator is supported for shot files Separators that denote the 3rd power of 10 (thousand) are not supported (for example 4500) The Microsoft Excel and OpenOffice templates reinforce these restrictions and are recommended for creating csv files
Appendix A Reference Information and Examples
Apollo Project User Guide16106R5 2009-03-24
43
You can enter data for multiple shot times
4 Click Save to save the file in Microsoft Office Excel format
5 Click File gt Save As and select CSV (Comma delimited) (csv) from the Save as type list
6 Click Save
7 Click OK on the message warning you that you are only saving the active sheet
8 Click Yes on the message warning you that file features might be incompatible with the csv format
9 Close Microsoft Office Excel
If you are using Microsoft Office Excel 2007 click the Microsoft Office Button and click Save As
Ensure that you save the file as a comma delimited file If the shot file is mistakenly saved in Microsoft Excel format (xls) the shot file will not work in Apollo Project
Appendix A Reference Information and Examples
44 Apollo Project User Guide16106R5 2009-03-24
A42 Creating a Shot File With OpenOfficeorg CalcThe OpenOffice template has been tested with OpenOfficeorg Calc version 23 Later versions of OpenOfficeorg Calc can be used at your discretion
To create a shot file based on the OpenOfficeorg Calc template
1 Double-click ShotFileTemplateots
A new OpenOffice spreadsheet is created from the template and opens in OpenOfficeorg Calc
2 Save the new spreadsheet as an OpenOffice Calc document (ods)
3 Enter the shot file data as specified in the OpenOffice spreadsheet
You can enter data for multiple shot times
4 Click Save to save the file in OpenOfficeorg Calc format
5 Click File gt Save As and select Text CSV (csv) from the Save as Type list
6 Select the Edit filter settings check box
7 Click Save
A warning message might appear that warns you that the document might contain formatting that cannot be saved in the csv format Click Yes on the warning message to save the file in csv format
The Export of text files window opens
8 Delete the double quotation marks () in the Text delimiter box and ensure that the Save cell content as shown check box is selected
9 Click OK to export the OpenOffice spreadsheet as a csv file
10 Click OK on the warning message
11 Close OpenOfficeorg Calc
Appendix A Reference Information and Examples
Apollo Project User Guide16106R5 2009-03-24
45
A43 Creating a Comma-Separated Values Shot FileYou can use any text editor to create a csv shot file
To create a csv shot file
1 Open ShotFileTemplatecsv in a text editor and save it with a different name
2 Format each line of the csv file as follows
Shot TimePre TimePost TimeLatitudeLongitudeElevation
For example
2008-08-28 103044090600000-6000004267
The format and units are as follows
3 Save the file as a csv formatted file
The csv shot file template is not compatible with Microsoft Office Excel Make sure that you do not double-click it and open it in Microsoft Office Excel
FormatUnits
Shot Time yyyy-mm-dd hhmmss
Pre Time seconds
Post Time seconds
Latitude degrees
Longitude degrees
Elevation meters
Appendix A Reference Information and Examples
46 Apollo Project User Guide16106R5 2009-03-24
Apollo Project User Guide16106R5 2009-03-24
47
Appendix B Retrieving SOH Data from a Taurus Version 2x
Taurus Version 2x SOH Data Retrieved by Apollo Project
Retrieving SOH Data from a Taurus Version 2x Streaming to Apollo Server
B1 Taurus Version 2x SOH Data Retrieved by Apollo Project This section presents the predefined datasets of SOH data Apollo Project will retrieve from a Taurus version 2x either through a direct connection or a stream to Apollo Server For instruction on retrieving streaming Taurus version 2x data from Apollo Server see Section B2 ldquoRetrieving SOH Data from a Taurus Version 2x Streaming to Apollo Serverrdquo on page 48
The order of the columns presented in the table below will differ when streaming Taurus version 2x SOH data from Apollo Server
Predefined SOH group SOH data
GPS Time Time (longsecs) (the number of seconds since 1970-01-01)Time (UTC) (time in yyyy-mm-dd hhmmssms format)Altitude (m)DAC CountError (ns) (time error)GPS Engine StatusLast Update Time(s)Lat (deg) (latitude in degrees)Long (deg) (longitude in degrees)NumSatellites (number of satellites used)PDOPPhaseLock (system clock phase lock)TDOPUncertainty (ns) (time uncertainty)
Note The values for Number of satellites used PDOP and TDOP are provided by the GPS receiver at the Last update time In order to see what time these values correspond to look at the Last update time When GPS is off these three parameters and the Last update time are not updated The last value displays until the next update arrives (after the GPS is turned on again)
Appendix B Retrieving SOH Data from a Taurus Version 2x
48 Apollo Project User Guide16106R5 2009-03-24
B2 Retrieving SOH Data from a Taurus Version 2x Streaming to Apollo ServerThis section provides instruction on configuring your Taurus version 2x to stream data to Apollo Server and instructions on how to use Apollo Project to retrieve this data from Apollo Server
B21 Streaming Data from a Taurus Version 2x to Apollo ServerUse the Taurus graphical user interface on either the Taurus display screen or through a Web browser to set up an NP stream from a Taurus version 2x to Apollo Server
1 Log in to the Taurus version 2x with either the tech or central user account
2 Select Advanced Configuration gt Communications gt NP Data Streaming
GPS Satellites Time (longsecs) (the number of seconds since 1970-01-01)Time (UTC) (time in yyyy-mm-dd hhmmssms format)
For each satelliteAcquisition FlagLast Update Time (ms)PRNSatellite Azimuth (microordm)Satellite Elevation (microordm)Signal Level (AMU)
Environment Time (longsecs) (the number of seconds since 1970-01-01)Time (UTC) (time in yyyy-mm-dd hhmmssms format)External SOH Voltage 1 (V) (12-bit voltage input) External SOH Voltage 2 (V) (12-bit voltage input) External SOH Voltage 3 (V) (12-bit voltage input) External SOH Voltage 4 (V) (12-bit voltage input) Sensor SOH Voltage 1 (V)Sensor SOH Voltage 2 (V)Sensor SOH Voltage 3 (V)
Instrument Time (longsecs) (the number of seconds since 1970-01-01)Time (UTC) (time in yyyy-mm-dd hhmmssms format)Controller Current (mA)Digitizer Current (mA)NMX Bus Current (mA) (external connector)Sensor Current (mA)Serial Port Current (mA)Supply Voltage (mV)Temperature (ordmC)
Predefined SOH group SOH data
Appendix B Retrieving SOH Data from a Taurus Version 2x
Apollo Project User Guide16106R5 2009-03-24
49
3 To have the Taurus stream both time series and SOH data to Apollo Server select both Stream Time Series and Stream SOH
-OR-
Select only Stream SOH if you only want to retrieve the SOH data from Apollo Server
4 Type the IP address for Apollo Server in the IP Address box
5 Type the port number Apollo Server uses to receive data in the Port box By default this is port number 32008
6 The Second IP Address and Second Port boxes are not necessary however cannot be left blank Type 127001 in the Second IP Address box and 32004 in the Second Port box
7 Type a value in the Maximum Throughput [bps] box if a limited data link is present between the Taurus and Apollo Server For instance if at some point the data link is limited to 9600 bps then this is the maximum throughput the link can allow If there are no throughput limitations set the value in this box to zero to disable the throughput limitation
8 Click Apply
9 Click Commit
B22 Retrieving Taurus Version 2x Data from Apollo ServerCreate a new project or use an existing project in Apollo Project to retrieve the Taurus version 2x data from Apollo Server For more information on creating or editing projects refer to Section 31 ldquoCreating New Projectsrdquo on page 11 and Section 36 ldquoEditing and Viewing the Settings of Projectsrdquo on page 31
When creating or editing the project
a) Add an IP address Store specification on the Store Selection tab (see step 4 in Section 31 ldquoCreating New Projectsrdquo) for Apollo Server including its client Web application port number Use the format
Apollo Server IP AddressApollo Server Client Web Application Port Number
b) Apply the appropriate filters on the Channel Group Selection tab to retrieve the desired channel groups from the Taurus version 2x See step 5 through step 12 in Section 31 ldquoCreating New Projectsrdquo for instruction on using the Channel Group Selection tab
Appendix B Retrieving SOH Data from a Taurus Version 2x
50 Apollo Project User Guide16106R5 2009-03-24
Apollo Project User Guide16106R5 2009-03-24
51
Appendix C Glossary
Glossary of Abbreviations and Terms
List of Unit Abbreviations and Symbols
C1 Glossary of Abbreviations and Terms
A
ASCIIAmerican Standard Code for Information Interchange
B
BHEBroad Band High Gain Seismometer East-West Orientation
Channel name based on the Global Seismological Network (GSN) standard
BHNBroad Band High Gain Seismometer North-South Orientation
Channel name based on the Global Seismological Network (GSN) standard
BHZBroad Band High Gain Seismometer Vertical Orientation
Channel name based on the Global Seismological Network (GSN) standard
Appendix C Glossary
52 Apollo Project User Guide16106R5 2009-03-24
C
CSVComma-Separated Values
D
DACDigital to Analog Converter
G
GPSGlobal Positioning System
J
JREJava Runtime Environment
JVMJava Virtual Machine
N
NFSNetwork File System
P
PDOPPosition Dilution of Precision
PRNPseudo-random Number
Appendix C Glossary
Apollo Project User Guide16106R5 2009-03-24
53
S
SACSeismic Analysis Code
An Apollo Project output file format that generates files that can be used by the SAC software (see http wwwirisedusoftwaresac)
SEEDStandard for the Exchange of Earthquake Data
SMBServer Message Block
SOHState of Health
T
TCPIPTransmission Control ProtocolInternet Protocol
TDOPTime Dilution of Precision
U
UNCUniform Naming Convention or Universal Naming Convention
URLUniform Resource Locator
UTCCoordinated Universal Time
Appendix C Glossary
54 Apollo Project User Guide16106R5 2009-03-24
C2 List of Unit Abbreviations and SymbolsTable C-1 provides a list of unit abbreviations and symbols commonly used in Nanometrics documentation
Table C-1 Unit abbreviations and symbols
Abbreviation or Symbol Definition Abbreviation
or Symbol Definition
deg degree lb pound
Oslash diameter m metre
micro micro ms metre per second
Ω ohm ms2 metre per second squared
A ampere mA milliampere
AC alternating current MB megabyte
b bit MΩ megaohm
B byte MHz megahertz
bps bits per second mi mile
C Celsius mL millilitre
cm centimetre mm millimetre
dB decibel ms millisecond
DC direct current MTU maximum transmission unit
F farad mV millivolt
ft foot mW milliwatt
g gram N Newton
g gravity nF nanofarad
GB gigabyte ns nanosecond
GHz gigahertz rad radian
Hz hertz rads radian per second
in inch s second
KB kilobyte sps samples per second
kg kilogram U rack unit
kHz kilohertz V volt
kΩ kiloohm Vpp Volts peak-to-peak
kW kilowatt W watt
L litre
Apollo Project User Guide16106R5 2009-03-24
55
About NanometricsNanometrics is a world leader in the development of precision instrumentation network technology and software applications for seismological and environmental studies Using Nanometrics technology our customers establish and grow research networks that are often located in extreme environments such as the frozen Arctic and Antarctic the arid deserts of the Middle East the jungles of South America and the depths of the worlds oceans Many of these are mission-critical national and regional networks that demand the highest possible data quality and availability
Nanometrics provides end-to-end solutions that include a growing portfolio of broadband and strong motion seismometers dataloggers and digitizers satellite ground station systems for remote site data collection and software applications for data and network analysis and management To support this portfolio Nanometrics also provides global systems engineering services for design installation and support of complete networks
Our head office research and development centre and production facility are located in the Kanata North Business Park of Ottawa the high-technology heart of Canadas capital region
Contacting NanometricsNanometrics Inc250 Herzberg RoadKanata Ontario Canada K2K 2A1Phone +1 613-592-6776Fax +1 613-592-5929Email infonanometricscaWeb wwwnanometricsca
Contacting Technical SupportIf you need technical support please submit a request on the Nanometrics technical support site or by email or fax Include a full explanation of the problem and related information such as log filesSupport site httpsupportnanometricsca
Email techsupportnanometricsca
Chapter 1 Getting Started
Apollo Project User Guide16106R5 2009-03-24
3
Table 1-1 Requirements for an Apollo Project server running Windows
System component Requirement
Operating system Windows XP with Service Pack 3Memory 1GB RAM minimum
2GB RAM recommendedDisk space Required free disk space for every 3 time series channels of data
retrieved is approximately 2GB per month This is roughly twice as much space as the retrieved data occupies in a Store
Java Sun Java Runtime Environment (JRE) version 60Software licence Order a licence from Nanometrics if capabilities beyond that of the
unlicensed configuration are required (see Section 121 ldquoSoftware Licencerdquo on page 2)
Table 1-2 Requirements for an Apollo Project server running Linux
System component Requirement
Operating system Any distribution running a GNULinux kernel of version 24 or laterTested on Red Hat Linux 9 (kernel 2420-8)
Memory 512MB RAM minimum2GB RAM recommended
Disk space Required free disk space for every 3 time series channels of data retrieved is approximately 2GB per month This is roughly twice as much space as the retrieved data occupies in a Store
Java Sun Java Runtime Environment (JRE) version 60Software licence Order a licence from Nanometrics if capabilities beyond that of the
unlicensed configuration are required (see Section 121 ldquoSoftware Licencerdquo)
Table 1-3 Requirements for an Apollo Project server running Mac OS X
System component Requirement
Operating system Mac OS X (1052 and later)Memory 1GB RAM minimum
2GB RAM recommendedDisk space Required free disk space for every 3 time series channels of data
retrieved is approximately 2GB per month This is roughly twice as much space as the retrieved data occupies in a Store
Java Sun Java Runtime Environment (JRE) version 60
Notes on the JRE for Mac systems JRE version 60 must be manually downloaded and installedAfter installing the JRE it must be set as the default Java Virtual Machine (JVM)
Software licence Order a licence from Nanometrics if capabilities beyond that of the unlicensed configuration are required (see Section 121 ldquoSoftware Licencerdquo on page 2)
Chapter 1 Getting Started
4 Apollo Project User Guide16106R5 2009-03-24
Apollo Project User Guide16106R5 2009-03-24
5
Chapter 2 Installing and Starting Apollo Project
Installing the Apollo Project Web Server
Installing an Apollo Project Licence File
Starting the Apollo Project Web Server
Running Apollo Project Client
Upgrading Apollo Project
21 Installing the Apollo Project Web ServerThe Apollo Project Web server is installed on a single computer and after it is installed and running the client can run locally on the server or on any computer with a Web browser and network access to the server computer
All Stores must be accessible from the server hosting the Apollo Project Web server All output files are created on the server and its accessible file systems as described in Section 33 ldquoConfiguring Apollo Projectrdquo on page 24
To install the Apollo Project Web server on a server computer running Windows Linux or Mac OS X
1 Install a supported version of the Java Runtime Environment JRE version 60 or later
2 If you have received a licence file from Nanometrics ensure it is in a drive or network location that is accessible to the Apollo Project Setup Wizard
You can install and run Apollo Project without a licence file For details see Section 121 ldquoSoftware Licencerdquo on page 2 Should you require a licence after Apollo Project is installed you can install a licence using the Nanometrics Licence Installation Wizard See Section 22 ldquoInstalling an Apollo Project Licence Filerdquo on page 7
Chapter 2 Installing and Starting Apollo Project
6 Apollo Project User Guide16106R5 2009-03-24
3 Follow the instructions for your operating system in Table 2-1
211 Uninstalling Apollo Project Web ServerTable 2-2 provides instructions for uninstalling Apollo Project from the server computer for each of the supported operating systems
Table 2-1 Installation instructions
Operating System To install the Apollo Project Web server
Windows 1 Double-click ApolloProject_windows_x_x_xexe where x_x_x is the Apollo Project version number on the Apollo Project CD
2 Follow the steps of the installation wizard making changes to the default settings as required
Linux 1 Open a Terminal window and change the directory to the Apollo Project CD
2 Run the following as rootsh ApolloProject_unix_x_x_xsh (where x_x_x is the Apollo Project version number)
3 Follow the steps of the installation wizard making changes to the default settings as required
Mac OS X 1 Double-click the ApolloProject_macos_x_x_xdmg where x_x_x is the Apollo Project version number disc image on the Apollo Project CDThe disc image mounts as a new volume on your desktop and automatically displays its contents in a Finder window
2 Double-click the installation file Apollo Project Installer in the Finder window
3 Follow the steps of the installation wizard making changes to the default settings as required
Note After installing Apollo Project you can drag the disc image to the Trash to eject it and remove it from your desktop
If you are uninstalling a version of Apollo Project prior to version 13 refer to the version 12 user guide for instruction on uninstalling Apollo Project
Apollo Project Version 12 User Guide revision 16106R2 released on 2008-09-09
Table 2-2 Uninstalling the Apollo Project Web server
Operating System To uninstall the Apollo Project Web server
Windows Click Start gt All Programs gt Nanometrics gt Apollo Project gt Apollo Project Uninstaller
Linux 1 Open a Terminal window and change the directory to the Apollo Project directory The location of the Apollo Project directory was defined when you installed Apollo Project The default location is optnanometricsApolloProject
2 Run the following as root uninstall
Mac OS X 1 Open the Finder2 Click Applications under Places3 Double-click the Apollo Project folder 4 Double-click Apollo Project Uninstaller
Chapter 2 Installing and Starting Apollo Project
Apollo Project User Guide16106R5 2009-03-24
7
22 Installing an Apollo Project Licence FileIf you did not install a licence file during the installation of the Apollo Project Web server application you can install one at any time using the Nanometrics Product Licence Installation Wizard
A licence for Apollo Project is only required if capabilities beyond those of the unlicensed version are needed See Section 121 ldquoSoftware Licencerdquo on page 2 for descriptions of the licensed and unlicensed versions Contact Nanometrics to order a licence (see Contacting Nanometrics on page 55)
If you have obtained a licence file from Nanometrics use the following steps to install the file
Installing a licence file after creating a project in Apollo Project will result in the loss of that project It is recommended that you install your licence before running Apollo Project for the first time
Operating System To install an Apollo Project licence file
Windows 1 Ensure the licence file is in a drive or network location that is accessible to the licence installation wizard
2 Click Start gt All Programs gt Nanometrics gt Apollo Project gt NmxLicenceInstaller
3 Follow the steps in the license installation wizard to select and install the licence file
Linux 1 Ensure the licence file is in a drive or network location that is accessible to the licence installation wizard
2 Open a Terminal window and change the directory to the Apollo Project directory The location of the Apollo Project directory was defined when you installed Apollo Project The default location is optnanometricsApolloProject
3 Run the following NmxLicenceInstaller
Mac OS X 1 Ensure the licence file is in a drive or network location that is accessible to the licence installation wizard
2 Open the Finder3 Click Applications under Places4 Double-click the Apollo Project folder 5 Double-click NmxLicenceInstaller6 Follow the steps in the license installation wizard to select and install
the licence file
Chapter 2 Installing and Starting Apollo Project
8 Apollo Project User Guide16106R5 2009-03-24
23 Starting the Apollo Project Web ServerUse the procedures in Table 2-3 that correspond to your Apollo Server computerrsquos operating system to start the Apollo Project Web server application
24 Running Apollo Project ClientIf you are running the Apollo Project client on the computer where the server application is installed open a browser and go to
httplocalhostPort
Where localhost is the local computer and port is the port number configured during installation The default port number for Apollo Project is 8088
To run an Apollo Project client when the server application resides on a different computer open a browser and go to
httpServer computer name or IP addressPort
For example if the domain name of the server computer is ApolloProjectServer with an IP address of 192168220 and the default port number of 8088 is being used the URL for the client application in your browser will be
httpApolloProjectServer8088
ndash OR ndash
http1921682208088
241 Troubleshooting Running Apollo Project ClientIf you are having trouble opening the Apollo Project client in your Web browser try these suggestions
a) Ensure that the Apollo Project Web server application is running on the Apollo Project server computer See Section 23 ldquoStarting the Apollo Project Web Serverrdquo
Table 2-3 Starting the Apollo Project Web server
Operating System To start the Apollo Project Web server
Windows Click Start gt All Programs gt Nanometrics gt Apollo Project gt Apollo ProjectLinux 1 Open a Terminal window and change the directory to the Apollo
Project directory The location of the Apollo Project directory was defined when you installed Apollo Project The default location is optnanometricsApolloProject
2 Run the following ApolloProject
Mac OS X 1 Open the Finder2 Click Applications under Places3 Double-click the Apollo Project folder 4 Double-click Apollo Project to start the Web server
Chapter 2 Installing and Starting Apollo Project
Apollo Project User Guide16106R5 2009-03-24
9
b) Verify that the firewall on the server computer is not blocking the port number used to serve Web pages (by default the port number is 8088) To check the port number used open ApolloProjectvmoptions in the ApolloProject folder and note the number identified for the -Dserverport setting
242 Stopping the Apollo Project Web ServerThe Apollo Project client provides the means to stop the Apollo Project Web server application To stop the Apollo Project Web server
1 Open the Apollo Project client
2 Click the Shut down Apollo Project button
3 Click OK to confirm the Web server shutdown
25 Upgrading Apollo ProjectTo upgrade Apollo Project from a previous version
1 Uninstall the Apollo Project Web server application as per Section 211 ldquoUninstalling Apollo Project Web Serverrdquo on page 6
2 Install the new version of Apollo Project as per Section 21 ldquoInstalling the Apollo Project Web Serverrdquo on page 5
When you shut down the Apollo Project Web server all clients are disconnected from the server To restore connectivity start the Apollo Project Web server using the instructions in Section 23 ldquoStarting the Apollo Project Web Serverrdquo on page 8
During the upgrade process all downloaded data will remain intact however you will need to recreate your projects and settings in the new version of Apollo Project
For Windows and Linux installations if you are upgrading from an earlier version of Apollo Project that used Apache Tomcat it is strongly recommended that you uninstall Tomcat before installing the new version of Apollo Project
Refer to the version 12 user guide for instruction on uninstalling versions of Apollo Project prior to version 13
Apollo Project Version 12 User Guide revision 16106R2 released on 2008-09-09
If you are using a licensed version of Apollo Project you will need a new licence file when installing the upgrade If you have not received a new licence file contact Nanometrics (see Contacting Nanometrics on page 55)
Chapter 2 Installing and Starting Apollo Project
10 Apollo Project User Guide16106R5 2009-03-24
Apollo Project User Guide16106R5 2009-03-24
11
Chapter 3 Retrieving Data
Creating New Projects
Creating a Station Table File
Configuring Apollo Project
Managing Projects
Running Projects
Editing and Viewing the Settings of Projects
Monitoring Project Status
31 Creating New ProjectsYou can create multiple projects up to the number supported by the software licence (see Section 121 ldquoSoftware Licencerdquo on page 2)
When you create a new project you have to
bull Select data Stores
bull Specify a station table file
bull Select the channel groups you want to download data from
bull Specify when you want the project to run
bull Select the output format
bull Specify the output location
To create a new project
1 Click New on the Apollo Project Existing Projects page
2 Click a project type and enter a unique name in the Project Name box
3 Click OK
Chapter 3 Retrieving Data
12 Apollo Project User Guide16106R5 2009-03-24
4 Select one or more data Stores by performing the following steps
Store type DescriptionSteps
File A file Store specification defines a particular Store that resides on a file system accessible by the server running Apollo Project The file system can be a local or a networked file system (for example accessible via SMB or NFS)
1 Click the File tab2 Enter the full path and file name of a Store file3 Click Add
Apollo Project adds the specification to the Selected Specifications section of the Store Selection page and finds all related Store files and adds them as a single Store to the Selected Stores section
Directory A directory Store specification defines the set of Stores that reside in a particular directory hierarchy on a file system accessible by the server running Apollo Project A recursive search from the specified directory identifies all of the available Stores The file system can be a local or a networked file system (for example accessible via SMB or NFS)
1 Click the Directory tab2 Enter a directory path name
If you specify a root directory such as C it will take a long time for Apollo Project to find all of the Store files in that root directory
3 Click AddApollo Project adds the specification to the Selected Specifications section of the Store Selection page and finds and adds all Stores in the specified directory and its subdirectories to the Selected Stores section
IP Address An IP Address Store specification defines the Store of a single instrument (or an instance of Apollo Server) The specified IP address must be an IP address bound to the Ethernet interface of an instrument At the same time the instrument must be running in communications mode and be accessible from the server running Apollo Project
1 Click the IP Address tab2 Enter the IP address of an instrument3 Click Add
Apollo Project adds the specification to the Selected Specifications section of the Store Selection page and finds all Stores associated with the IP address and adds them to the Selected Stores section
Chapter 3 Retrieving Data
Apollo Project User Guide16106R5 2009-03-24
13
Discovery A discovery Store specification specifies the Stores of multiple instruments In this case a class D (multicast) IP address and port is specified It is assumed that the Store of any instrument in communications mode is accessible from the LAN of the Apollo Project server When Discovery is enabled for the specified IP address and port these attributes are included upon running the project
1 Click the Discovery tab2 Enter the multicast address and port number of a group of instruments
For example 224199711386776Multicast addresses range from 224000 through 239255255255
3 Click AddApollo Project adds the specification to the Selected Specifications section of the Store Selection page and finds all Stores associated with the multicast address and adds them to the Selected Stores section of the Store Selection page
Notes When multiple multicast groups are used for discovery the port number must differ from existing discovery port numbers by 2 for each discovery port number in use x there must be no other discovery port configured for use with a value of x or x+1For example the default discovery multicast group used by Taurus is 224199711386776 To add another multicast group you have to specify a different port number (which cannot be 6776 or 6777)
Recent Specs
Apollo Project keeps the 16 most recently defined Store specifications and groups them by category on the Recent Specs page
1 Click the Recent Specs tab2 Expand a specification category (File Directory IP Address or Discovery)
and select a specification3 Click Add
Apollo Project adds the specification to the Selected Specifications section of the Store Selection page and finds all Stores associated with the specification and adds them to the Selected Stores section
Each time a project is run Apollo Project generates a list of available Stores based on the selected Store specifications The actual Stores from which data is retrieved can vary on successive project runs For example a discovery Store specification might result in a different number of instruments being included depending on current access to the instruments
Remove a specification (and its associated Stores) by selecting it and clicking Remove Remove all specifications (and all Stores) by clicking Remove All You cannot remove individual Stores from a specification but you can add a different specification and select a different group of Stores Alternatively you can use channel group attributes filtering to select the channel groups that data is retrieved from
When copying a Store from an instrument to your local computer do not overwrite an existing Store Instead delete the existing Store or move it to a different folder on the computer Stores are made up of multiple volumes and if the new Store has fewer volumes than the old Store you could see some unpredictable results with Apollo Project
Store type DescriptionSteps
Chapter 3 Retrieving Data
14 Apollo Project User Guide16106R5 2009-03-24
5 Click the Channel Group Selection tab
6 If you defined a default station table file and want to use it for this project go to step 7
For more information see Section 32 ldquoCreating a Station Table Filerdquo on page 22
-OR-
Click Create Default Station Table to create a table for all of the currently selected Stores and discovered instruments for this project using the default settings for the network name location and channel names
The default settings for the network name location and channel names are defined in the Behaviour and Defaults dialog box For more information see Section 33 ldquoConfiguring Apollo Projectrdquo on page 24
-OR-
Enter the path and file name of a station table for this project
7 If you want to download all data from all available Stores verify that the Retrieve data from all channel groups (do not filter) check box is selected and go to step 12
-OR-
If you want to filter the data by specific channel groups and channel group attributes go to step 8
8 Clear the Retrieve data from all channel groups (do not filter) check box
9 Select the time series channel groups you want to download data from
A station table is used to assign names to all of the selected channel groups For more information see Section 32 ldquoCreating a Station Table Filerdquo on page 22
If new Stores are found after a station table file has been defined for a project (for example as a result of Discovery or a directory specification) the default channel group names are used in the output files and no filtering is applied to the channel groups
If the text ldquoSelected Time Series Channels x of xrdquo where x represents the number of channels is red you have selected more time series channels than your licence permits You must select a valid number of time series channels (for the unlicenced version of Apollo Project there is a maximum of three time series channels) before you can create your project
Chapter 3 Retrieving Data
Apollo Project User Guide16106R5 2009-03-24
15
10 Select the state of health (SOH) channel groups you want to download data from Each group has a predefined dataset
To view the SOH data retrieved from a Taurus version 2x see Appendix B ldquoRetrieving SOH Data from a Taurus Version 2xrdquo
Predefined SOH group SOH data
GPS Time Time (longsecs) (the number of seconds since 1970-01-01)Time (UTC) (time in yyyy-mm-dd hhmmssms format)DAC CountGPS Engine StatusGPS Last Update Time(s)GPS PDOPGPS Satellites Used (number of satellites used)GPS TDOP Lat (deg) (latitude in degrees)Long (deg) (longitude in degrees)Timing Error (ns)Timing Phase Lock (system clock phase lock)Timing Uncertainty (ns)
Note The values for Number of satellites used PDOP and TDOP are provided by the GPS receiver at the Last update time In order to see what time these values correspond to look at the Last update time When GPS is off these three parameters and the Last update time are not updated The last value displays until the next update arrives (after the GPS is turned on again)
GPS Satellites Time (longsecs) (the number of seconds since 1970-01-01)Time (UTC) (time in yyyy-mm-dd hhmmssms format)
For each satelliteGPS Satellite Acquisition FlagGPS Satellite Azimuth (microordm)GPS Satellite Elevation (microordm)GPS Satellite Last Update Time (ms)GPS Satellite PRN GPS Satellite Signal Level (AMU)
Environment Time (longsecs) (the number of seconds since 1970-01-01)Time (UTC) (time in yyyy-mm-dd hhmmssms format)External SOH Voltage 1 (V) (12-bit voltage input)External SOH Voltage 2 (V) (12-bit voltage input)External SOH Voltage 3 (V) (12-bit voltage input)External SOH Voltage 4 (V) (12-bit voltage input)Sensor SOH Voltage 1 (V)Sensor SOH Voltage 2 (V)Sensor SOH Voltage 3 (V)
Chapter 3 Retrieving Data
16 Apollo Project User Guide16106R5 2009-03-24
11 If required enter additional filter information as comma-delimited text into the Network Station Location Channel and Instrument boxes
You can use an asterisk ()to represent 1 or more characters
12 Review the selected channel groups and if required edit the channel group mappings in the selected channel groups area of the tab
Channel groups that do not have a mapping appear as blanks in the selected channel groups area of the tab Mapping information for these channel groups can be entered and saved in the station table file for future projects
You can edit the mappings at any time The changes are reflected in future runs of any project using that same station table file For more information see Section 32 ldquoCreating a Station Table Filerdquo on page 22
13 Click the Time Selection tab and follow the steps for the project type you selected
Instrument Time (longsecs) (the number of seconds since 1970-01-01)Time (UTC) (time in yyyy-mm-dd hhmmssms format)Controller Current (mA)Digitizer Current (mA)NMX Bus Current (mA) (external connector)Sensor Current (mA)Serial Port Current (mA)Supply Voltage (mV)Temperature (ordmC)
Look in the selected channel groups area of the tab (lower half of the tab) for examples of filter details you can enter in the Network Station Location Channel and Instrument ID filter boxes
The NetworkStationLocationChannel column of the table presents information in the format implied by the column title For instance in an entry of XXA099901BHE(1) XX represents the network(2) A0999 represents the station(3) 01 represents the location(4) BHE represents the channel
Look at the Instrument ID column of the table for an example of an instrument name and serial number such as taurus_0999
Only mappings that are applicable for the selected channel groups appear in the selected channel groups area of the tab
All times use the UTC time zone
Predefined SOH group SOH data
Chapter 3 Retrieving Data
Apollo Project User Guide16106R5 2009-03-24
17
Project type DescriptionSteps
Archive Archive projects attempt to retrieve data up to the current timeThe time ranges for which output files will be produced are driven from the file interval and are aligned to the project start time It is therefore unlikely that the ldquomost recentrdquo file interval will align with the current time Therefore the most recent range for which data retrieval is attempted will have a portion of its data retrieved and the remainder (for future retrieval) will be declared unavailable However when the project is run later (after the end of the particular time range) the unavailable data will normally be retrieved and the situation will likely repeat itself with the ldquonewrdquo last range to retrieveTo run an Archive project manually1 If required edit the start time for the project2 Click Manual3 Specify the file interval
For example if you specify 2 hours then one file is created every 2 hours If the duration for the project is one day then a total of 12 files will be created
4 After you have finished creating the project click Run Now on the Summary page to run the project
To schedule an Archive project to run automatically at a regular interval1 Click Regular Interval and select the interval 2 Specify the file interval
For example if you specify 2 hours then one file is created every 2 hours If the duration for the project is one day then a total of 12 files will be created
3 After you have finished creating the project click Start Schedule on the Summary page to start the schedule for the project and click OK twice The project will run according to the interval you specified after you start the schedule For example if you click Start Schedule on a Wednesday and you specified every 2 days as the interval then the project will run for the first time on Friday and every two days after that If the computer has been rebooted and the Apollo Project Web server has been restarted the project will run according to the interval you specified after the computer has rebooted For example if the computer reboots on a Wednesday and you specified every 2 days as the interval then the project will run for the next time on Friday and every two days after that
Note Archive projects that are defined as scheduled projects can also be run manually at any timeTo schedule an Archive project to run automatically on a weekly basis1 If required edit the start time for the project2 Click Weekly Schedule and select the time and days of the week 3 Specify the file interval
For example if you specify 2 hours then one file is created every 2 hours If the duration for the project is one day then a total of 12 files will be created
4 After you have finished creating the project click Start Schedule on the Summary page to start the schedule for the project and click OK twice After you have finished creating the project the project will run for the first time according to the project start time and then it will run on a weekly basis according to the times and days you specified
Note Archive projects that are defined as scheduled projects can also be run manually at any time
Chapter 3 Retrieving Data
18 Apollo Project User Guide16106R5 2009-03-24
One Time A One Time project retrieves a single time segmentTo specify the start and end times for a One Time project1 If required edit the start time for the project2 Click End Time and enter an end time
-OR-Click Duration and specify the duration of the project The duration is the length of the requested time segment
3 Specify the file intervalFor example if you specify 2 hours then one file is created every 2 hours If the duration for the project is one day then a total of 12 files will be created
4 After you have finished creating the project click Run Now on the Summary page to run the project
Controlled Source
A Controlled Source project retrieves data specified as a set of individually entered shots and outputs the data in SEGY format To specify shots using a shots file1 Click Browse select a shots file and click OK2 Click Submit
The list of shots is imported and displayed in the Shot List section on the Time Selection page
Note For more information see Section A4 ldquoShot File Formats for Controlled Source Projectsrdquo on page 42To manually define shots1 Enter a shot time2 If required enter the latitude longitude and elevation3 If required select the pre-shot time period4 Select the post-shot time period5 Click Add
The shot is added to the Shot List section on the Time Selection page Triggers A Triggers project uses a CSV-formatted trigger list to specify the data to be
retrieved for example a trigger file that has been downloaded from a Taurus to the local computerTo define triggers1 Click Browse select a CSV triggers file and click OK2 Click Submit
The list of triggers is imported and displayed in the Triggers section on the Time Selection page
3 Select the pre-trigger and post-trigger time periodsThe pre-trigger and post-trigger time periods are used for all of the triggers
Project type DescriptionSteps
Chapter 3 Retrieving Data
Apollo Project User Guide16106R5 2009-03-24
19
14 If you selected a Controlled Source as the project type in step 2 go to step 17
You do not have to select an output format for a Controlled Source project because the output format for a Controlled Source project is always SEGY one output file is generated for all instruments and the stations are sorted by StationNameNetworkName
-OR-
If you selected one of the other project types go to step 15 to select an output format
15 Click the Output Format tab
Field Archive A Field Archive project is used for recurring data retrievals that occur at specified intervals The time of the last retrieval is stored on the instrumentTo define the start time and file interval1 If required edit the start time for the project2 Specify the file interval
For example if you specify 2 hours then one file is created every 2 hours3 If you want partial files retrieved select the Include last interval even if
incomplete check box You should only select this option when the retrieval of partial files is more important than retrieving the data for the current interval during a future project run
Be careful when specifying the file interval For example retrieving many hours or days of data and specifying a file interval of seconds or minutes could result in the generation of many files This is not only very resource intensive but could result in a data management problem as well
Project type DescriptionSteps
Chapter 3 Retrieving Data
20 Apollo Project User Guide16106R5 2009-03-24
16 Perform the following steps to select an output format
Output format Steps
MiniSEED 1 Click MiniSEED2 Click Per channel group to generate one output file per channel group
You must add the channel token to the Subdirectories or Filename box on the Output Location tab when choosing Per channel group-OR-Click Per instrument to generate one output file per instrument-OR-Click All Instruments to generate one output file for all instruments
3 Select the Sort check box if you want the output data sorted by timeData is put in a Store in the order received and this order may not always be chronological To ensure that the data in the resulting SEED file is chronological select Sort
4 Select the data record sizeThe default record size is 512 B However not all SEED file readers will support this file size Determine what your SEED reader supports and select an appropriate value The options are 512 B 1024 B 2048 B and 4096 B Note that a smaller record size will result in quicker SEED file output
Note The number of output files is determined by the file interval that you set on the Time Selection page
SAC 1 Click SACYou must add the channel token to the Subdirectories or Filename box on the Output Location tab when choosing SAC as the output format
NotesThere are two types of SAC files binary and ASCII Apollo Project only outputs binary SAC filesOne output file per channel group is generated
SEGY 1 Click SEGY2 Click Per channel group to generate one output file per channel group
You must add the channel token to the Subdirectories or Filename box on the Output Location tab when choosing Per channel group-OR-Click Per instrument to generate one output file per instrument-OR-Click All Instruments to generate one output file for all instruments
3 Select the Sort check box if you want the stations sorted by StationNameNetworkName
NotesAll stations must have the same sample rateThe maximum number of samples per trace is 32767SEGY trace headers from discovered instruments will not have station location information
Chapter 3 Retrieving Data
Apollo Project User Guide16106R5 2009-03-24
21
17 Click the Output Location tab
18 If you defined a default base directory when you configured Apollo Project and want to use it for this project go to step 21
For more information see Section 33 ldquoConfiguring Apollo Projectrdquo on page 24
-OR-
Enter the valid absolute path of the base directory for the processed data subdirectories and files
If the base directory you entered does not exist click Create to create it
19 If you defined a default expression for subdirectories when you configured Apollo Project and want to use it for this project go to step 21
For more information see Section 33 ldquoConfiguring Apollo Projectrdquo on page 24
-OR-
Enter the expression used to define path names for subfolders under the base directory
You can enter tokens in any order including any additional characters that are valid for paths
Seisan 1 Click Seisan
NotesYou must have Seisan installed on your computer with a WAVEFORM_BASE and CONT_BASE line included for each station in the DATSEISANDEF file You must define a SEISAN_TOP environment variableOne output file per channel group is generated
Regardless of the output format selected SOH channel group data is always output in CSV format
The Base Directory is the root of all data retrieved for the project and can be defined at any location in the file system of the server running Apollo Project including a networked drive on a separate server If you want to create or use a directory on a computer on the network you have to enter the server and share name in a modified UNC format that is prefixed by an additional two backslashes For example the usual fileserver1storefiles must be written as fileserver1storefiles
Large amounts of data can be stored in this location You must ensure that adequate disk space is available
For deployments of Apollo Project where the clients are not running on the server it is recommended that the file system containing the base directory on the server be shared or exported as a networked file system
It is not recommended that you use the channel token in the subdirectories expression if the project includes more than one channel group per instrument (selected on the Channel Group Selection tab) and the output is not per channel group (selected on the Output Format tab)
Output format Steps
Chapter 3 Retrieving Data
22 Apollo Project User Guide16106R5 2009-03-24
20 If you defined a default expression for file names when you configured Apollo Project and want to use it for this project go to step 21
For more information see Section 33 ldquoConfiguring Apollo Projectrdquo on page 24
-OR-
Enter the expression used to define file names for the processed data files that are stored in the subfolders under the base directory
You can enter tokens in any order including any additional characters that are valid for file names
21 Click OK to save the new project
The new project is created and the Summary page is displayed
32 Creating a Station Table FileYou can create a mapping between a given instrumentchannel group (for example taurus_1234digitizertimeSeries1) and a corresponding network station location and channel name These mappings are stored in a station table file and the mapped channel group names are used in the output files
You can create a station table file and use it as the default for all projects or you can create a station table for individual projects
To create a station table file and set is as the default
1 Click the configuration button in the upper right corner
2 Specify the network name location and channel names on the Behaviour and Defaults dialog box and click OK to save the new settings
The settings you enter here are used as the channel names in the station table file You can edit these settings in step 8
For more information on configuring Apollo Project settings see Section 33 ldquoConfiguring Apollo Projectrdquo on page 24
3 Click New on the Apollo Project Existing Projects page
Do not use the channel token in the filename expression if the project includes more than one channel group per instrument (selected on the Channel Group Selection tab) and the output is not per channel group (selected on the Output Format tab)
The Sample Path shows an example of a file name generated using the values for the Base Directory Subdirectories and Filename settings
You can only edit the settings of a project before it has run for the first time or been scheduled (Archive project) If you want to edit the settings of a project after it has already run once or been scheduled you can copy the project (see Section 345 ldquoCopying a Projectrdquo on page 28) and then edit the settings for the copy
It is recommended that you create a station table file and set it as the default for all projects You can update the mappings in this file when new Stores are added or discovered
Chapter 3 Retrieving Data
Apollo Project User Guide16106R5 2009-03-24
23
4 Type Station Table in the Project Name box and click any project type
5 Click OK
6 Click the Store Selection tab and select as many Stores as possible
See step 4 of Section 31 ldquoCreating New Projectsrdquo for information on how to add specifications and select Stores
7 Click the Channel Group Selection tab and click Create Default Station Table
A station table file is created and the name of the file is displayed in the Station Table File Name box
8 Edit the station table channel group mappings in the selected channel groups area of the tab (lower half of the tab) as required
The NetworkStationLocationChannel names will appear in the output files If the Location is empty it is interpreted as the SEED default of two spaces
9 Click OK to close the project and finish creating the station table
10 Click the configuration button in the upper right corner
11 Enter the path and name of the station table file you just created in the Station Table File Name box on the Behaviour and Defaults dialog box
12 Click OK to save the new settings
The station table file you specified will be used as the default for all future projects You can open the Station Table project and edit the station table file if you need to add more Stores or change the mappings
For more information on configuring Apollo Project settings see Section 33 ldquoConfiguring Apollo Projectrdquo on page 24
Make a note of the path of the station table file because you will have to enter it on the Behaviour and Defaults dialog box to set it as the default for all projects
Valid characters for the network station location and channel in the NetworkStationLocationChannel box are upper case letters A to Z numbers 0 to 9 and spaces are also acceptable for the location
Chapter 3 Retrieving Data
24 Apollo Project User Guide16106R5 2009-03-24
33 Configuring Apollo ProjectYou can configure basic settings for Apollo Project and the default settings for new projects The changes you make to the project default settings only apply to new projects
To configure Apollo Project
1 Click the configuration button in the upper right corner
2 Edit the following settings
Setting Description
Log Verbosity The level of detail that is logged by Apollo ProjectThe default setting is Info
Log Location The default name of the Apollo Project log folder Maximum Number of Retrieval Attempts
The maximum number of single retrieval attempt made for all missing time segments on all channel groups every time a project is run Enter an integer from 0 through 1000 The default value is 8
Notes If the Taurus is busy when a retrieval attempt is made the number of remaining retrieval attempts is not decreased by one attemptYou can view the channel group details page to see if there are any remaining retrieval attempts for any channel groups (see Section 373 ldquoMonitoring the Status of a Running Projectrdquo on page 34)
Number Of Retries The number of times Apollo Project attempts to connect to a data source if there is a network connectivity problem Enter an integer from 0 through 1000 The default value is 3
Note Every time a project is run it starts with the maximum number of retries
Retry Interval (secs) The amount of time in seconds that Apollo Project waits before trying to connect to a data source againEnter an integer from 0 through 1000 The default value is 5
Station Table File Name The file name and location of the station table file that is used to assign station names to all of the selected channel groupsA station table is used to assign names to all of the selected channel groups For more information see Section 32 ldquoCreating a Station Table Filerdquo on page 22No station table file is specified by default
Chapter 3 Retrieving Data
Apollo Project User Guide16106R5 2009-03-24
25
Base Directory The folder name and location of the base directory for the processed data subfolders and files Enter any valid folder name and location including any additional characters that are valid for paths The default base directory name is ApolloProject
Notes The Base Directory is the root of all data retrieved for the project and can be defined at any location in the file system of the server running Apollo Project including a shared folder on a different computer If you want to create or use a folder on a computer on the network you have to enter the server and share name in a modified UNC format that is prefixed by an additional two backslashes For example the usual fileserver1storefiles must be written as fileserver1storefilesLarge amounts of data can be stored in this location You must ensure that adequate disk space is availableFor deployments of Apollo Project where the clients are not running on the server it is recommended that the file system containing the base directory on the server be shared or exported as a networked file system
Subdirectories The expression used to define path names for subfolders under the base directoryEnter tokens in any order including any additional characters that are valid for paths The default path name is as follows projectyearmonthday
Filename The expression used to define file names for the processed data files that are stored in the subfolders under the base directoryEnter tokens in any order including any additional characters that are valid for file names The default filename is as follows instrument_time
Sample Path An example of a file name generated using the values for the Base Directory Subdirectories and Filename settings
Network Name A standard network codeEnter any two upper case letters or numbers The default code is XX
Location A location within a stationEnter any two upper case letters numbers or spaces
The default location is two spaces for ldquononerdquo You must delete the two default spaces if you enter a new location value
Setting Description
Chapter 3 Retrieving Data
26 Apollo Project User Guide16106R5 2009-03-24
3 Click OK to save the new settings
34 Managing ProjectsYou can view open close copy and delete projects Also you can create convenient links to run your individual projects with desktop shortcuts
341 Viewing Existing Projects1 Click Projects in the Projects bar
2 View the projects listed on the Existing Projects page
The Existing Projects page shows a list of all projects and a status overview of each project For more information see Section 371 ldquoViewing an Overview of the Status of All Projectsrdquo on page 32
Channel 1 Name A channel codeEnter any three upper case letters or numbersThe default channel code is BHZ
Channel 2 Name A channel codeEnter any three upper case letters or numbersThe default channel code is BHN
Channel 3 Name A channel codeEnter any three upper case letters or numbersThe default channel code is BHE
Setting Description
Chapter 3 Retrieving Data
Apollo Project User Guide16106R5 2009-03-24
27
342 Opening a Project1 Click the project name under the Name column on the Existing Projects page
2 Click the Open Project button
343 Creating a Desktop Shortcut to a ProjectLaunching a project with a desktop shortcut will open Apollo Project to that project and run the project
Methods for creating desktop shortcuts to Web sites vary from browser to browser These procedures explain how to create desktop shortcuts to specific projects for both Mozilla Firefox 3 and Microsoft Internet Explorer 7 Desktop shortcuts to projects include the Apollo Project icon and are titled in the format Project Name ndash Apollo Project
In Firefox 3
1 Open the project you want to create a shortcut to in Firefox
2 Reduce the size of the Firefox window so that the desktop is visible
3 Drag the Site Identification Button onto the desktop
The Site Identification Button is located to the left of the Location Bar and displays the Apollo Project icon
In Internet Explorer 7
1 Open the project you want to create a shortcut to in Internet Explorer
2 Press ALT+F
3 Select Send gt Shortcut to Desktop
344 Closing a Project
1 Click the Close Project button in the Projects bar
Launching a desktop shortcut to a project automatically runs that project It is important to note that once a project is run its settings can no longer be edited It is recommended that desktop shortcuts only be created for Field Archive projects
Firefox is the recommended browser for Apollo Project
Chapter 3 Retrieving Data
28 Apollo Project User Guide16106R5 2009-03-24
345 Copying a Project
1 Select the project name under the Name column on the Existing Projects page
2 Click Copy
3 Enter a unique name for the new project and click OK
4 Click Edit and edit the settings as required
5 Click OK to save the project after you have finished editing the settings
346 Deleting a ProjectWhen you delete a project only files in the temporary folder are deleted All processed data files are not deleted
1 Click the project name under the Name column on the Existing Projects page
2 Click Delete
3 Click OK on the confirmation message
35 Running ProjectsFor all project types you can run a project manually at any time Archive projects can also be defined to run automatically on a schedule
If it is a scheduled Archive Project and the schedule is started click Cancel Schedule before you create a copy of it (If the schedule is not started the Start Schedule button is visible if the schedule is started the Cancel Schedule button replaces the Start Schedule button)
Apollo Project stores intermediate files in a temporary subdirectory of the Base Directory specified for the output location of a project These intermediate files correspond to the actual channel group data retrieved from the Stores referenced by the project If a project is deleted from Apollo Project these temporary files will be removed automatically
Disk space can also be reclaimed by removing these temporary files manually without deleting the project However if the project is run again the output files produced might be incomplete if previously retrieved data from these temporary files is required
For more information on what happens when a project runs see Section A1 ldquoOverview of Running Projectsrdquo on page 37
Chapter 3 Retrieving Data
Apollo Project User Guide16106R5 2009-03-24
29
351 Running a Project1 Open a project
2 Click Run Now on the Summary page to start the project
The project starts running and the Retrieval Status page is displayed
352 Stopping a Project1 Open a project
2 Click Cancel Run on the Summary page to stop the project
3 Click OK on the success message
353 Merging Project Data FilesYou have the option to merge all of the downloaded data for the stations and instruments into one file per interval for each project
1 Open a project
2 Click Merge
A single file is generated for each time period The time period is determined by the file interval you specified on the Time Selection page when you created the project For more information see step 13 of Section 31 ldquoCreating New Projectsrdquo on page 11
The original data files are not modified when you select the option to merge project data files
You can also click Run Now on the Retrieval Status page to start a project
For more information on what happens when a project runs see Section A1 ldquoOverview of Running Projectsrdquo on page 37
You can also click Cancel Run on the Retrieval Status page to stop a project
You cannot merge data from Archive projects and you cannot merge data in the Seisan format
You can also click Merge on the Retrieval Status page to merge the data from a project
Chapter 3 Retrieving Data
30 Apollo Project User Guide16106R5 2009-03-24
354 Running a Scheduled Archive Project1 Open a project
2 Click Start Schedule to start the project schedule
3 Click OK on the confirmation message
4 Click OK on the success message
For a project scheduled to run weekly the project will run for the first time according to the project start time and then it will run on a weekly basis according to the times and days you specified
For a project scheduled to run at a regular interval the project will run according the to interval you specified after you start the schedule For example if you click Start Schedule on a Wednesday and you specified every 2 days as the interval then the project will run for the first time on Friday and every two days after that
3541 Cancelling a Schedule
If you cancel a scheduled project before it runs for the first time you can edit the project settings
If you cancel a project that is currently running the current project runs to completion but subsequent project runs will not occur
1 Open a project
2 Click Cancel Schedule to cancel the project schedule
3 Click OK on the confirmation message
4 Click OK on the success message
You can also click Start Schedule on the Retrieval Status page to start the schedule of a project
You can restart the schedule by opening the project and clicking Start Schedule
You can also click Cancel Schedule on the Retrieval Status page to cancel the schedule of a project
Chapter 3 Retrieving Data
Apollo Project User Guide16106R5 2009-03-24
31
36 Editing and Viewing the Settings of ProjectsYou can edit the settings of a project before it has run After it has run you can view the settings
361 Editing Project Settings1 Open the project
2 Click Edit on the Summary page
3 Edit the settings as required
4 Click OK to save the changes
362 Viewing Project Settings1 Open the project
2 Click View on the Summary page
3 Click the tabs to view the settings
4 Click Cancel when you have finished viewing the settings
You can only edit the settings of a project before it has run for the first time or been scheduled (Archive project) If you want to edit the settings of a project after it has already run once or been scheduled you can copy the project (see Section 345 ldquoCopying a Projectrdquo on page 28) and then edit the settings for the copy
Settings For more information
Store Selection See step 4 of Section 31 ldquoCreating New ProjectsrdquoChannel Group Selection See step 5 to step 12 of Section 31 ldquoCreating New ProjectsrdquoTime Selection See step 13 of Section 31 ldquoCreating New ProjectsrdquoOutput Format See step 15 and step 16 of Section 31 ldquoCreating New ProjectsrdquoOutput Location See step 17 to step 20 of Section 31 ldquoCreating New Projectsrdquo
You can also click Edit on the Retrieval Status page to edit the settings of a project
You can also click View on the Retrieval Status page to edit the settings of a project
Chapter 3 Retrieving Data
32 Apollo Project User Guide16106R5 2009-03-24
37 Monitoring Project StatusYou can monitor the status of a project by viewing information on the Existing Projects Summary and Retrieval Status pages
371 Viewing an Overview of the Status of All ProjectsThe Existing Projects page is the default home page of Apollo Project You see this page when you first open Apollo Project or when you click Projects in the projects bar For more information see Section 341 ldquoViewing Existing Projectsrdquo on page 26
You can view the following information for all projects on the Existing Projects page
bull Name
bull Type
bull Current status
bull Last time the project run
bull Status of data retrieved
The Data Retrieved bars on the Existing Projects page show the overall status of the data retrieval For more information see Section 3731 ldquoStatus Coloursrdquo on page 34
Chapter 3 Retrieving Data
Apollo Project User Guide16106R5 2009-03-24
33
372 Viewing the Status of an Individual ProjectWhen you open a project a detailed summary of the project is shown on the Summary page For more information see Section 342 ldquoOpening a Projectrdquo on page 27
You can view the following information for each project on the Summary page
bull Date it was created
bull Date it was last modified
bull Current status
bull Last time it ran
bull Next time it will run
You can also view a summary of all of the settings you specified when you created the project (Store specifications selected Stores selected time series channel groups selected SOH channel groups start and end times number of files generated file interval and output format and locations)
All times are reported using the UTC time zone
Chapter 3 Retrieving Data
34 Apollo Project User Guide16106R5 2009-03-24
373 Monitoring the Status of a Running ProjectYou can view the data retrieval status of a project while it is running on the Retrieval Status page The Retrieval Status page is displayed automatically when you click Run Now to run a project You can also view this page by opening a project and clicking the Retrieval Status tab
The status for each channel group is expressed in the form of two numbers (for example 60100) and two bar graphs The first number is the percentage available of the total time requested (for example 60) and the second number is the percentage retrieved of the time available (for example 100) For more information on the bar graph status colours see Section 3731 ldquoStatus Coloursrdquo on page 34
You can also view retrieval details for each channel group listed on the Retrieval Status page For more information see Section 3732 ldquoViewing the Retrieval Details for Each Channel Grouprdquo on page 35
3731 Status Colours
The data retrieval status bars use the following status colours
The information that is displayed on the Retrieval Status page is updated continuously while a project is running
Table 3-1 Status colours
Colour Status
Green Apollo Project has retrieved the data
Yellow Apollo Project is attempting to retrieve available data from the Store
Red Data is available in the Store but Apollo Project has failed to retrieve it on this attempt Apollo Project will make additional attempts to retrieve the data up to the configured Maximum Number of Retrieval Attempts For information on how to set the Maximum Number of Retrieval Attempts setting see Section 31 ldquoCreating New Projectsrdquo on page 11
White Data for some portion of the requested time segment is not available in the Store For example there are gaps in the data or the retrieval request is for a future time segment
Chapter 3 Retrieving Data
Apollo Project User Guide16106R5 2009-03-24
35
3732 Viewing the Retrieval Details for Each Channel Group
You can view the retrieval status of each time segment for a channel group
1 Click a channel group name
2 Click the Channel Group Details button that is located to the right of the channel group name
The Remaining Retrieval Attempts column displays the number of times that Apollo Project will try to download each missing time segment for the channel group when the project is run again For information on how to set the Maximum Number of Retrieval Attempts setting see Section 33 ldquoConfiguring Apollo Projectrdquo on page 24
3 Click OK when you have finished viewing the details
Chapter 3 Retrieving Data
36 Apollo Project User Guide16106R5 2009-03-24
Apollo Project User Guide16106R5 2009-03-24
37
Appendix A Reference Information and Examples
Overview of Running Projects
Example Project Settings
Example Deployment Scenarios
Shot File Formats for Controlled Source Projects
A1 Overview of Running ProjectsWhen a project is run Apollo Project performs the following steps
1 The requested time ranges are identified
2 The channel groups for which data are to be retrieved are identified
3 The actual Stores specified by the Store specifications of the project are identified
For each identified Store the following steps are performed
1 A data availability analysis for the outstanding time ranges is performed These are for the ranges for which data has not already been retrieved The availability of the data is recorded for reference It is possible that a given Store was not present at the time the project was last run If this is the case then an attempt is made to retrieve all of the required time ranges of the project from the Store
2 If any data exists in the Store for any of the requested time ranges then a retrieval of this data is performed and the retrieved data is stored to local temporary files
3 If the number of retrieval attempts for a given time range exceeds a configurable threshold (see Section 33 ldquoConfiguring Apollo Projectrdquo on page 24) then the retrieval of data within the stated range is not attempted again
If any data was retrieved during the run of the project then the corresponding output files of the desired output format are generated and stored in the output location specified for the project
When running Apollo Project with Taurus version 2x the schedule for Archive projects must be greater than 5 minutes in duration Schedules that are less than 5 minutes can result in data that is missing or not downloaded
Appendix A Reference Information and Examples
38 Apollo Project User Guide16106R5 2009-03-24
It is possible that the requested data for a given channel group exists across multiple Stores If all of these Stores are included by the Store specifications for the project then Apollo Project assembles the requested data
When a project runs detailed information regarding the results of the retrieved data and processed data are available For more information see Section 37 ldquoMonitoring Project Statusrdquo on page 32
A2 Example Project Settings
A21 Example 1 One Time ProjectProject Name Project1
Project Type One Time
Channel groups selected for retrieval CASTN1OTBHZ (on taurus_1234)
Requested Time Range January 30 2008 1400 ndash 1500 UTC
File Interval 20 minutes
Output Location Base Directory disk2ApolloProjectOutputData
Output Location Subdirectories projectyearmonthday
Output Location Filenamestationnetwork_time
When the project is run successfully the following output files will be created on the server running Apollo Project
disk2ApolloProjectOutputDataProject120080130STN1CA_20080130_140000seed
disk2ApolloProjectOutputDataProject120080130STN1CA_20080130_142000seed
disk2ApolloProjectOutputDataProject120080130STN1CA_20080130_144000seed
Appendix A Reference Information and Examples
Apollo Project User Guide16106R5 2009-03-24
39
A22 Example 2 Controlled Source ProjectProject Name Project2
Project Type Controlled Source
Channel groups selected for retrieval CASTN1OTBHZ (on taurus_1234) CASTN1OTBHN (on taurus_1234)
Requested Shot Times January 30 2008 1400 UTC January 30 2008 1430 UTC
Pre Time 30 seconds
Post Time 30 seconds
Output Location Base Directory disk2ApolloProjectOutputData
Output Location Subdirectories projectyearmonthday
Output Location Filename timeformat
When the project is run successfully the following output files will be created on the server running Apollo Project
disk2ApolloProjectOutputDataProject22008013020080130_135930segysgy
disk2ApolloProjectOutputDataProject22008013020080130_142930segysgy
A3 Example Deployment Scenarios
A31 One TimeYou want to download three days of data from multiple instruments on the network save the data in MiniSEED format and create a file for every hour of data
A One Time project is the recommended solution The Store of each instrument can be made available to Apollo Project by creating a corresponding IP Address Store specification with the IP address of the instrument The requested time range can be specified along with a file interval of one hour Ensure that the instruments are configured to run in Communications mode
A32 Scheduled ArchiveYou want seismic data to be retrieved automatically from a group of instruments on the network every six hours The instruments are always accessible via an Ethernet connection
A scheduled Archive project is the recommended solution Use the Regular Interval scheduling option and set the interval to six hours
You can also run a scheduled Archive project at any time For example if the scheduled retrieval interval of a project is six hours and between intervals you want to retrieve the data three hours early you can run the project and approximately three additional hours of data would be accumulated About three hours later the project will run automatically and accumulate the remaining three hours of data
Appendix A Reference Information and Examples
40 Apollo Project User Guide16106R5 2009-03-24
A33 Manual ArchiveYou want to retrieve seismic data from a group of instruments but their respective Stores are only available for retrieval on occasion (no regular dependable schedule for retrieval from these Stores is possible)
A manually run Archive project is the recommended solution You can create the project and run it whenever any of the instruments are available for retrieval
A34 Field ArchiveYou want to collect data from a set of isolated instruments in the field at recurring intervals (for example twice per month)
A Field Archive project is the recommended solution You can create a Field Archive project and either add all instrument IP addresses to the list or use a Discovery specification The time for the last retrieval is stored on the instrument and all data is recovered from the last recovery time
A35 Media HarvestingYou want to collect the media from a set of instruments in the field at a regular interval (for example once per week) You also have to retrieve all of the seismic data on the media for subsequent analysis
An Archive project is the recommended solution Initially a directory is created on the file system of the server running Apollo Project A directory Store specification is created with this directory as the parent directory from which to search for Stores The content of each media instance in the weekrsquos collection is copied from a media reader to a subdirectory of the directory When the project is run all of the copied Stores are automatically available and the project accumulates data for each instrument
Due to the nature of media harvesting and the replacement procedure for this example data is always missing for the last period of output files for the current week This period corresponds to the time that the media was taken from the instrument and replaced with a new one The following week when the media is harvested again from the instruments in the field Apollo Project fills in the missing time for these files with the new Store data regardless of the media instance on which the data currently resides
You can only create and run Field Archive projects for Taurus version 30 or later
Appendix A Reference Information and Examples
Apollo Project User Guide16106R5 2009-03-24
41
A36 Trigger Downloading You have set up a network of five Tauruses around a hydro dam Each Taurus is accessible over an Ethernet connection and each is set to record data over the weekend You have set the period for data retrieval at 30 seconds before and five minutes after any seismic activity but the following procedure shows you why it is not necessary to view all of the data accumulated over the whole weekend
1 Select the Taurus at the site with the least environmental noise or determine the best site for generating triggers and designate this Taurus ldquoTaurus Ardquo for reference
You need to perform this task in advance More information about triggers can be found in the Taurus Portable Seismograph User Guide
2 Download the trigger file from ldquoTaurus Ardquo and review the file to verify the correct number of triggers
3 Follow these steps to create a new Triggers project
a) Click New on the Apollo Project Existing Projects page
b) Click Triggers as the project type and enter a unique name in the Project Name box
c) Click OK
d) Click the IP Address tab on the Store Selection tab
e) Enter the IP address of a Taurus
f) Click Add
g) Repeat step e until you have entered the IP addresses of all five of the Tauruses
Apollo Project adds the IP address specifications to the Selected Specifications section of the Store Selection page and finds all five Stores associated with the IP addresses and adds them to the Selected Stores section
h) Click the Channel Group Selection tab
i) Click Create Default Station Table to create a table for all of the currently selected Stores and discovered instruments
j) Review the selected channel groups and if required edit the mappings in the selected channel groups area of the tab (lower half of the tab)
k) Click the Time Selection tab
l) Click the Browse button
m)Select the trigger file that you downloaded in step 2 and click OK
n) Click Submit
The list of triggers is imported and displayed in the Triggers section on the Time Selection page
o) Enter a Pre Time of 30 seconds and a Post Time of 5 minutes
p) Click the Output Format tab
q) Click MiniSEED
r) Click All Instruments
s) Click the Output Location tab
Appendix A Reference Information and Examples
42 Apollo Project User Guide16106R5 2009-03-24
t) Enter the valid absolute path of the base directory for the processed data subfolders and files
u) Enter the expression used to define path names for subfolders under the base directory
v) Enter the expression used to define file names for the processed data files that are stored in the subfolders under the base directory
w) Click OK
4 Click the Run Now button on the Summary page
When the project has finished running the output folder you specified in step t will contain ten files Each output file will contain 5 minutes and 30 seconds of data from the five Tauruses
A4 Shot File Formats for Controlled Source ProjectsYou have two options for defining shots for a Controlled Source project manually defining shots or importing shots from a shot file
You can create shot files in one of following three file formats
Microsoft Office Excel (xls) ndash See Section A41 ldquoCreating a Shot File With Microsoft Office Excelrdquo on page 42
OpenOfficeorg Calc (ods) ndash See Section A42 ldquoCreating a Shot File With OpenOfficeorg Calcrdquo on page 44
Comma-Separated Values (csv) ndash See Section A43 ldquoCreating a Comma-Separated Values Shot Filerdquo on page 45
The Shot file templates are located in the docShotFileImport folder on the Apollo Project CD
A41 Creating a Shot File With Microsoft Office ExcelThe Microsoft Office Excel template for Apollo Project can be used with Microsoft Office Excel version 2003 or later
To create an Microsoft Office Excel based shot file
1 Double-click ShotFileTemplatexlt
A new Microsoft Office Excel file is created from the template and opens in the Microsoft Office Excel
2 Save the new spreadsheet as a Microsoft Office Excel document (xls)
3 Enter shot file data as specified in the Microsoft Office Excel spreadsheet
Only the decimal separator is supported for shot files Separators that denote the 3rd power of 10 (thousand) are not supported (for example 4500) The Microsoft Excel and OpenOffice templates reinforce these restrictions and are recommended for creating csv files
Appendix A Reference Information and Examples
Apollo Project User Guide16106R5 2009-03-24
43
You can enter data for multiple shot times
4 Click Save to save the file in Microsoft Office Excel format
5 Click File gt Save As and select CSV (Comma delimited) (csv) from the Save as type list
6 Click Save
7 Click OK on the message warning you that you are only saving the active sheet
8 Click Yes on the message warning you that file features might be incompatible with the csv format
9 Close Microsoft Office Excel
If you are using Microsoft Office Excel 2007 click the Microsoft Office Button and click Save As
Ensure that you save the file as a comma delimited file If the shot file is mistakenly saved in Microsoft Excel format (xls) the shot file will not work in Apollo Project
Appendix A Reference Information and Examples
44 Apollo Project User Guide16106R5 2009-03-24
A42 Creating a Shot File With OpenOfficeorg CalcThe OpenOffice template has been tested with OpenOfficeorg Calc version 23 Later versions of OpenOfficeorg Calc can be used at your discretion
To create a shot file based on the OpenOfficeorg Calc template
1 Double-click ShotFileTemplateots
A new OpenOffice spreadsheet is created from the template and opens in OpenOfficeorg Calc
2 Save the new spreadsheet as an OpenOffice Calc document (ods)
3 Enter the shot file data as specified in the OpenOffice spreadsheet
You can enter data for multiple shot times
4 Click Save to save the file in OpenOfficeorg Calc format
5 Click File gt Save As and select Text CSV (csv) from the Save as Type list
6 Select the Edit filter settings check box
7 Click Save
A warning message might appear that warns you that the document might contain formatting that cannot be saved in the csv format Click Yes on the warning message to save the file in csv format
The Export of text files window opens
8 Delete the double quotation marks () in the Text delimiter box and ensure that the Save cell content as shown check box is selected
9 Click OK to export the OpenOffice spreadsheet as a csv file
10 Click OK on the warning message
11 Close OpenOfficeorg Calc
Appendix A Reference Information and Examples
Apollo Project User Guide16106R5 2009-03-24
45
A43 Creating a Comma-Separated Values Shot FileYou can use any text editor to create a csv shot file
To create a csv shot file
1 Open ShotFileTemplatecsv in a text editor and save it with a different name
2 Format each line of the csv file as follows
Shot TimePre TimePost TimeLatitudeLongitudeElevation
For example
2008-08-28 103044090600000-6000004267
The format and units are as follows
3 Save the file as a csv formatted file
The csv shot file template is not compatible with Microsoft Office Excel Make sure that you do not double-click it and open it in Microsoft Office Excel
FormatUnits
Shot Time yyyy-mm-dd hhmmss
Pre Time seconds
Post Time seconds
Latitude degrees
Longitude degrees
Elevation meters
Appendix A Reference Information and Examples
46 Apollo Project User Guide16106R5 2009-03-24
Apollo Project User Guide16106R5 2009-03-24
47
Appendix B Retrieving SOH Data from a Taurus Version 2x
Taurus Version 2x SOH Data Retrieved by Apollo Project
Retrieving SOH Data from a Taurus Version 2x Streaming to Apollo Server
B1 Taurus Version 2x SOH Data Retrieved by Apollo Project This section presents the predefined datasets of SOH data Apollo Project will retrieve from a Taurus version 2x either through a direct connection or a stream to Apollo Server For instruction on retrieving streaming Taurus version 2x data from Apollo Server see Section B2 ldquoRetrieving SOH Data from a Taurus Version 2x Streaming to Apollo Serverrdquo on page 48
The order of the columns presented in the table below will differ when streaming Taurus version 2x SOH data from Apollo Server
Predefined SOH group SOH data
GPS Time Time (longsecs) (the number of seconds since 1970-01-01)Time (UTC) (time in yyyy-mm-dd hhmmssms format)Altitude (m)DAC CountError (ns) (time error)GPS Engine StatusLast Update Time(s)Lat (deg) (latitude in degrees)Long (deg) (longitude in degrees)NumSatellites (number of satellites used)PDOPPhaseLock (system clock phase lock)TDOPUncertainty (ns) (time uncertainty)
Note The values for Number of satellites used PDOP and TDOP are provided by the GPS receiver at the Last update time In order to see what time these values correspond to look at the Last update time When GPS is off these three parameters and the Last update time are not updated The last value displays until the next update arrives (after the GPS is turned on again)
Appendix B Retrieving SOH Data from a Taurus Version 2x
48 Apollo Project User Guide16106R5 2009-03-24
B2 Retrieving SOH Data from a Taurus Version 2x Streaming to Apollo ServerThis section provides instruction on configuring your Taurus version 2x to stream data to Apollo Server and instructions on how to use Apollo Project to retrieve this data from Apollo Server
B21 Streaming Data from a Taurus Version 2x to Apollo ServerUse the Taurus graphical user interface on either the Taurus display screen or through a Web browser to set up an NP stream from a Taurus version 2x to Apollo Server
1 Log in to the Taurus version 2x with either the tech or central user account
2 Select Advanced Configuration gt Communications gt NP Data Streaming
GPS Satellites Time (longsecs) (the number of seconds since 1970-01-01)Time (UTC) (time in yyyy-mm-dd hhmmssms format)
For each satelliteAcquisition FlagLast Update Time (ms)PRNSatellite Azimuth (microordm)Satellite Elevation (microordm)Signal Level (AMU)
Environment Time (longsecs) (the number of seconds since 1970-01-01)Time (UTC) (time in yyyy-mm-dd hhmmssms format)External SOH Voltage 1 (V) (12-bit voltage input) External SOH Voltage 2 (V) (12-bit voltage input) External SOH Voltage 3 (V) (12-bit voltage input) External SOH Voltage 4 (V) (12-bit voltage input) Sensor SOH Voltage 1 (V)Sensor SOH Voltage 2 (V)Sensor SOH Voltage 3 (V)
Instrument Time (longsecs) (the number of seconds since 1970-01-01)Time (UTC) (time in yyyy-mm-dd hhmmssms format)Controller Current (mA)Digitizer Current (mA)NMX Bus Current (mA) (external connector)Sensor Current (mA)Serial Port Current (mA)Supply Voltage (mV)Temperature (ordmC)
Predefined SOH group SOH data
Appendix B Retrieving SOH Data from a Taurus Version 2x
Apollo Project User Guide16106R5 2009-03-24
49
3 To have the Taurus stream both time series and SOH data to Apollo Server select both Stream Time Series and Stream SOH
-OR-
Select only Stream SOH if you only want to retrieve the SOH data from Apollo Server
4 Type the IP address for Apollo Server in the IP Address box
5 Type the port number Apollo Server uses to receive data in the Port box By default this is port number 32008
6 The Second IP Address and Second Port boxes are not necessary however cannot be left blank Type 127001 in the Second IP Address box and 32004 in the Second Port box
7 Type a value in the Maximum Throughput [bps] box if a limited data link is present between the Taurus and Apollo Server For instance if at some point the data link is limited to 9600 bps then this is the maximum throughput the link can allow If there are no throughput limitations set the value in this box to zero to disable the throughput limitation
8 Click Apply
9 Click Commit
B22 Retrieving Taurus Version 2x Data from Apollo ServerCreate a new project or use an existing project in Apollo Project to retrieve the Taurus version 2x data from Apollo Server For more information on creating or editing projects refer to Section 31 ldquoCreating New Projectsrdquo on page 11 and Section 36 ldquoEditing and Viewing the Settings of Projectsrdquo on page 31
When creating or editing the project
a) Add an IP address Store specification on the Store Selection tab (see step 4 in Section 31 ldquoCreating New Projectsrdquo) for Apollo Server including its client Web application port number Use the format
Apollo Server IP AddressApollo Server Client Web Application Port Number
b) Apply the appropriate filters on the Channel Group Selection tab to retrieve the desired channel groups from the Taurus version 2x See step 5 through step 12 in Section 31 ldquoCreating New Projectsrdquo for instruction on using the Channel Group Selection tab
Appendix B Retrieving SOH Data from a Taurus Version 2x
50 Apollo Project User Guide16106R5 2009-03-24
Apollo Project User Guide16106R5 2009-03-24
51
Appendix C Glossary
Glossary of Abbreviations and Terms
List of Unit Abbreviations and Symbols
C1 Glossary of Abbreviations and Terms
A
ASCIIAmerican Standard Code for Information Interchange
B
BHEBroad Band High Gain Seismometer East-West Orientation
Channel name based on the Global Seismological Network (GSN) standard
BHNBroad Band High Gain Seismometer North-South Orientation
Channel name based on the Global Seismological Network (GSN) standard
BHZBroad Band High Gain Seismometer Vertical Orientation
Channel name based on the Global Seismological Network (GSN) standard
Appendix C Glossary
52 Apollo Project User Guide16106R5 2009-03-24
C
CSVComma-Separated Values
D
DACDigital to Analog Converter
G
GPSGlobal Positioning System
J
JREJava Runtime Environment
JVMJava Virtual Machine
N
NFSNetwork File System
P
PDOPPosition Dilution of Precision
PRNPseudo-random Number
Appendix C Glossary
Apollo Project User Guide16106R5 2009-03-24
53
S
SACSeismic Analysis Code
An Apollo Project output file format that generates files that can be used by the SAC software (see http wwwirisedusoftwaresac)
SEEDStandard for the Exchange of Earthquake Data
SMBServer Message Block
SOHState of Health
T
TCPIPTransmission Control ProtocolInternet Protocol
TDOPTime Dilution of Precision
U
UNCUniform Naming Convention or Universal Naming Convention
URLUniform Resource Locator
UTCCoordinated Universal Time
Appendix C Glossary
54 Apollo Project User Guide16106R5 2009-03-24
C2 List of Unit Abbreviations and SymbolsTable C-1 provides a list of unit abbreviations and symbols commonly used in Nanometrics documentation
Table C-1 Unit abbreviations and symbols
Abbreviation or Symbol Definition Abbreviation
or Symbol Definition
deg degree lb pound
Oslash diameter m metre
micro micro ms metre per second
Ω ohm ms2 metre per second squared
A ampere mA milliampere
AC alternating current MB megabyte
b bit MΩ megaohm
B byte MHz megahertz
bps bits per second mi mile
C Celsius mL millilitre
cm centimetre mm millimetre
dB decibel ms millisecond
DC direct current MTU maximum transmission unit
F farad mV millivolt
ft foot mW milliwatt
g gram N Newton
g gravity nF nanofarad
GB gigabyte ns nanosecond
GHz gigahertz rad radian
Hz hertz rads radian per second
in inch s second
KB kilobyte sps samples per second
kg kilogram U rack unit
kHz kilohertz V volt
kΩ kiloohm Vpp Volts peak-to-peak
kW kilowatt W watt
L litre
Apollo Project User Guide16106R5 2009-03-24
55
About NanometricsNanometrics is a world leader in the development of precision instrumentation network technology and software applications for seismological and environmental studies Using Nanometrics technology our customers establish and grow research networks that are often located in extreme environments such as the frozen Arctic and Antarctic the arid deserts of the Middle East the jungles of South America and the depths of the worlds oceans Many of these are mission-critical national and regional networks that demand the highest possible data quality and availability
Nanometrics provides end-to-end solutions that include a growing portfolio of broadband and strong motion seismometers dataloggers and digitizers satellite ground station systems for remote site data collection and software applications for data and network analysis and management To support this portfolio Nanometrics also provides global systems engineering services for design installation and support of complete networks
Our head office research and development centre and production facility are located in the Kanata North Business Park of Ottawa the high-technology heart of Canadas capital region
Contacting NanometricsNanometrics Inc250 Herzberg RoadKanata Ontario Canada K2K 2A1Phone +1 613-592-6776Fax +1 613-592-5929Email infonanometricscaWeb wwwnanometricsca
Contacting Technical SupportIf you need technical support please submit a request on the Nanometrics technical support site or by email or fax Include a full explanation of the problem and related information such as log filesSupport site httpsupportnanometricsca
Email techsupportnanometricsca
Apollo Project User Guide16106R5 2009-03-24
5
Chapter 2 Installing and Starting Apollo Project
Installing the Apollo Project Web Server
Installing an Apollo Project Licence File
Starting the Apollo Project Web Server
Running Apollo Project Client
Upgrading Apollo Project
21 Installing the Apollo Project Web ServerThe Apollo Project Web server is installed on a single computer and after it is installed and running the client can run locally on the server or on any computer with a Web browser and network access to the server computer
All Stores must be accessible from the server hosting the Apollo Project Web server All output files are created on the server and its accessible file systems as described in Section 33 ldquoConfiguring Apollo Projectrdquo on page 24
To install the Apollo Project Web server on a server computer running Windows Linux or Mac OS X
1 Install a supported version of the Java Runtime Environment JRE version 60 or later
2 If you have received a licence file from Nanometrics ensure it is in a drive or network location that is accessible to the Apollo Project Setup Wizard
You can install and run Apollo Project without a licence file For details see Section 121 ldquoSoftware Licencerdquo on page 2 Should you require a licence after Apollo Project is installed you can install a licence using the Nanometrics Licence Installation Wizard See Section 22 ldquoInstalling an Apollo Project Licence Filerdquo on page 7
Chapter 2 Installing and Starting Apollo Project
6 Apollo Project User Guide16106R5 2009-03-24
3 Follow the instructions for your operating system in Table 2-1
211 Uninstalling Apollo Project Web ServerTable 2-2 provides instructions for uninstalling Apollo Project from the server computer for each of the supported operating systems
Table 2-1 Installation instructions
Operating System To install the Apollo Project Web server
Windows 1 Double-click ApolloProject_windows_x_x_xexe where x_x_x is the Apollo Project version number on the Apollo Project CD
2 Follow the steps of the installation wizard making changes to the default settings as required
Linux 1 Open a Terminal window and change the directory to the Apollo Project CD
2 Run the following as rootsh ApolloProject_unix_x_x_xsh (where x_x_x is the Apollo Project version number)
3 Follow the steps of the installation wizard making changes to the default settings as required
Mac OS X 1 Double-click the ApolloProject_macos_x_x_xdmg where x_x_x is the Apollo Project version number disc image on the Apollo Project CDThe disc image mounts as a new volume on your desktop and automatically displays its contents in a Finder window
2 Double-click the installation file Apollo Project Installer in the Finder window
3 Follow the steps of the installation wizard making changes to the default settings as required
Note After installing Apollo Project you can drag the disc image to the Trash to eject it and remove it from your desktop
If you are uninstalling a version of Apollo Project prior to version 13 refer to the version 12 user guide for instruction on uninstalling Apollo Project
Apollo Project Version 12 User Guide revision 16106R2 released on 2008-09-09
Table 2-2 Uninstalling the Apollo Project Web server
Operating System To uninstall the Apollo Project Web server
Windows Click Start gt All Programs gt Nanometrics gt Apollo Project gt Apollo Project Uninstaller
Linux 1 Open a Terminal window and change the directory to the Apollo Project directory The location of the Apollo Project directory was defined when you installed Apollo Project The default location is optnanometricsApolloProject
2 Run the following as root uninstall
Mac OS X 1 Open the Finder2 Click Applications under Places3 Double-click the Apollo Project folder 4 Double-click Apollo Project Uninstaller
Chapter 2 Installing and Starting Apollo Project
Apollo Project User Guide16106R5 2009-03-24
7
22 Installing an Apollo Project Licence FileIf you did not install a licence file during the installation of the Apollo Project Web server application you can install one at any time using the Nanometrics Product Licence Installation Wizard
A licence for Apollo Project is only required if capabilities beyond those of the unlicensed version are needed See Section 121 ldquoSoftware Licencerdquo on page 2 for descriptions of the licensed and unlicensed versions Contact Nanometrics to order a licence (see Contacting Nanometrics on page 55)
If you have obtained a licence file from Nanometrics use the following steps to install the file
Installing a licence file after creating a project in Apollo Project will result in the loss of that project It is recommended that you install your licence before running Apollo Project for the first time
Operating System To install an Apollo Project licence file
Windows 1 Ensure the licence file is in a drive or network location that is accessible to the licence installation wizard
2 Click Start gt All Programs gt Nanometrics gt Apollo Project gt NmxLicenceInstaller
3 Follow the steps in the license installation wizard to select and install the licence file
Linux 1 Ensure the licence file is in a drive or network location that is accessible to the licence installation wizard
2 Open a Terminal window and change the directory to the Apollo Project directory The location of the Apollo Project directory was defined when you installed Apollo Project The default location is optnanometricsApolloProject
3 Run the following NmxLicenceInstaller
Mac OS X 1 Ensure the licence file is in a drive or network location that is accessible to the licence installation wizard
2 Open the Finder3 Click Applications under Places4 Double-click the Apollo Project folder 5 Double-click NmxLicenceInstaller6 Follow the steps in the license installation wizard to select and install
the licence file
Chapter 2 Installing and Starting Apollo Project
8 Apollo Project User Guide16106R5 2009-03-24
23 Starting the Apollo Project Web ServerUse the procedures in Table 2-3 that correspond to your Apollo Server computerrsquos operating system to start the Apollo Project Web server application
24 Running Apollo Project ClientIf you are running the Apollo Project client on the computer where the server application is installed open a browser and go to
httplocalhostPort
Where localhost is the local computer and port is the port number configured during installation The default port number for Apollo Project is 8088
To run an Apollo Project client when the server application resides on a different computer open a browser and go to
httpServer computer name or IP addressPort
For example if the domain name of the server computer is ApolloProjectServer with an IP address of 192168220 and the default port number of 8088 is being used the URL for the client application in your browser will be
httpApolloProjectServer8088
ndash OR ndash
http1921682208088
241 Troubleshooting Running Apollo Project ClientIf you are having trouble opening the Apollo Project client in your Web browser try these suggestions
a) Ensure that the Apollo Project Web server application is running on the Apollo Project server computer See Section 23 ldquoStarting the Apollo Project Web Serverrdquo
Table 2-3 Starting the Apollo Project Web server
Operating System To start the Apollo Project Web server
Windows Click Start gt All Programs gt Nanometrics gt Apollo Project gt Apollo ProjectLinux 1 Open a Terminal window and change the directory to the Apollo
Project directory The location of the Apollo Project directory was defined when you installed Apollo Project The default location is optnanometricsApolloProject
2 Run the following ApolloProject
Mac OS X 1 Open the Finder2 Click Applications under Places3 Double-click the Apollo Project folder 4 Double-click Apollo Project to start the Web server
Chapter 2 Installing and Starting Apollo Project
Apollo Project User Guide16106R5 2009-03-24
9
b) Verify that the firewall on the server computer is not blocking the port number used to serve Web pages (by default the port number is 8088) To check the port number used open ApolloProjectvmoptions in the ApolloProject folder and note the number identified for the -Dserverport setting
242 Stopping the Apollo Project Web ServerThe Apollo Project client provides the means to stop the Apollo Project Web server application To stop the Apollo Project Web server
1 Open the Apollo Project client
2 Click the Shut down Apollo Project button
3 Click OK to confirm the Web server shutdown
25 Upgrading Apollo ProjectTo upgrade Apollo Project from a previous version
1 Uninstall the Apollo Project Web server application as per Section 211 ldquoUninstalling Apollo Project Web Serverrdquo on page 6
2 Install the new version of Apollo Project as per Section 21 ldquoInstalling the Apollo Project Web Serverrdquo on page 5
When you shut down the Apollo Project Web server all clients are disconnected from the server To restore connectivity start the Apollo Project Web server using the instructions in Section 23 ldquoStarting the Apollo Project Web Serverrdquo on page 8
During the upgrade process all downloaded data will remain intact however you will need to recreate your projects and settings in the new version of Apollo Project
For Windows and Linux installations if you are upgrading from an earlier version of Apollo Project that used Apache Tomcat it is strongly recommended that you uninstall Tomcat before installing the new version of Apollo Project
Refer to the version 12 user guide for instruction on uninstalling versions of Apollo Project prior to version 13
Apollo Project Version 12 User Guide revision 16106R2 released on 2008-09-09
If you are using a licensed version of Apollo Project you will need a new licence file when installing the upgrade If you have not received a new licence file contact Nanometrics (see Contacting Nanometrics on page 55)
Chapter 2 Installing and Starting Apollo Project
10 Apollo Project User Guide16106R5 2009-03-24
Apollo Project User Guide16106R5 2009-03-24
11
Chapter 3 Retrieving Data
Creating New Projects
Creating a Station Table File
Configuring Apollo Project
Managing Projects
Running Projects
Editing and Viewing the Settings of Projects
Monitoring Project Status
31 Creating New ProjectsYou can create multiple projects up to the number supported by the software licence (see Section 121 ldquoSoftware Licencerdquo on page 2)
When you create a new project you have to
bull Select data Stores
bull Specify a station table file
bull Select the channel groups you want to download data from
bull Specify when you want the project to run
bull Select the output format
bull Specify the output location
To create a new project
1 Click New on the Apollo Project Existing Projects page
2 Click a project type and enter a unique name in the Project Name box
3 Click OK
Chapter 3 Retrieving Data
12 Apollo Project User Guide16106R5 2009-03-24
4 Select one or more data Stores by performing the following steps
Store type DescriptionSteps
File A file Store specification defines a particular Store that resides on a file system accessible by the server running Apollo Project The file system can be a local or a networked file system (for example accessible via SMB or NFS)
1 Click the File tab2 Enter the full path and file name of a Store file3 Click Add
Apollo Project adds the specification to the Selected Specifications section of the Store Selection page and finds all related Store files and adds them as a single Store to the Selected Stores section
Directory A directory Store specification defines the set of Stores that reside in a particular directory hierarchy on a file system accessible by the server running Apollo Project A recursive search from the specified directory identifies all of the available Stores The file system can be a local or a networked file system (for example accessible via SMB or NFS)
1 Click the Directory tab2 Enter a directory path name
If you specify a root directory such as C it will take a long time for Apollo Project to find all of the Store files in that root directory
3 Click AddApollo Project adds the specification to the Selected Specifications section of the Store Selection page and finds and adds all Stores in the specified directory and its subdirectories to the Selected Stores section
IP Address An IP Address Store specification defines the Store of a single instrument (or an instance of Apollo Server) The specified IP address must be an IP address bound to the Ethernet interface of an instrument At the same time the instrument must be running in communications mode and be accessible from the server running Apollo Project
1 Click the IP Address tab2 Enter the IP address of an instrument3 Click Add
Apollo Project adds the specification to the Selected Specifications section of the Store Selection page and finds all Stores associated with the IP address and adds them to the Selected Stores section
Chapter 3 Retrieving Data
Apollo Project User Guide16106R5 2009-03-24
13
Discovery A discovery Store specification specifies the Stores of multiple instruments In this case a class D (multicast) IP address and port is specified It is assumed that the Store of any instrument in communications mode is accessible from the LAN of the Apollo Project server When Discovery is enabled for the specified IP address and port these attributes are included upon running the project
1 Click the Discovery tab2 Enter the multicast address and port number of a group of instruments
For example 224199711386776Multicast addresses range from 224000 through 239255255255
3 Click AddApollo Project adds the specification to the Selected Specifications section of the Store Selection page and finds all Stores associated with the multicast address and adds them to the Selected Stores section of the Store Selection page
Notes When multiple multicast groups are used for discovery the port number must differ from existing discovery port numbers by 2 for each discovery port number in use x there must be no other discovery port configured for use with a value of x or x+1For example the default discovery multicast group used by Taurus is 224199711386776 To add another multicast group you have to specify a different port number (which cannot be 6776 or 6777)
Recent Specs
Apollo Project keeps the 16 most recently defined Store specifications and groups them by category on the Recent Specs page
1 Click the Recent Specs tab2 Expand a specification category (File Directory IP Address or Discovery)
and select a specification3 Click Add
Apollo Project adds the specification to the Selected Specifications section of the Store Selection page and finds all Stores associated with the specification and adds them to the Selected Stores section
Each time a project is run Apollo Project generates a list of available Stores based on the selected Store specifications The actual Stores from which data is retrieved can vary on successive project runs For example a discovery Store specification might result in a different number of instruments being included depending on current access to the instruments
Remove a specification (and its associated Stores) by selecting it and clicking Remove Remove all specifications (and all Stores) by clicking Remove All You cannot remove individual Stores from a specification but you can add a different specification and select a different group of Stores Alternatively you can use channel group attributes filtering to select the channel groups that data is retrieved from
When copying a Store from an instrument to your local computer do not overwrite an existing Store Instead delete the existing Store or move it to a different folder on the computer Stores are made up of multiple volumes and if the new Store has fewer volumes than the old Store you could see some unpredictable results with Apollo Project
Store type DescriptionSteps
Chapter 3 Retrieving Data
14 Apollo Project User Guide16106R5 2009-03-24
5 Click the Channel Group Selection tab
6 If you defined a default station table file and want to use it for this project go to step 7
For more information see Section 32 ldquoCreating a Station Table Filerdquo on page 22
-OR-
Click Create Default Station Table to create a table for all of the currently selected Stores and discovered instruments for this project using the default settings for the network name location and channel names
The default settings for the network name location and channel names are defined in the Behaviour and Defaults dialog box For more information see Section 33 ldquoConfiguring Apollo Projectrdquo on page 24
-OR-
Enter the path and file name of a station table for this project
7 If you want to download all data from all available Stores verify that the Retrieve data from all channel groups (do not filter) check box is selected and go to step 12
-OR-
If you want to filter the data by specific channel groups and channel group attributes go to step 8
8 Clear the Retrieve data from all channel groups (do not filter) check box
9 Select the time series channel groups you want to download data from
A station table is used to assign names to all of the selected channel groups For more information see Section 32 ldquoCreating a Station Table Filerdquo on page 22
If new Stores are found after a station table file has been defined for a project (for example as a result of Discovery or a directory specification) the default channel group names are used in the output files and no filtering is applied to the channel groups
If the text ldquoSelected Time Series Channels x of xrdquo where x represents the number of channels is red you have selected more time series channels than your licence permits You must select a valid number of time series channels (for the unlicenced version of Apollo Project there is a maximum of three time series channels) before you can create your project
Chapter 3 Retrieving Data
Apollo Project User Guide16106R5 2009-03-24
15
10 Select the state of health (SOH) channel groups you want to download data from Each group has a predefined dataset
To view the SOH data retrieved from a Taurus version 2x see Appendix B ldquoRetrieving SOH Data from a Taurus Version 2xrdquo
Predefined SOH group SOH data
GPS Time Time (longsecs) (the number of seconds since 1970-01-01)Time (UTC) (time in yyyy-mm-dd hhmmssms format)DAC CountGPS Engine StatusGPS Last Update Time(s)GPS PDOPGPS Satellites Used (number of satellites used)GPS TDOP Lat (deg) (latitude in degrees)Long (deg) (longitude in degrees)Timing Error (ns)Timing Phase Lock (system clock phase lock)Timing Uncertainty (ns)
Note The values for Number of satellites used PDOP and TDOP are provided by the GPS receiver at the Last update time In order to see what time these values correspond to look at the Last update time When GPS is off these three parameters and the Last update time are not updated The last value displays until the next update arrives (after the GPS is turned on again)
GPS Satellites Time (longsecs) (the number of seconds since 1970-01-01)Time (UTC) (time in yyyy-mm-dd hhmmssms format)
For each satelliteGPS Satellite Acquisition FlagGPS Satellite Azimuth (microordm)GPS Satellite Elevation (microordm)GPS Satellite Last Update Time (ms)GPS Satellite PRN GPS Satellite Signal Level (AMU)
Environment Time (longsecs) (the number of seconds since 1970-01-01)Time (UTC) (time in yyyy-mm-dd hhmmssms format)External SOH Voltage 1 (V) (12-bit voltage input)External SOH Voltage 2 (V) (12-bit voltage input)External SOH Voltage 3 (V) (12-bit voltage input)External SOH Voltage 4 (V) (12-bit voltage input)Sensor SOH Voltage 1 (V)Sensor SOH Voltage 2 (V)Sensor SOH Voltage 3 (V)
Chapter 3 Retrieving Data
16 Apollo Project User Guide16106R5 2009-03-24
11 If required enter additional filter information as comma-delimited text into the Network Station Location Channel and Instrument boxes
You can use an asterisk ()to represent 1 or more characters
12 Review the selected channel groups and if required edit the channel group mappings in the selected channel groups area of the tab
Channel groups that do not have a mapping appear as blanks in the selected channel groups area of the tab Mapping information for these channel groups can be entered and saved in the station table file for future projects
You can edit the mappings at any time The changes are reflected in future runs of any project using that same station table file For more information see Section 32 ldquoCreating a Station Table Filerdquo on page 22
13 Click the Time Selection tab and follow the steps for the project type you selected
Instrument Time (longsecs) (the number of seconds since 1970-01-01)Time (UTC) (time in yyyy-mm-dd hhmmssms format)Controller Current (mA)Digitizer Current (mA)NMX Bus Current (mA) (external connector)Sensor Current (mA)Serial Port Current (mA)Supply Voltage (mV)Temperature (ordmC)
Look in the selected channel groups area of the tab (lower half of the tab) for examples of filter details you can enter in the Network Station Location Channel and Instrument ID filter boxes
The NetworkStationLocationChannel column of the table presents information in the format implied by the column title For instance in an entry of XXA099901BHE(1) XX represents the network(2) A0999 represents the station(3) 01 represents the location(4) BHE represents the channel
Look at the Instrument ID column of the table for an example of an instrument name and serial number such as taurus_0999
Only mappings that are applicable for the selected channel groups appear in the selected channel groups area of the tab
All times use the UTC time zone
Predefined SOH group SOH data
Chapter 3 Retrieving Data
Apollo Project User Guide16106R5 2009-03-24
17
Project type DescriptionSteps
Archive Archive projects attempt to retrieve data up to the current timeThe time ranges for which output files will be produced are driven from the file interval and are aligned to the project start time It is therefore unlikely that the ldquomost recentrdquo file interval will align with the current time Therefore the most recent range for which data retrieval is attempted will have a portion of its data retrieved and the remainder (for future retrieval) will be declared unavailable However when the project is run later (after the end of the particular time range) the unavailable data will normally be retrieved and the situation will likely repeat itself with the ldquonewrdquo last range to retrieveTo run an Archive project manually1 If required edit the start time for the project2 Click Manual3 Specify the file interval
For example if you specify 2 hours then one file is created every 2 hours If the duration for the project is one day then a total of 12 files will be created
4 After you have finished creating the project click Run Now on the Summary page to run the project
To schedule an Archive project to run automatically at a regular interval1 Click Regular Interval and select the interval 2 Specify the file interval
For example if you specify 2 hours then one file is created every 2 hours If the duration for the project is one day then a total of 12 files will be created
3 After you have finished creating the project click Start Schedule on the Summary page to start the schedule for the project and click OK twice The project will run according to the interval you specified after you start the schedule For example if you click Start Schedule on a Wednesday and you specified every 2 days as the interval then the project will run for the first time on Friday and every two days after that If the computer has been rebooted and the Apollo Project Web server has been restarted the project will run according to the interval you specified after the computer has rebooted For example if the computer reboots on a Wednesday and you specified every 2 days as the interval then the project will run for the next time on Friday and every two days after that
Note Archive projects that are defined as scheduled projects can also be run manually at any timeTo schedule an Archive project to run automatically on a weekly basis1 If required edit the start time for the project2 Click Weekly Schedule and select the time and days of the week 3 Specify the file interval
For example if you specify 2 hours then one file is created every 2 hours If the duration for the project is one day then a total of 12 files will be created
4 After you have finished creating the project click Start Schedule on the Summary page to start the schedule for the project and click OK twice After you have finished creating the project the project will run for the first time according to the project start time and then it will run on a weekly basis according to the times and days you specified
Note Archive projects that are defined as scheduled projects can also be run manually at any time
Chapter 3 Retrieving Data
18 Apollo Project User Guide16106R5 2009-03-24
One Time A One Time project retrieves a single time segmentTo specify the start and end times for a One Time project1 If required edit the start time for the project2 Click End Time and enter an end time
-OR-Click Duration and specify the duration of the project The duration is the length of the requested time segment
3 Specify the file intervalFor example if you specify 2 hours then one file is created every 2 hours If the duration for the project is one day then a total of 12 files will be created
4 After you have finished creating the project click Run Now on the Summary page to run the project
Controlled Source
A Controlled Source project retrieves data specified as a set of individually entered shots and outputs the data in SEGY format To specify shots using a shots file1 Click Browse select a shots file and click OK2 Click Submit
The list of shots is imported and displayed in the Shot List section on the Time Selection page
Note For more information see Section A4 ldquoShot File Formats for Controlled Source Projectsrdquo on page 42To manually define shots1 Enter a shot time2 If required enter the latitude longitude and elevation3 If required select the pre-shot time period4 Select the post-shot time period5 Click Add
The shot is added to the Shot List section on the Time Selection page Triggers A Triggers project uses a CSV-formatted trigger list to specify the data to be
retrieved for example a trigger file that has been downloaded from a Taurus to the local computerTo define triggers1 Click Browse select a CSV triggers file and click OK2 Click Submit
The list of triggers is imported and displayed in the Triggers section on the Time Selection page
3 Select the pre-trigger and post-trigger time periodsThe pre-trigger and post-trigger time periods are used for all of the triggers
Project type DescriptionSteps
Chapter 3 Retrieving Data
Apollo Project User Guide16106R5 2009-03-24
19
14 If you selected a Controlled Source as the project type in step 2 go to step 17
You do not have to select an output format for a Controlled Source project because the output format for a Controlled Source project is always SEGY one output file is generated for all instruments and the stations are sorted by StationNameNetworkName
-OR-
If you selected one of the other project types go to step 15 to select an output format
15 Click the Output Format tab
Field Archive A Field Archive project is used for recurring data retrievals that occur at specified intervals The time of the last retrieval is stored on the instrumentTo define the start time and file interval1 If required edit the start time for the project2 Specify the file interval
For example if you specify 2 hours then one file is created every 2 hours3 If you want partial files retrieved select the Include last interval even if
incomplete check box You should only select this option when the retrieval of partial files is more important than retrieving the data for the current interval during a future project run
Be careful when specifying the file interval For example retrieving many hours or days of data and specifying a file interval of seconds or minutes could result in the generation of many files This is not only very resource intensive but could result in a data management problem as well
Project type DescriptionSteps
Chapter 3 Retrieving Data
20 Apollo Project User Guide16106R5 2009-03-24
16 Perform the following steps to select an output format
Output format Steps
MiniSEED 1 Click MiniSEED2 Click Per channel group to generate one output file per channel group
You must add the channel token to the Subdirectories or Filename box on the Output Location tab when choosing Per channel group-OR-Click Per instrument to generate one output file per instrument-OR-Click All Instruments to generate one output file for all instruments
3 Select the Sort check box if you want the output data sorted by timeData is put in a Store in the order received and this order may not always be chronological To ensure that the data in the resulting SEED file is chronological select Sort
4 Select the data record sizeThe default record size is 512 B However not all SEED file readers will support this file size Determine what your SEED reader supports and select an appropriate value The options are 512 B 1024 B 2048 B and 4096 B Note that a smaller record size will result in quicker SEED file output
Note The number of output files is determined by the file interval that you set on the Time Selection page
SAC 1 Click SACYou must add the channel token to the Subdirectories or Filename box on the Output Location tab when choosing SAC as the output format
NotesThere are two types of SAC files binary and ASCII Apollo Project only outputs binary SAC filesOne output file per channel group is generated
SEGY 1 Click SEGY2 Click Per channel group to generate one output file per channel group
You must add the channel token to the Subdirectories or Filename box on the Output Location tab when choosing Per channel group-OR-Click Per instrument to generate one output file per instrument-OR-Click All Instruments to generate one output file for all instruments
3 Select the Sort check box if you want the stations sorted by StationNameNetworkName
NotesAll stations must have the same sample rateThe maximum number of samples per trace is 32767SEGY trace headers from discovered instruments will not have station location information
Chapter 3 Retrieving Data
Apollo Project User Guide16106R5 2009-03-24
21
17 Click the Output Location tab
18 If you defined a default base directory when you configured Apollo Project and want to use it for this project go to step 21
For more information see Section 33 ldquoConfiguring Apollo Projectrdquo on page 24
-OR-
Enter the valid absolute path of the base directory for the processed data subdirectories and files
If the base directory you entered does not exist click Create to create it
19 If you defined a default expression for subdirectories when you configured Apollo Project and want to use it for this project go to step 21
For more information see Section 33 ldquoConfiguring Apollo Projectrdquo on page 24
-OR-
Enter the expression used to define path names for subfolders under the base directory
You can enter tokens in any order including any additional characters that are valid for paths
Seisan 1 Click Seisan
NotesYou must have Seisan installed on your computer with a WAVEFORM_BASE and CONT_BASE line included for each station in the DATSEISANDEF file You must define a SEISAN_TOP environment variableOne output file per channel group is generated
Regardless of the output format selected SOH channel group data is always output in CSV format
The Base Directory is the root of all data retrieved for the project and can be defined at any location in the file system of the server running Apollo Project including a networked drive on a separate server If you want to create or use a directory on a computer on the network you have to enter the server and share name in a modified UNC format that is prefixed by an additional two backslashes For example the usual fileserver1storefiles must be written as fileserver1storefiles
Large amounts of data can be stored in this location You must ensure that adequate disk space is available
For deployments of Apollo Project where the clients are not running on the server it is recommended that the file system containing the base directory on the server be shared or exported as a networked file system
It is not recommended that you use the channel token in the subdirectories expression if the project includes more than one channel group per instrument (selected on the Channel Group Selection tab) and the output is not per channel group (selected on the Output Format tab)
Output format Steps
Chapter 3 Retrieving Data
22 Apollo Project User Guide16106R5 2009-03-24
20 If you defined a default expression for file names when you configured Apollo Project and want to use it for this project go to step 21
For more information see Section 33 ldquoConfiguring Apollo Projectrdquo on page 24
-OR-
Enter the expression used to define file names for the processed data files that are stored in the subfolders under the base directory
You can enter tokens in any order including any additional characters that are valid for file names
21 Click OK to save the new project
The new project is created and the Summary page is displayed
32 Creating a Station Table FileYou can create a mapping between a given instrumentchannel group (for example taurus_1234digitizertimeSeries1) and a corresponding network station location and channel name These mappings are stored in a station table file and the mapped channel group names are used in the output files
You can create a station table file and use it as the default for all projects or you can create a station table for individual projects
To create a station table file and set is as the default
1 Click the configuration button in the upper right corner
2 Specify the network name location and channel names on the Behaviour and Defaults dialog box and click OK to save the new settings
The settings you enter here are used as the channel names in the station table file You can edit these settings in step 8
For more information on configuring Apollo Project settings see Section 33 ldquoConfiguring Apollo Projectrdquo on page 24
3 Click New on the Apollo Project Existing Projects page
Do not use the channel token in the filename expression if the project includes more than one channel group per instrument (selected on the Channel Group Selection tab) and the output is not per channel group (selected on the Output Format tab)
The Sample Path shows an example of a file name generated using the values for the Base Directory Subdirectories and Filename settings
You can only edit the settings of a project before it has run for the first time or been scheduled (Archive project) If you want to edit the settings of a project after it has already run once or been scheduled you can copy the project (see Section 345 ldquoCopying a Projectrdquo on page 28) and then edit the settings for the copy
It is recommended that you create a station table file and set it as the default for all projects You can update the mappings in this file when new Stores are added or discovered
Chapter 3 Retrieving Data
Apollo Project User Guide16106R5 2009-03-24
23
4 Type Station Table in the Project Name box and click any project type
5 Click OK
6 Click the Store Selection tab and select as many Stores as possible
See step 4 of Section 31 ldquoCreating New Projectsrdquo for information on how to add specifications and select Stores
7 Click the Channel Group Selection tab and click Create Default Station Table
A station table file is created and the name of the file is displayed in the Station Table File Name box
8 Edit the station table channel group mappings in the selected channel groups area of the tab (lower half of the tab) as required
The NetworkStationLocationChannel names will appear in the output files If the Location is empty it is interpreted as the SEED default of two spaces
9 Click OK to close the project and finish creating the station table
10 Click the configuration button in the upper right corner
11 Enter the path and name of the station table file you just created in the Station Table File Name box on the Behaviour and Defaults dialog box
12 Click OK to save the new settings
The station table file you specified will be used as the default for all future projects You can open the Station Table project and edit the station table file if you need to add more Stores or change the mappings
For more information on configuring Apollo Project settings see Section 33 ldquoConfiguring Apollo Projectrdquo on page 24
Make a note of the path of the station table file because you will have to enter it on the Behaviour and Defaults dialog box to set it as the default for all projects
Valid characters for the network station location and channel in the NetworkStationLocationChannel box are upper case letters A to Z numbers 0 to 9 and spaces are also acceptable for the location
Chapter 3 Retrieving Data
24 Apollo Project User Guide16106R5 2009-03-24
33 Configuring Apollo ProjectYou can configure basic settings for Apollo Project and the default settings for new projects The changes you make to the project default settings only apply to new projects
To configure Apollo Project
1 Click the configuration button in the upper right corner
2 Edit the following settings
Setting Description
Log Verbosity The level of detail that is logged by Apollo ProjectThe default setting is Info
Log Location The default name of the Apollo Project log folder Maximum Number of Retrieval Attempts
The maximum number of single retrieval attempt made for all missing time segments on all channel groups every time a project is run Enter an integer from 0 through 1000 The default value is 8
Notes If the Taurus is busy when a retrieval attempt is made the number of remaining retrieval attempts is not decreased by one attemptYou can view the channel group details page to see if there are any remaining retrieval attempts for any channel groups (see Section 373 ldquoMonitoring the Status of a Running Projectrdquo on page 34)
Number Of Retries The number of times Apollo Project attempts to connect to a data source if there is a network connectivity problem Enter an integer from 0 through 1000 The default value is 3
Note Every time a project is run it starts with the maximum number of retries
Retry Interval (secs) The amount of time in seconds that Apollo Project waits before trying to connect to a data source againEnter an integer from 0 through 1000 The default value is 5
Station Table File Name The file name and location of the station table file that is used to assign station names to all of the selected channel groupsA station table is used to assign names to all of the selected channel groups For more information see Section 32 ldquoCreating a Station Table Filerdquo on page 22No station table file is specified by default
Chapter 3 Retrieving Data
Apollo Project User Guide16106R5 2009-03-24
25
Base Directory The folder name and location of the base directory for the processed data subfolders and files Enter any valid folder name and location including any additional characters that are valid for paths The default base directory name is ApolloProject
Notes The Base Directory is the root of all data retrieved for the project and can be defined at any location in the file system of the server running Apollo Project including a shared folder on a different computer If you want to create or use a folder on a computer on the network you have to enter the server and share name in a modified UNC format that is prefixed by an additional two backslashes For example the usual fileserver1storefiles must be written as fileserver1storefilesLarge amounts of data can be stored in this location You must ensure that adequate disk space is availableFor deployments of Apollo Project where the clients are not running on the server it is recommended that the file system containing the base directory on the server be shared or exported as a networked file system
Subdirectories The expression used to define path names for subfolders under the base directoryEnter tokens in any order including any additional characters that are valid for paths The default path name is as follows projectyearmonthday
Filename The expression used to define file names for the processed data files that are stored in the subfolders under the base directoryEnter tokens in any order including any additional characters that are valid for file names The default filename is as follows instrument_time
Sample Path An example of a file name generated using the values for the Base Directory Subdirectories and Filename settings
Network Name A standard network codeEnter any two upper case letters or numbers The default code is XX
Location A location within a stationEnter any two upper case letters numbers or spaces
The default location is two spaces for ldquononerdquo You must delete the two default spaces if you enter a new location value
Setting Description
Chapter 3 Retrieving Data
26 Apollo Project User Guide16106R5 2009-03-24
3 Click OK to save the new settings
34 Managing ProjectsYou can view open close copy and delete projects Also you can create convenient links to run your individual projects with desktop shortcuts
341 Viewing Existing Projects1 Click Projects in the Projects bar
2 View the projects listed on the Existing Projects page
The Existing Projects page shows a list of all projects and a status overview of each project For more information see Section 371 ldquoViewing an Overview of the Status of All Projectsrdquo on page 32
Channel 1 Name A channel codeEnter any three upper case letters or numbersThe default channel code is BHZ
Channel 2 Name A channel codeEnter any three upper case letters or numbersThe default channel code is BHN
Channel 3 Name A channel codeEnter any three upper case letters or numbersThe default channel code is BHE
Setting Description
Chapter 3 Retrieving Data
Apollo Project User Guide16106R5 2009-03-24
27
342 Opening a Project1 Click the project name under the Name column on the Existing Projects page
2 Click the Open Project button
343 Creating a Desktop Shortcut to a ProjectLaunching a project with a desktop shortcut will open Apollo Project to that project and run the project
Methods for creating desktop shortcuts to Web sites vary from browser to browser These procedures explain how to create desktop shortcuts to specific projects for both Mozilla Firefox 3 and Microsoft Internet Explorer 7 Desktop shortcuts to projects include the Apollo Project icon and are titled in the format Project Name ndash Apollo Project
In Firefox 3
1 Open the project you want to create a shortcut to in Firefox
2 Reduce the size of the Firefox window so that the desktop is visible
3 Drag the Site Identification Button onto the desktop
The Site Identification Button is located to the left of the Location Bar and displays the Apollo Project icon
In Internet Explorer 7
1 Open the project you want to create a shortcut to in Internet Explorer
2 Press ALT+F
3 Select Send gt Shortcut to Desktop
344 Closing a Project
1 Click the Close Project button in the Projects bar
Launching a desktop shortcut to a project automatically runs that project It is important to note that once a project is run its settings can no longer be edited It is recommended that desktop shortcuts only be created for Field Archive projects
Firefox is the recommended browser for Apollo Project
Chapter 3 Retrieving Data
28 Apollo Project User Guide16106R5 2009-03-24
345 Copying a Project
1 Select the project name under the Name column on the Existing Projects page
2 Click Copy
3 Enter a unique name for the new project and click OK
4 Click Edit and edit the settings as required
5 Click OK to save the project after you have finished editing the settings
346 Deleting a ProjectWhen you delete a project only files in the temporary folder are deleted All processed data files are not deleted
1 Click the project name under the Name column on the Existing Projects page
2 Click Delete
3 Click OK on the confirmation message
35 Running ProjectsFor all project types you can run a project manually at any time Archive projects can also be defined to run automatically on a schedule
If it is a scheduled Archive Project and the schedule is started click Cancel Schedule before you create a copy of it (If the schedule is not started the Start Schedule button is visible if the schedule is started the Cancel Schedule button replaces the Start Schedule button)
Apollo Project stores intermediate files in a temporary subdirectory of the Base Directory specified for the output location of a project These intermediate files correspond to the actual channel group data retrieved from the Stores referenced by the project If a project is deleted from Apollo Project these temporary files will be removed automatically
Disk space can also be reclaimed by removing these temporary files manually without deleting the project However if the project is run again the output files produced might be incomplete if previously retrieved data from these temporary files is required
For more information on what happens when a project runs see Section A1 ldquoOverview of Running Projectsrdquo on page 37
Chapter 3 Retrieving Data
Apollo Project User Guide16106R5 2009-03-24
29
351 Running a Project1 Open a project
2 Click Run Now on the Summary page to start the project
The project starts running and the Retrieval Status page is displayed
352 Stopping a Project1 Open a project
2 Click Cancel Run on the Summary page to stop the project
3 Click OK on the success message
353 Merging Project Data FilesYou have the option to merge all of the downloaded data for the stations and instruments into one file per interval for each project
1 Open a project
2 Click Merge
A single file is generated for each time period The time period is determined by the file interval you specified on the Time Selection page when you created the project For more information see step 13 of Section 31 ldquoCreating New Projectsrdquo on page 11
The original data files are not modified when you select the option to merge project data files
You can also click Run Now on the Retrieval Status page to start a project
For more information on what happens when a project runs see Section A1 ldquoOverview of Running Projectsrdquo on page 37
You can also click Cancel Run on the Retrieval Status page to stop a project
You cannot merge data from Archive projects and you cannot merge data in the Seisan format
You can also click Merge on the Retrieval Status page to merge the data from a project
Chapter 3 Retrieving Data
30 Apollo Project User Guide16106R5 2009-03-24
354 Running a Scheduled Archive Project1 Open a project
2 Click Start Schedule to start the project schedule
3 Click OK on the confirmation message
4 Click OK on the success message
For a project scheduled to run weekly the project will run for the first time according to the project start time and then it will run on a weekly basis according to the times and days you specified
For a project scheduled to run at a regular interval the project will run according the to interval you specified after you start the schedule For example if you click Start Schedule on a Wednesday and you specified every 2 days as the interval then the project will run for the first time on Friday and every two days after that
3541 Cancelling a Schedule
If you cancel a scheduled project before it runs for the first time you can edit the project settings
If you cancel a project that is currently running the current project runs to completion but subsequent project runs will not occur
1 Open a project
2 Click Cancel Schedule to cancel the project schedule
3 Click OK on the confirmation message
4 Click OK on the success message
You can also click Start Schedule on the Retrieval Status page to start the schedule of a project
You can restart the schedule by opening the project and clicking Start Schedule
You can also click Cancel Schedule on the Retrieval Status page to cancel the schedule of a project
Chapter 3 Retrieving Data
Apollo Project User Guide16106R5 2009-03-24
31
36 Editing and Viewing the Settings of ProjectsYou can edit the settings of a project before it has run After it has run you can view the settings
361 Editing Project Settings1 Open the project
2 Click Edit on the Summary page
3 Edit the settings as required
4 Click OK to save the changes
362 Viewing Project Settings1 Open the project
2 Click View on the Summary page
3 Click the tabs to view the settings
4 Click Cancel when you have finished viewing the settings
You can only edit the settings of a project before it has run for the first time or been scheduled (Archive project) If you want to edit the settings of a project after it has already run once or been scheduled you can copy the project (see Section 345 ldquoCopying a Projectrdquo on page 28) and then edit the settings for the copy
Settings For more information
Store Selection See step 4 of Section 31 ldquoCreating New ProjectsrdquoChannel Group Selection See step 5 to step 12 of Section 31 ldquoCreating New ProjectsrdquoTime Selection See step 13 of Section 31 ldquoCreating New ProjectsrdquoOutput Format See step 15 and step 16 of Section 31 ldquoCreating New ProjectsrdquoOutput Location See step 17 to step 20 of Section 31 ldquoCreating New Projectsrdquo
You can also click Edit on the Retrieval Status page to edit the settings of a project
You can also click View on the Retrieval Status page to edit the settings of a project
Chapter 3 Retrieving Data
32 Apollo Project User Guide16106R5 2009-03-24
37 Monitoring Project StatusYou can monitor the status of a project by viewing information on the Existing Projects Summary and Retrieval Status pages
371 Viewing an Overview of the Status of All ProjectsThe Existing Projects page is the default home page of Apollo Project You see this page when you first open Apollo Project or when you click Projects in the projects bar For more information see Section 341 ldquoViewing Existing Projectsrdquo on page 26
You can view the following information for all projects on the Existing Projects page
bull Name
bull Type
bull Current status
bull Last time the project run
bull Status of data retrieved
The Data Retrieved bars on the Existing Projects page show the overall status of the data retrieval For more information see Section 3731 ldquoStatus Coloursrdquo on page 34
Chapter 3 Retrieving Data
Apollo Project User Guide16106R5 2009-03-24
33
372 Viewing the Status of an Individual ProjectWhen you open a project a detailed summary of the project is shown on the Summary page For more information see Section 342 ldquoOpening a Projectrdquo on page 27
You can view the following information for each project on the Summary page
bull Date it was created
bull Date it was last modified
bull Current status
bull Last time it ran
bull Next time it will run
You can also view a summary of all of the settings you specified when you created the project (Store specifications selected Stores selected time series channel groups selected SOH channel groups start and end times number of files generated file interval and output format and locations)
All times are reported using the UTC time zone
Chapter 3 Retrieving Data
34 Apollo Project User Guide16106R5 2009-03-24
373 Monitoring the Status of a Running ProjectYou can view the data retrieval status of a project while it is running on the Retrieval Status page The Retrieval Status page is displayed automatically when you click Run Now to run a project You can also view this page by opening a project and clicking the Retrieval Status tab
The status for each channel group is expressed in the form of two numbers (for example 60100) and two bar graphs The first number is the percentage available of the total time requested (for example 60) and the second number is the percentage retrieved of the time available (for example 100) For more information on the bar graph status colours see Section 3731 ldquoStatus Coloursrdquo on page 34
You can also view retrieval details for each channel group listed on the Retrieval Status page For more information see Section 3732 ldquoViewing the Retrieval Details for Each Channel Grouprdquo on page 35
3731 Status Colours
The data retrieval status bars use the following status colours
The information that is displayed on the Retrieval Status page is updated continuously while a project is running
Table 3-1 Status colours
Colour Status
Green Apollo Project has retrieved the data
Yellow Apollo Project is attempting to retrieve available data from the Store
Red Data is available in the Store but Apollo Project has failed to retrieve it on this attempt Apollo Project will make additional attempts to retrieve the data up to the configured Maximum Number of Retrieval Attempts For information on how to set the Maximum Number of Retrieval Attempts setting see Section 31 ldquoCreating New Projectsrdquo on page 11
White Data for some portion of the requested time segment is not available in the Store For example there are gaps in the data or the retrieval request is for a future time segment
Chapter 3 Retrieving Data
Apollo Project User Guide16106R5 2009-03-24
35
3732 Viewing the Retrieval Details for Each Channel Group
You can view the retrieval status of each time segment for a channel group
1 Click a channel group name
2 Click the Channel Group Details button that is located to the right of the channel group name
The Remaining Retrieval Attempts column displays the number of times that Apollo Project will try to download each missing time segment for the channel group when the project is run again For information on how to set the Maximum Number of Retrieval Attempts setting see Section 33 ldquoConfiguring Apollo Projectrdquo on page 24
3 Click OK when you have finished viewing the details
Chapter 3 Retrieving Data
36 Apollo Project User Guide16106R5 2009-03-24
Apollo Project User Guide16106R5 2009-03-24
37
Appendix A Reference Information and Examples
Overview of Running Projects
Example Project Settings
Example Deployment Scenarios
Shot File Formats for Controlled Source Projects
A1 Overview of Running ProjectsWhen a project is run Apollo Project performs the following steps
1 The requested time ranges are identified
2 The channel groups for which data are to be retrieved are identified
3 The actual Stores specified by the Store specifications of the project are identified
For each identified Store the following steps are performed
1 A data availability analysis for the outstanding time ranges is performed These are for the ranges for which data has not already been retrieved The availability of the data is recorded for reference It is possible that a given Store was not present at the time the project was last run If this is the case then an attempt is made to retrieve all of the required time ranges of the project from the Store
2 If any data exists in the Store for any of the requested time ranges then a retrieval of this data is performed and the retrieved data is stored to local temporary files
3 If the number of retrieval attempts for a given time range exceeds a configurable threshold (see Section 33 ldquoConfiguring Apollo Projectrdquo on page 24) then the retrieval of data within the stated range is not attempted again
If any data was retrieved during the run of the project then the corresponding output files of the desired output format are generated and stored in the output location specified for the project
When running Apollo Project with Taurus version 2x the schedule for Archive projects must be greater than 5 minutes in duration Schedules that are less than 5 minutes can result in data that is missing or not downloaded
Appendix A Reference Information and Examples
38 Apollo Project User Guide16106R5 2009-03-24
It is possible that the requested data for a given channel group exists across multiple Stores If all of these Stores are included by the Store specifications for the project then Apollo Project assembles the requested data
When a project runs detailed information regarding the results of the retrieved data and processed data are available For more information see Section 37 ldquoMonitoring Project Statusrdquo on page 32
A2 Example Project Settings
A21 Example 1 One Time ProjectProject Name Project1
Project Type One Time
Channel groups selected for retrieval CASTN1OTBHZ (on taurus_1234)
Requested Time Range January 30 2008 1400 ndash 1500 UTC
File Interval 20 minutes
Output Location Base Directory disk2ApolloProjectOutputData
Output Location Subdirectories projectyearmonthday
Output Location Filenamestationnetwork_time
When the project is run successfully the following output files will be created on the server running Apollo Project
disk2ApolloProjectOutputDataProject120080130STN1CA_20080130_140000seed
disk2ApolloProjectOutputDataProject120080130STN1CA_20080130_142000seed
disk2ApolloProjectOutputDataProject120080130STN1CA_20080130_144000seed
Appendix A Reference Information and Examples
Apollo Project User Guide16106R5 2009-03-24
39
A22 Example 2 Controlled Source ProjectProject Name Project2
Project Type Controlled Source
Channel groups selected for retrieval CASTN1OTBHZ (on taurus_1234) CASTN1OTBHN (on taurus_1234)
Requested Shot Times January 30 2008 1400 UTC January 30 2008 1430 UTC
Pre Time 30 seconds
Post Time 30 seconds
Output Location Base Directory disk2ApolloProjectOutputData
Output Location Subdirectories projectyearmonthday
Output Location Filename timeformat
When the project is run successfully the following output files will be created on the server running Apollo Project
disk2ApolloProjectOutputDataProject22008013020080130_135930segysgy
disk2ApolloProjectOutputDataProject22008013020080130_142930segysgy
A3 Example Deployment Scenarios
A31 One TimeYou want to download three days of data from multiple instruments on the network save the data in MiniSEED format and create a file for every hour of data
A One Time project is the recommended solution The Store of each instrument can be made available to Apollo Project by creating a corresponding IP Address Store specification with the IP address of the instrument The requested time range can be specified along with a file interval of one hour Ensure that the instruments are configured to run in Communications mode
A32 Scheduled ArchiveYou want seismic data to be retrieved automatically from a group of instruments on the network every six hours The instruments are always accessible via an Ethernet connection
A scheduled Archive project is the recommended solution Use the Regular Interval scheduling option and set the interval to six hours
You can also run a scheduled Archive project at any time For example if the scheduled retrieval interval of a project is six hours and between intervals you want to retrieve the data three hours early you can run the project and approximately three additional hours of data would be accumulated About three hours later the project will run automatically and accumulate the remaining three hours of data
Appendix A Reference Information and Examples
40 Apollo Project User Guide16106R5 2009-03-24
A33 Manual ArchiveYou want to retrieve seismic data from a group of instruments but their respective Stores are only available for retrieval on occasion (no regular dependable schedule for retrieval from these Stores is possible)
A manually run Archive project is the recommended solution You can create the project and run it whenever any of the instruments are available for retrieval
A34 Field ArchiveYou want to collect data from a set of isolated instruments in the field at recurring intervals (for example twice per month)
A Field Archive project is the recommended solution You can create a Field Archive project and either add all instrument IP addresses to the list or use a Discovery specification The time for the last retrieval is stored on the instrument and all data is recovered from the last recovery time
A35 Media HarvestingYou want to collect the media from a set of instruments in the field at a regular interval (for example once per week) You also have to retrieve all of the seismic data on the media for subsequent analysis
An Archive project is the recommended solution Initially a directory is created on the file system of the server running Apollo Project A directory Store specification is created with this directory as the parent directory from which to search for Stores The content of each media instance in the weekrsquos collection is copied from a media reader to a subdirectory of the directory When the project is run all of the copied Stores are automatically available and the project accumulates data for each instrument
Due to the nature of media harvesting and the replacement procedure for this example data is always missing for the last period of output files for the current week This period corresponds to the time that the media was taken from the instrument and replaced with a new one The following week when the media is harvested again from the instruments in the field Apollo Project fills in the missing time for these files with the new Store data regardless of the media instance on which the data currently resides
You can only create and run Field Archive projects for Taurus version 30 or later
Appendix A Reference Information and Examples
Apollo Project User Guide16106R5 2009-03-24
41
A36 Trigger Downloading You have set up a network of five Tauruses around a hydro dam Each Taurus is accessible over an Ethernet connection and each is set to record data over the weekend You have set the period for data retrieval at 30 seconds before and five minutes after any seismic activity but the following procedure shows you why it is not necessary to view all of the data accumulated over the whole weekend
1 Select the Taurus at the site with the least environmental noise or determine the best site for generating triggers and designate this Taurus ldquoTaurus Ardquo for reference
You need to perform this task in advance More information about triggers can be found in the Taurus Portable Seismograph User Guide
2 Download the trigger file from ldquoTaurus Ardquo and review the file to verify the correct number of triggers
3 Follow these steps to create a new Triggers project
a) Click New on the Apollo Project Existing Projects page
b) Click Triggers as the project type and enter a unique name in the Project Name box
c) Click OK
d) Click the IP Address tab on the Store Selection tab
e) Enter the IP address of a Taurus
f) Click Add
g) Repeat step e until you have entered the IP addresses of all five of the Tauruses
Apollo Project adds the IP address specifications to the Selected Specifications section of the Store Selection page and finds all five Stores associated with the IP addresses and adds them to the Selected Stores section
h) Click the Channel Group Selection tab
i) Click Create Default Station Table to create a table for all of the currently selected Stores and discovered instruments
j) Review the selected channel groups and if required edit the mappings in the selected channel groups area of the tab (lower half of the tab)
k) Click the Time Selection tab
l) Click the Browse button
m)Select the trigger file that you downloaded in step 2 and click OK
n) Click Submit
The list of triggers is imported and displayed in the Triggers section on the Time Selection page
o) Enter a Pre Time of 30 seconds and a Post Time of 5 minutes
p) Click the Output Format tab
q) Click MiniSEED
r) Click All Instruments
s) Click the Output Location tab
Appendix A Reference Information and Examples
42 Apollo Project User Guide16106R5 2009-03-24
t) Enter the valid absolute path of the base directory for the processed data subfolders and files
u) Enter the expression used to define path names for subfolders under the base directory
v) Enter the expression used to define file names for the processed data files that are stored in the subfolders under the base directory
w) Click OK
4 Click the Run Now button on the Summary page
When the project has finished running the output folder you specified in step t will contain ten files Each output file will contain 5 minutes and 30 seconds of data from the five Tauruses
A4 Shot File Formats for Controlled Source ProjectsYou have two options for defining shots for a Controlled Source project manually defining shots or importing shots from a shot file
You can create shot files in one of following three file formats
Microsoft Office Excel (xls) ndash See Section A41 ldquoCreating a Shot File With Microsoft Office Excelrdquo on page 42
OpenOfficeorg Calc (ods) ndash See Section A42 ldquoCreating a Shot File With OpenOfficeorg Calcrdquo on page 44
Comma-Separated Values (csv) ndash See Section A43 ldquoCreating a Comma-Separated Values Shot Filerdquo on page 45
The Shot file templates are located in the docShotFileImport folder on the Apollo Project CD
A41 Creating a Shot File With Microsoft Office ExcelThe Microsoft Office Excel template for Apollo Project can be used with Microsoft Office Excel version 2003 or later
To create an Microsoft Office Excel based shot file
1 Double-click ShotFileTemplatexlt
A new Microsoft Office Excel file is created from the template and opens in the Microsoft Office Excel
2 Save the new spreadsheet as a Microsoft Office Excel document (xls)
3 Enter shot file data as specified in the Microsoft Office Excel spreadsheet
Only the decimal separator is supported for shot files Separators that denote the 3rd power of 10 (thousand) are not supported (for example 4500) The Microsoft Excel and OpenOffice templates reinforce these restrictions and are recommended for creating csv files
Appendix A Reference Information and Examples
Apollo Project User Guide16106R5 2009-03-24
43
You can enter data for multiple shot times
4 Click Save to save the file in Microsoft Office Excel format
5 Click File gt Save As and select CSV (Comma delimited) (csv) from the Save as type list
6 Click Save
7 Click OK on the message warning you that you are only saving the active sheet
8 Click Yes on the message warning you that file features might be incompatible with the csv format
9 Close Microsoft Office Excel
If you are using Microsoft Office Excel 2007 click the Microsoft Office Button and click Save As
Ensure that you save the file as a comma delimited file If the shot file is mistakenly saved in Microsoft Excel format (xls) the shot file will not work in Apollo Project
Appendix A Reference Information and Examples
44 Apollo Project User Guide16106R5 2009-03-24
A42 Creating a Shot File With OpenOfficeorg CalcThe OpenOffice template has been tested with OpenOfficeorg Calc version 23 Later versions of OpenOfficeorg Calc can be used at your discretion
To create a shot file based on the OpenOfficeorg Calc template
1 Double-click ShotFileTemplateots
A new OpenOffice spreadsheet is created from the template and opens in OpenOfficeorg Calc
2 Save the new spreadsheet as an OpenOffice Calc document (ods)
3 Enter the shot file data as specified in the OpenOffice spreadsheet
You can enter data for multiple shot times
4 Click Save to save the file in OpenOfficeorg Calc format
5 Click File gt Save As and select Text CSV (csv) from the Save as Type list
6 Select the Edit filter settings check box
7 Click Save
A warning message might appear that warns you that the document might contain formatting that cannot be saved in the csv format Click Yes on the warning message to save the file in csv format
The Export of text files window opens
8 Delete the double quotation marks () in the Text delimiter box and ensure that the Save cell content as shown check box is selected
9 Click OK to export the OpenOffice spreadsheet as a csv file
10 Click OK on the warning message
11 Close OpenOfficeorg Calc
Appendix A Reference Information and Examples
Apollo Project User Guide16106R5 2009-03-24
45
A43 Creating a Comma-Separated Values Shot FileYou can use any text editor to create a csv shot file
To create a csv shot file
1 Open ShotFileTemplatecsv in a text editor and save it with a different name
2 Format each line of the csv file as follows
Shot TimePre TimePost TimeLatitudeLongitudeElevation
For example
2008-08-28 103044090600000-6000004267
The format and units are as follows
3 Save the file as a csv formatted file
The csv shot file template is not compatible with Microsoft Office Excel Make sure that you do not double-click it and open it in Microsoft Office Excel
FormatUnits
Shot Time yyyy-mm-dd hhmmss
Pre Time seconds
Post Time seconds
Latitude degrees
Longitude degrees
Elevation meters
Appendix A Reference Information and Examples
46 Apollo Project User Guide16106R5 2009-03-24
Apollo Project User Guide16106R5 2009-03-24
47
Appendix B Retrieving SOH Data from a Taurus Version 2x
Taurus Version 2x SOH Data Retrieved by Apollo Project
Retrieving SOH Data from a Taurus Version 2x Streaming to Apollo Server
B1 Taurus Version 2x SOH Data Retrieved by Apollo Project This section presents the predefined datasets of SOH data Apollo Project will retrieve from a Taurus version 2x either through a direct connection or a stream to Apollo Server For instruction on retrieving streaming Taurus version 2x data from Apollo Server see Section B2 ldquoRetrieving SOH Data from a Taurus Version 2x Streaming to Apollo Serverrdquo on page 48
The order of the columns presented in the table below will differ when streaming Taurus version 2x SOH data from Apollo Server
Predefined SOH group SOH data
GPS Time Time (longsecs) (the number of seconds since 1970-01-01)Time (UTC) (time in yyyy-mm-dd hhmmssms format)Altitude (m)DAC CountError (ns) (time error)GPS Engine StatusLast Update Time(s)Lat (deg) (latitude in degrees)Long (deg) (longitude in degrees)NumSatellites (number of satellites used)PDOPPhaseLock (system clock phase lock)TDOPUncertainty (ns) (time uncertainty)
Note The values for Number of satellites used PDOP and TDOP are provided by the GPS receiver at the Last update time In order to see what time these values correspond to look at the Last update time When GPS is off these three parameters and the Last update time are not updated The last value displays until the next update arrives (after the GPS is turned on again)
Appendix B Retrieving SOH Data from a Taurus Version 2x
48 Apollo Project User Guide16106R5 2009-03-24
B2 Retrieving SOH Data from a Taurus Version 2x Streaming to Apollo ServerThis section provides instruction on configuring your Taurus version 2x to stream data to Apollo Server and instructions on how to use Apollo Project to retrieve this data from Apollo Server
B21 Streaming Data from a Taurus Version 2x to Apollo ServerUse the Taurus graphical user interface on either the Taurus display screen or through a Web browser to set up an NP stream from a Taurus version 2x to Apollo Server
1 Log in to the Taurus version 2x with either the tech or central user account
2 Select Advanced Configuration gt Communications gt NP Data Streaming
GPS Satellites Time (longsecs) (the number of seconds since 1970-01-01)Time (UTC) (time in yyyy-mm-dd hhmmssms format)
For each satelliteAcquisition FlagLast Update Time (ms)PRNSatellite Azimuth (microordm)Satellite Elevation (microordm)Signal Level (AMU)
Environment Time (longsecs) (the number of seconds since 1970-01-01)Time (UTC) (time in yyyy-mm-dd hhmmssms format)External SOH Voltage 1 (V) (12-bit voltage input) External SOH Voltage 2 (V) (12-bit voltage input) External SOH Voltage 3 (V) (12-bit voltage input) External SOH Voltage 4 (V) (12-bit voltage input) Sensor SOH Voltage 1 (V)Sensor SOH Voltage 2 (V)Sensor SOH Voltage 3 (V)
Instrument Time (longsecs) (the number of seconds since 1970-01-01)Time (UTC) (time in yyyy-mm-dd hhmmssms format)Controller Current (mA)Digitizer Current (mA)NMX Bus Current (mA) (external connector)Sensor Current (mA)Serial Port Current (mA)Supply Voltage (mV)Temperature (ordmC)
Predefined SOH group SOH data
Appendix B Retrieving SOH Data from a Taurus Version 2x
Apollo Project User Guide16106R5 2009-03-24
49
3 To have the Taurus stream both time series and SOH data to Apollo Server select both Stream Time Series and Stream SOH
-OR-
Select only Stream SOH if you only want to retrieve the SOH data from Apollo Server
4 Type the IP address for Apollo Server in the IP Address box
5 Type the port number Apollo Server uses to receive data in the Port box By default this is port number 32008
6 The Second IP Address and Second Port boxes are not necessary however cannot be left blank Type 127001 in the Second IP Address box and 32004 in the Second Port box
7 Type a value in the Maximum Throughput [bps] box if a limited data link is present between the Taurus and Apollo Server For instance if at some point the data link is limited to 9600 bps then this is the maximum throughput the link can allow If there are no throughput limitations set the value in this box to zero to disable the throughput limitation
8 Click Apply
9 Click Commit
B22 Retrieving Taurus Version 2x Data from Apollo ServerCreate a new project or use an existing project in Apollo Project to retrieve the Taurus version 2x data from Apollo Server For more information on creating or editing projects refer to Section 31 ldquoCreating New Projectsrdquo on page 11 and Section 36 ldquoEditing and Viewing the Settings of Projectsrdquo on page 31
When creating or editing the project
a) Add an IP address Store specification on the Store Selection tab (see step 4 in Section 31 ldquoCreating New Projectsrdquo) for Apollo Server including its client Web application port number Use the format
Apollo Server IP AddressApollo Server Client Web Application Port Number
b) Apply the appropriate filters on the Channel Group Selection tab to retrieve the desired channel groups from the Taurus version 2x See step 5 through step 12 in Section 31 ldquoCreating New Projectsrdquo for instruction on using the Channel Group Selection tab
Appendix B Retrieving SOH Data from a Taurus Version 2x
50 Apollo Project User Guide16106R5 2009-03-24
Apollo Project User Guide16106R5 2009-03-24
51
Appendix C Glossary
Glossary of Abbreviations and Terms
List of Unit Abbreviations and Symbols
C1 Glossary of Abbreviations and Terms
A
ASCIIAmerican Standard Code for Information Interchange
B
BHEBroad Band High Gain Seismometer East-West Orientation
Channel name based on the Global Seismological Network (GSN) standard
BHNBroad Band High Gain Seismometer North-South Orientation
Channel name based on the Global Seismological Network (GSN) standard
BHZBroad Band High Gain Seismometer Vertical Orientation
Channel name based on the Global Seismological Network (GSN) standard
Appendix C Glossary
52 Apollo Project User Guide16106R5 2009-03-24
C
CSVComma-Separated Values
D
DACDigital to Analog Converter
G
GPSGlobal Positioning System
J
JREJava Runtime Environment
JVMJava Virtual Machine
N
NFSNetwork File System
P
PDOPPosition Dilution of Precision
PRNPseudo-random Number
Appendix C Glossary
Apollo Project User Guide16106R5 2009-03-24
53
S
SACSeismic Analysis Code
An Apollo Project output file format that generates files that can be used by the SAC software (see http wwwirisedusoftwaresac)
SEEDStandard for the Exchange of Earthquake Data
SMBServer Message Block
SOHState of Health
T
TCPIPTransmission Control ProtocolInternet Protocol
TDOPTime Dilution of Precision
U
UNCUniform Naming Convention or Universal Naming Convention
URLUniform Resource Locator
UTCCoordinated Universal Time
Appendix C Glossary
54 Apollo Project User Guide16106R5 2009-03-24
C2 List of Unit Abbreviations and SymbolsTable C-1 provides a list of unit abbreviations and symbols commonly used in Nanometrics documentation
Table C-1 Unit abbreviations and symbols
Abbreviation or Symbol Definition Abbreviation
or Symbol Definition
deg degree lb pound
Oslash diameter m metre
micro micro ms metre per second
Ω ohm ms2 metre per second squared
A ampere mA milliampere
AC alternating current MB megabyte
b bit MΩ megaohm
B byte MHz megahertz
bps bits per second mi mile
C Celsius mL millilitre
cm centimetre mm millimetre
dB decibel ms millisecond
DC direct current MTU maximum transmission unit
F farad mV millivolt
ft foot mW milliwatt
g gram N Newton
g gravity nF nanofarad
GB gigabyte ns nanosecond
GHz gigahertz rad radian
Hz hertz rads radian per second
in inch s second
KB kilobyte sps samples per second
kg kilogram U rack unit
kHz kilohertz V volt
kΩ kiloohm Vpp Volts peak-to-peak
kW kilowatt W watt
L litre
Apollo Project User Guide16106R5 2009-03-24
55
About NanometricsNanometrics is a world leader in the development of precision instrumentation network technology and software applications for seismological and environmental studies Using Nanometrics technology our customers establish and grow research networks that are often located in extreme environments such as the frozen Arctic and Antarctic the arid deserts of the Middle East the jungles of South America and the depths of the worlds oceans Many of these are mission-critical national and regional networks that demand the highest possible data quality and availability
Nanometrics provides end-to-end solutions that include a growing portfolio of broadband and strong motion seismometers dataloggers and digitizers satellite ground station systems for remote site data collection and software applications for data and network analysis and management To support this portfolio Nanometrics also provides global systems engineering services for design installation and support of complete networks
Our head office research and development centre and production facility are located in the Kanata North Business Park of Ottawa the high-technology heart of Canadas capital region
Contacting NanometricsNanometrics Inc250 Herzberg RoadKanata Ontario Canada K2K 2A1Phone +1 613-592-6776Fax +1 613-592-5929Email infonanometricscaWeb wwwnanometricsca
Contacting Technical SupportIf you need technical support please submit a request on the Nanometrics technical support site or by email or fax Include a full explanation of the problem and related information such as log filesSupport site httpsupportnanometricsca
Email techsupportnanometricsca
Chapter 2 Installing and Starting Apollo Project
Apollo Project User Guide16106R5 2009-03-24
7
22 Installing an Apollo Project Licence FileIf you did not install a licence file during the installation of the Apollo Project Web server application you can install one at any time using the Nanometrics Product Licence Installation Wizard
A licence for Apollo Project is only required if capabilities beyond those of the unlicensed version are needed See Section 121 ldquoSoftware Licencerdquo on page 2 for descriptions of the licensed and unlicensed versions Contact Nanometrics to order a licence (see Contacting Nanometrics on page 55)
If you have obtained a licence file from Nanometrics use the following steps to install the file
Installing a licence file after creating a project in Apollo Project will result in the loss of that project It is recommended that you install your licence before running Apollo Project for the first time
Operating System To install an Apollo Project licence file
Windows 1 Ensure the licence file is in a drive or network location that is accessible to the licence installation wizard
2 Click Start gt All Programs gt Nanometrics gt Apollo Project gt NmxLicenceInstaller
3 Follow the steps in the license installation wizard to select and install the licence file
Linux 1 Ensure the licence file is in a drive or network location that is accessible to the licence installation wizard
2 Open a Terminal window and change the directory to the Apollo Project directory The location of the Apollo Project directory was defined when you installed Apollo Project The default location is optnanometricsApolloProject
3 Run the following NmxLicenceInstaller
Mac OS X 1 Ensure the licence file is in a drive or network location that is accessible to the licence installation wizard
2 Open the Finder3 Click Applications under Places4 Double-click the Apollo Project folder 5 Double-click NmxLicenceInstaller6 Follow the steps in the license installation wizard to select and install
the licence file
Chapter 2 Installing and Starting Apollo Project
8 Apollo Project User Guide16106R5 2009-03-24
23 Starting the Apollo Project Web ServerUse the procedures in Table 2-3 that correspond to your Apollo Server computerrsquos operating system to start the Apollo Project Web server application
24 Running Apollo Project ClientIf you are running the Apollo Project client on the computer where the server application is installed open a browser and go to
httplocalhostPort
Where localhost is the local computer and port is the port number configured during installation The default port number for Apollo Project is 8088
To run an Apollo Project client when the server application resides on a different computer open a browser and go to
httpServer computer name or IP addressPort
For example if the domain name of the server computer is ApolloProjectServer with an IP address of 192168220 and the default port number of 8088 is being used the URL for the client application in your browser will be
httpApolloProjectServer8088
ndash OR ndash
http1921682208088
241 Troubleshooting Running Apollo Project ClientIf you are having trouble opening the Apollo Project client in your Web browser try these suggestions
a) Ensure that the Apollo Project Web server application is running on the Apollo Project server computer See Section 23 ldquoStarting the Apollo Project Web Serverrdquo
Table 2-3 Starting the Apollo Project Web server
Operating System To start the Apollo Project Web server
Windows Click Start gt All Programs gt Nanometrics gt Apollo Project gt Apollo ProjectLinux 1 Open a Terminal window and change the directory to the Apollo
Project directory The location of the Apollo Project directory was defined when you installed Apollo Project The default location is optnanometricsApolloProject
2 Run the following ApolloProject
Mac OS X 1 Open the Finder2 Click Applications under Places3 Double-click the Apollo Project folder 4 Double-click Apollo Project to start the Web server
Chapter 2 Installing and Starting Apollo Project
Apollo Project User Guide16106R5 2009-03-24
9
b) Verify that the firewall on the server computer is not blocking the port number used to serve Web pages (by default the port number is 8088) To check the port number used open ApolloProjectvmoptions in the ApolloProject folder and note the number identified for the -Dserverport setting
242 Stopping the Apollo Project Web ServerThe Apollo Project client provides the means to stop the Apollo Project Web server application To stop the Apollo Project Web server
1 Open the Apollo Project client
2 Click the Shut down Apollo Project button
3 Click OK to confirm the Web server shutdown
25 Upgrading Apollo ProjectTo upgrade Apollo Project from a previous version
1 Uninstall the Apollo Project Web server application as per Section 211 ldquoUninstalling Apollo Project Web Serverrdquo on page 6
2 Install the new version of Apollo Project as per Section 21 ldquoInstalling the Apollo Project Web Serverrdquo on page 5
When you shut down the Apollo Project Web server all clients are disconnected from the server To restore connectivity start the Apollo Project Web server using the instructions in Section 23 ldquoStarting the Apollo Project Web Serverrdquo on page 8
During the upgrade process all downloaded data will remain intact however you will need to recreate your projects and settings in the new version of Apollo Project
For Windows and Linux installations if you are upgrading from an earlier version of Apollo Project that used Apache Tomcat it is strongly recommended that you uninstall Tomcat before installing the new version of Apollo Project
Refer to the version 12 user guide for instruction on uninstalling versions of Apollo Project prior to version 13
Apollo Project Version 12 User Guide revision 16106R2 released on 2008-09-09
If you are using a licensed version of Apollo Project you will need a new licence file when installing the upgrade If you have not received a new licence file contact Nanometrics (see Contacting Nanometrics on page 55)
Chapter 2 Installing and Starting Apollo Project
10 Apollo Project User Guide16106R5 2009-03-24
Apollo Project User Guide16106R5 2009-03-24
11
Chapter 3 Retrieving Data
Creating New Projects
Creating a Station Table File
Configuring Apollo Project
Managing Projects
Running Projects
Editing and Viewing the Settings of Projects
Monitoring Project Status
31 Creating New ProjectsYou can create multiple projects up to the number supported by the software licence (see Section 121 ldquoSoftware Licencerdquo on page 2)
When you create a new project you have to
bull Select data Stores
bull Specify a station table file
bull Select the channel groups you want to download data from
bull Specify when you want the project to run
bull Select the output format
bull Specify the output location
To create a new project
1 Click New on the Apollo Project Existing Projects page
2 Click a project type and enter a unique name in the Project Name box
3 Click OK
Chapter 3 Retrieving Data
12 Apollo Project User Guide16106R5 2009-03-24
4 Select one or more data Stores by performing the following steps
Store type DescriptionSteps
File A file Store specification defines a particular Store that resides on a file system accessible by the server running Apollo Project The file system can be a local or a networked file system (for example accessible via SMB or NFS)
1 Click the File tab2 Enter the full path and file name of a Store file3 Click Add
Apollo Project adds the specification to the Selected Specifications section of the Store Selection page and finds all related Store files and adds them as a single Store to the Selected Stores section
Directory A directory Store specification defines the set of Stores that reside in a particular directory hierarchy on a file system accessible by the server running Apollo Project A recursive search from the specified directory identifies all of the available Stores The file system can be a local or a networked file system (for example accessible via SMB or NFS)
1 Click the Directory tab2 Enter a directory path name
If you specify a root directory such as C it will take a long time for Apollo Project to find all of the Store files in that root directory
3 Click AddApollo Project adds the specification to the Selected Specifications section of the Store Selection page and finds and adds all Stores in the specified directory and its subdirectories to the Selected Stores section
IP Address An IP Address Store specification defines the Store of a single instrument (or an instance of Apollo Server) The specified IP address must be an IP address bound to the Ethernet interface of an instrument At the same time the instrument must be running in communications mode and be accessible from the server running Apollo Project
1 Click the IP Address tab2 Enter the IP address of an instrument3 Click Add
Apollo Project adds the specification to the Selected Specifications section of the Store Selection page and finds all Stores associated with the IP address and adds them to the Selected Stores section
Chapter 3 Retrieving Data
Apollo Project User Guide16106R5 2009-03-24
13
Discovery A discovery Store specification specifies the Stores of multiple instruments In this case a class D (multicast) IP address and port is specified It is assumed that the Store of any instrument in communications mode is accessible from the LAN of the Apollo Project server When Discovery is enabled for the specified IP address and port these attributes are included upon running the project
1 Click the Discovery tab2 Enter the multicast address and port number of a group of instruments
For example 224199711386776Multicast addresses range from 224000 through 239255255255
3 Click AddApollo Project adds the specification to the Selected Specifications section of the Store Selection page and finds all Stores associated with the multicast address and adds them to the Selected Stores section of the Store Selection page
Notes When multiple multicast groups are used for discovery the port number must differ from existing discovery port numbers by 2 for each discovery port number in use x there must be no other discovery port configured for use with a value of x or x+1For example the default discovery multicast group used by Taurus is 224199711386776 To add another multicast group you have to specify a different port number (which cannot be 6776 or 6777)
Recent Specs
Apollo Project keeps the 16 most recently defined Store specifications and groups them by category on the Recent Specs page
1 Click the Recent Specs tab2 Expand a specification category (File Directory IP Address or Discovery)
and select a specification3 Click Add
Apollo Project adds the specification to the Selected Specifications section of the Store Selection page and finds all Stores associated with the specification and adds them to the Selected Stores section
Each time a project is run Apollo Project generates a list of available Stores based on the selected Store specifications The actual Stores from which data is retrieved can vary on successive project runs For example a discovery Store specification might result in a different number of instruments being included depending on current access to the instruments
Remove a specification (and its associated Stores) by selecting it and clicking Remove Remove all specifications (and all Stores) by clicking Remove All You cannot remove individual Stores from a specification but you can add a different specification and select a different group of Stores Alternatively you can use channel group attributes filtering to select the channel groups that data is retrieved from
When copying a Store from an instrument to your local computer do not overwrite an existing Store Instead delete the existing Store or move it to a different folder on the computer Stores are made up of multiple volumes and if the new Store has fewer volumes than the old Store you could see some unpredictable results with Apollo Project
Store type DescriptionSteps
Chapter 3 Retrieving Data
14 Apollo Project User Guide16106R5 2009-03-24
5 Click the Channel Group Selection tab
6 If you defined a default station table file and want to use it for this project go to step 7
For more information see Section 32 ldquoCreating a Station Table Filerdquo on page 22
-OR-
Click Create Default Station Table to create a table for all of the currently selected Stores and discovered instruments for this project using the default settings for the network name location and channel names
The default settings for the network name location and channel names are defined in the Behaviour and Defaults dialog box For more information see Section 33 ldquoConfiguring Apollo Projectrdquo on page 24
-OR-
Enter the path and file name of a station table for this project
7 If you want to download all data from all available Stores verify that the Retrieve data from all channel groups (do not filter) check box is selected and go to step 12
-OR-
If you want to filter the data by specific channel groups and channel group attributes go to step 8
8 Clear the Retrieve data from all channel groups (do not filter) check box
9 Select the time series channel groups you want to download data from
A station table is used to assign names to all of the selected channel groups For more information see Section 32 ldquoCreating a Station Table Filerdquo on page 22
If new Stores are found after a station table file has been defined for a project (for example as a result of Discovery or a directory specification) the default channel group names are used in the output files and no filtering is applied to the channel groups
If the text ldquoSelected Time Series Channels x of xrdquo where x represents the number of channels is red you have selected more time series channels than your licence permits You must select a valid number of time series channels (for the unlicenced version of Apollo Project there is a maximum of three time series channels) before you can create your project
Chapter 3 Retrieving Data
Apollo Project User Guide16106R5 2009-03-24
15
10 Select the state of health (SOH) channel groups you want to download data from Each group has a predefined dataset
To view the SOH data retrieved from a Taurus version 2x see Appendix B ldquoRetrieving SOH Data from a Taurus Version 2xrdquo
Predefined SOH group SOH data
GPS Time Time (longsecs) (the number of seconds since 1970-01-01)Time (UTC) (time in yyyy-mm-dd hhmmssms format)DAC CountGPS Engine StatusGPS Last Update Time(s)GPS PDOPGPS Satellites Used (number of satellites used)GPS TDOP Lat (deg) (latitude in degrees)Long (deg) (longitude in degrees)Timing Error (ns)Timing Phase Lock (system clock phase lock)Timing Uncertainty (ns)
Note The values for Number of satellites used PDOP and TDOP are provided by the GPS receiver at the Last update time In order to see what time these values correspond to look at the Last update time When GPS is off these three parameters and the Last update time are not updated The last value displays until the next update arrives (after the GPS is turned on again)
GPS Satellites Time (longsecs) (the number of seconds since 1970-01-01)Time (UTC) (time in yyyy-mm-dd hhmmssms format)
For each satelliteGPS Satellite Acquisition FlagGPS Satellite Azimuth (microordm)GPS Satellite Elevation (microordm)GPS Satellite Last Update Time (ms)GPS Satellite PRN GPS Satellite Signal Level (AMU)
Environment Time (longsecs) (the number of seconds since 1970-01-01)Time (UTC) (time in yyyy-mm-dd hhmmssms format)External SOH Voltage 1 (V) (12-bit voltage input)External SOH Voltage 2 (V) (12-bit voltage input)External SOH Voltage 3 (V) (12-bit voltage input)External SOH Voltage 4 (V) (12-bit voltage input)Sensor SOH Voltage 1 (V)Sensor SOH Voltage 2 (V)Sensor SOH Voltage 3 (V)
Chapter 3 Retrieving Data
16 Apollo Project User Guide16106R5 2009-03-24
11 If required enter additional filter information as comma-delimited text into the Network Station Location Channel and Instrument boxes
You can use an asterisk ()to represent 1 or more characters
12 Review the selected channel groups and if required edit the channel group mappings in the selected channel groups area of the tab
Channel groups that do not have a mapping appear as blanks in the selected channel groups area of the tab Mapping information for these channel groups can be entered and saved in the station table file for future projects
You can edit the mappings at any time The changes are reflected in future runs of any project using that same station table file For more information see Section 32 ldquoCreating a Station Table Filerdquo on page 22
13 Click the Time Selection tab and follow the steps for the project type you selected
Instrument Time (longsecs) (the number of seconds since 1970-01-01)Time (UTC) (time in yyyy-mm-dd hhmmssms format)Controller Current (mA)Digitizer Current (mA)NMX Bus Current (mA) (external connector)Sensor Current (mA)Serial Port Current (mA)Supply Voltage (mV)Temperature (ordmC)
Look in the selected channel groups area of the tab (lower half of the tab) for examples of filter details you can enter in the Network Station Location Channel and Instrument ID filter boxes
The NetworkStationLocationChannel column of the table presents information in the format implied by the column title For instance in an entry of XXA099901BHE(1) XX represents the network(2) A0999 represents the station(3) 01 represents the location(4) BHE represents the channel
Look at the Instrument ID column of the table for an example of an instrument name and serial number such as taurus_0999
Only mappings that are applicable for the selected channel groups appear in the selected channel groups area of the tab
All times use the UTC time zone
Predefined SOH group SOH data
Chapter 3 Retrieving Data
Apollo Project User Guide16106R5 2009-03-24
17
Project type DescriptionSteps
Archive Archive projects attempt to retrieve data up to the current timeThe time ranges for which output files will be produced are driven from the file interval and are aligned to the project start time It is therefore unlikely that the ldquomost recentrdquo file interval will align with the current time Therefore the most recent range for which data retrieval is attempted will have a portion of its data retrieved and the remainder (for future retrieval) will be declared unavailable However when the project is run later (after the end of the particular time range) the unavailable data will normally be retrieved and the situation will likely repeat itself with the ldquonewrdquo last range to retrieveTo run an Archive project manually1 If required edit the start time for the project2 Click Manual3 Specify the file interval
For example if you specify 2 hours then one file is created every 2 hours If the duration for the project is one day then a total of 12 files will be created
4 After you have finished creating the project click Run Now on the Summary page to run the project
To schedule an Archive project to run automatically at a regular interval1 Click Regular Interval and select the interval 2 Specify the file interval
For example if you specify 2 hours then one file is created every 2 hours If the duration for the project is one day then a total of 12 files will be created
3 After you have finished creating the project click Start Schedule on the Summary page to start the schedule for the project and click OK twice The project will run according to the interval you specified after you start the schedule For example if you click Start Schedule on a Wednesday and you specified every 2 days as the interval then the project will run for the first time on Friday and every two days after that If the computer has been rebooted and the Apollo Project Web server has been restarted the project will run according to the interval you specified after the computer has rebooted For example if the computer reboots on a Wednesday and you specified every 2 days as the interval then the project will run for the next time on Friday and every two days after that
Note Archive projects that are defined as scheduled projects can also be run manually at any timeTo schedule an Archive project to run automatically on a weekly basis1 If required edit the start time for the project2 Click Weekly Schedule and select the time and days of the week 3 Specify the file interval
For example if you specify 2 hours then one file is created every 2 hours If the duration for the project is one day then a total of 12 files will be created
4 After you have finished creating the project click Start Schedule on the Summary page to start the schedule for the project and click OK twice After you have finished creating the project the project will run for the first time according to the project start time and then it will run on a weekly basis according to the times and days you specified
Note Archive projects that are defined as scheduled projects can also be run manually at any time
Chapter 3 Retrieving Data
18 Apollo Project User Guide16106R5 2009-03-24
One Time A One Time project retrieves a single time segmentTo specify the start and end times for a One Time project1 If required edit the start time for the project2 Click End Time and enter an end time
-OR-Click Duration and specify the duration of the project The duration is the length of the requested time segment
3 Specify the file intervalFor example if you specify 2 hours then one file is created every 2 hours If the duration for the project is one day then a total of 12 files will be created
4 After you have finished creating the project click Run Now on the Summary page to run the project
Controlled Source
A Controlled Source project retrieves data specified as a set of individually entered shots and outputs the data in SEGY format To specify shots using a shots file1 Click Browse select a shots file and click OK2 Click Submit
The list of shots is imported and displayed in the Shot List section on the Time Selection page
Note For more information see Section A4 ldquoShot File Formats for Controlled Source Projectsrdquo on page 42To manually define shots1 Enter a shot time2 If required enter the latitude longitude and elevation3 If required select the pre-shot time period4 Select the post-shot time period5 Click Add
The shot is added to the Shot List section on the Time Selection page Triggers A Triggers project uses a CSV-formatted trigger list to specify the data to be
retrieved for example a trigger file that has been downloaded from a Taurus to the local computerTo define triggers1 Click Browse select a CSV triggers file and click OK2 Click Submit
The list of triggers is imported and displayed in the Triggers section on the Time Selection page
3 Select the pre-trigger and post-trigger time periodsThe pre-trigger and post-trigger time periods are used for all of the triggers
Project type DescriptionSteps
Chapter 3 Retrieving Data
Apollo Project User Guide16106R5 2009-03-24
19
14 If you selected a Controlled Source as the project type in step 2 go to step 17
You do not have to select an output format for a Controlled Source project because the output format for a Controlled Source project is always SEGY one output file is generated for all instruments and the stations are sorted by StationNameNetworkName
-OR-
If you selected one of the other project types go to step 15 to select an output format
15 Click the Output Format tab
Field Archive A Field Archive project is used for recurring data retrievals that occur at specified intervals The time of the last retrieval is stored on the instrumentTo define the start time and file interval1 If required edit the start time for the project2 Specify the file interval
For example if you specify 2 hours then one file is created every 2 hours3 If you want partial files retrieved select the Include last interval even if
incomplete check box You should only select this option when the retrieval of partial files is more important than retrieving the data for the current interval during a future project run
Be careful when specifying the file interval For example retrieving many hours or days of data and specifying a file interval of seconds or minutes could result in the generation of many files This is not only very resource intensive but could result in a data management problem as well
Project type DescriptionSteps
Chapter 3 Retrieving Data
20 Apollo Project User Guide16106R5 2009-03-24
16 Perform the following steps to select an output format
Output format Steps
MiniSEED 1 Click MiniSEED2 Click Per channel group to generate one output file per channel group
You must add the channel token to the Subdirectories or Filename box on the Output Location tab when choosing Per channel group-OR-Click Per instrument to generate one output file per instrument-OR-Click All Instruments to generate one output file for all instruments
3 Select the Sort check box if you want the output data sorted by timeData is put in a Store in the order received and this order may not always be chronological To ensure that the data in the resulting SEED file is chronological select Sort
4 Select the data record sizeThe default record size is 512 B However not all SEED file readers will support this file size Determine what your SEED reader supports and select an appropriate value The options are 512 B 1024 B 2048 B and 4096 B Note that a smaller record size will result in quicker SEED file output
Note The number of output files is determined by the file interval that you set on the Time Selection page
SAC 1 Click SACYou must add the channel token to the Subdirectories or Filename box on the Output Location tab when choosing SAC as the output format
NotesThere are two types of SAC files binary and ASCII Apollo Project only outputs binary SAC filesOne output file per channel group is generated
SEGY 1 Click SEGY2 Click Per channel group to generate one output file per channel group
You must add the channel token to the Subdirectories or Filename box on the Output Location tab when choosing Per channel group-OR-Click Per instrument to generate one output file per instrument-OR-Click All Instruments to generate one output file for all instruments
3 Select the Sort check box if you want the stations sorted by StationNameNetworkName
NotesAll stations must have the same sample rateThe maximum number of samples per trace is 32767SEGY trace headers from discovered instruments will not have station location information
Chapter 3 Retrieving Data
Apollo Project User Guide16106R5 2009-03-24
21
17 Click the Output Location tab
18 If you defined a default base directory when you configured Apollo Project and want to use it for this project go to step 21
For more information see Section 33 ldquoConfiguring Apollo Projectrdquo on page 24
-OR-
Enter the valid absolute path of the base directory for the processed data subdirectories and files
If the base directory you entered does not exist click Create to create it
19 If you defined a default expression for subdirectories when you configured Apollo Project and want to use it for this project go to step 21
For more information see Section 33 ldquoConfiguring Apollo Projectrdquo on page 24
-OR-
Enter the expression used to define path names for subfolders under the base directory
You can enter tokens in any order including any additional characters that are valid for paths
Seisan 1 Click Seisan
NotesYou must have Seisan installed on your computer with a WAVEFORM_BASE and CONT_BASE line included for each station in the DATSEISANDEF file You must define a SEISAN_TOP environment variableOne output file per channel group is generated
Regardless of the output format selected SOH channel group data is always output in CSV format
The Base Directory is the root of all data retrieved for the project and can be defined at any location in the file system of the server running Apollo Project including a networked drive on a separate server If you want to create or use a directory on a computer on the network you have to enter the server and share name in a modified UNC format that is prefixed by an additional two backslashes For example the usual fileserver1storefiles must be written as fileserver1storefiles
Large amounts of data can be stored in this location You must ensure that adequate disk space is available
For deployments of Apollo Project where the clients are not running on the server it is recommended that the file system containing the base directory on the server be shared or exported as a networked file system
It is not recommended that you use the channel token in the subdirectories expression if the project includes more than one channel group per instrument (selected on the Channel Group Selection tab) and the output is not per channel group (selected on the Output Format tab)
Output format Steps
Chapter 3 Retrieving Data
22 Apollo Project User Guide16106R5 2009-03-24
20 If you defined a default expression for file names when you configured Apollo Project and want to use it for this project go to step 21
For more information see Section 33 ldquoConfiguring Apollo Projectrdquo on page 24
-OR-
Enter the expression used to define file names for the processed data files that are stored in the subfolders under the base directory
You can enter tokens in any order including any additional characters that are valid for file names
21 Click OK to save the new project
The new project is created and the Summary page is displayed
32 Creating a Station Table FileYou can create a mapping between a given instrumentchannel group (for example taurus_1234digitizertimeSeries1) and a corresponding network station location and channel name These mappings are stored in a station table file and the mapped channel group names are used in the output files
You can create a station table file and use it as the default for all projects or you can create a station table for individual projects
To create a station table file and set is as the default
1 Click the configuration button in the upper right corner
2 Specify the network name location and channel names on the Behaviour and Defaults dialog box and click OK to save the new settings
The settings you enter here are used as the channel names in the station table file You can edit these settings in step 8
For more information on configuring Apollo Project settings see Section 33 ldquoConfiguring Apollo Projectrdquo on page 24
3 Click New on the Apollo Project Existing Projects page
Do not use the channel token in the filename expression if the project includes more than one channel group per instrument (selected on the Channel Group Selection tab) and the output is not per channel group (selected on the Output Format tab)
The Sample Path shows an example of a file name generated using the values for the Base Directory Subdirectories and Filename settings
You can only edit the settings of a project before it has run for the first time or been scheduled (Archive project) If you want to edit the settings of a project after it has already run once or been scheduled you can copy the project (see Section 345 ldquoCopying a Projectrdquo on page 28) and then edit the settings for the copy
It is recommended that you create a station table file and set it as the default for all projects You can update the mappings in this file when new Stores are added or discovered
Chapter 3 Retrieving Data
Apollo Project User Guide16106R5 2009-03-24
23
4 Type Station Table in the Project Name box and click any project type
5 Click OK
6 Click the Store Selection tab and select as many Stores as possible
See step 4 of Section 31 ldquoCreating New Projectsrdquo for information on how to add specifications and select Stores
7 Click the Channel Group Selection tab and click Create Default Station Table
A station table file is created and the name of the file is displayed in the Station Table File Name box
8 Edit the station table channel group mappings in the selected channel groups area of the tab (lower half of the tab) as required
The NetworkStationLocationChannel names will appear in the output files If the Location is empty it is interpreted as the SEED default of two spaces
9 Click OK to close the project and finish creating the station table
10 Click the configuration button in the upper right corner
11 Enter the path and name of the station table file you just created in the Station Table File Name box on the Behaviour and Defaults dialog box
12 Click OK to save the new settings
The station table file you specified will be used as the default for all future projects You can open the Station Table project and edit the station table file if you need to add more Stores or change the mappings
For more information on configuring Apollo Project settings see Section 33 ldquoConfiguring Apollo Projectrdquo on page 24
Make a note of the path of the station table file because you will have to enter it on the Behaviour and Defaults dialog box to set it as the default for all projects
Valid characters for the network station location and channel in the NetworkStationLocationChannel box are upper case letters A to Z numbers 0 to 9 and spaces are also acceptable for the location
Chapter 3 Retrieving Data
24 Apollo Project User Guide16106R5 2009-03-24
33 Configuring Apollo ProjectYou can configure basic settings for Apollo Project and the default settings for new projects The changes you make to the project default settings only apply to new projects
To configure Apollo Project
1 Click the configuration button in the upper right corner
2 Edit the following settings
Setting Description
Log Verbosity The level of detail that is logged by Apollo ProjectThe default setting is Info
Log Location The default name of the Apollo Project log folder Maximum Number of Retrieval Attempts
The maximum number of single retrieval attempt made for all missing time segments on all channel groups every time a project is run Enter an integer from 0 through 1000 The default value is 8
Notes If the Taurus is busy when a retrieval attempt is made the number of remaining retrieval attempts is not decreased by one attemptYou can view the channel group details page to see if there are any remaining retrieval attempts for any channel groups (see Section 373 ldquoMonitoring the Status of a Running Projectrdquo on page 34)
Number Of Retries The number of times Apollo Project attempts to connect to a data source if there is a network connectivity problem Enter an integer from 0 through 1000 The default value is 3
Note Every time a project is run it starts with the maximum number of retries
Retry Interval (secs) The amount of time in seconds that Apollo Project waits before trying to connect to a data source againEnter an integer from 0 through 1000 The default value is 5
Station Table File Name The file name and location of the station table file that is used to assign station names to all of the selected channel groupsA station table is used to assign names to all of the selected channel groups For more information see Section 32 ldquoCreating a Station Table Filerdquo on page 22No station table file is specified by default
Chapter 3 Retrieving Data
Apollo Project User Guide16106R5 2009-03-24
25
Base Directory The folder name and location of the base directory for the processed data subfolders and files Enter any valid folder name and location including any additional characters that are valid for paths The default base directory name is ApolloProject
Notes The Base Directory is the root of all data retrieved for the project and can be defined at any location in the file system of the server running Apollo Project including a shared folder on a different computer If you want to create or use a folder on a computer on the network you have to enter the server and share name in a modified UNC format that is prefixed by an additional two backslashes For example the usual fileserver1storefiles must be written as fileserver1storefilesLarge amounts of data can be stored in this location You must ensure that adequate disk space is availableFor deployments of Apollo Project where the clients are not running on the server it is recommended that the file system containing the base directory on the server be shared or exported as a networked file system
Subdirectories The expression used to define path names for subfolders under the base directoryEnter tokens in any order including any additional characters that are valid for paths The default path name is as follows projectyearmonthday
Filename The expression used to define file names for the processed data files that are stored in the subfolders under the base directoryEnter tokens in any order including any additional characters that are valid for file names The default filename is as follows instrument_time
Sample Path An example of a file name generated using the values for the Base Directory Subdirectories and Filename settings
Network Name A standard network codeEnter any two upper case letters or numbers The default code is XX
Location A location within a stationEnter any two upper case letters numbers or spaces
The default location is two spaces for ldquononerdquo You must delete the two default spaces if you enter a new location value
Setting Description
Chapter 3 Retrieving Data
26 Apollo Project User Guide16106R5 2009-03-24
3 Click OK to save the new settings
34 Managing ProjectsYou can view open close copy and delete projects Also you can create convenient links to run your individual projects with desktop shortcuts
341 Viewing Existing Projects1 Click Projects in the Projects bar
2 View the projects listed on the Existing Projects page
The Existing Projects page shows a list of all projects and a status overview of each project For more information see Section 371 ldquoViewing an Overview of the Status of All Projectsrdquo on page 32
Channel 1 Name A channel codeEnter any three upper case letters or numbersThe default channel code is BHZ
Channel 2 Name A channel codeEnter any three upper case letters or numbersThe default channel code is BHN
Channel 3 Name A channel codeEnter any three upper case letters or numbersThe default channel code is BHE
Setting Description
Chapter 3 Retrieving Data
Apollo Project User Guide16106R5 2009-03-24
27
342 Opening a Project1 Click the project name under the Name column on the Existing Projects page
2 Click the Open Project button
343 Creating a Desktop Shortcut to a ProjectLaunching a project with a desktop shortcut will open Apollo Project to that project and run the project
Methods for creating desktop shortcuts to Web sites vary from browser to browser These procedures explain how to create desktop shortcuts to specific projects for both Mozilla Firefox 3 and Microsoft Internet Explorer 7 Desktop shortcuts to projects include the Apollo Project icon and are titled in the format Project Name ndash Apollo Project
In Firefox 3
1 Open the project you want to create a shortcut to in Firefox
2 Reduce the size of the Firefox window so that the desktop is visible
3 Drag the Site Identification Button onto the desktop
The Site Identification Button is located to the left of the Location Bar and displays the Apollo Project icon
In Internet Explorer 7
1 Open the project you want to create a shortcut to in Internet Explorer
2 Press ALT+F
3 Select Send gt Shortcut to Desktop
344 Closing a Project
1 Click the Close Project button in the Projects bar
Launching a desktop shortcut to a project automatically runs that project It is important to note that once a project is run its settings can no longer be edited It is recommended that desktop shortcuts only be created for Field Archive projects
Firefox is the recommended browser for Apollo Project
Chapter 3 Retrieving Data
28 Apollo Project User Guide16106R5 2009-03-24
345 Copying a Project
1 Select the project name under the Name column on the Existing Projects page
2 Click Copy
3 Enter a unique name for the new project and click OK
4 Click Edit and edit the settings as required
5 Click OK to save the project after you have finished editing the settings
346 Deleting a ProjectWhen you delete a project only files in the temporary folder are deleted All processed data files are not deleted
1 Click the project name under the Name column on the Existing Projects page
2 Click Delete
3 Click OK on the confirmation message
35 Running ProjectsFor all project types you can run a project manually at any time Archive projects can also be defined to run automatically on a schedule
If it is a scheduled Archive Project and the schedule is started click Cancel Schedule before you create a copy of it (If the schedule is not started the Start Schedule button is visible if the schedule is started the Cancel Schedule button replaces the Start Schedule button)
Apollo Project stores intermediate files in a temporary subdirectory of the Base Directory specified for the output location of a project These intermediate files correspond to the actual channel group data retrieved from the Stores referenced by the project If a project is deleted from Apollo Project these temporary files will be removed automatically
Disk space can also be reclaimed by removing these temporary files manually without deleting the project However if the project is run again the output files produced might be incomplete if previously retrieved data from these temporary files is required
For more information on what happens when a project runs see Section A1 ldquoOverview of Running Projectsrdquo on page 37
Chapter 3 Retrieving Data
Apollo Project User Guide16106R5 2009-03-24
29
351 Running a Project1 Open a project
2 Click Run Now on the Summary page to start the project
The project starts running and the Retrieval Status page is displayed
352 Stopping a Project1 Open a project
2 Click Cancel Run on the Summary page to stop the project
3 Click OK on the success message
353 Merging Project Data FilesYou have the option to merge all of the downloaded data for the stations and instruments into one file per interval for each project
1 Open a project
2 Click Merge
A single file is generated for each time period The time period is determined by the file interval you specified on the Time Selection page when you created the project For more information see step 13 of Section 31 ldquoCreating New Projectsrdquo on page 11
The original data files are not modified when you select the option to merge project data files
You can also click Run Now on the Retrieval Status page to start a project
For more information on what happens when a project runs see Section A1 ldquoOverview of Running Projectsrdquo on page 37
You can also click Cancel Run on the Retrieval Status page to stop a project
You cannot merge data from Archive projects and you cannot merge data in the Seisan format
You can also click Merge on the Retrieval Status page to merge the data from a project
Chapter 3 Retrieving Data
30 Apollo Project User Guide16106R5 2009-03-24
354 Running a Scheduled Archive Project1 Open a project
2 Click Start Schedule to start the project schedule
3 Click OK on the confirmation message
4 Click OK on the success message
For a project scheduled to run weekly the project will run for the first time according to the project start time and then it will run on a weekly basis according to the times and days you specified
For a project scheduled to run at a regular interval the project will run according the to interval you specified after you start the schedule For example if you click Start Schedule on a Wednesday and you specified every 2 days as the interval then the project will run for the first time on Friday and every two days after that
3541 Cancelling a Schedule
If you cancel a scheduled project before it runs for the first time you can edit the project settings
If you cancel a project that is currently running the current project runs to completion but subsequent project runs will not occur
1 Open a project
2 Click Cancel Schedule to cancel the project schedule
3 Click OK on the confirmation message
4 Click OK on the success message
You can also click Start Schedule on the Retrieval Status page to start the schedule of a project
You can restart the schedule by opening the project and clicking Start Schedule
You can also click Cancel Schedule on the Retrieval Status page to cancel the schedule of a project
Chapter 3 Retrieving Data
Apollo Project User Guide16106R5 2009-03-24
31
36 Editing and Viewing the Settings of ProjectsYou can edit the settings of a project before it has run After it has run you can view the settings
361 Editing Project Settings1 Open the project
2 Click Edit on the Summary page
3 Edit the settings as required
4 Click OK to save the changes
362 Viewing Project Settings1 Open the project
2 Click View on the Summary page
3 Click the tabs to view the settings
4 Click Cancel when you have finished viewing the settings
You can only edit the settings of a project before it has run for the first time or been scheduled (Archive project) If you want to edit the settings of a project after it has already run once or been scheduled you can copy the project (see Section 345 ldquoCopying a Projectrdquo on page 28) and then edit the settings for the copy
Settings For more information
Store Selection See step 4 of Section 31 ldquoCreating New ProjectsrdquoChannel Group Selection See step 5 to step 12 of Section 31 ldquoCreating New ProjectsrdquoTime Selection See step 13 of Section 31 ldquoCreating New ProjectsrdquoOutput Format See step 15 and step 16 of Section 31 ldquoCreating New ProjectsrdquoOutput Location See step 17 to step 20 of Section 31 ldquoCreating New Projectsrdquo
You can also click Edit on the Retrieval Status page to edit the settings of a project
You can also click View on the Retrieval Status page to edit the settings of a project
Chapter 3 Retrieving Data
32 Apollo Project User Guide16106R5 2009-03-24
37 Monitoring Project StatusYou can monitor the status of a project by viewing information on the Existing Projects Summary and Retrieval Status pages
371 Viewing an Overview of the Status of All ProjectsThe Existing Projects page is the default home page of Apollo Project You see this page when you first open Apollo Project or when you click Projects in the projects bar For more information see Section 341 ldquoViewing Existing Projectsrdquo on page 26
You can view the following information for all projects on the Existing Projects page
bull Name
bull Type
bull Current status
bull Last time the project run
bull Status of data retrieved
The Data Retrieved bars on the Existing Projects page show the overall status of the data retrieval For more information see Section 3731 ldquoStatus Coloursrdquo on page 34
Chapter 3 Retrieving Data
Apollo Project User Guide16106R5 2009-03-24
33
372 Viewing the Status of an Individual ProjectWhen you open a project a detailed summary of the project is shown on the Summary page For more information see Section 342 ldquoOpening a Projectrdquo on page 27
You can view the following information for each project on the Summary page
bull Date it was created
bull Date it was last modified
bull Current status
bull Last time it ran
bull Next time it will run
You can also view a summary of all of the settings you specified when you created the project (Store specifications selected Stores selected time series channel groups selected SOH channel groups start and end times number of files generated file interval and output format and locations)
All times are reported using the UTC time zone
Chapter 3 Retrieving Data
34 Apollo Project User Guide16106R5 2009-03-24
373 Monitoring the Status of a Running ProjectYou can view the data retrieval status of a project while it is running on the Retrieval Status page The Retrieval Status page is displayed automatically when you click Run Now to run a project You can also view this page by opening a project and clicking the Retrieval Status tab
The status for each channel group is expressed in the form of two numbers (for example 60100) and two bar graphs The first number is the percentage available of the total time requested (for example 60) and the second number is the percentage retrieved of the time available (for example 100) For more information on the bar graph status colours see Section 3731 ldquoStatus Coloursrdquo on page 34
You can also view retrieval details for each channel group listed on the Retrieval Status page For more information see Section 3732 ldquoViewing the Retrieval Details for Each Channel Grouprdquo on page 35
3731 Status Colours
The data retrieval status bars use the following status colours
The information that is displayed on the Retrieval Status page is updated continuously while a project is running
Table 3-1 Status colours
Colour Status
Green Apollo Project has retrieved the data
Yellow Apollo Project is attempting to retrieve available data from the Store
Red Data is available in the Store but Apollo Project has failed to retrieve it on this attempt Apollo Project will make additional attempts to retrieve the data up to the configured Maximum Number of Retrieval Attempts For information on how to set the Maximum Number of Retrieval Attempts setting see Section 31 ldquoCreating New Projectsrdquo on page 11
White Data for some portion of the requested time segment is not available in the Store For example there are gaps in the data or the retrieval request is for a future time segment
Chapter 3 Retrieving Data
Apollo Project User Guide16106R5 2009-03-24
35
3732 Viewing the Retrieval Details for Each Channel Group
You can view the retrieval status of each time segment for a channel group
1 Click a channel group name
2 Click the Channel Group Details button that is located to the right of the channel group name
The Remaining Retrieval Attempts column displays the number of times that Apollo Project will try to download each missing time segment for the channel group when the project is run again For information on how to set the Maximum Number of Retrieval Attempts setting see Section 33 ldquoConfiguring Apollo Projectrdquo on page 24
3 Click OK when you have finished viewing the details
Chapter 3 Retrieving Data
36 Apollo Project User Guide16106R5 2009-03-24
Apollo Project User Guide16106R5 2009-03-24
37
Appendix A Reference Information and Examples
Overview of Running Projects
Example Project Settings
Example Deployment Scenarios
Shot File Formats for Controlled Source Projects
A1 Overview of Running ProjectsWhen a project is run Apollo Project performs the following steps
1 The requested time ranges are identified
2 The channel groups for which data are to be retrieved are identified
3 The actual Stores specified by the Store specifications of the project are identified
For each identified Store the following steps are performed
1 A data availability analysis for the outstanding time ranges is performed These are for the ranges for which data has not already been retrieved The availability of the data is recorded for reference It is possible that a given Store was not present at the time the project was last run If this is the case then an attempt is made to retrieve all of the required time ranges of the project from the Store
2 If any data exists in the Store for any of the requested time ranges then a retrieval of this data is performed and the retrieved data is stored to local temporary files
3 If the number of retrieval attempts for a given time range exceeds a configurable threshold (see Section 33 ldquoConfiguring Apollo Projectrdquo on page 24) then the retrieval of data within the stated range is not attempted again
If any data was retrieved during the run of the project then the corresponding output files of the desired output format are generated and stored in the output location specified for the project
When running Apollo Project with Taurus version 2x the schedule for Archive projects must be greater than 5 minutes in duration Schedules that are less than 5 minutes can result in data that is missing or not downloaded
Appendix A Reference Information and Examples
38 Apollo Project User Guide16106R5 2009-03-24
It is possible that the requested data for a given channel group exists across multiple Stores If all of these Stores are included by the Store specifications for the project then Apollo Project assembles the requested data
When a project runs detailed information regarding the results of the retrieved data and processed data are available For more information see Section 37 ldquoMonitoring Project Statusrdquo on page 32
A2 Example Project Settings
A21 Example 1 One Time ProjectProject Name Project1
Project Type One Time
Channel groups selected for retrieval CASTN1OTBHZ (on taurus_1234)
Requested Time Range January 30 2008 1400 ndash 1500 UTC
File Interval 20 minutes
Output Location Base Directory disk2ApolloProjectOutputData
Output Location Subdirectories projectyearmonthday
Output Location Filenamestationnetwork_time
When the project is run successfully the following output files will be created on the server running Apollo Project
disk2ApolloProjectOutputDataProject120080130STN1CA_20080130_140000seed
disk2ApolloProjectOutputDataProject120080130STN1CA_20080130_142000seed
disk2ApolloProjectOutputDataProject120080130STN1CA_20080130_144000seed
Appendix A Reference Information and Examples
Apollo Project User Guide16106R5 2009-03-24
39
A22 Example 2 Controlled Source ProjectProject Name Project2
Project Type Controlled Source
Channel groups selected for retrieval CASTN1OTBHZ (on taurus_1234) CASTN1OTBHN (on taurus_1234)
Requested Shot Times January 30 2008 1400 UTC January 30 2008 1430 UTC
Pre Time 30 seconds
Post Time 30 seconds
Output Location Base Directory disk2ApolloProjectOutputData
Output Location Subdirectories projectyearmonthday
Output Location Filename timeformat
When the project is run successfully the following output files will be created on the server running Apollo Project
disk2ApolloProjectOutputDataProject22008013020080130_135930segysgy
disk2ApolloProjectOutputDataProject22008013020080130_142930segysgy
A3 Example Deployment Scenarios
A31 One TimeYou want to download three days of data from multiple instruments on the network save the data in MiniSEED format and create a file for every hour of data
A One Time project is the recommended solution The Store of each instrument can be made available to Apollo Project by creating a corresponding IP Address Store specification with the IP address of the instrument The requested time range can be specified along with a file interval of one hour Ensure that the instruments are configured to run in Communications mode
A32 Scheduled ArchiveYou want seismic data to be retrieved automatically from a group of instruments on the network every six hours The instruments are always accessible via an Ethernet connection
A scheduled Archive project is the recommended solution Use the Regular Interval scheduling option and set the interval to six hours
You can also run a scheduled Archive project at any time For example if the scheduled retrieval interval of a project is six hours and between intervals you want to retrieve the data three hours early you can run the project and approximately three additional hours of data would be accumulated About three hours later the project will run automatically and accumulate the remaining three hours of data
Appendix A Reference Information and Examples
40 Apollo Project User Guide16106R5 2009-03-24
A33 Manual ArchiveYou want to retrieve seismic data from a group of instruments but their respective Stores are only available for retrieval on occasion (no regular dependable schedule for retrieval from these Stores is possible)
A manually run Archive project is the recommended solution You can create the project and run it whenever any of the instruments are available for retrieval
A34 Field ArchiveYou want to collect data from a set of isolated instruments in the field at recurring intervals (for example twice per month)
A Field Archive project is the recommended solution You can create a Field Archive project and either add all instrument IP addresses to the list or use a Discovery specification The time for the last retrieval is stored on the instrument and all data is recovered from the last recovery time
A35 Media HarvestingYou want to collect the media from a set of instruments in the field at a regular interval (for example once per week) You also have to retrieve all of the seismic data on the media for subsequent analysis
An Archive project is the recommended solution Initially a directory is created on the file system of the server running Apollo Project A directory Store specification is created with this directory as the parent directory from which to search for Stores The content of each media instance in the weekrsquos collection is copied from a media reader to a subdirectory of the directory When the project is run all of the copied Stores are automatically available and the project accumulates data for each instrument
Due to the nature of media harvesting and the replacement procedure for this example data is always missing for the last period of output files for the current week This period corresponds to the time that the media was taken from the instrument and replaced with a new one The following week when the media is harvested again from the instruments in the field Apollo Project fills in the missing time for these files with the new Store data regardless of the media instance on which the data currently resides
You can only create and run Field Archive projects for Taurus version 30 or later
Appendix A Reference Information and Examples
Apollo Project User Guide16106R5 2009-03-24
41
A36 Trigger Downloading You have set up a network of five Tauruses around a hydro dam Each Taurus is accessible over an Ethernet connection and each is set to record data over the weekend You have set the period for data retrieval at 30 seconds before and five minutes after any seismic activity but the following procedure shows you why it is not necessary to view all of the data accumulated over the whole weekend
1 Select the Taurus at the site with the least environmental noise or determine the best site for generating triggers and designate this Taurus ldquoTaurus Ardquo for reference
You need to perform this task in advance More information about triggers can be found in the Taurus Portable Seismograph User Guide
2 Download the trigger file from ldquoTaurus Ardquo and review the file to verify the correct number of triggers
3 Follow these steps to create a new Triggers project
a) Click New on the Apollo Project Existing Projects page
b) Click Triggers as the project type and enter a unique name in the Project Name box
c) Click OK
d) Click the IP Address tab on the Store Selection tab
e) Enter the IP address of a Taurus
f) Click Add
g) Repeat step e until you have entered the IP addresses of all five of the Tauruses
Apollo Project adds the IP address specifications to the Selected Specifications section of the Store Selection page and finds all five Stores associated with the IP addresses and adds them to the Selected Stores section
h) Click the Channel Group Selection tab
i) Click Create Default Station Table to create a table for all of the currently selected Stores and discovered instruments
j) Review the selected channel groups and if required edit the mappings in the selected channel groups area of the tab (lower half of the tab)
k) Click the Time Selection tab
l) Click the Browse button
m)Select the trigger file that you downloaded in step 2 and click OK
n) Click Submit
The list of triggers is imported and displayed in the Triggers section on the Time Selection page
o) Enter a Pre Time of 30 seconds and a Post Time of 5 minutes
p) Click the Output Format tab
q) Click MiniSEED
r) Click All Instruments
s) Click the Output Location tab
Appendix A Reference Information and Examples
42 Apollo Project User Guide16106R5 2009-03-24
t) Enter the valid absolute path of the base directory for the processed data subfolders and files
u) Enter the expression used to define path names for subfolders under the base directory
v) Enter the expression used to define file names for the processed data files that are stored in the subfolders under the base directory
w) Click OK
4 Click the Run Now button on the Summary page
When the project has finished running the output folder you specified in step t will contain ten files Each output file will contain 5 minutes and 30 seconds of data from the five Tauruses
A4 Shot File Formats for Controlled Source ProjectsYou have two options for defining shots for a Controlled Source project manually defining shots or importing shots from a shot file
You can create shot files in one of following three file formats
Microsoft Office Excel (xls) ndash See Section A41 ldquoCreating a Shot File With Microsoft Office Excelrdquo on page 42
OpenOfficeorg Calc (ods) ndash See Section A42 ldquoCreating a Shot File With OpenOfficeorg Calcrdquo on page 44
Comma-Separated Values (csv) ndash See Section A43 ldquoCreating a Comma-Separated Values Shot Filerdquo on page 45
The Shot file templates are located in the docShotFileImport folder on the Apollo Project CD
A41 Creating a Shot File With Microsoft Office ExcelThe Microsoft Office Excel template for Apollo Project can be used with Microsoft Office Excel version 2003 or later
To create an Microsoft Office Excel based shot file
1 Double-click ShotFileTemplatexlt
A new Microsoft Office Excel file is created from the template and opens in the Microsoft Office Excel
2 Save the new spreadsheet as a Microsoft Office Excel document (xls)
3 Enter shot file data as specified in the Microsoft Office Excel spreadsheet
Only the decimal separator is supported for shot files Separators that denote the 3rd power of 10 (thousand) are not supported (for example 4500) The Microsoft Excel and OpenOffice templates reinforce these restrictions and are recommended for creating csv files
Appendix A Reference Information and Examples
Apollo Project User Guide16106R5 2009-03-24
43
You can enter data for multiple shot times
4 Click Save to save the file in Microsoft Office Excel format
5 Click File gt Save As and select CSV (Comma delimited) (csv) from the Save as type list
6 Click Save
7 Click OK on the message warning you that you are only saving the active sheet
8 Click Yes on the message warning you that file features might be incompatible with the csv format
9 Close Microsoft Office Excel
If you are using Microsoft Office Excel 2007 click the Microsoft Office Button and click Save As
Ensure that you save the file as a comma delimited file If the shot file is mistakenly saved in Microsoft Excel format (xls) the shot file will not work in Apollo Project
Appendix A Reference Information and Examples
44 Apollo Project User Guide16106R5 2009-03-24
A42 Creating a Shot File With OpenOfficeorg CalcThe OpenOffice template has been tested with OpenOfficeorg Calc version 23 Later versions of OpenOfficeorg Calc can be used at your discretion
To create a shot file based on the OpenOfficeorg Calc template
1 Double-click ShotFileTemplateots
A new OpenOffice spreadsheet is created from the template and opens in OpenOfficeorg Calc
2 Save the new spreadsheet as an OpenOffice Calc document (ods)
3 Enter the shot file data as specified in the OpenOffice spreadsheet
You can enter data for multiple shot times
4 Click Save to save the file in OpenOfficeorg Calc format
5 Click File gt Save As and select Text CSV (csv) from the Save as Type list
6 Select the Edit filter settings check box
7 Click Save
A warning message might appear that warns you that the document might contain formatting that cannot be saved in the csv format Click Yes on the warning message to save the file in csv format
The Export of text files window opens
8 Delete the double quotation marks () in the Text delimiter box and ensure that the Save cell content as shown check box is selected
9 Click OK to export the OpenOffice spreadsheet as a csv file
10 Click OK on the warning message
11 Close OpenOfficeorg Calc
Appendix A Reference Information and Examples
Apollo Project User Guide16106R5 2009-03-24
45
A43 Creating a Comma-Separated Values Shot FileYou can use any text editor to create a csv shot file
To create a csv shot file
1 Open ShotFileTemplatecsv in a text editor and save it with a different name
2 Format each line of the csv file as follows
Shot TimePre TimePost TimeLatitudeLongitudeElevation
For example
2008-08-28 103044090600000-6000004267
The format and units are as follows
3 Save the file as a csv formatted file
The csv shot file template is not compatible with Microsoft Office Excel Make sure that you do not double-click it and open it in Microsoft Office Excel
FormatUnits
Shot Time yyyy-mm-dd hhmmss
Pre Time seconds
Post Time seconds
Latitude degrees
Longitude degrees
Elevation meters
Appendix A Reference Information and Examples
46 Apollo Project User Guide16106R5 2009-03-24
Apollo Project User Guide16106R5 2009-03-24
47
Appendix B Retrieving SOH Data from a Taurus Version 2x
Taurus Version 2x SOH Data Retrieved by Apollo Project
Retrieving SOH Data from a Taurus Version 2x Streaming to Apollo Server
B1 Taurus Version 2x SOH Data Retrieved by Apollo Project This section presents the predefined datasets of SOH data Apollo Project will retrieve from a Taurus version 2x either through a direct connection or a stream to Apollo Server For instruction on retrieving streaming Taurus version 2x data from Apollo Server see Section B2 ldquoRetrieving SOH Data from a Taurus Version 2x Streaming to Apollo Serverrdquo on page 48
The order of the columns presented in the table below will differ when streaming Taurus version 2x SOH data from Apollo Server
Predefined SOH group SOH data
GPS Time Time (longsecs) (the number of seconds since 1970-01-01)Time (UTC) (time in yyyy-mm-dd hhmmssms format)Altitude (m)DAC CountError (ns) (time error)GPS Engine StatusLast Update Time(s)Lat (deg) (latitude in degrees)Long (deg) (longitude in degrees)NumSatellites (number of satellites used)PDOPPhaseLock (system clock phase lock)TDOPUncertainty (ns) (time uncertainty)
Note The values for Number of satellites used PDOP and TDOP are provided by the GPS receiver at the Last update time In order to see what time these values correspond to look at the Last update time When GPS is off these three parameters and the Last update time are not updated The last value displays until the next update arrives (after the GPS is turned on again)
Appendix B Retrieving SOH Data from a Taurus Version 2x
48 Apollo Project User Guide16106R5 2009-03-24
B2 Retrieving SOH Data from a Taurus Version 2x Streaming to Apollo ServerThis section provides instruction on configuring your Taurus version 2x to stream data to Apollo Server and instructions on how to use Apollo Project to retrieve this data from Apollo Server
B21 Streaming Data from a Taurus Version 2x to Apollo ServerUse the Taurus graphical user interface on either the Taurus display screen or through a Web browser to set up an NP stream from a Taurus version 2x to Apollo Server
1 Log in to the Taurus version 2x with either the tech or central user account
2 Select Advanced Configuration gt Communications gt NP Data Streaming
GPS Satellites Time (longsecs) (the number of seconds since 1970-01-01)Time (UTC) (time in yyyy-mm-dd hhmmssms format)
For each satelliteAcquisition FlagLast Update Time (ms)PRNSatellite Azimuth (microordm)Satellite Elevation (microordm)Signal Level (AMU)
Environment Time (longsecs) (the number of seconds since 1970-01-01)Time (UTC) (time in yyyy-mm-dd hhmmssms format)External SOH Voltage 1 (V) (12-bit voltage input) External SOH Voltage 2 (V) (12-bit voltage input) External SOH Voltage 3 (V) (12-bit voltage input) External SOH Voltage 4 (V) (12-bit voltage input) Sensor SOH Voltage 1 (V)Sensor SOH Voltage 2 (V)Sensor SOH Voltage 3 (V)
Instrument Time (longsecs) (the number of seconds since 1970-01-01)Time (UTC) (time in yyyy-mm-dd hhmmssms format)Controller Current (mA)Digitizer Current (mA)NMX Bus Current (mA) (external connector)Sensor Current (mA)Serial Port Current (mA)Supply Voltage (mV)Temperature (ordmC)
Predefined SOH group SOH data
Appendix B Retrieving SOH Data from a Taurus Version 2x
Apollo Project User Guide16106R5 2009-03-24
49
3 To have the Taurus stream both time series and SOH data to Apollo Server select both Stream Time Series and Stream SOH
-OR-
Select only Stream SOH if you only want to retrieve the SOH data from Apollo Server
4 Type the IP address for Apollo Server in the IP Address box
5 Type the port number Apollo Server uses to receive data in the Port box By default this is port number 32008
6 The Second IP Address and Second Port boxes are not necessary however cannot be left blank Type 127001 in the Second IP Address box and 32004 in the Second Port box
7 Type a value in the Maximum Throughput [bps] box if a limited data link is present between the Taurus and Apollo Server For instance if at some point the data link is limited to 9600 bps then this is the maximum throughput the link can allow If there are no throughput limitations set the value in this box to zero to disable the throughput limitation
8 Click Apply
9 Click Commit
B22 Retrieving Taurus Version 2x Data from Apollo ServerCreate a new project or use an existing project in Apollo Project to retrieve the Taurus version 2x data from Apollo Server For more information on creating or editing projects refer to Section 31 ldquoCreating New Projectsrdquo on page 11 and Section 36 ldquoEditing and Viewing the Settings of Projectsrdquo on page 31
When creating or editing the project
a) Add an IP address Store specification on the Store Selection tab (see step 4 in Section 31 ldquoCreating New Projectsrdquo) for Apollo Server including its client Web application port number Use the format
Apollo Server IP AddressApollo Server Client Web Application Port Number
b) Apply the appropriate filters on the Channel Group Selection tab to retrieve the desired channel groups from the Taurus version 2x See step 5 through step 12 in Section 31 ldquoCreating New Projectsrdquo for instruction on using the Channel Group Selection tab
Appendix B Retrieving SOH Data from a Taurus Version 2x
50 Apollo Project User Guide16106R5 2009-03-24
Apollo Project User Guide16106R5 2009-03-24
51
Appendix C Glossary
Glossary of Abbreviations and Terms
List of Unit Abbreviations and Symbols
C1 Glossary of Abbreviations and Terms
A
ASCIIAmerican Standard Code for Information Interchange
B
BHEBroad Band High Gain Seismometer East-West Orientation
Channel name based on the Global Seismological Network (GSN) standard
BHNBroad Band High Gain Seismometer North-South Orientation
Channel name based on the Global Seismological Network (GSN) standard
BHZBroad Band High Gain Seismometer Vertical Orientation
Channel name based on the Global Seismological Network (GSN) standard
Appendix C Glossary
52 Apollo Project User Guide16106R5 2009-03-24
C
CSVComma-Separated Values
D
DACDigital to Analog Converter
G
GPSGlobal Positioning System
J
JREJava Runtime Environment
JVMJava Virtual Machine
N
NFSNetwork File System
P
PDOPPosition Dilution of Precision
PRNPseudo-random Number
Appendix C Glossary
Apollo Project User Guide16106R5 2009-03-24
53
S
SACSeismic Analysis Code
An Apollo Project output file format that generates files that can be used by the SAC software (see http wwwirisedusoftwaresac)
SEEDStandard for the Exchange of Earthquake Data
SMBServer Message Block
SOHState of Health
T
TCPIPTransmission Control ProtocolInternet Protocol
TDOPTime Dilution of Precision
U
UNCUniform Naming Convention or Universal Naming Convention
URLUniform Resource Locator
UTCCoordinated Universal Time
Appendix C Glossary
54 Apollo Project User Guide16106R5 2009-03-24
C2 List of Unit Abbreviations and SymbolsTable C-1 provides a list of unit abbreviations and symbols commonly used in Nanometrics documentation
Table C-1 Unit abbreviations and symbols
Abbreviation or Symbol Definition Abbreviation
or Symbol Definition
deg degree lb pound
Oslash diameter m metre
micro micro ms metre per second
Ω ohm ms2 metre per second squared
A ampere mA milliampere
AC alternating current MB megabyte
b bit MΩ megaohm
B byte MHz megahertz
bps bits per second mi mile
C Celsius mL millilitre
cm centimetre mm millimetre
dB decibel ms millisecond
DC direct current MTU maximum transmission unit
F farad mV millivolt
ft foot mW milliwatt
g gram N Newton
g gravity nF nanofarad
GB gigabyte ns nanosecond
GHz gigahertz rad radian
Hz hertz rads radian per second
in inch s second
KB kilobyte sps samples per second
kg kilogram U rack unit
kHz kilohertz V volt
kΩ kiloohm Vpp Volts peak-to-peak
kW kilowatt W watt
L litre
Apollo Project User Guide16106R5 2009-03-24
55
About NanometricsNanometrics is a world leader in the development of precision instrumentation network technology and software applications for seismological and environmental studies Using Nanometrics technology our customers establish and grow research networks that are often located in extreme environments such as the frozen Arctic and Antarctic the arid deserts of the Middle East the jungles of South America and the depths of the worlds oceans Many of these are mission-critical national and regional networks that demand the highest possible data quality and availability
Nanometrics provides end-to-end solutions that include a growing portfolio of broadband and strong motion seismometers dataloggers and digitizers satellite ground station systems for remote site data collection and software applications for data and network analysis and management To support this portfolio Nanometrics also provides global systems engineering services for design installation and support of complete networks
Our head office research and development centre and production facility are located in the Kanata North Business Park of Ottawa the high-technology heart of Canadas capital region
Contacting NanometricsNanometrics Inc250 Herzberg RoadKanata Ontario Canada K2K 2A1Phone +1 613-592-6776Fax +1 613-592-5929Email infonanometricscaWeb wwwnanometricsca
Contacting Technical SupportIf you need technical support please submit a request on the Nanometrics technical support site or by email or fax Include a full explanation of the problem and related information such as log filesSupport site httpsupportnanometricsca
Email techsupportnanometricsca
Chapter 2 Installing and Starting Apollo Project
Apollo Project User Guide16106R5 2009-03-24
9
b) Verify that the firewall on the server computer is not blocking the port number used to serve Web pages (by default the port number is 8088) To check the port number used open ApolloProjectvmoptions in the ApolloProject folder and note the number identified for the -Dserverport setting
242 Stopping the Apollo Project Web ServerThe Apollo Project client provides the means to stop the Apollo Project Web server application To stop the Apollo Project Web server
1 Open the Apollo Project client
2 Click the Shut down Apollo Project button
3 Click OK to confirm the Web server shutdown
25 Upgrading Apollo ProjectTo upgrade Apollo Project from a previous version
1 Uninstall the Apollo Project Web server application as per Section 211 ldquoUninstalling Apollo Project Web Serverrdquo on page 6
2 Install the new version of Apollo Project as per Section 21 ldquoInstalling the Apollo Project Web Serverrdquo on page 5
When you shut down the Apollo Project Web server all clients are disconnected from the server To restore connectivity start the Apollo Project Web server using the instructions in Section 23 ldquoStarting the Apollo Project Web Serverrdquo on page 8
During the upgrade process all downloaded data will remain intact however you will need to recreate your projects and settings in the new version of Apollo Project
For Windows and Linux installations if you are upgrading from an earlier version of Apollo Project that used Apache Tomcat it is strongly recommended that you uninstall Tomcat before installing the new version of Apollo Project
Refer to the version 12 user guide for instruction on uninstalling versions of Apollo Project prior to version 13
Apollo Project Version 12 User Guide revision 16106R2 released on 2008-09-09
If you are using a licensed version of Apollo Project you will need a new licence file when installing the upgrade If you have not received a new licence file contact Nanometrics (see Contacting Nanometrics on page 55)
Chapter 2 Installing and Starting Apollo Project
10 Apollo Project User Guide16106R5 2009-03-24
Apollo Project User Guide16106R5 2009-03-24
11
Chapter 3 Retrieving Data
Creating New Projects
Creating a Station Table File
Configuring Apollo Project
Managing Projects
Running Projects
Editing and Viewing the Settings of Projects
Monitoring Project Status
31 Creating New ProjectsYou can create multiple projects up to the number supported by the software licence (see Section 121 ldquoSoftware Licencerdquo on page 2)
When you create a new project you have to
bull Select data Stores
bull Specify a station table file
bull Select the channel groups you want to download data from
bull Specify when you want the project to run
bull Select the output format
bull Specify the output location
To create a new project
1 Click New on the Apollo Project Existing Projects page
2 Click a project type and enter a unique name in the Project Name box
3 Click OK
Chapter 3 Retrieving Data
12 Apollo Project User Guide16106R5 2009-03-24
4 Select one or more data Stores by performing the following steps
Store type DescriptionSteps
File A file Store specification defines a particular Store that resides on a file system accessible by the server running Apollo Project The file system can be a local or a networked file system (for example accessible via SMB or NFS)
1 Click the File tab2 Enter the full path and file name of a Store file3 Click Add
Apollo Project adds the specification to the Selected Specifications section of the Store Selection page and finds all related Store files and adds them as a single Store to the Selected Stores section
Directory A directory Store specification defines the set of Stores that reside in a particular directory hierarchy on a file system accessible by the server running Apollo Project A recursive search from the specified directory identifies all of the available Stores The file system can be a local or a networked file system (for example accessible via SMB or NFS)
1 Click the Directory tab2 Enter a directory path name
If you specify a root directory such as C it will take a long time for Apollo Project to find all of the Store files in that root directory
3 Click AddApollo Project adds the specification to the Selected Specifications section of the Store Selection page and finds and adds all Stores in the specified directory and its subdirectories to the Selected Stores section
IP Address An IP Address Store specification defines the Store of a single instrument (or an instance of Apollo Server) The specified IP address must be an IP address bound to the Ethernet interface of an instrument At the same time the instrument must be running in communications mode and be accessible from the server running Apollo Project
1 Click the IP Address tab2 Enter the IP address of an instrument3 Click Add
Apollo Project adds the specification to the Selected Specifications section of the Store Selection page and finds all Stores associated with the IP address and adds them to the Selected Stores section
Chapter 3 Retrieving Data
Apollo Project User Guide16106R5 2009-03-24
13
Discovery A discovery Store specification specifies the Stores of multiple instruments In this case a class D (multicast) IP address and port is specified It is assumed that the Store of any instrument in communications mode is accessible from the LAN of the Apollo Project server When Discovery is enabled for the specified IP address and port these attributes are included upon running the project
1 Click the Discovery tab2 Enter the multicast address and port number of a group of instruments
For example 224199711386776Multicast addresses range from 224000 through 239255255255
3 Click AddApollo Project adds the specification to the Selected Specifications section of the Store Selection page and finds all Stores associated with the multicast address and adds them to the Selected Stores section of the Store Selection page
Notes When multiple multicast groups are used for discovery the port number must differ from existing discovery port numbers by 2 for each discovery port number in use x there must be no other discovery port configured for use with a value of x or x+1For example the default discovery multicast group used by Taurus is 224199711386776 To add another multicast group you have to specify a different port number (which cannot be 6776 or 6777)
Recent Specs
Apollo Project keeps the 16 most recently defined Store specifications and groups them by category on the Recent Specs page
1 Click the Recent Specs tab2 Expand a specification category (File Directory IP Address or Discovery)
and select a specification3 Click Add
Apollo Project adds the specification to the Selected Specifications section of the Store Selection page and finds all Stores associated with the specification and adds them to the Selected Stores section
Each time a project is run Apollo Project generates a list of available Stores based on the selected Store specifications The actual Stores from which data is retrieved can vary on successive project runs For example a discovery Store specification might result in a different number of instruments being included depending on current access to the instruments
Remove a specification (and its associated Stores) by selecting it and clicking Remove Remove all specifications (and all Stores) by clicking Remove All You cannot remove individual Stores from a specification but you can add a different specification and select a different group of Stores Alternatively you can use channel group attributes filtering to select the channel groups that data is retrieved from
When copying a Store from an instrument to your local computer do not overwrite an existing Store Instead delete the existing Store or move it to a different folder on the computer Stores are made up of multiple volumes and if the new Store has fewer volumes than the old Store you could see some unpredictable results with Apollo Project
Store type DescriptionSteps
Chapter 3 Retrieving Data
14 Apollo Project User Guide16106R5 2009-03-24
5 Click the Channel Group Selection tab
6 If you defined a default station table file and want to use it for this project go to step 7
For more information see Section 32 ldquoCreating a Station Table Filerdquo on page 22
-OR-
Click Create Default Station Table to create a table for all of the currently selected Stores and discovered instruments for this project using the default settings for the network name location and channel names
The default settings for the network name location and channel names are defined in the Behaviour and Defaults dialog box For more information see Section 33 ldquoConfiguring Apollo Projectrdquo on page 24
-OR-
Enter the path and file name of a station table for this project
7 If you want to download all data from all available Stores verify that the Retrieve data from all channel groups (do not filter) check box is selected and go to step 12
-OR-
If you want to filter the data by specific channel groups and channel group attributes go to step 8
8 Clear the Retrieve data from all channel groups (do not filter) check box
9 Select the time series channel groups you want to download data from
A station table is used to assign names to all of the selected channel groups For more information see Section 32 ldquoCreating a Station Table Filerdquo on page 22
If new Stores are found after a station table file has been defined for a project (for example as a result of Discovery or a directory specification) the default channel group names are used in the output files and no filtering is applied to the channel groups
If the text ldquoSelected Time Series Channels x of xrdquo where x represents the number of channels is red you have selected more time series channels than your licence permits You must select a valid number of time series channels (for the unlicenced version of Apollo Project there is a maximum of three time series channels) before you can create your project
Chapter 3 Retrieving Data
Apollo Project User Guide16106R5 2009-03-24
15
10 Select the state of health (SOH) channel groups you want to download data from Each group has a predefined dataset
To view the SOH data retrieved from a Taurus version 2x see Appendix B ldquoRetrieving SOH Data from a Taurus Version 2xrdquo
Predefined SOH group SOH data
GPS Time Time (longsecs) (the number of seconds since 1970-01-01)Time (UTC) (time in yyyy-mm-dd hhmmssms format)DAC CountGPS Engine StatusGPS Last Update Time(s)GPS PDOPGPS Satellites Used (number of satellites used)GPS TDOP Lat (deg) (latitude in degrees)Long (deg) (longitude in degrees)Timing Error (ns)Timing Phase Lock (system clock phase lock)Timing Uncertainty (ns)
Note The values for Number of satellites used PDOP and TDOP are provided by the GPS receiver at the Last update time In order to see what time these values correspond to look at the Last update time When GPS is off these three parameters and the Last update time are not updated The last value displays until the next update arrives (after the GPS is turned on again)
GPS Satellites Time (longsecs) (the number of seconds since 1970-01-01)Time (UTC) (time in yyyy-mm-dd hhmmssms format)
For each satelliteGPS Satellite Acquisition FlagGPS Satellite Azimuth (microordm)GPS Satellite Elevation (microordm)GPS Satellite Last Update Time (ms)GPS Satellite PRN GPS Satellite Signal Level (AMU)
Environment Time (longsecs) (the number of seconds since 1970-01-01)Time (UTC) (time in yyyy-mm-dd hhmmssms format)External SOH Voltage 1 (V) (12-bit voltage input)External SOH Voltage 2 (V) (12-bit voltage input)External SOH Voltage 3 (V) (12-bit voltage input)External SOH Voltage 4 (V) (12-bit voltage input)Sensor SOH Voltage 1 (V)Sensor SOH Voltage 2 (V)Sensor SOH Voltage 3 (V)
Chapter 3 Retrieving Data
16 Apollo Project User Guide16106R5 2009-03-24
11 If required enter additional filter information as comma-delimited text into the Network Station Location Channel and Instrument boxes
You can use an asterisk ()to represent 1 or more characters
12 Review the selected channel groups and if required edit the channel group mappings in the selected channel groups area of the tab
Channel groups that do not have a mapping appear as blanks in the selected channel groups area of the tab Mapping information for these channel groups can be entered and saved in the station table file for future projects
You can edit the mappings at any time The changes are reflected in future runs of any project using that same station table file For more information see Section 32 ldquoCreating a Station Table Filerdquo on page 22
13 Click the Time Selection tab and follow the steps for the project type you selected
Instrument Time (longsecs) (the number of seconds since 1970-01-01)Time (UTC) (time in yyyy-mm-dd hhmmssms format)Controller Current (mA)Digitizer Current (mA)NMX Bus Current (mA) (external connector)Sensor Current (mA)Serial Port Current (mA)Supply Voltage (mV)Temperature (ordmC)
Look in the selected channel groups area of the tab (lower half of the tab) for examples of filter details you can enter in the Network Station Location Channel and Instrument ID filter boxes
The NetworkStationLocationChannel column of the table presents information in the format implied by the column title For instance in an entry of XXA099901BHE(1) XX represents the network(2) A0999 represents the station(3) 01 represents the location(4) BHE represents the channel
Look at the Instrument ID column of the table for an example of an instrument name and serial number such as taurus_0999
Only mappings that are applicable for the selected channel groups appear in the selected channel groups area of the tab
All times use the UTC time zone
Predefined SOH group SOH data
Chapter 3 Retrieving Data
Apollo Project User Guide16106R5 2009-03-24
17
Project type DescriptionSteps
Archive Archive projects attempt to retrieve data up to the current timeThe time ranges for which output files will be produced are driven from the file interval and are aligned to the project start time It is therefore unlikely that the ldquomost recentrdquo file interval will align with the current time Therefore the most recent range for which data retrieval is attempted will have a portion of its data retrieved and the remainder (for future retrieval) will be declared unavailable However when the project is run later (after the end of the particular time range) the unavailable data will normally be retrieved and the situation will likely repeat itself with the ldquonewrdquo last range to retrieveTo run an Archive project manually1 If required edit the start time for the project2 Click Manual3 Specify the file interval
For example if you specify 2 hours then one file is created every 2 hours If the duration for the project is one day then a total of 12 files will be created
4 After you have finished creating the project click Run Now on the Summary page to run the project
To schedule an Archive project to run automatically at a regular interval1 Click Regular Interval and select the interval 2 Specify the file interval
For example if you specify 2 hours then one file is created every 2 hours If the duration for the project is one day then a total of 12 files will be created
3 After you have finished creating the project click Start Schedule on the Summary page to start the schedule for the project and click OK twice The project will run according to the interval you specified after you start the schedule For example if you click Start Schedule on a Wednesday and you specified every 2 days as the interval then the project will run for the first time on Friday and every two days after that If the computer has been rebooted and the Apollo Project Web server has been restarted the project will run according to the interval you specified after the computer has rebooted For example if the computer reboots on a Wednesday and you specified every 2 days as the interval then the project will run for the next time on Friday and every two days after that
Note Archive projects that are defined as scheduled projects can also be run manually at any timeTo schedule an Archive project to run automatically on a weekly basis1 If required edit the start time for the project2 Click Weekly Schedule and select the time and days of the week 3 Specify the file interval
For example if you specify 2 hours then one file is created every 2 hours If the duration for the project is one day then a total of 12 files will be created
4 After you have finished creating the project click Start Schedule on the Summary page to start the schedule for the project and click OK twice After you have finished creating the project the project will run for the first time according to the project start time and then it will run on a weekly basis according to the times and days you specified
Note Archive projects that are defined as scheduled projects can also be run manually at any time
Chapter 3 Retrieving Data
18 Apollo Project User Guide16106R5 2009-03-24
One Time A One Time project retrieves a single time segmentTo specify the start and end times for a One Time project1 If required edit the start time for the project2 Click End Time and enter an end time
-OR-Click Duration and specify the duration of the project The duration is the length of the requested time segment
3 Specify the file intervalFor example if you specify 2 hours then one file is created every 2 hours If the duration for the project is one day then a total of 12 files will be created
4 After you have finished creating the project click Run Now on the Summary page to run the project
Controlled Source
A Controlled Source project retrieves data specified as a set of individually entered shots and outputs the data in SEGY format To specify shots using a shots file1 Click Browse select a shots file and click OK2 Click Submit
The list of shots is imported and displayed in the Shot List section on the Time Selection page
Note For more information see Section A4 ldquoShot File Formats for Controlled Source Projectsrdquo on page 42To manually define shots1 Enter a shot time2 If required enter the latitude longitude and elevation3 If required select the pre-shot time period4 Select the post-shot time period5 Click Add
The shot is added to the Shot List section on the Time Selection page Triggers A Triggers project uses a CSV-formatted trigger list to specify the data to be
retrieved for example a trigger file that has been downloaded from a Taurus to the local computerTo define triggers1 Click Browse select a CSV triggers file and click OK2 Click Submit
The list of triggers is imported and displayed in the Triggers section on the Time Selection page
3 Select the pre-trigger and post-trigger time periodsThe pre-trigger and post-trigger time periods are used for all of the triggers
Project type DescriptionSteps
Chapter 3 Retrieving Data
Apollo Project User Guide16106R5 2009-03-24
19
14 If you selected a Controlled Source as the project type in step 2 go to step 17
You do not have to select an output format for a Controlled Source project because the output format for a Controlled Source project is always SEGY one output file is generated for all instruments and the stations are sorted by StationNameNetworkName
-OR-
If you selected one of the other project types go to step 15 to select an output format
15 Click the Output Format tab
Field Archive A Field Archive project is used for recurring data retrievals that occur at specified intervals The time of the last retrieval is stored on the instrumentTo define the start time and file interval1 If required edit the start time for the project2 Specify the file interval
For example if you specify 2 hours then one file is created every 2 hours3 If you want partial files retrieved select the Include last interval even if
incomplete check box You should only select this option when the retrieval of partial files is more important than retrieving the data for the current interval during a future project run
Be careful when specifying the file interval For example retrieving many hours or days of data and specifying a file interval of seconds or minutes could result in the generation of many files This is not only very resource intensive but could result in a data management problem as well
Project type DescriptionSteps
Chapter 3 Retrieving Data
20 Apollo Project User Guide16106R5 2009-03-24
16 Perform the following steps to select an output format
Output format Steps
MiniSEED 1 Click MiniSEED2 Click Per channel group to generate one output file per channel group
You must add the channel token to the Subdirectories or Filename box on the Output Location tab when choosing Per channel group-OR-Click Per instrument to generate one output file per instrument-OR-Click All Instruments to generate one output file for all instruments
3 Select the Sort check box if you want the output data sorted by timeData is put in a Store in the order received and this order may not always be chronological To ensure that the data in the resulting SEED file is chronological select Sort
4 Select the data record sizeThe default record size is 512 B However not all SEED file readers will support this file size Determine what your SEED reader supports and select an appropriate value The options are 512 B 1024 B 2048 B and 4096 B Note that a smaller record size will result in quicker SEED file output
Note The number of output files is determined by the file interval that you set on the Time Selection page
SAC 1 Click SACYou must add the channel token to the Subdirectories or Filename box on the Output Location tab when choosing SAC as the output format
NotesThere are two types of SAC files binary and ASCII Apollo Project only outputs binary SAC filesOne output file per channel group is generated
SEGY 1 Click SEGY2 Click Per channel group to generate one output file per channel group
You must add the channel token to the Subdirectories or Filename box on the Output Location tab when choosing Per channel group-OR-Click Per instrument to generate one output file per instrument-OR-Click All Instruments to generate one output file for all instruments
3 Select the Sort check box if you want the stations sorted by StationNameNetworkName
NotesAll stations must have the same sample rateThe maximum number of samples per trace is 32767SEGY trace headers from discovered instruments will not have station location information
Chapter 3 Retrieving Data
Apollo Project User Guide16106R5 2009-03-24
21
17 Click the Output Location tab
18 If you defined a default base directory when you configured Apollo Project and want to use it for this project go to step 21
For more information see Section 33 ldquoConfiguring Apollo Projectrdquo on page 24
-OR-
Enter the valid absolute path of the base directory for the processed data subdirectories and files
If the base directory you entered does not exist click Create to create it
19 If you defined a default expression for subdirectories when you configured Apollo Project and want to use it for this project go to step 21
For more information see Section 33 ldquoConfiguring Apollo Projectrdquo on page 24
-OR-
Enter the expression used to define path names for subfolders under the base directory
You can enter tokens in any order including any additional characters that are valid for paths
Seisan 1 Click Seisan
NotesYou must have Seisan installed on your computer with a WAVEFORM_BASE and CONT_BASE line included for each station in the DATSEISANDEF file You must define a SEISAN_TOP environment variableOne output file per channel group is generated
Regardless of the output format selected SOH channel group data is always output in CSV format
The Base Directory is the root of all data retrieved for the project and can be defined at any location in the file system of the server running Apollo Project including a networked drive on a separate server If you want to create or use a directory on a computer on the network you have to enter the server and share name in a modified UNC format that is prefixed by an additional two backslashes For example the usual fileserver1storefiles must be written as fileserver1storefiles
Large amounts of data can be stored in this location You must ensure that adequate disk space is available
For deployments of Apollo Project where the clients are not running on the server it is recommended that the file system containing the base directory on the server be shared or exported as a networked file system
It is not recommended that you use the channel token in the subdirectories expression if the project includes more than one channel group per instrument (selected on the Channel Group Selection tab) and the output is not per channel group (selected on the Output Format tab)
Output format Steps
Chapter 3 Retrieving Data
22 Apollo Project User Guide16106R5 2009-03-24
20 If you defined a default expression for file names when you configured Apollo Project and want to use it for this project go to step 21
For more information see Section 33 ldquoConfiguring Apollo Projectrdquo on page 24
-OR-
Enter the expression used to define file names for the processed data files that are stored in the subfolders under the base directory
You can enter tokens in any order including any additional characters that are valid for file names
21 Click OK to save the new project
The new project is created and the Summary page is displayed
32 Creating a Station Table FileYou can create a mapping between a given instrumentchannel group (for example taurus_1234digitizertimeSeries1) and a corresponding network station location and channel name These mappings are stored in a station table file and the mapped channel group names are used in the output files
You can create a station table file and use it as the default for all projects or you can create a station table for individual projects
To create a station table file and set is as the default
1 Click the configuration button in the upper right corner
2 Specify the network name location and channel names on the Behaviour and Defaults dialog box and click OK to save the new settings
The settings you enter here are used as the channel names in the station table file You can edit these settings in step 8
For more information on configuring Apollo Project settings see Section 33 ldquoConfiguring Apollo Projectrdquo on page 24
3 Click New on the Apollo Project Existing Projects page
Do not use the channel token in the filename expression if the project includes more than one channel group per instrument (selected on the Channel Group Selection tab) and the output is not per channel group (selected on the Output Format tab)
The Sample Path shows an example of a file name generated using the values for the Base Directory Subdirectories and Filename settings
You can only edit the settings of a project before it has run for the first time or been scheduled (Archive project) If you want to edit the settings of a project after it has already run once or been scheduled you can copy the project (see Section 345 ldquoCopying a Projectrdquo on page 28) and then edit the settings for the copy
It is recommended that you create a station table file and set it as the default for all projects You can update the mappings in this file when new Stores are added or discovered
Chapter 3 Retrieving Data
Apollo Project User Guide16106R5 2009-03-24
23
4 Type Station Table in the Project Name box and click any project type
5 Click OK
6 Click the Store Selection tab and select as many Stores as possible
See step 4 of Section 31 ldquoCreating New Projectsrdquo for information on how to add specifications and select Stores
7 Click the Channel Group Selection tab and click Create Default Station Table
A station table file is created and the name of the file is displayed in the Station Table File Name box
8 Edit the station table channel group mappings in the selected channel groups area of the tab (lower half of the tab) as required
The NetworkStationLocationChannel names will appear in the output files If the Location is empty it is interpreted as the SEED default of two spaces
9 Click OK to close the project and finish creating the station table
10 Click the configuration button in the upper right corner
11 Enter the path and name of the station table file you just created in the Station Table File Name box on the Behaviour and Defaults dialog box
12 Click OK to save the new settings
The station table file you specified will be used as the default for all future projects You can open the Station Table project and edit the station table file if you need to add more Stores or change the mappings
For more information on configuring Apollo Project settings see Section 33 ldquoConfiguring Apollo Projectrdquo on page 24
Make a note of the path of the station table file because you will have to enter it on the Behaviour and Defaults dialog box to set it as the default for all projects
Valid characters for the network station location and channel in the NetworkStationLocationChannel box are upper case letters A to Z numbers 0 to 9 and spaces are also acceptable for the location
Chapter 3 Retrieving Data
24 Apollo Project User Guide16106R5 2009-03-24
33 Configuring Apollo ProjectYou can configure basic settings for Apollo Project and the default settings for new projects The changes you make to the project default settings only apply to new projects
To configure Apollo Project
1 Click the configuration button in the upper right corner
2 Edit the following settings
Setting Description
Log Verbosity The level of detail that is logged by Apollo ProjectThe default setting is Info
Log Location The default name of the Apollo Project log folder Maximum Number of Retrieval Attempts
The maximum number of single retrieval attempt made for all missing time segments on all channel groups every time a project is run Enter an integer from 0 through 1000 The default value is 8
Notes If the Taurus is busy when a retrieval attempt is made the number of remaining retrieval attempts is not decreased by one attemptYou can view the channel group details page to see if there are any remaining retrieval attempts for any channel groups (see Section 373 ldquoMonitoring the Status of a Running Projectrdquo on page 34)
Number Of Retries The number of times Apollo Project attempts to connect to a data source if there is a network connectivity problem Enter an integer from 0 through 1000 The default value is 3
Note Every time a project is run it starts with the maximum number of retries
Retry Interval (secs) The amount of time in seconds that Apollo Project waits before trying to connect to a data source againEnter an integer from 0 through 1000 The default value is 5
Station Table File Name The file name and location of the station table file that is used to assign station names to all of the selected channel groupsA station table is used to assign names to all of the selected channel groups For more information see Section 32 ldquoCreating a Station Table Filerdquo on page 22No station table file is specified by default
Chapter 3 Retrieving Data
Apollo Project User Guide16106R5 2009-03-24
25
Base Directory The folder name and location of the base directory for the processed data subfolders and files Enter any valid folder name and location including any additional characters that are valid for paths The default base directory name is ApolloProject
Notes The Base Directory is the root of all data retrieved for the project and can be defined at any location in the file system of the server running Apollo Project including a shared folder on a different computer If you want to create or use a folder on a computer on the network you have to enter the server and share name in a modified UNC format that is prefixed by an additional two backslashes For example the usual fileserver1storefiles must be written as fileserver1storefilesLarge amounts of data can be stored in this location You must ensure that adequate disk space is availableFor deployments of Apollo Project where the clients are not running on the server it is recommended that the file system containing the base directory on the server be shared or exported as a networked file system
Subdirectories The expression used to define path names for subfolders under the base directoryEnter tokens in any order including any additional characters that are valid for paths The default path name is as follows projectyearmonthday
Filename The expression used to define file names for the processed data files that are stored in the subfolders under the base directoryEnter tokens in any order including any additional characters that are valid for file names The default filename is as follows instrument_time
Sample Path An example of a file name generated using the values for the Base Directory Subdirectories and Filename settings
Network Name A standard network codeEnter any two upper case letters or numbers The default code is XX
Location A location within a stationEnter any two upper case letters numbers or spaces
The default location is two spaces for ldquononerdquo You must delete the two default spaces if you enter a new location value
Setting Description
Chapter 3 Retrieving Data
26 Apollo Project User Guide16106R5 2009-03-24
3 Click OK to save the new settings
34 Managing ProjectsYou can view open close copy and delete projects Also you can create convenient links to run your individual projects with desktop shortcuts
341 Viewing Existing Projects1 Click Projects in the Projects bar
2 View the projects listed on the Existing Projects page
The Existing Projects page shows a list of all projects and a status overview of each project For more information see Section 371 ldquoViewing an Overview of the Status of All Projectsrdquo on page 32
Channel 1 Name A channel codeEnter any three upper case letters or numbersThe default channel code is BHZ
Channel 2 Name A channel codeEnter any three upper case letters or numbersThe default channel code is BHN
Channel 3 Name A channel codeEnter any three upper case letters or numbersThe default channel code is BHE
Setting Description
Chapter 3 Retrieving Data
Apollo Project User Guide16106R5 2009-03-24
27
342 Opening a Project1 Click the project name under the Name column on the Existing Projects page
2 Click the Open Project button
343 Creating a Desktop Shortcut to a ProjectLaunching a project with a desktop shortcut will open Apollo Project to that project and run the project
Methods for creating desktop shortcuts to Web sites vary from browser to browser These procedures explain how to create desktop shortcuts to specific projects for both Mozilla Firefox 3 and Microsoft Internet Explorer 7 Desktop shortcuts to projects include the Apollo Project icon and are titled in the format Project Name ndash Apollo Project
In Firefox 3
1 Open the project you want to create a shortcut to in Firefox
2 Reduce the size of the Firefox window so that the desktop is visible
3 Drag the Site Identification Button onto the desktop
The Site Identification Button is located to the left of the Location Bar and displays the Apollo Project icon
In Internet Explorer 7
1 Open the project you want to create a shortcut to in Internet Explorer
2 Press ALT+F
3 Select Send gt Shortcut to Desktop
344 Closing a Project
1 Click the Close Project button in the Projects bar
Launching a desktop shortcut to a project automatically runs that project It is important to note that once a project is run its settings can no longer be edited It is recommended that desktop shortcuts only be created for Field Archive projects
Firefox is the recommended browser for Apollo Project
Chapter 3 Retrieving Data
28 Apollo Project User Guide16106R5 2009-03-24
345 Copying a Project
1 Select the project name under the Name column on the Existing Projects page
2 Click Copy
3 Enter a unique name for the new project and click OK
4 Click Edit and edit the settings as required
5 Click OK to save the project after you have finished editing the settings
346 Deleting a ProjectWhen you delete a project only files in the temporary folder are deleted All processed data files are not deleted
1 Click the project name under the Name column on the Existing Projects page
2 Click Delete
3 Click OK on the confirmation message
35 Running ProjectsFor all project types you can run a project manually at any time Archive projects can also be defined to run automatically on a schedule
If it is a scheduled Archive Project and the schedule is started click Cancel Schedule before you create a copy of it (If the schedule is not started the Start Schedule button is visible if the schedule is started the Cancel Schedule button replaces the Start Schedule button)
Apollo Project stores intermediate files in a temporary subdirectory of the Base Directory specified for the output location of a project These intermediate files correspond to the actual channel group data retrieved from the Stores referenced by the project If a project is deleted from Apollo Project these temporary files will be removed automatically
Disk space can also be reclaimed by removing these temporary files manually without deleting the project However if the project is run again the output files produced might be incomplete if previously retrieved data from these temporary files is required
For more information on what happens when a project runs see Section A1 ldquoOverview of Running Projectsrdquo on page 37
Chapter 3 Retrieving Data
Apollo Project User Guide16106R5 2009-03-24
29
351 Running a Project1 Open a project
2 Click Run Now on the Summary page to start the project
The project starts running and the Retrieval Status page is displayed
352 Stopping a Project1 Open a project
2 Click Cancel Run on the Summary page to stop the project
3 Click OK on the success message
353 Merging Project Data FilesYou have the option to merge all of the downloaded data for the stations and instruments into one file per interval for each project
1 Open a project
2 Click Merge
A single file is generated for each time period The time period is determined by the file interval you specified on the Time Selection page when you created the project For more information see step 13 of Section 31 ldquoCreating New Projectsrdquo on page 11
The original data files are not modified when you select the option to merge project data files
You can also click Run Now on the Retrieval Status page to start a project
For more information on what happens when a project runs see Section A1 ldquoOverview of Running Projectsrdquo on page 37
You can also click Cancel Run on the Retrieval Status page to stop a project
You cannot merge data from Archive projects and you cannot merge data in the Seisan format
You can also click Merge on the Retrieval Status page to merge the data from a project
Chapter 3 Retrieving Data
30 Apollo Project User Guide16106R5 2009-03-24
354 Running a Scheduled Archive Project1 Open a project
2 Click Start Schedule to start the project schedule
3 Click OK on the confirmation message
4 Click OK on the success message
For a project scheduled to run weekly the project will run for the first time according to the project start time and then it will run on a weekly basis according to the times and days you specified
For a project scheduled to run at a regular interval the project will run according the to interval you specified after you start the schedule For example if you click Start Schedule on a Wednesday and you specified every 2 days as the interval then the project will run for the first time on Friday and every two days after that
3541 Cancelling a Schedule
If you cancel a scheduled project before it runs for the first time you can edit the project settings
If you cancel a project that is currently running the current project runs to completion but subsequent project runs will not occur
1 Open a project
2 Click Cancel Schedule to cancel the project schedule
3 Click OK on the confirmation message
4 Click OK on the success message
You can also click Start Schedule on the Retrieval Status page to start the schedule of a project
You can restart the schedule by opening the project and clicking Start Schedule
You can also click Cancel Schedule on the Retrieval Status page to cancel the schedule of a project
Chapter 3 Retrieving Data
Apollo Project User Guide16106R5 2009-03-24
31
36 Editing and Viewing the Settings of ProjectsYou can edit the settings of a project before it has run After it has run you can view the settings
361 Editing Project Settings1 Open the project
2 Click Edit on the Summary page
3 Edit the settings as required
4 Click OK to save the changes
362 Viewing Project Settings1 Open the project
2 Click View on the Summary page
3 Click the tabs to view the settings
4 Click Cancel when you have finished viewing the settings
You can only edit the settings of a project before it has run for the first time or been scheduled (Archive project) If you want to edit the settings of a project after it has already run once or been scheduled you can copy the project (see Section 345 ldquoCopying a Projectrdquo on page 28) and then edit the settings for the copy
Settings For more information
Store Selection See step 4 of Section 31 ldquoCreating New ProjectsrdquoChannel Group Selection See step 5 to step 12 of Section 31 ldquoCreating New ProjectsrdquoTime Selection See step 13 of Section 31 ldquoCreating New ProjectsrdquoOutput Format See step 15 and step 16 of Section 31 ldquoCreating New ProjectsrdquoOutput Location See step 17 to step 20 of Section 31 ldquoCreating New Projectsrdquo
You can also click Edit on the Retrieval Status page to edit the settings of a project
You can also click View on the Retrieval Status page to edit the settings of a project
Chapter 3 Retrieving Data
32 Apollo Project User Guide16106R5 2009-03-24
37 Monitoring Project StatusYou can monitor the status of a project by viewing information on the Existing Projects Summary and Retrieval Status pages
371 Viewing an Overview of the Status of All ProjectsThe Existing Projects page is the default home page of Apollo Project You see this page when you first open Apollo Project or when you click Projects in the projects bar For more information see Section 341 ldquoViewing Existing Projectsrdquo on page 26
You can view the following information for all projects on the Existing Projects page
bull Name
bull Type
bull Current status
bull Last time the project run
bull Status of data retrieved
The Data Retrieved bars on the Existing Projects page show the overall status of the data retrieval For more information see Section 3731 ldquoStatus Coloursrdquo on page 34
Chapter 3 Retrieving Data
Apollo Project User Guide16106R5 2009-03-24
33
372 Viewing the Status of an Individual ProjectWhen you open a project a detailed summary of the project is shown on the Summary page For more information see Section 342 ldquoOpening a Projectrdquo on page 27
You can view the following information for each project on the Summary page
bull Date it was created
bull Date it was last modified
bull Current status
bull Last time it ran
bull Next time it will run
You can also view a summary of all of the settings you specified when you created the project (Store specifications selected Stores selected time series channel groups selected SOH channel groups start and end times number of files generated file interval and output format and locations)
All times are reported using the UTC time zone
Chapter 3 Retrieving Data
34 Apollo Project User Guide16106R5 2009-03-24
373 Monitoring the Status of a Running ProjectYou can view the data retrieval status of a project while it is running on the Retrieval Status page The Retrieval Status page is displayed automatically when you click Run Now to run a project You can also view this page by opening a project and clicking the Retrieval Status tab
The status for each channel group is expressed in the form of two numbers (for example 60100) and two bar graphs The first number is the percentage available of the total time requested (for example 60) and the second number is the percentage retrieved of the time available (for example 100) For more information on the bar graph status colours see Section 3731 ldquoStatus Coloursrdquo on page 34
You can also view retrieval details for each channel group listed on the Retrieval Status page For more information see Section 3732 ldquoViewing the Retrieval Details for Each Channel Grouprdquo on page 35
3731 Status Colours
The data retrieval status bars use the following status colours
The information that is displayed on the Retrieval Status page is updated continuously while a project is running
Table 3-1 Status colours
Colour Status
Green Apollo Project has retrieved the data
Yellow Apollo Project is attempting to retrieve available data from the Store
Red Data is available in the Store but Apollo Project has failed to retrieve it on this attempt Apollo Project will make additional attempts to retrieve the data up to the configured Maximum Number of Retrieval Attempts For information on how to set the Maximum Number of Retrieval Attempts setting see Section 31 ldquoCreating New Projectsrdquo on page 11
White Data for some portion of the requested time segment is not available in the Store For example there are gaps in the data or the retrieval request is for a future time segment
Chapter 3 Retrieving Data
Apollo Project User Guide16106R5 2009-03-24
35
3732 Viewing the Retrieval Details for Each Channel Group
You can view the retrieval status of each time segment for a channel group
1 Click a channel group name
2 Click the Channel Group Details button that is located to the right of the channel group name
The Remaining Retrieval Attempts column displays the number of times that Apollo Project will try to download each missing time segment for the channel group when the project is run again For information on how to set the Maximum Number of Retrieval Attempts setting see Section 33 ldquoConfiguring Apollo Projectrdquo on page 24
3 Click OK when you have finished viewing the details
Chapter 3 Retrieving Data
36 Apollo Project User Guide16106R5 2009-03-24
Apollo Project User Guide16106R5 2009-03-24
37
Appendix A Reference Information and Examples
Overview of Running Projects
Example Project Settings
Example Deployment Scenarios
Shot File Formats for Controlled Source Projects
A1 Overview of Running ProjectsWhen a project is run Apollo Project performs the following steps
1 The requested time ranges are identified
2 The channel groups for which data are to be retrieved are identified
3 The actual Stores specified by the Store specifications of the project are identified
For each identified Store the following steps are performed
1 A data availability analysis for the outstanding time ranges is performed These are for the ranges for which data has not already been retrieved The availability of the data is recorded for reference It is possible that a given Store was not present at the time the project was last run If this is the case then an attempt is made to retrieve all of the required time ranges of the project from the Store
2 If any data exists in the Store for any of the requested time ranges then a retrieval of this data is performed and the retrieved data is stored to local temporary files
3 If the number of retrieval attempts for a given time range exceeds a configurable threshold (see Section 33 ldquoConfiguring Apollo Projectrdquo on page 24) then the retrieval of data within the stated range is not attempted again
If any data was retrieved during the run of the project then the corresponding output files of the desired output format are generated and stored in the output location specified for the project
When running Apollo Project with Taurus version 2x the schedule for Archive projects must be greater than 5 minutes in duration Schedules that are less than 5 minutes can result in data that is missing or not downloaded
Appendix A Reference Information and Examples
38 Apollo Project User Guide16106R5 2009-03-24
It is possible that the requested data for a given channel group exists across multiple Stores If all of these Stores are included by the Store specifications for the project then Apollo Project assembles the requested data
When a project runs detailed information regarding the results of the retrieved data and processed data are available For more information see Section 37 ldquoMonitoring Project Statusrdquo on page 32
A2 Example Project Settings
A21 Example 1 One Time ProjectProject Name Project1
Project Type One Time
Channel groups selected for retrieval CASTN1OTBHZ (on taurus_1234)
Requested Time Range January 30 2008 1400 ndash 1500 UTC
File Interval 20 minutes
Output Location Base Directory disk2ApolloProjectOutputData
Output Location Subdirectories projectyearmonthday
Output Location Filenamestationnetwork_time
When the project is run successfully the following output files will be created on the server running Apollo Project
disk2ApolloProjectOutputDataProject120080130STN1CA_20080130_140000seed
disk2ApolloProjectOutputDataProject120080130STN1CA_20080130_142000seed
disk2ApolloProjectOutputDataProject120080130STN1CA_20080130_144000seed
Appendix A Reference Information and Examples
Apollo Project User Guide16106R5 2009-03-24
39
A22 Example 2 Controlled Source ProjectProject Name Project2
Project Type Controlled Source
Channel groups selected for retrieval CASTN1OTBHZ (on taurus_1234) CASTN1OTBHN (on taurus_1234)
Requested Shot Times January 30 2008 1400 UTC January 30 2008 1430 UTC
Pre Time 30 seconds
Post Time 30 seconds
Output Location Base Directory disk2ApolloProjectOutputData
Output Location Subdirectories projectyearmonthday
Output Location Filename timeformat
When the project is run successfully the following output files will be created on the server running Apollo Project
disk2ApolloProjectOutputDataProject22008013020080130_135930segysgy
disk2ApolloProjectOutputDataProject22008013020080130_142930segysgy
A3 Example Deployment Scenarios
A31 One TimeYou want to download three days of data from multiple instruments on the network save the data in MiniSEED format and create a file for every hour of data
A One Time project is the recommended solution The Store of each instrument can be made available to Apollo Project by creating a corresponding IP Address Store specification with the IP address of the instrument The requested time range can be specified along with a file interval of one hour Ensure that the instruments are configured to run in Communications mode
A32 Scheduled ArchiveYou want seismic data to be retrieved automatically from a group of instruments on the network every six hours The instruments are always accessible via an Ethernet connection
A scheduled Archive project is the recommended solution Use the Regular Interval scheduling option and set the interval to six hours
You can also run a scheduled Archive project at any time For example if the scheduled retrieval interval of a project is six hours and between intervals you want to retrieve the data three hours early you can run the project and approximately three additional hours of data would be accumulated About three hours later the project will run automatically and accumulate the remaining three hours of data
Appendix A Reference Information and Examples
40 Apollo Project User Guide16106R5 2009-03-24
A33 Manual ArchiveYou want to retrieve seismic data from a group of instruments but their respective Stores are only available for retrieval on occasion (no regular dependable schedule for retrieval from these Stores is possible)
A manually run Archive project is the recommended solution You can create the project and run it whenever any of the instruments are available for retrieval
A34 Field ArchiveYou want to collect data from a set of isolated instruments in the field at recurring intervals (for example twice per month)
A Field Archive project is the recommended solution You can create a Field Archive project and either add all instrument IP addresses to the list or use a Discovery specification The time for the last retrieval is stored on the instrument and all data is recovered from the last recovery time
A35 Media HarvestingYou want to collect the media from a set of instruments in the field at a regular interval (for example once per week) You also have to retrieve all of the seismic data on the media for subsequent analysis
An Archive project is the recommended solution Initially a directory is created on the file system of the server running Apollo Project A directory Store specification is created with this directory as the parent directory from which to search for Stores The content of each media instance in the weekrsquos collection is copied from a media reader to a subdirectory of the directory When the project is run all of the copied Stores are automatically available and the project accumulates data for each instrument
Due to the nature of media harvesting and the replacement procedure for this example data is always missing for the last period of output files for the current week This period corresponds to the time that the media was taken from the instrument and replaced with a new one The following week when the media is harvested again from the instruments in the field Apollo Project fills in the missing time for these files with the new Store data regardless of the media instance on which the data currently resides
You can only create and run Field Archive projects for Taurus version 30 or later
Appendix A Reference Information and Examples
Apollo Project User Guide16106R5 2009-03-24
41
A36 Trigger Downloading You have set up a network of five Tauruses around a hydro dam Each Taurus is accessible over an Ethernet connection and each is set to record data over the weekend You have set the period for data retrieval at 30 seconds before and five minutes after any seismic activity but the following procedure shows you why it is not necessary to view all of the data accumulated over the whole weekend
1 Select the Taurus at the site with the least environmental noise or determine the best site for generating triggers and designate this Taurus ldquoTaurus Ardquo for reference
You need to perform this task in advance More information about triggers can be found in the Taurus Portable Seismograph User Guide
2 Download the trigger file from ldquoTaurus Ardquo and review the file to verify the correct number of triggers
3 Follow these steps to create a new Triggers project
a) Click New on the Apollo Project Existing Projects page
b) Click Triggers as the project type and enter a unique name in the Project Name box
c) Click OK
d) Click the IP Address tab on the Store Selection tab
e) Enter the IP address of a Taurus
f) Click Add
g) Repeat step e until you have entered the IP addresses of all five of the Tauruses
Apollo Project adds the IP address specifications to the Selected Specifications section of the Store Selection page and finds all five Stores associated with the IP addresses and adds them to the Selected Stores section
h) Click the Channel Group Selection tab
i) Click Create Default Station Table to create a table for all of the currently selected Stores and discovered instruments
j) Review the selected channel groups and if required edit the mappings in the selected channel groups area of the tab (lower half of the tab)
k) Click the Time Selection tab
l) Click the Browse button
m)Select the trigger file that you downloaded in step 2 and click OK
n) Click Submit
The list of triggers is imported and displayed in the Triggers section on the Time Selection page
o) Enter a Pre Time of 30 seconds and a Post Time of 5 minutes
p) Click the Output Format tab
q) Click MiniSEED
r) Click All Instruments
s) Click the Output Location tab
Appendix A Reference Information and Examples
42 Apollo Project User Guide16106R5 2009-03-24
t) Enter the valid absolute path of the base directory for the processed data subfolders and files
u) Enter the expression used to define path names for subfolders under the base directory
v) Enter the expression used to define file names for the processed data files that are stored in the subfolders under the base directory
w) Click OK
4 Click the Run Now button on the Summary page
When the project has finished running the output folder you specified in step t will contain ten files Each output file will contain 5 minutes and 30 seconds of data from the five Tauruses
A4 Shot File Formats for Controlled Source ProjectsYou have two options for defining shots for a Controlled Source project manually defining shots or importing shots from a shot file
You can create shot files in one of following three file formats
Microsoft Office Excel (xls) ndash See Section A41 ldquoCreating a Shot File With Microsoft Office Excelrdquo on page 42
OpenOfficeorg Calc (ods) ndash See Section A42 ldquoCreating a Shot File With OpenOfficeorg Calcrdquo on page 44
Comma-Separated Values (csv) ndash See Section A43 ldquoCreating a Comma-Separated Values Shot Filerdquo on page 45
The Shot file templates are located in the docShotFileImport folder on the Apollo Project CD
A41 Creating a Shot File With Microsoft Office ExcelThe Microsoft Office Excel template for Apollo Project can be used with Microsoft Office Excel version 2003 or later
To create an Microsoft Office Excel based shot file
1 Double-click ShotFileTemplatexlt
A new Microsoft Office Excel file is created from the template and opens in the Microsoft Office Excel
2 Save the new spreadsheet as a Microsoft Office Excel document (xls)
3 Enter shot file data as specified in the Microsoft Office Excel spreadsheet
Only the decimal separator is supported for shot files Separators that denote the 3rd power of 10 (thousand) are not supported (for example 4500) The Microsoft Excel and OpenOffice templates reinforce these restrictions and are recommended for creating csv files
Appendix A Reference Information and Examples
Apollo Project User Guide16106R5 2009-03-24
43
You can enter data for multiple shot times
4 Click Save to save the file in Microsoft Office Excel format
5 Click File gt Save As and select CSV (Comma delimited) (csv) from the Save as type list
6 Click Save
7 Click OK on the message warning you that you are only saving the active sheet
8 Click Yes on the message warning you that file features might be incompatible with the csv format
9 Close Microsoft Office Excel
If you are using Microsoft Office Excel 2007 click the Microsoft Office Button and click Save As
Ensure that you save the file as a comma delimited file If the shot file is mistakenly saved in Microsoft Excel format (xls) the shot file will not work in Apollo Project
Appendix A Reference Information and Examples
44 Apollo Project User Guide16106R5 2009-03-24
A42 Creating a Shot File With OpenOfficeorg CalcThe OpenOffice template has been tested with OpenOfficeorg Calc version 23 Later versions of OpenOfficeorg Calc can be used at your discretion
To create a shot file based on the OpenOfficeorg Calc template
1 Double-click ShotFileTemplateots
A new OpenOffice spreadsheet is created from the template and opens in OpenOfficeorg Calc
2 Save the new spreadsheet as an OpenOffice Calc document (ods)
3 Enter the shot file data as specified in the OpenOffice spreadsheet
You can enter data for multiple shot times
4 Click Save to save the file in OpenOfficeorg Calc format
5 Click File gt Save As and select Text CSV (csv) from the Save as Type list
6 Select the Edit filter settings check box
7 Click Save
A warning message might appear that warns you that the document might contain formatting that cannot be saved in the csv format Click Yes on the warning message to save the file in csv format
The Export of text files window opens
8 Delete the double quotation marks () in the Text delimiter box and ensure that the Save cell content as shown check box is selected
9 Click OK to export the OpenOffice spreadsheet as a csv file
10 Click OK on the warning message
11 Close OpenOfficeorg Calc
Appendix A Reference Information and Examples
Apollo Project User Guide16106R5 2009-03-24
45
A43 Creating a Comma-Separated Values Shot FileYou can use any text editor to create a csv shot file
To create a csv shot file
1 Open ShotFileTemplatecsv in a text editor and save it with a different name
2 Format each line of the csv file as follows
Shot TimePre TimePost TimeLatitudeLongitudeElevation
For example
2008-08-28 103044090600000-6000004267
The format and units are as follows
3 Save the file as a csv formatted file
The csv shot file template is not compatible with Microsoft Office Excel Make sure that you do not double-click it and open it in Microsoft Office Excel
FormatUnits
Shot Time yyyy-mm-dd hhmmss
Pre Time seconds
Post Time seconds
Latitude degrees
Longitude degrees
Elevation meters
Appendix A Reference Information and Examples
46 Apollo Project User Guide16106R5 2009-03-24
Apollo Project User Guide16106R5 2009-03-24
47
Appendix B Retrieving SOH Data from a Taurus Version 2x
Taurus Version 2x SOH Data Retrieved by Apollo Project
Retrieving SOH Data from a Taurus Version 2x Streaming to Apollo Server
B1 Taurus Version 2x SOH Data Retrieved by Apollo Project This section presents the predefined datasets of SOH data Apollo Project will retrieve from a Taurus version 2x either through a direct connection or a stream to Apollo Server For instruction on retrieving streaming Taurus version 2x data from Apollo Server see Section B2 ldquoRetrieving SOH Data from a Taurus Version 2x Streaming to Apollo Serverrdquo on page 48
The order of the columns presented in the table below will differ when streaming Taurus version 2x SOH data from Apollo Server
Predefined SOH group SOH data
GPS Time Time (longsecs) (the number of seconds since 1970-01-01)Time (UTC) (time in yyyy-mm-dd hhmmssms format)Altitude (m)DAC CountError (ns) (time error)GPS Engine StatusLast Update Time(s)Lat (deg) (latitude in degrees)Long (deg) (longitude in degrees)NumSatellites (number of satellites used)PDOPPhaseLock (system clock phase lock)TDOPUncertainty (ns) (time uncertainty)
Note The values for Number of satellites used PDOP and TDOP are provided by the GPS receiver at the Last update time In order to see what time these values correspond to look at the Last update time When GPS is off these three parameters and the Last update time are not updated The last value displays until the next update arrives (after the GPS is turned on again)
Appendix B Retrieving SOH Data from a Taurus Version 2x
48 Apollo Project User Guide16106R5 2009-03-24
B2 Retrieving SOH Data from a Taurus Version 2x Streaming to Apollo ServerThis section provides instruction on configuring your Taurus version 2x to stream data to Apollo Server and instructions on how to use Apollo Project to retrieve this data from Apollo Server
B21 Streaming Data from a Taurus Version 2x to Apollo ServerUse the Taurus graphical user interface on either the Taurus display screen or through a Web browser to set up an NP stream from a Taurus version 2x to Apollo Server
1 Log in to the Taurus version 2x with either the tech or central user account
2 Select Advanced Configuration gt Communications gt NP Data Streaming
GPS Satellites Time (longsecs) (the number of seconds since 1970-01-01)Time (UTC) (time in yyyy-mm-dd hhmmssms format)
For each satelliteAcquisition FlagLast Update Time (ms)PRNSatellite Azimuth (microordm)Satellite Elevation (microordm)Signal Level (AMU)
Environment Time (longsecs) (the number of seconds since 1970-01-01)Time (UTC) (time in yyyy-mm-dd hhmmssms format)External SOH Voltage 1 (V) (12-bit voltage input) External SOH Voltage 2 (V) (12-bit voltage input) External SOH Voltage 3 (V) (12-bit voltage input) External SOH Voltage 4 (V) (12-bit voltage input) Sensor SOH Voltage 1 (V)Sensor SOH Voltage 2 (V)Sensor SOH Voltage 3 (V)
Instrument Time (longsecs) (the number of seconds since 1970-01-01)Time (UTC) (time in yyyy-mm-dd hhmmssms format)Controller Current (mA)Digitizer Current (mA)NMX Bus Current (mA) (external connector)Sensor Current (mA)Serial Port Current (mA)Supply Voltage (mV)Temperature (ordmC)
Predefined SOH group SOH data
Appendix B Retrieving SOH Data from a Taurus Version 2x
Apollo Project User Guide16106R5 2009-03-24
49
3 To have the Taurus stream both time series and SOH data to Apollo Server select both Stream Time Series and Stream SOH
-OR-
Select only Stream SOH if you only want to retrieve the SOH data from Apollo Server
4 Type the IP address for Apollo Server in the IP Address box
5 Type the port number Apollo Server uses to receive data in the Port box By default this is port number 32008
6 The Second IP Address and Second Port boxes are not necessary however cannot be left blank Type 127001 in the Second IP Address box and 32004 in the Second Port box
7 Type a value in the Maximum Throughput [bps] box if a limited data link is present between the Taurus and Apollo Server For instance if at some point the data link is limited to 9600 bps then this is the maximum throughput the link can allow If there are no throughput limitations set the value in this box to zero to disable the throughput limitation
8 Click Apply
9 Click Commit
B22 Retrieving Taurus Version 2x Data from Apollo ServerCreate a new project or use an existing project in Apollo Project to retrieve the Taurus version 2x data from Apollo Server For more information on creating or editing projects refer to Section 31 ldquoCreating New Projectsrdquo on page 11 and Section 36 ldquoEditing and Viewing the Settings of Projectsrdquo on page 31
When creating or editing the project
a) Add an IP address Store specification on the Store Selection tab (see step 4 in Section 31 ldquoCreating New Projectsrdquo) for Apollo Server including its client Web application port number Use the format
Apollo Server IP AddressApollo Server Client Web Application Port Number
b) Apply the appropriate filters on the Channel Group Selection tab to retrieve the desired channel groups from the Taurus version 2x See step 5 through step 12 in Section 31 ldquoCreating New Projectsrdquo for instruction on using the Channel Group Selection tab
Appendix B Retrieving SOH Data from a Taurus Version 2x
50 Apollo Project User Guide16106R5 2009-03-24
Apollo Project User Guide16106R5 2009-03-24
51
Appendix C Glossary
Glossary of Abbreviations and Terms
List of Unit Abbreviations and Symbols
C1 Glossary of Abbreviations and Terms
A
ASCIIAmerican Standard Code for Information Interchange
B
BHEBroad Band High Gain Seismometer East-West Orientation
Channel name based on the Global Seismological Network (GSN) standard
BHNBroad Band High Gain Seismometer North-South Orientation
Channel name based on the Global Seismological Network (GSN) standard
BHZBroad Band High Gain Seismometer Vertical Orientation
Channel name based on the Global Seismological Network (GSN) standard
Appendix C Glossary
52 Apollo Project User Guide16106R5 2009-03-24
C
CSVComma-Separated Values
D
DACDigital to Analog Converter
G
GPSGlobal Positioning System
J
JREJava Runtime Environment
JVMJava Virtual Machine
N
NFSNetwork File System
P
PDOPPosition Dilution of Precision
PRNPseudo-random Number
Appendix C Glossary
Apollo Project User Guide16106R5 2009-03-24
53
S
SACSeismic Analysis Code
An Apollo Project output file format that generates files that can be used by the SAC software (see http wwwirisedusoftwaresac)
SEEDStandard for the Exchange of Earthquake Data
SMBServer Message Block
SOHState of Health
T
TCPIPTransmission Control ProtocolInternet Protocol
TDOPTime Dilution of Precision
U
UNCUniform Naming Convention or Universal Naming Convention
URLUniform Resource Locator
UTCCoordinated Universal Time
Appendix C Glossary
54 Apollo Project User Guide16106R5 2009-03-24
C2 List of Unit Abbreviations and SymbolsTable C-1 provides a list of unit abbreviations and symbols commonly used in Nanometrics documentation
Table C-1 Unit abbreviations and symbols
Abbreviation or Symbol Definition Abbreviation
or Symbol Definition
deg degree lb pound
Oslash diameter m metre
micro micro ms metre per second
Ω ohm ms2 metre per second squared
A ampere mA milliampere
AC alternating current MB megabyte
b bit MΩ megaohm
B byte MHz megahertz
bps bits per second mi mile
C Celsius mL millilitre
cm centimetre mm millimetre
dB decibel ms millisecond
DC direct current MTU maximum transmission unit
F farad mV millivolt
ft foot mW milliwatt
g gram N Newton
g gravity nF nanofarad
GB gigabyte ns nanosecond
GHz gigahertz rad radian
Hz hertz rads radian per second
in inch s second
KB kilobyte sps samples per second
kg kilogram U rack unit
kHz kilohertz V volt
kΩ kiloohm Vpp Volts peak-to-peak
kW kilowatt W watt
L litre
Apollo Project User Guide16106R5 2009-03-24
55
About NanometricsNanometrics is a world leader in the development of precision instrumentation network technology and software applications for seismological and environmental studies Using Nanometrics technology our customers establish and grow research networks that are often located in extreme environments such as the frozen Arctic and Antarctic the arid deserts of the Middle East the jungles of South America and the depths of the worlds oceans Many of these are mission-critical national and regional networks that demand the highest possible data quality and availability
Nanometrics provides end-to-end solutions that include a growing portfolio of broadband and strong motion seismometers dataloggers and digitizers satellite ground station systems for remote site data collection and software applications for data and network analysis and management To support this portfolio Nanometrics also provides global systems engineering services for design installation and support of complete networks
Our head office research and development centre and production facility are located in the Kanata North Business Park of Ottawa the high-technology heart of Canadas capital region
Contacting NanometricsNanometrics Inc250 Herzberg RoadKanata Ontario Canada K2K 2A1Phone +1 613-592-6776Fax +1 613-592-5929Email infonanometricscaWeb wwwnanometricsca
Contacting Technical SupportIf you need technical support please submit a request on the Nanometrics technical support site or by email or fax Include a full explanation of the problem and related information such as log filesSupport site httpsupportnanometricsca
Email techsupportnanometricsca
Apollo Project User Guide16106R5 2009-03-24
11
Chapter 3 Retrieving Data
Creating New Projects
Creating a Station Table File
Configuring Apollo Project
Managing Projects
Running Projects
Editing and Viewing the Settings of Projects
Monitoring Project Status
31 Creating New ProjectsYou can create multiple projects up to the number supported by the software licence (see Section 121 ldquoSoftware Licencerdquo on page 2)
When you create a new project you have to
bull Select data Stores
bull Specify a station table file
bull Select the channel groups you want to download data from
bull Specify when you want the project to run
bull Select the output format
bull Specify the output location
To create a new project
1 Click New on the Apollo Project Existing Projects page
2 Click a project type and enter a unique name in the Project Name box
3 Click OK
Chapter 3 Retrieving Data
12 Apollo Project User Guide16106R5 2009-03-24
4 Select one or more data Stores by performing the following steps
Store type DescriptionSteps
File A file Store specification defines a particular Store that resides on a file system accessible by the server running Apollo Project The file system can be a local or a networked file system (for example accessible via SMB or NFS)
1 Click the File tab2 Enter the full path and file name of a Store file3 Click Add
Apollo Project adds the specification to the Selected Specifications section of the Store Selection page and finds all related Store files and adds them as a single Store to the Selected Stores section
Directory A directory Store specification defines the set of Stores that reside in a particular directory hierarchy on a file system accessible by the server running Apollo Project A recursive search from the specified directory identifies all of the available Stores The file system can be a local or a networked file system (for example accessible via SMB or NFS)
1 Click the Directory tab2 Enter a directory path name
If you specify a root directory such as C it will take a long time for Apollo Project to find all of the Store files in that root directory
3 Click AddApollo Project adds the specification to the Selected Specifications section of the Store Selection page and finds and adds all Stores in the specified directory and its subdirectories to the Selected Stores section
IP Address An IP Address Store specification defines the Store of a single instrument (or an instance of Apollo Server) The specified IP address must be an IP address bound to the Ethernet interface of an instrument At the same time the instrument must be running in communications mode and be accessible from the server running Apollo Project
1 Click the IP Address tab2 Enter the IP address of an instrument3 Click Add
Apollo Project adds the specification to the Selected Specifications section of the Store Selection page and finds all Stores associated with the IP address and adds them to the Selected Stores section
Chapter 3 Retrieving Data
Apollo Project User Guide16106R5 2009-03-24
13
Discovery A discovery Store specification specifies the Stores of multiple instruments In this case a class D (multicast) IP address and port is specified It is assumed that the Store of any instrument in communications mode is accessible from the LAN of the Apollo Project server When Discovery is enabled for the specified IP address and port these attributes are included upon running the project
1 Click the Discovery tab2 Enter the multicast address and port number of a group of instruments
For example 224199711386776Multicast addresses range from 224000 through 239255255255
3 Click AddApollo Project adds the specification to the Selected Specifications section of the Store Selection page and finds all Stores associated with the multicast address and adds them to the Selected Stores section of the Store Selection page
Notes When multiple multicast groups are used for discovery the port number must differ from existing discovery port numbers by 2 for each discovery port number in use x there must be no other discovery port configured for use with a value of x or x+1For example the default discovery multicast group used by Taurus is 224199711386776 To add another multicast group you have to specify a different port number (which cannot be 6776 or 6777)
Recent Specs
Apollo Project keeps the 16 most recently defined Store specifications and groups them by category on the Recent Specs page
1 Click the Recent Specs tab2 Expand a specification category (File Directory IP Address or Discovery)
and select a specification3 Click Add
Apollo Project adds the specification to the Selected Specifications section of the Store Selection page and finds all Stores associated with the specification and adds them to the Selected Stores section
Each time a project is run Apollo Project generates a list of available Stores based on the selected Store specifications The actual Stores from which data is retrieved can vary on successive project runs For example a discovery Store specification might result in a different number of instruments being included depending on current access to the instruments
Remove a specification (and its associated Stores) by selecting it and clicking Remove Remove all specifications (and all Stores) by clicking Remove All You cannot remove individual Stores from a specification but you can add a different specification and select a different group of Stores Alternatively you can use channel group attributes filtering to select the channel groups that data is retrieved from
When copying a Store from an instrument to your local computer do not overwrite an existing Store Instead delete the existing Store or move it to a different folder on the computer Stores are made up of multiple volumes and if the new Store has fewer volumes than the old Store you could see some unpredictable results with Apollo Project
Store type DescriptionSteps
Chapter 3 Retrieving Data
14 Apollo Project User Guide16106R5 2009-03-24
5 Click the Channel Group Selection tab
6 If you defined a default station table file and want to use it for this project go to step 7
For more information see Section 32 ldquoCreating a Station Table Filerdquo on page 22
-OR-
Click Create Default Station Table to create a table for all of the currently selected Stores and discovered instruments for this project using the default settings for the network name location and channel names
The default settings for the network name location and channel names are defined in the Behaviour and Defaults dialog box For more information see Section 33 ldquoConfiguring Apollo Projectrdquo on page 24
-OR-
Enter the path and file name of a station table for this project
7 If you want to download all data from all available Stores verify that the Retrieve data from all channel groups (do not filter) check box is selected and go to step 12
-OR-
If you want to filter the data by specific channel groups and channel group attributes go to step 8
8 Clear the Retrieve data from all channel groups (do not filter) check box
9 Select the time series channel groups you want to download data from
A station table is used to assign names to all of the selected channel groups For more information see Section 32 ldquoCreating a Station Table Filerdquo on page 22
If new Stores are found after a station table file has been defined for a project (for example as a result of Discovery or a directory specification) the default channel group names are used in the output files and no filtering is applied to the channel groups
If the text ldquoSelected Time Series Channels x of xrdquo where x represents the number of channels is red you have selected more time series channels than your licence permits You must select a valid number of time series channels (for the unlicenced version of Apollo Project there is a maximum of three time series channels) before you can create your project
Chapter 3 Retrieving Data
Apollo Project User Guide16106R5 2009-03-24
15
10 Select the state of health (SOH) channel groups you want to download data from Each group has a predefined dataset
To view the SOH data retrieved from a Taurus version 2x see Appendix B ldquoRetrieving SOH Data from a Taurus Version 2xrdquo
Predefined SOH group SOH data
GPS Time Time (longsecs) (the number of seconds since 1970-01-01)Time (UTC) (time in yyyy-mm-dd hhmmssms format)DAC CountGPS Engine StatusGPS Last Update Time(s)GPS PDOPGPS Satellites Used (number of satellites used)GPS TDOP Lat (deg) (latitude in degrees)Long (deg) (longitude in degrees)Timing Error (ns)Timing Phase Lock (system clock phase lock)Timing Uncertainty (ns)
Note The values for Number of satellites used PDOP and TDOP are provided by the GPS receiver at the Last update time In order to see what time these values correspond to look at the Last update time When GPS is off these three parameters and the Last update time are not updated The last value displays until the next update arrives (after the GPS is turned on again)
GPS Satellites Time (longsecs) (the number of seconds since 1970-01-01)Time (UTC) (time in yyyy-mm-dd hhmmssms format)
For each satelliteGPS Satellite Acquisition FlagGPS Satellite Azimuth (microordm)GPS Satellite Elevation (microordm)GPS Satellite Last Update Time (ms)GPS Satellite PRN GPS Satellite Signal Level (AMU)
Environment Time (longsecs) (the number of seconds since 1970-01-01)Time (UTC) (time in yyyy-mm-dd hhmmssms format)External SOH Voltage 1 (V) (12-bit voltage input)External SOH Voltage 2 (V) (12-bit voltage input)External SOH Voltage 3 (V) (12-bit voltage input)External SOH Voltage 4 (V) (12-bit voltage input)Sensor SOH Voltage 1 (V)Sensor SOH Voltage 2 (V)Sensor SOH Voltage 3 (V)
Chapter 3 Retrieving Data
16 Apollo Project User Guide16106R5 2009-03-24
11 If required enter additional filter information as comma-delimited text into the Network Station Location Channel and Instrument boxes
You can use an asterisk ()to represent 1 or more characters
12 Review the selected channel groups and if required edit the channel group mappings in the selected channel groups area of the tab
Channel groups that do not have a mapping appear as blanks in the selected channel groups area of the tab Mapping information for these channel groups can be entered and saved in the station table file for future projects
You can edit the mappings at any time The changes are reflected in future runs of any project using that same station table file For more information see Section 32 ldquoCreating a Station Table Filerdquo on page 22
13 Click the Time Selection tab and follow the steps for the project type you selected
Instrument Time (longsecs) (the number of seconds since 1970-01-01)Time (UTC) (time in yyyy-mm-dd hhmmssms format)Controller Current (mA)Digitizer Current (mA)NMX Bus Current (mA) (external connector)Sensor Current (mA)Serial Port Current (mA)Supply Voltage (mV)Temperature (ordmC)
Look in the selected channel groups area of the tab (lower half of the tab) for examples of filter details you can enter in the Network Station Location Channel and Instrument ID filter boxes
The NetworkStationLocationChannel column of the table presents information in the format implied by the column title For instance in an entry of XXA099901BHE(1) XX represents the network(2) A0999 represents the station(3) 01 represents the location(4) BHE represents the channel
Look at the Instrument ID column of the table for an example of an instrument name and serial number such as taurus_0999
Only mappings that are applicable for the selected channel groups appear in the selected channel groups area of the tab
All times use the UTC time zone
Predefined SOH group SOH data
Chapter 3 Retrieving Data
Apollo Project User Guide16106R5 2009-03-24
17
Project type DescriptionSteps
Archive Archive projects attempt to retrieve data up to the current timeThe time ranges for which output files will be produced are driven from the file interval and are aligned to the project start time It is therefore unlikely that the ldquomost recentrdquo file interval will align with the current time Therefore the most recent range for which data retrieval is attempted will have a portion of its data retrieved and the remainder (for future retrieval) will be declared unavailable However when the project is run later (after the end of the particular time range) the unavailable data will normally be retrieved and the situation will likely repeat itself with the ldquonewrdquo last range to retrieveTo run an Archive project manually1 If required edit the start time for the project2 Click Manual3 Specify the file interval
For example if you specify 2 hours then one file is created every 2 hours If the duration for the project is one day then a total of 12 files will be created
4 After you have finished creating the project click Run Now on the Summary page to run the project
To schedule an Archive project to run automatically at a regular interval1 Click Regular Interval and select the interval 2 Specify the file interval
For example if you specify 2 hours then one file is created every 2 hours If the duration for the project is one day then a total of 12 files will be created
3 After you have finished creating the project click Start Schedule on the Summary page to start the schedule for the project and click OK twice The project will run according to the interval you specified after you start the schedule For example if you click Start Schedule on a Wednesday and you specified every 2 days as the interval then the project will run for the first time on Friday and every two days after that If the computer has been rebooted and the Apollo Project Web server has been restarted the project will run according to the interval you specified after the computer has rebooted For example if the computer reboots on a Wednesday and you specified every 2 days as the interval then the project will run for the next time on Friday and every two days after that
Note Archive projects that are defined as scheduled projects can also be run manually at any timeTo schedule an Archive project to run automatically on a weekly basis1 If required edit the start time for the project2 Click Weekly Schedule and select the time and days of the week 3 Specify the file interval
For example if you specify 2 hours then one file is created every 2 hours If the duration for the project is one day then a total of 12 files will be created
4 After you have finished creating the project click Start Schedule on the Summary page to start the schedule for the project and click OK twice After you have finished creating the project the project will run for the first time according to the project start time and then it will run on a weekly basis according to the times and days you specified
Note Archive projects that are defined as scheduled projects can also be run manually at any time
Chapter 3 Retrieving Data
18 Apollo Project User Guide16106R5 2009-03-24
One Time A One Time project retrieves a single time segmentTo specify the start and end times for a One Time project1 If required edit the start time for the project2 Click End Time and enter an end time
-OR-Click Duration and specify the duration of the project The duration is the length of the requested time segment
3 Specify the file intervalFor example if you specify 2 hours then one file is created every 2 hours If the duration for the project is one day then a total of 12 files will be created
4 After you have finished creating the project click Run Now on the Summary page to run the project
Controlled Source
A Controlled Source project retrieves data specified as a set of individually entered shots and outputs the data in SEGY format To specify shots using a shots file1 Click Browse select a shots file and click OK2 Click Submit
The list of shots is imported and displayed in the Shot List section on the Time Selection page
Note For more information see Section A4 ldquoShot File Formats for Controlled Source Projectsrdquo on page 42To manually define shots1 Enter a shot time2 If required enter the latitude longitude and elevation3 If required select the pre-shot time period4 Select the post-shot time period5 Click Add
The shot is added to the Shot List section on the Time Selection page Triggers A Triggers project uses a CSV-formatted trigger list to specify the data to be
retrieved for example a trigger file that has been downloaded from a Taurus to the local computerTo define triggers1 Click Browse select a CSV triggers file and click OK2 Click Submit
The list of triggers is imported and displayed in the Triggers section on the Time Selection page
3 Select the pre-trigger and post-trigger time periodsThe pre-trigger and post-trigger time periods are used for all of the triggers
Project type DescriptionSteps
Chapter 3 Retrieving Data
Apollo Project User Guide16106R5 2009-03-24
19
14 If you selected a Controlled Source as the project type in step 2 go to step 17
You do not have to select an output format for a Controlled Source project because the output format for a Controlled Source project is always SEGY one output file is generated for all instruments and the stations are sorted by StationNameNetworkName
-OR-
If you selected one of the other project types go to step 15 to select an output format
15 Click the Output Format tab
Field Archive A Field Archive project is used for recurring data retrievals that occur at specified intervals The time of the last retrieval is stored on the instrumentTo define the start time and file interval1 If required edit the start time for the project2 Specify the file interval
For example if you specify 2 hours then one file is created every 2 hours3 If you want partial files retrieved select the Include last interval even if
incomplete check box You should only select this option when the retrieval of partial files is more important than retrieving the data for the current interval during a future project run
Be careful when specifying the file interval For example retrieving many hours or days of data and specifying a file interval of seconds or minutes could result in the generation of many files This is not only very resource intensive but could result in a data management problem as well
Project type DescriptionSteps
Chapter 3 Retrieving Data
20 Apollo Project User Guide16106R5 2009-03-24
16 Perform the following steps to select an output format
Output format Steps
MiniSEED 1 Click MiniSEED2 Click Per channel group to generate one output file per channel group
You must add the channel token to the Subdirectories or Filename box on the Output Location tab when choosing Per channel group-OR-Click Per instrument to generate one output file per instrument-OR-Click All Instruments to generate one output file for all instruments
3 Select the Sort check box if you want the output data sorted by timeData is put in a Store in the order received and this order may not always be chronological To ensure that the data in the resulting SEED file is chronological select Sort
4 Select the data record sizeThe default record size is 512 B However not all SEED file readers will support this file size Determine what your SEED reader supports and select an appropriate value The options are 512 B 1024 B 2048 B and 4096 B Note that a smaller record size will result in quicker SEED file output
Note The number of output files is determined by the file interval that you set on the Time Selection page
SAC 1 Click SACYou must add the channel token to the Subdirectories or Filename box on the Output Location tab when choosing SAC as the output format
NotesThere are two types of SAC files binary and ASCII Apollo Project only outputs binary SAC filesOne output file per channel group is generated
SEGY 1 Click SEGY2 Click Per channel group to generate one output file per channel group
You must add the channel token to the Subdirectories or Filename box on the Output Location tab when choosing Per channel group-OR-Click Per instrument to generate one output file per instrument-OR-Click All Instruments to generate one output file for all instruments
3 Select the Sort check box if you want the stations sorted by StationNameNetworkName
NotesAll stations must have the same sample rateThe maximum number of samples per trace is 32767SEGY trace headers from discovered instruments will not have station location information
Chapter 3 Retrieving Data
Apollo Project User Guide16106R5 2009-03-24
21
17 Click the Output Location tab
18 If you defined a default base directory when you configured Apollo Project and want to use it for this project go to step 21
For more information see Section 33 ldquoConfiguring Apollo Projectrdquo on page 24
-OR-
Enter the valid absolute path of the base directory for the processed data subdirectories and files
If the base directory you entered does not exist click Create to create it
19 If you defined a default expression for subdirectories when you configured Apollo Project and want to use it for this project go to step 21
For more information see Section 33 ldquoConfiguring Apollo Projectrdquo on page 24
-OR-
Enter the expression used to define path names for subfolders under the base directory
You can enter tokens in any order including any additional characters that are valid for paths
Seisan 1 Click Seisan
NotesYou must have Seisan installed on your computer with a WAVEFORM_BASE and CONT_BASE line included for each station in the DATSEISANDEF file You must define a SEISAN_TOP environment variableOne output file per channel group is generated
Regardless of the output format selected SOH channel group data is always output in CSV format
The Base Directory is the root of all data retrieved for the project and can be defined at any location in the file system of the server running Apollo Project including a networked drive on a separate server If you want to create or use a directory on a computer on the network you have to enter the server and share name in a modified UNC format that is prefixed by an additional two backslashes For example the usual fileserver1storefiles must be written as fileserver1storefiles
Large amounts of data can be stored in this location You must ensure that adequate disk space is available
For deployments of Apollo Project where the clients are not running on the server it is recommended that the file system containing the base directory on the server be shared or exported as a networked file system
It is not recommended that you use the channel token in the subdirectories expression if the project includes more than one channel group per instrument (selected on the Channel Group Selection tab) and the output is not per channel group (selected on the Output Format tab)
Output format Steps
Chapter 3 Retrieving Data
22 Apollo Project User Guide16106R5 2009-03-24
20 If you defined a default expression for file names when you configured Apollo Project and want to use it for this project go to step 21
For more information see Section 33 ldquoConfiguring Apollo Projectrdquo on page 24
-OR-
Enter the expression used to define file names for the processed data files that are stored in the subfolders under the base directory
You can enter tokens in any order including any additional characters that are valid for file names
21 Click OK to save the new project
The new project is created and the Summary page is displayed
32 Creating a Station Table FileYou can create a mapping between a given instrumentchannel group (for example taurus_1234digitizertimeSeries1) and a corresponding network station location and channel name These mappings are stored in a station table file and the mapped channel group names are used in the output files
You can create a station table file and use it as the default for all projects or you can create a station table for individual projects
To create a station table file and set is as the default
1 Click the configuration button in the upper right corner
2 Specify the network name location and channel names on the Behaviour and Defaults dialog box and click OK to save the new settings
The settings you enter here are used as the channel names in the station table file You can edit these settings in step 8
For more information on configuring Apollo Project settings see Section 33 ldquoConfiguring Apollo Projectrdquo on page 24
3 Click New on the Apollo Project Existing Projects page
Do not use the channel token in the filename expression if the project includes more than one channel group per instrument (selected on the Channel Group Selection tab) and the output is not per channel group (selected on the Output Format tab)
The Sample Path shows an example of a file name generated using the values for the Base Directory Subdirectories and Filename settings
You can only edit the settings of a project before it has run for the first time or been scheduled (Archive project) If you want to edit the settings of a project after it has already run once or been scheduled you can copy the project (see Section 345 ldquoCopying a Projectrdquo on page 28) and then edit the settings for the copy
It is recommended that you create a station table file and set it as the default for all projects You can update the mappings in this file when new Stores are added or discovered
Chapter 3 Retrieving Data
Apollo Project User Guide16106R5 2009-03-24
23
4 Type Station Table in the Project Name box and click any project type
5 Click OK
6 Click the Store Selection tab and select as many Stores as possible
See step 4 of Section 31 ldquoCreating New Projectsrdquo for information on how to add specifications and select Stores
7 Click the Channel Group Selection tab and click Create Default Station Table
A station table file is created and the name of the file is displayed in the Station Table File Name box
8 Edit the station table channel group mappings in the selected channel groups area of the tab (lower half of the tab) as required
The NetworkStationLocationChannel names will appear in the output files If the Location is empty it is interpreted as the SEED default of two spaces
9 Click OK to close the project and finish creating the station table
10 Click the configuration button in the upper right corner
11 Enter the path and name of the station table file you just created in the Station Table File Name box on the Behaviour and Defaults dialog box
12 Click OK to save the new settings
The station table file you specified will be used as the default for all future projects You can open the Station Table project and edit the station table file if you need to add more Stores or change the mappings
For more information on configuring Apollo Project settings see Section 33 ldquoConfiguring Apollo Projectrdquo on page 24
Make a note of the path of the station table file because you will have to enter it on the Behaviour and Defaults dialog box to set it as the default for all projects
Valid characters for the network station location and channel in the NetworkStationLocationChannel box are upper case letters A to Z numbers 0 to 9 and spaces are also acceptable for the location
Chapter 3 Retrieving Data
24 Apollo Project User Guide16106R5 2009-03-24
33 Configuring Apollo ProjectYou can configure basic settings for Apollo Project and the default settings for new projects The changes you make to the project default settings only apply to new projects
To configure Apollo Project
1 Click the configuration button in the upper right corner
2 Edit the following settings
Setting Description
Log Verbosity The level of detail that is logged by Apollo ProjectThe default setting is Info
Log Location The default name of the Apollo Project log folder Maximum Number of Retrieval Attempts
The maximum number of single retrieval attempt made for all missing time segments on all channel groups every time a project is run Enter an integer from 0 through 1000 The default value is 8
Notes If the Taurus is busy when a retrieval attempt is made the number of remaining retrieval attempts is not decreased by one attemptYou can view the channel group details page to see if there are any remaining retrieval attempts for any channel groups (see Section 373 ldquoMonitoring the Status of a Running Projectrdquo on page 34)
Number Of Retries The number of times Apollo Project attempts to connect to a data source if there is a network connectivity problem Enter an integer from 0 through 1000 The default value is 3
Note Every time a project is run it starts with the maximum number of retries
Retry Interval (secs) The amount of time in seconds that Apollo Project waits before trying to connect to a data source againEnter an integer from 0 through 1000 The default value is 5
Station Table File Name The file name and location of the station table file that is used to assign station names to all of the selected channel groupsA station table is used to assign names to all of the selected channel groups For more information see Section 32 ldquoCreating a Station Table Filerdquo on page 22No station table file is specified by default
Chapter 3 Retrieving Data
Apollo Project User Guide16106R5 2009-03-24
25
Base Directory The folder name and location of the base directory for the processed data subfolders and files Enter any valid folder name and location including any additional characters that are valid for paths The default base directory name is ApolloProject
Notes The Base Directory is the root of all data retrieved for the project and can be defined at any location in the file system of the server running Apollo Project including a shared folder on a different computer If you want to create or use a folder on a computer on the network you have to enter the server and share name in a modified UNC format that is prefixed by an additional two backslashes For example the usual fileserver1storefiles must be written as fileserver1storefilesLarge amounts of data can be stored in this location You must ensure that adequate disk space is availableFor deployments of Apollo Project where the clients are not running on the server it is recommended that the file system containing the base directory on the server be shared or exported as a networked file system
Subdirectories The expression used to define path names for subfolders under the base directoryEnter tokens in any order including any additional characters that are valid for paths The default path name is as follows projectyearmonthday
Filename The expression used to define file names for the processed data files that are stored in the subfolders under the base directoryEnter tokens in any order including any additional characters that are valid for file names The default filename is as follows instrument_time
Sample Path An example of a file name generated using the values for the Base Directory Subdirectories and Filename settings
Network Name A standard network codeEnter any two upper case letters or numbers The default code is XX
Location A location within a stationEnter any two upper case letters numbers or spaces
The default location is two spaces for ldquononerdquo You must delete the two default spaces if you enter a new location value
Setting Description
Chapter 3 Retrieving Data
26 Apollo Project User Guide16106R5 2009-03-24
3 Click OK to save the new settings
34 Managing ProjectsYou can view open close copy and delete projects Also you can create convenient links to run your individual projects with desktop shortcuts
341 Viewing Existing Projects1 Click Projects in the Projects bar
2 View the projects listed on the Existing Projects page
The Existing Projects page shows a list of all projects and a status overview of each project For more information see Section 371 ldquoViewing an Overview of the Status of All Projectsrdquo on page 32
Channel 1 Name A channel codeEnter any three upper case letters or numbersThe default channel code is BHZ
Channel 2 Name A channel codeEnter any three upper case letters or numbersThe default channel code is BHN
Channel 3 Name A channel codeEnter any three upper case letters or numbersThe default channel code is BHE
Setting Description
Chapter 3 Retrieving Data
Apollo Project User Guide16106R5 2009-03-24
27
342 Opening a Project1 Click the project name under the Name column on the Existing Projects page
2 Click the Open Project button
343 Creating a Desktop Shortcut to a ProjectLaunching a project with a desktop shortcut will open Apollo Project to that project and run the project
Methods for creating desktop shortcuts to Web sites vary from browser to browser These procedures explain how to create desktop shortcuts to specific projects for both Mozilla Firefox 3 and Microsoft Internet Explorer 7 Desktop shortcuts to projects include the Apollo Project icon and are titled in the format Project Name ndash Apollo Project
In Firefox 3
1 Open the project you want to create a shortcut to in Firefox
2 Reduce the size of the Firefox window so that the desktop is visible
3 Drag the Site Identification Button onto the desktop
The Site Identification Button is located to the left of the Location Bar and displays the Apollo Project icon
In Internet Explorer 7
1 Open the project you want to create a shortcut to in Internet Explorer
2 Press ALT+F
3 Select Send gt Shortcut to Desktop
344 Closing a Project
1 Click the Close Project button in the Projects bar
Launching a desktop shortcut to a project automatically runs that project It is important to note that once a project is run its settings can no longer be edited It is recommended that desktop shortcuts only be created for Field Archive projects
Firefox is the recommended browser for Apollo Project
Chapter 3 Retrieving Data
28 Apollo Project User Guide16106R5 2009-03-24
345 Copying a Project
1 Select the project name under the Name column on the Existing Projects page
2 Click Copy
3 Enter a unique name for the new project and click OK
4 Click Edit and edit the settings as required
5 Click OK to save the project after you have finished editing the settings
346 Deleting a ProjectWhen you delete a project only files in the temporary folder are deleted All processed data files are not deleted
1 Click the project name under the Name column on the Existing Projects page
2 Click Delete
3 Click OK on the confirmation message
35 Running ProjectsFor all project types you can run a project manually at any time Archive projects can also be defined to run automatically on a schedule
If it is a scheduled Archive Project and the schedule is started click Cancel Schedule before you create a copy of it (If the schedule is not started the Start Schedule button is visible if the schedule is started the Cancel Schedule button replaces the Start Schedule button)
Apollo Project stores intermediate files in a temporary subdirectory of the Base Directory specified for the output location of a project These intermediate files correspond to the actual channel group data retrieved from the Stores referenced by the project If a project is deleted from Apollo Project these temporary files will be removed automatically
Disk space can also be reclaimed by removing these temporary files manually without deleting the project However if the project is run again the output files produced might be incomplete if previously retrieved data from these temporary files is required
For more information on what happens when a project runs see Section A1 ldquoOverview of Running Projectsrdquo on page 37
Chapter 3 Retrieving Data
Apollo Project User Guide16106R5 2009-03-24
29
351 Running a Project1 Open a project
2 Click Run Now on the Summary page to start the project
The project starts running and the Retrieval Status page is displayed
352 Stopping a Project1 Open a project
2 Click Cancel Run on the Summary page to stop the project
3 Click OK on the success message
353 Merging Project Data FilesYou have the option to merge all of the downloaded data for the stations and instruments into one file per interval for each project
1 Open a project
2 Click Merge
A single file is generated for each time period The time period is determined by the file interval you specified on the Time Selection page when you created the project For more information see step 13 of Section 31 ldquoCreating New Projectsrdquo on page 11
The original data files are not modified when you select the option to merge project data files
You can also click Run Now on the Retrieval Status page to start a project
For more information on what happens when a project runs see Section A1 ldquoOverview of Running Projectsrdquo on page 37
You can also click Cancel Run on the Retrieval Status page to stop a project
You cannot merge data from Archive projects and you cannot merge data in the Seisan format
You can also click Merge on the Retrieval Status page to merge the data from a project
Chapter 3 Retrieving Data
30 Apollo Project User Guide16106R5 2009-03-24
354 Running a Scheduled Archive Project1 Open a project
2 Click Start Schedule to start the project schedule
3 Click OK on the confirmation message
4 Click OK on the success message
For a project scheduled to run weekly the project will run for the first time according to the project start time and then it will run on a weekly basis according to the times and days you specified
For a project scheduled to run at a regular interval the project will run according the to interval you specified after you start the schedule For example if you click Start Schedule on a Wednesday and you specified every 2 days as the interval then the project will run for the first time on Friday and every two days after that
3541 Cancelling a Schedule
If you cancel a scheduled project before it runs for the first time you can edit the project settings
If you cancel a project that is currently running the current project runs to completion but subsequent project runs will not occur
1 Open a project
2 Click Cancel Schedule to cancel the project schedule
3 Click OK on the confirmation message
4 Click OK on the success message
You can also click Start Schedule on the Retrieval Status page to start the schedule of a project
You can restart the schedule by opening the project and clicking Start Schedule
You can also click Cancel Schedule on the Retrieval Status page to cancel the schedule of a project
Chapter 3 Retrieving Data
Apollo Project User Guide16106R5 2009-03-24
31
36 Editing and Viewing the Settings of ProjectsYou can edit the settings of a project before it has run After it has run you can view the settings
361 Editing Project Settings1 Open the project
2 Click Edit on the Summary page
3 Edit the settings as required
4 Click OK to save the changes
362 Viewing Project Settings1 Open the project
2 Click View on the Summary page
3 Click the tabs to view the settings
4 Click Cancel when you have finished viewing the settings
You can only edit the settings of a project before it has run for the first time or been scheduled (Archive project) If you want to edit the settings of a project after it has already run once or been scheduled you can copy the project (see Section 345 ldquoCopying a Projectrdquo on page 28) and then edit the settings for the copy
Settings For more information
Store Selection See step 4 of Section 31 ldquoCreating New ProjectsrdquoChannel Group Selection See step 5 to step 12 of Section 31 ldquoCreating New ProjectsrdquoTime Selection See step 13 of Section 31 ldquoCreating New ProjectsrdquoOutput Format See step 15 and step 16 of Section 31 ldquoCreating New ProjectsrdquoOutput Location See step 17 to step 20 of Section 31 ldquoCreating New Projectsrdquo
You can also click Edit on the Retrieval Status page to edit the settings of a project
You can also click View on the Retrieval Status page to edit the settings of a project
Chapter 3 Retrieving Data
32 Apollo Project User Guide16106R5 2009-03-24
37 Monitoring Project StatusYou can monitor the status of a project by viewing information on the Existing Projects Summary and Retrieval Status pages
371 Viewing an Overview of the Status of All ProjectsThe Existing Projects page is the default home page of Apollo Project You see this page when you first open Apollo Project or when you click Projects in the projects bar For more information see Section 341 ldquoViewing Existing Projectsrdquo on page 26
You can view the following information for all projects on the Existing Projects page
bull Name
bull Type
bull Current status
bull Last time the project run
bull Status of data retrieved
The Data Retrieved bars on the Existing Projects page show the overall status of the data retrieval For more information see Section 3731 ldquoStatus Coloursrdquo on page 34
Chapter 3 Retrieving Data
Apollo Project User Guide16106R5 2009-03-24
33
372 Viewing the Status of an Individual ProjectWhen you open a project a detailed summary of the project is shown on the Summary page For more information see Section 342 ldquoOpening a Projectrdquo on page 27
You can view the following information for each project on the Summary page
bull Date it was created
bull Date it was last modified
bull Current status
bull Last time it ran
bull Next time it will run
You can also view a summary of all of the settings you specified when you created the project (Store specifications selected Stores selected time series channel groups selected SOH channel groups start and end times number of files generated file interval and output format and locations)
All times are reported using the UTC time zone
Chapter 3 Retrieving Data
34 Apollo Project User Guide16106R5 2009-03-24
373 Monitoring the Status of a Running ProjectYou can view the data retrieval status of a project while it is running on the Retrieval Status page The Retrieval Status page is displayed automatically when you click Run Now to run a project You can also view this page by opening a project and clicking the Retrieval Status tab
The status for each channel group is expressed in the form of two numbers (for example 60100) and two bar graphs The first number is the percentage available of the total time requested (for example 60) and the second number is the percentage retrieved of the time available (for example 100) For more information on the bar graph status colours see Section 3731 ldquoStatus Coloursrdquo on page 34
You can also view retrieval details for each channel group listed on the Retrieval Status page For more information see Section 3732 ldquoViewing the Retrieval Details for Each Channel Grouprdquo on page 35
3731 Status Colours
The data retrieval status bars use the following status colours
The information that is displayed on the Retrieval Status page is updated continuously while a project is running
Table 3-1 Status colours
Colour Status
Green Apollo Project has retrieved the data
Yellow Apollo Project is attempting to retrieve available data from the Store
Red Data is available in the Store but Apollo Project has failed to retrieve it on this attempt Apollo Project will make additional attempts to retrieve the data up to the configured Maximum Number of Retrieval Attempts For information on how to set the Maximum Number of Retrieval Attempts setting see Section 31 ldquoCreating New Projectsrdquo on page 11
White Data for some portion of the requested time segment is not available in the Store For example there are gaps in the data or the retrieval request is for a future time segment
Chapter 3 Retrieving Data
Apollo Project User Guide16106R5 2009-03-24
35
3732 Viewing the Retrieval Details for Each Channel Group
You can view the retrieval status of each time segment for a channel group
1 Click a channel group name
2 Click the Channel Group Details button that is located to the right of the channel group name
The Remaining Retrieval Attempts column displays the number of times that Apollo Project will try to download each missing time segment for the channel group when the project is run again For information on how to set the Maximum Number of Retrieval Attempts setting see Section 33 ldquoConfiguring Apollo Projectrdquo on page 24
3 Click OK when you have finished viewing the details
Chapter 3 Retrieving Data
36 Apollo Project User Guide16106R5 2009-03-24
Apollo Project User Guide16106R5 2009-03-24
37
Appendix A Reference Information and Examples
Overview of Running Projects
Example Project Settings
Example Deployment Scenarios
Shot File Formats for Controlled Source Projects
A1 Overview of Running ProjectsWhen a project is run Apollo Project performs the following steps
1 The requested time ranges are identified
2 The channel groups for which data are to be retrieved are identified
3 The actual Stores specified by the Store specifications of the project are identified
For each identified Store the following steps are performed
1 A data availability analysis for the outstanding time ranges is performed These are for the ranges for which data has not already been retrieved The availability of the data is recorded for reference It is possible that a given Store was not present at the time the project was last run If this is the case then an attempt is made to retrieve all of the required time ranges of the project from the Store
2 If any data exists in the Store for any of the requested time ranges then a retrieval of this data is performed and the retrieved data is stored to local temporary files
3 If the number of retrieval attempts for a given time range exceeds a configurable threshold (see Section 33 ldquoConfiguring Apollo Projectrdquo on page 24) then the retrieval of data within the stated range is not attempted again
If any data was retrieved during the run of the project then the corresponding output files of the desired output format are generated and stored in the output location specified for the project
When running Apollo Project with Taurus version 2x the schedule for Archive projects must be greater than 5 minutes in duration Schedules that are less than 5 minutes can result in data that is missing or not downloaded
Appendix A Reference Information and Examples
38 Apollo Project User Guide16106R5 2009-03-24
It is possible that the requested data for a given channel group exists across multiple Stores If all of these Stores are included by the Store specifications for the project then Apollo Project assembles the requested data
When a project runs detailed information regarding the results of the retrieved data and processed data are available For more information see Section 37 ldquoMonitoring Project Statusrdquo on page 32
A2 Example Project Settings
A21 Example 1 One Time ProjectProject Name Project1
Project Type One Time
Channel groups selected for retrieval CASTN1OTBHZ (on taurus_1234)
Requested Time Range January 30 2008 1400 ndash 1500 UTC
File Interval 20 minutes
Output Location Base Directory disk2ApolloProjectOutputData
Output Location Subdirectories projectyearmonthday
Output Location Filenamestationnetwork_time
When the project is run successfully the following output files will be created on the server running Apollo Project
disk2ApolloProjectOutputDataProject120080130STN1CA_20080130_140000seed
disk2ApolloProjectOutputDataProject120080130STN1CA_20080130_142000seed
disk2ApolloProjectOutputDataProject120080130STN1CA_20080130_144000seed
Appendix A Reference Information and Examples
Apollo Project User Guide16106R5 2009-03-24
39
A22 Example 2 Controlled Source ProjectProject Name Project2
Project Type Controlled Source
Channel groups selected for retrieval CASTN1OTBHZ (on taurus_1234) CASTN1OTBHN (on taurus_1234)
Requested Shot Times January 30 2008 1400 UTC January 30 2008 1430 UTC
Pre Time 30 seconds
Post Time 30 seconds
Output Location Base Directory disk2ApolloProjectOutputData
Output Location Subdirectories projectyearmonthday
Output Location Filename timeformat
When the project is run successfully the following output files will be created on the server running Apollo Project
disk2ApolloProjectOutputDataProject22008013020080130_135930segysgy
disk2ApolloProjectOutputDataProject22008013020080130_142930segysgy
A3 Example Deployment Scenarios
A31 One TimeYou want to download three days of data from multiple instruments on the network save the data in MiniSEED format and create a file for every hour of data
A One Time project is the recommended solution The Store of each instrument can be made available to Apollo Project by creating a corresponding IP Address Store specification with the IP address of the instrument The requested time range can be specified along with a file interval of one hour Ensure that the instruments are configured to run in Communications mode
A32 Scheduled ArchiveYou want seismic data to be retrieved automatically from a group of instruments on the network every six hours The instruments are always accessible via an Ethernet connection
A scheduled Archive project is the recommended solution Use the Regular Interval scheduling option and set the interval to six hours
You can also run a scheduled Archive project at any time For example if the scheduled retrieval interval of a project is six hours and between intervals you want to retrieve the data three hours early you can run the project and approximately three additional hours of data would be accumulated About three hours later the project will run automatically and accumulate the remaining three hours of data
Appendix A Reference Information and Examples
40 Apollo Project User Guide16106R5 2009-03-24
A33 Manual ArchiveYou want to retrieve seismic data from a group of instruments but their respective Stores are only available for retrieval on occasion (no regular dependable schedule for retrieval from these Stores is possible)
A manually run Archive project is the recommended solution You can create the project and run it whenever any of the instruments are available for retrieval
A34 Field ArchiveYou want to collect data from a set of isolated instruments in the field at recurring intervals (for example twice per month)
A Field Archive project is the recommended solution You can create a Field Archive project and either add all instrument IP addresses to the list or use a Discovery specification The time for the last retrieval is stored on the instrument and all data is recovered from the last recovery time
A35 Media HarvestingYou want to collect the media from a set of instruments in the field at a regular interval (for example once per week) You also have to retrieve all of the seismic data on the media for subsequent analysis
An Archive project is the recommended solution Initially a directory is created on the file system of the server running Apollo Project A directory Store specification is created with this directory as the parent directory from which to search for Stores The content of each media instance in the weekrsquos collection is copied from a media reader to a subdirectory of the directory When the project is run all of the copied Stores are automatically available and the project accumulates data for each instrument
Due to the nature of media harvesting and the replacement procedure for this example data is always missing for the last period of output files for the current week This period corresponds to the time that the media was taken from the instrument and replaced with a new one The following week when the media is harvested again from the instruments in the field Apollo Project fills in the missing time for these files with the new Store data regardless of the media instance on which the data currently resides
You can only create and run Field Archive projects for Taurus version 30 or later
Appendix A Reference Information and Examples
Apollo Project User Guide16106R5 2009-03-24
41
A36 Trigger Downloading You have set up a network of five Tauruses around a hydro dam Each Taurus is accessible over an Ethernet connection and each is set to record data over the weekend You have set the period for data retrieval at 30 seconds before and five minutes after any seismic activity but the following procedure shows you why it is not necessary to view all of the data accumulated over the whole weekend
1 Select the Taurus at the site with the least environmental noise or determine the best site for generating triggers and designate this Taurus ldquoTaurus Ardquo for reference
You need to perform this task in advance More information about triggers can be found in the Taurus Portable Seismograph User Guide
2 Download the trigger file from ldquoTaurus Ardquo and review the file to verify the correct number of triggers
3 Follow these steps to create a new Triggers project
a) Click New on the Apollo Project Existing Projects page
b) Click Triggers as the project type and enter a unique name in the Project Name box
c) Click OK
d) Click the IP Address tab on the Store Selection tab
e) Enter the IP address of a Taurus
f) Click Add
g) Repeat step e until you have entered the IP addresses of all five of the Tauruses
Apollo Project adds the IP address specifications to the Selected Specifications section of the Store Selection page and finds all five Stores associated with the IP addresses and adds them to the Selected Stores section
h) Click the Channel Group Selection tab
i) Click Create Default Station Table to create a table for all of the currently selected Stores and discovered instruments
j) Review the selected channel groups and if required edit the mappings in the selected channel groups area of the tab (lower half of the tab)
k) Click the Time Selection tab
l) Click the Browse button
m)Select the trigger file that you downloaded in step 2 and click OK
n) Click Submit
The list of triggers is imported and displayed in the Triggers section on the Time Selection page
o) Enter a Pre Time of 30 seconds and a Post Time of 5 minutes
p) Click the Output Format tab
q) Click MiniSEED
r) Click All Instruments
s) Click the Output Location tab
Appendix A Reference Information and Examples
42 Apollo Project User Guide16106R5 2009-03-24
t) Enter the valid absolute path of the base directory for the processed data subfolders and files
u) Enter the expression used to define path names for subfolders under the base directory
v) Enter the expression used to define file names for the processed data files that are stored in the subfolders under the base directory
w) Click OK
4 Click the Run Now button on the Summary page
When the project has finished running the output folder you specified in step t will contain ten files Each output file will contain 5 minutes and 30 seconds of data from the five Tauruses
A4 Shot File Formats for Controlled Source ProjectsYou have two options for defining shots for a Controlled Source project manually defining shots or importing shots from a shot file
You can create shot files in one of following three file formats
Microsoft Office Excel (xls) ndash See Section A41 ldquoCreating a Shot File With Microsoft Office Excelrdquo on page 42
OpenOfficeorg Calc (ods) ndash See Section A42 ldquoCreating a Shot File With OpenOfficeorg Calcrdquo on page 44
Comma-Separated Values (csv) ndash See Section A43 ldquoCreating a Comma-Separated Values Shot Filerdquo on page 45
The Shot file templates are located in the docShotFileImport folder on the Apollo Project CD
A41 Creating a Shot File With Microsoft Office ExcelThe Microsoft Office Excel template for Apollo Project can be used with Microsoft Office Excel version 2003 or later
To create an Microsoft Office Excel based shot file
1 Double-click ShotFileTemplatexlt
A new Microsoft Office Excel file is created from the template and opens in the Microsoft Office Excel
2 Save the new spreadsheet as a Microsoft Office Excel document (xls)
3 Enter shot file data as specified in the Microsoft Office Excel spreadsheet
Only the decimal separator is supported for shot files Separators that denote the 3rd power of 10 (thousand) are not supported (for example 4500) The Microsoft Excel and OpenOffice templates reinforce these restrictions and are recommended for creating csv files
Appendix A Reference Information and Examples
Apollo Project User Guide16106R5 2009-03-24
43
You can enter data for multiple shot times
4 Click Save to save the file in Microsoft Office Excel format
5 Click File gt Save As and select CSV (Comma delimited) (csv) from the Save as type list
6 Click Save
7 Click OK on the message warning you that you are only saving the active sheet
8 Click Yes on the message warning you that file features might be incompatible with the csv format
9 Close Microsoft Office Excel
If you are using Microsoft Office Excel 2007 click the Microsoft Office Button and click Save As
Ensure that you save the file as a comma delimited file If the shot file is mistakenly saved in Microsoft Excel format (xls) the shot file will not work in Apollo Project
Appendix A Reference Information and Examples
44 Apollo Project User Guide16106R5 2009-03-24
A42 Creating a Shot File With OpenOfficeorg CalcThe OpenOffice template has been tested with OpenOfficeorg Calc version 23 Later versions of OpenOfficeorg Calc can be used at your discretion
To create a shot file based on the OpenOfficeorg Calc template
1 Double-click ShotFileTemplateots
A new OpenOffice spreadsheet is created from the template and opens in OpenOfficeorg Calc
2 Save the new spreadsheet as an OpenOffice Calc document (ods)
3 Enter the shot file data as specified in the OpenOffice spreadsheet
You can enter data for multiple shot times
4 Click Save to save the file in OpenOfficeorg Calc format
5 Click File gt Save As and select Text CSV (csv) from the Save as Type list
6 Select the Edit filter settings check box
7 Click Save
A warning message might appear that warns you that the document might contain formatting that cannot be saved in the csv format Click Yes on the warning message to save the file in csv format
The Export of text files window opens
8 Delete the double quotation marks () in the Text delimiter box and ensure that the Save cell content as shown check box is selected
9 Click OK to export the OpenOffice spreadsheet as a csv file
10 Click OK on the warning message
11 Close OpenOfficeorg Calc
Appendix A Reference Information and Examples
Apollo Project User Guide16106R5 2009-03-24
45
A43 Creating a Comma-Separated Values Shot FileYou can use any text editor to create a csv shot file
To create a csv shot file
1 Open ShotFileTemplatecsv in a text editor and save it with a different name
2 Format each line of the csv file as follows
Shot TimePre TimePost TimeLatitudeLongitudeElevation
For example
2008-08-28 103044090600000-6000004267
The format and units are as follows
3 Save the file as a csv formatted file
The csv shot file template is not compatible with Microsoft Office Excel Make sure that you do not double-click it and open it in Microsoft Office Excel
FormatUnits
Shot Time yyyy-mm-dd hhmmss
Pre Time seconds
Post Time seconds
Latitude degrees
Longitude degrees
Elevation meters
Appendix A Reference Information and Examples
46 Apollo Project User Guide16106R5 2009-03-24
Apollo Project User Guide16106R5 2009-03-24
47
Appendix B Retrieving SOH Data from a Taurus Version 2x
Taurus Version 2x SOH Data Retrieved by Apollo Project
Retrieving SOH Data from a Taurus Version 2x Streaming to Apollo Server
B1 Taurus Version 2x SOH Data Retrieved by Apollo Project This section presents the predefined datasets of SOH data Apollo Project will retrieve from a Taurus version 2x either through a direct connection or a stream to Apollo Server For instruction on retrieving streaming Taurus version 2x data from Apollo Server see Section B2 ldquoRetrieving SOH Data from a Taurus Version 2x Streaming to Apollo Serverrdquo on page 48
The order of the columns presented in the table below will differ when streaming Taurus version 2x SOH data from Apollo Server
Predefined SOH group SOH data
GPS Time Time (longsecs) (the number of seconds since 1970-01-01)Time (UTC) (time in yyyy-mm-dd hhmmssms format)Altitude (m)DAC CountError (ns) (time error)GPS Engine StatusLast Update Time(s)Lat (deg) (latitude in degrees)Long (deg) (longitude in degrees)NumSatellites (number of satellites used)PDOPPhaseLock (system clock phase lock)TDOPUncertainty (ns) (time uncertainty)
Note The values for Number of satellites used PDOP and TDOP are provided by the GPS receiver at the Last update time In order to see what time these values correspond to look at the Last update time When GPS is off these three parameters and the Last update time are not updated The last value displays until the next update arrives (after the GPS is turned on again)
Appendix B Retrieving SOH Data from a Taurus Version 2x
48 Apollo Project User Guide16106R5 2009-03-24
B2 Retrieving SOH Data from a Taurus Version 2x Streaming to Apollo ServerThis section provides instruction on configuring your Taurus version 2x to stream data to Apollo Server and instructions on how to use Apollo Project to retrieve this data from Apollo Server
B21 Streaming Data from a Taurus Version 2x to Apollo ServerUse the Taurus graphical user interface on either the Taurus display screen or through a Web browser to set up an NP stream from a Taurus version 2x to Apollo Server
1 Log in to the Taurus version 2x with either the tech or central user account
2 Select Advanced Configuration gt Communications gt NP Data Streaming
GPS Satellites Time (longsecs) (the number of seconds since 1970-01-01)Time (UTC) (time in yyyy-mm-dd hhmmssms format)
For each satelliteAcquisition FlagLast Update Time (ms)PRNSatellite Azimuth (microordm)Satellite Elevation (microordm)Signal Level (AMU)
Environment Time (longsecs) (the number of seconds since 1970-01-01)Time (UTC) (time in yyyy-mm-dd hhmmssms format)External SOH Voltage 1 (V) (12-bit voltage input) External SOH Voltage 2 (V) (12-bit voltage input) External SOH Voltage 3 (V) (12-bit voltage input) External SOH Voltage 4 (V) (12-bit voltage input) Sensor SOH Voltage 1 (V)Sensor SOH Voltage 2 (V)Sensor SOH Voltage 3 (V)
Instrument Time (longsecs) (the number of seconds since 1970-01-01)Time (UTC) (time in yyyy-mm-dd hhmmssms format)Controller Current (mA)Digitizer Current (mA)NMX Bus Current (mA) (external connector)Sensor Current (mA)Serial Port Current (mA)Supply Voltage (mV)Temperature (ordmC)
Predefined SOH group SOH data
Appendix B Retrieving SOH Data from a Taurus Version 2x
Apollo Project User Guide16106R5 2009-03-24
49
3 To have the Taurus stream both time series and SOH data to Apollo Server select both Stream Time Series and Stream SOH
-OR-
Select only Stream SOH if you only want to retrieve the SOH data from Apollo Server
4 Type the IP address for Apollo Server in the IP Address box
5 Type the port number Apollo Server uses to receive data in the Port box By default this is port number 32008
6 The Second IP Address and Second Port boxes are not necessary however cannot be left blank Type 127001 in the Second IP Address box and 32004 in the Second Port box
7 Type a value in the Maximum Throughput [bps] box if a limited data link is present between the Taurus and Apollo Server For instance if at some point the data link is limited to 9600 bps then this is the maximum throughput the link can allow If there are no throughput limitations set the value in this box to zero to disable the throughput limitation
8 Click Apply
9 Click Commit
B22 Retrieving Taurus Version 2x Data from Apollo ServerCreate a new project or use an existing project in Apollo Project to retrieve the Taurus version 2x data from Apollo Server For more information on creating or editing projects refer to Section 31 ldquoCreating New Projectsrdquo on page 11 and Section 36 ldquoEditing and Viewing the Settings of Projectsrdquo on page 31
When creating or editing the project
a) Add an IP address Store specification on the Store Selection tab (see step 4 in Section 31 ldquoCreating New Projectsrdquo) for Apollo Server including its client Web application port number Use the format
Apollo Server IP AddressApollo Server Client Web Application Port Number
b) Apply the appropriate filters on the Channel Group Selection tab to retrieve the desired channel groups from the Taurus version 2x See step 5 through step 12 in Section 31 ldquoCreating New Projectsrdquo for instruction on using the Channel Group Selection tab
Appendix B Retrieving SOH Data from a Taurus Version 2x
50 Apollo Project User Guide16106R5 2009-03-24
Apollo Project User Guide16106R5 2009-03-24
51
Appendix C Glossary
Glossary of Abbreviations and Terms
List of Unit Abbreviations and Symbols
C1 Glossary of Abbreviations and Terms
A
ASCIIAmerican Standard Code for Information Interchange
B
BHEBroad Band High Gain Seismometer East-West Orientation
Channel name based on the Global Seismological Network (GSN) standard
BHNBroad Band High Gain Seismometer North-South Orientation
Channel name based on the Global Seismological Network (GSN) standard
BHZBroad Band High Gain Seismometer Vertical Orientation
Channel name based on the Global Seismological Network (GSN) standard
Appendix C Glossary
52 Apollo Project User Guide16106R5 2009-03-24
C
CSVComma-Separated Values
D
DACDigital to Analog Converter
G
GPSGlobal Positioning System
J
JREJava Runtime Environment
JVMJava Virtual Machine
N
NFSNetwork File System
P
PDOPPosition Dilution of Precision
PRNPseudo-random Number
Appendix C Glossary
Apollo Project User Guide16106R5 2009-03-24
53
S
SACSeismic Analysis Code
An Apollo Project output file format that generates files that can be used by the SAC software (see http wwwirisedusoftwaresac)
SEEDStandard for the Exchange of Earthquake Data
SMBServer Message Block
SOHState of Health
T
TCPIPTransmission Control ProtocolInternet Protocol
TDOPTime Dilution of Precision
U
UNCUniform Naming Convention or Universal Naming Convention
URLUniform Resource Locator
UTCCoordinated Universal Time
Appendix C Glossary
54 Apollo Project User Guide16106R5 2009-03-24
C2 List of Unit Abbreviations and SymbolsTable C-1 provides a list of unit abbreviations and symbols commonly used in Nanometrics documentation
Table C-1 Unit abbreviations and symbols
Abbreviation or Symbol Definition Abbreviation
or Symbol Definition
deg degree lb pound
Oslash diameter m metre
micro micro ms metre per second
Ω ohm ms2 metre per second squared
A ampere mA milliampere
AC alternating current MB megabyte
b bit MΩ megaohm
B byte MHz megahertz
bps bits per second mi mile
C Celsius mL millilitre
cm centimetre mm millimetre
dB decibel ms millisecond
DC direct current MTU maximum transmission unit
F farad mV millivolt
ft foot mW milliwatt
g gram N Newton
g gravity nF nanofarad
GB gigabyte ns nanosecond
GHz gigahertz rad radian
Hz hertz rads radian per second
in inch s second
KB kilobyte sps samples per second
kg kilogram U rack unit
kHz kilohertz V volt
kΩ kiloohm Vpp Volts peak-to-peak
kW kilowatt W watt
L litre
Apollo Project User Guide16106R5 2009-03-24
55
About NanometricsNanometrics is a world leader in the development of precision instrumentation network technology and software applications for seismological and environmental studies Using Nanometrics technology our customers establish and grow research networks that are often located in extreme environments such as the frozen Arctic and Antarctic the arid deserts of the Middle East the jungles of South America and the depths of the worlds oceans Many of these are mission-critical national and regional networks that demand the highest possible data quality and availability
Nanometrics provides end-to-end solutions that include a growing portfolio of broadband and strong motion seismometers dataloggers and digitizers satellite ground station systems for remote site data collection and software applications for data and network analysis and management To support this portfolio Nanometrics also provides global systems engineering services for design installation and support of complete networks
Our head office research and development centre and production facility are located in the Kanata North Business Park of Ottawa the high-technology heart of Canadas capital region
Contacting NanometricsNanometrics Inc250 Herzberg RoadKanata Ontario Canada K2K 2A1Phone +1 613-592-6776Fax +1 613-592-5929Email infonanometricscaWeb wwwnanometricsca
Contacting Technical SupportIf you need technical support please submit a request on the Nanometrics technical support site or by email or fax Include a full explanation of the problem and related information such as log filesSupport site httpsupportnanometricsca
Email techsupportnanometricsca
Chapter 3 Retrieving Data
Apollo Project User Guide16106R5 2009-03-24
13
Discovery A discovery Store specification specifies the Stores of multiple instruments In this case a class D (multicast) IP address and port is specified It is assumed that the Store of any instrument in communications mode is accessible from the LAN of the Apollo Project server When Discovery is enabled for the specified IP address and port these attributes are included upon running the project
1 Click the Discovery tab2 Enter the multicast address and port number of a group of instruments
For example 224199711386776Multicast addresses range from 224000 through 239255255255
3 Click AddApollo Project adds the specification to the Selected Specifications section of the Store Selection page and finds all Stores associated with the multicast address and adds them to the Selected Stores section of the Store Selection page
Notes When multiple multicast groups are used for discovery the port number must differ from existing discovery port numbers by 2 for each discovery port number in use x there must be no other discovery port configured for use with a value of x or x+1For example the default discovery multicast group used by Taurus is 224199711386776 To add another multicast group you have to specify a different port number (which cannot be 6776 or 6777)
Recent Specs
Apollo Project keeps the 16 most recently defined Store specifications and groups them by category on the Recent Specs page
1 Click the Recent Specs tab2 Expand a specification category (File Directory IP Address or Discovery)
and select a specification3 Click Add
Apollo Project adds the specification to the Selected Specifications section of the Store Selection page and finds all Stores associated with the specification and adds them to the Selected Stores section
Each time a project is run Apollo Project generates a list of available Stores based on the selected Store specifications The actual Stores from which data is retrieved can vary on successive project runs For example a discovery Store specification might result in a different number of instruments being included depending on current access to the instruments
Remove a specification (and its associated Stores) by selecting it and clicking Remove Remove all specifications (and all Stores) by clicking Remove All You cannot remove individual Stores from a specification but you can add a different specification and select a different group of Stores Alternatively you can use channel group attributes filtering to select the channel groups that data is retrieved from
When copying a Store from an instrument to your local computer do not overwrite an existing Store Instead delete the existing Store or move it to a different folder on the computer Stores are made up of multiple volumes and if the new Store has fewer volumes than the old Store you could see some unpredictable results with Apollo Project
Store type DescriptionSteps
Chapter 3 Retrieving Data
14 Apollo Project User Guide16106R5 2009-03-24
5 Click the Channel Group Selection tab
6 If you defined a default station table file and want to use it for this project go to step 7
For more information see Section 32 ldquoCreating a Station Table Filerdquo on page 22
-OR-
Click Create Default Station Table to create a table for all of the currently selected Stores and discovered instruments for this project using the default settings for the network name location and channel names
The default settings for the network name location and channel names are defined in the Behaviour and Defaults dialog box For more information see Section 33 ldquoConfiguring Apollo Projectrdquo on page 24
-OR-
Enter the path and file name of a station table for this project
7 If you want to download all data from all available Stores verify that the Retrieve data from all channel groups (do not filter) check box is selected and go to step 12
-OR-
If you want to filter the data by specific channel groups and channel group attributes go to step 8
8 Clear the Retrieve data from all channel groups (do not filter) check box
9 Select the time series channel groups you want to download data from
A station table is used to assign names to all of the selected channel groups For more information see Section 32 ldquoCreating a Station Table Filerdquo on page 22
If new Stores are found after a station table file has been defined for a project (for example as a result of Discovery or a directory specification) the default channel group names are used in the output files and no filtering is applied to the channel groups
If the text ldquoSelected Time Series Channels x of xrdquo where x represents the number of channels is red you have selected more time series channels than your licence permits You must select a valid number of time series channels (for the unlicenced version of Apollo Project there is a maximum of three time series channels) before you can create your project
Chapter 3 Retrieving Data
Apollo Project User Guide16106R5 2009-03-24
15
10 Select the state of health (SOH) channel groups you want to download data from Each group has a predefined dataset
To view the SOH data retrieved from a Taurus version 2x see Appendix B ldquoRetrieving SOH Data from a Taurus Version 2xrdquo
Predefined SOH group SOH data
GPS Time Time (longsecs) (the number of seconds since 1970-01-01)Time (UTC) (time in yyyy-mm-dd hhmmssms format)DAC CountGPS Engine StatusGPS Last Update Time(s)GPS PDOPGPS Satellites Used (number of satellites used)GPS TDOP Lat (deg) (latitude in degrees)Long (deg) (longitude in degrees)Timing Error (ns)Timing Phase Lock (system clock phase lock)Timing Uncertainty (ns)
Note The values for Number of satellites used PDOP and TDOP are provided by the GPS receiver at the Last update time In order to see what time these values correspond to look at the Last update time When GPS is off these three parameters and the Last update time are not updated The last value displays until the next update arrives (after the GPS is turned on again)
GPS Satellites Time (longsecs) (the number of seconds since 1970-01-01)Time (UTC) (time in yyyy-mm-dd hhmmssms format)
For each satelliteGPS Satellite Acquisition FlagGPS Satellite Azimuth (microordm)GPS Satellite Elevation (microordm)GPS Satellite Last Update Time (ms)GPS Satellite PRN GPS Satellite Signal Level (AMU)
Environment Time (longsecs) (the number of seconds since 1970-01-01)Time (UTC) (time in yyyy-mm-dd hhmmssms format)External SOH Voltage 1 (V) (12-bit voltage input)External SOH Voltage 2 (V) (12-bit voltage input)External SOH Voltage 3 (V) (12-bit voltage input)External SOH Voltage 4 (V) (12-bit voltage input)Sensor SOH Voltage 1 (V)Sensor SOH Voltage 2 (V)Sensor SOH Voltage 3 (V)
Chapter 3 Retrieving Data
16 Apollo Project User Guide16106R5 2009-03-24
11 If required enter additional filter information as comma-delimited text into the Network Station Location Channel and Instrument boxes
You can use an asterisk ()to represent 1 or more characters
12 Review the selected channel groups and if required edit the channel group mappings in the selected channel groups area of the tab
Channel groups that do not have a mapping appear as blanks in the selected channel groups area of the tab Mapping information for these channel groups can be entered and saved in the station table file for future projects
You can edit the mappings at any time The changes are reflected in future runs of any project using that same station table file For more information see Section 32 ldquoCreating a Station Table Filerdquo on page 22
13 Click the Time Selection tab and follow the steps for the project type you selected
Instrument Time (longsecs) (the number of seconds since 1970-01-01)Time (UTC) (time in yyyy-mm-dd hhmmssms format)Controller Current (mA)Digitizer Current (mA)NMX Bus Current (mA) (external connector)Sensor Current (mA)Serial Port Current (mA)Supply Voltage (mV)Temperature (ordmC)
Look in the selected channel groups area of the tab (lower half of the tab) for examples of filter details you can enter in the Network Station Location Channel and Instrument ID filter boxes
The NetworkStationLocationChannel column of the table presents information in the format implied by the column title For instance in an entry of XXA099901BHE(1) XX represents the network(2) A0999 represents the station(3) 01 represents the location(4) BHE represents the channel
Look at the Instrument ID column of the table for an example of an instrument name and serial number such as taurus_0999
Only mappings that are applicable for the selected channel groups appear in the selected channel groups area of the tab
All times use the UTC time zone
Predefined SOH group SOH data
Chapter 3 Retrieving Data
Apollo Project User Guide16106R5 2009-03-24
17
Project type DescriptionSteps
Archive Archive projects attempt to retrieve data up to the current timeThe time ranges for which output files will be produced are driven from the file interval and are aligned to the project start time It is therefore unlikely that the ldquomost recentrdquo file interval will align with the current time Therefore the most recent range for which data retrieval is attempted will have a portion of its data retrieved and the remainder (for future retrieval) will be declared unavailable However when the project is run later (after the end of the particular time range) the unavailable data will normally be retrieved and the situation will likely repeat itself with the ldquonewrdquo last range to retrieveTo run an Archive project manually1 If required edit the start time for the project2 Click Manual3 Specify the file interval
For example if you specify 2 hours then one file is created every 2 hours If the duration for the project is one day then a total of 12 files will be created
4 After you have finished creating the project click Run Now on the Summary page to run the project
To schedule an Archive project to run automatically at a regular interval1 Click Regular Interval and select the interval 2 Specify the file interval
For example if you specify 2 hours then one file is created every 2 hours If the duration for the project is one day then a total of 12 files will be created
3 After you have finished creating the project click Start Schedule on the Summary page to start the schedule for the project and click OK twice The project will run according to the interval you specified after you start the schedule For example if you click Start Schedule on a Wednesday and you specified every 2 days as the interval then the project will run for the first time on Friday and every two days after that If the computer has been rebooted and the Apollo Project Web server has been restarted the project will run according to the interval you specified after the computer has rebooted For example if the computer reboots on a Wednesday and you specified every 2 days as the interval then the project will run for the next time on Friday and every two days after that
Note Archive projects that are defined as scheduled projects can also be run manually at any timeTo schedule an Archive project to run automatically on a weekly basis1 If required edit the start time for the project2 Click Weekly Schedule and select the time and days of the week 3 Specify the file interval
For example if you specify 2 hours then one file is created every 2 hours If the duration for the project is one day then a total of 12 files will be created
4 After you have finished creating the project click Start Schedule on the Summary page to start the schedule for the project and click OK twice After you have finished creating the project the project will run for the first time according to the project start time and then it will run on a weekly basis according to the times and days you specified
Note Archive projects that are defined as scheduled projects can also be run manually at any time
Chapter 3 Retrieving Data
18 Apollo Project User Guide16106R5 2009-03-24
One Time A One Time project retrieves a single time segmentTo specify the start and end times for a One Time project1 If required edit the start time for the project2 Click End Time and enter an end time
-OR-Click Duration and specify the duration of the project The duration is the length of the requested time segment
3 Specify the file intervalFor example if you specify 2 hours then one file is created every 2 hours If the duration for the project is one day then a total of 12 files will be created
4 After you have finished creating the project click Run Now on the Summary page to run the project
Controlled Source
A Controlled Source project retrieves data specified as a set of individually entered shots and outputs the data in SEGY format To specify shots using a shots file1 Click Browse select a shots file and click OK2 Click Submit
The list of shots is imported and displayed in the Shot List section on the Time Selection page
Note For more information see Section A4 ldquoShot File Formats for Controlled Source Projectsrdquo on page 42To manually define shots1 Enter a shot time2 If required enter the latitude longitude and elevation3 If required select the pre-shot time period4 Select the post-shot time period5 Click Add
The shot is added to the Shot List section on the Time Selection page Triggers A Triggers project uses a CSV-formatted trigger list to specify the data to be
retrieved for example a trigger file that has been downloaded from a Taurus to the local computerTo define triggers1 Click Browse select a CSV triggers file and click OK2 Click Submit
The list of triggers is imported and displayed in the Triggers section on the Time Selection page
3 Select the pre-trigger and post-trigger time periodsThe pre-trigger and post-trigger time periods are used for all of the triggers
Project type DescriptionSteps
Chapter 3 Retrieving Data
Apollo Project User Guide16106R5 2009-03-24
19
14 If you selected a Controlled Source as the project type in step 2 go to step 17
You do not have to select an output format for a Controlled Source project because the output format for a Controlled Source project is always SEGY one output file is generated for all instruments and the stations are sorted by StationNameNetworkName
-OR-
If you selected one of the other project types go to step 15 to select an output format
15 Click the Output Format tab
Field Archive A Field Archive project is used for recurring data retrievals that occur at specified intervals The time of the last retrieval is stored on the instrumentTo define the start time and file interval1 If required edit the start time for the project2 Specify the file interval
For example if you specify 2 hours then one file is created every 2 hours3 If you want partial files retrieved select the Include last interval even if
incomplete check box You should only select this option when the retrieval of partial files is more important than retrieving the data for the current interval during a future project run
Be careful when specifying the file interval For example retrieving many hours or days of data and specifying a file interval of seconds or minutes could result in the generation of many files This is not only very resource intensive but could result in a data management problem as well
Project type DescriptionSteps
Chapter 3 Retrieving Data
20 Apollo Project User Guide16106R5 2009-03-24
16 Perform the following steps to select an output format
Output format Steps
MiniSEED 1 Click MiniSEED2 Click Per channel group to generate one output file per channel group
You must add the channel token to the Subdirectories or Filename box on the Output Location tab when choosing Per channel group-OR-Click Per instrument to generate one output file per instrument-OR-Click All Instruments to generate one output file for all instruments
3 Select the Sort check box if you want the output data sorted by timeData is put in a Store in the order received and this order may not always be chronological To ensure that the data in the resulting SEED file is chronological select Sort
4 Select the data record sizeThe default record size is 512 B However not all SEED file readers will support this file size Determine what your SEED reader supports and select an appropriate value The options are 512 B 1024 B 2048 B and 4096 B Note that a smaller record size will result in quicker SEED file output
Note The number of output files is determined by the file interval that you set on the Time Selection page
SAC 1 Click SACYou must add the channel token to the Subdirectories or Filename box on the Output Location tab when choosing SAC as the output format
NotesThere are two types of SAC files binary and ASCII Apollo Project only outputs binary SAC filesOne output file per channel group is generated
SEGY 1 Click SEGY2 Click Per channel group to generate one output file per channel group
You must add the channel token to the Subdirectories or Filename box on the Output Location tab when choosing Per channel group-OR-Click Per instrument to generate one output file per instrument-OR-Click All Instruments to generate one output file for all instruments
3 Select the Sort check box if you want the stations sorted by StationNameNetworkName
NotesAll stations must have the same sample rateThe maximum number of samples per trace is 32767SEGY trace headers from discovered instruments will not have station location information
Chapter 3 Retrieving Data
Apollo Project User Guide16106R5 2009-03-24
21
17 Click the Output Location tab
18 If you defined a default base directory when you configured Apollo Project and want to use it for this project go to step 21
For more information see Section 33 ldquoConfiguring Apollo Projectrdquo on page 24
-OR-
Enter the valid absolute path of the base directory for the processed data subdirectories and files
If the base directory you entered does not exist click Create to create it
19 If you defined a default expression for subdirectories when you configured Apollo Project and want to use it for this project go to step 21
For more information see Section 33 ldquoConfiguring Apollo Projectrdquo on page 24
-OR-
Enter the expression used to define path names for subfolders under the base directory
You can enter tokens in any order including any additional characters that are valid for paths
Seisan 1 Click Seisan
NotesYou must have Seisan installed on your computer with a WAVEFORM_BASE and CONT_BASE line included for each station in the DATSEISANDEF file You must define a SEISAN_TOP environment variableOne output file per channel group is generated
Regardless of the output format selected SOH channel group data is always output in CSV format
The Base Directory is the root of all data retrieved for the project and can be defined at any location in the file system of the server running Apollo Project including a networked drive on a separate server If you want to create or use a directory on a computer on the network you have to enter the server and share name in a modified UNC format that is prefixed by an additional two backslashes For example the usual fileserver1storefiles must be written as fileserver1storefiles
Large amounts of data can be stored in this location You must ensure that adequate disk space is available
For deployments of Apollo Project where the clients are not running on the server it is recommended that the file system containing the base directory on the server be shared or exported as a networked file system
It is not recommended that you use the channel token in the subdirectories expression if the project includes more than one channel group per instrument (selected on the Channel Group Selection tab) and the output is not per channel group (selected on the Output Format tab)
Output format Steps
Chapter 3 Retrieving Data
22 Apollo Project User Guide16106R5 2009-03-24
20 If you defined a default expression for file names when you configured Apollo Project and want to use it for this project go to step 21
For more information see Section 33 ldquoConfiguring Apollo Projectrdquo on page 24
-OR-
Enter the expression used to define file names for the processed data files that are stored in the subfolders under the base directory
You can enter tokens in any order including any additional characters that are valid for file names
21 Click OK to save the new project
The new project is created and the Summary page is displayed
32 Creating a Station Table FileYou can create a mapping between a given instrumentchannel group (for example taurus_1234digitizertimeSeries1) and a corresponding network station location and channel name These mappings are stored in a station table file and the mapped channel group names are used in the output files
You can create a station table file and use it as the default for all projects or you can create a station table for individual projects
To create a station table file and set is as the default
1 Click the configuration button in the upper right corner
2 Specify the network name location and channel names on the Behaviour and Defaults dialog box and click OK to save the new settings
The settings you enter here are used as the channel names in the station table file You can edit these settings in step 8
For more information on configuring Apollo Project settings see Section 33 ldquoConfiguring Apollo Projectrdquo on page 24
3 Click New on the Apollo Project Existing Projects page
Do not use the channel token in the filename expression if the project includes more than one channel group per instrument (selected on the Channel Group Selection tab) and the output is not per channel group (selected on the Output Format tab)
The Sample Path shows an example of a file name generated using the values for the Base Directory Subdirectories and Filename settings
You can only edit the settings of a project before it has run for the first time or been scheduled (Archive project) If you want to edit the settings of a project after it has already run once or been scheduled you can copy the project (see Section 345 ldquoCopying a Projectrdquo on page 28) and then edit the settings for the copy
It is recommended that you create a station table file and set it as the default for all projects You can update the mappings in this file when new Stores are added or discovered
Chapter 3 Retrieving Data
Apollo Project User Guide16106R5 2009-03-24
23
4 Type Station Table in the Project Name box and click any project type
5 Click OK
6 Click the Store Selection tab and select as many Stores as possible
See step 4 of Section 31 ldquoCreating New Projectsrdquo for information on how to add specifications and select Stores
7 Click the Channel Group Selection tab and click Create Default Station Table
A station table file is created and the name of the file is displayed in the Station Table File Name box
8 Edit the station table channel group mappings in the selected channel groups area of the tab (lower half of the tab) as required
The NetworkStationLocationChannel names will appear in the output files If the Location is empty it is interpreted as the SEED default of two spaces
9 Click OK to close the project and finish creating the station table
10 Click the configuration button in the upper right corner
11 Enter the path and name of the station table file you just created in the Station Table File Name box on the Behaviour and Defaults dialog box
12 Click OK to save the new settings
The station table file you specified will be used as the default for all future projects You can open the Station Table project and edit the station table file if you need to add more Stores or change the mappings
For more information on configuring Apollo Project settings see Section 33 ldquoConfiguring Apollo Projectrdquo on page 24
Make a note of the path of the station table file because you will have to enter it on the Behaviour and Defaults dialog box to set it as the default for all projects
Valid characters for the network station location and channel in the NetworkStationLocationChannel box are upper case letters A to Z numbers 0 to 9 and spaces are also acceptable for the location
Chapter 3 Retrieving Data
24 Apollo Project User Guide16106R5 2009-03-24
33 Configuring Apollo ProjectYou can configure basic settings for Apollo Project and the default settings for new projects The changes you make to the project default settings only apply to new projects
To configure Apollo Project
1 Click the configuration button in the upper right corner
2 Edit the following settings
Setting Description
Log Verbosity The level of detail that is logged by Apollo ProjectThe default setting is Info
Log Location The default name of the Apollo Project log folder Maximum Number of Retrieval Attempts
The maximum number of single retrieval attempt made for all missing time segments on all channel groups every time a project is run Enter an integer from 0 through 1000 The default value is 8
Notes If the Taurus is busy when a retrieval attempt is made the number of remaining retrieval attempts is not decreased by one attemptYou can view the channel group details page to see if there are any remaining retrieval attempts for any channel groups (see Section 373 ldquoMonitoring the Status of a Running Projectrdquo on page 34)
Number Of Retries The number of times Apollo Project attempts to connect to a data source if there is a network connectivity problem Enter an integer from 0 through 1000 The default value is 3
Note Every time a project is run it starts with the maximum number of retries
Retry Interval (secs) The amount of time in seconds that Apollo Project waits before trying to connect to a data source againEnter an integer from 0 through 1000 The default value is 5
Station Table File Name The file name and location of the station table file that is used to assign station names to all of the selected channel groupsA station table is used to assign names to all of the selected channel groups For more information see Section 32 ldquoCreating a Station Table Filerdquo on page 22No station table file is specified by default
Chapter 3 Retrieving Data
Apollo Project User Guide16106R5 2009-03-24
25
Base Directory The folder name and location of the base directory for the processed data subfolders and files Enter any valid folder name and location including any additional characters that are valid for paths The default base directory name is ApolloProject
Notes The Base Directory is the root of all data retrieved for the project and can be defined at any location in the file system of the server running Apollo Project including a shared folder on a different computer If you want to create or use a folder on a computer on the network you have to enter the server and share name in a modified UNC format that is prefixed by an additional two backslashes For example the usual fileserver1storefiles must be written as fileserver1storefilesLarge amounts of data can be stored in this location You must ensure that adequate disk space is availableFor deployments of Apollo Project where the clients are not running on the server it is recommended that the file system containing the base directory on the server be shared or exported as a networked file system
Subdirectories The expression used to define path names for subfolders under the base directoryEnter tokens in any order including any additional characters that are valid for paths The default path name is as follows projectyearmonthday
Filename The expression used to define file names for the processed data files that are stored in the subfolders under the base directoryEnter tokens in any order including any additional characters that are valid for file names The default filename is as follows instrument_time
Sample Path An example of a file name generated using the values for the Base Directory Subdirectories and Filename settings
Network Name A standard network codeEnter any two upper case letters or numbers The default code is XX
Location A location within a stationEnter any two upper case letters numbers or spaces
The default location is two spaces for ldquononerdquo You must delete the two default spaces if you enter a new location value
Setting Description
Chapter 3 Retrieving Data
26 Apollo Project User Guide16106R5 2009-03-24
3 Click OK to save the new settings
34 Managing ProjectsYou can view open close copy and delete projects Also you can create convenient links to run your individual projects with desktop shortcuts
341 Viewing Existing Projects1 Click Projects in the Projects bar
2 View the projects listed on the Existing Projects page
The Existing Projects page shows a list of all projects and a status overview of each project For more information see Section 371 ldquoViewing an Overview of the Status of All Projectsrdquo on page 32
Channel 1 Name A channel codeEnter any three upper case letters or numbersThe default channel code is BHZ
Channel 2 Name A channel codeEnter any three upper case letters or numbersThe default channel code is BHN
Channel 3 Name A channel codeEnter any three upper case letters or numbersThe default channel code is BHE
Setting Description
Chapter 3 Retrieving Data
Apollo Project User Guide16106R5 2009-03-24
27
342 Opening a Project1 Click the project name under the Name column on the Existing Projects page
2 Click the Open Project button
343 Creating a Desktop Shortcut to a ProjectLaunching a project with a desktop shortcut will open Apollo Project to that project and run the project
Methods for creating desktop shortcuts to Web sites vary from browser to browser These procedures explain how to create desktop shortcuts to specific projects for both Mozilla Firefox 3 and Microsoft Internet Explorer 7 Desktop shortcuts to projects include the Apollo Project icon and are titled in the format Project Name ndash Apollo Project
In Firefox 3
1 Open the project you want to create a shortcut to in Firefox
2 Reduce the size of the Firefox window so that the desktop is visible
3 Drag the Site Identification Button onto the desktop
The Site Identification Button is located to the left of the Location Bar and displays the Apollo Project icon
In Internet Explorer 7
1 Open the project you want to create a shortcut to in Internet Explorer
2 Press ALT+F
3 Select Send gt Shortcut to Desktop
344 Closing a Project
1 Click the Close Project button in the Projects bar
Launching a desktop shortcut to a project automatically runs that project It is important to note that once a project is run its settings can no longer be edited It is recommended that desktop shortcuts only be created for Field Archive projects
Firefox is the recommended browser for Apollo Project
Chapter 3 Retrieving Data
28 Apollo Project User Guide16106R5 2009-03-24
345 Copying a Project
1 Select the project name under the Name column on the Existing Projects page
2 Click Copy
3 Enter a unique name for the new project and click OK
4 Click Edit and edit the settings as required
5 Click OK to save the project after you have finished editing the settings
346 Deleting a ProjectWhen you delete a project only files in the temporary folder are deleted All processed data files are not deleted
1 Click the project name under the Name column on the Existing Projects page
2 Click Delete
3 Click OK on the confirmation message
35 Running ProjectsFor all project types you can run a project manually at any time Archive projects can also be defined to run automatically on a schedule
If it is a scheduled Archive Project and the schedule is started click Cancel Schedule before you create a copy of it (If the schedule is not started the Start Schedule button is visible if the schedule is started the Cancel Schedule button replaces the Start Schedule button)
Apollo Project stores intermediate files in a temporary subdirectory of the Base Directory specified for the output location of a project These intermediate files correspond to the actual channel group data retrieved from the Stores referenced by the project If a project is deleted from Apollo Project these temporary files will be removed automatically
Disk space can also be reclaimed by removing these temporary files manually without deleting the project However if the project is run again the output files produced might be incomplete if previously retrieved data from these temporary files is required
For more information on what happens when a project runs see Section A1 ldquoOverview of Running Projectsrdquo on page 37
Chapter 3 Retrieving Data
Apollo Project User Guide16106R5 2009-03-24
29
351 Running a Project1 Open a project
2 Click Run Now on the Summary page to start the project
The project starts running and the Retrieval Status page is displayed
352 Stopping a Project1 Open a project
2 Click Cancel Run on the Summary page to stop the project
3 Click OK on the success message
353 Merging Project Data FilesYou have the option to merge all of the downloaded data for the stations and instruments into one file per interval for each project
1 Open a project
2 Click Merge
A single file is generated for each time period The time period is determined by the file interval you specified on the Time Selection page when you created the project For more information see step 13 of Section 31 ldquoCreating New Projectsrdquo on page 11
The original data files are not modified when you select the option to merge project data files
You can also click Run Now on the Retrieval Status page to start a project
For more information on what happens when a project runs see Section A1 ldquoOverview of Running Projectsrdquo on page 37
You can also click Cancel Run on the Retrieval Status page to stop a project
You cannot merge data from Archive projects and you cannot merge data in the Seisan format
You can also click Merge on the Retrieval Status page to merge the data from a project
Chapter 3 Retrieving Data
30 Apollo Project User Guide16106R5 2009-03-24
354 Running a Scheduled Archive Project1 Open a project
2 Click Start Schedule to start the project schedule
3 Click OK on the confirmation message
4 Click OK on the success message
For a project scheduled to run weekly the project will run for the first time according to the project start time and then it will run on a weekly basis according to the times and days you specified
For a project scheduled to run at a regular interval the project will run according the to interval you specified after you start the schedule For example if you click Start Schedule on a Wednesday and you specified every 2 days as the interval then the project will run for the first time on Friday and every two days after that
3541 Cancelling a Schedule
If you cancel a scheduled project before it runs for the first time you can edit the project settings
If you cancel a project that is currently running the current project runs to completion but subsequent project runs will not occur
1 Open a project
2 Click Cancel Schedule to cancel the project schedule
3 Click OK on the confirmation message
4 Click OK on the success message
You can also click Start Schedule on the Retrieval Status page to start the schedule of a project
You can restart the schedule by opening the project and clicking Start Schedule
You can also click Cancel Schedule on the Retrieval Status page to cancel the schedule of a project
Chapter 3 Retrieving Data
Apollo Project User Guide16106R5 2009-03-24
31
36 Editing and Viewing the Settings of ProjectsYou can edit the settings of a project before it has run After it has run you can view the settings
361 Editing Project Settings1 Open the project
2 Click Edit on the Summary page
3 Edit the settings as required
4 Click OK to save the changes
362 Viewing Project Settings1 Open the project
2 Click View on the Summary page
3 Click the tabs to view the settings
4 Click Cancel when you have finished viewing the settings
You can only edit the settings of a project before it has run for the first time or been scheduled (Archive project) If you want to edit the settings of a project after it has already run once or been scheduled you can copy the project (see Section 345 ldquoCopying a Projectrdquo on page 28) and then edit the settings for the copy
Settings For more information
Store Selection See step 4 of Section 31 ldquoCreating New ProjectsrdquoChannel Group Selection See step 5 to step 12 of Section 31 ldquoCreating New ProjectsrdquoTime Selection See step 13 of Section 31 ldquoCreating New ProjectsrdquoOutput Format See step 15 and step 16 of Section 31 ldquoCreating New ProjectsrdquoOutput Location See step 17 to step 20 of Section 31 ldquoCreating New Projectsrdquo
You can also click Edit on the Retrieval Status page to edit the settings of a project
You can also click View on the Retrieval Status page to edit the settings of a project
Chapter 3 Retrieving Data
32 Apollo Project User Guide16106R5 2009-03-24
37 Monitoring Project StatusYou can monitor the status of a project by viewing information on the Existing Projects Summary and Retrieval Status pages
371 Viewing an Overview of the Status of All ProjectsThe Existing Projects page is the default home page of Apollo Project You see this page when you first open Apollo Project or when you click Projects in the projects bar For more information see Section 341 ldquoViewing Existing Projectsrdquo on page 26
You can view the following information for all projects on the Existing Projects page
bull Name
bull Type
bull Current status
bull Last time the project run
bull Status of data retrieved
The Data Retrieved bars on the Existing Projects page show the overall status of the data retrieval For more information see Section 3731 ldquoStatus Coloursrdquo on page 34
Chapter 3 Retrieving Data
Apollo Project User Guide16106R5 2009-03-24
33
372 Viewing the Status of an Individual ProjectWhen you open a project a detailed summary of the project is shown on the Summary page For more information see Section 342 ldquoOpening a Projectrdquo on page 27
You can view the following information for each project on the Summary page
bull Date it was created
bull Date it was last modified
bull Current status
bull Last time it ran
bull Next time it will run
You can also view a summary of all of the settings you specified when you created the project (Store specifications selected Stores selected time series channel groups selected SOH channel groups start and end times number of files generated file interval and output format and locations)
All times are reported using the UTC time zone
Chapter 3 Retrieving Data
34 Apollo Project User Guide16106R5 2009-03-24
373 Monitoring the Status of a Running ProjectYou can view the data retrieval status of a project while it is running on the Retrieval Status page The Retrieval Status page is displayed automatically when you click Run Now to run a project You can also view this page by opening a project and clicking the Retrieval Status tab
The status for each channel group is expressed in the form of two numbers (for example 60100) and two bar graphs The first number is the percentage available of the total time requested (for example 60) and the second number is the percentage retrieved of the time available (for example 100) For more information on the bar graph status colours see Section 3731 ldquoStatus Coloursrdquo on page 34
You can also view retrieval details for each channel group listed on the Retrieval Status page For more information see Section 3732 ldquoViewing the Retrieval Details for Each Channel Grouprdquo on page 35
3731 Status Colours
The data retrieval status bars use the following status colours
The information that is displayed on the Retrieval Status page is updated continuously while a project is running
Table 3-1 Status colours
Colour Status
Green Apollo Project has retrieved the data
Yellow Apollo Project is attempting to retrieve available data from the Store
Red Data is available in the Store but Apollo Project has failed to retrieve it on this attempt Apollo Project will make additional attempts to retrieve the data up to the configured Maximum Number of Retrieval Attempts For information on how to set the Maximum Number of Retrieval Attempts setting see Section 31 ldquoCreating New Projectsrdquo on page 11
White Data for some portion of the requested time segment is not available in the Store For example there are gaps in the data or the retrieval request is for a future time segment
Chapter 3 Retrieving Data
Apollo Project User Guide16106R5 2009-03-24
35
3732 Viewing the Retrieval Details for Each Channel Group
You can view the retrieval status of each time segment for a channel group
1 Click a channel group name
2 Click the Channel Group Details button that is located to the right of the channel group name
The Remaining Retrieval Attempts column displays the number of times that Apollo Project will try to download each missing time segment for the channel group when the project is run again For information on how to set the Maximum Number of Retrieval Attempts setting see Section 33 ldquoConfiguring Apollo Projectrdquo on page 24
3 Click OK when you have finished viewing the details
Chapter 3 Retrieving Data
36 Apollo Project User Guide16106R5 2009-03-24
Apollo Project User Guide16106R5 2009-03-24
37
Appendix A Reference Information and Examples
Overview of Running Projects
Example Project Settings
Example Deployment Scenarios
Shot File Formats for Controlled Source Projects
A1 Overview of Running ProjectsWhen a project is run Apollo Project performs the following steps
1 The requested time ranges are identified
2 The channel groups for which data are to be retrieved are identified
3 The actual Stores specified by the Store specifications of the project are identified
For each identified Store the following steps are performed
1 A data availability analysis for the outstanding time ranges is performed These are for the ranges for which data has not already been retrieved The availability of the data is recorded for reference It is possible that a given Store was not present at the time the project was last run If this is the case then an attempt is made to retrieve all of the required time ranges of the project from the Store
2 If any data exists in the Store for any of the requested time ranges then a retrieval of this data is performed and the retrieved data is stored to local temporary files
3 If the number of retrieval attempts for a given time range exceeds a configurable threshold (see Section 33 ldquoConfiguring Apollo Projectrdquo on page 24) then the retrieval of data within the stated range is not attempted again
If any data was retrieved during the run of the project then the corresponding output files of the desired output format are generated and stored in the output location specified for the project
When running Apollo Project with Taurus version 2x the schedule for Archive projects must be greater than 5 minutes in duration Schedules that are less than 5 minutes can result in data that is missing or not downloaded
Appendix A Reference Information and Examples
38 Apollo Project User Guide16106R5 2009-03-24
It is possible that the requested data for a given channel group exists across multiple Stores If all of these Stores are included by the Store specifications for the project then Apollo Project assembles the requested data
When a project runs detailed information regarding the results of the retrieved data and processed data are available For more information see Section 37 ldquoMonitoring Project Statusrdquo on page 32
A2 Example Project Settings
A21 Example 1 One Time ProjectProject Name Project1
Project Type One Time
Channel groups selected for retrieval CASTN1OTBHZ (on taurus_1234)
Requested Time Range January 30 2008 1400 ndash 1500 UTC
File Interval 20 minutes
Output Location Base Directory disk2ApolloProjectOutputData
Output Location Subdirectories projectyearmonthday
Output Location Filenamestationnetwork_time
When the project is run successfully the following output files will be created on the server running Apollo Project
disk2ApolloProjectOutputDataProject120080130STN1CA_20080130_140000seed
disk2ApolloProjectOutputDataProject120080130STN1CA_20080130_142000seed
disk2ApolloProjectOutputDataProject120080130STN1CA_20080130_144000seed
Appendix A Reference Information and Examples
Apollo Project User Guide16106R5 2009-03-24
39
A22 Example 2 Controlled Source ProjectProject Name Project2
Project Type Controlled Source
Channel groups selected for retrieval CASTN1OTBHZ (on taurus_1234) CASTN1OTBHN (on taurus_1234)
Requested Shot Times January 30 2008 1400 UTC January 30 2008 1430 UTC
Pre Time 30 seconds
Post Time 30 seconds
Output Location Base Directory disk2ApolloProjectOutputData
Output Location Subdirectories projectyearmonthday
Output Location Filename timeformat
When the project is run successfully the following output files will be created on the server running Apollo Project
disk2ApolloProjectOutputDataProject22008013020080130_135930segysgy
disk2ApolloProjectOutputDataProject22008013020080130_142930segysgy
A3 Example Deployment Scenarios
A31 One TimeYou want to download three days of data from multiple instruments on the network save the data in MiniSEED format and create a file for every hour of data
A One Time project is the recommended solution The Store of each instrument can be made available to Apollo Project by creating a corresponding IP Address Store specification with the IP address of the instrument The requested time range can be specified along with a file interval of one hour Ensure that the instruments are configured to run in Communications mode
A32 Scheduled ArchiveYou want seismic data to be retrieved automatically from a group of instruments on the network every six hours The instruments are always accessible via an Ethernet connection
A scheduled Archive project is the recommended solution Use the Regular Interval scheduling option and set the interval to six hours
You can also run a scheduled Archive project at any time For example if the scheduled retrieval interval of a project is six hours and between intervals you want to retrieve the data three hours early you can run the project and approximately three additional hours of data would be accumulated About three hours later the project will run automatically and accumulate the remaining three hours of data
Appendix A Reference Information and Examples
40 Apollo Project User Guide16106R5 2009-03-24
A33 Manual ArchiveYou want to retrieve seismic data from a group of instruments but their respective Stores are only available for retrieval on occasion (no regular dependable schedule for retrieval from these Stores is possible)
A manually run Archive project is the recommended solution You can create the project and run it whenever any of the instruments are available for retrieval
A34 Field ArchiveYou want to collect data from a set of isolated instruments in the field at recurring intervals (for example twice per month)
A Field Archive project is the recommended solution You can create a Field Archive project and either add all instrument IP addresses to the list or use a Discovery specification The time for the last retrieval is stored on the instrument and all data is recovered from the last recovery time
A35 Media HarvestingYou want to collect the media from a set of instruments in the field at a regular interval (for example once per week) You also have to retrieve all of the seismic data on the media for subsequent analysis
An Archive project is the recommended solution Initially a directory is created on the file system of the server running Apollo Project A directory Store specification is created with this directory as the parent directory from which to search for Stores The content of each media instance in the weekrsquos collection is copied from a media reader to a subdirectory of the directory When the project is run all of the copied Stores are automatically available and the project accumulates data for each instrument
Due to the nature of media harvesting and the replacement procedure for this example data is always missing for the last period of output files for the current week This period corresponds to the time that the media was taken from the instrument and replaced with a new one The following week when the media is harvested again from the instruments in the field Apollo Project fills in the missing time for these files with the new Store data regardless of the media instance on which the data currently resides
You can only create and run Field Archive projects for Taurus version 30 or later
Appendix A Reference Information and Examples
Apollo Project User Guide16106R5 2009-03-24
41
A36 Trigger Downloading You have set up a network of five Tauruses around a hydro dam Each Taurus is accessible over an Ethernet connection and each is set to record data over the weekend You have set the period for data retrieval at 30 seconds before and five minutes after any seismic activity but the following procedure shows you why it is not necessary to view all of the data accumulated over the whole weekend
1 Select the Taurus at the site with the least environmental noise or determine the best site for generating triggers and designate this Taurus ldquoTaurus Ardquo for reference
You need to perform this task in advance More information about triggers can be found in the Taurus Portable Seismograph User Guide
2 Download the trigger file from ldquoTaurus Ardquo and review the file to verify the correct number of triggers
3 Follow these steps to create a new Triggers project
a) Click New on the Apollo Project Existing Projects page
b) Click Triggers as the project type and enter a unique name in the Project Name box
c) Click OK
d) Click the IP Address tab on the Store Selection tab
e) Enter the IP address of a Taurus
f) Click Add
g) Repeat step e until you have entered the IP addresses of all five of the Tauruses
Apollo Project adds the IP address specifications to the Selected Specifications section of the Store Selection page and finds all five Stores associated with the IP addresses and adds them to the Selected Stores section
h) Click the Channel Group Selection tab
i) Click Create Default Station Table to create a table for all of the currently selected Stores and discovered instruments
j) Review the selected channel groups and if required edit the mappings in the selected channel groups area of the tab (lower half of the tab)
k) Click the Time Selection tab
l) Click the Browse button
m)Select the trigger file that you downloaded in step 2 and click OK
n) Click Submit
The list of triggers is imported and displayed in the Triggers section on the Time Selection page
o) Enter a Pre Time of 30 seconds and a Post Time of 5 minutes
p) Click the Output Format tab
q) Click MiniSEED
r) Click All Instruments
s) Click the Output Location tab
Appendix A Reference Information and Examples
42 Apollo Project User Guide16106R5 2009-03-24
t) Enter the valid absolute path of the base directory for the processed data subfolders and files
u) Enter the expression used to define path names for subfolders under the base directory
v) Enter the expression used to define file names for the processed data files that are stored in the subfolders under the base directory
w) Click OK
4 Click the Run Now button on the Summary page
When the project has finished running the output folder you specified in step t will contain ten files Each output file will contain 5 minutes and 30 seconds of data from the five Tauruses
A4 Shot File Formats for Controlled Source ProjectsYou have two options for defining shots for a Controlled Source project manually defining shots or importing shots from a shot file
You can create shot files in one of following three file formats
Microsoft Office Excel (xls) ndash See Section A41 ldquoCreating a Shot File With Microsoft Office Excelrdquo on page 42
OpenOfficeorg Calc (ods) ndash See Section A42 ldquoCreating a Shot File With OpenOfficeorg Calcrdquo on page 44
Comma-Separated Values (csv) ndash See Section A43 ldquoCreating a Comma-Separated Values Shot Filerdquo on page 45
The Shot file templates are located in the docShotFileImport folder on the Apollo Project CD
A41 Creating a Shot File With Microsoft Office ExcelThe Microsoft Office Excel template for Apollo Project can be used with Microsoft Office Excel version 2003 or later
To create an Microsoft Office Excel based shot file
1 Double-click ShotFileTemplatexlt
A new Microsoft Office Excel file is created from the template and opens in the Microsoft Office Excel
2 Save the new spreadsheet as a Microsoft Office Excel document (xls)
3 Enter shot file data as specified in the Microsoft Office Excel spreadsheet
Only the decimal separator is supported for shot files Separators that denote the 3rd power of 10 (thousand) are not supported (for example 4500) The Microsoft Excel and OpenOffice templates reinforce these restrictions and are recommended for creating csv files
Appendix A Reference Information and Examples
Apollo Project User Guide16106R5 2009-03-24
43
You can enter data for multiple shot times
4 Click Save to save the file in Microsoft Office Excel format
5 Click File gt Save As and select CSV (Comma delimited) (csv) from the Save as type list
6 Click Save
7 Click OK on the message warning you that you are only saving the active sheet
8 Click Yes on the message warning you that file features might be incompatible with the csv format
9 Close Microsoft Office Excel
If you are using Microsoft Office Excel 2007 click the Microsoft Office Button and click Save As
Ensure that you save the file as a comma delimited file If the shot file is mistakenly saved in Microsoft Excel format (xls) the shot file will not work in Apollo Project
Appendix A Reference Information and Examples
44 Apollo Project User Guide16106R5 2009-03-24
A42 Creating a Shot File With OpenOfficeorg CalcThe OpenOffice template has been tested with OpenOfficeorg Calc version 23 Later versions of OpenOfficeorg Calc can be used at your discretion
To create a shot file based on the OpenOfficeorg Calc template
1 Double-click ShotFileTemplateots
A new OpenOffice spreadsheet is created from the template and opens in OpenOfficeorg Calc
2 Save the new spreadsheet as an OpenOffice Calc document (ods)
3 Enter the shot file data as specified in the OpenOffice spreadsheet
You can enter data for multiple shot times
4 Click Save to save the file in OpenOfficeorg Calc format
5 Click File gt Save As and select Text CSV (csv) from the Save as Type list
6 Select the Edit filter settings check box
7 Click Save
A warning message might appear that warns you that the document might contain formatting that cannot be saved in the csv format Click Yes on the warning message to save the file in csv format
The Export of text files window opens
8 Delete the double quotation marks () in the Text delimiter box and ensure that the Save cell content as shown check box is selected
9 Click OK to export the OpenOffice spreadsheet as a csv file
10 Click OK on the warning message
11 Close OpenOfficeorg Calc
Appendix A Reference Information and Examples
Apollo Project User Guide16106R5 2009-03-24
45
A43 Creating a Comma-Separated Values Shot FileYou can use any text editor to create a csv shot file
To create a csv shot file
1 Open ShotFileTemplatecsv in a text editor and save it with a different name
2 Format each line of the csv file as follows
Shot TimePre TimePost TimeLatitudeLongitudeElevation
For example
2008-08-28 103044090600000-6000004267
The format and units are as follows
3 Save the file as a csv formatted file
The csv shot file template is not compatible with Microsoft Office Excel Make sure that you do not double-click it and open it in Microsoft Office Excel
FormatUnits
Shot Time yyyy-mm-dd hhmmss
Pre Time seconds
Post Time seconds
Latitude degrees
Longitude degrees
Elevation meters
Appendix A Reference Information and Examples
46 Apollo Project User Guide16106R5 2009-03-24
Apollo Project User Guide16106R5 2009-03-24
47
Appendix B Retrieving SOH Data from a Taurus Version 2x
Taurus Version 2x SOH Data Retrieved by Apollo Project
Retrieving SOH Data from a Taurus Version 2x Streaming to Apollo Server
B1 Taurus Version 2x SOH Data Retrieved by Apollo Project This section presents the predefined datasets of SOH data Apollo Project will retrieve from a Taurus version 2x either through a direct connection or a stream to Apollo Server For instruction on retrieving streaming Taurus version 2x data from Apollo Server see Section B2 ldquoRetrieving SOH Data from a Taurus Version 2x Streaming to Apollo Serverrdquo on page 48
The order of the columns presented in the table below will differ when streaming Taurus version 2x SOH data from Apollo Server
Predefined SOH group SOH data
GPS Time Time (longsecs) (the number of seconds since 1970-01-01)Time (UTC) (time in yyyy-mm-dd hhmmssms format)Altitude (m)DAC CountError (ns) (time error)GPS Engine StatusLast Update Time(s)Lat (deg) (latitude in degrees)Long (deg) (longitude in degrees)NumSatellites (number of satellites used)PDOPPhaseLock (system clock phase lock)TDOPUncertainty (ns) (time uncertainty)
Note The values for Number of satellites used PDOP and TDOP are provided by the GPS receiver at the Last update time In order to see what time these values correspond to look at the Last update time When GPS is off these three parameters and the Last update time are not updated The last value displays until the next update arrives (after the GPS is turned on again)
Appendix B Retrieving SOH Data from a Taurus Version 2x
48 Apollo Project User Guide16106R5 2009-03-24
B2 Retrieving SOH Data from a Taurus Version 2x Streaming to Apollo ServerThis section provides instruction on configuring your Taurus version 2x to stream data to Apollo Server and instructions on how to use Apollo Project to retrieve this data from Apollo Server
B21 Streaming Data from a Taurus Version 2x to Apollo ServerUse the Taurus graphical user interface on either the Taurus display screen or through a Web browser to set up an NP stream from a Taurus version 2x to Apollo Server
1 Log in to the Taurus version 2x with either the tech or central user account
2 Select Advanced Configuration gt Communications gt NP Data Streaming
GPS Satellites Time (longsecs) (the number of seconds since 1970-01-01)Time (UTC) (time in yyyy-mm-dd hhmmssms format)
For each satelliteAcquisition FlagLast Update Time (ms)PRNSatellite Azimuth (microordm)Satellite Elevation (microordm)Signal Level (AMU)
Environment Time (longsecs) (the number of seconds since 1970-01-01)Time (UTC) (time in yyyy-mm-dd hhmmssms format)External SOH Voltage 1 (V) (12-bit voltage input) External SOH Voltage 2 (V) (12-bit voltage input) External SOH Voltage 3 (V) (12-bit voltage input) External SOH Voltage 4 (V) (12-bit voltage input) Sensor SOH Voltage 1 (V)Sensor SOH Voltage 2 (V)Sensor SOH Voltage 3 (V)
Instrument Time (longsecs) (the number of seconds since 1970-01-01)Time (UTC) (time in yyyy-mm-dd hhmmssms format)Controller Current (mA)Digitizer Current (mA)NMX Bus Current (mA) (external connector)Sensor Current (mA)Serial Port Current (mA)Supply Voltage (mV)Temperature (ordmC)
Predefined SOH group SOH data
Appendix B Retrieving SOH Data from a Taurus Version 2x
Apollo Project User Guide16106R5 2009-03-24
49
3 To have the Taurus stream both time series and SOH data to Apollo Server select both Stream Time Series and Stream SOH
-OR-
Select only Stream SOH if you only want to retrieve the SOH data from Apollo Server
4 Type the IP address for Apollo Server in the IP Address box
5 Type the port number Apollo Server uses to receive data in the Port box By default this is port number 32008
6 The Second IP Address and Second Port boxes are not necessary however cannot be left blank Type 127001 in the Second IP Address box and 32004 in the Second Port box
7 Type a value in the Maximum Throughput [bps] box if a limited data link is present between the Taurus and Apollo Server For instance if at some point the data link is limited to 9600 bps then this is the maximum throughput the link can allow If there are no throughput limitations set the value in this box to zero to disable the throughput limitation
8 Click Apply
9 Click Commit
B22 Retrieving Taurus Version 2x Data from Apollo ServerCreate a new project or use an existing project in Apollo Project to retrieve the Taurus version 2x data from Apollo Server For more information on creating or editing projects refer to Section 31 ldquoCreating New Projectsrdquo on page 11 and Section 36 ldquoEditing and Viewing the Settings of Projectsrdquo on page 31
When creating or editing the project
a) Add an IP address Store specification on the Store Selection tab (see step 4 in Section 31 ldquoCreating New Projectsrdquo) for Apollo Server including its client Web application port number Use the format
Apollo Server IP AddressApollo Server Client Web Application Port Number
b) Apply the appropriate filters on the Channel Group Selection tab to retrieve the desired channel groups from the Taurus version 2x See step 5 through step 12 in Section 31 ldquoCreating New Projectsrdquo for instruction on using the Channel Group Selection tab
Appendix B Retrieving SOH Data from a Taurus Version 2x
50 Apollo Project User Guide16106R5 2009-03-24
Apollo Project User Guide16106R5 2009-03-24
51
Appendix C Glossary
Glossary of Abbreviations and Terms
List of Unit Abbreviations and Symbols
C1 Glossary of Abbreviations and Terms
A
ASCIIAmerican Standard Code for Information Interchange
B
BHEBroad Band High Gain Seismometer East-West Orientation
Channel name based on the Global Seismological Network (GSN) standard
BHNBroad Band High Gain Seismometer North-South Orientation
Channel name based on the Global Seismological Network (GSN) standard
BHZBroad Band High Gain Seismometer Vertical Orientation
Channel name based on the Global Seismological Network (GSN) standard
Appendix C Glossary
52 Apollo Project User Guide16106R5 2009-03-24
C
CSVComma-Separated Values
D
DACDigital to Analog Converter
G
GPSGlobal Positioning System
J
JREJava Runtime Environment
JVMJava Virtual Machine
N
NFSNetwork File System
P
PDOPPosition Dilution of Precision
PRNPseudo-random Number
Appendix C Glossary
Apollo Project User Guide16106R5 2009-03-24
53
S
SACSeismic Analysis Code
An Apollo Project output file format that generates files that can be used by the SAC software (see http wwwirisedusoftwaresac)
SEEDStandard for the Exchange of Earthquake Data
SMBServer Message Block
SOHState of Health
T
TCPIPTransmission Control ProtocolInternet Protocol
TDOPTime Dilution of Precision
U
UNCUniform Naming Convention or Universal Naming Convention
URLUniform Resource Locator
UTCCoordinated Universal Time
Appendix C Glossary
54 Apollo Project User Guide16106R5 2009-03-24
C2 List of Unit Abbreviations and SymbolsTable C-1 provides a list of unit abbreviations and symbols commonly used in Nanometrics documentation
Table C-1 Unit abbreviations and symbols
Abbreviation or Symbol Definition Abbreviation
or Symbol Definition
deg degree lb pound
Oslash diameter m metre
micro micro ms metre per second
Ω ohm ms2 metre per second squared
A ampere mA milliampere
AC alternating current MB megabyte
b bit MΩ megaohm
B byte MHz megahertz
bps bits per second mi mile
C Celsius mL millilitre
cm centimetre mm millimetre
dB decibel ms millisecond
DC direct current MTU maximum transmission unit
F farad mV millivolt
ft foot mW milliwatt
g gram N Newton
g gravity nF nanofarad
GB gigabyte ns nanosecond
GHz gigahertz rad radian
Hz hertz rads radian per second
in inch s second
KB kilobyte sps samples per second
kg kilogram U rack unit
kHz kilohertz V volt
kΩ kiloohm Vpp Volts peak-to-peak
kW kilowatt W watt
L litre
Apollo Project User Guide16106R5 2009-03-24
55
About NanometricsNanometrics is a world leader in the development of precision instrumentation network technology and software applications for seismological and environmental studies Using Nanometrics technology our customers establish and grow research networks that are often located in extreme environments such as the frozen Arctic and Antarctic the arid deserts of the Middle East the jungles of South America and the depths of the worlds oceans Many of these are mission-critical national and regional networks that demand the highest possible data quality and availability
Nanometrics provides end-to-end solutions that include a growing portfolio of broadband and strong motion seismometers dataloggers and digitizers satellite ground station systems for remote site data collection and software applications for data and network analysis and management To support this portfolio Nanometrics also provides global systems engineering services for design installation and support of complete networks
Our head office research and development centre and production facility are located in the Kanata North Business Park of Ottawa the high-technology heart of Canadas capital region
Contacting NanometricsNanometrics Inc250 Herzberg RoadKanata Ontario Canada K2K 2A1Phone +1 613-592-6776Fax +1 613-592-5929Email infonanometricscaWeb wwwnanometricsca
Contacting Technical SupportIf you need technical support please submit a request on the Nanometrics technical support site or by email or fax Include a full explanation of the problem and related information such as log filesSupport site httpsupportnanometricsca
Email techsupportnanometricsca
Chapter 3 Retrieving Data
Apollo Project User Guide16106R5 2009-03-24
15
10 Select the state of health (SOH) channel groups you want to download data from Each group has a predefined dataset
To view the SOH data retrieved from a Taurus version 2x see Appendix B ldquoRetrieving SOH Data from a Taurus Version 2xrdquo
Predefined SOH group SOH data
GPS Time Time (longsecs) (the number of seconds since 1970-01-01)Time (UTC) (time in yyyy-mm-dd hhmmssms format)DAC CountGPS Engine StatusGPS Last Update Time(s)GPS PDOPGPS Satellites Used (number of satellites used)GPS TDOP Lat (deg) (latitude in degrees)Long (deg) (longitude in degrees)Timing Error (ns)Timing Phase Lock (system clock phase lock)Timing Uncertainty (ns)
Note The values for Number of satellites used PDOP and TDOP are provided by the GPS receiver at the Last update time In order to see what time these values correspond to look at the Last update time When GPS is off these three parameters and the Last update time are not updated The last value displays until the next update arrives (after the GPS is turned on again)
GPS Satellites Time (longsecs) (the number of seconds since 1970-01-01)Time (UTC) (time in yyyy-mm-dd hhmmssms format)
For each satelliteGPS Satellite Acquisition FlagGPS Satellite Azimuth (microordm)GPS Satellite Elevation (microordm)GPS Satellite Last Update Time (ms)GPS Satellite PRN GPS Satellite Signal Level (AMU)
Environment Time (longsecs) (the number of seconds since 1970-01-01)Time (UTC) (time in yyyy-mm-dd hhmmssms format)External SOH Voltage 1 (V) (12-bit voltage input)External SOH Voltage 2 (V) (12-bit voltage input)External SOH Voltage 3 (V) (12-bit voltage input)External SOH Voltage 4 (V) (12-bit voltage input)Sensor SOH Voltage 1 (V)Sensor SOH Voltage 2 (V)Sensor SOH Voltage 3 (V)
Chapter 3 Retrieving Data
16 Apollo Project User Guide16106R5 2009-03-24
11 If required enter additional filter information as comma-delimited text into the Network Station Location Channel and Instrument boxes
You can use an asterisk ()to represent 1 or more characters
12 Review the selected channel groups and if required edit the channel group mappings in the selected channel groups area of the tab
Channel groups that do not have a mapping appear as blanks in the selected channel groups area of the tab Mapping information for these channel groups can be entered and saved in the station table file for future projects
You can edit the mappings at any time The changes are reflected in future runs of any project using that same station table file For more information see Section 32 ldquoCreating a Station Table Filerdquo on page 22
13 Click the Time Selection tab and follow the steps for the project type you selected
Instrument Time (longsecs) (the number of seconds since 1970-01-01)Time (UTC) (time in yyyy-mm-dd hhmmssms format)Controller Current (mA)Digitizer Current (mA)NMX Bus Current (mA) (external connector)Sensor Current (mA)Serial Port Current (mA)Supply Voltage (mV)Temperature (ordmC)
Look in the selected channel groups area of the tab (lower half of the tab) for examples of filter details you can enter in the Network Station Location Channel and Instrument ID filter boxes
The NetworkStationLocationChannel column of the table presents information in the format implied by the column title For instance in an entry of XXA099901BHE(1) XX represents the network(2) A0999 represents the station(3) 01 represents the location(4) BHE represents the channel
Look at the Instrument ID column of the table for an example of an instrument name and serial number such as taurus_0999
Only mappings that are applicable for the selected channel groups appear in the selected channel groups area of the tab
All times use the UTC time zone
Predefined SOH group SOH data
Chapter 3 Retrieving Data
Apollo Project User Guide16106R5 2009-03-24
17
Project type DescriptionSteps
Archive Archive projects attempt to retrieve data up to the current timeThe time ranges for which output files will be produced are driven from the file interval and are aligned to the project start time It is therefore unlikely that the ldquomost recentrdquo file interval will align with the current time Therefore the most recent range for which data retrieval is attempted will have a portion of its data retrieved and the remainder (for future retrieval) will be declared unavailable However when the project is run later (after the end of the particular time range) the unavailable data will normally be retrieved and the situation will likely repeat itself with the ldquonewrdquo last range to retrieveTo run an Archive project manually1 If required edit the start time for the project2 Click Manual3 Specify the file interval
For example if you specify 2 hours then one file is created every 2 hours If the duration for the project is one day then a total of 12 files will be created
4 After you have finished creating the project click Run Now on the Summary page to run the project
To schedule an Archive project to run automatically at a regular interval1 Click Regular Interval and select the interval 2 Specify the file interval
For example if you specify 2 hours then one file is created every 2 hours If the duration for the project is one day then a total of 12 files will be created
3 After you have finished creating the project click Start Schedule on the Summary page to start the schedule for the project and click OK twice The project will run according to the interval you specified after you start the schedule For example if you click Start Schedule on a Wednesday and you specified every 2 days as the interval then the project will run for the first time on Friday and every two days after that If the computer has been rebooted and the Apollo Project Web server has been restarted the project will run according to the interval you specified after the computer has rebooted For example if the computer reboots on a Wednesday and you specified every 2 days as the interval then the project will run for the next time on Friday and every two days after that
Note Archive projects that are defined as scheduled projects can also be run manually at any timeTo schedule an Archive project to run automatically on a weekly basis1 If required edit the start time for the project2 Click Weekly Schedule and select the time and days of the week 3 Specify the file interval
For example if you specify 2 hours then one file is created every 2 hours If the duration for the project is one day then a total of 12 files will be created
4 After you have finished creating the project click Start Schedule on the Summary page to start the schedule for the project and click OK twice After you have finished creating the project the project will run for the first time according to the project start time and then it will run on a weekly basis according to the times and days you specified
Note Archive projects that are defined as scheduled projects can also be run manually at any time
Chapter 3 Retrieving Data
18 Apollo Project User Guide16106R5 2009-03-24
One Time A One Time project retrieves a single time segmentTo specify the start and end times for a One Time project1 If required edit the start time for the project2 Click End Time and enter an end time
-OR-Click Duration and specify the duration of the project The duration is the length of the requested time segment
3 Specify the file intervalFor example if you specify 2 hours then one file is created every 2 hours If the duration for the project is one day then a total of 12 files will be created
4 After you have finished creating the project click Run Now on the Summary page to run the project
Controlled Source
A Controlled Source project retrieves data specified as a set of individually entered shots and outputs the data in SEGY format To specify shots using a shots file1 Click Browse select a shots file and click OK2 Click Submit
The list of shots is imported and displayed in the Shot List section on the Time Selection page
Note For more information see Section A4 ldquoShot File Formats for Controlled Source Projectsrdquo on page 42To manually define shots1 Enter a shot time2 If required enter the latitude longitude and elevation3 If required select the pre-shot time period4 Select the post-shot time period5 Click Add
The shot is added to the Shot List section on the Time Selection page Triggers A Triggers project uses a CSV-formatted trigger list to specify the data to be
retrieved for example a trigger file that has been downloaded from a Taurus to the local computerTo define triggers1 Click Browse select a CSV triggers file and click OK2 Click Submit
The list of triggers is imported and displayed in the Triggers section on the Time Selection page
3 Select the pre-trigger and post-trigger time periodsThe pre-trigger and post-trigger time periods are used for all of the triggers
Project type DescriptionSteps
Chapter 3 Retrieving Data
Apollo Project User Guide16106R5 2009-03-24
19
14 If you selected a Controlled Source as the project type in step 2 go to step 17
You do not have to select an output format for a Controlled Source project because the output format for a Controlled Source project is always SEGY one output file is generated for all instruments and the stations are sorted by StationNameNetworkName
-OR-
If you selected one of the other project types go to step 15 to select an output format
15 Click the Output Format tab
Field Archive A Field Archive project is used for recurring data retrievals that occur at specified intervals The time of the last retrieval is stored on the instrumentTo define the start time and file interval1 If required edit the start time for the project2 Specify the file interval
For example if you specify 2 hours then one file is created every 2 hours3 If you want partial files retrieved select the Include last interval even if
incomplete check box You should only select this option when the retrieval of partial files is more important than retrieving the data for the current interval during a future project run
Be careful when specifying the file interval For example retrieving many hours or days of data and specifying a file interval of seconds or minutes could result in the generation of many files This is not only very resource intensive but could result in a data management problem as well
Project type DescriptionSteps
Chapter 3 Retrieving Data
20 Apollo Project User Guide16106R5 2009-03-24
16 Perform the following steps to select an output format
Output format Steps
MiniSEED 1 Click MiniSEED2 Click Per channel group to generate one output file per channel group
You must add the channel token to the Subdirectories or Filename box on the Output Location tab when choosing Per channel group-OR-Click Per instrument to generate one output file per instrument-OR-Click All Instruments to generate one output file for all instruments
3 Select the Sort check box if you want the output data sorted by timeData is put in a Store in the order received and this order may not always be chronological To ensure that the data in the resulting SEED file is chronological select Sort
4 Select the data record sizeThe default record size is 512 B However not all SEED file readers will support this file size Determine what your SEED reader supports and select an appropriate value The options are 512 B 1024 B 2048 B and 4096 B Note that a smaller record size will result in quicker SEED file output
Note The number of output files is determined by the file interval that you set on the Time Selection page
SAC 1 Click SACYou must add the channel token to the Subdirectories or Filename box on the Output Location tab when choosing SAC as the output format
NotesThere are two types of SAC files binary and ASCII Apollo Project only outputs binary SAC filesOne output file per channel group is generated
SEGY 1 Click SEGY2 Click Per channel group to generate one output file per channel group
You must add the channel token to the Subdirectories or Filename box on the Output Location tab when choosing Per channel group-OR-Click Per instrument to generate one output file per instrument-OR-Click All Instruments to generate one output file for all instruments
3 Select the Sort check box if you want the stations sorted by StationNameNetworkName
NotesAll stations must have the same sample rateThe maximum number of samples per trace is 32767SEGY trace headers from discovered instruments will not have station location information
Chapter 3 Retrieving Data
Apollo Project User Guide16106R5 2009-03-24
21
17 Click the Output Location tab
18 If you defined a default base directory when you configured Apollo Project and want to use it for this project go to step 21
For more information see Section 33 ldquoConfiguring Apollo Projectrdquo on page 24
-OR-
Enter the valid absolute path of the base directory for the processed data subdirectories and files
If the base directory you entered does not exist click Create to create it
19 If you defined a default expression for subdirectories when you configured Apollo Project and want to use it for this project go to step 21
For more information see Section 33 ldquoConfiguring Apollo Projectrdquo on page 24
-OR-
Enter the expression used to define path names for subfolders under the base directory
You can enter tokens in any order including any additional characters that are valid for paths
Seisan 1 Click Seisan
NotesYou must have Seisan installed on your computer with a WAVEFORM_BASE and CONT_BASE line included for each station in the DATSEISANDEF file You must define a SEISAN_TOP environment variableOne output file per channel group is generated
Regardless of the output format selected SOH channel group data is always output in CSV format
The Base Directory is the root of all data retrieved for the project and can be defined at any location in the file system of the server running Apollo Project including a networked drive on a separate server If you want to create or use a directory on a computer on the network you have to enter the server and share name in a modified UNC format that is prefixed by an additional two backslashes For example the usual fileserver1storefiles must be written as fileserver1storefiles
Large amounts of data can be stored in this location You must ensure that adequate disk space is available
For deployments of Apollo Project where the clients are not running on the server it is recommended that the file system containing the base directory on the server be shared or exported as a networked file system
It is not recommended that you use the channel token in the subdirectories expression if the project includes more than one channel group per instrument (selected on the Channel Group Selection tab) and the output is not per channel group (selected on the Output Format tab)
Output format Steps
Chapter 3 Retrieving Data
22 Apollo Project User Guide16106R5 2009-03-24
20 If you defined a default expression for file names when you configured Apollo Project and want to use it for this project go to step 21
For more information see Section 33 ldquoConfiguring Apollo Projectrdquo on page 24
-OR-
Enter the expression used to define file names for the processed data files that are stored in the subfolders under the base directory
You can enter tokens in any order including any additional characters that are valid for file names
21 Click OK to save the new project
The new project is created and the Summary page is displayed
32 Creating a Station Table FileYou can create a mapping between a given instrumentchannel group (for example taurus_1234digitizertimeSeries1) and a corresponding network station location and channel name These mappings are stored in a station table file and the mapped channel group names are used in the output files
You can create a station table file and use it as the default for all projects or you can create a station table for individual projects
To create a station table file and set is as the default
1 Click the configuration button in the upper right corner
2 Specify the network name location and channel names on the Behaviour and Defaults dialog box and click OK to save the new settings
The settings you enter here are used as the channel names in the station table file You can edit these settings in step 8
For more information on configuring Apollo Project settings see Section 33 ldquoConfiguring Apollo Projectrdquo on page 24
3 Click New on the Apollo Project Existing Projects page
Do not use the channel token in the filename expression if the project includes more than one channel group per instrument (selected on the Channel Group Selection tab) and the output is not per channel group (selected on the Output Format tab)
The Sample Path shows an example of a file name generated using the values for the Base Directory Subdirectories and Filename settings
You can only edit the settings of a project before it has run for the first time or been scheduled (Archive project) If you want to edit the settings of a project after it has already run once or been scheduled you can copy the project (see Section 345 ldquoCopying a Projectrdquo on page 28) and then edit the settings for the copy
It is recommended that you create a station table file and set it as the default for all projects You can update the mappings in this file when new Stores are added or discovered
Chapter 3 Retrieving Data
Apollo Project User Guide16106R5 2009-03-24
23
4 Type Station Table in the Project Name box and click any project type
5 Click OK
6 Click the Store Selection tab and select as many Stores as possible
See step 4 of Section 31 ldquoCreating New Projectsrdquo for information on how to add specifications and select Stores
7 Click the Channel Group Selection tab and click Create Default Station Table
A station table file is created and the name of the file is displayed in the Station Table File Name box
8 Edit the station table channel group mappings in the selected channel groups area of the tab (lower half of the tab) as required
The NetworkStationLocationChannel names will appear in the output files If the Location is empty it is interpreted as the SEED default of two spaces
9 Click OK to close the project and finish creating the station table
10 Click the configuration button in the upper right corner
11 Enter the path and name of the station table file you just created in the Station Table File Name box on the Behaviour and Defaults dialog box
12 Click OK to save the new settings
The station table file you specified will be used as the default for all future projects You can open the Station Table project and edit the station table file if you need to add more Stores or change the mappings
For more information on configuring Apollo Project settings see Section 33 ldquoConfiguring Apollo Projectrdquo on page 24
Make a note of the path of the station table file because you will have to enter it on the Behaviour and Defaults dialog box to set it as the default for all projects
Valid characters for the network station location and channel in the NetworkStationLocationChannel box are upper case letters A to Z numbers 0 to 9 and spaces are also acceptable for the location
Chapter 3 Retrieving Data
24 Apollo Project User Guide16106R5 2009-03-24
33 Configuring Apollo ProjectYou can configure basic settings for Apollo Project and the default settings for new projects The changes you make to the project default settings only apply to new projects
To configure Apollo Project
1 Click the configuration button in the upper right corner
2 Edit the following settings
Setting Description
Log Verbosity The level of detail that is logged by Apollo ProjectThe default setting is Info
Log Location The default name of the Apollo Project log folder Maximum Number of Retrieval Attempts
The maximum number of single retrieval attempt made for all missing time segments on all channel groups every time a project is run Enter an integer from 0 through 1000 The default value is 8
Notes If the Taurus is busy when a retrieval attempt is made the number of remaining retrieval attempts is not decreased by one attemptYou can view the channel group details page to see if there are any remaining retrieval attempts for any channel groups (see Section 373 ldquoMonitoring the Status of a Running Projectrdquo on page 34)
Number Of Retries The number of times Apollo Project attempts to connect to a data source if there is a network connectivity problem Enter an integer from 0 through 1000 The default value is 3
Note Every time a project is run it starts with the maximum number of retries
Retry Interval (secs) The amount of time in seconds that Apollo Project waits before trying to connect to a data source againEnter an integer from 0 through 1000 The default value is 5
Station Table File Name The file name and location of the station table file that is used to assign station names to all of the selected channel groupsA station table is used to assign names to all of the selected channel groups For more information see Section 32 ldquoCreating a Station Table Filerdquo on page 22No station table file is specified by default
Chapter 3 Retrieving Data
Apollo Project User Guide16106R5 2009-03-24
25
Base Directory The folder name and location of the base directory for the processed data subfolders and files Enter any valid folder name and location including any additional characters that are valid for paths The default base directory name is ApolloProject
Notes The Base Directory is the root of all data retrieved for the project and can be defined at any location in the file system of the server running Apollo Project including a shared folder on a different computer If you want to create or use a folder on a computer on the network you have to enter the server and share name in a modified UNC format that is prefixed by an additional two backslashes For example the usual fileserver1storefiles must be written as fileserver1storefilesLarge amounts of data can be stored in this location You must ensure that adequate disk space is availableFor deployments of Apollo Project where the clients are not running on the server it is recommended that the file system containing the base directory on the server be shared or exported as a networked file system
Subdirectories The expression used to define path names for subfolders under the base directoryEnter tokens in any order including any additional characters that are valid for paths The default path name is as follows projectyearmonthday
Filename The expression used to define file names for the processed data files that are stored in the subfolders under the base directoryEnter tokens in any order including any additional characters that are valid for file names The default filename is as follows instrument_time
Sample Path An example of a file name generated using the values for the Base Directory Subdirectories and Filename settings
Network Name A standard network codeEnter any two upper case letters or numbers The default code is XX
Location A location within a stationEnter any two upper case letters numbers or spaces
The default location is two spaces for ldquononerdquo You must delete the two default spaces if you enter a new location value
Setting Description
Chapter 3 Retrieving Data
26 Apollo Project User Guide16106R5 2009-03-24
3 Click OK to save the new settings
34 Managing ProjectsYou can view open close copy and delete projects Also you can create convenient links to run your individual projects with desktop shortcuts
341 Viewing Existing Projects1 Click Projects in the Projects bar
2 View the projects listed on the Existing Projects page
The Existing Projects page shows a list of all projects and a status overview of each project For more information see Section 371 ldquoViewing an Overview of the Status of All Projectsrdquo on page 32
Channel 1 Name A channel codeEnter any three upper case letters or numbersThe default channel code is BHZ
Channel 2 Name A channel codeEnter any three upper case letters or numbersThe default channel code is BHN
Channel 3 Name A channel codeEnter any three upper case letters or numbersThe default channel code is BHE
Setting Description
Chapter 3 Retrieving Data
Apollo Project User Guide16106R5 2009-03-24
27
342 Opening a Project1 Click the project name under the Name column on the Existing Projects page
2 Click the Open Project button
343 Creating a Desktop Shortcut to a ProjectLaunching a project with a desktop shortcut will open Apollo Project to that project and run the project
Methods for creating desktop shortcuts to Web sites vary from browser to browser These procedures explain how to create desktop shortcuts to specific projects for both Mozilla Firefox 3 and Microsoft Internet Explorer 7 Desktop shortcuts to projects include the Apollo Project icon and are titled in the format Project Name ndash Apollo Project
In Firefox 3
1 Open the project you want to create a shortcut to in Firefox
2 Reduce the size of the Firefox window so that the desktop is visible
3 Drag the Site Identification Button onto the desktop
The Site Identification Button is located to the left of the Location Bar and displays the Apollo Project icon
In Internet Explorer 7
1 Open the project you want to create a shortcut to in Internet Explorer
2 Press ALT+F
3 Select Send gt Shortcut to Desktop
344 Closing a Project
1 Click the Close Project button in the Projects bar
Launching a desktop shortcut to a project automatically runs that project It is important to note that once a project is run its settings can no longer be edited It is recommended that desktop shortcuts only be created for Field Archive projects
Firefox is the recommended browser for Apollo Project
Chapter 3 Retrieving Data
28 Apollo Project User Guide16106R5 2009-03-24
345 Copying a Project
1 Select the project name under the Name column on the Existing Projects page
2 Click Copy
3 Enter a unique name for the new project and click OK
4 Click Edit and edit the settings as required
5 Click OK to save the project after you have finished editing the settings
346 Deleting a ProjectWhen you delete a project only files in the temporary folder are deleted All processed data files are not deleted
1 Click the project name under the Name column on the Existing Projects page
2 Click Delete
3 Click OK on the confirmation message
35 Running ProjectsFor all project types you can run a project manually at any time Archive projects can also be defined to run automatically on a schedule
If it is a scheduled Archive Project and the schedule is started click Cancel Schedule before you create a copy of it (If the schedule is not started the Start Schedule button is visible if the schedule is started the Cancel Schedule button replaces the Start Schedule button)
Apollo Project stores intermediate files in a temporary subdirectory of the Base Directory specified for the output location of a project These intermediate files correspond to the actual channel group data retrieved from the Stores referenced by the project If a project is deleted from Apollo Project these temporary files will be removed automatically
Disk space can also be reclaimed by removing these temporary files manually without deleting the project However if the project is run again the output files produced might be incomplete if previously retrieved data from these temporary files is required
For more information on what happens when a project runs see Section A1 ldquoOverview of Running Projectsrdquo on page 37
Chapter 3 Retrieving Data
Apollo Project User Guide16106R5 2009-03-24
29
351 Running a Project1 Open a project
2 Click Run Now on the Summary page to start the project
The project starts running and the Retrieval Status page is displayed
352 Stopping a Project1 Open a project
2 Click Cancel Run on the Summary page to stop the project
3 Click OK on the success message
353 Merging Project Data FilesYou have the option to merge all of the downloaded data for the stations and instruments into one file per interval for each project
1 Open a project
2 Click Merge
A single file is generated for each time period The time period is determined by the file interval you specified on the Time Selection page when you created the project For more information see step 13 of Section 31 ldquoCreating New Projectsrdquo on page 11
The original data files are not modified when you select the option to merge project data files
You can also click Run Now on the Retrieval Status page to start a project
For more information on what happens when a project runs see Section A1 ldquoOverview of Running Projectsrdquo on page 37
You can also click Cancel Run on the Retrieval Status page to stop a project
You cannot merge data from Archive projects and you cannot merge data in the Seisan format
You can also click Merge on the Retrieval Status page to merge the data from a project
Chapter 3 Retrieving Data
30 Apollo Project User Guide16106R5 2009-03-24
354 Running a Scheduled Archive Project1 Open a project
2 Click Start Schedule to start the project schedule
3 Click OK on the confirmation message
4 Click OK on the success message
For a project scheduled to run weekly the project will run for the first time according to the project start time and then it will run on a weekly basis according to the times and days you specified
For a project scheduled to run at a regular interval the project will run according the to interval you specified after you start the schedule For example if you click Start Schedule on a Wednesday and you specified every 2 days as the interval then the project will run for the first time on Friday and every two days after that
3541 Cancelling a Schedule
If you cancel a scheduled project before it runs for the first time you can edit the project settings
If you cancel a project that is currently running the current project runs to completion but subsequent project runs will not occur
1 Open a project
2 Click Cancel Schedule to cancel the project schedule
3 Click OK on the confirmation message
4 Click OK on the success message
You can also click Start Schedule on the Retrieval Status page to start the schedule of a project
You can restart the schedule by opening the project and clicking Start Schedule
You can also click Cancel Schedule on the Retrieval Status page to cancel the schedule of a project
Chapter 3 Retrieving Data
Apollo Project User Guide16106R5 2009-03-24
31
36 Editing and Viewing the Settings of ProjectsYou can edit the settings of a project before it has run After it has run you can view the settings
361 Editing Project Settings1 Open the project
2 Click Edit on the Summary page
3 Edit the settings as required
4 Click OK to save the changes
362 Viewing Project Settings1 Open the project
2 Click View on the Summary page
3 Click the tabs to view the settings
4 Click Cancel when you have finished viewing the settings
You can only edit the settings of a project before it has run for the first time or been scheduled (Archive project) If you want to edit the settings of a project after it has already run once or been scheduled you can copy the project (see Section 345 ldquoCopying a Projectrdquo on page 28) and then edit the settings for the copy
Settings For more information
Store Selection See step 4 of Section 31 ldquoCreating New ProjectsrdquoChannel Group Selection See step 5 to step 12 of Section 31 ldquoCreating New ProjectsrdquoTime Selection See step 13 of Section 31 ldquoCreating New ProjectsrdquoOutput Format See step 15 and step 16 of Section 31 ldquoCreating New ProjectsrdquoOutput Location See step 17 to step 20 of Section 31 ldquoCreating New Projectsrdquo
You can also click Edit on the Retrieval Status page to edit the settings of a project
You can also click View on the Retrieval Status page to edit the settings of a project
Chapter 3 Retrieving Data
32 Apollo Project User Guide16106R5 2009-03-24
37 Monitoring Project StatusYou can monitor the status of a project by viewing information on the Existing Projects Summary and Retrieval Status pages
371 Viewing an Overview of the Status of All ProjectsThe Existing Projects page is the default home page of Apollo Project You see this page when you first open Apollo Project or when you click Projects in the projects bar For more information see Section 341 ldquoViewing Existing Projectsrdquo on page 26
You can view the following information for all projects on the Existing Projects page
bull Name
bull Type
bull Current status
bull Last time the project run
bull Status of data retrieved
The Data Retrieved bars on the Existing Projects page show the overall status of the data retrieval For more information see Section 3731 ldquoStatus Coloursrdquo on page 34
Chapter 3 Retrieving Data
Apollo Project User Guide16106R5 2009-03-24
33
372 Viewing the Status of an Individual ProjectWhen you open a project a detailed summary of the project is shown on the Summary page For more information see Section 342 ldquoOpening a Projectrdquo on page 27
You can view the following information for each project on the Summary page
bull Date it was created
bull Date it was last modified
bull Current status
bull Last time it ran
bull Next time it will run
You can also view a summary of all of the settings you specified when you created the project (Store specifications selected Stores selected time series channel groups selected SOH channel groups start and end times number of files generated file interval and output format and locations)
All times are reported using the UTC time zone
Chapter 3 Retrieving Data
34 Apollo Project User Guide16106R5 2009-03-24
373 Monitoring the Status of a Running ProjectYou can view the data retrieval status of a project while it is running on the Retrieval Status page The Retrieval Status page is displayed automatically when you click Run Now to run a project You can also view this page by opening a project and clicking the Retrieval Status tab
The status for each channel group is expressed in the form of two numbers (for example 60100) and two bar graphs The first number is the percentage available of the total time requested (for example 60) and the second number is the percentage retrieved of the time available (for example 100) For more information on the bar graph status colours see Section 3731 ldquoStatus Coloursrdquo on page 34
You can also view retrieval details for each channel group listed on the Retrieval Status page For more information see Section 3732 ldquoViewing the Retrieval Details for Each Channel Grouprdquo on page 35
3731 Status Colours
The data retrieval status bars use the following status colours
The information that is displayed on the Retrieval Status page is updated continuously while a project is running
Table 3-1 Status colours
Colour Status
Green Apollo Project has retrieved the data
Yellow Apollo Project is attempting to retrieve available data from the Store
Red Data is available in the Store but Apollo Project has failed to retrieve it on this attempt Apollo Project will make additional attempts to retrieve the data up to the configured Maximum Number of Retrieval Attempts For information on how to set the Maximum Number of Retrieval Attempts setting see Section 31 ldquoCreating New Projectsrdquo on page 11
White Data for some portion of the requested time segment is not available in the Store For example there are gaps in the data or the retrieval request is for a future time segment
Chapter 3 Retrieving Data
Apollo Project User Guide16106R5 2009-03-24
35
3732 Viewing the Retrieval Details for Each Channel Group
You can view the retrieval status of each time segment for a channel group
1 Click a channel group name
2 Click the Channel Group Details button that is located to the right of the channel group name
The Remaining Retrieval Attempts column displays the number of times that Apollo Project will try to download each missing time segment for the channel group when the project is run again For information on how to set the Maximum Number of Retrieval Attempts setting see Section 33 ldquoConfiguring Apollo Projectrdquo on page 24
3 Click OK when you have finished viewing the details
Chapter 3 Retrieving Data
36 Apollo Project User Guide16106R5 2009-03-24
Apollo Project User Guide16106R5 2009-03-24
37
Appendix A Reference Information and Examples
Overview of Running Projects
Example Project Settings
Example Deployment Scenarios
Shot File Formats for Controlled Source Projects
A1 Overview of Running ProjectsWhen a project is run Apollo Project performs the following steps
1 The requested time ranges are identified
2 The channel groups for which data are to be retrieved are identified
3 The actual Stores specified by the Store specifications of the project are identified
For each identified Store the following steps are performed
1 A data availability analysis for the outstanding time ranges is performed These are for the ranges for which data has not already been retrieved The availability of the data is recorded for reference It is possible that a given Store was not present at the time the project was last run If this is the case then an attempt is made to retrieve all of the required time ranges of the project from the Store
2 If any data exists in the Store for any of the requested time ranges then a retrieval of this data is performed and the retrieved data is stored to local temporary files
3 If the number of retrieval attempts for a given time range exceeds a configurable threshold (see Section 33 ldquoConfiguring Apollo Projectrdquo on page 24) then the retrieval of data within the stated range is not attempted again
If any data was retrieved during the run of the project then the corresponding output files of the desired output format are generated and stored in the output location specified for the project
When running Apollo Project with Taurus version 2x the schedule for Archive projects must be greater than 5 minutes in duration Schedules that are less than 5 minutes can result in data that is missing or not downloaded
Appendix A Reference Information and Examples
38 Apollo Project User Guide16106R5 2009-03-24
It is possible that the requested data for a given channel group exists across multiple Stores If all of these Stores are included by the Store specifications for the project then Apollo Project assembles the requested data
When a project runs detailed information regarding the results of the retrieved data and processed data are available For more information see Section 37 ldquoMonitoring Project Statusrdquo on page 32
A2 Example Project Settings
A21 Example 1 One Time ProjectProject Name Project1
Project Type One Time
Channel groups selected for retrieval CASTN1OTBHZ (on taurus_1234)
Requested Time Range January 30 2008 1400 ndash 1500 UTC
File Interval 20 minutes
Output Location Base Directory disk2ApolloProjectOutputData
Output Location Subdirectories projectyearmonthday
Output Location Filenamestationnetwork_time
When the project is run successfully the following output files will be created on the server running Apollo Project
disk2ApolloProjectOutputDataProject120080130STN1CA_20080130_140000seed
disk2ApolloProjectOutputDataProject120080130STN1CA_20080130_142000seed
disk2ApolloProjectOutputDataProject120080130STN1CA_20080130_144000seed
Appendix A Reference Information and Examples
Apollo Project User Guide16106R5 2009-03-24
39
A22 Example 2 Controlled Source ProjectProject Name Project2
Project Type Controlled Source
Channel groups selected for retrieval CASTN1OTBHZ (on taurus_1234) CASTN1OTBHN (on taurus_1234)
Requested Shot Times January 30 2008 1400 UTC January 30 2008 1430 UTC
Pre Time 30 seconds
Post Time 30 seconds
Output Location Base Directory disk2ApolloProjectOutputData
Output Location Subdirectories projectyearmonthday
Output Location Filename timeformat
When the project is run successfully the following output files will be created on the server running Apollo Project
disk2ApolloProjectOutputDataProject22008013020080130_135930segysgy
disk2ApolloProjectOutputDataProject22008013020080130_142930segysgy
A3 Example Deployment Scenarios
A31 One TimeYou want to download three days of data from multiple instruments on the network save the data in MiniSEED format and create a file for every hour of data
A One Time project is the recommended solution The Store of each instrument can be made available to Apollo Project by creating a corresponding IP Address Store specification with the IP address of the instrument The requested time range can be specified along with a file interval of one hour Ensure that the instruments are configured to run in Communications mode
A32 Scheduled ArchiveYou want seismic data to be retrieved automatically from a group of instruments on the network every six hours The instruments are always accessible via an Ethernet connection
A scheduled Archive project is the recommended solution Use the Regular Interval scheduling option and set the interval to six hours
You can also run a scheduled Archive project at any time For example if the scheduled retrieval interval of a project is six hours and between intervals you want to retrieve the data three hours early you can run the project and approximately three additional hours of data would be accumulated About three hours later the project will run automatically and accumulate the remaining three hours of data
Appendix A Reference Information and Examples
40 Apollo Project User Guide16106R5 2009-03-24
A33 Manual ArchiveYou want to retrieve seismic data from a group of instruments but their respective Stores are only available for retrieval on occasion (no regular dependable schedule for retrieval from these Stores is possible)
A manually run Archive project is the recommended solution You can create the project and run it whenever any of the instruments are available for retrieval
A34 Field ArchiveYou want to collect data from a set of isolated instruments in the field at recurring intervals (for example twice per month)
A Field Archive project is the recommended solution You can create a Field Archive project and either add all instrument IP addresses to the list or use a Discovery specification The time for the last retrieval is stored on the instrument and all data is recovered from the last recovery time
A35 Media HarvestingYou want to collect the media from a set of instruments in the field at a regular interval (for example once per week) You also have to retrieve all of the seismic data on the media for subsequent analysis
An Archive project is the recommended solution Initially a directory is created on the file system of the server running Apollo Project A directory Store specification is created with this directory as the parent directory from which to search for Stores The content of each media instance in the weekrsquos collection is copied from a media reader to a subdirectory of the directory When the project is run all of the copied Stores are automatically available and the project accumulates data for each instrument
Due to the nature of media harvesting and the replacement procedure for this example data is always missing for the last period of output files for the current week This period corresponds to the time that the media was taken from the instrument and replaced with a new one The following week when the media is harvested again from the instruments in the field Apollo Project fills in the missing time for these files with the new Store data regardless of the media instance on which the data currently resides
You can only create and run Field Archive projects for Taurus version 30 or later
Appendix A Reference Information and Examples
Apollo Project User Guide16106R5 2009-03-24
41
A36 Trigger Downloading You have set up a network of five Tauruses around a hydro dam Each Taurus is accessible over an Ethernet connection and each is set to record data over the weekend You have set the period for data retrieval at 30 seconds before and five minutes after any seismic activity but the following procedure shows you why it is not necessary to view all of the data accumulated over the whole weekend
1 Select the Taurus at the site with the least environmental noise or determine the best site for generating triggers and designate this Taurus ldquoTaurus Ardquo for reference
You need to perform this task in advance More information about triggers can be found in the Taurus Portable Seismograph User Guide
2 Download the trigger file from ldquoTaurus Ardquo and review the file to verify the correct number of triggers
3 Follow these steps to create a new Triggers project
a) Click New on the Apollo Project Existing Projects page
b) Click Triggers as the project type and enter a unique name in the Project Name box
c) Click OK
d) Click the IP Address tab on the Store Selection tab
e) Enter the IP address of a Taurus
f) Click Add
g) Repeat step e until you have entered the IP addresses of all five of the Tauruses
Apollo Project adds the IP address specifications to the Selected Specifications section of the Store Selection page and finds all five Stores associated with the IP addresses and adds them to the Selected Stores section
h) Click the Channel Group Selection tab
i) Click Create Default Station Table to create a table for all of the currently selected Stores and discovered instruments
j) Review the selected channel groups and if required edit the mappings in the selected channel groups area of the tab (lower half of the tab)
k) Click the Time Selection tab
l) Click the Browse button
m)Select the trigger file that you downloaded in step 2 and click OK
n) Click Submit
The list of triggers is imported and displayed in the Triggers section on the Time Selection page
o) Enter a Pre Time of 30 seconds and a Post Time of 5 minutes
p) Click the Output Format tab
q) Click MiniSEED
r) Click All Instruments
s) Click the Output Location tab
Appendix A Reference Information and Examples
42 Apollo Project User Guide16106R5 2009-03-24
t) Enter the valid absolute path of the base directory for the processed data subfolders and files
u) Enter the expression used to define path names for subfolders under the base directory
v) Enter the expression used to define file names for the processed data files that are stored in the subfolders under the base directory
w) Click OK
4 Click the Run Now button on the Summary page
When the project has finished running the output folder you specified in step t will contain ten files Each output file will contain 5 minutes and 30 seconds of data from the five Tauruses
A4 Shot File Formats for Controlled Source ProjectsYou have two options for defining shots for a Controlled Source project manually defining shots or importing shots from a shot file
You can create shot files in one of following three file formats
Microsoft Office Excel (xls) ndash See Section A41 ldquoCreating a Shot File With Microsoft Office Excelrdquo on page 42
OpenOfficeorg Calc (ods) ndash See Section A42 ldquoCreating a Shot File With OpenOfficeorg Calcrdquo on page 44
Comma-Separated Values (csv) ndash See Section A43 ldquoCreating a Comma-Separated Values Shot Filerdquo on page 45
The Shot file templates are located in the docShotFileImport folder on the Apollo Project CD
A41 Creating a Shot File With Microsoft Office ExcelThe Microsoft Office Excel template for Apollo Project can be used with Microsoft Office Excel version 2003 or later
To create an Microsoft Office Excel based shot file
1 Double-click ShotFileTemplatexlt
A new Microsoft Office Excel file is created from the template and opens in the Microsoft Office Excel
2 Save the new spreadsheet as a Microsoft Office Excel document (xls)
3 Enter shot file data as specified in the Microsoft Office Excel spreadsheet
Only the decimal separator is supported for shot files Separators that denote the 3rd power of 10 (thousand) are not supported (for example 4500) The Microsoft Excel and OpenOffice templates reinforce these restrictions and are recommended for creating csv files
Appendix A Reference Information and Examples
Apollo Project User Guide16106R5 2009-03-24
43
You can enter data for multiple shot times
4 Click Save to save the file in Microsoft Office Excel format
5 Click File gt Save As and select CSV (Comma delimited) (csv) from the Save as type list
6 Click Save
7 Click OK on the message warning you that you are only saving the active sheet
8 Click Yes on the message warning you that file features might be incompatible with the csv format
9 Close Microsoft Office Excel
If you are using Microsoft Office Excel 2007 click the Microsoft Office Button and click Save As
Ensure that you save the file as a comma delimited file If the shot file is mistakenly saved in Microsoft Excel format (xls) the shot file will not work in Apollo Project
Appendix A Reference Information and Examples
44 Apollo Project User Guide16106R5 2009-03-24
A42 Creating a Shot File With OpenOfficeorg CalcThe OpenOffice template has been tested with OpenOfficeorg Calc version 23 Later versions of OpenOfficeorg Calc can be used at your discretion
To create a shot file based on the OpenOfficeorg Calc template
1 Double-click ShotFileTemplateots
A new OpenOffice spreadsheet is created from the template and opens in OpenOfficeorg Calc
2 Save the new spreadsheet as an OpenOffice Calc document (ods)
3 Enter the shot file data as specified in the OpenOffice spreadsheet
You can enter data for multiple shot times
4 Click Save to save the file in OpenOfficeorg Calc format
5 Click File gt Save As and select Text CSV (csv) from the Save as Type list
6 Select the Edit filter settings check box
7 Click Save
A warning message might appear that warns you that the document might contain formatting that cannot be saved in the csv format Click Yes on the warning message to save the file in csv format
The Export of text files window opens
8 Delete the double quotation marks () in the Text delimiter box and ensure that the Save cell content as shown check box is selected
9 Click OK to export the OpenOffice spreadsheet as a csv file
10 Click OK on the warning message
11 Close OpenOfficeorg Calc
Appendix A Reference Information and Examples
Apollo Project User Guide16106R5 2009-03-24
45
A43 Creating a Comma-Separated Values Shot FileYou can use any text editor to create a csv shot file
To create a csv shot file
1 Open ShotFileTemplatecsv in a text editor and save it with a different name
2 Format each line of the csv file as follows
Shot TimePre TimePost TimeLatitudeLongitudeElevation
For example
2008-08-28 103044090600000-6000004267
The format and units are as follows
3 Save the file as a csv formatted file
The csv shot file template is not compatible with Microsoft Office Excel Make sure that you do not double-click it and open it in Microsoft Office Excel
FormatUnits
Shot Time yyyy-mm-dd hhmmss
Pre Time seconds
Post Time seconds
Latitude degrees
Longitude degrees
Elevation meters
Appendix A Reference Information and Examples
46 Apollo Project User Guide16106R5 2009-03-24
Apollo Project User Guide16106R5 2009-03-24
47
Appendix B Retrieving SOH Data from a Taurus Version 2x
Taurus Version 2x SOH Data Retrieved by Apollo Project
Retrieving SOH Data from a Taurus Version 2x Streaming to Apollo Server
B1 Taurus Version 2x SOH Data Retrieved by Apollo Project This section presents the predefined datasets of SOH data Apollo Project will retrieve from a Taurus version 2x either through a direct connection or a stream to Apollo Server For instruction on retrieving streaming Taurus version 2x data from Apollo Server see Section B2 ldquoRetrieving SOH Data from a Taurus Version 2x Streaming to Apollo Serverrdquo on page 48
The order of the columns presented in the table below will differ when streaming Taurus version 2x SOH data from Apollo Server
Predefined SOH group SOH data
GPS Time Time (longsecs) (the number of seconds since 1970-01-01)Time (UTC) (time in yyyy-mm-dd hhmmssms format)Altitude (m)DAC CountError (ns) (time error)GPS Engine StatusLast Update Time(s)Lat (deg) (latitude in degrees)Long (deg) (longitude in degrees)NumSatellites (number of satellites used)PDOPPhaseLock (system clock phase lock)TDOPUncertainty (ns) (time uncertainty)
Note The values for Number of satellites used PDOP and TDOP are provided by the GPS receiver at the Last update time In order to see what time these values correspond to look at the Last update time When GPS is off these three parameters and the Last update time are not updated The last value displays until the next update arrives (after the GPS is turned on again)
Appendix B Retrieving SOH Data from a Taurus Version 2x
48 Apollo Project User Guide16106R5 2009-03-24
B2 Retrieving SOH Data from a Taurus Version 2x Streaming to Apollo ServerThis section provides instruction on configuring your Taurus version 2x to stream data to Apollo Server and instructions on how to use Apollo Project to retrieve this data from Apollo Server
B21 Streaming Data from a Taurus Version 2x to Apollo ServerUse the Taurus graphical user interface on either the Taurus display screen or through a Web browser to set up an NP stream from a Taurus version 2x to Apollo Server
1 Log in to the Taurus version 2x with either the tech or central user account
2 Select Advanced Configuration gt Communications gt NP Data Streaming
GPS Satellites Time (longsecs) (the number of seconds since 1970-01-01)Time (UTC) (time in yyyy-mm-dd hhmmssms format)
For each satelliteAcquisition FlagLast Update Time (ms)PRNSatellite Azimuth (microordm)Satellite Elevation (microordm)Signal Level (AMU)
Environment Time (longsecs) (the number of seconds since 1970-01-01)Time (UTC) (time in yyyy-mm-dd hhmmssms format)External SOH Voltage 1 (V) (12-bit voltage input) External SOH Voltage 2 (V) (12-bit voltage input) External SOH Voltage 3 (V) (12-bit voltage input) External SOH Voltage 4 (V) (12-bit voltage input) Sensor SOH Voltage 1 (V)Sensor SOH Voltage 2 (V)Sensor SOH Voltage 3 (V)
Instrument Time (longsecs) (the number of seconds since 1970-01-01)Time (UTC) (time in yyyy-mm-dd hhmmssms format)Controller Current (mA)Digitizer Current (mA)NMX Bus Current (mA) (external connector)Sensor Current (mA)Serial Port Current (mA)Supply Voltage (mV)Temperature (ordmC)
Predefined SOH group SOH data
Appendix B Retrieving SOH Data from a Taurus Version 2x
Apollo Project User Guide16106R5 2009-03-24
49
3 To have the Taurus stream both time series and SOH data to Apollo Server select both Stream Time Series and Stream SOH
-OR-
Select only Stream SOH if you only want to retrieve the SOH data from Apollo Server
4 Type the IP address for Apollo Server in the IP Address box
5 Type the port number Apollo Server uses to receive data in the Port box By default this is port number 32008
6 The Second IP Address and Second Port boxes are not necessary however cannot be left blank Type 127001 in the Second IP Address box and 32004 in the Second Port box
7 Type a value in the Maximum Throughput [bps] box if a limited data link is present between the Taurus and Apollo Server For instance if at some point the data link is limited to 9600 bps then this is the maximum throughput the link can allow If there are no throughput limitations set the value in this box to zero to disable the throughput limitation
8 Click Apply
9 Click Commit
B22 Retrieving Taurus Version 2x Data from Apollo ServerCreate a new project or use an existing project in Apollo Project to retrieve the Taurus version 2x data from Apollo Server For more information on creating or editing projects refer to Section 31 ldquoCreating New Projectsrdquo on page 11 and Section 36 ldquoEditing and Viewing the Settings of Projectsrdquo on page 31
When creating or editing the project
a) Add an IP address Store specification on the Store Selection tab (see step 4 in Section 31 ldquoCreating New Projectsrdquo) for Apollo Server including its client Web application port number Use the format
Apollo Server IP AddressApollo Server Client Web Application Port Number
b) Apply the appropriate filters on the Channel Group Selection tab to retrieve the desired channel groups from the Taurus version 2x See step 5 through step 12 in Section 31 ldquoCreating New Projectsrdquo for instruction on using the Channel Group Selection tab
Appendix B Retrieving SOH Data from a Taurus Version 2x
50 Apollo Project User Guide16106R5 2009-03-24
Apollo Project User Guide16106R5 2009-03-24
51
Appendix C Glossary
Glossary of Abbreviations and Terms
List of Unit Abbreviations and Symbols
C1 Glossary of Abbreviations and Terms
A
ASCIIAmerican Standard Code for Information Interchange
B
BHEBroad Band High Gain Seismometer East-West Orientation
Channel name based on the Global Seismological Network (GSN) standard
BHNBroad Band High Gain Seismometer North-South Orientation
Channel name based on the Global Seismological Network (GSN) standard
BHZBroad Band High Gain Seismometer Vertical Orientation
Channel name based on the Global Seismological Network (GSN) standard
Appendix C Glossary
52 Apollo Project User Guide16106R5 2009-03-24
C
CSVComma-Separated Values
D
DACDigital to Analog Converter
G
GPSGlobal Positioning System
J
JREJava Runtime Environment
JVMJava Virtual Machine
N
NFSNetwork File System
P
PDOPPosition Dilution of Precision
PRNPseudo-random Number
Appendix C Glossary
Apollo Project User Guide16106R5 2009-03-24
53
S
SACSeismic Analysis Code
An Apollo Project output file format that generates files that can be used by the SAC software (see http wwwirisedusoftwaresac)
SEEDStandard for the Exchange of Earthquake Data
SMBServer Message Block
SOHState of Health
T
TCPIPTransmission Control ProtocolInternet Protocol
TDOPTime Dilution of Precision
U
UNCUniform Naming Convention or Universal Naming Convention
URLUniform Resource Locator
UTCCoordinated Universal Time
Appendix C Glossary
54 Apollo Project User Guide16106R5 2009-03-24
C2 List of Unit Abbreviations and SymbolsTable C-1 provides a list of unit abbreviations and symbols commonly used in Nanometrics documentation
Table C-1 Unit abbreviations and symbols
Abbreviation or Symbol Definition Abbreviation
or Symbol Definition
deg degree lb pound
Oslash diameter m metre
micro micro ms metre per second
Ω ohm ms2 metre per second squared
A ampere mA milliampere
AC alternating current MB megabyte
b bit MΩ megaohm
B byte MHz megahertz
bps bits per second mi mile
C Celsius mL millilitre
cm centimetre mm millimetre
dB decibel ms millisecond
DC direct current MTU maximum transmission unit
F farad mV millivolt
ft foot mW milliwatt
g gram N Newton
g gravity nF nanofarad
GB gigabyte ns nanosecond
GHz gigahertz rad radian
Hz hertz rads radian per second
in inch s second
KB kilobyte sps samples per second
kg kilogram U rack unit
kHz kilohertz V volt
kΩ kiloohm Vpp Volts peak-to-peak
kW kilowatt W watt
L litre
Apollo Project User Guide16106R5 2009-03-24
55
About NanometricsNanometrics is a world leader in the development of precision instrumentation network technology and software applications for seismological and environmental studies Using Nanometrics technology our customers establish and grow research networks that are often located in extreme environments such as the frozen Arctic and Antarctic the arid deserts of the Middle East the jungles of South America and the depths of the worlds oceans Many of these are mission-critical national and regional networks that demand the highest possible data quality and availability
Nanometrics provides end-to-end solutions that include a growing portfolio of broadband and strong motion seismometers dataloggers and digitizers satellite ground station systems for remote site data collection and software applications for data and network analysis and management To support this portfolio Nanometrics also provides global systems engineering services for design installation and support of complete networks
Our head office research and development centre and production facility are located in the Kanata North Business Park of Ottawa the high-technology heart of Canadas capital region
Contacting NanometricsNanometrics Inc250 Herzberg RoadKanata Ontario Canada K2K 2A1Phone +1 613-592-6776Fax +1 613-592-5929Email infonanometricscaWeb wwwnanometricsca
Contacting Technical SupportIf you need technical support please submit a request on the Nanometrics technical support site or by email or fax Include a full explanation of the problem and related information such as log filesSupport site httpsupportnanometricsca
Email techsupportnanometricsca
Chapter 3 Retrieving Data
Apollo Project User Guide16106R5 2009-03-24
17
Project type DescriptionSteps
Archive Archive projects attempt to retrieve data up to the current timeThe time ranges for which output files will be produced are driven from the file interval and are aligned to the project start time It is therefore unlikely that the ldquomost recentrdquo file interval will align with the current time Therefore the most recent range for which data retrieval is attempted will have a portion of its data retrieved and the remainder (for future retrieval) will be declared unavailable However when the project is run later (after the end of the particular time range) the unavailable data will normally be retrieved and the situation will likely repeat itself with the ldquonewrdquo last range to retrieveTo run an Archive project manually1 If required edit the start time for the project2 Click Manual3 Specify the file interval
For example if you specify 2 hours then one file is created every 2 hours If the duration for the project is one day then a total of 12 files will be created
4 After you have finished creating the project click Run Now on the Summary page to run the project
To schedule an Archive project to run automatically at a regular interval1 Click Regular Interval and select the interval 2 Specify the file interval
For example if you specify 2 hours then one file is created every 2 hours If the duration for the project is one day then a total of 12 files will be created
3 After you have finished creating the project click Start Schedule on the Summary page to start the schedule for the project and click OK twice The project will run according to the interval you specified after you start the schedule For example if you click Start Schedule on a Wednesday and you specified every 2 days as the interval then the project will run for the first time on Friday and every two days after that If the computer has been rebooted and the Apollo Project Web server has been restarted the project will run according to the interval you specified after the computer has rebooted For example if the computer reboots on a Wednesday and you specified every 2 days as the interval then the project will run for the next time on Friday and every two days after that
Note Archive projects that are defined as scheduled projects can also be run manually at any timeTo schedule an Archive project to run automatically on a weekly basis1 If required edit the start time for the project2 Click Weekly Schedule and select the time and days of the week 3 Specify the file interval
For example if you specify 2 hours then one file is created every 2 hours If the duration for the project is one day then a total of 12 files will be created
4 After you have finished creating the project click Start Schedule on the Summary page to start the schedule for the project and click OK twice After you have finished creating the project the project will run for the first time according to the project start time and then it will run on a weekly basis according to the times and days you specified
Note Archive projects that are defined as scheduled projects can also be run manually at any time
Chapter 3 Retrieving Data
18 Apollo Project User Guide16106R5 2009-03-24
One Time A One Time project retrieves a single time segmentTo specify the start and end times for a One Time project1 If required edit the start time for the project2 Click End Time and enter an end time
-OR-Click Duration and specify the duration of the project The duration is the length of the requested time segment
3 Specify the file intervalFor example if you specify 2 hours then one file is created every 2 hours If the duration for the project is one day then a total of 12 files will be created
4 After you have finished creating the project click Run Now on the Summary page to run the project
Controlled Source
A Controlled Source project retrieves data specified as a set of individually entered shots and outputs the data in SEGY format To specify shots using a shots file1 Click Browse select a shots file and click OK2 Click Submit
The list of shots is imported and displayed in the Shot List section on the Time Selection page
Note For more information see Section A4 ldquoShot File Formats for Controlled Source Projectsrdquo on page 42To manually define shots1 Enter a shot time2 If required enter the latitude longitude and elevation3 If required select the pre-shot time period4 Select the post-shot time period5 Click Add
The shot is added to the Shot List section on the Time Selection page Triggers A Triggers project uses a CSV-formatted trigger list to specify the data to be
retrieved for example a trigger file that has been downloaded from a Taurus to the local computerTo define triggers1 Click Browse select a CSV triggers file and click OK2 Click Submit
The list of triggers is imported and displayed in the Triggers section on the Time Selection page
3 Select the pre-trigger and post-trigger time periodsThe pre-trigger and post-trigger time periods are used for all of the triggers
Project type DescriptionSteps
Chapter 3 Retrieving Data
Apollo Project User Guide16106R5 2009-03-24
19
14 If you selected a Controlled Source as the project type in step 2 go to step 17
You do not have to select an output format for a Controlled Source project because the output format for a Controlled Source project is always SEGY one output file is generated for all instruments and the stations are sorted by StationNameNetworkName
-OR-
If you selected one of the other project types go to step 15 to select an output format
15 Click the Output Format tab
Field Archive A Field Archive project is used for recurring data retrievals that occur at specified intervals The time of the last retrieval is stored on the instrumentTo define the start time and file interval1 If required edit the start time for the project2 Specify the file interval
For example if you specify 2 hours then one file is created every 2 hours3 If you want partial files retrieved select the Include last interval even if
incomplete check box You should only select this option when the retrieval of partial files is more important than retrieving the data for the current interval during a future project run
Be careful when specifying the file interval For example retrieving many hours or days of data and specifying a file interval of seconds or minutes could result in the generation of many files This is not only very resource intensive but could result in a data management problem as well
Project type DescriptionSteps
Chapter 3 Retrieving Data
20 Apollo Project User Guide16106R5 2009-03-24
16 Perform the following steps to select an output format
Output format Steps
MiniSEED 1 Click MiniSEED2 Click Per channel group to generate one output file per channel group
You must add the channel token to the Subdirectories or Filename box on the Output Location tab when choosing Per channel group-OR-Click Per instrument to generate one output file per instrument-OR-Click All Instruments to generate one output file for all instruments
3 Select the Sort check box if you want the output data sorted by timeData is put in a Store in the order received and this order may not always be chronological To ensure that the data in the resulting SEED file is chronological select Sort
4 Select the data record sizeThe default record size is 512 B However not all SEED file readers will support this file size Determine what your SEED reader supports and select an appropriate value The options are 512 B 1024 B 2048 B and 4096 B Note that a smaller record size will result in quicker SEED file output
Note The number of output files is determined by the file interval that you set on the Time Selection page
SAC 1 Click SACYou must add the channel token to the Subdirectories or Filename box on the Output Location tab when choosing SAC as the output format
NotesThere are two types of SAC files binary and ASCII Apollo Project only outputs binary SAC filesOne output file per channel group is generated
SEGY 1 Click SEGY2 Click Per channel group to generate one output file per channel group
You must add the channel token to the Subdirectories or Filename box on the Output Location tab when choosing Per channel group-OR-Click Per instrument to generate one output file per instrument-OR-Click All Instruments to generate one output file for all instruments
3 Select the Sort check box if you want the stations sorted by StationNameNetworkName
NotesAll stations must have the same sample rateThe maximum number of samples per trace is 32767SEGY trace headers from discovered instruments will not have station location information
Chapter 3 Retrieving Data
Apollo Project User Guide16106R5 2009-03-24
21
17 Click the Output Location tab
18 If you defined a default base directory when you configured Apollo Project and want to use it for this project go to step 21
For more information see Section 33 ldquoConfiguring Apollo Projectrdquo on page 24
-OR-
Enter the valid absolute path of the base directory for the processed data subdirectories and files
If the base directory you entered does not exist click Create to create it
19 If you defined a default expression for subdirectories when you configured Apollo Project and want to use it for this project go to step 21
For more information see Section 33 ldquoConfiguring Apollo Projectrdquo on page 24
-OR-
Enter the expression used to define path names for subfolders under the base directory
You can enter tokens in any order including any additional characters that are valid for paths
Seisan 1 Click Seisan
NotesYou must have Seisan installed on your computer with a WAVEFORM_BASE and CONT_BASE line included for each station in the DATSEISANDEF file You must define a SEISAN_TOP environment variableOne output file per channel group is generated
Regardless of the output format selected SOH channel group data is always output in CSV format
The Base Directory is the root of all data retrieved for the project and can be defined at any location in the file system of the server running Apollo Project including a networked drive on a separate server If you want to create or use a directory on a computer on the network you have to enter the server and share name in a modified UNC format that is prefixed by an additional two backslashes For example the usual fileserver1storefiles must be written as fileserver1storefiles
Large amounts of data can be stored in this location You must ensure that adequate disk space is available
For deployments of Apollo Project where the clients are not running on the server it is recommended that the file system containing the base directory on the server be shared or exported as a networked file system
It is not recommended that you use the channel token in the subdirectories expression if the project includes more than one channel group per instrument (selected on the Channel Group Selection tab) and the output is not per channel group (selected on the Output Format tab)
Output format Steps
Chapter 3 Retrieving Data
22 Apollo Project User Guide16106R5 2009-03-24
20 If you defined a default expression for file names when you configured Apollo Project and want to use it for this project go to step 21
For more information see Section 33 ldquoConfiguring Apollo Projectrdquo on page 24
-OR-
Enter the expression used to define file names for the processed data files that are stored in the subfolders under the base directory
You can enter tokens in any order including any additional characters that are valid for file names
21 Click OK to save the new project
The new project is created and the Summary page is displayed
32 Creating a Station Table FileYou can create a mapping between a given instrumentchannel group (for example taurus_1234digitizertimeSeries1) and a corresponding network station location and channel name These mappings are stored in a station table file and the mapped channel group names are used in the output files
You can create a station table file and use it as the default for all projects or you can create a station table for individual projects
To create a station table file and set is as the default
1 Click the configuration button in the upper right corner
2 Specify the network name location and channel names on the Behaviour and Defaults dialog box and click OK to save the new settings
The settings you enter here are used as the channel names in the station table file You can edit these settings in step 8
For more information on configuring Apollo Project settings see Section 33 ldquoConfiguring Apollo Projectrdquo on page 24
3 Click New on the Apollo Project Existing Projects page
Do not use the channel token in the filename expression if the project includes more than one channel group per instrument (selected on the Channel Group Selection tab) and the output is not per channel group (selected on the Output Format tab)
The Sample Path shows an example of a file name generated using the values for the Base Directory Subdirectories and Filename settings
You can only edit the settings of a project before it has run for the first time or been scheduled (Archive project) If you want to edit the settings of a project after it has already run once or been scheduled you can copy the project (see Section 345 ldquoCopying a Projectrdquo on page 28) and then edit the settings for the copy
It is recommended that you create a station table file and set it as the default for all projects You can update the mappings in this file when new Stores are added or discovered
Chapter 3 Retrieving Data
Apollo Project User Guide16106R5 2009-03-24
23
4 Type Station Table in the Project Name box and click any project type
5 Click OK
6 Click the Store Selection tab and select as many Stores as possible
See step 4 of Section 31 ldquoCreating New Projectsrdquo for information on how to add specifications and select Stores
7 Click the Channel Group Selection tab and click Create Default Station Table
A station table file is created and the name of the file is displayed in the Station Table File Name box
8 Edit the station table channel group mappings in the selected channel groups area of the tab (lower half of the tab) as required
The NetworkStationLocationChannel names will appear in the output files If the Location is empty it is interpreted as the SEED default of two spaces
9 Click OK to close the project and finish creating the station table
10 Click the configuration button in the upper right corner
11 Enter the path and name of the station table file you just created in the Station Table File Name box on the Behaviour and Defaults dialog box
12 Click OK to save the new settings
The station table file you specified will be used as the default for all future projects You can open the Station Table project and edit the station table file if you need to add more Stores or change the mappings
For more information on configuring Apollo Project settings see Section 33 ldquoConfiguring Apollo Projectrdquo on page 24
Make a note of the path of the station table file because you will have to enter it on the Behaviour and Defaults dialog box to set it as the default for all projects
Valid characters for the network station location and channel in the NetworkStationLocationChannel box are upper case letters A to Z numbers 0 to 9 and spaces are also acceptable for the location
Chapter 3 Retrieving Data
24 Apollo Project User Guide16106R5 2009-03-24
33 Configuring Apollo ProjectYou can configure basic settings for Apollo Project and the default settings for new projects The changes you make to the project default settings only apply to new projects
To configure Apollo Project
1 Click the configuration button in the upper right corner
2 Edit the following settings
Setting Description
Log Verbosity The level of detail that is logged by Apollo ProjectThe default setting is Info
Log Location The default name of the Apollo Project log folder Maximum Number of Retrieval Attempts
The maximum number of single retrieval attempt made for all missing time segments on all channel groups every time a project is run Enter an integer from 0 through 1000 The default value is 8
Notes If the Taurus is busy when a retrieval attempt is made the number of remaining retrieval attempts is not decreased by one attemptYou can view the channel group details page to see if there are any remaining retrieval attempts for any channel groups (see Section 373 ldquoMonitoring the Status of a Running Projectrdquo on page 34)
Number Of Retries The number of times Apollo Project attempts to connect to a data source if there is a network connectivity problem Enter an integer from 0 through 1000 The default value is 3
Note Every time a project is run it starts with the maximum number of retries
Retry Interval (secs) The amount of time in seconds that Apollo Project waits before trying to connect to a data source againEnter an integer from 0 through 1000 The default value is 5
Station Table File Name The file name and location of the station table file that is used to assign station names to all of the selected channel groupsA station table is used to assign names to all of the selected channel groups For more information see Section 32 ldquoCreating a Station Table Filerdquo on page 22No station table file is specified by default
Chapter 3 Retrieving Data
Apollo Project User Guide16106R5 2009-03-24
25
Base Directory The folder name and location of the base directory for the processed data subfolders and files Enter any valid folder name and location including any additional characters that are valid for paths The default base directory name is ApolloProject
Notes The Base Directory is the root of all data retrieved for the project and can be defined at any location in the file system of the server running Apollo Project including a shared folder on a different computer If you want to create or use a folder on a computer on the network you have to enter the server and share name in a modified UNC format that is prefixed by an additional two backslashes For example the usual fileserver1storefiles must be written as fileserver1storefilesLarge amounts of data can be stored in this location You must ensure that adequate disk space is availableFor deployments of Apollo Project where the clients are not running on the server it is recommended that the file system containing the base directory on the server be shared or exported as a networked file system
Subdirectories The expression used to define path names for subfolders under the base directoryEnter tokens in any order including any additional characters that are valid for paths The default path name is as follows projectyearmonthday
Filename The expression used to define file names for the processed data files that are stored in the subfolders under the base directoryEnter tokens in any order including any additional characters that are valid for file names The default filename is as follows instrument_time
Sample Path An example of a file name generated using the values for the Base Directory Subdirectories and Filename settings
Network Name A standard network codeEnter any two upper case letters or numbers The default code is XX
Location A location within a stationEnter any two upper case letters numbers or spaces
The default location is two spaces for ldquononerdquo You must delete the two default spaces if you enter a new location value
Setting Description
Chapter 3 Retrieving Data
26 Apollo Project User Guide16106R5 2009-03-24
3 Click OK to save the new settings
34 Managing ProjectsYou can view open close copy and delete projects Also you can create convenient links to run your individual projects with desktop shortcuts
341 Viewing Existing Projects1 Click Projects in the Projects bar
2 View the projects listed on the Existing Projects page
The Existing Projects page shows a list of all projects and a status overview of each project For more information see Section 371 ldquoViewing an Overview of the Status of All Projectsrdquo on page 32
Channel 1 Name A channel codeEnter any three upper case letters or numbersThe default channel code is BHZ
Channel 2 Name A channel codeEnter any three upper case letters or numbersThe default channel code is BHN
Channel 3 Name A channel codeEnter any three upper case letters or numbersThe default channel code is BHE
Setting Description
Chapter 3 Retrieving Data
Apollo Project User Guide16106R5 2009-03-24
27
342 Opening a Project1 Click the project name under the Name column on the Existing Projects page
2 Click the Open Project button
343 Creating a Desktop Shortcut to a ProjectLaunching a project with a desktop shortcut will open Apollo Project to that project and run the project
Methods for creating desktop shortcuts to Web sites vary from browser to browser These procedures explain how to create desktop shortcuts to specific projects for both Mozilla Firefox 3 and Microsoft Internet Explorer 7 Desktop shortcuts to projects include the Apollo Project icon and are titled in the format Project Name ndash Apollo Project
In Firefox 3
1 Open the project you want to create a shortcut to in Firefox
2 Reduce the size of the Firefox window so that the desktop is visible
3 Drag the Site Identification Button onto the desktop
The Site Identification Button is located to the left of the Location Bar and displays the Apollo Project icon
In Internet Explorer 7
1 Open the project you want to create a shortcut to in Internet Explorer
2 Press ALT+F
3 Select Send gt Shortcut to Desktop
344 Closing a Project
1 Click the Close Project button in the Projects bar
Launching a desktop shortcut to a project automatically runs that project It is important to note that once a project is run its settings can no longer be edited It is recommended that desktop shortcuts only be created for Field Archive projects
Firefox is the recommended browser for Apollo Project
Chapter 3 Retrieving Data
28 Apollo Project User Guide16106R5 2009-03-24
345 Copying a Project
1 Select the project name under the Name column on the Existing Projects page
2 Click Copy
3 Enter a unique name for the new project and click OK
4 Click Edit and edit the settings as required
5 Click OK to save the project after you have finished editing the settings
346 Deleting a ProjectWhen you delete a project only files in the temporary folder are deleted All processed data files are not deleted
1 Click the project name under the Name column on the Existing Projects page
2 Click Delete
3 Click OK on the confirmation message
35 Running ProjectsFor all project types you can run a project manually at any time Archive projects can also be defined to run automatically on a schedule
If it is a scheduled Archive Project and the schedule is started click Cancel Schedule before you create a copy of it (If the schedule is not started the Start Schedule button is visible if the schedule is started the Cancel Schedule button replaces the Start Schedule button)
Apollo Project stores intermediate files in a temporary subdirectory of the Base Directory specified for the output location of a project These intermediate files correspond to the actual channel group data retrieved from the Stores referenced by the project If a project is deleted from Apollo Project these temporary files will be removed automatically
Disk space can also be reclaimed by removing these temporary files manually without deleting the project However if the project is run again the output files produced might be incomplete if previously retrieved data from these temporary files is required
For more information on what happens when a project runs see Section A1 ldquoOverview of Running Projectsrdquo on page 37
Chapter 3 Retrieving Data
Apollo Project User Guide16106R5 2009-03-24
29
351 Running a Project1 Open a project
2 Click Run Now on the Summary page to start the project
The project starts running and the Retrieval Status page is displayed
352 Stopping a Project1 Open a project
2 Click Cancel Run on the Summary page to stop the project
3 Click OK on the success message
353 Merging Project Data FilesYou have the option to merge all of the downloaded data for the stations and instruments into one file per interval for each project
1 Open a project
2 Click Merge
A single file is generated for each time period The time period is determined by the file interval you specified on the Time Selection page when you created the project For more information see step 13 of Section 31 ldquoCreating New Projectsrdquo on page 11
The original data files are not modified when you select the option to merge project data files
You can also click Run Now on the Retrieval Status page to start a project
For more information on what happens when a project runs see Section A1 ldquoOverview of Running Projectsrdquo on page 37
You can also click Cancel Run on the Retrieval Status page to stop a project
You cannot merge data from Archive projects and you cannot merge data in the Seisan format
You can also click Merge on the Retrieval Status page to merge the data from a project
Chapter 3 Retrieving Data
30 Apollo Project User Guide16106R5 2009-03-24
354 Running a Scheduled Archive Project1 Open a project
2 Click Start Schedule to start the project schedule
3 Click OK on the confirmation message
4 Click OK on the success message
For a project scheduled to run weekly the project will run for the first time according to the project start time and then it will run on a weekly basis according to the times and days you specified
For a project scheduled to run at a regular interval the project will run according the to interval you specified after you start the schedule For example if you click Start Schedule on a Wednesday and you specified every 2 days as the interval then the project will run for the first time on Friday and every two days after that
3541 Cancelling a Schedule
If you cancel a scheduled project before it runs for the first time you can edit the project settings
If you cancel a project that is currently running the current project runs to completion but subsequent project runs will not occur
1 Open a project
2 Click Cancel Schedule to cancel the project schedule
3 Click OK on the confirmation message
4 Click OK on the success message
You can also click Start Schedule on the Retrieval Status page to start the schedule of a project
You can restart the schedule by opening the project and clicking Start Schedule
You can also click Cancel Schedule on the Retrieval Status page to cancel the schedule of a project
Chapter 3 Retrieving Data
Apollo Project User Guide16106R5 2009-03-24
31
36 Editing and Viewing the Settings of ProjectsYou can edit the settings of a project before it has run After it has run you can view the settings
361 Editing Project Settings1 Open the project
2 Click Edit on the Summary page
3 Edit the settings as required
4 Click OK to save the changes
362 Viewing Project Settings1 Open the project
2 Click View on the Summary page
3 Click the tabs to view the settings
4 Click Cancel when you have finished viewing the settings
You can only edit the settings of a project before it has run for the first time or been scheduled (Archive project) If you want to edit the settings of a project after it has already run once or been scheduled you can copy the project (see Section 345 ldquoCopying a Projectrdquo on page 28) and then edit the settings for the copy
Settings For more information
Store Selection See step 4 of Section 31 ldquoCreating New ProjectsrdquoChannel Group Selection See step 5 to step 12 of Section 31 ldquoCreating New ProjectsrdquoTime Selection See step 13 of Section 31 ldquoCreating New ProjectsrdquoOutput Format See step 15 and step 16 of Section 31 ldquoCreating New ProjectsrdquoOutput Location See step 17 to step 20 of Section 31 ldquoCreating New Projectsrdquo
You can also click Edit on the Retrieval Status page to edit the settings of a project
You can also click View on the Retrieval Status page to edit the settings of a project
Chapter 3 Retrieving Data
32 Apollo Project User Guide16106R5 2009-03-24
37 Monitoring Project StatusYou can monitor the status of a project by viewing information on the Existing Projects Summary and Retrieval Status pages
371 Viewing an Overview of the Status of All ProjectsThe Existing Projects page is the default home page of Apollo Project You see this page when you first open Apollo Project or when you click Projects in the projects bar For more information see Section 341 ldquoViewing Existing Projectsrdquo on page 26
You can view the following information for all projects on the Existing Projects page
bull Name
bull Type
bull Current status
bull Last time the project run
bull Status of data retrieved
The Data Retrieved bars on the Existing Projects page show the overall status of the data retrieval For more information see Section 3731 ldquoStatus Coloursrdquo on page 34
Chapter 3 Retrieving Data
Apollo Project User Guide16106R5 2009-03-24
33
372 Viewing the Status of an Individual ProjectWhen you open a project a detailed summary of the project is shown on the Summary page For more information see Section 342 ldquoOpening a Projectrdquo on page 27
You can view the following information for each project on the Summary page
bull Date it was created
bull Date it was last modified
bull Current status
bull Last time it ran
bull Next time it will run
You can also view a summary of all of the settings you specified when you created the project (Store specifications selected Stores selected time series channel groups selected SOH channel groups start and end times number of files generated file interval and output format and locations)
All times are reported using the UTC time zone
Chapter 3 Retrieving Data
34 Apollo Project User Guide16106R5 2009-03-24
373 Monitoring the Status of a Running ProjectYou can view the data retrieval status of a project while it is running on the Retrieval Status page The Retrieval Status page is displayed automatically when you click Run Now to run a project You can also view this page by opening a project and clicking the Retrieval Status tab
The status for each channel group is expressed in the form of two numbers (for example 60100) and two bar graphs The first number is the percentage available of the total time requested (for example 60) and the second number is the percentage retrieved of the time available (for example 100) For more information on the bar graph status colours see Section 3731 ldquoStatus Coloursrdquo on page 34
You can also view retrieval details for each channel group listed on the Retrieval Status page For more information see Section 3732 ldquoViewing the Retrieval Details for Each Channel Grouprdquo on page 35
3731 Status Colours
The data retrieval status bars use the following status colours
The information that is displayed on the Retrieval Status page is updated continuously while a project is running
Table 3-1 Status colours
Colour Status
Green Apollo Project has retrieved the data
Yellow Apollo Project is attempting to retrieve available data from the Store
Red Data is available in the Store but Apollo Project has failed to retrieve it on this attempt Apollo Project will make additional attempts to retrieve the data up to the configured Maximum Number of Retrieval Attempts For information on how to set the Maximum Number of Retrieval Attempts setting see Section 31 ldquoCreating New Projectsrdquo on page 11
White Data for some portion of the requested time segment is not available in the Store For example there are gaps in the data or the retrieval request is for a future time segment
Chapter 3 Retrieving Data
Apollo Project User Guide16106R5 2009-03-24
35
3732 Viewing the Retrieval Details for Each Channel Group
You can view the retrieval status of each time segment for a channel group
1 Click a channel group name
2 Click the Channel Group Details button that is located to the right of the channel group name
The Remaining Retrieval Attempts column displays the number of times that Apollo Project will try to download each missing time segment for the channel group when the project is run again For information on how to set the Maximum Number of Retrieval Attempts setting see Section 33 ldquoConfiguring Apollo Projectrdquo on page 24
3 Click OK when you have finished viewing the details
Chapter 3 Retrieving Data
36 Apollo Project User Guide16106R5 2009-03-24
Apollo Project User Guide16106R5 2009-03-24
37
Appendix A Reference Information and Examples
Overview of Running Projects
Example Project Settings
Example Deployment Scenarios
Shot File Formats for Controlled Source Projects
A1 Overview of Running ProjectsWhen a project is run Apollo Project performs the following steps
1 The requested time ranges are identified
2 The channel groups for which data are to be retrieved are identified
3 The actual Stores specified by the Store specifications of the project are identified
For each identified Store the following steps are performed
1 A data availability analysis for the outstanding time ranges is performed These are for the ranges for which data has not already been retrieved The availability of the data is recorded for reference It is possible that a given Store was not present at the time the project was last run If this is the case then an attempt is made to retrieve all of the required time ranges of the project from the Store
2 If any data exists in the Store for any of the requested time ranges then a retrieval of this data is performed and the retrieved data is stored to local temporary files
3 If the number of retrieval attempts for a given time range exceeds a configurable threshold (see Section 33 ldquoConfiguring Apollo Projectrdquo on page 24) then the retrieval of data within the stated range is not attempted again
If any data was retrieved during the run of the project then the corresponding output files of the desired output format are generated and stored in the output location specified for the project
When running Apollo Project with Taurus version 2x the schedule for Archive projects must be greater than 5 minutes in duration Schedules that are less than 5 minutes can result in data that is missing or not downloaded
Appendix A Reference Information and Examples
38 Apollo Project User Guide16106R5 2009-03-24
It is possible that the requested data for a given channel group exists across multiple Stores If all of these Stores are included by the Store specifications for the project then Apollo Project assembles the requested data
When a project runs detailed information regarding the results of the retrieved data and processed data are available For more information see Section 37 ldquoMonitoring Project Statusrdquo on page 32
A2 Example Project Settings
A21 Example 1 One Time ProjectProject Name Project1
Project Type One Time
Channel groups selected for retrieval CASTN1OTBHZ (on taurus_1234)
Requested Time Range January 30 2008 1400 ndash 1500 UTC
File Interval 20 minutes
Output Location Base Directory disk2ApolloProjectOutputData
Output Location Subdirectories projectyearmonthday
Output Location Filenamestationnetwork_time
When the project is run successfully the following output files will be created on the server running Apollo Project
disk2ApolloProjectOutputDataProject120080130STN1CA_20080130_140000seed
disk2ApolloProjectOutputDataProject120080130STN1CA_20080130_142000seed
disk2ApolloProjectOutputDataProject120080130STN1CA_20080130_144000seed
Appendix A Reference Information and Examples
Apollo Project User Guide16106R5 2009-03-24
39
A22 Example 2 Controlled Source ProjectProject Name Project2
Project Type Controlled Source
Channel groups selected for retrieval CASTN1OTBHZ (on taurus_1234) CASTN1OTBHN (on taurus_1234)
Requested Shot Times January 30 2008 1400 UTC January 30 2008 1430 UTC
Pre Time 30 seconds
Post Time 30 seconds
Output Location Base Directory disk2ApolloProjectOutputData
Output Location Subdirectories projectyearmonthday
Output Location Filename timeformat
When the project is run successfully the following output files will be created on the server running Apollo Project
disk2ApolloProjectOutputDataProject22008013020080130_135930segysgy
disk2ApolloProjectOutputDataProject22008013020080130_142930segysgy
A3 Example Deployment Scenarios
A31 One TimeYou want to download three days of data from multiple instruments on the network save the data in MiniSEED format and create a file for every hour of data
A One Time project is the recommended solution The Store of each instrument can be made available to Apollo Project by creating a corresponding IP Address Store specification with the IP address of the instrument The requested time range can be specified along with a file interval of one hour Ensure that the instruments are configured to run in Communications mode
A32 Scheduled ArchiveYou want seismic data to be retrieved automatically from a group of instruments on the network every six hours The instruments are always accessible via an Ethernet connection
A scheduled Archive project is the recommended solution Use the Regular Interval scheduling option and set the interval to six hours
You can also run a scheduled Archive project at any time For example if the scheduled retrieval interval of a project is six hours and between intervals you want to retrieve the data three hours early you can run the project and approximately three additional hours of data would be accumulated About three hours later the project will run automatically and accumulate the remaining three hours of data
Appendix A Reference Information and Examples
40 Apollo Project User Guide16106R5 2009-03-24
A33 Manual ArchiveYou want to retrieve seismic data from a group of instruments but their respective Stores are only available for retrieval on occasion (no regular dependable schedule for retrieval from these Stores is possible)
A manually run Archive project is the recommended solution You can create the project and run it whenever any of the instruments are available for retrieval
A34 Field ArchiveYou want to collect data from a set of isolated instruments in the field at recurring intervals (for example twice per month)
A Field Archive project is the recommended solution You can create a Field Archive project and either add all instrument IP addresses to the list or use a Discovery specification The time for the last retrieval is stored on the instrument and all data is recovered from the last recovery time
A35 Media HarvestingYou want to collect the media from a set of instruments in the field at a regular interval (for example once per week) You also have to retrieve all of the seismic data on the media for subsequent analysis
An Archive project is the recommended solution Initially a directory is created on the file system of the server running Apollo Project A directory Store specification is created with this directory as the parent directory from which to search for Stores The content of each media instance in the weekrsquos collection is copied from a media reader to a subdirectory of the directory When the project is run all of the copied Stores are automatically available and the project accumulates data for each instrument
Due to the nature of media harvesting and the replacement procedure for this example data is always missing for the last period of output files for the current week This period corresponds to the time that the media was taken from the instrument and replaced with a new one The following week when the media is harvested again from the instruments in the field Apollo Project fills in the missing time for these files with the new Store data regardless of the media instance on which the data currently resides
You can only create and run Field Archive projects for Taurus version 30 or later
Appendix A Reference Information and Examples
Apollo Project User Guide16106R5 2009-03-24
41
A36 Trigger Downloading You have set up a network of five Tauruses around a hydro dam Each Taurus is accessible over an Ethernet connection and each is set to record data over the weekend You have set the period for data retrieval at 30 seconds before and five minutes after any seismic activity but the following procedure shows you why it is not necessary to view all of the data accumulated over the whole weekend
1 Select the Taurus at the site with the least environmental noise or determine the best site for generating triggers and designate this Taurus ldquoTaurus Ardquo for reference
You need to perform this task in advance More information about triggers can be found in the Taurus Portable Seismograph User Guide
2 Download the trigger file from ldquoTaurus Ardquo and review the file to verify the correct number of triggers
3 Follow these steps to create a new Triggers project
a) Click New on the Apollo Project Existing Projects page
b) Click Triggers as the project type and enter a unique name in the Project Name box
c) Click OK
d) Click the IP Address tab on the Store Selection tab
e) Enter the IP address of a Taurus
f) Click Add
g) Repeat step e until you have entered the IP addresses of all five of the Tauruses
Apollo Project adds the IP address specifications to the Selected Specifications section of the Store Selection page and finds all five Stores associated with the IP addresses and adds them to the Selected Stores section
h) Click the Channel Group Selection tab
i) Click Create Default Station Table to create a table for all of the currently selected Stores and discovered instruments
j) Review the selected channel groups and if required edit the mappings in the selected channel groups area of the tab (lower half of the tab)
k) Click the Time Selection tab
l) Click the Browse button
m)Select the trigger file that you downloaded in step 2 and click OK
n) Click Submit
The list of triggers is imported and displayed in the Triggers section on the Time Selection page
o) Enter a Pre Time of 30 seconds and a Post Time of 5 minutes
p) Click the Output Format tab
q) Click MiniSEED
r) Click All Instruments
s) Click the Output Location tab
Appendix A Reference Information and Examples
42 Apollo Project User Guide16106R5 2009-03-24
t) Enter the valid absolute path of the base directory for the processed data subfolders and files
u) Enter the expression used to define path names for subfolders under the base directory
v) Enter the expression used to define file names for the processed data files that are stored in the subfolders under the base directory
w) Click OK
4 Click the Run Now button on the Summary page
When the project has finished running the output folder you specified in step t will contain ten files Each output file will contain 5 minutes and 30 seconds of data from the five Tauruses
A4 Shot File Formats for Controlled Source ProjectsYou have two options for defining shots for a Controlled Source project manually defining shots or importing shots from a shot file
You can create shot files in one of following three file formats
Microsoft Office Excel (xls) ndash See Section A41 ldquoCreating a Shot File With Microsoft Office Excelrdquo on page 42
OpenOfficeorg Calc (ods) ndash See Section A42 ldquoCreating a Shot File With OpenOfficeorg Calcrdquo on page 44
Comma-Separated Values (csv) ndash See Section A43 ldquoCreating a Comma-Separated Values Shot Filerdquo on page 45
The Shot file templates are located in the docShotFileImport folder on the Apollo Project CD
A41 Creating a Shot File With Microsoft Office ExcelThe Microsoft Office Excel template for Apollo Project can be used with Microsoft Office Excel version 2003 or later
To create an Microsoft Office Excel based shot file
1 Double-click ShotFileTemplatexlt
A new Microsoft Office Excel file is created from the template and opens in the Microsoft Office Excel
2 Save the new spreadsheet as a Microsoft Office Excel document (xls)
3 Enter shot file data as specified in the Microsoft Office Excel spreadsheet
Only the decimal separator is supported for shot files Separators that denote the 3rd power of 10 (thousand) are not supported (for example 4500) The Microsoft Excel and OpenOffice templates reinforce these restrictions and are recommended for creating csv files
Appendix A Reference Information and Examples
Apollo Project User Guide16106R5 2009-03-24
43
You can enter data for multiple shot times
4 Click Save to save the file in Microsoft Office Excel format
5 Click File gt Save As and select CSV (Comma delimited) (csv) from the Save as type list
6 Click Save
7 Click OK on the message warning you that you are only saving the active sheet
8 Click Yes on the message warning you that file features might be incompatible with the csv format
9 Close Microsoft Office Excel
If you are using Microsoft Office Excel 2007 click the Microsoft Office Button and click Save As
Ensure that you save the file as a comma delimited file If the shot file is mistakenly saved in Microsoft Excel format (xls) the shot file will not work in Apollo Project
Appendix A Reference Information and Examples
44 Apollo Project User Guide16106R5 2009-03-24
A42 Creating a Shot File With OpenOfficeorg CalcThe OpenOffice template has been tested with OpenOfficeorg Calc version 23 Later versions of OpenOfficeorg Calc can be used at your discretion
To create a shot file based on the OpenOfficeorg Calc template
1 Double-click ShotFileTemplateots
A new OpenOffice spreadsheet is created from the template and opens in OpenOfficeorg Calc
2 Save the new spreadsheet as an OpenOffice Calc document (ods)
3 Enter the shot file data as specified in the OpenOffice spreadsheet
You can enter data for multiple shot times
4 Click Save to save the file in OpenOfficeorg Calc format
5 Click File gt Save As and select Text CSV (csv) from the Save as Type list
6 Select the Edit filter settings check box
7 Click Save
A warning message might appear that warns you that the document might contain formatting that cannot be saved in the csv format Click Yes on the warning message to save the file in csv format
The Export of text files window opens
8 Delete the double quotation marks () in the Text delimiter box and ensure that the Save cell content as shown check box is selected
9 Click OK to export the OpenOffice spreadsheet as a csv file
10 Click OK on the warning message
11 Close OpenOfficeorg Calc
Appendix A Reference Information and Examples
Apollo Project User Guide16106R5 2009-03-24
45
A43 Creating a Comma-Separated Values Shot FileYou can use any text editor to create a csv shot file
To create a csv shot file
1 Open ShotFileTemplatecsv in a text editor and save it with a different name
2 Format each line of the csv file as follows
Shot TimePre TimePost TimeLatitudeLongitudeElevation
For example
2008-08-28 103044090600000-6000004267
The format and units are as follows
3 Save the file as a csv formatted file
The csv shot file template is not compatible with Microsoft Office Excel Make sure that you do not double-click it and open it in Microsoft Office Excel
FormatUnits
Shot Time yyyy-mm-dd hhmmss
Pre Time seconds
Post Time seconds
Latitude degrees
Longitude degrees
Elevation meters
Appendix A Reference Information and Examples
46 Apollo Project User Guide16106R5 2009-03-24
Apollo Project User Guide16106R5 2009-03-24
47
Appendix B Retrieving SOH Data from a Taurus Version 2x
Taurus Version 2x SOH Data Retrieved by Apollo Project
Retrieving SOH Data from a Taurus Version 2x Streaming to Apollo Server
B1 Taurus Version 2x SOH Data Retrieved by Apollo Project This section presents the predefined datasets of SOH data Apollo Project will retrieve from a Taurus version 2x either through a direct connection or a stream to Apollo Server For instruction on retrieving streaming Taurus version 2x data from Apollo Server see Section B2 ldquoRetrieving SOH Data from a Taurus Version 2x Streaming to Apollo Serverrdquo on page 48
The order of the columns presented in the table below will differ when streaming Taurus version 2x SOH data from Apollo Server
Predefined SOH group SOH data
GPS Time Time (longsecs) (the number of seconds since 1970-01-01)Time (UTC) (time in yyyy-mm-dd hhmmssms format)Altitude (m)DAC CountError (ns) (time error)GPS Engine StatusLast Update Time(s)Lat (deg) (latitude in degrees)Long (deg) (longitude in degrees)NumSatellites (number of satellites used)PDOPPhaseLock (system clock phase lock)TDOPUncertainty (ns) (time uncertainty)
Note The values for Number of satellites used PDOP and TDOP are provided by the GPS receiver at the Last update time In order to see what time these values correspond to look at the Last update time When GPS is off these three parameters and the Last update time are not updated The last value displays until the next update arrives (after the GPS is turned on again)
Appendix B Retrieving SOH Data from a Taurus Version 2x
48 Apollo Project User Guide16106R5 2009-03-24
B2 Retrieving SOH Data from a Taurus Version 2x Streaming to Apollo ServerThis section provides instruction on configuring your Taurus version 2x to stream data to Apollo Server and instructions on how to use Apollo Project to retrieve this data from Apollo Server
B21 Streaming Data from a Taurus Version 2x to Apollo ServerUse the Taurus graphical user interface on either the Taurus display screen or through a Web browser to set up an NP stream from a Taurus version 2x to Apollo Server
1 Log in to the Taurus version 2x with either the tech or central user account
2 Select Advanced Configuration gt Communications gt NP Data Streaming
GPS Satellites Time (longsecs) (the number of seconds since 1970-01-01)Time (UTC) (time in yyyy-mm-dd hhmmssms format)
For each satelliteAcquisition FlagLast Update Time (ms)PRNSatellite Azimuth (microordm)Satellite Elevation (microordm)Signal Level (AMU)
Environment Time (longsecs) (the number of seconds since 1970-01-01)Time (UTC) (time in yyyy-mm-dd hhmmssms format)External SOH Voltage 1 (V) (12-bit voltage input) External SOH Voltage 2 (V) (12-bit voltage input) External SOH Voltage 3 (V) (12-bit voltage input) External SOH Voltage 4 (V) (12-bit voltage input) Sensor SOH Voltage 1 (V)Sensor SOH Voltage 2 (V)Sensor SOH Voltage 3 (V)
Instrument Time (longsecs) (the number of seconds since 1970-01-01)Time (UTC) (time in yyyy-mm-dd hhmmssms format)Controller Current (mA)Digitizer Current (mA)NMX Bus Current (mA) (external connector)Sensor Current (mA)Serial Port Current (mA)Supply Voltage (mV)Temperature (ordmC)
Predefined SOH group SOH data
Appendix B Retrieving SOH Data from a Taurus Version 2x
Apollo Project User Guide16106R5 2009-03-24
49
3 To have the Taurus stream both time series and SOH data to Apollo Server select both Stream Time Series and Stream SOH
-OR-
Select only Stream SOH if you only want to retrieve the SOH data from Apollo Server
4 Type the IP address for Apollo Server in the IP Address box
5 Type the port number Apollo Server uses to receive data in the Port box By default this is port number 32008
6 The Second IP Address and Second Port boxes are not necessary however cannot be left blank Type 127001 in the Second IP Address box and 32004 in the Second Port box
7 Type a value in the Maximum Throughput [bps] box if a limited data link is present between the Taurus and Apollo Server For instance if at some point the data link is limited to 9600 bps then this is the maximum throughput the link can allow If there are no throughput limitations set the value in this box to zero to disable the throughput limitation
8 Click Apply
9 Click Commit
B22 Retrieving Taurus Version 2x Data from Apollo ServerCreate a new project or use an existing project in Apollo Project to retrieve the Taurus version 2x data from Apollo Server For more information on creating or editing projects refer to Section 31 ldquoCreating New Projectsrdquo on page 11 and Section 36 ldquoEditing and Viewing the Settings of Projectsrdquo on page 31
When creating or editing the project
a) Add an IP address Store specification on the Store Selection tab (see step 4 in Section 31 ldquoCreating New Projectsrdquo) for Apollo Server including its client Web application port number Use the format
Apollo Server IP AddressApollo Server Client Web Application Port Number
b) Apply the appropriate filters on the Channel Group Selection tab to retrieve the desired channel groups from the Taurus version 2x See step 5 through step 12 in Section 31 ldquoCreating New Projectsrdquo for instruction on using the Channel Group Selection tab
Appendix B Retrieving SOH Data from a Taurus Version 2x
50 Apollo Project User Guide16106R5 2009-03-24
Apollo Project User Guide16106R5 2009-03-24
51
Appendix C Glossary
Glossary of Abbreviations and Terms
List of Unit Abbreviations and Symbols
C1 Glossary of Abbreviations and Terms
A
ASCIIAmerican Standard Code for Information Interchange
B
BHEBroad Band High Gain Seismometer East-West Orientation
Channel name based on the Global Seismological Network (GSN) standard
BHNBroad Band High Gain Seismometer North-South Orientation
Channel name based on the Global Seismological Network (GSN) standard
BHZBroad Band High Gain Seismometer Vertical Orientation
Channel name based on the Global Seismological Network (GSN) standard
Appendix C Glossary
52 Apollo Project User Guide16106R5 2009-03-24
C
CSVComma-Separated Values
D
DACDigital to Analog Converter
G
GPSGlobal Positioning System
J
JREJava Runtime Environment
JVMJava Virtual Machine
N
NFSNetwork File System
P
PDOPPosition Dilution of Precision
PRNPseudo-random Number
Appendix C Glossary
Apollo Project User Guide16106R5 2009-03-24
53
S
SACSeismic Analysis Code
An Apollo Project output file format that generates files that can be used by the SAC software (see http wwwirisedusoftwaresac)
SEEDStandard for the Exchange of Earthquake Data
SMBServer Message Block
SOHState of Health
T
TCPIPTransmission Control ProtocolInternet Protocol
TDOPTime Dilution of Precision
U
UNCUniform Naming Convention or Universal Naming Convention
URLUniform Resource Locator
UTCCoordinated Universal Time
Appendix C Glossary
54 Apollo Project User Guide16106R5 2009-03-24
C2 List of Unit Abbreviations and SymbolsTable C-1 provides a list of unit abbreviations and symbols commonly used in Nanometrics documentation
Table C-1 Unit abbreviations and symbols
Abbreviation or Symbol Definition Abbreviation
or Symbol Definition
deg degree lb pound
Oslash diameter m metre
micro micro ms metre per second
Ω ohm ms2 metre per second squared
A ampere mA milliampere
AC alternating current MB megabyte
b bit MΩ megaohm
B byte MHz megahertz
bps bits per second mi mile
C Celsius mL millilitre
cm centimetre mm millimetre
dB decibel ms millisecond
DC direct current MTU maximum transmission unit
F farad mV millivolt
ft foot mW milliwatt
g gram N Newton
g gravity nF nanofarad
GB gigabyte ns nanosecond
GHz gigahertz rad radian
Hz hertz rads radian per second
in inch s second
KB kilobyte sps samples per second
kg kilogram U rack unit
kHz kilohertz V volt
kΩ kiloohm Vpp Volts peak-to-peak
kW kilowatt W watt
L litre
Apollo Project User Guide16106R5 2009-03-24
55
About NanometricsNanometrics is a world leader in the development of precision instrumentation network technology and software applications for seismological and environmental studies Using Nanometrics technology our customers establish and grow research networks that are often located in extreme environments such as the frozen Arctic and Antarctic the arid deserts of the Middle East the jungles of South America and the depths of the worlds oceans Many of these are mission-critical national and regional networks that demand the highest possible data quality and availability
Nanometrics provides end-to-end solutions that include a growing portfolio of broadband and strong motion seismometers dataloggers and digitizers satellite ground station systems for remote site data collection and software applications for data and network analysis and management To support this portfolio Nanometrics also provides global systems engineering services for design installation and support of complete networks
Our head office research and development centre and production facility are located in the Kanata North Business Park of Ottawa the high-technology heart of Canadas capital region
Contacting NanometricsNanometrics Inc250 Herzberg RoadKanata Ontario Canada K2K 2A1Phone +1 613-592-6776Fax +1 613-592-5929Email infonanometricscaWeb wwwnanometricsca
Contacting Technical SupportIf you need technical support please submit a request on the Nanometrics technical support site or by email or fax Include a full explanation of the problem and related information such as log filesSupport site httpsupportnanometricsca
Email techsupportnanometricsca
Chapter 3 Retrieving Data
Apollo Project User Guide16106R5 2009-03-24
19
14 If you selected a Controlled Source as the project type in step 2 go to step 17
You do not have to select an output format for a Controlled Source project because the output format for a Controlled Source project is always SEGY one output file is generated for all instruments and the stations are sorted by StationNameNetworkName
-OR-
If you selected one of the other project types go to step 15 to select an output format
15 Click the Output Format tab
Field Archive A Field Archive project is used for recurring data retrievals that occur at specified intervals The time of the last retrieval is stored on the instrumentTo define the start time and file interval1 If required edit the start time for the project2 Specify the file interval
For example if you specify 2 hours then one file is created every 2 hours3 If you want partial files retrieved select the Include last interval even if
incomplete check box You should only select this option when the retrieval of partial files is more important than retrieving the data for the current interval during a future project run
Be careful when specifying the file interval For example retrieving many hours or days of data and specifying a file interval of seconds or minutes could result in the generation of many files This is not only very resource intensive but could result in a data management problem as well
Project type DescriptionSteps
Chapter 3 Retrieving Data
20 Apollo Project User Guide16106R5 2009-03-24
16 Perform the following steps to select an output format
Output format Steps
MiniSEED 1 Click MiniSEED2 Click Per channel group to generate one output file per channel group
You must add the channel token to the Subdirectories or Filename box on the Output Location tab when choosing Per channel group-OR-Click Per instrument to generate one output file per instrument-OR-Click All Instruments to generate one output file for all instruments
3 Select the Sort check box if you want the output data sorted by timeData is put in a Store in the order received and this order may not always be chronological To ensure that the data in the resulting SEED file is chronological select Sort
4 Select the data record sizeThe default record size is 512 B However not all SEED file readers will support this file size Determine what your SEED reader supports and select an appropriate value The options are 512 B 1024 B 2048 B and 4096 B Note that a smaller record size will result in quicker SEED file output
Note The number of output files is determined by the file interval that you set on the Time Selection page
SAC 1 Click SACYou must add the channel token to the Subdirectories or Filename box on the Output Location tab when choosing SAC as the output format
NotesThere are two types of SAC files binary and ASCII Apollo Project only outputs binary SAC filesOne output file per channel group is generated
SEGY 1 Click SEGY2 Click Per channel group to generate one output file per channel group
You must add the channel token to the Subdirectories or Filename box on the Output Location tab when choosing Per channel group-OR-Click Per instrument to generate one output file per instrument-OR-Click All Instruments to generate one output file for all instruments
3 Select the Sort check box if you want the stations sorted by StationNameNetworkName
NotesAll stations must have the same sample rateThe maximum number of samples per trace is 32767SEGY trace headers from discovered instruments will not have station location information
Chapter 3 Retrieving Data
Apollo Project User Guide16106R5 2009-03-24
21
17 Click the Output Location tab
18 If you defined a default base directory when you configured Apollo Project and want to use it for this project go to step 21
For more information see Section 33 ldquoConfiguring Apollo Projectrdquo on page 24
-OR-
Enter the valid absolute path of the base directory for the processed data subdirectories and files
If the base directory you entered does not exist click Create to create it
19 If you defined a default expression for subdirectories when you configured Apollo Project and want to use it for this project go to step 21
For more information see Section 33 ldquoConfiguring Apollo Projectrdquo on page 24
-OR-
Enter the expression used to define path names for subfolders under the base directory
You can enter tokens in any order including any additional characters that are valid for paths
Seisan 1 Click Seisan
NotesYou must have Seisan installed on your computer with a WAVEFORM_BASE and CONT_BASE line included for each station in the DATSEISANDEF file You must define a SEISAN_TOP environment variableOne output file per channel group is generated
Regardless of the output format selected SOH channel group data is always output in CSV format
The Base Directory is the root of all data retrieved for the project and can be defined at any location in the file system of the server running Apollo Project including a networked drive on a separate server If you want to create or use a directory on a computer on the network you have to enter the server and share name in a modified UNC format that is prefixed by an additional two backslashes For example the usual fileserver1storefiles must be written as fileserver1storefiles
Large amounts of data can be stored in this location You must ensure that adequate disk space is available
For deployments of Apollo Project where the clients are not running on the server it is recommended that the file system containing the base directory on the server be shared or exported as a networked file system
It is not recommended that you use the channel token in the subdirectories expression if the project includes more than one channel group per instrument (selected on the Channel Group Selection tab) and the output is not per channel group (selected on the Output Format tab)
Output format Steps
Chapter 3 Retrieving Data
22 Apollo Project User Guide16106R5 2009-03-24
20 If you defined a default expression for file names when you configured Apollo Project and want to use it for this project go to step 21
For more information see Section 33 ldquoConfiguring Apollo Projectrdquo on page 24
-OR-
Enter the expression used to define file names for the processed data files that are stored in the subfolders under the base directory
You can enter tokens in any order including any additional characters that are valid for file names
21 Click OK to save the new project
The new project is created and the Summary page is displayed
32 Creating a Station Table FileYou can create a mapping between a given instrumentchannel group (for example taurus_1234digitizertimeSeries1) and a corresponding network station location and channel name These mappings are stored in a station table file and the mapped channel group names are used in the output files
You can create a station table file and use it as the default for all projects or you can create a station table for individual projects
To create a station table file and set is as the default
1 Click the configuration button in the upper right corner
2 Specify the network name location and channel names on the Behaviour and Defaults dialog box and click OK to save the new settings
The settings you enter here are used as the channel names in the station table file You can edit these settings in step 8
For more information on configuring Apollo Project settings see Section 33 ldquoConfiguring Apollo Projectrdquo on page 24
3 Click New on the Apollo Project Existing Projects page
Do not use the channel token in the filename expression if the project includes more than one channel group per instrument (selected on the Channel Group Selection tab) and the output is not per channel group (selected on the Output Format tab)
The Sample Path shows an example of a file name generated using the values for the Base Directory Subdirectories and Filename settings
You can only edit the settings of a project before it has run for the first time or been scheduled (Archive project) If you want to edit the settings of a project after it has already run once or been scheduled you can copy the project (see Section 345 ldquoCopying a Projectrdquo on page 28) and then edit the settings for the copy
It is recommended that you create a station table file and set it as the default for all projects You can update the mappings in this file when new Stores are added or discovered
Chapter 3 Retrieving Data
Apollo Project User Guide16106R5 2009-03-24
23
4 Type Station Table in the Project Name box and click any project type
5 Click OK
6 Click the Store Selection tab and select as many Stores as possible
See step 4 of Section 31 ldquoCreating New Projectsrdquo for information on how to add specifications and select Stores
7 Click the Channel Group Selection tab and click Create Default Station Table
A station table file is created and the name of the file is displayed in the Station Table File Name box
8 Edit the station table channel group mappings in the selected channel groups area of the tab (lower half of the tab) as required
The NetworkStationLocationChannel names will appear in the output files If the Location is empty it is interpreted as the SEED default of two spaces
9 Click OK to close the project and finish creating the station table
10 Click the configuration button in the upper right corner
11 Enter the path and name of the station table file you just created in the Station Table File Name box on the Behaviour and Defaults dialog box
12 Click OK to save the new settings
The station table file you specified will be used as the default for all future projects You can open the Station Table project and edit the station table file if you need to add more Stores or change the mappings
For more information on configuring Apollo Project settings see Section 33 ldquoConfiguring Apollo Projectrdquo on page 24
Make a note of the path of the station table file because you will have to enter it on the Behaviour and Defaults dialog box to set it as the default for all projects
Valid characters for the network station location and channel in the NetworkStationLocationChannel box are upper case letters A to Z numbers 0 to 9 and spaces are also acceptable for the location
Chapter 3 Retrieving Data
24 Apollo Project User Guide16106R5 2009-03-24
33 Configuring Apollo ProjectYou can configure basic settings for Apollo Project and the default settings for new projects The changes you make to the project default settings only apply to new projects
To configure Apollo Project
1 Click the configuration button in the upper right corner
2 Edit the following settings
Setting Description
Log Verbosity The level of detail that is logged by Apollo ProjectThe default setting is Info
Log Location The default name of the Apollo Project log folder Maximum Number of Retrieval Attempts
The maximum number of single retrieval attempt made for all missing time segments on all channel groups every time a project is run Enter an integer from 0 through 1000 The default value is 8
Notes If the Taurus is busy when a retrieval attempt is made the number of remaining retrieval attempts is not decreased by one attemptYou can view the channel group details page to see if there are any remaining retrieval attempts for any channel groups (see Section 373 ldquoMonitoring the Status of a Running Projectrdquo on page 34)
Number Of Retries The number of times Apollo Project attempts to connect to a data source if there is a network connectivity problem Enter an integer from 0 through 1000 The default value is 3
Note Every time a project is run it starts with the maximum number of retries
Retry Interval (secs) The amount of time in seconds that Apollo Project waits before trying to connect to a data source againEnter an integer from 0 through 1000 The default value is 5
Station Table File Name The file name and location of the station table file that is used to assign station names to all of the selected channel groupsA station table is used to assign names to all of the selected channel groups For more information see Section 32 ldquoCreating a Station Table Filerdquo on page 22No station table file is specified by default
Chapter 3 Retrieving Data
Apollo Project User Guide16106R5 2009-03-24
25
Base Directory The folder name and location of the base directory for the processed data subfolders and files Enter any valid folder name and location including any additional characters that are valid for paths The default base directory name is ApolloProject
Notes The Base Directory is the root of all data retrieved for the project and can be defined at any location in the file system of the server running Apollo Project including a shared folder on a different computer If you want to create or use a folder on a computer on the network you have to enter the server and share name in a modified UNC format that is prefixed by an additional two backslashes For example the usual fileserver1storefiles must be written as fileserver1storefilesLarge amounts of data can be stored in this location You must ensure that adequate disk space is availableFor deployments of Apollo Project where the clients are not running on the server it is recommended that the file system containing the base directory on the server be shared or exported as a networked file system
Subdirectories The expression used to define path names for subfolders under the base directoryEnter tokens in any order including any additional characters that are valid for paths The default path name is as follows projectyearmonthday
Filename The expression used to define file names for the processed data files that are stored in the subfolders under the base directoryEnter tokens in any order including any additional characters that are valid for file names The default filename is as follows instrument_time
Sample Path An example of a file name generated using the values for the Base Directory Subdirectories and Filename settings
Network Name A standard network codeEnter any two upper case letters or numbers The default code is XX
Location A location within a stationEnter any two upper case letters numbers or spaces
The default location is two spaces for ldquononerdquo You must delete the two default spaces if you enter a new location value
Setting Description
Chapter 3 Retrieving Data
26 Apollo Project User Guide16106R5 2009-03-24
3 Click OK to save the new settings
34 Managing ProjectsYou can view open close copy and delete projects Also you can create convenient links to run your individual projects with desktop shortcuts
341 Viewing Existing Projects1 Click Projects in the Projects bar
2 View the projects listed on the Existing Projects page
The Existing Projects page shows a list of all projects and a status overview of each project For more information see Section 371 ldquoViewing an Overview of the Status of All Projectsrdquo on page 32
Channel 1 Name A channel codeEnter any three upper case letters or numbersThe default channel code is BHZ
Channel 2 Name A channel codeEnter any three upper case letters or numbersThe default channel code is BHN
Channel 3 Name A channel codeEnter any three upper case letters or numbersThe default channel code is BHE
Setting Description
Chapter 3 Retrieving Data
Apollo Project User Guide16106R5 2009-03-24
27
342 Opening a Project1 Click the project name under the Name column on the Existing Projects page
2 Click the Open Project button
343 Creating a Desktop Shortcut to a ProjectLaunching a project with a desktop shortcut will open Apollo Project to that project and run the project
Methods for creating desktop shortcuts to Web sites vary from browser to browser These procedures explain how to create desktop shortcuts to specific projects for both Mozilla Firefox 3 and Microsoft Internet Explorer 7 Desktop shortcuts to projects include the Apollo Project icon and are titled in the format Project Name ndash Apollo Project
In Firefox 3
1 Open the project you want to create a shortcut to in Firefox
2 Reduce the size of the Firefox window so that the desktop is visible
3 Drag the Site Identification Button onto the desktop
The Site Identification Button is located to the left of the Location Bar and displays the Apollo Project icon
In Internet Explorer 7
1 Open the project you want to create a shortcut to in Internet Explorer
2 Press ALT+F
3 Select Send gt Shortcut to Desktop
344 Closing a Project
1 Click the Close Project button in the Projects bar
Launching a desktop shortcut to a project automatically runs that project It is important to note that once a project is run its settings can no longer be edited It is recommended that desktop shortcuts only be created for Field Archive projects
Firefox is the recommended browser for Apollo Project
Chapter 3 Retrieving Data
28 Apollo Project User Guide16106R5 2009-03-24
345 Copying a Project
1 Select the project name under the Name column on the Existing Projects page
2 Click Copy
3 Enter a unique name for the new project and click OK
4 Click Edit and edit the settings as required
5 Click OK to save the project after you have finished editing the settings
346 Deleting a ProjectWhen you delete a project only files in the temporary folder are deleted All processed data files are not deleted
1 Click the project name under the Name column on the Existing Projects page
2 Click Delete
3 Click OK on the confirmation message
35 Running ProjectsFor all project types you can run a project manually at any time Archive projects can also be defined to run automatically on a schedule
If it is a scheduled Archive Project and the schedule is started click Cancel Schedule before you create a copy of it (If the schedule is not started the Start Schedule button is visible if the schedule is started the Cancel Schedule button replaces the Start Schedule button)
Apollo Project stores intermediate files in a temporary subdirectory of the Base Directory specified for the output location of a project These intermediate files correspond to the actual channel group data retrieved from the Stores referenced by the project If a project is deleted from Apollo Project these temporary files will be removed automatically
Disk space can also be reclaimed by removing these temporary files manually without deleting the project However if the project is run again the output files produced might be incomplete if previously retrieved data from these temporary files is required
For more information on what happens when a project runs see Section A1 ldquoOverview of Running Projectsrdquo on page 37
Chapter 3 Retrieving Data
Apollo Project User Guide16106R5 2009-03-24
29
351 Running a Project1 Open a project
2 Click Run Now on the Summary page to start the project
The project starts running and the Retrieval Status page is displayed
352 Stopping a Project1 Open a project
2 Click Cancel Run on the Summary page to stop the project
3 Click OK on the success message
353 Merging Project Data FilesYou have the option to merge all of the downloaded data for the stations and instruments into one file per interval for each project
1 Open a project
2 Click Merge
A single file is generated for each time period The time period is determined by the file interval you specified on the Time Selection page when you created the project For more information see step 13 of Section 31 ldquoCreating New Projectsrdquo on page 11
The original data files are not modified when you select the option to merge project data files
You can also click Run Now on the Retrieval Status page to start a project
For more information on what happens when a project runs see Section A1 ldquoOverview of Running Projectsrdquo on page 37
You can also click Cancel Run on the Retrieval Status page to stop a project
You cannot merge data from Archive projects and you cannot merge data in the Seisan format
You can also click Merge on the Retrieval Status page to merge the data from a project
Chapter 3 Retrieving Data
30 Apollo Project User Guide16106R5 2009-03-24
354 Running a Scheduled Archive Project1 Open a project
2 Click Start Schedule to start the project schedule
3 Click OK on the confirmation message
4 Click OK on the success message
For a project scheduled to run weekly the project will run for the first time according to the project start time and then it will run on a weekly basis according to the times and days you specified
For a project scheduled to run at a regular interval the project will run according the to interval you specified after you start the schedule For example if you click Start Schedule on a Wednesday and you specified every 2 days as the interval then the project will run for the first time on Friday and every two days after that
3541 Cancelling a Schedule
If you cancel a scheduled project before it runs for the first time you can edit the project settings
If you cancel a project that is currently running the current project runs to completion but subsequent project runs will not occur
1 Open a project
2 Click Cancel Schedule to cancel the project schedule
3 Click OK on the confirmation message
4 Click OK on the success message
You can also click Start Schedule on the Retrieval Status page to start the schedule of a project
You can restart the schedule by opening the project and clicking Start Schedule
You can also click Cancel Schedule on the Retrieval Status page to cancel the schedule of a project
Chapter 3 Retrieving Data
Apollo Project User Guide16106R5 2009-03-24
31
36 Editing and Viewing the Settings of ProjectsYou can edit the settings of a project before it has run After it has run you can view the settings
361 Editing Project Settings1 Open the project
2 Click Edit on the Summary page
3 Edit the settings as required
4 Click OK to save the changes
362 Viewing Project Settings1 Open the project
2 Click View on the Summary page
3 Click the tabs to view the settings
4 Click Cancel when you have finished viewing the settings
You can only edit the settings of a project before it has run for the first time or been scheduled (Archive project) If you want to edit the settings of a project after it has already run once or been scheduled you can copy the project (see Section 345 ldquoCopying a Projectrdquo on page 28) and then edit the settings for the copy
Settings For more information
Store Selection See step 4 of Section 31 ldquoCreating New ProjectsrdquoChannel Group Selection See step 5 to step 12 of Section 31 ldquoCreating New ProjectsrdquoTime Selection See step 13 of Section 31 ldquoCreating New ProjectsrdquoOutput Format See step 15 and step 16 of Section 31 ldquoCreating New ProjectsrdquoOutput Location See step 17 to step 20 of Section 31 ldquoCreating New Projectsrdquo
You can also click Edit on the Retrieval Status page to edit the settings of a project
You can also click View on the Retrieval Status page to edit the settings of a project
Chapter 3 Retrieving Data
32 Apollo Project User Guide16106R5 2009-03-24
37 Monitoring Project StatusYou can monitor the status of a project by viewing information on the Existing Projects Summary and Retrieval Status pages
371 Viewing an Overview of the Status of All ProjectsThe Existing Projects page is the default home page of Apollo Project You see this page when you first open Apollo Project or when you click Projects in the projects bar For more information see Section 341 ldquoViewing Existing Projectsrdquo on page 26
You can view the following information for all projects on the Existing Projects page
bull Name
bull Type
bull Current status
bull Last time the project run
bull Status of data retrieved
The Data Retrieved bars on the Existing Projects page show the overall status of the data retrieval For more information see Section 3731 ldquoStatus Coloursrdquo on page 34
Chapter 3 Retrieving Data
Apollo Project User Guide16106R5 2009-03-24
33
372 Viewing the Status of an Individual ProjectWhen you open a project a detailed summary of the project is shown on the Summary page For more information see Section 342 ldquoOpening a Projectrdquo on page 27
You can view the following information for each project on the Summary page
bull Date it was created
bull Date it was last modified
bull Current status
bull Last time it ran
bull Next time it will run
You can also view a summary of all of the settings you specified when you created the project (Store specifications selected Stores selected time series channel groups selected SOH channel groups start and end times number of files generated file interval and output format and locations)
All times are reported using the UTC time zone
Chapter 3 Retrieving Data
34 Apollo Project User Guide16106R5 2009-03-24
373 Monitoring the Status of a Running ProjectYou can view the data retrieval status of a project while it is running on the Retrieval Status page The Retrieval Status page is displayed automatically when you click Run Now to run a project You can also view this page by opening a project and clicking the Retrieval Status tab
The status for each channel group is expressed in the form of two numbers (for example 60100) and two bar graphs The first number is the percentage available of the total time requested (for example 60) and the second number is the percentage retrieved of the time available (for example 100) For more information on the bar graph status colours see Section 3731 ldquoStatus Coloursrdquo on page 34
You can also view retrieval details for each channel group listed on the Retrieval Status page For more information see Section 3732 ldquoViewing the Retrieval Details for Each Channel Grouprdquo on page 35
3731 Status Colours
The data retrieval status bars use the following status colours
The information that is displayed on the Retrieval Status page is updated continuously while a project is running
Table 3-1 Status colours
Colour Status
Green Apollo Project has retrieved the data
Yellow Apollo Project is attempting to retrieve available data from the Store
Red Data is available in the Store but Apollo Project has failed to retrieve it on this attempt Apollo Project will make additional attempts to retrieve the data up to the configured Maximum Number of Retrieval Attempts For information on how to set the Maximum Number of Retrieval Attempts setting see Section 31 ldquoCreating New Projectsrdquo on page 11
White Data for some portion of the requested time segment is not available in the Store For example there are gaps in the data or the retrieval request is for a future time segment
Chapter 3 Retrieving Data
Apollo Project User Guide16106R5 2009-03-24
35
3732 Viewing the Retrieval Details for Each Channel Group
You can view the retrieval status of each time segment for a channel group
1 Click a channel group name
2 Click the Channel Group Details button that is located to the right of the channel group name
The Remaining Retrieval Attempts column displays the number of times that Apollo Project will try to download each missing time segment for the channel group when the project is run again For information on how to set the Maximum Number of Retrieval Attempts setting see Section 33 ldquoConfiguring Apollo Projectrdquo on page 24
3 Click OK when you have finished viewing the details
Chapter 3 Retrieving Data
36 Apollo Project User Guide16106R5 2009-03-24
Apollo Project User Guide16106R5 2009-03-24
37
Appendix A Reference Information and Examples
Overview of Running Projects
Example Project Settings
Example Deployment Scenarios
Shot File Formats for Controlled Source Projects
A1 Overview of Running ProjectsWhen a project is run Apollo Project performs the following steps
1 The requested time ranges are identified
2 The channel groups for which data are to be retrieved are identified
3 The actual Stores specified by the Store specifications of the project are identified
For each identified Store the following steps are performed
1 A data availability analysis for the outstanding time ranges is performed These are for the ranges for which data has not already been retrieved The availability of the data is recorded for reference It is possible that a given Store was not present at the time the project was last run If this is the case then an attempt is made to retrieve all of the required time ranges of the project from the Store
2 If any data exists in the Store for any of the requested time ranges then a retrieval of this data is performed and the retrieved data is stored to local temporary files
3 If the number of retrieval attempts for a given time range exceeds a configurable threshold (see Section 33 ldquoConfiguring Apollo Projectrdquo on page 24) then the retrieval of data within the stated range is not attempted again
If any data was retrieved during the run of the project then the corresponding output files of the desired output format are generated and stored in the output location specified for the project
When running Apollo Project with Taurus version 2x the schedule for Archive projects must be greater than 5 minutes in duration Schedules that are less than 5 minutes can result in data that is missing or not downloaded
Appendix A Reference Information and Examples
38 Apollo Project User Guide16106R5 2009-03-24
It is possible that the requested data for a given channel group exists across multiple Stores If all of these Stores are included by the Store specifications for the project then Apollo Project assembles the requested data
When a project runs detailed information regarding the results of the retrieved data and processed data are available For more information see Section 37 ldquoMonitoring Project Statusrdquo on page 32
A2 Example Project Settings
A21 Example 1 One Time ProjectProject Name Project1
Project Type One Time
Channel groups selected for retrieval CASTN1OTBHZ (on taurus_1234)
Requested Time Range January 30 2008 1400 ndash 1500 UTC
File Interval 20 minutes
Output Location Base Directory disk2ApolloProjectOutputData
Output Location Subdirectories projectyearmonthday
Output Location Filenamestationnetwork_time
When the project is run successfully the following output files will be created on the server running Apollo Project
disk2ApolloProjectOutputDataProject120080130STN1CA_20080130_140000seed
disk2ApolloProjectOutputDataProject120080130STN1CA_20080130_142000seed
disk2ApolloProjectOutputDataProject120080130STN1CA_20080130_144000seed
Appendix A Reference Information and Examples
Apollo Project User Guide16106R5 2009-03-24
39
A22 Example 2 Controlled Source ProjectProject Name Project2
Project Type Controlled Source
Channel groups selected for retrieval CASTN1OTBHZ (on taurus_1234) CASTN1OTBHN (on taurus_1234)
Requested Shot Times January 30 2008 1400 UTC January 30 2008 1430 UTC
Pre Time 30 seconds
Post Time 30 seconds
Output Location Base Directory disk2ApolloProjectOutputData
Output Location Subdirectories projectyearmonthday
Output Location Filename timeformat
When the project is run successfully the following output files will be created on the server running Apollo Project
disk2ApolloProjectOutputDataProject22008013020080130_135930segysgy
disk2ApolloProjectOutputDataProject22008013020080130_142930segysgy
A3 Example Deployment Scenarios
A31 One TimeYou want to download three days of data from multiple instruments on the network save the data in MiniSEED format and create a file for every hour of data
A One Time project is the recommended solution The Store of each instrument can be made available to Apollo Project by creating a corresponding IP Address Store specification with the IP address of the instrument The requested time range can be specified along with a file interval of one hour Ensure that the instruments are configured to run in Communications mode
A32 Scheduled ArchiveYou want seismic data to be retrieved automatically from a group of instruments on the network every six hours The instruments are always accessible via an Ethernet connection
A scheduled Archive project is the recommended solution Use the Regular Interval scheduling option and set the interval to six hours
You can also run a scheduled Archive project at any time For example if the scheduled retrieval interval of a project is six hours and between intervals you want to retrieve the data three hours early you can run the project and approximately three additional hours of data would be accumulated About three hours later the project will run automatically and accumulate the remaining three hours of data
Appendix A Reference Information and Examples
40 Apollo Project User Guide16106R5 2009-03-24
A33 Manual ArchiveYou want to retrieve seismic data from a group of instruments but their respective Stores are only available for retrieval on occasion (no regular dependable schedule for retrieval from these Stores is possible)
A manually run Archive project is the recommended solution You can create the project and run it whenever any of the instruments are available for retrieval
A34 Field ArchiveYou want to collect data from a set of isolated instruments in the field at recurring intervals (for example twice per month)
A Field Archive project is the recommended solution You can create a Field Archive project and either add all instrument IP addresses to the list or use a Discovery specification The time for the last retrieval is stored on the instrument and all data is recovered from the last recovery time
A35 Media HarvestingYou want to collect the media from a set of instruments in the field at a regular interval (for example once per week) You also have to retrieve all of the seismic data on the media for subsequent analysis
An Archive project is the recommended solution Initially a directory is created on the file system of the server running Apollo Project A directory Store specification is created with this directory as the parent directory from which to search for Stores The content of each media instance in the weekrsquos collection is copied from a media reader to a subdirectory of the directory When the project is run all of the copied Stores are automatically available and the project accumulates data for each instrument
Due to the nature of media harvesting and the replacement procedure for this example data is always missing for the last period of output files for the current week This period corresponds to the time that the media was taken from the instrument and replaced with a new one The following week when the media is harvested again from the instruments in the field Apollo Project fills in the missing time for these files with the new Store data regardless of the media instance on which the data currently resides
You can only create and run Field Archive projects for Taurus version 30 or later
Appendix A Reference Information and Examples
Apollo Project User Guide16106R5 2009-03-24
41
A36 Trigger Downloading You have set up a network of five Tauruses around a hydro dam Each Taurus is accessible over an Ethernet connection and each is set to record data over the weekend You have set the period for data retrieval at 30 seconds before and five minutes after any seismic activity but the following procedure shows you why it is not necessary to view all of the data accumulated over the whole weekend
1 Select the Taurus at the site with the least environmental noise or determine the best site for generating triggers and designate this Taurus ldquoTaurus Ardquo for reference
You need to perform this task in advance More information about triggers can be found in the Taurus Portable Seismograph User Guide
2 Download the trigger file from ldquoTaurus Ardquo and review the file to verify the correct number of triggers
3 Follow these steps to create a new Triggers project
a) Click New on the Apollo Project Existing Projects page
b) Click Triggers as the project type and enter a unique name in the Project Name box
c) Click OK
d) Click the IP Address tab on the Store Selection tab
e) Enter the IP address of a Taurus
f) Click Add
g) Repeat step e until you have entered the IP addresses of all five of the Tauruses
Apollo Project adds the IP address specifications to the Selected Specifications section of the Store Selection page and finds all five Stores associated with the IP addresses and adds them to the Selected Stores section
h) Click the Channel Group Selection tab
i) Click Create Default Station Table to create a table for all of the currently selected Stores and discovered instruments
j) Review the selected channel groups and if required edit the mappings in the selected channel groups area of the tab (lower half of the tab)
k) Click the Time Selection tab
l) Click the Browse button
m)Select the trigger file that you downloaded in step 2 and click OK
n) Click Submit
The list of triggers is imported and displayed in the Triggers section on the Time Selection page
o) Enter a Pre Time of 30 seconds and a Post Time of 5 minutes
p) Click the Output Format tab
q) Click MiniSEED
r) Click All Instruments
s) Click the Output Location tab
Appendix A Reference Information and Examples
42 Apollo Project User Guide16106R5 2009-03-24
t) Enter the valid absolute path of the base directory for the processed data subfolders and files
u) Enter the expression used to define path names for subfolders under the base directory
v) Enter the expression used to define file names for the processed data files that are stored in the subfolders under the base directory
w) Click OK
4 Click the Run Now button on the Summary page
When the project has finished running the output folder you specified in step t will contain ten files Each output file will contain 5 minutes and 30 seconds of data from the five Tauruses
A4 Shot File Formats for Controlled Source ProjectsYou have two options for defining shots for a Controlled Source project manually defining shots or importing shots from a shot file
You can create shot files in one of following three file formats
Microsoft Office Excel (xls) ndash See Section A41 ldquoCreating a Shot File With Microsoft Office Excelrdquo on page 42
OpenOfficeorg Calc (ods) ndash See Section A42 ldquoCreating a Shot File With OpenOfficeorg Calcrdquo on page 44
Comma-Separated Values (csv) ndash See Section A43 ldquoCreating a Comma-Separated Values Shot Filerdquo on page 45
The Shot file templates are located in the docShotFileImport folder on the Apollo Project CD
A41 Creating a Shot File With Microsoft Office ExcelThe Microsoft Office Excel template for Apollo Project can be used with Microsoft Office Excel version 2003 or later
To create an Microsoft Office Excel based shot file
1 Double-click ShotFileTemplatexlt
A new Microsoft Office Excel file is created from the template and opens in the Microsoft Office Excel
2 Save the new spreadsheet as a Microsoft Office Excel document (xls)
3 Enter shot file data as specified in the Microsoft Office Excel spreadsheet
Only the decimal separator is supported for shot files Separators that denote the 3rd power of 10 (thousand) are not supported (for example 4500) The Microsoft Excel and OpenOffice templates reinforce these restrictions and are recommended for creating csv files
Appendix A Reference Information and Examples
Apollo Project User Guide16106R5 2009-03-24
43
You can enter data for multiple shot times
4 Click Save to save the file in Microsoft Office Excel format
5 Click File gt Save As and select CSV (Comma delimited) (csv) from the Save as type list
6 Click Save
7 Click OK on the message warning you that you are only saving the active sheet
8 Click Yes on the message warning you that file features might be incompatible with the csv format
9 Close Microsoft Office Excel
If you are using Microsoft Office Excel 2007 click the Microsoft Office Button and click Save As
Ensure that you save the file as a comma delimited file If the shot file is mistakenly saved in Microsoft Excel format (xls) the shot file will not work in Apollo Project
Appendix A Reference Information and Examples
44 Apollo Project User Guide16106R5 2009-03-24
A42 Creating a Shot File With OpenOfficeorg CalcThe OpenOffice template has been tested with OpenOfficeorg Calc version 23 Later versions of OpenOfficeorg Calc can be used at your discretion
To create a shot file based on the OpenOfficeorg Calc template
1 Double-click ShotFileTemplateots
A new OpenOffice spreadsheet is created from the template and opens in OpenOfficeorg Calc
2 Save the new spreadsheet as an OpenOffice Calc document (ods)
3 Enter the shot file data as specified in the OpenOffice spreadsheet
You can enter data for multiple shot times
4 Click Save to save the file in OpenOfficeorg Calc format
5 Click File gt Save As and select Text CSV (csv) from the Save as Type list
6 Select the Edit filter settings check box
7 Click Save
A warning message might appear that warns you that the document might contain formatting that cannot be saved in the csv format Click Yes on the warning message to save the file in csv format
The Export of text files window opens
8 Delete the double quotation marks () in the Text delimiter box and ensure that the Save cell content as shown check box is selected
9 Click OK to export the OpenOffice spreadsheet as a csv file
10 Click OK on the warning message
11 Close OpenOfficeorg Calc
Appendix A Reference Information and Examples
Apollo Project User Guide16106R5 2009-03-24
45
A43 Creating a Comma-Separated Values Shot FileYou can use any text editor to create a csv shot file
To create a csv shot file
1 Open ShotFileTemplatecsv in a text editor and save it with a different name
2 Format each line of the csv file as follows
Shot TimePre TimePost TimeLatitudeLongitudeElevation
For example
2008-08-28 103044090600000-6000004267
The format and units are as follows
3 Save the file as a csv formatted file
The csv shot file template is not compatible with Microsoft Office Excel Make sure that you do not double-click it and open it in Microsoft Office Excel
FormatUnits
Shot Time yyyy-mm-dd hhmmss
Pre Time seconds
Post Time seconds
Latitude degrees
Longitude degrees
Elevation meters
Appendix A Reference Information and Examples
46 Apollo Project User Guide16106R5 2009-03-24
Apollo Project User Guide16106R5 2009-03-24
47
Appendix B Retrieving SOH Data from a Taurus Version 2x
Taurus Version 2x SOH Data Retrieved by Apollo Project
Retrieving SOH Data from a Taurus Version 2x Streaming to Apollo Server
B1 Taurus Version 2x SOH Data Retrieved by Apollo Project This section presents the predefined datasets of SOH data Apollo Project will retrieve from a Taurus version 2x either through a direct connection or a stream to Apollo Server For instruction on retrieving streaming Taurus version 2x data from Apollo Server see Section B2 ldquoRetrieving SOH Data from a Taurus Version 2x Streaming to Apollo Serverrdquo on page 48
The order of the columns presented in the table below will differ when streaming Taurus version 2x SOH data from Apollo Server
Predefined SOH group SOH data
GPS Time Time (longsecs) (the number of seconds since 1970-01-01)Time (UTC) (time in yyyy-mm-dd hhmmssms format)Altitude (m)DAC CountError (ns) (time error)GPS Engine StatusLast Update Time(s)Lat (deg) (latitude in degrees)Long (deg) (longitude in degrees)NumSatellites (number of satellites used)PDOPPhaseLock (system clock phase lock)TDOPUncertainty (ns) (time uncertainty)
Note The values for Number of satellites used PDOP and TDOP are provided by the GPS receiver at the Last update time In order to see what time these values correspond to look at the Last update time When GPS is off these three parameters and the Last update time are not updated The last value displays until the next update arrives (after the GPS is turned on again)
Appendix B Retrieving SOH Data from a Taurus Version 2x
48 Apollo Project User Guide16106R5 2009-03-24
B2 Retrieving SOH Data from a Taurus Version 2x Streaming to Apollo ServerThis section provides instruction on configuring your Taurus version 2x to stream data to Apollo Server and instructions on how to use Apollo Project to retrieve this data from Apollo Server
B21 Streaming Data from a Taurus Version 2x to Apollo ServerUse the Taurus graphical user interface on either the Taurus display screen or through a Web browser to set up an NP stream from a Taurus version 2x to Apollo Server
1 Log in to the Taurus version 2x with either the tech or central user account
2 Select Advanced Configuration gt Communications gt NP Data Streaming
GPS Satellites Time (longsecs) (the number of seconds since 1970-01-01)Time (UTC) (time in yyyy-mm-dd hhmmssms format)
For each satelliteAcquisition FlagLast Update Time (ms)PRNSatellite Azimuth (microordm)Satellite Elevation (microordm)Signal Level (AMU)
Environment Time (longsecs) (the number of seconds since 1970-01-01)Time (UTC) (time in yyyy-mm-dd hhmmssms format)External SOH Voltage 1 (V) (12-bit voltage input) External SOH Voltage 2 (V) (12-bit voltage input) External SOH Voltage 3 (V) (12-bit voltage input) External SOH Voltage 4 (V) (12-bit voltage input) Sensor SOH Voltage 1 (V)Sensor SOH Voltage 2 (V)Sensor SOH Voltage 3 (V)
Instrument Time (longsecs) (the number of seconds since 1970-01-01)Time (UTC) (time in yyyy-mm-dd hhmmssms format)Controller Current (mA)Digitizer Current (mA)NMX Bus Current (mA) (external connector)Sensor Current (mA)Serial Port Current (mA)Supply Voltage (mV)Temperature (ordmC)
Predefined SOH group SOH data
Appendix B Retrieving SOH Data from a Taurus Version 2x
Apollo Project User Guide16106R5 2009-03-24
49
3 To have the Taurus stream both time series and SOH data to Apollo Server select both Stream Time Series and Stream SOH
-OR-
Select only Stream SOH if you only want to retrieve the SOH data from Apollo Server
4 Type the IP address for Apollo Server in the IP Address box
5 Type the port number Apollo Server uses to receive data in the Port box By default this is port number 32008
6 The Second IP Address and Second Port boxes are not necessary however cannot be left blank Type 127001 in the Second IP Address box and 32004 in the Second Port box
7 Type a value in the Maximum Throughput [bps] box if a limited data link is present between the Taurus and Apollo Server For instance if at some point the data link is limited to 9600 bps then this is the maximum throughput the link can allow If there are no throughput limitations set the value in this box to zero to disable the throughput limitation
8 Click Apply
9 Click Commit
B22 Retrieving Taurus Version 2x Data from Apollo ServerCreate a new project or use an existing project in Apollo Project to retrieve the Taurus version 2x data from Apollo Server For more information on creating or editing projects refer to Section 31 ldquoCreating New Projectsrdquo on page 11 and Section 36 ldquoEditing and Viewing the Settings of Projectsrdquo on page 31
When creating or editing the project
a) Add an IP address Store specification on the Store Selection tab (see step 4 in Section 31 ldquoCreating New Projectsrdquo) for Apollo Server including its client Web application port number Use the format
Apollo Server IP AddressApollo Server Client Web Application Port Number
b) Apply the appropriate filters on the Channel Group Selection tab to retrieve the desired channel groups from the Taurus version 2x See step 5 through step 12 in Section 31 ldquoCreating New Projectsrdquo for instruction on using the Channel Group Selection tab
Appendix B Retrieving SOH Data from a Taurus Version 2x
50 Apollo Project User Guide16106R5 2009-03-24
Apollo Project User Guide16106R5 2009-03-24
51
Appendix C Glossary
Glossary of Abbreviations and Terms
List of Unit Abbreviations and Symbols
C1 Glossary of Abbreviations and Terms
A
ASCIIAmerican Standard Code for Information Interchange
B
BHEBroad Band High Gain Seismometer East-West Orientation
Channel name based on the Global Seismological Network (GSN) standard
BHNBroad Band High Gain Seismometer North-South Orientation
Channel name based on the Global Seismological Network (GSN) standard
BHZBroad Band High Gain Seismometer Vertical Orientation
Channel name based on the Global Seismological Network (GSN) standard
Appendix C Glossary
52 Apollo Project User Guide16106R5 2009-03-24
C
CSVComma-Separated Values
D
DACDigital to Analog Converter
G
GPSGlobal Positioning System
J
JREJava Runtime Environment
JVMJava Virtual Machine
N
NFSNetwork File System
P
PDOPPosition Dilution of Precision
PRNPseudo-random Number
Appendix C Glossary
Apollo Project User Guide16106R5 2009-03-24
53
S
SACSeismic Analysis Code
An Apollo Project output file format that generates files that can be used by the SAC software (see http wwwirisedusoftwaresac)
SEEDStandard for the Exchange of Earthquake Data
SMBServer Message Block
SOHState of Health
T
TCPIPTransmission Control ProtocolInternet Protocol
TDOPTime Dilution of Precision
U
UNCUniform Naming Convention or Universal Naming Convention
URLUniform Resource Locator
UTCCoordinated Universal Time
Appendix C Glossary
54 Apollo Project User Guide16106R5 2009-03-24
C2 List of Unit Abbreviations and SymbolsTable C-1 provides a list of unit abbreviations and symbols commonly used in Nanometrics documentation
Table C-1 Unit abbreviations and symbols
Abbreviation or Symbol Definition Abbreviation
or Symbol Definition
deg degree lb pound
Oslash diameter m metre
micro micro ms metre per second
Ω ohm ms2 metre per second squared
A ampere mA milliampere
AC alternating current MB megabyte
b bit MΩ megaohm
B byte MHz megahertz
bps bits per second mi mile
C Celsius mL millilitre
cm centimetre mm millimetre
dB decibel ms millisecond
DC direct current MTU maximum transmission unit
F farad mV millivolt
ft foot mW milliwatt
g gram N Newton
g gravity nF nanofarad
GB gigabyte ns nanosecond
GHz gigahertz rad radian
Hz hertz rads radian per second
in inch s second
KB kilobyte sps samples per second
kg kilogram U rack unit
kHz kilohertz V volt
kΩ kiloohm Vpp Volts peak-to-peak
kW kilowatt W watt
L litre
Apollo Project User Guide16106R5 2009-03-24
55
About NanometricsNanometrics is a world leader in the development of precision instrumentation network technology and software applications for seismological and environmental studies Using Nanometrics technology our customers establish and grow research networks that are often located in extreme environments such as the frozen Arctic and Antarctic the arid deserts of the Middle East the jungles of South America and the depths of the worlds oceans Many of these are mission-critical national and regional networks that demand the highest possible data quality and availability
Nanometrics provides end-to-end solutions that include a growing portfolio of broadband and strong motion seismometers dataloggers and digitizers satellite ground station systems for remote site data collection and software applications for data and network analysis and management To support this portfolio Nanometrics also provides global systems engineering services for design installation and support of complete networks
Our head office research and development centre and production facility are located in the Kanata North Business Park of Ottawa the high-technology heart of Canadas capital region
Contacting NanometricsNanometrics Inc250 Herzberg RoadKanata Ontario Canada K2K 2A1Phone +1 613-592-6776Fax +1 613-592-5929Email infonanometricscaWeb wwwnanometricsca
Contacting Technical SupportIf you need technical support please submit a request on the Nanometrics technical support site or by email or fax Include a full explanation of the problem and related information such as log filesSupport site httpsupportnanometricsca
Email techsupportnanometricsca
Chapter 3 Retrieving Data
Apollo Project User Guide16106R5 2009-03-24
21
17 Click the Output Location tab
18 If you defined a default base directory when you configured Apollo Project and want to use it for this project go to step 21
For more information see Section 33 ldquoConfiguring Apollo Projectrdquo on page 24
-OR-
Enter the valid absolute path of the base directory for the processed data subdirectories and files
If the base directory you entered does not exist click Create to create it
19 If you defined a default expression for subdirectories when you configured Apollo Project and want to use it for this project go to step 21
For more information see Section 33 ldquoConfiguring Apollo Projectrdquo on page 24
-OR-
Enter the expression used to define path names for subfolders under the base directory
You can enter tokens in any order including any additional characters that are valid for paths
Seisan 1 Click Seisan
NotesYou must have Seisan installed on your computer with a WAVEFORM_BASE and CONT_BASE line included for each station in the DATSEISANDEF file You must define a SEISAN_TOP environment variableOne output file per channel group is generated
Regardless of the output format selected SOH channel group data is always output in CSV format
The Base Directory is the root of all data retrieved for the project and can be defined at any location in the file system of the server running Apollo Project including a networked drive on a separate server If you want to create or use a directory on a computer on the network you have to enter the server and share name in a modified UNC format that is prefixed by an additional two backslashes For example the usual fileserver1storefiles must be written as fileserver1storefiles
Large amounts of data can be stored in this location You must ensure that adequate disk space is available
For deployments of Apollo Project where the clients are not running on the server it is recommended that the file system containing the base directory on the server be shared or exported as a networked file system
It is not recommended that you use the channel token in the subdirectories expression if the project includes more than one channel group per instrument (selected on the Channel Group Selection tab) and the output is not per channel group (selected on the Output Format tab)
Output format Steps
Chapter 3 Retrieving Data
22 Apollo Project User Guide16106R5 2009-03-24
20 If you defined a default expression for file names when you configured Apollo Project and want to use it for this project go to step 21
For more information see Section 33 ldquoConfiguring Apollo Projectrdquo on page 24
-OR-
Enter the expression used to define file names for the processed data files that are stored in the subfolders under the base directory
You can enter tokens in any order including any additional characters that are valid for file names
21 Click OK to save the new project
The new project is created and the Summary page is displayed
32 Creating a Station Table FileYou can create a mapping between a given instrumentchannel group (for example taurus_1234digitizertimeSeries1) and a corresponding network station location and channel name These mappings are stored in a station table file and the mapped channel group names are used in the output files
You can create a station table file and use it as the default for all projects or you can create a station table for individual projects
To create a station table file and set is as the default
1 Click the configuration button in the upper right corner
2 Specify the network name location and channel names on the Behaviour and Defaults dialog box and click OK to save the new settings
The settings you enter here are used as the channel names in the station table file You can edit these settings in step 8
For more information on configuring Apollo Project settings see Section 33 ldquoConfiguring Apollo Projectrdquo on page 24
3 Click New on the Apollo Project Existing Projects page
Do not use the channel token in the filename expression if the project includes more than one channel group per instrument (selected on the Channel Group Selection tab) and the output is not per channel group (selected on the Output Format tab)
The Sample Path shows an example of a file name generated using the values for the Base Directory Subdirectories and Filename settings
You can only edit the settings of a project before it has run for the first time or been scheduled (Archive project) If you want to edit the settings of a project after it has already run once or been scheduled you can copy the project (see Section 345 ldquoCopying a Projectrdquo on page 28) and then edit the settings for the copy
It is recommended that you create a station table file and set it as the default for all projects You can update the mappings in this file when new Stores are added or discovered
Chapter 3 Retrieving Data
Apollo Project User Guide16106R5 2009-03-24
23
4 Type Station Table in the Project Name box and click any project type
5 Click OK
6 Click the Store Selection tab and select as many Stores as possible
See step 4 of Section 31 ldquoCreating New Projectsrdquo for information on how to add specifications and select Stores
7 Click the Channel Group Selection tab and click Create Default Station Table
A station table file is created and the name of the file is displayed in the Station Table File Name box
8 Edit the station table channel group mappings in the selected channel groups area of the tab (lower half of the tab) as required
The NetworkStationLocationChannel names will appear in the output files If the Location is empty it is interpreted as the SEED default of two spaces
9 Click OK to close the project and finish creating the station table
10 Click the configuration button in the upper right corner
11 Enter the path and name of the station table file you just created in the Station Table File Name box on the Behaviour and Defaults dialog box
12 Click OK to save the new settings
The station table file you specified will be used as the default for all future projects You can open the Station Table project and edit the station table file if you need to add more Stores or change the mappings
For more information on configuring Apollo Project settings see Section 33 ldquoConfiguring Apollo Projectrdquo on page 24
Make a note of the path of the station table file because you will have to enter it on the Behaviour and Defaults dialog box to set it as the default for all projects
Valid characters for the network station location and channel in the NetworkStationLocationChannel box are upper case letters A to Z numbers 0 to 9 and spaces are also acceptable for the location
Chapter 3 Retrieving Data
24 Apollo Project User Guide16106R5 2009-03-24
33 Configuring Apollo ProjectYou can configure basic settings for Apollo Project and the default settings for new projects The changes you make to the project default settings only apply to new projects
To configure Apollo Project
1 Click the configuration button in the upper right corner
2 Edit the following settings
Setting Description
Log Verbosity The level of detail that is logged by Apollo ProjectThe default setting is Info
Log Location The default name of the Apollo Project log folder Maximum Number of Retrieval Attempts
The maximum number of single retrieval attempt made for all missing time segments on all channel groups every time a project is run Enter an integer from 0 through 1000 The default value is 8
Notes If the Taurus is busy when a retrieval attempt is made the number of remaining retrieval attempts is not decreased by one attemptYou can view the channel group details page to see if there are any remaining retrieval attempts for any channel groups (see Section 373 ldquoMonitoring the Status of a Running Projectrdquo on page 34)
Number Of Retries The number of times Apollo Project attempts to connect to a data source if there is a network connectivity problem Enter an integer from 0 through 1000 The default value is 3
Note Every time a project is run it starts with the maximum number of retries
Retry Interval (secs) The amount of time in seconds that Apollo Project waits before trying to connect to a data source againEnter an integer from 0 through 1000 The default value is 5
Station Table File Name The file name and location of the station table file that is used to assign station names to all of the selected channel groupsA station table is used to assign names to all of the selected channel groups For more information see Section 32 ldquoCreating a Station Table Filerdquo on page 22No station table file is specified by default
Chapter 3 Retrieving Data
Apollo Project User Guide16106R5 2009-03-24
25
Base Directory The folder name and location of the base directory for the processed data subfolders and files Enter any valid folder name and location including any additional characters that are valid for paths The default base directory name is ApolloProject
Notes The Base Directory is the root of all data retrieved for the project and can be defined at any location in the file system of the server running Apollo Project including a shared folder on a different computer If you want to create or use a folder on a computer on the network you have to enter the server and share name in a modified UNC format that is prefixed by an additional two backslashes For example the usual fileserver1storefiles must be written as fileserver1storefilesLarge amounts of data can be stored in this location You must ensure that adequate disk space is availableFor deployments of Apollo Project where the clients are not running on the server it is recommended that the file system containing the base directory on the server be shared or exported as a networked file system
Subdirectories The expression used to define path names for subfolders under the base directoryEnter tokens in any order including any additional characters that are valid for paths The default path name is as follows projectyearmonthday
Filename The expression used to define file names for the processed data files that are stored in the subfolders under the base directoryEnter tokens in any order including any additional characters that are valid for file names The default filename is as follows instrument_time
Sample Path An example of a file name generated using the values for the Base Directory Subdirectories and Filename settings
Network Name A standard network codeEnter any two upper case letters or numbers The default code is XX
Location A location within a stationEnter any two upper case letters numbers or spaces
The default location is two spaces for ldquononerdquo You must delete the two default spaces if you enter a new location value
Setting Description
Chapter 3 Retrieving Data
26 Apollo Project User Guide16106R5 2009-03-24
3 Click OK to save the new settings
34 Managing ProjectsYou can view open close copy and delete projects Also you can create convenient links to run your individual projects with desktop shortcuts
341 Viewing Existing Projects1 Click Projects in the Projects bar
2 View the projects listed on the Existing Projects page
The Existing Projects page shows a list of all projects and a status overview of each project For more information see Section 371 ldquoViewing an Overview of the Status of All Projectsrdquo on page 32
Channel 1 Name A channel codeEnter any three upper case letters or numbersThe default channel code is BHZ
Channel 2 Name A channel codeEnter any three upper case letters or numbersThe default channel code is BHN
Channel 3 Name A channel codeEnter any three upper case letters or numbersThe default channel code is BHE
Setting Description
Chapter 3 Retrieving Data
Apollo Project User Guide16106R5 2009-03-24
27
342 Opening a Project1 Click the project name under the Name column on the Existing Projects page
2 Click the Open Project button
343 Creating a Desktop Shortcut to a ProjectLaunching a project with a desktop shortcut will open Apollo Project to that project and run the project
Methods for creating desktop shortcuts to Web sites vary from browser to browser These procedures explain how to create desktop shortcuts to specific projects for both Mozilla Firefox 3 and Microsoft Internet Explorer 7 Desktop shortcuts to projects include the Apollo Project icon and are titled in the format Project Name ndash Apollo Project
In Firefox 3
1 Open the project you want to create a shortcut to in Firefox
2 Reduce the size of the Firefox window so that the desktop is visible
3 Drag the Site Identification Button onto the desktop
The Site Identification Button is located to the left of the Location Bar and displays the Apollo Project icon
In Internet Explorer 7
1 Open the project you want to create a shortcut to in Internet Explorer
2 Press ALT+F
3 Select Send gt Shortcut to Desktop
344 Closing a Project
1 Click the Close Project button in the Projects bar
Launching a desktop shortcut to a project automatically runs that project It is important to note that once a project is run its settings can no longer be edited It is recommended that desktop shortcuts only be created for Field Archive projects
Firefox is the recommended browser for Apollo Project
Chapter 3 Retrieving Data
28 Apollo Project User Guide16106R5 2009-03-24
345 Copying a Project
1 Select the project name under the Name column on the Existing Projects page
2 Click Copy
3 Enter a unique name for the new project and click OK
4 Click Edit and edit the settings as required
5 Click OK to save the project after you have finished editing the settings
346 Deleting a ProjectWhen you delete a project only files in the temporary folder are deleted All processed data files are not deleted
1 Click the project name under the Name column on the Existing Projects page
2 Click Delete
3 Click OK on the confirmation message
35 Running ProjectsFor all project types you can run a project manually at any time Archive projects can also be defined to run automatically on a schedule
If it is a scheduled Archive Project and the schedule is started click Cancel Schedule before you create a copy of it (If the schedule is not started the Start Schedule button is visible if the schedule is started the Cancel Schedule button replaces the Start Schedule button)
Apollo Project stores intermediate files in a temporary subdirectory of the Base Directory specified for the output location of a project These intermediate files correspond to the actual channel group data retrieved from the Stores referenced by the project If a project is deleted from Apollo Project these temporary files will be removed automatically
Disk space can also be reclaimed by removing these temporary files manually without deleting the project However if the project is run again the output files produced might be incomplete if previously retrieved data from these temporary files is required
For more information on what happens when a project runs see Section A1 ldquoOverview of Running Projectsrdquo on page 37
Chapter 3 Retrieving Data
Apollo Project User Guide16106R5 2009-03-24
29
351 Running a Project1 Open a project
2 Click Run Now on the Summary page to start the project
The project starts running and the Retrieval Status page is displayed
352 Stopping a Project1 Open a project
2 Click Cancel Run on the Summary page to stop the project
3 Click OK on the success message
353 Merging Project Data FilesYou have the option to merge all of the downloaded data for the stations and instruments into one file per interval for each project
1 Open a project
2 Click Merge
A single file is generated for each time period The time period is determined by the file interval you specified on the Time Selection page when you created the project For more information see step 13 of Section 31 ldquoCreating New Projectsrdquo on page 11
The original data files are not modified when you select the option to merge project data files
You can also click Run Now on the Retrieval Status page to start a project
For more information on what happens when a project runs see Section A1 ldquoOverview of Running Projectsrdquo on page 37
You can also click Cancel Run on the Retrieval Status page to stop a project
You cannot merge data from Archive projects and you cannot merge data in the Seisan format
You can also click Merge on the Retrieval Status page to merge the data from a project
Chapter 3 Retrieving Data
30 Apollo Project User Guide16106R5 2009-03-24
354 Running a Scheduled Archive Project1 Open a project
2 Click Start Schedule to start the project schedule
3 Click OK on the confirmation message
4 Click OK on the success message
For a project scheduled to run weekly the project will run for the first time according to the project start time and then it will run on a weekly basis according to the times and days you specified
For a project scheduled to run at a regular interval the project will run according the to interval you specified after you start the schedule For example if you click Start Schedule on a Wednesday and you specified every 2 days as the interval then the project will run for the first time on Friday and every two days after that
3541 Cancelling a Schedule
If you cancel a scheduled project before it runs for the first time you can edit the project settings
If you cancel a project that is currently running the current project runs to completion but subsequent project runs will not occur
1 Open a project
2 Click Cancel Schedule to cancel the project schedule
3 Click OK on the confirmation message
4 Click OK on the success message
You can also click Start Schedule on the Retrieval Status page to start the schedule of a project
You can restart the schedule by opening the project and clicking Start Schedule
You can also click Cancel Schedule on the Retrieval Status page to cancel the schedule of a project
Chapter 3 Retrieving Data
Apollo Project User Guide16106R5 2009-03-24
31
36 Editing and Viewing the Settings of ProjectsYou can edit the settings of a project before it has run After it has run you can view the settings
361 Editing Project Settings1 Open the project
2 Click Edit on the Summary page
3 Edit the settings as required
4 Click OK to save the changes
362 Viewing Project Settings1 Open the project
2 Click View on the Summary page
3 Click the tabs to view the settings
4 Click Cancel when you have finished viewing the settings
You can only edit the settings of a project before it has run for the first time or been scheduled (Archive project) If you want to edit the settings of a project after it has already run once or been scheduled you can copy the project (see Section 345 ldquoCopying a Projectrdquo on page 28) and then edit the settings for the copy
Settings For more information
Store Selection See step 4 of Section 31 ldquoCreating New ProjectsrdquoChannel Group Selection See step 5 to step 12 of Section 31 ldquoCreating New ProjectsrdquoTime Selection See step 13 of Section 31 ldquoCreating New ProjectsrdquoOutput Format See step 15 and step 16 of Section 31 ldquoCreating New ProjectsrdquoOutput Location See step 17 to step 20 of Section 31 ldquoCreating New Projectsrdquo
You can also click Edit on the Retrieval Status page to edit the settings of a project
You can also click View on the Retrieval Status page to edit the settings of a project
Chapter 3 Retrieving Data
32 Apollo Project User Guide16106R5 2009-03-24
37 Monitoring Project StatusYou can monitor the status of a project by viewing information on the Existing Projects Summary and Retrieval Status pages
371 Viewing an Overview of the Status of All ProjectsThe Existing Projects page is the default home page of Apollo Project You see this page when you first open Apollo Project or when you click Projects in the projects bar For more information see Section 341 ldquoViewing Existing Projectsrdquo on page 26
You can view the following information for all projects on the Existing Projects page
bull Name
bull Type
bull Current status
bull Last time the project run
bull Status of data retrieved
The Data Retrieved bars on the Existing Projects page show the overall status of the data retrieval For more information see Section 3731 ldquoStatus Coloursrdquo on page 34
Chapter 3 Retrieving Data
Apollo Project User Guide16106R5 2009-03-24
33
372 Viewing the Status of an Individual ProjectWhen you open a project a detailed summary of the project is shown on the Summary page For more information see Section 342 ldquoOpening a Projectrdquo on page 27
You can view the following information for each project on the Summary page
bull Date it was created
bull Date it was last modified
bull Current status
bull Last time it ran
bull Next time it will run
You can also view a summary of all of the settings you specified when you created the project (Store specifications selected Stores selected time series channel groups selected SOH channel groups start and end times number of files generated file interval and output format and locations)
All times are reported using the UTC time zone
Chapter 3 Retrieving Data
34 Apollo Project User Guide16106R5 2009-03-24
373 Monitoring the Status of a Running ProjectYou can view the data retrieval status of a project while it is running on the Retrieval Status page The Retrieval Status page is displayed automatically when you click Run Now to run a project You can also view this page by opening a project and clicking the Retrieval Status tab
The status for each channel group is expressed in the form of two numbers (for example 60100) and two bar graphs The first number is the percentage available of the total time requested (for example 60) and the second number is the percentage retrieved of the time available (for example 100) For more information on the bar graph status colours see Section 3731 ldquoStatus Coloursrdquo on page 34
You can also view retrieval details for each channel group listed on the Retrieval Status page For more information see Section 3732 ldquoViewing the Retrieval Details for Each Channel Grouprdquo on page 35
3731 Status Colours
The data retrieval status bars use the following status colours
The information that is displayed on the Retrieval Status page is updated continuously while a project is running
Table 3-1 Status colours
Colour Status
Green Apollo Project has retrieved the data
Yellow Apollo Project is attempting to retrieve available data from the Store
Red Data is available in the Store but Apollo Project has failed to retrieve it on this attempt Apollo Project will make additional attempts to retrieve the data up to the configured Maximum Number of Retrieval Attempts For information on how to set the Maximum Number of Retrieval Attempts setting see Section 31 ldquoCreating New Projectsrdquo on page 11
White Data for some portion of the requested time segment is not available in the Store For example there are gaps in the data or the retrieval request is for a future time segment
Chapter 3 Retrieving Data
Apollo Project User Guide16106R5 2009-03-24
35
3732 Viewing the Retrieval Details for Each Channel Group
You can view the retrieval status of each time segment for a channel group
1 Click a channel group name
2 Click the Channel Group Details button that is located to the right of the channel group name
The Remaining Retrieval Attempts column displays the number of times that Apollo Project will try to download each missing time segment for the channel group when the project is run again For information on how to set the Maximum Number of Retrieval Attempts setting see Section 33 ldquoConfiguring Apollo Projectrdquo on page 24
3 Click OK when you have finished viewing the details
Chapter 3 Retrieving Data
36 Apollo Project User Guide16106R5 2009-03-24
Apollo Project User Guide16106R5 2009-03-24
37
Appendix A Reference Information and Examples
Overview of Running Projects
Example Project Settings
Example Deployment Scenarios
Shot File Formats for Controlled Source Projects
A1 Overview of Running ProjectsWhen a project is run Apollo Project performs the following steps
1 The requested time ranges are identified
2 The channel groups for which data are to be retrieved are identified
3 The actual Stores specified by the Store specifications of the project are identified
For each identified Store the following steps are performed
1 A data availability analysis for the outstanding time ranges is performed These are for the ranges for which data has not already been retrieved The availability of the data is recorded for reference It is possible that a given Store was not present at the time the project was last run If this is the case then an attempt is made to retrieve all of the required time ranges of the project from the Store
2 If any data exists in the Store for any of the requested time ranges then a retrieval of this data is performed and the retrieved data is stored to local temporary files
3 If the number of retrieval attempts for a given time range exceeds a configurable threshold (see Section 33 ldquoConfiguring Apollo Projectrdquo on page 24) then the retrieval of data within the stated range is not attempted again
If any data was retrieved during the run of the project then the corresponding output files of the desired output format are generated and stored in the output location specified for the project
When running Apollo Project with Taurus version 2x the schedule for Archive projects must be greater than 5 minutes in duration Schedules that are less than 5 minutes can result in data that is missing or not downloaded
Appendix A Reference Information and Examples
38 Apollo Project User Guide16106R5 2009-03-24
It is possible that the requested data for a given channel group exists across multiple Stores If all of these Stores are included by the Store specifications for the project then Apollo Project assembles the requested data
When a project runs detailed information regarding the results of the retrieved data and processed data are available For more information see Section 37 ldquoMonitoring Project Statusrdquo on page 32
A2 Example Project Settings
A21 Example 1 One Time ProjectProject Name Project1
Project Type One Time
Channel groups selected for retrieval CASTN1OTBHZ (on taurus_1234)
Requested Time Range January 30 2008 1400 ndash 1500 UTC
File Interval 20 minutes
Output Location Base Directory disk2ApolloProjectOutputData
Output Location Subdirectories projectyearmonthday
Output Location Filenamestationnetwork_time
When the project is run successfully the following output files will be created on the server running Apollo Project
disk2ApolloProjectOutputDataProject120080130STN1CA_20080130_140000seed
disk2ApolloProjectOutputDataProject120080130STN1CA_20080130_142000seed
disk2ApolloProjectOutputDataProject120080130STN1CA_20080130_144000seed
Appendix A Reference Information and Examples
Apollo Project User Guide16106R5 2009-03-24
39
A22 Example 2 Controlled Source ProjectProject Name Project2
Project Type Controlled Source
Channel groups selected for retrieval CASTN1OTBHZ (on taurus_1234) CASTN1OTBHN (on taurus_1234)
Requested Shot Times January 30 2008 1400 UTC January 30 2008 1430 UTC
Pre Time 30 seconds
Post Time 30 seconds
Output Location Base Directory disk2ApolloProjectOutputData
Output Location Subdirectories projectyearmonthday
Output Location Filename timeformat
When the project is run successfully the following output files will be created on the server running Apollo Project
disk2ApolloProjectOutputDataProject22008013020080130_135930segysgy
disk2ApolloProjectOutputDataProject22008013020080130_142930segysgy
A3 Example Deployment Scenarios
A31 One TimeYou want to download three days of data from multiple instruments on the network save the data in MiniSEED format and create a file for every hour of data
A One Time project is the recommended solution The Store of each instrument can be made available to Apollo Project by creating a corresponding IP Address Store specification with the IP address of the instrument The requested time range can be specified along with a file interval of one hour Ensure that the instruments are configured to run in Communications mode
A32 Scheduled ArchiveYou want seismic data to be retrieved automatically from a group of instruments on the network every six hours The instruments are always accessible via an Ethernet connection
A scheduled Archive project is the recommended solution Use the Regular Interval scheduling option and set the interval to six hours
You can also run a scheduled Archive project at any time For example if the scheduled retrieval interval of a project is six hours and between intervals you want to retrieve the data three hours early you can run the project and approximately three additional hours of data would be accumulated About three hours later the project will run automatically and accumulate the remaining three hours of data
Appendix A Reference Information and Examples
40 Apollo Project User Guide16106R5 2009-03-24
A33 Manual ArchiveYou want to retrieve seismic data from a group of instruments but their respective Stores are only available for retrieval on occasion (no regular dependable schedule for retrieval from these Stores is possible)
A manually run Archive project is the recommended solution You can create the project and run it whenever any of the instruments are available for retrieval
A34 Field ArchiveYou want to collect data from a set of isolated instruments in the field at recurring intervals (for example twice per month)
A Field Archive project is the recommended solution You can create a Field Archive project and either add all instrument IP addresses to the list or use a Discovery specification The time for the last retrieval is stored on the instrument and all data is recovered from the last recovery time
A35 Media HarvestingYou want to collect the media from a set of instruments in the field at a regular interval (for example once per week) You also have to retrieve all of the seismic data on the media for subsequent analysis
An Archive project is the recommended solution Initially a directory is created on the file system of the server running Apollo Project A directory Store specification is created with this directory as the parent directory from which to search for Stores The content of each media instance in the weekrsquos collection is copied from a media reader to a subdirectory of the directory When the project is run all of the copied Stores are automatically available and the project accumulates data for each instrument
Due to the nature of media harvesting and the replacement procedure for this example data is always missing for the last period of output files for the current week This period corresponds to the time that the media was taken from the instrument and replaced with a new one The following week when the media is harvested again from the instruments in the field Apollo Project fills in the missing time for these files with the new Store data regardless of the media instance on which the data currently resides
You can only create and run Field Archive projects for Taurus version 30 or later
Appendix A Reference Information and Examples
Apollo Project User Guide16106R5 2009-03-24
41
A36 Trigger Downloading You have set up a network of five Tauruses around a hydro dam Each Taurus is accessible over an Ethernet connection and each is set to record data over the weekend You have set the period for data retrieval at 30 seconds before and five minutes after any seismic activity but the following procedure shows you why it is not necessary to view all of the data accumulated over the whole weekend
1 Select the Taurus at the site with the least environmental noise or determine the best site for generating triggers and designate this Taurus ldquoTaurus Ardquo for reference
You need to perform this task in advance More information about triggers can be found in the Taurus Portable Seismograph User Guide
2 Download the trigger file from ldquoTaurus Ardquo and review the file to verify the correct number of triggers
3 Follow these steps to create a new Triggers project
a) Click New on the Apollo Project Existing Projects page
b) Click Triggers as the project type and enter a unique name in the Project Name box
c) Click OK
d) Click the IP Address tab on the Store Selection tab
e) Enter the IP address of a Taurus
f) Click Add
g) Repeat step e until you have entered the IP addresses of all five of the Tauruses
Apollo Project adds the IP address specifications to the Selected Specifications section of the Store Selection page and finds all five Stores associated with the IP addresses and adds them to the Selected Stores section
h) Click the Channel Group Selection tab
i) Click Create Default Station Table to create a table for all of the currently selected Stores and discovered instruments
j) Review the selected channel groups and if required edit the mappings in the selected channel groups area of the tab (lower half of the tab)
k) Click the Time Selection tab
l) Click the Browse button
m)Select the trigger file that you downloaded in step 2 and click OK
n) Click Submit
The list of triggers is imported and displayed in the Triggers section on the Time Selection page
o) Enter a Pre Time of 30 seconds and a Post Time of 5 minutes
p) Click the Output Format tab
q) Click MiniSEED
r) Click All Instruments
s) Click the Output Location tab
Appendix A Reference Information and Examples
42 Apollo Project User Guide16106R5 2009-03-24
t) Enter the valid absolute path of the base directory for the processed data subfolders and files
u) Enter the expression used to define path names for subfolders under the base directory
v) Enter the expression used to define file names for the processed data files that are stored in the subfolders under the base directory
w) Click OK
4 Click the Run Now button on the Summary page
When the project has finished running the output folder you specified in step t will contain ten files Each output file will contain 5 minutes and 30 seconds of data from the five Tauruses
A4 Shot File Formats for Controlled Source ProjectsYou have two options for defining shots for a Controlled Source project manually defining shots or importing shots from a shot file
You can create shot files in one of following three file formats
Microsoft Office Excel (xls) ndash See Section A41 ldquoCreating a Shot File With Microsoft Office Excelrdquo on page 42
OpenOfficeorg Calc (ods) ndash See Section A42 ldquoCreating a Shot File With OpenOfficeorg Calcrdquo on page 44
Comma-Separated Values (csv) ndash See Section A43 ldquoCreating a Comma-Separated Values Shot Filerdquo on page 45
The Shot file templates are located in the docShotFileImport folder on the Apollo Project CD
A41 Creating a Shot File With Microsoft Office ExcelThe Microsoft Office Excel template for Apollo Project can be used with Microsoft Office Excel version 2003 or later
To create an Microsoft Office Excel based shot file
1 Double-click ShotFileTemplatexlt
A new Microsoft Office Excel file is created from the template and opens in the Microsoft Office Excel
2 Save the new spreadsheet as a Microsoft Office Excel document (xls)
3 Enter shot file data as specified in the Microsoft Office Excel spreadsheet
Only the decimal separator is supported for shot files Separators that denote the 3rd power of 10 (thousand) are not supported (for example 4500) The Microsoft Excel and OpenOffice templates reinforce these restrictions and are recommended for creating csv files
Appendix A Reference Information and Examples
Apollo Project User Guide16106R5 2009-03-24
43
You can enter data for multiple shot times
4 Click Save to save the file in Microsoft Office Excel format
5 Click File gt Save As and select CSV (Comma delimited) (csv) from the Save as type list
6 Click Save
7 Click OK on the message warning you that you are only saving the active sheet
8 Click Yes on the message warning you that file features might be incompatible with the csv format
9 Close Microsoft Office Excel
If you are using Microsoft Office Excel 2007 click the Microsoft Office Button and click Save As
Ensure that you save the file as a comma delimited file If the shot file is mistakenly saved in Microsoft Excel format (xls) the shot file will not work in Apollo Project
Appendix A Reference Information and Examples
44 Apollo Project User Guide16106R5 2009-03-24
A42 Creating a Shot File With OpenOfficeorg CalcThe OpenOffice template has been tested with OpenOfficeorg Calc version 23 Later versions of OpenOfficeorg Calc can be used at your discretion
To create a shot file based on the OpenOfficeorg Calc template
1 Double-click ShotFileTemplateots
A new OpenOffice spreadsheet is created from the template and opens in OpenOfficeorg Calc
2 Save the new spreadsheet as an OpenOffice Calc document (ods)
3 Enter the shot file data as specified in the OpenOffice spreadsheet
You can enter data for multiple shot times
4 Click Save to save the file in OpenOfficeorg Calc format
5 Click File gt Save As and select Text CSV (csv) from the Save as Type list
6 Select the Edit filter settings check box
7 Click Save
A warning message might appear that warns you that the document might contain formatting that cannot be saved in the csv format Click Yes on the warning message to save the file in csv format
The Export of text files window opens
8 Delete the double quotation marks () in the Text delimiter box and ensure that the Save cell content as shown check box is selected
9 Click OK to export the OpenOffice spreadsheet as a csv file
10 Click OK on the warning message
11 Close OpenOfficeorg Calc
Appendix A Reference Information and Examples
Apollo Project User Guide16106R5 2009-03-24
45
A43 Creating a Comma-Separated Values Shot FileYou can use any text editor to create a csv shot file
To create a csv shot file
1 Open ShotFileTemplatecsv in a text editor and save it with a different name
2 Format each line of the csv file as follows
Shot TimePre TimePost TimeLatitudeLongitudeElevation
For example
2008-08-28 103044090600000-6000004267
The format and units are as follows
3 Save the file as a csv formatted file
The csv shot file template is not compatible with Microsoft Office Excel Make sure that you do not double-click it and open it in Microsoft Office Excel
FormatUnits
Shot Time yyyy-mm-dd hhmmss
Pre Time seconds
Post Time seconds
Latitude degrees
Longitude degrees
Elevation meters
Appendix A Reference Information and Examples
46 Apollo Project User Guide16106R5 2009-03-24
Apollo Project User Guide16106R5 2009-03-24
47
Appendix B Retrieving SOH Data from a Taurus Version 2x
Taurus Version 2x SOH Data Retrieved by Apollo Project
Retrieving SOH Data from a Taurus Version 2x Streaming to Apollo Server
B1 Taurus Version 2x SOH Data Retrieved by Apollo Project This section presents the predefined datasets of SOH data Apollo Project will retrieve from a Taurus version 2x either through a direct connection or a stream to Apollo Server For instruction on retrieving streaming Taurus version 2x data from Apollo Server see Section B2 ldquoRetrieving SOH Data from a Taurus Version 2x Streaming to Apollo Serverrdquo on page 48
The order of the columns presented in the table below will differ when streaming Taurus version 2x SOH data from Apollo Server
Predefined SOH group SOH data
GPS Time Time (longsecs) (the number of seconds since 1970-01-01)Time (UTC) (time in yyyy-mm-dd hhmmssms format)Altitude (m)DAC CountError (ns) (time error)GPS Engine StatusLast Update Time(s)Lat (deg) (latitude in degrees)Long (deg) (longitude in degrees)NumSatellites (number of satellites used)PDOPPhaseLock (system clock phase lock)TDOPUncertainty (ns) (time uncertainty)
Note The values for Number of satellites used PDOP and TDOP are provided by the GPS receiver at the Last update time In order to see what time these values correspond to look at the Last update time When GPS is off these three parameters and the Last update time are not updated The last value displays until the next update arrives (after the GPS is turned on again)
Appendix B Retrieving SOH Data from a Taurus Version 2x
48 Apollo Project User Guide16106R5 2009-03-24
B2 Retrieving SOH Data from a Taurus Version 2x Streaming to Apollo ServerThis section provides instruction on configuring your Taurus version 2x to stream data to Apollo Server and instructions on how to use Apollo Project to retrieve this data from Apollo Server
B21 Streaming Data from a Taurus Version 2x to Apollo ServerUse the Taurus graphical user interface on either the Taurus display screen or through a Web browser to set up an NP stream from a Taurus version 2x to Apollo Server
1 Log in to the Taurus version 2x with either the tech or central user account
2 Select Advanced Configuration gt Communications gt NP Data Streaming
GPS Satellites Time (longsecs) (the number of seconds since 1970-01-01)Time (UTC) (time in yyyy-mm-dd hhmmssms format)
For each satelliteAcquisition FlagLast Update Time (ms)PRNSatellite Azimuth (microordm)Satellite Elevation (microordm)Signal Level (AMU)
Environment Time (longsecs) (the number of seconds since 1970-01-01)Time (UTC) (time in yyyy-mm-dd hhmmssms format)External SOH Voltage 1 (V) (12-bit voltage input) External SOH Voltage 2 (V) (12-bit voltage input) External SOH Voltage 3 (V) (12-bit voltage input) External SOH Voltage 4 (V) (12-bit voltage input) Sensor SOH Voltage 1 (V)Sensor SOH Voltage 2 (V)Sensor SOH Voltage 3 (V)
Instrument Time (longsecs) (the number of seconds since 1970-01-01)Time (UTC) (time in yyyy-mm-dd hhmmssms format)Controller Current (mA)Digitizer Current (mA)NMX Bus Current (mA) (external connector)Sensor Current (mA)Serial Port Current (mA)Supply Voltage (mV)Temperature (ordmC)
Predefined SOH group SOH data
Appendix B Retrieving SOH Data from a Taurus Version 2x
Apollo Project User Guide16106R5 2009-03-24
49
3 To have the Taurus stream both time series and SOH data to Apollo Server select both Stream Time Series and Stream SOH
-OR-
Select only Stream SOH if you only want to retrieve the SOH data from Apollo Server
4 Type the IP address for Apollo Server in the IP Address box
5 Type the port number Apollo Server uses to receive data in the Port box By default this is port number 32008
6 The Second IP Address and Second Port boxes are not necessary however cannot be left blank Type 127001 in the Second IP Address box and 32004 in the Second Port box
7 Type a value in the Maximum Throughput [bps] box if a limited data link is present between the Taurus and Apollo Server For instance if at some point the data link is limited to 9600 bps then this is the maximum throughput the link can allow If there are no throughput limitations set the value in this box to zero to disable the throughput limitation
8 Click Apply
9 Click Commit
B22 Retrieving Taurus Version 2x Data from Apollo ServerCreate a new project or use an existing project in Apollo Project to retrieve the Taurus version 2x data from Apollo Server For more information on creating or editing projects refer to Section 31 ldquoCreating New Projectsrdquo on page 11 and Section 36 ldquoEditing and Viewing the Settings of Projectsrdquo on page 31
When creating or editing the project
a) Add an IP address Store specification on the Store Selection tab (see step 4 in Section 31 ldquoCreating New Projectsrdquo) for Apollo Server including its client Web application port number Use the format
Apollo Server IP AddressApollo Server Client Web Application Port Number
b) Apply the appropriate filters on the Channel Group Selection tab to retrieve the desired channel groups from the Taurus version 2x See step 5 through step 12 in Section 31 ldquoCreating New Projectsrdquo for instruction on using the Channel Group Selection tab
Appendix B Retrieving SOH Data from a Taurus Version 2x
50 Apollo Project User Guide16106R5 2009-03-24
Apollo Project User Guide16106R5 2009-03-24
51
Appendix C Glossary
Glossary of Abbreviations and Terms
List of Unit Abbreviations and Symbols
C1 Glossary of Abbreviations and Terms
A
ASCIIAmerican Standard Code for Information Interchange
B
BHEBroad Band High Gain Seismometer East-West Orientation
Channel name based on the Global Seismological Network (GSN) standard
BHNBroad Band High Gain Seismometer North-South Orientation
Channel name based on the Global Seismological Network (GSN) standard
BHZBroad Band High Gain Seismometer Vertical Orientation
Channel name based on the Global Seismological Network (GSN) standard
Appendix C Glossary
52 Apollo Project User Guide16106R5 2009-03-24
C
CSVComma-Separated Values
D
DACDigital to Analog Converter
G
GPSGlobal Positioning System
J
JREJava Runtime Environment
JVMJava Virtual Machine
N
NFSNetwork File System
P
PDOPPosition Dilution of Precision
PRNPseudo-random Number
Appendix C Glossary
Apollo Project User Guide16106R5 2009-03-24
53
S
SACSeismic Analysis Code
An Apollo Project output file format that generates files that can be used by the SAC software (see http wwwirisedusoftwaresac)
SEEDStandard for the Exchange of Earthquake Data
SMBServer Message Block
SOHState of Health
T
TCPIPTransmission Control ProtocolInternet Protocol
TDOPTime Dilution of Precision
U
UNCUniform Naming Convention or Universal Naming Convention
URLUniform Resource Locator
UTCCoordinated Universal Time
Appendix C Glossary
54 Apollo Project User Guide16106R5 2009-03-24
C2 List of Unit Abbreviations and SymbolsTable C-1 provides a list of unit abbreviations and symbols commonly used in Nanometrics documentation
Table C-1 Unit abbreviations and symbols
Abbreviation or Symbol Definition Abbreviation
or Symbol Definition
deg degree lb pound
Oslash diameter m metre
micro micro ms metre per second
Ω ohm ms2 metre per second squared
A ampere mA milliampere
AC alternating current MB megabyte
b bit MΩ megaohm
B byte MHz megahertz
bps bits per second mi mile
C Celsius mL millilitre
cm centimetre mm millimetre
dB decibel ms millisecond
DC direct current MTU maximum transmission unit
F farad mV millivolt
ft foot mW milliwatt
g gram N Newton
g gravity nF nanofarad
GB gigabyte ns nanosecond
GHz gigahertz rad radian
Hz hertz rads radian per second
in inch s second
KB kilobyte sps samples per second
kg kilogram U rack unit
kHz kilohertz V volt
kΩ kiloohm Vpp Volts peak-to-peak
kW kilowatt W watt
L litre
Apollo Project User Guide16106R5 2009-03-24
55
About NanometricsNanometrics is a world leader in the development of precision instrumentation network technology and software applications for seismological and environmental studies Using Nanometrics technology our customers establish and grow research networks that are often located in extreme environments such as the frozen Arctic and Antarctic the arid deserts of the Middle East the jungles of South America and the depths of the worlds oceans Many of these are mission-critical national and regional networks that demand the highest possible data quality and availability
Nanometrics provides end-to-end solutions that include a growing portfolio of broadband and strong motion seismometers dataloggers and digitizers satellite ground station systems for remote site data collection and software applications for data and network analysis and management To support this portfolio Nanometrics also provides global systems engineering services for design installation and support of complete networks
Our head office research and development centre and production facility are located in the Kanata North Business Park of Ottawa the high-technology heart of Canadas capital region
Contacting NanometricsNanometrics Inc250 Herzberg RoadKanata Ontario Canada K2K 2A1Phone +1 613-592-6776Fax +1 613-592-5929Email infonanometricscaWeb wwwnanometricsca
Contacting Technical SupportIf you need technical support please submit a request on the Nanometrics technical support site or by email or fax Include a full explanation of the problem and related information such as log filesSupport site httpsupportnanometricsca
Email techsupportnanometricsca
Chapter 3 Retrieving Data
Apollo Project User Guide16106R5 2009-03-24
23
4 Type Station Table in the Project Name box and click any project type
5 Click OK
6 Click the Store Selection tab and select as many Stores as possible
See step 4 of Section 31 ldquoCreating New Projectsrdquo for information on how to add specifications and select Stores
7 Click the Channel Group Selection tab and click Create Default Station Table
A station table file is created and the name of the file is displayed in the Station Table File Name box
8 Edit the station table channel group mappings in the selected channel groups area of the tab (lower half of the tab) as required
The NetworkStationLocationChannel names will appear in the output files If the Location is empty it is interpreted as the SEED default of two spaces
9 Click OK to close the project and finish creating the station table
10 Click the configuration button in the upper right corner
11 Enter the path and name of the station table file you just created in the Station Table File Name box on the Behaviour and Defaults dialog box
12 Click OK to save the new settings
The station table file you specified will be used as the default for all future projects You can open the Station Table project and edit the station table file if you need to add more Stores or change the mappings
For more information on configuring Apollo Project settings see Section 33 ldquoConfiguring Apollo Projectrdquo on page 24
Make a note of the path of the station table file because you will have to enter it on the Behaviour and Defaults dialog box to set it as the default for all projects
Valid characters for the network station location and channel in the NetworkStationLocationChannel box are upper case letters A to Z numbers 0 to 9 and spaces are also acceptable for the location
Chapter 3 Retrieving Data
24 Apollo Project User Guide16106R5 2009-03-24
33 Configuring Apollo ProjectYou can configure basic settings for Apollo Project and the default settings for new projects The changes you make to the project default settings only apply to new projects
To configure Apollo Project
1 Click the configuration button in the upper right corner
2 Edit the following settings
Setting Description
Log Verbosity The level of detail that is logged by Apollo ProjectThe default setting is Info
Log Location The default name of the Apollo Project log folder Maximum Number of Retrieval Attempts
The maximum number of single retrieval attempt made for all missing time segments on all channel groups every time a project is run Enter an integer from 0 through 1000 The default value is 8
Notes If the Taurus is busy when a retrieval attempt is made the number of remaining retrieval attempts is not decreased by one attemptYou can view the channel group details page to see if there are any remaining retrieval attempts for any channel groups (see Section 373 ldquoMonitoring the Status of a Running Projectrdquo on page 34)
Number Of Retries The number of times Apollo Project attempts to connect to a data source if there is a network connectivity problem Enter an integer from 0 through 1000 The default value is 3
Note Every time a project is run it starts with the maximum number of retries
Retry Interval (secs) The amount of time in seconds that Apollo Project waits before trying to connect to a data source againEnter an integer from 0 through 1000 The default value is 5
Station Table File Name The file name and location of the station table file that is used to assign station names to all of the selected channel groupsA station table is used to assign names to all of the selected channel groups For more information see Section 32 ldquoCreating a Station Table Filerdquo on page 22No station table file is specified by default
Chapter 3 Retrieving Data
Apollo Project User Guide16106R5 2009-03-24
25
Base Directory The folder name and location of the base directory for the processed data subfolders and files Enter any valid folder name and location including any additional characters that are valid for paths The default base directory name is ApolloProject
Notes The Base Directory is the root of all data retrieved for the project and can be defined at any location in the file system of the server running Apollo Project including a shared folder on a different computer If you want to create or use a folder on a computer on the network you have to enter the server and share name in a modified UNC format that is prefixed by an additional two backslashes For example the usual fileserver1storefiles must be written as fileserver1storefilesLarge amounts of data can be stored in this location You must ensure that adequate disk space is availableFor deployments of Apollo Project where the clients are not running on the server it is recommended that the file system containing the base directory on the server be shared or exported as a networked file system
Subdirectories The expression used to define path names for subfolders under the base directoryEnter tokens in any order including any additional characters that are valid for paths The default path name is as follows projectyearmonthday
Filename The expression used to define file names for the processed data files that are stored in the subfolders under the base directoryEnter tokens in any order including any additional characters that are valid for file names The default filename is as follows instrument_time
Sample Path An example of a file name generated using the values for the Base Directory Subdirectories and Filename settings
Network Name A standard network codeEnter any two upper case letters or numbers The default code is XX
Location A location within a stationEnter any two upper case letters numbers or spaces
The default location is two spaces for ldquononerdquo You must delete the two default spaces if you enter a new location value
Setting Description
Chapter 3 Retrieving Data
26 Apollo Project User Guide16106R5 2009-03-24
3 Click OK to save the new settings
34 Managing ProjectsYou can view open close copy and delete projects Also you can create convenient links to run your individual projects with desktop shortcuts
341 Viewing Existing Projects1 Click Projects in the Projects bar
2 View the projects listed on the Existing Projects page
The Existing Projects page shows a list of all projects and a status overview of each project For more information see Section 371 ldquoViewing an Overview of the Status of All Projectsrdquo on page 32
Channel 1 Name A channel codeEnter any three upper case letters or numbersThe default channel code is BHZ
Channel 2 Name A channel codeEnter any three upper case letters or numbersThe default channel code is BHN
Channel 3 Name A channel codeEnter any three upper case letters or numbersThe default channel code is BHE
Setting Description
Chapter 3 Retrieving Data
Apollo Project User Guide16106R5 2009-03-24
27
342 Opening a Project1 Click the project name under the Name column on the Existing Projects page
2 Click the Open Project button
343 Creating a Desktop Shortcut to a ProjectLaunching a project with a desktop shortcut will open Apollo Project to that project and run the project
Methods for creating desktop shortcuts to Web sites vary from browser to browser These procedures explain how to create desktop shortcuts to specific projects for both Mozilla Firefox 3 and Microsoft Internet Explorer 7 Desktop shortcuts to projects include the Apollo Project icon and are titled in the format Project Name ndash Apollo Project
In Firefox 3
1 Open the project you want to create a shortcut to in Firefox
2 Reduce the size of the Firefox window so that the desktop is visible
3 Drag the Site Identification Button onto the desktop
The Site Identification Button is located to the left of the Location Bar and displays the Apollo Project icon
In Internet Explorer 7
1 Open the project you want to create a shortcut to in Internet Explorer
2 Press ALT+F
3 Select Send gt Shortcut to Desktop
344 Closing a Project
1 Click the Close Project button in the Projects bar
Launching a desktop shortcut to a project automatically runs that project It is important to note that once a project is run its settings can no longer be edited It is recommended that desktop shortcuts only be created for Field Archive projects
Firefox is the recommended browser for Apollo Project
Chapter 3 Retrieving Data
28 Apollo Project User Guide16106R5 2009-03-24
345 Copying a Project
1 Select the project name under the Name column on the Existing Projects page
2 Click Copy
3 Enter a unique name for the new project and click OK
4 Click Edit and edit the settings as required
5 Click OK to save the project after you have finished editing the settings
346 Deleting a ProjectWhen you delete a project only files in the temporary folder are deleted All processed data files are not deleted
1 Click the project name under the Name column on the Existing Projects page
2 Click Delete
3 Click OK on the confirmation message
35 Running ProjectsFor all project types you can run a project manually at any time Archive projects can also be defined to run automatically on a schedule
If it is a scheduled Archive Project and the schedule is started click Cancel Schedule before you create a copy of it (If the schedule is not started the Start Schedule button is visible if the schedule is started the Cancel Schedule button replaces the Start Schedule button)
Apollo Project stores intermediate files in a temporary subdirectory of the Base Directory specified for the output location of a project These intermediate files correspond to the actual channel group data retrieved from the Stores referenced by the project If a project is deleted from Apollo Project these temporary files will be removed automatically
Disk space can also be reclaimed by removing these temporary files manually without deleting the project However if the project is run again the output files produced might be incomplete if previously retrieved data from these temporary files is required
For more information on what happens when a project runs see Section A1 ldquoOverview of Running Projectsrdquo on page 37
Chapter 3 Retrieving Data
Apollo Project User Guide16106R5 2009-03-24
29
351 Running a Project1 Open a project
2 Click Run Now on the Summary page to start the project
The project starts running and the Retrieval Status page is displayed
352 Stopping a Project1 Open a project
2 Click Cancel Run on the Summary page to stop the project
3 Click OK on the success message
353 Merging Project Data FilesYou have the option to merge all of the downloaded data for the stations and instruments into one file per interval for each project
1 Open a project
2 Click Merge
A single file is generated for each time period The time period is determined by the file interval you specified on the Time Selection page when you created the project For more information see step 13 of Section 31 ldquoCreating New Projectsrdquo on page 11
The original data files are not modified when you select the option to merge project data files
You can also click Run Now on the Retrieval Status page to start a project
For more information on what happens when a project runs see Section A1 ldquoOverview of Running Projectsrdquo on page 37
You can also click Cancel Run on the Retrieval Status page to stop a project
You cannot merge data from Archive projects and you cannot merge data in the Seisan format
You can also click Merge on the Retrieval Status page to merge the data from a project
Chapter 3 Retrieving Data
30 Apollo Project User Guide16106R5 2009-03-24
354 Running a Scheduled Archive Project1 Open a project
2 Click Start Schedule to start the project schedule
3 Click OK on the confirmation message
4 Click OK on the success message
For a project scheduled to run weekly the project will run for the first time according to the project start time and then it will run on a weekly basis according to the times and days you specified
For a project scheduled to run at a regular interval the project will run according the to interval you specified after you start the schedule For example if you click Start Schedule on a Wednesday and you specified every 2 days as the interval then the project will run for the first time on Friday and every two days after that
3541 Cancelling a Schedule
If you cancel a scheduled project before it runs for the first time you can edit the project settings
If you cancel a project that is currently running the current project runs to completion but subsequent project runs will not occur
1 Open a project
2 Click Cancel Schedule to cancel the project schedule
3 Click OK on the confirmation message
4 Click OK on the success message
You can also click Start Schedule on the Retrieval Status page to start the schedule of a project
You can restart the schedule by opening the project and clicking Start Schedule
You can also click Cancel Schedule on the Retrieval Status page to cancel the schedule of a project
Chapter 3 Retrieving Data
Apollo Project User Guide16106R5 2009-03-24
31
36 Editing and Viewing the Settings of ProjectsYou can edit the settings of a project before it has run After it has run you can view the settings
361 Editing Project Settings1 Open the project
2 Click Edit on the Summary page
3 Edit the settings as required
4 Click OK to save the changes
362 Viewing Project Settings1 Open the project
2 Click View on the Summary page
3 Click the tabs to view the settings
4 Click Cancel when you have finished viewing the settings
You can only edit the settings of a project before it has run for the first time or been scheduled (Archive project) If you want to edit the settings of a project after it has already run once or been scheduled you can copy the project (see Section 345 ldquoCopying a Projectrdquo on page 28) and then edit the settings for the copy
Settings For more information
Store Selection See step 4 of Section 31 ldquoCreating New ProjectsrdquoChannel Group Selection See step 5 to step 12 of Section 31 ldquoCreating New ProjectsrdquoTime Selection See step 13 of Section 31 ldquoCreating New ProjectsrdquoOutput Format See step 15 and step 16 of Section 31 ldquoCreating New ProjectsrdquoOutput Location See step 17 to step 20 of Section 31 ldquoCreating New Projectsrdquo
You can also click Edit on the Retrieval Status page to edit the settings of a project
You can also click View on the Retrieval Status page to edit the settings of a project
Chapter 3 Retrieving Data
32 Apollo Project User Guide16106R5 2009-03-24
37 Monitoring Project StatusYou can monitor the status of a project by viewing information on the Existing Projects Summary and Retrieval Status pages
371 Viewing an Overview of the Status of All ProjectsThe Existing Projects page is the default home page of Apollo Project You see this page when you first open Apollo Project or when you click Projects in the projects bar For more information see Section 341 ldquoViewing Existing Projectsrdquo on page 26
You can view the following information for all projects on the Existing Projects page
bull Name
bull Type
bull Current status
bull Last time the project run
bull Status of data retrieved
The Data Retrieved bars on the Existing Projects page show the overall status of the data retrieval For more information see Section 3731 ldquoStatus Coloursrdquo on page 34
Chapter 3 Retrieving Data
Apollo Project User Guide16106R5 2009-03-24
33
372 Viewing the Status of an Individual ProjectWhen you open a project a detailed summary of the project is shown on the Summary page For more information see Section 342 ldquoOpening a Projectrdquo on page 27
You can view the following information for each project on the Summary page
bull Date it was created
bull Date it was last modified
bull Current status
bull Last time it ran
bull Next time it will run
You can also view a summary of all of the settings you specified when you created the project (Store specifications selected Stores selected time series channel groups selected SOH channel groups start and end times number of files generated file interval and output format and locations)
All times are reported using the UTC time zone
Chapter 3 Retrieving Data
34 Apollo Project User Guide16106R5 2009-03-24
373 Monitoring the Status of a Running ProjectYou can view the data retrieval status of a project while it is running on the Retrieval Status page The Retrieval Status page is displayed automatically when you click Run Now to run a project You can also view this page by opening a project and clicking the Retrieval Status tab
The status for each channel group is expressed in the form of two numbers (for example 60100) and two bar graphs The first number is the percentage available of the total time requested (for example 60) and the second number is the percentage retrieved of the time available (for example 100) For more information on the bar graph status colours see Section 3731 ldquoStatus Coloursrdquo on page 34
You can also view retrieval details for each channel group listed on the Retrieval Status page For more information see Section 3732 ldquoViewing the Retrieval Details for Each Channel Grouprdquo on page 35
3731 Status Colours
The data retrieval status bars use the following status colours
The information that is displayed on the Retrieval Status page is updated continuously while a project is running
Table 3-1 Status colours
Colour Status
Green Apollo Project has retrieved the data
Yellow Apollo Project is attempting to retrieve available data from the Store
Red Data is available in the Store but Apollo Project has failed to retrieve it on this attempt Apollo Project will make additional attempts to retrieve the data up to the configured Maximum Number of Retrieval Attempts For information on how to set the Maximum Number of Retrieval Attempts setting see Section 31 ldquoCreating New Projectsrdquo on page 11
White Data for some portion of the requested time segment is not available in the Store For example there are gaps in the data or the retrieval request is for a future time segment
Chapter 3 Retrieving Data
Apollo Project User Guide16106R5 2009-03-24
35
3732 Viewing the Retrieval Details for Each Channel Group
You can view the retrieval status of each time segment for a channel group
1 Click a channel group name
2 Click the Channel Group Details button that is located to the right of the channel group name
The Remaining Retrieval Attempts column displays the number of times that Apollo Project will try to download each missing time segment for the channel group when the project is run again For information on how to set the Maximum Number of Retrieval Attempts setting see Section 33 ldquoConfiguring Apollo Projectrdquo on page 24
3 Click OK when you have finished viewing the details
Chapter 3 Retrieving Data
36 Apollo Project User Guide16106R5 2009-03-24
Apollo Project User Guide16106R5 2009-03-24
37
Appendix A Reference Information and Examples
Overview of Running Projects
Example Project Settings
Example Deployment Scenarios
Shot File Formats for Controlled Source Projects
A1 Overview of Running ProjectsWhen a project is run Apollo Project performs the following steps
1 The requested time ranges are identified
2 The channel groups for which data are to be retrieved are identified
3 The actual Stores specified by the Store specifications of the project are identified
For each identified Store the following steps are performed
1 A data availability analysis for the outstanding time ranges is performed These are for the ranges for which data has not already been retrieved The availability of the data is recorded for reference It is possible that a given Store was not present at the time the project was last run If this is the case then an attempt is made to retrieve all of the required time ranges of the project from the Store
2 If any data exists in the Store for any of the requested time ranges then a retrieval of this data is performed and the retrieved data is stored to local temporary files
3 If the number of retrieval attempts for a given time range exceeds a configurable threshold (see Section 33 ldquoConfiguring Apollo Projectrdquo on page 24) then the retrieval of data within the stated range is not attempted again
If any data was retrieved during the run of the project then the corresponding output files of the desired output format are generated and stored in the output location specified for the project
When running Apollo Project with Taurus version 2x the schedule for Archive projects must be greater than 5 minutes in duration Schedules that are less than 5 minutes can result in data that is missing or not downloaded
Appendix A Reference Information and Examples
38 Apollo Project User Guide16106R5 2009-03-24
It is possible that the requested data for a given channel group exists across multiple Stores If all of these Stores are included by the Store specifications for the project then Apollo Project assembles the requested data
When a project runs detailed information regarding the results of the retrieved data and processed data are available For more information see Section 37 ldquoMonitoring Project Statusrdquo on page 32
A2 Example Project Settings
A21 Example 1 One Time ProjectProject Name Project1
Project Type One Time
Channel groups selected for retrieval CASTN1OTBHZ (on taurus_1234)
Requested Time Range January 30 2008 1400 ndash 1500 UTC
File Interval 20 minutes
Output Location Base Directory disk2ApolloProjectOutputData
Output Location Subdirectories projectyearmonthday
Output Location Filenamestationnetwork_time
When the project is run successfully the following output files will be created on the server running Apollo Project
disk2ApolloProjectOutputDataProject120080130STN1CA_20080130_140000seed
disk2ApolloProjectOutputDataProject120080130STN1CA_20080130_142000seed
disk2ApolloProjectOutputDataProject120080130STN1CA_20080130_144000seed
Appendix A Reference Information and Examples
Apollo Project User Guide16106R5 2009-03-24
39
A22 Example 2 Controlled Source ProjectProject Name Project2
Project Type Controlled Source
Channel groups selected for retrieval CASTN1OTBHZ (on taurus_1234) CASTN1OTBHN (on taurus_1234)
Requested Shot Times January 30 2008 1400 UTC January 30 2008 1430 UTC
Pre Time 30 seconds
Post Time 30 seconds
Output Location Base Directory disk2ApolloProjectOutputData
Output Location Subdirectories projectyearmonthday
Output Location Filename timeformat
When the project is run successfully the following output files will be created on the server running Apollo Project
disk2ApolloProjectOutputDataProject22008013020080130_135930segysgy
disk2ApolloProjectOutputDataProject22008013020080130_142930segysgy
A3 Example Deployment Scenarios
A31 One TimeYou want to download three days of data from multiple instruments on the network save the data in MiniSEED format and create a file for every hour of data
A One Time project is the recommended solution The Store of each instrument can be made available to Apollo Project by creating a corresponding IP Address Store specification with the IP address of the instrument The requested time range can be specified along with a file interval of one hour Ensure that the instruments are configured to run in Communications mode
A32 Scheduled ArchiveYou want seismic data to be retrieved automatically from a group of instruments on the network every six hours The instruments are always accessible via an Ethernet connection
A scheduled Archive project is the recommended solution Use the Regular Interval scheduling option and set the interval to six hours
You can also run a scheduled Archive project at any time For example if the scheduled retrieval interval of a project is six hours and between intervals you want to retrieve the data three hours early you can run the project and approximately three additional hours of data would be accumulated About three hours later the project will run automatically and accumulate the remaining three hours of data
Appendix A Reference Information and Examples
40 Apollo Project User Guide16106R5 2009-03-24
A33 Manual ArchiveYou want to retrieve seismic data from a group of instruments but their respective Stores are only available for retrieval on occasion (no regular dependable schedule for retrieval from these Stores is possible)
A manually run Archive project is the recommended solution You can create the project and run it whenever any of the instruments are available for retrieval
A34 Field ArchiveYou want to collect data from a set of isolated instruments in the field at recurring intervals (for example twice per month)
A Field Archive project is the recommended solution You can create a Field Archive project and either add all instrument IP addresses to the list or use a Discovery specification The time for the last retrieval is stored on the instrument and all data is recovered from the last recovery time
A35 Media HarvestingYou want to collect the media from a set of instruments in the field at a regular interval (for example once per week) You also have to retrieve all of the seismic data on the media for subsequent analysis
An Archive project is the recommended solution Initially a directory is created on the file system of the server running Apollo Project A directory Store specification is created with this directory as the parent directory from which to search for Stores The content of each media instance in the weekrsquos collection is copied from a media reader to a subdirectory of the directory When the project is run all of the copied Stores are automatically available and the project accumulates data for each instrument
Due to the nature of media harvesting and the replacement procedure for this example data is always missing for the last period of output files for the current week This period corresponds to the time that the media was taken from the instrument and replaced with a new one The following week when the media is harvested again from the instruments in the field Apollo Project fills in the missing time for these files with the new Store data regardless of the media instance on which the data currently resides
You can only create and run Field Archive projects for Taurus version 30 or later
Appendix A Reference Information and Examples
Apollo Project User Guide16106R5 2009-03-24
41
A36 Trigger Downloading You have set up a network of five Tauruses around a hydro dam Each Taurus is accessible over an Ethernet connection and each is set to record data over the weekend You have set the period for data retrieval at 30 seconds before and five minutes after any seismic activity but the following procedure shows you why it is not necessary to view all of the data accumulated over the whole weekend
1 Select the Taurus at the site with the least environmental noise or determine the best site for generating triggers and designate this Taurus ldquoTaurus Ardquo for reference
You need to perform this task in advance More information about triggers can be found in the Taurus Portable Seismograph User Guide
2 Download the trigger file from ldquoTaurus Ardquo and review the file to verify the correct number of triggers
3 Follow these steps to create a new Triggers project
a) Click New on the Apollo Project Existing Projects page
b) Click Triggers as the project type and enter a unique name in the Project Name box
c) Click OK
d) Click the IP Address tab on the Store Selection tab
e) Enter the IP address of a Taurus
f) Click Add
g) Repeat step e until you have entered the IP addresses of all five of the Tauruses
Apollo Project adds the IP address specifications to the Selected Specifications section of the Store Selection page and finds all five Stores associated with the IP addresses and adds them to the Selected Stores section
h) Click the Channel Group Selection tab
i) Click Create Default Station Table to create a table for all of the currently selected Stores and discovered instruments
j) Review the selected channel groups and if required edit the mappings in the selected channel groups area of the tab (lower half of the tab)
k) Click the Time Selection tab
l) Click the Browse button
m)Select the trigger file that you downloaded in step 2 and click OK
n) Click Submit
The list of triggers is imported and displayed in the Triggers section on the Time Selection page
o) Enter a Pre Time of 30 seconds and a Post Time of 5 minutes
p) Click the Output Format tab
q) Click MiniSEED
r) Click All Instruments
s) Click the Output Location tab
Appendix A Reference Information and Examples
42 Apollo Project User Guide16106R5 2009-03-24
t) Enter the valid absolute path of the base directory for the processed data subfolders and files
u) Enter the expression used to define path names for subfolders under the base directory
v) Enter the expression used to define file names for the processed data files that are stored in the subfolders under the base directory
w) Click OK
4 Click the Run Now button on the Summary page
When the project has finished running the output folder you specified in step t will contain ten files Each output file will contain 5 minutes and 30 seconds of data from the five Tauruses
A4 Shot File Formats for Controlled Source ProjectsYou have two options for defining shots for a Controlled Source project manually defining shots or importing shots from a shot file
You can create shot files in one of following three file formats
Microsoft Office Excel (xls) ndash See Section A41 ldquoCreating a Shot File With Microsoft Office Excelrdquo on page 42
OpenOfficeorg Calc (ods) ndash See Section A42 ldquoCreating a Shot File With OpenOfficeorg Calcrdquo on page 44
Comma-Separated Values (csv) ndash See Section A43 ldquoCreating a Comma-Separated Values Shot Filerdquo on page 45
The Shot file templates are located in the docShotFileImport folder on the Apollo Project CD
A41 Creating a Shot File With Microsoft Office ExcelThe Microsoft Office Excel template for Apollo Project can be used with Microsoft Office Excel version 2003 or later
To create an Microsoft Office Excel based shot file
1 Double-click ShotFileTemplatexlt
A new Microsoft Office Excel file is created from the template and opens in the Microsoft Office Excel
2 Save the new spreadsheet as a Microsoft Office Excel document (xls)
3 Enter shot file data as specified in the Microsoft Office Excel spreadsheet
Only the decimal separator is supported for shot files Separators that denote the 3rd power of 10 (thousand) are not supported (for example 4500) The Microsoft Excel and OpenOffice templates reinforce these restrictions and are recommended for creating csv files
Appendix A Reference Information and Examples
Apollo Project User Guide16106R5 2009-03-24
43
You can enter data for multiple shot times
4 Click Save to save the file in Microsoft Office Excel format
5 Click File gt Save As and select CSV (Comma delimited) (csv) from the Save as type list
6 Click Save
7 Click OK on the message warning you that you are only saving the active sheet
8 Click Yes on the message warning you that file features might be incompatible with the csv format
9 Close Microsoft Office Excel
If you are using Microsoft Office Excel 2007 click the Microsoft Office Button and click Save As
Ensure that you save the file as a comma delimited file If the shot file is mistakenly saved in Microsoft Excel format (xls) the shot file will not work in Apollo Project
Appendix A Reference Information and Examples
44 Apollo Project User Guide16106R5 2009-03-24
A42 Creating a Shot File With OpenOfficeorg CalcThe OpenOffice template has been tested with OpenOfficeorg Calc version 23 Later versions of OpenOfficeorg Calc can be used at your discretion
To create a shot file based on the OpenOfficeorg Calc template
1 Double-click ShotFileTemplateots
A new OpenOffice spreadsheet is created from the template and opens in OpenOfficeorg Calc
2 Save the new spreadsheet as an OpenOffice Calc document (ods)
3 Enter the shot file data as specified in the OpenOffice spreadsheet
You can enter data for multiple shot times
4 Click Save to save the file in OpenOfficeorg Calc format
5 Click File gt Save As and select Text CSV (csv) from the Save as Type list
6 Select the Edit filter settings check box
7 Click Save
A warning message might appear that warns you that the document might contain formatting that cannot be saved in the csv format Click Yes on the warning message to save the file in csv format
The Export of text files window opens
8 Delete the double quotation marks () in the Text delimiter box and ensure that the Save cell content as shown check box is selected
9 Click OK to export the OpenOffice spreadsheet as a csv file
10 Click OK on the warning message
11 Close OpenOfficeorg Calc
Appendix A Reference Information and Examples
Apollo Project User Guide16106R5 2009-03-24
45
A43 Creating a Comma-Separated Values Shot FileYou can use any text editor to create a csv shot file
To create a csv shot file
1 Open ShotFileTemplatecsv in a text editor and save it with a different name
2 Format each line of the csv file as follows
Shot TimePre TimePost TimeLatitudeLongitudeElevation
For example
2008-08-28 103044090600000-6000004267
The format and units are as follows
3 Save the file as a csv formatted file
The csv shot file template is not compatible with Microsoft Office Excel Make sure that you do not double-click it and open it in Microsoft Office Excel
FormatUnits
Shot Time yyyy-mm-dd hhmmss
Pre Time seconds
Post Time seconds
Latitude degrees
Longitude degrees
Elevation meters
Appendix A Reference Information and Examples
46 Apollo Project User Guide16106R5 2009-03-24
Apollo Project User Guide16106R5 2009-03-24
47
Appendix B Retrieving SOH Data from a Taurus Version 2x
Taurus Version 2x SOH Data Retrieved by Apollo Project
Retrieving SOH Data from a Taurus Version 2x Streaming to Apollo Server
B1 Taurus Version 2x SOH Data Retrieved by Apollo Project This section presents the predefined datasets of SOH data Apollo Project will retrieve from a Taurus version 2x either through a direct connection or a stream to Apollo Server For instruction on retrieving streaming Taurus version 2x data from Apollo Server see Section B2 ldquoRetrieving SOH Data from a Taurus Version 2x Streaming to Apollo Serverrdquo on page 48
The order of the columns presented in the table below will differ when streaming Taurus version 2x SOH data from Apollo Server
Predefined SOH group SOH data
GPS Time Time (longsecs) (the number of seconds since 1970-01-01)Time (UTC) (time in yyyy-mm-dd hhmmssms format)Altitude (m)DAC CountError (ns) (time error)GPS Engine StatusLast Update Time(s)Lat (deg) (latitude in degrees)Long (deg) (longitude in degrees)NumSatellites (number of satellites used)PDOPPhaseLock (system clock phase lock)TDOPUncertainty (ns) (time uncertainty)
Note The values for Number of satellites used PDOP and TDOP are provided by the GPS receiver at the Last update time In order to see what time these values correspond to look at the Last update time When GPS is off these three parameters and the Last update time are not updated The last value displays until the next update arrives (after the GPS is turned on again)
Appendix B Retrieving SOH Data from a Taurus Version 2x
48 Apollo Project User Guide16106R5 2009-03-24
B2 Retrieving SOH Data from a Taurus Version 2x Streaming to Apollo ServerThis section provides instruction on configuring your Taurus version 2x to stream data to Apollo Server and instructions on how to use Apollo Project to retrieve this data from Apollo Server
B21 Streaming Data from a Taurus Version 2x to Apollo ServerUse the Taurus graphical user interface on either the Taurus display screen or through a Web browser to set up an NP stream from a Taurus version 2x to Apollo Server
1 Log in to the Taurus version 2x with either the tech or central user account
2 Select Advanced Configuration gt Communications gt NP Data Streaming
GPS Satellites Time (longsecs) (the number of seconds since 1970-01-01)Time (UTC) (time in yyyy-mm-dd hhmmssms format)
For each satelliteAcquisition FlagLast Update Time (ms)PRNSatellite Azimuth (microordm)Satellite Elevation (microordm)Signal Level (AMU)
Environment Time (longsecs) (the number of seconds since 1970-01-01)Time (UTC) (time in yyyy-mm-dd hhmmssms format)External SOH Voltage 1 (V) (12-bit voltage input) External SOH Voltage 2 (V) (12-bit voltage input) External SOH Voltage 3 (V) (12-bit voltage input) External SOH Voltage 4 (V) (12-bit voltage input) Sensor SOH Voltage 1 (V)Sensor SOH Voltage 2 (V)Sensor SOH Voltage 3 (V)
Instrument Time (longsecs) (the number of seconds since 1970-01-01)Time (UTC) (time in yyyy-mm-dd hhmmssms format)Controller Current (mA)Digitizer Current (mA)NMX Bus Current (mA) (external connector)Sensor Current (mA)Serial Port Current (mA)Supply Voltage (mV)Temperature (ordmC)
Predefined SOH group SOH data
Appendix B Retrieving SOH Data from a Taurus Version 2x
Apollo Project User Guide16106R5 2009-03-24
49
3 To have the Taurus stream both time series and SOH data to Apollo Server select both Stream Time Series and Stream SOH
-OR-
Select only Stream SOH if you only want to retrieve the SOH data from Apollo Server
4 Type the IP address for Apollo Server in the IP Address box
5 Type the port number Apollo Server uses to receive data in the Port box By default this is port number 32008
6 The Second IP Address and Second Port boxes are not necessary however cannot be left blank Type 127001 in the Second IP Address box and 32004 in the Second Port box
7 Type a value in the Maximum Throughput [bps] box if a limited data link is present between the Taurus and Apollo Server For instance if at some point the data link is limited to 9600 bps then this is the maximum throughput the link can allow If there are no throughput limitations set the value in this box to zero to disable the throughput limitation
8 Click Apply
9 Click Commit
B22 Retrieving Taurus Version 2x Data from Apollo ServerCreate a new project or use an existing project in Apollo Project to retrieve the Taurus version 2x data from Apollo Server For more information on creating or editing projects refer to Section 31 ldquoCreating New Projectsrdquo on page 11 and Section 36 ldquoEditing and Viewing the Settings of Projectsrdquo on page 31
When creating or editing the project
a) Add an IP address Store specification on the Store Selection tab (see step 4 in Section 31 ldquoCreating New Projectsrdquo) for Apollo Server including its client Web application port number Use the format
Apollo Server IP AddressApollo Server Client Web Application Port Number
b) Apply the appropriate filters on the Channel Group Selection tab to retrieve the desired channel groups from the Taurus version 2x See step 5 through step 12 in Section 31 ldquoCreating New Projectsrdquo for instruction on using the Channel Group Selection tab
Appendix B Retrieving SOH Data from a Taurus Version 2x
50 Apollo Project User Guide16106R5 2009-03-24
Apollo Project User Guide16106R5 2009-03-24
51
Appendix C Glossary
Glossary of Abbreviations and Terms
List of Unit Abbreviations and Symbols
C1 Glossary of Abbreviations and Terms
A
ASCIIAmerican Standard Code for Information Interchange
B
BHEBroad Band High Gain Seismometer East-West Orientation
Channel name based on the Global Seismological Network (GSN) standard
BHNBroad Band High Gain Seismometer North-South Orientation
Channel name based on the Global Seismological Network (GSN) standard
BHZBroad Band High Gain Seismometer Vertical Orientation
Channel name based on the Global Seismological Network (GSN) standard
Appendix C Glossary
52 Apollo Project User Guide16106R5 2009-03-24
C
CSVComma-Separated Values
D
DACDigital to Analog Converter
G
GPSGlobal Positioning System
J
JREJava Runtime Environment
JVMJava Virtual Machine
N
NFSNetwork File System
P
PDOPPosition Dilution of Precision
PRNPseudo-random Number
Appendix C Glossary
Apollo Project User Guide16106R5 2009-03-24
53
S
SACSeismic Analysis Code
An Apollo Project output file format that generates files that can be used by the SAC software (see http wwwirisedusoftwaresac)
SEEDStandard for the Exchange of Earthquake Data
SMBServer Message Block
SOHState of Health
T
TCPIPTransmission Control ProtocolInternet Protocol
TDOPTime Dilution of Precision
U
UNCUniform Naming Convention or Universal Naming Convention
URLUniform Resource Locator
UTCCoordinated Universal Time
Appendix C Glossary
54 Apollo Project User Guide16106R5 2009-03-24
C2 List of Unit Abbreviations and SymbolsTable C-1 provides a list of unit abbreviations and symbols commonly used in Nanometrics documentation
Table C-1 Unit abbreviations and symbols
Abbreviation or Symbol Definition Abbreviation
or Symbol Definition
deg degree lb pound
Oslash diameter m metre
micro micro ms metre per second
Ω ohm ms2 metre per second squared
A ampere mA milliampere
AC alternating current MB megabyte
b bit MΩ megaohm
B byte MHz megahertz
bps bits per second mi mile
C Celsius mL millilitre
cm centimetre mm millimetre
dB decibel ms millisecond
DC direct current MTU maximum transmission unit
F farad mV millivolt
ft foot mW milliwatt
g gram N Newton
g gravity nF nanofarad
GB gigabyte ns nanosecond
GHz gigahertz rad radian
Hz hertz rads radian per second
in inch s second
KB kilobyte sps samples per second
kg kilogram U rack unit
kHz kilohertz V volt
kΩ kiloohm Vpp Volts peak-to-peak
kW kilowatt W watt
L litre
Apollo Project User Guide16106R5 2009-03-24
55
About NanometricsNanometrics is a world leader in the development of precision instrumentation network technology and software applications for seismological and environmental studies Using Nanometrics technology our customers establish and grow research networks that are often located in extreme environments such as the frozen Arctic and Antarctic the arid deserts of the Middle East the jungles of South America and the depths of the worlds oceans Many of these are mission-critical national and regional networks that demand the highest possible data quality and availability
Nanometrics provides end-to-end solutions that include a growing portfolio of broadband and strong motion seismometers dataloggers and digitizers satellite ground station systems for remote site data collection and software applications for data and network analysis and management To support this portfolio Nanometrics also provides global systems engineering services for design installation and support of complete networks
Our head office research and development centre and production facility are located in the Kanata North Business Park of Ottawa the high-technology heart of Canadas capital region
Contacting NanometricsNanometrics Inc250 Herzberg RoadKanata Ontario Canada K2K 2A1Phone +1 613-592-6776Fax +1 613-592-5929Email infonanometricscaWeb wwwnanometricsca
Contacting Technical SupportIf you need technical support please submit a request on the Nanometrics technical support site or by email or fax Include a full explanation of the problem and related information such as log filesSupport site httpsupportnanometricsca
Email techsupportnanometricsca
Chapter 3 Retrieving Data
Apollo Project User Guide16106R5 2009-03-24
25
Base Directory The folder name and location of the base directory for the processed data subfolders and files Enter any valid folder name and location including any additional characters that are valid for paths The default base directory name is ApolloProject
Notes The Base Directory is the root of all data retrieved for the project and can be defined at any location in the file system of the server running Apollo Project including a shared folder on a different computer If you want to create or use a folder on a computer on the network you have to enter the server and share name in a modified UNC format that is prefixed by an additional two backslashes For example the usual fileserver1storefiles must be written as fileserver1storefilesLarge amounts of data can be stored in this location You must ensure that adequate disk space is availableFor deployments of Apollo Project where the clients are not running on the server it is recommended that the file system containing the base directory on the server be shared or exported as a networked file system
Subdirectories The expression used to define path names for subfolders under the base directoryEnter tokens in any order including any additional characters that are valid for paths The default path name is as follows projectyearmonthday
Filename The expression used to define file names for the processed data files that are stored in the subfolders under the base directoryEnter tokens in any order including any additional characters that are valid for file names The default filename is as follows instrument_time
Sample Path An example of a file name generated using the values for the Base Directory Subdirectories and Filename settings
Network Name A standard network codeEnter any two upper case letters or numbers The default code is XX
Location A location within a stationEnter any two upper case letters numbers or spaces
The default location is two spaces for ldquononerdquo You must delete the two default spaces if you enter a new location value
Setting Description
Chapter 3 Retrieving Data
26 Apollo Project User Guide16106R5 2009-03-24
3 Click OK to save the new settings
34 Managing ProjectsYou can view open close copy and delete projects Also you can create convenient links to run your individual projects with desktop shortcuts
341 Viewing Existing Projects1 Click Projects in the Projects bar
2 View the projects listed on the Existing Projects page
The Existing Projects page shows a list of all projects and a status overview of each project For more information see Section 371 ldquoViewing an Overview of the Status of All Projectsrdquo on page 32
Channel 1 Name A channel codeEnter any three upper case letters or numbersThe default channel code is BHZ
Channel 2 Name A channel codeEnter any three upper case letters or numbersThe default channel code is BHN
Channel 3 Name A channel codeEnter any three upper case letters or numbersThe default channel code is BHE
Setting Description
Chapter 3 Retrieving Data
Apollo Project User Guide16106R5 2009-03-24
27
342 Opening a Project1 Click the project name under the Name column on the Existing Projects page
2 Click the Open Project button
343 Creating a Desktop Shortcut to a ProjectLaunching a project with a desktop shortcut will open Apollo Project to that project and run the project
Methods for creating desktop shortcuts to Web sites vary from browser to browser These procedures explain how to create desktop shortcuts to specific projects for both Mozilla Firefox 3 and Microsoft Internet Explorer 7 Desktop shortcuts to projects include the Apollo Project icon and are titled in the format Project Name ndash Apollo Project
In Firefox 3
1 Open the project you want to create a shortcut to in Firefox
2 Reduce the size of the Firefox window so that the desktop is visible
3 Drag the Site Identification Button onto the desktop
The Site Identification Button is located to the left of the Location Bar and displays the Apollo Project icon
In Internet Explorer 7
1 Open the project you want to create a shortcut to in Internet Explorer
2 Press ALT+F
3 Select Send gt Shortcut to Desktop
344 Closing a Project
1 Click the Close Project button in the Projects bar
Launching a desktop shortcut to a project automatically runs that project It is important to note that once a project is run its settings can no longer be edited It is recommended that desktop shortcuts only be created for Field Archive projects
Firefox is the recommended browser for Apollo Project
Chapter 3 Retrieving Data
28 Apollo Project User Guide16106R5 2009-03-24
345 Copying a Project
1 Select the project name under the Name column on the Existing Projects page
2 Click Copy
3 Enter a unique name for the new project and click OK
4 Click Edit and edit the settings as required
5 Click OK to save the project after you have finished editing the settings
346 Deleting a ProjectWhen you delete a project only files in the temporary folder are deleted All processed data files are not deleted
1 Click the project name under the Name column on the Existing Projects page
2 Click Delete
3 Click OK on the confirmation message
35 Running ProjectsFor all project types you can run a project manually at any time Archive projects can also be defined to run automatically on a schedule
If it is a scheduled Archive Project and the schedule is started click Cancel Schedule before you create a copy of it (If the schedule is not started the Start Schedule button is visible if the schedule is started the Cancel Schedule button replaces the Start Schedule button)
Apollo Project stores intermediate files in a temporary subdirectory of the Base Directory specified for the output location of a project These intermediate files correspond to the actual channel group data retrieved from the Stores referenced by the project If a project is deleted from Apollo Project these temporary files will be removed automatically
Disk space can also be reclaimed by removing these temporary files manually without deleting the project However if the project is run again the output files produced might be incomplete if previously retrieved data from these temporary files is required
For more information on what happens when a project runs see Section A1 ldquoOverview of Running Projectsrdquo on page 37
Chapter 3 Retrieving Data
Apollo Project User Guide16106R5 2009-03-24
29
351 Running a Project1 Open a project
2 Click Run Now on the Summary page to start the project
The project starts running and the Retrieval Status page is displayed
352 Stopping a Project1 Open a project
2 Click Cancel Run on the Summary page to stop the project
3 Click OK on the success message
353 Merging Project Data FilesYou have the option to merge all of the downloaded data for the stations and instruments into one file per interval for each project
1 Open a project
2 Click Merge
A single file is generated for each time period The time period is determined by the file interval you specified on the Time Selection page when you created the project For more information see step 13 of Section 31 ldquoCreating New Projectsrdquo on page 11
The original data files are not modified when you select the option to merge project data files
You can also click Run Now on the Retrieval Status page to start a project
For more information on what happens when a project runs see Section A1 ldquoOverview of Running Projectsrdquo on page 37
You can also click Cancel Run on the Retrieval Status page to stop a project
You cannot merge data from Archive projects and you cannot merge data in the Seisan format
You can also click Merge on the Retrieval Status page to merge the data from a project
Chapter 3 Retrieving Data
30 Apollo Project User Guide16106R5 2009-03-24
354 Running a Scheduled Archive Project1 Open a project
2 Click Start Schedule to start the project schedule
3 Click OK on the confirmation message
4 Click OK on the success message
For a project scheduled to run weekly the project will run for the first time according to the project start time and then it will run on a weekly basis according to the times and days you specified
For a project scheduled to run at a regular interval the project will run according the to interval you specified after you start the schedule For example if you click Start Schedule on a Wednesday and you specified every 2 days as the interval then the project will run for the first time on Friday and every two days after that
3541 Cancelling a Schedule
If you cancel a scheduled project before it runs for the first time you can edit the project settings
If you cancel a project that is currently running the current project runs to completion but subsequent project runs will not occur
1 Open a project
2 Click Cancel Schedule to cancel the project schedule
3 Click OK on the confirmation message
4 Click OK on the success message
You can also click Start Schedule on the Retrieval Status page to start the schedule of a project
You can restart the schedule by opening the project and clicking Start Schedule
You can also click Cancel Schedule on the Retrieval Status page to cancel the schedule of a project
Chapter 3 Retrieving Data
Apollo Project User Guide16106R5 2009-03-24
31
36 Editing and Viewing the Settings of ProjectsYou can edit the settings of a project before it has run After it has run you can view the settings
361 Editing Project Settings1 Open the project
2 Click Edit on the Summary page
3 Edit the settings as required
4 Click OK to save the changes
362 Viewing Project Settings1 Open the project
2 Click View on the Summary page
3 Click the tabs to view the settings
4 Click Cancel when you have finished viewing the settings
You can only edit the settings of a project before it has run for the first time or been scheduled (Archive project) If you want to edit the settings of a project after it has already run once or been scheduled you can copy the project (see Section 345 ldquoCopying a Projectrdquo on page 28) and then edit the settings for the copy
Settings For more information
Store Selection See step 4 of Section 31 ldquoCreating New ProjectsrdquoChannel Group Selection See step 5 to step 12 of Section 31 ldquoCreating New ProjectsrdquoTime Selection See step 13 of Section 31 ldquoCreating New ProjectsrdquoOutput Format See step 15 and step 16 of Section 31 ldquoCreating New ProjectsrdquoOutput Location See step 17 to step 20 of Section 31 ldquoCreating New Projectsrdquo
You can also click Edit on the Retrieval Status page to edit the settings of a project
You can also click View on the Retrieval Status page to edit the settings of a project
Chapter 3 Retrieving Data
32 Apollo Project User Guide16106R5 2009-03-24
37 Monitoring Project StatusYou can monitor the status of a project by viewing information on the Existing Projects Summary and Retrieval Status pages
371 Viewing an Overview of the Status of All ProjectsThe Existing Projects page is the default home page of Apollo Project You see this page when you first open Apollo Project or when you click Projects in the projects bar For more information see Section 341 ldquoViewing Existing Projectsrdquo on page 26
You can view the following information for all projects on the Existing Projects page
bull Name
bull Type
bull Current status
bull Last time the project run
bull Status of data retrieved
The Data Retrieved bars on the Existing Projects page show the overall status of the data retrieval For more information see Section 3731 ldquoStatus Coloursrdquo on page 34
Chapter 3 Retrieving Data
Apollo Project User Guide16106R5 2009-03-24
33
372 Viewing the Status of an Individual ProjectWhen you open a project a detailed summary of the project is shown on the Summary page For more information see Section 342 ldquoOpening a Projectrdquo on page 27
You can view the following information for each project on the Summary page
bull Date it was created
bull Date it was last modified
bull Current status
bull Last time it ran
bull Next time it will run
You can also view a summary of all of the settings you specified when you created the project (Store specifications selected Stores selected time series channel groups selected SOH channel groups start and end times number of files generated file interval and output format and locations)
All times are reported using the UTC time zone
Chapter 3 Retrieving Data
34 Apollo Project User Guide16106R5 2009-03-24
373 Monitoring the Status of a Running ProjectYou can view the data retrieval status of a project while it is running on the Retrieval Status page The Retrieval Status page is displayed automatically when you click Run Now to run a project You can also view this page by opening a project and clicking the Retrieval Status tab
The status for each channel group is expressed in the form of two numbers (for example 60100) and two bar graphs The first number is the percentage available of the total time requested (for example 60) and the second number is the percentage retrieved of the time available (for example 100) For more information on the bar graph status colours see Section 3731 ldquoStatus Coloursrdquo on page 34
You can also view retrieval details for each channel group listed on the Retrieval Status page For more information see Section 3732 ldquoViewing the Retrieval Details for Each Channel Grouprdquo on page 35
3731 Status Colours
The data retrieval status bars use the following status colours
The information that is displayed on the Retrieval Status page is updated continuously while a project is running
Table 3-1 Status colours
Colour Status
Green Apollo Project has retrieved the data
Yellow Apollo Project is attempting to retrieve available data from the Store
Red Data is available in the Store but Apollo Project has failed to retrieve it on this attempt Apollo Project will make additional attempts to retrieve the data up to the configured Maximum Number of Retrieval Attempts For information on how to set the Maximum Number of Retrieval Attempts setting see Section 31 ldquoCreating New Projectsrdquo on page 11
White Data for some portion of the requested time segment is not available in the Store For example there are gaps in the data or the retrieval request is for a future time segment
Chapter 3 Retrieving Data
Apollo Project User Guide16106R5 2009-03-24
35
3732 Viewing the Retrieval Details for Each Channel Group
You can view the retrieval status of each time segment for a channel group
1 Click a channel group name
2 Click the Channel Group Details button that is located to the right of the channel group name
The Remaining Retrieval Attempts column displays the number of times that Apollo Project will try to download each missing time segment for the channel group when the project is run again For information on how to set the Maximum Number of Retrieval Attempts setting see Section 33 ldquoConfiguring Apollo Projectrdquo on page 24
3 Click OK when you have finished viewing the details
Chapter 3 Retrieving Data
36 Apollo Project User Guide16106R5 2009-03-24
Apollo Project User Guide16106R5 2009-03-24
37
Appendix A Reference Information and Examples
Overview of Running Projects
Example Project Settings
Example Deployment Scenarios
Shot File Formats for Controlled Source Projects
A1 Overview of Running ProjectsWhen a project is run Apollo Project performs the following steps
1 The requested time ranges are identified
2 The channel groups for which data are to be retrieved are identified
3 The actual Stores specified by the Store specifications of the project are identified
For each identified Store the following steps are performed
1 A data availability analysis for the outstanding time ranges is performed These are for the ranges for which data has not already been retrieved The availability of the data is recorded for reference It is possible that a given Store was not present at the time the project was last run If this is the case then an attempt is made to retrieve all of the required time ranges of the project from the Store
2 If any data exists in the Store for any of the requested time ranges then a retrieval of this data is performed and the retrieved data is stored to local temporary files
3 If the number of retrieval attempts for a given time range exceeds a configurable threshold (see Section 33 ldquoConfiguring Apollo Projectrdquo on page 24) then the retrieval of data within the stated range is not attempted again
If any data was retrieved during the run of the project then the corresponding output files of the desired output format are generated and stored in the output location specified for the project
When running Apollo Project with Taurus version 2x the schedule for Archive projects must be greater than 5 minutes in duration Schedules that are less than 5 minutes can result in data that is missing or not downloaded
Appendix A Reference Information and Examples
38 Apollo Project User Guide16106R5 2009-03-24
It is possible that the requested data for a given channel group exists across multiple Stores If all of these Stores are included by the Store specifications for the project then Apollo Project assembles the requested data
When a project runs detailed information regarding the results of the retrieved data and processed data are available For more information see Section 37 ldquoMonitoring Project Statusrdquo on page 32
A2 Example Project Settings
A21 Example 1 One Time ProjectProject Name Project1
Project Type One Time
Channel groups selected for retrieval CASTN1OTBHZ (on taurus_1234)
Requested Time Range January 30 2008 1400 ndash 1500 UTC
File Interval 20 minutes
Output Location Base Directory disk2ApolloProjectOutputData
Output Location Subdirectories projectyearmonthday
Output Location Filenamestationnetwork_time
When the project is run successfully the following output files will be created on the server running Apollo Project
disk2ApolloProjectOutputDataProject120080130STN1CA_20080130_140000seed
disk2ApolloProjectOutputDataProject120080130STN1CA_20080130_142000seed
disk2ApolloProjectOutputDataProject120080130STN1CA_20080130_144000seed
Appendix A Reference Information and Examples
Apollo Project User Guide16106R5 2009-03-24
39
A22 Example 2 Controlled Source ProjectProject Name Project2
Project Type Controlled Source
Channel groups selected for retrieval CASTN1OTBHZ (on taurus_1234) CASTN1OTBHN (on taurus_1234)
Requested Shot Times January 30 2008 1400 UTC January 30 2008 1430 UTC
Pre Time 30 seconds
Post Time 30 seconds
Output Location Base Directory disk2ApolloProjectOutputData
Output Location Subdirectories projectyearmonthday
Output Location Filename timeformat
When the project is run successfully the following output files will be created on the server running Apollo Project
disk2ApolloProjectOutputDataProject22008013020080130_135930segysgy
disk2ApolloProjectOutputDataProject22008013020080130_142930segysgy
A3 Example Deployment Scenarios
A31 One TimeYou want to download three days of data from multiple instruments on the network save the data in MiniSEED format and create a file for every hour of data
A One Time project is the recommended solution The Store of each instrument can be made available to Apollo Project by creating a corresponding IP Address Store specification with the IP address of the instrument The requested time range can be specified along with a file interval of one hour Ensure that the instruments are configured to run in Communications mode
A32 Scheduled ArchiveYou want seismic data to be retrieved automatically from a group of instruments on the network every six hours The instruments are always accessible via an Ethernet connection
A scheduled Archive project is the recommended solution Use the Regular Interval scheduling option and set the interval to six hours
You can also run a scheduled Archive project at any time For example if the scheduled retrieval interval of a project is six hours and between intervals you want to retrieve the data three hours early you can run the project and approximately three additional hours of data would be accumulated About three hours later the project will run automatically and accumulate the remaining three hours of data
Appendix A Reference Information and Examples
40 Apollo Project User Guide16106R5 2009-03-24
A33 Manual ArchiveYou want to retrieve seismic data from a group of instruments but their respective Stores are only available for retrieval on occasion (no regular dependable schedule for retrieval from these Stores is possible)
A manually run Archive project is the recommended solution You can create the project and run it whenever any of the instruments are available for retrieval
A34 Field ArchiveYou want to collect data from a set of isolated instruments in the field at recurring intervals (for example twice per month)
A Field Archive project is the recommended solution You can create a Field Archive project and either add all instrument IP addresses to the list or use a Discovery specification The time for the last retrieval is stored on the instrument and all data is recovered from the last recovery time
A35 Media HarvestingYou want to collect the media from a set of instruments in the field at a regular interval (for example once per week) You also have to retrieve all of the seismic data on the media for subsequent analysis
An Archive project is the recommended solution Initially a directory is created on the file system of the server running Apollo Project A directory Store specification is created with this directory as the parent directory from which to search for Stores The content of each media instance in the weekrsquos collection is copied from a media reader to a subdirectory of the directory When the project is run all of the copied Stores are automatically available and the project accumulates data for each instrument
Due to the nature of media harvesting and the replacement procedure for this example data is always missing for the last period of output files for the current week This period corresponds to the time that the media was taken from the instrument and replaced with a new one The following week when the media is harvested again from the instruments in the field Apollo Project fills in the missing time for these files with the new Store data regardless of the media instance on which the data currently resides
You can only create and run Field Archive projects for Taurus version 30 or later
Appendix A Reference Information and Examples
Apollo Project User Guide16106R5 2009-03-24
41
A36 Trigger Downloading You have set up a network of five Tauruses around a hydro dam Each Taurus is accessible over an Ethernet connection and each is set to record data over the weekend You have set the period for data retrieval at 30 seconds before and five minutes after any seismic activity but the following procedure shows you why it is not necessary to view all of the data accumulated over the whole weekend
1 Select the Taurus at the site with the least environmental noise or determine the best site for generating triggers and designate this Taurus ldquoTaurus Ardquo for reference
You need to perform this task in advance More information about triggers can be found in the Taurus Portable Seismograph User Guide
2 Download the trigger file from ldquoTaurus Ardquo and review the file to verify the correct number of triggers
3 Follow these steps to create a new Triggers project
a) Click New on the Apollo Project Existing Projects page
b) Click Triggers as the project type and enter a unique name in the Project Name box
c) Click OK
d) Click the IP Address tab on the Store Selection tab
e) Enter the IP address of a Taurus
f) Click Add
g) Repeat step e until you have entered the IP addresses of all five of the Tauruses
Apollo Project adds the IP address specifications to the Selected Specifications section of the Store Selection page and finds all five Stores associated with the IP addresses and adds them to the Selected Stores section
h) Click the Channel Group Selection tab
i) Click Create Default Station Table to create a table for all of the currently selected Stores and discovered instruments
j) Review the selected channel groups and if required edit the mappings in the selected channel groups area of the tab (lower half of the tab)
k) Click the Time Selection tab
l) Click the Browse button
m)Select the trigger file that you downloaded in step 2 and click OK
n) Click Submit
The list of triggers is imported and displayed in the Triggers section on the Time Selection page
o) Enter a Pre Time of 30 seconds and a Post Time of 5 minutes
p) Click the Output Format tab
q) Click MiniSEED
r) Click All Instruments
s) Click the Output Location tab
Appendix A Reference Information and Examples
42 Apollo Project User Guide16106R5 2009-03-24
t) Enter the valid absolute path of the base directory for the processed data subfolders and files
u) Enter the expression used to define path names for subfolders under the base directory
v) Enter the expression used to define file names for the processed data files that are stored in the subfolders under the base directory
w) Click OK
4 Click the Run Now button on the Summary page
When the project has finished running the output folder you specified in step t will contain ten files Each output file will contain 5 minutes and 30 seconds of data from the five Tauruses
A4 Shot File Formats for Controlled Source ProjectsYou have two options for defining shots for a Controlled Source project manually defining shots or importing shots from a shot file
You can create shot files in one of following three file formats
Microsoft Office Excel (xls) ndash See Section A41 ldquoCreating a Shot File With Microsoft Office Excelrdquo on page 42
OpenOfficeorg Calc (ods) ndash See Section A42 ldquoCreating a Shot File With OpenOfficeorg Calcrdquo on page 44
Comma-Separated Values (csv) ndash See Section A43 ldquoCreating a Comma-Separated Values Shot Filerdquo on page 45
The Shot file templates are located in the docShotFileImport folder on the Apollo Project CD
A41 Creating a Shot File With Microsoft Office ExcelThe Microsoft Office Excel template for Apollo Project can be used with Microsoft Office Excel version 2003 or later
To create an Microsoft Office Excel based shot file
1 Double-click ShotFileTemplatexlt
A new Microsoft Office Excel file is created from the template and opens in the Microsoft Office Excel
2 Save the new spreadsheet as a Microsoft Office Excel document (xls)
3 Enter shot file data as specified in the Microsoft Office Excel spreadsheet
Only the decimal separator is supported for shot files Separators that denote the 3rd power of 10 (thousand) are not supported (for example 4500) The Microsoft Excel and OpenOffice templates reinforce these restrictions and are recommended for creating csv files
Appendix A Reference Information and Examples
Apollo Project User Guide16106R5 2009-03-24
43
You can enter data for multiple shot times
4 Click Save to save the file in Microsoft Office Excel format
5 Click File gt Save As and select CSV (Comma delimited) (csv) from the Save as type list
6 Click Save
7 Click OK on the message warning you that you are only saving the active sheet
8 Click Yes on the message warning you that file features might be incompatible with the csv format
9 Close Microsoft Office Excel
If you are using Microsoft Office Excel 2007 click the Microsoft Office Button and click Save As
Ensure that you save the file as a comma delimited file If the shot file is mistakenly saved in Microsoft Excel format (xls) the shot file will not work in Apollo Project
Appendix A Reference Information and Examples
44 Apollo Project User Guide16106R5 2009-03-24
A42 Creating a Shot File With OpenOfficeorg CalcThe OpenOffice template has been tested with OpenOfficeorg Calc version 23 Later versions of OpenOfficeorg Calc can be used at your discretion
To create a shot file based on the OpenOfficeorg Calc template
1 Double-click ShotFileTemplateots
A new OpenOffice spreadsheet is created from the template and opens in OpenOfficeorg Calc
2 Save the new spreadsheet as an OpenOffice Calc document (ods)
3 Enter the shot file data as specified in the OpenOffice spreadsheet
You can enter data for multiple shot times
4 Click Save to save the file in OpenOfficeorg Calc format
5 Click File gt Save As and select Text CSV (csv) from the Save as Type list
6 Select the Edit filter settings check box
7 Click Save
A warning message might appear that warns you that the document might contain formatting that cannot be saved in the csv format Click Yes on the warning message to save the file in csv format
The Export of text files window opens
8 Delete the double quotation marks () in the Text delimiter box and ensure that the Save cell content as shown check box is selected
9 Click OK to export the OpenOffice spreadsheet as a csv file
10 Click OK on the warning message
11 Close OpenOfficeorg Calc
Appendix A Reference Information and Examples
Apollo Project User Guide16106R5 2009-03-24
45
A43 Creating a Comma-Separated Values Shot FileYou can use any text editor to create a csv shot file
To create a csv shot file
1 Open ShotFileTemplatecsv in a text editor and save it with a different name
2 Format each line of the csv file as follows
Shot TimePre TimePost TimeLatitudeLongitudeElevation
For example
2008-08-28 103044090600000-6000004267
The format and units are as follows
3 Save the file as a csv formatted file
The csv shot file template is not compatible with Microsoft Office Excel Make sure that you do not double-click it and open it in Microsoft Office Excel
FormatUnits
Shot Time yyyy-mm-dd hhmmss
Pre Time seconds
Post Time seconds
Latitude degrees
Longitude degrees
Elevation meters
Appendix A Reference Information and Examples
46 Apollo Project User Guide16106R5 2009-03-24
Apollo Project User Guide16106R5 2009-03-24
47
Appendix B Retrieving SOH Data from a Taurus Version 2x
Taurus Version 2x SOH Data Retrieved by Apollo Project
Retrieving SOH Data from a Taurus Version 2x Streaming to Apollo Server
B1 Taurus Version 2x SOH Data Retrieved by Apollo Project This section presents the predefined datasets of SOH data Apollo Project will retrieve from a Taurus version 2x either through a direct connection or a stream to Apollo Server For instruction on retrieving streaming Taurus version 2x data from Apollo Server see Section B2 ldquoRetrieving SOH Data from a Taurus Version 2x Streaming to Apollo Serverrdquo on page 48
The order of the columns presented in the table below will differ when streaming Taurus version 2x SOH data from Apollo Server
Predefined SOH group SOH data
GPS Time Time (longsecs) (the number of seconds since 1970-01-01)Time (UTC) (time in yyyy-mm-dd hhmmssms format)Altitude (m)DAC CountError (ns) (time error)GPS Engine StatusLast Update Time(s)Lat (deg) (latitude in degrees)Long (deg) (longitude in degrees)NumSatellites (number of satellites used)PDOPPhaseLock (system clock phase lock)TDOPUncertainty (ns) (time uncertainty)
Note The values for Number of satellites used PDOP and TDOP are provided by the GPS receiver at the Last update time In order to see what time these values correspond to look at the Last update time When GPS is off these three parameters and the Last update time are not updated The last value displays until the next update arrives (after the GPS is turned on again)
Appendix B Retrieving SOH Data from a Taurus Version 2x
48 Apollo Project User Guide16106R5 2009-03-24
B2 Retrieving SOH Data from a Taurus Version 2x Streaming to Apollo ServerThis section provides instruction on configuring your Taurus version 2x to stream data to Apollo Server and instructions on how to use Apollo Project to retrieve this data from Apollo Server
B21 Streaming Data from a Taurus Version 2x to Apollo ServerUse the Taurus graphical user interface on either the Taurus display screen or through a Web browser to set up an NP stream from a Taurus version 2x to Apollo Server
1 Log in to the Taurus version 2x with either the tech or central user account
2 Select Advanced Configuration gt Communications gt NP Data Streaming
GPS Satellites Time (longsecs) (the number of seconds since 1970-01-01)Time (UTC) (time in yyyy-mm-dd hhmmssms format)
For each satelliteAcquisition FlagLast Update Time (ms)PRNSatellite Azimuth (microordm)Satellite Elevation (microordm)Signal Level (AMU)
Environment Time (longsecs) (the number of seconds since 1970-01-01)Time (UTC) (time in yyyy-mm-dd hhmmssms format)External SOH Voltage 1 (V) (12-bit voltage input) External SOH Voltage 2 (V) (12-bit voltage input) External SOH Voltage 3 (V) (12-bit voltage input) External SOH Voltage 4 (V) (12-bit voltage input) Sensor SOH Voltage 1 (V)Sensor SOH Voltage 2 (V)Sensor SOH Voltage 3 (V)
Instrument Time (longsecs) (the number of seconds since 1970-01-01)Time (UTC) (time in yyyy-mm-dd hhmmssms format)Controller Current (mA)Digitizer Current (mA)NMX Bus Current (mA) (external connector)Sensor Current (mA)Serial Port Current (mA)Supply Voltage (mV)Temperature (ordmC)
Predefined SOH group SOH data
Appendix B Retrieving SOH Data from a Taurus Version 2x
Apollo Project User Guide16106R5 2009-03-24
49
3 To have the Taurus stream both time series and SOH data to Apollo Server select both Stream Time Series and Stream SOH
-OR-
Select only Stream SOH if you only want to retrieve the SOH data from Apollo Server
4 Type the IP address for Apollo Server in the IP Address box
5 Type the port number Apollo Server uses to receive data in the Port box By default this is port number 32008
6 The Second IP Address and Second Port boxes are not necessary however cannot be left blank Type 127001 in the Second IP Address box and 32004 in the Second Port box
7 Type a value in the Maximum Throughput [bps] box if a limited data link is present between the Taurus and Apollo Server For instance if at some point the data link is limited to 9600 bps then this is the maximum throughput the link can allow If there are no throughput limitations set the value in this box to zero to disable the throughput limitation
8 Click Apply
9 Click Commit
B22 Retrieving Taurus Version 2x Data from Apollo ServerCreate a new project or use an existing project in Apollo Project to retrieve the Taurus version 2x data from Apollo Server For more information on creating or editing projects refer to Section 31 ldquoCreating New Projectsrdquo on page 11 and Section 36 ldquoEditing and Viewing the Settings of Projectsrdquo on page 31
When creating or editing the project
a) Add an IP address Store specification on the Store Selection tab (see step 4 in Section 31 ldquoCreating New Projectsrdquo) for Apollo Server including its client Web application port number Use the format
Apollo Server IP AddressApollo Server Client Web Application Port Number
b) Apply the appropriate filters on the Channel Group Selection tab to retrieve the desired channel groups from the Taurus version 2x See step 5 through step 12 in Section 31 ldquoCreating New Projectsrdquo for instruction on using the Channel Group Selection tab
Appendix B Retrieving SOH Data from a Taurus Version 2x
50 Apollo Project User Guide16106R5 2009-03-24
Apollo Project User Guide16106R5 2009-03-24
51
Appendix C Glossary
Glossary of Abbreviations and Terms
List of Unit Abbreviations and Symbols
C1 Glossary of Abbreviations and Terms
A
ASCIIAmerican Standard Code for Information Interchange
B
BHEBroad Band High Gain Seismometer East-West Orientation
Channel name based on the Global Seismological Network (GSN) standard
BHNBroad Band High Gain Seismometer North-South Orientation
Channel name based on the Global Seismological Network (GSN) standard
BHZBroad Band High Gain Seismometer Vertical Orientation
Channel name based on the Global Seismological Network (GSN) standard
Appendix C Glossary
52 Apollo Project User Guide16106R5 2009-03-24
C
CSVComma-Separated Values
D
DACDigital to Analog Converter
G
GPSGlobal Positioning System
J
JREJava Runtime Environment
JVMJava Virtual Machine
N
NFSNetwork File System
P
PDOPPosition Dilution of Precision
PRNPseudo-random Number
Appendix C Glossary
Apollo Project User Guide16106R5 2009-03-24
53
S
SACSeismic Analysis Code
An Apollo Project output file format that generates files that can be used by the SAC software (see http wwwirisedusoftwaresac)
SEEDStandard for the Exchange of Earthquake Data
SMBServer Message Block
SOHState of Health
T
TCPIPTransmission Control ProtocolInternet Protocol
TDOPTime Dilution of Precision
U
UNCUniform Naming Convention or Universal Naming Convention
URLUniform Resource Locator
UTCCoordinated Universal Time
Appendix C Glossary
54 Apollo Project User Guide16106R5 2009-03-24
C2 List of Unit Abbreviations and SymbolsTable C-1 provides a list of unit abbreviations and symbols commonly used in Nanometrics documentation
Table C-1 Unit abbreviations and symbols
Abbreviation or Symbol Definition Abbreviation
or Symbol Definition
deg degree lb pound
Oslash diameter m metre
micro micro ms metre per second
Ω ohm ms2 metre per second squared
A ampere mA milliampere
AC alternating current MB megabyte
b bit MΩ megaohm
B byte MHz megahertz
bps bits per second mi mile
C Celsius mL millilitre
cm centimetre mm millimetre
dB decibel ms millisecond
DC direct current MTU maximum transmission unit
F farad mV millivolt
ft foot mW milliwatt
g gram N Newton
g gravity nF nanofarad
GB gigabyte ns nanosecond
GHz gigahertz rad radian
Hz hertz rads radian per second
in inch s second
KB kilobyte sps samples per second
kg kilogram U rack unit
kHz kilohertz V volt
kΩ kiloohm Vpp Volts peak-to-peak
kW kilowatt W watt
L litre
Apollo Project User Guide16106R5 2009-03-24
55
About NanometricsNanometrics is a world leader in the development of precision instrumentation network technology and software applications for seismological and environmental studies Using Nanometrics technology our customers establish and grow research networks that are often located in extreme environments such as the frozen Arctic and Antarctic the arid deserts of the Middle East the jungles of South America and the depths of the worlds oceans Many of these are mission-critical national and regional networks that demand the highest possible data quality and availability
Nanometrics provides end-to-end solutions that include a growing portfolio of broadband and strong motion seismometers dataloggers and digitizers satellite ground station systems for remote site data collection and software applications for data and network analysis and management To support this portfolio Nanometrics also provides global systems engineering services for design installation and support of complete networks
Our head office research and development centre and production facility are located in the Kanata North Business Park of Ottawa the high-technology heart of Canadas capital region
Contacting NanometricsNanometrics Inc250 Herzberg RoadKanata Ontario Canada K2K 2A1Phone +1 613-592-6776Fax +1 613-592-5929Email infonanometricscaWeb wwwnanometricsca
Contacting Technical SupportIf you need technical support please submit a request on the Nanometrics technical support site or by email or fax Include a full explanation of the problem and related information such as log filesSupport site httpsupportnanometricsca
Email techsupportnanometricsca

Chapter 3 Retrieving Data
26 Apollo Project User Guide16106R5 2009-03-24
3 Click OK to save the new settings
34 Managing ProjectsYou can view open close copy and delete projects Also you can create convenient links to run your individual projects with desktop shortcuts
341 Viewing Existing Projects1 Click Projects in the Projects bar
2 View the projects listed on the Existing Projects page
The Existing Projects page shows a list of all projects and a status overview of each project For more information see Section 371 ldquoViewing an Overview of the Status of All Projectsrdquo on page 32
Channel 1 Name A channel codeEnter any three upper case letters or numbersThe default channel code is BHZ
Channel 2 Name A channel codeEnter any three upper case letters or numbersThe default channel code is BHN
Channel 3 Name A channel codeEnter any three upper case letters or numbersThe default channel code is BHE
Setting Description
Chapter 3 Retrieving Data
Apollo Project User Guide16106R5 2009-03-24
27
342 Opening a Project1 Click the project name under the Name column on the Existing Projects page
2 Click the Open Project button
343 Creating a Desktop Shortcut to a ProjectLaunching a project with a desktop shortcut will open Apollo Project to that project and run the project
Methods for creating desktop shortcuts to Web sites vary from browser to browser These procedures explain how to create desktop shortcuts to specific projects for both Mozilla Firefox 3 and Microsoft Internet Explorer 7 Desktop shortcuts to projects include the Apollo Project icon and are titled in the format Project Name ndash Apollo Project
In Firefox 3
1 Open the project you want to create a shortcut to in Firefox
2 Reduce the size of the Firefox window so that the desktop is visible
3 Drag the Site Identification Button onto the desktop
The Site Identification Button is located to the left of the Location Bar and displays the Apollo Project icon
In Internet Explorer 7
1 Open the project you want to create a shortcut to in Internet Explorer
2 Press ALT+F
3 Select Send gt Shortcut to Desktop
344 Closing a Project
1 Click the Close Project button in the Projects bar
Launching a desktop shortcut to a project automatically runs that project It is important to note that once a project is run its settings can no longer be edited It is recommended that desktop shortcuts only be created for Field Archive projects
Firefox is the recommended browser for Apollo Project
Chapter 3 Retrieving Data
28 Apollo Project User Guide16106R5 2009-03-24
345 Copying a Project
1 Select the project name under the Name column on the Existing Projects page
2 Click Copy
3 Enter a unique name for the new project and click OK
4 Click Edit and edit the settings as required
5 Click OK to save the project after you have finished editing the settings
346 Deleting a ProjectWhen you delete a project only files in the temporary folder are deleted All processed data files are not deleted
1 Click the project name under the Name column on the Existing Projects page
2 Click Delete
3 Click OK on the confirmation message
35 Running ProjectsFor all project types you can run a project manually at any time Archive projects can also be defined to run automatically on a schedule
If it is a scheduled Archive Project and the schedule is started click Cancel Schedule before you create a copy of it (If the schedule is not started the Start Schedule button is visible if the schedule is started the Cancel Schedule button replaces the Start Schedule button)
Apollo Project stores intermediate files in a temporary subdirectory of the Base Directory specified for the output location of a project These intermediate files correspond to the actual channel group data retrieved from the Stores referenced by the project If a project is deleted from Apollo Project these temporary files will be removed automatically
Disk space can also be reclaimed by removing these temporary files manually without deleting the project However if the project is run again the output files produced might be incomplete if previously retrieved data from these temporary files is required
For more information on what happens when a project runs see Section A1 ldquoOverview of Running Projectsrdquo on page 37
Chapter 3 Retrieving Data
Apollo Project User Guide16106R5 2009-03-24
29
351 Running a Project1 Open a project
2 Click Run Now on the Summary page to start the project
The project starts running and the Retrieval Status page is displayed
352 Stopping a Project1 Open a project
2 Click Cancel Run on the Summary page to stop the project
3 Click OK on the success message
353 Merging Project Data FilesYou have the option to merge all of the downloaded data for the stations and instruments into one file per interval for each project
1 Open a project
2 Click Merge
A single file is generated for each time period The time period is determined by the file interval you specified on the Time Selection page when you created the project For more information see step 13 of Section 31 ldquoCreating New Projectsrdquo on page 11
The original data files are not modified when you select the option to merge project data files
You can also click Run Now on the Retrieval Status page to start a project
For more information on what happens when a project runs see Section A1 ldquoOverview of Running Projectsrdquo on page 37
You can also click Cancel Run on the Retrieval Status page to stop a project
You cannot merge data from Archive projects and you cannot merge data in the Seisan format
You can also click Merge on the Retrieval Status page to merge the data from a project
Chapter 3 Retrieving Data
30 Apollo Project User Guide16106R5 2009-03-24
354 Running a Scheduled Archive Project1 Open a project
2 Click Start Schedule to start the project schedule
3 Click OK on the confirmation message
4 Click OK on the success message
For a project scheduled to run weekly the project will run for the first time according to the project start time and then it will run on a weekly basis according to the times and days you specified
For a project scheduled to run at a regular interval the project will run according the to interval you specified after you start the schedule For example if you click Start Schedule on a Wednesday and you specified every 2 days as the interval then the project will run for the first time on Friday and every two days after that
3541 Cancelling a Schedule
If you cancel a scheduled project before it runs for the first time you can edit the project settings
If you cancel a project that is currently running the current project runs to completion but subsequent project runs will not occur
1 Open a project
2 Click Cancel Schedule to cancel the project schedule
3 Click OK on the confirmation message
4 Click OK on the success message
You can also click Start Schedule on the Retrieval Status page to start the schedule of a project
You can restart the schedule by opening the project and clicking Start Schedule
You can also click Cancel Schedule on the Retrieval Status page to cancel the schedule of a project
Chapter 3 Retrieving Data
Apollo Project User Guide16106R5 2009-03-24
31
36 Editing and Viewing the Settings of ProjectsYou can edit the settings of a project before it has run After it has run you can view the settings
361 Editing Project Settings1 Open the project
2 Click Edit on the Summary page
3 Edit the settings as required
4 Click OK to save the changes
362 Viewing Project Settings1 Open the project
2 Click View on the Summary page
3 Click the tabs to view the settings
4 Click Cancel when you have finished viewing the settings
You can only edit the settings of a project before it has run for the first time or been scheduled (Archive project) If you want to edit the settings of a project after it has already run once or been scheduled you can copy the project (see Section 345 ldquoCopying a Projectrdquo on page 28) and then edit the settings for the copy
Settings For more information
Store Selection See step 4 of Section 31 ldquoCreating New ProjectsrdquoChannel Group Selection See step 5 to step 12 of Section 31 ldquoCreating New ProjectsrdquoTime Selection See step 13 of Section 31 ldquoCreating New ProjectsrdquoOutput Format See step 15 and step 16 of Section 31 ldquoCreating New ProjectsrdquoOutput Location See step 17 to step 20 of Section 31 ldquoCreating New Projectsrdquo
You can also click Edit on the Retrieval Status page to edit the settings of a project
You can also click View on the Retrieval Status page to edit the settings of a project
Chapter 3 Retrieving Data
32 Apollo Project User Guide16106R5 2009-03-24
37 Monitoring Project StatusYou can monitor the status of a project by viewing information on the Existing Projects Summary and Retrieval Status pages
371 Viewing an Overview of the Status of All ProjectsThe Existing Projects page is the default home page of Apollo Project You see this page when you first open Apollo Project or when you click Projects in the projects bar For more information see Section 341 ldquoViewing Existing Projectsrdquo on page 26
You can view the following information for all projects on the Existing Projects page
bull Name
bull Type
bull Current status
bull Last time the project run
bull Status of data retrieved
The Data Retrieved bars on the Existing Projects page show the overall status of the data retrieval For more information see Section 3731 ldquoStatus Coloursrdquo on page 34
Chapter 3 Retrieving Data
Apollo Project User Guide16106R5 2009-03-24
33
372 Viewing the Status of an Individual ProjectWhen you open a project a detailed summary of the project is shown on the Summary page For more information see Section 342 ldquoOpening a Projectrdquo on page 27
You can view the following information for each project on the Summary page
bull Date it was created
bull Date it was last modified
bull Current status
bull Last time it ran
bull Next time it will run
You can also view a summary of all of the settings you specified when you created the project (Store specifications selected Stores selected time series channel groups selected SOH channel groups start and end times number of files generated file interval and output format and locations)
All times are reported using the UTC time zone
Chapter 3 Retrieving Data
34 Apollo Project User Guide16106R5 2009-03-24
373 Monitoring the Status of a Running ProjectYou can view the data retrieval status of a project while it is running on the Retrieval Status page The Retrieval Status page is displayed automatically when you click Run Now to run a project You can also view this page by opening a project and clicking the Retrieval Status tab
The status for each channel group is expressed in the form of two numbers (for example 60100) and two bar graphs The first number is the percentage available of the total time requested (for example 60) and the second number is the percentage retrieved of the time available (for example 100) For more information on the bar graph status colours see Section 3731 ldquoStatus Coloursrdquo on page 34
You can also view retrieval details for each channel group listed on the Retrieval Status page For more information see Section 3732 ldquoViewing the Retrieval Details for Each Channel Grouprdquo on page 35
3731 Status Colours
The data retrieval status bars use the following status colours
The information that is displayed on the Retrieval Status page is updated continuously while a project is running
Table 3-1 Status colours
Colour Status
Green Apollo Project has retrieved the data
Yellow Apollo Project is attempting to retrieve available data from the Store
Red Data is available in the Store but Apollo Project has failed to retrieve it on this attempt Apollo Project will make additional attempts to retrieve the data up to the configured Maximum Number of Retrieval Attempts For information on how to set the Maximum Number of Retrieval Attempts setting see Section 31 ldquoCreating New Projectsrdquo on page 11
White Data for some portion of the requested time segment is not available in the Store For example there are gaps in the data or the retrieval request is for a future time segment
Chapter 3 Retrieving Data
Apollo Project User Guide16106R5 2009-03-24
35
3732 Viewing the Retrieval Details for Each Channel Group
You can view the retrieval status of each time segment for a channel group
1 Click a channel group name
2 Click the Channel Group Details button that is located to the right of the channel group name
The Remaining Retrieval Attempts column displays the number of times that Apollo Project will try to download each missing time segment for the channel group when the project is run again For information on how to set the Maximum Number of Retrieval Attempts setting see Section 33 ldquoConfiguring Apollo Projectrdquo on page 24
3 Click OK when you have finished viewing the details
Chapter 3 Retrieving Data
36 Apollo Project User Guide16106R5 2009-03-24
Apollo Project User Guide16106R5 2009-03-24
37
Appendix A Reference Information and Examples
Overview of Running Projects
Example Project Settings
Example Deployment Scenarios
Shot File Formats for Controlled Source Projects
A1 Overview of Running ProjectsWhen a project is run Apollo Project performs the following steps
1 The requested time ranges are identified
2 The channel groups for which data are to be retrieved are identified
3 The actual Stores specified by the Store specifications of the project are identified
For each identified Store the following steps are performed
1 A data availability analysis for the outstanding time ranges is performed These are for the ranges for which data has not already been retrieved The availability of the data is recorded for reference It is possible that a given Store was not present at the time the project was last run If this is the case then an attempt is made to retrieve all of the required time ranges of the project from the Store
2 If any data exists in the Store for any of the requested time ranges then a retrieval of this data is performed and the retrieved data is stored to local temporary files
3 If the number of retrieval attempts for a given time range exceeds a configurable threshold (see Section 33 ldquoConfiguring Apollo Projectrdquo on page 24) then the retrieval of data within the stated range is not attempted again
If any data was retrieved during the run of the project then the corresponding output files of the desired output format are generated and stored in the output location specified for the project
When running Apollo Project with Taurus version 2x the schedule for Archive projects must be greater than 5 minutes in duration Schedules that are less than 5 minutes can result in data that is missing or not downloaded
Appendix A Reference Information and Examples
38 Apollo Project User Guide16106R5 2009-03-24
It is possible that the requested data for a given channel group exists across multiple Stores If all of these Stores are included by the Store specifications for the project then Apollo Project assembles the requested data
When a project runs detailed information regarding the results of the retrieved data and processed data are available For more information see Section 37 ldquoMonitoring Project Statusrdquo on page 32
A2 Example Project Settings
A21 Example 1 One Time ProjectProject Name Project1
Project Type One Time
Channel groups selected for retrieval CASTN1OTBHZ (on taurus_1234)
Requested Time Range January 30 2008 1400 ndash 1500 UTC
File Interval 20 minutes
Output Location Base Directory disk2ApolloProjectOutputData
Output Location Subdirectories projectyearmonthday
Output Location Filenamestationnetwork_time
When the project is run successfully the following output files will be created on the server running Apollo Project
disk2ApolloProjectOutputDataProject120080130STN1CA_20080130_140000seed
disk2ApolloProjectOutputDataProject120080130STN1CA_20080130_142000seed
disk2ApolloProjectOutputDataProject120080130STN1CA_20080130_144000seed
Appendix A Reference Information and Examples
Apollo Project User Guide16106R5 2009-03-24
39
A22 Example 2 Controlled Source ProjectProject Name Project2
Project Type Controlled Source
Channel groups selected for retrieval CASTN1OTBHZ (on taurus_1234) CASTN1OTBHN (on taurus_1234)
Requested Shot Times January 30 2008 1400 UTC January 30 2008 1430 UTC
Pre Time 30 seconds
Post Time 30 seconds
Output Location Base Directory disk2ApolloProjectOutputData
Output Location Subdirectories projectyearmonthday
Output Location Filename timeformat
When the project is run successfully the following output files will be created on the server running Apollo Project
disk2ApolloProjectOutputDataProject22008013020080130_135930segysgy
disk2ApolloProjectOutputDataProject22008013020080130_142930segysgy
A3 Example Deployment Scenarios
A31 One TimeYou want to download three days of data from multiple instruments on the network save the data in MiniSEED format and create a file for every hour of data
A One Time project is the recommended solution The Store of each instrument can be made available to Apollo Project by creating a corresponding IP Address Store specification with the IP address of the instrument The requested time range can be specified along with a file interval of one hour Ensure that the instruments are configured to run in Communications mode
A32 Scheduled ArchiveYou want seismic data to be retrieved automatically from a group of instruments on the network every six hours The instruments are always accessible via an Ethernet connection
A scheduled Archive project is the recommended solution Use the Regular Interval scheduling option and set the interval to six hours
You can also run a scheduled Archive project at any time For example if the scheduled retrieval interval of a project is six hours and between intervals you want to retrieve the data three hours early you can run the project and approximately three additional hours of data would be accumulated About three hours later the project will run automatically and accumulate the remaining three hours of data
Appendix A Reference Information and Examples
40 Apollo Project User Guide16106R5 2009-03-24
A33 Manual ArchiveYou want to retrieve seismic data from a group of instruments but their respective Stores are only available for retrieval on occasion (no regular dependable schedule for retrieval from these Stores is possible)
A manually run Archive project is the recommended solution You can create the project and run it whenever any of the instruments are available for retrieval
A34 Field ArchiveYou want to collect data from a set of isolated instruments in the field at recurring intervals (for example twice per month)
A Field Archive project is the recommended solution You can create a Field Archive project and either add all instrument IP addresses to the list or use a Discovery specification The time for the last retrieval is stored on the instrument and all data is recovered from the last recovery time
A35 Media HarvestingYou want to collect the media from a set of instruments in the field at a regular interval (for example once per week) You also have to retrieve all of the seismic data on the media for subsequent analysis
An Archive project is the recommended solution Initially a directory is created on the file system of the server running Apollo Project A directory Store specification is created with this directory as the parent directory from which to search for Stores The content of each media instance in the weekrsquos collection is copied from a media reader to a subdirectory of the directory When the project is run all of the copied Stores are automatically available and the project accumulates data for each instrument
Due to the nature of media harvesting and the replacement procedure for this example data is always missing for the last period of output files for the current week This period corresponds to the time that the media was taken from the instrument and replaced with a new one The following week when the media is harvested again from the instruments in the field Apollo Project fills in the missing time for these files with the new Store data regardless of the media instance on which the data currently resides
You can only create and run Field Archive projects for Taurus version 30 or later
Appendix A Reference Information and Examples
Apollo Project User Guide16106R5 2009-03-24
41
A36 Trigger Downloading You have set up a network of five Tauruses around a hydro dam Each Taurus is accessible over an Ethernet connection and each is set to record data over the weekend You have set the period for data retrieval at 30 seconds before and five minutes after any seismic activity but the following procedure shows you why it is not necessary to view all of the data accumulated over the whole weekend
1 Select the Taurus at the site with the least environmental noise or determine the best site for generating triggers and designate this Taurus ldquoTaurus Ardquo for reference
You need to perform this task in advance More information about triggers can be found in the Taurus Portable Seismograph User Guide
2 Download the trigger file from ldquoTaurus Ardquo and review the file to verify the correct number of triggers
3 Follow these steps to create a new Triggers project
a) Click New on the Apollo Project Existing Projects page
b) Click Triggers as the project type and enter a unique name in the Project Name box
c) Click OK
d) Click the IP Address tab on the Store Selection tab
e) Enter the IP address of a Taurus
f) Click Add
g) Repeat step e until you have entered the IP addresses of all five of the Tauruses
Apollo Project adds the IP address specifications to the Selected Specifications section of the Store Selection page and finds all five Stores associated with the IP addresses and adds them to the Selected Stores section
h) Click the Channel Group Selection tab
i) Click Create Default Station Table to create a table for all of the currently selected Stores and discovered instruments
j) Review the selected channel groups and if required edit the mappings in the selected channel groups area of the tab (lower half of the tab)
k) Click the Time Selection tab
l) Click the Browse button
m)Select the trigger file that you downloaded in step 2 and click OK
n) Click Submit
The list of triggers is imported and displayed in the Triggers section on the Time Selection page
o) Enter a Pre Time of 30 seconds and a Post Time of 5 minutes
p) Click the Output Format tab
q) Click MiniSEED
r) Click All Instruments
s) Click the Output Location tab
Appendix A Reference Information and Examples
42 Apollo Project User Guide16106R5 2009-03-24
t) Enter the valid absolute path of the base directory for the processed data subfolders and files
u) Enter the expression used to define path names for subfolders under the base directory
v) Enter the expression used to define file names for the processed data files that are stored in the subfolders under the base directory
w) Click OK
4 Click the Run Now button on the Summary page
When the project has finished running the output folder you specified in step t will contain ten files Each output file will contain 5 minutes and 30 seconds of data from the five Tauruses
A4 Shot File Formats for Controlled Source ProjectsYou have two options for defining shots for a Controlled Source project manually defining shots or importing shots from a shot file
You can create shot files in one of following three file formats
Microsoft Office Excel (xls) ndash See Section A41 ldquoCreating a Shot File With Microsoft Office Excelrdquo on page 42
OpenOfficeorg Calc (ods) ndash See Section A42 ldquoCreating a Shot File With OpenOfficeorg Calcrdquo on page 44
Comma-Separated Values (csv) ndash See Section A43 ldquoCreating a Comma-Separated Values Shot Filerdquo on page 45
The Shot file templates are located in the docShotFileImport folder on the Apollo Project CD
A41 Creating a Shot File With Microsoft Office ExcelThe Microsoft Office Excel template for Apollo Project can be used with Microsoft Office Excel version 2003 or later
To create an Microsoft Office Excel based shot file
1 Double-click ShotFileTemplatexlt
A new Microsoft Office Excel file is created from the template and opens in the Microsoft Office Excel
2 Save the new spreadsheet as a Microsoft Office Excel document (xls)
3 Enter shot file data as specified in the Microsoft Office Excel spreadsheet
Only the decimal separator is supported for shot files Separators that denote the 3rd power of 10 (thousand) are not supported (for example 4500) The Microsoft Excel and OpenOffice templates reinforce these restrictions and are recommended for creating csv files
Appendix A Reference Information and Examples
Apollo Project User Guide16106R5 2009-03-24
43
You can enter data for multiple shot times
4 Click Save to save the file in Microsoft Office Excel format
5 Click File gt Save As and select CSV (Comma delimited) (csv) from the Save as type list
6 Click Save
7 Click OK on the message warning you that you are only saving the active sheet
8 Click Yes on the message warning you that file features might be incompatible with the csv format
9 Close Microsoft Office Excel
If you are using Microsoft Office Excel 2007 click the Microsoft Office Button and click Save As
Ensure that you save the file as a comma delimited file If the shot file is mistakenly saved in Microsoft Excel format (xls) the shot file will not work in Apollo Project
Appendix A Reference Information and Examples
44 Apollo Project User Guide16106R5 2009-03-24
A42 Creating a Shot File With OpenOfficeorg CalcThe OpenOffice template has been tested with OpenOfficeorg Calc version 23 Later versions of OpenOfficeorg Calc can be used at your discretion
To create a shot file based on the OpenOfficeorg Calc template
1 Double-click ShotFileTemplateots
A new OpenOffice spreadsheet is created from the template and opens in OpenOfficeorg Calc
2 Save the new spreadsheet as an OpenOffice Calc document (ods)
3 Enter the shot file data as specified in the OpenOffice spreadsheet
You can enter data for multiple shot times
4 Click Save to save the file in OpenOfficeorg Calc format
5 Click File gt Save As and select Text CSV (csv) from the Save as Type list
6 Select the Edit filter settings check box
7 Click Save
A warning message might appear that warns you that the document might contain formatting that cannot be saved in the csv format Click Yes on the warning message to save the file in csv format
The Export of text files window opens
8 Delete the double quotation marks () in the Text delimiter box and ensure that the Save cell content as shown check box is selected
9 Click OK to export the OpenOffice spreadsheet as a csv file
10 Click OK on the warning message
11 Close OpenOfficeorg Calc
Appendix A Reference Information and Examples
Apollo Project User Guide16106R5 2009-03-24
45
A43 Creating a Comma-Separated Values Shot FileYou can use any text editor to create a csv shot file
To create a csv shot file
1 Open ShotFileTemplatecsv in a text editor and save it with a different name
2 Format each line of the csv file as follows
Shot TimePre TimePost TimeLatitudeLongitudeElevation
For example
2008-08-28 103044090600000-6000004267
The format and units are as follows
3 Save the file as a csv formatted file
The csv shot file template is not compatible with Microsoft Office Excel Make sure that you do not double-click it and open it in Microsoft Office Excel
FormatUnits
Shot Time yyyy-mm-dd hhmmss
Pre Time seconds
Post Time seconds
Latitude degrees
Longitude degrees
Elevation meters
Appendix A Reference Information and Examples
46 Apollo Project User Guide16106R5 2009-03-24
Apollo Project User Guide16106R5 2009-03-24
47
Appendix B Retrieving SOH Data from a Taurus Version 2x
Taurus Version 2x SOH Data Retrieved by Apollo Project
Retrieving SOH Data from a Taurus Version 2x Streaming to Apollo Server
B1 Taurus Version 2x SOH Data Retrieved by Apollo Project This section presents the predefined datasets of SOH data Apollo Project will retrieve from a Taurus version 2x either through a direct connection or a stream to Apollo Server For instruction on retrieving streaming Taurus version 2x data from Apollo Server see Section B2 ldquoRetrieving SOH Data from a Taurus Version 2x Streaming to Apollo Serverrdquo on page 48
The order of the columns presented in the table below will differ when streaming Taurus version 2x SOH data from Apollo Server
Predefined SOH group SOH data
GPS Time Time (longsecs) (the number of seconds since 1970-01-01)Time (UTC) (time in yyyy-mm-dd hhmmssms format)Altitude (m)DAC CountError (ns) (time error)GPS Engine StatusLast Update Time(s)Lat (deg) (latitude in degrees)Long (deg) (longitude in degrees)NumSatellites (number of satellites used)PDOPPhaseLock (system clock phase lock)TDOPUncertainty (ns) (time uncertainty)
Note The values for Number of satellites used PDOP and TDOP are provided by the GPS receiver at the Last update time In order to see what time these values correspond to look at the Last update time When GPS is off these three parameters and the Last update time are not updated The last value displays until the next update arrives (after the GPS is turned on again)
Appendix B Retrieving SOH Data from a Taurus Version 2x
48 Apollo Project User Guide16106R5 2009-03-24
B2 Retrieving SOH Data from a Taurus Version 2x Streaming to Apollo ServerThis section provides instruction on configuring your Taurus version 2x to stream data to Apollo Server and instructions on how to use Apollo Project to retrieve this data from Apollo Server
B21 Streaming Data from a Taurus Version 2x to Apollo ServerUse the Taurus graphical user interface on either the Taurus display screen or through a Web browser to set up an NP stream from a Taurus version 2x to Apollo Server
1 Log in to the Taurus version 2x with either the tech or central user account
2 Select Advanced Configuration gt Communications gt NP Data Streaming
GPS Satellites Time (longsecs) (the number of seconds since 1970-01-01)Time (UTC) (time in yyyy-mm-dd hhmmssms format)
For each satelliteAcquisition FlagLast Update Time (ms)PRNSatellite Azimuth (microordm)Satellite Elevation (microordm)Signal Level (AMU)
Environment Time (longsecs) (the number of seconds since 1970-01-01)Time (UTC) (time in yyyy-mm-dd hhmmssms format)External SOH Voltage 1 (V) (12-bit voltage input) External SOH Voltage 2 (V) (12-bit voltage input) External SOH Voltage 3 (V) (12-bit voltage input) External SOH Voltage 4 (V) (12-bit voltage input) Sensor SOH Voltage 1 (V)Sensor SOH Voltage 2 (V)Sensor SOH Voltage 3 (V)
Instrument Time (longsecs) (the number of seconds since 1970-01-01)Time (UTC) (time in yyyy-mm-dd hhmmssms format)Controller Current (mA)Digitizer Current (mA)NMX Bus Current (mA) (external connector)Sensor Current (mA)Serial Port Current (mA)Supply Voltage (mV)Temperature (ordmC)
Predefined SOH group SOH data
Appendix B Retrieving SOH Data from a Taurus Version 2x
Apollo Project User Guide16106R5 2009-03-24
49
3 To have the Taurus stream both time series and SOH data to Apollo Server select both Stream Time Series and Stream SOH
-OR-
Select only Stream SOH if you only want to retrieve the SOH data from Apollo Server
4 Type the IP address for Apollo Server in the IP Address box
5 Type the port number Apollo Server uses to receive data in the Port box By default this is port number 32008
6 The Second IP Address and Second Port boxes are not necessary however cannot be left blank Type 127001 in the Second IP Address box and 32004 in the Second Port box
7 Type a value in the Maximum Throughput [bps] box if a limited data link is present between the Taurus and Apollo Server For instance if at some point the data link is limited to 9600 bps then this is the maximum throughput the link can allow If there are no throughput limitations set the value in this box to zero to disable the throughput limitation
8 Click Apply
9 Click Commit
B22 Retrieving Taurus Version 2x Data from Apollo ServerCreate a new project or use an existing project in Apollo Project to retrieve the Taurus version 2x data from Apollo Server For more information on creating or editing projects refer to Section 31 ldquoCreating New Projectsrdquo on page 11 and Section 36 ldquoEditing and Viewing the Settings of Projectsrdquo on page 31
When creating or editing the project
a) Add an IP address Store specification on the Store Selection tab (see step 4 in Section 31 ldquoCreating New Projectsrdquo) for Apollo Server including its client Web application port number Use the format
Apollo Server IP AddressApollo Server Client Web Application Port Number
b) Apply the appropriate filters on the Channel Group Selection tab to retrieve the desired channel groups from the Taurus version 2x See step 5 through step 12 in Section 31 ldquoCreating New Projectsrdquo for instruction on using the Channel Group Selection tab
Appendix B Retrieving SOH Data from a Taurus Version 2x
50 Apollo Project User Guide16106R5 2009-03-24
Apollo Project User Guide16106R5 2009-03-24
51
Appendix C Glossary
Glossary of Abbreviations and Terms
List of Unit Abbreviations and Symbols
C1 Glossary of Abbreviations and Terms
A
ASCIIAmerican Standard Code for Information Interchange
B
BHEBroad Band High Gain Seismometer East-West Orientation
Channel name based on the Global Seismological Network (GSN) standard
BHNBroad Band High Gain Seismometer North-South Orientation
Channel name based on the Global Seismological Network (GSN) standard
BHZBroad Band High Gain Seismometer Vertical Orientation
Channel name based on the Global Seismological Network (GSN) standard
Appendix C Glossary
52 Apollo Project User Guide16106R5 2009-03-24
C
CSVComma-Separated Values
D
DACDigital to Analog Converter
G
GPSGlobal Positioning System
J
JREJava Runtime Environment
JVMJava Virtual Machine
N
NFSNetwork File System
P
PDOPPosition Dilution of Precision
PRNPseudo-random Number
Appendix C Glossary
Apollo Project User Guide16106R5 2009-03-24
53
S
SACSeismic Analysis Code
An Apollo Project output file format that generates files that can be used by the SAC software (see http wwwirisedusoftwaresac)
SEEDStandard for the Exchange of Earthquake Data
SMBServer Message Block
SOHState of Health
T
TCPIPTransmission Control ProtocolInternet Protocol
TDOPTime Dilution of Precision
U
UNCUniform Naming Convention or Universal Naming Convention
URLUniform Resource Locator
UTCCoordinated Universal Time
Appendix C Glossary
54 Apollo Project User Guide16106R5 2009-03-24
C2 List of Unit Abbreviations and SymbolsTable C-1 provides a list of unit abbreviations and symbols commonly used in Nanometrics documentation
Table C-1 Unit abbreviations and symbols
Abbreviation or Symbol Definition Abbreviation
or Symbol Definition
deg degree lb pound
Oslash diameter m metre
micro micro ms metre per second
Ω ohm ms2 metre per second squared
A ampere mA milliampere
AC alternating current MB megabyte
b bit MΩ megaohm
B byte MHz megahertz
bps bits per second mi mile
C Celsius mL millilitre
cm centimetre mm millimetre
dB decibel ms millisecond
DC direct current MTU maximum transmission unit
F farad mV millivolt
ft foot mW milliwatt
g gram N Newton
g gravity nF nanofarad
GB gigabyte ns nanosecond
GHz gigahertz rad radian
Hz hertz rads radian per second
in inch s second
KB kilobyte sps samples per second
kg kilogram U rack unit
kHz kilohertz V volt
kΩ kiloohm Vpp Volts peak-to-peak
kW kilowatt W watt
L litre
Apollo Project User Guide16106R5 2009-03-24
55
About NanometricsNanometrics is a world leader in the development of precision instrumentation network technology and software applications for seismological and environmental studies Using Nanometrics technology our customers establish and grow research networks that are often located in extreme environments such as the frozen Arctic and Antarctic the arid deserts of the Middle East the jungles of South America and the depths of the worlds oceans Many of these are mission-critical national and regional networks that demand the highest possible data quality and availability
Nanometrics provides end-to-end solutions that include a growing portfolio of broadband and strong motion seismometers dataloggers and digitizers satellite ground station systems for remote site data collection and software applications for data and network analysis and management To support this portfolio Nanometrics also provides global systems engineering services for design installation and support of complete networks
Our head office research and development centre and production facility are located in the Kanata North Business Park of Ottawa the high-technology heart of Canadas capital region
Contacting NanometricsNanometrics Inc250 Herzberg RoadKanata Ontario Canada K2K 2A1Phone +1 613-592-6776Fax +1 613-592-5929Email infonanometricscaWeb wwwnanometricsca
Contacting Technical SupportIf you need technical support please submit a request on the Nanometrics technical support site or by email or fax Include a full explanation of the problem and related information such as log filesSupport site httpsupportnanometricsca
Email techsupportnanometricsca
Chapter 3 Retrieving Data
Apollo Project User Guide16106R5 2009-03-24
27
342 Opening a Project1 Click the project name under the Name column on the Existing Projects page
2 Click the Open Project button
343 Creating a Desktop Shortcut to a ProjectLaunching a project with a desktop shortcut will open Apollo Project to that project and run the project
Methods for creating desktop shortcuts to Web sites vary from browser to browser These procedures explain how to create desktop shortcuts to specific projects for both Mozilla Firefox 3 and Microsoft Internet Explorer 7 Desktop shortcuts to projects include the Apollo Project icon and are titled in the format Project Name ndash Apollo Project
In Firefox 3
1 Open the project you want to create a shortcut to in Firefox
2 Reduce the size of the Firefox window so that the desktop is visible
3 Drag the Site Identification Button onto the desktop
The Site Identification Button is located to the left of the Location Bar and displays the Apollo Project icon
In Internet Explorer 7
1 Open the project you want to create a shortcut to in Internet Explorer
2 Press ALT+F
3 Select Send gt Shortcut to Desktop
344 Closing a Project
1 Click the Close Project button in the Projects bar
Launching a desktop shortcut to a project automatically runs that project It is important to note that once a project is run its settings can no longer be edited It is recommended that desktop shortcuts only be created for Field Archive projects
Firefox is the recommended browser for Apollo Project
Chapter 3 Retrieving Data
28 Apollo Project User Guide16106R5 2009-03-24
345 Copying a Project
1 Select the project name under the Name column on the Existing Projects page
2 Click Copy
3 Enter a unique name for the new project and click OK
4 Click Edit and edit the settings as required
5 Click OK to save the project after you have finished editing the settings
346 Deleting a ProjectWhen you delete a project only files in the temporary folder are deleted All processed data files are not deleted
1 Click the project name under the Name column on the Existing Projects page
2 Click Delete
3 Click OK on the confirmation message
35 Running ProjectsFor all project types you can run a project manually at any time Archive projects can also be defined to run automatically on a schedule
If it is a scheduled Archive Project and the schedule is started click Cancel Schedule before you create a copy of it (If the schedule is not started the Start Schedule button is visible if the schedule is started the Cancel Schedule button replaces the Start Schedule button)
Apollo Project stores intermediate files in a temporary subdirectory of the Base Directory specified for the output location of a project These intermediate files correspond to the actual channel group data retrieved from the Stores referenced by the project If a project is deleted from Apollo Project these temporary files will be removed automatically
Disk space can also be reclaimed by removing these temporary files manually without deleting the project However if the project is run again the output files produced might be incomplete if previously retrieved data from these temporary files is required
For more information on what happens when a project runs see Section A1 ldquoOverview of Running Projectsrdquo on page 37
Chapter 3 Retrieving Data
Apollo Project User Guide16106R5 2009-03-24
29
351 Running a Project1 Open a project
2 Click Run Now on the Summary page to start the project
The project starts running and the Retrieval Status page is displayed
352 Stopping a Project1 Open a project
2 Click Cancel Run on the Summary page to stop the project
3 Click OK on the success message
353 Merging Project Data FilesYou have the option to merge all of the downloaded data for the stations and instruments into one file per interval for each project
1 Open a project
2 Click Merge
A single file is generated for each time period The time period is determined by the file interval you specified on the Time Selection page when you created the project For more information see step 13 of Section 31 ldquoCreating New Projectsrdquo on page 11
The original data files are not modified when you select the option to merge project data files
You can also click Run Now on the Retrieval Status page to start a project
For more information on what happens when a project runs see Section A1 ldquoOverview of Running Projectsrdquo on page 37
You can also click Cancel Run on the Retrieval Status page to stop a project
You cannot merge data from Archive projects and you cannot merge data in the Seisan format
You can also click Merge on the Retrieval Status page to merge the data from a project
Chapter 3 Retrieving Data
30 Apollo Project User Guide16106R5 2009-03-24
354 Running a Scheduled Archive Project1 Open a project
2 Click Start Schedule to start the project schedule
3 Click OK on the confirmation message
4 Click OK on the success message
For a project scheduled to run weekly the project will run for the first time according to the project start time and then it will run on a weekly basis according to the times and days you specified
For a project scheduled to run at a regular interval the project will run according the to interval you specified after you start the schedule For example if you click Start Schedule on a Wednesday and you specified every 2 days as the interval then the project will run for the first time on Friday and every two days after that
3541 Cancelling a Schedule
If you cancel a scheduled project before it runs for the first time you can edit the project settings
If you cancel a project that is currently running the current project runs to completion but subsequent project runs will not occur
1 Open a project
2 Click Cancel Schedule to cancel the project schedule
3 Click OK on the confirmation message
4 Click OK on the success message
You can also click Start Schedule on the Retrieval Status page to start the schedule of a project
You can restart the schedule by opening the project and clicking Start Schedule
You can also click Cancel Schedule on the Retrieval Status page to cancel the schedule of a project
Chapter 3 Retrieving Data
Apollo Project User Guide16106R5 2009-03-24
31
36 Editing and Viewing the Settings of ProjectsYou can edit the settings of a project before it has run After it has run you can view the settings
361 Editing Project Settings1 Open the project
2 Click Edit on the Summary page
3 Edit the settings as required
4 Click OK to save the changes
362 Viewing Project Settings1 Open the project
2 Click View on the Summary page
3 Click the tabs to view the settings
4 Click Cancel when you have finished viewing the settings
You can only edit the settings of a project before it has run for the first time or been scheduled (Archive project) If you want to edit the settings of a project after it has already run once or been scheduled you can copy the project (see Section 345 ldquoCopying a Projectrdquo on page 28) and then edit the settings for the copy
Settings For more information
Store Selection See step 4 of Section 31 ldquoCreating New ProjectsrdquoChannel Group Selection See step 5 to step 12 of Section 31 ldquoCreating New ProjectsrdquoTime Selection See step 13 of Section 31 ldquoCreating New ProjectsrdquoOutput Format See step 15 and step 16 of Section 31 ldquoCreating New ProjectsrdquoOutput Location See step 17 to step 20 of Section 31 ldquoCreating New Projectsrdquo
You can also click Edit on the Retrieval Status page to edit the settings of a project
You can also click View on the Retrieval Status page to edit the settings of a project
Chapter 3 Retrieving Data
32 Apollo Project User Guide16106R5 2009-03-24
37 Monitoring Project StatusYou can monitor the status of a project by viewing information on the Existing Projects Summary and Retrieval Status pages
371 Viewing an Overview of the Status of All ProjectsThe Existing Projects page is the default home page of Apollo Project You see this page when you first open Apollo Project or when you click Projects in the projects bar For more information see Section 341 ldquoViewing Existing Projectsrdquo on page 26
You can view the following information for all projects on the Existing Projects page
bull Name
bull Type
bull Current status
bull Last time the project run
bull Status of data retrieved
The Data Retrieved bars on the Existing Projects page show the overall status of the data retrieval For more information see Section 3731 ldquoStatus Coloursrdquo on page 34
Chapter 3 Retrieving Data
Apollo Project User Guide16106R5 2009-03-24
33
372 Viewing the Status of an Individual ProjectWhen you open a project a detailed summary of the project is shown on the Summary page For more information see Section 342 ldquoOpening a Projectrdquo on page 27
You can view the following information for each project on the Summary page
bull Date it was created
bull Date it was last modified
bull Current status
bull Last time it ran
bull Next time it will run
You can also view a summary of all of the settings you specified when you created the project (Store specifications selected Stores selected time series channel groups selected SOH channel groups start and end times number of files generated file interval and output format and locations)
All times are reported using the UTC time zone
Chapter 3 Retrieving Data
34 Apollo Project User Guide16106R5 2009-03-24
373 Monitoring the Status of a Running ProjectYou can view the data retrieval status of a project while it is running on the Retrieval Status page The Retrieval Status page is displayed automatically when you click Run Now to run a project You can also view this page by opening a project and clicking the Retrieval Status tab
The status for each channel group is expressed in the form of two numbers (for example 60100) and two bar graphs The first number is the percentage available of the total time requested (for example 60) and the second number is the percentage retrieved of the time available (for example 100) For more information on the bar graph status colours see Section 3731 ldquoStatus Coloursrdquo on page 34
You can also view retrieval details for each channel group listed on the Retrieval Status page For more information see Section 3732 ldquoViewing the Retrieval Details for Each Channel Grouprdquo on page 35
3731 Status Colours
The data retrieval status bars use the following status colours
The information that is displayed on the Retrieval Status page is updated continuously while a project is running
Table 3-1 Status colours
Colour Status
Green Apollo Project has retrieved the data
Yellow Apollo Project is attempting to retrieve available data from the Store
Red Data is available in the Store but Apollo Project has failed to retrieve it on this attempt Apollo Project will make additional attempts to retrieve the data up to the configured Maximum Number of Retrieval Attempts For information on how to set the Maximum Number of Retrieval Attempts setting see Section 31 ldquoCreating New Projectsrdquo on page 11
White Data for some portion of the requested time segment is not available in the Store For example there are gaps in the data or the retrieval request is for a future time segment
Chapter 3 Retrieving Data
Apollo Project User Guide16106R5 2009-03-24
35
3732 Viewing the Retrieval Details for Each Channel Group
You can view the retrieval status of each time segment for a channel group
1 Click a channel group name
2 Click the Channel Group Details button that is located to the right of the channel group name
The Remaining Retrieval Attempts column displays the number of times that Apollo Project will try to download each missing time segment for the channel group when the project is run again For information on how to set the Maximum Number of Retrieval Attempts setting see Section 33 ldquoConfiguring Apollo Projectrdquo on page 24
3 Click OK when you have finished viewing the details
Chapter 3 Retrieving Data
36 Apollo Project User Guide16106R5 2009-03-24
Apollo Project User Guide16106R5 2009-03-24
37
Appendix A Reference Information and Examples
Overview of Running Projects
Example Project Settings
Example Deployment Scenarios
Shot File Formats for Controlled Source Projects
A1 Overview of Running ProjectsWhen a project is run Apollo Project performs the following steps
1 The requested time ranges are identified
2 The channel groups for which data are to be retrieved are identified
3 The actual Stores specified by the Store specifications of the project are identified
For each identified Store the following steps are performed
1 A data availability analysis for the outstanding time ranges is performed These are for the ranges for which data has not already been retrieved The availability of the data is recorded for reference It is possible that a given Store was not present at the time the project was last run If this is the case then an attempt is made to retrieve all of the required time ranges of the project from the Store
2 If any data exists in the Store for any of the requested time ranges then a retrieval of this data is performed and the retrieved data is stored to local temporary files
3 If the number of retrieval attempts for a given time range exceeds a configurable threshold (see Section 33 ldquoConfiguring Apollo Projectrdquo on page 24) then the retrieval of data within the stated range is not attempted again
If any data was retrieved during the run of the project then the corresponding output files of the desired output format are generated and stored in the output location specified for the project
When running Apollo Project with Taurus version 2x the schedule for Archive projects must be greater than 5 minutes in duration Schedules that are less than 5 minutes can result in data that is missing or not downloaded
Appendix A Reference Information and Examples
38 Apollo Project User Guide16106R5 2009-03-24
It is possible that the requested data for a given channel group exists across multiple Stores If all of these Stores are included by the Store specifications for the project then Apollo Project assembles the requested data
When a project runs detailed information regarding the results of the retrieved data and processed data are available For more information see Section 37 ldquoMonitoring Project Statusrdquo on page 32
A2 Example Project Settings
A21 Example 1 One Time ProjectProject Name Project1
Project Type One Time
Channel groups selected for retrieval CASTN1OTBHZ (on taurus_1234)
Requested Time Range January 30 2008 1400 ndash 1500 UTC
File Interval 20 minutes
Output Location Base Directory disk2ApolloProjectOutputData
Output Location Subdirectories projectyearmonthday
Output Location Filenamestationnetwork_time
When the project is run successfully the following output files will be created on the server running Apollo Project
disk2ApolloProjectOutputDataProject120080130STN1CA_20080130_140000seed
disk2ApolloProjectOutputDataProject120080130STN1CA_20080130_142000seed
disk2ApolloProjectOutputDataProject120080130STN1CA_20080130_144000seed
Appendix A Reference Information and Examples
Apollo Project User Guide16106R5 2009-03-24
39
A22 Example 2 Controlled Source ProjectProject Name Project2
Project Type Controlled Source
Channel groups selected for retrieval CASTN1OTBHZ (on taurus_1234) CASTN1OTBHN (on taurus_1234)
Requested Shot Times January 30 2008 1400 UTC January 30 2008 1430 UTC
Pre Time 30 seconds
Post Time 30 seconds
Output Location Base Directory disk2ApolloProjectOutputData
Output Location Subdirectories projectyearmonthday
Output Location Filename timeformat
When the project is run successfully the following output files will be created on the server running Apollo Project
disk2ApolloProjectOutputDataProject22008013020080130_135930segysgy
disk2ApolloProjectOutputDataProject22008013020080130_142930segysgy
A3 Example Deployment Scenarios
A31 One TimeYou want to download three days of data from multiple instruments on the network save the data in MiniSEED format and create a file for every hour of data
A One Time project is the recommended solution The Store of each instrument can be made available to Apollo Project by creating a corresponding IP Address Store specification with the IP address of the instrument The requested time range can be specified along with a file interval of one hour Ensure that the instruments are configured to run in Communications mode
A32 Scheduled ArchiveYou want seismic data to be retrieved automatically from a group of instruments on the network every six hours The instruments are always accessible via an Ethernet connection
A scheduled Archive project is the recommended solution Use the Regular Interval scheduling option and set the interval to six hours
You can also run a scheduled Archive project at any time For example if the scheduled retrieval interval of a project is six hours and between intervals you want to retrieve the data three hours early you can run the project and approximately three additional hours of data would be accumulated About three hours later the project will run automatically and accumulate the remaining three hours of data
Appendix A Reference Information and Examples
40 Apollo Project User Guide16106R5 2009-03-24
A33 Manual ArchiveYou want to retrieve seismic data from a group of instruments but their respective Stores are only available for retrieval on occasion (no regular dependable schedule for retrieval from these Stores is possible)
A manually run Archive project is the recommended solution You can create the project and run it whenever any of the instruments are available for retrieval
A34 Field ArchiveYou want to collect data from a set of isolated instruments in the field at recurring intervals (for example twice per month)
A Field Archive project is the recommended solution You can create a Field Archive project and either add all instrument IP addresses to the list or use a Discovery specification The time for the last retrieval is stored on the instrument and all data is recovered from the last recovery time
A35 Media HarvestingYou want to collect the media from a set of instruments in the field at a regular interval (for example once per week) You also have to retrieve all of the seismic data on the media for subsequent analysis
An Archive project is the recommended solution Initially a directory is created on the file system of the server running Apollo Project A directory Store specification is created with this directory as the parent directory from which to search for Stores The content of each media instance in the weekrsquos collection is copied from a media reader to a subdirectory of the directory When the project is run all of the copied Stores are automatically available and the project accumulates data for each instrument
Due to the nature of media harvesting and the replacement procedure for this example data is always missing for the last period of output files for the current week This period corresponds to the time that the media was taken from the instrument and replaced with a new one The following week when the media is harvested again from the instruments in the field Apollo Project fills in the missing time for these files with the new Store data regardless of the media instance on which the data currently resides
You can only create and run Field Archive projects for Taurus version 30 or later
Appendix A Reference Information and Examples
Apollo Project User Guide16106R5 2009-03-24
41
A36 Trigger Downloading You have set up a network of five Tauruses around a hydro dam Each Taurus is accessible over an Ethernet connection and each is set to record data over the weekend You have set the period for data retrieval at 30 seconds before and five minutes after any seismic activity but the following procedure shows you why it is not necessary to view all of the data accumulated over the whole weekend
1 Select the Taurus at the site with the least environmental noise or determine the best site for generating triggers and designate this Taurus ldquoTaurus Ardquo for reference
You need to perform this task in advance More information about triggers can be found in the Taurus Portable Seismograph User Guide
2 Download the trigger file from ldquoTaurus Ardquo and review the file to verify the correct number of triggers
3 Follow these steps to create a new Triggers project
a) Click New on the Apollo Project Existing Projects page
b) Click Triggers as the project type and enter a unique name in the Project Name box
c) Click OK
d) Click the IP Address tab on the Store Selection tab
e) Enter the IP address of a Taurus
f) Click Add
g) Repeat step e until you have entered the IP addresses of all five of the Tauruses
Apollo Project adds the IP address specifications to the Selected Specifications section of the Store Selection page and finds all five Stores associated with the IP addresses and adds them to the Selected Stores section
h) Click the Channel Group Selection tab
i) Click Create Default Station Table to create a table for all of the currently selected Stores and discovered instruments
j) Review the selected channel groups and if required edit the mappings in the selected channel groups area of the tab (lower half of the tab)
k) Click the Time Selection tab
l) Click the Browse button
m)Select the trigger file that you downloaded in step 2 and click OK
n) Click Submit
The list of triggers is imported and displayed in the Triggers section on the Time Selection page
o) Enter a Pre Time of 30 seconds and a Post Time of 5 minutes
p) Click the Output Format tab
q) Click MiniSEED
r) Click All Instruments
s) Click the Output Location tab
Appendix A Reference Information and Examples
42 Apollo Project User Guide16106R5 2009-03-24
t) Enter the valid absolute path of the base directory for the processed data subfolders and files
u) Enter the expression used to define path names for subfolders under the base directory
v) Enter the expression used to define file names for the processed data files that are stored in the subfolders under the base directory
w) Click OK
4 Click the Run Now button on the Summary page
When the project has finished running the output folder you specified in step t will contain ten files Each output file will contain 5 minutes and 30 seconds of data from the five Tauruses
A4 Shot File Formats for Controlled Source ProjectsYou have two options for defining shots for a Controlled Source project manually defining shots or importing shots from a shot file
You can create shot files in one of following three file formats
Microsoft Office Excel (xls) ndash See Section A41 ldquoCreating a Shot File With Microsoft Office Excelrdquo on page 42
OpenOfficeorg Calc (ods) ndash See Section A42 ldquoCreating a Shot File With OpenOfficeorg Calcrdquo on page 44
Comma-Separated Values (csv) ndash See Section A43 ldquoCreating a Comma-Separated Values Shot Filerdquo on page 45
The Shot file templates are located in the docShotFileImport folder on the Apollo Project CD
A41 Creating a Shot File With Microsoft Office ExcelThe Microsoft Office Excel template for Apollo Project can be used with Microsoft Office Excel version 2003 or later
To create an Microsoft Office Excel based shot file
1 Double-click ShotFileTemplatexlt
A new Microsoft Office Excel file is created from the template and opens in the Microsoft Office Excel
2 Save the new spreadsheet as a Microsoft Office Excel document (xls)
3 Enter shot file data as specified in the Microsoft Office Excel spreadsheet
Only the decimal separator is supported for shot files Separators that denote the 3rd power of 10 (thousand) are not supported (for example 4500) The Microsoft Excel and OpenOffice templates reinforce these restrictions and are recommended for creating csv files
Appendix A Reference Information and Examples
Apollo Project User Guide16106R5 2009-03-24
43
You can enter data for multiple shot times
4 Click Save to save the file in Microsoft Office Excel format
5 Click File gt Save As and select CSV (Comma delimited) (csv) from the Save as type list
6 Click Save
7 Click OK on the message warning you that you are only saving the active sheet
8 Click Yes on the message warning you that file features might be incompatible with the csv format
9 Close Microsoft Office Excel
If you are using Microsoft Office Excel 2007 click the Microsoft Office Button and click Save As
Ensure that you save the file as a comma delimited file If the shot file is mistakenly saved in Microsoft Excel format (xls) the shot file will not work in Apollo Project
Appendix A Reference Information and Examples
44 Apollo Project User Guide16106R5 2009-03-24
A42 Creating a Shot File With OpenOfficeorg CalcThe OpenOffice template has been tested with OpenOfficeorg Calc version 23 Later versions of OpenOfficeorg Calc can be used at your discretion
To create a shot file based on the OpenOfficeorg Calc template
1 Double-click ShotFileTemplateots
A new OpenOffice spreadsheet is created from the template and opens in OpenOfficeorg Calc
2 Save the new spreadsheet as an OpenOffice Calc document (ods)
3 Enter the shot file data as specified in the OpenOffice spreadsheet
You can enter data for multiple shot times
4 Click Save to save the file in OpenOfficeorg Calc format
5 Click File gt Save As and select Text CSV (csv) from the Save as Type list
6 Select the Edit filter settings check box
7 Click Save
A warning message might appear that warns you that the document might contain formatting that cannot be saved in the csv format Click Yes on the warning message to save the file in csv format
The Export of text files window opens
8 Delete the double quotation marks () in the Text delimiter box and ensure that the Save cell content as shown check box is selected
9 Click OK to export the OpenOffice spreadsheet as a csv file
10 Click OK on the warning message
11 Close OpenOfficeorg Calc
Appendix A Reference Information and Examples
Apollo Project User Guide16106R5 2009-03-24
45
A43 Creating a Comma-Separated Values Shot FileYou can use any text editor to create a csv shot file
To create a csv shot file
1 Open ShotFileTemplatecsv in a text editor and save it with a different name
2 Format each line of the csv file as follows
Shot TimePre TimePost TimeLatitudeLongitudeElevation
For example
2008-08-28 103044090600000-6000004267
The format and units are as follows
3 Save the file as a csv formatted file
The csv shot file template is not compatible with Microsoft Office Excel Make sure that you do not double-click it and open it in Microsoft Office Excel
FormatUnits
Shot Time yyyy-mm-dd hhmmss
Pre Time seconds
Post Time seconds
Latitude degrees
Longitude degrees
Elevation meters
Appendix A Reference Information and Examples
46 Apollo Project User Guide16106R5 2009-03-24
Apollo Project User Guide16106R5 2009-03-24
47
Appendix B Retrieving SOH Data from a Taurus Version 2x
Taurus Version 2x SOH Data Retrieved by Apollo Project
Retrieving SOH Data from a Taurus Version 2x Streaming to Apollo Server
B1 Taurus Version 2x SOH Data Retrieved by Apollo Project This section presents the predefined datasets of SOH data Apollo Project will retrieve from a Taurus version 2x either through a direct connection or a stream to Apollo Server For instruction on retrieving streaming Taurus version 2x data from Apollo Server see Section B2 ldquoRetrieving SOH Data from a Taurus Version 2x Streaming to Apollo Serverrdquo on page 48
The order of the columns presented in the table below will differ when streaming Taurus version 2x SOH data from Apollo Server
Predefined SOH group SOH data
GPS Time Time (longsecs) (the number of seconds since 1970-01-01)Time (UTC) (time in yyyy-mm-dd hhmmssms format)Altitude (m)DAC CountError (ns) (time error)GPS Engine StatusLast Update Time(s)Lat (deg) (latitude in degrees)Long (deg) (longitude in degrees)NumSatellites (number of satellites used)PDOPPhaseLock (system clock phase lock)TDOPUncertainty (ns) (time uncertainty)
Note The values for Number of satellites used PDOP and TDOP are provided by the GPS receiver at the Last update time In order to see what time these values correspond to look at the Last update time When GPS is off these three parameters and the Last update time are not updated The last value displays until the next update arrives (after the GPS is turned on again)
Appendix B Retrieving SOH Data from a Taurus Version 2x
48 Apollo Project User Guide16106R5 2009-03-24
B2 Retrieving SOH Data from a Taurus Version 2x Streaming to Apollo ServerThis section provides instruction on configuring your Taurus version 2x to stream data to Apollo Server and instructions on how to use Apollo Project to retrieve this data from Apollo Server
B21 Streaming Data from a Taurus Version 2x to Apollo ServerUse the Taurus graphical user interface on either the Taurus display screen or through a Web browser to set up an NP stream from a Taurus version 2x to Apollo Server
1 Log in to the Taurus version 2x with either the tech or central user account
2 Select Advanced Configuration gt Communications gt NP Data Streaming
GPS Satellites Time (longsecs) (the number of seconds since 1970-01-01)Time (UTC) (time in yyyy-mm-dd hhmmssms format)
For each satelliteAcquisition FlagLast Update Time (ms)PRNSatellite Azimuth (microordm)Satellite Elevation (microordm)Signal Level (AMU)
Environment Time (longsecs) (the number of seconds since 1970-01-01)Time (UTC) (time in yyyy-mm-dd hhmmssms format)External SOH Voltage 1 (V) (12-bit voltage input) External SOH Voltage 2 (V) (12-bit voltage input) External SOH Voltage 3 (V) (12-bit voltage input) External SOH Voltage 4 (V) (12-bit voltage input) Sensor SOH Voltage 1 (V)Sensor SOH Voltage 2 (V)Sensor SOH Voltage 3 (V)
Instrument Time (longsecs) (the number of seconds since 1970-01-01)Time (UTC) (time in yyyy-mm-dd hhmmssms format)Controller Current (mA)Digitizer Current (mA)NMX Bus Current (mA) (external connector)Sensor Current (mA)Serial Port Current (mA)Supply Voltage (mV)Temperature (ordmC)
Predefined SOH group SOH data
Appendix B Retrieving SOH Data from a Taurus Version 2x
Apollo Project User Guide16106R5 2009-03-24
49
3 To have the Taurus stream both time series and SOH data to Apollo Server select both Stream Time Series and Stream SOH
-OR-
Select only Stream SOH if you only want to retrieve the SOH data from Apollo Server
4 Type the IP address for Apollo Server in the IP Address box
5 Type the port number Apollo Server uses to receive data in the Port box By default this is port number 32008
6 The Second IP Address and Second Port boxes are not necessary however cannot be left blank Type 127001 in the Second IP Address box and 32004 in the Second Port box
7 Type a value in the Maximum Throughput [bps] box if a limited data link is present between the Taurus and Apollo Server For instance if at some point the data link is limited to 9600 bps then this is the maximum throughput the link can allow If there are no throughput limitations set the value in this box to zero to disable the throughput limitation
8 Click Apply
9 Click Commit
B22 Retrieving Taurus Version 2x Data from Apollo ServerCreate a new project or use an existing project in Apollo Project to retrieve the Taurus version 2x data from Apollo Server For more information on creating or editing projects refer to Section 31 ldquoCreating New Projectsrdquo on page 11 and Section 36 ldquoEditing and Viewing the Settings of Projectsrdquo on page 31
When creating or editing the project
a) Add an IP address Store specification on the Store Selection tab (see step 4 in Section 31 ldquoCreating New Projectsrdquo) for Apollo Server including its client Web application port number Use the format
Apollo Server IP AddressApollo Server Client Web Application Port Number
b) Apply the appropriate filters on the Channel Group Selection tab to retrieve the desired channel groups from the Taurus version 2x See step 5 through step 12 in Section 31 ldquoCreating New Projectsrdquo for instruction on using the Channel Group Selection tab
Appendix B Retrieving SOH Data from a Taurus Version 2x
50 Apollo Project User Guide16106R5 2009-03-24
Apollo Project User Guide16106R5 2009-03-24
51
Appendix C Glossary
Glossary of Abbreviations and Terms
List of Unit Abbreviations and Symbols
C1 Glossary of Abbreviations and Terms
A
ASCIIAmerican Standard Code for Information Interchange
B
BHEBroad Band High Gain Seismometer East-West Orientation
Channel name based on the Global Seismological Network (GSN) standard
BHNBroad Band High Gain Seismometer North-South Orientation
Channel name based on the Global Seismological Network (GSN) standard
BHZBroad Band High Gain Seismometer Vertical Orientation
Channel name based on the Global Seismological Network (GSN) standard
Appendix C Glossary
52 Apollo Project User Guide16106R5 2009-03-24
C
CSVComma-Separated Values
D
DACDigital to Analog Converter
G
GPSGlobal Positioning System
J
JREJava Runtime Environment
JVMJava Virtual Machine
N
NFSNetwork File System
P
PDOPPosition Dilution of Precision
PRNPseudo-random Number
Appendix C Glossary
Apollo Project User Guide16106R5 2009-03-24
53
S
SACSeismic Analysis Code
An Apollo Project output file format that generates files that can be used by the SAC software (see http wwwirisedusoftwaresac)
SEEDStandard for the Exchange of Earthquake Data
SMBServer Message Block
SOHState of Health
T
TCPIPTransmission Control ProtocolInternet Protocol
TDOPTime Dilution of Precision
U
UNCUniform Naming Convention or Universal Naming Convention
URLUniform Resource Locator
UTCCoordinated Universal Time
Appendix C Glossary
54 Apollo Project User Guide16106R5 2009-03-24
C2 List of Unit Abbreviations and SymbolsTable C-1 provides a list of unit abbreviations and symbols commonly used in Nanometrics documentation
Table C-1 Unit abbreviations and symbols
Abbreviation or Symbol Definition Abbreviation
or Symbol Definition
deg degree lb pound
Oslash diameter m metre
micro micro ms metre per second
Ω ohm ms2 metre per second squared
A ampere mA milliampere
AC alternating current MB megabyte
b bit MΩ megaohm
B byte MHz megahertz
bps bits per second mi mile
C Celsius mL millilitre
cm centimetre mm millimetre
dB decibel ms millisecond
DC direct current MTU maximum transmission unit
F farad mV millivolt
ft foot mW milliwatt
g gram N Newton
g gravity nF nanofarad
GB gigabyte ns nanosecond
GHz gigahertz rad radian
Hz hertz rads radian per second
in inch s second
KB kilobyte sps samples per second
kg kilogram U rack unit
kHz kilohertz V volt
kΩ kiloohm Vpp Volts peak-to-peak
kW kilowatt W watt
L litre
Apollo Project User Guide16106R5 2009-03-24
55
About NanometricsNanometrics is a world leader in the development of precision instrumentation network technology and software applications for seismological and environmental studies Using Nanometrics technology our customers establish and grow research networks that are often located in extreme environments such as the frozen Arctic and Antarctic the arid deserts of the Middle East the jungles of South America and the depths of the worlds oceans Many of these are mission-critical national and regional networks that demand the highest possible data quality and availability
Nanometrics provides end-to-end solutions that include a growing portfolio of broadband and strong motion seismometers dataloggers and digitizers satellite ground station systems for remote site data collection and software applications for data and network analysis and management To support this portfolio Nanometrics also provides global systems engineering services for design installation and support of complete networks
Our head office research and development centre and production facility are located in the Kanata North Business Park of Ottawa the high-technology heart of Canadas capital region
Contacting NanometricsNanometrics Inc250 Herzberg RoadKanata Ontario Canada K2K 2A1Phone +1 613-592-6776Fax +1 613-592-5929Email infonanometricscaWeb wwwnanometricsca
Contacting Technical SupportIf you need technical support please submit a request on the Nanometrics technical support site or by email or fax Include a full explanation of the problem and related information such as log filesSupport site httpsupportnanometricsca
Email techsupportnanometricsca
Chapter 3 Retrieving Data
Apollo Project User Guide16106R5 2009-03-24
29
351 Running a Project1 Open a project
2 Click Run Now on the Summary page to start the project
The project starts running and the Retrieval Status page is displayed
352 Stopping a Project1 Open a project
2 Click Cancel Run on the Summary page to stop the project
3 Click OK on the success message
353 Merging Project Data FilesYou have the option to merge all of the downloaded data for the stations and instruments into one file per interval for each project
1 Open a project
2 Click Merge
A single file is generated for each time period The time period is determined by the file interval you specified on the Time Selection page when you created the project For more information see step 13 of Section 31 ldquoCreating New Projectsrdquo on page 11
The original data files are not modified when you select the option to merge project data files
You can also click Run Now on the Retrieval Status page to start a project
For more information on what happens when a project runs see Section A1 ldquoOverview of Running Projectsrdquo on page 37
You can also click Cancel Run on the Retrieval Status page to stop a project
You cannot merge data from Archive projects and you cannot merge data in the Seisan format
You can also click Merge on the Retrieval Status page to merge the data from a project
Chapter 3 Retrieving Data
30 Apollo Project User Guide16106R5 2009-03-24
354 Running a Scheduled Archive Project1 Open a project
2 Click Start Schedule to start the project schedule
3 Click OK on the confirmation message
4 Click OK on the success message
For a project scheduled to run weekly the project will run for the first time according to the project start time and then it will run on a weekly basis according to the times and days you specified
For a project scheduled to run at a regular interval the project will run according the to interval you specified after you start the schedule For example if you click Start Schedule on a Wednesday and you specified every 2 days as the interval then the project will run for the first time on Friday and every two days after that
3541 Cancelling a Schedule
If you cancel a scheduled project before it runs for the first time you can edit the project settings
If you cancel a project that is currently running the current project runs to completion but subsequent project runs will not occur
1 Open a project
2 Click Cancel Schedule to cancel the project schedule
3 Click OK on the confirmation message
4 Click OK on the success message
You can also click Start Schedule on the Retrieval Status page to start the schedule of a project
You can restart the schedule by opening the project and clicking Start Schedule
You can also click Cancel Schedule on the Retrieval Status page to cancel the schedule of a project
Chapter 3 Retrieving Data
Apollo Project User Guide16106R5 2009-03-24
31
36 Editing and Viewing the Settings of ProjectsYou can edit the settings of a project before it has run After it has run you can view the settings
361 Editing Project Settings1 Open the project
2 Click Edit on the Summary page
3 Edit the settings as required
4 Click OK to save the changes
362 Viewing Project Settings1 Open the project
2 Click View on the Summary page
3 Click the tabs to view the settings
4 Click Cancel when you have finished viewing the settings
You can only edit the settings of a project before it has run for the first time or been scheduled (Archive project) If you want to edit the settings of a project after it has already run once or been scheduled you can copy the project (see Section 345 ldquoCopying a Projectrdquo on page 28) and then edit the settings for the copy
Settings For more information
Store Selection See step 4 of Section 31 ldquoCreating New ProjectsrdquoChannel Group Selection See step 5 to step 12 of Section 31 ldquoCreating New ProjectsrdquoTime Selection See step 13 of Section 31 ldquoCreating New ProjectsrdquoOutput Format See step 15 and step 16 of Section 31 ldquoCreating New ProjectsrdquoOutput Location See step 17 to step 20 of Section 31 ldquoCreating New Projectsrdquo
You can also click Edit on the Retrieval Status page to edit the settings of a project
You can also click View on the Retrieval Status page to edit the settings of a project
Chapter 3 Retrieving Data
32 Apollo Project User Guide16106R5 2009-03-24
37 Monitoring Project StatusYou can monitor the status of a project by viewing information on the Existing Projects Summary and Retrieval Status pages
371 Viewing an Overview of the Status of All ProjectsThe Existing Projects page is the default home page of Apollo Project You see this page when you first open Apollo Project or when you click Projects in the projects bar For more information see Section 341 ldquoViewing Existing Projectsrdquo on page 26
You can view the following information for all projects on the Existing Projects page
bull Name
bull Type
bull Current status
bull Last time the project run
bull Status of data retrieved
The Data Retrieved bars on the Existing Projects page show the overall status of the data retrieval For more information see Section 3731 ldquoStatus Coloursrdquo on page 34
Chapter 3 Retrieving Data
Apollo Project User Guide16106R5 2009-03-24
33
372 Viewing the Status of an Individual ProjectWhen you open a project a detailed summary of the project is shown on the Summary page For more information see Section 342 ldquoOpening a Projectrdquo on page 27
You can view the following information for each project on the Summary page
bull Date it was created
bull Date it was last modified
bull Current status
bull Last time it ran
bull Next time it will run
You can also view a summary of all of the settings you specified when you created the project (Store specifications selected Stores selected time series channel groups selected SOH channel groups start and end times number of files generated file interval and output format and locations)
All times are reported using the UTC time zone
Chapter 3 Retrieving Data
34 Apollo Project User Guide16106R5 2009-03-24
373 Monitoring the Status of a Running ProjectYou can view the data retrieval status of a project while it is running on the Retrieval Status page The Retrieval Status page is displayed automatically when you click Run Now to run a project You can also view this page by opening a project and clicking the Retrieval Status tab
The status for each channel group is expressed in the form of two numbers (for example 60100) and two bar graphs The first number is the percentage available of the total time requested (for example 60) and the second number is the percentage retrieved of the time available (for example 100) For more information on the bar graph status colours see Section 3731 ldquoStatus Coloursrdquo on page 34
You can also view retrieval details for each channel group listed on the Retrieval Status page For more information see Section 3732 ldquoViewing the Retrieval Details for Each Channel Grouprdquo on page 35
3731 Status Colours
The data retrieval status bars use the following status colours
The information that is displayed on the Retrieval Status page is updated continuously while a project is running
Table 3-1 Status colours
Colour Status
Green Apollo Project has retrieved the data
Yellow Apollo Project is attempting to retrieve available data from the Store
Red Data is available in the Store but Apollo Project has failed to retrieve it on this attempt Apollo Project will make additional attempts to retrieve the data up to the configured Maximum Number of Retrieval Attempts For information on how to set the Maximum Number of Retrieval Attempts setting see Section 31 ldquoCreating New Projectsrdquo on page 11
White Data for some portion of the requested time segment is not available in the Store For example there are gaps in the data or the retrieval request is for a future time segment
Chapter 3 Retrieving Data
Apollo Project User Guide16106R5 2009-03-24
35
3732 Viewing the Retrieval Details for Each Channel Group
You can view the retrieval status of each time segment for a channel group
1 Click a channel group name
2 Click the Channel Group Details button that is located to the right of the channel group name
The Remaining Retrieval Attempts column displays the number of times that Apollo Project will try to download each missing time segment for the channel group when the project is run again For information on how to set the Maximum Number of Retrieval Attempts setting see Section 33 ldquoConfiguring Apollo Projectrdquo on page 24
3 Click OK when you have finished viewing the details
Chapter 3 Retrieving Data
36 Apollo Project User Guide16106R5 2009-03-24
Apollo Project User Guide16106R5 2009-03-24
37
Appendix A Reference Information and Examples
Overview of Running Projects
Example Project Settings
Example Deployment Scenarios
Shot File Formats for Controlled Source Projects
A1 Overview of Running ProjectsWhen a project is run Apollo Project performs the following steps
1 The requested time ranges are identified
2 The channel groups for which data are to be retrieved are identified
3 The actual Stores specified by the Store specifications of the project are identified
For each identified Store the following steps are performed
1 A data availability analysis for the outstanding time ranges is performed These are for the ranges for which data has not already been retrieved The availability of the data is recorded for reference It is possible that a given Store was not present at the time the project was last run If this is the case then an attempt is made to retrieve all of the required time ranges of the project from the Store
2 If any data exists in the Store for any of the requested time ranges then a retrieval of this data is performed and the retrieved data is stored to local temporary files
3 If the number of retrieval attempts for a given time range exceeds a configurable threshold (see Section 33 ldquoConfiguring Apollo Projectrdquo on page 24) then the retrieval of data within the stated range is not attempted again
If any data was retrieved during the run of the project then the corresponding output files of the desired output format are generated and stored in the output location specified for the project
When running Apollo Project with Taurus version 2x the schedule for Archive projects must be greater than 5 minutes in duration Schedules that are less than 5 minutes can result in data that is missing or not downloaded
Appendix A Reference Information and Examples
38 Apollo Project User Guide16106R5 2009-03-24
It is possible that the requested data for a given channel group exists across multiple Stores If all of these Stores are included by the Store specifications for the project then Apollo Project assembles the requested data
When a project runs detailed information regarding the results of the retrieved data and processed data are available For more information see Section 37 ldquoMonitoring Project Statusrdquo on page 32
A2 Example Project Settings
A21 Example 1 One Time ProjectProject Name Project1
Project Type One Time
Channel groups selected for retrieval CASTN1OTBHZ (on taurus_1234)
Requested Time Range January 30 2008 1400 ndash 1500 UTC
File Interval 20 minutes
Output Location Base Directory disk2ApolloProjectOutputData
Output Location Subdirectories projectyearmonthday
Output Location Filenamestationnetwork_time
When the project is run successfully the following output files will be created on the server running Apollo Project
disk2ApolloProjectOutputDataProject120080130STN1CA_20080130_140000seed
disk2ApolloProjectOutputDataProject120080130STN1CA_20080130_142000seed
disk2ApolloProjectOutputDataProject120080130STN1CA_20080130_144000seed
Appendix A Reference Information and Examples
Apollo Project User Guide16106R5 2009-03-24
39
A22 Example 2 Controlled Source ProjectProject Name Project2
Project Type Controlled Source
Channel groups selected for retrieval CASTN1OTBHZ (on taurus_1234) CASTN1OTBHN (on taurus_1234)
Requested Shot Times January 30 2008 1400 UTC January 30 2008 1430 UTC
Pre Time 30 seconds
Post Time 30 seconds
Output Location Base Directory disk2ApolloProjectOutputData
Output Location Subdirectories projectyearmonthday
Output Location Filename timeformat
When the project is run successfully the following output files will be created on the server running Apollo Project
disk2ApolloProjectOutputDataProject22008013020080130_135930segysgy
disk2ApolloProjectOutputDataProject22008013020080130_142930segysgy
A3 Example Deployment Scenarios
A31 One TimeYou want to download three days of data from multiple instruments on the network save the data in MiniSEED format and create a file for every hour of data
A One Time project is the recommended solution The Store of each instrument can be made available to Apollo Project by creating a corresponding IP Address Store specification with the IP address of the instrument The requested time range can be specified along with a file interval of one hour Ensure that the instruments are configured to run in Communications mode
A32 Scheduled ArchiveYou want seismic data to be retrieved automatically from a group of instruments on the network every six hours The instruments are always accessible via an Ethernet connection
A scheduled Archive project is the recommended solution Use the Regular Interval scheduling option and set the interval to six hours
You can also run a scheduled Archive project at any time For example if the scheduled retrieval interval of a project is six hours and between intervals you want to retrieve the data three hours early you can run the project and approximately three additional hours of data would be accumulated About three hours later the project will run automatically and accumulate the remaining three hours of data
Appendix A Reference Information and Examples
40 Apollo Project User Guide16106R5 2009-03-24
A33 Manual ArchiveYou want to retrieve seismic data from a group of instruments but their respective Stores are only available for retrieval on occasion (no regular dependable schedule for retrieval from these Stores is possible)
A manually run Archive project is the recommended solution You can create the project and run it whenever any of the instruments are available for retrieval
A34 Field ArchiveYou want to collect data from a set of isolated instruments in the field at recurring intervals (for example twice per month)
A Field Archive project is the recommended solution You can create a Field Archive project and either add all instrument IP addresses to the list or use a Discovery specification The time for the last retrieval is stored on the instrument and all data is recovered from the last recovery time
A35 Media HarvestingYou want to collect the media from a set of instruments in the field at a regular interval (for example once per week) You also have to retrieve all of the seismic data on the media for subsequent analysis
An Archive project is the recommended solution Initially a directory is created on the file system of the server running Apollo Project A directory Store specification is created with this directory as the parent directory from which to search for Stores The content of each media instance in the weekrsquos collection is copied from a media reader to a subdirectory of the directory When the project is run all of the copied Stores are automatically available and the project accumulates data for each instrument
Due to the nature of media harvesting and the replacement procedure for this example data is always missing for the last period of output files for the current week This period corresponds to the time that the media was taken from the instrument and replaced with a new one The following week when the media is harvested again from the instruments in the field Apollo Project fills in the missing time for these files with the new Store data regardless of the media instance on which the data currently resides
You can only create and run Field Archive projects for Taurus version 30 or later
Appendix A Reference Information and Examples
Apollo Project User Guide16106R5 2009-03-24
41
A36 Trigger Downloading You have set up a network of five Tauruses around a hydro dam Each Taurus is accessible over an Ethernet connection and each is set to record data over the weekend You have set the period for data retrieval at 30 seconds before and five minutes after any seismic activity but the following procedure shows you why it is not necessary to view all of the data accumulated over the whole weekend
1 Select the Taurus at the site with the least environmental noise or determine the best site for generating triggers and designate this Taurus ldquoTaurus Ardquo for reference
You need to perform this task in advance More information about triggers can be found in the Taurus Portable Seismograph User Guide
2 Download the trigger file from ldquoTaurus Ardquo and review the file to verify the correct number of triggers
3 Follow these steps to create a new Triggers project
a) Click New on the Apollo Project Existing Projects page
b) Click Triggers as the project type and enter a unique name in the Project Name box
c) Click OK
d) Click the IP Address tab on the Store Selection tab
e) Enter the IP address of a Taurus
f) Click Add
g) Repeat step e until you have entered the IP addresses of all five of the Tauruses
Apollo Project adds the IP address specifications to the Selected Specifications section of the Store Selection page and finds all five Stores associated with the IP addresses and adds them to the Selected Stores section
h) Click the Channel Group Selection tab
i) Click Create Default Station Table to create a table for all of the currently selected Stores and discovered instruments
j) Review the selected channel groups and if required edit the mappings in the selected channel groups area of the tab (lower half of the tab)
k) Click the Time Selection tab
l) Click the Browse button
m)Select the trigger file that you downloaded in step 2 and click OK
n) Click Submit
The list of triggers is imported and displayed in the Triggers section on the Time Selection page
o) Enter a Pre Time of 30 seconds and a Post Time of 5 minutes
p) Click the Output Format tab
q) Click MiniSEED
r) Click All Instruments
s) Click the Output Location tab
Appendix A Reference Information and Examples
42 Apollo Project User Guide16106R5 2009-03-24
t) Enter the valid absolute path of the base directory for the processed data subfolders and files
u) Enter the expression used to define path names for subfolders under the base directory
v) Enter the expression used to define file names for the processed data files that are stored in the subfolders under the base directory
w) Click OK
4 Click the Run Now button on the Summary page
When the project has finished running the output folder you specified in step t will contain ten files Each output file will contain 5 minutes and 30 seconds of data from the five Tauruses
A4 Shot File Formats for Controlled Source ProjectsYou have two options for defining shots for a Controlled Source project manually defining shots or importing shots from a shot file
You can create shot files in one of following three file formats
Microsoft Office Excel (xls) ndash See Section A41 ldquoCreating a Shot File With Microsoft Office Excelrdquo on page 42
OpenOfficeorg Calc (ods) ndash See Section A42 ldquoCreating a Shot File With OpenOfficeorg Calcrdquo on page 44
Comma-Separated Values (csv) ndash See Section A43 ldquoCreating a Comma-Separated Values Shot Filerdquo on page 45
The Shot file templates are located in the docShotFileImport folder on the Apollo Project CD
A41 Creating a Shot File With Microsoft Office ExcelThe Microsoft Office Excel template for Apollo Project can be used with Microsoft Office Excel version 2003 or later
To create an Microsoft Office Excel based shot file
1 Double-click ShotFileTemplatexlt
A new Microsoft Office Excel file is created from the template and opens in the Microsoft Office Excel
2 Save the new spreadsheet as a Microsoft Office Excel document (xls)
3 Enter shot file data as specified in the Microsoft Office Excel spreadsheet
Only the decimal separator is supported for shot files Separators that denote the 3rd power of 10 (thousand) are not supported (for example 4500) The Microsoft Excel and OpenOffice templates reinforce these restrictions and are recommended for creating csv files
Appendix A Reference Information and Examples
Apollo Project User Guide16106R5 2009-03-24
43
You can enter data for multiple shot times
4 Click Save to save the file in Microsoft Office Excel format
5 Click File gt Save As and select CSV (Comma delimited) (csv) from the Save as type list
6 Click Save
7 Click OK on the message warning you that you are only saving the active sheet
8 Click Yes on the message warning you that file features might be incompatible with the csv format
9 Close Microsoft Office Excel
If you are using Microsoft Office Excel 2007 click the Microsoft Office Button and click Save As
Ensure that you save the file as a comma delimited file If the shot file is mistakenly saved in Microsoft Excel format (xls) the shot file will not work in Apollo Project
Appendix A Reference Information and Examples
44 Apollo Project User Guide16106R5 2009-03-24
A42 Creating a Shot File With OpenOfficeorg CalcThe OpenOffice template has been tested with OpenOfficeorg Calc version 23 Later versions of OpenOfficeorg Calc can be used at your discretion
To create a shot file based on the OpenOfficeorg Calc template
1 Double-click ShotFileTemplateots
A new OpenOffice spreadsheet is created from the template and opens in OpenOfficeorg Calc
2 Save the new spreadsheet as an OpenOffice Calc document (ods)
3 Enter the shot file data as specified in the OpenOffice spreadsheet
You can enter data for multiple shot times
4 Click Save to save the file in OpenOfficeorg Calc format
5 Click File gt Save As and select Text CSV (csv) from the Save as Type list
6 Select the Edit filter settings check box
7 Click Save
A warning message might appear that warns you that the document might contain formatting that cannot be saved in the csv format Click Yes on the warning message to save the file in csv format
The Export of text files window opens
8 Delete the double quotation marks () in the Text delimiter box and ensure that the Save cell content as shown check box is selected
9 Click OK to export the OpenOffice spreadsheet as a csv file
10 Click OK on the warning message
11 Close OpenOfficeorg Calc
Appendix A Reference Information and Examples
Apollo Project User Guide16106R5 2009-03-24
45
A43 Creating a Comma-Separated Values Shot FileYou can use any text editor to create a csv shot file
To create a csv shot file
1 Open ShotFileTemplatecsv in a text editor and save it with a different name
2 Format each line of the csv file as follows
Shot TimePre TimePost TimeLatitudeLongitudeElevation
For example
2008-08-28 103044090600000-6000004267
The format and units are as follows
3 Save the file as a csv formatted file
The csv shot file template is not compatible with Microsoft Office Excel Make sure that you do not double-click it and open it in Microsoft Office Excel
FormatUnits
Shot Time yyyy-mm-dd hhmmss
Pre Time seconds
Post Time seconds
Latitude degrees
Longitude degrees
Elevation meters
Appendix A Reference Information and Examples
46 Apollo Project User Guide16106R5 2009-03-24
Apollo Project User Guide16106R5 2009-03-24
47
Appendix B Retrieving SOH Data from a Taurus Version 2x
Taurus Version 2x SOH Data Retrieved by Apollo Project
Retrieving SOH Data from a Taurus Version 2x Streaming to Apollo Server
B1 Taurus Version 2x SOH Data Retrieved by Apollo Project This section presents the predefined datasets of SOH data Apollo Project will retrieve from a Taurus version 2x either through a direct connection or a stream to Apollo Server For instruction on retrieving streaming Taurus version 2x data from Apollo Server see Section B2 ldquoRetrieving SOH Data from a Taurus Version 2x Streaming to Apollo Serverrdquo on page 48
The order of the columns presented in the table below will differ when streaming Taurus version 2x SOH data from Apollo Server
Predefined SOH group SOH data
GPS Time Time (longsecs) (the number of seconds since 1970-01-01)Time (UTC) (time in yyyy-mm-dd hhmmssms format)Altitude (m)DAC CountError (ns) (time error)GPS Engine StatusLast Update Time(s)Lat (deg) (latitude in degrees)Long (deg) (longitude in degrees)NumSatellites (number of satellites used)PDOPPhaseLock (system clock phase lock)TDOPUncertainty (ns) (time uncertainty)
Note The values for Number of satellites used PDOP and TDOP are provided by the GPS receiver at the Last update time In order to see what time these values correspond to look at the Last update time When GPS is off these three parameters and the Last update time are not updated The last value displays until the next update arrives (after the GPS is turned on again)
Appendix B Retrieving SOH Data from a Taurus Version 2x
48 Apollo Project User Guide16106R5 2009-03-24
B2 Retrieving SOH Data from a Taurus Version 2x Streaming to Apollo ServerThis section provides instruction on configuring your Taurus version 2x to stream data to Apollo Server and instructions on how to use Apollo Project to retrieve this data from Apollo Server
B21 Streaming Data from a Taurus Version 2x to Apollo ServerUse the Taurus graphical user interface on either the Taurus display screen or through a Web browser to set up an NP stream from a Taurus version 2x to Apollo Server
1 Log in to the Taurus version 2x with either the tech or central user account
2 Select Advanced Configuration gt Communications gt NP Data Streaming
GPS Satellites Time (longsecs) (the number of seconds since 1970-01-01)Time (UTC) (time in yyyy-mm-dd hhmmssms format)
For each satelliteAcquisition FlagLast Update Time (ms)PRNSatellite Azimuth (microordm)Satellite Elevation (microordm)Signal Level (AMU)
Environment Time (longsecs) (the number of seconds since 1970-01-01)Time (UTC) (time in yyyy-mm-dd hhmmssms format)External SOH Voltage 1 (V) (12-bit voltage input) External SOH Voltage 2 (V) (12-bit voltage input) External SOH Voltage 3 (V) (12-bit voltage input) External SOH Voltage 4 (V) (12-bit voltage input) Sensor SOH Voltage 1 (V)Sensor SOH Voltage 2 (V)Sensor SOH Voltage 3 (V)
Instrument Time (longsecs) (the number of seconds since 1970-01-01)Time (UTC) (time in yyyy-mm-dd hhmmssms format)Controller Current (mA)Digitizer Current (mA)NMX Bus Current (mA) (external connector)Sensor Current (mA)Serial Port Current (mA)Supply Voltage (mV)Temperature (ordmC)
Predefined SOH group SOH data
Appendix B Retrieving SOH Data from a Taurus Version 2x
Apollo Project User Guide16106R5 2009-03-24
49
3 To have the Taurus stream both time series and SOH data to Apollo Server select both Stream Time Series and Stream SOH
-OR-
Select only Stream SOH if you only want to retrieve the SOH data from Apollo Server
4 Type the IP address for Apollo Server in the IP Address box
5 Type the port number Apollo Server uses to receive data in the Port box By default this is port number 32008
6 The Second IP Address and Second Port boxes are not necessary however cannot be left blank Type 127001 in the Second IP Address box and 32004 in the Second Port box
7 Type a value in the Maximum Throughput [bps] box if a limited data link is present between the Taurus and Apollo Server For instance if at some point the data link is limited to 9600 bps then this is the maximum throughput the link can allow If there are no throughput limitations set the value in this box to zero to disable the throughput limitation
8 Click Apply
9 Click Commit
B22 Retrieving Taurus Version 2x Data from Apollo ServerCreate a new project or use an existing project in Apollo Project to retrieve the Taurus version 2x data from Apollo Server For more information on creating or editing projects refer to Section 31 ldquoCreating New Projectsrdquo on page 11 and Section 36 ldquoEditing and Viewing the Settings of Projectsrdquo on page 31
When creating or editing the project
a) Add an IP address Store specification on the Store Selection tab (see step 4 in Section 31 ldquoCreating New Projectsrdquo) for Apollo Server including its client Web application port number Use the format
Apollo Server IP AddressApollo Server Client Web Application Port Number
b) Apply the appropriate filters on the Channel Group Selection tab to retrieve the desired channel groups from the Taurus version 2x See step 5 through step 12 in Section 31 ldquoCreating New Projectsrdquo for instruction on using the Channel Group Selection tab
Appendix B Retrieving SOH Data from a Taurus Version 2x
50 Apollo Project User Guide16106R5 2009-03-24
Apollo Project User Guide16106R5 2009-03-24
51
Appendix C Glossary
Glossary of Abbreviations and Terms
List of Unit Abbreviations and Symbols
C1 Glossary of Abbreviations and Terms
A
ASCIIAmerican Standard Code for Information Interchange
B
BHEBroad Band High Gain Seismometer East-West Orientation
Channel name based on the Global Seismological Network (GSN) standard
BHNBroad Band High Gain Seismometer North-South Orientation
Channel name based on the Global Seismological Network (GSN) standard
BHZBroad Band High Gain Seismometer Vertical Orientation
Channel name based on the Global Seismological Network (GSN) standard
Appendix C Glossary
52 Apollo Project User Guide16106R5 2009-03-24
C
CSVComma-Separated Values
D
DACDigital to Analog Converter
G
GPSGlobal Positioning System
J
JREJava Runtime Environment
JVMJava Virtual Machine
N
NFSNetwork File System
P
PDOPPosition Dilution of Precision
PRNPseudo-random Number
Appendix C Glossary
Apollo Project User Guide16106R5 2009-03-24
53
S
SACSeismic Analysis Code
An Apollo Project output file format that generates files that can be used by the SAC software (see http wwwirisedusoftwaresac)
SEEDStandard for the Exchange of Earthquake Data
SMBServer Message Block
SOHState of Health
T
TCPIPTransmission Control ProtocolInternet Protocol
TDOPTime Dilution of Precision
U
UNCUniform Naming Convention or Universal Naming Convention
URLUniform Resource Locator
UTCCoordinated Universal Time
Appendix C Glossary
54 Apollo Project User Guide16106R5 2009-03-24
C2 List of Unit Abbreviations and SymbolsTable C-1 provides a list of unit abbreviations and symbols commonly used in Nanometrics documentation
Table C-1 Unit abbreviations and symbols
Abbreviation or Symbol Definition Abbreviation
or Symbol Definition
deg degree lb pound
Oslash diameter m metre
micro micro ms metre per second
Ω ohm ms2 metre per second squared
A ampere mA milliampere
AC alternating current MB megabyte
b bit MΩ megaohm
B byte MHz megahertz
bps bits per second mi mile
C Celsius mL millilitre
cm centimetre mm millimetre
dB decibel ms millisecond
DC direct current MTU maximum transmission unit
F farad mV millivolt
ft foot mW milliwatt
g gram N Newton
g gravity nF nanofarad
GB gigabyte ns nanosecond
GHz gigahertz rad radian
Hz hertz rads radian per second
in inch s second
KB kilobyte sps samples per second
kg kilogram U rack unit
kHz kilohertz V volt
kΩ kiloohm Vpp Volts peak-to-peak
kW kilowatt W watt
L litre
Apollo Project User Guide16106R5 2009-03-24
55
About NanometricsNanometrics is a world leader in the development of precision instrumentation network technology and software applications for seismological and environmental studies Using Nanometrics technology our customers establish and grow research networks that are often located in extreme environments such as the frozen Arctic and Antarctic the arid deserts of the Middle East the jungles of South America and the depths of the worlds oceans Many of these are mission-critical national and regional networks that demand the highest possible data quality and availability
Nanometrics provides end-to-end solutions that include a growing portfolio of broadband and strong motion seismometers dataloggers and digitizers satellite ground station systems for remote site data collection and software applications for data and network analysis and management To support this portfolio Nanometrics also provides global systems engineering services for design installation and support of complete networks
Our head office research and development centre and production facility are located in the Kanata North Business Park of Ottawa the high-technology heart of Canadas capital region
Contacting NanometricsNanometrics Inc250 Herzberg RoadKanata Ontario Canada K2K 2A1Phone +1 613-592-6776Fax +1 613-592-5929Email infonanometricscaWeb wwwnanometricsca
Contacting Technical SupportIf you need technical support please submit a request on the Nanometrics technical support site or by email or fax Include a full explanation of the problem and related information such as log filesSupport site httpsupportnanometricsca
Email techsupportnanometricsca
Chapter 3 Retrieving Data
Apollo Project User Guide16106R5 2009-03-24
31
36 Editing and Viewing the Settings of ProjectsYou can edit the settings of a project before it has run After it has run you can view the settings
361 Editing Project Settings1 Open the project
2 Click Edit on the Summary page
3 Edit the settings as required
4 Click OK to save the changes
362 Viewing Project Settings1 Open the project
2 Click View on the Summary page
3 Click the tabs to view the settings
4 Click Cancel when you have finished viewing the settings
You can only edit the settings of a project before it has run for the first time or been scheduled (Archive project) If you want to edit the settings of a project after it has already run once or been scheduled you can copy the project (see Section 345 ldquoCopying a Projectrdquo on page 28) and then edit the settings for the copy
Settings For more information
Store Selection See step 4 of Section 31 ldquoCreating New ProjectsrdquoChannel Group Selection See step 5 to step 12 of Section 31 ldquoCreating New ProjectsrdquoTime Selection See step 13 of Section 31 ldquoCreating New ProjectsrdquoOutput Format See step 15 and step 16 of Section 31 ldquoCreating New ProjectsrdquoOutput Location See step 17 to step 20 of Section 31 ldquoCreating New Projectsrdquo
You can also click Edit on the Retrieval Status page to edit the settings of a project
You can also click View on the Retrieval Status page to edit the settings of a project
Chapter 3 Retrieving Data
32 Apollo Project User Guide16106R5 2009-03-24
37 Monitoring Project StatusYou can monitor the status of a project by viewing information on the Existing Projects Summary and Retrieval Status pages
371 Viewing an Overview of the Status of All ProjectsThe Existing Projects page is the default home page of Apollo Project You see this page when you first open Apollo Project or when you click Projects in the projects bar For more information see Section 341 ldquoViewing Existing Projectsrdquo on page 26
You can view the following information for all projects on the Existing Projects page
bull Name
bull Type
bull Current status
bull Last time the project run
bull Status of data retrieved
The Data Retrieved bars on the Existing Projects page show the overall status of the data retrieval For more information see Section 3731 ldquoStatus Coloursrdquo on page 34
Chapter 3 Retrieving Data
Apollo Project User Guide16106R5 2009-03-24
33
372 Viewing the Status of an Individual ProjectWhen you open a project a detailed summary of the project is shown on the Summary page For more information see Section 342 ldquoOpening a Projectrdquo on page 27
You can view the following information for each project on the Summary page
bull Date it was created
bull Date it was last modified
bull Current status
bull Last time it ran
bull Next time it will run
You can also view a summary of all of the settings you specified when you created the project (Store specifications selected Stores selected time series channel groups selected SOH channel groups start and end times number of files generated file interval and output format and locations)
All times are reported using the UTC time zone
Chapter 3 Retrieving Data
34 Apollo Project User Guide16106R5 2009-03-24
373 Monitoring the Status of a Running ProjectYou can view the data retrieval status of a project while it is running on the Retrieval Status page The Retrieval Status page is displayed automatically when you click Run Now to run a project You can also view this page by opening a project and clicking the Retrieval Status tab
The status for each channel group is expressed in the form of two numbers (for example 60100) and two bar graphs The first number is the percentage available of the total time requested (for example 60) and the second number is the percentage retrieved of the time available (for example 100) For more information on the bar graph status colours see Section 3731 ldquoStatus Coloursrdquo on page 34
You can also view retrieval details for each channel group listed on the Retrieval Status page For more information see Section 3732 ldquoViewing the Retrieval Details for Each Channel Grouprdquo on page 35
3731 Status Colours
The data retrieval status bars use the following status colours
The information that is displayed on the Retrieval Status page is updated continuously while a project is running
Table 3-1 Status colours
Colour Status
Green Apollo Project has retrieved the data
Yellow Apollo Project is attempting to retrieve available data from the Store
Red Data is available in the Store but Apollo Project has failed to retrieve it on this attempt Apollo Project will make additional attempts to retrieve the data up to the configured Maximum Number of Retrieval Attempts For information on how to set the Maximum Number of Retrieval Attempts setting see Section 31 ldquoCreating New Projectsrdquo on page 11
White Data for some portion of the requested time segment is not available in the Store For example there are gaps in the data or the retrieval request is for a future time segment
Chapter 3 Retrieving Data
Apollo Project User Guide16106R5 2009-03-24
35
3732 Viewing the Retrieval Details for Each Channel Group
You can view the retrieval status of each time segment for a channel group
1 Click a channel group name
2 Click the Channel Group Details button that is located to the right of the channel group name
The Remaining Retrieval Attempts column displays the number of times that Apollo Project will try to download each missing time segment for the channel group when the project is run again For information on how to set the Maximum Number of Retrieval Attempts setting see Section 33 ldquoConfiguring Apollo Projectrdquo on page 24
3 Click OK when you have finished viewing the details
Chapter 3 Retrieving Data
36 Apollo Project User Guide16106R5 2009-03-24
Apollo Project User Guide16106R5 2009-03-24
37
Appendix A Reference Information and Examples
Overview of Running Projects
Example Project Settings
Example Deployment Scenarios
Shot File Formats for Controlled Source Projects
A1 Overview of Running ProjectsWhen a project is run Apollo Project performs the following steps
1 The requested time ranges are identified
2 The channel groups for which data are to be retrieved are identified
3 The actual Stores specified by the Store specifications of the project are identified
For each identified Store the following steps are performed
1 A data availability analysis for the outstanding time ranges is performed These are for the ranges for which data has not already been retrieved The availability of the data is recorded for reference It is possible that a given Store was not present at the time the project was last run If this is the case then an attempt is made to retrieve all of the required time ranges of the project from the Store
2 If any data exists in the Store for any of the requested time ranges then a retrieval of this data is performed and the retrieved data is stored to local temporary files
3 If the number of retrieval attempts for a given time range exceeds a configurable threshold (see Section 33 ldquoConfiguring Apollo Projectrdquo on page 24) then the retrieval of data within the stated range is not attempted again
If any data was retrieved during the run of the project then the corresponding output files of the desired output format are generated and stored in the output location specified for the project
When running Apollo Project with Taurus version 2x the schedule for Archive projects must be greater than 5 minutes in duration Schedules that are less than 5 minutes can result in data that is missing or not downloaded
Appendix A Reference Information and Examples
38 Apollo Project User Guide16106R5 2009-03-24
It is possible that the requested data for a given channel group exists across multiple Stores If all of these Stores are included by the Store specifications for the project then Apollo Project assembles the requested data
When a project runs detailed information regarding the results of the retrieved data and processed data are available For more information see Section 37 ldquoMonitoring Project Statusrdquo on page 32
A2 Example Project Settings
A21 Example 1 One Time ProjectProject Name Project1
Project Type One Time
Channel groups selected for retrieval CASTN1OTBHZ (on taurus_1234)
Requested Time Range January 30 2008 1400 ndash 1500 UTC
File Interval 20 minutes
Output Location Base Directory disk2ApolloProjectOutputData
Output Location Subdirectories projectyearmonthday
Output Location Filenamestationnetwork_time
When the project is run successfully the following output files will be created on the server running Apollo Project
disk2ApolloProjectOutputDataProject120080130STN1CA_20080130_140000seed
disk2ApolloProjectOutputDataProject120080130STN1CA_20080130_142000seed
disk2ApolloProjectOutputDataProject120080130STN1CA_20080130_144000seed
Appendix A Reference Information and Examples
Apollo Project User Guide16106R5 2009-03-24
39
A22 Example 2 Controlled Source ProjectProject Name Project2
Project Type Controlled Source
Channel groups selected for retrieval CASTN1OTBHZ (on taurus_1234) CASTN1OTBHN (on taurus_1234)
Requested Shot Times January 30 2008 1400 UTC January 30 2008 1430 UTC
Pre Time 30 seconds
Post Time 30 seconds
Output Location Base Directory disk2ApolloProjectOutputData
Output Location Subdirectories projectyearmonthday
Output Location Filename timeformat
When the project is run successfully the following output files will be created on the server running Apollo Project
disk2ApolloProjectOutputDataProject22008013020080130_135930segysgy
disk2ApolloProjectOutputDataProject22008013020080130_142930segysgy
A3 Example Deployment Scenarios
A31 One TimeYou want to download three days of data from multiple instruments on the network save the data in MiniSEED format and create a file for every hour of data
A One Time project is the recommended solution The Store of each instrument can be made available to Apollo Project by creating a corresponding IP Address Store specification with the IP address of the instrument The requested time range can be specified along with a file interval of one hour Ensure that the instruments are configured to run in Communications mode
A32 Scheduled ArchiveYou want seismic data to be retrieved automatically from a group of instruments on the network every six hours The instruments are always accessible via an Ethernet connection
A scheduled Archive project is the recommended solution Use the Regular Interval scheduling option and set the interval to six hours
You can also run a scheduled Archive project at any time For example if the scheduled retrieval interval of a project is six hours and between intervals you want to retrieve the data three hours early you can run the project and approximately three additional hours of data would be accumulated About three hours later the project will run automatically and accumulate the remaining three hours of data
Appendix A Reference Information and Examples
40 Apollo Project User Guide16106R5 2009-03-24
A33 Manual ArchiveYou want to retrieve seismic data from a group of instruments but their respective Stores are only available for retrieval on occasion (no regular dependable schedule for retrieval from these Stores is possible)
A manually run Archive project is the recommended solution You can create the project and run it whenever any of the instruments are available for retrieval
A34 Field ArchiveYou want to collect data from a set of isolated instruments in the field at recurring intervals (for example twice per month)
A Field Archive project is the recommended solution You can create a Field Archive project and either add all instrument IP addresses to the list or use a Discovery specification The time for the last retrieval is stored on the instrument and all data is recovered from the last recovery time
A35 Media HarvestingYou want to collect the media from a set of instruments in the field at a regular interval (for example once per week) You also have to retrieve all of the seismic data on the media for subsequent analysis
An Archive project is the recommended solution Initially a directory is created on the file system of the server running Apollo Project A directory Store specification is created with this directory as the parent directory from which to search for Stores The content of each media instance in the weekrsquos collection is copied from a media reader to a subdirectory of the directory When the project is run all of the copied Stores are automatically available and the project accumulates data for each instrument
Due to the nature of media harvesting and the replacement procedure for this example data is always missing for the last period of output files for the current week This period corresponds to the time that the media was taken from the instrument and replaced with a new one The following week when the media is harvested again from the instruments in the field Apollo Project fills in the missing time for these files with the new Store data regardless of the media instance on which the data currently resides
You can only create and run Field Archive projects for Taurus version 30 or later
Appendix A Reference Information and Examples
Apollo Project User Guide16106R5 2009-03-24
41
A36 Trigger Downloading You have set up a network of five Tauruses around a hydro dam Each Taurus is accessible over an Ethernet connection and each is set to record data over the weekend You have set the period for data retrieval at 30 seconds before and five minutes after any seismic activity but the following procedure shows you why it is not necessary to view all of the data accumulated over the whole weekend
1 Select the Taurus at the site with the least environmental noise or determine the best site for generating triggers and designate this Taurus ldquoTaurus Ardquo for reference
You need to perform this task in advance More information about triggers can be found in the Taurus Portable Seismograph User Guide
2 Download the trigger file from ldquoTaurus Ardquo and review the file to verify the correct number of triggers
3 Follow these steps to create a new Triggers project
a) Click New on the Apollo Project Existing Projects page
b) Click Triggers as the project type and enter a unique name in the Project Name box
c) Click OK
d) Click the IP Address tab on the Store Selection tab
e) Enter the IP address of a Taurus
f) Click Add
g) Repeat step e until you have entered the IP addresses of all five of the Tauruses
Apollo Project adds the IP address specifications to the Selected Specifications section of the Store Selection page and finds all five Stores associated with the IP addresses and adds them to the Selected Stores section
h) Click the Channel Group Selection tab
i) Click Create Default Station Table to create a table for all of the currently selected Stores and discovered instruments
j) Review the selected channel groups and if required edit the mappings in the selected channel groups area of the tab (lower half of the tab)
k) Click the Time Selection tab
l) Click the Browse button
m)Select the trigger file that you downloaded in step 2 and click OK
n) Click Submit
The list of triggers is imported and displayed in the Triggers section on the Time Selection page
o) Enter a Pre Time of 30 seconds and a Post Time of 5 minutes
p) Click the Output Format tab
q) Click MiniSEED
r) Click All Instruments
s) Click the Output Location tab
Appendix A Reference Information and Examples
42 Apollo Project User Guide16106R5 2009-03-24
t) Enter the valid absolute path of the base directory for the processed data subfolders and files
u) Enter the expression used to define path names for subfolders under the base directory
v) Enter the expression used to define file names for the processed data files that are stored in the subfolders under the base directory
w) Click OK
4 Click the Run Now button on the Summary page
When the project has finished running the output folder you specified in step t will contain ten files Each output file will contain 5 minutes and 30 seconds of data from the five Tauruses
A4 Shot File Formats for Controlled Source ProjectsYou have two options for defining shots for a Controlled Source project manually defining shots or importing shots from a shot file
You can create shot files in one of following three file formats
Microsoft Office Excel (xls) ndash See Section A41 ldquoCreating a Shot File With Microsoft Office Excelrdquo on page 42
OpenOfficeorg Calc (ods) ndash See Section A42 ldquoCreating a Shot File With OpenOfficeorg Calcrdquo on page 44
Comma-Separated Values (csv) ndash See Section A43 ldquoCreating a Comma-Separated Values Shot Filerdquo on page 45
The Shot file templates are located in the docShotFileImport folder on the Apollo Project CD
A41 Creating a Shot File With Microsoft Office ExcelThe Microsoft Office Excel template for Apollo Project can be used with Microsoft Office Excel version 2003 or later
To create an Microsoft Office Excel based shot file
1 Double-click ShotFileTemplatexlt
A new Microsoft Office Excel file is created from the template and opens in the Microsoft Office Excel
2 Save the new spreadsheet as a Microsoft Office Excel document (xls)
3 Enter shot file data as specified in the Microsoft Office Excel spreadsheet
Only the decimal separator is supported for shot files Separators that denote the 3rd power of 10 (thousand) are not supported (for example 4500) The Microsoft Excel and OpenOffice templates reinforce these restrictions and are recommended for creating csv files
Appendix A Reference Information and Examples
Apollo Project User Guide16106R5 2009-03-24
43
You can enter data for multiple shot times
4 Click Save to save the file in Microsoft Office Excel format
5 Click File gt Save As and select CSV (Comma delimited) (csv) from the Save as type list
6 Click Save
7 Click OK on the message warning you that you are only saving the active sheet
8 Click Yes on the message warning you that file features might be incompatible with the csv format
9 Close Microsoft Office Excel
If you are using Microsoft Office Excel 2007 click the Microsoft Office Button and click Save As
Ensure that you save the file as a comma delimited file If the shot file is mistakenly saved in Microsoft Excel format (xls) the shot file will not work in Apollo Project
Appendix A Reference Information and Examples
44 Apollo Project User Guide16106R5 2009-03-24
A42 Creating a Shot File With OpenOfficeorg CalcThe OpenOffice template has been tested with OpenOfficeorg Calc version 23 Later versions of OpenOfficeorg Calc can be used at your discretion
To create a shot file based on the OpenOfficeorg Calc template
1 Double-click ShotFileTemplateots
A new OpenOffice spreadsheet is created from the template and opens in OpenOfficeorg Calc
2 Save the new spreadsheet as an OpenOffice Calc document (ods)
3 Enter the shot file data as specified in the OpenOffice spreadsheet
You can enter data for multiple shot times
4 Click Save to save the file in OpenOfficeorg Calc format
5 Click File gt Save As and select Text CSV (csv) from the Save as Type list
6 Select the Edit filter settings check box
7 Click Save
A warning message might appear that warns you that the document might contain formatting that cannot be saved in the csv format Click Yes on the warning message to save the file in csv format
The Export of text files window opens
8 Delete the double quotation marks () in the Text delimiter box and ensure that the Save cell content as shown check box is selected
9 Click OK to export the OpenOffice spreadsheet as a csv file
10 Click OK on the warning message
11 Close OpenOfficeorg Calc
Appendix A Reference Information and Examples
Apollo Project User Guide16106R5 2009-03-24
45
A43 Creating a Comma-Separated Values Shot FileYou can use any text editor to create a csv shot file
To create a csv shot file
1 Open ShotFileTemplatecsv in a text editor and save it with a different name
2 Format each line of the csv file as follows
Shot TimePre TimePost TimeLatitudeLongitudeElevation
For example
2008-08-28 103044090600000-6000004267
The format and units are as follows
3 Save the file as a csv formatted file
The csv shot file template is not compatible with Microsoft Office Excel Make sure that you do not double-click it and open it in Microsoft Office Excel
FormatUnits
Shot Time yyyy-mm-dd hhmmss
Pre Time seconds
Post Time seconds
Latitude degrees
Longitude degrees
Elevation meters
Appendix A Reference Information and Examples
46 Apollo Project User Guide16106R5 2009-03-24
Apollo Project User Guide16106R5 2009-03-24
47
Appendix B Retrieving SOH Data from a Taurus Version 2x
Taurus Version 2x SOH Data Retrieved by Apollo Project
Retrieving SOH Data from a Taurus Version 2x Streaming to Apollo Server
B1 Taurus Version 2x SOH Data Retrieved by Apollo Project This section presents the predefined datasets of SOH data Apollo Project will retrieve from a Taurus version 2x either through a direct connection or a stream to Apollo Server For instruction on retrieving streaming Taurus version 2x data from Apollo Server see Section B2 ldquoRetrieving SOH Data from a Taurus Version 2x Streaming to Apollo Serverrdquo on page 48
The order of the columns presented in the table below will differ when streaming Taurus version 2x SOH data from Apollo Server
Predefined SOH group SOH data
GPS Time Time (longsecs) (the number of seconds since 1970-01-01)Time (UTC) (time in yyyy-mm-dd hhmmssms format)Altitude (m)DAC CountError (ns) (time error)GPS Engine StatusLast Update Time(s)Lat (deg) (latitude in degrees)Long (deg) (longitude in degrees)NumSatellites (number of satellites used)PDOPPhaseLock (system clock phase lock)TDOPUncertainty (ns) (time uncertainty)
Note The values for Number of satellites used PDOP and TDOP are provided by the GPS receiver at the Last update time In order to see what time these values correspond to look at the Last update time When GPS is off these three parameters and the Last update time are not updated The last value displays until the next update arrives (after the GPS is turned on again)
Appendix B Retrieving SOH Data from a Taurus Version 2x
48 Apollo Project User Guide16106R5 2009-03-24
B2 Retrieving SOH Data from a Taurus Version 2x Streaming to Apollo ServerThis section provides instruction on configuring your Taurus version 2x to stream data to Apollo Server and instructions on how to use Apollo Project to retrieve this data from Apollo Server
B21 Streaming Data from a Taurus Version 2x to Apollo ServerUse the Taurus graphical user interface on either the Taurus display screen or through a Web browser to set up an NP stream from a Taurus version 2x to Apollo Server
1 Log in to the Taurus version 2x with either the tech or central user account
2 Select Advanced Configuration gt Communications gt NP Data Streaming
GPS Satellites Time (longsecs) (the number of seconds since 1970-01-01)Time (UTC) (time in yyyy-mm-dd hhmmssms format)
For each satelliteAcquisition FlagLast Update Time (ms)PRNSatellite Azimuth (microordm)Satellite Elevation (microordm)Signal Level (AMU)
Environment Time (longsecs) (the number of seconds since 1970-01-01)Time (UTC) (time in yyyy-mm-dd hhmmssms format)External SOH Voltage 1 (V) (12-bit voltage input) External SOH Voltage 2 (V) (12-bit voltage input) External SOH Voltage 3 (V) (12-bit voltage input) External SOH Voltage 4 (V) (12-bit voltage input) Sensor SOH Voltage 1 (V)Sensor SOH Voltage 2 (V)Sensor SOH Voltage 3 (V)
Instrument Time (longsecs) (the number of seconds since 1970-01-01)Time (UTC) (time in yyyy-mm-dd hhmmssms format)Controller Current (mA)Digitizer Current (mA)NMX Bus Current (mA) (external connector)Sensor Current (mA)Serial Port Current (mA)Supply Voltage (mV)Temperature (ordmC)
Predefined SOH group SOH data
Appendix B Retrieving SOH Data from a Taurus Version 2x
Apollo Project User Guide16106R5 2009-03-24
49
3 To have the Taurus stream both time series and SOH data to Apollo Server select both Stream Time Series and Stream SOH
-OR-
Select only Stream SOH if you only want to retrieve the SOH data from Apollo Server
4 Type the IP address for Apollo Server in the IP Address box
5 Type the port number Apollo Server uses to receive data in the Port box By default this is port number 32008
6 The Second IP Address and Second Port boxes are not necessary however cannot be left blank Type 127001 in the Second IP Address box and 32004 in the Second Port box
7 Type a value in the Maximum Throughput [bps] box if a limited data link is present between the Taurus and Apollo Server For instance if at some point the data link is limited to 9600 bps then this is the maximum throughput the link can allow If there are no throughput limitations set the value in this box to zero to disable the throughput limitation
8 Click Apply
9 Click Commit
B22 Retrieving Taurus Version 2x Data from Apollo ServerCreate a new project or use an existing project in Apollo Project to retrieve the Taurus version 2x data from Apollo Server For more information on creating or editing projects refer to Section 31 ldquoCreating New Projectsrdquo on page 11 and Section 36 ldquoEditing and Viewing the Settings of Projectsrdquo on page 31
When creating or editing the project
a) Add an IP address Store specification on the Store Selection tab (see step 4 in Section 31 ldquoCreating New Projectsrdquo) for Apollo Server including its client Web application port number Use the format
Apollo Server IP AddressApollo Server Client Web Application Port Number
b) Apply the appropriate filters on the Channel Group Selection tab to retrieve the desired channel groups from the Taurus version 2x See step 5 through step 12 in Section 31 ldquoCreating New Projectsrdquo for instruction on using the Channel Group Selection tab
Appendix B Retrieving SOH Data from a Taurus Version 2x
50 Apollo Project User Guide16106R5 2009-03-24
Apollo Project User Guide16106R5 2009-03-24
51
Appendix C Glossary
Glossary of Abbreviations and Terms
List of Unit Abbreviations and Symbols
C1 Glossary of Abbreviations and Terms
A
ASCIIAmerican Standard Code for Information Interchange
B
BHEBroad Band High Gain Seismometer East-West Orientation
Channel name based on the Global Seismological Network (GSN) standard
BHNBroad Band High Gain Seismometer North-South Orientation
Channel name based on the Global Seismological Network (GSN) standard
BHZBroad Band High Gain Seismometer Vertical Orientation
Channel name based on the Global Seismological Network (GSN) standard
Appendix C Glossary
52 Apollo Project User Guide16106R5 2009-03-24
C
CSVComma-Separated Values
D
DACDigital to Analog Converter
G
GPSGlobal Positioning System
J
JREJava Runtime Environment
JVMJava Virtual Machine
N
NFSNetwork File System
P
PDOPPosition Dilution of Precision
PRNPseudo-random Number
Appendix C Glossary
Apollo Project User Guide16106R5 2009-03-24
53
S
SACSeismic Analysis Code
An Apollo Project output file format that generates files that can be used by the SAC software (see http wwwirisedusoftwaresac)
SEEDStandard for the Exchange of Earthquake Data
SMBServer Message Block
SOHState of Health
T
TCPIPTransmission Control ProtocolInternet Protocol
TDOPTime Dilution of Precision
U
UNCUniform Naming Convention or Universal Naming Convention
URLUniform Resource Locator
UTCCoordinated Universal Time
Appendix C Glossary
54 Apollo Project User Guide16106R5 2009-03-24
C2 List of Unit Abbreviations and SymbolsTable C-1 provides a list of unit abbreviations and symbols commonly used in Nanometrics documentation
Table C-1 Unit abbreviations and symbols
Abbreviation or Symbol Definition Abbreviation
or Symbol Definition
deg degree lb pound
Oslash diameter m metre
micro micro ms metre per second
Ω ohm ms2 metre per second squared
A ampere mA milliampere
AC alternating current MB megabyte
b bit MΩ megaohm
B byte MHz megahertz
bps bits per second mi mile
C Celsius mL millilitre
cm centimetre mm millimetre
dB decibel ms millisecond
DC direct current MTU maximum transmission unit
F farad mV millivolt
ft foot mW milliwatt
g gram N Newton
g gravity nF nanofarad
GB gigabyte ns nanosecond
GHz gigahertz rad radian
Hz hertz rads radian per second
in inch s second
KB kilobyte sps samples per second
kg kilogram U rack unit
kHz kilohertz V volt
kΩ kiloohm Vpp Volts peak-to-peak
kW kilowatt W watt
L litre
Apollo Project User Guide16106R5 2009-03-24
55
About NanometricsNanometrics is a world leader in the development of precision instrumentation network technology and software applications for seismological and environmental studies Using Nanometrics technology our customers establish and grow research networks that are often located in extreme environments such as the frozen Arctic and Antarctic the arid deserts of the Middle East the jungles of South America and the depths of the worlds oceans Many of these are mission-critical national and regional networks that demand the highest possible data quality and availability
Nanometrics provides end-to-end solutions that include a growing portfolio of broadband and strong motion seismometers dataloggers and digitizers satellite ground station systems for remote site data collection and software applications for data and network analysis and management To support this portfolio Nanometrics also provides global systems engineering services for design installation and support of complete networks
Our head office research and development centre and production facility are located in the Kanata North Business Park of Ottawa the high-technology heart of Canadas capital region
Contacting NanometricsNanometrics Inc250 Herzberg RoadKanata Ontario Canada K2K 2A1Phone +1 613-592-6776Fax +1 613-592-5929Email infonanometricscaWeb wwwnanometricsca
Contacting Technical SupportIf you need technical support please submit a request on the Nanometrics technical support site or by email or fax Include a full explanation of the problem and related information such as log filesSupport site httpsupportnanometricsca
Email techsupportnanometricsca

Chapter 3 Retrieving Data
32 Apollo Project User Guide16106R5 2009-03-24
37 Monitoring Project StatusYou can monitor the status of a project by viewing information on the Existing Projects Summary and Retrieval Status pages
371 Viewing an Overview of the Status of All ProjectsThe Existing Projects page is the default home page of Apollo Project You see this page when you first open Apollo Project or when you click Projects in the projects bar For more information see Section 341 ldquoViewing Existing Projectsrdquo on page 26
You can view the following information for all projects on the Existing Projects page
bull Name
bull Type
bull Current status
bull Last time the project run
bull Status of data retrieved
The Data Retrieved bars on the Existing Projects page show the overall status of the data retrieval For more information see Section 3731 ldquoStatus Coloursrdquo on page 34
Chapter 3 Retrieving Data
Apollo Project User Guide16106R5 2009-03-24
33
372 Viewing the Status of an Individual ProjectWhen you open a project a detailed summary of the project is shown on the Summary page For more information see Section 342 ldquoOpening a Projectrdquo on page 27
You can view the following information for each project on the Summary page
bull Date it was created
bull Date it was last modified
bull Current status
bull Last time it ran
bull Next time it will run
You can also view a summary of all of the settings you specified when you created the project (Store specifications selected Stores selected time series channel groups selected SOH channel groups start and end times number of files generated file interval and output format and locations)
All times are reported using the UTC time zone
Chapter 3 Retrieving Data
34 Apollo Project User Guide16106R5 2009-03-24
373 Monitoring the Status of a Running ProjectYou can view the data retrieval status of a project while it is running on the Retrieval Status page The Retrieval Status page is displayed automatically when you click Run Now to run a project You can also view this page by opening a project and clicking the Retrieval Status tab
The status for each channel group is expressed in the form of two numbers (for example 60100) and two bar graphs The first number is the percentage available of the total time requested (for example 60) and the second number is the percentage retrieved of the time available (for example 100) For more information on the bar graph status colours see Section 3731 ldquoStatus Coloursrdquo on page 34
You can also view retrieval details for each channel group listed on the Retrieval Status page For more information see Section 3732 ldquoViewing the Retrieval Details for Each Channel Grouprdquo on page 35
3731 Status Colours
The data retrieval status bars use the following status colours
The information that is displayed on the Retrieval Status page is updated continuously while a project is running
Table 3-1 Status colours
Colour Status
Green Apollo Project has retrieved the data
Yellow Apollo Project is attempting to retrieve available data from the Store
Red Data is available in the Store but Apollo Project has failed to retrieve it on this attempt Apollo Project will make additional attempts to retrieve the data up to the configured Maximum Number of Retrieval Attempts For information on how to set the Maximum Number of Retrieval Attempts setting see Section 31 ldquoCreating New Projectsrdquo on page 11
White Data for some portion of the requested time segment is not available in the Store For example there are gaps in the data or the retrieval request is for a future time segment
Chapter 3 Retrieving Data
Apollo Project User Guide16106R5 2009-03-24
35
3732 Viewing the Retrieval Details for Each Channel Group
You can view the retrieval status of each time segment for a channel group
1 Click a channel group name
2 Click the Channel Group Details button that is located to the right of the channel group name
The Remaining Retrieval Attempts column displays the number of times that Apollo Project will try to download each missing time segment for the channel group when the project is run again For information on how to set the Maximum Number of Retrieval Attempts setting see Section 33 ldquoConfiguring Apollo Projectrdquo on page 24
3 Click OK when you have finished viewing the details
Chapter 3 Retrieving Data
36 Apollo Project User Guide16106R5 2009-03-24
Apollo Project User Guide16106R5 2009-03-24
37
Appendix A Reference Information and Examples
Overview of Running Projects
Example Project Settings
Example Deployment Scenarios
Shot File Formats for Controlled Source Projects
A1 Overview of Running ProjectsWhen a project is run Apollo Project performs the following steps
1 The requested time ranges are identified
2 The channel groups for which data are to be retrieved are identified
3 The actual Stores specified by the Store specifications of the project are identified
For each identified Store the following steps are performed
1 A data availability analysis for the outstanding time ranges is performed These are for the ranges for which data has not already been retrieved The availability of the data is recorded for reference It is possible that a given Store was not present at the time the project was last run If this is the case then an attempt is made to retrieve all of the required time ranges of the project from the Store
2 If any data exists in the Store for any of the requested time ranges then a retrieval of this data is performed and the retrieved data is stored to local temporary files
3 If the number of retrieval attempts for a given time range exceeds a configurable threshold (see Section 33 ldquoConfiguring Apollo Projectrdquo on page 24) then the retrieval of data within the stated range is not attempted again
If any data was retrieved during the run of the project then the corresponding output files of the desired output format are generated and stored in the output location specified for the project
When running Apollo Project with Taurus version 2x the schedule for Archive projects must be greater than 5 minutes in duration Schedules that are less than 5 minutes can result in data that is missing or not downloaded
Appendix A Reference Information and Examples
38 Apollo Project User Guide16106R5 2009-03-24
It is possible that the requested data for a given channel group exists across multiple Stores If all of these Stores are included by the Store specifications for the project then Apollo Project assembles the requested data
When a project runs detailed information regarding the results of the retrieved data and processed data are available For more information see Section 37 ldquoMonitoring Project Statusrdquo on page 32
A2 Example Project Settings
A21 Example 1 One Time ProjectProject Name Project1
Project Type One Time
Channel groups selected for retrieval CASTN1OTBHZ (on taurus_1234)
Requested Time Range January 30 2008 1400 ndash 1500 UTC
File Interval 20 minutes
Output Location Base Directory disk2ApolloProjectOutputData
Output Location Subdirectories projectyearmonthday
Output Location Filenamestationnetwork_time
When the project is run successfully the following output files will be created on the server running Apollo Project
disk2ApolloProjectOutputDataProject120080130STN1CA_20080130_140000seed
disk2ApolloProjectOutputDataProject120080130STN1CA_20080130_142000seed
disk2ApolloProjectOutputDataProject120080130STN1CA_20080130_144000seed
Appendix A Reference Information and Examples
Apollo Project User Guide16106R5 2009-03-24
39
A22 Example 2 Controlled Source ProjectProject Name Project2
Project Type Controlled Source
Channel groups selected for retrieval CASTN1OTBHZ (on taurus_1234) CASTN1OTBHN (on taurus_1234)
Requested Shot Times January 30 2008 1400 UTC January 30 2008 1430 UTC
Pre Time 30 seconds
Post Time 30 seconds
Output Location Base Directory disk2ApolloProjectOutputData
Output Location Subdirectories projectyearmonthday
Output Location Filename timeformat
When the project is run successfully the following output files will be created on the server running Apollo Project
disk2ApolloProjectOutputDataProject22008013020080130_135930segysgy
disk2ApolloProjectOutputDataProject22008013020080130_142930segysgy
A3 Example Deployment Scenarios
A31 One TimeYou want to download three days of data from multiple instruments on the network save the data in MiniSEED format and create a file for every hour of data
A One Time project is the recommended solution The Store of each instrument can be made available to Apollo Project by creating a corresponding IP Address Store specification with the IP address of the instrument The requested time range can be specified along with a file interval of one hour Ensure that the instruments are configured to run in Communications mode
A32 Scheduled ArchiveYou want seismic data to be retrieved automatically from a group of instruments on the network every six hours The instruments are always accessible via an Ethernet connection
A scheduled Archive project is the recommended solution Use the Regular Interval scheduling option and set the interval to six hours
You can also run a scheduled Archive project at any time For example if the scheduled retrieval interval of a project is six hours and between intervals you want to retrieve the data three hours early you can run the project and approximately three additional hours of data would be accumulated About three hours later the project will run automatically and accumulate the remaining three hours of data
Appendix A Reference Information and Examples
40 Apollo Project User Guide16106R5 2009-03-24
A33 Manual ArchiveYou want to retrieve seismic data from a group of instruments but their respective Stores are only available for retrieval on occasion (no regular dependable schedule for retrieval from these Stores is possible)
A manually run Archive project is the recommended solution You can create the project and run it whenever any of the instruments are available for retrieval
A34 Field ArchiveYou want to collect data from a set of isolated instruments in the field at recurring intervals (for example twice per month)
A Field Archive project is the recommended solution You can create a Field Archive project and either add all instrument IP addresses to the list or use a Discovery specification The time for the last retrieval is stored on the instrument and all data is recovered from the last recovery time
A35 Media HarvestingYou want to collect the media from a set of instruments in the field at a regular interval (for example once per week) You also have to retrieve all of the seismic data on the media for subsequent analysis
An Archive project is the recommended solution Initially a directory is created on the file system of the server running Apollo Project A directory Store specification is created with this directory as the parent directory from which to search for Stores The content of each media instance in the weekrsquos collection is copied from a media reader to a subdirectory of the directory When the project is run all of the copied Stores are automatically available and the project accumulates data for each instrument
Due to the nature of media harvesting and the replacement procedure for this example data is always missing for the last period of output files for the current week This period corresponds to the time that the media was taken from the instrument and replaced with a new one The following week when the media is harvested again from the instruments in the field Apollo Project fills in the missing time for these files with the new Store data regardless of the media instance on which the data currently resides
You can only create and run Field Archive projects for Taurus version 30 or later
Appendix A Reference Information and Examples
Apollo Project User Guide16106R5 2009-03-24
41
A36 Trigger Downloading You have set up a network of five Tauruses around a hydro dam Each Taurus is accessible over an Ethernet connection and each is set to record data over the weekend You have set the period for data retrieval at 30 seconds before and five minutes after any seismic activity but the following procedure shows you why it is not necessary to view all of the data accumulated over the whole weekend
1 Select the Taurus at the site with the least environmental noise or determine the best site for generating triggers and designate this Taurus ldquoTaurus Ardquo for reference
You need to perform this task in advance More information about triggers can be found in the Taurus Portable Seismograph User Guide
2 Download the trigger file from ldquoTaurus Ardquo and review the file to verify the correct number of triggers
3 Follow these steps to create a new Triggers project
a) Click New on the Apollo Project Existing Projects page
b) Click Triggers as the project type and enter a unique name in the Project Name box
c) Click OK
d) Click the IP Address tab on the Store Selection tab
e) Enter the IP address of a Taurus
f) Click Add
g) Repeat step e until you have entered the IP addresses of all five of the Tauruses
Apollo Project adds the IP address specifications to the Selected Specifications section of the Store Selection page and finds all five Stores associated with the IP addresses and adds them to the Selected Stores section
h) Click the Channel Group Selection tab
i) Click Create Default Station Table to create a table for all of the currently selected Stores and discovered instruments
j) Review the selected channel groups and if required edit the mappings in the selected channel groups area of the tab (lower half of the tab)
k) Click the Time Selection tab
l) Click the Browse button
m)Select the trigger file that you downloaded in step 2 and click OK
n) Click Submit
The list of triggers is imported and displayed in the Triggers section on the Time Selection page
o) Enter a Pre Time of 30 seconds and a Post Time of 5 minutes
p) Click the Output Format tab
q) Click MiniSEED
r) Click All Instruments
s) Click the Output Location tab
Appendix A Reference Information and Examples
42 Apollo Project User Guide16106R5 2009-03-24
t) Enter the valid absolute path of the base directory for the processed data subfolders and files
u) Enter the expression used to define path names for subfolders under the base directory
v) Enter the expression used to define file names for the processed data files that are stored in the subfolders under the base directory
w) Click OK
4 Click the Run Now button on the Summary page
When the project has finished running the output folder you specified in step t will contain ten files Each output file will contain 5 minutes and 30 seconds of data from the five Tauruses
A4 Shot File Formats for Controlled Source ProjectsYou have two options for defining shots for a Controlled Source project manually defining shots or importing shots from a shot file
You can create shot files in one of following three file formats
Microsoft Office Excel (xls) ndash See Section A41 ldquoCreating a Shot File With Microsoft Office Excelrdquo on page 42
OpenOfficeorg Calc (ods) ndash See Section A42 ldquoCreating a Shot File With OpenOfficeorg Calcrdquo on page 44
Comma-Separated Values (csv) ndash See Section A43 ldquoCreating a Comma-Separated Values Shot Filerdquo on page 45
The Shot file templates are located in the docShotFileImport folder on the Apollo Project CD
A41 Creating a Shot File With Microsoft Office ExcelThe Microsoft Office Excel template for Apollo Project can be used with Microsoft Office Excel version 2003 or later
To create an Microsoft Office Excel based shot file
1 Double-click ShotFileTemplatexlt
A new Microsoft Office Excel file is created from the template and opens in the Microsoft Office Excel
2 Save the new spreadsheet as a Microsoft Office Excel document (xls)
3 Enter shot file data as specified in the Microsoft Office Excel spreadsheet
Only the decimal separator is supported for shot files Separators that denote the 3rd power of 10 (thousand) are not supported (for example 4500) The Microsoft Excel and OpenOffice templates reinforce these restrictions and are recommended for creating csv files
Appendix A Reference Information and Examples
Apollo Project User Guide16106R5 2009-03-24
43
You can enter data for multiple shot times
4 Click Save to save the file in Microsoft Office Excel format
5 Click File gt Save As and select CSV (Comma delimited) (csv) from the Save as type list
6 Click Save
7 Click OK on the message warning you that you are only saving the active sheet
8 Click Yes on the message warning you that file features might be incompatible with the csv format
9 Close Microsoft Office Excel
If you are using Microsoft Office Excel 2007 click the Microsoft Office Button and click Save As
Ensure that you save the file as a comma delimited file If the shot file is mistakenly saved in Microsoft Excel format (xls) the shot file will not work in Apollo Project
Appendix A Reference Information and Examples
44 Apollo Project User Guide16106R5 2009-03-24
A42 Creating a Shot File With OpenOfficeorg CalcThe OpenOffice template has been tested with OpenOfficeorg Calc version 23 Later versions of OpenOfficeorg Calc can be used at your discretion
To create a shot file based on the OpenOfficeorg Calc template
1 Double-click ShotFileTemplateots
A new OpenOffice spreadsheet is created from the template and opens in OpenOfficeorg Calc
2 Save the new spreadsheet as an OpenOffice Calc document (ods)
3 Enter the shot file data as specified in the OpenOffice spreadsheet
You can enter data for multiple shot times
4 Click Save to save the file in OpenOfficeorg Calc format
5 Click File gt Save As and select Text CSV (csv) from the Save as Type list
6 Select the Edit filter settings check box
7 Click Save
A warning message might appear that warns you that the document might contain formatting that cannot be saved in the csv format Click Yes on the warning message to save the file in csv format
The Export of text files window opens
8 Delete the double quotation marks () in the Text delimiter box and ensure that the Save cell content as shown check box is selected
9 Click OK to export the OpenOffice spreadsheet as a csv file
10 Click OK on the warning message
11 Close OpenOfficeorg Calc
Appendix A Reference Information and Examples
Apollo Project User Guide16106R5 2009-03-24
45
A43 Creating a Comma-Separated Values Shot FileYou can use any text editor to create a csv shot file
To create a csv shot file
1 Open ShotFileTemplatecsv in a text editor and save it with a different name
2 Format each line of the csv file as follows
Shot TimePre TimePost TimeLatitudeLongitudeElevation
For example
2008-08-28 103044090600000-6000004267
The format and units are as follows
3 Save the file as a csv formatted file
The csv shot file template is not compatible with Microsoft Office Excel Make sure that you do not double-click it and open it in Microsoft Office Excel
FormatUnits
Shot Time yyyy-mm-dd hhmmss
Pre Time seconds
Post Time seconds
Latitude degrees
Longitude degrees
Elevation meters
Appendix A Reference Information and Examples
46 Apollo Project User Guide16106R5 2009-03-24
Apollo Project User Guide16106R5 2009-03-24
47
Appendix B Retrieving SOH Data from a Taurus Version 2x
Taurus Version 2x SOH Data Retrieved by Apollo Project
Retrieving SOH Data from a Taurus Version 2x Streaming to Apollo Server
B1 Taurus Version 2x SOH Data Retrieved by Apollo Project This section presents the predefined datasets of SOH data Apollo Project will retrieve from a Taurus version 2x either through a direct connection or a stream to Apollo Server For instruction on retrieving streaming Taurus version 2x data from Apollo Server see Section B2 ldquoRetrieving SOH Data from a Taurus Version 2x Streaming to Apollo Serverrdquo on page 48
The order of the columns presented in the table below will differ when streaming Taurus version 2x SOH data from Apollo Server
Predefined SOH group SOH data
GPS Time Time (longsecs) (the number of seconds since 1970-01-01)Time (UTC) (time in yyyy-mm-dd hhmmssms format)Altitude (m)DAC CountError (ns) (time error)GPS Engine StatusLast Update Time(s)Lat (deg) (latitude in degrees)Long (deg) (longitude in degrees)NumSatellites (number of satellites used)PDOPPhaseLock (system clock phase lock)TDOPUncertainty (ns) (time uncertainty)
Note The values for Number of satellites used PDOP and TDOP are provided by the GPS receiver at the Last update time In order to see what time these values correspond to look at the Last update time When GPS is off these three parameters and the Last update time are not updated The last value displays until the next update arrives (after the GPS is turned on again)
Appendix B Retrieving SOH Data from a Taurus Version 2x
48 Apollo Project User Guide16106R5 2009-03-24
B2 Retrieving SOH Data from a Taurus Version 2x Streaming to Apollo ServerThis section provides instruction on configuring your Taurus version 2x to stream data to Apollo Server and instructions on how to use Apollo Project to retrieve this data from Apollo Server
B21 Streaming Data from a Taurus Version 2x to Apollo ServerUse the Taurus graphical user interface on either the Taurus display screen or through a Web browser to set up an NP stream from a Taurus version 2x to Apollo Server
1 Log in to the Taurus version 2x with either the tech or central user account
2 Select Advanced Configuration gt Communications gt NP Data Streaming
GPS Satellites Time (longsecs) (the number of seconds since 1970-01-01)Time (UTC) (time in yyyy-mm-dd hhmmssms format)
For each satelliteAcquisition FlagLast Update Time (ms)PRNSatellite Azimuth (microordm)Satellite Elevation (microordm)Signal Level (AMU)
Environment Time (longsecs) (the number of seconds since 1970-01-01)Time (UTC) (time in yyyy-mm-dd hhmmssms format)External SOH Voltage 1 (V) (12-bit voltage input) External SOH Voltage 2 (V) (12-bit voltage input) External SOH Voltage 3 (V) (12-bit voltage input) External SOH Voltage 4 (V) (12-bit voltage input) Sensor SOH Voltage 1 (V)Sensor SOH Voltage 2 (V)Sensor SOH Voltage 3 (V)
Instrument Time (longsecs) (the number of seconds since 1970-01-01)Time (UTC) (time in yyyy-mm-dd hhmmssms format)Controller Current (mA)Digitizer Current (mA)NMX Bus Current (mA) (external connector)Sensor Current (mA)Serial Port Current (mA)Supply Voltage (mV)Temperature (ordmC)
Predefined SOH group SOH data
Appendix B Retrieving SOH Data from a Taurus Version 2x
Apollo Project User Guide16106R5 2009-03-24
49
3 To have the Taurus stream both time series and SOH data to Apollo Server select both Stream Time Series and Stream SOH
-OR-
Select only Stream SOH if you only want to retrieve the SOH data from Apollo Server
4 Type the IP address for Apollo Server in the IP Address box
5 Type the port number Apollo Server uses to receive data in the Port box By default this is port number 32008
6 The Second IP Address and Second Port boxes are not necessary however cannot be left blank Type 127001 in the Second IP Address box and 32004 in the Second Port box
7 Type a value in the Maximum Throughput [bps] box if a limited data link is present between the Taurus and Apollo Server For instance if at some point the data link is limited to 9600 bps then this is the maximum throughput the link can allow If there are no throughput limitations set the value in this box to zero to disable the throughput limitation
8 Click Apply
9 Click Commit
B22 Retrieving Taurus Version 2x Data from Apollo ServerCreate a new project or use an existing project in Apollo Project to retrieve the Taurus version 2x data from Apollo Server For more information on creating or editing projects refer to Section 31 ldquoCreating New Projectsrdquo on page 11 and Section 36 ldquoEditing and Viewing the Settings of Projectsrdquo on page 31
When creating or editing the project
a) Add an IP address Store specification on the Store Selection tab (see step 4 in Section 31 ldquoCreating New Projectsrdquo) for Apollo Server including its client Web application port number Use the format
Apollo Server IP AddressApollo Server Client Web Application Port Number
b) Apply the appropriate filters on the Channel Group Selection tab to retrieve the desired channel groups from the Taurus version 2x See step 5 through step 12 in Section 31 ldquoCreating New Projectsrdquo for instruction on using the Channel Group Selection tab
Appendix B Retrieving SOH Data from a Taurus Version 2x
50 Apollo Project User Guide16106R5 2009-03-24
Apollo Project User Guide16106R5 2009-03-24
51
Appendix C Glossary
Glossary of Abbreviations and Terms
List of Unit Abbreviations and Symbols
C1 Glossary of Abbreviations and Terms
A
ASCIIAmerican Standard Code for Information Interchange
B
BHEBroad Band High Gain Seismometer East-West Orientation
Channel name based on the Global Seismological Network (GSN) standard
BHNBroad Band High Gain Seismometer North-South Orientation
Channel name based on the Global Seismological Network (GSN) standard
BHZBroad Band High Gain Seismometer Vertical Orientation
Channel name based on the Global Seismological Network (GSN) standard
Appendix C Glossary
52 Apollo Project User Guide16106R5 2009-03-24
C
CSVComma-Separated Values
D
DACDigital to Analog Converter
G
GPSGlobal Positioning System
J
JREJava Runtime Environment
JVMJava Virtual Machine
N
NFSNetwork File System
P
PDOPPosition Dilution of Precision
PRNPseudo-random Number
Appendix C Glossary
Apollo Project User Guide16106R5 2009-03-24
53
S
SACSeismic Analysis Code
An Apollo Project output file format that generates files that can be used by the SAC software (see http wwwirisedusoftwaresac)
SEEDStandard for the Exchange of Earthquake Data
SMBServer Message Block
SOHState of Health
T
TCPIPTransmission Control ProtocolInternet Protocol
TDOPTime Dilution of Precision
U
UNCUniform Naming Convention or Universal Naming Convention
URLUniform Resource Locator
UTCCoordinated Universal Time
Appendix C Glossary
54 Apollo Project User Guide16106R5 2009-03-24
C2 List of Unit Abbreviations and SymbolsTable C-1 provides a list of unit abbreviations and symbols commonly used in Nanometrics documentation
Table C-1 Unit abbreviations and symbols
Abbreviation or Symbol Definition Abbreviation
or Symbol Definition
deg degree lb pound
Oslash diameter m metre
micro micro ms metre per second
Ω ohm ms2 metre per second squared
A ampere mA milliampere
AC alternating current MB megabyte
b bit MΩ megaohm
B byte MHz megahertz
bps bits per second mi mile
C Celsius mL millilitre
cm centimetre mm millimetre
dB decibel ms millisecond
DC direct current MTU maximum transmission unit
F farad mV millivolt
ft foot mW milliwatt
g gram N Newton
g gravity nF nanofarad
GB gigabyte ns nanosecond
GHz gigahertz rad radian
Hz hertz rads radian per second
in inch s second
KB kilobyte sps samples per second
kg kilogram U rack unit
kHz kilohertz V volt
kΩ kiloohm Vpp Volts peak-to-peak
kW kilowatt W watt
L litre
Apollo Project User Guide16106R5 2009-03-24
55
About NanometricsNanometrics is a world leader in the development of precision instrumentation network technology and software applications for seismological and environmental studies Using Nanometrics technology our customers establish and grow research networks that are often located in extreme environments such as the frozen Arctic and Antarctic the arid deserts of the Middle East the jungles of South America and the depths of the worlds oceans Many of these are mission-critical national and regional networks that demand the highest possible data quality and availability
Nanometrics provides end-to-end solutions that include a growing portfolio of broadband and strong motion seismometers dataloggers and digitizers satellite ground station systems for remote site data collection and software applications for data and network analysis and management To support this portfolio Nanometrics also provides global systems engineering services for design installation and support of complete networks
Our head office research and development centre and production facility are located in the Kanata North Business Park of Ottawa the high-technology heart of Canadas capital region
Contacting NanometricsNanometrics Inc250 Herzberg RoadKanata Ontario Canada K2K 2A1Phone +1 613-592-6776Fax +1 613-592-5929Email infonanometricscaWeb wwwnanometricsca
Contacting Technical SupportIf you need technical support please submit a request on the Nanometrics technical support site or by email or fax Include a full explanation of the problem and related information such as log filesSupport site httpsupportnanometricsca
Email techsupportnanometricsca
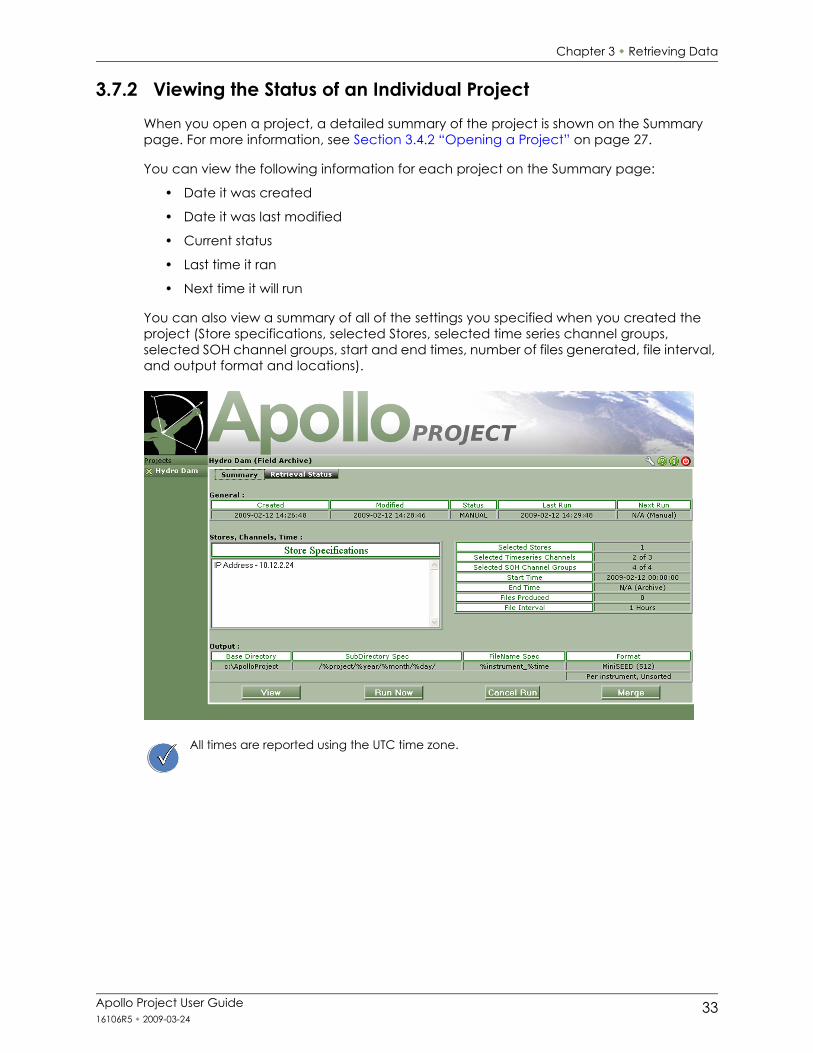
Chapter 3 Retrieving Data
Apollo Project User Guide16106R5 2009-03-24
33
372 Viewing the Status of an Individual ProjectWhen you open a project a detailed summary of the project is shown on the Summary page For more information see Section 342 ldquoOpening a Projectrdquo on page 27
You can view the following information for each project on the Summary page
bull Date it was created
bull Date it was last modified
bull Current status
bull Last time it ran
bull Next time it will run
You can also view a summary of all of the settings you specified when you created the project (Store specifications selected Stores selected time series channel groups selected SOH channel groups start and end times number of files generated file interval and output format and locations)
All times are reported using the UTC time zone
Chapter 3 Retrieving Data
34 Apollo Project User Guide16106R5 2009-03-24
373 Monitoring the Status of a Running ProjectYou can view the data retrieval status of a project while it is running on the Retrieval Status page The Retrieval Status page is displayed automatically when you click Run Now to run a project You can also view this page by opening a project and clicking the Retrieval Status tab
The status for each channel group is expressed in the form of two numbers (for example 60100) and two bar graphs The first number is the percentage available of the total time requested (for example 60) and the second number is the percentage retrieved of the time available (for example 100) For more information on the bar graph status colours see Section 3731 ldquoStatus Coloursrdquo on page 34
You can also view retrieval details for each channel group listed on the Retrieval Status page For more information see Section 3732 ldquoViewing the Retrieval Details for Each Channel Grouprdquo on page 35
3731 Status Colours
The data retrieval status bars use the following status colours
The information that is displayed on the Retrieval Status page is updated continuously while a project is running
Table 3-1 Status colours
Colour Status
Green Apollo Project has retrieved the data
Yellow Apollo Project is attempting to retrieve available data from the Store
Red Data is available in the Store but Apollo Project has failed to retrieve it on this attempt Apollo Project will make additional attempts to retrieve the data up to the configured Maximum Number of Retrieval Attempts For information on how to set the Maximum Number of Retrieval Attempts setting see Section 31 ldquoCreating New Projectsrdquo on page 11
White Data for some portion of the requested time segment is not available in the Store For example there are gaps in the data or the retrieval request is for a future time segment
Chapter 3 Retrieving Data
Apollo Project User Guide16106R5 2009-03-24
35
3732 Viewing the Retrieval Details for Each Channel Group
You can view the retrieval status of each time segment for a channel group
1 Click a channel group name
2 Click the Channel Group Details button that is located to the right of the channel group name
The Remaining Retrieval Attempts column displays the number of times that Apollo Project will try to download each missing time segment for the channel group when the project is run again For information on how to set the Maximum Number of Retrieval Attempts setting see Section 33 ldquoConfiguring Apollo Projectrdquo on page 24
3 Click OK when you have finished viewing the details
Chapter 3 Retrieving Data
36 Apollo Project User Guide16106R5 2009-03-24
Apollo Project User Guide16106R5 2009-03-24
37
Appendix A Reference Information and Examples
Overview of Running Projects
Example Project Settings
Example Deployment Scenarios
Shot File Formats for Controlled Source Projects
A1 Overview of Running ProjectsWhen a project is run Apollo Project performs the following steps
1 The requested time ranges are identified
2 The channel groups for which data are to be retrieved are identified
3 The actual Stores specified by the Store specifications of the project are identified
For each identified Store the following steps are performed
1 A data availability analysis for the outstanding time ranges is performed These are for the ranges for which data has not already been retrieved The availability of the data is recorded for reference It is possible that a given Store was not present at the time the project was last run If this is the case then an attempt is made to retrieve all of the required time ranges of the project from the Store
2 If any data exists in the Store for any of the requested time ranges then a retrieval of this data is performed and the retrieved data is stored to local temporary files
3 If the number of retrieval attempts for a given time range exceeds a configurable threshold (see Section 33 ldquoConfiguring Apollo Projectrdquo on page 24) then the retrieval of data within the stated range is not attempted again
If any data was retrieved during the run of the project then the corresponding output files of the desired output format are generated and stored in the output location specified for the project
When running Apollo Project with Taurus version 2x the schedule for Archive projects must be greater than 5 minutes in duration Schedules that are less than 5 minutes can result in data that is missing or not downloaded
Appendix A Reference Information and Examples
38 Apollo Project User Guide16106R5 2009-03-24
It is possible that the requested data for a given channel group exists across multiple Stores If all of these Stores are included by the Store specifications for the project then Apollo Project assembles the requested data
When a project runs detailed information regarding the results of the retrieved data and processed data are available For more information see Section 37 ldquoMonitoring Project Statusrdquo on page 32
A2 Example Project Settings
A21 Example 1 One Time ProjectProject Name Project1
Project Type One Time
Channel groups selected for retrieval CASTN1OTBHZ (on taurus_1234)
Requested Time Range January 30 2008 1400 ndash 1500 UTC
File Interval 20 minutes
Output Location Base Directory disk2ApolloProjectOutputData
Output Location Subdirectories projectyearmonthday
Output Location Filenamestationnetwork_time
When the project is run successfully the following output files will be created on the server running Apollo Project
disk2ApolloProjectOutputDataProject120080130STN1CA_20080130_140000seed
disk2ApolloProjectOutputDataProject120080130STN1CA_20080130_142000seed
disk2ApolloProjectOutputDataProject120080130STN1CA_20080130_144000seed
Appendix A Reference Information and Examples
Apollo Project User Guide16106R5 2009-03-24
39
A22 Example 2 Controlled Source ProjectProject Name Project2
Project Type Controlled Source
Channel groups selected for retrieval CASTN1OTBHZ (on taurus_1234) CASTN1OTBHN (on taurus_1234)
Requested Shot Times January 30 2008 1400 UTC January 30 2008 1430 UTC
Pre Time 30 seconds
Post Time 30 seconds
Output Location Base Directory disk2ApolloProjectOutputData
Output Location Subdirectories projectyearmonthday
Output Location Filename timeformat
When the project is run successfully the following output files will be created on the server running Apollo Project
disk2ApolloProjectOutputDataProject22008013020080130_135930segysgy
disk2ApolloProjectOutputDataProject22008013020080130_142930segysgy
A3 Example Deployment Scenarios
A31 One TimeYou want to download three days of data from multiple instruments on the network save the data in MiniSEED format and create a file for every hour of data
A One Time project is the recommended solution The Store of each instrument can be made available to Apollo Project by creating a corresponding IP Address Store specification with the IP address of the instrument The requested time range can be specified along with a file interval of one hour Ensure that the instruments are configured to run in Communications mode
A32 Scheduled ArchiveYou want seismic data to be retrieved automatically from a group of instruments on the network every six hours The instruments are always accessible via an Ethernet connection
A scheduled Archive project is the recommended solution Use the Regular Interval scheduling option and set the interval to six hours
You can also run a scheduled Archive project at any time For example if the scheduled retrieval interval of a project is six hours and between intervals you want to retrieve the data three hours early you can run the project and approximately three additional hours of data would be accumulated About three hours later the project will run automatically and accumulate the remaining three hours of data
Appendix A Reference Information and Examples
40 Apollo Project User Guide16106R5 2009-03-24
A33 Manual ArchiveYou want to retrieve seismic data from a group of instruments but their respective Stores are only available for retrieval on occasion (no regular dependable schedule for retrieval from these Stores is possible)
A manually run Archive project is the recommended solution You can create the project and run it whenever any of the instruments are available for retrieval
A34 Field ArchiveYou want to collect data from a set of isolated instruments in the field at recurring intervals (for example twice per month)
A Field Archive project is the recommended solution You can create a Field Archive project and either add all instrument IP addresses to the list or use a Discovery specification The time for the last retrieval is stored on the instrument and all data is recovered from the last recovery time
A35 Media HarvestingYou want to collect the media from a set of instruments in the field at a regular interval (for example once per week) You also have to retrieve all of the seismic data on the media for subsequent analysis
An Archive project is the recommended solution Initially a directory is created on the file system of the server running Apollo Project A directory Store specification is created with this directory as the parent directory from which to search for Stores The content of each media instance in the weekrsquos collection is copied from a media reader to a subdirectory of the directory When the project is run all of the copied Stores are automatically available and the project accumulates data for each instrument
Due to the nature of media harvesting and the replacement procedure for this example data is always missing for the last period of output files for the current week This period corresponds to the time that the media was taken from the instrument and replaced with a new one The following week when the media is harvested again from the instruments in the field Apollo Project fills in the missing time for these files with the new Store data regardless of the media instance on which the data currently resides
You can only create and run Field Archive projects for Taurus version 30 or later
Appendix A Reference Information and Examples
Apollo Project User Guide16106R5 2009-03-24
41
A36 Trigger Downloading You have set up a network of five Tauruses around a hydro dam Each Taurus is accessible over an Ethernet connection and each is set to record data over the weekend You have set the period for data retrieval at 30 seconds before and five minutes after any seismic activity but the following procedure shows you why it is not necessary to view all of the data accumulated over the whole weekend
1 Select the Taurus at the site with the least environmental noise or determine the best site for generating triggers and designate this Taurus ldquoTaurus Ardquo for reference
You need to perform this task in advance More information about triggers can be found in the Taurus Portable Seismograph User Guide
2 Download the trigger file from ldquoTaurus Ardquo and review the file to verify the correct number of triggers
3 Follow these steps to create a new Triggers project
a) Click New on the Apollo Project Existing Projects page
b) Click Triggers as the project type and enter a unique name in the Project Name box
c) Click OK
d) Click the IP Address tab on the Store Selection tab
e) Enter the IP address of a Taurus
f) Click Add
g) Repeat step e until you have entered the IP addresses of all five of the Tauruses
Apollo Project adds the IP address specifications to the Selected Specifications section of the Store Selection page and finds all five Stores associated with the IP addresses and adds them to the Selected Stores section
h) Click the Channel Group Selection tab
i) Click Create Default Station Table to create a table for all of the currently selected Stores and discovered instruments
j) Review the selected channel groups and if required edit the mappings in the selected channel groups area of the tab (lower half of the tab)
k) Click the Time Selection tab
l) Click the Browse button
m)Select the trigger file that you downloaded in step 2 and click OK
n) Click Submit
The list of triggers is imported and displayed in the Triggers section on the Time Selection page
o) Enter a Pre Time of 30 seconds and a Post Time of 5 minutes
p) Click the Output Format tab
q) Click MiniSEED
r) Click All Instruments
s) Click the Output Location tab
Appendix A Reference Information and Examples
42 Apollo Project User Guide16106R5 2009-03-24
t) Enter the valid absolute path of the base directory for the processed data subfolders and files
u) Enter the expression used to define path names for subfolders under the base directory
v) Enter the expression used to define file names for the processed data files that are stored in the subfolders under the base directory
w) Click OK
4 Click the Run Now button on the Summary page
When the project has finished running the output folder you specified in step t will contain ten files Each output file will contain 5 minutes and 30 seconds of data from the five Tauruses
A4 Shot File Formats for Controlled Source ProjectsYou have two options for defining shots for a Controlled Source project manually defining shots or importing shots from a shot file
You can create shot files in one of following three file formats
Microsoft Office Excel (xls) ndash See Section A41 ldquoCreating a Shot File With Microsoft Office Excelrdquo on page 42
OpenOfficeorg Calc (ods) ndash See Section A42 ldquoCreating a Shot File With OpenOfficeorg Calcrdquo on page 44
Comma-Separated Values (csv) ndash See Section A43 ldquoCreating a Comma-Separated Values Shot Filerdquo on page 45
The Shot file templates are located in the docShotFileImport folder on the Apollo Project CD
A41 Creating a Shot File With Microsoft Office ExcelThe Microsoft Office Excel template for Apollo Project can be used with Microsoft Office Excel version 2003 or later
To create an Microsoft Office Excel based shot file
1 Double-click ShotFileTemplatexlt
A new Microsoft Office Excel file is created from the template and opens in the Microsoft Office Excel
2 Save the new spreadsheet as a Microsoft Office Excel document (xls)
3 Enter shot file data as specified in the Microsoft Office Excel spreadsheet
Only the decimal separator is supported for shot files Separators that denote the 3rd power of 10 (thousand) are not supported (for example 4500) The Microsoft Excel and OpenOffice templates reinforce these restrictions and are recommended for creating csv files
Appendix A Reference Information and Examples
Apollo Project User Guide16106R5 2009-03-24
43
You can enter data for multiple shot times
4 Click Save to save the file in Microsoft Office Excel format
5 Click File gt Save As and select CSV (Comma delimited) (csv) from the Save as type list
6 Click Save
7 Click OK on the message warning you that you are only saving the active sheet
8 Click Yes on the message warning you that file features might be incompatible with the csv format
9 Close Microsoft Office Excel
If you are using Microsoft Office Excel 2007 click the Microsoft Office Button and click Save As
Ensure that you save the file as a comma delimited file If the shot file is mistakenly saved in Microsoft Excel format (xls) the shot file will not work in Apollo Project
Appendix A Reference Information and Examples
44 Apollo Project User Guide16106R5 2009-03-24
A42 Creating a Shot File With OpenOfficeorg CalcThe OpenOffice template has been tested with OpenOfficeorg Calc version 23 Later versions of OpenOfficeorg Calc can be used at your discretion
To create a shot file based on the OpenOfficeorg Calc template
1 Double-click ShotFileTemplateots
A new OpenOffice spreadsheet is created from the template and opens in OpenOfficeorg Calc
2 Save the new spreadsheet as an OpenOffice Calc document (ods)
3 Enter the shot file data as specified in the OpenOffice spreadsheet
You can enter data for multiple shot times
4 Click Save to save the file in OpenOfficeorg Calc format
5 Click File gt Save As and select Text CSV (csv) from the Save as Type list
6 Select the Edit filter settings check box
7 Click Save
A warning message might appear that warns you that the document might contain formatting that cannot be saved in the csv format Click Yes on the warning message to save the file in csv format
The Export of text files window opens
8 Delete the double quotation marks () in the Text delimiter box and ensure that the Save cell content as shown check box is selected
9 Click OK to export the OpenOffice spreadsheet as a csv file
10 Click OK on the warning message
11 Close OpenOfficeorg Calc
Appendix A Reference Information and Examples
Apollo Project User Guide16106R5 2009-03-24
45
A43 Creating a Comma-Separated Values Shot FileYou can use any text editor to create a csv shot file
To create a csv shot file
1 Open ShotFileTemplatecsv in a text editor and save it with a different name
2 Format each line of the csv file as follows
Shot TimePre TimePost TimeLatitudeLongitudeElevation
For example
2008-08-28 103044090600000-6000004267
The format and units are as follows
3 Save the file as a csv formatted file
The csv shot file template is not compatible with Microsoft Office Excel Make sure that you do not double-click it and open it in Microsoft Office Excel
FormatUnits
Shot Time yyyy-mm-dd hhmmss
Pre Time seconds
Post Time seconds
Latitude degrees
Longitude degrees
Elevation meters
Appendix A Reference Information and Examples
46 Apollo Project User Guide16106R5 2009-03-24
Apollo Project User Guide16106R5 2009-03-24
47
Appendix B Retrieving SOH Data from a Taurus Version 2x
Taurus Version 2x SOH Data Retrieved by Apollo Project
Retrieving SOH Data from a Taurus Version 2x Streaming to Apollo Server
B1 Taurus Version 2x SOH Data Retrieved by Apollo Project This section presents the predefined datasets of SOH data Apollo Project will retrieve from a Taurus version 2x either through a direct connection or a stream to Apollo Server For instruction on retrieving streaming Taurus version 2x data from Apollo Server see Section B2 ldquoRetrieving SOH Data from a Taurus Version 2x Streaming to Apollo Serverrdquo on page 48
The order of the columns presented in the table below will differ when streaming Taurus version 2x SOH data from Apollo Server
Predefined SOH group SOH data
GPS Time Time (longsecs) (the number of seconds since 1970-01-01)Time (UTC) (time in yyyy-mm-dd hhmmssms format)Altitude (m)DAC CountError (ns) (time error)GPS Engine StatusLast Update Time(s)Lat (deg) (latitude in degrees)Long (deg) (longitude in degrees)NumSatellites (number of satellites used)PDOPPhaseLock (system clock phase lock)TDOPUncertainty (ns) (time uncertainty)
Note The values for Number of satellites used PDOP and TDOP are provided by the GPS receiver at the Last update time In order to see what time these values correspond to look at the Last update time When GPS is off these three parameters and the Last update time are not updated The last value displays until the next update arrives (after the GPS is turned on again)
Appendix B Retrieving SOH Data from a Taurus Version 2x
48 Apollo Project User Guide16106R5 2009-03-24
B2 Retrieving SOH Data from a Taurus Version 2x Streaming to Apollo ServerThis section provides instruction on configuring your Taurus version 2x to stream data to Apollo Server and instructions on how to use Apollo Project to retrieve this data from Apollo Server
B21 Streaming Data from a Taurus Version 2x to Apollo ServerUse the Taurus graphical user interface on either the Taurus display screen or through a Web browser to set up an NP stream from a Taurus version 2x to Apollo Server
1 Log in to the Taurus version 2x with either the tech or central user account
2 Select Advanced Configuration gt Communications gt NP Data Streaming
GPS Satellites Time (longsecs) (the number of seconds since 1970-01-01)Time (UTC) (time in yyyy-mm-dd hhmmssms format)
For each satelliteAcquisition FlagLast Update Time (ms)PRNSatellite Azimuth (microordm)Satellite Elevation (microordm)Signal Level (AMU)
Environment Time (longsecs) (the number of seconds since 1970-01-01)Time (UTC) (time in yyyy-mm-dd hhmmssms format)External SOH Voltage 1 (V) (12-bit voltage input) External SOH Voltage 2 (V) (12-bit voltage input) External SOH Voltage 3 (V) (12-bit voltage input) External SOH Voltage 4 (V) (12-bit voltage input) Sensor SOH Voltage 1 (V)Sensor SOH Voltage 2 (V)Sensor SOH Voltage 3 (V)
Instrument Time (longsecs) (the number of seconds since 1970-01-01)Time (UTC) (time in yyyy-mm-dd hhmmssms format)Controller Current (mA)Digitizer Current (mA)NMX Bus Current (mA) (external connector)Sensor Current (mA)Serial Port Current (mA)Supply Voltage (mV)Temperature (ordmC)
Predefined SOH group SOH data
Appendix B Retrieving SOH Data from a Taurus Version 2x
Apollo Project User Guide16106R5 2009-03-24
49
3 To have the Taurus stream both time series and SOH data to Apollo Server select both Stream Time Series and Stream SOH
-OR-
Select only Stream SOH if you only want to retrieve the SOH data from Apollo Server
4 Type the IP address for Apollo Server in the IP Address box
5 Type the port number Apollo Server uses to receive data in the Port box By default this is port number 32008
6 The Second IP Address and Second Port boxes are not necessary however cannot be left blank Type 127001 in the Second IP Address box and 32004 in the Second Port box
7 Type a value in the Maximum Throughput [bps] box if a limited data link is present between the Taurus and Apollo Server For instance if at some point the data link is limited to 9600 bps then this is the maximum throughput the link can allow If there are no throughput limitations set the value in this box to zero to disable the throughput limitation
8 Click Apply
9 Click Commit
B22 Retrieving Taurus Version 2x Data from Apollo ServerCreate a new project or use an existing project in Apollo Project to retrieve the Taurus version 2x data from Apollo Server For more information on creating or editing projects refer to Section 31 ldquoCreating New Projectsrdquo on page 11 and Section 36 ldquoEditing and Viewing the Settings of Projectsrdquo on page 31
When creating or editing the project
a) Add an IP address Store specification on the Store Selection tab (see step 4 in Section 31 ldquoCreating New Projectsrdquo) for Apollo Server including its client Web application port number Use the format
Apollo Server IP AddressApollo Server Client Web Application Port Number
b) Apply the appropriate filters on the Channel Group Selection tab to retrieve the desired channel groups from the Taurus version 2x See step 5 through step 12 in Section 31 ldquoCreating New Projectsrdquo for instruction on using the Channel Group Selection tab
Appendix B Retrieving SOH Data from a Taurus Version 2x
50 Apollo Project User Guide16106R5 2009-03-24
Apollo Project User Guide16106R5 2009-03-24
51
Appendix C Glossary
Glossary of Abbreviations and Terms
List of Unit Abbreviations and Symbols
C1 Glossary of Abbreviations and Terms
A
ASCIIAmerican Standard Code for Information Interchange
B
BHEBroad Band High Gain Seismometer East-West Orientation
Channel name based on the Global Seismological Network (GSN) standard
BHNBroad Band High Gain Seismometer North-South Orientation
Channel name based on the Global Seismological Network (GSN) standard
BHZBroad Band High Gain Seismometer Vertical Orientation
Channel name based on the Global Seismological Network (GSN) standard
Appendix C Glossary
52 Apollo Project User Guide16106R5 2009-03-24
C
CSVComma-Separated Values
D
DACDigital to Analog Converter
G
GPSGlobal Positioning System
J
JREJava Runtime Environment
JVMJava Virtual Machine
N
NFSNetwork File System
P
PDOPPosition Dilution of Precision
PRNPseudo-random Number
Appendix C Glossary
Apollo Project User Guide16106R5 2009-03-24
53
S
SACSeismic Analysis Code
An Apollo Project output file format that generates files that can be used by the SAC software (see http wwwirisedusoftwaresac)
SEEDStandard for the Exchange of Earthquake Data
SMBServer Message Block
SOHState of Health
T
TCPIPTransmission Control ProtocolInternet Protocol
TDOPTime Dilution of Precision
U
UNCUniform Naming Convention or Universal Naming Convention
URLUniform Resource Locator
UTCCoordinated Universal Time
Appendix C Glossary
54 Apollo Project User Guide16106R5 2009-03-24
C2 List of Unit Abbreviations and SymbolsTable C-1 provides a list of unit abbreviations and symbols commonly used in Nanometrics documentation
Table C-1 Unit abbreviations and symbols
Abbreviation or Symbol Definition Abbreviation
or Symbol Definition
deg degree lb pound
Oslash diameter m metre
micro micro ms metre per second
Ω ohm ms2 metre per second squared
A ampere mA milliampere
AC alternating current MB megabyte
b bit MΩ megaohm
B byte MHz megahertz
bps bits per second mi mile
C Celsius mL millilitre
cm centimetre mm millimetre
dB decibel ms millisecond
DC direct current MTU maximum transmission unit
F farad mV millivolt
ft foot mW milliwatt
g gram N Newton
g gravity nF nanofarad
GB gigabyte ns nanosecond
GHz gigahertz rad radian
Hz hertz rads radian per second
in inch s second
KB kilobyte sps samples per second
kg kilogram U rack unit
kHz kilohertz V volt
kΩ kiloohm Vpp Volts peak-to-peak
kW kilowatt W watt
L litre
Apollo Project User Guide16106R5 2009-03-24
55
About NanometricsNanometrics is a world leader in the development of precision instrumentation network technology and software applications for seismological and environmental studies Using Nanometrics technology our customers establish and grow research networks that are often located in extreme environments such as the frozen Arctic and Antarctic the arid deserts of the Middle East the jungles of South America and the depths of the worlds oceans Many of these are mission-critical national and regional networks that demand the highest possible data quality and availability
Nanometrics provides end-to-end solutions that include a growing portfolio of broadband and strong motion seismometers dataloggers and digitizers satellite ground station systems for remote site data collection and software applications for data and network analysis and management To support this portfolio Nanometrics also provides global systems engineering services for design installation and support of complete networks
Our head office research and development centre and production facility are located in the Kanata North Business Park of Ottawa the high-technology heart of Canadas capital region
Contacting NanometricsNanometrics Inc250 Herzberg RoadKanata Ontario Canada K2K 2A1Phone +1 613-592-6776Fax +1 613-592-5929Email infonanometricscaWeb wwwnanometricsca
Contacting Technical SupportIf you need technical support please submit a request on the Nanometrics technical support site or by email or fax Include a full explanation of the problem and related information such as log filesSupport site httpsupportnanometricsca
Email techsupportnanometricsca
Chapter 3 Retrieving Data
34 Apollo Project User Guide16106R5 2009-03-24
373 Monitoring the Status of a Running ProjectYou can view the data retrieval status of a project while it is running on the Retrieval Status page The Retrieval Status page is displayed automatically when you click Run Now to run a project You can also view this page by opening a project and clicking the Retrieval Status tab
The status for each channel group is expressed in the form of two numbers (for example 60100) and two bar graphs The first number is the percentage available of the total time requested (for example 60) and the second number is the percentage retrieved of the time available (for example 100) For more information on the bar graph status colours see Section 3731 ldquoStatus Coloursrdquo on page 34
You can also view retrieval details for each channel group listed on the Retrieval Status page For more information see Section 3732 ldquoViewing the Retrieval Details for Each Channel Grouprdquo on page 35
3731 Status Colours
The data retrieval status bars use the following status colours
The information that is displayed on the Retrieval Status page is updated continuously while a project is running
Table 3-1 Status colours
Colour Status
Green Apollo Project has retrieved the data
Yellow Apollo Project is attempting to retrieve available data from the Store
Red Data is available in the Store but Apollo Project has failed to retrieve it on this attempt Apollo Project will make additional attempts to retrieve the data up to the configured Maximum Number of Retrieval Attempts For information on how to set the Maximum Number of Retrieval Attempts setting see Section 31 ldquoCreating New Projectsrdquo on page 11
White Data for some portion of the requested time segment is not available in the Store For example there are gaps in the data or the retrieval request is for a future time segment
Chapter 3 Retrieving Data
Apollo Project User Guide16106R5 2009-03-24
35
3732 Viewing the Retrieval Details for Each Channel Group
You can view the retrieval status of each time segment for a channel group
1 Click a channel group name
2 Click the Channel Group Details button that is located to the right of the channel group name
The Remaining Retrieval Attempts column displays the number of times that Apollo Project will try to download each missing time segment for the channel group when the project is run again For information on how to set the Maximum Number of Retrieval Attempts setting see Section 33 ldquoConfiguring Apollo Projectrdquo on page 24
3 Click OK when you have finished viewing the details
Chapter 3 Retrieving Data
36 Apollo Project User Guide16106R5 2009-03-24
Apollo Project User Guide16106R5 2009-03-24
37
Appendix A Reference Information and Examples
Overview of Running Projects
Example Project Settings
Example Deployment Scenarios
Shot File Formats for Controlled Source Projects
A1 Overview of Running ProjectsWhen a project is run Apollo Project performs the following steps
1 The requested time ranges are identified
2 The channel groups for which data are to be retrieved are identified
3 The actual Stores specified by the Store specifications of the project are identified
For each identified Store the following steps are performed
1 A data availability analysis for the outstanding time ranges is performed These are for the ranges for which data has not already been retrieved The availability of the data is recorded for reference It is possible that a given Store was not present at the time the project was last run If this is the case then an attempt is made to retrieve all of the required time ranges of the project from the Store
2 If any data exists in the Store for any of the requested time ranges then a retrieval of this data is performed and the retrieved data is stored to local temporary files
3 If the number of retrieval attempts for a given time range exceeds a configurable threshold (see Section 33 ldquoConfiguring Apollo Projectrdquo on page 24) then the retrieval of data within the stated range is not attempted again
If any data was retrieved during the run of the project then the corresponding output files of the desired output format are generated and stored in the output location specified for the project
When running Apollo Project with Taurus version 2x the schedule for Archive projects must be greater than 5 minutes in duration Schedules that are less than 5 minutes can result in data that is missing or not downloaded
Appendix A Reference Information and Examples
38 Apollo Project User Guide16106R5 2009-03-24
It is possible that the requested data for a given channel group exists across multiple Stores If all of these Stores are included by the Store specifications for the project then Apollo Project assembles the requested data
When a project runs detailed information regarding the results of the retrieved data and processed data are available For more information see Section 37 ldquoMonitoring Project Statusrdquo on page 32
A2 Example Project Settings
A21 Example 1 One Time ProjectProject Name Project1
Project Type One Time
Channel groups selected for retrieval CASTN1OTBHZ (on taurus_1234)
Requested Time Range January 30 2008 1400 ndash 1500 UTC
File Interval 20 minutes
Output Location Base Directory disk2ApolloProjectOutputData
Output Location Subdirectories projectyearmonthday
Output Location Filenamestationnetwork_time
When the project is run successfully the following output files will be created on the server running Apollo Project
disk2ApolloProjectOutputDataProject120080130STN1CA_20080130_140000seed
disk2ApolloProjectOutputDataProject120080130STN1CA_20080130_142000seed
disk2ApolloProjectOutputDataProject120080130STN1CA_20080130_144000seed
Appendix A Reference Information and Examples
Apollo Project User Guide16106R5 2009-03-24
39
A22 Example 2 Controlled Source ProjectProject Name Project2
Project Type Controlled Source
Channel groups selected for retrieval CASTN1OTBHZ (on taurus_1234) CASTN1OTBHN (on taurus_1234)
Requested Shot Times January 30 2008 1400 UTC January 30 2008 1430 UTC
Pre Time 30 seconds
Post Time 30 seconds
Output Location Base Directory disk2ApolloProjectOutputData
Output Location Subdirectories projectyearmonthday
Output Location Filename timeformat
When the project is run successfully the following output files will be created on the server running Apollo Project
disk2ApolloProjectOutputDataProject22008013020080130_135930segysgy
disk2ApolloProjectOutputDataProject22008013020080130_142930segysgy
A3 Example Deployment Scenarios
A31 One TimeYou want to download three days of data from multiple instruments on the network save the data in MiniSEED format and create a file for every hour of data
A One Time project is the recommended solution The Store of each instrument can be made available to Apollo Project by creating a corresponding IP Address Store specification with the IP address of the instrument The requested time range can be specified along with a file interval of one hour Ensure that the instruments are configured to run in Communications mode
A32 Scheduled ArchiveYou want seismic data to be retrieved automatically from a group of instruments on the network every six hours The instruments are always accessible via an Ethernet connection
A scheduled Archive project is the recommended solution Use the Regular Interval scheduling option and set the interval to six hours
You can also run a scheduled Archive project at any time For example if the scheduled retrieval interval of a project is six hours and between intervals you want to retrieve the data three hours early you can run the project and approximately three additional hours of data would be accumulated About three hours later the project will run automatically and accumulate the remaining three hours of data
Appendix A Reference Information and Examples
40 Apollo Project User Guide16106R5 2009-03-24
A33 Manual ArchiveYou want to retrieve seismic data from a group of instruments but their respective Stores are only available for retrieval on occasion (no regular dependable schedule for retrieval from these Stores is possible)
A manually run Archive project is the recommended solution You can create the project and run it whenever any of the instruments are available for retrieval
A34 Field ArchiveYou want to collect data from a set of isolated instruments in the field at recurring intervals (for example twice per month)
A Field Archive project is the recommended solution You can create a Field Archive project and either add all instrument IP addresses to the list or use a Discovery specification The time for the last retrieval is stored on the instrument and all data is recovered from the last recovery time
A35 Media HarvestingYou want to collect the media from a set of instruments in the field at a regular interval (for example once per week) You also have to retrieve all of the seismic data on the media for subsequent analysis
An Archive project is the recommended solution Initially a directory is created on the file system of the server running Apollo Project A directory Store specification is created with this directory as the parent directory from which to search for Stores The content of each media instance in the weekrsquos collection is copied from a media reader to a subdirectory of the directory When the project is run all of the copied Stores are automatically available and the project accumulates data for each instrument
Due to the nature of media harvesting and the replacement procedure for this example data is always missing for the last period of output files for the current week This period corresponds to the time that the media was taken from the instrument and replaced with a new one The following week when the media is harvested again from the instruments in the field Apollo Project fills in the missing time for these files with the new Store data regardless of the media instance on which the data currently resides
You can only create and run Field Archive projects for Taurus version 30 or later
Appendix A Reference Information and Examples
Apollo Project User Guide16106R5 2009-03-24
41
A36 Trigger Downloading You have set up a network of five Tauruses around a hydro dam Each Taurus is accessible over an Ethernet connection and each is set to record data over the weekend You have set the period for data retrieval at 30 seconds before and five minutes after any seismic activity but the following procedure shows you why it is not necessary to view all of the data accumulated over the whole weekend
1 Select the Taurus at the site with the least environmental noise or determine the best site for generating triggers and designate this Taurus ldquoTaurus Ardquo for reference
You need to perform this task in advance More information about triggers can be found in the Taurus Portable Seismograph User Guide
2 Download the trigger file from ldquoTaurus Ardquo and review the file to verify the correct number of triggers
3 Follow these steps to create a new Triggers project
a) Click New on the Apollo Project Existing Projects page
b) Click Triggers as the project type and enter a unique name in the Project Name box
c) Click OK
d) Click the IP Address tab on the Store Selection tab
e) Enter the IP address of a Taurus
f) Click Add
g) Repeat step e until you have entered the IP addresses of all five of the Tauruses
Apollo Project adds the IP address specifications to the Selected Specifications section of the Store Selection page and finds all five Stores associated with the IP addresses and adds them to the Selected Stores section
h) Click the Channel Group Selection tab
i) Click Create Default Station Table to create a table for all of the currently selected Stores and discovered instruments
j) Review the selected channel groups and if required edit the mappings in the selected channel groups area of the tab (lower half of the tab)
k) Click the Time Selection tab
l) Click the Browse button
m)Select the trigger file that you downloaded in step 2 and click OK
n) Click Submit
The list of triggers is imported and displayed in the Triggers section on the Time Selection page
o) Enter a Pre Time of 30 seconds and a Post Time of 5 minutes
p) Click the Output Format tab
q) Click MiniSEED
r) Click All Instruments
s) Click the Output Location tab
Appendix A Reference Information and Examples
42 Apollo Project User Guide16106R5 2009-03-24
t) Enter the valid absolute path of the base directory for the processed data subfolders and files
u) Enter the expression used to define path names for subfolders under the base directory
v) Enter the expression used to define file names for the processed data files that are stored in the subfolders under the base directory
w) Click OK
4 Click the Run Now button on the Summary page
When the project has finished running the output folder you specified in step t will contain ten files Each output file will contain 5 minutes and 30 seconds of data from the five Tauruses
A4 Shot File Formats for Controlled Source ProjectsYou have two options for defining shots for a Controlled Source project manually defining shots or importing shots from a shot file
You can create shot files in one of following three file formats
Microsoft Office Excel (xls) ndash See Section A41 ldquoCreating a Shot File With Microsoft Office Excelrdquo on page 42
OpenOfficeorg Calc (ods) ndash See Section A42 ldquoCreating a Shot File With OpenOfficeorg Calcrdquo on page 44
Comma-Separated Values (csv) ndash See Section A43 ldquoCreating a Comma-Separated Values Shot Filerdquo on page 45
The Shot file templates are located in the docShotFileImport folder on the Apollo Project CD
A41 Creating a Shot File With Microsoft Office ExcelThe Microsoft Office Excel template for Apollo Project can be used with Microsoft Office Excel version 2003 or later
To create an Microsoft Office Excel based shot file
1 Double-click ShotFileTemplatexlt
A new Microsoft Office Excel file is created from the template and opens in the Microsoft Office Excel
2 Save the new spreadsheet as a Microsoft Office Excel document (xls)
3 Enter shot file data as specified in the Microsoft Office Excel spreadsheet
Only the decimal separator is supported for shot files Separators that denote the 3rd power of 10 (thousand) are not supported (for example 4500) The Microsoft Excel and OpenOffice templates reinforce these restrictions and are recommended for creating csv files
Appendix A Reference Information and Examples
Apollo Project User Guide16106R5 2009-03-24
43
You can enter data for multiple shot times
4 Click Save to save the file in Microsoft Office Excel format
5 Click File gt Save As and select CSV (Comma delimited) (csv) from the Save as type list
6 Click Save
7 Click OK on the message warning you that you are only saving the active sheet
8 Click Yes on the message warning you that file features might be incompatible with the csv format
9 Close Microsoft Office Excel
If you are using Microsoft Office Excel 2007 click the Microsoft Office Button and click Save As
Ensure that you save the file as a comma delimited file If the shot file is mistakenly saved in Microsoft Excel format (xls) the shot file will not work in Apollo Project
Appendix A Reference Information and Examples
44 Apollo Project User Guide16106R5 2009-03-24
A42 Creating a Shot File With OpenOfficeorg CalcThe OpenOffice template has been tested with OpenOfficeorg Calc version 23 Later versions of OpenOfficeorg Calc can be used at your discretion
To create a shot file based on the OpenOfficeorg Calc template
1 Double-click ShotFileTemplateots
A new OpenOffice spreadsheet is created from the template and opens in OpenOfficeorg Calc
2 Save the new spreadsheet as an OpenOffice Calc document (ods)
3 Enter the shot file data as specified in the OpenOffice spreadsheet
You can enter data for multiple shot times
4 Click Save to save the file in OpenOfficeorg Calc format
5 Click File gt Save As and select Text CSV (csv) from the Save as Type list
6 Select the Edit filter settings check box
7 Click Save
A warning message might appear that warns you that the document might contain formatting that cannot be saved in the csv format Click Yes on the warning message to save the file in csv format
The Export of text files window opens
8 Delete the double quotation marks () in the Text delimiter box and ensure that the Save cell content as shown check box is selected
9 Click OK to export the OpenOffice spreadsheet as a csv file
10 Click OK on the warning message
11 Close OpenOfficeorg Calc
Appendix A Reference Information and Examples
Apollo Project User Guide16106R5 2009-03-24
45
A43 Creating a Comma-Separated Values Shot FileYou can use any text editor to create a csv shot file
To create a csv shot file
1 Open ShotFileTemplatecsv in a text editor and save it with a different name
2 Format each line of the csv file as follows
Shot TimePre TimePost TimeLatitudeLongitudeElevation
For example
2008-08-28 103044090600000-6000004267
The format and units are as follows
3 Save the file as a csv formatted file
The csv shot file template is not compatible with Microsoft Office Excel Make sure that you do not double-click it and open it in Microsoft Office Excel
FormatUnits
Shot Time yyyy-mm-dd hhmmss
Pre Time seconds
Post Time seconds
Latitude degrees
Longitude degrees
Elevation meters
Appendix A Reference Information and Examples
46 Apollo Project User Guide16106R5 2009-03-24
Apollo Project User Guide16106R5 2009-03-24
47
Appendix B Retrieving SOH Data from a Taurus Version 2x
Taurus Version 2x SOH Data Retrieved by Apollo Project
Retrieving SOH Data from a Taurus Version 2x Streaming to Apollo Server
B1 Taurus Version 2x SOH Data Retrieved by Apollo Project This section presents the predefined datasets of SOH data Apollo Project will retrieve from a Taurus version 2x either through a direct connection or a stream to Apollo Server For instruction on retrieving streaming Taurus version 2x data from Apollo Server see Section B2 ldquoRetrieving SOH Data from a Taurus Version 2x Streaming to Apollo Serverrdquo on page 48
The order of the columns presented in the table below will differ when streaming Taurus version 2x SOH data from Apollo Server
Predefined SOH group SOH data
GPS Time Time (longsecs) (the number of seconds since 1970-01-01)Time (UTC) (time in yyyy-mm-dd hhmmssms format)Altitude (m)DAC CountError (ns) (time error)GPS Engine StatusLast Update Time(s)Lat (deg) (latitude in degrees)Long (deg) (longitude in degrees)NumSatellites (number of satellites used)PDOPPhaseLock (system clock phase lock)TDOPUncertainty (ns) (time uncertainty)
Note The values for Number of satellites used PDOP and TDOP are provided by the GPS receiver at the Last update time In order to see what time these values correspond to look at the Last update time When GPS is off these three parameters and the Last update time are not updated The last value displays until the next update arrives (after the GPS is turned on again)
Appendix B Retrieving SOH Data from a Taurus Version 2x
48 Apollo Project User Guide16106R5 2009-03-24
B2 Retrieving SOH Data from a Taurus Version 2x Streaming to Apollo ServerThis section provides instruction on configuring your Taurus version 2x to stream data to Apollo Server and instructions on how to use Apollo Project to retrieve this data from Apollo Server
B21 Streaming Data from a Taurus Version 2x to Apollo ServerUse the Taurus graphical user interface on either the Taurus display screen or through a Web browser to set up an NP stream from a Taurus version 2x to Apollo Server
1 Log in to the Taurus version 2x with either the tech or central user account
2 Select Advanced Configuration gt Communications gt NP Data Streaming
GPS Satellites Time (longsecs) (the number of seconds since 1970-01-01)Time (UTC) (time in yyyy-mm-dd hhmmssms format)
For each satelliteAcquisition FlagLast Update Time (ms)PRNSatellite Azimuth (microordm)Satellite Elevation (microordm)Signal Level (AMU)
Environment Time (longsecs) (the number of seconds since 1970-01-01)Time (UTC) (time in yyyy-mm-dd hhmmssms format)External SOH Voltage 1 (V) (12-bit voltage input) External SOH Voltage 2 (V) (12-bit voltage input) External SOH Voltage 3 (V) (12-bit voltage input) External SOH Voltage 4 (V) (12-bit voltage input) Sensor SOH Voltage 1 (V)Sensor SOH Voltage 2 (V)Sensor SOH Voltage 3 (V)
Instrument Time (longsecs) (the number of seconds since 1970-01-01)Time (UTC) (time in yyyy-mm-dd hhmmssms format)Controller Current (mA)Digitizer Current (mA)NMX Bus Current (mA) (external connector)Sensor Current (mA)Serial Port Current (mA)Supply Voltage (mV)Temperature (ordmC)
Predefined SOH group SOH data
Appendix B Retrieving SOH Data from a Taurus Version 2x
Apollo Project User Guide16106R5 2009-03-24
49
3 To have the Taurus stream both time series and SOH data to Apollo Server select both Stream Time Series and Stream SOH
-OR-
Select only Stream SOH if you only want to retrieve the SOH data from Apollo Server
4 Type the IP address for Apollo Server in the IP Address box
5 Type the port number Apollo Server uses to receive data in the Port box By default this is port number 32008
6 The Second IP Address and Second Port boxes are not necessary however cannot be left blank Type 127001 in the Second IP Address box and 32004 in the Second Port box
7 Type a value in the Maximum Throughput [bps] box if a limited data link is present between the Taurus and Apollo Server For instance if at some point the data link is limited to 9600 bps then this is the maximum throughput the link can allow If there are no throughput limitations set the value in this box to zero to disable the throughput limitation
8 Click Apply
9 Click Commit
B22 Retrieving Taurus Version 2x Data from Apollo ServerCreate a new project or use an existing project in Apollo Project to retrieve the Taurus version 2x data from Apollo Server For more information on creating or editing projects refer to Section 31 ldquoCreating New Projectsrdquo on page 11 and Section 36 ldquoEditing and Viewing the Settings of Projectsrdquo on page 31
When creating or editing the project
a) Add an IP address Store specification on the Store Selection tab (see step 4 in Section 31 ldquoCreating New Projectsrdquo) for Apollo Server including its client Web application port number Use the format
Apollo Server IP AddressApollo Server Client Web Application Port Number
b) Apply the appropriate filters on the Channel Group Selection tab to retrieve the desired channel groups from the Taurus version 2x See step 5 through step 12 in Section 31 ldquoCreating New Projectsrdquo for instruction on using the Channel Group Selection tab
Appendix B Retrieving SOH Data from a Taurus Version 2x
50 Apollo Project User Guide16106R5 2009-03-24
Apollo Project User Guide16106R5 2009-03-24
51
Appendix C Glossary
Glossary of Abbreviations and Terms
List of Unit Abbreviations and Symbols
C1 Glossary of Abbreviations and Terms
A
ASCIIAmerican Standard Code for Information Interchange
B
BHEBroad Band High Gain Seismometer East-West Orientation
Channel name based on the Global Seismological Network (GSN) standard
BHNBroad Band High Gain Seismometer North-South Orientation
Channel name based on the Global Seismological Network (GSN) standard
BHZBroad Band High Gain Seismometer Vertical Orientation
Channel name based on the Global Seismological Network (GSN) standard
Appendix C Glossary
52 Apollo Project User Guide16106R5 2009-03-24
C
CSVComma-Separated Values
D
DACDigital to Analog Converter
G
GPSGlobal Positioning System
J
JREJava Runtime Environment
JVMJava Virtual Machine
N
NFSNetwork File System
P
PDOPPosition Dilution of Precision
PRNPseudo-random Number
Appendix C Glossary
Apollo Project User Guide16106R5 2009-03-24
53
S
SACSeismic Analysis Code
An Apollo Project output file format that generates files that can be used by the SAC software (see http wwwirisedusoftwaresac)
SEEDStandard for the Exchange of Earthquake Data
SMBServer Message Block
SOHState of Health
T
TCPIPTransmission Control ProtocolInternet Protocol
TDOPTime Dilution of Precision
U
UNCUniform Naming Convention or Universal Naming Convention
URLUniform Resource Locator
UTCCoordinated Universal Time
Appendix C Glossary
54 Apollo Project User Guide16106R5 2009-03-24
C2 List of Unit Abbreviations and SymbolsTable C-1 provides a list of unit abbreviations and symbols commonly used in Nanometrics documentation
Table C-1 Unit abbreviations and symbols
Abbreviation or Symbol Definition Abbreviation
or Symbol Definition
deg degree lb pound
Oslash diameter m metre
micro micro ms metre per second
Ω ohm ms2 metre per second squared
A ampere mA milliampere
AC alternating current MB megabyte
b bit MΩ megaohm
B byte MHz megahertz
bps bits per second mi mile
C Celsius mL millilitre
cm centimetre mm millimetre
dB decibel ms millisecond
DC direct current MTU maximum transmission unit
F farad mV millivolt
ft foot mW milliwatt
g gram N Newton
g gravity nF nanofarad
GB gigabyte ns nanosecond
GHz gigahertz rad radian
Hz hertz rads radian per second
in inch s second
KB kilobyte sps samples per second
kg kilogram U rack unit
kHz kilohertz V volt
kΩ kiloohm Vpp Volts peak-to-peak
kW kilowatt W watt
L litre
Apollo Project User Guide16106R5 2009-03-24
55
About NanometricsNanometrics is a world leader in the development of precision instrumentation network technology and software applications for seismological and environmental studies Using Nanometrics technology our customers establish and grow research networks that are often located in extreme environments such as the frozen Arctic and Antarctic the arid deserts of the Middle East the jungles of South America and the depths of the worlds oceans Many of these are mission-critical national and regional networks that demand the highest possible data quality and availability
Nanometrics provides end-to-end solutions that include a growing portfolio of broadband and strong motion seismometers dataloggers and digitizers satellite ground station systems for remote site data collection and software applications for data and network analysis and management To support this portfolio Nanometrics also provides global systems engineering services for design installation and support of complete networks
Our head office research and development centre and production facility are located in the Kanata North Business Park of Ottawa the high-technology heart of Canadas capital region
Contacting NanometricsNanometrics Inc250 Herzberg RoadKanata Ontario Canada K2K 2A1Phone +1 613-592-6776Fax +1 613-592-5929Email infonanometricscaWeb wwwnanometricsca
Contacting Technical SupportIf you need technical support please submit a request on the Nanometrics technical support site or by email or fax Include a full explanation of the problem and related information such as log filesSupport site httpsupportnanometricsca
Email techsupportnanometricsca
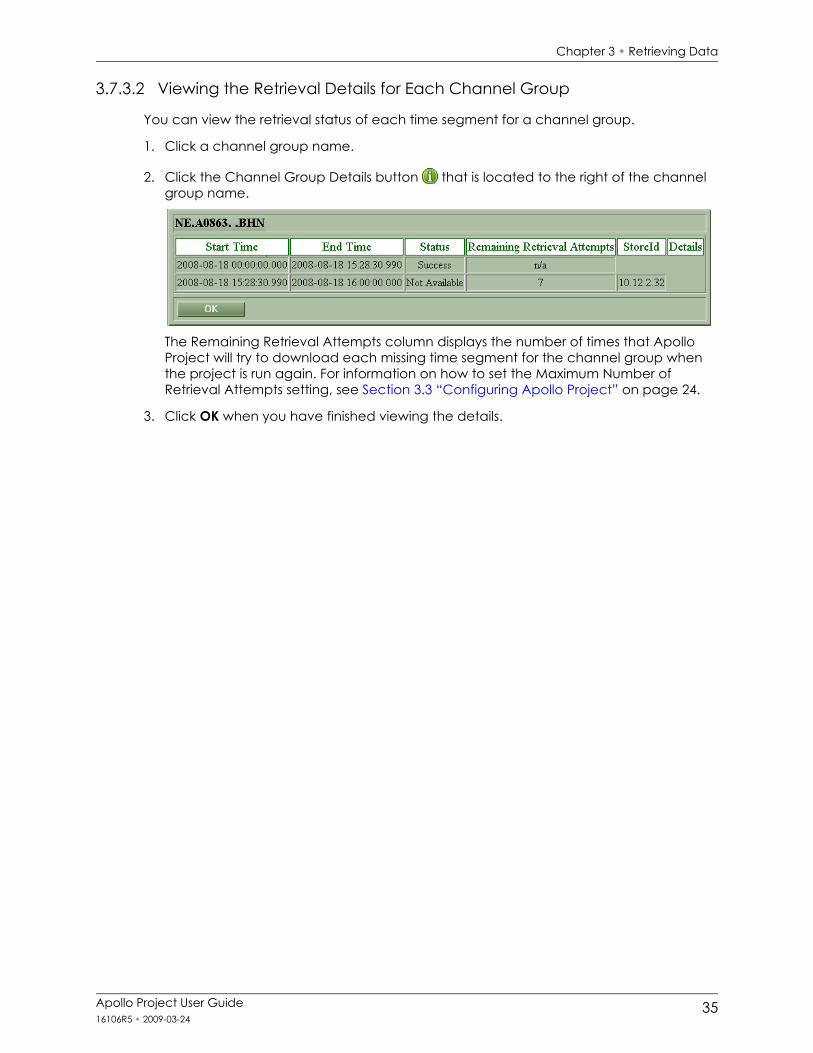
Chapter 3 Retrieving Data
Apollo Project User Guide16106R5 2009-03-24
35
3732 Viewing the Retrieval Details for Each Channel Group
You can view the retrieval status of each time segment for a channel group
1 Click a channel group name
2 Click the Channel Group Details button that is located to the right of the channel group name
The Remaining Retrieval Attempts column displays the number of times that Apollo Project will try to download each missing time segment for the channel group when the project is run again For information on how to set the Maximum Number of Retrieval Attempts setting see Section 33 ldquoConfiguring Apollo Projectrdquo on page 24
3 Click OK when you have finished viewing the details
Chapter 3 Retrieving Data
36 Apollo Project User Guide16106R5 2009-03-24
Apollo Project User Guide16106R5 2009-03-24
37
Appendix A Reference Information and Examples
Overview of Running Projects
Example Project Settings
Example Deployment Scenarios
Shot File Formats for Controlled Source Projects
A1 Overview of Running ProjectsWhen a project is run Apollo Project performs the following steps
1 The requested time ranges are identified
2 The channel groups for which data are to be retrieved are identified
3 The actual Stores specified by the Store specifications of the project are identified
For each identified Store the following steps are performed
1 A data availability analysis for the outstanding time ranges is performed These are for the ranges for which data has not already been retrieved The availability of the data is recorded for reference It is possible that a given Store was not present at the time the project was last run If this is the case then an attempt is made to retrieve all of the required time ranges of the project from the Store
2 If any data exists in the Store for any of the requested time ranges then a retrieval of this data is performed and the retrieved data is stored to local temporary files
3 If the number of retrieval attempts for a given time range exceeds a configurable threshold (see Section 33 ldquoConfiguring Apollo Projectrdquo on page 24) then the retrieval of data within the stated range is not attempted again
If any data was retrieved during the run of the project then the corresponding output files of the desired output format are generated and stored in the output location specified for the project
When running Apollo Project with Taurus version 2x the schedule for Archive projects must be greater than 5 minutes in duration Schedules that are less than 5 minutes can result in data that is missing or not downloaded
Appendix A Reference Information and Examples
38 Apollo Project User Guide16106R5 2009-03-24
It is possible that the requested data for a given channel group exists across multiple Stores If all of these Stores are included by the Store specifications for the project then Apollo Project assembles the requested data
When a project runs detailed information regarding the results of the retrieved data and processed data are available For more information see Section 37 ldquoMonitoring Project Statusrdquo on page 32
A2 Example Project Settings
A21 Example 1 One Time ProjectProject Name Project1
Project Type One Time
Channel groups selected for retrieval CASTN1OTBHZ (on taurus_1234)
Requested Time Range January 30 2008 1400 ndash 1500 UTC
File Interval 20 minutes
Output Location Base Directory disk2ApolloProjectOutputData
Output Location Subdirectories projectyearmonthday
Output Location Filenamestationnetwork_time
When the project is run successfully the following output files will be created on the server running Apollo Project
disk2ApolloProjectOutputDataProject120080130STN1CA_20080130_140000seed
disk2ApolloProjectOutputDataProject120080130STN1CA_20080130_142000seed
disk2ApolloProjectOutputDataProject120080130STN1CA_20080130_144000seed
Appendix A Reference Information and Examples
Apollo Project User Guide16106R5 2009-03-24
39
A22 Example 2 Controlled Source ProjectProject Name Project2
Project Type Controlled Source
Channel groups selected for retrieval CASTN1OTBHZ (on taurus_1234) CASTN1OTBHN (on taurus_1234)
Requested Shot Times January 30 2008 1400 UTC January 30 2008 1430 UTC
Pre Time 30 seconds
Post Time 30 seconds
Output Location Base Directory disk2ApolloProjectOutputData
Output Location Subdirectories projectyearmonthday
Output Location Filename timeformat
When the project is run successfully the following output files will be created on the server running Apollo Project
disk2ApolloProjectOutputDataProject22008013020080130_135930segysgy
disk2ApolloProjectOutputDataProject22008013020080130_142930segysgy
A3 Example Deployment Scenarios
A31 One TimeYou want to download three days of data from multiple instruments on the network save the data in MiniSEED format and create a file for every hour of data
A One Time project is the recommended solution The Store of each instrument can be made available to Apollo Project by creating a corresponding IP Address Store specification with the IP address of the instrument The requested time range can be specified along with a file interval of one hour Ensure that the instruments are configured to run in Communications mode
A32 Scheduled ArchiveYou want seismic data to be retrieved automatically from a group of instruments on the network every six hours The instruments are always accessible via an Ethernet connection
A scheduled Archive project is the recommended solution Use the Regular Interval scheduling option and set the interval to six hours
You can also run a scheduled Archive project at any time For example if the scheduled retrieval interval of a project is six hours and between intervals you want to retrieve the data three hours early you can run the project and approximately three additional hours of data would be accumulated About three hours later the project will run automatically and accumulate the remaining three hours of data
Appendix A Reference Information and Examples
40 Apollo Project User Guide16106R5 2009-03-24
A33 Manual ArchiveYou want to retrieve seismic data from a group of instruments but their respective Stores are only available for retrieval on occasion (no regular dependable schedule for retrieval from these Stores is possible)
A manually run Archive project is the recommended solution You can create the project and run it whenever any of the instruments are available for retrieval
A34 Field ArchiveYou want to collect data from a set of isolated instruments in the field at recurring intervals (for example twice per month)
A Field Archive project is the recommended solution You can create a Field Archive project and either add all instrument IP addresses to the list or use a Discovery specification The time for the last retrieval is stored on the instrument and all data is recovered from the last recovery time
A35 Media HarvestingYou want to collect the media from a set of instruments in the field at a regular interval (for example once per week) You also have to retrieve all of the seismic data on the media for subsequent analysis
An Archive project is the recommended solution Initially a directory is created on the file system of the server running Apollo Project A directory Store specification is created with this directory as the parent directory from which to search for Stores The content of each media instance in the weekrsquos collection is copied from a media reader to a subdirectory of the directory When the project is run all of the copied Stores are automatically available and the project accumulates data for each instrument
Due to the nature of media harvesting and the replacement procedure for this example data is always missing for the last period of output files for the current week This period corresponds to the time that the media was taken from the instrument and replaced with a new one The following week when the media is harvested again from the instruments in the field Apollo Project fills in the missing time for these files with the new Store data regardless of the media instance on which the data currently resides
You can only create and run Field Archive projects for Taurus version 30 or later
Appendix A Reference Information and Examples
Apollo Project User Guide16106R5 2009-03-24
41
A36 Trigger Downloading You have set up a network of five Tauruses around a hydro dam Each Taurus is accessible over an Ethernet connection and each is set to record data over the weekend You have set the period for data retrieval at 30 seconds before and five minutes after any seismic activity but the following procedure shows you why it is not necessary to view all of the data accumulated over the whole weekend
1 Select the Taurus at the site with the least environmental noise or determine the best site for generating triggers and designate this Taurus ldquoTaurus Ardquo for reference
You need to perform this task in advance More information about triggers can be found in the Taurus Portable Seismograph User Guide
2 Download the trigger file from ldquoTaurus Ardquo and review the file to verify the correct number of triggers
3 Follow these steps to create a new Triggers project
a) Click New on the Apollo Project Existing Projects page
b) Click Triggers as the project type and enter a unique name in the Project Name box
c) Click OK
d) Click the IP Address tab on the Store Selection tab
e) Enter the IP address of a Taurus
f) Click Add
g) Repeat step e until you have entered the IP addresses of all five of the Tauruses
Apollo Project adds the IP address specifications to the Selected Specifications section of the Store Selection page and finds all five Stores associated with the IP addresses and adds them to the Selected Stores section
h) Click the Channel Group Selection tab
i) Click Create Default Station Table to create a table for all of the currently selected Stores and discovered instruments
j) Review the selected channel groups and if required edit the mappings in the selected channel groups area of the tab (lower half of the tab)
k) Click the Time Selection tab
l) Click the Browse button
m)Select the trigger file that you downloaded in step 2 and click OK
n) Click Submit
The list of triggers is imported and displayed in the Triggers section on the Time Selection page
o) Enter a Pre Time of 30 seconds and a Post Time of 5 minutes
p) Click the Output Format tab
q) Click MiniSEED
r) Click All Instruments
s) Click the Output Location tab
Appendix A Reference Information and Examples
42 Apollo Project User Guide16106R5 2009-03-24
t) Enter the valid absolute path of the base directory for the processed data subfolders and files
u) Enter the expression used to define path names for subfolders under the base directory
v) Enter the expression used to define file names for the processed data files that are stored in the subfolders under the base directory
w) Click OK
4 Click the Run Now button on the Summary page
When the project has finished running the output folder you specified in step t will contain ten files Each output file will contain 5 minutes and 30 seconds of data from the five Tauruses
A4 Shot File Formats for Controlled Source ProjectsYou have two options for defining shots for a Controlled Source project manually defining shots or importing shots from a shot file
You can create shot files in one of following three file formats
Microsoft Office Excel (xls) ndash See Section A41 ldquoCreating a Shot File With Microsoft Office Excelrdquo on page 42
OpenOfficeorg Calc (ods) ndash See Section A42 ldquoCreating a Shot File With OpenOfficeorg Calcrdquo on page 44
Comma-Separated Values (csv) ndash See Section A43 ldquoCreating a Comma-Separated Values Shot Filerdquo on page 45
The Shot file templates are located in the docShotFileImport folder on the Apollo Project CD
A41 Creating a Shot File With Microsoft Office ExcelThe Microsoft Office Excel template for Apollo Project can be used with Microsoft Office Excel version 2003 or later
To create an Microsoft Office Excel based shot file
1 Double-click ShotFileTemplatexlt
A new Microsoft Office Excel file is created from the template and opens in the Microsoft Office Excel
2 Save the new spreadsheet as a Microsoft Office Excel document (xls)
3 Enter shot file data as specified in the Microsoft Office Excel spreadsheet
Only the decimal separator is supported for shot files Separators that denote the 3rd power of 10 (thousand) are not supported (for example 4500) The Microsoft Excel and OpenOffice templates reinforce these restrictions and are recommended for creating csv files
Appendix A Reference Information and Examples
Apollo Project User Guide16106R5 2009-03-24
43
You can enter data for multiple shot times
4 Click Save to save the file in Microsoft Office Excel format
5 Click File gt Save As and select CSV (Comma delimited) (csv) from the Save as type list
6 Click Save
7 Click OK on the message warning you that you are only saving the active sheet
8 Click Yes on the message warning you that file features might be incompatible with the csv format
9 Close Microsoft Office Excel
If you are using Microsoft Office Excel 2007 click the Microsoft Office Button and click Save As
Ensure that you save the file as a comma delimited file If the shot file is mistakenly saved in Microsoft Excel format (xls) the shot file will not work in Apollo Project
Appendix A Reference Information and Examples
44 Apollo Project User Guide16106R5 2009-03-24
A42 Creating a Shot File With OpenOfficeorg CalcThe OpenOffice template has been tested with OpenOfficeorg Calc version 23 Later versions of OpenOfficeorg Calc can be used at your discretion
To create a shot file based on the OpenOfficeorg Calc template
1 Double-click ShotFileTemplateots
A new OpenOffice spreadsheet is created from the template and opens in OpenOfficeorg Calc
2 Save the new spreadsheet as an OpenOffice Calc document (ods)
3 Enter the shot file data as specified in the OpenOffice spreadsheet
You can enter data for multiple shot times
4 Click Save to save the file in OpenOfficeorg Calc format
5 Click File gt Save As and select Text CSV (csv) from the Save as Type list
6 Select the Edit filter settings check box
7 Click Save
A warning message might appear that warns you that the document might contain formatting that cannot be saved in the csv format Click Yes on the warning message to save the file in csv format
The Export of text files window opens
8 Delete the double quotation marks () in the Text delimiter box and ensure that the Save cell content as shown check box is selected
9 Click OK to export the OpenOffice spreadsheet as a csv file
10 Click OK on the warning message
11 Close OpenOfficeorg Calc
Appendix A Reference Information and Examples
Apollo Project User Guide16106R5 2009-03-24
45
A43 Creating a Comma-Separated Values Shot FileYou can use any text editor to create a csv shot file
To create a csv shot file
1 Open ShotFileTemplatecsv in a text editor and save it with a different name
2 Format each line of the csv file as follows
Shot TimePre TimePost TimeLatitudeLongitudeElevation
For example
2008-08-28 103044090600000-6000004267
The format and units are as follows
3 Save the file as a csv formatted file
The csv shot file template is not compatible with Microsoft Office Excel Make sure that you do not double-click it and open it in Microsoft Office Excel
FormatUnits
Shot Time yyyy-mm-dd hhmmss
Pre Time seconds
Post Time seconds
Latitude degrees
Longitude degrees
Elevation meters
Appendix A Reference Information and Examples
46 Apollo Project User Guide16106R5 2009-03-24
Apollo Project User Guide16106R5 2009-03-24
47
Appendix B Retrieving SOH Data from a Taurus Version 2x
Taurus Version 2x SOH Data Retrieved by Apollo Project
Retrieving SOH Data from a Taurus Version 2x Streaming to Apollo Server
B1 Taurus Version 2x SOH Data Retrieved by Apollo Project This section presents the predefined datasets of SOH data Apollo Project will retrieve from a Taurus version 2x either through a direct connection or a stream to Apollo Server For instruction on retrieving streaming Taurus version 2x data from Apollo Server see Section B2 ldquoRetrieving SOH Data from a Taurus Version 2x Streaming to Apollo Serverrdquo on page 48
The order of the columns presented in the table below will differ when streaming Taurus version 2x SOH data from Apollo Server
Predefined SOH group SOH data
GPS Time Time (longsecs) (the number of seconds since 1970-01-01)Time (UTC) (time in yyyy-mm-dd hhmmssms format)Altitude (m)DAC CountError (ns) (time error)GPS Engine StatusLast Update Time(s)Lat (deg) (latitude in degrees)Long (deg) (longitude in degrees)NumSatellites (number of satellites used)PDOPPhaseLock (system clock phase lock)TDOPUncertainty (ns) (time uncertainty)
Note The values for Number of satellites used PDOP and TDOP are provided by the GPS receiver at the Last update time In order to see what time these values correspond to look at the Last update time When GPS is off these three parameters and the Last update time are not updated The last value displays until the next update arrives (after the GPS is turned on again)
Appendix B Retrieving SOH Data from a Taurus Version 2x
48 Apollo Project User Guide16106R5 2009-03-24
B2 Retrieving SOH Data from a Taurus Version 2x Streaming to Apollo ServerThis section provides instruction on configuring your Taurus version 2x to stream data to Apollo Server and instructions on how to use Apollo Project to retrieve this data from Apollo Server
B21 Streaming Data from a Taurus Version 2x to Apollo ServerUse the Taurus graphical user interface on either the Taurus display screen or through a Web browser to set up an NP stream from a Taurus version 2x to Apollo Server
1 Log in to the Taurus version 2x with either the tech or central user account
2 Select Advanced Configuration gt Communications gt NP Data Streaming
GPS Satellites Time (longsecs) (the number of seconds since 1970-01-01)Time (UTC) (time in yyyy-mm-dd hhmmssms format)
For each satelliteAcquisition FlagLast Update Time (ms)PRNSatellite Azimuth (microordm)Satellite Elevation (microordm)Signal Level (AMU)
Environment Time (longsecs) (the number of seconds since 1970-01-01)Time (UTC) (time in yyyy-mm-dd hhmmssms format)External SOH Voltage 1 (V) (12-bit voltage input) External SOH Voltage 2 (V) (12-bit voltage input) External SOH Voltage 3 (V) (12-bit voltage input) External SOH Voltage 4 (V) (12-bit voltage input) Sensor SOH Voltage 1 (V)Sensor SOH Voltage 2 (V)Sensor SOH Voltage 3 (V)
Instrument Time (longsecs) (the number of seconds since 1970-01-01)Time (UTC) (time in yyyy-mm-dd hhmmssms format)Controller Current (mA)Digitizer Current (mA)NMX Bus Current (mA) (external connector)Sensor Current (mA)Serial Port Current (mA)Supply Voltage (mV)Temperature (ordmC)
Predefined SOH group SOH data
Appendix B Retrieving SOH Data from a Taurus Version 2x
Apollo Project User Guide16106R5 2009-03-24
49
3 To have the Taurus stream both time series and SOH data to Apollo Server select both Stream Time Series and Stream SOH
-OR-
Select only Stream SOH if you only want to retrieve the SOH data from Apollo Server
4 Type the IP address for Apollo Server in the IP Address box
5 Type the port number Apollo Server uses to receive data in the Port box By default this is port number 32008
6 The Second IP Address and Second Port boxes are not necessary however cannot be left blank Type 127001 in the Second IP Address box and 32004 in the Second Port box
7 Type a value in the Maximum Throughput [bps] box if a limited data link is present between the Taurus and Apollo Server For instance if at some point the data link is limited to 9600 bps then this is the maximum throughput the link can allow If there are no throughput limitations set the value in this box to zero to disable the throughput limitation
8 Click Apply
9 Click Commit
B22 Retrieving Taurus Version 2x Data from Apollo ServerCreate a new project or use an existing project in Apollo Project to retrieve the Taurus version 2x data from Apollo Server For more information on creating or editing projects refer to Section 31 ldquoCreating New Projectsrdquo on page 11 and Section 36 ldquoEditing and Viewing the Settings of Projectsrdquo on page 31
When creating or editing the project
a) Add an IP address Store specification on the Store Selection tab (see step 4 in Section 31 ldquoCreating New Projectsrdquo) for Apollo Server including its client Web application port number Use the format
Apollo Server IP AddressApollo Server Client Web Application Port Number
b) Apply the appropriate filters on the Channel Group Selection tab to retrieve the desired channel groups from the Taurus version 2x See step 5 through step 12 in Section 31 ldquoCreating New Projectsrdquo for instruction on using the Channel Group Selection tab
Appendix B Retrieving SOH Data from a Taurus Version 2x
50 Apollo Project User Guide16106R5 2009-03-24
Apollo Project User Guide16106R5 2009-03-24
51
Appendix C Glossary
Glossary of Abbreviations and Terms
List of Unit Abbreviations and Symbols
C1 Glossary of Abbreviations and Terms
A
ASCIIAmerican Standard Code for Information Interchange
B
BHEBroad Band High Gain Seismometer East-West Orientation
Channel name based on the Global Seismological Network (GSN) standard
BHNBroad Band High Gain Seismometer North-South Orientation
Channel name based on the Global Seismological Network (GSN) standard
BHZBroad Band High Gain Seismometer Vertical Orientation
Channel name based on the Global Seismological Network (GSN) standard
Appendix C Glossary
52 Apollo Project User Guide16106R5 2009-03-24
C
CSVComma-Separated Values
D
DACDigital to Analog Converter
G
GPSGlobal Positioning System
J
JREJava Runtime Environment
JVMJava Virtual Machine
N
NFSNetwork File System
P
PDOPPosition Dilution of Precision
PRNPseudo-random Number
Appendix C Glossary
Apollo Project User Guide16106R5 2009-03-24
53
S
SACSeismic Analysis Code
An Apollo Project output file format that generates files that can be used by the SAC software (see http wwwirisedusoftwaresac)
SEEDStandard for the Exchange of Earthquake Data
SMBServer Message Block
SOHState of Health
T
TCPIPTransmission Control ProtocolInternet Protocol
TDOPTime Dilution of Precision
U
UNCUniform Naming Convention or Universal Naming Convention
URLUniform Resource Locator
UTCCoordinated Universal Time
Appendix C Glossary
54 Apollo Project User Guide16106R5 2009-03-24
C2 List of Unit Abbreviations and SymbolsTable C-1 provides a list of unit abbreviations and symbols commonly used in Nanometrics documentation
Table C-1 Unit abbreviations and symbols
Abbreviation or Symbol Definition Abbreviation
or Symbol Definition
deg degree lb pound
Oslash diameter m metre
micro micro ms metre per second
Ω ohm ms2 metre per second squared
A ampere mA milliampere
AC alternating current MB megabyte
b bit MΩ megaohm
B byte MHz megahertz
bps bits per second mi mile
C Celsius mL millilitre
cm centimetre mm millimetre
dB decibel ms millisecond
DC direct current MTU maximum transmission unit
F farad mV millivolt
ft foot mW milliwatt
g gram N Newton
g gravity nF nanofarad
GB gigabyte ns nanosecond
GHz gigahertz rad radian
Hz hertz rads radian per second
in inch s second
KB kilobyte sps samples per second
kg kilogram U rack unit
kHz kilohertz V volt
kΩ kiloohm Vpp Volts peak-to-peak
kW kilowatt W watt
L litre
Apollo Project User Guide16106R5 2009-03-24
55
About NanometricsNanometrics is a world leader in the development of precision instrumentation network technology and software applications for seismological and environmental studies Using Nanometrics technology our customers establish and grow research networks that are often located in extreme environments such as the frozen Arctic and Antarctic the arid deserts of the Middle East the jungles of South America and the depths of the worlds oceans Many of these are mission-critical national and regional networks that demand the highest possible data quality and availability
Nanometrics provides end-to-end solutions that include a growing portfolio of broadband and strong motion seismometers dataloggers and digitizers satellite ground station systems for remote site data collection and software applications for data and network analysis and management To support this portfolio Nanometrics also provides global systems engineering services for design installation and support of complete networks
Our head office research and development centre and production facility are located in the Kanata North Business Park of Ottawa the high-technology heart of Canadas capital region
Contacting NanometricsNanometrics Inc250 Herzberg RoadKanata Ontario Canada K2K 2A1Phone +1 613-592-6776Fax +1 613-592-5929Email infonanometricscaWeb wwwnanometricsca
Contacting Technical SupportIf you need technical support please submit a request on the Nanometrics technical support site or by email or fax Include a full explanation of the problem and related information such as log filesSupport site httpsupportnanometricsca
Email techsupportnanometricsca

Chapter 3 Retrieving Data
36 Apollo Project User Guide16106R5 2009-03-24
Apollo Project User Guide16106R5 2009-03-24
37
Appendix A Reference Information and Examples
Overview of Running Projects
Example Project Settings
Example Deployment Scenarios
Shot File Formats for Controlled Source Projects
A1 Overview of Running ProjectsWhen a project is run Apollo Project performs the following steps
1 The requested time ranges are identified
2 The channel groups for which data are to be retrieved are identified
3 The actual Stores specified by the Store specifications of the project are identified
For each identified Store the following steps are performed
1 A data availability analysis for the outstanding time ranges is performed These are for the ranges for which data has not already been retrieved The availability of the data is recorded for reference It is possible that a given Store was not present at the time the project was last run If this is the case then an attempt is made to retrieve all of the required time ranges of the project from the Store
2 If any data exists in the Store for any of the requested time ranges then a retrieval of this data is performed and the retrieved data is stored to local temporary files
3 If the number of retrieval attempts for a given time range exceeds a configurable threshold (see Section 33 ldquoConfiguring Apollo Projectrdquo on page 24) then the retrieval of data within the stated range is not attempted again
If any data was retrieved during the run of the project then the corresponding output files of the desired output format are generated and stored in the output location specified for the project
When running Apollo Project with Taurus version 2x the schedule for Archive projects must be greater than 5 minutes in duration Schedules that are less than 5 minutes can result in data that is missing or not downloaded
Appendix A Reference Information and Examples
38 Apollo Project User Guide16106R5 2009-03-24
It is possible that the requested data for a given channel group exists across multiple Stores If all of these Stores are included by the Store specifications for the project then Apollo Project assembles the requested data
When a project runs detailed information regarding the results of the retrieved data and processed data are available For more information see Section 37 ldquoMonitoring Project Statusrdquo on page 32
A2 Example Project Settings
A21 Example 1 One Time ProjectProject Name Project1
Project Type One Time
Channel groups selected for retrieval CASTN1OTBHZ (on taurus_1234)
Requested Time Range January 30 2008 1400 ndash 1500 UTC
File Interval 20 minutes
Output Location Base Directory disk2ApolloProjectOutputData
Output Location Subdirectories projectyearmonthday
Output Location Filenamestationnetwork_time
When the project is run successfully the following output files will be created on the server running Apollo Project
disk2ApolloProjectOutputDataProject120080130STN1CA_20080130_140000seed
disk2ApolloProjectOutputDataProject120080130STN1CA_20080130_142000seed
disk2ApolloProjectOutputDataProject120080130STN1CA_20080130_144000seed
Appendix A Reference Information and Examples
Apollo Project User Guide16106R5 2009-03-24
39
A22 Example 2 Controlled Source ProjectProject Name Project2
Project Type Controlled Source
Channel groups selected for retrieval CASTN1OTBHZ (on taurus_1234) CASTN1OTBHN (on taurus_1234)
Requested Shot Times January 30 2008 1400 UTC January 30 2008 1430 UTC
Pre Time 30 seconds
Post Time 30 seconds
Output Location Base Directory disk2ApolloProjectOutputData
Output Location Subdirectories projectyearmonthday
Output Location Filename timeformat
When the project is run successfully the following output files will be created on the server running Apollo Project
disk2ApolloProjectOutputDataProject22008013020080130_135930segysgy
disk2ApolloProjectOutputDataProject22008013020080130_142930segysgy
A3 Example Deployment Scenarios
A31 One TimeYou want to download three days of data from multiple instruments on the network save the data in MiniSEED format and create a file for every hour of data
A One Time project is the recommended solution The Store of each instrument can be made available to Apollo Project by creating a corresponding IP Address Store specification with the IP address of the instrument The requested time range can be specified along with a file interval of one hour Ensure that the instruments are configured to run in Communications mode
A32 Scheduled ArchiveYou want seismic data to be retrieved automatically from a group of instruments on the network every six hours The instruments are always accessible via an Ethernet connection
A scheduled Archive project is the recommended solution Use the Regular Interval scheduling option and set the interval to six hours
You can also run a scheduled Archive project at any time For example if the scheduled retrieval interval of a project is six hours and between intervals you want to retrieve the data three hours early you can run the project and approximately three additional hours of data would be accumulated About three hours later the project will run automatically and accumulate the remaining three hours of data
Appendix A Reference Information and Examples
40 Apollo Project User Guide16106R5 2009-03-24
A33 Manual ArchiveYou want to retrieve seismic data from a group of instruments but their respective Stores are only available for retrieval on occasion (no regular dependable schedule for retrieval from these Stores is possible)
A manually run Archive project is the recommended solution You can create the project and run it whenever any of the instruments are available for retrieval
A34 Field ArchiveYou want to collect data from a set of isolated instruments in the field at recurring intervals (for example twice per month)
A Field Archive project is the recommended solution You can create a Field Archive project and either add all instrument IP addresses to the list or use a Discovery specification The time for the last retrieval is stored on the instrument and all data is recovered from the last recovery time
A35 Media HarvestingYou want to collect the media from a set of instruments in the field at a regular interval (for example once per week) You also have to retrieve all of the seismic data on the media for subsequent analysis
An Archive project is the recommended solution Initially a directory is created on the file system of the server running Apollo Project A directory Store specification is created with this directory as the parent directory from which to search for Stores The content of each media instance in the weekrsquos collection is copied from a media reader to a subdirectory of the directory When the project is run all of the copied Stores are automatically available and the project accumulates data for each instrument
Due to the nature of media harvesting and the replacement procedure for this example data is always missing for the last period of output files for the current week This period corresponds to the time that the media was taken from the instrument and replaced with a new one The following week when the media is harvested again from the instruments in the field Apollo Project fills in the missing time for these files with the new Store data regardless of the media instance on which the data currently resides
You can only create and run Field Archive projects for Taurus version 30 or later
Appendix A Reference Information and Examples
Apollo Project User Guide16106R5 2009-03-24
41
A36 Trigger Downloading You have set up a network of five Tauruses around a hydro dam Each Taurus is accessible over an Ethernet connection and each is set to record data over the weekend You have set the period for data retrieval at 30 seconds before and five minutes after any seismic activity but the following procedure shows you why it is not necessary to view all of the data accumulated over the whole weekend
1 Select the Taurus at the site with the least environmental noise or determine the best site for generating triggers and designate this Taurus ldquoTaurus Ardquo for reference
You need to perform this task in advance More information about triggers can be found in the Taurus Portable Seismograph User Guide
2 Download the trigger file from ldquoTaurus Ardquo and review the file to verify the correct number of triggers
3 Follow these steps to create a new Triggers project
a) Click New on the Apollo Project Existing Projects page
b) Click Triggers as the project type and enter a unique name in the Project Name box
c) Click OK
d) Click the IP Address tab on the Store Selection tab
e) Enter the IP address of a Taurus
f) Click Add
g) Repeat step e until you have entered the IP addresses of all five of the Tauruses
Apollo Project adds the IP address specifications to the Selected Specifications section of the Store Selection page and finds all five Stores associated with the IP addresses and adds them to the Selected Stores section
h) Click the Channel Group Selection tab
i) Click Create Default Station Table to create a table for all of the currently selected Stores and discovered instruments
j) Review the selected channel groups and if required edit the mappings in the selected channel groups area of the tab (lower half of the tab)
k) Click the Time Selection tab
l) Click the Browse button
m)Select the trigger file that you downloaded in step 2 and click OK
n) Click Submit
The list of triggers is imported and displayed in the Triggers section on the Time Selection page
o) Enter a Pre Time of 30 seconds and a Post Time of 5 minutes
p) Click the Output Format tab
q) Click MiniSEED
r) Click All Instruments
s) Click the Output Location tab
Appendix A Reference Information and Examples
42 Apollo Project User Guide16106R5 2009-03-24
t) Enter the valid absolute path of the base directory for the processed data subfolders and files
u) Enter the expression used to define path names for subfolders under the base directory
v) Enter the expression used to define file names for the processed data files that are stored in the subfolders under the base directory
w) Click OK
4 Click the Run Now button on the Summary page
When the project has finished running the output folder you specified in step t will contain ten files Each output file will contain 5 minutes and 30 seconds of data from the five Tauruses
A4 Shot File Formats for Controlled Source ProjectsYou have two options for defining shots for a Controlled Source project manually defining shots or importing shots from a shot file
You can create shot files in one of following three file formats
Microsoft Office Excel (xls) ndash See Section A41 ldquoCreating a Shot File With Microsoft Office Excelrdquo on page 42
OpenOfficeorg Calc (ods) ndash See Section A42 ldquoCreating a Shot File With OpenOfficeorg Calcrdquo on page 44
Comma-Separated Values (csv) ndash See Section A43 ldquoCreating a Comma-Separated Values Shot Filerdquo on page 45
The Shot file templates are located in the docShotFileImport folder on the Apollo Project CD
A41 Creating a Shot File With Microsoft Office ExcelThe Microsoft Office Excel template for Apollo Project can be used with Microsoft Office Excel version 2003 or later
To create an Microsoft Office Excel based shot file
1 Double-click ShotFileTemplatexlt
A new Microsoft Office Excel file is created from the template and opens in the Microsoft Office Excel
2 Save the new spreadsheet as a Microsoft Office Excel document (xls)
3 Enter shot file data as specified in the Microsoft Office Excel spreadsheet
Only the decimal separator is supported for shot files Separators that denote the 3rd power of 10 (thousand) are not supported (for example 4500) The Microsoft Excel and OpenOffice templates reinforce these restrictions and are recommended for creating csv files
Appendix A Reference Information and Examples
Apollo Project User Guide16106R5 2009-03-24
43
You can enter data for multiple shot times
4 Click Save to save the file in Microsoft Office Excel format
5 Click File gt Save As and select CSV (Comma delimited) (csv) from the Save as type list
6 Click Save
7 Click OK on the message warning you that you are only saving the active sheet
8 Click Yes on the message warning you that file features might be incompatible with the csv format
9 Close Microsoft Office Excel
If you are using Microsoft Office Excel 2007 click the Microsoft Office Button and click Save As
Ensure that you save the file as a comma delimited file If the shot file is mistakenly saved in Microsoft Excel format (xls) the shot file will not work in Apollo Project
Appendix A Reference Information and Examples
44 Apollo Project User Guide16106R5 2009-03-24
A42 Creating a Shot File With OpenOfficeorg CalcThe OpenOffice template has been tested with OpenOfficeorg Calc version 23 Later versions of OpenOfficeorg Calc can be used at your discretion
To create a shot file based on the OpenOfficeorg Calc template
1 Double-click ShotFileTemplateots
A new OpenOffice spreadsheet is created from the template and opens in OpenOfficeorg Calc
2 Save the new spreadsheet as an OpenOffice Calc document (ods)
3 Enter the shot file data as specified in the OpenOffice spreadsheet
You can enter data for multiple shot times
4 Click Save to save the file in OpenOfficeorg Calc format
5 Click File gt Save As and select Text CSV (csv) from the Save as Type list
6 Select the Edit filter settings check box
7 Click Save
A warning message might appear that warns you that the document might contain formatting that cannot be saved in the csv format Click Yes on the warning message to save the file in csv format
The Export of text files window opens
8 Delete the double quotation marks () in the Text delimiter box and ensure that the Save cell content as shown check box is selected
9 Click OK to export the OpenOffice spreadsheet as a csv file
10 Click OK on the warning message
11 Close OpenOfficeorg Calc
Appendix A Reference Information and Examples
Apollo Project User Guide16106R5 2009-03-24
45
A43 Creating a Comma-Separated Values Shot FileYou can use any text editor to create a csv shot file
To create a csv shot file
1 Open ShotFileTemplatecsv in a text editor and save it with a different name
2 Format each line of the csv file as follows
Shot TimePre TimePost TimeLatitudeLongitudeElevation
For example
2008-08-28 103044090600000-6000004267
The format and units are as follows
3 Save the file as a csv formatted file
The csv shot file template is not compatible with Microsoft Office Excel Make sure that you do not double-click it and open it in Microsoft Office Excel
FormatUnits
Shot Time yyyy-mm-dd hhmmss
Pre Time seconds
Post Time seconds
Latitude degrees
Longitude degrees
Elevation meters
Appendix A Reference Information and Examples
46 Apollo Project User Guide16106R5 2009-03-24
Apollo Project User Guide16106R5 2009-03-24
47
Appendix B Retrieving SOH Data from a Taurus Version 2x
Taurus Version 2x SOH Data Retrieved by Apollo Project
Retrieving SOH Data from a Taurus Version 2x Streaming to Apollo Server
B1 Taurus Version 2x SOH Data Retrieved by Apollo Project This section presents the predefined datasets of SOH data Apollo Project will retrieve from a Taurus version 2x either through a direct connection or a stream to Apollo Server For instruction on retrieving streaming Taurus version 2x data from Apollo Server see Section B2 ldquoRetrieving SOH Data from a Taurus Version 2x Streaming to Apollo Serverrdquo on page 48
The order of the columns presented in the table below will differ when streaming Taurus version 2x SOH data from Apollo Server
Predefined SOH group SOH data
GPS Time Time (longsecs) (the number of seconds since 1970-01-01)Time (UTC) (time in yyyy-mm-dd hhmmssms format)Altitude (m)DAC CountError (ns) (time error)GPS Engine StatusLast Update Time(s)Lat (deg) (latitude in degrees)Long (deg) (longitude in degrees)NumSatellites (number of satellites used)PDOPPhaseLock (system clock phase lock)TDOPUncertainty (ns) (time uncertainty)
Note The values for Number of satellites used PDOP and TDOP are provided by the GPS receiver at the Last update time In order to see what time these values correspond to look at the Last update time When GPS is off these three parameters and the Last update time are not updated The last value displays until the next update arrives (after the GPS is turned on again)
Appendix B Retrieving SOH Data from a Taurus Version 2x
48 Apollo Project User Guide16106R5 2009-03-24
B2 Retrieving SOH Data from a Taurus Version 2x Streaming to Apollo ServerThis section provides instruction on configuring your Taurus version 2x to stream data to Apollo Server and instructions on how to use Apollo Project to retrieve this data from Apollo Server
B21 Streaming Data from a Taurus Version 2x to Apollo ServerUse the Taurus graphical user interface on either the Taurus display screen or through a Web browser to set up an NP stream from a Taurus version 2x to Apollo Server
1 Log in to the Taurus version 2x with either the tech or central user account
2 Select Advanced Configuration gt Communications gt NP Data Streaming
GPS Satellites Time (longsecs) (the number of seconds since 1970-01-01)Time (UTC) (time in yyyy-mm-dd hhmmssms format)
For each satelliteAcquisition FlagLast Update Time (ms)PRNSatellite Azimuth (microordm)Satellite Elevation (microordm)Signal Level (AMU)
Environment Time (longsecs) (the number of seconds since 1970-01-01)Time (UTC) (time in yyyy-mm-dd hhmmssms format)External SOH Voltage 1 (V) (12-bit voltage input) External SOH Voltage 2 (V) (12-bit voltage input) External SOH Voltage 3 (V) (12-bit voltage input) External SOH Voltage 4 (V) (12-bit voltage input) Sensor SOH Voltage 1 (V)Sensor SOH Voltage 2 (V)Sensor SOH Voltage 3 (V)
Instrument Time (longsecs) (the number of seconds since 1970-01-01)Time (UTC) (time in yyyy-mm-dd hhmmssms format)Controller Current (mA)Digitizer Current (mA)NMX Bus Current (mA) (external connector)Sensor Current (mA)Serial Port Current (mA)Supply Voltage (mV)Temperature (ordmC)
Predefined SOH group SOH data
Appendix B Retrieving SOH Data from a Taurus Version 2x
Apollo Project User Guide16106R5 2009-03-24
49
3 To have the Taurus stream both time series and SOH data to Apollo Server select both Stream Time Series and Stream SOH
-OR-
Select only Stream SOH if you only want to retrieve the SOH data from Apollo Server
4 Type the IP address for Apollo Server in the IP Address box
5 Type the port number Apollo Server uses to receive data in the Port box By default this is port number 32008
6 The Second IP Address and Second Port boxes are not necessary however cannot be left blank Type 127001 in the Second IP Address box and 32004 in the Second Port box
7 Type a value in the Maximum Throughput [bps] box if a limited data link is present between the Taurus and Apollo Server For instance if at some point the data link is limited to 9600 bps then this is the maximum throughput the link can allow If there are no throughput limitations set the value in this box to zero to disable the throughput limitation
8 Click Apply
9 Click Commit
B22 Retrieving Taurus Version 2x Data from Apollo ServerCreate a new project or use an existing project in Apollo Project to retrieve the Taurus version 2x data from Apollo Server For more information on creating or editing projects refer to Section 31 ldquoCreating New Projectsrdquo on page 11 and Section 36 ldquoEditing and Viewing the Settings of Projectsrdquo on page 31
When creating or editing the project
a) Add an IP address Store specification on the Store Selection tab (see step 4 in Section 31 ldquoCreating New Projectsrdquo) for Apollo Server including its client Web application port number Use the format
Apollo Server IP AddressApollo Server Client Web Application Port Number
b) Apply the appropriate filters on the Channel Group Selection tab to retrieve the desired channel groups from the Taurus version 2x See step 5 through step 12 in Section 31 ldquoCreating New Projectsrdquo for instruction on using the Channel Group Selection tab
Appendix B Retrieving SOH Data from a Taurus Version 2x
50 Apollo Project User Guide16106R5 2009-03-24
Apollo Project User Guide16106R5 2009-03-24
51
Appendix C Glossary
Glossary of Abbreviations and Terms
List of Unit Abbreviations and Symbols
C1 Glossary of Abbreviations and Terms
A
ASCIIAmerican Standard Code for Information Interchange
B
BHEBroad Band High Gain Seismometer East-West Orientation
Channel name based on the Global Seismological Network (GSN) standard
BHNBroad Band High Gain Seismometer North-South Orientation
Channel name based on the Global Seismological Network (GSN) standard
BHZBroad Band High Gain Seismometer Vertical Orientation
Channel name based on the Global Seismological Network (GSN) standard
Appendix C Glossary
52 Apollo Project User Guide16106R5 2009-03-24
C
CSVComma-Separated Values
D
DACDigital to Analog Converter
G
GPSGlobal Positioning System
J
JREJava Runtime Environment
JVMJava Virtual Machine
N
NFSNetwork File System
P
PDOPPosition Dilution of Precision
PRNPseudo-random Number
Appendix C Glossary
Apollo Project User Guide16106R5 2009-03-24
53
S
SACSeismic Analysis Code
An Apollo Project output file format that generates files that can be used by the SAC software (see http wwwirisedusoftwaresac)
SEEDStandard for the Exchange of Earthquake Data
SMBServer Message Block
SOHState of Health
T
TCPIPTransmission Control ProtocolInternet Protocol
TDOPTime Dilution of Precision
U
UNCUniform Naming Convention or Universal Naming Convention
URLUniform Resource Locator
UTCCoordinated Universal Time
Appendix C Glossary
54 Apollo Project User Guide16106R5 2009-03-24
C2 List of Unit Abbreviations and SymbolsTable C-1 provides a list of unit abbreviations and symbols commonly used in Nanometrics documentation
Table C-1 Unit abbreviations and symbols
Abbreviation or Symbol Definition Abbreviation
or Symbol Definition
deg degree lb pound
Oslash diameter m metre
micro micro ms metre per second
Ω ohm ms2 metre per second squared
A ampere mA milliampere
AC alternating current MB megabyte
b bit MΩ megaohm
B byte MHz megahertz
bps bits per second mi mile
C Celsius mL millilitre
cm centimetre mm millimetre
dB decibel ms millisecond
DC direct current MTU maximum transmission unit
F farad mV millivolt
ft foot mW milliwatt
g gram N Newton
g gravity nF nanofarad
GB gigabyte ns nanosecond
GHz gigahertz rad radian
Hz hertz rads radian per second
in inch s second
KB kilobyte sps samples per second
kg kilogram U rack unit
kHz kilohertz V volt
kΩ kiloohm Vpp Volts peak-to-peak
kW kilowatt W watt
L litre
Apollo Project User Guide16106R5 2009-03-24
55
About NanometricsNanometrics is a world leader in the development of precision instrumentation network technology and software applications for seismological and environmental studies Using Nanometrics technology our customers establish and grow research networks that are often located in extreme environments such as the frozen Arctic and Antarctic the arid deserts of the Middle East the jungles of South America and the depths of the worlds oceans Many of these are mission-critical national and regional networks that demand the highest possible data quality and availability
Nanometrics provides end-to-end solutions that include a growing portfolio of broadband and strong motion seismometers dataloggers and digitizers satellite ground station systems for remote site data collection and software applications for data and network analysis and management To support this portfolio Nanometrics also provides global systems engineering services for design installation and support of complete networks
Our head office research and development centre and production facility are located in the Kanata North Business Park of Ottawa the high-technology heart of Canadas capital region
Contacting NanometricsNanometrics Inc250 Herzberg RoadKanata Ontario Canada K2K 2A1Phone +1 613-592-6776Fax +1 613-592-5929Email infonanometricscaWeb wwwnanometricsca
Contacting Technical SupportIf you need technical support please submit a request on the Nanometrics technical support site or by email or fax Include a full explanation of the problem and related information such as log filesSupport site httpsupportnanometricsca
Email techsupportnanometricsca
Apollo Project User Guide16106R5 2009-03-24
37
Appendix A Reference Information and Examples
Overview of Running Projects
Example Project Settings
Example Deployment Scenarios
Shot File Formats for Controlled Source Projects
A1 Overview of Running ProjectsWhen a project is run Apollo Project performs the following steps
1 The requested time ranges are identified
2 The channel groups for which data are to be retrieved are identified
3 The actual Stores specified by the Store specifications of the project are identified
For each identified Store the following steps are performed
1 A data availability analysis for the outstanding time ranges is performed These are for the ranges for which data has not already been retrieved The availability of the data is recorded for reference It is possible that a given Store was not present at the time the project was last run If this is the case then an attempt is made to retrieve all of the required time ranges of the project from the Store
2 If any data exists in the Store for any of the requested time ranges then a retrieval of this data is performed and the retrieved data is stored to local temporary files
3 If the number of retrieval attempts for a given time range exceeds a configurable threshold (see Section 33 ldquoConfiguring Apollo Projectrdquo on page 24) then the retrieval of data within the stated range is not attempted again
If any data was retrieved during the run of the project then the corresponding output files of the desired output format are generated and stored in the output location specified for the project
When running Apollo Project with Taurus version 2x the schedule for Archive projects must be greater than 5 minutes in duration Schedules that are less than 5 minutes can result in data that is missing or not downloaded
Appendix A Reference Information and Examples
38 Apollo Project User Guide16106R5 2009-03-24
It is possible that the requested data for a given channel group exists across multiple Stores If all of these Stores are included by the Store specifications for the project then Apollo Project assembles the requested data
When a project runs detailed information regarding the results of the retrieved data and processed data are available For more information see Section 37 ldquoMonitoring Project Statusrdquo on page 32
A2 Example Project Settings
A21 Example 1 One Time ProjectProject Name Project1
Project Type One Time
Channel groups selected for retrieval CASTN1OTBHZ (on taurus_1234)
Requested Time Range January 30 2008 1400 ndash 1500 UTC
File Interval 20 minutes
Output Location Base Directory disk2ApolloProjectOutputData
Output Location Subdirectories projectyearmonthday
Output Location Filenamestationnetwork_time
When the project is run successfully the following output files will be created on the server running Apollo Project
disk2ApolloProjectOutputDataProject120080130STN1CA_20080130_140000seed
disk2ApolloProjectOutputDataProject120080130STN1CA_20080130_142000seed
disk2ApolloProjectOutputDataProject120080130STN1CA_20080130_144000seed
Appendix A Reference Information and Examples
Apollo Project User Guide16106R5 2009-03-24
39
A22 Example 2 Controlled Source ProjectProject Name Project2
Project Type Controlled Source
Channel groups selected for retrieval CASTN1OTBHZ (on taurus_1234) CASTN1OTBHN (on taurus_1234)
Requested Shot Times January 30 2008 1400 UTC January 30 2008 1430 UTC
Pre Time 30 seconds
Post Time 30 seconds
Output Location Base Directory disk2ApolloProjectOutputData
Output Location Subdirectories projectyearmonthday
Output Location Filename timeformat
When the project is run successfully the following output files will be created on the server running Apollo Project
disk2ApolloProjectOutputDataProject22008013020080130_135930segysgy
disk2ApolloProjectOutputDataProject22008013020080130_142930segysgy
A3 Example Deployment Scenarios
A31 One TimeYou want to download three days of data from multiple instruments on the network save the data in MiniSEED format and create a file for every hour of data
A One Time project is the recommended solution The Store of each instrument can be made available to Apollo Project by creating a corresponding IP Address Store specification with the IP address of the instrument The requested time range can be specified along with a file interval of one hour Ensure that the instruments are configured to run in Communications mode
A32 Scheduled ArchiveYou want seismic data to be retrieved automatically from a group of instruments on the network every six hours The instruments are always accessible via an Ethernet connection
A scheduled Archive project is the recommended solution Use the Regular Interval scheduling option and set the interval to six hours
You can also run a scheduled Archive project at any time For example if the scheduled retrieval interval of a project is six hours and between intervals you want to retrieve the data three hours early you can run the project and approximately three additional hours of data would be accumulated About three hours later the project will run automatically and accumulate the remaining three hours of data
Appendix A Reference Information and Examples
40 Apollo Project User Guide16106R5 2009-03-24
A33 Manual ArchiveYou want to retrieve seismic data from a group of instruments but their respective Stores are only available for retrieval on occasion (no regular dependable schedule for retrieval from these Stores is possible)
A manually run Archive project is the recommended solution You can create the project and run it whenever any of the instruments are available for retrieval
A34 Field ArchiveYou want to collect data from a set of isolated instruments in the field at recurring intervals (for example twice per month)
A Field Archive project is the recommended solution You can create a Field Archive project and either add all instrument IP addresses to the list or use a Discovery specification The time for the last retrieval is stored on the instrument and all data is recovered from the last recovery time
A35 Media HarvestingYou want to collect the media from a set of instruments in the field at a regular interval (for example once per week) You also have to retrieve all of the seismic data on the media for subsequent analysis
An Archive project is the recommended solution Initially a directory is created on the file system of the server running Apollo Project A directory Store specification is created with this directory as the parent directory from which to search for Stores The content of each media instance in the weekrsquos collection is copied from a media reader to a subdirectory of the directory When the project is run all of the copied Stores are automatically available and the project accumulates data for each instrument
Due to the nature of media harvesting and the replacement procedure for this example data is always missing for the last period of output files for the current week This period corresponds to the time that the media was taken from the instrument and replaced with a new one The following week when the media is harvested again from the instruments in the field Apollo Project fills in the missing time for these files with the new Store data regardless of the media instance on which the data currently resides
You can only create and run Field Archive projects for Taurus version 30 or later
Appendix A Reference Information and Examples
Apollo Project User Guide16106R5 2009-03-24
41
A36 Trigger Downloading You have set up a network of five Tauruses around a hydro dam Each Taurus is accessible over an Ethernet connection and each is set to record data over the weekend You have set the period for data retrieval at 30 seconds before and five minutes after any seismic activity but the following procedure shows you why it is not necessary to view all of the data accumulated over the whole weekend
1 Select the Taurus at the site with the least environmental noise or determine the best site for generating triggers and designate this Taurus ldquoTaurus Ardquo for reference
You need to perform this task in advance More information about triggers can be found in the Taurus Portable Seismograph User Guide
2 Download the trigger file from ldquoTaurus Ardquo and review the file to verify the correct number of triggers
3 Follow these steps to create a new Triggers project
a) Click New on the Apollo Project Existing Projects page
b) Click Triggers as the project type and enter a unique name in the Project Name box
c) Click OK
d) Click the IP Address tab on the Store Selection tab
e) Enter the IP address of a Taurus
f) Click Add
g) Repeat step e until you have entered the IP addresses of all five of the Tauruses
Apollo Project adds the IP address specifications to the Selected Specifications section of the Store Selection page and finds all five Stores associated with the IP addresses and adds them to the Selected Stores section
h) Click the Channel Group Selection tab
i) Click Create Default Station Table to create a table for all of the currently selected Stores and discovered instruments
j) Review the selected channel groups and if required edit the mappings in the selected channel groups area of the tab (lower half of the tab)
k) Click the Time Selection tab
l) Click the Browse button
m)Select the trigger file that you downloaded in step 2 and click OK
n) Click Submit
The list of triggers is imported and displayed in the Triggers section on the Time Selection page
o) Enter a Pre Time of 30 seconds and a Post Time of 5 minutes
p) Click the Output Format tab
q) Click MiniSEED
r) Click All Instruments
s) Click the Output Location tab
Appendix A Reference Information and Examples
42 Apollo Project User Guide16106R5 2009-03-24
t) Enter the valid absolute path of the base directory for the processed data subfolders and files
u) Enter the expression used to define path names for subfolders under the base directory
v) Enter the expression used to define file names for the processed data files that are stored in the subfolders under the base directory
w) Click OK
4 Click the Run Now button on the Summary page
When the project has finished running the output folder you specified in step t will contain ten files Each output file will contain 5 minutes and 30 seconds of data from the five Tauruses
A4 Shot File Formats for Controlled Source ProjectsYou have two options for defining shots for a Controlled Source project manually defining shots or importing shots from a shot file
You can create shot files in one of following three file formats
Microsoft Office Excel (xls) ndash See Section A41 ldquoCreating a Shot File With Microsoft Office Excelrdquo on page 42
OpenOfficeorg Calc (ods) ndash See Section A42 ldquoCreating a Shot File With OpenOfficeorg Calcrdquo on page 44
Comma-Separated Values (csv) ndash See Section A43 ldquoCreating a Comma-Separated Values Shot Filerdquo on page 45
The Shot file templates are located in the docShotFileImport folder on the Apollo Project CD
A41 Creating a Shot File With Microsoft Office ExcelThe Microsoft Office Excel template for Apollo Project can be used with Microsoft Office Excel version 2003 or later
To create an Microsoft Office Excel based shot file
1 Double-click ShotFileTemplatexlt
A new Microsoft Office Excel file is created from the template and opens in the Microsoft Office Excel
2 Save the new spreadsheet as a Microsoft Office Excel document (xls)
3 Enter shot file data as specified in the Microsoft Office Excel spreadsheet
Only the decimal separator is supported for shot files Separators that denote the 3rd power of 10 (thousand) are not supported (for example 4500) The Microsoft Excel and OpenOffice templates reinforce these restrictions and are recommended for creating csv files
Appendix A Reference Information and Examples
Apollo Project User Guide16106R5 2009-03-24
43
You can enter data for multiple shot times
4 Click Save to save the file in Microsoft Office Excel format
5 Click File gt Save As and select CSV (Comma delimited) (csv) from the Save as type list
6 Click Save
7 Click OK on the message warning you that you are only saving the active sheet
8 Click Yes on the message warning you that file features might be incompatible with the csv format
9 Close Microsoft Office Excel
If you are using Microsoft Office Excel 2007 click the Microsoft Office Button and click Save As
Ensure that you save the file as a comma delimited file If the shot file is mistakenly saved in Microsoft Excel format (xls) the shot file will not work in Apollo Project
Appendix A Reference Information and Examples
44 Apollo Project User Guide16106R5 2009-03-24
A42 Creating a Shot File With OpenOfficeorg CalcThe OpenOffice template has been tested with OpenOfficeorg Calc version 23 Later versions of OpenOfficeorg Calc can be used at your discretion
To create a shot file based on the OpenOfficeorg Calc template
1 Double-click ShotFileTemplateots
A new OpenOffice spreadsheet is created from the template and opens in OpenOfficeorg Calc
2 Save the new spreadsheet as an OpenOffice Calc document (ods)
3 Enter the shot file data as specified in the OpenOffice spreadsheet
You can enter data for multiple shot times
4 Click Save to save the file in OpenOfficeorg Calc format
5 Click File gt Save As and select Text CSV (csv) from the Save as Type list
6 Select the Edit filter settings check box
7 Click Save
A warning message might appear that warns you that the document might contain formatting that cannot be saved in the csv format Click Yes on the warning message to save the file in csv format
The Export of text files window opens
8 Delete the double quotation marks () in the Text delimiter box and ensure that the Save cell content as shown check box is selected
9 Click OK to export the OpenOffice spreadsheet as a csv file
10 Click OK on the warning message
11 Close OpenOfficeorg Calc
Appendix A Reference Information and Examples
Apollo Project User Guide16106R5 2009-03-24
45
A43 Creating a Comma-Separated Values Shot FileYou can use any text editor to create a csv shot file
To create a csv shot file
1 Open ShotFileTemplatecsv in a text editor and save it with a different name
2 Format each line of the csv file as follows
Shot TimePre TimePost TimeLatitudeLongitudeElevation
For example
2008-08-28 103044090600000-6000004267
The format and units are as follows
3 Save the file as a csv formatted file
The csv shot file template is not compatible with Microsoft Office Excel Make sure that you do not double-click it and open it in Microsoft Office Excel
FormatUnits
Shot Time yyyy-mm-dd hhmmss
Pre Time seconds
Post Time seconds
Latitude degrees
Longitude degrees
Elevation meters
Appendix A Reference Information and Examples
46 Apollo Project User Guide16106R5 2009-03-24
Apollo Project User Guide16106R5 2009-03-24
47
Appendix B Retrieving SOH Data from a Taurus Version 2x
Taurus Version 2x SOH Data Retrieved by Apollo Project
Retrieving SOH Data from a Taurus Version 2x Streaming to Apollo Server
B1 Taurus Version 2x SOH Data Retrieved by Apollo Project This section presents the predefined datasets of SOH data Apollo Project will retrieve from a Taurus version 2x either through a direct connection or a stream to Apollo Server For instruction on retrieving streaming Taurus version 2x data from Apollo Server see Section B2 ldquoRetrieving SOH Data from a Taurus Version 2x Streaming to Apollo Serverrdquo on page 48
The order of the columns presented in the table below will differ when streaming Taurus version 2x SOH data from Apollo Server
Predefined SOH group SOH data
GPS Time Time (longsecs) (the number of seconds since 1970-01-01)Time (UTC) (time in yyyy-mm-dd hhmmssms format)Altitude (m)DAC CountError (ns) (time error)GPS Engine StatusLast Update Time(s)Lat (deg) (latitude in degrees)Long (deg) (longitude in degrees)NumSatellites (number of satellites used)PDOPPhaseLock (system clock phase lock)TDOPUncertainty (ns) (time uncertainty)
Note The values for Number of satellites used PDOP and TDOP are provided by the GPS receiver at the Last update time In order to see what time these values correspond to look at the Last update time When GPS is off these three parameters and the Last update time are not updated The last value displays until the next update arrives (after the GPS is turned on again)
Appendix B Retrieving SOH Data from a Taurus Version 2x
48 Apollo Project User Guide16106R5 2009-03-24
B2 Retrieving SOH Data from a Taurus Version 2x Streaming to Apollo ServerThis section provides instruction on configuring your Taurus version 2x to stream data to Apollo Server and instructions on how to use Apollo Project to retrieve this data from Apollo Server
B21 Streaming Data from a Taurus Version 2x to Apollo ServerUse the Taurus graphical user interface on either the Taurus display screen or through a Web browser to set up an NP stream from a Taurus version 2x to Apollo Server
1 Log in to the Taurus version 2x with either the tech or central user account
2 Select Advanced Configuration gt Communications gt NP Data Streaming
GPS Satellites Time (longsecs) (the number of seconds since 1970-01-01)Time (UTC) (time in yyyy-mm-dd hhmmssms format)
For each satelliteAcquisition FlagLast Update Time (ms)PRNSatellite Azimuth (microordm)Satellite Elevation (microordm)Signal Level (AMU)
Environment Time (longsecs) (the number of seconds since 1970-01-01)Time (UTC) (time in yyyy-mm-dd hhmmssms format)External SOH Voltage 1 (V) (12-bit voltage input) External SOH Voltage 2 (V) (12-bit voltage input) External SOH Voltage 3 (V) (12-bit voltage input) External SOH Voltage 4 (V) (12-bit voltage input) Sensor SOH Voltage 1 (V)Sensor SOH Voltage 2 (V)Sensor SOH Voltage 3 (V)
Instrument Time (longsecs) (the number of seconds since 1970-01-01)Time (UTC) (time in yyyy-mm-dd hhmmssms format)Controller Current (mA)Digitizer Current (mA)NMX Bus Current (mA) (external connector)Sensor Current (mA)Serial Port Current (mA)Supply Voltage (mV)Temperature (ordmC)
Predefined SOH group SOH data
Appendix B Retrieving SOH Data from a Taurus Version 2x
Apollo Project User Guide16106R5 2009-03-24
49
3 To have the Taurus stream both time series and SOH data to Apollo Server select both Stream Time Series and Stream SOH
-OR-
Select only Stream SOH if you only want to retrieve the SOH data from Apollo Server
4 Type the IP address for Apollo Server in the IP Address box
5 Type the port number Apollo Server uses to receive data in the Port box By default this is port number 32008
6 The Second IP Address and Second Port boxes are not necessary however cannot be left blank Type 127001 in the Second IP Address box and 32004 in the Second Port box
7 Type a value in the Maximum Throughput [bps] box if a limited data link is present between the Taurus and Apollo Server For instance if at some point the data link is limited to 9600 bps then this is the maximum throughput the link can allow If there are no throughput limitations set the value in this box to zero to disable the throughput limitation
8 Click Apply
9 Click Commit
B22 Retrieving Taurus Version 2x Data from Apollo ServerCreate a new project or use an existing project in Apollo Project to retrieve the Taurus version 2x data from Apollo Server For more information on creating or editing projects refer to Section 31 ldquoCreating New Projectsrdquo on page 11 and Section 36 ldquoEditing and Viewing the Settings of Projectsrdquo on page 31
When creating or editing the project
a) Add an IP address Store specification on the Store Selection tab (see step 4 in Section 31 ldquoCreating New Projectsrdquo) for Apollo Server including its client Web application port number Use the format
Apollo Server IP AddressApollo Server Client Web Application Port Number
b) Apply the appropriate filters on the Channel Group Selection tab to retrieve the desired channel groups from the Taurus version 2x See step 5 through step 12 in Section 31 ldquoCreating New Projectsrdquo for instruction on using the Channel Group Selection tab
Appendix B Retrieving SOH Data from a Taurus Version 2x
50 Apollo Project User Guide16106R5 2009-03-24
Apollo Project User Guide16106R5 2009-03-24
51
Appendix C Glossary
Glossary of Abbreviations and Terms
List of Unit Abbreviations and Symbols
C1 Glossary of Abbreviations and Terms
A
ASCIIAmerican Standard Code for Information Interchange
B
BHEBroad Band High Gain Seismometer East-West Orientation
Channel name based on the Global Seismological Network (GSN) standard
BHNBroad Band High Gain Seismometer North-South Orientation
Channel name based on the Global Seismological Network (GSN) standard
BHZBroad Band High Gain Seismometer Vertical Orientation
Channel name based on the Global Seismological Network (GSN) standard
Appendix C Glossary
52 Apollo Project User Guide16106R5 2009-03-24
C
CSVComma-Separated Values
D
DACDigital to Analog Converter
G
GPSGlobal Positioning System
J
JREJava Runtime Environment
JVMJava Virtual Machine
N
NFSNetwork File System
P
PDOPPosition Dilution of Precision
PRNPseudo-random Number
Appendix C Glossary
Apollo Project User Guide16106R5 2009-03-24
53
S
SACSeismic Analysis Code
An Apollo Project output file format that generates files that can be used by the SAC software (see http wwwirisedusoftwaresac)
SEEDStandard for the Exchange of Earthquake Data
SMBServer Message Block
SOHState of Health
T
TCPIPTransmission Control ProtocolInternet Protocol
TDOPTime Dilution of Precision
U
UNCUniform Naming Convention or Universal Naming Convention
URLUniform Resource Locator
UTCCoordinated Universal Time
Appendix C Glossary
54 Apollo Project User Guide16106R5 2009-03-24
C2 List of Unit Abbreviations and SymbolsTable C-1 provides a list of unit abbreviations and symbols commonly used in Nanometrics documentation
Table C-1 Unit abbreviations and symbols
Abbreviation or Symbol Definition Abbreviation
or Symbol Definition
deg degree lb pound
Oslash diameter m metre
micro micro ms metre per second
Ω ohm ms2 metre per second squared
A ampere mA milliampere
AC alternating current MB megabyte
b bit MΩ megaohm
B byte MHz megahertz
bps bits per second mi mile
C Celsius mL millilitre
cm centimetre mm millimetre
dB decibel ms millisecond
DC direct current MTU maximum transmission unit
F farad mV millivolt
ft foot mW milliwatt
g gram N Newton
g gravity nF nanofarad
GB gigabyte ns nanosecond
GHz gigahertz rad radian
Hz hertz rads radian per second
in inch s second
KB kilobyte sps samples per second
kg kilogram U rack unit
kHz kilohertz V volt
kΩ kiloohm Vpp Volts peak-to-peak
kW kilowatt W watt
L litre
Apollo Project User Guide16106R5 2009-03-24
55
About NanometricsNanometrics is a world leader in the development of precision instrumentation network technology and software applications for seismological and environmental studies Using Nanometrics technology our customers establish and grow research networks that are often located in extreme environments such as the frozen Arctic and Antarctic the arid deserts of the Middle East the jungles of South America and the depths of the worlds oceans Many of these are mission-critical national and regional networks that demand the highest possible data quality and availability
Nanometrics provides end-to-end solutions that include a growing portfolio of broadband and strong motion seismometers dataloggers and digitizers satellite ground station systems for remote site data collection and software applications for data and network analysis and management To support this portfolio Nanometrics also provides global systems engineering services for design installation and support of complete networks
Our head office research and development centre and production facility are located in the Kanata North Business Park of Ottawa the high-technology heart of Canadas capital region
Contacting NanometricsNanometrics Inc250 Herzberg RoadKanata Ontario Canada K2K 2A1Phone +1 613-592-6776Fax +1 613-592-5929Email infonanometricscaWeb wwwnanometricsca
Contacting Technical SupportIf you need technical support please submit a request on the Nanometrics technical support site or by email or fax Include a full explanation of the problem and related information such as log filesSupport site httpsupportnanometricsca
Email techsupportnanometricsca
Appendix A Reference Information and Examples
Apollo Project User Guide16106R5 2009-03-24
39
A22 Example 2 Controlled Source ProjectProject Name Project2
Project Type Controlled Source
Channel groups selected for retrieval CASTN1OTBHZ (on taurus_1234) CASTN1OTBHN (on taurus_1234)
Requested Shot Times January 30 2008 1400 UTC January 30 2008 1430 UTC
Pre Time 30 seconds
Post Time 30 seconds
Output Location Base Directory disk2ApolloProjectOutputData
Output Location Subdirectories projectyearmonthday
Output Location Filename timeformat
When the project is run successfully the following output files will be created on the server running Apollo Project
disk2ApolloProjectOutputDataProject22008013020080130_135930segysgy
disk2ApolloProjectOutputDataProject22008013020080130_142930segysgy
A3 Example Deployment Scenarios
A31 One TimeYou want to download three days of data from multiple instruments on the network save the data in MiniSEED format and create a file for every hour of data
A One Time project is the recommended solution The Store of each instrument can be made available to Apollo Project by creating a corresponding IP Address Store specification with the IP address of the instrument The requested time range can be specified along with a file interval of one hour Ensure that the instruments are configured to run in Communications mode
A32 Scheduled ArchiveYou want seismic data to be retrieved automatically from a group of instruments on the network every six hours The instruments are always accessible via an Ethernet connection
A scheduled Archive project is the recommended solution Use the Regular Interval scheduling option and set the interval to six hours
You can also run a scheduled Archive project at any time For example if the scheduled retrieval interval of a project is six hours and between intervals you want to retrieve the data three hours early you can run the project and approximately three additional hours of data would be accumulated About three hours later the project will run automatically and accumulate the remaining three hours of data
Appendix A Reference Information and Examples
40 Apollo Project User Guide16106R5 2009-03-24
A33 Manual ArchiveYou want to retrieve seismic data from a group of instruments but their respective Stores are only available for retrieval on occasion (no regular dependable schedule for retrieval from these Stores is possible)
A manually run Archive project is the recommended solution You can create the project and run it whenever any of the instruments are available for retrieval
A34 Field ArchiveYou want to collect data from a set of isolated instruments in the field at recurring intervals (for example twice per month)
A Field Archive project is the recommended solution You can create a Field Archive project and either add all instrument IP addresses to the list or use a Discovery specification The time for the last retrieval is stored on the instrument and all data is recovered from the last recovery time
A35 Media HarvestingYou want to collect the media from a set of instruments in the field at a regular interval (for example once per week) You also have to retrieve all of the seismic data on the media for subsequent analysis
An Archive project is the recommended solution Initially a directory is created on the file system of the server running Apollo Project A directory Store specification is created with this directory as the parent directory from which to search for Stores The content of each media instance in the weekrsquos collection is copied from a media reader to a subdirectory of the directory When the project is run all of the copied Stores are automatically available and the project accumulates data for each instrument
Due to the nature of media harvesting and the replacement procedure for this example data is always missing for the last period of output files for the current week This period corresponds to the time that the media was taken from the instrument and replaced with a new one The following week when the media is harvested again from the instruments in the field Apollo Project fills in the missing time for these files with the new Store data regardless of the media instance on which the data currently resides
You can only create and run Field Archive projects for Taurus version 30 or later
Appendix A Reference Information and Examples
Apollo Project User Guide16106R5 2009-03-24
41
A36 Trigger Downloading You have set up a network of five Tauruses around a hydro dam Each Taurus is accessible over an Ethernet connection and each is set to record data over the weekend You have set the period for data retrieval at 30 seconds before and five minutes after any seismic activity but the following procedure shows you why it is not necessary to view all of the data accumulated over the whole weekend
1 Select the Taurus at the site with the least environmental noise or determine the best site for generating triggers and designate this Taurus ldquoTaurus Ardquo for reference
You need to perform this task in advance More information about triggers can be found in the Taurus Portable Seismograph User Guide
2 Download the trigger file from ldquoTaurus Ardquo and review the file to verify the correct number of triggers
3 Follow these steps to create a new Triggers project
a) Click New on the Apollo Project Existing Projects page
b) Click Triggers as the project type and enter a unique name in the Project Name box
c) Click OK
d) Click the IP Address tab on the Store Selection tab
e) Enter the IP address of a Taurus
f) Click Add
g) Repeat step e until you have entered the IP addresses of all five of the Tauruses
Apollo Project adds the IP address specifications to the Selected Specifications section of the Store Selection page and finds all five Stores associated with the IP addresses and adds them to the Selected Stores section
h) Click the Channel Group Selection tab
i) Click Create Default Station Table to create a table for all of the currently selected Stores and discovered instruments
j) Review the selected channel groups and if required edit the mappings in the selected channel groups area of the tab (lower half of the tab)
k) Click the Time Selection tab
l) Click the Browse button
m)Select the trigger file that you downloaded in step 2 and click OK
n) Click Submit
The list of triggers is imported and displayed in the Triggers section on the Time Selection page
o) Enter a Pre Time of 30 seconds and a Post Time of 5 minutes
p) Click the Output Format tab
q) Click MiniSEED
r) Click All Instruments
s) Click the Output Location tab
Appendix A Reference Information and Examples
42 Apollo Project User Guide16106R5 2009-03-24
t) Enter the valid absolute path of the base directory for the processed data subfolders and files
u) Enter the expression used to define path names for subfolders under the base directory
v) Enter the expression used to define file names for the processed data files that are stored in the subfolders under the base directory
w) Click OK
4 Click the Run Now button on the Summary page
When the project has finished running the output folder you specified in step t will contain ten files Each output file will contain 5 minutes and 30 seconds of data from the five Tauruses
A4 Shot File Formats for Controlled Source ProjectsYou have two options for defining shots for a Controlled Source project manually defining shots or importing shots from a shot file
You can create shot files in one of following three file formats
Microsoft Office Excel (xls) ndash See Section A41 ldquoCreating a Shot File With Microsoft Office Excelrdquo on page 42
OpenOfficeorg Calc (ods) ndash See Section A42 ldquoCreating a Shot File With OpenOfficeorg Calcrdquo on page 44
Comma-Separated Values (csv) ndash See Section A43 ldquoCreating a Comma-Separated Values Shot Filerdquo on page 45
The Shot file templates are located in the docShotFileImport folder on the Apollo Project CD
A41 Creating a Shot File With Microsoft Office ExcelThe Microsoft Office Excel template for Apollo Project can be used with Microsoft Office Excel version 2003 or later
To create an Microsoft Office Excel based shot file
1 Double-click ShotFileTemplatexlt
A new Microsoft Office Excel file is created from the template and opens in the Microsoft Office Excel
2 Save the new spreadsheet as a Microsoft Office Excel document (xls)
3 Enter shot file data as specified in the Microsoft Office Excel spreadsheet
Only the decimal separator is supported for shot files Separators that denote the 3rd power of 10 (thousand) are not supported (for example 4500) The Microsoft Excel and OpenOffice templates reinforce these restrictions and are recommended for creating csv files
Appendix A Reference Information and Examples
Apollo Project User Guide16106R5 2009-03-24
43
You can enter data for multiple shot times
4 Click Save to save the file in Microsoft Office Excel format
5 Click File gt Save As and select CSV (Comma delimited) (csv) from the Save as type list
6 Click Save
7 Click OK on the message warning you that you are only saving the active sheet
8 Click Yes on the message warning you that file features might be incompatible with the csv format
9 Close Microsoft Office Excel
If you are using Microsoft Office Excel 2007 click the Microsoft Office Button and click Save As
Ensure that you save the file as a comma delimited file If the shot file is mistakenly saved in Microsoft Excel format (xls) the shot file will not work in Apollo Project
Appendix A Reference Information and Examples
44 Apollo Project User Guide16106R5 2009-03-24
A42 Creating a Shot File With OpenOfficeorg CalcThe OpenOffice template has been tested with OpenOfficeorg Calc version 23 Later versions of OpenOfficeorg Calc can be used at your discretion
To create a shot file based on the OpenOfficeorg Calc template
1 Double-click ShotFileTemplateots
A new OpenOffice spreadsheet is created from the template and opens in OpenOfficeorg Calc
2 Save the new spreadsheet as an OpenOffice Calc document (ods)
3 Enter the shot file data as specified in the OpenOffice spreadsheet
You can enter data for multiple shot times
4 Click Save to save the file in OpenOfficeorg Calc format
5 Click File gt Save As and select Text CSV (csv) from the Save as Type list
6 Select the Edit filter settings check box
7 Click Save
A warning message might appear that warns you that the document might contain formatting that cannot be saved in the csv format Click Yes on the warning message to save the file in csv format
The Export of text files window opens
8 Delete the double quotation marks () in the Text delimiter box and ensure that the Save cell content as shown check box is selected
9 Click OK to export the OpenOffice spreadsheet as a csv file
10 Click OK on the warning message
11 Close OpenOfficeorg Calc
Appendix A Reference Information and Examples
Apollo Project User Guide16106R5 2009-03-24
45
A43 Creating a Comma-Separated Values Shot FileYou can use any text editor to create a csv shot file
To create a csv shot file
1 Open ShotFileTemplatecsv in a text editor and save it with a different name
2 Format each line of the csv file as follows
Shot TimePre TimePost TimeLatitudeLongitudeElevation
For example
2008-08-28 103044090600000-6000004267
The format and units are as follows
3 Save the file as a csv formatted file
The csv shot file template is not compatible with Microsoft Office Excel Make sure that you do not double-click it and open it in Microsoft Office Excel
FormatUnits
Shot Time yyyy-mm-dd hhmmss
Pre Time seconds
Post Time seconds
Latitude degrees
Longitude degrees
Elevation meters
Appendix A Reference Information and Examples
46 Apollo Project User Guide16106R5 2009-03-24
Apollo Project User Guide16106R5 2009-03-24
47
Appendix B Retrieving SOH Data from a Taurus Version 2x
Taurus Version 2x SOH Data Retrieved by Apollo Project
Retrieving SOH Data from a Taurus Version 2x Streaming to Apollo Server
B1 Taurus Version 2x SOH Data Retrieved by Apollo Project This section presents the predefined datasets of SOH data Apollo Project will retrieve from a Taurus version 2x either through a direct connection or a stream to Apollo Server For instruction on retrieving streaming Taurus version 2x data from Apollo Server see Section B2 ldquoRetrieving SOH Data from a Taurus Version 2x Streaming to Apollo Serverrdquo on page 48
The order of the columns presented in the table below will differ when streaming Taurus version 2x SOH data from Apollo Server
Predefined SOH group SOH data
GPS Time Time (longsecs) (the number of seconds since 1970-01-01)Time (UTC) (time in yyyy-mm-dd hhmmssms format)Altitude (m)DAC CountError (ns) (time error)GPS Engine StatusLast Update Time(s)Lat (deg) (latitude in degrees)Long (deg) (longitude in degrees)NumSatellites (number of satellites used)PDOPPhaseLock (system clock phase lock)TDOPUncertainty (ns) (time uncertainty)
Note The values for Number of satellites used PDOP and TDOP are provided by the GPS receiver at the Last update time In order to see what time these values correspond to look at the Last update time When GPS is off these three parameters and the Last update time are not updated The last value displays until the next update arrives (after the GPS is turned on again)
Appendix B Retrieving SOH Data from a Taurus Version 2x
48 Apollo Project User Guide16106R5 2009-03-24
B2 Retrieving SOH Data from a Taurus Version 2x Streaming to Apollo ServerThis section provides instruction on configuring your Taurus version 2x to stream data to Apollo Server and instructions on how to use Apollo Project to retrieve this data from Apollo Server
B21 Streaming Data from a Taurus Version 2x to Apollo ServerUse the Taurus graphical user interface on either the Taurus display screen or through a Web browser to set up an NP stream from a Taurus version 2x to Apollo Server
1 Log in to the Taurus version 2x with either the tech or central user account
2 Select Advanced Configuration gt Communications gt NP Data Streaming
GPS Satellites Time (longsecs) (the number of seconds since 1970-01-01)Time (UTC) (time in yyyy-mm-dd hhmmssms format)
For each satelliteAcquisition FlagLast Update Time (ms)PRNSatellite Azimuth (microordm)Satellite Elevation (microordm)Signal Level (AMU)
Environment Time (longsecs) (the number of seconds since 1970-01-01)Time (UTC) (time in yyyy-mm-dd hhmmssms format)External SOH Voltage 1 (V) (12-bit voltage input) External SOH Voltage 2 (V) (12-bit voltage input) External SOH Voltage 3 (V) (12-bit voltage input) External SOH Voltage 4 (V) (12-bit voltage input) Sensor SOH Voltage 1 (V)Sensor SOH Voltage 2 (V)Sensor SOH Voltage 3 (V)
Instrument Time (longsecs) (the number of seconds since 1970-01-01)Time (UTC) (time in yyyy-mm-dd hhmmssms format)Controller Current (mA)Digitizer Current (mA)NMX Bus Current (mA) (external connector)Sensor Current (mA)Serial Port Current (mA)Supply Voltage (mV)Temperature (ordmC)
Predefined SOH group SOH data
Appendix B Retrieving SOH Data from a Taurus Version 2x
Apollo Project User Guide16106R5 2009-03-24
49
3 To have the Taurus stream both time series and SOH data to Apollo Server select both Stream Time Series and Stream SOH
-OR-
Select only Stream SOH if you only want to retrieve the SOH data from Apollo Server
4 Type the IP address for Apollo Server in the IP Address box
5 Type the port number Apollo Server uses to receive data in the Port box By default this is port number 32008
6 The Second IP Address and Second Port boxes are not necessary however cannot be left blank Type 127001 in the Second IP Address box and 32004 in the Second Port box
7 Type a value in the Maximum Throughput [bps] box if a limited data link is present between the Taurus and Apollo Server For instance if at some point the data link is limited to 9600 bps then this is the maximum throughput the link can allow If there are no throughput limitations set the value in this box to zero to disable the throughput limitation
8 Click Apply
9 Click Commit
B22 Retrieving Taurus Version 2x Data from Apollo ServerCreate a new project or use an existing project in Apollo Project to retrieve the Taurus version 2x data from Apollo Server For more information on creating or editing projects refer to Section 31 ldquoCreating New Projectsrdquo on page 11 and Section 36 ldquoEditing and Viewing the Settings of Projectsrdquo on page 31
When creating or editing the project
a) Add an IP address Store specification on the Store Selection tab (see step 4 in Section 31 ldquoCreating New Projectsrdquo) for Apollo Server including its client Web application port number Use the format
Apollo Server IP AddressApollo Server Client Web Application Port Number
b) Apply the appropriate filters on the Channel Group Selection tab to retrieve the desired channel groups from the Taurus version 2x See step 5 through step 12 in Section 31 ldquoCreating New Projectsrdquo for instruction on using the Channel Group Selection tab
Appendix B Retrieving SOH Data from a Taurus Version 2x
50 Apollo Project User Guide16106R5 2009-03-24
Apollo Project User Guide16106R5 2009-03-24
51
Appendix C Glossary
Glossary of Abbreviations and Terms
List of Unit Abbreviations and Symbols
C1 Glossary of Abbreviations and Terms
A
ASCIIAmerican Standard Code for Information Interchange
B
BHEBroad Band High Gain Seismometer East-West Orientation
Channel name based on the Global Seismological Network (GSN) standard
BHNBroad Band High Gain Seismometer North-South Orientation
Channel name based on the Global Seismological Network (GSN) standard
BHZBroad Band High Gain Seismometer Vertical Orientation
Channel name based on the Global Seismological Network (GSN) standard
Appendix C Glossary
52 Apollo Project User Guide16106R5 2009-03-24
C
CSVComma-Separated Values
D
DACDigital to Analog Converter
G
GPSGlobal Positioning System
J
JREJava Runtime Environment
JVMJava Virtual Machine
N
NFSNetwork File System
P
PDOPPosition Dilution of Precision
PRNPseudo-random Number
Appendix C Glossary
Apollo Project User Guide16106R5 2009-03-24
53
S
SACSeismic Analysis Code
An Apollo Project output file format that generates files that can be used by the SAC software (see http wwwirisedusoftwaresac)
SEEDStandard for the Exchange of Earthquake Data
SMBServer Message Block
SOHState of Health
T
TCPIPTransmission Control ProtocolInternet Protocol
TDOPTime Dilution of Precision
U
UNCUniform Naming Convention or Universal Naming Convention
URLUniform Resource Locator
UTCCoordinated Universal Time
Appendix C Glossary
54 Apollo Project User Guide16106R5 2009-03-24
C2 List of Unit Abbreviations and SymbolsTable C-1 provides a list of unit abbreviations and symbols commonly used in Nanometrics documentation
Table C-1 Unit abbreviations and symbols
Abbreviation or Symbol Definition Abbreviation
or Symbol Definition
deg degree lb pound
Oslash diameter m metre
micro micro ms metre per second
Ω ohm ms2 metre per second squared
A ampere mA milliampere
AC alternating current MB megabyte
b bit MΩ megaohm
B byte MHz megahertz
bps bits per second mi mile
C Celsius mL millilitre
cm centimetre mm millimetre
dB decibel ms millisecond
DC direct current MTU maximum transmission unit
F farad mV millivolt
ft foot mW milliwatt
g gram N Newton
g gravity nF nanofarad
GB gigabyte ns nanosecond
GHz gigahertz rad radian
Hz hertz rads radian per second
in inch s second
KB kilobyte sps samples per second
kg kilogram U rack unit
kHz kilohertz V volt
kΩ kiloohm Vpp Volts peak-to-peak
kW kilowatt W watt
L litre
Apollo Project User Guide16106R5 2009-03-24
55
About NanometricsNanometrics is a world leader in the development of precision instrumentation network technology and software applications for seismological and environmental studies Using Nanometrics technology our customers establish and grow research networks that are often located in extreme environments such as the frozen Arctic and Antarctic the arid deserts of the Middle East the jungles of South America and the depths of the worlds oceans Many of these are mission-critical national and regional networks that demand the highest possible data quality and availability
Nanometrics provides end-to-end solutions that include a growing portfolio of broadband and strong motion seismometers dataloggers and digitizers satellite ground station systems for remote site data collection and software applications for data and network analysis and management To support this portfolio Nanometrics also provides global systems engineering services for design installation and support of complete networks
Our head office research and development centre and production facility are located in the Kanata North Business Park of Ottawa the high-technology heart of Canadas capital region
Contacting NanometricsNanometrics Inc250 Herzberg RoadKanata Ontario Canada K2K 2A1Phone +1 613-592-6776Fax +1 613-592-5929Email infonanometricscaWeb wwwnanometricsca
Contacting Technical SupportIf you need technical support please submit a request on the Nanometrics technical support site or by email or fax Include a full explanation of the problem and related information such as log filesSupport site httpsupportnanometricsca
Email techsupportnanometricsca
Appendix A Reference Information and Examples
Apollo Project User Guide16106R5 2009-03-24
41
A36 Trigger Downloading You have set up a network of five Tauruses around a hydro dam Each Taurus is accessible over an Ethernet connection and each is set to record data over the weekend You have set the period for data retrieval at 30 seconds before and five minutes after any seismic activity but the following procedure shows you why it is not necessary to view all of the data accumulated over the whole weekend
1 Select the Taurus at the site with the least environmental noise or determine the best site for generating triggers and designate this Taurus ldquoTaurus Ardquo for reference
You need to perform this task in advance More information about triggers can be found in the Taurus Portable Seismograph User Guide
2 Download the trigger file from ldquoTaurus Ardquo and review the file to verify the correct number of triggers
3 Follow these steps to create a new Triggers project
a) Click New on the Apollo Project Existing Projects page
b) Click Triggers as the project type and enter a unique name in the Project Name box
c) Click OK
d) Click the IP Address tab on the Store Selection tab
e) Enter the IP address of a Taurus
f) Click Add
g) Repeat step e until you have entered the IP addresses of all five of the Tauruses
Apollo Project adds the IP address specifications to the Selected Specifications section of the Store Selection page and finds all five Stores associated with the IP addresses and adds them to the Selected Stores section
h) Click the Channel Group Selection tab
i) Click Create Default Station Table to create a table for all of the currently selected Stores and discovered instruments
j) Review the selected channel groups and if required edit the mappings in the selected channel groups area of the tab (lower half of the tab)
k) Click the Time Selection tab
l) Click the Browse button
m)Select the trigger file that you downloaded in step 2 and click OK
n) Click Submit
The list of triggers is imported and displayed in the Triggers section on the Time Selection page
o) Enter a Pre Time of 30 seconds and a Post Time of 5 minutes
p) Click the Output Format tab
q) Click MiniSEED
r) Click All Instruments
s) Click the Output Location tab
Appendix A Reference Information and Examples
42 Apollo Project User Guide16106R5 2009-03-24
t) Enter the valid absolute path of the base directory for the processed data subfolders and files
u) Enter the expression used to define path names for subfolders under the base directory
v) Enter the expression used to define file names for the processed data files that are stored in the subfolders under the base directory
w) Click OK
4 Click the Run Now button on the Summary page
When the project has finished running the output folder you specified in step t will contain ten files Each output file will contain 5 minutes and 30 seconds of data from the five Tauruses
A4 Shot File Formats for Controlled Source ProjectsYou have two options for defining shots for a Controlled Source project manually defining shots or importing shots from a shot file
You can create shot files in one of following three file formats
Microsoft Office Excel (xls) ndash See Section A41 ldquoCreating a Shot File With Microsoft Office Excelrdquo on page 42
OpenOfficeorg Calc (ods) ndash See Section A42 ldquoCreating a Shot File With OpenOfficeorg Calcrdquo on page 44
Comma-Separated Values (csv) ndash See Section A43 ldquoCreating a Comma-Separated Values Shot Filerdquo on page 45
The Shot file templates are located in the docShotFileImport folder on the Apollo Project CD
A41 Creating a Shot File With Microsoft Office ExcelThe Microsoft Office Excel template for Apollo Project can be used with Microsoft Office Excel version 2003 or later
To create an Microsoft Office Excel based shot file
1 Double-click ShotFileTemplatexlt
A new Microsoft Office Excel file is created from the template and opens in the Microsoft Office Excel
2 Save the new spreadsheet as a Microsoft Office Excel document (xls)
3 Enter shot file data as specified in the Microsoft Office Excel spreadsheet
Only the decimal separator is supported for shot files Separators that denote the 3rd power of 10 (thousand) are not supported (for example 4500) The Microsoft Excel and OpenOffice templates reinforce these restrictions and are recommended for creating csv files
Appendix A Reference Information and Examples
Apollo Project User Guide16106R5 2009-03-24
43
You can enter data for multiple shot times
4 Click Save to save the file in Microsoft Office Excel format
5 Click File gt Save As and select CSV (Comma delimited) (csv) from the Save as type list
6 Click Save
7 Click OK on the message warning you that you are only saving the active sheet
8 Click Yes on the message warning you that file features might be incompatible with the csv format
9 Close Microsoft Office Excel
If you are using Microsoft Office Excel 2007 click the Microsoft Office Button and click Save As
Ensure that you save the file as a comma delimited file If the shot file is mistakenly saved in Microsoft Excel format (xls) the shot file will not work in Apollo Project
Appendix A Reference Information and Examples
44 Apollo Project User Guide16106R5 2009-03-24
A42 Creating a Shot File With OpenOfficeorg CalcThe OpenOffice template has been tested with OpenOfficeorg Calc version 23 Later versions of OpenOfficeorg Calc can be used at your discretion
To create a shot file based on the OpenOfficeorg Calc template
1 Double-click ShotFileTemplateots
A new OpenOffice spreadsheet is created from the template and opens in OpenOfficeorg Calc
2 Save the new spreadsheet as an OpenOffice Calc document (ods)
3 Enter the shot file data as specified in the OpenOffice spreadsheet
You can enter data for multiple shot times
4 Click Save to save the file in OpenOfficeorg Calc format
5 Click File gt Save As and select Text CSV (csv) from the Save as Type list
6 Select the Edit filter settings check box
7 Click Save
A warning message might appear that warns you that the document might contain formatting that cannot be saved in the csv format Click Yes on the warning message to save the file in csv format
The Export of text files window opens
8 Delete the double quotation marks () in the Text delimiter box and ensure that the Save cell content as shown check box is selected
9 Click OK to export the OpenOffice spreadsheet as a csv file
10 Click OK on the warning message
11 Close OpenOfficeorg Calc
Appendix A Reference Information and Examples
Apollo Project User Guide16106R5 2009-03-24
45
A43 Creating a Comma-Separated Values Shot FileYou can use any text editor to create a csv shot file
To create a csv shot file
1 Open ShotFileTemplatecsv in a text editor and save it with a different name
2 Format each line of the csv file as follows
Shot TimePre TimePost TimeLatitudeLongitudeElevation
For example
2008-08-28 103044090600000-6000004267
The format and units are as follows
3 Save the file as a csv formatted file
The csv shot file template is not compatible with Microsoft Office Excel Make sure that you do not double-click it and open it in Microsoft Office Excel
FormatUnits
Shot Time yyyy-mm-dd hhmmss
Pre Time seconds
Post Time seconds
Latitude degrees
Longitude degrees
Elevation meters
Appendix A Reference Information and Examples
46 Apollo Project User Guide16106R5 2009-03-24
Apollo Project User Guide16106R5 2009-03-24
47
Appendix B Retrieving SOH Data from a Taurus Version 2x
Taurus Version 2x SOH Data Retrieved by Apollo Project
Retrieving SOH Data from a Taurus Version 2x Streaming to Apollo Server
B1 Taurus Version 2x SOH Data Retrieved by Apollo Project This section presents the predefined datasets of SOH data Apollo Project will retrieve from a Taurus version 2x either through a direct connection or a stream to Apollo Server For instruction on retrieving streaming Taurus version 2x data from Apollo Server see Section B2 ldquoRetrieving SOH Data from a Taurus Version 2x Streaming to Apollo Serverrdquo on page 48
The order of the columns presented in the table below will differ when streaming Taurus version 2x SOH data from Apollo Server
Predefined SOH group SOH data
GPS Time Time (longsecs) (the number of seconds since 1970-01-01)Time (UTC) (time in yyyy-mm-dd hhmmssms format)Altitude (m)DAC CountError (ns) (time error)GPS Engine StatusLast Update Time(s)Lat (deg) (latitude in degrees)Long (deg) (longitude in degrees)NumSatellites (number of satellites used)PDOPPhaseLock (system clock phase lock)TDOPUncertainty (ns) (time uncertainty)
Note The values for Number of satellites used PDOP and TDOP are provided by the GPS receiver at the Last update time In order to see what time these values correspond to look at the Last update time When GPS is off these three parameters and the Last update time are not updated The last value displays until the next update arrives (after the GPS is turned on again)
Appendix B Retrieving SOH Data from a Taurus Version 2x
48 Apollo Project User Guide16106R5 2009-03-24
B2 Retrieving SOH Data from a Taurus Version 2x Streaming to Apollo ServerThis section provides instruction on configuring your Taurus version 2x to stream data to Apollo Server and instructions on how to use Apollo Project to retrieve this data from Apollo Server
B21 Streaming Data from a Taurus Version 2x to Apollo ServerUse the Taurus graphical user interface on either the Taurus display screen or through a Web browser to set up an NP stream from a Taurus version 2x to Apollo Server
1 Log in to the Taurus version 2x with either the tech or central user account
2 Select Advanced Configuration gt Communications gt NP Data Streaming
GPS Satellites Time (longsecs) (the number of seconds since 1970-01-01)Time (UTC) (time in yyyy-mm-dd hhmmssms format)
For each satelliteAcquisition FlagLast Update Time (ms)PRNSatellite Azimuth (microordm)Satellite Elevation (microordm)Signal Level (AMU)
Environment Time (longsecs) (the number of seconds since 1970-01-01)Time (UTC) (time in yyyy-mm-dd hhmmssms format)External SOH Voltage 1 (V) (12-bit voltage input) External SOH Voltage 2 (V) (12-bit voltage input) External SOH Voltage 3 (V) (12-bit voltage input) External SOH Voltage 4 (V) (12-bit voltage input) Sensor SOH Voltage 1 (V)Sensor SOH Voltage 2 (V)Sensor SOH Voltage 3 (V)
Instrument Time (longsecs) (the number of seconds since 1970-01-01)Time (UTC) (time in yyyy-mm-dd hhmmssms format)Controller Current (mA)Digitizer Current (mA)NMX Bus Current (mA) (external connector)Sensor Current (mA)Serial Port Current (mA)Supply Voltage (mV)Temperature (ordmC)
Predefined SOH group SOH data
Appendix B Retrieving SOH Data from a Taurus Version 2x
Apollo Project User Guide16106R5 2009-03-24
49
3 To have the Taurus stream both time series and SOH data to Apollo Server select both Stream Time Series and Stream SOH
-OR-
Select only Stream SOH if you only want to retrieve the SOH data from Apollo Server
4 Type the IP address for Apollo Server in the IP Address box
5 Type the port number Apollo Server uses to receive data in the Port box By default this is port number 32008
6 The Second IP Address and Second Port boxes are not necessary however cannot be left blank Type 127001 in the Second IP Address box and 32004 in the Second Port box
7 Type a value in the Maximum Throughput [bps] box if a limited data link is present between the Taurus and Apollo Server For instance if at some point the data link is limited to 9600 bps then this is the maximum throughput the link can allow If there are no throughput limitations set the value in this box to zero to disable the throughput limitation
8 Click Apply
9 Click Commit
B22 Retrieving Taurus Version 2x Data from Apollo ServerCreate a new project or use an existing project in Apollo Project to retrieve the Taurus version 2x data from Apollo Server For more information on creating or editing projects refer to Section 31 ldquoCreating New Projectsrdquo on page 11 and Section 36 ldquoEditing and Viewing the Settings of Projectsrdquo on page 31
When creating or editing the project
a) Add an IP address Store specification on the Store Selection tab (see step 4 in Section 31 ldquoCreating New Projectsrdquo) for Apollo Server including its client Web application port number Use the format
Apollo Server IP AddressApollo Server Client Web Application Port Number
b) Apply the appropriate filters on the Channel Group Selection tab to retrieve the desired channel groups from the Taurus version 2x See step 5 through step 12 in Section 31 ldquoCreating New Projectsrdquo for instruction on using the Channel Group Selection tab
Appendix B Retrieving SOH Data from a Taurus Version 2x
50 Apollo Project User Guide16106R5 2009-03-24
Apollo Project User Guide16106R5 2009-03-24
51
Appendix C Glossary
Glossary of Abbreviations and Terms
List of Unit Abbreviations and Symbols
C1 Glossary of Abbreviations and Terms
A
ASCIIAmerican Standard Code for Information Interchange
B
BHEBroad Band High Gain Seismometer East-West Orientation
Channel name based on the Global Seismological Network (GSN) standard
BHNBroad Band High Gain Seismometer North-South Orientation
Channel name based on the Global Seismological Network (GSN) standard
BHZBroad Band High Gain Seismometer Vertical Orientation
Channel name based on the Global Seismological Network (GSN) standard
Appendix C Glossary
52 Apollo Project User Guide16106R5 2009-03-24
C
CSVComma-Separated Values
D
DACDigital to Analog Converter
G
GPSGlobal Positioning System
J
JREJava Runtime Environment
JVMJava Virtual Machine
N
NFSNetwork File System
P
PDOPPosition Dilution of Precision
PRNPseudo-random Number
Appendix C Glossary
Apollo Project User Guide16106R5 2009-03-24
53
S
SACSeismic Analysis Code
An Apollo Project output file format that generates files that can be used by the SAC software (see http wwwirisedusoftwaresac)
SEEDStandard for the Exchange of Earthquake Data
SMBServer Message Block
SOHState of Health
T
TCPIPTransmission Control ProtocolInternet Protocol
TDOPTime Dilution of Precision
U
UNCUniform Naming Convention or Universal Naming Convention
URLUniform Resource Locator
UTCCoordinated Universal Time
Appendix C Glossary
54 Apollo Project User Guide16106R5 2009-03-24
C2 List of Unit Abbreviations and SymbolsTable C-1 provides a list of unit abbreviations and symbols commonly used in Nanometrics documentation
Table C-1 Unit abbreviations and symbols
Abbreviation or Symbol Definition Abbreviation
or Symbol Definition
deg degree lb pound
Oslash diameter m metre
micro micro ms metre per second
Ω ohm ms2 metre per second squared
A ampere mA milliampere
AC alternating current MB megabyte
b bit MΩ megaohm
B byte MHz megahertz
bps bits per second mi mile
C Celsius mL millilitre
cm centimetre mm millimetre
dB decibel ms millisecond
DC direct current MTU maximum transmission unit
F farad mV millivolt
ft foot mW milliwatt
g gram N Newton
g gravity nF nanofarad
GB gigabyte ns nanosecond
GHz gigahertz rad radian
Hz hertz rads radian per second
in inch s second
KB kilobyte sps samples per second
kg kilogram U rack unit
kHz kilohertz V volt
kΩ kiloohm Vpp Volts peak-to-peak
kW kilowatt W watt
L litre
Apollo Project User Guide16106R5 2009-03-24
55
About NanometricsNanometrics is a world leader in the development of precision instrumentation network technology and software applications for seismological and environmental studies Using Nanometrics technology our customers establish and grow research networks that are often located in extreme environments such as the frozen Arctic and Antarctic the arid deserts of the Middle East the jungles of South America and the depths of the worlds oceans Many of these are mission-critical national and regional networks that demand the highest possible data quality and availability
Nanometrics provides end-to-end solutions that include a growing portfolio of broadband and strong motion seismometers dataloggers and digitizers satellite ground station systems for remote site data collection and software applications for data and network analysis and management To support this portfolio Nanometrics also provides global systems engineering services for design installation and support of complete networks
Our head office research and development centre and production facility are located in the Kanata North Business Park of Ottawa the high-technology heart of Canadas capital region
Contacting NanometricsNanometrics Inc250 Herzberg RoadKanata Ontario Canada K2K 2A1Phone +1 613-592-6776Fax +1 613-592-5929Email infonanometricscaWeb wwwnanometricsca
Contacting Technical SupportIf you need technical support please submit a request on the Nanometrics technical support site or by email or fax Include a full explanation of the problem and related information such as log filesSupport site httpsupportnanometricsca
Email techsupportnanometricsca
Appendix A Reference Information and Examples
42 Apollo Project User Guide16106R5 2009-03-24
t) Enter the valid absolute path of the base directory for the processed data subfolders and files
u) Enter the expression used to define path names for subfolders under the base directory
v) Enter the expression used to define file names for the processed data files that are stored in the subfolders under the base directory
w) Click OK
4 Click the Run Now button on the Summary page
When the project has finished running the output folder you specified in step t will contain ten files Each output file will contain 5 minutes and 30 seconds of data from the five Tauruses
A4 Shot File Formats for Controlled Source ProjectsYou have two options for defining shots for a Controlled Source project manually defining shots or importing shots from a shot file
You can create shot files in one of following three file formats
Microsoft Office Excel (xls) ndash See Section A41 ldquoCreating a Shot File With Microsoft Office Excelrdquo on page 42
OpenOfficeorg Calc (ods) ndash See Section A42 ldquoCreating a Shot File With OpenOfficeorg Calcrdquo on page 44
Comma-Separated Values (csv) ndash See Section A43 ldquoCreating a Comma-Separated Values Shot Filerdquo on page 45
The Shot file templates are located in the docShotFileImport folder on the Apollo Project CD
A41 Creating a Shot File With Microsoft Office ExcelThe Microsoft Office Excel template for Apollo Project can be used with Microsoft Office Excel version 2003 or later
To create an Microsoft Office Excel based shot file
1 Double-click ShotFileTemplatexlt
A new Microsoft Office Excel file is created from the template and opens in the Microsoft Office Excel
2 Save the new spreadsheet as a Microsoft Office Excel document (xls)
3 Enter shot file data as specified in the Microsoft Office Excel spreadsheet
Only the decimal separator is supported for shot files Separators that denote the 3rd power of 10 (thousand) are not supported (for example 4500) The Microsoft Excel and OpenOffice templates reinforce these restrictions and are recommended for creating csv files
Appendix A Reference Information and Examples
Apollo Project User Guide16106R5 2009-03-24
43
You can enter data for multiple shot times
4 Click Save to save the file in Microsoft Office Excel format
5 Click File gt Save As and select CSV (Comma delimited) (csv) from the Save as type list
6 Click Save
7 Click OK on the message warning you that you are only saving the active sheet
8 Click Yes on the message warning you that file features might be incompatible with the csv format
9 Close Microsoft Office Excel
If you are using Microsoft Office Excel 2007 click the Microsoft Office Button and click Save As
Ensure that you save the file as a comma delimited file If the shot file is mistakenly saved in Microsoft Excel format (xls) the shot file will not work in Apollo Project
Appendix A Reference Information and Examples
44 Apollo Project User Guide16106R5 2009-03-24
A42 Creating a Shot File With OpenOfficeorg CalcThe OpenOffice template has been tested with OpenOfficeorg Calc version 23 Later versions of OpenOfficeorg Calc can be used at your discretion
To create a shot file based on the OpenOfficeorg Calc template
1 Double-click ShotFileTemplateots
A new OpenOffice spreadsheet is created from the template and opens in OpenOfficeorg Calc
2 Save the new spreadsheet as an OpenOffice Calc document (ods)
3 Enter the shot file data as specified in the OpenOffice spreadsheet
You can enter data for multiple shot times
4 Click Save to save the file in OpenOfficeorg Calc format
5 Click File gt Save As and select Text CSV (csv) from the Save as Type list
6 Select the Edit filter settings check box
7 Click Save
A warning message might appear that warns you that the document might contain formatting that cannot be saved in the csv format Click Yes on the warning message to save the file in csv format
The Export of text files window opens
8 Delete the double quotation marks () in the Text delimiter box and ensure that the Save cell content as shown check box is selected
9 Click OK to export the OpenOffice spreadsheet as a csv file
10 Click OK on the warning message
11 Close OpenOfficeorg Calc
Appendix A Reference Information and Examples
Apollo Project User Guide16106R5 2009-03-24
45
A43 Creating a Comma-Separated Values Shot FileYou can use any text editor to create a csv shot file
To create a csv shot file
1 Open ShotFileTemplatecsv in a text editor and save it with a different name
2 Format each line of the csv file as follows
Shot TimePre TimePost TimeLatitudeLongitudeElevation
For example
2008-08-28 103044090600000-6000004267
The format and units are as follows
3 Save the file as a csv formatted file
The csv shot file template is not compatible with Microsoft Office Excel Make sure that you do not double-click it and open it in Microsoft Office Excel
FormatUnits
Shot Time yyyy-mm-dd hhmmss
Pre Time seconds
Post Time seconds
Latitude degrees
Longitude degrees
Elevation meters
Appendix A Reference Information and Examples
46 Apollo Project User Guide16106R5 2009-03-24
Apollo Project User Guide16106R5 2009-03-24
47
Appendix B Retrieving SOH Data from a Taurus Version 2x
Taurus Version 2x SOH Data Retrieved by Apollo Project
Retrieving SOH Data from a Taurus Version 2x Streaming to Apollo Server
B1 Taurus Version 2x SOH Data Retrieved by Apollo Project This section presents the predefined datasets of SOH data Apollo Project will retrieve from a Taurus version 2x either through a direct connection or a stream to Apollo Server For instruction on retrieving streaming Taurus version 2x data from Apollo Server see Section B2 ldquoRetrieving SOH Data from a Taurus Version 2x Streaming to Apollo Serverrdquo on page 48
The order of the columns presented in the table below will differ when streaming Taurus version 2x SOH data from Apollo Server
Predefined SOH group SOH data
GPS Time Time (longsecs) (the number of seconds since 1970-01-01)Time (UTC) (time in yyyy-mm-dd hhmmssms format)Altitude (m)DAC CountError (ns) (time error)GPS Engine StatusLast Update Time(s)Lat (deg) (latitude in degrees)Long (deg) (longitude in degrees)NumSatellites (number of satellites used)PDOPPhaseLock (system clock phase lock)TDOPUncertainty (ns) (time uncertainty)
Note The values for Number of satellites used PDOP and TDOP are provided by the GPS receiver at the Last update time In order to see what time these values correspond to look at the Last update time When GPS is off these three parameters and the Last update time are not updated The last value displays until the next update arrives (after the GPS is turned on again)
Appendix B Retrieving SOH Data from a Taurus Version 2x
48 Apollo Project User Guide16106R5 2009-03-24
B2 Retrieving SOH Data from a Taurus Version 2x Streaming to Apollo ServerThis section provides instruction on configuring your Taurus version 2x to stream data to Apollo Server and instructions on how to use Apollo Project to retrieve this data from Apollo Server
B21 Streaming Data from a Taurus Version 2x to Apollo ServerUse the Taurus graphical user interface on either the Taurus display screen or through a Web browser to set up an NP stream from a Taurus version 2x to Apollo Server
1 Log in to the Taurus version 2x with either the tech or central user account
2 Select Advanced Configuration gt Communications gt NP Data Streaming
GPS Satellites Time (longsecs) (the number of seconds since 1970-01-01)Time (UTC) (time in yyyy-mm-dd hhmmssms format)
For each satelliteAcquisition FlagLast Update Time (ms)PRNSatellite Azimuth (microordm)Satellite Elevation (microordm)Signal Level (AMU)
Environment Time (longsecs) (the number of seconds since 1970-01-01)Time (UTC) (time in yyyy-mm-dd hhmmssms format)External SOH Voltage 1 (V) (12-bit voltage input) External SOH Voltage 2 (V) (12-bit voltage input) External SOH Voltage 3 (V) (12-bit voltage input) External SOH Voltage 4 (V) (12-bit voltage input) Sensor SOH Voltage 1 (V)Sensor SOH Voltage 2 (V)Sensor SOH Voltage 3 (V)
Instrument Time (longsecs) (the number of seconds since 1970-01-01)Time (UTC) (time in yyyy-mm-dd hhmmssms format)Controller Current (mA)Digitizer Current (mA)NMX Bus Current (mA) (external connector)Sensor Current (mA)Serial Port Current (mA)Supply Voltage (mV)Temperature (ordmC)
Predefined SOH group SOH data
Appendix B Retrieving SOH Data from a Taurus Version 2x
Apollo Project User Guide16106R5 2009-03-24
49
3 To have the Taurus stream both time series and SOH data to Apollo Server select both Stream Time Series and Stream SOH
-OR-
Select only Stream SOH if you only want to retrieve the SOH data from Apollo Server
4 Type the IP address for Apollo Server in the IP Address box
5 Type the port number Apollo Server uses to receive data in the Port box By default this is port number 32008
6 The Second IP Address and Second Port boxes are not necessary however cannot be left blank Type 127001 in the Second IP Address box and 32004 in the Second Port box
7 Type a value in the Maximum Throughput [bps] box if a limited data link is present between the Taurus and Apollo Server For instance if at some point the data link is limited to 9600 bps then this is the maximum throughput the link can allow If there are no throughput limitations set the value in this box to zero to disable the throughput limitation
8 Click Apply
9 Click Commit
B22 Retrieving Taurus Version 2x Data from Apollo ServerCreate a new project or use an existing project in Apollo Project to retrieve the Taurus version 2x data from Apollo Server For more information on creating or editing projects refer to Section 31 ldquoCreating New Projectsrdquo on page 11 and Section 36 ldquoEditing and Viewing the Settings of Projectsrdquo on page 31
When creating or editing the project
a) Add an IP address Store specification on the Store Selection tab (see step 4 in Section 31 ldquoCreating New Projectsrdquo) for Apollo Server including its client Web application port number Use the format
Apollo Server IP AddressApollo Server Client Web Application Port Number
b) Apply the appropriate filters on the Channel Group Selection tab to retrieve the desired channel groups from the Taurus version 2x See step 5 through step 12 in Section 31 ldquoCreating New Projectsrdquo for instruction on using the Channel Group Selection tab
Appendix B Retrieving SOH Data from a Taurus Version 2x
50 Apollo Project User Guide16106R5 2009-03-24
Apollo Project User Guide16106R5 2009-03-24
51
Appendix C Glossary
Glossary of Abbreviations and Terms
List of Unit Abbreviations and Symbols
C1 Glossary of Abbreviations and Terms
A
ASCIIAmerican Standard Code for Information Interchange
B
BHEBroad Band High Gain Seismometer East-West Orientation
Channel name based on the Global Seismological Network (GSN) standard
BHNBroad Band High Gain Seismometer North-South Orientation
Channel name based on the Global Seismological Network (GSN) standard
BHZBroad Band High Gain Seismometer Vertical Orientation
Channel name based on the Global Seismological Network (GSN) standard
Appendix C Glossary
52 Apollo Project User Guide16106R5 2009-03-24
C
CSVComma-Separated Values
D
DACDigital to Analog Converter
G
GPSGlobal Positioning System
J
JREJava Runtime Environment
JVMJava Virtual Machine
N
NFSNetwork File System
P
PDOPPosition Dilution of Precision
PRNPseudo-random Number
Appendix C Glossary
Apollo Project User Guide16106R5 2009-03-24
53
S
SACSeismic Analysis Code
An Apollo Project output file format that generates files that can be used by the SAC software (see http wwwirisedusoftwaresac)
SEEDStandard for the Exchange of Earthquake Data
SMBServer Message Block
SOHState of Health
T
TCPIPTransmission Control ProtocolInternet Protocol
TDOPTime Dilution of Precision
U
UNCUniform Naming Convention or Universal Naming Convention
URLUniform Resource Locator
UTCCoordinated Universal Time
Appendix C Glossary
54 Apollo Project User Guide16106R5 2009-03-24
C2 List of Unit Abbreviations and SymbolsTable C-1 provides a list of unit abbreviations and symbols commonly used in Nanometrics documentation
Table C-1 Unit abbreviations and symbols
Abbreviation or Symbol Definition Abbreviation
or Symbol Definition
deg degree lb pound
Oslash diameter m metre
micro micro ms metre per second
Ω ohm ms2 metre per second squared
A ampere mA milliampere
AC alternating current MB megabyte
b bit MΩ megaohm
B byte MHz megahertz
bps bits per second mi mile
C Celsius mL millilitre
cm centimetre mm millimetre
dB decibel ms millisecond
DC direct current MTU maximum transmission unit
F farad mV millivolt
ft foot mW milliwatt
g gram N Newton
g gravity nF nanofarad
GB gigabyte ns nanosecond
GHz gigahertz rad radian
Hz hertz rads radian per second
in inch s second
KB kilobyte sps samples per second
kg kilogram U rack unit
kHz kilohertz V volt
kΩ kiloohm Vpp Volts peak-to-peak
kW kilowatt W watt
L litre
Apollo Project User Guide16106R5 2009-03-24
55
About NanometricsNanometrics is a world leader in the development of precision instrumentation network technology and software applications for seismological and environmental studies Using Nanometrics technology our customers establish and grow research networks that are often located in extreme environments such as the frozen Arctic and Antarctic the arid deserts of the Middle East the jungles of South America and the depths of the worlds oceans Many of these are mission-critical national and regional networks that demand the highest possible data quality and availability
Nanometrics provides end-to-end solutions that include a growing portfolio of broadband and strong motion seismometers dataloggers and digitizers satellite ground station systems for remote site data collection and software applications for data and network analysis and management To support this portfolio Nanometrics also provides global systems engineering services for design installation and support of complete networks
Our head office research and development centre and production facility are located in the Kanata North Business Park of Ottawa the high-technology heart of Canadas capital region
Contacting NanometricsNanometrics Inc250 Herzberg RoadKanata Ontario Canada K2K 2A1Phone +1 613-592-6776Fax +1 613-592-5929Email infonanometricscaWeb wwwnanometricsca
Contacting Technical SupportIf you need technical support please submit a request on the Nanometrics technical support site or by email or fax Include a full explanation of the problem and related information such as log filesSupport site httpsupportnanometricsca
Email techsupportnanometricsca
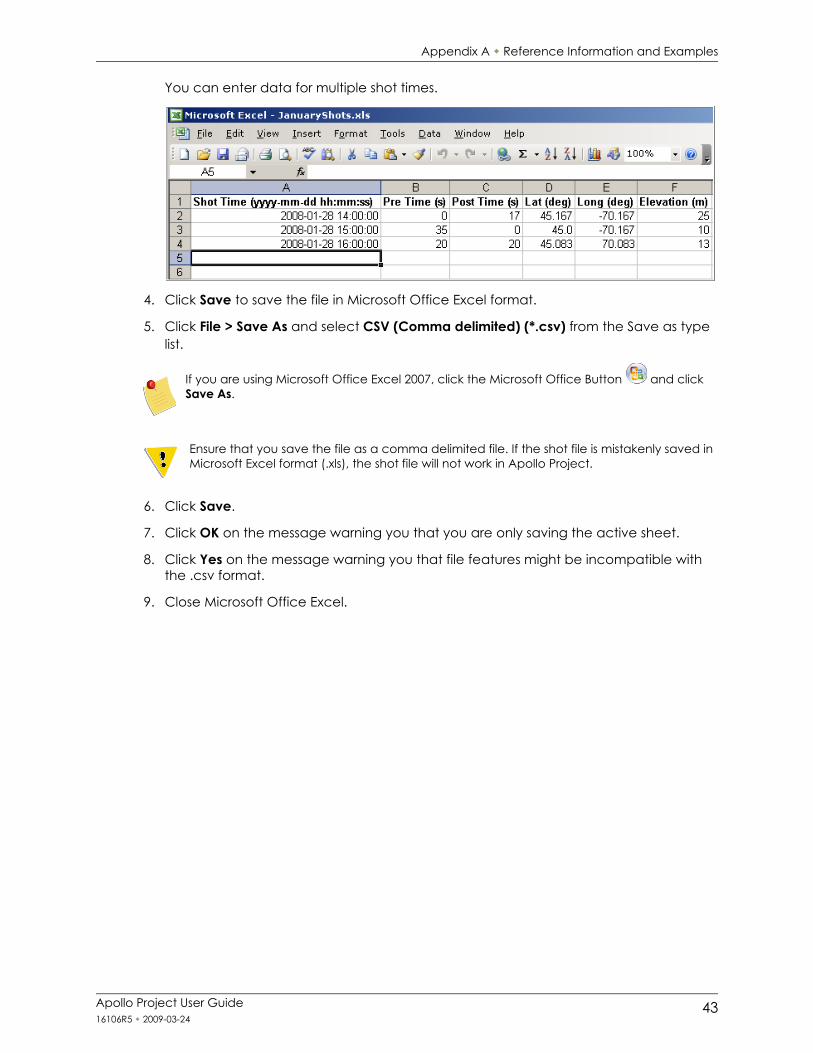
Appendix A Reference Information and Examples
Apollo Project User Guide16106R5 2009-03-24
43
You can enter data for multiple shot times
4 Click Save to save the file in Microsoft Office Excel format
5 Click File gt Save As and select CSV (Comma delimited) (csv) from the Save as type list
6 Click Save
7 Click OK on the message warning you that you are only saving the active sheet
8 Click Yes on the message warning you that file features might be incompatible with the csv format
9 Close Microsoft Office Excel
If you are using Microsoft Office Excel 2007 click the Microsoft Office Button and click Save As
Ensure that you save the file as a comma delimited file If the shot file is mistakenly saved in Microsoft Excel format (xls) the shot file will not work in Apollo Project
Appendix A Reference Information and Examples
44 Apollo Project User Guide16106R5 2009-03-24
A42 Creating a Shot File With OpenOfficeorg CalcThe OpenOffice template has been tested with OpenOfficeorg Calc version 23 Later versions of OpenOfficeorg Calc can be used at your discretion
To create a shot file based on the OpenOfficeorg Calc template
1 Double-click ShotFileTemplateots
A new OpenOffice spreadsheet is created from the template and opens in OpenOfficeorg Calc
2 Save the new spreadsheet as an OpenOffice Calc document (ods)
3 Enter the shot file data as specified in the OpenOffice spreadsheet
You can enter data for multiple shot times
4 Click Save to save the file in OpenOfficeorg Calc format
5 Click File gt Save As and select Text CSV (csv) from the Save as Type list
6 Select the Edit filter settings check box
7 Click Save
A warning message might appear that warns you that the document might contain formatting that cannot be saved in the csv format Click Yes on the warning message to save the file in csv format
The Export of text files window opens
8 Delete the double quotation marks () in the Text delimiter box and ensure that the Save cell content as shown check box is selected
9 Click OK to export the OpenOffice spreadsheet as a csv file
10 Click OK on the warning message
11 Close OpenOfficeorg Calc
Appendix A Reference Information and Examples
Apollo Project User Guide16106R5 2009-03-24
45
A43 Creating a Comma-Separated Values Shot FileYou can use any text editor to create a csv shot file
To create a csv shot file
1 Open ShotFileTemplatecsv in a text editor and save it with a different name
2 Format each line of the csv file as follows
Shot TimePre TimePost TimeLatitudeLongitudeElevation
For example
2008-08-28 103044090600000-6000004267
The format and units are as follows
3 Save the file as a csv formatted file
The csv shot file template is not compatible with Microsoft Office Excel Make sure that you do not double-click it and open it in Microsoft Office Excel
FormatUnits
Shot Time yyyy-mm-dd hhmmss
Pre Time seconds
Post Time seconds
Latitude degrees
Longitude degrees
Elevation meters
Appendix A Reference Information and Examples
46 Apollo Project User Guide16106R5 2009-03-24
Apollo Project User Guide16106R5 2009-03-24
47
Appendix B Retrieving SOH Data from a Taurus Version 2x
Taurus Version 2x SOH Data Retrieved by Apollo Project
Retrieving SOH Data from a Taurus Version 2x Streaming to Apollo Server
B1 Taurus Version 2x SOH Data Retrieved by Apollo Project This section presents the predefined datasets of SOH data Apollo Project will retrieve from a Taurus version 2x either through a direct connection or a stream to Apollo Server For instruction on retrieving streaming Taurus version 2x data from Apollo Server see Section B2 ldquoRetrieving SOH Data from a Taurus Version 2x Streaming to Apollo Serverrdquo on page 48
The order of the columns presented in the table below will differ when streaming Taurus version 2x SOH data from Apollo Server
Predefined SOH group SOH data
GPS Time Time (longsecs) (the number of seconds since 1970-01-01)Time (UTC) (time in yyyy-mm-dd hhmmssms format)Altitude (m)DAC CountError (ns) (time error)GPS Engine StatusLast Update Time(s)Lat (deg) (latitude in degrees)Long (deg) (longitude in degrees)NumSatellites (number of satellites used)PDOPPhaseLock (system clock phase lock)TDOPUncertainty (ns) (time uncertainty)
Note The values for Number of satellites used PDOP and TDOP are provided by the GPS receiver at the Last update time In order to see what time these values correspond to look at the Last update time When GPS is off these three parameters and the Last update time are not updated The last value displays until the next update arrives (after the GPS is turned on again)
Appendix B Retrieving SOH Data from a Taurus Version 2x
48 Apollo Project User Guide16106R5 2009-03-24
B2 Retrieving SOH Data from a Taurus Version 2x Streaming to Apollo ServerThis section provides instruction on configuring your Taurus version 2x to stream data to Apollo Server and instructions on how to use Apollo Project to retrieve this data from Apollo Server
B21 Streaming Data from a Taurus Version 2x to Apollo ServerUse the Taurus graphical user interface on either the Taurus display screen or through a Web browser to set up an NP stream from a Taurus version 2x to Apollo Server
1 Log in to the Taurus version 2x with either the tech or central user account
2 Select Advanced Configuration gt Communications gt NP Data Streaming
GPS Satellites Time (longsecs) (the number of seconds since 1970-01-01)Time (UTC) (time in yyyy-mm-dd hhmmssms format)
For each satelliteAcquisition FlagLast Update Time (ms)PRNSatellite Azimuth (microordm)Satellite Elevation (microordm)Signal Level (AMU)
Environment Time (longsecs) (the number of seconds since 1970-01-01)Time (UTC) (time in yyyy-mm-dd hhmmssms format)External SOH Voltage 1 (V) (12-bit voltage input) External SOH Voltage 2 (V) (12-bit voltage input) External SOH Voltage 3 (V) (12-bit voltage input) External SOH Voltage 4 (V) (12-bit voltage input) Sensor SOH Voltage 1 (V)Sensor SOH Voltage 2 (V)Sensor SOH Voltage 3 (V)
Instrument Time (longsecs) (the number of seconds since 1970-01-01)Time (UTC) (time in yyyy-mm-dd hhmmssms format)Controller Current (mA)Digitizer Current (mA)NMX Bus Current (mA) (external connector)Sensor Current (mA)Serial Port Current (mA)Supply Voltage (mV)Temperature (ordmC)
Predefined SOH group SOH data
Appendix B Retrieving SOH Data from a Taurus Version 2x
Apollo Project User Guide16106R5 2009-03-24
49
3 To have the Taurus stream both time series and SOH data to Apollo Server select both Stream Time Series and Stream SOH
-OR-
Select only Stream SOH if you only want to retrieve the SOH data from Apollo Server
4 Type the IP address for Apollo Server in the IP Address box
5 Type the port number Apollo Server uses to receive data in the Port box By default this is port number 32008
6 The Second IP Address and Second Port boxes are not necessary however cannot be left blank Type 127001 in the Second IP Address box and 32004 in the Second Port box
7 Type a value in the Maximum Throughput [bps] box if a limited data link is present between the Taurus and Apollo Server For instance if at some point the data link is limited to 9600 bps then this is the maximum throughput the link can allow If there are no throughput limitations set the value in this box to zero to disable the throughput limitation
8 Click Apply
9 Click Commit
B22 Retrieving Taurus Version 2x Data from Apollo ServerCreate a new project or use an existing project in Apollo Project to retrieve the Taurus version 2x data from Apollo Server For more information on creating or editing projects refer to Section 31 ldquoCreating New Projectsrdquo on page 11 and Section 36 ldquoEditing and Viewing the Settings of Projectsrdquo on page 31
When creating or editing the project
a) Add an IP address Store specification on the Store Selection tab (see step 4 in Section 31 ldquoCreating New Projectsrdquo) for Apollo Server including its client Web application port number Use the format
Apollo Server IP AddressApollo Server Client Web Application Port Number
b) Apply the appropriate filters on the Channel Group Selection tab to retrieve the desired channel groups from the Taurus version 2x See step 5 through step 12 in Section 31 ldquoCreating New Projectsrdquo for instruction on using the Channel Group Selection tab
Appendix B Retrieving SOH Data from a Taurus Version 2x
50 Apollo Project User Guide16106R5 2009-03-24
Apollo Project User Guide16106R5 2009-03-24
51
Appendix C Glossary
Glossary of Abbreviations and Terms
List of Unit Abbreviations and Symbols
C1 Glossary of Abbreviations and Terms
A
ASCIIAmerican Standard Code for Information Interchange
B
BHEBroad Band High Gain Seismometer East-West Orientation
Channel name based on the Global Seismological Network (GSN) standard
BHNBroad Band High Gain Seismometer North-South Orientation
Channel name based on the Global Seismological Network (GSN) standard
BHZBroad Band High Gain Seismometer Vertical Orientation
Channel name based on the Global Seismological Network (GSN) standard
Appendix C Glossary
52 Apollo Project User Guide16106R5 2009-03-24
C
CSVComma-Separated Values
D
DACDigital to Analog Converter
G
GPSGlobal Positioning System
J
JREJava Runtime Environment
JVMJava Virtual Machine
N
NFSNetwork File System
P
PDOPPosition Dilution of Precision
PRNPseudo-random Number
Appendix C Glossary
Apollo Project User Guide16106R5 2009-03-24
53
S
SACSeismic Analysis Code
An Apollo Project output file format that generates files that can be used by the SAC software (see http wwwirisedusoftwaresac)
SEEDStandard for the Exchange of Earthquake Data
SMBServer Message Block
SOHState of Health
T
TCPIPTransmission Control ProtocolInternet Protocol
TDOPTime Dilution of Precision
U
UNCUniform Naming Convention or Universal Naming Convention
URLUniform Resource Locator
UTCCoordinated Universal Time
Appendix C Glossary
54 Apollo Project User Guide16106R5 2009-03-24
C2 List of Unit Abbreviations and SymbolsTable C-1 provides a list of unit abbreviations and symbols commonly used in Nanometrics documentation
Table C-1 Unit abbreviations and symbols
Abbreviation or Symbol Definition Abbreviation
or Symbol Definition
deg degree lb pound
Oslash diameter m metre
micro micro ms metre per second
Ω ohm ms2 metre per second squared
A ampere mA milliampere
AC alternating current MB megabyte
b bit MΩ megaohm
B byte MHz megahertz
bps bits per second mi mile
C Celsius mL millilitre
cm centimetre mm millimetre
dB decibel ms millisecond
DC direct current MTU maximum transmission unit
F farad mV millivolt
ft foot mW milliwatt
g gram N Newton
g gravity nF nanofarad
GB gigabyte ns nanosecond
GHz gigahertz rad radian
Hz hertz rads radian per second
in inch s second
KB kilobyte sps samples per second
kg kilogram U rack unit
kHz kilohertz V volt
kΩ kiloohm Vpp Volts peak-to-peak
kW kilowatt W watt
L litre
Apollo Project User Guide16106R5 2009-03-24
55
About NanometricsNanometrics is a world leader in the development of precision instrumentation network technology and software applications for seismological and environmental studies Using Nanometrics technology our customers establish and grow research networks that are often located in extreme environments such as the frozen Arctic and Antarctic the arid deserts of the Middle East the jungles of South America and the depths of the worlds oceans Many of these are mission-critical national and regional networks that demand the highest possible data quality and availability
Nanometrics provides end-to-end solutions that include a growing portfolio of broadband and strong motion seismometers dataloggers and digitizers satellite ground station systems for remote site data collection and software applications for data and network analysis and management To support this portfolio Nanometrics also provides global systems engineering services for design installation and support of complete networks
Our head office research and development centre and production facility are located in the Kanata North Business Park of Ottawa the high-technology heart of Canadas capital region
Contacting NanometricsNanometrics Inc250 Herzberg RoadKanata Ontario Canada K2K 2A1Phone +1 613-592-6776Fax +1 613-592-5929Email infonanometricscaWeb wwwnanometricsca
Contacting Technical SupportIf you need technical support please submit a request on the Nanometrics technical support site or by email or fax Include a full explanation of the problem and related information such as log filesSupport site httpsupportnanometricsca
Email techsupportnanometricsca
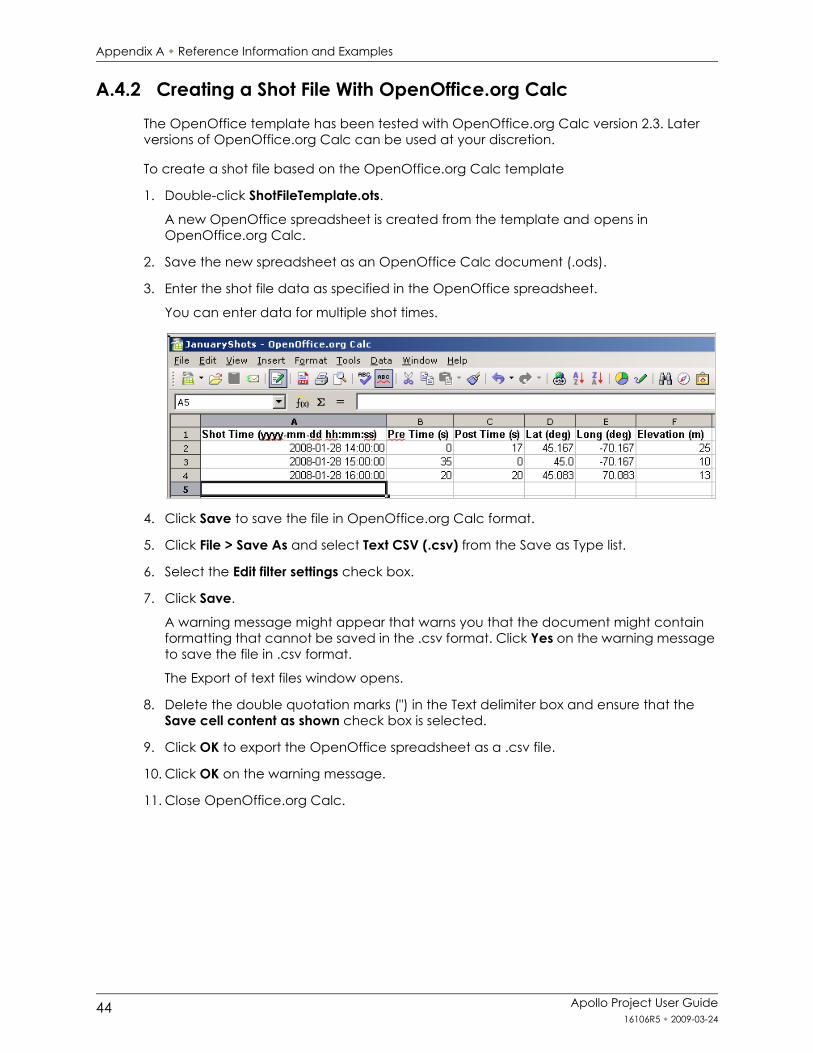
Appendix A Reference Information and Examples
44 Apollo Project User Guide16106R5 2009-03-24
A42 Creating a Shot File With OpenOfficeorg CalcThe OpenOffice template has been tested with OpenOfficeorg Calc version 23 Later versions of OpenOfficeorg Calc can be used at your discretion
To create a shot file based on the OpenOfficeorg Calc template
1 Double-click ShotFileTemplateots
A new OpenOffice spreadsheet is created from the template and opens in OpenOfficeorg Calc
2 Save the new spreadsheet as an OpenOffice Calc document (ods)
3 Enter the shot file data as specified in the OpenOffice spreadsheet
You can enter data for multiple shot times
4 Click Save to save the file in OpenOfficeorg Calc format
5 Click File gt Save As and select Text CSV (csv) from the Save as Type list
6 Select the Edit filter settings check box
7 Click Save
A warning message might appear that warns you that the document might contain formatting that cannot be saved in the csv format Click Yes on the warning message to save the file in csv format
The Export of text files window opens
8 Delete the double quotation marks () in the Text delimiter box and ensure that the Save cell content as shown check box is selected
9 Click OK to export the OpenOffice spreadsheet as a csv file
10 Click OK on the warning message
11 Close OpenOfficeorg Calc
Appendix A Reference Information and Examples
Apollo Project User Guide16106R5 2009-03-24
45
A43 Creating a Comma-Separated Values Shot FileYou can use any text editor to create a csv shot file
To create a csv shot file
1 Open ShotFileTemplatecsv in a text editor and save it with a different name
2 Format each line of the csv file as follows
Shot TimePre TimePost TimeLatitudeLongitudeElevation
For example
2008-08-28 103044090600000-6000004267
The format and units are as follows
3 Save the file as a csv formatted file
The csv shot file template is not compatible with Microsoft Office Excel Make sure that you do not double-click it and open it in Microsoft Office Excel
FormatUnits
Shot Time yyyy-mm-dd hhmmss
Pre Time seconds
Post Time seconds
Latitude degrees
Longitude degrees
Elevation meters
Appendix A Reference Information and Examples
46 Apollo Project User Guide16106R5 2009-03-24
Apollo Project User Guide16106R5 2009-03-24
47
Appendix B Retrieving SOH Data from a Taurus Version 2x
Taurus Version 2x SOH Data Retrieved by Apollo Project
Retrieving SOH Data from a Taurus Version 2x Streaming to Apollo Server
B1 Taurus Version 2x SOH Data Retrieved by Apollo Project This section presents the predefined datasets of SOH data Apollo Project will retrieve from a Taurus version 2x either through a direct connection or a stream to Apollo Server For instruction on retrieving streaming Taurus version 2x data from Apollo Server see Section B2 ldquoRetrieving SOH Data from a Taurus Version 2x Streaming to Apollo Serverrdquo on page 48
The order of the columns presented in the table below will differ when streaming Taurus version 2x SOH data from Apollo Server
Predefined SOH group SOH data
GPS Time Time (longsecs) (the number of seconds since 1970-01-01)Time (UTC) (time in yyyy-mm-dd hhmmssms format)Altitude (m)DAC CountError (ns) (time error)GPS Engine StatusLast Update Time(s)Lat (deg) (latitude in degrees)Long (deg) (longitude in degrees)NumSatellites (number of satellites used)PDOPPhaseLock (system clock phase lock)TDOPUncertainty (ns) (time uncertainty)
Note The values for Number of satellites used PDOP and TDOP are provided by the GPS receiver at the Last update time In order to see what time these values correspond to look at the Last update time When GPS is off these three parameters and the Last update time are not updated The last value displays until the next update arrives (after the GPS is turned on again)
Appendix B Retrieving SOH Data from a Taurus Version 2x
48 Apollo Project User Guide16106R5 2009-03-24
B2 Retrieving SOH Data from a Taurus Version 2x Streaming to Apollo ServerThis section provides instruction on configuring your Taurus version 2x to stream data to Apollo Server and instructions on how to use Apollo Project to retrieve this data from Apollo Server
B21 Streaming Data from a Taurus Version 2x to Apollo ServerUse the Taurus graphical user interface on either the Taurus display screen or through a Web browser to set up an NP stream from a Taurus version 2x to Apollo Server
1 Log in to the Taurus version 2x with either the tech or central user account
2 Select Advanced Configuration gt Communications gt NP Data Streaming
GPS Satellites Time (longsecs) (the number of seconds since 1970-01-01)Time (UTC) (time in yyyy-mm-dd hhmmssms format)
For each satelliteAcquisition FlagLast Update Time (ms)PRNSatellite Azimuth (microordm)Satellite Elevation (microordm)Signal Level (AMU)
Environment Time (longsecs) (the number of seconds since 1970-01-01)Time (UTC) (time in yyyy-mm-dd hhmmssms format)External SOH Voltage 1 (V) (12-bit voltage input) External SOH Voltage 2 (V) (12-bit voltage input) External SOH Voltage 3 (V) (12-bit voltage input) External SOH Voltage 4 (V) (12-bit voltage input) Sensor SOH Voltage 1 (V)Sensor SOH Voltage 2 (V)Sensor SOH Voltage 3 (V)
Instrument Time (longsecs) (the number of seconds since 1970-01-01)Time (UTC) (time in yyyy-mm-dd hhmmssms format)Controller Current (mA)Digitizer Current (mA)NMX Bus Current (mA) (external connector)Sensor Current (mA)Serial Port Current (mA)Supply Voltage (mV)Temperature (ordmC)
Predefined SOH group SOH data
Appendix B Retrieving SOH Data from a Taurus Version 2x
Apollo Project User Guide16106R5 2009-03-24
49
3 To have the Taurus stream both time series and SOH data to Apollo Server select both Stream Time Series and Stream SOH
-OR-
Select only Stream SOH if you only want to retrieve the SOH data from Apollo Server
4 Type the IP address for Apollo Server in the IP Address box
5 Type the port number Apollo Server uses to receive data in the Port box By default this is port number 32008
6 The Second IP Address and Second Port boxes are not necessary however cannot be left blank Type 127001 in the Second IP Address box and 32004 in the Second Port box
7 Type a value in the Maximum Throughput [bps] box if a limited data link is present between the Taurus and Apollo Server For instance if at some point the data link is limited to 9600 bps then this is the maximum throughput the link can allow If there are no throughput limitations set the value in this box to zero to disable the throughput limitation
8 Click Apply
9 Click Commit
B22 Retrieving Taurus Version 2x Data from Apollo ServerCreate a new project or use an existing project in Apollo Project to retrieve the Taurus version 2x data from Apollo Server For more information on creating or editing projects refer to Section 31 ldquoCreating New Projectsrdquo on page 11 and Section 36 ldquoEditing and Viewing the Settings of Projectsrdquo on page 31
When creating or editing the project
a) Add an IP address Store specification on the Store Selection tab (see step 4 in Section 31 ldquoCreating New Projectsrdquo) for Apollo Server including its client Web application port number Use the format
Apollo Server IP AddressApollo Server Client Web Application Port Number
b) Apply the appropriate filters on the Channel Group Selection tab to retrieve the desired channel groups from the Taurus version 2x See step 5 through step 12 in Section 31 ldquoCreating New Projectsrdquo for instruction on using the Channel Group Selection tab
Appendix B Retrieving SOH Data from a Taurus Version 2x
50 Apollo Project User Guide16106R5 2009-03-24
Apollo Project User Guide16106R5 2009-03-24
51
Appendix C Glossary
Glossary of Abbreviations and Terms
List of Unit Abbreviations and Symbols
C1 Glossary of Abbreviations and Terms
A
ASCIIAmerican Standard Code for Information Interchange
B
BHEBroad Band High Gain Seismometer East-West Orientation
Channel name based on the Global Seismological Network (GSN) standard
BHNBroad Band High Gain Seismometer North-South Orientation
Channel name based on the Global Seismological Network (GSN) standard
BHZBroad Band High Gain Seismometer Vertical Orientation
Channel name based on the Global Seismological Network (GSN) standard
Appendix C Glossary
52 Apollo Project User Guide16106R5 2009-03-24
C
CSVComma-Separated Values
D
DACDigital to Analog Converter
G
GPSGlobal Positioning System
J
JREJava Runtime Environment
JVMJava Virtual Machine
N
NFSNetwork File System
P
PDOPPosition Dilution of Precision
PRNPseudo-random Number
Appendix C Glossary
Apollo Project User Guide16106R5 2009-03-24
53
S
SACSeismic Analysis Code
An Apollo Project output file format that generates files that can be used by the SAC software (see http wwwirisedusoftwaresac)
SEEDStandard for the Exchange of Earthquake Data
SMBServer Message Block
SOHState of Health
T
TCPIPTransmission Control ProtocolInternet Protocol
TDOPTime Dilution of Precision
U
UNCUniform Naming Convention or Universal Naming Convention
URLUniform Resource Locator
UTCCoordinated Universal Time
Appendix C Glossary
54 Apollo Project User Guide16106R5 2009-03-24
C2 List of Unit Abbreviations and SymbolsTable C-1 provides a list of unit abbreviations and symbols commonly used in Nanometrics documentation
Table C-1 Unit abbreviations and symbols
Abbreviation or Symbol Definition Abbreviation
or Symbol Definition
deg degree lb pound
Oslash diameter m metre
micro micro ms metre per second
Ω ohm ms2 metre per second squared
A ampere mA milliampere
AC alternating current MB megabyte
b bit MΩ megaohm
B byte MHz megahertz
bps bits per second mi mile
C Celsius mL millilitre
cm centimetre mm millimetre
dB decibel ms millisecond
DC direct current MTU maximum transmission unit
F farad mV millivolt
ft foot mW milliwatt
g gram N Newton
g gravity nF nanofarad
GB gigabyte ns nanosecond
GHz gigahertz rad radian
Hz hertz rads radian per second
in inch s second
KB kilobyte sps samples per second
kg kilogram U rack unit
kHz kilohertz V volt
kΩ kiloohm Vpp Volts peak-to-peak
kW kilowatt W watt
L litre
Apollo Project User Guide16106R5 2009-03-24
55
About NanometricsNanometrics is a world leader in the development of precision instrumentation network technology and software applications for seismological and environmental studies Using Nanometrics technology our customers establish and grow research networks that are often located in extreme environments such as the frozen Arctic and Antarctic the arid deserts of the Middle East the jungles of South America and the depths of the worlds oceans Many of these are mission-critical national and regional networks that demand the highest possible data quality and availability
Nanometrics provides end-to-end solutions that include a growing portfolio of broadband and strong motion seismometers dataloggers and digitizers satellite ground station systems for remote site data collection and software applications for data and network analysis and management To support this portfolio Nanometrics also provides global systems engineering services for design installation and support of complete networks
Our head office research and development centre and production facility are located in the Kanata North Business Park of Ottawa the high-technology heart of Canadas capital region
Contacting NanometricsNanometrics Inc250 Herzberg RoadKanata Ontario Canada K2K 2A1Phone +1 613-592-6776Fax +1 613-592-5929Email infonanometricscaWeb wwwnanometricsca
Contacting Technical SupportIf you need technical support please submit a request on the Nanometrics technical support site or by email or fax Include a full explanation of the problem and related information such as log filesSupport site httpsupportnanometricsca
Email techsupportnanometricsca
Appendix A Reference Information and Examples
Apollo Project User Guide16106R5 2009-03-24
45
A43 Creating a Comma-Separated Values Shot FileYou can use any text editor to create a csv shot file
To create a csv shot file
1 Open ShotFileTemplatecsv in a text editor and save it with a different name
2 Format each line of the csv file as follows
Shot TimePre TimePost TimeLatitudeLongitudeElevation
For example
2008-08-28 103044090600000-6000004267
The format and units are as follows
3 Save the file as a csv formatted file
The csv shot file template is not compatible with Microsoft Office Excel Make sure that you do not double-click it and open it in Microsoft Office Excel
FormatUnits
Shot Time yyyy-mm-dd hhmmss
Pre Time seconds
Post Time seconds
Latitude degrees
Longitude degrees
Elevation meters
Appendix A Reference Information and Examples
46 Apollo Project User Guide16106R5 2009-03-24
Apollo Project User Guide16106R5 2009-03-24
47
Appendix B Retrieving SOH Data from a Taurus Version 2x
Taurus Version 2x SOH Data Retrieved by Apollo Project
Retrieving SOH Data from a Taurus Version 2x Streaming to Apollo Server
B1 Taurus Version 2x SOH Data Retrieved by Apollo Project This section presents the predefined datasets of SOH data Apollo Project will retrieve from a Taurus version 2x either through a direct connection or a stream to Apollo Server For instruction on retrieving streaming Taurus version 2x data from Apollo Server see Section B2 ldquoRetrieving SOH Data from a Taurus Version 2x Streaming to Apollo Serverrdquo on page 48
The order of the columns presented in the table below will differ when streaming Taurus version 2x SOH data from Apollo Server
Predefined SOH group SOH data
GPS Time Time (longsecs) (the number of seconds since 1970-01-01)Time (UTC) (time in yyyy-mm-dd hhmmssms format)Altitude (m)DAC CountError (ns) (time error)GPS Engine StatusLast Update Time(s)Lat (deg) (latitude in degrees)Long (deg) (longitude in degrees)NumSatellites (number of satellites used)PDOPPhaseLock (system clock phase lock)TDOPUncertainty (ns) (time uncertainty)
Note The values for Number of satellites used PDOP and TDOP are provided by the GPS receiver at the Last update time In order to see what time these values correspond to look at the Last update time When GPS is off these three parameters and the Last update time are not updated The last value displays until the next update arrives (after the GPS is turned on again)
Appendix B Retrieving SOH Data from a Taurus Version 2x
48 Apollo Project User Guide16106R5 2009-03-24
B2 Retrieving SOH Data from a Taurus Version 2x Streaming to Apollo ServerThis section provides instruction on configuring your Taurus version 2x to stream data to Apollo Server and instructions on how to use Apollo Project to retrieve this data from Apollo Server
B21 Streaming Data from a Taurus Version 2x to Apollo ServerUse the Taurus graphical user interface on either the Taurus display screen or through a Web browser to set up an NP stream from a Taurus version 2x to Apollo Server
1 Log in to the Taurus version 2x with either the tech or central user account
2 Select Advanced Configuration gt Communications gt NP Data Streaming
GPS Satellites Time (longsecs) (the number of seconds since 1970-01-01)Time (UTC) (time in yyyy-mm-dd hhmmssms format)
For each satelliteAcquisition FlagLast Update Time (ms)PRNSatellite Azimuth (microordm)Satellite Elevation (microordm)Signal Level (AMU)
Environment Time (longsecs) (the number of seconds since 1970-01-01)Time (UTC) (time in yyyy-mm-dd hhmmssms format)External SOH Voltage 1 (V) (12-bit voltage input) External SOH Voltage 2 (V) (12-bit voltage input) External SOH Voltage 3 (V) (12-bit voltage input) External SOH Voltage 4 (V) (12-bit voltage input) Sensor SOH Voltage 1 (V)Sensor SOH Voltage 2 (V)Sensor SOH Voltage 3 (V)
Instrument Time (longsecs) (the number of seconds since 1970-01-01)Time (UTC) (time in yyyy-mm-dd hhmmssms format)Controller Current (mA)Digitizer Current (mA)NMX Bus Current (mA) (external connector)Sensor Current (mA)Serial Port Current (mA)Supply Voltage (mV)Temperature (ordmC)
Predefined SOH group SOH data
Appendix B Retrieving SOH Data from a Taurus Version 2x
Apollo Project User Guide16106R5 2009-03-24
49
3 To have the Taurus stream both time series and SOH data to Apollo Server select both Stream Time Series and Stream SOH
-OR-
Select only Stream SOH if you only want to retrieve the SOH data from Apollo Server
4 Type the IP address for Apollo Server in the IP Address box
5 Type the port number Apollo Server uses to receive data in the Port box By default this is port number 32008
6 The Second IP Address and Second Port boxes are not necessary however cannot be left blank Type 127001 in the Second IP Address box and 32004 in the Second Port box
7 Type a value in the Maximum Throughput [bps] box if a limited data link is present between the Taurus and Apollo Server For instance if at some point the data link is limited to 9600 bps then this is the maximum throughput the link can allow If there are no throughput limitations set the value in this box to zero to disable the throughput limitation
8 Click Apply
9 Click Commit
B22 Retrieving Taurus Version 2x Data from Apollo ServerCreate a new project or use an existing project in Apollo Project to retrieve the Taurus version 2x data from Apollo Server For more information on creating or editing projects refer to Section 31 ldquoCreating New Projectsrdquo on page 11 and Section 36 ldquoEditing and Viewing the Settings of Projectsrdquo on page 31
When creating or editing the project
a) Add an IP address Store specification on the Store Selection tab (see step 4 in Section 31 ldquoCreating New Projectsrdquo) for Apollo Server including its client Web application port number Use the format
Apollo Server IP AddressApollo Server Client Web Application Port Number
b) Apply the appropriate filters on the Channel Group Selection tab to retrieve the desired channel groups from the Taurus version 2x See step 5 through step 12 in Section 31 ldquoCreating New Projectsrdquo for instruction on using the Channel Group Selection tab
Appendix B Retrieving SOH Data from a Taurus Version 2x
50 Apollo Project User Guide16106R5 2009-03-24
Apollo Project User Guide16106R5 2009-03-24
51
Appendix C Glossary
Glossary of Abbreviations and Terms
List of Unit Abbreviations and Symbols
C1 Glossary of Abbreviations and Terms
A
ASCIIAmerican Standard Code for Information Interchange
B
BHEBroad Band High Gain Seismometer East-West Orientation
Channel name based on the Global Seismological Network (GSN) standard
BHNBroad Band High Gain Seismometer North-South Orientation
Channel name based on the Global Seismological Network (GSN) standard
BHZBroad Band High Gain Seismometer Vertical Orientation
Channel name based on the Global Seismological Network (GSN) standard
Appendix C Glossary
52 Apollo Project User Guide16106R5 2009-03-24
C
CSVComma-Separated Values
D
DACDigital to Analog Converter
G
GPSGlobal Positioning System
J
JREJava Runtime Environment
JVMJava Virtual Machine
N
NFSNetwork File System
P
PDOPPosition Dilution of Precision
PRNPseudo-random Number
Appendix C Glossary
Apollo Project User Guide16106R5 2009-03-24
53
S
SACSeismic Analysis Code
An Apollo Project output file format that generates files that can be used by the SAC software (see http wwwirisedusoftwaresac)
SEEDStandard for the Exchange of Earthquake Data
SMBServer Message Block
SOHState of Health
T
TCPIPTransmission Control ProtocolInternet Protocol
TDOPTime Dilution of Precision
U
UNCUniform Naming Convention or Universal Naming Convention
URLUniform Resource Locator
UTCCoordinated Universal Time
Appendix C Glossary
54 Apollo Project User Guide16106R5 2009-03-24
C2 List of Unit Abbreviations and SymbolsTable C-1 provides a list of unit abbreviations and symbols commonly used in Nanometrics documentation
Table C-1 Unit abbreviations and symbols
Abbreviation or Symbol Definition Abbreviation
or Symbol Definition
deg degree lb pound
Oslash diameter m metre
micro micro ms metre per second
Ω ohm ms2 metre per second squared
A ampere mA milliampere
AC alternating current MB megabyte
b bit MΩ megaohm
B byte MHz megahertz
bps bits per second mi mile
C Celsius mL millilitre
cm centimetre mm millimetre
dB decibel ms millisecond
DC direct current MTU maximum transmission unit
F farad mV millivolt
ft foot mW milliwatt
g gram N Newton
g gravity nF nanofarad
GB gigabyte ns nanosecond
GHz gigahertz rad radian
Hz hertz rads radian per second
in inch s second
KB kilobyte sps samples per second
kg kilogram U rack unit
kHz kilohertz V volt
kΩ kiloohm Vpp Volts peak-to-peak
kW kilowatt W watt
L litre
Apollo Project User Guide16106R5 2009-03-24
55
About NanometricsNanometrics is a world leader in the development of precision instrumentation network technology and software applications for seismological and environmental studies Using Nanometrics technology our customers establish and grow research networks that are often located in extreme environments such as the frozen Arctic and Antarctic the arid deserts of the Middle East the jungles of South America and the depths of the worlds oceans Many of these are mission-critical national and regional networks that demand the highest possible data quality and availability
Nanometrics provides end-to-end solutions that include a growing portfolio of broadband and strong motion seismometers dataloggers and digitizers satellite ground station systems for remote site data collection and software applications for data and network analysis and management To support this portfolio Nanometrics also provides global systems engineering services for design installation and support of complete networks
Our head office research and development centre and production facility are located in the Kanata North Business Park of Ottawa the high-technology heart of Canadas capital region
Contacting NanometricsNanometrics Inc250 Herzberg RoadKanata Ontario Canada K2K 2A1Phone +1 613-592-6776Fax +1 613-592-5929Email infonanometricscaWeb wwwnanometricsca
Contacting Technical SupportIf you need technical support please submit a request on the Nanometrics technical support site or by email or fax Include a full explanation of the problem and related information such as log filesSupport site httpsupportnanometricsca
Email techsupportnanometricsca
Apollo Project User Guide16106R5 2009-03-24
47
Appendix B Retrieving SOH Data from a Taurus Version 2x
Taurus Version 2x SOH Data Retrieved by Apollo Project
Retrieving SOH Data from a Taurus Version 2x Streaming to Apollo Server
B1 Taurus Version 2x SOH Data Retrieved by Apollo Project This section presents the predefined datasets of SOH data Apollo Project will retrieve from a Taurus version 2x either through a direct connection or a stream to Apollo Server For instruction on retrieving streaming Taurus version 2x data from Apollo Server see Section B2 ldquoRetrieving SOH Data from a Taurus Version 2x Streaming to Apollo Serverrdquo on page 48
The order of the columns presented in the table below will differ when streaming Taurus version 2x SOH data from Apollo Server
Predefined SOH group SOH data
GPS Time Time (longsecs) (the number of seconds since 1970-01-01)Time (UTC) (time in yyyy-mm-dd hhmmssms format)Altitude (m)DAC CountError (ns) (time error)GPS Engine StatusLast Update Time(s)Lat (deg) (latitude in degrees)Long (deg) (longitude in degrees)NumSatellites (number of satellites used)PDOPPhaseLock (system clock phase lock)TDOPUncertainty (ns) (time uncertainty)
Note The values for Number of satellites used PDOP and TDOP are provided by the GPS receiver at the Last update time In order to see what time these values correspond to look at the Last update time When GPS is off these three parameters and the Last update time are not updated The last value displays until the next update arrives (after the GPS is turned on again)
Appendix B Retrieving SOH Data from a Taurus Version 2x
48 Apollo Project User Guide16106R5 2009-03-24
B2 Retrieving SOH Data from a Taurus Version 2x Streaming to Apollo ServerThis section provides instruction on configuring your Taurus version 2x to stream data to Apollo Server and instructions on how to use Apollo Project to retrieve this data from Apollo Server
B21 Streaming Data from a Taurus Version 2x to Apollo ServerUse the Taurus graphical user interface on either the Taurus display screen or through a Web browser to set up an NP stream from a Taurus version 2x to Apollo Server
1 Log in to the Taurus version 2x with either the tech or central user account
2 Select Advanced Configuration gt Communications gt NP Data Streaming
GPS Satellites Time (longsecs) (the number of seconds since 1970-01-01)Time (UTC) (time in yyyy-mm-dd hhmmssms format)
For each satelliteAcquisition FlagLast Update Time (ms)PRNSatellite Azimuth (microordm)Satellite Elevation (microordm)Signal Level (AMU)
Environment Time (longsecs) (the number of seconds since 1970-01-01)Time (UTC) (time in yyyy-mm-dd hhmmssms format)External SOH Voltage 1 (V) (12-bit voltage input) External SOH Voltage 2 (V) (12-bit voltage input) External SOH Voltage 3 (V) (12-bit voltage input) External SOH Voltage 4 (V) (12-bit voltage input) Sensor SOH Voltage 1 (V)Sensor SOH Voltage 2 (V)Sensor SOH Voltage 3 (V)
Instrument Time (longsecs) (the number of seconds since 1970-01-01)Time (UTC) (time in yyyy-mm-dd hhmmssms format)Controller Current (mA)Digitizer Current (mA)NMX Bus Current (mA) (external connector)Sensor Current (mA)Serial Port Current (mA)Supply Voltage (mV)Temperature (ordmC)
Predefined SOH group SOH data
Appendix B Retrieving SOH Data from a Taurus Version 2x
Apollo Project User Guide16106R5 2009-03-24
49
3 To have the Taurus stream both time series and SOH data to Apollo Server select both Stream Time Series and Stream SOH
-OR-
Select only Stream SOH if you only want to retrieve the SOH data from Apollo Server
4 Type the IP address for Apollo Server in the IP Address box
5 Type the port number Apollo Server uses to receive data in the Port box By default this is port number 32008
6 The Second IP Address and Second Port boxes are not necessary however cannot be left blank Type 127001 in the Second IP Address box and 32004 in the Second Port box
7 Type a value in the Maximum Throughput [bps] box if a limited data link is present between the Taurus and Apollo Server For instance if at some point the data link is limited to 9600 bps then this is the maximum throughput the link can allow If there are no throughput limitations set the value in this box to zero to disable the throughput limitation
8 Click Apply
9 Click Commit
B22 Retrieving Taurus Version 2x Data from Apollo ServerCreate a new project or use an existing project in Apollo Project to retrieve the Taurus version 2x data from Apollo Server For more information on creating or editing projects refer to Section 31 ldquoCreating New Projectsrdquo on page 11 and Section 36 ldquoEditing and Viewing the Settings of Projectsrdquo on page 31
When creating or editing the project
a) Add an IP address Store specification on the Store Selection tab (see step 4 in Section 31 ldquoCreating New Projectsrdquo) for Apollo Server including its client Web application port number Use the format
Apollo Server IP AddressApollo Server Client Web Application Port Number
b) Apply the appropriate filters on the Channel Group Selection tab to retrieve the desired channel groups from the Taurus version 2x See step 5 through step 12 in Section 31 ldquoCreating New Projectsrdquo for instruction on using the Channel Group Selection tab
Appendix B Retrieving SOH Data from a Taurus Version 2x
50 Apollo Project User Guide16106R5 2009-03-24
Apollo Project User Guide16106R5 2009-03-24
51
Appendix C Glossary
Glossary of Abbreviations and Terms
List of Unit Abbreviations and Symbols
C1 Glossary of Abbreviations and Terms
A
ASCIIAmerican Standard Code for Information Interchange
B
BHEBroad Band High Gain Seismometer East-West Orientation
Channel name based on the Global Seismological Network (GSN) standard
BHNBroad Band High Gain Seismometer North-South Orientation
Channel name based on the Global Seismological Network (GSN) standard
BHZBroad Band High Gain Seismometer Vertical Orientation
Channel name based on the Global Seismological Network (GSN) standard
Appendix C Glossary
52 Apollo Project User Guide16106R5 2009-03-24
C
CSVComma-Separated Values
D
DACDigital to Analog Converter
G
GPSGlobal Positioning System
J
JREJava Runtime Environment
JVMJava Virtual Machine
N
NFSNetwork File System
P
PDOPPosition Dilution of Precision
PRNPseudo-random Number
Appendix C Glossary
Apollo Project User Guide16106R5 2009-03-24
53
S
SACSeismic Analysis Code
An Apollo Project output file format that generates files that can be used by the SAC software (see http wwwirisedusoftwaresac)
SEEDStandard for the Exchange of Earthquake Data
SMBServer Message Block
SOHState of Health
T
TCPIPTransmission Control ProtocolInternet Protocol
TDOPTime Dilution of Precision
U
UNCUniform Naming Convention or Universal Naming Convention
URLUniform Resource Locator
UTCCoordinated Universal Time
Appendix C Glossary
54 Apollo Project User Guide16106R5 2009-03-24
C2 List of Unit Abbreviations and SymbolsTable C-1 provides a list of unit abbreviations and symbols commonly used in Nanometrics documentation
Table C-1 Unit abbreviations and symbols
Abbreviation or Symbol Definition Abbreviation
or Symbol Definition
deg degree lb pound
Oslash diameter m metre
micro micro ms metre per second
Ω ohm ms2 metre per second squared
A ampere mA milliampere
AC alternating current MB megabyte
b bit MΩ megaohm
B byte MHz megahertz
bps bits per second mi mile
C Celsius mL millilitre
cm centimetre mm millimetre
dB decibel ms millisecond
DC direct current MTU maximum transmission unit
F farad mV millivolt
ft foot mW milliwatt
g gram N Newton
g gravity nF nanofarad
GB gigabyte ns nanosecond
GHz gigahertz rad radian
Hz hertz rads radian per second
in inch s second
KB kilobyte sps samples per second
kg kilogram U rack unit
kHz kilohertz V volt
kΩ kiloohm Vpp Volts peak-to-peak
kW kilowatt W watt
L litre
Apollo Project User Guide16106R5 2009-03-24
55
About NanometricsNanometrics is a world leader in the development of precision instrumentation network technology and software applications for seismological and environmental studies Using Nanometrics technology our customers establish and grow research networks that are often located in extreme environments such as the frozen Arctic and Antarctic the arid deserts of the Middle East the jungles of South America and the depths of the worlds oceans Many of these are mission-critical national and regional networks that demand the highest possible data quality and availability
Nanometrics provides end-to-end solutions that include a growing portfolio of broadband and strong motion seismometers dataloggers and digitizers satellite ground station systems for remote site data collection and software applications for data and network analysis and management To support this portfolio Nanometrics also provides global systems engineering services for design installation and support of complete networks
Our head office research and development centre and production facility are located in the Kanata North Business Park of Ottawa the high-technology heart of Canadas capital region
Contacting NanometricsNanometrics Inc250 Herzberg RoadKanata Ontario Canada K2K 2A1Phone +1 613-592-6776Fax +1 613-592-5929Email infonanometricscaWeb wwwnanometricsca
Contacting Technical SupportIf you need technical support please submit a request on the Nanometrics technical support site or by email or fax Include a full explanation of the problem and related information such as log filesSupport site httpsupportnanometricsca
Email techsupportnanometricsca
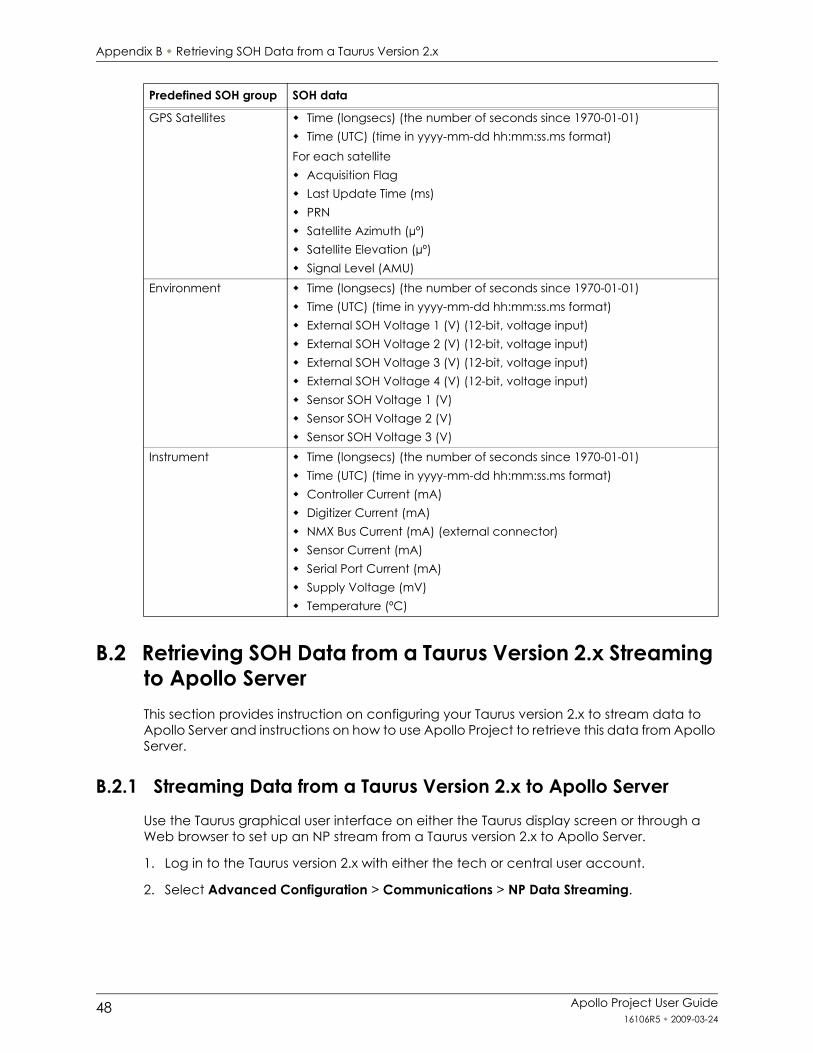
Appendix B Retrieving SOH Data from a Taurus Version 2x
48 Apollo Project User Guide16106R5 2009-03-24
B2 Retrieving SOH Data from a Taurus Version 2x Streaming to Apollo ServerThis section provides instruction on configuring your Taurus version 2x to stream data to Apollo Server and instructions on how to use Apollo Project to retrieve this data from Apollo Server
B21 Streaming Data from a Taurus Version 2x to Apollo ServerUse the Taurus graphical user interface on either the Taurus display screen or through a Web browser to set up an NP stream from a Taurus version 2x to Apollo Server
1 Log in to the Taurus version 2x with either the tech or central user account
2 Select Advanced Configuration gt Communications gt NP Data Streaming
GPS Satellites Time (longsecs) (the number of seconds since 1970-01-01)Time (UTC) (time in yyyy-mm-dd hhmmssms format)
For each satelliteAcquisition FlagLast Update Time (ms)PRNSatellite Azimuth (microordm)Satellite Elevation (microordm)Signal Level (AMU)
Environment Time (longsecs) (the number of seconds since 1970-01-01)Time (UTC) (time in yyyy-mm-dd hhmmssms format)External SOH Voltage 1 (V) (12-bit voltage input) External SOH Voltage 2 (V) (12-bit voltage input) External SOH Voltage 3 (V) (12-bit voltage input) External SOH Voltage 4 (V) (12-bit voltage input) Sensor SOH Voltage 1 (V)Sensor SOH Voltage 2 (V)Sensor SOH Voltage 3 (V)
Instrument Time (longsecs) (the number of seconds since 1970-01-01)Time (UTC) (time in yyyy-mm-dd hhmmssms format)Controller Current (mA)Digitizer Current (mA)NMX Bus Current (mA) (external connector)Sensor Current (mA)Serial Port Current (mA)Supply Voltage (mV)Temperature (ordmC)
Predefined SOH group SOH data
Appendix B Retrieving SOH Data from a Taurus Version 2x
Apollo Project User Guide16106R5 2009-03-24
49
3 To have the Taurus stream both time series and SOH data to Apollo Server select both Stream Time Series and Stream SOH
-OR-
Select only Stream SOH if you only want to retrieve the SOH data from Apollo Server
4 Type the IP address for Apollo Server in the IP Address box
5 Type the port number Apollo Server uses to receive data in the Port box By default this is port number 32008
6 The Second IP Address and Second Port boxes are not necessary however cannot be left blank Type 127001 in the Second IP Address box and 32004 in the Second Port box
7 Type a value in the Maximum Throughput [bps] box if a limited data link is present between the Taurus and Apollo Server For instance if at some point the data link is limited to 9600 bps then this is the maximum throughput the link can allow If there are no throughput limitations set the value in this box to zero to disable the throughput limitation
8 Click Apply
9 Click Commit
B22 Retrieving Taurus Version 2x Data from Apollo ServerCreate a new project or use an existing project in Apollo Project to retrieve the Taurus version 2x data from Apollo Server For more information on creating or editing projects refer to Section 31 ldquoCreating New Projectsrdquo on page 11 and Section 36 ldquoEditing and Viewing the Settings of Projectsrdquo on page 31
When creating or editing the project
a) Add an IP address Store specification on the Store Selection tab (see step 4 in Section 31 ldquoCreating New Projectsrdquo) for Apollo Server including its client Web application port number Use the format
Apollo Server IP AddressApollo Server Client Web Application Port Number
b) Apply the appropriate filters on the Channel Group Selection tab to retrieve the desired channel groups from the Taurus version 2x See step 5 through step 12 in Section 31 ldquoCreating New Projectsrdquo for instruction on using the Channel Group Selection tab
Appendix B Retrieving SOH Data from a Taurus Version 2x
50 Apollo Project User Guide16106R5 2009-03-24
Apollo Project User Guide16106R5 2009-03-24
51
Appendix C Glossary
Glossary of Abbreviations and Terms
List of Unit Abbreviations and Symbols
C1 Glossary of Abbreviations and Terms
A
ASCIIAmerican Standard Code for Information Interchange
B
BHEBroad Band High Gain Seismometer East-West Orientation
Channel name based on the Global Seismological Network (GSN) standard
BHNBroad Band High Gain Seismometer North-South Orientation
Channel name based on the Global Seismological Network (GSN) standard
BHZBroad Band High Gain Seismometer Vertical Orientation
Channel name based on the Global Seismological Network (GSN) standard
Appendix C Glossary
52 Apollo Project User Guide16106R5 2009-03-24
C
CSVComma-Separated Values
D
DACDigital to Analog Converter
G
GPSGlobal Positioning System
J
JREJava Runtime Environment
JVMJava Virtual Machine
N
NFSNetwork File System
P
PDOPPosition Dilution of Precision
PRNPseudo-random Number
Appendix C Glossary
Apollo Project User Guide16106R5 2009-03-24
53
S
SACSeismic Analysis Code
An Apollo Project output file format that generates files that can be used by the SAC software (see http wwwirisedusoftwaresac)
SEEDStandard for the Exchange of Earthquake Data
SMBServer Message Block
SOHState of Health
T
TCPIPTransmission Control ProtocolInternet Protocol
TDOPTime Dilution of Precision
U
UNCUniform Naming Convention or Universal Naming Convention
URLUniform Resource Locator
UTCCoordinated Universal Time
Appendix C Glossary
54 Apollo Project User Guide16106R5 2009-03-24
C2 List of Unit Abbreviations and SymbolsTable C-1 provides a list of unit abbreviations and symbols commonly used in Nanometrics documentation
Table C-1 Unit abbreviations and symbols
Abbreviation or Symbol Definition Abbreviation
or Symbol Definition
deg degree lb pound
Oslash diameter m metre
micro micro ms metre per second
Ω ohm ms2 metre per second squared
A ampere mA milliampere
AC alternating current MB megabyte
b bit MΩ megaohm
B byte MHz megahertz
bps bits per second mi mile
C Celsius mL millilitre
cm centimetre mm millimetre
dB decibel ms millisecond
DC direct current MTU maximum transmission unit
F farad mV millivolt
ft foot mW milliwatt
g gram N Newton
g gravity nF nanofarad
GB gigabyte ns nanosecond
GHz gigahertz rad radian
Hz hertz rads radian per second
in inch s second
KB kilobyte sps samples per second
kg kilogram U rack unit
kHz kilohertz V volt
kΩ kiloohm Vpp Volts peak-to-peak
kW kilowatt W watt
L litre
Apollo Project User Guide16106R5 2009-03-24
55
About NanometricsNanometrics is a world leader in the development of precision instrumentation network technology and software applications for seismological and environmental studies Using Nanometrics technology our customers establish and grow research networks that are often located in extreme environments such as the frozen Arctic and Antarctic the arid deserts of the Middle East the jungles of South America and the depths of the worlds oceans Many of these are mission-critical national and regional networks that demand the highest possible data quality and availability
Nanometrics provides end-to-end solutions that include a growing portfolio of broadband and strong motion seismometers dataloggers and digitizers satellite ground station systems for remote site data collection and software applications for data and network analysis and management To support this portfolio Nanometrics also provides global systems engineering services for design installation and support of complete networks
Our head office research and development centre and production facility are located in the Kanata North Business Park of Ottawa the high-technology heart of Canadas capital region
Contacting NanometricsNanometrics Inc250 Herzberg RoadKanata Ontario Canada K2K 2A1Phone +1 613-592-6776Fax +1 613-592-5929Email infonanometricscaWeb wwwnanometricsca
Contacting Technical SupportIf you need technical support please submit a request on the Nanometrics technical support site or by email or fax Include a full explanation of the problem and related information such as log filesSupport site httpsupportnanometricsca
Email techsupportnanometricsca
Appendix B Retrieving SOH Data from a Taurus Version 2x
Apollo Project User Guide16106R5 2009-03-24
49
3 To have the Taurus stream both time series and SOH data to Apollo Server select both Stream Time Series and Stream SOH
-OR-
Select only Stream SOH if you only want to retrieve the SOH data from Apollo Server
4 Type the IP address for Apollo Server in the IP Address box
5 Type the port number Apollo Server uses to receive data in the Port box By default this is port number 32008
6 The Second IP Address and Second Port boxes are not necessary however cannot be left blank Type 127001 in the Second IP Address box and 32004 in the Second Port box
7 Type a value in the Maximum Throughput [bps] box if a limited data link is present between the Taurus and Apollo Server For instance if at some point the data link is limited to 9600 bps then this is the maximum throughput the link can allow If there are no throughput limitations set the value in this box to zero to disable the throughput limitation
8 Click Apply
9 Click Commit
B22 Retrieving Taurus Version 2x Data from Apollo ServerCreate a new project or use an existing project in Apollo Project to retrieve the Taurus version 2x data from Apollo Server For more information on creating or editing projects refer to Section 31 ldquoCreating New Projectsrdquo on page 11 and Section 36 ldquoEditing and Viewing the Settings of Projectsrdquo on page 31
When creating or editing the project
a) Add an IP address Store specification on the Store Selection tab (see step 4 in Section 31 ldquoCreating New Projectsrdquo) for Apollo Server including its client Web application port number Use the format
Apollo Server IP AddressApollo Server Client Web Application Port Number
b) Apply the appropriate filters on the Channel Group Selection tab to retrieve the desired channel groups from the Taurus version 2x See step 5 through step 12 in Section 31 ldquoCreating New Projectsrdquo for instruction on using the Channel Group Selection tab
Appendix B Retrieving SOH Data from a Taurus Version 2x
50 Apollo Project User Guide16106R5 2009-03-24
Apollo Project User Guide16106R5 2009-03-24
51
Appendix C Glossary
Glossary of Abbreviations and Terms
List of Unit Abbreviations and Symbols
C1 Glossary of Abbreviations and Terms
A
ASCIIAmerican Standard Code for Information Interchange
B
BHEBroad Band High Gain Seismometer East-West Orientation
Channel name based on the Global Seismological Network (GSN) standard
BHNBroad Band High Gain Seismometer North-South Orientation
Channel name based on the Global Seismological Network (GSN) standard
BHZBroad Band High Gain Seismometer Vertical Orientation
Channel name based on the Global Seismological Network (GSN) standard
Appendix C Glossary
52 Apollo Project User Guide16106R5 2009-03-24
C
CSVComma-Separated Values
D
DACDigital to Analog Converter
G
GPSGlobal Positioning System
J
JREJava Runtime Environment
JVMJava Virtual Machine
N
NFSNetwork File System
P
PDOPPosition Dilution of Precision
PRNPseudo-random Number
Appendix C Glossary
Apollo Project User Guide16106R5 2009-03-24
53
S
SACSeismic Analysis Code
An Apollo Project output file format that generates files that can be used by the SAC software (see http wwwirisedusoftwaresac)
SEEDStandard for the Exchange of Earthquake Data
SMBServer Message Block
SOHState of Health
T
TCPIPTransmission Control ProtocolInternet Protocol
TDOPTime Dilution of Precision
U
UNCUniform Naming Convention or Universal Naming Convention
URLUniform Resource Locator
UTCCoordinated Universal Time
Appendix C Glossary
54 Apollo Project User Guide16106R5 2009-03-24
C2 List of Unit Abbreviations and SymbolsTable C-1 provides a list of unit abbreviations and symbols commonly used in Nanometrics documentation
Table C-1 Unit abbreviations and symbols
Abbreviation or Symbol Definition Abbreviation
or Symbol Definition
deg degree lb pound
Oslash diameter m metre
micro micro ms metre per second
Ω ohm ms2 metre per second squared
A ampere mA milliampere
AC alternating current MB megabyte
b bit MΩ megaohm
B byte MHz megahertz
bps bits per second mi mile
C Celsius mL millilitre
cm centimetre mm millimetre
dB decibel ms millisecond
DC direct current MTU maximum transmission unit
F farad mV millivolt
ft foot mW milliwatt
g gram N Newton
g gravity nF nanofarad
GB gigabyte ns nanosecond
GHz gigahertz rad radian
Hz hertz rads radian per second
in inch s second
KB kilobyte sps samples per second
kg kilogram U rack unit
kHz kilohertz V volt
kΩ kiloohm Vpp Volts peak-to-peak
kW kilowatt W watt
L litre
Apollo Project User Guide16106R5 2009-03-24
55
About NanometricsNanometrics is a world leader in the development of precision instrumentation network technology and software applications for seismological and environmental studies Using Nanometrics technology our customers establish and grow research networks that are often located in extreme environments such as the frozen Arctic and Antarctic the arid deserts of the Middle East the jungles of South America and the depths of the worlds oceans Many of these are mission-critical national and regional networks that demand the highest possible data quality and availability
Nanometrics provides end-to-end solutions that include a growing portfolio of broadband and strong motion seismometers dataloggers and digitizers satellite ground station systems for remote site data collection and software applications for data and network analysis and management To support this portfolio Nanometrics also provides global systems engineering services for design installation and support of complete networks
Our head office research and development centre and production facility are located in the Kanata North Business Park of Ottawa the high-technology heart of Canadas capital region
Contacting NanometricsNanometrics Inc250 Herzberg RoadKanata Ontario Canada K2K 2A1Phone +1 613-592-6776Fax +1 613-592-5929Email infonanometricscaWeb wwwnanometricsca
Contacting Technical SupportIf you need technical support please submit a request on the Nanometrics technical support site or by email or fax Include a full explanation of the problem and related information such as log filesSupport site httpsupportnanometricsca
Email techsupportnanometricsca

Apollo Project User Guide16106R5 2009-03-24
51
Appendix C Glossary
Glossary of Abbreviations and Terms
List of Unit Abbreviations and Symbols
C1 Glossary of Abbreviations and Terms
A
ASCIIAmerican Standard Code for Information Interchange
B
BHEBroad Band High Gain Seismometer East-West Orientation
Channel name based on the Global Seismological Network (GSN) standard
BHNBroad Band High Gain Seismometer North-South Orientation
Channel name based on the Global Seismological Network (GSN) standard
BHZBroad Band High Gain Seismometer Vertical Orientation
Channel name based on the Global Seismological Network (GSN) standard
Appendix C Glossary
52 Apollo Project User Guide16106R5 2009-03-24
C
CSVComma-Separated Values
D
DACDigital to Analog Converter
G
GPSGlobal Positioning System
J
JREJava Runtime Environment
JVMJava Virtual Machine
N
NFSNetwork File System
P
PDOPPosition Dilution of Precision
PRNPseudo-random Number
Appendix C Glossary
Apollo Project User Guide16106R5 2009-03-24
53
S
SACSeismic Analysis Code
An Apollo Project output file format that generates files that can be used by the SAC software (see http wwwirisedusoftwaresac)
SEEDStandard for the Exchange of Earthquake Data
SMBServer Message Block
SOHState of Health
T
TCPIPTransmission Control ProtocolInternet Protocol
TDOPTime Dilution of Precision
U
UNCUniform Naming Convention or Universal Naming Convention
URLUniform Resource Locator
UTCCoordinated Universal Time
Appendix C Glossary
54 Apollo Project User Guide16106R5 2009-03-24
C2 List of Unit Abbreviations and SymbolsTable C-1 provides a list of unit abbreviations and symbols commonly used in Nanometrics documentation
Table C-1 Unit abbreviations and symbols
Abbreviation or Symbol Definition Abbreviation
or Symbol Definition
deg degree lb pound
Oslash diameter m metre
micro micro ms metre per second
Ω ohm ms2 metre per second squared
A ampere mA milliampere
AC alternating current MB megabyte
b bit MΩ megaohm
B byte MHz megahertz
bps bits per second mi mile
C Celsius mL millilitre
cm centimetre mm millimetre
dB decibel ms millisecond
DC direct current MTU maximum transmission unit
F farad mV millivolt
ft foot mW milliwatt
g gram N Newton
g gravity nF nanofarad
GB gigabyte ns nanosecond
GHz gigahertz rad radian
Hz hertz rads radian per second
in inch s second
KB kilobyte sps samples per second
kg kilogram U rack unit
kHz kilohertz V volt
kΩ kiloohm Vpp Volts peak-to-peak
kW kilowatt W watt
L litre
Apollo Project User Guide16106R5 2009-03-24
55
About NanometricsNanometrics is a world leader in the development of precision instrumentation network technology and software applications for seismological and environmental studies Using Nanometrics technology our customers establish and grow research networks that are often located in extreme environments such as the frozen Arctic and Antarctic the arid deserts of the Middle East the jungles of South America and the depths of the worlds oceans Many of these are mission-critical national and regional networks that demand the highest possible data quality and availability
Nanometrics provides end-to-end solutions that include a growing portfolio of broadband and strong motion seismometers dataloggers and digitizers satellite ground station systems for remote site data collection and software applications for data and network analysis and management To support this portfolio Nanometrics also provides global systems engineering services for design installation and support of complete networks
Our head office research and development centre and production facility are located in the Kanata North Business Park of Ottawa the high-technology heart of Canadas capital region
Contacting NanometricsNanometrics Inc250 Herzberg RoadKanata Ontario Canada K2K 2A1Phone +1 613-592-6776Fax +1 613-592-5929Email infonanometricscaWeb wwwnanometricsca
Contacting Technical SupportIf you need technical support please submit a request on the Nanometrics technical support site or by email or fax Include a full explanation of the problem and related information such as log filesSupport site httpsupportnanometricsca
Email techsupportnanometricsca

Appendix C Glossary
52 Apollo Project User Guide16106R5 2009-03-24
C
CSVComma-Separated Values
D
DACDigital to Analog Converter
G
GPSGlobal Positioning System
J
JREJava Runtime Environment
JVMJava Virtual Machine
N
NFSNetwork File System
P
PDOPPosition Dilution of Precision
PRNPseudo-random Number
Appendix C Glossary
Apollo Project User Guide16106R5 2009-03-24
53
S
SACSeismic Analysis Code
An Apollo Project output file format that generates files that can be used by the SAC software (see http wwwirisedusoftwaresac)
SEEDStandard for the Exchange of Earthquake Data
SMBServer Message Block
SOHState of Health
T
TCPIPTransmission Control ProtocolInternet Protocol
TDOPTime Dilution of Precision
U
UNCUniform Naming Convention or Universal Naming Convention
URLUniform Resource Locator
UTCCoordinated Universal Time
Appendix C Glossary
54 Apollo Project User Guide16106R5 2009-03-24
C2 List of Unit Abbreviations and SymbolsTable C-1 provides a list of unit abbreviations and symbols commonly used in Nanometrics documentation
Table C-1 Unit abbreviations and symbols
Abbreviation or Symbol Definition Abbreviation
or Symbol Definition
deg degree lb pound
Oslash diameter m metre
micro micro ms metre per second
Ω ohm ms2 metre per second squared
A ampere mA milliampere
AC alternating current MB megabyte
b bit MΩ megaohm
B byte MHz megahertz
bps bits per second mi mile
C Celsius mL millilitre
cm centimetre mm millimetre
dB decibel ms millisecond
DC direct current MTU maximum transmission unit
F farad mV millivolt
ft foot mW milliwatt
g gram N Newton
g gravity nF nanofarad
GB gigabyte ns nanosecond
GHz gigahertz rad radian
Hz hertz rads radian per second
in inch s second
KB kilobyte sps samples per second
kg kilogram U rack unit
kHz kilohertz V volt
kΩ kiloohm Vpp Volts peak-to-peak
kW kilowatt W watt
L litre
Apollo Project User Guide16106R5 2009-03-24
55
About NanometricsNanometrics is a world leader in the development of precision instrumentation network technology and software applications for seismological and environmental studies Using Nanometrics technology our customers establish and grow research networks that are often located in extreme environments such as the frozen Arctic and Antarctic the arid deserts of the Middle East the jungles of South America and the depths of the worlds oceans Many of these are mission-critical national and regional networks that demand the highest possible data quality and availability
Nanometrics provides end-to-end solutions that include a growing portfolio of broadband and strong motion seismometers dataloggers and digitizers satellite ground station systems for remote site data collection and software applications for data and network analysis and management To support this portfolio Nanometrics also provides global systems engineering services for design installation and support of complete networks
Our head office research and development centre and production facility are located in the Kanata North Business Park of Ottawa the high-technology heart of Canadas capital region
Contacting NanometricsNanometrics Inc250 Herzberg RoadKanata Ontario Canada K2K 2A1Phone +1 613-592-6776Fax +1 613-592-5929Email infonanometricscaWeb wwwnanometricsca
Contacting Technical SupportIf you need technical support please submit a request on the Nanometrics technical support site or by email or fax Include a full explanation of the problem and related information such as log filesSupport site httpsupportnanometricsca
Email techsupportnanometricsca
Appendix C Glossary
Apollo Project User Guide16106R5 2009-03-24
53
S
SACSeismic Analysis Code
An Apollo Project output file format that generates files that can be used by the SAC software (see http wwwirisedusoftwaresac)
SEEDStandard for the Exchange of Earthquake Data
SMBServer Message Block
SOHState of Health
T
TCPIPTransmission Control ProtocolInternet Protocol
TDOPTime Dilution of Precision
U
UNCUniform Naming Convention or Universal Naming Convention
URLUniform Resource Locator
UTCCoordinated Universal Time
Appendix C Glossary
54 Apollo Project User Guide16106R5 2009-03-24
C2 List of Unit Abbreviations and SymbolsTable C-1 provides a list of unit abbreviations and symbols commonly used in Nanometrics documentation
Table C-1 Unit abbreviations and symbols
Abbreviation or Symbol Definition Abbreviation
or Symbol Definition
deg degree lb pound
Oslash diameter m metre
micro micro ms metre per second
Ω ohm ms2 metre per second squared
A ampere mA milliampere
AC alternating current MB megabyte
b bit MΩ megaohm
B byte MHz megahertz
bps bits per second mi mile
C Celsius mL millilitre
cm centimetre mm millimetre
dB decibel ms millisecond
DC direct current MTU maximum transmission unit
F farad mV millivolt
ft foot mW milliwatt
g gram N Newton
g gravity nF nanofarad
GB gigabyte ns nanosecond
GHz gigahertz rad radian
Hz hertz rads radian per second
in inch s second
KB kilobyte sps samples per second
kg kilogram U rack unit
kHz kilohertz V volt
kΩ kiloohm Vpp Volts peak-to-peak
kW kilowatt W watt
L litre
Apollo Project User Guide16106R5 2009-03-24
55
About NanometricsNanometrics is a world leader in the development of precision instrumentation network technology and software applications for seismological and environmental studies Using Nanometrics technology our customers establish and grow research networks that are often located in extreme environments such as the frozen Arctic and Antarctic the arid deserts of the Middle East the jungles of South America and the depths of the worlds oceans Many of these are mission-critical national and regional networks that demand the highest possible data quality and availability
Nanometrics provides end-to-end solutions that include a growing portfolio of broadband and strong motion seismometers dataloggers and digitizers satellite ground station systems for remote site data collection and software applications for data and network analysis and management To support this portfolio Nanometrics also provides global systems engineering services for design installation and support of complete networks
Our head office research and development centre and production facility are located in the Kanata North Business Park of Ottawa the high-technology heart of Canadas capital region
Contacting NanometricsNanometrics Inc250 Herzberg RoadKanata Ontario Canada K2K 2A1Phone +1 613-592-6776Fax +1 613-592-5929Email infonanometricscaWeb wwwnanometricsca
Contacting Technical SupportIf you need technical support please submit a request on the Nanometrics technical support site or by email or fax Include a full explanation of the problem and related information such as log filesSupport site httpsupportnanometricsca
Email techsupportnanometricsca


![Anno 2009 Numero apporti tecnici - earth-prints.org tecnico.pdf · La stazione sismica mobile Nanometrics Taurus [Nanometrics Inc. Documentation, 2007] è costituita](https://img.pdfslide.net/doc/110x75/5b3fe0227f8b9a51528c8c2a/anno-2009-numero-apporti-tecnici-earth-tecnicopdf-la-stazione-sismica-mobile.jpg)