Embed Size (px)
Citation preview
© 2015 Citrix Systems, Inc. All rights reserved.
App Orchestration 2.6
Integrated Provisioning Deployment Guide
Version: 1.0
Last Updated: July 8, 2015
App Orchestration 2.6: Integrated Provisioning Deployment Guide
Page 2 © 2015 Citrix Systems, Inc. All rights reserved.
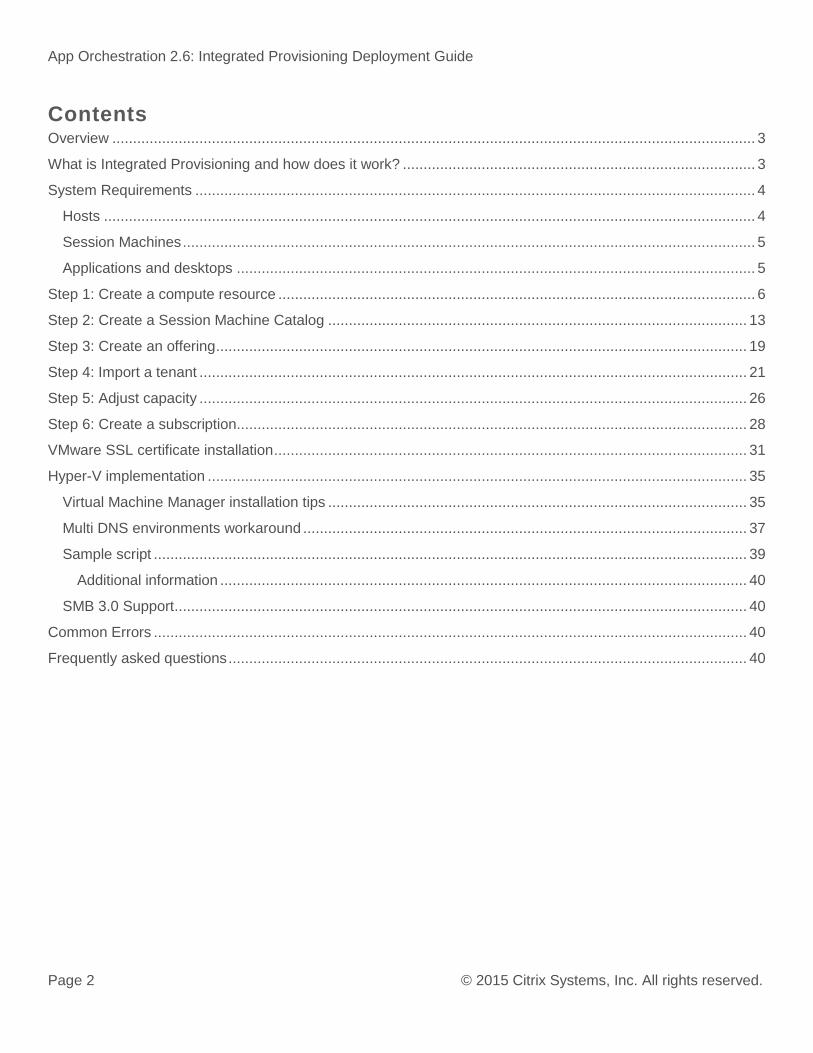
Contents Overview ........................................................................................................................................................... 3
What is Integrated Provisioning and how does it work? ..................................................................................... 3
System Requirements ....................................................................................................................................... 4
Hosts ............................................................................................................................................................. 4
Session Machines .......................................................................................................................................... 5
Applications and desktops ............................................................................................................................. 5
Step 1: Create a compute resource ................................................................................................................... 6
Step 2: Create a Session Machine Catalog ..................................................................................................... 13
Step 3: Create an offering ................................................................................................................................ 19
Step 4: Import a tenant .................................................................................................................................... 21
Step 5: Adjust capacity .................................................................................................................................... 26
Step 6: Create a subscription........................................................................................................................... 28
VMware SSL certificate installation .................................................................................................................. 31
Hyper-V implementation .................................................................................................................................. 35
Virtual Machine Manager installation tips ..................................................................................................... 35
Multi DNS environments workaround ........................................................................................................... 37
Sample script ............................................................................................................................................... 39
Additional information ............................................................................................................................... 40
SMB 3.0 Support .......................................................................................................................................... 40
Common Errors ............................................................................................................................................... 40
Frequently asked questions ............................................................................................................................. 40
App Orchestration 2.6: Integrated Provisioning Deployment Guide
Page 3 © 2015 Citrix Systems, Inc. All rights reserved.
Overview
This document describes basic deployment of the App Orchestration Integrated Provisioning feature. In
addition to introducing the feature, it describes:
Creating a Compute Resource, Integrated Provisioning Session Machine Catalog and Offering
Tenant Import
Capacity adjustments
Tenant Subscription to the Offering.
Before you begin, make sure the following is complete:
App Orchestration Group Policy Objects (GPOs) in place
A master image (a.k.a. template VM) is prepared and the NIC configuration points to the desired DNS
server.
Any machines you are going to use are located in an App Orchestration OU/sub-OU where these policies
are properly applied.
This guide does not describe how to create Delivery Sites or StoreFront Server Groups.
What is Integrated Provisioning and how does it work?
Integrated Provisioning lets you automatically deploy both single-user and multi-user Session Machines from
an existing virtual machine (VM) or snapshot. This VM or snapshot is known as a template.
The administrator is responsible for installing the VDA on the template. After the VDA is installed, Session
Machine Catalog creation can begin. Machine Creation Services (MCS) on the App Orchestration configuration
server generates a temporary provisioned machine of the template VM in its current state. This temporary
machine is scanned for applications that will be made available as offerings. Finally, the temporary machine is
deleted and an offering can be created.
The Delivery Controllers initiate provisioning of multiple machines only after an offering is created from the
catalog and a delivery group is created. Delivery groups are created by subscribing tenants to offerings or by
allocating capacity to an offering.
App Orchestration 2.6: Integrated Provisioning Deployment Guide
Page 4 © 2015 Citrix Systems, Inc. All rights reserved.
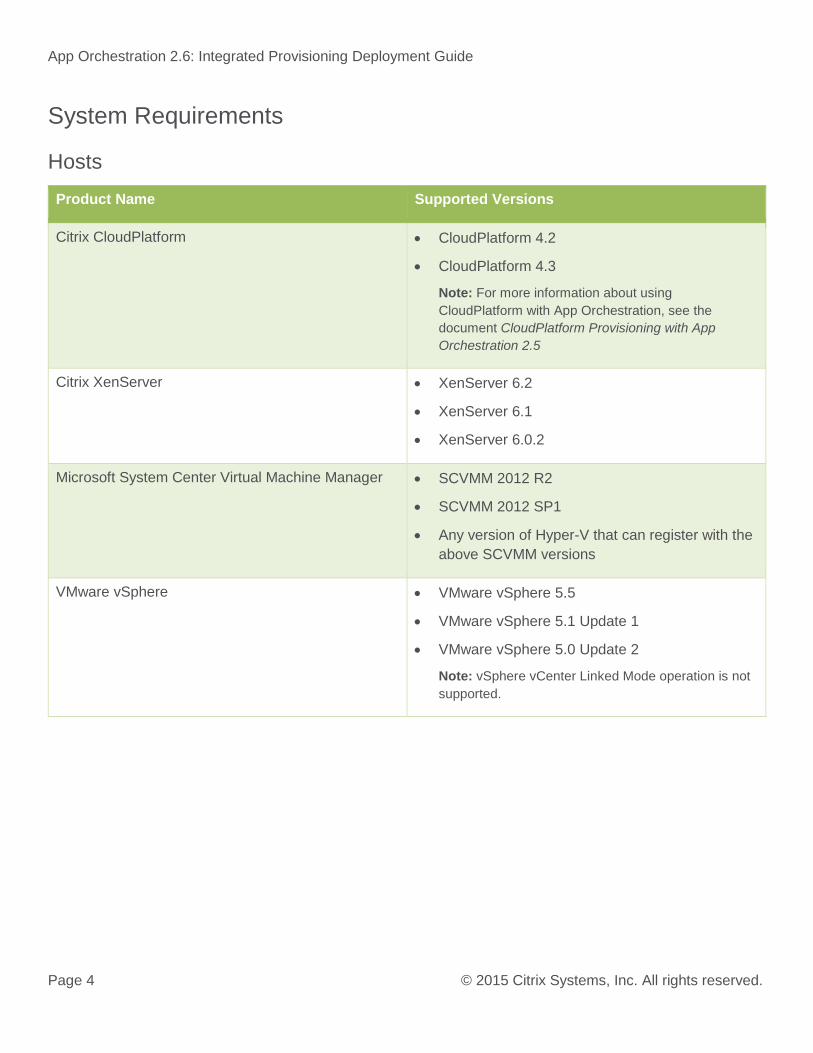
System Requirements
Hosts
Product Name Supported Versions
Citrix CloudPlatform CloudPlatform 4.2
CloudPlatform 4.3
Note: For more information about using
CloudPlatform with App Orchestration, see the
document CloudPlatform Provisioning with App
Orchestration 2.5
Citrix XenServer XenServer 6.2
XenServer 6.1
XenServer 6.0.2
Microsoft System Center Virtual Machine Manager SCVMM 2012 R2
SCVMM 2012 SP1
Any version of Hyper-V that can register with the
above SCVMM versions
VMware vSphere VMware vSphere 5.5
VMware vSphere 5.1 Update 1
VMware vSphere 5.0 Update 2
Note: vSphere vCenter Linked Mode operation is not
supported.
App Orchestration 2.6: Integrated Provisioning Deployment Guide
Page 5 © 2015 Citrix Systems, Inc. All rights reserved.
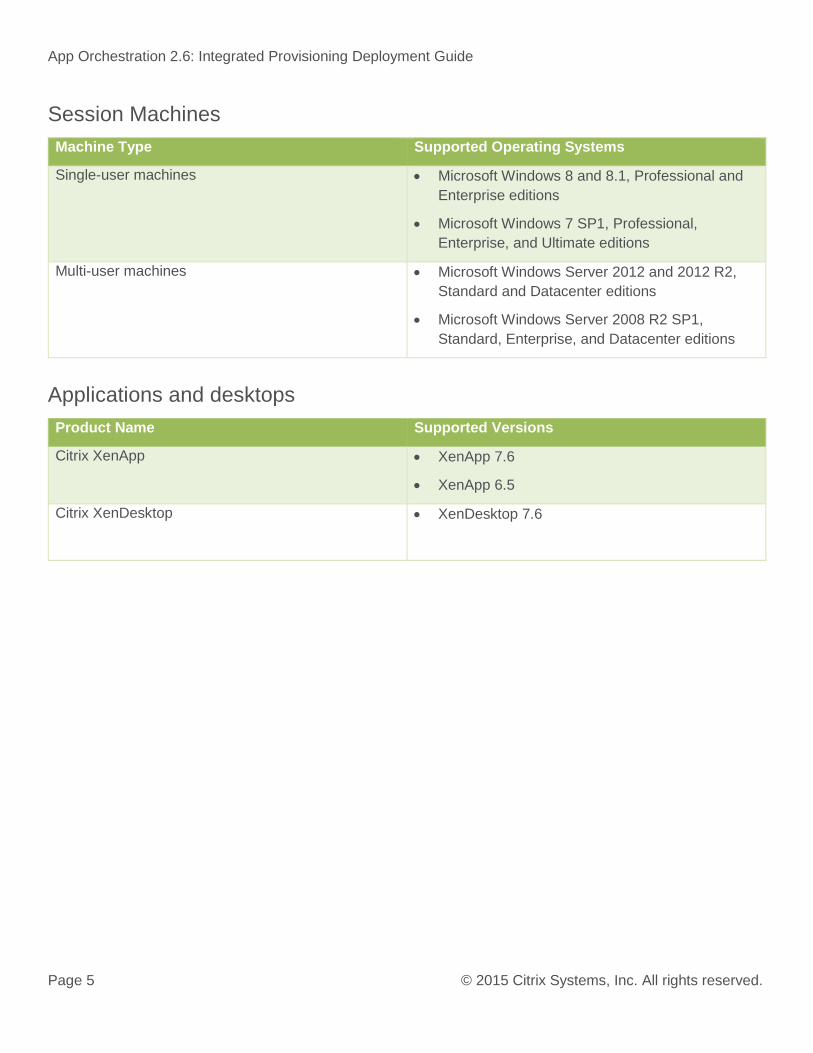
Session Machines
Machine Type Supported Operating Systems
Single-user machines Microsoft Windows 8 and 8.1, Professional and
Enterprise editions
Microsoft Windows 7 SP1, Professional,
Enterprise, and Ultimate editions
Multi-user machines Microsoft Windows Server 2012 and 2012 R2,
Standard and Datacenter editions
Microsoft Windows Server 2008 R2 SP1,
Standard, Enterprise, and Datacenter editions
Applications and desktops
Product Name Supported Versions
Citrix XenApp XenApp 7.6
XenApp 6.5
Citrix XenDesktop XenDesktop 7.6
App Orchestration 2.6: Integrated Provisioning Deployment Guide
Page 6 © 2015 Citrix Systems, Inc. All rights reserved.
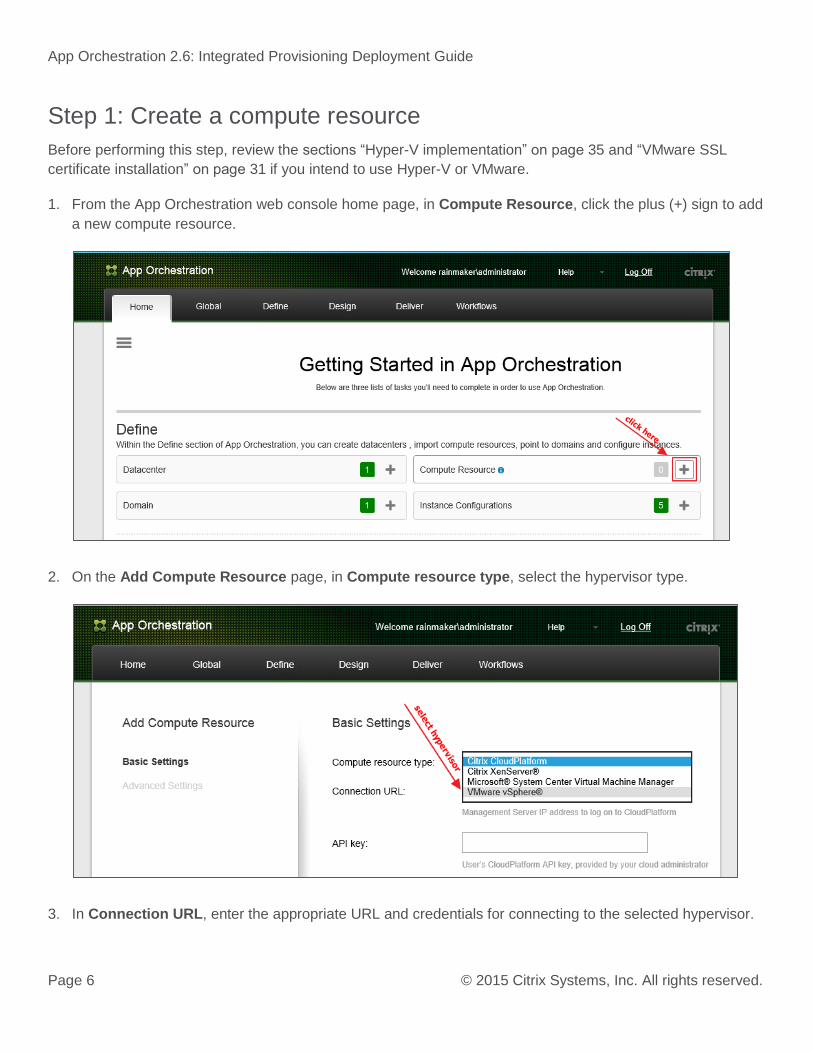
Step 1: Create a compute resource
Before performing this step, review the sections “Hyper-V implementation” on page 35 and “VMware SSL
certificate installation” on page 31 if you intend to use Hyper-V or VMware.
1. From the App Orchestration web console home page, in Compute Resource, click the plus (+) sign to add
a new compute resource.
2. On the Add Compute Resource page, in Compute resource type, select the hypervisor type.
3. In Connection URL, enter the appropriate URL and credentials for connecting to the selected hypervisor.
App Orchestration 2.6: Integrated Provisioning Deployment Guide
Page 7 © 2015 Citrix Systems, Inc. All rights reserved.
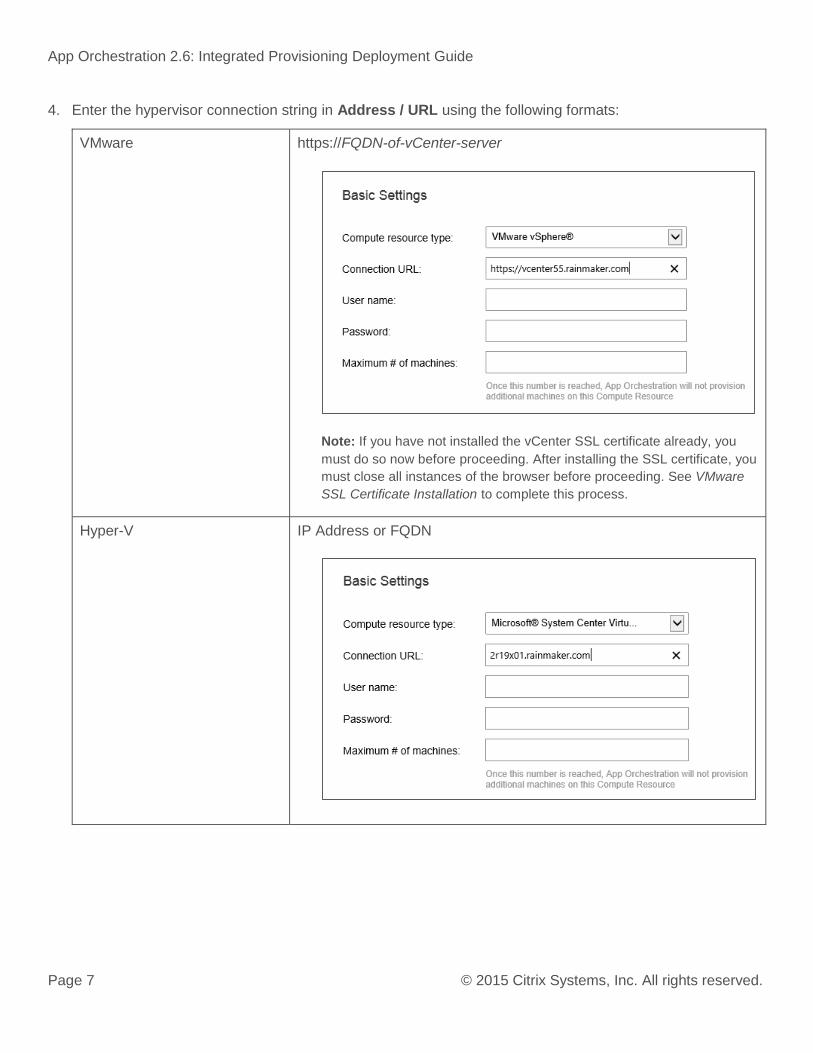
4. Enter the hypervisor connection string in Address / URL using the following formats:
VMware https://FQDN-of-vCenter-server
Note: If you have not installed the vCenter SSL certificate already, you
must do so now before proceeding. After installing the SSL certificate, you
must close all instances of the browser before proceeding. See VMware
SSL Certificate Installation to complete this process.
Hyper-V IP Address or FQDN
App Orchestration 2.6: Integrated Provisioning Deployment Guide
Page 8 © 2015 Citrix Systems, Inc. All rights reserved.
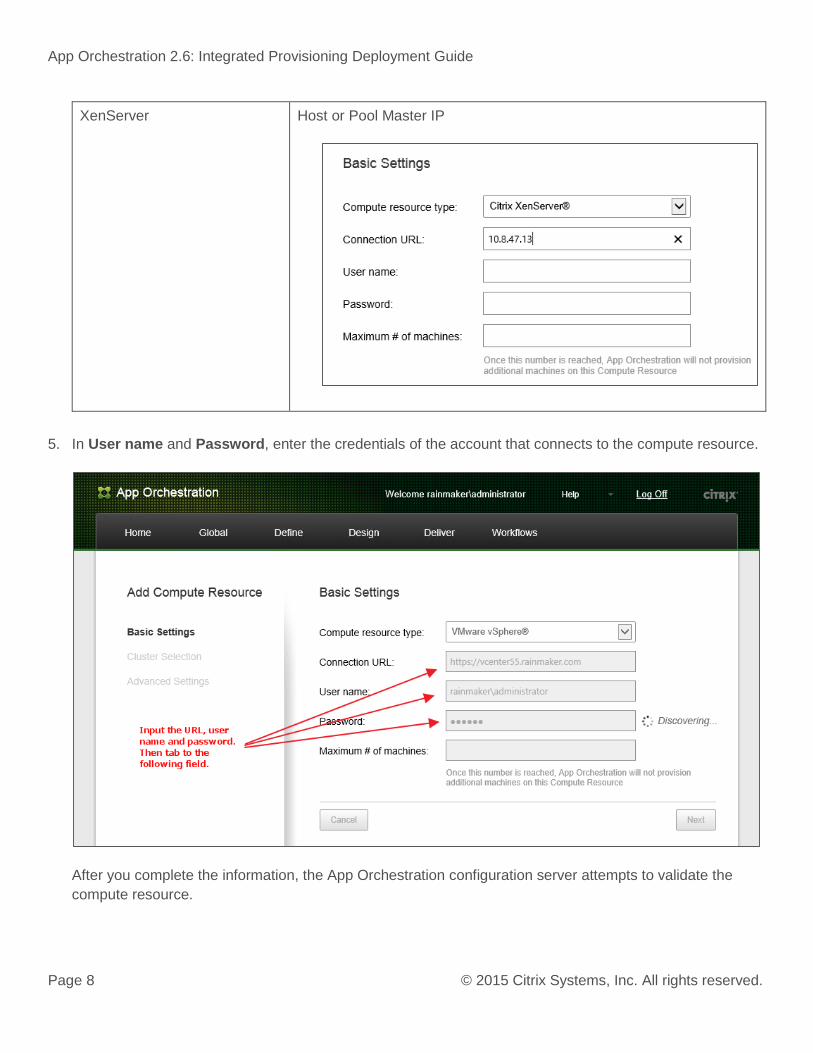
XenServer Host or Pool Master IP
5. In User name and Password, enter the credentials of the account that connects to the compute resource.
After you complete the information, the App Orchestration configuration server attempts to validate the
compute resource.
App Orchestration 2.6: Integrated Provisioning Deployment Guide
Page 9 © 2015 Citrix Systems, Inc. All rights reserved.
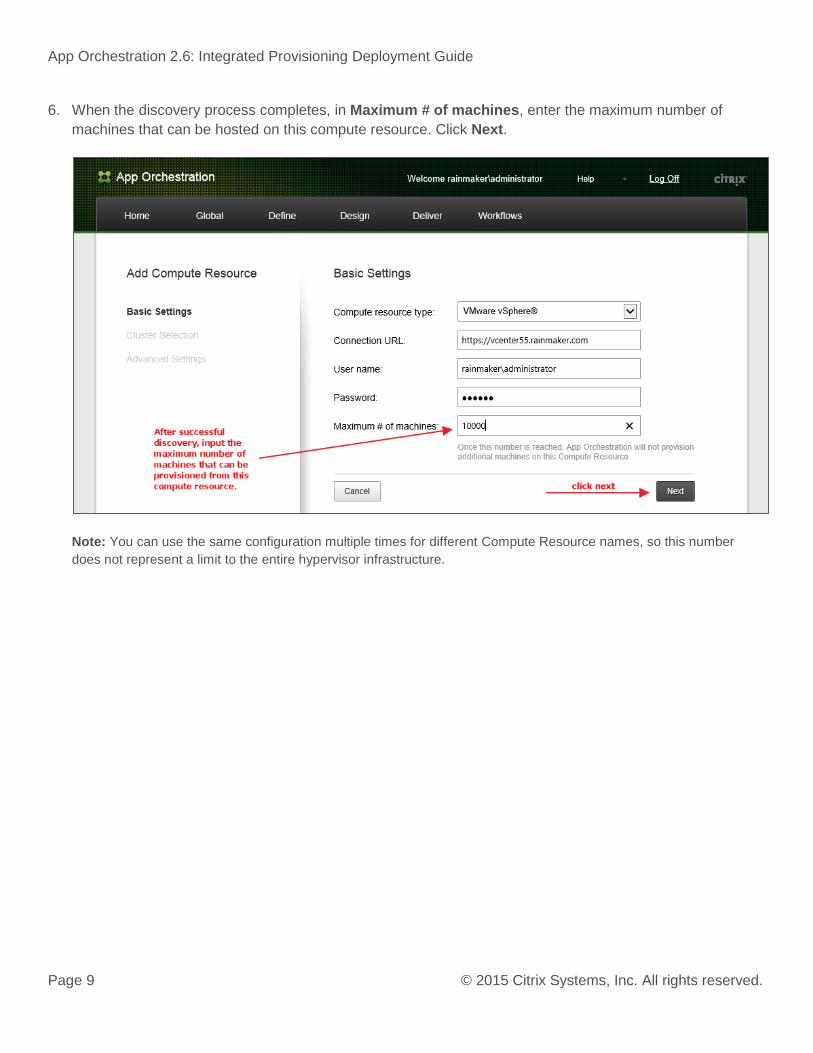
6. When the discovery process completes, in Maximum # of machines, enter the maximum number of
machines that can be hosted on this compute resource. Click Next.
Note: You can use the same configuration multiple times for different Compute Resource names, so this number
does not represent a limit to the entire hypervisor infrastructure.
App Orchestration 2.6: Integrated Provisioning Deployment Guide
Page 10 © 2015 Citrix Systems, Inc. All rights reserved.
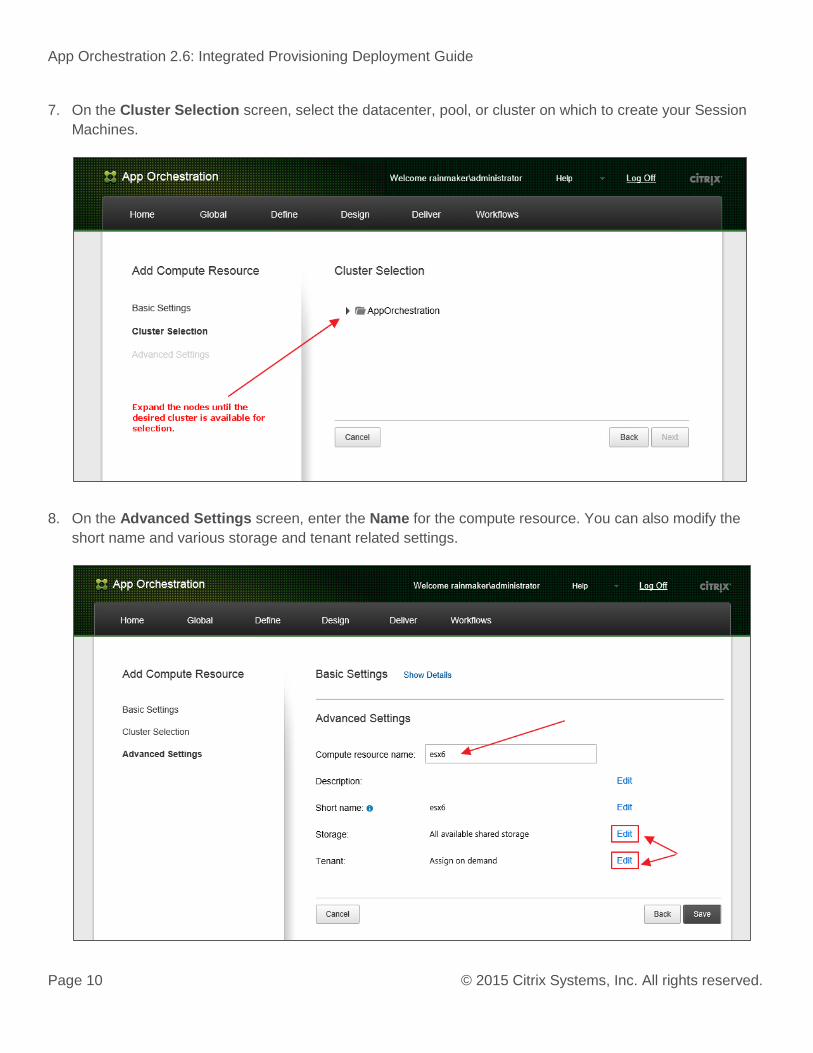
7. On the Cluster Selection screen, select the datacenter, pool, or cluster on which to create your Session
Machines.
8. On the Advanced Settings screen, enter the Name for the compute resource. You can also modify the
short name and various storage and tenant related settings.
App Orchestration 2.6: Integrated Provisioning Deployment Guide
Page 11 © 2015 Citrix Systems, Inc. All rights reserved.
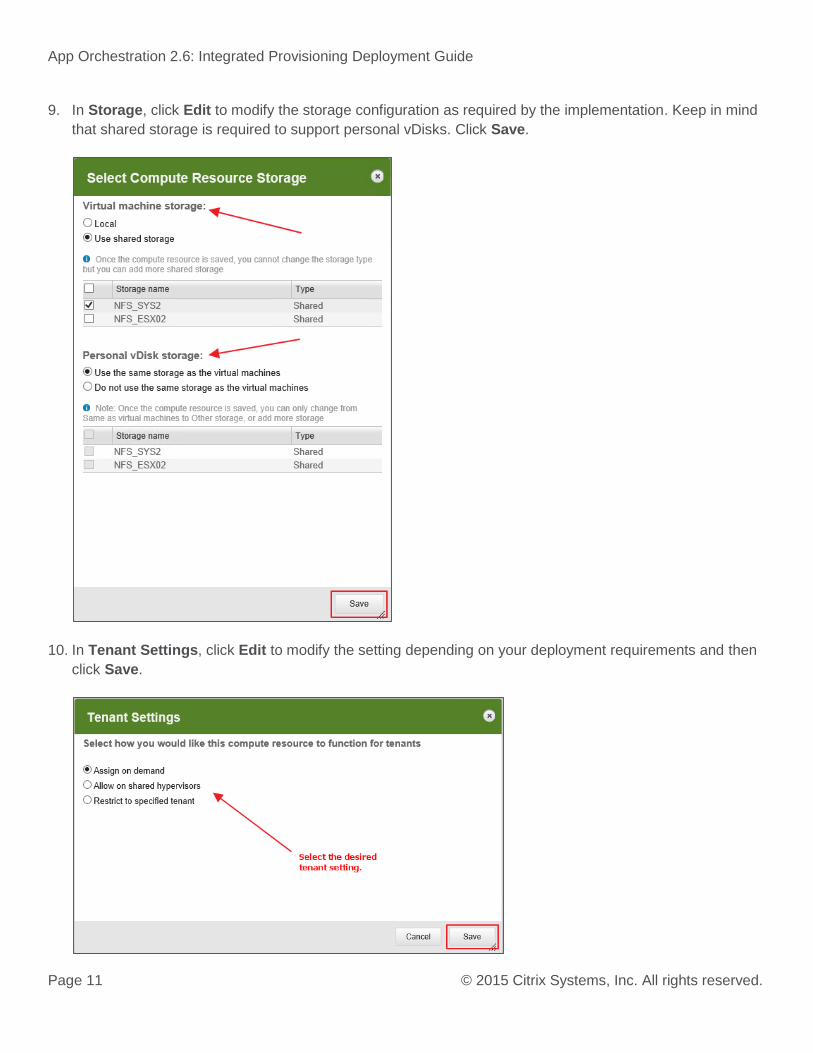
9. In Storage, click Edit to modify the storage configuration as required by the implementation. Keep in mind
that shared storage is required to support personal vDisks. Click Save.
10. In Tenant Settings, click Edit to modify the setting depending on your deployment requirements and then
click Save.
App Orchestration 2.6: Integrated Provisioning Deployment Guide
Page 12 © 2015 Citrix Systems, Inc. All rights reserved.
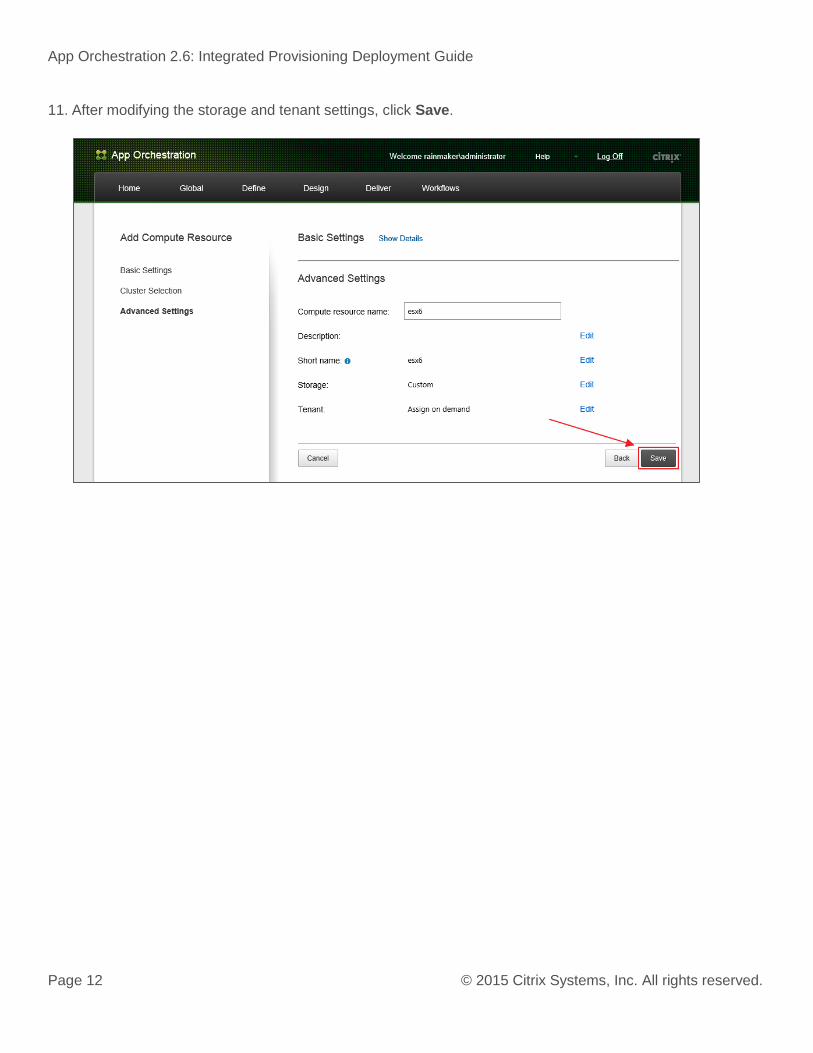
11. After modifying the storage and tenant settings, click Save.
App Orchestration 2.6: Integrated Provisioning Deployment Guide
Page 13 © 2015 Citrix Systems, Inc. All rights reserved.
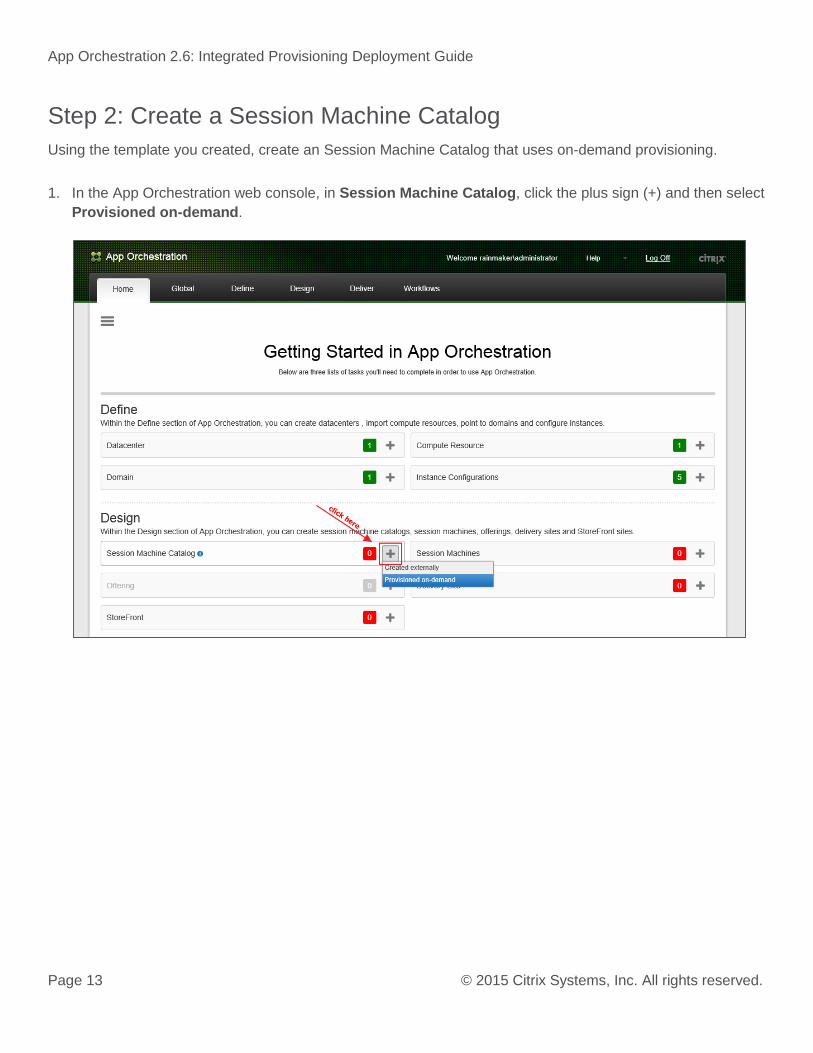
Step 2: Create a Session Machine Catalog
Using the template you created, create an Session Machine Catalog that uses on-demand provisioning.
1. In the App Orchestration web console, in Session Machine Catalog, click the plus sign (+) and then select
Provisioned on-demand.
App Orchestration 2.6: Integrated Provisioning Deployment Guide
Page 14 © 2015 Citrix Systems, Inc. All rights reserved.
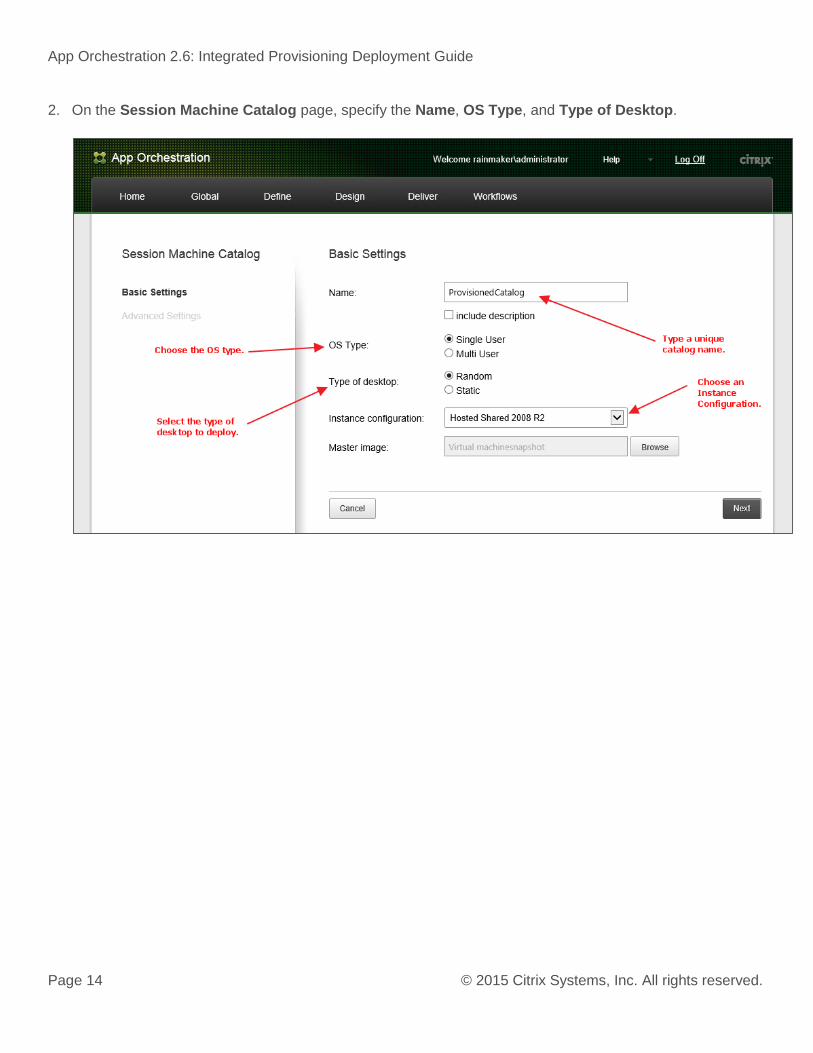
2. On the Session Machine Catalog page, specify the Name, OS Type, and Type of Desktop.
App Orchestration 2.6: Integrated Provisioning Deployment Guide
Page 15 © 2015 Citrix Systems, Inc. All rights reserved.
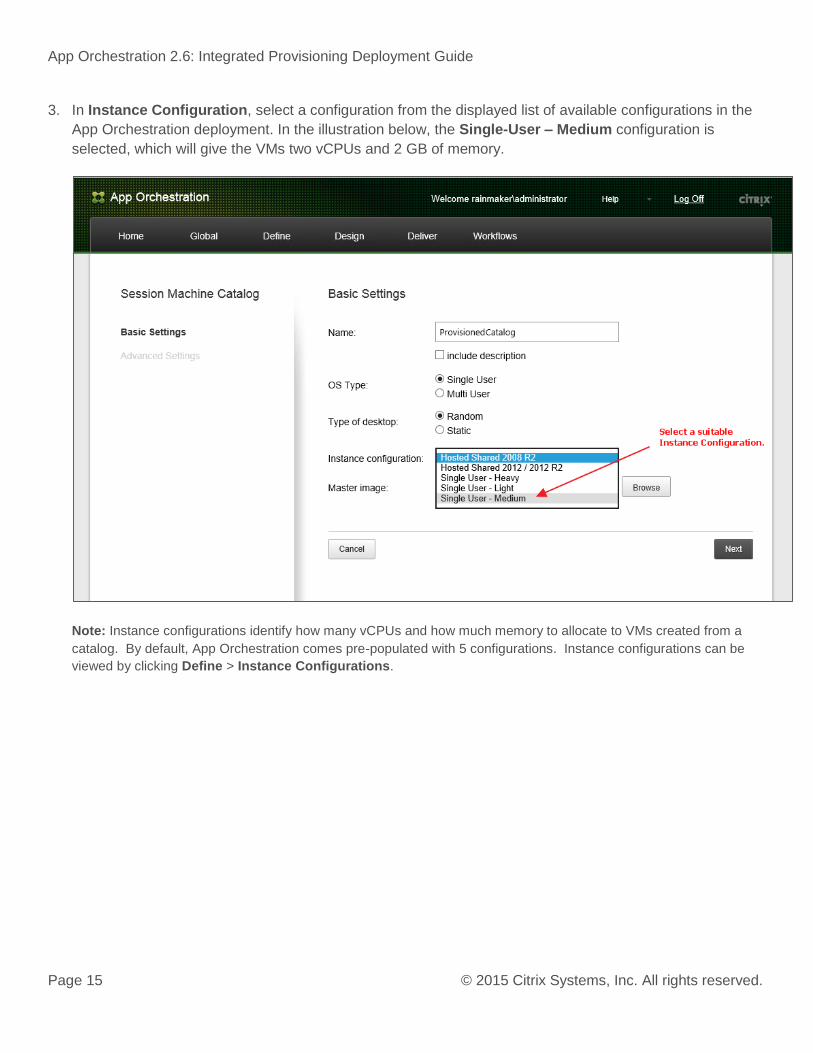
3. In Instance Configuration, select a configuration from the displayed list of available configurations in the
App Orchestration deployment. In the illustration below, the Single-User – Medium configuration is
selected, which will give the VMs two vCPUs and 2 GB of memory.
Note: Instance configurations identify how many vCPUs and how much memory to allocate to VMs created from a
catalog. By default, App Orchestration comes pre-populated with 5 configurations. Instance configurations can be
viewed by clicking Define > Instance Configurations.

App Orchestration 2.6: Integrated Provisioning Deployment Guide
Page 16 © 2015 Citrix Systems, Inc. All rights reserved.
4. In Master Image, click Browse.
5. In Find a compute resource, select a compute resource from the list of displayed resources. All non-
MCS-created VMs appear.
6. Click on a VM to expand its snapshots. Either a VM, snapshot, or checkpoint can be chosen as the base
image, the VM/snaphost which has duplicated name will not show in the list, App Orchestration can use
any snapshot in the chain, up to the amount supported by the hypervisor, in order to provision machines.
App Orchestration 2.6: Integrated Provisioning Deployment Guide
Page 17 © 2015 Citrix Systems, Inc. All rights reserved.
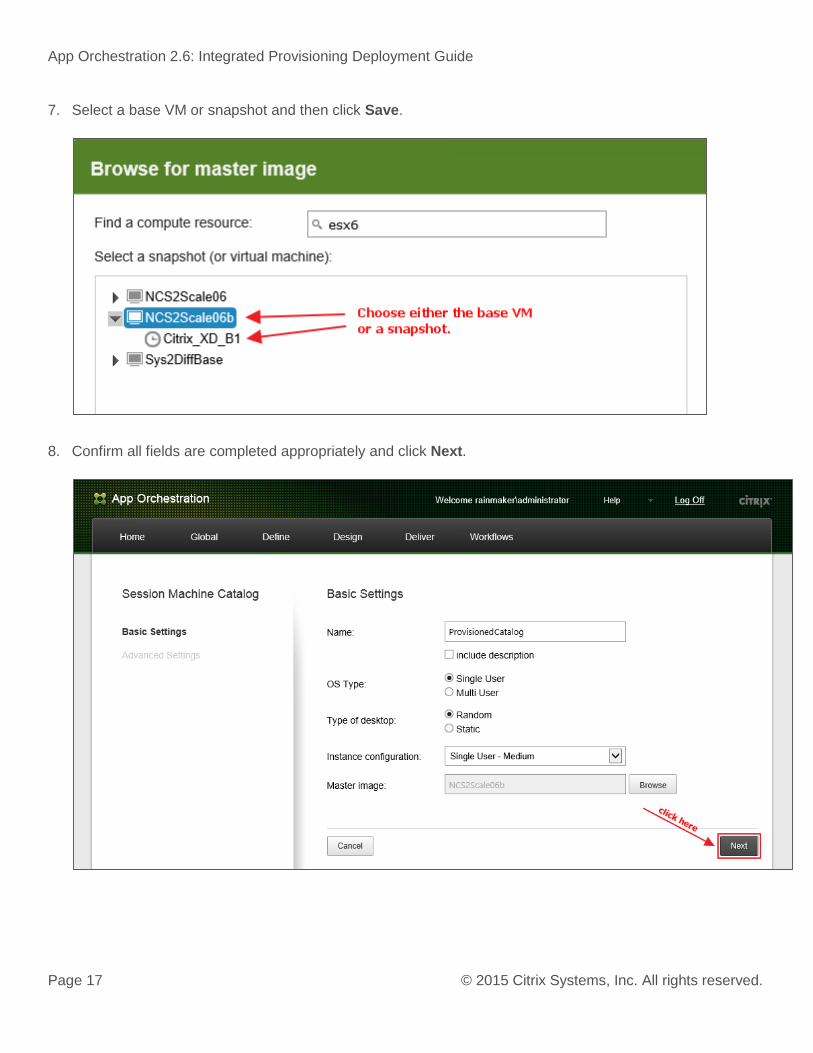
7. Select a base VM or snapshot and then click Save.
8. Confirm all fields are completed appropriately and click Next.
App Orchestration 2.6: Integrated Provisioning Deployment Guide
Page 18 © 2015 Citrix Systems, Inc. All rights reserved.
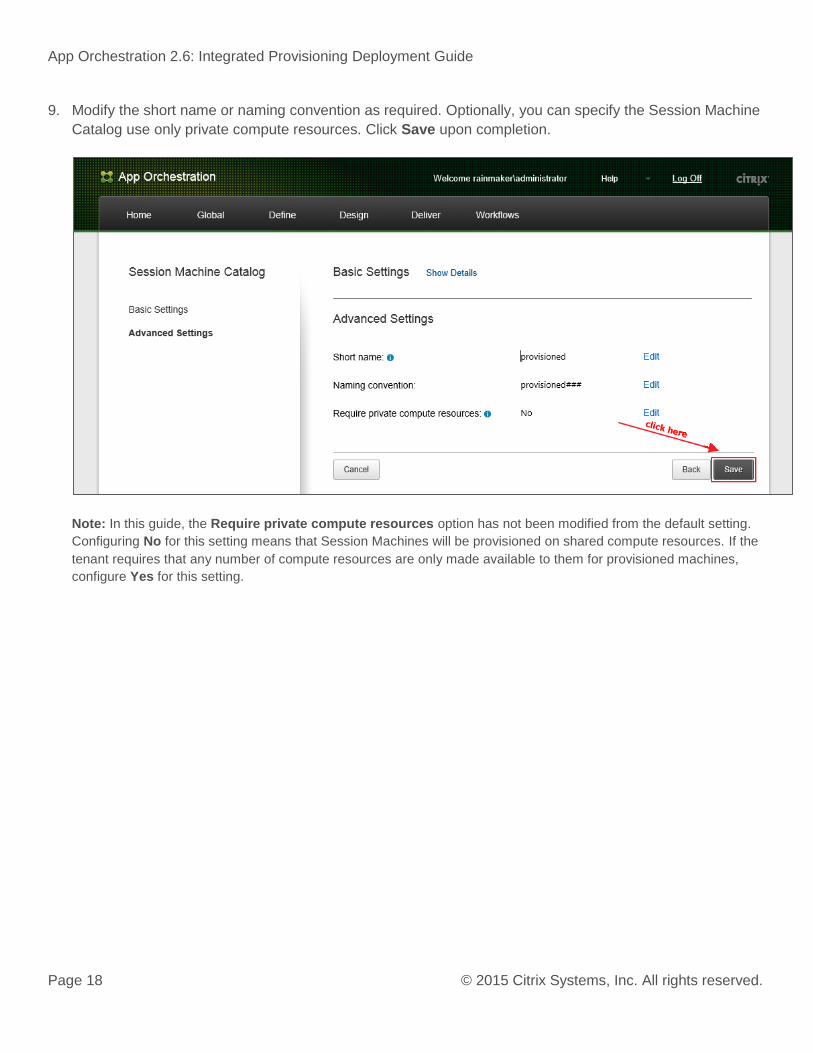
9. Modify the short name or naming convention as required. Optionally, you can specify the Session Machine
Catalog use only private compute resources. Click Save upon completion.
Note: In this guide, the Require private compute resources option has not been modified from the default setting.
Configuring No for this setting means that Session Machines will be provisioned on shared compute resources. If the
tenant requires that any number of compute resources are only made available to them for provisioned machines,
configure Yes for this setting.

App Orchestration 2.6: Integrated Provisioning Deployment Guide
Page 19 © 2015 Citrix Systems, Inc. All rights reserved.
Step 3: Create an offering
After creating the Session Machine catalog, create an offering using that catalog.
1. In the App Orchestration web console, in Offerings, click the plus (+) sign and then select Create a
Desktop Offering.
2. If you have multiple catalogs, select the on-demand catalog and then click Next.
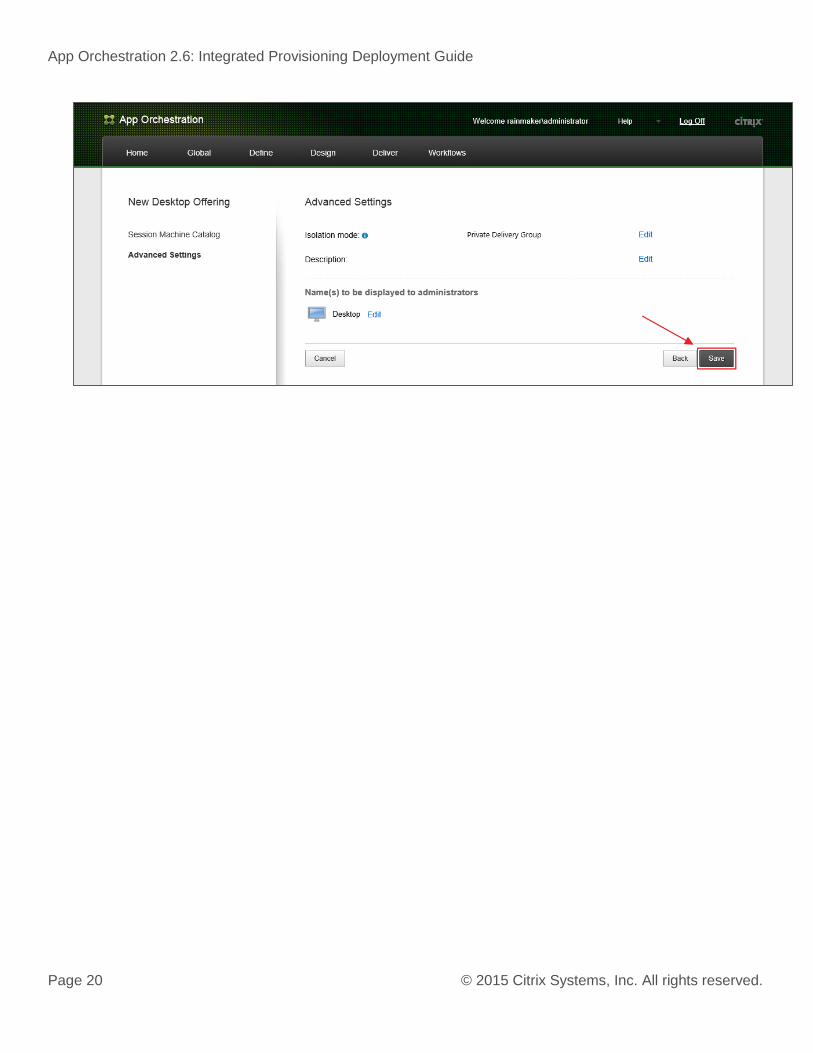
3. On the Advanced Settings screen, leave the default Isolation mode (Private Delivery Group) and click
Save.
App Orchestration 2.6: Integrated Provisioning Deployment Guide
Page 20 © 2015 Citrix Systems, Inc. All rights reserved.
App Orchestration 2.6: Integrated Provisioning Deployment Guide
Page 21 © 2015 Citrix Systems, Inc. All rights reserved.
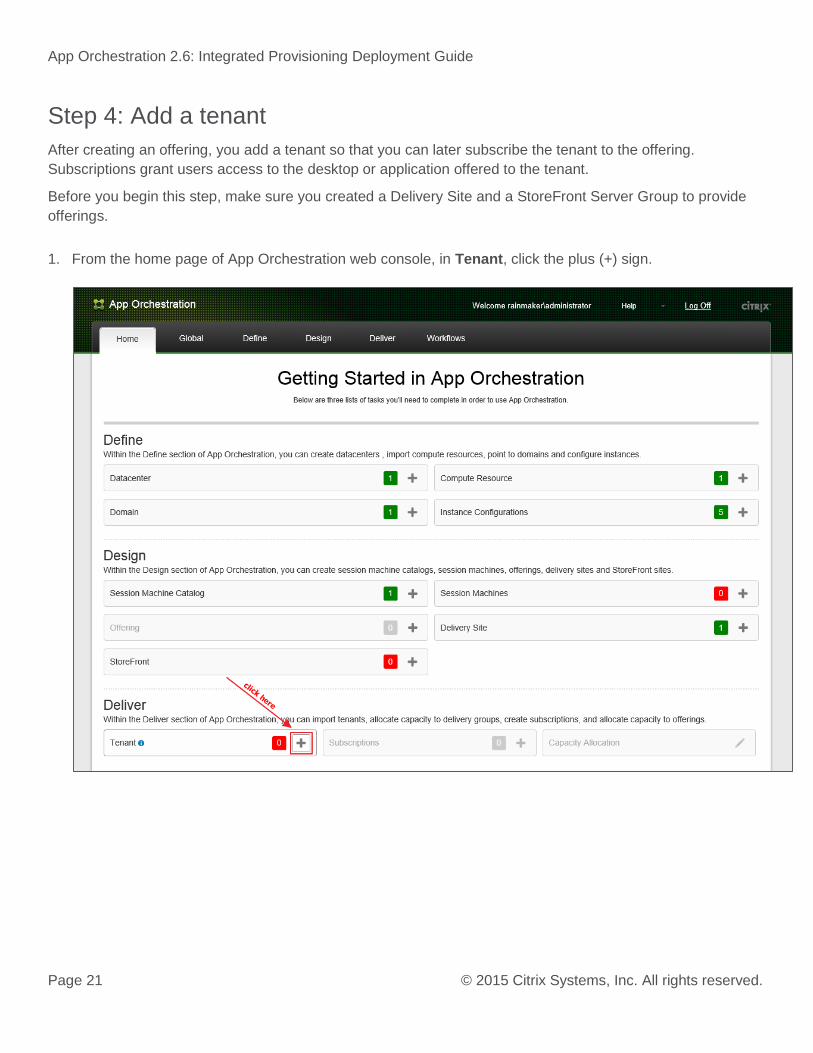
Step 4: Add a tenant
After creating an offering, you add a tenant so that you can later subscribe the tenant to the offering.
Subscriptions grant users access to the desktop or application offered to the tenant.
Before you begin this step, make sure you created a Delivery Site and a StoreFront Server Group to provide
offerings.
1. From the home page of App Orchestration web console, in Tenant, click the plus (+) sign.
App Orchestration 2.6: Integrated Provisioning Deployment Guide
Page 22 © 2015 Citrix Systems, Inc. All rights reserved.
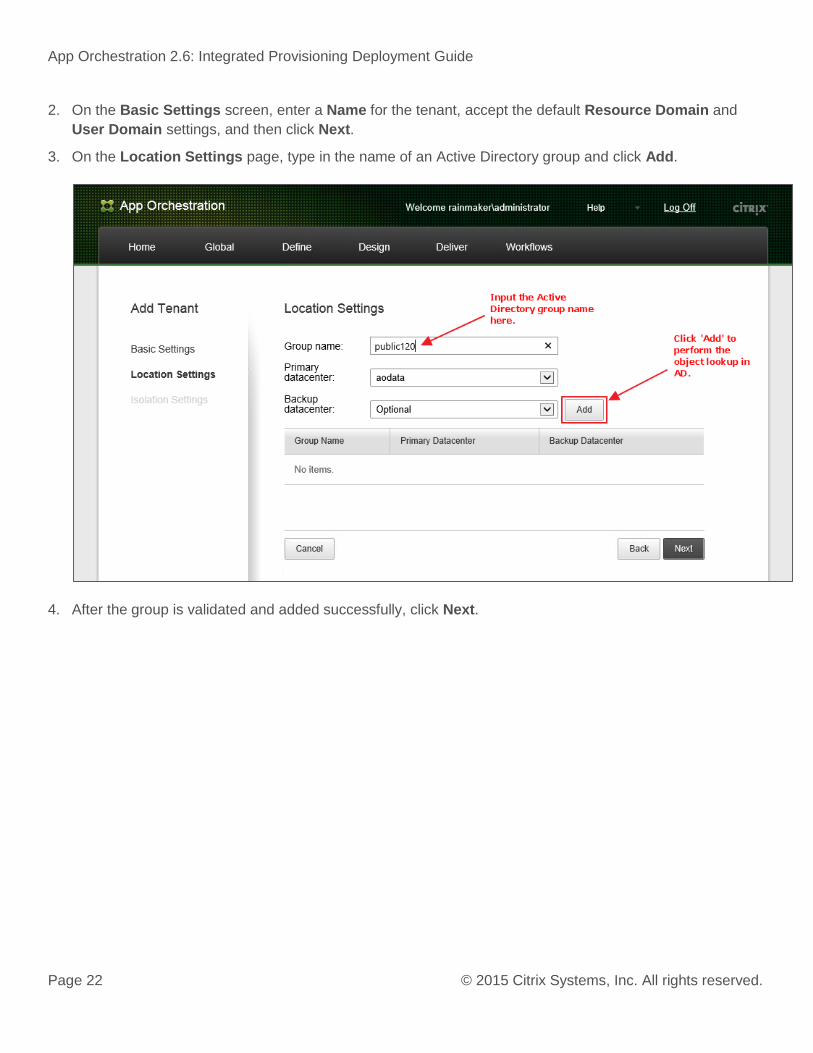
2. On the Basic Settings screen, enter a Name for the tenant, accept the default Resource Domain and
User Domain settings, and then click Next.
3. On the Location Settings page, type in the name of an Active Directory group and click Add.
4. After the group is validated and added successfully, click Next.
App Orchestration 2.6: Integrated Provisioning Deployment Guide
Page 23 © 2015 Citrix Systems, Inc. All rights reserved.
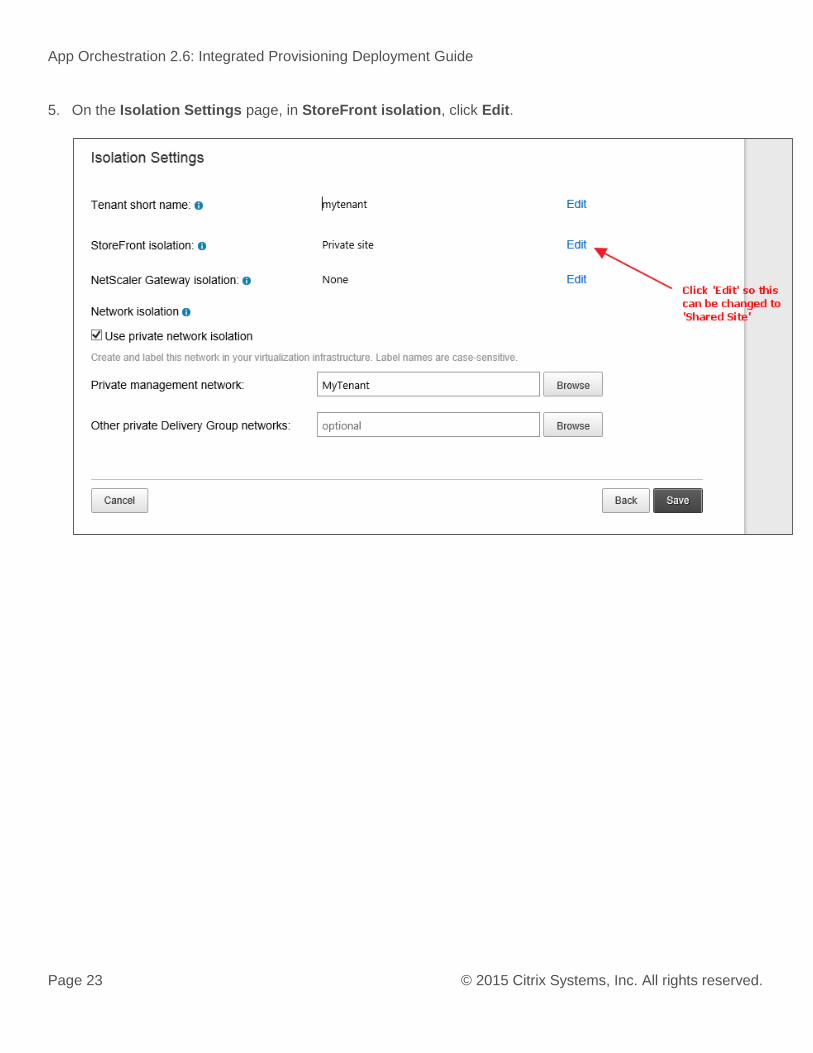
5. On the Isolation Settings page, in StoreFront isolation, click Edit.
App Orchestration 2.6: Integrated Provisioning Deployment Guide
Page 24 © 2015 Citrix Systems, Inc. All rights reserved.
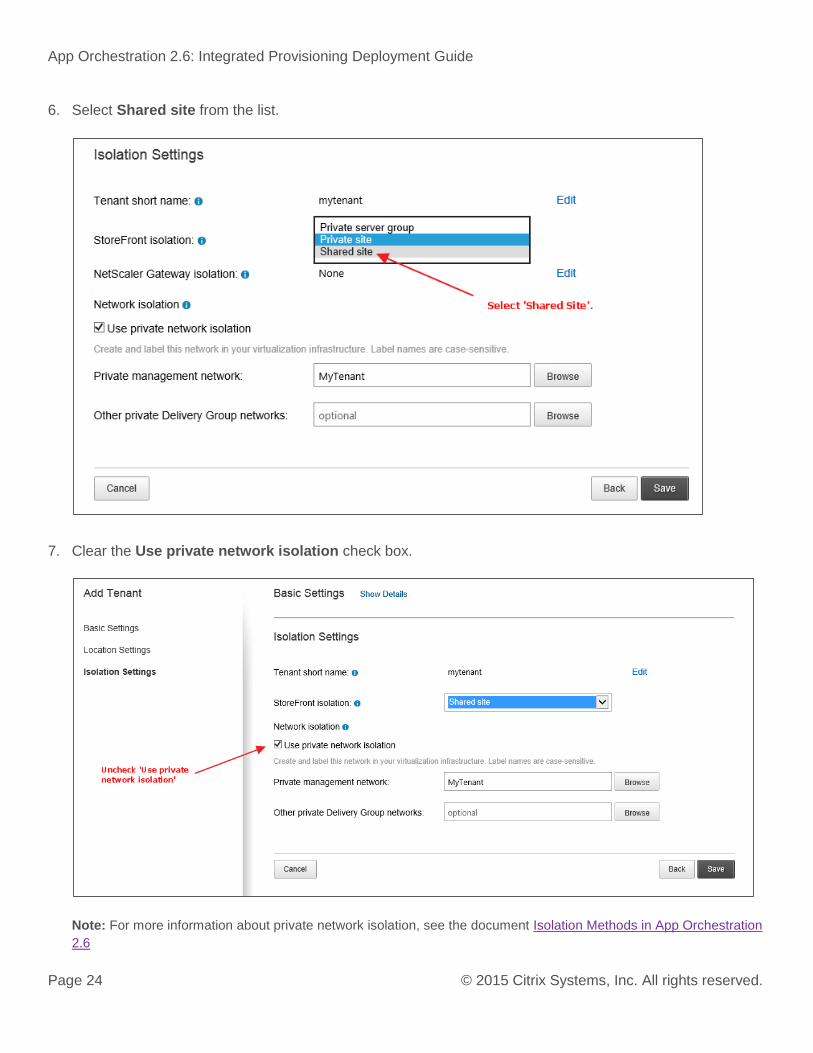
6. Select Shared site from the list.
7. Clear the Use private network isolation check box.
Note: For more information about private network isolation, see the document Isolation Methods in App Orchestration
2.6
App Orchestration 2.6: Integrated Provisioning Deployment Guide
Page 25 © 2015 Citrix Systems, Inc. All rights reserved.
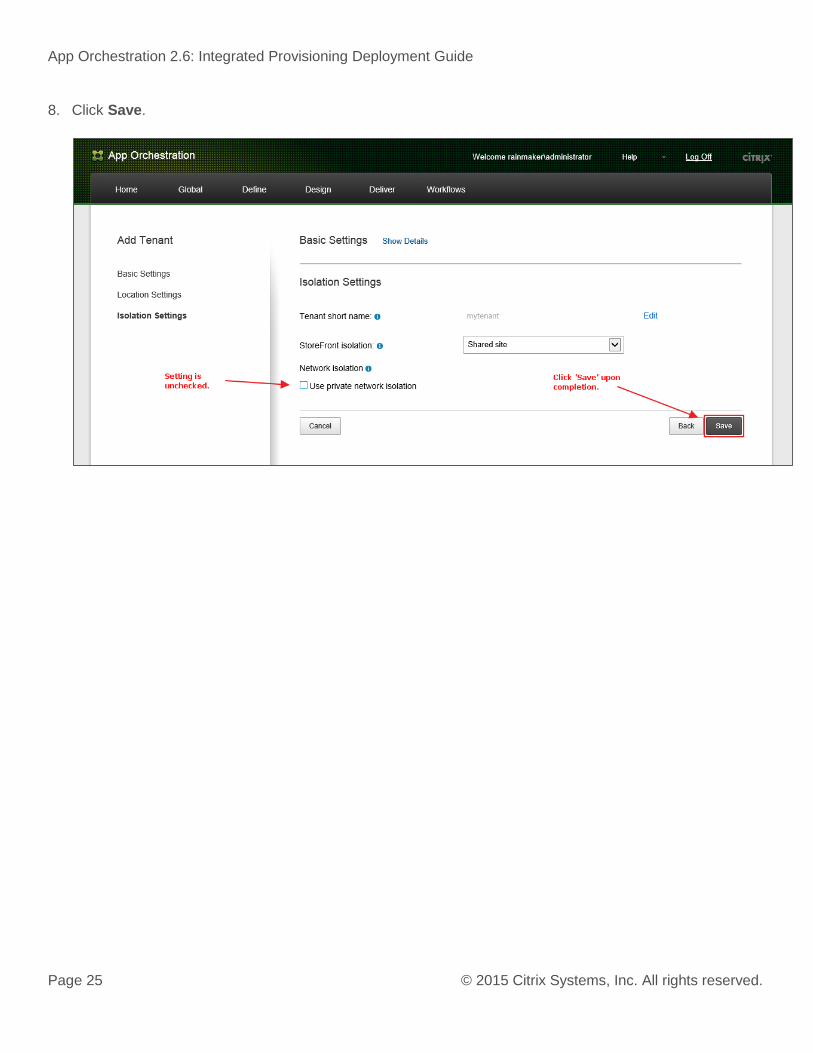
8. Click Save.
App Orchestration 2.6: Integrated Provisioning Deployment Guide
Page 26 © 2015 Citrix Systems, Inc. All rights reserved.
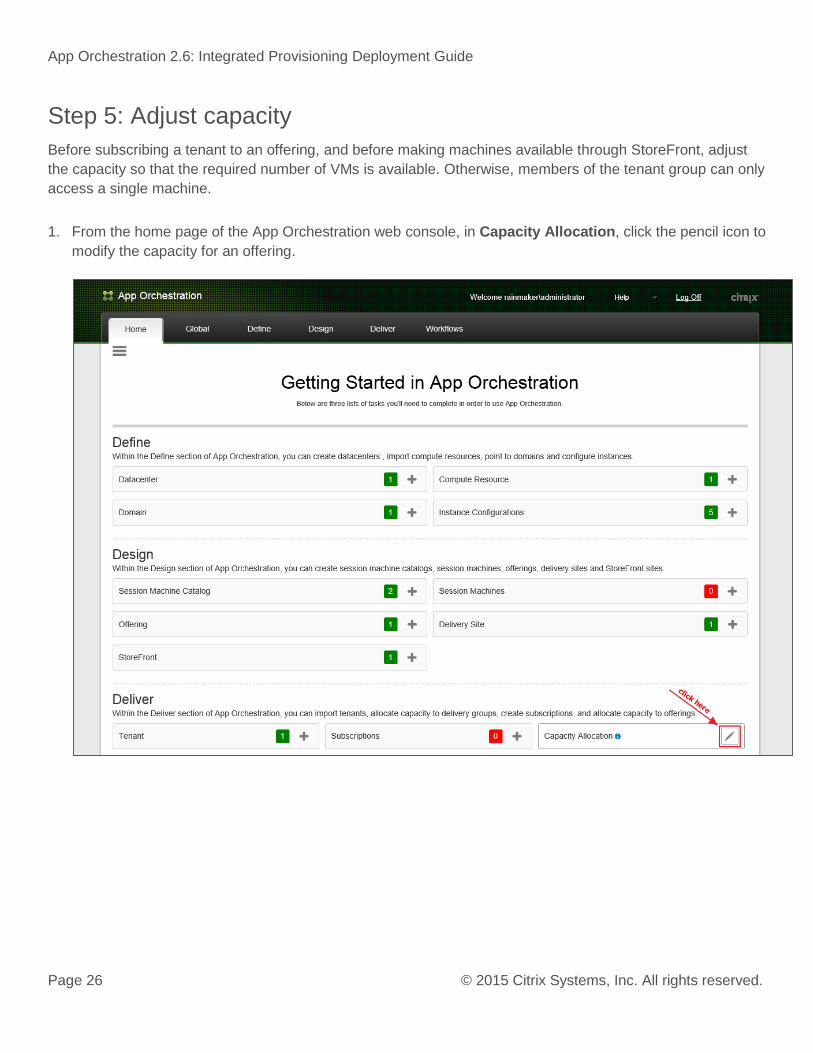
Step 5: Adjust capacity
Before subscribing a tenant to an offering, and before making machines available through StoreFront, adjust
the capacity so that the required number of VMs is available. Otherwise, members of the tenant group can only
access a single machine.
1. From the home page of the App Orchestration web console, in Capacity Allocation, click the pencil icon to
modify the capacity for an offering.
App Orchestration 2.6: Integrated Provisioning Deployment Guide
Page 27 © 2015 Citrix Systems, Inc. All rights reserved.
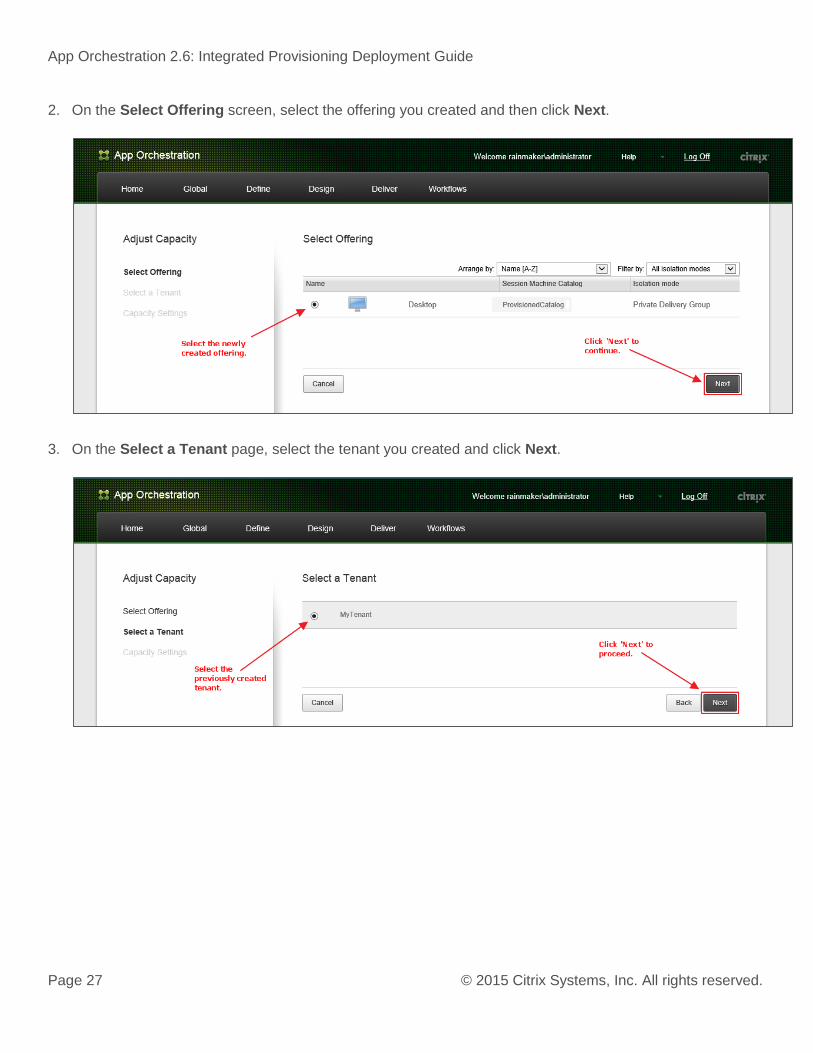
2. On the Select Offering screen, select the offering you created and then click Next.
3. On the Select a Tenant page, select the tenant you created and click Next.
App Orchestration 2.6: Integrated Provisioning Deployment Guide
Page 28 © 2015 Citrix Systems, Inc. All rights reserved.
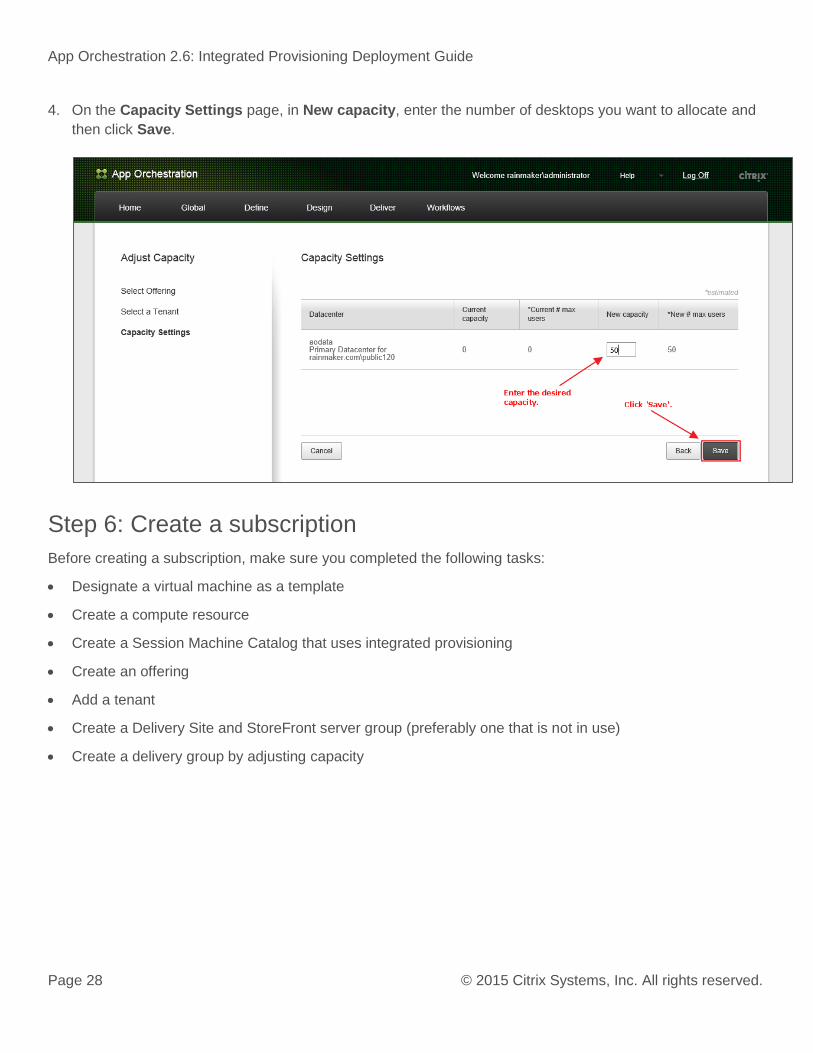
4. On the Capacity Settings page, in New capacity, enter the number of desktops you want to allocate and
then click Save.
Step 6: Create a subscription
Before creating a subscription, make sure you completed the following tasks:
Designate a virtual machine as a template
Create a compute resource
Create a Session Machine Catalog that uses integrated provisioning
Create an offering
Add a tenant
Create a Delivery Site and StoreFront server group (preferably one that is not in use)
Create a delivery group by adjusting capacity
App Orchestration 2.6: Integrated Provisioning Deployment Guide
Page 29 © 2015 Citrix Systems, Inc. All rights reserved.
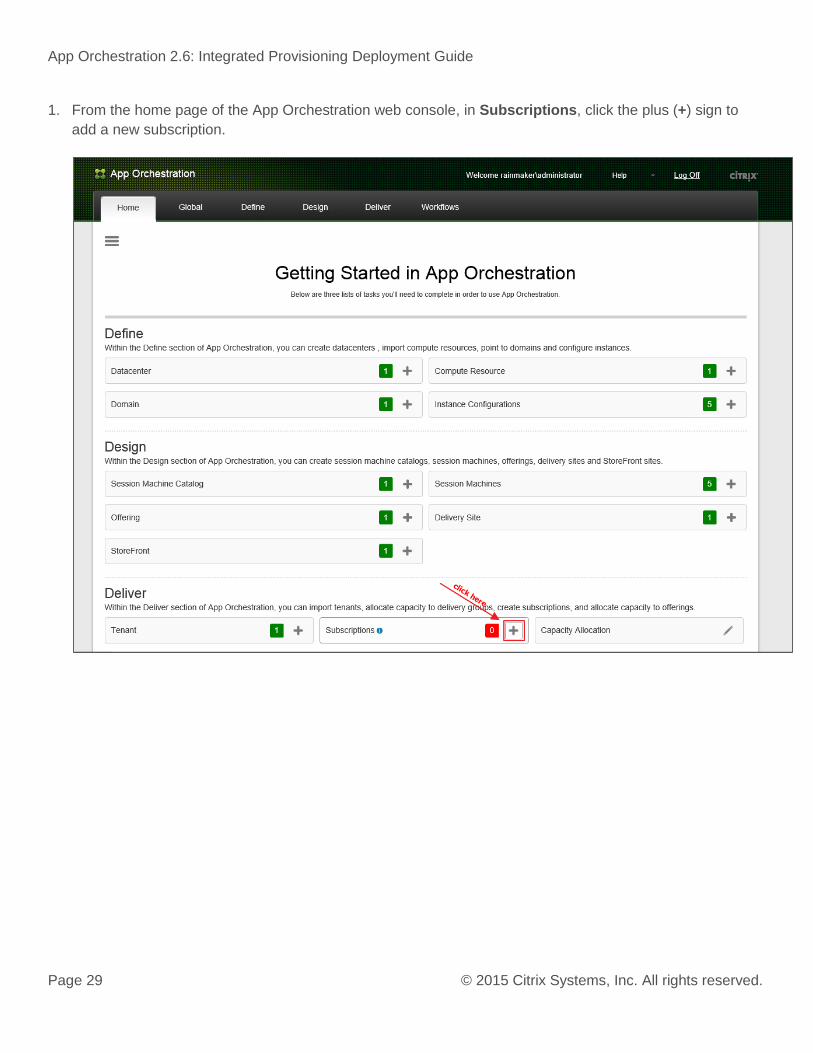
1. From the home page of the App Orchestration web console, in Subscriptions, click the plus (+) sign to
add a new subscription.
App Orchestration 2.6: Integrated Provisioning Deployment Guide
Page 30 © 2015 Citrix Systems, Inc. All rights reserved.
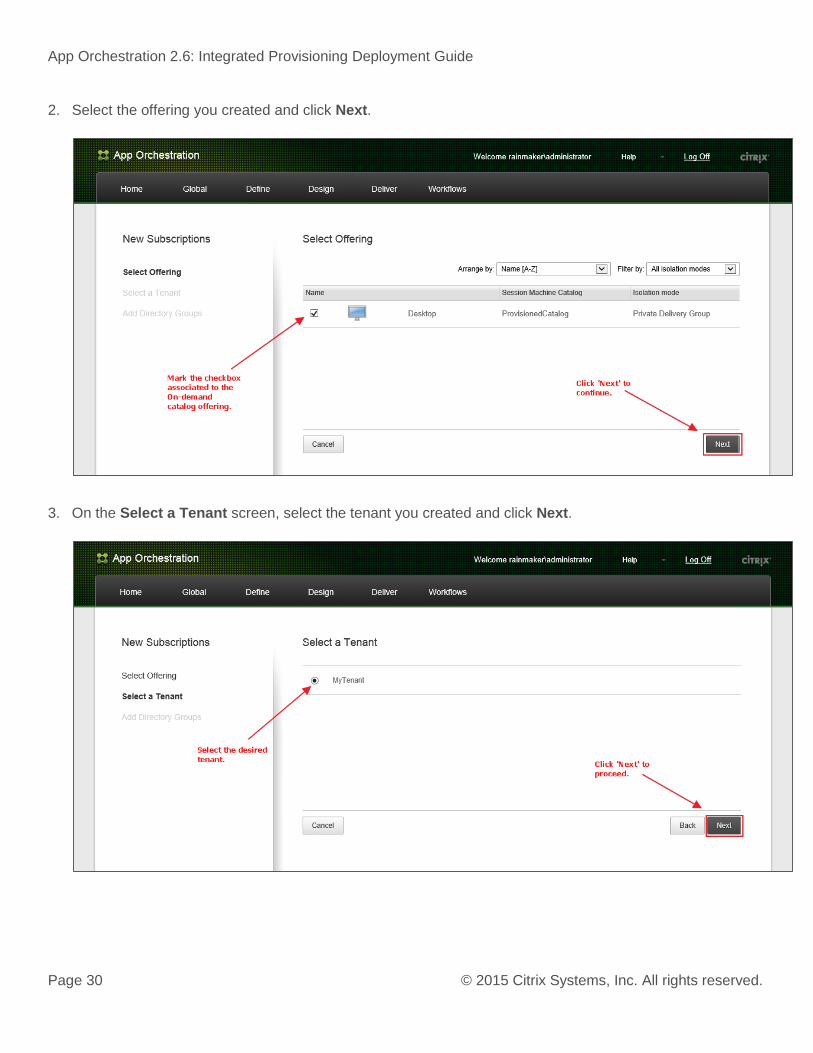
2. Select the offering you created and click Next.
3. On the Select a Tenant screen, select the tenant you created and click Next.
App Orchestration 2.6: Integrated Provisioning Deployment Guide
Page 31 © 2015 Citrix Systems, Inc. All rights reserved.
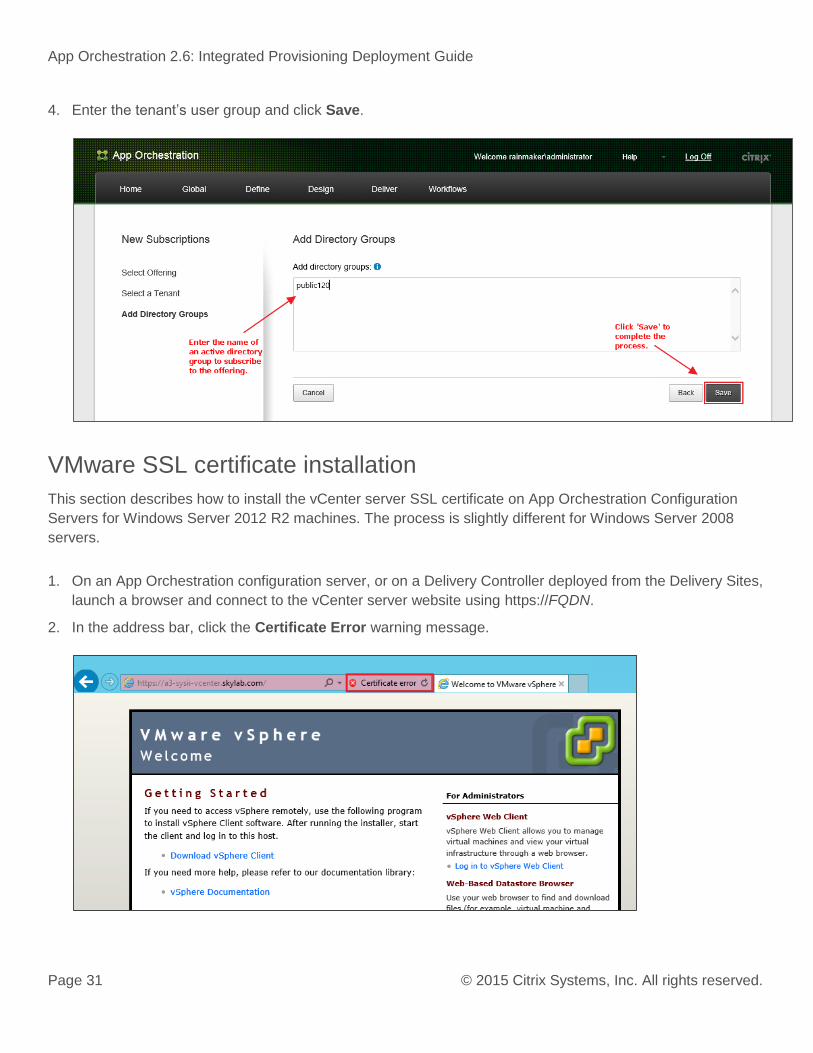
4. Enter the tenant’s user group and click Save.
VMware SSL certificate installation
This section describes how to install the vCenter server SSL certificate on App Orchestration Configuration
Servers for Windows Server 2012 R2 machines. The process is slightly different for Windows Server 2008
servers.
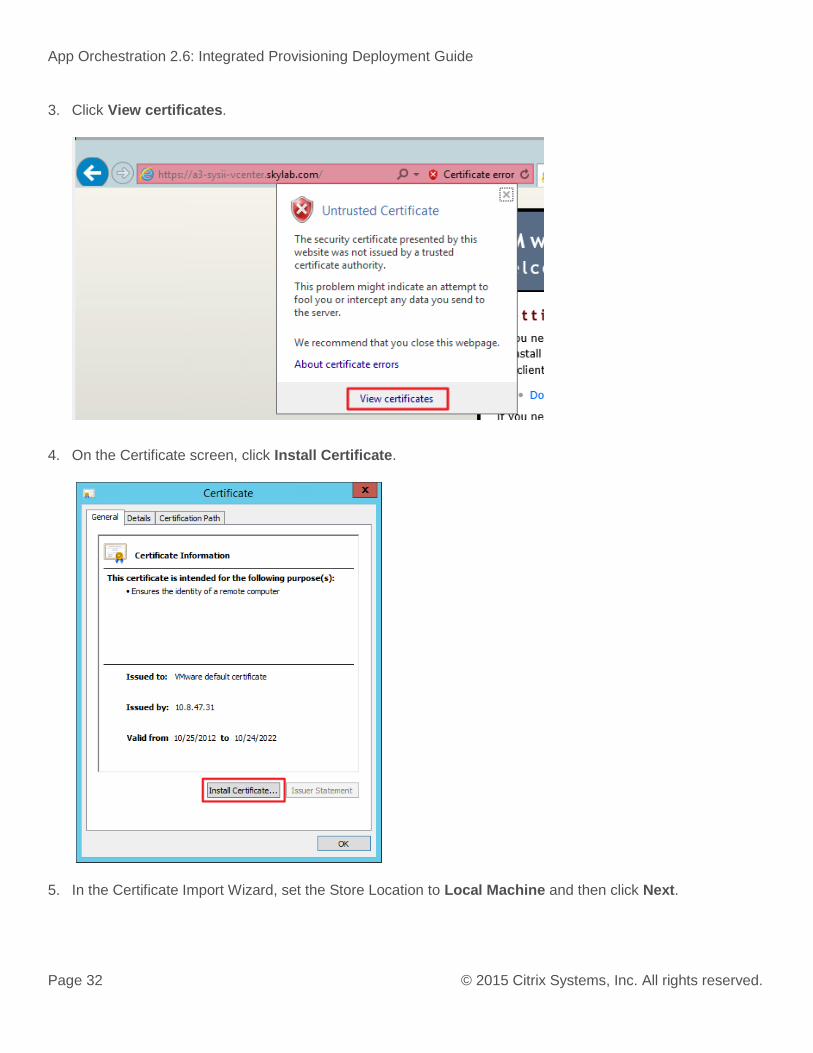
1. On an App Orchestration configuration server, or on a Delivery Controller deployed from the Delivery Sites,
launch a browser and connect to the vCenter server website using https://FQDN.
2. In the address bar, click the Certificate Error warning message.
App Orchestration 2.6: Integrated Provisioning Deployment Guide
Page 32 © 2015 Citrix Systems, Inc. All rights reserved.
3. Click View certificates.
4. On the Certificate screen, click Install Certificate.
5. In the Certificate Import Wizard, set the Store Location to Local Machine and then click Next.
App Orchestration 2.6: Integrated Provisioning Deployment Guide
Page 33 © 2015 Citrix Systems, Inc. All rights reserved.
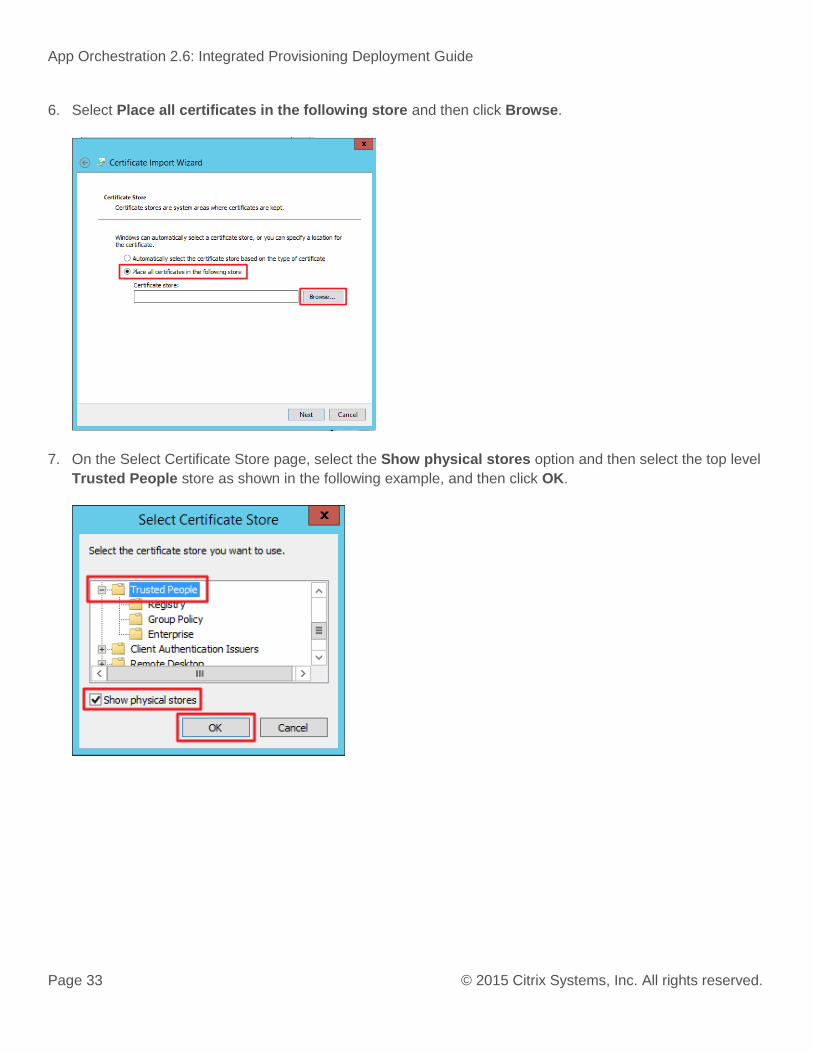
6. Select Place all certificates in the following store and then click Browse.
7. On the Select Certificate Store page, select the Show physical stores option and then select the top level
Trusted People store as shown in the following example, and then click OK.
App Orchestration 2.6: Integrated Provisioning Deployment Guide
Page 34 © 2015 Citrix Systems, Inc. All rights reserved.
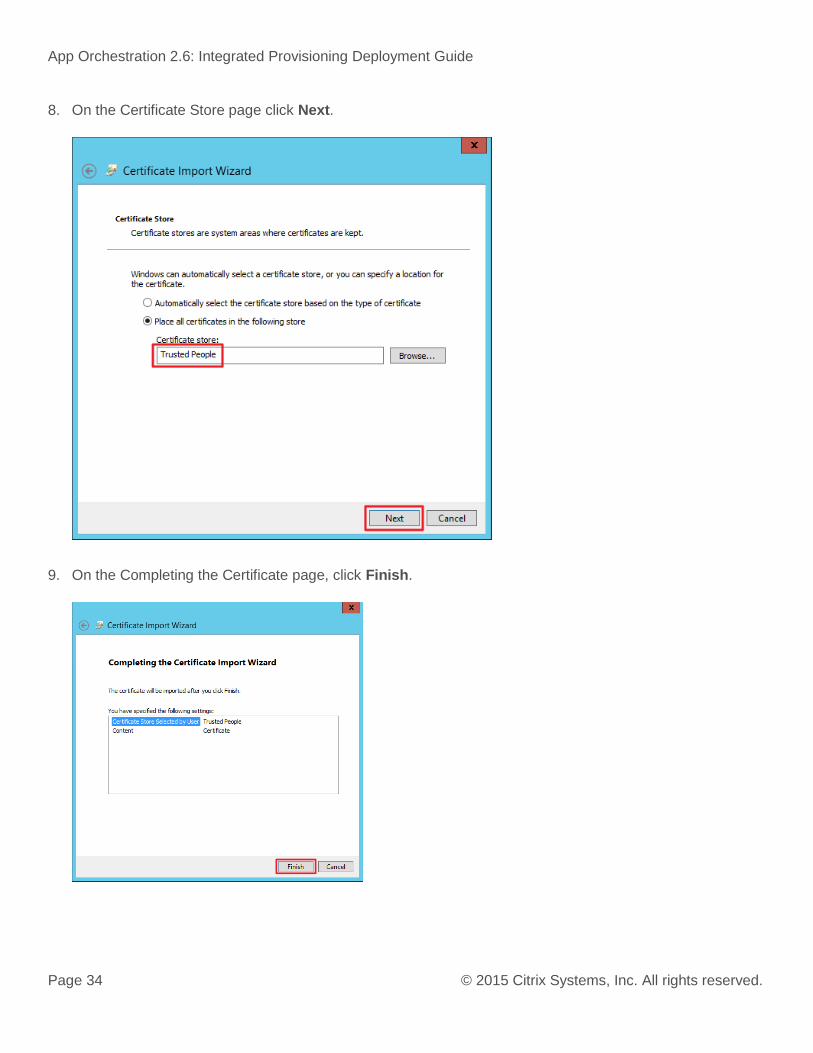
8. On the Certificate Store page click Next.
9. On the Completing the Certificate page, click Finish.
App Orchestration 2.6: Integrated Provisioning Deployment Guide
Page 35 © 2015 Citrix Systems, Inc. All rights reserved.
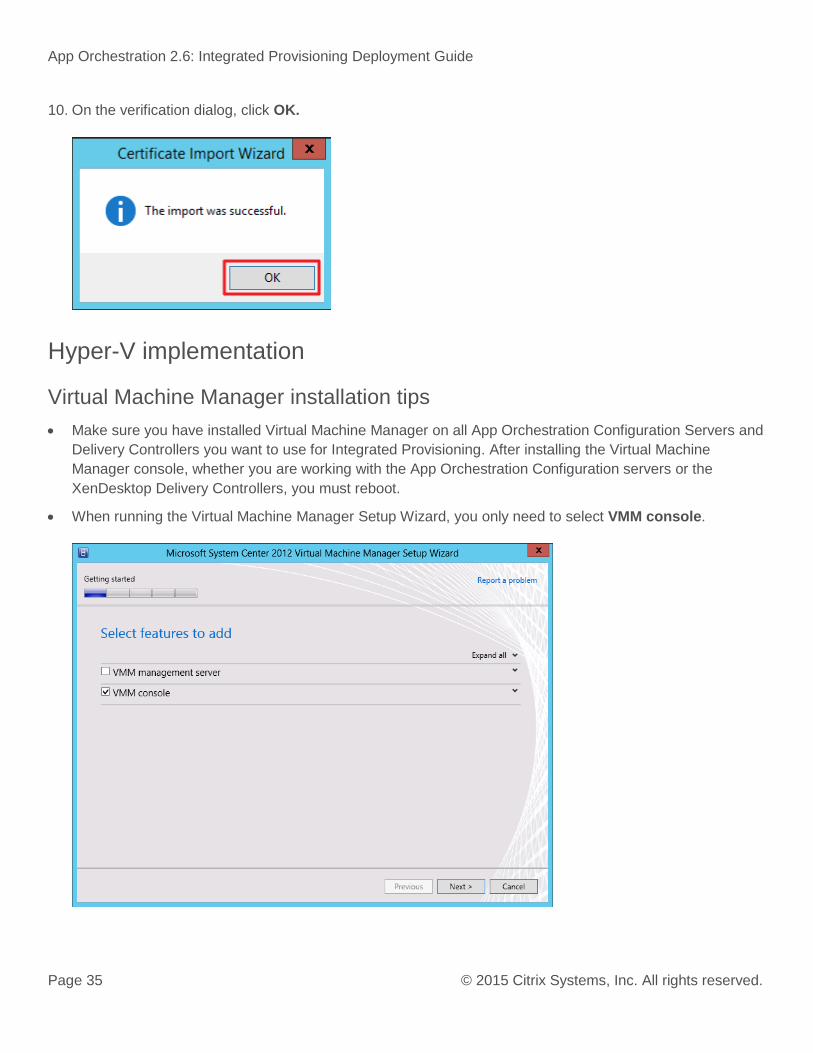
10. On the verification dialog, click OK.
Hyper-V implementation
Virtual Machine Manager installation tips
Make sure you have installed Virtual Machine Manager on all App Orchestration Configuration Servers and
Delivery Controllers you want to use for Integrated Provisioning. After installing the Virtual Machine
Manager console, whether you are working with the App Orchestration Configuration servers or the
XenDesktop Delivery Controllers, you must reboot.
When running the Virtual Machine Manager Setup Wizard, you only need to select VMM console.
App Orchestration 2.6: Integrated Provisioning Deployment Guide
Page 36 © 2015 Citrix Systems, Inc. All rights reserved.
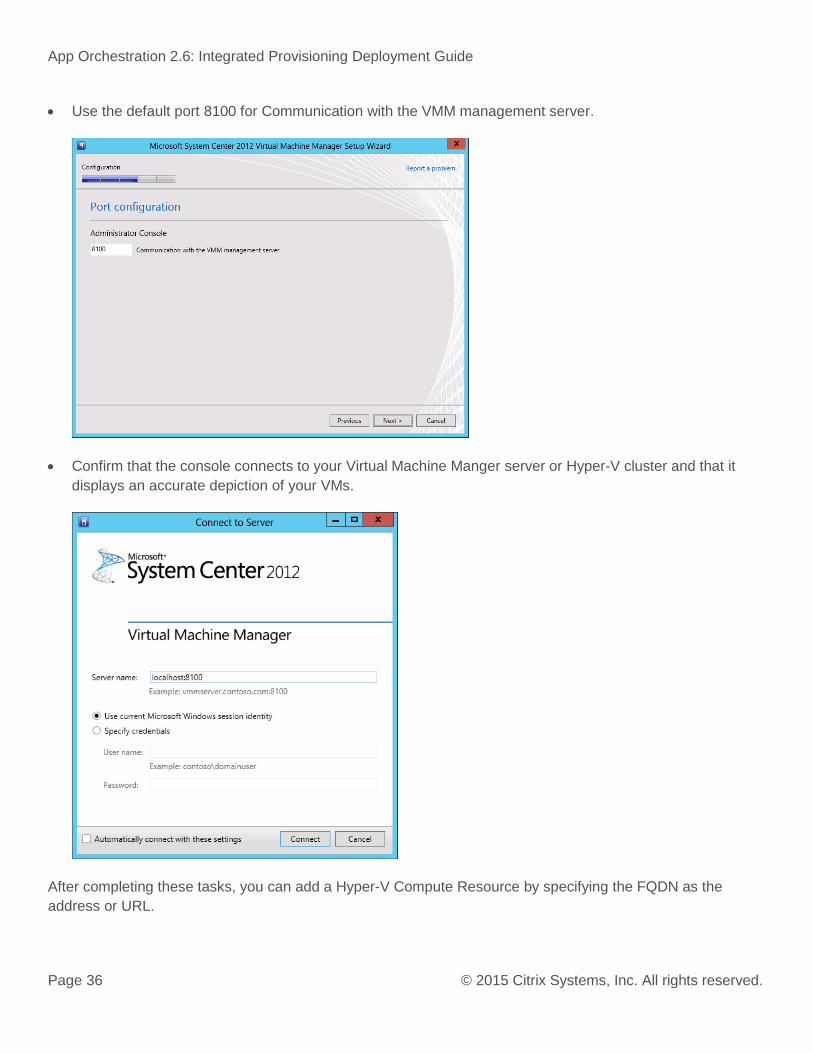
Use the default port 8100 for Communication with the VMM management server.
Confirm that the console connects to your Virtual Machine Manger server or Hyper-V cluster and that it
displays an accurate depiction of your VMs.
After completing these tasks, you can add a Hyper-V Compute Resource by specifying the FQDN as the
address or URL.
App Orchestration 2.6: Integrated Provisioning Deployment Guide
Page 37 © 2015 Citrix Systems, Inc. All rights reserved.
Multi DNS environments workaround
When using Machine Creation Services to provision VDA machines with Microsoft System Center Virtual
Machine Manager 2012 SP1, the provisioned machines DNS properties reset. This is not an issue if a single
DNS server registers the machine’s FQDN. However, a problem can result if multiple authorities DNS servers
exist in the environment. The newly provisioned VDA machine cannot resolve the XenDesktop Domain
Controllers’ FQDN to an IP address. Therefore, the VDA cannot join the XenDesktop site.
To resolve this problem, create a Group Policy Object that pushes out a startup script that sets the NIC’s DNS
settings to point to the correct DNS servers. With the policy applied, newly provisioned machines can register
with the correct DNS server, resolve the FQDN of the Delivery Controllers, and successfully join the
XenDesktop site.
1. Make sure that PowerShell 3.0 is installed on the template or master image.
2. Copy the script that sets the DNS setting of NIC to the following folder on the template to
C:\Windows\Systems32\GroupPolicy\Machine\Scripts\Startup\.
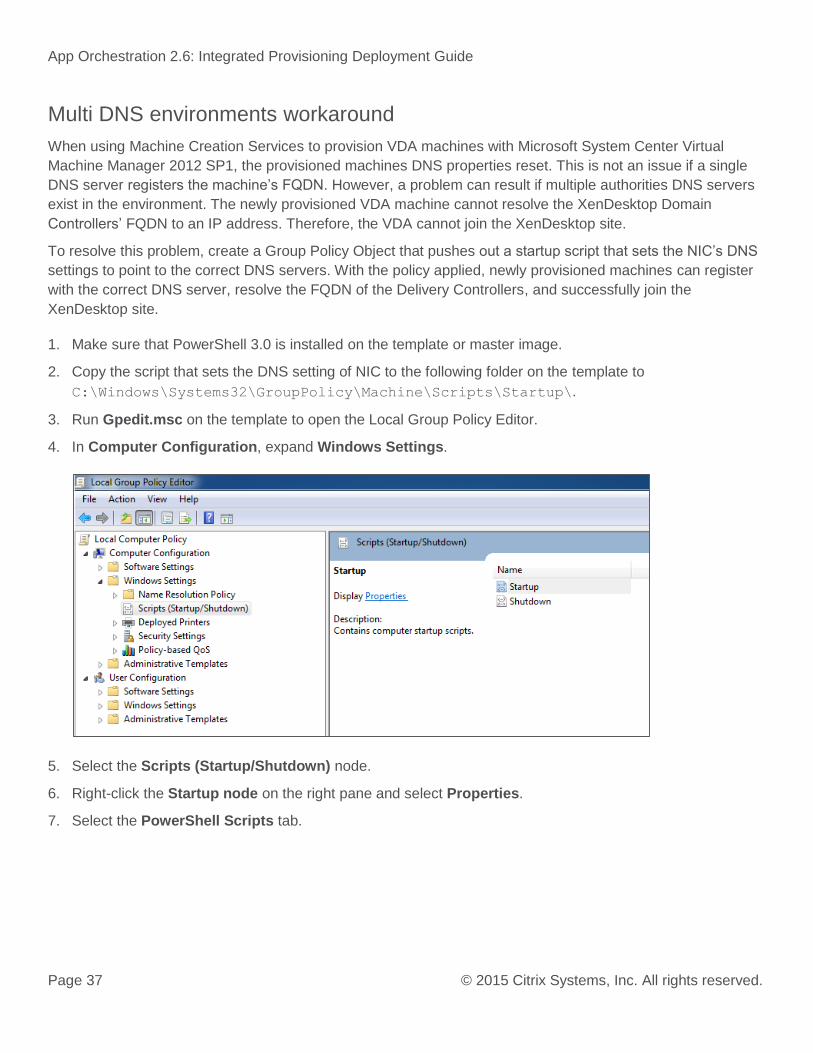
3. Run Gpedit.msc on the template to open the Local Group Policy Editor.
4. In Computer Configuration, expand Windows Settings.
5. Select the Scripts (Startup/Shutdown) node.
6. Right-click the Startup node on the right pane and select Properties.
7. Select the PowerShell Scripts tab.
App Orchestration 2.6: Integrated Provisioning Deployment Guide
Page 38 © 2015 Citrix Systems, Inc. All rights reserved.
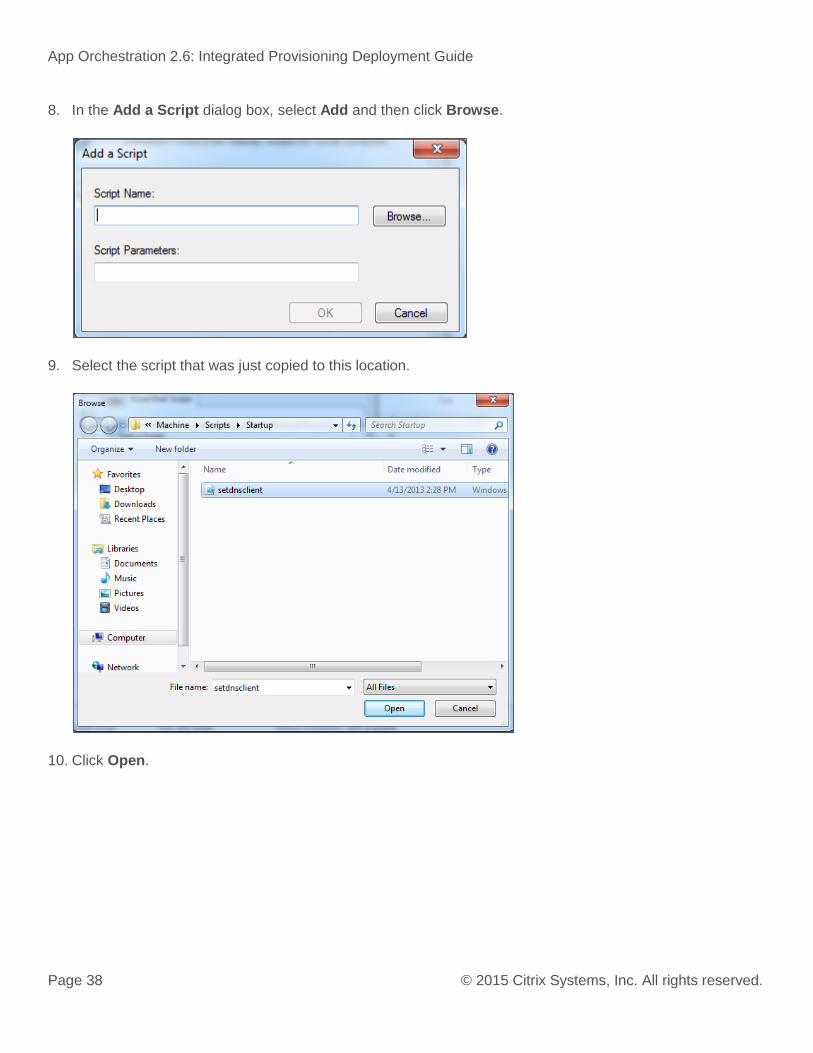
8. In the Add a Script dialog box, select Add and then click Browse.
9. Select the script that was just copied to this location.
10. Click Open.
App Orchestration 2.6: Integrated Provisioning Deployment Guide
Page 39 © 2015 Citrix Systems, Inc. All rights reserved.
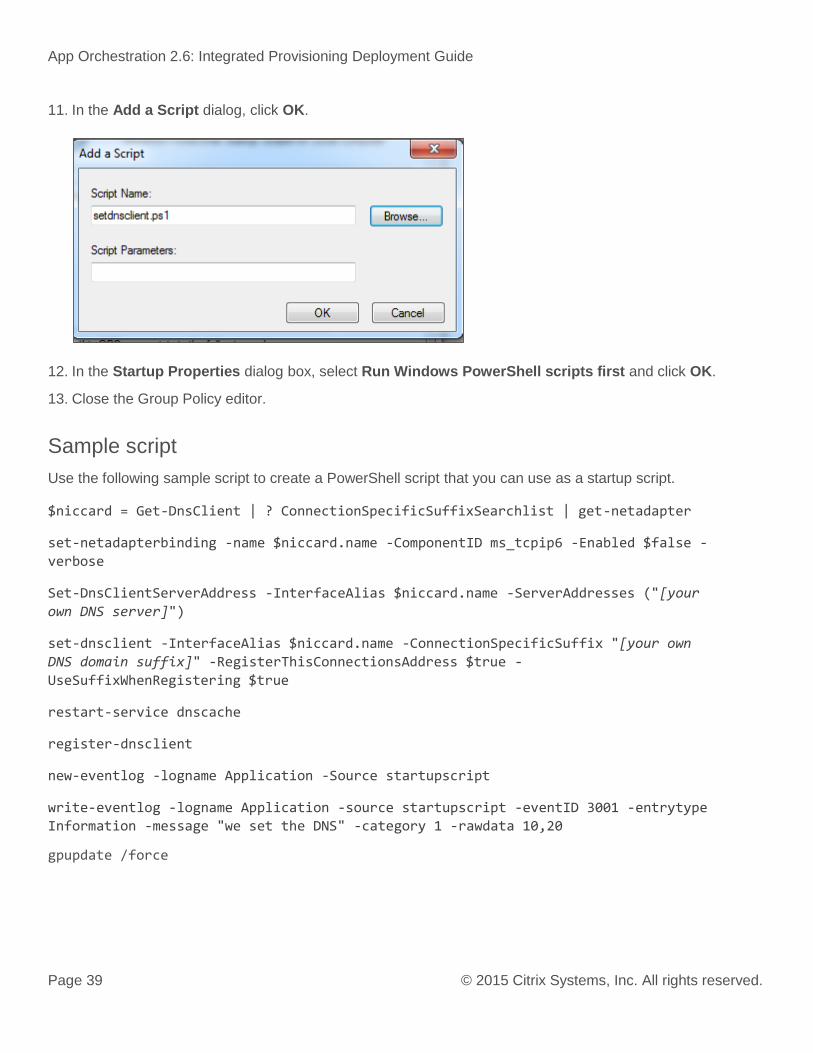
11. In the Add a Script dialog, click OK.
12. In the Startup Properties dialog box, select Run Windows PowerShell scripts first and click OK.
13. Close the Group Policy editor.
Sample script
Use the following sample script to create a PowerShell script that you can use as a startup script.
$niccard = Get-DnsClient | ? ConnectionSpecificSuffixSearchlist | get-netadapter
set-netadapterbinding -name $niccard.name -ComponentID ms_tcpip6 -Enabled $false -
verbose
Set-DnsClientServerAddress -InterfaceAlias $niccard.name -ServerAddresses ("[your
own DNS server]")
set-dnsclient -InterfaceAlias $niccard.name -ConnectionSpecificSuffix "[your own
DNS domain suffix]" -RegisterThisConnectionsAddress $true -
UseSuffixWhenRegistering $true
restart-service dnscache
register-dnsclient
new-eventlog -logname Application -Source startupscript
write-eventlog -logname Application -source startupscript -eventID 3001 -entrytype Information -message "we set the DNS" -category 1 -rawdata 10,20
gpupdate /force
App Orchestration 2.6: Integrated Provisioning Deployment Guide
Page 40 © 2015 Citrix Systems, Inc. All rights reserved.
Additional information
Replace the [your own DNS server] string with the actual DNS server in the environment. The DNS server
should be the server that the base VM uses to join the correct domain, and the VM was able to resolve the
DDC’s FQDN.
Replace the [your own DNS domain suffix] string with the environment’s DNS domain suffix.
SMB 3.0 Support
SMB 3.0 is a supported storage configuration for Hyper-V compute resources implemented as part of an App
Orchestration deployment. To successfully use SMB 3.0, you must enable CredSSP on each Hyper-V host.
To enable CredSSP, follow the instructions in the article CTX137465, “Machine Creation Fails When Creating
Remote PowerShell Session” on the Citrix Support web site.
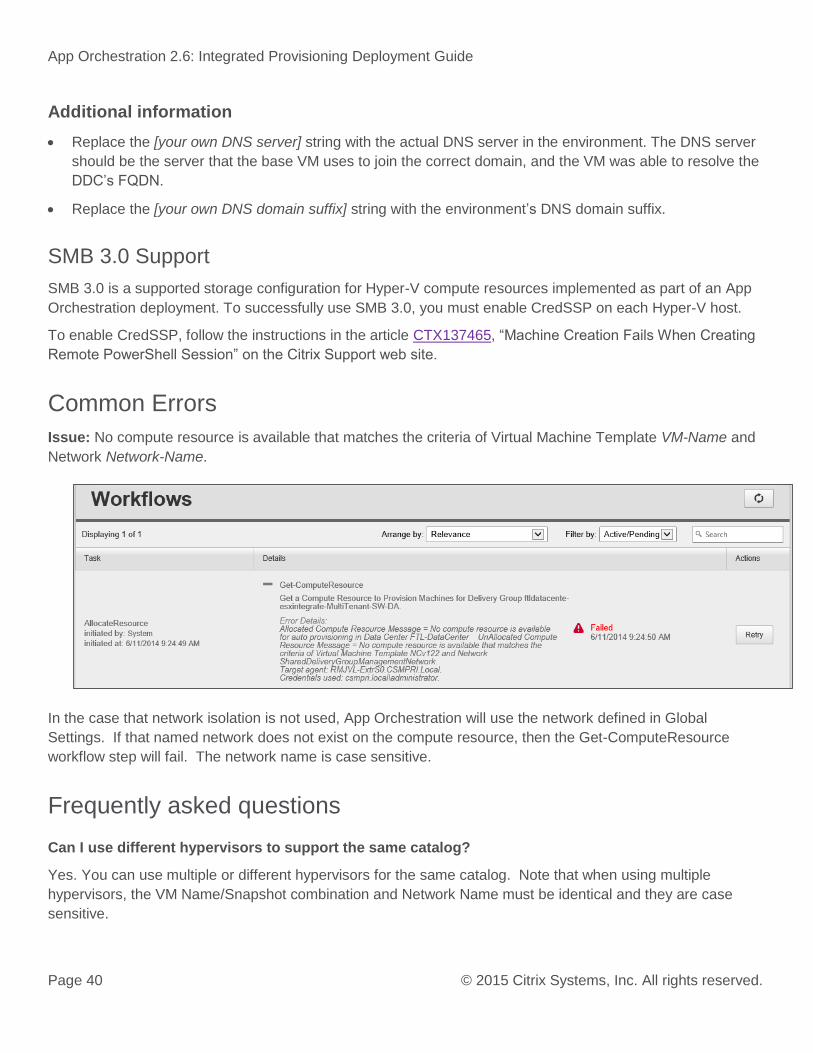
Common Errors
Issue: No compute resource is available that matches the criteria of Virtual Machine Template VM-Name and
Network Network-Name.
In the case that network isolation is not used, App Orchestration will use the network defined in Global
Settings. If that named network does not exist on the compute resource, then the Get-ComputeResource
workflow step will fail. The network name is case sensitive.
Frequently asked questions
Can I use different hypervisors to support the same catalog?
Yes. You can use multiple or different hypervisors for the same catalog. Note that when using multiple
hypervisors, the VM Name/Snapshot combination and Network Name must be identical and they are case
sensitive.
App Orchestration 2.6: Integrated Provisioning Deployment Guide
Page 41 © 2015 Citrix Systems, Inc. All rights reserved.
Does App Orchestration support SMB 3.0 with System Center Virtual Machine Manager deployments?
It does. As with XenDesktop, CredSSP needs to be enabled. To do this, follow the instructions in the article
CTX137465, “Machine Creation Fails When Creating Remote PowerShell Session” on the Citrix Support web
site.
Can I update a Session Machine Catalog using a previously used template?
No. Currently you must create a new template for each Session Machine catalog and each new update.
Can I use Integrated Provisioning for XenApp servers?
No. You can only provision XenDesktop Single-user and Multi-user Session Machines.
What happens if I need to delete a compute resource after I have used it to deploy Session Machines?
If you attempt to delete a compute resource that is being used to deploy Session Machines, App Orchestration
displays a warning message indicating that all the machines using the compute resource will be deleted as
well. However, the delivery groups to which the Session Machines belong are not deleted.
If you still want to delete the compute resource, ensure there is an alternate compute resource that can service
the delivery groups that are associated with the compute resource you want to delete. This compute resource
should have the same label and VM template as the compute resource you want to delete.
If you have only one compute resource in your deployment and you have used it to deploy Session Machines,
deleting the compute resource will fail because there are no other compute resources with which to associate
the existing delivery groups.
If you delete a compute resource that has not yet been used to deploy Session Machines, App Orchestration
deletes the compute resource without further warning.


![ACCEPTED TO IEEE JOURNAL ON SELECTED AREAS IN ...bbcr.uwaterloo.ca/~wzhuang/papers/Omar JSAC Jan20.pdf · orchestration and provisioning of NFV-enabled service re-quests [1]–[8]](https://img.pdfslide.net/doc/110x75/5ed155b5efd7b2537304c8e9/accepted-to-ieee-journal-on-selected-areas-in-bbcr-wzhuangpapersomar-jsac.jpg)