Embed Size (px)
Citation preview
App Portal 2015 R2End User Guide
Legal Information
Copyright NoticeCopyright © 2015 Flexera Software LLC. All Rights Reserved.This product contains proprietary and confidential technology, information and creative works owned by Flexera Software LLC and its licensors, if any. Any use, copying, publication, distribution, display, modification, or transmission of such technology in whole or in part in any form or by any means without the prior express written permission of Flexera Software LLC is strictly prohibited. Except where expressly provided by Flexera Software LLC in writing, possession of this technology shall not be construed to confer any license or rights under any Flexera Software LLC intellectual property rights, whether by estoppel, implication, or otherwise.All copies of the technology and related information, if allowed by Flexera Software LLC, must display this notice of copyright and ownership in full.
Intellectual PropertyFor a list of trademarks and patents that are owned by Flexera Software, see http://www.flexerasoftware.com/intellectual-property. All other brand and product names mentioned in Flexera Software products, product documentation, and marketing materials are the trademarks and registered trademarks of their respective owners.
Restricted Rights LegendThe Software is commercial computer software. If the user or licensee of the Software is an agency, department, or other entity of the United States Government, the use, duplication, reproduction, release, modification, disclosure, or transfer of the Software, or any related documentation of any kind, including technical data and manuals, is restricted by a license agreement or by the terms of this Agreement in accordance with Federal Acquisition Regulation 12.212 for civilian purposes and Defense Federal Acquisition Regulation Supplement 227.7202 for military purposes. The Software was developed fully at private expense. All other use is prohibited.
Book Name: App Portal 2015 R2 End User Guide
Part Number: APP-2015R2-UG00
Product Release Date: 03 November 2015
Contents
1 App Portal 2015 R2 End User Guide . . . . . . . . . . . . . . . . . . . . . . . . . . . . . . . . . . . . . . . . . . . . . . . . . 5Using Help . . . . . . . . . . . . . . . . . . . . . . . . . . . . . . . . . . . . . . . . . . . . . . . . . . . . . . . . . . . . . . . . . . . . . . . . . . . . . . . . . . . . . . . .8Contacting Us. . . . . . . . . . . . . . . . . . . . . . . . . . . . . . . . . . . . . . . . . . . . . . . . . . . . . . . . . . . . . . . . . . . . . . . . . . . . . . . . . . . . .11
2 Submitting Requests on the Browse Catalog Tab. . . . . . . . . . . . . . . . . . . . . . . . . . . . . . . . . . . . . 13About the Browse Catalog Tab . . . . . . . . . . . . . . . . . . . . . . . . . . . . . . . . . . . . . . . . . . . . . . . . . . . . . . . . . . . . . . . . . . . . . .14Icons Displayed on the Browse Catalog Tab and on Checkout Screens. . . . . . . . . . . . . . . . . . . . . . . . . . . . . . . . . . . . . .21Requesting Catalog Items. . . . . . . . . . . . . . . . . . . . . . . . . . . . . . . . . . . . . . . . . . . . . . . . . . . . . . . . . . . . . . . . . . . . . . . . . . .23
Searching for Catalog Items. . . . . . . . . . . . . . . . . . . . . . . . . . . . . . . . . . . . . . . . . . . . . . . . . . . . . . . . . . . . . . . . . . . . . . . . . . . . . . . . 23Adding Catalog Items to Your Shopping Cart . . . . . . . . . . . . . . . . . . . . . . . . . . . . . . . . . . . . . . . . . . . . . . . . . . . . . . . . . . . . . . . . 27Checking Out . . . . . . . . . . . . . . . . . . . . . . . . . . . . . . . . . . . . . . . . . . . . . . . . . . . . . . . . . . . . . . . . . . . . . . . . . . . . . . . . . . . . . . . . . . . . 28
Overview of the Checkout Process . . . . . . . . . . . . . . . . . . . . . . . . . . . . . . . . . . . . . . . . . . . . . . . . . . . . . . . . . . . . . . . . . . . . . . . 29Checking Out and Submitting Your Request . . . . . . . . . . . . . . . . . . . . . . . . . . . . . . . . . . . . . . . . . . . . . . . . . . . . . . . . . . . . . . 33Checkout Options . . . . . . . . . . . . . . . . . . . . . . . . . . . . . . . . . . . . . . . . . . . . . . . . . . . . . . . . . . . . . . . . . . . . . . . . . . . . . . . . . . . . . 37
Answering Questions . . . . . . . . . . . . . . . . . . . . . . . . . . . . . . . . . . . . . . . . . . . . . . . . . . . . . . . . . . . . . . . . . . . . . . . . . . . . . . . . 38Specifying the Target of the Request . . . . . . . . . . . . . . . . . . . . . . . . . . . . . . . . . . . . . . . . . . . . . . . . . . . . . . . . . . . . . . . . . . . 39Approving a Request on Behalf of Another User . . . . . . . . . . . . . . . . . . . . . . . . . . . . . . . . . . . . . . . . . . . . . . . . . . . . . . . . . 43Uploading Files. . . . . . . . . . . . . . . . . . . . . . . . . . . . . . . . . . . . . . . . . . . . . . . . . . . . . . . . . . . . . . . . . . . . . . . . . . . . . . . . . . . . . 44
Requesting Mobile Application Catalog Items. . . . . . . . . . . . . . . . . . . . . . . . . . . . . . . . . . . . . . . . . . . . . . . . . . . . . . . . . .46Requesting a Mobile Application on the Browse Catalog Tab. . . . . . . . . . . . . . . . . . . . . . . . . . . . . . . . . . . . . . . . . . . . . . . . . . . 47Requesting a Mobile Application Using the App Portal Mobile Interface . . . . . . . . . . . . . . . . . . . . . . . . . . . . . . . . . . . . . . . . . 50
3 Viewing Request Status on the My Requests and Reporting Tabs . . . . . . . . . . . . . . . . . . . . . . . 53Viewing Request Status on the My Requests Tab . . . . . . . . . . . . . . . . . . . . . . . . . . . . . . . . . . . . . . . . . . . . . . . . . . . . . . .54
Searching for a Request on the My Requests Tab . . . . . . . . . . . . . . . . . . . . . . . . . . . . . . . . . . . . . . . . . . . . . . . . . . . . . . . . . . . . . 55Viewing Status Icons on the My Requests Tab . . . . . . . . . . . . . . . . . . . . . . . . . . . . . . . . . . . . . . . . . . . . . . . . . . . . . . . . . . . . . . . . 56
Viewing Reports . . . . . . . . . . . . . . . . . . . . . . . . . . . . . . . . . . . . . . . . . . . . . . . . . . . . . . . . . . . . . . . . . . . . . . . . . . . . . . . . . .58
App Portal 2015 R2 End User Guide APP-2015R2-UG00 3
Contents
4 Approving or Rejecting Requests on the Approve/Reject Tab . . . . . . . . . . . . . . . . . . . . . . . . . . 59Approving a Request. . . . . . . . . . . . . . . . . . . . . . . . . . . . . . . . . . . . . . . . . . . . . . . . . . . . . . . . . . . . . . . . . . . . . . . . . . . . . . .60Reassigning a Request . . . . . . . . . . . . . . . . . . . . . . . . . . . . . . . . . . . . . . . . . . . . . . . . . . . . . . . . . . . . . . . . . . . . . . . . . . . . .62Requesting Additional Information. . . . . . . . . . . . . . . . . . . . . . . . . . . . . . . . . . . . . . . . . . . . . . . . . . . . . . . . . . . . . . . . . . .64Rejecting a Request. . . . . . . . . . . . . . . . . . . . . . . . . . . . . . . . . . . . . . . . . . . . . . . . . . . . . . . . . . . . . . . . . . . . . . . . . . . . . . . .65
5 Viewing Request History on the Processed Tab . . . . . . . . . . . . . . . . . . . . . . . . . . . . . . . . . . . . . . 67
6 Viewing Request Details . . . . . . . . . . . . . . . . . . . . . . . . . . . . . . . . . . . . . . . . . . . . . . . . . . . . . . . . . 69General Tab . . . . . . . . . . . . . . . . . . . . . . . . . . . . . . . . . . . . . . . . . . . . . . . . . . . . . . . . . . . . . . . . . . . . . . . . . . . . . . . . . . . . . .70Inventory Tab. . . . . . . . . . . . . . . . . . . . . . . . . . . . . . . . . . . . . . . . . . . . . . . . . . . . . . . . . . . . . . . . . . . . . . . . . . . . . . . . . . . . .71Approval Status Tab . . . . . . . . . . . . . . . . . . . . . . . . . . . . . . . . . . . . . . . . . . . . . . . . . . . . . . . . . . . . . . . . . . . . . . . . . . . . . . .71Notes Tab . . . . . . . . . . . . . . . . . . . . . . . . . . . . . . . . . . . . . . . . . . . . . . . . . . . . . . . . . . . . . . . . . . . . . . . . . . . . . . . . . . . . . . . .72Questions Tab . . . . . . . . . . . . . . . . . . . . . . . . . . . . . . . . . . . . . . . . . . . . . . . . . . . . . . . . . . . . . . . . . . . . . . . . . . . . . . . . . . . .73Install Status Tab . . . . . . . . . . . . . . . . . . . . . . . . . . . . . . . . . . . . . . . . . . . . . . . . . . . . . . . . . . . . . . . . . . . . . . . . . . . . . . . . . .75Alternates Tab . . . . . . . . . . . . . . . . . . . . . . . . . . . . . . . . . . . . . . . . . . . . . . . . . . . . . . . . . . . . . . . . . . . . . . . . . . . . . . . . . . . .76Files Tab . . . . . . . . . . . . . . . . . . . . . . . . . . . . . . . . . . . . . . . . . . . . . . . . . . . . . . . . . . . . . . . . . . . . . . . . . . . . . . . . . . . . . . . . .77
7 Using the My Apps Tab to Manage Your Applications and Software Policy Score™ . . . . . . . . 79Viewing Your Installed Applications on the My Apps Tab . . . . . . . . . . . . . . . . . . . . . . . . . . . . . . . . . . . . . . . . . . . . . . . .81Viewing Your Software Policy Score™ Chart on the My Apps Tab. . . . . . . . . . . . . . . . . . . . . . . . . . . . . . . . . . . . . . . . . .84Resolving Alerts on the My Apps Tab . . . . . . . . . . . . . . . . . . . . . . . . . . . . . . . . . . . . . . . . . . . . . . . . . . . . . . . . . . . . . . . . .85
About Alerts . . . . . . . . . . . . . . . . . . . . . . . . . . . . . . . . . . . . . . . . . . . . . . . . . . . . . . . . . . . . . . . . . . . . . . . . . . . . . . . . . . . . . . . . . . . . . 86Resolving Alerts . . . . . . . . . . . . . . . . . . . . . . . . . . . . . . . . . . . . . . . . . . . . . . . . . . . . . . . . . . . . . . . . . . . . . . . . . . . . . . . . . . . . . . . . . . 87
8 Setting User Preferences on the Profile Tab . . . . . . . . . . . . . . . . . . . . . . . . . . . . . . . . . . . . . . . . . 89Viewing User Information on the User View . . . . . . . . . . . . . . . . . . . . . . . . . . . . . . . . . . . . . . . . . . . . . . . . . . . . . . . . . . .90Viewing Categories on the My Categories Tab . . . . . . . . . . . . . . . . . . . . . . . . . . . . . . . . . . . . . . . . . . . . . . . . . . . . . . . . .91Viewing Readiness Records on the My Readiness Tab . . . . . . . . . . . . . . . . . . . . . . . . . . . . . . . . . . . . . . . . . . . . . . . . . . .92
Index . . . . . . . . . . . . . . . . . . . . . . . . . . . . . . . . . . . . . . . . . . . . . . . . . . . . . . . . . . . . . . . . . . . . . . . . . 93
4 APP-2015R2-UG00 App Portal 2015 R2 End User Guide
1
App Portal 2015 R2End User Guide
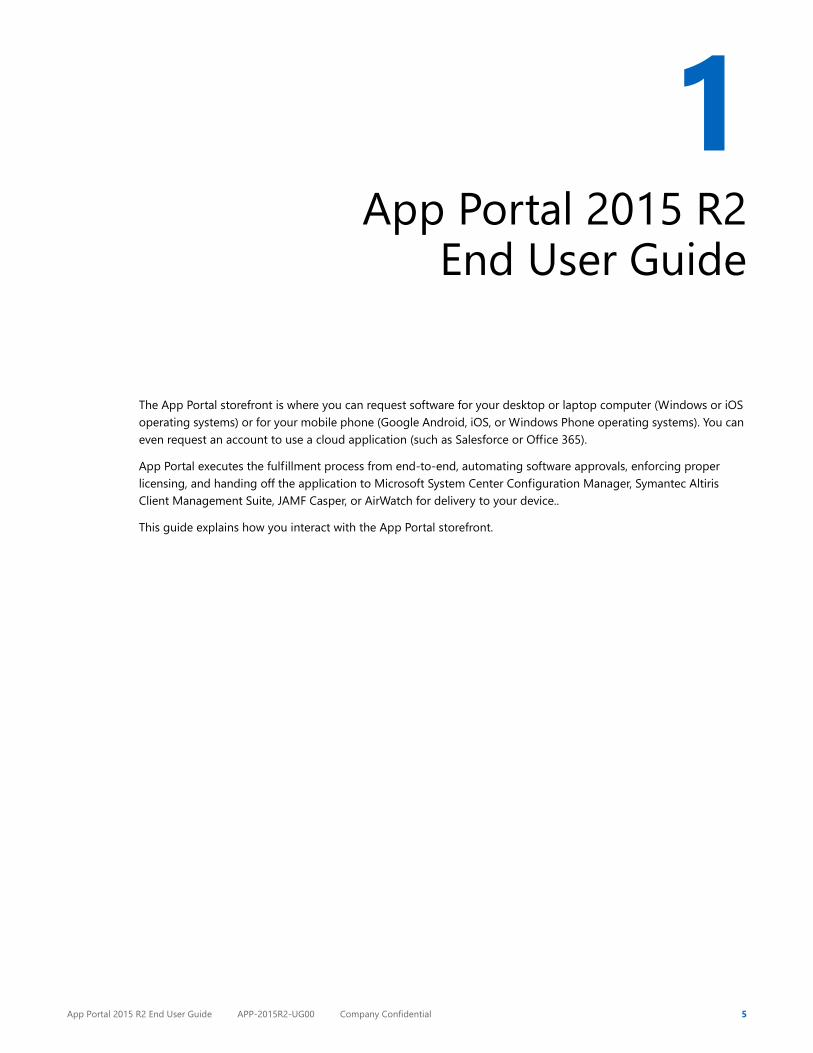
The App Portal storefront is where you can request software for your desktop or laptop computer (Windows or iOS operating systems) or for your mobile phone (Google Android, iOS, or Windows Phone operating systems). You can even request an account to use a cloud application (such as Salesforce or Office 365).
App Portal executes the fulfillment process from end-to-end, automating software approvals, enforcing proper licensing, and handing off the application to Microsoft System Center Configuration Manager, Symantec Altiris Client Management Suite, JAMF Casper, or AirWatch for delivery to your device..
This guide explains how you interact with the App Portal storefront.
App Portal 2015 R2 End User Guide APP-2015R2-UG00 Company Confidential 5
Chapter 1 App Portal 2015 R2 End User Guide
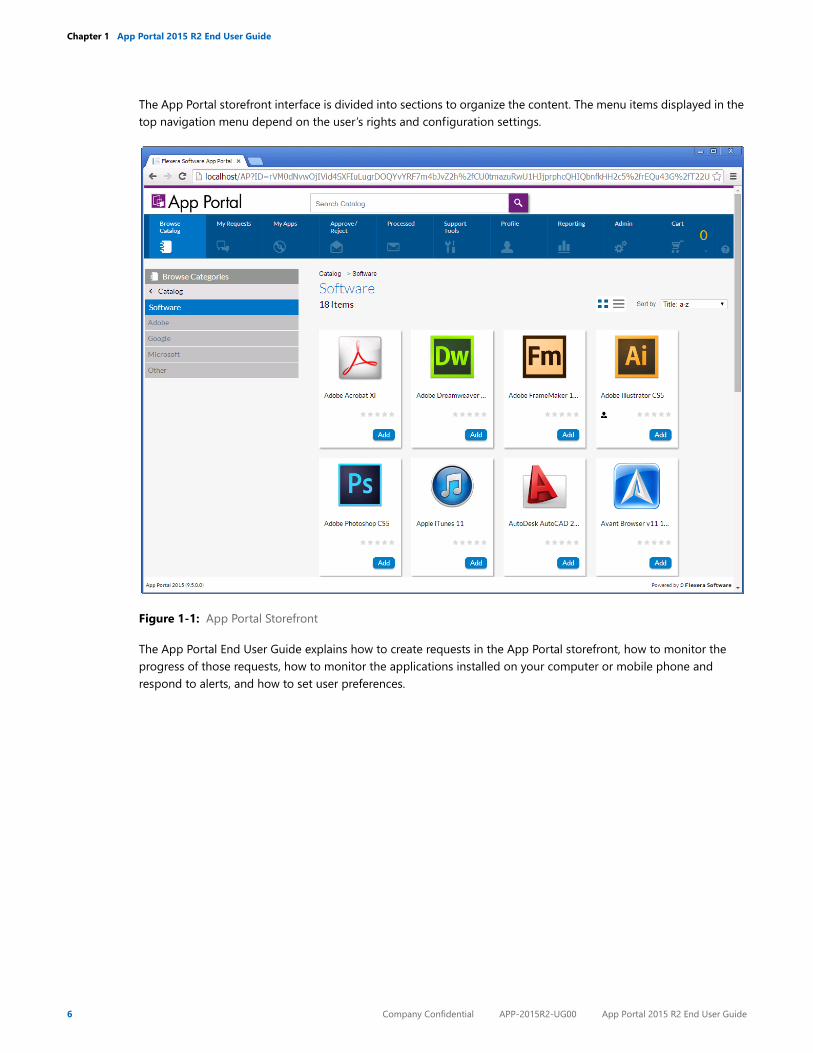
The App Portal storefront interface is divided into sections to organize the content. The menu items displayed in the top navigation menu depend on the user’s rights and configuration settings.
Figure 1-1: App Portal Storefront
The App Portal End User Guide explains how to create requests in the App Portal storefront, how to monitor the progress of those requests, how to monitor the applications installed on your computer or mobile phone and respond to alerts, and how to set user preferences.
6 Company Confidential APP-2015R2-UG00 App Portal 2015 R2 End User Guide
Chapter 1 App Portal 2015 R2 End User Guide
Information about using App Portal is presented in the following sections:
Table 1-1 • App Portal End User Guide
Topic Content
Submitting Requests on the Browse Catalog Tab
Explains how to use the Browse Catalog tab to submit catalog item requests.
Viewing Request Status on the My Requests and Reporting Tabs
Explains how to view your submitted requests on the My Requests tab.
Approving or Rejecting Requests on the Approve/Reject Tab
Explains how to use the Approve / Reject tab to approve or reject requests.
Viewing Request History on the Processed Tab
Explains how to use the Processed tab to view all the items approved and rejected for the current approver.
Viewing Request Details Explains how to view information on submitted requests on the Request Details view.
Using the My Apps Tab to Manage Your Applications and Software Policy Score™
Explains how to use the My Apps tab of view a list of applications installed on your computer, view your Software Policy Score™, and respond to unused software and other alerts regarding those applications.
Setting User Preferences on the Profile Tab
Explains how to use the Profile tab to set user settings and to view the software installed on the current computer that has corresponding inventory records and catalog items.
App Portal 2015 R2 End User Guide APP-2015R2-UG00 Company Confidential 7
Chapter 1 App Portal 2015 R2 End User GuideUsing Help
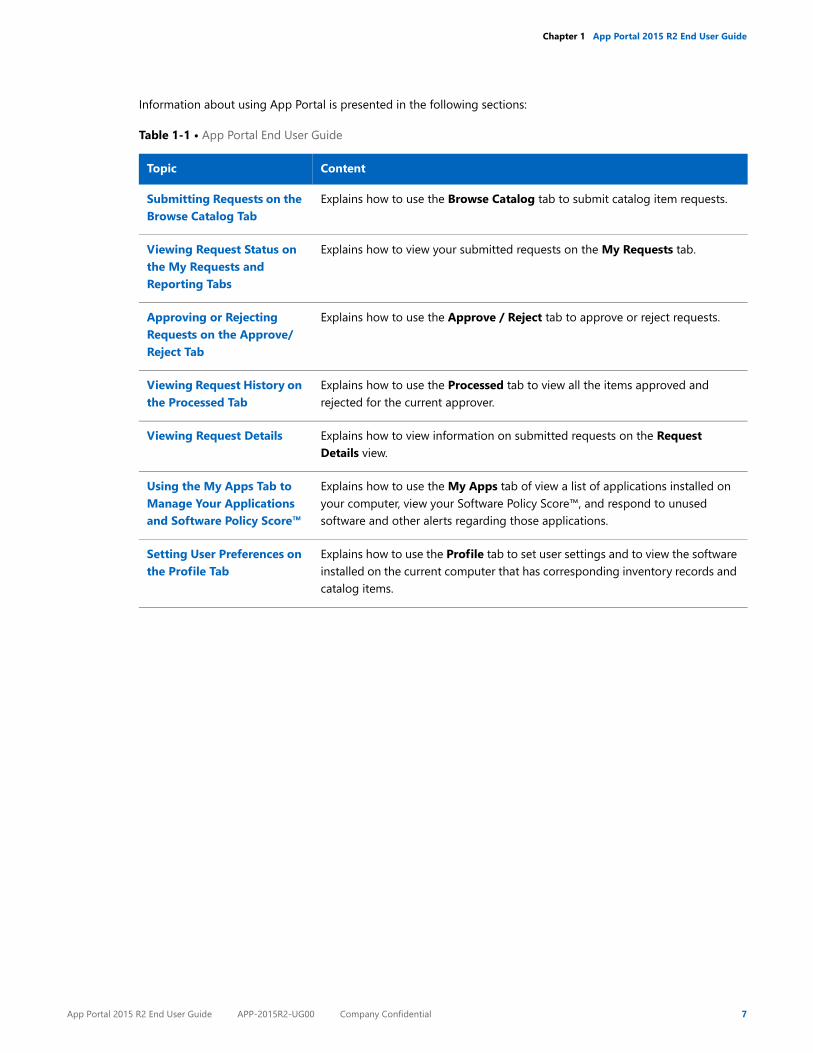
Using HelpTo view user documentation specific to your organization’s App Portal app store, click the help icon in the navigation bar:
Figure 1-2: Opening User Documentation from the Navigation Menu
Note • If you click on the help icon in the navigation bar when the Admin tab is active, instead of opening a Help tab with help information specific to your organization, a page opens providing links to open the full set of App Portal user documentation.
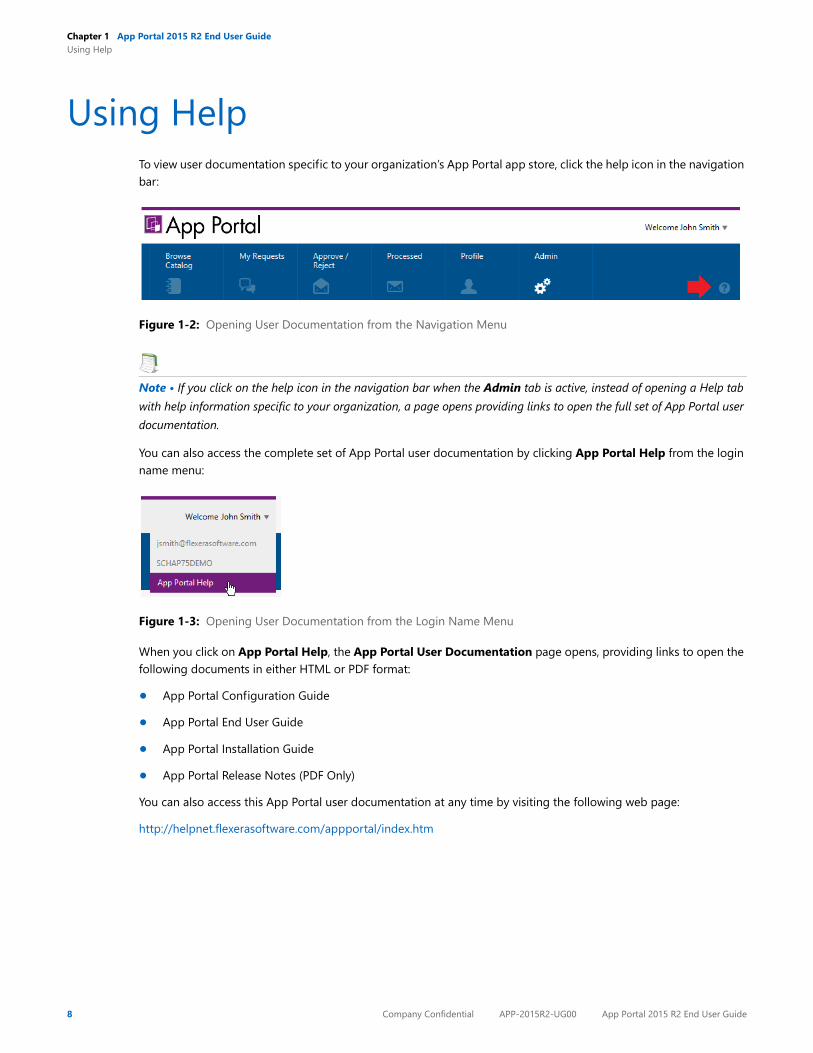
You can also access the complete set of App Portal user documentation by clicking App Portal Help from the login name menu:
Figure 1-3: Opening User Documentation from the Login Name Menu
When you click on App Portal Help, the App Portal User Documentation page opens, providing links to open the following documents in either HTML or PDF format:
• App Portal Configuration Guide
• App Portal End User Guide
• App Portal Installation Guide
• App Portal Release Notes (PDF Only)
You can also access this App Portal user documentation at any time by visiting the following web page:
http://helpnet.flexerasoftware.com/appportal/index.htm
8 Company Confidential APP-2015R2-UG00 App Portal 2015 R2 End User Guide
Chapter 1 App Portal 2015 R2 End User GuideUsing Help
Help ConventionsIn this documentation, reader alert and style conventions are used to bring your attention to specific information or help you identify information.
Reader Alert ConventionsReader alerts are used throughout this documentation to notify you of both supplementary and essential information. The following table explains the meaning of each alert.
Table 1-2 • Reader Alert Conventions
Image Alert Name Description
Note Notes are used to draw attention to pieces of information that should stand out.
Important Note Important notes are used for information that is essential for users to read.
Caution Cautions indicate that this information is critical to the success of the desired feature or product functionality.
Tip Tips are used to indicate helpful information that could assist you in better utilizing the desired function or feature.
Best Practices Best Practices alerts instruct you on the best way to accomplish a task.
Version-Specific Note Version-specific notes indicate that the information applies to a specific version of a product (such as Version 9.0 or Version 11.0).
Security Security alerts identify security issues.
Task The Task graphic indicates that procedural instructions follow.
App Portal 2015 R2 End User Guide APP-2015R2-UG00 Company Confidential 9
Chapter 1 App Portal 2015 R2 End User GuideUsing Help
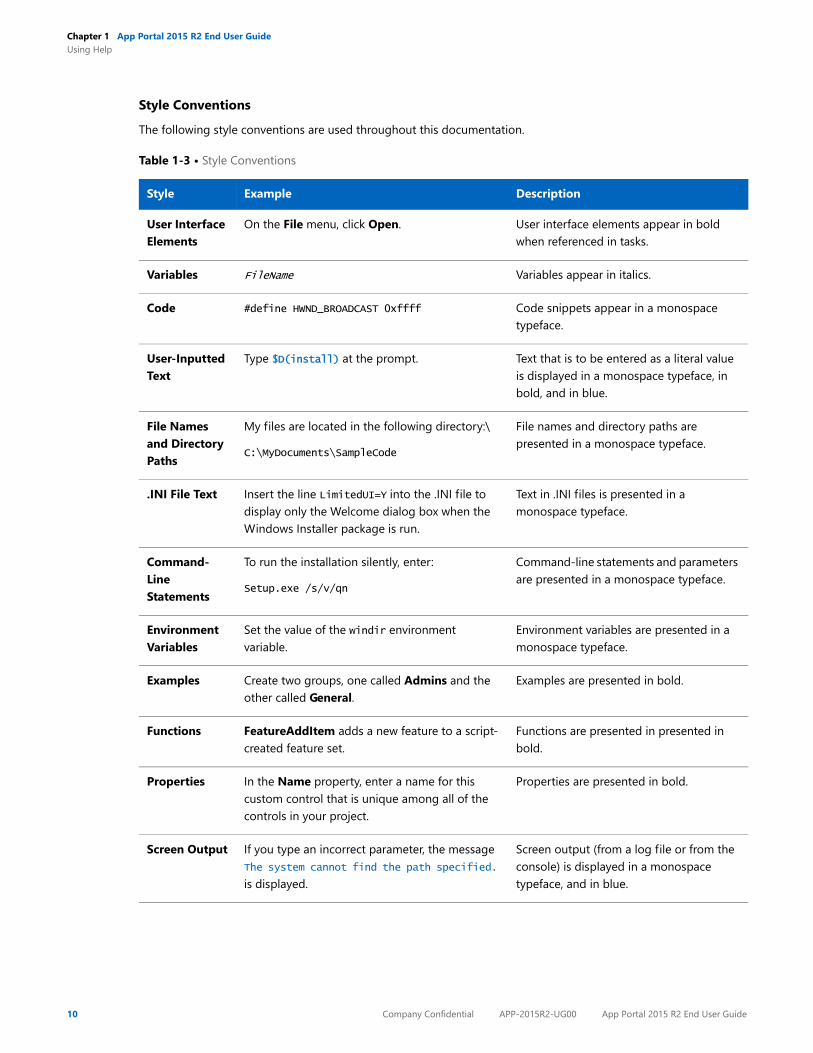
Style ConventionsThe following style conventions are used throughout this documentation.
Table 1-3 • Style Conventions
Style Example Description
User Interface Elements
On the File menu, click Open. User interface elements appear in bold when referenced in tasks.
Variables FileName Variables appear in italics.
Code #define HWND_BROADCAST 0xffff Code snippets appear in a monospace typeface.
User-Inputted Text
Type $D(install) at the prompt. Text that is to be entered as a literal value is displayed in a monospace typeface, in bold, and in blue.
File Names and Directory Paths
My files are located in the following directory:\
C:\MyDocuments\SampleCode
File names and directory paths are presented in a monospace typeface.
.INI File Text Insert the line LimitedUI=Y into the .INI file to display only the Welcome dialog box when the Windows Installer package is run.
Text in .INI files is presented in a monospace typeface.
Command-Line Statements
To run the installation silently, enter:
Setup.exe /s/v/qn
Command-line statements and parameters are presented in a monospace typeface.
Environment Variables
Set the value of the windir environment variable.
Environment variables are presented in a monospace typeface.
Examples Create two groups, one called Admins and the other called General.
Examples are presented in bold.
Functions FeatureAddItem adds a new feature to a script-created feature set.
Functions are presented in presented in bold.
Properties In the Name property, enter a name for this custom control that is unique among all of the controls in your project.
Properties are presented in bold.
Screen Output If you type an incorrect parameter, the message The system cannot find the path specified. is displayed.
Screen output (from a log file or from the console) is displayed in a monospace typeface, and in blue.
10 Company Confidential APP-2015R2-UG00 App Portal 2015 R2 End User Guide
Chapter 1 App Portal 2015 R2 End User GuideContacting Us
Contacting UsYou may contact us from anywhere in the world by visiting our Web site at:
http://www.flexerasoftware.com
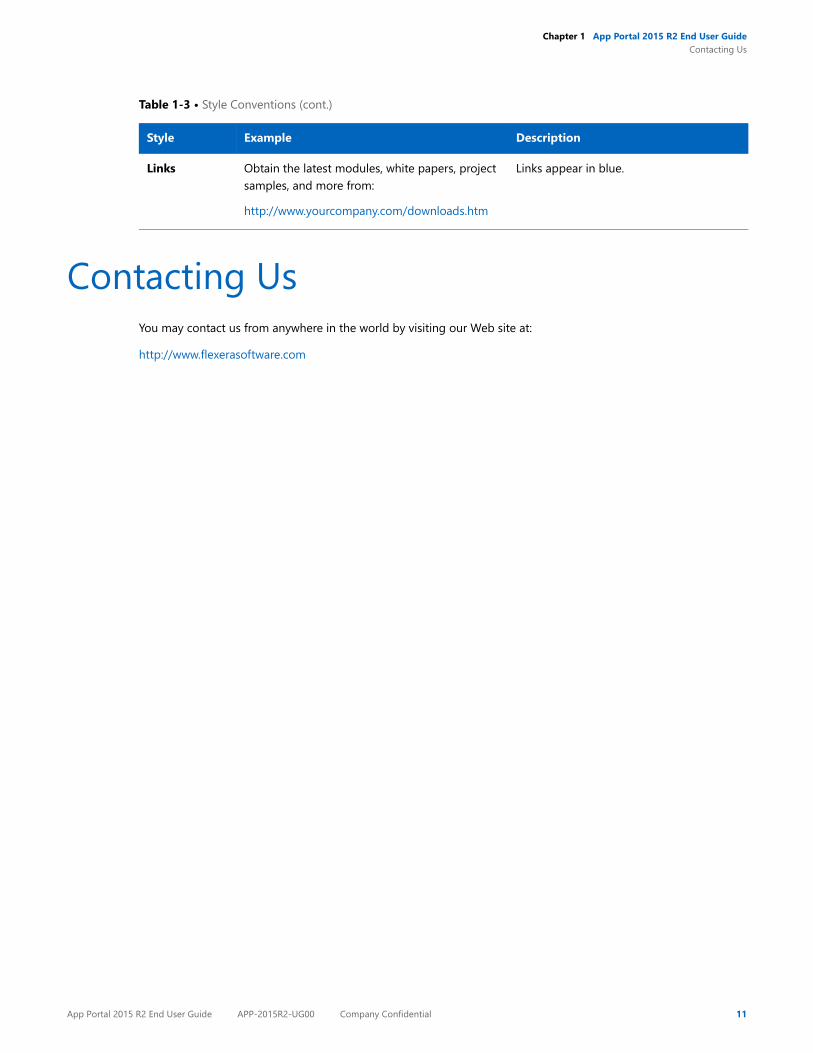
Links Obtain the latest modules, white papers, project samples, and more from:
http://www.yourcompany.com/downloads.htm
Links appear in blue.
Table 1-3 • Style Conventions (cont.)
Style Example Description
App Portal 2015 R2 End User Guide APP-2015R2-UG00 Company Confidential 11
Chapter 1 App Portal 2015 R2 End User GuideContacting Us
12 Company Confidential APP-2015R2-UG00 App Portal 2015 R2 End User Guide
2
Submitting Requests on theBrowse Catalog Tab
Information about using the Browse Catalog tab to submit requests for software and other assets is organized into the following sections:
• About the Browse Catalog Tab
• Icons Displayed on the Browse Catalog Tab and on Checkout Screens
• Requesting Catalog Items
• Requesting Mobile Application Catalog Items
App Portal 2015 R2 End User Guide APP-2015R2-UG00 Company Confidential 13

Chapter 2 Submitting Requests on the Browse Catalog TabAbout the Browse Catalog Tab
About the Browse Catalog TabThe App Portal Browse Catalog tab is where you submit requests for software and other assets.
• On the Browse Catalog tab, you can request both desktop and mobile applications.
• You can browse through categories or perform a search to locate catalog items.
• You can view catalog items in card, list, or detailed view.
• When you click Add, that catalog item is added to the cart.
• Click on the cart to begin the checkout experience.
Figure 2-1: Browse Catalog Tab
Information about the Browse Catalog tab is described in the following sections:
• Areas of the Browse Catalog Tab
• Browsing Through Catalog Items in the Results Pane
• Sorting Catalog Items
• Invoking Checkout
14 Company Confidential APP-2015R2-UG00 App Portal 2015 R2 End User Guide
Chapter 2 Submitting Requests on the Browse Catalog TabAbout the Browse Catalog Tab
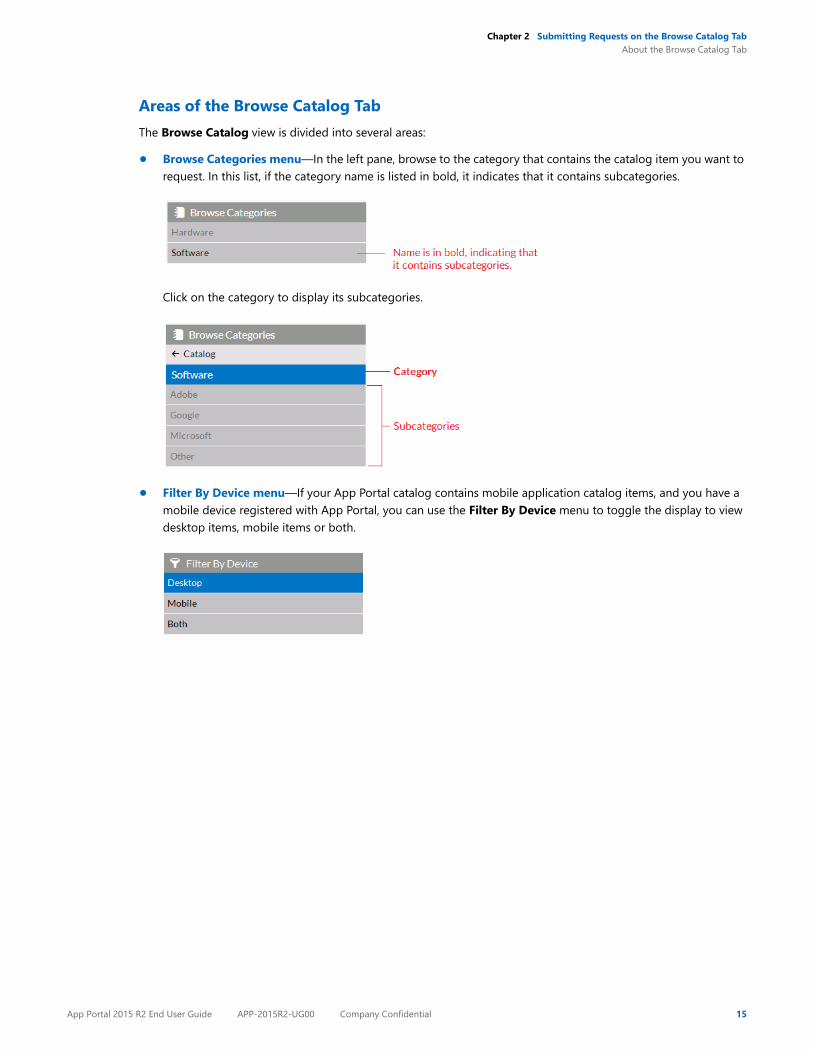
Areas of the Browse Catalog TabThe Browse Catalog view is divided into several areas:
• Browse Categories menu—In the left pane, browse to the category that contains the catalog item you want to request. In this list, if the category name is listed in bold, it indicates that it contains subcategories.
Click on the category to display its subcategories.
• Filter By Device menu—If your App Portal catalog contains mobile application catalog items, and you have a mobile device registered with App Portal, you can use the Filter By Device menu to toggle the display to view desktop items, mobile items or both.
App Portal 2015 R2 End User Guide APP-2015R2-UG00 Company Confidential 15
Chapter 2 Submitting Requests on the Browse Catalog TabAbout the Browse Catalog Tab
• Search box—Use the Search box, above the tabs, to filter the list of displayed catalog items. For detailed information on performing searches, see Searching for Catalog Items.
• Results pane—The right pane either lists all of the catalog items in the selected category or the search results. Catalog items, which can be listed in either card or list format, include icons that provide additional information about each software item. See Icons Displayed on the Browse Catalog Tab and on Checkout Screens for more information.
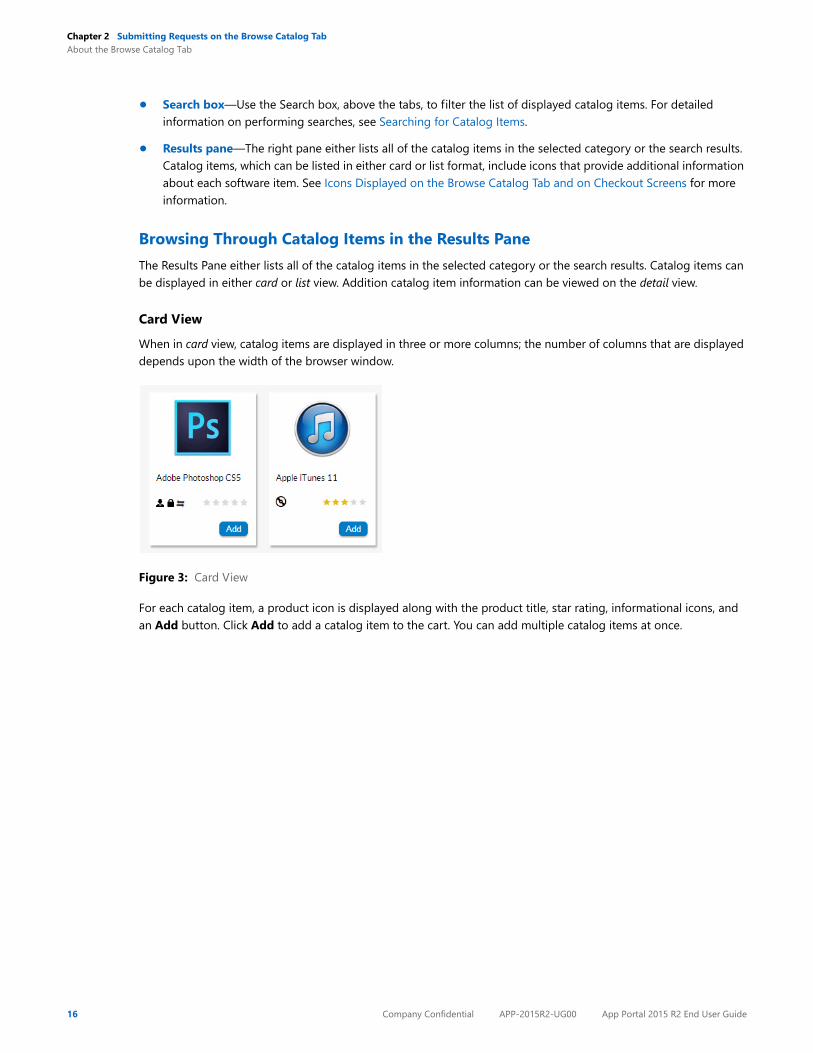
Browsing Through Catalog Items in the Results PaneThe Results Pane either lists all of the catalog items in the selected category or the search results. Catalog items can be displayed in either card or list view. Addition catalog item information can be viewed on the detail view.
Card ViewWhen in card view, catalog items are displayed in three or more columns; the number of columns that are displayed depends upon the width of the browser window.
Figure 3: Card View
For each catalog item, a product icon is displayed along with the product title, star rating, informational icons, and an Add button. Click Add to add a catalog item to the cart. You can add multiple catalog items at once.
16 Company Confidential APP-2015R2-UG00 App Portal 2015 R2 End User Guide
Chapter 2 Submitting Requests on the Browse Catalog TabAbout the Browse Catalog Tab
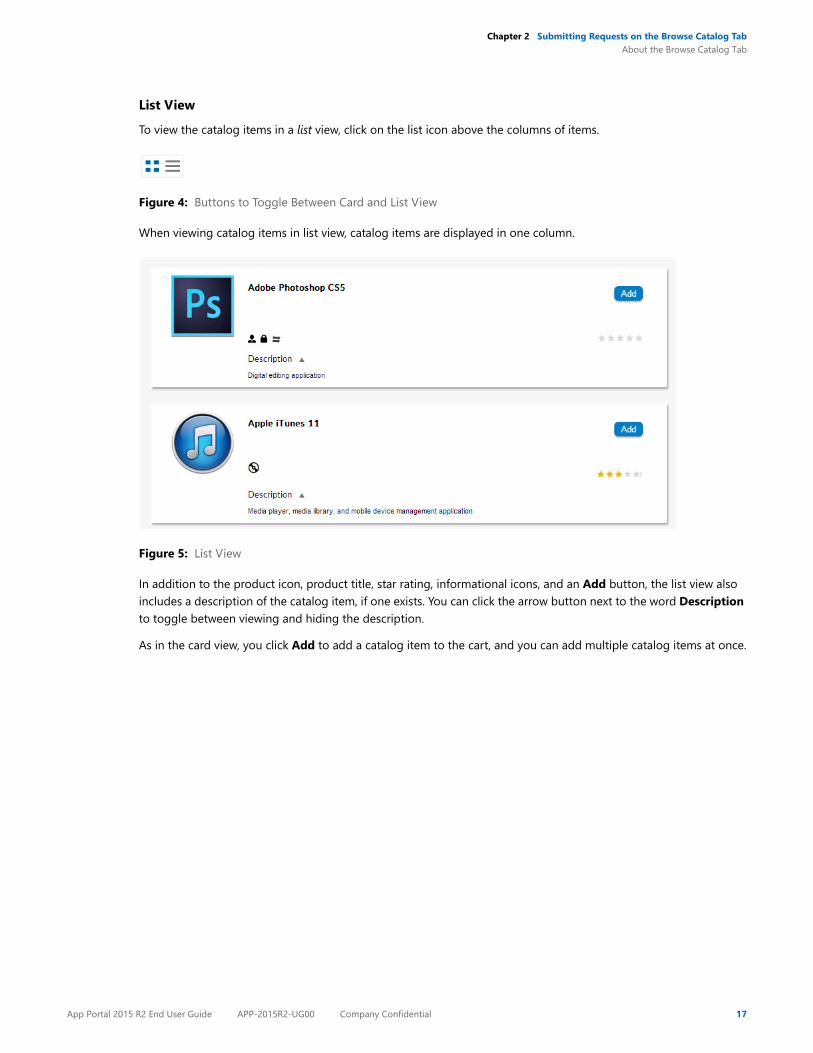
List ViewTo view the catalog items in a list view, click on the list icon above the columns of items.
Figure 4: Buttons to Toggle Between Card and List View
When viewing catalog items in list view, catalog items are displayed in one column.
Figure 5: List View
In addition to the product icon, product title, star rating, informational icons, and an Add button, the list view also includes a description of the catalog item, if one exists. You can click the arrow button next to the word Description to toggle between viewing and hiding the description.
As in the card view, you click Add to add a catalog item to the cart, and you can add multiple catalog items at once.
App Portal 2015 R2 End User Guide APP-2015R2-UG00 Company Confidential 17
Chapter 2 Submitting Requests on the Browse Catalog TabAbout the Browse Catalog Tab
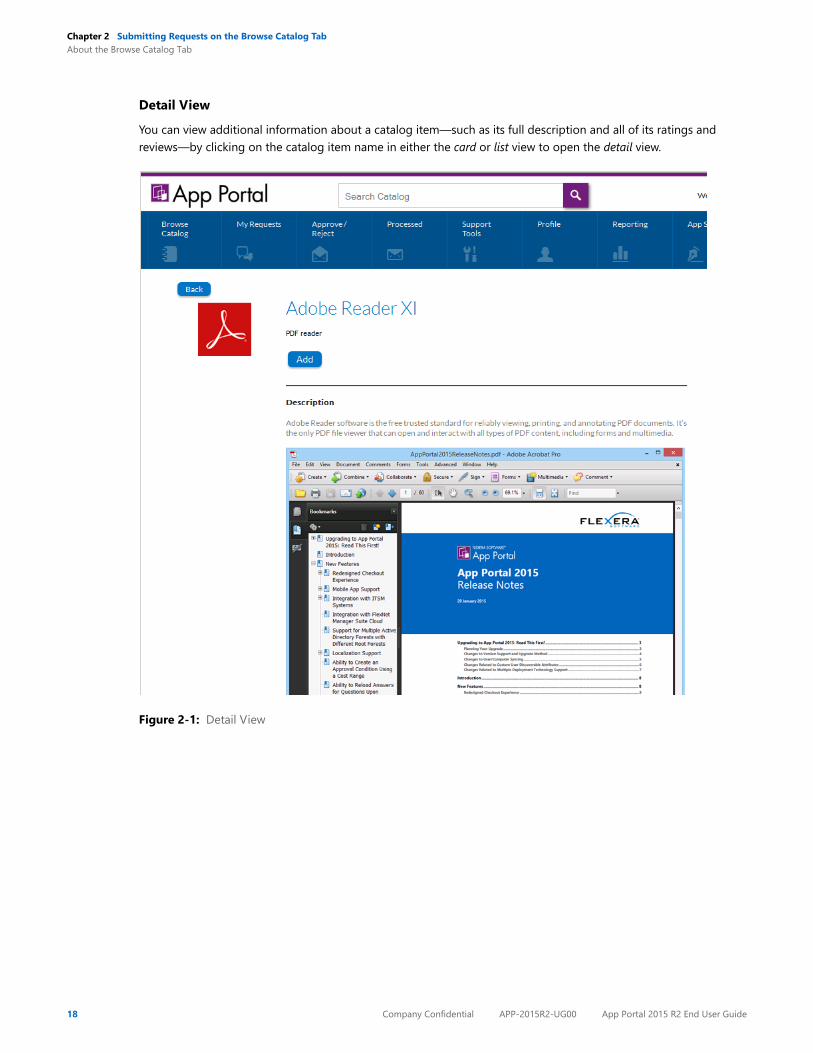
Detail ViewYou can view additional information about a catalog item—such as its full description and all of its ratings and reviews—by clicking on the catalog item name in either the card or list view to open the detail view.
Figure 2-1: Detail View
18 Company Confidential APP-2015R2-UG00 App Portal 2015 R2 End User Guide
Chapter 2 Submitting Requests on the Browse Catalog TabAbout the Browse Catalog Tab
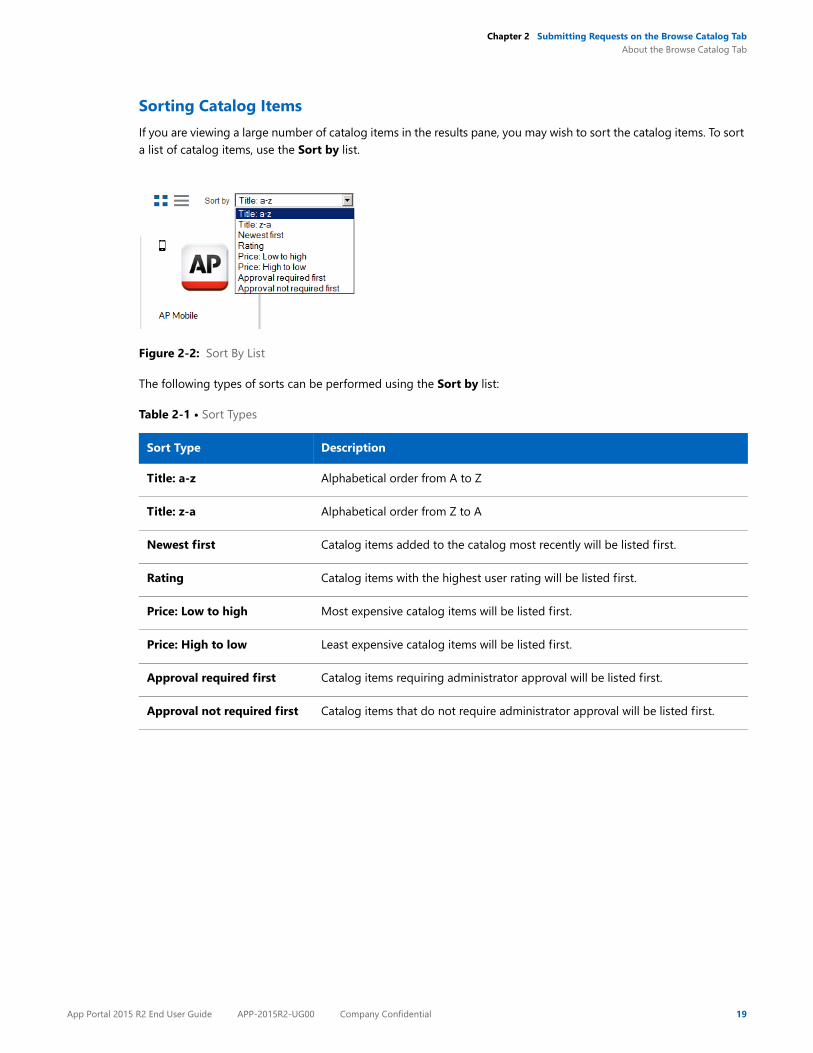
Sorting Catalog ItemsIf you are viewing a large number of catalog items in the results pane, you may wish to sort the catalog items. To sort a list of catalog items, use the Sort by list.
Figure 2-2: Sort By List
The following types of sorts can be performed using the Sort by list:
Table 2-1 • Sort Types
Sort Type Description
Title: a-z Alphabetical order from A to Z
Title: z-a Alphabetical order from Z to A
Newest first Catalog items added to the catalog most recently will be listed first.
Rating Catalog items with the highest user rating will be listed first.
Price: Low to high Most expensive catalog items will be listed first.
Price: High to low Least expensive catalog items will be listed first.
Approval required first Catalog items requiring administrator approval will be listed first.
Approval not required first Catalog items that do not require administrator approval will be listed first.
App Portal 2015 R2 End User Guide APP-2015R2-UG00 Company Confidential 19
Chapter 2 Submitting Requests on the Browse Catalog TabAbout the Browse Catalog Tab
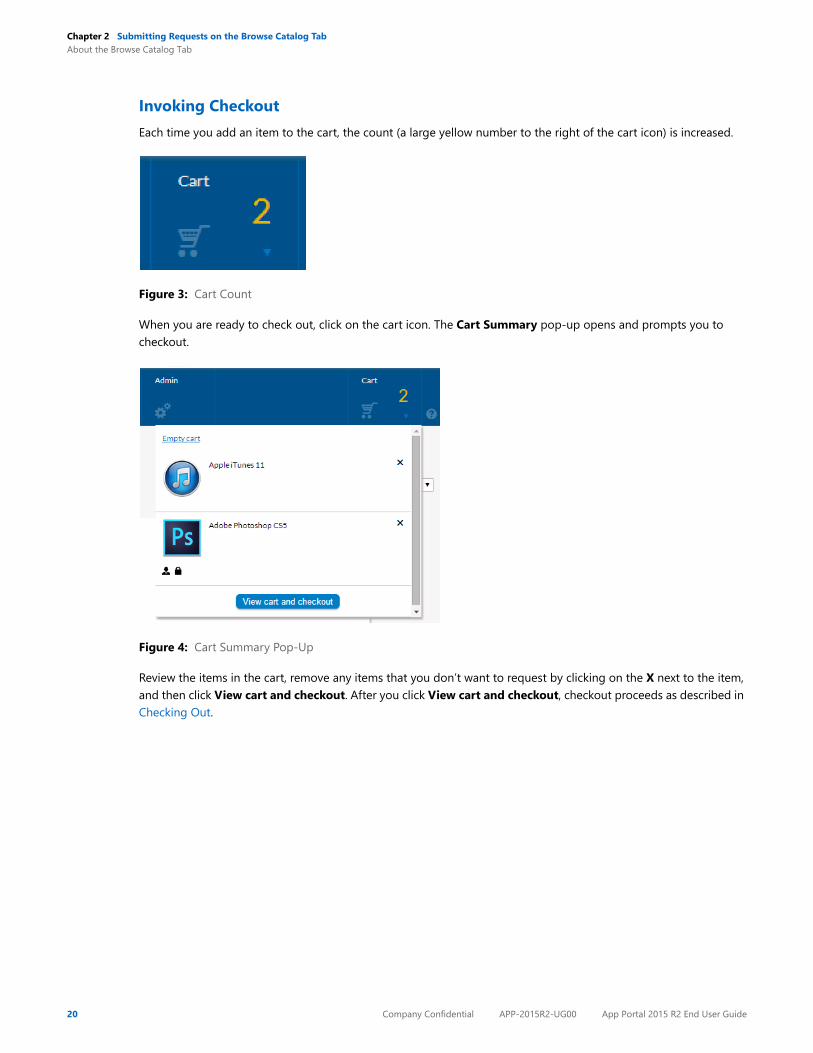
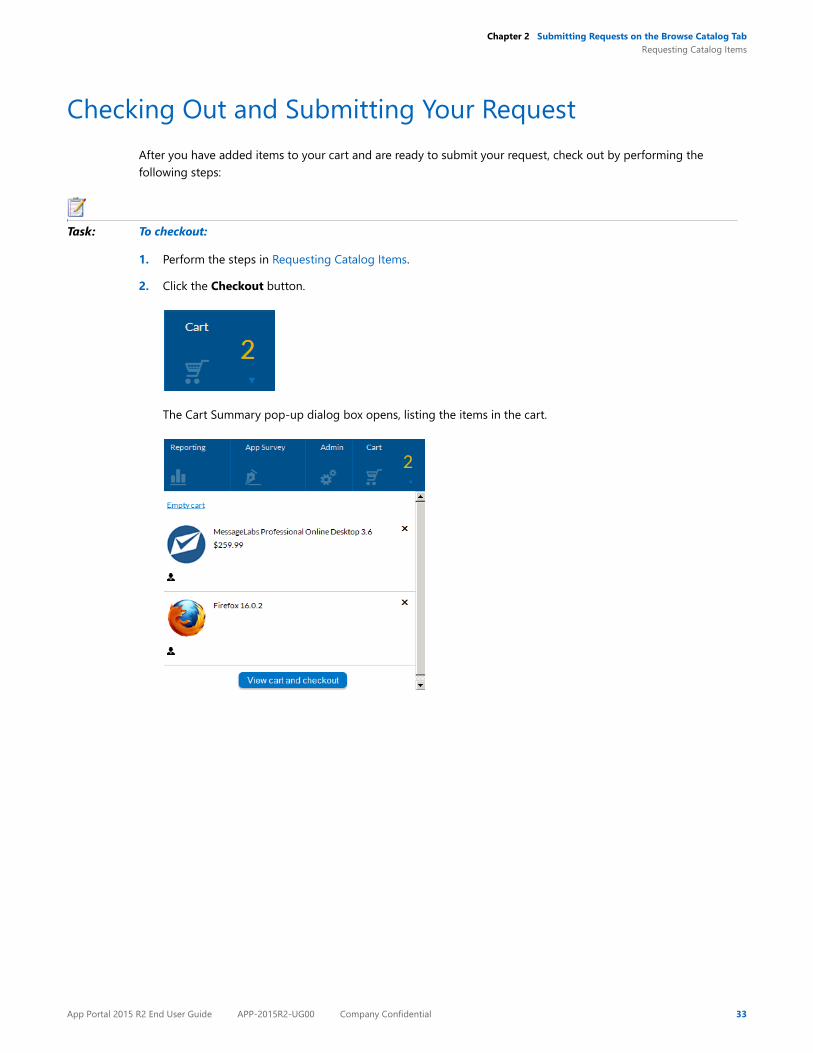
Invoking CheckoutEach time you add an item to the cart, the count (a large yellow number to the right of the cart icon) is increased.
Figure 3: Cart Count
When you are ready to check out, click on the cart icon. The Cart Summary pop-up opens and prompts you to checkout.
Figure 4: Cart Summary Pop-Up
Review the items in the cart, remove any items that you don’t want to request by clicking on the X next to the item, and then click View cart and checkout. After you click View cart and checkout, checkout proceeds as described in Checking Out.
20 Company Confidential APP-2015R2-UG00 App Portal 2015 R2 End User Guide
Chapter 2 Submitting Requests on the Browse Catalog TabIcons Displayed on the Browse Catalog Tab and on Checkout Screens
Icons Displayed on the Browse Catalog Tab and on Checkout Screens
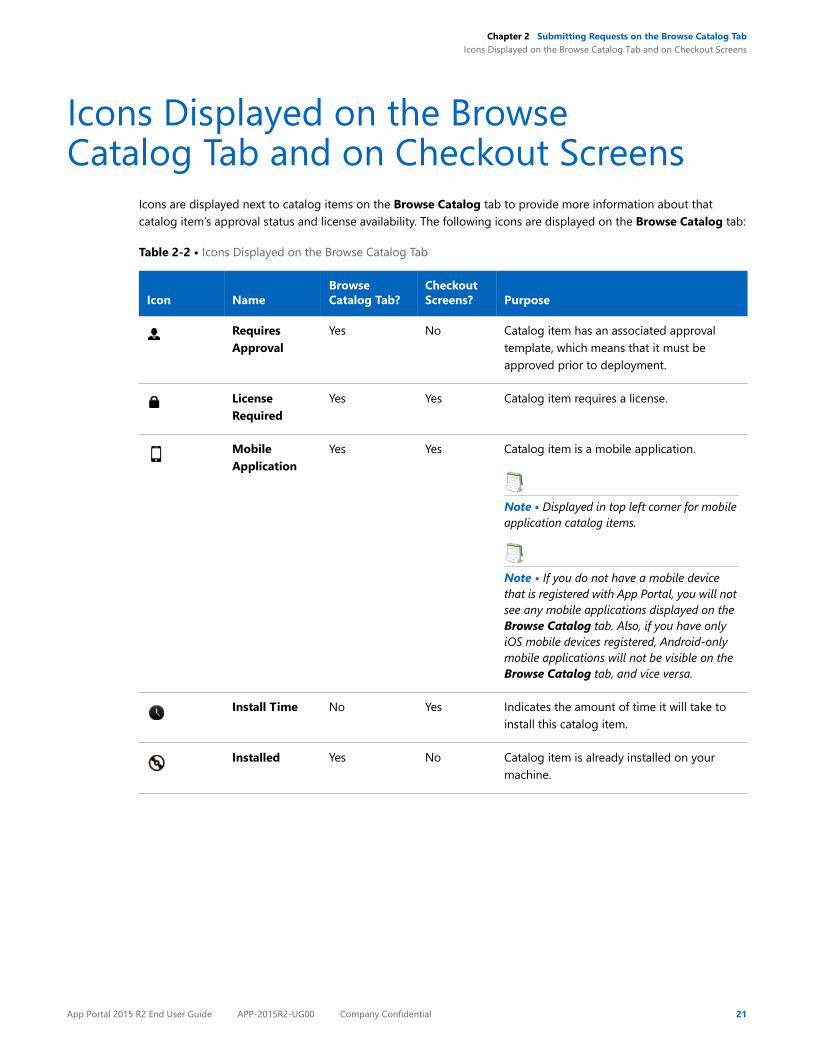
Icons are displayed next to catalog items on the Browse Catalog tab to provide more information about that catalog item’s approval status and license availability. The following icons are displayed on the Browse Catalog tab:
Table 2-2 • Icons Displayed on the Browse Catalog Tab
Icon NameBrowse Catalog Tab?
Checkout Screens? Purpose
Requires Approval
Yes No Catalog item has an associated approval template, which means that it must be approved prior to deployment.
License Required
Yes Yes Catalog item requires a license.
Mobile Application
Yes Yes Catalog item is a mobile application.
Note • Displayed in top left corner for mobile application catalog items.
Note • If you do not have a mobile device that is registered with App Portal, you will not see any mobile applications displayed on the Browse Catalog tab. Also, if you have only iOS mobile devices registered, Android-only mobile applications will not be visible on the Browse Catalog tab, and vice versa.
Install Time No Yes Indicates the amount of time it will take to install this catalog item.
Installed Yes No Catalog item is already installed on your machine.
App Portal 2015 R2 End User Guide APP-2015R2-UG00 Company Confidential 21
Chapter 2 Submitting Requests on the Browse Catalog TabIcons Displayed on the Browse Catalog Tab and on Checkout Screens
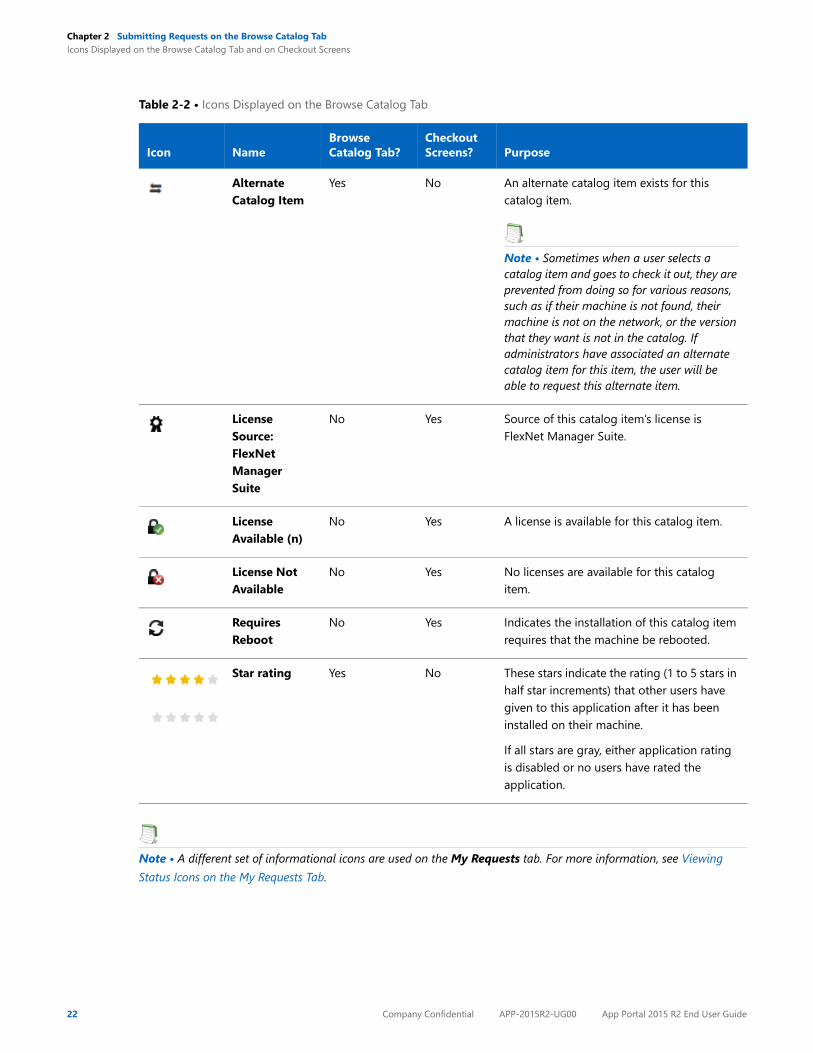
Note • A different set of informational icons are used on the My Requests tab. For more information, see Viewing Status Icons on the My Requests Tab.
Alternate Catalog Item
Yes No An alternate catalog item exists for this catalog item.
Note • Sometimes when a user selects a catalog item and goes to check it out, they are prevented from doing so for various reasons, such as if their machine is not found, their machine is not on the network, or the version that they want is not in the catalog. If administrators have associated an alternate catalog item for this item, the user will be able to request this alternate item.
License Source: FlexNet Manager Suite
No Yes Source of this catalog item’s license is FlexNet Manager Suite.
License Available (n)
No Yes A license is available for this catalog item.
License Not Available
No Yes No licenses are available for this catalog item.
Requires Reboot
No Yes Indicates the installation of this catalog item requires that the machine be rebooted.
Star rating Yes No These stars indicate the rating (1 to 5 stars in half star increments) that other users have given to this application after it has been installed on their machine.
If all stars are gray, either application rating is disabled or no users have rated the application.
Table 2-2 • Icons Displayed on the Browse Catalog Tab
Icon NameBrowse Catalog Tab?
Checkout Screens? Purpose
22 Company Confidential APP-2015R2-UG00 App Portal 2015 R2 End User Guide
Chapter 2 Submitting Requests on the Browse Catalog TabRequesting Catalog Items
Requesting Catalog ItemsWhen submitting a request, your first step is to locate the items in the catalog that you want to request, and to then add those items to your shopping cart.
• Searching for Catalog Items
• Adding Catalog Items to Your Shopping Cart
• Checking Out
Important • The procedure for requesting a mobile application catalog item is not the same as the procedure for requesting other catalog items. See Requesting Mobile Application Catalog Items.
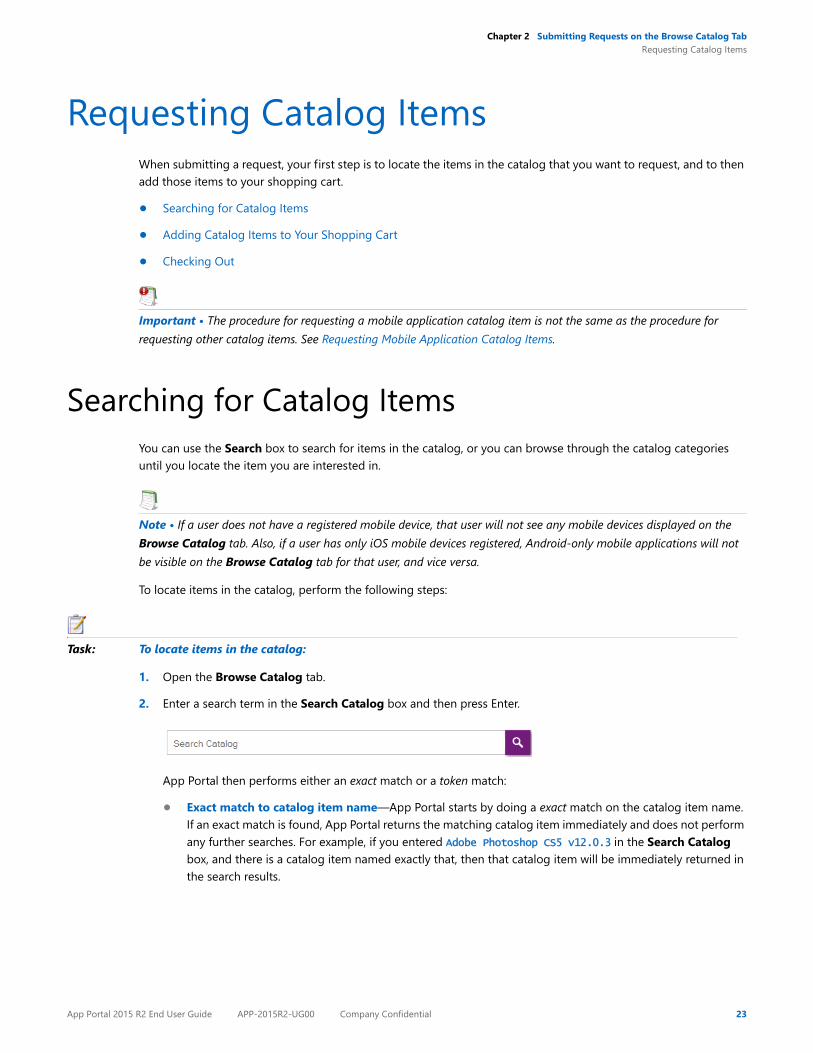
Searching for Catalog ItemsYou can use the Search box to search for items in the catalog, or you can browse through the catalog categories until you locate the item you are interested in.
Note • If a user does not have a registered mobile device, that user will not see any mobile devices displayed on the Browse Catalog tab. Also, if a user has only iOS mobile devices registered, Android-only mobile applications will not be visible on the Browse Catalog tab for that user, and vice versa.
To locate items in the catalog, perform the following steps:
Task: To locate items in the catalog:
1. Open the Browse Catalog tab.
2. Enter a search term in the Search Catalog box and then press Enter.
App Portal then performs either an exact match or a token match:
• Exact match to catalog item name—App Portal starts by doing a exact match on the catalog item name. If an exact match is found, App Portal returns the matching catalog item immediately and does not perform any further searches. For example, if you entered Adobe Photoshop CS5 v12.0.3 in the Search Catalog box, and there is a catalog item named exactly that, then that catalog item will be immediately returned in the search results.
App Portal 2015 R2 End User Guide APP-2015R2-UG00 Company Confidential 23
Chapter 2 Submitting Requests on the Browse Catalog TabRequesting Catalog Items
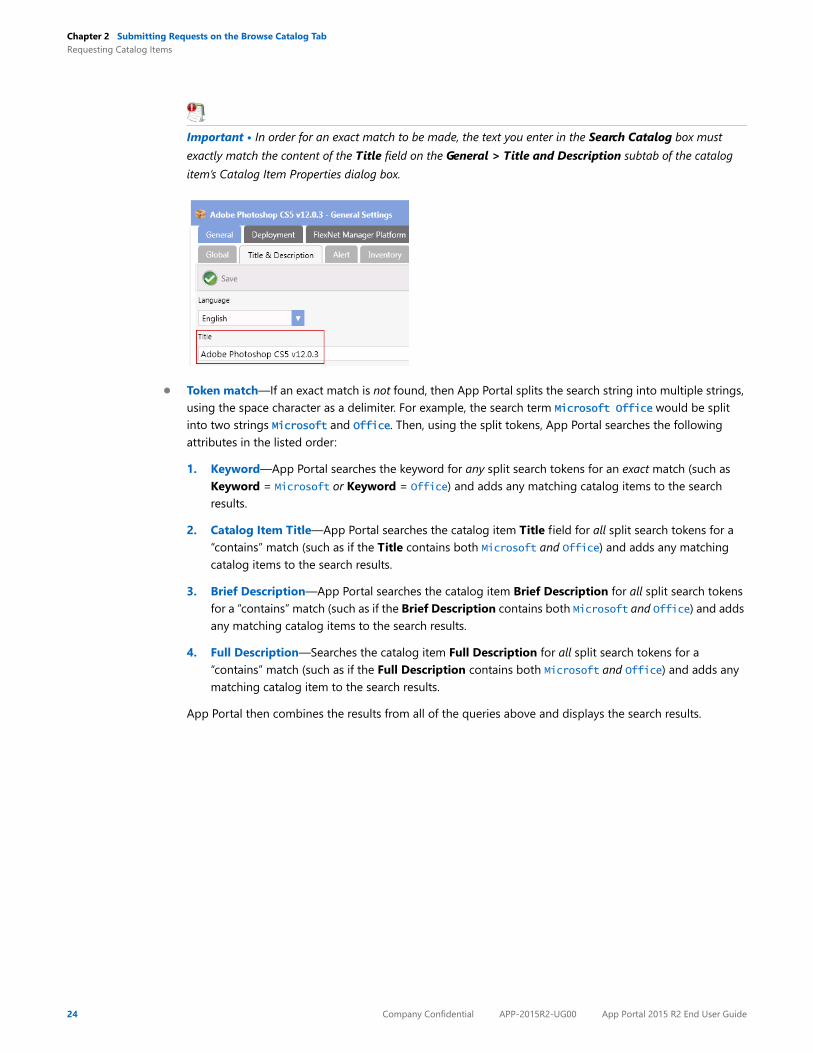
Important • In order for an exact match to be made, the text you enter in the Search Catalog box must exactly match the content of the Title field on the General > Title and Description subtab of the catalog item’s Catalog Item Properties dialog box.
• Token match—If an exact match is not found, then App Portal splits the search string into multiple strings, using the space character as a delimiter. For example, the search term Microsoft Office would be split into two strings Microsoft and Office. Then, using the split tokens, App Portal searches the following attributes in the listed order:
1. Keyword—App Portal searches the keyword for any split search tokens for an exact match (such as Keyword = Microsoft or Keyword = Office) and adds any matching catalog items to the search results.
2. Catalog Item Title—App Portal searches the catalog item Title field for all split search tokens for a “contains” match (such as if the Title contains both Microsoft and Office) and adds any matching catalog items to the search results.
3. Brief Description—App Portal searches the catalog item Brief Description for all split search tokens for a “contains” match (such as if the Brief Description contains both Microsoft and Office) and adds any matching catalog items to the search results.
4. Full Description—Searches the catalog item Full Description for all split search tokens for a “contains” match (such as if the Full Description contains both Microsoft and Office) and adds any matching catalog item to the search results.
App Portal then combines the results from all of the queries above and displays the search results.
24 Company Confidential APP-2015R2-UG00 App Portal 2015 R2 End User Guide
Chapter 2 Submitting Requests on the Browse Catalog TabRequesting Catalog Items
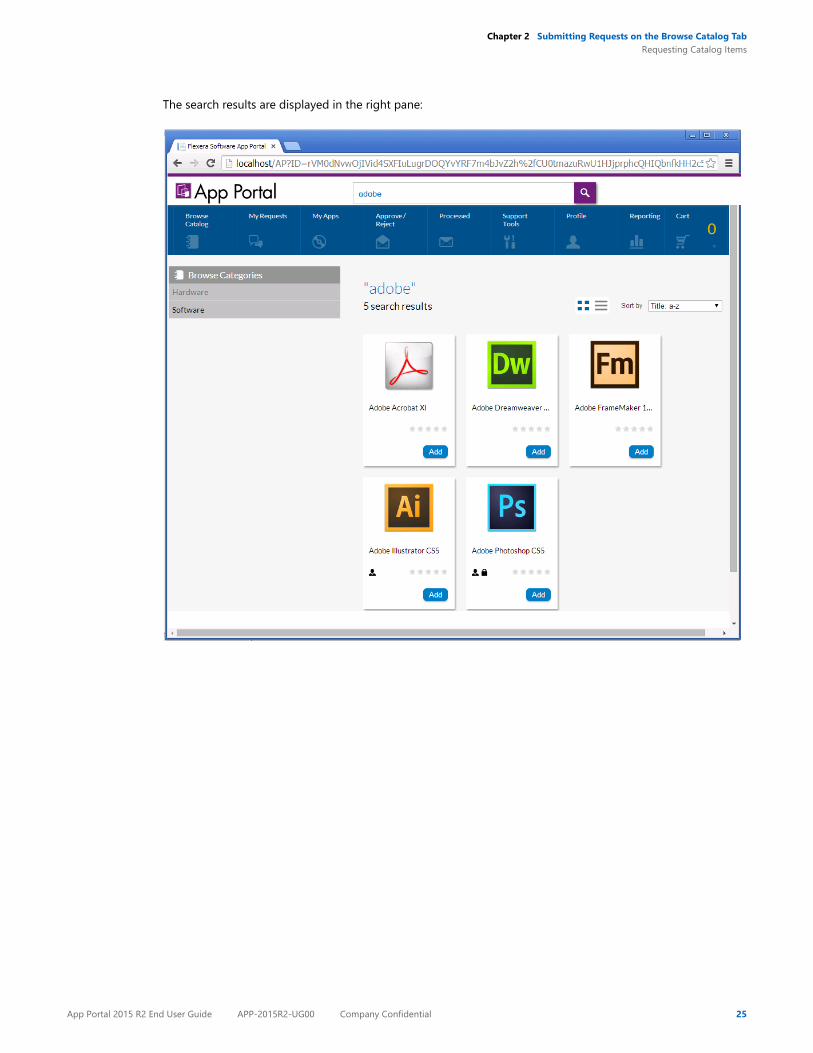
The search results are displayed in the right pane:
App Portal 2015 R2 End User Guide APP-2015R2-UG00 Company Confidential 25
Chapter 2 Submitting Requests on the Browse Catalog TabRequesting Catalog Items
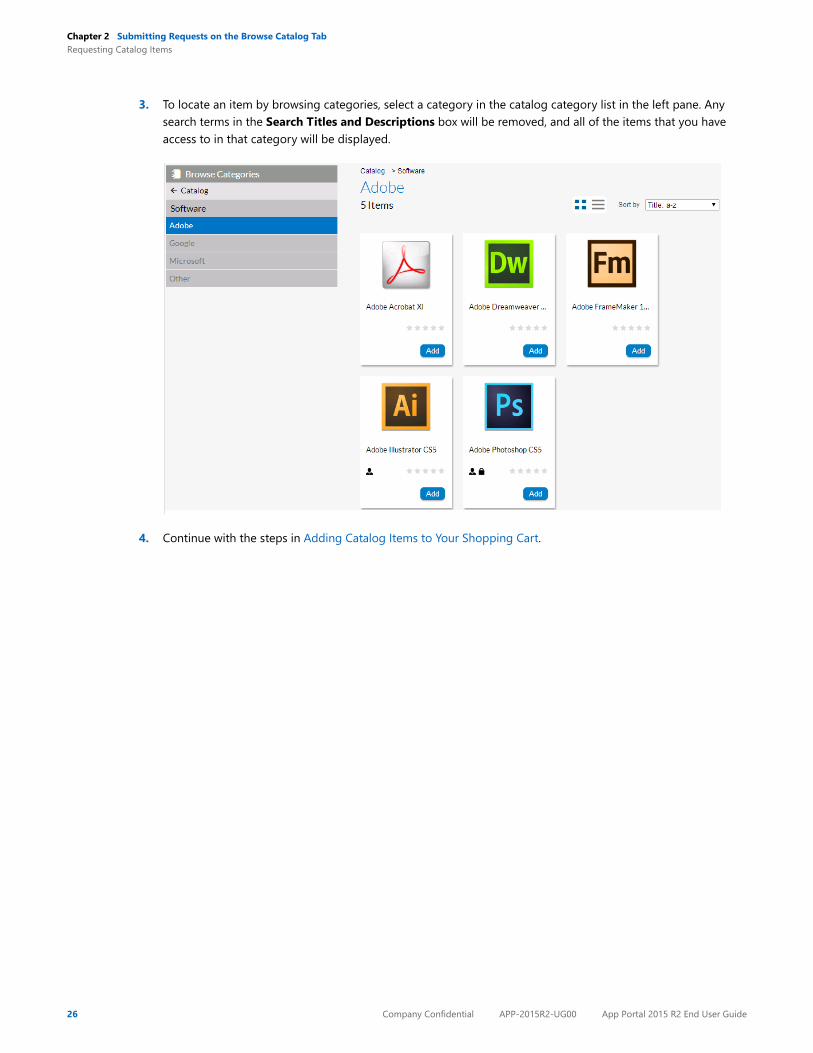
3. To locate an item by browsing categories, select a category in the catalog category list in the left pane. Any search terms in the Search Titles and Descriptions box will be removed, and all of the items that you have access to in that category will be displayed.
4. Continue with the steps in Adding Catalog Items to Your Shopping Cart.
26 Company Confidential APP-2015R2-UG00 App Portal 2015 R2 End User Guide
Chapter 2 Submitting Requests on the Browse Catalog TabRequesting Catalog Items
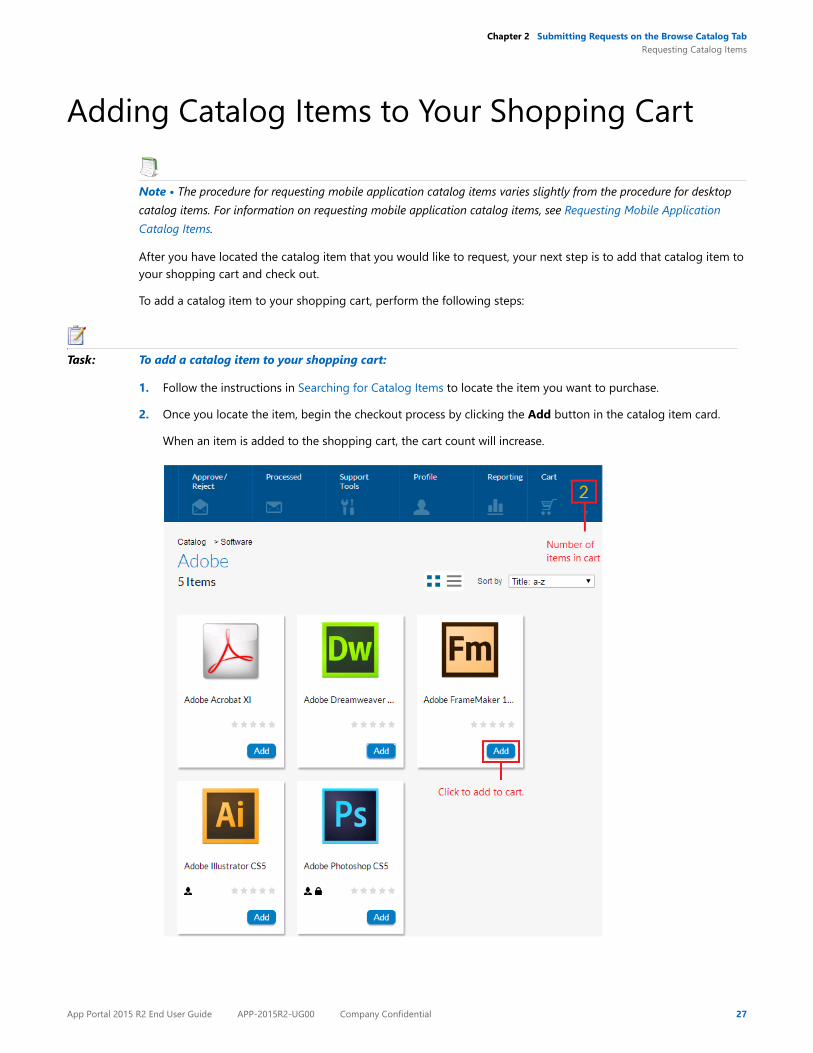
Adding Catalog Items to Your Shopping Cart
Note • The procedure for requesting mobile application catalog items varies slightly from the procedure for desktop catalog items. For information on requesting mobile application catalog items, see Requesting Mobile Application Catalog Items.
After you have located the catalog item that you would like to request, your next step is to add that catalog item to your shopping cart and check out.
To add a catalog item to your shopping cart, perform the following steps:
Task: To add a catalog item to your shopping cart:
1. Follow the instructions in Searching for Catalog Items to locate the item you want to purchase.
2. Once you locate the item, begin the checkout process by clicking the Add button in the catalog item card.
When an item is added to the shopping cart, the cart count will increase.
App Portal 2015 R2 End User Guide APP-2015R2-UG00 Company Confidential 27
Chapter 2 Submitting Requests on the Browse Catalog TabRequesting Catalog Items
3. Add additional items to the cart, if desired.
4. Note the following about adding catalog items to your shopping cart:
• Creating an order—If you add more than one catalog item to the cart and then check out, those items are treated as one order and are tracked as one unit.
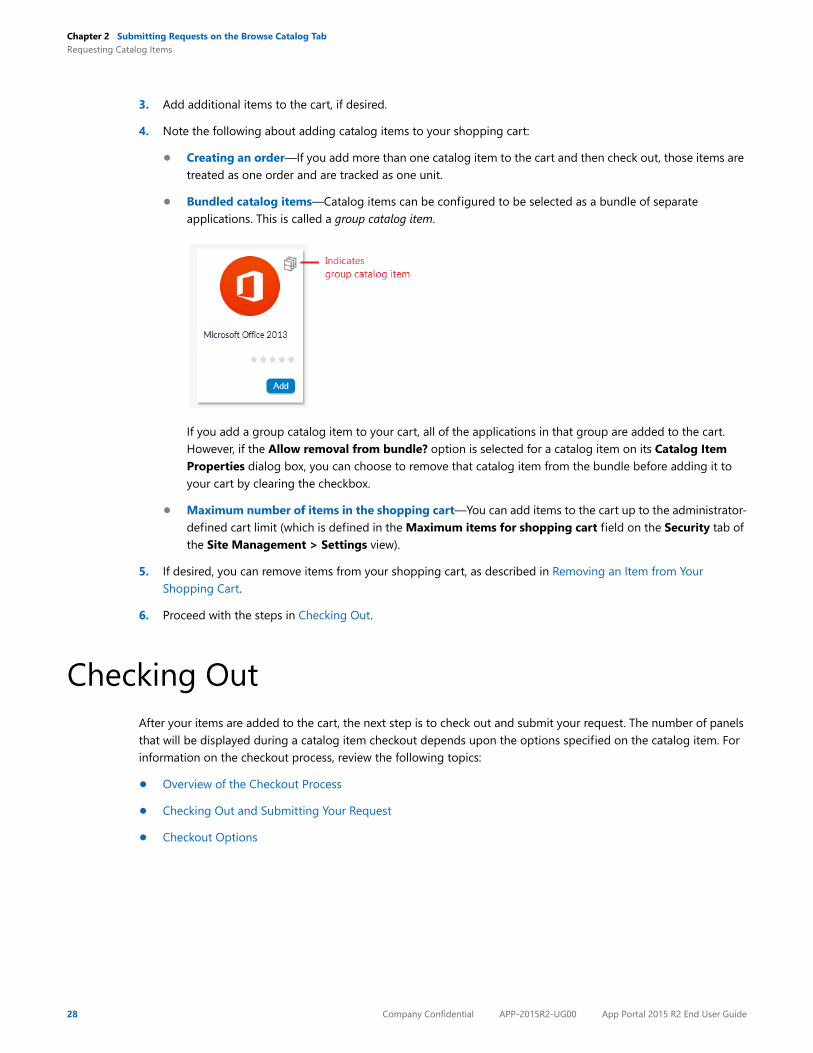
• Bundled catalog items—Catalog items can be configured to be selected as a bundle of separate applications. This is called a group catalog item.
If you add a group catalog item to your cart, all of the applications in that group are added to the cart. However, if the Allow removal from bundle? option is selected for a catalog item on its Catalog Item Properties dialog box, you can choose to remove that catalog item from the bundle before adding it to your cart by clearing the checkbox.
• Maximum number of items in the shopping cart—You can add items to the cart up to the administrator-defined cart limit (which is defined in the Maximum items for shopping cart field on the Security tab of the Site Management > Settings view).
5. If desired, you can remove items from your shopping cart, as described in Removing an Item from Your Shopping Cart.
6. Proceed with the steps in Checking Out.
Checking OutAfter your items are added to the cart, the next step is to check out and submit your request. The number of panels that will be displayed during a catalog item checkout depends upon the options specified on the catalog item. For information on the checkout process, review the following topics:
• Overview of the Checkout Process
• Checking Out and Submitting Your Request
• Checkout Options
28 Company Confidential APP-2015R2-UG00 App Portal 2015 R2 End User Guide
Chapter 2 Submitting Requests on the Browse Catalog TabRequesting Catalog Items
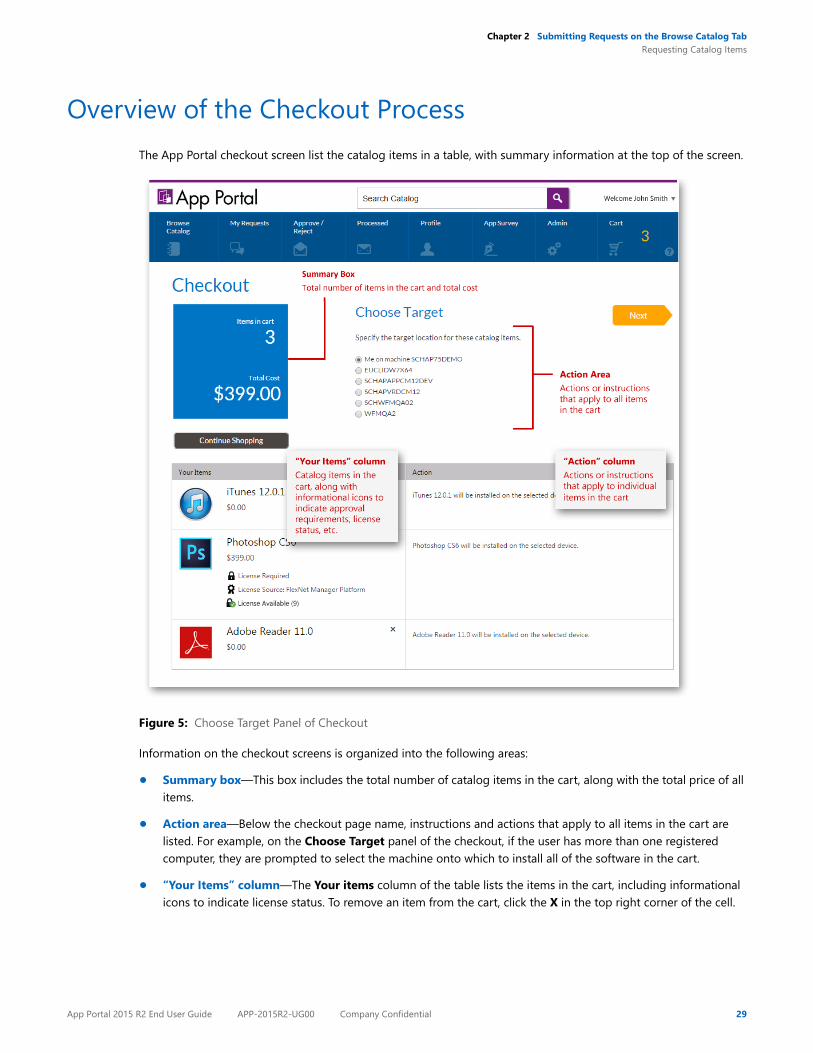
Overview of the Checkout ProcessThe App Portal checkout screen list the catalog items in a table, with summary information at the top of the screen.
Figure 5: Choose Target Panel of Checkout
Information on the checkout screens is organized into the following areas:
• Summary box—This box includes the total number of catalog items in the cart, along with the total price of all items.
• Action area—Below the checkout page name, instructions and actions that apply to all items in the cart are listed. For example, on the Choose Target panel of the checkout, if the user has more than one registered computer, they are prompted to select the machine onto which to install all of the software in the cart.
• “Your Items” column—The Your items column of the table lists the items in the cart, including informational icons to indicate license status. To remove an item from the cart, click the X in the top right corner of the cell.
App Portal 2015 R2 End User Guide APP-2015R2-UG00 Company Confidential 29
Chapter 2 Submitting Requests on the Browse Catalog TabRequesting Catalog Items
• “Action” column—The Action column prompts the user to take some action regarding that catalog item, such as to make a selection or answer a question, or provides instructions or information specific to that catalog item.
• Next button—Click to proceed to the next panel in the checkout process.
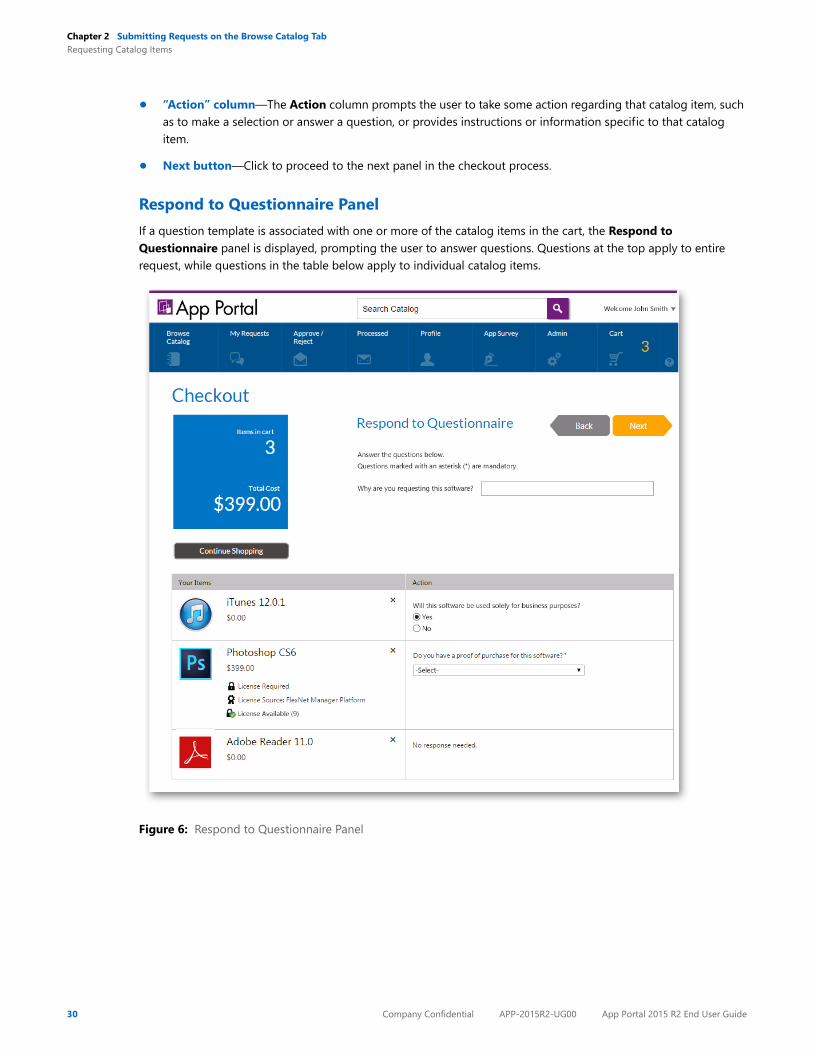
Respond to Questionnaire PanelIf a question template is associated with one or more of the catalog items in the cart, the Respond to Questionnaire panel is displayed, prompting the user to answer questions. Questions at the top apply to entire request, while questions in the table below apply to individual catalog items.
Figure 6: Respond to Questionnaire Panel
30 Company Confidential APP-2015R2-UG00 App Portal 2015 R2 End User Guide
Chapter 2 Submitting Requests on the Browse Catalog TabRequesting Catalog Items
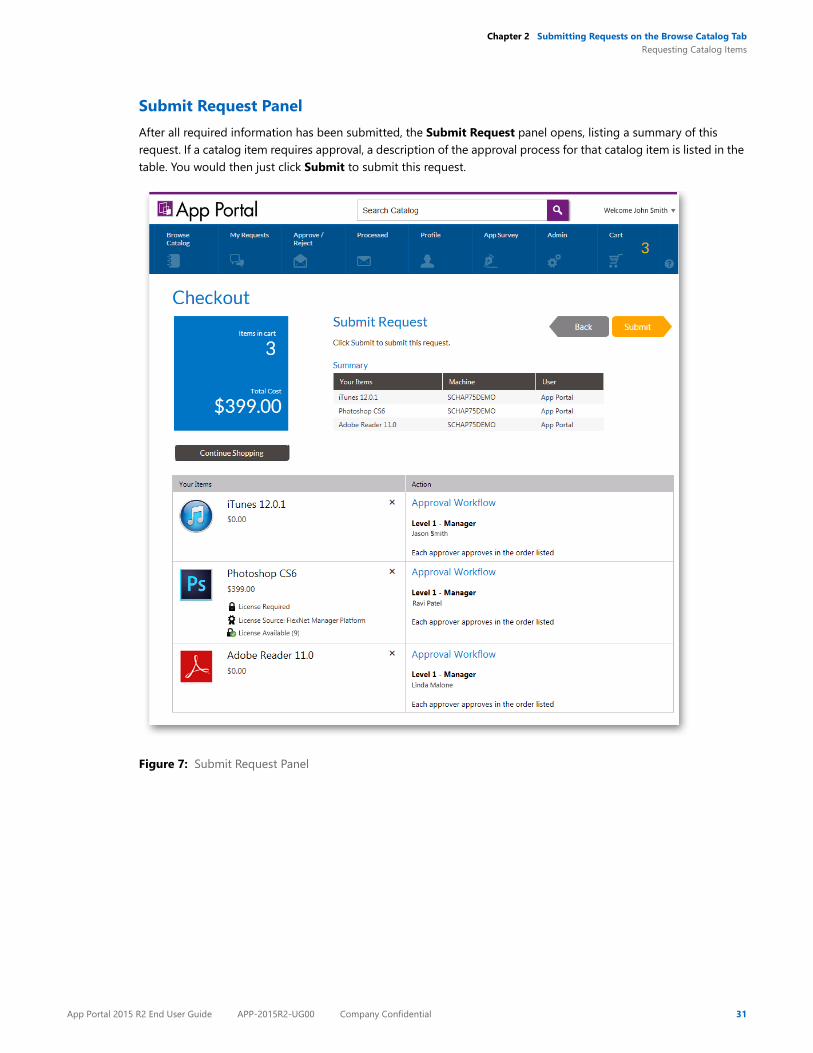
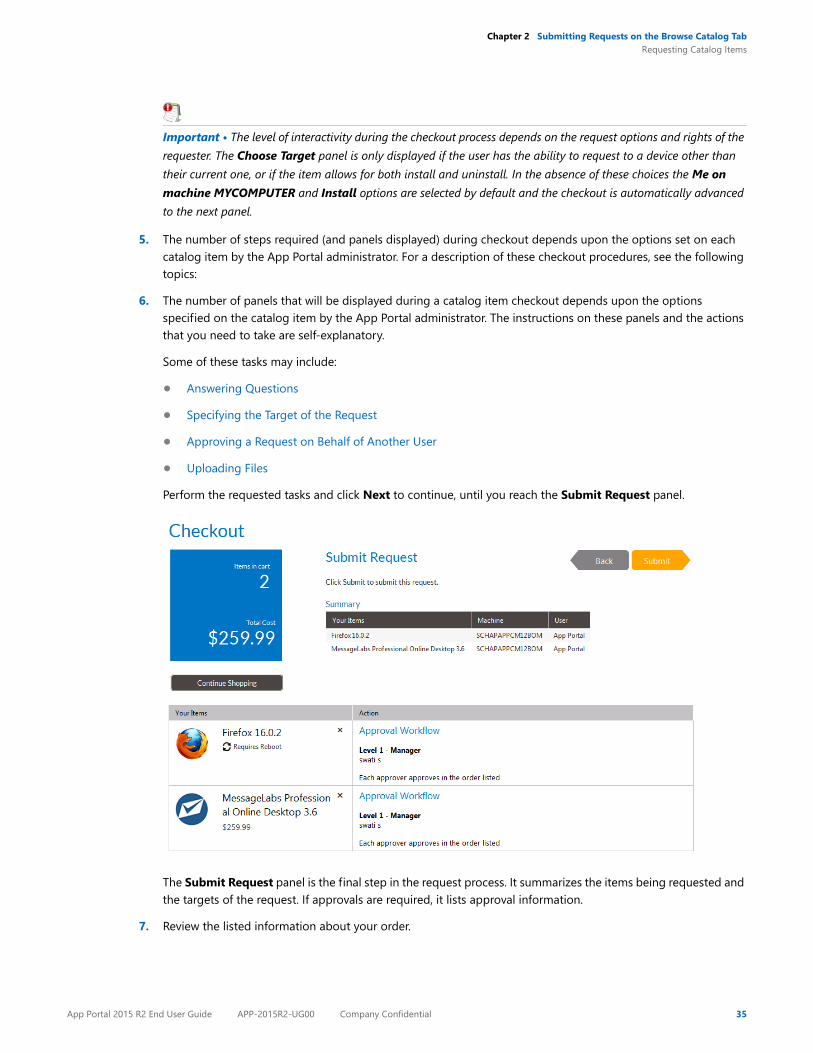
Submit Request PanelAfter all required information has been submitted, the Submit Request panel opens, listing a summary of this request. If a catalog item requires approval, a description of the approval process for that catalog item is listed in the table. You would then just click Submit to submit this request.
Figure 7: Submit Request Panel
App Portal 2015 R2 End User Guide APP-2015R2-UG00 Company Confidential 31
Chapter 2 Submitting Requests on the Browse Catalog TabRequesting Catalog Items
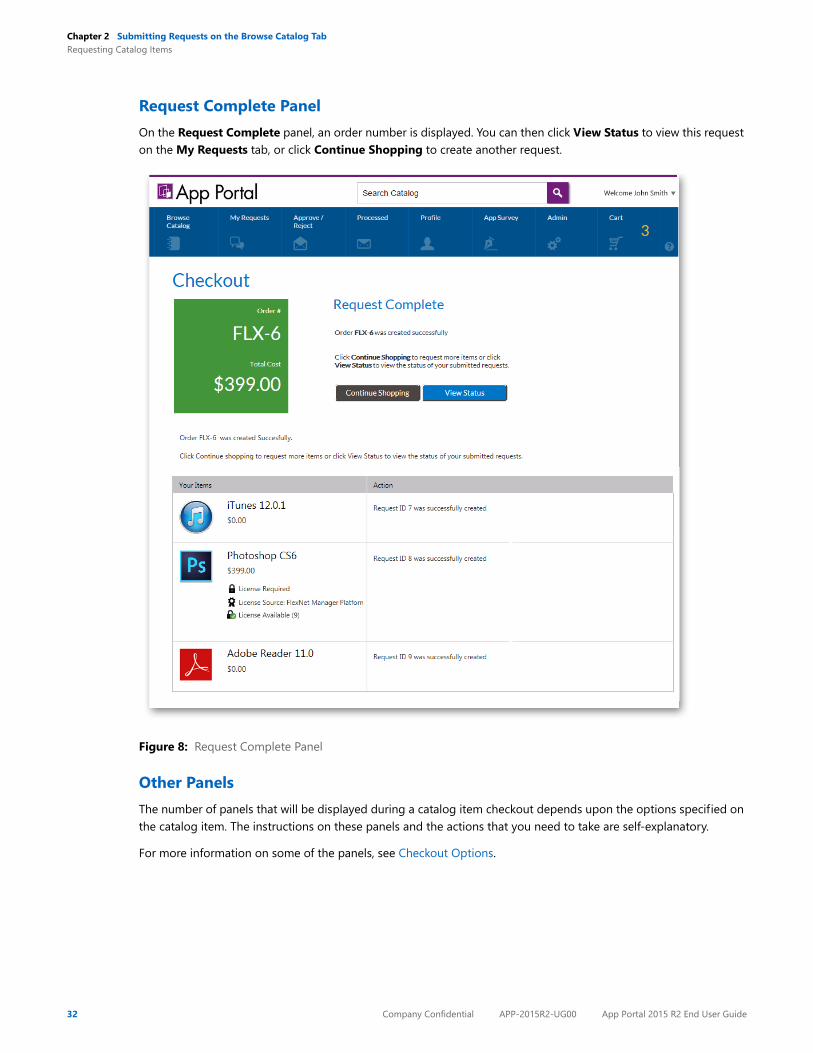
Request Complete PanelOn the Request Complete panel, an order number is displayed. You can then click View Status to view this request on the My Requests tab, or click Continue Shopping to create another request.
Figure 8: Request Complete Panel
Other PanelsThe number of panels that will be displayed during a catalog item checkout depends upon the options specified on the catalog item. The instructions on these panels and the actions that you need to take are self-explanatory.
For more information on some of the panels, see Checkout Options.
32 Company Confidential APP-2015R2-UG00 App Portal 2015 R2 End User Guide
Chapter 2 Submitting Requests on the Browse Catalog TabRequesting Catalog Items
Checking Out and Submitting Your RequestAfter you have added items to your cart and are ready to submit your request, check out by performing the following steps:
Task: To checkout:
1. Perform the steps in Requesting Catalog Items.
2. Click the Checkout button.
The Cart Summary pop-up dialog box opens, listing the items in the cart.
App Portal 2015 R2 End User Guide APP-2015R2-UG00 Company Confidential 33
Chapter 2 Submitting Requests on the Browse Catalog TabRequesting Catalog Items
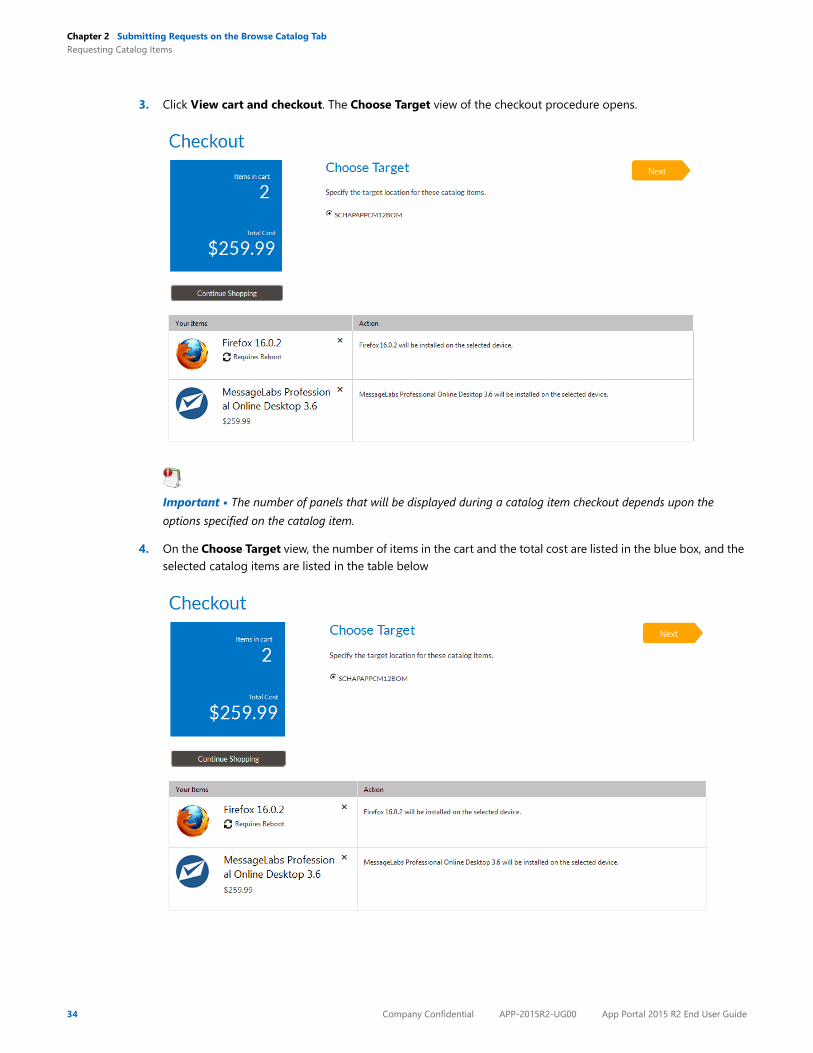
3. Click View cart and checkout. The Choose Target view of the checkout procedure opens.
Important • The number of panels that will be displayed during a catalog item checkout depends upon the options specified on the catalog item.
4. On the Choose Target view, the number of items in the cart and the total cost are listed in the blue box, and the selected catalog items are listed in the table below
34 Company Confidential APP-2015R2-UG00 App Portal 2015 R2 End User Guide
Chapter 2 Submitting Requests on the Browse Catalog TabRequesting Catalog Items
Important • The level of interactivity during the checkout process depends on the request options and rights of the requester. The Choose Target panel is only displayed if the user has the ability to request to a device other than their current one, or if the item allows for both install and uninstall. In the absence of these choices the Me on machine MYCOMPUTER and Install options are selected by default and the checkout is automatically advanced to the next panel.
5. The number of steps required (and panels displayed) during checkout depends upon the options set on each catalog item by the App Portal administrator. For a description of these checkout procedures, see the following topics:
6. The number of panels that will be displayed during a catalog item checkout depends upon the options specified on the catalog item by the App Portal administrator. The instructions on these panels and the actions that you need to take are self-explanatory.
Some of these tasks may include:
• Answering Questions
• Specifying the Target of the Request
• Approving a Request on Behalf of Another User
• Uploading Files
Perform the requested tasks and click Next to continue, until you reach the Submit Request panel.
The Submit Request panel is the final step in the request process. It summarizes the items being requested and the targets of the request. If approvals are required, it lists approval information.
7. Review the listed information about your order.
App Portal 2015 R2 End User Guide APP-2015R2-UG00 Company Confidential 35
Chapter 2 Submitting Requests on the Browse Catalog TabRequesting Catalog Items
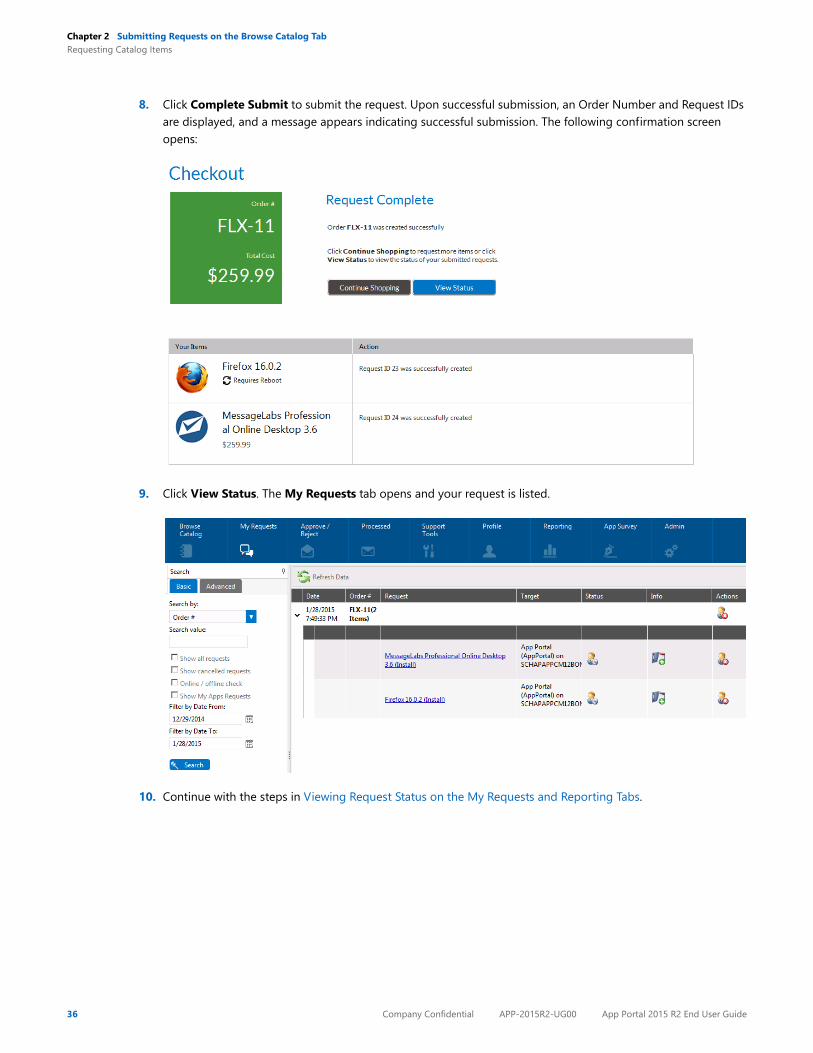
8. Click Complete Submit to submit the request. Upon successful submission, an Order Number and Request IDs are displayed, and a message appears indicating successful submission. The following confirmation screen opens:
9. Click View Status. The My Requests tab opens and your request is listed.
10. Continue with the steps in Viewing Request Status on the My Requests and Reporting Tabs.
36 Company Confidential APP-2015R2-UG00 App Portal 2015 R2 End User Guide
Chapter 2 Submitting Requests on the Browse Catalog TabRequesting Catalog Items
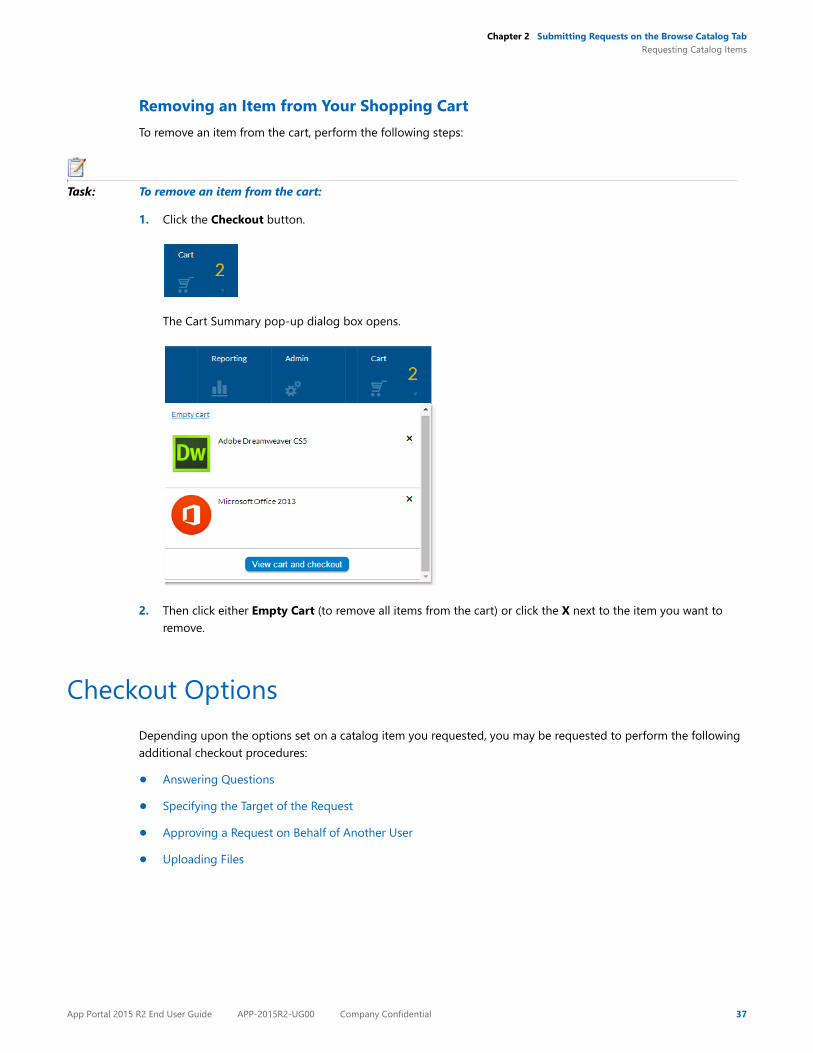
Removing an Item from Your Shopping CartTo remove an item from the cart, perform the following steps:
Task: To remove an item from the cart:
1. Click the Checkout button.
The Cart Summary pop-up dialog box opens.
2. Then click either Empty Cart (to remove all items from the cart) or click the X next to the item you want to remove.
Checkout OptionsDepending upon the options set on a catalog item you requested, you may be requested to perform the following additional checkout procedures:
• Answering Questions
• Specifying the Target of the Request
• Approving a Request on Behalf of Another User
• Uploading Files
App Portal 2015 R2 End User Guide APP-2015R2-UG00 Company Confidential 37
Chapter 2 Submitting Requests on the Browse Catalog TabRequesting Catalog Items
Answering Questions
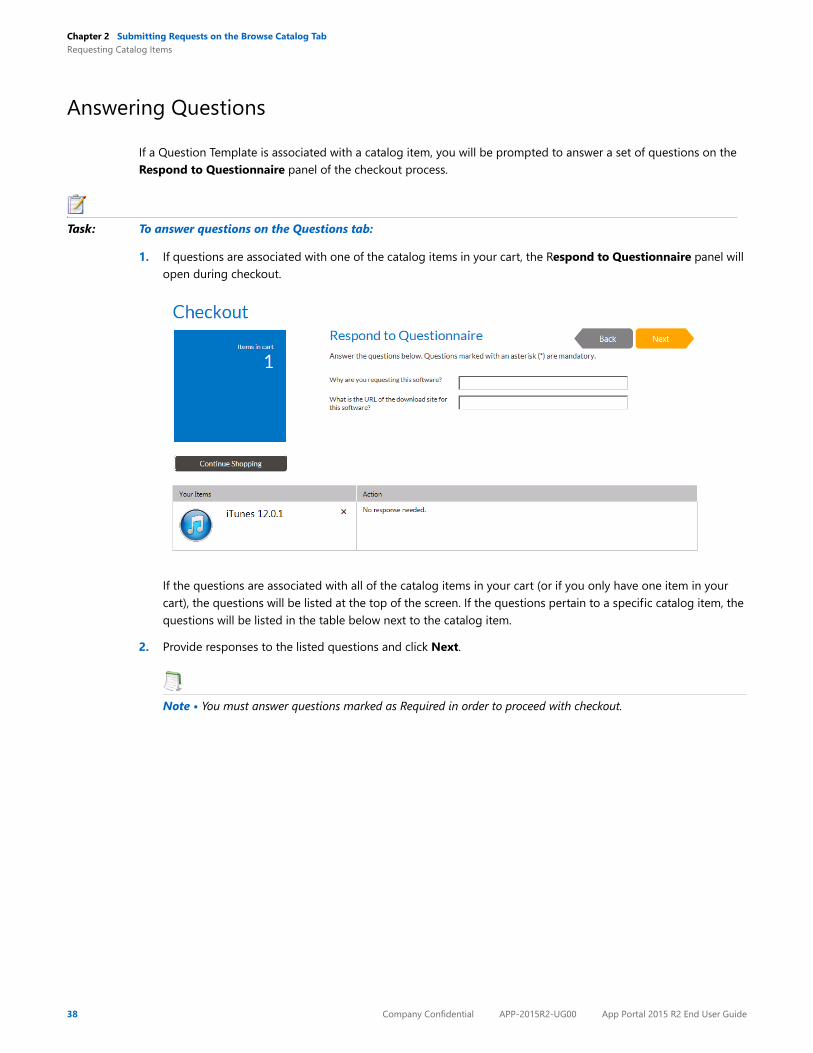
If a Question Template is associated with a catalog item, you will be prompted to answer a set of questions on the Respond to Questionnaire panel of the checkout process.
Task: To answer questions on the Questions tab:
1. If questions are associated with one of the catalog items in your cart, the Respond to Questionnaire panel will open during checkout.
If the questions are associated with all of the catalog items in your cart (or if you only have one item in your cart), the questions will be listed at the top of the screen. If the questions pertain to a specific catalog item, the questions will be listed in the table below next to the catalog item.
2. Provide responses to the listed questions and click Next.
Note • You must answer questions marked as Required in order to proceed with checkout.
38 Company Confidential APP-2015R2-UG00 App Portal 2015 R2 End User Guide
Chapter 2 Submitting Requests on the Browse Catalog TabRequesting Catalog Items
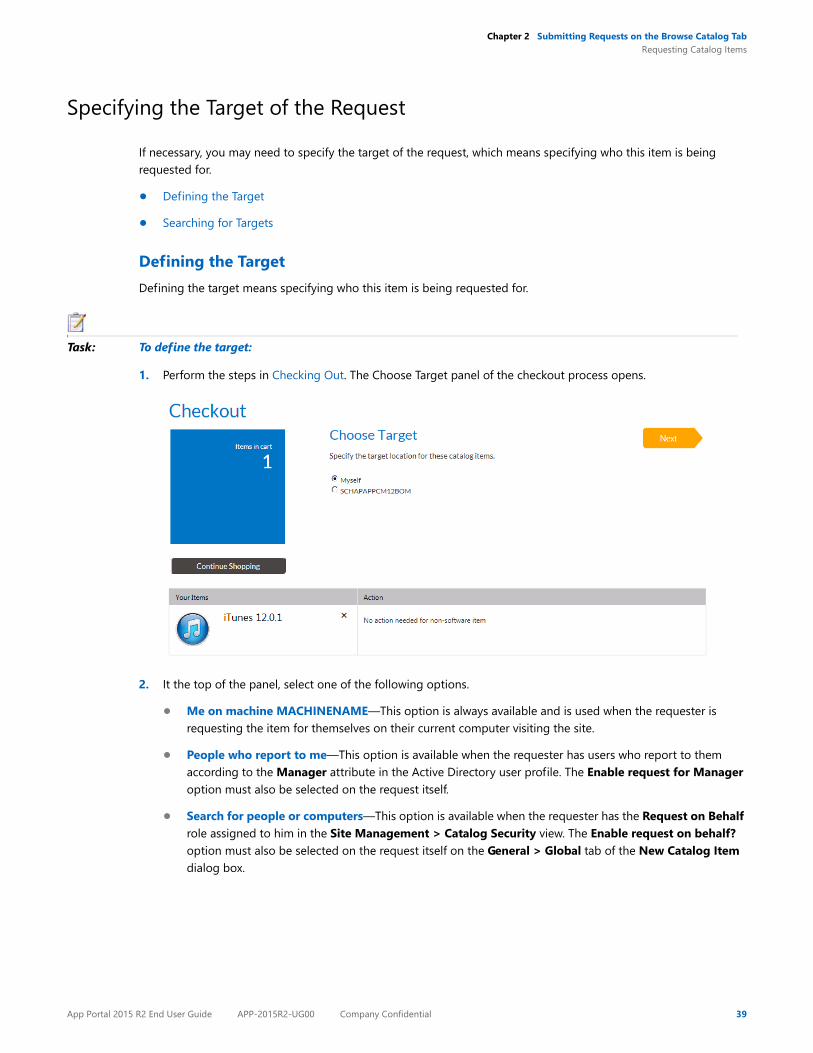
Specifying the Target of the Request
If necessary, you may need to specify the target of the request, which means specifying who this item is being requested for.
• Defining the Target
• Searching for Targets
Defining the TargetDefining the target means specifying who this item is being requested for.
Task: To define the target:
1. Perform the steps in Checking Out. The Choose Target panel of the checkout process opens.
2. It the top of the panel, select one of the following options.
• Me on machine MACHINENAME—This option is always available and is used when the requester is requesting the item for themselves on their current computer visiting the site.
• People who report to me—This option is available when the requester has users who report to them according to the Manager attribute in the Active Directory user profile. The Enable request for Manager option must also be selected on the request itself.
• Search for people or computers—This option is available when the requester has the Request on Behalf role assigned to him in the Site Management > Catalog Security view. The Enable request on behalf? option must also be selected on the request itself on the General > Global tab of the New Catalog Item dialog box.
App Portal 2015 R2 End User Guide APP-2015R2-UG00 Company Confidential 39
Chapter 2 Submitting Requests on the Browse Catalog TabRequesting Catalog Items
• Add machine names or user IDs manually—This option is available when the requester has the Request on Behalf role assigned to him in the Site Management > Catalog Security view. The Enable request on behalf? option must also be selected on the request itself on the General > Global tab of the New Catalog Item dialog box.
Note • The options for the target that are listed in the Who is this for? area depend on the options defined on the request itself and the permissions of the requesting user.
3. Click Next and proceed with checkout.
Searching for TargetsWhen any option other than Me on Machine MACHINENAME is selected in the Who is this for? area of the first panel of the checkout process, the next step in the checkout process will be to search and specify the targets of the request.
The Search tab is divided into two grids.
• The top grid is used to search and locate targets.
• The bottom grid contains the selected targets.
To search for targets during the checkout process, perform the following steps.
Task: To search for targets during the checkout process:
1. Perform the steps in Defining the Target. The Choose Target panel of the checkout process opens.
2. Search for targets using the grid column filters for Name. UserID, Machine, etc.
3. Once the record is located, select the checkbox and select the Add Selected Records button at the bottom of the top grid.
Note • When each item is selected, it goes through several checks to validate the selection against the items being requested. If there is a problem with adding one of the selections, a warning icon is displayed. Hover over the icon to display the message. Not all warnings prevent the computer from being added.
40 Company Confidential APP-2015R2-UG00 App Portal 2015 R2 End User Guide
Chapter 2 Submitting Requests on the Browse Catalog TabRequesting Catalog Items
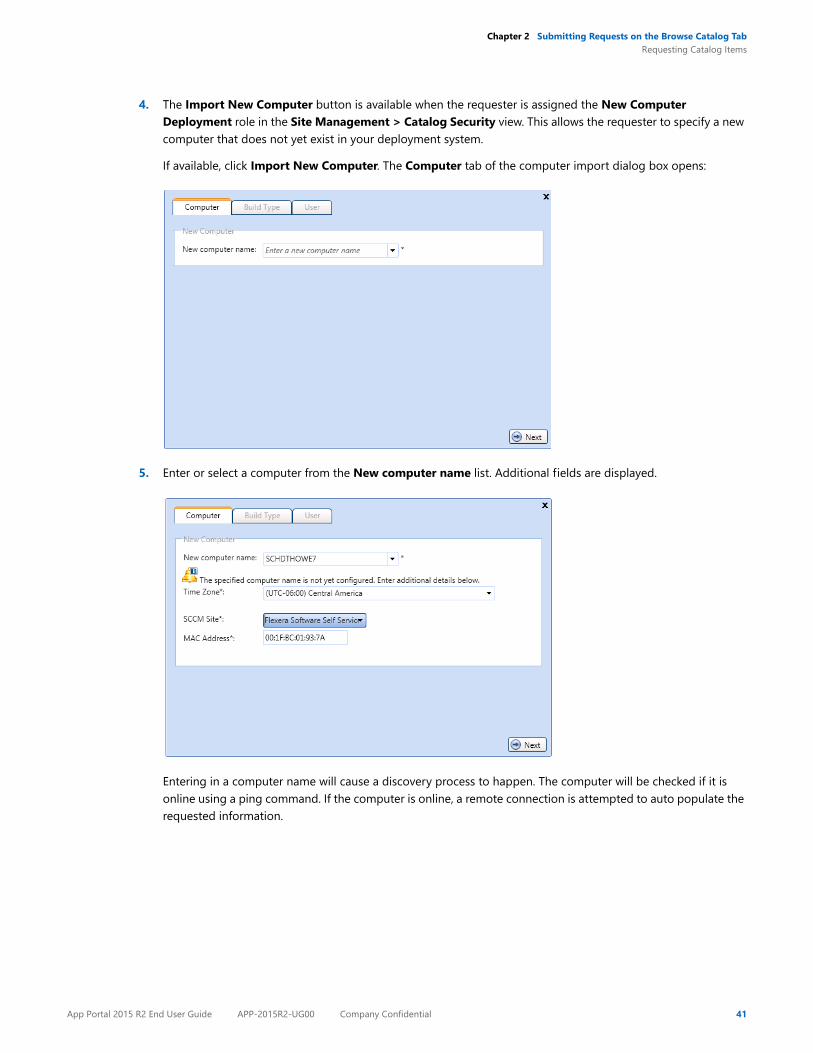
4. The Import New Computer button is available when the requester is assigned the New Computer Deployment role in the Site Management > Catalog Security view. This allows the requester to specify a new computer that does not yet exist in your deployment system.
If available, click Import New Computer. The Computer tab of the computer import dialog box opens:
5. Enter or select a computer from the New computer name list. Additional fields are displayed.
Entering in a computer name will cause a discovery process to happen. The computer will be checked if it is online using a ping command. If the computer is online, a remote connection is attempted to auto populate the requested information.
App Portal 2015 R2 End User Guide APP-2015R2-UG00 Company Confidential 41
Chapter 2 Submitting Requests on the Browse Catalog TabRequesting Catalog Items
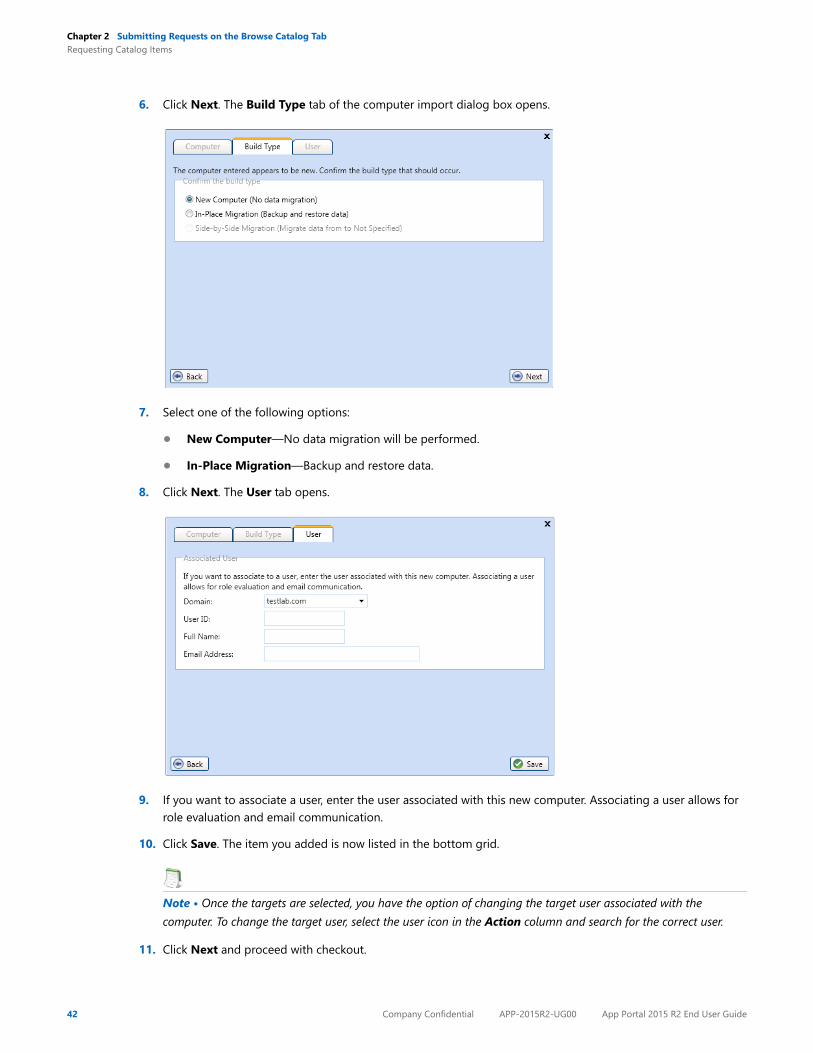
6. Click Next. The Build Type tab of the computer import dialog box opens.
7. Select one of the following options:
• New Computer—No data migration will be performed.
• In-Place Migration—Backup and restore data.
8. Click Next. The User tab opens.
9. If you want to associate a user, enter the user associated with this new computer. Associating a user allows for role evaluation and email communication.
10. Click Save. The item you added is now listed in the bottom grid.
Note • Once the targets are selected, you have the option of changing the target user associated with the computer. To change the target user, select the user icon in the Action column and search for the correct user.
11. Click Next and proceed with checkout.
42 Company Confidential APP-2015R2-UG00 App Portal 2015 R2 End User Guide
Chapter 2 Submitting Requests on the Browse Catalog TabRequesting Catalog Items
Approving a Request on Behalf of Another User
In the event that the item requires approval and you are requesting it on behalf of another user, the Approval panel of the checkout procedure is displayed.
Note • This option is disabled by default and can be enabled from the Approval Process tab when editing the request details.
To approve a request on behalf of another user, perform the following steps:
Task: To approve a request on behalf of another user:
1. Perform the steps in Checking Out. The Approval panel opens.
2. Select one of the following options:
• User targets approval process—Use the approval process of the target users of the request.
• Use my approval process—Use the approval process of the requester
Note • If enabled, the requester can also name their own approver.
3. Click Next and continue with checkout.
App Portal 2015 R2 End User Guide APP-2015R2-UG00 Company Confidential 43
Chapter 2 Submitting Requests on the Browse Catalog TabRequesting Catalog Items
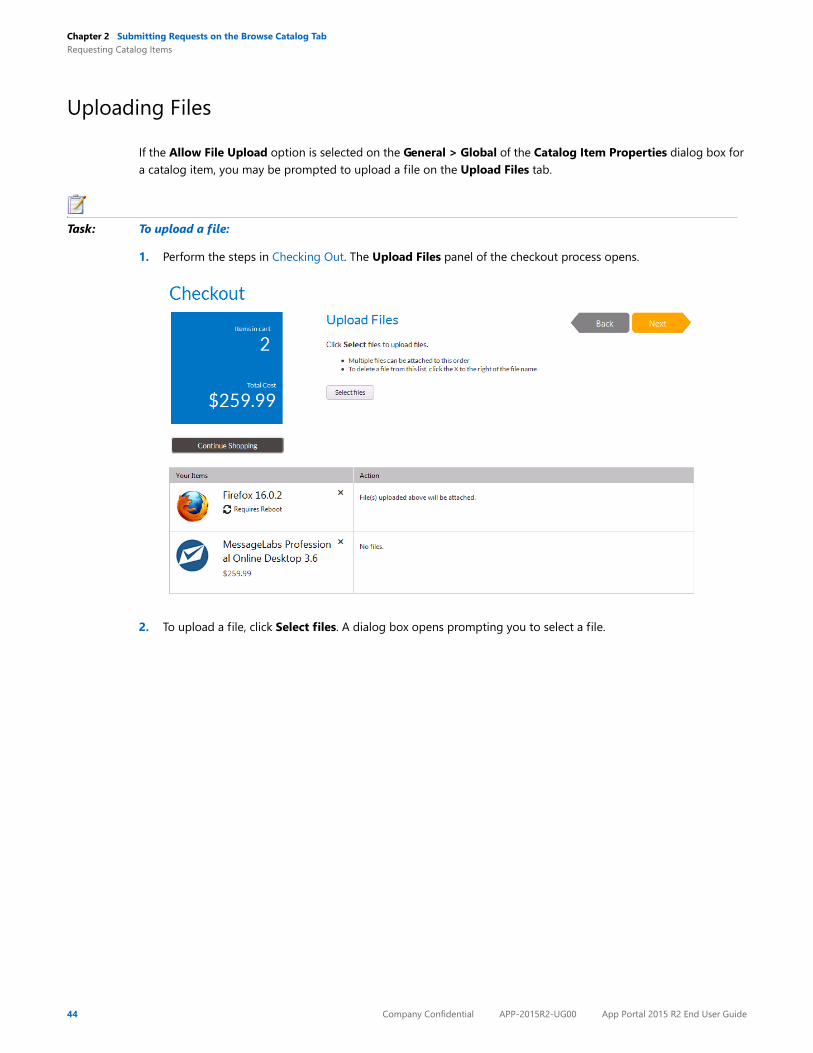
Uploading Files
If the Allow File Upload option is selected on the General > Global of the Catalog Item Properties dialog box for a catalog item, you may be prompted to upload a file on the Upload Files tab.
Task: To upload a file:
1. Perform the steps in Checking Out. The Upload Files panel of the checkout process opens.
2. To upload a file, click Select files. A dialog box opens prompting you to select a file.
44 Company Confidential APP-2015R2-UG00 App Portal 2015 R2 End User Guide
Chapter 2 Submitting Requests on the Browse Catalog TabRequesting Catalog Items
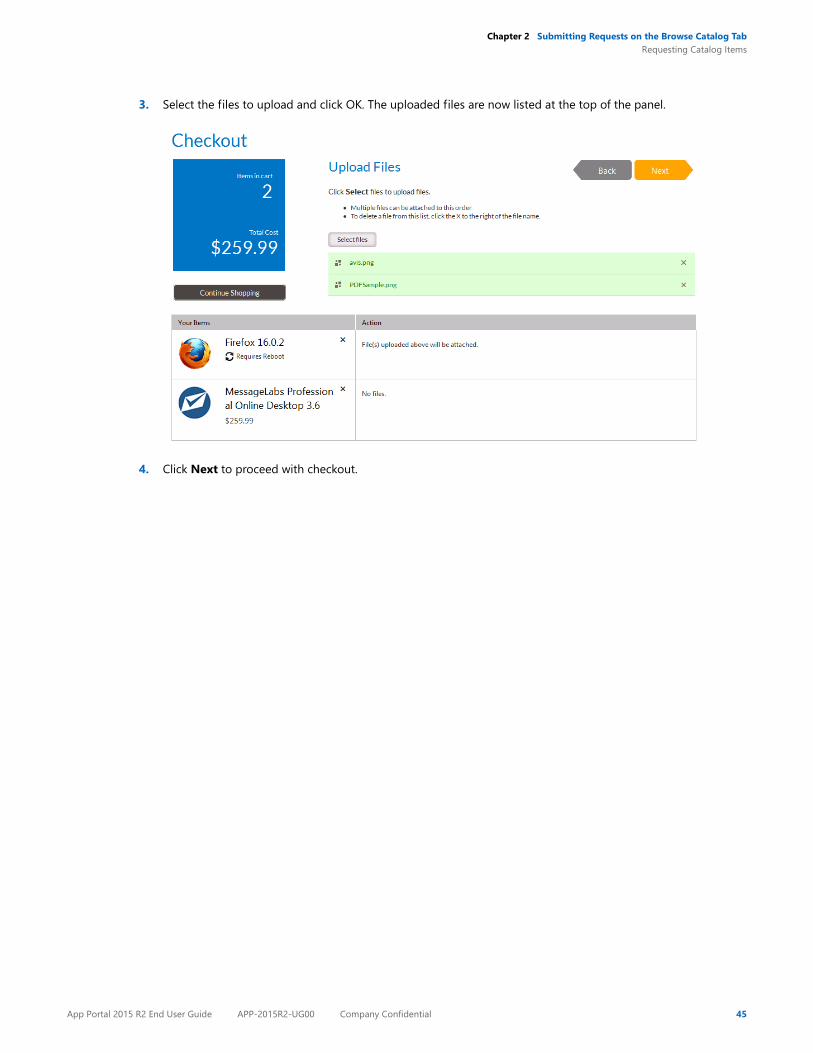
3. Select the files to upload and click OK. The uploaded files are now listed at the top of the panel.
4. Click Next to proceed with checkout.
App Portal 2015 R2 End User Guide APP-2015R2-UG00 Company Confidential 45
Chapter 2 Submitting Requests on the Browse Catalog TabRequesting Mobile Application Catalog Items
Requesting Mobile Application Catalog Items
You can choose to request a mobile application catalog item by itself by clicking the Add button on the Browse Catalog tab. In this case, the mobile application’s checkout procedure will open in pop-up; you will not be required to open the cart.
You can link a mobile application catalog item with its associated desktop catalog item so that when one of the linked applications is requested, the user will be informed that the other linked catalog item is also available. Then you can request both the desktop application and its associated mobile application in the same request. App Portal will deploy the desktop application using System Center Configuration Manager or Symantec Altiris, while it will use AirWatch to deploy the mobile application. In this case, the checkout procedure of the two catalog item types will be combined.
• Requesting a Mobile Application on the Browse Catalog Tab
• Requesting a Desktop Catalog Item That is Linked to a Mobile Catalog Item
46 Company Confidential APP-2015R2-UG00 App Portal 2015 R2 End User Guide
Chapter 2 Submitting Requests on the Browse Catalog TabRequesting Mobile Application Catalog Items
Requesting a Mobile Application on the Browse Catalog Tab
There are several scenarios for that you could experience when requesting a mobile application on the Browse Catalog tab.
• Mobile Application / No Approval Required / Not Linked to Desktop Item
• Mobile Application / Approval Required / Not Linked to Desktop Item
• Mobile Application / Linked to Desktop Item
• Requesting a Desktop Catalog Item That is Linked to a Mobile Catalog Item
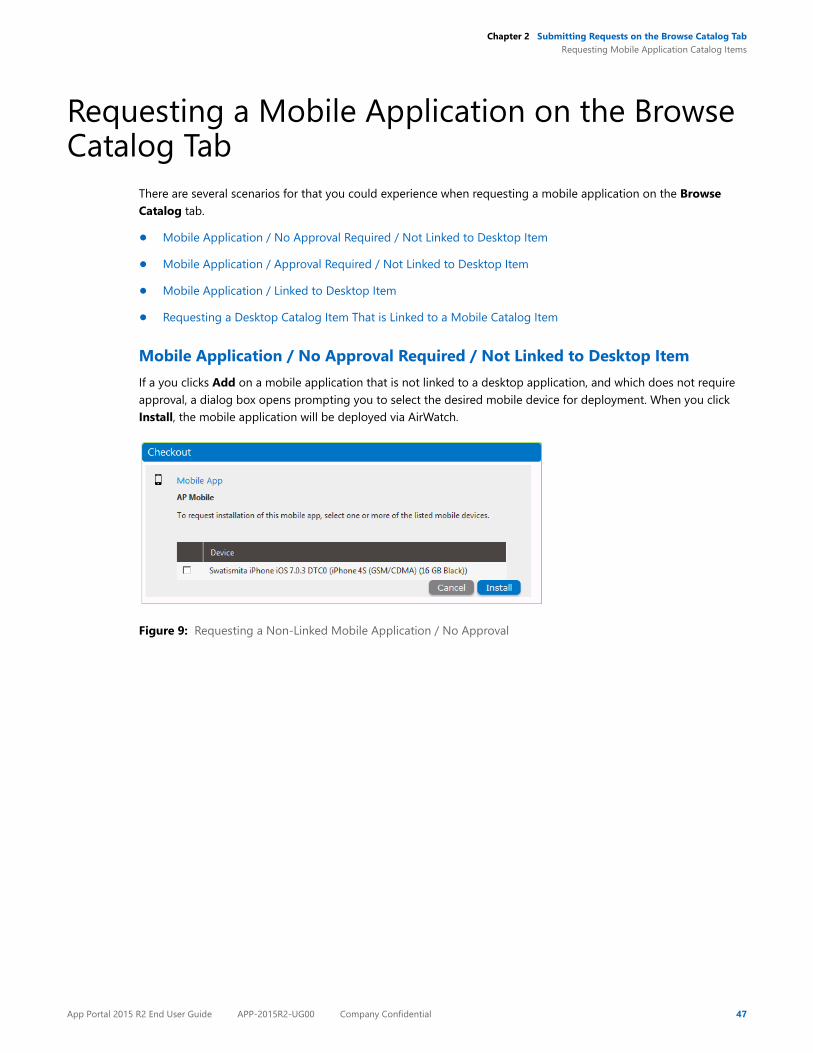
Mobile Application / No Approval Required / Not Linked to Desktop ItemIf a you clicks Add on a mobile application that is not linked to a desktop application, and which does not require approval, a dialog box opens prompting you to select the desired mobile device for deployment. When you click Install, the mobile application will be deployed via AirWatch.
Figure 9: Requesting a Non-Linked Mobile Application / No Approval
App Portal 2015 R2 End User Guide APP-2015R2-UG00 Company Confidential 47

Chapter 2 Submitting Requests on the Browse Catalog TabRequesting Mobile Application Catalog Items
Mobile Application / Approval Required / Not Linked to Desktop ItemIf you click Add on a mobile application that is not linked to a desktop catalog item but which does require approval, a similar dialog box opens, and prompts you for a response to a question. When you click Install, the request will be submitted for approval and, when approved, will be deployed by AirWatch.
Mobile Application / Linked to Desktop ItemIf you click Add on a mobile application that is linked to a desktop catalog item, you will be informed that a desktop catalog item exists, and you are prompted to indicate whether you would also like to request the linked desktop catalog item.
Figure 10: Prompt to Add Linked Desktop Item to Cart
48 Company Confidential APP-2015R2-UG00 App Portal 2015 R2 End User Guide
Chapter 2 Submitting Requests on the Browse Catalog TabRequesting Mobile Application Catalog Items
If you click Yes, both items are added to the cart.
Figure 11: Both Desktop and Mobile Catalog Item In Cart
If you click No, the request will proceed as described in the previous scenarios.
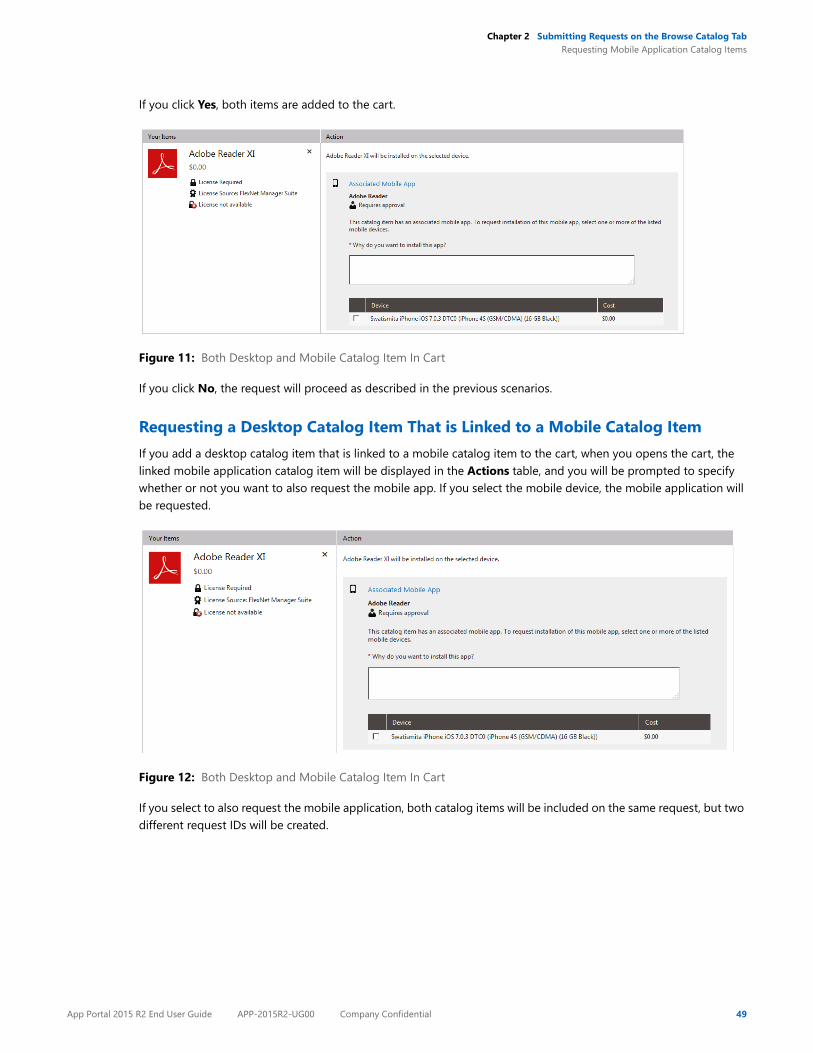
Requesting a Desktop Catalog Item That is Linked to a Mobile Catalog ItemIf you add a desktop catalog item that is linked to a mobile catalog item to the cart, when you opens the cart, the linked mobile application catalog item will be displayed in the Actions table, and you will be prompted to specify whether or not you want to also request the mobile app. If you select the mobile device, the mobile application will be requested.
Figure 12: Both Desktop and Mobile Catalog Item In Cart
If you select to also request the mobile application, both catalog items will be included on the same request, but two different request IDs will be created.
App Portal 2015 R2 End User Guide APP-2015R2-UG00 Company Confidential 49
Chapter 2 Submitting Requests on the Browse Catalog TabRequesting Mobile Application Catalog Items
Requesting a Mobile Application Using the App Portal Mobile Interface
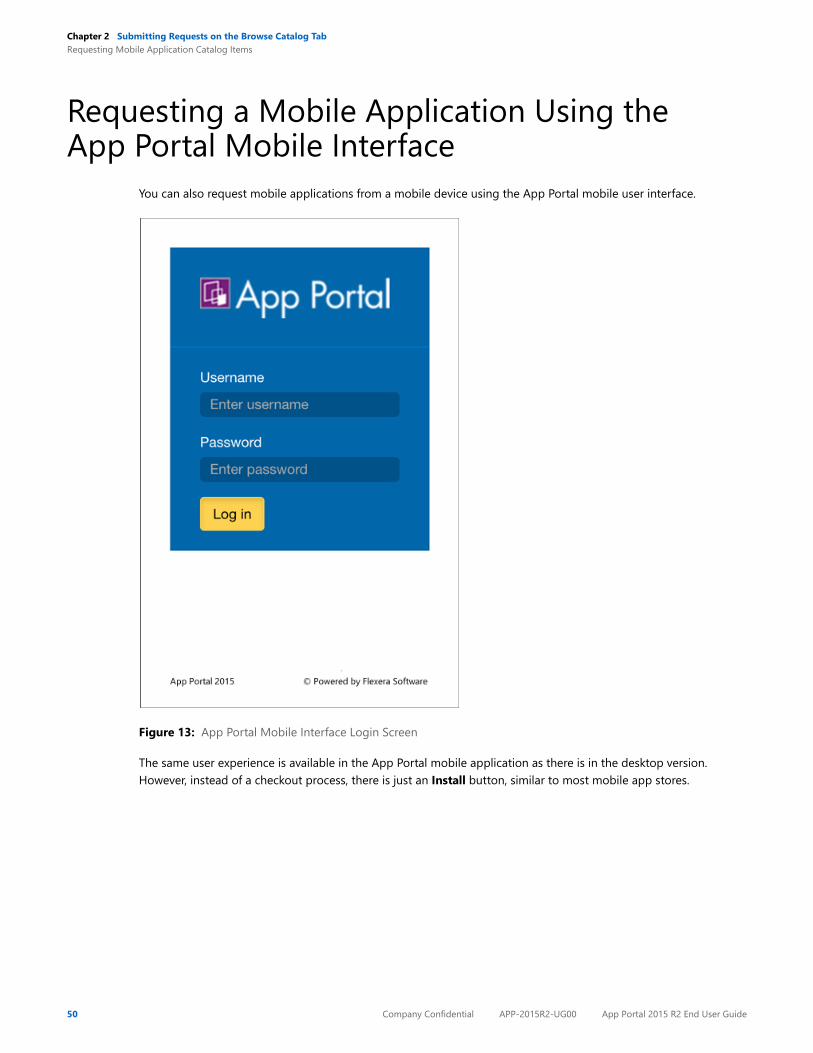
You can also request mobile applications from a mobile device using the App Portal mobile user interface.
Figure 13: App Portal Mobile Interface Login Screen
The same user experience is available in the App Portal mobile application as there is in the desktop version. However, instead of a checkout process, there is just an Install button, similar to most mobile app stores.
50 Company Confidential APP-2015R2-UG00 App Portal 2015 R2 End User Guide
Chapter 2 Submitting Requests on the Browse Catalog TabRequesting Mobile Application Catalog Items
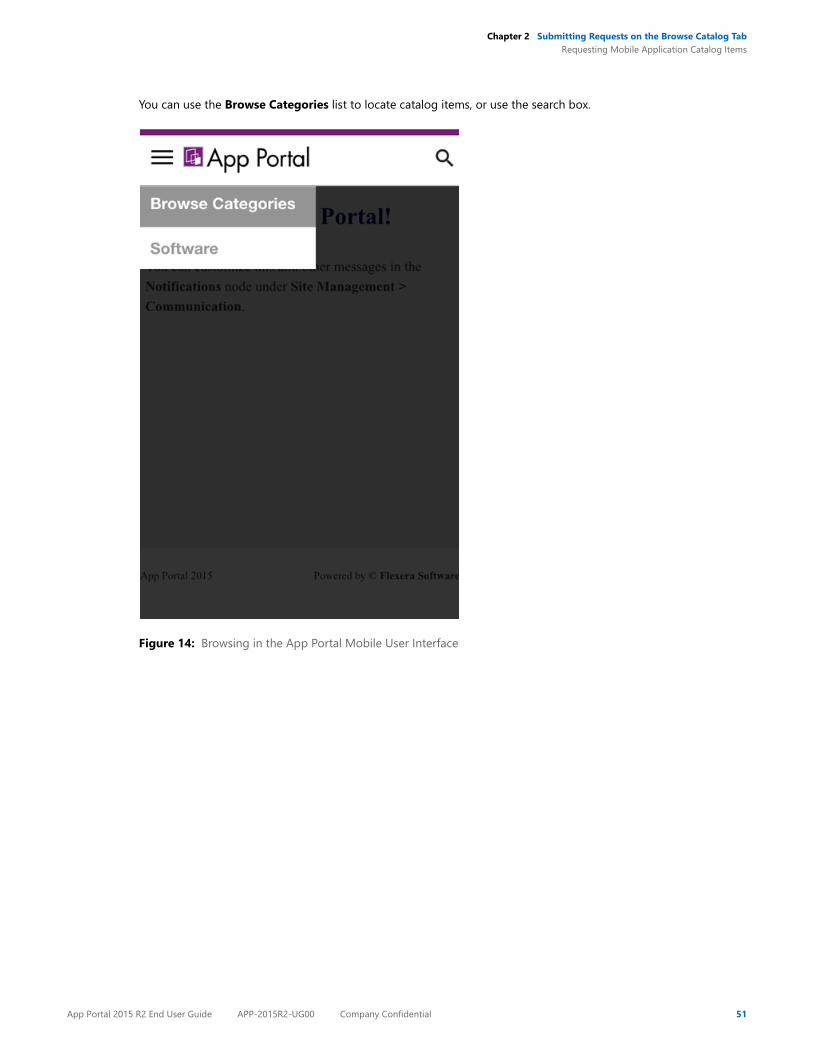
You can use the Browse Categories list to locate catalog items, or use the search box.
Figure 14: Browsing in the App Portal Mobile User Interface
App Portal 2015 R2 End User Guide APP-2015R2-UG00 Company Confidential 51
Chapter 2 Submitting Requests on the Browse Catalog TabRequesting Mobile Application Catalog Items
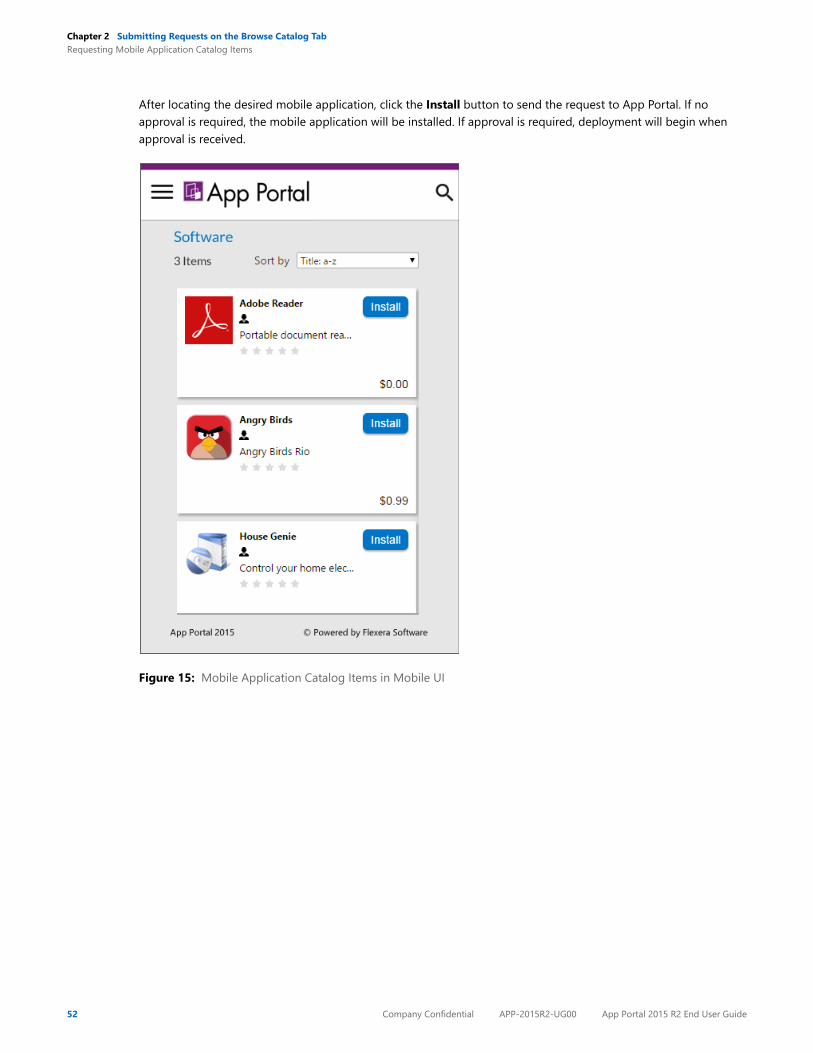
After locating the desired mobile application, click the Install button to send the request to App Portal. If no approval is required, the mobile application will be installed. If approval is required, deployment will begin when approval is received.
Figure 15: Mobile Application Catalog Items in Mobile UI
52 Company Confidential APP-2015R2-UG00 App Portal 2015 R2 End User Guide
3
Viewing Request Status on the MyRequests and Reporting Tabs
Note • Starting with App Portal 2014, a permanent Flexera Software color theme has been applied to the user interface, and the top navigation menu has changed from tabs to menu selections; however, all functionality remains the same.
You can view request status on the My Requests tab and also on the Reporting tab of the App Portal Storefront.
• Viewing Request Status on the My Requests Tab
• Viewing Reports
App Portal 2015 R2 End User Guide APP-2015R2-UG00 Company Confidential 53
Chapter 3 Viewing Request Status on the My Requests and Reporting TabsViewing Request Status on the My Requests Tab
Viewing Request Status on the My Requests Tab
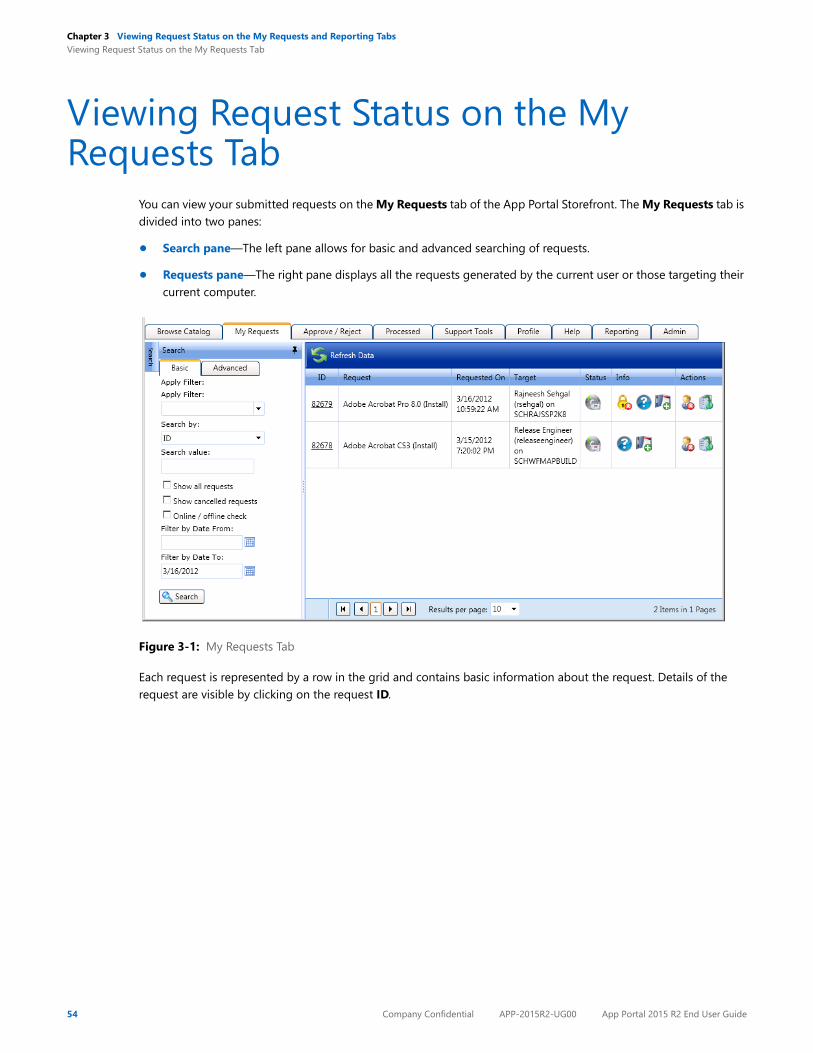
You can view your submitted requests on the My Requests tab of the App Portal Storefront. The My Requests tab is divided into two panes:
• Search pane—The left pane allows for basic and advanced searching of requests.
• Requests pane—The right pane displays all the requests generated by the current user or those targeting their current computer.
Figure 3-1: My Requests Tab
Each request is represented by a row in the grid and contains basic information about the request. Details of the request are visible by clicking on the request ID.
54 Company Confidential APP-2015R2-UG00 App Portal 2015 R2 End User Guide
Chapter 3 Viewing Request Status on the My Requests and Reporting TabsViewing Request Status on the My Requests Tab
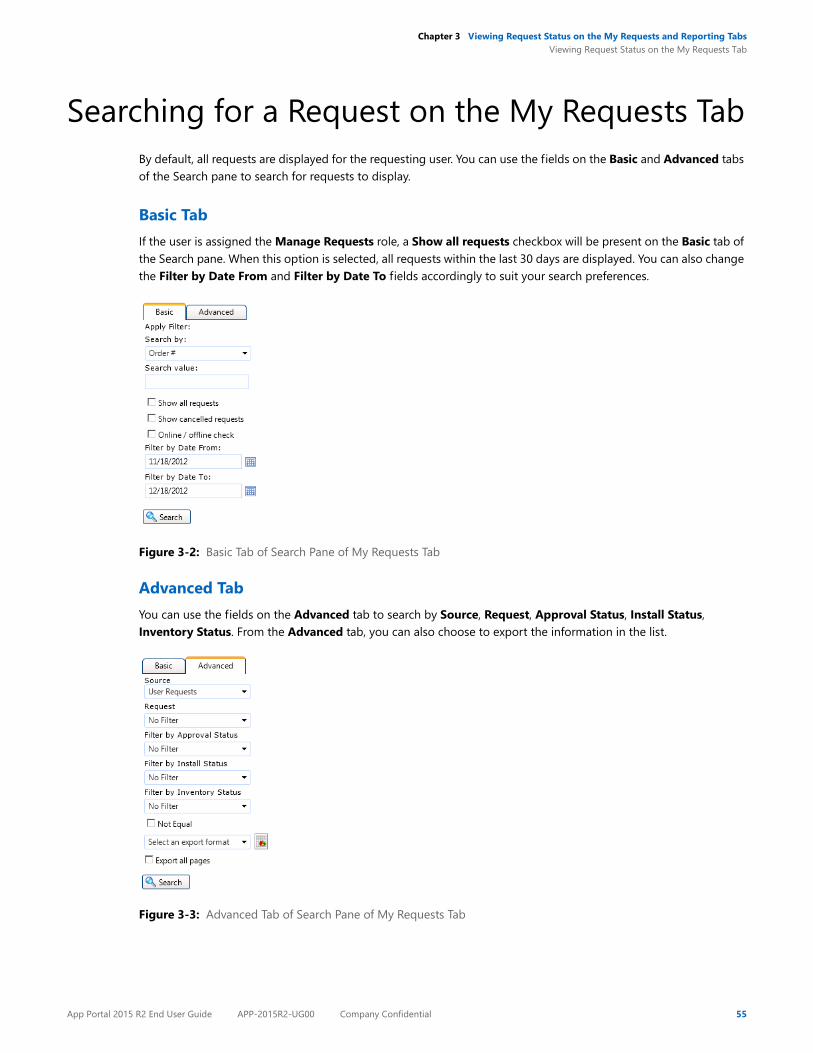
Searching for a Request on the My Requests TabBy default, all requests are displayed for the requesting user. You can use the fields on the Basic and Advanced tabs of the Search pane to search for requests to display.
Basic TabIf the user is assigned the Manage Requests role, a Show all requests checkbox will be present on the Basic tab of the Search pane. When this option is selected, all requests within the last 30 days are displayed. You can also change the Filter by Date From and Filter by Date To fields accordingly to suit your search preferences.
Figure 3-2: Basic Tab of Search Pane of My Requests Tab
Advanced TabYou can use the fields on the Advanced tab to search by Source, Request, Approval Status, Install Status, Inventory Status. From the Advanced tab, you can also choose to export the information in the list.
Figure 3-3: Advanced Tab of Search Pane of My Requests Tab
App Portal 2015 R2 End User Guide APP-2015R2-UG00 Company Confidential 55
Chapter 3 Viewing Request Status on the My Requests and Reporting TabsViewing Request Status on the My Requests Tab
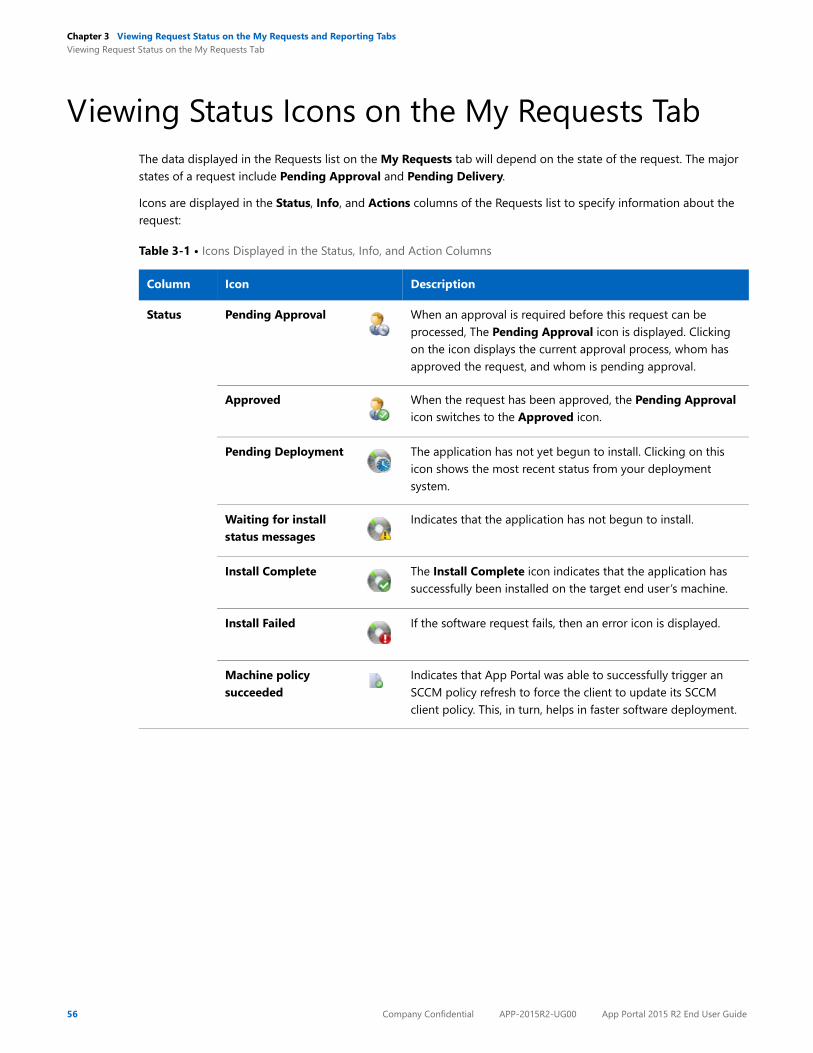
Viewing Status Icons on the My Requests TabThe data displayed in the Requests list on the My Requests tab will depend on the state of the request. The major states of a request include Pending Approval and Pending Delivery.
Icons are displayed in the Status, Info, and Actions columns of the Requests list to specify information about the request:
Table 3-1 • Icons Displayed in the Status, Info, and Action Columns
Column Icon Description
Status Pending Approval When an approval is required before this request can be processed, The Pending Approval icon is displayed. Clicking on the icon displays the current approval process, whom has approved the request, and whom is pending approval.
Approved When the request has been approved, the Pending Approval icon switches to the Approved icon.
Pending Deployment The application has not yet begun to install. Clicking on this icon shows the most recent status from your deployment system.
Waiting for install status messages
Indicates that the application has not begun to install.
Install Complete The Install Complete icon indicates that the application has successfully been installed on the target end user’s machine.
Install Failed If the software request fails, then an error icon is displayed.
Machine policy succeeded
Indicates that App Portal was able to successfully trigger an SCCM policy refresh to force the client to update its SCCM client policy. This, in turn, helps in faster software deployment.
56 Company Confidential APP-2015R2-UG00 App Portal 2015 R2 End User Guide
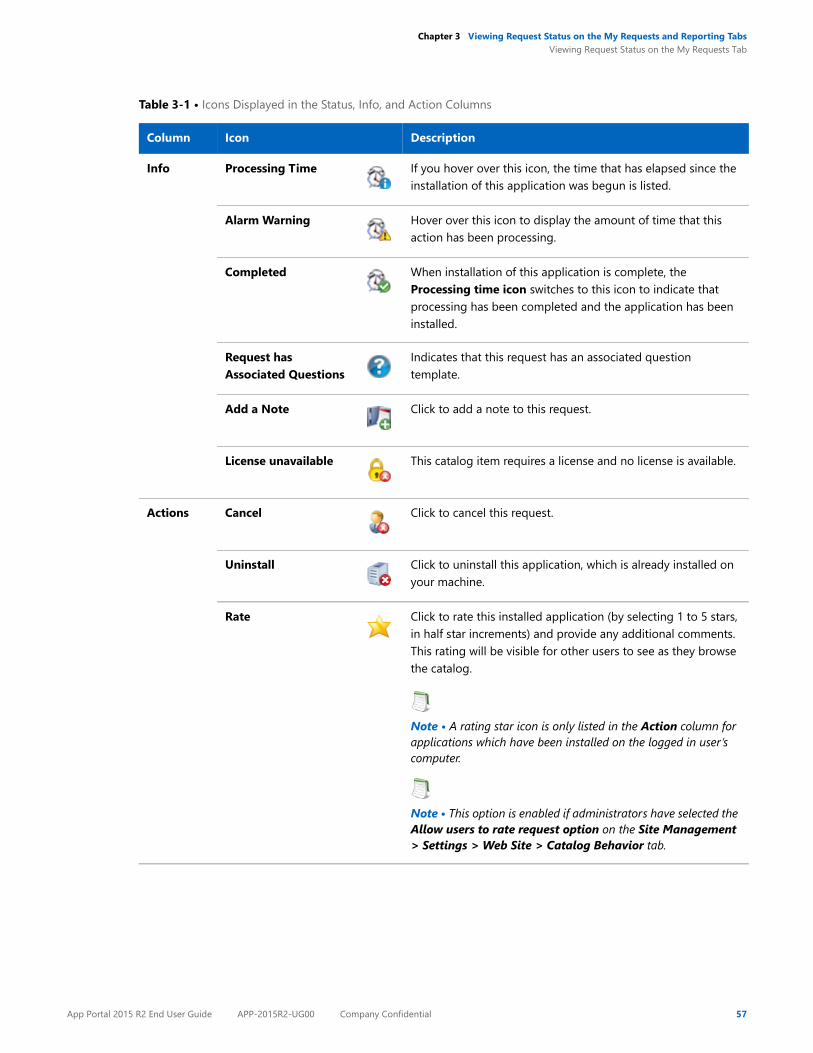
Chapter 3 Viewing Request Status on the My Requests and Reporting TabsViewing Request Status on the My Requests Tab
Info Processing Time If you hover over this icon, the time that has elapsed since the installation of this application was begun is listed.
Alarm Warning Hover over this icon to display the amount of time that this action has been processing.
Completed When installation of this application is complete, the Processing time icon switches to this icon to indicate that processing has been completed and the application has been installed.
Request has Associated Questions
Indicates that this request has an associated question template.
Add a Note Click to add a note to this request.
License unavailable This catalog item requires a license and no license is available.
Actions Cancel Click to cancel this request.
Uninstall Click to uninstall this application, which is already installed on your machine.
Rate Click to rate this installed application (by selecting 1 to 5 stars, in half star increments) and provide any additional comments. This rating will be visible for other users to see as they browse the catalog.
Note • A rating star icon is only listed in the Action column for applications which have been installed on the logged in user’s computer.
Note • This option is enabled if administrators have selected the Allow users to rate request option on the Site Management > Settings > Web Site > Catalog Behavior tab.
Table 3-1 • Icons Displayed in the Status, Info, and Action Columns
Column Icon Description
App Portal 2015 R2 End User Guide APP-2015R2-UG00 Company Confidential 57
Chapter 3 Viewing Request Status on the My Requests and Reporting TabsViewing Reports
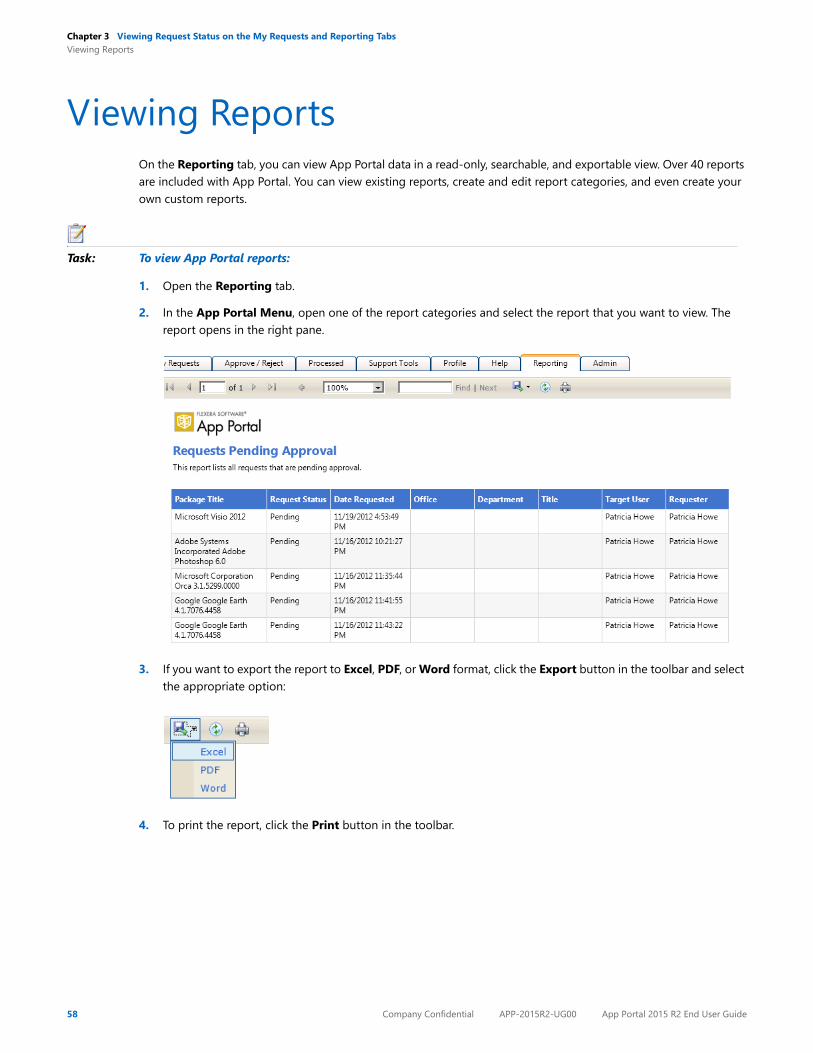
Viewing ReportsOn the Reporting tab, you can view App Portal data in a read-only, searchable, and exportable view. Over 40 reports are included with App Portal. You can view existing reports, create and edit report categories, and even create your own custom reports.
Task: To view App Portal reports:
1. Open the Reporting tab.
2. In the App Portal Menu, open one of the report categories and select the report that you want to view. The report opens in the right pane.
3. If you want to export the report to Excel, PDF, or Word format, click the Export button in the toolbar and select the appropriate option:
4. To print the report, click the Print button in the toolbar.
58 Company Confidential APP-2015R2-UG00 App Portal 2015 R2 End User Guide
4
Approving or Rejecting Requestson the Approve/Reject Tab
Note • Starting with App Portal 2014, a permanent Flexera Software color theme has been applied to the user interface, and the top navigation menu has changed from tabs to menu selections; however, all functionality remains the same.
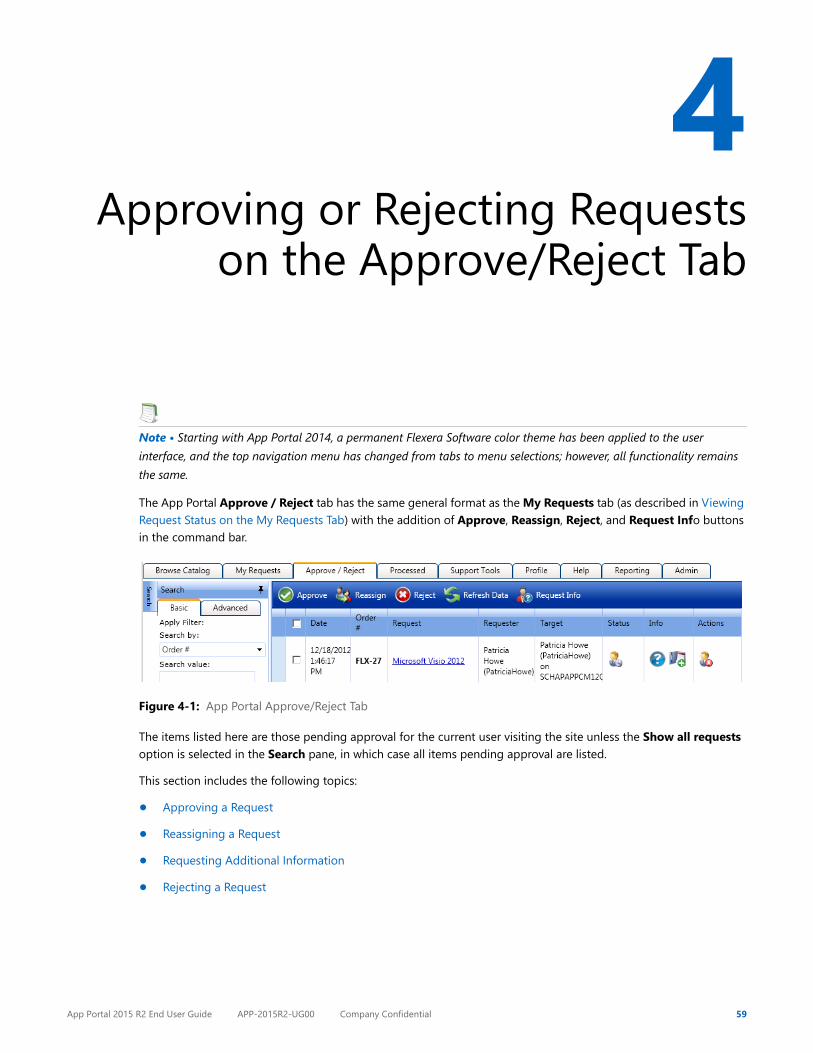
The App Portal Approve / Reject tab has the same general format as the My Requests tab (as described in Viewing Request Status on the My Requests Tab) with the addition of Approve, Reassign, Reject, and Request Info buttons in the command bar.
Figure 4-1: App Portal Approve/Reject Tab
The items listed here are those pending approval for the current user visiting the site unless the Show all requests option is selected in the Search pane, in which case all items pending approval are listed.
This section includes the following topics:
• Approving a Request
• Reassigning a Request
• Requesting Additional Information
• Rejecting a Request
App Portal 2015 R2 End User Guide APP-2015R2-UG00 Company Confidential 59
Chapter 4 Approving or Rejecting Requests on the Approve/Reject TabApproving a Request
Approving a RequestTo approve a request, perform the following steps.
Task: To approve a request:
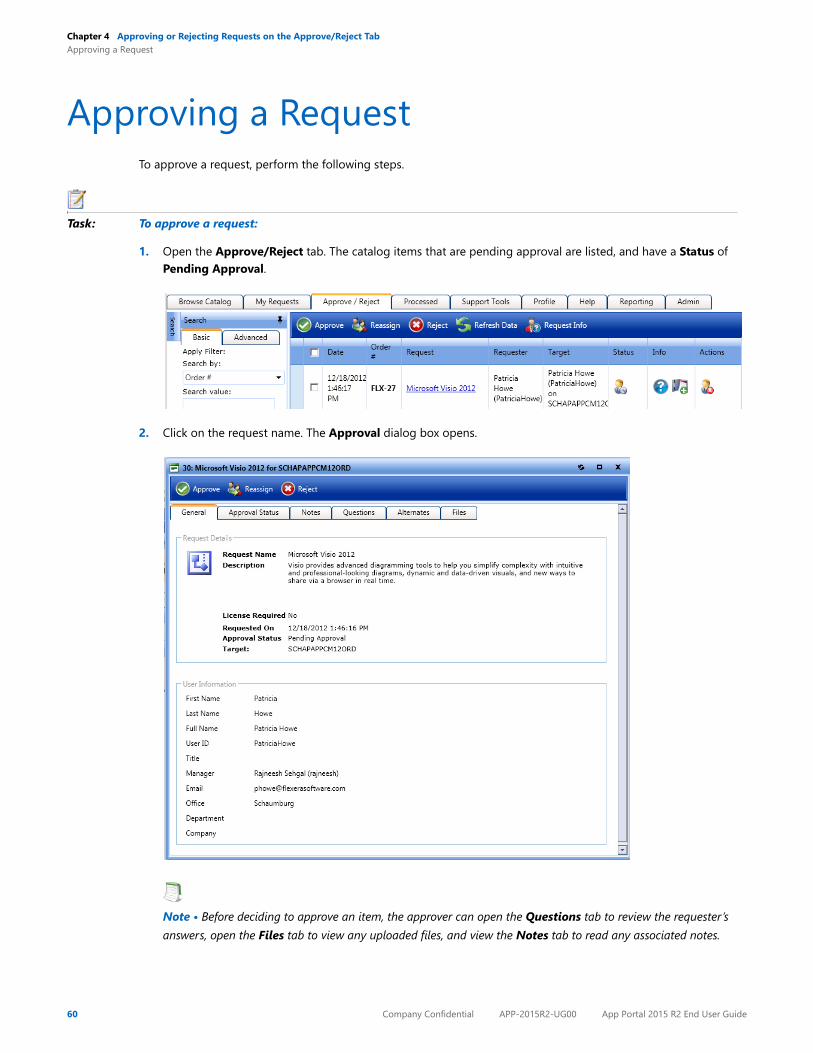
1. Open the Approve/Reject tab. The catalog items that are pending approval are listed, and have a Status of Pending Approval.
2. Click on the request name. The Approval dialog box opens.
Note • Before deciding to approve an item, the approver can open the Questions tab to review the requester’s answers, open the Files tab to view any uploaded files, and view the Notes tab to read any associated notes.
60 Company Confidential APP-2015R2-UG00 App Portal 2015 R2 End User Guide
Chapter 4 Approving or Rejecting Requests on the Approve/Reject TabApproving a Request
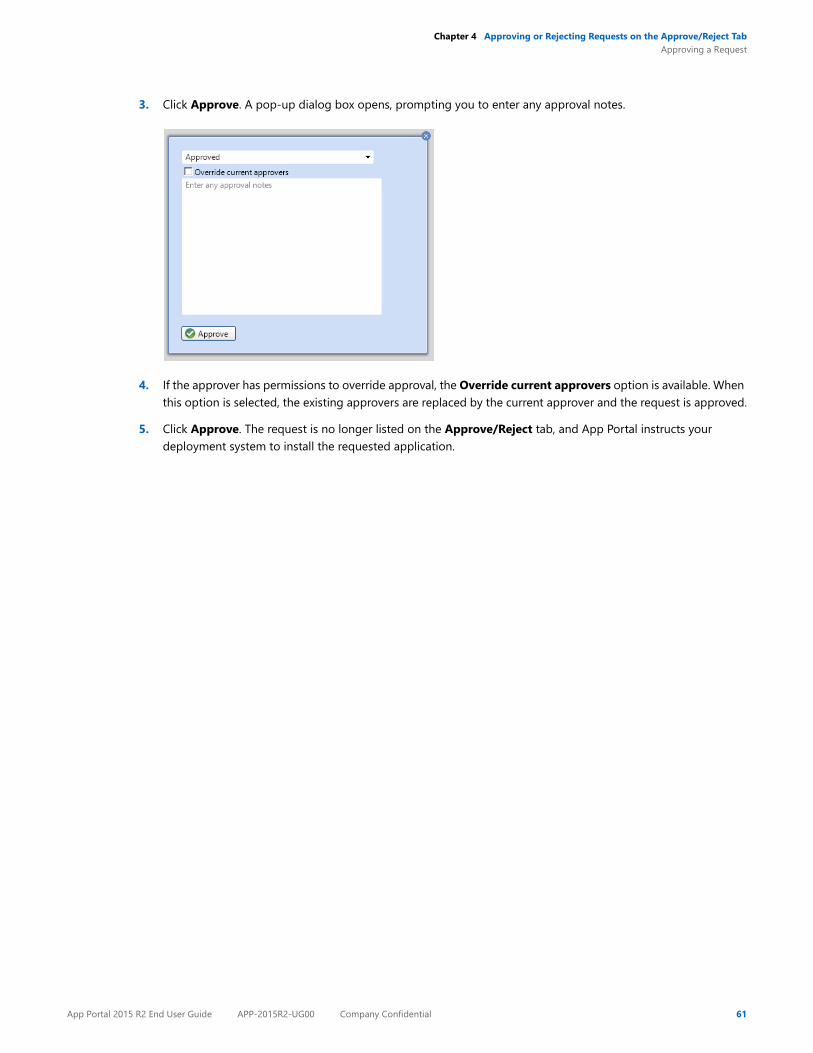
3. Click Approve. A pop-up dialog box opens, prompting you to enter any approval notes.
4. If the approver has permissions to override approval, the Override current approvers option is available. When this option is selected, the existing approvers are replaced by the current approver and the request is approved.
5. Click Approve. The request is no longer listed on the Approve/Reject tab, and App Portal instructs your deployment system to install the requested application.
App Portal 2015 R2 End User Guide APP-2015R2-UG00 Company Confidential 61
Chapter 4 Approving or Rejecting Requests on the Approve/Reject TabReassigning a Request
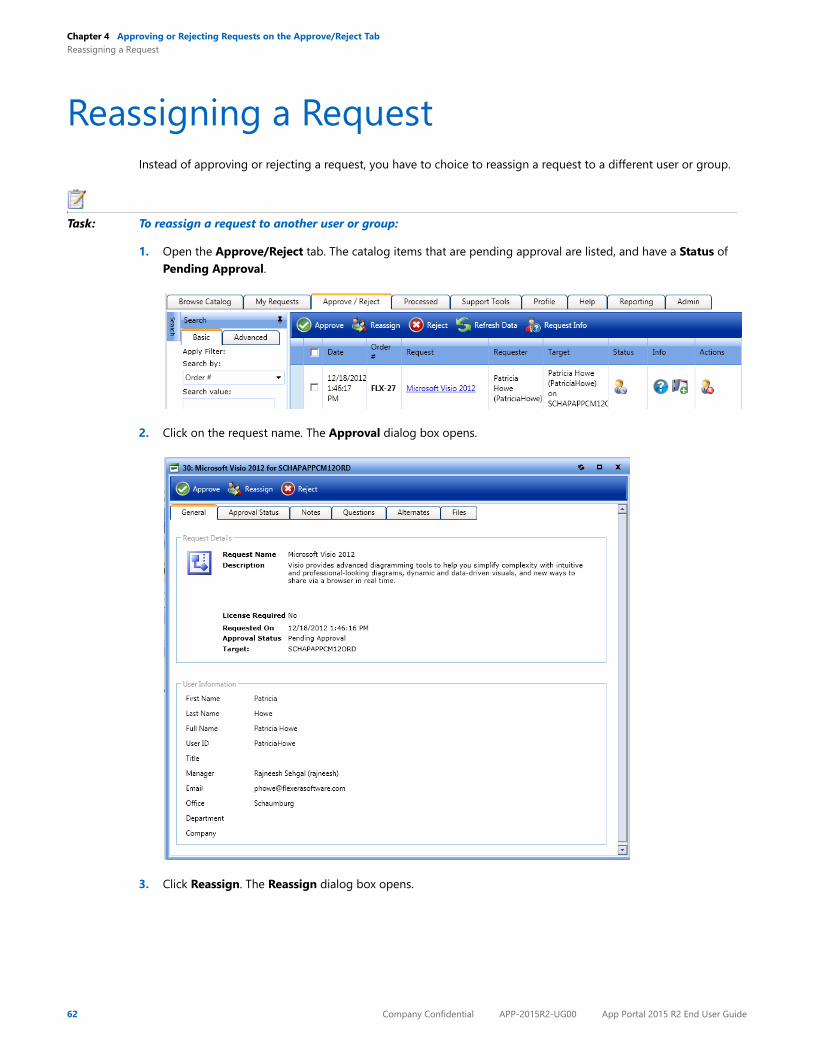
Reassigning a RequestInstead of approving or rejecting a request, you have to choice to reassign a request to a different user or group.
Task: To reassign a request to another user or group:
1. Open the Approve/Reject tab. The catalog items that are pending approval are listed, and have a Status of Pending Approval.
2. Click on the request name. The Approval dialog box opens.
3. Click Reassign. The Reassign dialog box opens.
62 Company Confidential APP-2015R2-UG00 App Portal 2015 R2 End User Guide
Chapter 4 Approving or Rejecting Requests on the Approve/Reject TabReassigning a Request
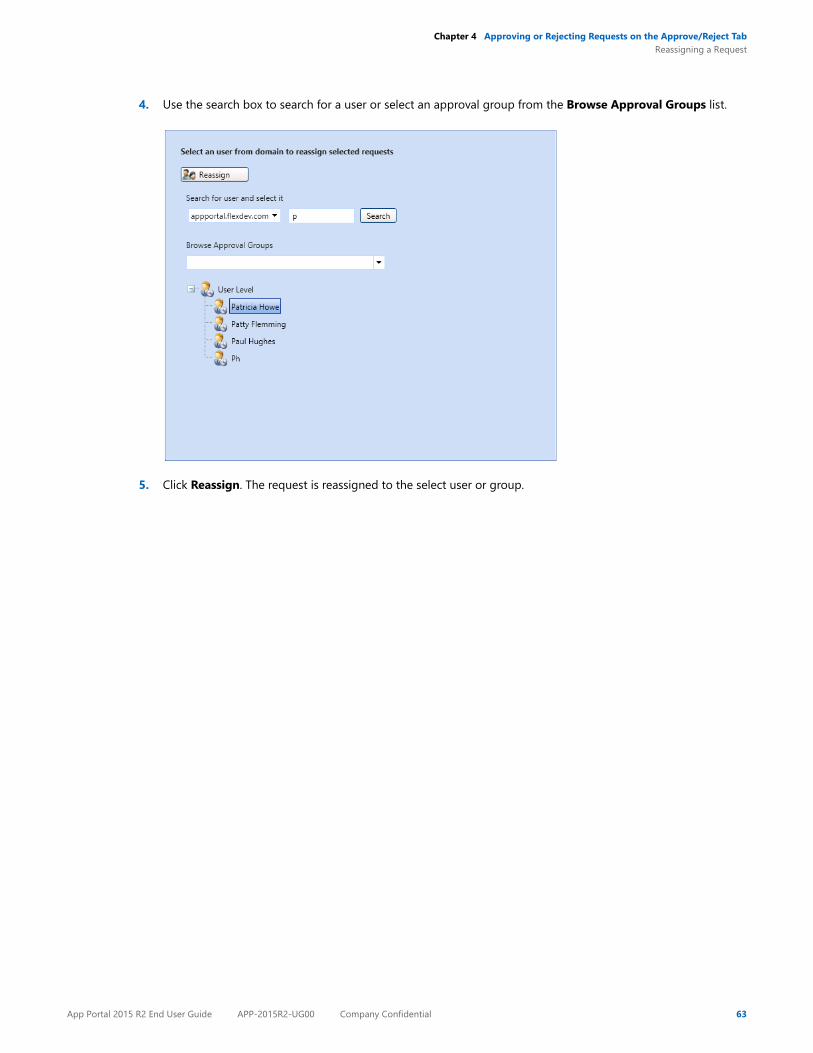
4. Use the search box to search for a user or select an approval group from the Browse Approval Groups list.
5. Click Reassign. The request is reassigned to the select user or group.
App Portal 2015 R2 End User Guide APP-2015R2-UG00 Company Confidential 63
Chapter 4 Approving or Rejecting Requests on the Approve/Reject TabRequesting Additional Information
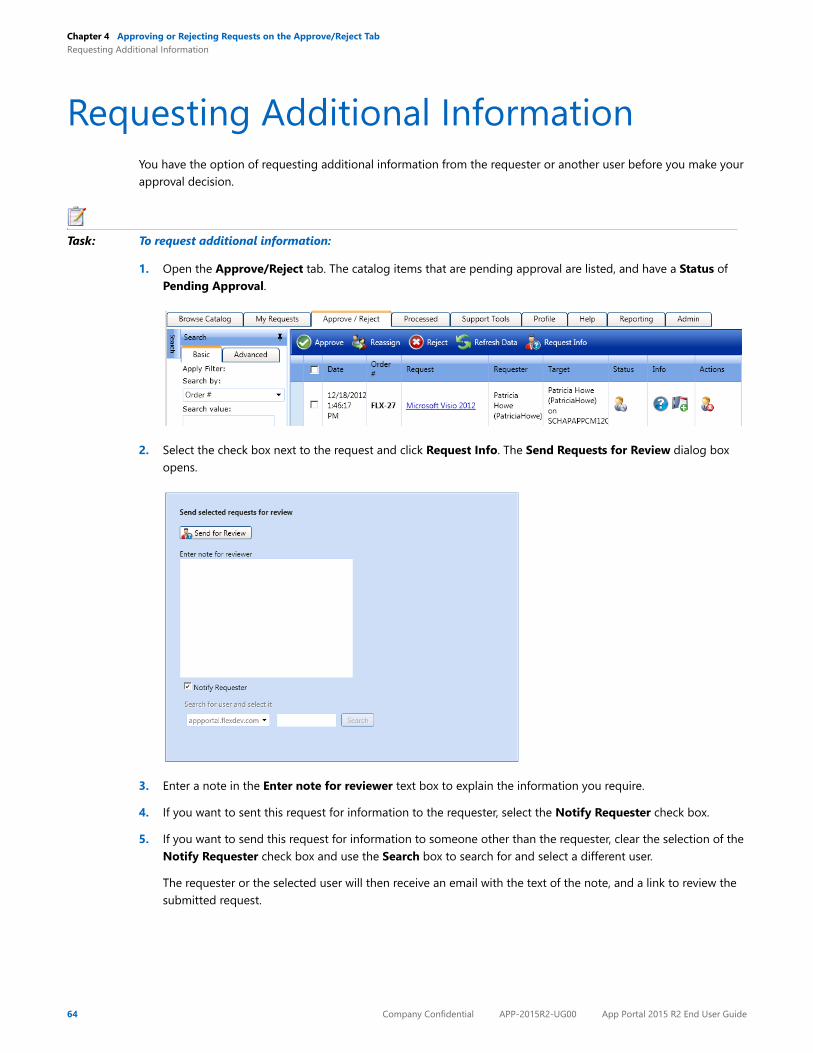
Requesting Additional InformationYou have the option of requesting additional information from the requester or another user before you make your approval decision.
Task: To request additional information:
1. Open the Approve/Reject tab. The catalog items that are pending approval are listed, and have a Status of Pending Approval.
2. Select the check box next to the request and click Request Info. The Send Requests for Review dialog box opens.
3. Enter a note in the Enter note for reviewer text box to explain the information you require.
4. If you want to sent this request for information to the requester, select the Notify Requester check box.
5. If you want to send this request for information to someone other than the requester, clear the selection of the Notify Requester check box and use the Search box to search for and select a different user.
The requester or the selected user will then receive an email with the text of the note, and a link to review the submitted request.
64 Company Confidential APP-2015R2-UG00 App Portal 2015 R2 End User Guide
Chapter 4 Approving or Rejecting Requests on the Approve/Reject TabRejecting a Request
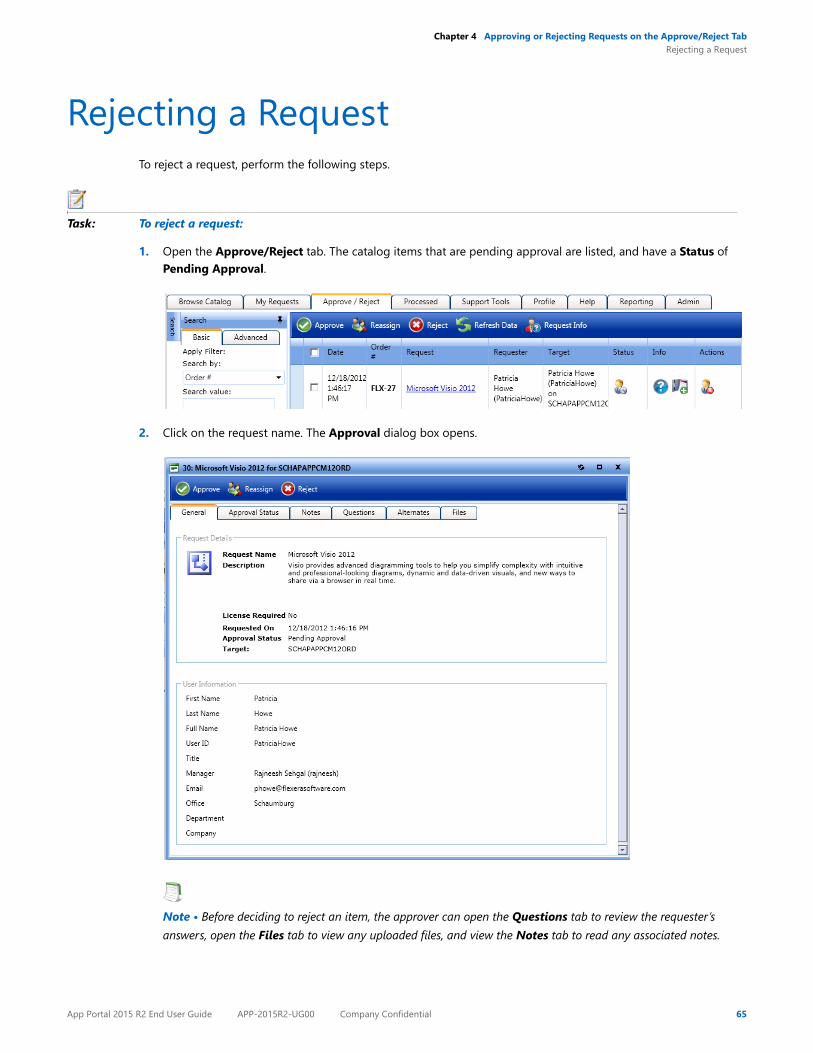
Rejecting a RequestTo reject a request, perform the following steps.
Task: To reject a request:
1. Open the Approve/Reject tab. The catalog items that are pending approval are listed, and have a Status of Pending Approval.
2. Click on the request name. The Approval dialog box opens.
Note • Before deciding to reject an item, the approver can open the Questions tab to review the requester’s answers, open the Files tab to view any uploaded files, and view the Notes tab to read any associated notes.
App Portal 2015 R2 End User Guide APP-2015R2-UG00 Company Confidential 65
Chapter 4 Approving or Rejecting Requests on the Approve/Reject TabRejecting a Request
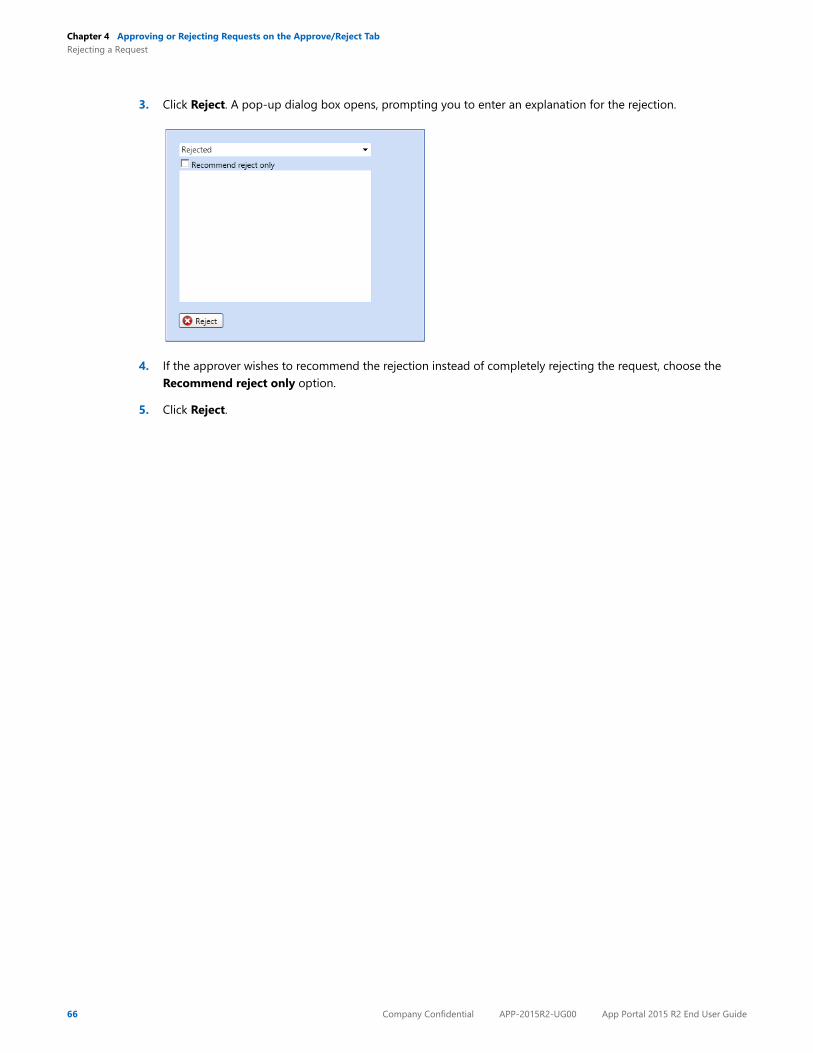
3. Click Reject. A pop-up dialog box opens, prompting you to enter an explanation for the rejection.
4. If the approver wishes to recommend the rejection instead of completely rejecting the request, choose the Recommend reject only option.
5. Click Reject.
66 Company Confidential APP-2015R2-UG00 App Portal 2015 R2 End User Guide
5
Viewing Request History on theProcessed Tab
Note • Starting with App Portal 2014, a permanent Flexera Software color theme has been applied to the user interface, and the top navigation menu has changed from tabs to menu selections; however, all functionality remains the same.
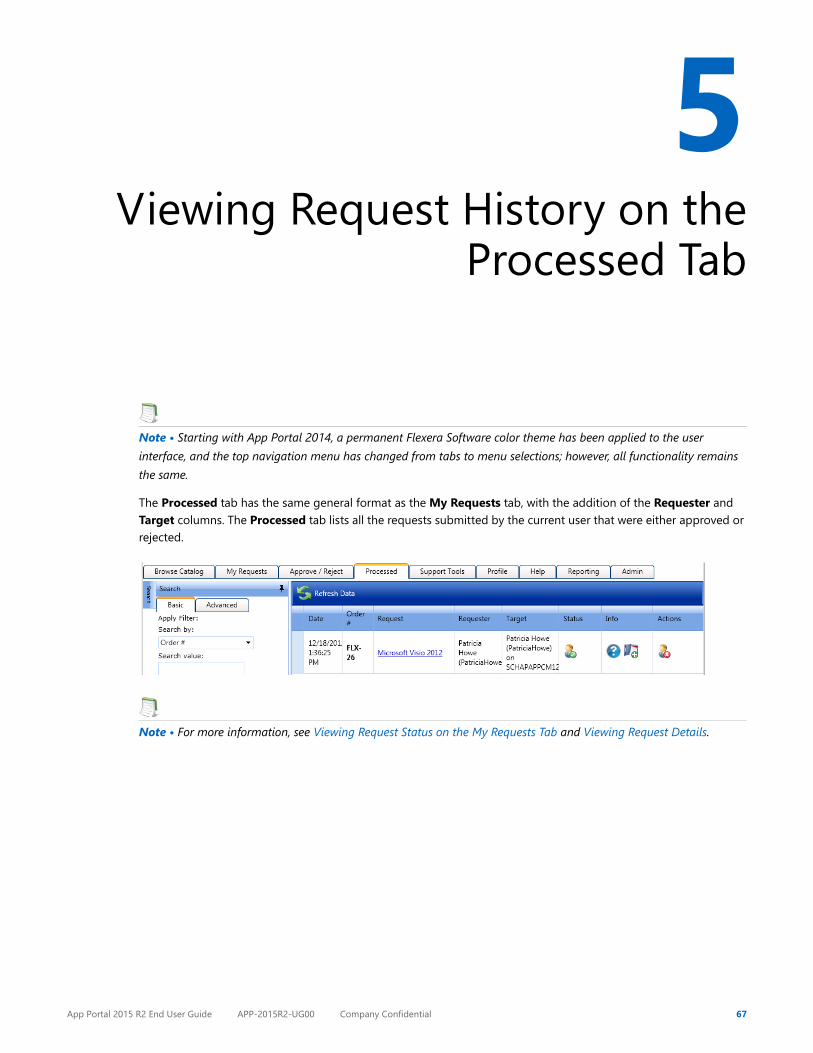
The Processed tab has the same general format as the My Requests tab, with the addition of the Requester and Target columns. The Processed tab lists all the requests submitted by the current user that were either approved or rejected.
Note • For more information, see Viewing Request Status on the My Requests Tab and Viewing Request Details.
App Portal 2015 R2 End User Guide APP-2015R2-UG00 Company Confidential 67
Chapter 5 Viewing Request History on the Processed Tab
68 Company Confidential APP-2015R2-UG00 App Portal 2015 R2 End User Guide
6
Viewing Request DetailsNote • Starting with App Portal 2014, a permanent Flexera Software color theme has been applied to the user interface, and the top navigation menu has changed from tabs to menu selections; however, all functionality remains the same.
Each submitted request has a Request Details view, which is opened by selecting the Request column on the My Requests tab. The tabs displayed in the Request Details view depend on the type of request and the options enabled.
• General Tab
• Inventory Tab
• Approval Status Tab
• Notes Tab
• Questions Tab
• Install Status Tab
• Alternates Tab
• Files Tab
App Portal 2015 R2 End User Guide APP-2015R2-UG00 Company Confidential 69
Chapter 6 Viewing Request DetailsGeneral Tab
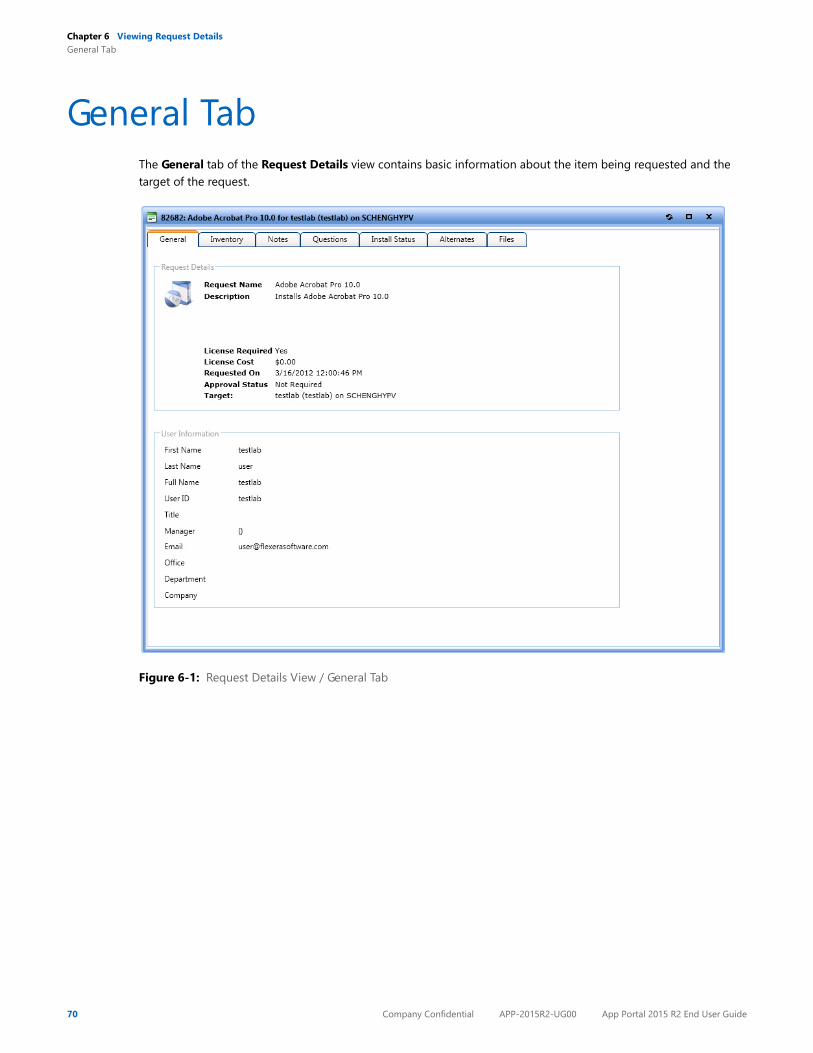
General TabThe General tab of the Request Details view contains basic information about the item being requested and the target of the request.
Figure 6-1: Request Details View / General Tab
70 Company Confidential APP-2015R2-UG00 App Portal 2015 R2 End User Guide
Chapter 6 Viewing Request DetailsInventory Tab
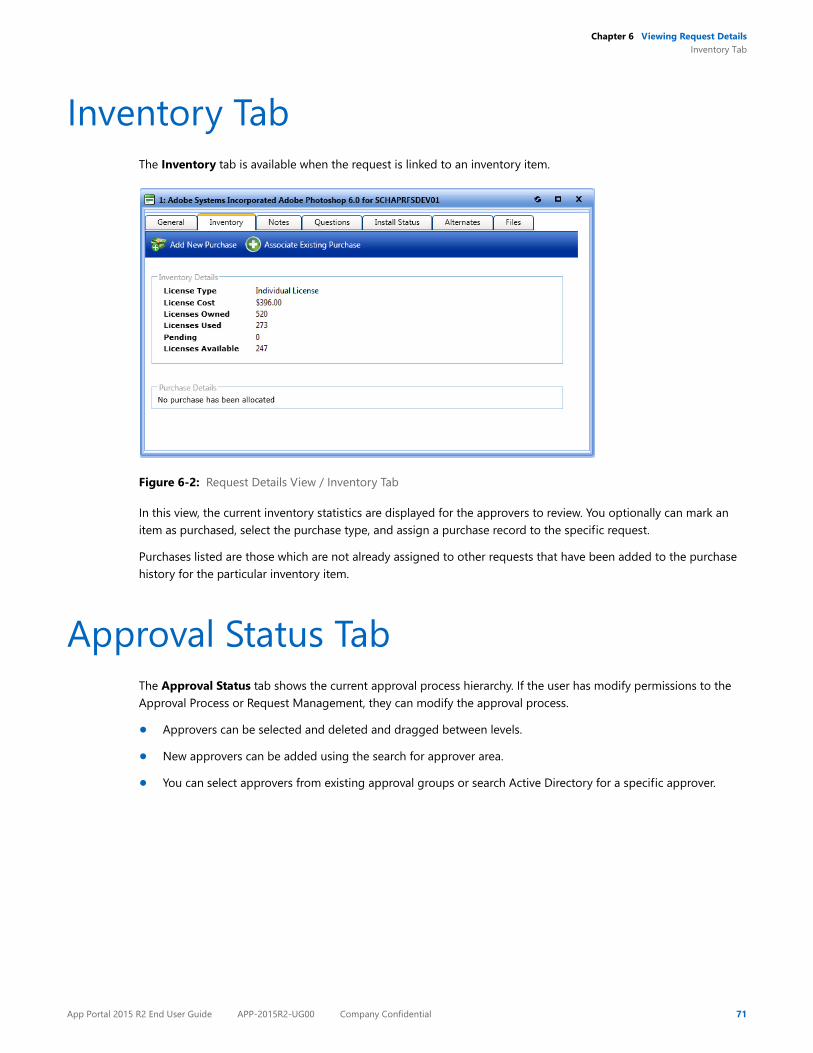
Inventory TabThe Inventory tab is available when the request is linked to an inventory item.
Figure 6-2: Request Details View / Inventory Tab
In this view, the current inventory statistics are displayed for the approvers to review. You optionally can mark an item as purchased, select the purchase type, and assign a purchase record to the specific request.
Purchases listed are those which are not already assigned to other requests that have been added to the purchase history for the particular inventory item.
Approval Status TabThe Approval Status tab shows the current approval process hierarchy. If the user has modify permissions to the Approval Process or Request Management, they can modify the approval process.
• Approvers can be selected and deleted and dragged between levels.
• New approvers can be added using the search for approver area.
• You can select approvers from existing approval groups or search Active Directory for a specific approver.
App Portal 2015 R2 End User Guide APP-2015R2-UG00 Company Confidential 71
Chapter 6 Viewing Request DetailsNotes Tab
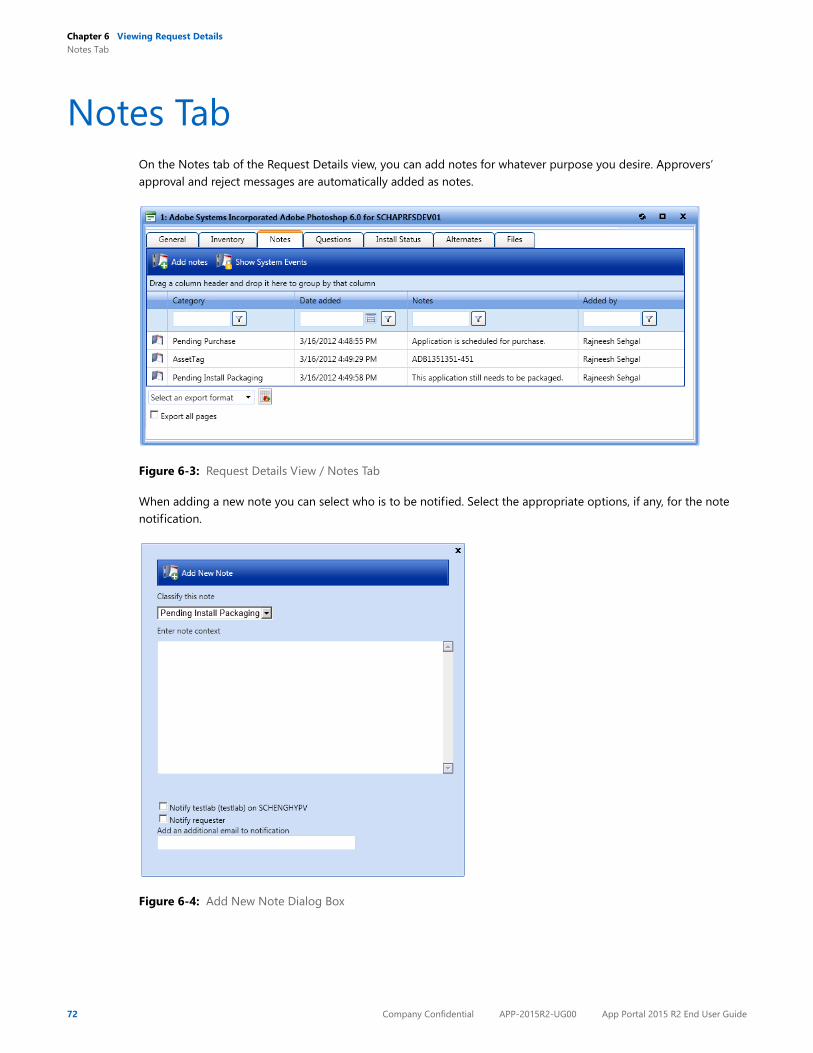
Notes TabOn the Notes tab of the Request Details view, you can add notes for whatever purpose you desire. Approvers’ approval and reject messages are automatically added as notes.
Figure 6-3: Request Details View / Notes Tab
When adding a new note you can select who is to be notified. Select the appropriate options, if any, for the note notification.
Figure 6-4: Add New Note Dialog Box
72 Company Confidential APP-2015R2-UG00 App Portal 2015 R2 End User Guide
Chapter 6 Viewing Request DetailsQuestions Tab
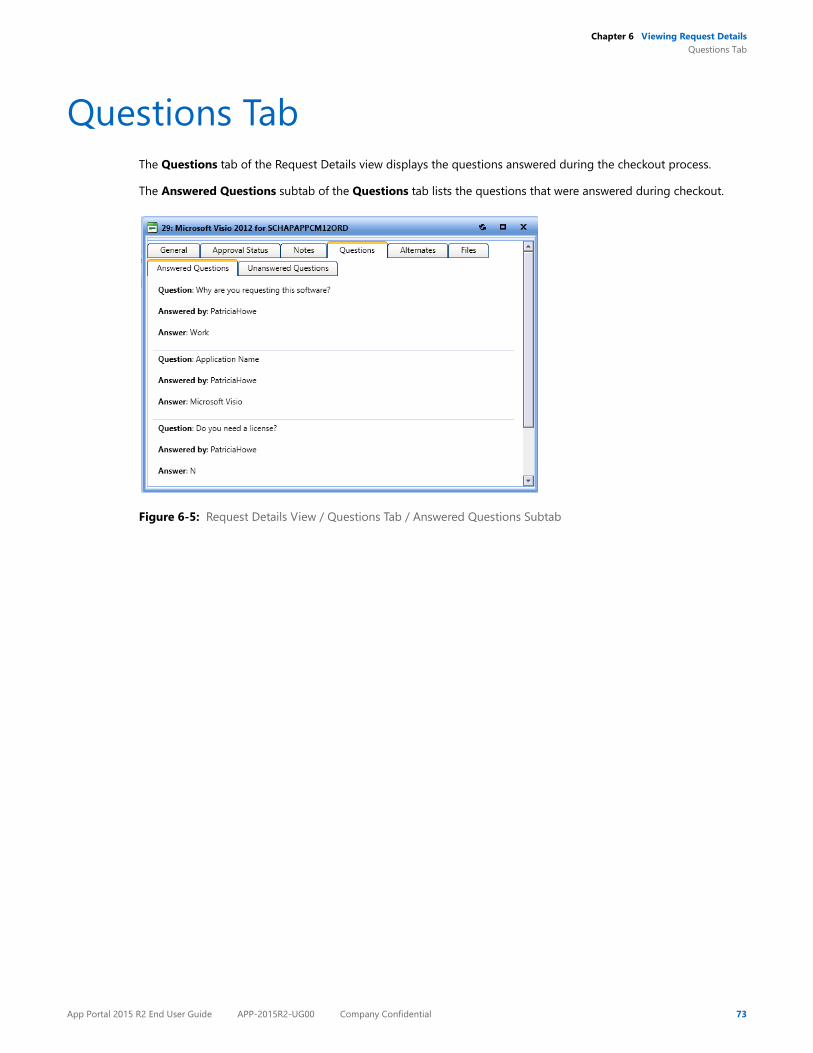
Questions TabThe Questions tab of the Request Details view displays the questions answered during the checkout process.
The Answered Questions subtab of the Questions tab lists the questions that were answered during checkout.
Figure 6-5: Request Details View / Questions Tab / Answered Questions Subtab
App Portal 2015 R2 End User Guide APP-2015R2-UG00 Company Confidential 73
Chapter 6 Viewing Request DetailsQuestions Tab
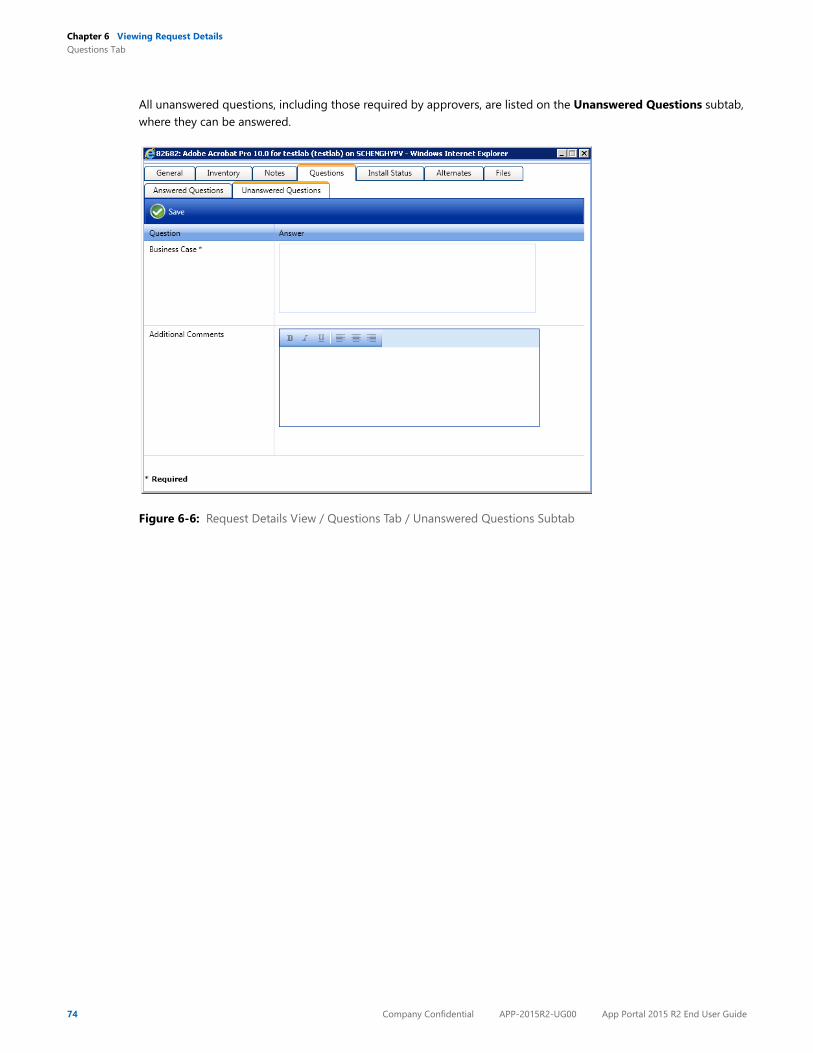
All unanswered questions, including those required by approvers, are listed on the Unanswered Questions subtab, where they can be answered.
Figure 6-6: Request Details View / Questions Tab / Unanswered Questions Subtab
74 Company Confidential APP-2015R2-UG00 App Portal 2015 R2 End User Guide
Chapter 6 Viewing Request DetailsInstall Status Tab
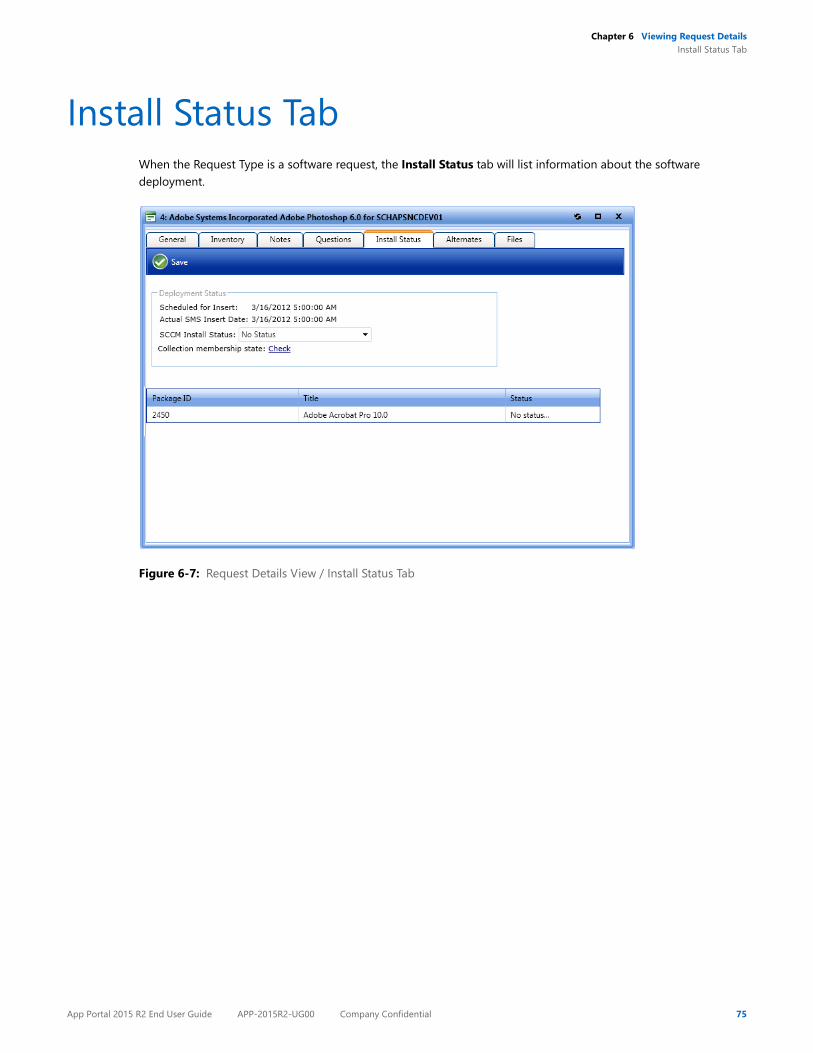
Install Status TabWhen the Request Type is a software request, the Install Status tab will list information about the software deployment.
Figure 6-7: Request Details View / Install Status Tab
App Portal 2015 R2 End User Guide APP-2015R2-UG00 Company Confidential 75
Chapter 6 Viewing Request DetailsAlternates Tab
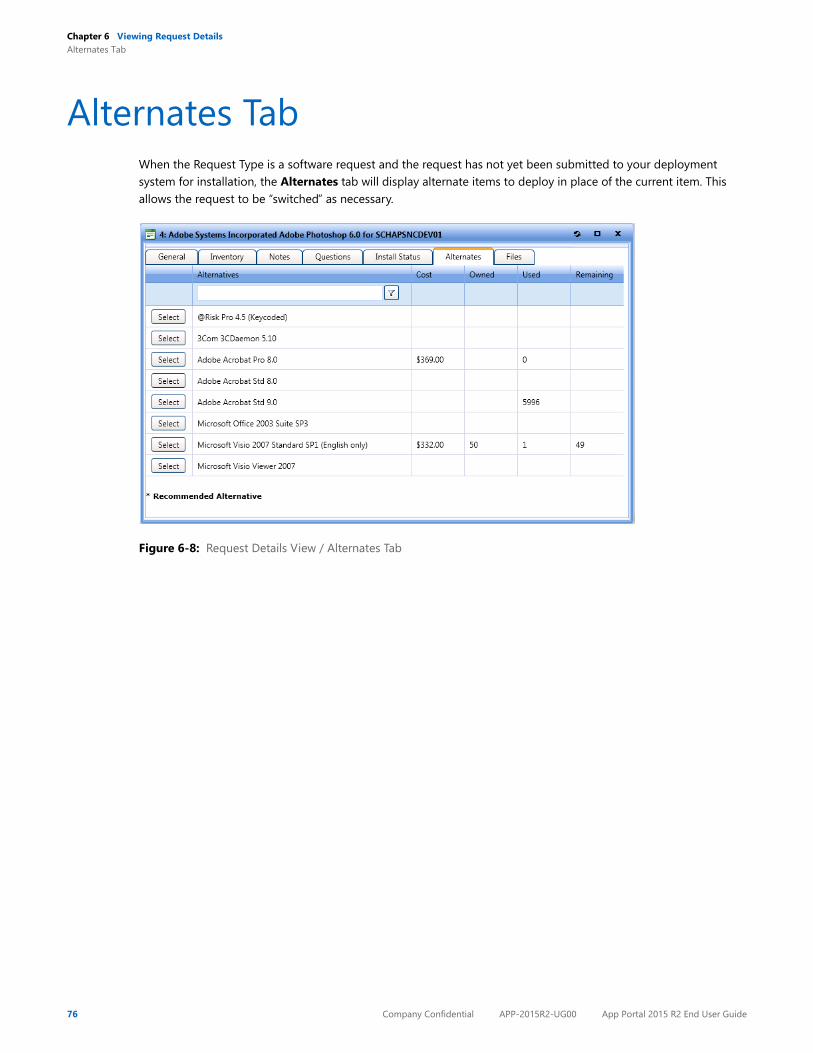
Alternates TabWhen the Request Type is a software request and the request has not yet been submitted to your deployment system for installation, the Alternates tab will display alternate items to deploy in place of the current item. This allows the request to be “switched” as necessary.
Figure 6-8: Request Details View / Alternates Tab
76 Company Confidential APP-2015R2-UG00 App Portal 2015 R2 End User Guide
Chapter 6 Viewing Request DetailsFiles Tab
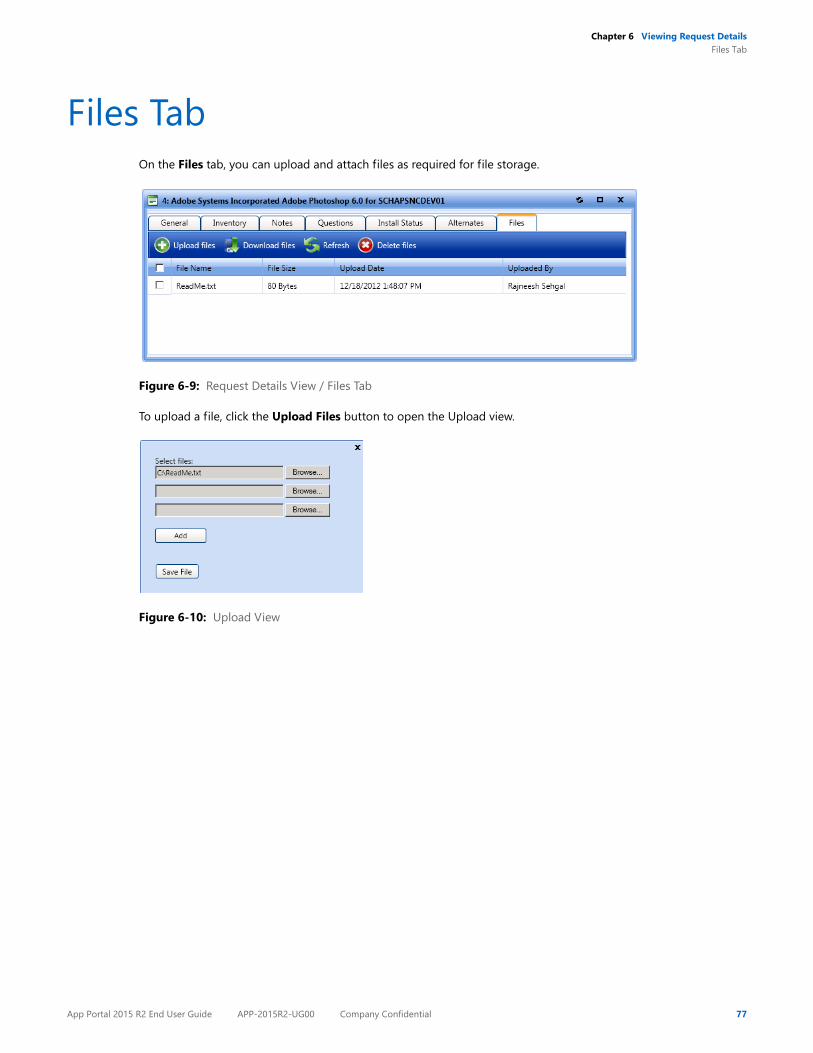
Files TabOn the Files tab, you can upload and attach files as required for file storage.
Figure 6-9: Request Details View / Files Tab
To upload a file, click the Upload Files button to open the Upload view.
Figure 6-10: Upload View
App Portal 2015 R2 End User Guide APP-2015R2-UG00 Company Confidential 77

Chapter 6 Viewing Request DetailsFiles Tab
78 Company Confidential APP-2015R2-UG00 App Portal 2015 R2 End User Guide
7
Using the My Apps Tab toManage Your Applications andSoftware Policy Score™
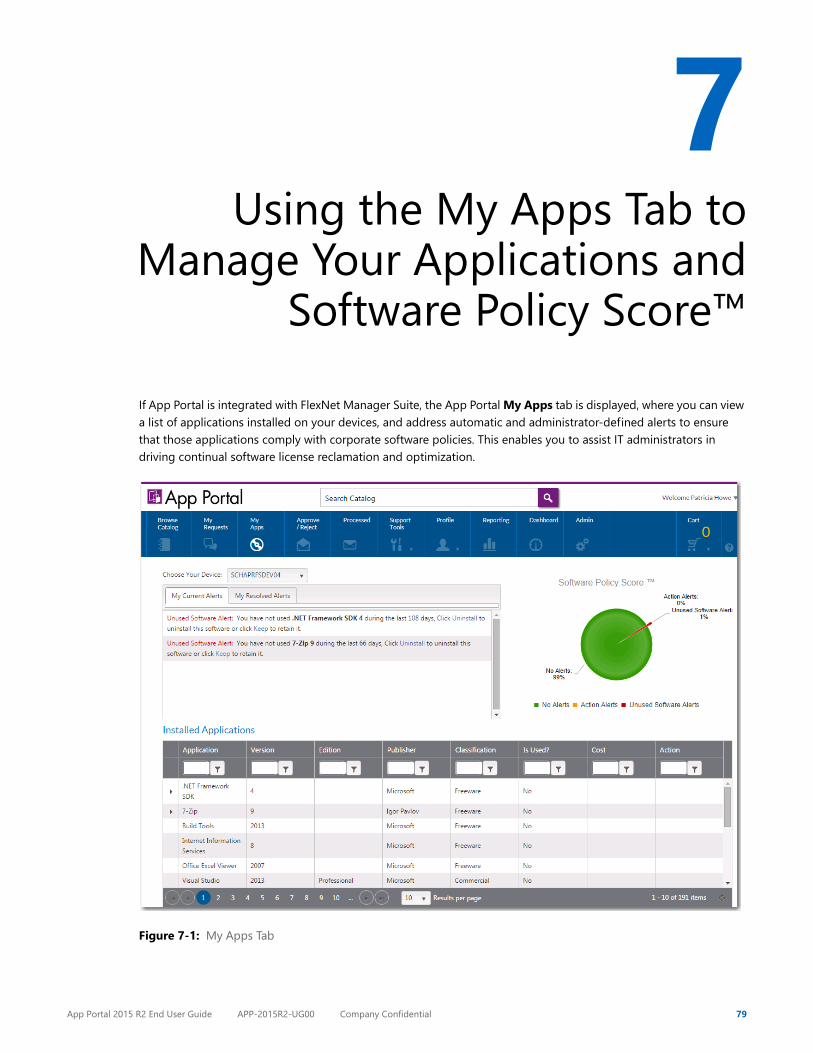
If App Portal is integrated with FlexNet Manager Suite, the App Portal My Apps tab is displayed, where you can view a list of applications installed on your devices, and address automatic and administrator-defined alerts to ensure that those applications comply with corporate software policies. This enables you to assist IT administrators in driving continual software license reclamation and optimization.
Figure 7-1: My Apps Tab
App Portal 2015 R2 End User Guide APP-2015R2-UG00 Company Confidential 79
Chapter 7 Using the My Apps Tab to Manage Your Applications and Software Policy Score™
Information about using the My Apps tab is described in the following topics:
• Viewing Your Installed Applications on the My Apps Tab
• Viewing Your Software Policy Score™ Chart on the My Apps Tab
• Resolving Alerts on the My Apps Tab
80 Company Confidential APP-2015R2-UG00 App Portal 2015 R2 End User Guide
Chapter 7 Using the My Apps Tab to Manage Your Applications and Software Policy Score™Viewing Your Installed Applications on the My Apps Tab
Viewing Your Installed Applications on the My Apps Tab
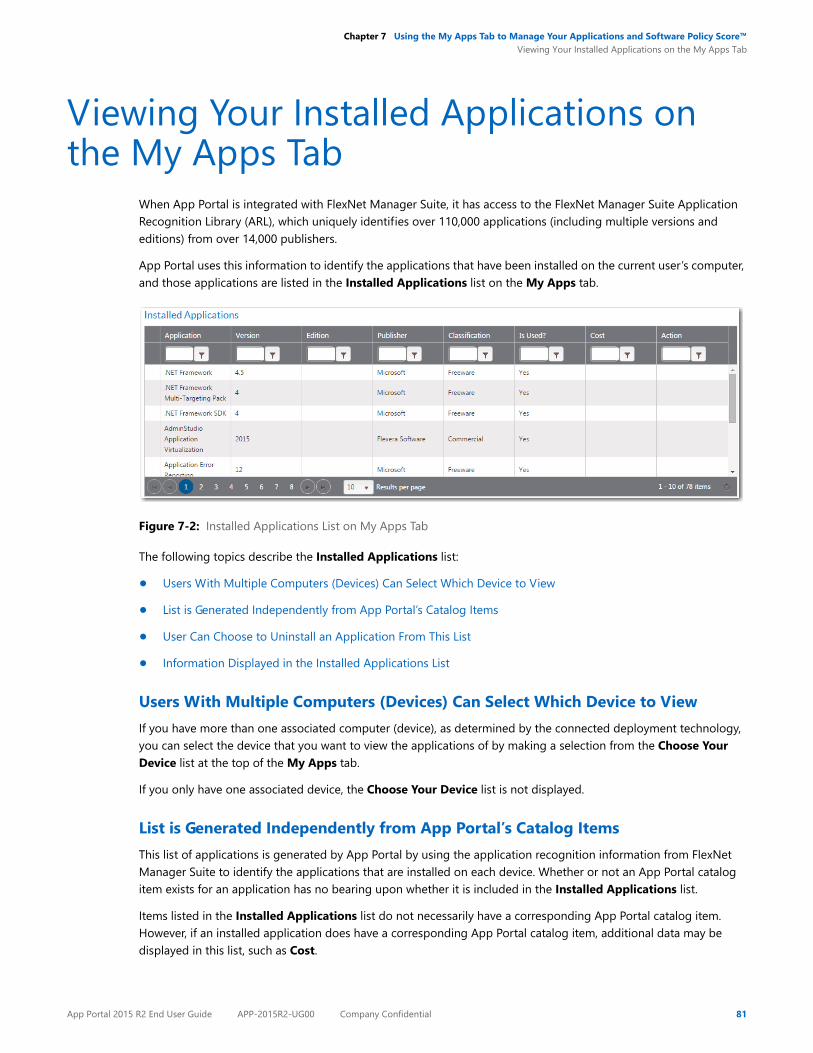
When App Portal is integrated with FlexNet Manager Suite, it has access to the FlexNet Manager Suite Application Recognition Library (ARL), which uniquely identifies over 110,000 applications (including multiple versions and editions) from over 14,000 publishers.
App Portal uses this information to identify the applications that have been installed on the current user’s computer, and those applications are listed in the Installed Applications list on the My Apps tab.
Figure 7-2: Installed Applications List on My Apps Tab
The following topics describe the Installed Applications list:
• Users With Multiple Computers (Devices) Can Select Which Device to View
• List is Generated Independently from App Portal’s Catalog Items
• User Can Choose to Uninstall an Application From This List
• Information Displayed in the Installed Applications List
Users With Multiple Computers (Devices) Can Select Which Device to ViewIf you have more than one associated computer (device), as determined by the connected deployment technology, you can select the device that you want to view the applications of by making a selection from the Choose Your Device list at the top of the My Apps tab.
If you only have one associated device, the Choose Your Device list is not displayed.
List is Generated Independently from App Portal’s Catalog ItemsThis list of applications is generated by App Portal by using the application recognition information from FlexNet Manager Suite to identify the applications that are installed on each device. Whether or not an App Portal catalog item exists for an application has no bearing upon whether it is included in the Installed Applications list.
Items listed in the Installed Applications list do not necessarily have a corresponding App Portal catalog item. However, if an installed application does have a corresponding App Portal catalog item, additional data may be displayed in this list, such as Cost.
App Portal 2015 R2 End User Guide APP-2015R2-UG00 Company Confidential 81
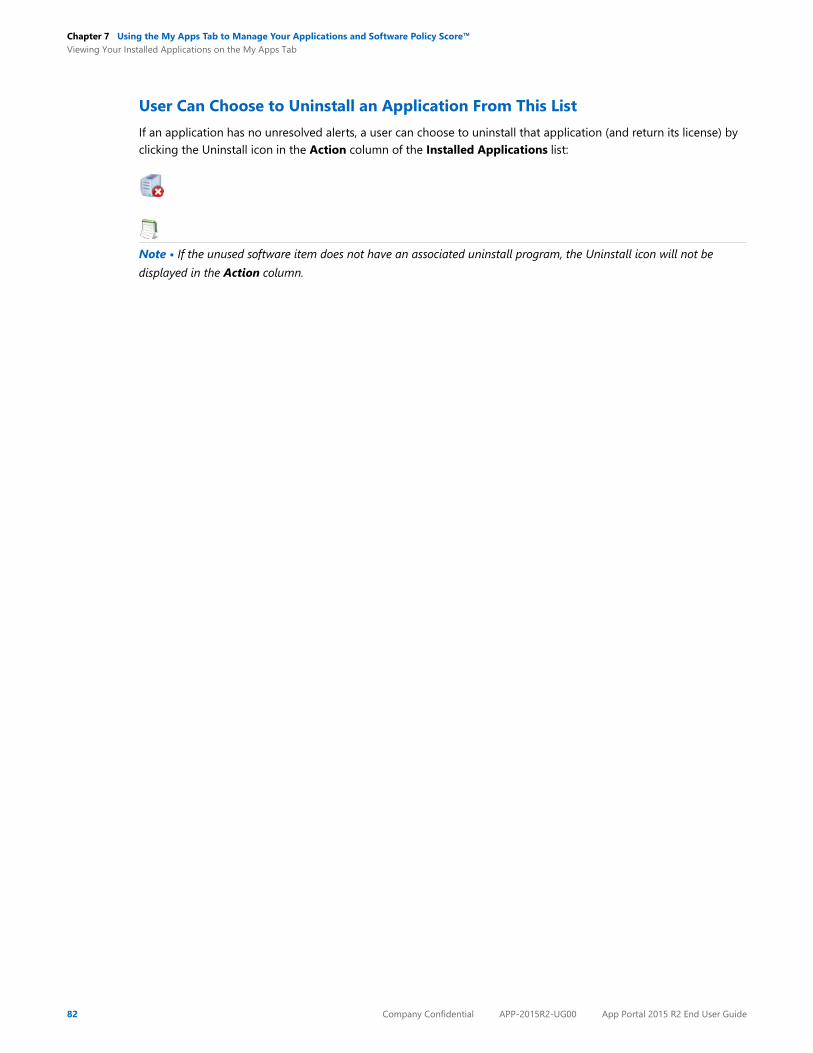
Chapter 7 Using the My Apps Tab to Manage Your Applications and Software Policy Score™Viewing Your Installed Applications on the My Apps Tab
User Can Choose to Uninstall an Application From This ListIf an application has no unresolved alerts, a user can choose to uninstall that application (and return its license) by clicking the Uninstall icon in the Action column of the Installed Applications list:
Note • If the unused software item does not have an associated uninstall program, the Uninstall icon will not be displayed in the Action column.
82 Company Confidential APP-2015R2-UG00 App Portal 2015 R2 End User Guide
Chapter 7 Using the My Apps Tab to Manage Your Applications and Software Policy Score™Viewing Your Installed Applications on the My Apps Tab
Information Displayed in the Installed Applications ListThe following information is displayed for applications in the installed applications list:
Table 7-1 • Installed Applications List Properties
Property Description
Application Application name as defined in FlexNet Manager Suite.
Version Application version.
Edition Application edition, if this information was defined in FlexNet Manager Suite.
Publisher Name of manufacturer of application.
Classification Category, defined by FlexNet Manager Suite, which can be used to filter lists of applications. For example, administrators might choose to hide all applications that are classified as Freeware, because of the low impact of their licensing. The following classifications are available:
• Beta—Pre-release application (such as beta releases, alpha releases, or release candidates).
• Component—Item is used/installed as a component of another application or suite, and is not licensed as a standalone item.
• Commercial—Requires a license to be purchased for use in a commercial setting.
• Freeware—Licensed for use in a commercial setting free of charge.• Malware—Application is considered to be potentially harmful (such as a virus or
a Trojan horse).• Shareware—Application is available for download from Internet shareware sites,
and typically uses a “try-before-you-buy” licensing model.• Update—Application represents an update (such as a service pack) to another
application, issued free to all customers regardless of purchasing agreements or support contracts (a “minor” update).
• X Rated—Application potentially contains objectionable or sexually explicit material.
Is Used? Indicates whether or not the application has been used during the License Reclamation Threshold period defined by the App Portal administrator.
Cost If application has an associated App Portal catalog item, and the catalog item has an associated cost, the cost is listed in this column.
Action If an application has no unresolved alerts, an Uninstall button is listed in this column:
If you click the Uninstall button, the application will be uninstalled and any associated license will be returned.
App Portal 2015 R2 End User Guide APP-2015R2-UG00 Company Confidential 83
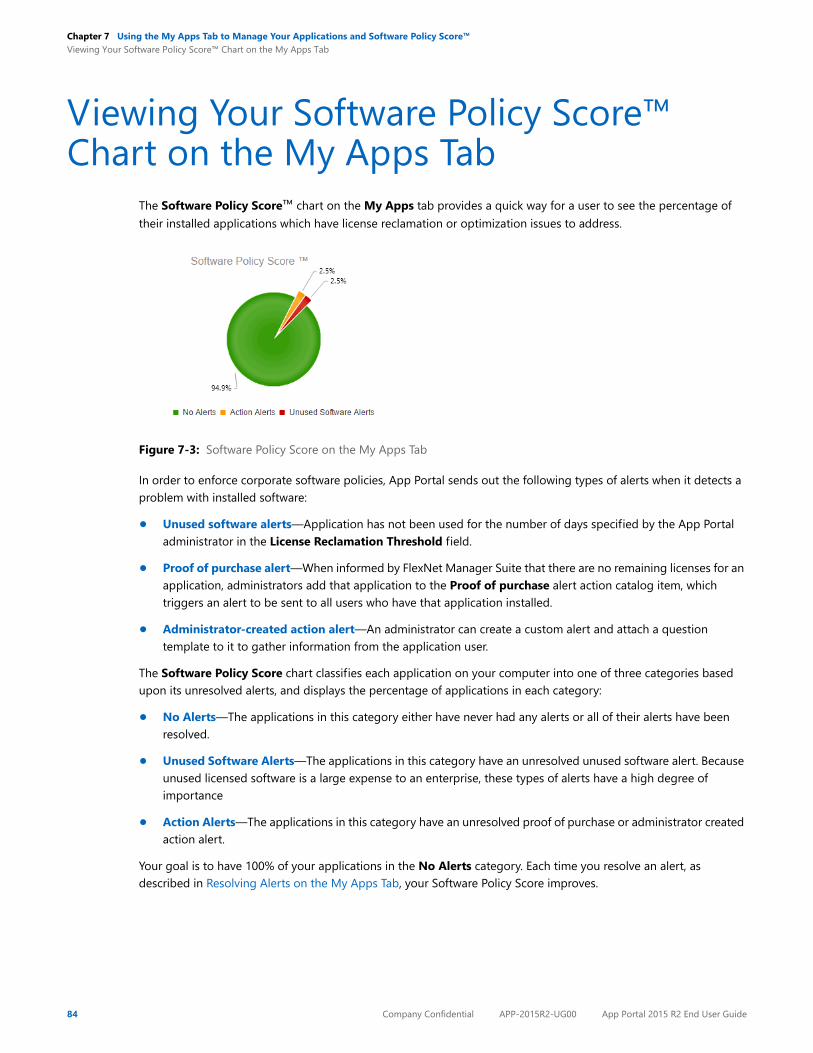
Chapter 7 Using the My Apps Tab to Manage Your Applications and Software Policy Score™Viewing Your Software Policy Score™ Chart on the My Apps Tab
Viewing Your Software Policy Score™ Chart on the My Apps Tab
The Software Policy Score™ chart on the My Apps tab provides a quick way for a user to see the percentage of their installed applications which have license reclamation or optimization issues to address.
Figure 7-3: Software Policy Score on the My Apps Tab
In order to enforce corporate software policies, App Portal sends out the following types of alerts when it detects a problem with installed software:
• Unused software alerts—Application has not been used for the number of days specified by the App Portal administrator in the License Reclamation Threshold field.
• Proof of purchase alert—When informed by FlexNet Manager Suite that there are no remaining licenses for an application, administrators add that application to the Proof of purchase alert action catalog item, which triggers an alert to be sent to all users who have that application installed.
• Administrator-created action alert—An administrator can create a custom alert and attach a question template to it to gather information from the application user.
The Software Policy Score chart classifies each application on your computer into one of three categories based upon its unresolved alerts, and displays the percentage of applications in each category:
• No Alerts—The applications in this category either have never had any alerts or all of their alerts have been resolved.
• Unused Software Alerts—The applications in this category have an unresolved unused software alert. Because unused licensed software is a large expense to an enterprise, these types of alerts have a high degree of importance
• Action Alerts—The applications in this category have an unresolved proof of purchase or administrator created action alert.
Your goal is to have 100% of your applications in the No Alerts category. Each time you resolve an alert, as described in Resolving Alerts on the My Apps Tab, your Software Policy Score improves.
84 Company Confidential APP-2015R2-UG00 App Portal 2015 R2 End User Guide
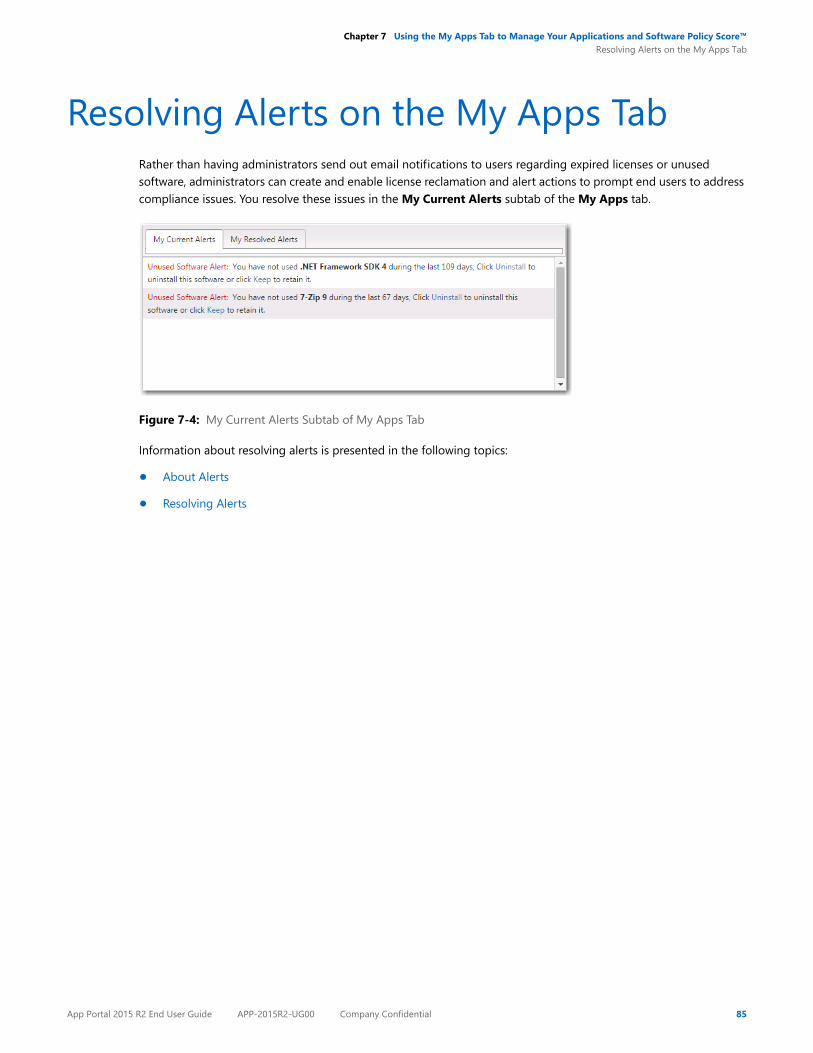
Chapter 7 Using the My Apps Tab to Manage Your Applications and Software Policy Score™Resolving Alerts on the My Apps Tab
Resolving Alerts on the My Apps TabRather than having administrators send out email notifications to users regarding expired licenses or unused software, administrators can create and enable license reclamation and alert actions to prompt end users to address compliance issues. You resolve these issues in the My Current Alerts subtab of the My Apps tab.
Figure 7-4: My Current Alerts Subtab of My Apps Tab
Information about resolving alerts is presented in the following topics:
• About Alerts
• Resolving Alerts
App Portal 2015 R2 End User Guide APP-2015R2-UG00 Company Confidential 85
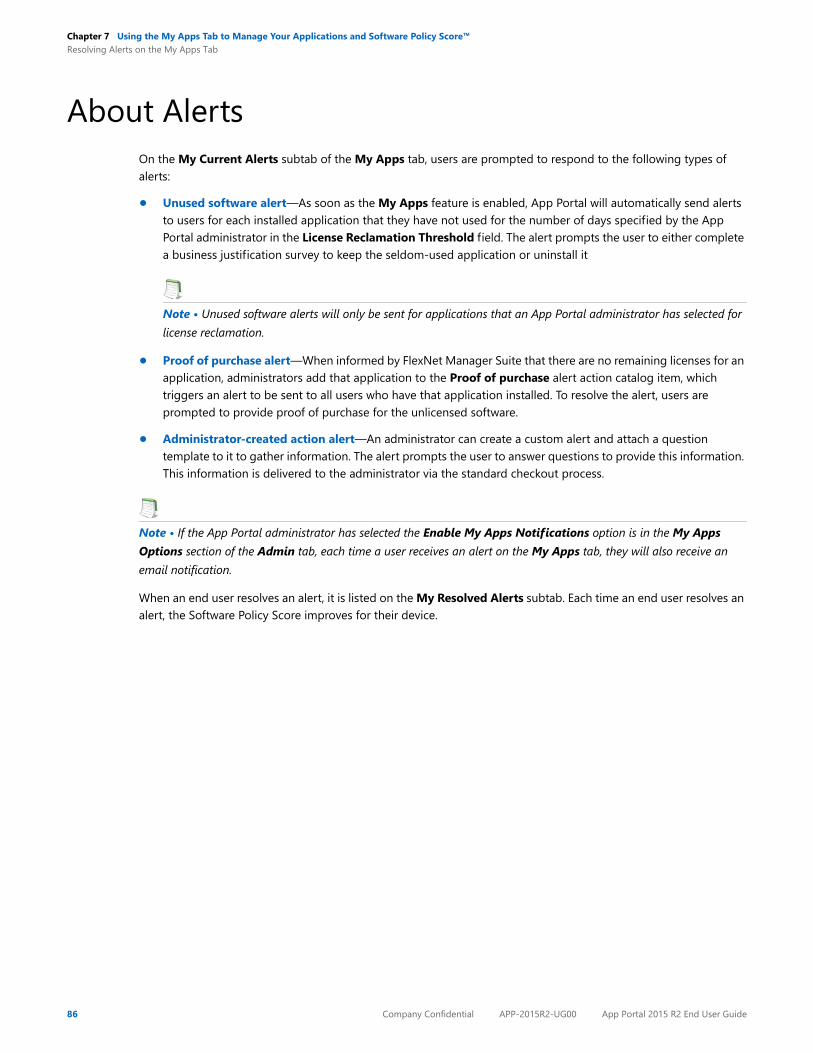
Chapter 7 Using the My Apps Tab to Manage Your Applications and Software Policy Score™Resolving Alerts on the My Apps Tab
About AlertsOn the My Current Alerts subtab of the My Apps tab, users are prompted to respond to the following types of alerts:
• Unused software alert—As soon as the My Apps feature is enabled, App Portal will automatically send alerts to users for each installed application that they have not used for the number of days specified by the App Portal administrator in the License Reclamation Threshold field. The alert prompts the user to either complete a business justification survey to keep the seldom-used application or uninstall it
Note • Unused software alerts will only be sent for applications that an App Portal administrator has selected for license reclamation.
• Proof of purchase alert—When informed by FlexNet Manager Suite that there are no remaining licenses for an application, administrators add that application to the Proof of purchase alert action catalog item, which triggers an alert to be sent to all users who have that application installed. To resolve the alert, users are prompted to provide proof of purchase for the unlicensed software.
• Administrator-created action alert—An administrator can create a custom alert and attach a question template to it to gather information. The alert prompts the user to answer questions to provide this information. This information is delivered to the administrator via the standard checkout process.
Note • If the App Portal administrator has selected the Enable My Apps Notifications option is in the My Apps Options section of the Admin tab, each time a user receives an alert on the My Apps tab, they will also receive an email notification.
When an end user resolves an alert, it is listed on the My Resolved Alerts subtab. Each time an end user resolves an alert, the Software Policy Score improves for their device.
86 Company Confidential APP-2015R2-UG00 App Portal 2015 R2 End User Guide
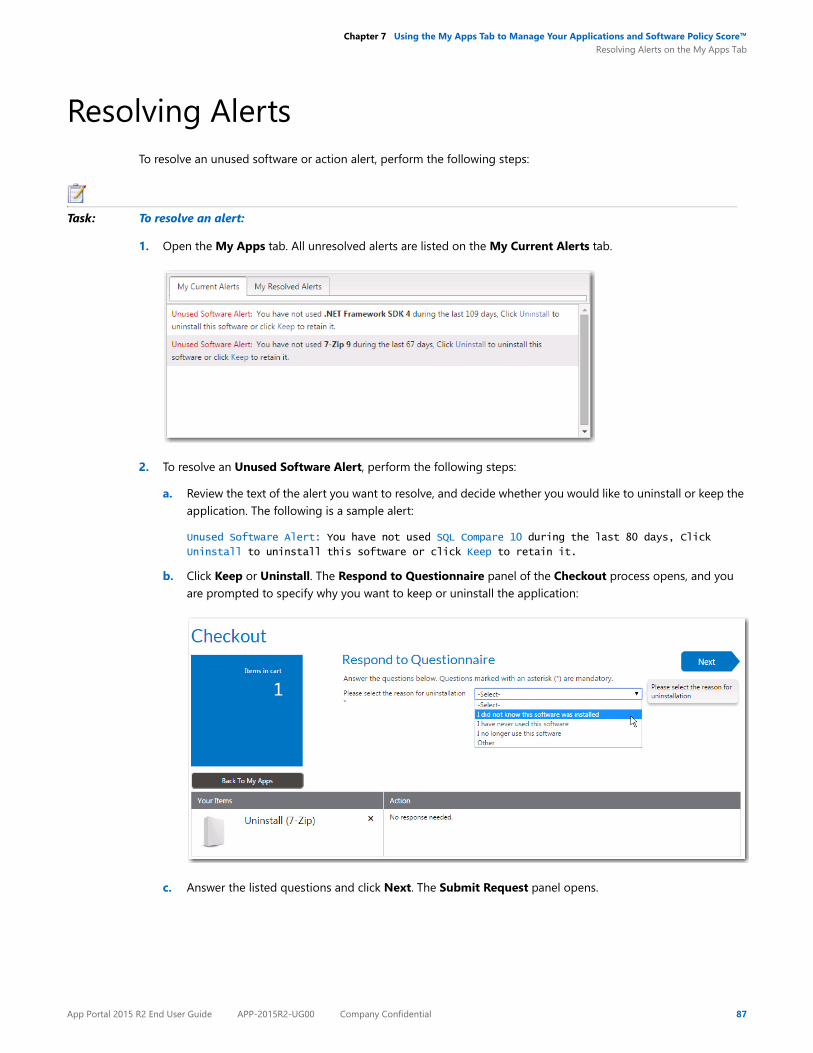
Chapter 7 Using the My Apps Tab to Manage Your Applications and Software Policy Score™Resolving Alerts on the My Apps Tab
Resolving AlertsTo resolve an unused software or action alert, perform the following steps:
Task: To resolve an alert:
1. Open the My Apps tab. All unresolved alerts are listed on the My Current Alerts tab.
2. To resolve an Unused Software Alert, perform the following steps:
a. Review the text of the alert you want to resolve, and decide whether you would like to uninstall or keep the application. The following is a sample alert:
Unused Software Alert: You have not used SQL Compare 10 during the last 80 days, Click
Uninstall to uninstall this software or click Keep to retain it.
b. Click Keep or Uninstall. The Respond to Questionnaire panel of the Checkout process opens, and you are prompted to specify why you want to keep or uninstall the application:
c. Answer the listed questions and click Next. The Submit Request panel opens.
App Portal 2015 R2 End User Guide APP-2015R2-UG00 Company Confidential 87
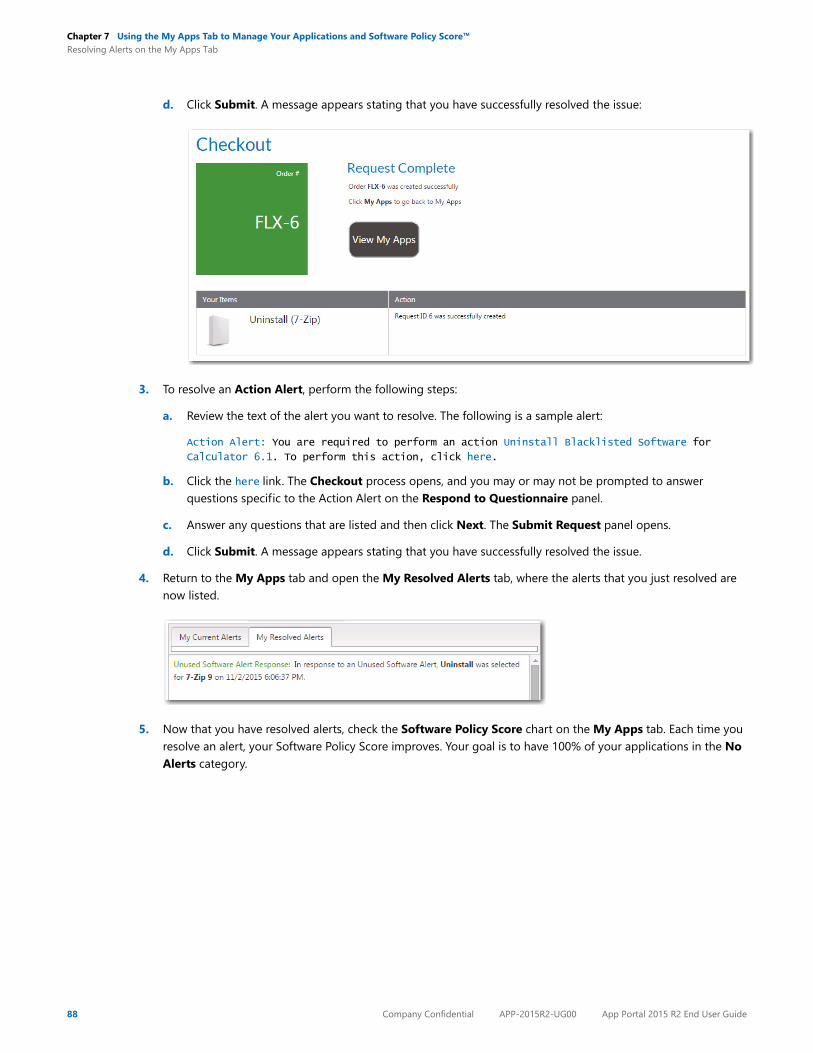
Chapter 7 Using the My Apps Tab to Manage Your Applications and Software Policy Score™Resolving Alerts on the My Apps Tab
d. Click Submit. A message appears stating that you have successfully resolved the issue:
3. To resolve an Action Alert, perform the following steps:
a. Review the text of the alert you want to resolve. The following is a sample alert:
Action Alert: You are required to perform an action Uninstall Blacklisted Software for
Calculator 6.1. To perform this action, click here.
b. Click the here link. The Checkout process opens, and you may or may not be prompted to answer questions specific to the Action Alert on the Respond to Questionnaire panel.
c. Answer any questions that are listed and then click Next. The Submit Request panel opens.
d. Click Submit. A message appears stating that you have successfully resolved the issue.
4. Return to the My Apps tab and open the My Resolved Alerts tab, where the alerts that you just resolved are now listed.
5. Now that you have resolved alerts, check the Software Policy Score chart on the My Apps tab. Each time you resolve an alert, your Software Policy Score improves. Your goal is to have 100% of your applications in the No Alerts category.
88 Company Confidential APP-2015R2-UG00 App Portal 2015 R2 End User Guide
8
Setting User Preferences onthe Profile Tab
The App Portal Profile tab is used to display user information and set user preferences. The Profile tab consists of the following views:
• Viewing User Information on the User View
• Viewing Categories on the My Categories Tab
• Viewing Readiness Records on the My Readiness Tab
App Portal 2015 R2 End User Guide APP-2015R2-UG00 Company Confidential 89

Chapter 8 Setting User Preferences on the Profile TabViewing User Information on the User View
Viewing User Information on the User View
The Profile > User tab has two sections: Profile and User Assignments.
Figure 8-1: Profile >User View
ProfileThe Profile area contains attributes of the user and allows the user to define themselves as Out of office as well as specify an Alternate approver.
User AssignmentsThe User Assignments area shows catalog items assigned to the user.
• To determine whether an assignment targets a user or a computer depends on the calculation method used in the inventory item.
• Each assignment will display whether it is currently installed and on what systems it is installed on.
• The Assigned by value denotes how the assignment was made.
• Assignments can be made as part of an approval process or manually using direct assignments.
90 Company Confidential APP-2015R2-UG00 App Portal 2015 R2 End User Guide

Chapter 8 Setting User Preferences on the Profile TabViewing Categories on the My Categories Tab
Viewing Categories on the My Categories Tab
The My Categories view of the Profile tab lists all of the catalog categories that you are assigned as the owner of. On the My Categories view, category owners can manipulate the applications within their categories.
Figure 8-2: Profile > My Categories View
Note • Category owners are assigned by clicking the Set Categories Owner button on the Categories > Catalog Categories view under Site Management on the Admin tab.
App Portal 2015 R2 End User Guide APP-2015R2-UG00 Company Confidential 91
Chapter 8 Setting User Preferences on the Profile TabViewing Readiness Records on the My Readiness Tab
Viewing Readiness Records on the My Readiness Tab
User readiness is used to define records allowing a requester to be defined as “ready” for a catalog item. You use user readiness to inform users using email that they are ready for an item and also restrict the ability to request an item by the presence of a user readiness record.
User readiness records are added to a catalog item that is marked with the Require User Readiness record? option in the Scheduling options area of the General > Global tab of the Catalog Item Properties dialog box. User readiness records are added on the Deployment Management > User Readiness view on the Admin tab.
A user’s readiness records can be viewed by selecting My Readiness on the Profile tab.
Figure 8-3: My Readiness View
From this view, you can perform many of the same tasks that can be performed on the Deployment Management > User Readiness view on the Admin tab.
92 Company Confidential APP-2015R2-UG00 App Portal 2015 R2 End User Guide
Index
AAction Alert 85alerts
responding to 85Approve/Reject tab 59
BBrowse Catalog tab 14
about 14checkout 28icons displayed on 21purchasing items 27
Ccatalog items
requesting 13checkout 28Checkout view
Approval tab 43Questions tab 38Search tab 40Target tab 39
Hhelp
using 8
Iicons
displayed on Browse Catalog tab 21
MMy Apps
responding to alerts 85My Apps tab 79
viewing installed applications 81viewing Software Policy Score 84
My Requests tab 53request list 56search pane 55
PProcessed tab 67Profile tab 89
User subtab 90purchasing 27
checkout 28
RRequest Details view 69
Alternates tab 76Approval Status tab 71Files tab 77General tab 70Install Status tab 75Inventory tab 71Notes tab 72Questions tab 73uploading files 77
requestssubmitting 13
App Portal 2015 R2 End User Guide APP-2015R2-UG00 93
Index
SSoftware Policy Score 84
UUnused Software Alert 85
94 APP-2015R2-UG00 App Portal 2015 R2 End User Guide