Embed Size (px)
Citation preview
1 / 42
Apparo Fast Edit
Installation Guide
3.0
Linux & IBM AIX / Standalone version
2 / 42
Table of content
1 Prior to Installation ____________________________________________________ 4
1.1 Hardware requirements __________________________________________________ 4
1.2 Supported operating systems ______________________________________________ 4
1.3 Supported web server ____________________________________________________ 4
1.4 Supported virtual environments ___________________________________________ 4
1.5 Architecture ____________________________________________________________ 5
1.6 Overview installation steps _______________________________________________ 6
2 Preparation __________________________________________________________ 7
2.1 Creation of a database user for the Apparo repository__________________________ 8
2.2 Defining the security group _______________________________________________ 9
3 Installation __________________________________________________________ 10
3.1 License agreement _____________________________________________________ 12
3.2 Selecting the architecture ________________________________________________ 13
3.3 Defining the target file directory __________________________________________ 13
3.4 Carrying out the installation ______________________________________________ 14
3.5 Installation finish_______________________________________________________ 14
4 Configuration ________________________________________________________ 16
4.1 Architecture ___________________________________________________________ 18
4.2 Application server ______________________________________________________ 18
4.3 File system paths _______________________________________________________ 18
4.4 Security ______________________________________________________________ 20
4.5 eMail security system ___________________________________________________ 21
4.6 Repository ____________________________________________________________ 22
4.7 License key ___________________________________________________________ 23
4.8 Testing configuration ___________________________________________________ 24
5 Configuration of the Apparo gateway ____________________________________ 25
5.1 Configuration of the Apache Webserver with ajp proxy ________________________ 26
6 Creating the Apparo Designer link _______________________________________ 28
7 Installation clients ____________________________________________________ 31
8 Configuration Manager using command line ______________________________ 34
9 Import/Export definitions using command line _____________________________ 35
9.1 Importing definitions ___________________________________________________ 35
9.2 Exporting definitions ____________________________________________________ 36
10 Start-up of Apparo Fast Edit without Configuration Manager _______________ 37
3 / 42
9. The Apparo system log ______________________________________________ 39
10 Using Sybase ASE / IQ / Anywhere as data source _________________________ 40
10.1 Usage of the right Sybase IQ driver ______________________________________ 40
11 Online documentation _______________________________________________ 41
12 Support ___________________________________________________________ 42
4 / 42
1 Prior to Installation Installing Apparo Fast Edit can be done in 30 minutes if you prepare your environment. Please be aware of the following points before starting installation: 1.1 Hardware requirements File system: about 600 MB Main memory: about 2000 MB 1.2 Supported operating systems
Linux 64 Bit
IBM AIX 7 1.3 Supported web server
Apache web server 2.2
Apache web server 2.4
1.4 Supported virtual environments
VMware ESX/ESXi (for Linux)
Apparo Fast Edit must be installed using a root account. This version is running only on the Apache Tomcat 7 Application Server. This Tomcat server will be installed automatically.
5 / 42
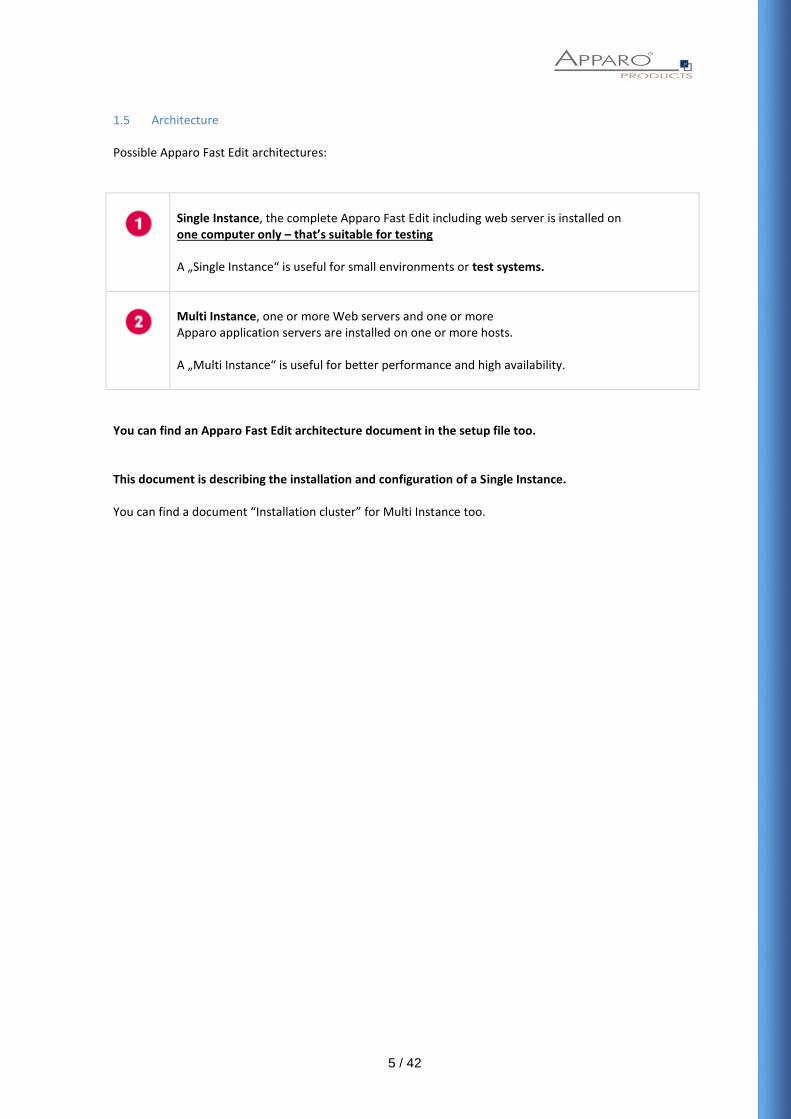
1.5 Architecture Possible Apparo Fast Edit architectures:
Single Instance, the complete Apparo Fast Edit including web server is installed on one computer only – that’s suitable for testing A „Single Instance“ is useful for small environments or test systems.
Multi Instance, one or more Web servers and one or more Apparo application servers are installed on one or more hosts. A „Multi Instance“ is useful for better performance and high availability.
You can find an Apparo Fast Edit architecture document in the setup file too. This document is describing the installation and configuration of a Single Instance. You can find a document “Installation cluster” for Multi Instance too.
6 / 42
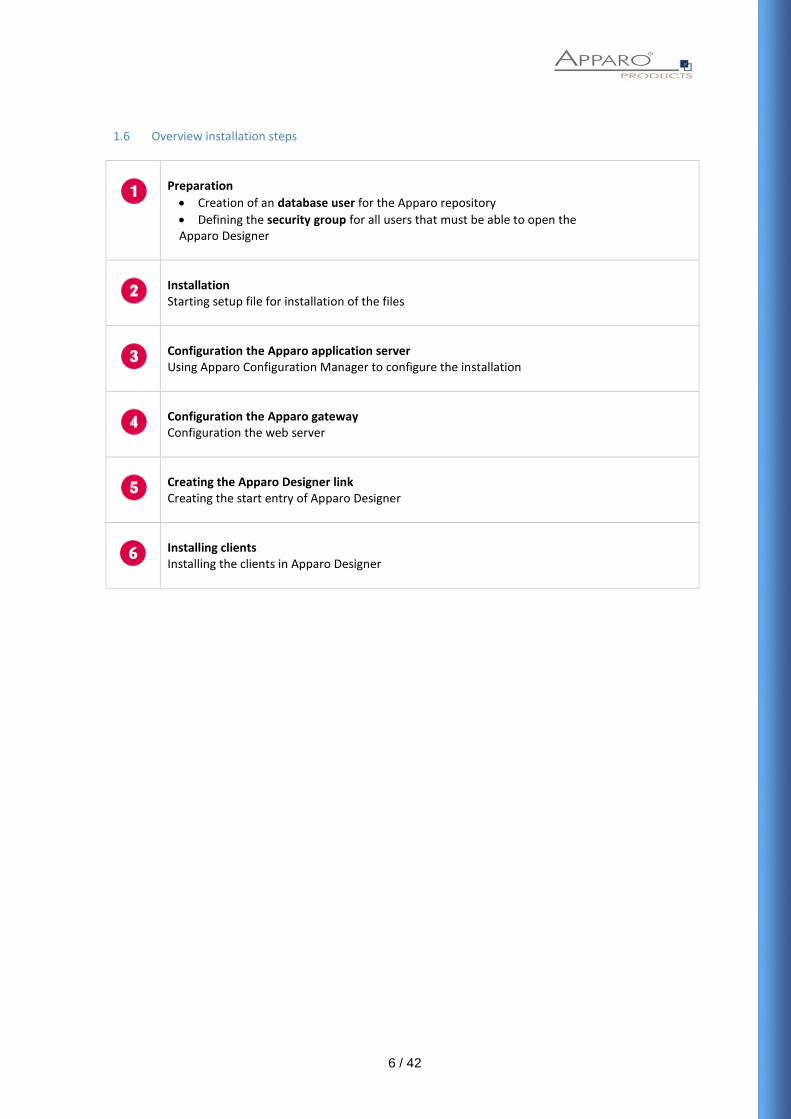
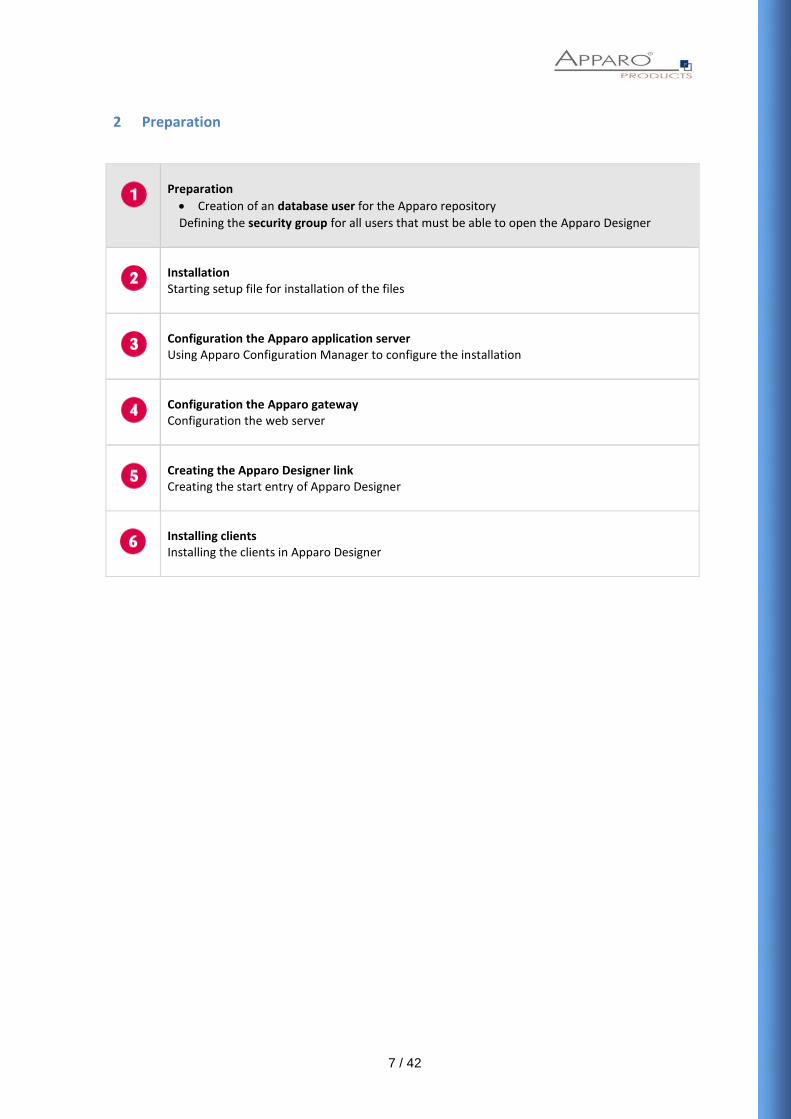
1.6 Overview installation steps
Preparation
Creation of an database user for the Apparo repository
Defining the security group for all users that must be able to open the Apparo Designer
Installation Starting setup file for installation of the files
Configuration the Apparo application server Using Apparo Configuration Manager to configure the installation
Configuration the Apparo gateway Configuration the web server
Creating the Apparo Designer link Creating the start entry of Apparo Designer
Installing clients Installing the clients in Apparo Designer
7 / 42
2 Preparation
Preparation
Creation of an database user for the Apparo repository
Defining the security group for all users that must be able to open the Apparo Designer
Installation Starting setup file for installation of the files
Configuration the Apparo application server Using Apparo Configuration Manager to configure the installation
Configuration the Apparo gateway Configuration the web server
Creating the Apparo Designer link Creating the start entry of Apparo Designer
Installing clients Installing the clients in Apparo Designer
8 / 42
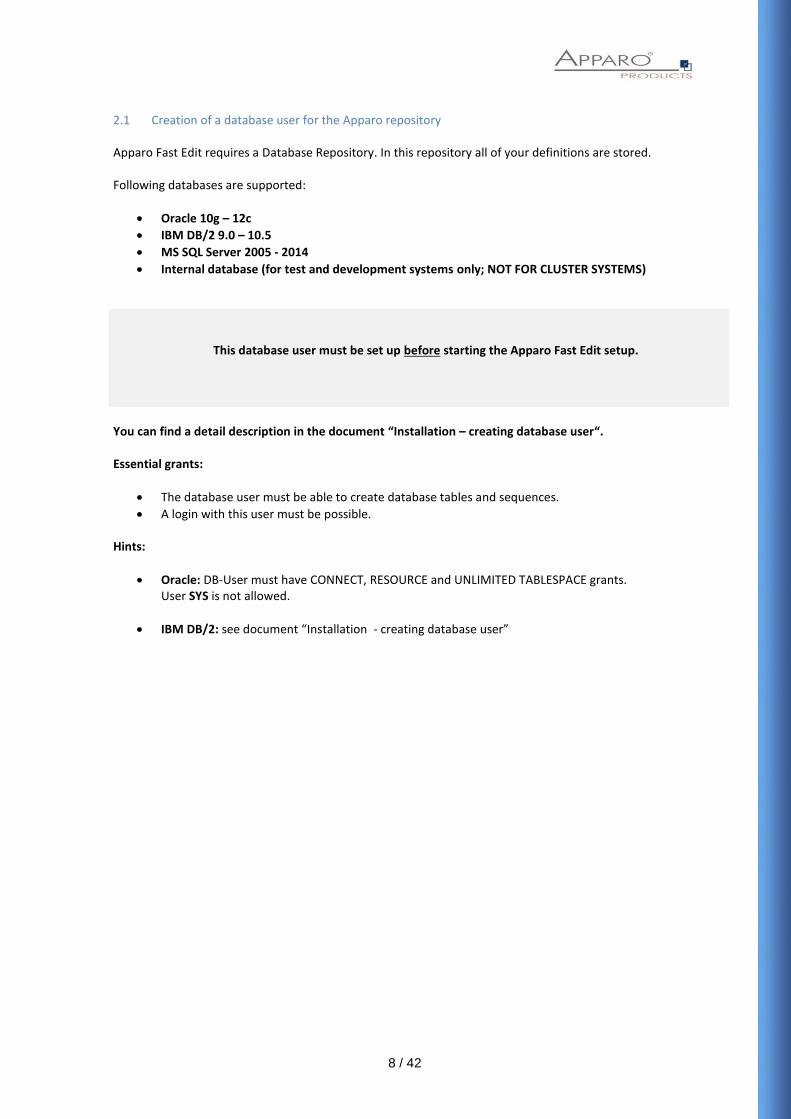
2.1 Creation of a database user for the Apparo repository Apparo Fast Edit requires a Database Repository. In this repository all of your definitions are stored. Following databases are supported:
Oracle 10g – 12c
IBM DB/2 9.0 – 10.5
MS SQL Server 2005 - 2014
Internal database (for test and development systems only; NOT FOR CLUSTER SYSTEMS)
This database user must be set up before starting the Apparo Fast Edit setup.
You can find a detail description in the document “Installation – creating database user“. Essential grants:
The database user must be able to create database tables and sequences.
A login with this user must be possible. Hints:
Oracle: DB-User must have CONNECT, RESOURCE and UNLIMITED TABLESPACE grants. User SYS is not allowed.
IBM DB/2: see document “Installation - creating database user”
9 / 42
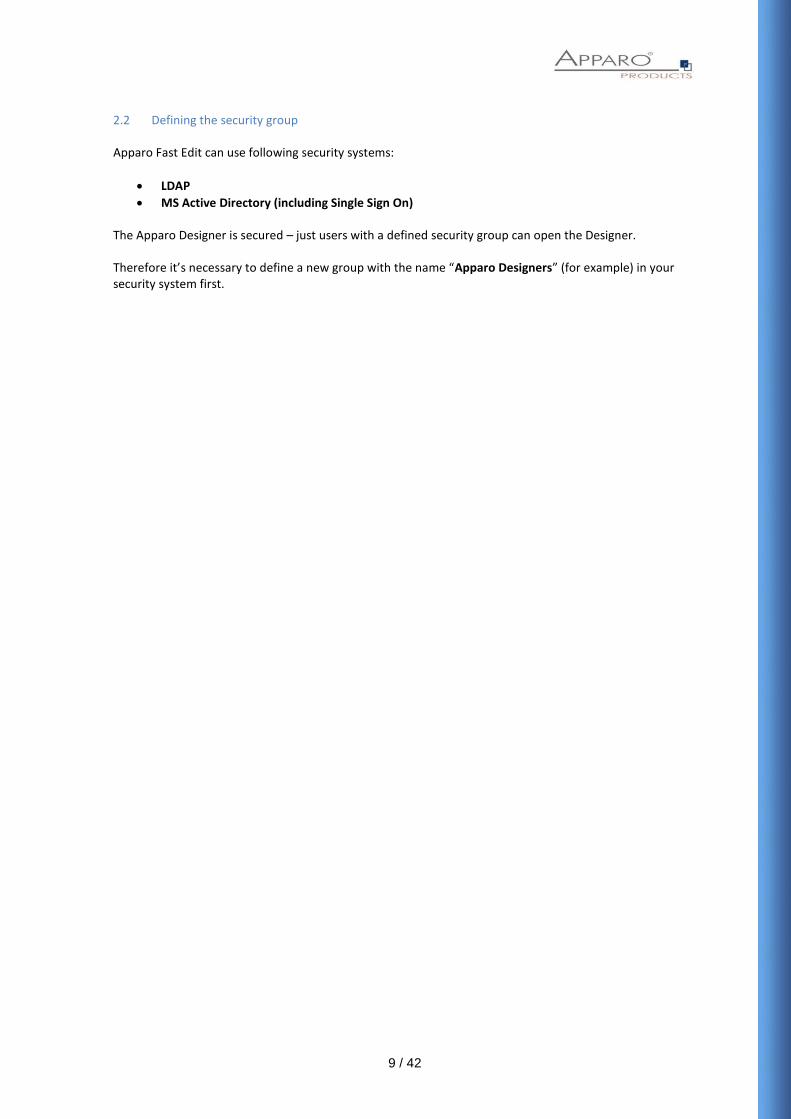
2.2 Defining the security group Apparo Fast Edit can use following security systems:
LDAP
MS Active Directory (including Single Sign On)
The Apparo Designer is secured – just users with a defined security group can open the Designer. Therefore it’s necessary to define a new group with the name “Apparo Designers” (for example) in your security system first.
10 / 42
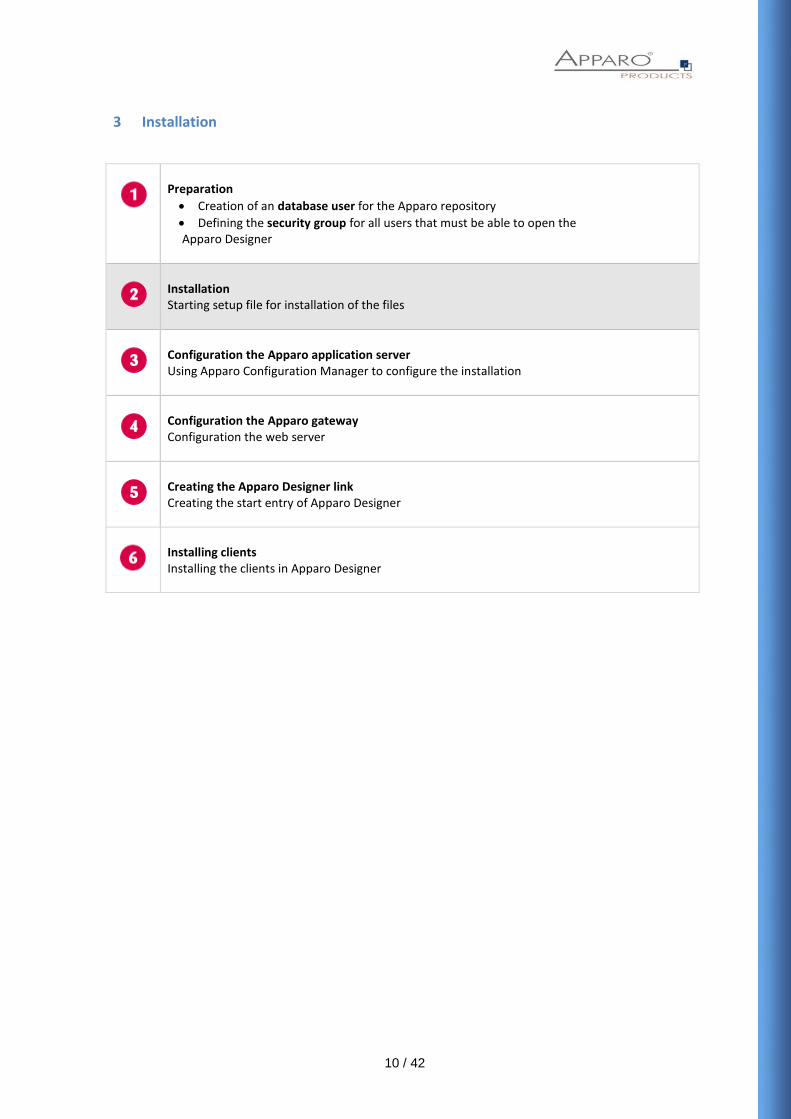
3 Installation
Preparation
Creation of an database user for the Apparo repository
Defining the security group for all users that must be able to open the Apparo Designer
Installation Starting setup file for installation of the files
Configuration the Apparo application server Using Apparo Configuration Manager to configure the installation
Configuration the Apparo gateway Configuration the web server
Creating the Apparo Designer link Creating the start entry of Apparo Designer
Installing clients Installing the clients in Apparo Designer
11 / 42
Start the installation by executing the file
FastEdit3.0.x.y.zzz_linux64_tomcat_standalone.sh (for a 64 Bit-only Linux environment) Or for IBM AIX:
FastEdit3.0.x.y.zzz_aix_tomcat_standalone.sh (for a 64 Bit only AIX environment) Please use the chmod command: chmod 777 FastEdit*.sh
The graphical UI (X Window) is preferred but not necessary. You can run the Fast Edit setup in text mode too.
The Apparo Configuration Manager is running in graphical mode only.
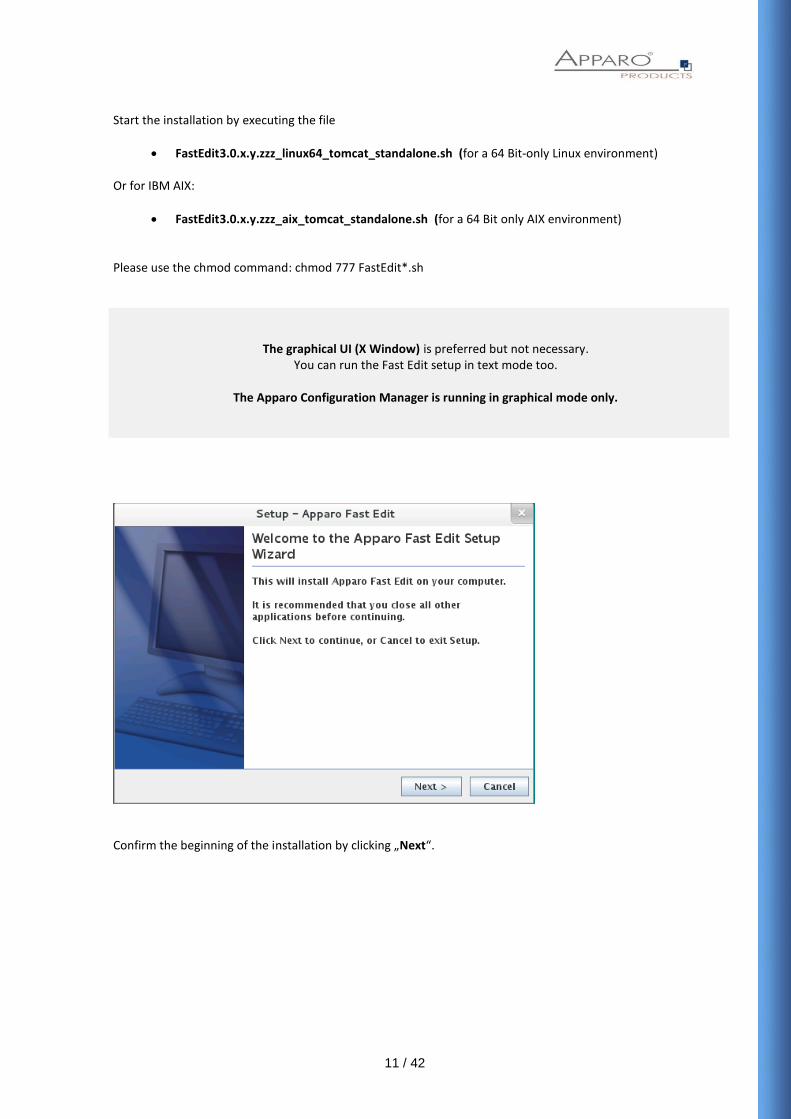
Confirm the beginning of the installation by clicking „Next“.
12 / 42
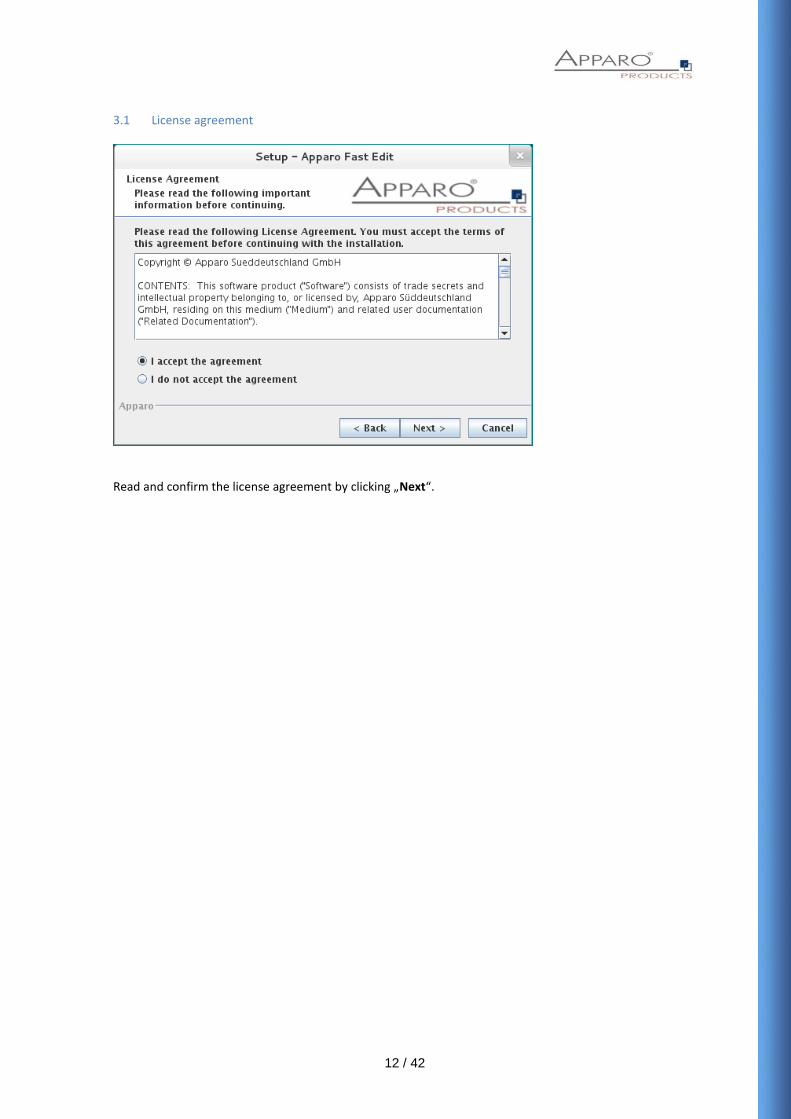
3.1 License agreement
Read and confirm the license agreement by clicking „Next“.
13 / 42
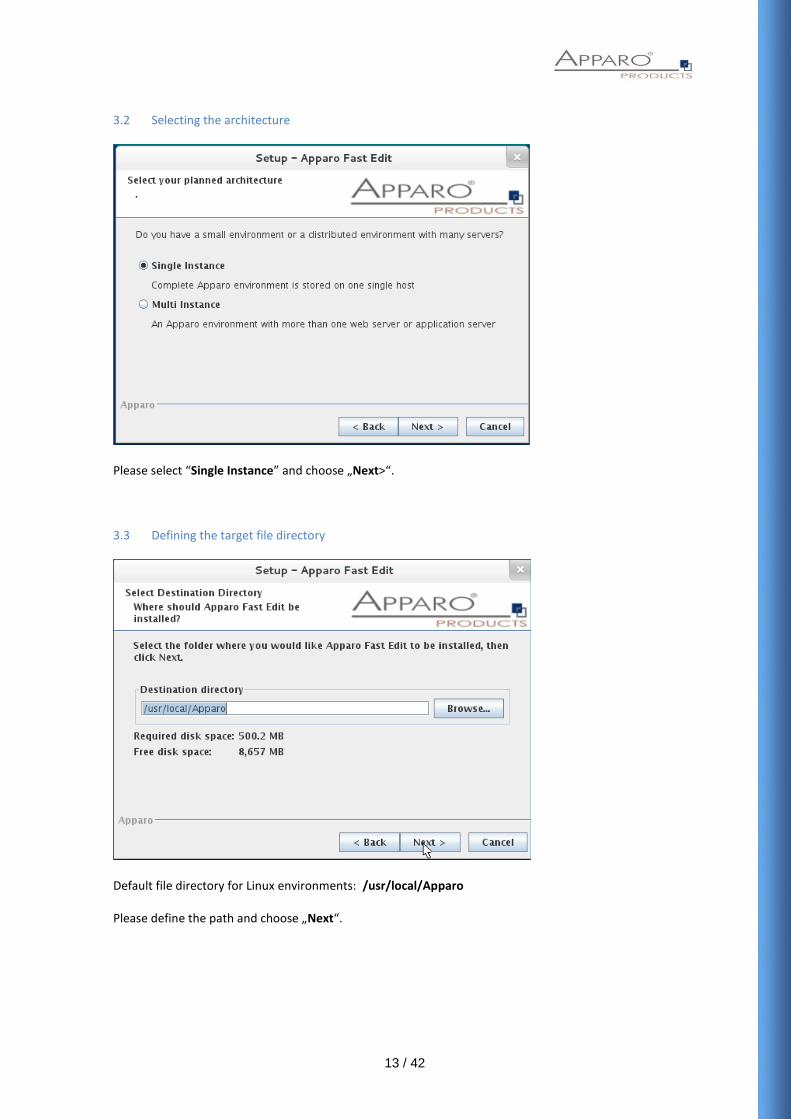
3.2 Selecting the architecture
Please select “Single Instance” and choose „Next>“. 3.3 Defining the target file directory
Default file directory for Linux environments: /usr/local/Apparo Please define the path and choose „Next“.
14 / 42
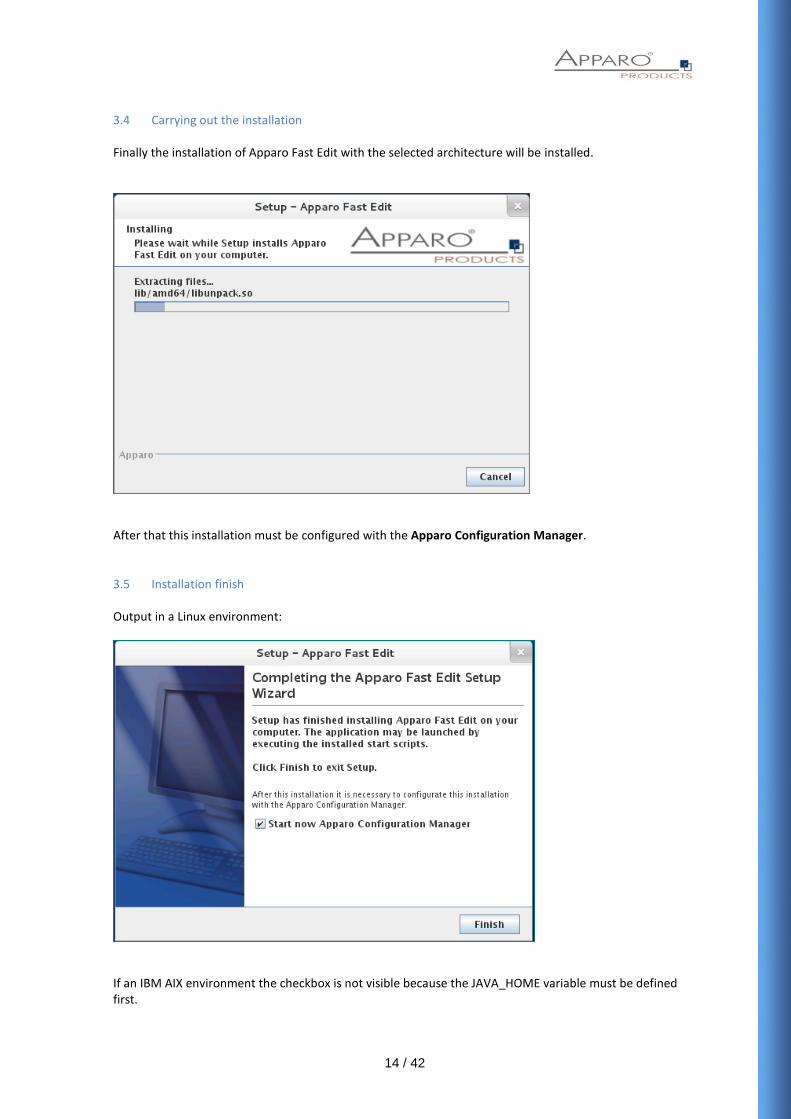
3.4 Carrying out the installation Finally the installation of Apparo Fast Edit with the selected architecture will be installed.
After that this installation must be configured with the Apparo Configuration Manager. 3.5 Installation finish
Output in a Linux environment:
If an IBM AIX environment the checkbox is not visible because the JAVA_HOME variable must be defined first.
15 / 42
Now it’s time to configure the installation with the Apparo Configuration Manager. Click „Finish" for completing the installation and to start the configuration.
For IBM AIX: Please check that Java 7 Release 1 is already installed, default file directory: /usr/java71_64 Please check that variable JAVA_HOME and PATH are correctly set to support this java vm. Next step: Go into folder [APPARO_HOME]/FastEdit/cm Start script: ./cm.sh
16 / 42
4 Configuration
Preparation
Creation of an database user for the Apparo repository
Defining the security group for all users that must be able to open the Apparo Designer
Installation Starting setup file for installation of the files
Configuration the Apparo application server Using Apparo Configuration Manager to configure the installation
Configuration the Apparo gateway Configuration the web server
Creating the Apparo Designer link Creating the start entry of Apparo Designer
Installing clients Installing the clients in Apparo Designer
17 / 42
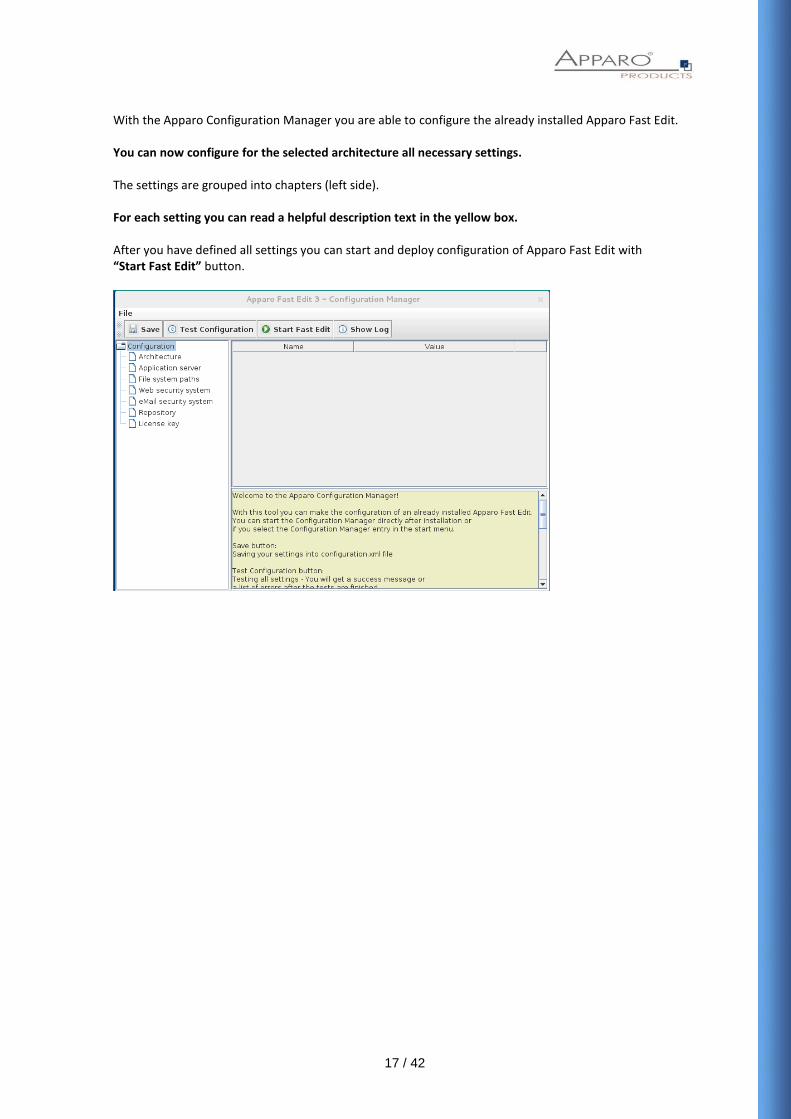
With the Apparo Configuration Manager you are able to configure the already installed Apparo Fast Edit. You can now configure for the selected architecture all necessary settings. The settings are grouped into chapters (left side). For each setting you can read a helpful description text in the yellow box. After you have defined all settings you can start and deploy configuration of Apparo Fast Edit with “Start Fast Edit” button.
18 / 42
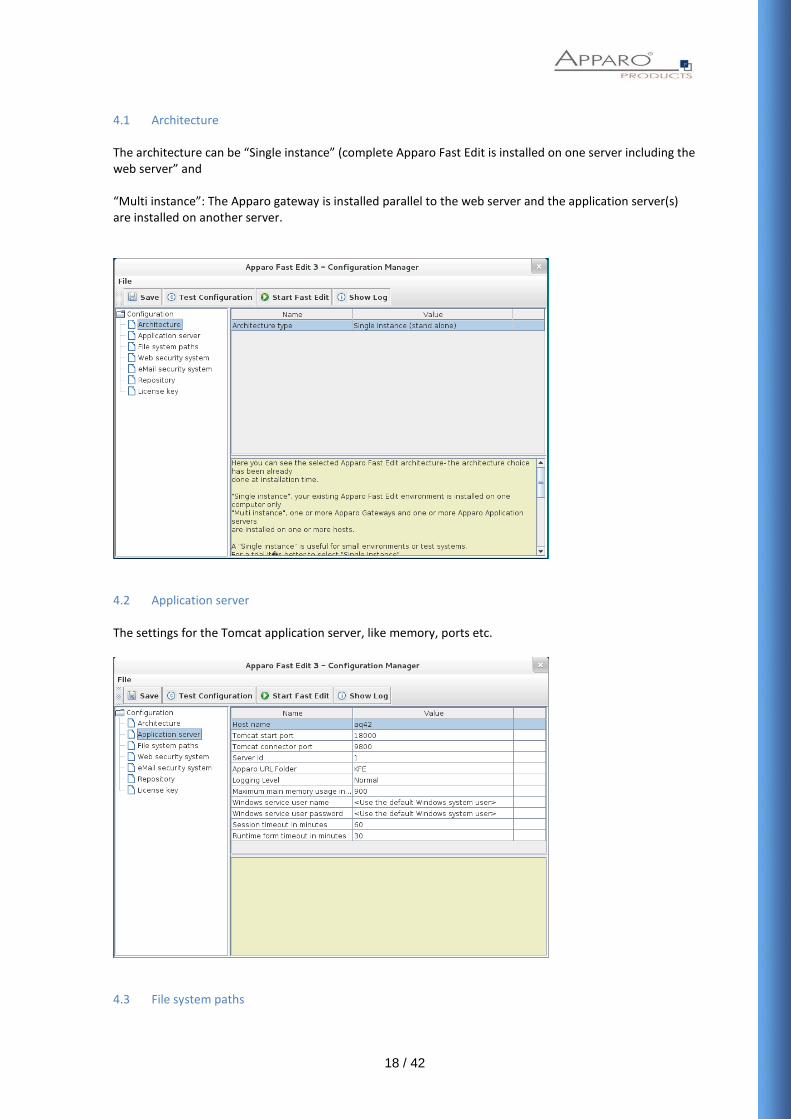
4.1 Architecture The architecture can be “Single instance” (complete Apparo Fast Edit is installed on one server including the web server” and “Multi instance”: The Apparo gateway is installed parallel to the web server and the application server(s) are installed on another server.
4.2 Application server The settings for the Tomcat application server, like memory, ports etc.
4.3 File system paths
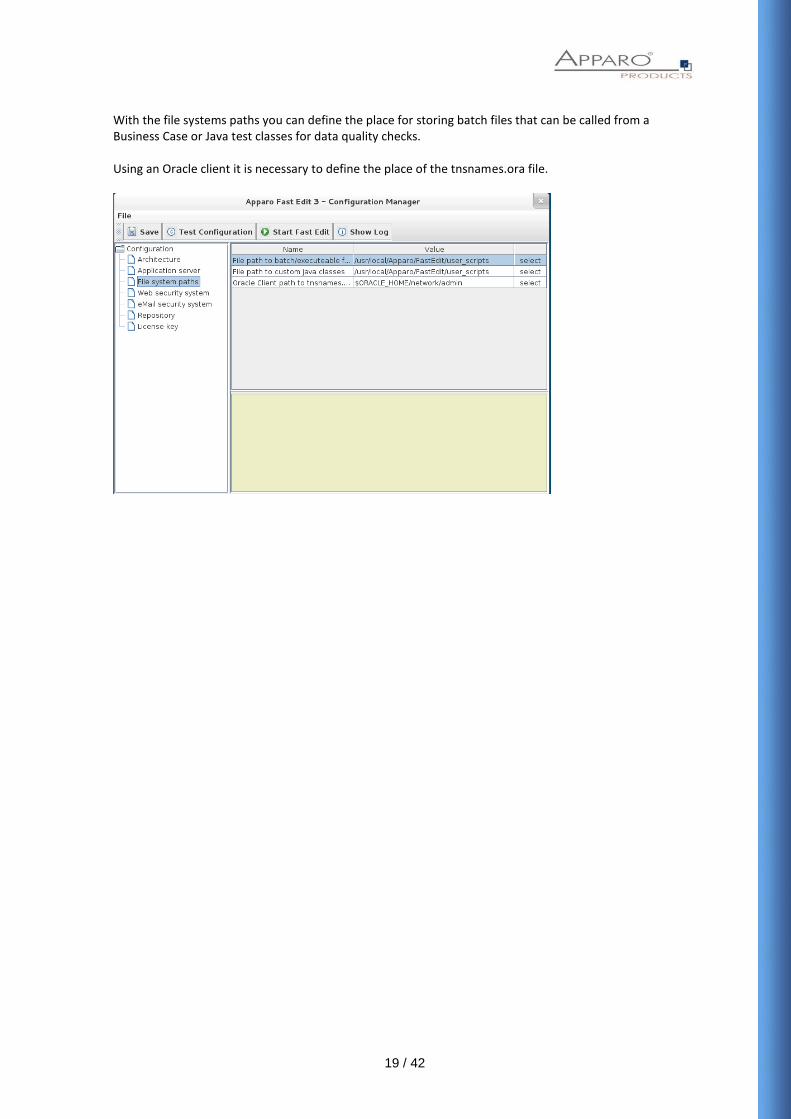
19 / 42
With the file systems paths you can define the place for storing batch files that can be called from a Business Case or Java test classes for data quality checks. Using an Oracle client it is necessary to define the place of the tnsnames.ora file.
20 / 42
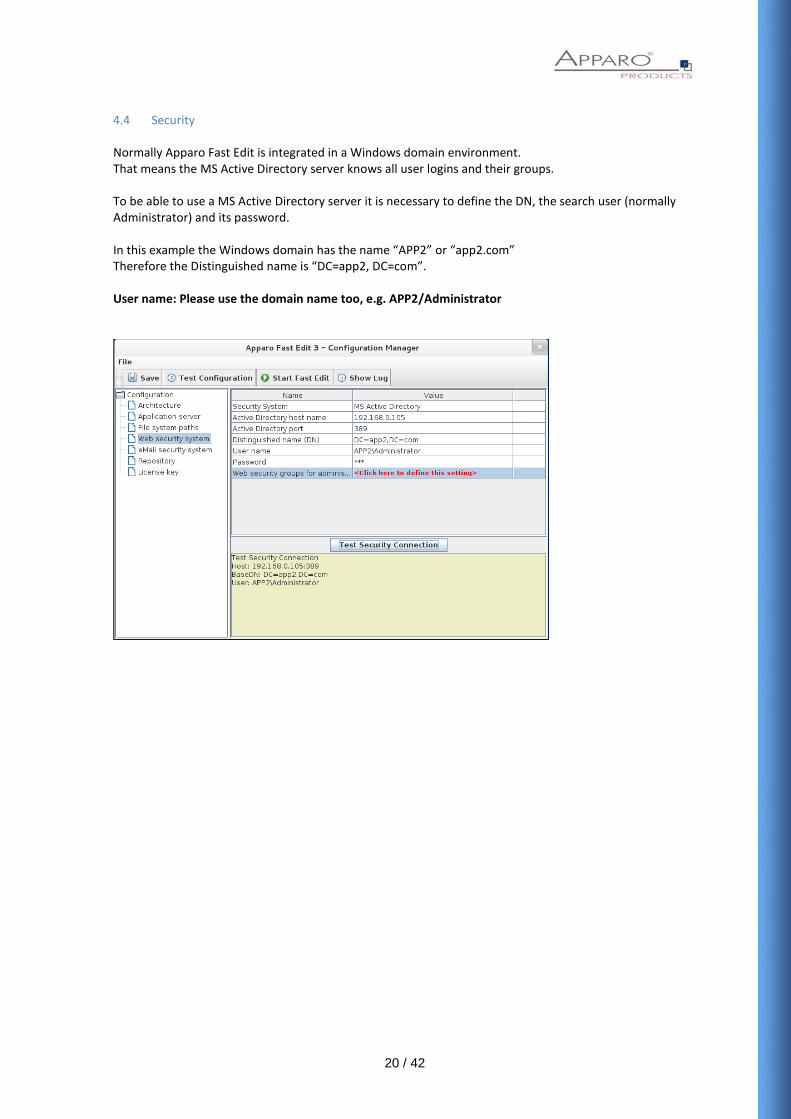
4.4 Security Normally Apparo Fast Edit is integrated in a Windows domain environment. That means the MS Active Directory server knows all user logins and their groups. To be able to use a MS Active Directory server it is necessary to define the DN, the search user (normally Administrator) and its password. In this example the Windows domain has the name “APP2” or “app2.com” Therefore the Distinguished name is “DC=app2, DC=com”. User name: Please use the domain name too, e.g. APP2/Administrator
21 / 42
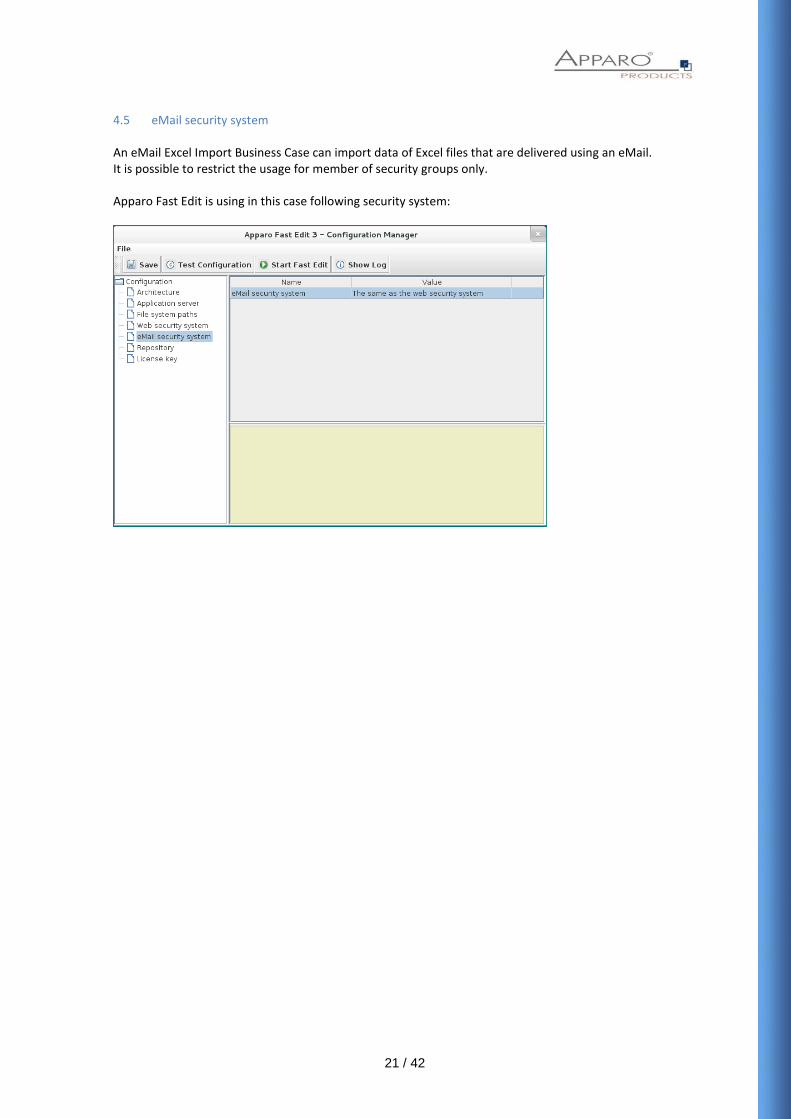
4.5 eMail security system An eMail Excel Import Business Case can import data of Excel files that are delivered using an eMail. It is possible to restrict the usage for member of security groups only. Apparo Fast Edit is using in this case following security system:
22 / 42
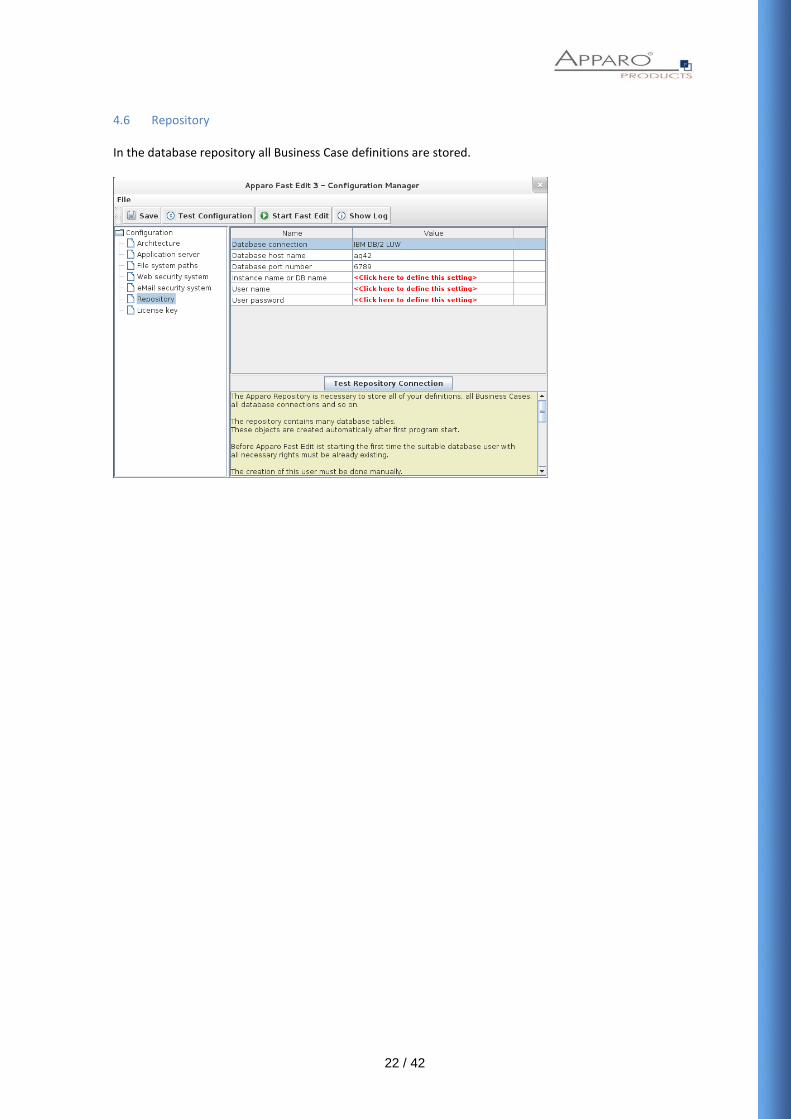
4.6 Repository In the database repository all Business Case definitions are stored.
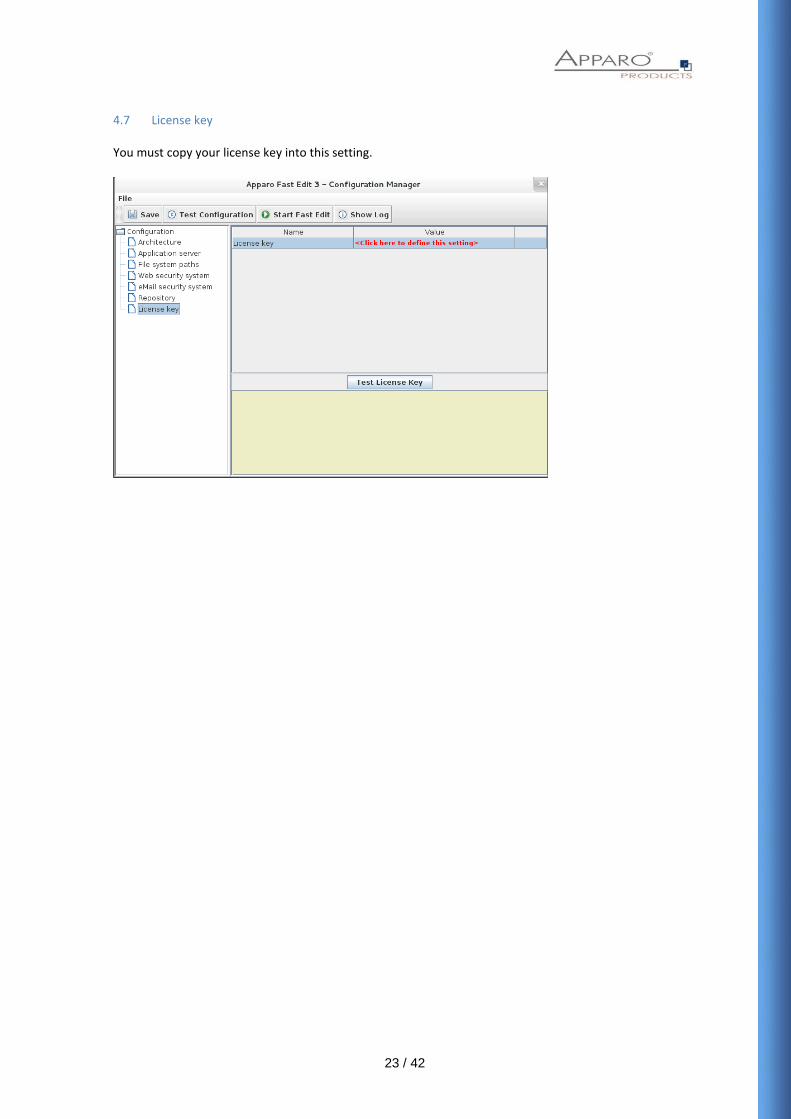
23 / 42
4.7 License key You must copy your license key into this setting.
24 / 42
4.8 Testing configuration Apparo Fast Edit is running if you can see following message in the Log file: ++++++++++++++++++++++++++++++++++++++++++++++++++++++++++++++++++++++ + Apparo Fast Edit 3.0.x.x was successfully started at <Start time and date> ++++++++++++++++++++++++++++++++++++++++++++++++++++++++++++++++++++++ Test of an Apparo application servers without using an Apparo gateway: http://<applicationserver:<startport>/KFE/pages/apptest.xhtml Example: http://server1:18000/KFE/pages/apptest.xhtml With this URL you can test if the Apparo application server is running fine or has problems. If you want to use the EIBC (eMail Import Business Case) then Apparo Fast Edit need 2 GB main memory.
25 / 42
5 Configuration of the Apparo gateway
Preparation
Creation of an database user for the Apparo repository
Defining the security group for all users that must be able to open the Apparo Designer
Installation Starting setup file for installation of the files
Configuration the Apparo application server Using Apparo Configuration Manager to configure the installation
Configuration the Apparo gateway Configuration the web server
Creating the Apparo Designer link Creating the start entry of Apparo Designer
Installing clients Installing the clients in Apparo Designer
26 / 42
5.1 Configuration of the Apache Webserver with ajp proxy This chapter is explaining the installation of AJP PROXY for Apache 2.2/2.4 web server. Hint: The configuration of Apparo Fast Edit using Apparo Configuration Manager must be already finished before you can continue. Please ask your Linux administrator for detail installation information about the installed Apache web server. The file directories can be different. Following installation steps are necessary:
1. Configure the ajp proxy and the ajp proxy balancer modules, by modifying httpd.conf of your Apache web server httpd.conf
LoadModule proxy_module modules/mod_proxy.so LoadModule proxy_ajp_module modules/mod_proxy_ajp.so LoadModule proxy_balancer_module modules/mod_proxy_balancer.so
2. Configure the load balancer members under <IfModule mod_proxy.c>: Open text file „ http_ajp_proxy_settings.txt “ that is stored in directory cgi-bin in a text editor. Replace in httpd.conf the line “<IfModule mod_proxy.c> “ with the content of the text file http_ajp_proxy_settings.txt. Example – a configuration with 2 nodes:
<IfModule mod_proxy.c> ProxyPass /KFE balancer://ApparoFastEdit/KFE ProxyPassReverse /KFE balancer://ApparoFastEdit/KFE ProxyIOBufferSize 32768
<Proxy balancer://ApparoFastEdit> BalancerMember ajp://192.168.0.103:9800 route=s1 loadfactor=1 BalancerMember ajp://192.168.0.115:9800 route=s2 loadfactor=1
ProxySet timeout=3000 ProxySet lbmethod=bytraffic ProxySet nofailover=On ProxySet stickysession=JSESSIONID|jsessionid </Proxy>
<Location /balancer-manager> SetHandler balancer-manager </Location> </IfModule>
27 / 42
Save the file httpd.conf and restart the web server. Hint if using RedHat Linux: If you get an Apache error like: [error] (13)Permission denied: proxy: AJP: attempt to connect to
<servername:9800> failed
Please enter following command: /usr/sbin/setsebool -P httpd_can_network_connect 1
Server Time out: Please check that your Apache web server configuration has the setting TimeOut 1800 Apparo Fast Edit need much time for importing/exporting/upgrading and Excel import. Now the installation of the Apparo gateway for Apache web server is finished.
28 / 42
6 Creating the Apparo Designer link
Preparation
Creation of an database user for the Apparo repository
Defining the security group for all users that must be able to open the Fast Edit Designer
Installation Starting setup file for installation of the files
Configuration the Apparo application server Using Apparo Configuration Manager to configure the installation
Configuration the Apparo gateway Configuration the web server
Creating the Apparo Designer link Creating the start entry of Apparo Designer
Installing clients Installing the clients in Apparo Designer
29 / 42
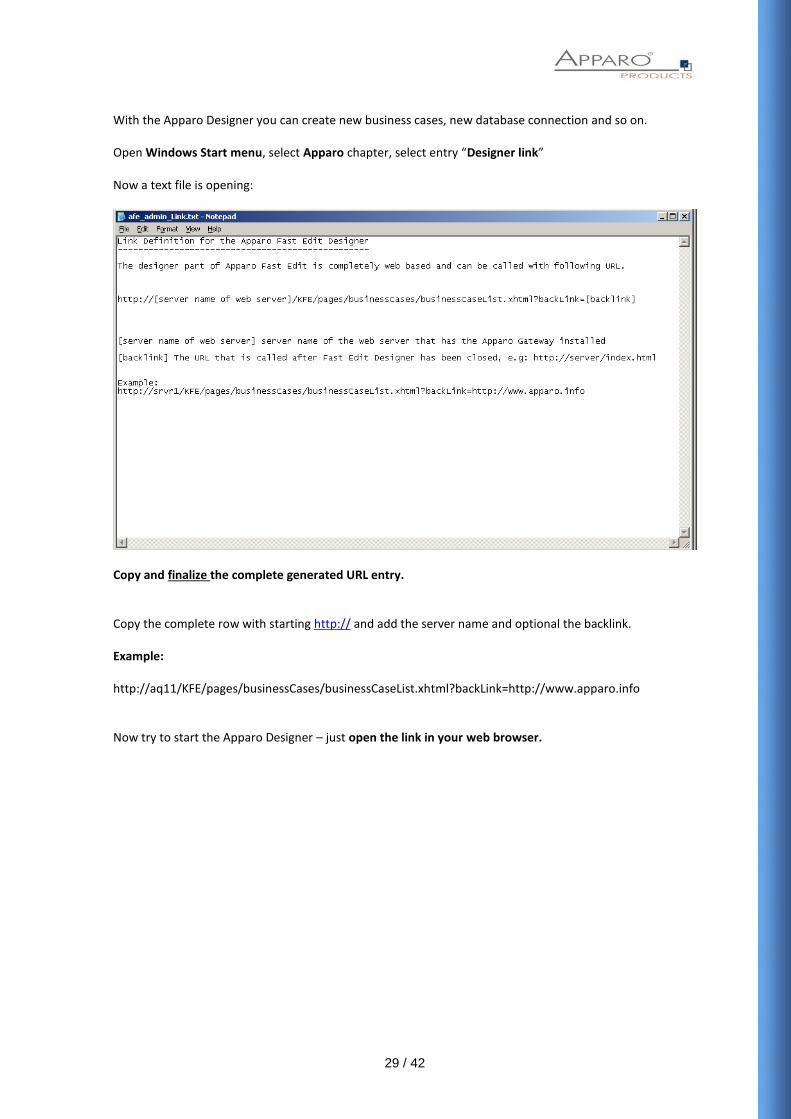
With the Apparo Designer you can create new business cases, new database connection and so on. Open Windows Start menu, select Apparo chapter, select entry “Designer link” Now a text file is opening:
Copy and finalize the complete generated URL entry. Copy the complete row with starting http:// and add the server name and optional the backlink. Example: http://aq11/KFE/pages/businessCases/businessCaseList.xhtml?backLink=http://www.apparo.info Now try to start the Apparo Designer – just open the link in your web browser.
30 / 42
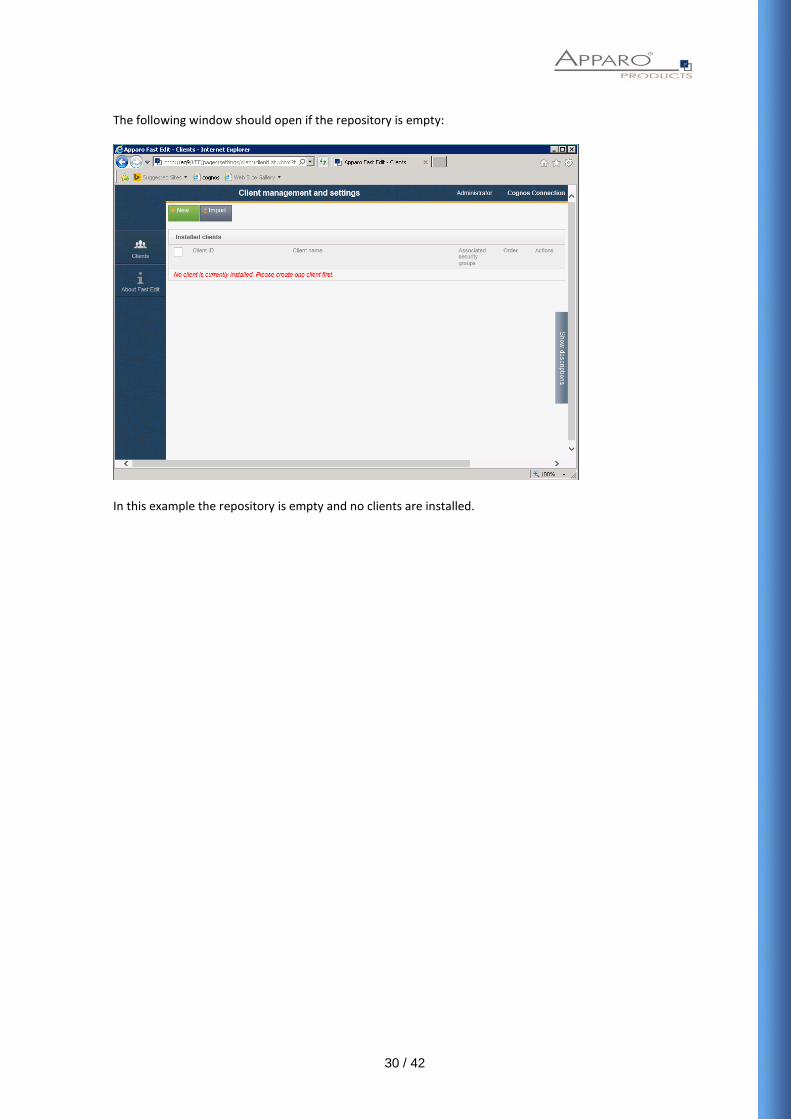
The following window should open if the repository is empty:
In this example the repository is empty and no clients are installed.
31 / 42
7 Installation clients
Preparation
Creation of an database user for the Apparo repository
Defining the security group for all users that must be able to open the Apparo Designer
Installation Starting setup file for installation of the files
Configuration the Apparo application server Using Apparo Configuration Manager to configure the installation
Configuration the Apparo gateway Configuration the web server
Creating the Apparo Designer link Creating the start entry of Apparo Designer
Installing clients

32 / 42
Please read the document “Configuration Guide” for how to install clients etc.
33 / 42
The installation & configuration is now complete. If you open the Apparo designer then you can create a new client if necessary. You can find all details in document “Configuration guide”. Take the document “First Steps / Training manual” for the fundamental using. Movies: http://movies.apparo.info
34 / 42
8 Configuration Manager using command line
It is possible to automate the configuration process of the Configuration Manager. The complete configuration is stored in the file configuration.xml You can find this file in the [APPARO_HOME]/FastEdit/cm file directory. Using this command line the configuration can be restored: [APPARO_HOME]/FastEdit/cm/cmc.sh parameter1 parameter2 …
Parameter name
Functionality
-?
Displays this help text
-deploy true/false
Configuration Manager will deploy the setting files, default:true
-start true/false
Start Apparo Fast Edit (if no gateway), default: true
35 / 42
9 Import/Export definitions using command line You can export and import clients (including languages, folder, Business Cases, connections, and DB-messages), Business Cases, folder and connections using scripts. 9.1 Importing definitions The import program is stored in the file directory “import”: [APPARO_HOME]/FastEdit/import Use script afe-import.sh (If you start the script without arguments then you see the possible arguments) -afeUrl <URL> The Apparo Fast Edit URL address that will export the data.
Example: http://localhost:18000/KFE. If you don't use this argument then the export is using the application server of this installation and its installation port.
-clientId <CLIENT_ID> ID of a client that Business Cases, language definitions, database messages or connection definitions will be imported into.
-f <FILE> The file that contains the client, Business Case, language definition, database messages or connection definitions. -h Displays this help text -importSecurity <true|false> Business cases and folders may contain a list of user groups defining who can access them. If this option is set to false, such
security information will not be imported. -overwriteBc <true|false> If true then Business Cases from the import file will overwrite already existing Business Cases if their Business Case ID are the same. If false, Business Cases with such conflicting identifiers will be skipped. -overwriteClient <true|false> If true then clients from the import file will overwrite already
existing clients with the same identifiers including client content like Business Cases. If false then clients with such conflicting identifiers will be skipped.
-overwriteConnection <true|false> If true then database and email connections from the import file will overwrite already existing connections with the same names. If false then connections with such conflicting names will be skipped. -p <PASSWORD> The password used to authenticate. This setting is necessary in a secured environment. -u <USERNAME> The user used to authenticate. This setting is necessary in
a secured environment. All import activities are logged server side in file directory logs, file afeimport.log Sample: afe-import.sh –f /etc/definition.xml –u aferep –p aferep -clientId Sales
36 / 42
9.2 Exporting definitions The export program is stored in the file directory “export”: [APPARO_HOME]/FastEdit/export Use script afe-export.sh If you start the script without arguments then you can see the possible arguments: -afeUrl <URL> The Apparo Fast Edit URL address that will export the data. Example: http://localhost:18000/KFE. If you don't use this argument then the export is using the application server of this installation and its installation port. -bcid <BUSINESS_CASE_ID> ID of a Business Case you want to export. -clientId <CLIENT_ID> ID of a client you either want to export or an ID of a client the target object (Business Case, folder or connection) belongs to. -dbc <CONN_NAME> Name of a database connection you want to export. -emailc <CONN_NAME> Name of an email connection you want to export. -f <FILEPATH> Filename & path where to write the exported XML. -folderPath <PATH> Path of a folder you want to export. It should start with a slash character '/' which should also be used as a path separator. -h Displays this help text -p <PASSWORD> The password used to authenticate. This setting is necessary
in a secured environment non BI environment. -u <USERNAME> The user used to authenticate. This setting is necessary in a secured non BI environment. All export activities are logged server side in file directory logs, file afeexport.log Sample: afe-export.sh –f /etc/definition.xml -clientId DemoClient

37 / 42
10 Start-up of Apparo Fast Edit without Configuration Manager Apparo Fast Edit can be started using the script startService.sh it is stored in [APPARO_HOME]/FastEdit/bin Following arguments are necessary: 1. Start port of Tomcat, default: 18000 (see settings in Configuration Manager) 2. Main memory max, default: 1024 (in MB) Example: ./startService.sh 18000 2048
38 / 42
Starting of Apparo Configuration Manager The Apparo Configuration Manager can be started using: ./cm.sh it is stored in [APPARO_HOME]/FastEdit/cm Example: cd /opt/Apparo/FastEdit/cm ./cm.sh Important for IBM AIX: Please be sure that variables JAVA_HOME and PATH are set correctly and the Java 7 Release 1 is in use.
39 / 42
9. The Apparo system log All internal system message of Apparo Fast Edit are stored in afe.log it is stored in: [APPARO_HOME]/FastEdit/logs Example: cd /opt/Apparo/FastEdit/logs gedit afe.log The Tomcat system log is stored in: [APPARO_HOME]/FastEdit/tomcat/logs Example: cd /opt/Apparo/FastEdit/tomcat/logs gedit catalina.log
40 / 42
10 Using Sybase ASE / IQ / Anywhere as data source If you want to use Sybase ASE / IQ / Anywhere as data source, you must configure the master database for the usage of the Sybase ASE / IQ / Anywhere JDBC driver. You will find the original Sybase ASE / IQ / Anywhere files in: [APPARO_HOME]/etc/Sybase_JDBC/jConnect-7_0/sp Depending on the used database version you have to run the matching script in the master database:
sql_server.sql - installs stored procedures on Adaptive Server earlier than version 12.0.
sql_server12.sql - installs stored procedures on Adaptive Server 12.0.x.
sql_server12.5.sql - installs stored procedures on Adaptive Server 12.5.x.
sql_server15.0.sql - installs stored procedures on Adaptive Server 15.0.x through 15.5.x.
sql_server15.7.sql - installs stored procedures on Adaptive Server 15.7 or later.
sql_asa.sql - installs stored procedures on SQL Anywhere 9.x.
sql_asa10.sql - installs stored procedures on SQL Anywhere 10.x.
sql_asa11.sql - installs stored procedures on SQL Anywhere 11.x.
sql_asa12.sql - installs stored procedures on SQL Anywhere 12.x. 10.1 Usage of the right Sybase IQ driver
You can select the right driver in the file in cm/input/afe.properties with these entries: # Sybase JDBC driver - version 6 or version 7 can be used. # Jconnect 6: For Sybase IQ version less or equals than 15.2 jdbc.sybase.driver=com.sybase.jdbc3.jdbc.SybDriver # Sybase JDBC driver Jconnect 7: For Sybase IQ version 15.4 and higher #jdbc.sybase.driver=com.sybase.jdbc4.jdbc.SybDriver Depending on the driver you have to use, it has to be activated. Uncomment the driver for your version and put a ‚#‘ in front of the driver you don’t have to use. Finally restart AFE in the Configuration Manager by pressing the ‚Start Fast Edit‘ button.
41 / 42
11 Online documentation The complete documentation is stored in [APPARO_HOME]/FastEdit/doc


![User Guide Apparo Fast Edit for QlikView Version 3.1 · The sort can be changed by clicking the orange arrows: [8] 2.1.3 Folder ... Teradata from Version V2R6 Exasol Informix Sybase](https://img.pdfslide.net/doc/110x75/5b57eb4c7f8b9aec628bb596/user-guide-apparo-fast-edit-for-qlikview-version-31-the-sort-can-be-changed.jpg)


![User Guide Apparo Fast Edit for Qlik Sense Version 3.0 · [5] 1 Premises Apparo Fast Edit must be installed successfully and the Apparo Designer Extension must be already installed](https://img.pdfslide.net/doc/110x75/5c63fe6709d3f202208c1a85/user-guide-apparo-fast-edit-for-qlik-sense-version-30-5-1-premises-apparo.jpg)


![User Guide Apparo Fast Edit for IBM Cognos Analytics ... · Apparo Fast Edit for IBM Cognos Analytics Version 3.0.7.1 [2] ... 1.1 Business Case Export/Import ... Teradata from Version](https://img.pdfslide.net/doc/110x75/5b41b79c7f8b9a51528decb9/user-guide-apparo-fast-edit-for-ibm-cognos-analytics-apparo-fast-edit-for.jpg)
![Benutzerhandbuch Apparo Fast Edit für QlikView Version 3 · [5] 1 Voraussetzungen a) Apparo Fast Edit muss erfolgreich installiert und der Apparo Designer-Eintrag muss im Web Portal](https://img.pdfslide.net/doc/110x75/5e153bc53abc2051cd6be150/benutzerhandbuch-apparo-fast-edit-fr-qlikview-version-3-5-1-voraussetzungen.jpg)