Embed Size (px)
Citation preview

Automation task
___________________
___________________
___________________
___________________
SIMATIC
Automation task
Getting Started
03/2013 A5E31938126-AA
Introduction 1
Application 2
Hardware configuration 3
Sample project 4

Siemens AG Industry Sector Postfach 48 48 90026 NÜRNBERG GERMANY
A5E31938126-AA Ⓟ 03/2013 Technical data subject to change
Copyright © Siemens AG 2013. All rights reserved
Legal information Warning notice system
This manual contains notices you have to observe in order to ensure your personal safety, as well as to prevent damage to property. The notices referring to your personal safety are highlighted in the manual by a safety alert symbol, notices referring only to property damage have no safety alert symbol. These notices shown below are graded according to the degree of danger.
DANGER indicates that death or severe personal injury will result if proper precautions are not taken.
WARNING indicates that death or severe personal injury may result if proper precautions are not taken.
CAUTION indicates that minor personal injury can result if proper precautions are not taken.
NOTICE indicates that property damage can result if proper precautions are not taken.
If more than one degree of danger is present, the warning notice representing the highest degree of danger will be used. A notice warning of injury to persons with a safety alert symbol may also include a warning relating to property damage.
Qualified Personnel The product/system described in this documentation may be operated only by personnel qualified for the specific task in accordance with the relevant documentation, in particular its warning notices and safety instructions. Qualified personnel are those who, based on their training and experience, are capable of identifying risks and avoiding potential hazards when working with these products/systems.
Proper use of Siemens products Note the following:
WARNING Siemens products may only be used for the applications described in the catalog and in the relevant technical documentation. If products and components from other manufacturers are used, these must be recommended or approved by Siemens. Proper transport, storage, installation, assembly, commissioning, operation and maintenance are required to ensure that the products operate safely and without any problems. The permissible ambient conditions must be complied with. The information in the relevant documentation must be observed.
Trademarks All names identified by ® are registered trademarks of Siemens AG. The remaining trademarks in this publication may be trademarks whose use by third parties for their own purposes could violate the rights of the owner.
Disclaimer of Liability We have reviewed the contents of this publication to ensure consistency with the hardware and software described. Since variance cannot be precluded entirely, we cannot guarantee full consistency. However, the information in this publication is reviewed regularly and any necessary corrections are included in subsequent editions.
Automation task Getting Started, 03/2013, A5E31938126-AA 3
Table of contents
1 Introduction ............................................................................................................................................. 5
2 Application .............................................................................................................................................. 7
3 Hardware configuration ........................................................................................................................... 9
4 Sample project ...................................................................................................................................... 11
4.1 Overview ...................................................................................................................................... 11
4.2 Selecting the recipe ..................................................................................................................... 12
4.3 Displaying the CMYK and RGB values ........................................................................................ 13
4.4 Filling the recipe ........................................................................................................................... 14
4.5 Starting the mixing process .......................................................................................................... 15
4.6 Filling the color mixture ................................................................................................................ 16
4.7 Resetting the fill level ................................................................................................................... 17

Table of contents
Automation task 4 Getting Started, 03/2013, A5E31938126-AA

Automation task Getting Started, 03/2013, A5E31938126-AA 5
Introduction 1
Introduction In the following section, you will become familiar with the automation task.
You can find out more about the application example, the hardware configuration and the components of the sample project.
Introduction
Automation task 6 Getting Started, 03/2013, A5E31938126-AA
Automation task Getting Started, 03/2013, A5E31938126-AA 7
Application 2
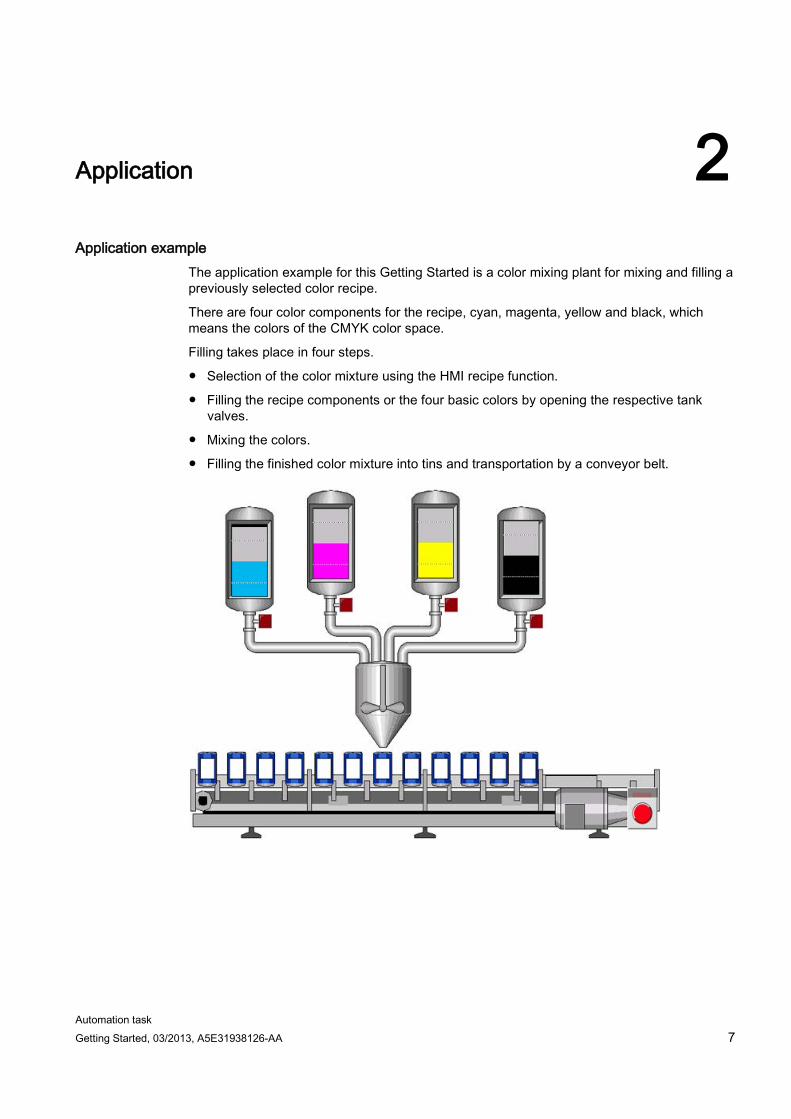
Application example The application example for this Getting Started is a color mixing plant for mixing and filling a previously selected color recipe.
There are four color components for the recipe, cyan, magenta, yellow and black, which means the colors of the CMYK color space.
Filling takes place in four steps.
● Selection of the color mixture using the HMI recipe function.
● Filling the recipe components or the four basic colors by opening the respective tank valves.
● Mixing the colors.
● Filling the finished color mixture into tins and transportation by a conveyor belt.
Application
Automation task 8 Getting Started, 03/2013, A5E31938126-AA

Automation task Getting Started, 03/2013, A5E31938126-AA 9
Hardware configuration 3
Design of the hardware configuration The hardware configuration consists of the following devices:
● The CPU 1511-1 PN with an S7-1500 load current supply, a digital input module and a digital output module.
● HMI Panel TP1200 Comfort that can also be simulated with the TIA Portal.
● Distributed ET 200MP I/O system with IM 155-5 PN ST interface module and digital input and digital output modules.
● Distributed ET 200SP I/O system with IM 155-6 PN ST interface module, digital input modules, digital output modules and server module.
Hardware configuration
Automation task 10 Getting Started, 03/2013, A5E31938126-AA

Automation task Getting Started, 03/2013, A5E31938126-AA 11
Sample project 4 4.1 Overview
Sample project for the application To configure the color mixing system with the TIA Portal, create the sample project "Color_Filling_Station".
The following project components already exist for the sample project:
● The program blocks of the CPU
● The visualization of the HMI on a Comfort Panel
In this section, we will explain the relationships between the individual project components of the sample project.
You will carry out the necessary configuration steps yourself at a later point in time.
Sample project 4.2 Selecting the recipe
Automation task 12 Getting Started, 03/2013, A5E31938126-AA
4.2 Selecting the recipe
Selecting the recipe
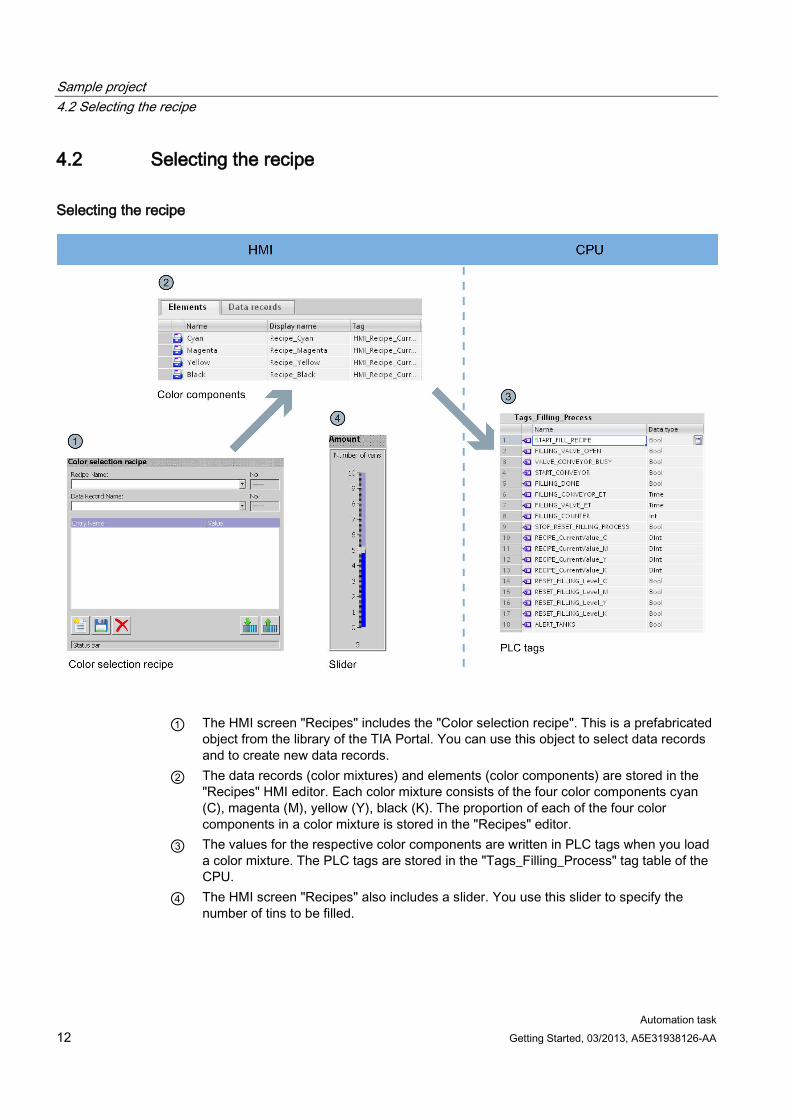
① The HMI screen "Recipes" includes the "Color selection recipe". This is a prefabricated object from the library of the TIA Portal. You can use this object to select data records and to create new data records.
② The data records (color mixtures) and elements (color components) are stored in the "Recipes" HMI editor. Each color mixture consists of the four color components cyan (C), magenta (M), yellow (Y), black (K). The proportion of each of the four color components in a color mixture is stored in the "Recipes" editor.
③ The values for the respective color components are written in PLC tags when you load a color mixture. The PLC tags are stored in the "Tags_Filling_Process" tag table of the CPU.
④ The HMI screen "Recipes" also includes a slider. You use this slider to specify the number of tins to be filled.
Sample project 4.3 Displaying the CMYK and RGB values
Automation task Getting Started, 03/2013, A5E31938126-AA 13
4.3 Displaying the CMYK and RGB values
Displaying the CMYK and RGB values
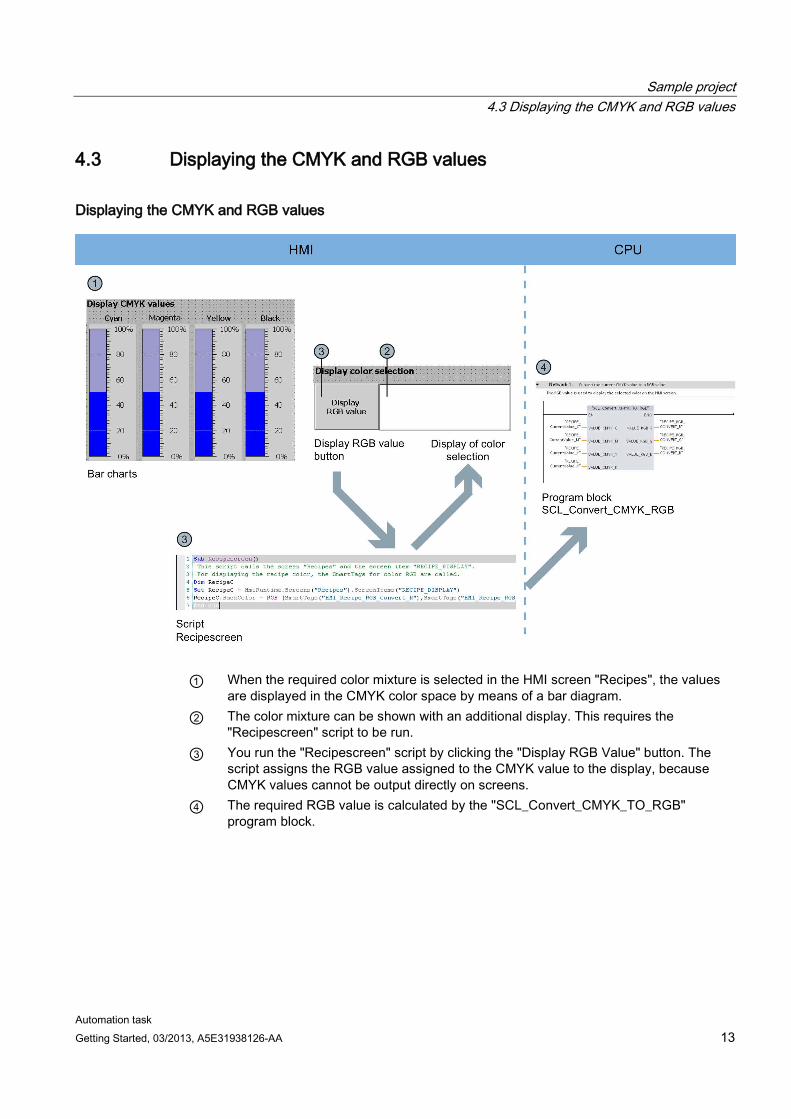
① When the required color mixture is selected in the HMI screen "Recipes", the values are displayed in the CMYK color space by means of a bar diagram.
② The color mixture can be shown with an additional display. This requires the "Recipescreen" script to be run.
③ You run the "Recipescreen" script by clicking the "Display RGB Value" button. The script assigns the RGB value assigned to the CMYK value to the display, because CMYK values cannot be output directly on screens.
④ The required RGB value is calculated by the "SCL_Convert_CMYK_TO_RGB" program block.

Sample project 4.4 Filling the recipe
Automation task 14 Getting Started, 03/2013, A5E31938126-AA
4.4 Filling the recipe
Filling the recipe
① The "Fill recipe" button starts the filling of the color components in the HMI screen "Start screen". The button activates the "LAD_Control_Color_Valves" program block.
② The program block calculates how long each of the four valves needs to stay open for the color mixture based on the specified recipe and the number of tins that have to be filled.
③ LEDs below the tanks indicate that the valves are opened.

Sample project 4.5 Starting the mixing process
Automation task Getting Started, 03/2013, A5E31938126-AA 15
④ The "LAD_Tanks_Filling_Level" program block is executed at the same time as the filling. The program block calculates the quantity remaining in the tank for the tank fill level. The fill levels of the tanks are stored in the global data block "Filling".
⑤ The fill level indicators in the HMI screen are directly linked with the global data block and are updated with each runtime acquisition cycle.
4.5 Starting the mixing process
Starting the mixing process
① The "Start mixing process" button starts the mixer of the color mixing plant in the HMI screen "Start screen".
② The "LAD_Mixer" program block is called for this purpose at the CPU end. It activates the mixer for three seconds.
③ The activation of the mixer is indicated by flashing in the HMI screen.

Sample project 4.6 Filling the color mixture
Automation task 16 Getting Started, 03/2013, A5E31938126-AA
4.6 Filling the color mixture
Filling the color mixture
① The "Fill Color Mixture" button starts the filling of the tins in the HMI screen "Start screen".
② The "SCL_Valve_Conveyor" program block is activated for this purpose at the CPU end; it controls the valves and the conveyor belt.
③ The tins are animated according to the movement of the conveyor belt in the HMI screen.
④ A counter indicates the number of tins that have already been filled.

Sample project 4.7 Resetting the fill level
Automation task Getting Started, 03/2013, A5E31938126-AA 17
4.7 Resetting the fill level
Resetting the fill level
① There is a button to reset the fill level of each of the four color tanks in the HMI screen "Start screen".
② The reset of the respective fill level has been implemented in the "Main" program block in networks 6 to 9.
③ Networks 6 to 9 reset the values to the Start value in the global data block "Filling".
Sample project 4.7 Resetting the fill level
Automation task 18 Getting Started, 03/2013, A5E31938126-AA