Embed Size (px)
Citation preview

SAP SPQ MODELING UI
PROJECT DOCUMENTATION
Document type : Authors:
draft Anh Huynh
to be validated Adriaan Venter
validated
Purpose of the document
This document will attempt to explain the inner workings of the “Visual Modeling Tool”. It is
created to assist future developers who would wish to maintain and/or implement new
functionalities.

1. Introduction
1.1 Scope of the development project
The main objective for this project was to create a user friendly tool for use with the SAP
CPQ modeling software. This to lower the barriers to entry for potential modelers and
customers. The tool should be usable by anyone connected to the internet, and should require
little knowledge in CPQ modeling. This tool must translate a model created online into valid
.ssc files that can be imported into the Eclipse SME IDE and then exported as valid model
platforms.
1.2 Definitions, acronyms, and abbreviations
SAP – Systems Applications Products
CPQ – Configure Price Quote
JSON – JavaScript Object Notation
1.3 References
Angular.js
https://angularjs.org/
https://www.codeschool.com/courses/shaping-up-with-angular-js
https://en.wikipedia.org/wiki/AngularJS
https://www.youtube.com/watch?v=WAZTZUgeLhQ
http://mattiash.github.io/angular-presentation/presentation.html#26
SAP CPQ
http://go.sap.com/product/crm/sales-configurator-cpq.html
http://help.sap.com/saphelp_ssc200/helpdata/en/f4/ee271973864f48ad502c070b50
ef8a/frameset.html
Bootstrap
http://getbootstrap.com/
.SSC
https://help.sap.com/saphelp_erp60_sp/helpdata/en/1a/40b953495bb44ce1000000
0a174cb4/content.htm?current_toc=/en/33/65b6531de6b64ce10000000a174cb4/pl
ain.htm&show_children=true
1.4 Overview of document
This document will be organized by rank of importance. First all the components will be
listed along with their relationships with each other. This will be ordered front to back,
starting with the front end components. It included an abridged User Manual, and then a more
in depth explanation of its implementation.
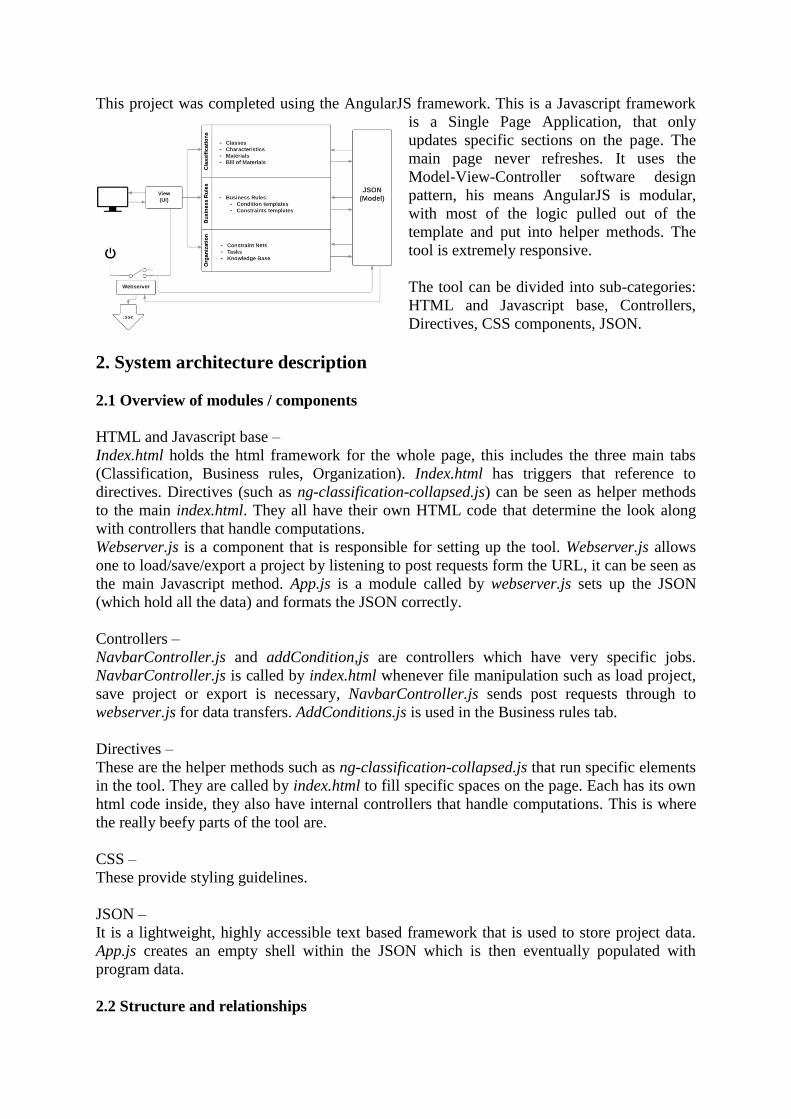
This project was completed using the AngularJS framework. This is a Javascript framework
is a Single Page Application, that only
updates specific sections on the page. The
main page never refreshes. It uses the
Model-View-Controller software design
pattern, his means AngularJS is modular,
with most of the logic pulled out of the
template and put into helper methods. The
tool is extremely responsive.
The tool can be divided into sub-categories:
HTML and Javascript base, Controllers,
Directives, CSS components, JSON.
2. System architecture description
2.1 Overview of modules / components
HTML and Javascript base –
Index.html holds the html framework for the whole page, this includes the three main tabs
(Classification, Business rules, Organization). Index.html has triggers that reference to
directives. Directives (such as ng-classification-collapsed.js) can be seen as helper methods
to the main index.html. They all have their own HTML code that determine the look along
with controllers that handle computations.
Webserver.js is a component that is responsible for setting up the tool. Webserver.js allows
one to load/save/export a project by listening to post requests form the URL, it can be seen as
the main Javascript method. App.js is a module called by webserver.js sets up the JSON
(which hold all the data) and formats the JSON correctly.
Controllers –
NavbarController.js and addCondition,js are controllers which have very specific jobs.
NavbarController.js is called by index.html whenever file manipulation such as load project,
save project or export is necessary, NavbarController.js sends post requests through to
webserver.js for data transfers. AddConditions.js is used in the Business rules tab.
Directives –
These are the helper methods such as ng-classification-collapsed.js that run specific elements
in the tool. They are called by index.html to fill specific spaces on the page. Each has its own
html code inside, they also have internal controllers that handle computations. This is where
the really beefy parts of the tool are.
CSS –
These provide styling guidelines.
JSON –
It is a lightweight, highly accessible text based framework that is used to store project data.
App.js creates an empty shell within the JSON which is then eventually populated with
program data.
2.2 Structure and relationships

The diagram explains in broad terms how the tool works. Where index.html and webserver.js
can be seen as the main methods connected to helper methods. All the project data is saved
inside a single JSON file. Each arrow indicated the flow of data. And the standby icon is
there to show that webserver.js is used to start the tool. Webserver.js is also used to translate
all the data that is in the JSON to valid .ssc files.
Angular runs Single Page Applications, this means that the main page never refreshes. Only
segments of the page would refresh based on directive commands.
navbarController.js

AngularJS follows the Model View Controller pattern. Model View Controller or MVC, is a
software design pattern for developing web applications. A Model View Controller pattern is
made up of the following three parts:
Model stores data that is retrieved according to
commands from the controller and displayed in the view.
View generates new output to the user based on changes
in the model.
Controller can send commands to the model to update
the model's state (e.g. editing a document). It can also
send commands to its associated view to change the
view's presentation of the model (e.g. by scrolling through
a document).
It allows the architecture to be modular in structure. This separation of roles makes the MVC
pattern very powerful. It does also make the code complicated. There are many relationships
to define and variables to parse.
For more information -
https://en.wikipedia.org/wiki/Model%E2%80%93view%E2%80%93controller
2.3 User interface
Main functionality tabs
1. Classifications - Where the base objects are created and defined
2. Business Rules - Where logic threads are enforced on objects
3. Organization - Where base objects are grouped
2.3.1 - “Classification Screen”
Templates
Where new objects are created and defined
Objects - Classes, Characteristics, Materials, BOMs
Where individual objects are manipulated and fine tuned
*previews of .ssc code -> click the 'title-box' of the object
**see appendix 1
Tabs
Processing area

2.3.1.1 – “Templates Tab”
a) Create new Class
b) Create new Characteristic
c) Create new Material
d) Create new Bill of Material
2.3.1.2– “Classes Tab”
a) List of existing Classes
b) “CAR” with Characteristics shown
c) “ENGINE” with Inherited Classes shown
d) “FLYING_CAR” with Name and Description shown
e) Preview of “CAR” as a .ssc file, triggered by clicking “CAR” label
a
a
b
c
d
b
d
c
a
b
c
d
e

2.3.2 - “Business Rules Screen”
a) List of Constraints
b) Name and Description of Constraint
c) List of Conditions
d) Constraint
e) Classes/Materials selected to be in the Pattern
f) Template Wizard
2.3.3 - “Organization Screen”
a) List of Elements
b) Constraint Net “CAR_CSN” with list of constraints
c) Task “CAR_TASK” with Constraint Net shown
d) Knowledge Base “CAR_KB” with Additional Info show
*previews of .ssc code -> click the 'title-box' of the object
** see appendix 2
a
b
c
d
e
f
a
b
d
c
x

2.3.4 - File Manipulation
A) Load Existing model (.json) & Current
Model loaded
B) Create new model
C) Save Current model (.json)
D) Export Current Model to .ssc files*
*This option saves the model that is loaded currently. You choose where you want the .ssc
files saved.
2.3.5 - Menu Structure
The menu structure is relatively simple. The menu items that have to do with file
manipulation i.e. Save, Load, Export are under the [MENU] dropdown in the top right corner.
The rest of the page is where you would work on the project. Below is the menu structure
diagram to illustrate how all the menus fit together.
It is important to understand the difference between the canvas and the palette. The canvas is
the where unsaved changes are stored. Once you save a piece of work it is then saved to the
palette. Once a menu is closed and taken off the ‘work area’ it is also removed from the
canvas. The palette is the backbone where everything is saved and is a json file. Whenever an
object is selected to be edited its information is transferred from the palette to the canvas.
When it is saved after being edited the palette is overwritten with the new object data from
the canvas. See appendix 1 or 2.


2.3.6 User Interface Functionalities
Object classification and editing
Business Rule creation
Object Organization
SSC Preview
Functionalities not described
o Field Validation
o Automatic BOM position# allocation
o Default Constraint to Constraint Net allocation
o Dynamic Updating
These are not described as they are less important to the actual use of the tool. They are in
the background.
2.3.6.1 Object Classification and Editing All object entities can be newly created. Each entity can be edited i.e. Name and Description,
Additional Info, dependent Info. If an object is edited in one window, all its instances will
also change to the newest form.
Description and Field of Context
Objects can be accessed by clicking “Edit”. The object will then appear in on the canvas
ready to be edited. Information is input through text
fields and dropdowns. Dropdowns are populated by
the relevant lists, for “FLYING_CAR” the
[Extends] dropdown is populated by the list of
classes as it shows inheritance. All inherited characteristics will be added as read only
characteristics to FLYING_CARs. [Names] presents text boxes. And [Characteristics] is
populated by the list of
characteristics.
One cannot choose a dropdown
object that is not already saved
into the model. You can only
choose from those that actually
exist.
1) FLYING_CAR with its
inherited classes.
2) FLYING_CAR with its Name
and Description.
3) FLYING_CAR with all its
characteristics (inherited
characteristics marked read-
only).

Description of actions
1) Choose Classes that FLYING_CAR should inherit from.
2) Assign or Edit the name and description for FLYING_CAR.
3) Choose Characteristics for FLYING_CAR, remembering that all if any class inherits from
FLYING_CAR that class would also have changed characteristics.
2.3.6.2 Business rule creation
Business rules can be created easily through template use without sacrificing flexibility.
Create constraints to be added and also choose from predetermined templates what the
business rule would look like.
Description of field
1) Where elements (classes, materials) destined for the pattern are chosen to be used in
the business rule.
2) Where pattern (used entities) are displayed.
3) Where conditions are determined and die constraint is given an identification.
4) The selected constraint template wizard will be here. Based on the combination of
inputs the business rule syntax will be generated.
2.3.6.3 Object Organization
Once Constraints, Tasks, Knowledgebases and Constraint Nets are created they can be
rearranged.
Description of field
1) CAR_CSN is a
Constraintnet where
Constraints are grouped
together.
2) CAR_TASK is a Task that
holds CAR_CSN.
1 3
2
4

3) CAR_KB is a knowledgebase that holds CAR_TASK. In [Additional Info] one can input
a Version-number and a Material.
Description of actions
1) Edit CAR_CSN by entering a Name & Description and choosing Constraints.
2) Edit CAR_TASK by choosing the relevant ConstraintNet.
3) Edit CAR_KB by choosing the relevant Task.
Be sure that every constraint is only in one constraintnet, and that every constraintnet is in
one task, and every task is in one knowledgebase.
2.3.6.3 SSC Preview
A preview to the .ssc code that will be generated is available on every object or constraint. By
clicking on the title button one can see what will be in that objects .ssc file.
Description of fields
1) The object is CAR, once title button is clicked a
prompt will appear with the .ssc code that will
be in CAR.ssc once the project is exported.
2) The prompt with .ssc code
3. Detailed description of components

3.1 Component template description
This section is not part of your design. It is the pattern you will use to describe the
components given in subsections 3.2 - 3.n. Each part of the template will be identified by a
label. Here in 3.1, you must briefly explain the purpose of each point. To make the
presentation clear, use a table or bullet list. You may adapt the template suggested below to
your particular needs (although deviations from the suggested template should be minimal
and well motivated).
3.2 index.html
Identification Index.html
Type HTML template.
Purpose Defines what the page will look like. It houses the components the User will interact
with.
Function Index.html lives at the root of front-end-structure. It defines what goes where, like
where all the directives will be placed and called. It includes no logic, all logical
calculations are done by the directives and JS files. The outputs to these calculations
are then put forth by indez.html. It stores no data. All I/O is done behind the scenes by
directives.
Subordinates Index.html allocates sections of the page to different directives and JS files.
Dependencies Index.html is integral to the success of the tool. It provides the backbone, allots tasks,
and then presents the result to the use. Directives such as ng-classifications-element.js
or ng-rules-template.js are called and placed on the page by index.html. Index.html is
then tasked by these directives as to what it should show and what information it
should pass along to the directives to be processed.
Interfaces Index.html houses the main page interface. All inputs and outputs it displays are
dictated by directives.
This is the page set out by index.html.
Resources Index.html stores no data and makes no computations. It does not require much
memory or processing time
Processing Index.html does not process inputs, it simply passes them along to directives.
Data Index.html stores no data.
3.3 webserver.js
Identification Webserver.js
Type Javascript file
Purpose Webserver.js functions mainly for the setup of the site and acting as the bridge
between the page and the machine.
Function Webserver.js calls all the angular libraries, it references all the directives, it sets up the
host connection (host and post) and it sets up the file directories. Once it has
successfully established the connection to the URL, it starts listening to port 8080.
Http requests can be sent to webserver at any time from navbarController.js.
webserver.js will then execute the request. Possible actions are New Workspace, Load

Workspace, Save Workspace, and Export. These actions are converted by
navbarController.js to http requests (command + data) and sent through a service
called jsonRequest.js to webserver.js, which then executes the file manipulation.
Subordinates function setupDir(jsonInfo, fileName):
To setup an empty file structure on the local machine. Calls all the generate
functions to populate directories
function generateXXXFormat(XXXindex):
Takes XXXindex (classIndex, charIndex, materialIndex) which is a single
entity in a list of XXXs (class in classList, material in materialist) and
translates it into a String of .ssc code with the correct format. This can only
translate one object at a time, thus has to be called for every object in a list of
objects. This String is returned
function generatePaletteModel(palette, fileName):
Creates a file locally for every XXX (class, characteristic, material, BOM) in
the Palette in the JSON, and then calls generateXXXFormat in a loop to
populate file with the String that is returned from genereateXXXFormat.
Effectively converting JSON text, and writing it into the .ssc file structure
saved locally.
function generateOrganizationPalette(organizationPalette, fileName):
Does the same as generatePaletteModel but for XXX in the organization-
palette (tasks, constraintnets, knowledgebases).
app.post(xxxx, function(req,res):
These functions are used as to communicate to the site through post requests.
Dependencies Webserver.js listens to the port it created. Any delay in http requests will delay
webserver.js. If the JSON is very large, it may take more time to process/convert.
Interfaces
A) Webserver.js is run in Node to
start the tool, this shows that it
essentially starts the program,
initiates the connection and starts
listening to the port
B) These menu items, once
selected, will prompt a message
being sent to webserver.js for
processing. The prompts will
include the transfer of the entire
JSON file either to load into the browser or to be converted into .ssc files
locally.
Resources It requires a constant connection to the port 8080. And the ability to download and
upload the JSON file.
Processing It processes very effectively as the JSON is a very lightweight framework. Functions
are modular and mostly run in tandem with each other. Therefore both time and space
complexities are satisfactory.
Data This diagram below demonstrates the different ways the data can be represented with
.ssc format for CAR on the left and the JSON format for CAR on the right.
Webserver.js has to facilitate the translation from JSON to .ssc once ‘Export’ is
selected.

In our current program it is not possible to translate .ssc files to JSON. So projects
need to be imparted as JSON files of created from scratch.
3.4 jsonRequest,js
Identification jsonRequest.js
Type JavaScript file
Purpose This service is the median of the UI and webserver, using http request to pass
information back and forth. It acts as the messenger.
Function This function gives controllers mostly just navbarController.js the ability to send and
receive post requests to and from webserver.js.
Subordinates The internal structure of the component, the constituents of the component, and the
functional requirements satisfied by each part.
Dependencies loadJson(fileName):
Sends http get request to the webserver url and returns data, if it exists, which
webserver.js then finds fileName (in >angular/json directory), and sends (the
requested JSON) to be returned.
saveJson(jsonData,fileName):
Sends http request to the webserver url and returns jsonData sent to "/data" in
webserver. Webserver.js takes this JSON and saves it locally at json/fileName.
exportJson(jsonData, fileName);
Sends http post request to the webserver url. Webserver.js then converts the
jsonData to .ssc files and stores it at >angular/projects/fileName
Interfaces JsonRequest.js communicates solely with webserver.js.
Resources JsonRequest.js is merely the messenger so it does not store any of the data it
sends/receives.
Processing JsonRequest.js does not process data.
Data JsonRequest.js would first convert the JSON to a string before it sends, and expects a
string in return.
3.5 ng-classifications-collapsed.js same as (ng-organizations-collapsed.js & ng-rules-
collapsed,js)
Identification Ng-classifications-collapsed.js
Type Directive

Purpose Ng-classifications-collapsed.js is there as a ‘template’ to represent all elements inside
the classifications tab. Ng-classifications-collapsed.js allows the user to interact with
elements within the main accordion.
Function It waits for prompts from the user. If one of its 3 buttons (‘Copy’, ‘Title’, ‘Edit’) are
clicked it will respond. ‘Copy’ will result in a copy of the object appearing. ‘Title’
will result in a prompt with the objects .ssc code appearing. ‘Edit’ will result in the
object being pulled out to the ‘processing area’ and its JSON code copied to the
‘canvas’ in the JSON (canvas = editing, palette = saved).
Subordinates templateUrl: '../templates/collapsed-box.html'
This is the http format of this directive. It is what the user will see on the
screen. Can be found in >angular/templates.
$scope.editElement:
Pulls the element into the ‘processing area’ by copying its JSON index to the
‘canvas’.
&scope.loadFlag:
Signals the directive that the element will not be edited anywhere else (which
would cause it being overwritten).
&scope.copyElement:
Makes a copy of the JSON of the element, which is then added to the object
list to which it belongs (classlist, materialist, etc.)
&scope.previewElement:
Prompts a preview of the elements .ssc code to appear in a prompt box.
Dependencies Ng-classifications-collapsed.js is called to represent every object in the classifications
palette. This directive is called repeatedly by loops in index.html to represent all the
objects.
When ‘Edit’ is clicked, another directive ng-classifications-element.js is called to
appear in the processing area.
Interfaces
All the buttons are explained above.
Resources Minimal resources are required. Except for the ‘preview’ function which will require
more to execute string manipulations.
Processing The only processing required is for loadflag and preview. The rest is just for copying
elements from within the JSON.
Data $rootscope references to the JSON as a whole, $scope only refers to the element
which is being changed.
3.6 ng-classifications-element.js (same as ng-organizations-element.js & ng-rules-
element .js)
Identification Ng-classifications-element.js
Type Directive

Purpose Ng-classifications-element.js is there as a ‘template’ to represent all elements once
they are in the ‘processing area’. Ng-classifications-element.js allows the user to
interact with elements and edit all the necessary fields. This directive is pivotal to the
elements looking and behaving the way the user wants.
Function It waits for prompts from the user. It puts forth a HTML template based on the object
type (class, cStic, material, BOM), which is displayed on the ‘processing area’, its
JSON is copied to the canvas. Then based on what input the user interacts with
different actions are triggered within the controller. The changes are all saved to the
Canvas in the JSON. Once the user is satisfied with the object and clicks the ‘SAVE’
button, the changes are saved to the Palette in the JSON.
Subordinates The rest of the methods follow the same path
There are 3 types of subordinates:
1) Templates: html, stored in strings
templateUrl ; '../templates/classifications-box.html'
The html shell with CSS styling included
var formattingData = [...]
variable parsing based on object type
var XXXformat = ' <div class ="charDeltail....'
html format based on object type (XXX) saved as a String.
With these will be the accordions that will appear inside these
formats
2) JSON changers: functions tasked with changing $scope or $rootscope
scope.$watch('....', function(){ xxx})
watches for changes in the variables > '....' and then executes
some function {xxx}
function updateXXXOnPaletteMaterials()
updates JSON references to XXX
$scope.deleteElement, -.saveElement, -.closeElement
updates JSON basef on button clicks
3) Validators: functions that validate inputs and outputs
Functions: contains, removeOldInherited, addNewInherited,
previewElement
$scope.add
creates an empty JSON object shell based on what you are adding and fills it
with whatever the user inputs
Dependencies Ng-classifications-element.js is called to represent every object, once prompted, in the
classifications canvas. This directive is triggered by clicking ‘edit’ in ng-
classification-collapsed.js or by creating a new object in the “New Templates” menu
item.
The bottom buttons ‘Save’, ‘Close’ and ‘Delete’ will change make changes in the
JSON palette. See their functions in the Controller (saveElement, closeElement and
deleteElement)

Interfaces
This in an example of an object put forth in ng-classifications-
element.js. This example is for class ‘CAR’, so its template is
selected as –var classFormat. It is populated. Now this area of is
run by ng-classifications-element.js and the element is ‘CAR’. If
the user were to pull another object into the ‘processing area’ that
will be seen as a different element. Although ‘CAR’s
characteristic list will be updated automatically if another
characteristic is created, the same goes for its ‘Extends’ dropdown.
Resources The resources required depends on the action prompted. Most include only JSON
manipulation.
Processing Processing required mostly just JSON manipulation. This ng-classifications-
element.js is modular so repeat processing is minimal.
Data $rootscope references to the JSON as a whole, $scope only refers to the element
which is being changed. Be sure to understand the variable allocation that happens
within formattingData.
3.7 ng-classifications-collapsed-template.js
same as (ng-organizations-collapsed-template.js)
Identification Ng-classifications-collapsed-template.js
Type Directive
Purpose Ng-classifications-collapsed-template.js is there as a ‘template’ to represent all
elements inside the templates menu. Ng-classifications-collapsed-template.js allows
the user to interact with elements within the main accordion and create new instances
of each object.
Function It waits for prompts from the user. It lists the possible objects a user can create with
buttons ‘New Class’, ‘New Characteristic’, ‘New Material’ will result in the object
being created and puller out to the ‘processing area’. Correctly formatted JSON code
will be copied to the ‘canvas’ in the JSON (canvas = editing, palette = saved).
Subordinates templateUrl: '../templates/collapsed-template.html'
This is the http format of this directive. It is what the user will see on the
screen. Can be found in >angular/templates.
$scope.createClass:
Creates a new instance of Class in classList in the JSON, it is an empty class.
This instance is also copied out to the canvas part of the JSON.
&scope.loadFlag:
Signals the directive that the element will not be edited anywhere else (which
would cause it being overwritten).
&scope.previewElement:
Prompts a preview of the elements .ssc code to appear in a prompt box.
Dependencies Ng-classifications-collapsed-template.js is called to represent the option to create a
new object in the classifications palette.
When ‘New XXX’ is clicked, another directive ng-classifications-element.js is called
to appear in the processing area.

Interfaces
All the buttons are explained above.
Resources Minimal resources are required. This is merely a trigger. At most it will only alter the
JSON in one place.
Processing The only processing required is for loadflag and preview. The rest is just for copying
elements from within the JSON.
Data $rootscope references to the JSON as a whole, $scope only refers to the element
which is being changed.
3.8 style.css
Identification Style.css
Type Css file
Purpose To keep the styling and aesthetic consistent throughout the tool.
Function It can be called by in any html code in any of the directives to use the styling for any
of button, box, dropdown or accordion. This way a box called by ng-classifications-
element.js will look the same as a box called by ng-classifications-collapsed-
template.js will look consistent
Subordinates Styling :
.accordion{xxx}
.box{xxx}
.collapsed-box{xxx}
.collapsed-template-frame{xxx} etc.
Dependencies Any html code is dependent on this css file.
Interfaces The styling for each of these was determined by the css file. This is why
a Class CAR can look consistent with CAR_CSN.
Resources This file uses minimal resources.
Processing N/A
Data N/A
3.9 ng-condition-bar.js
Identification Ng-condition-bar.js
Type Directive

Purpose Ng-condition-bar.js is there as a ‘template’ to represent conditions assigned to
constraints within the business rules tab. Ng-condition-bar.js allows the user to
interact with elements, elements represent by ng-condition-variable.js, within the
conditions accordion and create new conditions to add to constraints. Ng-condition-
bar.js is the basket that holds conditions, where you can prompt to add more
conditions.
Function It waits for prompts from the user. It lists the possible condition ‘types’ at the top of
the ‘Conditions’ accordion. These condition types are predetermined. Then, based on
the condition type chosen, a condition line appears. The user would articulate a
condition. If “AND” or “OR” are picked another condition line, represented by ng-
condition-variable.js, will appear. Correctly formatted JSON code will be copied to
the ‘canvas’ in the JSON (canvas = editing, palette = saved).
Subordinates templateUrl: '../templates/condition-bar.html'
This is the http format of this directive. It is what the user will see on the
screen. Can be found in >angular/templates.
scope.$watch(‘next’, function(){xx}):
Creates a new condition bar conditionList in the JSON, it is an empty
condition. This instance is also copied out to the canvas part of the JSON.
Triggered if there is a ‘AND’ or ‘OR’ and the current condition in defined.
&scope.loadFlag:
Signals the directive that the element will not be edited anywhere else (which
would cause it being overwritten).
Dependencies Ng-condition-bar.js is called to represent the option to add a new condition. It
depends on its condition-bar.html. Ng-condition-bar.js is also dependent on
condition-variable.js to supply template information.
Interfaces
Each of these lines are
represented by ng-
condition-variable.js
which is called by ng-condition-bar.js. Ng-condition-bar listens to the “and” or “or”
dropdown.
Resources The resources required depends on the action prompted. Most include only JSON
manipulation.
Processing Processing required mostly just JSON manipulation. This ng-condition-bar.js is
modular so repeat processing is minimal.
Data $rootscope references to the JSON as a whole, $scope only refers to the element
which is being changed.
3.10 ng-condition-variable.js
Identification Ng-condition-variable.js
Type Directive
Purpose Ng-condition-variable.js is there as a ‘template’ to represent every single condition
assigned to constraints within the ‘Condition Bar’. Ng-conditoin-variable.js allows
the user to interact with individual elements within the ‘Condition Bar’ and edit
conditions.

Function It waits for prompts from the user. It lists input options based on what variables that
need to be filled. These variable types are predetermined and are based on the
condition type chosen. The user would articulate a condition. Correctly formatted
JSON code will be copied to the ‘canvas’ in the JSON (canvas = editing, palette =
saved).
Subordinates templateUrl: ''<div class="dependentDropdown"></div>'
This is the http format of this directive. It is what the user will see on the
screen.
scope.$watch(‘'$xxx.listOfElement', function(){xx}):
Creates a new condition bar conditionList in the JSON, it is an empty
condition. This instance is also copied out to the canvas part of the JSON.
Triggered if there is a ‘AND’ or ‘OR’ and the current condition in defined.
&scope.loadFlag:
Signals the directive that the element will not be edited anywhere else (which
would cause it being overwritten).
Dependencies Ng-condition-bar.js is called to represent the option to add a new condition. It
depends on its condition-bar.html. Ng-condition-bar.js is also dependent on
condition-variable.js to supply template information.
Interfaces Each of these lines are
represented by ng-
condition-variable.js
which is called by ng-
condition-bar.js. Ng-condition-bar listens to the “and” or “or” dropdown.
Resources The resources required depends on the action prompted. Most include only JSON
manipulation.
Processing Processing required mostly just JSON manipulation. This ng-condition-variable.js is
modular so repeat processing is minimal.
Data $rootscope references to the JSON as a whole, $scope only refers to the element
which is being changed.
3.11 ng-rules-template.js
Identification Ng-rules-template.js
Type Directive
Purpose Ng-rules-template.js is there as a ‘template’ to represent the set of inputs in the
“templates wizard” in the ‘After State’. Ng-rules-template.js allows the user to
interact with individual inputs, inputs are decided by selected template.
Function It waits for prompts from the user. It lists input options based on what variables that
need to be filled. These variable types are predetermined and are based on the
template chosen. The user would articulate a rule. Correctly formatted JSON code
will be copied to the ‘canvas’ in the JSON (canvas = editing, palette = saved).

Subordinates templateUrl: ''../templates/rules-template.html”
This is the http format of this directive. It is what the user will see on the screen.
function checkDefName():
If no there is no name specified by user, use default name from template.
scope.$watch(‘''$root.jsonData.canvasRule.rule', function(){xx}):
Load in rule's template when rule is added to canvas from palette. This is
triggered by a rule being selected in the ‘Templates’ accordion, or in the
dropdown within the Template Wizard.
function parseCsNameBody(template):
This function extracts the name of the template chosen. If the user does not
assign a name to the constraint the name of the template will be assigned as
the name of the constraint.
function updateRulesOnPaletteCsns():
Update rules of corresponding constraint nets on palette.
function findExtraCs():
Looking for extra (syntax) constraints in the interface, will not be represented
in UI.
$scope.saveTemp = function():
Save template object as part of the model object to the JSON.
$scope.clearCanvas = function():
Once called the canvas will be cleared, and only an empty shell loaded.
function updateCsnOnExtraCs():
Update constraint nets reference of extra constraints that have IDs.
&scope.loadFlag:
Signals the directive that the element will not be edited anywhere else (which
would cause it being overwritten).
Preview:
There are helper functions that convert the JSON to valid .ssc syntax
All are function parseXXX
Dependencies Ng-rules-template.js is called to represent the option to edit the rule/restriction to a
constraint. It depends on its index.html.
Interfaces Selecting a template from the top dropdown (or in
template accordion on the left) will call ng-rules-
template. All the dropdowns are run by ng-rules-
template, and all the inputs gathered from them
would be processed accordingly.
Resources The resources required depends on the action prompted. Most include only JSON
manipulation.
Processing Processing required mostly just JSON manipulation. This ng-condition-variable.js is
modular so repeat processing is minimal. Although the ‘preview’ function does
require some processing.
Data $rootscope references to the JSON as a whole, $scope only refers to the element
which is being changed.

3.11 JSON
The JSON is where all the data is stored. It has a
tree branch format. It is lightweight and effective
for storing the type of data we work with.
The data is easily accessible: here is an example of
a compare statement with JSON elements.
$rootScope.jsonData.palette.classList[i].id
> This is how easily data can be accessed
To see how the JSON is set out, Copy one of the
JSON texts and use http://codebeautify.org/jsonviewer to beautify it.
3.12 Constraint Templates
The screenshot above is of a constraint template. It is used to populate the constraint wizard
in the Business Rules tab.
This wizard, seen on the left is populated by the contents of
the above template. Each template in the template list is
listed in the ‘Templates’ accordion. Once one is selected it is
then brought out to the ‘After State’ screen. All the
dropdowns are labeled with the “prompt” variable inside the
“listOfVariables”. Now the user will select options in the
dropdowns, based off which Materials and Classes are
available in the ‘Before State’ and the “domain” and
“parent” variables, which defined the scope of dropdown
options, in the template. Once these values are selected by
the User they are saved in the “selected” variables in the
template instance. Once the user clicks “save”, the template
is saved to the paletteRule structure in the JSON. Their default Constraint Net is DEF_NET
within DEF_TASK. When the
Project is exported and translated to
.ssc code, a method searched through
the ”body” string for “&” characters,
it reads the digit after the “&”
character and finds its corresponding
variable in the “listOfVariables” and
replaces the digit with the variable in
“selected”. The returned string is
then saved in its Constraint Net and
Task. See ADD_ENGINE right

4 Future plans and refinement
First we should define what should be done to further enhance this tool
Future plans:
Create more constraint templates. o We will create and test more constraint templates to evaluate the robustness of
our constraint wizard. This can be done by generating generic constraints and
by replacing variables with &1 or &3. Look at current templates saved in
app.js in the templates list. Headless Export
o Ability to generate (runnable) models, skipping the SME. There is a tool in the
Eclipse SME that converts .ssc files to SAP models. We suspect that if you
pipe the export file to this tool a headless export will be possible. Search bar
o Allows searching of templates, which extensive description and help for each
(images, videos). This could be done with code that would look like the
following: https://www.youtube.com/watch?v=YFsduR7mBfY but rather than
the search would search for template names. Import .ssc files
o Right now the tool only allows creating new projects. It cannot read existing
projects created in the SME and turn them into UI. We do not have an idea Templates generator
o Allows modelers to simply write business rules templates in SME syntax,
instead of having to deal with foreign technologies (JSON). Good
encapsulation SAP ecosystem integration
o Further integration to existing SAP systems and technology (right now the tool
is written is completely independent and open-source frameworks)
5 Design decisions and tradeoffs
Advantages
Quick and responsive: This is mainly due to its MVC architecture and its single page
design. Aesthetic: We kept to a consistent aesthetic, with bright colored borders and rounded
corners, we didn’t want it to look intimidating. The whole idea is to make it easier for
normal people to use. So, by making it less “teckey”, it becomes more inviting. Web based: This one speaks for itself. It’s highly accessible and can be run anywhere,
and can be maintained remotely. Drawbacks:
Maintainability: While we try to follow the best Angular practice and keep the code-
base consistent, the complexity of the technology alone might make it hard to
maintain. What makes Angular fast and dynamic, which are the data-binding
templates and directives, would also make it more complicated to understand and
maintain, due to cross-reference of templates and controllers (We find this first-hand,
because we inherited this project from a previous intern. We were able to do it
though. It just takes time)

Scalability: Possibly for large-scale model, due to complicated and large-size JSON (the
format we store the model in).We ourselves haven’t experienced performance issues, but we
suspect once the model gets big enough, there might be. Further tests will be conducted.
6 Pseudocode for components
TBD
7 Appendices

7.1 APPENDIX 1

7.2 APPENDIX 2