Embed Size (px)
Citation preview

Arduino-based Gamification Tool for Multipurpose Usage in Teaching
and Learning at Rural Schools.
Teng Jun Fei
54071
Bachelor of Computer Science with Honours
(Network Computing)
2019
Arduino-based Gamification Tool for Multipurpose Usage in Teaching
and Learning at Rural Schools.
TENG JUN FEI
54071
This project is submitted in partial fulfillment of the
Requirements for the degree of
Bachelor of Computer Science with Honours
(Network Computing)
Faculty of Computer Science and Information Technology
UNIVERSITI MALAYSIA SARAWAK
2019


DECLARATION OF ORIGINALITY
I hereby declare that this research together with all of its content is none other
than that of my own work, with consideration of the exception of research-based
information and relative materials that were adapted and extracted from other
resources, which have evidently been quoted or stated respectively.
Signed,
…………………………………………….
TENG JUN FEI
Faculty of Computer Science and Information Technology 14/5/2019
University Malaysia Sarawak.

i
ACKNOWLEDGEMENT
Hereby, I would like to express my deepest appreciation to all those who provided me
the possibility to complete this Final Year Project. A special gratidude gives to my Final Year
Project supervisor, Mr Terrin Lim, whose contribute a lot in stimulating suggestion, solution
and encouragement to help me coordinate my project and writing this report.
Besides, I would like to acknowledge Final Year Project Coordinator, Dr Wang Yin
Chai for conducting workshop and briefing to guide in completing my Final Year Project.
Furthermore, I would like to thank my parents for their mental support, give me advise
and motivation when I stressed out.
I would also like to acknowledge my lectures and friend that give me related idea and
useful information. Last but not least, my grateful acknowledgment gives to the public journals,
articles, websites and conferences that provide review and knowledge for my Final Year
Project.

ii
TABLE OF CONTENTS
ACKNOWLEDGEMENT .......................................................................................................... i
LIST OF FIGURES ................................................................................................................... v
LIST OF TABLE ...................................................................................................................... vi
ABSTRACT ............................................................................................................................. vii
ABSTRAK ............................................................................................................................... vii
CHAPTER 1: INTRODUCTION .............................................................................................. 1
1.1 Project Title ...................................................................................................................... 1
1.2 Introduction ...................................................................................................................... 1
1.3 Problem Statement ........................................................................................................... 2
1.4 Scope ................................................................................................................................ 3
1.5 Objective .......................................................................................................................... 3
1.6 Methodology .................................................................................................................... 3
1.7 Significance of Project ..................................................................................................... 5
1.8 Project Schedule............................................................................................................... 5
1.9 Expected Outcome ........................................................................................................... 7
CHAPTER 2: LITERATURE REVIEW ................................................................................... 8
2.1 Introduction ...................................................................................................................... 8
2.2 Arduino ............................................................................................................................ 9
2.2.1 What is Arduino ........................................................................................................ 9
2.2.2 the Arduino Hardware and Software ...................................................................... 10
2.2.3 History of Microcontroller ...................................................................................... 12
2.2.4 Arduino As a Learning Tool ................................................................................... 13
2.2.5 Why Arduino? ......................................................................................................... 13
2.3 Rural schools .................................................................................................................. 15
2.3.1 Definition of Rural Schools .................................................................................... 15

iii
2.3.2 Characteristic of a Quality Rural School ................................................................ 15
2.3.3 Education Ecosystem in Rural Schools Still Far Behind ........................................ 16
2.3.4 Environment constraint and User requirement. ...................................................... 17
2.4 Physic Theory ................................................................................................................ 18
2.5 Education through Gamification .................................................................................... 21
2.5.1 Introduction ............................................................................................................. 21
2.5.2 Gamification ........................................................................................................... 23
2.6 Comparison and Reviews of Existing System ............................................................... 25
2.6.1 Projector .................................................................................................................. 25
2.6.2 Overhead Projector OHP ........................................................................................ 26
2.6.3 Arduino-based Gamification Tool for Multipurpose Usage in Teaching and Learning
at Rural Schools. .............................................................................................................. 27
2.7 Conclusion ..................................................................................................................... 29
Chapter 3: Methodology .......................................................................................................... 30
3.0 Introduction .................................................................................................................... 30
3.1 Overview of Methodology ............................................................................................. 30
3.2 System Development Life-Cycle ................................................................................... 31
3.3 Graphic User Interface ................................................................................................... 33
3.4 Overall Functionality ..................................................................................................... 34
3.5 Flow Chart ..................................................................................................................... 36
Chapter 4 Implementation and Testing .................................................................................... 38
4.1 Introduction .................................................................................................................... 38
4.2 Hardware Implementation ............................................................................................. 38
4.2.1 Arduino Hardware Implementation ........................................................................ 38
4.2.2 Projector Implementation........................................................................................ 40
4.2.3 Cost of Hardware Implementation .......................................................................... 43
4.3 Software Implementation ............................................................................................... 43

iv
4.3.1 MIT App Inventor ................................................................................................... 44
4.3.2 Arduino IDE............................................................................................................ 46
4.4 Testing............................................................................................................................ 49
Chapter 5 Conclusion and Future Work .................................................................................. 52
5.1 Introduction .................................................................................................................... 52
5.2 Summary ........................................................................................................................ 52
5.4 System Limitation .......................................................................................................... 53
5.5 Future Work ................................................................................................................... 54
5.6 Conclusion ..................................................................................................................... 54
References ................................................................................................................................ 55
Appendix A .............................................................................. Error! Bookmark not defined.

v
LIST OF FIGURES
Figure 1.1 (Bassil, 2012) Waterfall model. ............................................................................... 3
Figure 2.2.1 Arduino board ...................................................................................................... 10
Figure 2.2.1.2 IDE software on PC .......................................................................................... 11
Figure 2.4.1 Overall view inside Projector .............................................................................. 18
Figure 2.4.2 Convex lens forming the real image .................................................................... 19
Figure 2.4.3 If object between 𝒇 and the lens .......................................................................... 20
Figure 2.4.3 If object at 𝒇 ........................................................................................................ 20
Figure 2.5.2 (Matthews & Wrigley, 2017) Design thinking Stanford D-School ..................... 24
Figure 2.6.1 LCD portable projector Product size (L x W x H): 17.80 x 10.30 x 5.00 cm Product
weight: 0.5420 kg .................................................................................................................... 25
Figure 2.6.2 Overhead projector .............................................................................................. 26
Figure 2.6.3 example of screen adjustment ............................................................................. 29
Figure 3.3.1 Overall view of the GUI ...................................................................................... 33
Figure 3.4.1 Hardware setup of the prototype ......................................................................... 34
Figure 3.4.2 3D Design of the prototype ................................................................................. 35
Figure 3.5.1 flow chart of the prototype .................................................................................. 36
Figure 4.2.1.1 Overall pin connection. .................................................................................... 39
Figure 4.2.2.1 setup of the front Fresnel lens. ......................................................................... 40
Figure 4.2.2.2 Setup of the back Fresnel lens with 2 servo motor. .......................................... 40
Figure 4.2.2.3 projection lens .................................................................................................. 41
Figure 4.2.2.4 Setup of Projection lens with servo motor ....................................................... 41
Figure 4.2.2.5 complete setup of the projector. ....................................................................... 42
Figure 4.2.2.6 LED lamp. ........................................................................................................ 42
Figure 4.3.1.1 Arduino-based gamification App and the GUI design. .................................... 44
Figure 4.3.1.2 show the code block of the Bluetooth connection. ........................................... 44
Figure 4.3.1.3 Button up, down, left and right code block. ..................................................... 45
Figure 4.3.1.4 submit/OK button code block ........................................................................... 45
Figure 4.3.2.1 Setup Arduino IDE ........................................................................................... 46
Figure 4.3.2.2 Include Servo motor and serial peripheral interface library ............................. 46
Figure 4.3.2.3 create servo object and set digital pin for servo motor ..................................... 46
Figure 4.3.2.4 initialize serial communication, attach servo on pin and set default value. ..... 47

vi
Figure 4.3.2.5 read the value from the app and write value on serial communication if value is
available ................................................................................................................................... 47
Figure 4.3.2.6 read current angle of servo and adjust the angle according to the input. ......... 47
Figure 4.3.2.7 adjust the servo motor angle ............................................................................. 48
Figure 4.4.1 projection image of overhead projector ............................................................... 49
Figure 4.4.2 projection image of projector .............................................................................. 49
Figure 4.4.3 show the apk file and main page of the app. ....................................................... 50
Figure 4.4.4 show Bluetooth is connected/ disconnected ........................................................ 51
Figure 5.5.1 printer mechanism ............................................................................................... 54
LIST OF TABLE
Table 1.8 Project Schedule ........................................................................................................ 5
Table 4.2.1.1 Interfacing table between Arduino Uno and Bluetooth module ........................ 39
Table 4.2.1.2 Interfacing table between Arduino Uno and Servo motor ................................. 39
Table 4.2.3.1 Hardware implementation cost .......................................................................... 39

vii
ABSTRACT
The purpose of the project is to develop an Arduino-based gamification tool for multipurpose usage in
teaching and learning at rural schools. In fact, rural schools that do not receive fair share of education
funding directly lead to lack of basic infrastructure, no clean water supply and no 24-hour electricity
supply. Thus, student in rural school eventually do not have chances to access to latest technologies to
aid in learning. With the problem statement, the objective for the project is to develop a gamification
prototype system using Arduino to learn physic STEM topics, develop an interactive interface to
facilitate student’s learning in the topics and also create a low energy mini-projector/OHP as a solution
to electricity deficient areas. Gamification through education is one of the great innovative technique
that used to improve quality of education. Gamification is a way uses game thinking and game mechanic
in a non-game context to engage user’s involvement. Gamification in education will motivate student
in learning process and improve classroom interaction and engagement. This gamified prototype is
developed using Arduino which acts as mini projector and also an overhead projector. Hence, student
in rural schools able to learn STEM physic subject in Light reflection and refraction in a more
interactive way. The prototype is tested at semi rural schools Sarawak and the feedback collected from
the teachers and students is good and met expectations.
ABSTRAK
Tujuan projek ini ialah manghasilkan alat Arduino yang pelbagai penggunaan untuk menagajar dan
belajar di Kawasan kampung. Sebenarnya, Kawasan kampung tidak menerima kewangan Pendidikan
yang adil dari pihak kerajaan. Oleh itu, sekolah di kampung tidak ada kuasa elektrik, air yang bersih
dan asas infrastruktur. Secara langsungnya, pelajar di sekolah kampung tidak ada peluang untuk
mengakses teknologi terbaru. Projek ini dapat membantu pelajar sekolah kampung untuk belajar laksatif,
menarik minat untuk belajar tentang pantulan dan pembiasan cahaya.

1 | P a g e
CHAPTER 1: INTRODUCTION
1.1 Project Title
Arduino-based Gamification Tool for Multipurpose Usage in Teaching and Learning at
Rural Schools.
1.2 Introduction
Nowadays, one of the breakthroughs and development of our society is the
incorporation of modern technology into education. Technology has been in schools in
decades, but the evolution of technology like projectors, typewriters, OHPs and chalk
boards play an important role in education in our country. Traditional education bound to
be evolved with new learning models and technology available. Technology provide
personalized learning models which can accommodate unique learning styles. Many
schools utilizing gamification in the learning models. The collision of playing and learning
makes difficult subject more interactive and interesting. Through the digital transformation
and the evolution of the education technology, many schools have making radical change
in form of education methods and models, instruction, assessment and even the physical of
classroom. Schools are providing computers and devices to the student in the classroom
now. Thus, student will not need to bring own device and no longer need to go to the
computer lab for access to the computer. With all this progression, but still most of the rural
schools in Sarawak is using traditional education methods and not yet access to the latest
technology.
Rural school play key role in educate people in rural areas. However, government is
still paying less attention to the rural school. (Theobald, 2005) This is due to the office of
education is mostly located at urban areas and (Mitra, Dangwal, & Thadani, 2008) the

2 | P a g e
remoteness of rural schools. (Ling, 2018) The Education, Science and Technological
Research Minister said that many rural schools in Sarawak lack of proper infrastructure and
basic facilities which 70% of the schools are physically battered and 375 no electricity
supply.
To help rural school’s student access to some latest technology, An Arduino-based
Project is developed for Physics STEM Learning that serves as well as a Mini Projector or
an OHP. Due to lack of resources or constrains such as frequent electricity disruptions (or
no electricity at all), shortage of basic teaching materials, etc. this proposed prototype
would be helpful in assisting in the teaching and learning activities in these rural schools.
Firstly, this project is to develop a prototype using Arduino to help student to learn physic
STEM topic in a more interactive way. Secondly, it is multipurpose enough to be used as
mini projector or an OHP where reusability is widely appreciated by these teachers in
remote locations.
1.3 Problem Statement
In fact, student in rural school do not have access to latest technologies to aid in learning
STEM subjects. Introducing latest technology to the rural schools will be first step to
improve education level and quality in rural schools. Since, electricity in concern in rural
areas, a low energy prototype is developed to fulfil the constraint. Besides that, rural
schools lack of infrastructure and basic facilities, (Romano, 2014) Arduino boards will be
the best choice to develop in rural schools which are relatively cheap compared with
another microcontroller platform. Using projector and gamified software in learning class
will set up electronic media and virtual learning environments in rural schools which is
more interesting compare to traditional education method.

3 | P a g e
1.4 Scope
• This project in used for Physics STEM Learning in rural school.
• This project mainly focused on Arduino hardware kits and software.
1.5 Objective
To create a gamification prototype for the use in STEM Learning specifically in Physics
that has the capability functions as a teaching aid for teachers. Thus, the detailed objectives
of this project are as follows:
• To develop a gamification prototype system using Arduino to learn physic STEM topics.
• To develop an interactive interface to facilitate student’s learning in the topics.
• To create a low energy mini-projector/OHP as a solution to electricity deficient areas.
1.6 Methodology
Waterfall model referred to as a linear-sequential lifecycle, each phase must be
completed before the next phase begin. Figure 1.1 illustrate the different stage of
waterfall model.
Figure 1.1 (Bassil, 2012) Waterfall model.

4 | P a g e
At Requirement Analysis phase, gather all the possible requirement of the prototype
system to be developed. They requirement is then studied to get more complete understanding.
System Design phase, system design in developed. This phase helps to specify the
hardware, software and requirement of the project and develop overall system architecture.
Implementation phase is the phase to start implement the hardware and software of the
prototype. Using the system design, the physical prototype, software which is the interface for
input, mini projector and the Bluetooth module is then developed. Each of this small program
is tested for its functionality.
Testing phase is where all the small program is integrated become the full prototype
system. Then the integrated system is tested for faults and failures. Testing of the prototype
will be used in semi-rural school to get approval from relevant authorities.
Maintenance phase is where there is some issue from user, the issue is then fixed, and
the new patches are released.
Waterfall model is simple and easy to understand. Each phase is processed one at a time.
Thus, it is more manageable and works well for small project whereas the requirement is well
understood.
5 | P a g e
1.7 Significance of Project
The significance of this project is to develop a prototype used to learn physics STEM topics
which is refraction and reflection of the light for the rural schools. Using the prototype
student in rural area have the chance to access to latest technology of Arduino. Besides,
this prototype also acts as low energy projector which able to project image from devices.
Nowadays, the internet and smart device is widely used. There are a lot of information and
knowledge waiting to be explored. Hence, teacher can use the projector to show related
information or knowledge from internet to the student. Using technology in education will
surely yield twice the result with half the effort and bring huge impact on future pillars of
society not just in urban area but also rural area.
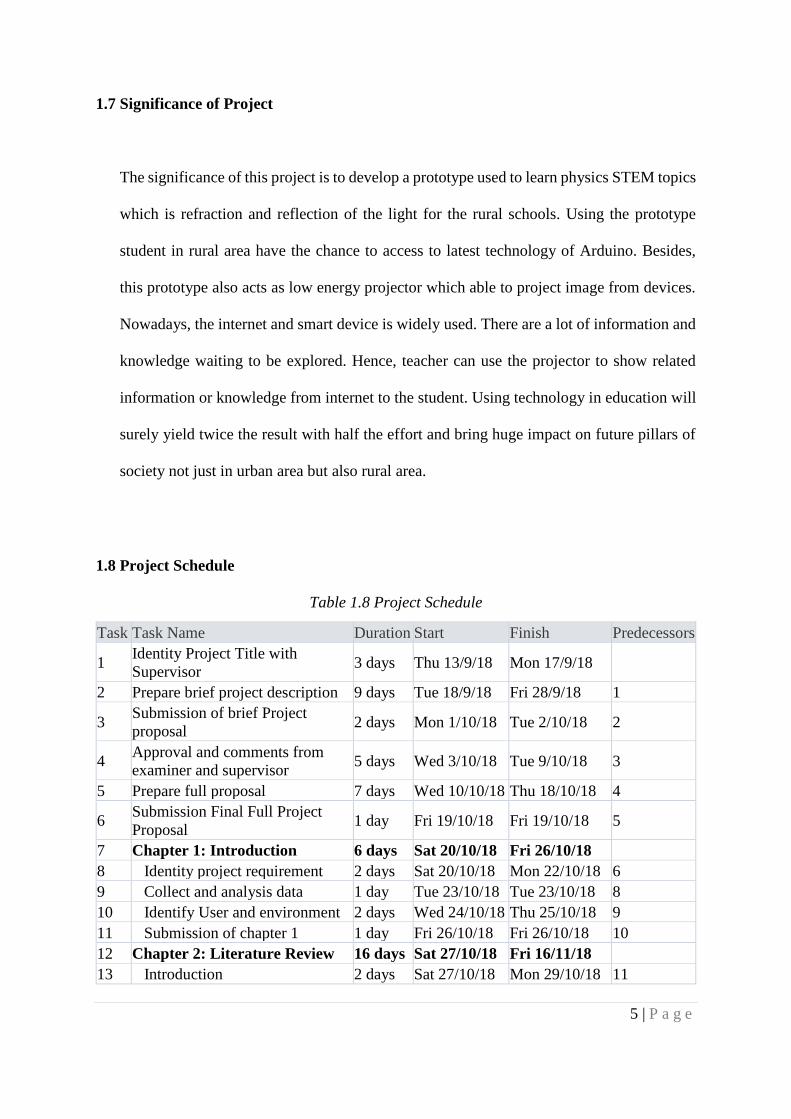
1.8 Project Schedule
Table 1.8 Project Schedule
Task Task Name Duration Start Finish Predecessors
1 Identity Project Title with
Supervisor 3 days Thu 13/9/18 Mon 17/9/18
2 Prepare brief project description 9 days Tue 18/9/18 Fri 28/9/18 1
3 Submission of brief Project
proposal 2 days Mon 1/10/18 Tue 2/10/18 2
4 Approval and comments from
examiner and supervisor 5 days Wed 3/10/18 Tue 9/10/18 3
5 Prepare full proposal 7 days Wed 10/10/18 Thu 18/10/18 4
6 Submission Final Full Project
Proposal 1 day Fri 19/10/18 Fri 19/10/18 5
7 Chapter 1: Introduction 6 days Sat 20/10/18 Fri 26/10/18
8 Identity project requirement 2 days Sat 20/10/18 Mon 22/10/18 6
9 Collect and analysis data 1 day Tue 23/10/18 Tue 23/10/18 8
10 Identify User and environment 2 days Wed 24/10/18 Thu 25/10/18 9
11 Submission of chapter 1 1 day Fri 26/10/18 Fri 26/10/18 10
12 Chapter 2: Literature Review 16 days Sat 27/10/18 Fri 16/11/18
13 Introduction 2 days Sat 27/10/18 Mon 29/10/18 11

6 | P a g e
14 Review on Arduino 4 days Tue 30/10/18 Fri 2/11/18 13
15 Review on rural schools 3 days Sat 3/11/18 Tue 6/11/18 14
16 Review on Physic theory 3 days Wed 7/11/18 Fri 9/11/18 15
17 Review on Education through
gamification 2 days Sat 10/11/18 Mon 12/11/18 16
18 Comparison and reviews on
existing system 2 days Tue 13/11/18 Wed 14/11/18 17
19 Conclusion 1 day Thu 15/11/18 Thu 15/11/18 18
20 Submission Chapter 2 1 day Fri 16/11/18 Fri 16/11/18 19
21 Chapter 3: methodology 17 days Sat 17/11/18 Sat 8/12/18
22 Introduction 4 days Sat 17/11/18 Wed 21/11/18 20
23 Overview of methodology 2 days Thu 22/11/18 Fri 23/11/18 22
24 System development life-cycle 3 days Mon 26/11/18 Wed 28/11/18 23
25 Graphic user interface 2 days Thu 29/11/18 Fri 30/11/18 24
26 Overall functionality 3 days Mon 3/12/18 Wed 5/12/18 25
27 Use case model 1 day Thu 6/12/18 Thu 6/12/18 26
28 Flow Chart 1 day Fri 7/12/18 Fri 7/12/18 27
29 Submission Chapter 3 1 day Sat 8/12/18 Sat 8/12/18 28
30 Final Year Project 1 6 days Sun 9/12/18 Fri 14/12/18 29
31 Submission FYP1 final report 1 day Sat 15/12/18 Sat 15/12/18 30
32 FYP 1 Presentation 2 days Thu 20/12/18 Fri 21/12/18 31
33 Chapter 4: Implementation and
testing 66 days
Sun 23/12/18 Fri 22/3/19
34 implement the hardware of the
system 30 days
Sun 23/12/18 Thu 31/1/19
35 programming 20 days Fri 1/2/19 Thu 28/2/19 34
36 debugging 10 days Fri 1/3/19 Thu 14/3/19 35
37 testing 6 days Fri 15/3/19 Fri 22/3/19 36
38 Chapter 5: Conclusion and
Future work
42 days Sat 23/3/19 Mon 20/5/19
39 Present system to Supervisor and 2 days Sat 23/3/19 Mon 25/3/19
40 Identify new user requirement 3 days Tue 26/3/19 Thu 28/3/19 39
41 Improving system 18 days Fri 29/3/19 Tue 23/4/19 40
42 Prepare FYP 2 Full report 4 days Tue 23/4/19 Fri 26/4/19 41
43 Submission of FYP2 report 0 days Sat 27/4/19 Sat 27/4/19 42
44 Presentation for FYP2 1 day Thu 2/5/19 Thu 2/5/19 43
45 Final adjustment of FYP2 Report 12 days Fri 3/5/19 Sun 19/5/19 44
46 Submission of FYP2 hardcopy 0 days Mon 20/5/19 Mon 20/5/19 45
Project schedule Gantt chart will be show in Appendix A.

7 | P a g e
1.9 Expected Outcome
The expected outcome for this project is to build a prototype that can read the input value,
move the lens according to the input and perform projection of the image. Therefore,
student in rural school able to learn physic STEM topics using Arduino in a more interactive
way. The proposed project will consist of two main components:
• Hardware part: Arduino board with Bluetooth module connect to a mini projector which
also function as an OHP. Bluetooth module allow the prototype to connect with a Smart
Devices.
• Software part: Interactive, Ease-of-Use interface for gamification in learning STEM
Physics (light and prism topics).

8 | P a g e
CHAPTER 2: LITERATURE REVIEW
2.1 Introduction
In this chapter, background study and literature review are carried out to total achieve
the objective of the proposed project. Some existing system that related to the purposed project
has been reviewed to converge the information and comparison with the purposed prototype.
Literature review is based on various resources such as journal, article and website to have
clear overview of the strength and weakness of existing system and produce solution to
improve the purposed prototype. The purpose prototype environment will be Sarawak’s rural
schools. Thus, the background study for rural school around is reviewed to gather the constraint
and requirement for the rural school. In order to ease the teaching and learning in rural school,
a gamified STEM physic learning prototype is purposed. To develop a fully functional
prototype, research on the Physic theory of the reflection and refraction of the light is
fundamental.
Currently, rural schools in Sarawak lack of proper infrastructure and basic facilities
which most of the schools are physically battered and without electricity supply. This leads to
poor quality and level of education and the student in rural school does not have chances to
access with the latest technology. Projector is inconvenient to used which rural area is lack of
electricity and spend more expenses on cost. Other than that, student in rural school lack of
learning motivation. Gamification is the use of game design and mechanic to enhance non-
game context by improve the user participation and engagement. Games in any kind of form
increase motivation through engagement. Introduce gamify education in rural school will be
helpful to motivate and attract interest of student in learning STEM subject.
Nowadays, there were countless existing gamified education tools, applications and
resources. However, some of the requirement and constraint is not suitable in rural areas. Lack

9 | P a g e
of devices, internet access and electricity supply will be the main constraint to develop the
prototype. The purposed project is to develop a prototype system using Arduino to learn
Physics STEM subject with interactive interface that include gamification and low energy
consumption mini-projector and also an Overhead Projector (OHP).
2.2 Arduino
2.2.1 What is Arduino
(Arduino, n.d.) Arduino is an open-sources electronic platform based on easy-to-use
hardware that is used to develop electronic project or prototype. Arduino consist of two part
which are the physical programmable circuit board as the microcontroller and the software part
call the Integrated Development Environment (IDE). IDE run on computer, used to write and
upload code to the Arduino board. Arduino designed to create interactive prototype with the
environments. Complete Arduino project or prototype consist of the microcontroller, sensor
and the actuator. Arduino sensor module function to react with the environment or the user to
retrieve or receive input. Example of sensor: laser sensor, heat sensor, smoke sensor, RFID
sensor, etc. Connective modules lie Wi-Fi and Bluetooth module allow Arduino board to have
wireless connectivity with other devices. Whereas the actuator like LED board, Servo motor,
etc. will produce the result or output.
(Gibb, 2010) In these modern days, Arduino used wisely in microcontroller
programming among various type of embedded system and prototype due to its user friendly
and ease-to-use settings. Arduino does not need separate hardware in order to load new code
into the board unlike most old type programmable circuit board. Programme code can be
upload to board via USB cable and Arduino IDE uses simplified version of C++.

10 | P a g e
2.2.2 the Arduino Hardware and Software
Arduino hardware part which is the Arduino board consist of several component that works
together.
Figure 2.2.1 Arduino board
(Image source: http://arduinoarts.com/what-is-arduino/)
Figure 2.2.1.1 show the image of an Arduino UNO board. The component on the board:
• USB plug: Function as to upload programme code to the microcontroller and regulated
voltage of 5 volts.
• External Power Supply: ONLY used to power the board which regulated 9 to 12 volts
of power.
• Reset Button: Used to resets the Arduino.
• Microcontroller: The main brain of Arduino which receive/send information/command
to the respective circuit.
• Analog Pins: Analog input pins from A0 to A5.
• Digital I/O pins: Digital input or output pin from pins 2 to 13.
• In-Circuit Programmer: Another source to upload programme code.

11 | P a g e
• Digital and Analog Ground pins (GND)
• Power Pins: one 3.3v pin and one 5v pin.
(Boxall, 2013) The Arduino IDE is a software which act as a set of instruction that
communicate and give instruction to the hardware. Arduino IDE consist of three main part:
Figure 2.2.1.2 IDE software on PC

12 | P a g e
• (Yusuf, 2014) Command area – consist of menu item like File, Edit, Sketch, Tools,
Help, Verify button for code verification. Upload Button to upload code to the board,
New, Open, Save and Serial Monitor which function as passing data between Arduino
and the IDE.
• Text Area – place to write code which uses simplified C++ programming language and
call as sketch. Two main function in IDE:
1. Setup function – Initial condition of variable is set, and the preliminary code only
run once. Variable must be initialized before setup and assign to used.
2. Loop routine – Loop that run or execute the main code repeatedly.
• Message Window Area – Verification code and shows error in coding.
2.2.3 History of Microcontroller
Early of 70’s, both Intel and Texas instruments started developing the higher integrated
microprocessor. (Siewiorek, Bell, & Newell, 1982) Intel continue the development of
microprocessor while Texas decided to add built in memory to the microprocessor which
become the microcontroller.
Microprocessor is basic for a more powerful computer which need to cooperate with
other chips to work. On the other hand, (IEEE, 2014) microcontroller is an all-in-one approach
which less rely on other chips but has limited functionality. Starting from develop
microcontroller in simple calculators, microcontrollers now can be found in countless
electronic devices and embedded systems.

13 | P a g e
2.2.4 Arduino As a Learning Tool
(Arduino, n.d.) Massimo Banzi is an interaction designer, teacher, maker, bottleneck
and also the Co-founder of Arduino. Arduino was founded and formed when Massimo Banzi’s
student unable to find affordable and efficient microcontrollers for the project. (Arduino, n.d.)
Massimo Banzi, David Cuartielles, Tom Igoe, Gianluca Martino and David Mellis which is
one of the Banzi’s student create the first and very own board and writing the programming
language for the board. Arduino soon become popular due to it easy-to-use and does not need
much computer programming and electronic knowledge. Thus, Arduino with others type of
module would be handful in developing or designing new prototype. (Galadima, 2014) The
number of project Arduino can be work on are endless and are limited only by one’s
imagination.
2.2.5 Why Arduino?
Why use Arduino? What makes it different with others? With countless microcontroller around
us, reason for Arduino have been choose in this project is:
• There were active community users of Arduino. Thus, it will be easy to get help on
troubleshoot which similar issue might face by others. (Rodriguez, 2014) “What you
find is that if you can create a community around an open source project then it becomes
really alive because everyone starts to contribute. If you do not have an ecosystem, the
platform will not be successful. If you start charging for everything, everything dies
very quickly.” says Banzi, Arduino Co-founder.
• Arduino would be ideal for newcomer to get start quickly since Arduino was developed
in an educational setting.