Embed Size (px)
Citation preview

©2013 Shelby Systems, Inc.
Other brand and product names are trademarks or registered trademarks of the respective holders.
Arena: Form Builder
Presented by:
Ben Lane
Senior Arena Training Lead

Objective
Learn step by step how to build custom forms and deploy them in Arena. Form Builder uses the Custom
Fields and Custom Field Groups so you can create surveys and forms to display statistics or credential
information.
In this session, you will learn:
• What the Form Builder is
• How to set up the forms
• How to see the results
• How to use on your external website
Arena Form Builder
The Form Builder in Arena is very new and is still under development at this time, but the functions that
are available form the foundation for a very useful tool. It is designed primarily for Headquarter
organizations that need a good way to collect information from their churches or pastors. This tool allows
you to create custom forms, have churches or individuals enter their information, and then be able to
retrieve that information. Since it is built on the already existing custom field structure in Arena, the
forms are easy to build.
Building Forms
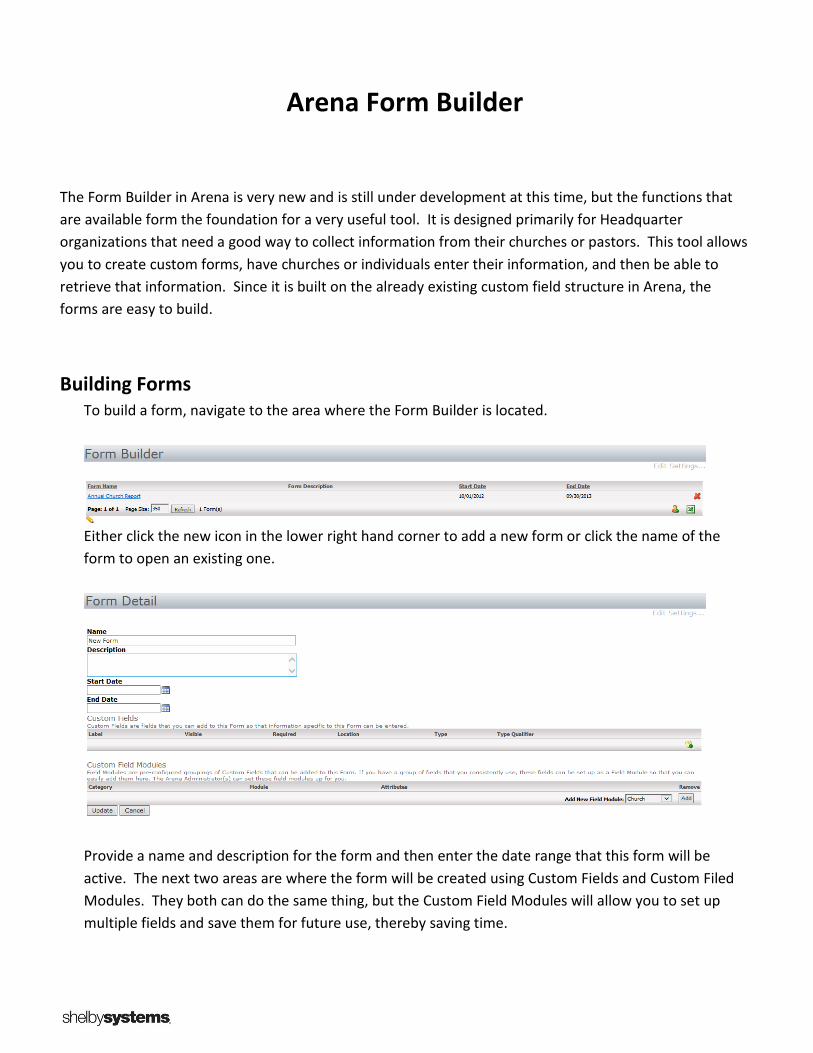
To build a form, navigate to the area where the Form Builder is located.
Either click the new icon in the lower right hand corner to add a new form or click the name of the
form to open an existing one.
Provide a name and description for the form and then enter the date range that this form will be
active. The next two areas are where the form will be created using Custom Fields and Custom Filed
Modules. They both can do the same thing, but the Custom Field Modules will allow you to set up
multiple fields and save them for future use, thereby saving time.

Set up Custom Fields
To add a Custom Field, select the New Custom Field icon, and then click the Edit Custom Field
icon. Fill in the required fields as desired and needed. To change the order of Custom Fields use
the arrow button.
Custom Fields
• Label – Enter the name for the custom field.
• Label Location – Select the label location. Options are left, right, top, or bottom.
• Field Type – Select the type of field to use.
o Address – This field give you the ability for participants to enter an address.
o Area – This field enables you to specify a page to display the group area. This works with
groups and allows records to show up on a map.
o Checkbox – This field enables you to create a multi-select list of options for participants.
Enter the options in comma-delimited format in the Values field.
o Custom Query – This field enables you to enter a custom query in the Query field.
o Date – This field allows registrants to enter a date.
o Document – This field enables registrants to attach a document. You will first need to
select a Document Type to associate with uploaded registrant documents. Document Type
is a customizable Lookup.
o Dropdown List – This field enables you to create a drop-down list of options for
registrations to select. Enter values in comma-delimited format (e.g. Option a, Option B,
Option C) in the Values field.
o Image – This field enables registrants to upload an image.
o Lookup Type – This field enables you to select an existing drop-down from Lookups.
o Person – This field enables registrants to search for a single existing record, using default
Person Page ID (7).
o Phone Number – This field enables registrants to enter a 10-digit telephone number with
the option to enter an extension.

o Radio List – This field enables you to create a single-select radio list of options for
registrants. Enter values in comma-delimited format (e.g. Option a, Option B, Option C) in
the Values field.
o Rich Text Field – This fields enables you to enter rich text.
o Static HTML Content – This field enables you to enter static text or static HTML-formatted
text in the HTML field.
o Textbox – This field enables registrants to enter text.
o Rows – Use this option to adjust the number of rows to use for the custom field, e.g., a
rich text field or static HTML content.
o Pixels Wide – Use this to specify the width of the custom field.
o Value(s) – Depending on the Field Type, you may be required to enter a value for the
choices presented. Field Types that require this are checkbox, radio, drop-down, and
static. These values are comma-delimited for multiple values.
• Visible – Check this box to make the field visible (both internally and externally).
• Required – Check this box for fields that registrants are required to select or complete.
• Read Only – Check this box for view only fields. This will make the field display as a disabled
field (grayed out).
• Enable Auto-Fill – For forms behind a member login, check this box for required custom fields.
• Show on List – Check this box for fields to display on the Tag-Member page.

Custom Field Modules
Custom Field Groups are a predefined collection of fields Arena Administrators create for use with
Groups, Tags, and Mission Trips. You can edit Custom Field Groups only on this page. Users are not able to
edit the fields.
Steps to Create Custom Field Groups:
1) Go to Administration\Custom Field Groups.
2) Click Add. Arena creates a New Field Group placeholder.
3) Click the Edit button.
4) Enter a Group Name for this custom field group. This is the group name users select, not the specific
fields.
5) Select a Category. You can customize this Custom Field Module Category Lookup.
6) Click the Update button to save.
7) Select the name of the new Custom Field Group.
8) Select the Add New Field button to create a field.

9) Complete fields, as desired.
• Title – Enter the name for this the custom field.
• Title Location – Select where to display the field. Options are left, right, top, bottom, and none.
• Type – Select a field type. Options are below.
o Address – This field gives users the ability to enter an address.
o Area – This field enables you to select an available area. You can create Areas in Groups.
o Checkbox – This field enables you the ability to create a multi-select list of options for
users. Enter values in comma-delimited format in the Values box that displays below the
Type dropdown.
o Custom Query – This field gives you the ability to enter a custom SQL query.
o Date – This field allows users to enter a date.
o Document – This this field gives users the ability to attach a document. You must create at
least one Document Type for this field to be available.
o Dropdown List – This field enables you the ability to create a drop-down list of options for users
to select. Enter values in comma-delimited format in the Values box that displays below the Type
dropdown.
o Image – This field gives users the ability to upload an image.
o Lookup Type – This field gives users the ability to select a drop-down from existing Lookups.
o Person – This field gives users the ability to search for a single existing record.
Person Page ID is “7.”
o Phone Number – This field gives users the ability to enter a 10-digit telephone number with
the option to enter an extension.
o Radio List – This field gives you the ability to create a single-select radio list of option for users.
Enter values in comma-delimited format in the Values box that displays below the Type dropdown.
o Rich Text Field – This field gives users the ability to enter rich text.
o Static HTML Content – This field gives you the ability to enter static content, with the option to
use HTML.
o Textbox- This field gives users the ability to enter text.

• Rows – Used to expand area for fields; enables word wrapping for the number of entered rows.
• Pixels Wide – This option widens the custom field box, often used with Checkbox, Radio List,
Rich Text Field, Static and HTML Content.
• Visible – Check this box to make the field visible.
• Required – Check this box for fields that are required.
• Read Only – Check this box to indicate fields that are view only. This will make the field
display as a disabled field (grayed out).
• Enable Auto-Fill – Check this box for the field to auto-populate, using existing Arena data. This option
is for fields behind a login.
• Show on List – Check this box for fields to display on the confirmation page of event registration.
10) Click Update.
11) Repeat steps 8 and 9 for all fields you want to add to the Custom Field Group.

Steps to Delete a Custom Field and Custom Field Group:
1) Remove where custom field is used.
2) Go to Administration\Custom Fields Groups.
3) Select the Custom Field Group.
4) Identify the custom field you want to delete
5) Click red to delete the field.
6) Go back to Administration\Custom Fields Groups.
7) Click red to delete for the Custom Field Group.

Providing Access
After you have set up your forms, you need to determine how people will have access to enter the
information. There are a couple of determining factors on how you would set this up. Primarily, you
need to determine if everyone who will be entering information will be in the database before entering
information in the form. If so, they will log in and the system will automatically recognize them and
the information entered on the form will be assigned or related to that record. If they do not have a
record, they can create an account and then the system will relate the data enter on the form to the
newly created record. If the person does not have a record and it is not required by you that they have
a record, then the survey will have and Frist and Last name Field as well as the form questions. When
this happens the data will be stored, along with the person’s name, and the information entered.
The second consideration is related to the location of the web page that they will be directed to enter
the data. You can use your existing website and hyperlink to your Arena website, or you can just send
a hyperlink directly to the page where the form is located.
Retrieving the Form Data
There are several ways to retrieve the form data after it has been entered.
On the Form—Below, where the form was created, a list of all the people who have filled out
the forms will appear and their data will be visible when the record is selected.
O
n
t
h
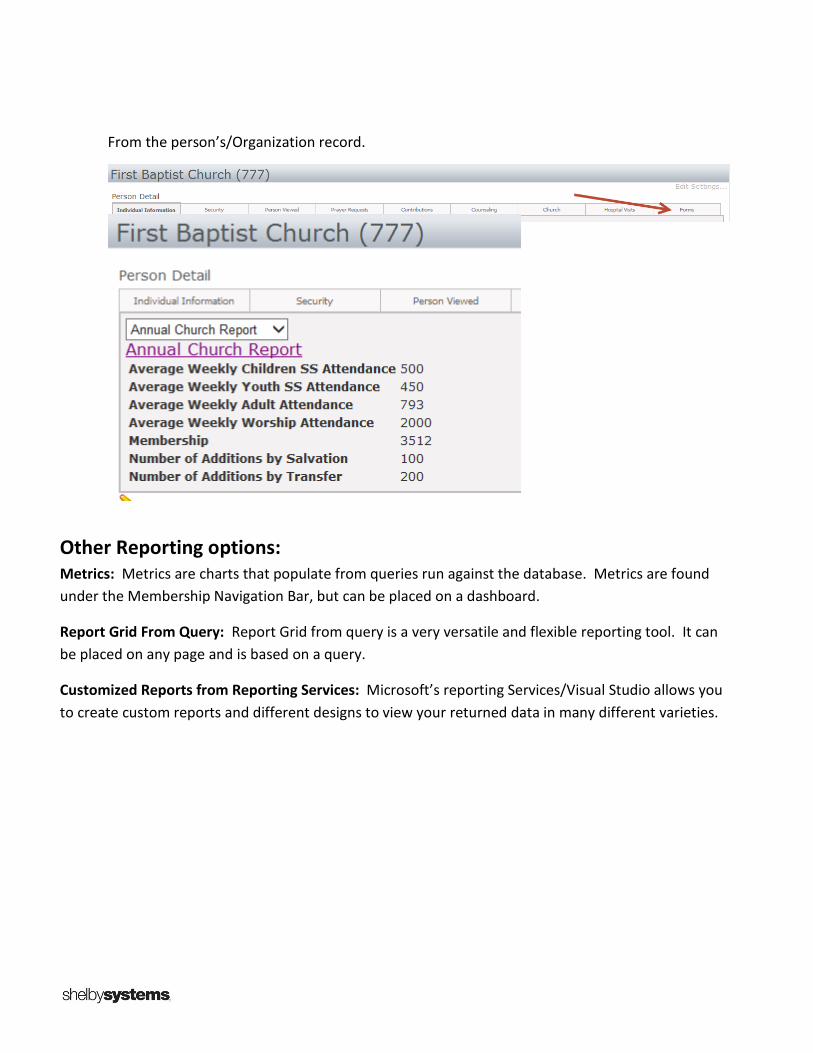
From the person’s/Organization record.
Other Reporting options:
Metrics: Metrics are charts that populate from queries run against the database. Metrics are found
under the Membership Navigation Bar, but can be placed on a dashboard.
Report Grid From Query: Report Grid from query is a very versatile and flexible reporting tool. It can
be placed on any page and is based on a query.
Customized Reports from Reporting Services: Microsoft’s reporting Services/Visual Studio allows you
to create custom reports and different designs to view your returned data in many different varieties.

Ben Lane
Senior Arena Training Lead [email protected]
Before joining Shelby Systems as a certified staff trainer, Ben Lane served as a youth minister
and a minister of education at various churches. His desire is to help churches maximize their
ministry through effective use of Shelby software. Currently he is Senior Arena Training Lead
and oversees training on the exciting web-based Arena software.