Embed Size (px)
Citation preview

ap
pli
cati
on
man
ual
>>
AR
MA
FLEX
ap
pli
cati
on
man
ual
>>
AR
MA
FLEX
application manual
B
H
1/2 Ø 1/2 Ø
ap
pli
cati
on
man
ual
>>
AR
MA
FLEX
2
1 GENERAL 2
» Working with Armafl ex 3
» Tools for installing Armafl ex 3
» The correct use of Armafl ex adhesive 3
» Wet sealing of butt joints 4
» Outdoor Use of Armafl ex 5
» Advice for insulating in refrigeration and A/C equipment 5
» Insulating stainless steel pipes 5
2 PIPES AND FITTINGS 7
» Insulating pipes using Armafl ex tubes • Cutting Armafl ex Tubes 7
• Insulating new pipes by Sleeving -On 8
• Insulating existing pipes by Snap -On 8
• Insulating pipes with Armafl ex SelfSeal tubes 9
• Multi-layer insulation of pipes 10
• Using the Armafl ex template 10
• Detailed drawings for fabrication of
- Bend with 90° angle 11
- Bend with 45° angle 11
- Segmented bend with 1 middle part 11
- Segmented bend with 2 middle parts 11
- Segmented bend with 3 middle parts 11
- Cross piece joint 11
- Y-tube 12
- Swept T-piece 12
- T-Piece 12
- Insulating coupling pipe joints 13
- Angle T-piece (in question) 13
- Pipe reducer 14
» Insulating pipes & fi ttings using Armafl ex sheet • Insulating pipes with Armafl ex sheet 15
• Insulating large pipes with Armafl ex sheet 15
• Step-by-step guides for the fabrication of
- Two part bend 16
- Valve insulation with D-box 17
- Insulation of valve body 18
- Neck-T / Pipe-T / Valve Handle 19
- Offset angle & pipework bend angle joints 20
- Strainers, Strainer Valves & inclined seat valves 21
- Flange-Box 22
- Victaulic Couplings 23
- Concentric Reducers 24
© ARMACELL UK LTD.
APPLICATION MANUAL
» Pipe Supports 25• Insulating pipe supports 25
• Installing Armafi x insulated pipe supports 25
• Installing Armaload pipe supports 25
• Insulating “over” (encapsulating) pipe supports with Armafl ex 26
• Insulating through mounted “saddle” supports 26
• Installing Armaload pipe supports sections 26
3 DUCTS 27
» Measure surface dimension for insulating rectangular ducts 27
» Insulating ducts with Armafl ex sheets 27
» Insulating ducts with self-adhesive Armafl ex sheets 27
» Insulating duct brackets with Armafl ex 28
» Insulating circular ducts with Armafl ex sheets 28
4 VESSELS AND TANKS 29
» Insulating vessels and tanks using Armafl ex sheet 29
» Insulating small (Ø< 1.5m) tanks and vessels using Armafl ex sheet 30
» Insulating big (Ø > 1.5m) tanks and vessels using Armafl ex sheet 31
5ADDITIONAL APPLICATION ADVICE / REFERENCES 33
» Use of adhesive in applications involving hot and humid environment 33
» Insulation of Non-Armafl ex-System pipe supports 33
» References In addition to this manual Armacell provides additional documents, freely available from www.armacell.com/uk (or as part of our ArmaPlus CD). These documents contain further detailed advice for specifi c applicat- ions. 34
6 ALL ARMAFLEX PRODUCTS 35
1 - General >> Working with Armafl ex APPLICATION MANUAL
© ARMACELL UK LTD.
Gen
era
l >
> W
ork
ing
wit
h A
rmafl
ex
THE CORRECT USE OF ARMAFLEX ADHESIVE
Armafl ex Adhesive 520Armafl ex Adhesive 520 has been specially developed to bond Armafl ex. It joins the surfaces reliably and safely at medium temperatures of up to +105ºC. The bond is resistant to weathering and aging.
Armafl ex Adhesive HT625Armafl ex Adhesive HT625 has been specially devel-oped to bond HT Armafl ex insulation for medium tem-peratures of up to +150ºC*. When using HT Armafl ex only Armafl ex Adhesive HT625 should be used.* For temperatures below -50°C or above +150°C, please consult our
Customer Services Department.
PREPARING FOR WORK
Check condition of Armafl ex Adhesive. Cans of Armafl ex Adhesive should have been stored in a cool environ-ment wherever possible. Cans must also have been kept free from frost.
Damage due to frost can be reversed by storing in warm conditions, or for immediate use by placing the can into a bucket of hot water. Shelf life approx. 1 year.
1. Where installation surfaces are soiled with dust, dirt, oil or water all of these contaminants must be removed and, where applicable, cleaned with Armafl ex cleaner before starting work. In addition all surfaces to be joined must be dry before gluing begins.
2. Pay close attention to the installation instructions on the adhesive can. Use small cans during work so that the adhesive does not thicken too quickly. Refi ll from larger cans when necessary and keep closed when not in use to avoid thickening
3. Plants must not be in operation during the installation process!
4. Do not use adhesive under 0°C. If the adhesive is too cold it can be warmed in a bucket of hot water. At temperatures below 5°C, condensation can appear on the surfaces to be glued or the adhesive fi lm. If this occurs the materials can be glued only with diffi culty. Check whether this has happened by applying absorbent paper. When working in areas with a high atmospheric humidity and high temperatures see ““Hot Climates” page 33 of this manual.
5. Stir adhesive well after opening. If left to stand, heavier components in the adhesive may settle in the bottom of the can. These must be mixed thoroughly before use in order to effectively activate the adhesive.
3
WORKING WITH ARMAFLEX
• Use good quality tools, in particular a sharp knife, fresh Armafl ex adhesive and a good brush.
• Oval tubes should always be split on the fl at side.
• Use clean Armafl ex material – with no dust, dirt, oil or water on the surface, if present clean with Armafl ex cleaner.
• Use the right dimensions! Never pull glued joints when sealing them, always push them together.
• Never insulate plants and systems that are in operation! Only start insulated plants after 36 hours - after this time the adhesive is fully cured.
• Armafi nish FR paint can be applied immediately after the insulation has been installed, with a second coat of paint applied within 3 days, to provide UV protec- tion (see page 5).
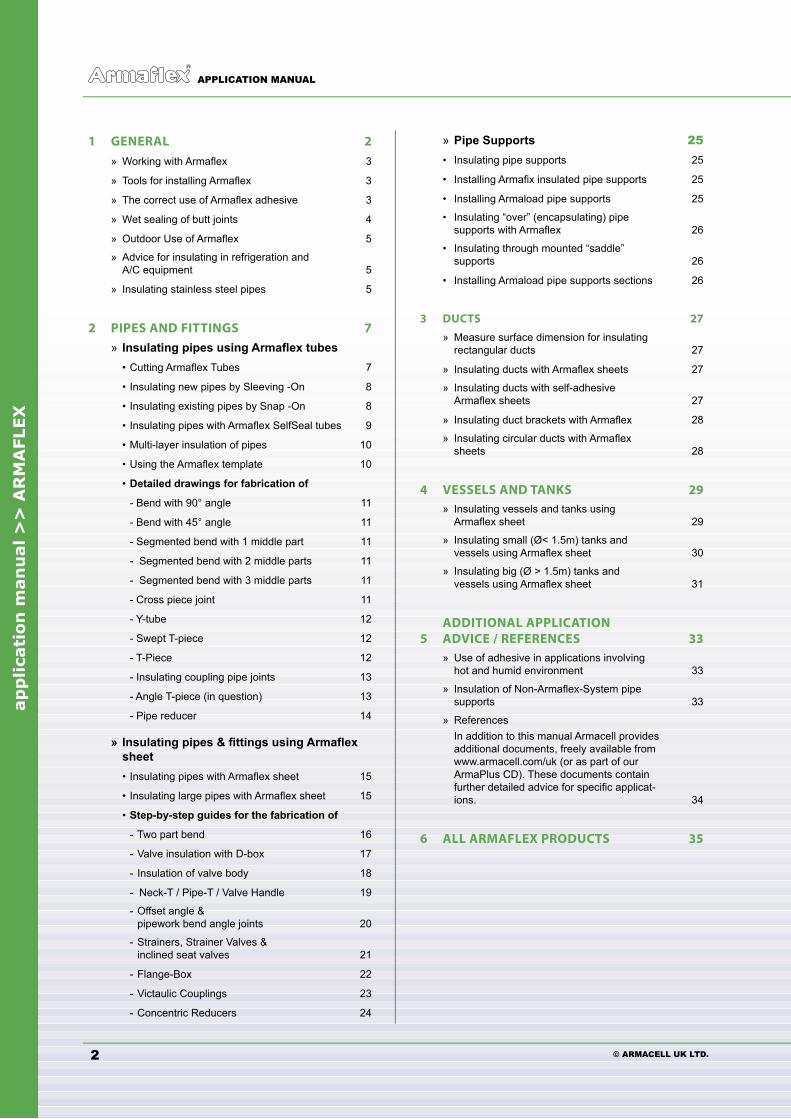
TOOLS FOR INSTALLING ARMAFLEX
Folding rule / tape measure T-Ruler
Template (printed on every Armafl ex carton)
Scissors
Chalk for marking irregular shapes
Silver ink marker pen
Dividers
Brushs with short, fi rm bristles
Callipers Smooth spatula for smoothing down covering
Knifes * Sharpened pipe ends for the most common pipe diameters
Safe edge craft knife
Paint fabric rollers for surface gluing and smoothing down covering
Sharpening stone Gluemaster
* A three knife set plus sharpening stone are available together as a tool kit
Gen
era
l >
> W
ork
ing
wit
h A
rmafl
ex
© ARMACELL UK LTD.
APPLICATION MANUAL 1 - General >> Working with Armafl ex
4
STEEL PIPES
Check that the adhesive will adhere to any rust-inhib-iting primer that has been used to protect steel pipes. Armafl ex adhesive may not adhere to asphalt, bitumen, red-lead or cement surfaces.
APPLICATION
1. Use a brush with short, stiff bristles and keep clean. For larger areas a spatula or (non foam type) paint roller or the Armafl ex Gluemaster may be used to speed up application.
2. Apply Armafl ex adhesive thinly and evenly onto both surfaces to be glued.
3. When adhering Armafl ex to other materials (e.g. metal), fi rst apply the adhesive to the Armafl ex and then to the other clean surface.
4. The tack time for Armafl ex adhesives ranges between 3 and 10 min.(1) .The time will vary accord- ing to the grade, ambient temperature and relative humidity. Avoid ‘open times’ (2) in excess of 20 min. (1) Tack time for NH/Armafl ex varies - please see special application advice for NH/Armafl ex - available from www.armacell.com/uk. (2) The ‘open time’ is defi ned as the period between ~ fi rst applying adhesive and fi nally closing together the joint, seams or surfaces.
5. Allow the adhesive to ‘tack-dry’. The correct initial drying time may be determined by the ‘fi ngernail-test’: touch the surface with a fi ngernail, if the fi ngernail does not adhere to the surface and the surface itself does not feel tacky the joint may be closed. The maxi- mum adhesive force will be obtained when two tack dry surfaces are brought together.
6. The glued surfaces should be pressed together, do not stretch. Do not leave glued seams on the top of the insulation in external locations. When working outdoors, always turn the glued seams away from the sun.
7. When gluing joints under compression, with no gaps present, the wet adhesive method should be applied. Pull the seam apart slightly and apply Armafl ex adhesive thinly and evenly with the brush to both surfaces and press together. No open time is needed in this case.
8. Use Armafl ex cleaner to clean your tools, contami- nated metal surfaces and surfaces which have had talc applied.
9. Curing time for Adhesive 520 / 625: 36 hours.
Note: Do not mix Armafl ex cleaner with Armafl ex adhe-sive to thin it out - warm it.
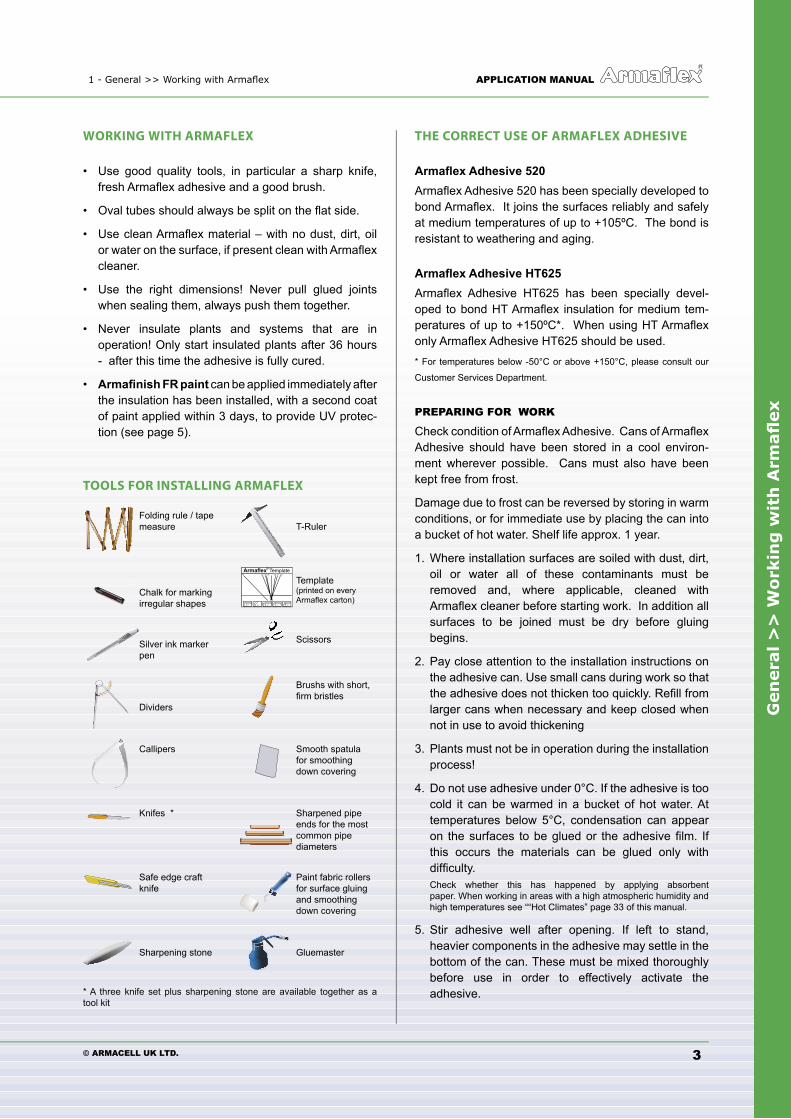
WET SEALING OF BUTT JOINTS
1. On all cold lines and all piping equipment in a external location, fi x and secure down to the piping surface, Armafl ex tube/sheet ends with Armafl ex adhesive.2. The adhesive bonding will equal the isulation thick- ness as a minimum.
3. For the fi nal wet sealing of the tube/sheet, pull the compressed butt joint apart with the fi nger and apply a thin even fi lm of adhesive to the two butt joint edges with a small brush.4. Apply fi rm and even pressure to the glued joint using the fi ngers and thumbs to fi nish.
Note: In addition all other types of Hot piping lines located externally, it is highly recommended to follow the same procedures as with cold lines.
1 - General >> Working with Armafl ex APPLICATION MANUAL
© ARMACELL UK LTD.
Gen
era
l >
> W
ork
ing
wit
h A
rmafl
ex
5
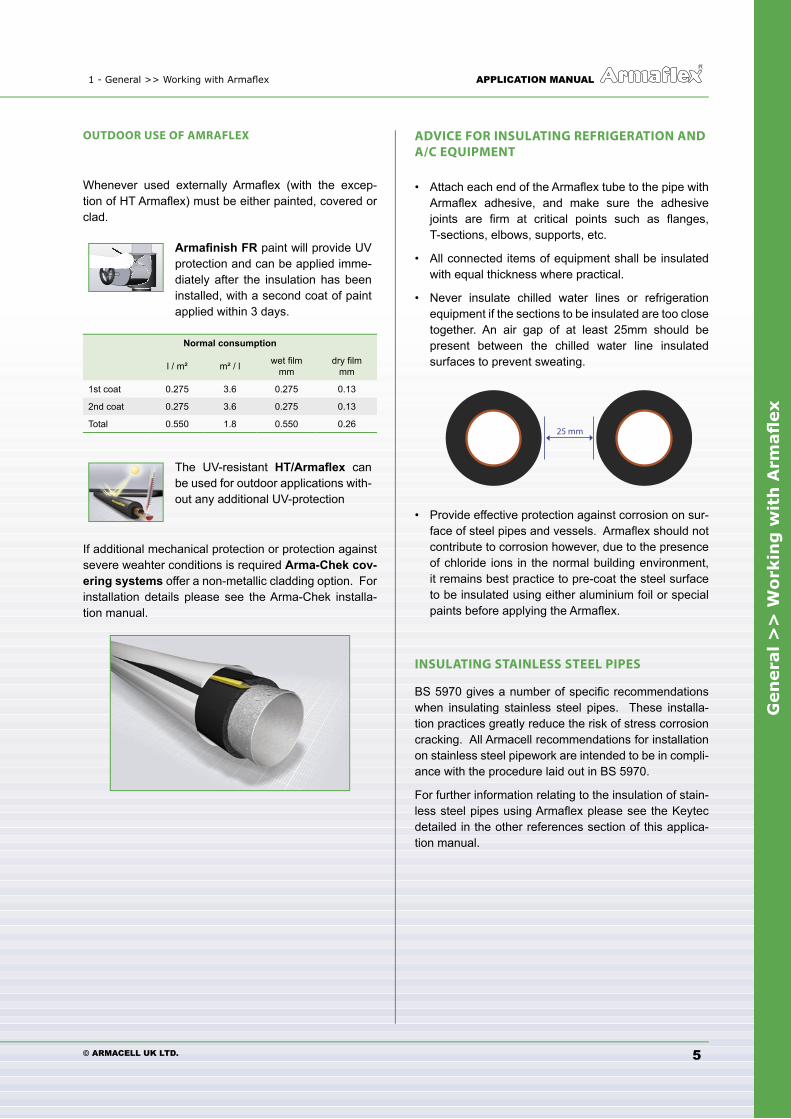
OUTDOOR USE OF AMRAFLEX
Whenever used externally Armafl ex (with the excep-tion of HT Armafl ex) must be either painted, covered or clad.
Armafi nish FR paint will provide UV protection and can be applied imme-diately after the insulation has been installed, with a second coat of paint applied within 3 days.
Normal consumption
l / m² m² / l wet fi lmmm
dry fi lmmm
1st coat 0.275 3.6 0.275 0.13
2nd coat 0.275 3.6 0.275 0.13
Total 0.550 1.8 0.550 0.26
The UV-resistant HT/Armafl ex can be used for outdoor applications with-out any additional UV-protection
If additional mechanical protection or protection against severe weahter conditions is required Arma-Chek cov-ering systems offer a non-metallic cladding option. For installation details please see the Arma-Chek installa-tion manual.
ADVICE FOR INSULATING REFRIGERATION AND A/C EQUIPMENT
• Attach each end of the Armafl ex tube to the pipe with Armafl ex adhesive, and make sure the adhesive joints are fi rm at critical points such as fl anges, T-sections, elbows, supports, etc.
• All connected items of equipment shall be insulated with equal thickness where practical.
• Never insulate chilled water lines or refrigeration equipment if the sections to be insulated are too close together. An air gap of at least 25mm should be present between the chilled water line insulated surfaces to prevent sweating.
25 mm
• Provide effective protection against corrosion on sur- face of steel pipes and vessels. Armafl ex should not contribute to corrosion however, due to the presence of chloride ions in the normal building environment, it remains best practice to pre-coat the steel surface to be insulated using either aluminium foil or special paints before applying the Armafl ex.
INSULATING STAINLESS STEEL PIPES
BS 5970 gives a number of specifi c recommendations when insulating stainless steel pipes. These installa-tion practices greatly reduce the risk of stress corrosion cracking. All Armacell recommendations for installation on stainless steel pipework are intended to be in compli-ance with the procedure laid out in BS 5970.
For further information relating to the insulation of stain-less steel pipes using Armafl ex please see the Keytec detailed in the other references section of this applica-tion manual.

Gen
era
l >
> W
ork
ing
wit
h A
rmafl
ex
© ARMACELL UK LTD.
APPLICATION MANUAL 1 - General >> Working with Armafl ex
6
2 - Pipes & Fittings >> Using Armafl ex Tubes APPLICATION MANUAL
© ARMACELL UK LTD.
Pip
es
& F
itti
ng
s >
> U
sin
g A
rmafl
ex T
ub
es
7
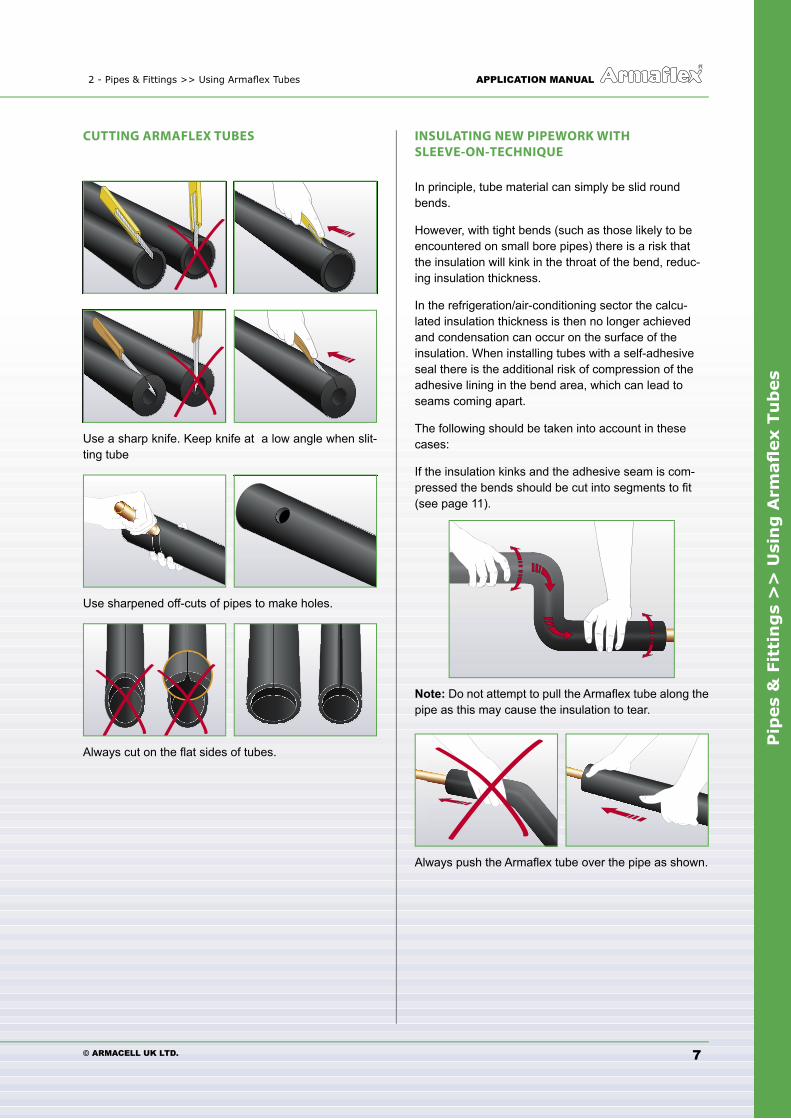
CUTTING ARMAFLEX TUBES
Use a sharp knife. Keep knife at a low angle when slit-ting tube
Use sharpened off-cuts of pipes to make holes.
Always cut on the fl at sides of tubes.
INSULATING NEW PIPEWORK WITHSLEEVE-ON-TECHNIQUE
In principle, tube material can simply be slid round bends.
However, with tight bends (such as those likely to be encountered on small bore pipes) there is a risk that the insulation will kink in the throat of the bend, reduc-ing insulation thickness.
In the refrigeration/air-conditioning sector the calcu-lated insulation thickness is then no longer achieved and condensation can occur on the surface of the insulation. When installing tubes with a self-adhesive seal there is the additional risk of compression of the adhesive lining in the bend area, which can lead to seams coming apart.
The following should be taken into account in these cases:
If the insulation kinks and the adhesive seam is com-pressed the bends should be cut into segments to fi t (see page 11).
Note: Do not attempt to pull the Armafl ex tube along the pipe as this may cause the insulation to tear.
Always push the Armafl ex tube over the pipe as shown.

Pip
es
& F
itti
ng
s >
> U
sin
g A
rmafl
ex T
ub
es
© ARMACELL UK LTD.
APPLICATION MANUAL 2 - Pipes & Fittings >> Using Armafl ex Tubes
8
INSULATING EXISTING PIPEWORK WITH SNAP-ON-TECHNIQUE
1. With a sharp knife, slit the fl at part of the unslit tube along the entire length.
2. Place the slit tube onto the clean pipe; apply Armafl ex adhesive to the two cut edges with a thin even fi lm of adhesive using a short bristle brush. Apply the adhesive at 200mm intervals , along the tube length.
3. Allow the adhesive to touch dry, test with the fi nger- nail.
4. Free the seams from the pipe where applicable, line the edges together and press the seam detail with fi rm even pressure to fi nish.
2 - Pipes & Fittings >> Using Armafl ex Tubes APPLICATION MANUAL
© ARMACELL UK LTD.
Pip
es
& F
itti
ng
s >
> U
sin
g A
rmafl
ex T
ub
es
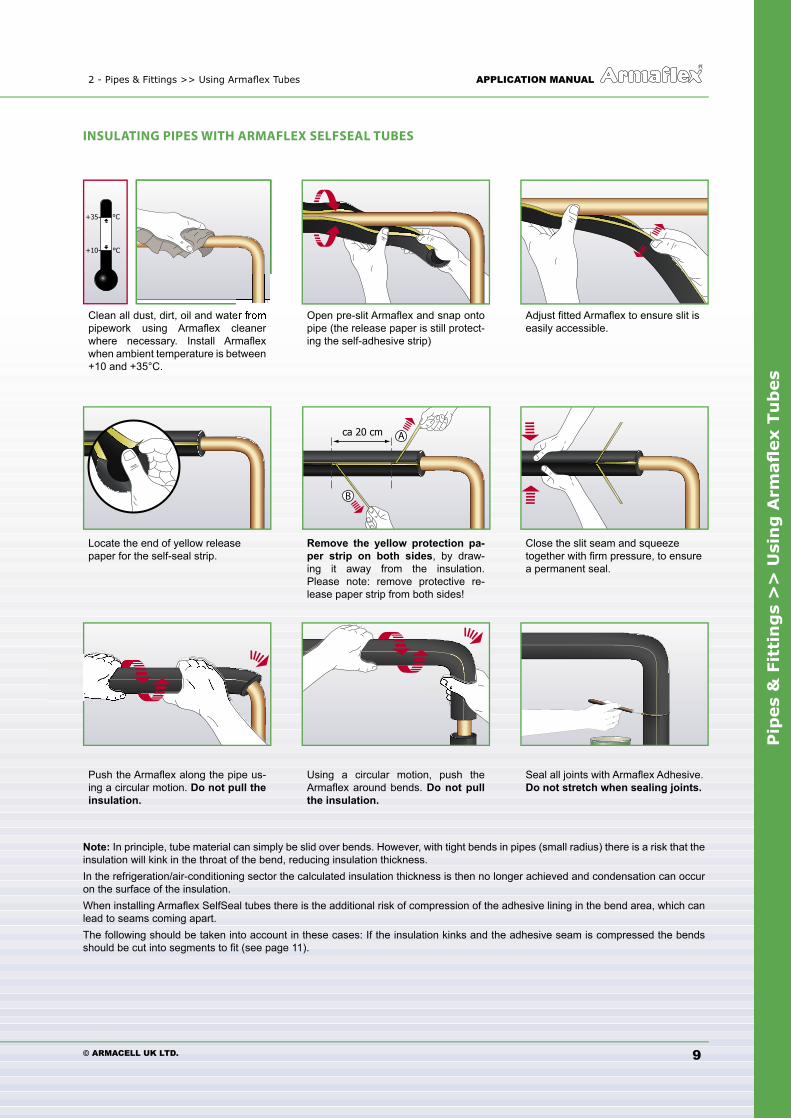
INSULATING PIPES WITH ARMAFLEX SELFSEAL TUBES
Clean all dust, dirt, oil and water from pipework using Armafl ex cleaner where necessary. Install Armafl ex when ambient temperature is between +10 and +35°C.
Open pre-slit Armafl ex and snap onto pipe (the release paper is still protect-ing the self-adhesive strip)
Adjust fi tted Armafl ex to ensure slit is easily accessible.
Locate the end of yellow release paper for the self-seal strip.
Remove the yellow protection pa-per strip on both sides, by draw-ing it away from the insulation. Please note: remove protective re-lease paper strip from both sides!
Close the slit seam and squeeze together with fi rm pressure, to ensure a permanent seal.
Push the Armafl ex along the pipe us-ing a circular motion. Do not pull the insulation.
Using a circular motion, push the Armafl ex around bends. Do not pull the insulation.
Seal all joints with Armafl ex Adhesive. Do not stretch when sealing joints.
Note: In principle, tube material can simply be slid over bends. However, with tight bends in pipes (small radius) there is a risk that the insulation will kink in the throat of the bend, reducing insulation thickness.In the refrigeration/air-conditioning sector the calculated insulation thickness is then no longer achieved and condensation can occur on the surface of the insulation. When installing Armafl ex SelfSeal tubes there is the additional risk of compression of the adhesive lining in the bend area, which can lead to seams coming apart.The following should be taken into account in these cases: If the insulation kinks and the adhesive seam is compressed the bends should be cut into segments to fi t (see page 11).
ca 20 cm A
B
9
+35
+10
°C
°C
Pip
es
& F
itti
ng
s >
> U
sin
g A
rmafl
ex T
ub
es
© ARMACELL UK LTD.
APPLICATION MANUAL 2 - Pipes & Fittings >> Using Armafl ex Tubes
Multi-layer insulation for fl at surface
• In the case of single and multi-layering applications adhesive is applied with all-over adhesive coverage to all contacting surfaces. DO NOT apply only spots or strips of adhesive.
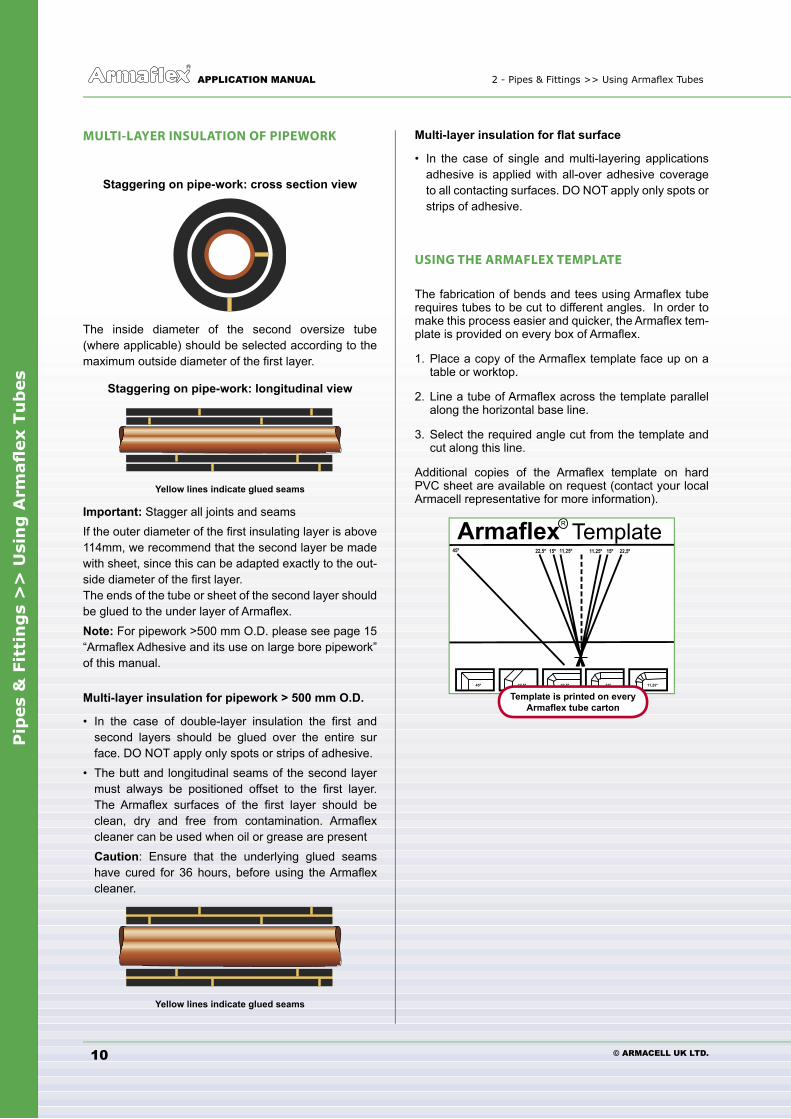
USING THE ARMAFLEX TEMPLATE
The fabrication of bends and tees using Armafl ex tube requires tubes to be cut to different angles. In order to make this process easier and quicker, the Armafl ex tem-plate is provided on every box of Armafl ex.
1. Place a copy of the Armafl ex template face up on a table or worktop.
2. Line a tube of Armafl ex across the template parallel along the horizontal base line.
3. Select the required angle cut from the template and cut along this line.
Additional copies of the Armafl ex template on hard PVC sheet are available on request (contact your local Armacell representative for more information).
10
MULTI-LAYER INSULATION OF PIPEWORK
Staggering on pipe-work: cross section view
The inside diameter of the second oversize tube (where applicable) should be selected according to the maximum outside diameter of the fi rst layer.
Staggering on pipe-work: longitudinal view
Yellow lines indicate glued seams
Important: Stagger all joints and seamsIf the outer diameter of the fi rst insulating layer is above 114mm, we recommend that the second layer be made with sheet, since this can be adapted exactly to the out-side diameter of the fi rst layer.The ends of the tube or sheet of the second layer should be glued to the under layer of Armafl ex.Note: For pipework >500 mm O.D. please see page 15 “Armafl ex Adhesive and its use on large bore pipework” of this manual.
Multi-layer insulation for pipework > 500 mm O.D.
• In the case of double-layer insulation the fi rst and second layers should be glued over the entire sur face. DO NOT apply only spots or strips of adhesive.• The butt and longitudinal seams of the second layer must always be positioned offset to the fi rst layer. The Armafl ex surfaces of the fi rst layer should be clean, dry and free from contamination. Armafl ex cleaner can be used when oil or grease are present Caution: Ensure that the underlying glued seams have cured for 36 hours, before using the Armafl ex cleaner.
Yellow lines indicate glued seams
Template is printed on every Armafl ex tube carton
2 - Pipes & Fittings >> Using Armafl ex Tubes APPLICATION MANUAL
© ARMACELL UK LTD.
Pip
es
& F
itti
ng
s >
> U
sin
g A
rmafl
ex T
ub
es
11
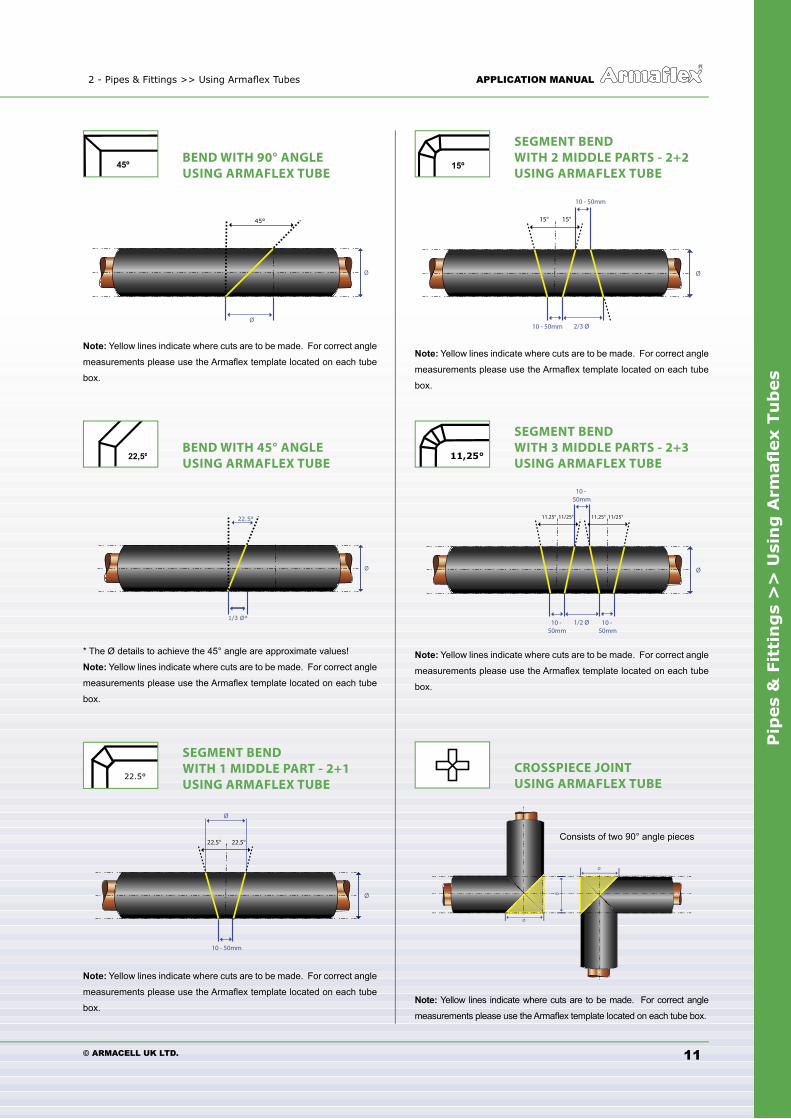
BEND WITH 90° ANGLE USING ARMAFLEX TUBE
45°
Ø
Ø
Note: Yellow lines indicate where cuts are to be made. For correct angle
measurements please use the Armafl ex template located on each tube
box.
BEND WITH 45° ANGLE USING ARMAFLEX TUBE
22.5°
Ø
1/3 Ø*
* The Ø details to achieve the 45° angle are approximate values!
Note: Yellow lines indicate where cuts are to be made. For correct angle
measurements please use the Armafl ex template located on each tube
box.
SEGMENT BEND WITH 1 MIDDLE PART - 2+1USING ARMAFLEX TUBE
22.5° 22.5°
10 - 50mm
Ø
Ø
Note: Yellow lines indicate where cuts are to be made. For correct angle
measurements please use the Armafl ex template located on each tube
box.
22.5°
SEGMENT BEND WITH 2 MIDDLE PARTS - 2+2 USING ARMAFLEX TUBE
15° 15°
10 - 50mm
Ø
10 - 50mm
2/3 Ø
Note: Yellow lines indicate where cuts are to be made. For correct angle
measurements please use the Armafl ex template located on each tube
box.
SEGMENT BEND WITH 3 MIDDLE PARTS - 2+3 USING ARMAFLEX TUBE
11.25° 11/25°
10 - 50mm
Ø
10 - 50mm
1/2 Ø 10 - 50mm
11.25° 11/25°
Note: Yellow lines indicate where cuts are to be made. For correct angle
measurements please use the Armafl ex template located on each tube
box.
CROSSPIECE JOINTUSING ARMAFLEX TUBE
Ø
Ø
Ø Ø
Ø
Note: Yellow lines indicate where cuts are to be made. For correct angle
measurements please use the Armafl ex template located on each tube box.
11,25°
Consists of two 90° angle pieces
Pip
es
& F
itti
ng
s >
> U
sin
g A
rmafl
ex T
ub
es
© ARMACELL UK LTD.
APPLICATION MANUAL 2 - Pipes & Fittings >> Using Armafl ex Tubes
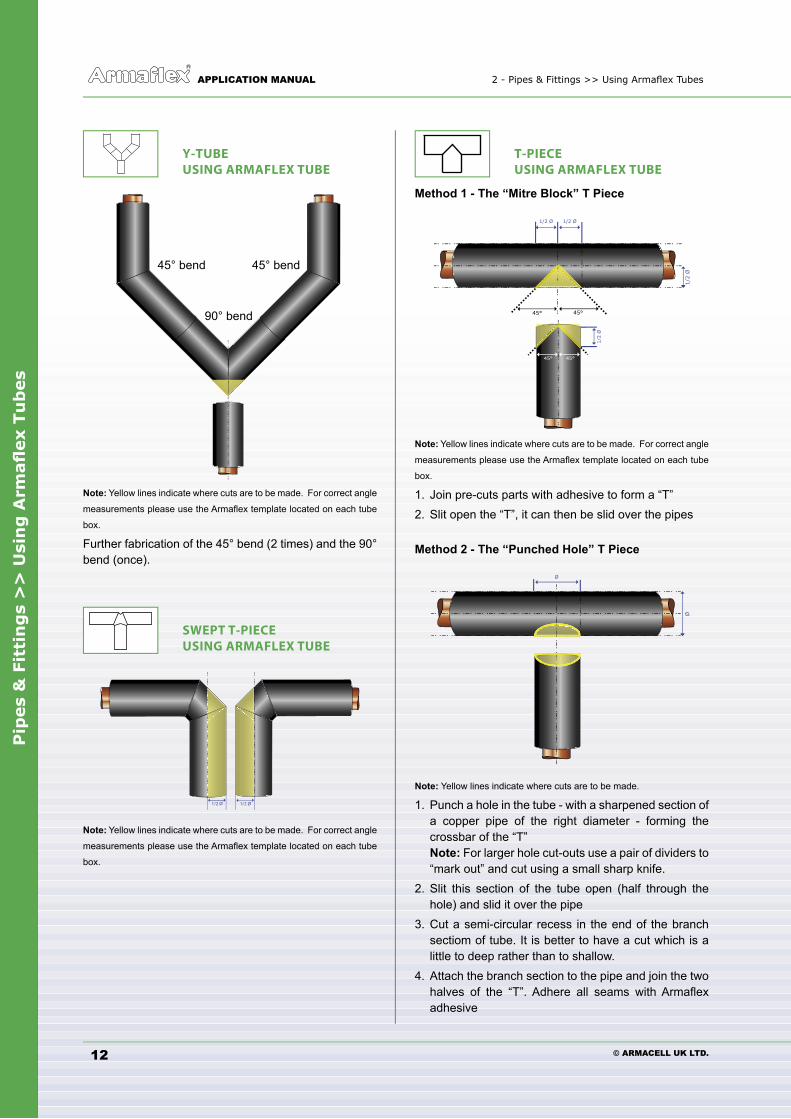
T-PIECEUSING ARMAFLEX TUBE
Method 1 - The “Mitre Block” T Piece
45°
1/2
Ø
1/2 Ø
45°
1/2 Ø
1/2
Ø
45° 45°
Note: Yellow lines indicate where cuts are to be made. For correct angle
measurements please use the Armafl ex template located on each tube
box.
1. Join pre-cuts parts with adhesive to form a “T”2. Slit open the “T”, it can then be slid over the pipes
Method 2 - The “Punched Hole” T Piece
Ø
Ø
Note: Yellow lines indicate where cuts are to be made.
1. Punch a hole in the tube - with a sharpened section of a copper pipe of the right diameter - forming the crossbar of the “T” Note: For larger hole cut-outs use a pair of dividers to “mark out” and cut using a small sharp knife.2. Slit this section of the tube open (half through the hole) and slid it over the pipe3. Cut a semi-circular recess in the end of the branch sectiom of tube. It is better to have a cut which is a little to deep rather than to shallow.4. Attach the branch section to the pipe and join the two halves of the “T”. Adhere all seams with Armafl ex adhesive
12
Y-TUBEUSING ARMAFLEX TUBE
Note: Yellow lines indicate where cuts are to be made. For correct angle
measurements please use the Armafl ex template located on each tube
box.
Further fabrication of the 45° bend (2 times) and the 90° bend (once).
SWEPT T-PIECEUSING ARMAFLEX TUBE
1/2 Ø 1/2 Ø
Note: Yellow lines indicate where cuts are to be made. For correct angle
measurements please use the Armafl ex template located on each tube
box.
45° bend 45° bend
90° bend
2 - Pipes & Fittings >> Using Armafl ex Tubes APPLICATION MANUAL
© ARMACELL UK LTD.
Pip
es
& F
itti
ng
s >
> U
sin
g A
rmafl
ex T
ub
es
13
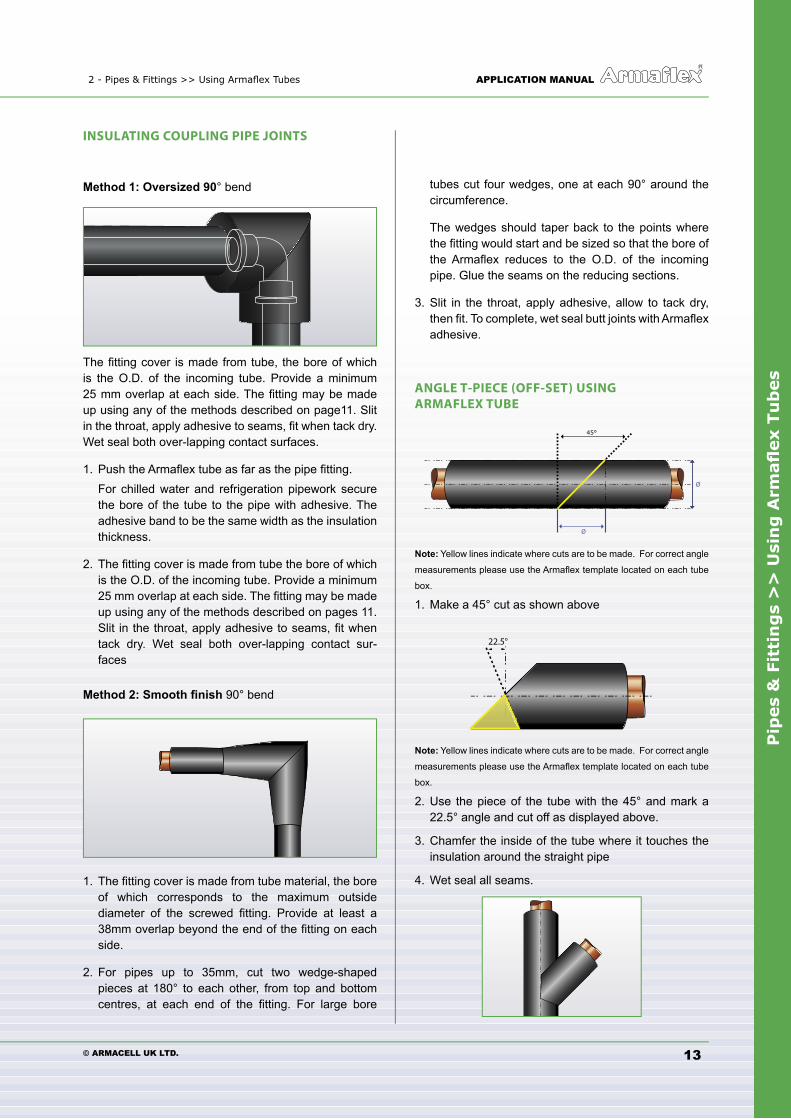
INSULATING COUPLING PIPE JOINTS
Method 1: Oversized 90° bend
The fi tting cover is made from tube, the bore of which is the O.D. of the incoming tube. Provide a minimum 25 mm overlap at each side. The fi tting may be made up using any of the methods described on page11. Slit in the throat, apply adhesive to seams, fi t when tack dry. Wet seal both over-lapping contact surfaces.
1. Push the Armafl ex tube as far as the pipe fi tting. For chilled water and refrigeration pipework secure the bore of the tube to the pipe with adhesive. The adhesive band to be the same width as the insulation thickness.
2. The fi tting cover is made from tube the bore of which is the O.D. of the incoming tube. Provide a minimum 25 mm overlap at each side. The fi tting may be made up using any of the methods described on pages 11. Slit in the throat, apply adhesive to seams, fi t when tack dry. Wet seal both over-lapping contact sur- faces
Method 2: Smooth fi nish 90° bend
1. The fi tting cover is made from tube material, the bore of which corresponds to the maximum outside diameter of the screwed fi tting. Provide at least a 38mm overlap beyond the end of the fi tting on each side.
2. For pipes up to 35mm, cut two wedge-shaped pieces at 180° to each other, from top and bottom centres, at each end of the fi tting. For large bore
tubes cut four wedges, one at each 90° around the circumference.
The wedges should taper back to the points where the fi tting would start and be sized so that the bore of the Armafl ex reduces to the O.D. of the incoming pipe. Glue the seams on the reducing sections.
3. Slit in the throat, apply adhesive, allow to tack dry, then fi t. To complete, wet seal butt joints with Armafl ex adhesive.
ANGLE T-PIECE (OFF-SET) USING ARMAFLEX TUBE
45°
Ø
Ø
Note: Yellow lines indicate where cuts are to be made. For correct angle
measurements please use the Armafl ex template located on each tube
box.
1. Make a 45° cut as shown above
22.5°
Note: Yellow lines indicate where cuts are to be made. For correct angle
measurements please use the Armafl ex template located on each tube
box.
2. Use the piece of the tube with the 45° and mark a 22.5° angle and cut off as displayed above.
3. Chamfer the inside of the tube where it touches the insulation around the straight pipe
4. Wet seal all seams.
Pip
es
& F
itti
ng
s >
> U
sin
g A
rmafl
ex T
ub
es
© ARMACELL UK LTD.
APPLICATION MANUAL 2 - Pipes & Fittings >> Using Armafl ex Tubes
14
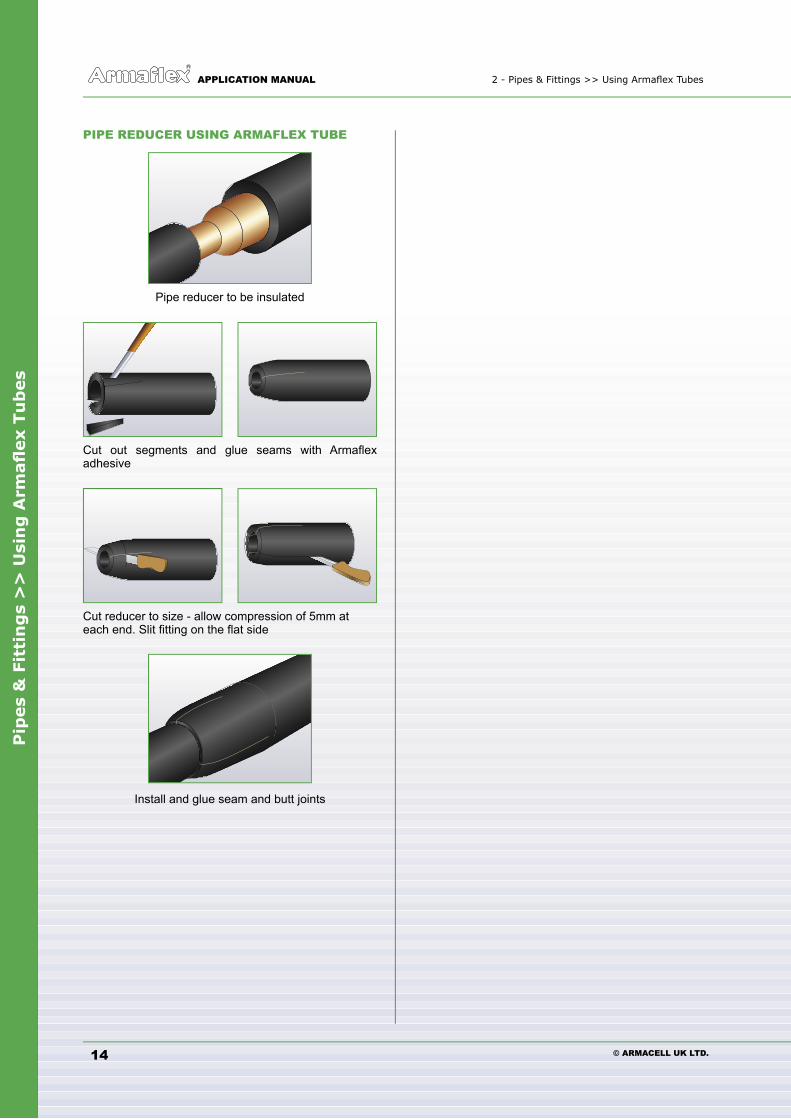
PIPE REDUCER USING ARMAFLEX TUBE
Pipe reducer to be insulated
Cut out segments and glue seams with Armafl ex adhesive
Cut reducer to size - allow compression of 5mm at each end. Slit fi tting on the fl at side
Install and glue seam and butt joints
2 - Pipes & Fittings >> Using Armafl ex Sheets APPLICATION MANUAL
© ARMACELL UK LTD.
Pip
es
& F
itti
ng
s >
> U
sin
g A
rmafl
ex S
heets
15
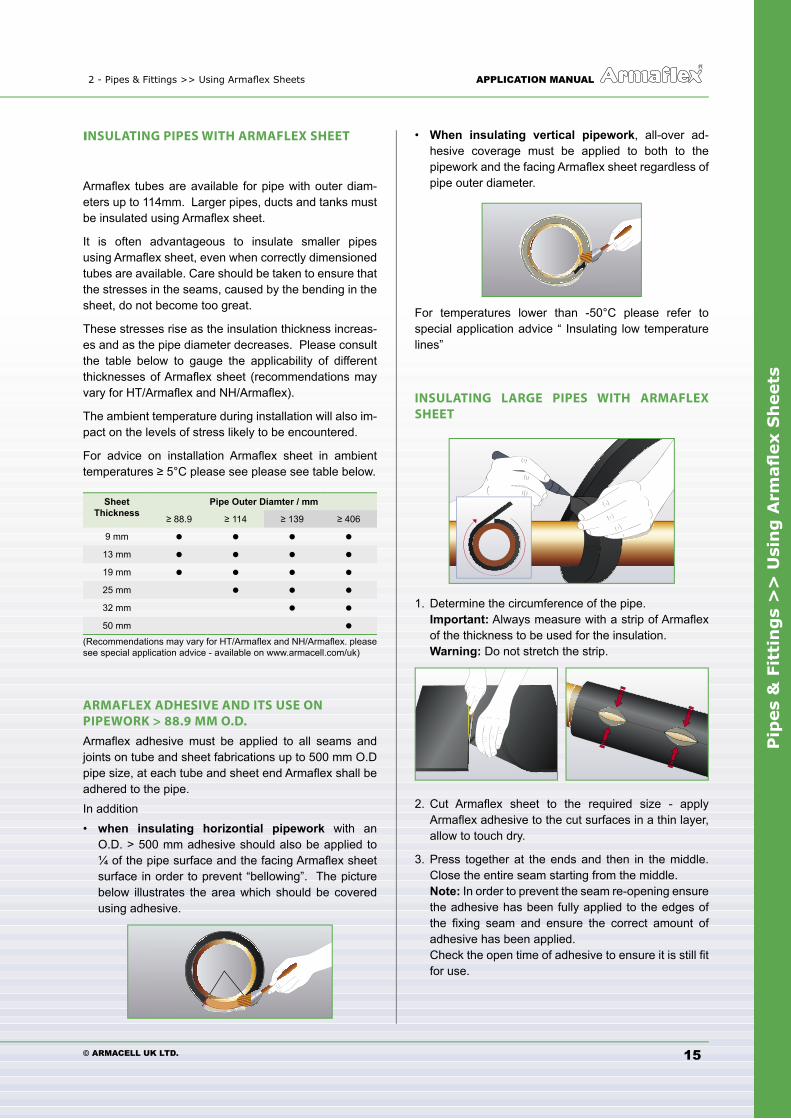
INSULATING PIPES WITH ARMAFLEX SHEET
Armafl ex tubes are available for pipe with outer diam-eters up to 114mm. Larger pipes, ducts and tanks must be insulated using Armafl ex sheet.
It is often advantageous to insulate smaller pipes using Armafl ex sheet, even when correctly dimensioned tubes are available. Care should be taken to ensure that the stresses in the seams, caused by the bending in the sheet, do not become too great.
These stresses rise as the insulation thickness increas-es and as the pipe diameter decreases. Please consult the table below to gauge the applicability of different thicknesses of Armafl ex sheet (recommendations may vary for HT/Armafl ex and NH/Armafl ex).
The ambient temperature during installation will also im-pact on the levels of stress likely to be encountered.
For advice on installation Armafl ex sheet in ambient temperatures ≥ 5°C please see please see table below.
Sheet Thickness
Pipe Outer Diamter / mm
≥ 88.9 ≥ 114 ≥ 139 ≥ 406
9 mm
13 mm
19 mm
25 mm
32 mm
50 mm
(Recommendations may vary for HT/Armafl ex and NH/Armafl ex. please see special application advice - available on www.armacell.com/uk)
ARMAFLEX ADHESIVE AND ITS USE ON PIPEWORK > 88.9 MM O.D.
Armafl ex adhesive must be applied to all seams and joints on tube and sheet fabrications up to 500 mm O.D pipe size, at each tube and sheet end Armafl ex shall be adhered to the pipe.In addition• when insulating horizontial pipework with an O.D. > 500 mm adhesive should also be applied to ¼ of the pipe surface and the facing Armafl ex sheet surface in order to prevent “bellowing”. The picture below illustrates the area which should be covered using adhesive.
• When insulating vertical pipework, all-over ad- hesive coverage must be applied to both to the pipework and the facing Armafl ex sheet regardless of pipe outer diameter.
For temperatures lower than -50°C please refer to special application advice “ Insulating low temperature lines”
INSULATING LARGE PIPES WITH ARMAFLEX SHEET
1. Determine the circumference of the pipe. Important: Always measure with a strip of Armafl ex of the thickness to be used for the insulation. Warning: Do not stretch the strip.
2. Cut Armafl ex sheet to the required size - apply Armafl ex adhesive to the cut surfaces in a thin layer, allow to touch dry.
3. Press together at the ends and then in the middle. Close the entire seam starting from the middle. Note: In order to prevent the seam re-opening ensure the adhesive has been fully applied to the edges of the fi xing seam and ensure the correct amount of adhesive has been applied. Check the open time of adhesive to ensure it is still fi t for use.
Pip
es
& F
itti
ng
s >
> U
sin
g A
rmafl
ex S
heets
© ARMACELL UK LTD.
APPLICATION MANUAL 2 - Pipes & Fittings >> Using Armafl ex Sheets
16
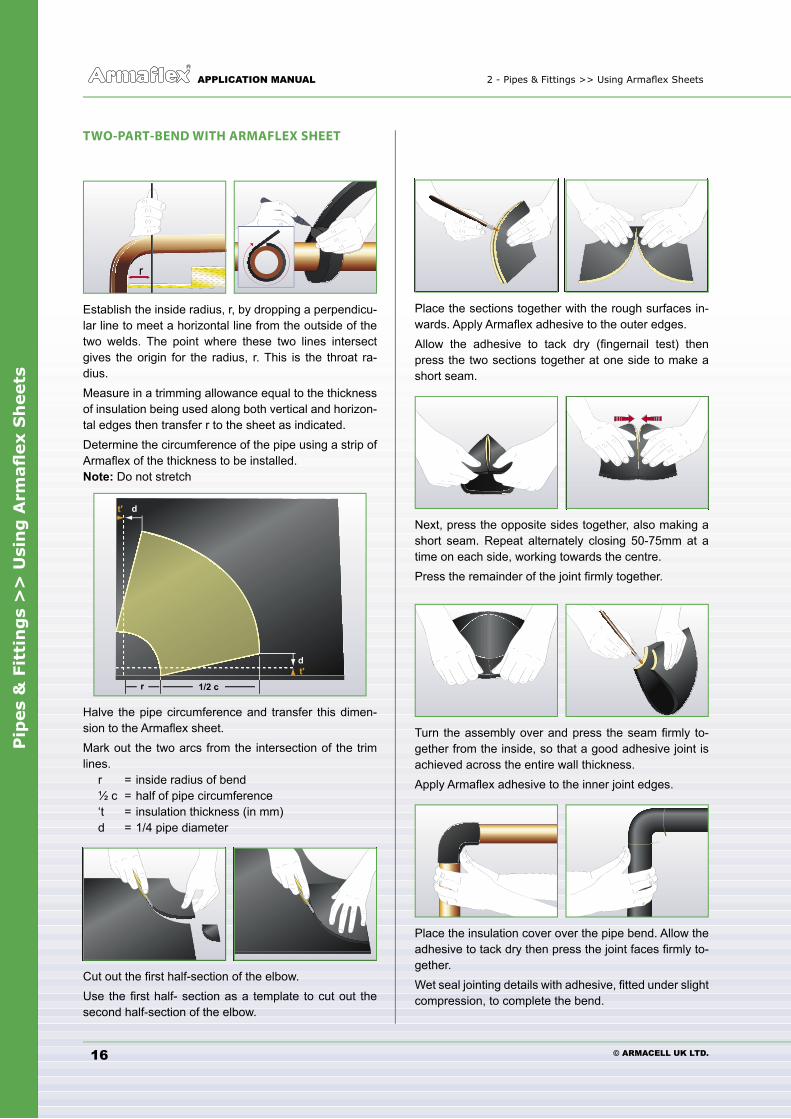
TWO-PART-BEND WITH ARMAFLEX SHEET
r
Establish the inside radius, r, by dropping a perpendicu-lar line to meet a horizontal line from the outside of the two welds. The point where these two lines intersect gives the origin for the radius, r. This is the throat ra-dius.Measure in a trimming allowance equal to the thickness of insulation being used along both vertical and horizon-tal edges then transfer r to the sheet as indicated.Determine the circumference of the pipe using a strip of Armafl ex of the thickness to be installed.Note: Do not stretch
d
1/2 c
t'
d
rt'
Halve the pipe circumference and transfer this dimen-sion to the Armafl ex sheet.Mark out the two arcs from the intersection of the trim lines. r = inside radius of bend ½ c = half of pipe circumference ‘t = insulation thickness (in mm) d = 1/4 pipe diameter
Cut out the fi rst half-section of the elbow.Use the fi rst half- section as a template to cut out the second half-section of the elbow.
Place the sections together with the rough surfaces in-wards. Apply Armafl ex adhesive to the outer edges.Allow the adhesive to tack dry (fi ngernail test) then press the two sections together at one side to make a short seam.
Next, press the opposite sides together, also making a short seam. Repeat alternately closing 50-75mm at a time on each side, working towards the centre.Press the remainder of the joint fi rmly together.
Turn the assembly over and press the seam fi rmly to-gether from the inside, so that a good adhesive joint is achieved across the entire wall thickness.Apply Armafl ex adhesive to the inner joint edges.
Place the insulation cover over the pipe bend. Allow the adhesive to tack dry then press the joint faces fi rmly to-gether.Wet seal jointing details with adhesive, fi tted under slight compression, to complete the bend.
2 - Pipes & Fittings >> Using Armafl ex Sheets APPLICATION MANUAL
© ARMACELL UK LTD.
Pip
es
& F
itti
ng
s >
> U
sin
g A
rmafl
ex S
heets
17
c = circumference of end panel
L
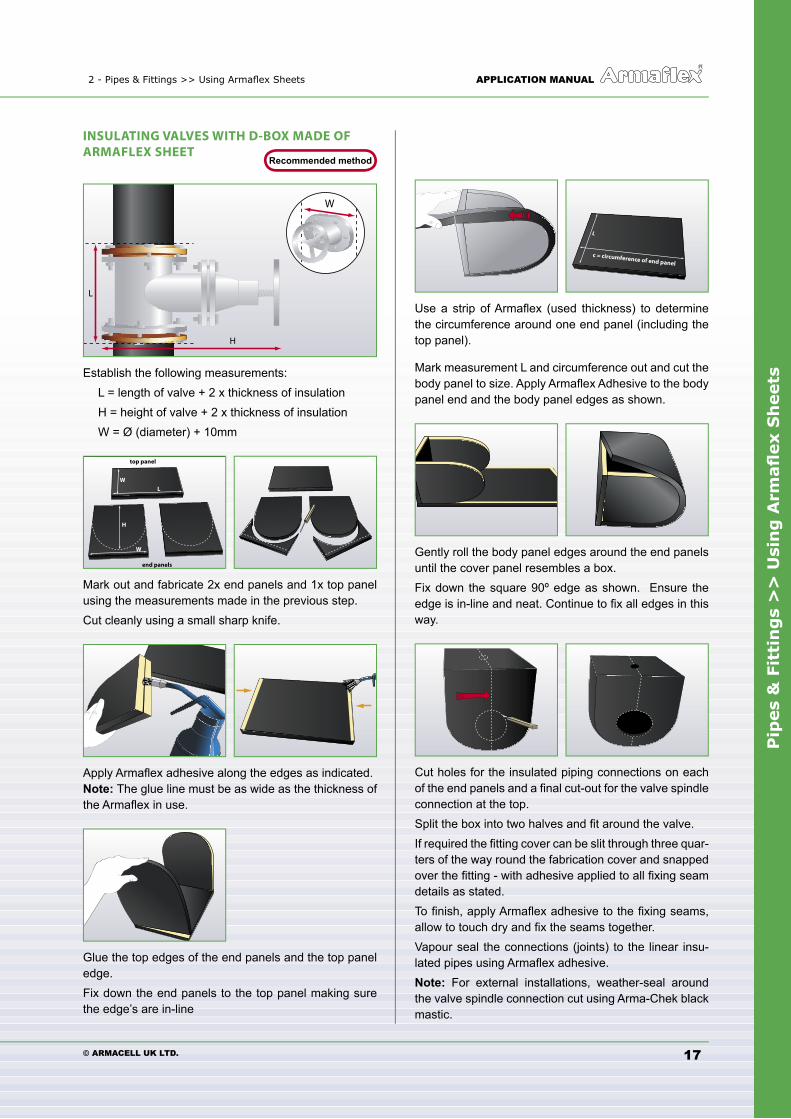
Use a strip of Armafl ex (used thickness) to determine the circumference around one end panel (including the top panel).
Mark measurement L and circumference out and cut the body panel to size. Apply Armafl ex Adhesive to the body panel end and the body panel edges as shown.
Gently roll the body panel edges around the end panels until the cover panel resembles a box.Fix down the square 90º edge as shown. Ensure the edge is in-line and neat. Continue to fi x all edges in this way.
Cut holes for the insulated piping connections on each of the end panels and a fi nal cut-out for the valve spindle connection at the top.Split the box into two halves and fi t around the valve. If required the fi tting cover can be slit through three quar-ters of the way round the fabrication cover and snapped over the fi tting - with adhesive applied to all fi xing seam details as stated.To fi nish, apply Armafl ex adhesive to the fi xing seams, allow to touch dry and fi x the seams together. Vapour seal the connections (joints) to the linear insu-lated pipes using Armafl ex adhesive. Note: For external installations, weather-seal around the valve spindle connection cut using Arma-Chek black mastic.
INSULATING VALVES WITH D-BOX MADE OF ARMAFLEX SHEET
W
L
H
Establish the following measurements: L = length of valve + 2 x thickness of insulation H = height of valve + 2 x thickness of insulation W = Ø (diameter) + 10mm
end panels
top panel
H
W
L
W
Mark out and fabricate 2x end panels and 1x top panel using the measurements made in the previous step.Cut cleanly using a small sharp knife.
Apply Armafl ex adhesive along the edges as indicated. Note: The glue line must be as wide as the thickness of the Armafl ex in use.
Glue the top edges of the end panels and the top panel edge.Fix down the end panels to the top panel making sure the edge’s are in-line
Recommended method
Pip
es
& F
itti
ng
s >
> U
sin
g A
rmafl
ex S
heets
© ARMACELL UK LTD.
APPLICATION MANUAL 2 - Pipes & Fittings >> Using Armafl ex Sheets
18
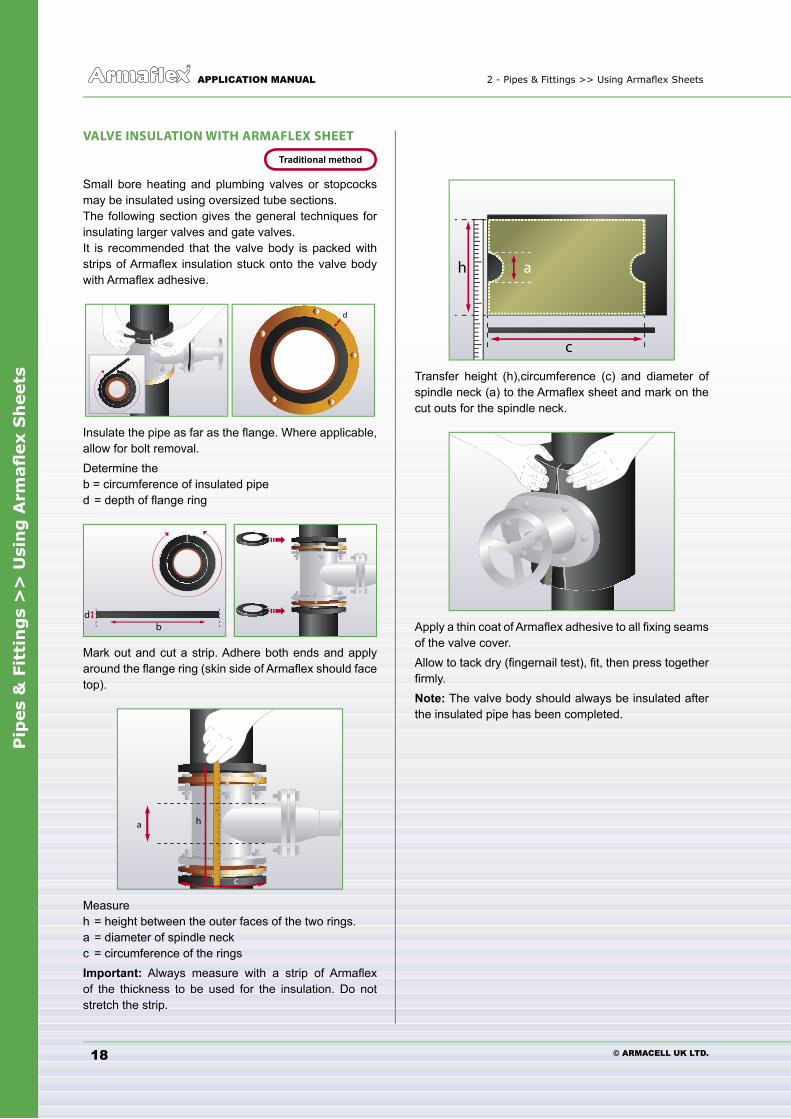
VALVE INSULATION WITH ARMAFLEX SHEET
Small bore heating and plumbing valves or stopcocks may be insulated using oversized tube sections.The following section gives the general techniques for insulating larger valves and gate valves.It is recommended that the valve body is packed with strips of Armafl ex insulation stuck onto the valve body with Armafl ex adhesive.
d
Insulate the pipe as far as the fl ange. Where applicable, allow for bolt removal.Determine the b = circumference of insulated piped = depth of fl ange ring
db
Mark out and cut a strip. Adhere both ends and apply around the fl ange ring (skin side of Armafl ex should face top).
a h
c
Measure h = height between the outer faces of the two rings.a = diameter of spindle neckc = circumference of the rings Important: Always measure with a strip of Armafl ex of the thickness to be used for the insulation. Do not stretch the strip.
h a
c
Transfer height (h),circumference (c) and diameter of spindle neck (a) to the Armafl ex sheet and mark on the cut outs for the spindle neck.
Apply a thin coat of Armafl ex adhesive to all fi xing seams of the valve cover. Allow to tack dry (fi ngernail test), fi t, then press together fi rmly.Note: The valve body should always be insulated after the insulated pipe has been completed.
Traditional method
2 - Pipes & Fittings >> Using Armafl ex Sheets APPLICATION MANUAL
© ARMACELL UK LTD.
Pip
es
& F
itti
ng
s >
> U
sin
g A
rmafl
ex S
heets
19
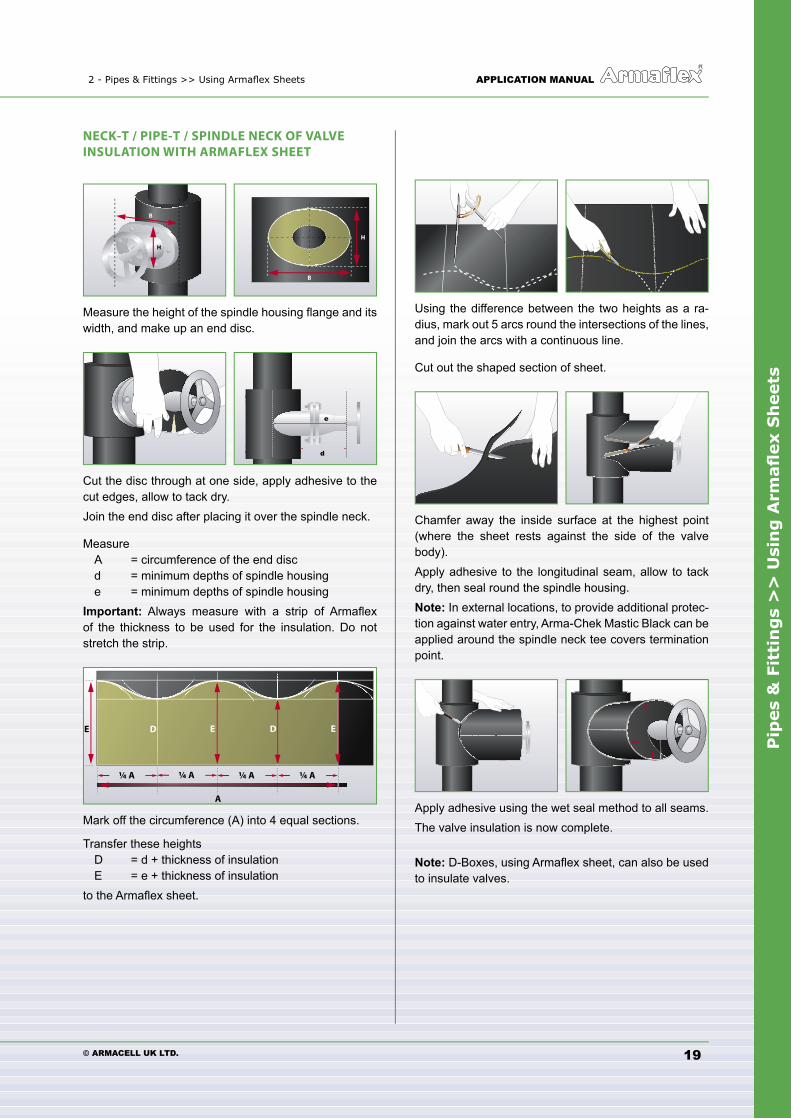
Using the difference between the two heights as a ra-dius, mark out 5 arcs round the intersections of the lines, and join the arcs with a continuous line.
Cut out the shaped section of sheet.
Chamfer away the inside surface at the highest point (where the sheet rests against the side of the valve body).Apply adhesive to the longitudinal seam, allow to tack dry, then seal round the spindle housing.Note: In external locations, to provide additional protec-tion against water entry, Arma-Chek Mastic Black can be applied around the spindle neck tee covers termination point.
Apply adhesive using the wet seal method to all seams.The valve insulation is now complete.
Note: D-Boxes, using Armafl ex sheet, can also be used to insulate valves.
NECK-T / PIPE-T / SPINDLE NECK OF VALVE INSULATION WITH ARMAFLEX SHEET
B
H
B
H
Measure the height of the spindle housing fl ange and its width, and make up an end disc.
d
e
Cut the disc through at one side, apply adhesive to the cut edges, allow to tack dry.Join the end disc after placing it over the spindle neck.
Measure A = circumference of the end disc d = minimum depths of spindle housing e = minimum depths of spindle housing Important: Always measure with a strip of Armafl ex of the thickness to be used for the insulation. Do not stretch the strip.
EDEDE
A
¼ A ¼ A ¼ A ¼ A
Mark off the circumference (A) into 4 equal sections.
Transfer these heights D = d + thickness of insulation E = e + thickness of insulationto the Armafl ex sheet.
Pip
es
& F
itti
ng
s >
> U
sin
g A
rmafl
ex S
heets
© ARMACELL UK LTD.
APPLICATION MANUAL 2 - Pipes & Fittings >> Using Armafl ex Sheets
20
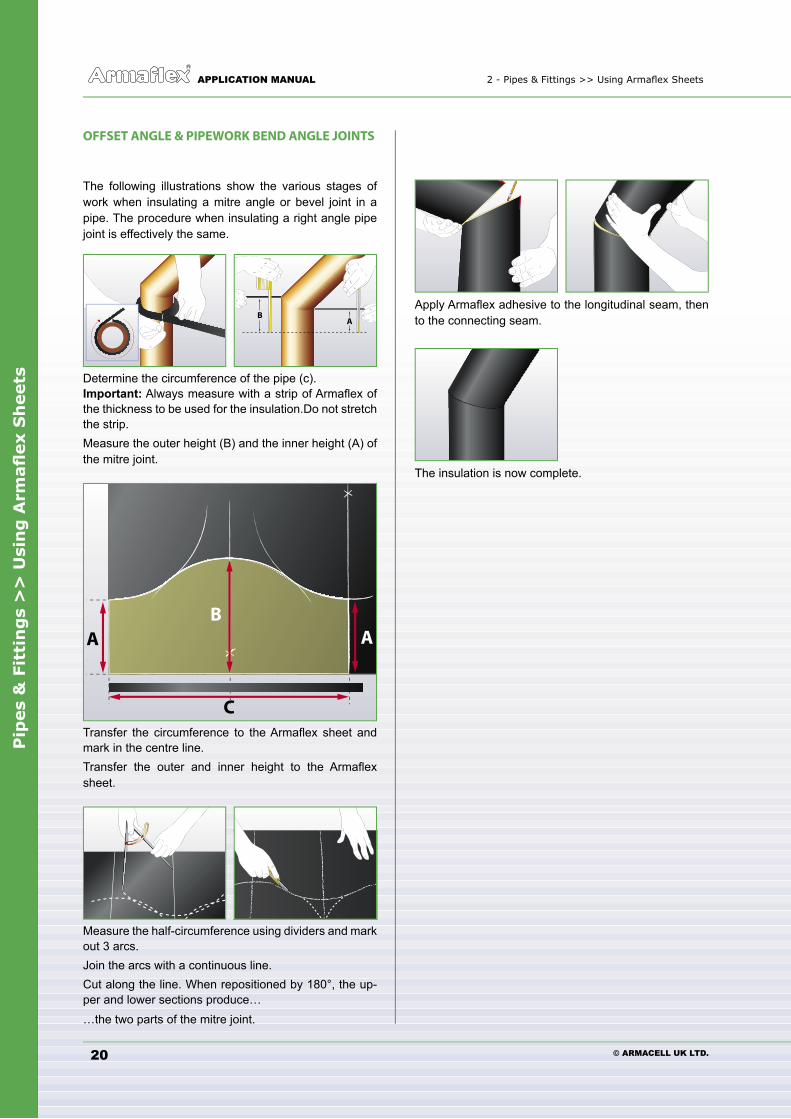
Apply Armafl ex adhesive to the longitudinal seam, then to the connecting seam.
The insulation is now complete.
OFFSET ANGLE & PIPEWORK BEND ANGLE JOINTS
The following illustrations show the various stages of work when insulating a mitre angle or bevel joint in a pipe. The procedure when insulating a right angle pipe joint is effectively the same.
BA
Determine the circumference of the pipe (c).Important: Always measure with a strip of Armafl ex of the thickness to be used for the insulation.Do not stretch the strip.Measure the outer height (B) and the inner height (A) of the mitre joint.
BA
C
A
Transfer the circumference to the Armafl ex sheet and mark in the centre line. Transfer the outer and inner height to the Armafl ex sheet.
Measure the half-circumference using dividers and mark out 3 arcs.Join the arcs with a continuous line.Cut along the line. When repositioned by 180°, the up-per and lower sections produce……the two parts of the mitre joint.
2 - Pipes & Fittings >> Using Armafl ex Sheets APPLICATION MANUAL
© ARMACELL UK LTD.
Pip
es
& F
itti
ng
s >
> U
sin
g A
rmafl
ex S
heets
21
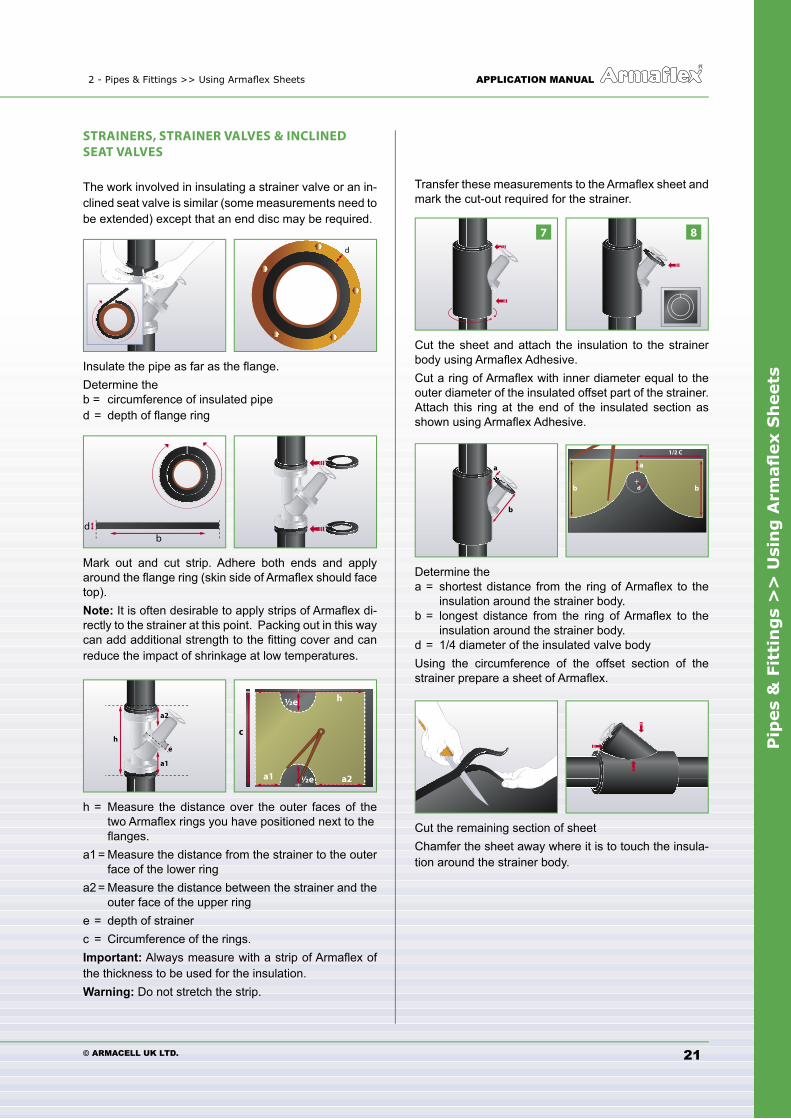
STRAINERS, STRAINER VALVES & INCLINED SEAT VALVES
The work involved in insulating a strainer valve or an in-clined seat valve is similar (some measurements need to be extended) except that an end disc may be required.
d
Insulate the pipe as far as the fl ange. Determine the b = circumference of insulated piped = depth of fl ange ring
db
Mark out and cut strip. Adhere both ends and apply around the fl ange ring (skin side of Armafl ex should face top).Note: It is often desirable to apply strips of Armafl ex di-rectly to the strainer at this point. Packing out in this way can add additional strength to the fi tting cover and can reduce the impact of shrinkage at low temperatures.
eh
a1
a2
c
h
a1 a2½e
½e
h = Measure the distance over the outer faces of the two Armafl ex rings you have positioned next to the fl anges.a1 = Measure the distance from the strainer to the outer face of the lower ringa2 = Measure the distance between the strainer and the outer face of the upper ringe = depth of strainer c = Circumference of the rings.Important: Always measure with a strip of Armafl ex of the thickness to be used for the insulation.Warning: Do not stretch the strip.
Transfer these measurements to the Armafl ex sheet and mark the cut-out required for the strainer.
Cut the sheet and attach the insulation to the strainer body using Armafl ex Adhesive.Cut a ring of Armafl ex with inner diameter equal to the outer diameter of the insulated offset part of the strainer. Attach this ring at the end of the insulated section as shown using Armafl ex Adhesive.
a
b
+
a
bb
1/2 C
d
Determine the a = shortest distance from the ring of Armafl ex to the insulation around the strainer body.b = longest distance from the ring of Armafl ex to the insulation around the strainer body.d = 1/4 diameter of the insulated valve bodyUsing the circumference of the offset section of the strainer prepare a sheet of Armafl ex.
Cut the remaining section of sheetChamfer the sheet away where it is to touch the insula-tion around the strainer body.
87
Pip
es
& F
itti
ng
s >
> U
sin
g A
rmafl
ex S
heets
© ARMACELL UK LTD.
APPLICATION MANUAL 2 - Pipes & Fittings >> Using Armafl ex Sheets
22
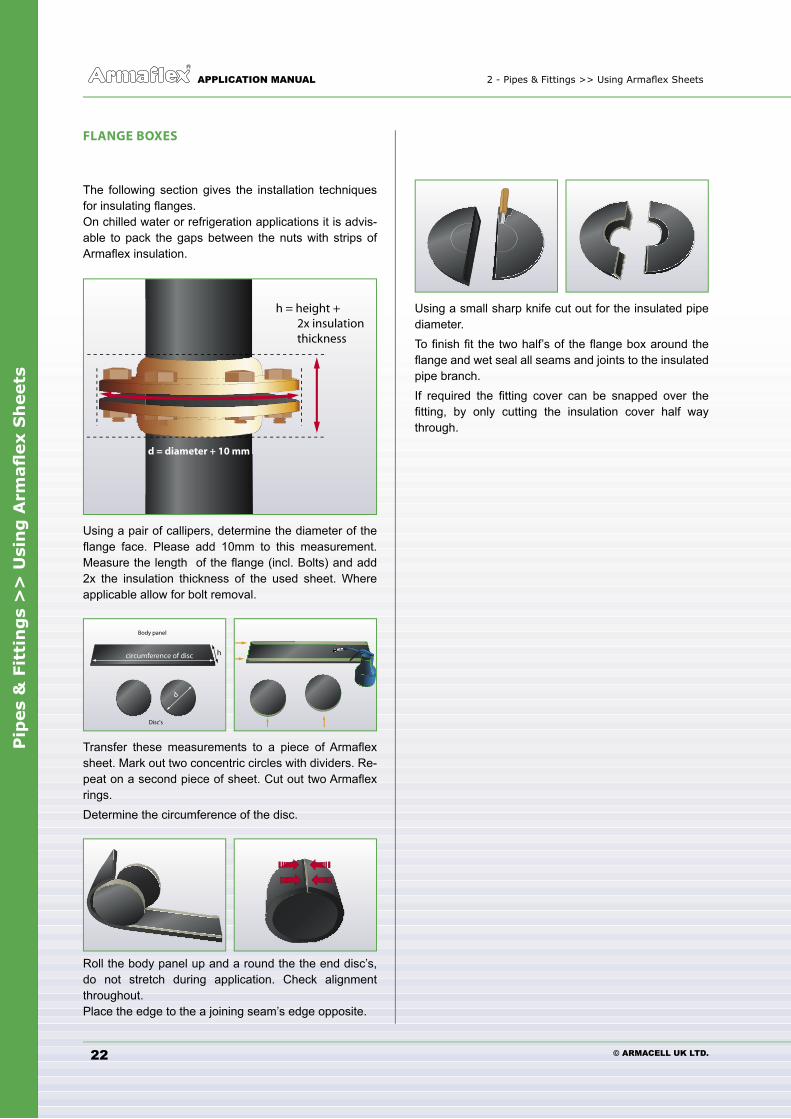
FLANGE BOXES
The following section gives the installation techniques for insulating fl anges.On chilled water or refrigeration applications it is advis-able to pack the gaps between the nuts with strips of Armafl ex insulation.
h = height + 2x insulation thickness
d = diameter + 10 mm
Using a pair of callipers, determine the diameter of the fl ange face. Please add 10mm to this measurement. Measure the length of the fl ange (incl. Bolts) and add 2x the insulation thickness of the used sheet. Where applicable allow for bolt removal.
Disc's
circumference of disc
Body panel
d
h
Transfer these measurements to a piece of Armafl ex sheet. Mark out two concentric circles with dividers. Re-peat on a second piece of sheet. Cut out two Armafl ex rings.Determine the circumference of the disc.
Roll the body panel up and a round the the end disc’s, do not stretch during application. Check alignment throughout.Place the edge to the a joining seam’s edge opposite.
Using a small sharp knife cut out for the insulated pipe diameter.To fi nish fi t the two half’s of the fl ange box around the fl ange and wet seal all seams and joints to the insulated pipe branch.If required the fi tting cover can be snapped over the fi tting, by only cutting the insulation cover half way through.
2 - Pipes & Fittings >> Using Armafl ex Sheets APPLICATION MANUAL
© ARMACELL UK LTD.
Pip
es
& F
itti
ng
s >
> U
sin
g A
rmafl
ex S
heets
23
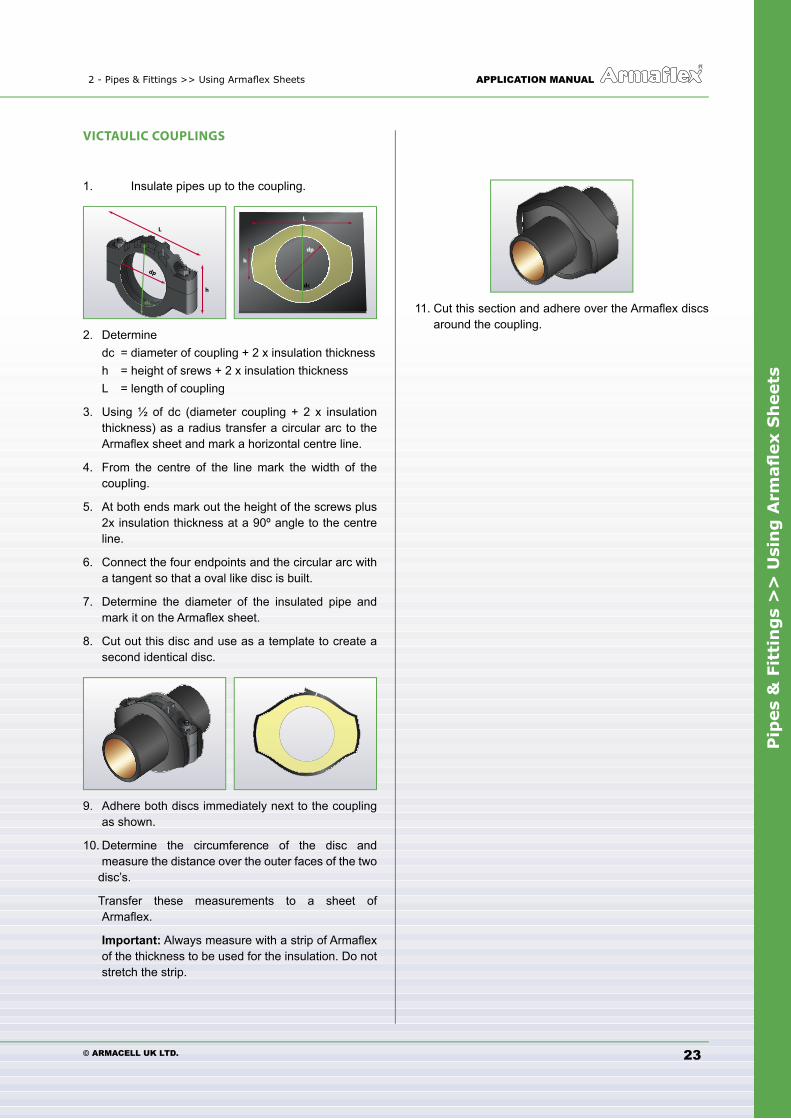
VICTAULIC COUPLINGS
1. Insulate pipes up to the coupling.
L
h
dp
dc
h
L
dp
dc
2. Determine dc = diameter of coupling + 2 x insulation thickness h = height of srews + 2 x insulation thickness L = length of coupling
3. Using ½ of dc (diameter coupling + 2 x insulation thickness) as a radius transfer a circular arc to the Armafl ex sheet and mark a horizontal centre line.
4. From the centre of the line mark the width of the coupling.
5. At both ends mark out the height of the screws plus 2x insulation thickness at a 90º angle to the centre line.
6. Connect the four endpoints and the circular arc with a tangent so that a oval like disc is built.
7. Determine the diameter of the insulated pipe and mark it on the Armafl ex sheet.
8. Cut out this disc and use as a template to create a second identical disc.
9. Adhere both discs immediately next to the coupling as shown.
10. Determine the circumference of the disc and measure the distance over the outer faces of the two disc’s.
Transfer these measurements to a sheet of Armafl ex.
Important: Always measure with a strip of Armaflex of the thickness to be used for the insulation. Do not stretch the strip.
11. Cut this section and adhere over the Armafl ex discs around the coupling.
Pip
es
& F
itti
ng
s >
> U
sin
g A
rmafl
ex S
heets
© ARMACELL UK LTD.
APPLICATION MANUAL 2 - Pipes & Fittings >> Using Armafl ex Sheets
24
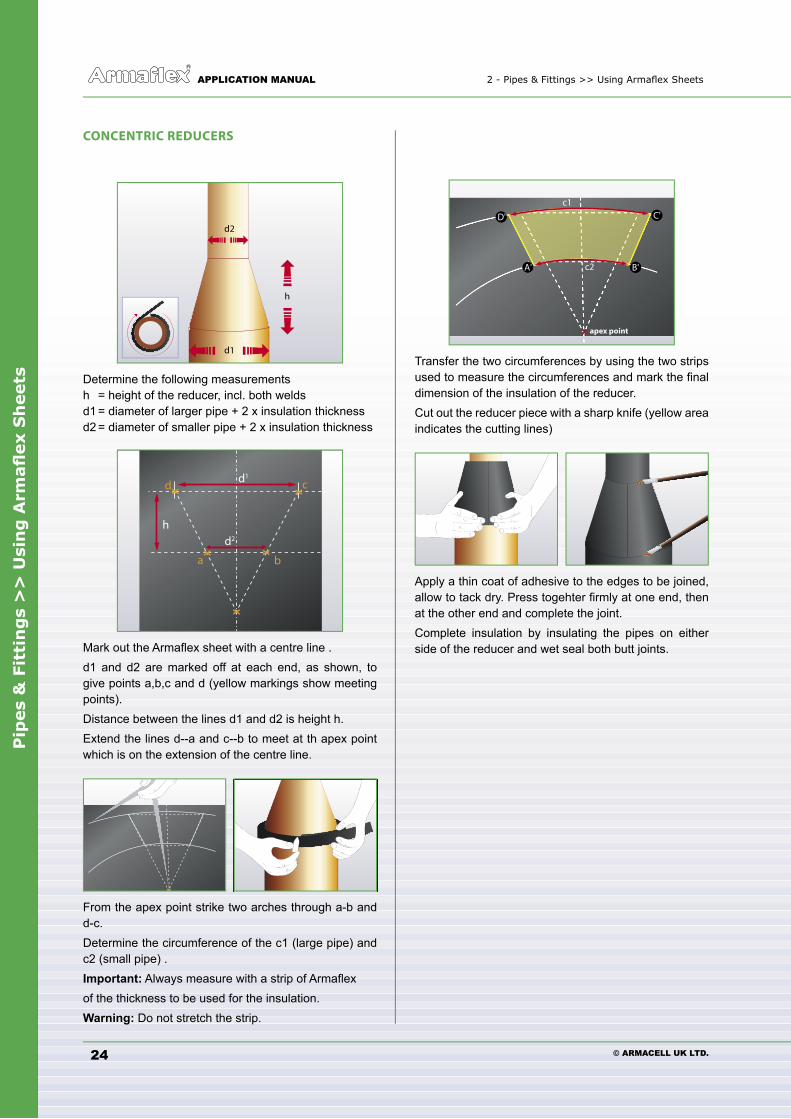
CONCENTRIC REDUCERS
d2
d1
h
Determine the following measurementsh = height of the reducer, incl. both weldsd1 = diameter of larger pipe + 2 x insulation thicknessd2 = diameter of smaller pipe + 2 x insulation thickness
cdd1
h
d2
ba
X
X X
X X
Mark out the Armafl ex sheet with a centre line .d1 and d2 are marked off at each end, as shown, to give points a,b,c and d (yellow markings show meeting points).Distance between the lines d1 and d2 is height h.Extend the lines d--a and c--b to meet at th apex point which is on the extension of the centre line.
X From the apex point strike two arches through a-b and d-c.Determine the circumference of the c1 (large pipe) and c2 (small pipe) .Important: Always measure with a strip of Armafl exof the thickness to be used for the insulation.Warning: Do not stretch the strip.
c1
c2
D' C'
A' B'
x apex point
Transfer the two circumferences by using the two strips used to measure the circumferences and mark the fi nal dimension of the insulation of the reducer.Cut out the reducer piece with a sharp knife (yellow area indicates the cutting lines)
Apply a thin coat of adhesive to the edges to be joined, allow to tack dry. Press togehter fi rmly at one end, then at the other end and complete the joint.Complete insulation by insulating the pipes on either side of the reducer and wet seal both butt joints.
2 - Pipes & Fittings >> Insulating Pipe Supports APPLICATION MANUAL
© ARMACELL UK LTD.
Pip
es
& F
itti
ng
s >
> I
nsu
lati
ng
Pip
e S
up
po
rts
25
INSULATING PIPE SUPPORTS
Where Armafl ex is installed, the use of Armafi x or Armaload pipe supports are the preferred solution for the prevention of ice and condensation on cold instal-lations. However, when Armafi x pipe supports are not selected, the following instructions are imperative:
• Ensure that the Armafl ex is fi tted tight to the support, with no air gaps present and vapour sealed with Armafl ex adhesive.
• Install Armafl ex self adhesive tape to the butt joint where the Armafl ex and the support meet. Ensure the surface of the butt joint is free from dust before install- ing the Armafl ex tape.
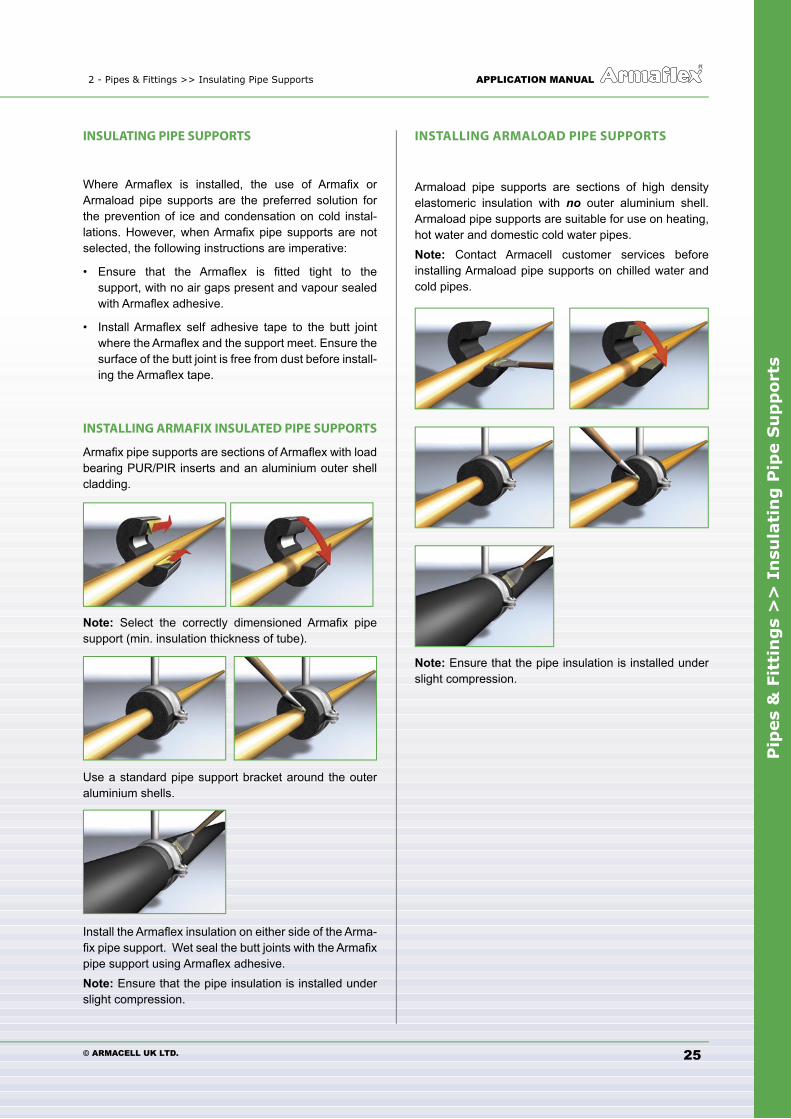
INSTALLING ARMAFIX INSULATED PIPE SUPPORTS
Armafi x pipe supports are sections of Armafl ex with load bearing PUR/PIR inserts and an aluminium outer shell cladding.
Note: Select the correctly dimensioned Armafi x pipe support (min. insulation thickness of tube).
Use a standard pipe support bracket around the outer aluminium shells.
Install the Armafl ex insulation on either side of the Arma-fi x pipe support. Wet seal the butt joints with the Armafi x pipe support using Armafl ex adhesive.Note: Ensure that the pipe insulation is installed under slight compression.
INSTALLING ARMALOAD PIPE SUPPORTS
Armaload pipe supports are sections of high density elastomeric insulation with no outer aluminium shell. Armaload pipe supports are suitable for use on heating, hot water and domestic cold water pipes. Note: Contact Armacell customer services before installing Armaload pipe supports on chilled water and cold pipes.
Note: Ensure that the pipe insulation is installed under slight compression.
Pip
es
& F
itti
ng
s >
> I
nsu
lati
ng
Pip
e S
up
po
rt
© ARMACELL UK LTD.
APPLICATION MANUAL 2 - Pipes &Fittings >> Insulating Pipe Supports
26
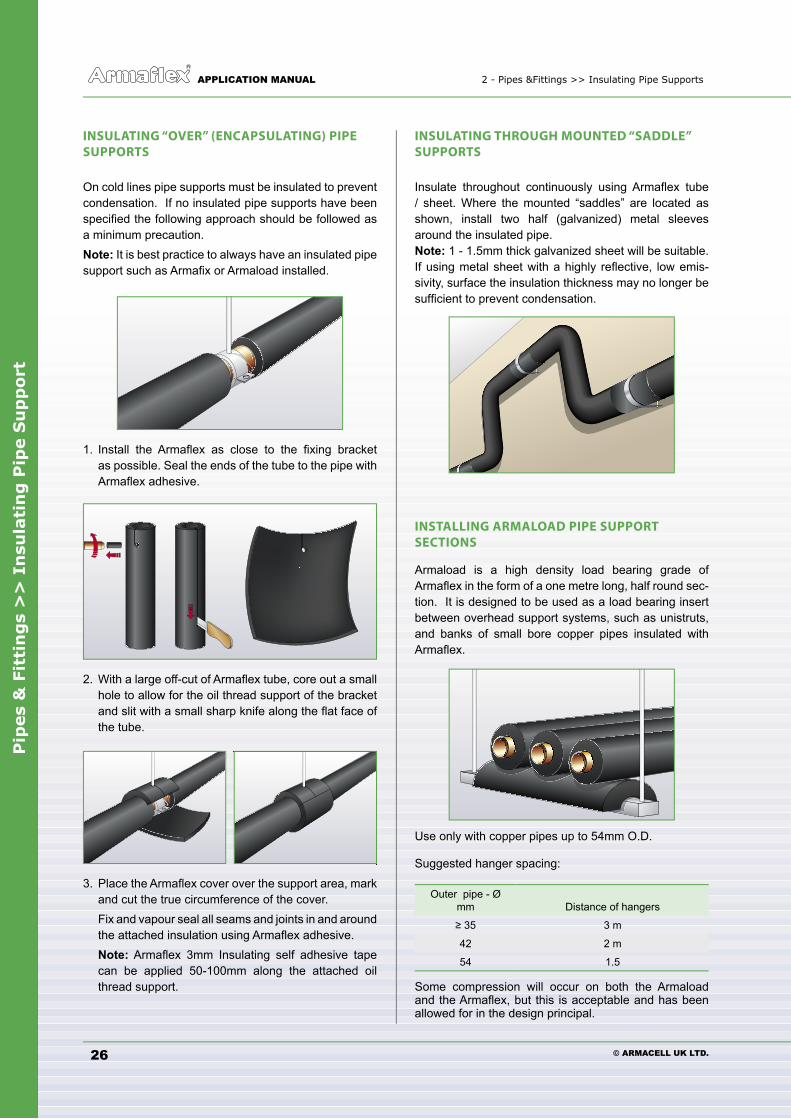
INSULATING THROUGH MOUNTED “SADDLE” SUPPORTS
Insulate throughout continuously using Armafl ex tube / sheet. Where the mounted “saddles” are located as shown, install two half (galvanized) metal sleeves around the insulated pipe. Note: 1 - 1.5mm thick galvanized sheet will be suitable. If using metal sheet with a highly refl ective, low emis-sivity, surface the insulation thickness may no longer be suffi cient to prevent condensation.
INSTALLING ARMALOAD PIPE SUPPORT SECTIONS
Armaload is a high density load bearing grade of Armafl ex in the form of a one metre long, half round sec-tion. It is designed to be used as a load bearing insert between overhead support systems, such as unistruts, and banks of small bore copper pipes insulated with Armafl ex.
Use only with copper pipes up to 54mm O.D.
Suggested hanger spacing:
Outer pipe - Ø mm Distance of hangers
≥ 35 3 m
42 2 m
54 1.5
Some compression will occur on both the Armaload and the Armafl ex, but this is acceptable and has been allowed for in the design principal.
INSULATING “OVER” (ENCAPSULATING) PIPE SUPPORTS
On cold lines pipe supports must be insulated to prevent condensation. If no insulated pipe supports have been specifi ed the following approach should be followed as a minimum precaution.Note: It is best practice to always have an insulated pipe support such as Armafi x or Armaload installed.
1. Install the Armafl ex as close to the fi xing bracket as possible. Seal the ends of the tube to the pipe with Armafl ex adhesive.
2. With a large off-cut of Armafl ex tube, core out a small hole to allow for the oil thread support of the bracket and slit with a small sharp knife along the fl at face of the tube.
3. Place the Armafl ex cover over the support area, mark and cut the true circumference of the cover. Fix and vapour seal all seams and joints in and around the attached insulation using Armafl ex adhesive. Note: Armafl ex 3mm Insulating self adhesive tape can be applied 50-100mm along the attached oil thread support.
3 - Ducts >> Insulating Ducts with Armafl ex Sheet APPLICATION MANUAL
© ARMACELL UK LTD.
Du
cts
>>
In
sula
tin
g D
uct
s w
ith
Arm
afl
ex S
heet
27
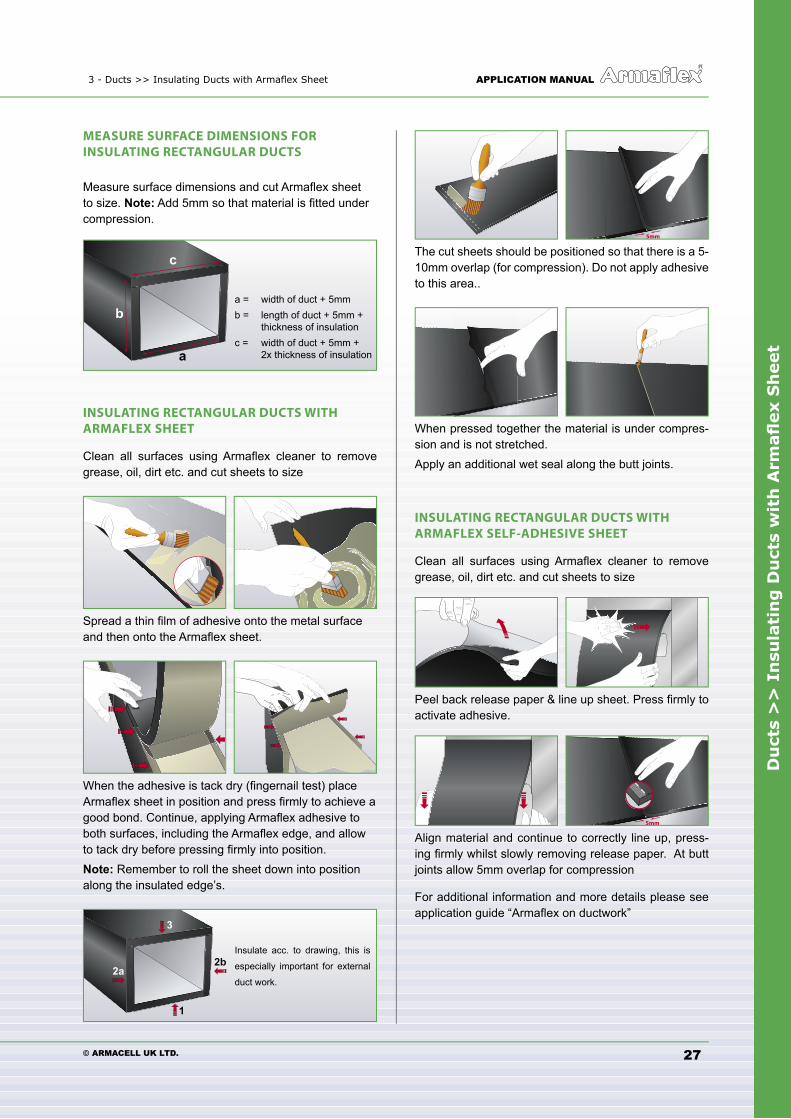
MEASURE SURFACE DIMENSIONS FOR INSULATING RECTANGULAR DUCTS
Measure surface dimensions and cut Armafl ex sheet to size. Note: Add 5mm so that material is fi tted under compression.
a
c
ba = width of duct + 5mmb = length of duct + 5mm + thickness of insulationc = width of duct + 5mm + 2x thickness of insulation
INSULATING RECTANGULAR DUCTS WITH ARMAFLEX SHEET
Clean all surfaces using Armafl ex cleaner to remove grease, oil, dirt etc. and cut sheets to size
Spread a thin fi lm of adhesive onto the metal surface and then onto the Armafl ex sheet.
When the adhesive is tack dry (fi ngernail test) place Armafl ex sheet in position and press fi rmly to achieve a good bond. Continue, applying Armafl ex adhesive to both surfaces, including the Armafl ex edge, and allow to tack dry before pressing fi rmly into position.Note: Remember to roll the sheet down into position along the insulated edge’s.
1
3
2a2b
5mm
The cut sheets should be positioned so that there is a 5-10mm overlap (for compression). Do not apply adhesive to this area..
When pressed together the material is under compres-sion and is not stretched. Apply an additional wet seal along the butt joints.
INSULATING RECTANGULAR DUCTS WITH ARMAFLEX SELF-ADHESIVE SHEET
Clean all surfaces using Armafl ex cleaner to remove grease, oil, dirt etc. and cut sheets to size
Peel back release paper & line up sheet. Press fi rmly to activate adhesive.
5mm
Align material and continue to correctly line up, press-ing fi rmly whilst slowly removing release paper. At butt joints allow 5mm overlap for compression
For additional information and more details please see application guide “Armafl ex on ductwork”
Insulate acc. to drawing, this is
especially important for external
duct work.
Du
cts
>>
In
sula
tin
g D
uct
s w
ith
Arm
afl
ex S
heet
© ARMACELL UK LTD.
APPLICATION MANUAL 3 - Ducts >> Insulating Ducts with Armafl ex Sheet
28
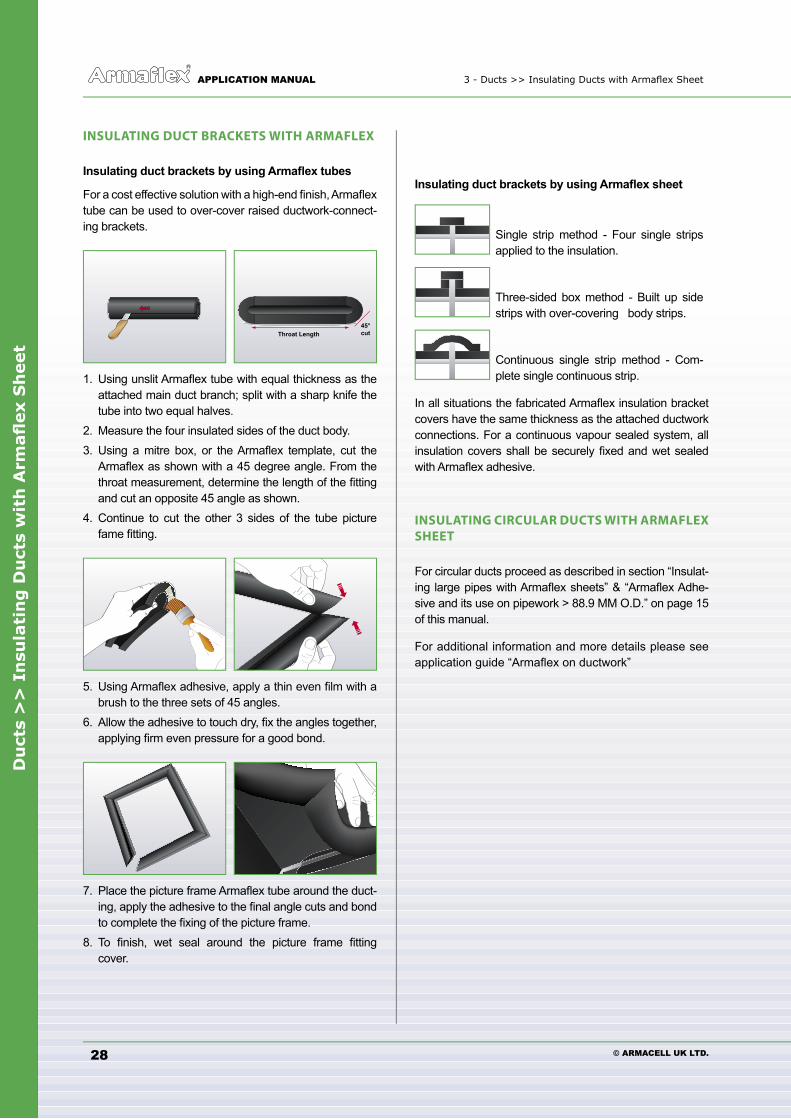
INSULATING DUCT BRACKETS WITH ARMAFLEX
Insulating duct brackets by using Armafl ex tubes
For a cost effective solution with a high-end fi nish, Armafl ex tube can be used to over-cover raised ductwork-connect-ing brackets.
Throat Length
45°
cut
1. Using unslit Armafl ex tube with equal thickness as the attached main duct branch; split with a sharp knife the tube into two equal halves.2. Measure the four insulated sides of the duct body.3. Using a mitre box, or the Armafl ex template, cut the Armafl ex as shown with a 45 degree angle. From the throat measurement, determine the length of the fi tting and cut an opposite 45 angle as shown.4. Continue to cut the other 3 sides of the tube picture fame fi tting.
5. Using Armafl ex adhesive, apply a thin even fi lm with a brush to the three sets of 45 angles.6. Allow the adhesive to touch dry, fi x the angles together, applying fi rm even pressure for a good bond.
7. Place the picture frame Armafl ex tube around the duct- ing, apply the adhesive to the fi nal angle cuts and bond to complete the fi xing of the picture frame.8. To fi nish, wet seal around the picture frame fi tting cover.
Insulating duct brackets by using Armafl ex sheet
Single strip method - Four single strips applied to the insulation.
Three-sided box method - Built up side strips with over-covering body strips.
Continuous single strip method - Com-plete single continuous strip.
In all situations the fabricated Armafl ex insulation bracket covers have the same thickness as the attached ductwork connections. For a continuous vapour sealed system, all insulation covers shall be securely fi xed and wet sealed with Armafl ex adhesive.
INSULATING CIRCULAR DUCTS WITH ARMAFLEX SHEET
For circular ducts proceed as described in section “Insulat-ing large pipes with Armafl ex sheets” & “Armafl ex Adhe-sive and its use on pipework > 88.9 MM O.D.” on page 15 of this manual.
For additional information and more details please see application guide “Armafl ex on ductwork”
4 - Vessel & Tanks >> Insulating with Armafl ex sheet APPLICATION MANUAL
© ARMACELL UK LTD.
Vess
el
an
d T
an
ks
>>
In
sula
tin
g w
ith
Arm
afl
ex S
heet
29
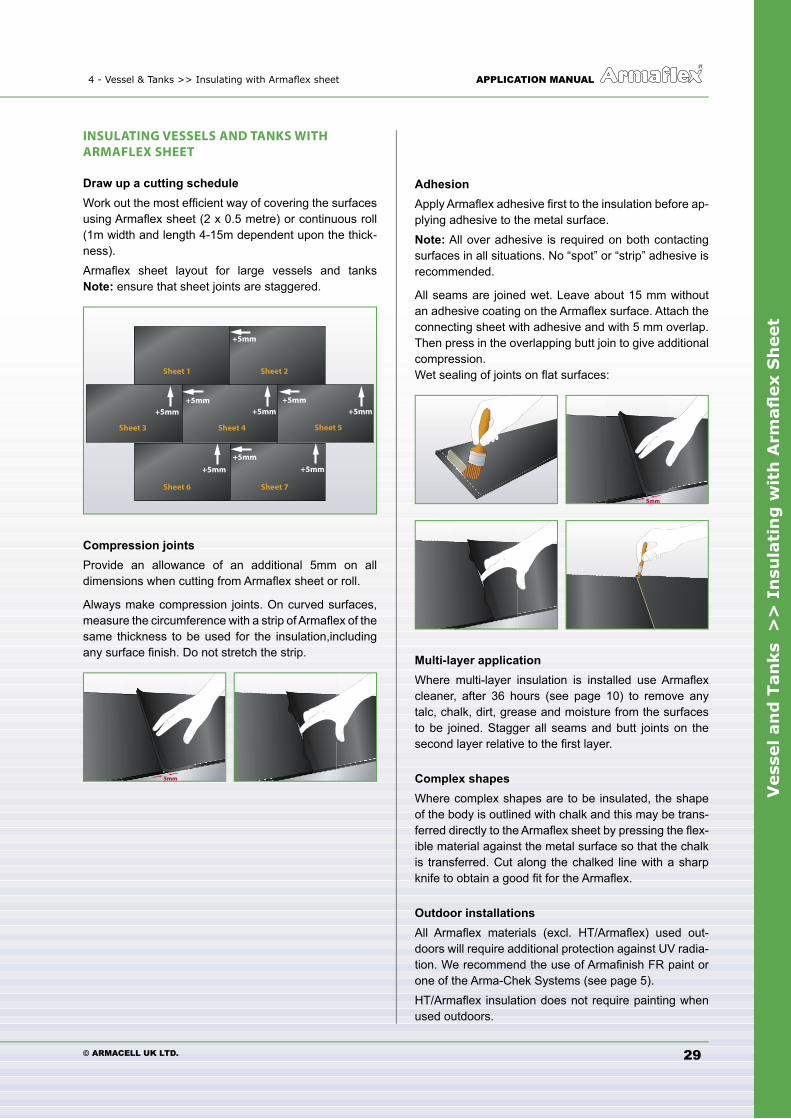
INSULATING VESSELS AND TANKS WITH ARMAFLEX SHEET
Draw up a cutting scheduleWork out the most effi cient way of covering the surfaces using Armafl ex sheet (2 x 0.5 metre) or continuous roll (1m width and length 4-15m dependent upon the thick-ness).Armafl ex sheet layout for large vessels and tanks Note: ensure that sheet joints are staggered.
Sheet 1 Sheet 2
Sheet 3 Sheet 4 Sheet 5
Sheet 6 Sheet 7
+5mm +5mm
+5mm
+5mm +5mm
+5mm
+5mm +5mm+5mm
Compression jointsProvide an allowance of an additional 5mm on all dimensions when cutting from Armafl ex sheet or roll.
Always make compression joints. On curved surfaces, measure the circumference with a strip of Armafl ex of the same thickness to be used for the insulation,including any surface fi nish. Do not stretch the strip.
5mm
Adhesion Apply Armafl ex adhesive fi rst to the insulation before ap-plying adhesive to the metal surface. Note: All over adhesive is required on both contacting surfaces in all situations. No “spot” or “strip” adhesive is recommended.
All seams are joined wet. Leave about 15 mm without an adhesive coating on the Armafl ex surface. Attach the connecting sheet with adhesive and with 5 mm overlap. Then press in the overlapping butt join to give additional compression. Wet sealing of joints on fl at surfaces:
5mm
Multi-layer applicationWhere multi-layer insulation is installed use Armafl ex cleaner, after 36 hours (see page 10) to remove any talc, chalk, dirt, grease and moisture from the surfaces to be joined. Stagger all seams and butt joints on the second layer relative to the fi rst layer.
Complex shapesWhere complex shapes are to be insulated, the shape of the body is outlined with chalk and this may be trans-ferred directly to the Armafl ex sheet by pressing the fl ex-ible material against the metal surface so that the chalk is transferred. Cut along the chalked line with a sharp knife to obtain a good fi t for the Armafl ex.
Outdoor installationsAll Armafl ex materials (excl. HT/Armafl ex) used out-doors will require additional protection against UV radia-tion. We recommend the use of Armafi nish FR paint or one of the Arma-Chek Systems (see page 5).HT/Armafl ex insulation does not require painting when used outdoors.
Vess
el
an
d T
an
ks
>>
In
sula
tin
g w
ith
Arm
afl
ex S
heet
© ARMACELL UK LTD.
APPLICATION MANUAL 4 - Vessel & Tanks >> Insulating with Armafl ex sheet
30
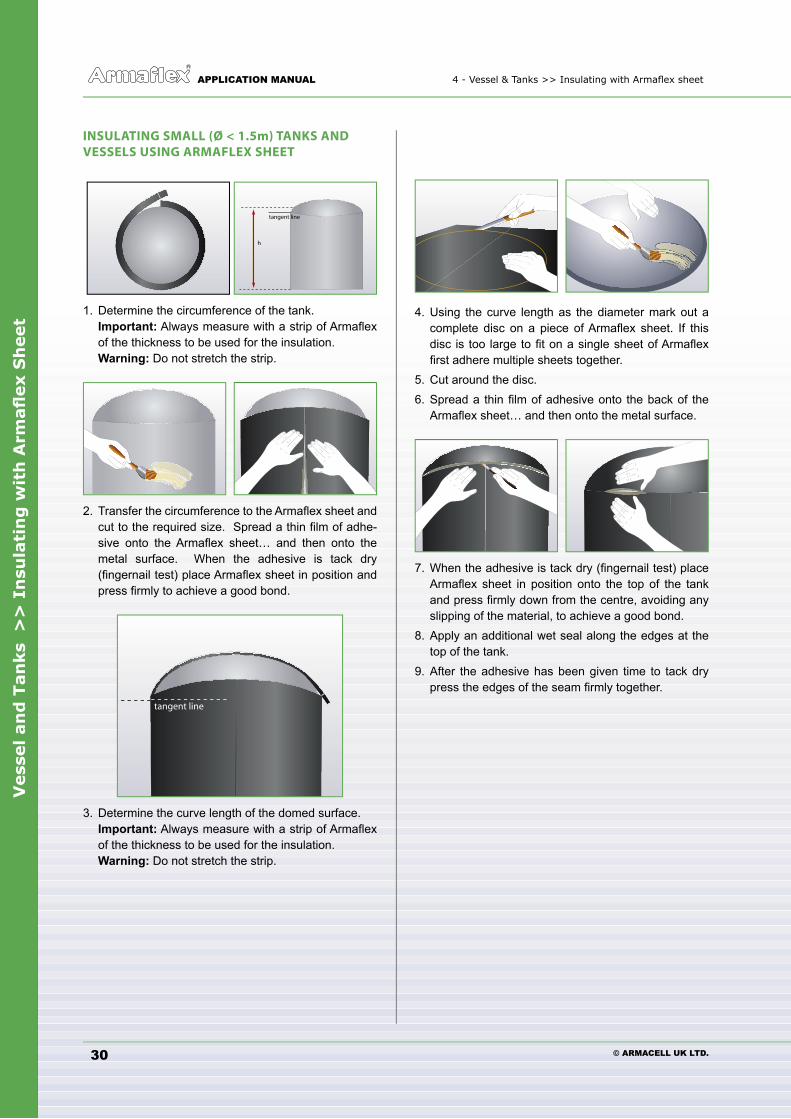
INSULATING SMALL (Ø < 1.5m) TANKS AND VESSELS USING ARMAFLEX SHEET
h
tangent line
1. Determine the circumference of the tank. Important: Always measure with a strip of Armafl ex of the thickness to be used for the insulation. Warning: Do not stretch the strip.
2. Transfer the circumference to the Armafl ex sheet and cut to the required size. Spread a thin fi lm of adhe- sive onto the Armafl ex sheet… and then onto the metal surface. When the adhesive is tack dry (fi ngernail test) place Armafl ex sheet in position and press fi rmly to achieve a good bond.
tangent line
3. Determine the curve length of the domed surface. Important: Always measure with a strip of Armafl ex of the thickness to be used for the insulation. Warning: Do not stretch the strip.
4. Using the curve length as the diameter mark out a complete disc on a piece of Armafl ex sheet. If this disc is too large to fi t on a single sheet of Armafl ex fi rst adhere multiple sheets together.5. Cut around the disc.6. Spread a thin fi lm of adhesive onto the back of the Armafl ex sheet… and then onto the metal surface.
7. When the adhesive is tack dry (fi ngernail test) place Armafl ex sheet in position onto the top of the tank and press fi rmly down from the centre, avoiding any slipping of the material, to achieve a good bond.8. Apply an additional wet seal along the edges at the top of the tank.9. After the adhesive has been given time to tack dry press the edges of the seam fi rmly together.
4 - Vessel & Tanks >> Insulating with Armafl ex sheet APPLICATION MANUAL
© ARMACELL UK LTD.
Vess
el
an
d T
an
ks
>>
In
sula
tin
g w
ith
Arm
afl
ex S
heet
31
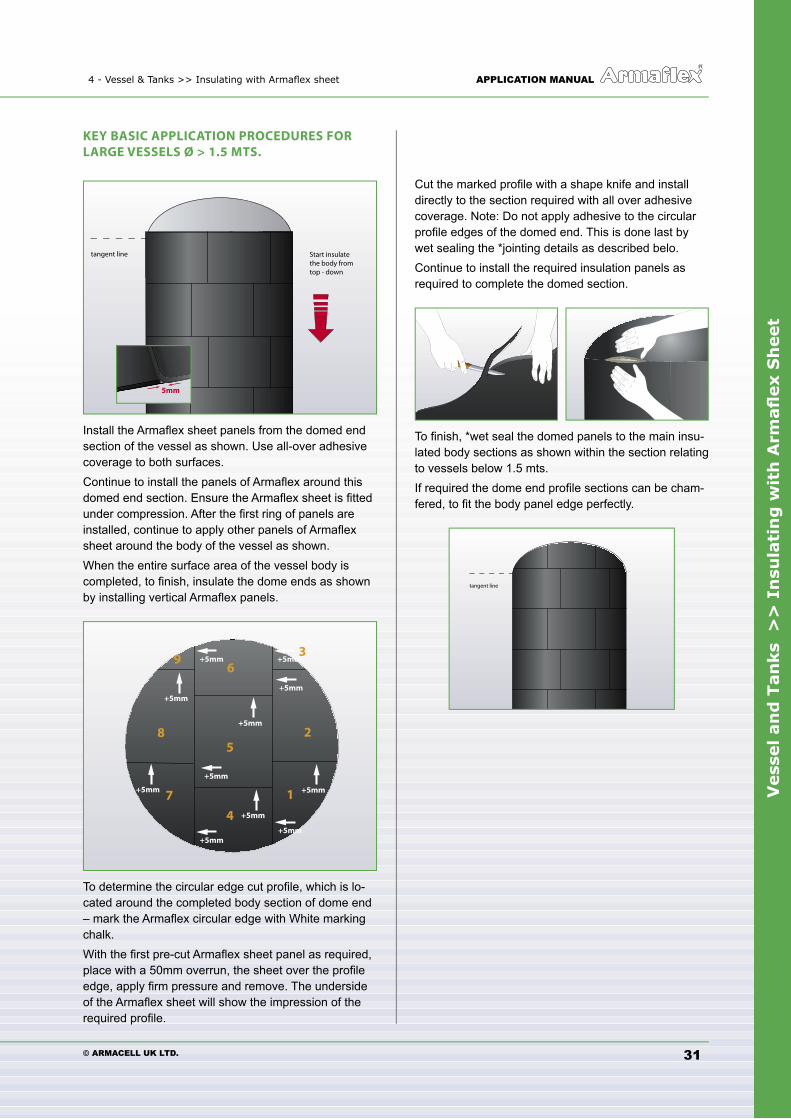
KEY BASIC APPLICATION PROCEDURES FOR LARGE VESSELS Ø > 1.5 MTS.
Start insulatethe body fromtop - down
tangent line
Install the Armafl ex sheet panels from the domed end section of the vessel as shown. Use all-over adhesive coverage to both surfaces.Continue to install the panels of Armafl ex around this domed end section. Ensure the Armafl ex sheet is fi tted under compression. After the fi rst ring of panels are installed, continue to apply other panels of Armafl ex sheet around the body of the vessel as shown.When the entire surface area of the vessel body is completed, to fi nish, insulate the dome ends as shown by installing vertical Armafl ex panels.
1
2
36
5
4
7
8
9
+5mm
+5mm
+5mm
+5mm
+5mm
+5mm
+5mm+5mm
+5mm
+5mm
+5mm
To determine the circular edge cut profi le, which is lo-cated around the completed body section of dome end – mark the Armafl ex circular edge with White marking chalk.With the fi rst pre-cut Armafl ex sheet panel as required, place with a 50mm overrun, the sheet over the profi le edge, apply fi rm pressure and remove. The underside of the Armafl ex sheet will show the impression of the required profi le.
Cut the marked profi le with a shape knife and install directly to the section required with all over adhesive coverage. Note: Do not apply adhesive to the circular profi le edges of the domed end. This is done last by wet sealing the *jointing details as described belo. Continue to install the required insulation panels as required to complete the domed section.
To fi nish, *wet seal the domed panels to the main insu-lated body sections as shown within the section relating to vessels below 1.5 mts.If required the dome end profi le sections can be cham-fered, to fi t the body panel edge perfectly.
tangent line
5mm

Vess
el
an
d T
an
ks
>>
In
sula
tin
g w
ith
Arm
afl
ex S
heet
© ARMACELL UK LTD.
APPLICATION MANUAL 4 - Vessel & Tanks >> Insulating with Armafl ex sheet
32
5 - Additional Information, Application Guides & Calculation Tools APPLICATION MANUAL
© ARMACELL UK LTD.
Ad
dit
ion
al
Info
rmati
on
, A
pp
lica
tio
n G
uid
es
& C
alc
ula
tio
n T
oo
ls
33
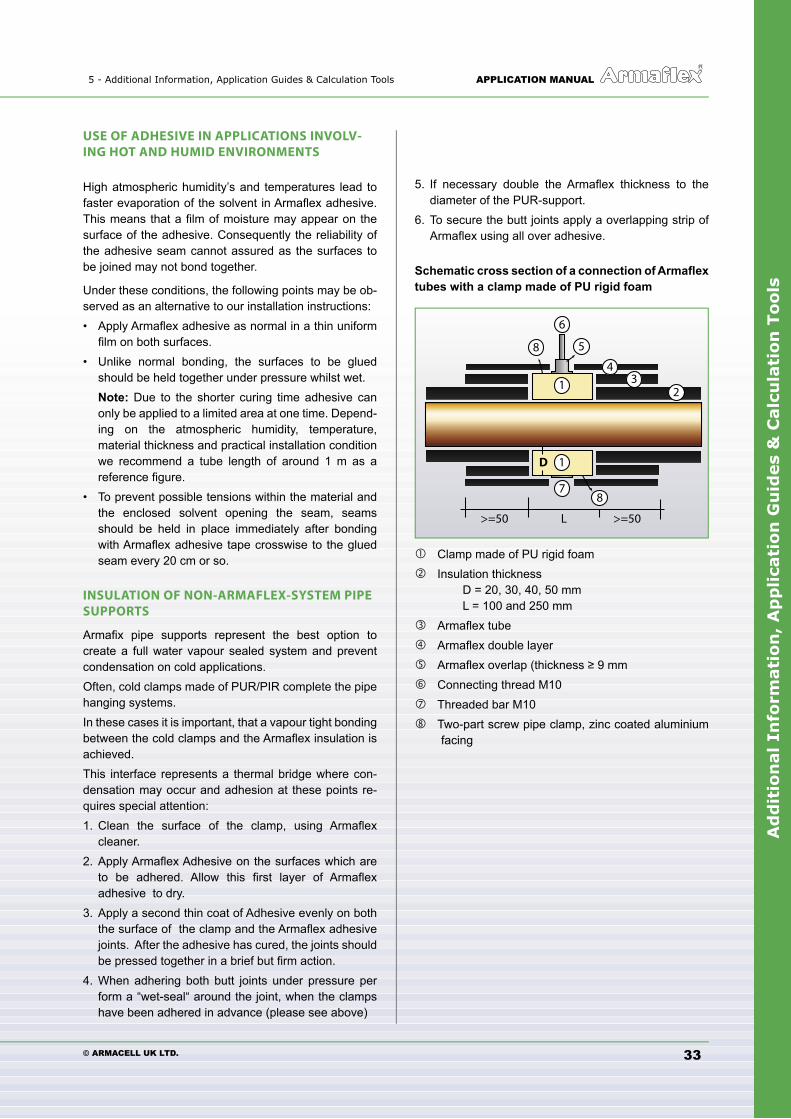
5. If necessary double the Armafl ex thickness to the diameter of the PUR-support.6. To secure the butt joints apply a overlapping strip of Armafl ex using all over adhesive.
Schematic cross section of a connection of Armafl ex tubes with a clamp made of PU rigid foam
6
D
>=50 >=50L
23
5
4
8
1
1
78
Clamp made of PU rigid foam Insulation thickness D = 20, 30, 40, 50 mm L = 100 and 250 mm Armafl ex tube Armafl ex double layer Armafl ex overlap (thickness ≥ 9 mm Connecting thread M10 Threaded bar M10 Two-part screw pipe clamp, zinc coated aluminium facing
USE OF ADHESIVE IN APPLICATIONS INVOLV-ING HOT AND HUMID ENVIRONMENTS
High atmospheric humidity’s and temperatures lead to faster evaporation of the solvent in Armafl ex adhesive. This means that a fi lm of moisture may appear on the surface of the adhesive. Consequently the reliability of the adhesive seam cannot assured as the surfaces to be joined may not bond together.
Under these conditions, the following points may be ob-served as an alternative to our installation instructions:• Apply Armafl ex adhesive as normal in a thin uniform fi lm on both surfaces. • Unlike normal bonding, the surfaces to be glued should be held together under pressure whilst wet. Note: Due to the shorter curing time adhesive can only be applied to a limited area at one time. Depend- ing on the atmospheric humidity, temperature, material thickness and practical installation condition we recommend a tube length of around 1 m as a reference fi gure.• To prevent possible tensions within the material and the enclosed solvent opening the seam, seams should be held in place immediately after bonding with Armafl ex adhesive tape crosswise to the glued seam every 20 cm or so.
INSULATION OF NON-ARMAFLEX-SYSTEM PIPE SUPPORTS
Armafi x pipe supports represent the best option to create a full water vapour sealed system and prevent condensation on cold applications.Often, cold clamps made of PUR/PIR complete the pipe hanging systems.In these cases it is important, that a vapour tight bonding between the cold clamps and the Armafl ex insulation is achieved.This interface represents a thermal bridge where con-densation may occur and adhesion at these points re-quires special attention:1. Clean the surface of the clamp, using Armafl ex cleaner. 2. Apply Armafl ex Adhesive on the surfaces which are to be adhered. Allow this fi rst layer of Armafl ex adhesive to dry.3. Apply a second thin coat of Adhesive evenly on both the surface of the clamp and the Armafl ex adhesive joints. After the adhesive has cured, the joints should be pressed together in a brief but fi rm action.4. When adhering both butt joints under pressure per form a “wet-seal“ around the joint, when the clamps have been adhered in advance (please see above)
Ad
dit
ion
al
Info
rmati
on
, A
pp
lica
tio
n G
uid
es
& C
alc
ula
tio
n T
oo
ls
© ARMACELL UK LTD.
APPLICATION MANUAL 5 - Additional Information, Application Guides & Calculation Tools
OTHER APPLICATION GUIDES
Application Guides for Arma-Chek S Plus, Arma-Chek T, Arma-Chek D and Arma-Chek R
» Special Application Advice for NH/Armafl ex
» Special Application Advice for HT/Armafl ex
» Application Hints for Armafl ex Underground
» Application hints for Armafl ex TuffCoat
» Application of Armafl ex DuoSolar VA
» Armafl ex application guide for plastic pipes
» Armafl ex Protect R-90 application guide
Application guide for Armafl ex on ductwork
» Application guide for ArmaSound Industrial Systems
» Armafl ex & Arma-Chek application video
CALCULATION TOOLS
» Armafi nish FR paint - Coverage Calculator
Arma-Chek T - Coverage Calculator
» keytec. ISO 15665 Determine the right ArmaSound Industrial Systems
» keytec. Armafl ex Underground Calculate the impact of insulation on the time until pipe freezing occurs.
keytec. Arma-Chek R fi shtail calulator Calculate the exact shape and measurements for fi stails used to cover bends insulated with Armafl ex
keytec. Unit converter metric / imperial Calculate the most common units from metric to imperial measurements
» ArmWin AS Armwin AS is the technical calculation program to determine insulation thicknesses required to prevent surface condensation and limit energy losses. It also allows users to calculate U-values, heat fl ows and temperature changes for pipes, ducts and tanks.
New
34
REFERENCES
In addition to this manual Armacell provides the following documents, freely available from www.armacell.com/uk (or as part of our ArmaPlus CD). These documents con-tain further detailed advice for specifi c applications.
MECHANICAL PROTECTION AND OUTDOOR APPLICATIONS WITH ARMAFLEX
Explanation of the issues arising when installing Armafl ex outdoors and evaluation of solutions to protect Armafl ex from mechanical damage.
INSULATING COLD LINES WITH LINE TEMPERATURES BETWEEN -50°C TO -196°C (-58°F to -320°F)
Installation advice on issues arising when insulating low temperature lines below -40°C.
ARMAFLEX UNDERGROUND
Explanation of the theory underlying insulating under-ground pipes, including advice on insulating under-ground pipes using Armafl ex and also including a cal-culation tool to calculate the impact of insulation on the time until pipe freezing occurs.
TRACE HEATING
Explanation of the theory underlying insulating trace heated pipes, including advice on selecting correctly di-mensioned insulation tube.
ARMAFLEX ON RECTANGULAR & CIRCULAR DUCT-WORK
Additional detailed installation advice when installing Armafl ex onto rectangular or circular ductwork.
ARMAFLEX IN CONCRETE
Installation advice when burying pipes insulated in Armafl ex directly in concrete.
GLUING ARMAFLEX ONTO CELLULAR GLASS
Installation advice when installing Armafl ex directly onto a cellular glass surface.
New
New
New
New
New
New
New
ap
pli
cati
on
man
ual
>>
AR
MA
FLEX
ARMAFLEX TUFFCOAT
Class O Armafl ex tubes with a tough white covering pre-applied. Covering provides protection against UV expo-sure, impact damage and weathering.
ARMAFLEX SPLIT / DUOSPLIT
Copper pipes pre-insulated with a naturally UV resistant closed cell EPDM rubber based Armafl ex insulation. In-sulation comes with a tough white covering pre-applied. Designed for use with split air conditioning systems.
ARMAFLEX DUOSOLAR
Parallel stainless steel or copper pipes pre-insulated with a naturally UV resistant closed cell EPDM rub-ber based Armafl ex insulation. Insulation comes with a tough black covering pre-applied. Designed to with-stand the temperatures associated with solar hot water systems.
ARMAFLEX PROTECT R-90
Effective fi re penetration sealing for pipe and ductwork. Available in tubes and sheet, Armafl ex Protect R-90 pro-vides up to 120 minutes insulation and integrity ratings.
ARMAFIX PIPE SUPPORT
Armafl ex sections with load bearing PUR/PIR inserts and an aluminium outer cladding to prevent excessive material compression.
ARMALOAD PIPE SUPPORT & SECTIONS
High density sections of Armafl ex designed to resist ma-terial compression.
ARMAFLEX ACCESSORIES
Armafl ex Adhesive 520, for adhering nitrile rubber based Armafl ex materials and Armafl ex Adhesive 625 for ad-hering EPDM based Armafl ex materials.Armafi nish FR paint, for visual impact and to prevent damage from UV exposure when Armafl ex is used out-side.
35© ARMACELL UK LTD.
APPLICATION MANUAL
ARMAFLEX PRODUCTS
CLASS O ARMAFLEX
Closed cell, elastomeric, nitrile rubber insulation mate-rial with a Class O fi re rating and excellent thermal prop-erties. Available in tubes, pre-slit tubes, sheets, self-ad-hesive sheets and tapes.
CLASS O ARMAFLEX 15M COILS
Continuous and coils of Class O Armafl ex tube ideal for new pipework.
CLASS O ARMAFLEX SELFSEAL
Pre-slit Class O Armafl ex tubes with a pair of self adhe-sive strips down the longitudinal seam. Specifi cally de-signed to reduce installation time on existing pipework.
ARMAFLEX AC COILS
Long lengths of continuous Armafl ex coils for air condi-tioning and domestic heating pipes. Achieves a Class O fi re rating. Supplied in easy to carry boxes.
HT/ARMAFLEX
Naturally UV resistant closed cell EPDM rubber based Armafl ex insulation material capable of operating at line temperatures up to 150ºC.
NH/ARMAFLEX
Halogen free, closed cell nitrile rubber based Armafl ex insulation material with a low smoke toxicity rat-ing. Achieves a number of maritime fi re performance certifi cates.
CLASS O ARMAFLEX DUCT
The highly fl exible, aluminium foil covered Class O Armafl ex Duct is designed for insulation of both, rectangular and circular ductwork - matching contours exactly.

ap
pli
cati
on
man
ual
>>
AR
MA
FLEX
Armacell UK LimitedMars Street · Oldham, Greater Manchester · OL9 6LYTel 0161 287 7100 · Fax 0161 633 2685www.armacell.com/uk · [email protected]
Armacell provides this information as a technical service. To the extent the information is derived from sources other than Armacell, Armacell is substantially, if not wholly, rely-ing upon the other source(s) to provide accurate information. Information provided as a result of Armacell’s own technical analysis and testing is accurate to the extent of our knowledge and ability, as of date of printing, using effective standardized methods and procedures. Each user of these products, or information, should perform their own tests to determine the safety, fi tness and suitability of the products, or combination of products, for any foreseeable purposes, applications and uses by the user and by any third party to which the user may convey the products. Since Armacell cannot control the end use of this product, Armacell does not guarantee that the user will obtain the same results as published in this document. The data and information are provided as a technical service and are subject to change without notice.
© Armacell UK Ltd. · Subject to alterations · Printed in UK 000-005-0109-EN (UK,ROI,ZA)
ap
pli
cati
on
man
ual
>>
AR
MA
FLEX
The Armaflex Assurance System - your peace-of-mind assurance that Armaflex is made to the strictest quality, technical performance and environmentally friendly standards.
Prevents Moisture PermeationMulti-layered closed wall cells provide a built-in vapour barrier which can’t be compromised by surface punc-tures or rips - this ensures the vapour barrier stays working for the lifetime of the insulation system.
Provides Long-Term Thermal PerformanceNon-wicking - No transmission of water vapour is possible through the insulation due to the closed cell nature of Armaflex. Moisture will not migrate through professionally installed Armaflex.
Long-Term DurabilityNo fragile water vapour barrier - The built-in vapour barrier can’t be “damaged” during installation or over the lifetime of the insulation.
Avoids Thermal BridgingArmaflex is a seamless insulation system - these same technical properties provide a secure system.
Long-Term Energy EfficiencyBy minimising the ingress of water vapour into the insulation the multi-layered cells in Armaflex prevent the thermal conductivity from rising. Increased thermal conductivity can in the long term lead to increased energy costs and surface condensation.
Inhibits Growth of Mould• Minimises moisture permeation, the first require- ment for mould growth• Minimises the second requirement: No cellulosic vapour jacket, and the smooth surface doesn’t trap dust
Formaldehyde-FreeEnsures that Armaflex is a low-emitting product. It is also low VOC.
Support Requirements of Health & IAQ (Indoor-Air-Quality)
• Dust and Fibre-Free• Will not emit any particles or fibres - even when cut into shapes and fittings • No outgassing - CFC & HCFC free manufacturing process
Supervised Manufacturing & Technical ValuesFactory Mutual Approval Guide - guarantee consistent performance to published values by monitoring • Fire Performance (FM pipe chase test, Flammability test)
• Water Vapour Transmission• Thermal Conductivity
Supervised Quality StandardsISO Registration ensures that all Armacell manufactur-ing facilities consistently meet customer requirements . . . by managing all processes with ongoing quality assessments.
The Armaflex Assurance System


![Index []...2003/01/28 · IRL Jack O'Leary 04/11/1997 IRL Peter Lynch 26/11/1997 IRL Darragh McElhinney 2000 IRL Fearghal Curtin 14/07/1998 IRL Charlie O'Donovan 06/08/1999 IRL Barry](https://img.pdfslide.net/doc/110x75/5e9ad3bf924b7b6d1915a79a/index-20030128-irl-jack-oleary-04111997-irl-peter-lynch-26111997.jpg)