Embed Size (px)
Citation preview

Army CompressedAir Diver
Course 97/02
24901710Private Marshall
Defence Diving School
List of Contents
1. Physics of Diving.A. Water Pressure.B. Effects of Pressure.C. Properties of Gases.D. Types of gases.
2. Decompression Theory.A. Decompression Theory & Physiology.B. Decompression Rules.C. Decompression illness.
3. Effects of Pressure on the Body.4. Signals. (DTWC to do)
A. Divers Through Water Communications.B. Manual (Lifeline) SignalsC. Control of an Attended Divers Ascent.
5. Underwater Hazards.6. Underwater Searches.7. Ships Bottom Search.8. River Recce.9. Medical Equipment Set.10. Emergency Procedures.11. First Aid.
A. Diving First Aid.B. Extremes of Temperature.
12. Diving Illness’13. Swimmers Air Breathing Apparatus14. Broco.15. 10/50 Compressor.16. Hydraulic Pack.
2
Chapter 1Physic’s of Diving
The human body underwater is operating in a completely different environment, in which it is exposed to much greater pressure than it would experience on the surface. It is therefore necessary to consider carefully the meaning of the following terms:
A. Force: This is identified as Mass x Acceleration. Its measure of unit is KG/F or G/F.
B. Pressure: This is defined as being the force applied to a unit of area or surface, Force divided by Area. Its unit of measure is KG/M2 or Bars.
C. Density: This is defined as Mass divided by Volume. Its unit of measure is KG/M3.
D. Liquids: This has volume and a weight and is regarded as being incompressible. Small changes in volume caused by fluctuating temperatures can be disregarded.
I. Density of fresh water = 1000 KG/M3.II. Density of salt water = 1030 KG/M3.
E. Gases: All gases have some weight and occupy space but they have no definite shape. Gases are light and compressible; the density varies with the pressure that is applied. Thus the density of gases breathed by a diver changes according to the depth at which he is working at.
Part OneWater Pressure
The pressure with which the diver is most directly concerned with is the pressure of the surrounding water at his diving depth. Pressure in liquids conforms to certain basic laws which are as follows:
I. Pressure caused by the weight of the liquid above the object.II. Pressure acts in all directions.III. Pressure will act at right angles to any surface of the object.
A. Example of Water Pressure:
I. Water pressure at 10 metres = 10300 KG/M2.II. Water pressure at 1 metre = 10300 – 10 metres.III. Water pressure at 1 metre = 1030 KG/M2 or 0.1 Bar.
3

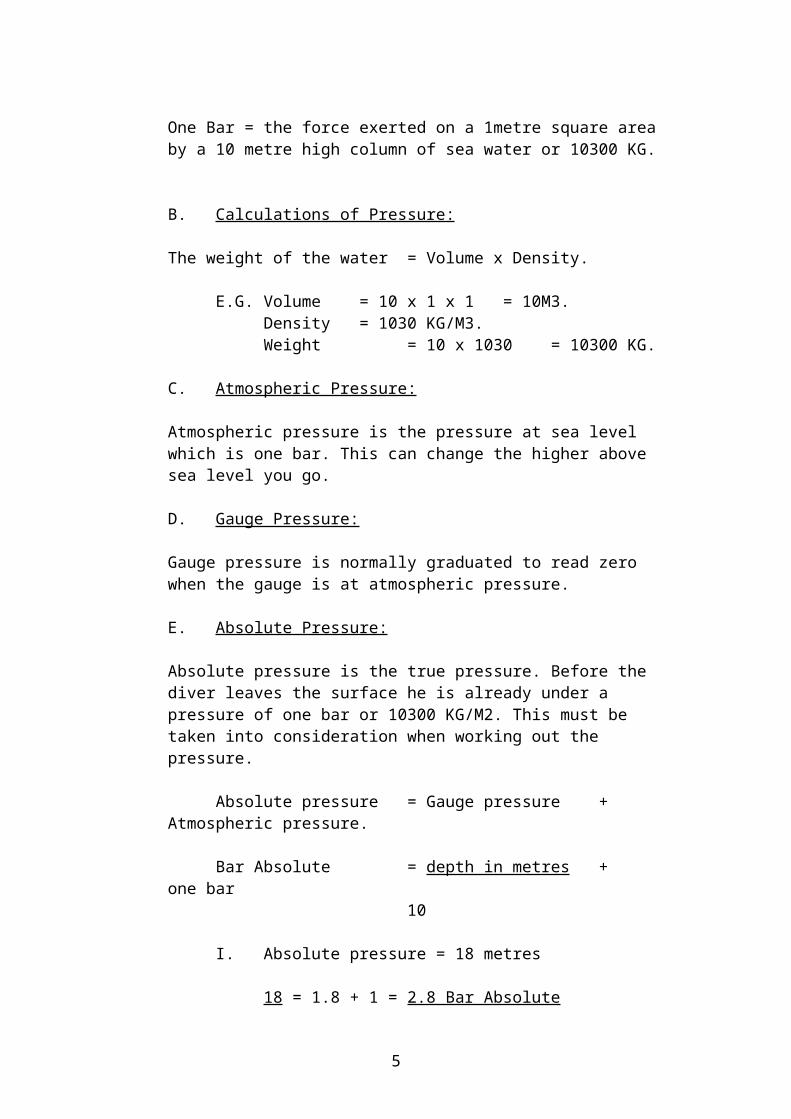
One Bar = the force exerted on a 1metre square area by a 10 metre high column of sea water or 10300 KG.
B. Calculations of Pressure:
The weight of the water = Volume x Density.
E.G. Volume = 10 x 1 x 1 = 10M3.Density = 1030 KG/M3.Weight = 10 x 1030 = 10300 KG.
C. Atmospheric Pressure:
Atmospheric pressure is the pressure at sea level which is one bar. This can change the higher above sea level you go.
D. Gauge Pressure:
Gauge pressure is normally graduated to read zero when the gauge is at atmospheric pressure.
E. Absolute Pressure:
Absolute pressure is the true pressure. Before the diver leaves the surface he is already under a pressure of one bar or 10300 KG/M2. This must be taken into consideration when working out the pressure.
Absolute pressure = Gauge pressure + Atmospheric pressure.
Bar Absolute = depth in metres + one bar10
I. Absolute pressure = 18 metres
18 = 1.8 + 1 = 2.8 Bar Absolute10
II. Absolute pressure = 33 metres
33 = 3.3 + 1 = 4.3 Bar Absolute10
III. Absolute pressure = 50 metres
50 = 5 + 1 = 6 Bar Absolute10
4
Part twoEffects of Pressure
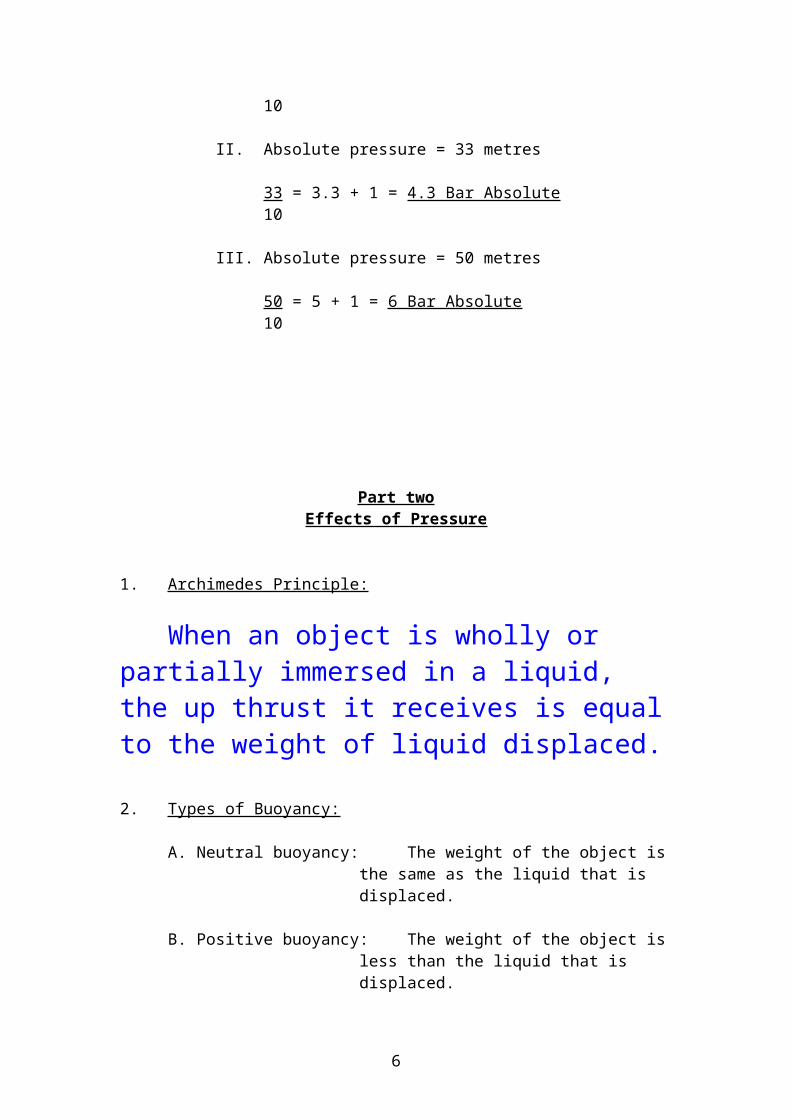
1. Archimedes Principle:
When an object is wholly or partially immersed in a liquid, the up thrust it receives is equal to the weight of liquid displaced.
2. Types of Buoyancy:
A. Neutral buoyancy: The weight of the object is the same as the liquid that is displaced.
B. Positive buoyancy: The weight of the object is less than the liquid that is displaced.
C. Negative buoyancy: The weight of the object is more than the liquid that is displaced.
3. Effects of Buoyancy:
Buoyancy for the diver can be affected by the following:
A. Extra weight.B. Equipment.C. Clothing.D. Area of operation.
4. Blow-up:
This can be caused by air being placed in the suit (using the SIU or by inflating the BCA) as the diver ascends the air will expand causing the divers buoyancy to become positive, thus making his ascent to be fast and uncontrollable.
5. Boyle’s Law Triangle:
FORCE
5
PRESSURE VOLUME
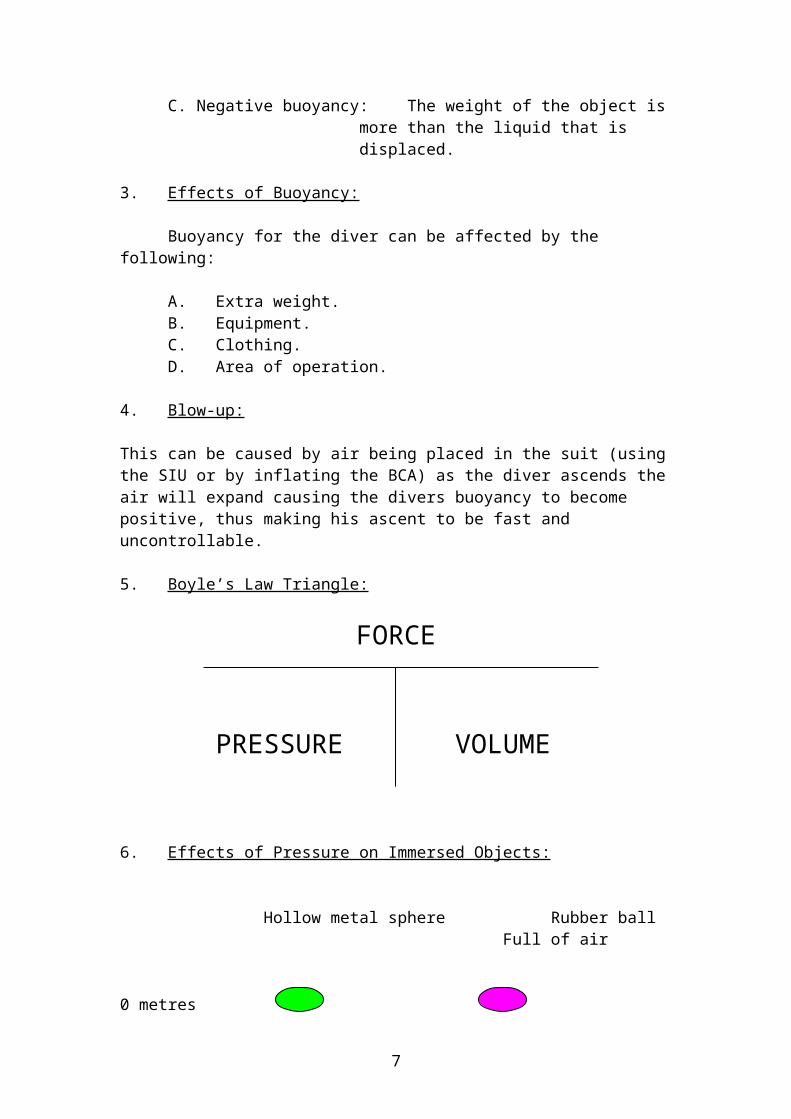
6. Effects of Pressure on Immersed Objects:
Hollow metal sphere Rubber ballFull of air
0 metres
10 metres
A. Hollow metal sphere: This will remain unaffected provided the shell is strong enough.
B. Air filled rubber ball: The air inside will be compressed to the pressure of the surrounding water. At 10 metres the ball will be half its original size and the air pressure will be two bar absolute.
Part ThreeProperties of Gases
1. Boyle’s Law:
If the temperature is kept constant, the volume of a given mass of gas will vary inversely at its absolute pressure.
2. Meaning:
If the volume of a gas is doubled, the density is also doubled, but the volume is decreased to one half of its original volume.
6
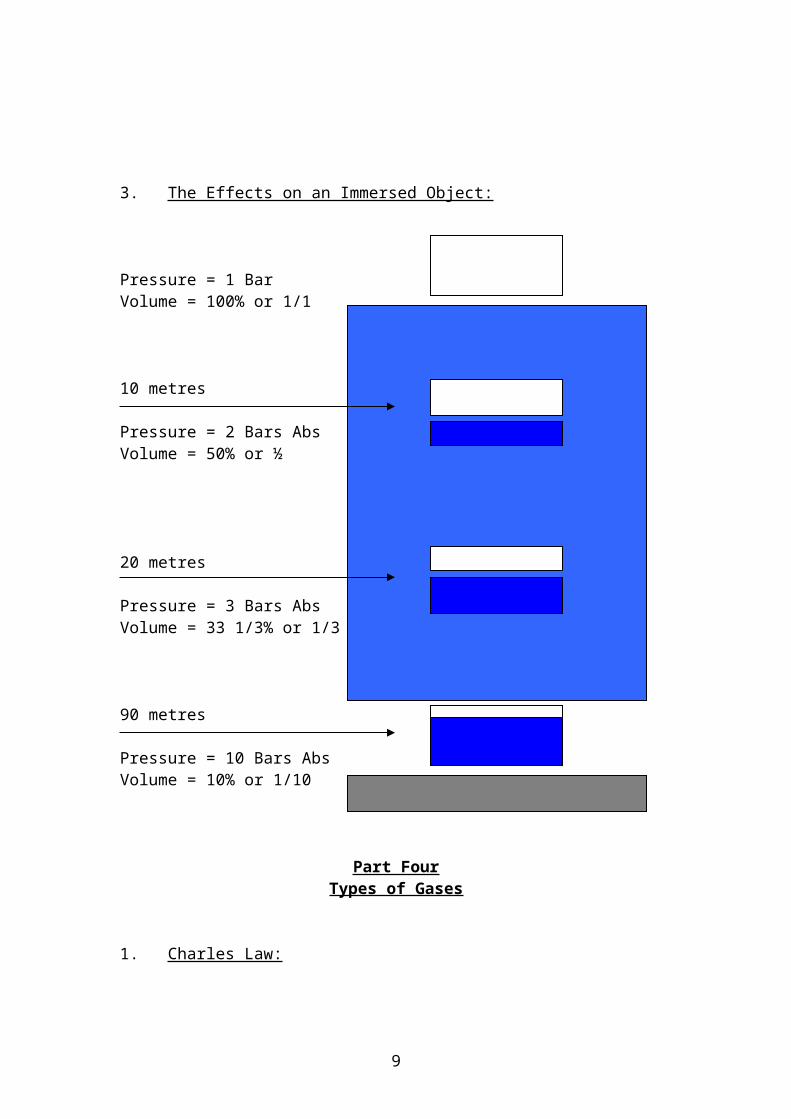
3. The Effects on an Immersed Object:
Pressure = 1 BarVolume = 100% or 1/1
10 metres
Pressure = 2 Bars AbsVolume = 50% or ½
20 metres
Pressure = 3 Bars AbsVolume = 33 1/3% or 1/3
90 metres
Pressure = 10 Bars AbsVolume = 10% or 1/10
Part FourTypes of Gases
1. Charles Law:
A given mass of gas increases in volume by 1/273 of its volume at zero degree’s centigrade, for every degree centigrade rise in temperature providing the temperature remains constant.
7

2. Oxygen:
A. No colour, taste or odour.B. Forms 21% of the atmosphere.C. Often used as breathing gas instead of air.D. The limit required to sustain life is minimum 0.2 Bar and maximum is
2 Bar
3. Nitrogen:
A. No colour, taste or odour.B. Forms 79% of the atmosphere.C. Is not capable of sustaining life.D. Under pressure may lead to nitrogen narcosis.
4. Carbon Dioxide:
A. Poisonous gas.B. Diver produces one litre per minute whilst diving.C. No taste, colour or odour except in high concentration.D. At atmospheric pressure up to 3% can be breathed.E. At 4% it causes CO2 poisoning.
5. Carbon Monoxide:
A. Very poisonous gas.B. Exhaust fumes from petrol engines have a very high concentration.C. Has no taste, colour or odour unless mixed with petrol vapour.D. Red blood cells prefer it to oxygen.
6. Cylinders:
A. Air: Grey body and black neck (1/4 white).B. Medical O2: Black body and white neck.C. Industrial O2: All black.D. Nitrox: All blue.
8
Chapter 2Decompression Theory
Part OneDecompression Theory & Physiology
1. Nitrogen Narcosis:
Nitrogen becomes narcosis at depths exceeding 30 metres, as the depth increases so do the symptoms:
Effects: Light-headed.Irresponsible.Lacking power of concentration.
To minimize the effects you should work up to deeper dives.
2. Henry’s Law:
At a constant temperature the mass of gas that dissolves in a given mass of liquid with which it is in contact is almost directly proportional to the partial pressure of that gas.
A. At atmospheric pressure, one litre of nitrogen (N2) is present in the body. It is solution in the blood and in the tissues.
B. The amount of N2 dissolved in the fluid depends on the pressure exerted:
E.G. Atmospheric pressure = 1.25 or 1 litre.2 Bar Abs = 2.50 or 2 litres.3 Bar Abs = 3.75 or 3 litres.
C. Half of the N2 present in the body is in the blood and tissues. The other half is held in the fatty tissues. Nitrogen is 5x more soluble in fat.
3. Saturation:
9

A. Time - 12 hours for total saturation.B. Blood and watery tissues saturate quicker.C. Fatty tissues take longer to saturate.D. Therefore blood and watery tissues will de-saturate quicker than fatty tissues.
E. The amount of gas contained in the body depends on:I. Pressure to which it has been exerted.II. Time spent at depth.
4. Decompression:
The term decompression applies to a reduction in pressure either from atmosphere to sub-atmosphere or from depth to atmospheric pressure.
5. Haladanes Theory:
Bubbles form in the body of the pressure gas. Within the body is more than two and a quarter times the pressure than outside the body. Therefore it is always safe to ascend directly from 10 metres (2 Bars Abs) to the surface (1 Bar Abs), since bubbles do not form.
6. Useful To Know In An Emergency:
A diver may always be allowed to ascend safely to half his absolute depth for pressure.
I.E. Depth 30 metres = 4 Bar Absolute – half this is 2 Bar Abs = 10 metres.
7. Types of Decompression:
A. In the water while the diver is ascending.B. In a decompression chamber on the surface.C. In a submersible compression chamber.
8. Control of Divers Ascent (Lazy Shot):
The lazy shot cordage is married to the shot line by a shackle and is marked the same as a life line. The first 3 metre point is from the scaffolding bar, when ascending to the shot your chest (lungs) must be in line with the bar.
10

A. The lazy shot is to be shackled to the shot rope and lowered to 3 metres below the diver’s first stop.
B. The diver is given 5 bells, come into shot, he answers 5 bells.C. He then gives 1 pull when reaching the shot, the attendant will reply
with 1 pull.D. The diver is then sent 4 pulls, he replies with 4 pulls.E. The diver then checks around himself for any obstructions and sends 1
pull, this is unanswered.F. At the appropriate time the supervisor will tell the attendant to send 1
pull. The diver does not answer this and will start his ascent. He will ascend at 1 metre every 4 seconds or as quick as the smallest bubbles.
G. When the diver reaches the lazy shot, he will send 1 pull (at lazy shot).H. The lazy shot is then raised to the diver’s first stop by the service
support (again 1 metre every 4 seconds).I. Once the diver is on the lazy shot, the decompression is controlled by
the surface support.J. Once decompression is complete, then the diver will be given 4 pulls,
the diver will reply with 4 pulls and ascend.
Part TwoDecompression Rules
1. Compression Chamber Requirement:
A. Before any diving takes place, the location of the nearest two compartment R.C.C. must be known.
B. If the dive requires decompression stops then a chamber must be on-site.
C. If there is no R.C.C. on-site then only no-stop diving may take place to a maximum of 42 metres.
D. A single man R.C.C. can be used on-site, however only one diver is allowed to dive.
Note: Hard work increases decompression.
2. Exercise After Diving:
Diving after approaching the “no-stop” limit should not do excessive exercise for 2 hours after diving.
3. Procedures after Diving in Excess of 30 Metres:
Diving deeper than 30 metres and above the limit line is to remain within 4 hours travelling time of a R.C.C. for 12 hours after the dive is complete.
4. Repetitive Dives to 42 metres or Less:
A. Dives with a surface interval of less than 6 hours is to be classed as combined dives.
11

B. A dive to 10 metres or less may follow deeper dives without the requirement for further decompression.
C. Dives to 10 metres or less followed by deeper dives is to be classed as combined dives.
D. Standby divers must observe the 5:5:10 rule.E. If the surface interval between dives exceeds 6 hours then no
modification to the decompression table is required.
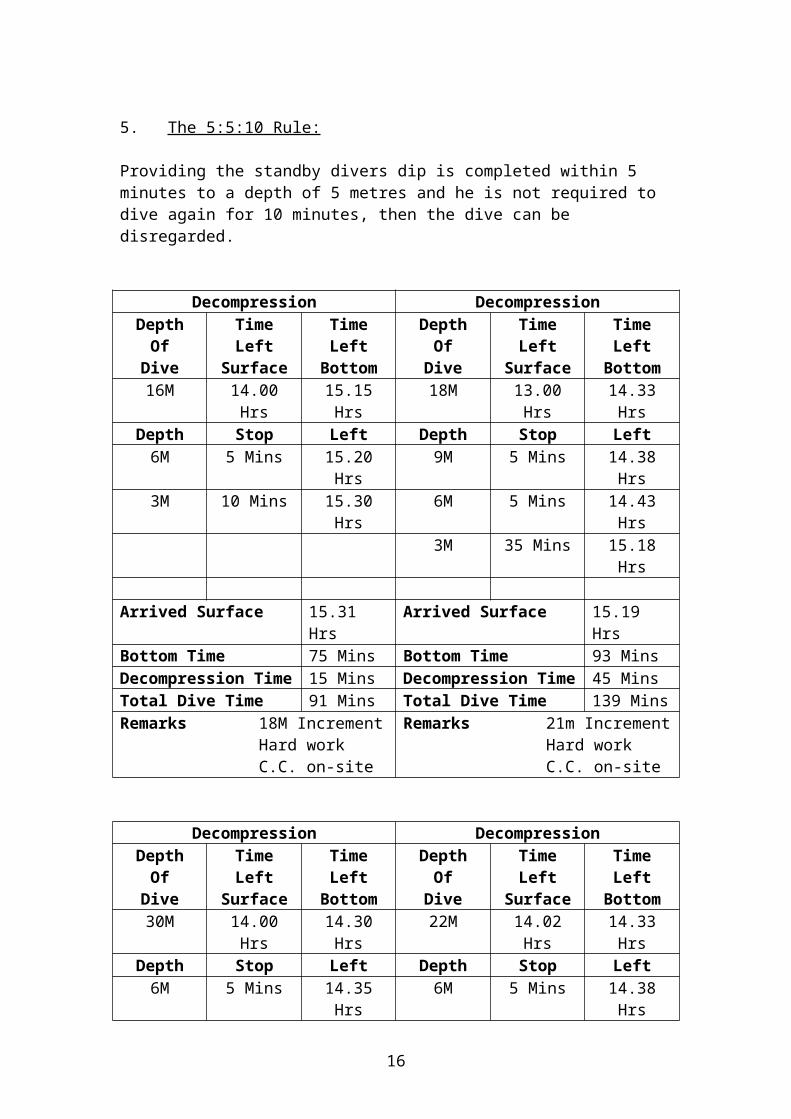
5. The 5:5:10 Rule:
Providing the standby divers dip is completed within 5 minutes to a depth of 5 metres and he is not required to dive again for 10 minutes, then the dive can be disregarded.
Decompression DecompressionDepth Time Time Depth Time Time
Of Left Left Of Left LeftDive Surface Bottom Dive Surface Bottom16M 14.00 Hrs 15.15 Hrs 18M 13.00 Hrs 14.33 Hrs
Depth Stop Left Depth Stop Left6M 5 Mins 15.20 Hrs 9M 5 Mins 14.38 Hrs3M 10 Mins 15.30 Hrs 6M 5 Mins 14.43 Hrs
3M 35 Mins 15.18 Hrs
Arrived Surface 15.31 Hrs Arrived Surface 15.19 HrsBottom Time 75 Mins Bottom Time 93 MinsDecompression Time 15 Mins Decompression Time 45 MinsTotal Dive Time 91 Mins Total Dive Time 139 MinsRemarks 18M Increment Remarks 21m Increment
Hard work Hard workC.C. on-site C.C. on-site
Decompression DecompressionDepth Time Time Depth Time Time
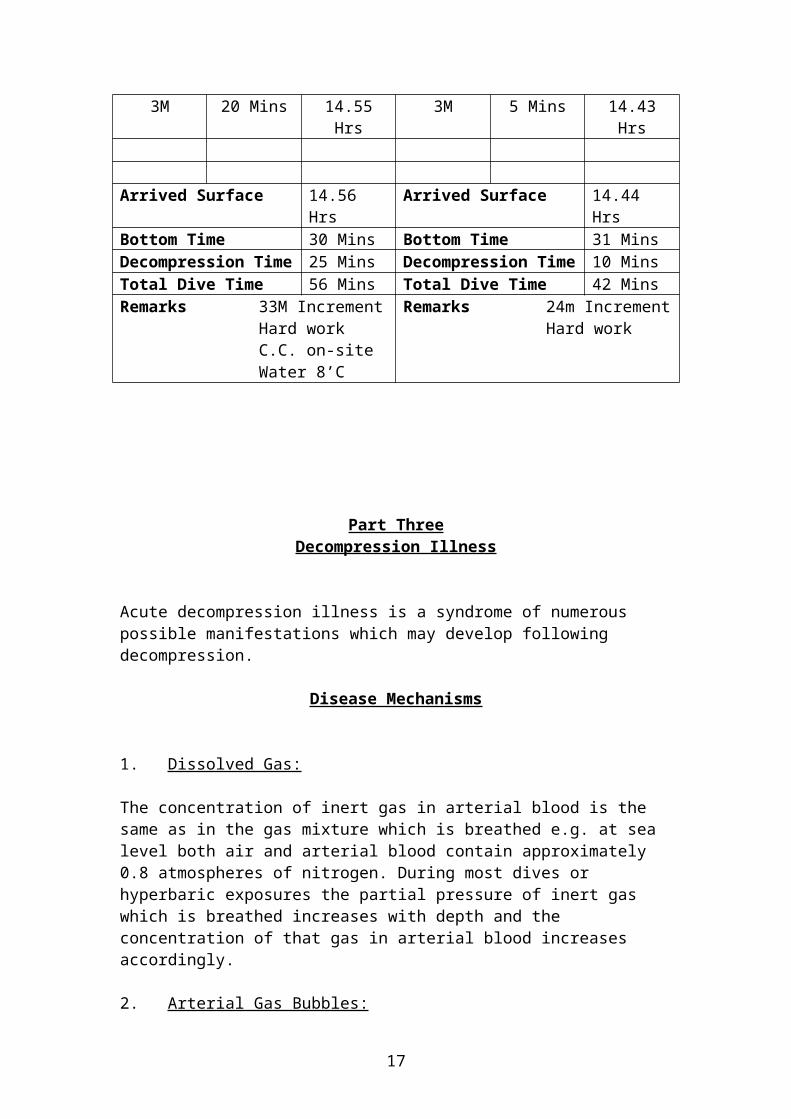
Of Left Left Of Left LeftDive Surface Bottom Dive Surface Bottom30M 14.00 Hrs 14.30 Hrs 22M 14.02 Hrs 14.33 Hrs
Depth Stop Left Depth Stop Left6M 5 Mins 14.35 Hrs 6M 5 Mins 14.38 Hrs3M 20 Mins 14.55 Hrs 3M 5 Mins 14.43 Hrs
Arrived Surface 14.56 Hrs Arrived Surface 14.44 HrsBottom Time 30 Mins Bottom Time 31 MinsDecompression Time 25 Mins Decompression Time 10 MinsTotal Dive Time 56 Mins Total Dive Time 42 MinsRemarks 33M Increment Remarks 24m Increment
Hard work Hard work
12
C.C. on-siteWater 8’C
Part ThreeDecompression Illness
Acute decompression illness is a syndrome of numerous possible manifestations which may develop following decompression.
Disease Mechanisms
1. Dissolved Gas:
The concentration of inert gas in arterial blood is the same as in the gas mixture which is breathed e.g. at sea level both air and arterial blood contain approximately 0.8 atmospheres of nitrogen. During most dives or hyperbaric exposures the partial pressure of inert gas which is breathed increases with depth and the concentration of that gas in arterial blood increases accordingly.
2. Arterial Gas Bubbles:
This is when escaped gas enters the pulmonary veins and is transported to the heart. Bubbles of gas in the arteries may cause blockages to the blood supply in vital organs.
Symptoms: A. Rapid onset of unconsciousness.B. Convulsions.C. Weakness or numbing of limbs.D. Other symptoms related to the central nervous system.E. Death.
3. Descriptive Protocol:
To simplify a bewildering collection of terms, the symptoms and signs of decompression illness will be discussed using evolution and manifestation terms:
A. Evolution:
This describes how the condition came about and is broken down into the following categories:
I. Progressive – Number or severity of signs and symptoms are increasing.
13

II. Static – Number or severity of signs and symptoms are remaining the same.III. Spontaneously improving – Signs and symptoms are improving albeit transiently in certain instances without recompression.IV. Relapsing – Occasionally cases which have improved spontaneously undergo a secondary deterioration.V. Resolved – When signs and symptoms have cleared altogether.
B. Manifestations:
There are a number of manifestations of decompression illness which occur commonly and these are listed below:
I. Pain – (Limb and girdle) deep aching pain in or around one or more joints.II. Neurological – It is likely that many of the dis-orders involve the brain.III. Audio vestibular – Used to describe Vertigo, Tinnitus, Nystagums or loss of hearing after a dive.IV. Pulmonary – Involvement of the lungs in decompression illness.V. Cutaneous (The skin) – This term should be used to describe the condition which generally presents with severe itching around the shoulders or over the trunk.VI. Lymphatic – Occasionally lymph nodes may become enlarged and tender and this may be associated with oedema. The skin feels thickened and may have the pitted appearance of an orange peel.VII. Constitutional – A number of non specific symptoms that occur after diving and which if severe or if accompanied by other manifestations may be considered part of the decompression syndrome.
Example:
a. Acute relapsing neurological decompression illness.b. Acute progressive pain decompression illness.
4. Treatment:
A. Airway, breathing and circulation.B. Neurological examination.C. Administer 100% O2.D. Rehydrate conscious casualty with oral fluids.E. Recompress using table 62.F. Record vital signs and fluid balance.G. Do not give painkillers.H. Do not put unconscious in a one man chamber.I. Contact duty diving medical officer at Institute of Naval Medicine.
14

Chapter 3Effects of Pressure on the Body
1. Middle Ear Barotrauma:
A. Symptoms: Acute pain.Ear drums will rupture.Bleeding and some deafness.
B. Prevention: Do not dive with a cold.
2. Round Window Rupture:
A. Symptoms: Sudden onset of vertigo.Hearing loss.Nystagums.Nausea or vomiting.
B. Treatment: Bed rest with the head elevated.
3. Reversed Ears:
A. Symptoms: Onset of pain.Mild conduction deafness, vertigo and nausea.Possible bleeding from the ear.Lining of external ear canal swollen.
B. Prevention: Do not dive with tight fitting hood.Do not insert plugs into the ear before diving.Do not dive with an external ear infection.
4. Alternobaric Vertigo:
A. Symptoms: Caused by a difference in the middle ear pressure.
5. Swimmers Ear:
A. Symptoms: Itching/a wet feeling in the affected ear.
15
Swelling of lymph nodes in the neck.Fever in severe cases.
B. Treatment: A temporary cessation of diving.Use aluminium acetate drops plus antibiotic ear drops.In serious cases systemic antibiotic may be necessary.
6. Sinus:
Are designed to lighten the skull and to add resonance to the voice.
Chapter 4Signals
1. Types of Signal:
A. Lifelines, float-lines and buddy-lines.B. Visual signals on the surface.C. Through water communications.D. Underwater explosions.E. Flags and lights.
2. Life-lines and Float-lines:
Lifelines are made of 11mm hoarse rope and come in two lengths (18 metres and 37 metres). They are marked by a blue datum mark 1.5 metres from the divers end. The lifeline is then marked as follows:
A. 3 metres = 1 yellow mark.B. 6 metres = 2 yellow marks.C. 9 metres = 3 yellow marks.D. 12 metres = 4 yellow marks.E. 15 metres = 1 red mark.F. 18 metres = 1 red mark plus 1 yellow mark.
Float-lines are marked the same as life-lines and should be tied off at one and a third of the depth i.e. depth = 6 metres tied off at 8 metres.
3. Flags and Lights:
The International Code of Signals Flag Alpha is used to indicate that divers are down. The International Code of Signals Flags Romeo and Yankee when used together mean keep a wide berth and pass at a slow speed. In restricted visibility or at night then lights are used instead of flags. These are red, white, and red in a vertical line with 1 metre between each light and the lower light 2 metres above the gunnel.
4. Underwater Explosion:
16
A weighted thunderflash is used as the divers emergency recall system. The thunderflash will sink to a depth of 7 metres before exploding and can be heard up to a radius of 100 metres. Actions on hearing the diver recall are:
A. Surface immediately under control.B. Raise one arm to show diver well.C. If on a float-line coil the line up as you ascend and surface under your float.D. Look into the supervisor for instructions.E. If the supervisor is busy, then swim to the nearest safe place, get inboard, place yourself on atmosphere and then shout “diver well”.
5. Visual Signals:
At night or in nil visibility “Q” lights are attached to the side of the divers spider on the face mask (these are optional). When diving at night the diver’s distress light is worn on the right arm or right side of the stab-jacket. These lights can be seen up to 6 miles away on a clear night, they are waterproof up to 500 metres and the battery has a life of 12 hours (these are worn at all times).
6. Divers Through Water Communications:
7. Manual Signals:
In the absence of any alternative method, manual signals by line are employed for all communications in which two divers or an attendant and a diver are physically in contact whether it is by lifeline, floatline, Buddyline, snagline or airline. Signals are of two kinds:
A. Long, steady and distinct PULLS.B. Short, sharp BELL pulls made with the same timing as striking a ships bell (sent in groups of two).
Attendant to Diver
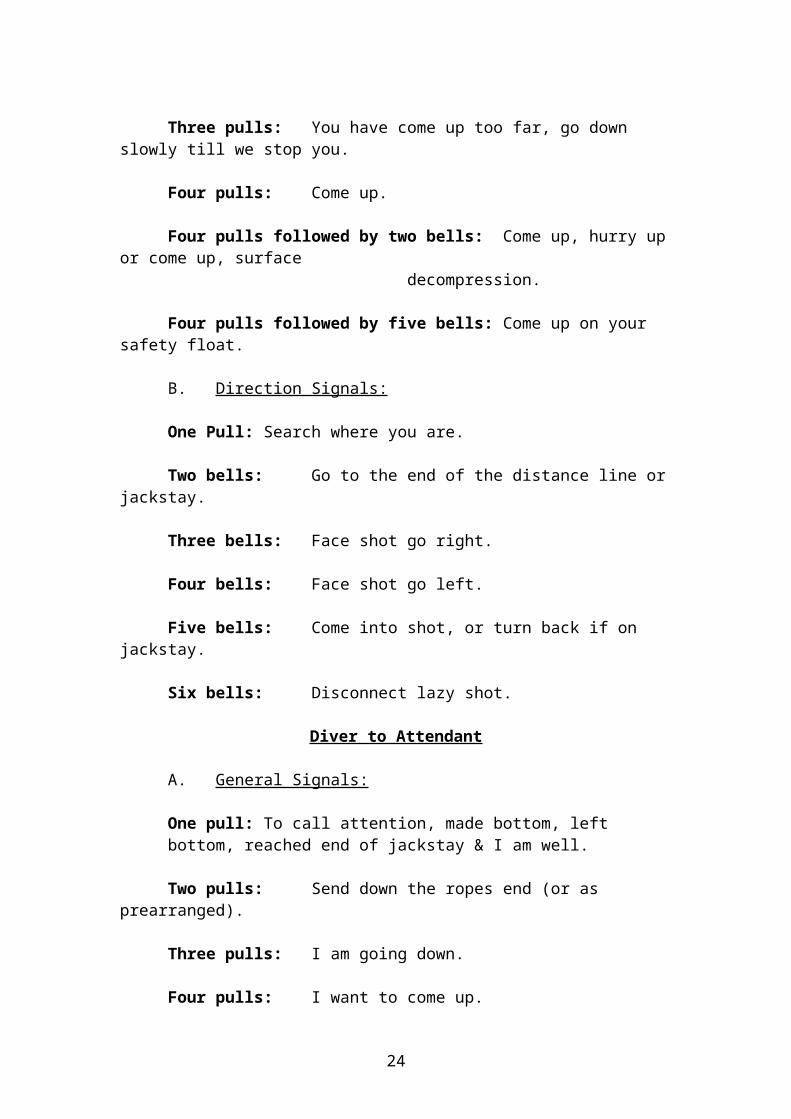
A. General Signals:
One pull: To call attention or are you well.
Two pulls: Am sending down a ropes end (or as prearranged).
Three pulls: You have come up too far, go down slowly till we stop you.
Four pulls: Come up.
Four pulls followed by two bells: Come up, hurry up or come up, surfacedecompression.
Four pulls followed by five bells: Come up on your safety float.
B. Direction Signals:
17
One Pull: Search where you are.
Two bells: Go to the end of the distance line or jackstay.
Three bells: Face shot go right.
Four bells: Face shot go left.
Five bells: Come into shot, or turn back if on jackstay.
Six bells: Disconnect lazy shot.
Diver to Attendant
A. General Signals:
One pull: To call attention, made bottom, left bottom, reached end of jackstay & I am well.
Two pulls: Send down the ropes end (or as prearranged).
Three pulls: I am going down.
Four pulls: I want to come up.
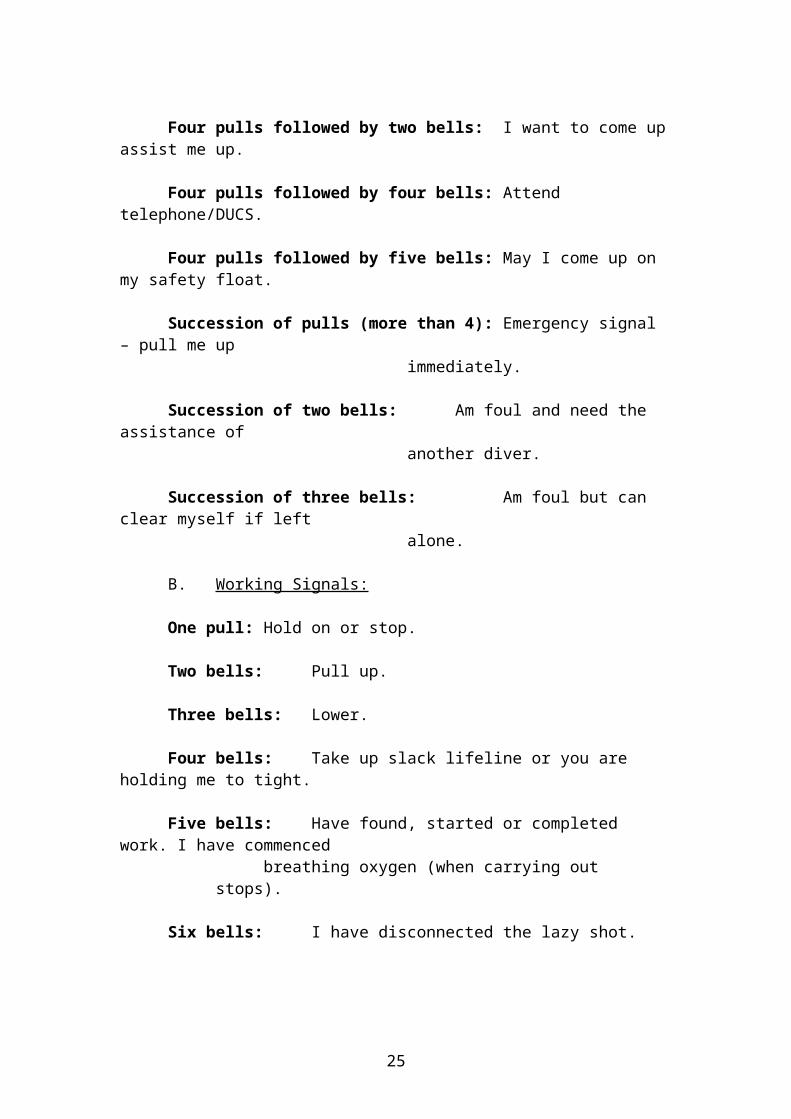
Four pulls followed by two bells: I want to come up assist me up.
Four pulls followed by four bells: Attend telephone/DUCS.
Four pulls followed by five bells: May I come up on my safety float.
Succession of pulls (more than 4): Emergency signal – pull me up immediately.
Succession of two bells: Am foul and need the assistance of another diver.
Succession of three bells: Am foul but can clear myself if left alone.
B. Working Signals:
One pull: Hold on or stop.
Two bells: Pull up.
Three bells: Lower.
Four bells: Take up slack lifeline or you are holding me to tight.
18
Five bells: Have found, started or completed work. I have commenced breathing oxygen (when carrying out stops).
Six bells: I have disconnected the lazy shot.
19
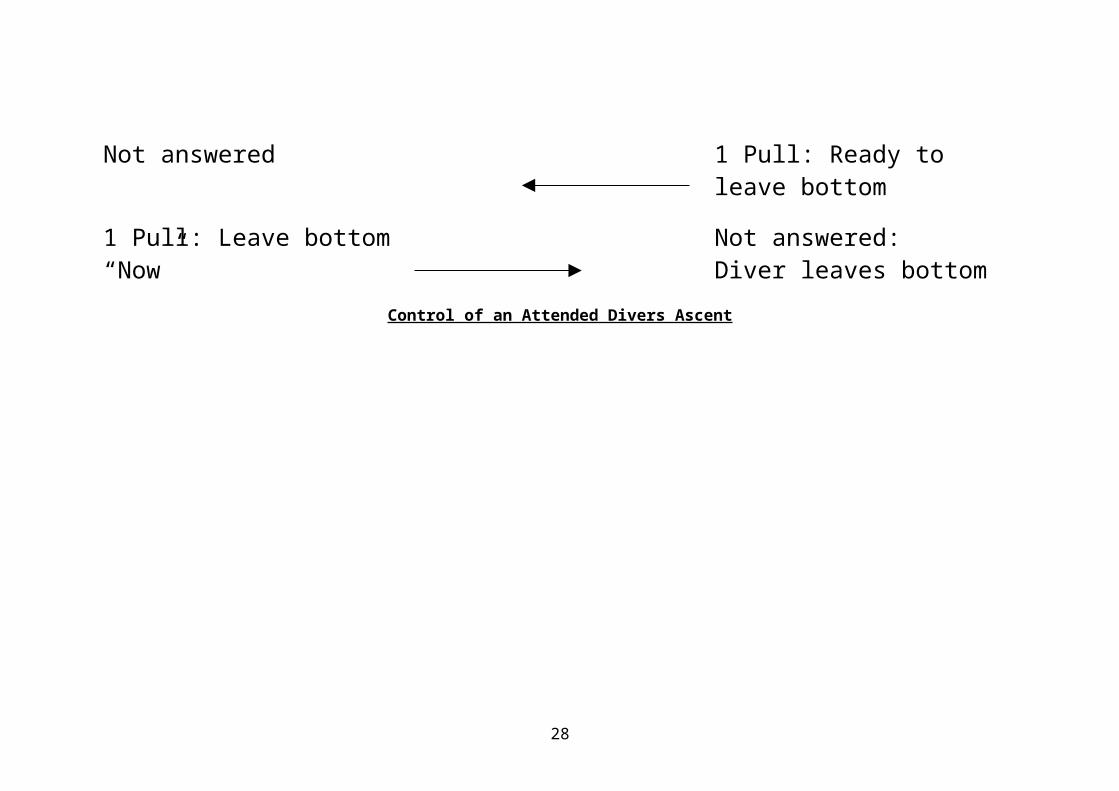
Attendant Diver
1 Pull: Call attention 1 Pull: answers
5 Bells: Finish work, come into shot
5 Bells: Answers
1 Pull: Answers 1 Pull: At shot
1 Pull: Call attention 1 Pull: Answers
4 Pulls: Come up 4 Pulls: Answers
Not answered 1 Pull: Ready to leave bottom
1 Pull: Leave bottom “Now” Not answered:
20

Diver leaves bottomControl of an Attended Divers Ascent
21
Chapter 5Underwater Hazards
1. Diving Team Organisation:
A. The minimum number of personnel required to carry out an attended dive is four. This is broken down as follows:
I. Supervisor (the standby’s attendant).II. Diver.III. Diver’s attendant.IV. Standby diver.
B. The minimum number of personnel required to carry out a marked dive is five. This is broken down as follows:
I. Supervisor (helmsman).II. Diver.III. Attendant/Surface swimmer (one per two divers).IV. Standby diver.V. Standby diver’s attendant.
2. Limitations:
Attended DiveSupervisor Attendant Standby Divers
1 ADS 1 per diver 1 1 - 61 UDS 1 per diver 1 1 – 4
Marked DiveSupervisor Attendant Standby Divers
1 ADS1 surface swimmer
per divers + standby attendant
1 1
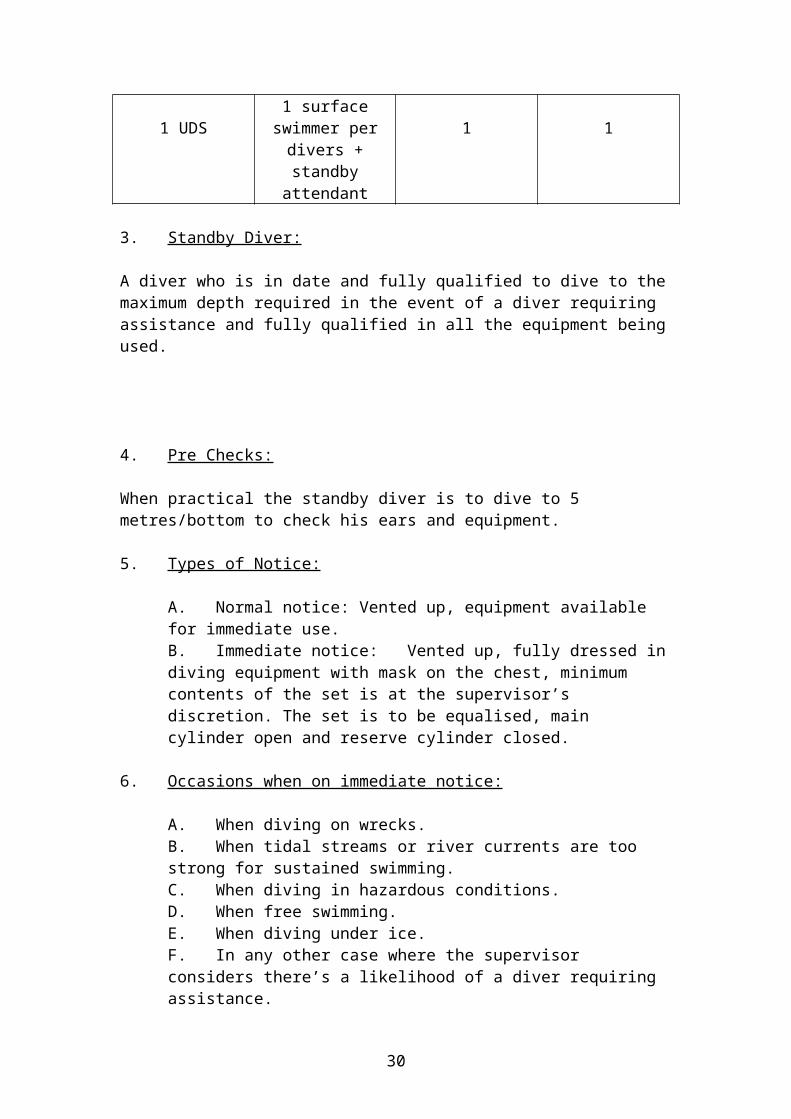
1 UDS1 surface swimmer
per divers + standby attendant
1 1
3. Standby Diver:
A diver who is in date and fully qualified to dive to the maximum depth required in the event of a diver requiring assistance and fully qualified in all the equipment being used.
22
4. Pre Checks:
When practical the standby diver is to dive to 5 metres/bottom to check his ears and equipment.
5. Types of Notice:
A. Normal notice: Vented up, equipment available for immediate use.B. Immediate notice: Vented up, fully dressed in diving equipment with mask on the chest, minimum contents of the set is at the supervisor’s discretion. The set is to be equalised, main cylinder open and reserve cylinder closed.
6. Occasions when on immediate notice:
A. When diving on wrecks.B. When tidal streams or river currents are too strong for sustained swimming.C. When diving in hazardous conditions.D. When free swimming.E. When diving under ice.F. In any other case where the supervisor considers there’s a likelihood of a diver requiring assistance.
7. Publications:
The following publications are related to diving:
A. BR 2806 Volume One: Theory of diving and admin regulations.B. BR 2806 Volume Two: Diving regulations, drills and procedures.C. BR 2808: Underwater hazards.D. BR Handbook Series: Equipment.E. DSM: Diving Safety Memorandums.
8. Diving Hazards:
There are three main hazards related to diving, these are:
A. Surface hazards.
I. Weather: Temperature.Wind chill.Rough sea.Reduced visibility.
II. Environment: Site restriction.Other vessels.
III. Equipment: Handling and operating.
23
B. Sub-surface hazards.
I. Water: Depth.Current.Poor/nil visibility.Temperature.
II. Obstructions.III. Sea bed litter.IV. Unfriendly marine life.V. Diving operations: Near culverts.
On or near ships’ bottom’s.Through ice.Near nuclear powered vessels.In confined spaces.
C. Personal hazards.
I. Alcohol & food: Diving is not to take place within 6 hours of consuming alcohol or within 2 hours of a heavy meal.II. Dentures & contact lens: Remove full plated dentures and fixed dentures must be secured. Contact lenses are to be removed before diving.III. Jewellery: Not to be worn.IV. Illness: Inform your supervisor of diving related illness, non diving related illness, medicines and drugs.V. Fitness.VI. Divers negligence: Not listening to the brief, doing his own thing, doesn’t apply the correct drills and procedures, dives beyond his ability and doesn’t think of the consequences of his actions.
24
Chapter 6Underwater Searches
1. Types of Search:
There are two different types of underwater search schemes:
A. Open water search.B. Fast water search.
The following factors must be considered when carrying out a search:
A. Size of the object to be found.B. Area to bee searched.C. Is the location known?D. Weather and tidal conditions.E. Men and equipment available.
2. Open Water Searches:
A. Circular search:
The following equipment is required to carry out a circular search:
I. One x shot rope.II. One x 25kg shot.III. One x distance line (max 15 metres).
B. Grid search: Ladder, Zig zag & Snag line.
The following equipment is required to carry out a ladder search:
I. Four x 25kg shots.II. Four x conical buoys.III. Two x 50 metre jack stays.IV. Two x 25 metre jack stays.V. One x 27 metre moveable jack stay.
3. Fast Water Searches:
A. Drift search:
This used if the position of the object is not known. Up to four divers in one boat can be used. The diver is to be fully dressed, vented up and on air.
25

Manpower: Supervisor.Surface swimmer (one per two divers).Standby diver.Standby diver’s attendant.
B. Single line jack stay:
The diver’s are fully dressed and on air.
Stores: One x large anchor.One x 25kg shot.Two x conical buoys.One x 50 metre jack stay.
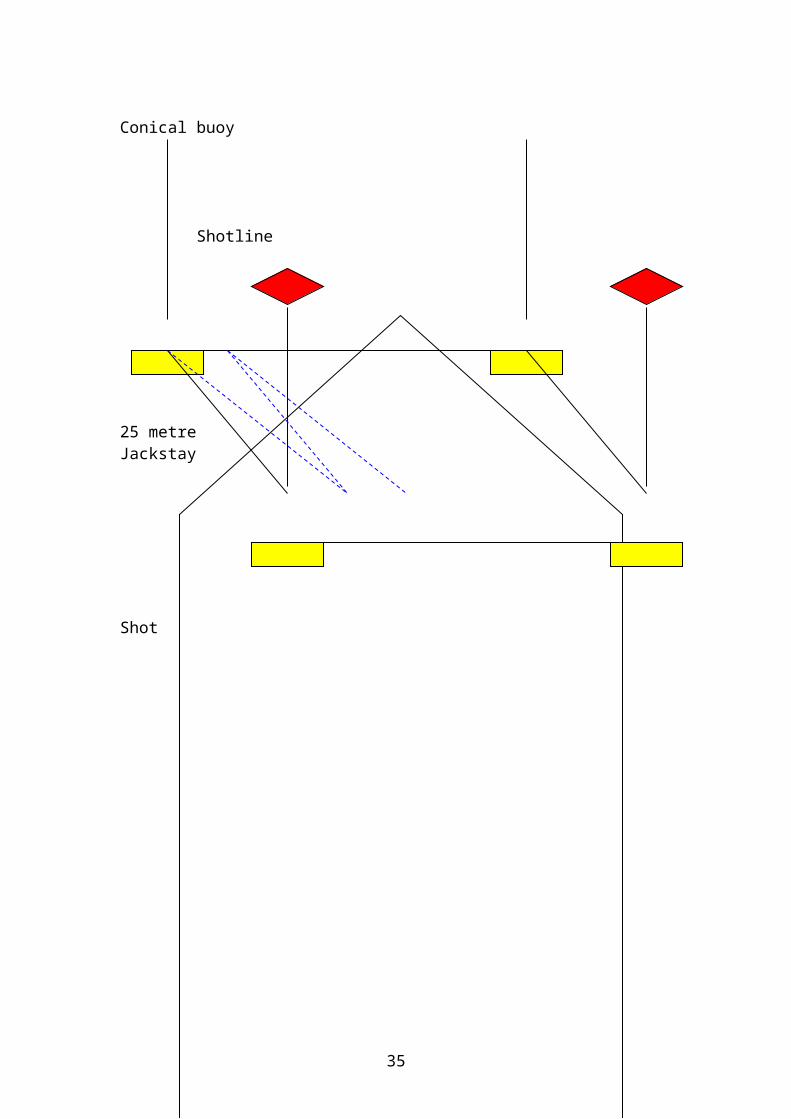
Zig Zag Search
Conical buoy
Shotline
25 metreJackstay
50 metre jack stay
Shot
26

Single Line Jacksta y
27
28

Snag Line Search
29
Circular Search
30

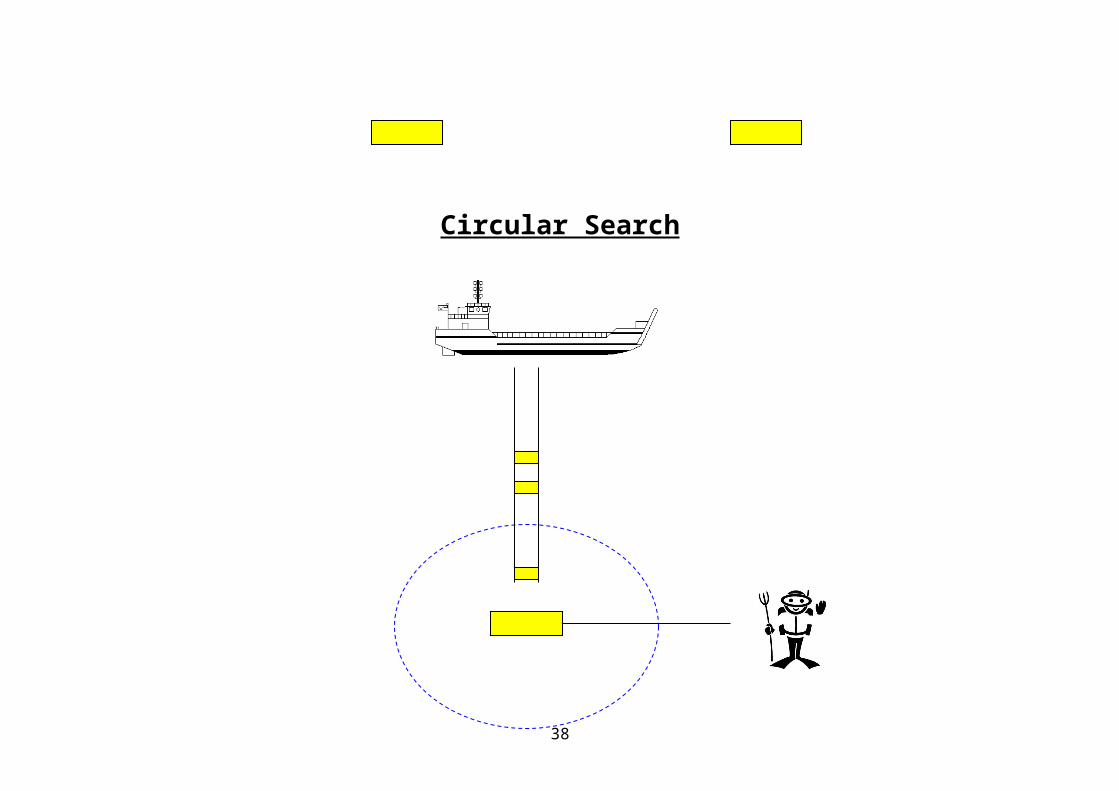
Chapter 7Ship’s Bottom Search
1. Safe to Dive Procedures:
A. The ships engineering officer must be aware that divers are working in the vicinity.B. That no machinery will be switched on or off during the dive.C. The ships engines are to be off.D. The location of any main inlets/outlets is known and the divers are aware of them.E. Rudders and stabilizers are not going to move and the stabilizer breaker is open at the switch board with a warning sign “do not close, diver overboard” is displayed.F. The duty official is informed of diving operations being carried out.G. The flag alpha is displayed from the ship and a lookout is positioned on each side of the ship.H. There is no sonar operation within 15 metres of a hooded diver and 40 metres from an unhooded diver.I. With some modern sonar’s, diving operations cannot take place.J. If working on a cathodic protected vessel then the system must be switched off before the diver enters the water.
2. Diver Safety Points:
A. Never cross the keel.B. Do not pass between the propshaft and the hull.C. Know the location of any major inlets/outlets; do not approach within 15 metres of any inlets/outlets unless you know they are running at a safe speed.D. Neutral buoyancy must be maintained.
3. Additional Points:
A. Pass on all signals to the next diver.B. Know what you are looking for.C. Remember “air endurance”.D. If possible have a dry run.
If there are not enough divers to cover one side of the hull, then it is possible to search from the waterline to the keel in a section at a time. Ensuring the sections that have been searched are marked.
4. Emergency:
31
Send the emergency signal to the other divers on the ships necklace. On receipt of the signal, you are to relay it to the other divers before ascending. A diver may assist a distressed diver if in a position to do so.5. Half Necklace Search:
A. Stores:
I. One x Gemini.II. Buddyline attachments.III. One x half necklace search line.IV. One x magnet (optional).V. One x snorkel and half mask.
B. Signals:
I. 2 pulls = start search or restart.II. 1 pull = stop search.III. 1 pull = normal signals.IV. 5 bells = found what I’ve been looking for.V. 4 bells = pull float under the water/float on surface, sufficient clearance for diver to surface.
Note:
Signals are not preceded with one pull.
32
Chapter 8River Recce
1. Equipment:
The following equipment is required when carrying out a river recce:
A. One x Gemini.B. One x snatch block.C. One x sledgehammer.D. 100 metres of 35mm cordage (marked at 2 metre intervals).E. Set of depth rods.F. Reel of dio cable.G. One x 30 metre tape.H. One x Plum line.I. Four x 3 pickets.J. One x Compass.K. Two x radios.L. One x brickies level.
2. Tasks:
A. Supervisor (ADS or UDS).B. Diver.C. Divers attendant.D. Depth rod man.E. Boat operator.F. Recorder.G. Standby diver.H. Standby diver’s attendant.
These tasks are shared out between a 4 man team as follows:
A. Supervisor: depth rod man, standby diver’s attendant.B. Diver:C. Diver’s attendant: boat operator.D. Standby diver: recorder.
3. Details To Be Recorded:
A. Home bank.B. Wet gap.C. Far bank.
33
4. Wet Gap:
The distances between waters edge to waters edge, recording depth and bottom type. The first 5 metres and last 5 metres are recorded every 1 metre, the others are at 2 metre intervals.
5. Information recorded:
The following information is recorded:
A. Location.B. Grid reference.C. Map sheet.D. Sketch of area.E. Datum points.F. Height of datum above water level.G. Speed of current.H. Direction of wet current.I. Distance of wet gap.J. Compass bearings.K. Photographs of area.L. Map of the area.M. Supervisors name.N. Unit and date of recce.
6. Methods:
The cordage is stretched across the bank. It is then passed through the snatch block and secured. The Gemini is attached to the cordage on the down river side. For the first 5 metres the diver will descend to the bottom and bring a sample of the sea bed every 1 metre. The depth will also be recorded. After 5 metres the diver will descend every 2 metres, once all the information has been recorded it is then transferred onto an AF 4012A.
34
Chapter 9Medical Equipment Set (MES)
1. Characteristics:
The maximum capacity of the cylinder is 137 bars. A full cylinder will last approximately twenty minutes. If the cylinder has 70 bars or below then a spare cylinder must be on site. If the cylinder is below 35 bars then the cylinder must be changed.
2. Component Parts:
A. Oxygen cylinder.B. Regulator.C. Reservoir bag.D. Resuscitating bag.E. Patient valve.F. Face mask.
3. Tests:
The following tests are to be carried out on the MES:
A. On issue from stores and before diving operations are carried out.B. Weekly and on returning to the store.C. Monthly medical and dental inspection.D. Five year regulator manufacturers overhaul.
4. Safety Points:
A. No oil or grease of any kind can be allowed to come into contact with high pressure oxygen equipment.B. The O2 cylinder is a standard medical oxygen cylinder. It is charged to 137 bars. When the contents fall below 70 bars, a spare cylinder is to be made available, when it falls below 35 bars the cylinder is to be changed. However when diving operations are taking place then common knowledge and sense should prevail and an adequate supply must be available.C. Two cylumes should be placed in the box at night to aid vision at night and to direct the emergency services.D. All equipment supplied with the MES is to remain in the case.E. Always ensure a suitable cylinder key is inside the case.F. All servicing and periodic maintenance should be recorded in the diving store records on MOD form 374.
35
5. Pre Diving Setup:
A. Check all the equipment for serviceability and it is in date.B. Snift the O2 cylinder to remove any grit.C. Fit the regulator ensuring that all checks are carried out on the regulator prior to fitting.D. Ensure the regulator is set at zero, switch on and check contents of the cylinder.E. Fit reservoir bag to the resuscitator bag.F. Fit the patient valve to the resuscitator bag.G. Fit the correct size face mask to the patient valve.H. Fit the regulator hose to the reservoir bag.I. Set the regulator to 15 LPM and ensure the air is getting to the reservoir bag.J. Switch the air supply off; ensure the regulator remains set at 15 LPM.
36

Chapter 10Emergency Procedures
The first thing to do is “DO NOT PANIC”
1. Stage 1:
A. The standby diver is alerted.B. The exact time is noted.C. Attempts are made to raise the diver.D. The standby diver is given his instructions by the supervisor.
Note: All this is done under the supervision of the supervisor and is carried out if the diver fails to respond to a signal or if the diver sends the emergency signal.
2. Actions On:
A. If the diver is on the surface, the standby diver is to assist.B. If the diver is on the bottom and his bubbles can be seen, the standby diver is to follow the diver’s bubbles or descend on the diver’s lifeline/floatline.C. If the diver is on the bottom and there are no bubbles, the companion diver drill is to be carried out.
3. Companion Diver Drill:
NEEDS TO BE UPDATED.
Note: The standby diver is to carry out this drill when he is sent to investigate a diver who is not answering signals or if the diver has sent the emergency signal.
4. Detached Diver Drill:
If the diver becomes detached from his floatline/lifeline then the following drill is to be carried out:
A. Use the emergency recall signal (underwater thunderflash).B. If known mark the divers last known position with the lost diver marker (LDM).C. The standby diver is to enter the water and carry out a search as decided by the supervisor.
37
D. If the diver is aware that he has become detached from his lifeline/floatline, he is to surface immediately, raise one arm to show well and draw the supervisor’s attention.
5. Surface Activity:
A. Prepare the emergency equipment.B. Assess the diver’s condition if required.C. Alert the standby diver.D. Obtain medical aid.E. Arrange recompression if required.
6. First Aid Action:
A. Carry out DRAC.B. Protect from further harm.C. Maintain the ABC’s.D. Transfer to a compression chamber, medical aid is to be carried out concurrently with the above.
7. Actions on Hearing an Underwater Explosion:
A. The diver is to ascend to the surface under control on his floatline/lifeline ensuring that the line is coiled up during the ascent.B. Raise one arm as you break the surface to show well.C. Inflate your buoyancy control aid using your direct feed or by using your emergency cylinder (no longer fitted) if you are in trouble.D. Try to gain the supervisors attention for directions.E. If the supervisor is otherwise occupied then swim to the nearest safe area and put yourself inboard.
8. Emergency Ascent:
If breathing becomes difficult or your set becomes faulty, the following drill is to be carried out:
A. If buddied up, inform your buddy of your intentions to surface.B. Slip your weights if necessary.C. Breath normally throughout the ascent, if this is not possible then breath out.D. Once on the surface, slip your weights if you have not already done so.E. Inflate your buoyancy control aid by operating your emergency cylinder.F. Remove your face mask if safe to do so.G. Turn on to your back and fin to the nearest point of safety.
38

9. Post incident procedures (SABA):
A. Note the pressure gauge reading (if fitted).B. Close the main cylinder valve and note the number of turns.C. Check the reserve cylinder is closed and note how many turns if not closed.D. Do not remove the first stage or the demand valve.E. Check that the emergency cylinder is fully closed and note how many turns if not closed (if fitted).F. Examine the equipment and note any defects or the presence of any water or foreign objects.G. Isolate the equipment for examination.H. All the above is to be carried out by the 2IC of the dive site.
10. S333 Series of Forms:
If a diving incident occurs then the S333 series of forms must be completed, these are:
A. S333 Part One: Summary of incident.B. S333 Part Two: Supervisors statement.C. S333 Alpha: Equipment report.D. S333 Bravo: Medical report.E. S333 Charlie: Statement of witness.
39

Chapter 11First Aid
Part OneDiving First Aid
1. Aims of First Aid:
The aims of first aid are as follows:
A. Save life.B. Prevent further injury to the casualty and self.C. Preserve life.
2. Reporting An Accident:
When reporting an accident to the emergency services the following information should be passed on:
A. Location.B. Incident.C. Other services required.D. Number of casualties.E. Extent of injuries.
3. Priority of Treatment:
When you first come across an incident there may be a need to place the casualties in an order of priority:
A. Lifesaving.B. Life threatening.C. Screaming/walking wounded.D. Dead.
4. Casualty Treatment:
The following actions should be carried out when you first come across a casualty:
A. Danger: To yourself or the casualty.
40
B. Response: Does the casualty respond to touch or verbal commands.C. Airways: Check the airway is clear, maintain this once it is clear.D. Breathing: Check that the casualty is breathing by looking at his chest for movement, feeling his chest with your hand for movement and by placing your ear to his mouth to listen for his breathing. If the casualty is not breathing give him two breathes.E. Circulation: This is checked by feeling the carotid pulse. If there is no pulse then cardio pulmonary resuscitation is to be carried out.F. Cardio pulmonary resuscitation: Give 15 external compressions at a rate of 100 per minute followed by 2 inflations. Carry this out until the casualty shows signs of life. The rate is the same for 2 people.
5. Going for Help:
When going for help there are three categories that are taken into consideration:
A. Trauma casualty.B. Drowning casualty.C. Infant casualty.
If the casualty falls into one of the above categories then carry out cardio pulmonary resuscitation for approximately 1 minute then go for help. As soon as this is done carry on with the cardio pulmonary resuscitation.
6. Non TDI Casualties:
Most non TDI casualties are heart problems and their best chance of survival is by contacting the emergency services as soon as possible. Once the casualty is breathing for himself, he should be placed in the recovery position. A full body check should then be carried out to check for further injuries. To achieve this, the body should be split into three sections:
A. Head and shoulders.B. Torso.C. Hips and Legs.
7. Causes of Shock:
The causes of shock could be one of the following:
A. Fluid loss.B. Injury and pain.C. Poison.D. Emotion.E. Reaction.
8. Signs & Symptoms of Shock:
A. Fast pulse.B. Anxious.
41

C. Cold, clammy skin.D. Grey/blue coloured skin.E. Dizziness.F. Nausea.G. Thirsty.H. Short breaths.
9. Treatment of Shock:
Sit the casualty down, keep him warm, protect from the elements, reassure him, elevate his legs, do not move if possible, give O2 if possible, do not give fluids. Once you have treated the casualty for shock, the following observations should be carried out every 10 minutes and recorded:
A. Eyes.B. Skin.C. Breathing.D. Conscious level: Alert.
Verbal.Pain.Unresponsive.
D. Pulse.
Part TwoExtremes of Temperature
1. Hyperthermia:
This condition occurs when the body’s core temperature falls below 35 degrees centigrade. The normal temperature for the body’s core is 36.9 degrees centigrade.
A. Causes:
I. Sudden/prolonged immersion in cold water.II. Inadequate protection in a cold environment.III. Alcohol and certain drugs.IV. Disease e.g. diabetes.V. Inadequate diet.
B. Signs & Symptoms:
I. Coldness and miserable.II. Pale skin.III. Skin cold to touch.IV. Uncontrollable shivering.V. Shivering decreases, replaced by a lack of muscle coordination
and slurred speech.VI. Thought process slows down.
42
VII. Pulse and respiration slows down.VIII. Loss of consciousness.IX. Pulse and respiration difficult to detect.X. Death.
C. Treatment:
Immerse in a bath of warm water at 40 degrees centigrade, the casualty must then be observed for 3 days.
2. Heat Exhaustion:
This occurs when the body cannot remove excessive heat.
A. Signs & Symptoms:
I. Exhausted but restless.II. Headaches, tired, dizzy and nausea.III. Muscle cramp.IV. Pale, cold and clammy skin.V. Breathing fast and shallow.VI. Pulse will be fast and weak.VII. Temperature will be normal.
B. Treatment:
I. Airway maintained.II. Remove to a cool environment.III. Replace fluids with sips of water.IV. If casualty is unconscious place in the recovery position.V. Seek medical aid.
3. Heat Stroke:
A. Signs & Symptoms:
I. Headaches, dizziness, hot and restless.II. Unconsciousness may develop.III. Body temperature will rise to 40 degrees centigrade.IV. Pulse will be full and bounding.V. Noisy breathing.VI. Skin dry and hot.
B. Treatment:
I. Remove the casualty to a cool environment.II. If conscious, place in the sitting position.
43
III. If unconscious, place in the recovery position.IV. Wrap in a cold damp sheet.V. Fan cold air onto the casualty until his body temperature drops
to 38 degrees centigrade.VI. Cover with a dry sheet.VII. If the temperature rises again, repeat stages IV to VI again.VIII. Seek medical aid.
4. Asphxia:
This condition is caused when not enough oxygen is available for the tissues of the body. It may be due to insufficient oxygen in the air breathed or from an interference or injury to the respiratory system.
A. Causes:
I. Obstructed airway.II. Suffocation.III. Strangulation.IV. Drowning.V. Smoke inhalation.VI. Toxic fumes.
5. Hypoxia:
This condition is caused by a reduction in the amount of oxygen in the tissues.
6. Anoxia:
This condition is caused by a total absence of oxygen in the tissues.
A. Signs & Symptoms:
I. Distressed and throat grasping.II. Difficulty in breathing.III. Change in the rate and depth of breathing.IV. Bulging neck veins.V. Cyanosis.VI. Gradual loss of consciousness.VII. Stoppage of breathing.
44
Chapter 12Diving illnesses
1. Types of Barotrauma:
A. Middle ear.B. Suit squeeze.C. Sinus squeeze.D. Lung squeeze.E. Whole body squeeze.F. Face mask squeeze.G. Tooth squeeze.
Treatment:
A. Stop descending.B. Ascend to a shallower depth or abort the dive.C. Seek medical attention for all but a simple suit squeeze.
2. Alternobaric Vertigo:
During an ascent or a descent the change of middle ear pressure may be different between the two sides. This can result in a transient sensation of vertigo, disorientation and nausea. Normally only lasts a few minutes but if it occurs at depth it may be dangerous.
3. Caloric Vertigo:
Water enters the ears cooling the left and right vestibular apparatus to different temperatures. This results in a powerful sensation of vertigo.
A. Signs & symptoms:
I. The further down you go, the ears become more painful.II. Blocked ear.III. Deafness may be noticed.IV. May be tinnitus vertigo.
B. Note:
45
If the tinnitus ruptures, some relief of he pain will occur. Diving deafness may be noticed and a little bleeding from the ear may occur.
C. Treatment:
The casualty must see an ear and throat specialist. Do not instill ear drops if perforated tinnitus is suspected.
4. Cerebral Oxygen Toxicity:
It caused when oxygen is breathed at a high partial pressure, even if only for a short period of time. The high concentration of this oxygen may rapidly become toxic to the brain.
A. Signs & Symptoms:
I. Lip twitches.II. Dizziness.III. Nausea.IV. Tinnitus.V. Tunnel vision.VI. Difficulty in breathing.VII. Tremors.VIII. Substernal burning.
B. Treatment:
I. If a convulsion occurs underwater the diver’s depth should be kept as constant as possible.II. Remove the casualty from the water and carry out ABC’s.III. Remove breathing apparatus and suit if practical.IV. Place casualty in fresh water.V. If further convulsions occur protect from further injuries and maintain his airway.VI. Keep under observation for 12 hours, may experience temporary memory loss.
5. Nitrogen Narcosis:
Nitrogen narcosis occurs at depths of 30 metres or more.
6. Types of Drowning:
A. Wet.B. Dry.C. Secondary.
7. Decompression Pulmonary Barotrauma:
46

This is a syndrome which results when gas normally retained within the alveoli wall escapes its normal confines and enters one of the following:
A. Interstitial: Space within the lungs.B. Plural: Cavity causing Pneumothoray.C. Arterial: Circulation resulting in an arterial embolism.
Signs & Symptoms:
A. Sharp pain in the chest.B. Shortness of breath.C. Difficulty in breathingD. A productive cough with possible blood stained sputum.
Treatment:
If symptom free then no treatment, a few symptoms then 100% oxygen and for serious cases recompression to 18 metres may be required.
8. Arterial Gas Embolism:
A. Signs & Symptoms:
I. Rapid onset of unconsciousness.II. Convulsions.III. Weakness/numbness of limbs.
B. Treatment:
Firstly administer the ABC’s recompression, 100% oxygen and then lay flat.
47

Chapter 13Swimmers Air Breathing Apparatus
1. Operating Temperatures:
The swimmers air breathing apparatus has a minimum operating temperature of:
A. -2 degrees centigrade in slat water.B. +1 degrees centigrade in fresh water.C. -10 degrees centigrade in air.
2. Data:
A. Emergency cylinder test pressure = 348 bars.B. Emergency cylinder working pressure = 205 bars.C. Emergency cylinder net capacity = 0.4 litres.D. Weight of fully charged set = 34kg.E. Maximum working depth = 30 metres.F. Main cylinder test pressure = 348 bars.G. Working pressure = 205 bars.H. Main cylinder burst disc = 310 – 345 bars.I. Main cylinder wet capacity = 7 litres per cylinder.J. Main cylinder working capacity = 205 x 14 = 2870.K. Fully charged capacity – reserve capacity = 2870 – 25% = 2153 litre
Note: cylinders tested from new = 2 years, then every 2 years after visual/hydraulic.
3. First Stage Regulator:
The first stage regulator is diaphragm operated. It is sensitive to water pressure through the silicon fluid contained in the spring retainer body by the secondary diaphragm. It is designed to reduce the high pressure cylinder air from 205 bars to 9.65 bars + 1.034 bars.
4. Intermediate Hose:
Transfers the intermediate pressure from the first stage to the second stage.
48

5. Direct Feed:
Transfers low pressure air to the main inflation valve on the BCA.
6. Contents Gauge and Hose:
Allows a visual appreciation of the pressure in the cylinder being used.
7. Second Stage Demand Valve:
The top and bottom sections are held together with the principle diaphragm between them, by a screw tightening clamp ring. Within the top box is a purge bottom. The non return valve is fitted below the mouth piece and exhausts exhaled air into the rubber exhaust tube.
8. Wide Face Mask:
This is the standard mask used in Army diving.
9. Cylinders:
The set consists of 2 x 7 litres wet capacity cylinders. The following information is stamped on the neck of the cylinders.
A. Serial number.B. Local set number.C. Test date.D. Working pressure.E. Test pressure.
10. Manifold:
A brass fitting which connects the cylinders to the first stage regulator.
11. Safety Regulations:
A. Ice may form on the demand lever if the unit is purged in cold weather for more than 5 seconds, which will cause free flow.B. Don’t attempt to remove the first stage while the cylinders are open.C. Only in date equipment is to be used.D. All current Health & Safety regulations applicable to compressed air are to be observed.E. All connections are to be hand tight.F. Only fomblin grease is to be used on high pressure connections.G. Never graunch cylinder valves open or closed.
49
Chapter 14Ultrathermal Underwater Cutting Equipment
(Broco)
1. Components:
The Broco is made up of the following components:
A. Broco rods.B. Broco torch.C. Oxygen regulator and O2 supply.D. Hose assembly.E. Power cable.F. Earth return cable and clamp.G. Circuit breaker 600 amp (knife switch).H. 2 x 12 volt, 90 amp heavy duty batteries.I. Battery cable x 2.J. Battery connecting cable.K. Visor with welding lens.L. Insulating gloves.
Diagram of Broco
Torch
Broco rod
Industrial Regulatoroxygen
50
Circuitbreaker(600 amp)
2 x 12 volt Earth clamp90 ampHD batteries
Target2. Broco Rods:
Since mild steel is a good fuel, burning at a very high temperature, it can be used to make cutting lances, by packing a steel tube with mild steel rods. In the Broco system 6 mild steel rods and a seventh rod made of a special alloy are packed into a steel tube. The seventh rod is designed to burn independently once an arc is struck and oxygen is flowing through the tube. This tube is called an “ultrathermal electrode”.
3. Advantages of Broco:
A. Cutting technique is simple.B. Cutting can continue after electric current is switched off.C. Cutting is performed as rapidly as oxy arc.D. It will cut both ferrous and non ferrous metal.E. The cuts need no preparation.
4. Disadvantages of Broco:
A. Large amounts of O2 required and wasted.B. Life of a burning rod is only about 1 minute.
5. Safety Procedures:
A. No work of any kind is permitted above the diver.B. Power supply is to be earthed.C. Earth cable is to be securely grounded to the work or strike plate.D. Torch and any submerged power cables are to be isolated. A visual check is to be carried out prior to diving. Repairs are to be carried out by a qualified electrician only.E. Only DC power supply is to be used.F. A positive double pole isolator switch must be part of the circuit to protect the diver.G. The earthing clamp must be positive polarity.H. Torch and O2 must be free from oil, grease and dirt.I. The switch is to be in the open (cold) position unless the diver is actually trying to light the rod.
6. Rules for the Diver:
51

A. Gloves are to be worn to provide adequate protection when cutting.B. Power is to be off as soon as the arc is struck and when cutting is not taking place.C. The diver is to signal the surface to turn power off before changing rods.D. Under no circumstances should the torch be held so that the electrode points towards the diver.E. Under no circumstances is the diver to position himself between the torch and the ground return clamp.F. Before cutting check behind the target. If not possible cut from top to bottom.
7. Blow Back:
Underwater cutting equipment can cause explosions due to a build up of heat and trapped gas. Particularly when cutting thick targets due to the bulk retaining the heat. The risk of explosions will greatly be reduced when cutting, if cutting is started from the top downwards to allow the gas to escape.
8. Maintenance:
After the equipment has been used, the following must be removed and inspected:
A. Locking nut.B. Neoprene washer.C. Collet.D. Flash arrester and filter (NO OIL OR GREASE TO BE USED).E. Dip the head of the torch in fresh water.
9. Pressure:
A. Surface pressure = 90 PSI or 6.2 bars.B. Increase pressure = 18 PSI or 1 bar for every 10 metres of depth.
52

Chapter 15Bristol 10/50
Portable Charging Compressor
1. Components:
The Bristol 10/50 portable charging compressor is designed as a self contained unit comprising of:
A. Diesel engine.B. Bristol pneumatic air compressor.C. Air purifying system.D. Control panel.
2. Connections:
The 10/50 has 4 types of connections for charging cylinders, each connection is colour coded as follows:
A. SIU Brown 190 bars.B. 4250 light cylinder Blue 205 bars.C. SABA Yellow 205 bars.D. EOD BA Green 310 bars.
3. Technical Data:
A. Maximum working pressure = 345 bars.B. Cylinder charging rate = 4.8 litres per second.C. Compressor: Stages = 4.
Lubricating oil = Anderoll 500.Lubricating oil capacity = 2.3 litres.Cooling = Air.
D. Engine: Model = Petters.Fuel tank capacity = 5.13 litres.Lubricating oil = OMD 80.
53

Lubricating oil capacity = 3.4 litres.Fuel = Diesel.
4. Air Purification System:
This comprises of 2 stages, a mechanical first stage followed by a chemical second filter, along the flexible hose, through 4 stages of compression and through an after cooler before being fed into the second stage air purifying system which cleans and dries the air.
The first stage consists of a separator which is used to collect water vapour and turn it into droplets. When the droplets become too heavy to be carried in the air stream, they fall into the separator sump for draining.
The second stage is a chemical stage, which is fitted with a replaceable cartridge containing a molecular sieve and silica gel. These chemicals remove all contaminated vapour and remaining odours from the air to give a high quality breathing air. The cartridge is changed every 50 hours or 3 months and also when the crystals turn pink.
Operating Procedures
1. Setting Up:
A. Position the unit outdoors on level ground, ensuring that the exhaust is downwind of the compressor.B. Position the air intake upwind.C. Ensure it is sited away from vehicles or other sources of exhaust fumes and air pollution.
2. Pre Checks:
A. Visual check of engine and compressor for damage.B. Secure loose airlines.C. Check all oil and fuel levels.D. Open drain valve on first stage.E. Open bleed valve on purifier.F. Close charging stop valves on panel.
3. Starting:
A. Move to “S” the control lever.B. Move engine stop/run lever to run.C. Push down and release the overload stop lever (older models only).D. Engage the starting handle.E. Don ear protection at this stage.F. list decompression levers and turn the handle slowly clockwise and listen for the “squeak” of the injectors. Once they have “squeaked” turn the handle as fast as possible, then release the second decompression lever.G. Disengage the starting handle.
54
H. Allow to run for a few minutes (10 minutes) to warm up and purge the moisture from the moisture separator.I. Once “hissing” is heard, close the drain valve on the moisture separator.J. Close bleed valve on air purifier when air “hisses” through.
4. Charging:
A. Connect cylinder to the correct hose.B. Secure lanyard.C. Close the hose vent valve.D. Open cylinder valve(s).E. Open the appropriate charging valve.F. Move the control lever to “R”.G. Charge to the appropriate pressure.H. Close cylinder valve(s).I. Close charging valve.J. Move control lever to “S”.K. Open hose vent valve.L. Disconnect cylinder.
Note:
When charging large capacity cylinders move control to “S” for 10 seconds every 30 minutes to allow moisture to be purged from the separator. Do not allow the PRV to blow off for more than 2 minutes.
Maintenance
1. Daily Checks:
A. Check all oils and fuel, top up if necessary.B. Check that the engine and compressor cooling system are free from obstructions.C. Check the compressor unloading system is functioning correctly.
2. 50 hours or 3 monthly:
A. Clean First Stage:
I. Open the drain valve, ensure there is no pressure in the system.II. Unscrew the body.III. Clean by wiping internal surface of body, check “O” rings and anti extraction ring and refit the body.
55

B. Replace Air Purifier Cartridge:
I. Open the bleed valve.II. Unscrew the body and remove.III. Remove old cartridge and replace.IV. Replace “O” rings with new one.V. Check the “O” rings and anti extraction ring at the base of the purifier. Refit the body and close the bleed valve. Pressurize the system and check for leaks.
Chapter 16Hydraulic Tool Power Pack
1. Introduction:
The hydraulic tool power pack consists of a diesel driven hydraulic pack with a capacity to run two separate tool circuits. Each circuit has a variable output and the two circuits can be combined to give a higher output for a single tool. Hydraulic oil is pumped by the pack along the delivery hose to the tool. The oil then works the tool and returns to the pack along the return hose.
2. Equipment:
The equipment consists of the following three main components:
A. Hydraulic power unit.B. Hoses.C. Tools.
3. Technical Data:
A. Engine speed = 1750 – 3000 RPM.B. Flow range per circuit = 19.8 – 34 litres per minute.C. PRV setting = 140 bars or 2000 PSI.D. Lubricating oil/capacity = OMD 80/2.8 litres.E. Hydraulic oil/capacity = OM 33/ 68 litres.F. Fuel/capacity = Diesel/10 litres.
4. Hand Throttle:
A. Adjusts the engine speed and deliveries.B. Oil pressure for circuit B.
5. Flow Diverter Valve:
56
This valve controls the flow to each circuit. When on separate, both circuits are in operation, giving each circuit a flow range of 19.8 – 34 litres per minute (LPM) and when on combined, a flow range of 39.6 – 68 LPM can be achieved on circuit A only.
6. Hoses:
The hoses are made up of lengths of twin hose. Two lengths are available, 15 metres and 30 metres. The twin hose consists of:
A. Delivery hose 5/8” bore (red).B. Return hose 3/4” bore (blue).
The end couplings are self sealing and should only ever be done hand tight.Note:
Always use the shortest length of hose possible, if work is to be done in excess of 60 metres then 2 x 30 metre hoses and 1 x 15 metre hose should be connected up and te pack should run on circuit A combined.
7. Tools:
There is a vast range of tools available for use with the hydraulic pack, consisting of either light or heavy categories. The flow rate of the tool can be found on the chart on the pack or on the tool itself.
A. Light tools have a flow range of: 19.8 - 34 LPM.B. Heavy tools have a flow range of: 34.0 - 68 LPM.
8. Pre Start Checks & Starting:
A. Site on firm level ground and chock the wheels.B. Check all oils and fuel level.C. Check for obstructions within the engine moving parts.D. Ensure main tank delivery valve is open.E. Check by pass valves are in the by pass position.F. Flow diverter valve in separate position.G. Set flow regulator to maximum.H. Stop switch fully pushed in.I. Turn battery isolator switch to on and check:
I. Alternator/oil warning lights are on.
If not – do not proceed any further and consult a fitter.
II. Battery condition on meter.J. Set hand throttle to half open.K. Don ear protection.L. Depress start button.M. Check that the alternator/oil lights go out.
If not – do not proceed any further and consult a fitter.
57
N. Test the delivery pressure for both circuits as follows:I. With the engine running and throttle at half speed turn both circuit by pass valves to run.II. Turn the test valves to test, each gauge should read 2000 PSI.
If not – do not proceed any further and consult a fitter.
III. Turn test valves back to run.IV. Set hand throttle to minimum.
O. Connect hoses correctly.P. Connect tools to hoses.Q. Set correct circuit(s) and set the correct flow rate(s) using the hand throttle and flow regulator.
I. Circuit A – Regulator.II. Circuit B – Throttle.
R. Use the tool(s) by turning the by pass valve(s) to run and operate the tool.
Note:
Ensure that the by pass valve is at by pass whilst the tool is being lowered to the diver and ensure that the tool is lowered on a working line and not on the hose.
9. Stopping:
A. Turn run/by pass valve to by pass.B. Set hand throttle to minimum.C. Pull out engine stop button.D. Replace the stop button.E. Turn battery isolator switch to off.
Note:
If the equipment is finished with, then strip out in reverse order, wash up tools and hoses in fresh water and chalk up hoses and replace end caps.
10. Maintenance:
All reference for the maintenance can be found in the following:
A. BR 2807 (6B).B. Hopkins instruction and maintenance manual.C. Lombardini engine handbook.
Maintenance to be carried out by an ACAD is as follows:
A. Daily/after use routine.B. Weekly.
58
59
Hydraulic Pack – Control Chart
Tool Flow setting Circuit A Circuit B Flow Diverter
Flow Rate Adjustment
Throttle Regulator
1 19.8 to 34 Light Separate Adjust Max
1 39.6 to 68 Heavy Combine Adjust Max
2 equal flow rates
19.8 to 34 Either tool Either tool Separate Adjust Max
2 different flow rates
19.8 to 34 Tool with lowest rate
Tool with highest rate
Separate Adjust for circuit B
Adjust for circuit A
60