Embed Size (px)
Citation preview


127
AFTER READING THIS CHAPTER, YOU SHOULD BE ABLE TO:
7Understanding Artisan Breads
CONSUMER INTEREST IN flavorful, handmade breads has grown tremendously in
recent years. In North America, this has stimulated bakers to research and exper-
iment with traditional European breads in order to offer their customers distinc-
tive, handcrafted products. More and more restaurants are either making their
own breads on the premises or purchasing from local bakers who practice bak-
ing more as a craft than as an industry. Many fine European bakeries have pre-
served and practiced these techniques for generations, but to most practitioners
in North America, they are new discoveries.
In Chapter 6, you learned the basic procedures for producing conventional yeast
products of many types. These principles and techniques hold true for artisan
breads as well, but you must understand additional complexities before you can
produce fine sourdoughs and other artisan products.
1. Select flour for making artisan breads.
2. Prepare yeast pre-ferments.
3. Prepare and maintain a sourdough starter.
4. Mix bread doughs using the technique called autolyse.
5. Bake artisan breads properly.

1 2 8 C H A P T E R 7 UndERsTAnding ARTisAn BREAds
Artisan bread has many definitions. Most of the possible definitions include expressions like homemade, handmade, made in small quantities, lacking in preservatives, and using traditional techniques. But for every definition, it is possible to find exceptions. Clearly, none of those terms completely defines what we understand to be artisan breads or separate them from con-ventional breads. After all, every bread formula in this book can be made by hand in small quantities, yet many of them would not be considered artisan. At the same time, commercial bakeries use machines to transform thousands of pounds of flour a day into high-quality breads that nearly anyone would call artisan, or that at least have all the eating qualities of artisan breads. Furthermore, now that supermarket chains are selling mass-produced loaves with “ar-tisan” on the label, the word is harder than ever to define, if not impossible.
The dictionary defines an artisan as a “skilled manual worker, a craftsperson.” An artisan bread, then, is one made by hand by a skilled baker. This is a good start, but it is not precise. Another definition sometimes given is that artisan breads are made using traditional methods. This is also important, but we still must determine what is meant by traditional methods. We may not be able to come up with a definition of artisan bread that satisfies everyone, but we can list the characteristics that, according to many bakers, should be present.
Handmade. This is the characteristic most closely related to the dictionary definition of artisan. Does this mean that machinery cannot be used at all? A home baker can make bread from start to finish without machinery, but clearly it would be difficult for a bakery to produce enough bread to be commercially viable without using even a mixer. Some form of machinery is used in virtually every baking operation. Nevertheless, hand work plays an important role in artisan production, and the manual skill and judgment of the artisan baker are essential. By necessity, then, artisan bread production is usually small-scale, not high-volume. Making artisan bread is not an automatic or purely mechanical process.
Use of pre-ferments and sourdough or culture starters. A pre-ferment is a fermented dough or batter used to provide leavening for a larger batch of dough. The discussion of the sponge mixing method in the previous chapter introduced the subject of pre-ferments. As you learned, one advantage of using a sponge is that it creates more flavor by means of a long, slow fermentation. A sourdough starter is similar to a yeast pre-ferment, except it uses wild yeast instead of commercial yeast. Pre-ferments and sourdough starters are discussed in more detail later in this chapter.
No chemical additives or preservatives. The classic artisan bread is crisp-crusted and contains nothing but flour, water, and salt; and it is leavened either by wild yeast (sourdough) or commercial yeast. Other ingredients may be added for specialty breads, including dough ingredients such as milk, eggs, and butter, and add-ins such as herbs, spices, nuts, dried fruit, and olives. But all ingredients should be recognizable by the consumer as familiar food items.
Traditional production methods. Bread has been made for centuries without the use of machinery except, of course, ovens; and until recently those ovens were wood-fired. Today’s artisan bakers try to duplicate as much as possible these traditional methods. As already noted, at least part of the production should be by hand, even if mixers are used to make the dough. Bakers also seek out flours similar to those used for old-fashioned European breads, most notably flours with slightly lower protein content and higher ash (see p. 59). Also, because the fermentation process is so important for flavor, doughs are usually fermented for longer times at lower temperatures, often without the use of proof boxes. Hearth ovens or deck ovens are invariably used, and some bakeries have even installed wood-fired hearth ovens for their breads.
AS ANY CHEF knows, choosing high-quality ingredients is an important part of cooking the finest dishes. Unlike the cook in the kitchen, however, the bread baker has few ingredients to worry about. Flour, of course, is the baker’s main ingredient, so the quality of flour in the bake-shop affects nearly all the baker’s products, and especially bread.
Artisan bread maker at work.
Courtesy of iStockphoto.com.
WHAT IS ARTISAN BREAD?
FLOUR

PRE-fERmEnTs And soURdoUgH sTARTERs 1 2 9
One of the great inspirations for bread bakers today is the late Lionel Poilâne, whose fa-mous breads were shipped around the world. Poilâne was particular about his selection of flours, insisting on using only organically grown wheat that conformed to his exacting specifi-cations. Today’s artisan bakers, in North America as well as Europe, are following his lead and seeking out the best organic flours, often made from wheat grown in small quantities.
As we have said, artisan bread bakers in North America often try to replicate the traditional breads of France and other European countries, so they look for flour that is similar to European flours. This means, first of all, flour with a protein content around 11.5%, rather than the 12.5% common to North American bread flours.
Keep in mind that lower protein content means a lower absorption ratio (pp. 59–60). This means that if you are substituting a lower-protein flour in a formula in which you have always used a higher-protein patent flour, you must use less liquid in order to get the same dough con-sistency. Whenever you change flours, it is best to test a small batch to see how the new flour performs.
Second, while North American straight flours are about 72% extraction (see p. 58), arti-san breads are often made with higher-extraction flour, anywhere from 77 to 90%. This means the flour is darker and has a higher ash content, resulting in fuller flavor. In addition, the higher mineral content is beneficial to the long, slow fermentations favored for artisan breads. If it is not possible to find such flours, they can be approximated in two ways. The easier way is to mix a little whole wheat flour with the white flour. A more laborious way, but one that gives a closer approximation to a high-extraction flour, is to sift whole wheat flour through a fine sieve to re-move the coarse flakes of bran. You can save the bran for another use.
CHAPTER 6 INTRODUCED the subject of pre-ferments (also spelled preferments) with its discus-sion of the sponge method of bread mixing. Pre-ferments give the fermentation a strong head start, and they contribute to flavor by extending the fermentation period. In addition, the use of pre-ferments allows the baker to reduce or eliminate the amount of commercial yeast used. Third, short-fermentation straight doughs may be difficult to handle, requiring the use of dough conditioners and other additives. Pre-ferments, on the other hand, naturally improve the dough texture, making it easier to work without resorting to additives.
There are two basic types of pre-ferments: yeast pre-ferments, sometimes called yeast starters, and sourdough pre-ferments, usually called sourdough starters or natural starters. (Note that some bakers use the term pre-ferment only for yeast starters. In this book, we use the term generically for any fermented dough used to provide leavening.)
Sourdough starters are similar to yeast pre-ferments except they are made with wild yeasts. As a result, they are handled somewhat differently. These starters are “sour” because of the acidity created in the dough during the long fermentation. This acidity affects not only the flavor of the bread but also the texture. The starches and proteins are modified by the acids, re-sulting in a moister crumb and better keeping qualities.
Note that some sourdough cultures produce only a mild acidity, resulting in a bread that does not taste particularly sour (see the discussion of bacterial fermentation on page 132). The term sourdough, however, is commonly used for wild cultures of any degree of acidity. Some bakers prefer the terms levain (p. 131) or culture starter to describe this category, reserving sourdough for only those cultures with a strong acidity.
PRE-FERMENTS AND SOURDOUGH STARTERS
KEY POINTS TO REVIEW
• What is an artisan?
• What are the four main characteristics of artisan bread?
• What types of flour are preferred for typical artisan breads?

1 3 0 C H A P T E R 7 UndERsTAnding ARTisAn BREAds
Yeast Pre-FermentsThe basics of yeast pre-ferments were introduced in Chapter 6 in the discussion of the sponge mixing method (p. 109). The general procedure outlined there is applicable to any pre-ferment. However, additional information is useful to the baker of artisan breads because pre-ferments are subject to many variations.
Many traditional terms are used for types of pre-ferment. Unfortunately, the terminology is not used consistently. Some of the terms are introduced here, but you may find that various bakers use them in different ways. As artisan breads become more common, these terms will probably become more standardized. Even the word sponge is used in different ways. When this text refers to the mixing method called the sponge method (p. 109), the term sponge can in-dicate any yeast pre-ferment. Other bakers use the word sponge only for a specific kind of yeast pre-ferment that has a hydration of around 60%.
Unlike sourdoughs, which can last indefinitely, yeast starters have a limited life and are best made fresh for each new batch of dough. Overfermented yeast pre-ferments should be discarded because a dough made from them will not handle well, and the bread will have un-desirable flavors.
When mixing a pre-ferment, keep in mind that developing gluten is not necessary at this stage, so mix only to blend the ingredients into a uniform dough or batter. If the pre-ferment is overmixed, the gluten is likely to become overdeveloped when it is added to the final dough and mixed again.
The most important types of pre-ferments are described in the following sections.
PoolishThis type of starter is said to have originated in Poland, and the word poolish comes from “Polish.” A poolish (or poolisch) is a thin yeast starter made with equal parts flour and water (by weight), plus commercial yeast. In other words, a formula for poolish is 100% flour, 100% water, and varying percentages of yeast, depending on the desired speed of fermentation.
To contribute maximum flavor, a poolish is made with only a small quantity of yeast and given a long fermentation at room temperature. The poolish bubbles up and increases in vol-ume, and when it is at its peak, it starts to fall back slightly and the top surface appears wrin-kled. A poolish given a slow fermentation may hold its peak quality for several hours. After this period, the acidity will increase and the quality will deteriorate.
Because of the high level of water in a poolish, the yeast is very active. For this reason, a lower percentage of yeast is used than for drier pre-ferments. A lower quantity of yeast is suf-ficient to ferment the poolish, creating flavor and developing gluten. However, it is not always enough to leaven the finished dough. Frequently, additional yeast is added to the final dough to boost fermentation. See the discussion of mixed fermentation below.
If a shorter fermentation is needed, use more yeast. In this case, however, the starter will be at its peak of quality for a shorter time before it starts to deteriorate. In addition, a short fer-mentation for the poolish will lose much of the advantage of using a pre-ferment—that is, the flavor improvement given by a long fermentation. See the Yeast Quantities and Approximate Poolish Fermentation Times table for yeast quantities and fermentation times.
YEAST QUANTITIES AND APPROXIMATE POOLISH FERMENTATION TIMES
QUANTITY OF FRESH YEAST (PERCENT OF FLOUR USED IN POOLISH)
QUANTITY OF INSTANT YEAST (PERCENT OF FLOUR USED IN POOLISH)
APPROXIMATE FERMENTATION TIME AT ROOM TEMPERATURE (65°–68°F OR 18°–20°C)
(3%) (1%) (2 hours)*
1.5% 0.5% 4 hours
0.8% 0.28% 8 hours
0.25% 0.08% 12–16 hours
*A 2-hour fermentation is possible, so quantities are given. However, such a short fermentation for a poolish is not recommended if a quality product is desired.

PRE-fERmEnTs And soURdoUgH sTARTERs 1 3 1
BigaBiga is the Italian term for pre-ferment. Although the word can, in theory, refer to a starter of any consistency, it is usually used for stiff pre-ferments. Stiffer doughs ferment more slowly than wet ones. Therefore a biga is generally made with more yeast. Use about two times the quantity of yeast as in a poolish to get the same fermentation time.
A typical biga contains 100% flour, 50 to 60% water, and about 0.8 to 1.5% fresh yeast.
Levain-LevureThis is the general French term for yeast pre-ferment. It is usually stiff like a biga, but the term is sometimes used for thin pre-ferments like the poolish as well. The word levure means “yeast.” Do not confuse levain-levure with the word levain alone. Levain means “sourdough” or “cul-ture starter,” and pain au levain means “sourdough bread.”
Pre-Fermented Dough or Scrap DoughScrap dough is simply a piece of fermented bread dough saved from a previous batch. It is sometimes known as pâte fermentée (pot fer mawn TAY), meaning “fermented dough.” Sav-ing a piece of fermented dough, preferably in the retarder so it doesn’t overferment, is an easy and common way to get the benefits of using a pre-ferment without having to make one sepa-rately. Of course, it is also possible to make a batch of bread dough just to use as a pre-ferment.
A lean dough containing only flour, water, yeast, and salt is the best choice for a pre- fermented dough because they can be used in any kind of dough. If the scrap dough contains fat, eggs, or other ingredients, of course it can be used only in bread formulas that contain those ingredients, and so are more limited in their uses.
Because scrap dough is actually bread dough, it differs from other ferments in that it con-tains salt as well as flour, water, and yeast. The salt slows the fermentation. To balance the salt, a scrap dough contains more yeast than the other types of pre-ferments we have discussed.
Scrap dough can be used in almost any quantity in a dough formula, but the usual amount is around 40 to 50%, based on the total weight of flour in the final dough. For example, if the formula contains 10 pounds flour, 4 to 5 pounds of scrap dough might be added by the baker. Scrap dough should be added to the final dough near the end of mixing time. This is because its gluten is already developed. Other pre-ferments, such as biga and poolish, are added at the beginning of mixing, because their gluten has not been developed.
Mixed FermentationWhen pure pre-ferments like a sponge or biga are used in bread, they may be the only source of leavening. But scrap dough may not be strong enough to ferment the bread on its own. There-fore, yeast may be added to the scrap dough when the final bread dough is mixed. In other words, such a bread dough is a straight dough (p. 108) to which scrap dough is added as an ingredient. This method, in which both a pre-ferment and a fresh addition of yeast are used to provide leavening, is sometimes called mixed fermentation.
Doughs with other pre-ferments, especially poolish (see above), may also be given added yeast in the finished dough to boost fermentation and shorten the bulk fermentation time. Some sourdoughs are also produced using mixed fermentation—that is, they contain commer-cial yeast in addition to the sourdough starter.
Sourdough StartersFor purposes of this discussion, we define a sourdough as a dough leavened by a sourdough starter. A sourdough starter is a dough or batter that contains wild yeasts and bacteria, has a noticeable acidity as a result of fermentation by these organisms, and is used to leaven other doughs.
Sourdough starter is also called a natural sour or natural starter. Before commercially prepared yeast was available, bread was started by mixing flour and water and letting this mix-ture stand until wild yeasts began to ferment it. This starter was then used to leaven bread. A portion of the starter was saved, mixed with more flour and water, and set aside to leaven the next day’s bread. This process is still used today.
There are two important points to notice in these definitions: the presence of wild yeasts, not commercial yeasts, and the importance of bacteria.

1 3 2 C H A P T E R 7 UndERsTAnding ARTisAn BREAds
Wild YeastsThe wild yeasts in sourdough starters are not the same organisms as commercial yeasts. Conse-quently, they act somewhat differently. Also, different wild yeasts are found in different regions and environments. For example, the wild yeast that gives San Francisco sourdough its distinc-tive flavor is not the same as wild yeasts found in other parts of the world. If a starter is brought from one region to another, the sour may gradually change character because the yeasts in the new location apparently take over.
Wild yeasts can tolerate more acidity than commercial yeasts. If a dough made with com-mercial yeast becomes too sour or acidic, the yeast is likely to die, and the resulting bread will have an “off” taste. Wild yeasts used in starters can tolerate and grow in higher levels of acidity.
Although you can approximate sourdough breads using yeast pre-ferments, the complex flavor and moist texture or crumb of a true sourdough can be made only with a true natural starter containing wild yeasts.
Bacterial FermentationThe second important point is that sourdough starters contain bacteria as well as yeast. The most important of these bacteria belong to a group called Lactobacilli (singular form: Lactoba-cillus). Like the yeast, these bacteria ferment some of the sugars in the dough and produce car-bon dioxide gas. In addition, they create acids. These acids give sourdough its sourness. As in the case of wild yeasts, the exact strains of bacteria present vary from starter to starter, so each starter has unique characteristics.
Two kinds of acid are created by the bacteria: lactic acid and acetic acid. Lactic acid is a weak or mild acid. Acetic acid, which is the acid in vinegar, is a strong acid. Getting a good bal-ance of these two acids is an important goal of the baker. The balance of these acids gives the bread its characteristic sourdough flavor. Too much acetic acid in the dough makes the bread taste harsh and vinegary. Lactic acid is necessary to balance the flavor, but if the dough con-tains only lactic acid and little or no acetic acid, the bread has little sourdough flavor.
The ways in which the baker maintains the starter and controls the fermentation process affect the formation of these two acids.
Starting and Maintaining Natural StartersAs we have said, the microorganisms (yeasts and bacteria) that create sourdough starters differ from place to place. In addition, individual bakers look for different results in their sourdough breads. Thus, the procedures for creating, maintaining, and using natural starters vary consid-erably. We begin this section with a general explanation of the important factors that should be considered. We then present a general procedure for making a natural starter. Please keep in mind that, until your starter is well established and strong and you have baked breads with con-sistent quality with this starter, your procedures will be somewhat experimental.
SOURCE OF MICROORGANISMS
As you have read, if a flour-and-water dough or batter is left to stand long enough, sooner or later it is likely to start fermenting, either from yeasts and bacteria in the air and environment or from yeasts and bacteria that were already present in the flour. Unfortunately, however, just letting a dough stand, and hoping for the best, is not the ideal way to make a batch of bread. To create a starter, the baker usually looks for a more reliable source of fermentation.
Wild yeasts are naturally present on the surface of fruits and on the surface of whole grains, and these are the most common sources used for creating natural sours. Mixing whole wheat flour or whole-grain rye flour into a batter or dough with water and letting it stand until it fer-ments is one of the best and most reliable ways of creating a starter. The initial fermentation usually takes at least two or three days. Rye is a good environment for wild yeasts, and start-ers begun with rye are more likely to be more successful than starters begun with wheat flour only. Whole-grain rye generally contains more of these organisms, but if it is not available, use the darkest rye you can find. Light rye is made from the interior of the grain and contains fewer organisms.
Another popular way to create a sour is to mix a batter or loose dough with regular bread flour (wheat) and bury pieces of fruit (grapes are often used) or vegetable in it until it begins

PRE-fERmEnTs And soURdoUgH sTARTERs 1 3 3
to ferment. Then remove the fruit. Some bakers feel this method is not as good as using rye because grain is the natural environment for the yeasts on rye, whereas the yeasts on fruit are not as well adapted for growing in grain or flour.
Formulas for both types of starter are included in the next chapter. Just keep in mind that results will vary depending on your location.
REFRESHING THE STARTER
After the initial fermentation has begun, the starter must be refreshed, or fed, regularly so the yeasts and bacteria are nourished and will multiply until they are strong enough to ferment a bread dough. Depending on the environment and other factors, this can take several weeks. The yeasts and bacteria must be supplied regularly with fresh food, in the form of wheat flour, so they can grow. The basic procedure is to combine a portion of the fermenting starter with ad-ditional flour and water in the correct ratio (see the next section) and again letting the mixture ferment.
You can imagine that if you continually add more flour and water to a starter, soon you will have more starter than you can use. For this reason, part of the starter is discarded each time it is refreshed.
Because every starter is different, it is impossible to predict how much time is needed be-tween refreshments. Generally, it may take two days or more at the beginning of the process, but as the yeasts and bacteria multiply, the starter gets stronger and faster-acting. A developed starter is usually refreshed every day, or more often if the temperature is warm.
The starter should always be given a final refreshment before using it in a dough. Starters that have been in storage are not as active and don’t work as well for leavening bread.
FLOUR/WATER RATIO IN THE STARTER
Some sourdough starters are stiff doughs, similar to the type of pre-ferment called a biga (p. 131). A stiff starter is sometimes referred to by its French name, levain. Others are looser batters, with the same consistency as a poolish (p. 130). Thin starters are sometimes called barms or liquid levains. The two types are handled somewhat differently and yield slightly different results.
A thick, doughlike starter is relatively stable and does not need to be refreshed as often. It can be refrigerated without being refreshed for several days, or even a week. Stiff starters favor the production of both lactic acid and acetic acid. Furthermore, the starter will produce more acetic acid under refrigeration than at room temperature. Often a baker will retard a stiff starter with the goal of increasing the ratio of acetic to lactic acid.
A thin starter is less stable and must be refreshed more often. It ferments more quickly than a stiff starter and can become strongly acidic in a short time, so it must be monitored care-fully. Thin starters favor the production primarily of lactic acid.
The type of starter you choose to make depends on the flavor profile (balance of acids) you would like and on your production schedule. Professional bakeshops can usually manage the demanding feeding schedule of a thin starter. The fact that wet starters ferment more quickly may make them more adaptable to a bakeshop’s schedule. Casual or amateur bakers often start with a thin starter because it is easier to mix, but they may find that a stiff starter is easier to maintain in the long run. Production techniques are outlined in the General Procedure for Making a Sourdough Starter (p. 134).
KEY POINTS TO REVIEW
• What are the two basic types of pre-ferments?
• What are the characteristics of a poolish? A biga? Pre-fermented dough?
• Which organisms provide the fermentation of a sourdough starter?
• How does a baker start and maintain a sourdough starter?

1 3 4 C H A P T E R 7 UndERsTAnding ARTisAn BREAds
GENERAL PROCEDURE: Making a Sourdough Starter
This is only a general procedure and is, therefore, subject to many variations, as described in the accompanying text.
1. Combine the ingredients for the first stage as directed in the formula. Most starters fall into two groups:
• Mix together whole rye flour and water (a).
• Or mix together bread flour and water. Add the selected fresh fruit or vegetable.
2. Cover the starter and let stand at room temperature until it begins to ferment. Continue to let ferment until it bubbles up, increases in volume, and then falls back (b). This will probably take two or three days.
3. Refresh the starter. Mix together bread flour, water, and all or some of the starter from step 1. Use the quantities or ratios in your formula, or use the following guidelines:
• A typical stiff starter, or levain, may use the following ratio:
Flour 100%
Water 50–60%
Fermented starter 67%
• A typical thin starter, or barm, may use the following ratio:
Flour 100%
Water 100%
Fermented starter 200%
4. Cover and let stand at room temperature until well fermented. It should be sticky and full of bubbles, and it should have increased in volume at least 50% (c). This may take about two days, depending on the room temperature.
5. Repeat the refreshment as in step 3.
6. Continue to ferment and refresh as in steps 4 and 5. As the starter becomes stronger and more active, the fermentation will eventually take only one day or less. Once the starter has reached this level of activity, it is ready to use (d). Total time varies greatly, but will average about two weeks.
7. After the starter is fully developed, it can be refrigerated to slow its rate of activity and increase the time between refreshments. Do not refrigerate a starter unless it has been refreshed recently, or the yeast may use up its food. Bring a refrigerated starter to room temperature and refresh it again before using it to make bread.
8. The developed starter may be used as is in formulas, or it may be used as a storage starter. This means it is a source of leavening that the baker keeps and maintains in storage. To use this storage starter, the baker removes a quantity of it as needed and refreshes this portion of it with the amounts of flour and water specified in an individual bread formula. This starter is then called an intermediate starter. For best results, always use either a refreshed starter or an intermediate starter in a bread formula. A storage starter taken from the refrigerator may not be active enough to provide the best fermentation.
A
B
C
D

fERmEnTATion 1 3 5
ARTISAN BAKERS USUALLY take an extra step during the mixing of the final dough. This step is called autolyse (pronounced auto-lees). To mix a bread dough in this fashion, first combine the flour and water and mix at low speed just until all the flour is moistened and a dough is formed. Turn off the mixer and let stand for 20 to 30 minutes.
During the autolyse, the flour hydrates fully, meaning the water is completely absorbed by the flour’s proteins and starches. Also, the enzymes in the dough begin acting on the pro-teins before they are too stretched by mixing. This improves the gluten structure in the bread, making the finished dough easier to handle and mold. It also improves the texture of the baked bread. Because of the improved gluten structure, mixing time is reduced, meaning less air is mixed into the dough. Therefore, the color and flavor of the bread are improved, because of less oxidation.
Notice that only the flour and water are included in the autolyse. The yeast or starter, the salt, and other ingredi-ents are not added until after this rest pe-riod. If the yeast or starter were added to the dough before the autolyse, the yeast action would increase the acidity of the dough, and this acidity would affect dough strength, making the dough less extensi-ble. If the salt were added, it would inter-fere with water absorption by the gluten proteins and interfere with the action of the enzymes.
After the autolyse period is over, add the remaining ingredients and finish mix-ing the dough.
AFTER THE FINISHED dough is made, the next step in the production of yeast breads is fermenta-tion. The basics of this stage of production are explained in Chapter 6. Additional information useful for the baker making artisan breads is provided here.
One of the advantages of using pre-ferments is the improvement in flavor and texture re-sulting from the extended fermentation time. This holds true for the fermentation of the fin-ished bread dough as well. Yeast will ferment at any temperature between 33° and 105°F (1° to 40°C). If the temperature is too low, however, fermentation will be slow and acidity will be produced. On the other hand, a high temperature promotes excessively rapid fermentation and the development of “off” flavors. As you recall, most production breads are fermented at a tem-perature of about 77° to 80°F (25° to 27°C).
A lower temperature is preferable for artisan breads. Before the development of proof boxes, doughs were simply fermented at room temperature. Attempting to duplicate these con-ditions, artisan bakers may use fermentation temperatures in the range of 72° to 75°F (22° to 24°C). At these slightly cooler temperatures, doughs made with a yeast pre-ferment may take two to three hours to ferment until doubled in bulk.
Sourdoughs ferment more slowly. A sourdough may take eight hours to ferment at these cooler temperatures. Some bakers make sourdoughs at the end of the workday and allow them to ferment overnight. The following morning, they then make up, proof, and bake the loaves.
It is possible to ferment any of these doughs—yeast pre-ferment doughs and sourdoughs—at a still lower temperature of about 68°F (20°C). Keep in mind, however, that the fermenta-tion period will be longer. More acidity will develop because the acid-forming bacteria will be more active than the yeast. This increased acidity may or may not be desirable, depending on the product. You may want to experiment with the results of various fermentation temperatures and times.
Y E A S T A N D A U T O L Y S E
According to the text, autolyse should take place without the presence of yeast. Some bakers, however, make exceptions to this rule.
If instant yeast is used, it is sometimes added just before autolyse. This is because the yeast takes time to absorb water. By the time the yeast is fully dissolved, the autolyse period may be mostly over.
Similarly, a poolish that contains a low quantity of yeast is sometimes added before autolyse, because the small amount of yeast is believed to have little effect on the gluten.
FERMENTATION
AUTOLYSE

1 3 6 C H A P T E R 7 UndERsTAnding ARTisAn BREAds
THE TYPES OF artisan breads described in this chapter are usually baked as hearth breads. That is, they are baked directly on the deck or floor of deck or hearth ovens. If you must bake them in rack ovens, it is best to use perforated pans rather than solid pans, because the perfo-rated pans allow for better heat circulation and more even browning of the crust.
Underbaking is a common fault. Most lean hearth breads are best baked in a hot oven pre-heated to 425° to 450°F (218° to 232°C) until the crust takes on a rich, deep brown color. Use the lower end of this range for large loaves and the hotter temperatures for small products. Small products need a higher temperature so the crust browns sufficiently in the shorter baking time. A well-browned crust has a richer flavor because of the well-caramelized carbohydrates and the browned proteins. Pale golden crusts have a blander flavor. In addition, taking care to bake the bread fully ensures a crisp crust that is less likely to be softened by excessive moisture from the interior of the bread.
Steam should be used for at least the first 15 minutes of baking. Injecting moisture into the oven delays the formation of the crust so the bread can expand fully. Thus, the crust will be thin and crisp rather than thick and hard. The moisture also affects the starches on the surface of the bread, aiding in creating a more attractively browned crust.
NOW THAT WE have surveyed the concepts, ingredients, and techniques used by artisan bakers, we return to the discussion that opened this chapter: What is artisan bread?
In presenting the basic procedures for making artisan breads, in this chapter we focused on the most fundamental bread formulas—those consisting only of flour, water, salt, and leav-ening in the form of a yeast pre-ferment or sourdough starter. The same concepts are also ap-plied to many specialty breads, such as breads flavored with nuts, olives, dried fruit, and so on. Furthermore, bakers specializing in fine handcrafted breads find they can increase sales by of-fering not only crisp-crusted sourdough breads but also a variety of rich dough products such as brioche (p. 192) and kugelhopf (p. 189), preparing these products with the same care as their lean breads. Are these products considered artisan breads as well? As we have said, it is hard to define the term in a way everyone agrees on.
The formulas in Chapter 8 begin with a variety of simple straight dough breads and rolls. These are intended to illustrate the basic yeast dough procedures discussed in Chapter 6. Prob-ably no one would consider these artisan breads, but that doesn’t mean they should not be prepared with care, skill, and attention to detail. The latter part of Chapter 8 includes many spe-cialty breads, including sourdough breads, multigrain loaves, and specialty products. Which of these are artisan breads? That is for you to determine.
ARTISAN BREAD FORMULAS
KEY POINTS TO REVIEW
• What is autolyse?
• What are the preferred temperatures for fermenting typical artisan bread doughs?
• What measures are taken to make sure artisan breads are properly baked?
BAKING

QUEsTions foR disCUssion 1 3 7
T E R M S F O R R E V I E W
artisan bread
pre-ferment
poolish
biga
levure
levain-levure
levain
pâte fermentée
mixed fermentation
sourdough
sourdough starter
natural sour
natural starter
Lactobacilli
barm
liquid levain
autolyse
1. What do bakers mean by the term artisan bread? Can you give examples from local bakeries?
2. Describe the types of flour bakers favor for making artisan breads.
3. What is the difference between a natural starter and a yeast starter? Describe the source of yeast for each.
4. Describe the kinds of acids that make a sourdough sour. Where do these acids come from?
5. Describe how to mix a bread dough using the technique called autolyse.
6. What is the difference between fermenting artisan bread doughs and fermenting conventional bread doughs?
Q U E S T I O N S F O R D I S C U S S I O N


139
AFTER READING THIS CHAPTER, YOU SHOULD BE ABLE TO:
8Lean Yeast Doughs
1. Prepare lean straight doughs and doughs made with a sponge or pre-ferment.
2. Prepare natural starters and yeast starters, and mix sourdoughs using them.
3. Make up a variety of loaf and roll types using lean doughs.
4. Prepare a variety of specialty bread items with nonstandard makeup and baking techniques, including English muffins, crumpets, and bagels.
THE BASIC YEAST dough production methods discussed in Chapters 6 and 7
apply to the formulas presented in this chapter. Therefore, the methods are not
repeated in detail for each formula. The basic procedures are indicated, and you
should refer to these chapters if you need to refresh your memory of the details.
The discussion of yeast doughs is divided into two chapters. This chapter pres-
ents lean dough products, representing a complete range of formula types, from
basic white loaves and dinner rolls to sourdoughs to artisan breads to popular
specialty items like bagels, pita, focaccia, and crumpets. Chapter 9 completes
the study of yeast products with a range of rich doughs and laminated doughs,
including Danish, brioche, and sweet roll doughs.

1 4 0 C H A P T E R 8 LEAn YEAsT DougHs
Large bakeries have machinery that automatically forms loaves and rolls of many types. In a small bakeshop, however, the baker still makes up most products by hand. Learning how to shape loaves, rolls, and pastries is an im-portant part of the art and craft of fine baking.
NOT MANY YEARS ago, bread was something of an afterthought in most restaurants. They of-fered little in the way of variety and paid scant attention to quality in most cases. In many cities today, however, fine restaurants vie with one another to serve the most interesting selections of fresh artisan breads. Customers are often given a choice from among four, five, or even more types. Likewise, handcrafted specialty breads are appearing in neighborhood bakeries, and everyone seems to have discovered the delights of sourdough.
Traditional formulas such as hard and soft rolls, Italian bread, white and whole wheat loaf breads, and American-style rye bread form the core of this chapter. It is important to learn well the basics of yeast dough production, and this is easiest to do when you are working on familiar formulas that do not require unusual techniques and exotic ingredients. Not only will you learn how to mix basic yeast doughs, but you will also practice making up a variety of loaf and roll types by hand to develop your manual skills. Then you can proceed with confidence to specialty handcrafted items. Working with sourdoughs, in particular, is more challenging than working with straight doughs, so your earlier practice and experience will benefit you later.
The conventional yeast dough formulas in this chapter are augmented with specialty items. These include newly popular breads such as olive bread, prosciutto bread, ciabatta, multigrain breads, and focaccia, and are joined by several sourdough bread formulas, includ-ing a traditional French country bread, or pain de campagne.
Making and fermenting dough is a craft distinct from making up rolls and loaves using these doughs. Each dough may be made into many types of loaves and rolls, and each makeup method may be applied to many formulas. Therefore, most makeup techniques—except for a few unique procedures for specialty items—are described in a section at the end of the chapter rather than repeated after every formula.
Using the FormulasProcedures and techniques for mixing and fermenting bread doughs are explained in detail in Chapter 6. Be sure to read and understand that material thoroughly before trying the formu-las in this chapter. Additionally, read Chapter 7 before tackling the specialty breads later in the chapter that use sourdough starters and pre-ferments. Again, these procedures are not re-peated with each formula here.
In particular, familiarize yourself with the steps in the basic mixing methods:
## Straight dough method (p. 108)
## Modified straight dough method (p. 108)
## Sponge method (p. 109)
and with the three mixing techniques:
## Short mix (p. 110)
## Improved mix (pp. 110–111)
## Intensive mix (p. 111)
In the formulas in the first two sections (pp. 142–153), mixing techniques and procedures are indicated by name, along with page references. Refer to those pages if you need to review the procedures. Mixing and fermentation times are summarized in the Mixing Times, Fermenta-tion, and Folds table on page 112. For your convenience, that table is repeated here in this sec-tion. In the final section on specialty breads, including sourdoughs, most of the formulas and
INTRODUCTION TO HANDCRAFTED BREADS
CRisP-CRusTED BREAD FoRmuLAs 1 4 1
procedures need more detail, largely because using sourdough starters adds complexity. The procedures for most of these formulas supply the necessary added detail and do not refer the table below.
Many of the formulas, especially those at the beginning of the chapter, use the intensive mix technique (p. 111). These enable you to produce doughs that can be mixed and fermented in a short time, so you can move on to practicing makeup techniques for various breads and rolls. After you have developed skill in mixing and handling doughs, you might try making some of these intensive mix doughs using the improved mix technique to gain further experience and to see how the mixing technique affects bread characteristics.
Note that in a number of formulas, more than one mixing technique is indicated. This is done to give you the most opportunities to experience producing a wide variety of products within limited schedules. For example, see the formula for Italian Bread on page 143: Both in-tensive mix and improved mix are indicated. In such cases, you may use the intensive mix tech-nique to produce an acceptable product if your schedule does not allow time for the improved mix. However, the improved mix is more appropriate for that product. As a general rule, when given more than one choice of mixing technique, use the one with the longest fermentation time permitted by your schedule.
In many baking operations, instant yeast has replaced fresh yeast as the preferred leav-ening. Still, some bakers continue to prefer fresh yeast for at least some preparations, such as yeast pre-ferments. However, to simplify your purchasing and storage needs, with a few excep-tions, the formulas in this book specify only instant yeast. To substitute another form of yeast, see page 81 for the necessary calculations.
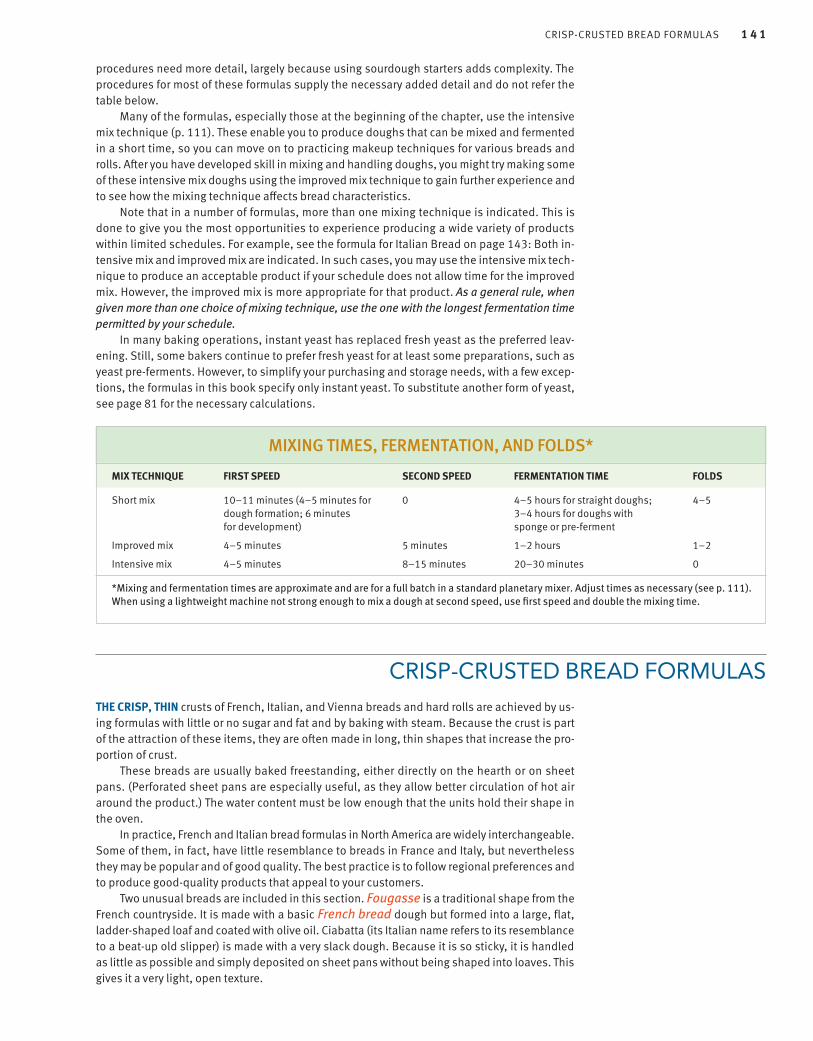
MIXING TIMES, FERMENTATION, AND FOLDS*
MIX TECHNIQUE FIRST SPEED SECOND SPEED FERMENTATION TIME FOLDS
Short mix 10–11 minutes (4–5 minutes for dough formation; 6 minutes for development)
0 4–5 hours for straight doughs; 3–4 hours for doughs with sponge or pre-ferment
4–5
Improved mix 4–5 minutes 5 minutes 1–2 hours 1–2
Intensive mix 4–5 minutes 8–15 minutes 20–30 minutes 0
*Mixing and fermentation times are approximate and are for a full batch in a standard planetary mixer. Adjust times as necessary (see p. 111). When using a lightweight machine not strong enough to mix a dough at second speed, use first speed and double the mixing time.
THE CRISP, THIN crusts of French, Italian, and Vienna breads and hard rolls are achieved by us-ing formulas with little or no sugar and fat and by baking with steam. Because the crust is part of the attraction of these items, they are often made in long, thin shapes that increase the pro-portion of crust.
These breads are usually baked freestanding, either directly on the hearth or on sheet pans. (Perforated sheet pans are especially useful, as they allow better circulation of hot air around the product.) The water content must be low enough that the units hold their shape in the oven.
In practice, French and Italian bread formulas in North America are widely interchangeable. Some of them, in fact, have little resemblance to breads in France and Italy, but nevertheless they may be popular and of good quality. The best practice is to follow regional preferences and to produce good-quality products that appeal to your customers.
Two unusual breads are included in this section. Fougasse is a traditional shape from the French countryside. It is made with a basic French bread dough but formed into a large, flat, ladder-shaped loaf and coated with olive oil. Ciabatta (its Italian name refers to its resemblance to a beat-up old slipper) is made with a very slack dough. Because it is so sticky, it is handled as little as possible and simply deposited on sheet pans without being shaped into loaves. This gives it a very light, open texture.
CRISP-CRUSTED BREAD FORMULAS

1 4 2 C H A P T E R 8 LEAn YEAsT DougHs
HARD ROLLSFor large-quantity measurements, see page 716.
Ingredients U.S. Metric %
Bread flour 1 lb 16.25 oz 625 g 100.25
Water 13.25 oz 370 g 59.25
Yeast, instant 0.25 oz 7 g 1.25
Salt 0.55 oz 14 g 2.25
Sugar 0.55 oz 14 g 2.25
Shortening 0.55 oz 14 g 2.25
Egg whites 0.55 oz 14 g 2.25
Total weight: 2 lb 15.25 oz 1058 g 169.25%
VIENNA BREADFor large-quantity measurements, see page 716.
Ingredients U.S. Metric %
Bread flour 1 lb 16.25 oz 625 g 100.25
Water 13.25 oz 370 g 59.25
Yeast, instant 0.25 oz 7 g 1.25
Salt 0.55 oz 14 g 2.25
Sugar 0.65 oz 18 g 3.25
Malt syrup 0.25 oz 6 g 1.25
Oil 0.65 oz 18 g 3.25
Eggs 0.95 oz 25 g 4.25
Total weight: 2 lb 16.25 oz 1098 g 173.25%
PROCEDURE
MIXING AND FERMENTATION
Straight dough method (p. 108)
Intensive mix (See Mixing Times, Fermentation, and Folds table on p. 141 for mixing and fermentation times.)
Desired dough temperature: 77°F (25°C)
MAKEUP
See pages 171–175.
PROOFING
80°F (27°C) at 80% humidity
BAKING
425°F (218°C) for loaves; 450°F (230°C) for rolls. Steam for first 10 minutes.
P I Z Z ANaples, Italy, takes pride in being the birthplace of pizza. Today, the Associazione Verace Pizza Napoletana sets the rules by which its members must abide if they wish to claim they serve authentic Neapolitan pizza. The rules state the dough must contain only flour, water, salt, and natural yeast, and it must be made by hand or in an approved mixer. The pizza must be shaped by hand and baked on the hearth of a wood-burning oven. Toppings are limited to a list of approved ingredients. Two pizzas—Margherita, topped with tomatoes, basil, and buffalo mozzarella; and Marinara, topped with tomatoes, garlic, oregano, and olive oil—are considered the original and true Neapolitan pizzas.
Pizza has grown beyond its origins to an international favorite. In North America, most pizzas served make no claim to being authentically Italian, and instead sport toppings such as barbecued chicken, beef with peppers and taco seasonings, and smoked salmon with artichokes, in addition to old favorites like sausage and pepperoni.
CRisP-CRusTED BREAD FoRmuLAs 1 4 3
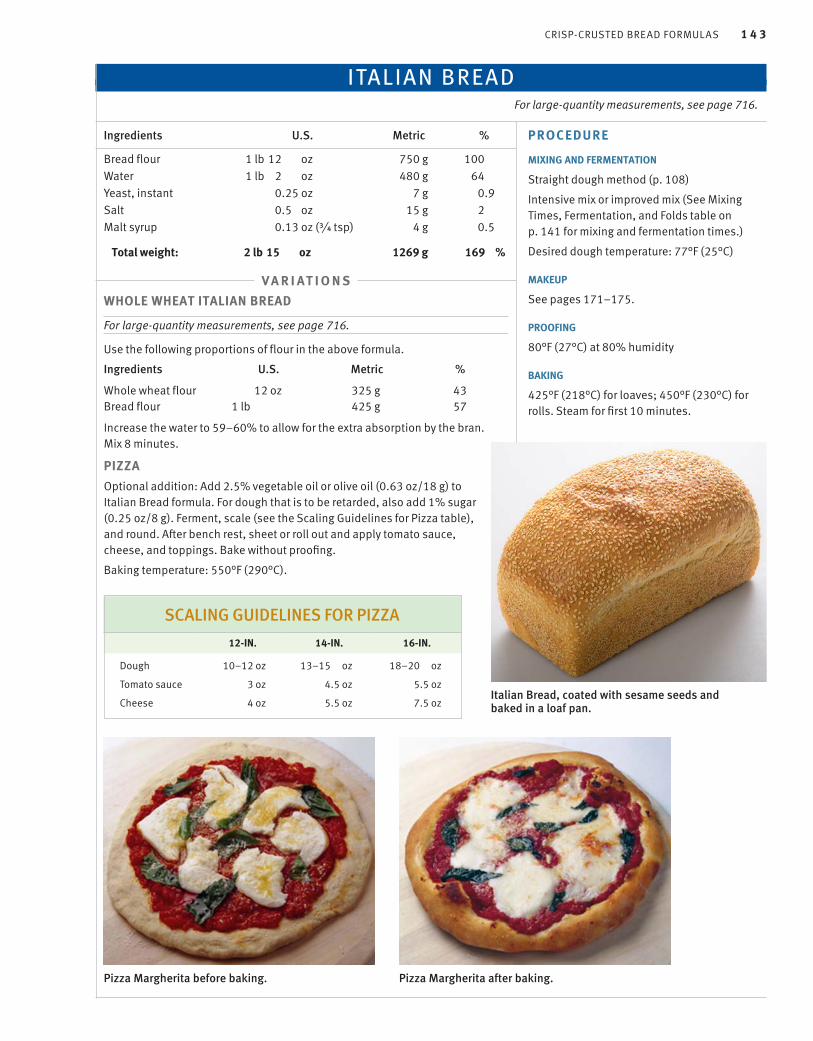
ITALIAN BREADFor large-quantity measurements, see page 716.
Ingredients U.S. Metric %
Bread flour 1 lb 12.25 oz (3/4 tsp) 750 g 100.9Water 1 lb 12.25 oz (3/4 tsp) 480 g 64.9Yeast, instant 0.25 oz (3/4 tsp) 7 g 0.9Salt 0.55 oz (3/4 tsp) 15 g 2.9Malt syrup 0.13 oz (3/4 tsp) 4 g 0.5
Total weight: 2 lb 15.25 oz3/4 tsp) 1269 g 169.9%
SCALING GUIDELINES FOR PIZZA
12-IN. 14-IN. 16-IN.
Dough 10–12 oz 13–15.5 oz 18–20.5 oz
Tomato sauce 3 oz 4.5 oz 5.5 oz
Cheese 4 oz 5.5 oz 7.5 oz
PROCEDURE
MIXING AND FERMENTATION
Straight dough method (p. 108)
Intensive mix or improved mix (See Mixing Times, Fermentation, and Folds table on p. 141 for mixing and fermentation times.)
Desired dough temperature: 77°F (25°C)
MAKEUP
See pages 171–175.
PROOFING
80°F (27°C) at 80% humidity
BAKING
425°F (218°C) for loaves; 450°F (230°C) for rolls. Steam for first 10 minutes.
Pizza Margherita before baking. Pizza Margherita after baking.
V A R I A T I O N S
WHOLE WHEAT ITALIAN BREAD
For large-quantity measurements, see page 716.
Use the following proportions of flour in the above formula.
Ingredients U.S. Metric %
Whole wheat flour 12 oz 325 g 43Bread flour 1 lb 12 oz 425 g 57
Increase the water to 59–60% to allow for the extra absorption by the bran. Mix 8 minutes.
PIZZA
Optional addition: Add 2.5% vegetable oil or olive oil (0.63 oz/18 g) to Italian Bread formula. For dough that is to be retarded, also add 1% sugar (0.25 oz/8 g). Ferment, scale (see the Scaling Guidelines for Pizza table), and round. After bench rest, sheet or roll out and apply tomato sauce, cheese, and toppings. Bake without proofing.
Baking temperature: 550°F (290°C).
Italian Bread, coated with sesame seeds and baked in a loaf pan.

1 4 4 C H A P T E R 8 LEAn YEAsT DougHs
FRENCH BREAD (STRAIGHT DOUGH)For large-quantity measurements, see page 717.
Ingredients U.S. Metric %
Bread flour 1 lb 12.25 oz 750 g 100.25Water 1 lb 12.25 oz 480 g 64.25Yeast, instant 0.25 oz 7 g 0.95Salt 0.55 oz 15 g 2.25 Malt syrup 0.13 oz 4 g 0.55Sugar 0.55 oz 12 g 1.75Shortening 0.55 oz 12 g 1.75
Total weight: 2 lb 15.25 oz 1280 g 170.25%
PROCEDURE
MIXING AND FERMENTATION
Straight dough method (p. 108)
Improved mix (See Mixing Times, Fermentation, and Folds table on p. 141 for mixing and fermentation times.)
Desired dough temperature: 77°F (25°C)
MAKEUP
See pages 171–175.
PROOFING
80°F (27°C) at 80% humidity
BAKING
425°F (218°C) for loaves; 450°F (230°C) for rolls. Steam for first 10 minutes.
V A R I A T I O N
WHOLE WHEAT FRENCH BREAD
For large-quantity measurements, see page 717.
Use the following proportions of flour in the above formula.
Ingredients U.S. Metric %
Whole wheat flour 12 oz 325 g 43Bread flour 1 lb 12 oz 425 g 57
Increase the water to 66–67% to allow for the extra absorption by the bran. Mix 8 minutes.
F R E N C H B R E A D
The long, slender loaf called the baguette (bah GET) is the classic French loaf familiar to most people in North America. However, the terms French bread and baguette are not interchangeable. Many types of bread are produced in France other than the light, crusty baguette.
Baguettes should be made only with lean doughs that produce a crisp crust. It is not a good practice to make baguette-shaped loaves with ordinary soft-crusted white bread and sell it labeled as French bread.

CRisP-CRusTED BREAD FoRmuLAs 1 4 5
FRENCH BREAD (SPONGE)For large-quantity measurements, see page 717.
Ingredients U.S. Metric %
Sponge (poolish)
Bread flour 8.25 oz (2 1/4 tsp) 250 g 33.75 Water 8.25 oz (2 1/4 tsp) 250 g 33.75 Yeast, instant 0.17 oz (2 1/4 tsp) 5 g 0.75 Malt syrup 0.25 oz (2 1/4 tsp) 8 g 1.75
Dough Bread flour 1 lb 18.25 oz (2 1/4 tsp) 500 g 67.75 Water 8.25 oz (2 1/4 tsp) 250 g 33.75 Salt 0.44 oz (2 1/4 tsp) 13 g 1.75
Total weight: 2 lb 18.25 oz (2 1/4 tsp) 1276 g 169.75%
V A R I A T I O N
COUNTRY-STYLE FRENCH BREAD
For large-quantity measurements, see page 717.
Use the following proportions of flour and water in the dough stage of the above formula.
Ingredients U.S. Metric %
Clear or bread flour 6.5 oz 200 g 25Whole wheat flour 10.5 oz 300 g 42Water 8.5 oz 260 g 35
Make up the dough into round loaves.
PROCEDURE
MIXING AND FERMENTATION
Sponge method (p. 109)
Intensive mix or improved mix (See Mixing Times, Fermentation, and Folds table p. 141).
Ferment poolish for 4 hours at 75°F (24°C) or overnight at 65°F (18°C).
See the table on page 141 for final dough fermentation times.
Desired dough temperature: 77°F (25°C)
MAKEUP
See pages 171–175.
PROOFING
80°F (27°C) at 80% humidity
BAKING
425°F (218°C) for loaves; 450°F (230°C) for rolls. Steam for first 10 minutes.

1 4 6 C H A P T E R 8 LEAn YEAsT DougHs
BAGUETTEFor large-quantity measurements, see page 716.
Ingredients U.S. Metric %
Bread flour 2 lb 12.67 oz 1000 g 100.8
Salt 0.67 oz 20 g 2.8
Yeast, instant 0.25 oz 8 g 0.8
Water 1 lb 16.67 oz 650 g 65.8
Total weight: 3 lb 19.67 oz 1695 g 169.8%
CUBAN BREADFor large-quantity measurements, see page 717.
Ingredients U.S. Metric %
Bread flour 1 lb 18.35 oz 750 g 100.5
Water 15.35 oz 465 g 62.5
Yeast, instant 0.35 oz 11 g 1.5
Salt 0.53 oz 15 g 2.5
Sugar 1.35 oz 30 g 4.5
Total weight: 2 lb 19.35 oz 1290 g 172.5%
PROCEDURE
MIXING
Straight dough method (p. 108)
Improved mix (see Mixing Times, Fermentation, and Folds table on p. 141), but mix a total of 12 minutes at first speed.
Desired dough temperature: 77°F (25°C)
MAKEUP
Scale at 20 oz (625 g). Shape into round loaves (p. 174).
PROOFING
80°F (27°C) at 80% humidity
BAKING
Score top with a cross.
400°F (200°C)
PROCEDUREMIXING AND FERMENTATION
Straight dough method (p. 108)
Intensive mix (See Mixing Times, Fermentation, and Folds table on p. 141 for mixing and fermentation times.)
Desired dough temperature: 77°F (25°C)
MAKEUP
See page 173.
PROOFING
80°F (27°C) at 80% humidity
BAKING
425°F (218°C) for loaves; 450°F (230°C) for rolls. Steam for first 10 minutes.
V A R I A T I O N S
For baguettes with a more open crumb, increase the water to 70% (1 lb 7.8 oz/700 g), decrease the instant yeast to 0.3% (0.1 oz/3 g), and use the short mix technique.
FOUGASSE
Scale dough at 18 oz (540 g). See page 175 for makeup.

CRisP-CRusTED BREAD FoRmuLAs 1 4 7
CIABATTAFor large-quantity measurements, see page 717.
Ingredients U.S. Metric %
Sponge
Bread flour 1 lb 10.33 oz 450 g 67.33
Water 1 lb 11.33 oz 480 g 72.33
Yeast, instant 0.33 oz 9 g 1.33
Virgin olive oil 0.72 oz 20 g 3.33
Dough
Salt 0.53 oz 13 g 2.33
Bread flour 8.33 oz 220 g 33.33
Total weight: 2 lb 10.33 oz 1192 g 202.33%
PROCEDURE
MIXING
Sponge method
1. Combine the sponge ingredients. Mix to form a soft batter. Beat well for approximately 5 minutes or until the sponge starts to become smooth.
2. Cover and leave at room temperature until doubled in size, approximately 1 hour.
3. Stir down and add the ingredients for the dough. Beat for a few minutes to form a smooth dough, which will be very soft and sticky.
FERMENTATION
Cover and allow to ferment at room temperature until doubled in size, approximately 1 hour. Do not fold.
MAKEUP AND BAKING
1. Flour a work surface well. Handling the fermented dough as little as possible, turn it out onto the work surface and shape into a rectangle (a).
2. Cut the dough into equally sized rectangles the shape and size of the desired loaves (b).
3. Carefully lift the loaves onto parchment-lined sheet pans, handling the dough as little as possible to avoid deflating it (c).
4. Proof at room temperature until the dough doubles in volume.
5. Bake at 425°F (220°C) for about 30 minutes, until golden. Cool on a wire rack.
A B
C

1 4 8 C H A P T E R 8 LEAn YEAsT DougHs
THIS CATEGORY INCLUDES sandwich-type breads baked in loaf pans, soft rolls, braided breads, and straight-dough rye (sour rye breads are covered in the next section). Many of these formu-las incorporate milk, eggs, and higher percentages of sugar and fat.
WHITE PAN BREADFor large-quantity measurements, see page 717.
Ingredients U.S. Metric %
Bread flour 1 lb 14.75 oz 500 g 100.75
Water 12.75 oz 300 g 60.75
Yeast, instant 0.25 oz 6 g 1.35
Salt 0.55 oz 12 g 2.55
Sugar 0.75 oz 18 g 3.75
Nonfat milk solids 1.75 oz 25 g 5.75
Shortening 0.75 oz 18 g 3.75
Total weight: 2 lb 13.75 oz 879 g 176.75%
WHITE PAN BREAD (SPONGE)For large-quantity measurements, see page 718.
Ingredients U.S. Metric %
Sponge Flour 1 lb 10.75 oz 500 g 67.8 Water 11.75 oz 340 g 45.8 Yeast, instant 0.25 oz 6 g 0.8 Malt syrup 0.13 oz 4 g 0.5
Dough Flour 8.75 oz 250 g 33.8 Water 3.55 oz 112 g 15.8 Salt 0.55 oz 15 g 2.8 Nonfat milk solids 0.75 oz 22 g 3.8 Sugar 1.25 oz 38 g 5.8 Shortening 0.75 oz 22 g 3.8
Total weight: 2 lb 10.75 oz 1307 g 174.8%
SOFT-CRUSTED BREAD AND RYE BREAD FORMULAS
PROCEDURE
MIXING AND FERMENTATION
Straight dough method (p. 108)
Intensive mix (See Mixing Times, Fermentation, and Folds table on p. 141 for mixing and fermentation times.)
Desired dough temperature: 77°F (25°C)
MAKEUP
See page 178.
PROOFING
80°F (27°C) at 80% humidity
BAKING
400°F (200°C)V A R I A T I O N
WHOLE WHEAT BREAD
For large-quantity measurements, see page 717.
Use the following proportions of flour in the above formula.
Ingredients U.S. Metric %
Bread flour 8 oz 200 g 40Whole wheat flour 12 oz 300 g 60
PROCEDURE
MIXING AND FERMENTATION
Straight dough method (p. 108)
Intensive mix (See Mixing Times, Fermentation, and Folds table on p. 141 for mixing and fermentation times.)
Ferment sponge about 4 hours at 75°F (24°C)
Desired dough temperature: 77°F (25°C)
MAKEUP
See page 178. Especially suitable for pullman loaf.
PROOFING
80°F (27°C) at 80% humidity
BAKING
400°F (200°C)
Whole Wheat Bread.
soFT-CRusTED BREAD AnD RYE BREAD FoRmuLAs 1 4 9
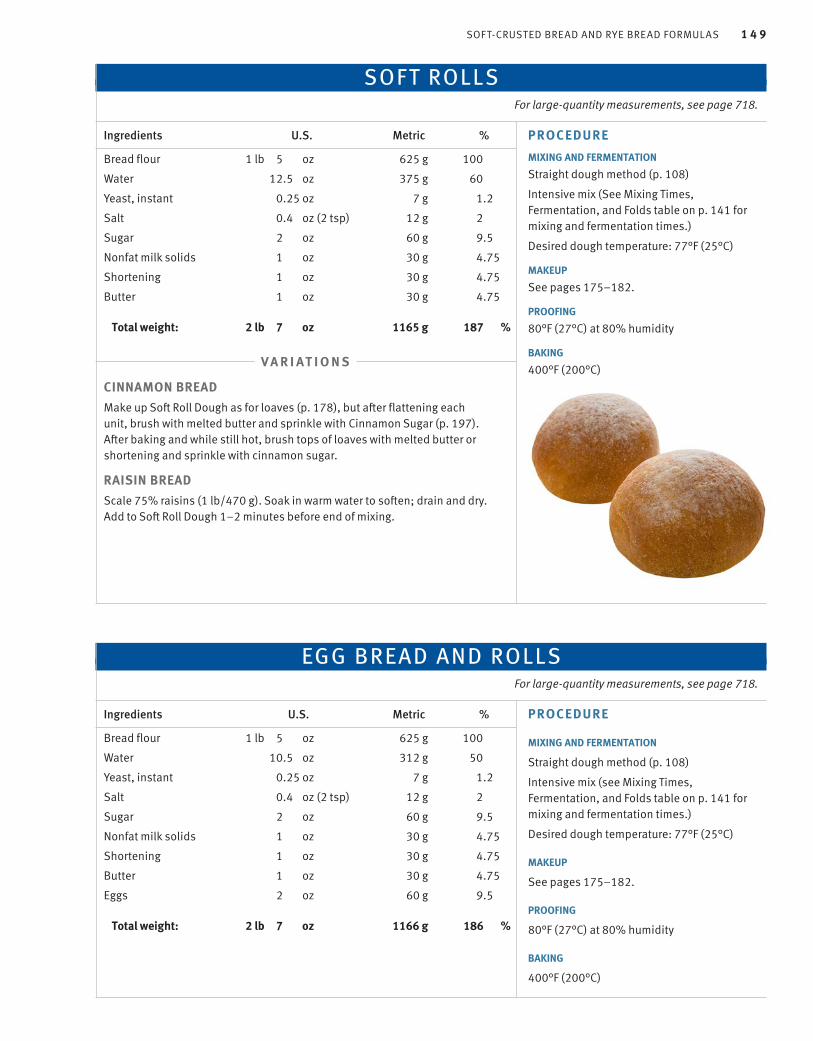
SOFT ROLLSFor large-quantity measurements, see page 718.
Ingredients U.S. Metric %
Bread flour 1 lb 15.25 oz (2 tsp) 625 g 100.75
Water 12.55 oz (2 tsp) 375 g 60.75
Yeast, instant 0.25 oz (2 tsp) 7 g 1.25
Salt 0.45 oz (2 tsp) 12 g 2.75
Sugar 2.25 oz (2 tsp) 60 g 9.55
Nonfat milk solids 1.25 oz (2 tsp) 30 g 4.75
Shortening 1.25 oz (2 tsp) 30 g 4.75
Butter 1.25 oz (2 tsp) 30 g 4.75
Total weight: 2 lb 17.25 oz (2 tsp) 1165 g 187.75%
EGG BREAD AND ROLLSFor large-quantity measurements, see page 718.
Ingredients U.S. Metric %
Bread flour 1 lb 15.25 oz (2 tsp) 625 g 100.75
Water 10.55 oz (2 tsp) 312 g 50.75
Yeast, instant 0.25 oz (2 tsp) 7 g 1.25
Salt 0.45 oz (2 tsp) 12 g 2.75
Sugar 2.25 oz (2 tsp) 60 g 9.55
Nonfat milk solids 1.25 oz (2 tsp) 30 g 4.75
Shortening 1.25 oz (2 tsp) 30 g 4.75
Butter 1.25 oz (2 tsp) 30 g 4.75
Eggs 2.25 oz (2 tsp) 60 g 9.55
Total weight: 2 lb 17.25 oz (2 tsp) 1166 g 186.75%
PROCEDURE
MIXING AND FERMENTATION
Straight dough method (p. 108)
Intensive mix (See Mixing Times, Fermentation, and Folds table on p. 141 for mixing and fermentation times.)
Desired dough temperature: 77°F (25°C)
MAKEUP
See pages 175–182.
PROOFING
80°F (27°C) at 80% humidity
BAKING
400°F (200°C)V A R I A T I O N S
CINNAMON BREAD
Make up Soft Roll Dough as for loaves (p. 178), but after flattening each unit, brush with melted butter and sprinkle with Cinnamon Sugar (p. 197). After baking and while still hot, brush tops of loaves with melted butter or shortening and sprinkle with cinnamon sugar.
RAISIN BREAD
Scale 75% raisins (1 lb/470 g). Soak in warm water to soften; drain and dry. Add to Soft Roll Dough 1–2 minutes before end of mixing.
PROCEDURE
MIXING AND FERMENTATION
Straight dough method (p. 108)
Intensive mix (see Mixing Times, Fermentation, and Folds table on p. 141 for mixing and fermentation times.)
Desired dough temperature: 77°F (25°C)
MAKEUP
See pages 175–182.
PROOFING
80°F (27°C) at 80% humidity
BAKING
400°F (200°C)

1 5 0 C H A P T E R 8 LEAn YEAsT DougHs
100% WHOLE WHEAT BREADFor large-quantity measurements, see page 718.
Ingredients U.S. Metric %
Whole wheat flour 1 lb 10.25 oz 750 g 100
Water 1 lb 12.25 oz 515 g 69
Yeast, instant 0.25 oz 7 g 1
Sugar 0.55 oz 15 g 2
Malt syrup 0.55 oz 15 g 2
Nonfat milk solids 0.75 oz 22 g 3
Shortening 1.25 oz 30 g 4
Salt 0.55 oz 15 g 2
Total weight: 3 lb 10.25 oz 1369 g 183%
CHALLAHFor large-quantity measurements, see page 718.
Ingredients U.S. Metric %
Bread flour 1 lb 14.25 oz (2 tsp) 500 g 100.25
Water 8.25 oz (2 tsp) 200 g 40.25
Yeast, instant 0.25 oz (2 tsp) 6 g 1.25
Egg yolks 4.25 oz (2 tsp) 100 g 20.25
Sugar 1.55 oz (2 tsp) 38 g 7.55
Malt syrup 0.13 oz (2 tsp) 2 g 0.65
Salt 0.45 oz (2 tsp) 10 g 1.95
Vegetable oil 2.25 oz (2 tsp) 62 g 10.25
Total weight: 2 lb 14.25 oz (2 tsp) 918 g 181.25%
PROCEDURE
MIXING AND FERMENTATION
Straight dough method (p. 108)
Intensive mix (See Mixing Times, Fermentation, and Folds table on p. 141 for mixing and fermentation times.)
Desired dough temperature: 77°F (25°C)
MAKEUP
See page 178.
PROOFING
80°F (27°C) at 80% humidity
BAKING
400°F (200°C)
PROCEDURE
MIXING AND FERMENTATION
Straight dough method (p. 108)
Intensive mix (See Mixing Times, Fermentation, and Folds table on p. 141 for mixing and fermentation times, but extend fermentation time as necessary, up to 1 1/2 hours.)
Desired dough temperature: 77°F (25°C)
MAKEUP
See pages 179–182.
PROOFING
80°F (27°C) at 80% humidity
BAKING
400°F (200°C)

soFT-CRusTED BREAD AnD RYE BREAD FoRmuLAs 1 5 1
MILK BREAD (PAIN AU LAIT)For large-quantity measurements, see page 718.
Ingredients U.S. Metric %
Bread flour 2 lb 14.33 oz 1000 g 100
Yeast, instant 0.35 oz 10 g 1
Milk, scalded and cooled 1 lb 12.33 oz 500 g 50
Sugar 3.55 oz 100 g 10
Salt 0.75 oz 20 g 2
Eggs 3.55 oz 100 g 10
Butter or margarine 5.33 oz 150 g 15
Malt syrup 0.33 oz 10 g 1
Total weight: 4 lb 13.33 oz 1890 g 189%
LIGHT AMERICAN RYE BREAD AND ROLLSFor large-quantity measurements, see page 719.
Ingredients U.S. Metric %
Light rye flour 8.25 oz (2 tsp) 250 g 40.25
Bread flour or clear flour 12.25 oz (2 tsp) 350 g 60.25
Water 12.25 oz (2 tsp) 350 g 60.25
Yeast, instant 0.25 oz (2 tsp) 7 g 1.25
Salt 0.45 oz (2 tsp) 12 g 2.25
Shortening 0.55 oz (2 tsp) 15 g 2.55
Molasses or malt syrup 0.55 oz (2 tsp) 15 g 2.55
Caraway seeds (optional) 0.25 oz (2 tsp) 8 g 1.25
Rye flavor 0.25 oz (2 tsp) 8 g 1.25
Total weight: 2 lb 12.25 oz (2 tsp) 1015 g 170.25%
PROCEDURE
MIXING AND FERMENTATION
Straight dough method (p. 108)
Intensive mix (See Mixing Times, Fermentation, and Folds table p. 141 for mixing and fermentation times, but extend fermentation time as necessary up to 1 1/2 hours.)
Desired dough temperature: 77°F (25°C)
MAKEUP
Any method for soft rolls, pages 175–178.
PROOFING
80°F (27°C) at 80% humidity
BAKING
Glaze with egg wash.
425°F (218°C)
Assorted rolls made with milk bread (pain au lait) dough.
PROCEDURE
MIXING AND FERMENTATION
Straight dough method (p. 108)
Improved mix (See Mixing Times, Fermentation, and Folds table on p. 141 for mixing and fermentation times, but reduce second-speed mixing time to 3 minutes.)
Desired dough temperature: 77°F (25°C)
MAKEUP
See pages 171–182.
PROOFING
80°F (27°C) at 80% humidity
BAKING
400°F (200°C). Steam for first 10 minutes.
V A R I A T I O N
Add up to 10% Rye Starter (p. 154) to the formula to contribute flavor.

1 5 2 C H A P T E R 8 LEAn YEAsT DougHs
ONION RYEFor large-quantity measurements, see page 719.
Ingredients U.S. Metric %
Light rye flour 7.25 oz (2 tsp) 175 g 35.25
Clear flour 13.25 oz (2 tsp) 325 g 65.25
Water 12.25 oz (2 tsp) 300 g 60.25
Yeast, instant 0.25 oz (2 tsp) 6 g 1.25
Dried onions, scaled, soaked in water, and well drained
1.25 oz (2 tsp) 25 g 5.25
Salt 0.45 oz (2 tsp) 10 g 1.95
Caraway seeds 0.25 oz (2 tsp) 6 g 1.25
Rye flavor 0.25 oz (2 tsp) 6 g 1.25
Malt syrup 0.55 oz (2 tsp) 12 g 2.55
Total weight: 2 lb 12.25 oz (2 tsp) 865 g 173.25%
PROCEDURE
MIXING AND FERMENTATION
Straight dough method (p. 108)
Improved mix (See Mixing Times, Fermentation, and Folds table on p. 141 for mixing and fermentation times, but reduce second-speed mixing time to 3 minutes.)
Desired dough temperature: 77°F (25°C)
MAKEUP
See pages 171–182.
PROOFING
80°F (27°C) at 80% humidity
BAKING
400°F (200°C). Steam for first 10 minutes.V A R I A T I O N
ONION PUMPERNICKEL (NONSOUR)
For large-quantity measurements, see page 719.
Use the following proportions of flour in the above formula.
Ingredients U.S. Metric %
Rye meal 4 oz 100 g 20 (pumpernickel flour)
Medium rye flour 3 oz 75 g 15Clear flour 13 oz 325 g 65
Dough may be colored with caramel color or cocoa powder.
S O A K E R S
Adding large quantities of whole or cracked grains to bread doughs can have two undesirable effects. First, the grains absorb water from the dough, resulting in a dry baked loaf. Second, the grains may not hydrate sufficiently, resulting in hard chunks in the bread that are difficult to eat.
The seven-grain bread formula given here contains a relatively small quantity of small, fairly tender grains, and there is sufficient water in the formula to hydrate them. Thus, they can be added directly to the other ingredients.
However, if larger quantities of grains are added, especially if those grains include large, hard grains such as wheat berries, it is better to prepare what is known as a soaker. This procedure hydrates the grains before they are included in the bread dough.
Two kinds of soakers, hot and cold, are used. For large, hard grains, a hot soaker is preferred. To prepare a hot soaker, bring the required quantity of water to a boil, as indicated in the formula. Pour the water over the grains and stir. Cover tightly and let stand four hours or more, or until the grains are softened and cooled. Drain and add to the dough as indicated in the formula.
Use a cold soaker for smaller and softer grains. Pour cold or room-temperature water over the grains, stir, cover, and let stand until softened. If a cold soaker is used for hard grains, it may be necessary to prepare it one day ahead of time. In warm weather, store the soaker in the refrigerator to inhibit fermentation or enzyme activity.

souRDougH FoRmuLAs AnD sPECiALT Y BREADs FoR THE ARTisAn BAkER 1 5 3
SEVEN-GRAIN BREADIngredients U.S. Metric %
Bread flour 1 lb 18.33 oz 750 g 57.8
Rye flour 6.33 oz 185 g 14.8
Barley flour 2.33 oz 65 g 5.8
Cornmeal 3.33 oz 90 g 7.8
Rolled oats 3.33 oz 90 g 7.8
Flax seeds 2.33 oz 65 g 5.8
Millet 2.33 oz 65 g 5.8
Water 1 lb 10.33 oz 815 g 62.8
Yeast, instant 0.33 oz 10 g 0.8
Salt 0.75 oz 24 g 1.8
Total weight: 4 lb 15.33 oz 2159 g 164.8%
Note: For the purposes of calculating with percentages, all seven grains are included as part of the total flour, even though three of them are not ground.
THIS SECTION BEGINS with several formulas for yeast starters, also called yeast pre-ferments, and for sourdough starters, also called natural starters. These starters are explained in detail in Chapter 7. Please review that material if necessary before preparing these formulas.
Pre-ferments provide leavening and improve the flavor and texture of the finished bread. True sourdough breads use only a sour starter for leavening. However, it is also possible to use a starter primarily as an ingredient to improve flavor and texture and to rely on additional yeast for leavening. This type of process is called mixed fermentation, as explained on page 131, and can be used with any type of pre-ferment, whether it is a natural starter or yeast starter.
PROCEDURE
MIXING AND FERMENTATION
Straight dough method (p. 108)
Sift together the bread flour, rye flour, barley flour, and cornmeal; add the oats, flax seeds, and millet and mix well. This ensures even distribution of the flours.
Improved mix (See Mixing Times, Fermentation, and Folds table on p. 141 for mixing and fermentation times, but reduce second-speed mixing time to 3 minutes.)
Desired dough temperature: 77°F (25°C)
MAKEUP
See pages 174 and 178. Make up as desired for loaf pans or round loaves.
PROOFING
80°F (27°C) at 80% humidity
BAKING
425°F (220°C)
V A R I A T I O N
MULTIGRAIN BREAD1. Use 80% bread flour and 20% whole wheat flour in the basic
recipe and omit the remaining flours and grains.
2. Separately, prepare a cold soaker (see the Soakers sidebar) using 35% commercial nine-grain mixture and 35% water.
3. Let stand, covered, until the grains are soft and the water is absorbed, 8 hours or more.
4. Drain the soaker.
5. Mix the bread dough 5 minutes, add the soaker, and then continue mixing until the gluten is developed.
SOURDOUGH FORMULAS AND SPECIALTY BREADS FOR THE ARTISAN BAKER
KEY POINTS TO REVIEW
• What factors produce crisp crusts in certain breads?
• What factors produce soft crusts in certain breads?
• What are soakers, and how are they used?

1 5 4 C H A P T E R 8 LEAn YEAsT DougHs
When mixed fermentation is used, the formula can be expressed as if it were a straight dough formula, and the separately made starter is one of the ingredients. This section includes exam-ples of mixed fermentation, in addition to a number of pure sourdough formulas.
Sourdoughs, especially sour rye doughs, are stickier than regular doughs, so handling the dough and making up loaves requires more skill and practice. Take care not to overmix the dough, and use low speed to avoid damaging the gluten.
Underproof sourdough breads slightly. Proofed units are fragile. Steam should be used in baking to allow the crust to expand without breaking.
The final formulas in the chapter include a number of specialty breads and other yeast dough items. Some of these are produced by methods unlike those of other breads. English muffins and crumpets, for example, are made on a griddle rather than baked in an oven. Both of these items are toasted before being eaten. But English muffins are split in half before toast-ing, whereas crumpets are toasted whole. True bagels—dense, chewy, and boiled in a malt syrup before baking—are unlike the soft imitation bagels widely sold today (see the Bagels sidebar and formula on p. 164).
Production methods for these items are modified here for use in a small bakeshop. Large producers have special equipment for bagels, English muffins, and crumpets.
Additional formulas in this chapter include two popular ones for focaccia, which is closely related to pizza dough; an unusual and flavorful bread made with chestnut flour; a flatbread called pita, which puffs up when baked to form a hollow center; and an Amish-style soft pretzel.
BASIC YEAST STARTER (BIGA)For large-quantity measurements, see page 719.
Ingredients U.S. Metric %
Bread flour 15.015 oz 450.5 g 100.1
Water 9.015 oz 270.5 g 60.1
Yeast, instant 0.015 oz 0.5 g 0.1
Total weight: 1 lb 18.015 oz 720.5 g 160.1%
RYE STARTER IFor large-quantity measurements, see page 719.
Ingredients U.S. Metric %
Rye flour 1 lb112.08 oz (1 tsp 400 g 100.5Yeast, instant 0.08 oz (1 tsp) 2 g 0.5Water 12.08 oz (1 tsp) 300 g 75.5Onion, halved (optional) 1.08 oz (1 tsp) 1 g
Total weight: 1 lb 12.08 oz (1 tsp) 702 g 175.5%
RYE STARTER IIFor large-quantity measurements, see page 719.
Ingredients U.S. Metric %
Rye flour 1 lb 0.108 oz 500.5 g 100.5Water, warm (85–90°F/
30–35°C)1 lb 0.108 oz 500.5 g 100.5
Yeast, instant 0.08 oz 2.5 g 0.5
Total weight: 2 lb 0.018 oz 1002.5 g 201.5%
PROCEDUREMIXING
Straight dough method (p. 108). Mix just until a dough forms.
FERMENTATION
12–14 hours at 77°F (25°C) or 18 hours at 70°F (21°C)
PROCEDURE1. Mix the yeast with the rye flour.2. Add the water and mix until smooth.3. Bury the onion in the mix.4. Let stand 24 hours. Desired temperature:
70°F (21°C)5. Remove the onion.
PROCEDURE
1. Mix together all ingredients.
2. Cover and let ferment at room temperature for about 15 hours.

souRDougH FoRmuLAs AnD sPECiALT Y BREADs FoR THE ARTisAn BAkER 1 5 5
BASIC SOURDOUGH STARTERYield: 1 lb 10 oz (815 g)
Ingredients U.S. Metric %
Stage 1
Water, warm 8 oz 250 g 100
Whole rye flour 8 oz 250 g 100
Stage 2
Bread flour 8 oz 250 g 100
Starter from stage 1 1 lb 12 oz 500 g 200
Stage 3
Bread flour 12 oz 375 g 100
Water 6 oz 190 g 50
Starter from stage 2 8 oz 250 g 67
To refresh starter as needed
Bread flour 12 oz 375 g 100
Water 6 oz 190 g 50
Starter 8 oz 250 g 67
YOGURT SOURIngredients U.S. Metric %
Skim milk 7 oz 225 g 180
Plain yogurt 3 oz 90 g 72
Bread flour 4 oz 125 g 100
Total weight: 14 oz 440 g 352%
PROCEDURE
1. Combine the water and rye flour and mix together. Place in a nonreactive container (such as stainless steel or plastic) and cover. Let stand at room temperature until the mixture becomes bubbly and fermented and has a noticeable fermented aroma. This should take 2 or 3 days.
2. Mix together the ingredients in stage 2 to make a stiff dough. Cover and let stand until well fermented. This may take 1 or 2 days.
3. Combine the ingredients in stage 3, discarding the leftover starter from the previous step. Mix into a stiff dough. Cover and let stand until the starter has fermented and the volume has increased by about half. This will probably take at least 1 day, possibly longer, depending on conditions and the strength of the wild yeast.
4. Continue to refresh the starter as in step 3 until it is strong enough to double in volume in 8 to 12 hours. The procedure may take about 2 weeks in all. At this point, the starter is ready to use in bread.
5. Refresh the starter at least once a day to keep it healthy and vigorous. If this is not possible, refresh the starter, let it ferment for a few hours, then refrigerate, tightly covered, for up to 1 week. To return the starter to active use, let it come back to room temperature and refresh it at least once before using in bread.
PROCEDURE
1. Warm the milk to about 98°F (37°C), or body temperature.
2. Stir in the yogurt.
3. Mix in the flour until smooth.
4. Pour into a sterile container, cover with a damp cloth, then cover tightly with plastic film.
5. Allow to stand in a warm place for 2–5 days, until bubbles form.

1 5 6 C H A P T E R 8 LEAn YEAsT DougHs
APPLE SOURYield: 2 lb (900 g)
Ingredients U.S. Metric
Starter
Whole apple, cored 12.67 oz 360 g
Sugar 2.67 oz 60 g
Water 1.33 oz 40 g
First build
Honey 0.67 oz 20 g
Water, warm 4.67 oz 120 g
Apple starter (above) 5.67 oz 160 g
Bread flour (see Note) 13.67 oz 390 g
Second build
Honey 0.27 oz 6 g
Water, warm 3.67 oz 85 g
Starter from first build 1 lb 16.67 oz 650 g
Bread flour 6.67 oz 195 g
Note: For best results, use unbleached organic bread flour. The total weight is less than the summed weights of the ingredients due to losses from
evaporation and from skimming and other mixing losses.
OLD-FASHIONED RYE BREADFor large-quantity measurements, see page 719.
Ingredients U.S. Metric %
Water 8.33 oz 200.5 g 50.35
Fermented Rye Starter I (p. 154)
9.55 oz 240.5 g 60.35
Clear flour 1 lb 11.33 oz 400.5 g 100.35
Yeast, instant 0.06 oz 1.5 g 0.35
Salt 0.33 oz 8.5 g 2.35
Total weight: 2 lb 11.33 oz 852.5 g 213.35%
Optional Ingredients
Caraway seeds up to 0.25 oz up to 6 g up to 1.5
Molasses or malt syrup up to 0.55 oz up to 12 g up to 3.5
Caramel color up to 0.25 oz up to 6 g up to 1.5
PROCEDURE
1. Leaving the skin on, grate the cored apple.
2. Combine the ingredients for the starter. Cover with a damp cloth and plastic film. Keep in a warm place for 8–10 days.
3. Each day, dampen the cloth, but do not mix the starter. Once the mixture starts to give off gases, it is ready. Remove any crust that may have formed on the surface.
4. For the first build, dissolve the honey in warm water. Mix in the apple starter and mash to a paste. Mix in the flour. Knead by hand 5–10 minutes to form a dough.
5. Place in a clean bowl and cover with a damp cloth and plastic film. Allow to ferment 8–10 hours.
6. Repeat step 3 with the ingredients for the second build.
7. Allow to ferment 5–8 hours. The dough should be well risen.
PROCEDURE
MIXING
1. Combine water and starter. Mix to break up the starter. Dissolve the yeast in the water.
2. Mix together the flour, yeast, and salt.
3. Add the flour mixture and optional flavoring ingredients to the mixing bowl with the water and starter. Develop the dough 3 minutes at low speed and then 3 minutes at second speed. Do not overmix.
FERMENTATION
30 minutes at 77°F (25°C)
MAKEUP
See pages 171–175. Give only 3/4 proof.
BAKING
425°F (218°C) with steam for first 10 minutes.

souRDougH FoRmuLAs AnD sPECiALT Y BREADs FoR THE ARTisAn BAkER 1 5 7
PUMPERNICKEL BREADFor large-quantity measurements, see page 720.
Ingredients U.S. Metric %
Water 12.25 oz 375 g 50.5
Fermented Rye Starter I (p. 154) 10.25 oz 315 g 42.5
Rye meal (pumpernickel) 5.25 oz 150 g 20.5
Clear flour 1 lb 13.25 oz 600 g 80.5
Yeast, instant 0.12 oz 4 g 0.5
Salt 0.55 oz 15 g 2.5
Malt syrup 0.25 oz 8 g 1.5
Molasses 0.55 oz 15 g 2.5
Caramel color (optional) 0.38 oz 12 g 1.5
Total weight: 2 lb 15.25 oz 1498 g 199.5%
RUSTIC SOURDOUGH BREADIngredients U.S. Metric %
Bread flour 2 lb 10.5 oz 1320 g 88
Whole wheat flour 3.5 oz 90 g 6
Dark rye flour 3.5 oz 90 g 6
Water 2 lb 10.5 oz 1020 g 68
Basic Sourdough Starter (p. 155), refreshed 8–12 hours earlier
9.5 oz 300 g 20
Salt 1.5 oz 30 g 2
Total weight: 5 lb 11.5 oz 2850 g 190%
PROCEDURE
MIXING
1. Combine the water and starter. Mix to break up the starter.
2. Combine the rye meal, flour, yeast, and salt. Mix to combine.
3. Add the flour mixture, malt, molasses, and color. Develop the dough 3 minutes at low speed and then 2–3 minutes at second speed. Do not overmix.
FERMENTATION
30 minutes at 77°F (25°C).
MAKEUP
See pages 171–175. Give only 3/4 proof.
BAKING
425°F (218°C) with steam for first 10 minutes.
PROCEDURE
MIXING
1. Combine all the flours and the water and mix just until combined.
2. Let stand 30 minutes (autolyse).
3. Add the starter and salt. Mix at low speed 5–8 minutes, to develop the dough.
FERMENTATION
Ferment at 75°F (24°C) until almost double in bulk, about 8 hours.
MAKEUP AND PROOFING
1. Scale at 1 lb 12 oz (900 g).
2. Make up into round loaves.
3. Proof until almost double in bulk, about 3–4 hours.
BAKING
425°F (218°C) with steam, 40–45 minutes
V A R I A T I O N
Omit the rye flour and whole wheat flour and use instead 100% bread flour. If possible, use a high-extraction, high-ash European-style flour (see p. 61). You may need to use slightly less water, depending on the protein content of the flour.

1 5 8 C H A P T E R 8 LEAn YEAsT DougHs
WHITE SOURDOUGH (MIXED FERMENTATION)Ingredients U.S. Metric %
Starter
Bread flour 7.8 oz] 210.8 g] 30.4]
Water 3.5 oz] 105.8 g] 15.4]
[Basic Sourdough Starter (p. 155)] (see Note)
[4.8 oz] [140.8 g] [20].4
Dough
Bread flour 1 lb 11.8 oz] 490.8 g] 70.4]
Instant yeast 0.1 oz] 2.8 g] 0.4]
Water 12.5 oz] 364.8 g] 52.4]
Salt 0.5 oz] 14.8 g] 2.4]
Total weight: 2 lb 18.8 oz] 1185.8 g] 169.4]%
Note: The Basic Sourdough Starter is not included in ingredient weight totals in this formula, since it is subtracted from the starter before the dough is mixed (see Procedure).
PROCEDURE
MIXING AND FERMENTATION
Sponge method (p. 109)
The sponge in this formula is an intermediate pre-ferment (see p. 134). It uses a sourdough starter rather than a commercial yeast. After the starter has fermented, subtract the original weight of starter and set it aside so that it can be refreshed and used again. Add the remaining starter to the dough formula.
Improved mix (See Mixing Times, Fermentation, and Folds table on p. 141 for mixing and fermentation times.)
Desired dough temperature: 75°F (24°C)
MAKEUP
See page 174. Shape into round or oval loaves.
PROOFING
80°F (27°C) at 80% humidity
BAKING
425°F (218°C) with steam for first 10 minutes

souRDougH FoRmuLAs AnD sPECiALT Y BREADs FoR THE ARTisAn BAkER 1 5 9
FIG HAZELNUT BREADIngredients U.S. Metric %
Bread flour 2 lb 19.2 oz 1290 g 86.5
Whole wheat flour 2.2 oz 60 g 4.5
Medium or light rye flour 5.2 oz 150 g 10.5
Water 1 lb 15.2 oz 975 g 65.5
Basic Sourdough Starter (p. 155), refreshed 8–12 hours earlier
12.2 oz 375 g 25.5
Salt 1.2 oz 38 g 2.5
Dried figs, diced (see Note) 1 lb 15.2 oz 500 g 33.5
Hazelnuts, lightly toasted (see Note)
8.2 oz 250 g 17.5
Total weight: 7 lb 14.2 oz 3638 g 242.5%
Note: The quantities of fruit and nuts in this formula makes the dough somewhat difficult to handle. If desired, reduce the quantities of figs and nuts to taste.
PROCEDURE
MIXING
1. Combine all the flours and the water and mix just until combined.
2. Let stand 30 minutes (autolyse).
3. Add the starter and salt. Mix at low speed 5–8 minutes to develop the dough.
4. Remove the dough from the mixer to a worktable. Add the figs and nuts and knead in by hand until evenly distributed in the dough.
FERMENTATION
Ferment at 75°F (24°C) until almost double in bulk, about 8 hours.
MAKEUP
1. Scale at 1 lb 8 oz (750 g).
2. Make up into bâtard loaves (thick French-type loaves, p. 173).
3. Proof until almost double in bulk, 3–4 hours.
BAKING
425°F (218°C) with steam, 40–45 minutes
V A R I A T I O N
FIG ROLLS
Omit the hazelnuts. Make up into round rolls scaled at 4 oz (125 g) each. Bake at 450°F (232°C).

1 6 0 C H A P T E R 8 LEAn YEAsT DougHs
FRENCH RYEFor large-quantity measurements, see page 720.
Ingredients U.S. Metric %
Rye Starter II (p. 154) 1 lb 18.33 oz 750 g 600
Bread flour 4.33 oz 125 g 100
Salt 0.33 oz 10 g 8
Total weight: 1 lb 12.33 oz 985 g 708%
PAIN DE CAMPAGNE (COUNTRY-ST YLE BREAD)For large-quantity measurements, see page 720.
Ingredients U.S. Metric %
Rye Starter II (p. 154) 6.15 oz 200 g 20.5
Bread flour 1 lb 18.15 oz 800 g 80.5
Rye flour 6.15 oz 200 g 20.5
Salt 0.65 oz 20 g 2.5
Yeast, instant 0.15 oz 5 g 0.5
Water 1 lb 14.15 oz 650 g 65.5
Lard or goose fat (optional) 0.65 oz 20 g 2.5
Total weight: 3 lb 19.15 oz 1895 g 189.5%
PROCEDURE
MIXING
1. Place the starter in a mixing bowl. Add the flour and salt.
2. Mix at low speed for 10 minutes. The dough will be soft and somewhat sticky, and therefore a little difficult to handle.
FERMENTATION
30 minutes at warm room temperature
MAKEUP
1. Scale at 1 lb (500 g). Shape into round or slightly oval loaves.
2. Brush or spray with water and dust heavily with flour.
3. Proof 30–60 minutes at 85°F (27°C), or until about double in volume.
4. Score the tops of the loaves.
BAKING
450°F (230°C) with steam, 40–45 minutes
PROCEDURE
MIXING AND FERMENTATION
Straight dough method (mixed fermentation, p. 108)
Improved mix (See Mixing Times, Fermentation, and Folds table on p. 141.) Reduce mixing at second speed to 3 minutes.
Desired dough temperature: 70°F/21°C.
MAKEUP
1. Scale at 1 lb 12 oz (950 g). Shape into tight, round loaves.
2. Dust with flour before proofing.
3. Before baking, score in a crosshatch or grid pattern.
BAKING
425°F (218°C) with steam, about 45 minutes

souRDougH FoRmuLAs AnD sPECiALT Y BREADs FoR THE ARTisAn BAkER 1 6 1
APPLE SOURDOUGHYield: 5 lb 10 oz (2400 g)
Ingredients U.S. Metric %
Granny Smith apples 15.25 oz 450 g 64.85
Butter 2.55 oz 80 g 11.85
Cinnamon 0.25 oz 8 g 1.85
Yeast, dry 0.25 oz 8 g 1.85
Water, warm 12.25 oz 360 g 51.85
Honey 0.25 oz 6 g 0.85
Salt 0.55 oz 15 g 2.85
Apple Sour (p. 156) 1 lb 14.25 oz 900 g 129.85
Bread flour (see Note) 1 lb 12.25 oz 525 g 75.85
Rye flour 6.25 oz 175 g 25.85
Raisins or dried cranberries 7.25 oz 200 g 29.85
Note: For best results, use unbleached organic flour for this bread. The dough yield is less than the summed weights of the ingredients, due mostly to
trimming and cooking loss of the apples.
PROCEDURE
MIXING
1. Peel, core, and chop the apples into 1/4-in. (5-mm) pieces. Sauté in the butter with the cinnamon until tender. Pour onto a tray and allow to cool.
2. Dissolve the yeast with half of the warm water. Mix to dissolve. Dissolve the honey and salt in the remaining water.
3. Cut the apple sour into pieces and place in the bowl of a mixer fitted with the dough hook.
4. Add the yeast liquid and then the honey, salt, and water, adding slowly to make a smooth paste.
5. Add the flour slowly until a soft dough is formed.
6. Add the sautéed apples and raisins. Mix until combined.
7. Turn out the dough onto a lightly floured work surface and knead gently to form a smooth dough.
FERMENTATION
2 1/2–3 hours at 77°F (25°C)
MAKEUP
1. Scale at 1 lb 6 oz (600 g).
2. Make up into long loaves like Italian or Vienna loaves (p. 173).
3. Allow 2–3 hours for proofing.
BAKING
425°F (220°C) for 20 minutes. Reduce the temperature to 375°F (190°C) for another 20 minutes.

1 6 2 C H A P T E R 8 LEAn YEAsT DougHs
WHOLE WHEAT, RYE, AND NUT SOURDOUGHIngredients U.S. Metric %
Sponge
Yogurt Sour (p. 155) 10.35 oz 290 g 27.9
Water, warm 13.35 oz 375 g 35.9
Whole wheat flour 12.35 oz 350 g 32.9
Dough
Water 8.55 oz 250 g 23.9
Yeast, instant 0.35 oz 11 g 1.9
Salt 0.33 oz 10 g 0.9
Whole wheat flour 11.35 oz 325 g 30.9
Rye flour 8.35 oz 225 g 21.9
Bread flour 6.35 oz 180 g 17.9
Walnuts, chopped and lightly toasted
2.55 oz 70 g 6.5
Pecans, chopped and lightly toasted
2.55 oz 70 g 6.5
Total weight: 4 lb 10.35 oz 2150 g 200.9%
PROCEDURE
MIXING
Sponge method (p. 109)
The sponge in this formula is an intermediate pre-ferment (see p. 134). It uses a sourdough starter rather than a commercial yeast.
FERMENTATION
Sponge: 8 hours or overnight at room temperature
Dough: 1 hour at warm room temperature
MAKEUP
1. Scale at 2 lb 4 oz (1050 g) for large loaves, 1 lb 8 oz (700 g) for medium loaves.
2. Shape into round or elongated oval loaves. Spray tops with water and dust heavily with flour. Proof until double in volume.
3. Score tops with desired pattern.
BAKING
425°F (220°C) for 30 minutes. Reduce to 350°F (180°C) until done.
V A R I A T I O N S
The nuts used may be varied—as, for example, all walnuts, all pecans, all hazelnuts, or all almonds. Raisins may be included in addition to the nuts.

souRDougH FoRmuLAs AnD sPECiALT Y BREADs FoR THE ARTisAn BAkER 1 6 3
FOUR-GRAIN BREADIngredients U.S. Metric %
Water 1 lb 10.75 oz 770 g 63.4Bread flour 1 lb 14.75 oz 600 g 49.4Rye flour 14.75 oz 415 g 34.4Barley flour 3.75 oz 85 g 7.4Oat flour 4.75 oz 125 g 10.4Yeast, instant 0.16 oz 5 g 0.4Salt 0.75 oz 24 g 2.4Basic Yeast Starter (p. 155) or
fermented dough1 lb 10.75 oz 490 g 40.4
Total weight: 5 lb 13.75 oz 2514 g 205.4%
ENGLISH MUFFINSFor large-quantity measurements, see page 720.
Ingredients U.S. Metric %
Bread flour 1 lb 13.08 oz (2 tsp) 500.5 g 100.5
Yeast, instant 0.08 oz (2 tsp) 2.5 g 0.5
Water (see Mixing) 12.08 oz (2 tsp) 375.5 g 75.5
Salt 0.25 oz (2 tsp) 8.5 g 1.5
Sugar 0.25 oz (2 tsp) 8.5 g 1.5
Nonfat milk solids 0.24 oz (2 tsp) 12.5 g 2.3
Shortening 0.25 oz (2 tsp) 8.5 g 1.5
Total weight: 1 lb 13.08 oz (2 tsp) 913.5 g 182.5%
PROCEDURE
MIXING AND FERMENTATION
Straight dough method (p. 108). Sift the flours together before mixing to ensure even distribution.
Improved mix or short mix (See Mixing Times, Fermentation, and Folds table on p. 141 for mixing and fermentation times.)
Desired dough temperature: 75°F (24°C)
MAKEUP
See pages 174 and 178. Make up as desired for loaf pans or round loaves.
PROOFING
80°F (27°C) at 80% humidity
BAKING
425°F (220°C)
PROCEDURE
MIXING
Straight dough method (p. 108)
20–25 minutes at second speed (see p. 111)
This dough is intentionally overmixed in order to develop its characteristic coarse texture. Because of this long mixing time, use twice your normal machine friction factor (see p. 122) when calculating water temperature. For this reason, and because of the low fermentation temperature, it is usually necessary to use very cold water or part crushed ice when making large batches.
FERMENTATION
Dough temperature: 70°F (21°C). Ferment 2 1/2–3 hours.
SCALING AND MAKEUP
Because this dough is very soft and sticky, you must use plenty of dusting flour. 1. Scale at 2 oz (60 g) per unit. Round and relax the units, then flatten with the palms of the hands. 2. Place on cornmeal-covered trays to proof.
BAKING
Bake on both sides on a griddle at low heat.

1 6 4 C H A P T E R 8 LEAn YEAsT DougHs
BAGELSFor large-quantity measurements, see page 720.
Ingredients U.S. Metric %
High-gluten flour 1 lb 19.33 oz (1 tsp) 500 g 100.6
Yeast, instant 0.16 oz (1 tsp) 5 g 1.6
Water 9.33 oz (1 tsp) 280 g 56.6
Diastatic malt powder 0.13 oz (1 tsp) 3 g 0.6
Salt 0.33 oz (1 tsp) 10 g 2.6
Total weight: 1 lb 19.33 oz (1 tsp) 798 g 159.6%
PROCEDURE
MIXING
Straight dough method (p. 108)
8–10 minutes at low speed
FERMENTATION
1 hour at 75°F (24°C)
MAKEUP AND BAKING
1. Scale at 4 oz (110 g) per unit.
2. One of two methods may be used for shaping bagels by hand:
• Roll with the palms of the hands into ropes (as for knotted or tied rolls). Loop around palms into doughnut shape (a). Seal the ends together well by rolling under the palms on the bench (b, c).
• Round the scaled unit and flatten into a thick disk. Press a hole in the center and tear open with the fingers. Pull the hole open and smooth the edges.
3. Give half proof.
4. Boil in a malt solution (1/3 qt malt syrup per 4 gal water, or 3 dL malt per 15 L water) about 1 minute.
5. Place on sheet pans about 1 in. (2.5 cm) apart. Bake at 450°F (230°C) until golden brown, turning them over when they are half baked. Total baking time is about 20 minutes. If desired, sprinkle bagels with sesame seeds, poppy seeds, diced onion, or coarse salt before baking.
B A G E L S
As bagels have become more popular, bagel-like rolls that are really only ordinary bread shaped like bagels have proliferated. True bagels are dense, chewy rolls made with high-gluten flour and a low proportion of water. They are boiled in a malt solution before being baked to give them a glossy, distinctly flavored crust. Also, flavorings for true bagels are generally limited to toppings, such as poppy seeds, sesame seeds, coarse salt, and chopped onion or garlic. Two popular exceptions are pumpernickel bagels and cinnamon-raisin bagels.
The traditional baking method is to arrange bagels on wet canvas-covered boards and partially bake them in a hearth oven. When half done, they are tipped over directly onto the hearth to finish baking. They should be baked until well-browned. Proper bagels are not pale.
A B
C

souRDougH FoRmuLAs AnD sPECiALT Y BREADs FoR THE ARTisAn BAkER 1 6 5
OLIVE FOCACCIAFor large-quantity measurements, see page 720.
Ingredients U.S. Metric %
Bread flour 1 lb 28.12 oz 750 g 100.5
Water 15.12 oz 470 g 62.5
Yeast, instant 0.12 oz 4 g 0.5
Salt 0.52 oz 15 g 2.5
Olive oil 1.12 oz 25 g 3.5
Chopped, pitted oil-cured black olives
8.12 oz 250 g 33.5
Total weight: 3 lb 28.12 oz 1514 g 201.5%
PROCEDURE
MIXING
Straight dough method (p. 108)
Add the olives after the other ingredients have formed a dough.
12 minutes at first speed.
FERMENTATION
1 1/2 hours at 77°F (25°C)
MAKEUP AND BAKING
See Herb Focaccia (p. 166).
This dough, without the olives, may also be used as a base for pizza (see p. 143).

1 6 6 C H A P T E R 8 LEAn YEAsT DougHs
HERB FOCACCIA (SPONGE METHOD)For large-quantity measurements, see page 721.
Ingredients U.S. Metric %
Sponge
Flour 8.06 oz 225.6 g 29.75
Water 6.06 oz 175.6 g 21.75
Yeast, instant 0.06 oz 1.6 g 0.26
Flour 1 lb 14.06 oz 575.6 g 71.75
Water 14.06 oz 400.6 g 50.75
Yeast, instant 0.06 oz 1.6 g 0.26
Salt 0.56 oz 15.6 g 1.75
Olive oil 1.06 oz 30.6 g 3.56
Rosemary and salt (see Makeup)
Total weight: 3 lb 11.06 oz 1424.6 g 176.75%
PROCEDURE
MIXING AND FERMENTATION
Sponge method (p. 109)
Ferment sponge: 8–16 hours at 70°F (21°C)
Mix dough using short mix technique (see table, p. 141): Reduce fermentation time to 60 minutes. Fold every 15 to 20 minutes.
Desired dough temperature: 77°F (25°C)
MAKEUP AND BAKING
1. Scale at 3 lb (1400 g) for each half-size sheet pan.
2. Oil pans heavily with olive oil.
3. Roll and stretch the dough into a rectangle to fit the pans. Place in the pans (a).
4. Proof until doubled in thickness.
5. Top each unit with 2 oz (60 mL) olive oil (b). With your fingertips, poke holes heavily at regular intervals (c).
6. Top each unit with 2 tbsp (30 mL) fresh rosemary and with coarse salt to taste (d).
7. Bake at 400°F (200°C) for 30 minutes.
A B
C D

souRDougH FoRmuLAs AnD sPECiALT Y BREADs FoR THE ARTisAn BAkER 1 6 7
CHESTNUT BREADFor large-quantity measurements, see page 721.
Ingredients U.S. Metric %
High-gluten flour 15.6 oz 450 g 75.5
Chestnut flour 5.6 oz 150 g 25.5
Water 12.6 oz 360 g 60.6
Yeast, instant 0.4 oz 12 g 2.6
Salt 0.5 oz 15 g 2.5
Butter 0.6 oz 18 g 3.6
Total weight: 2 lb 11.6 oz 1005 g 167.6 %
PROSCIUTTO BREADFor large-quantity measurements, see page 721.
Ingredients U.S. Metric %
Bread flour 1 lb 10.33 oz 500.5 g 100.7
Water 9.33 oz 285.5 g 57.7
Yeast, instant 0.11 oz 3.5 g 0.7
Salt 0.33 oz 10.5 g 2.7
Rendered lard or prosciutto fat 1.33 oz 30.5 g 6.7
Basic Yeast Starter (p. 154) or fermented dough
3.25 oz 100.5 g 20.7
Prosciutto, chopped or diced into small pieces
3.25 oz 100.5 g 20.7
Total weight: 2 lb 11.33 oz 1028.5 g 205.7%
PROCEDURE
MIXING
Straight dough method (p. 108)
10 minutes at first speed
FERMENTATION
40 minutes at 80°F (27°C)
MAKEUP
Scale at 10–11 oz (300–330 g). Make up into oval-shaped loaves.
BAKING
450°F (230°C)V A R I A T I O N
For a more developed flavor, add 30% Basic Yeast Starter (p. 154)
PROCEDURE
MIXING
Straight dough method (mixed fermentation)
1. Mix the water, yeast, flour, salt, and fat 6 minutes at first speed.
2. Add the Basic Yeast Starter and mix another 4 minutes.
3. Add the prosciutto and mix another 1–2 minutes.
FERMENTATION
1 hour at 77°F (25°C)
MAKEUP
Scale at 12–18 oz (360–540 g) or as desired. Shape like long Italian loaves. See page 173.
BAKING
425°F (220°C) with steam

1 6 8 C H A P T E R 8 LEAn YEAsT DougHs
OLIVE BREADFor large-quantity measurements, see page 721.
Ingredients U.S. Metric %
Bread flour 15.5 oz 450 g 75.5
Whole wheat flour 2.5 oz 60 g 10.5
Rye flour 3.5 oz 90 g 15.5
Yeast, instant 0.1 oz 3 g 0.5
Water 12.5 oz 370 g 62.5
Salt 0.4 oz 12 g 2.5
Olive oil 1.5 oz 30 g 5.5
Basic Yeast Starter (p. 154) or fermented dough
4.5 oz 120 g 20.5
Pitted black olives, whole or halved (see Note)
6.5 oz 180 g 30.5
Total weight: 2 lb 12.5 oz 1321 g 220.5%
Note: Use a flavorful brined olive such as Greek kalamata. Do not use canned, water-packed olives, as they have little flavor.
CRUMPETSFor large-quantity measurements, see page 721.
Ingredients U.S. Metric %
Water, warm 1 lb 14.35 oz (3/4 tsp) 550.5 g 110.7
Yeast, instant 0.35 oz (3/4 tsp) 10.5 g 2.7
Bread flour 1 lb 12.35 oz (3/4 tsp) 500.5 g 100.7
Salt 0.33 oz (3/4 tsp) 10.5 g 2.7
Sugar 0.13 oz (3/4 tsp) 3.5 g 0.7
Baking soda 0.06 oz (3/8 tsp) 1.5 g 0.3
Water, cold 5.35 oz (3/4 tsp) 140.5 g 28.7
Total weight: 2 lb 11.35 oz (3/4 tsp) 1215.5 g 243.7%
PROCEDURE
MIXING
Straight dough method (mixed fermentation)
1. Mix all the ingredients except the olives 10 minutes at first speed.
2. Add the olives and mix another 4–5 minutes.
FERMENTATION
90 minutes at 75°F (24°C)
MAKEUP
Same as Prosciutto Bread (p. 167)
BAKING
425°F (220°C) with steam
PROCEDURE
1. Mix the warm water, yeast, flour, salt, and sugar to form a soft dough or batter. Ferment 1 1/2 hours at room temperature.
2. Dissolve the baking soda in the second quantity of water. Mix into the flour mixture until smooth.
3. Lightly grease crumpet rings or any round cutters. Place on a moderately hot griddle. Using a ladle or dropping funnel, fill the rings with the batter to a depth of about 1/2 in. (12 mm). The amount of batter for each crumpet varies from 1 1/2 to 2 oz (45 to 60 g) depending on the size of the rings.
4. As the crumpets bake, they will develop bubbles on the surface. When the bubbles become holes and the batter is set, remove the rings and turn the crumpets over with a spatula. Continue to bake until the second side just begins to color.

souRDougH FoRmuLAs AnD sPECiALT Y BREADs FoR THE ARTisAn BAkER 1 6 9
B
D
AMISH-ST YLE SOFT PRETZELSIngredients U.S. Metric %
Bread flour 12.13 oz 375 g 75.8
Pastry flour 4.13 oz 125 g 25.8
Water 10.5 oz 325 g 65.8
Yeast, instant 0.13 oz 4 g 0.8
Salt 0.1 oz 3 g 0.6
Sugar 0.3 oz 10 g 2.8
Soda wash
Water, warm 8.13 oz 250 g
Baking soda 1.13 oz 30 g
Pretzel salt or coarse salt
Total dough weight: 1 lb 15 oz 842 g 168.8%
PROCEDURE
MIXING
Straight dough method (p. 108)
FERMENTATION
After mixing, allow a bench rest, covered, for 30–60 minutes before makeup.
MAKEUP
1. Scaling: With a bench scraper, cut off a long piece of dough 5 oz (150 g) in weight.
2. With the palms of the hands, roll on the bench to a uniform strip 30 in. (75 cm) long (a). Twist into a pretzel shape (b, c).
3. Dip in a solution of 2 oz (60 g) baking soda in 1 pt (500 mL) water. Arrange on baking sheets lined with parchment. Stretch and reform the pretzel shapes as necessary. (Note: After dipping in soda solution, the units are difficult to handle. If desired, pan the pretzels first, then brush thoroughly with the soda solution.)
4. Sprinkle with pretzel salt.
5. Bake immediately (without proofing) at 500°F (260°C) for 8–9 minutes, or until well browned.
6. Optional: Dip in melted butter immediately after baking and drain on racks (d).
A
C
P R E T Z E L S
Pretzels have been made for more than a thousand years. Their origins are lost in history, although there are several folk tales that attempt to explain how they first came to be. For centuries, the pretzel has been used in Europe as a symbol of the trade by bakers and bakers’ guilds; it can still be seen on bakeshop signs.
Amish-style pretzels are an unusual variety of the more familiar soft pretzels that come to us from German-speaking regions of Europe. Although they are similar to regular soft pretzels in appearance, their flavor is different because of the way they are prepared. Traditional pretzels derive their flavor in part because of the lye bath they receive before being baked. (Lye is a harsh chemical, sodium hydroxide, that is available in a food grade for baking. When working with lye, wear rubber gloves and goggles for protection. In each quart of water, dissolve 1 oz lye, or 30 g lye per liter of water.) In addition to giving pretzels their distinctive flavor, lye also gives them their rich brown color.
Amish-style pretzels, by contrast, are dipped in a simple baking-soda solution, rather than a lye solution. In addition, they are usually dipped in melted butter after baking.

1 7 0 C H A P T E R 8 LEAn YEAsT DougHs
PITAIngredients U.S. Metric %
Bread flour 1 lb 14.67 oz 625 g 83.5
Whole wheat flour 4.67 oz 125 g 17.5
Water 14.67 oz 435 g 58.5
Yeast, instant 0.45 oz 10 g 1.4
Salt 0.55 oz 15 g 2.5
Sugar 0.67 oz 22 g 3.5
Yogurt, plain low-fat 3.67 oz 90 g 12.5
Oil, preferably olive 1.67 oz 30 g 4.5
Total weight: 2 lb 12.67 oz 1352 g 181.5%
THE OBJECT OF yeast dough makeup is to shape the dough into rolls or loaves that bake properly and have an attractive appearance. When you shape a roll or loaf correctly, you stretch the glu-ten strands on the surface into a smooth skin. This tight gluten surface holds the item in shape. This is especially important for loaves and rolls that are baked freestanding, not in pans. Units that are not made up correctly develop irregular shapes and splits and may flatten out.
Use of Dusting FlourIn most cases, the bench and the dough must be dusted lightly with flour to prevent the dough from sticking to the bench and hands. Some bakers use light rye flour for dusting. Others pre-fer bread flour.
Whichever dusting flour you use, one rule is very important: Use as little as possible. Ex-cessive flour makes seams difficult to seal and shows up as streaks in the baked product.
PROCEDURE
MIXING AND FERMENTATION
Straight dough method (p. 108)
Improved mix (See Mixing Times, Fermentation, and Folds table on p. 141 for mixing and fermentation times.)
Desired dough temperature: 77°F (25°C)
MAKEUP AND BAKING
1. Scale at 3 oz (90 g). Round the units and bench-rest.
2. With a rolling pin, roll out into circles about 4–5 in. (10–12 cm) in diameter.
3. Bake on oven hearth or dry sheet pans at 500°F (260°C) until lightly golden around edges, about 5 minutes. Do not overbake, or the pitas will be dry and stiff. They should be soft when cool.
MAKEUP TECHNIQUES
KEY POINTS TO REVIEW
• What is mixed fermentation?
• What precautions should be taken when mixing, handling, and proofing sourdoughs?
• How is a basic sourdough starter produced?
• What equipment is used to bake English muffins and crumpets?
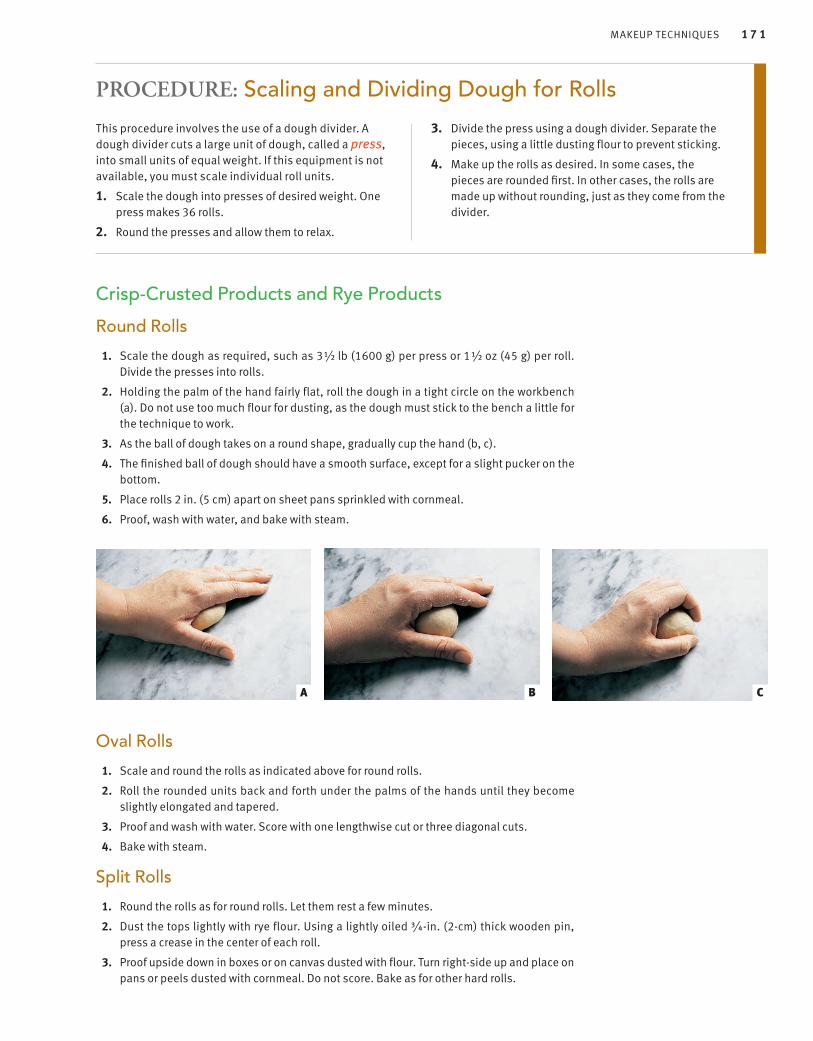
mAkEuP TECHniquEs 1 7 1
Crisp-Crusted Products and Rye Products
Round Rolls
1. Scale the dough as required, such as 3 1/2 lb (1600 g) per press or 1 1/2 oz (45 g) per roll. Divide the presses into rolls.
2. Holding the palm of the hand fairly flat, roll the dough in a tight circle on the workbench (a). Do not use too much flour for dusting, as the dough must stick to the bench a little for the technique to work.
3. As the ball of dough takes on a round shape, gradually cup the hand (b, c).
4. The finished ball of dough should have a smooth surface, except for a slight pucker on the bottom.
5. Place rolls 2 in. (5 cm) apart on sheet pans sprinkled with cornmeal.
6. Proof, wash with water, and bake with steam.
Oval Rolls
1. Scale and round the rolls as indicated above for round rolls.
2. Roll the rounded units back and forth under the palms of the hands until they become slightly elongated and tapered.
3. Proof and wash with water. Score with one lengthwise cut or three diagonal cuts.
4. Bake with steam.
Split Rolls
1. Round the rolls as for round rolls. Let them rest a few minutes.
2. Dust the tops lightly with rye flour. Using a lightly oiled 3/4-in. (2-cm) thick wooden pin, press a crease in the center of each roll.
3. Proof upside down in boxes or on canvas dusted with flour. Turn right-side up and place on pans or peels dusted with cornmeal. Do not score. Bake as for other hard rolls.
PROCEDURE: Scaling and Dividing Dough for Rolls
This procedure involves the use of a dough divider. A dough divider cuts a large unit of dough, called a press, into small units of equal weight. If this equipment is not available, you must scale individual roll units.
1. Scale the dough into presses of desired weight. One press makes 36 rolls.
2. Round the presses and allow them to relax.
3. Divide the press using a dough divider. Separate the pieces, using a little dusting flour to prevent sticking.
4. Make up the rolls as desired. In some cases, the pieces are rounded first. In other cases, the rolls are made up without rounding, just as they come from the divider.
A B C

1 7 2 C H A P T E R 8 LEAn YEAsT DougHs
Crescent Rolls
1. Scale the dough into 16–20-oz (450–575-g) units. Round and relax the units.
2. Flatten the dough and roll out into 12-in. (30-cm) circles.
3. With a pastry wheel, cut each dough circle into 12 equal wedges or triangles. (Alterna-tive method: For large quantities of dough, roll out into a rectangle and cut like croissant dough; see p. 203.)
4. Roll the triangles into crescents using the same technique as for croissants (see p. 203). The rolls may be either left as straight sticks or bent into crescents.
5. Proof. Wash with water and, if desired, sprinkle with poppy seeds, caraway seeds, sesame seeds, or coarse salt. Bake with steam.
Club Rolls
Rather than being rounded, these units are molded as they come from the divider.
1. Flatten the piece of dough roughly into a rectangle (a).
2. Begin to roll up the dough by folding over the back edge of the rectangle. Press the seam firmly with the fingertips (b).
3. Continue to roll the dough, always pressing the seam firmly after each turn. As you roll up the dough, the front edge will appear to shrink. Stretch the front corners, as shown by the arrows, to keep the width uniform (c).
4. When the roll is finished, seal the seam well so the roll is tight (d).
5. Scoring the proofed roll with a single slash gives the baked roll this appearance (e).
6. Place the units 2 in. (5 cm) apart on sheet pans sprinkled with cornmeal.
7. Proof, wash with water, and score with one cut lengthwise. Bake with steam.
Onion Rolls (for Rye or Hard Roll Dough)
1. Prepare the onion mixture:
a. Cover 1 lb (500 g) dried onions with water and soak until soft. Drain.
b. Mix with 2 oz (60 g) oil and 1/2 oz (15 g) salt.
c. Place on a flat pan. Keep covered until ready to use.
2. Divide and round the dough for rolls. Let rest 10 minutes.
3. Place the rolls face down on top of the onions and flatten well with the hands. Place the flattened rolls onion-side up on paper-lined pans.
4. Proof. Press the center of each roll with two fingers to make an indentation. Bake with steam.
Kaiser Rolls
1. Scale Vienna dough to produce rolls of desired size. For sandwich-size rolls, use 5-lb (2300-g) presses to yield 2-oz (60-g) baked rolls.
2. Press the dough in the divider and separate the pieces, dusting them with light rye flour.
3. Round the units and let them rest.
4. Flatten the pieces lightly with the hands.
5. Stamp each roll with a kaiser roll tool. The cuts should go about halfway through the rolls. Do not cut all the way through.
6. Place the rolls upside down on boxes or trays sprinkled generously with poppy seeds or lined with canvas cloth. Proof.
7. Place right-side up on cornmeal-dusted baking sheets or peels. Place in the oven and bake with steam.
A
B
C
D
E
Kaiser roll tool.
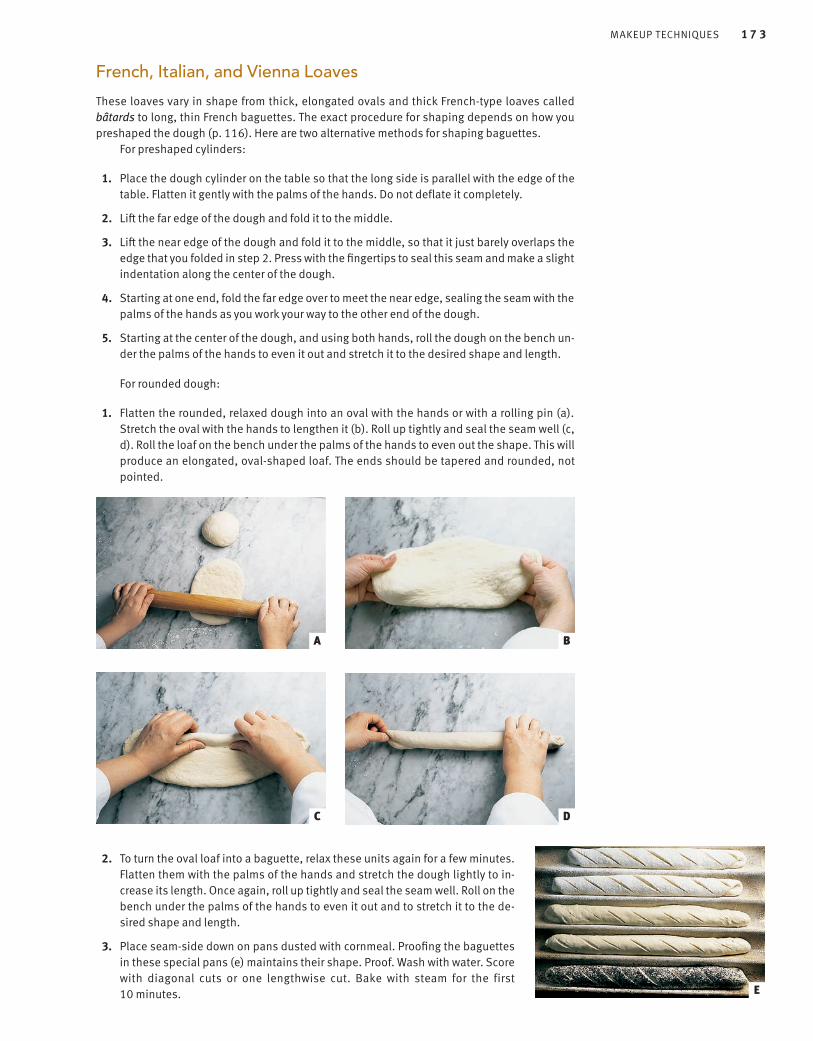
mAkEuP TECHniquEs 1 7 3
French, Italian, and Vienna Loaves
These loaves vary in shape from thick, elongated ovals and thick French-type loaves called bâtards to long, thin French baguettes. The exact procedure for shaping depends on how you preshaped the dough (p. 116). Here are two alternative methods for shaping baguettes.
For preshaped cylinders:
1. Place the dough cylinder on the table so that the long side is parallel with the edge of the table. Flatten it gently with the palms of the hands. Do not deflate it completely.
2. Lift the far edge of the dough and fold it to the middle.
3. Lift the near edge of the dough and fold it to the middle, so that it just barely overlaps the edge that you folded in step 2. Press with the fingertips to seal this seam and make a slight indentation along the center of the dough.
4. Starting at one end, fold the far edge over to meet the near edge, sealing the seam with the palms of the hands as you work your way to the other end of the dough.
5. Starting at the center of the dough, and using both hands, roll the dough on the bench un-der the palms of the hands to even it out and stretch it to the desired shape and length.
For rounded dough:
1. Flatten the rounded, relaxed dough into an oval with the hands or with a rolling pin (a). Stretch the oval with the hands to lengthen it (b). Roll up tightly and seal the seam well (c, d). Roll the loaf on the bench under the palms of the hands to even out the shape. This will produce an elongated, oval-shaped loaf. The ends should be tapered and rounded, not pointed.
2. To turn the oval loaf into a baguette, relax these units again for a few minutes. Flatten them with the palms of the hands and stretch the dough lightly to in-crease its length. Once again, roll up tightly and seal the seam well. Roll on the bench under the palms of the hands to even it out and to stretch it to the de-sired shape and length.
3. Place seam-side down on pans dusted with cornmeal. Proofing the baguettes in these special pans (e) maintains their shape. Proof. Wash with water. Score with diagonal cuts or one lengthwise cut. Bake with steam for the first 10 minutes.
A B
C D
E

1 7 4 C H A P T E R 8 LEAn YEAsT DougHs
Round Loaves and Oval LoavesThese techniques are used for many types of breads, including pain de campagne and French rye. A round loaf is called a boule.
For round loaves, like pain de campagne:
1. Flatten the rounded, relaxed dough into a circle. Fold the sides over the center, then round again. Shape the dough into a seam-free ball (a).
2. Place on pans sprinkled with cornmeal or flour. Proof, wash the tops with water, and score the tops in a crosshatch pattern (b, c). Bake with steam.
For oval loaves, like French rye:
1. As for round loaves, flatten the rounded, relaxed dough into a circle. Fold the sides over the center, then round again. Roll the dough under the palms of the hands into a smooth oval loaf (a).
2. Place on pans sprinkled with cornmeal or flour (b). Proof, wash the tops with water, and dredge with flour. Score as shown (c).
As an alternative to proofing on pans, proof upside down in special baskets called bannetons. Dust the inside of the banneton with flour and push the dough firmly into the basket (d). When the dough is proofed, turn out onto a sheet pan or a peel and slide into the oven.
A B C
A B
C D
Canvas-lined banneton.

mAkEuP TECHniquEs 1 7 5
Fougasse
1. Roll out the dough into a large, thin oval, letting it rest at intervals to allow the gluten to relax.
2. Oil a sheet pan with olive oil. Place the dough on the sheet pan and brush the dough well with olive oil (a).
3. Press the fingertips into the dough at regular intervals, as for focaccia (b) (see p. 166).
4. Cut slits in the dough (c). Stretch the dough to open the slits (d).
5. Proof for 30 minutes at room temperature.
Soft Roll Doughs, Pan Loaves, and Braided Breads
A B
C D

1 7 6 C H A P T E R 8 LEAn YEAsT DougHs
Tied or Knotted Rolls
1. Scale the dough into presses of desired size. Divide the presses.
2. With the palms of the hands, roll each unit on the workbench into a strip or rope of dough.
3. Tie the rolls as shown below.
4. Place rolls 2 in. (5 cm) apart on greased or paper-lined baking sheets.
5. Proof, egg-wash, and bake without steam.
Sawtooth Rolls
1. Prepare elongated oval rolls.
2. With scissors, cut a row of snips down the tops of the rolls.
Single-knot rolls.
Figure-eight rolls.
Double-knot rolls. Braided rolls.

mAkEuP TECHniquEs 1 7 7
Crescent Rolls
1. Make up as for hard crescent rolls, except brush the triangles with melted butter before rolling up.
2. Proof, egg-wash, and sprinkle with poppy seeds. Bake without steam.
Pan Rolls
1. Scale the dough into presses of desired size. Divide.
2. Make up as for round hard rolls.
3. Place on greased pans 1/2 in. (1 cm) apart.
Parker House Rolls
1. Scale the dough into presses of desired size. Divide.
2. Round the scaled piece of dough (a).
3. Flatten the center of the dough with a narrow rolling pin (b).
4. Fold the dough over and press down on the folded edge to make a crease (c).
5. Place on a greased baking sheet 1/2 in. (1 cm) apart The baked rolls have a seam that splits open easily (d).
Butterflake Rolls
1. Roll out the dough into a very thin rectangular shape. Brush it with melted butter. Cut it into strips 1 in. (2.5 cm) wide (a).
2. Stack 6 strips. Cut into 1 1/2 -in. (3.5-cm) pieces (b).
3. Place the pieces on end in greased muffin tins (c). Proof. The baked rolls have a flaky ap-pearance (d).
A B
C D
A B
C D

1 7 8 C H A P T E R 8 LEAn YEAsT DougHs
Cloverleaf Rolls
1. Scale the dough into presses of desired size. Divide each piece of dough into 3 equal parts and shape them into balls.
2. Place 3 balls in the bottom of each greased muffin tin (a). The balls merge as they bake to form a cloverleaf shape (b).
Pan Loaves
1. Start with the rounded, benched dough (a).
2. Stretch it into a long rectangle (b).
3. Fold into thirds (c, d).
4. Roll the dough into a tight roll that has the same length as the pan it is to be baked in (e). Seal the seam well and place the dough seam-side down in the greased pan.
For split-top loaves, make one cut from end to end in the top of the loaf after proofing.
Pullman LoafPullman loaves are baked in loaf pans with sliding lids so slices from the baked loaf are square, ideal for sandwiches. Pans are usually of standard sizes to make 1-lb (450-g), 1 1/2-lb (675-g), 2-lb (900-g), and 3-lb (1350-g) loaves.
1. Scale the dough to fit the loaf pans. Add an extra 2 oz (50 g) dough per pound (450 g) to allow for baking loss.
2. Make up loaves in one of two ways:
## Make up as standard pan loaves as in the preceding technique.
## Divide each scaled unit into 2 pieces. Roll out into strips and twist the 2 strips together. Seal the ends well. This method is preferred by many bakers because it gives extra strength to the loaf structure. The sides of the loaf are less likely to collapse.
3. Place the made-up loaves in lightly greased pans. Put on the lids (greased on the under-side), but leave them open about 1 in. (2.5 cm).
A B
A B C
D E

mAkEuP TECHniquEs 1 7 9
4. Proof until the dough has risen almost to the lids.
5. Close the lids. Bake at 400°–425°F (200°–218°C) without steam.
6. Remove the lids after 30 minutes. The bread should be taking on color by this time. If the lid sticks, it may be because the bread requires a few more minutes of baking with the lid. Try again after a few minutes.
7. Complete baking with the lids off to allow moisture to escape.
Braided LoavesEgg-enriched soft roll dough and challah dough are the most appropriate for braided loaves. The dough should be relatively stiff so the braids hold their shape.
Braids of one to six strands are commonly made. More complicated braids of seven or more strands are not presented here because they are rarely made.
Braided breads are egg-washed after proofing. If desired, they may also be sprinkled with poppy seeds after washing.
ONE-STRAND BRAID
1. Roll the dough into a smooth, straight strip with the palms of the hands. The strip should be of uniform thickness from end to end.
2. Tie or braid the strip as for a braided roll (see p. 176).
TWO-, THREE-, FOUR-, FIVE-, AND SIX-STRAND BRAIDS
1. Divide the dough into equal pieces, depending on how many strips are required.For a double three-strand braid, divide the dough into 4 equal pieces, then divide one
of these pieces into 3 smaller pieces to yield 3 large and 3 small pieces.
2. Roll the pieces with the palms of the hands into long, smooth strips. The pieces should be thickest in the middle and gradually taper toward the ends.
3. Braid the strips as shown in the illustrations. Please note that the numbers used in these descriptions refer to the positions of the strands (numbered from left to right). At each stage in the braiding, number 1 always indicates the first strand on the left.
Two-Strand Braids
1. Cross the 2 strands in the middle (a).
2. Fold the two ends of the bottom strand over the upper one (b).
3. Now fold the ends of the other strand over in the same way (c).
4. Repeat steps 2 and 3 until the braid is finished (d).
A B
C D
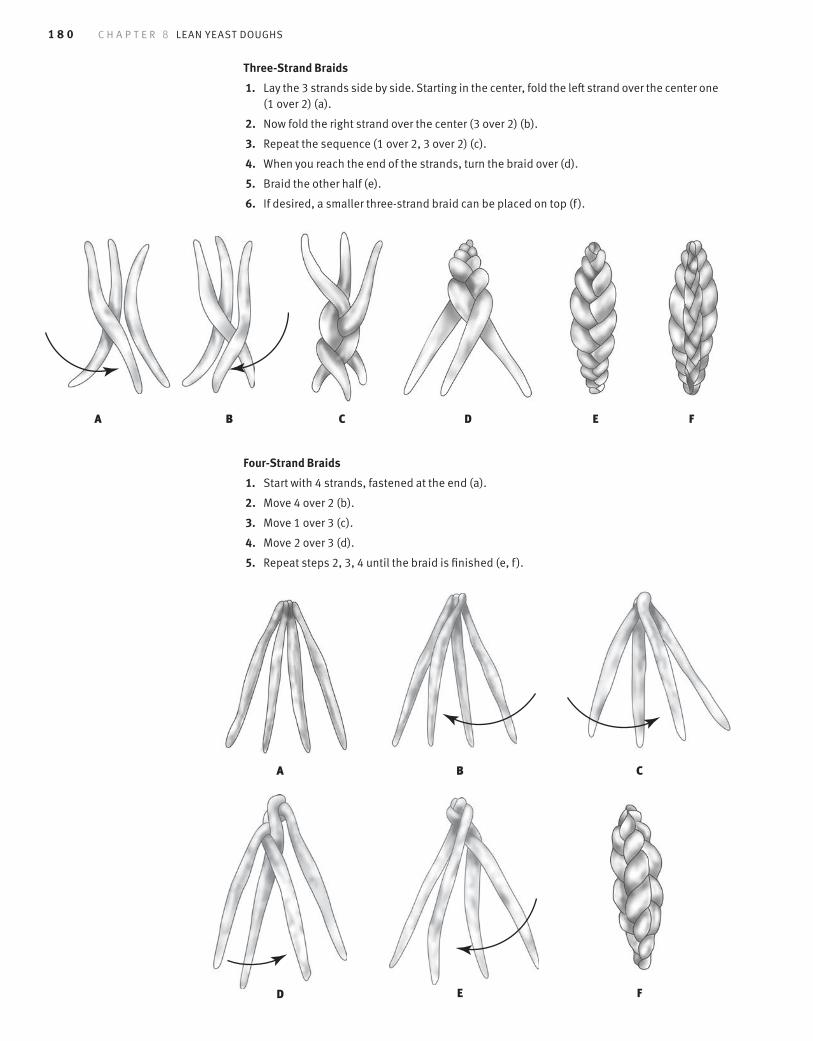
1 8 0 C H A P T E R 8 LEAn YEAsT DougHs
Three-Strand Braids
1. Lay the 3 strands side by side. Starting in the center, fold the left strand over the center one (1 over 2) (a).
2. Now fold the right strand over the center (3 over 2) (b).
3. Repeat the sequence (1 over 2, 3 over 2) (c).
4. When you reach the end of the strands, turn the braid over (d).
5. Braid the other half (e).
6. If desired, a smaller three-strand braid can be placed on top (f ).
Four-Strand Braids
1. Start with 4 strands, fastened at the end (a).
2. Move 4 over 2 (b).
3. Move 1 over 3 (c).
4. Move 2 over 3 (d).
5. Repeat steps 2, 3, 4 until the braid is finished (e, f ).
A B C D E F
A B C
D E F

mAkEuP TECHniquEs 1 8 1
Five-Strand Braids
1. Start with 5 strands, fastened at the end (a).
2. Move 1 over 3 (b).
3. Move 2 over 3 (c).
4. Move 5 over 2 (d).
5. Repeat steps 2, 3, 4 until the braid is finished (e, f ).
A B
C D
E F
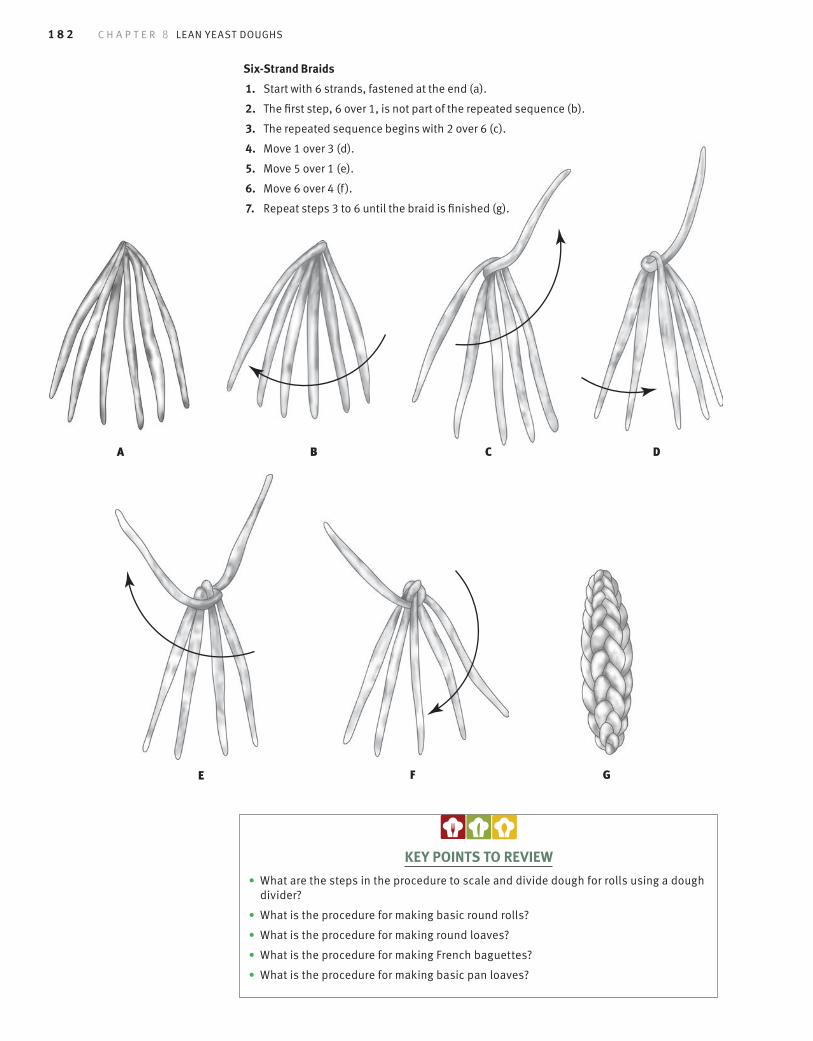
1 8 2 C H A P T E R 8 LEAn YEAsT DougHs
Six-Strand Braids
1. Start with 6 strands, fastened at the end (a).
2. The first step, 6 over 1, is not part of the repeated sequence (b).
3. The repeated sequence begins with 2 over 6 (c).
4. Move 1 over 3 (d).
5. Move 5 over 1 (e).
6. Move 6 over 4 (f ).
7. Repeat steps 3 to 6 until the braid is finished (g).
A B C D
E F G
KEY POINTS TO REVIEW
• What are the steps in the procedure to scale and divide dough for rolls using a dough divider?
• What is the procedure for making basic round rolls?
• What is the procedure for making round loaves?
• What is the procedure for making French baguettes?
• What is the procedure for making basic pan loaves?

quEsTions FoR DisCussion 1 8 3
T E R M S F O R R E V I E W
ciabatta
focaccia
pain de campagne
fougasse
French bread
sour
English muffin
bagel
press
pullman loaf
1. How would the baked loaves be different if you increased the shortening in the French bread formula (p. 144) to 7%?
2. Why is the baking temperature for Italian bread (p. 143) higher than that for challah (p. 150)?
3. How could you modify the formula for Vienna bread (p. 142) if you didn’t have any malt?
4. Why is it important not to use too much dusting flour when making up breads and rolls?
5. Describe the procedure for makeup of focaccia.
6. Describe the procedure for using a dough divider.
7. Describe the procedure for rounding rolls.
8. Describe the procedure for makeup of baguettes.
Q U E S T I O N S F O R D I S C U S S I O N


185
AFTER READING THIS CHAPTER, YOU SHOULD BE ABLE TO:
9Rich Yeast Doughs
1. Produce simple sweet doughs.
2. Produce laminated yeast doughs.
3. Prepare a variety of toppings and fillings for rich yeast doughs.
4. Make up a variety of products using sweet doughs and laminated doughs, including Danish pastry and croissants.
THIS CHAPTER COMPLETES the study of yeast doughs with a survey of the most
important rich yeast doughs. As explained in Chapter 6, rich doughs are those
with higher proportions of fat and, sometimes, sugar and eggs as well.
Simple sweet-roll doughs are the easiest of these products to handle. Even
these, however, require care, as they are usually softer and stickier than bread
doughs. Because their gluten structure is not as strong as that of lean doughs,
more care must be taken in proofing and baking sweet dough products.
Laminated doughs, such as those for Danish pastries and croissants, are espe-
cially rich in fat because they consist of layers of butter between layers of dough.
Like other sweet doughs, these yeast-leavened doughs are often the responsibility

1 8 6 C H A P T E R 9 RiCH YEAsT DougHs
of the pastry chef rather than the bread baker. Considerable practice and skill are required for the makeup of fine Danish products.
As in Chapter 8, the dough formulas and makeup techniques covered in this chapter are given in separate sections because each dough can be made up into a great many items. This chapter also includes a selection of fillings and toppings suitable for rich yeast-dough products.
Review Chapter 6 with respect to the basic mixing methods and other produc-tion procedures for yeast doughs.
IT IS IMPORTANT to remember that high percentages of fat and sugar in yeast dough inhibit fermentation. For this reason, most of the doughs in this section are mixed by the sponge method so that most of the fermentation can take place before the sugar and fat are added. The major exception is regular sweet dough, or bun dough, which is low enough in fat and sugar to be mixed by the modified straight dough method. The quantity of yeast is also increased. Refer to Chapter 6, pages 108–109, to review these basic mixing methods.
High levels of fat and eggs make rich doughs very soft. The amount of liquid is reduced to compensate for this. High levels of sugar and fat hinder gluten development, so sweet, nonlaminated doughs are often mixed using the intensive mix technique (p. 111), to produce gluten strength. Be careful not to overmix the dough, however. Likewise, do not let the dough get too warm (due to machine friction). If the dough is warmer than the desired temperature after mixing, refrigerate briefly to cool the dough to the proper temperature.
Rich doughs, because they are so tender, are generally underfermented and underproofed. About three-quarters proof is best for rich doughs. Overproofed units may collapse in baking.
Line bun pans with silicone paper whenever there is danger of sticking. This is especially pertinent for items with fruit fillings or other sugary fillings or toppings.
Note that the recipes in this section exemplify two ways of mixing rich sponge doughs. Rich sweet dough and kugelhopf dough are high in sugar, as is panettone, an Italian sweet bread containing dried and candied fruit. To ensure even distribution in the dough, the sugar is creamed with the fat, just as in the modified straight dough method. Brioche and baba doughs contain relatively little sugar, so this method is not used. The fat is mixed into the dough last.
Yeast SelectionWhen the percentage of sugar is 12% or greater, the preferred yeast to use is osmotolerant yeast (see page 80). Regular yeast becomes fairly inactive when sugar quantities are high. Osmotol-erant yeast, in contrast, can tolerate high sugar levels.
The formulas in this chapter specify osmotolerant instant yeast whenever the sugar levels are 12% or higher. If osmotolerant yeast is unavailable, multiply the quantity by 1.3 to get the amount of regular instant yeast to substitute. For example, if a formula calls for 0.5 oz osmotol-erant yeast, you could substitute 0.65 oz (0.5 × 1.3) regular instant yeast.
Makeup and Baking of Sweet Dough ProductsEach of the dough formulas in this chapter can be used for a wide variety of products. Similarly, each makeup method can be applied to more than one dough. As in Chapter 8, makeup meth-ods are grouped together later in the chapter.
From makeup to finished product, take note of a number of techniques especially appli-cable to rich doughs.
SWEET DOUGH AND RICH DOUGH FORMULAS
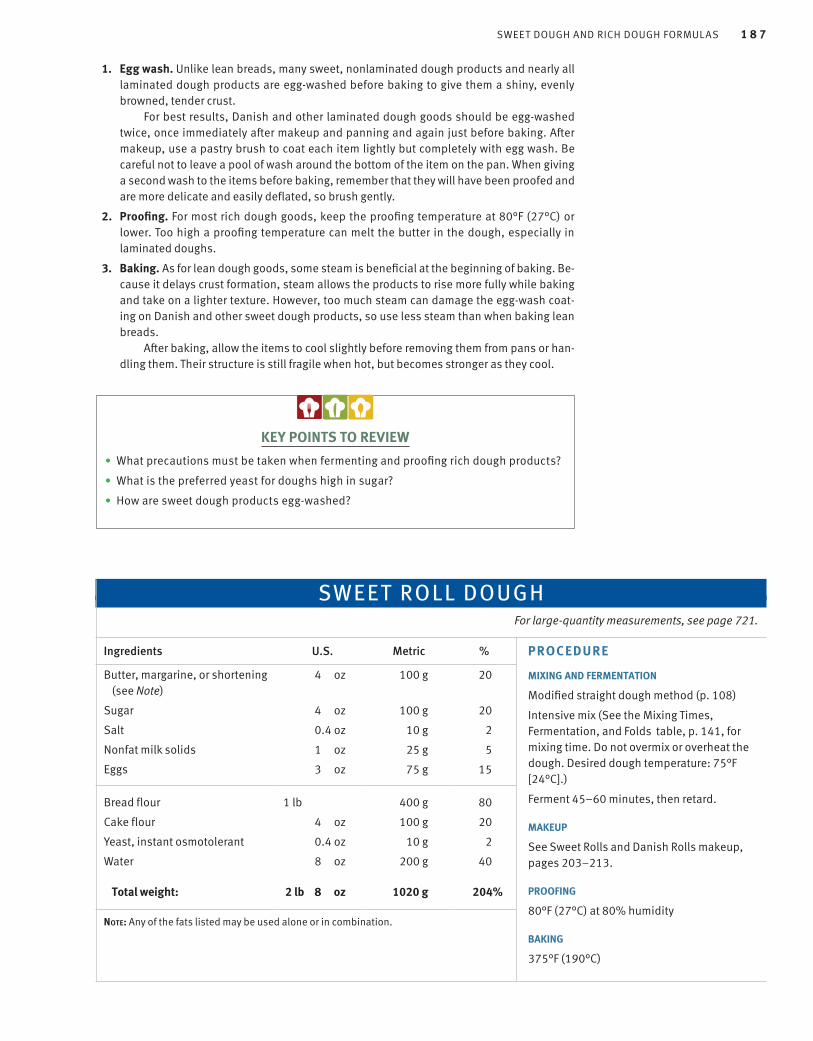
swEET DougH AnD RiCH DougH FoRmulAs 1 8 7
1. Egg wash. Unlike lean breads, many sweet, nonlaminated dough products and nearly all laminated dough products are egg-washed before baking to give them a shiny, evenly browned, tender crust.
For best results, Danish and other laminated dough goods should be egg-washed twice, once immediately after makeup and panning and again just before baking. After makeup, use a pastry brush to coat each item lightly but completely with egg wash. Be careful not to leave a pool of wash around the bottom of the item on the pan. When giving a second wash to the items before baking, remember that they will have been proofed and are more delicate and easily deflated, so brush gently.
2. Proofing. For most rich dough goods, keep the proofing temperature at 80°F (27°C) or lower. Too high a proofing temperature can melt the butter in the dough, especially in laminated doughs.
3. Baking. As for lean dough goods, some steam is beneficial at the beginning of baking. Be-cause it delays crust formation, steam allows the products to rise more fully while baking and take on a lighter texture. However, too much steam can damage the egg-wash coat-ing on Danish and other sweet dough products, so use less steam than when baking lean breads.
After baking, allow the items to cool slightly before removing them from pans or han-dling them. Their structure is still fragile when hot, but becomes stronger as they cool.
SWEET ROLL DOUGHFor large-quantity measurements, see page 721.
Ingredients U.S. Metric %
Butter, margarine, or shortening (see Note)
4 0.oz 100 g 20
Sugar 4 0.oz 100 g 20
Salt 0.4 oz 10 g 2
Nonfat milk solids 1.4 oz 25 g 5
Eggs 3.4 oz 75 g 15
Bread flour 1 lb 1. 4 .4 . 400 g 80
Cake flour 4.4 oz 100 g 20
Yeast, instant osmotolerant 0.4 oz 10 g 2
Water 18.4 oz 200 g 40
Total weight: 2 lb 18.4 oz 1020 g 204%
Note: Any of the fats listed may be used alone or in combination.
PROCEDURE
MIXING AND FERMENTATION
Modified straight dough method (p. 108)
Intensive mix (See the Mixing Times, Fermentation, and Folds table, p. 141, for mixing time. Do not overmix or overheat the dough. Desired dough temperature: 75°F [24°C].)
Ferment 45–60 minutes, then retard.
MAKEUP
See Sweet Rolls and Danish Rolls makeup, pages 203–213.
PROOFING
80°F (27°C) at 80% humidity
BAKING
375°F (190°C)
KEY POINTS TO REVIEW
• What precautions must be taken when fermenting and proofing rich dough products?
• What is the preferred yeast for doughs high in sugar?
• How are sweet dough products egg-washed?

1 8 8 C H A P T E R 9 RiCH YEAsT DougHs
RICH SWEET DOUGHFor large-quantity measurements, see page 722.
Ingredients U.S. Metric %
Milk, scalded and cooled 8.4 oz 200 g 40
Yeast, instant osmotolerant 0.4 oz 10 g 2
Bread flour 10.4 oz 250 g 50
Butter 8 0.oz 200 g 40
Sugar 4 0.oz 100 g 20
Salt 0.4 oz 10 g 2
Eggs 5 0.oz 125 g 25
Bread flour 10 0.oz 250 g 50
Total weight: 2 lb 13 0.oz 1145 g 229%
PROCEDURE
MIXING
Sponge method
Intensive mix (See Mixing Times, Fermentation, and Folds table, p. 141.)
1. Make a sponge with the first 3 ingredients. Ferment until double.
2. Cream butter, sugar, and salt until well blended. Blend in eggs.
3. Add the sponge. Mix to break up the sponge.
4. Add the flour and develop the dough. Mixing time: about 3–4 minutes at first speed and 8 minutes at second speed. Do not overmix or overheat the dough.
Desired dough temperature: 75°F (24°C)
FERMENTATION
40–60 minutes and then retard; or retard immediately. Retarding makes it easier to handle the dough, which is very soft.
V A R I A T I O N S
STOLLEN
For large-quantity measurements, see page 722.
Ingredients U.S. Metric %
Almond extract 0.12 oz (3/4 tsp) 2 g 0.5Lemon rind, grated 0.12 oz (1 1/2 tsp) 2 g 0.5Vanilla extract 0.12 oz (3/4 tsp) 2 g 0.5
Raisins (light, dark, 6.12 oz 150 g 30 or a mixture)
Mixed glacéed fruit 7.12 oz 175 g 35
Add almond extract, lemon rind, and vanilla extract to the butter and sugar during the blending stage. Knead raisins and mixed glacéed fruit into the dough.
MAKEUP
1. Scale, round, and let rest. Scaling weights may range from 12 oz to 2 lb (350 g to 1 kg), depending on individual needs.
2. With hands or a rolling pin, flatten slightly into an oval shape.
3. Wash the top with butter.
4. Make a crease down the length of the oval about 1/2 in. (1 cm) off-center. Fold one side (the smaller side) over the other, as though you were making a large, wide Parker House Roll (see p. 177).
5. Give three-quarters proof. Wash the tops with melted butter.
6. Bake at 375°F (190°C).
7. Cool. Dredge heavily with 4X or 6X sugar.
BABKA
For large-quantity measurements, see page 722.
Ingredients U.S. Metric %
Vanilla extract 0.12 oz (3/4 tsp) 2 g 0.5Cardamom 0.06 oz (3/4 tsp) 1 g 0.25Raisins 4.06 oz 100 g 20
Add vanilla and cardamom to the butter during blending. Knead the raisins into the dough.
MAKEUP
Loaf Coffee Cake (p. 212). May be topped with streusel.
BAKING
350°F (175°C). Be sure to bake thoroughly; underbaked units will have sticky crumbs and may collapse.

swEET DougH AnD RiCH DougH FoRmulAs 1 8 9
KUGELHOPFIngredients U.S. Metric %
Milk, scalded and cooled 6 0.oz 190.5 g 30.5
Yeast, instant osmotolerant 0.4 oz 12.5 g 2.5
Bread flour 6 0.oz 190.5 g 30.5
Butter 80. oz 250.5 g 40.5
Sugar 40. oz 125.5 g 20.5
Salt 0.4 oz 13.5 g 2.5
Eggs 7 0.oz 220.5 g 35.5
Bread flour 14 0.oz 440.5 g 70.5
Raisins 2.5 oz 75.5 g 12.5
Total weight: 2 lb 15 0.oz 1509.5 g 241.5%
PROCEDURE
MIXING
Sponge method
Intensive mix (See Mixing Times, Fermentation, and Folds table, p. 141.)
1. Make a sponge with the first 3 ingredients. Ferment until double.
2. Cream the butter, sugar, and salt until well blended. Blend in the eggs.
3. Add the sponge. Mix to break up the sponge.
4. Add the flour and develop the dough. Mixing time: about 3–4 minutes at first speed, 8 minutes at second speed. Do not overmix or overheat the dough. Desired dough temperature: 75°F (24°C). Dough will be very soft and sticky.
5. Carefully blend in the raisins.
FERMENTATION
Needs only 15–20 minutes bench rest before scaling and panning. Or retard immediately.
MAKEUP
1. Heavily butter kugelhopf molds or tube pans.
2. Optional step: Line molds with sliced almonds (which will stick to the buttered sides).
3. Fill molds halfway with dough (each quart of volume requires about 1 lb dough, or each liter requires about 500 g).
4. Give three-quarters proof.
BAKING
375°F (190°C)
Unmold and cool completely. Dust with confectioners’ sugar.

1 9 0 C H A P T E R 9 RiCH YEAsT DougHs
HOT CROSS BUNSFor large-quantity measurements, see page 722.
Ingredients U.S. Metric
Sweet Roll Dough (p. 187) 2 lb 18.07 oz (1 tsp) 1250.5 g
Dried currants 4.07 oz (1 tsp) 125.5 g
Golden raisins 2.07 oz (1 tsp) 60.5 g
Mixed candied peel, diced 1.07 oz (1 tsp) 30.5 g
Ground allspice 0.07 oz (1 tsp) 2.5 g
Total weight: 2 lb 15.07 oz (1 tsp) 1467.5 g
BABA/SAVARIN DOUGHFor large-quantity measurements, see page 722.
Ingredients U.S. Metric %
Milk, scalded and cooled
4.25 oz (1 tsp) 120 g 40.5
Yeast, instant 0.25 oz (1 tsp) 8 g 2.5
Bread flour 2.55 oz (1 tsp) 75 g 25.5
Eggs 5.25 oz (1 tsp) 150 g 50.5
Bread flour 7.55 oz (1 tsp) 225 g 75.5
Sugar 0.25 oz (1 tsp) 8 g 2.5
Salt 0.25 oz (1 tsp) 4 g 2.5
Butter, melted 4.25 oz (1 tsp) 120 g 40.5
Total weight: 1 lb 17225 oz (1 tsp) 710 g 236.5%
PROCEDURE
1. Undermix the Sweet Roll Dough. Mix together the fruits and spice until thoroughly mixed, then work into the dough until well incorporated.
2. See Sweet Roll Dough formula, page 187, for fermentation and baking.
MAKEUP
1. Scale into 2-oz (60-g) units and round.
2. Place on greased or parchment-lined sheet pans, just touching. Egg-wash.
3. After baking, brush with Clear Glaze (p. 197). Pipe Flat Icing (p. 429) into a cross shape on each roll.
V A R I A T I O N
For a more traditional cross on top of the buns, mix together the ingredients for Cross Paste (below) until smooth. Pipe crosses onto the buns after they are proofed but before they are baked.
CROSS PASTEIngredients U.S. Metric %
Water 10.06 oz 300 g 111Pastry flour or cake flour 9.06 oz 270 g 100Shortening 2.06 oz 60 g 22Milk powder 1.06 oz 30 g 11Baking powder 0.06 oz (1/3 tsp) 2 g 0.7Salt 0.06 oz (1/3 tsp) 2 g 0.7
PROCEDUREMIXING
Sponge method1. Make a sponge with the first 3 ingredients.
Ferment until double.2. Using the paddle attachment, gradually mix in eggs
and then dry ingredients to make a soft dough.3. Beat in butter a little at a time until it is completely
absorbed and the dough is smooth. Dough will be very soft and sticky.
MAKEUP AND BAKING
1. Fill greased molds half full. Average baba molds require about 2 oz (60 g). For savarin molds (ring molds), the following are averages:5-in. ring: 5–6 oz 13-cm ring: 140–170 g7-in. ring: 10–12 oz 18-cm ring: 280–340 g8-in. ring: 14–16 oz 20-cm ring: 400–450 g10-in. ring: 20–24 oz 25-cm ring: 575–675 g
2. Proof until dough is level with top of mold.3. Bake at 400°F (200°C).4. While still warm, soak in Dessert Syrup (p. 258)
flavored with rum or kirsch. Drain.5. Glaze with Apricot Glaze (p. 198). If desired,
decorate with candied fruits.
V A R I A T I O N
Add 25% raisins (10 oz/300 g) to baba dough.

swEET DougH AnD RiCH DougH FoRmulAs 1 9 1
PANETTONEIngredients U.S. Metric %
Raisins 1.75 oz(1 1/4 tsp) 50.7 g 11.25
Golden raisins or sultanas 1.75 oz(1 1/4 tsp) 50.7 g 11.25
Mixed candied peel 3.45 oz 1 1/4 tsp) 100.7 g 21.25
Blanched almonds, chopped 1.75 oz(1 1/4 tsp) 50.7 g 11.25
Grated lemon zest 0.15 oz (1 1/4 tsp) 2.7 g 0.65
Grated orange zest 0.15 oz (1 1/4 tsp) 2.7 g 0.65
Lemon juice 1.55 oz (1 1/4 tsp) 40.7 g 9.25
Orange juice 1.55 oz (1 1/4 tsp) 40.7 g 9.25
Rum 0.55 oz (1 1/4 tsp) 13.7 g 3.25
Nutmeg 0.04 oz (1/2 tsp)1 1.2 g 0.25
Bread flour 8 5 oz (1 1/4 tsp) 235.7 g 50.25
Water 6.45 oz (1 1/4 tsp) 188.7 g 40.25
Yeast, instant osmotolerant 0.37 oz (1 1/4 tsp) 11.7 g 2.35
Egg yolks 2.75 oz (1 1/4 tsp) 80.7 g 17.25
Salt 0.15 oz (1/2 tsp)1 3.3 g 0.75
Sugar 2.75 oz (1 1/4 tsp) 80.7 g 17.25
Milk solids 0.33 oz (1 1/4 tsp 9.7 g 2.25
Bread flour 8 04 oz (1 1/4 tsp) 235.7 g 50.25
Butter, softened 3.25 oz (1 1/4 tsp) 94.7 g 20.25
Total weight: 2 lb 19 04 oz (1 1/4 tsp)) 1285.7 g 275.25%
PROCEDURE
PREPARE THE MARINATED FRUIT MIXTURE
Combine the raisins, peel, almonds, zest, juice, rum, and nutmeg in a bowl. Cover and allow to marinate several hours; or refrigerate overnight.
MIXING AND FERMENTATION
1. Make a sponge with the first quantity of flour, the milk, and the yeast. Let stand at room temperature for 1 hour.
2. Mix the egg yolks, salt, sugar, and milk powder until well blended.
3. Add the sponge and mix to break it up.
4. Add the last quantity of flour and develop into a dough, about 4-5 minutes at first speed. Do not overdevelop the dough, as it will develop more when the fruit and butter are added.
5. Ferment at room temperature until doubled in size.
6. Drain the marinated fruit. Add the fruit and the butter to the dough, and mix until smooth and well incorporated. Put back into the bowl and let ferment a second time at room temperature until doubled in size.
PAN PREPARATION AND BAKING
1. Have ready a 7-in. (18-cm) paper panettone mold. If such a mold is not available, line the side of a 7-in. (18-cm) buttered cake pan with a double layer of parchment extending about 4 1/2 in. (12 cm) high and tied with a string.
2. Punch down the dough and round it into a smooth ball.
3. Place the dough in the prepared cake tin and press down lightly with the knuckles.
4. Cover and proof at room temperature until doubled in volume.
5. Cut a cross into the top of the dough and brush with melted butter.
6. Bake in a preheated oven at 375°F (190°C). Cover the top of the panettone with foil when golden to prevent excessive browning.
7. Reduce oven temperature to 325°F (160°C). Continue baking until a skewer inserted in the center comes out clean, approximately 1 3/4–2 hours in all.
8. Remove from the oven and brush with melted butter.
9. Once cold, dust the top with confectioners’ sugar, if desired.

1 9 2 C H A P T E R 9 RiCH YEAsT DougHs
BRIOCHEFor large-quantity measurements, see page 722.
Ingredients U.S. Metric %
Milk, scalded and cooled 2.5 oz (1 tsp) 60 g 20
Bread flour 2.5 oz (1 tsp) 60 g 20
Yeast, instant osmotolerant 0.2 oz (1 tsp) 6 g 2
Eggs 5.5 oz (1 tsp) 150 g 50
Bread flour 8.5 oz (1 tsp) 240 g 80
Sugar 0.5 oz (1 tsp) 15 g 5
Salt 0.2 oz (1 tsp) 6 g 2
Butter, softened (see Note) 6.5 oz (1 tsp) 180 g 60
Total weight: 1 lb 18.5 oz (1 tsp) 717 g 239%
Note: To make the dough less sticky and easier to handle, the butter may be reduced to 50% (5 oz/150 g) or as low as 35% (3.5 oz/105 g). However, the product will not be as rich and delicate.
PROCEDURE
MIXING
Sponge method1. Make a sponge with the milk, flour, and
yeast. Let rise until double.2. Using the paddle attachment, gradually mix
in the eggs and then the dry ingredients to make a soft dough.
3. Beat in the butter a little at a time until it is completely absorbed and the dough is smooth. Dough will be very soft and sticky.
FERMENTATION
1. If the dough will require much handling in makeup, as for small brioche rolls, it is easiest to retard the dough overnight. Making it up while chilled reduces stickiness.
2. If the dough is to be simply deposited in pans, its stickiness and softness will not be problems, so it need not be retarded. Ferment 20 minutes, then scale and pan.
MAKEUP
See Brioches makeup, page 204. Egg-wash after proofing.
BAKING
400°F (200°C) for small rolls; 375°F (190°C) for large units
LAMINATED OR ROLLED-IN doughs contain many layers of fat sandwiched between layers of dough. These layers create the flakiness you are familiar with in Danish pastry.
In the classic pastry shop, there are two basic rolled-in yeast doughs:
1. Croissant dough (also called Danish pastry dough, croissant-style) resembles a puff pas-try (see Chapter 14) with the addition of yeast. It is based on a dough made of milk, flour, a little sugar, and, of course, yeast. The rolled-in butter gives the dough its flaky texture.
2. Danish dough, brioche-style, is a richer dough containing eggs, although it is not as rich in eggs as regular brioche. This dough is also called brioche feuilletée, or flaky brioche.
Both these doughs are used in making Danish pastries, although only the first one is generally used for croissants. In addition to the classic French recipes for these two pastry doughs, this section also includes two formulas similar to those widely used in North Ameri-can bakeshops.
Unlike nonlaminated sweet doughs, which are often mixed using the intensive method, laminated doughs require much less mixing. This is because the gluten continues to be developed during the rolling-in process. A dough that comes from the mixer fully developed will be overdeveloped by the time the lamination process is completed.
Butter is the preferred fat because of its flavor and melt-in-the-mouth qualities. The highest-quality products use butter for at least part of the rolled-in fat. However, butter is difficult to work because it is hard when cold and soft when a little too warm. Specially formulated shortenings and margarines (called roll-in compounds) can be used when lower cost and greater ease of handling are important considerations.
LAMINATED DOUGH FORMULAS
V I E N N O I S E R I E
Viennoiserie (vee en wahz REE), or Viennese pastry, is the general term given to sweet yeast-raised dough goods, both laminated and nonlaminated. Brioche, Danish, and croissants are classic examples of viennoiserie.

lAminATED DougH FoRmulAs 1 9 3
ROLLING-IN PROCEDURE: Danish and Croissant Dough
The rolling-in procedure has two major parts: enclosing the fat in the dough, and rolling out and folding the dough to increase the number of layers.
In these doughs, you use a simple fold, or three-fold, which means you fold the dough in thirds. Each complete rolling and folding step is called a turn. Give Danish dough three turns, resting the dough in the refrigerator for 30 minutes after the first turn to allow the gluten to relax.
After each turn, use the fingertips to press indentations in the dough near the edge—one indentation after the first turn, two after the second, three after the third. This helps you keep track of your production if you have several batches in progress; and it is essential if you have several people working on the same dough.
1. Roll out the dough into a rectangle. Smear softened butter over two-thirds of the dough, leaving a margin around the edges (a, b).
A
B
2. Fold the unbuttered third of the dough over the center (c).
C
3. Fold the remaining third on top (d).
D
4. Rotate the dough 90 degrees on the countertop. This step is necessary before each rolling-out of the dough so that it is stretched in all directions, not just lengthwise. In addition, always place the more uneven side up before rolling so it will be hidden after folding and the smoother side will be on the outside. Roll out the dough into a long rectangle (e).
E
5. Fold the dough into thirds by first folding the top third over the center (f ).
F
6. Fold over the remaining third. This is the first turn, or first fold (enclosing the butter doesn’t count as a turn). Let the dough rest in the refrigerator 30 minutes to relax the gluten. Repeat this rolling and folding two more times for a total of three turns (g).
G

1 9 4 C H A P T E R 9 RiCH YEAsT DougHs
B
D
DANISH PASTRY DOUGH (CROISSANT-ST YLE)Ingredients U.S. Metric %
Water 7.25 oz 200 g 18.5
Yeast, fresh (see Note) 1.25 oz 40 g 3.5
Bread flour 5.25 oz 150 g 14.5
Sugar 2.55 oz 80 g 7.5
Salt 0.75 oz 25 g 2.5
Milk 12.25 oz 350 g 32.5
Water 1.55 oz 50 g 4.5
Bread flour 2 lb.1.25 25 950 g 86.5
Butter 1 lb 14.25 oz 600 g 55.5
Total weight: 5 lb 12 .25 oz 2445 g 222.5%
Note: To use instant yeast, substitute 1.4% (0.5 oz/16 g) instant for the fresh yeast, and mix all ingredients (except the butter for rolling in) as a regular straight dough (p. 108). Develop the dough as in steps 4–7 of the procedure at the right.
PROCEDURE
MIXING AND FERMENTATION
Modified straight dough method
1. In a bowl, mix the yeast and water (a). Sprinkle the first quantity of flour over the mixture (b). Let stand about 15 minutes.
2. In another bowl, mix the sugar, salt, milk, and water until the solids are dissolved.
3. Sift the flour and add it to the yeast mixture. Add the liquid mixture. Begin mixing to form a dough (c).
4. Mix just until a uniform dough is formed. Continue mixing by hand; avoid overmixing (d).
5. Finish by kneading the dough on the countertop (e).
6. Cover and allow to ferment for 40 minutes at room temperature.
7. Punch down and place in refrigerator for 1 hour.
ROLLING IN
Incorporate the butter and give 3 three-folds (see Rolling-in Procedure for Danish and Croissant Dough, p. 193, for rolling-in procedure).
A
C
E

lAminATED DougH FoRmulAs 1 9 5
DANISH PASTRY DOUGH (BRIOCHE-ST YLE)For large-quantity measurements, see page 722.
Ingredients U.S. Metric %
Milk 7.25 oz (2 tsp) 225 g 28 25
Yeast, fresh (see Note) 1.33 oz (2 tsp) 40 g 5 25
Bread flour 1 lb 10.25 oz (2 tsp) 800 g 100 25
Eggs 3.25 oz (2 tsp) 100 g 12.55
Butter, melted 1.55 oz (2 tsp) 50 g 6 25
Salt 0.33 oz (2 tsp) 10 g 1.25
Sugar 1.55 oz (2 tsp) 50 g 6 25
Milk 2.55 oz (2 tsp) 75 g 9 25
Butter, softened 1 lb 25 .2 (2 tsp) 500 g 62 25
Total weight: 3 lb 11.25 oz (2 tsp) 1850 g 229 2 5%
Note: To use instant yeast, substitute 2% (0.5 oz/15 g) instant for the fresh yeast, and mix all ingredients (except the butter for rolling in) as a regular straight dough (p. 108). Develop the dough as in steps 4–6 of the procedure at the right.
A B
C D
PROCEDURE
MIXING AND FERMENTATION
1. In a bowl, mix the first quantity of milk with the yeast (a).
2. Sift the flour on top of the yeast mixture. Add the eggs and melted butter (b).
3. Dissolve the salt and sugar in the second quantity of milk (c). Add to the bowl.
4. With the dough hook, mix on first speed for 2 minutes to form a dough (d).
5. Place the dough in a mixing bowl, cover, and let ferment 30 minutes at room temperature, or overnight in the refrigerator.
6. Punch down the dough and rest in the refrigerator for 45 minutes.
ROLLING IN
Incorporate the last quantity of butter and give 3 three-folds (see Rolling-in Procedure for Danish and Croissant Dough, p. 193).

1 9 6 C H A P T E R 9 RiCH YEAsT DougHs
CROISSANTSFor large-quantity measurements, see page 723.
Ingredients U.S. Metric %
Milk 8.25 oz 225.5 g 57.4
Sugar 0.55 oz 15.5 g 4.4
Salt 0.25 oz 8.5 g 2.4
Butter, softened 1.55 oz 40.5 g 10.4
Bread flour 14.25 oz 400.5 g 100.4
Yeast, instant 0.25 oz 5.5 g 1.4
Butter 8.25 oz 225.5 g 57.4
Total weight: 2 lb 1 4.25 oz 918.5 g 231.4%
T H E C R O I S S A N T L E G E N D S
Several stories are often told about the origin of the croissant. The most popular of these tales says that the pastry was invented in 1683, in Vienna, to commemorate the defeat of the Turks, who had laid siege to the city. According to the legend, bakers were the first to alert the city to the coming attack because they were working at night while everyone else slept. The crescent shape of the pastry mirrors the crescent on the Turkish flag.
Other stories trace the origin of the croissant to the defeat of a Muslim invasion of France in 732, or to a particular whim of Marie Antoinette in the 1700s. Although all these stories have been disproved long ago, they continue to be told.
What is known is that croissant-shaped pastries and breads have been made in various regions of Europe at least since the thirteenth century. The modern French croissant apparently dates to 1839, with the founding of the Boulangerie Viennoise (Viennese Bakery) in Paris.
PROCEDURE
MIXING
Straight dough method
1. Scald the milk and cool to lukewarm.
2. Add the remaining ingredients except the last quantity of butter.
3. Mix into a smooth dough, but do not develop the gluten. Gluten development will take place during rolling-in procedure.
FERMENTATION
1–1 1/2 hours at 75°F (24°C)
Punch down, spread out on a flat pan, and rest in refrigerator or retarder 30 minutes.
ROLLING IN
Incorporate the last amount of butter and give 3 three-folds (see Rolling-in Procedure for Danish and Croissant Dough, p. 193). Rest in retarder overnight.
MAKEUP
See Croissant Dough makeup, pages 203–204.
Proof at 75°F (24°C) and 65% humidity. Egg-wash before baking.
BAKING
400°F (200°C)

Fillings AnD ToPPings 1 9 7
DANISH PASTRYFor large-quantity measurements, see page 723.
Ingredients U.S. Metric %
Butter 2.50 oz (1/2 tsp) 62 g 12.5Sugar 3.04 oz (1/2 tsp) 75 g 15.5Nonfat milk solids 1.04 oz (1/2 tsp) 25 g 5.5Salt 0.40 oz (1/2 tsp) 10 g 2.5Cardamom or mace (optional) 0.04 oz (1/2 tsp) 1 g 0.2Whole eggs 4.04 oz (1/2 tsp) 100 g 20.5Egg yolks 1.04 oz (1/2 tsp) 25 g 5.5
Bread flour 1 lb11.04oz (1/2 tsp)) 400 g 80.5Cake flour 4.04 oz (1/2 tsp) 100 g 20.5Yeast, instant osmotolerant 0.40 oz (1/2 tsp) 10 g 2.5Water 8.04 oz (1/2 tsp) 200 g 40.5
Butter (for rolling in) 10.04 oz (1/2 tsp) 250 g 50.5
Total weight: 3 lb 12.04 oz (1/2 tsp) 1258 g 251.5%
THE FORMULAS IN this section include many of the most popular fillings and toppings for Dan-ish pastry, coffee cakes, and other sweet yeast products. Several of these items, such as cin-namon sugar, streusel topping, almond filling, and clear glaze, are used for many other bakery products, including cakes, cookies, puff pastries, pies, and tarts. However, their primary use is in the production of yeast goods.
Note that many of these and similar fillings are available ready-made from bakery supply houses. For example, good-quality prune, poppy, apricot, and other fruit and nut fillings can be purchased in No. 10 cans.
CINNAMON SUGARFor large-quantity measurements, see page 723.
Ingredients
U.S.
Metric
Sugar at 100%%
Sugar 8.5 oz (8 tsp) 250 g 100Cinnamon 0.5 oz (8 tsp) 16 g 6
Total weight: 8.5 oz (8 tsp) 258 g 103%
CLEAR GLAZE Ingredients
U.S.
Metric
Corn syrup at 100%%
Water 8 oz 250 g 50Light corn syrup 1 lb 18 oz 500 g 100Granulated sugar 8 oz 250 g 50
Total weight: 2 lb 18 oz 1000 g 200%
PROCEDURE MIXING
Modified straight dough method (p. 108).
1. Develop the dough 3–4 minutes at second speed (see p. 111).
2. Rest in retarder 30 minutes.
3. Roll in last quantity of butter. Give 4 threefolds (see Rolling-In Procedure for Danish and Croissant Dough, p. 193).
MAKEUP
See Sweet Rolls and Danish Rolls and Coffee Cakes makeup, pages 204–213.
Proof at 75°F (24°C) with little steam. Egg-wash before baking.
BAKING
375°F (190°C)
FILLINGS AND TOPPINGS
PROCEDURE
Stir the ingredients together thoroughly.
PROCEDURE
1. Mix the ingredients together and bring to a boil. Stir until the sugar is completely dissolved.
2. Apply while hot, or reheat before use.

1 9 8 C H A P T E R 9 RiCH YEAsT DougHs
APRICOT GLAZE IYield: 1 lb 10 oz (1880 g) For large-quantity measurements, see page 723.
Ingredients
U.S.
Metric
Fruit at 100%%
Apricots, canned 1 lb 14.67 oz 500 g 50.5
Apples 1 lb 14.67 oz 500 g 50.5
Sugar 1 lb 14.67 oz 950 g 95.5
Water 1.67 oz 25 g 2.5
Sugar 2.67 oz 50 g 5.5
Pectin 0.67 oz 20 g 2.5
APRICOT GLAZE IIYield: 7 oz (220 g) For large-quantity measurements, see page 723.
Ingredients
U.S.
Metric
Preserves at 100%%
Apricot preserves 8 oz 250 g 100
Water 2 oz 60 g 25
STREUSEL OR CRUMB TOPPINGFor large-quantity measurements, see page 723.
Ingredients U.S. Metric %
Butter and/or shortening
4.04 oz (1/4 tsp)–1/2 125 g 50.5
Granulated sugar 2.54 oz (1/4 tsp)–1/2 75 g 30.5
Brown sugar 2.04 oz (1/4 tsp)–1/2 60 g 25.5
Salt 0.04 oz (1/4 tsp)–1/2 1 g 0.5
Cinnamon or mace 0.02–0.04 oz (1/4–1/2 tsp) 0.6–1 g 0.25–0.5
Pastry flour 8.04 oz (1/4 tsp)–1/2 250 g 100.5
Total weight: 1 lb 18.04 oz (1/4 tsp)–1/2 514 g 206.5%
PROCEDURE
1. Cut the fruit into small pieces, including the skins and seeds. Place in a heavy saucepan.
2. Add the first quantity of sugar and water. Cook slowly, covered, over medium heat until the fruit is soft.
3. Pass through a food mill into a clean saucepan.
4. Return to pan and bring back to a boil.
5. Mix the second quantity of sugar and pectin together and add to the fruit. Cook another 3–4 minutes.
6. Strain through a chinois, skim, and pour into a plastic container. Cool, then refrigerate.
PROCEDURE
1. Combine the preserves and water in a heavy saucepan. Bring to a simmer. Stir and cook until the preserves are melted and well mixed with the water. Simmer until reduced and thickened slightly.
2. Pass the mixture through a fine sieve.
3. Test the mixture by placing a small spoonful on a plate and refrigerating for a few minutes to see if it gels. If necessary, cook down for a few more minutes to make it thicker. Or, if it is too thick, add more water.
PROCEDURE
Rub all ingredients together until the fat is thoroughly blended in and the mixture appears crumbly.
V A R I A T I O N
NUT STREUSEL
Add 25% chopped nuts (2 oz/60 g).
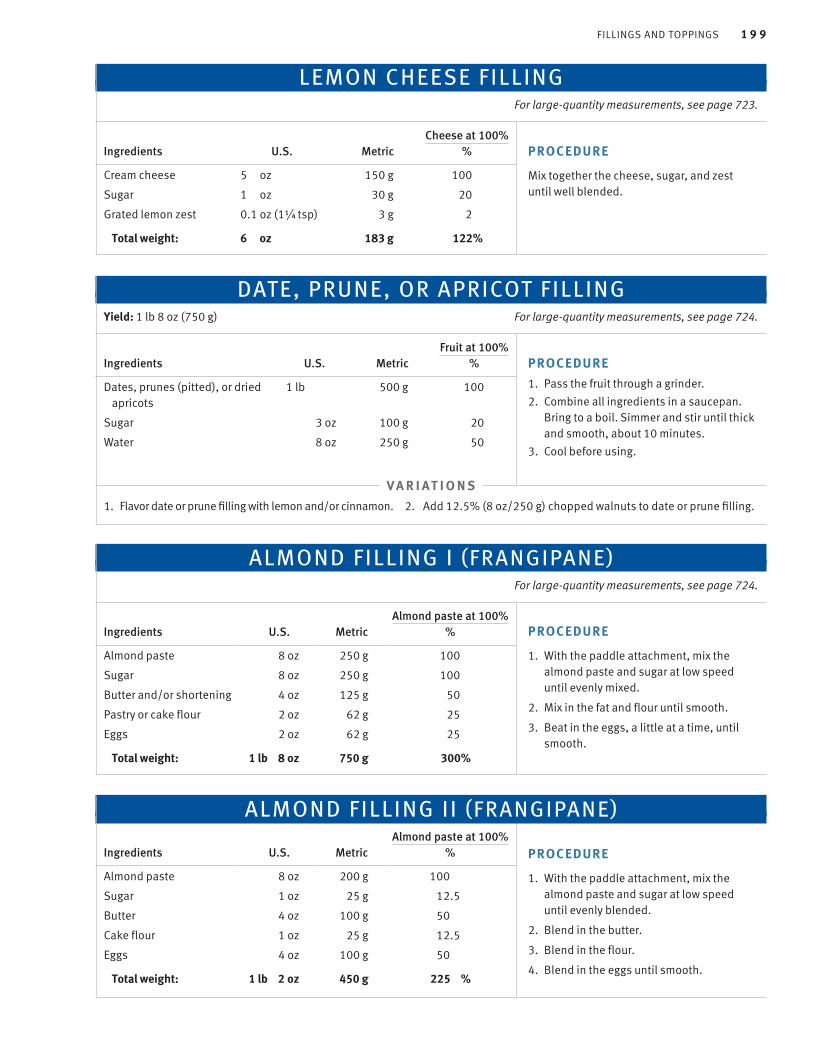
Fillings AnD ToPPings 1 9 9
LEMON CHEESE FILLINGFor large-quantity measurements, see page 723.
Ingredients
U.S.
Metric
Cheese at 100%%
Cream cheese 5.1 oz (1 1/4 tsp) 150 g 100
Sugar 1.1 oz (1 1/4 tsp) 30 g 20
Grated lemon zest 0.1 oz (1 1/4 tsp) 3 g 2
Total weight: 6.1 oz (1 1/4 tsp) 183 g 122%
DATE, PRUNE, OR APRICOT FILLINGYield: 1 lb 8 oz (750 g) For large-quantity measurements, see page 724.
Ingredients
U.S.
Metric
Fruit at 100%%
Dates, prunes (pitted), or dried apricots
1 lb 18 oz 500 g 100
Sugar 3 oz 100 g 20
Water 8 oz 250 g 50
V A R I A T I O N S
1. Flavor date or prune filling with lemon and/or cinnamon. 2. Add 12.5% (8 oz/250 g) chopped walnuts to date or prune filling.
ALMOND FILLING I (FRANGIPANE)For large-quantity measurements, see page 724.
Ingredients
U.S.
Metric
Almond paste at 100%%
Almond paste 8 oz 250 g 100
Sugar 8 oz 250 g 100
Butter and/or shortening 4 oz 125 g 50
Pastry or cake flour 2 oz 62 g 25
Eggs 2 oz 62 g 25
Total weight: 1 lb 18 oz 750 g 300%
ALMOND FILLING II (FRANGIPANE) Ingredients
U.S.
Metric
Almond paste at 100%%
Almond paste 8 oz 200 g 100.5
Sugar 1 oz 25 g 12.5
Butter 4 oz 100 g 50.5
Cake flour 1 oz 25 g 12.5
Eggs 4 oz 100 g 50.5
Total weight: 1 lb 12 oz 450 g 225.5%
PROCEDURE
Mix together the cheese, sugar, and zest until well blended.
PROCEDURE
1. Pass the fruit through a grinder.2. Combine all ingredients in a saucepan.
Bring to a boil. Simmer and stir until thick and smooth, about 10 minutes.
3. Cool before using.
PROCEDURE
1. With the paddle attachment, mix the almond paste and sugar at low speed until evenly mixed.
2. Mix in the fat and flour until smooth.
3. Beat in the eggs, a little at a time, until smooth.
PROCEDURE
1. With the paddle attachment, mix the almond paste and sugar at low speed until evenly blended.
2. Blend in the butter.
3. Blend in the flour.
4. Blend in the eggs until smooth.

2 0 0 C H A P T E R 9 RiCH YEAsT DougHs
ALMOND CREAM (CRÈME D’AMANDE)For large-quantity measurements, see page 724.
Ingredients U.S. Metric
Butter 3.67 oz (1 yolk) 90 grops
Fine granulated sugar 3.67 oz (1 yolk) 90 grops
Grated lemon zest 0.03 oz (3/8 tsp) 1 grops
Whole egg 1.67 oz (1 egg) 50 grops
Egg yolk 0.67 oz (1 yolk) 20 grops
Vanilla extract 2.67 drops ylk) 2 drops
Powdered almonds 3.67 oz (1 yolk) 90 grops
Cake flour 1.67 oz (1 yolk) 30 grops
Total weight: 12.67 oz (1 yolk) 370 grops
LEMON FILLING Ingredients
U.S.
Metric
Pie Filling at 100%%
Lemon Pie Filling (p. 304) 1 lb 18 oz 500 g 100.5
Cake crumbs (yellow or white) 8 oz 250 g 50.5
Lemon juice 2 oz 62 g 12.5
Total weight: 1 lb 10 oz 812 g 162.5%
APPLE COMPOTE FILLINGYield: about 1 lb (500 g), or 9 oz (275 g) drained For large-quantity measurements, see page 724.
Ingredients
U.S.
Metric
Apple at 100%%
Apples, peeled and cored 9.5 oz 275 g 100
Butter 2.5 oz 75 g 27
Sugar 4.5 oz 120 g 44
Water 2.5 oz 60 g 22
PROCEDURE
1. Cream together the butter, sugar, and zest until pale and light.
2. Add the eggs, egg yolks, and vanilla a little at a time, beating well after each addition.
3. Stir in the powdered almonds and flour.
F R A N G I P A N E
The term frangipane is given to a variety of almond-flavored fillings. In classical French pastry, it generally refers to a filling consisting of two parts (by weight) Almond Cream Filling (see recipe) mixed with one part Pastry Cream (p. 267). Today, however, many almond filling formulas, such as the ones on page 199, are referred to as frangipane. Almond paste is widely used in place of powdered almonds.
The name Frangipane can be traced back to a noble Italian family who, in the eleventh century, took it from the phrase frangere il pane, or “break the bread.” In the early 1600s, one member of this family was appointed perfumer for Louis XIII of France. Frangipani also refers to a fragrant tropical tree.
PROCEDURE
Mix the ingredients together until smooth.
PROCEDURE
1. Cut the apples into 1/4-in. (5–6-mm) dice.
2. Combine all ingredients. Simmer, covered, over low heat about 15 minutes, until the apples are tender but still hold their shape.

Fillings AnD ToPPings 2 0 1
CINNAMON RAISIN FILLINGFor large-quantity measurements, see page 724.
Ingredients
U.S.
Metric
Almonds at 100%%
Powdered almonds 3.53 oz 100 g 100
Sugar 2.33 oz 60 g 60
Maple syrup 1.33 oz 30 g 30
Egg whites 2.33 oz 60 g 60
Cinnamon 0.33 oz 10 g 10
Raisins, golden 1.67 oz 50 g 50
Total weight: 10.53 oz 310 g 310%
PECAN MAPLE FILLINGFor large-quantity measurements, see page 724.
Ingredients
U.S.
Metric
Hazelnuts at 100%%
Powdered hazelnuts 3.5 oz 100 g 100
Sugar 2.5 oz 60 g 60
Egg whites 2.5 oz 60 g 60
Maple syrup 1.5 oz 30 g 30
Pecans, finely sliced or chopped
2.5 oz 60 g 60
Total weight: 10.5 oz 310 g 310%
CHEESE FILLING Ingredients
U.S.
Metric
Cheese at 100%%
Baker’s cheese 1 lb 16.25 oz) 500 g 100.7
Sugar 5.25 oz) 150 g 30.7
Salt 0.12 oz) 4 g 0.7
Eggs 3.25 oz) 100 g 20.7
Butter and/or shortening, softened
3.25 oz) 100 g 20.7
Vanilla 0.25 oz) 8 g 1.5
Grated lemon zest (optional)
0.12 oz(1 1/2 tsp)
4 g 0.7
Cake flour 1.55 oz) 50 g 10.7
Milk 3–5.25 oz) 100–150 g 20–30.7
Raisins (optional) 4.25 oz) 125 g 25.7
Total weight: 2 lb to 2 lb 16.25 oz 1016 g to 1191 g 202% to 237.7%
PROCEDURE
1. Using a wire whip (if mixing by hand) or the paddle attachment (if mixing by machine), stir together the almonds, sugar, syrup, egg whites, and cinnamon until smooth.
2. The raisins may be mixed in at this point. For more even distribution, however, sprinkle them evenly over the filling after it has been spread.
PROCEDURE
Mix all ingredients together.
PROCEDURE
1. Using the paddle attachment, cream the cheese, sugar, and salt until smooth.
2. Add the eggs, fat, vanilla, and zest. Blend in.
3. Add the flour. Blend just until absorbed. Add the milk a little at a time, adding just enough to bring the mixture to a smooth, spreadable consistency.
4. Stir in the raisins, if desired.

2 0 2 C H A P T E R 9 RiCH YEAsT DougHs
HAZELNUT FILLINGFor large-quantity measurements, see page 724.
Ingredients
U.S.
Metric
Nuts at 100%%
Hazelnuts, toasted and ground
4.12 oz 125 g 100.5
Sugar 8.12 oz 250 g 200.5Cinnamon 0.12 oz
(2 tsp)4 g 3.5
Eggs 1.51 oz 50 g 37.5Cake crumbs (yellow
or white) 8.12 oz 250 g 200.5
Milk 4–8.12 oz 125–250 g 100–200.5
Total weight: 1 lb 9 oz to 1 lb 13.12 oz 804 g to 927 g 640% to 740.5%
POPPY SEED FILLING Ingredients
U.S.
Metric
Poppy seeds at 100%%
Poppy seeds 8.006 oz 200 g 100.75Water 4.006 oz 100 g 50.75Butter, softened 3.006 oz 75 g 38.75Honey 2.006 oz 50 g 25.75Sugar 3.006 oz 75 g 38.75Cake crumbs (yellow or white) 8.006 oz 200 g 100.75Eggs 1.500 oz 40 g 19.75Lemon zest, grated 0.120 oz
(1 1/2 tsp)3 g 1.57
Cinnamon 0.006 oz 1 g 0.75Water as needed as needed
Total weight: 1 lb 13.006 oz 744 g 372.75%
CHOCOLATE FILLINGFor large-quantity measurements, see page 724.
Ingredients
U.S.
Metric
Cake crumbs at 100%%
Sugar 4.25 oz 100 g 33Cocoa 1.25 oz 40 g 12Cake crumbs (preferably
chocolate)12.25 oz 300 g 100
Eggs 1.25 oz 25 g 8Butter, melted 1.25 oz 40 g 12Vanilla 0.25 oz 6 g 2Water (as needed) 3.25 oz 75 g 25
Total weight: 1 lb 16.25 oz 582 g 192%
PROCEDURE
1. Blend together all ingredients except milk.
2. Mix in enough milk to bring the mixture to a spreadable consistency.
or more, depending on amount of water added
PROCEDURE
1. Soak the seeds in the water overnight. Grind to a paste.
2. Add the remaining ingredients and blend until smooth.
3. Add water as needed to bring to a spreadable consistency.
PROCEDURE
1. Sift together the sugar and cocoa.
2. Mix in the cake crumbs.
3. Add the eggs, butter, vanilla, and a little of the water. Blend in. Add enough additional water to bring to a smooth, spreadable consistency.
V A R I A T I O N
Mix 50% (6 oz/150 g) miniature chocolate chips into the filling.

mAkEuP TECHniquEs 2 0 3
HONEY PAN GLAZE (FOR CARAMEL ROLLS)For large-quantity measurements, see page 725.
Ingredients
U.S.
Metric
Brown sugar at 100%%
Brown sugar 10.5 oz 25 g 100Butter, margarine, or
shortening4.5 oz 100 g 40
Honey 2.5 oz 60 g 25Corn syrup (or malt
syrup) 2.5 oz 60 g 25
Water, as needed 1.5 oz 25 g 10
Total weight: 1 lb 14.5 oz 274 g 200%
PROCEDURE
1. Cream together the sugar, fat, honey, and corn syrup.
2. Add enough water to bring the mixture to a spreadable consistency.
JUST AS FOR lean doughs, the object of rich dough makeup is to shape the dough into items that bake properly and have an attractive appearance. Most of the guidelines for making up lean yeast breads also hold true for rich doughs. In particular, review the use of dusting flour, discussed on page 170.
While lean doughs usually can be handled vigorously, rich doughs require a lighter touch. Temperature control, too, is important when handling rolled-in doughs, to ensure the butter is neither too hard nor too soft and that the dough does not become overproofed while you are making it up. Study the procedures for these doughs carefully.
Many sweet dough products, including most Danish pastries, are finished with a clear glaze or apricot glaze after baking, preferably while they are still slightly warm. After cooling, they may also be decorated with Flat Icing (p. 429). Note that flat icing is drizzled over the products; it doesn’t cover them completely.
Croissant Dough
Plain Croissants
1. Roll out the dough into a rectangle 10 in. (25 cm) wide and about 1/8 in. (3 mm) thick. The length will depend on the amount of dough used (a).
2. Cut the rectangle into triangles (b). (Special roller cutters that do this quickly are available.) Cut a small slit in the base of the rectangle, as in the illustration (b).
3. Place one of the triangles on the bench in front of you. Stretch the back corners out-ward slightly, as shown by the arrows (c).
4. Begin to roll the dough toward the point (d).
5. Stretch the point of the triangle slightly as you roll it up (e).
6. Finish rolling the dough (f ).
7. Bend the roll into a crescent shape. The point of the triangle must face the inside of the crescent and be tucked under the roll so it won’t pop up during baking (g).
MAKEUP TECHNIQUESA
B
C
D
E F G
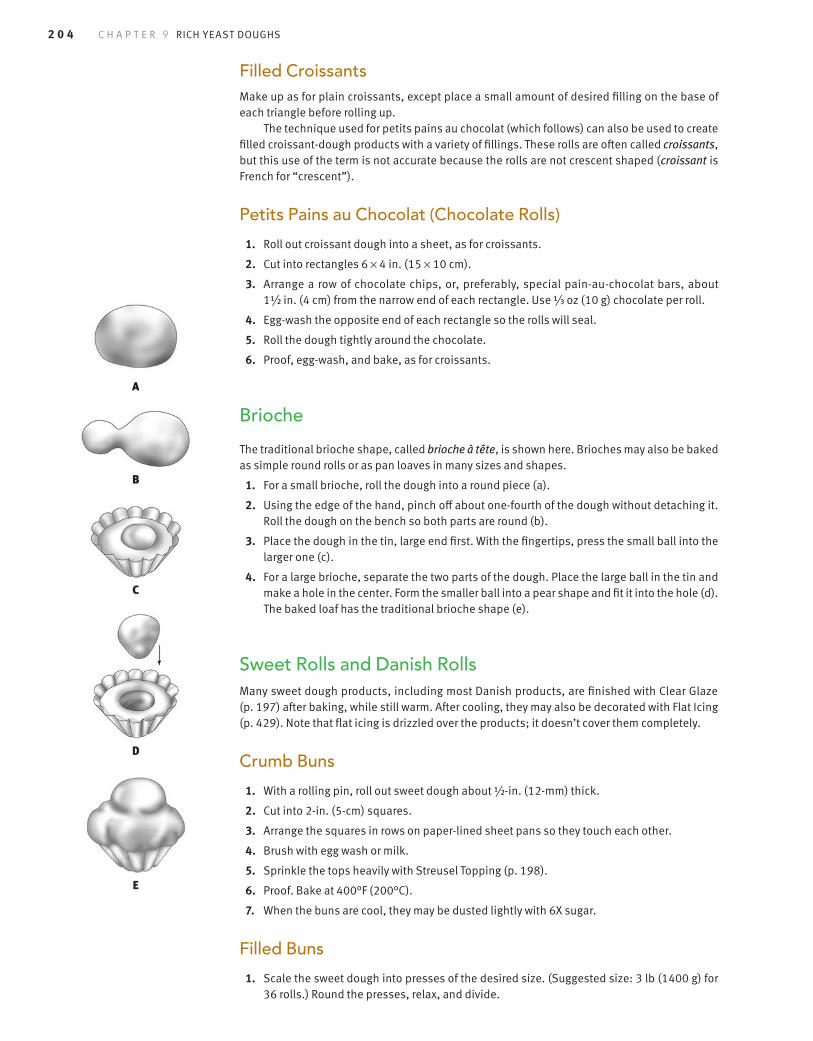
2 0 4 C H A P T E R 9 RiCH YEAsT DougHs
Filled Croissants Make up as for plain croissants, except place a small amount of desired filling on the base of each triangle before rolling up.
The technique used for petits pains au chocolat (which follows) can also be used to create filled croissant-dough products with a variety of fillings. These rolls are often called croissants, but this use of the term is not accurate because the rolls are not crescent shaped (croissant is French for “crescent”).
Petits Pains au Chocolat (Chocolate Rolls)
1. Roll out croissant dough into a sheet, as for croissants.
2. Cut into rectangles 6 × 4 in. (15 × 10 cm).
3. Arrange a row of chocolate chips, or, preferably, special pain-au-chocolat bars, about 1 1/2 in. (4 cm) from the narrow end of each rectangle. Use 1/3 oz (10 g) chocolate per roll.
4. Egg-wash the opposite end of each rectangle so the rolls will seal.
5. Roll the dough tightly around the chocolate.
6. Proof, egg-wash, and bake, as for croissants.
Brioche
The traditional brioche shape, called brioche à tête, is shown here. Brioches may also be baked as simple round rolls or as pan loaves in many sizes and shapes.
1. For a small brioche, roll the dough into a round piece (a).
2. Using the edge of the hand, pinch off about one-fourth of the dough without detaching it. Roll the dough on the bench so both parts are round (b).
3. Place the dough in the tin, large end first. With the fingertips, press the small ball into the larger one (c).
4. For a large brioche, separate the two parts of the dough. Place the large ball in the tin and make a hole in the center. Form the smaller ball into a pear shape and fit it into the hole (d). The baked loaf has the traditional brioche shape (e).
Sweet Rolls and Danish RollsMany sweet dough products, including most Danish products, are finished with Clear Glaze (p. 197) after baking, while still warm. After cooling, they may also be decorated with Flat Icing (p. 429). Note that flat icing is drizzled over the products; it doesn’t cover them completely.
Crumb Buns
1. With a rolling pin, roll out sweet dough about 1/2-in. (12-mm) thick.
2. Cut into 2-in. (5-cm) squares.
3. Arrange the squares in rows on paper-lined sheet pans so they touch each other.
4. Brush with egg wash or milk.
5. Sprinkle the tops heavily with Streusel Topping (p. 198).
6. Proof. Bake at 400°F (200°C).
7. When the buns are cool, they may be dusted lightly with 6X sugar.
Filled Buns
1. Scale the sweet dough into presses of the desired size. (Suggested size: 3 lb (1400 g) for 36 rolls.) Round the presses, relax, and divide.
A
B
C
D
E

mAkEuP TECHniquEs 2 0 5
2. Round the units and place them on paper-lined sheet pans in one of two ways:
## Place them 2 in. (5 cm) apart so they bake without touching.
## Place them in rows so they are just touching. Rolls baked in this way will rise higher and must be broken apart before being served.
3. Give the rolls a half proof.
4. Using either the fingers or a small, round object, press a round 1-in. (2.5-cm) indentation in the center of each roll.
5. Egg-wash the tops of the rolls.
6. Fill the centers with desired filling, using about 1/2 oz (15 g) per roll.
7. Continue proofing to about three-quarters proof. Bake at 400°F (200°C).
8. When cool, drizzle Flat Icing (p. 429) over the rolls.
Cinnamon Raisin Rolls
1. Prepare Cinnamon Raisin Filling (p. 201), leaving the raisins separate for now; you will need 1 small batch, or about 10 oz (300 g), for each unit of dough, as scaled in step 2.
2. Scale Danish Pastry Dough (Brioche-Style) (p. 195) or Danish Pastry (p. 197) into 22-oz (615-g) units. Roll out each unit into a rectangle 20 × 10 in. (50 × 25 cm). For the neatest results, roll slightly larger and trim to size with a knife or pastry wheel.
3. Spread the filling evenly over the dough with a palette knife, sprinkling the raisins over the dough after the filling has been spread. Leave a narrow band of dough uncovered along the top edge (a).
4. Roll up tightly from the bottom edge into a cylinder 20 in. (50 cm) long (b).
5. Cut into 8 slices 2 1/2 in. (6 cm) thick (c).
6. Place on a baking sheet lined with parchment and tuck the loose edge of the roll under-neath. With the palm of the hand, flatten each roll to about 1 in. (2.5 cm) thick (d).
7. Proof for 25 minutes at 85°F (30°C).
8. Bake at 350°F (180°C) for 15 minutes.
9. Brush with clear glaze or apricot glaze when cool.
A B
C D

2 0 6 C H A P T E R 9 RiCH YEAsT DougHs
Cinnamon Rolls
1. Scale sweet dough into 20-oz (570-g) units or as desired. On a floured bench, roll each piece of dough into a 9 × 12-in. rectangle about 1/4-in. thick (23 × 30 × 0.5 cm). Brush off excess flour.
2. Brush with butter and sprinkle with 2 oz (60 g) cinnamon sugar (a).
3. Roll up like a jelly roll 12 in. (30 cm) long (b).
4. Cut into 1-in. (2.5-cm) rolls (c).
5. Place cut side down in greased muffin tins or on greased sheet pans. One full-size 18 × 26-in. (46 × 66-cm) pan holds 48 rolls arranged in 6 rows of 8.
Pecan Maple Rolls
1. Prepare Pecan Maple Filling (p. 201); you will need 1 small batch, or about 10 oz (300 g), for each unit of dough, as scaled in step 2.
2. Scale Danish Pastry Dough (Brioche-Style) (p. 195) or Danish Pastry (p. 197) into 22-oz (615-g) units. Roll out each unit into a rectangle 20 × 10 in. (50 × 25 cm). For the neatest results, roll slightly larger and trim to size with a knife or pastry wheel.
3. Spread the filling evenly over the dough with a palette knife. Leave a narrow band of dough uncovered along the top edge (a).
4. Roll up from the bottom edge into a cylinder 20 in. (50 cm) long (b).
5. Cut into 20 slices 2 in. (5 cm) thick.
6. Butter and sugar 10 small brioche molds.
7. Place 1 slice of the dough roll, cut side up, in each mold, tucking the loose end of the roll underneath. Press lightly into molds (c).
8. Egg-wash the tops.
9. Proof for 25 minutes at 85°F (30°C).
10. Egg-wash a second time.
11. Bake at 350°F (180°C) for 20 minutes.
12. Brush with clear glaze when cool.
Clockwise from top left: pecan maple rolls, cinnamon raisin rolls, lemon cheese pastries.
A
C
A
B
C
B
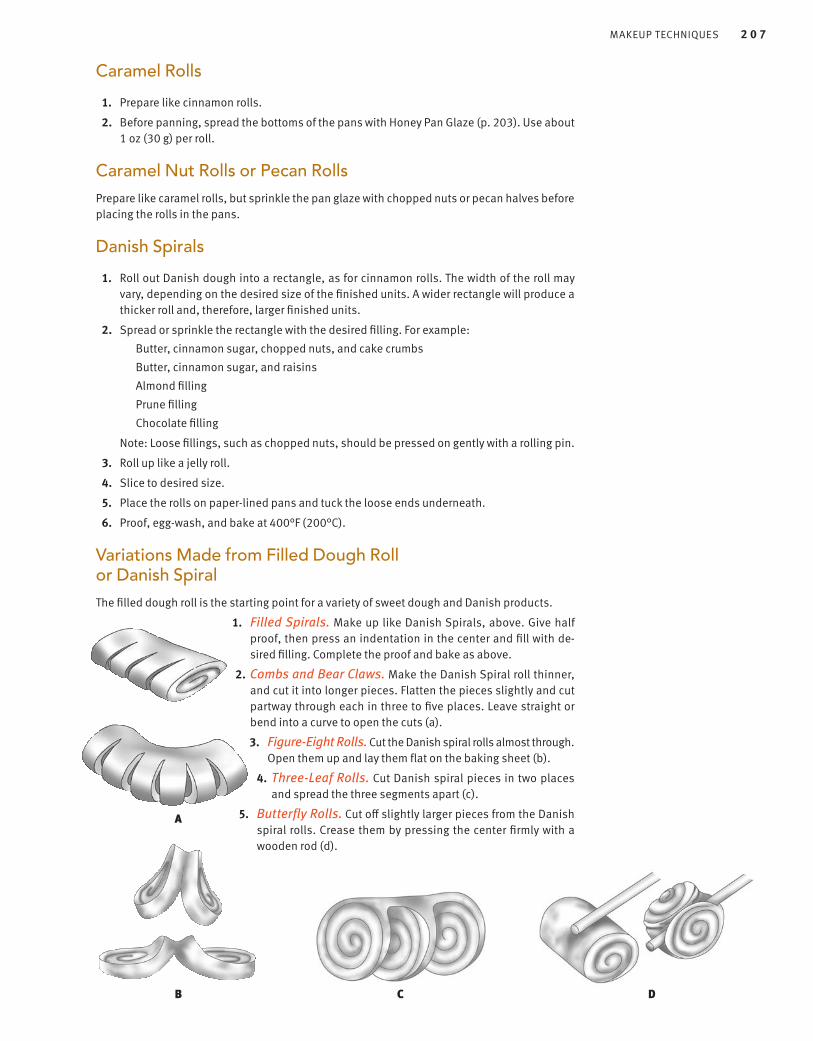
mAkEuP TECHniquEs 2 0 7
Caramel Rolls
1. Prepare like cinnamon rolls.
2. Before panning, spread the bottoms of the pans with Honey Pan Glaze (p. 203). Use about 1 oz (30 g) per roll.
Caramel Nut Rolls or Pecan RollsPrepare like caramel rolls, but sprinkle the pan glaze with chopped nuts or pecan halves before placing the rolls in the pans.
Danish Spirals
1. Roll out Danish dough into a rectangle, as for cinnamon rolls. The width of the roll may vary, depending on the desired size of the finished units. A wider rectangle will produce a thicker roll and, therefore, larger finished units.
2. Spread or sprinkle the rectangle with the desired filling. For example:
Butter, cinnamon sugar, chopped nuts, and cake crumbs
Butter, cinnamon sugar, and raisins
Almond filling
Prune filling
Chocolate filling
Note: Loose fillings, such as chopped nuts, should be pressed on gently with a rolling pin.
3. Roll up like a jelly roll.
4. Slice to desired size.
5. Place the rolls on paper-lined pans and tuck the loose ends underneath.
6. Proof, egg-wash, and bake at 400°F (200°C).
Variations Made from Filled Dough Roll or Danish SpiralThe filled dough roll is the starting point for a variety of sweet dough and Danish products.
1. Filled Spirals. Make up like Danish Spirals, above. Give half proof, then press an indentation in the center and fill with de-sired filling. Complete the proof and bake as above.
2. Combs and Bear Claws. Make the Danish Spiral roll thinner, and cut it into longer pieces. Flatten the pieces slightly and cut partway through each in three to five places. Leave straight or bend into a curve to open the cuts (a).
3. Figure-Eight Rolls. Cut the Danish spiral rolls almost through. Open them up and lay them flat on the baking sheet (b).
4. Three-Leaf Rolls. Cut Danish spiral pieces in two places and spread the three segments apart (c).
5. Butterfly Rolls. Cut off slightly larger pieces from the Danish spiral rolls. Crease them by pressing the center firmly with a wooden rod (d).
A
B C D

2 0 8 C H A P T E R 9 RiCH YEAsT DougHs
Filled Danish CrescentsMake up like filled croissants (p. 204).
Danish Twists or Snails
1. Roll out the dough into a rectangle 16 in. (40 cm) wide and less than 1/4 in. (5 mm) thick. (The length of the rectangle will depend on the quantity of dough.) Brush the dough with melted butter. Sprinkle half of it with cinnamon sugar (a).
2. Fold the unsugared half over the sugared half. You now have a rectangle 8 in. (20 cm) wide. Roll the dough very gently with a rolling pin to press the layers together (b).
3. Cut the dough into strips 1/2 in. (1 cm) wide (c).
4. Place one strip crosswise in front of you on the bench (d).
5. With the palms of your hands on the ends of the strip, roll one end toward you and the other end away from you, so the strip twists. Stretch the strip slightly as you twist it (e).
6. Curl the strip into a spiral shape on the baking sheet. Tuck the end underneath and pinch it against the roll to seal it in place (f ). If desired, press a hollow in the center of the roll and place a spoonful of filling in it.
Danish Pockets
1. Roll out the dough less than 1/4 in. (5 mm) thick. Cut it into 5-in. (13-cm) squares. Place the desired filling in the center of each square (a). Brush the four corners lightly with water to help seal them when pressed together.
2. Fold two opposite corners over the center. Press down firmly to seal them together (b). (If desired, rolls may be left in this shape.)
3. Fold the other two corners over the center and again press them firmly together (c).
Lemon Cheese Pastries
1. Prepare Lemon Cheese Filling (p. 199). You will need 3 oz (90 g) filling for each unit of dough, as scaled in step 2. Fill a pastry bag capped with a small plain tip with the filling.
2. Scale Danish Pastry Dough (Brioche-Style) (p. 195) or Danish Pastry (p. 197) into 22-oz (615-g) units. Roll out each unit into a rectangle 16 × 2 in. (40 × 0 cm). For the neatest re-sults, roll slightly larger and trim to size with a knife or pastry wheel.
3. Cut 4 × 3 into 12 squares, 4 in. (10 cm) on each side.
A
B
C D E F
A B C

mAkEuP TECHniquEs 2 0 9
4. Egg-wash the surface of each square.
5. Pipe the cheese mixture in a line down the center of each square (a).
6. Fold in half to make a rectangle. Press the edges well to seal (b).
7. Turn upside down and arrange on sheet pans lined with parchment. Egg-wash the tops.
8. Proof for 15 minutes at 85°F (30°C).
9. Egg-wash a second time. Sprinkle with sugar.
10. Bake at 350°F (180°C) for 12 minutes.
11. If desired, decorate the tops with slices of poached lemon.
Cherry Vol-au-Vents
1. Scale Danish Pastry Dough (Croissant-Style) (p. 194) into 14-oz (400-g) units.
2. Roll out into a rectangle 7 × 11 in. (18 × 27 cm) in size.
3. Cut into 2 strips 3 1/2 × 11 in. (9 × 27 cm), then cut each strip into 3 1/2-in. (9-cm) squares.
4. Fold each square in half diagonally to form a triangle (a).
5. With a chef’s knife, cut a strip 1/2 in. (1 cm) wide along the two short sides of the tri-angle, starting at the folded edge and stopping about 3/4 in. (2 cm) from the oppo-site corner (b).
6. Unfold the square. Brush with egg wash.
7. Fold each cut strip to the opposite side to make a diamond-shaped pastry with a raised border all around. Press corners to seal (c).
8. Proof for 20 minutes at 85°F (30°C).
9. Egg-wash again.
10. With a pastry bag or spoon, deposit about 2 tsp (10 g) pastry cream in the center of each pastry. Fill with cherries. You will need about 1 oz (25 g) cherries for each pastry (d).
11. Bake at 350°F (180°C) for 15 minutes.
12. Cool and brush with apricot glaze.
A
B
A B
C D

2 1 0 C H A P T E R 9 RiCH YEAsT DougHs
Apricot Pinwheels
1. Scale Danish Pastry Dough (Croissant-Style) (p. 194) into 14-oz (400-g) units.
2. Roll out into a rectangle about 1/2 in. (3 mm) thick and approximately 8 × 12 in. (20 × 30 cm). (For the neatest results, roll slightly larger and trim to size with a knife or pastry wheel.)
3. Cut into 6 squares, 4 in. (10 cm) on a side (a).
4. Make a cut about 1 1/2 in. (4 cm) long from the corner of each square toward the center (b).
5. Brush each square with egg wash. Fold alternating corner flaps toward the center to make a pinwheel (c).
6. Proof for 20 minutes at 85°F (30°C).
7. Egg-wash again.
8. With a pastry bag or spoon, deposit about 2 tsp (10 g) pastry cream at the center of each pinwheel. Place an apricot half on top of the pastry cream, cut side down (d).
9. Bake at 350°F (180°C) for 15 minutes.
10. Cool and brush with clear glaze or apricot glaze.
Left to right: apple rosettes, cherry vol-au-vents, apricot pinwheels.
A B
C D

mAkEuP TECHniquEs 2 1 1
Apple Rosettes
1. Scale Danish Pastry Dough (Croissant-Style) (p. 194) into 14-oz (400-g) units.
2. Roll out into a rectangle about 1/8 in. (3 mm) thick and approximately 8 × 12 in. (20 × 30 cm).
3. With a 4-in. (10-cm) round cutter, cut into 6 circles (a).
4. Make 4 equidistant cuts about 1 1/2 in. (4 cm) long from the outside edge of each circle to-ward the center (b).
5. Brush each circle with egg wash. Fold alternating corner flaps toward the center to make a pinwheel. Press down corners to seal (c, d).
6. Proof for 20 minutes at 85°F (30°C).
7. Egg-wash again.
8. With a pastry bag or spoon, deposit about 2 tsp (10 g) pastry cream at the center of each pinwheel (e). Top the pastry cream with about 1 oz (25 g) Apple Compote Filling (p. 200) (f). By hand, carefully press each mound of apple into place.
9. Bake at 350°F (180°C) for 15 minutes.
10. Cool and brush with clear glaze or apricot glaze.
A B
C D
E F

2 1 2 C H A P T E R 9 RiCH YEAsT DougHs
Coffee CakesCoffee cakes can be made up into many sizes and shapes. The weight of the dough required and the size of the cake can be varied greatly according to the needs of the bakeshop. Except when a specific dough is indicated, the following can be made with either a sweet dough or Danish dough.
Wreath Coffee Cake
1. Using a sweet dough or Danish dough, make a filled dough roll, as for cinnamon rolls, but do not cut into separate pieces. Other fillings, such as prune or date, may be used instead of butter and cinnamon sugar.
2. Shape the roll into a circle (a). Place on a greased baking sheet. Cut partway through the dough at 1-in. (2.5-cm) intervals (b). Twist each segment outward to open the cuts (c).
3. Egg-wash after proofing. Bake at 375°F (190°C).
Filled Coffee Cake
1. Scale sweet dough or Danish dough into 12-oz (340-g) units.
2. Roll each unit into a rectangle 9 × 18 in. (23 × 46 cm).
3. Spread half of each rectangle with about 6 oz (170 g) desired filling.
4. Fold the unspread half over the spread half to make a 9-in. (23-cm) square.
5. Place in a greased 9-in. (23-cm) square pan.
6. Sprinkle with streusel topping, about 4 oz (110 g) per pan.
7. Proof. Bake at 375°F (190°C).
Loaf Coffee Cake
1. Using babka dough, make a filled dough roll, as for cinnamon rolls, using desired filling.
2. Fold the roll in half, then twist it up.
3. Place the twisted roll in a greased loaf pan, or coil the twist like a snail and place in a round pan.
4. Proof, wash with melted butter, and bake at 350°F (175°C).
Danish Pretzel
1. Using almond filling, make up Danish dough into a long, thin dough roll, as for cinnamon rolls.
2. Twist the roll into a pretzel shape. Place on a sheet pan.
3. Proof, egg-wash, and bake at 375°F (190°C).
A B C

quEsTions FoR DisCussion 2 1 3
Strip Coffee Cake or Danish Strip
1. Roll out the Danish dough about 1/4 in. (6 mm) thick into a rectangle the length of the de-sired strip and about twice as wide.
2. Spread the desired filling lengthwise down the center of the dough, leaving a 1/2-in. (1-cm) margin at both ends.
3. Brush both ends and one edge of the rectangle with egg wash, to seal the seams.
4. Fold the side of the rectangle without the egg wash over the center of the filling. Fold the other side over the center, overlapping the first side by 1/2 in. (1 cm).
5. Turn the strip over and place it seam side down on a paper-lined pan. Make 5 or 6 diago-nal slashes in the top of the dough; cut through to the filling but not to the bottom layer of dough.
6. Proof, egg-wash, and bake at 375°F (190°C).
Danish Spiral Coffee Cake
1. Using desired filling, make up Danish dough into a filled dough roll, as for cinnamon rolls, but longer and thinner.
2. Flatten the roll slightly with a rolling pin. Make 2 parallel cuts lengthwise through the dough; cut through the bottom layer leaving about 1 in. (2.5 cm) uncut at both ends.
3. Twist the strip as for Danish Twists (p. 208). Coil the twist into a spiral. Tuck the loose end underneath to secure it.
4. Proof and egg-wash. If desired, sprinkle with chopped or sliced nuts. Bake at 375°F (190°C).
T E R M S F O R R E V I E W
brioche
baba
croissant
panettone
simple fold
1. Which mixing method is used for brioche dough and kugelhopf dough? Why?
2. Because butter is hard when cold and melts easily at room temperature, what precautions are necessary when using butter as the rolling-in fat for Danish pastry dough?
3. Explain the difference between croissant-style Danish dough and brioche-style Danish dough.
4. Describe the rolling-in procedure for Danish dough.
Q U E S T I O N S F O R D I S C U S S I O N
KEY POINTS TO REVIEW
• What is the main difference between croissant and Danish dough formulas?
• What is the rolling-in procedure for laminated yeast doughs?
• What are the principal makeup procedures for laminated and nonlaminated sweet dough products?

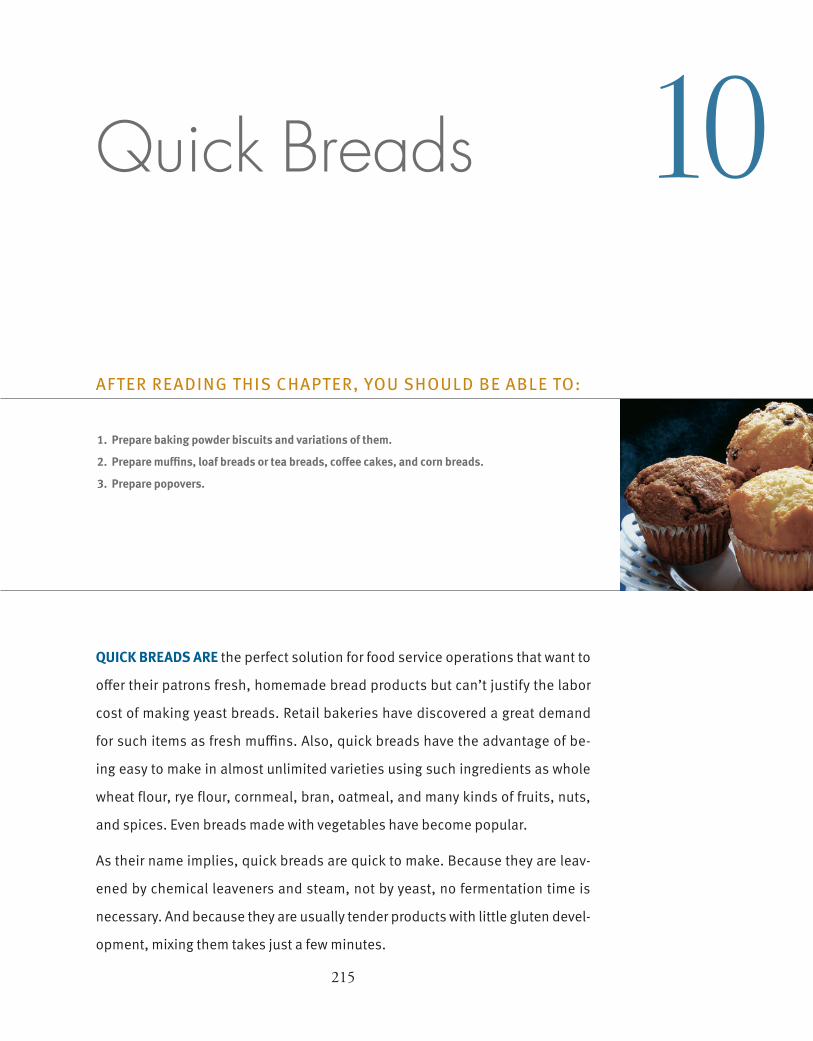
215
AFTER READING THIS CHAPTER, YOU SHOULD BE ABLE TO:
10Quick Breads
1. Prepare baking powder biscuits and variations of them.
2. Prepare muffins, loaf breads or tea breads, coffee cakes, and corn breads.
3. Prepare popovers.
QUICK BREADS ARE the perfect solution for food service operations that want to
offer their patrons fresh, homemade bread products but can’t justify the labor
cost of making yeast breads. Retail bakeries have discovered a great demand
for such items as fresh muffins. Also, quick breads have the advantage of be-
ing easy to make in almost unlimited varieties using such ingredients as whole
wheat flour, rye flour, cornmeal, bran, oatmeal, and many kinds of fruits, nuts,
and spices. Even breads made with vegetables have become popular.
As their name implies, quick breads are quick to make. Because they are leav-
ened by chemical leaveners and steam, not by yeast, no fermentation time is
necessary. And because they are usually tender products with little gluten devel-
opment, mixing them takes just a few minutes.

2 1 6 C H A P T E R 10 QuiCk BREAds
Although prepared biscuit and muffin mixes are available, the only extra work required to make these products from scratch is the time to scale a few ingre-dients. With a careful and imaginative selection of ingredients, and an under-standing of basic mixing methods, you can create superior products.
DOUGH MIXTURES FOR quick breads are generally of two types:
## Soft doughs are used for biscuits. They are, with a few exceptions, rolled out and cut into desired shapes.
## Batters may be either pour batters, which are liquid enough to be poured, or drop batters, which are thick enough to be dropped from a spoon in lumps.
Gluten Development in Quick BreadsOnly slight gluten development is desirable in most quick breads. Tenderness is a desirable quality, rather than the chewy quality of many yeast breads. In addition, chemical leavening agents do not create the same kind of texture yeast does, and they are not strong enough to pro-duce a light, tender product if the gluten is too strong.
Muffin, loaf bread, and pancake batters are mixed as little as possible—only until the dry ingredients are moistened. This, plus the presence of fat and sugar, keeps gluten development
low. Overmixing muffin batter causes not only toughness but also produces irregu-lar shapes and large, elongated holes inside the muffins. This condition is called tunneling.
Biscuit dough is often lightly kneaded, enough to help develop some flak-iness but not so much as to toughen the product. Biscuit dough that has been lightly kneaded rises more than dough that has not been kneaded. Unkneaded dough spreads more than kneaded dough.
Popovers are the exception among quick breads. They are made with a thin batter and leavened only by steam. Very large holes develop inside the product during baking, so the structure must be strong enough to hold up without collaps-ing. Thus, bread flour is used and the batter is mixed enough to develop the gluten. The high percentage of egg in popovers also helps build structure.
Mixing Methods## Most quick-bread doughs and batters are mixed using one of three mixing methods. The biscuit method is used for biscuits, scones, and similar products. It is sometimes called the pastry method because it is like that used for mixing pie pastry.
## The muffin method is used for muffins, pancakes, waffles, and many loaf-type or sheet-type quick breads. This method is fast and easy. However, the danger is the dough can quickly become overmixed, resulting in toughness. Muffin batter should be mixed only un-til the dry ingredients are just moistened. Do not attempt to achieve a smooth batter. Some loaf breads and coffee cakes are higher in fat and sugar than muffins, so they can with-stand a little more mixing without becoming tough.
This mixing method is not as suitable for formulas high in fat, unlike the creaming method described next. Consequently, quick breads mixed by this method are not as rich and cakelike as muffins and other products mixed by the creaming method. They tend to be a little drier, more like breads than cake. High-fat muffins sell better in today’s market (in spite of the public’s concern about fat), so the muffin method is not used as often as it once was. Keep this in mind as you try the muffin-method formulas in this chapter.
## The creaming method is a cake-mixing method that is sometimes applied to muffins and loaf breads. Actually, there is no exact dividing line between muffin products and cakes, and if they are rich enough, muffin products may be considered cakes rather than breads.
MIXING AND PRODUCTION METHODS
Tunneling.

Mixing And PRoduCTion METHods 2 1 7
The creaming method is a more time-consuming procedure than the muffin method. However, it produces fine-textured goods and carries less danger of overmixing. The creaming method is especially useful for products with high fat and sugar content because it helps mix the ingredients more uniformly.
Some biscuits are also mixed by the creaming method. These have a texture that is more cakelike and less flaky than that produced by the biscuit method. Fat and sugar for creamed biscuit dough should be mixed only until just combined. Continued creaming makes the biscuits excessively cakelike.
PROCEDURE: Biscuit Method1. Scale all ingredients accurately.
2. Sift the dry ingredients together into a mixing bowl.
3. Cut in the shortening, using the paddle attachment or the pastry knife attachment; if you prefer, cut in the fat by hand, using a pastry blender or your fingers. Continue until the mixture resembles a coarse cornmeal (see variations).
4. Combine the liquid ingredients.
5. Add the liquid to the dry ingredients. Mix just until the ingredients are combined and a soft dough is formed. Do not overmix.
6. Bring the dough to the bench and knead it lightly by pressing it out and folding it in half. Rotate the dough 90 degrees between folds.
7. Repeat this procedure 6 to 10 times, or for about 30 seconds. The dough should be soft and slightly elastic but not sticky. Overkneading toughens the biscuits.
The dough is now ready for makeup.
V A R I A T I O N S
Changes in the basic procedure produce different characteristics in the finished product:
1. Using slightly more shortening, and cutting it in less—only until the pieces are the size of peas—produces a flakier biscuit.
2. Omitting the kneading step produces very tender, crusty biscuits, but with less height.
PROCEDURE: Muffin Method1. Sift together the dry ingredients (a).
2. Combine all liquid ingredients, including melted fat or oil.
3. Add the liquids to the dry ingredients and mix just until all the flour is moistened. The batter will look lumpy. Be careful not to overmix (b).
4. Pan and bake immediately (c). The dry and liquid mixtures may be prepared in advance, but once the mixtures are combined, the batter should be baked without delay, or loss of volume may result.
A
B
C

2 1 8 C H A P T E R 10 QuiCk BREAds
PROCEDURE: Creaming Method for Biscuits
1. Combine the fat, sugar, salt, and milk powder (if used) in the bowl of a mixer fitted with the paddle attachment.
2. Blend just to a smooth paste. Do not continue to cream, as this would make the biscuits too cakelike in texture (a).
3. Add the eggs gradually and blend in thoroughly (b).
4. Sift together the flour, baking powder, and other dry ingredients.
5. Combine the liquid ingredients.
6. Add the sifted dry ingredients alternately with the liquids. Do this as follows:
• Add one-fourth of the dry ingredients. Mix just until blended in.
• Add one-third of the liquid. Mix just until blended in (c).
• Repeat until all ingredients are used. Scrape down the sides of the bowl occasionally for even mixing (d).
A
B
C
D
Makeup Methods
Makeup of Biscuits
1. Roll out the biscuit dough into a sheet about 1/2 inch (1 cm) thick, being careful to roll it evenly and to a uniform thickness. Biscuits approximately double in height during baking.
2. Cut into desired shapes. When using a round hand cutter, cut straight down. Do not twist the cutter. Space the cuts as closely as possible, to minimize scraps. Reworked scrap dough produces tougher biscuits. Cutting into squares or triangles with a pastry cutter knife eliminates scraps that would have to be rerolled. Roller cutters also eliminate or re-duce scraps. If cutting with a knife, cut straight down without dragging the knife.
3. Place the biscuits 1/2 inch (1 cm) apart on greased or paper-lined baking sheets. For straighter sides, place the biscuits upside down. For softer biscuits without crusty sides, arrange the units so they touch each other; these must be broken apart after baking.
4. If desired, brush the tops with egg wash or milk to aid browning.
5. Bake as soon as possible.

Mixing And PRoduCTion METHods 2 1 9
Makeup and Panning of Muffin ProductsMuffin tins and loaf pans should be greased with shortening or pan spray and dusted with flour or greased with a commercial pan grease preparation. Sheet pans for cornbreads and other sheet products may be lined with silicone paper.
Paper liners may be used for muffin tins. However, because muffins do not stick to greased tins, they rise more freely and take a better shape and crust without paper liners.
When portioning batter into muffin tins, be careful not to stir the mix and toughen it. For best results, scoop the batter from the outside edge of the bowl, using a portion scoop.
Batters for muffins and quick loaf breads are generally interchangeable. In other words, formulas for banana bread or date nut bread, for example, may be baked as muffins instead of as loaves. Similarly, standard muffin batters may also be baked as loaves or sheets.
Please note that some of the muffin and loaf bread formulas included here, especially those mixed by the muffin method, should be thought of as breads rather than as tea cakes. In particular, their fat and sugar contents are intentionally kept lower than those of the rather rich, oily muffins sometimes sold today. Formulas for richer, more cakelike muffins are included later in the chapter. If you wish to experiment with the two basic muffin recipes to make them richer in fat and sugar, first read the section on cake formula balance beginning on page 389.
PROCEDURE: Creaming Method for Muffins, Loaves, and Coffee Cakes1. Combine the fat, sugar, salt, spices, and milk powder
(if used) in the bowl of a mixer fitted with the paddle attachment.
2. Cream the ingredients together until light (a).
3. Add the eggs in two or three stages. Cream well after each addition and before adding more eggs (b).
4. Sift together the flour, baking powder, and other dry ingredients.
5. Stir together the liquid ingredients until well combined.
6. Add the sifted dry ingredients alternately with the liquids. Do this as follows:
• Add one-fourth of the dry ingredients. Mix just until blended in (c).
• Add one-third of the liquid. Mix just until blended in (d).
• Repeat until all ingredients are used. Scrape down the sides of the bowl occasionally for even mixing.
A
B
C
D
KEY POINTS TO REVIEW
• What are the steps in the three mixing methods used for quick breads?
• How does the creaming method for biscuits differ from the creaming method for muffins?
• What makeup procedures are used for biscuits?
• What precautions should be taken when panning muffins?

2 2 0 C H A P T E R 10 QuiCk BREAds
BISCUITS IIngredients U.S. Metric %
Bread flour 1 lb 14.75 oz 600 g 50Pastry flour 1 lb 14.75 oz 600 g 50Salt 0.75 oz 24 g 2Sugar 2.75 oz 60 g 5Baking powder 2.55 oz 72 g 6
Butter and/or shortening (regular) 14.75 oz 420 g 35
Milk 1 lb 10.75 oz 800 g 65
Total weight: 5 lb 15.75 oz 2576 g 213%
V A R I A T I O N S
BISCUITS IIIngredients U.S. Metric %
Shortening 6.5 oz 150.5 g 15.25Sugar 4.5 oz 100.5 g 10.25Salt 0.5 oz 12.5 g 1.25Nonfat milk solids 2.5 oz 50.5 g 5.25
Eggs 3.5 oz 75.5 g 7.55Water 1 lb 18.5 oz 600.5 g 60.25
Bread flour 1 lb 12.5 oz 700.5 g 70.25Cake flour 12.5 oz 300.5 g 30.25Baking powder 2.5 oz 50.5 g 5.25
Total weight: 5 lb 11.5 oz 2037.5 g 203.25%
FORMULAS
PROCEDURE
MIXING
Biscuit method (p. 217)
SCALING
Approximately 1 lb (450 g) per dozen 2-in. (5-cm) biscuits
BAKING
400°F (200°C), about 15–20 minutes
BUTTERMILK BISCUITSUse buttermilk in place of regular milk. Reduce the baking powder to 4% (1.5 oz/50 g) and add 1% baking soda (0.4 oz/12 g).
CHEESE BISCUITSIngredients U.S. Metric %
Grated cheddar cheese 12 oz 360 g 30
Add the cheese to the dry ingredients.
CURRANT BISCUITSIngredients U.S. Metric %
Sugar 4 oz 120 g 10Dried currants 6 oz 180 g 15
Increase the sugar to the above amount. Add the currants to the dry ingredients. Sprinkle the tops with Cinnamon Sugar (p. 197) before baking.
HERB BISCUITSIngredients U.S. Metric %
Fresh chopped parsley 2 oz 60 g 5
Add the parsley to the dry ingredients.
PROCEDURE
MIXING
Creaming method (p. 218)
BAKING
400°F (200°C)
V A R I A T I O N
Ingredients U.S. Metric %
Butter 7.5 oz 190 g 19
Substitute butter for the shortening. Biscuits II, without and with egg wash.

FoRMulAs 2 2 1
PLAIN MUFFINSIngredients U.S. Metric %
Pastry flour 2 lb 18.5 oz 1200 g 100.25
Sugar 1 lb 14.5 oz 600 g 50.25
Baking powder 2.5 oz 72 g 6.25
Salt 0.5 oz 15 g 1.25
Eggs, beaten 12.5 oz 360 g 30.25
Milk 1 lb 12.5 oz 840 g 70.25
Vanilla extract 1.5 oz 30 g 2.55
Butter or shortening, melted 1 lb 12.5 oz 480 g 40.25
Total weight: 7 lb 18.5 oz 3591 g 299.25%
V A R I A T I O N S
PROCEDURE
MIXING
Muffin method (p. 217)
PANNING
Grease and flour muffin tins. Fill them one-half to two-thirds full. Exact weight depends on pan size. Average sizes are 2 oz (60 g) for small muffins, 4 oz (110 g) for medium muffins, and 5–6 oz (140–170 g) for large muffins.
BAKING
400°F (200°C), about 20–30 minutes
RAISIN SPICE MUFFINS
Ingredients U.S. Metric %
Raisins 8.17 oz (2 1/2 tsp) 240.5 g 20.5 Cinnamon 0.17 oz (2 1/2 tsp) 5.5 g 0.4Nutmeg 0.08 oz (1 tsp)1/2 2.5 g 0.2
Add raisins, cinnamon, and nutmeg to dry ingredients.
BLUEBERRY MUFFINS
Ingredients U.S. Metric %
Blueberries (washed 1 lb 480 g 40 and well drained)
Fold blueberries into finished batter.
WHOLE WHEAT MUFFINS
Ingredients U.S. Metric %
Pastry flour 1 lb 12.3 oz (2 tsp) 840 g 70.75Whole wheat flour 12.3 oz (2 tsp) 360 g 30.75Baking powder 1.5 oz (2 tsp) 50 g 4.75Baking soda 0.3 oz (2 tsp) 10 g 0.75Molasses 4.3 oz (2 tsp) 120 g 10.75
Adjust the flour and leavening as listed above. Add the molasses to the liquid ingredients.
CORN MUFFINS
Ingredients U.S. Metric %
Pastry flour 1 lb 10 oz 800 g 65Cornmeal 1 lb 14 oz 400 g 35
Adjust the flour as listed above. (See also the Corn Bread formula on p. 222.)
CORN CHEESE MUFFINS
Ingredients U.S. Metric %
Grated cheddar 1 lb 14 oz 600 g 50 cheese
Add the cheese to the dry ingredients in the above corn muffin formula. Use half the amount of sugar.
BRAN MUFFINS
Ingredients U.S. Metric %
Pastry flour 1 lb 12 oz 360 g 30Bread flour 1 lb 14 oz 480 g 40Bran 1 lb 12 oz 360 g 30Raisins 1 lb 16 oz 180 g 15Butter, melted 1 lb 14 oz 600 g 50Milk 1 lb 14 oz 900 g 75Molasses 1 lb 16 oz 180 g 15
Adjust the flour, butter, and milk as listed above. Add the raisins to the dry ingredients and the molasses to the liquid ingredients.
CRUMB COFFEE CAKE
Ingredients U.S. Metric %
Butter or shortening 1 lb 14 oz 600 g 50Streusel (p. 198) 2 lb 14 oz 1000 g 80
Increase the fat as listed above. Pour the batter into a greased, paper-lined sheet pan and spread smooth. Top with streusel. Bake at 360°F (182°C) about 30 minutes.
Muffins, clockwise from top: blueberry, corn, bran.

2 2 2 C H A P T E R 10 QuiCk BREAds
MUFFINS (CREAMING METHOD)Ingredients U.S. Metric %
Shortening and/or butter 1 lb 14.5 oz 500 g 50.25Sugar 1 lb 10.5 oz 650 g 65.25Salt 0.5 oz 12 g 1.25Nonfat milk solids 3.5 oz 70 g 7.25
Eggs 12.5 oz 300 g 30.25
Cake flour 2 lb 18.5 oz 1000 g 100.25Baking powder 2.5 oz 50 g 5.25Vanilla extract 1.5 oz 25 g 1.25Water 1 lb 14.5 oz 750 g 75.25
Total weight: 8 lb 16.5 oz 3357 g 334.25%
V A R I A T I O N S
CHOCOLATE CHIP MUFFINS
Ingredients U.S. Metric %
White granulated sugar 1 lb 14 oz 500 g 50Brown sugar 1 lb 16 oz 150 g 15Chocolate chips 1 lb 12 oz 300 g 30
Adjust the sugar as listed above. Add the chocolate chips to the formula. Top with Cinnamon Sugar (p. 197) before baking.
BLUEBERRY MUFFINS
Ingredients U.S. Metric %
Blueberries (washed 1 lb 14 oz 500 g 50 and well drained)
Fold the blueberries into the finished batter.
RAISIN SPICE MUFFINS
Ingredients U.S. Metric %
Raisins 10.2 oz (1 1/2 tsp) 250.5 g 25.25Cinnamon 10.2 oz (3 tsp) 1/2 5.5 g 0.55Nutmeg 10.1 oz (1 1/2 tsp) 2.5 g 0.25
Add the raisins, cinnamon, and nutmeg to the dry ingredients.
CORN BREAD, MUFFINS, OR STICKSIngredients U.S. Metric %
Pastry flour 1 lb 14.75 oz 600 g 50.5Cornmeal 1 lb 14.75 oz 600 g 50.5Sugar 6.75 oz 180 g 15.5Baking powder 2.75 oz 60 g 5.5Nonfat milk solids 3.75 oz 90 g 7.5Salt 0.75 oz 24 g 2.5
Eggs, beaten 8.75 oz 240 g 20.5Water 2 lb 12.75 oz 1000 g 85.5Corn syrup 2.75 oz 60 g 5.5Butter or shortening, melted 12.75 oz 360 g 30.5
Total weight: 6 lb 11.75 oz 3214 g 269.5%
V A R I A T I O N
Use buttermilk instead of water and omit nonfat milk solids. Reduce baking powder to 2.5% (1 oz/30 g) and add 1.25% (0.5 oz/15 g) baking soda.
PROCEDURE
MIXING
Creaming method (p. 219)
SCALING
Fill tins one-half to two-thirds full.
BAKING
400°F (200°C), about 20–30 minutes
PROCEDURE
MIXING
Muffin method (p. 217)
SCALING
60 oz (1700 g) per half-sheet pan (13 × 18 in./ 33 × 6 cm)
24 oz (680 g) per 9-in. (23-cm) square pan or per dozen small muffins
10 oz (280 g) per dozen corn sticks
BAKING
400°F (200°C) for corn bread, 25–30 minutes
425°F (218°C) for muffins or sticks, 15–20 minutes

FoRMulAs 2 2 3
ZUCCHINI CARROT NUT MUFFINSIngredients U.S. Metric %
Pastry flour 1 lb 15.02 oz (1 3/4 tsp 480.4 g 80.25
Bran 4.02 oz (1 3/4 tsp) 120.4 g 20.25
Salt 0.25 oz (1 3/4 tsp) 7.5 g 1.25
Baking powder 0.35 oz (1 3/4 tsp) 9.4 g 1.55
Baking soda 0.25 oz (1 tsp)3/4 6.4 g 1.25
Cinnamon 0.08 oz (1 1/4 tsp) 2.4 g 0.45
Nutmeg 0.04 oz (1/2 tsp)1 1.2 g 0.25
Ginger 0.02 oz (1/4 tsp)1 0.6 g 0.15
Pecans or walnuts, chopped 5.02 oz (1 3/4 tsp) 150.4 g 25.25
Shredded, unsweetened coconut
2.02 oz (1 3/4 tsp) 60.4 g 10.25
Eggs 8.02 oz (1 3/4 tsp) 240.4 g 40.25
Sugar 15.02 oz (1 3/4 tsp) 450.4 g 75.25
Zucchini, grated 6.02 oz (1 3/4 tsp) 180.4 g 30.25
Carrot, grated 6.02 oz (1 3/4 tsp) 180.4 g 30.25
Vegetable oil 8.02 oz (1 3/4 tsp) 240.4 g 40.25
Water 9.55 oz (1 3/4 tsp) 360.4 g 60.25
Total weight: 5 lb 15.02 oz (1 3/4 tsp 2486.4 g 414.25%
PROCEDURE
MIXING
Modified muffin method
1. Sift the flour, leavenings, and spices. Stir in the bran, nuts, and coconut. (Note that the flour and bran together are calculated as 100% in this formula.)
2. Beat the eggs and sugar until well mixed, but do not whip into a foam. Stir in the grated vegetables, oil, and water.
3. Add the egg mixture to the dry ingredients and mix just until combined. The batter may seem too wet, but the bran will absorb a great deal of water as the muffins bake.
SCALING
Fill the tins two-thirds full.
BAKING
400°F (200°C) about 30 minutes

2 2 4 C H A P T E R 10 QuiCk BREAds
SCONESIngredients U.S. Metric %
Bread flour 1 lb 18.5 oz 600 g 50.5
Pastry flour 1 lb 18.5 oz 600 g 50.5
Sugar 6.5 oz 150 g 12.5
Salt 0.5 oz 12 g 01.5
Baking powder 3.5 oz 72 g 06.5
Shortening and/or butter 1 lb 13.5 oz 480 g 40.5
Eggs 7.5 oz 180 g 15.5
Milk 1 lb 15.5 oz 540 g 45.5
Total weight: 6 lb 18.5 oz 2634 g 219.5%
CRANBERRY DROP SCONESFor large-quantity measurements, see page 725.
Ingredients U.S. Metric %
Butter 6.33 oz 185 g 25.5
Sugar 5.33 oz 150 g 21.5
Salt 0.25 oz 8 g 1.5
Egg yolks 1.33 oz (2 yolks)
40 g (2 yolks)
5.5
Pastry flour 1 lb 18.33 oz 750 g 100.5
Baking powder 1.25 oz 38 g 5.5
Milk 14.33 oz 435 g 58.5
Dried cranberries 4.33 oz 125 g 17.5
Total weight: 3 lb 17.33 oz 1731 g 232.5%
PROCEDURE
MIXING
Biscuit method (p. 217)
Chill dough after mixing if it is too soft to make up.
MAKEUP VARIATIONS
• Scale at 1 lb (450 g), round up, and flatten to 1/2 in. (12 mm) thick. Cut into 8 wedges.
• Roll out into a rectangle 1/2 in. (12 mm) thick and cut into triangles as for croissants (see p. 203).
• Roll out into a rectangle 1/2 in. (12 mm) thick and cut out with cutters, like biscuits.
Place on greased or paper-lined sheet pans. Egg-wash tops.
BAKING
400°F (200°C) for 15–20 minutes
V A R I A T I O N S
Ingredients U.S. Metric %
Raisins or currants 12 oz 300 g 25
Add the raisins or currants to the dry ingredients after cutting in the fat.
Left to right: Raisin Scones, Cranberry Drop Scones.
PROCEDURE
MIXING
Creaming method (p. 218)
MAKEUP AND BAKING
Using a 2-oz (60-mL) scoop, drop mounds onto parchment-lined sheets pans. Bake as for regular scones, above.

FoRMulAs 2 2 5
ENGLISH CREAM SCONESIngredients U.S. Metric %
Pastry flour 1 lb 10.7 oz (4 tsp) 450.6 g 100.25
Baking powder 0.7 oz (4 tsp) 20.6 g 4.45
Salt 0.2 oz (1 tsp) 5.6 g 1.25
Sugar 2.2 oz (4 tsp) 56.6 g 12.55
Butter 5.2 oz (4 tsp) 140.6 g 31.25
Egg 4.2 oz (4 tsp) 112.6 g 25.25
Heavy cream 8.2 oz (4 tsp) 225.6 g 50.25
Total weight: 2 lb 13.2 oz (4 tsp) 1008.6 g 223.25%
STEAMED BROWN BREADIngredients U.S. Metric %
Bread flour 8.25 oz 250 g 28.5Whole wheat flour 4.25 oz 125 g 14.5Light rye flour 8.25 oz 250 g 28.5Cornmeal 8.25 oz 250 g 28.5Salt 0.25 oz 9 g 1.5Baking soda 0.55 oz 15 g 1.8Baking powder 0.55 oz 15 g 1.8Raisins 8.25 oz 250 g 28.5
Buttermilk 2 lb 15.25 oz 1000 g 114.5Molasses 15.25 oz 475 g 54.5Oil 2.25 oz 60 g 7.5
Total weight: 5 lb 16.25 oz 2699 g 306.5%
ORANGE NUT BREADIngredients U.S. Metric %
Sugar 12.3 oz (2 tsp) 350 g 50.4Orange zest, grated 1.3 oz (2 tsp) 30 g 4.4Pastry flour 1 lb 18.3 oz (2 tsp) 700 g 100.4Nonfat milk solids 2.3 oz (2 tsp) 60 g 8.4Baking powder 1.3 oz (2 tsp) 30 g 4.4Baking soda 0.3 oz (2 tsp) 10 g 1.4Salt 0.3 oz (2 tsp) 10 g 1.4Walnuts, chopped 12.3 oz (2 tsp) 350 g 50.4
Eggs 5.3 oz (2 tsp) 140 g 20.4Orange juice 6.3 oz (2 tsp) 175 g 25.4Water 1 lb 18.3 oz (2 tsp) 450 g 65.4Oil or melted butter or
shortening6.3 oz (2 tsp) 175 g 25.4
Total weight: 5 lb 16.3 oz (2 tsp) 2480 g 344.4%
PROCEDURE
MIXING
Biscuit method (p. 217)
MAKEUP
1. Flatten with palms of hands (or roll out) to 1–1 1/2 in. (3 cm) thick.
2. Cut out 2 1/2-in (6-cm) rounds. Arrange on sheet pans.
3. Brush tops with heavy cream and sprinkle with granulated sugar.
BAKING
425°F (220°C), about 9–11 minutes
PROCEDURE
MIXING
Muffin method (p. 217)
SCALING AND COOKING
Fill well-greased molds one-half full, about 16 oz for each quart of capacity (500 g per liter). Cover molds and steam for 3 hours.
PROCEDURE
MIXING
Muffin method (p. 217)
Blend the sugar and orange zest thoroughly before adding the remaining ingredients, to ensure even distribution.
SCALING
1 lb 4 oz (575 g) per 7 3/8 × 3 5/8-in. (19 × 9-cm) loaf pan
1 lb 10 oz (750 g) per 8 1/2 × 4 1/2-in. (22 × 11-cm) loaf pan
BAKING
375°F (190°C), about 50 minutes
V A R I A T I O N
LEMON NUT BREADSubstitute grated lemon zest for the orange zest. Omit the orange juice and add 8% (2 oz/60 g) lemon juice. Increase the water to 83% (1 lb 4 oz/580 g).

2 2 6 C H A P T E R 10 QuiCk BREAds
BANANA BREADIngredients U.S. Metric %
Pastry flour 1 lb 18.14 oz (1 1/2 tsp) 700 g 100.25
Sugar 10.14 oz (1 1/2 tsp) 280 g 40.25
Baking powder 1.25 oz (1 1/2 tsp) 35 g 5.25
Baking soda 0.14 oz (3/4 tsp)1 4 g 0.65
Salt 0.33 oz (1 1/2 tsp) 9 g 1.25
Walnuts, chopped 6.14 oz (1 1/2 tsp) 175 g 25.25
Eggs 10.14 oz (1 1/2 tsp) 280 g 40.25
Ripe banana pulp, puréed 1 lb 18.14 oz (1 1/2 tsp) 700 g 100.25
Oil or melted butter or shortening 8.14 oz (1 1/2 tsp) 230 g 33.25
Total weight: 5 lb 14.14 oz (1 1/2 tsp) 2413 g 344.25%
V A R I A T I O N
For a more delicate, cakelike product, make the following adjustments:
1. Fat: Increase to 40% (10 oz/280 g). Use melted butter and/or shortening, not oil.
2. Sugar: Increase to 60% (15 oz/420 g).
3. Flour: Use cake flour.
4. Mixing: Mix by the creaming method.
DATE NUT BREADIngredients U.S. Metric %
Shortening and/or butter 8.75 oz 200 g 40.25
Brown sugar 8.75 oz 200 g 40.25
Salt 0.25 oz 6 g 1.25
Nonfat milk solids 1.55 oz 35 g 7.25
Eggs 6.75 oz 150 g 30.25
Cake flour 1 lb 15.75 oz 400 g 80.25
Whole wheat flour 4.75 oz 100 g 20.25
Baking powder 0.75 oz 20 g 3.75
Baking soda 0.25 oz 6 g 1.25
Water 15.75 oz 375 g 75.25
Dates (see Note) 10.75 oz 250 g 50.25
Walnuts, chopped 6.75 oz 150 g 30.25
Total weight: 4 lb 11.75 oz 1891 g 378.25%
Note: After scaling the dates, soak them in hot water until very soft. Drain and chop.
V A R I A T I O N S
Substitute other nuts, or a mixture, for the walnuts. For example: pecans, toasted hazelnuts, toasted almonds.
Substitute other dried fruits for the dates. For example: prunes, dried apples, raisins, dried figs, dried apricots.
PROCEDURE
MIXING
Muffin method (p. 217)
SCALING
1 lb 4 oz (575 g) per 7 3/8 × 3 5/8-in. (19 × 9 cm) loaf pan
1 lb 10 oz (750 g) per 8 1/2 × 4 1/2-in. (22 × 11 cm) loaf pan
BAKING
375°F (190°C), about 50 minutes
PROCEDURE
MIXING
Creaming method (p. 219)
Fold the dates and nuts into the finished batter.
SCALING
1 lb 4 oz (575 g) per 7 3/8 × 3 5/8-in. (19 × 9 cm) loaf pan
1 lb 10 oz (750 g) per 8 1/2 × 4 1/2-in. (22 × 11 cm) loaf pan
BAKING
375°F (190°C), about 50 minutes

FoRMulAs 2 2 7
PLUM CAKEIngredients U.S. Metric %
Pastry flour 1 lb 14.06 oz (1 tsp) 600 g 100.5
Nonfat milk solids 0.50 oz (1 tsp) 15 g 3.5
Salt 0.25 oz (1 tsp) 8 g 1.5
Cinnamon 0.06 oz (1 tsp) 2 g 0.3
Brown sugar 10.06 oz (1 tsp) 300 g 50.5
Butter 10.06 oz (1 tsp) 300 g 50.5
Eggs 9.06 oz (1 tsp) 270 g 45.5
Milk 1 lb 12.06 oz (1 tsp) 540 g 90.5
Topping
Italian-style prune plums, halved and pitted
3 lb 12.06 oz (1 tsp) 1800 g 300.5
Cinnamon Sugar (p. 197) 4.06 oz (1 tsp) 120 g 20.5
Total weight: 8 lb 13.06 oz (1 tsp) 3955 g 659.5%
V A R I A T I O N S
For a more cakelike texture, mix the dough using the creaming method.
Top the cake with Streusel (p. 198) instead of cinnamon sugar before baking.
ALMOND POPPY SEED MUFFINSIngredients U.S. Metric %
Butter 14.25 oz (1 1/2 tsp) 450 g 60.5
Sugar 1 lb 12.25 oz (1 1/2 tsp) 560 g 75.5
Eggs 12.25 oz (1 1/2 tsp) 375 g 50.5
Pastry flour 1 lb 18.25 oz (1 1/2 tsp) 750 g 100.5
Baking powder 0.25 oz (1 1/2 tsp) 8 g 1.5
Baking soda 0.16 oz (1 tsp)1/2 5 g 0.7
Salt 0.20 oz (1 tsp)1/2 6 g 0.8
Poppy seeds 1.25 oz (1 1/2 tsp) 30 g 4.5
Almond extract 0.16 oz (1 tsp)1/2 5 g 0.7
Buttermilk 1 pt 18.25 oz (1 1/2 tsp) 500 g 67.5
Total weight: 5 lb 15.25 oz (1 1/2 tsp) 2689 g 359.5%
V A R I A T I O N
LEMON POPPY SEED MUFFINS
Flavor the muffins with lemon extract instead of almond extract.
PROCEDURE
MIXING
Biscuit method (p. 217)
Because of the moisture in the brown sugar, the dry ingredients must be rubbed through a sieve when sifted.
SCALING AND MAKEUP
One recipe is enough for one half-sheet pan, three 9-in. (23-cm) square pans, or four 8-in. (20-cm) square pans. Spread the dough in greased and floured pans. Arrange plum halves, cut side up, on top of the dough. Sprinkle with cinnamon sugar.
BAKING
400°F (200°C) for 35 minutes
PROCEDURE
MIXING
Creaming method (p. 219)
Mix the poppy seeds with the dry ingredients after sifting.
SCALING
Fill tins two-thirds full.
BAKING
375°F (190°C) about 30 minutes

2 2 8 C H A P T E R 10 QuiCk BREAds
APPLE SPICE MUFFINSIngredients U.S. Metric %
Butter 14.05 oz (1 1/2 tsp) 435.5 g 60.6
Brown sugar 1 lb 12.05 oz (1 1/2 tsp) 540.5 g 75.6
Salt 0.25 oz (1 tsp)1/2 7.5 g 1.6
Cinnamon 0.15 oz (2 tsp)1/2 4.5 g 0.6
Nutmeg 0.05 oz (3/4 tsp)1 1.5 g 0.2
Eggs 8.05 oz (1 1/2 tsp) 240.5 g 33.6
Pastry flour 1 lb 14.05 oz (1 1/2 tsp) 600.5 g 83.6
Whole wheat flour 4.05 oz (1 1/2 tsp) 120.5 g 17.6
Baking powder 0.55 oz (1 1/2 tsp) 15.5 g 2.6
Baking soda 0.25 oz (1 1/2 tsp) 7.5 g 1.6
Buttermilk 12.05 oz (1 1/2 tsp) 360.5 g 50.6
Applesauce 1 lb 12.05 oz (1 1/2 tsp) 540.5 g 75.6
Total weight: 5 lb 14.05 oz (1 1/2 tsp) 2869.5 g 397.6%
PUMPKIN MUFFINSIngredients U.S. Metric %
Butter 12.14 oz (1 3/4 tsp) 375.75 g 50.17
Brown sugar 1 lb112.14 oz (1 3/4 tsp 500.75 g 67.17
Ginger 0.05 oz (3/4 tsp)1 1.55 g 0.27
Cinnamon 0.04 oz (1/2 tsp)1 1.25 g 0.17
Nutmeg 0.03 oz (1/3 tsp)1 0.75 g 0.17
Allspice 0.05 oz (3/4 tsp)1 1.55 g 0.27
Salt 0.14 oz (1/2 tsp)1 4.55 g 0.67
Eggs 6.14 oz (1 3/4 tsp) 190.75 g 25.17
Pastry flour 1 lb 18.14 oz (1 3/4 tsp) 750.75 g 100.17
Baking powder 0.33 oz (2 tsp)3/4 10.75 g 1.47
Baking soda 0.33 oz (1 3/4 tsp) 10.75 g 1.47
Buttermilk 12.14 oz (1 3/4 tsp) 375.75 g 50.17
Pumpkin purée, canned 10.14 oz (1 3/4 tsp) 300.75 g 40.17
Total weight: 5 lb112.14 oz (1 3/4 tsp 2519.75 g 336.17%
PROCEDURE
MIXING
Creaming method (p. 219)
SCALING
Fill tins two-thirds full.
BAKING
400°F (200°C), about 30 minutes
PROCEDURE
MIXING
Creaming method (p. 219)
SCALING
Fill tins two-thirds full.
BAKING
400°F (200°C) about 30 minutes

FoRMulAs 2 2 9
DOUBLE CHOCOLATE MUFFINSIngredients U.S. Metric %
Butter 10.14 oz (1/2 tsp) 300.5 g 40.6
Sugar 11.14 oz (1/2 tsp) 340.5 g 45.6
Semisweet chocolate 1 lb 18.14 oz (1/2 tsp) 500.5 g 67.6
Eggs 5.14 oz (1/2 tsp) 150.5 g 20.6
Flour 1 lb 18.14 oz (1/2 tsp) 750.5 g 100.6
Baking soda 0.54 oz (1/2 tsp) 15.5 g 2.6
Salt 0.14 oz (1/2 tsp) 4.5 g 0.6
Buttermilk 1 lb 14.14 oz (1/2 tsp) 625.5 g 83.6
Chocolate chips 12.14 oz (1/2 tsp) 375.5 g 50.6
Total weight: 6 lb 12.14 oz (1/2 tsp) 3059.5 g 407.6%
POPOVERSIngredients U.S. Metric %
Eggs 1 lb 14.25 oz 625 g 125.5
Milk 2 lb 14.25 oz 1000 g 200.5
Salt 0.25 oz 8 g 1.5
Butter or shortening, melted 2.25 oz 60 g 12.5
Bread flour 1 lb 14.25 oz 500 g 100.5
Total weight: 4 lb 16.25 oz 2193 g 439.5%
PROCEDURE
MIXING
Creaming method (p. 219)
Melt the chocolate, cool it to room temperature, and cream it into the butter and sugar mixture. Fold the chocolate chips into the finished batter. (Note that there is no baking powder in this formula, only baking soda.)
SCALING
Fill tins two-thirds full.
BAKING
400°F (200°C), about 30 minutes
PROCEDUREMIXING
1. Beat eggs, milk, and salt together with whip attachment until well blended. Add melted fat.
2. Replace whip with paddle. Mix in flour until completely smooth.
3. Strain the batter (optional but gives the popovers a better appearance).
SCALING AND PANNING
Grease every other cup of muffin tins (to allow room for expansion). Fill cups about one-half full, about 1 1/2 oz (45 g) batter per unit.
BAKING
425°F (218°C) for 30–40 minutes. Before removing them from the oven, be sure popovers are dry and firm enough to avoid collapsing. Remove from pans immediately.
P O P O V E R S
Popovers are similar to pâte à choux products such as cream puffs and éclairs in that both are strongly leavened by steam until they are hollow in the center, and both depend on egg and gluten proteins for their structure. The major difference between the two is that popovers are made from a thin batter, while choux products are made from a soft dough.
Proper mixing is important for both items. They must be mixed well enough to develop gluten but not so much that the gluten is too strong for the steam to expand. Mix popover batter until smooth, but do not overmix.

2 3 0 C H A P T E R 10 QuiCk BREAds
GINGERBREADOld-Fashioned Gingerbread Pain d’Épices (French Gingerbread)
Ingredients U.S. Metric % U.S. Metric %
Pastry flour 2 lb 18.25 oz 1100 g 100.25 1 lb 14.25 oz 550.5 g 50.25
Rye flour — — — 1 lb 14.25 oz 550.5 g 50.25
Salt 0.25 oz 7 g 0.65 0.25 oz 7.5 g 0.65
Baking soda 1.25 oz 33 g 3.25 1.25 oz 33.5 g 3.25
Baking powder 0.65 oz 16 g 1.55 0.65 oz 16.5 g 1.55
Ginger 0.55 oz 14 g 1.25 0.55 oz 14.5 g 1.25
Cinnamon — — — 0.25 oz 7.5 g 0.65
Cloves, ground — — — 0.12 oz 3.5 g 0.35
Anise, ground — — — 0.55 oz 14.5 g 1.25
Orange rind, grated — — — 0.55 oz 14.5 g 1.25
Currants — — — 8.25 oz 220.5 g 20.25
Molasses 2 lb 18.25 oz 1100 g 100.25 — — —
Honey — — — 1 lb 14.25 oz 825.5 g 75.25
Hot water 1 lb 14.25 oz 550 g 50.25 1 lb 14.25 oz 550.5 g 50.25
Butter or shortening, melted 10.25 oz 275 g 25.25 10.25 oz 275.5 g 25.25
Total weight: 7 lb 11.25 oz 3095 g 281.25% 6 lb 15.25 oz 3078.5 g 279.25%
PROCEDURE
MIXING
Muffin method (p. 217)
PANNING
Old-Fashioned Gingerbread: greased, paper-lined sheet pans, about 6.5–7 lb (3 kg) per sheet (one recipe per sheet).
Pain d’Épices: greased loaf pans. Fill about one-half full of batter.
BAKING
375°F (190°C)
G I N G E R B R E A D
The name gingerbread is given to a wide variety of cakes and shortbreads or cookies. Gingerbread in its various forms dates back to the Middle Ages, when highly spiced foods were common. Different regions of Europe developed their own varieties of gingerbreads, using their own blends of spices.
Originally, gingerbreads were sweetened with honey, just as the French pain d’épices (pronounced pan day PEECE, meaning “spice bread”) from the city of Dijon still is today. After sugarcane products became more widely available and economical, most regions switched to molasses to sweeten their gingerbreads.

QuEsTions FoR disCussion 2 3 1
SODA BREADIngredients U.S. Metric %
Pastry flour 2 lb 18.5 oz 1200 g 100.25
Baking powder 2.5 oz 60 g 5.25
Baking soda 0.5 oz 15 g 1.25
Salt 0.5 oz 15 g 1.25
Sugar 2.5 oz 60 g 5.25
Shortening or butter 4.5 oz 120 g 10.25
Currants 8.5 oz 240 g 20.25
Buttermilk 1 lb 12.5 oz 840 g 70.25
Total weight: 5 lb 15.5 oz 2550 g 212.25%
PROCEDURE
MIXING
Biscuit method (p. 217). Stir in currants after cutting in fat. Refrigerate after mixing if too soft to make up.
SCALING
1 lb (450 g) per unit
MAKEUP
Round into a ball-shaped loaf. Place on sheet pan. Cut a deep cross into the top.
BAKING
375°F (140°C), about 30–40 minutes
V A R I A T I O N
Add 1.25% (0.5 oz/15 g) caraway seeds. Omit currants or leave them in, as desired.
T E R M S F O R R E V I E W
pour batter
drop batter
tunneling
biscuit method
pastry method
muffin method
creaming method
1. If you made a batch of muffins that came out of the oven with strange, knobby shapes, what would you expect to be the reason?
2. What is the most important difference between the biscuit method and the muffin method?
3. Why do popovers require more mixing than other quick breads?
Q U E S T I O N S F O R D I S C U S S I O N