Embed Size (px)
Citation preview

The ATG-‐1 Floor Processor Core Pack Software v3.10
Author: Dr. Andy Hildebrand
February 2015

2
Contents Introduction .................................................................................... 3 Chapter 1 Absolutely Required Essential Stuff ................................. 7 Chapter 2 String Tune and Solid-‐Tunetm ........................................... 12
Chapter 3 CONTROL LED................................................................. 14 VOLUME (and stereo) .............................................. ALT TUNING ............................................................ 16 PICK-‐UP ................................................................... PITCH SHIFT ............................................................ CAPO ....................................................................... 17 DOUBLE ................................................................... MODEL .................................................................... TONE ....................................................................... 18 Chapter 4 CONTROLS Screens Solid-‐Tunetm (Control) ............................................... 18 Custom Alt Tuning (Control) ..................................... Custom Doubling (Control) ....................................... 19 Detune (Global) ........................................................ Transpose (Global) ................................................... 20 MIDI Channel (Global) .............................................. Input Gain (Global) ................................................... Output Gain (Global) ................................................. Tone Offset (Global) .................................................. String Gains (Global) ................................................. 21 LCD Contrast (Global) ............................................... Pickup Type (Global) ................................................. Scale Length (Global) ................................................ Pickup Offset (Global) ............................................... Select Application (Global) ........................................ 22 Pedal Calibration (Global) ......................................... Chapter 5 Globals, SAVE PRESET, BANK SELECT and PRESET SELECT .................................................. 23 Chapter 6 Fret Control .................................................................... 25 Chapter 7 MIDI Control ................................................................... 30
3
Introduction Darn. I meant for this intro to be short. But apparently it is not. If you want to do the minimum reading possible, proceed directly to Chapter 1 "Absolutely Required Essential Stuff". Once you get into operating the processor, come back here for lots more useful information. The electric guitar is a musical instrument. In the hands of a skilled guitarist, it is subtle and responsive. There are many playing techniques; strumming, plucking, palm muting, harmonics, plucked harmonics, hammer-‐on, finger mutes, string mutes, etc. The electric guitar is as complex, or more complex, than a violin or a saxophone. The ATG-‐1 (Auto-‐Tune for Guitar -‐ 1) Floor Processor does not get in the way of any of that. The ATG-‐1 passes through all the sounds and gestures of the player. It adds only two features: controlling pitch and compensating for the harsh tonality of the required hexaphonic pickups. ATG-‐1does not create sound. It only processes sounds created by the player. ATG-‐1 is not genre specific and is equally helpful for rock, soul, jazz, C&W and others. The ATG-‐1 Floor Processor is the outboard version of the ATG processor used in guitars. The ATG-‐1 Floor Processor interfaces to the guitar using the Roland 13 pin interface, currently provided on any guitar using Roland's GK-‐3 interface. Some guitar manufacturers integrate the 13 pin interface into the guitar: these are Roland, Godin, Carvin, and Brian Moore Guitars. Pickup/interfaces for 13 pin are made by Roland, RMC and GraphTech. What is this manual about, anyway? This manual is a discussion of two things. First, it is a discussion of the ATG-‐1 Floor Processor hardware -‐ the switches, buttons, knobs -‐ and what they do. Second, this is a discussion of the software. Specifically, the power-‐on screen shows: '1:Core Pack v3.01' which says the feature pack slot "1" is running and has the name "Core Pack v3.01". This is the current feature pack distributed on the ATG-‐1 Floor Processor. This distinction between hardware and software is important because six feature packs can reside on the ATG-‐1 processor and you can choose which of the six you run. For example, when our preset editor is ready (likely it will be when you read this), we will release 'Core Pack v3.10'

4
with the enhanced functionality. You can download the update pack from www.autotuneforguitar.com and install it into whichever of the six slots you choose. Similarly, we will make feature packs with distinctive functionality, like auto-‐harmonizer, or pedal steel simulator, etc. as separate feature packs that can simultaneously reside on your ATG-‐1. You can choose which feature pack to run via a CONTROLS screen, or you can change feature packs during performance with a MIDI control message. Musical Features of the ATG-‐1 Getting the ATG-‐1 to do musical stuff is easy. Just press the switch to light the CONTROL LED, press any of the various control switches (1 to 8) and make selections with switches, pedal or DATA dial. The unique function of this instrument is intonation: The first means to do this is "String Tune" which determines a pitch correction that causes the open strings of the guitar to be brought to the standard tunings. String Tune can be used at any time, even during Alternate Tunings, Doublings and Virtual Capos. After those effects are removed, the open strings are still set to the standard tuning. The second pitch control is Solid-‐Tunetm intonation. ATG constantly monitors the pitch of each string. If the pitch of the string is close to a note, that pitch is tuned exactly to the note. If not, the pitch is allowed to not be on the note, allowing strings to be bent or vibrato to be used. Solid-‐Tunetm intonation thereby corrects for excess finger pressure on a string, non-‐ideal setup, geometry errors of the guitar and string pitch change after a pluck. There are a variety of physical models including pick-‐up modeling. We call these "Precision Analog Models". The approach we used was to purchase guitars and upgrade pickups for each guitar on our list. These guitars formed our guitar “library”, and we used them to do model designs and adjustments. The models did not pass until they produced identical results as the corresponding library guitars.
Pitch Changing is Perfectly Seamless You hear Auto-‐Tune change pitch every day. Whether it is used to correct the pitch of a singer or as a musical effect, you never hear a click or a clunk. You will hear no flaws in your guitar playing either.

5
Other musical features are Virtual Capos, Alternate Tunings and Doublings. Examples of Alternate Tunings are DADGAD, Open E, Baritone, etc. Doublings refers to the fact that each processing channel (there are six, one for each string) can produce two string sounds pitched at different pitches. Examples are Octaver and Twelve String. So, for example, you can create a Twelve String in Drop-‐D tuning. Finally, the processor has controls for Pitch Shift, Tone and Volume. There are various stereo effects, mapping strings of the guitar, and the doubling channels across the stereo field in various adjustable ways. Logistical Features of the ATG-‐1 The ATG-‐1 has 64 Presets: eight Presets per Bank and eight Banks. To call up a preset in the current Bank, press the PRESET/CONTROL switch to light the PRESET LED, then press the switch with the preset number you desire. Changing Banks is also easy: Press the BANK switch, then click the bank number followed by the preset number within that bank. Saving presets is also trivial. Presets are going to get better: As I write this, Trish Nielsen (our web manager and database guru) is developing a preset editor that runs on Windows or Mac. It will open up your guitar presets via MIDI, let you examine them and edit them. You can also write them to a disk file and share them with friends. This editor will support user defined custom scales and custom doublings (not yet available in the shipped version of the ATG-‐1 Processor). Most 13 pin guitars and the GK-‐3 have onboard controls. The ATG-‐1 processor recognizes the volume control, preset up/down switches and MIX switch. Finally, there are two other ways the ATG-‐1 can be controlled. One is Fret control, the other is MIDI input. Fret control allows you to use the guitar's fret-‐board to directly call up any Model, Capo, Alternate Tuning, Doubling or any of the first 21 Presets. This bypasses the problem of having to fumble through lists of settings on the processor switch interface. Concerning MIDI input, the different settings can be controlled using MIDI Control Change messages. Also, the ATG-‐1 changes presets in response to the MIDI Program Change message. Finally, the ATG-‐1 responds to MIDI Pitch Bend message allowing a range of one octave down to one octave up.

6
About Processing Latency I often get the comment from ATG-‐1 users there is no latency. Actually there is. There is about 50 samples of latency from the ADC and DAC converters. (That would be Analog to Digital and Digital to Analog Converters.) 50 samples is about 1 millisecond (.001 seconds). There is no latency from the modeling because they have an impulse response that starts at zero. Changing the pitch is another matter and it is easy to understand. Changing pitch ultimately involves compressing cycles and adding cycles to make the pitch sharper or stretching cycles and removing cycles to make the pitch flatter. The processing algorithm guarantees the output is no more than one cycle delayed from the input. At one cycle delay it is time to drop a cycle if going flatter (which brings it to zero delay) or the algorithm has just repeated a cycle if going sharper (changing from zero to one cycle delay). Add 10 samples for a brief crossfade, and there you have it. No human has been documented to perceive one cycle of latency, at any pitch. Hence latency that varies from (50 samples + 10 samples) to (50 samples + 10 samples + one cycle) is not perceived. Other Reading Since you have gotten this far, I think you must like to read. In which case, I would suggest you have a look at the ATG "Software Feature Pack Manual", available on your distribution disk or the www.autotuneforguitar.com web site. That manual has a lot of interesting history of the ATG technology development as well as a fair amount of the science of guitars and pitch detection.

7
Chapter 1 Absolutely Required Essential Stuff
This chapter explains how the ATG-‐1 processor operates and walks you through required settings, without which, you will be subjecting yourself really nasty sounds. So, plug in your 13 pin cable, plug in your amp, plug in your power and turn everything on. If you see nothing on the ATG-‐1's screen, you're in trouble. If you're not in trouble yet, you'll see the software version screen, which only lasts a few seconds. The next screen is the VOLUME control: Move the pedal to toe down and pluck a string. If you hear nothing, you're in trouble. Connector Interface
Figure 1: The rear connector interface Obviously you plug your guitar into "GUITAR INTERFACE IN". "GUITAR INTERFACE OUT" is just a pass-‐through of the input and has no processing. The MIDI plugs are the standard. The AUDIO plugs relate to stereo processing you may be doing. Using the monaural option, you can plug into L/MONO or R and get the same result. Operating Foot Switches The STRING TUNE foot switch is the central functionality of the ATG-‐1 Floor Processor. At any time, with open strings, strum all 6 guitar strings and immediately press (and hold down for .2 seconds) the STRING TUNE switch. If all six strings are heard by the processor, the LED will be lit, you will hear a scooping sound and all strings will be correctly tuned. You can also use the STRING TUNE to control parameters from the fret board (see "fret control" later in this manual). The foot switches numbered 1 through 8 call up different screens. Initially the CONTROL LED is lit and the eight buttons call up screens for VOLUME, ALT TUNING, PICKUP, etc. Pressing the CONTROL/PRESET switch toggles to the PRESET LED and the eight buttons call up Presets 1 to 8 in the current bank.

8
Pressing the BANK SELECT switch lights up it's LED, allowing you to select bank 1 to 8 followed by preset 1 to 8 within that bank. Screen and Field Nomenclature You control the ATG-‐1 by changing the content of the current field on screens. The current field is indicated by a flashing underline cursor. Some screens that instruct you what to do don't have a field. If there is more than one field on a screen, the cursor can be moved among fields using the arrow, <-‐ or -‐>, buttons. A field's value can be changed (depending on the context) using the pedal, DATA dial and/or foot switch. Screens accessed by foot switches that have multiple fields are:
-‐ VOLUME screen has Eff: field to control stereo effect, Amt: field to control stereo spread and default Vol: field to control loudness.
-‐ PITCH SHIFT screen has Range: field to control 8va, 8vb, etc, and default Shift: field to control the amount of pitch change.
Just two more buttons So far, just about everything you see is explained. There are just two more buttons: the CONTROLS button and the SAVE PRESET button. The SAVE PRESET button is easy and explained later in the document. The CONTROLS button is a lot more fun. (When my Mother would say "this is going to be fun", I knew I was in trouble.) The CONTROLS button Press the CONTROLS button (not the CONTROL/PRESET switch). The CONTROLS LED will light up indicating you are looking at CONTROLS screens. The display appears: 'Control Solid-Tune: ' ' On ' Note the cursor is under the word "Control", indicating the screen title is itself a field. Rotate the DATA dial to see about a dozen screens that manage various items.

9
Set the Pickup Type In the CONTROLS, navigate to the screen: 'Global Pickup Type: ' ' Piezo ' The second line is selectable between 'Piezo' and 'Magnetic' and must be set to the type of 13 pin hex pickup you have on your guitar. Move the cursor to the 'Piezo'/'Magnetic' field. Next, use the DATA knob to modify the field contents to match the kind of pickup you have. If you have a Piezo, once 'Piezo' is selected you may skip the next two steps and proceed directly to "Set the Pedal Range Calibration" Set the Scale Length Use the <-‐ or -‐> keys to move the cursor to the screen name field, then turn the DATA knob one click clockwise to the screen 'Global Scale Length:' Use the <-‐ or -‐> keys to move the cursor to the length field on the second line. Turn the DATA knob to set the scale length of your guitar in millimeters. The Scale Length is the distance from the string roll-‐over point to the nut. For example, a typical length is 25.5 (inches) * 25.4 (millimeters/inch) = 648 (millimeters). But that typical is only an example. Use the actual length of your guitar so that you can dial in the correct processing. Set the Pickup Offset for each string Use the <-‐ or -‐> keys to move the cursor to the screen name field, then turn the DATA knob one click clockwise to the screen 'Global Pickup Offset' This screen allows you to set the Pickup Offset (the distance for the string roll-‐over point to the center of the magnetic pickup) for each of the six strings. If you measure in inches, multiply by 25.4. For each of the six strings, first move the cursor to the 'Str:' field, select the string, then move the cursor to the 'Offset:' field and set the offset using the DATA dial. Double check all your numbers are correct by stepping through all the strings before you are finished.
10
Set the Pedal Range Calibration Use the <-‐ or -‐> keys to move the cursor to the screen name field, then turn the DATA knob to show the screen 'Pedal Calibration'. Follow the directions to calibrate the pedal. Set Input Gain The ATG-‐1 has an input analog gain adjustment. Adjusting this gain optimizes the signal to noise ratio of the digital section by gaining the input to the loudest level of playing. Use the <-‐ or -‐> keys to move the cursor to the screen name field, then turn the DATA knob to show the screen 'Global In Gain: 0dB' Play the guitar as loud as you will use it and rotate the DATA dial to set the gain as high as possible without overflowing the meter. Tone Controls Assuming you are a perfectionist, the tone of the instrument may not be exactly what you want. In that case, give attention to the following: the Tone control, "Global Tone Offset", and "Global String Gains". See Chapter 4 for more details on these screens.

11
Chapter 2 String Tune and Solid-‐Tunetm
String Tune Summary:
The first way ATG-‐1 controls an out-‐of-‐tune guitar is "String Tune," invoked by strumming the open strings, then pressing the String Tune button (for .2 seconds). A “scooping” sound occurs if all six strings are tuned.
The processor continuously listens to each string and if there is any periodic waveform, it detects it and follows the pitch. This happens about eight thousand times a second. (That's correct: 8,000 times a second.) That's about once every five audio samples. I say "about" because the system sometimes has something else to do, like process a button press or interpret MIDI data. In those cases, the pitch update might take six samples. Anyway, when you press the String Tune button, the processor takes the current natural pitch of the string and compares it to the standard E1, A1, D2, G2, B2 and E3 pitches. It instantly computes and applies a pitch correction coefficient for each string to change that pitch to the standard. This will happen independently of any Alternate Tuning, Virtual Capo setting or Solid-‐Tunetm pitch change currently in effect. Almost. The DSP also follows the amplitude of each string. A string must have a specific minimum amplitude to get tuned. If you hear the scooping sound, that tells you the guitar has heard all six strings and has tuned them. In that case, the guitar also flashes the LED for couple of seconds in case you want to turn the Volume down to not broadcast the scoop. If the amplitude test fails some strings, the remainder are tuned anyway, and no scoop and no LED flashing occurs.
User Tip #1 If you don't like the scooping sound, turn down the volume, strum, press and watch for the LED flash.

12
Having Fun With String Tune: Craig Anderton wrote a very positive and in-‐depth review of the Peavey AT-‐200 for the www.harmonycentral.com website: "Peavey AT-‐200 Guitar with Antares Auto-‐Tune®". In http://www.harmonycentral.com/docs/DOC-‐2786, Craig explains:
"Auto-‐Tune® works based on the pitch at the nut, but you can fool it into thinking the nut is somewhere else. For example, suppose you want a dropped D tuning. Fret the second fret on the sixth string (F#), strum the strings, and initiate tuning. Auto-‐Tune® will “think” the F# is the open E, and tune F# to E. So now when you play the E open string, you’ll hear a D as the string is transposed down two steps. "It gets better. Want that heavy metal drop tuning? Barre on, for example, the fourth fret while tuning, and now whatever you play will be transposed down four semitones. Being a wise guy, I tried this on the 12th fret and—yes, I was now playing bass. What’s more, it actually sounds like a bass. Say what? Or try this: fret the 12th fret on only the 5th and 6th strings. Now when you play chords, you’ll have one helluva bottom end. The [Peavey] manual gives suggested fingering to create various alternate tunings—open G, baritone, DADGAD, open tunings, and the like."
Because ATG-‐1 applies the String Tune result independently of Alternate Tunings and Capo, you can also use fretting with String Tune to modify those tunings as well. The only problem is if you press a little hard during String Tune, the string will be slightly sharp and the resulting tuning will be slightly flat.
User Tip #2 When using fretting with String Tune, be careful to press down lightly at the fret to minimize having the results be flat.
User Tip #3 When using fretting with String Tune, Fret Control will no longer function as documented. The frets will be shifted.

13
Solid-‐Tunetm Summary:
The second intonation correction is Solid-‐Tunetm intonation. This works automatically, unless you disable it (humor).
After String Tune, the ATG-‐1 is constantly monitoring the pitch of each string (8,000 times a second). If the pitch of a (String Tuned) string is close to a note, that pitch is tuned exactly to the note. If not, the pitch is allowed to not be on the note so you can bend strings or use vibrato. Solid-‐Tunetm intonation thereby corrects for finger pressure on a string, non-‐ideal setup, geometry errors of the guitar, and the gradual pitch change of strings decreasing in pitch as they sustain.
To disable Solid-‐Tunetm on the ATG-‐1, see the section about Solid-‐Tunetm in Chapter 5: CONTROLS Screen.
User Tip #4 Solid-‐Tunetm does wonky things (engineering lingo) to pitch if String Tune is not done, or if a string changes its natural pitch too much since the last String Tune. Do a String Tune frequently after changing strings.
14
Chapter 3 CONTROL LED
To access the various controls (Capo, Models, etc.) first press the CONTROL/PRESET switch until the CONTROL LED lights. You can then press one of eight control switches, (1 -‐ VOLUME, 2 -‐ ALT TUNIG, 3 -‐ PICKUP, etc.), to access the respective options. You can step through the options one at a time by repeatedly pressing the switch, moving the pedal or turning the DATA dial. After setting a control, you can switch away to other options and it will not change. When you switch back, the value will be as you left it, even if the pedal position has changed. Two of the CONTROL screens have multiple fields: the VOLUME has three fields, the PITCH SHIFT has two fields. If you don’t remember what a field is or how to navigate around them, then reread Chapter 1. If you still don’t remember then get medical attention. Concerning presets: Almost all of the CONTROL parameters are saved in presets. The exceptions are the Vol: parameter in the VOLUME controls, and the Shift: amount in the PITCH SHIFT field. Also, depending on the feature pack, one or more Controls accessed through the CONTROLS menus are saved in presets. Currently this only includes the Solid-‐Tune On/Off control. VOLUME (and stereo) Selecting VOLUME, the screen appears with the current field being the Vol: field. This is the initial default control when the ATG-‐1 powers on. 'Eff:-----name-------',0 'Amt:xxx Vol: xxxdB',0 You can navigate to the stereo effect field, Eff:, and select among the following: Eff: parameter Amt: parameter ================= =================== ' monaural ' mono on L&R out ' pan L/R ' pans mono on L&R out 'pan L/R chn2 R/L' pans primary and doubling separately 'L/R alt strings ' pans 3 string L/R and others R/L 'spread chn 1&2 ' spreads primary and doubled strings 'spread chn 2 opp' spreads primary and doubled opposite

15
ALT TUNING The alternate tuning selections are: 'Standard Tuning' 'Drop D ' 'DADGAD ' 'Open E ' 'Open A ' 'Open G ' 'Open D ' 'Open E minor ' 'Open A minor ' 'Open D minor ' 'Double Drop D ' 'Bass ' 'Bass Split '
PICK-‐UP The pickup selections depend on the model being accessed. Guitars with two pickups have the choices: 'Bridge ' 'Bridge + Neck ' 'Neck ' Guitars with three pickups have the choices: 'Bridge ' 'Bridge + Middle ' 'Middle ' 'Middle + Neck ' 'Neck ' The acoustic Models have the choices: 'Dreadnought ' 'OM guitar ' 'Finger Style ' The Bass Models have the choices: 'Precision bass ' 'Jazz neck+bridge' 'Jazz bridge ' PITCH SHIFT The Range: selections are: 'Octave Up ' 'Octave Down' '8vb to 8va ' (octave down to octave up) '1vb to 1va ' (whole step down to whole step up)

16
CAPO The capo values are from -‐12 to +12 semitones. DOUBLE Doubling refers to a second virtual string generated by the current sound and shifted a fixed (sometimes microtonal) amount. The choices are: '(no doubling) ' 'Twelve String #1 ' 'Poly Octaver Down' 'Seven String #1 ' 'Fifth Up ' 'Seven String #2 ' 'Fourth Up ' 'Poly Octaver Up ' 'Twelve String #2 ' MODEL We refer to the modeling technology as "Precision Analog Modeling". The approach we used was to make a list of guitars, purchase each and upgrade their pickups. These guitars formed our guitar “library”, and we used them to do model designs and adjustment of variables in A/B testing. The models did not pass until they produced identical results as the corresponding library guitars. Our most impressive models are the acoustics (Dreadnought, OM and finger style) and the bass guitars (Jazz bridge, Jazz neck & bridge, and P bass). We also replaced the two pickup lipstick with a lipstick Strat style, added a music man SM-‐Y2D and Ibanez JEM. The MODEL selections are: 'Modern Humbucker ' 'Calif. Single Coil' 'Acoustic ' 'Nash. Single Coil ' 'Mini Humbucker ' 'P-90 ' 'SLO custom HSH ' 'Vintage Humbucker ' 'Vintage Lipstick ' 'Bass ' 'Japan custom HSH ' Some Modeling notes are:
Modern Humbucker used a 24 fret/25.5" scale guitar with a set of Seymour Duncan Hot Rodded Humbucker set (SH-‐4 JB and SH-‐2n) . California Single Coil used a standard Strat (25.5" scale) with standard Strat Pickup locations.

17
Acoustic used three different steel string guitars, a dreadnought (Bridge), an OM (Middle), and a finger style guitar (Neck). Nashville Single Coil used a standard Tele (25.5" scale) with standard Tele Pickup locations. Mini Humbucker is a Les Paul with Mini Humbuckers. P-‐90 used a Les Paul Special with 22 fret/24.75" scale and the pickups at the following locations: Pickup distance from the bridge break over point to the center of the pickup: Bridge Pickup: 1.937”/Neck Pickup: 5.875”. SLO Custom HSH: This is based on a MusicMan SM-‐Y2D with 22 fret/25.5" scale. Pickups in the following locations (bridge break over point to center of pickup): Bridge 1.625", Middle 2.812" (right next to the bridge p/u), 5.812". Vintage Humbucker: Les Paul 22 fret/24.75" scale with vintage pickups in standard LP positions. Vintage Lipstick: Originally a three-‐position (two pickup), this model is now a five position (three pickup) configuration for more sound possibilities. Strat (25.5" scale) with standard Strat pickup locations and vintage Lipstick pickups. Bass is a three position selection with the following models: Jazz Bass bridge (Bridge position), Jazz Bass both pickups (Middle position), and Precision (P-‐Bass) Bass (Neck position). Japan Custom HSH is an Ibanez JEM EVO replica used with 25.5" scale and pickups in standard Ibanez locations.
TONE values range from 0 (toe down) for wide open to -‐11 for max closed. The effect of this tone control is limited to the range of the modeled guitars. A much broader tonal range is allowed by the 'Global Tone Offset:' parameter in the set of CONTROLS. See Chapter 4 for more information on Tone Offset.

18
Chapter 4 CONTROLS Screens
The term Controls refers to parameters that are saved in presets. The term Globals refers to parameters that are independent of presets and therefore apply to all presets. Globals are automatically saved (after 3 seconds of not being changed) and automatically restored. In the CONTROLS screens the screen name itself is a field and you go from screen to screen by selecting the screen name field (the top left of the screen) and turning the DATA dial. To change other fields, use the arrows, -‐> and <-‐ to navigate to the field and turn the DATA dial. Pressing the CONTROLS button to set the LED on always puts you at the first screen (the Solid-‐Tune screen). Solid-‐Tune (Control) Dialog 'Control Solid-Tune:' The ATG-‐1 constantly monitors the pitch of each string. If the pitch of the string is close to a note, that pitch is tuned exactly to the note. If not, the pitch is allowed to not be on the note, allowing bending or vibrato. Solid-‐Tunetm intonation thereby corrects for excess finger pressure on a string, non-‐ideal setup, geometry errors of the guitar and string pitch change after a pluck. This control allows you to turn Solid-‐Tunetm off or on. In general you will want Solid-‐Tunetm on. But occasionally for a specific song you may want it off. By making this parameter a control, its value is saved with presets allowing you to set it with a minimum of effort. Custom Alt Tuning (Control) Dialog 'Custom Alt Tuning: ' Versions 3.10 and later provides for Custom Alternate Tuning and Custom Doubling. The Alternate Tuning coefficients are defined here. Two things need to happen to hear an alternate tuning:
First, the Custom Alt Tuning coefficients must be set (this dialog). These are six numbers, one for each string, that describe how to tune its respective string. These six numbers are stored in each preset. Therefore, you can define as many alternate tunings as there are presets -‐ which is 64. Second, once defined or recalled with a preset, these six coefficients sit alongside the built-‐in factory coefficients for other tunings (Standard, Open-‐E, Drop D, etc.) To use the custom coefficients, the ALT TUNING parameter

19
must be set to "Custom (preset)". (In earlier versions than 3.10, item 12 was Bass-‐split.) It also replaces Bass-‐split in the MIDI controls (see Table 7, MIDI control value = 1).
This screen allows you to set the Alt Tuning coefficients for each of the six strings. For each of the six strings, first move the cursor to the 'Str:' field, select the string, then move the cursor to the 'Cnts:' field and set the coefficient. The coefficients are cents ranging from -‐1250 cents to +1250 cents. 100 cents is a half step up, -‐1200 cents is an octave down. The Custom Alt Tuning are cents in deviation from the standard tuning (E3, B2, …, E1). Hence a Drop-‐D tuning is (E3, B2, …, E1) = (0,0,0,0,0,-‐200). While adjusting the coefficients, if ALT TUNING is set to "Custom (preset)", you will be able to listen to the pitch change with the adjustment. Because these coefficients are stored in the preset, the next preset load will replace the new values, so remember to save your new entries and a preset. Custom Doubling (Control) Dialog 'Custom Doubling: ' Custom Doublings are identical to Custom Alternate Tunings, so this text assumes you already understand Custom Alternate Tunings. Like Custom Alternate Tunings, the Custom Doubling coefficients defined here must be stored in a preset. The Custom Doubling coefficients are cents applied in the doubling channel to the results of the Custom Alt Tuning. Hence a 12 string guitar doubling might be (E3, B2, …, E1) = (-‐5,10,1220,1990,1210,1980) which creates 6 doubling channels where the two high strings are slightly de-‐tuned and the remaining strings are raised an octave and de-‐tuned. While adjusting the coefficients, if DOUBLING is set to "Custom (preset)", you will be able to listen to the pitch change with the adjustment Because these coefficients are stored in the preset, the next preset load will replace the new values, so remember to save your new entries in a preset. Detune (Global) Dialog 'Global Detune:' This is for when A = 440 Hz will not do. Remember that global parameters stay set forever or until you change them again. Even if you power off and then power on. If the -‐63 cent to +64 cent is not enough, and you need to go flatter, bump Global Transpose and try again. If you need to go sharper than +64 cents (who has to go sharp?), you're going to have to change your Capos.

20
Transpose (Global) Dialog 'Global Transpose:' Global Transpose was created to solve the following problem: Assume you have programmed Presets, including Capo changes for your gig. Then your singer shows up with a sore throat and announces everything has to be brought down a couple of whole steps. So there you are with half a dozen Presets to rework during the hassle of getting everything else done. No problem: use Global Transpose. The Global Transpose will add a transpose from 0 to -‐7 half steps. MIDI Channel (Global) Dialog 'Global MIDI Channel' This Global control the MIDI input channel. You can select 'omni' for all channels, or channels 1 to 16 specifically. There is currently no MIDI output occurring from the ATG-‐1. Input Gain (Global) Dialog 'Global In Gain:' The ATG-‐1 has electronically controlled operational pre-‐amps that allow you to optimally gain the input data before A/D conversion. The gains of -‐6, 0, +6 and +12 dB are selectable. The second line of the control is a meter. If the meter hits the far right on your loudest playing, there will be some distortion because of clipping. So work to set the gain as high as possible without clipping. Output Gain (Global) Dialog 'Global Output Gain:' This is basically to address that the ATG-‐1 volume is not very loud on some amps when compared to certain guitars. The allowed range of this parameter is from 0 to +12dB, with a default value of +6dB. The software that implements this does not clip. Rather it uses an sample by sample remapping of amplitudes as data approaches the internal limits. This algorithm may produce some tonal changes as audio levels increase. To stop these tone changes, set the gain to zero and use the amplifier gain to compensate. Tone Offset (Global) Dialog 'Global Tone Offset:' The tone control is set to a limited range typical of each modeled guitar as part of the model integrity. However, the tone of the instrument can be controlled to a much wider range. This Tone Offset gives you the ability to modify the range of the Tone Control. Using Global Tone Offset, you can re-‐map the tone control to cover a very low to very high range. Be careful here: If you've been to too many rock
21
concerts, you may have lost some hearing, and what may sound good to you may be very irritating to someone else. Global Tone Offset of zero (default) causes the Tone Control to model the guitar's typical response. Global Tone Offset can be set from -‐7 to +12. String Gains (Global) Dialog 'Global String Gains:' Individual Gains can be set on each string from -‐6dB to +6dB. The intention is to equalize variations in the hex pickup sensing elements. However, you should also consider using these gains as a means to change the overall tone of the instrument, similar to tweaking the bass and treble controls of an amplifier. To set the string gains, first dial in the string name (E1 is the low E string, up to E3 is the high E string), and then set the gain for that string. Double check your entries by scrolling through the string names. LCD Contrast (Global) Dialog 'Global LCD Contrast:' Adjust it. Enough said. Pickup Type (Global) Dialog 'Global Pickup Type:' There are two kinds of hex pickups that can be processed by the ATG-‐1: piezo and miniature magnetic. Different processing required for each type, so you must tell the ATG-‐1 what kind of pickup you are using. Scale Length (Global) Dialog 'Global Scale Length:' Use the <-‐ or -‐> keys to move the cursor to the length field on the second line. Turn the DATA knob to set the scale length of your guitar in millimeters. The Scale Length is the distance for the string roll-‐over point to the nut. For example, a typical length is 25.5 (inches) * 25.4 (millimeters/inch) = 648 (millimeters). But that typical is only an example. Use the actual length of your guitar so that you can dial in the correct processing. Pickup Offset (Global) Dialog 'Global Pickup Offset' For magnetic pickups, it is necessary for the processing to know the distance from the bridge to the center of the pickup in order to reverse the adverse effects of the

22
pickup. This screen allows you to set the Pickup Offset (the distance from the string roll-‐over point to the center of the magnetic pickup) for each of the six strings. If you measure in inches, multiply by 25.4. For each of the six strings, first move the cursor to the 'Str:' field, select the string, then move the cursor to the 'Offset:' field and set the offset using the DATA dial. Double check all your numbers are correct by stepping through the string names before you move on. Select Application (Global) Dialog 'Select Application' This screen is only visible if there is more than one feature pack on the guitar. Since the current shipped product has only one feature pack, this screen does not appear. You can go to www.autotuneforguitar.com to download a maintenance release or upgrade in which case you may have more than one feature pack. At that point, you can use this dialog to select the feature pack you wish to run. To select an feature pack press -‐> . You are then shown a screen 'n:-----app name-----' '<- Esc, or -> Reboot' where "n" is the slot number 1 through 6 and "-‐-‐-‐-‐-‐app name-‐-‐-‐-‐-‐" is the feature pack name. Turn the DATA dial to find the feature pack you want, then press the right arrow to start it. If you don’t want to change, press the left arrow to escape. There is a second way to change the current feature pack that can be used in the middle of a song. That is the MIDI Control Change message with Control Number 24. Both of these methods start a feature pack a little differently than a power-‐on startup. With a power-‐on startup, the Application name is displayed for a few seconds before audio is processed and the String Tune data is defaulted to no pitch change. When starting an feature pack with this menu or MIDI, the Application name is bypassed, audio is processed immediately and the String Tune data is carried into the new application. Using MIDI, it takes about 200 milliseconds to be up and running in the new feature pack. Pedal Calibration (Global) Dialog 'Global Calibration' Because of mechanical variations, it is sometimes necessary to recalibrate the range of operation of the pedal. Use the Pedal Calibration screen to do this. When asked to move the pedal to heel down or toe down, do not continue to push down on the pedal, but take force off the pedal before moving to the next step. This will give you about 5% operational buffer at the end of each extreme. If you want more, simply don't move the pedal to its full extreme.

23
Chapter 5 Globals, SAVE PRESET, BANK SELECT
and PRESET SELECT Globals Many Global variables were discussed in the previous chapter. As you have learned, Global variables apply across all presets. Global variables also apply across all feature packs. So when you run a different feature Pack, the existing Global variables will be applied. There are also hidden Globals, whose effects are intuitive. But they none-‐the-‐less exist. The first are Previous Application and Desired Application. When you select a feature pack, or an application using MIDI, you are setting the Desired Application Global. When the bootstrap loader sees a non-‐zero Desired Application, it copies that into the Previous Application Global, zeroes the Desired Application Global and loads the new (or old) Previous Application. The behaviors that result are, when you power-‐on the ATG-‐1, it will always restart the feature pack that was running when the unit was powered off. Other hidden Globals are the String Tune coefficients. When changing the feature pack via MIDI, the String Tune coefficients are loaded into the new feature pack to preserve intonation during a performance. The last hidden Globals are the Current Bank and Current Preset Globals. When an application is booted, The Current Bank and Preset (the prior preset that had been called up) is loaded. This occurs when you power-‐on the unit or when loading a new Desired Application. Therefore, there is always a current preset. SAVE PRESET To save the current control settings in a preset, press the SAVE PRESET button. The SAVE PRESET LED will light and you are presented with a screen that has three fields; Bank, Preset and title. The fields are set to the current preset. 'Save Bank:2 Preset:3' 'drop D 12 string ' All three of these fields can be edited. The Bank and Preset will be where the preset is saved to. To edit the title, move the cursor to the letter you want to change and turn the DATA dial to change it. When you are done editing the screen, press the SAVE PRESET button again. You will see a second screen:

24
' Press SAVE, Press ' ' others to cancel. ' To save the preset, press SAVE PRESET again. Otherwise, press any button to exit. BANK SELECT To recall a preset in a different bank, press the BANK SELECT switch. The BANK SELECT LED will light, and the screen shows 'Press switch 1-8 to ' ' Select a Bank. ' Press the numbered switch of the bank you want. Say that was a 3. The screen then shows 'Bank:3 ' 'Press 1-8 for Preset' Press the numbered switch of the preset in the bank. Say that is 5. The system then goes to PRESET SELECT state. PRESET SELECT You get here by pressing the PRESET SELECT switch or at the end of BANK SELECT. The PRESET SELECT LED is lit. The screen shows something like: 'Bank:3 Preset:5 ' 'P bass 8vb wide BW ' You can press any numbered switch (1 to 8) and that preset within the current bank will be recalled.

25
Chapter 6 Fret Control
Fret control allows you to use the guitar's fret-‐board to directly call up any Model, Capo, Alternate Tuning, Doubling or any of the first 21 Presets. This bypasses the problem of having to fumble through lists of settings on the processor switch interface. Here's how it works. First, do a String Tune with open string (no fretting). Anytime after such a String Tune, hold down the String Tune button and, while continuing to hold down the button, pluck a note. A setting will change (details below). To avoid issues with unintended "plucks", like a finger hitting a fret or a pick hitting a string, the pluck has to be a strong enough amplitude.
While the String Tune button is down, you can pluck multiple notes, even quickly in a strum, to set multiple settings.
User Tip #5 When using fretting with String Tune, Fret Control will no longer function as documented. The frets will be shifted.
User Tip #6 Be careful with Fret Control plucking. As you get casual, you will have plucks fail because of the amplitude threshold. Then you will get an unwanted String Tune with your finger down on a fret. Once the pluck is accepted as a Fret Control event, then no String Tune will happen when you lift the button.

26
Here is the assignment of parameters to strings:
String # Function
High E 1 Presets B 2 Capo down G 3 Capo up D 4 Doublings and Global Transpose A 5 Alternate Tunings Low E 6 Models
Table 1: Fret Control String Assignments
Please note that Virtual Capo, Doubling, Alternate Tuning and Model are stored in Presets. However Global Transpose will remain in force for eternity, or until you change it again. Guitar Models (String 6 -‐ low E string):
Fret Guitar Model 0 Modern Humbucker 1 California Single Coil 2 Acoustic 3 Nashville Single Coil 4 Mini Humbucker 5 P-‐90 6 SLO custom HSH 7 Vintage Humbucker 8 Vintage Lipstick-‐tube 9 Bass 10 Japan Custom HSH
Table 2: Low E-‐String Guitar Models
27
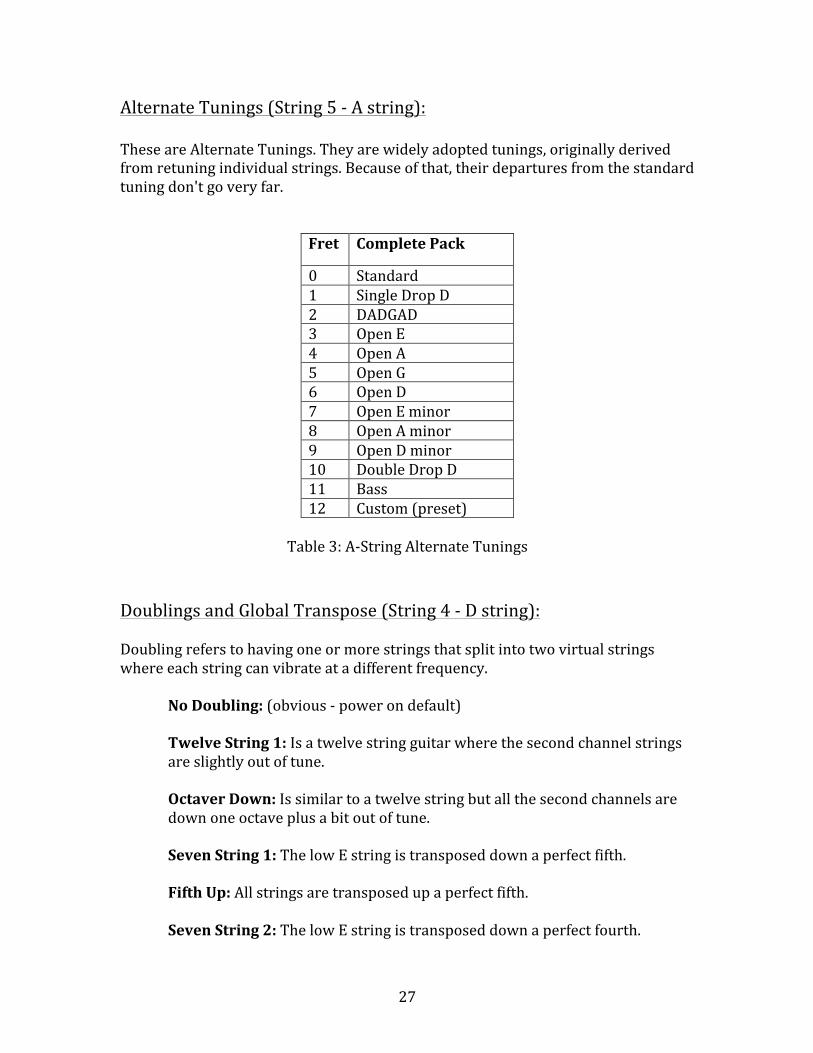
Alternate Tunings (String 5 -‐ A string): These are Alternate Tunings. They are widely adopted tunings, originally derived from retuning individual strings. Because of that, their departures from the standard tuning don't go very far.
Fret Complete Pack
0 Standard 1 Single Drop D 2 DADGAD 3 Open E 4 Open A 5 Open G 6 Open D 7 Open E minor 8 Open A minor 9 Open D minor 10 Double Drop D 11 Bass 12 Custom (preset)
Table 3: A-‐String Alternate Tunings
Doublings and Global Transpose (String 4 -‐ D string): Doubling refers to having one or more strings that split into two virtual strings where each string can vibrate at a different frequency.
No Doubling: (obvious -‐ power on default) Twelve String 1: Is a twelve string guitar where the second channel strings are slightly out of tune. Octaver Down: Is similar to a twelve string but all the second channels are down one octave plus a bit out of tune. Seven String 1: The low E string is transposed down a perfect fifth. Fifth Up: All strings are transposed up a perfect fifth. Seven String 2: The low E string is transposed down a perfect fourth.

28
Fourth Up: All strings are transposed up a perfect fourth. Octaver Up: Is like Octaver Down, but the second strings are up an octave and slightly out of tune. Twelve String 2: Is a twelve string guitar where the second channel strings are very flat.
Global Transpose was created to solve the following problem: Assume you have programmed Presets, including Capo changes for your gig. Then your singer shows up with a sore throat and announces everything has to be brought down a couple of whole steps. So there you are with half a dozen Presets to rework during the hassle of getting everything else done. No problem: use Global Transpose. The Global Transpose will add a transpose from 0 to -‐7 half steps. Globals are settings that remain in effect across preset selections, power cycles and Feature Pack changes. You can set Global Transpose from Fret Control on the D string.
Fret Doublings
0 No Doubling 1 Twelve String 1 2 Octaver Down 3 Seven String 1 4 Fifth Up 5 Seven String 2 6 Fourth Up 7 Octaver Up 8 Twelve String 2 9 Custom (preset)
Global Transpose Down by half steps:
12 0 13 1 14 2 15 3 16 4 17 5 18 6 19 7
Table 4: G-‐String Doubling and Global Transpose Assignments
29
Capo Up (String 3 -‐ G string): Capo Up and Capo Down control the single Capo control value, so whichever is used last is the Capo result. To Capo up one half step, hold the String Tune button down and pluck fret 1 on the B string. To Capo up one whole step, use Fret 2, etc. To cancel Capo, use Fret 0. (that's O for Open -‐ or maybe I'm just an old C programmer: Our number line starts at zero, before negative numbers were invented.) Capo Down (String 2 -‐ B string): To Capo down one half step, hold the String Tune button down and pluck fret 1 on the B string. To Capo down one whole step, use Fret 2, etc. To cancel Capo, use Fret 0 Presets (String 1 -‐ high E string): Presets can be saved and recalled using String 1, the high E string. The open string is Preset 1, the first fret is Preset 2, etc. The second Bank follows the first Bank. You can access Bank 1 Presets 1 through Bank 3 Presets 5 (21 presets) To recall Bank 1 Preset 3, go to String 1, hold down the String Tune button, and pluck fret 2 (the open fret is Preset 1). To save a preset, hold down the String Tune button, pluck String 1, fret 21 or higher to get the preset save mode beep, then pluck the fret you want to assign the preset to get the preset saved beep.
User Tip #7 Use Preset #1 (open string) as a default preset. Set it to whatever you like, then keep it. That way you can always pull up Preset #1 and know what you are going to get.
30
Chapter 7 MIDI Control
Introduction to MIDI MIDI is the abbreviation for Musical Instrument Digital Interface. MIDI is a standard that includes the physical layer voltages, interface circuits and connectors. It is also a signaling standard that describes serial data baud rate, word length and parity bits. Finally it is a protocol standard the defines the message contents. The MIDI standard was originally introduced as a way for keyboards to tell synthesizers what sound to produce. Typical messages are Note On, Note Off, Program Change, Control Change (Mod wheel, Volume, etc.), Pitch Bend Change, System Exclusive, etc. There are many books and web resources that can teach you about MIDI details. An excellent place to learn more is www.MIDI.org, which is the site of the governing regulatory and standards organization. Standard MIDI cables carry data in one direction only. A cable might carry data from a keyboard to a synthesizer, or MIDI computer interface to a synthesizer, or keyboard to a computer interface, etc. A standard MIDI cable has a 5 pin DIN connector at both ends. It is not possible to plug a cable in backwards, because there is no backwards or forwards. You can plug a cable into a wrong "port", say from a MIDI computer interface MIDI out port to the MIDI out of a keyboard. The MIDI standard allows this to happen without damage to the circuits, so if you plug your cable incorrectly, you need only change it to be correct. This manual assumes that you know enough about MIDI to take care of your needs. The various message contents the ATG-‐1 uses are described below.

31
How MIDI is used on an ATG-‐1 Floor Processor The physical interface to MIDI on the floor processor are the standard MIDI connectors on the back of the unit:
Figure 2: The standard MIDI plugs on the ATG-‐1 Floor Processor Downloading Feature Packs with MIDI The ATG-‐1 uses both MIDI output and input to connect to the ATG Manager on www.autotuneforguitar.com so that you can download and manage the processor's contents. In order to do this you must connect a MIDI interface to your computer, and two standard MIDI cables: The web site has documentation on how to connect your processor and transfer data. MIDI data input A frequent use of this interface is to connect an iPad via the Apple USB adapter connected to a MIDI interface cable, which is in turn connected the MIDI IN of the processor. Antares provides a control file for the "MIDI Designer Pro" iPad application that lets you completely control the processor from the iPad application.

32
Figure 3: MIDI Designer Pro example screen shot. A second use of the ATG-‐1 MIDI IN is that the various controls can be programmed into MIDI foot pedals, MIDI sequencers or other MIDI controllers. These are devices used by musicians to send MIDI data to devices, such as the ATG-‐1, during performances. The programming of foot pedals and sequencers is up to you, the user.

33
MIDI Control Change Messages Most settings are controlled with MIDI Control Change (MIDI CC) messages. These include all the Controls and Globals discussed earlier. The Control Change messages have a Channel Number which can be any value (OMNI mode), a control number and a control value. The control number and control values are listed in the following Tables 6 through 9. Function Control
Number Control Value
String Tune 2 >= 64 to tune Solid-‐Tunetm on/off 3 >= 64 on, < 64 off Alternate Tuning 7 See Table 7 Capo 11 64 + (-‐12, -‐11, ... 0, 1, .... +12) except Essential Pack
which allows (-‐5, -‐2, -‐1, 0, 1, 2) Models 14 See Table 9 Tone 17 56 to 67, 56 is open Pitch Shift Configuration 20 0 for no shift to one octave up,
1 for no shift to one octave down, 2 for one octave down to one octave up, 3 for a whole step down to a whole step up
Pitch Shift 21 0 to 127. see Pitch Shift Configuration Pickup Select 22 0 to 4. See notes below. Save Preset 23 0, 1, 2,... for preset numbers 1, 2, 3,... Startup new Pack 24 string numbers 1 to 6 for high E to low E Doublings 27 See Table 8
Global Tone Offset 8 (57 to 76) for offset (-‐7, to +12) Global Gain 18 0 to 127: 0 is no gain, 127 is +12dB Global Detune 19 0 to 127 for -‐63 to 0 to +64 cents detune Global Transpose 28 0, ..., 7 for half steps down. E3 string gain 29 64 + (-‐6, -‐5, ... 0, 1,..., 6) for -‐6db to +6dB gain B2 string gain 30 64 + (-‐6, -‐5, ... 0, 1,..., 6) for -‐6db to +6dB gain G2 string gain 31 64 + (-‐6, -‐5, ... 0, 1,..., 6) for -‐6db to +6dB gain D2 string gain 32 64 + (-‐6, -‐5, ... 0, 1,..., 6) for -‐6db to +6dB gain A1 string gain 33 64 + (-‐6, -‐5, ... 0, 1,..., 6) for -‐6db to +6dB gain E1 string gain 34 64 + (-‐6, -‐5, ... 0, 1,..., 6) for -‐6db to +6dB gain
Table 5: MIDI control numbers and control values

34
Tuning Name MIDI
control value
Standard 0 Custom (preset) 1
Bass 2 Single Drop D 3 Double Drop D 4 DADGAD 5 Open G 6 Open D 7 Open E 8 Open A 9
Open E minor 10 Open D minor 11 Open A minor 12
Table 6: Alternate Tunings MIDI control values
Doubling Name MIDI control value
No doubling 0 Octaver Down 1 Octaver Up 2 Fourth Up 3 Fifth Up 4
Seven String 1 5 Seven String 2 6 Twelve String 1 7 Twelve String 2 8 Custom (preset) 9
Table 7: Doublings MIDI control values

35
Model Name MIDI control value
Modern Humbucker 0 Vintage Humbucker 1 Mini Humbucker 2
P-‐90 3 SLO Custom HSH 4
Nashville Single Coil 5 California Single Coil 6 Vintage Lipstick-‐tube 7
Acoustic 8 Bass 9
Japan Custom HSH 10
Table 8: Model MIDI control values (See Chapter 3: MODEL for more modeling details.)
Discussion of the Pickup Select Message: The trick here is the parameter values, 0 to 4. This MIDI command directly accesses the Model software, as compared to a guitar’s three position selector which first goes through interface software. The three position hardware selector accesses model parameter values 0, 2 and 4. The parameter values, in turn, access model pickups as follows:
• On 1 pickup models, the parameter is ignored. • On 2 pickup models, the parameter values work as follows:
• 0 accesses neck • 1, 2, 3 access neck + bridge • 4 accesses bridge
• On 3 pickup models • 0 accesses neck • 1 accesses neck + middle • 2 accesses middle • 3 accesses middle + bridge • 4 accesses bridge
36
In Addition to Control Change Messages... Besides MIDI Control messages, there are two other MIDI messages that can be processed by the ATG-‐1. Both of these messages have a Channel Number, which can be matched to the MIDI Channel Global.
Program Change Message: This is normally used to recall a patch change in a synthesizer. ATG uses this to recall presets. Set the patch number to 0 for preset 1, 1 for preset 2, etc. Pitch Bend Change Message: This message is typically output when moving the Pitch Bend Wheel on a keyboard. These wheels go from low to high and when released return to the middle position. On the ATG-‐1, the full range of the Pitch Bend Setting maps from one octave down to one octave up, and is independent of the current Pitch Shift Configuration Control setting.