Embed Size (px)
Citation preview

ATHEROSCLEROSIS RISK IN COMMUNITIES STUDY
Manual II
Sitting Blood Pressure
The National Heart, Lung, and Blood Institute of the National Institutes of Health

Atherosclerosis Risk in C olmlunities study Rotocol
r4anual11
Sitting Blood Pressure and Postural Changes in Blood Pressure and Heart Rate
For Copies, Please Contact ARIC Coordinating Center
Suite 203, NCNB Plaza 137 E. Franklin St.
Chapel Hill, NC 27514
Version 1.0: April 16, 1987

FOREWORD
This manual, entitled Sitting Blood Pressure and Postural Changes in Blood Pressure and Heart Rate, is one of a series of protocols and manuals of operation for the Atherosclerosis Risk in Connnunities (ARK) Study. The complexity of the ARIC Study requires that a sizeable number of procedures be described, thus this rather extensive list of materials has been organized into the set of manuals listed below. Manual 1 provides the background, organization, and general objectives of the ARIC Study. Manuals 2 and 3 describe the operation of the Cohort and Surveillance Components of the study. Detailed Manuals of Operation for specific procedures, including those of reading centers and central laboratories , make up Manuals 4 through 11. Manual 12 on Quality Assurance contains a general description of the study's approach to quality assurance as well as the details for quality assurance for the different study procedures.
The version status of each manual is printed on the title sheet. The first edition of each manual is Version 1.0. Subsequent modifications of Version 1 (pages updated, pages added, or pages deleted) are indicated as Versions 1.1, 1.2, and so on, and are described in detail in the Revision Log located immediately after the title page. When revisions require a new printing of the manual, the version (e.g., Version 2.0) on the title page.
ARIC Study Protocols and Manuals
MANUL
1
2
3
4
5 Electrocardiography
6
7
8
9
10
11
are substantial enough to number will be updated
of Operation
TITLE
General Description and Study Management
Cohort Component Procedures
Surveillance Component Procedures
Pulmonary Function Assessment
Ultrasound Assessment
Blood Collection and Processing
Lipid and Lipoprotein Determinations
Hemostasis Determinations
Clinical Chemistry Determinations
Sitting Blood Pressure and Postural Changes in Blood Pressure and Heart Rate
12 Quality Assurance and Quality Control for ARIC Cohort Study

TABLEOF-
1. Sitting +od Pressure Protocol . . . . . . . . . . . . . . . . . . . . . . . . . . . . . . 1
1.1 Introduction ................................................. 1 1.2 Standardized Clinic Procedures ............................... 1 1.3 Description of the Equipment ................................. 2
1.3.1 Stethoscope ........................................... 2 1.3.2 Sphygmomanometers ..................................... 2 1.3.3 Random-Zero Mercury Manometer ...................... ...2 1.3.4 Cuffs and Bulbs ....................................... 3
1.4 Blood Pressure Measurement Instructions ................... ...3 1.5 Staff Preparation for Participant Visit ................... ...4 1.6 Measurement Procedures ....................................... 4 1.7 Reporting the Blood Pressure Results to the Participant .... ..S 1.8 Procedure for Changing the Peak Inflation Level ........... ...6 1.9 Sitting Blood Pressure Training and Certification ......... ...6
1.9.1 Tapes ................................................. 7 1.9.2 Using the Cronus Stop Watch with the Prineas Blood
Blood Pressure Tapes .................................. 7 1.9.3 Y Tube Stethoscope Observations .................... ...8
1.10 Quality Control .............................................. 8 1.11 Technician Training and Quality Control ................... ...9 1.12 Equipment Maintenance ........................................ 9
1.12.1 Random Zero and Standard Sphygmomanometers ......... ...9 1.13 Referral of Hypertensives .................................... 9
2. Postural Changes in Blood Pressure and Heart Rate...........1 1
2.1 Background .................................................. 11 2.2 Introduction ................................................ 11 2.3 Equipment and Environment ................................... 12 2.4 Measurement Procedures ...................................... 13
2.4.1 Preparing the Work Station and the Participant.......1 3 2.4.2 Lower Extremity Blood Pressure and Heart Rate
Measurements ......................................... 16 2.4.3 Lower Extremity Ultrasound Scan......................1 7 2.4.4 Upper Extremity Blood Pressure and Heart Rate........1 7 2.4.5 Carotid Ultrasound Scan .............................. 18 2.4.6 Carotid Arterial Distensibility......................1 8 2.4.7 Postural Change Examination .......................... 19
2.5 Quality Control ............................................. 21
APPENDIcE!
I. Maintenance for Random-Zero Sphygmomanometer..........;.....2 5 II. Maintenance for Standard Sphygmomanometer...................2 7 III. Checklist for Monthly Observation of BP Technicians.........2 8 IV. Monthly Log for Sitting BP Station .......................... 31 V. Accuracy Check on the Random-Zero Sphygmomanometer..........3 4 VI. Form for Simultaneous BP Observation........................3 5 VII. Checklist for Observation of Postural Changes...............3 7
ARIC PROTOCOL 11. Sitting Blood Pressure and Postural Changes 4/16/87
1. SITlTNGBUODPRESSURE
1.1 Introduction
As blood pressure rises, so does risk of ischemic heart disease and its complications. The range of normal blood pressures is wide. Even within the "normal" range, risk increases as the upper limits are approached. Usually, blood pressures are expressed as systolic pressure/diastolic pressure; values exceeding 140/90 mmHg are considered to be hypertensive for adults. Middle-aged persons with a diastolic blood pressure of 90-104.mmHg (so-called "mild" hypertension) have a risk of heart attack that is about 70 percent higher than that of persons with a diastolic pressure under 80 mmHg (normal value). Persons with a diastolic blood pressure exceeding 104 mmHg (moderately severe to severe hypertension) have a risk more than twice that of those with a normal value. Hypertension is an especially strong risk factor for stroke and, to a lesser extent, for peripheral vascular disease. Most of the knowledge of the consequences of high blood pressure arises from studies of sitting arm blood pressure , as described in this section. Less is known about the health consequences of blood pressure measured after a prolonged period of rest, or after assuming the upright position. The latter are also measured in. ARIC, as described later in this Manual.
In ARIC, sitting blood pressure is measured in a resting state, using 3 measurements with a random zero sphygmomanometer. The random zero machine has two advantages over the fixed zero manometer. Digit preference does not appear in the data. It may still exist in the reading itself, but it is "removed" from the data by the use of the randomly chosen zero point. More importantly, it prevents the blood pressure technician from knowing the actual value, and therefore removes judgements about blood pressure levels for readings close to critical values such as 90 diastolic. It should be noted, however, that the random zero machines tend to yield blood pressures which are about 1.5 mm Hg less than those obtained when using a fixed zero machine. Within person , variation in blood pressure is substantial, even within a few minutes and particularly under conditions perceived as stressful. Use of three replicate readings tends to reduce this short-term variation.
1.2 Standardized Clinic Rocedures
Correct measurement of blood pressure is of the utmost importance to the success of this study. It is essential that the procedure described below for measuring blood pressure be followed exactly. Major differences in blood pressure measurement methodology among health professionals from several countries have been observed despite the fact that international recommendations on blood pressure measurement were established in 1939 by a joint committee of the American Heart Association and the Cardiac Society of Great Britain and Ireland. Precision is essential for valid comparisons of blood pressure between groups of people and in individuals on different occasions.
ARIC PROTOCOL 11. Sitting Blood Pressure and Postural Changes 4116187

Page 2
1.3 Description of the Equipment
1.3.1 Stethoscope
A standard Littman stethoscope with a bell is used. Korotkoff sounds are best heard with the bell because of their low pitch. Stethoscope tubing should be about lo-12 inches from the bell piece to "Y" branching. This length provides optimal acoustical properties and allows the observer to read the sphygmomanometer at eye level and in a comfortable position. Earpieces should fit comfortably and snugly in the ears. Four points should be observed in using the stethoscope.
1. The ear pieces should be directed downwards and forwards into the external ear canal.
2. The ear pieces should be tight enough to exclude outside sound but not so tight that they cause discomfort.
3. The valve between the bell and the diaphragm should be turned in the correct direction.
4. The bell of the stethoscope should be placed lightly on the skin overlying the brachial artery - immediately below the cuff and medial to the cubital fossa above the medial epicondyle of the radius and posterior to the biceps muscle. Light pressure accentuates low-pitched sound and avoids compression murmurs. Pressing too heavily with the stethoscope over the brachial artery causes turbulent flow in the artery and a murmur can be heard which may prolong the apparent duration of phase 4.
1.3.2 Sphygmomanometers
Standardized Hawksley random-zero instruments are used for all clinic visits. Standard Baum manometers are used for determining peak inflation level.
The mercury manometer consists of a screw cap, a face with numbers, a lined glass column , a reservoir containing mercury, rubber tubing, and a metal case. The rubber tubing from the mercury manometer connects to the rubber tubing from the inflatable rubber bladder of the cuff. As the inflatable rubber bladder is filled with air, the air pressure in the bladder travels through the connecting rubber tubing. The pressure pushes the mercury out of the reservoir and into the lined glass column. The number for each line is read when the rounded top of the mercury, the meniscus, is level with it. If the meniscus is exactly between the lines, the reading is made from the line immediately above, i.e., rounded up to the nearest even number.
1.3.3 Random-Zero Mercury Manometer
The random-zero (R-Z) manometer has all the parts of the standard mercury manometer. In addition, it has a device built into the box-shaped back that changes the level of mercury in the calibrated glass tube. The device includes a second mercury reservoir the size of which can be changed to hold a
ARIC PROTOCOL 11. Sitting Blood Pressure and Postural Changes 4116187

Page 3
larger or smaller amount of the mercury and therefore allow different amounts of mercury to remain in the calibrated glass tube and the outside reservoir. The size of the second reservoir is changed by turning a wheel on the side of the wooden box. The second reservoir is opened and closed with a Bellows control valve on the face of the manometer.
1.3.4 Cuffs and Bulbs
Proper size of the cuff is essential for accurate blood pressure measurement. Field Centers have four standardized cuffs available - small adult, adult, large adult, and thigh cuff. The same standardized cuff sizes are used for the sitting blood pressure and for the measurement of postural changes in blood pressure. The standard cuffs provided are by the Baum Company for the sitting, and by Dinamap for the postural measurements at the Ultrasound work station.
The range markings on commercial cuffs overlap from size to size and do not offer a precise guideline. In the ARIC Study arm size is measured, and the cuff size is selected as follows:
Table 1. Determination of cuff size based on arm circumference
Cuff Size Arm Circumference
Small Adult < 24 cm
Adult 24 to 32 cm
Large Adult 33 to 41 cm
Thigh > 41 cm
1.4 Blood Pressure M easurement Instructions
Some of the many extraneous factors influencing blood pressure are controlled by standardizing the measurement technique and the environment in which the measurement is made. Uncontrolled factors (temperature, time of day, arm.circumference , recent use of caffeine, identity of the observer) are recorded, so that they can be taken into account during analysis.
ARIC participants are asked during the home interview to avoid caffeine (from tea, coffee, chocolate, and soft drinks), eating, heavy physical activity, smoking and alcohol intake for twelve hours prior to the clinic visit. Current drug intake, including medications affecting blood pressure, and non-prescription drugs is recorded on the day of the examination. A detailed history of alcohol intake history is recorded along with the nutrition history. Recent physical activity at work and leisure is also recorded.
ARIC PROTOCOL 11. Sitting Blood Pressure and Postural Changes 4/16/87

Page 4
h-5 Staff Reparation for Participant Visit
In relating to the ARK participants, remember that participation in the study is voluntary. Participants are given full explanation and instructions about the preparation for the blood pressure examination and'an opportunity for questions. The setting in which blood pressure measurements are made is standardized and takes place in a separate, quiet room where no other activity is taking place, and where temperature fluctuations are minimal. Clinic scheduling procedures establish consistent appointment times to minimize as much as possible the impact of daily blood pressure variation.
1.6 Heasur-t Procedures
The sitting arm blood pressure is measured three times at each clinic visit. It takes approximately lo-15 minutes to make three blood pressure measurements including the initial five minute rest. The blood pressure measurements are made early in the clinic visit sequence immediately following the reception and informed consent, and before the physical exam, blood drawing, ultrasound test, or any potentially stressful interview.
Once the participant is given instructions and explanations, and the equipment has been checked, blood pressure measurement begins. The following steps must be followed precisely. The procedure is described here employing the ARIC paper form. When using the ARIC Direct Data Entry System, calculations are performed by the system.
1. If the participant indicates that there is a medical or post-surgical reason for not having the blood pressure measured on the right arm (or if the right arm is missing) , reverse chairs and proceed with the left arm. Indicate on the Itinerary Form and on a Note Log that the left arm is used. If in doubt, or if the participant prefers not to have a blood pressure taken on either arm, consult with the supervisor.
2. If the arm circumference has not been measured already at the Anthropometry work station, have the participant stand facing away from the observer with the right arm bent 90 degrees at the elbow, hand on midsection. Locate the tip of the acromion (shoulder bone) and measure the length of the upper arm from acromion to tip of elbow using a centimeter tape measure. Mark the midway point of the arm and then have the participant relax the arm at the side. Wrap the tape around the arm over the midpoint mark, making sure that the tape is level. Measure the arm circumference to the nearest l/2 centimeter and record.
3. Seat the participant with right arm on table. The bend at the elbow (cubital fossa) should be at heart level. Legs should be uncrossed and feet comfortably flat on the floor, not dangling. Be sure that the chair head support is comfortable and the participant is able to relax the neck and shoulder muscles as much as possible.
4. Palpate the brachial artery (just medial to and above the cubital fossa), and mark this location for stethoscope placement. Choose the correct cuff size and wrap the cuff on the arm with the center of the bladder over the
ARIC PROTOCOL 11. Sitting Blood Pressure and Postural Changes 4116187

Page 5
artery. If the participant seems particularly apprehensive, delay wrapping the cuff until after the five minute wait.
5. Record the time. Allow a five minute wait before taking the blood pressure. Conversation should be limited. However, a brief explanation of the procedure can be repeated at this time if necessary.
6. After 5 minutes connect the cuff to a standard manometer and establish the pulse obliteration pressure by slowly inflating while palpating the radial artery until pulse is no longer felt. Deflate and disconnect the cuff. Record the pulse obliteration pressure. Record the R-Z maximum zero number (found next to mercury column). Calculate and record the peak inflation level (i.e., pulse obliteration pressure + R-Z maximum zero number + 30).
7. Measurement 1: Connect the cuff to the random-zero manometer. Open the bellows control valve and wait until the mercury settles. Using downstrokes only turn the thumbwheel two or three times. Note: Do not spin the thumbwheel. Inflate rapidly to the R-Z peak 'inflation level. Holding the pressure constant with the bulb, wait 5 seconds. Close the bellows control valve. Place the bell of the stethoscope on the brachial artery and slowly deflate the cuff (2 mm per second) while listening. Record the 1st and 5th phases , reading the pressure in mmHg to the nearest even number. The first sound heard in a series of at least two sounds is recorded for systolic blood pressure (phase 1). The first silence in a series of at least two silences is recorded for diastolic blood pressure (phase S), not the last sound heard. Disconnect the cuff and record the zero reading.
8. Measurements 2 and 3: Have the participant raise measurement arm for five seconds. After waiting another 25 seconds with the participant's arm on the table, repeat the measurement as in step 5 above and disconnect cuff.
Blood pressure calculations are made only for the second and third readings. When using paper forms , subtract the zero value from the readings to get the actual (corrected) systolic and diastolic blood pressure measurement. This is done on the worksheet at the end of the form. Because of the importance of the blood pressure averages, to inform the participant and for the purpose of referral, all arithmetic is done with a calculator.
If for any reason the observer is unable to complete, or has forgotten to complete any portion of the exam (and the participant is gone), draw two horizontal lines through the space(s) on the form, if using paper forms. This is the correct way to indicate missed information, If an entire reading is missed and the participant is still sitting at the blood pressure work station, completely deflate the cuff and start over with a replacement reading. However, under no other circumstances may a replacement reading be obtained. .Always wait at least 30 seconds between readings.
1.7 Reporting the Blood Ressure.Results to the Participant
Using a calculator, average the second and third corrected R-Z readings and record the average on the form if using paper forms. Record this average on the transmittal slip or itinerary form in the participant's folder, and
ARIC PROTOCOL 11. Sitting Blood Pressure and Postural Changes 4116187

Page 6
mention the results to the participant. State clearly the systolic and diastolic pressure, and offer to write down these values for the participant.
1.8 Procedure for changing the peak inflation level
Occasionally the Korotkoff sounds may be heard as soon as one places the stethoscope over the brachial pulse. If this happens, the peak inflation level used was too low. The observer immediately deflates the cuff by releasing the thumbscrew and disconnecting the cuff tube. Then have the participant hold the cuff-wrapped arm vertically for five seconds. As shown below in Table 2 draw a line through the previously recorded Pulse Obliteration Presssure and Peak Inflation Level. Increase each number by ten and write the new number above the original one, as shown below. When using the Direct Data Entry system, the Peak Inflation Level values change automatically when the Pulse Obliteration Pressure is changed. Proceed with blood pressure measurement, starting at the new Peak Inflation Level.
Table 2. Changing the Peak Inflation Level on paper forms.
Pulse obliteration pressure
R-Z maximum Zero + 22
Peak Inflation Level (Random-Zero)
182 =33%
1.9 Sitting Blood Pressure Training and Certification
At each field center a minimum of three clinic staff persons are trained for measuring sitting blood pressure. They need not be health professionals, but they must be trained and certified by ARIC in the blood pressure measurement technique. Observers should also have experience in relating to people.
The first training session begins with a description and demonstration of the correct blood pressure measurement procedure. Trainees listen to the 1st (training) audio-cassette tape, taking the test sequences until they are confident they can identify 1st and 5th phase Korotkoff sounds. Then, they use the 2nd tape until they have passed the test. After passing the second test, they are given the 3rd tape test. Alternated with the tapes are actual practice sessions with live subjects under the instruction and observation of the training supervisor. Some live practices may be done with a standard stethoscope, but most employ the Y-tube stethoscope. After the first day of training, each trainee is given a cuff and manometer (no stethoscope) to take home and practice control of the valve. This is done by wrapping the cuff on
ARIC PROTOCOL 11. Sitting Blood Pressure and Postural Changes 4116187

Page 7
a jar or bottle and alternately pumping up and dropping the mercury at a steady rate of 2 mm per second. After two or three sessions, trainees are also given a stethoscope to practice on family or friends. Out-of-class practice is very important to build confidence. Practice time allowed in class is not enough without outside practice time. Once each trainee has passed the third tape test, he or she does at least two live readings with the training supervisor on the Y-tube stethoscope. The readings must agree within 4 mm and the average must agree within 3 mm. If they do not, the trainee needs additional practice with tapes and live subjects. The training supervisor also verifies that the trainee understands and follows proper procedures.
Additional time is allowed for instruction and mastering the use of the Random-Zero device. Trainees are certified after passing tape tests 2 and 3 (tape 4 is held in reserve for recertification) and at least 2 live readings. Observers are recertified every six months by taking and passing tape 3 or 4 and one or two readings with the blood pressure supervisor on a Y-tube stethoscope.
The Coordinating Center notifies each field center when recertifications are required. It is the responsibility of each field center to conduct these procedures and report to the Coordinating Center when the procedures are complete.
1.9.1 Tapes
The ARIC Study uses four tapes of Korotkoff sounds. Tape 1 is a training tape. Tape 2 is a practice tape. Tapes 3 and 4 are test tapes. A new trainee listens to tape 1, goes to tape 2 and repeats it as often as necessary. Tape 3 is taken as a test. It, too, may be repeated if necessary. Tape 4 is held in reserve for the six month recertification. Tapes 3 and 4 are alternated thereafter for recertification.
1.9.2 Using the Cronus Stop Watch with the Prineas Blood Pressure Tapes
The Cronus stopwatch, model 3-S, is an interval timer and is the preferred timing device to be used with the training tapes. Of the various options, it seems to be the simplest and easiest to read. It is generally available at a local sporting goods store. The address of the manufacturer is:
Cronus Precision Products, Inc. 2895 Northwestern Parkway Santa Clara, CA 95051 USA
If only Phase 1 and Phase 5 are learned, two ordinary stop watches may be used. Using one in each hand, both are started at the beep; one is stopped when the first Korotkoff sounds are heard and the other stopped at disappearance. The interval watch is preferred even if Phase 4 is not being recorded because it is much easier to change one's mind if sounds change, and it is easier to read.
1. Turn on the stop watch and press the reset button.
ARIC PROTOCOL 11. Sitting Blood Pressure and Postural Changes 4116187

Page 8
2. Start the tape, wearing headphones. At the beginning of each tape is a timing sequence, with no Korotkoff sounds. When the beep is heard, start the watch by pressing the button at the top. Stop the watch with the button at the top when the second beep is heard. Record the time elapsed to the nearest 10th of a second on the top of the student form.
3. Press reset button. When the tape announces sequence 1, start the watch at the beep.
4. When the first Korotkoff sound is heard, stop the watch with the button at the top. Record the time elapsed to the nearest 10th of a second. The watch continues to run internally.
5. When the Phase 5 (disappearance) is heard, stop the watch. Record the time elapsed to the nearest 10th of a second. Press reset. Repeat steps 3 thru 5 for each sequence. Remember that the tapes were designed for a special timing device. The answers given are double the stop watch values. At the end be sure to turn off the stop watch in order to save batteries. To score the tests , add all the sequences, and divide by the number of sequences. The average should be within plus or minus one second.
1.9.3 Y Tube Stethoscope Observations
Y Tube stethoscope observations are made in conjunction with the blood pressure tapes during initial training and for monthly quality control. The trainer has the observer-trainee go through the entire blood pressure measurement procedure using a quality control checklist. The observer and trainer listen with the Y Tube and record the values on separate sheets. Two measurements on one subject are obtained. Measurements by the trainer and the trainee should agree within 4 mmHg on any one reading (systolic or diastolic) and averages should agree within 3 mm?ig.
1.10 Quality Control
To ensure the accuracy of the blood pressure measurements throughout the study, quality control measures are developed centrally and applied at all field centers. These measures include:
1. recruitment of the most qualified personnel 2. standardized training and certification 3. retraining and recertification 4. observation of data collection by supervisors, using
the checklist given in Appendix III. One checklist is used for each technician and mailed to the Coordinating . Center each month.
5. frequent staff meetings to provide feedback 6. editing of data, both manual and by computer 7. a quality assurance program administered by the
Coordinating Center 8. simultaneous Y Tube observation of each technician
by the blood pressure supervisor 9. equipment maintenance program
ARIC PROTOCOL 11. Sitting Blood Pressure and Postural Changes 4/16/87
Page 9
1.11 Technician Training and Quality Control
Blood pressure technicians are trained centrally prior to participant recruitment; New technicians hired after the start of the study are trained locally by the Study Coordinator or a designated "Blood Pressure Supervisor". Recertification occurs every six months. Prior to certification, each technician is tested for vision (reading) and a clinical hearing test.
The Coordinating Center directs a blood pressure quality assurance program to review six-monthly data. This includes quality analysis and review of blood pressure data every 3 months , comparing means for each technician with the values for all technicians, by center. These statistics are adjusted for weight, age and sex of the participants by the use of Z-scores. Arbitrary levels of Z-scores, (which can be modified according to performance) are used to flag possible systematic deviations in blood pressure measurement by individual technicians. Digit preference is also monitored for each technician.
1.12 Rquipment Maintenance
Each field center is responsible for the proper operation and maintenance of its equipment. Maintenance responsibility is assumed by the quality control officer and all staff are instructed to report any real or suspected equipment problems to that person promptly.
All checks, inspections, cleanings and problems indicated are documented and recorded by date in a permanent log. Problems and solutions are also recorded. The local quality control officer sends a copy of this log monthly to the Coordinating Center. A copy of this log is given in Appendix IV.
1.12.1 Random Zero and Standard Sphygmomanometers
The Random Zero manometer is inspected once a week and the standard manonometer once a month. These inspections include a check of:
1. the zero level of the standard manometer 2. mercury leakage 3. manometer column for dirt or mercury oxide deposit 4. condition of all tubing and fittings.
The equipment is cleaned if inspection indicates it needed, or at least once a year. Specific instructions for the random zero device are provided in Appendix I, and for the standard manometer in Appendix II. In addition, every two months the accuracy of the random zero instrument is checked using a standard manometer and a Y connection, as described in Appendix V.
1.13 Referral of Hypertensives
As shown below in Table 3, blood pressure referral levels are consistent with the recommendations given in the 1984 report of the Joint National Committee
ARIC PROTOCOL 11. Sitting Blood Pressure and Postural Changes 4/16/87

Page 10
on Detection, Evaluation, and Treatment of High Blood Pressure. The average of the second and third resting blood pressure readings is used.
Table 3. Referral criteria for hypertensives in the ARIC Study
Diastolic blood pressure (mmHg) Recommended follow-up
<85 " . Recheck at next ARIC visit
85 to 89 Recommend that participant check blood pressure within 1 year.
90 to 104 Recommend that participant confirm blood pressure reading within 2 months.
105 to 114 Refer promptly to a source of care (not to exceed 2 weeks).
2115 Refer immediately to a source of care.
Systolic blood pressure (mmHg) When DBP < 90 mmHg) Recommended follow-up
(140 Recheck at next ARIC visit
140 to 199 Recommend that participant confirm blood pressure reading within 2 months.
,200 Refer promptly to source of care (not to exceed 2 weeks).
If recommendations for follow-up of diastolic and systolic blood pressure are different, the shorter time period supercedes.
ARIC PROTOCOL 11, Sitting Blood Pressure and Postural Changes 4116187

Page 11
2. POSTURALcBANGBsINBu)(3DPRESSURBANDHEABTRATE
2.1 Backgrormd
Sitting blood pressure measured at the arm is one of the strongest and best established risk factors for subsequent cardiovascular and cerebrovascular morbidity and mortality. There is some evidence now that blood pressure readings from other body locations and in other body positions can have additional value in predicting cardiovascular risk. Thus, study of these blood pressure measurements may improve our understanding of pathogenic processes and our ability to identify high risk populations.
There is evidence that blood pressure monitoring of individuals as they change position in a controlled clinic setting is safe, relatively simple, and can yield useful information about the body's response to a constant, "readily available" physiologic stressor -- gravity. Simple measurements of postural change in diastolic blood pressure have been found to be predictive of myocardial infarction after 8 l/2 years of follow-up. Supine systolic arm blood pressure alone and the supine-sitting systolic arm blood pressure difference were both independently associated with improved prediction of subsequent development of hypertension.
The ARIC Study includes a mild Postural Change Examination of heart rate and blood pressure in its baseline examination. This adds a dynamic component to the measurements of static blood pressure in several body locations and positions (arm sitting, supine, and standing; ankle prone). Further, the prolonged rest period afforded by the ultrasound examination (during which arm blood pressure readings are taken by an automated procedure) provides an opportunity to approximate a basal supine blood pressure measurement.
Participant safety has priority during the Postural Change Examination. Safety precautions in the protocol include identifying participants who may have experienced orthostatic hypotension, and users of medications that may induce hypotension on standing up; instructions given by the sonographers to participants on how to stand up; and, instructions to sonographers on detecting and responding to symptoms of hypotension. The data on postural change are collected in the normal course of getting the participant up from the examination table at completion of the ultrasound examination.
2.2 Introduction
At the ultrasound work station, B-Mode scanning, measurement of arterial distensibility, and the measurements of postural change are integrated into a single procedure. They are executed by ARIC sonographers trained and certified in each of these components. The measurements share the equipment of the ultrasound work station. A dedicated microcomputer coordinates the administration of the examination and collects all data. Measurements at the
ARIC PROTOCOL 11. Sitting Blood Pressure and Postural Changes 4/16/87

Page 12
ultrasound work station are described in two separate manuals: Sitting Blood Pressure and Postural Changes in Blood Pressure and Heart Rate in this manual (Manual 11); and Ultrasound B-Mode, Doppler, and Arterial Distensibility Measurements in.Manual 6. While the participant is recumbent on the examination table, baseline measurements of blood pressure and heart rate are taken during the ultrasound examination. Immediately after the participant stands up, additional heart rate and blood pressure measurements are recorded to assess the cardiovascular response to the change in posture. Baseline prone lower extremity and supine upper extremity blood pressure readings are taken in conjunction with the popliteal and carotid ultrasound examinations, respectively. The latter are obtained before and after the carotid arterial distensibilty measurement.
The measurement of postural changes in blood pressure and heart rate is the final examination at the ultrasound work station, so that each participant has approximately a half hour of comfortable rest during the ultrasound and arterial distensibility studies. It is important that the participant be kept warm, relaxed and quiet, so that valid baseline blood pressure determinations can be obtained.
2.3 Equipment and Environment
The measurements of heart rate and blood pressure described in this section require a Dinamap-SX automated oscillometric machine, a dedicated microcomputer with software support, a continuous heart rate monitor, and the study flow panel described in Manual 6. Prior to the examination, the equipment and the sequence of procedures are explained to the participant.
The ultrasound work station measurements are driven by the Ultrasound Program, as detailed in Appendix I to Manual 6. This PC-based program controls leg artery randomization, collects various data during the study, and assists the sonographer in performing the ultrasound and postural change measurements. The data collected by the program consist of: (1) demographic and descriptive data on the participant, (2) study cod es and times for steps of the measurement protocol as they are performed, (3) blood pressures recorded periodically during the ultrasound exam, (4) arterial distensibility data, and (5) heart rate and blood pressure data during the postural change study.
The sonographer interacts with the computer: (1) during the completion of an initial questionnaire screen, (2) at the b eg nn ng i i of the postural change examination, (3) at the time the participant's feet touch the floor during the postural change, and (4) at the completion of the study. The computer program controls communications with the study flow panel (SFP), both receiving instructions from the SFP to determine when to take blood pressures, and sending instructions to the SFP to control randomization.
The ultrasound table is padded and at least 30 inches wide to allow upper extremity relaxation for the arm blood pressure measurements. The table is 30 (+/- 2) inches from the floor to maximize ease of transition from the lying to standing position , and to standardize this motion.
Tape is used to stabilize the Dinamap tubing to the edge of the table. Heart rate monitor wires are positioned and anchored in a similar manner to avoid
ARIC PROTOCOL 11. Sitting Blood Pressure and Postural Changes 4/16/87

Page 13
tangling and any tugging discomfort on the participant. A blanket is available for use if the participant feels cold. If this were to occur, it would be most likely while the participant is immobile during the carotid scanning. For the same reasons, a carpet or an area rug is placed on the floor under the examination table to prevent inadvertent cold discomfort for the participant upon standing for the dynamic blood pressure sequence. The sonographer maintains the floor area free of obstruction, so that participants can stand comfortably about 18 inches from the table.
Before each phase of the examination, the sonographer describes the key aspects of the examination to the participant. Since anxiety and concern influence blood pressure determinations, the sonographer maintains a consistently calm, patient , and reassuring disposition. If a participant inquires about his/her blood pressure or heart rate in the course of the exam, the sonographer politely indicates that s/he must withhold specific information about the blood pressure and heart rate until after the examination. Persistent talking and/or signs of anxiety are noted in a Problem Log immediately after the participant leaves the work station.
The participant is made as physically comfortable as possible. He/she is encouraged throughout the examination to voice any discomfort. Attention is paid by the sonographer to the room temperature (to be maintained around 70 degrees), and to musculoskeletal, cardiac , or respiratory discomforts, in particular othopnea. Either hospital gowns, shoulder-seam snap or disposable paper gowns are available at the work station, so that the sonographer can offer these to obese participants as an alternative to the scrub suit. Maximal relaxation of the participant is a primary objective.
2.4 basur-t Procedures
2.4.1 Preparing the Work Station and the Participant
Before the participant arrives at the work station the sonographer verifies that the SFP, the Video Casette Recorders, the microcomputer, and the Dinamap are turned on. The ultrasound program is then activated by typing YJS" (upper or lower case), and the system responds by displaying the preliminary questionnaire screen. The sonographer completes the header information of this screen and participant identification. At this time the sonographer also determines whether the right or left lower extremity will be examined.from the information displayed on the screen.
When the participant arrives at the ultrasound station, the work station equipment and procedures are described, as indicated earlier. Although the participant is already wearing a scrub suit, the sonographer makes a quick check to verify that all jewelry has been removed from the neck area. All participants are then advised to use the bathroom, since the examination extends over 45 minutes, uninterrupted. During training sonographers are made aware that either bladder or rectal distention discomfort can influence blood pressure and/or induce pre-syncope. The participant is instructed (and assisted if necessary) to remove his/her shoes, and the sock or stocking of the leg to be examined , unless the room is cool.
ARIC PROTOCOL 11. Sitting Blood Pressure and Postural Changes 4/16/87

The sonographer then makes any needed adjustments to avoid a physical "jolt" later when the participant stands up for the postural change sequence (when sitting on the ultrasound table the participant's heels should be no more than four inches above the floor). A platform is placed in front of the ultrasound table in the case of persons of short stature. The dimensions of this platform are 48 in. length, 36 in. width, and 4 in. height. The sonographer now completes the "pre-info" screen by asking the participant about any history of falls, dizziness, syncope , and current use of medications which might cause orthostatic symptoms. If potential orthostatic symptoms are suspected, the sonographer instructs the participant at the appropriate time to sit at the edge of the examination table for 15 seconds before standing up.
2.4.1.1 Applying the Heart Rate Leads
Before applying the heart rate monitor leads on the participant's lower chest and abdomen, the sonographer makes sure that his/her hands are warm to avoid a "cold" temperature aversive stimulus (rubbing them together usually suffices). A check for satisfactory hand temperature can be made by touching the back of the hand to the participant's upper arm. Local body hair shaving for heart rate monitor lead placement is not done unless, in the sonographer's judgement, undue discomfort will occur when the lead is removed. A small, quiet, battery-powered shaver is available at the work station for quick, minimal shaving in such instances.
The 3 self-adherent chest lead patches, to which the 3 heart rate monitor wires connect (snap-on), are placed as follows:
White (RA): Midline upper epigastrium just below the xiphoid process;
Green (RL): Midline lower epigastrium just above the umbilicus; and,
Black (LA): Left sub-Costa1 area in the mid-axillary line.
These can be applied without removing the scrub suit shirt by sliding the bottom edge of the shirt up for lower lateral chest and upper abdominal access.
The three heart rate monitor lead wires all course inferiorly at the side of the participant on which the arm blood pressure cuff will be applied for the measurements of Postural Changes. They are snapped on to the skin electrodes at this time.
2.4.1.2 Moving the Participant to the Prone Position
Now the participant is ready to be assisted in moving to the prone position on the ultrasound table. In instructing the participant the sonographer can demonstrate the proper position on the table , and how to hold the heart rate cable while assuming this position. As the participant does this, attention is focussed on two items:
(1) since the ultrasound table has no guard rails, the sonographer stands near the table to make sure that the participant does not get too close to the edge;
(2) the participant's feet should extend slightly .past the end of the ultrasound table so that they are able to hang comfortably with the leg and foot muscles relaxed.
ARIC PROTOCOL 11. Sitting Blood Pressure and Postural Changes 4116187

Page 15
Once the participant is in the prone position, he/she is offered some information to help determine the most comfortable position for his/her arms. The recommended position is for the arms to be relaxed at the participant's side, and an optional thin pillow under the head only. On the other hand, some participants may request to position their arms overhead and use one or more pillows under the shoulders, chest, and/or head. In this case, if the participant does not accept a polite suggestion of the recommended positions, then attention must be paid to possible shoulder 'hyperabduction syndrome' symptoms (distal upper extremity tingling and numbness). At this time the sonographer questions the participant for any prior history of such symptoms. If positive, the participant must use the "arms-at-the-side" position. It is likely that during the popliteal ultrasound study some participants who choose to "hug" a pillow or two under their upper body and head will develop these symptoms and become restless. During training the sonographers are made aware of the potential for unwanted adrenergic side effects, which could cause invalid determinations. In general, participants are asked not to change position once an ultrasound exam sequence has begun.
2.4.1.3 Applying the Blood Pressure Cuff
As is the case with sitting blood pressure , careful attention is given to the selection of the appropriate cuff size and the cuffing technique. The cuff size used for the sitting blood pressure measurements, recorded on the Itinerary Form, is used in selecting the size of the Dinamap cuff for the upper extremity. At each field center sonographers are trained by the sitting blood pressure certifier/trainer in the technique for applying the Dinamap blood pressure cuff to the upper extremity. Because of this, greater attention is given in this manual to the lower extremity as regards selection and application of the blood pressure cuff.
The ankle blood pressure cuff is applied on the lower extremity selected for the popliteal scan (socks or stockings have been removed, or moved below the ankle to keep the participant's foot and/or toes warm if the room is cool). If an Adult or Small Adult cuff size was used for the sitting arm blood pressure, the same size is used for the ankle. If a Large Adult cuff size was used on the arm, an Adult size is used on the ankle. If the participant's ankle is very large and/or strongly tapered, a larger cuff may be necessary. Infrequently, measuring actual arm circumference with a disposable paper tape measure may be necessary; to determine the cuff width to be used on the ankle, the sonographer then refers to Table 4 for ankle cuff size selection criteria:
Table 4. Determination of ankle cuff size based on arm circumference
Arm Circumference Ankle Cuff Size
< 24 cm
24 to 36 cm
> 36 cm
.
Small Adult
Adult
Large Adult
ARIC PROTOCOL 11. Sitting Blood Pressure and Postural Changes 4116187

Page 16
At this point, a Dinamap blood pressure cuff is applied above the ankle of the selected leg, as shown in Figure 1. Place the cuff flat on the table (the surface marked "side to the patient" face up) with the appropriate ankle centered on the cuff. At this time disregard the "over the artery" marker. The lower edge of the cuff (from which the hoses extend) should be approximately 2-2 l/2 inches above the medial malleolus. Following the contour of the lower leg, wrap the end of the cuff with the velcro 'fabric" over the ankle, as shown in Figure 2. Note that depending on the degree of tapering in this area, the cuff corner will be offset from parallel toward the knee. Holding the cuff from sliding, wrap the other end over the ankle (step III in Figure 21, again following the contour of the ankle, and secure the velcro. .Check to be sure that the corners of the cuff extending above the upper edge of the cuff are about equal: if one end extends more than the other, loosen the velcro and adjust the wrap. Next, locate the "over the artery" marker of the cuff, and rotate the cuff so that this line is directly over the posterior tibia1 artery. The cuff may be rotated more easily by sliding it toward the malleolus, and after alignment, the cuff can be made snug by pulling it up toward the calf. The cuff should conform closely to the shape of the ankle, with the lower edge 2-2 l/2 inches above the malleolus.
The posterior tibia1 artery is usually palpated as it courses posteriorly to the medial malleolus. Even if the posterior tibia1 pulse is not palpable, the posterior tibia1 artery is used as the location for the marker line on the cuff for the "over the artery position". Any kinks in the tubing are removed, and any "tugging" of the tubing on the participant's leg is relieved. Masking tape or hospital clips are applied at this time to anchor the tubing to the ultrasound table to maintain this position.
2.4.2 Lower Extremity Blood Pressure and Heart Rate Measurements
The sonographer now exits the screen by typing \F.XIT (do not depress Return at this time), and verifies that the participant's heart rate is properly received by the SFP as indicated by the monitor light and the audible signal. The volume is adjusted so that the sonographer will detect if the electrodes or cable.become detached, while preventing the beep tones from becoming an irritation to the participant. The system is in calibration mode and the sonographer then sets the SFP to START STUDY.
At this time the Dinamap, which is kept in Manual Mode at all times, is triggered manually to obtain a single blood pressure measurement to verify proper operation of the equipment and adequate wrapping of the cuff. While this happens the sonographer describes to the participant what s/he can expect to feel and that repeated blood pressure measurements will be obtained automatically. The participant is advised that the first inflation is always somewhat uncomfortable due to lack of "individualized"justment by the machine to that particular person's blood pressure. Subsequent readings are at a lower pressure and much less uncomfortable. If an adequate systolic blood pressure measurement is not obtained at the ankle, the sonographer verifies that the cuff has been wrapped appropriately and has not slipped.
ARIC PROTOCOL 11. Sitting Blood Pressure and Postural Changes 4/16/87

Page 17
The sonographer observes the participant for a tendency to "stretch" the calf or wiggle the foot during the blood pressure reading. If it occurs, this is discussed with the participant before the ultrasound scan is started. The sonographer stresses the need for the leg and arm to be kept still during the blood pressure readings. Discomfort during the blood pressure measurement may. indicate that the ankle cuff has been applied too tight, not applied smoothly, or that it is too narrow. If in doubt, the sonographer m=ures the arm circumference and refers to Table 4.
Before activating the next phase of the study, the sonographer takes a minute to instruct the participant on the "no conversation" rule. Also, the participant is reminded to "hold questions" about exam results until after the last portion of the ultrasound station exam is completed, since it is important that all participants be "treated the same way".
The sonographer then turns the recorder on and presses the Return key on the computer keyboard , and proceeds to calibrate the system. Upon completion of the calibration the foot switch is depressed for the duration of 5 to 7 cardiac cycles. When this occurs the computer automatically takes and records a blood pressure.
2.4.3 Lower Extremity Ultrasound Scan
The participant is now ready for the popliteal ultrasound scan to begin (see Manual 6). The preparatory scan of the leg is performed, and the artery located and placed so as to record the image. The foot switch is depressed and held for five to seven seconds , providing the instruction to the equipment to record the image.
Fifteen seconds after this depression of the foot switch the system automatically takes the blood pressure again. Note that this provides a blood pressure measurement before and after the popliteal scan. The sonographer does not advance the Study Flow Panel until this second blood pressure is taken.
The ankle blood pressure cuff is now removed and the clips or tape used to hold the tubing in proper position during the exam are removed and kept in a handy location, since they will be re-used when the arm blood pressure cuff is applied. When indicated, a blanket is used to keep the participant's lower extremities warm during the carotid scan.
2.4.4 Upper Extremity Blood Pressure and Heart Rate
Next, the participant turns to the supine position. The participant is instructed to lean on his/her right side and swing the legs toward the opposite end of the table. The sonographer'assists the participant in moving from the prone to the supine position. In particular, two precautions are observed during this motion: a) the sonographer holds the heart rate cable as the participant turns , and b) the sonographer guards the edge of the ultrasound table to keep the participant from rolling off accidentally. The sonographer then helps the participant to slide toward the "head' end of the ultrasound table. The top of the participant's head is positioned at least 4 inches from the end of the table, to avoid hyperextension of the neck and for easiest access to the carotid area with the transducer.
ARIC PROTOCOL 11. Sitting Blood Pressure and Postural Changes 4116187

Page 18
The sonographer checks the heart rate monitor wires and chest lead patches to verify that they are connected properly , and the signal is received by the SFP. Any wire tangles are eliminated. The sonographer now applies the blood pressure cuff over the brachial artery according to the instructions found in the Sitting Blood Pressure section of this manual. By consulting the participant's Itinerary Form, the sonographer verifies that the same arm and the same cuff size are used as for the sitting blood pressure readings. The sonographer also verifies comfortable cuff fit: the wrap of the Dinamap cuff should be less "snug" than the cuff fit used for the sitting blood pressure measurements. If unsure about proper cuff size the sonographer measures the participant's arm circumference and determines the appropriate cuff size from Table 1.
If the participant had his/her sitting blood pressure taken on the left arm earlier in the clinic exam, the cuff is applied on the left arm at this time. The cuff tubing and the heart rate cable are taped to the left side,of the table. The sonographer then connects the cuff tubing to thxnamap console and checks for kinks or "tugging" on the participant. The tubing is stabilized with tape or clips to the edge of the ultrasound table. As for the ankle blood pressure , a manually triggered blood pressure is now obtained (which is not recorded by the system) to verify adequate cuff inflation and positioning. Questions about the upper extremity blood pressure determinations are solicited and answered at this point.
The Study Flow Panel display now indicates that the next scan is the right side, optimal angle, common carotid, B-mode study. The computer remains inactive until the foot switch is depressed, to indicate that the sonographer has performed the initial scan to locate structures, found the common carotid, and placed the best image on the screen.
When the sonographer presses the foot switch indicating the beginning of the scan in the neck, the system takes the first arm blood pressure automatically. The computer program now enters an automatic phase during which it continues to take blood pressure measurements every five minutes. Since the system is "unaware" of the status of the ultrasound exam, these blood pressure determinations occur at different phases of the scan.
2.4.5 Carotid Ultrasound Scan
The every-five-minute blood pressure phase of the computer continues as the sonographer collects carotid artery data according to the scanning protocol, until the last scan of the ultrasound protocol is reached. After indicating that this step is complete by pressing the foot switch, the sonographer waits until the system completes the automatic every-five-minute phase of blood pressure determinations by taking a blood pressure measurement. The arterial distensibility study is then performed according the scanning protocol.
2.4.6 Carotid Arterial Distensibility
The sonographer prepares to collect the arterial distensibility data, and when ready depresses the foot switch. A message appears on the screen asking the sonographer to wait until the data from distensibility scan is stored, which requires approximately 3-5 seconds. After the recording is complete, the system again performs a blood pressure determination.
ARIC PROTOCOL 11. Sitting Blood Pressure and Postural Changes 4/16/87

Page 19
At this point, the ultrasound portion of the protocol is complete and the postural change protocol follows. A message is displayed on the screen indicating that the system is ready to begin the supine portion of the postural change. protocol.
2.4.7 Postural Change Examination
The second sonographer or a trained assistant is called to help perform the Postural Changes Examination. If the participant has fallen asleep, s/he is gently awakened at this point and asked to stay awake for the rest of the examination. The sonographer now lightly removes excess conduction jelly from the carotid area (it is important that no pressure be exerted on the carotid area until after the Postural Change Exam). At the same time, the ultrasound assistant unclips the blood pressure tubing and heart rate monitor cords from the ultrasound table and moves the comfortable, lightweight arm-chair within easy reach (in case of participant intolerance of the postural change).
The computer program displays the elapsed time since the onset of the study. If less than 20 minutes have elapsed, the postural changes examination is delayed until 20 minutes elapsed time are displayed on the computer monitor. There is no upper limit on the time the participant may be in the recumbent position to be eligible for the postural changes examination. Meanwhile, the sonographer verifies that the digital read-out of the Dinamap console is in easy view to the sonographer.
The participant is politely reminded-to refrain from talking until told that the examination is complete , and the sonographer instructs the participant on the supine-to-standing sequence. If the participant has reported orthostatic symptoms ("usually gets dizzy on standing up") the sonographer instructs the participant to sit at the edge of the ultrasound table for 15 seconds before standing up. Otherwise, the participant is instructed to stand up quickly, safely, and in one smooth motion, as described below. These instructions are provided prior to the supine portion of the postural change exam. The sonographer also explains to the participant that s/he will be told when to stand up.
When the sonographer wishes to begin the supine portion of the postural change exam, s/he presses the Fl key on the computer key board. The screen is cleared, and replaced by a screen showing the participant's ID, the study number (a "1" indicating that this is the first part of the postural change examination); the elapsed time (in decimal minutes - that is, the system will count to 0.99, not 0:59, before going to one minute); the time the study is to run (2 minutes in this case); the number of heart beats and the maximum number of heart beats to be counted (in this.case 9999, so that the length of the study will be terminated by time and not heart cycles); and statistics on the blood pressure and heart rate.
Once the Fl key is depressed, the heart rate is measured on a beat-to-beat basis, and the blood pressure determined as quickly as possible. With each beat of the heart and blood pressure determination, the statistics on the screen are updated. The statistics shown include the last measurement, the average measurement during this phase of the postural change protocol, and the minimum and maximum during this phase.
ARIC PROTOCOL 11. Sitting Blood Pressure and Postural Changes 4/16/87

Page 20
The computer collects these data for two minutes , and then a message appears on the screen to indicate the end of the supine portion of the protocol. The system is now ready to collect the standing portion of the postural change examination.
The sonographer now positions the computer keyboard next to the ultrasound table. At this time the ultrasound assistant is standing'at the foot of the ultrasound table and then moves to the participant's side when s/he moves from t.he sitting to standing position. The sonographer communicates with the assistant (preferably not verbally) that they are ready to proceed to the next phase of the exam. The sonographer places the ECG cable in the participant's hand and instructs him/her to hold it on standing up, then moves close to the pre-positioned keyboard and prompts the participant to stand up. "When I say go, I would like YOU to get UP from the table quickly but safely, and stand next to the table. If you get dizzy or need to so for any other reason, YOU can lean against the table. Go". As the participant begins to arise the sonographer depresses the F4 key once. This marks the onset of the second phase of the examination and sends the signal to the system to begin the measurements. As soon as the participant has reached the upright position the sonographer depresses the F5 key once, to mark "standing position ,attained" which records the duration of the standing up motion. Again the screen clears and is replaced by a screen similar to that of the supine phase of the study (the only difference is the STUDY field which now shows a 2, indicating the second phase of the postural change protocol). The program then collects data until the end of this phase.
While watching the participant for any signs of discomfort, the sonographer now asks the participant to bend the elbows and hold the hand supporting the heart rate harness with the other hand, in a comfortable and relaxed position. This prevents the cuff from sliding (by bending the elbow), distracts the participant, and places him/her in a standard and comfortable position.
The sonographer watches the participant's position relative to the ultrasound table: participants should not be touching the examination table, with both feet flat on the floor. If at any time the participant feels dizzy or uncomfortable s/he is instructed to lean against the table, and then helped into the chair.
If the participant is noted (or requests) to "flex" or wiggle his/her hand, this is permitted if it occurs immediately after the completion of a blood pressure determination, during the 2 to 3 second interval between the end of one cycle and the beginning of the next. This is helpful if the participant expresses discomfort due to venous congestion in the hand (a mild numbness or tingling), which occurs rarely.
If at any time during the 2-minute standing data collection interval, the participant does not tolerate the standing postion, the sonographer marks this -m on the participant's record by depressing the F8 key once, while the sonographer and the assistant help the participant to sit down in the pre-positioned armchair. The participant's arm with the blood pressure cuff is placed on the chair arm. The data collection is completed in the sitting position, and later so indicated on the computer screen.
When the postural change protocol is complete a new screen is displayed to be completed after the participant departs. The participant is instructed to sit
ARIC PROTOCOL 11. Sitting Blood Pressure and Postural Changes 4/ 16187

Page 21
in the adjacent chair after the final Dinamap reading. The sonographer checks with the participant that s/he feels well. If the participant is not feeling well, s/he is positioned supine on the ultrasound table, the blood pressure is checked on the Dinamap, and the PA, nurse practitioner, or physician is contacted.
The sonographer now removes all conduction jelly. Socks and a robe or other garments are now replaced and the participant is escorted to the next work station. The armchair is repositioned out of the way, and the wires and tubing are placed safely by the computer console. Finally, the sonographer completes the last data entry screen, the processing for the ultrasound station participant diskette, and the examination Checklist (see Manual 6).
2.5. Quality Control
Quality assurance for the postural change examination data is based on four main components: (1) Sonographer training and certification; (2) Equipment calibration and maintenance; (3) Quality analysis of study data; and (41, Monitoring by the Ultrasound Reading Center (URC) and the Coordinating Center (cc).
Sonographer Training and Certification. All ARIC sonographers are trained and certified by the URC. Periodic recertification takes place according to a schedule determined by the URC. Sonographers whose data exhibit quality problems are required to take additional training, and may be required to complete recertification steps.
Equipment Calibration and Maintenance. Maintenance of the Dinamap equipment' is the responsibility of the sonographer. A maintenance log is kept by the sonographer, with a record of the maintenance schedule and any equipment performance problems. Calibration of the Dinamap is checked on a monthly basis, or when there is doubt about the validity of the pressure readings. The calibration checks specified below are performed monthly by the sonographer, and a record is kept in the maintenance log.
Calibration checks are performed with the calibration kit supplied with the unit, kept free of moisture and particulate matter. A mercury manometer is connected to the Monitor using the parts supplied with the calibration kit, as shown in Figure 6-l of the Dinamap Operation Manual. An adult cuff and 12-foot hose are used in the calibration procedure. To start the calibration check press and hold the SET switch while pressing the POWER ON switch. Flashing 88s in CYCLE MINUTES display confirms that calibration mode has been entered. The unit will turn on, will light the CUFF indicator, and will display cuff pressure in the MAP display.
Using the inflation bulb, manually pump up the pressure to 200 mmRg as indicated by the mercury manometer and close pneumatic release valve on manometer bulb. Verify that the pressure indicated by the mercury manometer does not change more than 12 mmRg in 60 seconds for all cuff and hose combinations. If the leakdown is greater than 12 mmRg in 60 seconds, check cuff and hose junctions and rubber "0" rings for cracks, tears, or breaks. If no cuff or hose leaks are found, refer to qualified service personnel.
ARIC PROTOCOL 11. Sitting Blood Pressure and Postural Changes 4/16/87

Page 22
Next, verify that the MAP display indicated the correct pressure at the following pressure levels, as shown in Table 5.
Table 5. Calibration check pressure levels
MANOMETRR INDICATED PRRSSDRR LEVEL MAP DISPLAY
200 mmHg 2oommRg+5mmHg 150 mmHg 15ommHg+4mmHg 100 mmHg lOOmmRg~4mmRg 50 mmHg 5ommRg+4mmRg
0 m"e ommHg+1mmHg-OmmHg
If the indicated pressures are not within tolerance, the Monitor is calibrated by qualified service personnel.
Pump up the manometer slowly to avoid pressure spikes and, as pressure increases between 305 mmHg and 320 mmRg, verify that the Monitor briefly blanks the displays , opens the deflate valves, and then issues an 800 alarm. If the overpressure point is not within tolerance (310 mmHg + 107-5 mmRg), the overpressure switch needs to be adjusted by service personnel.
Quality Analysis of Study Data. Quality analysis of the postural change examination data is performed by the CC, as part of the routine quality assurance procedures. During this process, study data are examined by field center and by sonographer code. Outlying values and systematic patterns in the data are reported to the CRC for corrective action. URC personnel work with the pertinent sonographer(s) to establish the cause of the data quality problem and institute corrections.
Monitoring Visits. Monitoring visits by,URC and CC personnel are part of the ARIC quality assurance program, which includes observation of the postural change examination performed by each sonographer. Since repeat examinations on a participant are not practical, these visits serve to document adherence to protocol at the different field centers, and over time.
ARIC PROTOCOL 11. Sitting Blood Pressure and Postural Changes 4/16/87

Page 23
Figure 1. Placement of the Blood Pressure Cuff on the Ankle. Step I. Positioning the Lower Leg on the Cuff
I. Position Lower Leg on Cuff
i-
calf
I I i lower leg centered on cuff
exam table
back of he&l
ARIC PROTOCOL 11. Sitting Blood Pressure and Postural Changes 4116187

Page 24
Figure 2. Placement of the Blood Pressure Cuff on the Ankle. Steps II and III: Wrapping and Securing the Cuff
II. Wrap Fabric End of Contour of Ankle
Cuff Following III. Wrap and Secure Cuff
ARIC PROTOCOL 11. Sitting Blood Pressure and Postural Changes 4116187

Page 25
Appendix I. Check Procedures and Maintenance Instructions Random-Zero Sphygmomanomter
1. Check cap of manometer column to be sure it fits properly and is tight. The 0 ring cr seal must be seated correctly. Clean cap of any mercury (Hg) beads or dust. The cap should be firmly finger tight. Any time the mercury seems to "bounce" in the column of either a standard manometer or random-zero (R-Z) manometer, it may be due to a loose cap. Check the opening. If it becomes blocked, the mercury column falls too slowly due to a vacuum effect. This may result in false high readings and an erratically oscillating column. This procedure should be carried out for both standard manometers and R-Zs.
2. Remove back of case (two screws at top of face and two at bottom rear of case). Swing back from the left around the thumb screw on the right side. Check for spring placement - it should be in line. Tighten all screws except the one holding the bellows plate in place.
3. Wrap an arm cuff around a bottle or can.
4. With reservoir valve open (newer models do not have a reservoir valve) and bellows valve closed, pump mercury to top of column (270-290 mmHg). If the mercury holds at a steady level for 15 seconds or drops 2-4 mm, that system is airtight.
5. With the high pressure still in the system, close the reservoir and disconnect cuff to see if that valve holds steady pressure. If a leak is discovered in the reservoir valve, remove hose and valve (with Allen wrench). Valve handle unscrews or lifts off. There are two 0 rings on the valve stem. Clean stem and replace 0 rings. Use stopcock grease in 0 rings and valve.
6. If the closed reservoir valve is tight, but there was a leak with it open, check the inflation assembly. There may be a leak in the bulb, valve, or cuff. To test the inflation assembly, immerse each section, especially valves and tubing connections in water while the pressure is high and watch for air bubbles. To test the tubing of the Hg reservoir, put soapy water on it. Most leaks occur at or near tubing connections or from valves. If a valve leaks, sometimes a shot of silicone lubricant on the thumb screw and worked in will solve the problem. Otherwise it may need to be replaced. Tubing leaks near a connector can be repaired by removing the connector, cutting off l/2 to 3/4 inches and replacing the connector. Lubricate a sharp knife with soapy water to make the cut, and lubricate the cut tube to make it easier to reattach.
7. Turn R-‘Z with back toward you. With bellows valve open, retract mercury to just below the plexiglass valve chamber. Close the bellows valve, pump mercury to top and visually check that leakage does not occur at that valve point. If Hg rises into the chamber, the valve needs repair. Replacing 0 rings on that valve can be done locally if someone is qualified to do it. It is a more difficult job than on the reservoir valve. Otherwise it should be sent to Baum. A serious leak in this valve can affect blood pressure readings. Whenever the manometer tube seems
ARIC PROTOCOL 11. Sitting Blood Pressure and Postural Changes 4116187

Page 26
dirty in the area of the "zeros" or if the Hg seems to hang up there, the tube should be cleaned. A dirty tube can affect "zero" readings. To clean tube, set cam at lowest zero. Pump up, close bellows valve, release pressure. This leaves little mercury in the column. Tilt manometer, getting rest of mercury out of glass and into reservoir. Close reservoir valve. Lean manometer at angle so that no mercury is in glass. Remove the tube and clean tube and seats. Check to be sure the rubber gaskets are seated properly. Replace tube. This procedure should be done only by a qualified person in a controlled setting. The manometer is set in a catch basin so that no mercury can escape. There should be a rap-type vacuum pump available to pick up any small spills.
8. Check "maximum" and "minimum" zeros and of bellows and cam function. (This must be done only if there are doubts about the values of those zeros or functions or if Hg has been added or lost.)
a. Release all pressure and open the bellows valve. The large thumb wheel with the black rubber "tire" and the cam against which it is pressed should turn freely without binding. If they do bind, bring in the R-Z.
b. Inflate the system while watching the large (about 2-l/4' diameter) disc above and to the left of the bellows valve chamber. (Bellows valve is still open.) As pressure rises one can see the disc, a piston, pushed toward the back plate until a ring around the center of the disc touches the forward rim of the cam. That rim is tapered, and thus determines how far the piston can move, depending on the position of the taper in relation to the ring at the center of the piston - a matter of change in normal operation of the R-Z. The distance that the piston can move before being stopped by the cam determines the volume of Hg in the bellows chamber, hence the volume of Hg left in the rest of the manometer.
C. To read "maximum" zero, release pressure with bellows valve still open. Turn the cam so that the point of its taper nearest the piston will be hit by the ring of the piston. (It may take an inflation and deflation or two before you find the correct cam position, which allows the minimum volume of Hg in the bellows chamber, hence maximum Hg in the rest of the system.) Inflate to about 200 mmHg, close the bellows valve, release pressure and read the zero as usual; this is the "maximum". Repeat the procedure once or twice, checking the cam position to make sure you get the same reading. Note that this is not a fixed value for if you were to inflate to 300 before closing the bellows valve, the reading would be lower; and inflation to 120-130 would give a higher value. For this reason, always record the maximum zero reading when taking blood pressures.
d. "Minimum" zero is measured as in c above, except that the cam is turned so that the piston can travel its maximum. It is usually nearly 20 mm lower than the "maximum' and should not be closer than about 4 mm to the 0 on the anometer tube scale.
ARIC PROTOCOL 11. Sitting Blood Pressure and Postural Changes 4116187

Page 27
e. Replace the rear case, putting it over the thumb wheel first. Start all four screws before tightening any. Take care not to cross thread.
f. After a series of blood pressure readings or before transport, open the bellows valve to drain Hg from that chamber, then close it and the reservoir valve. Between readings, the bellows valve should be left on "open" so that pressure on the bellows is not left in the device.
ARIC PROTOCOL 11. Sitting Blood Pressure and Postural Changes 4/ 16187

Page 28
Appendix II. Maintenance Procedures for Standard Sphygmonmnometer
The following checks should be conducted at least every month, and a log kept of the dates and the people carrying out the troubleshooting (see Appendix IV).
1. With the instrument placed flat on the table, and the inflation system disconnected, the level of mercury should read zero in the standard instrument. If the reading is either above or below the zero mark, mercury should be added or withdrawn until it does read zero. The top of the meniscus is on the zero line when the eyes are level with this line and the mercury is correctly adjusted.
2. The inflation system should then be reconnected, and the cuff rolled around a bottle and secured. The valve should be closed on the Air Flo system, and the instrument inflated until the mercury rises to 240 mmRg. The Air Flo valve should then be slowly opened and the mercury allowed to fall to 200 mmHg. The valve should then be closed, at which time the mercury column should remain stable. If the column continues to fall, there is an air leak, and the following step should be taken:
3. The system should be reinflated until the column rises to 200 mmHg. The' tubing should be pinched at various locations to localize the area of the leak. Appropriate replacement of the tubing, cuff, or valve should be performed.
4. With the instrument inflated above full calibration, the screw cap should be examined for mercury leaks. If this happens, the screw cap should be tightened. If the leak persists or the mercury is seen at the bottom of the tube, the silicone rubber which provides a seat for both ends of the glass tube should be replaced. .
5. With time, the mercury will become dirty and an oxide layer will be deposited on the inside of the glass tube. The instrument should be laid nearly on its side (on a tray) so that the mercury will return to the reservoir and none can be seen in the glass tube. The tube should be removed carefully and cleaned out using the long pipe cleaner supplied with the instrument. The tube should then be replaced and the zero level rechecked.
Since mercury is a toxic substance, all maintenance procedures must be performed carefully and with attention to safety. Mercury should not be allowed to get in contact with rings and other jewelry.
(Maintenance instructions for the standard sphygmomanometer are adapted from those given for the MRFIT study in Controlled Clinical Trials, Vol. 7, No. 3 (Supplement), Sept. 1986.
ARIC PROTOCOL 11. Sitting Blood Pressure and Postural Changes 4/16/87
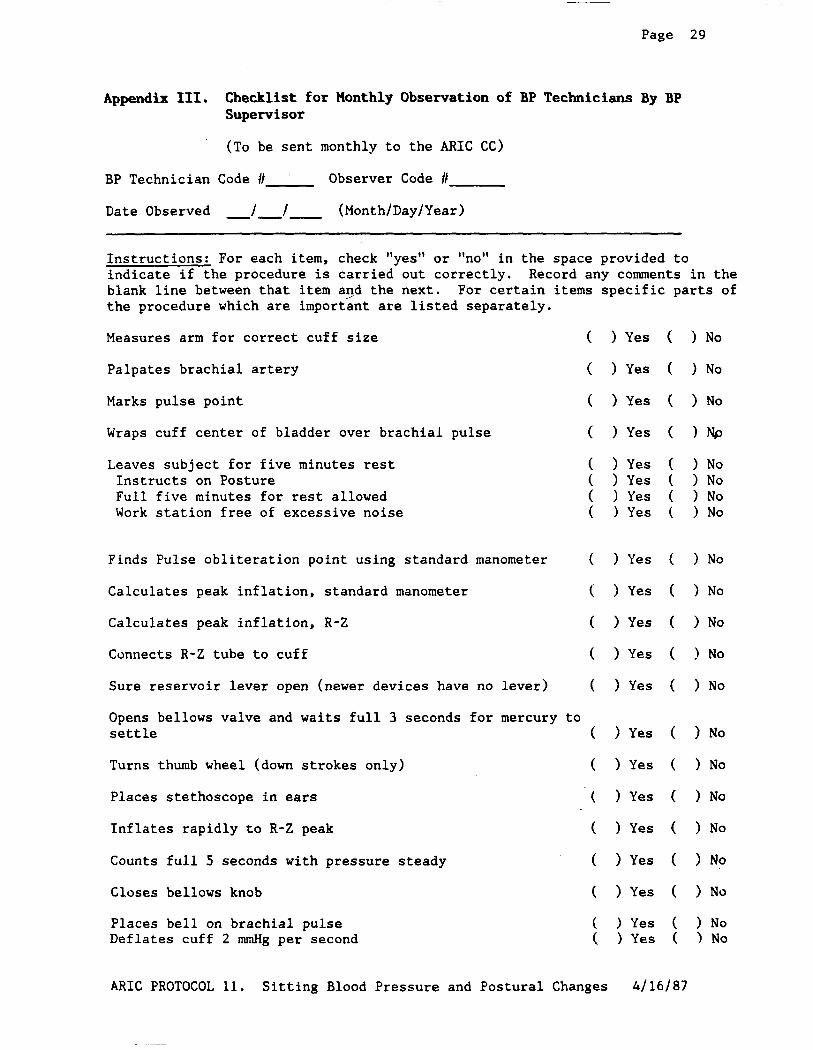
Page 29
Appendix III. Checklist for Monthly Observation of BP Technicians By BP Supervisor
(To be sent monthly to the ARIC CC)
BP Technician Code I/ Observer Code H
Date Observed -J-J- (Month/Day/Year)
Instructions: For each item, check "yes" or "no" in the space provided to indicate if the procedure is carried out correctly. Record any comments in the blank line between that item and the next. For certain items specific parts of the procedure which are important are listed separately.
Measures arm for correct cuff size
Palpates brachial artery
Marks pulse point
Wraps cuff center of bladder over brachial pulse
Leaves subject for five minutes rest Instructs on Posture Full five minutes for rest allowed Work station free of excessive noise
Finds Pulse obliteration point using standard manometer
Calculates peak inflation, standard manometer
Calculates peak inflation, R-Z
Connects R-Z tube to cuff
Sure reservoir lever open (newer devices have no lever)
Opens bellows valve and waits full 3 seconds for mercury settle
Turns thumb wheel (down strokes only)
Places stethoscope in ears
Inflates rapidly to R-Z peak
Counts full 5 seconds with pressure steady
Closes bellows knob
Places bell on brachial pulse Deflates cuff 2 mmHg per second
( > Yes ( ) No
( > Yes ( ) No
( ) Yes ( > No
( )Yes ( )Np
( > Yes ( ) No ( > Yes ( > No ( ) Yes ( > No ( ) Yes ( > No
( ) Yes ( > No
( > Yes ( ) No
( > Yes ( > No
( ) Yes ( ) No
( ) Yes ( > No
to ( ) Yes ( ) No
( ) Yes ( > No
( ) Yes ( > No
( ) Yes ( ) No
( > Yes ( > No
( ) Yes ( ) No
( ) Yes ( ) No ( ) Yes ( 1 No
ARIC PROTOCOL 11. Sitting Blood Pressure and Postural Changes 4J 16/87

Deflates cuff after 2 absent sounds
Records readings
Disconnects tubes
Reads zero. value
Subtracts zero value from each BP reading, if using paper form
Intructs to hold arm vertical for full 5 seconds
Waits at least 30 seconds before proceeding
Repeats R-Z readings
Informs participant of average readings
Special Comments:
Page
> Yes
> Yes
> Yes
) Yes
) Yes
) Yes
) Yes
) Yes
) Yes
.....................................................................
.....................................................................
.....................................................................
30
) No
) No
> No
) No
> No
> No
> No
) No
> No
ARIC PROTOCOL 11. Sitting Blood Pressure and Postural Changes 4/16/87

Page 31
Appendix IV. ARIC Monthly Log for Sitting Blood Pressure Station
Field Center-F H -.I M Month Year
Weekly Check Procedures: Week
1 2 3 4 5
1. Random-Zero Sphygmomanometer:
Date of Check -----
A. Check Tube for Oxide Dust -----
B. Check Cap for Tightness -----
Procedures performed only if there appear to be problems:
C. If mercury bounces even though the cap appears tight, remove cap, clqan of any mercury beads, and check opening at top of tube for dust
Check Needed and Performed during weeks 1 2 3 4 5 (Circle number of weeks applicable)
D. If tube appears "dirty" (oxidized mercury) remove cap, tip manometer to retract mercury, run pipe cleaner down, replace cap
Needed and Performed during weeks 12 3 4 5 (Circle number of weeks applicable)
E. For any other problems contact Dot Buckingham for instructions before proceeding. List the problem encountered, the date, and the actions taken below:
2. Measuring tape for arm circumference worn or stretched
Check by holding the zero mark of the tape against the ruler used to measure standing height at the 150 cm mark. If the 30 cm mark on the tape used for arm circumference falls outside the range 119.5 to 120.5 on the standing height ruler it should be replaced.
Week: 1 2 3 4 5
Date of check: ----
Point on height ruler where 30 cm on tape falls ----
ARIC PROTOCOL 11. Sitting Blood Pressure and Postural Changes 4J 16/87

Page 32
Monthly Check Procedures:
A. Accuracy Check on Random-Zero Sphygmomanometer (to be performed every 2 months):
Date last accuracy check performed:
Is an accuracy check due this month? ( ) Yes ( ) No
Date accuracy check performed, if due:
Problems found on accuracy check? ( > Yes ( ) No
If yes, list problems found and corrective action taken:
. . . . . . . . . . . . . . . . . . . . . . . . . . . . . . . . . . . . . . . . . . . . . . . . . . . . . . . . . . . . . . . . .
. . . . . . . . . . . . . . . . . . . . . . . . . . . . . . . . . . . . . . . . . . . . . . . . . . . . . . . . . . . . . . . . .
. . . . . . . . . . . . . . . . . . . . . . . . . . . . . . . . . . . . . . . . . . . . . . . . . . . . . . . . . . . . . . . . .
B. Standard sphygmomanometer check:
Date of check:
A. Check cap for tightness
B. Check tube for oxide dust
C. Check that mercury is at zero with no pressure
List any problems found and corrective action taken:
. . . . . . . . . . . . . . . . . . . . . . . . . . . . . . . . . . . . . . . . . . . . . . . . . . . . . . . . . . . . . . . . .
. . . . . . . . . . . . . . . . . . . . . . . . . . . . . . . . . . . . . . . . . . . . . . . . . . . . . . . . . . . . . . . . .
. . . . . . . . . . . . . . . . . . . . . . . . . . . . . . . . . . . . . . . . . . . . . . . . . . . . . . . . . . . . . . . . .
C. Simultaneous measurements by two BP technicians using a Y-tube on volunteers (to be performed by each BP technician each month). List the IDS technicians paired this month below.
1st Technician 2nd Technician Date
a. First pair, technician ID numbers
b. Second pair, technician ID numbers
c. Third pair, technician ID numbers
ARIC PROTOCOL 11. Sitting Blood Pressure and Postural Changes 4/16/87
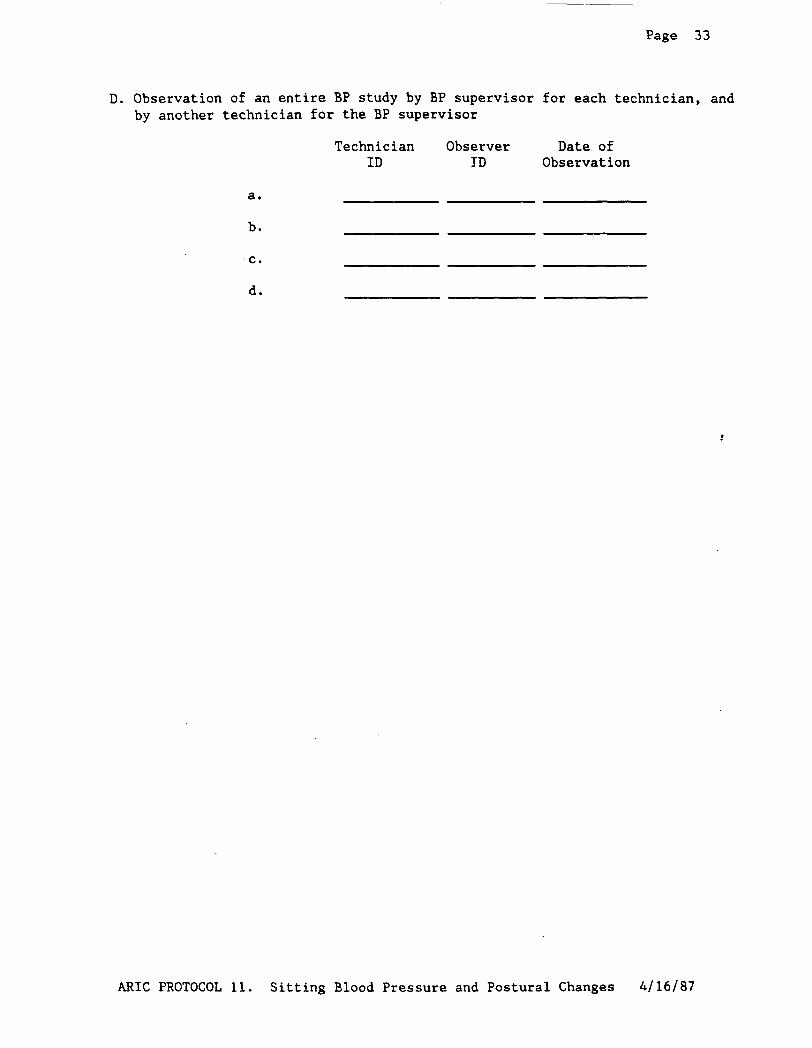
Page 33
D. Observation of an entire BP study by BP supervisor for each technician, and by another technician for the BP supervisor
Technician Observer Date of ID ID Observation
a.
b.
C.
d.
ARIC PROTOCOL 11. Sitting Blood Pressure and Postural Changes 4J 16J87

Page 34
Appendix V. Accuracy Check on the Random-Zero Sphygmomanometer
This check should be performed every two months, using a standard manometer and a Y connector. Check that the mercury level of the standard device reads zero with no pressure in the system. If it does, it should be treated as accurate and having an adequate supply of mercury.
To perform the accuracy check on the R-Z instrument, attach the two arms of the Y connector directly to the reservoirs of the R-Z and standard devices, using Latex tubing. Attach the base of the Y connector to a cuff with an Air Flo control valve and bulb. To attach the Latex tubing to the reservoirs or to a valve, it may be helpful to moisten the openings of the tubing to allow the tubing to slip onto the desired parts. Wrap the cuff around a bottle or can.
First open the Air Flo valve to insure that all pressure is out of the system. Check the zero level of the standard device. Next, turn the R-Z valve to the OPEN position. Close the Air Flo valve and .nflate both machines until the mercury level in the standard device is at the 250 mmHg level. After 5 seconds, close the R-Z valve. Record the exact levels of mercury in the R-Z and standard devices. Reapeat the procedure at 200 mmRg, 170 mmHg, 110 mmRg,,80 mmHg, and 60 mmRg. Release the air from the Air Flo valve. When the merdury in the R-Z instrument has stabilized and the standard is at zero, record the zero reading from the R-Z. Substract this value from the R-Z readings.
The results should agree with the comparable readings on the standard instrument within +J- 2mmHg. If this agreement is not found at all levels, repeat the procedure. If the disagreement is constant, stop using the instrument and contact the manufacturer.
Worn parts should only be changed as necessary (when there is disagreement between the R-Z and standard devices). Only those parts in the parts kit should be changed. No attempt should be made to change the rubber diaphragm or bellows.
Note: These instructions are adapted from the procedures employed by the MRFIT study, described in Controlled Clinical Trials, Vol. 7, No. 3 (Supplement), September 1986.
ARIC PROTOCOL 11. Sitting Blood Pressure and Postural Changes 4J 16J87

Page 35
Appendix VI. Form for Recording Simultaneous Blood Pressure Observations On a Volunteer by Two Technicians
Instructions: Once a month, each technician should be part of a pair of technicians who simultaneously measure blood pressure using a Y-tube on a volunteer (not an ARIC participant). Each technician should separately record his/her measurements on a standard paper ARIC SBP form. The blood pressure supervisor should then transfer the results to this form and calculate the differences between the two sets of measurements. If the difference on any individual measurement is greater than 4 mmHg, or if the averages of the three readings for each technician differ by more than 3 mmHg, the supervisor should indicate the corrective action taken on this form. Any further sets of simultaneous measurements for a given pair should appear on a new form. A COPY of each form should be sent to the Coordinating Center each week.
Technician IDS: 1st ID: 2nd ID: Date:
a. Initial Arm Circum- ference (cm)
b. Initial Cuff Size Selected
c. Pulse Obliteration Pressure
d. First SBP
e. First DBP
g. First Zero Reading
h. First Net SBP Corrected for Zero
i. First Net DBP Corrected for Zero
j. Second SBP
k. Second DBP
1. Second Zero Reading
m. Second Net SBP Corrected for Zero
n. Second Net DBP Corrected for Zero
o. Third SBP
1st Technician 2nd Technician Difference
ARIC PROTOCOL 11. Sitting Blood Pressure and Postural Changes 4/16/87

Page 36
p. Third DBP
q. Third Zero Reading
r. Third Net SBP Corrected for Zero
s. Third Net DBP Corrected for Zero
t. Average Net SBP
u. Average Net DBP
ACTION TAKEN IF DIFFERENCES BETWEEN TECHNICIANS EXCEED LIMITS SPECIFIED:
.....................................................................
.....................................................................
.....................................................................
.....................................................................
......................................................................
ARIC PROTOCOL 11. Sitting Blood Pressure and Postural Changes 4/16/87

Page 37
Appendix VII. Checklist for Observation of Postural Changes Examination
Sonographer Code /I Observer Code II J Initials
Date Observed -J-J- (Month/Day/Year)
Instructions: For each item, check "yes" or "no" in the space provided to indicate if the procedure is carried out correctly. Record comments in the blank line between that item and the next. Space is also provided on the last page for general comments. Items are presented in the sequence of the examination procedure, but may require confirmation before, or after the exam.
(Sonographer) P repares work station and header information on monitor screen before participant arrives ( ) Yes ( ) No
Explains procedures to participant before starting the exam ( ) Yes ( ) No
Selects cuff size from Itinerary Form
Uses correct procedure to place cuff on ankle
( ) Yes ( ! No
( ) Yes ( ) No
After completing the pre-info screen and before depressing the foot switch for the first time:
Verifies that heart rate is received (visual and audible - signals can be seen/heard by sonographer) ( ) Yes ( > No
Takes a manually triggered blood pressure ( > Yes ( > No
Explains that first blood pressure is taken at higher pressures than subsequent measurements ( > Yes ( ) No
Waits until blood pressure is taken after popliteal scan before advancing the Study Flow Panel ( > Yes ( > No
Instructs and assists participant on moving from prone to supine position ( ) Yes ( ) No
Stays close to participant during this motion (safety) ( ) Yes ( ) No
Verifies ECG lead placement and receipt of heart rate signals after change of position ( ) Yes ( ) No
Uses proper.cuff size and technique in placing cuff on arm ( ) Observer not qualified to assess technique.
( > Yes ( ) No
Takes a manually triggered blood pressure before pressing the foot switch ( ) Yes ( ) No
After completing carotid scan, prepares to collect
ARIC PROTOCOL 11. Sitting Blood Pressure and Postural Changes 4/16/87

Page 38
distensibility data before depressing foot switch
Gives clear instructions before starting the supine portion of the postural change examination
Places ECG cables in participant's hand while providing instructions to stand up
Brings computer keyboard close to ultrasound table before instructing participant to stand up
Uses the instructions provided in the protocol to indicate to the participant to stand up in a smooth motion and stand by the table
Stays close to participant while s/he stands up
Correctly records F4 and F5 times on keyboard
Instructs the participant to bend arms slightly and hold hands loosely after standing up
Stays close to participant during of the standing portion of the examination
Instructs (or assists) participant in sitting down after standing portion of the examination
( ) Yes ( ) No
( ) Yes ( ) NO
( ) Yes ( > No
( ) Yes ( > No
( ) Yes ( > No
( ) Yes ( > No
( ) Yes ( ) No
( > Yes ( > No
( 1 Yes ( ) No
( ) Yes ( > No
(Verify before or after observing the exam procedure)
Work station offers privacy, comfortable temperature, and low noise level ( > Yes ( ) No
A platform is available for persons of short stature ( ) Yes ( ) No
Furniture and transducer holder are out of the way, to allow smooth and safe motion in standing up from the table ( ) Yes ( > No
A Dinamap calibration log is kept ( ) Yes ( ) No
Record the date of the last 4 Dinamap calibrations (Month/Day/Year):
-J J i -J -J ,,i -J -J m-i -J J -> e
Record alarm settings on Dinamap (DBP) (SPP)
2ecial Comments:. -*- -
. ..'.................................................................
. . . ..i......~.....................,..................................
. ..-.................................................................
ARIC PROTOCOL 11. Sitting Blood Pressure and Postural Changes 4/16/87

Atherosclerosis Risk in C oimnmities Study Protocol
t4anual11
Sitting Blood Pressure and Postural Changes in Blood Pressure and&art Rate
For Copies, Please Contact ARIC Coordinating Center
Suite 203, NCNB Plaza 137 E. Franklin St.
Chapel Hill, NC 27514
Version 1.0: April 16, 1987 Version 1.1: July 18, 1988

Page 5
artery. If the participant seems particularly apprehensive, delay wrapping the cuff until after the five minute wait.
5.
6.
7.
8.
Record the time. Allow a five minute wait before taking the blood pressure. Conversation should be limited. However, a brief explanation of the procedure can be repeated at this time if necessary.
After 5 minutes connect the cuff to a standard manometer and establish the pulse obliteration pressure by slowly inflating while palpating the radial artery until pulse is no longer felt. Deflate and disconnect the cuff. Record the pulse obliteration pressure. Record the R-Z maximum zero number (found next to mercury column). Calculate and record the peak inflation level (i.e., pulse obliteration pressure + R-Z maximum zero number + 30).
Measurement 1: Connect the cuff to the random-zero manometer. Open the bellows control valve and wait until the mercury settles. Using downstrokes only turn the thumbwheel two or three times. Note: Do not spin the thumbwheel. Inflate rapidly to the R-Z peak inflation level. Holding the pressure constant with the bulb, wait 5 seconds. Close the bellows control valve. Place the bell of the stethoscope on the brachial artery and slowly deflate the cuff (2 mm per second) while listening. Record the 1st and 5th phases, reading the pressure in mmHg to the nearest even number. The first sound heard in a series of at least two sounds is recorded for systolic blood pressure (phase 1). The first silence in a series of at least two silences is recorded for diastolic blood pressure (phase 51, not the last sound heard. Disconnect the cuff and record the zero readinc
Measurements 2 and 3: Have the participant raise measurement arm for five seconds. After waiting another 25 seconds with the participant's arm on the table, repeat the measurement as in step 7 above and disconnect cuff.
Blood pressure calculations are made only for the second and third readings. When using paper forms, subtract the zero value from the readings to get the actual (corrected) systolic and diastolic blood pressure measurement. This is done on the worksheet at the end of the form. Because of the importance of the blood pressure averages, to inform the participant and for the purpose of referral, all arithmetic is done with a calculator.
If for any reason the observer is unable to complete, or has forgotten to complete any portion of the exam (and the participant is gone), draw two horizontal lines through the space(s) on the form, if using paper forms. This is the correct way to indicate missed information. If an entire reading is missed and the participant is still sitting at the blood pressure work station, completely deflate the cuff and start over with a replacement reading. However, under no other circumstances may a replacement reading be obtained. Always wait at least 30 seconds between readings.
1.7 Reporting the Blood Ressure Results to the Participant
Using a calculator, average the second and third corrected R-Z readings and record the average on the form if using paper forms. Record this average on the transmittal slip or itinerary form in the participant's folder, and
ARIC PROTOCOL 11. Sitting Blood Pressure and Postural Changes Version 1.1 7/18/88

Page 6
mention the results to the participant. State clearly the systolic and diastolic pressure, and offer to write down these values for the participant.
1.8 Procedure for changing the peak inflation level
Occasionally the Korotkoff sounds may be heard as soon as one places the stethoscope over the brachial pulse. If this happens, the peak inflation level used was too low. The observer immediately deflates the cuff by releasing the thumbscrew and disconnecting the cuff tube. Then have the participant hold the cuff-wrapped arm vertically for five seconds. As shown below in Table 2 draw a line through the previously recorded Pulse Obliteration Presssure and Peak Inflation Level. Increase each number by ten and write the new number above the original one, as shown below. When using the Direct Data Entry system, the Peak Inflation Level values change automatically when the Pulse Obliteration Pressure is changed. Proceed with blood pressure measurement, starting at the new Peak Inflation Level.
Table 2. Changing the Peak Inflation Level on paper forms.
Pulse obliteration pressure 130
120
R-Z maximum Zero + 22
Peak Inflation Level (Random-Zero)
182 =172
1.9 Sitting Blood Pressure Training and Certification
At each field center a minimum of three clinic staff persons are trained for measuring sitting blood pressure. They need not be health professionals, but they must be trained and certified by ARIC in the blood pressure measurement technique. Observers should also have experience in relating to people.
The first training session begins with a description and demonstration of the correct blood pressure measurement procedure. Trainees listen to the 1st (training) audio-cassette tape, taking the test sequences until they are confident they can identify 1st and 5th phase Korotkoff sounds. Then, they use the 2nd tape until they have passed the test. After passing the second test, they are given the 3rd tape test. Alternated with the tapes are actual practice sessions with live subjects under the instruction and observation of the training supervisor. Some live practices may be done with a standard stethoscope, but most employ the Y-tube stethoscope. After the first day of training, each trainee is given a cuff and manometer (no stethoscope) to take home and practice control of the valve. This is done by wrapping the cuff on
ARIC PROTOCOL 11. Sitting Blood Pressure and Postural Changes 4116187

Page 11
2. PQsTuRAL- INBumDPmssuRBANDEBARTRATE
2.1 Background
Sitting blood pressure measured at the arm is'one of the strongest and best established risk factors for subsequent cardiovascular and cerebrovascular morbidity and mortality. There is some evidence now that blood pressure readings from other body locations and in other body positions can have additional value in predicting cardiovascular risk. Thus, study of these blood pressure measurements may improve our understanding of pathogenic processes and our ability to identify high risk populations.
There is evidence that blood pressure monitoring of individuals as they change position in a controlled clinic setting is safe, relatively simple, and can yield useful information about the body's response to a constant, "readily available" physiologic stressor -- gravity. Simple measurements of postural change in diastolic blood pressure have been found to be predictive of myocardial infarction after 8 l/2 years of follow-up. Supine systolic arm blood pressure alone and the supine-sitting systolic arm blood pressure difference were both independently associated with improved prediction of subsequent development of hypertension.
The ARIC Study includes a mild Postural Change Examination of heart rate and blood pressure in its baseline examination. This adds a dynamic component to the measurements of static blood pressure in several body locations and positions (arm sitting, supine, and standing; ankle prone). Further, the prolonged rest period afforded by the ultrasound examination (during which arm blood pressure readings are taken by an automated procedure) provides an opportunity to approximate a basal supine blood pressure measurement.
Participant safety has priority during the Postural Change Examination. Safety precautions in the protocol include identifying participants who may have experienced orthostatic hypotension , and users of medications that may induce hypotension on standing up; instructions given by the sonographers to participants on how to stand up; and, instructions to sonographers on detecting and responding to symptoms of hypotension. The data on postural change are collected in the normal course of getting the participant upxfrom the examination table at completion of the ultrasound examination.
2.2 Introduction
At the ultrasound work station, B-Mode scanning, measurement of arterial distensibility, and the measurements of postural change are integrated into a single procedure. They are executed by ARIC sonographers trained and certified in each of these components. The measurements share the equipment of the ultrasound work station. A dedicated microcomputer coordinates the administration of the examination and collects all data. Measurements at the
ARIC PROTOCOL 11. Sitting Blood Pressure and Postural Changes 4116187

Page 12
ultrasound work station are described in two separate manuals: Sitting Blood Pressure and Postural Changes in Blood Pressure and Heart Rate in this manual (Manual 11); and Ultrasound B-Mode, Doppler , and Arterial Distensibility Measurements in Manual 6. While the participant is recumbent on the examination table, baseline measurements of blood pressure and heart rate are taken during the ultrasound examination. Immediately after the participant stands up, additional heart rate and blood pressure measurements are recorded to assess the cardiovascular response to the change in posture. Baseline prone lower extremity and supine upper extremity blood pressure readings are taken in conjunction with the popliteal and carotid ultrasound examinations, respectively. The latter are obtained before and after the carotid arterial distensibilty measurement.
The measurement of postural changes in blood pressure and heart rate is the final examination at the ultrasound work station , so that each participant has approximately a half hour of comfortable rest during the ultrasound and arterial distensibility studies. It is important that the participant be kept warm, relaxed and quiet, so that valid baseline blood pressure determinations can be obtained.
2.3 Equipment and Environment
The measurements of heart rate and blood pressure described in this section require a Dinamap-SX automated oscillometric machine, a dedicated microcomputer with software support , a continuous heart rate monitor, and the study flow panel described in Manual 6. Prior to the examination, the equipment and the sequence of procedures are explained to the participant.
The ultrasound work station measurements are driven by the Ultrasound Program, as detailed in Appendix I to Manual 6. This PC-based program controls leg artery randomization, collects various data during the study, and assists the sonographer in performing the ultrasound and postural change measurements. The data collected by the program consist of: (1) demographic and descriptive data on the participant, (2) study codes and times for steps of the measurement protocol as they are performed, (3) blood pressures recorded periodically during the ultrasound exam, (4) arterial distensibility data, and (5) heart rate and blood pressure data during the postural change study.
The sonographer interacts with the computer: (1) during the completion of an initial questionnaire screen, (2) at the b eg nning i of the postural change examination, (3) as the participant starts to move to the standing position, (4) at the time the participant's feet touch the floor during the postural change, and (5) at the completion of the study. The computer program controls communications with the study flow panel (SFP), both receiving instructions from the SFP to determine when to take blood pressures, and sending instructions to the SFP to control randomization.
The ultrasound table is padded and at least 30 inches wide to allow upper extremity relaxation for the arm blood pressure measurements. The table is 30 (t/- 2) inches from the floor to maximize ease of transition from the lying to standing position, and to standardize this motion.
Tape is used to stabilize the Dinamap tubing to the edge of the table. Heart rate monitor wires are positioned and anchored in a similar manner to avoid
ARIC PROTOCOL 11. Sitting Blood Pressure and Postural Changes Version 1.1 7/ia/a8

Page 13
tangling and any tugging discomfort on the participant. A blanket is available for use if'the participant feels cold. If this were to occur, it would be most likely while, the participant is immobile during the carotid scanning. For the same reasons, a carpet or an area rug is placed on the floor under the examination table to prevent inadvertent cold discomfort for the participant upon standing for the dynamic blood pressure sequence. The sonographer maintains the floor area free of obstruction, so that participants can stand comfortably about 18 inches from the table.
Before each phase of the examination, the sonographer describes the key aspects of the examination to the participant. Since anxiety and concern influence blood pressure determinations, the sonographer maintains a consistently calm, patient , and reassuring disposition. If a participant inquires about his/her blood pressure or heart rate in the course of the exam, the sonographer politely indicates that s/he must withhold specific information about the blood pressure and heart rate until after the examination. Persistent talking and/or signs of anxiety are noted in a Problem Log immediately after the participant leaves the work station.
The participant is made as physically comfortable as possible. He/she is encouraged throughout the examination to voice any discomfort. Attention is paid by the sonographer to the room temperature (to be maintained around 70 degrees), and to musculoskeletal, cardiac, or respiratory discomforts, in particular othopnea. Either hospital gowns, shoulder-seam snap or disposable paper gowns are available at the work station, so that the sonographer can offer these to obese participants as an alternative to the scrub suit. Maximal relaxation of the participant is a primary objective.
2.4 MeesuremantRocedures
2.4.1 Preparing the Work Station and the Participant
Before the participant arrives at the work station the sonographer verifies that the SFP, the Video Casette Recorders, the microcomputer, and the Dinamap are turned on. The ultrasound program is then activated by typing "US" (upper or lower case) , and the system responds by displaying the preliminary questionnaire screen. The sonographer completes the header information of this screen and participant identification. At this time the sonographer also determines whether the right or left lower extremity will be examined from the information displayed on the screen.
When the participant arrives at the ultrasound station, the work station equipment and procedures are described, as indicated earlier. Although the participant is already wearing a scrub suit, the sonographer makes a quick check to verify that all jewelry has been removed from the neck area. All participants are then advised to use the bathroom, since the examination extends over 45 minutes, uninterrupted. During training sonographers are made aware that either bladder or rectal distention discomfort can influence blood pressure and/or induce pre-syncope. The participant is instructed (and assisted if necessary) to remove his/her shoes , and the sock or stocking of the leg to be examined , unless the room is cool.
: ARIC PROTOCOL 11. Sitting Blood Pressure and Postural Changes 4116187

?age 14
The sonographer should make any needed adjustments to avoid a physical "jolt" later when the participant stands up for the postural change sequence (when sitting on the ultrasound table the participant's heels should be no more than four inches above the floor). A platform can be placed in front of the ultrasound table in the case of ,persons of short stature. The dimensions of this platform should be 48 in. length, 36 in. width, and 4 in. height. The sonographer now completes the "pre-info" screen by asking the participant about any history of falls, dizziness, syncope, an d current use of medications which might cause orthostatic symptoms. If potential orthostatic symptoms are suspected, the sonographer instructs the participant at the appropriate time to get up only as quickly as the participant feels is safe, pausing in the seated position if necessary.
2.4.1.1 Applying the Heart Rate Leads
Before applying the heart rate monitor leads on the participant's lower chest and abdomen, the sonographer makes sure that his/her hands are warm to avoid a "cold" temperature aversive stimulus (rubbing them together usually suffices). A check for satisfactory hand temperature can be made by touching the back of the hand to the participant's upper arm. Local body hair shaving for heart rate monitor lead placement is not done unless, in the sonographer's judgement, undue discomfort will occur when the lead is removed. A small, quiet, battery-powered shaver is available at the work station for quick, minimal shaving in such instances.
The 3 self-adherent chest lead patches, to which the 3 heart rate monitor wires connect (snap-on), are placed as follows:
White (RA): Midline upper epigastrium just below the xiphoid process;
Green (RL): Midline lower epigastrium just above the umbilicus; and,
Black (LA): Left sub-Costa1 area in the mid-axillary line.
These can be applied without removing the scrub suit shirt by sliding the bottom edge of the shirt up for lower lateral chest and upper abdominal access.
The three heart rate monitor lead wires all course inferiorly at the side of the participant on which the arm blood pressure cuff will be applied for the measurements of Postural Changes. They are snapped on to the skin electrodes at this time.
2.4.1.2 Moving the Participant to the Prone Position
Now the participant is ready to be assisted in moving to the prone position on the ultrasound table. In instructing the participant the sonographer can demonstrate the proper position on the table, and how to hold the heart rate cable while assuming this position. As the participant does this, attention is focussed on two items:
(1) since the ultrasound table has no guard rails, the sonographer stands near the table to make sure that the participant does not get too close to the edge;
(2) the participant's feet should extend slightly past the end of the ultrasound table so that they are able to hang comfortably with the leg and foot muscles relaxed.
ARIC PROTOCOL 11. Sitting Blood Pressure and Postural Changes Version 1.1 7/18/88

Page 15
Once the participant is in the prone position, he/she is offered some information to help determine the most comfortable position for his/her arms. The recommended position is for the arms to be relaxed at the participant's side, and an optional thin pillow under the head only. On the other hand, some participants may request to position their arms overhead and use one or more pillows under the shoulders, chest, and/or head. In this case, if the participant does not accept a polite suggestion of the recommended positions, then attention must be paid to possible shoulder "hvperabduction syndrome" symptoms (distal upper extremity tingling and numbness). At this time-the sonographer questions the participant for any prior history of such symptoms. If positive, the participant must use the "arms-at-the-side" position. It is likely that during the popliteal ultrasound study some participants who choose to "hug" a pillow or two under their upper body and head will develop these symptoms and become restless. During training the sonographers are made aware of the potential for unwanted adrenergic side effects, which could cause invalid determinations. In general, participants are asked not to change position once an ultrasound exam sequence has begun.
2.4.1.3 Applying the Blood Pressure Cuff
As is the case with sitting blood pressure, careful attention is given to the selection of the appropriate cuff size and the cuffing technique. The cuff size used for the sitting blood pressure measurements, recorded on the Itinerary Form, is used in selecting the size of the Dinamap cuff for the upper extremity. At each field center sonographers are trained by the sitting blood pressure certifier/trainer in the technique for applying the Dinamap blood pressure cuff to the upper extremity. Because of this, greater attention is given in this manual to the lower extremity as regards selection and application of the blood pressure cuff.
The ankle blood pressure cuff is applied on the lower extremity selected for the popliteal scan (socks or stockings have been removed, or moved below the ankle to keep the participant's foot and/or toes warm if the room is cool). If an Adult cuff size was used for the sitting arm blood pressure, the same size is used for the ankle. If a Large Adult cuff size was used on the arm, an Adult size is used on the ankle. If the participant's ankle is very large and/or strongly tapered, a larger cuff may be necessary. Infrequently, measuring actual arm circumference with a disposable paper tape measure may be necessary; to determine the cuff width to be used on the ankle, the sonographer then refers to Table 4 for ankle cuff size selection criteria:
Table 4. Determination of ankle cuff size based on arm circumference
Arm Circumference Ankle Cuff Size
< 24 cm
24 to 36 cm
> 36 cm
Small Adult
Adult
Large Adult
ARIC PROTOCOL 11. Sitting Blood Pressure and Postural Changes Version 1.1 7/1a/as ;
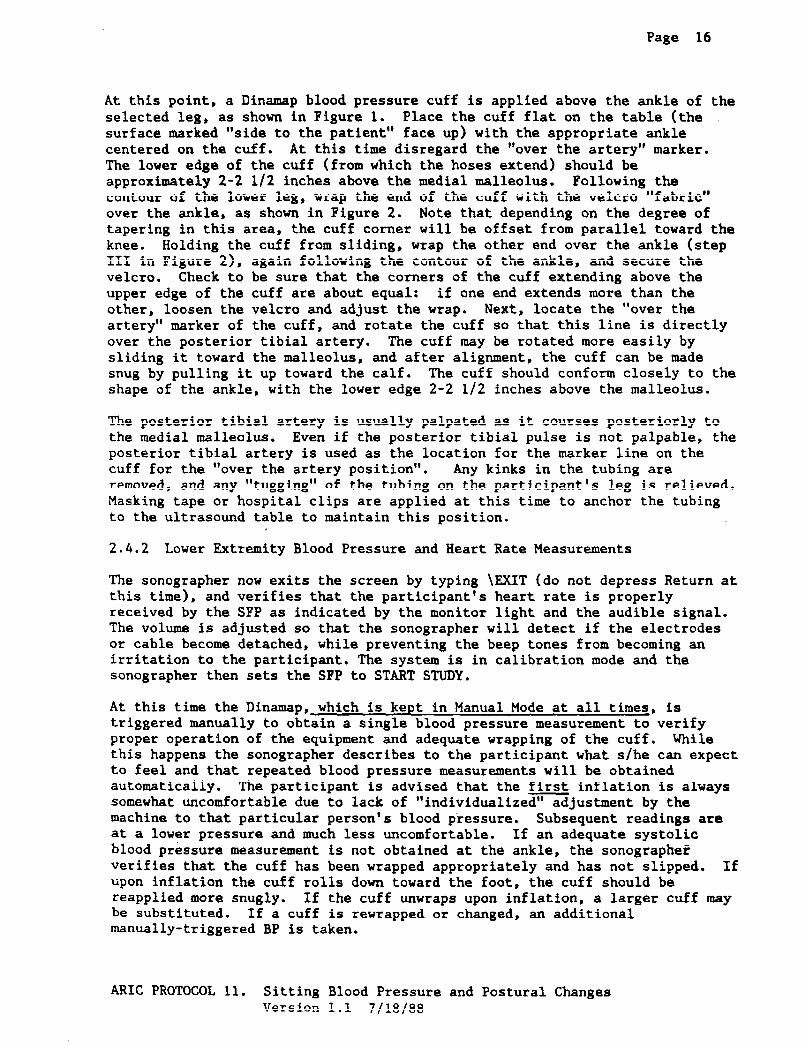
Page 16
At this point, a Dinamap blood pressure cuff is applied above the ankle of the selected leg, as shown in Figure 1. Place the cuff flat on the table (the surface marked "side to the patient" face up) with the appropriate ankle centered on the cuff. At this time disregard the "over the artery' marker. The lower edge of the cuff (from which the hoses extend) should be approximately 2-2 l/2 inches above the medial malleolus. Following the contour of the lower leg, wrap the end of the cuff with the velcro 'fabric" over the ankle, as shown in Figure 2. Note that depending on the degree of tapering in this area, the cuff comer will be offset from parallel toward the knee. Holding the cuff from sliding, wrap the other end over the ankle (step III in Figure 21, again following the contour of the ankle, and secure the velcro. Check to be sure that the corners of the cuff extending above the upper edge of the cuff are about equal: if one end extends more than the other, loosen the velcro and adjust the wrap. Next, locate the "over the artery" marker of the cuff, and rotate the cuff so that this line is directly over the posterior tibia1 artery. The cuff may be rotated more easily by sliding it toward the malleolus, and after alignment, the cuff can be made snug by pulling it up toward the calf. The cuff should conform closely to the shape of the ankle, with the lower edge 2-2 l/2 inches above the malleolus.
The posterior tibia1 artery is usually palpated as it courses posteriorly to the medial malleolus. Even if the posterior tibia1 pulse is not palpable, the posterior tibia1 artery is used as the location for the marker line on the cuff for the "over the artery position". Any kinks in the tubing are removed, and any 'tugging" of the tubing on the participant's leg is relieved. Masking tape or hospital clips are applied at this time to anchor the tubing to the ultrasound table to maintain this position.
2.4.2 Lower Extremity Blood Pressure and Heart Rate Measurements
The sonographer now exits the screen by typing \EXIT (do not depress Return at this time), and verifies that the participant's heart rate is properly received by the SFP as indicated by the monitor light and the audible signal. The volume is adjusted so that the sonographer will detect if the electrodes or cable become detached, while preventing the beep tones from becoming an irritation to the participant. The system is in calibration mode and the sonographer then sets the SFP to START STUDY.
At this time the Dinamap, which is kept in Manual Mode at all times, is triggered manually to obtain a single blood pressure measurement to verify proper operation of the equipment and adequate wrapping of the cuff. While this happens the sonographer describes to the participant what s/he can expect to feel and that repeated blood pressure measurements will be obtained automatically. The participant is advised that the first inflation is always somewhat uncomfortable due to lack of 'individualized" adjustment by the machine to that particular person's blood pressure. Subsequent readings are at a lower pressure and much less uncomfortable. If an adequate systolic blood pressure measurement is not obtained at the ankle, the sonographet verifies that the cuff has been wrapped appropriately and has not slipped. If upon inflation the cuff rolls down toward the foot, the cuff should be reapplied more snugly. If the cuff unwraps upon inflation, a larger cuff may be substituted. If a cuff is rewrapped or changed, an additional manually-triggered BP is taken.
ARIC PROTOCOL 11. Sitting Blood Pressure and Postural Changes Version 1.1 7/lajaa

Page 17
The sonographer observes the participant for a tendency to "stretch" the calf or wiggle the foot during the blood pressure reading. If it occurs, this is discussed with the participant before the ultrasound scan is started. The sonographer stresses the need for the leg and arm to be kept still during the blood pressure readings. Discomfort during the blood pressure measurement may indicate that the ankle cuff has been applied too tight, applied smoothly, or that it is too narrow.
Before activating the next phase of the study, the sonographer takes a minute to instruct the participant on the 'no conversation' rule. Also, the participant is reminded to "hold questions" about exam results until after the last portion of the ultrasound station exam is completed, since it is important that all participants be 'treated the same way".
The sonographer then turns the recorder on and presses the Return key on the computer keyboard , and proceeds to calibrate the system. Upon completion of the calibration the foot switch is depressed for the duration of 5 to 7 cardiac cycles. When this occurs the computer automatically takes and records a blood pressure.
2.4.3 Lower Extremity Ultrasound Scan
The participant is now ready for the popliteal ultrasound scan to begin (see Manual 6). The preparatory scan of the leg is performed, and the artery located and placed so as to record the image. The foot switch is depressed and held for five to seven seconds, providing the instruction to the equipment to record the image.
Fifteen seconds after this depression of the foot switch the system automatically takes the blood pressure again. Note that this provides a blood pressure measurement before and after the popliteal scan. The sonographer does not advance the Study Flow Panel until this second blood pressure is taken.
The ankle blood pressure cuff is now removed and the clips or tape used to hold the tubing in proper position during the exam are removed and kept in a handy location, since they will be re-used when the arm blood pressure cuff is applied. When indicated, a blanket is used to keep the participant's lower extremities warm during the carotid scan.
2.4.4 Upper Extremity Blood Pressure and Heart Rate
The sonographer assists the participant in riroving from the prone to the seated position. The sonographer now applies the blood pressure cuff over the brachial artery according to the instructions found in the Sitting Blood Pressure section of this manual. By consulting the participant's Itinerary Form, the sonographer verifies that the same arm and the same cuff size are used as for the sitting blood pressure readings. The sonographer also verifies comfortable' cuff fit: the wrap of the Dinamap cuff should be less "snug' than the cuff fit used for the sitting blood pressure measurements. If unsure about proper cuff size, the sonographer measures the participant's arm circumference and determines the appropriate cuff size from Table 1.
ARIC PROTOCOL 11. Sitting Blood Pressure and Postural Changes Version 1.1 7/1a/as

Page 18
Next, the participant is assisted to the supine position. In particular, two precautions are observed during this motion: a) the sonographer holds the heart rate cable as the participant turns, and b) the sonographer guards the edge of the ultrasound table to keep the participant from rolling off accidentally. The sonographer then helps the participant to slide toward the "head" end of the untrasound table. The top of the participant's head is positioned at least 4 inches from the end of the table, to avoid hyperextension of the neck and for easiest access to the carotid area with the transducer.
The sonographer checks the heart rate monitor wires and chest lead patches to verify that they are connected properly , and the signal is received by the SFP. Any wire tangles are eliminated. As for the ankle blood pressure, a manually-triggered blood pressure is now obtained (which is not recorded by the system) to verify adequate cuff inflation and positioning. Questions about the upper extremity blood pressure determinations are solicited and answered at this point.
The Study Flow Panel display now indicates that the next scan is the right side, optimal angle, common carotid, B-mode study. The computer remains inactive until the foot switch is depressed, to indicate that the sonographer has performed the initial scan to locate structures, found the common carotid, and placed the best image on the screen.
When the sonographer presses the foot switch indicating the beginning of the scan in the neck, the system takes the first arm blood pressure automatically. The computer program now enters an automatic phase during which it continues to take blood pressure measurements every five minutes. Since the system is "unaware" of the status of the ultrasound exam, these blood pressure determinations occur at different phases of the scan.
2.4.5 Carotid Ultrasound Scan
The every-five-minute blood pressure phase of the computer continues as the sonographer collects carotid artery data according to the scanning protocol, until the last scan of the ultrasound protocol is reached. After indicating that this step is complete by pressing the foot switch, the sonographer waits until the system completes the automatic every-five-minute phase of blood pressure determinations by taking a blood pressure measurement. The arterial distensibility study is then performed according the scanning protocol.
2.4.6 Carotid Arterial Distensibility
The sonographer prepares to collect the arterial distensibility data, and when ready depresses the foot switch. A message appears on the screen asking the sonographer to wait until the data from distensibility scan is stored, which requires approximately 3-S seconds. After the recording is complete, the system again performs a blood pressure determination.
ARIC PROTOCOL 11. Sitting Blood Pressure and Postural Changes Version 1.1 7/ia/a8

Page 19
At this point, the ultrasound portion of the protocol is complete and the postural change protocol follows. A message is displayed on the screen indicating that the system is ready to begin the supine portion of the postural change protocol. -
2.4.7 Postural Change Examination
The second sonographer or a trained assistant is called to help perform the Postural Changes Examination. If the participant has fallen asleep, s/he is gently awakened at this point and asked to stay awake for the rest of the examination. The sonographer now lightly removes excess conduction jelly from the carotid area (it is important that no pressure be exerted on the carotid area until after the Postural Change Exam). At the same time, the ultrasound assistant unclips the blood pressure tubing and heart rate monitor cords from the ultrasound table and moves the comfortable, lightweight arm-chair within easy reach (in case of participant intolerance of the postural change).
The computer program displays the elapsed time since the onset of the study. If less than 20 minutes have elapsed, the postural changes examination is delayed until 20 minutes elapsed time are displayed on the computer monitor. There is no upper limit on the time the participant may be in the recumbent position to be eligible for the postural changes examination. Meanwhile, the sonographer verifies that the digital read-out of the Dinamap console is in easy view to the sonographer.
The participant is politely reminded to refrain from talking until told that the examination is complete, and the sonographer instructs the participant on the supine-to-standing sequence. If the participant has reported orthostatic symptoms ("usually gets dizzy on standing up") the sonographer instructs the participant to pause in the seated position at the edge of the ultrasound table until the participant feels it is safe to stand. Otherwise, the participant is instructed to stand up quickly, safely, and in one smooth motion, as described below. These instructions are provided prior to the supine portion of the postural change exam. The sonographer also explains to the participant that s/he will be told when to stand up.
When the sonographer wishes to begin the supine portion of the postural change exam, s/he presses the Fl key on the computer key board. The screen is cleared, and replaced by a screen showing the participant's ID, the study number (a '1" indicating that this is the first part of the postural change examination); the elapsed time (in decimal minutes - that is, the system will count to 0.99, not 0:59, before going to one minute); the time the study is to run (2 minutes in this case); the number of heart beats and the maximum number of heart beats to be counted (in this case 9999, so that the length of the study will be terminated by time and not heart cycles); and statistics on the blood pressure and heart rate.
Once the Pl key is depressed, the heart rate is measured on a beat-to-beat basis, and the blood pressure determined as quickly as possible. With each beat of the heart and blood pressure determination, the statistics on the screen are updated. The statistics shown include the last measurement, the average measurement during this phase of the postural change protocol, and the minimum and maximum during this phase.
ARIC PROTOCOL 11. Sitting Blood Pressure and Postural Changes Version 1.1 7/1a/as

Page 20
The computer collects these data for two minutes , and then a message appears on the screen to indicate the end of the supine portion of the protocol. The system is now ready to collect the standing portion of the postural change examination.
The sonographer now positions the computer keyboard next to the ultrasound table. At this time the ultrasound assistant is standing at the foot of the ultrasound table and then moves to the participant's side when s/he moves from the sitting to standing position. The sonographer communicates with the assistant (preferably not verbally) that they are ready to proceed to the next phase of the exam. The sonographer places the ECG cable in the participant's hand and instructs him/her to hold it on standing up, then moves close to the pre-positioned keyboard and prompts the participant to stand up. "When I say go, I would like you to get up from the table quickly but safely, and stand next to the table. If you get dizzy or need to so for any other reason, you can lean against the table. ‘Go". As the participant begins to arise the sonographer depresses the F4 key once. This marks the onset of the second phase of the examination and sends the signal to the system to begin the measurements. As soon as the participant has reached the upright position the sonographer depresses the F5 key once, to mark "standing position attained" which records the duration of the standing up motion. Again the screen clears and is replaced by a screen similar to that of the supine phase of the study (the only difference is the STUDY field which now shows a 2, indicating the second phase of the postural change protocol). The program then collects data until the end of this phase.
While watching the participant for any signs of discomfort, the sonographer now asks the participant to bend the elbows and hold the hand supporting the heart rate harness with the other hand, in a comfortable and relaxed position. This prevents the cuff from sliding (by bending the elbow), distracts the participant, and places him/her in a standard and comfortable position.
The sonographer watches the participant's position relative to the ultrasound table: participants should not be touching the examination table, with both feet flat on the floor. If at any time the participant feels dizzy or uncomfortable s/he is instructed to lean against the table, and then helped into the chair.
If the participant is noted (or requests) to "flex" or wiggle his/her hand, this is permitted if it occurs immediately after the completion of a blood pressure determination, during the 2 to 3 second interval between the end of one cycle and the beginning of the next. This is helpful if the participant expresses discomfort due to venous congestion in the hand (a mild numbness or tingling), which occurs rarely.
If at any time during the 'L-minute standing data collection interval the participant does not tolerate the standing postion, the sonographer marks this -m on the participant's record by depressing the F8 key once, after the sonographer and the assistant help the participant to sit down in the pre-positioned armchair. The participant's arm with the blood pressure cuff is placed on the chair arm. The data collection is completed in the sitting position, and later so indicated on the computer screen.
When the postural change protocol is complete a new screen is displayed to be completed after the participant departs. The participant is instructed to sit
ARIC PROTOCOL 11. Sitting Blood Pressure and Postural Changes Version 1.1 7/1a/as

page 37
Appendix VII. Checklist for Observation of Postural Changes Examination
Sonographer Code # Observer Code #/Initials
Date Observed // - '(Month/Day/Year)
Instructions: Check each item on the line provided if that procedure is carried out correctly. If not, enter "no" on the line and provide an explanation in the space following that item, or at the end of the section. Items are presented in the sequence of the examination procedure, but may require confirmation before or after the examination.
A. The following items apply throughout the Postural Changes Exam (PCE):
Participant is kept warm, relaxed and comfortable.
The participant is discouraged from talking, except to voice discomfort or confusion about instructions.
Sonographer maintains a consistently calm, patient and reassuring disposition.
B. Procedures to be completed prior to receiving participant:
(Sonographer) prepares work station verifying that power is "on" for SFP, VCR, PC and Dinamap.
Verifies that a chair, blanket (and platform) are available.
Completes header information for next participant.
Determines which leg is to be used for ankle BP and popliteal study.
-l-
ARIC PROTOCOL 11. Sitting Blood Pressure and Postural Changes Version 1.1 7/ia/a8

page 38
C. Preparatory steps (prior to examination)
Provides participant with information on Ultrasound Station procedures. .
Offers the participant an opportunity to use rest room.
Determines whether participant might experience orthostatic hypotension (history of dizziness upon arising).
Verifies that all jewelry has been removed. Asks participant to remove shoes, and remove or roll down sock on appropriate foot.
Places HR monitor leads correctly. Verifies audio and visual signal.
Assists (if necessary) participant in assuming the prone position on exam table.
Applies regular adult cuff to appropriate ankle using a contour wrap.
Takes a manually-triggered BP and observes wrap and fit of cuff. If necessary, applies large adult cuff and takes an additional manually-triggered BP. (Explains that subsequent inflations will use lower pressure.)
D. Popliteal, Carotid and Distensibility Exams
[Completes popliteal scan here]
Waits until BP cuff is fully deflated after 3rd reading to remove gel from popliteal area.
Instructs and assists participant to move from prone to sitting position.
Applies appropriate BP cuff to upper arm.
Assists participant to supine position. (Places pillow under knees.)
Places HR leads, and Dinamap hose in participant's hand, unless they will remain in place out of participant's way when moving to the standing position.
- 2 -
ARIC PROTOCOL 11. Sitting Blood Pressure and Postural Changes Version 1.1 7/18/88

page 39
Verifies HR signal, checks lead placement and adjusts if necessary.
Takes a manually triggered BP, checking cuff wrap and fit.
[Completes carotid scan here]
[Completes distensibility study here]
E. Postural Changes Exam Procedures
Verifies that at least 20 minutes has elapsed.
Gives clear instructions before starting the supine portion of the PCE.
Reminds participant to hold HR cables, and continue to hold them while standing to prevent detachment. If participant does not hold cables, verifies that they will not interfere with the postural change.
Moves PC keyboard close to exam table before postural change, unless an assistant is available.
Presses "Fl" to start study.
As soon as possible after supine study is complete, instructs participant to stand.
Presses F4 as participant starts to move to the standing position.
Presses F5 as participant's feet hit the floor.
Stays close to participant while participant moves to standing position.
If BP cuff slips upon deflation, repositions cuff and instructs/assists participant to bend elbow and gently clasp hands loosely.
Verifies that participant is tolerating challenge well. If any doubt exists, instructs/assists participant to lean on exam table, or to sit in chair if necessary. Presses F8 at end of study if participant did not complete the study in free-standing position.
- 3 -
ARIC PROTOCOL 11. Sitting Blood Pressure and Postural Changes Version 1.1 7118188

page 40
Removes cuff and HR leads.
Instructs/assists participant to sit once standing portion is completed.
Completes final screen. Notes specific problems or deviations from protocol.
Record the date of the last 4 Dinamap calibrations (Month/Day/Year):
Record alarm settings on Dinamap -(DJ=) (SW
Special Comments:
-4-
ARIC PROTOCOL 11. Sitting Blood Pressure and Postural Changes Version 1.1 7118188

MEMORANDUM
To: Kay Paton From: Gerard0 Heiss Date: July 20, 1988 . Re: Replacement Pages for ARIC Manual 11
The following are changes made to Version 1.0 of ARIC Manual 11.
Page 5
Page 12
Page 14
Page 15
Page 16
Page 17
Page 17 & 18
Page 19
Page 20
Appendix VII
Under #8: Step 5 was changed to step 7.
Under 2.3 Equipment and Environment, paragraph 3: Added "(3) as the participant starts to move to the standing position", and renumbered rest of listing.
First paragraph: In the first sentence, "then makes" was changed to "should make". In the second sentence "A platform is placed" was changed to "A platform can be placed". In the third sentence, "platform are 48 in. length" was changed to "platform should be 48 in. length".
Third paragraph, second sentence: deleted "or Small Adult".
Added the last sentence of the last paragraph that begins, "If upon inflation the cuff rolls down...".
Deleted the last sentence of the first paragraph that begins, "If in doubt, the sonographer measures...".
Replaced the first three paragraphs in section 2.4.4
Third paragraph of section 2.4.7, second sentence now reads: If the participant has reported orthostat1c symptoms ("usually gets dizzy on standing up") the sonographer instructs the participant to pause in the seated position at the edge of the ultrasound table until the participant feels it is safe to stand.
Paragraph 6: removed the coma (,) after interval and changed the word "while" to "after" in the first sentence.
Checklist for Observation of Postural Changes Examination has been replaced with a new version.

THE UNIVERSITY OF NORTH CAROLINA AT
CHAPEL HILL
ollaborative Studies Coordinating Center Department of Biostatistics
School of Public Health
TO:
FROM:
DATE:
SUBJECT:
CB# 8030. Suite 203, NCNB Plaza The University of North Carolina at Chapel Hill Chapel Hill, NC. 275144145
ARIC Principal Investigators, Study and Data Coordinators
ARIC Coordinating Center
April 4, 1989
Replacement Pages for ARIC Manual 11, Version 1.2
For the above named manual, please replace the title page and the page(s) which are listed on the Revision Log with the enclosed material. Following the instructions in the Revision Log, remove the outdated page(s) in your current manual, file it (them) for future reference, and insert the enclosed pages. To assist you in keeping a permanent record of all procedural changes that are implemented during the study, the footer of each page in the manual is updated to reflect the date the Steering Committee approved the revision and the manual's new version number.
Instructions:
Replace pages 11-22 in Version 1.0 with pages 11-22 in Version 1.1.
Section 2.2, page 12, paragraph 2, line 3: . . . approximately 20 minutes of - comfortable . . .
Section 2.3, page 12. The last two sentences on page 12 (which extends onto the first line of page 13) are replaced with a paragraph beginning, "The ultrasound table . ..". which is now located on page 13.
Section 2.4, page 14. The investigation of the tendency to get dizzy has been revised to read . ..asking the participant "DO you tend to get dizzy when you stand up quickly?"
Section 2.4.1.1, page 14. The last sentence in the section's first paragraph has been revised to read "A small, quiet, battery-powered shaver or scissors may be used for minimal shaving or to clip excess hair to make the application of electrodes easier."
Section 2.4.1.1, page 14. The first sentence of the section's second to last paragraph is revised to read, 'The three heart rate monitor lead wires all course inferiorly at the opposite side of . ..'
Section 2.4.1.1, page 14. The last sentence of the section's last paragraph was deleted.
Section 2.4.1.3, page 15. The text after the first sentence of the second paragraph and Table 4 are deleted except for the following. A regular adult cuff is used. If the participant's ankle is very large and/or strongly tapered, a larger cuff may be necessary.
Section 2.4.2, page 16. The first sentence of the first paragraph is revised to read, "The sonographer now verifies that the participant's . ..'
Section 2.4.2, page 17. The last sentence of the first paragraph is deleted.
Section 2.4.2, page 17. The first sentence of the third paragraph is revised to read 'The sonographer then turns the recorder on and presses the Y key for yes on the . .."
Section 2.4.3, page 17. The first sentence of the third paragraph is revised to read "The ankle blood pressure cuff is now removed and the clips or tape used to hold the tubing in proper position during the exam are removed.
Section 2.4.4, page 17 and 18. The section's first three paragraphs are replaced with new text.
Section 2.4.6, page 17 and 18. Except for the first sentence, the text in the section is new.
Section 2.4.7, page 18. The first sentence of the first paragraph is deleted. The last sentence of that paragraph is revised to read "The sonographer makes sure the arm chair is within reach (in case of participant intolerance of the postural change).
Section 2.4.7, page 18. New instructions for postural change are inserted after the section's third paragraph.
Section 2.4.7, page 19. ,The first 6 sentences of the second paragraph (the 4th paragraph in the revised text) are replaced by "The sonographer says 'that's over'."
Section 2.4.7, page 19. The first sentence of the 3rd paragraph (the 5th paragraph in the revised text) is revised to read, " The sonographer stands close to the participant while watching for any signs of discomfort. The sonographer . .."
Section 2.4.7, page 21. The third sentence in the first complete paragraph (the 3rd paragraph in the revised text) is revised to read "The armchair is repositioned out of the way if necessary, and the wires and . ..'

Page 11 __
2. POSTURAL CHANGES IN BLOOD PRESSURE AND HEART RATE
2.1 Background
Sitting blood pressure measured at the arm is one of the strongest and best established risk factors for subsequent cardiovascular and cerebrovascular morbidity and mortality. There is some evidence now that blood pressure readings from other body locations and in other body positions can have additional value in predicting cardiovascular risk. Thus, study of these blood pressure measurements may improve our understanding of pathogenic processes and our ability to identify high risk populations.
There is evidence that blood pressure monitoring of individuals as they chancre position in a controlled clinic setting is safe, relatively simple, and can yield useful information about the body's response to a constant, "readily available" physiologic stressor -- gravity. Simple measurements of postural change in diastolic blood pressure have been found to be predictive of myocardial infarction after 8 l/2 years of follow-up. Supine systolic arm blood pressure alone and the supine-sitting systolic arm blood pressure difference were both independently associated with improved prediction of subsequent development of hypertension.
The ARIC Study includes a mild Postural Change Examination of heart rate and blood pressure in its baseline examination. This adds a dynamic component to the measurements of static blood pressure in several body locations and positions (arm sitting, supine, and standing; ankle prone). Further, the prolonged rest period afforded by the ultrasound examination (during which arm blood pressure readings are taken by an automated procedure) provides an opportunity to approximate a basal supine blood pressure measurement.
Participant safety has priority during the Postural Change Examination. Safety precautions in the protocol include identifying participants who may have experienced orthostatic hypotension, and users of medications that may induce hypotension on standing up; instructions given by the sonographers to participants on how to stand up; and, instructions to sonographers on detecting and responding to symptoms of hypotension. The data on postural change are collected in the normal course of getting the participant up from the examination table at completion of the ultrasound examination.
2.2 Introduction
At the ultrasound work station, B-Mode scanning, measurement of arterial distensibility, and the measurements of postural change are integrated into a single procedure. They are executed by ARIC sonographers trained and certified in each of these components. The measurements share the equipment of the ultrasound work station. A dedicated microcomputer coordinates the administration of the examination and collects all data. Measurements at the
ARIC PROTOCOL 11. Sitting Blood Pressure and Postural Changes Version 1.2 L/S9

Page 12
ultrasound work station are described in two separate manuals: Sitting Blood Pressure and Postural Changes in Blood Pressure and Heart Rate in this manual (Manual 11); and Ultrasound B-Mode, Doppler, and Arterial Distensibility Measurements in Manual 6. While the participant is recumbent on the examination table, baseline measurements of blood pressure and heart rate are taken during the ultrasound examination. Immediately after the participant stands up, additional heart rate and blood pressure measurements are recorded to assess the cardiovascular response to the change in posture. Baseline prone lower extremity and supine upper extremity blood pressure readings are taken in conjunction with the popliteal and carotid ultrasound examinations, respectively. The latter are obtained before and after the carotid arterial distensibilty measurement.
The measurement of postural changes in blood pressure and heart rate is the final examination at the ultrasound work station, so that each participant has approximately 20 minutes of comfortable rest during the ultrasound and arterial distensibility studies. It is .important that the participant be kept warm, relaxed and quiet, so that valid baseline blood pressure determinations can be obtained.
2.3 Equipment and Environment
The measurements of heart rate and blood pressure described in this section require a Dinamap-SX automated oscillometric machine, a dedicated microcomputer with software support, a continuous heart rate monitor, and the study flow panel described in Manual 6. Prior to the examination, the equipment and the sequence of procedures are explained to the participant.
The ultrasound work station measurements are driven by the Ultrasound Program, as detailed in Appendix I to Manual 6. This PC-based program controls leg artery randomization, collects various data during the study, and assists the sonographer in performing the ultrasound and postural change measurements. The data collected by the program consist of: (1) demographic and descriptive data on the participant, (2) study codes and times for steps of the measurement protocol as they are performed, (3) blood pressures recorded periodically during the ultrasound exam, (4) arterial distensibility data, and (5) heart rate and blood pressure data during the postural change study.
The sonographer interacts with the computer: (1) during the completion of an initial questionnaire screen, (2) at the beginning of the postural change examination, (3) as the participant starts to move to the standing position, (4) at the time the participant's feet touch the floor during the postural change, and (5) at the completion of the study. The computer program controls communications with the study flow panel (SFP), both receiving instructions from the SFP to determine when to take blood pressures, and sending instructions to the SFP to control randomization.
The ultrasound table is padded and at least 30 inches wide to allow upper extremity relaxation for the arm blood pressure measurements. The table is 30 (+/- 2) inches from the floor to maximize ease of transition from the lying to standing position, and to standardize this motion. A comfortable arm chair is
ARIC PROTOCOL 11. Sitting Blood Pressure and Postural Changes Version 1.2 l/S9

Page 13
within reach of the table to insure safety for the standing portion of postural change.
The participant's arm is used to stabilize the Dinamap tubing on the table. The heart rate monitor wires are placed in the participant's hand, to avoid any spurious beats caused by movement of the heart rate cables or electrodes. A blanket is available for use if the participant feels cold. If this were to occur, it would be most likely while the participant is immobile during the carotid scanning. For the same reasons, a carpet or an area rug is placed on the floor under the examination table to prevent inadvertent cold discomfort for the participant upon standing for the dynamic blood pressure sequence. The sonographer maintains the floor area free of obstruction, so that participants can stand comfortably about 18 inches from the table.
Before each phase of the examination, the sonographer describes the key aspects of the examination to the participant. Since anxiety and concern influence blood pressure determinations, the sonographer maintains a consistently calm, patient, and reassuring disposition. If a participant inquires about his/her blood pressure or heart rate in the course of the exam, the sonographer politely indicates that s/he must withhold specific information about the blood pressure and heart rate until after the examination. Persistent talking and/or signs of anxiety are noted in a Problem Log immediately after the participant leaves the work station.
The participant is made as physically comfortable as possible. He/she is encouraged throughout the examination to voice any discomfort. Attention is paid by the sonographer to the room temperature (to be maintained around 70 degrees), and to musculoskeletal, cardiac, or respiratory discomforts, in particular othopnea. Either hospital gowns, shoulder-seam snap or disposable paper gowns are available at the work station, so that the sonographer can offer these to obese participants as an alternative to the scrub suit. Maximal relaxation of the participant is a primary objective.
2.4 Measurement Procedures
2.4.1 Preparing the Work Station and the Participant
Before the participant arrives at the work station the sonographer verifies that the SFP, the Video Casette Recorders, the microcomputer, and the Dinamap are turned on. The ultrasound program is then activated by typing "US" (upper or lower case), and the system responds by displaying the preliminary questionnaire screen. The sonographer completes the header information of this screen and participant identification. At this time the sonographer also determines whether the right or left lower extremity will be examined from the information displayed on the screen.
When the participant arrives at the ultrasound station, the work station equipment and procedures are described, as indicated earlier. Although the participant is already wearing a scrub suit, the sonographer makes a quick check to verify that all jewelry has been removed from the neck area. All participants are then advised to use the bathroom, since the examination
ARIC PROTOCOL 11. Sitting Blood Pressure and Postural Changes Version 1.2 l/89

Page 14
extends over 45 minutes, uninterrupted. During training sonographers are made aware that either bladder or rectal distention discomfort can influence blood pressure and/or induce pre-syncope. The participant is instructed (and assisted if necessary) to remove his/her shoes, and the sock or stocking of the leg to be examined, unless the room is cool.
The sonographer should make any needed adjustments to avoid a physical "jolt" later when the participant stands up for the postural change sequence (when sitting on the ultrasound table the participant's heels should be no more than four inches above the floor). A platform can be placed in front of the ultrasound table in the case of persons of short stature. The dimensions of this platform should be 48 in. length, 36 in. width, and 4 in. height. The sonographer now completes the "pre-info" screen by asking the participant "DO you tend to get dizzy when you stand up quickly?". If potential orthostatic symptoms are suspected, the sonographer instructs the participant at the appropriate time to get up only as quickly as the participant feels is safe, pausing in the seated positionif necessary.
2.4.1.1 Applying the Heart Rate Leads
Before applying the heart rate monitor leads on the participant's lower chest and abdomen, the sonographer makes sure that his/her hands are warm to avoid a "cold" temperature aversive stimulus (rubbing them together usually suffices). A check for satisfactory hand temperature can be made by touching the back of the hand to the participant's upper arm. Local body hair shaving for heart rate monitor lead placement is not done unless, in the sonographer's judgement, undue discomfort will occur when the lead is removed. A small, quiet, battery-powered shaver or scissors may be used for minimal shaving or to clip excess hair to make the application of electrodes easier.
The 3 self-adherent chest lead patches, to which the 3 heart rate monitor wires connect (snap-on), are placed as follows:
White (RA): Midline upper epigastrium just below the xiphoid process;
Green (RL): Midline lower epigastrium just above the umbilicus; and,
Black (LA): Left sub-Costa1 area in the mid-axillary line.
These can be applied without removing the scrub suit shirt by sliding the bottom edge of the shirt up for lower lateral chest and upper abdominal access.
The three heart rate monitor lead wires all course inferiorly at the opposite side of the participant on which the arm blood pressure cuff will be applied for the measurements of Postural Changes.
2.4.1.2 Moving the Participant to the Prone Position
Now the participant is ready to be assisted in moving to the prone position on the ultrasound table. In instructing the participant the sonographer can demonstrate the proper position on the table, and how to hold the heart rate
ARIC PROTOCOL 11. Sitting Blood Pressure and Postural Changes Version 1.2 l/89

Page 15
cable while assuming this position. As the participant does this, attention is focussed on two items:
(1) since the ultrasound table has no guard rails, the sonographer stands near the table to make sure that the participant does not get too close to the edge;
(2) the participant's feet should extend slightly past the end of the ultrasound table so that they are able to hang comfortably with the leg and foot muscles relaxed.
Once the participant is in the prone position, he/she is offered some information to help determine the most comfortable position for his/her arms. The recommended uosition is for the arms to be relaxed at the participant's side, and an optional thin pillow under the head only. On the other hand, some participants may request to position their arms overhead and use one or more pillows under the shoulders, chest, and/or head. In this case, if the participant does not accept a polite suggestion of the recommended positions, then attention must be paid to possible shoulder "hvoerabduction svndrome" symptoms (distal upper extremity tingling and numbness). At this time the sonographer questions the participant for any prior history of such symptoms. If positive, the participant must use the "arms-at-the-side" position. It is likely that during the popliteal ultrasound study some participants who choose to "hug" a pillow or two under their upper body and head will develop these symptoms and become restless. During training the sonographers are made aware of the potential for unwanted adrenergic side effects, which could cause invalid determinations. In general, participants are asked not to change position once an ultrasound exam sequence has begun.
2.4.1.3 Applying the Blood Pressure Cuff
As is the case with sitting blood pressure, careful attention is given to the selection of the appropriate cuff size and the cuffing technique. The cuff size used for the sitting blood pressure measurements, recorded on the Itinerary Form, is used in selecting the size of the Dinamap cuff for the upper extremity. At each field center sonographers are trained by the sitting blood pressure certifier/trainer in the technique for applying the Dinamap blood pressure cuff to the upper extremity. Because of this, greater attention is given in this manual to the lower extremity as regards selection and application of the blood pressure cuff.
The ankle blood pressure cuff is applied on the lower extremity selected for the popliteal scan (socks or stockings have been removed, or moved below the ankle to keep the participant's foot and/or toes warm if the room is cool). A regular adult cuff is used. If the participant's ankle is very large and/or strongly tapered, a larger cuff may be necessary.
At this point, a Dinamap blood pressure cuff is applied above the ankle of the selected leg, as shown in Figure 1. Place the cuff flat on the table (the surface marked "side to the patient" face up) with the appropriate ankle centered on the cuff. At this time disregard the "over the artery" marker. The lower edge of the cuff (from which the hoses extend) should be approximately 2-2 l/2 inches above the medial malleolus. Following the contour of the lower leg, wrap the end of the cuff with the velcro "fabric" over the
ARIC PROTOCOL 11. Sitting Blood Pressure and Postural Changes Version 1.2 l/89

Page 16
ankle, as shown in Figure 2. Note that depending on the degree of tapering in this area, the cuff corner will be offset from parallel toward the knee. Holding the cuff from sliding, wrap the other end over the ankle (step III in Figure 2), again following the contour of the ankle, and secure the velcro. Check to be sure that the corners of the cuff extending above.the upper edge of the cuff are about equal: if one end extends more than the other, loosen the velcro and adjust the wrap. Next, locate the "over the artery" marker of the cuff, and rotate the cuff so that this line is directly over the posterior tibia1 artery. The cuff may be rotated more easily by sliding it toward the malleolus, and after alignment, the cuff can be made snug by pulling it up toward the calf. The cuff should conform closely to the shape of the ankle, with the lower edge 2-2 l/2 inches above the malleolus.
The posterior tibia1 artery is usually palpated as it courses posteriorly to the medial malleolus. Even if the posterior tibia1 pulse is not palpable, the posterior tibia1 artery is used as the location for the marker line on the cuff for the "over the artery position". Any kinks in the tubing are removed, and any "tugging" of the tubing on the participant's leg is relieved. Masking tape or hospital clips are applied at this time to anchor the tubing to the ultrasound table to maintain this position.
2.4.2 Lower Extremity Blood Pressure and Heart Rate Measurements
The sonographer now verifies that the participant's heart rate is properly received by the SFP as indicated by the monitor light and the audible signal. The volume is adjusted so that the sonographer will detect if the electrodes or cable become detached, while preventing the beep tones from becoming an irritation to the participant. The system is in calibration mode and the sonographer then sets the SFP to START STUDY.
At this time the Dinamap, which is keot in Manual Mode at all times, is triggered manually to obtain a single blood pressure measurement to verify proper operation of the equipment and adequate wrapping of the cuff. While this happens the sonographer describes to the participant what s/he can expect to feel and that repeated blood pressure measurements will be obtained automatically. The participant is advised that the first inflation is always somewhat uncomfortable due to lack of "individualized" adjustment by the machine to that particular person's blood pressure. Subsequent readings are at a lower pressure and much less uncomfortable. If an adequate systolic blood pressure measurement is not obtained at the ankle, the sonographer verifies that the cuff has been wrapped appropriately and has not slipped. If upon inflation the cuff rolls down toward the foot, the cuff should be reapplied more snugly. If the cuff unwraps upon inflation, a larger cuff may be substituted. If a cuff is rewrapped or changed, an additional manually-triggered BP is taken.
The sonographer observes the participant for a tendency to "stretch" the calf or wiggle the foot during the blood pressure reading. If it occurs, this is discussed with the participant before the ultrasound scan is started. The sonographer stresses the need for the leg and arm to be kept still during the blood pressure readings. Discomfort during the blood pressure measurement may
ARIC PROTOCOL 11. Sitting Blood Pressure and Postural Changes Version 1.2 l/89

Page 17
indicate that the ankle cuff has been applied too tight, not applied smoothly, or that it is too narrow.
Before activating the next phase of the study, the sonographer takes a minute to instruct the participant on the "no conversation" rule, Also, the participant is reminded to "hold questions" about exam results until after the last portion of the ultrasound station exam is completed, since it is important that all participants be "treated the same way".
The sonographer then turns the recorder on and presses the Y key for yes on the computer keyboard, and proceeds to calibrate the system. Upon completion of the calibration the foot switch is depressed for the duration of 5 to 7 cardiac cycles. When this occurs the computer automatically takes and records a blood pressure.
2.4.3 Lower Extremity Ultrasound Scan
The participant is now ready for the popliteal ultrasound scan to begin (see Manual 6). The preparatory scan of the leg is performed, and the artery located and placed so as to record the image. The foot switch is depressed and held for five to seven seconds, providing the instruction to the equipment to record the image.
Fifteen seconds after this depression of the foot switch the system automatically takes the blood pressure again. Note that this provides a blood pressure measurement before and after the popliteal scan. The sonographer does not advance the Studv Flow Panel until this second blood pressure is taken.
The ankle blood pressure cuff is now removed and the clips or tape used to hold the tubing in proper position during the exam are removed. When indicated, a blanket is used to keep the participant's lower extremities warm during the carotid scan.
2.4.4 Upper Extremity Blood Pressure and Heart Rate
The sonographer assists the participant in moving from the prone to the seated position. The sonographer now applies the blood pressure cuff over the brachial artery according to the instructions found in the Sitting Blood Pressure section of this manual. By consulting the participant's Itinerary Form, the sonographer 'verifies that the same arm and the same cuff size are used as for the sitting blood pressure readings. The sonographer also verifies comfortable cuff fit: the wrap of the Dinamap cuff should be less "snug" than the cuff fit used for the sitting blood pressure measurements. If unsure about proper cuff size, the sonographer measures the participant's arm circumference and determines the appropriate cuff size from Table 1. The participant is told that the cuff will inflate automatically every five minutes while the sonographer scans the neck.
Next, the participant is assisted to the supine position. In particular, two precautions are observed during this motion: a) the sonographer holds the heart rate cable as the participant turns, and b) the sonographer guards the edge of the ultrasound table to keep the participant from rolling off
ARIC PROTOCOL 11. Sitting Blood Pressure and Postural Changes Version 1.2 l/89

Page 18
accidentally. The sonographer then helps the participant to slide toward the "head" end of the untrasound table. The top of the participant's head is positioned at least 4 inches from the end of the table, to avoid hyperextension of the neck and for easiest access to the carotid area with the transducer. A pillow is placed under the participant's knees, to reduce stress on his/her lower back.
The sonographer checks the heart rate monitor wires and chest lead patches to verify that they are connected properly, and the signal is received by the SFP. The cuff tubing is stabilized by the participant's right arm. The heart rate cable is placed in the participant's left hand. The participant is told to hold lightly to the cable. This is done to insure there are not any spurious heart rate beats due to movement of the cable. As for the ankle blood pressure, a manually-triggered blood pressure is now obtained (which is not recorded by the system) to verify adequate cuff inflation and positioning. Questions about the upper extremity blood pressure determinations are solicited and answered at this point.
The Study Flow Panel display now indicates that the next scan is the right side, optimal angle, common carotid, B-mode study. The computer remains inactive until the foot switch is depressed, to indicate that the sonographer has performed the initial scan to locate structures, found the common carotid, and placed the best image on the screen.
When the sonographer presses the foot switch indicating the beginning of the scan in the neck, the system takes the first arm blood pressure automatically. The computer program now enters an automatic phase during which it continues to take blood pressure measurements every five minutes. Since the system is "unaware" of the status of the ultrasound exam, these blood pressure determinations occur at different phases of the scan.
2.4.5 Carotid Ultrasound Scan
The every-five-minute blood pressure phase of the computer continues as the sonographer collects carotid artery data according to the scanning protocol, until the last scan of the ultrasound protocol is reached. After indicating that this step is complete by pressing the foot switch, the sonographer waits until the system completes the automatic every-five-minute phase of blood pressure determinations by taking a blood pressure measurement. The arterial distensibility study is then performed according the scanning protocol.
2.4.6 Carotid Arterial Distensibility
The sonographer prepares to collect the arterial distensibility data, and when ready depresses the foot switch. A message appears on the screen asking the sonographer to press Fl to bypass distensibility or press any key to begin collecting data. After pressing any key, the message "In ADC loop' appears on the screen. Once 12 seconds has passed and/or adequate data has been collected, the footswitch is pressed to end data acquisition. A message appears "press Y to repeat study". If adequate data has been obtained, the sonographer presses any key to end distensibility. After the recording to complete, the system will perform a blood pressure.
ARIC PROTOCOL 11. Sitting Blood Pressure and Postural Changes Version 1.2 l/89

Page 19
At this point, the ultrasound portion of the protocol is complete and the postural change protocol follows. A message is displayed on the screen indicating that the system is ready to begin the supine portion of the postural change protocol, and a clock stating length of time since study began.
2.4.7 Postural Change Examination
If the participant has fallen asleep, s/he is gently awakened at this point and asked to stay awake for the rest of the examination. The sonographer now lizhtlv removes excess conduction jelly from the carotid area (it is important that no pressure be exerted on the carotid area until after the Postural Change Exam). The sonographer makes sure the arm chair is within reach (in case of participant intolerance of the postural change).
The computer program displays the elaDsed time since the onset of the study. If less than 20 minutes have elapsed, the postural changes examination is delayed until 20 minutes elapsed time are displayed on the computer monitor. There is no upper limit on the time the participant may be in the recumbent position to be eligible for the postural changes examination. Meanwhile, the sonographer verifies that the digital read-out of the Dinamap console is in easy view to the sonographer.
The participant is politely reminded to refrain from talking until told that the examination is complete, and the sonographer instructs the participant on the supine-to-standing sequence. If the participant has reported orthostatic symptoms ("usually gets dizzy on standing up") the sonographer instructs the participant to pause in the seated position at the edge of the ultrasound table until the participant feels it is safe to stand. Otherwise, the participant is instructed to stand up quickly, safely, and in one smooth motion, as described below. These instructions are provided prior to the supine portion of the postural change exam. The sonographer also explains to the participant that s/he will be told when to stand up.
Postural Chance Instructions
"We are now going to do a two-minute resting blood pressure study, and a two-minute standing blood pressure study. We will do the resting BP first. The automatic blood pressure machine will take your blood pressure several times during the two-minute period. I will not talk to you during this time so it will be as if you are resting in your bed. After the two-minute period is over, I will say "that's over". I will walk over to you and remove the pillow under your knees. Then I will return to my computer and say a. When I say g, I want you to get up off the table as quickly and safely as you can and stand facing the wall. Once your feet touch the floor, the automatic blood pressure machine will start taking your blood pressure while you are standing for two minutes. If you feel dizzy when you get up, lean back against the table. If you do not feel dizzy, stand away from the table. Please continue to hold on to the heart rate cable when you get up so the electrodes do not pull off." If necessary, the sonographer repeats the instructions to insure the participant understands the sequence. The sonographer then says "we will start you resting BP study now".
ARIC PROTOCOL 11. Sitting Blood Pressure and Postural Changes Version 1.2 l/89

Page 20
When the sonographer wishes to begin the supine portion of the postural change exam, s/he presses the Fl key on the computer key board. The screen is cleared, and replaced by a screen showing the participant's ID, the study number (a "1" indicating that this is the first part of the postural change examination); the elapsed time (in decimal minutes - that is;the system will count to 0.99, not 0:59, before going to one minute); the time the study is to run (2 minutes in this case); the number of heart beats and the maximum number of heart beats to be counted (in this case 9999, so that the length of the study will be terminated by time and not heart cycles); and statistics on the blood pressure and heart rate.
Once the Fl key is depressed, the heart rate is measured on a beat-to-beat basis, and the blood pressure determined as quickly as possible. With each beat of the heart and blood pressure determination, the statistics on the screen are updated. The statistics shown include the last measurement, the average measurement during this phase of the postural change protocol, and the minimum and maximum during this. phase.
The computer collects these data for two minutes, and then a message appears on the screen to indicate the end of the supine portion of the protocol. The system is now ready to collect the standing portion of the postural change examination.
The sonographer says "that's over". Goes to remove the pillow and says "go" to the participant. As the participant begins to arise the sonographer depresses the F4 key once. This marks the onset of the second phase of the examination and sends the signal to the system to begin the measurements. As soon as the participant has reached the upright position the sonographer depresses the F5 key once, to mark "standing position attained" which records the duration of the standing up motion. Again the screen clears and is replaced by a screen similar to that of the supine phase of the study (the only difference is the STUDY field which now shows a 2, indicating the second phase of the postural change protocol). The program then collects data until the end of this phase.
The sonographer stands close to the participant, while watching for any signs of discomfort. The sonographer now asks the participant to bend the elbows and hold the hand supporting the heart rate harness with the other hand, in a comfortable and relaxed position. This prevents the cuff from sliding (by bending the elbow), distracts the participant, and places him/her in a standard and comfortable position.
The sonographer watches the participant's position relative to the ultrasound table: participants should not be touching the examination table, with both feet flat on the floor. If at any time the participant feels dizzy or uncomfortable s/he is instructed to lean against the table, and then helped into the chair.
If the participant is noted (or requests) to "flex" or wiggle his/her hand, this is permitted if it occurs immediatelv after the completion of a blood pressure determination, during the 2 to 3 second interval between the end of one cycle and the beginning of the next. This is helpful if the participant expresses discomfort due to venous congestion in the hand (a mild numbness or
ARIC PROTOCOL 11. Sitting Blood Pressure and Postural Changes Version 1.2 l/89

Page 21
tingling), which occurs rarely.
If at any time during the i-minute standing data collection interval the participant does n& tolerate.the standing postion, the sonographer marks this on the par*Lcipant's: record by depressing the F8 key once, after the sonographer and the assistant help the participant to sit down in the pre-positioned armchair. The participant's arm with the blood pressure cuff is placed on the chair arm. The data collection is completed in the sitting position, and later so indicated on the computer screen.
When the postural change protocol is complete a new screen is displayed to be comple‘ted after the: participant departs. The participant is instructed to sit in the adjacent chalir after the final Dinamap reading. The sonographer checks with the participant that s/he feels well. If the participant is not feeling well, s/he is positioned supineton the ultrasound table, the blood pressure is checked on-the Dinamap, and the PA, nurse practitioner, or physician is contacted.
The sonographer now removes all conduction jelly. Socks and a robe or other garments .are now replaced and the participant is escorted to the next work station. The armchair is repositioned out of the way, if necessary, and the wires and tubing are placed safely by the computer console. Finally, the sonographer completes the last data entry screen, the processing for the ultrasound station participant diskette, and the examination Checklist (see Manual 6).
2.5. Quality Control
Quality assurance for the postural change examination data is based on four , main components: (1) Sonographer training and certification; (2) Equipment
calibration and maintenance; (3) Quality analysis of study data; and (4), Monitoring by the Ultrasound Reading Center (URC) and the Coordinating Center (CC) *
-... SotiograDher Trainink and Certification. All ARIC sonographers are trained and .,- certified by the URC. ., -. Periodic irecertification takes place according to a schedule. heterminedby the:URC. ;Sonographers whose data exhibit, quality problems are required to take 'additional training, and may be required to complete recertification steps,.. .: .,
Y , EpuiDment Calibratii'n and Maintenance. is the responsibility of.:the :$onggrapher.
Maintenance of the Dinhap equipment
-i ;onog.fapher, A maintenance log is kept by the with a:*record..ofth:e maintenance schedule and any equipment
!: performance problems. . .- Eksis ) ..- Calibration of the Dinamap is checked on a monthly or when there is doubt about the validity of the pressure readings. The
calibration checks specified below are performed monthly by the sonographer, and-a record is keptzzin the mgix$enance log. : .
., j. I Ca1ibration'check.s are performed:with the calibration kit supplied with the unit, kept .free of moisture. and.particulate matter. A mercury manometer is connected' to the Monitor'.using the parts supplied with the calibration kit, as
ARIC PROTOCOL 11. Sitting Blood Pressure and Postural Changes Version 1.2 l/89

Page 22
shown in Figure 6-l of the Dinamap Operation Manual. An adult cuff and 12-foot hose are used in the calibration procedure. To start the calibration check press and hold the SET switch while pressing the POWER ON switch. Flashing 88s in CYCLE MINUTES display confirms that calibration mode has been entered. The unit will turn on, will light the CUFF indicator, and will display cuff pressure in the MAP display.
Using the inflation bulb, manually pump up the pressure to 200 mmHg as indicated by the mercury manometer and close pneumatic release valve on manometer bulb. Verify that the pressure indicated by the mercury manometer does not change more than 12 mmhg in 60 seconds for all cuff and hose combinations. If the leakdown is greater than.12 mmHg in 60 seconds, check cuff and hose junctions and rubber "0" rings for cracks, tears, or breaks. If no cuff or hose leaks are found, refer to qualified service personnel. Next, verify that the MAP display indicated the correct pressure at the following pressure levels, as shown in Table 5.
Table 5. Calibration check pressure levels
MANOMETER INDICATED PRESSURE LEVEL MAP DISPLAY
200 Imdig 2oommHg+5mmHg 150 mInHg 15ommHg+4mmHg 100 mmHg lOOmmHg+4mmHg
50 lllmg 5ommHg+4mmHg omm% ommHg+1mmHg-OmmHg
If the indicated pressures are not within tolerance, the Monitor is calibrated by qualified service personnel.
Pump up the manometer slowly to avoid pressure spikes and, as pressure increases between 305 mtnHg and 320 mmHg, verify,that the Monitor briefly blanks the displays, opens the deflate valves, and then Issues an 800 alarm. If the overpressure point is not within tolerance (310 mmHg + lo/-5 mmHg), the overpressure switch needs to be adjusted by service personnel.
Qualitv Analvsis of Studv Data. Quality analysis of the postural change examination data is performed by the CC, as part of the routine quality assurance procedures. During this process, study-.data are examined by field center and by sonographer code. Outlying values and systematic patterns in the data are reported to the URC for corrective action. URC personnel work with the pertinent sonographer(s) to establish the cause of the data quality problem and institute corrections.
Monitorine Visits. Monitoring visits by URC and CC personnel are part of the ARIC quality assurance program, which includes observation of the postural change examination performed by each sonographer..e Since repeat examinations on a participant are not practical, these visits serve to document adherence to protocol at the different field centers, and over time.
ARIC PROTOCOL 11. Sitting Blood Pressure and Po!+ral Changes Version 1.2 l/89