Embed Size (px)
Citation preview

SummaryAtmel's SAM4L series is a member of a family of Flash microcontrollers basedon the high performance 32-bit ARM Cortex-M4 RISC processor running at fre-quencies up to 48MHz.
The SAM4L series embeds state-of-the-art picoPower technology for ultra-lowpower consumption. Combined power control techniques are used to bringactive current consumption down to 90µA/MHz. The device allows a wide rangeof options between functionality and power consumption, giving the user theability to reach the lowest possible power consumption with the feature setrequired for the application. The WAIT and RETENTION modes provide full logicand RAM retention, associated with fast wake-up capability (<1.5µs) and a verylow consumption of, respectively, 3 µA and 1.5 µA. In addition, WAIT mode sup-ports SleepWalking features. In BACKUP mode, CPU, peripherals and RAM arepowered off and, while consuming less than 0.9µA with external interrupt wake-up supported.
The SAM4L series offers a wide range of peripherals such as segment LCD con-troller, embedded hardware capacitive touch (QTouch), USB device & embeddedhost, 128-bit AES and audio interfaces in addition to high speed serial peripher-als such as USART, SPI and I2C. Additionally the Peripheral Event System andSleepWalking allows the peripherals to communicate directly with each otherand make intelligent decisions and decide to wake-up the system on a qualifiedevents on a peripheral level; such as I2C address match or and ADC threshold.
Features• Core
– ARM® CortexTM-M4 running at up to 48MHz– Memory Protection Unit (MPU)– Thumb®-2 instruction set
• picoPower® Technology for Ultra-low Power Consumption– Active mode downto 90µA/MHz with configurable voltage scaling– High performance and efficiency: 28 coremark/mA– Wait mode downto 3µA with fast wake-up time (<1.5µs) supporting SleepWalking– Full RAM and Logic Retention mode downto 1.5µA with fast wake-up time (<1.5µs)– Ultra low power Backup mode with/without RTC downto 1,5/0.9µA
• Memories– From 128 to 512Kbytes embedded Flash, 64-bit wide access,
• 0 wait-state capability up to 24MHz– up to 64Kbytes embedded SRAM
• System Functions– Embedded voltage linear and switching regulator for single supply operation– Two Power-on-Reset and Two Brown-out Detectors (BOD) – Quartz or ceramic resonator oscillators: 0.6 to 30MHz main power with Failure
Detection and low power 32.768 kHz for RTC or device clock– High precision 4/8/12MHz factory trimmed internal RC oscillator – Slow Clock Internal RC oscillator as permanent low-power mode device clock– High speed 80MHz internal RC oscillator– Low power 32kHz internal RC oscillator– PLL up to 240MHz for device clock and for USB 42023G–03/2014
ATSAM---e ARM-based Flash MCU
SAM4L Series
242023G–SAM–03/2014
ATSAM4L8/L4/L2
– Digital Frequency Locked Loop (DFLL) with wide input range– Up to 16 peripheral DMA (PDCA) channels
• Peripherals– USB 2.0 Device and Embedded Host: 12 Mbps, up to 8 bidirectional Endpoints and Multi-packet Ping-pong Mode. On-
Chip Transceiver– Liquid Crystal Display (LCD) Module with Capacity up to 40 Segments and up to 4 Common Terminals– One USART with ISO7816, IrDA®, RS-485, SPI, Manchester and LIN Mode– Three USART with SPI Mode– One PicoUART for extended UART wake-up capabilities in all sleep modes– Windowed Watchdog Timer (WDT)– Asynchronous Timer (AST) with Real-time Clock Capability, Counter or Calendar Mode Supported– Frequency Meter (FREQM) for Accurate Measuring of Clock Frequency– Six 16-bit Timer/Counter (TC) Channels with capture, waveform, compare and PWM mode– One Master/Slave Serial Peripheral Interface (SPI) with Chip Select Signals– Four Master and Two Slave Two-wire Interfaces (TWI), up to 3.4Mbit/s I2C-compatible– One Advanced Encryption System (AES) with 128-bit key length– One 16-channel ADC 300Ksps (ADC) with up to 12 Bits Resolution– One DAC 500Ksps (DACC) with up to 10 Bits Resolution– Four Analog Comparators (ACIFC) with Optional Window Detection– Capacitive Touch Module (CATB) supporting up to 32 buttons– Audio Bitstream DAC (ABDACB) Suitable for Stereo Audio– Inter-IC Sound (IISC) Controller, Compliant with Inter-IC Sound (I2S) Specification– Peripheral Event System for Direct Peripheral to Peripheral Communication– 32-bit Cyclic Redundancy Check Calculation Unit (CRCCU)– Random generator (TRNG)– Parallel Capture Module (PARC)– Glue Logic Controller (GLOC)
• I/O– Up to 75 I/O lines with external interrupt capability (edge or level sensitivity), debouncing, glitch filtering and slew-rate
control– Up to Six High-drive I/O Pins
• Single 1.68-3.6V Power Supply• Packages
– 100-lead LQFP, 14 x 14 mm, pitch 0.5 mm/100-ball VFBGA, 7x7 mm, pitch 0.65 mm– 64-lead LQFP, 10 x 10 mm, pitch 0.5 mm/64-pad QFN 9x9 mm, pitch 0.5 mm– 64-ball WLCSP, 4,314x4,434 mm, pitch 0.5 mm for SAM4LC4/2 and SAM4LS4/2 series– 64-ball WLCSP, 5,270x5,194 mm, pitch 0.5 mm for SAM4LC8 and SAM4LS8 series– 48-lead LQFP, 7 x 7 mm, pitch 0.5 mm/48-pad QFN 7x7 mm, pitch 0.5 mm
342023G–SAM–03/2014
ATSAM4L8/L4/L2
1. DescriptionAtmel's SAM4L series is a member of a family of Flash microcontrollers based on the high per-formance 32-bit ARM Cortex-M4 RISC processor running at frequencies up to 48MHz.
The processor implements a Memory Protection Unit (MPU) and a fast and flexible interrupt con-troller for supporting modern and real-time operating systems.
The ATSAM4L8/L4/L2 embeds state-of-the-art picoPower technology for ultra-low power con-sumption. Combined power control techniques are used to bring active current consumptiondown to 90µA/MHz. The device allows a wide range of options between functionality and powerconsumption, giving the user the ability to reach the lowest possible power consumption with thefeature set required for the application. On-chip regulator improves power efficiency when usedin swichting mode with an external inductor or can be used in linear mode if application is noisesensitive.
The ATSAM4L8/L4/L2 supports 4 power saving strategies. The SLEEP mode put the CPU inidle mode and offers different sub-modes which automatically switch off/on bus clocks, PLL,oscillators. The WAIT and RETENTION modes provide full logic and RAM retention, associatedwith fast wake-up capability (<1.5µs) and a very low consumption of, respectively, 3 µA and 1.5µA. In addition, WAIT mode supports SleepWalking features. In BACKUP mode, CPU, peripher-als and RAM are powered off and, while consuming less than 0.5µA, the device is able to wake-up from external interrupts.
The ATSAM4L8/L4/L2 incorporates on-chip Flash tightly coupled to a low power cache(LPCACHE) for active consumption optimization and SRAM memories for fast access.
The LCD controller is intended for monochrome passive liquid crystal display (LCD) with up to 4Common terminals and up to 40 Segments terminals. Dedicated Low Power Waveform, Con-trast Control, Extended Interrupt Mode, Selectable Frame Frequency and Blink functionality aresupported to offload the CPU, reduce interrupts and reduce power consumption. The controllerincludes integrated LCD buffers and integrated power supply voltage.
The low-power and high performance capacitive touch module (CATB) is introduced to meet thedemand for a low power capacitive touch solution that could be used to handle buttons, slidersand wheels. The CATB provides excellent signal performance, as well as autonomous touchand proximity detection for up to 32 sensors. This solution includes an advanced sequencer inaddition to an hardware filtering unit.
The Advanced Encryption Standard module (AESA) is compliant with the FIPS (Federal Infor-mation Processing Standard) Publication 197, Advanced Encryption Standard (AES), whichspecifies a symmetric block cipher that is used to encrypt and decrypt electronic data. Encryp-tion is the transformation of a usable message, called the plaintext, into an unreadable form,called the ciphertext. On the other hand, decryption is the transformation that recovers the plain-text from the ciphertext. AESA supports 128 bits cryptographic key sizes.
The Peripheral Direct Memory Access (DMA) controller enables data transfers between periph-erals and memories without processor involvement. The Peripheral DMA controller drasticallyreduces processing overhead when transferring continuous and large data streams.
The Peripheral Event System (PES) allows peripherals to receive, react to, and send peripheralevents without CPU intervention. Asynchronous interrupts allow advanced peripheral operationin low power modes.
The Power Manager (PM) improves design flexibility and security. The Power Manager supportsSleepWalking functionality, by which a module can be selectively activated based on peripheral
442023G–SAM–03/2014
ATSAM4L8/L4/L2
events, even in sleep modes where the module clock is stopped. Power monitoring is supportedby on-chip Power-on Reset (POR18, POR33), Brown-out Detectors (BOD18, BOD33). Thedevice features several oscillators, such as Phase Locked Loop (PLL), Digital FrequencyLocked Loop (DFLL), Oscillator 0 (OSC0), Internal RC 4,8,12MHz oscillator (RCFAST), systemRC oscillator (RCSYS), Internal RC 80MHz, Internal 32kHz RC and 32kHz Crystal Oscillator.Either of these oscillators can be used as source for the system clock. The DFLL is a program-mable internal oscillator from 40 to 150MHz. It can be tuned to a high accuracy if an accuratereference clock is running, e.g. the 32kHz crystal oscillator.
The Watchdog Timer (WDT) will reset the device unless it is periodically serviced by the soft-ware. This allows the device to recover from a condition that has caused the system to beunstable.
The Asynchronous Timer (AST) combined with the 32kHz crystal oscillator supports powerfulreal-time clock capabilities, with a maximum timeout of up to 136 years. The AST can operate incounter or calendar mode.
The Frequency Meter (FREQM) allows accurate measuring of a clock frequency by comparing itto a known reference clock.
The Full-speed USB 2.0 device and embedded host interface (USBC) supports several USBclasses at the same time utilizing the rich end-point configuration.
The device includes six identical 16-bit Timer/Counter (TC) channels. Each channel can be inde-pendently programmed to perform frequency measurement, event counting, intervalmeasurement, pulse generation, delay timing, and pulse width modulation.
The ATSAM4L8/L4/L2 also features many communication interfaces, like USART, SPI, or TWI,for communication intensive applications. The USART supports different communication modes,like SPI Mode and LIN Mode.
A general purpose 16-channel ADC is provided, as well as four analog comparators (ACIFC).The ADC can operate in 12-bit mode at full speed. The analog comparators can be paired todetect when the sensing voltage is within or outside the defined reference window.
Atmel offers the QTouch Library for embedding capacitive touch buttons, sliders, and wheelsfunctionality. The patented charge-transfer signal acquisition offers robust sensing and includesfully debounced reporting of touch keys as well as Adjacent Key Suppression® (AKS®) technol-ogy for unambiguous detection of key events. The easy-to-use QTouch Suite toolchain allowsyou to explore, develop, and debug your own touch applications.
The Audio Bitstream DAC (ABDACB) converts a 16-bit sample value to a digital bitstream withan average value proportional to the sample value. Two channels are supported, making theABDAC particularly suitable for stereo audio.
The Inter-IC Sound Controller (IISC) provides a 5-bit wide, bidirectional, synchronous, digitalaudio link with external audio devices. The controller is compliant with the Inter-IC Sound (I2S)bus specification.
542023G–SAM–03/2014
ATSAM4L8/L4/L2
2. Overview
2.1 Block Diagram
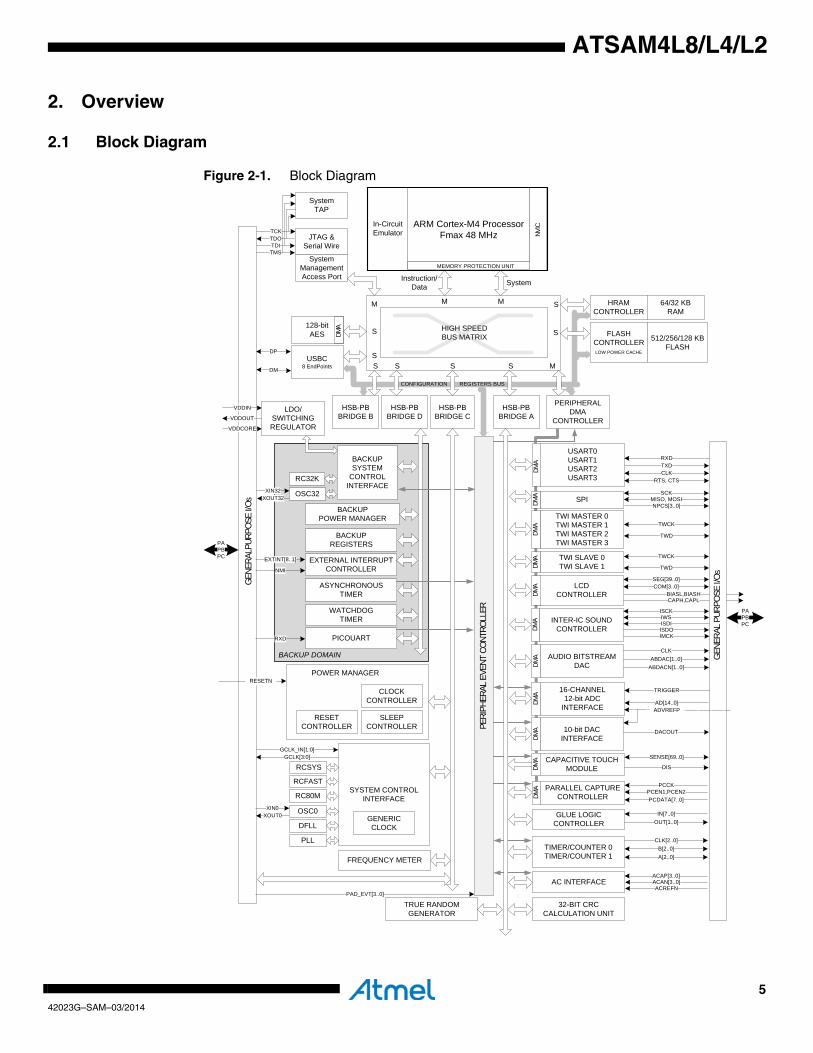
Figure 2-1. Block Diagram
BIASL,BIASHCAPH,CAPL
ASYNCHRONOUS TIMER
PERIPHERALDMA
CONTROLLER
HSB-PBBRIDGE B
HSB-PB BRIDGE A
S
M M
S M
EXTERNAL INTERRUPTCONTROLLER
HIGH SPEEDBUS MATRIX
GEN
ERAL
PURP
OSE
I/Os
GENE
RAL
PURP
OSE
I/Os
PAPBPC EXTINT[8..1]
NMI
PAPBPC
SPIDMA
MISO, MOSINPCS[3..0]
USART0USART1USART2USART3
DMA RXD
TXDCLK
RTS, CTS
WATCHDOGTIMER
SCK
JTAG &Serial Wire
TDOTDITMS
CONFIGURATION REGISTERS BUS
S
ARM Cortex-M4 ProcessorFmax 48 MHz
In-Circuit Emulator NV
IC
TWI MASTER 0TWI MASTER 1TWI MASTER 2TWI MASTER 3
DMA
TWI SLAVE 0TWI SLAVE 1DM
A
RESETCONTROLLER
SLEEPCONTROLLER
CLOCKCONTROLLER
TCK
TWCK
TWD
TWCK
TWD
USBC8 EndPoints
DMA INTER-IC SOUND
CONTROLLER
AUDIO BITSTREAM DACDM
A ABDAC[1..0]ABDACN[1..0]
ISCKIWSISDIISDOIMCK
CLK
M
S
DM
DP
SYSTEM CONTROL INTERFACE
GCLK[3:0]
VDDCORE
VDDOUT
RCSYS
XIN0XOUT0
OSC0
DFLL
RC32K
PLL
GCLK_IN[1:0]
S
MEMORY PROTECTION UNIT
Instruction/Data System
SystemTAP
HSB-PBBRIDGE D
S
POWER MANAGERRESETN
BACKUPSYSTEM
CONTROL INTERFACE
BACKUPREGISTERS
CAPACITIVE TOUCHMODULE
BACKUPPOWER MANAGER
LDO/SWITCHINGREGULATOR
DMA SENSE[69..0]
DIS
GLUE LOGIC CONTROLLER
IN[7..0]OUT[1..0]
TIMER/COUNTER 0TIMER/COUNTER 1 A[2..0]
B[2..0]CLK[2..0]
FREQUENCY METER
16-CHANNEL 12-bit ADC
INTERFACE
DMA TRIGGER
AD[14..0]ADVREFP
AC INTERFACEACREFN
ACAN[3..0]ACAP[3..0]
HSB-PB BRIDGE C
RCFASTPARALLEL CAPTURE
CONTROLLER
S
BACKUP DOMAIN
PCCK
DMA
32-BIT CRC CALCULATION UNIT
VDDIN
TRUE RANDOMGENERATOR
10-bit DACINTERFACEDM
A DACOUT
PICOUARTRXD
PCEN1,PCEN2PCDATA[7..0]
LCDCONTROLLER
SEG[39..0]COM[3..0]
DMA
128-bitAES SDM
AFLASH
CONTROLLERLOW POWER CACHE
512/256/128 KBFLASH
HRAMCONTROLLER
64/32 KBRAM
SystemManagement Access Port
RC80M
XIN32XOUT32 OSC32
PERI
PHER
AL E
VENT
CON
TROL
LER
PAD_EVT[3..0]
GENERICCLOCK
642023G–SAM–03/2014
ATSAM4L8/L4/L2
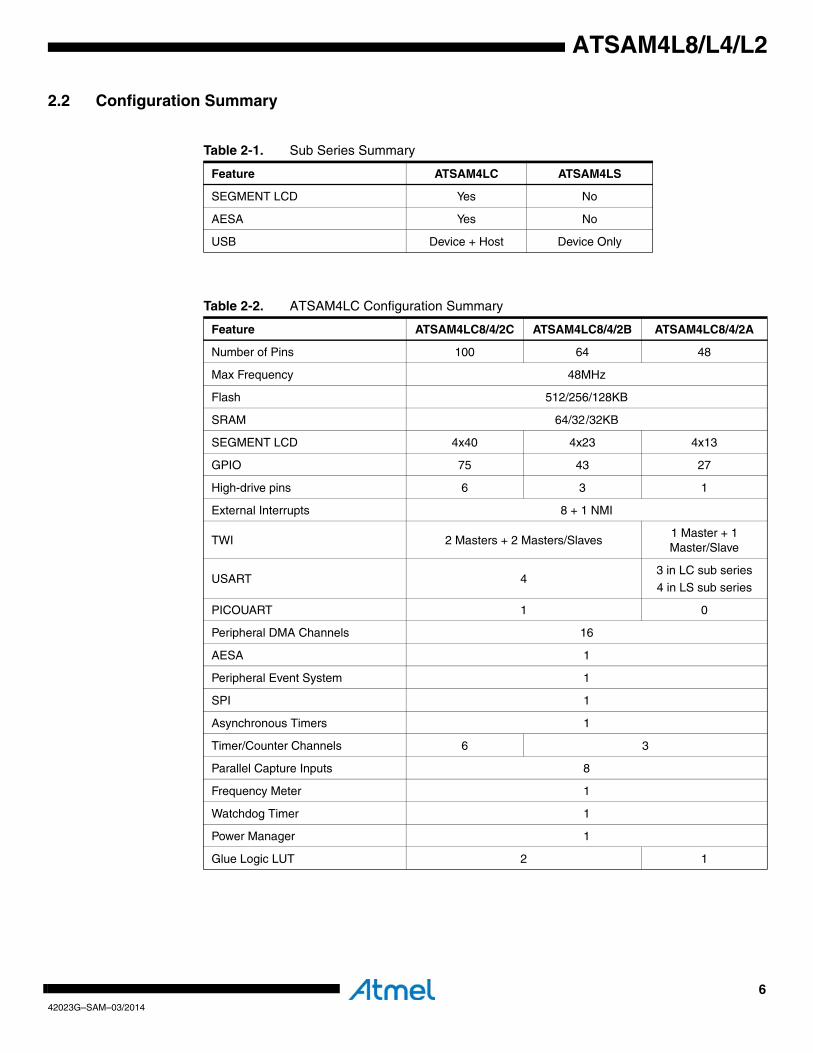
2.2 Configuration Summary
Table 2-1. Sub Series Summary
Feature ATSAM4LC ATSAM4LS
SEGMENT LCD Yes No
AESA Yes No
USB Device + Host Device Only
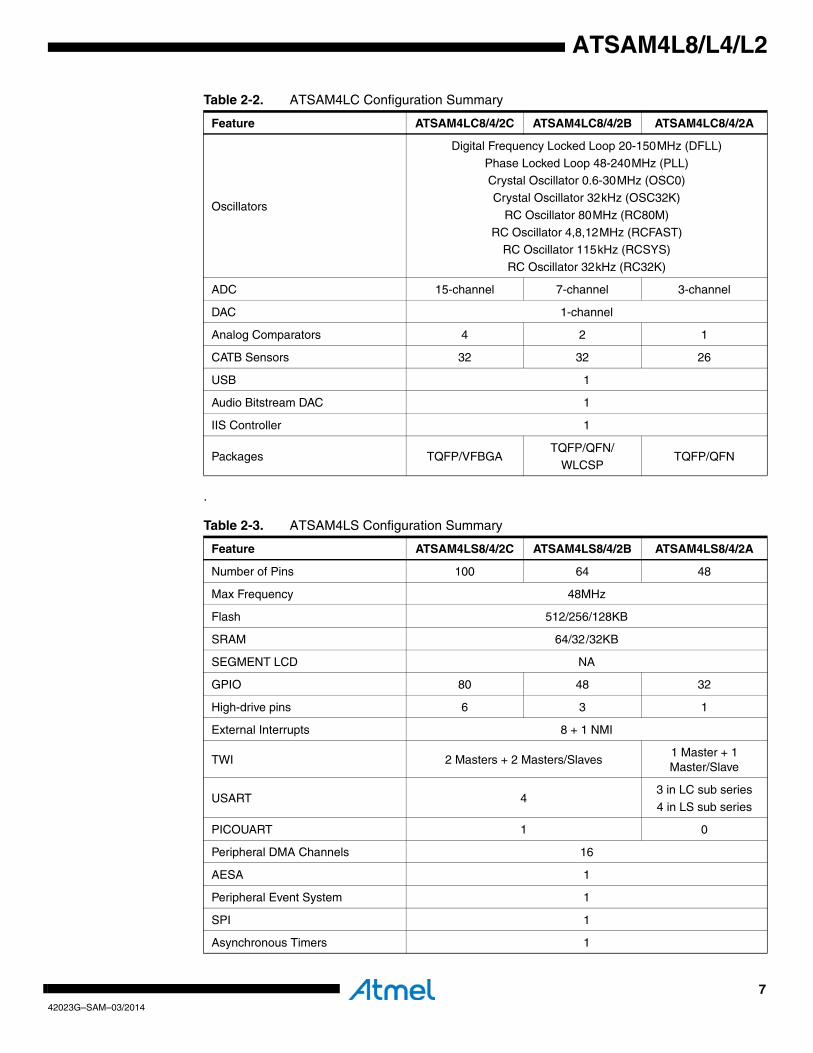
Table 2-2. ATSAM4LC Configuration Summary
Feature ATSAM4LC8/4/2C ATSAM4LC8/4/2B ATSAM4LC8/4/2A
Number of Pins 100 64 48
Max Frequency 48MHz
Flash 512/256/128KB
SRAM 64/32/32KB
SEGMENT LCD 4x40 4x23 4x13
GPIO 75 43 27
High-drive pins 6 3 1
External Interrupts 8 + 1 NMI
TWI 2 Masters + 2 Masters/Slaves1 Master + 1 Master/Slave
USART 43 in LC sub series
4 in LS sub series
PICOUART 1 0
Peripheral DMA Channels 16
AESA 1
Peripheral Event System 1
SPI 1
Asynchronous Timers 1
Timer/Counter Channels 6 3
Parallel Capture Inputs 8
Frequency Meter 1
Watchdog Timer 1
Power Manager 1
Glue Logic LUT 2 1
742023G–SAM–03/2014
ATSAM4L8/L4/L2
.
Oscillators
Digital Frequency Locked Loop 20-150MHz (DFLL)
Phase Locked Loop 48-240MHz (PLL)Crystal Oscillator 0.6-30MHz (OSC0)
Crystal Oscillator 32kHz (OSC32K)
RC Oscillator 80MHz (RC80M)
RC Oscillator 4,8,12MHz (RCFAST)RC Oscillator 115kHz (RCSYS)
RC Oscillator 32kHz (RC32K)
ADC 15-channel 7-channel 3-channel
DAC 1-channel
Analog Comparators 4 2 1
CATB Sensors 32 32 26
USB 1
Audio Bitstream DAC 1
IIS Controller 1
Packages TQFP/VFBGATQFP/QFN/
WLCSPTQFP/QFN
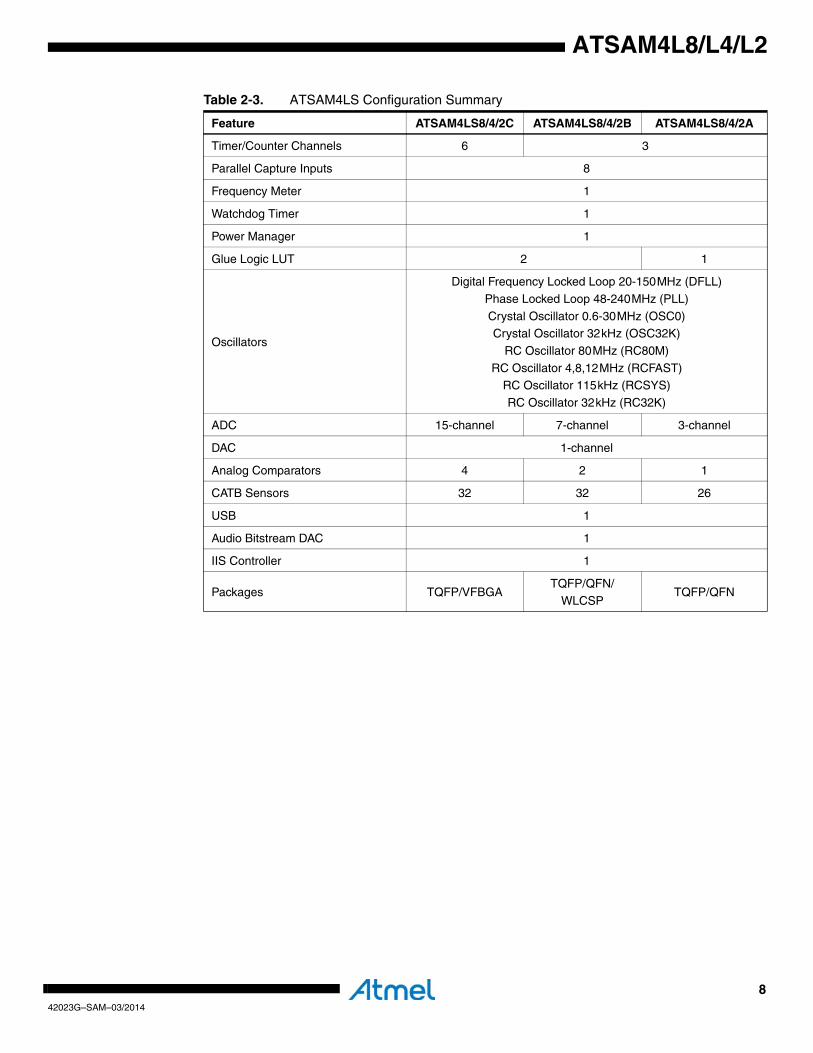
Table 2-3. ATSAM4LS Configuration Summary
Feature ATSAM4LS8/4/2C ATSAM4LS8/4/2B ATSAM4LS8/4/2A
Number of Pins 100 64 48
Max Frequency 48MHz
Flash 512/256/128KB
SRAM 64/32/32KB
SEGMENT LCD NA
GPIO 80 48 32
High-drive pins 6 3 1
External Interrupts 8 + 1 NMI
TWI 2 Masters + 2 Masters/Slaves1 Master + 1 Master/Slave
USART 43 in LC sub series
4 in LS sub series
PICOUART 1 0
Peripheral DMA Channels 16
AESA 1
Peripheral Event System 1
SPI 1
Asynchronous Timers 1
Table 2-2. ATSAM4LC Configuration Summary
Feature ATSAM4LC8/4/2C ATSAM4LC8/4/2B ATSAM4LC8/4/2A
842023G–SAM–03/2014
ATSAM4L8/L4/L2
Timer/Counter Channels 6 3
Parallel Capture Inputs 8
Frequency Meter 1
Watchdog Timer 1
Power Manager 1
Glue Logic LUT 2 1
Oscillators
Digital Frequency Locked Loop 20-150MHz (DFLL)
Phase Locked Loop 48-240MHz (PLL)
Crystal Oscillator 0.6-30MHz (OSC0)Crystal Oscillator 32kHz (OSC32K)
RC Oscillator 80MHz (RC80M)
RC Oscillator 4,8,12MHz (RCFAST)RC Oscillator 115kHz (RCSYS)
RC Oscillator 32kHz (RC32K)
ADC 15-channel 7-channel 3-channel
DAC 1-channel
Analog Comparators 4 2 1
CATB Sensors 32 32 26
USB 1
Audio Bitstream DAC 1
IIS Controller 1
Packages TQFP/VFBGATQFP/QFN/
WLCSPTQFP/QFN
Table 2-3. ATSAM4LS Configuration Summary
Feature ATSAM4LS8/4/2C ATSAM4LS8/4/2B ATSAM4LS8/4/2A
942023G–SAM–03/2014
ATSAM4L8/L4/L2
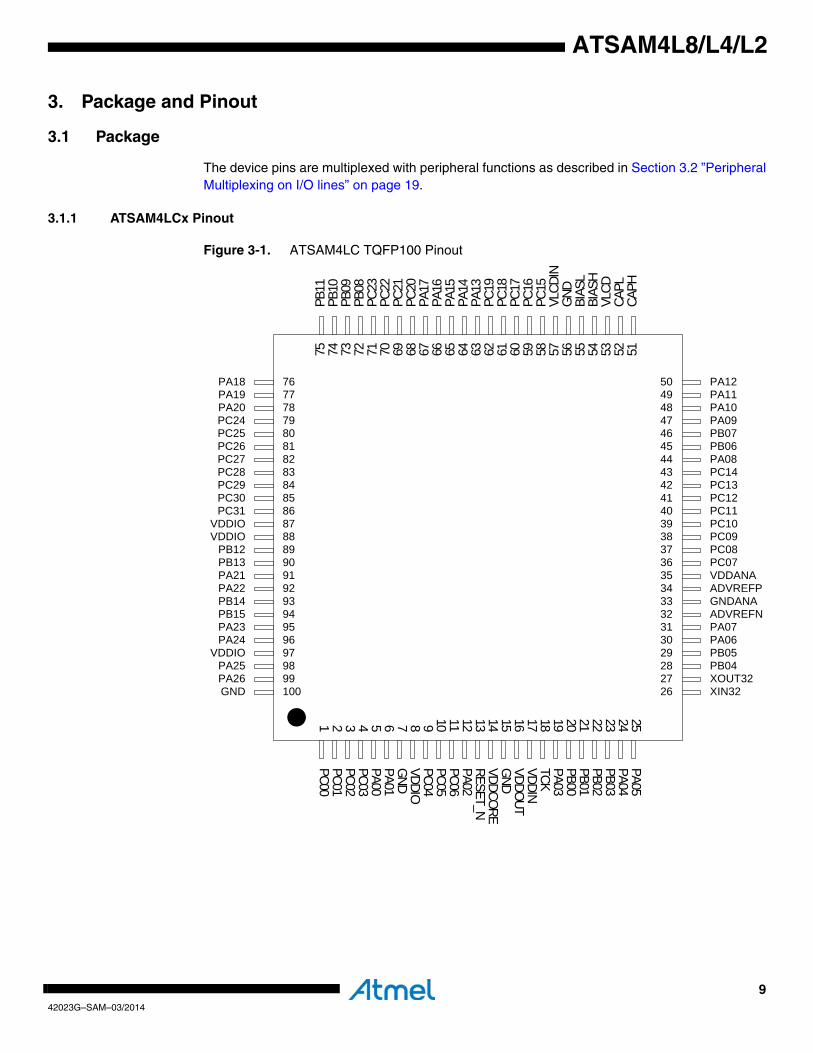
3. Package and Pinout
3.1 Package
The device pins are multiplexed with peripheral functions as described in Section 3.2 ”PeripheralMultiplexing on I/O lines” on page 19.
3.1.1 ATSAM4LCx Pinout
Figure 3-1. ATSAM4LC TQFP100 Pinout
PC001
PC012
PC023
PC034
PA005
PA016
GND7
VDDIO8
PC049
PC0510
PC0611
PA0212
RESET_N13
VDDCORE14
GND15
VDDOUT16
VDDIN17
TCK18
PA0319
PB0020
PB0121
PB0222
PB0323
PA0424
PA0525
XIN3226XOUT3227PB0428PB0529PA0630PA0731ADVREFN32GNDANA33ADVREFP34VDDANA35PC0736PC0837PC0938PC1039PC1140PC1241PC1342PC1443PA0844PB0645PB0746PA0947PA1048PA1149PA1250
PB11
75PB
1074
PB09
73PB
0872
PC23
71PC
2270
PC21
69PC
2068
PA17
67PA
1666
PA15
65PA
1464
PA13
63PC
1962
PC18
61PC
1760
PC16
59PC
1558
VLCD
IN57
GND
56BI
ASL
55BI
ASH
54VL
CD53
CAPL
52CA
PH51
PA18 76PA19 77PA20 78PC24 79PC25 80PC26 81PC27 82PC28 83PC29 84PC30 85PC31 86
VDDIO 87VDDIO 88
PB12 89PB13 90PA21 91PA22 92PB14 93PB15 94PA23 95PA24 96
VDDIO 97PA25 98PA26 99GND 100
1042023G–SAM–03/2014
ATSAM4L8/L4/L2
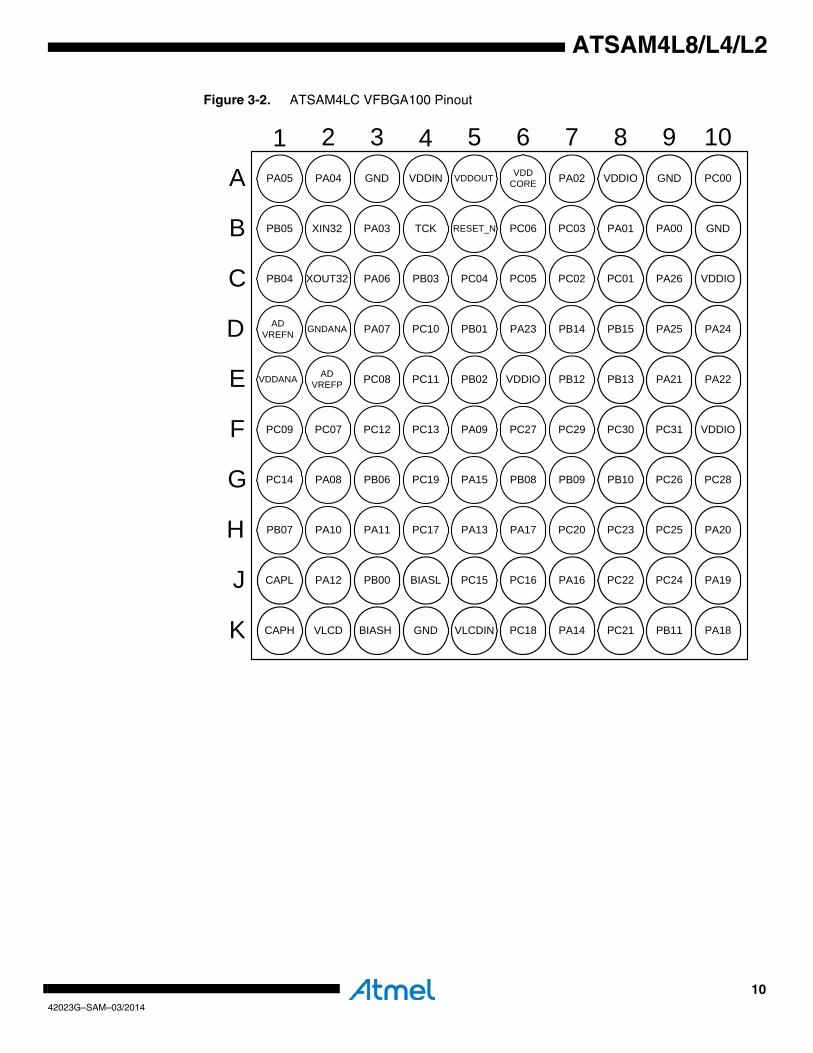
Figure 3-2. ATSAM4LC VFBGA100 Pinout
10987654321A
B
C
D
E
F
G
H
J
K
VDDCOREVDDOUTPA05 GND VDDINPA04 PC00GNDVDDIOPA02
XIN32
XOUT32PB04
PB05
PA06
PA07GNDANA
ADVREFP
PC07
PC08
PC09
PC10
PC11
PC12 PC13
PC14 PA08 PB06
PB07
PA09
PA10 PA11
PA12
CAPH
CAPL
VLCD BIASH
BIASL
GND VLCDIN
PC15 PC16
PC17
PC18
PC19
PA13
PA14
PA15
PA16
PA17 PC20
PC21
PC22
PC23
PB08 PB09 PB10
PB11 PA18
PA19
PA20
PC24
PC25
PC26
PC27
PC28
PC29 PC30 PC31
VDDIO
VDDIO
PB12 PB13 PA21 PA22
PB14 PB15PA23 PA24
VDDIO
PA25
PA26
GND
PC01PC02
PC03 PA00PA01
PC04 PC05
PC06RESET_NTCKPA03
PB00
PB01
PB02
PB03
ADVREFN
VDDANA
1142023G–SAM–03/2014
ATSAM4L8/L4/L2
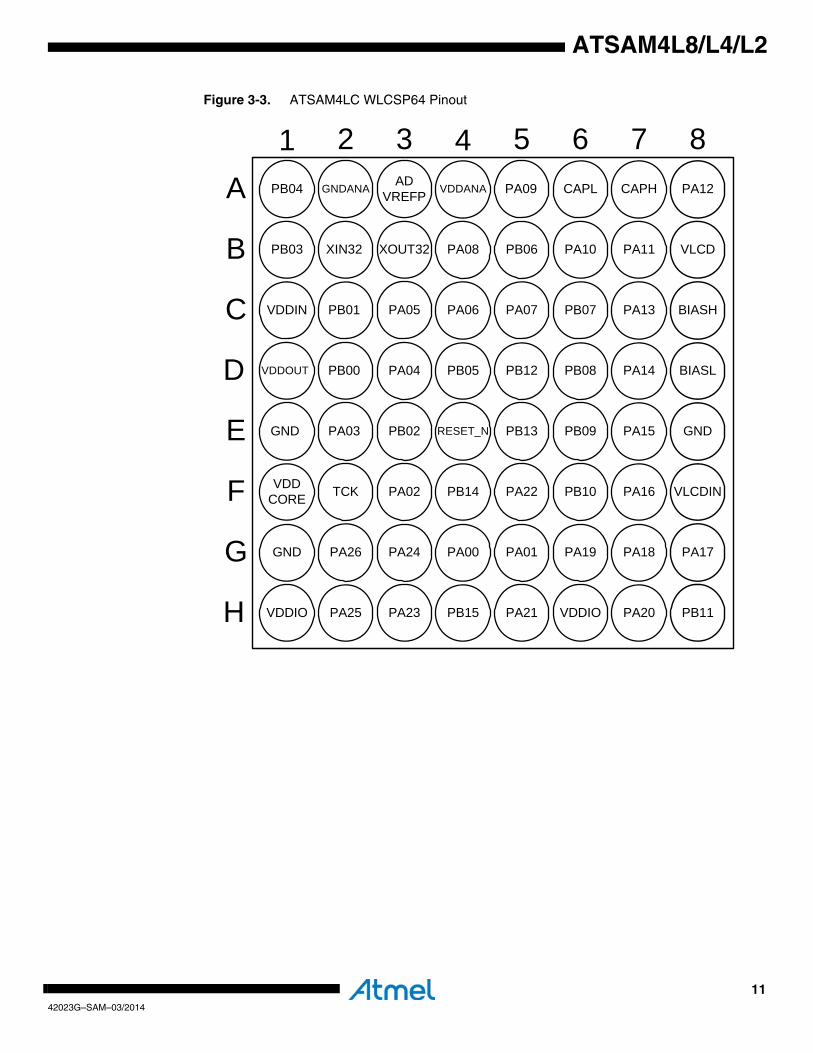
Figure 3-3. ATSAM4LC WLCSP64 Pinout
87654321A
B
C
D
E
F
G
H
CAPLPA09PB04 ADVREFP VDDANAGNDANA PA12CAPH
XIN32
PB01VDDIN
PB03
PA05
PA04PB00
PA03
TCK
PB02
VDDCORE
PB05
RESET_N
PA02 PB14
GND PA26 PA24
VDDIO
PA22
PA25 PA23 PB15
PA00
PA21
PA01
VDDIO PA20 PB11
PA19 PA18 PA17
PB10 PA16 VLCDIN
PB09 PA15 GND
PA14 BIASLPB08
BIASHPA13
PA11 VLCD
PA07 PB07
PA10PB06PA08XOUT32
PB12
PB13
PA06
VDDOUT
GND
1242023G–SAM–03/2014
ATSAM4L8/L4/L2
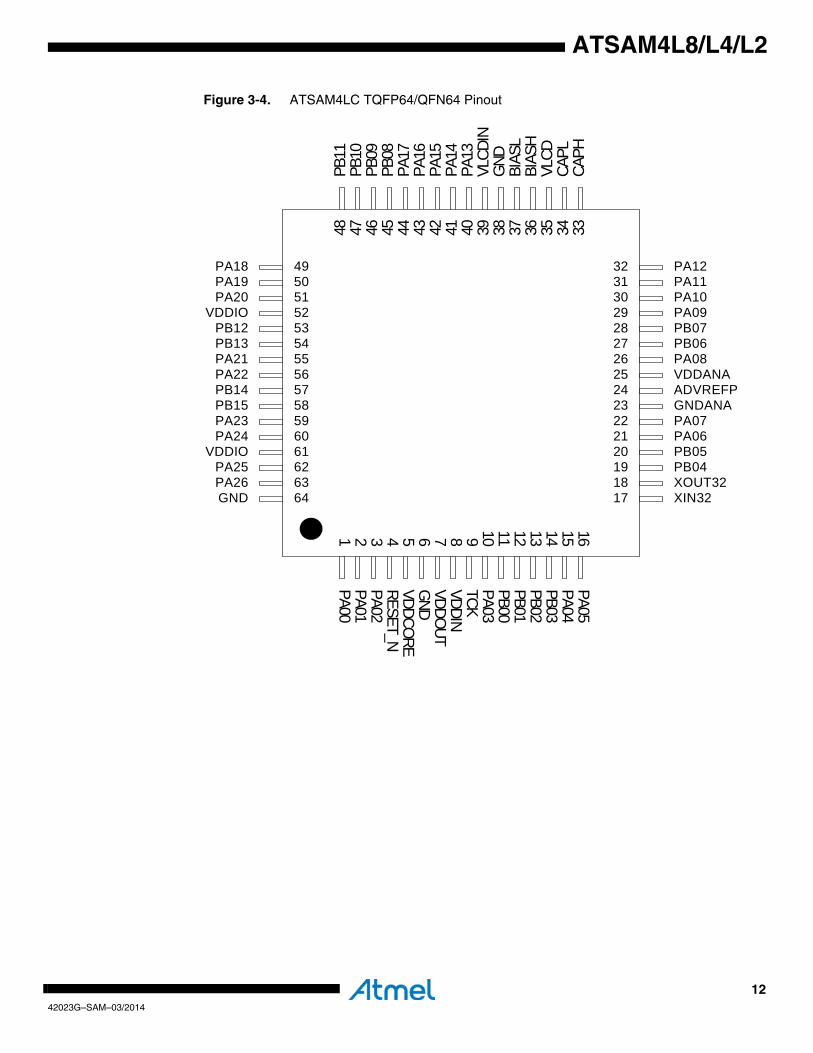
Figure 3-4. ATSAM4LC TQFP64/QFN64 Pinout
PA001
PA012
PA023
RESET_N4
VDDCORE5
GND6
VDDOUT7
VDDIN8
TCK9
PA0310
PB0011
PB0112
PB0213
PB0314
PA0415
PA0516
XIN3217XOUT3218PB0419PB0520PA0621PA0722GNDANA23ADVREFP24VDDANA25PA0826PB0627PB0728PA0929PA1030PA1131PA1232
PB11
48PB
1047
PB09
46PB
0845
PA17
44PA
1643
PA15
42PA
1441
PA13
40VL
CDIN
39GN
D38
BIAS
L37
BIAS
H36
VLCD
35CA
PL34
CAPH
33
PA18 49PA19 50PA20 51
VDDIO 52PB12 53PB13 54PA21 55PA22 56PB14 57PB15 58PA23 59PA24 60
VDDIO 61PA25 62PA26 63GND 64
1342023G–SAM–03/2014
ATSAM4L8/L4/L2
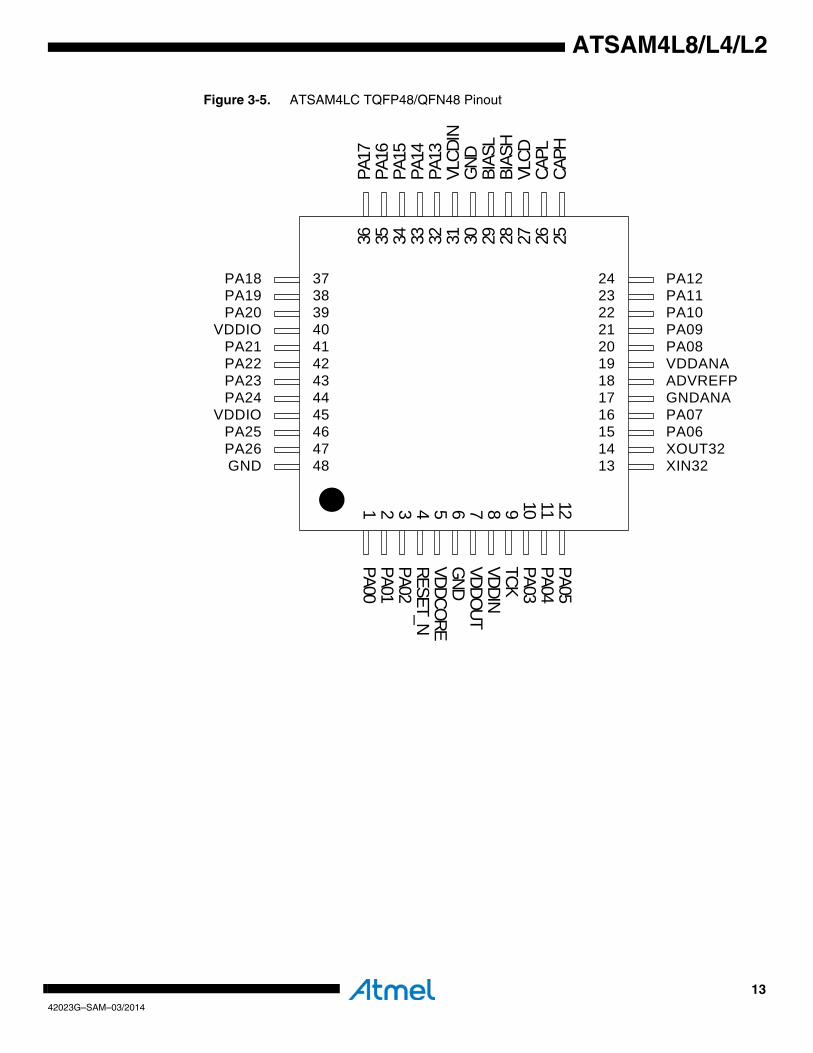
Figure 3-5. ATSAM4LC TQFP48/QFN48 Pinout
PA001
PA012
PA023
RESET_N4
VDDCORE5
GND6
VDDOUT7
VDDIN8
TCK9
PA0310
PA0411
PA0512
XIN3213XOUT3214PA0615PA0716GNDANA17ADVREFP18VDDANA19PA0820PA0921PA1022PA1123PA1224
PA17
36PA
1635
PA15
34PA
1433
PA13
32VL
CDIN
31GN
D30
BIAS
L29
BIAS
H28
VLCD
27CA
PL26
CAPH
25
PA18 37PA19 38PA20 39
VDDIO 40PA21 41PA22 42PA23 43PA24 44
VDDIO 45PA25 46PA26 47GND 48
1442023G–SAM–03/2014
ATSAM4L8/L4/L2
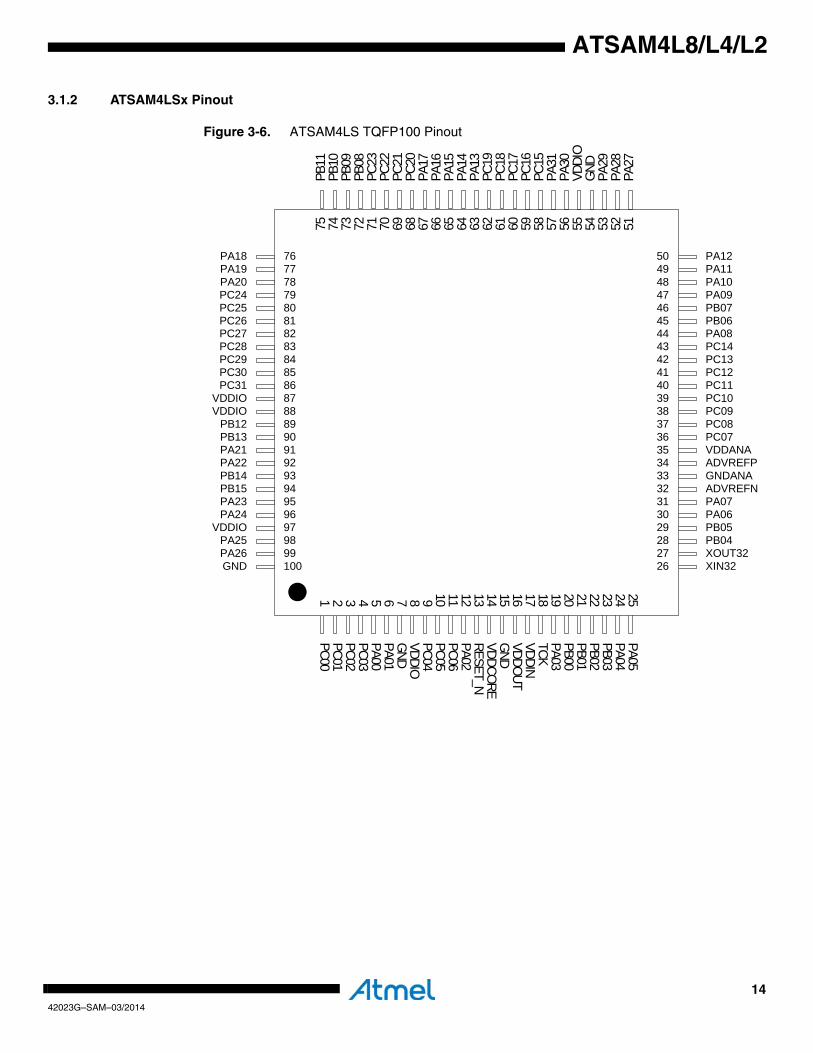
3.1.2 ATSAM4LSx Pinout
Figure 3-6. ATSAM4LS TQFP100 Pinout
PC001
PC012
PC023
PC034
PA005
PA016
GND7
VDDIO8
PC049
PC0510
PC0611
PA0212
RESET_N13
VDDCORE14
GND15
VDDOUT16
VDDIN17
TCK18
PA0319
PB0020
PB0121
PB0222
PB0323
PA0424
PA0525
XIN3226XOUT3227PB0428PB0529PA0630PA0731ADVREFN32GNDANA33ADVREFP34VDDANA35PC0736PC0837PC0938PC1039PC1140PC1241PC1342PC1443PA0844PB0645PB0746PA0947PA1048PA1149PA1250
PB11
75PB
1074
PB09
73PB
0872
PC23
71PC
2270
PC21
69PC
2068
PA17
67PA
1666
PA15
65PA
1464
PA13
63PC
1962
PC18
61PC
1760
PC16
59PC
1558
PA31
57PA
3056
VDDI
O55
GND
54PA
2953
PA28
52PA
2751
PA18 76PA19 77PA20 78PC24 79PC25 80PC26 81PC27 82PC28 83PC29 84PC30 85PC31 86
VDDIO 87VDDIO 88
PB12 89PB13 90PA21 91PA22 92PB14 93PB15 94PA23 95PA24 96
VDDIO 97PA25 98PA26 99GND 100

1542023G–SAM–03/2014
ATSAM4L8/L4/L2
Figure 3-7. ATSAM4LS VFBGA100 Pinout
10987654321A
B
C
D
E
F
G
H
J
K
VDDCOREVDDOUTPA05 GND VDDINPA04 PC00GNDVDDIOPA02
XIN32
XOUT32PB04
PB05
PA06
PA07GNDANA
ADVREFP
PC07
PC08
PC09
PC10
PC11
PC12 PC13
PC14 PA08 PB06
PB07
PA09
PA10 PA11
PA12
PA27
PA28
PA29 GND
VDDIO
PA30 PA31
PC15 PC16
PC17
PC18
PC19
PA13
PA14
PA15
PA16
PA17 PC20
PC21
PC22
PC23
PB08 PB09 PB10
PB11 PA18
PA19
PA20
PC24
PC25
PC26
PC27
PC28
PC29 PC30 PC31
VDDIO
VDDIO
PB12 PB13 PA21 PA22
PB14 PB15PA23 PA24
VDDIO
PA25
PA26
GND
PC01PC02
PC03 PA00PA01
PC04 PC05
PC06RESET_NTCKPA03
PB00
PB01
PB02
PB03
ADVREFN
VDDANA
1642023G–SAM–03/2014
ATSAM4L8/L4/L2
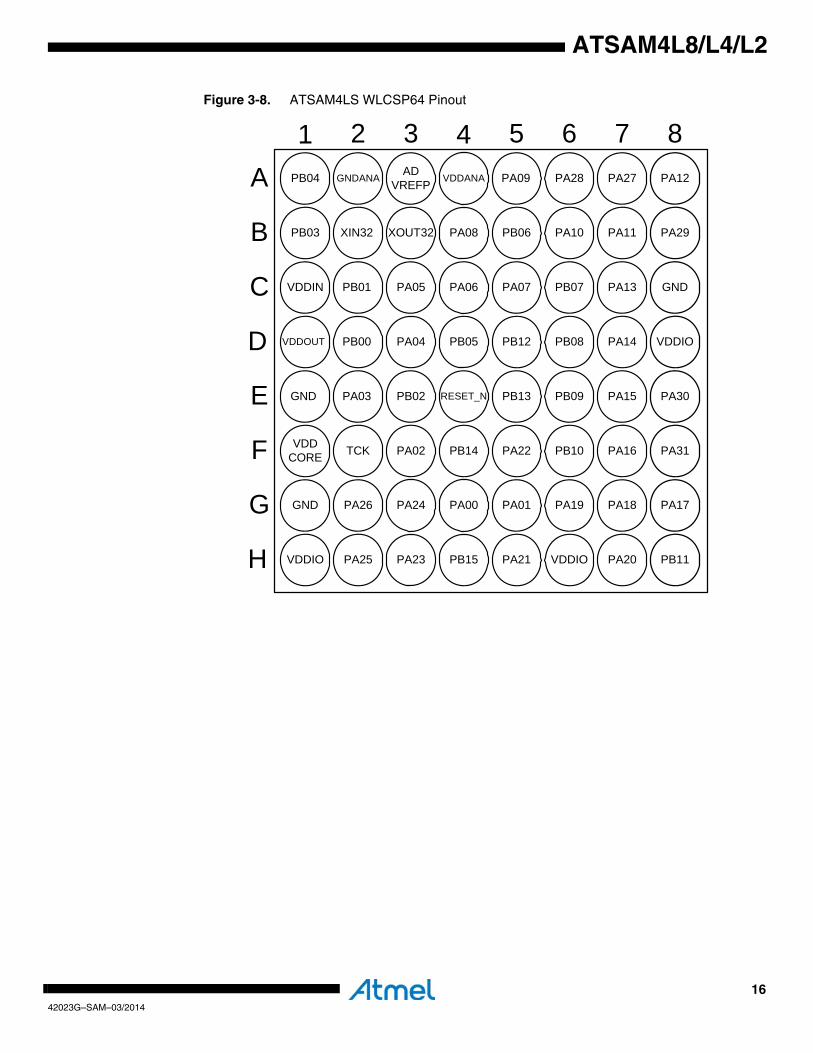
Figure 3-8. ATSAM4LS WLCSP64 Pinout
87654321A
B
C
D
E
F
G
H
PA28PA09PB04 ADVREFP VDDANAGNDANA PA12PA27
XIN32
PB01VDDIN
PB03
PA05
PA04PB00
PA03
TCK
PB02
VDDCORE
PB05
RESET_N
PA02 PB14
GND PA26 PA24
VDDIO
PA22
PA25 PA23 PB15
PA00
PA21
PA01
VDDIO PA20 PB11
PA19 PA18 PA17
PB10 PA16 PA31
PB09 PA15 PA30
PA14 VDDIOPB08
GNDPA13
PA11 PA29
PA07 PB07
PA10PB06PA08XOUT32
PB12
PB13
PA06
VDDOUT
GND
1742023G–SAM–03/2014
ATSAM4L8/L4/L2
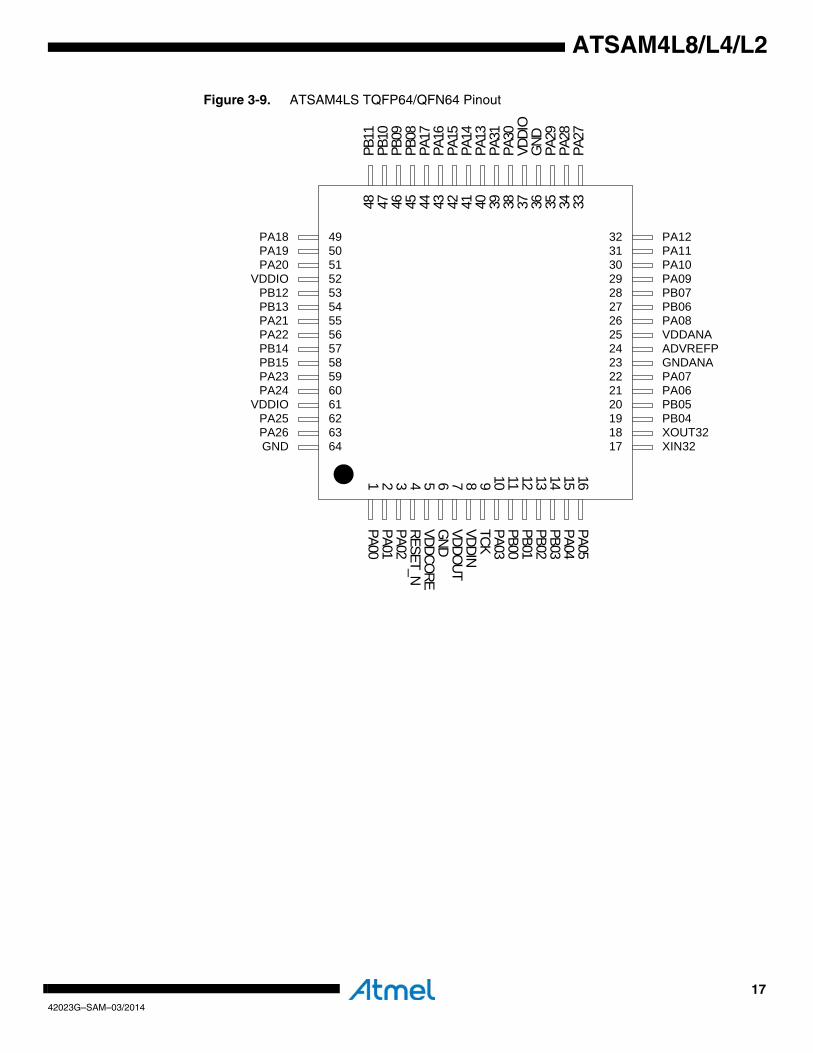
Figure 3-9. ATSAM4LS TQFP64/QFN64 Pinout
PA001
PA012
PA023
RESET_N4
VDDCORE5
GND6
VDDOUT7
VDDIN8
TCK9
PA0310
PB0011
PB0112
PB0213
PB0314
PA0415
PA0516
XIN3217XOUT3218PB0419PB0520PA0621PA0722GNDANA23ADVREFP24VDDANA25PA0826PB0627PB0728PA0929PA1030PA1131PA1232
PB11
48PB
1047
PB09
46PB
0845
PA17
44PA
1643
PA15
42PA
1441
PA13
40PA
3139
PA30
38VD
DIO
37GN
D36
PA29
35PA
2834
PA27
33
PA18 49PA19 50PA20 51
VDDIO 52PB12 53PB13 54PA21 55PA22 56PB14 57PB15 58PA23 59PA24 60
VDDIO 61PA25 62PA26 63GND 64
1842023G–SAM–03/2014
ATSAM4L8/L4/L2
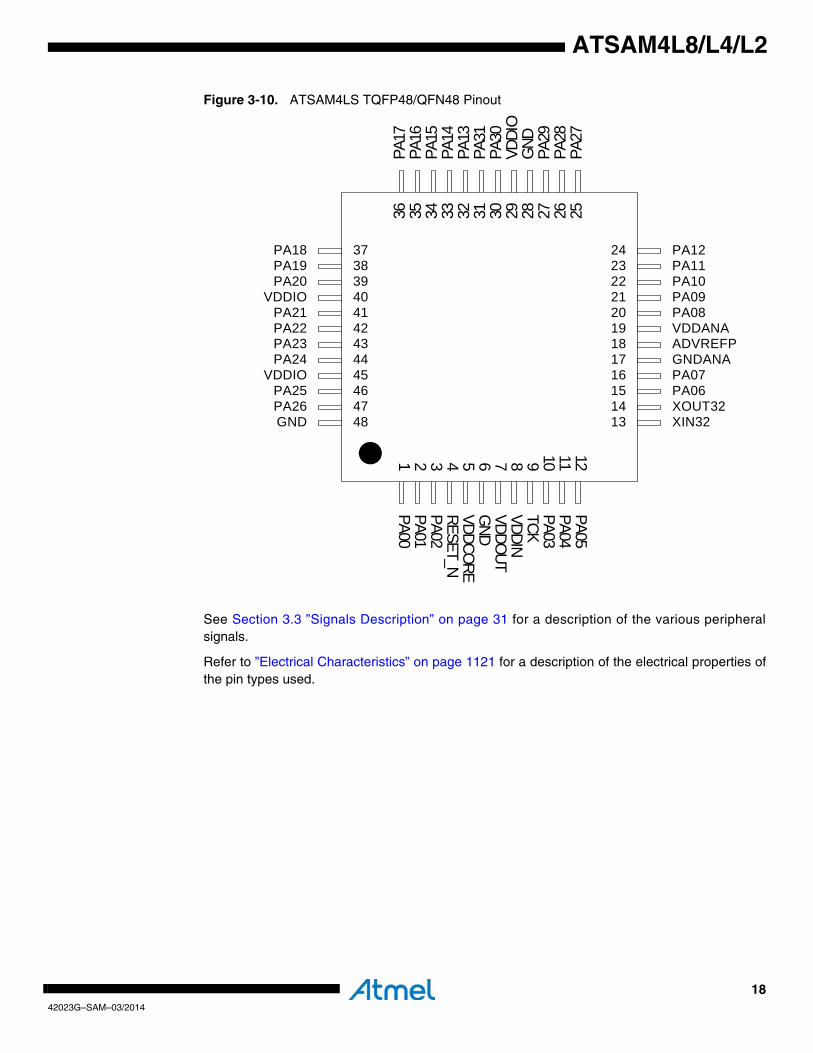
Figure 3-10. ATSAM4LS TQFP48/QFN48 Pinout
See Section 3.3 ”Signals Description” on page 31 for a description of the various peripheralsignals.
Refer to ”Electrical Characteristics” on page 1121 for a description of the electrical properties ofthe pin types used.
PA001
PA012
PA023
RESET_N4
VDDCORE5
GND6
VDDOUT7
VDDIN8
TCK9
PA0310
PA0411
PA0512
XIN3213XOUT3214PA0615PA0716GNDANA17ADVREFP18VDDANA19PA0820PA0921PA1022PA1123PA1224
PA17
36PA
1635
PA15
34PA
1433
PA13
32PA
3131
PA30
30VD
DIO
29GN
D28
PA29
27PA
2826
PA27
25
PA18 37PA19 38PA20 39
VDDIO 40PA21 41PA22 42PA23 43PA24 44
VDDIO 45PA25 46PA26 47GND 48
1942023G–SAM–03/2014
ATSAM4L8/L4/L2
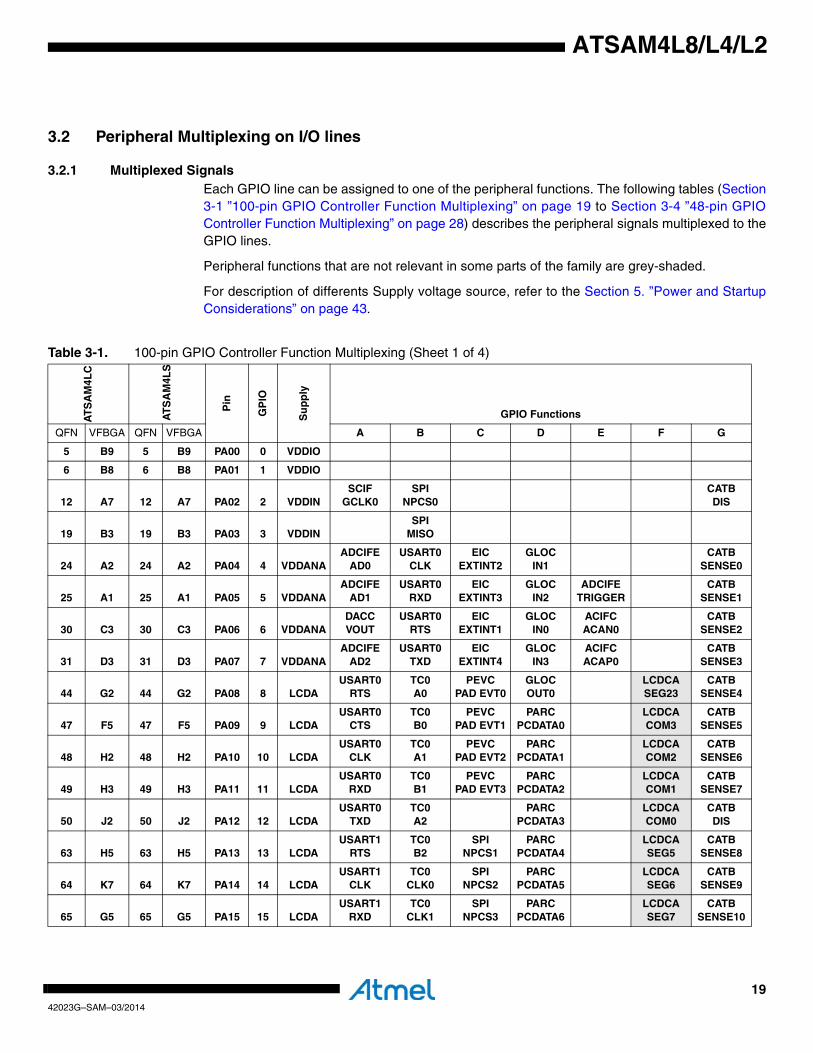
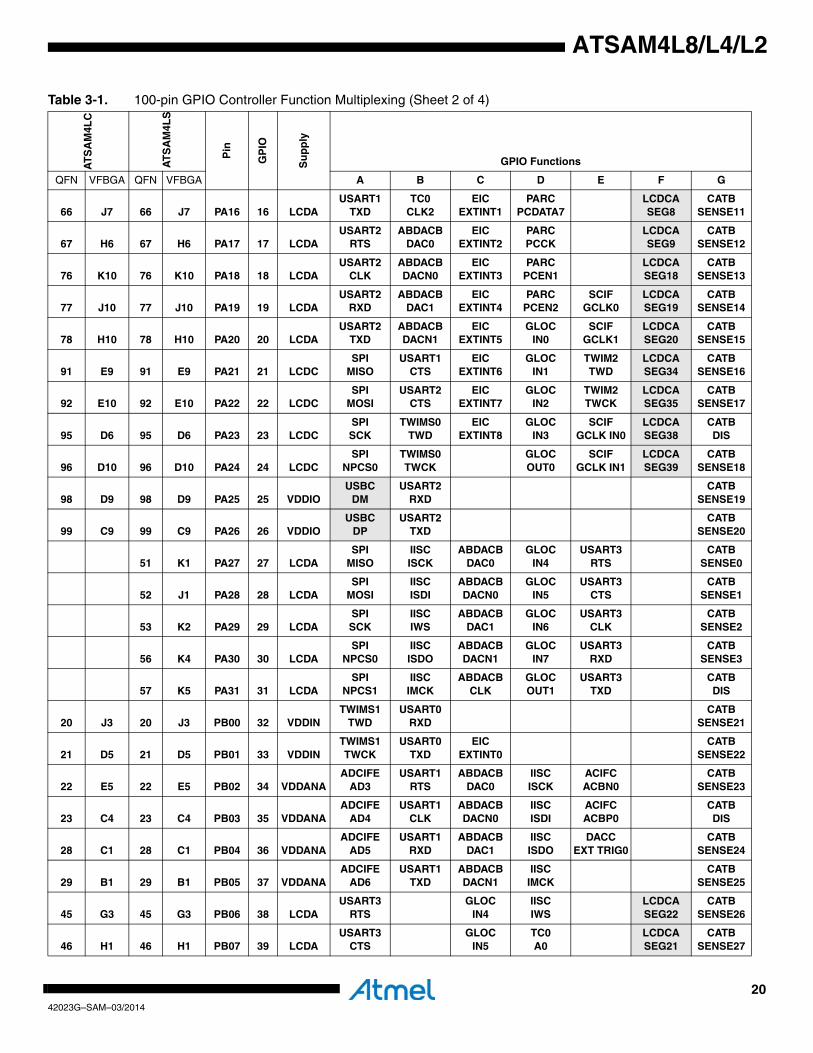
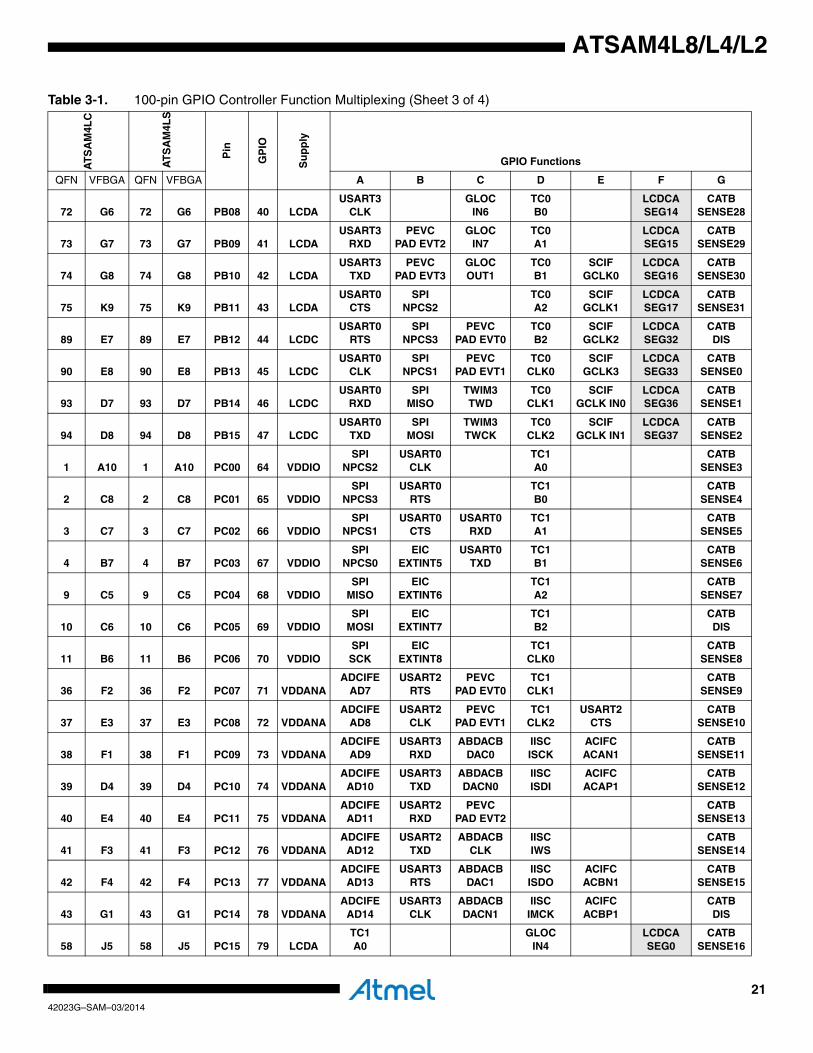
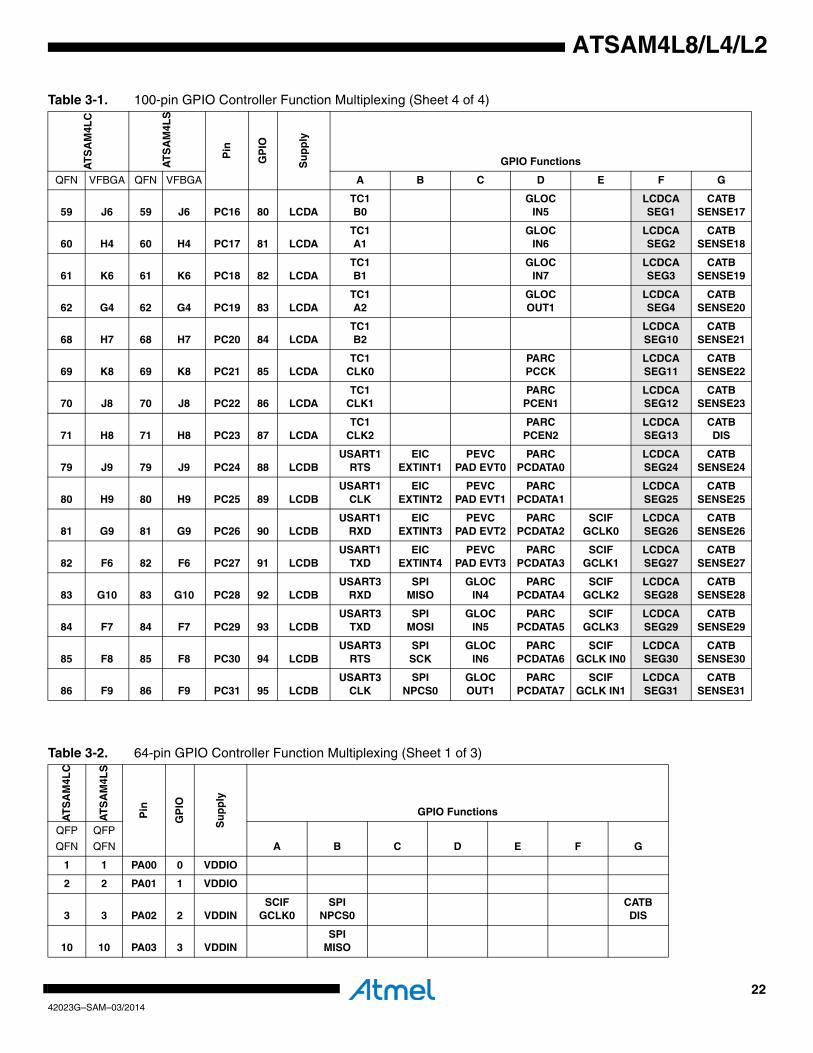
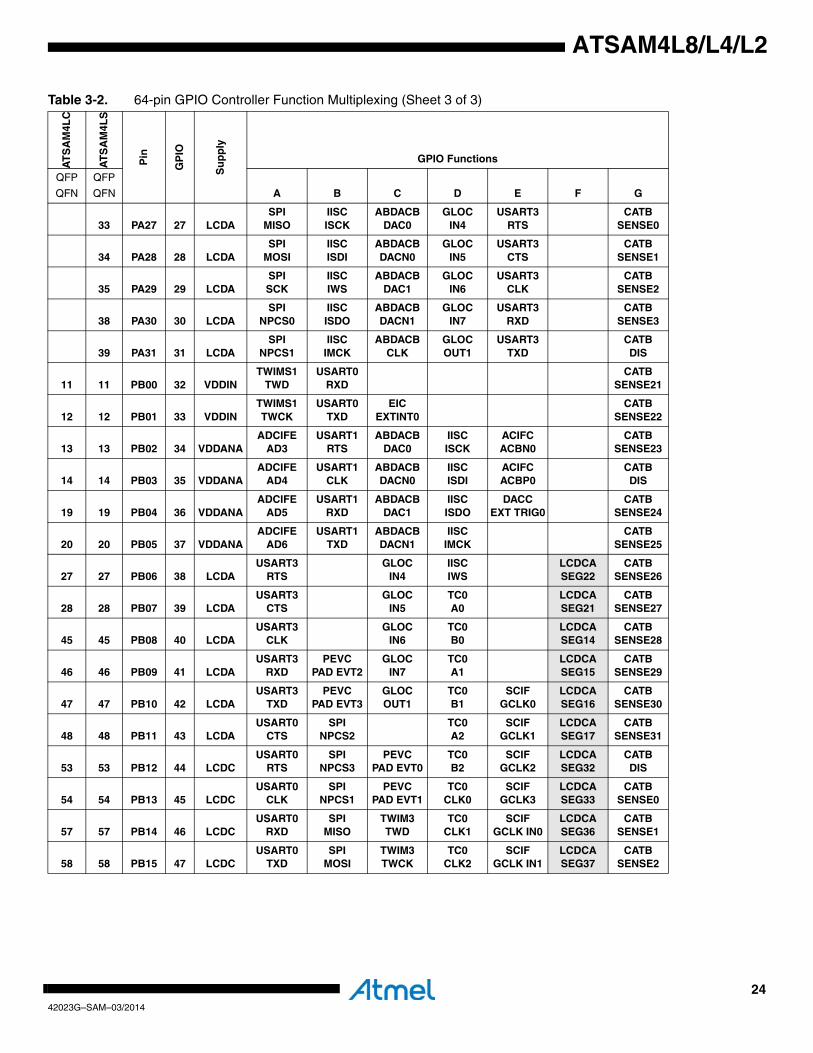
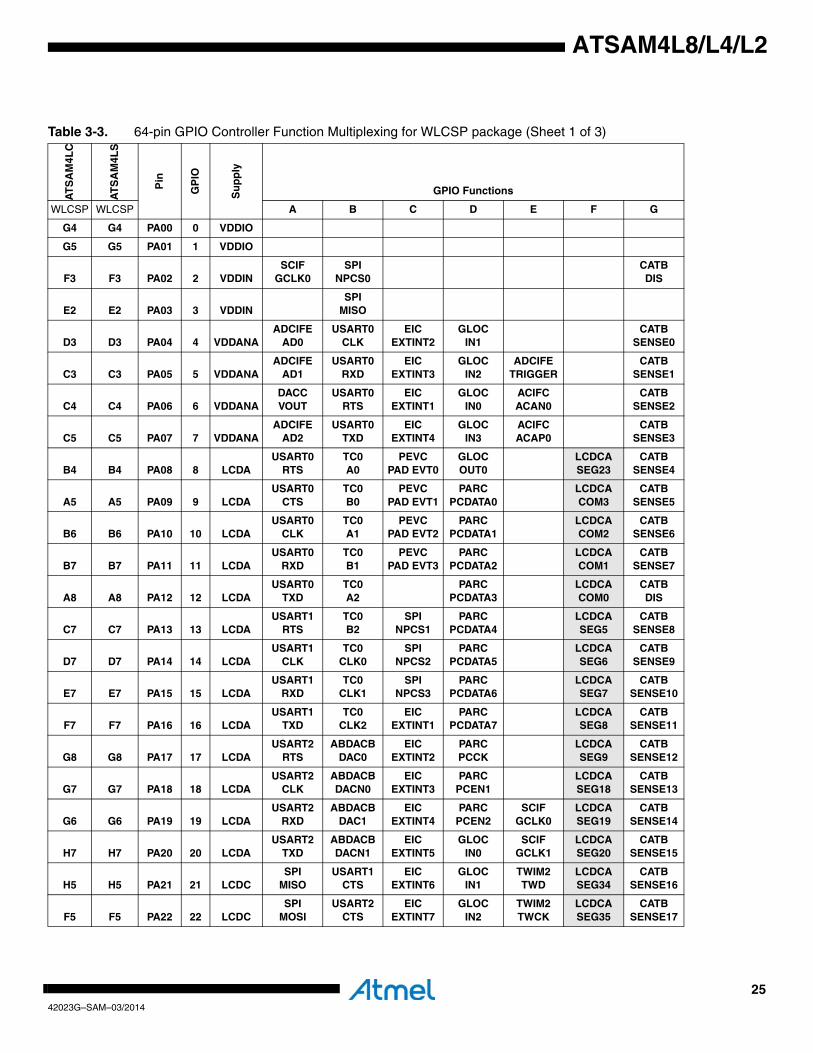
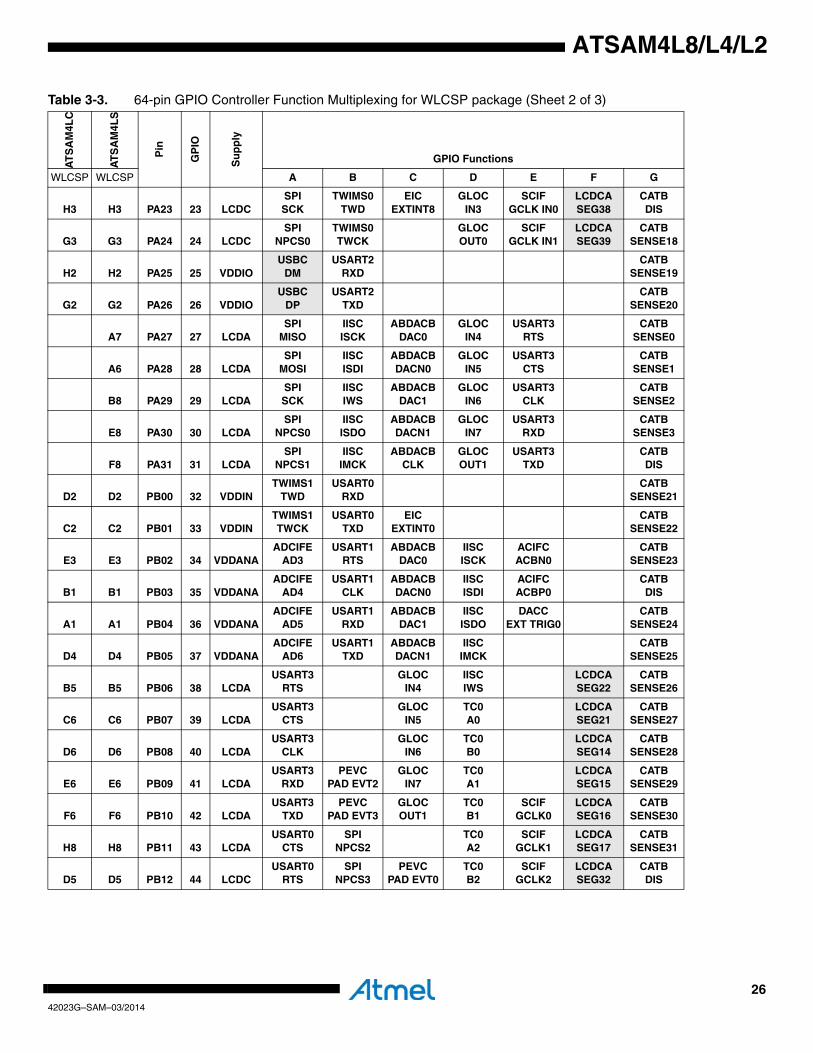
3.2 Peripheral Multiplexing on I/O lines
3.2.1 Multiplexed SignalsEach GPIO line can be assigned to one of the peripheral functions. The following tables (Section3-1 ”100-pin GPIO Controller Function Multiplexing” on page 19 to Section 3-4 ”48-pin GPIOController Function Multiplexing” on page 28) describes the peripheral signals multiplexed to theGPIO lines.
Peripheral functions that are not relevant in some parts of the family are grey-shaded.
For description of differents Supply voltage source, refer to the Section 5. ”Power and StartupConsiderations” on page 43.
Table 3-1. 100-pin GPIO Controller Function Multiplexing (Sheet 1 of 4)
AT
SA
M4L
C
AT
SA
M4L
S
Pin
GP
IO
Su
pp
ly
GPIO Functions
QFN VFBGA QFN VFBGA A B C D E F G
5 B9 5 B9 PA00 0 VDDIO
6 B8 6 B8 PA01 1 VDDIO
12 A7 12 A7 PA02 2 VDDINSCIF
GCLK0SPI
NPCS0CATB DIS
19 B3 19 B3 PA03 3 VDDINSPI
MISO
24 A2 24 A2 PA04 4 VDDANAADCIFE
AD0USART0
CLKEIC
EXTINT2GLOC
IN1CATB
SENSE0
25 A1 25 A1 PA05 5 VDDANAADCIFE
AD1USART0
RXDEIC
EXTINT3GLOC
IN2ADCIFE
TRIGGERCATB
SENSE1
30 C3 30 C3 PA06 6 VDDANADACC VOUT
USART0 RTS
EIC EXTINT1
GLOC IN0
ACIFC ACAN0
CATB SENSE2
31 D3 31 D3 PA07 7 VDDANAADCIFE
AD2USART0
TXDEIC
EXTINT4GLOC
IN3ACIFC ACAP0
CATB SENSE3
44 G2 44 G2 PA08 8 LCDAUSART0
RTSTC0 A0
PEVC PAD EVT0
GLOC OUT0
LCDCA SEG23
CATB SENSE4
47 F5 47 F5 PA09 9 LCDAUSART0
CTSTC0 B0
PEVC PAD EVT1
PARC PCDATA0
LCDCA COM3
CATB SENSE5
48 H2 48 H2 PA10 10 LCDAUSART0
CLKTC0 A1
PEVC PAD EVT2
PARC PCDATA1
LCDCA COM2
CATB SENSE6
49 H3 49 H3 PA11 11 LCDAUSART0
RXDTC0 B1
PEVC PAD EVT3
PARC PCDATA2
LCDCA COM1
CATB SENSE7
50 J2 50 J2 PA12 12 LCDAUSART0
TXDTC0 A2
PARC PCDATA3
LCDCA COM0
CATB DIS
63 H5 63 H5 PA13 13 LCDAUSART1
RTSTC0 B2
SPI NPCS1
PARC PCDATA4
LCDCA SEG5
CATB SENSE8
64 K7 64 K7 PA14 14 LCDAUSART1
CLKTC0
CLK0SPI
NPCS2PARC
PCDATA5LCDCA SEG6
CATB SENSE9
65 G5 65 G5 PA15 15 LCDAUSART1
RXDTC0
CLK1SPI
NPCS3PARC
PCDATA6LCDCA SEG7
CATB SENSE10
2042023G–SAM–03/2014
ATSAM4L8/L4/L2
66 J7 66 J7 PA16 16 LCDAUSART1
TXDTC0
CLK2EIC
EXTINT1PARC
PCDATA7LCDCA SEG8
CATB SENSE11
67 H6 67 H6 PA17 17 LCDAUSART2
RTSABDACB
DAC0EIC
EXTINT2PARC PCCK
LCDCA SEG9
CATB SENSE12
76 K10 76 K10 PA18 18 LCDAUSART2
CLKABDACB DACN0
EIC EXTINT3
PARC PCEN1
LCDCA SEG18
CATB SENSE13
77 J10 77 J10 PA19 19 LCDAUSART2
RXDABDACB
DAC1EIC
EXTINT4PARC
PCEN2SCIF
GCLK0LCDCA SEG19
CATB SENSE14
78 H10 78 H10 PA20 20 LCDAUSART2
TXDABDACB DACN1
EIC EXTINT5
GLOC IN0
SCIF GCLK1
LCDCA SEG20
CATB SENSE15
91 E9 91 E9 PA21 21 LCDCSPI
MISOUSART1
CTSEIC
EXTINT6GLOC
IN1TWIM2 TWD
LCDCA SEG34
CATB SENSE16
92 E10 92 E10 PA22 22 LCDCSPI
MOSIUSART2
CTSEIC
EXTINT7GLOC
IN2TWIM2 TWCK
LCDCA SEG35
CATB SENSE17
95 D6 95 D6 PA23 23 LCDCSPI SCK
TWIMS0 TWD
EIC EXTINT8
GLOC IN3
SCIF GCLK IN0
LCDCA SEG38
CATB DIS
96 D10 96 D10 PA24 24 LCDCSPI
NPCS0TWIMS0 TWCK
GLOC OUT0
SCIF GCLK IN1
LCDCA SEG39
CATB SENSE18
98 D9 98 D9 PA25 25 VDDIOUSBC
DMUSART2
RXDCATB
SENSE19
99 C9 99 C9 PA26 26 VDDIOUSBC
DPUSART2
TXDCATB
SENSE20
51 K1 PA27 27 LCDASPI
MISOIISC ISCK
ABDACB DAC0
GLOC IN4
USART3 RTS
CATB SENSE0
52 J1 PA28 28 LCDASPI
MOSIIISC ISDI
ABDACB DACN0
GLOC IN5
USART3 CTS
CATB SENSE1
53 K2 PA29 29 LCDASPI SCK
IISC IWS
ABDACB DAC1
GLOC IN6
USART3 CLK
CATB SENSE2
56 K4 PA30 30 LCDASPI
NPCS0IISC ISDO
ABDACB DACN1
GLOC IN7
USART3 RXD
CATB SENSE3
57 K5 PA31 31 LCDASPI
NPCS1IISC
IMCKABDACB
CLKGLOC OUT1
USART3 TXD
CATB DIS
20 J3 20 J3 PB00 32 VDDINTWIMS1
TWDUSART0
RXDCATB
SENSE21
21 D5 21 D5 PB01 33 VDDINTWIMS1 TWCK
USART0 TXD
EIC EXTINT0
CATB SENSE22
22 E5 22 E5 PB02 34 VDDANAADCIFE
AD3USART1
RTSABDACB
DAC0IISC ISCK
ACIFC ACBN0
CATB SENSE23
23 C4 23 C4 PB03 35 VDDANAADCIFE
AD4USART1
CLKABDACB DACN0
IISC ISDI
ACIFC ACBP0
CATB DIS
28 C1 28 C1 PB04 36 VDDANAADCIFE
AD5USART1
RXDABDACB
DAC1IISC ISDO
DACC EXT TRIG0
CATB SENSE24
29 B1 29 B1 PB05 37 VDDANAADCIFE
AD6USART1
TXDABDACB DACN1
IISC IMCK
CATB SENSE25
45 G3 45 G3 PB06 38 LCDAUSART3
RTSGLOC
IN4IISC IWS
LCDCA SEG22
CATB SENSE26
46 H1 46 H1 PB07 39 LCDAUSART3
CTSGLOC
IN5TC0 A0
LCDCA SEG21
CATB SENSE27
Table 3-1. 100-pin GPIO Controller Function Multiplexing (Sheet 2 of 4)A
TS
AM
4LC
AT
SA
M4L
S
Pin
GP
IO
Su
pp
ly
GPIO Functions
QFN VFBGA QFN VFBGA A B C D E F G
2142023G–SAM–03/2014
ATSAM4L8/L4/L2
72 G6 72 G6 PB08 40 LCDAUSART3
CLKGLOC
IN6TC0 B0
LCDCA SEG14
CATB SENSE28
73 G7 73 G7 PB09 41 LCDAUSART3
RXDPEVC
PAD EVT2GLOC
IN7TC0 A1
LCDCA SEG15
CATB SENSE29
74 G8 74 G8 PB10 42 LCDAUSART3
TXDPEVC
PAD EVT3GLOC OUT1
TC0 B1
SCIF GCLK0
LCDCA SEG16
CATB SENSE30
75 K9 75 K9 PB11 43 LCDAUSART0
CTSSPI
NPCS2TC0 A2
SCIF GCLK1
LCDCA SEG17
CATB SENSE31
89 E7 89 E7 PB12 44 LCDCUSART0
RTSSPI
NPCS3PEVC
PAD EVT0TC0 B2
SCIF GCLK2
LCDCA SEG32
CATB DIS
90 E8 90 E8 PB13 45 LCDCUSART0
CLKSPI
NPCS1PEVC
PAD EVT1TC0
CLK0SCIF
GCLK3LCDCA SEG33
CATB SENSE0
93 D7 93 D7 PB14 46 LCDCUSART0
RXDSPI
MISOTWIM3 TWD
TC0 CLK1
SCIF GCLK IN0
LCDCA SEG36
CATB SENSE1
94 D8 94 D8 PB15 47 LCDCUSART0
TXDSPI
MOSITWIM3 TWCK
TC0 CLK2
SCIF GCLK IN1
LCDCA SEG37
CATB SENSE2
1 A10 1 A10 PC00 64 VDDIOSPI
NPCS2USART0
CLKTC1 A0
CATB SENSE3
2 C8 2 C8 PC01 65 VDDIOSPI
NPCS3USART0
RTSTC1 B0
CATB SENSE4
3 C7 3 C7 PC02 66 VDDIOSPI
NPCS1USART0
CTSUSART0
RXDTC1 A1
CATB SENSE5
4 B7 4 B7 PC03 67 VDDIOSPI
NPCS0EIC
EXTINT5USART0
TXDTC1 B1
CATB SENSE6
9 C5 9 C5 PC04 68 VDDIOSPI
MISOEIC
EXTINT6TC1 A2
CATB SENSE7
10 C6 10 C6 PC05 69 VDDIOSPI
MOSIEIC
EXTINT7TC1 B2
CATB DIS
11 B6 11 B6 PC06 70 VDDIOSPI SCK
EIC EXTINT8
TC1 CLK0
CATB SENSE8
36 F2 36 F2 PC07 71 VDDANAADCIFE
AD7USART2
RTSPEVC
PAD EVT0TC1
CLK1CATB
SENSE9
37 E3 37 E3 PC08 72 VDDANAADCIFE
AD8USART2
CLKPEVC
PAD EVT1TC1
CLK2USART2
CTSCATB
SENSE10
38 F1 38 F1 PC09 73 VDDANAADCIFE
AD9USART3
RXDABDACB
DAC0IISC ISCK
ACIFC ACAN1
CATB SENSE11
39 D4 39 D4 PC10 74 VDDANAADCIFE
AD10USART3
TXDABDACB DACN0
IISC ISDI
ACIFC ACAP1
CATB SENSE12
40 E4 40 E4 PC11 75 VDDANAADCIFE
AD11USART2
RXDPEVC
PAD EVT2CATB
SENSE13
41 F3 41 F3 PC12 76 VDDANAADCIFE
AD12USART2
TXDABDACB
CLKIISC IWS
CATB SENSE14
42 F4 42 F4 PC13 77 VDDANAADCIFE
AD13USART3
RTSABDACB
DAC1IISC ISDO
ACIFC ACBN1
CATB SENSE15
43 G1 43 G1 PC14 78 VDDANAADCIFE
AD14USART3
CLKABDACB DACN1
IISC IMCK
ACIFC ACBP1
CATB DIS
58 J5 58 J5 PC15 79 LCDATC1 A0
GLOC IN4
LCDCA SEG0
CATB SENSE16
Table 3-1. 100-pin GPIO Controller Function Multiplexing (Sheet 3 of 4)A
TS
AM
4LC
AT
SA
M4L
S
Pin
GP
IO
Su
pp
ly
GPIO Functions
QFN VFBGA QFN VFBGA A B C D E F G
2242023G–SAM–03/2014
ATSAM4L8/L4/L2
59 J6 59 J6 PC16 80 LCDATC1 B0
GLOC IN5
LCDCA SEG1
CATB SENSE17
60 H4 60 H4 PC17 81 LCDATC1 A1
GLOC IN6
LCDCA SEG2
CATB SENSE18
61 K6 61 K6 PC18 82 LCDATC1 B1
GLOC IN7
LCDCA SEG3
CATB SENSE19
62 G4 62 G4 PC19 83 LCDATC1 A2
GLOC OUT1
LCDCA SEG4
CATB SENSE20
68 H7 68 H7 PC20 84 LCDATC1 B2
LCDCA SEG10
CATB SENSE21
69 K8 69 K8 PC21 85 LCDATC1
CLK0PARC PCCK
LCDCA SEG11
CATB SENSE22
70 J8 70 J8 PC22 86 LCDATC1
CLK1PARC
PCEN1LCDCA SEG12
CATB SENSE23
71 H8 71 H8 PC23 87 LCDATC1
CLK2PARC
PCEN2LCDCA SEG13
CATB DIS
79 J9 79 J9 PC24 88 LCDBUSART1
RTSEIC
EXTINT1PEVC
PAD EVT0PARC
PCDATA0LCDCA SEG24
CATB SENSE24
80 H9 80 H9 PC25 89 LCDBUSART1
CLKEIC
EXTINT2PEVC
PAD EVT1PARC
PCDATA1LCDCA SEG25
CATB SENSE25
81 G9 81 G9 PC26 90 LCDBUSART1
RXDEIC
EXTINT3PEVC
PAD EVT2PARC
PCDATA2SCIF
GCLK0LCDCA SEG26
CATB SENSE26
82 F6 82 F6 PC27 91 LCDBUSART1
TXDEIC
EXTINT4PEVC
PAD EVT3PARC
PCDATA3SCIF
GCLK1LCDCA SEG27
CATB SENSE27
83 G10 83 G10 PC28 92 LCDBUSART3
RXDSPI
MISOGLOC
IN4PARC
PCDATA4SCIF
GCLK2LCDCA SEG28
CATB SENSE28
84 F7 84 F7 PC29 93 LCDBUSART3
TXDSPI
MOSIGLOC
IN5PARC
PCDATA5SCIF
GCLK3LCDCA SEG29
CATB SENSE29
85 F8 85 F8 PC30 94 LCDBUSART3
RTSSPI SCK
GLOC IN6
PARC PCDATA6
SCIF GCLK IN0
LCDCA SEG30
CATB SENSE30
86 F9 86 F9 PC31 95 LCDBUSART3
CLKSPI
NPCS0GLOC OUT1
PARC PCDATA7
SCIF GCLK IN1
LCDCA SEG31
CATB SENSE31
Table 3-1. 100-pin GPIO Controller Function Multiplexing (Sheet 4 of 4)A
TS
AM
4LC
AT
SA
M4L
S
Pin
GP
IO
Su
pp
ly
GPIO Functions
QFN VFBGA QFN VFBGA A B C D E F G
Table 3-2. 64-pin GPIO Controller Function Multiplexing (Sheet 1 of 3)
AT
SA
M4L
C
AT
SA
M4L
S
Pin
GP
IO
Su
pp
ly
GPIO Functions
QFP
QFN
QFP
QFN A B C D E F G
1 1 PA00 0 VDDIO
2 2 PA01 1 VDDIO
3 3 PA02 2 VDDINSCIF
GCLK0SPI
NPCS0CATB DIS
10 10 PA03 3 VDDINSPI
MISO

2342023G–SAM–03/2014
ATSAM4L8/L4/L2
15 15 PA04 4 VDDANAADCIFE
AD0USART0
CLKEIC
EXTINT2GLOC
IN1CATB
SENSE0
16 16 PA05 5 VDDANAADCIFE
AD1USART0
RXDEIC
EXTINT3GLOC
IN2ADCIFE
TRIGGERCATB
SENSE1
21 21 PA06 6 VDDANADACC VOUT
USART0 RTS
EIC EXTINT1
GLOC IN0
ACIFC ACAN0
CATB SENSE2
22 22 PA07 7 VDDANAADCIFE
AD2USART0
TXDEIC
EXTINT4GLOC
IN3ACIFC ACAP0
CATB SENSE3
26 26 PA08 8 LCDAUSART0
RTSTC0 A0
PEVC PAD EVT0
GLOC OUT0
LCDCA SEG23
CATB SENSE4
29 29 PA09 9 LCDAUSART0
CTSTC0 B0
PEVC PAD EVT1
PARC PCDATA0
LCDCA COM3
CATB SENSE5
30 30 PA10 10 LCDAUSART0
CLKTC0 A1
PEVC PAD EVT2
PARC PCDATA1
LCDCA COM2
CATB SENSE6
31 31 PA11 11 LCDAUSART0
RXDTC0 B1
PEVC PAD EVT3
PARC PCDATA2
LCDCA COM1
CATB SENSE7
32 32 PA12 12 LCDAUSART0
TXDTC0 A2
PARC PCDATA3
LCDCA COM0
CATB DIS
40 40 PA13 13 LCDAUSART1
RTSTC0 B2
SPI NPCS1
PARC PCDATA4
LCDCA SEG5
CATB SENSE8
41 41 PA14 14 LCDAUSART1
CLKTC0
CLK0SPI
NPCS2PARC
PCDATA5LCDCA SEG6
CATB SENSE9
42 42 PA15 15 LCDAUSART1
RXDTC0
CLK1SPI
NPCS3PARC
PCDATA6LCDCA SEG7
CATB SENSE10
43 43 PA16 16 LCDAUSART1
TXDTC0
CLK2EIC
EXTINT1PARC
PCDATA7LCDCA SEG8
CATB SENSE11
44 44 PA17 17 LCDAUSART2
RTSABDACB
DAC0EIC
EXTINT2PARC PCCK
LCDCA SEG9
CATB SENSE12
49 49 PA18 18 LCDAUSART2
CLKABDACB DACN0
EIC EXTINT3
PARC PCEN1
LCDCA SEG18
CATB SENSE13
50 50 PA19 19 LCDAUSART2
RXDABDACB
DAC1EIC
EXTINT4PARC
PCEN2SCIF
GCLK0LCDCA SEG19
CATB SENSE14
51 51 PA20 20 LCDAUSART2
TXDABDACB DACN1
EIC EXTINT5
GLOC IN0
SCIF GCLK1
LCDCA SEG20
CATB SENSE15
55 55 PA21 21 LCDCSPI
MISOUSART1
CTSEIC
EXTINT6GLOC
IN1TWIM2 TWD
LCDCA SEG34
CATB SENSE16
56 56 PA22 22 LCDCSPI
MOSIUSART2
CTSEIC
EXTINT7GLOC
IN2TWIM2 TWCK
LCDCA SEG35
CATB SENSE17
59 59 PA23 23 LCDCSPI SCK
TWIMS0 TWD
EIC EXTINT8
GLOC IN3
SCIF GCLK IN0
LCDCA SEG38
CATB DIS
60 60 PA24 24 LCDCSPI
NPCS0TWIMS0 TWCK
GLOC OUT0
SCIF GCLK IN1
LCDCA SEG39
CATB SENSE18
62 62 PA25 25 VDDIOUSBC
DMUSART2
RXDCATB
SENSE19
63 63 PA26 26 VDDIOUSBC
DPUSART2
TXDCATB
SENSE20
Table 3-2. 64-pin GPIO Controller Function Multiplexing (Sheet 2 of 3)
AT
SA
M4L
C
AT
SA
M4L
S
Pin
GP
IO
Su
pp
ly
GPIO Functions
QFP
QFN
QFP
QFN A B C D E F G
2442023G–SAM–03/2014
ATSAM4L8/L4/L2
33 PA27 27 LCDASPI
MISOIISC ISCK
ABDACB DAC0
GLOC IN4
USART3 RTS
CATB SENSE0
34 PA28 28 LCDASPI
MOSIIISC ISDI
ABDACB DACN0
GLOC IN5
USART3 CTS
CATB SENSE1
35 PA29 29 LCDASPI SCK
IISC IWS
ABDACB DAC1
GLOC IN6
USART3 CLK
CATB SENSE2
38 PA30 30 LCDASPI
NPCS0IISC ISDO
ABDACB DACN1
GLOC IN7
USART3 RXD
CATB SENSE3
39 PA31 31 LCDASPI
NPCS1IISC
IMCKABDACB
CLKGLOC OUT1
USART3 TXD
CATB DIS
11 11 PB00 32 VDDINTWIMS1
TWDUSART0
RXDCATB
SENSE21
12 12 PB01 33 VDDINTWIMS1 TWCK
USART0 TXD
EIC EXTINT0
CATB SENSE22
13 13 PB02 34 VDDANAADCIFE
AD3USART1
RTSABDACB
DAC0IISC ISCK
ACIFC ACBN0
CATB SENSE23
14 14 PB03 35 VDDANAADCIFE
AD4USART1
CLKABDACB DACN0
IISC ISDI
ACIFC ACBP0
CATB DIS
19 19 PB04 36 VDDANAADCIFE
AD5USART1
RXDABDACB
DAC1IISC ISDO
DACC EXT TRIG0
CATB SENSE24
20 20 PB05 37 VDDANAADCIFE
AD6USART1
TXDABDACB DACN1
IISC IMCK
CATB SENSE25
27 27 PB06 38 LCDAUSART3
RTSGLOC
IN4IISC IWS
LCDCA SEG22
CATB SENSE26
28 28 PB07 39 LCDAUSART3
CTSGLOC
IN5TC0 A0
LCDCA SEG21
CATB SENSE27
45 45 PB08 40 LCDAUSART3
CLKGLOC
IN6TC0 B0
LCDCA SEG14
CATB SENSE28
46 46 PB09 41 LCDAUSART3
RXDPEVC
PAD EVT2GLOC
IN7TC0 A1
LCDCA SEG15
CATB SENSE29
47 47 PB10 42 LCDAUSART3
TXDPEVC
PAD EVT3GLOC OUT1
TC0 B1
SCIF GCLK0
LCDCA SEG16
CATB SENSE30
48 48 PB11 43 LCDAUSART0
CTSSPI
NPCS2TC0 A2
SCIF GCLK1
LCDCA SEG17
CATB SENSE31
53 53 PB12 44 LCDCUSART0
RTSSPI
NPCS3PEVC
PAD EVT0TC0 B2
SCIF GCLK2
LCDCA SEG32
CATB DIS
54 54 PB13 45 LCDCUSART0
CLKSPI
NPCS1PEVC
PAD EVT1TC0
CLK0SCIF
GCLK3LCDCA SEG33
CATB SENSE0
57 57 PB14 46 LCDCUSART0
RXDSPI
MISOTWIM3 TWD
TC0 CLK1
SCIF GCLK IN0
LCDCA SEG36
CATB SENSE1
58 58 PB15 47 LCDCUSART0
TXDSPI
MOSITWIM3 TWCK
TC0 CLK2
SCIF GCLK IN1
LCDCA SEG37
CATB SENSE2
Table 3-2. 64-pin GPIO Controller Function Multiplexing (Sheet 3 of 3)
AT
SA
M4L
C
AT
SA
M4L
S
Pin
GP
IO
Su
pp
ly
GPIO Functions
QFP
QFN
QFP
QFN A B C D E F G
2542023G–SAM–03/2014
ATSAM4L8/L4/L2
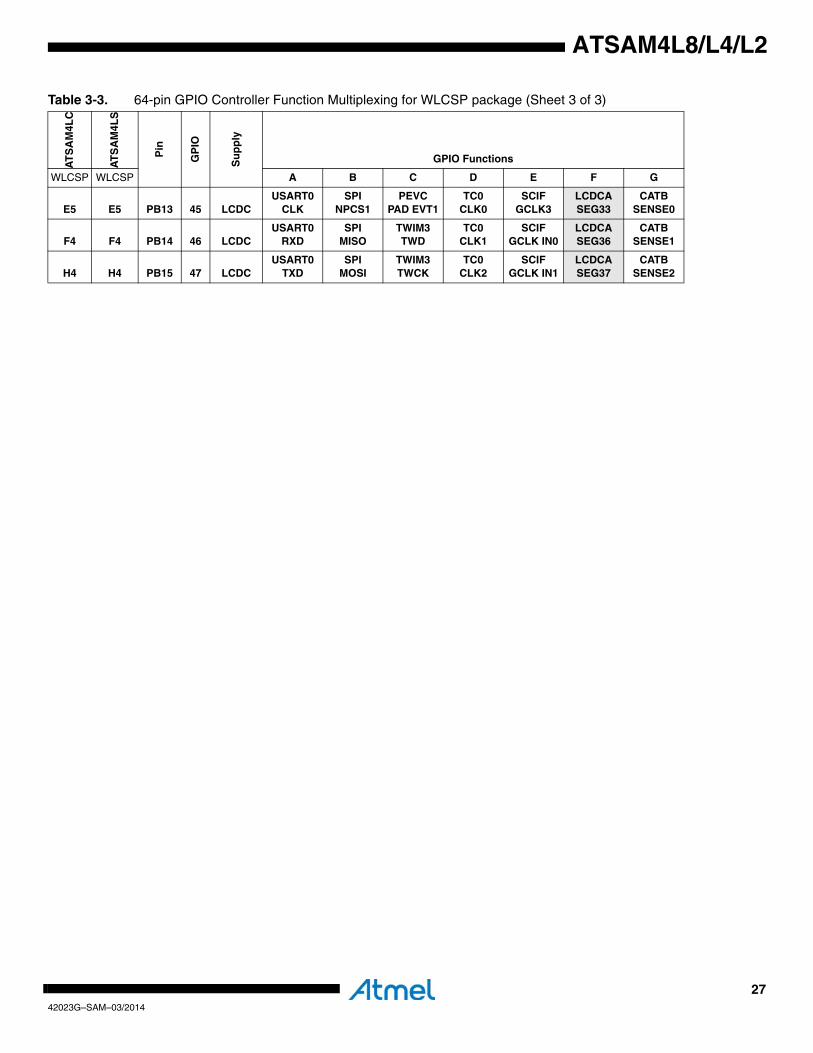
Table 3-3. 64-pin GPIO Controller Function Multiplexing for WLCSP package (Sheet 1 of 3)
AT
SA
M4L
C
AT
SA
M4L
S
Pin
GP
IO
Su
pp
ly
GPIO Functions
WLCSP WLCSP A B C D E F G
G4 G4 PA00 0 VDDIO
G5 G5 PA01 1 VDDIO
F3 F3 PA02 2 VDDINSCIF
GCLK0SPI
NPCS0CATB DIS
E2 E2 PA03 3 VDDINSPI
MISO
D3 D3 PA04 4 VDDANAADCIFE
AD0USART0
CLKEIC
EXTINT2GLOC
IN1CATB
SENSE0
C3 C3 PA05 5 VDDANAADCIFE
AD1USART0
RXDEIC
EXTINT3GLOC
IN2ADCIFE
TRIGGERCATB
SENSE1
C4 C4 PA06 6 VDDANADACC VOUT
USART0 RTS
EIC EXTINT1
GLOC IN0
ACIFC ACAN0
CATB SENSE2
C5 C5 PA07 7 VDDANAADCIFE
AD2USART0
TXDEIC
EXTINT4GLOC
IN3ACIFC ACAP0
CATB SENSE3
B4 B4 PA08 8 LCDAUSART0
RTSTC0 A0
PEVC PAD EVT0
GLOC OUT0
LCDCA SEG23
CATB SENSE4
A5 A5 PA09 9 LCDAUSART0
CTSTC0 B0
PEVC PAD EVT1
PARC PCDATA0
LCDCA COM3
CATB SENSE5
B6 B6 PA10 10 LCDAUSART0
CLKTC0 A1
PEVC PAD EVT2
PARC PCDATA1
LCDCA COM2
CATB SENSE6
B7 B7 PA11 11 LCDAUSART0
RXDTC0 B1
PEVC PAD EVT3
PARC PCDATA2
LCDCA COM1
CATB SENSE7
A8 A8 PA12 12 LCDAUSART0
TXDTC0 A2
PARC PCDATA3
LCDCA COM0
CATB DIS
C7 C7 PA13 13 LCDAUSART1
RTSTC0 B2
SPI NPCS1
PARC PCDATA4
LCDCA SEG5
CATB SENSE8
D7 D7 PA14 14 LCDAUSART1
CLKTC0
CLK0SPI
NPCS2PARC
PCDATA5LCDCA SEG6
CATB SENSE9
E7 E7 PA15 15 LCDAUSART1
RXDTC0
CLK1SPI
NPCS3PARC
PCDATA6LCDCA SEG7
CATB SENSE10
F7 F7 PA16 16 LCDAUSART1
TXDTC0
CLK2EIC
EXTINT1PARC
PCDATA7LCDCA SEG8
CATB SENSE11
G8 G8 PA17 17 LCDAUSART2
RTSABDACB
DAC0EIC
EXTINT2PARC PCCK
LCDCA SEG9
CATB SENSE12
G7 G7 PA18 18 LCDAUSART2
CLKABDACB DACN0
EIC EXTINT3
PARC PCEN1
LCDCA SEG18
CATB SENSE13
G6 G6 PA19 19 LCDAUSART2
RXDABDACB
DAC1EIC
EXTINT4PARC
PCEN2SCIF
GCLK0LCDCA SEG19
CATB SENSE14
H7 H7 PA20 20 LCDAUSART2
TXDABDACB DACN1
EIC EXTINT5
GLOC IN0
SCIF GCLK1
LCDCA SEG20
CATB SENSE15
H5 H5 PA21 21 LCDCSPI
MISOUSART1
CTSEIC
EXTINT6GLOC
IN1TWIM2 TWD
LCDCA SEG34
CATB SENSE16
F5 F5 PA22 22 LCDCSPI
MOSIUSART2
CTSEIC
EXTINT7GLOC
IN2TWIM2 TWCK
LCDCA SEG35
CATB SENSE17
2642023G–SAM–03/2014
ATSAM4L8/L4/L2
H3 H3 PA23 23 LCDCSPI SCK
TWIMS0 TWD
EIC EXTINT8
GLOC IN3
SCIF GCLK IN0
LCDCA SEG38
CATB DIS
G3 G3 PA24 24 LCDCSPI
NPCS0TWIMS0 TWCK
GLOC OUT0
SCIF GCLK IN1
LCDCA SEG39
CATB SENSE18
H2 H2 PA25 25 VDDIOUSBC
DMUSART2
RXDCATB
SENSE19
G2 G2 PA26 26 VDDIOUSBC
DPUSART2
TXDCATB
SENSE20
A7 PA27 27 LCDASPI
MISOIISC ISCK
ABDACB DAC0
GLOC IN4
USART3 RTS
CATB SENSE0
A6 PA28 28 LCDASPI
MOSIIISC ISDI
ABDACB DACN0
GLOC IN5
USART3 CTS
CATB SENSE1
B8 PA29 29 LCDASPI SCK
IISC IWS
ABDACB DAC1
GLOC IN6
USART3 CLK
CATB SENSE2
E8 PA30 30 LCDASPI
NPCS0IISC ISDO
ABDACB DACN1
GLOC IN7
USART3 RXD
CATB SENSE3
F8 PA31 31 LCDASPI
NPCS1IISC
IMCKABDACB
CLKGLOC OUT1
USART3 TXD
CATB DIS
D2 D2 PB00 32 VDDINTWIMS1
TWDUSART0
RXDCATB
SENSE21
C2 C2 PB01 33 VDDINTWIMS1 TWCK
USART0 TXD
EIC EXTINT0
CATB SENSE22
E3 E3 PB02 34 VDDANAADCIFE
AD3USART1
RTSABDACB
DAC0IISC ISCK
ACIFC ACBN0
CATB SENSE23
B1 B1 PB03 35 VDDANAADCIFE
AD4USART1
CLKABDACB DACN0
IISC ISDI
ACIFC ACBP0
CATB DIS
A1 A1 PB04 36 VDDANAADCIFE
AD5USART1
RXDABDACB
DAC1IISC ISDO
DACC EXT TRIG0
CATB SENSE24
D4 D4 PB05 37 VDDANAADCIFE
AD6USART1
TXDABDACB DACN1
IISC IMCK
CATB SENSE25
B5 B5 PB06 38 LCDAUSART3
RTSGLOC
IN4IISC IWS
LCDCA SEG22
CATB SENSE26
C6 C6 PB07 39 LCDAUSART3
CTSGLOC
IN5TC0 A0
LCDCA SEG21
CATB SENSE27
D6 D6 PB08 40 LCDAUSART3
CLKGLOC
IN6TC0 B0
LCDCA SEG14
CATB SENSE28
E6 E6 PB09 41 LCDAUSART3
RXDPEVC
PAD EVT2GLOC
IN7TC0 A1
LCDCA SEG15
CATB SENSE29
F6 F6 PB10 42 LCDAUSART3
TXDPEVC
PAD EVT3GLOC OUT1
TC0 B1
SCIF GCLK0
LCDCA SEG16
CATB SENSE30
H8 H8 PB11 43 LCDAUSART0
CTSSPI
NPCS2TC0 A2
SCIF GCLK1
LCDCA SEG17
CATB SENSE31
D5 D5 PB12 44 LCDCUSART0
RTSSPI
NPCS3PEVC
PAD EVT0TC0 B2
SCIF GCLK2
LCDCA SEG32
CATB DIS
Table 3-3. 64-pin GPIO Controller Function Multiplexing for WLCSP package (Sheet 2 of 3)
AT
SA
M4L
C
AT
SA
M4L
S
Pin
GP
IO
Su
pp
ly
GPIO Functions
WLCSP WLCSP A B C D E F G
2742023G–SAM–03/2014
ATSAM4L8/L4/L2
E5 E5 PB13 45 LCDCUSART0
CLKSPI
NPCS1PEVC
PAD EVT1TC0
CLK0SCIF
GCLK3LCDCA SEG33
CATB SENSE0
F4 F4 PB14 46 LCDCUSART0
RXDSPI
MISOTWIM3 TWD
TC0 CLK1
SCIF GCLK IN0
LCDCA SEG36
CATB SENSE1
H4 H4 PB15 47 LCDCUSART0
TXDSPI
MOSITWIM3 TWCK
TC0 CLK2
SCIF GCLK IN1
LCDCA SEG37
CATB SENSE2
Table 3-3. 64-pin GPIO Controller Function Multiplexing for WLCSP package (Sheet 3 of 3)
AT
SA
M4L
C
AT
SA
M4L
S
Pin
GP
IO
Su
pp
ly
GPIO Functions
WLCSP WLCSP A B C D E F G
2842023G–SAM–03/2014
ATSAM4L8/L4/L2
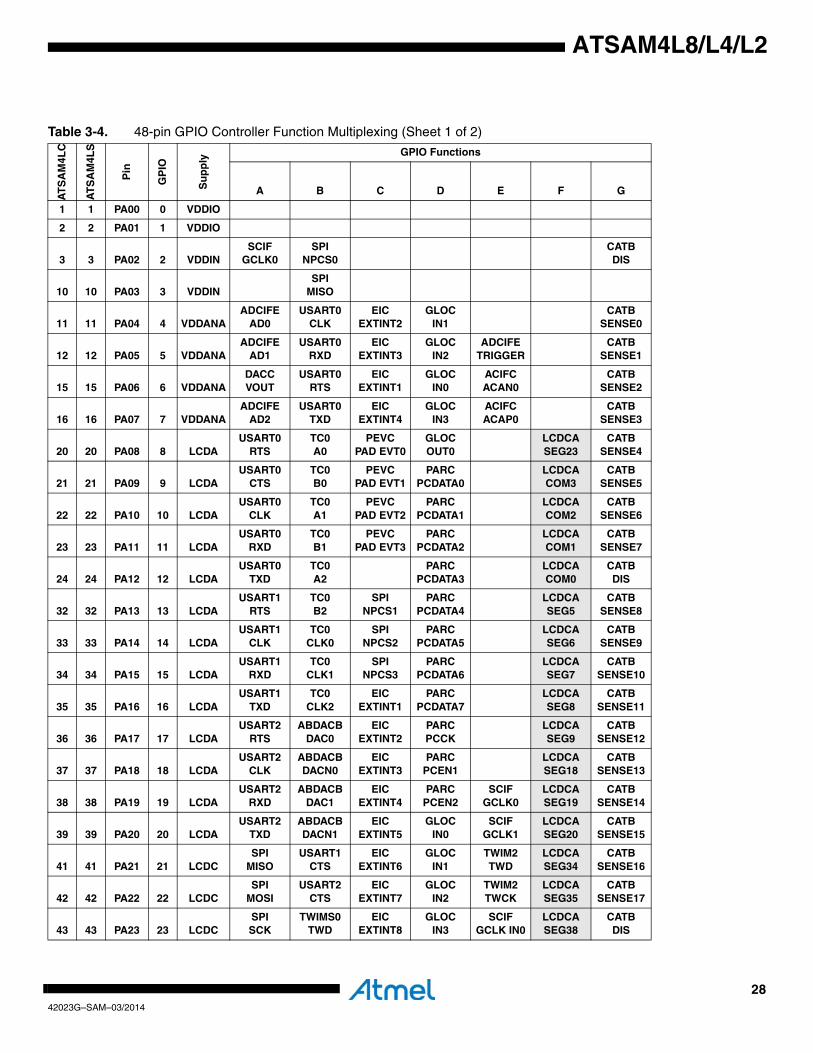
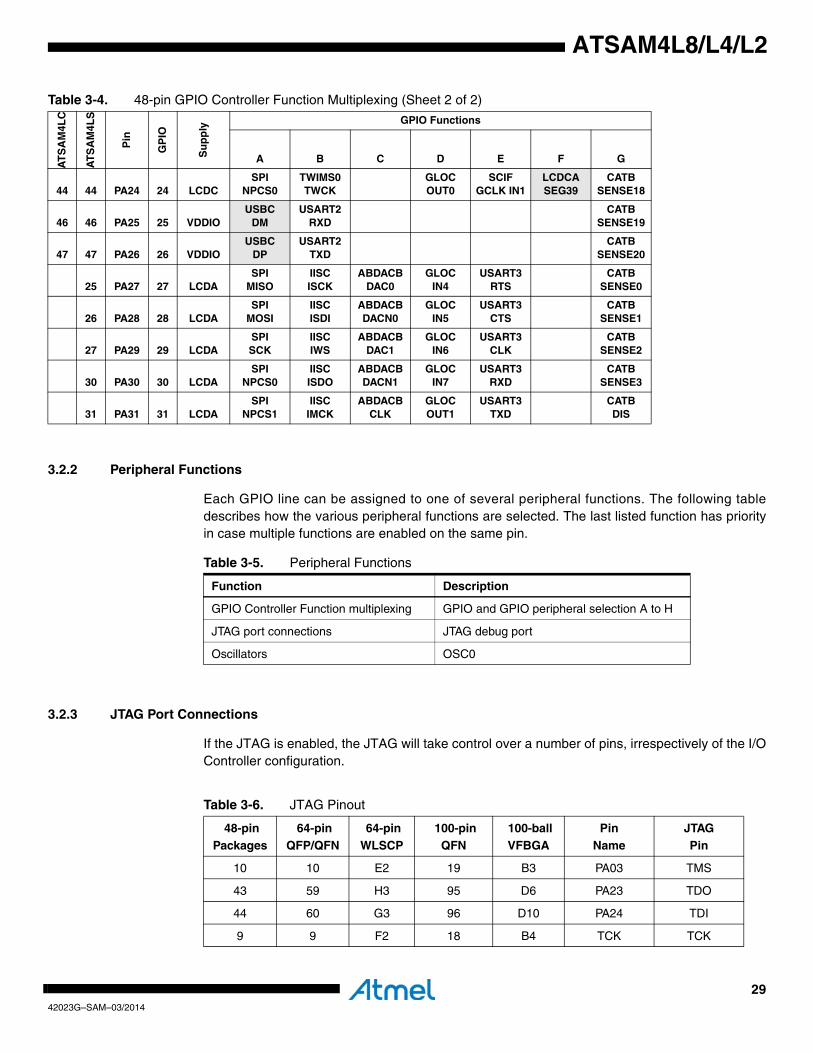
Table 3-4. 48-pin GPIO Controller Function Multiplexing (Sheet 1 of 2)
AT
SA
M4L
C
AT
SA
M4L
S
Pin
GP
IO
Su
pp
ly
GPIO Functions
A B C D E F G
1 1 PA00 0 VDDIO
2 2 PA01 1 VDDIO
3 3 PA02 2 VDDINSCIF
GCLK0SPI
NPCS0CATB DIS
10 10 PA03 3 VDDINSPI
MISO
11 11 PA04 4 VDDANAADCIFE
AD0USART0
CLKEIC
EXTINT2GLOC
IN1CATB
SENSE0
12 12 PA05 5 VDDANAADCIFE
AD1USART0
RXDEIC
EXTINT3GLOC
IN2ADCIFE
TRIGGERCATB
SENSE1
15 15 PA06 6 VDDANADACC VOUT
USART0 RTS
EIC EXTINT1
GLOC IN0
ACIFC ACAN0
CATB SENSE2
16 16 PA07 7 VDDANAADCIFE
AD2USART0
TXDEIC
EXTINT4GLOC
IN3ACIFC ACAP0
CATB SENSE3
20 20 PA08 8 LCDAUSART0
RTSTC0 A0
PEVC PAD EVT0
GLOC OUT0
LCDCA SEG23
CATB SENSE4
21 21 PA09 9 LCDAUSART0
CTSTC0 B0
PEVC PAD EVT1
PARC PCDATA0
LCDCA COM3
CATB SENSE5
22 22 PA10 10 LCDAUSART0
CLKTC0 A1
PEVC PAD EVT2
PARC PCDATA1
LCDCA COM2
CATB SENSE6
23 23 PA11 11 LCDAUSART0
RXDTC0 B1
PEVC PAD EVT3
PARC PCDATA2
LCDCA COM1
CATB SENSE7
24 24 PA12 12 LCDAUSART0
TXDTC0 A2
PARC PCDATA3
LCDCA COM0
CATB DIS
32 32 PA13 13 LCDAUSART1
RTSTC0 B2
SPI NPCS1
PARC PCDATA4
LCDCA SEG5
CATB SENSE8
33 33 PA14 14 LCDAUSART1
CLKTC0
CLK0SPI
NPCS2PARC
PCDATA5LCDCA SEG6
CATB SENSE9
34 34 PA15 15 LCDAUSART1
RXDTC0
CLK1SPI
NPCS3PARC
PCDATA6LCDCA SEG7
CATB SENSE10
35 35 PA16 16 LCDAUSART1
TXDTC0
CLK2EIC
EXTINT1PARC
PCDATA7LCDCA SEG8
CATB SENSE11
36 36 PA17 17 LCDAUSART2
RTSABDACB
DAC0EIC
EXTINT2PARC PCCK
LCDCA SEG9
CATB SENSE12
37 37 PA18 18 LCDAUSART2
CLKABDACB DACN0
EIC EXTINT3
PARC PCEN1
LCDCA SEG18
CATB SENSE13
38 38 PA19 19 LCDAUSART2
RXDABDACB
DAC1EIC
EXTINT4PARC
PCEN2SCIF
GCLK0LCDCA SEG19
CATB SENSE14
39 39 PA20 20 LCDAUSART2
TXDABDACB DACN1
EIC EXTINT5
GLOC IN0
SCIF GCLK1
LCDCA SEG20
CATB SENSE15
41 41 PA21 21 LCDCSPI
MISOUSART1
CTSEIC
EXTINT6GLOC
IN1TWIM2 TWD
LCDCA SEG34
CATB SENSE16
42 42 PA22 22 LCDCSPI
MOSIUSART2
CTSEIC
EXTINT7GLOC
IN2TWIM2 TWCK
LCDCA SEG35
CATB SENSE17
43 43 PA23 23 LCDCSPI SCK
TWIMS0 TWD
EIC EXTINT8
GLOC IN3
SCIF GCLK IN0
LCDCA SEG38
CATB DIS
2942023G–SAM–03/2014
ATSAM4L8/L4/L2
3.2.2 Peripheral Functions
Each GPIO line can be assigned to one of several peripheral functions. The following tabledescribes how the various peripheral functions are selected. The last listed function has priorityin case multiple functions are enabled on the same pin.
3.2.3 JTAG Port Connections
If the JTAG is enabled, the JTAG will take control over a number of pins, irrespectively of the I/OController configuration.
44 44 PA24 24 LCDCSPI
NPCS0TWIMS0 TWCK
GLOC OUT0
SCIF GCLK IN1
LCDCA SEG39
CATB SENSE18
46 46 PA25 25 VDDIOUSBC
DMUSART2
RXDCATB
SENSE19
47 47 PA26 26 VDDIOUSBC
DPUSART2
TXDCATB
SENSE20
25 PA27 27 LCDASPI
MISOIISC ISCK
ABDACB DAC0
GLOC IN4
USART3 RTS
CATB SENSE0
26 PA28 28 LCDASPI
MOSIIISC ISDI
ABDACB DACN0
GLOC IN5
USART3 CTS
CATB SENSE1
27 PA29 29 LCDASPI SCK
IISC IWS
ABDACB DAC1
GLOC IN6
USART3 CLK
CATB SENSE2
30 PA30 30 LCDASPI
NPCS0IISC ISDO
ABDACB DACN1
GLOC IN7
USART3 RXD
CATB SENSE3
31 PA31 31 LCDASPI
NPCS1IISC
IMCKABDACB
CLKGLOC OUT1
USART3 TXD
CATB DIS
Table 3-4. 48-pin GPIO Controller Function Multiplexing (Sheet 2 of 2)
AT
SA
M4L
C
AT
SA
M4L
S
Pin
GP
IO
Su
pp
ly
GPIO Functions
A B C D E F G
Table 3-5. Peripheral Functions
Function Description
GPIO Controller Function multiplexing GPIO and GPIO peripheral selection A to H
JTAG port connections JTAG debug port
Oscillators OSC0
Table 3-6. JTAG Pinout
48-pinPackages
64-pinQFP/QFN
64-pinWLSCP
100-pinQFN
100-ballVFBGA
PinName
JTAGPin
10 10 E2 19 B3 PA03 TMS
43 59 H3 95 D6 PA23 TDO
44 60 G3 96 D10 PA24 TDI
9 9 F2 18 B4 TCK TCK
3042023G–SAM–03/2014
ATSAM4L8/L4/L2
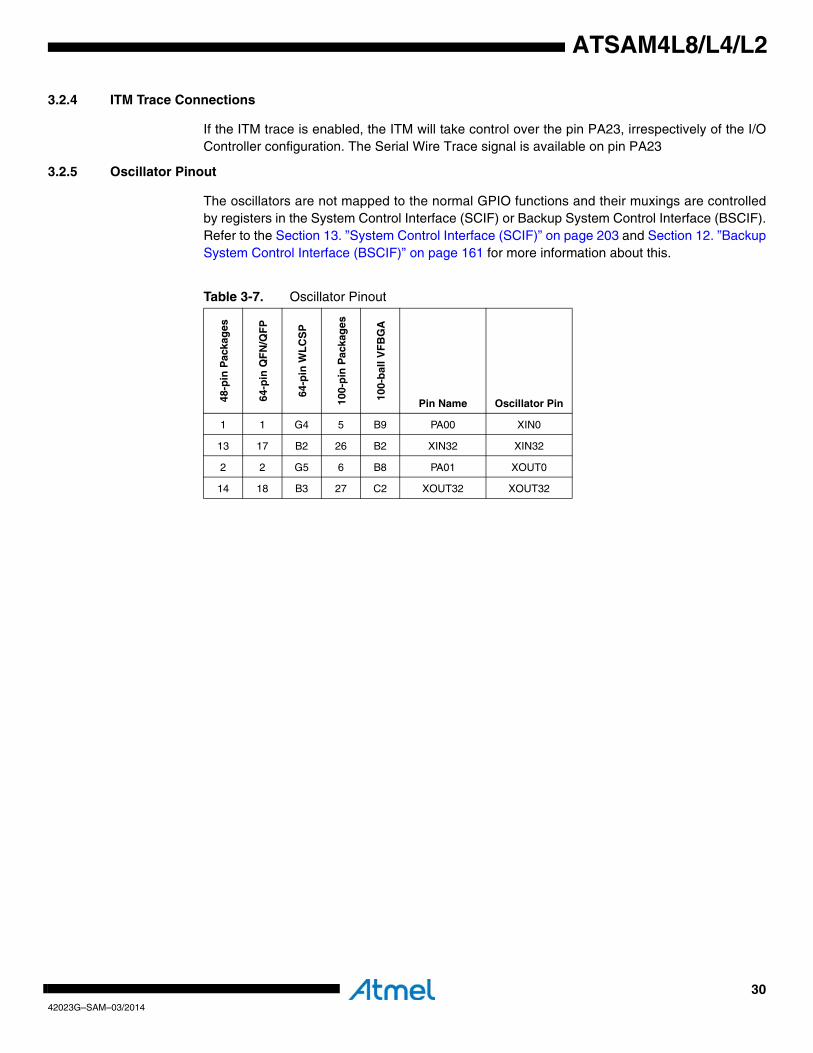
3.2.4 ITM Trace Connections
If the ITM trace is enabled, the ITM will take control over the pin PA23, irrespectively of the I/OController configuration. The Serial Wire Trace signal is available on pin PA23
3.2.5 Oscillator Pinout
The oscillators are not mapped to the normal GPIO functions and their muxings are controlledby registers in the System Control Interface (SCIF) or Backup System Control Interface (BSCIF).Refer to the Section 13. ”System Control Interface (SCIF)” on page 203 and Section 12. ”BackupSystem Control Interface (BSCIF)” on page 161 for more information about this.
Table 3-7. Oscillator Pinout
48-p
in P
acka
ges
64-p
in Q
FN
/QF
P
64-p
in W
LC
SP
100-
pin
Pac
kag
es
100-
bal
l VF
BG
A
Pin Name Oscillator Pin
1 1 G4 5 B9 PA00 XIN0
13 17 B2 26 B2 XIN32 XIN32
2 2 G5 6 B8 PA01 XOUT0
14 18 B3 27 C2 XOUT32 XOUT32
3142023G–SAM–03/2014
ATSAM4L8/L4/L2
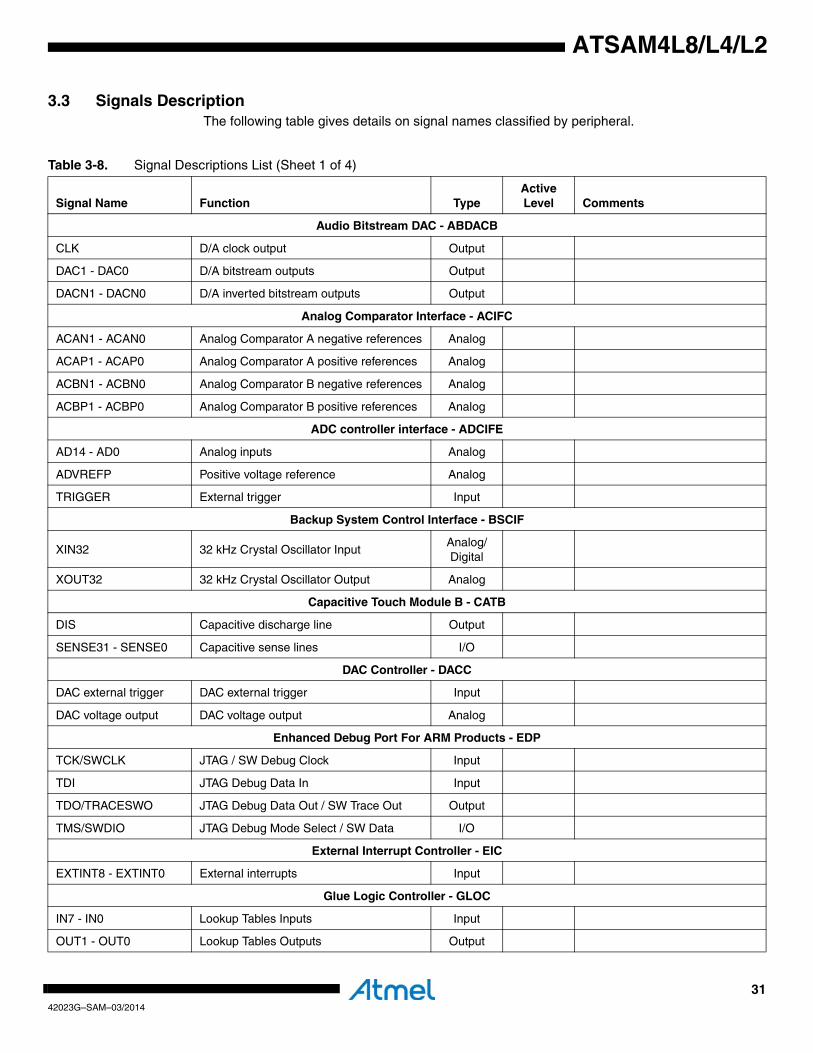
3.3 Signals DescriptionThe following table gives details on signal names classified by peripheral.
Table 3-8. Signal Descriptions List (Sheet 1 of 4)
Signal Name Function TypeActive Level Comments
Audio Bitstream DAC - ABDACB
CLK D/A clock output Output
DAC1 - DAC0 D/A bitstream outputs Output
DACN1 - DACN0 D/A inverted bitstream outputs Output
Analog Comparator Interface - ACIFC
ACAN1 - ACAN0 Analog Comparator A negative references Analog
ACAP1 - ACAP0 Analog Comparator A positive references Analog
ACBN1 - ACBN0 Analog Comparator B negative references Analog
ACBP1 - ACBP0 Analog Comparator B positive references Analog
ADC controller interface - ADCIFE
AD14 - AD0 Analog inputs Analog
ADVREFP Positive voltage reference Analog
TRIGGER External trigger Input
Backup System Control Interface - BSCIF
XIN32 32 kHz Crystal Oscillator InputAnalog/ Digital
XOUT32 32 kHz Crystal Oscillator Output Analog
Capacitive Touch Module B - CATB
DIS Capacitive discharge line Output
SENSE31 - SENSE0 Capacitive sense lines I/O
DAC Controller - DACC
DAC external trigger DAC external trigger Input
DAC voltage output DAC voltage output Analog
Enhanced Debug Port For ARM Products - EDP
TCK/SWCLK JTAG / SW Debug Clock Input
TDI JTAG Debug Data In Input
TDO/TRACESWO JTAG Debug Data Out / SW Trace Out Output
TMS/SWDIO JTAG Debug Mode Select / SW Data I/O
External Interrupt Controller - EIC
EXTINT8 - EXTINT0 External interrupts Input
Glue Logic Controller - GLOC
IN7 - IN0 Lookup Tables Inputs Input
OUT1 - OUT0 Lookup Tables Outputs Output
3242023G–SAM–03/2014
ATSAM4L8/L4/L2
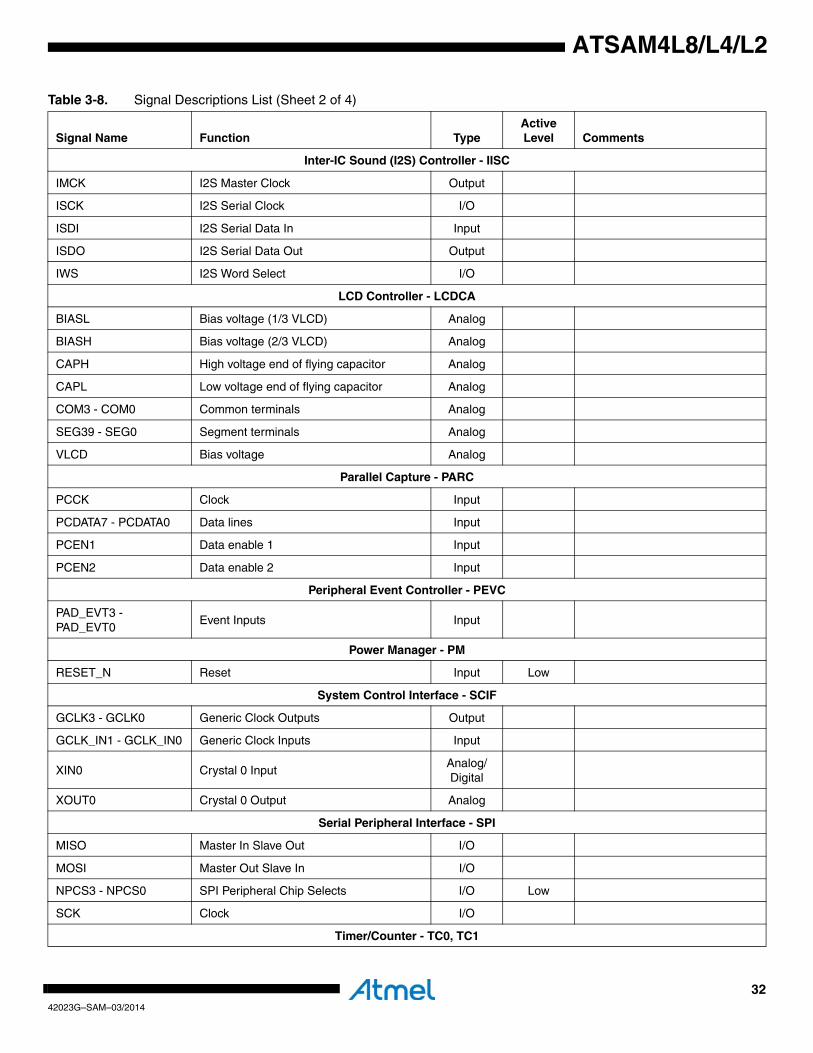
Inter-IC Sound (I2S) Controller - IISC
IMCK I2S Master Clock Output
ISCK I2S Serial Clock I/O
ISDI I2S Serial Data In Input
ISDO I2S Serial Data Out Output
IWS I2S Word Select I/O
LCD Controller - LCDCA
BIASL Bias voltage (1/3 VLCD) Analog
BIASH Bias voltage (2/3 VLCD) Analog
CAPH High voltage end of flying capacitor Analog
CAPL Low voltage end of flying capacitor Analog
COM3 - COM0 Common terminals Analog
SEG39 - SEG0 Segment terminals Analog
VLCD Bias voltage Analog
Parallel Capture - PARC
PCCK Clock Input
PCDATA7 - PCDATA0 Data lines Input
PCEN1 Data enable 1 Input
PCEN2 Data enable 2 Input
Peripheral Event Controller - PEVC
PAD_EVT3 - PAD_EVT0
Event Inputs Input
Power Manager - PM
RESET_N Reset Input Low
System Control Interface - SCIF
GCLK3 - GCLK0 Generic Clock Outputs Output
GCLK_IN1 - GCLK_IN0 Generic Clock Inputs Input
XIN0 Crystal 0 InputAnalog/ Digital
XOUT0 Crystal 0 Output Analog
Serial Peripheral Interface - SPI
MISO Master In Slave Out I/O
MOSI Master Out Slave In I/O
NPCS3 - NPCS0 SPI Peripheral Chip Selects I/O Low
SCK Clock I/O
Timer/Counter - TC0, TC1
Table 3-8. Signal Descriptions List (Sheet 2 of 4)
Signal Name Function TypeActive Level Comments
3342023G–SAM–03/2014
ATSAM4L8/L4/L2
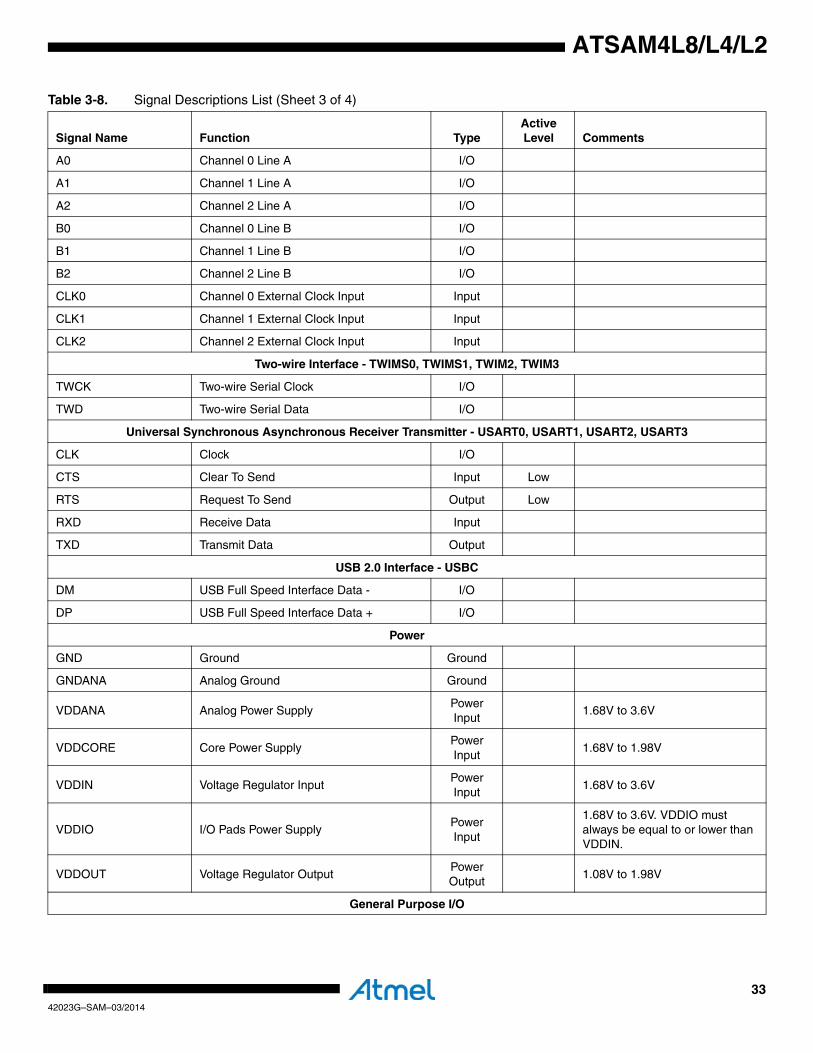
A0 Channel 0 Line A I/O
A1 Channel 1 Line A I/O
A2 Channel 2 Line A I/O
B0 Channel 0 Line B I/O
B1 Channel 1 Line B I/O
B2 Channel 2 Line B I/O
CLK0 Channel 0 External Clock Input Input
CLK1 Channel 1 External Clock Input Input
CLK2 Channel 2 External Clock Input Input
Two-wire Interface - TWIMS0, TWIMS1, TWIM2, TWIM3
TWCK Two-wire Serial Clock I/O
TWD Two-wire Serial Data I/O
Universal Synchronous Asynchronous Receiver Transmitter - USART0, USART1, USART2, USART3
CLK Clock I/O
CTS Clear To Send Input Low
RTS Request To Send Output Low
RXD Receive Data Input
TXD Transmit Data Output
USB 2.0 Interface - USBC
DM USB Full Speed Interface Data - I/O
DP USB Full Speed Interface Data + I/O
Power
GND Ground Ground
GNDANA Analog Ground Ground
VDDANA Analog Power SupplyPower Input
1.68V to 3.6V
VDDCORE Core Power SupplyPower Input
1.68V to 1.98V
VDDIN Voltage Regulator InputPower Input
1.68V to 3.6V
VDDIO I/O Pads Power SupplyPower Input
1.68V to 3.6V. VDDIO must always be equal to or lower than VDDIN.
VDDOUT Voltage Regulator OutputPower Output
1.08V to 1.98V
General Purpose I/O
Table 3-8. Signal Descriptions List (Sheet 3 of 4)
Signal Name Function TypeActive Level Comments
3442023G–SAM–03/2014
ATSAM4L8/L4/L2
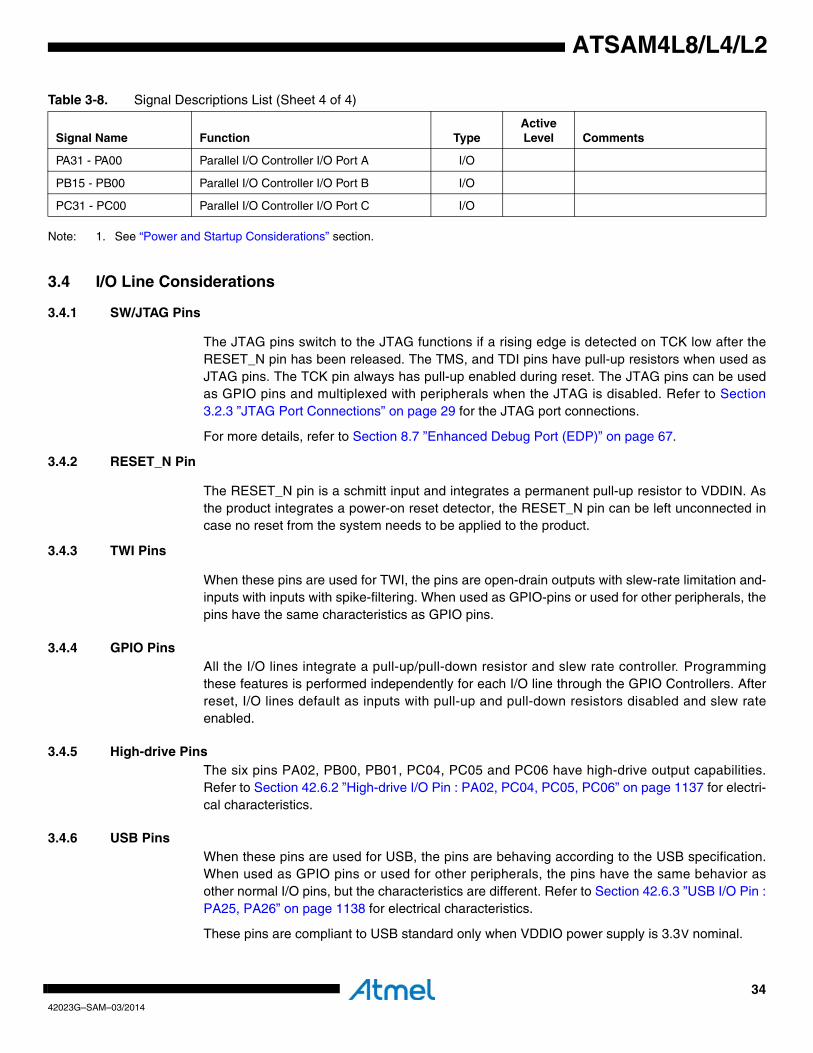
Note: 1. See “Power and Startup Considerations” section.
3.4 I/O Line Considerations
3.4.1 SW/JTAG Pins
The JTAG pins switch to the JTAG functions if a rising edge is detected on TCK low after theRESET_N pin has been released. The TMS, and TDI pins have pull-up resistors when used asJTAG pins. The TCK pin always has pull-up enabled during reset. The JTAG pins can be usedas GPIO pins and multiplexed with peripherals when the JTAG is disabled. Refer to Section3.2.3 ”JTAG Port Connections” on page 29 for the JTAG port connections.
For more details, refer to Section 8.7 ”Enhanced Debug Port (EDP)” on page 67.
3.4.2 RESET_N Pin
The RESET_N pin is a schmitt input and integrates a permanent pull-up resistor to VDDIN. Asthe product integrates a power-on reset detector, the RESET_N pin can be left unconnected incase no reset from the system needs to be applied to the product.
3.4.3 TWI Pins
When these pins are used for TWI, the pins are open-drain outputs with slew-rate limitation and-inputs with inputs with spike-filtering. When used as GPIO-pins or used for other peripherals, thepins have the same characteristics as GPIO pins.
3.4.4 GPIO PinsAll the I/O lines integrate a pull-up/pull-down resistor and slew rate controller. Programmingthese features is performed independently for each I/O line through the GPIO Controllers. Afterreset, I/O lines default as inputs with pull-up and pull-down resistors disabled and slew rateenabled.
3.4.5 High-drive PinsThe six pins PA02, PB00, PB01, PC04, PC05 and PC06 have high-drive output capabilities.Refer to Section 42.6.2 ”High-drive I/O Pin : PA02, PC04, PC05, PC06” on page 1137 for electri-cal characteristics.
3.4.6 USB Pins When these pins are used for USB, the pins are behaving according to the USB specification.When used as GPIO pins or used for other peripherals, the pins have the same behavior asother normal I/O pins, but the characteristics are different. Refer to Section 42.6.3 ”USB I/O Pin :PA25, PA26” on page 1138 for electrical characteristics.
These pins are compliant to USB standard only when VDDIO power supply is 3.3V nominal.
PA31 - PA00 Parallel I/O Controller I/O Port A I/O
PB15 - PB00 Parallel I/O Controller I/O Port B I/O
PC31 - PC00 Parallel I/O Controller I/O Port C I/O
Table 3-8. Signal Descriptions List (Sheet 4 of 4)
Signal Name Function TypeActive Level Comments

3542023G–SAM–03/2014
ATSAM4L8/L4/L2
3.4.7 ADC Input Pins
These pins are regular I/O pins powered from the VDDANA.
3642023G–SAM–03/2014
ATSAM4L8/L4/L2
4. Cortex-M4 processor and core peripherals
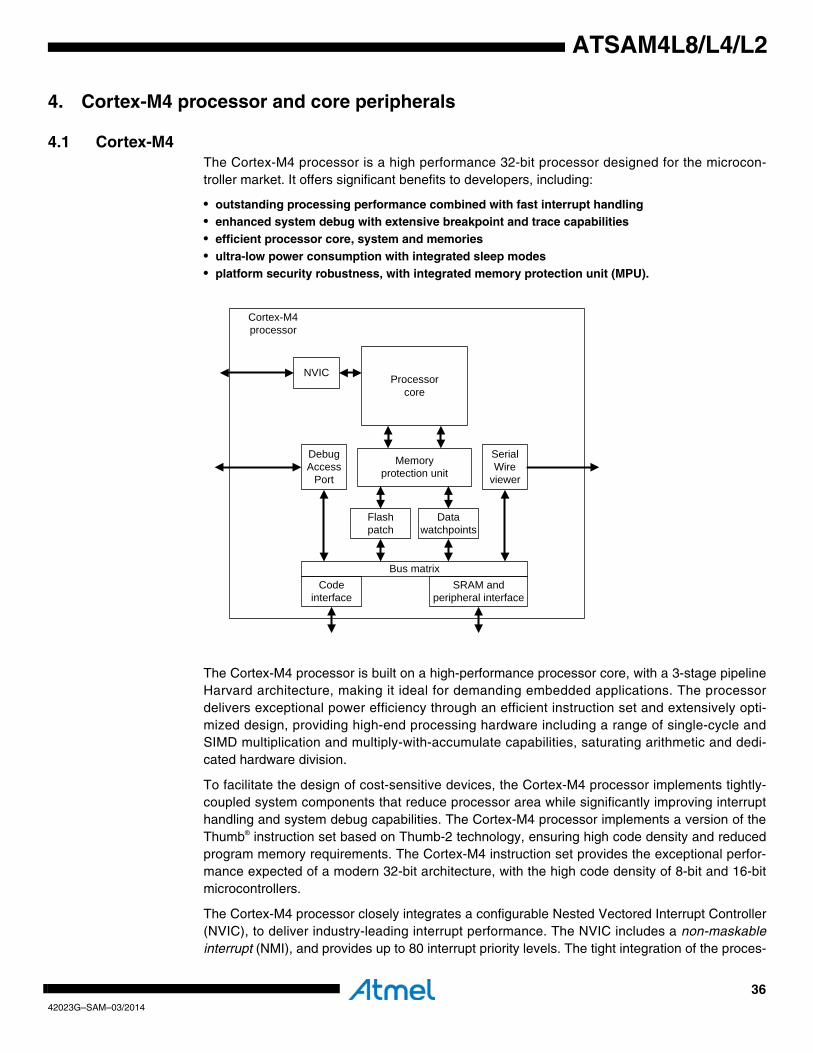
4.1 Cortex-M4The Cortex-M4 processor is a high performance 32-bit processor designed for the microcon-troller market. It offers significant benefits to developers, including:
• outstanding processing performance combined with fast interrupt handling• enhanced system debug with extensive breakpoint and trace capabilities• efficient processor core, system and memories• ultra-low power consumption with integrated sleep modes• platform security robustness, with integrated memory protection unit (MPU).
The Cortex-M4 processor is built on a high-performance processor core, with a 3-stage pipelineHarvard architecture, making it ideal for demanding embedded applications. The processordelivers exceptional power efficiency through an efficient instruction set and extensively opti-mized design, providing high-end processing hardware including a range of single-cycle andSIMD multiplication and multiply-with-accumulate capabilities, saturating arithmetic and dedi-cated hardware division.
To facilitate the design of cost-sensitive devices, the Cortex-M4 processor implements tightly-coupled system components that reduce processor area while significantly improving interrupthandling and system debug capabilities. The Cortex-M4 processor implements a version of theThumb® instruction set based on Thumb-2 technology, ensuring high code density and reducedprogram memory requirements. The Cortex-M4 instruction set provides the exceptional perfor-mance expected of a modern 32-bit architecture, with the high code density of 8-bit and 16-bitmicrocontrollers.
The Cortex-M4 processor closely integrates a configurable Nested Vectored Interrupt Controller(NVIC), to deliver industry-leading interrupt performance. The NVIC includes a non-maskableinterrupt (NMI), and provides up to 80 interrupt priority levels. The tight integration of the proces-
NVIC
Debug Access
Port
Memoryprotection unit
Serial Wire
viewer
Bus matrixCode
interfaceSRAM and
peripheral interface
Data watchpoints
Flashpatch
Cortex-M4 processor
Processorcore
3742023G–SAM–03/2014
ATSAM4L8/L4/L2
sor core and NVIC provides fast execution of interrupt service routines (ISRs), dramaticallyreducing the interrupt latency. This is achieved through the hardware stacking of registers, andthe ability to suspend load-multiple and store-multiple operations. Interrupt handlers do notrequire wrapping in assembler code, removing any code overhead from the ISRs. A tail-chainoptimization also significantly reduces the overhead when switching from one ISR to another.
To optimize low-power designs, the NVIC integrates with the sleep modes, that include a deepsleep function enabling the entire device to be rapidly powered down while still retaining pro-gram state.
4.2 System level interfaceThe Cortex-M4 processor provides multiple interfaces using AMBA® technology to provide highspeed, low latency memory accesses. It supports unaligned data accesses and implementsatomic bit manipulation that enables faster peripheral controls, system spinlocks and thread-safeBoolean data handling.
The Cortex-M4 processor has an memory protection unit (MPU) that provides fine grain memorycontrol, enabling applications to utilize multiple privilege levels, separating and protecting code,data and stack on a task-by-task basis. Such requirements are becoming critical in manyembedded applications such as automotive.
4.3 Integrated configurable debugThe Cortex-M4 processor implements a complete hardware debug solution. This provides highsystem visibility of the processor and memory through either a traditional JTAG port or a 2-pinSerial Wire Debug (SWD) port that is ideal for microcontrollers and other small package devices.
For system trace the processor integrates an Instrumentation Trace Macrocell (ITM) alongsidedata watchpoints and a profiling unit. To enable simple and cost-effective profiling of the systemevents these generate, a Serial Wire Viewer (SWV) can export a stream of software-generatedmessages, data trace, and profiling information through a single pin.
The Flash Patch and Breakpoint Unit (FPB) provides 8 hardware breakpoint comparators thatdebuggers can use. The comparators in the FPB also provide remap functions of up to 8 wordsin the program code in the CODE memory region. This enables applications stored on a non-erasable, ROM-based microcontroller to be patched if a small programmable memory, for exam-ple flash, is available in the device. During initialization, the application in ROM detects, from theprogrammable memory, whether a patch is required. If a patch is required, the application pro-grams the FPB to remap a number of addresses. When those addresses are accessed, theaccesses are redirected to a remap table specified in the FPB configuration, which means theprogram in the non-modifiable ROM can be patched.
A specific Peripheral Debug (PDBG) register is implemented in the Private Peripheral Busaddress map. This register allows the user to configure the behavior of some modules in debugmode.
3842023G–SAM–03/2014
ATSAM4L8/L4/L2
4.4 Cortex-M4 processor features and benefits summary• tight integration of system peripherals reduces area and development costs• Thumb instruction set combines high code density with 32-bit performance• code-patch ability for ROM system updates• power control optimization of system components• integrated sleep modes for low power consumption• fast code execution permits slower processor clock or increases sleep mode time• hardware division and fast digital-signal-processing orientated multiply accumulate• saturating arithmetic for signal processing• deterministic, high-performance interrupt handling for time-critical applications• memory protection unit (MPU) for safety-critical applications• extensive debug and trace capabilities:
– Serial Wire Debug and Serial Wire Trace reduce the number of pins required for debugging, tracing, and code profiling.
4.5 Cortex-M4 core peripheralsThese are:
Nested Vectored Interrupt Controller
The NVIC is an embedded interrupt controller that supports low latency interrupt processing.
System control block
The System control block (SCB) is the programmers model interface to the processor. It pro-vides system implementation information and system control, including configuration, control,and reporting of system exceptions.
System timer
The system timer, SysTick, is a 24-bit count-down timer. Use this as a Real Time Operating Sys-tem (RTOS) tick timer or as a simple counter.
Memory protection unit
The Memory protection unit (MPU) improves system reliability by defining the memory attributesfor different memory regions. It provides up to eight different regions, and an optional predefinedbackground region.
The complete Cortex-M4 User Guide can be found on the ARM web site:
http://infocenter.arm.com/help/topic/com.arm.doc.dui0553a/DUI0553A_cortex_m4_dgug.pdf
3942023G–SAM–03/2014
ATSAM4L8/L4/L2
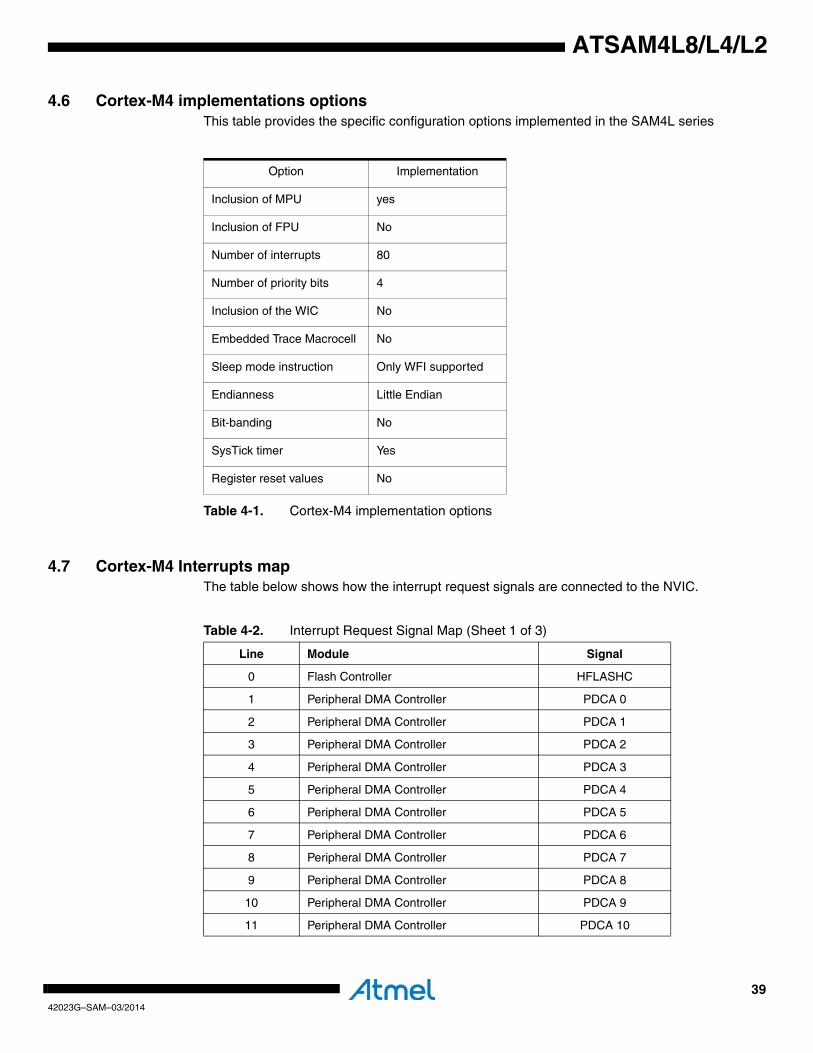
4.6 Cortex-M4 implementations optionsThis table provides the specific configuration options implemented in the SAM4L series
Table 4-1. Cortex-M4 implementation options
4.7 Cortex-M4 Interrupts mapThe table below shows how the interrupt request signals are connected to the NVIC.
Option Implementation
Inclusion of MPU yes
Inclusion of FPU No
Number of interrupts 80
Number of priority bits 4
Inclusion of the WIC No
Embedded Trace Macrocell No
Sleep mode instruction Only WFI supported
Endianness Little Endian
Bit-banding No
SysTick timer Yes
Register reset values No
Table 4-2. Interrupt Request Signal Map (Sheet 1 of 3)
Line Module Signal
0 Flash Controller HFLASHC
1 Peripheral DMA Controller PDCA 0
2 Peripheral DMA Controller PDCA 1
3 Peripheral DMA Controller PDCA 2
4 Peripheral DMA Controller PDCA 3
5 Peripheral DMA Controller PDCA 4
6 Peripheral DMA Controller PDCA 5
7 Peripheral DMA Controller PDCA 6
8 Peripheral DMA Controller PDCA 7
9 Peripheral DMA Controller PDCA 8
10 Peripheral DMA Controller PDCA 9
11 Peripheral DMA Controller PDCA 10

4042023G–SAM–03/2014
ATSAM4L8/L4/L2
12 Peripheral DMA Controller PDCA 11
13 Peripheral DMA Controller PDCA 12
14 Peripheral DMA Controller PDCA 13
15 Peripheral DMA Controller PDCA 14
16 Peripheral DMA Controller PDCA 15
17 CRC Calculation Unit CRCCU
18 USB 2.0 Interface USBC
19 Peripheral Event Controller PEVC TR
20 Peripheral Event Controller PEVC OV
21 Advanced Encryption Standard AESA
22 Power Manager PM
23 System Control Interface SCIF
24 Frequency Meter FREQM
25 General-Purpose Input/Output Controller GPIO 0
26 General-Purpose Input/Output Controller GPIO 1
27 General-Purpose Input/Output Controller GPIO 2
28 General-Purpose Input/Output Controller GPIO 3
29 General-Purpose Input/Output Controller GPIO 4
30 General-Purpose Input/Output Controller GPIO 5
31 General-Purpose Input/Output Controller GPIO 6
32 General-Purpose Input/Output Controller GPIO 7
33 General-Purpose Input/Output Controller GPIO 8
34 General-Purpose Input/Output Controller GPIO 9
35 General-Purpose Input/Output Controller GPIO 10
36 General-Purpose Input/Output Controller GPIO 11
37 Backup Power Manager BPM
38 Backup System Control Interface BSCIF
39 Asynchronous Timer AST ALARM
40 Asynchronous Timer AST PER
41 Asynchronous Timer AST OVF
42 Asynchronous Timer AST READY
43 Asynchronous Timer AST CLKREADY
44 Watchdog Timer WDT
45 External Interrupt Controller EIC 1
46 External Interrupt Controller EIC 2
47 External Interrupt Controller EIC 3
Table 4-2. Interrupt Request Signal Map (Sheet 2 of 3)
Line Module Signal
4142023G–SAM–03/2014
ATSAM4L8/L4/L2
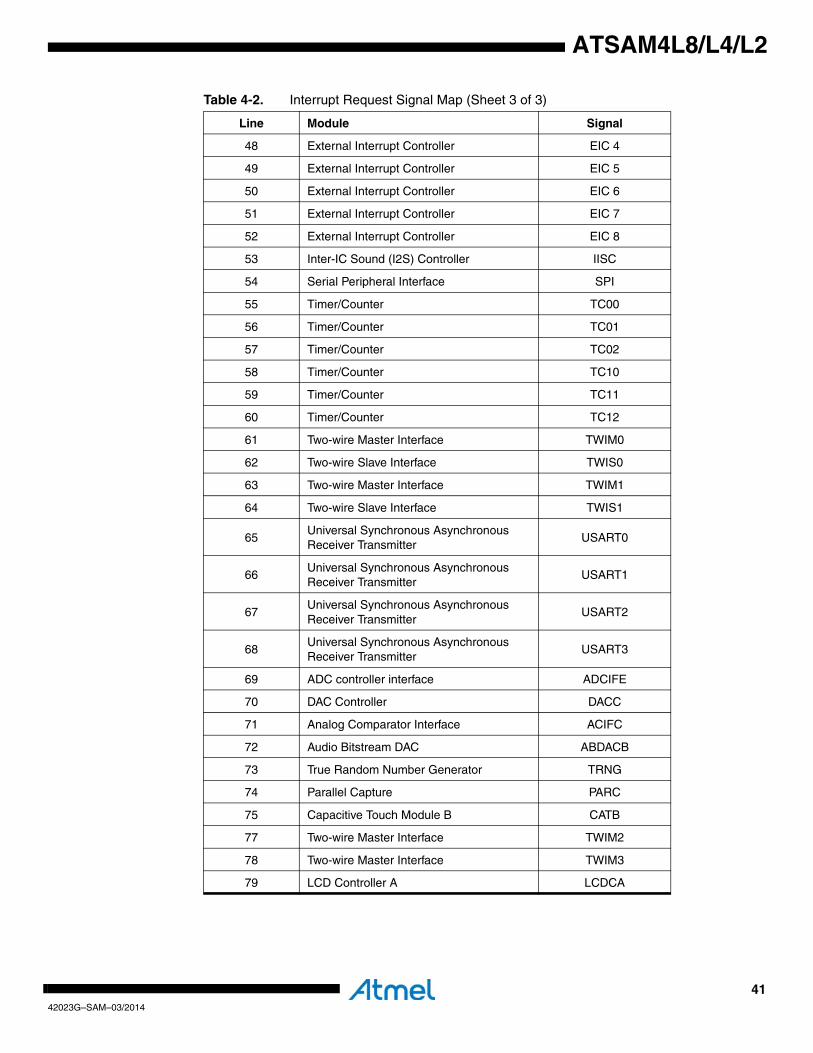
48 External Interrupt Controller EIC 4
49 External Interrupt Controller EIC 5
50 External Interrupt Controller EIC 6
51 External Interrupt Controller EIC 7
52 External Interrupt Controller EIC 8
53 Inter-IC Sound (I2S) Controller IISC
54 Serial Peripheral Interface SPI
55 Timer/Counter TC00
56 Timer/Counter TC01
57 Timer/Counter TC02
58 Timer/Counter TC10
59 Timer/Counter TC11
60 Timer/Counter TC12
61 Two-wire Master Interface TWIM0
62 Two-wire Slave Interface TWIS0
63 Two-wire Master Interface TWIM1
64 Two-wire Slave Interface TWIS1
65Universal Synchronous Asynchronous Receiver Transmitter
USART0
66Universal Synchronous Asynchronous Receiver Transmitter
USART1
67Universal Synchronous Asynchronous Receiver Transmitter
USART2
68Universal Synchronous Asynchronous Receiver Transmitter
USART3
69 ADC controller interface ADCIFE
70 DAC Controller DACC
71 Analog Comparator Interface ACIFC
72 Audio Bitstream DAC ABDACB
73 True Random Number Generator TRNG
74 Parallel Capture PARC
75 Capacitive Touch Module B CATB
77 Two-wire Master Interface TWIM2
78 Two-wire Master Interface TWIM3
79 LCD Controller A LCDCA
Table 4-2. Interrupt Request Signal Map (Sheet 3 of 3)
Line Module Signal
4242023G–SAM–03/2014
ATSAM4L8/L4/L2
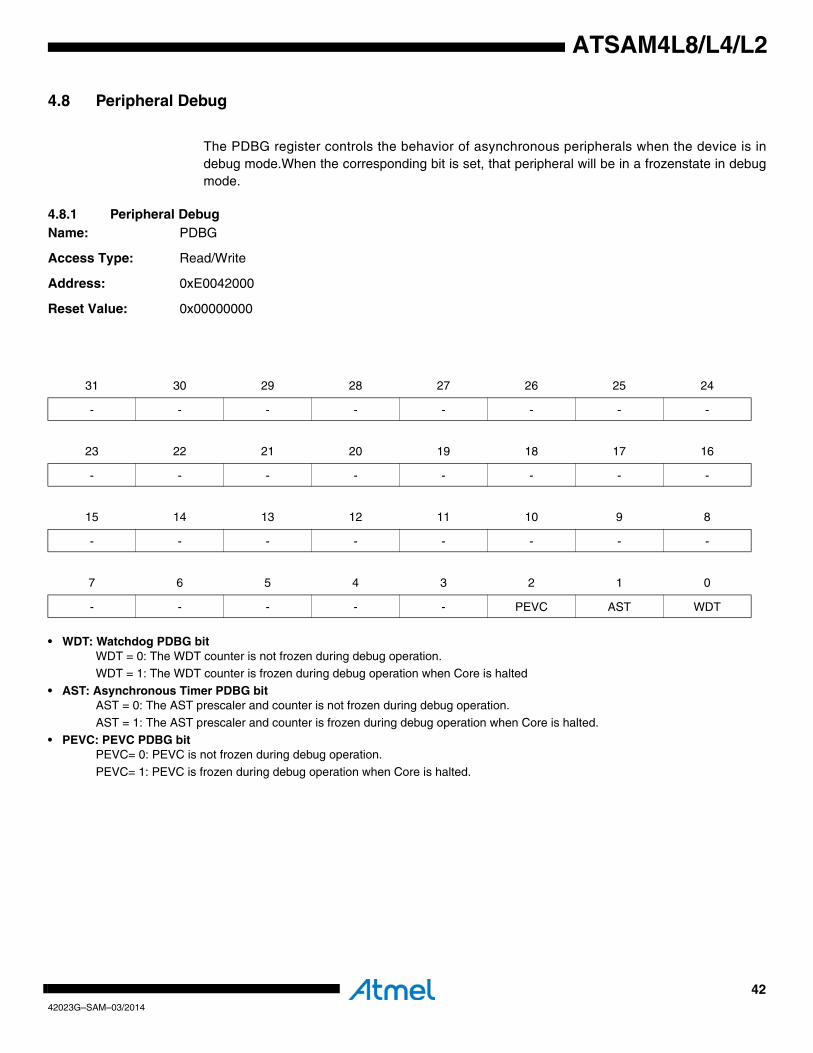
4.8 Peripheral Debug
The PDBG register controls the behavior of asynchronous peripherals when the device is indebug mode.When the corresponding bit is set, that peripheral will be in a frozenstate in debugmode.
4.8.1 Peripheral DebugName: PDBG
Access Type: Read/Write
Address: 0xE0042000
Reset Value: 0x00000000
• WDT: Watchdog PDBG bitWDT = 0: The WDT counter is not frozen during debug operation.WDT = 1: The WDT counter is frozen during debug operation when Core is halted
• AST: Asynchronous Timer PDBG bitAST = 0: The AST prescaler and counter is not frozen during debug operation.
AST = 1: The AST prescaler and counter is frozen during debug operation when Core is halted.
• PEVC: PEVC PDBG bitPEVC= 0: PEVC is not frozen during debug operation.
PEVC= 1: PEVC is frozen during debug operation when Core is halted.
31 30 29 28 27 26 25 24
- - - - - - - -
23 22 21 20 19 18 17 16
- - - - - - - -
15 14 13 12 11 10 9 8
- - - - - - - -
7 6 5 4 3 2 1 0
- - - - - PEVC AST WDT

4342023G–SAM–03/2014
ATSAM4L8/L4/L2
5. Power and Startup Considerations
5.1 Power Domain Overview
Figure 5-1. ATSAM4LS Power Domain Diagram
ASYNCHRONOUS TIMER
EXTERNAL INTERRUPTCONTROLLER
WATCHDOGTIMER
BACKUP POWER MANAGER
BACKUP SYSTEMCONTROL INTERFACE
OSC32K
RC32K
BACKUPREGISTERS
SYSTEMCONTROL INTERFACE
POWER MANAGER FREQUENCYMETER
GPIO
POR33
BOD33
BOD18
STARTUPLOGIC
POR18
PLL
DFLL
RCSYS
PERIPHERAL BRIDGE C
PERIPHERALS
PERIPHERAL BRIDGE A
AHB PERIPHERALS
PERIPHERAL BRIDGE B
BUS MATRIX
CORTEX M4CPU
FLASHPDCA RAM
PERIPHERAL BRIDGE D
CORE DOMAIN
VDDANA DOMAIN
BACKUP DOMAINVDDANA GNDANA
MPOSC
AD0-AD14
ADVREF
AC0A-AC3A
AC0B-AC3B
XIN32
XOUT32
EXTINT0-EXTINT8
USBC
ANALOG COMPARATORS
ADC
RCFAST
RC80M
VDDI
N
GND
VDDO
UT
VDDC
ORE
DUAL OUTPUTTRIMMABLE
VOLTAGEREGULATOR
BUCK
/LDO
n(P
A02)
DACDACOUT
VDDIO GND
VDDIO DOMAIN
GPIOs
USBPADS
4442023G–SAM–03/2014
ATSAM4L8/L4/L2
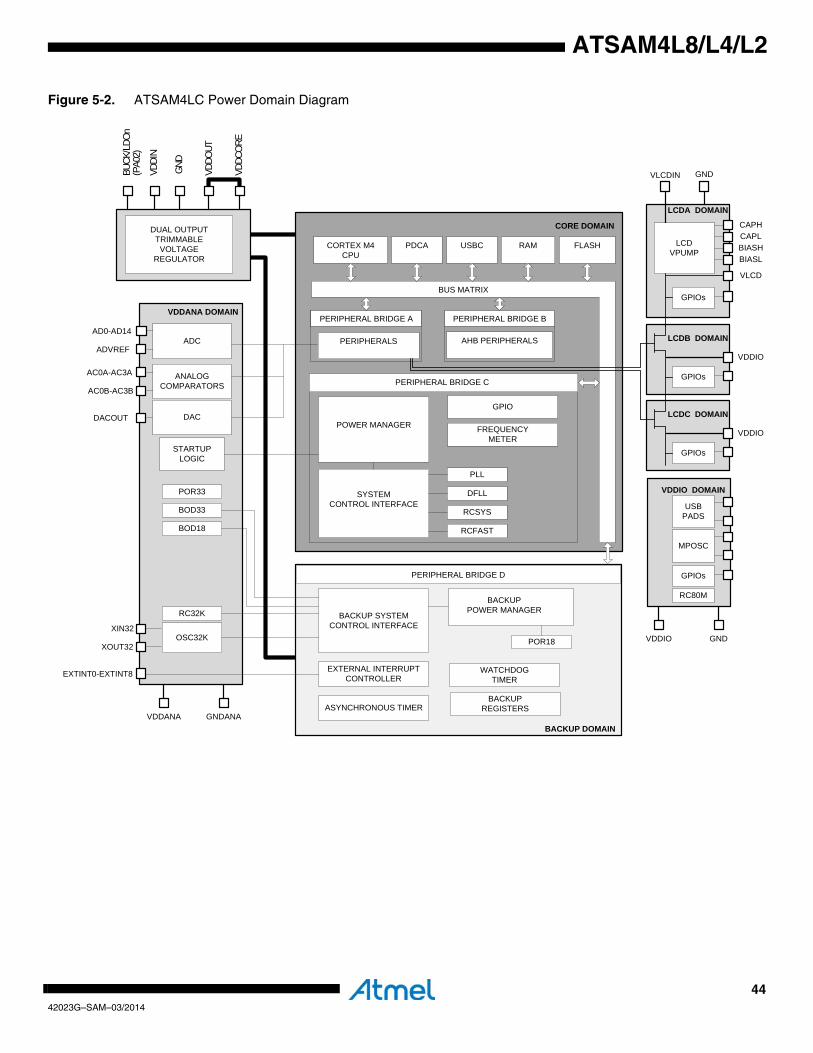
Figure 5-2. ATSAM4LC Power Domain Diagram
ASYNCHRONOUS TIMER
EXTERNAL INTERRUPTCONTROLLER
WATCHDOGTIMER
BACKUP POWER MANAGER
BACKUP SYSTEMCONTROL INTERFACE
OSC32K
RC32K
BACKUPREGISTERS
SYSTEMCONTROL INTERFACE
POWER MANAGER FREQUENCYMETER
GPIO
POR33
BOD33
BOD18
STARTUPLOGIC
POR18
PLL
DFLL
RCSYS
PERIPHERAL BRIDGE C
PERIPHERALS
PERIPHERAL BRIDGE A
AHB PERIPHERALS
PERIPHERAL BRIDGE B
BUS MATRIX
CORTEX M4CPU
FLASHPDCA RAM
PERIPHERAL BRIDGE D
CORE DOMAIN
VDDANA DOMAIN
BACKUP DOMAINVDDANA GNDANA
MPOSC
AD0-AD14
ADVREF
AC0A-AC3A
AC0B-AC3B
XIN32
XOUT32
EXTINT0-EXTINT8
USBC
ANALOG COMPARATORS
ADC
RCFAST
RC80M
VDDI
N
GND
VDDO
UT
VDDC
ORE
DUAL OUTPUTTRIMMABLEVOLTAGE
REGULATOR
BUCK
/LDO
n(P
A02)
DACDACOUT
VLCDIN GND
LCDA DOMAIN
GPIOs
LCDVPUMP
CAPHCAPLBIASHBIASL
VLCD
VDDIO
LCDB DOMAIN
GPIOs
VDDIO
GPIOs
LCDC DOMAIN
VDDIO GND
VDDIO DOMAIN
GPIOs
USBPADS
4542023G–SAM–03/2014
ATSAM4L8/L4/L2
5.2 Power SuppliesThe ATSAM4L8/L4/L2 has several types of power supply pins:
• VDDIO: Powers I/O lines, the general purpose oscillator (OSC), the 80MHz integrated RC oscillator (RC80M) . Voltage is 1.68V to 3.6V.
• VLCDIN: (ATSAM4LC only) Powers the LCD voltage pump. Voltage is 1.68V to 3.6V.
• VDDIN: Powers the internal voltage regulator. Voltage is 1.68V to 3.6V.
• VDDANA: Powers the ADC, the DAC, the Analog Comparators, the 32kHz oscillator (OSC32K), the 32kHz integrated RC oscillator (RC32K)and the Brown-out detectors (BOD18 and BOD33). Voltage is 1.68V to 3.6V nominal.
• VDDCORE: Powers the core, memories, peripherals, the PLL, the DFLL, the 4MHz integrated RC oscillator (RCFAST) and the 115kHz integrated RC oscillator (RCSYS).
– VDDOUT is the output voltage of the regulator and must be connected with or without an inductor to VDDCORE.
The ground pins GND are common to VDDCORE, VDDIO, and VDDIN. The ground pin forVDDANA is GNDANA.
For decoupling recommendations for the different power supplies, refer to the schematicdocument.
5.2.1 Voltage RegulatorAn embedded voltage regulator supplies all the digital logic in the Core and the Backup powerdomains.
The regulator has two functionnal mode depending of BUCK/LDOn (PA02) pin value. When thispin is low, the regulator is in linear mode and VDDOUT must be connected to VDDCORE exter-nally. When this pin is high, it behaves as a switching regulator and an inductor must be placedbetween VDDOUT and VDDCORE. The value of this pin is sampled during the power-up phasewhen the Power On Reset 33 reaches VPOT+ (Section 42.9 ”Analog Characteristics” on page1151)
Its output voltages in the Core domain (VCORE) and in the Backup domain (VBKUP) are alwaysequal except in Backup mode where the Core domain is not powered (VCORE=0). The Backupdomain is always powered. The voltage regulator features three different modes:
• Normal mode: the regulator is configured as linear or switching regulator. It can support all different Run and Sleep modes.
• Low Power (LP) mode: the regulator consumes little static current. It can be used in Wait modes.
• Ultra Low Power (ULP) mode: the regulator consumes very little static current . It is dedicated to Retention and Backup modes. In Backup mode, the regulator only supplies the backup domain.
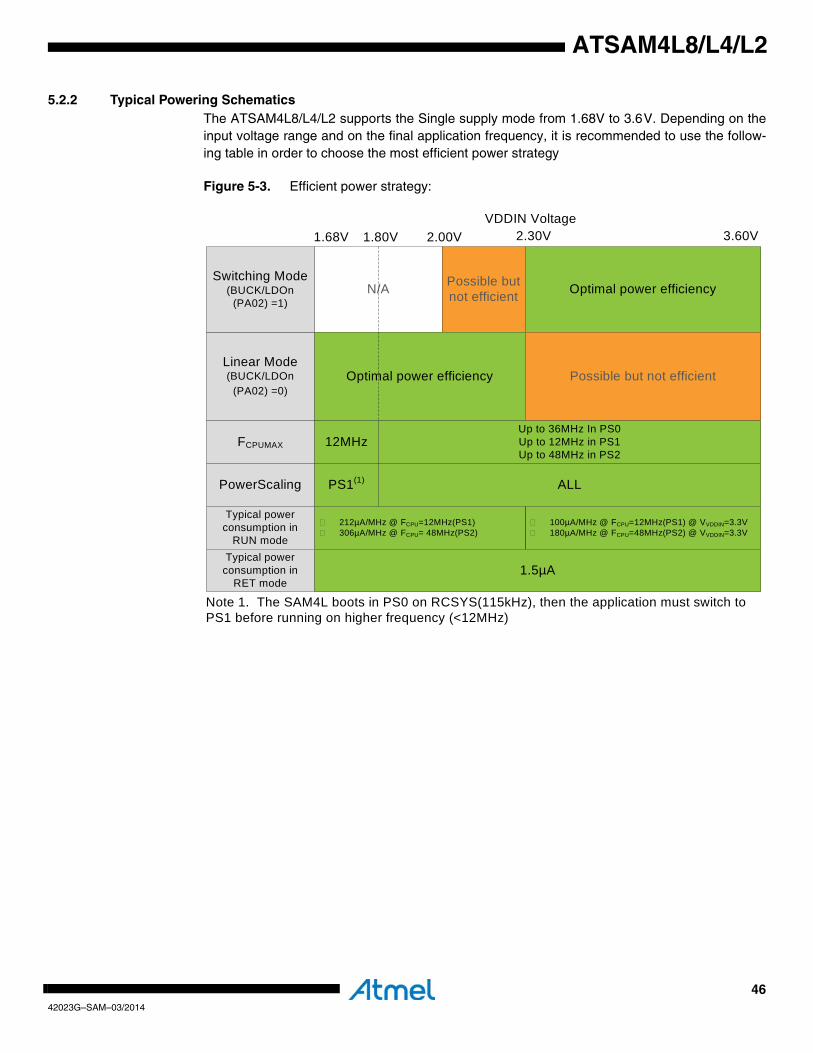
4642023G–SAM–03/2014
ATSAM4L8/L4/L2
5.2.2 Typical Powering SchematicsThe ATSAM4L8/L4/L2 supports the Single supply mode from 1.68V to 3.6V. Depending on theinput voltage range and on the final application frequency, it is recommended to use the follow-ing table in order to choose the most efficient power strategy
Figure 5-3. Efficient power strategy:
N/A Possible but not efficient
1.68V 1.80V 2.00V 2.30V 3.60V
Optimal power efficiency
Linear Mode(BUCK/LDOn
(PA02) =0)Optimal power efficiency Possible but not efficient
Switching Mode(BUCK/LDOn
(PA02) =1)
FCPUMAX 12MHz
PowerScaling PS1(1)
Up to 36MHz In PS0Up to 12MHz in PS1Up to 48MHz in PS2
ALL
VDDIN Voltage
Typical power consumption in
RUN mode
100µA/MHz @ FCPU=12MHz(PS1) @ VVDDIN=3.3V180µA/MHz @ FCPU=48MHz(PS2) @ VVDDIN=3.3V
212µA/MHz @ FCPU=12MHz(PS1)306µA/MHz @ FCPU= 48MHz(PS2)
Typical power consumption in
RET mode1.5µA
Note 1. The SAM4L boots in PS0 on RCSYS(115kHz), then the application must switch to PS1 before running on higher frequency (<12MHz)
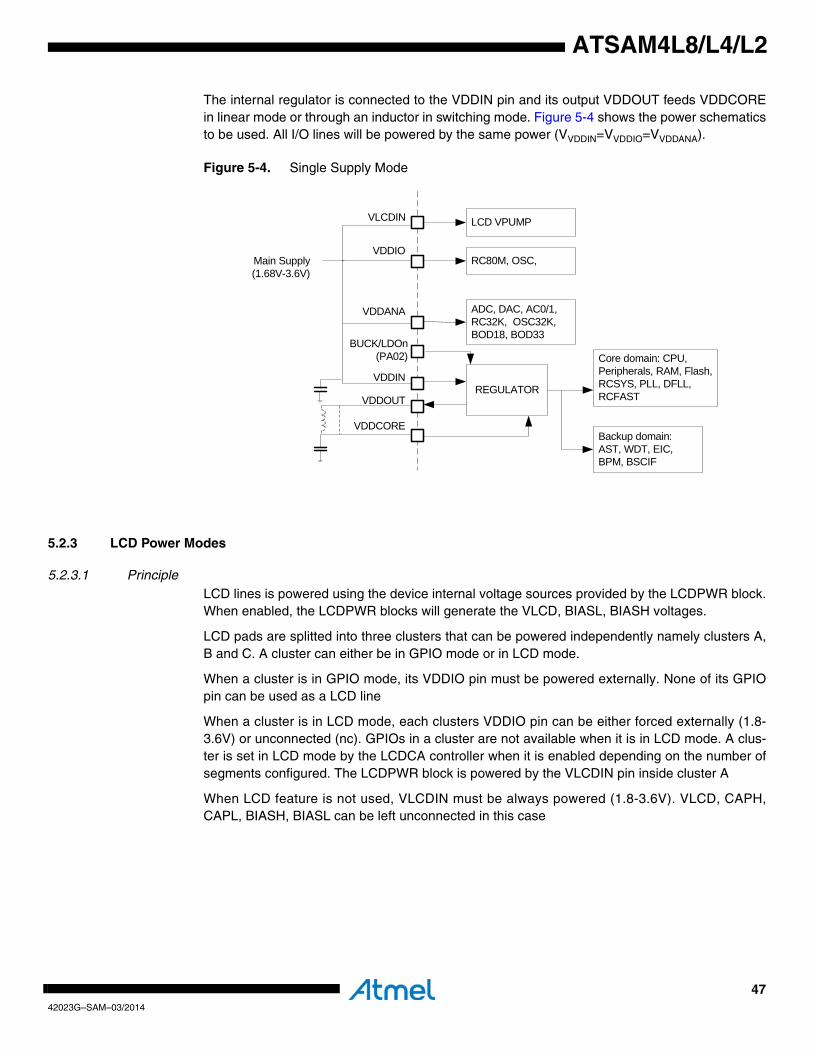
4742023G–SAM–03/2014
ATSAM4L8/L4/L2
The internal regulator is connected to the VDDIN pin and its output VDDOUT feeds VDDCOREin linear mode or through an inductor in switching mode. Figure 5-4 shows the power schematicsto be used. All I/O lines will be powered by the same power (VVDDIN=VVDDIO=VVDDANA).
Figure 5-4. Single Supply Mode
5.2.3 LCD Power Modes
5.2.3.1 PrincipleLCD lines is powered using the device internal voltage sources provided by the LCDPWR block.When enabled, the LCDPWR blocks will generate the VLCD, BIASL, BIASH voltages.
LCD pads are splitted into three clusters that can be powered independently namely clusters A,B and C. A cluster can either be in GPIO mode or in LCD mode.
When a cluster is in GPIO mode, its VDDIO pin must be powered externally. None of its GPIOpin can be used as a LCD line
When a cluster is in LCD mode, each clusters VDDIO pin can be either forced externally (1.8-3.6V) or unconnected (nc). GPIOs in a cluster are not available when it is in LCD mode. A clus-ter is set in LCD mode by the LCDCA controller when it is enabled depending on the number ofsegments configured. The LCDPWR block is powered by the VLCDIN pin inside cluster A
When LCD feature is not used, VLCDIN must be always powered (1.8-3.6V). VLCD, CAPH,CAPL, BIASH, BIASL can be left unconnected in this case
VDDIN
VDDIO
VDDANA
VDDCORE
REGULATOR
ADC, DAC, AC0/1, RC32K, OSC32K, BOD18, BOD33
RC80M, OSC,
Core domain: CPU, Peripherals, RAM, Flash, RCSYS, PLL, DFLL, RCFAST
Backup domain: AST, WDT, EIC, BPM, BSCIF
Main Supply (1.68V-3.6V)
VDDOUT
BUCK/LDOn(PA02)
VLCDIN LCD VPUMP

4842023G–SAM–03/2014
ATSAM4L8/L4/L2
Figure 5-5. LCD clusters in the device
5.2.3.2 Internal LCD VoltageIn this mode the LCD voltages are internally generated. Depending of the number of segmentsrequired by the application, LCDB and LDCC clusters VDDIO pin must be unconnected (nc) or
1 2 3 4 5 6
GND7
VDDIO8 9 10 11 12 13 14
GND15 16 17 18 19 20 21 22 23 24 25
26
27
28
29
30
31
32
GNDANA33
34
VDDANA35
36
37
38
39
40
41
42
43
44
45
46
47
COM248
COM149
COM050SE
G17
75
SEG1
674
SEG1
573
SEG1
472
SEG1
371
SEG1
270
SEG1
169
SEG1
068
SEG9
67
SEG8
66
SEG7
65
SEG6
64
SEG5
63
SEG4
62
SEG3
61
SEG2
60
SEG1
59
SEG0
58
VLCD
IN57
GND
56
BIAS
L55
BIAS
H54
VLCD
53
CAPL
52
CAPH
51
SEG18 76
SEG19 77
SEG20 78
SEG24 79
SEG25 80
SEG26 81
SEG27 82
SEG28 83
SEG29 84
SEG30 85
SEG31 86
VDDIO 87
VDDIO 88
SEG32 89
SEG33 90
SEG34 91
SEG35 92
SEG36 93
SEG37 94
SEG38 95
SEG39 96
97
98
99
GND 100
VDDOUT
VDDIN
VDDCORE
COM3
SEG21
SEG22
SEG23
1 2 3 4VDDCORE
5GND
6VDDOUT
7VDDIN
8 9 10 11 12 13 14 15 16
17
18
19
20
21
22
GNDANA23
24
VDDANA25
26
27
28
29
SEG14
30
SEG13
31
SEG12
32SE
G848
SEG7
47SE
G646
SEG5
45SE
G444
SEG3
43SE
G242
SEG1
41SE
G040
VLCD
IN39
GND
38BI
ASL
37BI
ASH
36VL
CD35
CAPL
34CA
PH33
SEG9 49
SEG10 50
SEG11 51
VDDIO 52
53
54
55
56
57
58
59
60
VDDIO 61
62
63
GND 64
COM3
COM2
COM1
COM0
SEG15
SEG16
SEG17
SEG18SEG19
SEG20
SEG21
SEG22
1 2 3 4VDDCORE
5GND
6VDDOUT
7VDDIN
8 9 10 11 12
13141516
GNDANA1718
VDDANA19SEG820COM321COM222COM123COM024
SEG4
36SE
G335
SEG2
34SE
G133
SEG0
32VL
CDIN
31GN
D30
BIAS
L29
BIAS
H28
VLCD
27CA
PL26
CAPH
25
SEG5 37SEG6 38SEG7 39
VDDIO 40SEG9 41
SEG10 42SEG11 43SEG12 44VDDIO 45
4647
GND 48
TQFP48/QFN48
TQFP64/QFN64
TQFP100
LCDA
CLU
STER
LCDB
CLU
STER
LCDC
CLU
STER
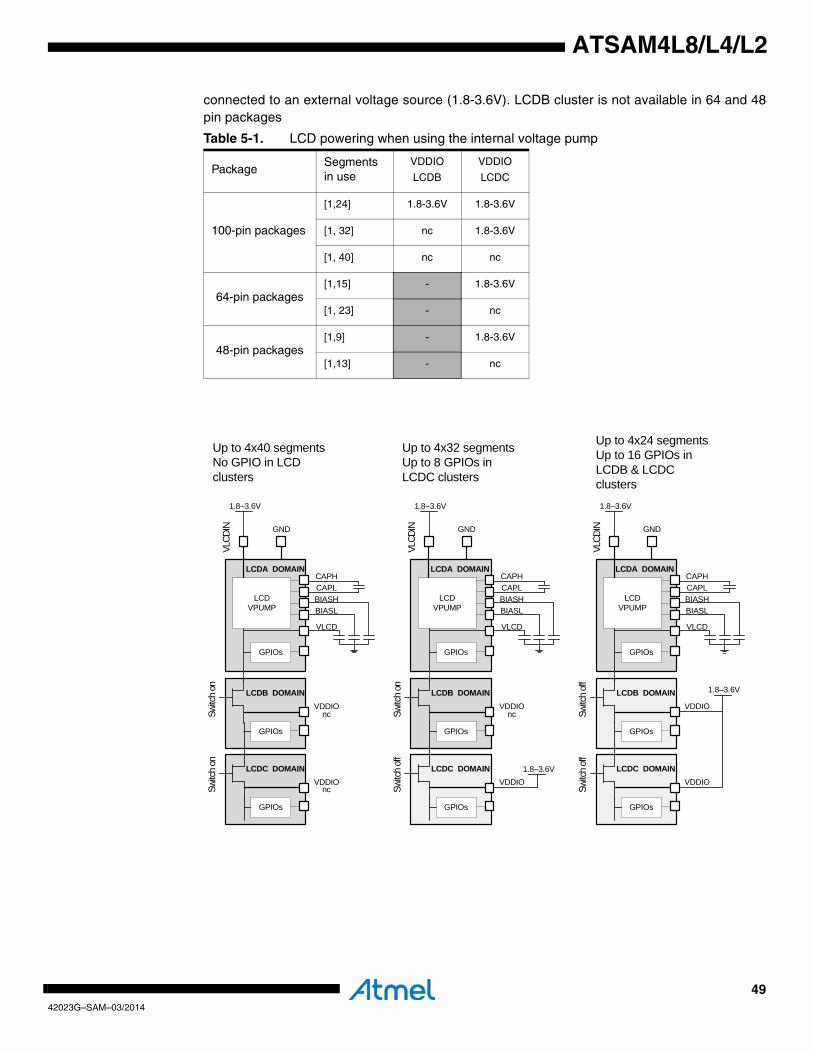
4942023G–SAM–03/2014
ATSAM4L8/L4/L2
connected to an external voltage source (1.8-3.6V). LCDB cluster is not available in 64 and 48pin packages
Table 5-1. LCD powering when using the internal voltage pump
PackageSegments in use
VDDIO
LCDB
VDDIO
LCDC
100-pin packages
[1,24] 1.8-3.6V 1.8-3.6V
[1, 32] nc 1.8-3.6V
[1, 40] nc nc
64-pin packages[1,15] - 1.8-3.6V
[1, 23] - nc
48-pin packages[1,9] - 1.8-3.6V
[1,13] - nc
VLCD
IN GND
GPIOs
LCDVPUMP
CAPHCAPLBIASHBIASL
VLCD
VDDIOLCDB DOMAIN
GPIOs
VDDIO
GPIOs
LCDC DOMAIN
Switc
h on
Switc
h on
nc
nc
1.8–3.6V
VLCD
IN GND
GPIOs
LCDVPUMP
CAPHCAPLBIASHBIASL
VLCD
VDDIOLCDB DOMAIN
GPIOs
VDDIO
GPIOs
LCDC DOMAIN
Switc
h on
Switc
h of
f
nc
1.8–3.6V
VLCD
IN GND
GPIOs
LCDVPUMP
CAPHCAPLBIASHBIASL
VLCD
VDDIOLCDB DOMAIN
GPIOs
VDDIO
GPIOs
LCDC DOMAIN
Switc
h of
fSw
itch
off
1.8–3.6V
1.8–3.6V
LCDA DOMAIN LCDA DOMAIN LCDA DOMAIN
1.8–3.6V
Up to 4x40 segmentsNo GPIO in LCD clusters
Up to 4x32 segmentsUp to 8 GPIOs in LCDC clusters
Up to 4x24 segmentsUp to 16 GPIOs in LCDB & LCDC clusters
5042023G–SAM–03/2014
ATSAM4L8/L4/L2
5.2.4 Power-up Sequence
5.2.4.1 Maximum Rise RateTo avoid risk of latch-up, the rise rate of the power supplies must not exceed the valuesdescribed in Table 42-3 on page 1122.
5.2.4.2 Minimum Rise RateThe integrated Power-on Reset (POR33) circuitry monitoring the VDDIN powering supplyrequires a minimum rise rate for the VDDIN power supply.
See Table 42-3 on page 1122 for the minimum rise rate value.
If the application can not ensure that the minimum rise rate condition for the VDDIN power sup-ply is met, the following configuration can be used:
• A logic “0” value is applied during power-up on pin RESET_N until VDDIN rises above 1.6 V.
5.3 Startup ConsiderationsThis section summarizes the boot sequence of the ATSAM4L8/L4/L2. The behavior after power-up is controlled by the Power Manager. For specific details, refer to Section 10. ”Power Manager(PM)” on page 109.
5.3.1 Starting of ClocksAfter power-up, the device will be held in a reset state by the power-up circuitry for a short timeto allow the power to stabilize throughout the device. After reset, the device will use the SystemRC Oscillator (RCSYS) as clock source. Refer to Section 42. ”Electrical Characteristics” on page1121 for the frequency for this oscillator.
On system start-up, the DFLL and the PLLs are disabled. Only the necessary clocks are activeallowing software execution. Refer to Section 10-5 ”Maskable Module Clocks in ATSAM4L.” onpage 120 to know the list of peripheral clock running.. No clocks have a divided frequency; allparts of the system receive a clock with the same frequency as the System RC Oscillator.
5.3.2 Fetching of Initial InstructionsAfter reset has been released, the Cortex M4 CPU starts fetching PC and SP values from thereset address, which is 0x00000000. Refer to the ARM Architecture Reference Manual for moreinformation on CPU startup. This address points to the first address in the internal Flash.
The code read from the internal flash is free to configure the clock system and clock sources.
5.4 Power-on-Reset, Brownout and Supply MonitorThe SAM4L embeds four features to monitor, warm, and/or reset the device:
• POR33: Power-on-Reset on VDDANA
• BOD33: Brownout detector on VDDANA
• POR18: Power-on-Reset on VDDCORE
• BOD18: Brownout detector on VDDCORE
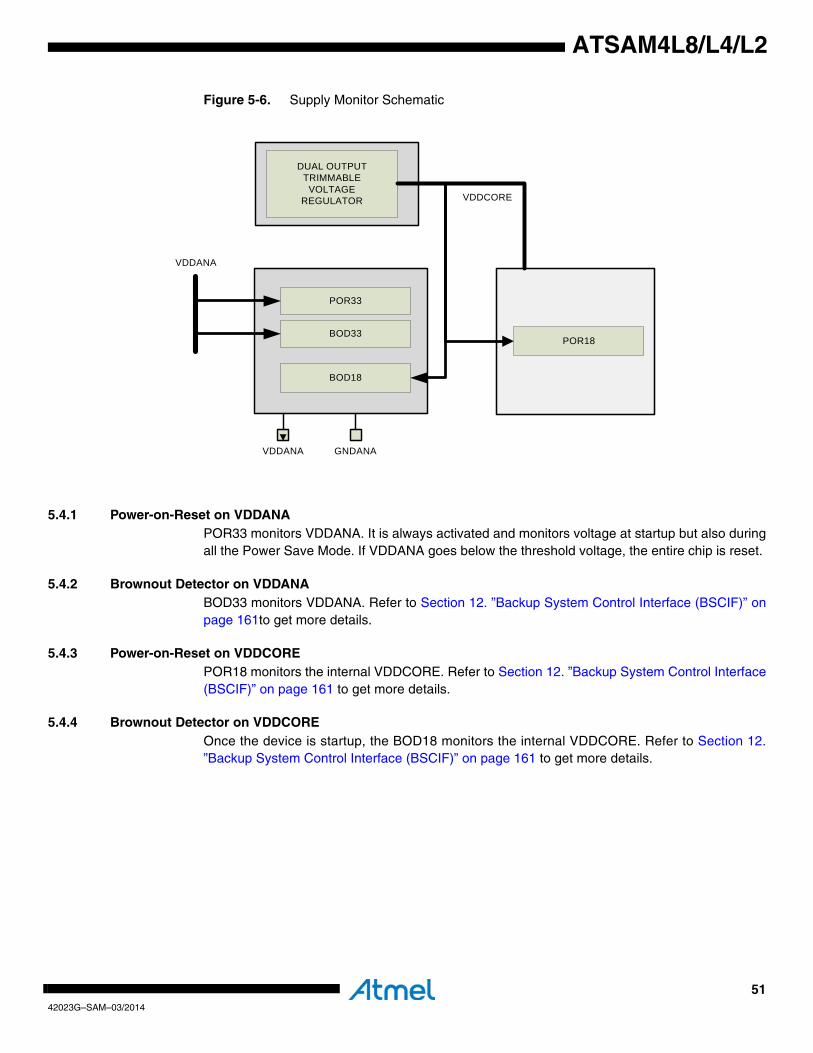
5142023G–SAM–03/2014
ATSAM4L8/L4/L2
Figure 5-6. Supply Monitor Schematic
5.4.1 Power-on-Reset on VDDANAPOR33 monitors VDDANA. It is always activated and monitors voltage at startup but also duringall the Power Save Mode. If VDDANA goes below the threshold voltage, the entire chip is reset.
5.4.2 Brownout Detector on VDDANABOD33 monitors VDDANA. Refer to Section 12. ”Backup System Control Interface (BSCIF)” onpage 161to get more details.
5.4.3 Power-on-Reset on VDDCOREPOR18 monitors the internal VDDCORE. Refer to Section 12. ”Backup System Control Interface(BSCIF)” on page 161 to get more details.
5.4.4 Brownout Detector on VDDCOREOnce the device is startup, the BOD18 monitors the internal VDDCORE. Refer to Section 12.”Backup System Control Interface (BSCIF)” on page 161 to get more details.
POR33
BOD33
BOD18
VDDANA GNDANA
VDDANA
POR18
DUAL OUTPUTTRIMMABLE
VOLTAGEREGULATOR VDDCORE
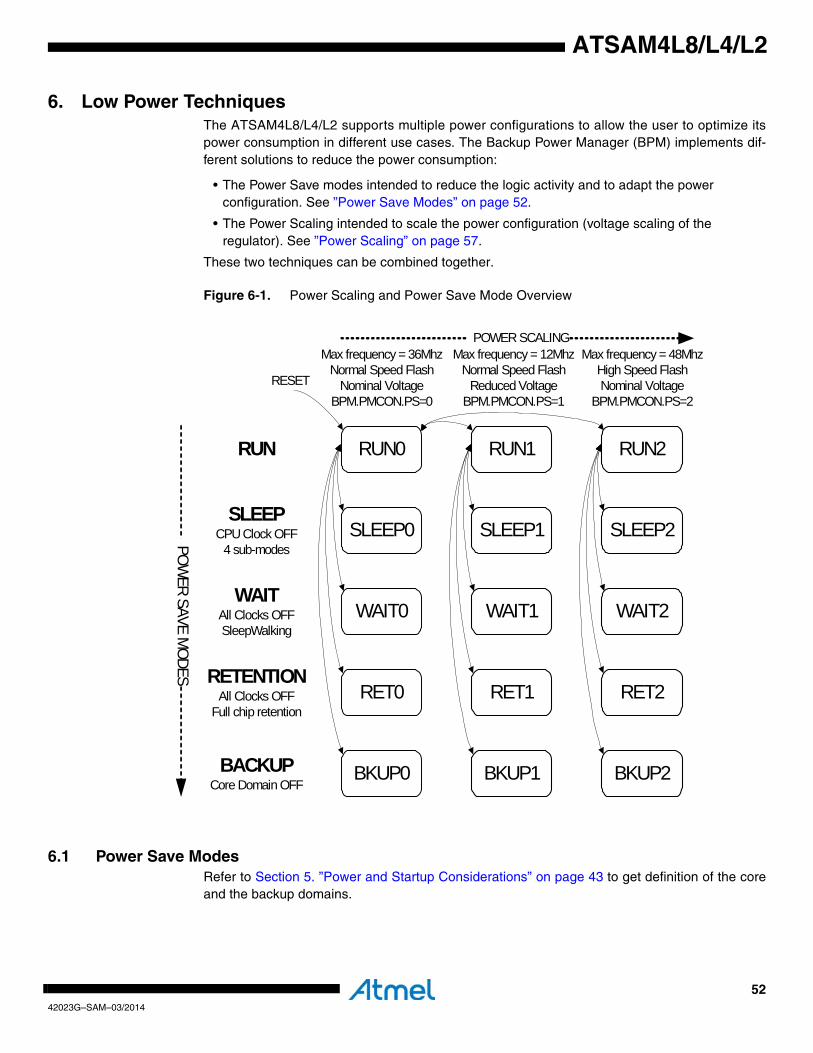
5242023G–SAM–03/2014
ATSAM4L8/L4/L2
6. Low Power TechniquesThe ATSAM4L8/L4/L2 supports multiple power configurations to allow the user to optimize itspower consumption in different use cases. The Backup Power Manager (BPM) implements dif-ferent solutions to reduce the power consumption:
• The Power Save modes intended to reduce the logic activity and to adapt the power configuration. See ”Power Save Modes” on page 52.
• The Power Scaling intended to scale the power configuration (voltage scaling of the regulator). See ”Power Scaling” on page 57.
These two techniques can be combined together.
Figure 6-1. Power Scaling and Power Save Mode Overview
6.1 Power Save ModesRefer to Section 5. ”Power and Startup Considerations” on page 43 to get definition of the coreand the backup domains.
SLEEP1
WAIT1
RET1
BKUP1
RUN1
POWER SCALING Max frequency = 36Mhz
Normal Speed FlashNominal Voltage
BPM.PMCON.PS=0
Max frequency = 12MhzNormal Speed Flash
Reduced VoltageBPM.PMCON.PS=1
RESET
RUN
SLEEP0
WAIT0
RET0
BKUP0
RUN0
SLEEPCPU Clock OFF
4 sub-modes
WAITAll Clocks OFFSleepWalking
RETENTIONAll Clocks OFF
Full chip retention
BACKUPCore Domain OFF
POWER SAVE M
ODES
Max frequency = 48MhzHigh Speed FlashNominal Voltage
BPM.PMCON.PS=2
SLEEP2
WAIT2
RET2
BKUP2
RUN2

5342023G–SAM–03/2014
ATSAM4L8/L4/L2
At power-up or after a reset, the ATSAM4L8/L4/L2 is in the RUN0 mode. Only the necessaryclocks are enabled allowing software execution. The Power Manager (PM) can be used to adjustthe clock frequencies and to enable and disable the peripheral clocks.
When the CPU is entering a Power Save Mode, the CPU stops executing code. The user canchoose between four Power Save Modes to optimize power consumption:
• SLEEP mode: the Cortex-M4 core is stopped, optionally some clocks are stopped, peripherals are kept running if enabled by the user.
• WAIT mode: all clock sources are stopped, the core and all the peripherals are stopped except the modules running with the 32kHz clock if enabled. This is the lowest power configuration where SleepWalking is supported.
• RETENTION mode: similar to the WAIT mode in terms of clock activity. This is the lowest power configuration where the logic is retained.
• BACKUP mode: the Core domain is powered off, the Backup domain is kept powered.
A wake up source exits the system to the RUN mode from which the Power Save Mode wasentered.
A reset source always exits the system from the Power Save Mode to the RUN0 mode.
The configuration of the I/O lines are maintained in all Power Save Modes. Refer to Section 11.”Backup Power Manager (BPM)” on page 140.
6.1.1 SLEEP modeThe SLEEP mode allows power optimization with the fastest wake up time.
The CPU is stopped. To further reduce power consumption, the user can switch off modules-clocks and synchronous clock sources through the BPM.PMCON.SLEEP field (See Table 6-1).The required modules will be halted regardless of the bit settings of the mask registers in thePower Manager (PM.AHBMASK, PM.APBxMASK).
Notes: 1. from modules with clock running.
2. OSC32K and RC32K will only remain operational if pre-enabled.
6.1.1.1 Entering SLEEP mode
The SLEEP mode is entered by executing the WFI instruction. Additionally, if the SLEEPONEXIT bit in the Cortex-M4 System Control Register (SCR) is set,the SLEEP mode will also be entered when the Cortex-M4 exits the lowest priority ISR. This
Table 6-1. SLEEP mode Configuration
BPM.PSAVE.SLEEPCPU clock
AHB clocks
APB clocksGCLK
Clock sources: OSC, RCFAST, RC80M, PLL, DFLL RCSYS
OSC32KRC32K(2) Wake up Sources
0 Stop Run Run Run Run Run Any interrupt
1 Stop Stop Run Run Run Run Any interrupt(1)
2 Stop Stop Stop Run Run Run Any interrupt(1)
3 Stop Stop Stop Stop Run Run Any interrupt(1)
5442023G–SAM–03/2014
ATSAM4L8/L4/L2
mechanism can be useful for applications that only require the processor to run when an inter-rupt occurs.
Before entering the SLEEP mode, the user must configure:
• the SLEEP mode configuration field (BPM.PMCON.SLEEP), Refer to Table 6-1.
• the SCR.SLEEPDEEP bit to 0. (See the Power Management section in the ARM Cortex-M4 Processor chapter).
• the BPM.PMCON.RET bit to 0.
• the BPM.PMCON.BKUP bit to 0.
6.1.1.2 Exiting SLEEP modeThe NVIC wakes the system up when it detects any non-masked interrupt with sufficient priorityto cause exception entry. The system goes back to the RUN mode from which the SLEEP modewas entered. The CPU and affected modules are restarted. Note that even if an interrupt isenabled in SLEEP mode, it will not trigger if the source module is not clocked.
6.1.2 WAIT Mode and RETENTION ModeThe WAIT and RETENTION modes allow achieving very low power consumption while main-taining the Core domain powered-on. Internal SRAM and registers contents of the Core domainare preserved.
In these modes, all clocks are stopped except the 32kHz clocks (OSC32K, RC32K) which arekept running if enabled.
In RETENTION mode, the SleepWalking feature is not supported and must not be used.
6.1.2.1 Entering WAIT or RETENTION ModeThe WAIT or RETENTION modes are entered by executing the WFI instruction with the follow-ing settings:
• set the SCR.SLEEPDEEP bit to 1. (See the Power Management section in the ARM Cortex-M4 Processor chapter).
• set the BPM.PSAVE.BKUP bit to 0.
• set the BPM.PMCON.RET bit to RETENTION or WAIT mode.
SLEEPONEXIT feature is also available. See ”Entering SLEEP mode” on page 53.
6.1.2.2 Exiting WAIT or RETENTION ModeIn WAIT or RETENTION modes, synchronous clocks are stopped preventing interrupt sourcesfrom triggering. To wakeup the system, asynchronous wake up sources (AST, EIC, USBC ...)should be enabled in the peripheral (refer to the documentation of the peripheral). ThePM.AWEN (Asynchronous Wake Up Enable) register should also be enabled for all peripheralexcept for EIC and AST.
When the enabled asynchronous wake up event occurs and the system is waken-up, it will gen-erate either:
• an interrupt on the PM WAKE interrupt line if enabled (Refer to Section 10. ”Power Manager (PM)” on page 109). In that case, the PM.WCAUSE register indicates the wakeup source.
• or an interrupt directly from the peripheral if enabled (Refer to the section of the peripheral).
When waking up, the system goes back to the RUN mode mode from which the WAIT orRETENTION mode was entered.
5542023G–SAM–03/2014
ATSAM4L8/L4/L2
6.1.3 BACKUP ModeThe BACKUP mode allows achieving the lowest power consumption possible in a system whichis performing periodic wake-ups to perform tasks but not requiring fast startup time.
The Core domain is powered-off. The internal SRAM and register contents of the Core domainare lost. The Backup domain is kept powered-on. The 32kHz clock (RC32K or OSC32K) is keptrunning if enabled to feed modules that require clocking.
In BACKUP mode, the configuration of the I/O lines is preserved. Refer to Section 11. ”BackupPower Manager (BPM)” on page 140 to have more details.
6.1.3.1 Entering BACKUP ModeThe Backup mode is entered by using the WFI instruction with the following settings:
• set the SCR.SLEEPDEEP bit to 1. (See the Power Management section in the ARM Cortex-M4 Processor chapter).
• set the BPM.PSAVE.BKUP bit to 1.
6.1.3.2 Exiting BACKUP ModeExit from BACKUP mode happens if a reset occurs or if an enabled wake up event occurs.
The reset sources are:
• BOD33 reset
• BOD18 reset
• WDT reset
• External reset in RESET_N pin
The wake up sources are:
• EIC lines (level transition only)
• BOD33 interrupt
• BOD18 interrupt
• AST alarm, periodic, overflow
• WDT interrupt
The RC32K or OSC32K should be used as clock source for modules if required. ThePMCON.CK32S is used to select one of these two 32kHz clock sources.
Exiting the BACKUP mode is triggered by:
• a reset source: an internal reset sequence is performed according to the reset source. Once VDDCORE is stable and has the correct value according to RUN0 mode, the internal reset is released and program execution starts. The corresponding reset source is flagged in the Reset Cause register (RCAUSE) of the PM.
• a wake up source: the Backup domain is not reset. An internal reset is generated to the Core domain, and the system switches back to the previous RUN mode. Once VDDCORE is stable and has the correct value, the internal reset in the Core domain is released and program execution starts. The BKUP bit is set in the Reset Cause register (RCAUSE) of the PM. It allows the user to discriminate between the reset cause and a wake up cause from the BACKUP mode. The wake up cause can be found in the Backup Wake up Cause register (BPM.BKUPWCAUSE).
5642023G–SAM–03/2014
ATSAM4L8/L4/L2
6.1.4 Wakeup Time
6.1.4.1 Wakeup Time From SLEEP ModeThe latency depends on the clock sources wake up time. If the clock sources are not stopped,there is no latency to wake the clocks up.
6.1.4.2 Wakeup Time From WAIT or RETENTION ModeThe wake up latency consists of:
• the switching time from the low power configuration to the RUN mode power configuration. By default, the switching time is completed when all the voltage regulation system is ready. To speed-up the startup time, the user can set the Fast Wakeup bit in BPM.PMCON register.
• the wake up time of the RC oscillator used to start the system up. By default, the RCSYS oscillator is used to startup the system. The user can use another clock source (RCFAST for example) to speed up the startup time by configuring the PM.FASTWKUP register. Refer to Section 10. ”Power Manager (PM)” on page 109.
• the Flash memory wake up time.
To have the shortest wakeup time, the user should:
- set the BPM.PMCON.FASTWKUP bit.
- configure the PM.FASTSLEEP.FASTRCOSC field to use the RCFAST main clock.
- enter the WAIT or RETENTION mode
Upon a wakeup, this is required to keep the main clock connected to RCFAST until the voltageregulation system is fully ready (when BPM.ISR.PSOK bit is one). During this wakeup period,the FLASHCALW module is automatically configured to operate in “1 wait state mode”.
6.1.4.3 Wake time from BACKUP modeIt is equal to the Core domain logic reset latency (similar to the reset latency caused by an exter-nal reset in RESET_N pin) added to the time required for the voltage regulation system to bestabilized.
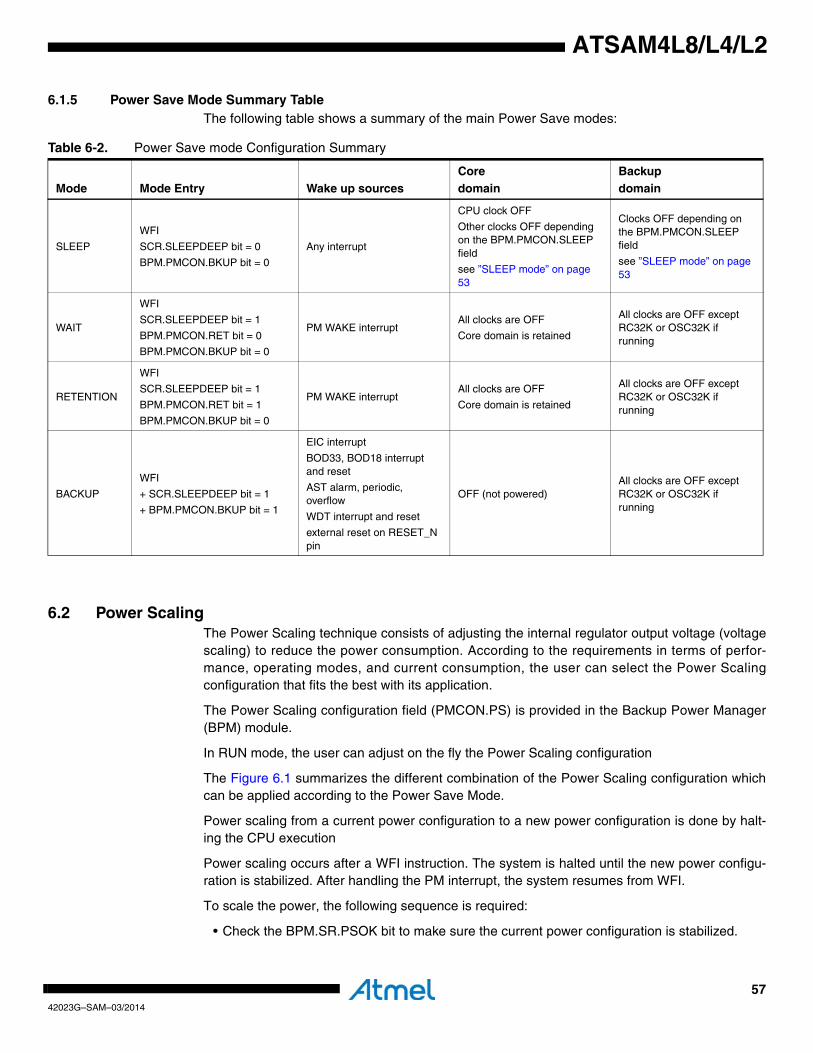
5742023G–SAM–03/2014
ATSAM4L8/L4/L2
6.1.5 Power Save Mode Summary TableThe following table shows a summary of the main Power Save modes:
6.2 Power ScalingThe Power Scaling technique consists of adjusting the internal regulator output voltage (voltagescaling) to reduce the power consumption. According to the requirements in terms of perfor-mance, operating modes, and current consumption, the user can select the Power Scalingconfiguration that fits the best with its application.
The Power Scaling configuration field (PMCON.PS) is provided in the Backup Power Manager(BPM) module.
In RUN mode, the user can adjust on the fly the Power Scaling configuration
The Figure 6.1 summarizes the different combination of the Power Scaling configuration whichcan be applied according to the Power Save Mode.
Power scaling from a current power configuration to a new power configuration is done by halt-ing the CPU execution
Power scaling occurs after a WFI instruction. The system is halted until the new power configu-ration is stabilized. After handling the PM interrupt, the system resumes from WFI.
To scale the power, the following sequence is required:
• Check the BPM.SR.PSOK bit to make sure the current power configuration is stabilized.
Table 6-2. Power Save mode Configuration Summary
Mode Mode Entry Wake up sourcesCoredomain
Backupdomain
SLEEP
WFI
SCR.SLEEPDEEP bit = 0
BPM.PMCON.BKUP bit = 0
Any interrupt
CPU clock OFF
Other clocks OFF depending on the BPM.PMCON.SLEEP field
see ”SLEEP mode” on page 53
Clocks OFF depending on the BPM.PMCON.SLEEP field
see ”SLEEP mode” on page 53
WAIT
WFI
SCR.SLEEPDEEP bit = 1
BPM.PMCON.RET bit = 0
BPM.PMCON.BKUP bit = 0
PM WAKE interruptAll clocks are OFF
Core domain is retained
All clocks are OFF except RC32K or OSC32K if running
RETENTION
WFI
SCR.SLEEPDEEP bit = 1
BPM.PMCON.RET bit = 1
BPM.PMCON.BKUP bit = 0
PM WAKE interruptAll clocks are OFF
Core domain is retained
All clocks are OFF except RC32K or OSC32K if running
BACKUP
WFI
+ SCR.SLEEPDEEP bit = 1
+ BPM.PMCON.BKUP bit = 1
EIC interrupt
BOD33, BOD18 interrupt and reset
AST alarm, periodic, overflow
WDT interrupt and reset
external reset on RESET_N pin
OFF (not powered)All clocks are OFF except RC32K or OSC32K if running
5842023G–SAM–03/2014
ATSAM4L8/L4/L2
• Set the clock frequency to be supported in both power configurations.
• Set the high speed read mode of the FLASH to be supported in both power scaling configurations
– Only relevant when entering or exiting BPM.PMCON.PS=2
• Configure the BPM.PMCON.PS field to the new power configuration.
• Set the BPM.PMCON.PSCREQ bit to one.
• Disable all the interrupts except the PM WCAUSE interrupt and enable only the PSOK asynchronous event in the AWEN register of PM.
• Execute the WFI instruction.
• WAIT for PM interrupt.
The new power configuration is reached when the system is waken up by the PM interruptthanks to the PSOK event.
By default, all features are available in all Power Scaling modes. However some specific fea-tures are not available in PS1 (BPM.PMCON.PS=1) mode :
– USB
– DFLL
– PLL
– Programming/Erasing in Flash
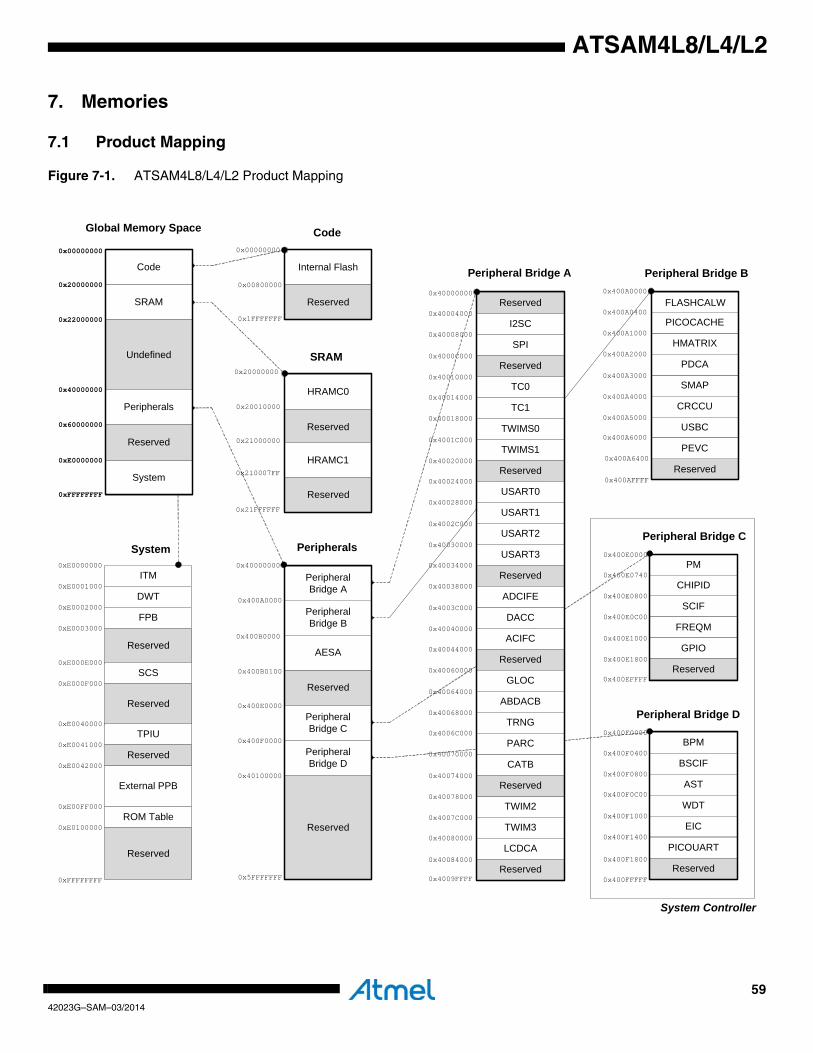
5942023G–SAM–03/2014
ATSAM4L8/L4/L2
7. Memories
7.1 Product Mapping
Figure 7-1. ATSAM4L8/L4/L2 Product Mapping
System
Reserved
Reserved
HRAMC1
Global Memory Space
Peripherals
Code
Internal Flash
Reserved
0x00000000
0x00800000
0x1FFFFFFF
Code
SRAM
Undefined
Peripherals
Reserved
0x00000000
0x20000000
0x40000000
0x60000000
0xFFFFFFFF
0x22000000
0x5FFFFFFF
SRAM
HRAMC0
Reserved
0x20000000
0x20010000
0x21000000
0x210007FF
0x21FFFFFF
PeripheralBridge A
Reserved
PeripheralBridge B
PeripheralBridge C
PeripheralBridge D
AESA
0x400E0000
0x400F0000
0x40100000
0x400B0000
0x400A0000
0x40000000
0x400B0100
System Controller
TWIM2
CATB
DACC
Reserved
Reserved
I2SC
SPI
Reserved
TC0
TC1
TWIMS0
TWIMS1
USART0
USART1
USART2
USART3
Reserved
ADCIFE
ACIFC
Reserved
GLOC
ABDACB
TRNG
PARC
Reserved
0x40000000
0x40004000
0x40008000
0x4000C000
0x40010000
0x40014000
0x40018000
0x4001C000
0x40020000
0x40024000
0x40028000
0x4002C000
0x40030000
0x40034000
0x40038000
0x4003C000
0x40040000
0x40044000
0x40060000
0x40064000
0x40068000
0x4006C000
0x40070000
0x40074000
0x40078000
TWIM30x4007C000
0x40080000
LCDCA
Reserved0x40084000
0x4009FFFF
PICOUART
Peripheral Bridge C
PM
SCIF
CHIPID
FREQM
GPIO
Reserved
BPM
BSCIF
AST
WDT
EIC
Reserved
0x400E0000
0x400E0740
0x400E0800
0x400E0C00
0x400E1000
0x400E1800
0x400F0000
0x400F0400
0x400F0800
0x400F0C00
0x400F1000
0x400F1400
Peripheral Bridge D
0x400FFFFF
0x400F1800
0x400EFFFF
Peripheral Bridge B
FLASHCALW
HMATRIX
SMAP
CRCCU
PICOCACHE
Reserved
0x400A0000
0x400A0400
0x400A1000
0x400A2000
0x400A3000
0x400A4000
0x400A5000
PDCA
USBC
PEVC0x400A6000
0x400A6400
0x400AFFFF
Peripheral Bridge A
ITM
DWT
FPB
Reserved
SCS
Reserved
TPIU
Reserved
External PPB
ROM Table
0xE0000000
0xE0000000
0xE0001000
0xE0002000
0xE0003000
0xE000E000
0xE000F000
0xE0040000
0xE0041000
0xE0042000
0xE00FF000
0xE0100000
Reserved
0xFFFFFFFF
System
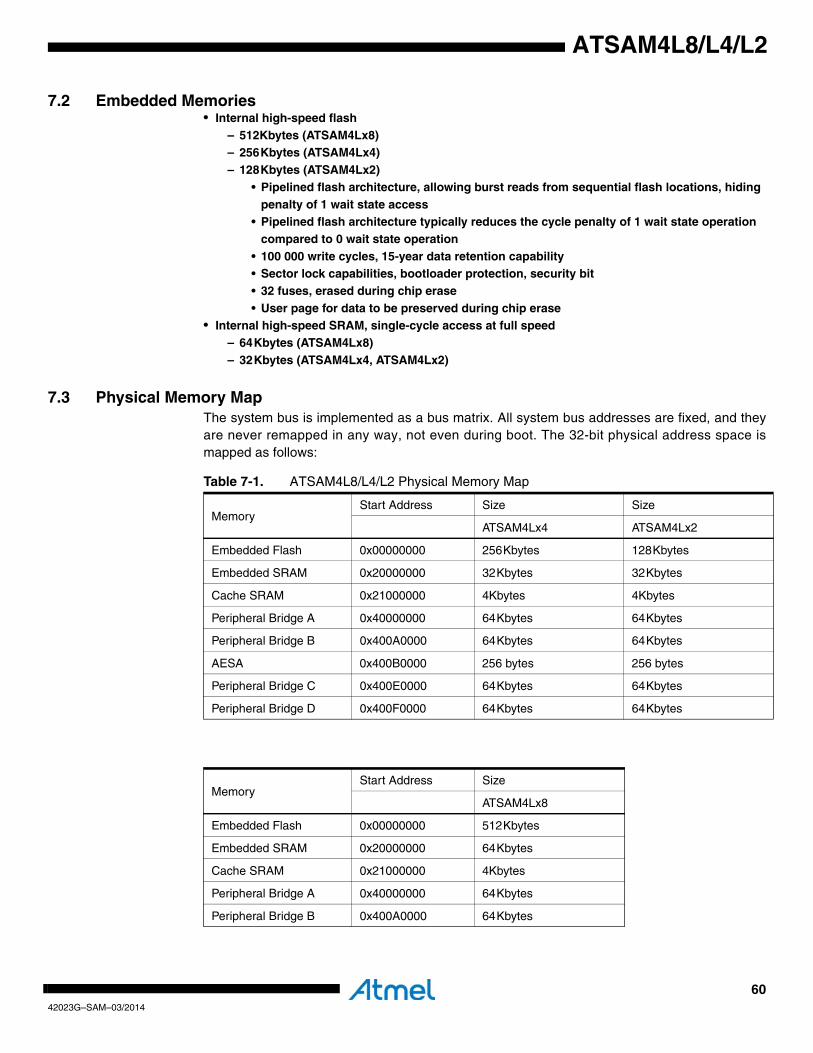
6042023G–SAM–03/2014
ATSAM4L8/L4/L2
7.2 Embedded Memories• Internal high-speed flash
– 512Kbytes (ATSAM4Lx8)– 256Kbytes (ATSAM4Lx4)– 128Kbytes (ATSAM4Lx2)
• Pipelined flash architecture, allowing burst reads from sequential flash locations, hiding penalty of 1 wait state access
• Pipelined flash architecture typically reduces the cycle penalty of 1 wait state operation compared to 0 wait state operation
• 100 000 write cycles, 15-year data retention capability• Sector lock capabilities, bootloader protection, security bit• 32 fuses, erased during chip erase• User page for data to be preserved during chip erase
• Internal high-speed SRAM, single-cycle access at full speed– 64Kbytes (ATSAM4Lx8)– 32Kbytes (ATSAM4Lx4, ATSAM4Lx2)
7.3 Physical Memory MapThe system bus is implemented as a bus matrix. All system bus addresses are fixed, and theyare never remapped in any way, not even during boot. The 32-bit physical address space ismapped as follows:
Table 7-1. ATSAM4L8/L4/L2 Physical Memory Map
MemoryStart Address Size Size
ATSAM4Lx4 ATSAM4Lx2
Embedded Flash 0x00000000 256Kbytes 128Kbytes
Embedded SRAM 0x20000000 32Kbytes 32Kbytes
Cache SRAM 0x21000000 4Kbytes 4Kbytes
Peripheral Bridge A 0x40000000 64Kbytes 64Kbytes
Peripheral Bridge B 0x400A0000 64Kbytes 64Kbytes
AESA 0x400B0000 256 bytes 256 bytes
Peripheral Bridge C 0x400E0000 64Kbytes 64Kbytes
Peripheral Bridge D 0x400F0000 64Kbytes 64Kbytes
MemoryStart Address Size
ATSAM4Lx8
Embedded Flash 0x00000000 512Kbytes
Embedded SRAM 0x20000000 64Kbytes
Cache SRAM 0x21000000 4Kbytes
Peripheral Bridge A 0x40000000 64Kbytes
Peripheral Bridge B 0x400A0000 64Kbytes
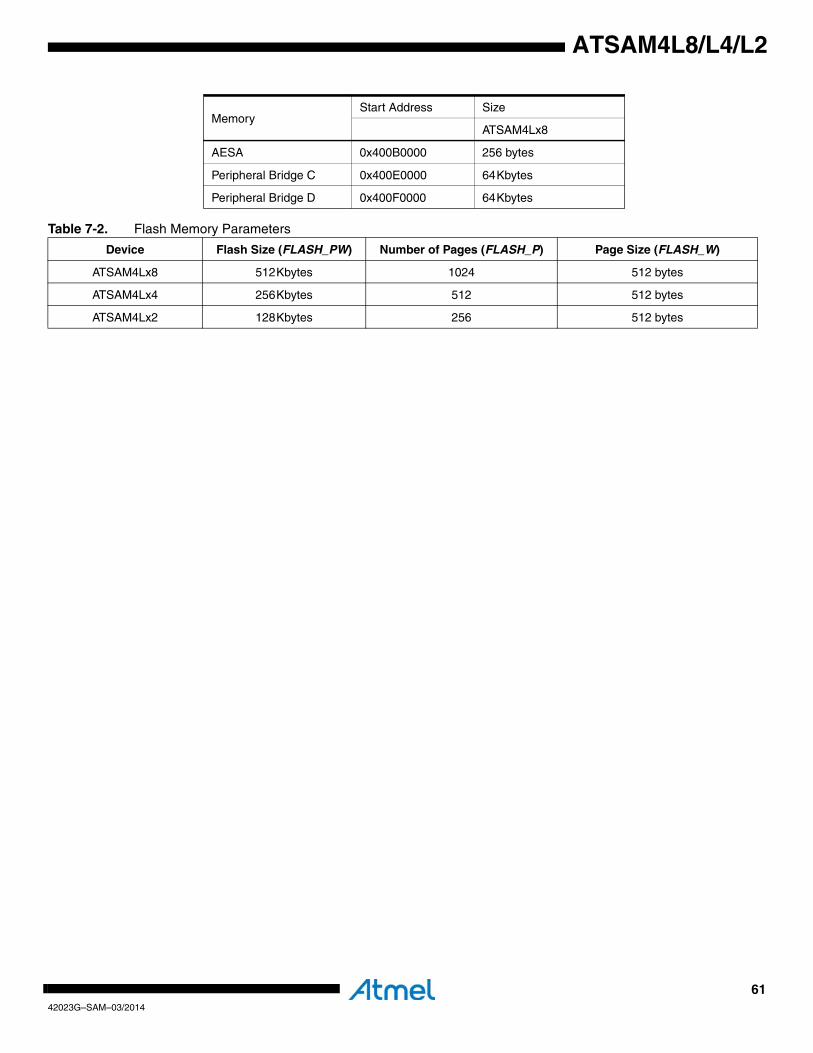
6142023G–SAM–03/2014
ATSAM4L8/L4/L2
AESA 0x400B0000 256 bytes
Peripheral Bridge C 0x400E0000 64Kbytes
Peripheral Bridge D 0x400F0000 64Kbytes
MemoryStart Address Size
ATSAM4Lx8
Table 7-2. Flash Memory Parameters
Device Flash Size (FLASH_PW) Number of Pages (FLASH_P) Page Size (FLASH_W)
ATSAM4Lx8 512Kbytes 1024 512 bytes
ATSAM4Lx4 256Kbytes 512 512 bytes
ATSAM4Lx2 128Kbytes 256 512 bytes
6242023G–SAM–03/2014
ATSAM4L8/L4/L2
8. Debug and Test
8.1 Features• IEEE1149.1 compliant JTAG Debug Port• Serial Wire Debug Port• Boundary-Scan chain on all digital pins for board-level testing• Direct memory access and programming capabilities through debug ports• Flash Patch and Breakpoint (FPB) unit for implementing breakpoints and code patches• Data Watchpoint and Trace (DWT) unit for implementing watchpoints, data tracing, and system
profiling• Instrumentation Trace Macrocell (ITM) for support of printf style debugging• Chip Erase command and status• Unlimited Flash User page read access• Cortex-M4 core reset source• CRC32 of any memory accessible through the bus matrix• Debugger Hot Plugging
8.2 OverviewDebug and test features are made available to external tools by:
• The Enhanced Debug Port (EDP) embedding:
– a Serial Wire Debug Port (SW-DP) part of the ARM coresight architecture
– an IEEE 1149.1 JTAG Debug Debug Port (JTAG-DP) part of the ARM coresight architecture
– a supplementary IEEE 1149.1 JTAG TAP machine that implements the boundary scan feature
• The System Manager Acces Port (SMAP) providing unlimited flash User page read access, CRC32 of any memory accessible through the bus matrix and Cortex-M4 core reset services
• The AHB Access Port (AHB-AP) providing Direct memory access, programming capabilities and standard debugging functions
• The Instrumentation Trace macrocell part of the ARM coresight architecture
For more information on ARM debug components, refer to:
• ARMv7-M Architecture Reference Manual
• ARM Debug Interface v5.1 Architecture Specification document
• ARM CoreSight Architecture Specification
• ARM ETM Architecture Specification v3.5
• ARM Cortex-M4 Technical Reference Manual
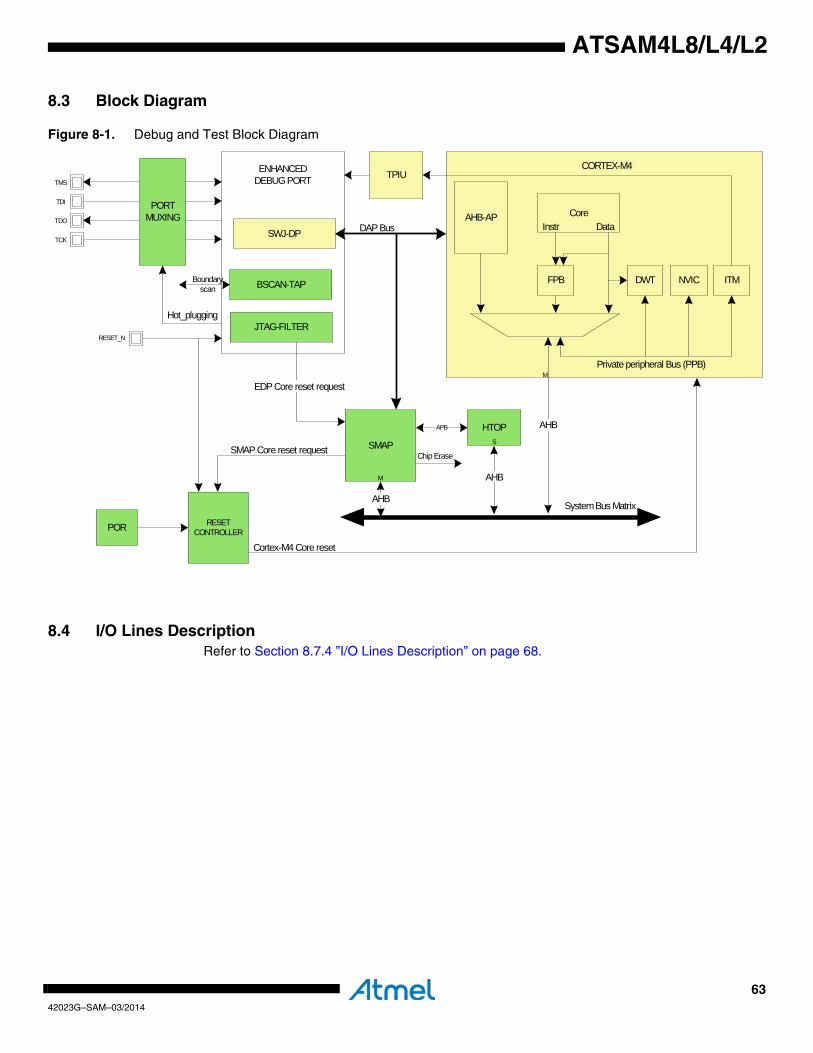
6342023G–SAM–03/2014
ATSAM4L8/L4/L2
8.3 Block Diagram
Figure 8-1. Debug and Test Block Diagram
8.4 I/O Lines DescriptionRefer to Section 8.7.4 ”I/O Lines Description” on page 68.
SWJ-DPAHB-AP
TCK
RESET_N
RESET CONTROLLER
BSCAN-TAP
TDO
TDI
TMS
POR
Boundary scan
SMAP Core reset request SMAP
ENHANCED DEBUG PORT
DAP Bus
Hot_plugging JTAG-FILTER
AHB
CORTEX-M4
NVICFPB DWT ITM
CoreInstr Data
Private peripheral Bus (PPB)
TPIU
PORT MUXING
HTOPAPB
AHB
Cortex-M4 Core reset
AHB
M
M
S
Chip Erase
EDP Core reset request
System Bus Matrix
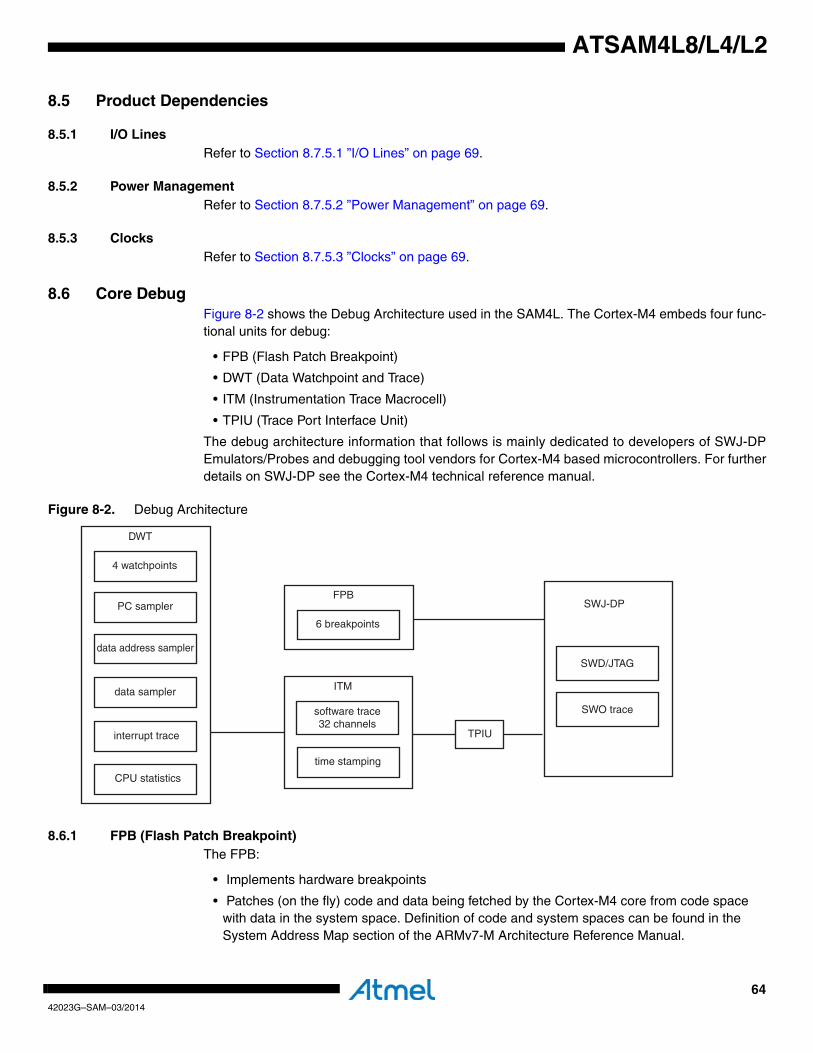
6442023G–SAM–03/2014
ATSAM4L8/L4/L2
8.5 Product Dependencies
8.5.1 I/O LinesRefer to Section 8.7.5.1 ”I/O Lines” on page 69.
8.5.2 Power ManagementRefer to Section 8.7.5.2 ”Power Management” on page 69.
8.5.3 ClocksRefer to Section 8.7.5.3 ”Clocks” on page 69.
8.6 Core DebugFigure 8-2 shows the Debug Architecture used in the SAM4L. The Cortex-M4 embeds four func-tional units for debug:
• FPB (Flash Patch Breakpoint)
• DWT (Data Watchpoint and Trace)
• ITM (Instrumentation Trace Macrocell)
• TPIU (Trace Port Interface Unit)
The debug architecture information that follows is mainly dedicated to developers of SWJ-DPEmulators/Probes and debugging tool vendors for Cortex-M4 based microcontrollers. For furtherdetails on SWJ-DP see the Cortex-M4 technical reference manual.
Figure 8-2. Debug Architecture
8.6.1 FPB (Flash Patch Breakpoint)The FPB:
• Implements hardware breakpoints
• Patches (on the fly) code and data being fetched by the Cortex-M4 core from code space with data in the system space. Definition of code and system spaces can be found in the System Address Map section of the ARMv7-M Architecture Reference Manual.
4 watchpoints
PC sampler
data address sampler
data sampler
interrupt trace
CPU statistics
DWT
6 breakpoints
FPB
software trace32 channels
time stamping
ITM
SWD/JTAG
SWJ-DP
SWO trace
TPIU
6542023G–SAM–03/2014
ATSAM4L8/L4/L2
The FPB unit contains:
• Two literal comparators for matching against literal loads from Code space, and remapping to a corresponding area in System space.
• Six instruction comparators for matching against instruction fetches from Code space and remapping to a corresponding area in System space.
• Alternatively, comparators can also be configured to generate a Breakpoint instruction to the processor core on a match.
8.6.2 DWT (Data Watchpoint and Trace)The DWT contains four comparators which can be configured to generate the following:
• PC sampling packets at set intervals
• PC or Data watchpoint packets
• Watchpoint event to halt core
The DWT contains counters for the items that follow:
• Clock cycle (CYCCNT)
• Folded instructions
• Load Store Unit (LSU) operations
• Sleep Cycles
• CPI (all instruction cycles except for the first cycle)
• Interrupt overhead
8.6.3 ITM (Instrumentation Trace Macrocell)The ITM is an application driven trace source that supports printf style debugging to trace Oper-ating System (OS) and application events, and emits diagnostic system information. The ITMemits trace information as packets which can be generated by three different sources with sev-eral priority levels:
• Software trace: This can be done thanks to the printf style debugging. For more information, refer to Section “How to Configure the ITM:”.
• Hardware trace: The ITM emits packets generated by the DWT.
• Time stamping: Timestamps are emitted relative to packets. The ITM contains a 21-bit counter to generate the timestamp.
How to Configure the ITM:
The following example describes how to output trace data in asynchronous trace mode.
• Configure the TPIU for asynchronous trace mode (refer to Section “5.4.3. How to Configure the TPIU”)
• Enable the write accesses into the ITM registers by writing “0xC5ACCE55” into the Lock Access Register (Address: 0xE0000FB0)
• Write 0x00010015 into the Trace Control Register:
– Enable ITM
– Enable Synchronization packets
– Enable SWO behavior
6642023G–SAM–03/2014
ATSAM4L8/L4/L2
– Fix the ATB ID to 1
• Write 0x1 into the Trace Enable Register:
– Enable the Stimulus port 0
• Write 0x1 into the Trace Privilege Register:
– Stimulus port 0 only accessed in privileged mode (Clearing a bit in this register will result in the corresponding stimulus port being accessible in user mode.)
• Write into the Stimulus port 0 register: TPIU (Trace Port Interface Unit)
The TPIU acts as a bridge between the on-chip trace data and the Instruction Trace Macro-cell (ITM).
The TPIU formats and transmits trace data off-chip at frequencies asynchronous to the core.
Asynchronous Mode:
The TPIU is configured in asynchronous mode, trace data are output using the single TRAC-ESWO pin. The TRACESWO signal is multiplexed with the TDO signal of the JTAG Debug Port.As a consequence, asynchronous trace mode is only available when the Serial Wire Debugmode is selected since TDO signal is used in JTAG debug mode.
Two encoding formats are available for the single pin output:
• Manchester encoded stream. This is the reset value.
• NRZ_based UART byte structure
5.4.3. How to Configure the TPIU
This example only concerns the asynchronous trace mode.
• Set the TRCENA bit to 1 into the Debug Exception and Monitor Register (0xE000EDFC) to enable the use of trace and debug blocks.
• Write 0x2 into the Selected Pin Protocol Register
– Select the Serial Wire Output – NRZ
• Write 0x100 into the Formatter and Flush Control Register
• Set the suitable clock prescaler value into the Async Clock Prescaler Register to scale the baud rate of the asynchronous output (this can be done automatically by the debugging tool).
6742023G–SAM–03/2014
ATSAM4L8/L4/L2
8.7 Enhanced Debug Port (EDP)Rev.: 1.0.0.0
8.7.1 Features• IEEE1149.1 compliant JTAG debug port• Serial Wire Debug Port• Boundary-Scan chain on all digital pins for board-level testing • Debugger Hot-Plugging• SMAP core reset request source
8.7.2 OverviewThe enhanced debug port embeds a standard ARM debug port plus some specific hardwareintended for testability and activation of the debug port features. All the information related to theARM Debug Interface implementation can be found in the ARM Debug Interface v5.1 Architec-ture Specification document.
It features:
• A single Debug Port (SWJ-DP), that provides the external physical connection to the interface and supports two DP implementations:
– the JTAG Debug Port (JTAG-DP)
– the Serial Wire Debug Port (SW-DP)
• A supplementary JTAG TAP (BSCAN-TAP) connected in parallel with the JTAG-DP that implements the boundary scan instructions detailed in
• A JTAG-FILTER module that monitors TCK and RESET_N pins to handle specific features like the detection of a debugger hot-plugging and the request of reset of the Cortex-M4 at startup.
The JTAG-FILTER module detects the presence of a debugger. When present, JTAG pins areautomatically assigned to the Enhanced Debug Port(EDP). If the SWJ-DP is switched to the SWmode, then TDI and TDO alternate functions are released. The JTAG-FILTER also implements aCPU halt mechanism. When triggered, the Cortex-M4 is maintained under reset after the exter-nal reset is released to prevent any system corruption during later programmation operations.
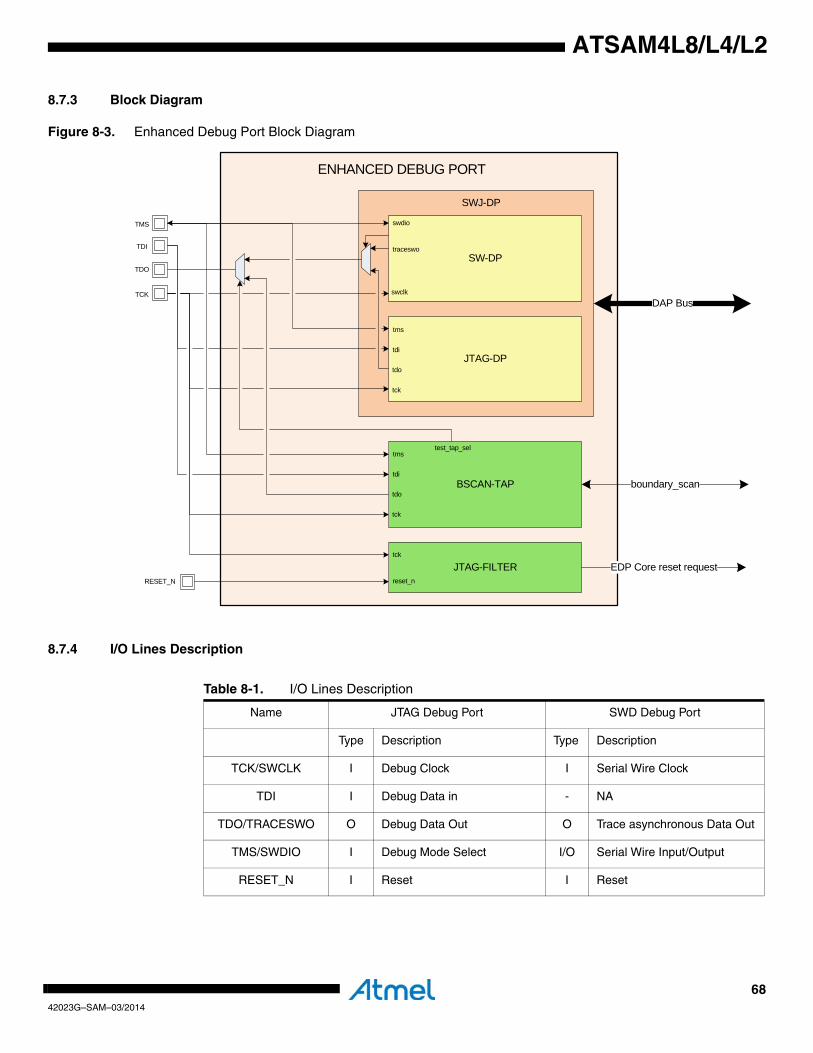
6842023G–SAM–03/2014
ATSAM4L8/L4/L2
8.7.3 Block Diagram
Figure 8-3. Enhanced Debug Port Block Diagram
8.7.4 I/O Lines Description
TCK
RESET_N
TDO
TDI
TMS
boundary_scan
JTAG-FILTER EDP Core reset request
ENHANCED DEBUG PORT
DAP Bus
SW-DP
SWJ-DP
JTAG-DP
BSCAN-TAP
traceswo
swclk
swdio
tdo
tck
tms
tdi
tdo
tck
tms
tdi
tck
reset_n
test_tap_sel
Table 8-1. I/O Lines Description
Name JTAG Debug Port SWD Debug Port
Type Description Type Description
TCK/SWCLK I Debug Clock I Serial Wire Clock
TDI I Debug Data in - NA
TDO/TRACESWO O Debug Data Out O Trace asynchronous Data Out
TMS/SWDIO I Debug Mode Select I/O Serial Wire Input/Output
RESET_N I Reset I Reset
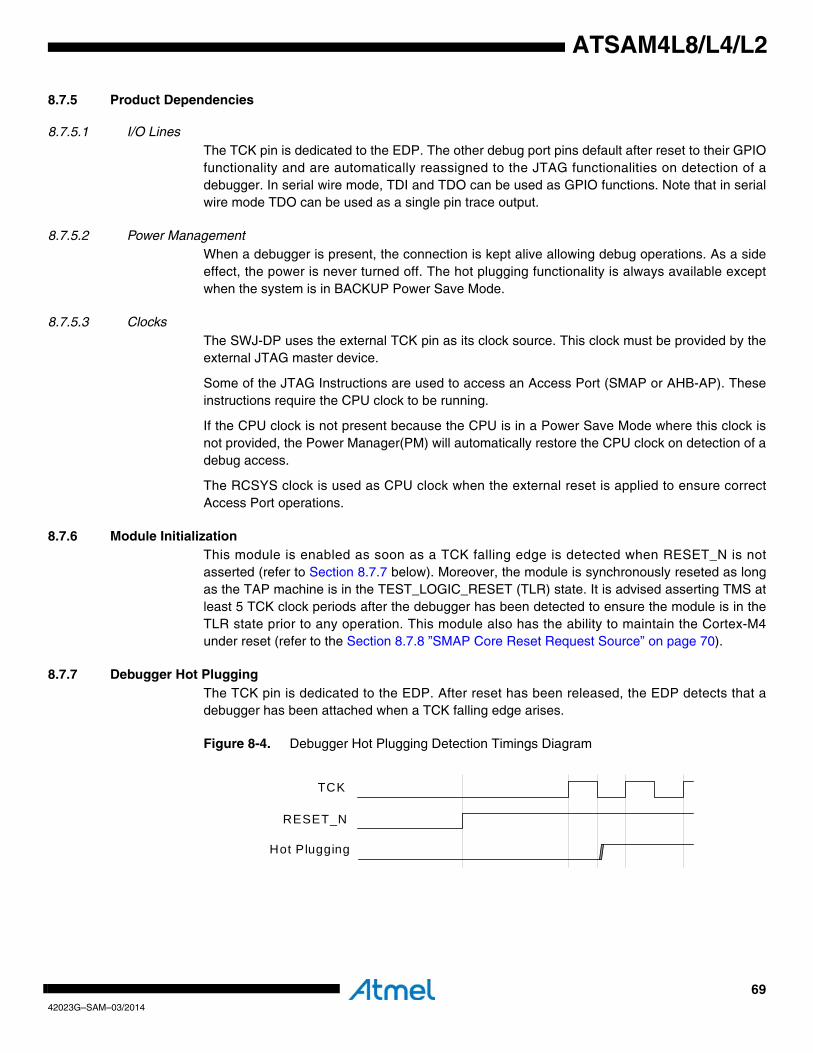
6942023G–SAM–03/2014
ATSAM4L8/L4/L2
8.7.5 Product Dependencies
8.7.5.1 I/O LinesThe TCK pin is dedicated to the EDP. The other debug port pins default after reset to their GPIOfunctionality and are automatically reassigned to the JTAG functionalities on detection of adebugger. In serial wire mode, TDI and TDO can be used as GPIO functions. Note that in serialwire mode TDO can be used as a single pin trace output.
8.7.5.2 Power ManagementWhen a debugger is present, the connection is kept alive allowing debug operations. As a sideeffect, the power is never turned off. The hot plugging functionality is always available exceptwhen the system is in BACKUP Power Save Mode.
8.7.5.3 ClocksThe SWJ-DP uses the external TCK pin as its clock source. This clock must be provided by theexternal JTAG master device.
Some of the JTAG Instructions are used to access an Access Port (SMAP or AHB-AP). Theseinstructions require the CPU clock to be running.
If the CPU clock is not present because the CPU is in a Power Save Mode where this clock isnot provided, the Power Manager(PM) will automatically restore the CPU clock on detection of adebug access.
The RCSYS clock is used as CPU clock when the external reset is applied to ensure correctAccess Port operations.
8.7.6 Module InitializationThis module is enabled as soon as a TCK falling edge is detected when RESET_N is notasserted (refer to Section 8.7.7 below). Moreover, the module is synchronously reseted as longas the TAP machine is in the TEST_LOGIC_RESET (TLR) state. It is advised asserting TMS atleast 5 TCK clock periods after the debugger has been detected to ensure the module is in theTLR state prior to any operation. This module also has the ability to maintain the Cortex-M4under reset (refer to the Section 8.7.8 ”SMAP Core Reset Request Source” on page 70).
8.7.7 Debugger Hot PluggingThe TCK pin is dedicated to the EDP. After reset has been released, the EDP detects that adebugger has been attached when a TCK falling edge arises.
Figure 8-4. Debugger Hot Plugging Detection Timings Diagram
TCK
RESET_N
Hot_plugging
TCK
RESET_N
Hot Plugging
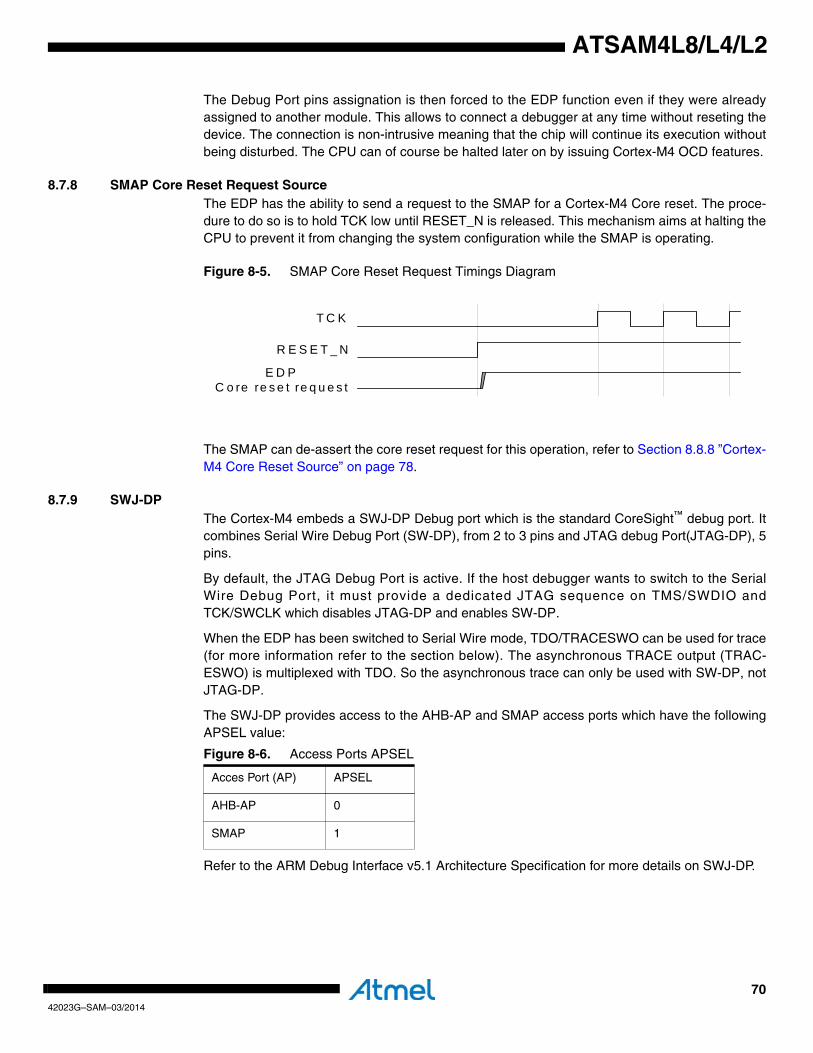
7042023G–SAM–03/2014
ATSAM4L8/L4/L2
The Debug Port pins assignation is then forced to the EDP function even if they were alreadyassigned to another module. This allows to connect a debugger at any time without reseting thedevice. The connection is non-intrusive meaning that the chip will continue its execution withoutbeing disturbed. The CPU can of course be halted later on by issuing Cortex-M4 OCD features.
8.7.8 SMAP Core Reset Request SourceThe EDP has the ability to send a request to the SMAP for a Cortex-M4 Core reset. The proce-dure to do so is to hold TCK low until RESET_N is released. This mechanism aims at halting theCPU to prevent it from changing the system configuration while the SMAP is operating.
Figure 8-5. SMAP Core Reset Request Timings Diagram
The SMAP can de-assert the core reset request for this operation, refer to Section 8.8.8 ”Cortex-M4 Core Reset Source” on page 78.
8.7.9 SWJ-DPThe Cortex-M4 embeds a SWJ-DP Debug port which is the standard CoreSight™ debug port. Itcombines Serial Wire Debug Port (SW-DP), from 2 to 3 pins and JTAG debug Port(JTAG-DP), 5pins.
By default, the JTAG Debug Port is active. If the host debugger wants to switch to the SerialWire Debug Port, it must provide a dedicated JTAG sequence on TMS/SWDIO andTCK/SWCLK which disables JTAG-DP and enables SW-DP.
When the EDP has been switched to Serial Wire mode, TDO/TRACESWO can be used for trace(for more information refer to the section below). The asynchronous TRACE output (TRAC-ESWO) is multiplexed with TDO. So the asynchronous trace can only be used with SW-DP, notJTAG-DP.
The SWJ-DP provides access to the AHB-AP and SMAP access ports which have the followingAPSEL value:
Refer to the ARM Debug Interface v5.1 Architecture Specification for more details on SWJ-DP.
reset request
T C K
R E S E T _ N
E D P C o re re s e t re q u e s t
Figure 8-6. Access Ports APSEL
Acces Port (AP) APSEL
AHB-AP 0
SMAP 1
7142023G–SAM–03/2014
ATSAM4L8/L4/L2
8.7.10 SW-DP and JTAG-DP Selection MechanismAfter reset, the SWJ-DP is in JTAG mode but it can be switched to the Serial Wire mode. Debugport selection mechanism is done by sending specific SWDIOTMS sequence. The JTAG-DP isselected by default after reset.
• Switch from JTAG-DP to SW-DP. The sequence is:
– Send more than 50 SWCLKTCK cycles with SWDIOTMS = 1
– Send the 16-bit sequence on SWDIOTMS = 0111100111100111 (0x79E7 MSB first)
– Send more than 50 SWCLKTCK cycles with SWDIOTMS = 1
• Switch from SWD to JTAG. The sequence is:
– Send more than 50 SWCLKTCK cycles with SWDIOTMS = 1
– Send the 16-bit sequence on SWDIOTMS = 0011110011100111 (0x3CE7 MSB first)
Send more than 50 SWCLKTCK cycles with SWDIOTMS = 1
Note that the BSCAN-TAP is not available when the debug port is switched to Serial Mode.Boundary scan instructions are not available.
8.7.11 JTAG-DP and BSCAN-TAP Selection MechanismAfter the DP has been enabled, the BSCAN-TAP and the JTAG-DP run simultaneously has longas the SWJ-DP remains in JTAG mode. Each TAP captures simultaneously the JTAG instruc-tions that are shifted. If an instruction is recognized by the BSCAN-TAP, then the BSCAN-TAPTDO is selected instead of the SWJ-DP TDO. TDO selection changes dynamically depending onthe current instruction held in the BSCAN-TAP instruction register.
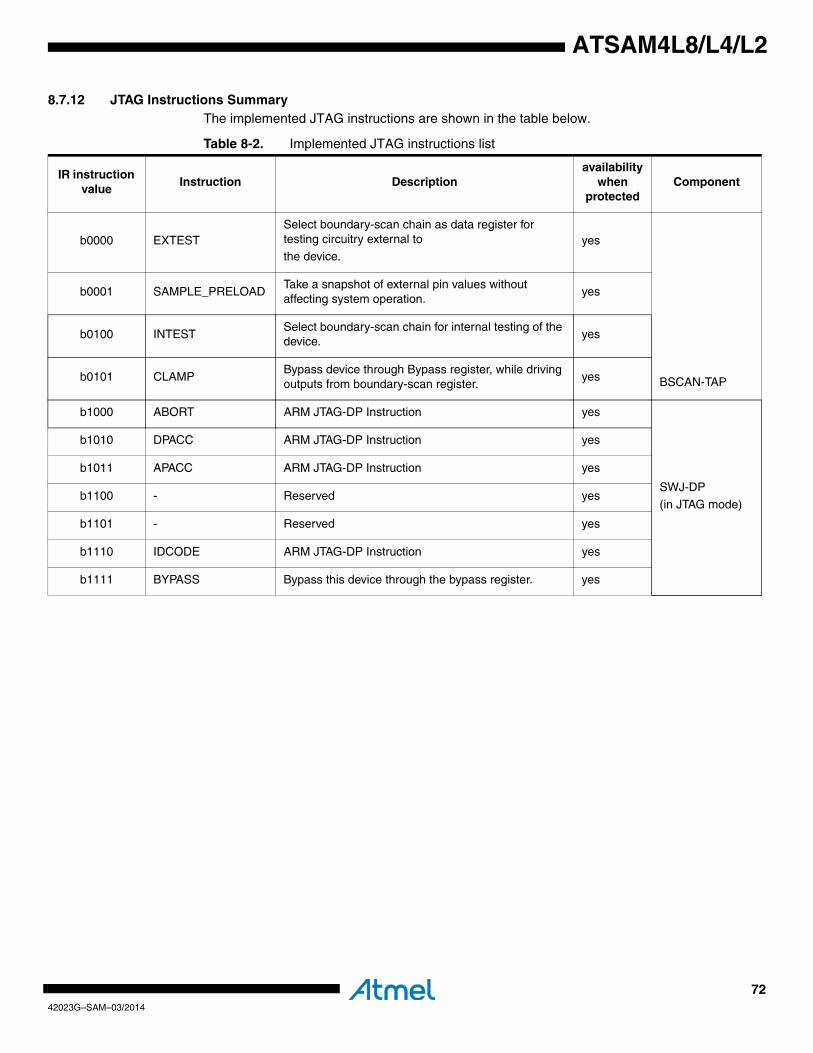
7242023G–SAM–03/2014
ATSAM4L8/L4/L2
8.7.12 JTAG Instructions SummaryThe implemented JTAG instructions are shown in the table below.
Table 8-2. Implemented JTAG instructions list
IR instruction value
Instruction Descriptionavailability
when protected
Component
b0000 EXTESTSelect boundary-scan chain as data register for testing circuitry external to
the device.yes
BSCAN-TAP
b0001 SAMPLE_PRELOADTake a snapshot of external pin values without affecting system operation.
yes
b0100 INTESTSelect boundary-scan chain for internal testing of the device.
yes
b0101 CLAMPBypass device through Bypass register, while driving outputs from boundary-scan register.
yes
b1000 ABORT ARM JTAG-DP Instruction yes
SWJ-DP
(in JTAG mode)
b1010 DPACC ARM JTAG-DP Instruction yes
b1011 APACC ARM JTAG-DP Instruction yes
b1100 - Reserved yes
b1101 - Reserved yes
b1110 IDCODE ARM JTAG-DP Instruction yes
b1111 BYPASS Bypass this device through the bypass register. yes
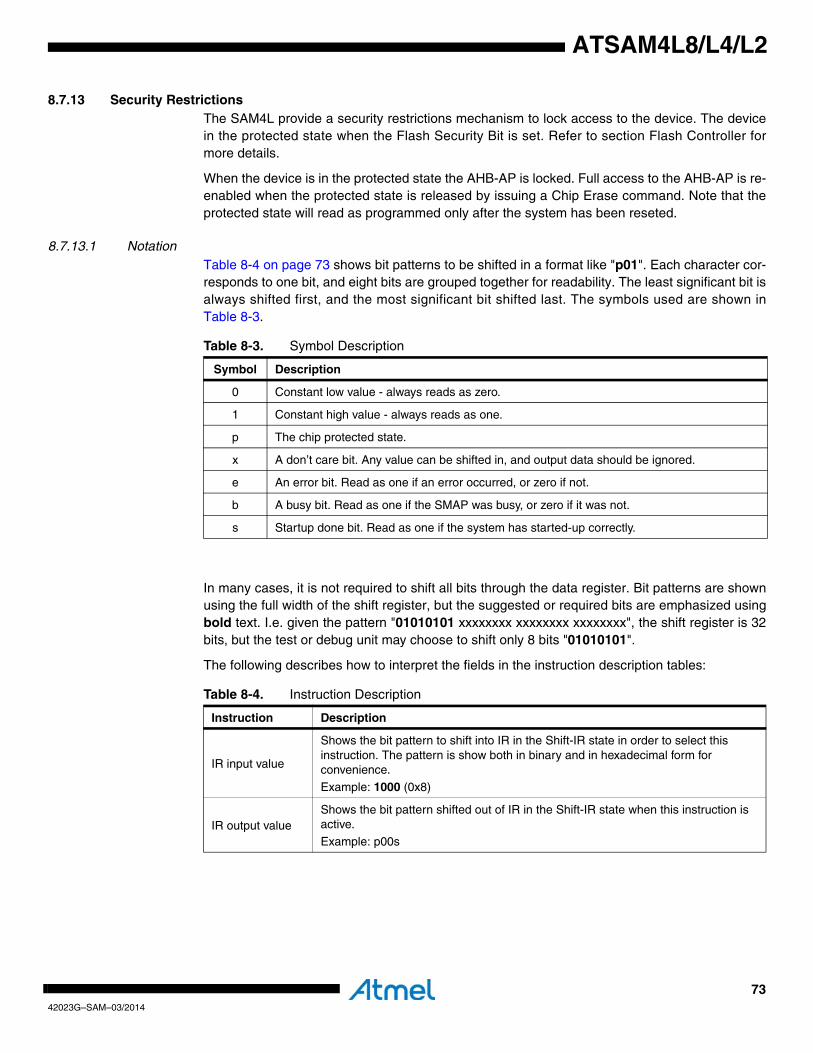
7342023G–SAM–03/2014
ATSAM4L8/L4/L2
8.7.13 Security RestrictionsThe SAM4L provide a security restrictions mechanism to lock access to the device. The devicein the protected state when the Flash Security Bit is set. Refer to section Flash Controller formore details.
When the device is in the protected state the AHB-AP is locked. Full access to the AHB-AP is re-enabled when the protected state is released by issuing a Chip Erase command. Note that theprotected state will read as programmed only after the system has been reseted.
8.7.13.1 NotationTable 8-4 on page 73 shows bit patterns to be shifted in a format like "p01". Each character cor-responds to one bit, and eight bits are grouped together for readability. The least significant bit isalways shifted first, and the most significant bit shifted last. The symbols used are shown inTable 8-3.
In many cases, it is not required to shift all bits through the data register. Bit patterns are shownusing the full width of the shift register, but the suggested or required bits are emphasized usingbold text. I.e. given the pattern "01010101 xxxxxxxx xxxxxxxx xxxxxxxx", the shift register is 32bits, but the test or debug unit may choose to shift only 8 bits "01010101".
The following describes how to interpret the fields in the instruction description tables:
Table 8-3. Symbol Description
Symbol Description
0 Constant low value - always reads as zero.
1 Constant high value - always reads as one.
p The chip protected state.
x A don’t care bit. Any value can be shifted in, and output data should be ignored.
e An error bit. Read as one if an error occurred, or zero if not.
b A busy bit. Read as one if the SMAP was busy, or zero if it was not.
s Startup done bit. Read as one if the system has started-up correctly.
Table 8-4. Instruction Description
Instruction Description
IR input value
Shows the bit pattern to shift into IR in the Shift-IR state in order to select this instruction. The pattern is show both in binary and in hexadecimal form for convenience.
Example: 1000 (0x8)
IR output valueShows the bit pattern shifted out of IR in the Shift-IR state when this instruction is active.
Example: p00s

7442023G–SAM–03/2014
ATSAM4L8/L4/L2
8.7.14 JTAG InstructionsRefer to the ARM Debug Interface v5.1 Architecture Specification for more details on ABORT,DPACC, APACC and IDCODE instructions.
8.7.14.1 EXTESTThis instruction selects the boundary-scan chain as Data Register for testing circuitry external tothe chip package. The contents of the latched outputs of the boundary-scan chain is driven outas soon as the JTAG IR-register is loaded with the EXTEST instruction.
Starting in Run-Test/Idle, the EXTEST instruction is accessed the following way:
1. Select the IR Scan path.
2. In Capture-IR: The IR output value is latched into the shift register.
3. In Shift-IR: The instruction register is shifted by the TCK input.
4. In Update-IR: The data from the boundary-scan chain is applied to the output pins.
5. Return to Run-Test/Idle.
6. Select the DR Scan path.
7. In Capture-DR: The data on the external pins is sampled into the boundary-scan chain.
8. In Shift-DR: The boundary-scan chain is shifted by the TCK input.
9. In Update-DR: The data from the scan chain is applied to the output pins.
10. Return to Run-Test/Idle.
8.7.14.2 SAMPLE_PRELOAD
This instruction takes a snap-shot of the input/output pins without affecting the system operation,and pre-loading the scan chain without updating the DR-latch. The boundary-scan chain isselected as Data Register.
Starting in Run-Test/Idle, the Device Identification register is accessed in the following way:
DR SizeShows the number of bits in the data register chain when this instruction is active.
Example: 32 bits
DR input valueShows which bit pattern to shift into the data register in the Shift-DR state when this instruction is active.
DR output valueShows the bit pattern shifted out of the data register in the Shift-DR state when this instruction is active.
Table 8-4. Instruction Description (Continued)
Instruction Description
Table 8-5. EXTEST Details
Instructions Details
IR input value 0000 (0x0)
IR output value p00s
DR Size Depending on boundary-scan chain, see BSDL-file.
DR input value Depending on boundary-scan chain, see BSDL-file.
DR output value Depending on boundary-scan chain, see BSDL-file.
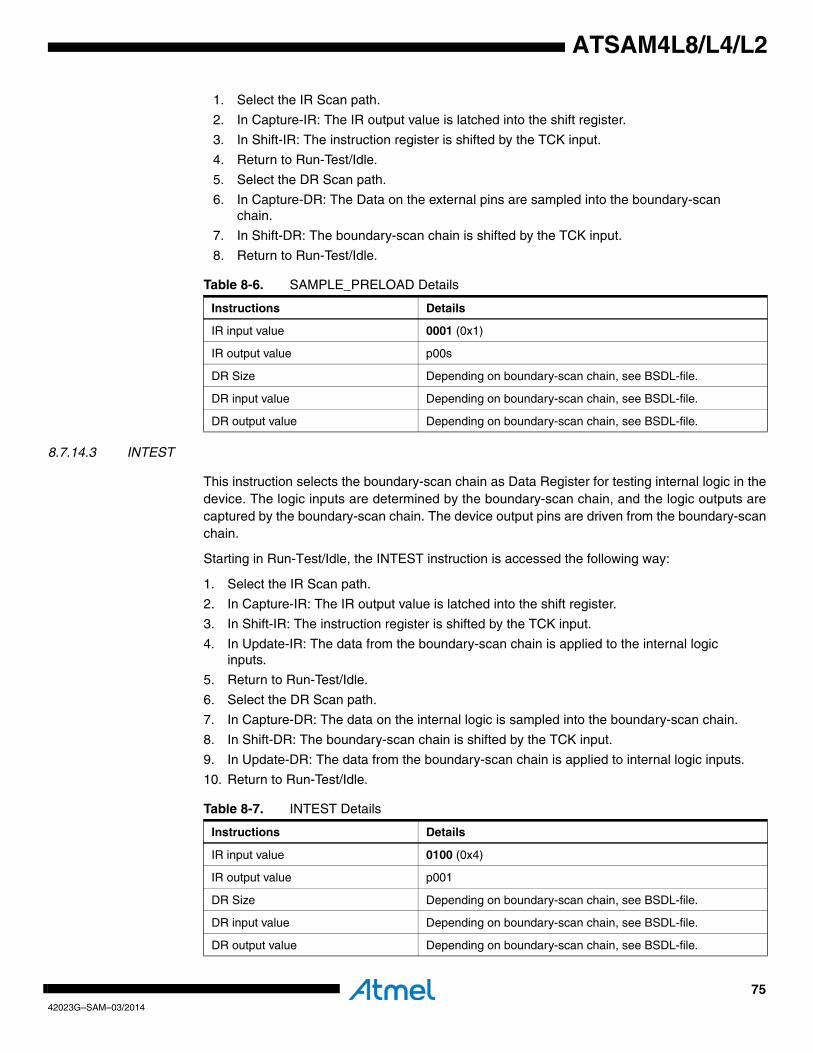
7542023G–SAM–03/2014
ATSAM4L8/L4/L2
1. Select the IR Scan path.
2. In Capture-IR: The IR output value is latched into the shift register.
3. In Shift-IR: The instruction register is shifted by the TCK input.
4. Return to Run-Test/Idle.
5. Select the DR Scan path.
6. In Capture-DR: The Data on the external pins are sampled into the boundary-scan chain.
7. In Shift-DR: The boundary-scan chain is shifted by the TCK input.
8. Return to Run-Test/Idle.
8.7.14.3 INTEST
This instruction selects the boundary-scan chain as Data Register for testing internal logic in thedevice. The logic inputs are determined by the boundary-scan chain, and the logic outputs arecaptured by the boundary-scan chain. The device output pins are driven from the boundary-scanchain.
Starting in Run-Test/Idle, the INTEST instruction is accessed the following way:
1. Select the IR Scan path.
2. In Capture-IR: The IR output value is latched into the shift register.
3. In Shift-IR: The instruction register is shifted by the TCK input.
4. In Update-IR: The data from the boundary-scan chain is applied to the internal logic inputs.
5. Return to Run-Test/Idle.
6. Select the DR Scan path.
7. In Capture-DR: The data on the internal logic is sampled into the boundary-scan chain.
8. In Shift-DR: The boundary-scan chain is shifted by the TCK input.
9. In Update-DR: The data from the boundary-scan chain is applied to internal logic inputs.
10. Return to Run-Test/Idle.
Table 8-6. SAMPLE_PRELOAD Details
Instructions Details
IR input value 0001 (0x1)
IR output value p00s
DR Size Depending on boundary-scan chain, see BSDL-file.
DR input value Depending on boundary-scan chain, see BSDL-file.
DR output value Depending on boundary-scan chain, see BSDL-file.
Table 8-7. INTEST Details
Instructions Details
IR input value 0100 (0x4)
IR output value p001
DR Size Depending on boundary-scan chain, see BSDL-file.
DR input value Depending on boundary-scan chain, see BSDL-file.
DR output value Depending on boundary-scan chain, see BSDL-file.
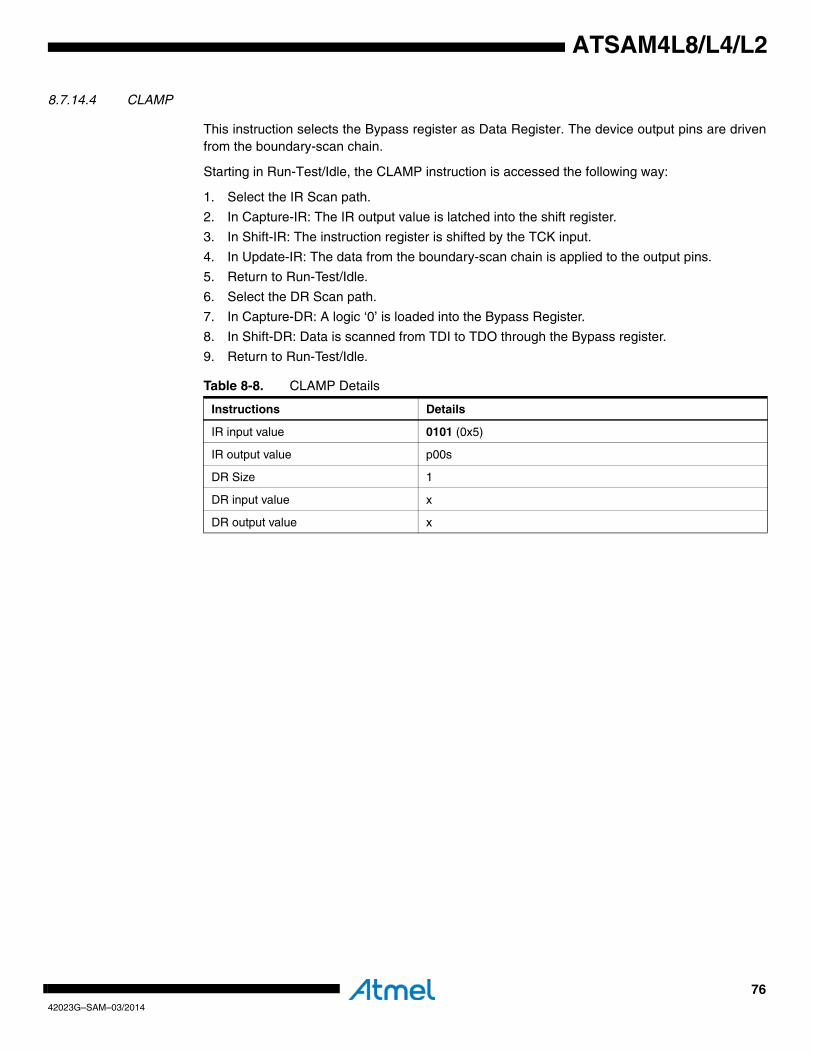
7642023G–SAM–03/2014
ATSAM4L8/L4/L2
8.7.14.4 CLAMP
This instruction selects the Bypass register as Data Register. The device output pins are drivenfrom the boundary-scan chain.
Starting in Run-Test/Idle, the CLAMP instruction is accessed the following way:
1. Select the IR Scan path.
2. In Capture-IR: The IR output value is latched into the shift register.
3. In Shift-IR: The instruction register is shifted by the TCK input.
4. In Update-IR: The data from the boundary-scan chain is applied to the output pins.
5. Return to Run-Test/Idle.
6. Select the DR Scan path.
7. In Capture-DR: A logic ‘0’ is loaded into the Bypass Register.
8. In Shift-DR: Data is scanned from TDI to TDO through the Bypass register.
9. Return to Run-Test/Idle.
Table 8-8. CLAMP Details
Instructions Details
IR input value 0101 (0x5)
IR output value p00s
DR Size 1
DR input value x
DR output value x
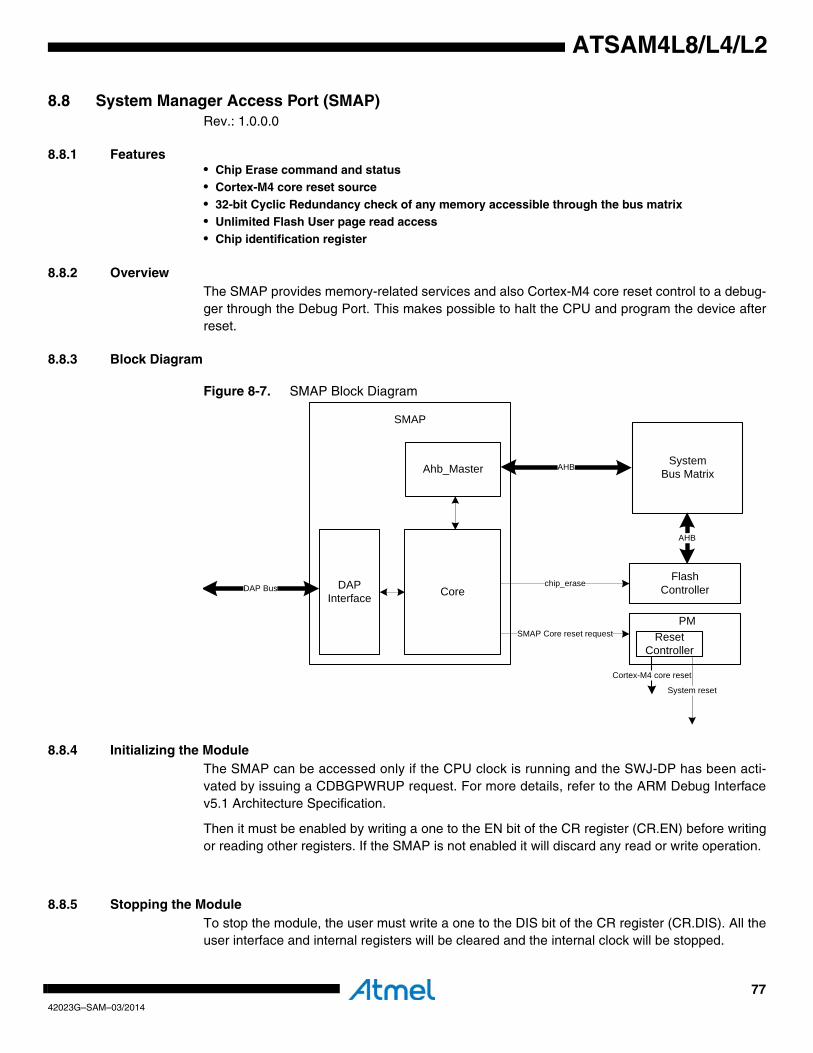
7742023G–SAM–03/2014
ATSAM4L8/L4/L2
8.8 System Manager Access Port (SMAP)Rev.: 1.0.0.0
8.8.1 Features• Chip Erase command and status• Cortex-M4 core reset source• 32-bit Cyclic Redundancy check of any memory accessible through the bus matrix• Unlimited Flash User page read access• Chip identification register
8.8.2 OverviewThe SMAP provides memory-related services and also Cortex-M4 core reset control to a debug-ger through the Debug Port. This makes possible to halt the CPU and program the device afterreset.
8.8.3 Block Diagram
Figure 8-7. SMAP Block Diagram
8.8.4 Initializing the ModuleThe SMAP can be accessed only if the CPU clock is running and the SWJ-DP has been acti-vated by issuing a CDBGPWRUP request. For more details, refer to the ARM Debug Interfacev5.1 Architecture Specification.
Then it must be enabled by writing a one to the EN bit of the CR register (CR.EN) before writingor reading other registers. If the SMAP is not enabled it will discard any read or write operation.
8.8.5 Stopping the ModuleTo stop the module, the user must write a one to the DIS bit of the CR register (CR.DIS). All theuser interface and internal registers will be cleared and the internal clock will be stopped.
SMAP Core reset request
DAP Bus
System Bus Matrix
AHB
chip_eraseFlash
Controller
AHB
SMAP
Ahb_Master
CoreDAP Interface
ResetController
PM
Cortex-M4 core reset
System reset
7842023G–SAM–03/2014
ATSAM4L8/L4/L2
8.8.6 Security ConsiderationsIn protected state this module may access sensible information located in the device memories.To avoid any risk of sensible data extraction from the module registers, all operations are noninterruptible except by a disable command triggered by writing a one to CR.DIS. Issuing thiscommand clears all the interface and internal registers.
Some registers have some special protection:
• It is not possible to read or write the LENGTH register when the part is protected.
• In addition, when the part is protected and an operation is ongoing, it is not possible to read the ADDR and DATA registers. Once an operation has started, the user has to wait until it has terminated by polling the DONE field in the Status Register (SR.DONE).
8.8.7 Chip EraseThe Chip erase operation consists in:
1. clearing all the volatile memories in the system
2. clearing the whole flash array
3. clearing the protected state
No proprietary or sensitive information is left in volatile memories once the protected state isdisabled.
This feature is operated by writing a one to the CE bit of the Control Register (CR.CE). When theoperation completes, SR.DONE is asserted.
8.8.8 Cortex-M4 Core Reset SourceThe SMAP processes the EDP Core hold reset requests (Refer to Section 8.7.8 ”SMAP CoreReset Request Source” on page 70). When requested, it instructs the Power Manager to holdthe Cortex-M4 core under reset.
The SMAP can de-assert the core reset request if a one is written to the Hold Core Reset bit inthe Status Clear Register (SCR.HCR). This has the effect of releasing the CPU from its resetstate. To assert again this signal, a new reset sequence with TCK tied low must be issued.
Note that clearing HCR with this module is only possible when it is enabled, for more informationrefer to Section 8.8.4 ”Initializing the Module” on page 77. Also note that asserting RESET_Nautomatically clears HCR.
7942023G–SAM–03/2014
ATSAM4L8/L4/L2
8.8.9 Unlimited Flash User Page Read AccessThe SMAP can access the User page even if the protected state is set. Prior to operate such anaccess, the user should check that the module is not busy by checking that SR.STATE is equalto zerp. Once the offset of the word to access inside the page is written in ADDR.ADDR, theread operation can be initiated by writing a one in CR.FSPR. The SR.STATE field will indicatethe FSPR state. Addresses written to ADDR.ADDR must be world aligned. Failing to do so willresult in unpredictable behavior. The result can be read in the DATA register as soon asSR.DONE rises. The ADDR field is used as an offset in the page, bits outside a page boundarywill be silently discarded. The ADDR register is automatically incremented at the end of the readoperation making possible to dump consecutive words without writing the next offset intoADDR.ADDR.
8.8.10 32-bit Cyclic Redundancy Check (CRC)The SMAP unit provides support for calculating a Cyclic Redundancy Check (CRC) value for amemory area. The algorithm used is the industry standard CRC32 algorithm using the generatorpolynomial 0xEDB88320.
8.8.10.1 Starting CRC CalculationTo calculate CRC for a memory range, the start address must be written into the ADDR register,and the size of the memory range into the LENGTH register. Both the start address and thelength must be word aligned.
The initial value used for the CRC calculation must be written to the DATA register. This valuewill usually be 0xFFFFFFFF, but can be e.g. the result of a previous CRC calculation if generat-ing a common CRC of separate memory blocks.
Once completed, the calculated CRC value can be read out of the DATA register. The readvalue must be inverted to match standard CRC32 implementations, or kept non-inverted if usedas starting point for subsequent CRC calculations.
If the device is in protected state, it is only possible to calculate the CRC of the whole flash array.In most cases this area will be the entire onboard nonvolatile memory. The ADDR, LENGTH,and DATA registers will be forced to predefined values once the CRC operation is started, anduser-written values are ignored. This allows the user to verify the contents of a protected device.
The actual test is started by writing a one in CR.CRC. A running CRC operation can be can-celled by disabling the module (write a one in CR.DIS). This has the effect of resetting themodule. The module has to be restarted by issuing an enable command (write a one in CR.EN).
8.8.10.2 Interpreting the ResultsThe user should monitor the SR register (Refer to Section 8.8.11.2 ”Status Register” on page82). When the operation is completed SR.DONE is set. Then the SR.BERR and SR.FAIL mustbe read to ensure that no bus error nor functional error occured.
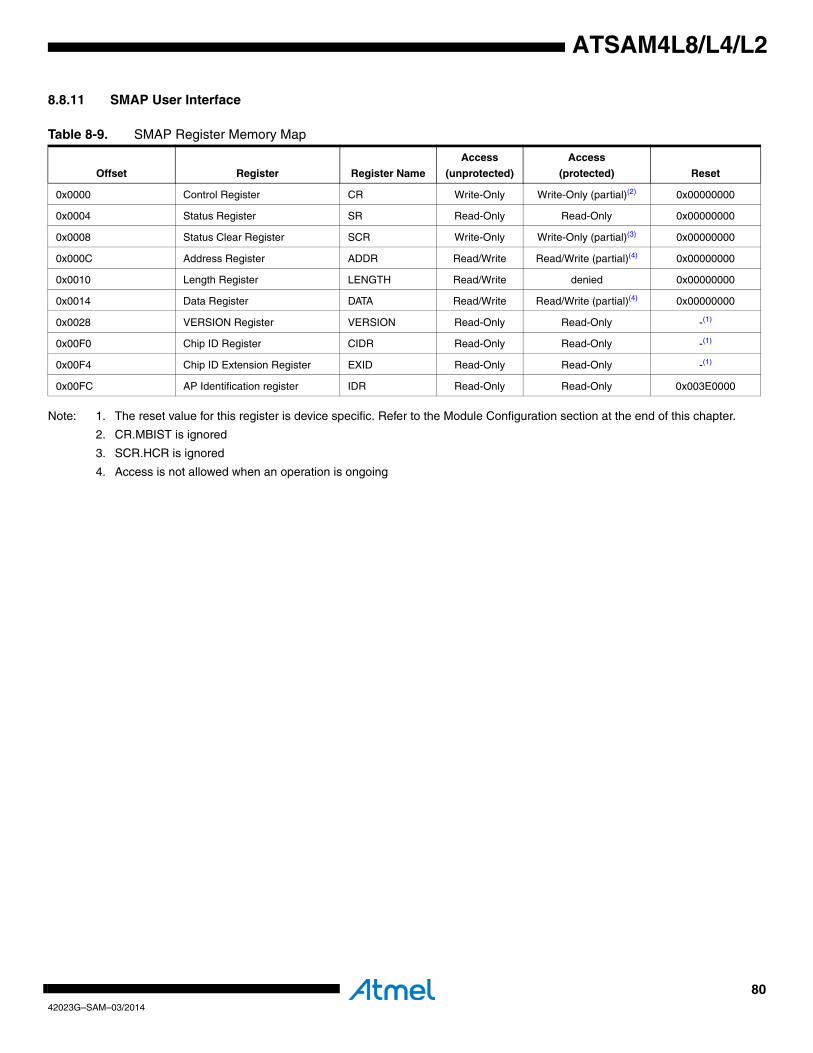
8042023G–SAM–03/2014
ATSAM4L8/L4/L2
8.8.11 SMAP User Interface
Note: 1. The reset value for this register is device specific. Refer to the Module Configuration section at the end of this chapter.
2. CR.MBIST is ignored
3. SCR.HCR is ignored
4. Access is not allowed when an operation is ongoing
Table 8-9. SMAP Register Memory Map
Offset Register Register Name
Access
(unprotected)
Access
(protected) Reset
0x0000 Control Register CR Write-Only Write-Only (partial)(2) 0x00000000
0x0004 Status Register SR Read-Only Read-Only 0x00000000
0x0008 Status Clear Register SCR Write-Only Write-Only (partial)(3) 0x00000000
0x000C Address Register ADDR Read/Write Read/Write (partial)(4) 0x00000000
0x0010 Length Register LENGTH Read/Write denied 0x00000000
0x0014 Data Register DATA Read/Write Read/Write (partial)(4) 0x00000000
0x0028 VERSION Register VERSION Read-Only Read-Only -(1)
0x00F0 Chip ID Register CIDR Read-Only Read-Only -(1)
0x00F4 Chip ID Extension Register EXID Read-Only Read-Only -(1)
0x00FC AP Identification register IDR Read-Only Read-Only 0x003E0000
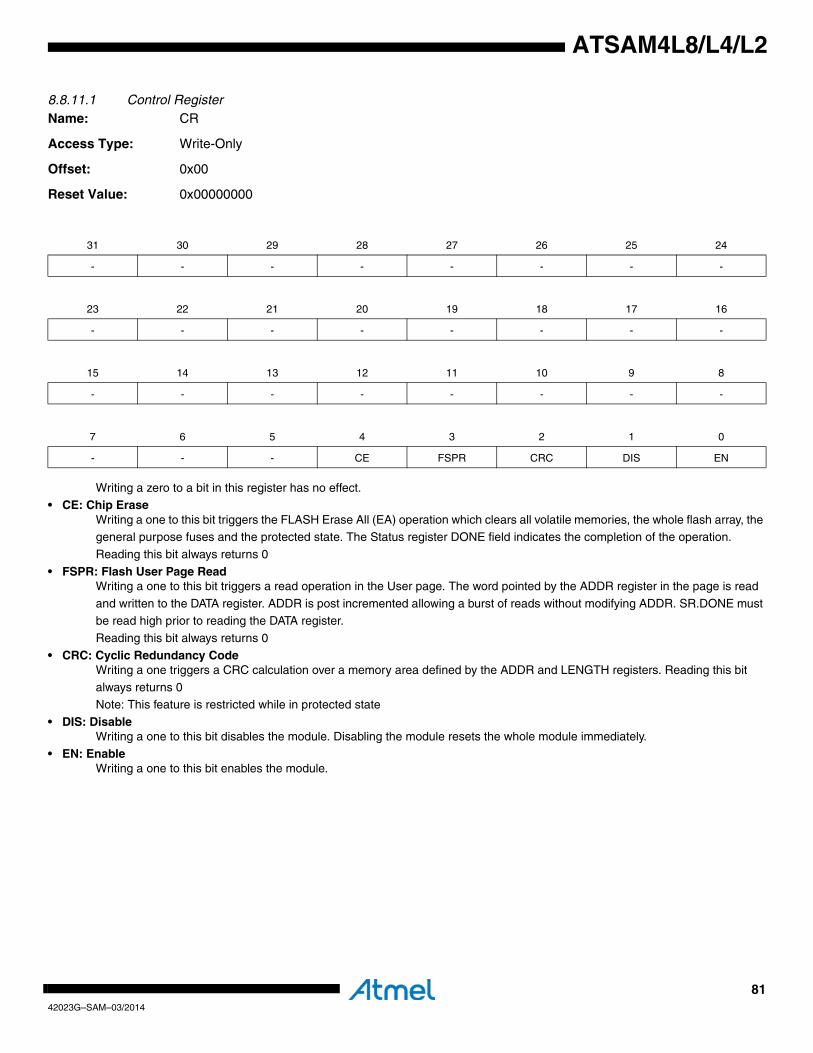
8142023G–SAM–03/2014
ATSAM4L8/L4/L2
8.8.11.1 Control RegisterName: CR
Access Type: Write-Only
Offset: 0x00
Reset Value: 0x00000000
Writing a zero to a bit in this register has no effect.• CE: Chip Erase
Writing a one to this bit triggers the FLASH Erase All (EA) operation which clears all volatile memories, the whole flash array, the general purpose fuses and the protected state. The Status register DONE field indicates the completion of the operation.
Reading this bit always returns 0
• FSPR: Flash User Page ReadWriting a one to this bit triggers a read operation in the User page. The word pointed by the ADDR register in the page is read
and written to the DATA register. ADDR is post incremented allowing a burst of reads without modifying ADDR. SR.DONE must be read high prior to reading the DATA register.
Reading this bit always returns 0
• CRC: Cyclic Redundancy CodeWriting a one triggers a CRC calculation over a memory area defined by the ADDR and LENGTH registers. Reading this bit
always returns 0Note: This feature is restricted while in protected state
• DIS: DisableWriting a one to this bit disables the module. Disabling the module resets the whole module immediately.
• EN: EnableWriting a one to this bit enables the module.
31 30 29 28 27 26 25 24
- - - - - - - -
23 22 21 20 19 18 17 16
- - - - - - - -
15 14 13 12 11 10 9 8
- - - - - - - -
7 6 5 4 3 2 1 0
- - - CE FSPR CRC DIS EN
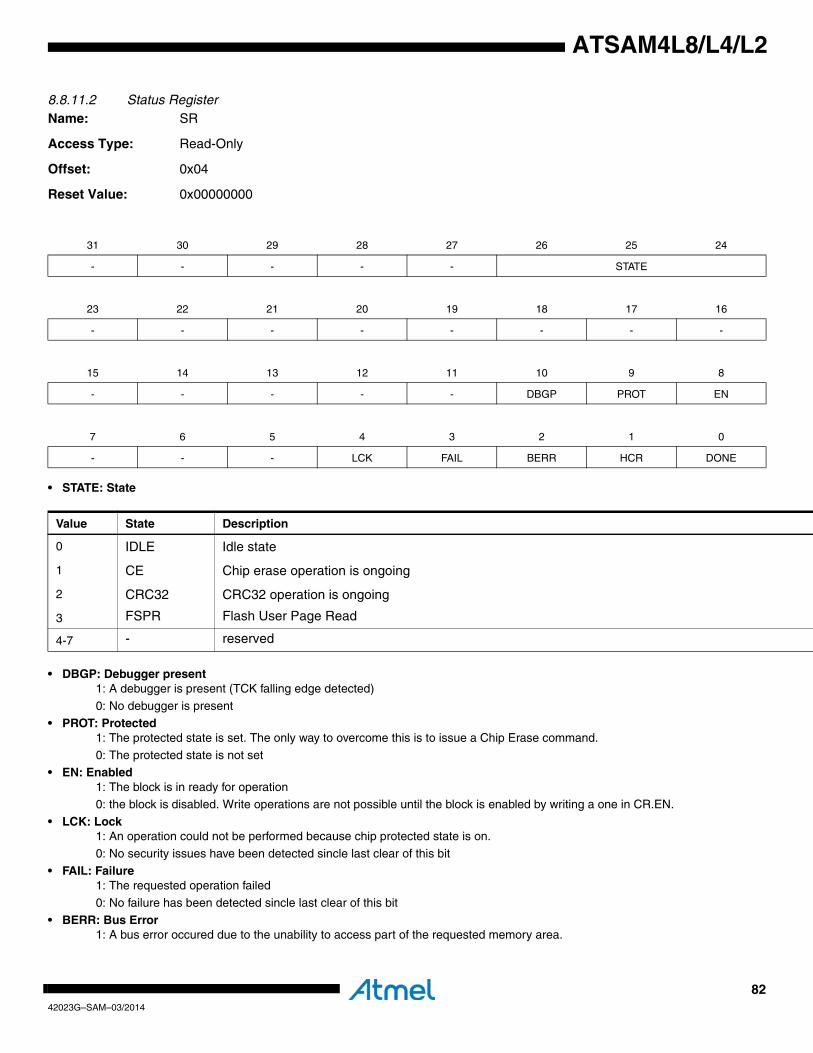
8242023G–SAM–03/2014
ATSAM4L8/L4/L2
8.8.11.2 Status RegisterName: SR
Access Type: Read-Only
Offset: 0x04
Reset Value: 0x00000000
• STATE: State
• DBGP: Debugger present1: A debugger is present (TCK falling edge detected)
0: No debugger is present
• PROT: Protected1: The protected state is set. The only way to overcome this is to issue a Chip Erase command.
0: The protected state is not set• EN: Enabled
1: The block is in ready for operation0: the block is disabled. Write operations are not possible until the block is enabled by writing a one in CR.EN.
• LCK: Lock1: An operation could not be performed because chip protected state is on.
0: No security issues have been detected sincle last clear of this bit
• FAIL: Failure1: The requested operation failed
0: No failure has been detected sincle last clear of this bit
• BERR: Bus Error1: A bus error occured due to the unability to access part of the requested memory area.
31 30 29 28 27 26 25 24
- - - - - STATE
23 22 21 20 19 18 17 16
- - - - - - - -
15 14 13 12 11 10 9 8
- - - - - DBGP PROT EN
7 6 5 4 3 2 1 0
- - - LCK FAIL BERR HCR DONE
Value State Description
0 IDLE Idle state
1 CE Chip erase operation is ongoing
2 CRC32 CRC32 operation is ongoing
3 FSPR Flash User Page Read
4-7 - reserved

8342023G–SAM–03/2014
ATSAM4L8/L4/L2
0: No bus error has been detected sincle last clear of this bit• HCR: Hold Core reset
1: The Cortex-M4 core is held under reset0: The Cortex-M4 core is not held under reset
• DONE: Operation done1: At least one operation has terminated since last clear of this field
0: No operation has terminated since last clear of this field
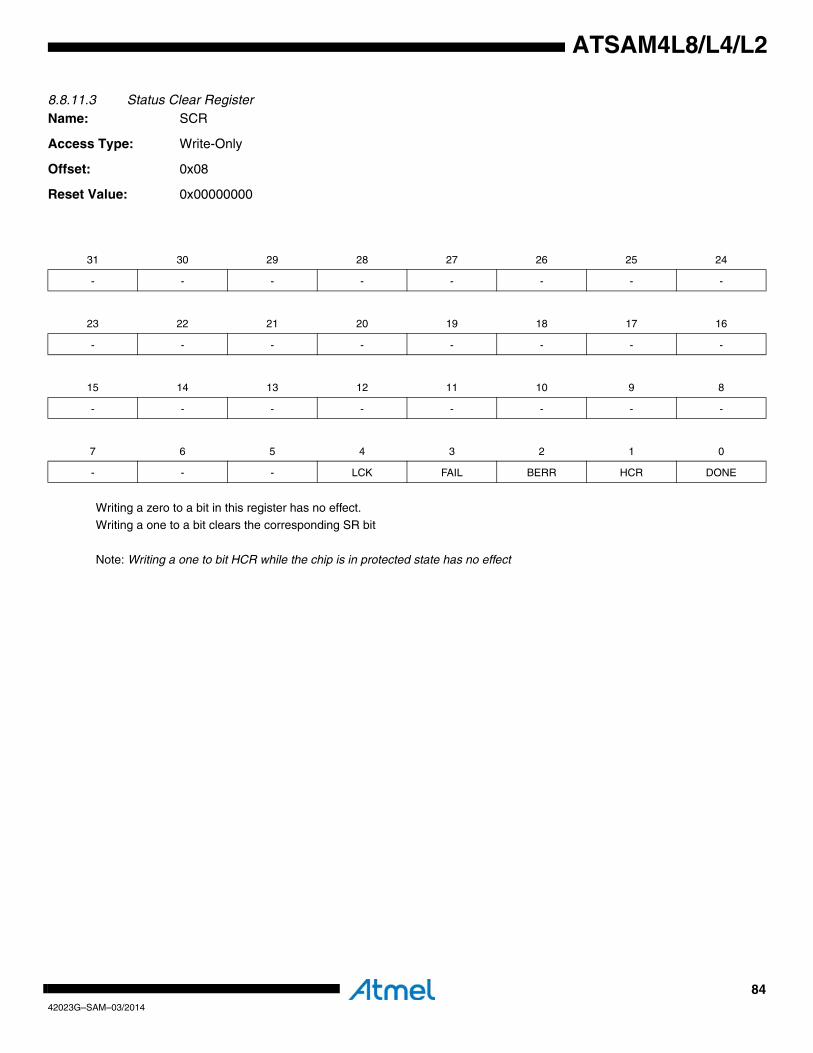
8442023G–SAM–03/2014
ATSAM4L8/L4/L2
8.8.11.3 Status Clear RegisterName: SCR
Access Type: Write-Only
Offset: 0x08
Reset Value: 0x00000000
Writing a zero to a bit in this register has no effect.Writing a one to a bit clears the corresponding SR bit
Note: Writing a one to bit HCR while the chip is in protected state has no effect
31 30 29 28 27 26 25 24
- - - - - - - -
23 22 21 20 19 18 17 16
- - - - - - - -
15 14 13 12 11 10 9 8
- - - - - - - -
7 6 5 4 3 2 1 0
- - - LCK FAIL BERR HCR DONE
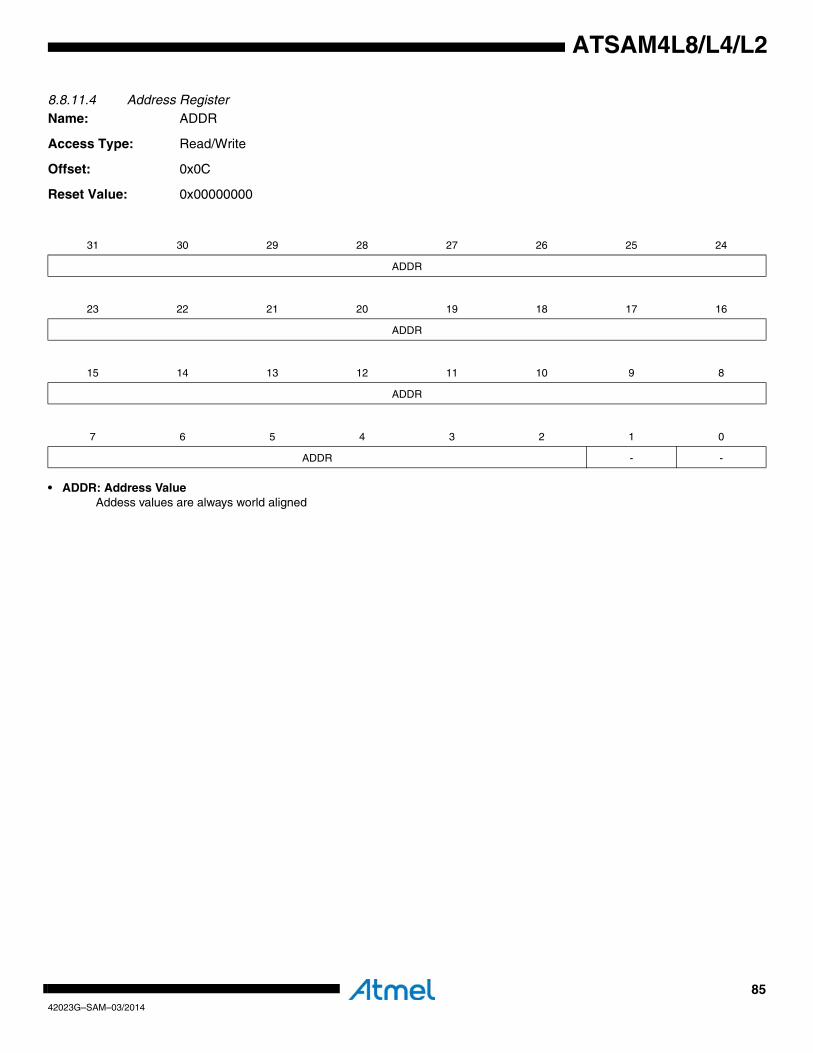
8542023G–SAM–03/2014
ATSAM4L8/L4/L2
8.8.11.4 Address RegisterName: ADDR
Access Type: Read/Write
Offset: 0x0C
Reset Value: 0x00000000
• ADDR: Address ValueAddess values are always world aligned
31 30 29 28 27 26 25 24
ADDR
23 22 21 20 19 18 17 16
ADDR
15 14 13 12 11 10 9 8
ADDR
7 6 5 4 3 2 1 0
ADDR - -
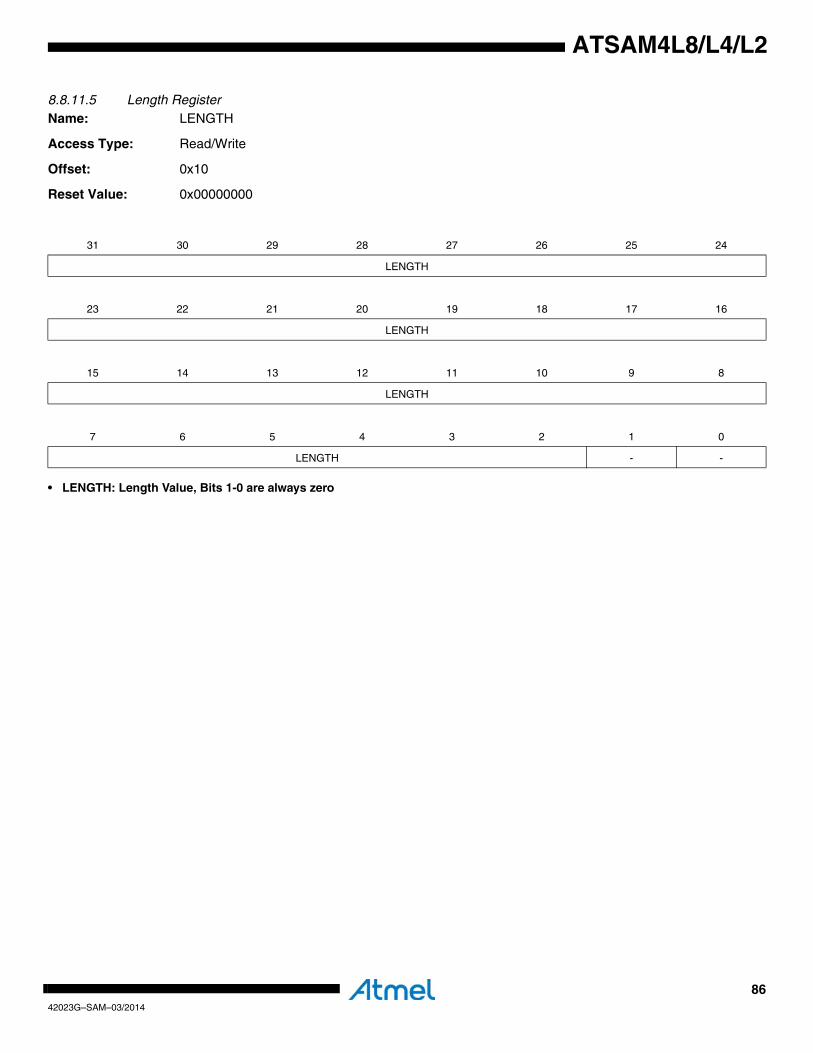
8642023G–SAM–03/2014
ATSAM4L8/L4/L2
8.8.11.5 Length RegisterName: LENGTH
Access Type: Read/Write
Offset: 0x10
Reset Value: 0x00000000
• LENGTH: Length Value, Bits 1-0 are always zero
31 30 29 28 27 26 25 24
LENGTH
23 22 21 20 19 18 17 16
LENGTH
15 14 13 12 11 10 9 8
LENGTH
7 6 5 4 3 2 1 0
LENGTH - -

8742023G–SAM–03/2014
ATSAM4L8/L4/L2
8.8.11.6 Data RegisterName: DATA
Access Type: Read/Write
Offset: 0x14
Reset Value: 0x00000000
• DATA: Generic data register
31 30 29 28 27 26 25 24
DATA
23 22 21 20 19 18 17 16
DATA
15 14 13 12 11 10 9 8
DATA
7 6 5 4 3 2 1 0
DATA
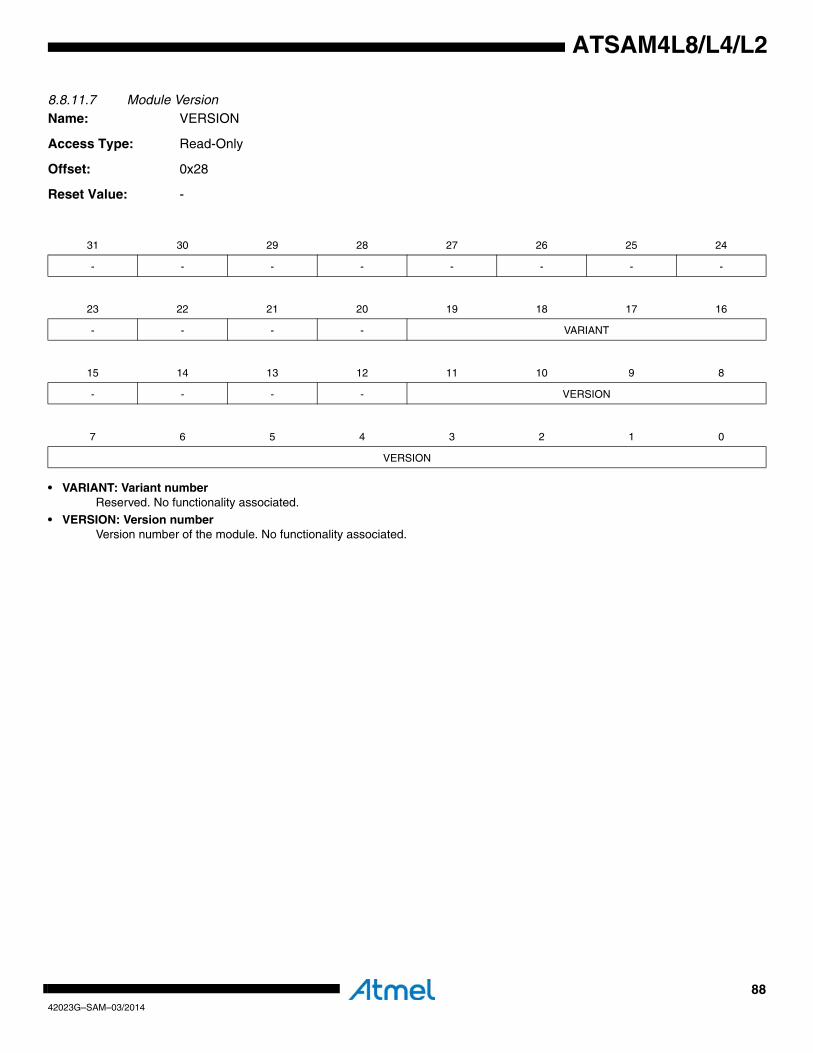
8842023G–SAM–03/2014
ATSAM4L8/L4/L2
8.8.11.7 Module VersionName: VERSION
Access Type: Read-Only
Offset: 0x28
Reset Value: -
• VARIANT: Variant numberReserved. No functionality associated.
• VERSION: Version numberVersion number of the module. No functionality associated.
31 30 29 28 27 26 25 24
- - - - - - - -
23 22 21 20 19 18 17 16
- - - - VARIANT
15 14 13 12 11 10 9 8
- - - - VERSION
7 6 5 4 3 2 1 0
VERSION
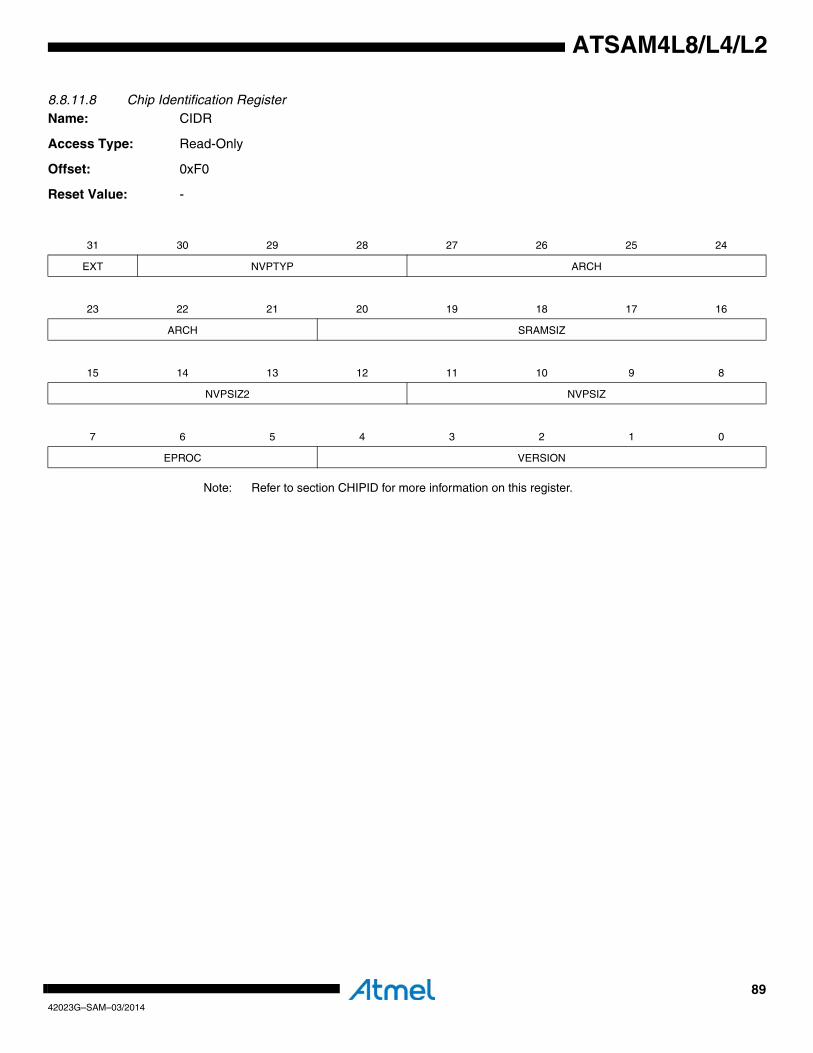
8942023G–SAM–03/2014
ATSAM4L8/L4/L2
8.8.11.8 Chip Identification RegisterName: CIDR
Access Type: Read-Only
Offset: 0xF0
Reset Value: -
Note: Refer to section CHIPID for more information on this register.
31 30 29 28 27 26 25 24
EXT NVPTYP ARCH
23 22 21 20 19 18 17 16
ARCH SRAMSIZ
15 14 13 12 11 10 9 8
NVPSIZ2 NVPSIZ
7 6 5 4 3 2 1 0
EPROC VERSION
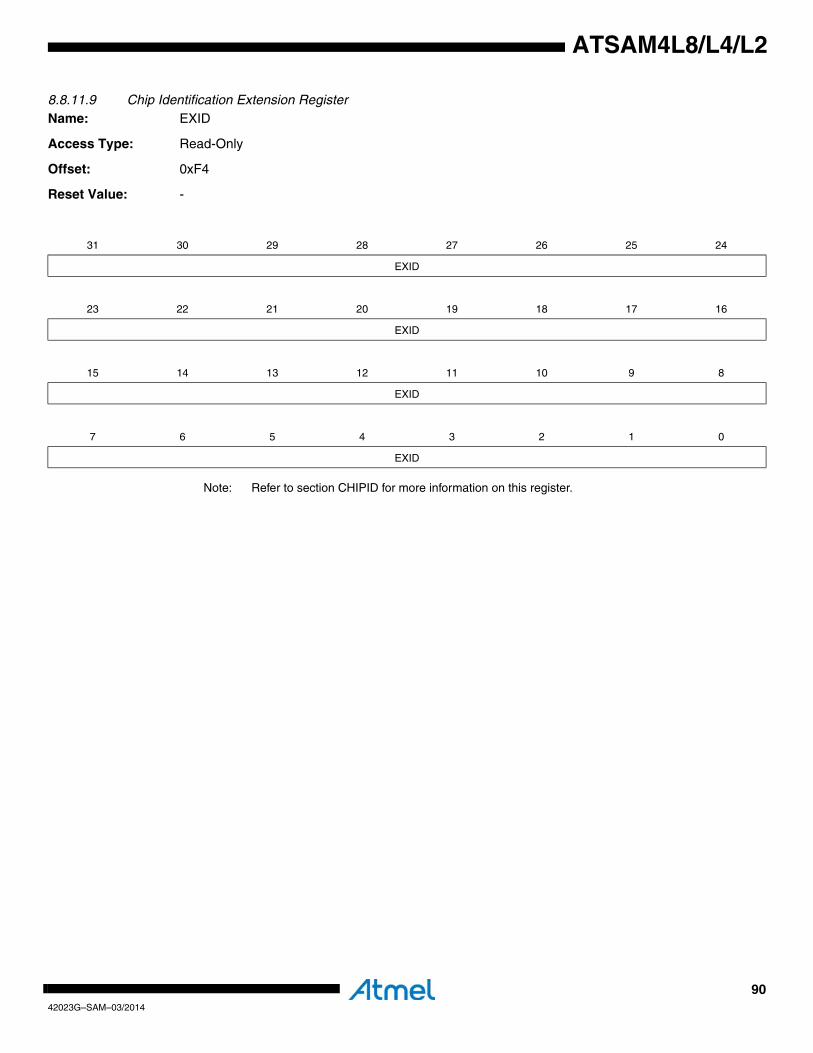
9042023G–SAM–03/2014
ATSAM4L8/L4/L2
8.8.11.9 Chip Identification Extension RegisterName: EXID
Access Type: Read-Only
Offset: 0xF4
Reset Value: -
Note: Refer to section CHIPID for more information on this register.
31 30 29 28 27 26 25 24
EXID
23 22 21 20 19 18 17 16
EXID
15 14 13 12 11 10 9 8
EXID
7 6 5 4 3 2 1 0
EXID

9142023G–SAM–03/2014
ATSAM4L8/L4/L2
8.8.11.10 Identification RegisterName: IDR
Access Type: Read-Only
Offset: 0xFC
Reset Value: -
• REVISION: Revision• CC: JEP-106 Continuation Code
Atmel continuation code is 0x0
• IC: JEP-106 Identity CodeAtmel identification code is 0x1F
• CLSS: Class0: This AP is not a Memory Access Port
1: This AP is a Memory Access Port
• APID: AP Identification• APIDV: AP Identification Variant
For more information about this register, refer to the ARM Debug Interface v5.1 ArchitectureSpecification document.
31 30 29 28 27 26 25 24
REVISION CC
23 22 21 20 19 18 17 16
IC CLSS
15 14 13 12 11 10 9 8
Reserved
7 6 5 4 3 2 1 0
APID APIDV
9242023G–SAM–03/2014
ATSAM4L8/L4/L2
8.9 AHB-AP Access PortThe AHB-AP is a Memory Access Port (MEM-AP) as defined in the ARM Debug Interface v5Architecture Specification. The AHB-AP provides access to all memory and registers in the sys-tem, including processor registers through the System Control Space (SCS). System access isindependent of the processor status. Either SW-DP or SWJ-DP is used to access the AHB-AP.The AHB-AP is a master into the Bus Matrix. Transactions are made using the AHB-AP pro-grammers model (refer to the ARM Cortex-M4 Technical Reference Manual), which generatesAHB-Lite transactions into the Bus Matrix. The AHB-AP does not perform back-to-back transac-tions on the bus, so all transactions are non-sequential. The AHB-AP can perform unaligned andbit-band transactions. The Bus Matrix handles these. The AHB-AP transactions are not subjectto MPU lookups. AHB-AP transactions bypass the FPB, and so the FPB cannot remap AHB-APtransactions. AHB-AP transactions are little-endian.
Note that while an external reset is applied, AHB-AP accesses are not possible. In addition,access is denied when the protected state is set. In order to discard the protected state, a chiperase operation is necessary.
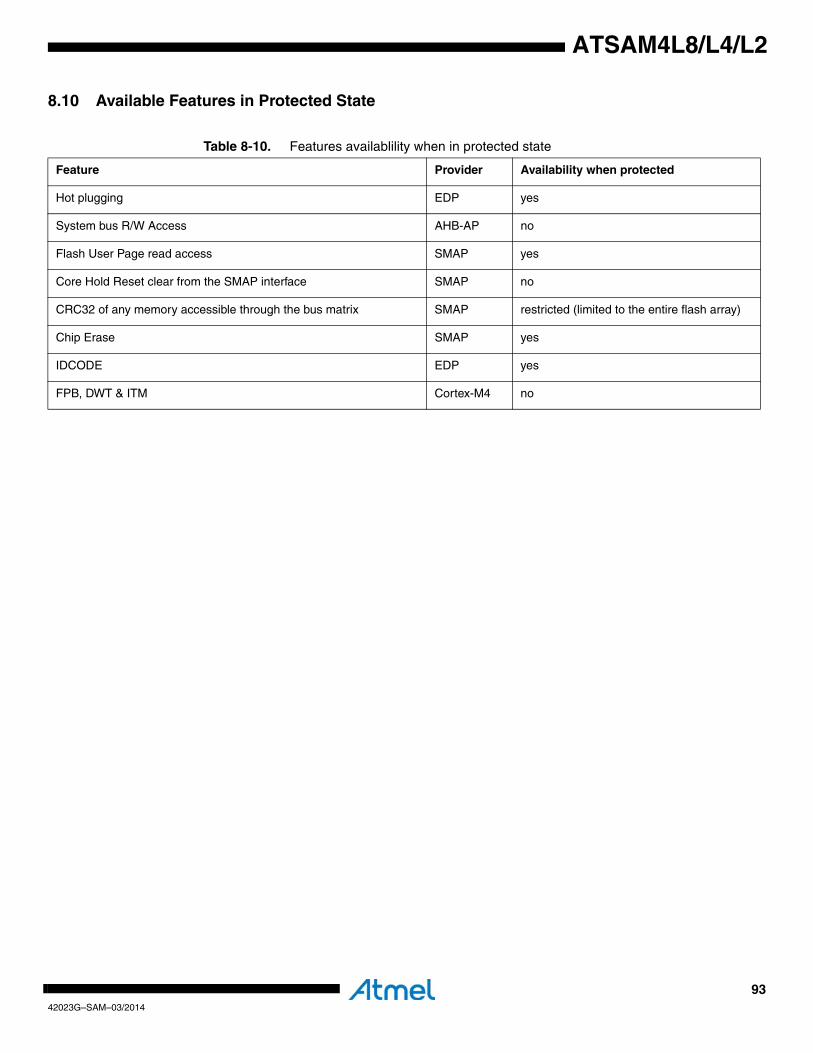
9342023G–SAM–03/2014
ATSAM4L8/L4/L2
8.10 Available Features in Protected State
Table 8-10. Features availablility when in protected state
Feature Provider Availability when protected
Hot plugging EDP yes
System bus R/W Access AHB-AP no
Flash User Page read access SMAP yes
Core Hold Reset clear from the SMAP interface SMAP no
CRC32 of any memory accessible through the bus matrix SMAP restricted (limited to the entire flash array)
Chip Erase SMAP yes
IDCODE EDP yes
FPB, DWT & ITM Cortex-M4 no
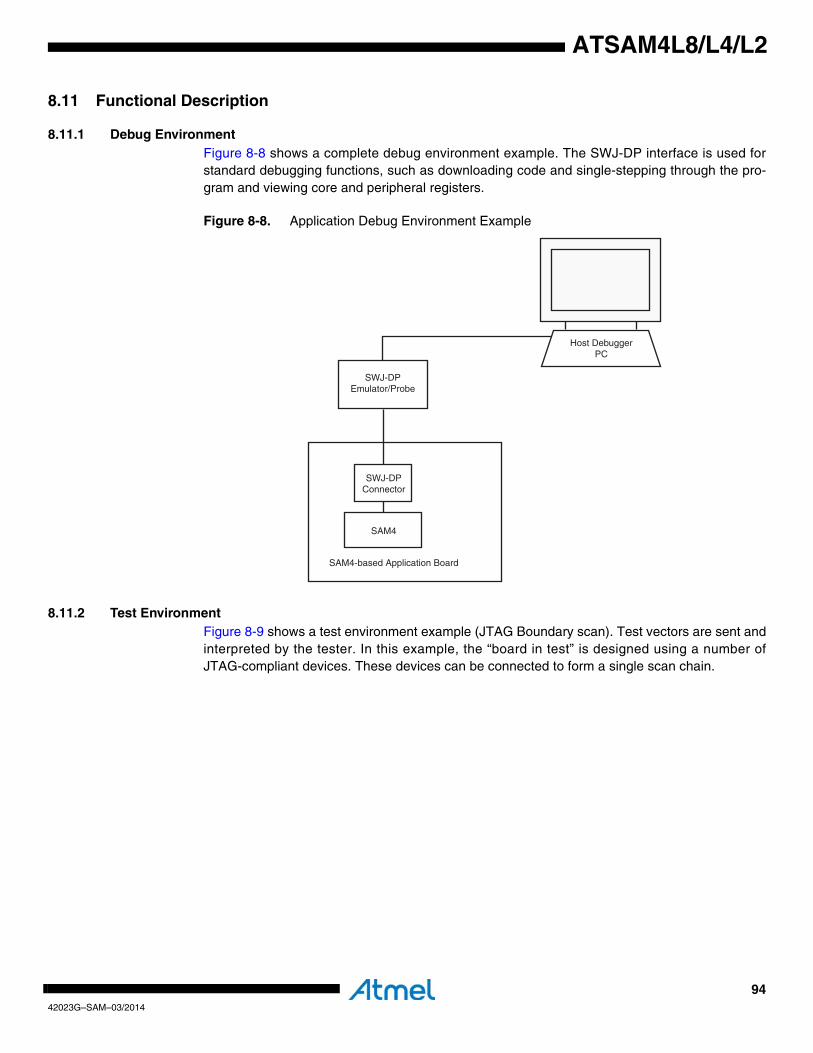
9442023G–SAM–03/2014
ATSAM4L8/L4/L2
8.11 Functional Description
8.11.1 Debug EnvironmentFigure 8-8 shows a complete debug environment example. The SWJ-DP interface is used forstandard debugging functions, such as downloading code and single-stepping through the pro-gram and viewing core and peripheral registers.
Figure 8-8. Application Debug Environment Example
8.11.2 Test EnvironmentFigure 8-9 shows a test environment example (JTAG Boundary scan). Test vectors are sent andinterpreted by the tester. In this example, the “board in test” is designed using a number ofJTAG-compliant devices. These devices can be connected to form a single scan chain.
SAM4
Host DebuggerPC
SAM4-based Application Board
SWJ-DPConnector
SWJ-DPEmulator/Probe
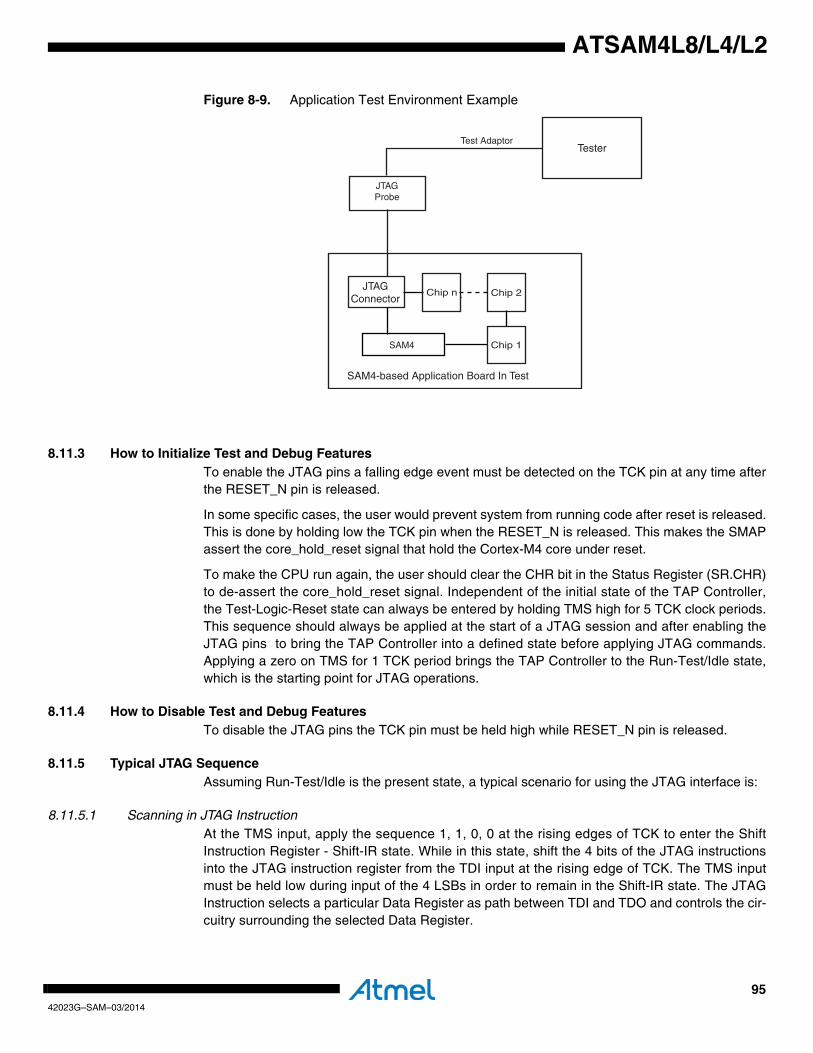
9542023G–SAM–03/2014
ATSAM4L8/L4/L2
Figure 8-9. Application Test Environment Example
8.11.3 How to Initialize Test and Debug FeaturesTo enable the JTAG pins a falling edge event must be detected on the TCK pin at any time afterthe RESET_N pin is released.
In some specific cases, the user would prevent system from running code after reset is released.This is done by holding low the TCK pin when the RESET_N is released. This makes the SMAPassert the core_hold_reset signal that hold the Cortex-M4 core under reset.
To make the CPU run again, the user should clear the CHR bit in the Status Register (SR.CHR)to de-assert the core_hold_reset signal. Independent of the initial state of the TAP Controller,the Test-Logic-Reset state can always be entered by holding TMS high for 5 TCK clock periods.This sequence should always be applied at the start of a JTAG session and after enabling theJTAG pins to bring the TAP Controller into a defined state before applying JTAG commands.Applying a zero on TMS for 1 TCK period brings the TAP Controller to the Run-Test/Idle state,which is the starting point for JTAG operations.
8.11.4 How to Disable Test and Debug FeaturesTo disable the JTAG pins the TCK pin must be held high while RESET_N pin is released.
8.11.5 Typical JTAG SequenceAssuming Run-Test/Idle is the present state, a typical scenario for using the JTAG interface is:
8.11.5.1 Scanning in JTAG InstructionAt the TMS input, apply the sequence 1, 1, 0, 0 at the rising edges of TCK to enter the ShiftInstruction Register - Shift-IR state. While in this state, shift the 4 bits of the JTAG instructionsinto the JTAG instruction register from the TDI input at the rising edge of TCK. The TMS inputmust be held low during input of the 4 LSBs in order to remain in the Shift-IR state. The JTAGInstruction selects a particular Data Register as path between TDI and TDO and controls the cir-cuitry surrounding the selected Data Register.
Chip 2Chip n
Chip 1SAM4
SAM4-based Application Board In Test
JTAGConnector
TesterTest Adaptor
JTAGProbe
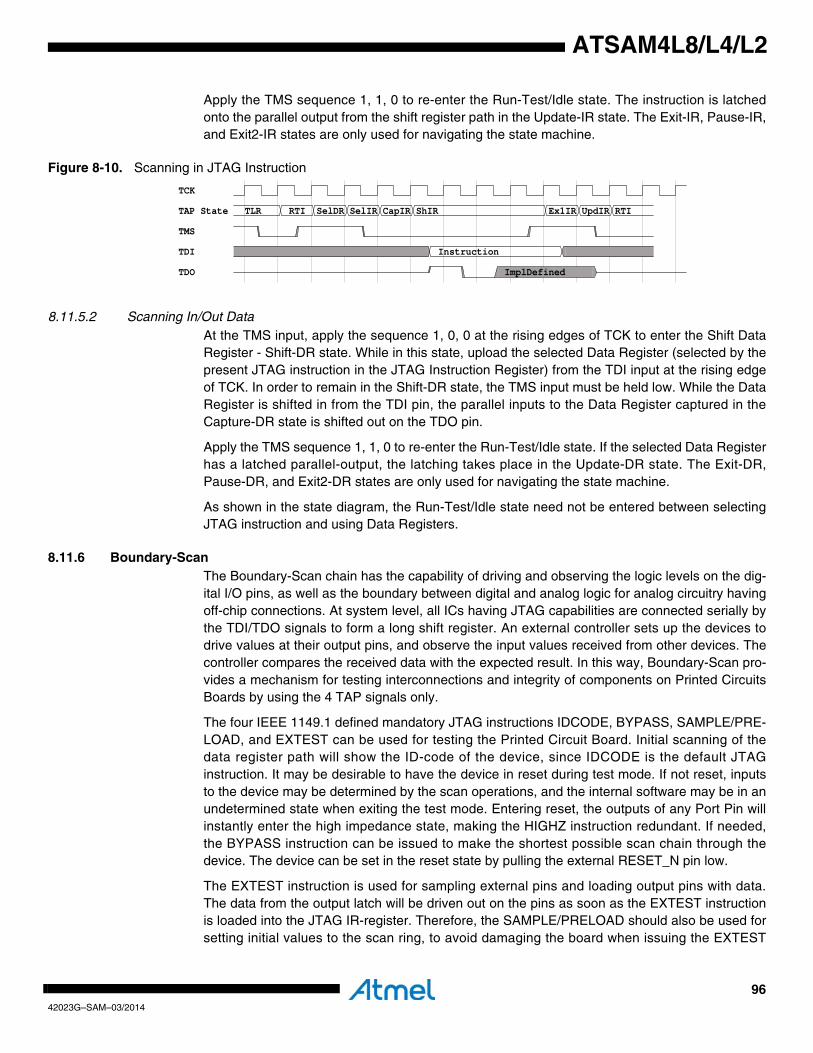
9642023G–SAM–03/2014
ATSAM4L8/L4/L2
Apply the TMS sequence 1, 1, 0 to re-enter the Run-Test/Idle state. The instruction is latchedonto the parallel output from the shift register path in the Update-IR state. The Exit-IR, Pause-IR,and Exit2-IR states are only used for navigating the state machine.
Figure 8-10. Scanning in JTAG Instruction
8.11.5.2 Scanning In/Out DataAt the TMS input, apply the sequence 1, 0, 0 at the rising edges of TCK to enter the Shift DataRegister - Shift-DR state. While in this state, upload the selected Data Register (selected by thepresent JTAG instruction in the JTAG Instruction Register) from the TDI input at the rising edgeof TCK. In order to remain in the Shift-DR state, the TMS input must be held low. While the DataRegister is shifted in from the TDI pin, the parallel inputs to the Data Register captured in theCapture-DR state is shifted out on the TDO pin.
Apply the TMS sequence 1, 1, 0 to re-enter the Run-Test/Idle state. If the selected Data Registerhas a latched parallel-output, the latching takes place in the Update-DR state. The Exit-DR,Pause-DR, and Exit2-DR states are only used for navigating the state machine.
As shown in the state diagram, the Run-Test/Idle state need not be entered between selectingJTAG instruction and using Data Registers.
8.11.6 Boundary-ScanThe Boundary-Scan chain has the capability of driving and observing the logic levels on the dig-ital I/O pins, as well as the boundary between digital and analog logic for analog circuitry havingoff-chip connections. At system level, all ICs having JTAG capabilities are connected serially bythe TDI/TDO signals to form a long shift register. An external controller sets up the devices todrive values at their output pins, and observe the input values received from other devices. Thecontroller compares the received data with the expected result. In this way, Boundary-Scan pro-vides a mechanism for testing interconnections and integrity of components on Printed CircuitsBoards by using the 4 TAP signals only.
The four IEEE 1149.1 defined mandatory JTAG instructions IDCODE, BYPASS, SAMPLE/PRE-LOAD, and EXTEST can be used for testing the Printed Circuit Board. Initial scanning of thedata register path will show the ID-code of the device, since IDCODE is the default JTAGinstruction. It may be desirable to have the device in reset during test mode. If not reset, inputsto the device may be determined by the scan operations, and the internal software may be in anundetermined state when exiting the test mode. Entering reset, the outputs of any Port Pin willinstantly enter the high impedance state, making the HIGHZ instruction redundant. If needed,the BYPASS instruction can be issued to make the shortest possible scan chain through thedevice. The device can be set in the reset state by pulling the external RESET_N pin low.
The EXTEST instruction is used for sampling external pins and loading output pins with data.The data from the output latch will be driven out on the pins as soon as the EXTEST instructionis loaded into the JTAG IR-register. Therefore, the SAMPLE/PRELOAD should also be used forsetting initial values to the scan ring, to avoid damaging the board when issuing the EXTEST
TCK
TAP State TLR RTI SelDR SelIR CapIR ShIR Ex1IR UpdIR RTI
TMS
TDI Instruction
TDO ImplDefined
9742023G–SAM–03/2014
ATSAM4L8/L4/L2
instruction for the first time. SAMPLE/PRELOAD can also be used for taking a snapshot of theexternal pins during normal operation of the part.
When using the JTAG interface for Boundary-Scan, the JTAG TCK clock is independent of theinternal chip clock, which is not required to run.
NOTE: For pins connected to 5V lines care should be taken to not drive the pins to a logic oneusing boundary scan, as this will create a current flowing from the 3,3V driver to the 5V pullup onthe line. Optionally a series resistor can be added between the line and the pin to reduce thecurrent.
8.11.7 Flash Programming Typical ProcedureFlash programming is performed by operating Flash controller commands. The Flash controlleris connected to the system bus matrix and is then controllable from the AHP-AP. The AHB-APcannot write the FLASH page buffer while the core_hold_reset is asserted. The AHB-AP cannotbe accessed when the device is in protected state. It is important to ensure that the CPU ishalted prior to operating any flash programming operation to prevent it from corrupting the sys-tem configuration. The recommended sequence is shown below:
1. At power up, RESET_N is driven low by a debugger. The on-chip regulator holds the system in a POR state until the input supply is above the POR threshold. The system continues to be held in this static state until the internally regulated supplies have reached a safe operating.
2. PM starts, clocks are switched to the slow clock (Core Clock, System Clock, Flash Clock, and any Bus Clocks that do not have clock gate control). Internal resets are maintained due to the external reset.
– The Debug Port (DP) and Access Ports (AP) receives a clock and leave the reset state,
3. The debugger maintains a low level on TCK and release RESET_N.
– The SMAP asserts the core_hold_reset signal
4. The Cortex-M4 core remains in reset state, meanwhile the rest of the system is released.
5. The debugger then configures the NVIC to catch the Cortex-M4 core reset vector fetch. For more information on how to program the NVIC, refer to the ARMv7-M Architecture Reference Manual.
6. The debugger writes a one in the SMAP SCR.HCR to release the Cortex-M4 core reset to make the system bus matrix accessible from the AHB-AP.
7. The Cortex-M4 core initializes the SP, then read the exception vector and stalls
8. Programming is available through the AHB-AP
9. After operation is completed, the chip can be restarted either by asserting RESET_N or switching power off/on or clearing SCR.HCR. Make sure that the TCK pin is high when releasing RESET_N not to halt the core.
9842023G–SAM–03/2014
ATSAM4L8/L4/L2
8.11.8 Chip Erase Typical ProcedureThe chip erase operation is triggered by writing a one in the CE bit in the Control Register(CR.CE). This clears first all volatile memories in the system and second the whole flash array.Note that the User page is not erased in this process. To ensure that the chip erase operation iscompleted, check the DONE bit in the Status Register (SR.DONE). Also note that the chip eraseoperation depends on clocks and power management features that can be altered by the CPU.It is important to ensure that it is stopped. The recommended sequence is shown below:
1. At power up, RESET_N is driven low by a debugger. The on-chip regulator holds the system in a POR state until the input supply is above the POR threshold. The system continues to be held in this static state until the internally regulated supplies have reached a safe operating.
2. PM starts, clocks are switched to the slow clock (Core Clock, System Clock, Flash Clock, and any Bus Clocks that do not have clock gate control). Internal resets are maintained due to the external reset.
– The debug port and access ports receives a clock and leave the reset state
3. The debugger maintains a low level on TCK and release RESET_N.
– The SMAP asserts the core_hold_reset signal
4. The Cortex-M4 core remains in reset state, meanwhile the rest of the system is released.
5. The Chip erase operation can be performed by issuing the SMAP Chip Erase com-mand. In this case:
– volatile memories are cleared first
– followed by the clearing of the flash array
– followed by the clearing of the protected state
6. After operation is completed, the device must be restarted by either controling RESET_N or switching power off/on. Make sure that the TCK pin is high when releas-ing RESET_N not to halt the core.
8.11.9 Setting the Protected StateThis is done by issuing a specific flash controller command, for more information, refer to Sec-tion 14. ”Flash Controller (FLASHCALW)” on page 263 and to Section 8.11.7 ”FlashProgramming Typical Procedure” on page 97. The protected state is defined by a highly secureFlash builtin mechanism. Note that for this programmation to propagate, it is required to resetthe device.
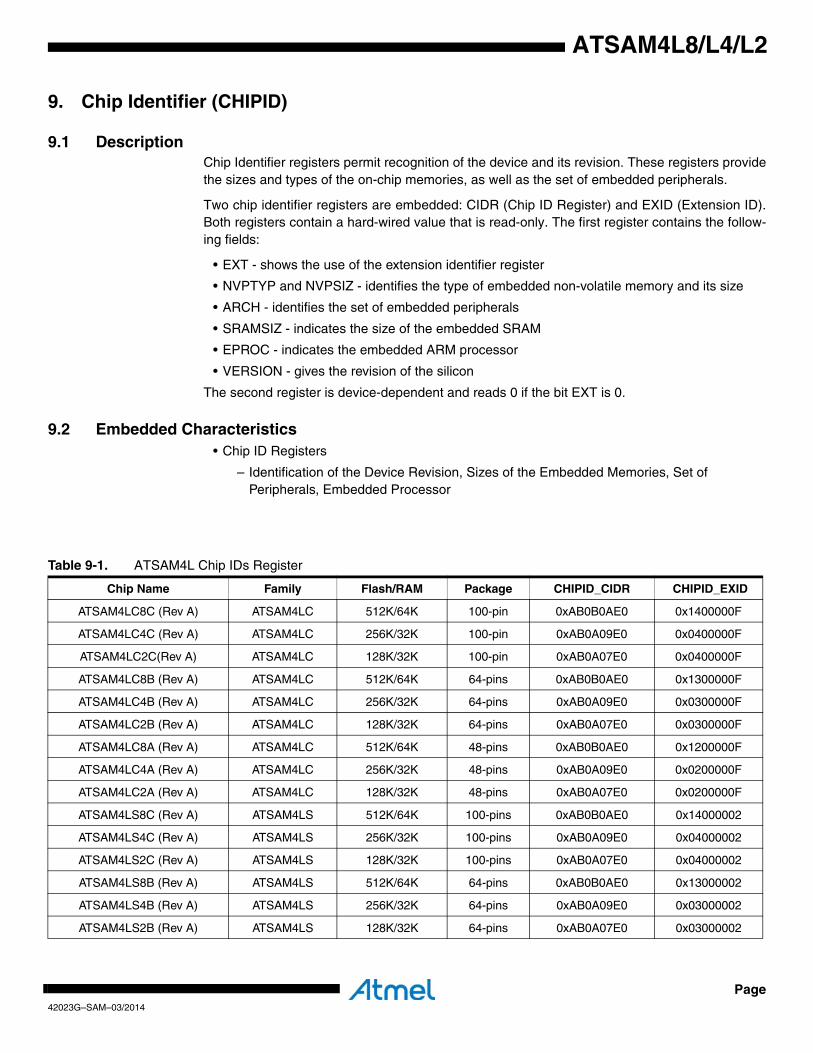
Page42023G–SAM–03/2014
ATSAM4L8/L4/L2
9. Chip Identifier (CHIPID)
9.1 DescriptionChip Identifier registers permit recognition of the device and its revision. These registers providethe sizes and types of the on-chip memories, as well as the set of embedded peripherals.
Two chip identifier registers are embedded: CIDR (Chip ID Register) and EXID (Extension ID).Both registers contain a hard-wired value that is read-only. The first register contains the follow-ing fields:
• EXT - shows the use of the extension identifier register
• NVPTYP and NVPSIZ - identifies the type of embedded non-volatile memory and its size
• ARCH - identifies the set of embedded peripherals
• SRAMSIZ - indicates the size of the embedded SRAM
• EPROC - indicates the embedded ARM processor
• VERSION - gives the revision of the silicon
The second register is device-dependent and reads 0 if the bit EXT is 0.
9.2 Embedded Characteristics• Chip ID Registers
– Identification of the Device Revision, Sizes of the Embedded Memories, Set of Peripherals, Embedded Processor
Table 9-1. ATSAM4L Chip IDs Register
Chip Name Family Flash/RAM Package CHIPID_CIDR CHIPID_EXID
ATSAM4LC8C (Rev A) ATSAM4LC 512K/64K 100-pin 0xAB0B0AE0 0x1400000F
ATSAM4LC4C (Rev A) ATSAM4LC 256K/32K 100-pin 0xAB0A09E0 0x0400000F
ATSAM4LC2C(Rev A) ATSAM4LC 128K/32K 100-pin 0xAB0A07E0 0x0400000F
ATSAM4LC8B (Rev A) ATSAM4LC 512K/64K 64-pins 0xAB0B0AE0 0x1300000F
ATSAM4LC4B (Rev A) ATSAM4LC 256K/32K 64-pins 0xAB0A09E0 0x0300000F
ATSAM4LC2B (Rev A) ATSAM4LC 128K/32K 64-pins 0xAB0A07E0 0x0300000F
ATSAM4LC8A (Rev A) ATSAM4LC 512K/64K 48-pins 0xAB0B0AE0 0x1200000F
ATSAM4LC4A (Rev A) ATSAM4LC 256K/32K 48-pins 0xAB0A09E0 0x0200000F
ATSAM4LC2A (Rev A) ATSAM4LC 128K/32K 48-pins 0xAB0A07E0 0x0200000F
ATSAM4LS8C (Rev A) ATSAM4LS 512K/64K 100-pins 0xAB0B0AE0 0x14000002
ATSAM4LS4C (Rev A) ATSAM4LS 256K/32K 100-pins 0xAB0A09E0 0x04000002
ATSAM4LS2C (Rev A) ATSAM4LS 128K/32K 100-pins 0xAB0A07E0 0x04000002
ATSAM4LS8B (Rev A) ATSAM4LS 512K/64K 64-pins 0xAB0B0AE0 0x13000002
ATSAM4LS4B (Rev A) ATSAM4LS 256K/32K 64-pins 0xAB0A09E0 0x03000002
ATSAM4LS2B (Rev A) ATSAM4LS 128K/32K 64-pins 0xAB0A07E0 0x03000002

Page42023G–SAM–03/2014
ATSAM4L8/L4/L2
ATSAM4LS8A (Rev A) ATSAM4LS 512K/64K 48-pins 0xAB0B0AE0 0x12000002
ATSAM4LS4A (Rev A) ATSAM4LS 256K/32K 48-pins 0xAB0A09E0 0x02000002
ATSAM4LS2A (Rev A) ATSAM4LS 128K/32K 48-pins 0xAB0A07E0 0x02000002
Table 9-1. ATSAM4L Chip IDs Register
Chip Name Family Flash/RAM Package CHIPID_CIDR CHIPID_EXID

Page42023G–SAM–03/2014
ATSAM4L8/L4/L2
9.3 User Interface
Table 9-2. CHIPID Register Memory Map
Offset Register Register Name Access Reset
0x0 Chip ID Register CIDR Read-only –
0x4 Chip ID Extension Register EXID Read-only –

Page42023G–SAM–03/2014
ATSAM4L8/L4/L2
9.3.1 Chip ID RegisterName: CIDR
Access: Read-only
Offset: 0x0
Reset Value: -
• EXT: Extension Flag0 = Chip ID has a single register definition without extension1 = An extended Chip ID exists.
• NVPTYP: Nonvolatile Program Memory Type
31 30 29 28 27 26 25 24
EXT NVPTYP ARCH[7:4]
23 22 21 20 19 18 17 16
ARCH[3:0] SRAMSIZ
15 14 13 12 11 10 9 8
NVPSIZ2 NVPSIZ
7 6 5 4 3 2 1 0
EPROC VERSION
Value Name Description
0 ROM ROM
1 ROMLESS ROMless or on-chip Flash
4 SRAM SRAM emulating ROM
2 FLASH Embedded Flash Memory
3 ROM_FLASHROM and Embedded Flash Memory
NVPSIZ is ROM size NVPSIZ2 is Flash size
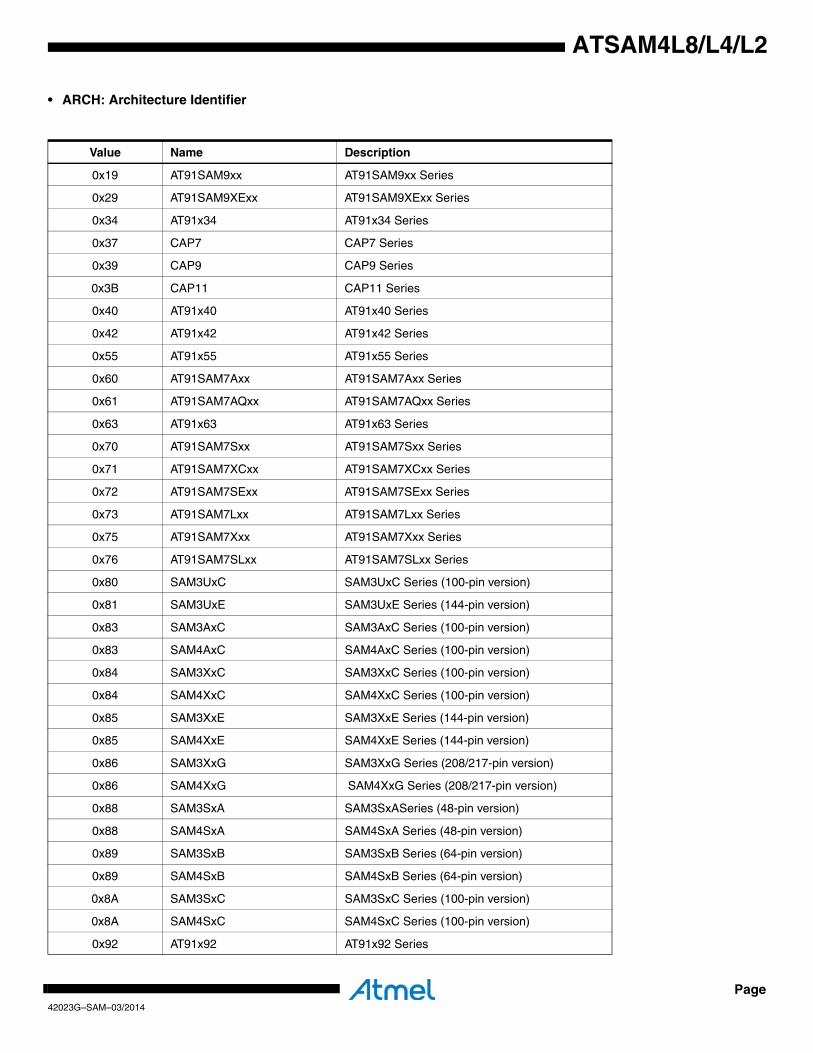
Page42023G–SAM–03/2014
ATSAM4L8/L4/L2
• ARCH: Architecture Identifier
Value Name Description
0x19 AT91SAM9xx AT91SAM9xx Series
0x29 AT91SAM9XExx AT91SAM9XExx Series
0x34 AT91x34 AT91x34 Series
0x37 CAP7 CAP7 Series
0x39 CAP9 CAP9 Series
0x3B CAP11 CAP11 Series
0x40 AT91x40 AT91x40 Series
0x42 AT91x42 AT91x42 Series
0x55 AT91x55 AT91x55 Series
0x60 AT91SAM7Axx AT91SAM7Axx Series
0x61 AT91SAM7AQxx AT91SAM7AQxx Series
0x63 AT91x63 AT91x63 Series
0x70 AT91SAM7Sxx AT91SAM7Sxx Series
0x71 AT91SAM7XCxx AT91SAM7XCxx Series
0x72 AT91SAM7SExx AT91SAM7SExx Series
0x73 AT91SAM7Lxx AT91SAM7Lxx Series
0x75 AT91SAM7Xxx AT91SAM7Xxx Series
0x76 AT91SAM7SLxx AT91SAM7SLxx Series
0x80 SAM3UxC SAM3UxC Series (100-pin version)
0x81 SAM3UxE SAM3UxE Series (144-pin version)
0x83 SAM3AxC SAM3AxC Series (100-pin version)
0x83 SAM4AxC SAM4AxC Series (100-pin version)
0x84 SAM3XxC SAM3XxC Series (100-pin version)
0x84 SAM4XxC SAM4XxC Series (100-pin version)
0x85 SAM3XxE SAM3XxE Series (144-pin version)
0x85 SAM4XxE SAM4XxE Series (144-pin version)
0x86 SAM3XxG SAM3XxG Series (208/217-pin version)
0x86 SAM4XxG SAM4XxG Series (208/217-pin version)
0x88 SAM3SxA SAM3SxASeries (48-pin version)
0x88 SAM4SxA SAM4SxA Series (48-pin version)
0x89 SAM3SxB SAM3SxB Series (64-pin version)
0x89 SAM4SxB SAM4SxB Series (64-pin version)
0x8A SAM3SxC SAM3SxC Series (100-pin version)
0x8A SAM4SxC SAM4SxC Series (100-pin version)
0x92 AT91x92 AT91x92 Series
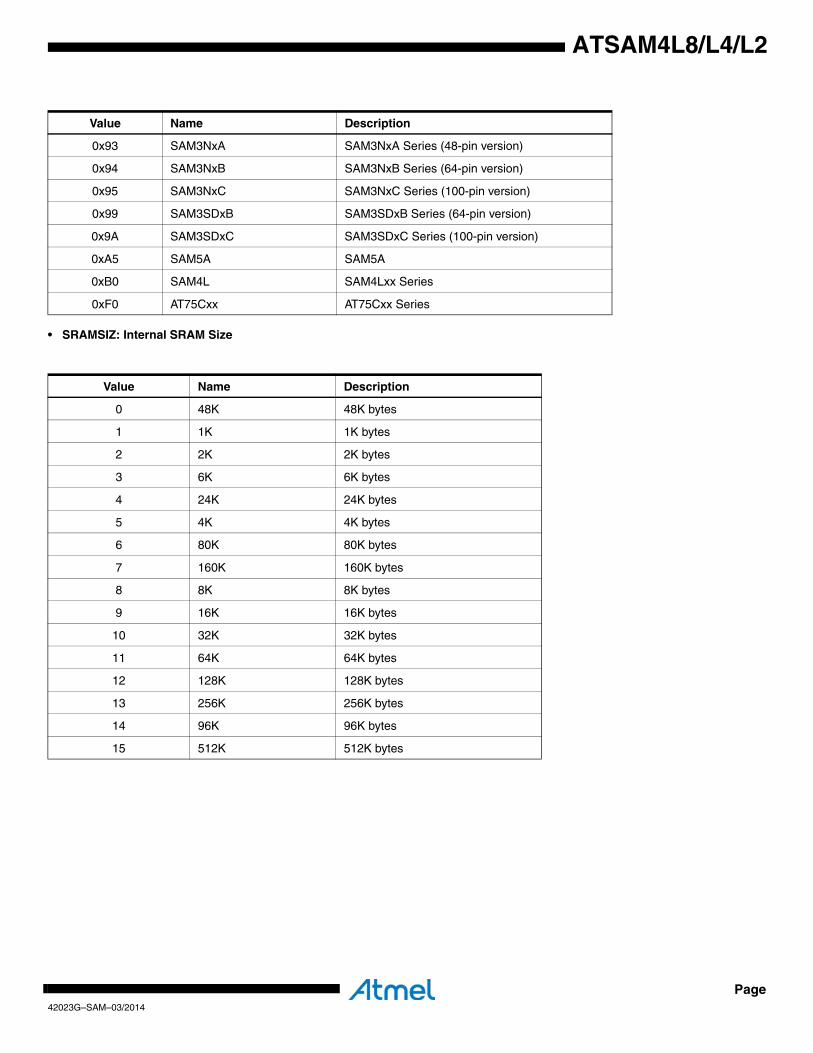
Page42023G–SAM–03/2014
ATSAM4L8/L4/L2
• SRAMSIZ: Internal SRAM Size
0x93 SAM3NxA SAM3NxA Series (48-pin version)
0x94 SAM3NxB SAM3NxB Series (64-pin version)
0x95 SAM3NxC SAM3NxC Series (100-pin version)
0x99 SAM3SDxB SAM3SDxB Series (64-pin version)
0x9A SAM3SDxC SAM3SDxC Series (100-pin version)
0xA5 SAM5A SAM5A
0xB0 SAM4L SAM4Lxx Series
0xF0 AT75Cxx AT75Cxx Series
Value Name Description
0 48K 48K bytes
1 1K 1K bytes
2 2K 2K bytes
3 6K 6K bytes
4 24K 24K bytes
5 4K 4K bytes
6 80K 80K bytes
7 160K 160K bytes
8 8K 8K bytes
9 16K 16K bytes
10 32K 32K bytes
11 64K 64K bytes
12 128K 128K bytes
13 256K 256K bytes
14 96K 96K bytes
15 512K 512K bytes
Value Name Description
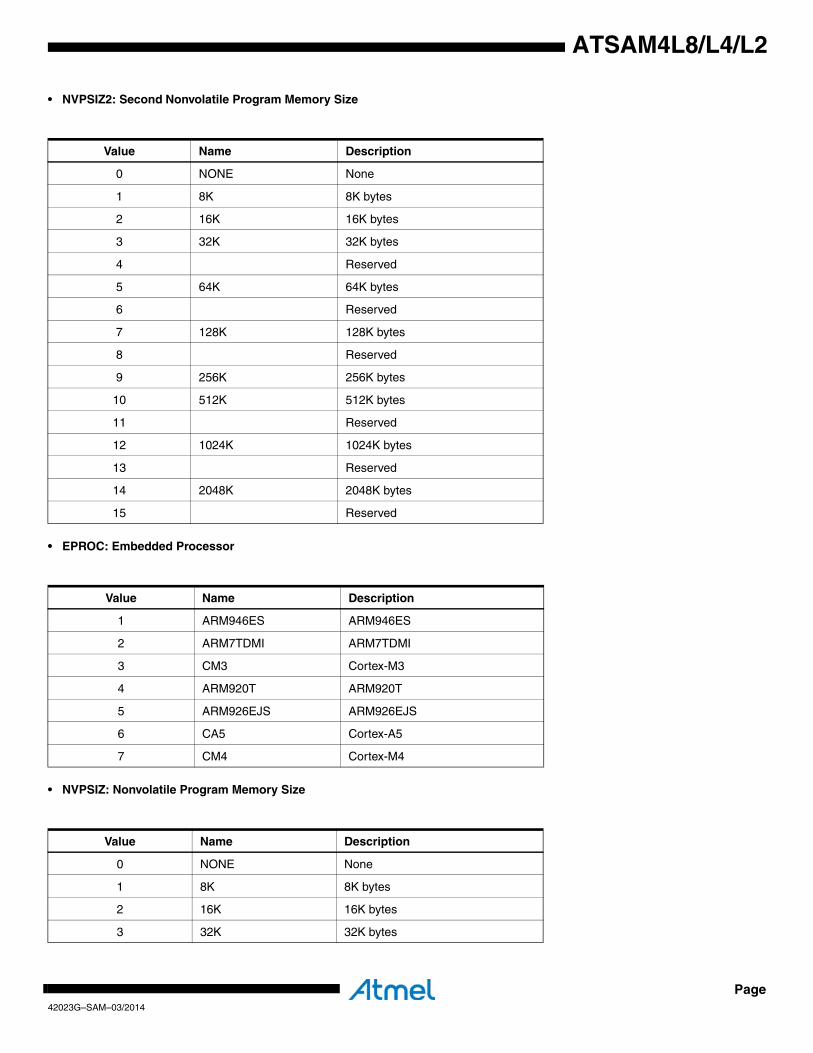
Page42023G–SAM–03/2014
ATSAM4L8/L4/L2
• NVPSIZ2: Second Nonvolatile Program Memory Size
• EPROC: Embedded Processor
• NVPSIZ: Nonvolatile Program Memory Size
Value Name Description
0 NONE None
1 8K 8K bytes
2 16K 16K bytes
3 32K 32K bytes
4 Reserved
5 64K 64K bytes
6 Reserved
7 128K 128K bytes
8 Reserved
9 256K 256K bytes
10 512K 512K bytes
11 Reserved
12 1024K 1024K bytes
13 Reserved
14 2048K 2048K bytes
15 Reserved
Value Name Description
1 ARM946ES ARM946ES
2 ARM7TDMI ARM7TDMI
3 CM3 Cortex-M3
4 ARM920T ARM920T
5 ARM926EJS ARM926EJS
6 CA5 Cortex-A5
7 CM4 Cortex-M4
Value Name Description
0 NONE None
1 8K 8K bytes
2 16K 16K bytes
3 32K 32K bytes
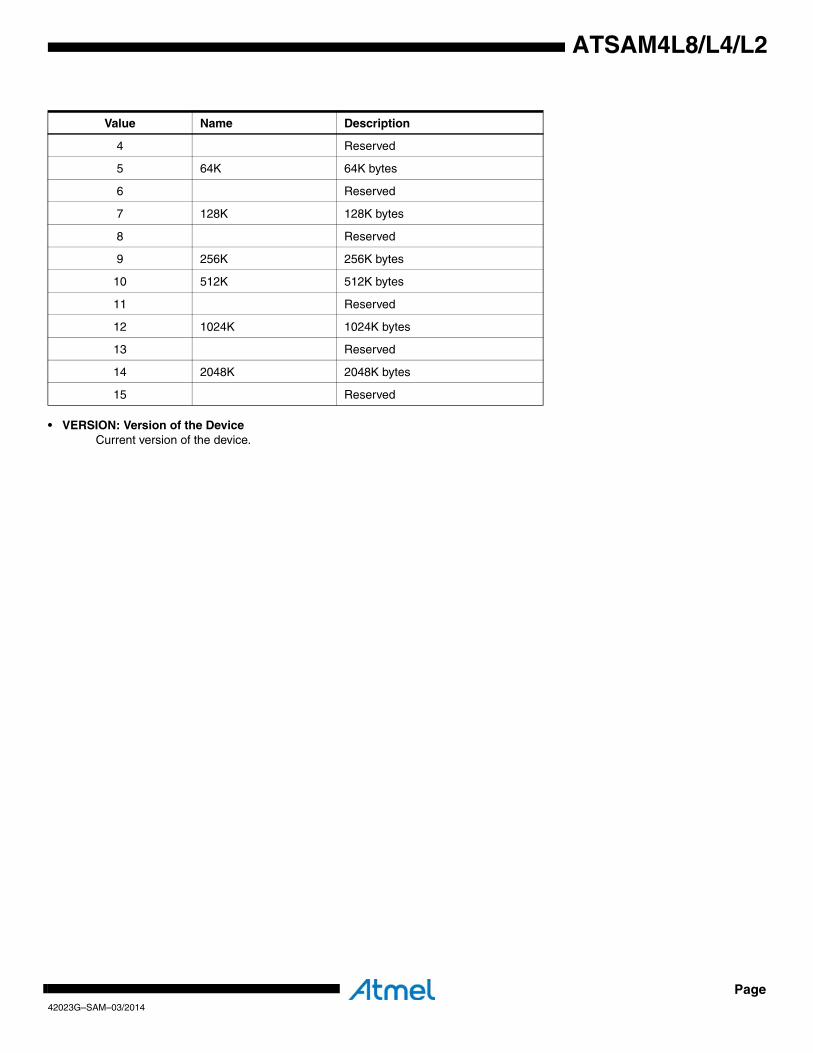
Page42023G–SAM–03/2014
ATSAM4L8/L4/L2
• VERSION: Version of the DeviceCurrent version of the device.
4 Reserved
5 64K 64K bytes
6 Reserved
7 128K 128K bytes
8 Reserved
9 256K 256K bytes
10 512K 512K bytes
11 Reserved
12 1024K 1024K bytes
13 Reserved
14 2048K 2048K bytes
15 Reserved
Value Name Description
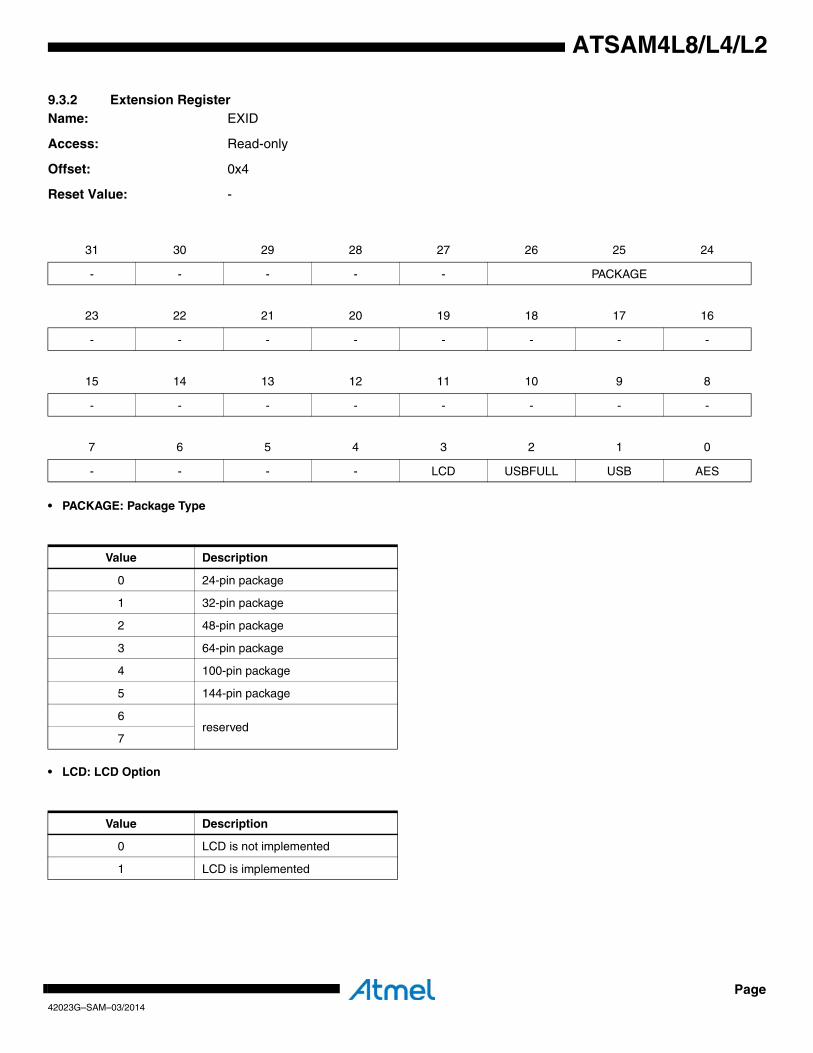
Page42023G–SAM–03/2014
ATSAM4L8/L4/L2
9.3.2 Extension RegisterName: EXID
Access: Read-only
Offset: 0x4
Reset Value: -
• PACKAGE: Package Type
• LCD: LCD Option
31 30 29 28 27 26 25 24
- - - - - PACKAGE
23 22 21 20 19 18 17 16
- - - - - - - -
15 14 13 12 11 10 9 8
- - - - - - - -
7 6 5 4 3 2 1 0
- - - - LCD USBFULL USB AES
Value Description
0 24-pin package
1 32-pin package
2 48-pin package
3 64-pin package
4 100-pin package
5 144-pin package
6reserved
7
Value Description
0 LCD is not implemented
1 LCD is implemented
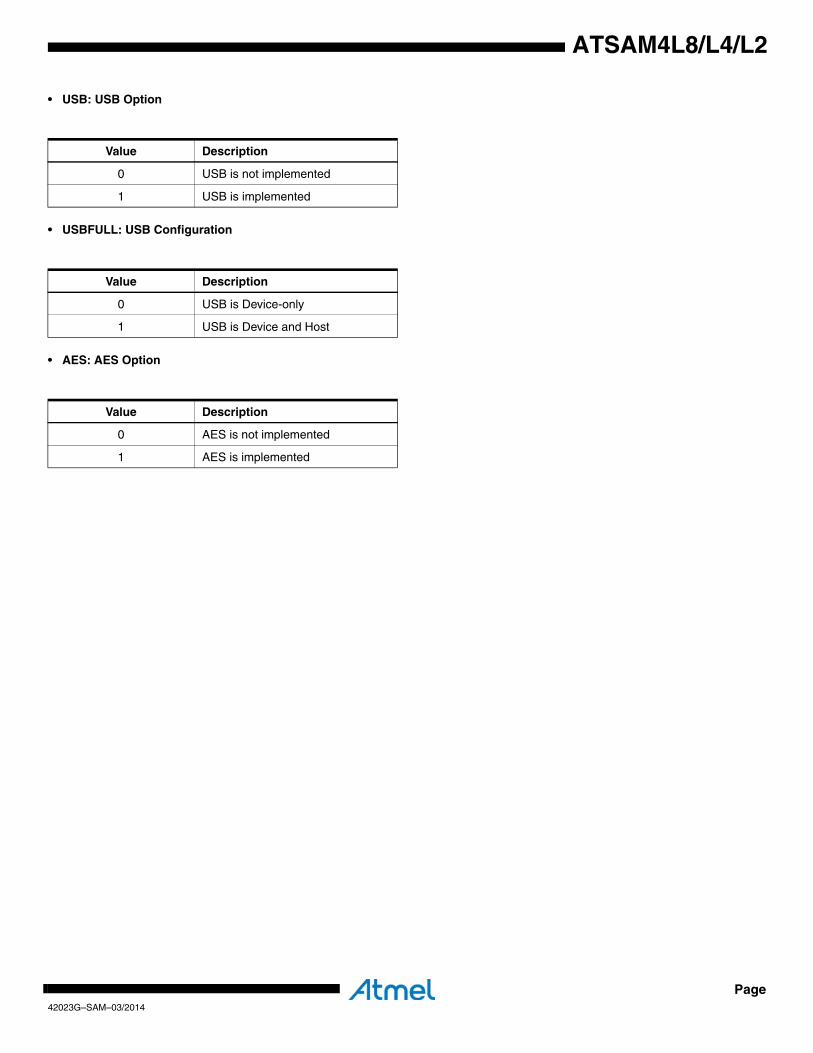
Page42023G–SAM–03/2014
ATSAM4L8/L4/L2
• USB: USB Option
• USBFULL: USB Configuration
• AES: AES Option
Value Description
0 USB is not implemented
1 USB is implemented
Value Description
0 USB is Device-only
1 USB is Device and Host
Value Description
0 AES is not implemented
1 AES is implemented
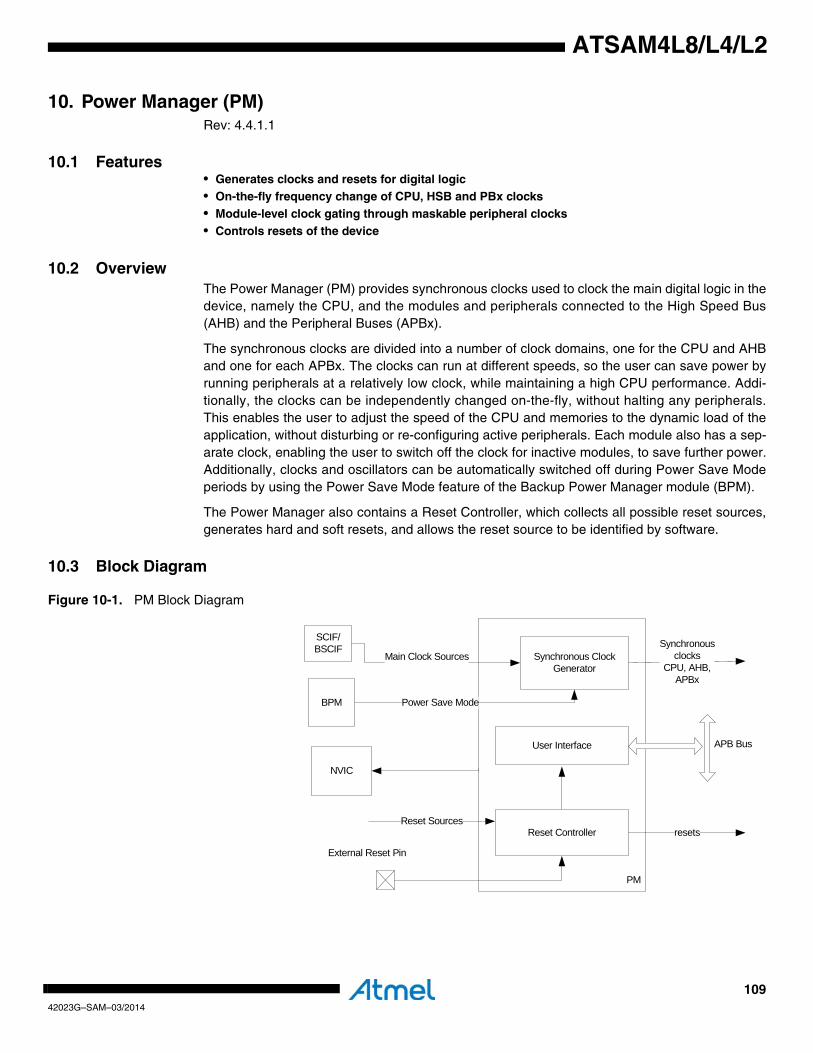
10942023G–SAM–03/2014
ATSAM4L8/L4/L2
10. Power Manager (PM)Rev: 4.4.1.1
10.1 Features• Generates clocks and resets for digital logic• On-the-fly frequency change of CPU, HSB and PBx clocks• Module-level clock gating through maskable peripheral clocks• Controls resets of the device
10.2 OverviewThe Power Manager (PM) provides synchronous clocks used to clock the main digital logic in thedevice, namely the CPU, and the modules and peripherals connected to the High Speed Bus(AHB) and the Peripheral Buses (APBx).
The synchronous clocks are divided into a number of clock domains, one for the CPU and AHBand one for each APBx. The clocks can run at different speeds, so the user can save power byrunning peripherals at a relatively low clock, while maintaining a high CPU performance. Addi-tionally, the clocks can be independently changed on-the-fly, without halting any peripherals.This enables the user to adjust the speed of the CPU and memories to the dynamic load of theapplication, without disturbing or re-configuring active peripherals. Each module also has a sep-arate clock, enabling the user to switch off the clock for inactive modules, to save further power.Additionally, clocks and oscillators can be automatically switched off during Power Save Modeperiods by using the Power Save Mode feature of the Backup Power Manager module (BPM).
The Power Manager also contains a Reset Controller, which collects all possible reset sources,generates hard and soft resets, and allows the reset source to be identified by software.
10.3 Block Diagram
Figure 10-1. PM Block Diagram
PM
Synchronous Clock Generator
Reset Controller resets
Synchronousclocks
CPU, AHB, APBx
External Reset Pin
SCIF/BSCIF
Power Save Mode
APB BusUser Interface
NVIC
Reset Sources
BPM
Main Clock Sources
11042023G–SAM–03/2014
ATSAM4L8/L4/L2
10.4 I/O Lines Description
10.5 Product Dependencies
10.5.1 InterruptThe PM interrupt line is connected to one of the internal sources of the NVIC. Using the PMinterrupt requires the NVIC to be programmed first.
10.5.2 Clock ImplementationIn ATSAM4L, the AHB shares the source clock with the CPU.
The clock for the PM bus interface (CLK_PM) is generated by the Power Manager. This clock isenabled at reset, and can be disabled in the Power Manager. If disabled, it can only be re-enabled by a reset.
10.6 Functional Description
10.6.1 Synchronous ClocksThe System RC Oscillator (RCSYS) or a set of other clock sources provide the source for themain clock, which is the common root for the synchronous clocks for the CPU, AHB and APBxmodules. For details about the other main clock sources, refer to the register description of theMain Clock Control Register (MCCTRL). The main clock is divided by an 8-bit prescaler, andeach of these synchronous clocks can run from any tapping of this prescaler, or the undividedmain clock, as long as fCPU ≥ fAPBx,. The synchronous clock source can be changed on-the fly,responding to varying load in the application. The clocks for each module in each synchronousclock domain can be individually masked, to avoid power consumption in inactive modules.Depending on the Power Save mode, some clock domains can be cut.
Table 10-1. I/O Lines Description
Name Description Type Active Level
RESET_N Reset Input Low
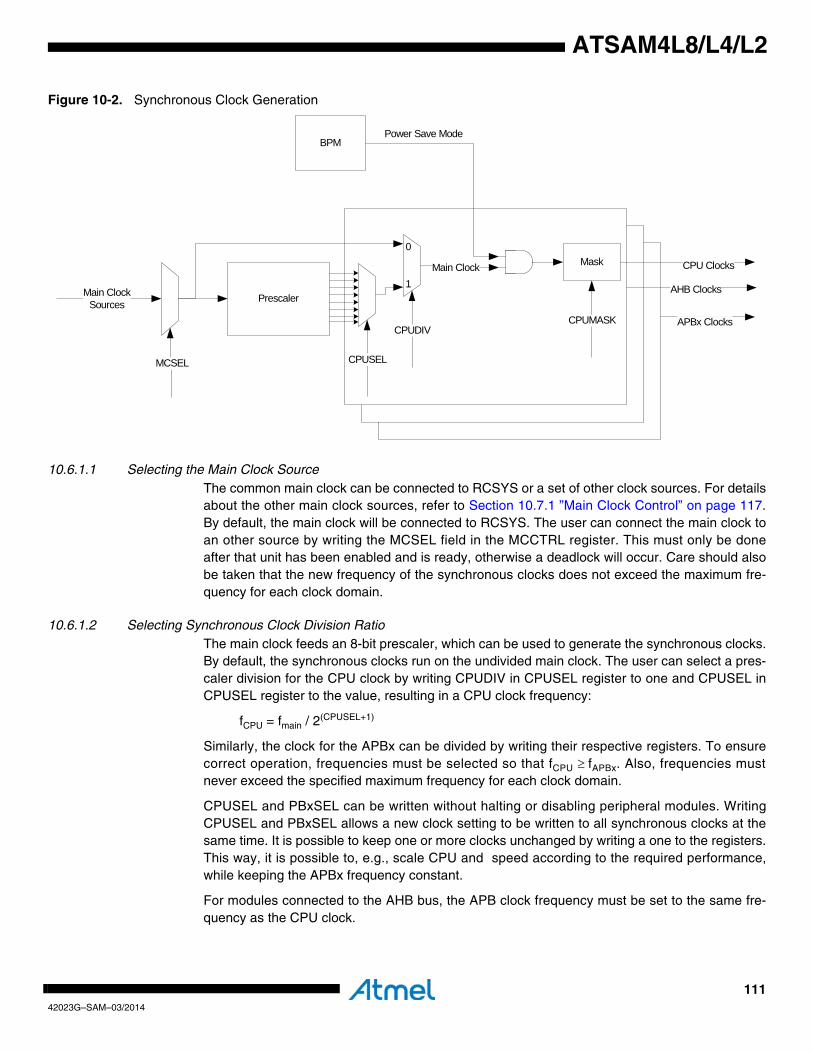
11142023G–SAM–03/2014
ATSAM4L8/L4/L2
Figure 10-2. Synchronous Clock Generation
10.6.1.1 Selecting the Main Clock SourceThe common main clock can be connected to RCSYS or a set of other clock sources. For detailsabout the other main clock sources, refer to Section 10.7.1 ”Main Clock Control” on page 117.By default, the main clock will be connected to RCSYS. The user can connect the main clock toan other source by writing the MCSEL field in the MCCTRL register. This must only be doneafter that unit has been enabled and is ready, otherwise a deadlock will occur. Care should alsobe taken that the new frequency of the synchronous clocks does not exceed the maximum fre-quency for each clock domain.
10.6.1.2 Selecting Synchronous Clock Division RatioThe main clock feeds an 8-bit prescaler, which can be used to generate the synchronous clocks.By default, the synchronous clocks run on the undivided main clock. The user can select a pres-caler division for the CPU clock by writing CPUDIV in CPUSEL register to one and CPUSEL inCPUSEL register to the value, resulting in a CPU clock frequency:
fCPU = fmain / 2(CPUSEL+1)
Similarly, the clock for the APBx can be divided by writing their respective registers. To ensurecorrect operation, frequencies must be selected so that fCPU ≥ fAPBx. Also, frequencies mustnever exceed the specified maximum frequency for each clock domain.
CPUSEL and PBxSEL can be written without halting or disabling peripheral modules. WritingCPUSEL and PBxSEL allows a new clock setting to be written to all synchronous clocks at thesame time. It is possible to keep one or more clocks unchanged by writing a one to the registers.This way, it is possible to, e.g., scale CPU and speed according to the required performance,while keeping the APBx frequency constant.
For modules connected to the AHB bus, the APB clock frequency must be set to the same fre-quency as the CPU clock.
Mask
PrescalerMain ClockSources
MCSEL
0
1
CPUSEL
CPUDIV
Main Clock
BPM
CPUMASK
CPU Clocks
AHB Clocks
APBx Clocks
Power Save Mode
11242023G–SAM–03/2014
ATSAM4L8/L4/L2
10.6.1.3 Clock Ready FlagThere is a slight delay from CPUSEL and PBxSEL being written to the new clock setting takingeffect. During this interval, the Clock Ready bit in the Status Register (SR.CKRDY) will read aszero. When the clock settings change is completed, the bit will read as one. The Clock Selectregisters (CPUSEL, PBxSEL) must not be written to while SR.CKRDY is zero, or the systemmay become unstable or hang.
The Clock Ready bit in the Interrupt Status Register (ISR.CKRDY) is set on a SR.CKRDY zero-to-one transition. If the Clock Ready bit in the Interrupt Mask Register (IMR.CKRDY) is set, aninterrupt request is generated. IMR.CKRDY is set by writing a one to the corresponding bit in theInterrupt Enable Register (IER.CKRDY).
10.6.2 Peripheral Clock MaskingBy default, only the necessary clocks are enabled (see the reset value of the MASK registers). Itis possible to disable or enable the clock for a module in the CPU, or APBx clock domain bywriting the corresponding bit in the Clock Mask register (CPU/HSB/PBx) to zero or one. When amodule is not clocked, it will cease operation, and its registers cannot be read or written. Themodule can be re-enabled later by writing the corresponding mask bit to one.
A module may be connected to several clock domains, in which case it will have several maskbits.
The Maskable Module Clocks table contains a list of implemented maskable clocks.
10.6.2.1 Cautionary NoteNote that clocks should only be switched off if it is certain that the module will not be used.Switching off the clock for the flash controller will cause a problem if the CPU needs to read fromthe flash. Switching off the clock to the Power Manager (PM), which contains the mask registers,or the corresponding APBx bridge, will make it impossible to write the mask registers again. Inthis case, they can only be re-enabled by a system reset.
10.6.2.2 SleepWalking™
In all power save modes except in BACKUP mode, where the APBx clocks are stopped, thedevice can wake partially up if a APBx module asynchronously discovers that it needs its clock.Only the requested clocks and clock sources needed will be started, and all other clocks will bemasked to zero. E.g. if the main clock source is OSC0, only OSC0 will be started even if otherclock sources were enabled in RUN mode. Also generic clocks can be started in a similar way.The state where only requested clocks are running is referred to as SleepWalking.
The time spent to start the requested clock is mostly limited by the startup time of the given clocksource. This allows APBx modules to handle incoming requests, while still keeping the powerconsumption at a minimum.
When the device is SleepWalking any asynchronous wake up sources can wake up the deviceat any time without stopping the requested APBx clock.
All requests to start clocks can be masked by writing to the Peripheral Power Control Register(PPCR), all requests are enabled at reset.
During SleepWalking the NVIC clock will be running except in BACKUP mode. If an interrupt ispending when entering SleepWalking, this will wake up the whole device.
11342023G–SAM–03/2014
ATSAM4L8/L4/L2
10.6.3 Speeding-up Sleep Modes Wake Up Times
The normal way for the Power Manager to enter WAIT mode involves automatically switchingthe main clock to RCSYS before stopping all oscillators. During wake-up, the main clock is auto-matically switched back from RCSYS to the oscillator selected before the WFI instruction wasexecuted. The delay needed to switch to/from the RCSYS oscillator is around three RCSYSclock cycles, plus oscillator startup times when waking up.
It is possible to speed-up the enter/wake-up times for the WAIT modes by disabling the auto-matic switch to RCSYS. This is only useful if a high frequency oscillator with a very fast startuptime is used. The user has to select the main clock source by writing a one to the correspondingbit in the FASTSLEEP register. The device will not wake up correctly if the right oscillator in theFASTSLEEP register is not selected.
To have a fast wakeup time in WAIT and RETENTION power save mode, refer to Section 6.1.4”Wakeup Time” on page 56
10.6.4 Divided APB ClocksThe clock generator in the Power Manager provides divided APBx clocks for use by peripheralsthat require a prescaled APBx clock. This is described in the documentation for the relevantmodules.
The divided clocks are directly maskable, and are stopped in Power Save modes where theAPBx clocks are stopped.
10.6.5 Reset ControllerThe Reset Controller collects the various reset sources and generates resets for the device.
The device contains a Power-On Detector, which keeps the system reset until power is stable.This eliminates the need for external reset circuitry to guarantee stable operation when poweringup the device.
It is also possible to reset the device by pulling the RESET_N pin low. This pin has an internalpull-up, and does not need to be driven externally during normal operation. Table 10-2 on page113 lists these and other reset sources supported by the Reset Controller.
Table 10-2. Reset Description
Reset source Description
POR18 ResetSupply voltage below the 1.8V power-on reset detector threshold voltage
External Reset RESET_N pin asserted
BOD18 ResetSupply voltage on VDDCORE below the 1.8V brownout reset detector threshold voltage
BOD33 ResetSupply voltage on I/O below the 3.3V brownout reset detector threshold voltage
POR33 ResetSupply voltage on I/O below the 3.3 V power-on reset detector threshold voltage
Watchdog Timer See Watchdog Timer documentation
Backup Reset Reset from backup mode when a wake up source occurs
OCD Reset See On-Chip Debug and Test chapter
11442023G–SAM–03/2014
ATSAM4L8/L4/L2
Depending on the reset source, when a Reset occurs, some parts of the device are not alwaysreset. Only the Power On Reset (POR) will force a whole device reset. Refer to the table in theModule Configuration section at the end of this chapter for further details. The latest reset causecan be read in the RCAUSE register, and can be read during the applications boot sequence inorder to determine proper action.
The table below lists parts of the device that are reset, depending on the reset type. The causeof the last reset can be read from the RCAUSE register. This register contains one bit for eachreset source, and can be read during the boot sequence of an application.
10.6.6 Clock Failure DetectorThis mechanism allows switching the main clock to the safe RCSYS clock, when the main clocksource is considered off. This may happen when a external crystal is selected as the clocksource of the main clock but the crystal is not mounted on the board. The mechanism is todetect, during a RCSYS period, at least one rising edge of the main clock. If no rising edge isseen the clock is considered failed.
Example:
* RCSYS = 115khz
=> Failure detected if the main clock is < 115 kHz
As soon as the detector is enabled, the clock failure detector will monitor the divided main clock.Note that the detector does not monitor if the RCSYS is the source of the main clock, or if themain clock is temporarily not available (startup-time after a wake-up, switching timing etc.), or inSLEEP mode where the main clock is driven by the RCSYS (SLEEP mode level 3). When aclock failure is detected, the main clock automatically switches to the RCSYS clock and the CFDinterrupt is generated if enabled.
The MCCTRL register that selects the source clock of the main clock is changed by hardware toindicate that the main clock comes from RCSYS.
10.6.7 InterruptsThe PM has a number of interrupts:
• AE - Access Error,
– A lock protected register is written to without first being unlocked.
• CKRDY - Clock Ready:
– New Clock Select settings in the CPUSEL/PBxSEL registers have taken effect. (A zero-to-one transition on SR.CKRDY is detected).
• CFD - Clock Failure Detected:
– The system detects that the main clock is not running.
• WAKE - Asynchronous wake Detected:
– An asynchronous wakeup from a peripheral is detetcted.
The Interrupt Status Register contains one bit for each interrupt source. A bit in this register isset on a zero-to-one transition of the corresponding bit in the Status Register (SR), and clearedby writing a one to the corresponding bit in the Interrupt Clear Register (ICR). The interruptsources will generate an interrupt request if the corresponding bit in the Interrupt Mask Registeris set. The interrupt sources are ORed together to form one interrupt request. The Power Man-

11542023G–SAM–03/2014
ATSAM4L8/L4/L2
ager will generate an interrupt request if at least one of the bits in the Interrupt Mask Register(IMR) is set. Bits in IMR are set by writing a one to the corresponding bit in the Interrupt EnableRegister (IER), and cleared by writing a one to the corresponding bit in the Interrupt DisableRegister (IDR). The interrupt request remains active until the corresponding bit in the InterruptStatus Register (ISR) is cleared by writing a one to the corresponding bit in the Interrupt ClearRegister (ICR). Because all the interrupt sources are ORed together, the interrupt request fromthe Power Manager will remain active until all the bits in ISR are cleared.
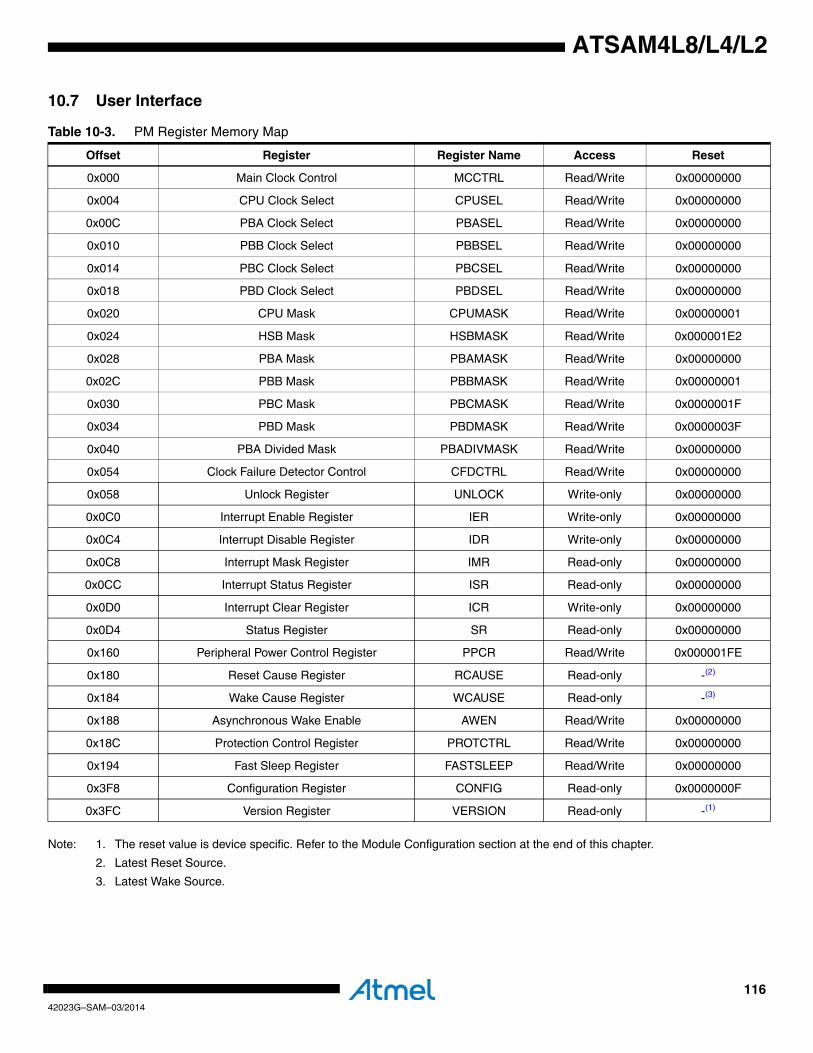
11642023G–SAM–03/2014
ATSAM4L8/L4/L2
10.7 User Interface
Note: 1. The reset value is device specific. Refer to the Module Configuration section at the end of this chapter.
2. Latest Reset Source.
3. Latest Wake Source.
Table 10-3. PM Register Memory Map
Offset Register Register Name Access Reset
0x000 Main Clock Control MCCTRL Read/Write 0x00000000
0x004 CPU Clock Select CPUSEL Read/Write 0x00000000
0x00C PBA Clock Select PBASEL Read/Write 0x00000000
0x010 PBB Clock Select PBBSEL Read/Write 0x00000000
0x014 PBC Clock Select PBCSEL Read/Write 0x00000000
0x018 PBD Clock Select PBDSEL Read/Write 0x00000000
0x020 CPU Mask CPUMASK Read/Write 0x00000001
0x024 HSB Mask HSBMASK Read/Write 0x000001E2
0x028 PBA Mask PBAMASK Read/Write 0x00000000
0x02C PBB Mask PBBMASK Read/Write 0x00000001
0x030 PBC Mask PBCMASK Read/Write 0x0000001F
0x034 PBD Mask PBDMASK Read/Write 0x0000003F
0x040 PBA Divided Mask PBADIVMASK Read/Write 0x00000000
0x054 Clock Failure Detector Control CFDCTRL Read/Write 0x00000000
0x058 Unlock Register UNLOCK Write-only 0x00000000
0x0C0 Interrupt Enable Register IER Write-only 0x00000000
0x0C4 Interrupt Disable Register IDR Write-only 0x00000000
0x0C8 Interrupt Mask Register IMR Read-only 0x00000000
0x0CC Interrupt Status Register ISR Read-only 0x00000000
0x0D0 Interrupt Clear Register ICR Write-only 0x00000000
0x0D4 Status Register SR Read-only 0x00000000
0x160 Peripheral Power Control Register PPCR Read/Write 0x000001FE
0x180 Reset Cause Register RCAUSE Read-only -(2)
0x184 Wake Cause Register WCAUSE Read-only -(3)
0x188 Asynchronous Wake Enable AWEN Read/Write 0x00000000
0x18C Protection Control Register PROTCTRL Read/Write 0x00000000
0x194 Fast Sleep Register FASTSLEEP Read/Write 0x00000000
0x3F8 Configuration Register CONFIG Read-only 0x0000000F
0x3FC Version Register VERSION Read-only -(1)
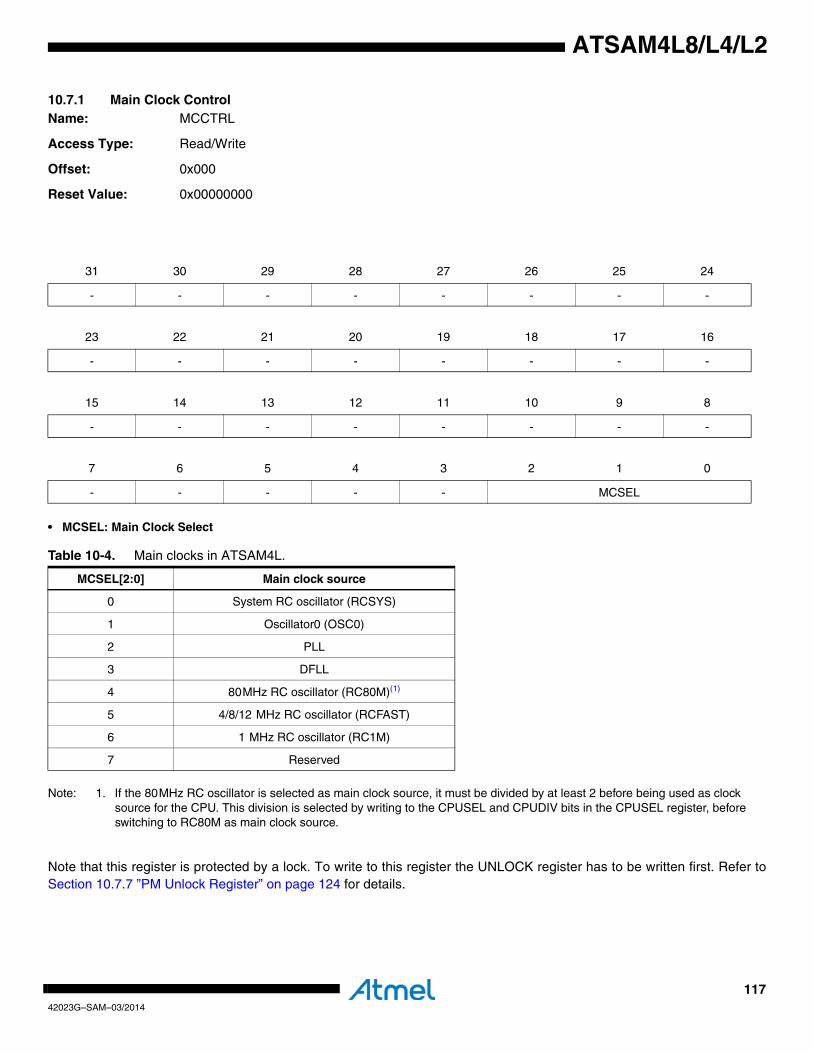
11742023G–SAM–03/2014
ATSAM4L8/L4/L2
10.7.1 Main Clock ControlName: MCCTRL
Access Type: Read/Write
Offset: 0x000
Reset Value: 0x00000000
• MCSEL: Main Clock Select
Note: 1. If the 80MHz RC oscillator is selected as main clock source, it must be divided by at least 2 before being used as clock source for the CPU. This division is selected by writing to the CPUSEL and CPUDIV bits in the CPUSEL register, before switching to RC80M as main clock source.
Note that this register is protected by a lock. To write to this register the UNLOCK register has to be written first. Refer toSection 10.7.7 ”PM Unlock Register” on page 124 for details.
31 30 29 28 27 26 25 24
- - - - - - - -
23 22 21 20 19 18 17 16
- - - - - - - -
15 14 13 12 11 10 9 8
- - - - - - - -
7 6 5 4 3 2 1 0
- - - - - MCSEL
Table 10-4. Main clocks in ATSAM4L.
MCSEL[2:0] Main clock source
0 System RC oscillator (RCSYS)
1 Oscillator0 (OSC0)
2 PLL
3 DFLL
4 80MHz RC oscillator (RC80M)(1)
5 4/8/12 MHz RC oscillator (RCFAST)
6 1 MHz RC oscillator (RC1M)
7 Reserved
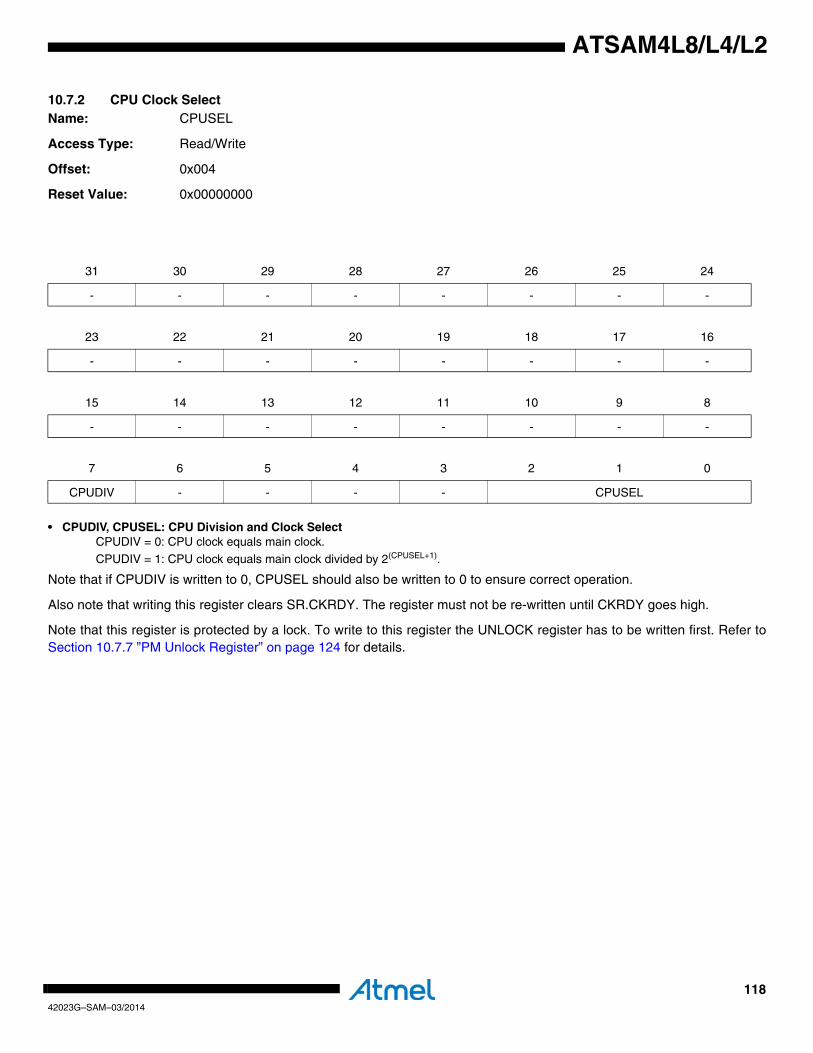
11842023G–SAM–03/2014
ATSAM4L8/L4/L2
10.7.2 CPU Clock SelectName: CPUSEL
Access Type: Read/Write
Offset: 0x004
Reset Value: 0x00000000
• CPUDIV, CPUSEL: CPU Division and Clock SelectCPUDIV = 0: CPU clock equals main clock.
CPUDIV = 1: CPU clock equals main clock divided by 2(CPUSEL+1).
Note that if CPUDIV is written to 0, CPUSEL should also be written to 0 to ensure correct operation.
Also note that writing this register clears SR.CKRDY. The register must not be re-written until CKRDY goes high.
Note that this register is protected by a lock. To write to this register the UNLOCK register has to be written first. Refer toSection 10.7.7 ”PM Unlock Register” on page 124 for details.
31 30 29 28 27 26 25 24
- - - - - - - -
23 22 21 20 19 18 17 16
- - - - - - - -
15 14 13 12 11 10 9 8
- - - - - - - -
7 6 5 4 3 2 1 0
CPUDIV - - - - CPUSEL

11942023G–SAM–03/2014
ATSAM4L8/L4/L2
10.7.3 PBx Clock SelectName: PBxSEL
Access Type: Read/Write
Offset: 0x00C-0x018
Reset Value: 0x00000000
• PBDIV, PBSEL: PBx Division and Clock SelectPBDIV = 0: APBx clock equals main clock.
PBDIV = 1: APBx clock equals main clock divided by 2(PBSEL+1).
Note that if PBDIV is written to 0, PBSEL should also be written to 0 to ensure correct operation.
Also note that writing this register clears SR.CKRDY. The register must not be re-written until SR.CKRDY goes high.
Note that this register is protected by a lock. To write to this register the UNLOCK register has to be written first. Refer toSection 10.7.7 ”PM Unlock Register” on page 124 for details.
31 30 29 28 27 26 25 24
- - - - - - - -
23 22 21 20 19 18 17 16
- - - - - - - -
15 14 13 12 11 10 9 8
- - - - - - - -
7 6 5 4 3 2 1 0
PBDIV - - - - PBSEL
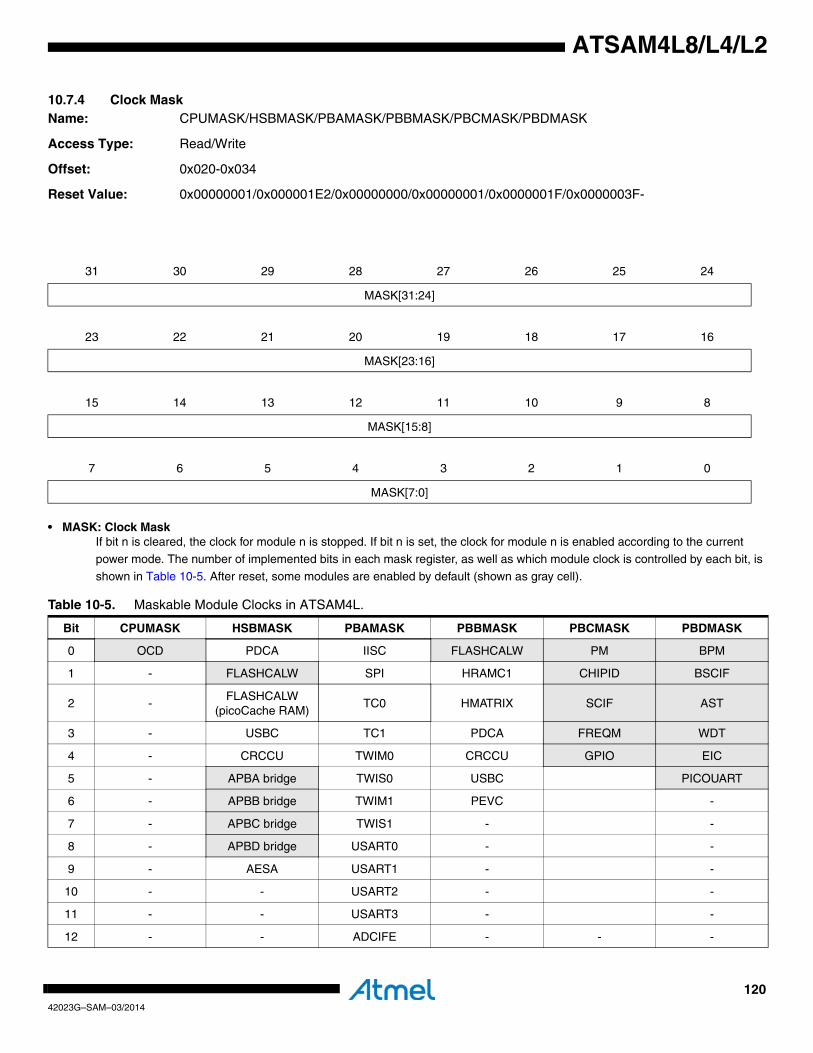
12042023G–SAM–03/2014
ATSAM4L8/L4/L2
10.7.4 Clock MaskName: CPUMASK/HSBMASK/PBAMASK/PBBMASK/PBCMASK/PBDMASK
Access Type: Read/Write
Offset: 0x020-0x034
Reset Value: 0x00000001/0x000001E2/0x00000000/0x00000001/0x0000001F/0x0000003F-
• MASK: Clock MaskIf bit n is cleared, the clock for module n is stopped. If bit n is set, the clock for module n is enabled according to the current
power mode. The number of implemented bits in each mask register, as well as which module clock is controlled by each bit, is
shown in Table 10-5. After reset, some modules are enabled by default (shown as gray cell).
31 30 29 28 27 26 25 24
MASK[31:24]
23 22 21 20 19 18 17 16
MASK[23:16]
15 14 13 12 11 10 9 8
MASK[15:8]
7 6 5 4 3 2 1 0
MASK[7:0]
Table 10-5. Maskable Module Clocks in ATSAM4L.
Bit CPUMASK HSBMASK PBAMASK PBBMASK PBCMASK PBDMASK
0 OCD PDCA IISC FLASHCALW PM BPM
1 - FLASHCALW SPI HRAMC1 CHIPID BSCIF
2 -FLASHCALW
(picoCache RAM)TC0 HMATRIX SCIF AST
3 - USBC TC1 PDCA FREQM WDT
4 - CRCCU TWIM0 CRCCU GPIO EIC
5 - APBA bridge TWIS0 USBC PICOUART
6 - APBB bridge TWIM1 PEVC -
7 - APBC bridge TWIS1 - -
8 - APBD bridge USART0 - -
9 - AESA USART1 - -
10 - - USART2 - -
11 - - USART3 - -
12 - - ADCIFE - - -
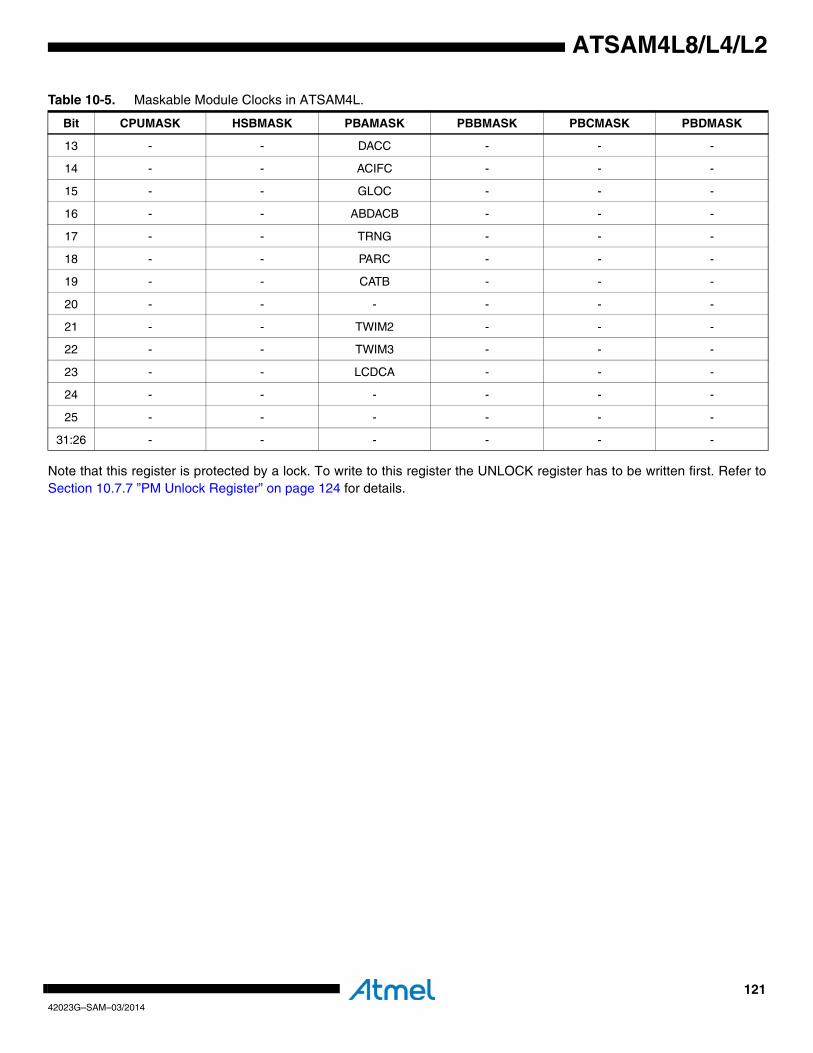
12142023G–SAM–03/2014
ATSAM4L8/L4/L2
Note that this register is protected by a lock. To write to this register the UNLOCK register has to be written first. Refer toSection 10.7.7 ”PM Unlock Register” on page 124 for details.
13 - - DACC - - -
14 - - ACIFC - - -
15 - - GLOC - - -
16 - - ABDACB - - -
17 - - TRNG - - -
18 - - PARC - - -
19 - - CATB - - -
20 - - - - - -
21 - - TWIM2 - - -
22 - - TWIM3 - - -
23 - - LCDCA - - -
24 - - - - - -
25 - - - - - -
31:26 - - - - - -
Table 10-5. Maskable Module Clocks in ATSAM4L.
Bit CPUMASK HSBMASK PBAMASK PBBMASK PBCMASK PBDMASK
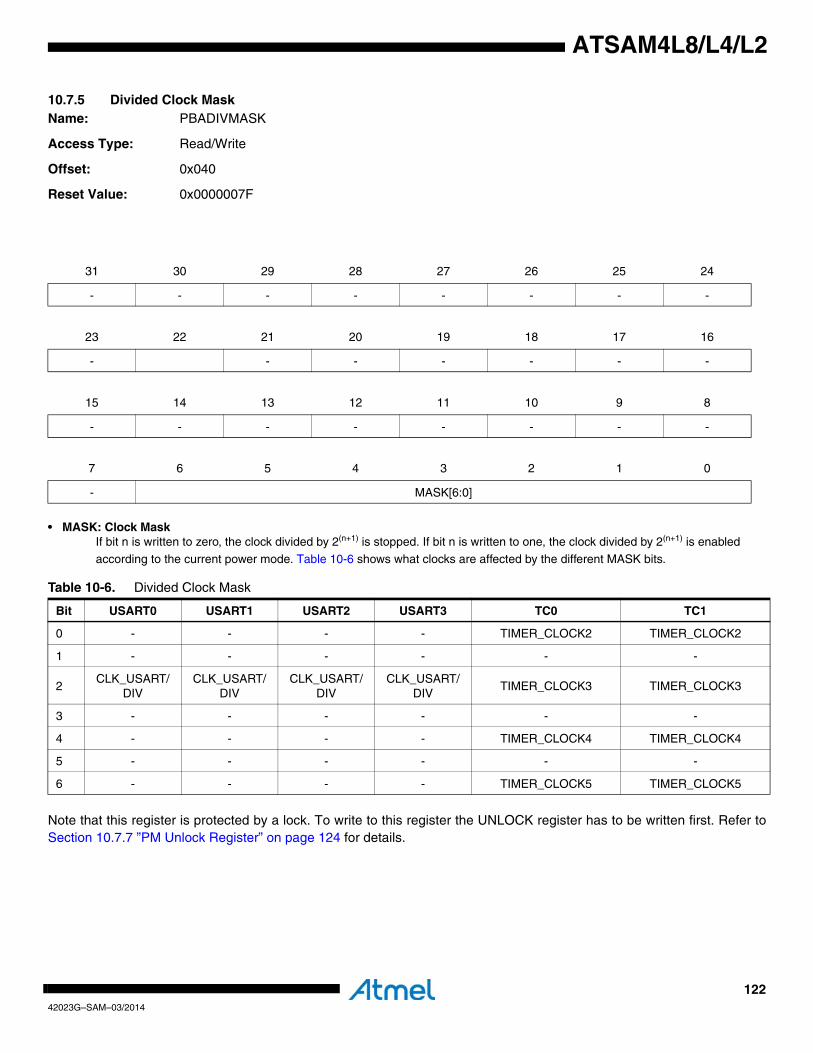
12242023G–SAM–03/2014
ATSAM4L8/L4/L2
10.7.5 Divided Clock MaskName: PBADIVMASK
Access Type: Read/Write
Offset: 0x040
Reset Value: 0x0000007F
• MASK: Clock MaskIf bit n is written to zero, the clock divided by 2(n+1) is stopped. If bit n is written to one, the clock divided by 2(n+1) is enabled
according to the current power mode. Table 10-6 shows what clocks are affected by the different MASK bits.
Note that this register is protected by a lock. To write to this register the UNLOCK register has to be written first. Refer toSection 10.7.7 ”PM Unlock Register” on page 124 for details.
31 30 29 28 27 26 25 24
- - - - - - - -
23 22 21 20 19 18 17 16
- - - - - - -
15 14 13 12 11 10 9 8
- - - - - - - -
7 6 5 4 3 2 1 0
- MASK[6:0]
Table 10-6. Divided Clock Mask
Bit USART0 USART1 USART2 USART3 TC0 TC1
0 - - - - TIMER_CLOCK2 TIMER_CLOCK2
1 - - - - - -
2CLK_USART/
DIVCLK_USART/
DIVCLK_USART/
DIVCLK_USART/
DIVTIMER_CLOCK3 TIMER_CLOCK3
3 - - - - - -
4 - - - - TIMER_CLOCK4 TIMER_CLOCK4
5 - - - - - -
6 - - - - TIMER_CLOCK5 TIMER_CLOCK5
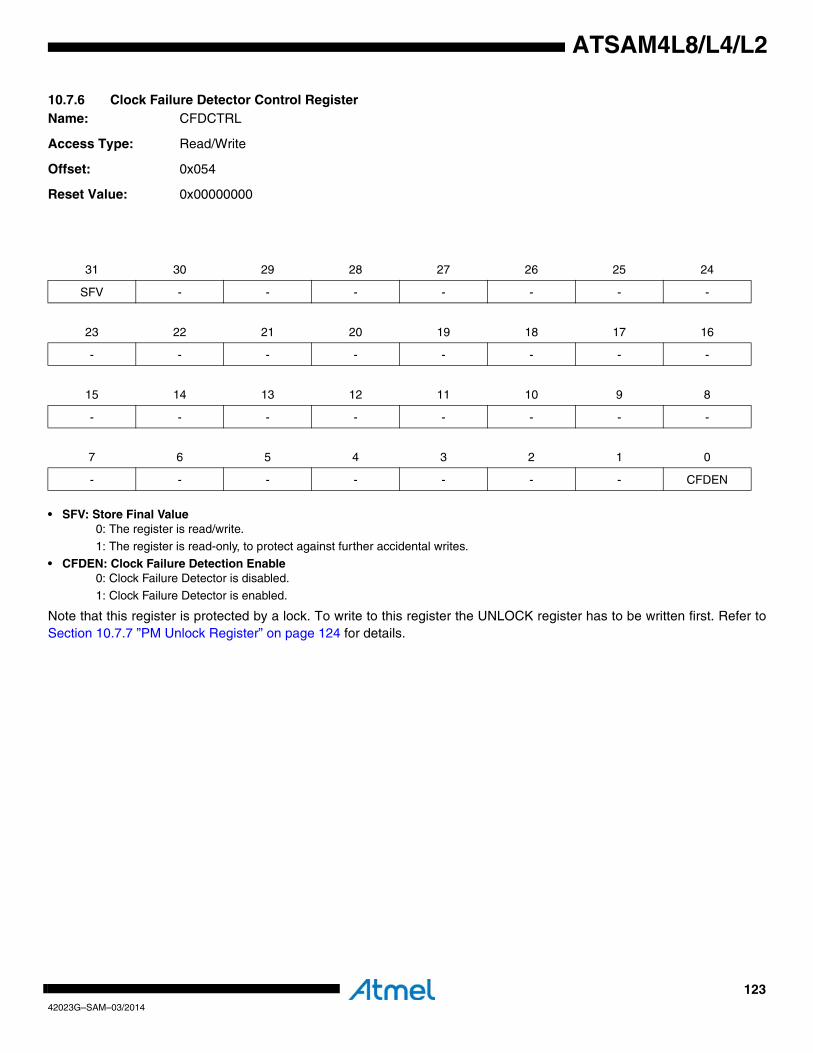
12342023G–SAM–03/2014
ATSAM4L8/L4/L2
10.7.6 Clock Failure Detector Control RegisterName: CFDCTRL
Access Type: Read/Write
Offset: 0x054
Reset Value: 0x00000000
• SFV: Store Final Value0: The register is read/write.
1: The register is read-only, to protect against further accidental writes.
• CFDEN: Clock Failure Detection Enable0: Clock Failure Detector is disabled.
1: Clock Failure Detector is enabled.
Note that this register is protected by a lock. To write to this register the UNLOCK register has to be written first. Refer toSection 10.7.7 ”PM Unlock Register” on page 124 for details.
31 30 29 28 27 26 25 24
SFV - - - - - - -
23 22 21 20 19 18 17 16
- - - - - - - -
15 14 13 12 11 10 9 8
- - - - - - - -
7 6 5 4 3 2 1 0
- - - - - - - CFDEN
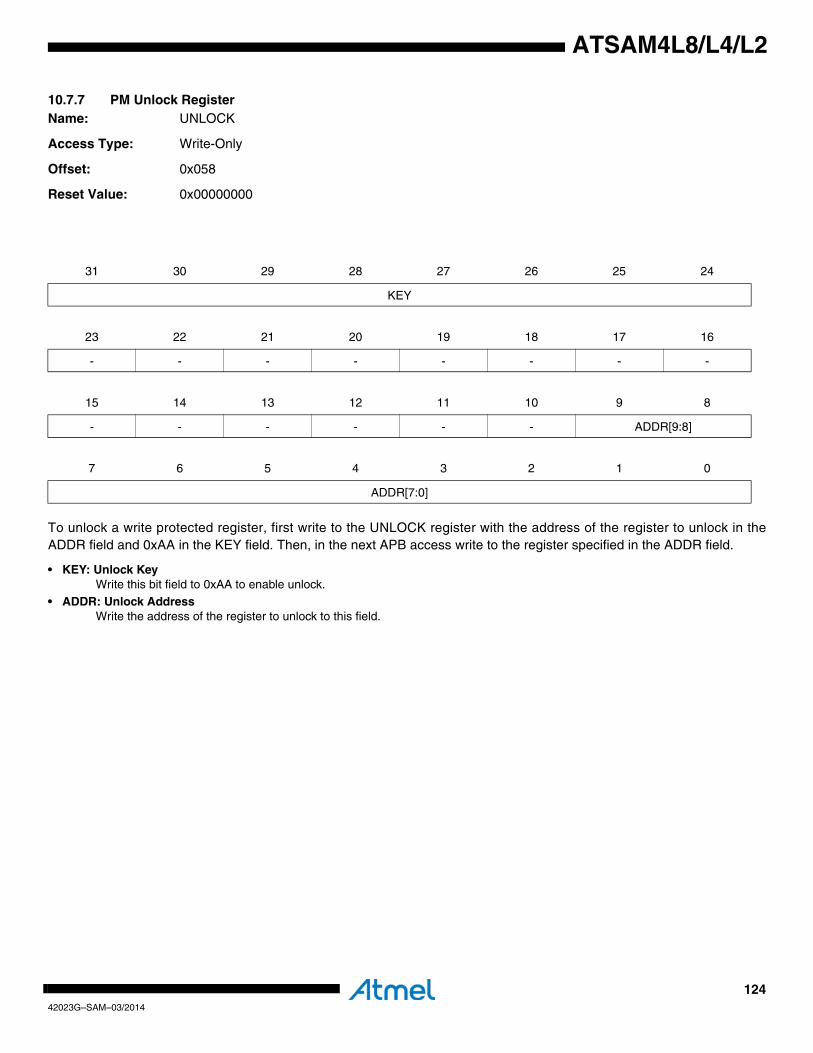
12442023G–SAM–03/2014
ATSAM4L8/L4/L2
10.7.7 PM Unlock RegisterName: UNLOCK
Access Type: Write-Only
Offset: 0x058
Reset Value: 0x00000000
To unlock a write protected register, first write to the UNLOCK register with the address of the register to unlock in theADDR field and 0xAA in the KEY field. Then, in the next APB access write to the register specified in the ADDR field.
• KEY: Unlock KeyWrite this bit field to 0xAA to enable unlock.
• ADDR: Unlock AddressWrite the address of the register to unlock to this field.
31 30 29 28 27 26 25 24
KEY
23 22 21 20 19 18 17 16
- - - - - - - -
15 14 13 12 11 10 9 8
- - - - - - ADDR[9:8]
7 6 5 4 3 2 1 0
ADDR[7:0]
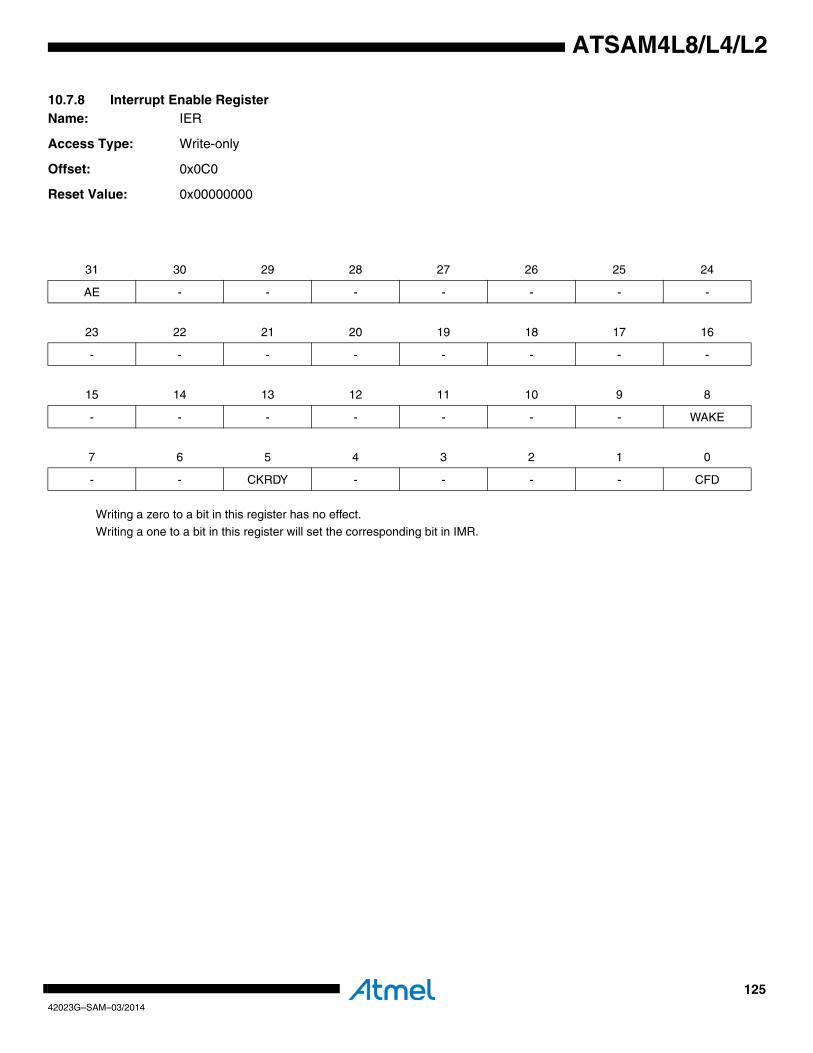
12542023G–SAM–03/2014
ATSAM4L8/L4/L2
10.7.8 Interrupt Enable RegisterName: IER
Access Type: Write-only
Offset: 0x0C0
Reset Value: 0x00000000
Writing a zero to a bit in this register has no effect.
Writing a one to a bit in this register will set the corresponding bit in IMR.
31 30 29 28 27 26 25 24
AE - - - - - - -
23 22 21 20 19 18 17 16
- - - - - - - -
15 14 13 12 11 10 9 8
- - - - - - - WAKE
7 6 5 4 3 2 1 0
- - CKRDY - - - - CFD

12642023G–SAM–03/2014
ATSAM4L8/L4/L2
10.7.9 Interrupt Disable RegisterName: IDR
Access Type: Write-only
Offset: 0x0C4
Reset Value: 0x00000000
Writing a zero to a bit in this register has no effect.
Writing a one to a bit in this register will clear the corresponding bit in IMR.
31 30 29 28 27 26 25 24
AE - - - - - - -
23 22 21 20 19 18 17 16
- - - - - - - -
15 14 13 12 11 10 9 8
- - - - - - - WAKE
7 6 5 4 3 2 1 0
- - CKRDY - - - - CFD
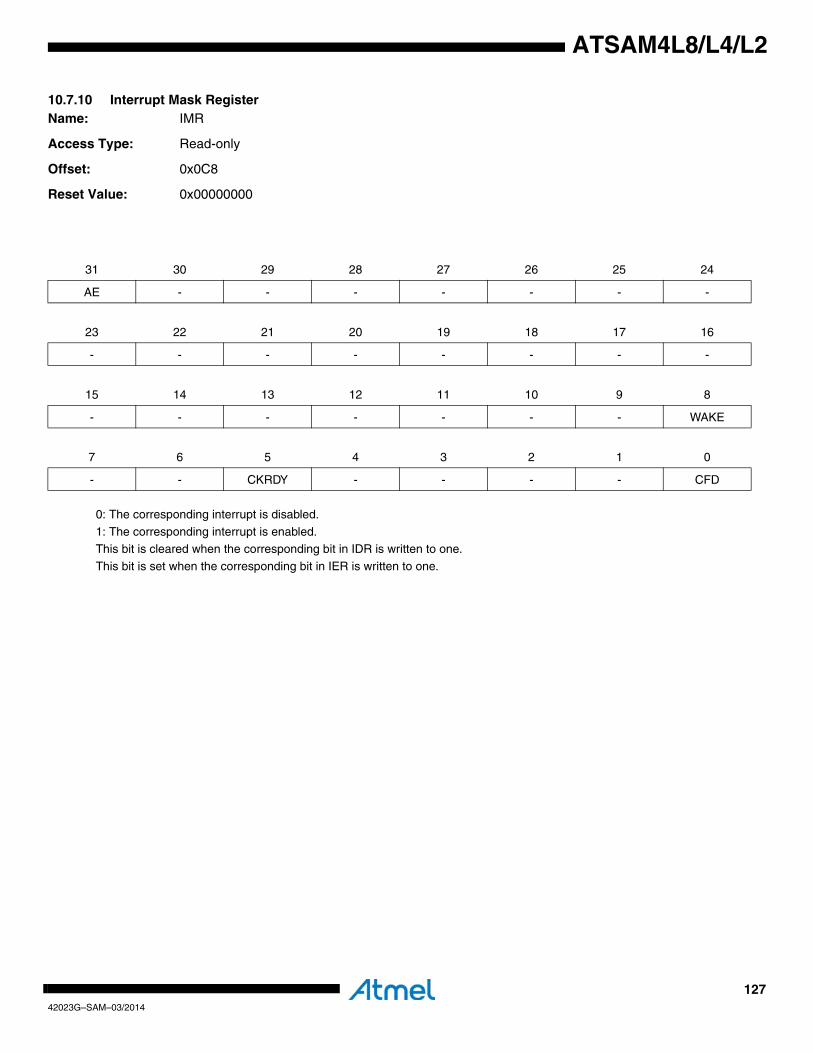
12742023G–SAM–03/2014
ATSAM4L8/L4/L2
10.7.10 Interrupt Mask RegisterName: IMR
Access Type: Read-only
Offset: 0x0C8
Reset Value: 0x00000000
0: The corresponding interrupt is disabled.
1: The corresponding interrupt is enabled.This bit is cleared when the corresponding bit in IDR is written to one.
This bit is set when the corresponding bit in IER is written to one.
31 30 29 28 27 26 25 24
AE - - - - - - -
23 22 21 20 19 18 17 16
- - - - - - - -
15 14 13 12 11 10 9 8
- - - - - - - WAKE
7 6 5 4 3 2 1 0
- - CKRDY - - - - CFD
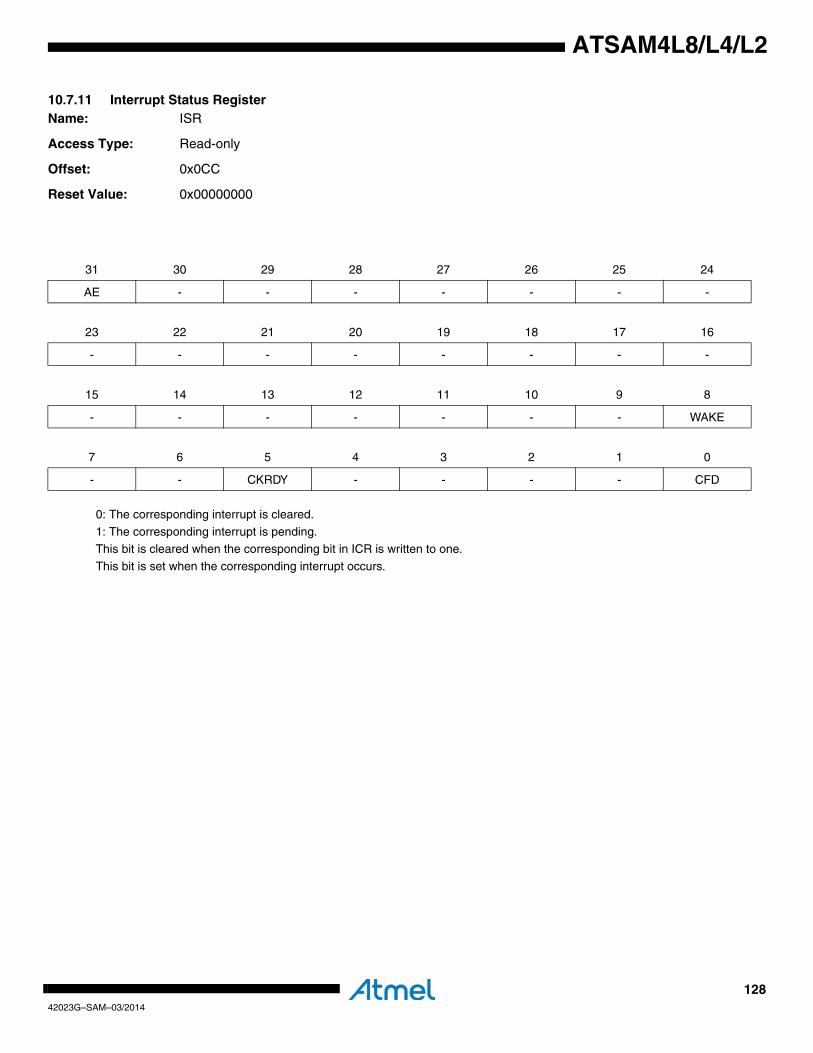
12842023G–SAM–03/2014
ATSAM4L8/L4/L2
10.7.11 Interrupt Status RegisterName: ISR
Access Type: Read-only
Offset: 0x0CC
Reset Value: 0x00000000
0: The corresponding interrupt is cleared.
1: The corresponding interrupt is pending.This bit is cleared when the corresponding bit in ICR is written to one.
This bit is set when the corresponding interrupt occurs.
31 30 29 28 27 26 25 24
AE - - - - - - -
23 22 21 20 19 18 17 16
- - - - - - - -
15 14 13 12 11 10 9 8
- - - - - - - WAKE
7 6 5 4 3 2 1 0
- - CKRDY - - - - CFD

12942023G–SAM–03/2014
ATSAM4L8/L4/L2
10.7.12 Interrupt Clear RegisterName: ICR
Access Type: Write-only
Offset: 0x0D0
Reset Value: 0x00000000
Writing a zero to a bit in this register has no effect.
Writing a one to a bit in this register will clear the corresponding bit in ISR.
31 30 29 28 27 26 25 24
AE - - - - - - -
23 22 21 20 19 18 17 16
- - - - - - - -
15 14 13 12 11 10 9 8
- - - - - - - WAKE
7 6 5 4 3 2 1 0
- - CKRDY - - - - CFD

13042023G–SAM–03/2014
ATSAM4L8/L4/L2
10.7.13 Status RegisterName: SR
Access Type: Read-only
Offset: 0x0D4
Reset Value: 0x00000000
• AE: Access Error0: No access error has occurred.
1: A write to lock protected register without unlocking it has occurred.
• WAKE: Wake up0: No wakeup has occurred.
1: A wakeup event has occurred. Refer the WCAUSE register to know the wakeup source.• CKRDY: Clock Ready
0: The CKSEL register has been written, and the new clock setting is not yet effective.1: The synchronous clocks have frequencies as indicated in the CKSEL register.
• CFD: Clock Failure Detected0: Main clock is running correctly.
1: Failure on main clock detected. Main clock reverting to RCSYS.
31 30 29 28 27 26 25 24
AE - - - - - - -
23 22 21 20 19 18 17 16
- - - - - - - -
15 14 13 12 11 10 9 8
- - - - - - - WAKE
7 6 5 4 3 2 1 0
- - CKRDY - - - - CFD
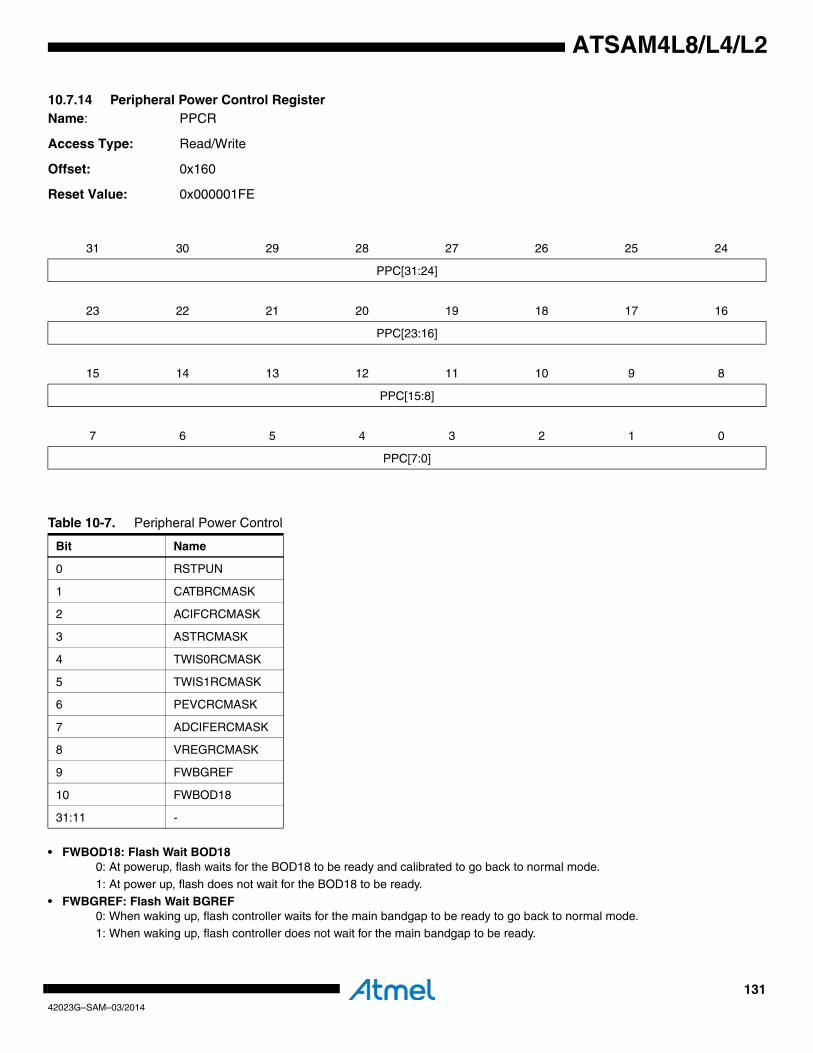
13142023G–SAM–03/2014
ATSAM4L8/L4/L2
10.7.14 Peripheral Power Control RegisterName: PPCR
Access Type: Read/Write
Offset: 0x160
Reset Value: 0x000001FE
• FWBOD18: Flash Wait BOD180: At powerup, flash waits for the BOD18 to be ready and calibrated to go back to normal mode.
1: At power up, flash does not wait for the BOD18 to be ready.• FWBGREF: Flash Wait BGREF
0: When waking up, flash controller waits for the main bandgap to be ready to go back to normal mode.1: When waking up, flash controller does not wait for the main bandgap to be ready.
31 30 29 28 27 26 25 24
PPC[31:24]
23 22 21 20 19 18 17 16
PPC[23:16]
15 14 13 12 11 10 9 8
PPC[15:8]
7 6 5 4 3 2 1 0
PPC[7:0]
Table 10-7. Peripheral Power Control
Bit Name
0 RSTPUN
1 CATBRCMASK
2 ACIFCRCMASK
3 ASTRCMASK
4 TWIS0RCMASK
5 TWIS1RCMASK
6 PEVCRCMASK
7 ADCIFERCMASK
8 VREGRCMASK
9 FWBGREF
10 FWBOD18
31:11 -
13242023G–SAM–03/2014
ATSAM4L8/L4/L2
• VREGRCMASK: VREG Request Clock Mask0: VREG Request Clock is disabled
1: VREG Request Clock is enabled• ADCIFERCMASK: ADCIFE Request Clock Mask
0: ADCIFE Request Clock is disabled1: ADCIFE Request Clock is enabled
• PEVCRCMASK: PEVC Request Clock Mask0: PEVC Request Clock is disabled1: PEVC Request Clock is enabled
• TWIS1RCMASK: TWIS1 Request Clock Mask0: TWIS1 Request Clock is disabled
1: TWIS1 Request Clock is enabled
• TWIS0RCMASK: TWIS0 Request Clock Mask0: TWIS0 Request Clock is disabled
1: TWIS0 Request Clock is enabled• ASTRCMASK: AST Request Clock Mask
0: AST Request Clock is disabled1: AST Request Clock is enabled
• ACIFCRCMASK: ACIFC Request Clock Mask0: ACIFC Request Clock is disabled
1: ACIFC Request Clock is enabled
• CATBRCMASK: CAT Request Clock Mask0: CAT Request Clock is disabled
1: CAT Request Clock is enabled• RSTPUN: Reset Pullup
0: Pullup on the external reset pin is disabled.1: Pullup on the external reset pin is enabled.
Note that this register is protected by a lock. To write to this register the UNLOCK register has to be written first. Refer toSection 10.7.7 ”PM Unlock Register” on page 124 for details.
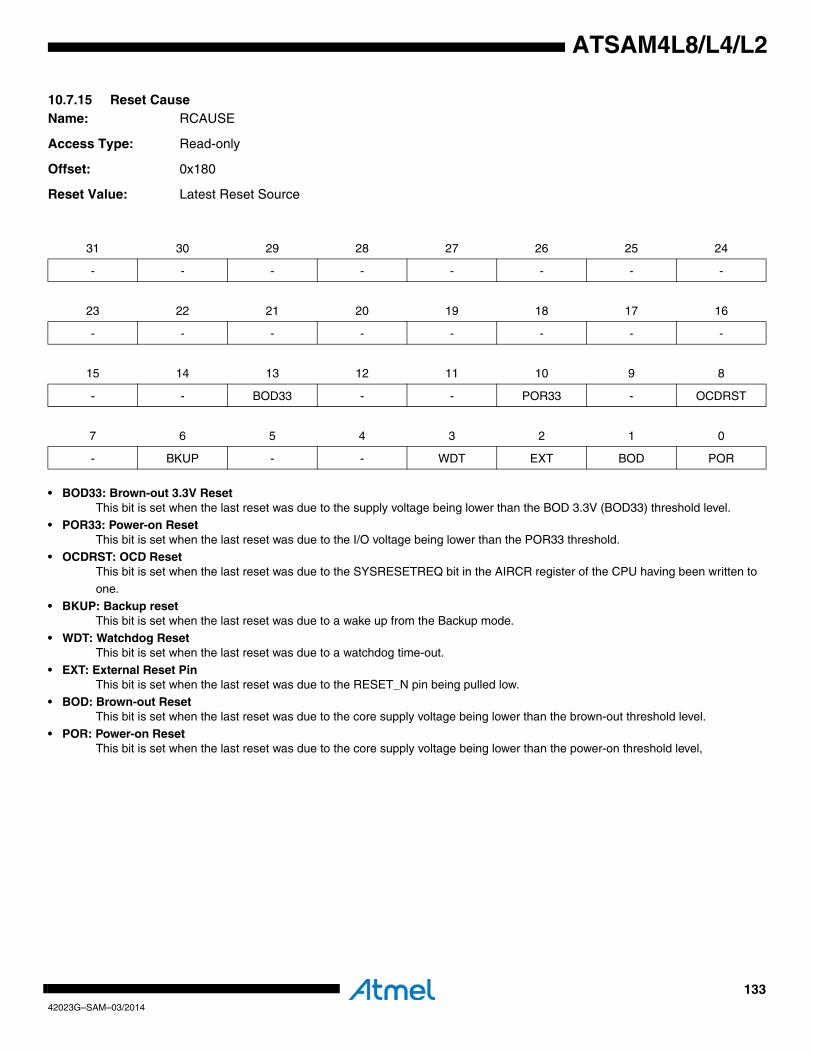
13342023G–SAM–03/2014
ATSAM4L8/L4/L2
10.7.15 Reset CauseName: RCAUSE
Access Type: Read-only
Offset: 0x180
Reset Value: Latest Reset Source
• BOD33: Brown-out 3.3V ResetThis bit is set when the last reset was due to the supply voltage being lower than the BOD 3.3V (BOD33) threshold level.
• POR33: Power-on ResetThis bit is set when the last reset was due to the I/O voltage being lower than the POR33 threshold.
• OCDRST: OCD ResetThis bit is set when the last reset was due to the SYSRESETREQ bit in the AIRCR register of the CPU having been written to one.
• BKUP: Backup resetThis bit is set when the last reset was due to a wake up from the Backup mode.
• WDT: Watchdog ResetThis bit is set when the last reset was due to a watchdog time-out.
• EXT: External Reset Pin This bit is set when the last reset was due to the RESET_N pin being pulled low.
• BOD: Brown-out ResetThis bit is set when the last reset was due to the core supply voltage being lower than the brown-out threshold level.
• POR: Power-on Reset This bit is set when the last reset was due to the core supply voltage being lower than the power-on threshold level,
31 30 29 28 27 26 25 24
- - - - - - - -
23 22 21 20 19 18 17 16
- - - - - - - -
15 14 13 12 11 10 9 8
- - BOD33 - - POR33 - OCDRST
7 6 5 4 3 2 1 0
- BKUP - - WDT EXT BOD POR

13442023G–SAM–03/2014
ATSAM4L8/L4/L2
10.7.16 Wake Cause Register Name: WCAUSE
Access Type: Read-only
Offset: 0x184
Reset Value: Latest Wake Source
A bit in this register is set on wake up caused by the peripheral referred to in Table 10-8 on page 134.
31 30 29 28 27 26 25 24
WCAUSE[31:24]
23 22 21 20 19 18 17 16
WCAUSE[23:16]
15 14 13 12 11 10 9 8
WCAUSE[15:8]
7 6 5 4 3 2 1 0
WCAUSE[7:0]
Table 10-8. Wake Cause
Bit Wake Cause
0 TWI Slave 0
1 TWI Slave 1
2 USBC
3 PSOK
4 BOD18 IRQ
5 BOD33 IRQ
6 PICOUART
7 LCDCA
15:8 -
16 EIC
17 AST
31:18 -
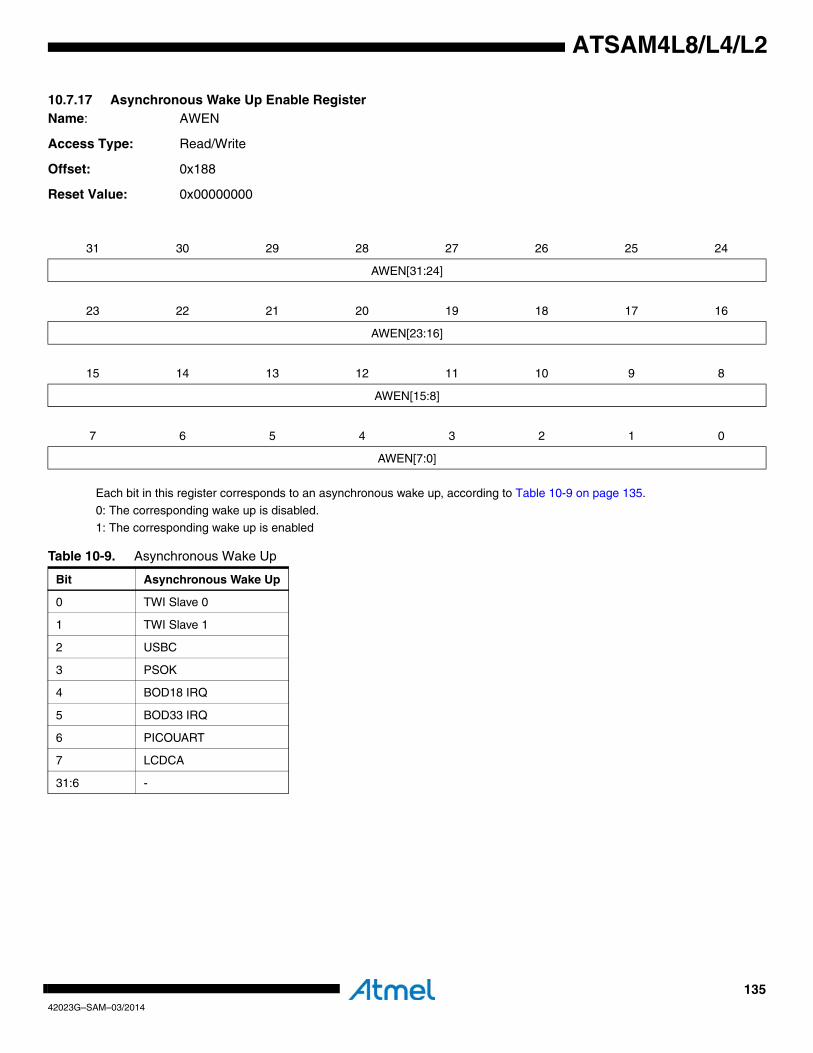
13542023G–SAM–03/2014
ATSAM4L8/L4/L2
10.7.17 Asynchronous Wake Up Enable RegisterName: AWEN
Access Type: Read/Write
Offset: 0x188
Reset Value: 0x00000000
Each bit in this register corresponds to an asynchronous wake up, according to Table 10-9 on page 135.
0: The corresponding wake up is disabled.
1: The corresponding wake up is enabled
31 30 29 28 27 26 25 24
AWEN[31:24]
23 22 21 20 19 18 17 16
AWEN[23:16]
15 14 13 12 11 10 9 8
AWEN[15:8]
7 6 5 4 3 2 1 0
AWEN[7:0]
Table 10-9. Asynchronous Wake Up
Bit Asynchronous Wake Up
0 TWI Slave 0
1 TWI Slave 1
2 USBC
3 PSOK
4 BOD18 IRQ
5 BOD33 IRQ
6 PICOUART
7 LCDCA
31:6 -
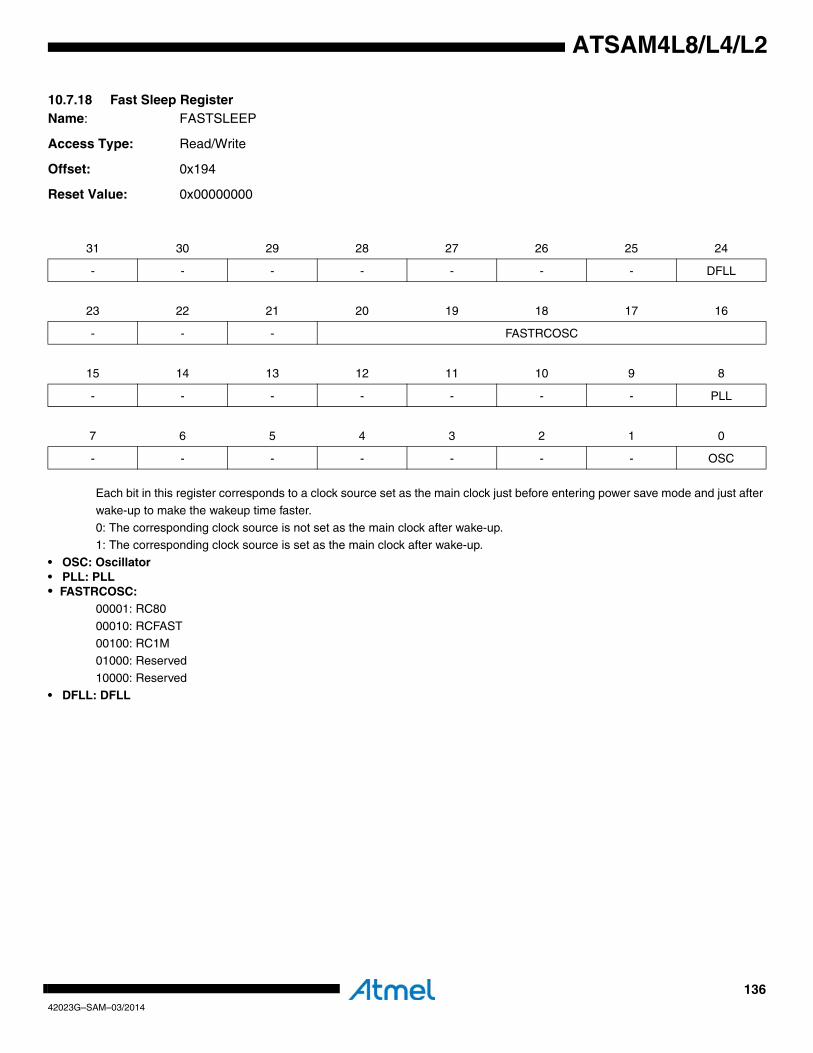
13642023G–SAM–03/2014
ATSAM4L8/L4/L2
10.7.18 Fast Sleep RegisterName: FASTSLEEP
Access Type: Read/Write
Offset: 0x194
Reset Value: 0x00000000
Each bit in this register corresponds to a clock source set as the main clock just before entering power save mode and just after
wake-up to make the wakeup time faster.
0: The corresponding clock source is not set as the main clock after wake-up.1: The corresponding clock source is set as the main clock after wake-up.
• OSC: Oscillator• PLL: PLL• FASTRCOSC:
00001: RC80
00010: RCFAST
00100: RC1M01000: Reserved
10000: Reserved
• DFLL: DFLL
31 30 29 28 27 26 25 24
- - - - - - - DFLL
23 22 21 20 19 18 17 16
- - - FASTRCOSC
15 14 13 12 11 10 9 8
- - - - - - - PLL
7 6 5 4 3 2 1 0
- - - - - - - OSC
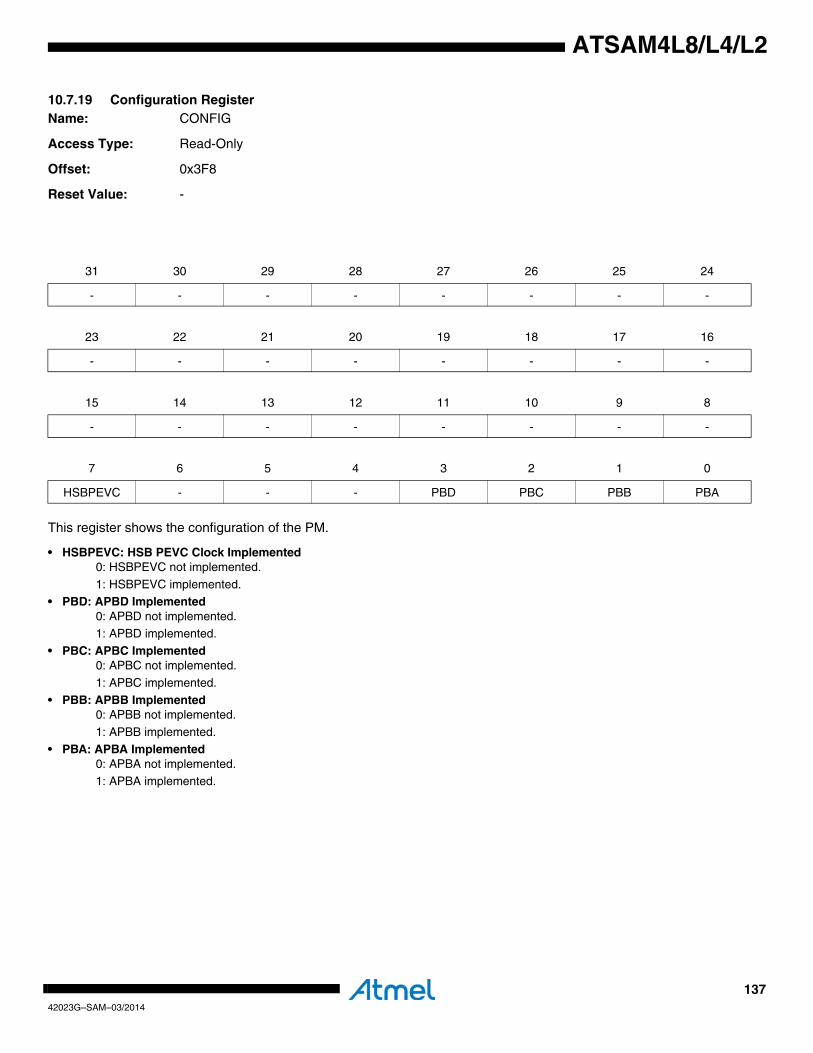
13742023G–SAM–03/2014
ATSAM4L8/L4/L2
10.7.19 Configuration RegisterName: CONFIG
Access Type: Read-Only
Offset: 0x3F8
Reset Value: -
This register shows the configuration of the PM.
• HSBPEVC: HSB PEVC Clock Implemented0: HSBPEVC not implemented.
1: HSBPEVC implemented.• PBD: APBD Implemented
0: APBD not implemented.1: APBD implemented.
• PBC: APBC Implemented0: APBC not implemented.
1: APBC implemented.
• PBB: APBB Implemented0: APBB not implemented.
1: APBB implemented.• PBA: APBA Implemented
0: APBA not implemented.1: APBA implemented.
31 30 29 28 27 26 25 24
- - - - - - - -
23 22 21 20 19 18 17 16
- - - - - - - -
15 14 13 12 11 10 9 8
- - - - - - - -
7 6 5 4 3 2 1 0
HSBPEVC - - - PBD PBC PBB PBA
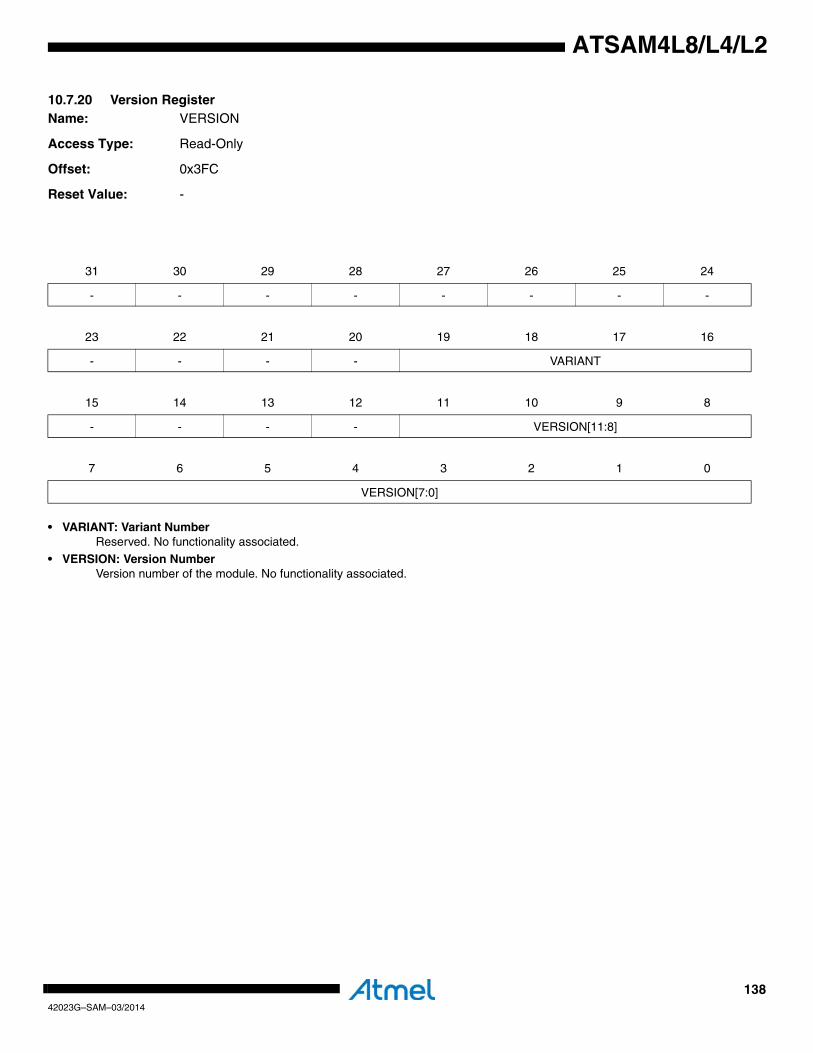
13842023G–SAM–03/2014
ATSAM4L8/L4/L2
10.7.20 Version RegisterName: VERSION
Access Type: Read-Only
Offset: 0x3FC
Reset Value: -
• VARIANT: Variant NumberReserved. No functionality associated.
• VERSION: Version NumberVersion number of the module. No functionality associated.
31 30 29 28 27 26 25 24
- - - - - - - -
23 22 21 20 19 18 17 16
- - - - VARIANT
15 14 13 12 11 10 9 8
- - - - VERSION[11:8]
7 6 5 4 3 2 1 0
VERSION[7:0]
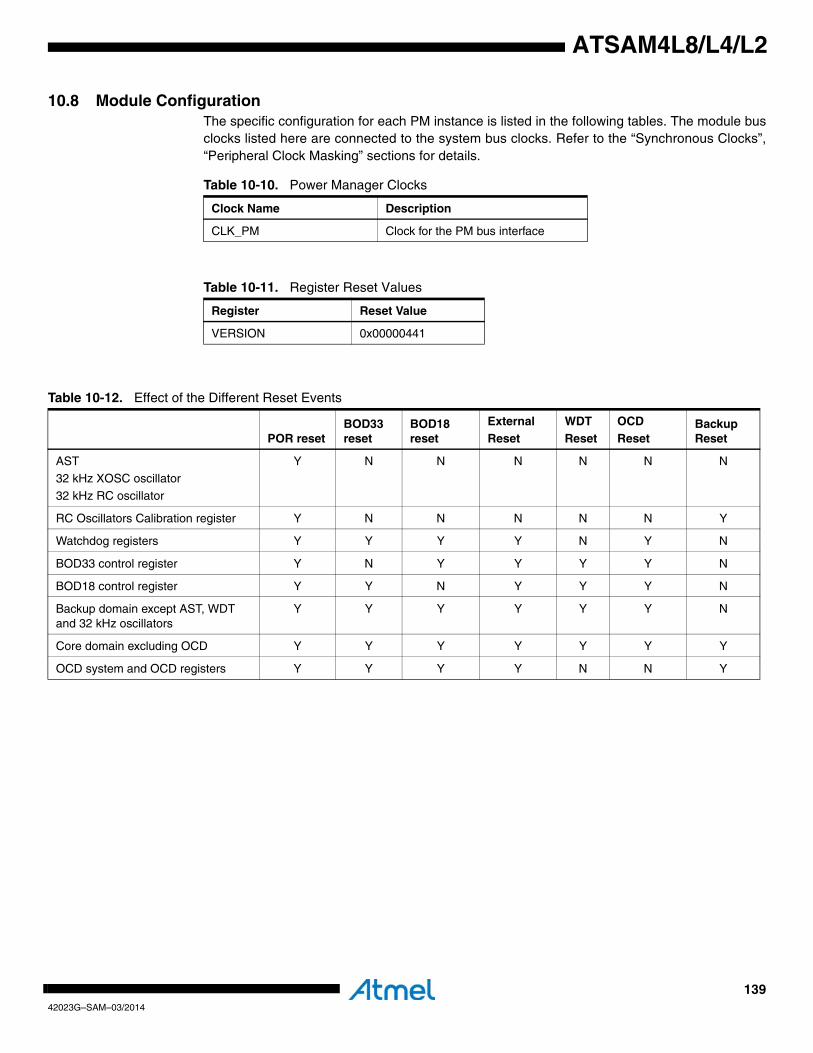
13942023G–SAM–03/2014
ATSAM4L8/L4/L2
10.8 Module ConfigurationThe specific configuration for each PM instance is listed in the following tables. The module busclocks listed here are connected to the system bus clocks. Refer to the “Synchronous Clocks”,“Peripheral Clock Masking” sections for details.
Table 10-10. Power Manager Clocks
Clock Name Description
CLK_PM Clock for the PM bus interface
Table 10-11. Register Reset Values
Register Reset Value
VERSION 0x00000441
Table 10-12. Effect of the Different Reset Events
POR resetBOD33 reset
BOD18 reset
ExternalReset
WDTReset
OCD Reset
Backup Reset
AST
32 kHz XOSC oscillator
32 kHz RC oscillator
Y N N N N N N
RC Oscillators Calibration register Y N N N N N Y
Watchdog registers Y Y Y Y N Y N
BOD33 control register Y N Y Y Y Y N
BOD18 control register Y Y N Y Y Y N
Backup domain except AST, WDT and 32 kHz oscillators
Y Y Y Y Y Y N
Core domain excluding OCD Y Y Y Y Y Y Y
OCD system and OCD registers Y Y Y Y N N Y

14042023G–SAM–03/2014
ATSAM4L8/L4/L2
11. Backup Power Manager (BPM)Rev: 1.2.0.5
11.1 Features• Supports the Power Scaling Technique• Controls the Power Save Modes• Manages I/O lines pin muxing for Backup mode• Manages I/O lines retention in Backup mode• Stores the wake up source from Backup mode
11.2 OverviewThe Backup Power Manager (BPM) located in the Backup domain is an extension of the PowerManager (PM) module.
To optimize power consumption, the BPM supports the Power Scaling Technique. The BPMallows changing the Power Scaling configuration in both RUN and Power Save Mode.
The BPM allows the user to choose between different Power Save Modes depending on appli-cation requirements. It controls the way the microcontroller enters or exits a Power Save Mode.
In BACKUP mode, some I/O lines are dedicated to system wakeup. The BPM takes control ofthese I/O line pins muxing needed to wake up the system.
The configuration of the I/O lines is kept in all Power Save Modes. Exiting the BACKUP modewill reset the Core domain and by default will put the I/O lines in their reset state. The BPMallows retaining the I/O line state when exiting the BACKUP mode, preventing I/O lines from tog-gling during wake up.
The BPM flags the wake up source when the BACKUP mode is exited.
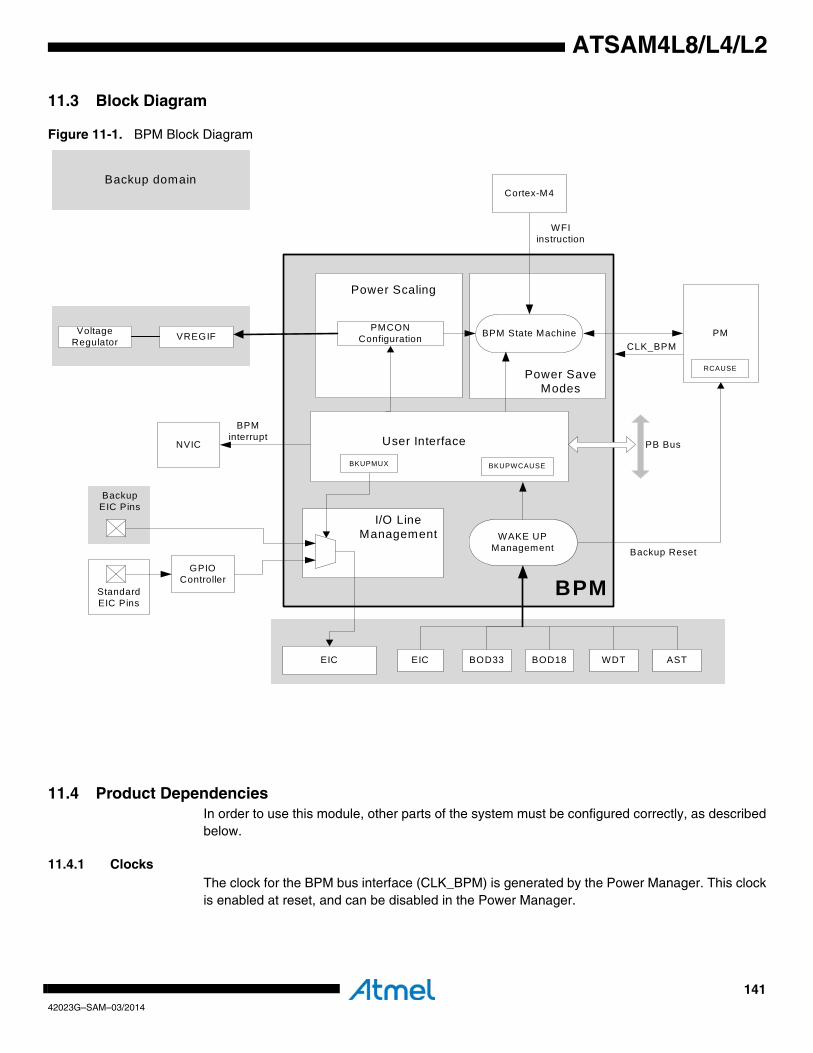
14142023G–SAM–03/2014
ATSAM4L8/L4/L2
11.3 Block Diagram
Figure 11-1. BPM Block Diagram
11.4 Product DependenciesIn order to use this module, other parts of the system must be configured correctly, as describedbelow.
11.4.1 ClocksThe clock for the BPM bus interface (CLK_BPM) is generated by the Power Manager. This clockis enabled at reset, and can be disabled in the Power Manager.
BPM
VREGIF
PB Bus
PMCON Configuration BPM State Machine
Cortex-M4
BPM interrupt User Interface
GPIO Controller
EIC
I/O Line Management
Power Scaling
Power SaveModes
WAKE UPManagement Backup Reset
BackupEIC Pins
CLK_BPM
NVIC
PMVoltageRegulator
EIC BOD33 BOD18 WDT AST
WFI instruction
RCAUSE
BKUPMUX
Backup domain
BKUPWCAUSE
StandardEIC Pins
14242023G–SAM–03/2014
ATSAM4L8/L4/L2
11.4.2 InterruptsThe BPM interrupt line is connected to the NVIC. Using the BPM interrupt requires the NVIC tobe programmed first.
11.4.3 Debug OperationIf a BACKUP mode is requested by the system while in debug mode, the core domain is kept tothose in RUN mode, and the debug modules are kept running to allow the debugger to accessinternal registers.
When exiting the BACKUP mode upon a wakeup event, all the core domain is reset but thedebug session. It allows the user to keep using its current debug session.
Note: Hot plugging in backup mode is not supported.
11.5 Functional Description
11.5.1 Power ScalingThe power scaling feature is programmed thanks to the PMCON register where the user canselect the Power Scaling Configuration (PS) and the Power Scaling Change Request(PSCREQ).
When exiting the BACKUP mode, the Power Scaling Configuration field (PMCON.PS) isunchanged. It ensures that the system is running in the same power scaling configuration.
When a reset occurs (See ”Reset Description” on page 113.), the PMCON.PS field is reset to itsdefault value, and then, the system goes back to the reset power configuration mode (RUN0mode).
Refer to the Low Power Technique chapter (See ”Power Scaling” on page 57.) to understand thesequence to apply.
11.5.2 Power Save ModesThe Power Save Mode feature is supported thanks to the PMCON register where the user canselect the SLEEP mode configuration (SLEEP), the BACKUP mode (BKUP) and the RETEN-TION mode (RET). The SLEEPDEEP bit located in the System Control Register in the CortexM4 should also be used to manage the different Power Save Modes.
The selected power save mode is entered after a WFI instruction.
Refer to the Low Power Technique chapter (See ”Power Scaling” on page 57.) to have moredetails.
11.5.3 I/O Lines Pin Muxing in Backup ModeIn all modes including the BACKUP mode, a subset of pins (external interrupts) can be directlyrouted to a list of peripheral function bypassing the GPIO controller.
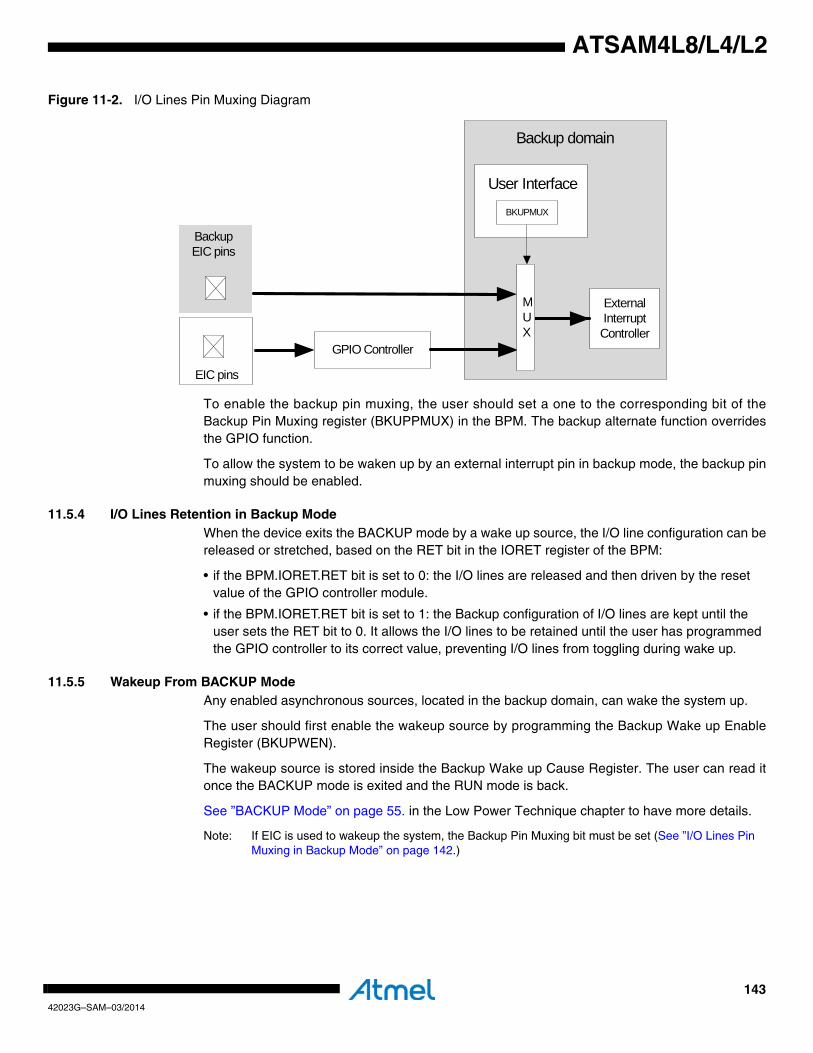
14342023G–SAM–03/2014
ATSAM4L8/L4/L2
Figure 11-2. I/O Lines Pin Muxing Diagram
To enable the backup pin muxing, the user should set a one to the corresponding bit of theBackup Pin Muxing register (BKUPPMUX) in the BPM. The backup alternate function overridesthe GPIO function.
To allow the system to be waken up by an external interrupt pin in backup mode, the backup pinmuxing should be enabled.
11.5.4 I/O Lines Retention in Backup ModeWhen the device exits the BACKUP mode by a wake up source, the I/O line configuration can bereleased or stretched, based on the RET bit in the IORET register of the BPM:
• if the BPM.IORET.RET bit is set to 0: the I/O lines are released and then driven by the reset value of the GPIO controller module.
• if the BPM.IORET.RET bit is set to 1: the Backup configuration of I/O lines are kept until the user sets the RET bit to 0. It allows the I/O lines to be retained until the user has programmed the GPIO controller to its correct value, preventing I/O lines from toggling during wake up.
11.5.5 Wakeup From BACKUP ModeAny enabled asynchronous sources, located in the backup domain, can wake the system up.
The user should first enable the wakeup source by programming the Backup Wake up EnableRegister (BKUPWEN).
The wakeup source is stored inside the Backup Wake up Cause Register. The user can read itonce the BACKUP mode is exited and the RUN mode is back.
See ”BACKUP Mode” on page 55. in the Low Power Technique chapter to have more details.
Note: If EIC is used to wakeup the system, the Backup Pin Muxing bit must be set (See ”I/O Lines Pin Muxing in Backup Mode” on page 142.)
User Interface
GPIO Controller
ExternalInterruptController
Backup EIC pins
BKUPMUX
Backup domain
MUX
EIC pins

14442023G–SAM–03/2014
ATSAM4L8/L4/L2
11.5.6 Precautions When Entering Power Save Mode.Modules communicating with external circuits should be disabled before entering a Power SaveMode that will stop the module operation. This prevents erratic behavior when entering or exitingPower Save Mode. Refer to the relevant module documentation for recommended actions.
Communication between the synchronous clock domains is disturbed when entering and exitingPower Save Modes. This means that bus transactions are not allowed between clock domainsaffected by the Power Save Mode. The system may hang if the bus clocks are stopped in themiddle of a bus transaction.
When entering a Power Save Mode where AHB clocks are stopped, all AHB masters must bestopped before entering the Power Save Mode. Also, if there is a chance that any APB writeoperations are incomplete, the CPU should perform a read operation from any register on theAPB bus before executing the WFI instruction. This will stall the CPU while waiting for any pend-ing APB operations to complete.
Note: All these recommendations also apply when changing the power scaling as the system is halted.
11.5.7 InterruptsThe BPM has a number of interrupts:
• AE: Access Error, set if a lock protected register is written without first being unlocked.
• PSOK: Power Scaling configuration OK, set if the requested Power configuration is ready (regulator mode ready, regulator output voltage as expected).
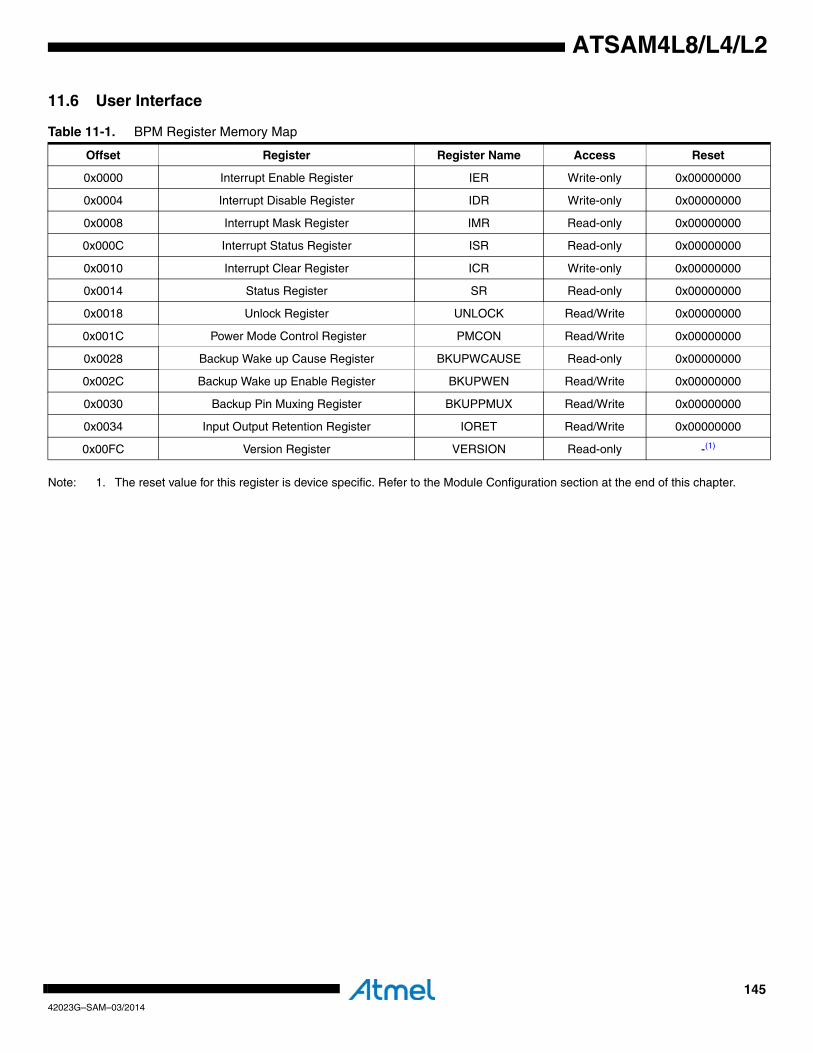
14542023G–SAM–03/2014
ATSAM4L8/L4/L2
11.6 User Interface
Note: 1. The reset value for this register is device specific. Refer to the Module Configuration section at the end of this chapter.
Table 11-1. BPM Register Memory Map
Offset Register Register Name Access Reset
0x0000 Interrupt Enable Register IER Write-only 0x00000000
0x0004 Interrupt Disable Register IDR Write-only 0x00000000
0x0008 Interrupt Mask Register IMR Read-only 0x00000000
0x000C Interrupt Status Register ISR Read-only 0x00000000
0x0010 Interrupt Clear Register ICR Write-only 0x00000000
0x0014 Status Register SR Read-only 0x00000000
0x0018 Unlock Register UNLOCK Read/Write 0x00000000
0x001C Power Mode Control Register PMCON Read/Write 0x00000000
0x0028 Backup Wake up Cause Register BKUPWCAUSE Read-only 0x00000000
0x002C Backup Wake up Enable Register BKUPWEN Read/Write 0x00000000
0x0030 Backup Pin Muxing Register BKUPPMUX Read/Write 0x00000000
0x0034 Input Output Retention Register IORET Read/Write 0x00000000
0x00FC Version Register VERSION Read-only -(1)

14642023G–SAM–03/2014
ATSAM4L8/L4/L2
11.6.1 Interrupt Enable RegisterName: IER
Access Type: Write-only
Offset: 0x0000
Reset Value: 0x00000000
Writing a zero to a bit in this register has no effect.
Writing a one to a bit in this register will set the corresponding bit in IMR.
31 30 29 28 27 26 25 24
AE - - - - - - -
23 22 21 20 19 18 17 16
- - - - - - - -
15 14 13 12 11 10 9 8
- - - - - - - -
7 6 5 4 3 2 1 0
- - - - - - PSOK

14742023G–SAM–03/2014
ATSAM4L8/L4/L2
11.6.2 Interrupt Disable RegisterName: IDR
Access Type: Write-only
Offset: 0x0004
Reset Value: 0x00000000
Writing a zero to a bit in this register has no effect.
Writing a one to a bit in this register will clear the corresponding bit in IMR.
31 30 29 28 27 26 25 24
AE - - - - - - -
23 22 21 20 19 18 17 16
- - - - - - - -
15 14 13 12 11 10 9 8
- - - - - - - -
7 6 5 4 3 2 1 0
- - - - - - PSOK
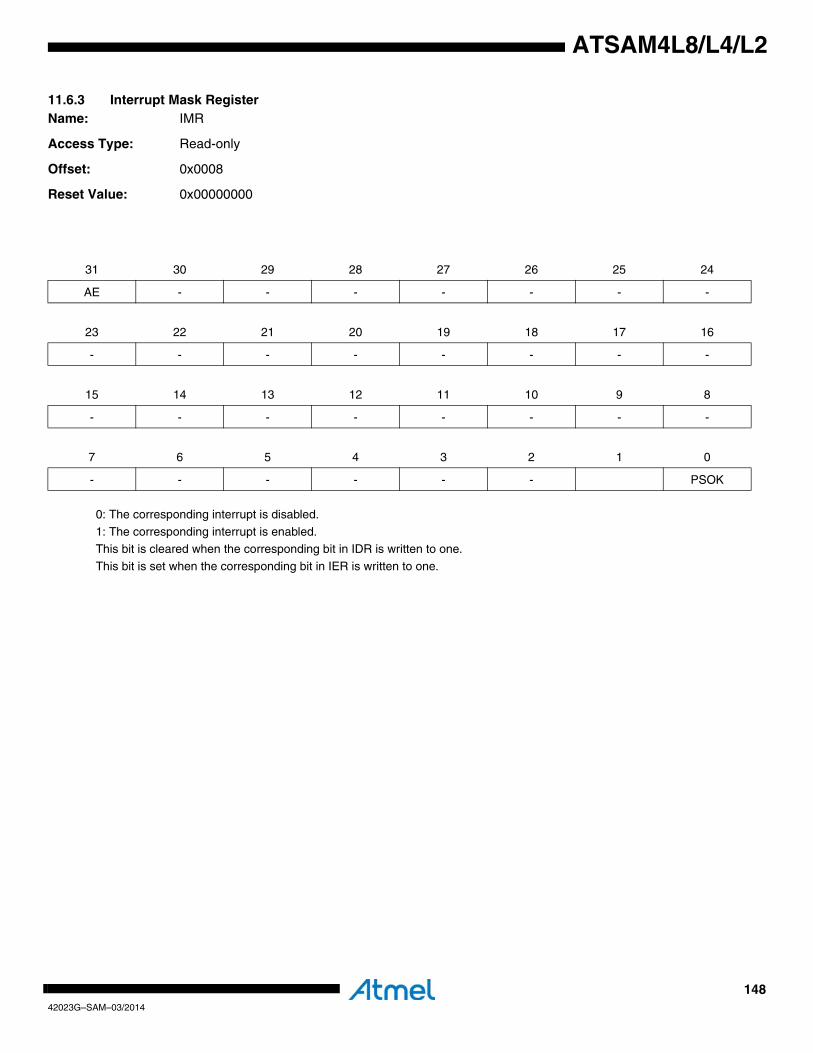
14842023G–SAM–03/2014
ATSAM4L8/L4/L2
11.6.3 Interrupt Mask RegisterName: IMR
Access Type: Read-only
Offset: 0x0008
Reset Value: 0x00000000
0: The corresponding interrupt is disabled.
1: The corresponding interrupt is enabled.This bit is cleared when the corresponding bit in IDR is written to one.
This bit is set when the corresponding bit in IER is written to one.
31 30 29 28 27 26 25 24
AE - - - - - - -
23 22 21 20 19 18 17 16
- - - - - - - -
15 14 13 12 11 10 9 8
- - - - - - - -
7 6 5 4 3 2 1 0
- - - - - - PSOK

14942023G–SAM–03/2014
ATSAM4L8/L4/L2
11.6.4 Interrupt Status RegisterName: ISR
Access Type: Read-only
Offset: 0x000C
Reset Value: 0x00000000
0: The corresponding interrupt is cleared.
1: The corresponding interrupt is pending.This bit is cleared when the corresponding bit in ICR is written to one.
This bit is set when the corresponding interrupt occurs.
31 30 29 28 27 26 25 24
AE - - - - - - -
23 22 21 20 19 18 17 16
- - - - - - - -
15 14 13 12 11 10 9 8
- - - - - - - -
7 6 5 4 3 2 1 0
- - - - - - PSOK

15042023G–SAM–03/2014
ATSAM4L8/L4/L2
11.6.5 Interrupt Clear RegisterName: ICR
Access Type: Write-only
Offset: 0x0010
Reset Value: 0x00000000
Writing a zero to a bit in this register has no effect.
Writing a one to a bit in this register will clear the corresponding bit in ISR.
31 30 29 28 27 26 25 24
AE - - - - - - -
23 22 21 20 19 18 17 16
- - - - - - - -
15 14 13 12 11 10 9 8
- - - - - - - -
7 6 5 4 3 2 1 0
- - - - - - PSOK
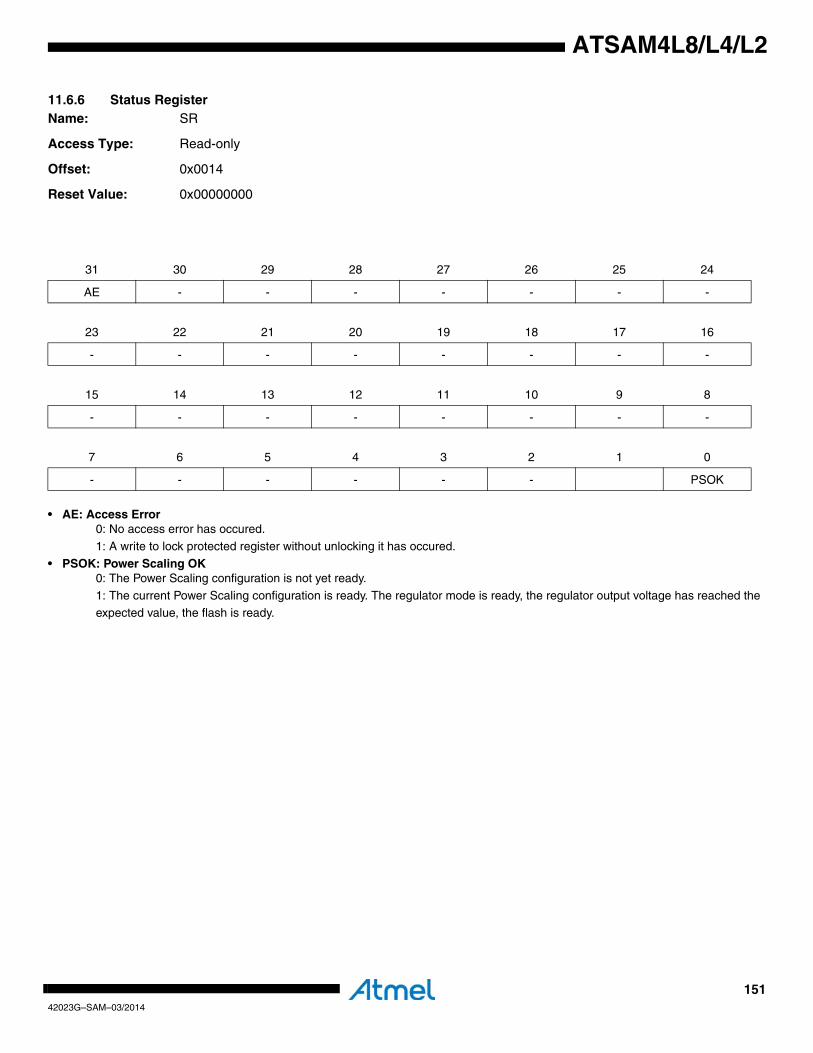
15142023G–SAM–03/2014
ATSAM4L8/L4/L2
11.6.6 Status RegisterName: SR
Access Type: Read-only
Offset: 0x0014
Reset Value: 0x00000000
• AE: Access Error0: No access error has occured.
1: A write to lock protected register without unlocking it has occured.
• PSOK: Power Scaling OK0: The Power Scaling configuration is not yet ready.
1: The current Power Scaling configuration is ready. The regulator mode is ready, the regulator output voltage has reached the expected value, the flash is ready.
31 30 29 28 27 26 25 24
AE - - - - - - -
23 22 21 20 19 18 17 16
- - - - - - - -
15 14 13 12 11 10 9 8
- - - - - - - -
7 6 5 4 3 2 1 0
- - - - - - PSOK

15242023G–SAM–03/2014
ATSAM4L8/L4/L2
11.6.7 Unlock RegisterName: UNLOCK
Access Type: Write-Only
Offset: 0x018
Reset Value: 0x00000000
To unlock a write protected register, first write to the UNLOCK register with the address of the register to unlock in theADDR field and 0xAA in the KEY field. Then, in the next PB access write to the register specified in the ADDR field.
• KEY: Unlock KeyWrite this bit field to 0xAA to enable unlock.
• ADDR: Unlock AddressWrite the address of the register to unlock to this field.
31 30 29 28 27 26 25 24
KEY
23 22 21 20 19 18 17 16
- - - - - - - -
15 14 13 12 11 10 9 8
- - - - - - ADDR[9:8]
7 6 5 4 3 2 1 0
ADDR[7:0]

15342023G–SAM–03/2014
ATSAM4L8/L4/L2
11.6.8 Power Mode Control RegisterName: PMCON
Access Type: Read/Write
Offset: 0x001C
Reset Value: 0x00000000
• FASTWKUP: Fast Wakeup0: Normal wakeup time for analog modules.1: Fast wakeup time for analog modules. To have an optimal fast wakeup, this is also required to configure the PM.FASTSLEEP
register to wakeup the system on a Fast RC oscillator clock source. If the flash high speed mode is enabled, the fast wakeup has
no effect.During the wakeup period, the FLASHCALW module is forced to operate in wait state 1 until the BPM.SR.PSOK bit is one.
• CK32S: 32kHz-1kHz Clock Source Selection0: the 32kHz and 1kHz clock sources are from the OSC32K.1: the 32kHz and 1kHz clock sources are from the RC32K.
• SLEEP: SLEEP mode Configuration
• RET: RETENTION Mode0: the Power Save Mode will not be the RETENTION mode.
31 30 29 28 27 26 25 24
- - - - - - - FASTWKUP
23 22 21 20 19 18 17 16
- - - - - - - CK32S
15 14 13 12 11 10 9 8
- SLEEP - - RET BKUP
7 6 5 4 3 2 1 0
- - - - PSCREQ PS
Table 11-2. SLEEP mode Configuration
SLEEP Description
0 The CPU clock is stopped.
1 The CPU and AHB clocks are stopped.
2The CPU, AHB, PB and GCLK clocks are stopped. Clock sources (OSC, Fast RC Oscillators, PLL, DFLL) are still running.
3The CPU, AHB, PB, GCLK clocks and clock sources (OSC, RCFast, PLL, DFLL) are stopped.
RCSYS is still running. RC32K or OSC32K are still running if enabled.

15442023G–SAM–03/2014
ATSAM4L8/L4/L2
1: the Power Save Mode will be the RETENTION mode if the SCR.SLEEPDEEP bit is set to 1 and the Backup Mode is set to zero.
• BKUP: BACKUP Mode0: the Power Save Mode will not be the BACKUP mode.
1: the Power Save Mode will be the BACKUP mode if the SCR.SLEEPDEEP bit is set to 1.
• PSCREQ: Power Scaling Change Request0: A new power scaling is not requested.
1: A new power scaling is requested.
This bit is cleared by hardware after the completion of the power scaling change.• PS: Power Scaling Configuration Value
Refer to Section 6.1.5 ”Power Save Mode Summary Table” on page 57 and to Figure 6-1 on page 52This field is reset to its default value when exiting the backup mode.
Note that this register is protected by a lock. To write to this register the UNLOCK register has to be written first. Refer toSection 11.6.7 ”Unlock Register” on page 152 for details.

15542023G–SAM–03/2014
ATSAM4L8/L4/L2
11.6.9 Backup Wake up Cause RegisterName: BKUPWCAUSE
Access Type: Read-only
Offset: 0x0028
Reset Value: Latest Wake up Source from Backup mode
A bit in this register is set when the system is waking up from the Backup mode and the wake up source is caused by the
peripheral referred to in Table 11-3 on page 155.
31 30 29 28 27 26 25 24
BKUPWC[31:24]
23 22 21 20 19 18 17 16
BKUPWC[23:16]
15 14 13 12 11 10 9 8
BKUPWC[15:8]
7 6 5 4 3 2 1 0
BKUPWC[7:0]
Table 11-3. Backup Wake up Cause
Bit Wake Cause
0 EIC
1 AST
2 WDT interrupt
3 BOD33 interrupt
4 BOD18 interrupt
5 PICOUART interrupt
31:6 -
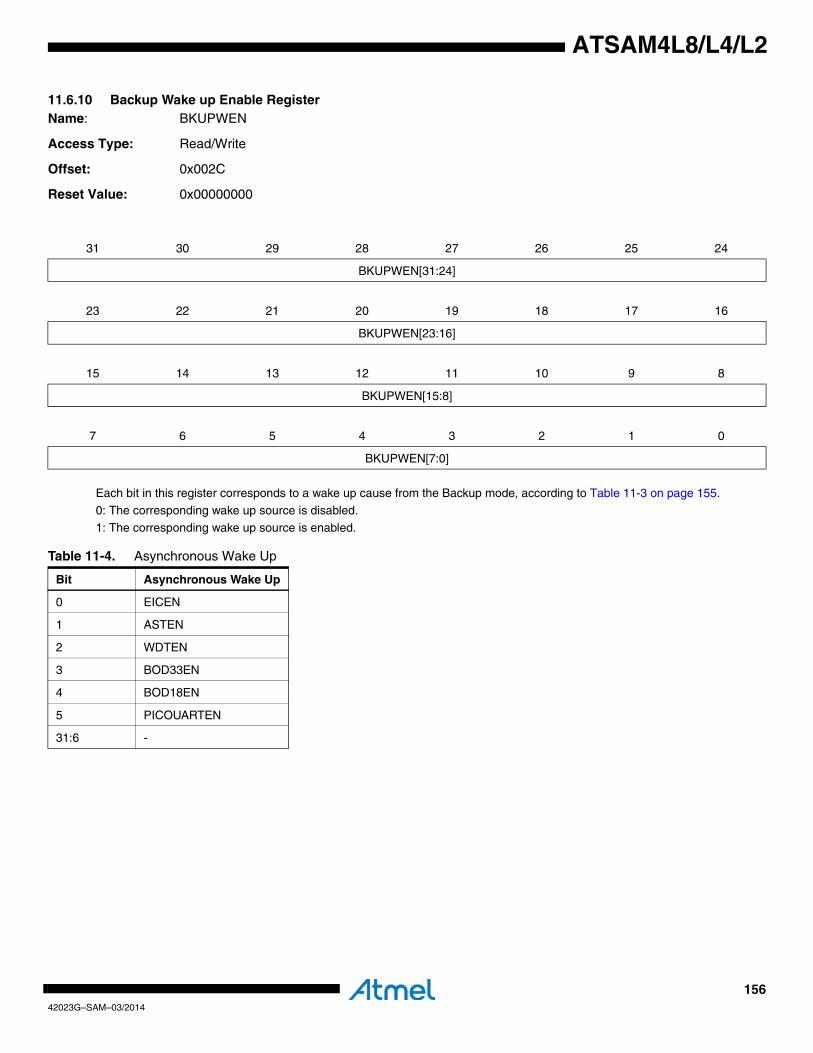
15642023G–SAM–03/2014
ATSAM4L8/L4/L2
11.6.10 Backup Wake up Enable RegisterName: BKUPWEN
Access Type: Read/Write
Offset: 0x002C
Reset Value: 0x00000000
Each bit in this register corresponds to a wake up cause from the Backup mode, according to Table 11-3 on page 155.
0: The corresponding wake up source is disabled.
1: The corresponding wake up source is enabled.
31 30 29 28 27 26 25 24
BKUPWEN[31:24]
23 22 21 20 19 18 17 16
BKUPWEN[23:16]
15 14 13 12 11 10 9 8
BKUPWEN[15:8]
7 6 5 4 3 2 1 0
BKUPWEN[7:0]
Table 11-4. Asynchronous Wake Up
Bit Asynchronous Wake Up
0 EICEN
1 ASTEN
2 WDTEN
3 BOD33EN
4 BOD18EN
5 PICOUARTEN
31:6 -
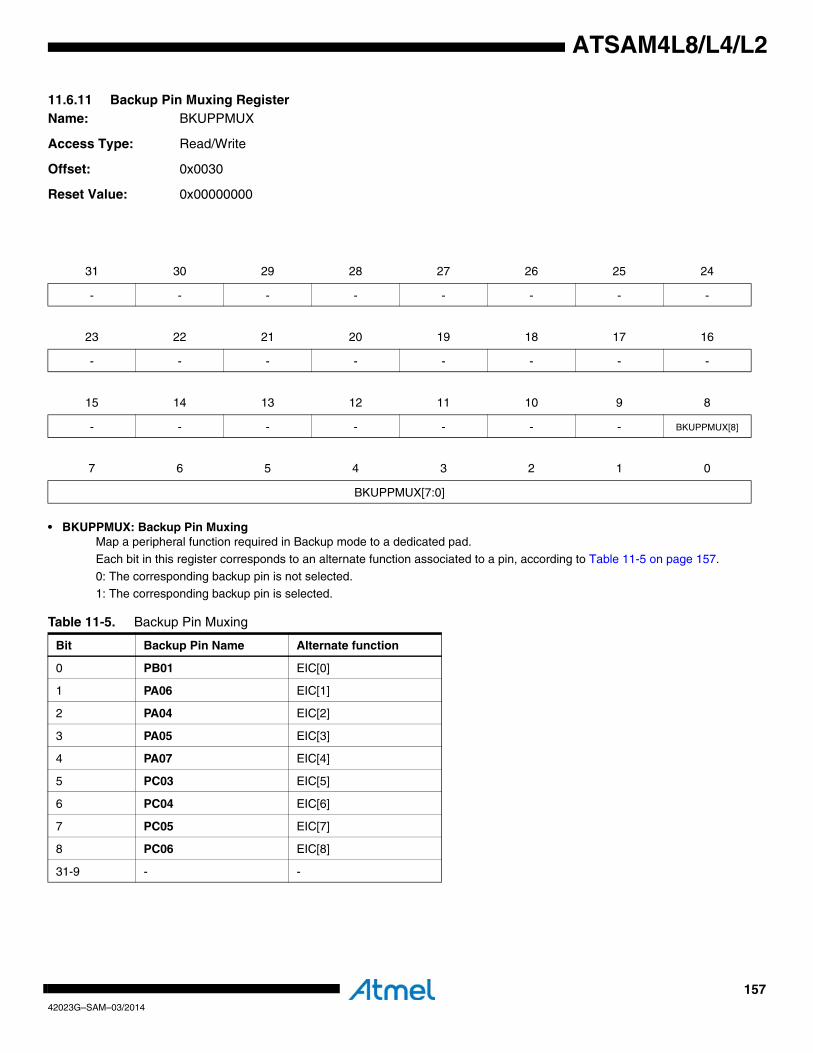
15742023G–SAM–03/2014
ATSAM4L8/L4/L2
11.6.11 Backup Pin Muxing Register Name: BKUPPMUX
Access Type: Read/Write
Offset: 0x0030
Reset Value: 0x00000000
• BKUPPMUX: Backup Pin MuxingMap a peripheral function required in Backup mode to a dedicated pad.
Each bit in this register corresponds to an alternate function associated to a pin, according to Table 11-5 on page 157.
0: The corresponding backup pin is not selected.1: The corresponding backup pin is selected.
31 30 29 28 27 26 25 24
- - - - - - - -
23 22 21 20 19 18 17 16
- - - - - - - -
15 14 13 12 11 10 9 8
- - - - - - - BKUPPMUX[8]
7 6 5 4 3 2 1 0
BKUPPMUX[7:0]
Table 11-5. Backup Pin Muxing
Bit Backup Pin Name Alternate function
0 PB01 EIC[0]
1 PA06 EIC[1]
2 PA04 EIC[2]
3 PA05 EIC[3]
4 PA07 EIC[4]
5 PC03 EIC[5]
6 PC04 EIC[6]
7 PC05 EIC[7]
8 PC06 EIC[8]
31-9 - -
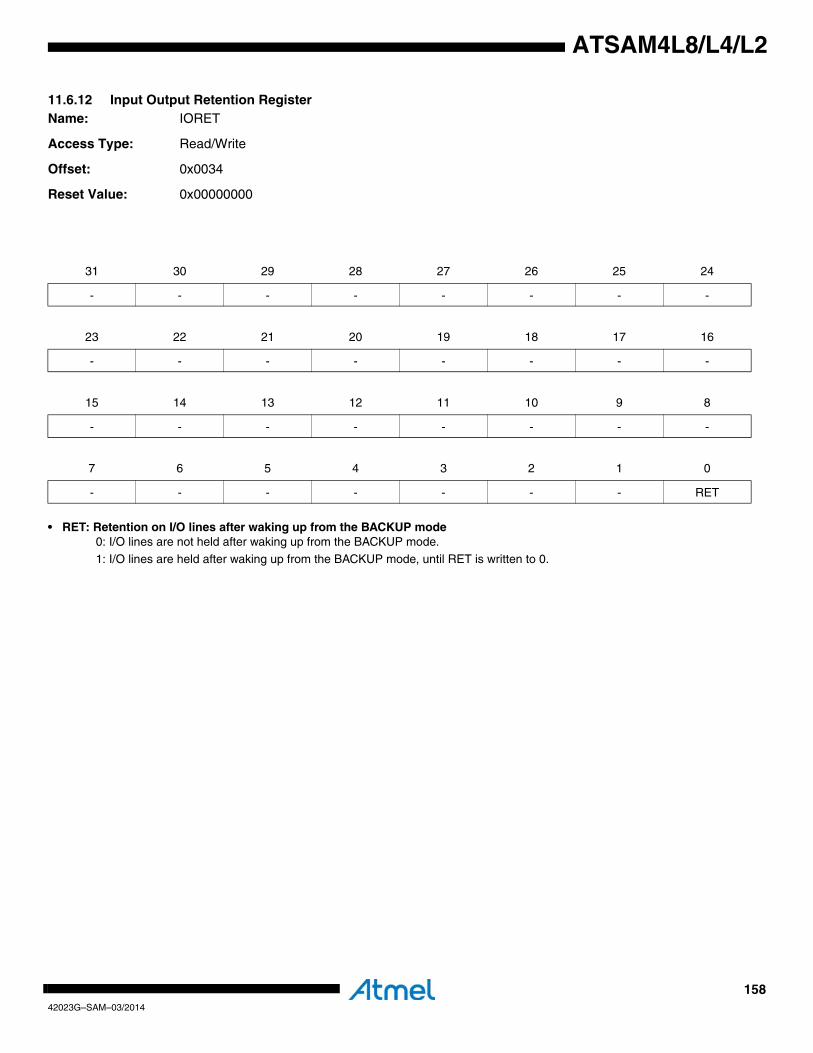
15842023G–SAM–03/2014
ATSAM4L8/L4/L2
11.6.12 Input Output Retention RegisterName: IORET
Access Type: Read/Write
Offset: 0x0034
Reset Value: 0x00000000
• RET: Retention on I/O lines after waking up from the BACKUP mode0: I/O lines are not held after waking up from the BACKUP mode.
1: I/O lines are held after waking up from the BACKUP mode, until RET is written to 0.
31 30 29 28 27 26 25 24
- - - - - - - -
23 22 21 20 19 18 17 16
- - - - - - - -
15 14 13 12 11 10 9 8
- - - - - - - -
7 6 5 4 3 2 1 0
- - - - - - - RET
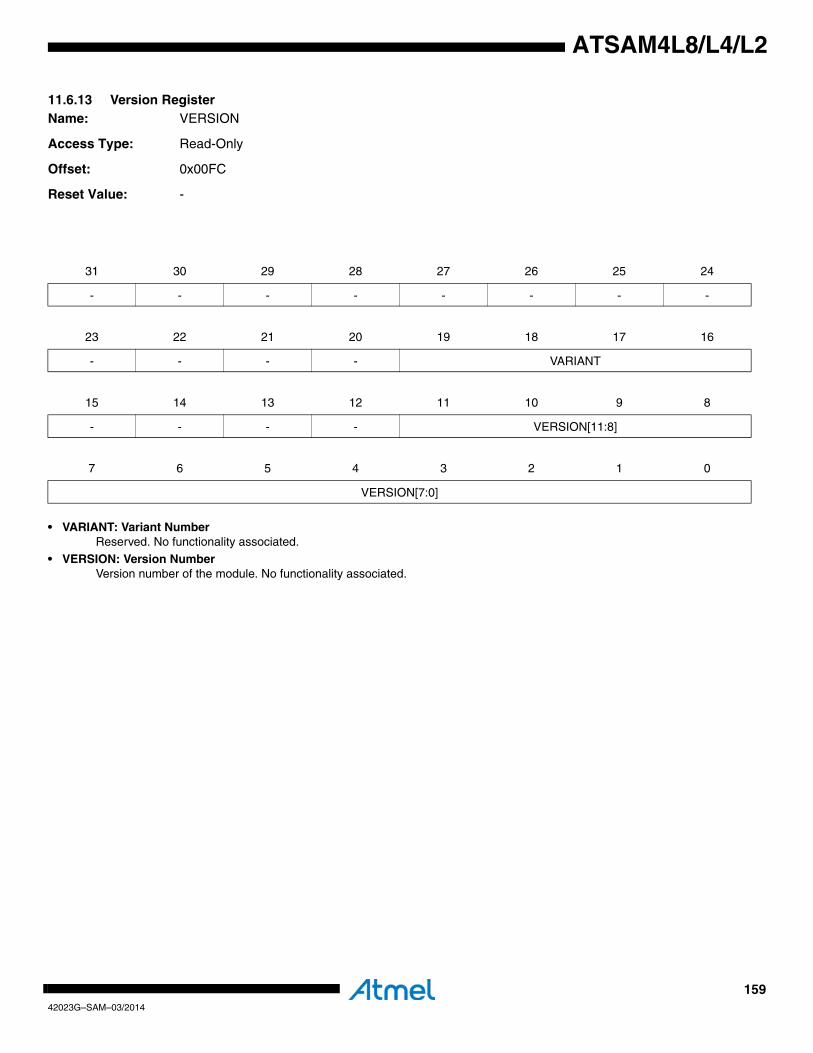
15942023G–SAM–03/2014
ATSAM4L8/L4/L2
11.6.13 Version RegisterName: VERSION
Access Type: Read-Only
Offset: 0x00FC
Reset Value: -
• VARIANT: Variant NumberReserved. No functionality associated.
• VERSION: Version NumberVersion number of the module. No functionality associated.
31 30 29 28 27 26 25 24
- - - - - - - -
23 22 21 20 19 18 17 16
- - - - VARIANT
15 14 13 12 11 10 9 8
- - - - VERSION[11:8]
7 6 5 4 3 2 1 0
VERSION[7:0]
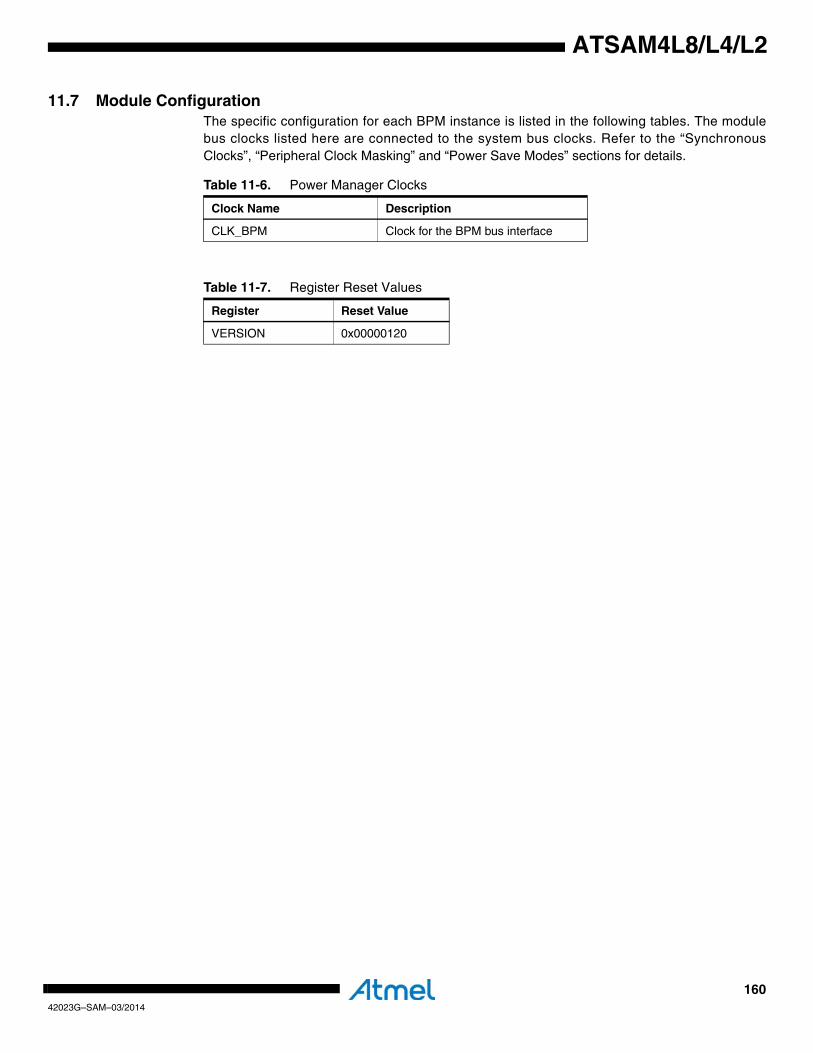
16042023G–SAM–03/2014
ATSAM4L8/L4/L2
11.7 Module ConfigurationThe specific configuration for each BPM instance is listed in the following tables. The modulebus clocks listed here are connected to the system bus clocks. Refer to the “SynchronousClocks”, “Peripheral Clock Masking” and “Power Save Modes” sections for details.
Table 11-6. Power Manager Clocks
Clock Name Description
CLK_BPM Clock for the BPM bus interface
Table 11-7. Register Reset Values
Register Reset Value
VERSION 0x00000120
16142023G–SAM–03/2014
ATSAM4L8/L4/L2
12. Backup System Control Interface (BSCIF)Rev: 1.0.0.0
12.1 Features• Supports 32KHz ultra-low-power oscillator (OSC32K)•Supports 32kHz RC oscillator (RC32K)• Supports 1MHz RC oscillator (RC1M)• Controls Brown-out detectors (BOD18 and BOD33)• Controls the Voltage Regulation System• Four 32-bit general-purpose backup registers
12.2 OverviewThe Backup System Control Interface (BSCIF) controls the oscillators, BODs, Voltage Regula-tion System and Backup Registers. It is located in Backup domain.
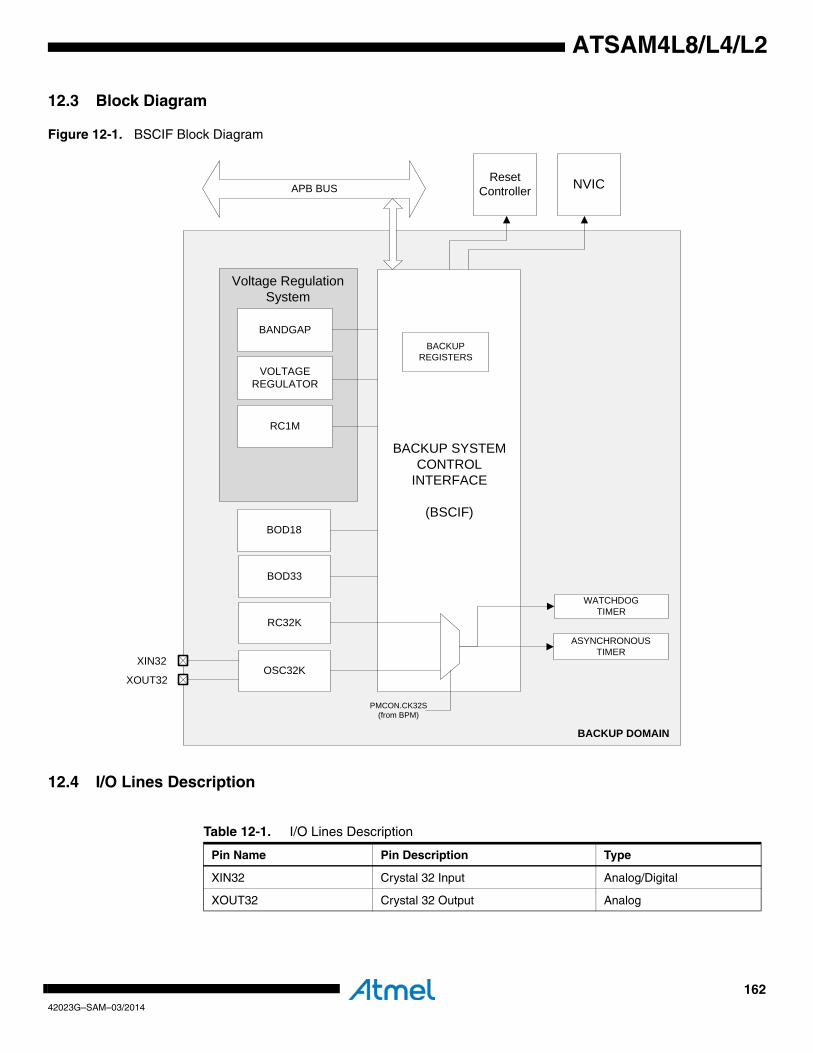
16242023G–SAM–03/2014
ATSAM4L8/L4/L2
12.3 Block Diagram
Figure 12-1. BSCIF Block Diagram
12.4 I/O Lines Description
ASYNCHRONOUS TIMER
WATCHDOGTIMER
OSC32K
RC32K
XIN32
XOUT32
BACKUP SYSTEM CONTROL
INTERFACE
(BSCIF)
APB BUS
BOD33
BOD18
Voltage Regulation System
VOLTAGE REGULATOR
BANDGAP
RC1M
BACKUPREGISTERS
PMCON.CK32S(from BPM)
NVICResetController
BACKUP DOMAIN
Table 12-1. I/O Lines Description
Pin Name Pin Description Type
XIN32 Crystal 32 Input Analog/Digital
XOUT32 Crystal 32 Output Analog
16342023G–SAM–03/2014
ATSAM4L8/L4/L2
12.5 Product DependenciesIn order to use this module, other parts of the system must be configured correctly, as describedbelow.
12.5.1 Power ManagementThe 32 kHz oscillators (RC32K and OSC32K) are not turned off in Power Save modes. BODsare turned off in some Power Save modes and turned automatically on when the device wakesup. The Voltage Regulation System is controlled by the BPM, refer to Section 11. ”BackupPower Manager (BPM)” on page 140 for details.
12.5.2 ClocksThe BSCIF controls the 32kHz oscillators as well as the 1MHz RC in the device. The oscillatorscan be used as source for the CPU and peripherals, selection of source is done in the PowerManager. The oscillator can also be used as source for generic clocks. Device modules using a32 kHz clock must choose between the 32 kHz crystal oscillator and the RC 32 kHz oscillator forthe clock source. Setting the CK32S bit to one in the PMCON register (PMCON.CK32S) willselect the RC32K oscillator as the 32 kHz clock source, and leaving it to zero will select the 32kHz crystal oscillator output.
12.5.3 InterruptsThe BSCIF interrupt request line is connected to the NVIC. Using the BSCIF interrupt requiresthe NVIC to be programmed first.
12.5.4 Debug OperationThe BSCIF does not interact with debug operations.
12.6 Functional Description
12.6.1 32KHz Oscillator (OSC32K) OperationRev: 2.0.0.0
The 32KHz oscillator operates as the standard main oscillator. The 32KHz oscillator can beused as source clock for the Asynchronous Timer (AST), the Watchdog Timer (WDT) and theBrown Out Detectors (BODs) when they are used in sampling mode. The 32KHz oscillator canalso be used as source for the generic clocks.
The oscillator is disabled by default after reset.
The oscillator is enabled by writing a one to the OSC32 Enable bit in the 32KHz Oscillator Con-trol Register (OSCCTRL32.OSC32EN). The oscillator is disabled by writing a zero to theOSC32EN bit, while keeping the other bits unchanged. Writing to OSC32EN while also writing toother bits may result in unpredictable behavior. Operation mode (external clock or crystal) isselected by writing to the Oscillator Mode bit in OSCCTRL32 (OSCCTRL32.MODE). The oscilla-tor is an ultra low power design and remains enabled in all Power Save Modes.
The start-up time of the 32KHz oscillator is selected by writing to the Oscillator Start-up Timefield in the OSCCTRL32 register (OSCCTRL32.STARTUP). The BSCIF masks the oscillatoroutput during the start-up time, to ensure that no unstable clock cycles propagate to the digitallogic.
The OSC32 Ready bit in the Power and Clock Status Register (PCLKSR.OSC32RDY) is setwhen the oscillator is stable and ready to be used as clock source. An interrupt can be gener-
16442023G–SAM–03/2014
ATSAM4L8/L4/L2
ated on a zero-to-one transition on PCLKSR.OSC32RDY if the OSC32RDY bit in the InterruptMask Register (IMR.OSC32RDY) is set. This bit is set by writing a one to the corresponding bitin the Interrupt Enable Register (IER.OSC32RDY).
As a crystal oscillator usually requires a very long start-up time (up to 1 second), the 32KHzoscillator will keep running across resets, except a Power-on Reset (POR).
The current driven into the crystal can be adjusted according to the component specificationrequirements via the SELCURR bitfield in the OSC32CTRL register (OSC32CTRL.SELCURR).
The 32KHz oscillator also has a 1KHz output (CLK_1K). This is enabled by writing a one to theEnable 1KHz output bit in the OSCCTRL32 register (OSCCTRL32.EN1K). If the 32KHz outputclock is not needed when the CLK_1K is enabled, this can be disabled by writing a zero to theEnab le 32 KHz ou tpu t b i t i n the OSCCTRL32 reg is te r (OSCCTRL32.EN32K) .OSCCTRL32.EN32K is set after a POR. The CLK_1K output is only usable when XIN32 is con-nected to a crystal, and not when an external digital clock is applied on XIN32.
12.6.2 32 KHz RC Oscillator (RC32K)Rev: 1.0.0.1
The RC32K oscillator provides a tunable, low speed, low-power clock source. The RC32K isenabled by default as a system clock, except in Static mode. The RC32K is enabled as a32 KHz Generic clock source by writing a one to the enable bit in the RC32K Control Register(RC32KCR.EN). It is disabled by writing a zero to RC32KCR.EN. The RC32K is also availablefor direct use as a 32 KHz clock, enabled by writing a one to the Enable 32 KHz bit(RC32KCR.EN32K). A 1 KHz clock output can be enabled by writing a one to the Enable 1kHzbit (RC32KCR.EN1K).
The RC32K oscillator supports temperature compensation, which can be enabled for a morestable frequency. The temperature compensation is enabled by writing a one to the Tempera-ture Compensation Enable bit (RC32KCR.TCEN), and disabled by writing a zero.
The frequency of the RC32K oscillator is controlled by two values in the RC32K Tuning RegisterRC32KTUNE.COARSE and RC32KTUNE.FINE. COARSE is loaded by the fuses, and compen-sates for process variation, while FINE is used to keep the frequency accurate over thetemperature range. The COARSE value can be overridden by the user by writing to theCOARSE field. The FINE value can be tuned in two different modes, selected by theRC32KCR.MODE bit where a zero is open loop mode and a one is closed loop mode.
In open loop mode the user can tune the frequency by writing to the RC32KTUNE register.When writing to RC32KTUNE, the user must wait for the PCLKSR.RC32KRDY bit to go highbefore the value has been committed to the oscillator. See Section 42.7 ”Oscillator Characteris-tics” on page 1143 for how FINE and COARSE affects the frequency.
In closed loop mode the RC32K automatically tunes FINE to synchronize the RC32K oscillatorwith an external 32768 Hz reference. The reference source is selected by the Reference Selectbit (RC32KCR.REF). In closed loop mode, the RC32K does a binary search on the FINE field toconverge towards the reference. When the RC32K has converged on the reference frequency,the RC32K lock bit (PCLKSR.RC32KLOCK) is set, and the RC32K continues to measure andtrack the reference frequency. If the user switches from closed loop mode to open loop modeand back to closed loop again, RC32K will restart the synchronization procedure, disregardingprevious locks.
16542023G–SAM–03/2014
ATSAM4L8/L4/L2
If the reference clock stops when the RC32K is in closed loop mode, the RC32K ReferenceError bit (PCLKSR.RC32KREFE) is set, and the RC32K stays in closed loop mode, keeping thecurrent FINE value. When the reference clock starts again, the RC32K automatically resumesthe tracking of the reference clock.
In closed loop mode, if the correct frequency is out of range for the FINE value, it will saturatedue to an incorrect COARSE setting. The RC32K Saturation bit (PCLKSR.RC32KSAT) is setand the user can read the current FINE value to determine further action. Note thatRC32KTUNE can only be written to when closed loop mode is disabled. When disabling closedloop mode, wait for the RC32K Ready bit (PCLKSR.RC32KRDY) to be set before writing toRC32KTUNE, and then wait for it to be set again before going back to closed loop mode. TheFINE field will always read as zeroes when in closed loop mode.
If the range of FINE is not sufficient to obtain the correct frequency, RC32KTUNE can be modi-fied by the user with a new COARSE value to change the FINE offset. The user should select aFINE value of 0x20 before enabling closed loop mode.
When the RC32K is enabled with either EN, EN32K, or EN1K in the RC32KCR register, theoscillator is kept running during all Power Save Modes.
12.6.3 Brow-Out Detector (BOD) OperationRev: 1.1.0.0
The Brown-out Detectors BOD18 and BOD 33 monitors the VDDCORE and VDDIO suppliesrespectively, and compares the voltage with the brown-out trigger level, as set in theBOD18/33LEVEL register. The BOD is disabled by default, but can be enabled either by soft-ware or by flash fuses. The Brown-out Detector can generate either an interrupt or a reset whenthe supply voltage is below the Brown-out trigger level, as shown in Figure 12-2. The BOD18/33de tec t ion s ta tus can be read f rom the Power and C lock S ta tus Reg is te r(PCLKSR.BOD18/33DET).
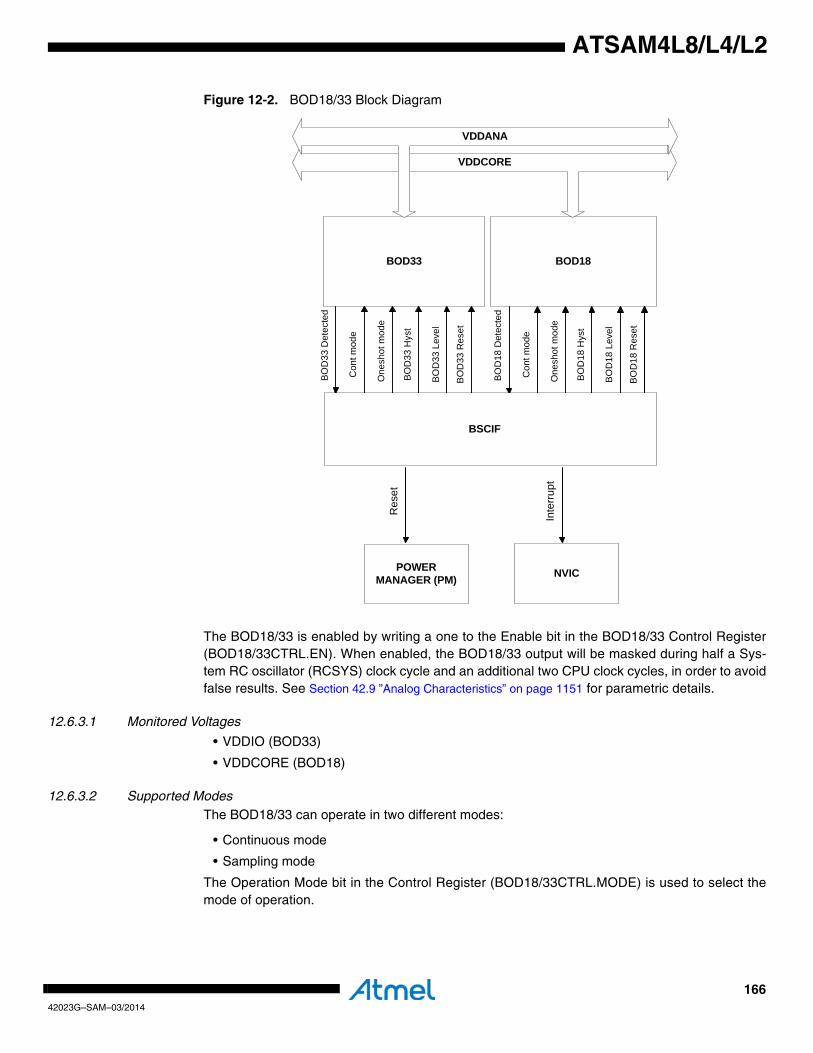
16642023G–SAM–03/2014
ATSAM4L8/L4/L2
Figure 12-2. BOD18/33 Block Diagram
The BOD18/33 is enabled by writing a one to the Enable bit in the BOD18/33 Control Register(BOD18/33CTRL.EN). When enabled, the BOD18/33 output will be masked during half a Sys-tem RC oscillator (RCSYS) clock cycle and an additional two CPU clock cycles, in order to avoidfalse results. See Section 42.9 ”Analog Characteristics” on page 1151 for parametric details.
12.6.3.1 Monitored Voltages
• VDDIO (BOD33)
• VDDCORE (BOD18)
12.6.3.2 Supported ModesThe BOD18/33 can operate in two different modes:
• Continuous mode
• Sampling mode
The Operation Mode bit in the Control Register (BOD18/33CTRL.MODE) is used to select themode of operation.
POWER MANAGER (PM)
Inte
rrup
t
BOD33
VDDCORE
VDDANA
Res
et
BOD
33 D
etec
ted
Con
t mod
e
One
shot
mod
e
BO
D33
Hys
t
BOD
33 L
evel
BO
D33
Res
et
NVIC
BOD18
BO
D18
Det
ecte
d
Con
t mod
e
One
shot
mod
e
BO
D18
Hys
t
BO
D18
Lev
el
BOD
18 R
eset
SCIFBSCIF
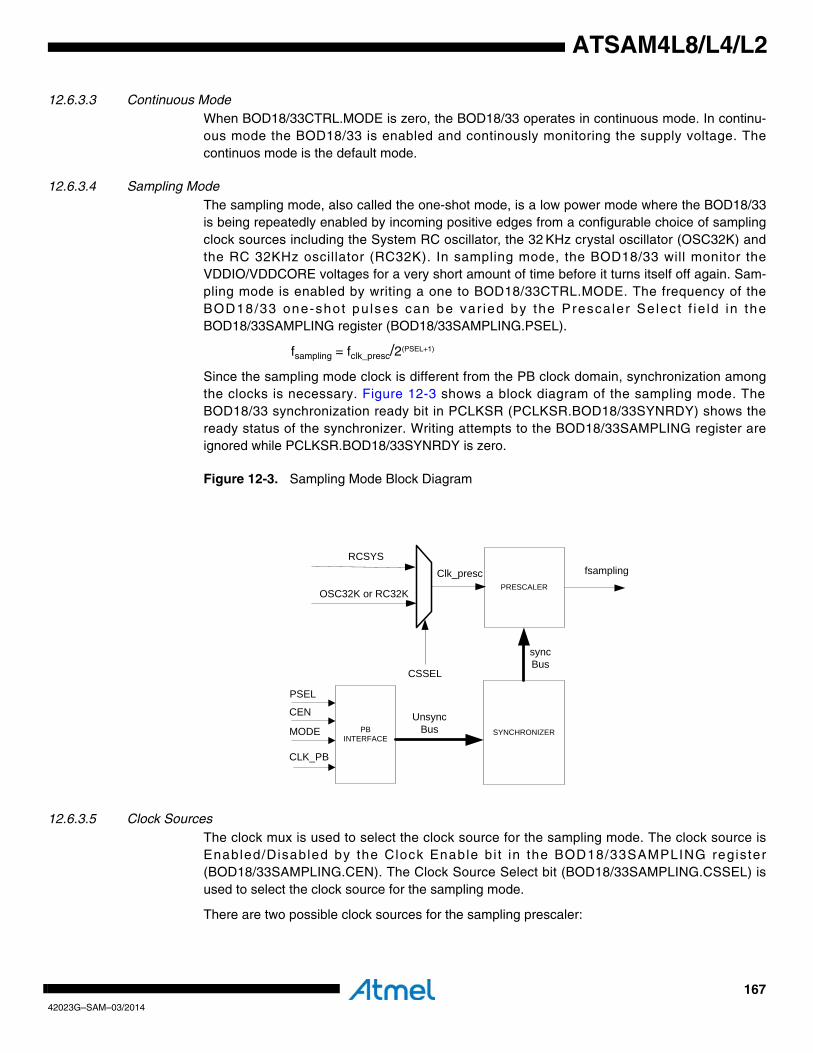
16742023G–SAM–03/2014
ATSAM4L8/L4/L2
12.6.3.3 Continuous ModeWhen BOD18/33CTRL.MODE is zero, the BOD18/33 operates in continuous mode. In continu-ous mode the BOD18/33 is enabled and continously monitoring the supply voltage. Thecontinuos mode is the default mode.
12.6.3.4 Sampling ModeThe sampling mode, also called the one-shot mode, is a low power mode where the BOD18/33is being repeatedly enabled by incoming positive edges from a configurable choice of samplingclock sources including the System RC oscillator, the 32 KHz crystal oscillator (OSC32K) andthe RC 32KHz oscillator (RC32K). In sampling mode, the BOD18/33 will monitor theVDDIO/VDDCORE voltages for a very short amount of time before it turns itself off again. Sam-pling mode is enabled by writing a one to BOD18/33CTRL.MODE. The frequency of theBOD18/33 one-shot pu lses can be var ied by the Presca ler Se lect f ie ld in theBOD18/33SAMPLING register (BOD18/33SAMPLING.PSEL).
fsampling = fclk_presc/2(PSEL+1)
Since the sampling mode clock is different from the PB clock domain, synchronization amongthe clocks is necessary. Figure 12-3 shows a block diagram of the sampling mode. TheBOD18/33 synchronization ready bit in PCLKSR (PCLKSR.BOD18/33SYNRDY) shows theready status of the synchronizer. Writing attempts to the BOD18/33SAMPLING register areignored while PCLKSR.BOD18/33SYNRDY is zero.
Figure 12-3. Sampling Mode Block Diagram
12.6.3.5 Clock SourcesThe clock mux is used to select the clock source for the sampling mode. The clock source isEnabled/Disabled by the Clock Enable bi t in the BOD18/33SAMPLING register(BOD18/33SAMPLING.CEN). The Clock Source Select bit (BOD18/33SAMPLING.CSSEL) isused to select the clock source for the sampling mode.
There are two possible clock sources for the sampling prescaler:
PRESCALER
SYNCHRONIZERPB INTERFACE
UnsyncBus
fsampling
OSC32K or RC32K
RCSYS
CSSEL
syncBus
CLK_PB
Clk_presc
CEN
PSEL
MODE

16842023G–SAM–03/2014
ATSAM4L8/L4/L2
• RCSYS: This oscillator is always enabled when selected as clock source. Refer to Section 10. ”Power Manager (PM)” on page 109 for details about RCSYS and the Power Save Modes. Refer to the Section 42.7 ”Oscillator Characteristics” on page 1143 chapter for the oscillator’s frequency characteristics.
• OSC32K or RC32K: This oscillator has to be enabled in the BSCIF Interface before using it as clock source for the BOD18/33. The BOD18/33 will not be able to detect if this clock is stopped.
It is recommended to disable the BOD18/33 before disabling the clock, to avoid freezing theBOD18/33 in an undefined state.
12.6.3.6 Changing Clock SourceThe BOD18/33SAMPLING.CEN bit should always be disabled before changing the samplingclock source. To change the clock for the BOD18/33 the following steps need to be taken:
1. Write a zero to the CEN bit, leaving the other bits unchanged, to stop the clock.
2. Wait until CEN reads as zero, giving the clock time to stop.
3. Select a new clock source by writing to the BOD18/33SAMPLING.CSSEL bit.
4. Write a one to the CEN bit, leaving the other bits unchanged, to enable the clock.
5. Wait until CEN reads as one, giving the clock time to start.
12.6.3.7 Changing the PrescalerTo change the Prescaler value for the BOD18/33 during sampling mode the following stepsneed to be taken:
1.Wait until the PCLKSR.BOD18/33SYNRDY bit is one.
2.Write the selected value to the PSEL field.
12.6.3.8 BOD18/33 Interrupts/ResetThe BOD18/33 can generate either an interrupt or a reset based on the ACTION field in theBOD18/33CTRL register. The Interrupt/Reset is triggered when there is a voltage(VDDIO/VDDCORE) failure. Before enabling the BOD18/33 reset mode the ACTION field mustfirst be initialized to zero in order to avoid any false BOD18/33 detection when the BOD18/33 isnot ready.
12.6.3.9 HysteresisThe hysteresis functionality may be used in both continuous and sampling mode. Writing a oneto the HYST bit in BOD18/33CTRL can add hysteresis to the BOD18/33 trigger level.
12.6.3.10 BOD18 Threshold RangesThe BOD18 has two threshold voltage ranges. There is a Standard Threshold Range, for opera-tion in Power Scaling 0 and 2 Mode (PS0 andPS2), and a Low Threshold Range for operation atlower supply voltage values, such as Power Scaling 1 Mode or deep Power Save Mode. Theuser must take care of using the right threshold settings according to the different Modes. Referto Section 42.9 ”Analog Characteristics” on page 1151 for regulator minimal values in the differ-ent modes
16942023G–SAM–03/2014
ATSAM4L8/L4/L2
12.6.3.11 Power Save ModesIn continuous mode the BOD18/33 will be off during WAIT, RETENTION and BACKUP PowerSave Modes. In sampling mode the BOD18/33 is enabled in all Power Save Modes.
12.6.3.12 Flash FusesIt is not recommended to override the default factory settings, but can be done (after reset) bywriting to the BOD18/33 registers. Refer to the Fuse settings chapter for more details aboutBOD18/33 fuses and how to program these fuses.
If the Flash Calibration Done (FCD) bit in the BOD18/33CTRL register is 0 at reset, the flash cal-ibration will be redone and the BOD18/33CTRL.FCD bit will be set before program executionstarts in the CPU. If BOD18/33CTRL.FCD is one, the BOD18/33 configuration will not be alteredafter reset.
12.6.4 Voltage Regulator (VREG)The embedded voltage regulator can be used to supply all the digital logic in the Core and theBackup power domains. The VREG features three different modes: normal mode, low powermode (LP) and Ultra Low Power mode (ULP).
To support Power Scaling and Power Save mode features, the VREG is controlled by theBackup Power Manager (BPM).
After a reset, the VREG is enabled. If an external voltage is applied on the VDDCORE pin, theVREG can be disabled by writing a one to the Disable bit of the VREG Configuration register(VREGCR.DIS).
When the regulator has reached its expected value, the VREGOK bit in the PCLKSR register isset. An interrupt is generated on a zero-to-one transition of VREGOK.
12.6.4.1 Register ProtectionTo prevent unexpected writes due to software bugs, write access to the VREGCR register is pro-tected by a locking mechanism, for details refer to Section 12.7.7 ”Unlock Register” on page180.
To prevent further modifications by software, the contents of the calibration (VREG.CALIB) anddisable (VREGCR.DIS) fields can be set as read-only by writing a one to the Store Final Valuebit (VREGCR.SFV). Once this bit is set, the contents of VREGCR can not be modified until aPOR18 reset is applied.
Table 12-2. BOD18/33 in different modes
Mode
Continuous Mode Possible actions during different modes
Sampling Mode Possible actions during different Modes
RUN Reset Interrupt Reset Interrupt
SLEEP Reset Interrupt Reset Interrupt
WAIT OFF OFF Reset Delayed Interrupt
RETENTION OFF OFF Reset Delayed Interrupt
BACKUP OFF OFF Reset Delayed Interrupt
17042023G–SAM–03/2014
ATSAM4L8/L4/L2
12.6.4.2 1MHz RC OscillatorThe 1MHz RC Oscillator which is used for switching regulator operation can also be internallyrouted to be used as a logic clock. This oscillator is controlled by the RC1MCR register. Itsstartup calibration value is read from flash fuses.
12.6.5 BandgapRev: 1.1.0.7
The Bandgap provides a stable voltage reference used by the internally by the device. This ref-erence is automatically turned on at startup. To save power consumption, the Bandgap featuresa Low Power Bandgap voltage reference which may be automatically enabled in Wait or Retmode.
All modules using the Bandgap voltage reference, get their signal through a bandgap buffer.These buffers are controlled automatically.
12.6.6 Backup Registers (BR)Rev: 1.0.0.1
Four 32-bit backup registers are available to store values when the device is in BACKUP PowerSave Mode. These registers will keep their content even when the VDDCORE supply and theinternal regulator supply voltage supplies are removed. The backup registers can be accessedby reading from and writing to the BR0, BR1, BR2, and BR3 registers.
12.6.7 InterruptsThe SCIF has the following interrupt sources:
• AE - Access Error:
– A protected SCIF register was accessed without first being correctly unlocked.
• LPBGRDY- Access Error:
– A 0 to 1 transition on the PCLKSR.LPBGRDY bit is detected..
• VREGOK: Voltage Regulator OK:
– Set on 0 to 1 transition on the PCLKSR.VREGOK bit is detected.
• SSWRDY: Buck voltage regulator has stopped switching:
– Set on 0 to 1 transition on the PCLKSR.SSWRDY bit is detected.
• BOD18SYNRDY - BOD18 synchronization ready:
– Set on 0 to 1 transition on the PCLKSR.BOD18SYNRDY bit is detected.
• BOD33SYNRDY - BOD33 synchronization ready:
– Set on 0 to 1 transition on the PCLKSR.BOD33SYNRDY bit is detected.
• BOD18DET - Brown out 1.8 Detected:
– Set on 0 to 1 transition on the PCLKSR.BOD18DET bit is detected.
17142023G–SAM–03/2014
ATSAM4L8/L4/L2
• BOD33DET - Brown out 3.3 Detected:
– Set on 0 to 1 transition on the PCLKSR.BOD33DET bit is detected.
• RC32KSAT- RC32K FINE value saturated:
– 0: The RC32K autocalibration has not saturated the FINE value.
– 1: The RC32K autocalibration has brought FINE into saturation.
• RC32KREFE - RC32K Reference error:
– 0: The RC32K has detected a running reference frequency.
– 1: The RC32K reference frequency has stopped.
• RC32KLOCK - RC32K Locked to reference:
– 0: The RC32K has not obtained a lock to the reference frequency.
– 1: The RC32K has obtained alock to the reference frequency.
• RC32KRDY - RC32K Ready:
– 0: Reads from FINE and COARSE will yield invalid values. Writes to FINE and COARSE is not yet complete
– 1: FINE and COARSE can be read, writes to FINE and COARSE have been commited.
• OSC32RDY - 32kHz Oscillator Ready:
– A 0 to 1 transition on the PCLKSR.OSC32RDY bit is detected.
The interrupt sources will generate an interrupt request if the corresponding bit in the InterruptMask Register is set. The interrupt sources are ORed together to form one interrupt request. TheBSCIF will generate an interrupt request if at least one of the bits in the Interrupt Mask Register(IMR) is set. Bits in IMR are set by writing a one to the corresponding bit in the Interrupt EnableRegister (IER), and cleared by writing a one to the corresponding bit in the Interrupt DisableRegister (IDR). The interrupt request remains active until the corresponding bit in the InterruptStatus Register (ISR) is cleared by writing a one to the corresponding bit in the Interrupt ClearRegister (ICR). Because all the interrupt sources are ORed together, the interrupt request fromthe BSCIF will remain active until all the bits in ISR are cleared.
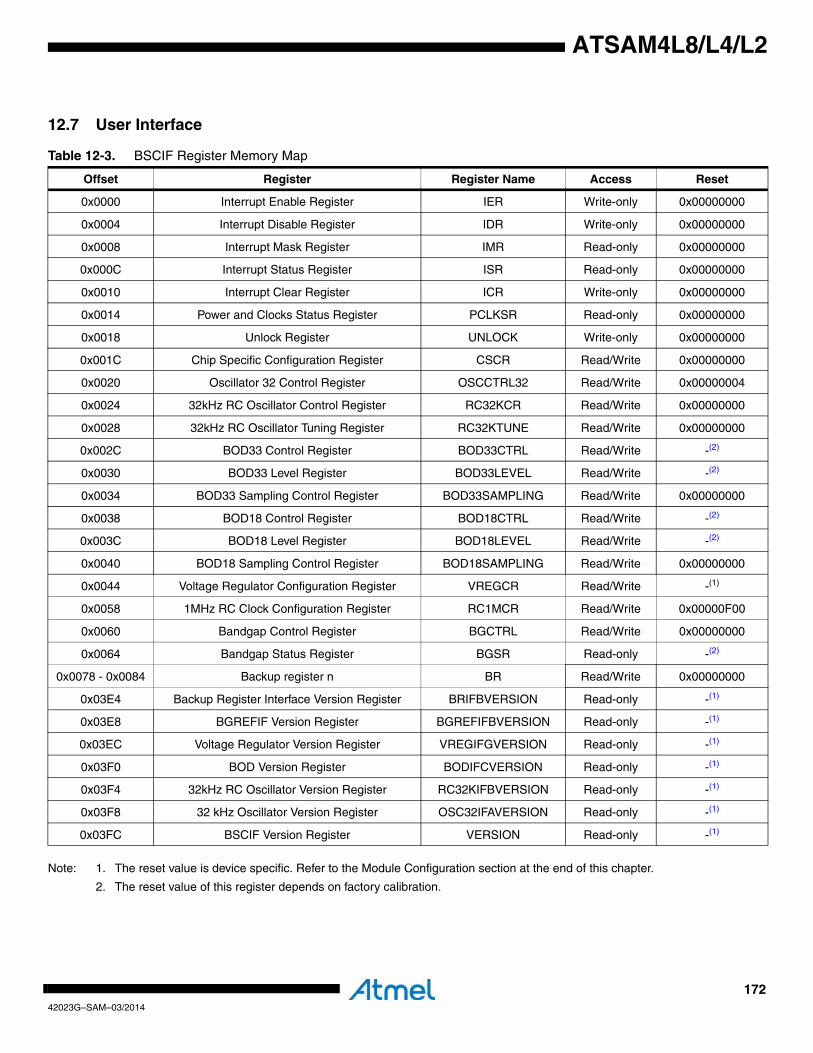
17242023G–SAM–03/2014
ATSAM4L8/L4/L2
12.7 User Interface
Note: 1. The reset value is device specific. Refer to the Module Configuration section at the end of this chapter.
2. The reset value of this register depends on factory calibration.
Table 12-3. BSCIF Register Memory Map
Offset Register Register Name Access Reset
0x0000 Interrupt Enable Register IER Write-only 0x00000000
0x0004 Interrupt Disable Register IDR Write-only 0x00000000
0x0008 Interrupt Mask Register IMR Read-only 0x00000000
0x000C Interrupt Status Register ISR Read-only 0x00000000
0x0010 Interrupt Clear Register ICR Write-only 0x00000000
0x0014 Power and Clocks Status Register PCLKSR Read-only 0x00000000
0x0018 Unlock Register UNLOCK Write-only 0x00000000
0x001C Chip Specific Configuration Register CSCR Read/Write 0x00000000
0x0020 Oscillator 32 Control Register OSCCTRL32 Read/Write 0x00000004
0x0024 32kHz RC Oscillator Control Register RC32KCR Read/Write 0x00000000
0x0028 32kHz RC Oscillator Tuning Register RC32KTUNE Read/Write 0x00000000
0x002C BOD33 Control Register BOD33CTRL Read/Write -(2)
0x0030 BOD33 Level Register BOD33LEVEL Read/Write -(2)
0x0034 BOD33 Sampling Control Register BOD33SAMPLING Read/Write 0x00000000
0x0038 BOD18 Control Register BOD18CTRL Read/Write -(2)
0x003C BOD18 Level Register BOD18LEVEL Read/Write -(2)
0x0040 BOD18 Sampling Control Register BOD18SAMPLING Read/Write 0x00000000
0x0044 Voltage Regulator Configuration Register VREGCR Read/Write -(1)
0x0058 1MHz RC Clock Configuration Register RC1MCR Read/Write 0x00000F00
0x0060 Bandgap Control Register BGCTRL Read/Write 0x00000000
0x0064 Bandgap Status Register BGSR Read-only -(2)
0x0078 - 0x0084 Backup register n BR Read/Write 0x00000000
0x03E4 Backup Register Interface Version Register BRIFBVERSION Read-only -(1)
0x03E8 BGREFIF Version Register BGREFIFBVERSION Read-only -(1)
0x03EC Voltage Regulator Version Register VREGIFGVERSION Read-only -(1)
0x03F0 BOD Version Register BODIFCVERSION Read-only -(1)
0x03F4 32kHz RC Oscillator Version Register RC32KIFBVERSION Read-only -(1)
0x03F8 32 kHz Oscillator Version Register OSC32IFAVERSION Read-only -(1)
0x03FC BSCIF Version Register VERSION Read-only -(1)

17342023G–SAM–03/2014
ATSAM4L8/L4/L2
12.7.1 Interrupt Enable Register
Name: IER
Access Type: Write-only
Offset: 0x0000
Reset Value: 0x00000000
Writing a zero to a bit in this register has no effect.
Writing a one to a bit in this register will set the corresponding bit in IMR.
31 30 29 28 27 26 25 24
AE - - - - - - -
23 22 21 20 19 18 17 16
- - - - - - - -
15 14 13 12 11 10 9 8
- - - LPBGRDY - VREGOK SSWRDYBOD18SYN
RDY
7 6 5 4 3 2 1 0
BOD33SYNRDY
BOD18DET BOD33DET RC32SAT RC32KREFE RC32KLOCK RC32KRDY OSC32RDY
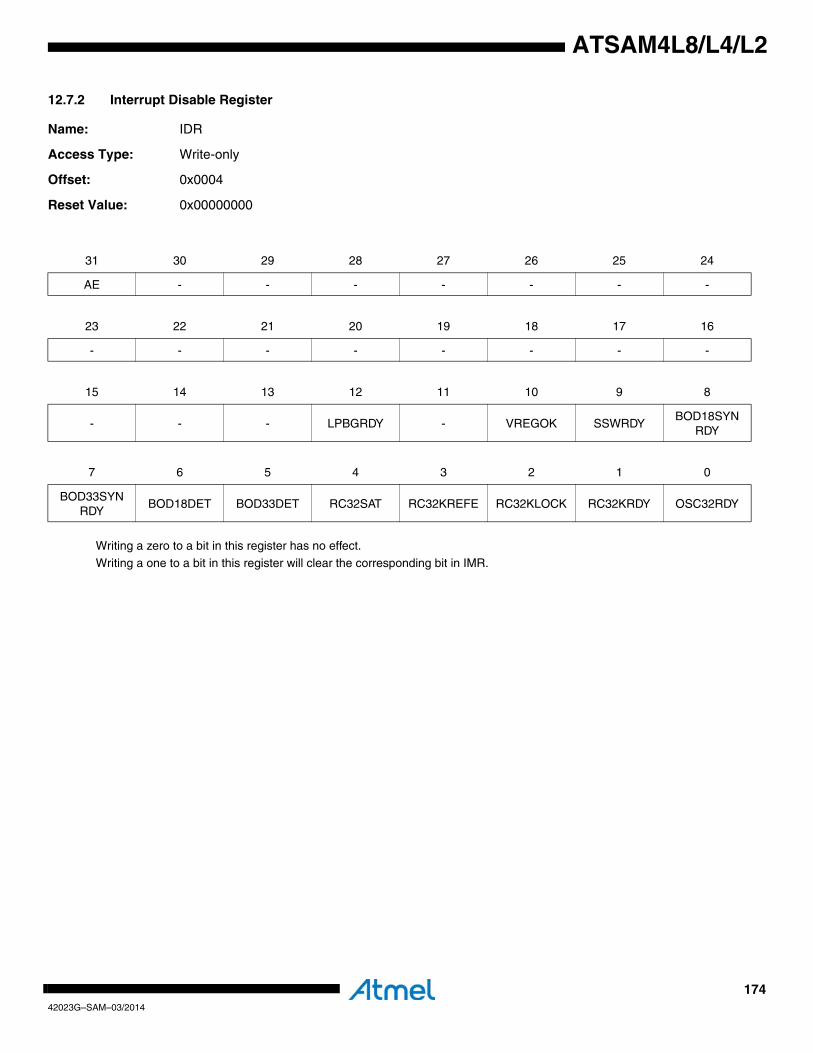
17442023G–SAM–03/2014
ATSAM4L8/L4/L2
12.7.2 Interrupt Disable Register
Name: IDR
Access Type: Write-only
Offset: 0x0004
Reset Value: 0x00000000
Writing a zero to a bit in this register has no effect.
Writing a one to a bit in this register will clear the corresponding bit in IMR.
31 30 29 28 27 26 25 24
AE - - - - - - -
23 22 21 20 19 18 17 16
- - - - - - - -
15 14 13 12 11 10 9 8
- - - LPBGRDY - VREGOK SSWRDYBOD18SYN
RDY
7 6 5 4 3 2 1 0
BOD33SYNRDY
BOD18DET BOD33DET RC32SAT RC32KREFE RC32KLOCK RC32KRDY OSC32RDY

17542023G–SAM–03/2014
ATSAM4L8/L4/L2
12.7.3 Interrupt Mask Register
Name: IMR
Access Type: Read-only
Offset: 0x0008
Reset Value: 0x00000000
0: The corresponding interrupt is disabled.
1: The corresponding interrupt is enabled.A bit in this register is cleared when the corresponding bit in IDR is written to one.
A bit in this register is set when the corresponding bit in IER is written to one.
31 30 29 28 27 26 25 24
AE - - - - - - -
23 22 21 20 19 18 17 16
- - - - - - - -
15 14 13 12 11 10 9 8
- - - LPBGRDY - VREGOK SSWRDYBOD18SYN
RDY
7 6 5 4 3 2 1 0
BOD33SYNRDY
BOD18DET BOD33DET RC32SAT RC32KREFE RC32KLOCK RC32KRDY OSC32RDY
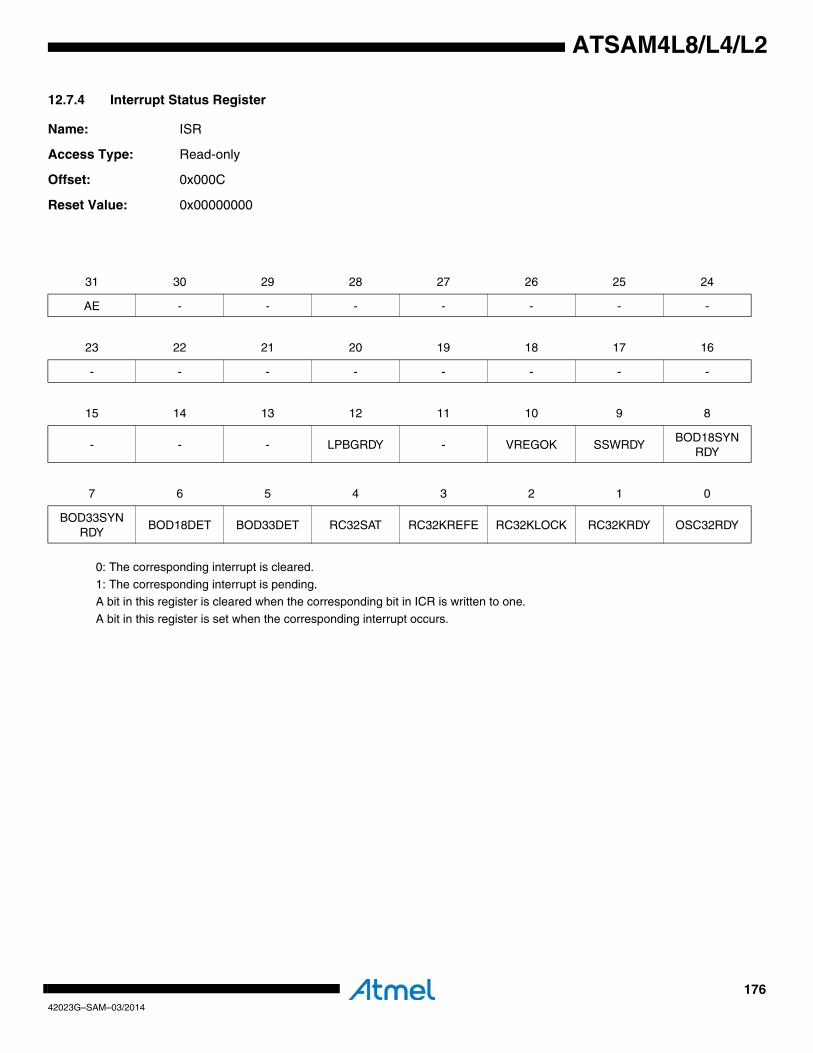
17642023G–SAM–03/2014
ATSAM4L8/L4/L2
12.7.4 Interrupt Status Register
Name: ISR
Access Type: Read-only
Offset: 0x000C
Reset Value: 0x00000000
0: The corresponding interrupt is cleared.
1: The corresponding interrupt is pending.A bit in this register is cleared when the corresponding bit in ICR is written to one.
A bit in this register is set when the corresponding interrupt occurs.
31 30 29 28 27 26 25 24
AE - - - - - - -
23 22 21 20 19 18 17 16
- - - - - - - -
15 14 13 12 11 10 9 8
- - - LPBGRDY - VREGOK SSWRDYBOD18SYN
RDY
7 6 5 4 3 2 1 0
BOD33SYNRDY
BOD18DET BOD33DET RC32SAT RC32KREFE RC32KLOCK RC32KRDY OSC32RDY
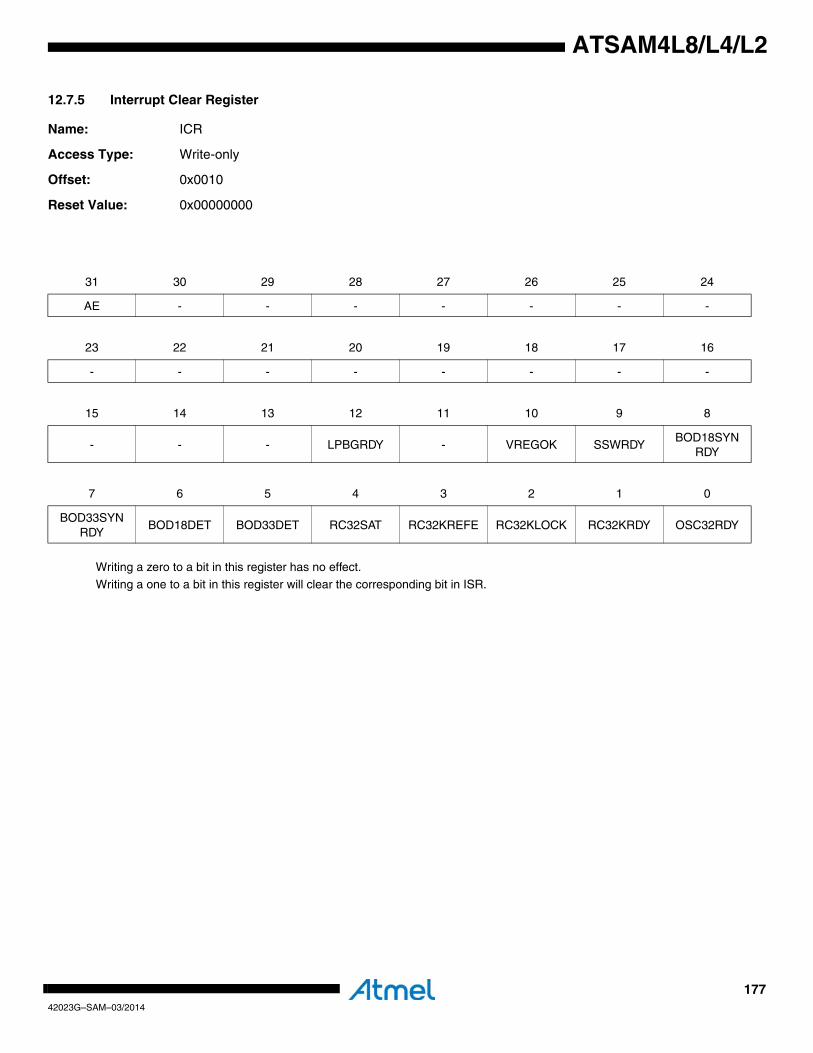
17742023G–SAM–03/2014
ATSAM4L8/L4/L2
12.7.5 Interrupt Clear Register
Name: ICR
Access Type: Write-only
Offset: 0x0010
Reset Value: 0x00000000
Writing a zero to a bit in this register has no effect.
Writing a one to a bit in this register will clear the corresponding bit in ISR.
31 30 29 28 27 26 25 24
AE - - - - - - -
23 22 21 20 19 18 17 16
- - - - - - - -
15 14 13 12 11 10 9 8
- - - LPBGRDY - VREGOK SSWRDYBOD18SYN
RDY
7 6 5 4 3 2 1 0
BOD33SYNRDY
BOD18DET BOD33DET RC32SAT RC32KREFE RC32KLOCK RC32KRDY OSC32RDY
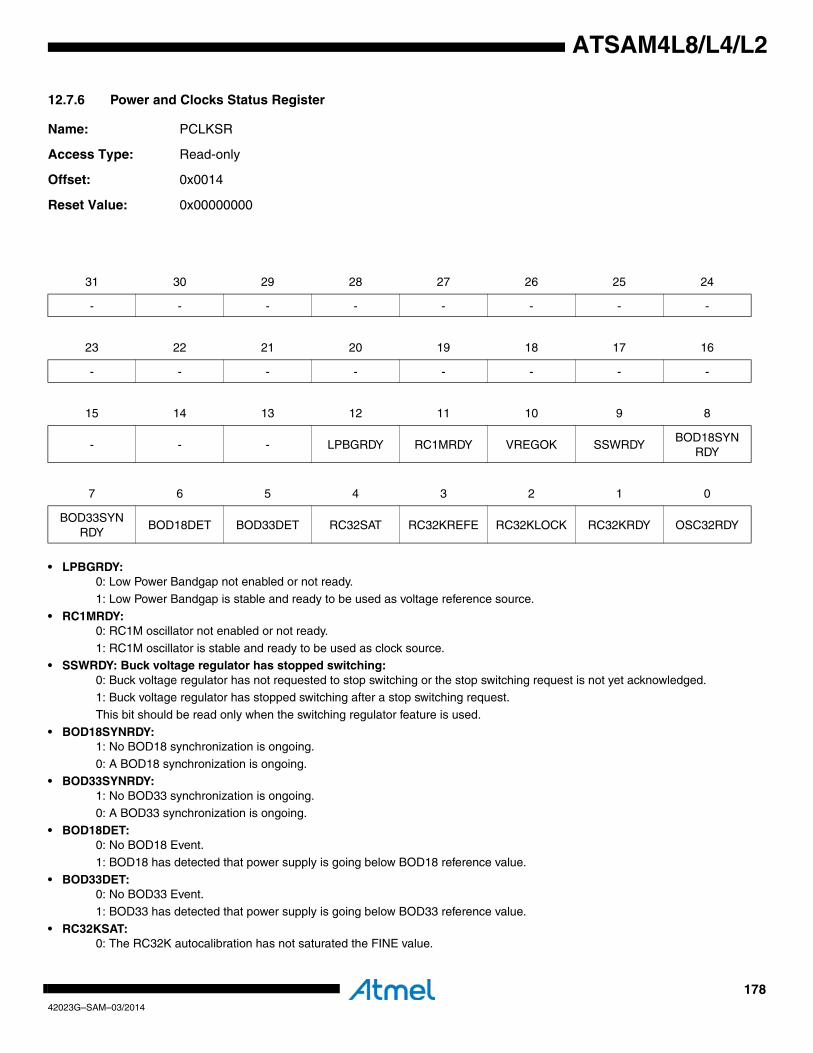
17842023G–SAM–03/2014
ATSAM4L8/L4/L2
12.7.6 Power and Clocks Status Register
Name: PCLKSR
Access Type: Read-only
Offset: 0x0014
Reset Value: 0x00000000
• LPBGRDY:0: Low Power Bandgap not enabled or not ready.
1: Low Power Bandgap is stable and ready to be used as voltage reference source.
• RC1MRDY: 0: RC1M oscillator not enabled or not ready.
1: RC1M oscillator is stable and ready to be used as clock source.• SSWRDY: Buck voltage regulator has stopped switching:
0: Buck voltage regulator has not requested to stop switching or the stop switching request is not yet acknowledged.1: Buck voltage regulator has stopped switching after a stop switching request.
This bit should be read only when the switching regulator feature is used.
• BOD18SYNRDY: 1: No BOD18 synchronization is ongoing.
0: A BOD18 synchronization is ongoing.• BOD33SYNRDY:
1: No BOD33 synchronization is ongoing.0: A BOD33 synchronization is ongoing.
• BOD18DET: 0: No BOD18 Event.
1: BOD18 has detected that power supply is going below BOD18 reference value.
• BOD33DET: 0: No BOD33 Event.
1: BOD33 has detected that power supply is going below BOD33 reference value.
• RC32KSAT: 0: The RC32K autocalibration has not saturated the FINE value.
31 30 29 28 27 26 25 24
- - - - - - - -
23 22 21 20 19 18 17 16
- - - - - - - -
15 14 13 12 11 10 9 8
- - - LPBGRDY RC1MRDY VREGOK SSWRDYBOD18SYN
RDY
7 6 5 4 3 2 1 0
BOD33SYNRDY
BOD18DET BOD33DET RC32SAT RC32KREFE RC32KLOCK RC32KRDY OSC32RDY
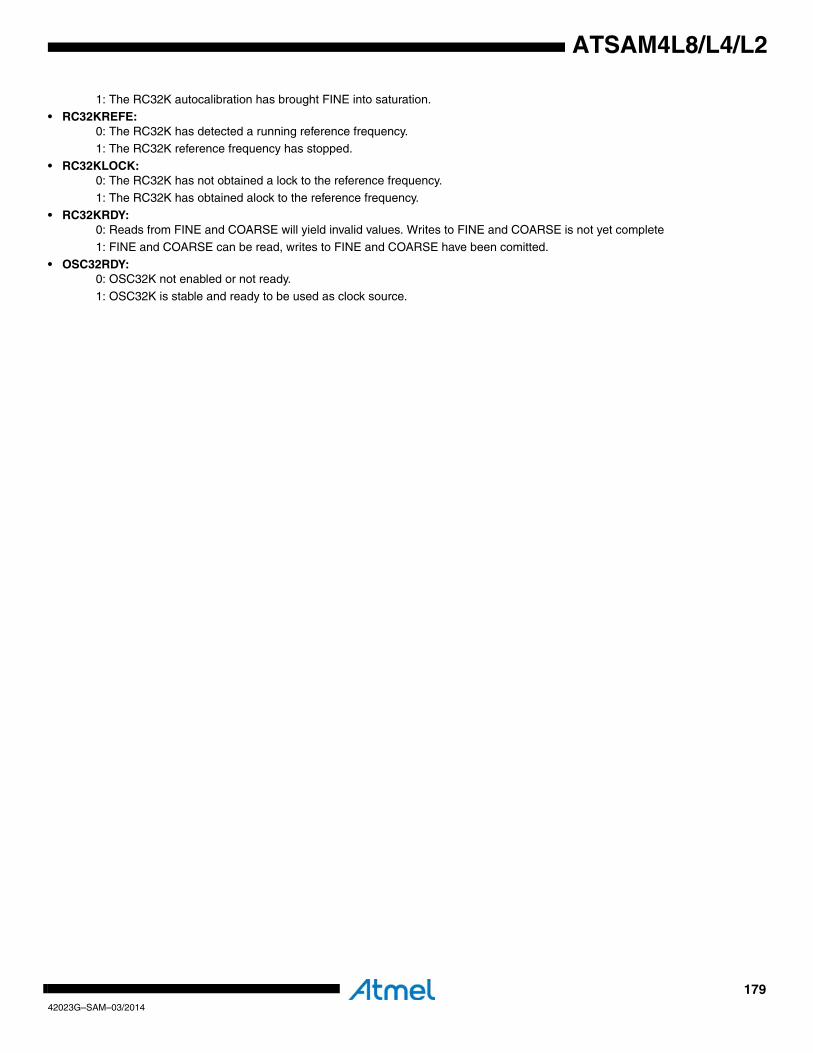
17942023G–SAM–03/2014
ATSAM4L8/L4/L2
1: The RC32K autocalibration has brought FINE into saturation.• RC32KREFE:
0: The RC32K has detected a running reference frequency.1: The RC32K reference frequency has stopped.
• RC32KLOCK:0: The RC32K has not obtained a lock to the reference frequency.
1: The RC32K has obtained alock to the reference frequency.
• RC32KRDY: 0: Reads from FINE and COARSE will yield invalid values. Writes to FINE and COARSE is not yet complete
1: FINE and COARSE can be read, writes to FINE and COARSE have been comitted.
• OSC32RDY: 0: OSC32K not enabled or not ready.
1: OSC32K is stable and ready to be used as clock source.

18042023G–SAM–03/2014
ATSAM4L8/L4/L2
12.7.7 Unlock Register
Name: UNLOCK
Access Type: Write-only
Offset: 0x0018
Reset Value: 0x00000000
To unlock a write protected register, first write to the UNLOCK register with the address of the register to unlock in the ADDR
field and 0xAA in the KEY field. Then, in the next PB access write to the register specified in the ADDR field.
• KEY: Unlock KeyWrite this bit field to 0xAA to enable unlock.
• ADDR: Unlock AddressWrite the address offset of the register to unlock to this field.
31 30 29 28 27 26 25 24
KEY
23 22 21 20 19 18 17 16
- - - - - - - -
15 14 13 12 11 10 9 8
- - - - - - ADDR[9:8]
7 6 5 4 3 2 1 0
ADDR[7:0]
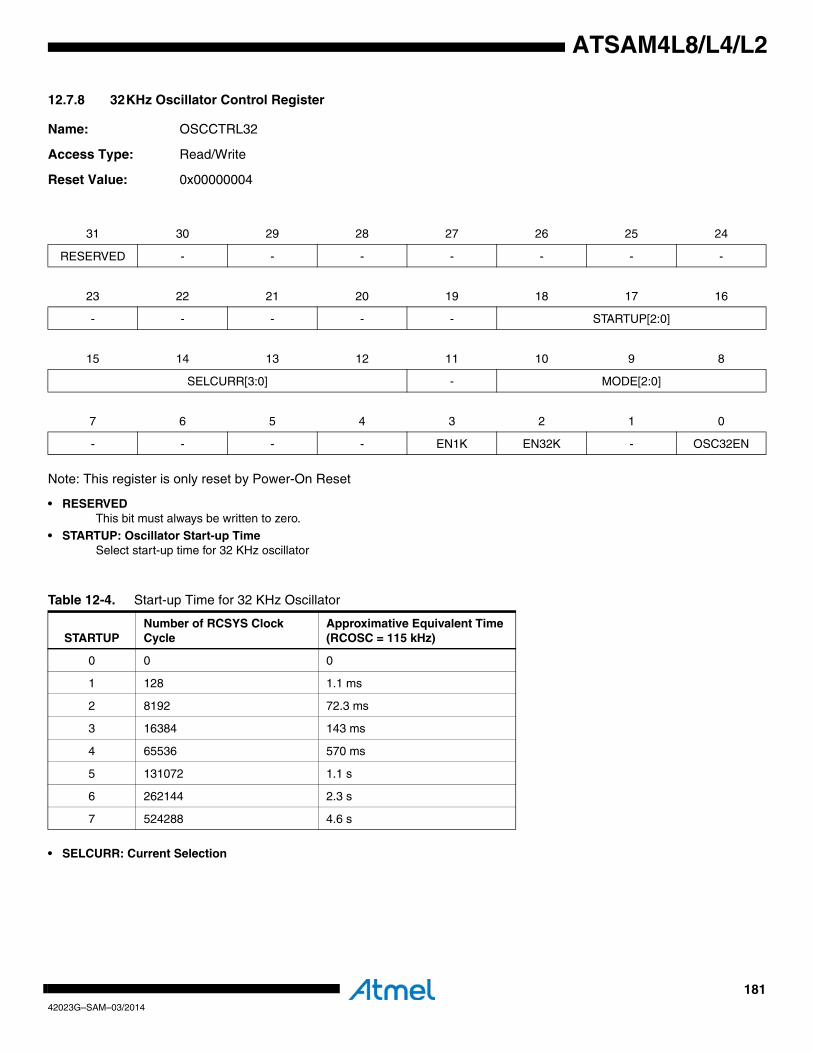
18142023G–SAM–03/2014
ATSAM4L8/L4/L2
12.7.8 32KHz Oscillator Control Register
Name: OSCCTRL32
Access Type: Read/Write
Reset Value: 0x00000004
Note: This register is only reset by Power-On Reset
• RESERVEDThis bit must always be written to zero.
• STARTUP: Oscillator Start-up Time Select start-up time for 32 KHz oscillator
• SELCURR: Current Selection
31 30 29 28 27 26 25 24
RESERVED - - - - - - -
23 22 21 20 19 18 17 16
- - - - - STARTUP[2:0]
15 14 13 12 11 10 9 8
SELCURR[3:0] - MODE[2:0]
7 6 5 4 3 2 1 0
- - - - EN1K EN32K - OSC32EN
Table 12-4. Start-up Time for 32 KHz Oscillator
STARTUPNumber of RCSYS Clock Cycle
Approximative Equivalent Time (RCOSC = 115 kHz)
0 0 0
1 128 1.1 ms
2 8192 72.3 ms
3 16384 143 ms
4 65536 570 ms
5 131072 1.1 s
6 262144 2.3 s
7 524288 4.6 s

18242023G–SAM–03/2014
ATSAM4L8/L4/L2
Select current driven into the crystal.
• MODE: Oscillator Mode
• EN1K: 1 KHz output Enable 0: The 1 KHz output is disabled.
1: The 1 KHz output is enabled.• EN32K: 32 KHz output Enable
0: The 32 KHz output is disabled.1: The 32 KHz output is enabled.
• OSC32EN: 32 KHz Oscillator Enable0: The 32 KHz Oscillator is disabled
Table 12-5. Crystal Current selection
SELCURR Current Value (nA)
0 50
1 75
2 100
3 125
4 150
5 175
6 200
7 225
8 250
9 275
10 300 (recommended value)
11 325
12 350
13 375
14 400
15 425
Table 12-6. Operation Mode for 32 KHz Oscillator
MODE Description
0 External clock connected to XIN32
1 Crystal mode. Crystal is connected to XIN32/XOUT32.
2 Reserved
3 Crystal mode with amplitude controlled mode. Crystal is connected to XIN32/XOUT32.
4 Crystal and high current mode. Crystal is connected to XIN32/XOUT32.
5 Crystal with high current mode and amplitude controlled mode. Crystal is connected to XIN32/XOUT32.
6 Reserved
7 Reserved

18342023G–SAM–03/2014
ATSAM4L8/L4/L2
1: The 32 KHz Oscillator is enabled
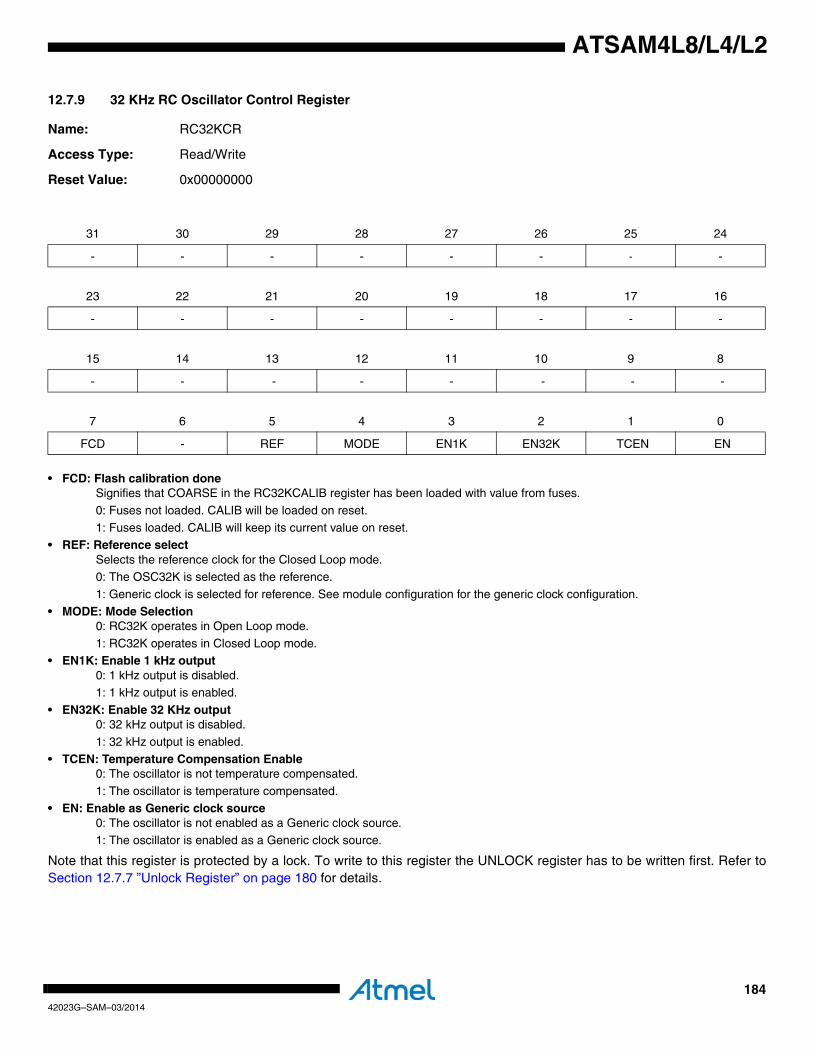
18442023G–SAM–03/2014
ATSAM4L8/L4/L2
12.7.9 32 KHz RC Oscillator Control Register
Name: RC32KCR
Access Type: Read/Write
Reset Value: 0x00000000
• FCD: Flash calibration doneSignifies that COARSE in the RC32KCALIB register has been loaded with value from fuses.
0: Fuses not loaded. CALIB will be loaded on reset.
1: Fuses loaded. CALIB will keep its current value on reset.• REF: Reference select
Selects the reference clock for the Closed Loop mode.0: The OSC32K is selected as the reference.
1: Generic clock is selected for reference. See module configuration for the generic clock configuration.
• MODE: Mode Selection0: RC32K operates in Open Loop mode.
1: RC32K operates in Closed Loop mode.• EN1K: Enable 1 kHz output
0: 1 kHz output is disabled.1: 1 kHz output is enabled.
• EN32K: Enable 32 KHz output0: 32 kHz output is disabled.
1: 32 kHz output is enabled.
• TCEN: Temperature Compensation Enable0: The oscillator is not temperature compensated.
1: The oscillator is temperature compensated.• EN: Enable as Generic clock source
0: The oscillator is not enabled as a Generic clock source.1: The oscillator is enabled as a Generic clock source.
Note that this register is protected by a lock. To write to this register the UNLOCK register has to be written first. Refer toSection 12.7.7 ”Unlock Register” on page 180 for details.
31 30 29 28 27 26 25 24
- - - - - - - -
23 22 21 20 19 18 17 16
- - - - - - - -
15 14 13 12 11 10 9 8
- - - - - - - -
7 6 5 4 3 2 1 0
FCD - REF MODE EN1K EN32K TCEN EN
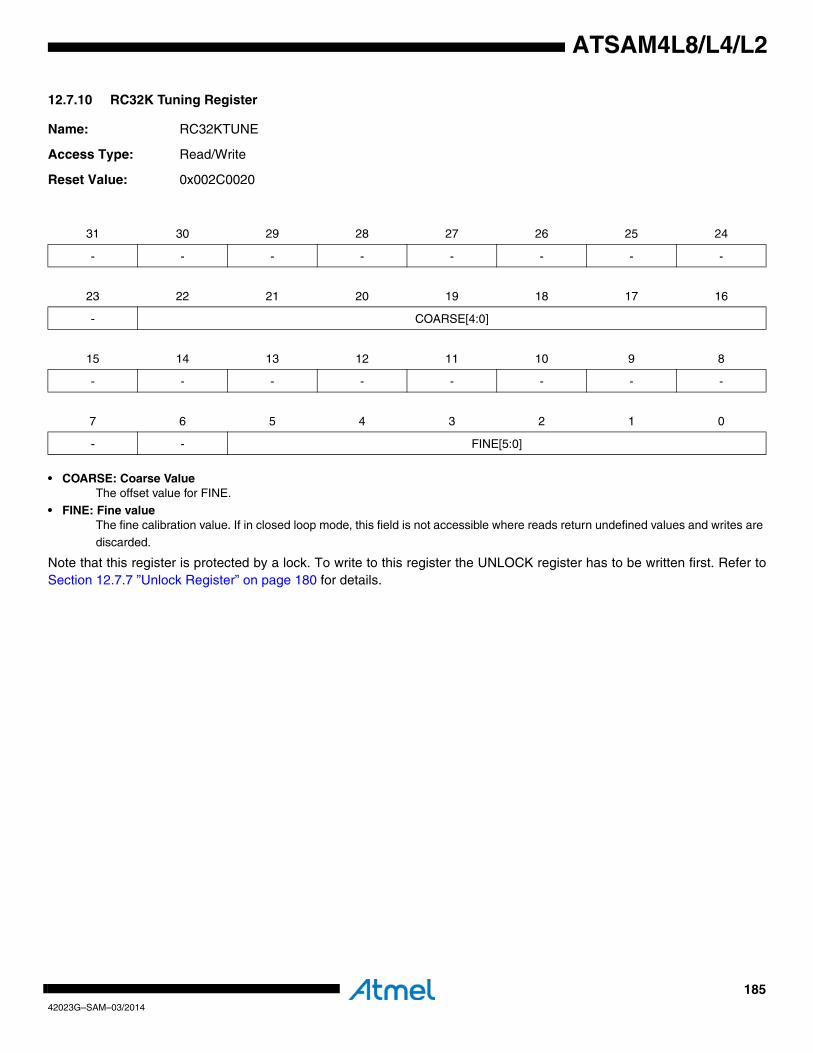
18542023G–SAM–03/2014
ATSAM4L8/L4/L2
12.7.10 RC32K Tuning Register
Name: RC32KTUNE
Access Type: Read/Write
Reset Value: 0x002C0020
• COARSE: Coarse ValueThe offset value for FINE.
• FINE: Fine valueThe fine calibration value. If in closed loop mode, this field is not accessible where reads return undefined values and writes are
discarded.
Note that this register is protected by a lock. To write to this register the UNLOCK register has to be written first. Refer toSection 12.7.7 ”Unlock Register” on page 180 for details.
31 30 29 28 27 26 25 24
- - - - - - - -
23 22 21 20 19 18 17 16
- COARSE[4:0]
15 14 13 12 11 10 9 8
- - - - - - - -
7 6 5 4 3 2 1 0
- - FINE[5:0]
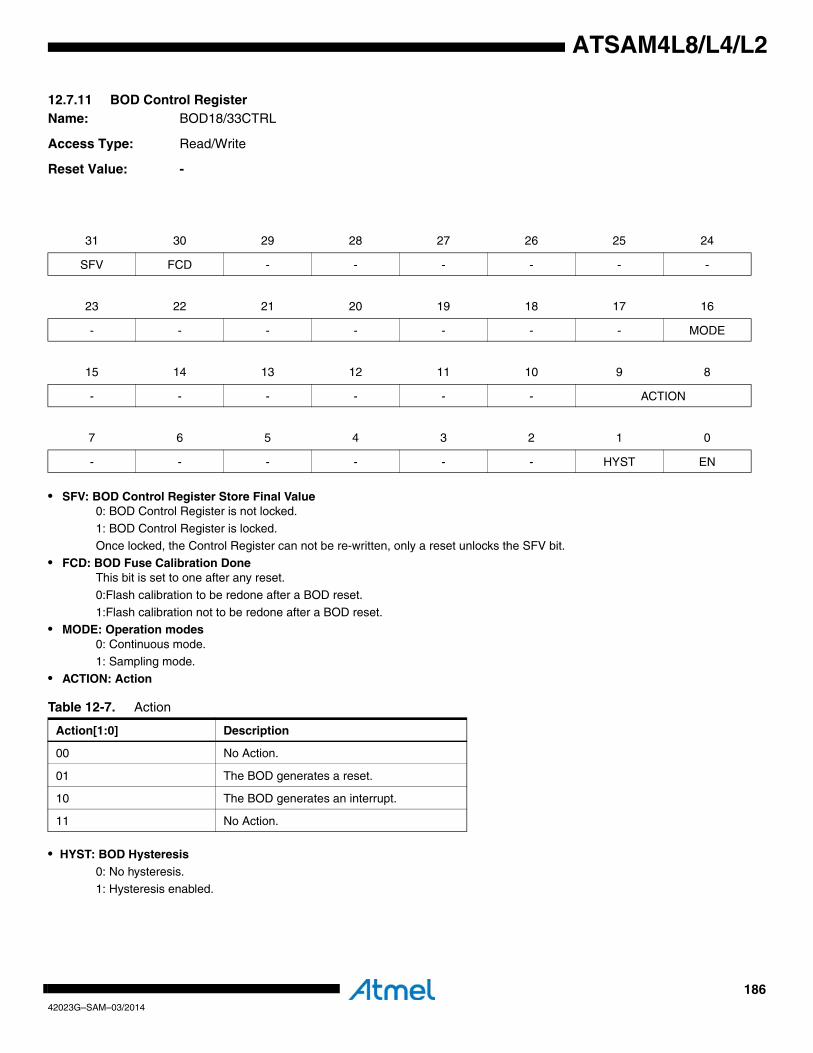
18642023G–SAM–03/2014
ATSAM4L8/L4/L2
12.7.11 BOD Control RegisterName: BOD18/33CTRL
Access Type: Read/Write
Reset Value: -
• SFV: BOD Control Register Store Final Value0: BOD Control Register is not locked.
1: BOD Control Register is locked.Once locked, the Control Register can not be re-written, only a reset unlocks the SFV bit.
• FCD: BOD Fuse Calibration DoneThis bit is set to one after any reset.
0:Flash calibration to be redone after a BOD reset.
1:Flash calibration not to be redone after a BOD reset.• MODE: Operation modes
0: Continuous mode.1: Sampling mode.
• ACTION: Action
• HYST: BOD Hysteresis0: No hysteresis.
1: Hysteresis enabled.
31 30 29 28 27 26 25 24
SFV FCD - - - - - -
23 22 21 20 19 18 17 16
- - - - - - - MODE
15 14 13 12 11 10 9 8
- - - - - - ACTION
7 6 5 4 3 2 1 0
- - - - - - HYST EN
Table 12-7. Action
Action[1:0] Description
00 No Action.
01 The BOD generates a reset.
10 The BOD generates an interrupt.
11 No Action.

18742023G–SAM–03/2014
ATSAM4L8/L4/L2
• EN: Enable0: The BOD is disabled.
1: The BOD is enabled.
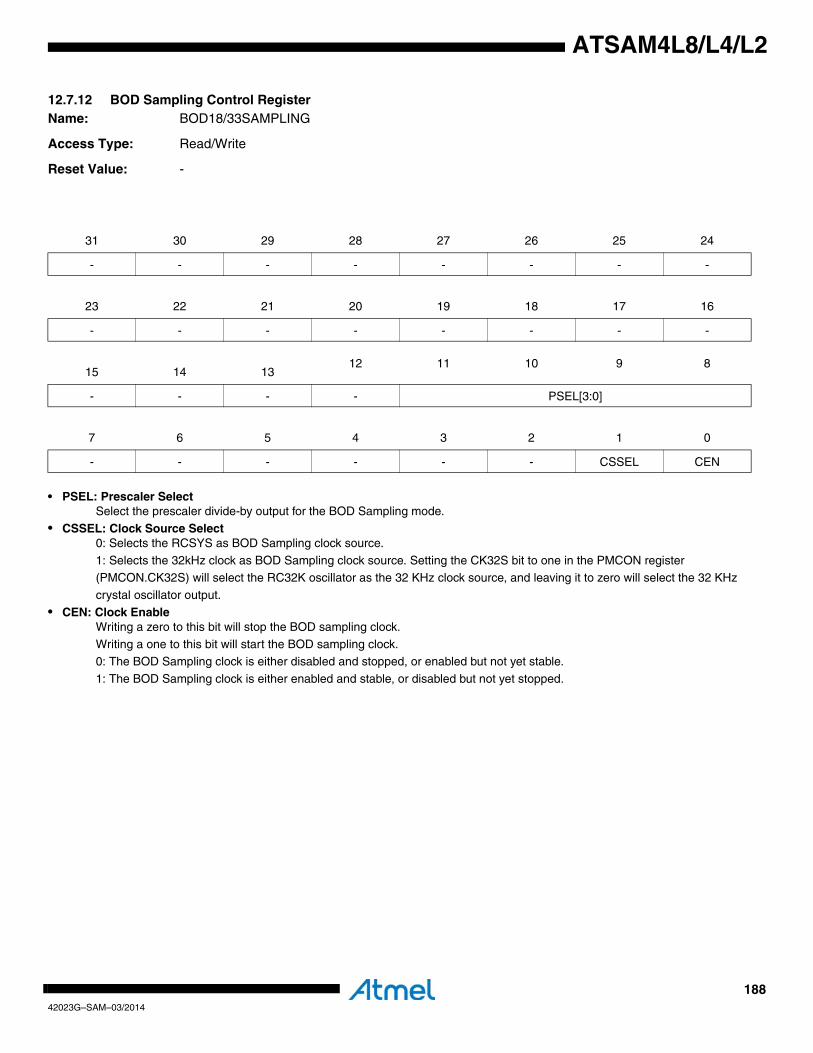
18842023G–SAM–03/2014
ATSAM4L8/L4/L2
12.7.12 BOD Sampling Control RegisterName: BOD18/33SAMPLING
Access Type: Read/Write
Reset Value: -
• PSEL: Prescaler SelectSelect the prescaler divide-by output for the BOD Sampling mode.
• CSSEL: Clock Source Select0: Selects the RCSYS as BOD Sampling clock source.
1: Selects the 32kHz clock as BOD Sampling clock source. Setting the CK32S bit to one in the PMCON register (PMCON.CK32S) will select the RC32K oscillator as the 32 KHz clock source, and leaving it to zero will select the 32 KHz
crystal oscillator output.
• CEN: Clock EnableWriting a zero to this bit will stop the BOD sampling clock.
Writing a one to this bit will start the BOD sampling clock.0: The BOD Sampling clock is either disabled and stopped, or enabled but not yet stable.
1: The BOD Sampling clock is either enabled and stable, or disabled but not yet stopped.
31 30 29 28 27 26 25 24
- - - - - - - -
23 22 21 20 19 18 17 16
- - - - - - - -
15 14 1312 11 10 9 8
- - - - PSEL[3:0]
7 6 5 4 3 2 1 0
- - - - - - CSSEL CEN
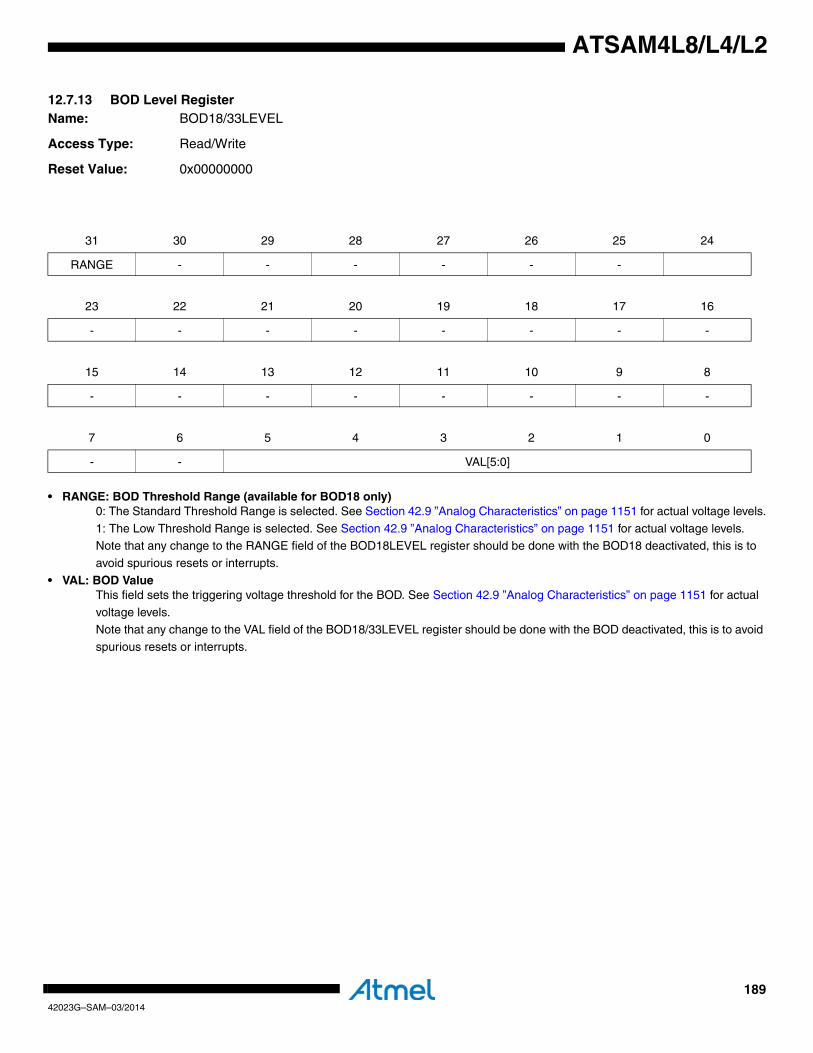
18942023G–SAM–03/2014
ATSAM4L8/L4/L2
12.7.13 BOD Level RegisterName: BOD18/33LEVEL
Access Type: Read/Write
Reset Value: 0x00000000
• RANGE: BOD Threshold Range (available for BOD18 only)0: The Standard Threshold Range is selected. See Section 42.9 ”Analog Characteristics” on page 1151 for actual voltage levels.
1: The Low Threshold Range is selected. See Section 42.9 ”Analog Characteristics” on page 1151 for actual voltage levels.Note that any change to the RANGE field of the BOD18LEVEL register should be done with the BOD18 deactivated, this is to
avoid spurious resets or interrupts.
• VAL: BOD ValueThis field sets the triggering voltage threshold for the BOD. See Section 42.9 ”Analog Characteristics” on page 1151 for actual
voltage levels.Note that any change to the VAL field of the BOD18/33LEVEL register should be done with the BOD deactivated, this is to avoid
spurious resets or interrupts.
31 30 29 28 27 26 25 24
RANGE - - - - - -
23 22 21 20 19 18 17 16
- - - - - - - -
15 14 13 12 11 10 9 8
- - - - - - - -
7 6 5 4 3 2 1 0
- - VAL[5:0]
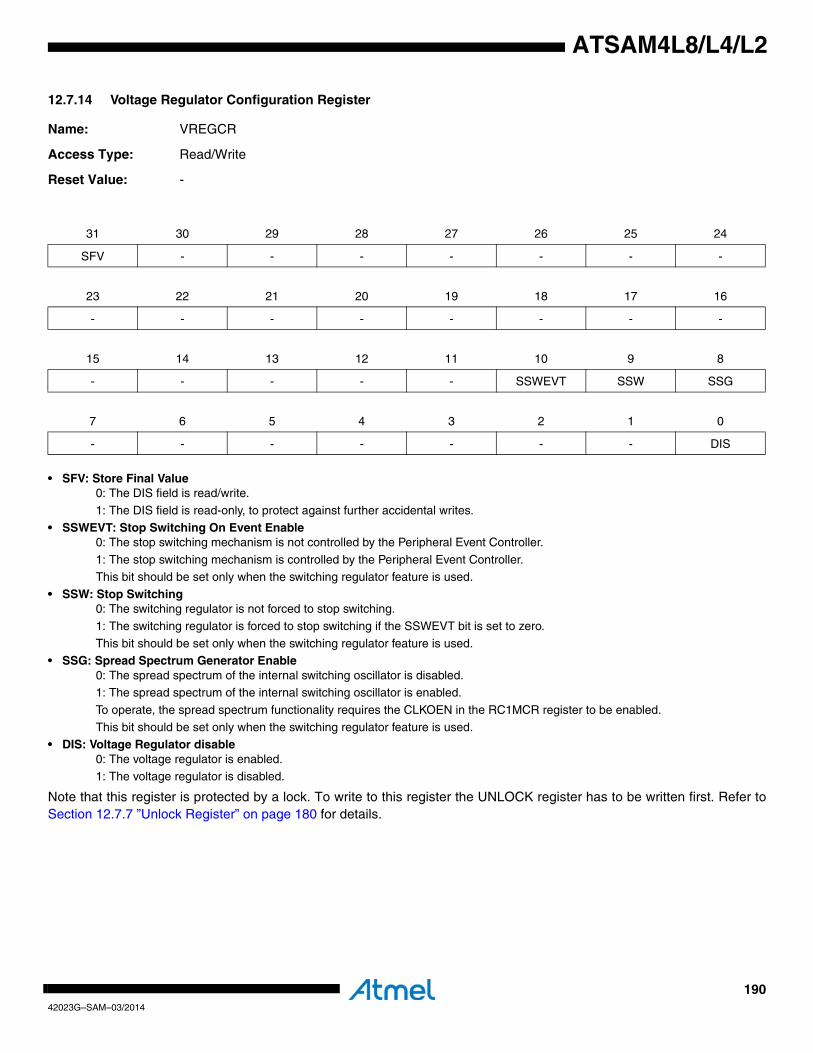
19042023G–SAM–03/2014
ATSAM4L8/L4/L2
12.7.14 Voltage Regulator Configuration Register
Name: VREGCR
Access Type: Read/Write
Reset Value: -
• SFV: Store Final Value0: The DIS field is read/write.
1: The DIS field is read-only, to protect against further accidental writes.
• SSWEVT: Stop Switching On Event Enable0: The stop switching mechanism is not controlled by the Peripheral Event Controller.
1: The stop switching mechanism is controlled by the Peripheral Event Controller.This bit should be set only when the switching regulator feature is used.
• SSW: Stop Switching0: The switching regulator is not forced to stop switching.
1: The switching regulator is forced to stop switching if the SSWEVT bit is set to zero.
This bit should be set only when the switching regulator feature is used.• SSG: Spread Spectrum Generator Enable
0: The spread spectrum of the internal switching oscillator is disabled.1: The spread spectrum of the internal switching oscillator is enabled.
To operate, the spread spectrum functionality requires the CLKOEN in the RC1MCR register to be enabled.
This bit should be set only when the switching regulator feature is used.• DIS: Voltage Regulator disable
0: The voltage regulator is enabled.1: The voltage regulator is disabled.
Note that this register is protected by a lock. To write to this register the UNLOCK register has to be written first. Refer toSection 12.7.7 ”Unlock Register” on page 180 for details.
31 30 29 28 27 26 25 24
SFV - - - - - - -
23 22 21 20 19 18 17 16
- - - - - - - -
15 14 13 12 11 10 9 8
- - - - - SSWEVT SSW SSG
7 6 5 4 3 2 1 0
- - - - - - - DIS
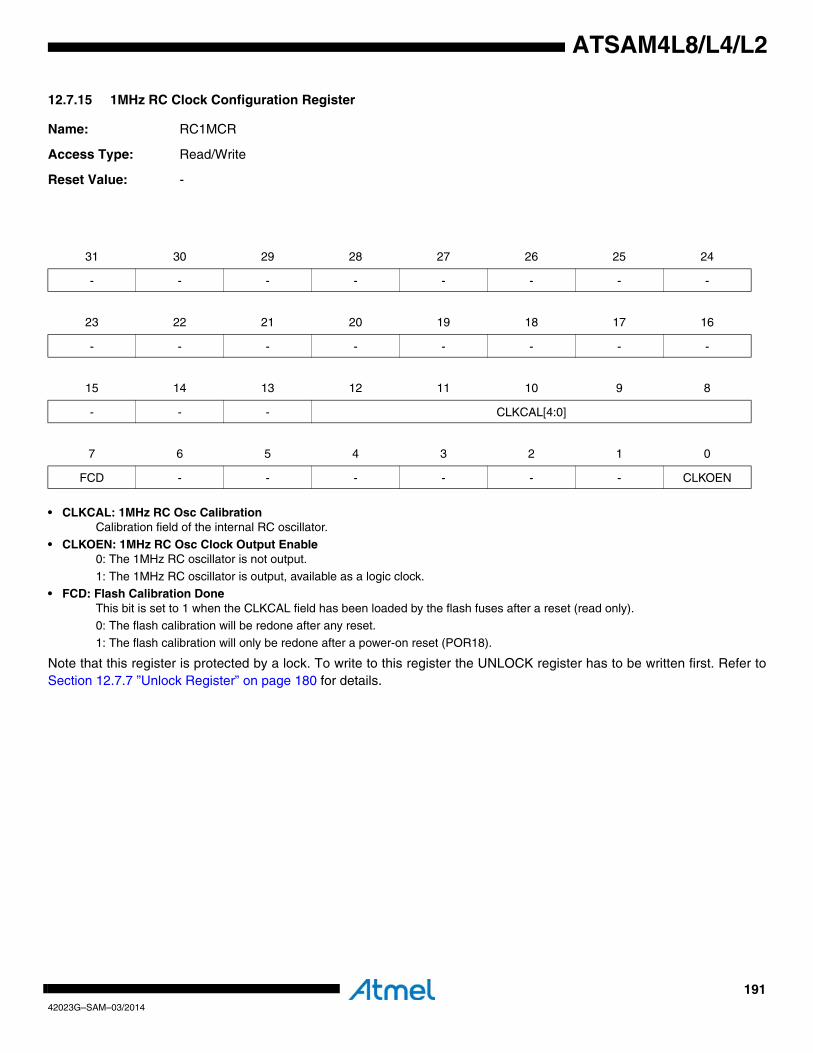
19142023G–SAM–03/2014
ATSAM4L8/L4/L2
12.7.15 1MHz RC Clock Configuration Register
Name: RC1MCR
Access Type: Read/Write
Reset Value: -
• CLKCAL: 1MHz RC Osc CalibrationCalibration field of the internal RC oscillator.
• CLKOEN: 1MHz RC Osc Clock Output Enable0: The 1MHz RC oscillator is not output.
1: The 1MHz RC oscillator is output, available as a logic clock.• FCD: Flash Calibration Done
This bit is set to 1 when the CLKCAL field has been loaded by the flash fuses after a reset (read only).0: The flash calibration will be redone after any reset.
1: The flash calibration will only be redone after a power-on reset (POR18).
Note that this register is protected by a lock. To write to this register the UNLOCK register has to be written first. Refer toSection 12.7.7 ”Unlock Register” on page 180 for details.
31 30 29 28 27 26 25 24
- - - - - - - -
23 22 21 20 19 18 17 16
- - - - - - - -
15 14 13 12 11 10 9 8
- - - CLKCAL[4:0]
7 6 5 4 3 2 1 0
FCD - - - - - - CLKOEN
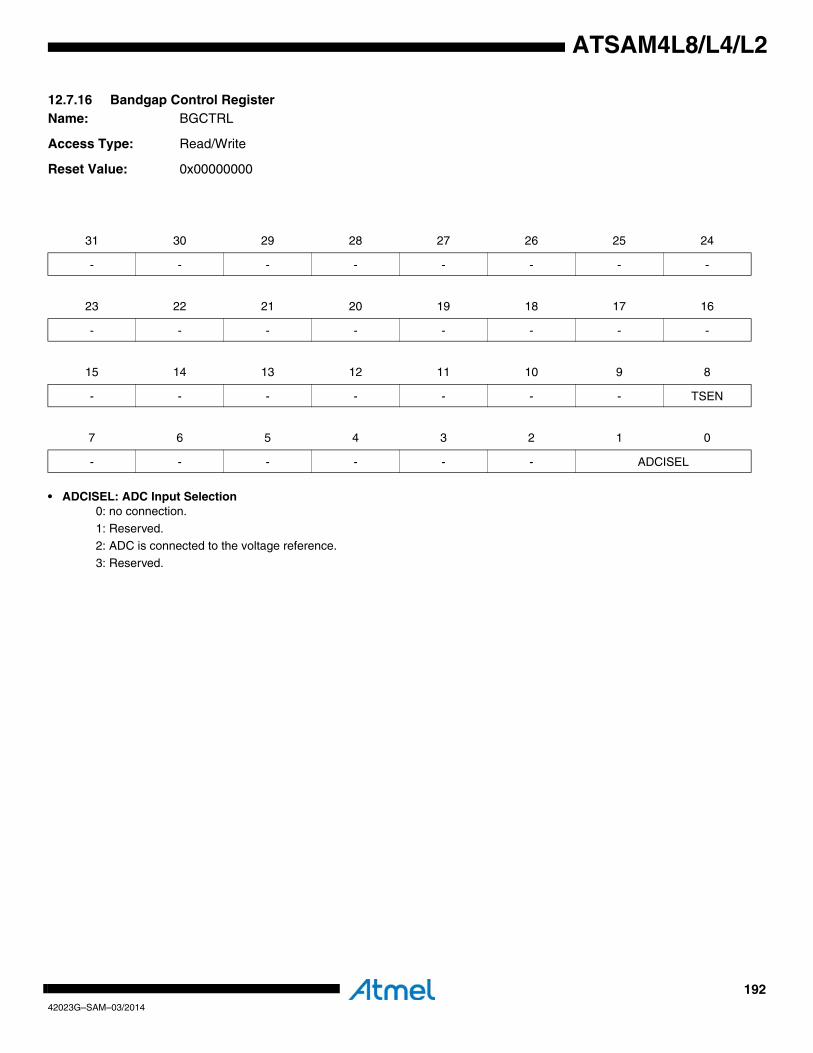
19242023G–SAM–03/2014
ATSAM4L8/L4/L2
12.7.16 Bandgap Control RegisterName: BGCTRL
Access Type: Read/Write
Reset Value: 0x00000000
• ADCISEL: ADC Input Selection0: no connection.
1: Reserved.2: ADC is connected to the voltage reference.
3: Reserved.
31 30 29 28 27 26 25 24
- - - - - - - -
23 22 21 20 19 18 17 16
- - - - - - - -
15 14 13 12 11 10 9 8
- - - - - - - TSEN
7 6 5 4 3 2 1 0
- - - - - - ADCISEL
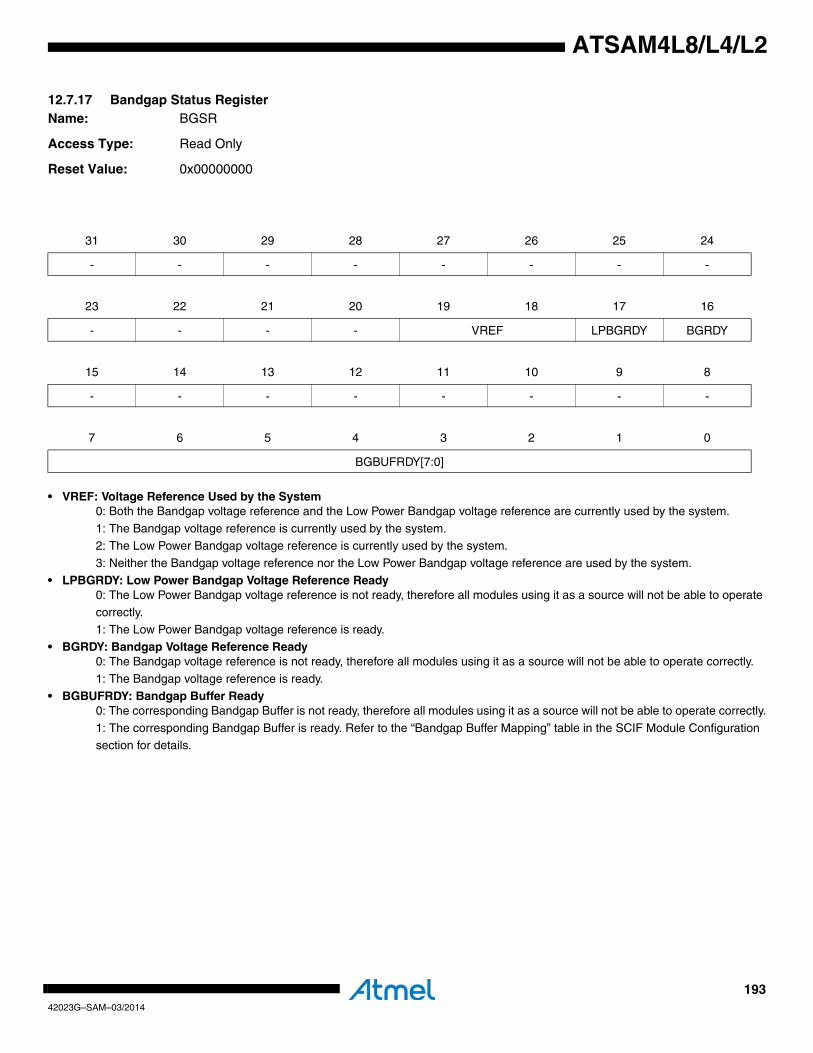
19342023G–SAM–03/2014
ATSAM4L8/L4/L2
12.7.17 Bandgap Status RegisterName: BGSR
Access Type: Read Only
Reset Value: 0x00000000
• VREF: Voltage Reference Used by the System0: Both the Bandgap voltage reference and the Low Power Bandgap voltage reference are currently used by the system.
1: The Bandgap voltage reference is currently used by the system.2: The Low Power Bandgap voltage reference is currently used by the system.
3: Neither the Bandgap voltage reference nor the Low Power Bandgap voltage reference are used by the system.
• LPBGRDY: Low Power Bandgap Voltage Reference Ready0: The Low Power Bandgap voltage reference is not ready, therefore all modules using it as a source will not be able to operate
correctly.1: The Low Power Bandgap voltage reference is ready.
• BGRDY: Bandgap Voltage Reference Ready0: The Bandgap voltage reference is not ready, therefore all modules using it as a source will not be able to operate correctly.
1: The Bandgap voltage reference is ready.
• BGBUFRDY: Bandgap Buffer Ready0: The corresponding Bandgap Buffer is not ready, therefore all modules using it as a source will not be able to operate correctly.
1: The corresponding Bandgap Buffer is ready. Refer to the “Bandgap Buffer Mapping” table in the SCIF Module Configuration section for details.
31 30 29 28 27 26 25 24
- - - - - - - -
23 22 21 20 19 18 17 16
- - - - VREF LPBGRDY BGRDY
15 14 13 12 11 10 9 8
- - - - - - - -
7 6 5 4 3 2 1 0
BGBUFRDY[7:0]

19442023G–SAM–03/2014
ATSAM4L8/L4/L2
12.7.18 Backup Register n
Name: BRn
Access Type: Read/Write
Reset Value: 0x00000000
This is a set of general-purpose read/write registers. Data stored in these registers is retained when the device is inBACKUP Power Save Mode.
Note that this registers are protected by a lock. To write to these registers the UNLOCK register has to be written first.Refer to Section 12.7.7 ”Unlock Register” on page 180 for details.
31 30 29 28 27 26 25 24
DATA[31:24]
23 22 21 20 19 18 17 16
DATA[23:16]
15 14 13 12 11 10 9 8
DATA[15:8]
7 6 5 4 3 2 1 0
DATA[7:0]

19542023G–SAM–03/2014
ATSAM4L8/L4/L2
12.7.19 Backup Register Interface Version RegisterName: BRIFBVERSION
Access Type: Read-only
Offset: 0x03E4
Reset Value: -
• VARIANT: Variant numberReserved. No functionality associated.
• VERSION: Version numberVersion number of the module. No functionality associated.
31 30 29 28 27 26 25 24
- - - - - - - -
23 22 21 20 19 18 17 16
- - - - VARIANT
15 14 13 12 11 10 9 8
- - - - VERSION[11:8]
7 6 5 4 3 2 1 0
VERSION[7:0]

19642023G–SAM–03/2014
ATSAM4L8/L4/L2
12.7.20 Bandgap Reference Interface Version Register
Name: BGREFIFBVERSION
Access Type: Read-only
Offset: 0x03E8
Reset Value: -
• VARIANT: Variant numberReserved. No functionality associated.
• VERSION: Version numberVersion number of the module. No functionality associated.
31 30 29 28 27 26 25 24
- - - - - - - -
23 22 21 20 19 18 17 16
- - - - VARIANT
15 14 13 12 11 10 9 8
- - - - VERSION[11:8]
7 6 5 4 3 2 1 0
VERSION[7:0]
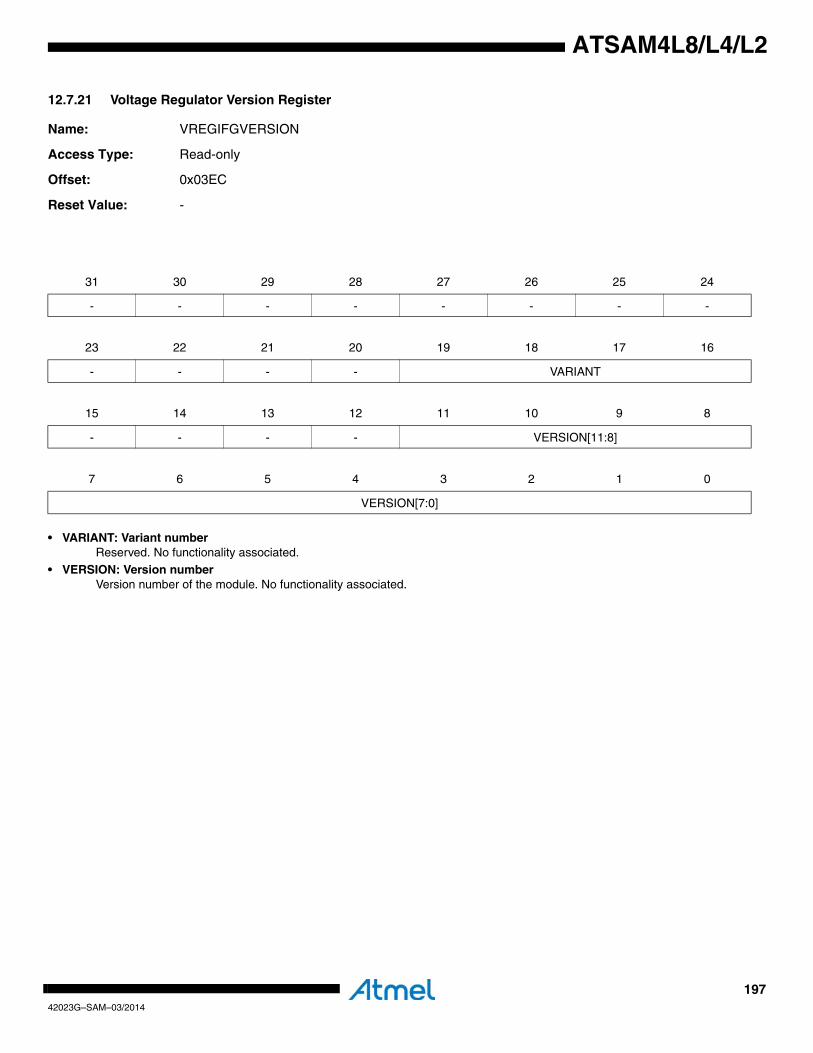
19742023G–SAM–03/2014
ATSAM4L8/L4/L2
12.7.21 Voltage Regulator Version Register
Name: VREGIFGVERSION
Access Type: Read-only
Offset: 0x03EC
Reset Value: -
• VARIANT: Variant numberReserved. No functionality associated.
• VERSION: Version numberVersion number of the module. No functionality associated.
31 30 29 28 27 26 25 24
- - - - - - - -
23 22 21 20 19 18 17 16
- - - - VARIANT
15 14 13 12 11 10 9 8
- - - - VERSION[11:8]
7 6 5 4 3 2 1 0
VERSION[7:0]
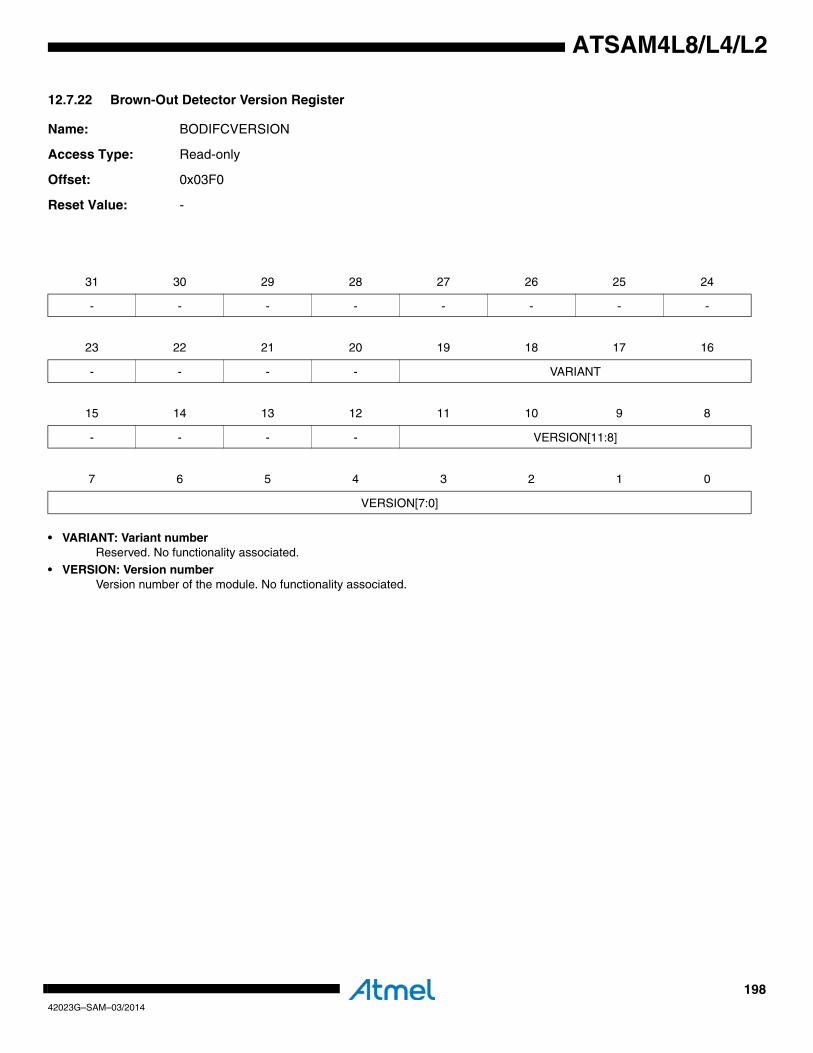
19842023G–SAM–03/2014
ATSAM4L8/L4/L2
12.7.22 Brown-Out Detector Version Register
Name: BODIFCVERSION
Access Type: Read-only
Offset: 0x03F0
Reset Value: -
• VARIANT: Variant numberReserved. No functionality associated.
• VERSION: Version numberVersion number of the module. No functionality associated.
31 30 29 28 27 26 25 24
- - - - - - - -
23 22 21 20 19 18 17 16
- - - - VARIANT
15 14 13 12 11 10 9 8
- - - - VERSION[11:8]
7 6 5 4 3 2 1 0
VERSION[7:0]

19942023G–SAM–03/2014
ATSAM4L8/L4/L2
12.7.23 32kHz RC Oscillator Version Register
Name: RC32KIFBVERSION
Access Type: Read-only
Offset: 0x03F4
Reset Value: -
• VARIANT: Variant numberReserved. No functionality associated.
• VERSION: Version numberVersion number of the module. No functionality associated.
31 30 29 28 27 26 25 24
- - - - - - - -
23 22 21 20 19 18 17 16
- - - - VARIANT
15 14 13 12 11 10 9 8
- - - - VERSION[11:8]
7 6 5 4 3 2 1 0
VERSION[7:0]

20042023G–SAM–03/2014
ATSAM4L8/L4/L2
12.7.24 32kHz Oscillator Version Register
Name: OSC32IFAVERSION
Access Type: Read-only
Offset: 0x03F8
Reset Value: -
• VARIANT: Variant numberReserved. No functionality associated.
• VERSION: Version numberVersion number of the module. No functionality associated.
31 30 29 28 27 26 25 24
- - - - - - - -
23 22 21 20 19 18 17 16
- - - - VARIANT
15 14 13 12 11 10 9 8
- - - - VERSION[11:8]
7 6 5 4 3 2 1 0
VERSION[7:0]

20142023G–SAM–03/2014
ATSAM4L8/L4/L2
12.7.25 BSCIF Version Register
Name: VERSION
Access Type: Read-only
Offset: 0x03FC
Reset Value: -
• VARIANT: Variant numberReserved. No functionality associated.
• VERSION: Version numberVersion number of the module. No functionality associated.
31 30 29 28 27 26 25 24
- - - - - - - -
23 22 21 20 19 18 17 16
- - - - VARIANT
15 14 13 12 11 10 9 8
- - - - VERSION[11:0]
7 6 5 4 3 2 1 0
VERSION[7:0]
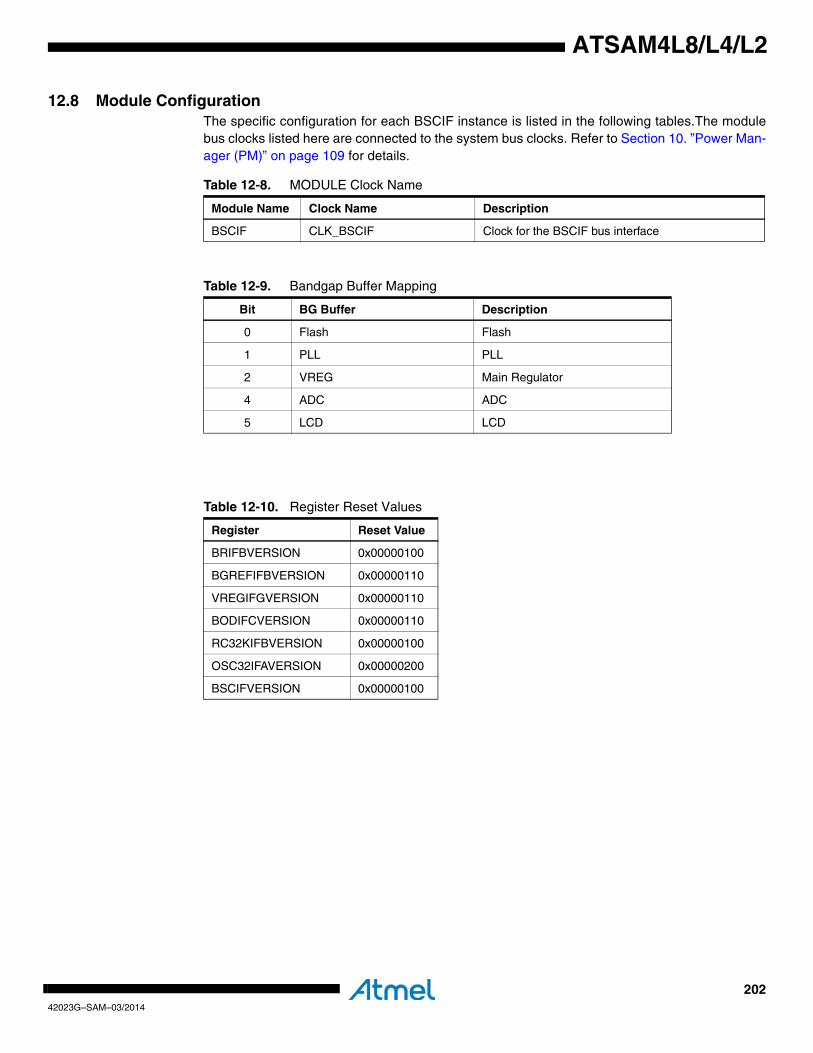
20242023G–SAM–03/2014
ATSAM4L8/L4/L2
12.8 Module ConfigurationThe specific configuration for each BSCIF instance is listed in the following tables.The modulebus clocks listed here are connected to the system bus clocks. Refer to Section 10. ”Power Man-ager (PM)” on page 109 for details.
Table 12-8. MODULE Clock Name
Module Name Clock Name Description
BSCIF CLK_BSCIF Clock for the BSCIF bus interface
Table 12-9. Bandgap Buffer Mapping
Bit BG Buffer Description
0 Flash Flash
1 PLL PLL
2 VREG Main Regulator
4 ADC ADC
5 LCD LCD
Table 12-10. Register Reset Values
Register Reset Value
BRIFBVERSION 0x00000100
BGREFIFBVERSION 0x00000110
VREGIFGVERSION 0x00000110
BODIFCVERSION 0x00000110
RC32KIFBVERSION 0x00000100
OSC32IFAVERSION 0x00000200
BSCIFVERSION 0x00000100
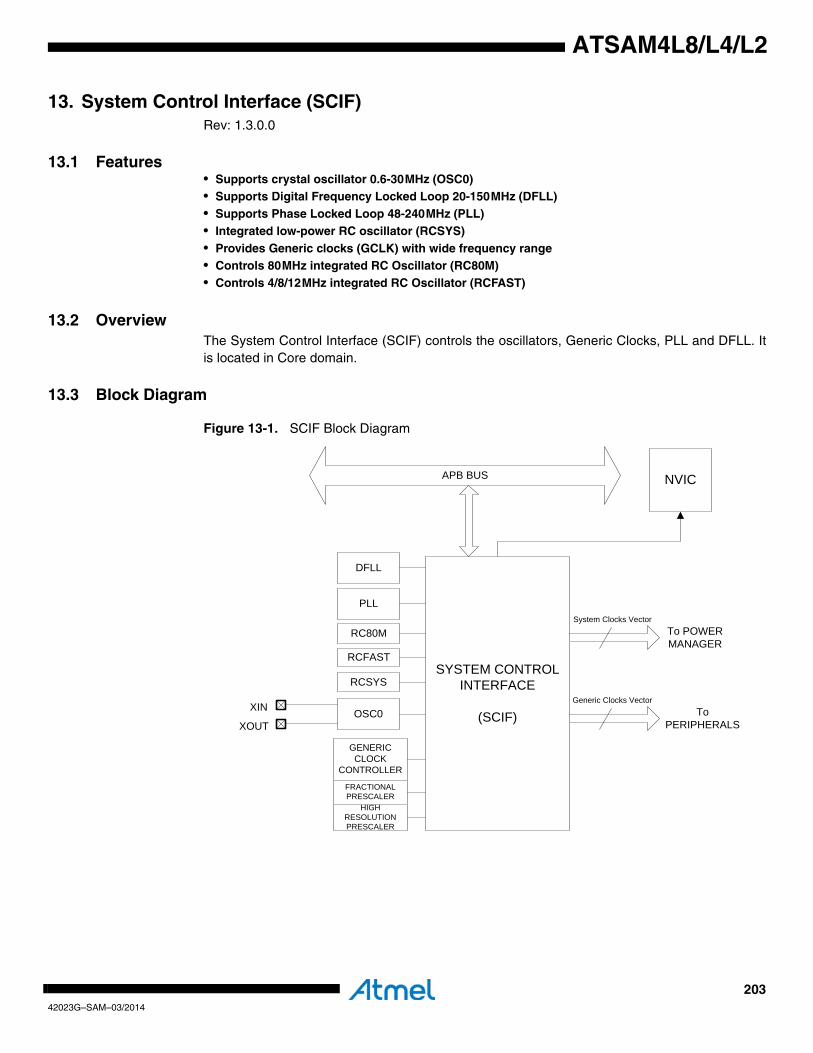
20342023G–SAM–03/2014
ATSAM4L8/L4/L2
13. System Control Interface (SCIF)Rev: 1.3.0.0
13.1 Features• Supports crystal oscillator 0.6-30MHz (OSC0)• Supports Digital Frequency Locked Loop 20-150MHz (DFLL)• Supports Phase Locked Loop 48-240MHz (PLL)• Integrated low-power RC oscillator (RCSYS)• Provides Generic clocks (GCLK) with wide frequency range• Controls 80MHz integrated RC Oscillator (RC80M)• Controls 4/8/12MHz integrated RC Oscillator (RCFAST)
13.2 OverviewThe System Control Interface (SCIF) controls the oscillators, Generic Clocks, PLL and DFLL. Itis located in Core domain.
13.3 Block Diagram
Figure 13-1. SCIF Block Diagram
OSC0
RCSYS
XIN
XOUT
SYSTEM CONTROL INTERFACE
(SCIF)
APB BUS
PLL
DFLL
NVIC
RCFAST
RC80M
GENERIC CLOCK
CONTROLLER
FRACTIONAL PRESCALER
HIGH RESOLUTION PRESCALER
To POWER MANAGER
System Clocks Vector
To PERIPHERALS
Generic Clocks Vector
20442023G–SAM–03/2014
ATSAM4L8/L4/L2
13.4 I/O Lines Description
13.5 Product DependenciesIn order to use this module, other parts of the system must be configured correctly, as describedbelow.
13.5.1 I/O LinesThe SCIF provides a number of generic clock outputs, which can be connected to output pins,multiplexed with GPIO lines. The user must first program the GPIO controller to assign thesepins to their peripheral function. If the I/O pins of the SCIF are not used by the application, theycan be used for other purposes by the GPIO controller. Oscillator pins are also multiplexed withGPIO. When oscillators are used, the related pins are controlled directly by the SCIF, overridingGPIO settings.
13.5.2 Power ManagementOscillators are turned off in some Power Save modes and turned automatically on when thedevice wakes up.
13.5.3 ClocksThe SCIF controls some oscillators in the device. The oscillators can be used as source for theCPU and peripherals, selection of source is done in the Power Manager. The oscillator can alsobe used as source for generic clocks.
13.5.4 InterruptsThe SCIF interrupt request line is connected to the NVIC. Using the SCIF interrupt requires theNVIC to be programmed first.
13.5.5 Debug OperationThe SCIF does not interact with debug operations.
13.6 Functional Description
13.6.1 Oscillator (OSC) OperationRev: 1.1.4.0
The main oscillator (OSCn) is designed to be used with an external 0.6 to 30MHz crystal andtwo biasing capacitors, as shown in the Electrical Characteristics chapter, or with an externalclock connected to the XIN. The oscillator can be used as source for the main clock in thedevice, as described in the Power Manager chapter. The oscillator can be used as source for thegeneric clocks, as described in the Generic Clocks section.
Table 13-1. I/O Lines Description
Pin Name Pin Description Type
XIN Crystal Input Analog/Digital
XOUT Crystal Output Analog
GCLK3-GCLK0 Generic Clock Output Output
GCLK_IN1-GCLK_IN0 Generic Clock Input Input
20542023G–SAM–03/2014
ATSAM4L8/L4/L2
The oscillator is disabled by default after reset. When the oscillator is disabled, the XIN andXOUT pins can be used as general purpose I/Os. When the oscillator is enabled, the XIN andXOUT pins are controlled directly by the SCIF, overriding GPIO settings. When the oscillator isconfigured to use an external clock, the clock must be applied to the XIN pin while the XOUT pincan be used as general purpose I/O.
The oscillator is enabled by writing a one to the Oscillator Enable bit in the Oscillator Control reg-ister (OSCCTRLn.OSCEN). Operation mode (external clock or crystal) is selected by writing tothe Oscillator Mode bit in OSCCTRLn (OSCCTRLn.MODE). The oscillator is automatically dis-abled in certain sleep modes to reduce power consumption, as described in the Power Managerchapter.
After a hard reset, or when waking up from a sleep mode where the oscillators were disabled,the oscillator will need a certain amount of time to stabilize on the correct frequency. This start-up time can be set in the OSCCTRLn register.
The SCIF masks the oscillator outputs during the start-up time, to ensure that no unstable clockspropagate to the digital logic.
The OSCn Ready bit in the Power and Clock Status Register (PCLKSR.OSCnRDY) is set whenthe oscillator is stable and ready to be used as clock source. An interrupt can be generated on azero-to-one transition on OSCnRDY if the OSCnRDY bit in the Interrupt Mask Register(IMR.OSCnRDY) is set. This bit is set by writing a one to the corresponding bit in the InterruptEnable Register (IER.OSCnRDY).
13.6.2 PLL OperationRev: 1.1.2.0
The device contains one Phase Locked Loop (PLL), which is controlled by the Phase LockedLoop Interface (PLLIF). The PLL is disabled by default, but can be enabled to provide high fre-quency source clocks for synchronous or generic clocks. The PLL can use different clocksources as reference clock, refer to the “PLL Clock Sources” table in the SCIF Module Configu-ration section for details. The PLL output is divided by a multiplication factor, and the PLLcompares the phase of the resulting clock to the reference clock. The PLL will adjust its outputfrequency until the two compared clocks phases are equal, thus locking the output frequency toa multiple of the reference clock frequency.
When the PLL is switched on, or when changing the clock source or multiplication factor for thePLL, the PLL is unlocked and the output frequency is undefined. The PLL clock for the digitallogic is automatically masked when the PLL is unlocked, to prevent the connected digital logicfrom receiving a too high frequency and thus become unstable.
The PLL can be configured by writing the PLL Control Register (PLLn). To prevent unexpectedwrites due to software bugs, write access to the PLLn register is protected by a locking mecha-nism, for details refer to Section 13.7.7 ”Unlock Register” on page 229.
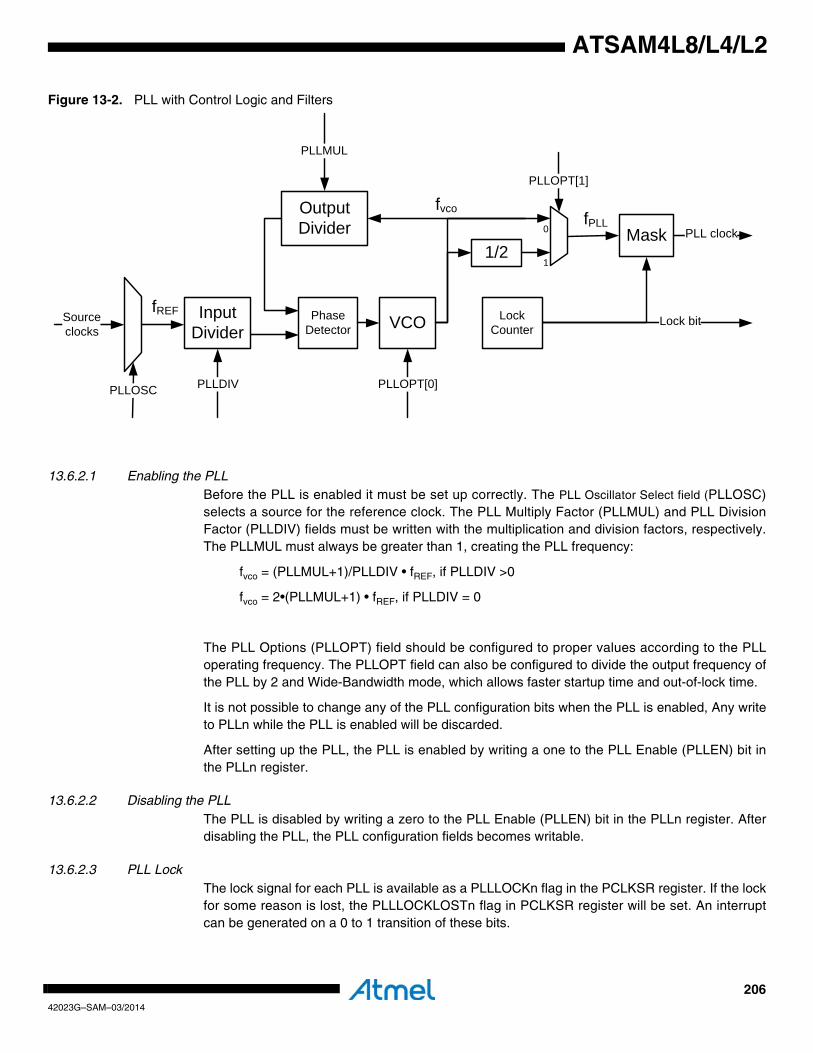
20642023G–SAM–03/2014
ATSAM4L8/L4/L2
Figure 13-2. PLL with Control Logic and Filters
13.6.2.1 Enabling the PLLBefore the PLL is enabled it must be set up correctly. The PLL Oscillator Select field (PLLOSC)selects a source for the reference clock. The PLL Multiply Factor (PLLMUL) and PLL DivisionFactor (PLLDIV) fields must be written with the multiplication and division factors, respectively.The PLLMUL must always be greater than 1, creating the PLL frequency:
fvco = (PLLMUL+1)/PLLDIV • fREF, if PLLDIV >0
fvco = 2•(PLLMUL+1) • fREF, if PLLDIV = 0
The PLL Options (PLLOPT) field should be configured to proper values according to the PLLoperating frequency. The PLLOPT field can also be configured to divide the output frequency ofthe PLL by 2 and Wide-Bandwidth mode, which allows faster startup time and out-of-lock time.
It is not possible to change any of the PLL configuration bits when the PLL is enabled, Any writeto PLLn while the PLL is enabled will be discarded.
After setting up the PLL, the PLL is enabled by writing a one to the PLL Enable (PLLEN) bit inthe PLLn register.
13.6.2.2 Disabling the PLLThe PLL is disabled by writing a zero to the PLL Enable (PLLEN) bit in the PLLn register. Afterdisabling the PLL, the PLL configuration fields becomes writable.
13.6.2.3 PLL LockThe lock signal for each PLL is available as a PLLLOCKn flag in the PCLKSR register. If the lockfor some reason is lost, the PLLLOCKLOSTn flag in PCLKSR register will be set. An interruptcan be generated on a 0 to 1 transition of these bits.
Phase Detector
Output Divider
Source clocks
PLLOSC PLLOPT[0]
PLLMUL
Lock bit
Mask PLL clock
Input Divider
PLLDIV
1/2
PLLOPT[1]
0
1
VCO
fvcofPLL
LockCounter
fREF

20742023G–SAM–03/2014
ATSAM4L8/L4/L2
13.6.3 Digital Frequency Locked Loop (DFLL) OperationRev.: 1.1.0.0
The number of DFLLs is device specific. A specific DFLL is referred to as DFLLx, where x canbe any number from 0 to n, where n refers to the last DFLL instance. Refer to the module config-uration section for details. The DFLLx is controlled by the corresponding DFLLx registers. DFLLxis disabled by default, but can be enabled to provide a high-frequency source clock for synchro-nous and generic clocks.
Features:
• Internal oscillator with no external components
• 20-150MHz output frequency
• Can operate standalone as a high-frequency programmable oscillator in open loop mode
• Can operate as an accurate frequency multiplier against a known frequency in closed loop mode
• Optional spread-spectrum clock generation
• Very high-frequency multiplication supported - can generate all frequencies from a 32KHz reference clock
DFLLx can operate in both open loop mode and closed loop mode. In closed loop mode a low-frequency clock with high accuracy can be used as reference clock to get high accuracy on theoutput clock (CLK_DFLLx).
To prevent unexpected writes due to software bugs, write access to the configuration registers isprotected by a locking mechanism. For details refer to Section 13.7.7 ”Unlock Register” on page229.
Figure 13-3. Block Diagram
CO ARSE
FIN E
5
8
CLK_DFLLxDFLLx
M UL16
C LK_D FLLx_R EF
FREQUENCY TUNER
DFLLxLO C KC
D FLLxLO C KF
D FLLxTR ACKO OB
CSTEPFSTEP
5+8
CALIB
RANG E2
4
20842023G–SAM–03/2014
ATSAM4L8/L4/L2
13.6.3.1 Enabling the DFLLDFLLx is enabled by writing a one to the Enable bit in the DFLLx Configuration Register (DFLLx-CONF.EN). No other bits or fields in DFLLxCONF must be changed simultaneously, or beforeDFLLx is enabled.
13.6.3.2 Internal SynchronizationDue to multiple clock domains, values in the DFLLx configuration registers need to be synchro-nized to other clock domains. The status of this synchronization can be read from the Power andClocks Status Register (PCLKSR). Before writing to any of the DFLLx configuration registers,the user must check that the DFLLx Ready bit in PCLKSR is one (PCLKSR.DFLLxRDY). Whenthis bit is set, the DFLLx can be configured, and CLK_DFLLx is ready to be used. Any write toany of the DFLLx configuration register while DFLLxRDY is zero will be ignored. An interrupt canbe generated on a zero-to-one transition of DFLLxRDY.
Before reading the value in any of the DFLLx configuration registers a one must be written to theSynchronization bit in the DFLLx Synchronization Register (DFLLxSYNC.SYNC). The DFLLxconfiguration registers are ready to be read when PCLKSR.DFLLxRDY is set.
13.6.3.3 Disabling the DFLLDFLLx is disabled by writing a zero to DFLLxCONF.EN. No other bits or fields in DFLLxCONFmust be changed simultaneously.
13.6.3.4 Open Loop OperationAfter enabling DFLLx, open loop mode is selected. When operating in open loop mode the out-put frequency of the DFLLx will be determined by the values written to the Calibration Value fieldand the Range Value field in DFLLxCONF (DFLLxCONF.CALIB and DFLLxCONF.RANGE), andthe Coarse Value field and the Fine Value field in the DFLLx Value Register (DFLLxVAL.COARSand DFLLxVAL.FINE). CALIB is used for process calibration, and should not be changed by theuser. It is loaded with a factory defined value stored in the Flash fuses. The Fuse CalibrationDone bit in DFLLxCONF (DFLLXCONF.FCD) is set when the fuse values are loaded. Writing azero to this bit will reload the CALIB value from the Flash fuses after any reset. Refer to the FuseSettings chapter for more details about how to program the fuses. RANGE selects the frequencyrange of the DFLLx, see Table 13-2.
It is possible to change the value of DFLLxCONF.CALIB, DFLLxCONF.RANGE, DFLLx-VAL.COARSE, and DFLLxVAL.FINE, and thereby the output frequency of the DFLLx outputclock, CLK_DFLLx, while the DFLL is enabled and in use.
CLK_DFLLx is ready to be used when PCLKSR.DFLLxRDY is set after enabling the DFLLx.
The frequency range in open loop mode is 20-150MHz, but maximum frequency can be higher,and the minimum frequency can be lower. The best way to start the DFLL at a specific frequency
Table 13-2. DFLL Frequency Range
RANGE Frequency range [MHz]
0 96-150
1 50-110
2 25-55
3 20-30
20942023G–SAM–03/2014
ATSAM4L8/L4/L2
in open loop mode is to first configure it for closed loop mode, see Section 13.6.3.5. When a lockis achieved, read back the COARSE and FINE values and switch to open loop mode using thesevalues. An alternative approach is to use the Frequency Meter (FREQM) to monitor the DFLLfrequency and adjust the COARSE and FINE values based on measurement results form theFREQM. Refer to the FREQM chapter for more information on how to use it. Note that the outputfrequency of the DFLL will drift when in open loop mode due to temperature and voltagechanges. Refer to Section 42. ”Electrical Characteristics” on page 1121 for details.
13.6.3.5 Closed Loop OperationDFLLx must be correctly configured before closed loop operation can be enabled. After enablingDFLLx, the DFLLx must be configured in the following way:
1. Enable and select a reference clock (CLK_DFLLx_REF). CLK_DFLLx_REF is a generic clock, refer to Generic Clocks section for details.
2. Write an appropriate value to DFLLxCONF.RANGE to choose desired range of the out-put frequency.
3. Select the multiplication factor in the Multiply Factor field in the DFLLx Multiplier Regis-ter (DFLLxMUL.MUL). Care must be taken when choosing MUL so the output frequency does not exceed the maximum frequency of the device.
4. Select the maximum step size allowed in finding the COARSE and FINE values by writ-ing the appropriate values to the Coarse Maximum Step field and Fine Maximum Step field in the DFLLx Maximum Step Register (DFLLxSTEP.CSTEP and DFLLx-STEP.FSTEP). A small step size will ensure low overshoot on the output frequency, but can typically result in longer lock times. A high value might give a big overshoot, but can typically give faster locking. DFLLxSTEP.CSTEP and DFLLxSTEP.FSTEP must not be higher than 50% of the maximum value of DFLLxVAL.COARSE and DFLLxVAL.FINE respectively.
5. Optional: Select start values for COARSE and FINE by writing the appropriate values to DFLLxVAL.COARSE and DFLLxVAL.FINE respectively. Selecting values for COARSE and FINE that are close to the final values and small step sizes for CSTEP and FSTEP will reduce the time required to achieving lock on COARSE and FINE. If this step is skipped, COARSE will start at its current value and FINE will start at half its maximum value.
6. Start the closed loop mode by writing a one to Mode Selection bit in DFLLxCONF (DFLLxCONF.MODE).
The frequency of CLK_DFLLx (fCLK_DFLLx) is given by:
where fCLK_DFLLx_REF is the frequency of the reference clock (CLK_DFLLx_REF). DFLLx-VAL.COARSE and DFLLxVAL.FINE are read-only in closed loop mode, and are controlled bythe frequency tuner shown in Figure 13-3 to meet user specified frequency.
In closed loop mode, the value in DFLLxVAL.COARSE is used by the frequency tuner as a start-ing point for COARSE and half the maximum value of FINE will be used as a starting point forFINE. Writing DFLLxVAL.COARSE to a value close to the final value before entering closed loopmode will reduce the time needed to get a lock on COARSE. This can be done both before orafter writing the multiplication value to DFLLxMUL.MUL. If this is done after writing DFLLx-MUL.MUL, the value written to DFLLxVAL.FINE will also be used as a starting point for FINEinstead of the default behavior which is to use half the maximum value of FINE.
fCLK_DFLLx DFLLxMUL.MUL fCLK_DFLLx_REF⋅=
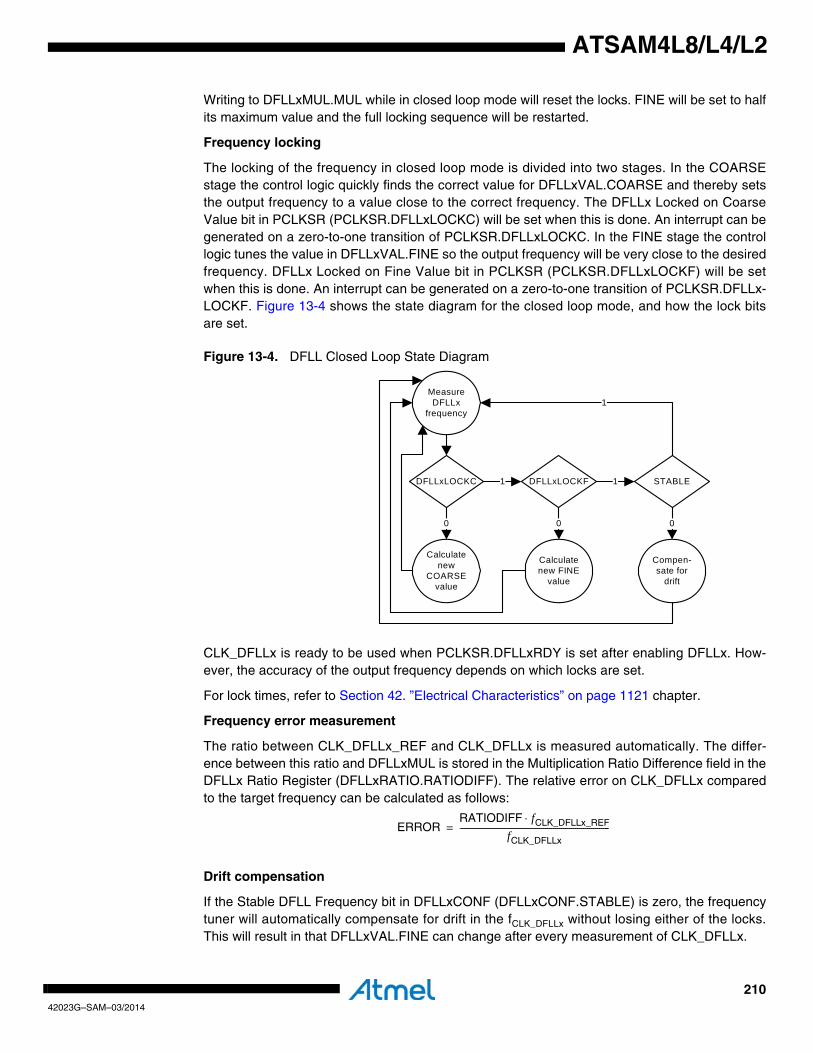
21042023G–SAM–03/2014
ATSAM4L8/L4/L2
Writing to DFLLxMUL.MUL while in closed loop mode will reset the locks. FINE will be set to halfits maximum value and the full locking sequence will be restarted.
Frequency locking
The locking of the frequency in closed loop mode is divided into two stages. In the COARSEstage the control logic quickly finds the correct value for DFLLxVAL.COARSE and thereby setsthe output frequency to a value close to the correct frequency. The DFLLx Locked on CoarseValue bit in PCLKSR (PCLKSR.DFLLxLOCKC) will be set when this is done. An interrupt can begenerated on a zero-to-one transition of PCLKSR.DFLLxLOCKC. In the FINE stage the controllogic tunes the value in DFLLxVAL.FINE so the output frequency will be very close to the desiredfrequency. DFLLx Locked on Fine Value bit in PCLKSR (PCLKSR.DFLLxLOCKF) will be setwhen this is done. An interrupt can be generated on a zero-to-one transition of PCLKSR.DFLLx-LOCKF. Figure 13-4 shows the state diagram for the closed loop mode, and how the lock bitsare set.
Figure 13-4. DFLL Closed Loop State Diagram
CLK_DFLLx is ready to be used when PCLKSR.DFLLxRDY is set after enabling DFLLx. How-ever, the accuracy of the output frequency depends on which locks are set.
For lock times, refer to Section 42. ”Electrical Characteristics” on page 1121 chapter.
Frequency error measurement
The ratio between CLK_DFLLx_REF and CLK_DFLLx is measured automatically. The differ-ence between this ratio and DFLLxMUL is stored in the Multiplication Ratio Difference field in theDFLLx Ratio Register (DFLLxRATIO.RATIODIFF). The relative error on CLK_DFLLx comparedto the target frequency can be calculated as follows:
Drift compensation
If the Stable DFLL Frequency bit in DFLLxCONF (DFLLxCONF.STABLE) is zero, the frequencytuner will automatically compensate for drift in the fCLK_DFLLx without losing either of the locks.This will result in that DFLLxVAL.FINE can change after every measurement of CLK_DFLLx.
Measure DFLLx
frequency
Calculate new
COARSE value
DFLLxLOCKC
0
Calculate new FINE
value
DFLLxLOCKF
0
1
1
STABLE1
Compen-sate for
drift
0
ERRORRATIODIFF fCLK_DFLLx_REF⋅
fCLK_DFLLx---------------------------------------------------------------------------=
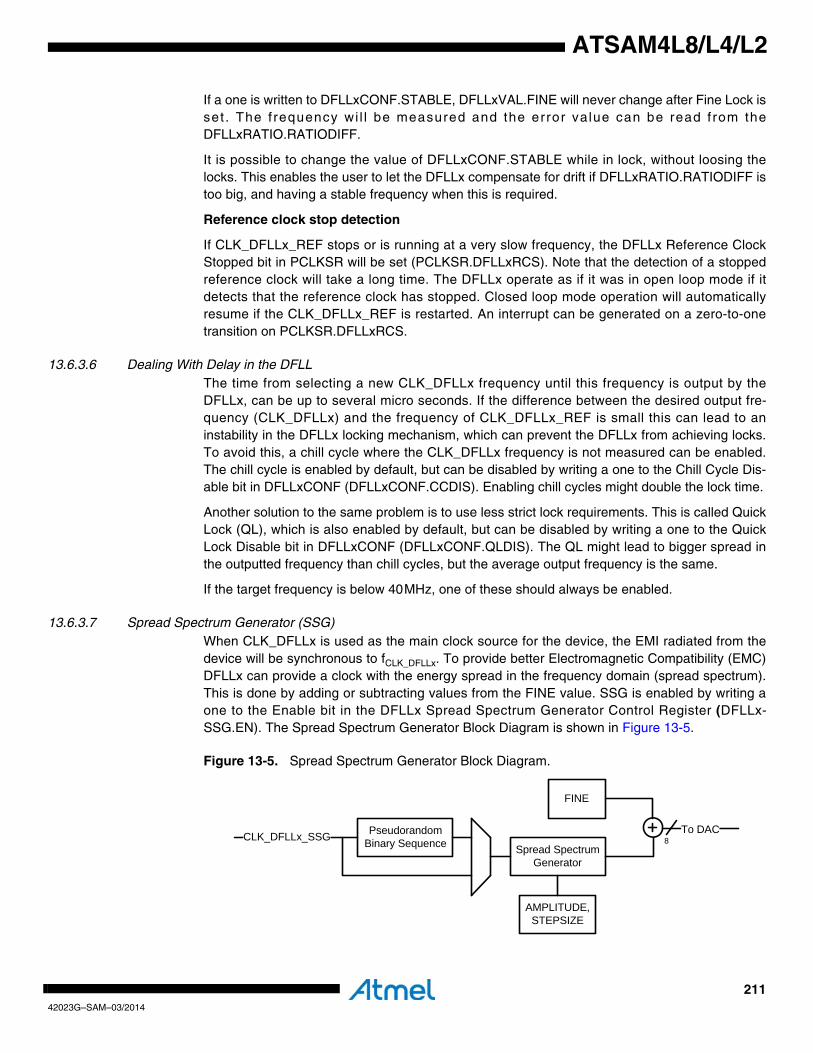
21142023G–SAM–03/2014
ATSAM4L8/L4/L2
If a one is written to DFLLxCONF.STABLE, DFLLxVAL.FINE will never change after Fine Lock isset . The f requency wi l l be measured and the error value can be read f rom theDFLLxRATIO.RATIODIFF.
It is possible to change the value of DFLLxCONF.STABLE while in lock, without loosing thelocks. This enables the user to let the DFLLx compensate for drift if DFLLxRATIO.RATIODIFF istoo big, and having a stable frequency when this is required.
Reference clock stop detection
If CLK_DFLLx_REF stops or is running at a very slow frequency, the DFLLx Reference ClockStopped bit in PCLKSR will be set (PCLKSR.DFLLxRCS). Note that the detection of a stoppedreference clock will take a long time. The DFLLx operate as if it was in open loop mode if itdetects that the reference clock has stopped. Closed loop mode operation will automaticallyresume if the CLK_DFLLx_REF is restarted. An interrupt can be generated on a zero-to-onetransition on PCLKSR.DFLLxRCS.
13.6.3.6 Dealing With Delay in the DFLLThe time from selecting a new CLK_DFLLx frequency until this frequency is output by theDFLLx, can be up to several micro seconds. If the difference between the desired output fre-quency (CLK_DFLLx) and the frequency of CLK_DFLLx_REF is small this can lead to aninstability in the DFLLx locking mechanism, which can prevent the DFLLx from achieving locks.To avoid this, a chill cycle where the CLK_DFLLx frequency is not measured can be enabled.The chill cycle is enabled by default, but can be disabled by writing a one to the Chill Cycle Dis-able bit in DFLLxCONF (DFLLxCONF.CCDIS). Enabling chill cycles might double the lock time.
Another solution to the same problem is to use less strict lock requirements. This is called QuickLock (QL), which is also enabled by default, but can be disabled by writing a one to the QuickLock Disable bit in DFLLxCONF (DFLLxCONF.QLDIS). The QL might lead to bigger spread inthe outputted frequency than chill cycles, but the average output frequency is the same.
If the target frequency is below 40MHz, one of these should always be enabled.
13.6.3.7 Spread Spectrum Generator (SSG)When CLK_DFLLx is used as the main clock source for the device, the EMI radiated from thedevice will be synchronous to fCLK_DFLLx. To provide better Electromagnetic Compatibility (EMC)DFLLx can provide a clock with the energy spread in the frequency domain (spread spectrum).This is done by adding or subtracting values from the FINE value. SSG is enabled by writing aone to the Enable bit in the DFLLx Spread Spectrum Generator Control Register (DFLLx-SSG.EN). The Spread Spectrum Generator Block Diagram is shown in Figure 13-5.
Figure 13-5. Spread Spectrum Generator Block Diagram.
Pseudorandom Binary Sequence Spread Spectrum
Generator
FINE
8To DAC
CLK_DFLLx_SSG
AMPLITUDE,STEPSIZE
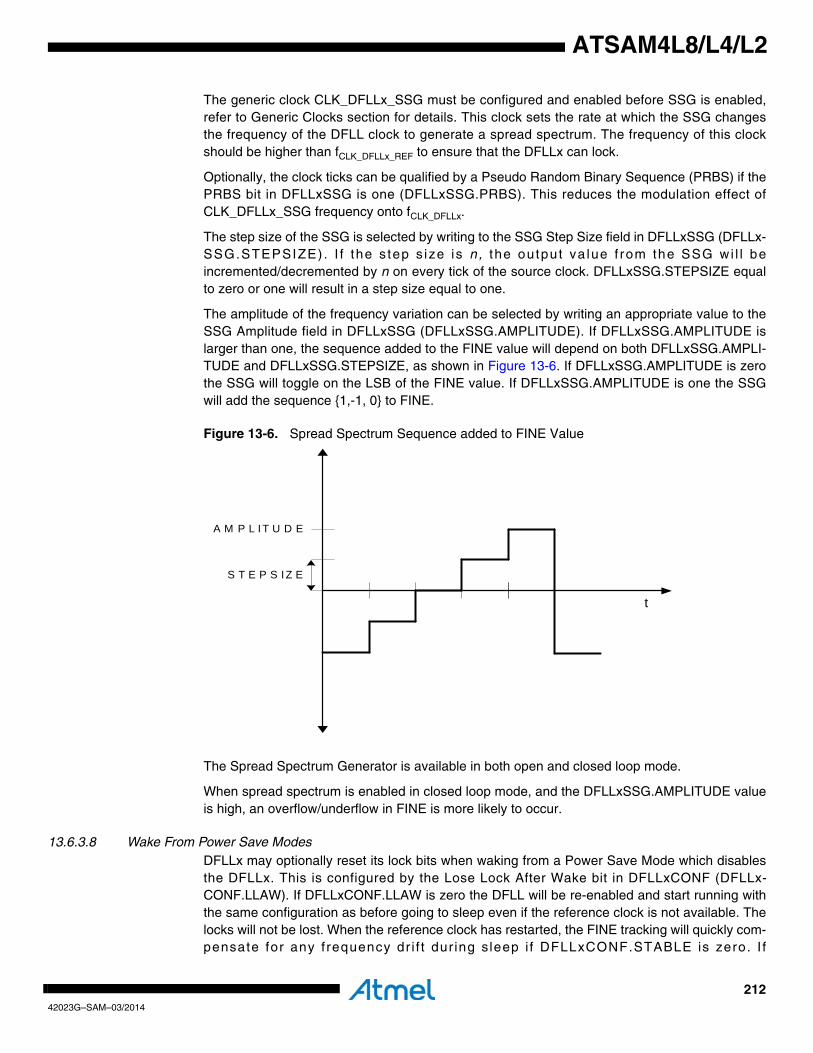
21242023G–SAM–03/2014
ATSAM4L8/L4/L2
The generic clock CLK_DFLLx_SSG must be configured and enabled before SSG is enabled,refer to Generic Clocks section for details. This clock sets the rate at which the SSG changesthe frequency of the DFLL clock to generate a spread spectrum. The frequency of this clockshould be higher than fCLK_DFLLx_REF to ensure that the DFLLx can lock.
Optionally, the clock ticks can be qualified by a Pseudo Random Binary Sequence (PRBS) if thePRBS bit in DFLLxSSG is one (DFLLxSSG.PRBS). This reduces the modulation effect ofCLK_DFLLx_SSG frequency onto fCLK_DFLLx.
The step size of the SSG is selected by writing to the SSG Step Size field in DFLLxSSG (DFLLx-SSG.STEPSIZE) . I f the s tep s ize is n, the output va lue f rom the SSG wi l l beincremented/decremented by n on every tick of the source clock. DFLLxSSG.STEPSIZE equalto zero or one will result in a step size equal to one.
The amplitude of the frequency variation can be selected by writing an appropriate value to theSSG Amplitude field in DFLLxSSG (DFLLxSSG.AMPLITUDE). If DFLLxSSG.AMPLITUDE islarger than one, the sequence added to the FINE value will depend on both DFLLxSSG.AMPLI-TUDE and DFLLxSSG.STEPSIZE, as shown in Figure 13-6. If DFLLxSSG.AMPLITUDE is zerothe SSG will toggle on the LSB of the FINE value. If DFLLxSSG.AMPLITUDE is one the SSGwill add the sequence {1,-1, 0} to FINE.
Figure 13-6. Spread Spectrum Sequence added to FINE Value
The Spread Spectrum Generator is available in both open and closed loop mode.
When spread spectrum is enabled in closed loop mode, and the DFLLxSSG.AMPLITUDE valueis high, an overflow/underflow in FINE is more likely to occur.
13.6.3.8 Wake From Power Save ModesDFLLx may optionally reset its lock bits when waking from a Power Save Mode which disablesthe DFLLx. This is configured by the Lose Lock After Wake bit in DFLLxCONF (DFLLx-CONF.LLAW). If DFLLxCONF.LLAW is zero the DFLL will be re-enabled and start running withthe same configuration as before going to sleep even if the reference clock is not available. Thelocks will not be lost. When the reference clock has restarted, the FINE tracking will quickly com-pensate for any f requency dr i f t dur ing s leep i f DFLLxCONF.STABLE is zero. I f
A M P L I T U D E
S T E P S I Z E
t
21342023G–SAM–03/2014
ATSAM4L8/L4/L2
DFLLxCONF.LLAW is one when going to a Power Save Mode where the DFLLx is turned off,the DFLLx will lose all its locks when waking up, and needs to regain these through the full locksequence.
13.6.3.9 AccuracyThere are mainly three factors that decide the accuracy of the fCLK_DFLLx. These can be tuned toobtain maximum accuracy when fine lock is achieved.
• FINE resolution: The frequency step between two FINE values. This is relatively smaller for high output frequencies.
• Resolution of the measurement: If the resolution of the measured fCLK_DFLLx is low, i.e. the ratio between the CLK_DFLLx frequency and the CLK_DFLLx_REF frequency is small, then the DFLLx might lock at a frequency that is lower than the targeted frequency. It is recommended to use a reference clock frequency of 32KHz or lower to avoid this issue for low target frequencies.
• The accuracy of the reference clock.
13.6.4 System RC Oscillator (RCSYS)Rev: 1.1.4.0
The system RC oscillator has a startup time of three cycles, and is always available except insome sleep modes. Refer to Section 10. ”Power Manager (PM)” on page 109 for details. Thesystem RC oscillator operates at a nominal frequency of 115kHz, and is calibrated using theCalibration Value field (CALIB) in the RC Oscillator Calibration Register (RCCR). After a Power-on Reset (POR), the RCCR.CALIB field is loaded with a factory defined value stored in the Flashfuses. Refer to the Fuse setting chapter for more details about RCCR fuses and how to programthe fuses.
If the Flash Calibration Done (FCD) bit in the RCCR is zero at any reset, the flash calibration willbe redone and the RCCR.FCD bit will be set before program execution starts in the CPU. If theRCCR.FCD is one, the flash calibration will only be redone after a Power-on Reset.
To prevent unexpected writes to RCCR due to software bugs, write access to this register is pro-tected by a locking mechanism. For details refer to Section 13.7.7 ”Unlock Register” on page229.
Although it is not recommended to override default factory settings, it is still possible to overridethe default values by writing to RCCR.CALIB.
13.6.5 4/8/12MHz RC Oscillator (RCFAST) OperationRev: 2.0.02
The RCFAST can be used as the main clock in the device, as described in Section 10. ”PowerManager (PM)” on page 109. The RCFAST can also be used as source for the generic clocks,as described in the “Generic Clocks” section of the SCIF.
The RCFAST is enabled by writing a one to the Oscillator Enable bit in the RCFAST Configura-tion Register (RCFASTCFG.EN), and disabled by writing a zero to this bit. When enabling theRCFAST, RCFASTCFG.EN must be read back until it reads one. The user must ensure that theRCFAST is fully disabled before enabling, and that the RCFAST is fully enabled before disablingby reading back RCFASTCFG.EN.
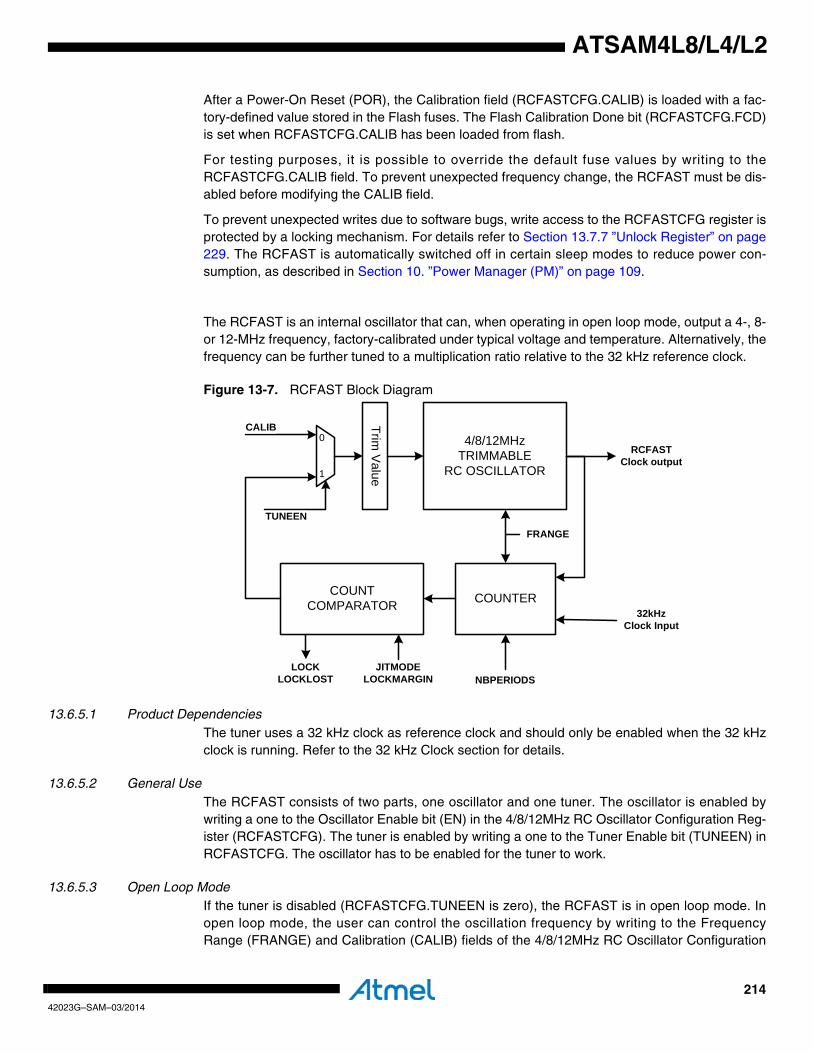
21442023G–SAM–03/2014
ATSAM4L8/L4/L2
After a Power-On Reset (POR), the Calibration field (RCFASTCFG.CALIB) is loaded with a fac-tory-defined value stored in the Flash fuses. The Flash Calibration Done bit (RCFASTCFG.FCD)is set when RCFASTCFG.CALIB has been loaded from flash.
For testing purposes, it is possible to override the default fuse values by writing to theRCFASTCFG.CALIB field. To prevent unexpected frequency change, the RCFAST must be dis-abled before modifying the CALIB field.
To prevent unexpected writes due to software bugs, write access to the RCFASTCFG register isprotected by a locking mechanism. For details refer to Section 13.7.7 ”Unlock Register” on page229. The RCFAST is automatically switched off in certain sleep modes to reduce power con-sumption, as described in Section 10. ”Power Manager (PM)” on page 109.
The RCFAST is an internal oscillator that can, when operating in open loop mode, output a 4-, 8-or 12-MHz frequency, factory-calibrated under typical voltage and temperature. Alternatively, thefrequency can be further tuned to a multiplication ratio relative to the 32 kHz reference clock.
Figure 13-7. RCFAST Block Diagram
13.6.5.1 Product DependenciesThe tuner uses a 32 kHz clock as reference clock and should only be enabled when the 32 kHzclock is running. Refer to the 32 kHz Clock section for details.
13.6.5.2 General UseThe RCFAST consists of two parts, one oscillator and one tuner. The oscillator is enabled bywriting a one to the Oscillator Enable bit (EN) in the 4/8/12MHz RC Oscillator Configuration Reg-ister (RCFASTCFG). The tuner is enabled by writing a one to the Tuner Enable bit (TUNEEN) inRCFASTCFG. The oscillator has to be enabled for the tuner to work.
13.6.5.3 Open Loop ModeIf the tuner is disabled (RCFASTCFG.TUNEEN is zero), the RCFAST is in open loop mode. Inopen loop mode, the user can control the oscillation frequency by writing to the FrequencyRange (FRANGE) and Calibration (CALIB) fields of the 4/8/12MHz RC Oscillator Configuration
4/8/12MHz TRIMMABLE
RC OSCILLATOR
COUNTERCOUNT COMPARATOR
32kHzClock Input
RCFASTClock output
Trim V
alue0
1
CALIB
TUNEEN
FRANGE
NBPERIODSJITMODE
LOCKMARGINLOCK
LOCKLOST
21542023G–SAM–03/2014
ATSAM4L8/L4/L2
Register (RCFASTCFG). The FRANGE and CALIB fields should only be updated when theRCFAST is disabled. Since this is in open loop mode, the frequency will be voltage, tempera-ture, and process dependent. Refer to Section 42. ”Electrical Characteristics” on page 1121 fordetails.
13.6.5.4 Closed Loop ModeIf the tuner is enabled (RCFASTCFG.TUNEEN is one), the RCFAST is in closed loop mode. Inclosed loop mode, the frequency is controlled by a tuner which measures the ratio between theRCFAST output frequency and the 32 kHz reference clock frequency. The initial output fre-quency is first chosen, when the RCFAST is disabled, by writing to the Frequency Range(FRANGE) and Calibration (CALIB) fields of the 4/8/12 MHz RC Oscillator Configuration Regis-ter (RCFASTCFG). The RCFAST clock periods are counted during one or several 32kHz clockperiods. And that count allows the tuner to adjust the RCFAST trim value to get closer to the tar-get number of 32 kHz clock periods. The value of the RCFASTCFG.NBPERIODS field is used toimprove the tuner precision by counting RCFAST clock periods across (1 << NBPERIODS) peri-ods of the 32 kHz clock. The NBPERIODS, LOCKMARGIN and JITMODE fields should only beupdated when the tuner is disabled.
The 32 kHz reference clock is controlled by the BSCIF, refer to the 32 kHz Clock section fordetails.
When a tuning procedure is completed, the Lock bit (RCFASTLOCK) in the Status Register(PCLKSR) will be set if the current count is within RCFASTCFG.LOCKMARGIN of the targetcount. Otherwise, the Lock Lost bit (RCFASTLOCKLOST) in PCLKSR will be set.
13.6.5.5 Factory CalibrationIf the Flash Calibration Done (FCD) bit in RCFASTCFG is zero at any reset, then the calibrationwill be redone, using the factory calibration value stored in the Flash fuses, and theRCFASTCFG.FCD bit will be set before program execution starts in the CPU. If theRCFASTCFG.FCD bit is one, then the RCFAST configuration will not be changed during anyreset except POR reset.
13.6.5.6 Register ProtectionTo prevent unexpected writes to RCFAST registers due to software bugs, write access to theregisters are protected by a locking mechanism. For details refer to Section 13.7.7 ”Unlock Reg-ister” on page 229.
13.6.6 80MHz RC Oscillator (RC80M) OperationRev: 1.0.0.1
The RC80M can be used as the main clock in the device, as described in Section 10. ”PowerManager (PM)” on page 109. The RC80M can also be used as source for the generic clocks, asdescribed in the “Generic Clocks” section of the SCIF.
The RC80M is enabled by writing a one to the Enable bit in the RC80M Control register(RC80MCR.EN), and disabled by writing a zero to this bit. When enabling the RC80M,RC80MCR.EN must be read back until it reads one. The user must ensure that the RC80M isfully disabled before enabling, and that the RC80M is fully enabled before disabling by readingback RC80MCR.EN.
After a Power-On Reset (POR), the Calibration Value field (RC80MCR.CALIB) is loaded with afactory defined value stored in the Flash fuses.
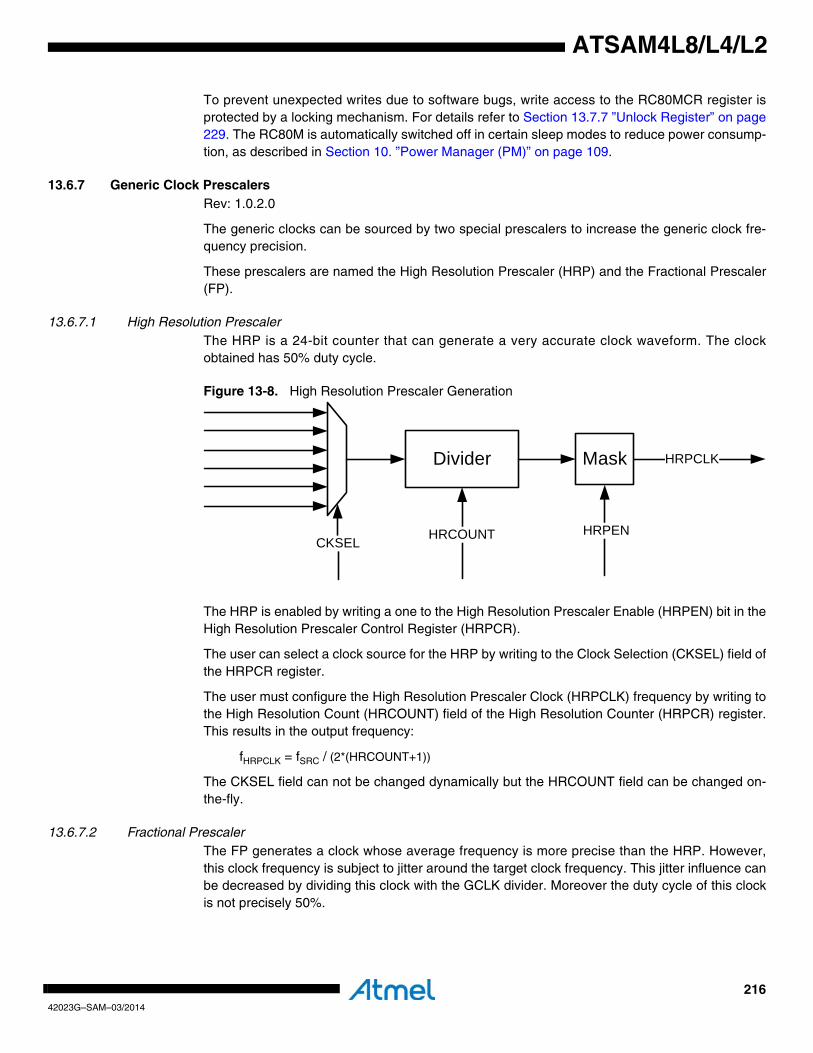
21642023G–SAM–03/2014
ATSAM4L8/L4/L2
To prevent unexpected writes due to software bugs, write access to the RC80MCR register isprotected by a locking mechanism. For details refer to Section 13.7.7 ”Unlock Register” on page229. The RC80M is automatically switched off in certain sleep modes to reduce power consump-tion, as described in Section 10. ”Power Manager (PM)” on page 109.
13.6.7 Generic Clock PrescalersRev: 1.0.2.0
The generic clocks can be sourced by two special prescalers to increase the generic clock fre-quency precision.
These prescalers are named the High Resolution Prescaler (HRP) and the Fractional Prescaler(FP).
13.6.7.1 High Resolution PrescalerThe HRP is a 24-bit counter that can generate a very accurate clock waveform. The clockobtained has 50% duty cycle.
Figure 13-8. High Resolution Prescaler Generation
The HRP is enabled by writing a one to the High Resolution Prescaler Enable (HRPEN) bit in theHigh Resolution Prescaler Control Register (HRPCR).
The user can select a clock source for the HRP by writing to the Clock Selection (CKSEL) field ofthe HRPCR register.
The user must configure the High Resolution Prescaler Clock (HRPCLK) frequency by writing tothe High Resolution Count (HRCOUNT) field of the High Resolution Counter (HRPCR) register.This results in the output frequency:
fHRPCLK = fSRC / (2*(HRCOUNT+1))
The CKSEL field can not be changed dynamically but the HRCOUNT field can be changed on-the-fly.
13.6.7.2 Fractional PrescalerThe FP generates a clock whose average frequency is more precise than the HRP. However,this clock frequency is subject to jitter around the target clock frequency. This jitter influence canbe decreased by dividing this clock with the GCLK divider. Moreover the duty cycle of this clockis not precisely 50%.
Divider
CKSEL
HRPCLK
HRCOUNT
Mask
HRPEN
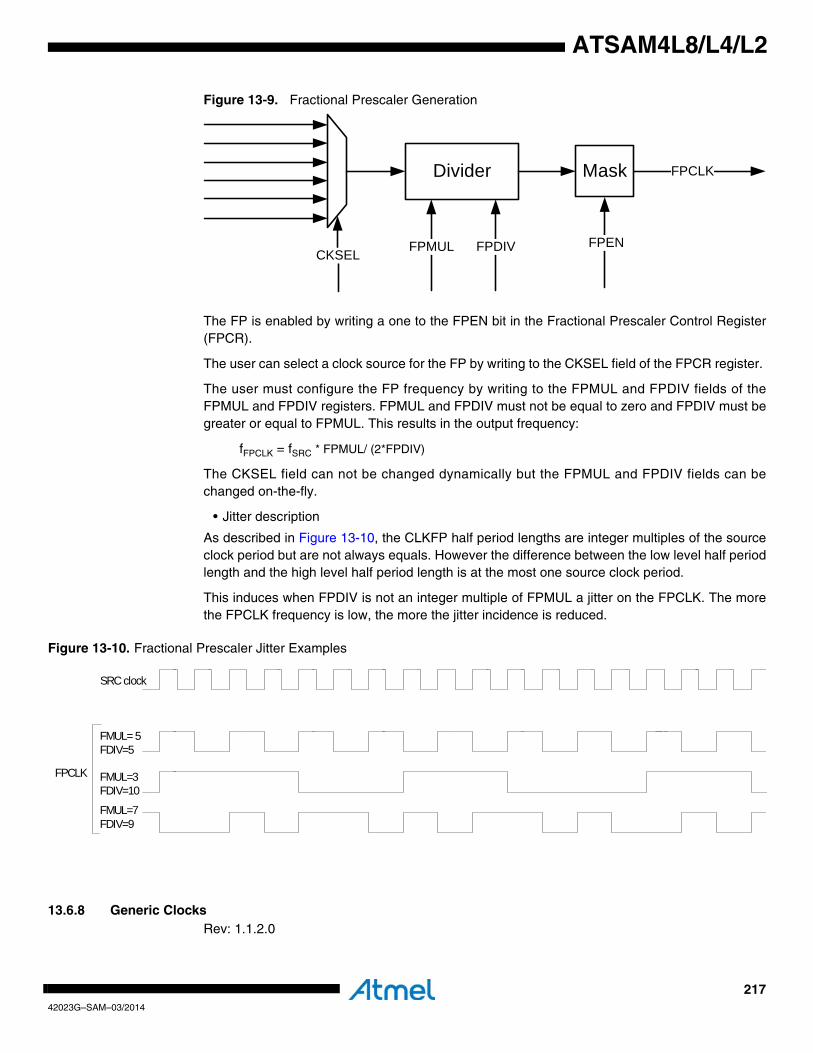
21742023G–SAM–03/2014
ATSAM4L8/L4/L2
Figure 13-9. Fractional Prescaler Generation
The FP is enabled by writing a one to the FPEN bit in the Fractional Prescaler Control Register(FPCR).
The user can select a clock source for the FP by writing to the CKSEL field of the FPCR register.
The user must configure the FP frequency by writing to the FPMUL and FPDIV fields of theFPMUL and FPDIV registers. FPMUL and FPDIV must not be equal to zero and FPDIV must begreater or equal to FPMUL. This results in the output frequency:
fFPCLK = fSRC * FPMUL/ (2*FPDIV)
The CKSEL field can not be changed dynamically but the FPMUL and FPDIV fields can bechanged on-the-fly.
• Jitter description
As described in Figure 13-10, the CLKFP half period lengths are integer multiples of the sourceclock period but are not always equals. However the difference between the low level half periodlength and the high level half period length is at the most one source clock period.
This induces when FPDIV is not an integer multiple of FPMUL a jitter on the FPCLK. The morethe FPCLK frequency is low, the more the jitter incidence is reduced.
Figure 13-10. Fractional Prescaler Jitter Examples
13.6.8 Generic ClocksRev: 1.1.2.0
Divider
CKSEL
FPCLK
FPDIV
Mask
FPENFPMUL
SRC clock
FPCLK
FMUL= 5FDIV=5
FMUL=3FDIV=10
FMUL=7FDIV=9
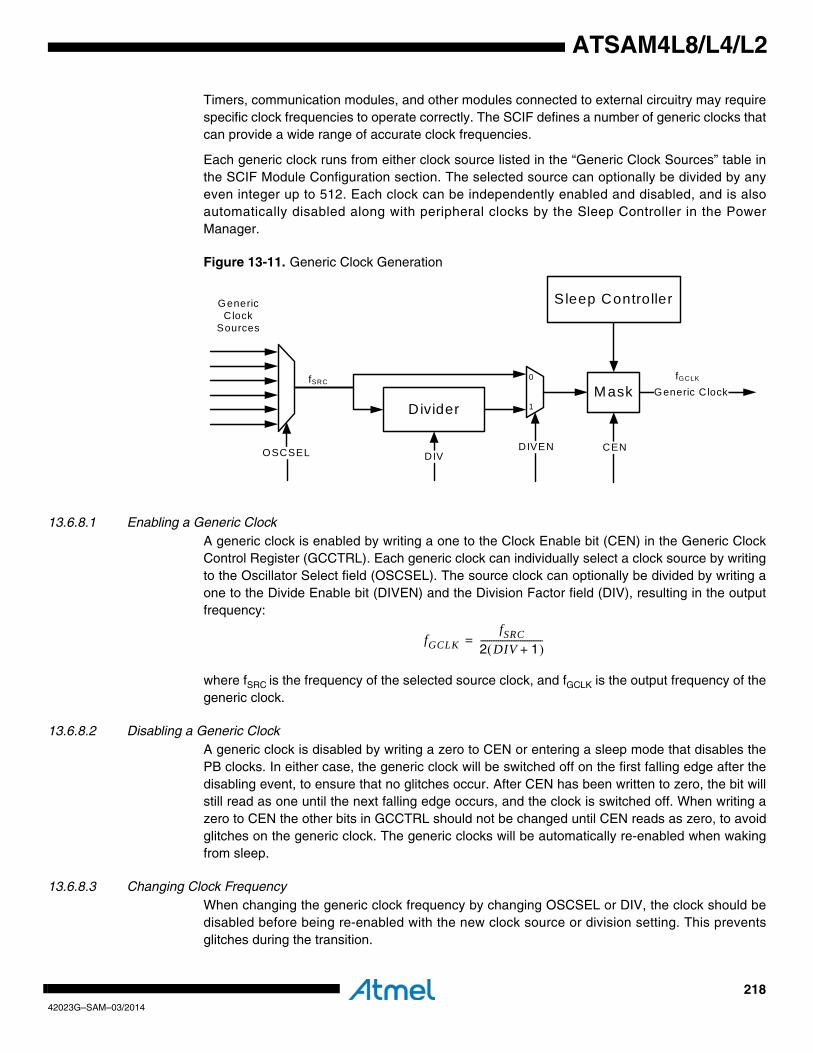
21842023G–SAM–03/2014
ATSAM4L8/L4/L2
Timers, communication modules, and other modules connected to external circuitry may requirespecific clock frequencies to operate correctly. The SCIF defines a number of generic clocks thatcan provide a wide range of accurate clock frequencies.
Each generic clock runs from either clock source listed in the “Generic Clock Sources” table inthe SCIF Module Configuration section. The selected source can optionally be divided by anyeven integer up to 512. Each clock can be independently enabled and disabled, and is alsoautomatically disabled along with peripheral clocks by the Sleep Controller in the PowerManager.
Figure 13-11. Generic Clock Generation
13.6.8.1 Enabling a Generic ClockA generic clock is enabled by writing a one to the Clock Enable bit (CEN) in the Generic ClockControl Register (GCCTRL). Each generic clock can individually select a clock source by writingto the Oscillator Select field (OSCSEL). The source clock can optionally be divided by writing aone to the Divide Enable bit (DIVEN) and the Division Factor field (DIV), resulting in the outputfrequency:
where fSRC is the frequency of the selected source clock, and fGCLK is the output frequency of thegeneric clock.
13.6.8.2 Disabling a Generic ClockA generic clock is disabled by writing a zero to CEN or entering a sleep mode that disables thePB clocks. In either case, the generic clock will be switched off on the first falling edge after thedisabling event, to ensure that no glitches occur. After CEN has been written to zero, the bit willstill read as one until the next falling edge occurs, and the clock is switched off. When writing azero to CEN the other bits in GCCTRL should not be changed until CEN reads as zero, to avoidglitches on the generic clock. The generic clocks will be automatically re-enabled when wakingfrom sleep.
13.6.8.3 Changing Clock FrequencyWhen changing the generic clock frequency by changing OSCSEL or DIV, the clock should bedisabled before being re-enabled with the new clock source or division setting. This preventsglitches during the transition.
Divider
OSCSEL
Generic Clock
DIV
0
1
DIVEN
Mask
CEN
Sleep Controller
fSRCfGCLK
Generic Clock
Sources
fGCLKfSRC
2 DIV 1+( )----------------------------=
21942023G–SAM–03/2014
ATSAM4L8/L4/L2
13.6.8.4 Generic Clock AllocationThe generic clocks are allocated to different functions as shown in the “Generic Clock Allocation”table in the SCIF Module Configuration section.
13.6.9 InterruptsThe SCIF has the following interrupt sources:
• AE - Access Error:
– A protected SCIF register was accessed without first being correctly unlocked.
• RCFASTLOCKLOST - RCFASTLock Lost
– A to 1 transition on the PCLKSR.RCFASTLOCKLOST bit is detected.
• RCFASTLOCK - RCFAST Lock
– A 0 to 1 transition on the PCLKSR.RCFASTLOCK bit is detected.
• PLLLOCKLOST - PLL Lock Lost
– A to 1 transition on the PCLKSR.PLLLOCKLOST bit is detected.
• PLLLOCK - PLL Lock
– A 0 to 1 transition on the PCLKSR.PLLLOCK bit is detected.
• DFLL0RCS - DFLL Reference Clock Stopped:
– A 0 to 1 transition on the PCLKSR.DFLLRCS bit is detected.
• DFLL0RDY - DFLL Ready:
– A 0 to 1 transition on the PCLKSR.DFLLRDY bit is detected.
• DFLL0LOCKF - DFLL Locked on Fine value:
– A 0 to 1 transition on the PCLKSR.DFLLLOCKF bit is detected.
• DFLL0LOCKC - DFLL Locked on Coarse value:
– A 0 to 1 transition on the PCLKSR.DFLLLOCKC bit is detected.
• OSCRDY - OSCReady:
– A 0 to 1 transition on the PCLKSR.OSCRDY bit is detected.
The interrupt sources will generate an interrupt request if the corresponding bit in the InterruptMask Register is set. The interrupt sources are ORed together to form one interrupt request. TheSCIF will generate an interrupt request if at least one of the bits in the Interrupt Mask Register(IMR) is set. Bits in IMR are set by writing a one to the corresponding bit in the Interrupt EnableRegister (IER), and cleared by writing a one to the corresponding bit in the Interrupt DisableRegister (IDR). The interrupt request remains active until the corresponding bit in the InterruptStatus Register (ISR) is cleared by writing a one to the corresponding bit in the Interrupt ClearRegister (ICR). Because all the interrupt sources are ORed together, the interrupt request fromthe SCIF will remain active until all the bits in ISR are cleared.
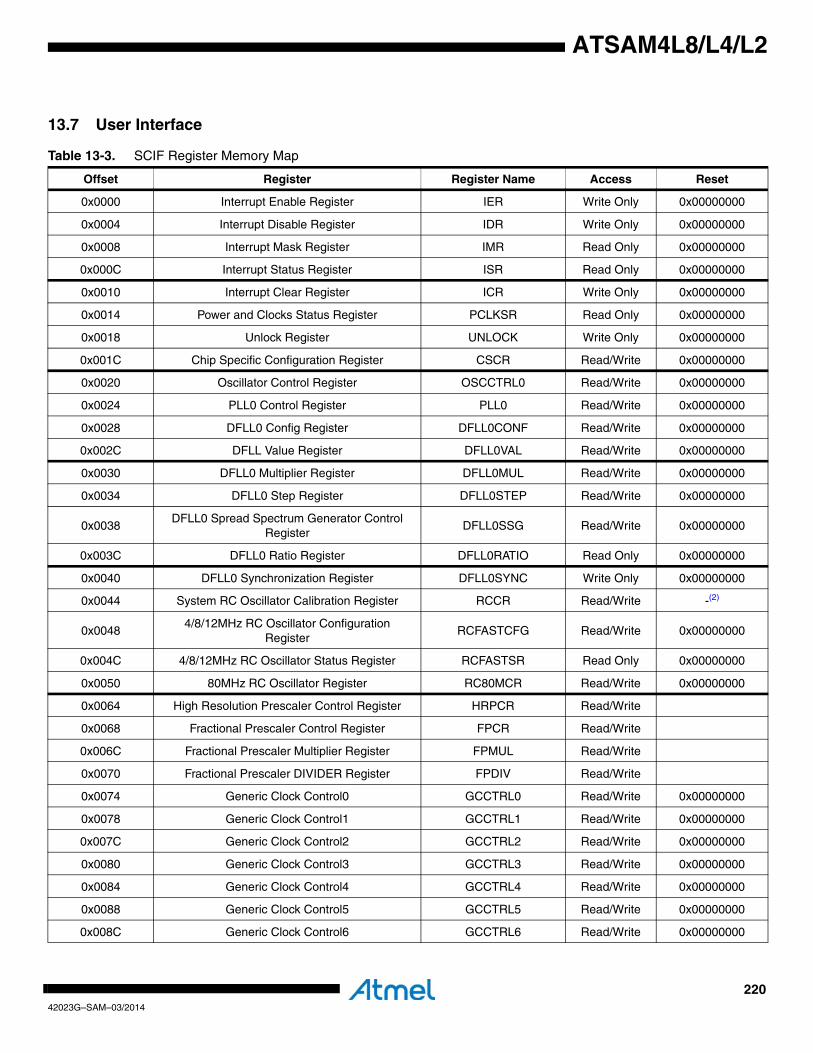
22042023G–SAM–03/2014
ATSAM4L8/L4/L2
13.7 User Interface
Table 13-3. SCIF Register Memory Map
Offset Register Register Name Access Reset
0x0000 Interrupt Enable Register IER Write Only 0x00000000
0x0004 Interrupt Disable Register IDR Write Only 0x00000000
0x0008 Interrupt Mask Register IMR Read Only 0x00000000
0x000C Interrupt Status Register ISR Read Only 0x00000000
0x0010 Interrupt Clear Register ICR Write Only 0x00000000
0x0014 Power and Clocks Status Register PCLKSR Read Only 0x00000000
0x0018 Unlock Register UNLOCK Write Only 0x00000000
0x001C Chip Specific Configuration Register CSCR Read/Write 0x00000000
0x0020 Oscillator Control Register OSCCTRL0 Read/Write 0x00000000
0x0024 PLL0 Control Register PLL0 Read/Write 0x00000000
0x0028 DFLL0 Config Register DFLL0CONF Read/Write 0x00000000
0x002C DFLL Value Register DFLL0VAL Read/Write 0x00000000
0x0030 DFLL0 Multiplier Register DFLL0MUL Read/Write 0x00000000
0x0034 DFLL0 Step Register DFLL0STEP Read/Write 0x00000000
0x0038DFLL0 Spread Spectrum Generator Control
RegisterDFLL0SSG Read/Write 0x00000000
0x003C DFLL0 Ratio Register DFLL0RATIO Read Only 0x00000000
0x0040 DFLL0 Synchronization Register DFLL0SYNC Write Only 0x00000000
0x0044 System RC Oscillator Calibration Register RCCR Read/Write -(2)
0x00484/8/12MHz RC Oscillator Configuration
RegisterRCFASTCFG Read/Write 0x00000000
0x004C 4/8/12MHz RC Oscillator Status Register RCFASTSR Read Only 0x00000000
0x0050 80MHz RC Oscillator Register RC80MCR Read/Write 0x00000000
0x0064 High Resolution Prescaler Control Register HRPCR Read/Write
0x0068 Fractional Prescaler Control Register FPCR Read/Write
0x006C Fractional Prescaler Multiplier Register FPMUL Read/Write
0x0070 Fractional Prescaler DIVIDER Register FPDIV Read/Write
0x0074 Generic Clock Control0 GCCTRL0 Read/Write 0x00000000
0x0078 Generic Clock Control1 GCCTRL1 Read/Write 0x00000000
0x007C Generic Clock Control2 GCCTRL2 Read/Write 0x00000000
0x0080 Generic Clock Control3 GCCTRL3 Read/Write 0x00000000
0x0084 Generic Clock Control4 GCCTRL4 Read/Write 0x00000000
0x0088 Generic Clock Control5 GCCTRL5 Read/Write 0x00000000
0x008C Generic Clock Control6 GCCTRL6 Read/Write 0x00000000
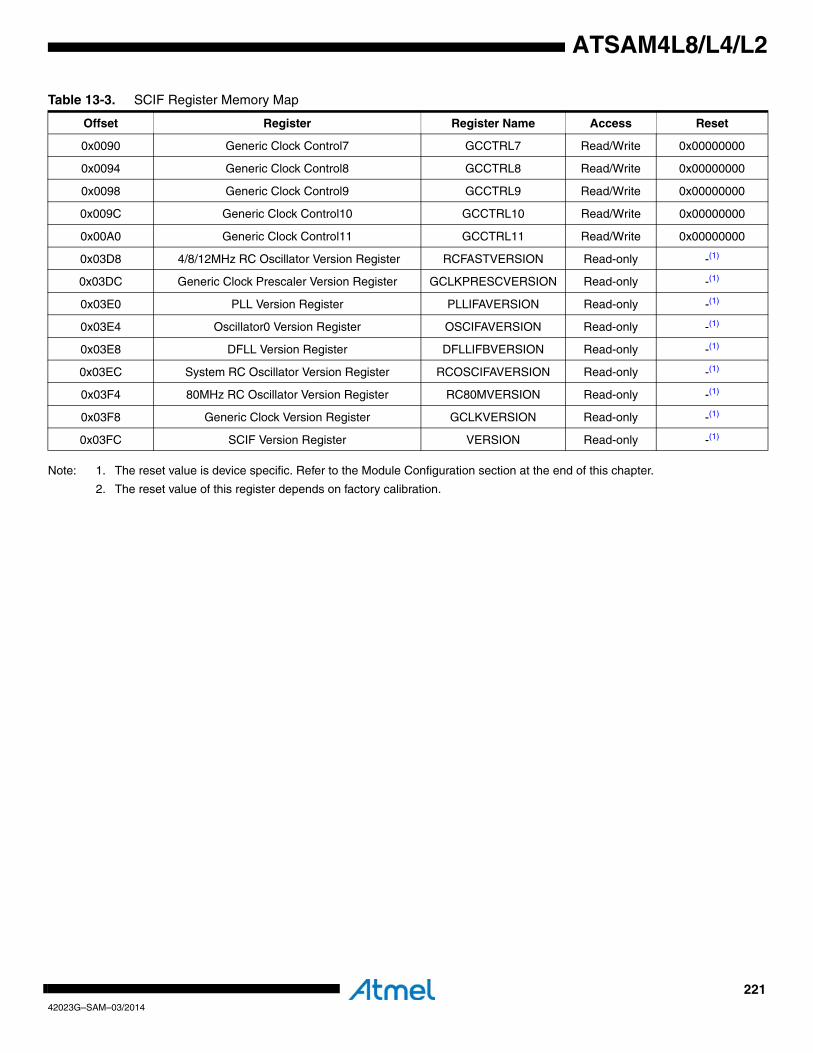
22142023G–SAM–03/2014
ATSAM4L8/L4/L2
Note: 1. The reset value is device specific. Refer to the Module Configuration section at the end of this chapter.
2. The reset value of this register depends on factory calibration.
0x0090 Generic Clock Control7 GCCTRL7 Read/Write 0x00000000
0x0094 Generic Clock Control8 GCCTRL8 Read/Write 0x00000000
0x0098 Generic Clock Control9 GCCTRL9 Read/Write 0x00000000
0x009C Generic Clock Control10 GCCTRL10 Read/Write 0x00000000
0x00A0 Generic Clock Control11 GCCTRL11 Read/Write 0x00000000
0x03D8 4/8/12MHz RC Oscillator Version Register RCFASTVERSION Read-only -(1)
0x03DC Generic Clock Prescaler Version Register GCLKPRESCVERSION Read-only -(1)
0x03E0 PLL Version Register PLLIFAVERSION Read-only -(1)
0x03E4 Oscillator0 Version Register OSCIFAVERSION Read-only -(1)
0x03E8 DFLL Version Register DFLLIFBVERSION Read-only -(1)
0x03EC System RC Oscillator Version Register RCOSCIFAVERSION Read-only -(1)
0x03F4 80MHz RC Oscillator Version Register RC80MVERSION Read-only -(1)
0x03F8 Generic Clock Version Register GCLKVERSION Read-only -(1)
0x03FC SCIF Version Register VERSION Read-only -(1)
Table 13-3. SCIF Register Memory Map
Offset Register Register Name Access Reset
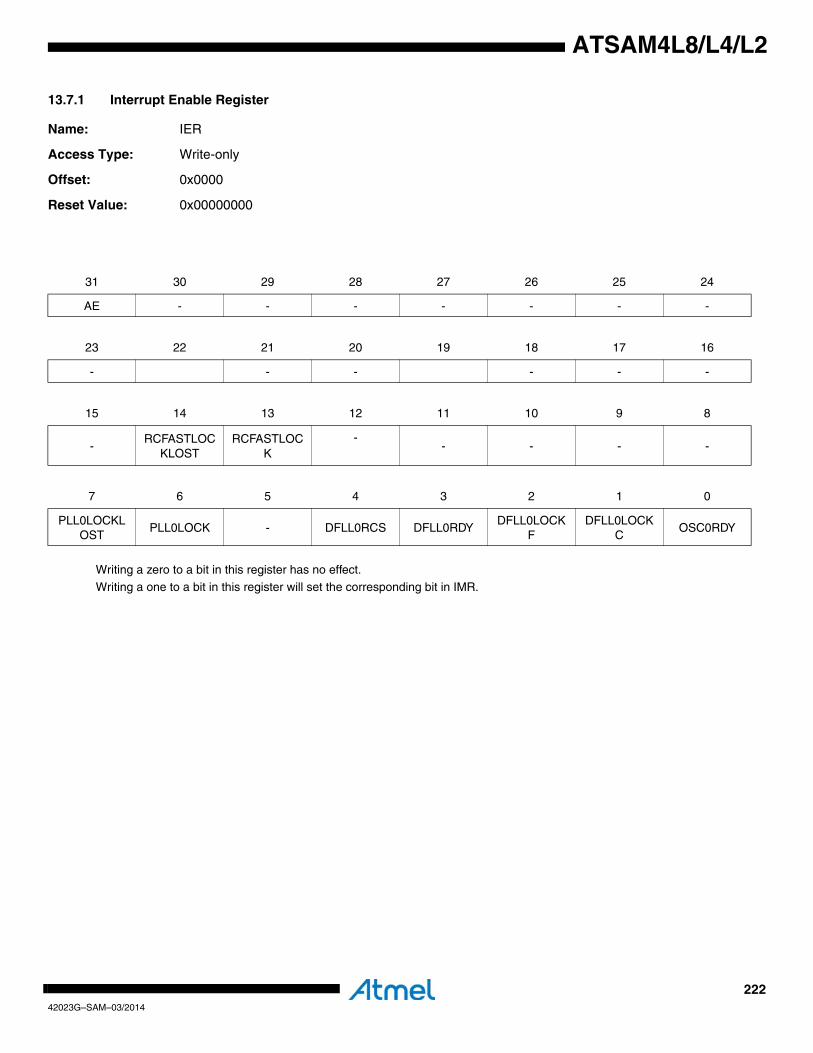
22242023G–SAM–03/2014
ATSAM4L8/L4/L2
13.7.1 Interrupt Enable Register
Name: IER
Access Type: Write-only
Offset: 0x0000
Reset Value: 0x00000000
Writing a zero to a bit in this register has no effect.
Writing a one to a bit in this register will set the corresponding bit in IMR.
31 30 29 28 27 26 25 24
AE - - - - - - -
23 22 21 20 19 18 17 16
- - - - - -
15 14 13 12 11 10 9 8
-RCFASTLOC
KLOSTRCFASTLOC
K-
- - - -
7 6 5 4 3 2 1 0
PLL0LOCKLOST
PLL0LOCK - DFLL0RCS DFLL0RDYDFLL0LOCK
FDFLL0LOCK
COSC0RDY

22342023G–SAM–03/2014
ATSAM4L8/L4/L2
13.7.2 Interrupt Disable Register
Name: IDR
Access Type: Write-only
Offset: 0x0004
Reset Value: 0x00000000
Writing a zero to a bit in this register has no effect.
Writing a one to a bit in this register will clear the corresponding bit in IMR.
31 30 29 28 27 26 25 24
AE - - - - - - -
23 22 21 20 19 18 17 16
- - - - - - - -
15 14 13 12 11 10 9 8
-RCFASTLOC
KLOSTRCFASTLOC
K- - - - -
7 6 5 4 3 2 1 0
PLL0LOCKLOST
PLL0LOCK - DFLL0RCS DFLL0RDYDFLL0LOCK
FDFLL0LOCK
COSC0RDY
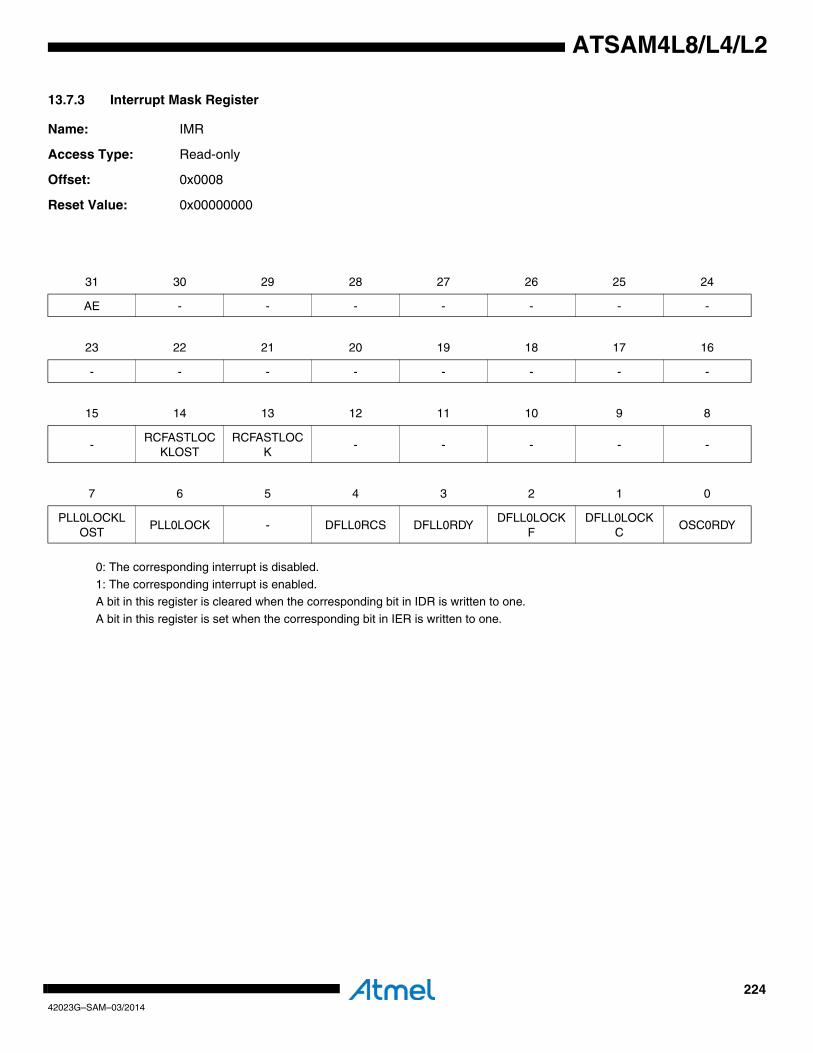
22442023G–SAM–03/2014
ATSAM4L8/L4/L2
13.7.3 Interrupt Mask Register
Name: IMR
Access Type: Read-only
Offset: 0x0008
Reset Value: 0x00000000
0: The corresponding interrupt is disabled.
1: The corresponding interrupt is enabled.A bit in this register is cleared when the corresponding bit in IDR is written to one.
A bit in this register is set when the corresponding bit in IER is written to one.
31 30 29 28 27 26 25 24
AE - - - - - - -
23 22 21 20 19 18 17 16
- - - - - - - -
15 14 13 12 11 10 9 8
-RCFASTLOC
KLOSTRCFASTLOC
K- - - - -
7 6 5 4 3 2 1 0
PLL0LOCKLOST
PLL0LOCK - DFLL0RCS DFLL0RDYDFLL0LOCK
FDFLL0LOCK
COSC0RDY
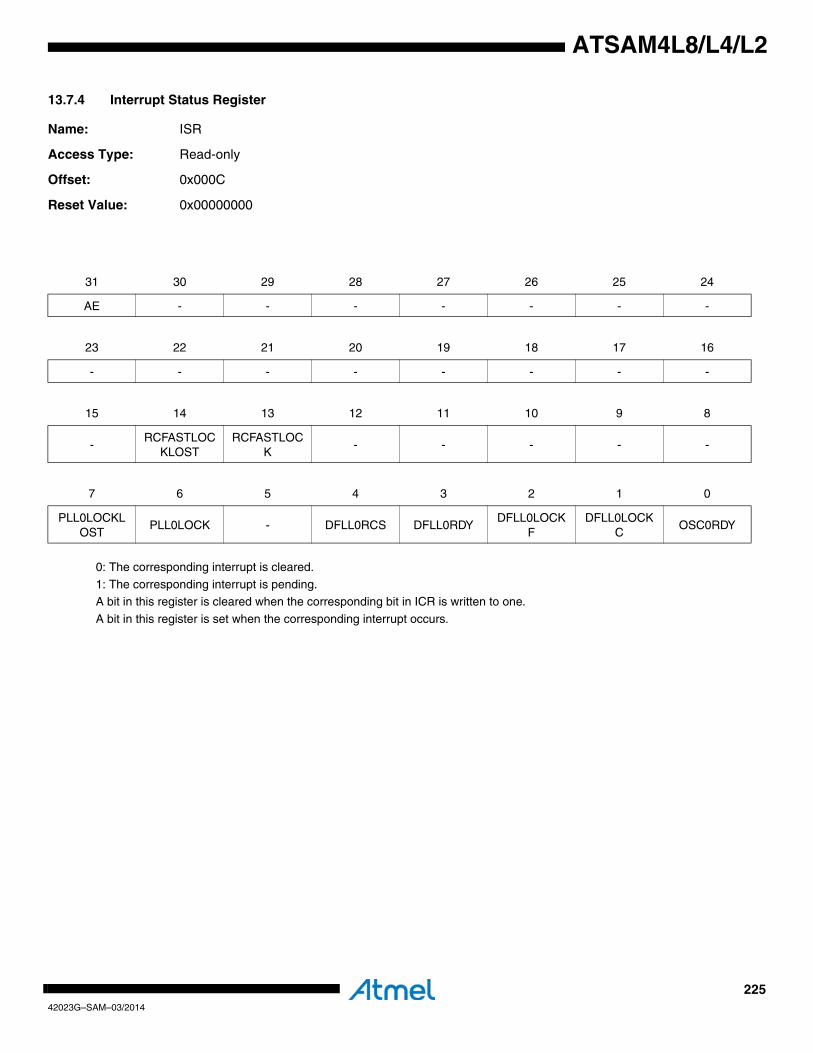
22542023G–SAM–03/2014
ATSAM4L8/L4/L2
13.7.4 Interrupt Status Register
Name: ISR
Access Type: Read-only
Offset: 0x000C
Reset Value: 0x00000000
0: The corresponding interrupt is cleared.
1: The corresponding interrupt is pending.A bit in this register is cleared when the corresponding bit in ICR is written to one.
A bit in this register is set when the corresponding interrupt occurs.
31 30 29 28 27 26 25 24
AE - - - - - - -
23 22 21 20 19 18 17 16
- - - - - - - -
15 14 13 12 11 10 9 8
-RCFASTLOC
KLOSTRCFASTLOC
K- - - - -
7 6 5 4 3 2 1 0
PLL0LOCKLOST
PLL0LOCK - DFLL0RCS DFLL0RDYDFLL0LOCK
FDFLL0LOCK
COSC0RDY
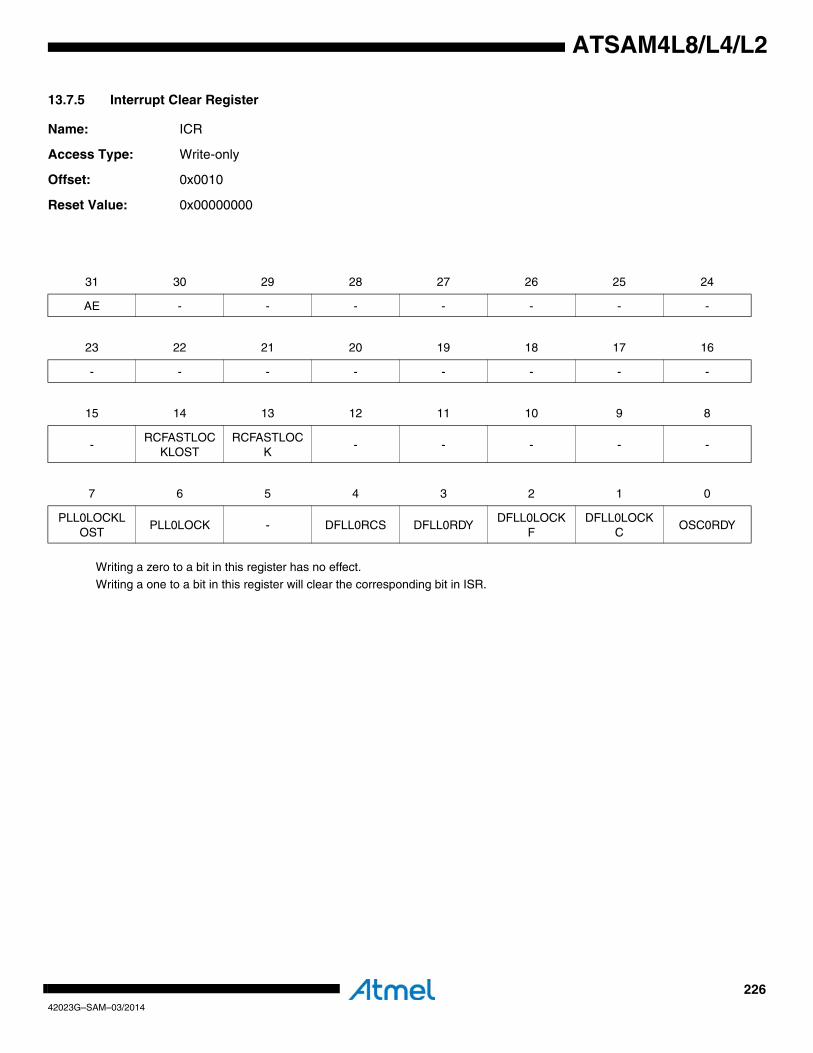
22642023G–SAM–03/2014
ATSAM4L8/L4/L2
13.7.5 Interrupt Clear Register
Name: ICR
Access Type: Write-only
Offset: 0x0010
Reset Value: 0x00000000
Writing a zero to a bit in this register has no effect.
Writing a one to a bit in this register will clear the corresponding bit in ISR.
31 30 29 28 27 26 25 24
AE - - - - - - -
23 22 21 20 19 18 17 16
- - - - - - - -
15 14 13 12 11 10 9 8
-RCFASTLOC
KLOSTRCFASTLOC
K- - - - -
7 6 5 4 3 2 1 0
PLL0LOCKLOST
PLL0LOCK - DFLL0RCS DFLL0RDYDFLL0LOCK
FDFLL0LOCK
COSC0RDY

22742023G–SAM–03/2014
ATSAM4L8/L4/L2
13.7.6 Power and Clocks Status Register
Name: PCLKSR
Access Type: Read-only
Offset: 0x0014
Reset Value: 0x00000000
• RCFASTLOCKLOST: RCFAST lock lost value0: RCFAST has not lost it’s lock or has never been enabled.
1: RCFAST has lost it’s lock.
• RCFASTLOCK: RCFAST Locked on Accurate value0: RCFAST is not locked on accurate value.
1: RCFAST is locked on accurate value, the tuning procedure is completed and the current count is within the RCFASTCFG.LOCKMARGIN of the target count.
• PLL0LOCKLOST: PLL0 lock lost value0: PLL0 has not lost it’s lock or has never been enabled.
1: PLL0 has lost it’s lock, either by disabling the PLL0 or due to faulty operation.
• PLL0LOCK: PLL0 Locked on Accurate value0: PLL0 is unlocked on accurate value.
1: PLL0 is locked on accurate value, and is ready to be selected as clock source with an accurate output clock.• DFLL0RCS: DFLL0 Reference Clock Stopped
0: The DFLL reference clock is running, or has never been enabled.1: The DFLL reference clock has stopped or is too slow.
• DFLL0RDY: DFLL0 Synchronization Ready0: Read or write to DFLL registers is invalid.
1: Read or write to DFLL registers is valid.
• DFLL0LOCKF: DFLL0 Locked on Fine Value0: DFLL is unlocked on Fine value.
1: DFLL is locked on Fine value, and is ready to be selected as clock source with a high accuracy on the output clock.
• DFLL0LOCKC: DFLL0 Locked on Coarse Value0: DFLL is unlocked on Coarse value.
31 30 29 28 27 26 25 24
- - - - - - - -
23 22 21 20 19 18 17 16
- - - - - - -
15 14 13 12 11 10 9 8
-RCFASTLOC
KLOSTRCFASTLOC
K- - - - -
7 6 5 4 3 2 1 0
PLL0LOCKLOST
PLL0LOCK - DFLL0RCS DFLL0RDYDFLL0LOCK
FDFLL0LOCK
COSC0RDY

22842023G–SAM–03/2014
ATSAM4L8/L4/L2
1: DFLL is locked on Coarse value, and is ready to be selected as clock source with medium accuracy on the output clock.• OSC0RDY: OSC0 Ready
0: Oscillator not enabled or not ready.1: Oscillator is stable and ready to be used as clock source.
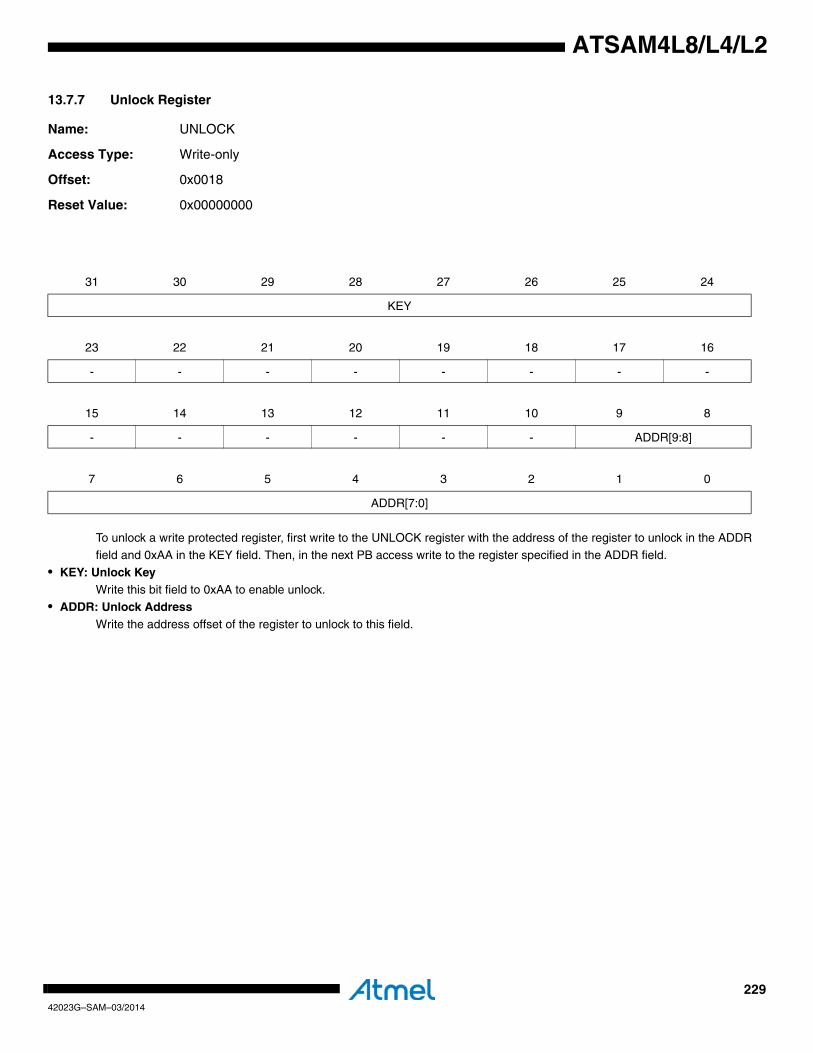
22942023G–SAM–03/2014
ATSAM4L8/L4/L2
13.7.7 Unlock Register
Name: UNLOCK
Access Type: Write-only
Offset: 0x0018
Reset Value: 0x00000000
To unlock a write protected register, first write to the UNLOCK register with the address of the register to unlock in the ADDR
field and 0xAA in the KEY field. Then, in the next PB access write to the register specified in the ADDR field.
• KEY: Unlock KeyWrite this bit field to 0xAA to enable unlock.
• ADDR: Unlock AddressWrite the address offset of the register to unlock to this field.
31 30 29 28 27 26 25 24
KEY
23 22 21 20 19 18 17 16
- - - - - - - -
15 14 13 12 11 10 9 8
- - - - - - ADDR[9:8]
7 6 5 4 3 2 1 0
ADDR[7:0]
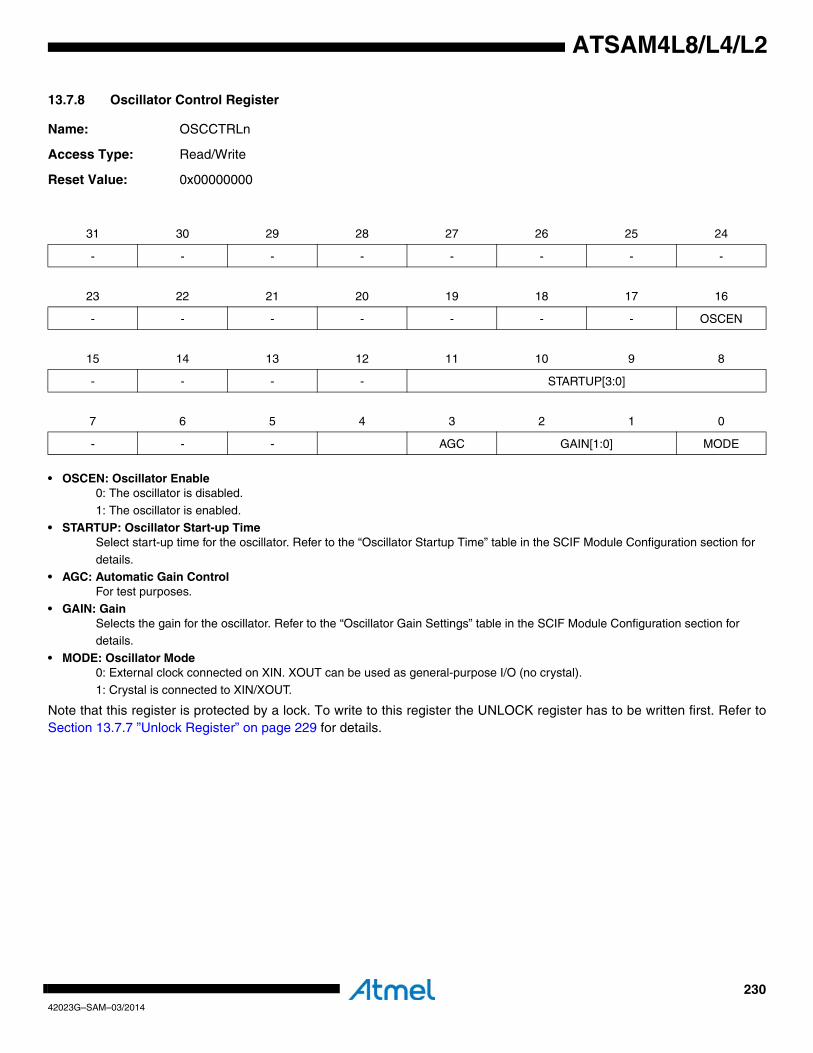
23042023G–SAM–03/2014
ATSAM4L8/L4/L2
13.7.8 Oscillator Control Register
Name: OSCCTRLn
Access Type: Read/Write
Reset Value: 0x00000000
• OSCEN: Oscillator Enable0: The oscillator is disabled.
1: The oscillator is enabled.
• STARTUP: Oscillator Start-up TimeSelect start-up time for the oscillator. Refer to the “Oscillator Startup Time” table in the SCIF Module Configuration section for
details.• AGC: Automatic Gain Control
For test purposes.• GAIN: Gain
Selects the gain for the oscillator. Refer to the “Oscillator Gain Settings” table in the SCIF Module Configuration section for details.
• MODE: Oscillator Mode0: External clock connected on XIN. XOUT can be used as general-purpose I/O (no crystal).
1: Crystal is connected to XIN/XOUT.
Note that this register is protected by a lock. To write to this register the UNLOCK register has to be written first. Refer toSection 13.7.7 ”Unlock Register” on page 229 for details.
31 30 29 28 27 26 25 24
- - - - - - - -
23 22 21 20 19 18 17 16
- - - - - - - OSCEN
15 14 13 12 11 10 9 8
- - - - STARTUP[3:0]
7 6 5 4 3 2 1 0
- - - AGC GAIN[1:0] MODE
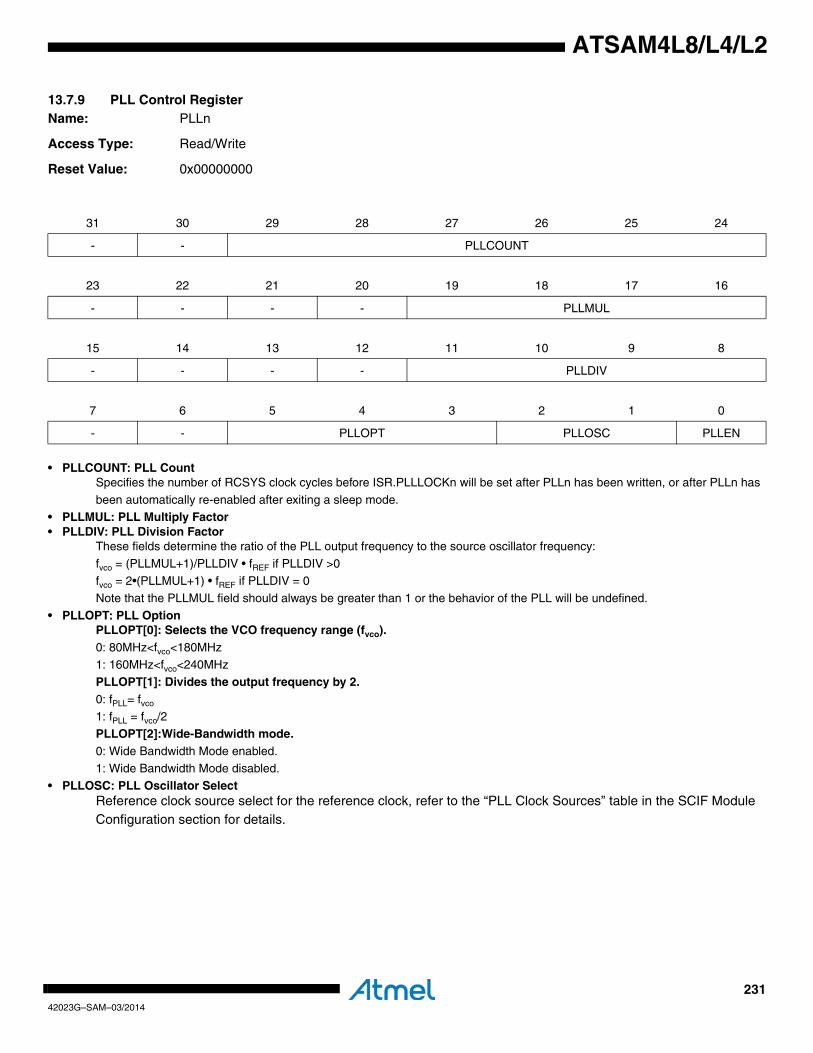
23142023G–SAM–03/2014
ATSAM4L8/L4/L2
13.7.9 PLL Control RegisterName: PLLn
Access Type: Read/Write
Reset Value: 0x00000000
• PLLCOUNT: PLL CountSpecifies the number of RCSYS clock cycles before ISR.PLLLOCKn will be set after PLLn has been written, or after PLLn has
been automatically re-enabled after exiting a sleep mode.• PLLMUL: PLL Multiply Factor• PLLDIV: PLL Division Factor
These fields determine the ratio of the PLL output frequency to the source oscillator frequency:
fvco = (PLLMUL+1)/PLLDIV • fREF if PLLDIV >0fvco = 2•(PLLMUL+1) • fREF if PLLDIV = 0
Note that the PLLMUL field should always be greater than 1 or the behavior of the PLL will be undefined.
• PLLOPT: PLL OptionPLLOPT[0]: Selects the VCO frequency range (fvco).0: 80MHz<fvco<180MHz1: 160MHz<fvco<240MHz
PLLOPT[1]: Divides the output frequency by 2.0: fPLL= fvco
1: fPLL = fvco/2
PLLOPT[2]:Wide-Bandwidth mode.0: Wide Bandwidth Mode enabled.1: Wide Bandwidth Mode disabled.
• PLLOSC: PLL Oscillator SelectReference clock source select for the reference clock, refer to the “PLL Clock Sources” table in the SCIF Module Configuration section for details.
31 30 29 28 27 26 25 24
- - PLLCOUNT
23 22 21 20 19 18 17 16
- - - - PLLMUL
15 14 13 12 11 10 9 8
- - - - PLLDIV
7 6 5 4 3 2 1 0
- - PLLOPT PLLOSC PLLEN

23242023G–SAM–03/2014
ATSAM4L8/L4/L2
• PLLEN: PLL Enable0: PLL is disabled.
1: PLL is enabled.
Note that it is not possible to change any of the PLL configuration bits when the PLL is enabled, Any write to PLLn while the PLL is enabled will be discarded.
Note that this register is protected by a lock. To write to this register the UNLOCK register has to be written first. Refer toSection 13.7.7 ”Unlock Register” on page 229 for details.
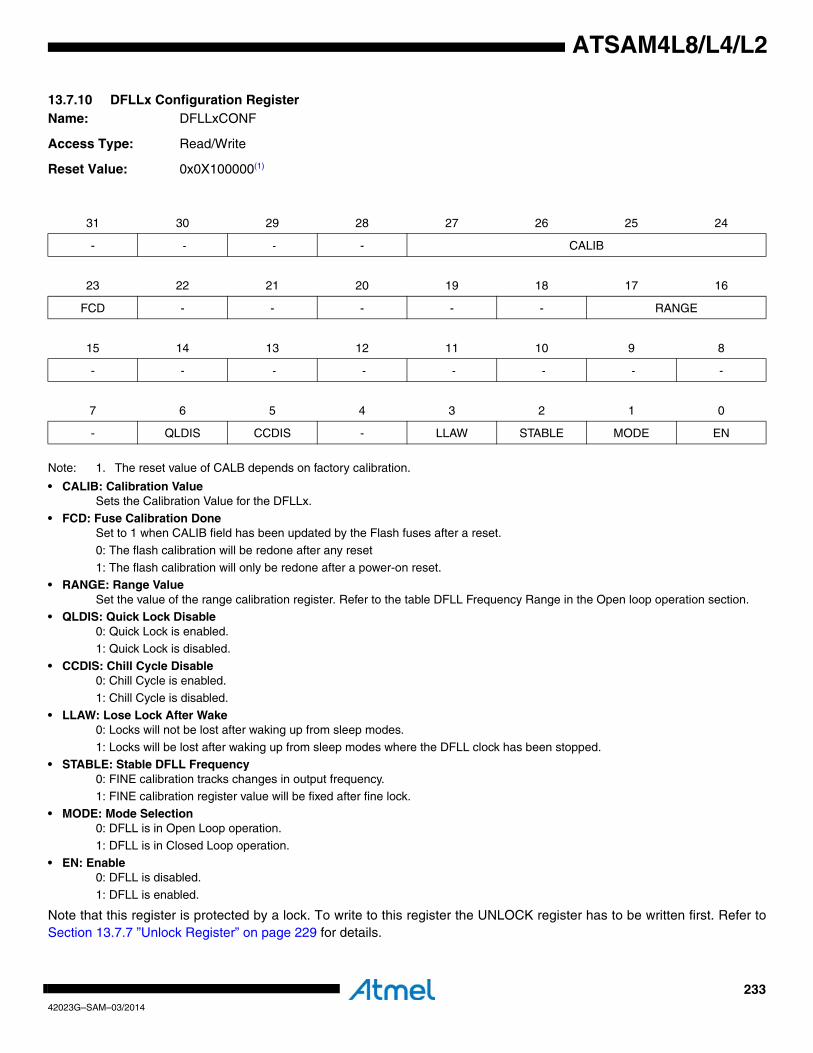
23342023G–SAM–03/2014
ATSAM4L8/L4/L2
13.7.10 DFLLx Configuration RegisterName: DFLLxCONF
Access Type: Read/Write
Reset Value: 0x0X100000(1)
Note: 1. The reset value of CALB depends on factory calibration.
• CALIB: Calibration ValueSets the Calibration Value for the DFLLx.
• FCD: Fuse Calibration DoneSet to 1 when CALIB field has been updated by the Flash fuses after a reset.
0: The flash calibration will be redone after any reset
1: The flash calibration will only be redone after a power-on reset. • RANGE: Range Value
Set the value of the range calibration register. Refer to the table DFLL Frequency Range in the Open loop operation section. • QLDIS: Quick Lock Disable
0: Quick Lock is enabled.1: Quick Lock is disabled.
• CCDIS: Chill Cycle Disable0: Chill Cycle is enabled.
1: Chill Cycle is disabled.
• LLAW: Lose Lock After Wake0: Locks will not be lost after waking up from sleep modes.
1: Locks will be lost after waking up from sleep modes where the DFLL clock has been stopped.• STABLE: Stable DFLL Frequency
0: FINE calibration tracks changes in output frequency.1: FINE calibration register value will be fixed after fine lock.
• MODE: Mode Selection0: DFLL is in Open Loop operation.
1: DFLL is in Closed Loop operation.
• EN: Enable0: DFLL is disabled.
1: DFLL is enabled.
Note that this register is protected by a lock. To write to this register the UNLOCK register has to be written first. Refer toSection 13.7.7 ”Unlock Register” on page 229 for details.
31 30 29 28 27 26 25 24
- - - - CALIB
23 22 21 20 19 18 17 16
FCD - - - - - RANGE
15 14 13 12 11 10 9 8
- - - - - - - -
7 6 5 4 3 2 1 0
- QLDIS CCDIS - LLAW STABLE MODE EN
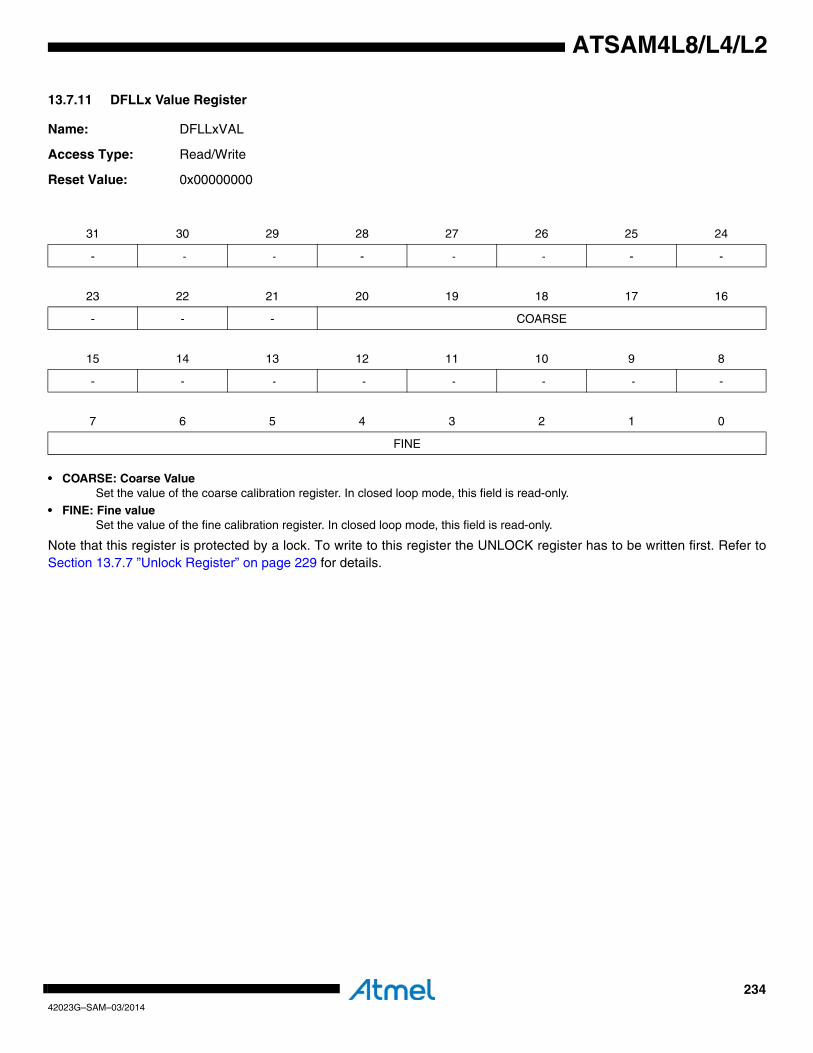
23442023G–SAM–03/2014
ATSAM4L8/L4/L2
13.7.11 DFLLx Value Register
Name: DFLLxVAL
Access Type: Read/Write
Reset Value: 0x00000000
• COARSE: Coarse ValueSet the value of the coarse calibration register. In closed loop mode, this field is read-only.
• FINE: Fine valueSet the value of the fine calibration register. In closed loop mode, this field is read-only.
Note that this register is protected by a lock. To write to this register the UNLOCK register has to be written first. Refer toSection 13.7.7 ”Unlock Register” on page 229 for details.
31 30 29 28 27 26 25 24
- - - - - - - -
23 22 21 20 19 18 17 16
- - - COARSE
15 14 13 12 11 10 9 8
- - - - - - - -
7 6 5 4 3 2 1 0
FINE
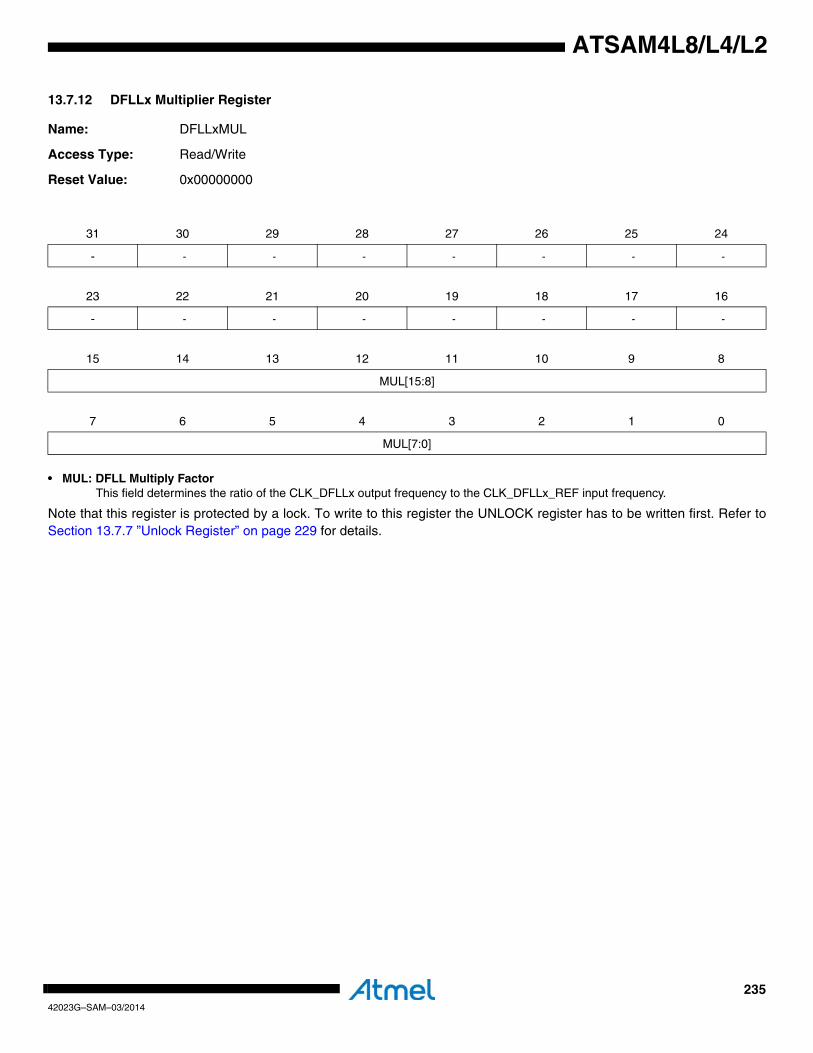
23542023G–SAM–03/2014
ATSAM4L8/L4/L2
13.7.12 DFLLx Multiplier Register
Name: DFLLxMUL
Access Type: Read/Write
Reset Value: 0x00000000
• MUL: DFLL Multiply FactorThis field determines the ratio of the CLK_DFLLx output frequency to the CLK_DFLLx_REF input frequency.
Note that this register is protected by a lock. To write to this register the UNLOCK register has to be written first. Refer toSection 13.7.7 ”Unlock Register” on page 229 for details.
31 30 29 28 27 26 25 24
- - - - - - - -
23 22 21 20 19 18 17 16
- - - - - - - -
15 14 13 12 11 10 9 8
MUL[15:8]
7 6 5 4 3 2 1 0
MUL[7:0]
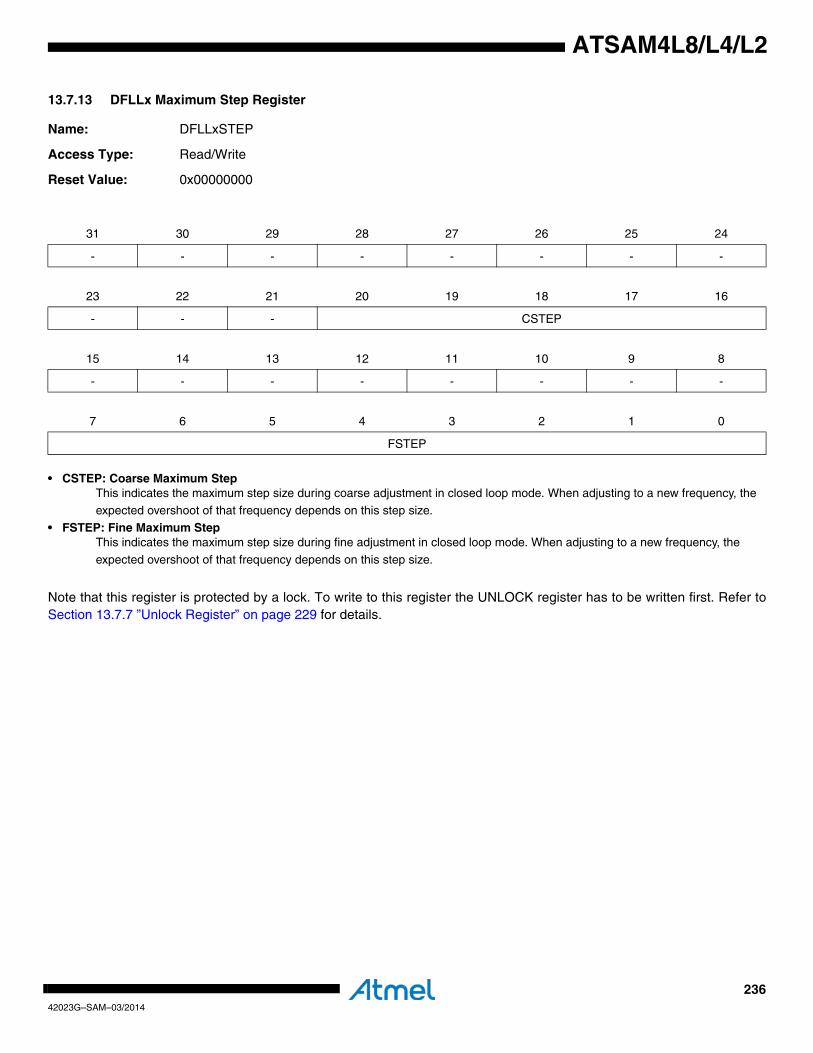
23642023G–SAM–03/2014
ATSAM4L8/L4/L2
13.7.13 DFLLx Maximum Step Register
Name: DFLLxSTEP
Access Type: Read/Write
Reset Value: 0x00000000
• CSTEP: Coarse Maximum StepThis indicates the maximum step size during coarse adjustment in closed loop mode. When adjusting to a new frequency, the
expected overshoot of that frequency depends on this step size.
• FSTEP: Fine Maximum StepThis indicates the maximum step size during fine adjustment in closed loop mode. When adjusting to a new frequency, the
expected overshoot of that frequency depends on this step size.
Note that this register is protected by a lock. To write to this register the UNLOCK register has to be written first. Refer toSection 13.7.7 ”Unlock Register” on page 229 for details.
31 30 29 28 27 26 25 24
- - - - - - - -
23 22 21 20 19 18 17 16
- - - CSTEP
15 14 13 12 11 10 9 8
- - - - - - - -
7 6 5 4 3 2 1 0
FSTEP
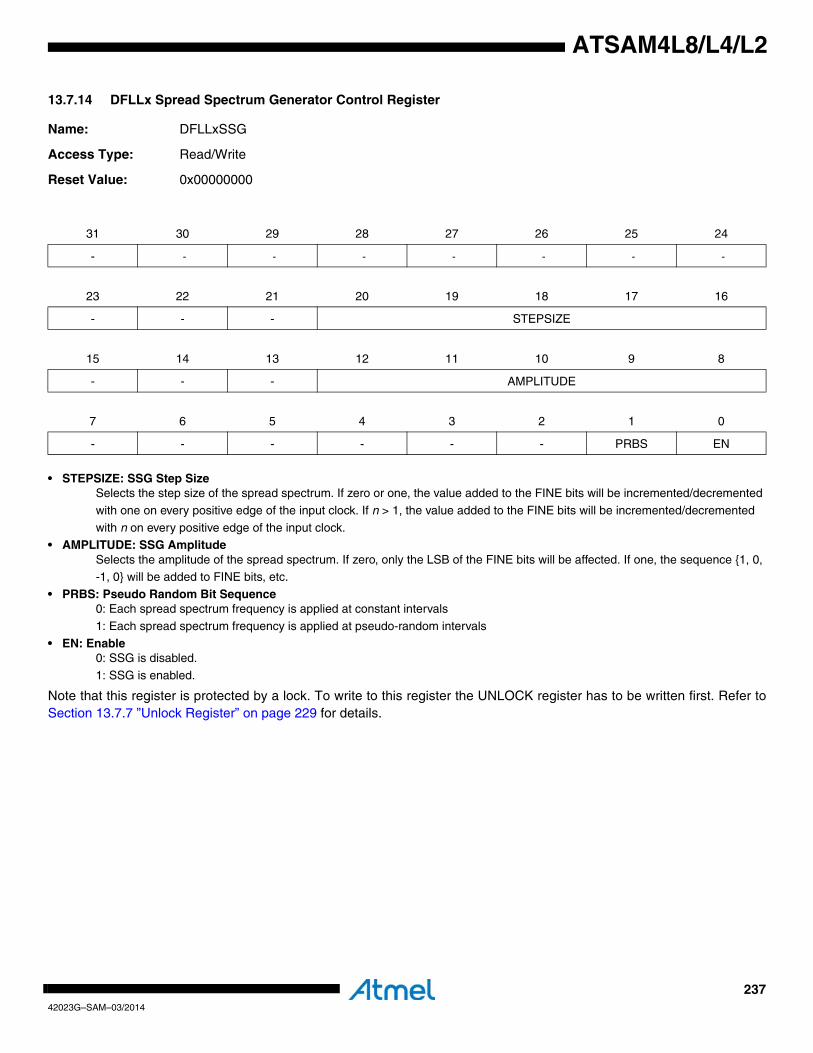
23742023G–SAM–03/2014
ATSAM4L8/L4/L2
13.7.14 DFLLx Spread Spectrum Generator Control Register
Name: DFLLxSSG
Access Type: Read/Write
Reset Value: 0x00000000
• STEPSIZE: SSG Step SizeSelects the step size of the spread spectrum. If zero or one, the value added to the FINE bits will be incremented/decremented
with one on every positive edge of the input clock. If n > 1, the value added to the FINE bits will be incremented/decremented
with n on every positive edge of the input clock.• AMPLITUDE: SSG Amplitude
Selects the amplitude of the spread spectrum. If zero, only the LSB of the FINE bits will be affected. If one, the sequence {1, 0, -1, 0} will be added to FINE bits, etc.
• PRBS: Pseudo Random Bit Sequence0: Each spread spectrum frequency is applied at constant intervals
1: Each spread spectrum frequency is applied at pseudo-random intervals
• EN: Enable0: SSG is disabled.
1: SSG is enabled.
Note that this register is protected by a lock. To write to this register the UNLOCK register has to be written first. Refer toSection 13.7.7 ”Unlock Register” on page 229 for details.
31 30 29 28 27 26 25 24
- - - - - - - -
23 22 21 20 19 18 17 16
- - - STEPSIZE
15 14 13 12 11 10 9 8
- - - AMPLITUDE
7 6 5 4 3 2 1 0
- - - - - - PRBS EN
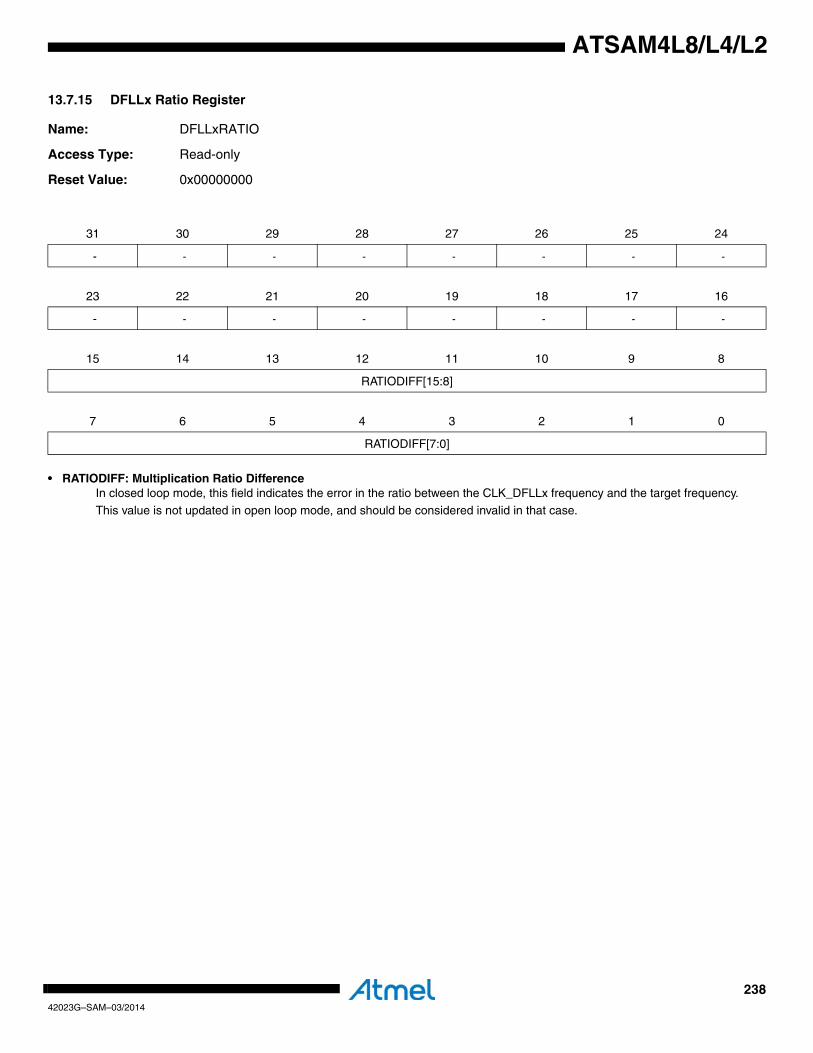
23842023G–SAM–03/2014
ATSAM4L8/L4/L2
13.7.15 DFLLx Ratio Register
Name: DFLLxRATIO
Access Type: Read-only
Reset Value: 0x00000000
• RATIODIFF: Multiplication Ratio DifferenceIn closed loop mode, this field indicates the error in the ratio between the CLK_DFLLx frequency and the target frequency.
This value is not updated in open loop mode, and should be considered invalid in that case.
31 30 29 28 27 26 25 24
- - - - - - - -
23 22 21 20 19 18 17 16
- - - - - - - -
15 14 13 12 11 10 9 8
RATIODIFF[15:8]
7 6 5 4 3 2 1 0
RATIODIFF[7:0]

23942023G–SAM–03/2014
ATSAM4L8/L4/L2
13.7.16 DFLLx Synchronization Register
Name: DFLLxSYNC
Access Type: Write-only
Reset Value: 0x00000000
• SYNC: SynchronizationTo be able to read the current value of DFLLxVAL or DFLLxRATIO, this bit must be written to one. The updated value are
available in DFLLxVAL or DFLLxRATIO when PCLKSR.DFLL0RDY is set.
31 30 29 28 27 26 25 24
- - - - - - - -
23 22 21 20 19 18 17 16
- - - - - - - -
15 14 13 12 11 10 9 8
- - - - - - - -
7 6 5 4 3 2 1 0
- - - - - - - SYNC
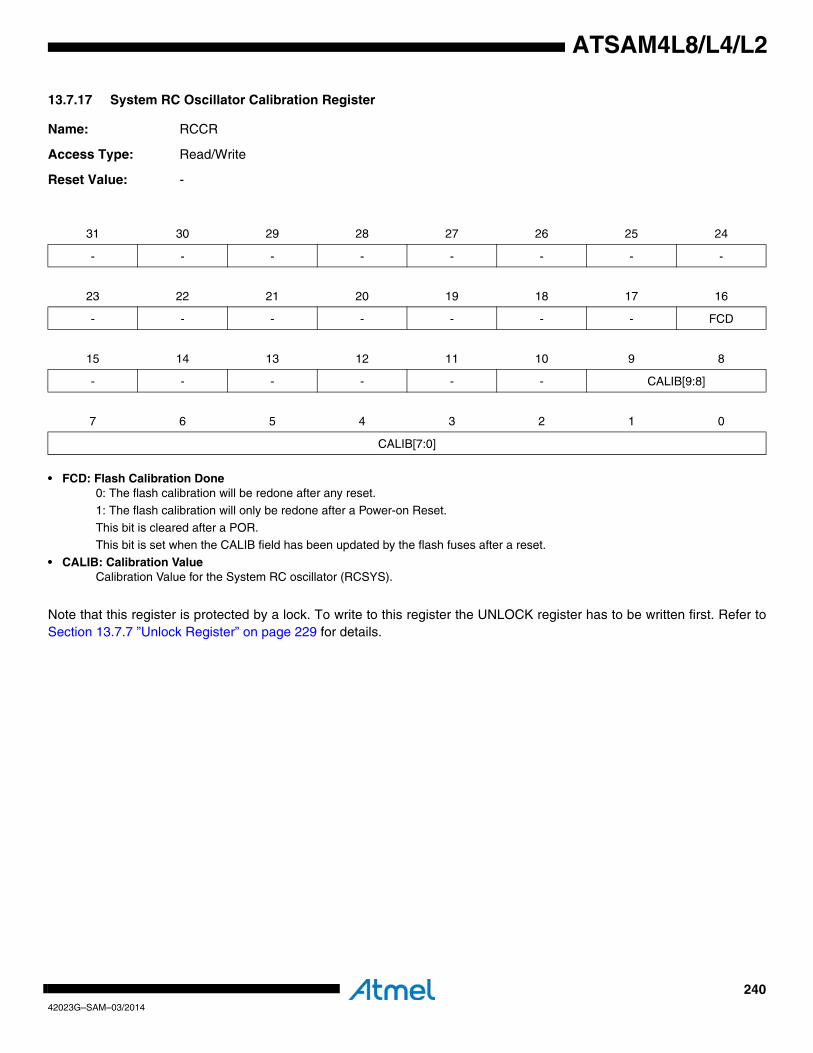
24042023G–SAM–03/2014
ATSAM4L8/L4/L2
13.7.17 System RC Oscillator Calibration Register
Name: RCCR
Access Type: Read/Write
Reset Value: -
• FCD: Flash Calibration Done 0: The flash calibration will be redone after any reset.
1: The flash calibration will only be redone after a Power-on Reset.
This bit is cleared after a POR.This bit is set when the CALIB field has been updated by the flash fuses after a reset.
• CALIB: Calibration Value Calibration Value for the System RC oscillator (RCSYS).
Note that this register is protected by a lock. To write to this register the UNLOCK register has to be written first. Refer toSection 13.7.7 ”Unlock Register” on page 229 for details.
31 30 29 28 27 26 25 24
- - - - - - - -
23 22 21 20 19 18 17 16
- - - - - - - FCD
15 14 13 12 11 10 9 8
- - - - - - CALIB[9:8]
7 6 5 4 3 2 1 0
CALIB[7:0]

24142023G–SAM–03/2014
ATSAM4L8/L4/L2
13.7.18 4/8/12MHz RC Oscillator Configuration RegisterName: RCFASTCFG
Access Type: Read/Write
Reset Value: 0x00000000
• CALIB: Oscillator Calibration ValueWriting a value to this field sets the oscillator trim value. A small value will produce a fast RCFAST clock and a big value will
produce a slow clock. If the tuner is enabled, writing to this field will cause the tuner to start tuning from the written value.• LOCKMARGIN: Accepted Count Error for Lock
Writing a value to this field defines the maximum absolute value of the current count error with respect to the theoretical count that will be trigger the RCFASTLOCK condition:
If abs(Count - Count_theor) <= LOCKMARGIN, then RCFASTLOCK is set, otherwise RCFASTLOCKLOST is set, with
Count_theor = 122 x (1 + FRANGE) << NBPERIODS.• FRANGE: Frequency Range
00: 4MHz range selected.01: 8MHz range selected.
10: 12MHz range selected.
11: Reserved.• FCD: RCFAST Fuse Calibration Done
Always read as 1 (read only).Set to 1 when the CALIB field has been updated by the Flash Fuses after a reset (read only).
0: Calibration from Flash Fuses has not been loaded. Calibration from Flash Fuses will be redone after any reset.
1: Calibration from Flash Fuses has been loaded. Calibration from Flash Fuses will only be redone after a Power-on Reset.• NBPERIODS: Number of 32kHz Periods
Writing a value to this field defines the number of periods of the 32kHz clock used to compare the RCFAST clock output. A higher value increases the tuner precision and smoothes the calibration adjustments.
• JITMODE: Jitter Mode0: The RCFAST trim value is only updated when the RCFASTLOCKLOST is set; it is kept stable as long as the RCFASTLOCK
condition is set.
1: The RCFAST trim value is continuously updated.
• TUNEEN: Tuner Enable0: Tuner is not enabled, and the RCFAST operates in open loop mode.
1: Tuner is enabled, and the RCFAST operates in closed loop mode.• EN: Oscillator Enable
0: The RCFAST clock is disabled, and the output clock is stopped.
31 30 29 28 27 26 25 24
- - - - - - - -
23 22 21 20 19 18 17 16
- CALIB
15 14 13 12 11 10 9 8
LOCKMARGIN - - FRANGE
7 6 5 4 3 2 1 0
FCD NBPERIODS - JITMODE TUNEEN EN

24242023G–SAM–03/2014
ATSAM4L8/L4/L2
1: The RCFAST clock is enabled, and the output clock is running.
Note that this register is protected by a lock. To write to this register the UNLOCK register has to be written first. Refer toSection 13.7.7 ”Unlock Register” on page 229 for details.
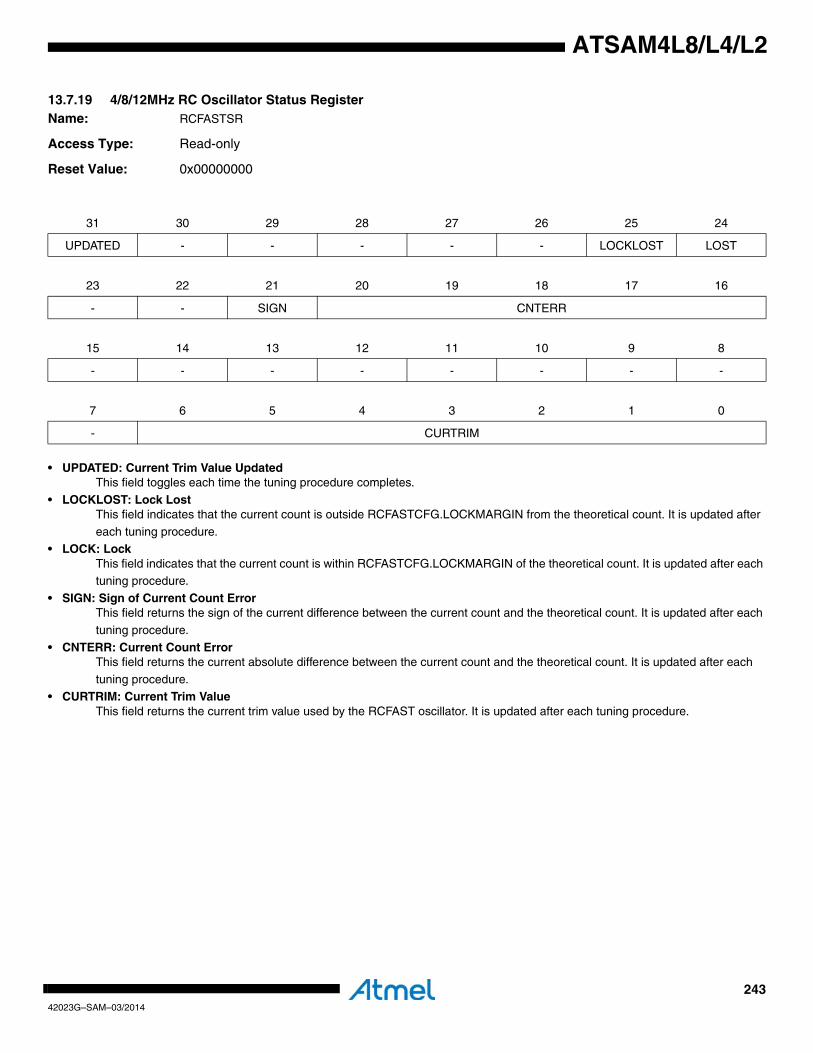
24342023G–SAM–03/2014
ATSAM4L8/L4/L2
13.7.19 4/8/12MHz RC Oscillator Status RegisterName: RCFASTSR
Access Type: Read-only
Reset Value: 0x00000000
• UPDATED: Current Trim Value UpdatedThis field toggles each time the tuning procedure completes.
• LOCKLOST: Lock LostThis field indicates that the current count is outside RCFASTCFG.LOCKMARGIN from the theoretical count. It is updated after
each tuning procedure.• LOCK: Lock
This field indicates that the current count is within RCFASTCFG.LOCKMARGIN of the theoretical count. It is updated after each tuning procedure.
• SIGN: Sign of Current Count ErrorThis field returns the sign of the current difference between the current count and the theoretical count. It is updated after each
tuning procedure.
• CNTERR: Current Count ErrorThis field returns the current absolute difference between the current count and the theoretical count. It is updated after each
tuning procedure.• CURTRIM: Current Trim Value
This field returns the current trim value used by the RCFAST oscillator. It is updated after each tuning procedure.
31 30 29 28 27 26 25 24
UPDATED - - - - - LOCKLOST LOST
23 22 21 20 19 18 17 16
- - SIGN CNTERR
15 14 13 12 11 10 9 8
- - - - - - - -
7 6 5 4 3 2 1 0
- CURTRIM
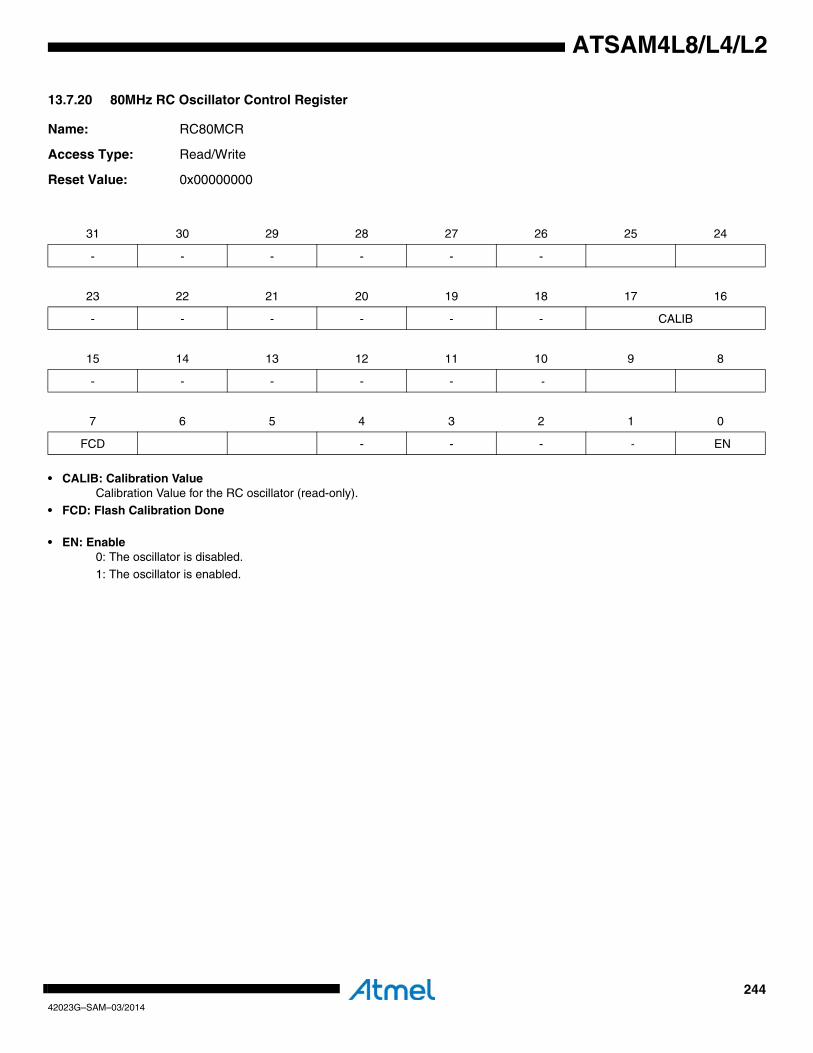
24442023G–SAM–03/2014
ATSAM4L8/L4/L2
13.7.20 80MHz RC Oscillator Control Register
Name: RC80MCR
Access Type: Read/Write
Reset Value: 0x00000000
• CALIB: Calibration ValueCalibration Value for the RC oscillator (read-only).
• FCD: Flash Calibration Done
• EN: Enable0: The oscillator is disabled.
1: The oscillator is enabled.
31 30 29 28 27 26 25 24
- - - - - -
23 22 21 20 19 18 17 16
- - - - - - CALIB
15 14 13 12 11 10 9 8
- - - - - -
7 6 5 4 3 2 1 0
FCD - - - - EN
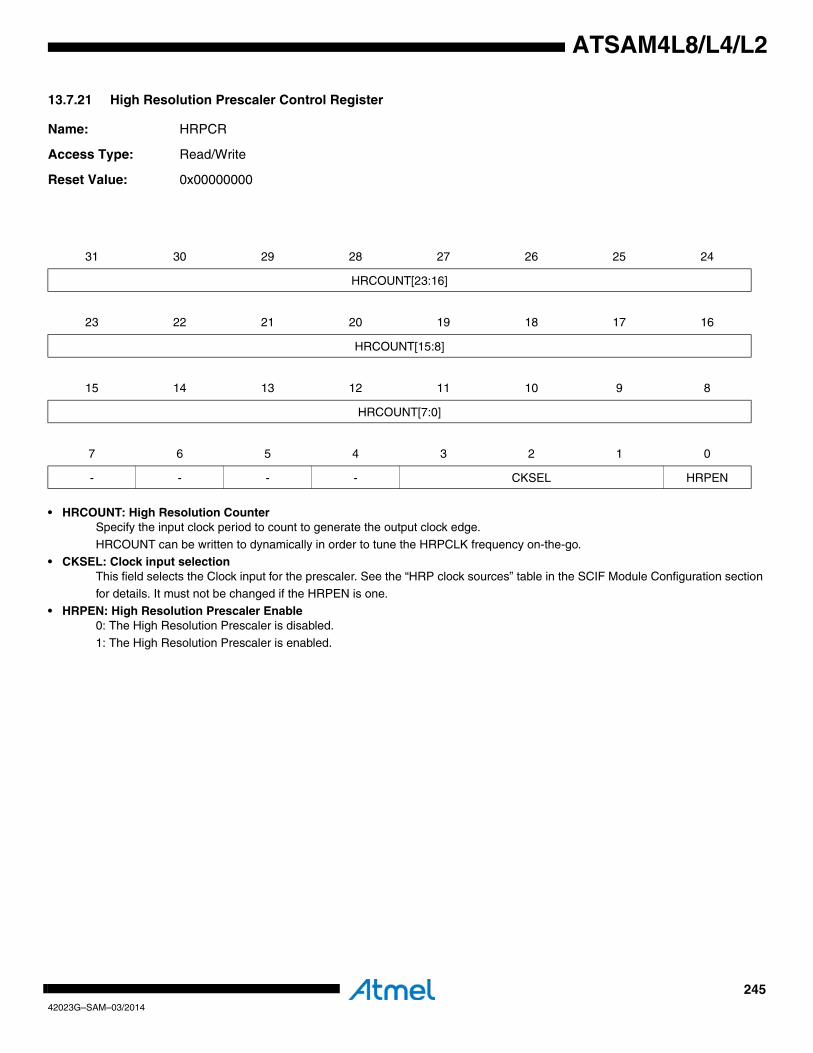
24542023G–SAM–03/2014
ATSAM4L8/L4/L2
13.7.21 High Resolution Prescaler Control Register
Name: HRPCR
Access Type: Read/Write
Reset Value: 0x00000000
• HRCOUNT: High Resolution CounterSpecify the input clock period to count to generate the output clock edge.
HRCOUNT can be written to dynamically in order to tune the HRPCLK frequency on-the-go.• CKSEL: Clock input selection
This field selects the Clock input for the prescaler. See the “HRP clock sources” table in the SCIF Module Configuration section for details. It must not be changed if the HRPEN is one.
• HRPEN: High Resolution Prescaler Enable0: The High Resolution Prescaler is disabled.
1: The High Resolution Prescaler is enabled.
31 30 29 28 27 26 25 24
HRCOUNT[23:16]
23 22 21 20 19 18 17 16
HRCOUNT[15:8]
15 14 13 12 11 10 9 8
HRCOUNT[7:0]
7 6 5 4 3 2 1 0
- - - - CKSEL HRPEN
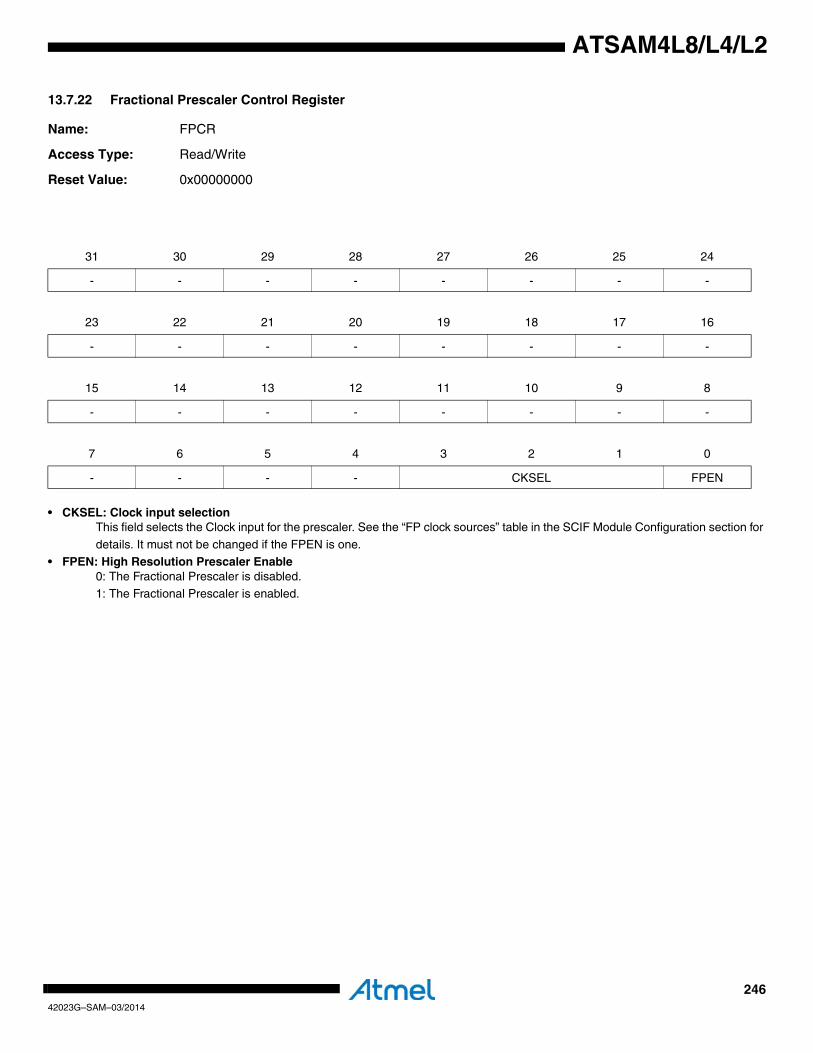
24642023G–SAM–03/2014
ATSAM4L8/L4/L2
13.7.22 Fractional Prescaler Control Register
Name: FPCR
Access Type: Read/Write
Reset Value: 0x00000000
• CKSEL: Clock input selectionThis field selects the Clock input for the prescaler. See the “FP clock sources” table in the SCIF Module Configuration section for
details. It must not be changed if the FPEN is one.• FPEN: High Resolution Prescaler Enable
0: The Fractional Prescaler is disabled.1: The Fractional Prescaler is enabled.
31 30 29 28 27 26 25 24
- - - - - - - -
23 22 21 20 19 18 17 16
- - - - - - - -
15 14 13 12 11 10 9 8
- - - - - - - -
7 6 5 4 3 2 1 0
- - - - CKSEL FPEN

24742023G–SAM–03/2014
ATSAM4L8/L4/L2
13.7.23 Fractional Prescaler Mul Register
Name: FPMUL
Access Type: Read/Write
Reset Value: 0x00000000
• FPMUL: Fractional Prescaler Multiplication FactorThis field selects the multiplication factor for the prescaler.
Notice that FPMUL is always smaller than FPDIV. FPMUL can be written to dynamically in order to tune the FPCLK frequency on-the-go.
31 30 29 28 27 26 25 24
- - - - - - - -
23 22 21 20 19 18 17 16
- - - - - - - -
15 14 13 12 11 10 9 8
FPMUL[15:8]
7 6 5 4 3 2 1 0
FPMUL[7:0]
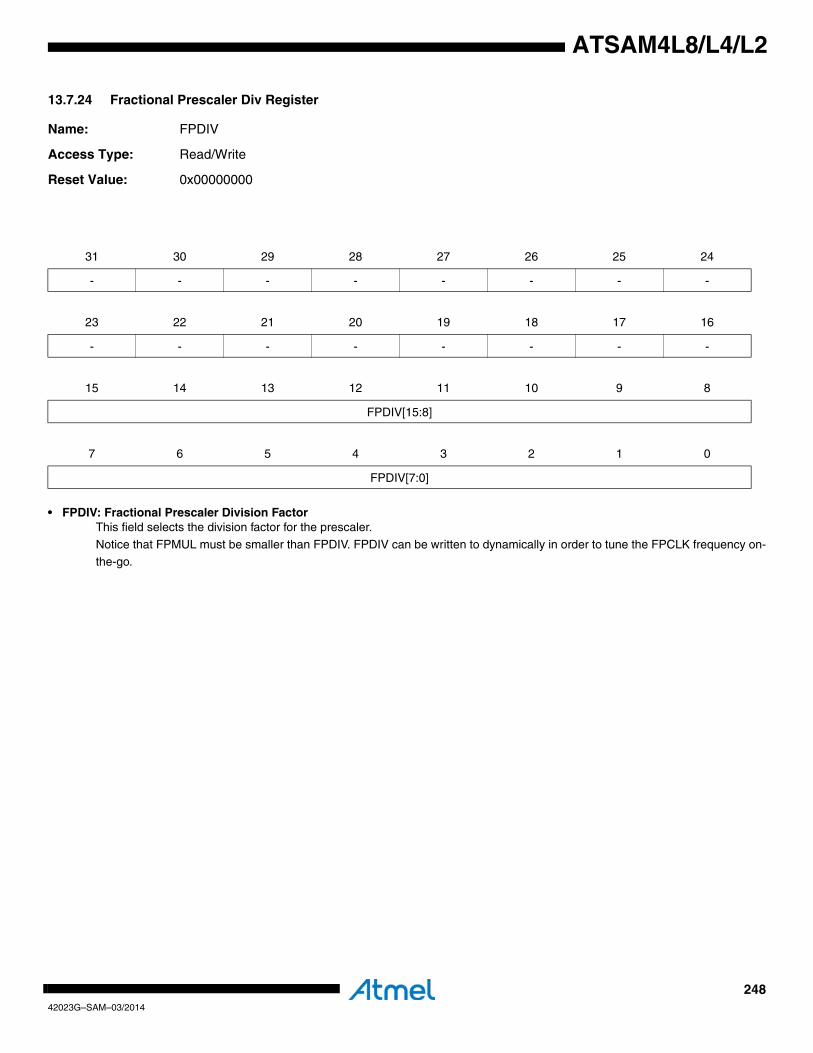
24842023G–SAM–03/2014
ATSAM4L8/L4/L2
13.7.24 Fractional Prescaler Div Register
Name: FPDIV
Access Type: Read/Write
Reset Value: 0x00000000
• FPDIV: Fractional Prescaler Division FactorThis field selects the division factor for the prescaler.
Notice that FPMUL must be smaller than FPDIV. FPDIV can be written to dynamically in order to tune the FPCLK frequency on-the-go.
31 30 29 28 27 26 25 24
- - - - - - - -
23 22 21 20 19 18 17 16
- - - - - - - -
15 14 13 12 11 10 9 8
FPDIV[15:8]
7 6 5 4 3 2 1 0
FPDIV[7:0]
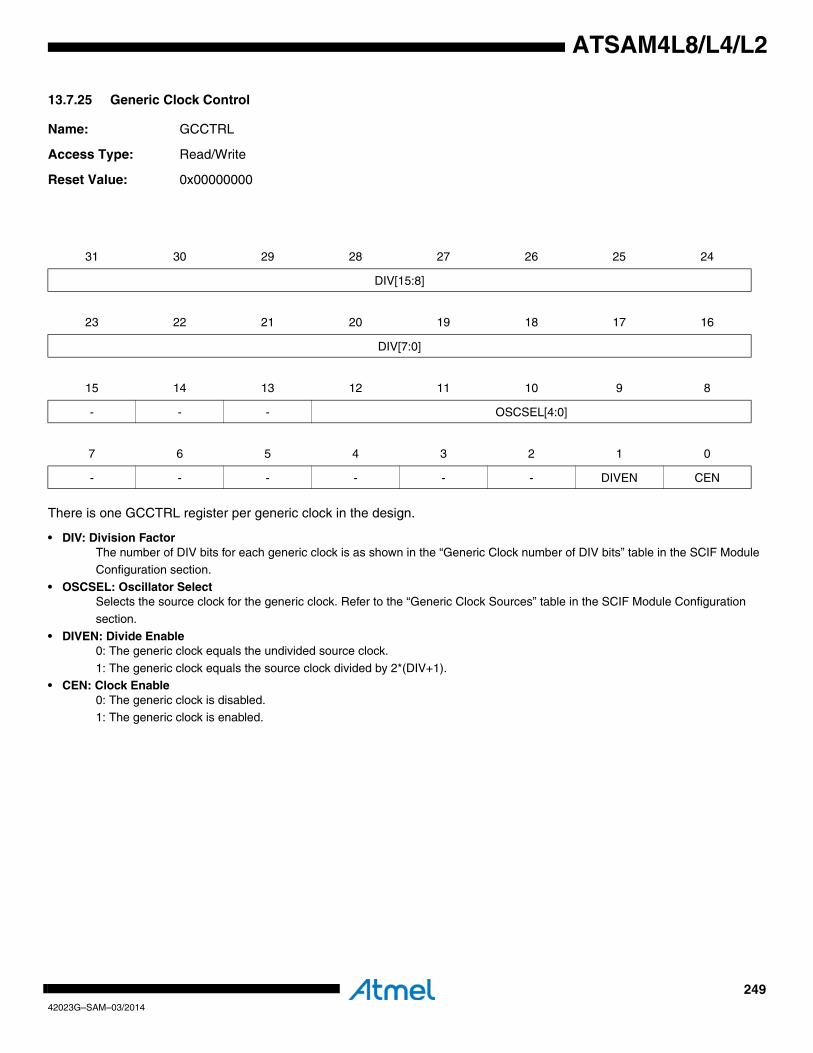
24942023G–SAM–03/2014
ATSAM4L8/L4/L2
13.7.25 Generic Clock Control
Name: GCCTRL
Access Type: Read/Write
Reset Value: 0x00000000
There is one GCCTRL register per generic clock in the design.
• DIV: Division FactorThe number of DIV bits for each generic clock is as shown in the “Generic Clock number of DIV bits” table in the SCIF Module Configuration section.
• OSCSEL: Oscillator SelectSelects the source clock for the generic clock. Refer to the “Generic Clock Sources” table in the SCIF Module Configuration
section.
• DIVEN: Divide Enable0: The generic clock equals the undivided source clock.
1: The generic clock equals the source clock divided by 2*(DIV+1).• CEN: Clock Enable
0: The generic clock is disabled.1: The generic clock is enabled.
31 30 29 28 27 26 25 24
DIV[15:8]
23 22 21 20 19 18 17 16
DIV[7:0]
15 14 13 12 11 10 9 8
- - - OSCSEL[4:0]
7 6 5 4 3 2 1 0
- - - - - - DIVEN CEN
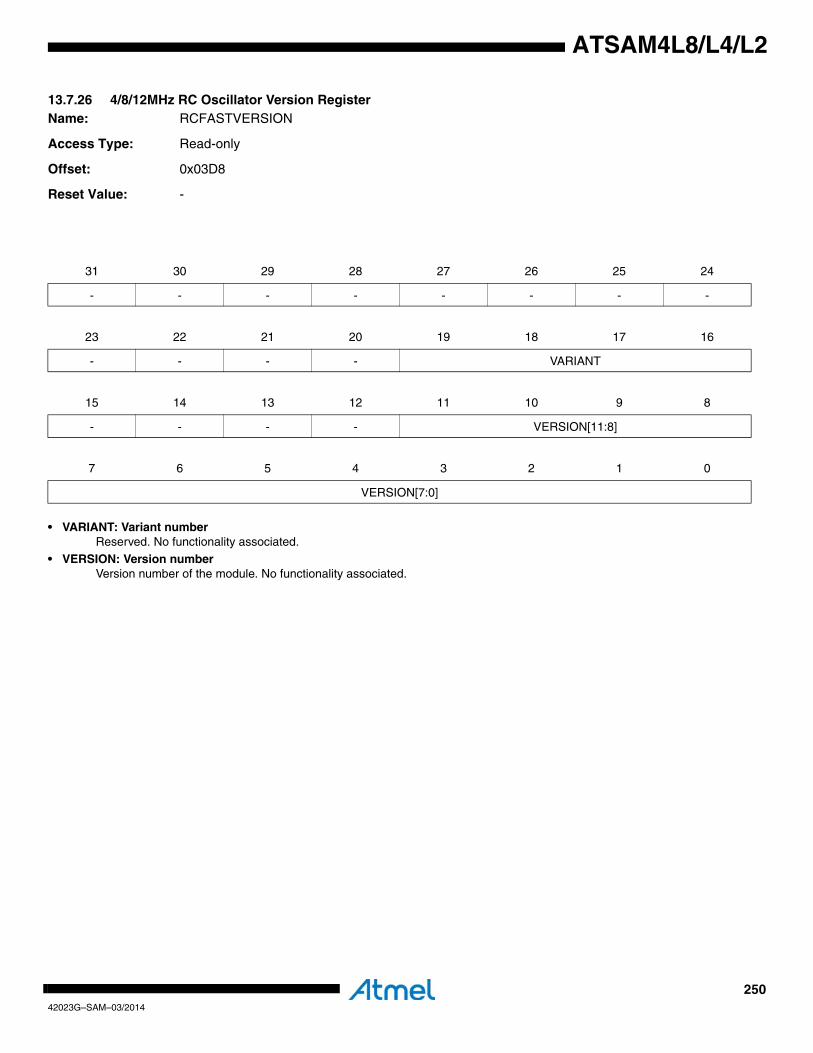
25042023G–SAM–03/2014
ATSAM4L8/L4/L2
13.7.26 4/8/12MHz RC Oscillator Version RegisterName: RCFASTVERSION
Access Type: Read-only
Offset: 0x03D8
Reset Value: -
• VARIANT: Variant numberReserved. No functionality associated.
• VERSION: Version numberVersion number of the module. No functionality associated.
31 30 29 28 27 26 25 24
- - - - - - - -
23 22 21 20 19 18 17 16
- - - - VARIANT
15 14 13 12 11 10 9 8
- - - - VERSION[11:8]
7 6 5 4 3 2 1 0
VERSION[7:0]
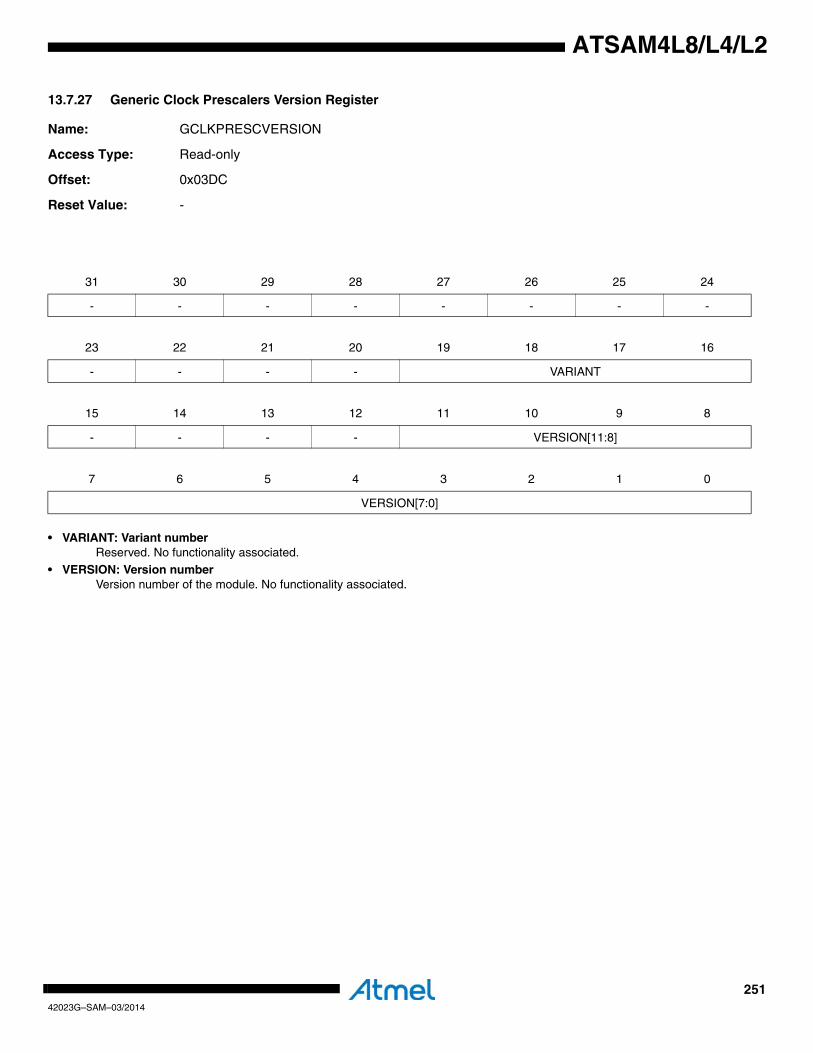
25142023G–SAM–03/2014
ATSAM4L8/L4/L2
13.7.27 Generic Clock Prescalers Version Register
Name: GCLKPRESCVERSION
Access Type: Read-only
Offset: 0x03DC
Reset Value: -
• VARIANT: Variant numberReserved. No functionality associated.
• VERSION: Version numberVersion number of the module. No functionality associated.
31 30 29 28 27 26 25 24
- - - - - - - -
23 22 21 20 19 18 17 16
- - - - VARIANT
15 14 13 12 11 10 9 8
- - - - VERSION[11:8]
7 6 5 4 3 2 1 0
VERSION[7:0]
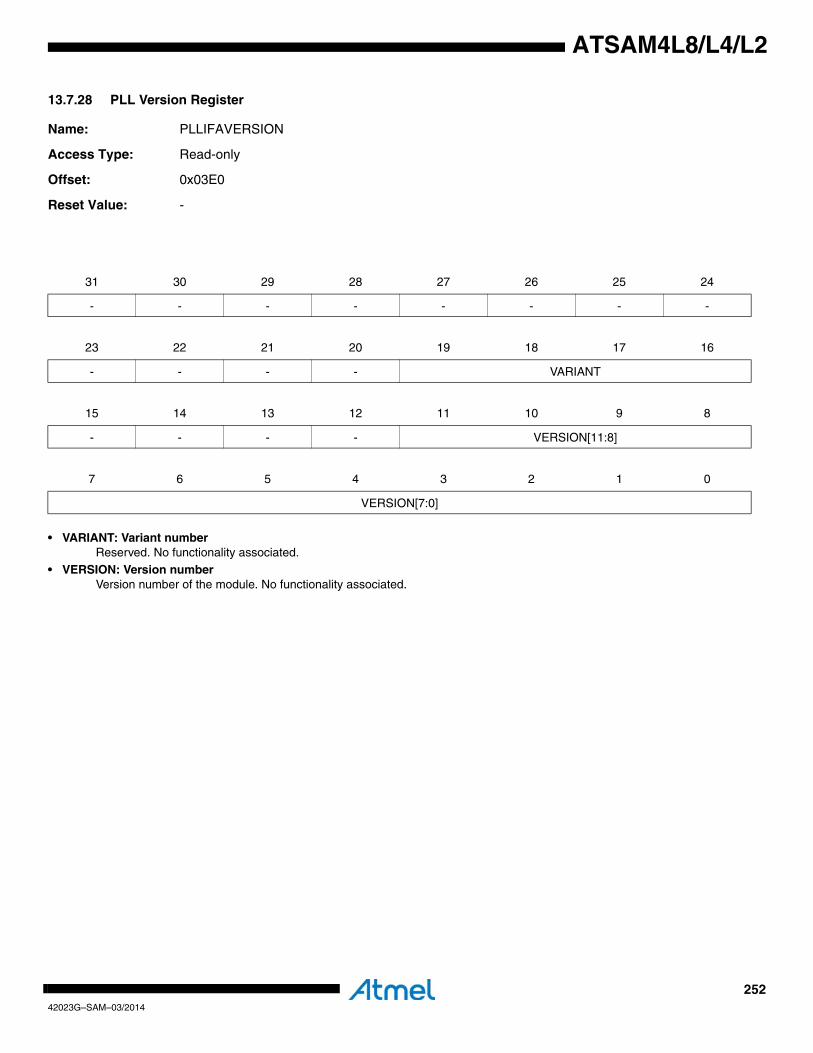
25242023G–SAM–03/2014
ATSAM4L8/L4/L2
13.7.28 PLL Version Register
Name: PLLIFAVERSION
Access Type: Read-only
Offset: 0x03E0
Reset Value: -
• VARIANT: Variant numberReserved. No functionality associated.
• VERSION: Version numberVersion number of the module. No functionality associated.
31 30 29 28 27 26 25 24
- - - - - - - -
23 22 21 20 19 18 17 16
- - - - VARIANT
15 14 13 12 11 10 9 8
- - - - VERSION[11:8]
7 6 5 4 3 2 1 0
VERSION[7:0]

25342023G–SAM–03/2014
ATSAM4L8/L4/L2
13.7.29 Oscillator 0 Version Register
Name: OSCIFAVERSION
Access Type: Read-only
Offset: 0x03E4
Reset Value: -
• VARIANT: Variant numberReserved. No functionality associated.
• VERSION: Version numberVersion number of the module. No functionality associated.
31 30 29 28 27 26 25 24
- - - - - - - -
23 22 21 20 19 18 17 16
- - - - VARIANT
15 14 13 12 11 10 9 8
- - - - VERSION[11:8]
7 6 5 4 3 2 1 0
VERSION[7:0]
25442023G–SAM–03/2014
ATSAM4L8/L4/L2
13.7.30 Digital Frequency Locked Loop Version Register
Name: DFLLIFBVERSION
Access Type: Read-only
Offset: 0x03E8
Reset Value: -
• VARIANT: Variant numberReserved. No functionality associated.
• VERSION: Version numberVersion number of the module. No functionality associated.
31 30 29 28 27 26 25 24
- - - - - - - -
23 22 21 20 19 18 17 16
- - - - VARIANT
15 14 13 12 11 10 9 8
- - - - VERSION[11:8]
7 6 5 4 3 2 1 0
VERSION[7:0]

25542023G–SAM–03/2014
ATSAM4L8/L4/L2
13.7.31 RC Oscillator Version Register
Name: RCOSCIFAVERSION
Access Type: Read-only
Offset: 0x03EC
Reset Value: -
• VARIANT: Variant numberReserved. No functionality associated.
• VERSION: Version numberVersion number of the module. No functionality associated.
31 30 29 28 27 26 25 24
- - - - - - - -
23 22 21 20 19 18 17 16
- - - - VARIANT
15 14 13 12 11 10 9 8
- - - - VERSION[11:8]
7 6 5 4 3 2 1 0
VERSION[7:0]
25642023G–SAM–03/2014
ATSAM4L8/L4/L2
13.7.32 80MHz RC Oscillator Version Register
Name: RC80MVERSION
Access Type: Read-only
Offset: 0x03F4
Reset Value: -
• VARIANT: Variant numberReserved. No functionality associated.
• VERSION: Version numberVersion number of the module. No functionality associated.
31 30 29 28 27 26 25 24
- - - - - - - -
23 22 21 20 19 18 17 16
- - - - VARIANT
15 14 13 12 11 10 9 8
- - - - VERSION[11:8]
7 6 5 4 3 2 1 0
VERSION[7:0]

25742023G–SAM–03/2014
ATSAM4L8/L4/L2
13.7.33 Generic Clock Version Register
Name: GCLKIFVERSION
Access Type: Read-only
Offset: 0x03F8
Reset Value: -
• VARIANT: Variant numberReserved. No functionality associated.
• VERSION: Version numberVersion number of the module. No functionality associated.
31 30 29 28 27 26 25 24
- - - - - - - -
23 22 21 20 19 18 17 16
- - - - VARIANT
15 14 13 12 11 10 9 8
- - - - VERSION[11:8]
7 6 5 4 3 2 1 0
VERSION[7:0]
25842023G–SAM–03/2014
ATSAM4L8/L4/L2
13.7.34 SCIF Version Register
Name: VERSION
Access Type: Read-only
Offset: 0x03FC
Reset Value: -
• VARIANT: Variant numberReserved. No functionality associated.
• VERSION: Version numberVersion number of the module. No functionality associated.
31 30 29 28 27 26 25 24
- - - - - - - -
23 22 21 20 19 18 17 16
- - - - VARIANT
15 14 13 12 11 10 9 8
- - - - VERSION[11:0]
7 6 5 4 3 2 1 0
VERSION[7:0]
25942023G–SAM–03/2014
ATSAM4L8/L4/L2
13.8 Module ConfigurationThe specific configuration for each SCIF instance is listed in the following tables.The module busclocks listed here are connected to the system bus clocks. Refer to Section 10. ”Power Manager(PM)” on page 109 for details.
Table 13-4. SCIF Clock Name
Module Name Clock Name Description
SCIF CLK_SCIF Clock for the SCIF bus interface
Table 13-5. Oscillator Startup Times
STARTUPNumber of System RC oscillator clock cycle
Approximative Equivalent time (RCSYS = 115 kHz)
0 0 0
1 64 557 us
2 128 1.1 ms
3 2048 18 ms
4 4096 36 ms
5 8192 71 ms
6 16384 143 ms
7 32768 285 ms
8 4 35 us
9 8 70 us
10 16 139 us
11 32 278 us
12 256 2.2 ms
13 512 4.5 ms
14 1024 8.9 ms
15 32768 285 ms
Table 13-6. Oscillator Gain Settings
GAIN[1:0] Function
0 Oscillator is used with gain G0 (XIN from 0.6MHz to 2.0MHz)
1 Oscillator is used with gain G1 (XIN from 2.0MHz to 4.0MHz)
2 Oscillator is used with gain G2 (XIN from 4.0MHz to 8.0MHz)
3 Oscillator is used with gain G3 (XIN from 8.0MHz to 16.0MHz)
4 Oscillator is used with gain G4 (XIN from 16.0MHz to 30.0MHz)
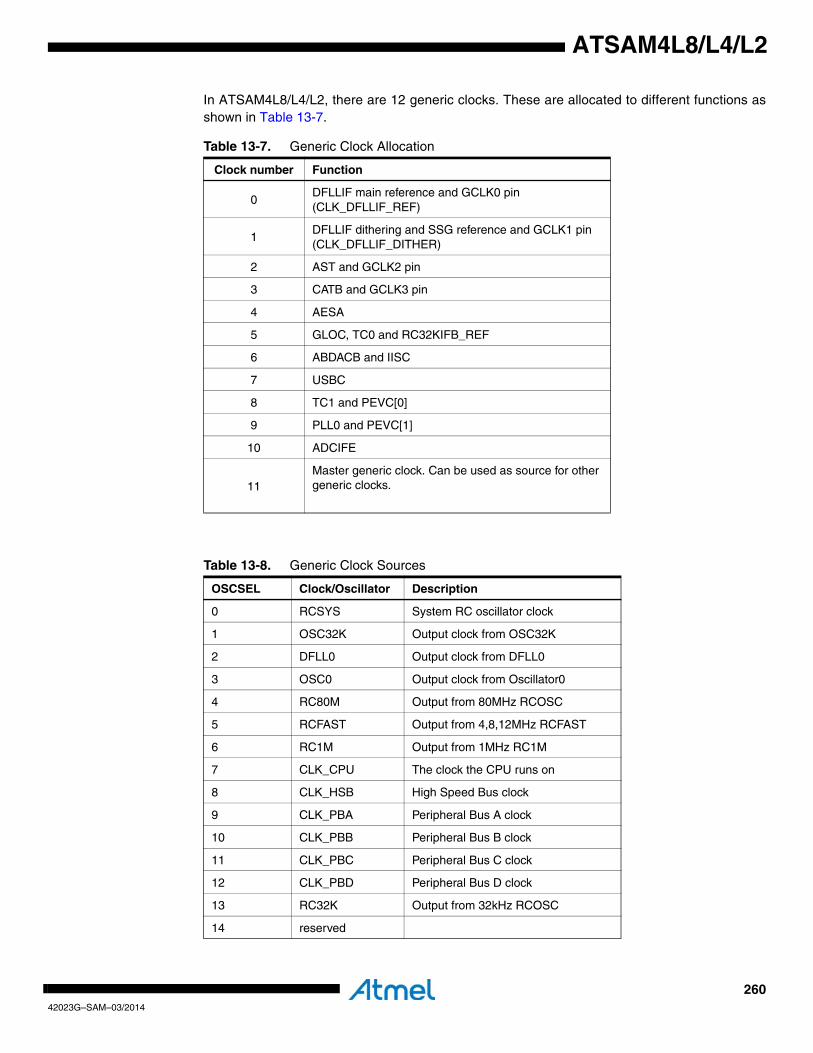
26042023G–SAM–03/2014
ATSAM4L8/L4/L2
In ATSAM4L8/L4/L2, there are 12 generic clocks. These are allocated to different functions asshown in Table 13-7.
Table 13-7. Generic Clock Allocation
Clock number Function
0DFLLIF main reference and GCLK0 pin (CLK_DFLLIF_REF)
1DFLLIF dithering and SSG reference and GCLK1 pin (CLK_DFLLIF_DITHER)
2 AST and GCLK2 pin
3 CATB and GCLK3 pin
4 AESA
5 GLOC, TC0 and RC32KIFB_REF
6 ABDACB and IISC
7 USBC
8 TC1 and PEVC[0]
9 PLL0 and PEVC[1]
10 ADCIFE
11Master generic clock. Can be used as source for other generic clocks.
Table 13-8. Generic Clock Sources
OSCSEL Clock/Oscillator Description
0 RCSYS System RC oscillator clock
1 OSC32K Output clock from OSC32K
2 DFLL0 Output clock from DFLL0
3 OSC0 Output clock from Oscillator0
4 RC80M Output from 80MHz RCOSC
5 RCFAST Output from 4,8,12MHz RCFAST
6 RC1M Output from 1MHz RC1M
7 CLK_CPU The clock the CPU runs on
8 CLK_HSB High Speed Bus clock
9 CLK_PBA Peripheral Bus A clock
10 CLK_PBB Peripheral Bus B clock
11 CLK_PBC Peripheral Bus C clock
12 CLK_PBD Peripheral Bus D clock
13 RC32K Output from 32kHz RCOSC
14 reserved
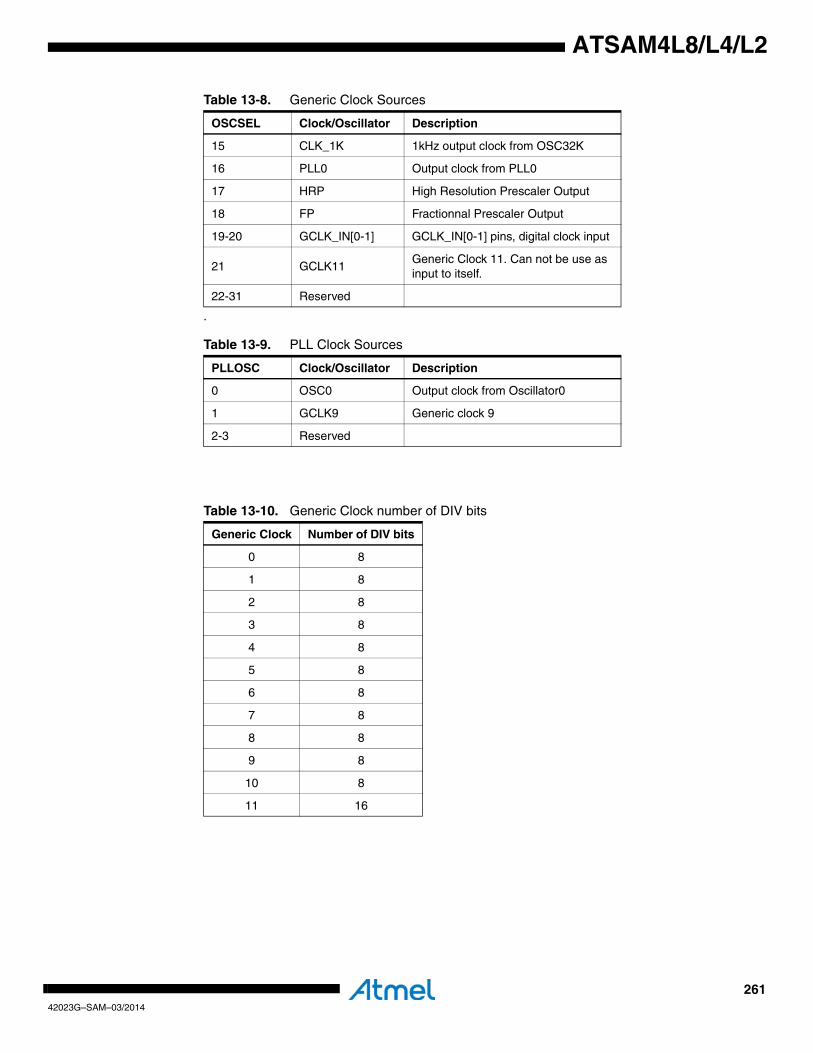
26142023G–SAM–03/2014
ATSAM4L8/L4/L2
.
15 CLK_1K 1kHz output clock from OSC32K
16 PLL0 Output clock from PLL0
17 HRP High Resolution Prescaler Output
18 FP Fractionnal Prescaler Output
19-20 GCLK_IN[0-1] GCLK_IN[0-1] pins, digital clock input
21 GCLK11Generic Clock 11. Can not be use as input to itself.
22-31 Reserved
Table 13-9. PLL Clock Sources
PLLOSC Clock/Oscillator Description
0 OSC0 Output clock from Oscillator0
1 GCLK9 Generic clock 9
2-3 Reserved
Table 13-10. Generic Clock number of DIV bits
Generic Clock Number of DIV bits
0 8
1 8
2 8
3 8
4 8
5 8
6 8
7 8
8 8
9 8
10 8
11 16
Table 13-8. Generic Clock Sources
OSCSEL Clock/Oscillator Description

26242023G–SAM–03/2014
ATSAM4L8/L4/L2
Table 13-11. HRP and FP Clock Sources
CKSEL Clock/Oscillator Description
0 OSC0 Output clock from Oscillator0
1 PLL0 Output clock from PLL0
2 DFLL0 Output clock from DFLL0
3 reserved
4 RC80M Output from 80MHz RCOSC
Table 13-12. Register Reset Values
Register Reset Value
RCFASTVERSION 0x00000200
GCLKPRESCVERSION 0x00000102
PLLIFAVERSION 0x00000112
OSCIFAVERSION 0x00000114
DFLLIFBVERSION 0x00000110
RCOSCIFAVERSION 0x00000114
RC80MVERSION 0x00000100
GCLKIFVERSION 0x00000112
VERSION 0x00000130
26342023G–SAM–03/2014
ATSAM4L8/L4/L2
14. Flash Controller (FLASHCALW)Rev: 1.1.0.1
14.1 Features• Controls on-chip flash memory• Supports 0 and 1 wait state bus access• Flash Read-Standby mode to achieve very low power flash operation• Unified direct mapped PicoCache to minimize flash active power and improve performance• 32-bit HSB interface for reads from flash and writes to page buffer• 32-bit PB interface for issuing commands to and configuration of the controller• 32-bit HSB interface for reads and writes to the PicoCache RAM when it is disabled• Flash memory is divided into 16 regions that can be individually protected or unprotected• Supports reads and writes of general-purpose Non Volatile Memory (NVM) bits• Supports reads and writes of additional NVM pages• Supports strong device protection
14.2 OverviewThe Flash Controller (FLASHCALW) interfaces the on-chip flash memory with the 32-bit internalHSB bus. The controller manages the reading, writing, erasing, locking, and unlockingsequences. To minimize power consumption, the module is tigthly coupled to a direct mappedcache resulting in a significant decrease of the flash active power consumption and also in a per-formance increase when running with one wait state.
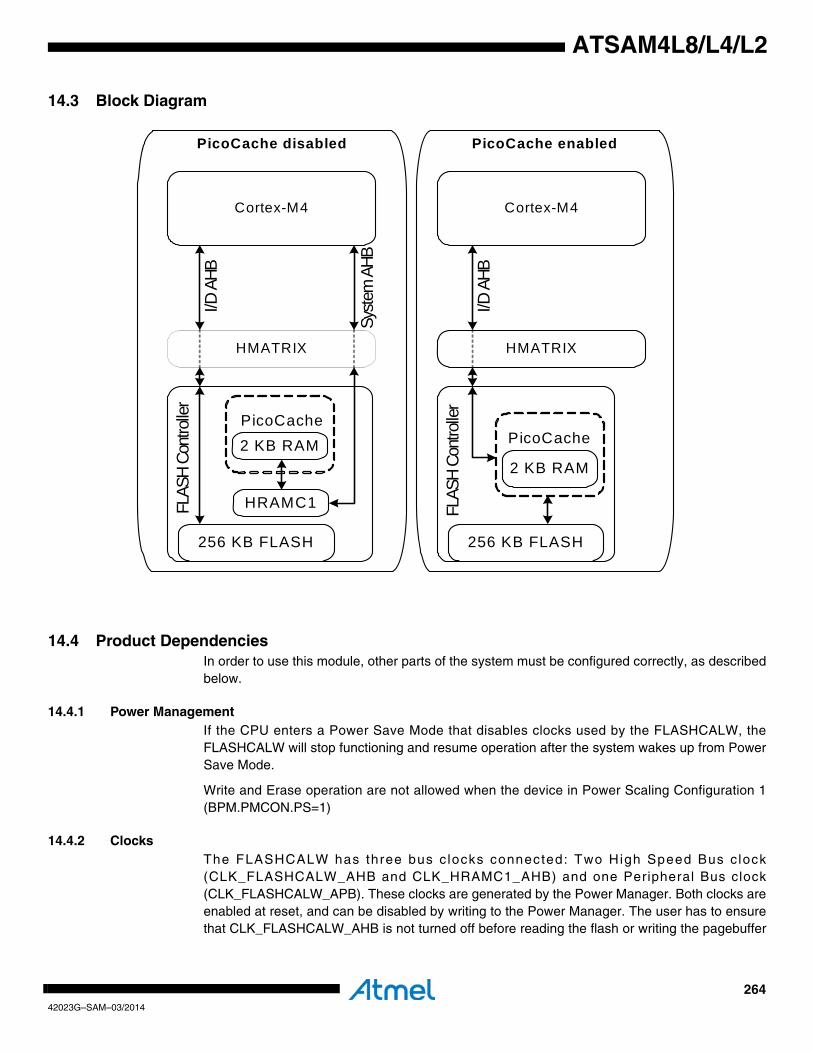
26442023G–SAM–03/2014
ATSAM4L8/L4/L2
14.3 Block Diagram
14.4 Product DependenciesIn order to use this module, other parts of the system must be configured correctly, as describedbelow.
14.4.1 Power ManagementIf the CPU enters a Power Save Mode that disables clocks used by the FLASHCALW, theFLASHCALW will stop functioning and resume operation after the system wakes up from PowerSave Mode.
Write and Erase operation are not allowed when the device in Power Scaling Configuration 1(BPM.PMCON.PS=1)
14.4.2 ClocksThe FLASHCALW has three bus c locks connected: Two High Speed Bus c lock(CLK_FLASHCALW_AHB and CLK_HRAMC1_AHB) and one Peripheral Bus clock(CLK_FLASHCALW_APB). These clocks are generated by the Power Manager. Both clocks areenabled at reset, and can be disabled by writing to the Power Manager. The user has to ensurethat CLK_FLASHCALW_AHB is not turned off before reading the flash or writing the pagebuffer
Cortex-M4
PicoCache
2 KB RAM
256 KB FLASH
HMATRIX
Cortex-M4
PicoCache
2 KB RAM
256 KB FLASH
HMATRIX
I/D A
HB
Syste
m A
HB
FLAS
H Co
ntro
ller
FLAS
H Co
ntro
ller
I/D A
HB
PicoCache disabled PicoCache enabled
HRAMC1
26542023G–SAM–03/2014
ATSAM4L8/L4/L2
and that CLK_FLASHCALW_APB is not turned off before accessing the FLASHCALW configu-ration and control registers. Failing to do so may deadlock the bus.
14.4.3 InterruptsThe FLASHCALW interrupt request lines are connected to the NVIC. Using the FLASHCALWinterrupts requires that it is programmed first.
14.4.4 Debug OperationWhen an external debugger forces the CPU into debug mode, the FLASHCALW continues nor-mal operation. If the FLASHCALW is configured in a way that requires it to be periodicallyserviced by the CPU through interrupts or similar, improper operation or data loss may resultduring debugging.
26642023G–SAM–03/2014
ATSAM4L8/L4/L2
14.5 Functional Description
14.5.1 Bus InterfacesThe FLASHCALW has three bus interfaces, two High Speed Bus (HSB) interfaces for:
– reads from the flash memory and writes to the page buffer
– read/write in the PicoCache internal RAM when it is disabled
and one Peripheral Bus (PB) interface for issuing commands and reading status from thecontroller.
26742023G–SAM–03/2014
ATSAM4L8/L4/L2
14.5.2 Flash Memory OrganizationThe flash memory is divided into a set of pages. A page is the basic unit addressed when pro-gramming the flash. A page consists of several words. The pages are grouped into 16 regions ofequal size. _AHBEach of these regions can be locked by a dedicated fuse bit, protecting it fromaccidental modification.
• p pages (FLASH_P)
• w bytes in each page and in the page buffer (FLASH_W)
• pw bytes in total (FLASH_PW)
• f general-purpose fuse bits (FLASH_F), used as region lock bits and for other device-specific purposes
• security fuses
• 1 User page
14.5.3 User PageThe User page is an additional page, outside the regular flash array, that can be used to storevarious data, such as calibration data and serial numbers. This page is not erased by regularchip erase. The User page can only be written and erased by a special set of commands. Readaccesses to the User page are performed just as any other read accesses to the flash. Theaddress map of the User page is given in Figure 14-2 on page 269.
14.5.4 Read OperationsThe on-chip flash memory is typically used for storing instructions to be executed by the CPU.The CPU will address instructions using the HSB bus, and the FLASHCALW will access theflash memory and return the addressed 32-bit word.
In systems where the HSB clock period is slower than the access time of the flash memory, theFLASHCALW can operate in 0 wait state mode, and output one 32-bit word on the bus per clockcycle. If the clock frequency allows, the user should use 0 wait state mode, because this givesthe highest performance as no stall cycles are encountered.
The FLASHCALW can also operate in systems where the HSB bus clock period is faster thanthe access speed of the flash memory. Wait state support and a read granularity of 64 bitsensure efficiency in such systems.
Performance for systems with high clock frequency is increased since the internal read wordwidth of the flash memory is 64 bits. When a 32-bit word is to be addressed, the word itself andalso the other word in the same 64-bit location is read.
The user can select the wait states required by writing to the FWS field in the Flash Control Reg-ister (FCR). It is the responsibility of the user to select a number of wait states compatible withthe clock frequency and timing characteristics of the flash memory.
In 0ws mode, no wait states are encountered on any flash read operations. In 1 ws mode, onestall cycle is encountered every 64-bit aligned transfer. If the PicoCache is enabled and there isa hit, then it will service the transfer with no penalty.
The Flash Controller address space is displayed in Figure 14-1. The memory space betweenaddress pw and the User page is reserved, and reading addresses in this space returns an
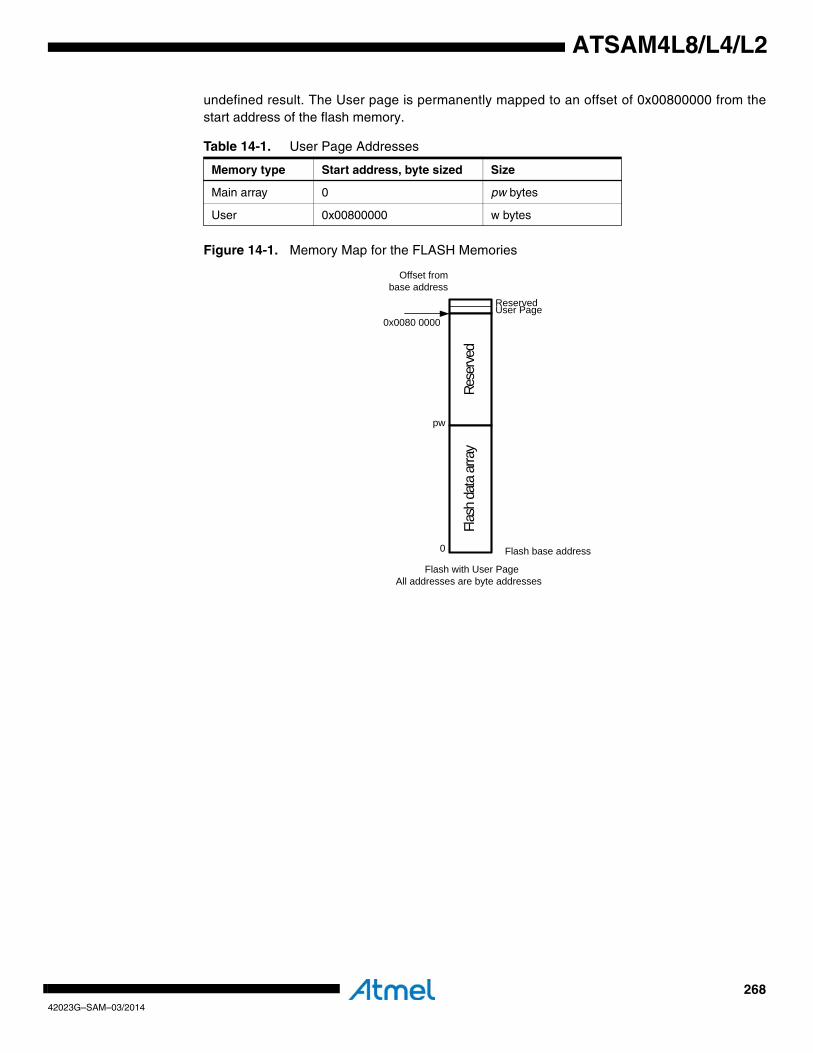
26842023G–SAM–03/2014
ATSAM4L8/L4/L2
undefined result. The User page is permanently mapped to an offset of 0x00800000 from thestart address of the flash memory.
Figure 14-1. Memory Map for the FLASH Memories
Table 14-1. User Page Addresses
Memory type Start address, byte sized Size
Main array 0 pw bytes
User 0x00800000 w bytes
0
pw
Rese
rved
Flas
h da
ta a
rray
ReservedUser Page
Flash with User Page
0x0080 0000
All addresses are byte addresses
Flash base address
Offset from base address

26942023G–SAM–03/2014
ATSAM4L8/L4/L2
Figure 14-2. Memory Map for the Flash Memories
14.5.5 High Speed Read ModeThe flash provides a High Speed Read Mode, offering slightly higher flash read speed at thecost of higher power consumption. Two dedicated commands, High Speed Read Mode Enable(HSEN) and High Speed Read Mode Disable (HSDIS) control the speed mode. The High SpeedMode (HSMODE) bit in the Flash Status Register (FSR) shows which mode the flash is in. Afterreset, the High Speed Mode is disabled, and must be manually enabled if the user wants to.
Refer to Section 42. ”Electrical Characteristics” on page 1121 at the end of this datasheet fordetails on the maximum clock frequencies in Normal and High Speed Read Mode.
0
pw
Rese
rved
Flas
h da
ta a
rray
ReservedUser Page
Flash with User Page
0x0080 0000
All addresses are byte addresses
Flash base address
Offset from base address
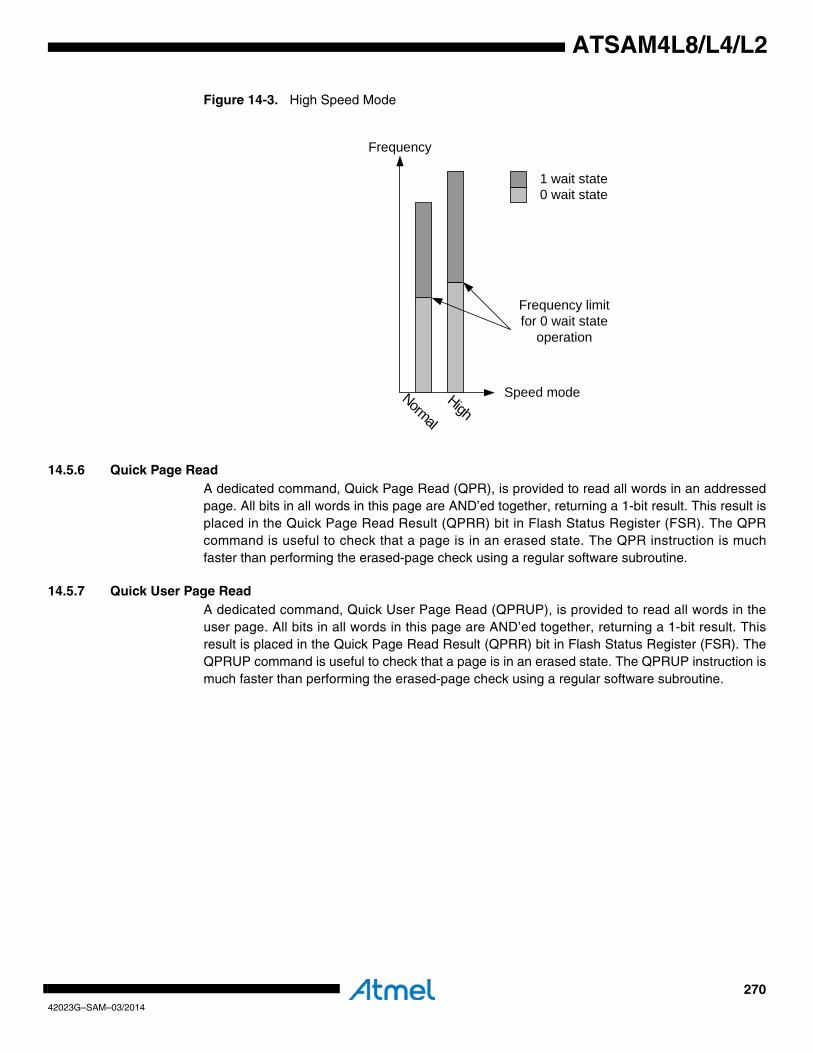
27042023G–SAM–03/2014
ATSAM4L8/L4/L2
Figure 14-3. High Speed Mode
14.5.6 Quick Page ReadA dedicated command, Quick Page Read (QPR), is provided to read all words in an addressedpage. All bits in all words in this page are AND’ed together, returning a 1-bit result. This result isplaced in the Quick Page Read Result (QPRR) bit in Flash Status Register (FSR). The QPRcommand is useful to check that a page is in an erased state. The QPR instruction is muchfaster than performing the erased-page check using a regular software subroutine.
14.5.7 Quick User Page ReadA dedicated command, Quick User Page Read (QPRUP), is provided to read all words in theuser page. All bits in all words in this page are AND’ed together, returning a 1-bit result. Thisresult is placed in the Quick Page Read Result (QPRR) bit in Flash Status Register (FSR). TheQPRUP command is useful to check that a page is in an erased state. The QPRUP instruction ismuch faster than performing the erased-page check using a regular software subroutine.
Frequency
Frequency limit for 0 wait state
operation
Normal
HighSpeed mode
1 wait state0 wait state
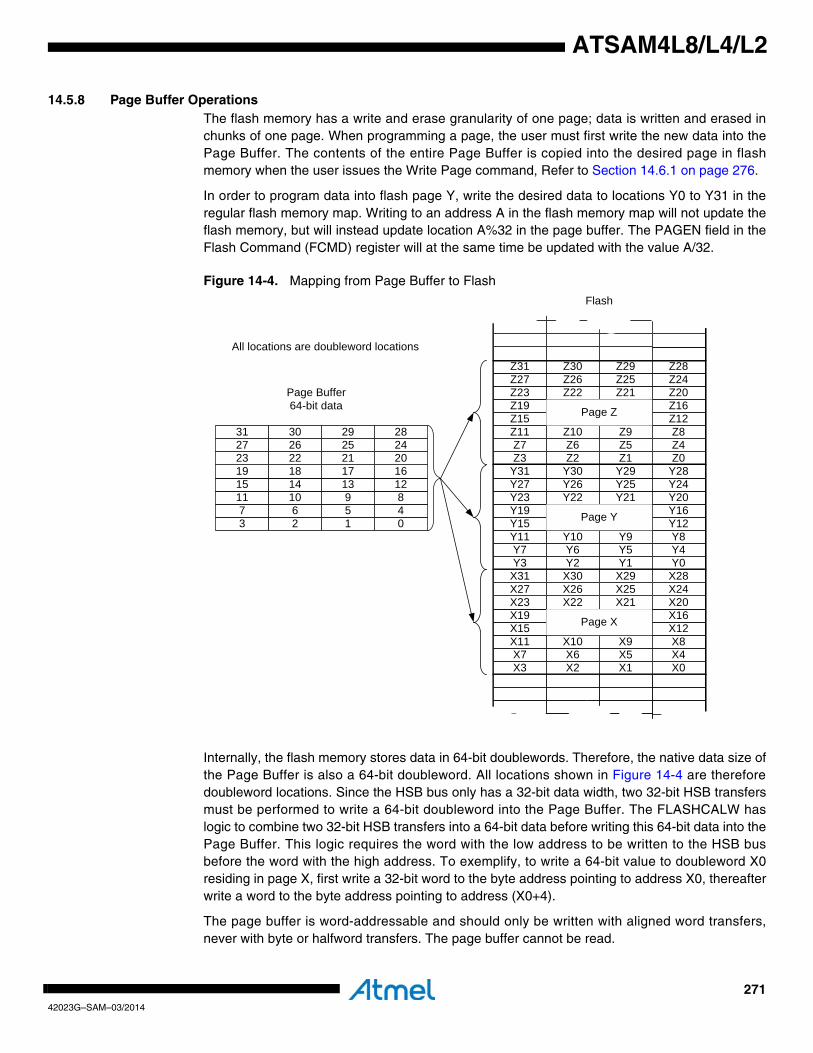
27142023G–SAM–03/2014
ATSAM4L8/L4/L2
14.5.8 Page Buffer OperationsThe flash memory has a write and erase granularity of one page; data is written and erased inchunks of one page. When programming a page, the user must first write the new data into thePage Buffer. The contents of the entire Page Buffer is copied into the desired page in flashmemory when the user issues the Write Page command, Refer to Section 14.6.1 on page 276.
In order to program data into flash page Y, write the desired data to locations Y0 to Y31 in theregular flash memory map. Writing to an address A in the flash memory map will not update theflash memory, but will instead update location A%32 in the page buffer. The PAGEN field in theFlash Command (FCMD) register will at the same time be updated with the value A/32.
Figure 14-4. Mapping from Page Buffer to Flash
Internally, the flash memory stores data in 64-bit doublewords. Therefore, the native data size ofthe Page Buffer is also a 64-bit doubleword. All locations shown in Figure 14-4 are thereforedoubleword locations. Since the HSB bus only has a 32-bit data width, two 32-bit HSB transfersmust be performed to write a 64-bit doubleword into the Page Buffer. The FLASHCALW haslogic to combine two 32-bit HSB transfers into a 64-bit data before writing this 64-bit data into thePage Buffer. This logic requires the word with the low address to be written to the HSB busbefore the word with the high address. To exemplify, to write a 64-bit value to doubleword X0residing in page X, first write a 32-bit word to the byte address pointing to address X0, thereafterwrite a word to the byte address pointing to address (X0+4).
The page buffer is word-addressable and should only be written with aligned word transfers,never with byte or halfword transfers. The page buffer cannot be read.
Z3 Z2 Z1 Z0Z7 Z6 Z5 Z4
Z11 Z10 Z9 Z8Z15 Z14 Z13 Z12Z19 Z18 Z17 Z16Z23 Z22 Z21 Z20Z27 Z26 Z25 Z24Z31 Z30 Z29 Z28
Y3 Y2 Y1 Y0Y7 Y6 Y5 Y4
Y11 Y10 Y9 Y8Y15 Y14 Y13 Y12Y19 Y18 Y17 Y16Y23 Y22 Y21 Y20Y27 Y26 Y25 Y24Y31 Y30 Y29 Y28
X3 X2 X1 X0X7 X6 X5 X4
X11 X10 X9 X8X15 X14 X13 X12X19 X18 X17 X16X23 X22 X21 X20X27 X26 X25 X24X31 X30 X29 X28
3 2 1 07 6 5 4
11 10 9 815 14 13 1219 18 17 1623 22 21 2027 26 25 2431 30 29 28
Page X
Page Y
Page Z
Page Buffer64-bit data
Flash
All locations are doubleword locations

27242023G–SAM–03/2014
ATSAM4L8/L4/L2
The page buffer is also used for writes to the User page.
Page buffer write operations are performed with 4 wait states. Any accesses attempted to theFLASHCALW on the HSB bus during these cycles will be automatically stalled.
Writing to the page buffer can only change page buffer bits from one to zero, i.e. writing0xAAAAAAAA to a page buffer location that has the value 0x00000000 will not change the pagebuffer value. The only way to change a bit from zero to one is to erase the entire page buffer withthe Clear Page Buffer command.
The page buffer is not automatically reset after a page write. The user should do this manuallyby issuing the Clear Page Buffer flash command. This can be done after a page write, or beforethe page buffer is loaded with data to be stored to the flash page.
27342023G–SAM–03/2014
ATSAM4L8/L4/L2
14.5.9 PicoCache Description
14.5.9.1 OverviewThe PicoCache is an unified direct mapped cache controller. It integrates a controller, a tagdirectory, a data memory, a metadata memory and a configuration interface. When it is not acti-vated, the cache memory is accessible as a supplementary RAM connected on the bus matrix.Note that for security reasons, this memory is cleared by a chip erase operation.
14.5.9.2 Cache OperationOn reset, the cache controller data entries are all invalidated and the cache is disabled. Thecache is transparent to processor operations making flash access timings predicatable. Thecache controller is activated through the use of its configuration registers. Use the followingsequence to enable the cache controller
1. Verify that the cache controller is disabled, reading the value of the CSTS (cache sta-
tus) field of the SR register.
2. Enable the cache controller writing one to CEN (cache enable) field of the CTRL register.
14.5.9.3 Cache Invalidate By Line OperationWhen an invalidate by line command is issued the cache controller reset the valid bit informationof the decoded cache line. As the line is no longer valid the replacement counter points to thatline.
Use the following sequence to invalidate one line of cache:
1. Disable the cache controller writing 0 to the CEN field of the CTRL register.
2. Check CSTS field of the SR to verify that the cache is successfully disabled.
3. Perform an invalidate by line writing the field index in the MAINT1 register.
4. Enable the cache controller writing 1 to the CEN field of the CTRL register.
14.5.9.4 Cache Invalidate All OperationUse the following sequence to invalidate all cache entries:
1. Write 1 to the INVALL field of the MAINT0 register.
14.5.9.5 Cache Performance MonitoringThis module includes a programmable monitor 32-bit counter. The monitor can be configured tocount the number of clock cycles, the number of data hit or the number of instruction hit.
Use the following sequence to activate the counter
1. Configure the monitor counter writing the MODE field of the CFG register.
2. Enable the counter writing one to the MENABLE field of the MEN register.
3. If required reset the counter, writing one to the SWRST field of the MCTRL register.
4. Check the value of the monitor counter, reading EVENT_CNT field of the SR
14.5.10 Accessing the PicoCache Memory Block As a Regular Memory On the System BusThis is only possible when the PicoCache is disabled. In case of an access in this memory whilethe PicoCache is active, the memory slave will return an error response which will result in a

27442023G–SAM–03/2014
ATSAM4L8/L4/L2
Cortex-M4 Memory Fault exception. When operating a chip erase, the PicoCache will be clearedwhether it was enabled or not.
27542023G–SAM–03/2014
ATSAM4L8/L4/L2
14.6 Flash CommandsThe FLASHCALW offers a command set to manage programming of the flash memory, lockingand unlocking of regions, and full flash erasing. See Section 14.10.2 for a complete list ofcommands.
To run a command, the CMD field in the Flash Command Register (FCMD) has to be writtenwith the command number. As soon as the FCMD register is written, the FRDY bit in the FlashStatus Register (FSR) is automatically cleared. Once the current command is complete, theFSR.FRDY bit is automatically set. If an interrupt has been enabled by writing a one toFCR.FRDY, the interrupt request line of the Flash Controller is activated. All flash commandsexcept for Quick Page Read (QPR) and Quick User Page Read (QPRUP) will generate an inter-rupt request upon completion if FCR.FRDY is one.
Any HSB bus transfers attempting to read flash memory when the FLASHCALW is busy execut-ing a flash command will be stalled, and allowed to continue when the flash command iscomplete.
After a command has been written to FCMD, the programming algorithm should wait until thecommand has been executed before attempting to read instructions or data from the flash orwriting to the page buffer, as the flash will be busy. The waiting can be performed either by poll-ing the Flash Status Register (FSR) or by waiting for the flash ready interrupt. The commandwritten to FCMD is initiated on the first clock cycle where the HSB bus interface in FLASHCALWis IDLE. The user must make sure that the access pattern to the FLASHCALW HSB interfacecontains an IDLE cycle so that the command is allowed to start. Make sure that no bus masterssuch as DMA controllers are performing endless burst transfers from the flash. Also, make surethat the CPU does not perform endless burst transfers from flash. This is done by letting theCPU enter Power Save mode after writing to FCMD, or by polling FSR for command completion.This polling will result in an access pattern with IDLE HSB cycles.
All the commands are protected by the same keyword, which has to be written in the eight high-est bits of the FCMD register. Writing FCMD with data that does not contain the correct keyand/or with an invalid command has no effect on the flash memory; however, the PROGE bit isset in the Flash Status Register (FSR). This bit is automatically cleared by a read access to theFSR register.
Writing a command to FCMD while another command is being executed has no effect on theflash memory; however, the PROGE bit is set in the Flash Status Register (FSR). This bit isautomatically cleared by a read access to the FSR register.
If the current command writes or erases a page in a locked region the command has no effect onthe flash memory; however, the LOCKE bit is set in the FSR register. This bit is automaticallycleared by a read access to the FSR register.
27642023G–SAM–03/2014
ATSAM4L8/L4/L2
14.6.1 Write/Erase Page OperationFlash technology requires that an erase must be done before programming. The entire flash canbe erased by an Erase All command. Alternatively, pages can be individually erased by theErase Page command.
The User page can be written and erased using the mechanisms described in this chapter.
After programming, the page can be locked to prevent miscellaneous write or erase sequences.Locking is performed on a per-region basis, so locking a region locks all pages inside the region.
Data to be written is stored in an internal buffer called the page buffer. The page buffer containsw words. The page buffer wraps around within the internal memory area address space andappears to be repeated by the number of pages in it. Writing of 8-bit and 16-bit data to the pagebuffer is not allowed and may lead to unpredictable data corruption.
Data must be written to the page buffer before the programming command is written to the FlashCommand Register (FCMD). The sequence is as follows:
• Erase the page to be programmed.
• Reset the page buffer with the Clear Page Buffer command.
• Fill the page buffer with the desired contents as described in Section 14.5.8 on page 271.
• Programming starts as soon as the programming key and the programming command are written to the Flash Command Register. The PAGEN field in the Flash Command Register (FCMD) must contain the address of the page to write. PAGEN is automatically updated when writing to the page buffer, but can also be written to directly. The FRDY bit in the Flash Status Register (FSR) is automatically cleared when the page write operation starts.
• When programming is completed, the FRDY bit in the Flash Status Register (FSR) is set. If an interrupt was enabled by writing FCR.FRDY to one, an interrupt request is generated.
Two errors can be detected in the FSR register after a programming sequence:
• Programming Error: A bad keyword and/or an invalid command have been written in the FCMD register.
• Lock Error: Can have two different causes:
– The page to be programmed belongs to a locked region. A command must be executed to unlock the corresponding region before programming can start.
– A bus master without secure status attempted to program a page requiring secure privileges.
14.6.2 Erase All OperationThe entire memory is erased if the Erase All command (EA) is written to the Flash CommandRegister (FCMD). Erase All erases all bits in the flash array. The User page is not erased. Allflash memory locations, the general-purpose fuse bits, and the security fuses are erased (resetto 0xFF) after an Erase All.
The EA command also ensures that all volatile memories, such as register file and RAMs, areerased before the security fuses are erased.
Erase All operation is allowed only if no regions are locked. Thus, if at least one region is locked,the bit LOCKE in FSR is set and the command is cancelled. If the LOCKE bit in FCR is one, aninterrupt request is set generated.

27742023G–SAM–03/2014
ATSAM4L8/L4/L2
When the command is complete, the FRDY bit in the Flash Status Register (FSR) is set. If aninterrupt has been enabled by writing FCR.FRDY to one, an interrupt request is generated. Twoerrors can be detected in the FSR register after issuing the command:
• Programming Error: A bad keyword and/or an invalid command have been written in the FCMD register.
• Lock Error: At least one lock region is protected. The erase command has been aborted and no page has been erased. A “Unlock region containing given page” (UP) command must be executed to unlock any locked regions.
14.6.3 Region Lock BitsThe flash memory has p pages, and these pages are grouped into 16 lock regions, each regioncontaining p/16 pages. Each region has a dedicated lock bit preventing writing and erasingpages in the region. After production, the device may have some regions locked. These lockedregions are reserved for a boot or default application. Locked regions can be unlocked to beerased and then programmed with another application or other data.
To lock or unlock a region, the commands Lock Region Containing Page (LP) and UnlockRegion Containing Page (UP) are provided. Writing one of these commands, together with thenumber of the page whose region should be locked/unlocked, performs the desired operation.
One error can be detected in the FSR register after issuing the command:
• Programming Error: A bad keyword and/or an invalid command have been written in the FCMD register.
The lock bits are implemented using the lowest 16 general-purpose fuse bits. This means thatlock bits can also be set/cleared using the commands for writing/erasing general-purpose fusebits, see Section 14.7. The general-purpose bit being in an erased (1) state means that theregion is unlocked.
14.7 General-purpose Fuse BitsThe flash memory has a number of general-purpose fuse bits that the application programmercan use freely. The fuse bits can be written and erased using dedicated commands, and readthrough a dedicated Peripheral Bus address. Some of the general-purpose fuse bits arereserved for special purposes, and should not be used for other functions:
To erase or write a general-purpose fuse bit, the commands Write General-Purpose Fuse Bit(WGPB) and Erase General-Purpose Fuse Bit (EGPB) are provided. Writing one of these com-mands, together with the number of the fuse to write/erase, performs the desired operation.
An entire General-Purpose Fuse byte can be written at a time by using the Program GP FuseByte (PGPFB) instruction. A PGPFB to GP fuse byte 2 is not allowed if the flash is locked by thesecurity fuses. The PFB command is issued with a parameter in the PAGEN field:
• PAGEN[2:0] - byte to write
Table 14-2. General-purpose Fuses with Special Functions
General-Purpose fuse number Name Usage
15:0 LOCK Region lock bits.
27842023G–SAM–03/2014
ATSAM4L8/L4/L2
• PAGEN[10:3] - Fuse value to write
All general-purpose fuses can be erased by the Erase All General-Purpose fuses (EAGP) com-mand. An EAGP command is not allowed if the flash is locked by the security fuses.
Two errors can be detected in the FSR register after issuing these commands:
• Programming Error: A bad keyword and/or an invalid command have been written in the FCMD register.
• Lock Error:
The lock bits are implemented using the lowest 16 general-purpose fuse bits. This means thatthe 16 lowest general-purpose fuse bits can also be written/erased using the commands forlocking/unlocking regions, see Section 14.6.3.
14.8 Security FusesThe security fuses allow the entire device to be locked from external JTAG or other debugaccess for code security. The security fuses can be written by a dedicated command, Set Secu-rity Fuses (SSB). Once set, the only way to clear the security fuses is through the JTAG ChipErase command.
Once the security fuses are set, the following Flash Controller commands will be unavailableand return a lock error if attempted:
• Program General-Purpose Fuse Byte (PGPFB) of fuse byte 2
• Erase All General-Purpose Fuses (EAGPF)
One error can be detected in the FSR register after issuing the command:
• Programming Error: A bad keyword and/or an invalid command have been written in the FCMD register.
14.9 Error Correcting CodeError Correcting Code (ECC) logic is implemented to detect and correct errors that may arise inthe flash array. The ECC logic is able to detect two bit errors and correct one bit error per 32-bitword in the array. An interrupt is requested upon detection of an ECC error if the ECC ErrorInterrupt Enable (ECCE) bit in the Flash Control Register (FCR) is set is set. The ECCERR fieldin Flash Status Register (FSR) indicates the ECC status of the words read from the flash.
Upon detection of an ECC error, the FERRADR register is updated with the failing address. Ifthe ECCE bit is set, FERRADR is loaded only on the first occurrence of an ECC error. Other-wise, it is loaded on all occurrences. ECC checking is performed on a 64-bit basis, so an ECCfailure may be present in any of the two words that are output from the flash, not necessarily theword that is addressed on the bus.
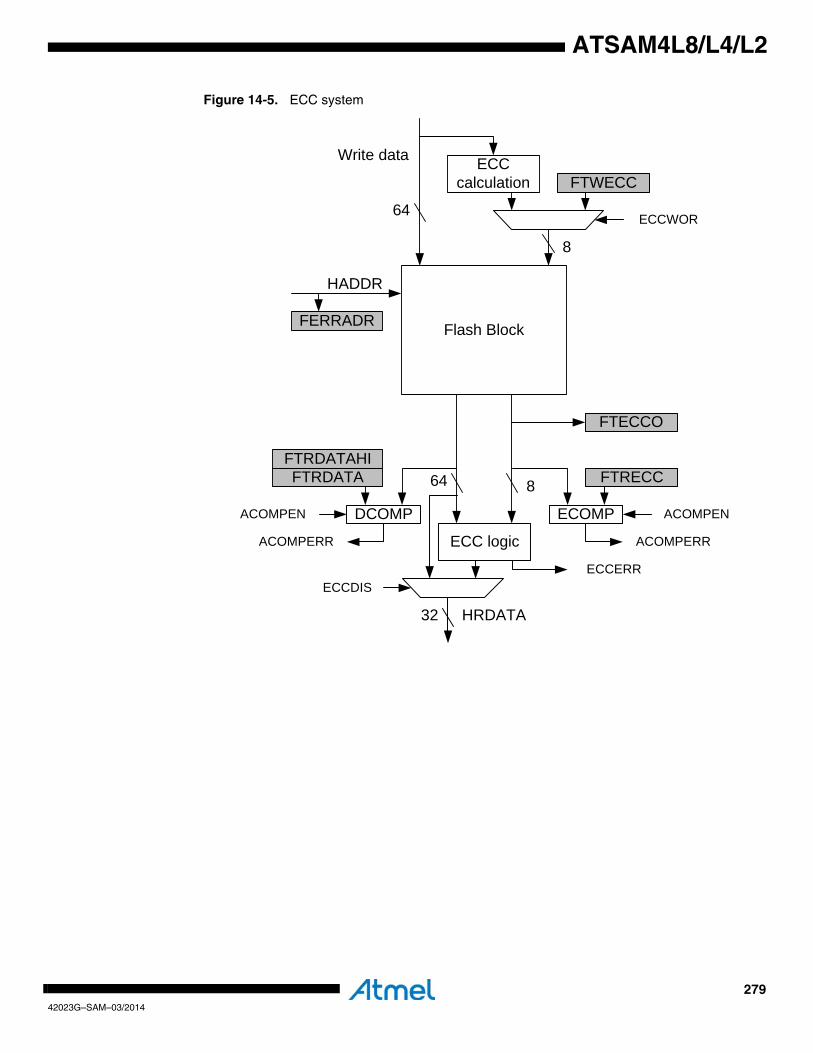
27942023G–SAM–03/2014
ATSAM4L8/L4/L2
Figure 14-5. ECC system
Flash Block
ECC calculation FTWECC
64
8
64 8 FTRECCFTRDATA
DCOMP ECOMP
Write data
HADDR
FERRADR
ECC logic
HRDATA32
ECCERR
ECCWOR
ECCDIS
ACOMPEN ACOMPEN
ACOMPERR ACOMPERR
FTECCO
FTRDATAHI

28042023G–SAM–03/2014
ATSAM4L8/L4/L2
14.10 User Interface
Note: 1. The value of the Lock bits depend on their programmed state. All other bits in FSR are 0.
2. All bits in FGPRHI/LO are dependent on the programmed state of the fuses they map to. Any bits in these registers not mapped to a fuse read as 0.
3. The reset values for these registers are device specific. Refer to the Module Configuration section at the end of this chapter.
Table 14-3. FLASHCALW Register Memory Map
Offset Register Register Name Access Reset
0x00 Flash Control Register FCR Read/Write 0x00000000
0x04 Flash Command Register FCMD Read/Write 0x00000000
0x08 Flash Status Register FSR Read-only -(1)
0x0C Flash Parameter Register FPR Read-only -(3)
0x10 Flash Version Register FVR Read-only -(3)
0x14 Flash General Purpose Fuse Register Hi FGPFRHI Read-only -(2)
0x18 Flash General Purpose Fuse Register Lo FGPFRLO Read-only -(2)
0x408 PicoCache Control Register CTRL Write-only 0x00000000
0x40C PicoCache Status Register SR Read/Write 0x00000000
0x420 PicoCache Maintenance Register 0 MAINT0 Write-only -(3)
0x424 PicoCache Maintenance Register 1 MAINT1 Write-only -(3)
0x428 PicoCache Monitor Configuration Register MCFG Read/Write 0x00000000
0x42C PicoCache Monitor Enable Register MEN Read/Write 0x00000000
0x430 PicoCache Monitor Control Register MCTRL Write-only -(3)
0x434 PicoCache Monitor Status Register MSR Read-only 0x00000000
0x4FC Version Register PVR Read-only -(3)
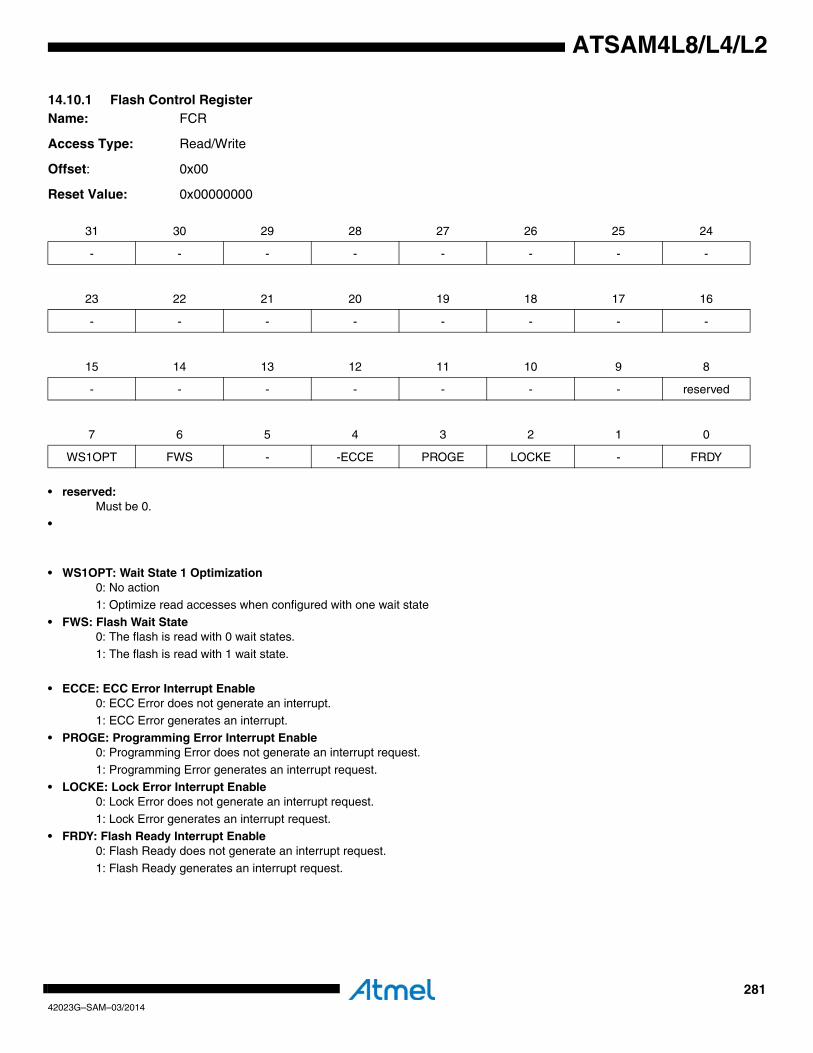
28142023G–SAM–03/2014
ATSAM4L8/L4/L2
14.10.1 Flash Control RegisterName: FCR
Access Type: Read/Write
Offset: 0x00
Reset Value: 0x00000000
• reserved:Must be 0.
•
• WS1OPT: Wait State 1 Optimization0: No action1: Optimize read accesses when configured with one wait state
• FWS: Flash Wait State 0: The flash is read with 0 wait states.
1: The flash is read with 1 wait state.
• ECCE: ECC Error Interrupt Enable 0: ECC Error does not generate an interrupt. 1: ECC Error generates an interrupt.
• PROGE: Programming Error Interrupt Enable 0: Programming Error does not generate an interrupt request.
1: Programming Error generates an interrupt request.
• LOCKE: Lock Error Interrupt Enable 0: Lock Error does not generate an interrupt request.
1: Lock Error generates an interrupt request. • FRDY: Flash Ready Interrupt Enable
0: Flash Ready does not generate an interrupt request.
1: Flash Ready generates an interrupt request.
31 30 29 28 27 26 25 24
- - - - - - - -
23 22 21 20 19 18 17 16
- - - - - - - -
15 14 13 12 11 10 9 8
- - - - - - - reserved
7 6 5 4 3 2 1 0
WS1OPT FWS - -ECCE PROGE LOCKE - FRDY
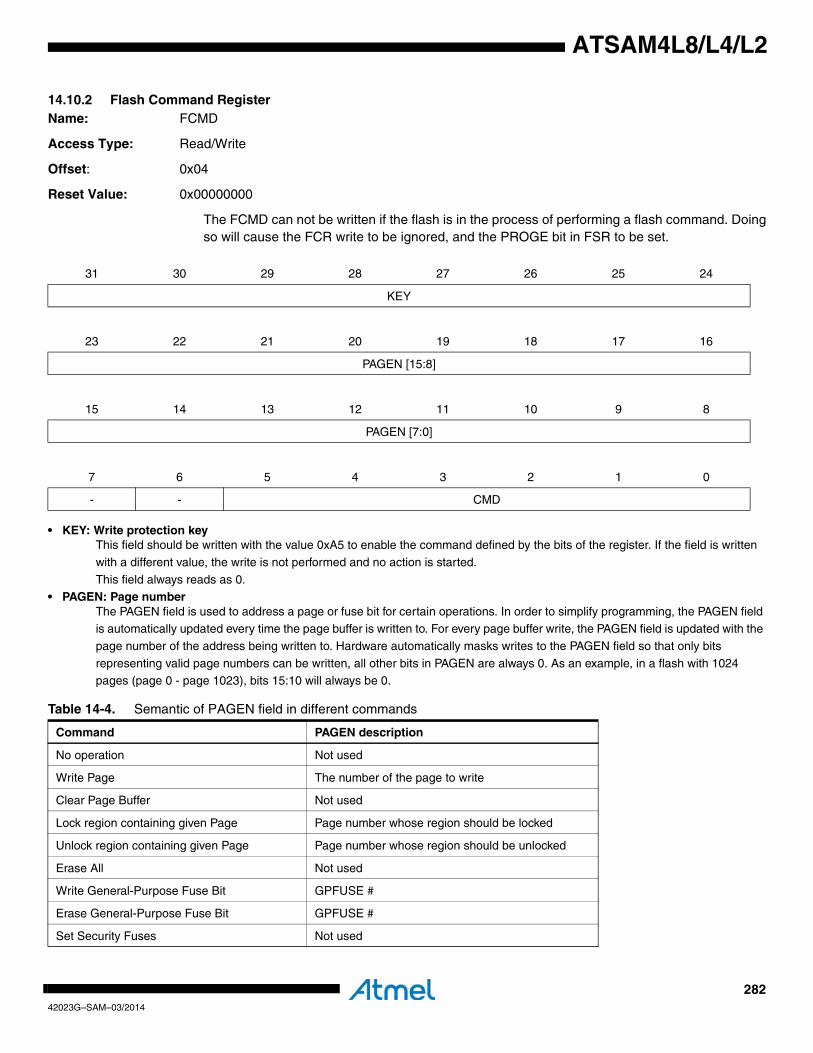
28242023G–SAM–03/2014
ATSAM4L8/L4/L2
14.10.2 Flash Command RegisterName: FCMD
Access Type: Read/Write
Offset: 0x04
Reset Value: 0x00000000
The FCMD can not be written if the flash is in the process of performing a flash command. Doingso will cause the FCR write to be ignored, and the PROGE bit in FSR to be set.
• KEY: Write protection keyThis field should be written with the value 0xA5 to enable the command defined by the bits of the register. If the field is written
with a different value, the write is not performed and no action is started.
This field always reads as 0.• PAGEN: Page number
The PAGEN field is used to address a page or fuse bit for certain operations. In order to simplify programming, the PAGEN field is automatically updated every time the page buffer is written to. For every page buffer write, the PAGEN field is updated with the
page number of the address being written to. Hardware automatically masks writes to the PAGEN field so that only bits
representing valid page numbers can be written, all other bits in PAGEN are always 0. As an example, in a flash with 1024 pages (page 0 - page 1023), bits 15:10 will always be 0.
31 30 29 28 27 26 25 24
KEY
23 22 21 20 19 18 17 16
PAGEN [15:8]
15 14 13 12 11 10 9 8
PAGEN [7:0]
7 6 5 4 3 2 1 0
- - CMD
Table 14-4. Semantic of PAGEN field in different commands
Command PAGEN description
No operation Not used
Write Page The number of the page to write
Clear Page Buffer Not used
Lock region containing given Page Page number whose region should be locked
Unlock region containing given Page Page number whose region should be unlocked
Erase All Not used
Write General-Purpose Fuse Bit GPFUSE #
Erase General-Purpose Fuse Bit GPFUSE #
Set Security Fuses Not used
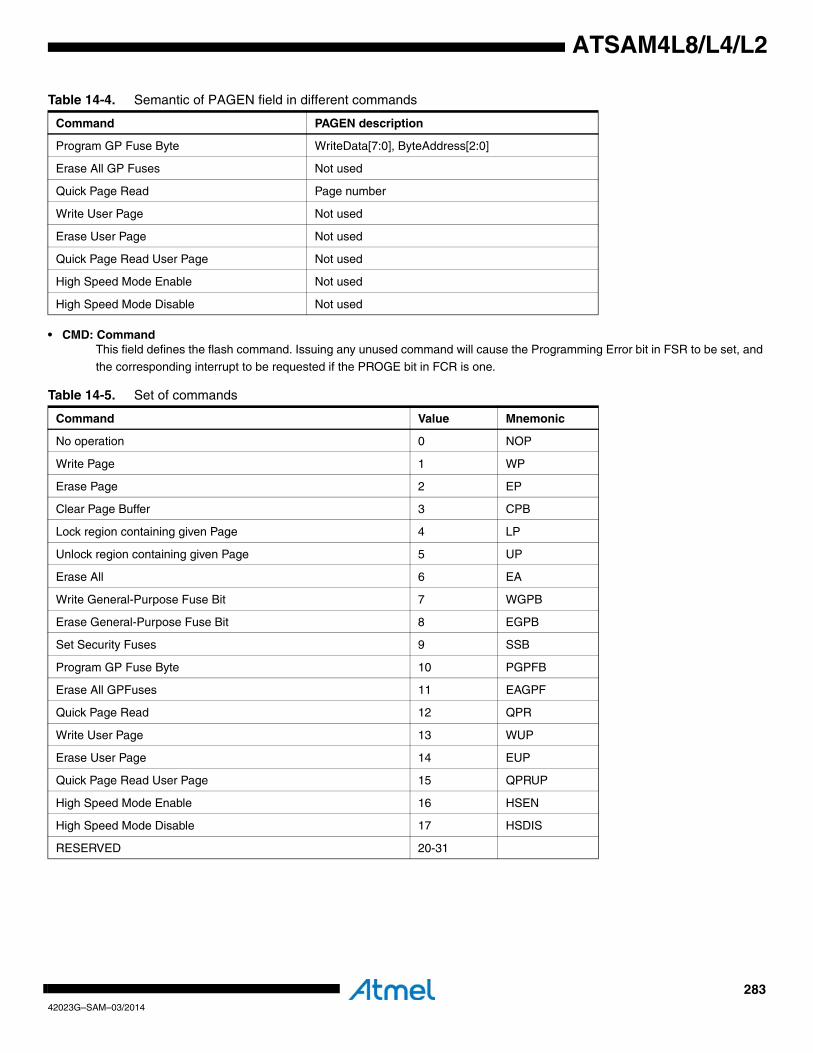
28342023G–SAM–03/2014
ATSAM4L8/L4/L2
• CMD: CommandThis field defines the flash command. Issuing any unused command will cause the Programming Error bit in FSR to be set, and
the corresponding interrupt to be requested if the PROGE bit in FCR is one.
Program GP Fuse Byte WriteData[7:0], ByteAddress[2:0]
Erase All GP Fuses Not used
Quick Page Read Page number
Write User Page Not used
Erase User Page Not used
Quick Page Read User Page Not used
High Speed Mode Enable Not used
High Speed Mode Disable Not used
Table 14-5. Set of commands
Command Value Mnemonic
No operation 0 NOP
Write Page 1 WP
Erase Page 2 EP
Clear Page Buffer 3 CPB
Lock region containing given Page 4 LP
Unlock region containing given Page 5 UP
Erase All 6 EA
Write General-Purpose Fuse Bit 7 WGPB
Erase General-Purpose Fuse Bit 8 EGPB
Set Security Fuses 9 SSB
Program GP Fuse Byte 10 PGPFB
Erase All GPFuses 11 EAGPF
Quick Page Read 12 QPR
Write User Page 13 WUP
Erase User Page 14 EUP
Quick Page Read User Page 15 QPRUP
High Speed Mode Enable 16 HSEN
High Speed Mode Disable 17 HSDIS
RESERVED 20-31
Table 14-4. Semantic of PAGEN field in different commands
Command PAGEN description
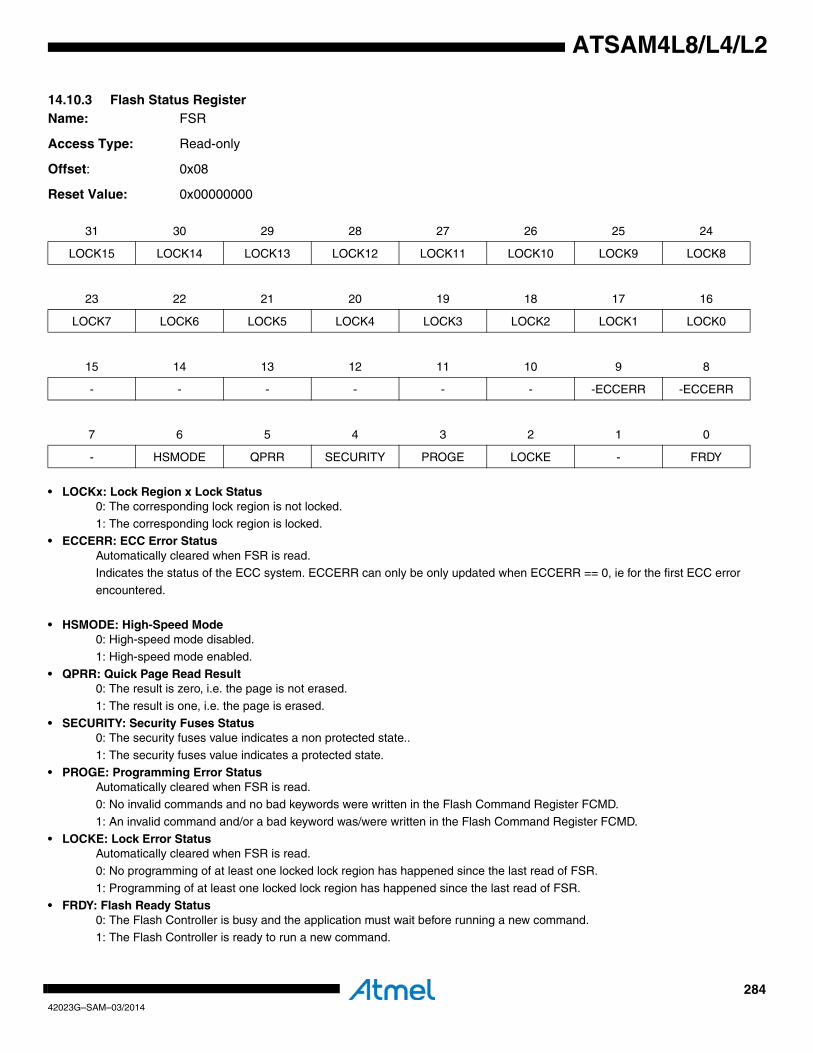
28442023G–SAM–03/2014
ATSAM4L8/L4/L2
14.10.3 Flash Status RegisterName: FSR
Access Type: Read-only
Offset: 0x08
Reset Value: 0x00000000
• LOCKx: Lock Region x Lock Status0: The corresponding lock region is not locked.
1: The corresponding lock region is locked.• ECCERR: ECC Error Status
Automatically cleared when FSR is read.Indicates the status of the ECC system. ECCERR can only be only updated when ECCERR == 0, ie for the first ECC error
encountered.
• HSMODE: High-Speed Mode0: High-speed mode disabled.1: High-speed mode enabled.
• QPRR: Quick Page Read Result0: The result is zero, i.e. the page is not erased.
1: The result is one, i.e. the page is erased.
• SECURITY: Security Fuses Status0: The security fuses value indicates a non protected state..
1: The security fuses value indicates a protected state.• PROGE: Programming Error Status
Automatically cleared when FSR is read.0: No invalid commands and no bad keywords were written in the Flash Command Register FCMD.
1: An invalid command and/or a bad keyword was/were written in the Flash Command Register FCMD.
• LOCKE: Lock Error StatusAutomatically cleared when FSR is read.
0: No programming of at least one locked lock region has happened since the last read of FSR.
1: Programming of at least one locked lock region has happened since the last read of FSR.• FRDY: Flash Ready Status
0: The Flash Controller is busy and the application must wait before running a new command.1: The Flash Controller is ready to run a new command.
31 30 29 28 27 26 25 24
LOCK15 LOCK14 LOCK13 LOCK12 LOCK11 LOCK10 LOCK9 LOCK8
23 22 21 20 19 18 17 16
LOCK7 LOCK6 LOCK5 LOCK4 LOCK3 LOCK2 LOCK1 LOCK0
15 14 13 12 11 10 9 8
- - - - - - -ECCERR -ECCERR
7 6 5 4 3 2 1 0
- HSMODE QPRR SECURITY PROGE LOCKE - FRDY
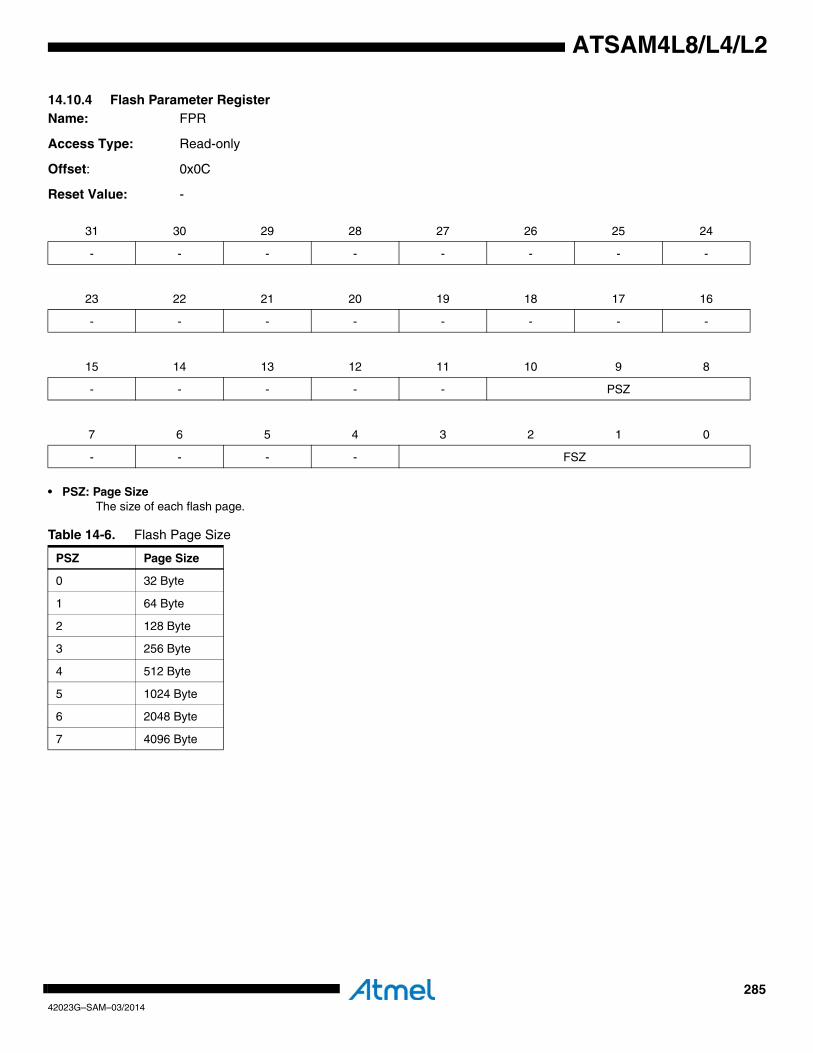
28542023G–SAM–03/2014
ATSAM4L8/L4/L2
14.10.4 Flash Parameter RegisterName: FPR
Access Type: Read-only
Offset: 0x0C
Reset Value: -
• PSZ: Page SizeThe size of each flash page.
31 30 29 28 27 26 25 24
- - - - - - - -
23 22 21 20 19 18 17 16
- - - - - - - -
15 14 13 12 11 10 9 8
- - - - - PSZ
7 6 5 4 3 2 1 0
- - - - FSZ
Table 14-6. Flash Page Size
PSZ Page Size
0 32 Byte
1 64 Byte
2 128 Byte
3 256 Byte
4 512 Byte
5 1024 Byte
6 2048 Byte
7 4096 Byte
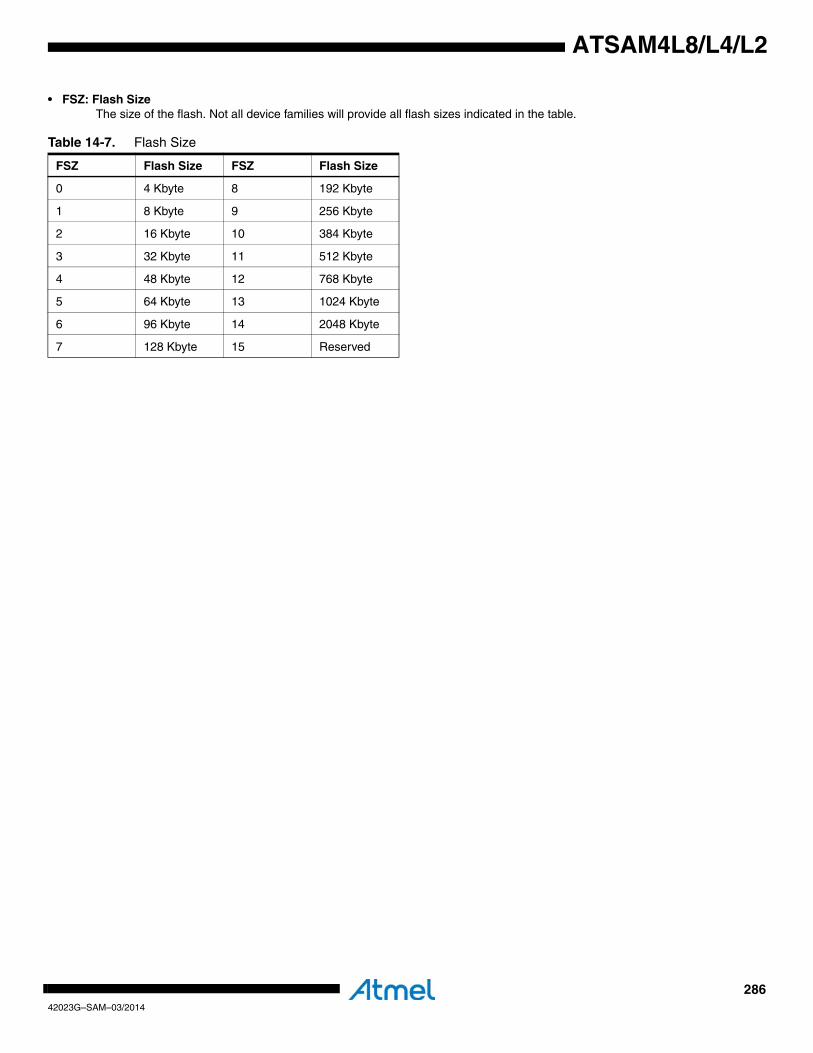
28642023G–SAM–03/2014
ATSAM4L8/L4/L2
• FSZ: Flash SizeThe size of the flash. Not all device families will provide all flash sizes indicated in the table.
Table 14-7. Flash Size
FSZ Flash Size FSZ Flash Size
0 4 Kbyte 8 192 Kbyte
1 8 Kbyte 9 256 Kbyte
2 16 Kbyte 10 384 Kbyte
3 32 Kbyte 11 512 Kbyte
4 48 Kbyte 12 768 Kbyte
5 64 Kbyte 13 1024 Kbyte
6 96 Kbyte 14 2048 Kbyte
7 128 Kbyte 15 Reserved

28742023G–SAM–03/2014
ATSAM4L8/L4/L2
14.10.5 Flash Version RegisterName: FVR
Access Type: Read-only
Offset: 0x10
Reset Value: 0x00000000
• VARIANT: Variant NumberReserved. No functionality associated.
• VERSION: Version NumberVersion number of the module. No functionality associated.
31 30 29 28 27 26 25 24
- - - - - - - -
23 22 21 20 19 18 17 16
- - - - VARIANT
15 14 13 12 11 10 9 8
- - - - VERSION[11:8]
7 6 5 4 3 2 1 0
VERSION[7:0]
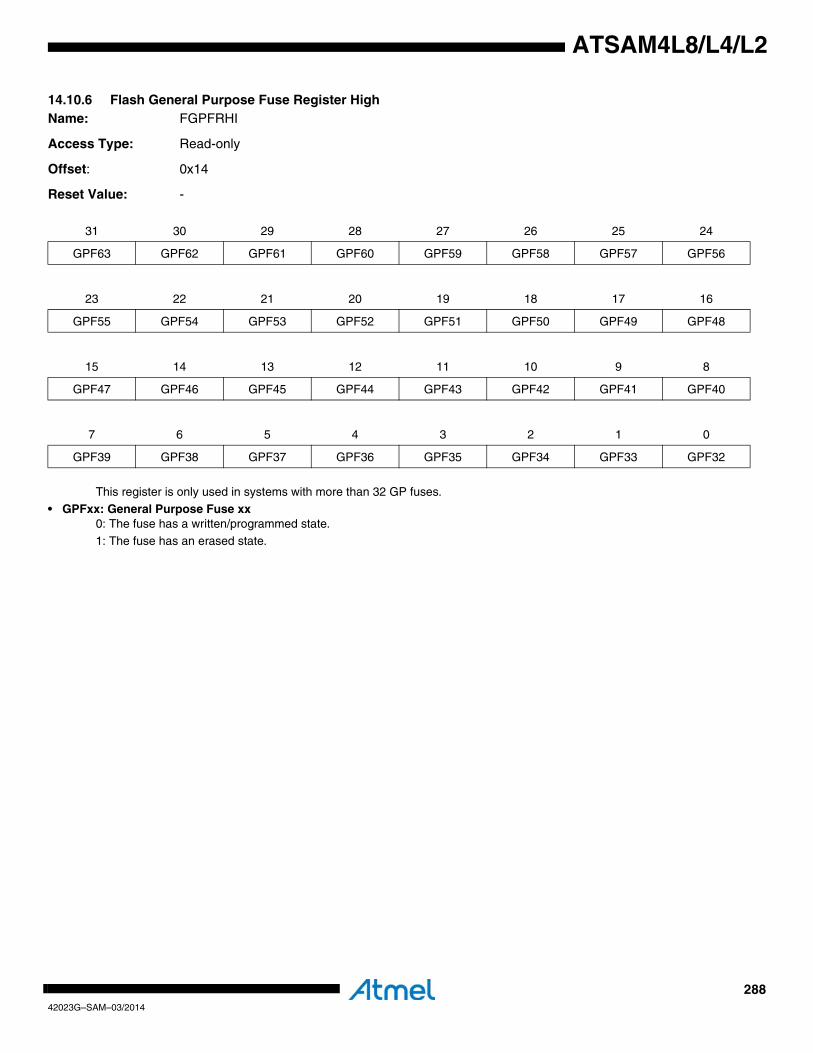
28842023G–SAM–03/2014
ATSAM4L8/L4/L2
14.10.6 Flash General Purpose Fuse Register HighName: FGPFRHI
Access Type: Read-only
Offset: 0x14
Reset Value: -
This register is only used in systems with more than 32 GP fuses.• GPFxx: General Purpose Fuse xx
0: The fuse has a written/programmed state.1: The fuse has an erased state.
31 30 29 28 27 26 25 24
GPF63 GPF62 GPF61 GPF60 GPF59 GPF58 GPF57 GPF56
23 22 21 20 19 18 17 16
GPF55 GPF54 GPF53 GPF52 GPF51 GPF50 GPF49 GPF48
15 14 13 12 11 10 9 8
GPF47 GPF46 GPF45 GPF44 GPF43 GPF42 GPF41 GPF40
7 6 5 4 3 2 1 0
GPF39 GPF38 GPF37 GPF36 GPF35 GPF34 GPF33 GPF32
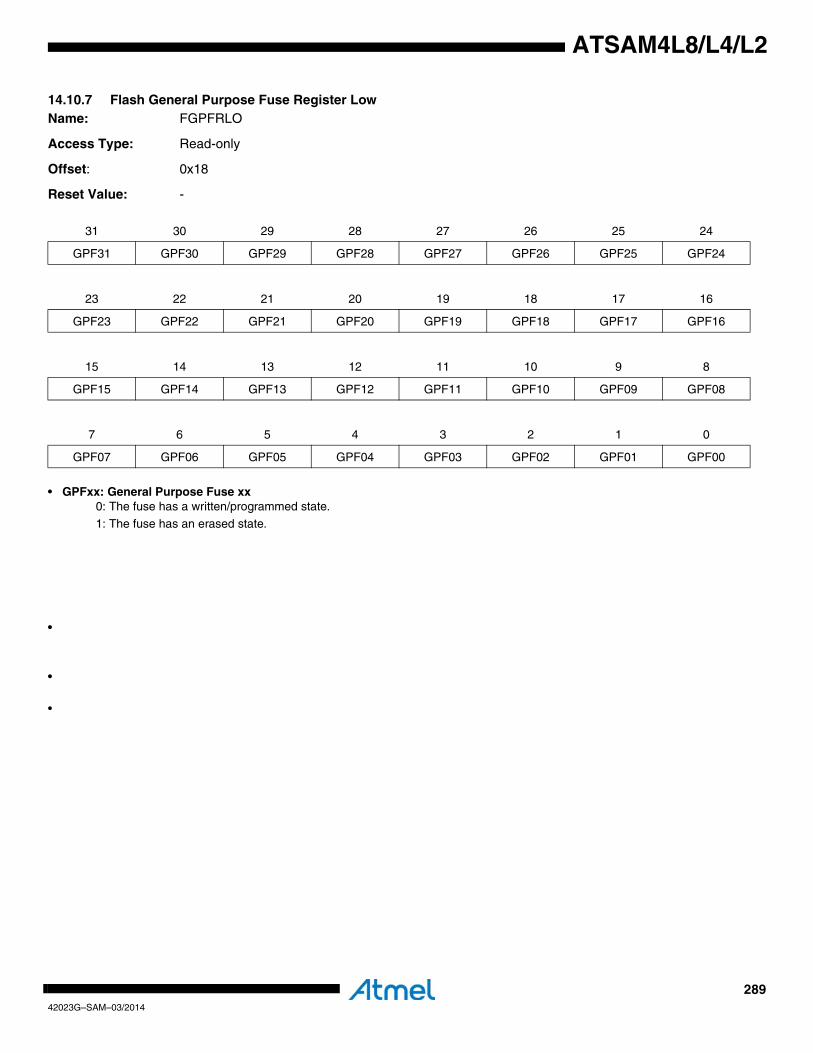
28942023G–SAM–03/2014
ATSAM4L8/L4/L2
14.10.7 Flash General Purpose Fuse Register LowName: FGPFRLO
Access Type: Read-only
Offset: 0x18
Reset Value: -
• GPFxx: General Purpose Fuse xx0: The fuse has a written/programmed state.
1: The fuse has an erased state.
•
•
•
31 30 29 28 27 26 25 24
GPF31 GPF30 GPF29 GPF28 GPF27 GPF26 GPF25 GPF24
23 22 21 20 19 18 17 16
GPF23 GPF22 GPF21 GPF20 GPF19 GPF18 GPF17 GPF16
15 14 13 12 11 10 9 8
GPF15 GPF14 GPF13 GPF12 GPF11 GPF10 GPF09 GPF08
7 6 5 4 3 2 1 0
GPF07 GPF06 GPF05 GPF04 GPF03 GPF02 GPF01 GPF00
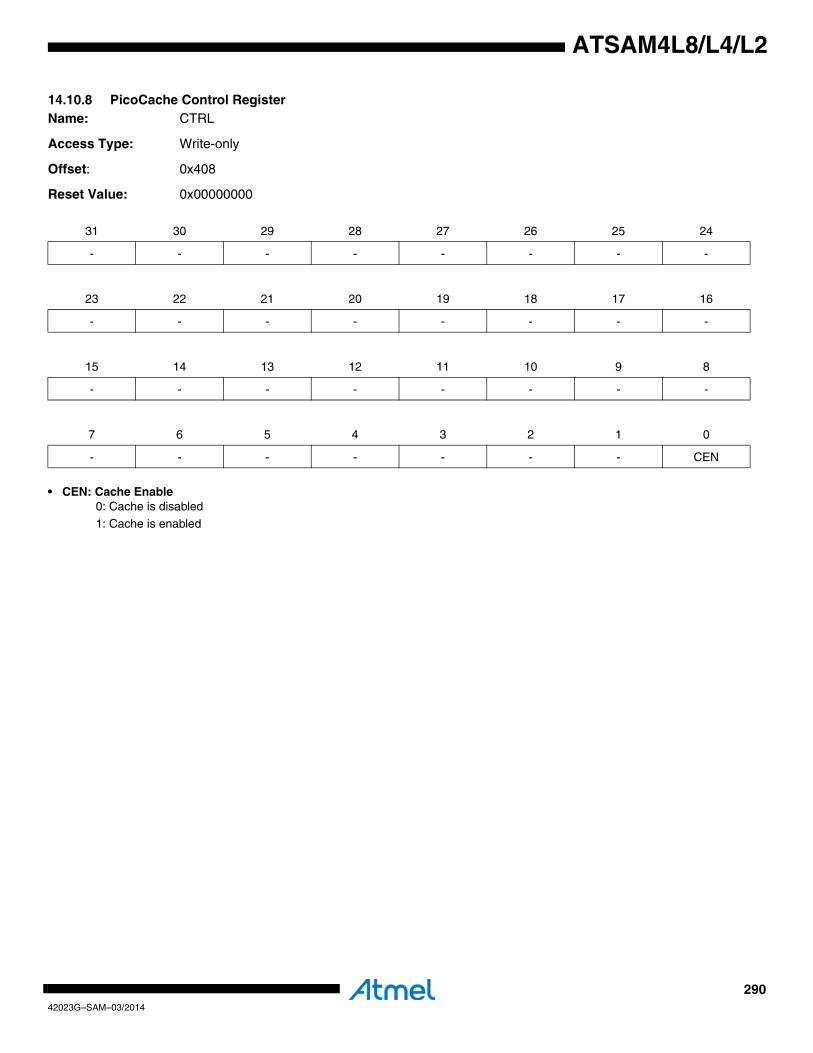
29042023G–SAM–03/2014
ATSAM4L8/L4/L2
14.10.8 PicoCache Control RegisterName: CTRL
Access Type: Write-only
Offset: 0x408
Reset Value: 0x00000000
• CEN: Cache Enable0: Cache is disabled
1: Cache is enabled
31 30 29 28 27 26 25 24
- - - - - - - -
23 22 21 20 19 18 17 16
- - - - - - - -
15 14 13 12 11 10 9 8
- - - - - - - -
7 6 5 4 3 2 1 0
- - - - - - - CEN
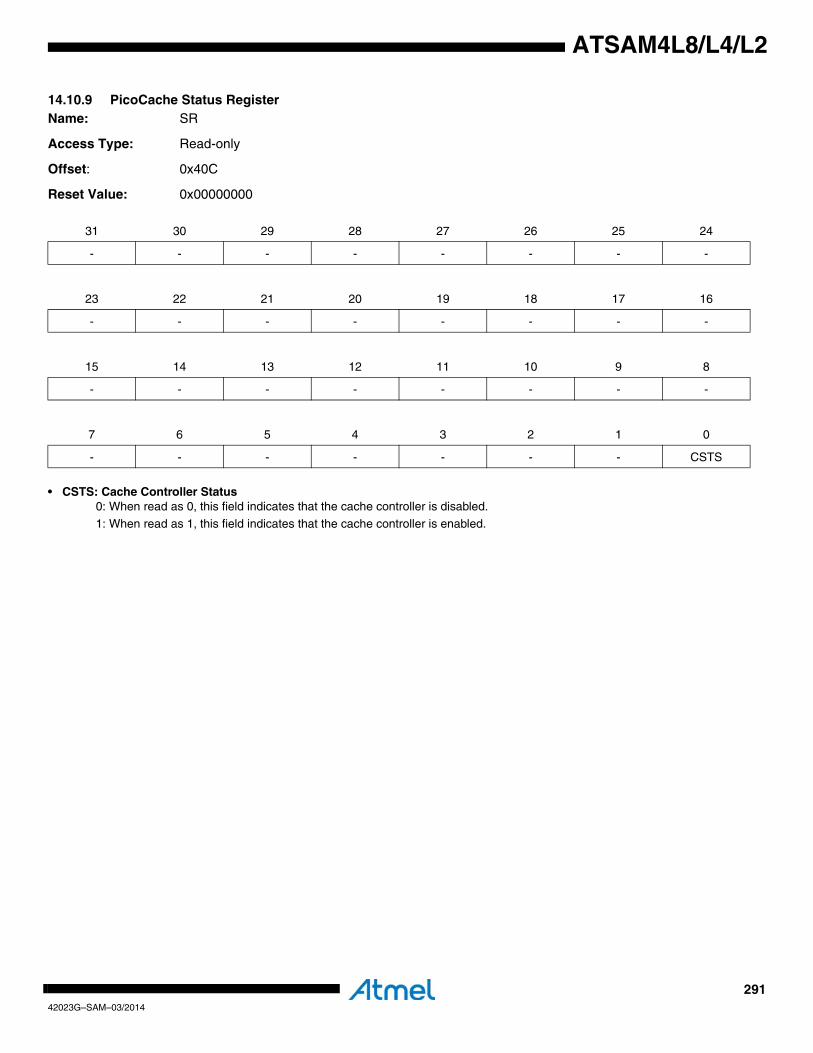
29142023G–SAM–03/2014
ATSAM4L8/L4/L2
14.10.9 PicoCache Status RegisterName: SR
Access Type: Read-only
Offset: 0x40C
Reset Value: 0x00000000
• CSTS: Cache Controller Status0: When read as 0, this field indicates that the cache controller is disabled.
1: When read as 1, this field indicates that the cache controller is enabled.
31 30 29 28 27 26 25 24
- - - - - - - -
23 22 21 20 19 18 17 16
- - - - - - - -
15 14 13 12 11 10 9 8
- - - - - - - -
7 6 5 4 3 2 1 0
- - - - - - - CSTS

29242023G–SAM–03/2014
ATSAM4L8/L4/L2
14.10.10 PicoCache Maintenance Register 0Name: MAINT0
Access Type: Write-only
Offset: 0x420
Reset Value: 0x00000000
• INVALL: Cache Controller Invalidate All0: no effect.
1: When set to one, this field invalidate all cache entries.
31 30 29 28 27 26 25 24
- - - - - - - -
23 22 21 20 19 18 17 16
- - - - - - - -
15 14 13 12 11 10 9 8
- - - - - - - -
7 6 5 4 3 2 1 0
- - - - - - - INVALL
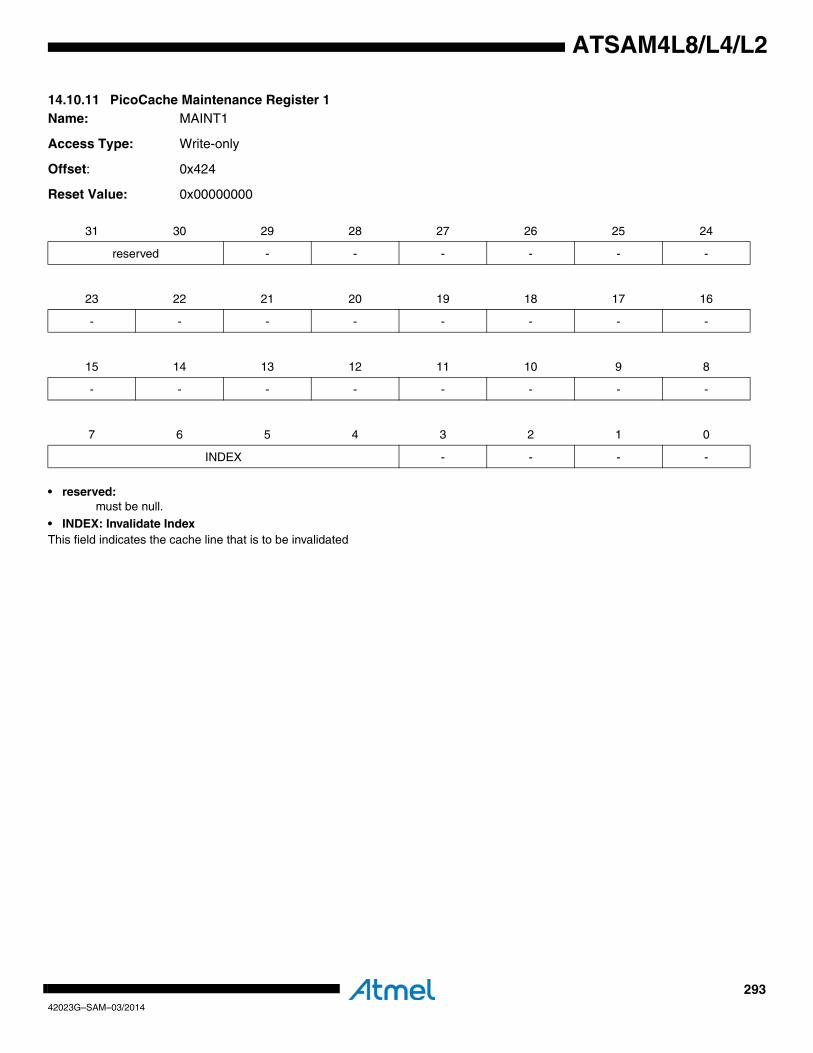
29342023G–SAM–03/2014
ATSAM4L8/L4/L2
14.10.11 PicoCache Maintenance Register 1Name: MAINT1
Access Type: Write-only
Offset: 0x424
Reset Value: 0x00000000
• reserved:must be null.
• INDEX: Invalidate IndexThis field indicates the cache line that is to be invalidated
31 30 29 28 27 26 25 24
reserved - - - - - -
23 22 21 20 19 18 17 16
- - - - - - - -
15 14 13 12 11 10 9 8
- - - - - - - -
7 6 5 4 3 2 1 0
INDEX - - - -
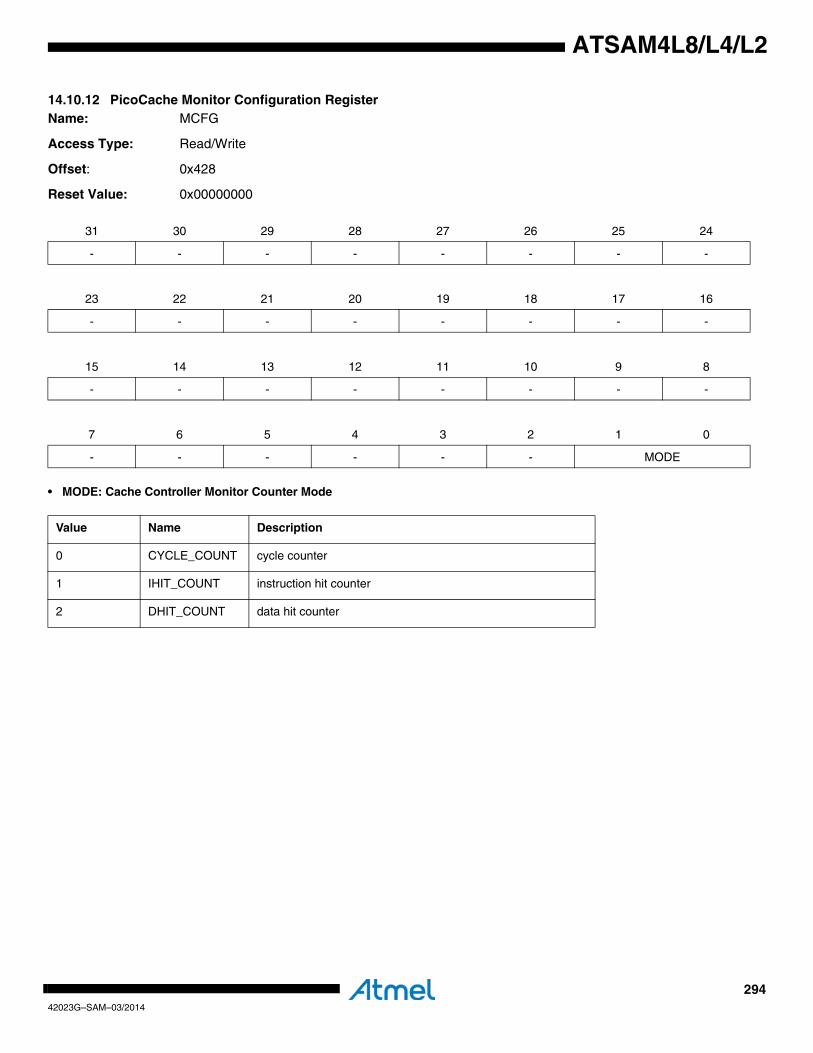
29442023G–SAM–03/2014
ATSAM4L8/L4/L2
14.10.12 PicoCache Monitor Configuration RegisterName: MCFG
Access Type: Read/Write
Offset: 0x428
Reset Value: 0x00000000
• MODE: Cache Controller Monitor Counter Mode
31 30 29 28 27 26 25 24
- - - - - - - -
23 22 21 20 19 18 17 16
- - - - - - - -
15 14 13 12 11 10 9 8
- - - - - - - -
7 6 5 4 3 2 1 0
- - - - - - MODE
Value Name Description
0 CYCLE_COUNT cycle counter
1 IHIT_COUNT instruction hit counter
2 DHIT_COUNT data hit counter
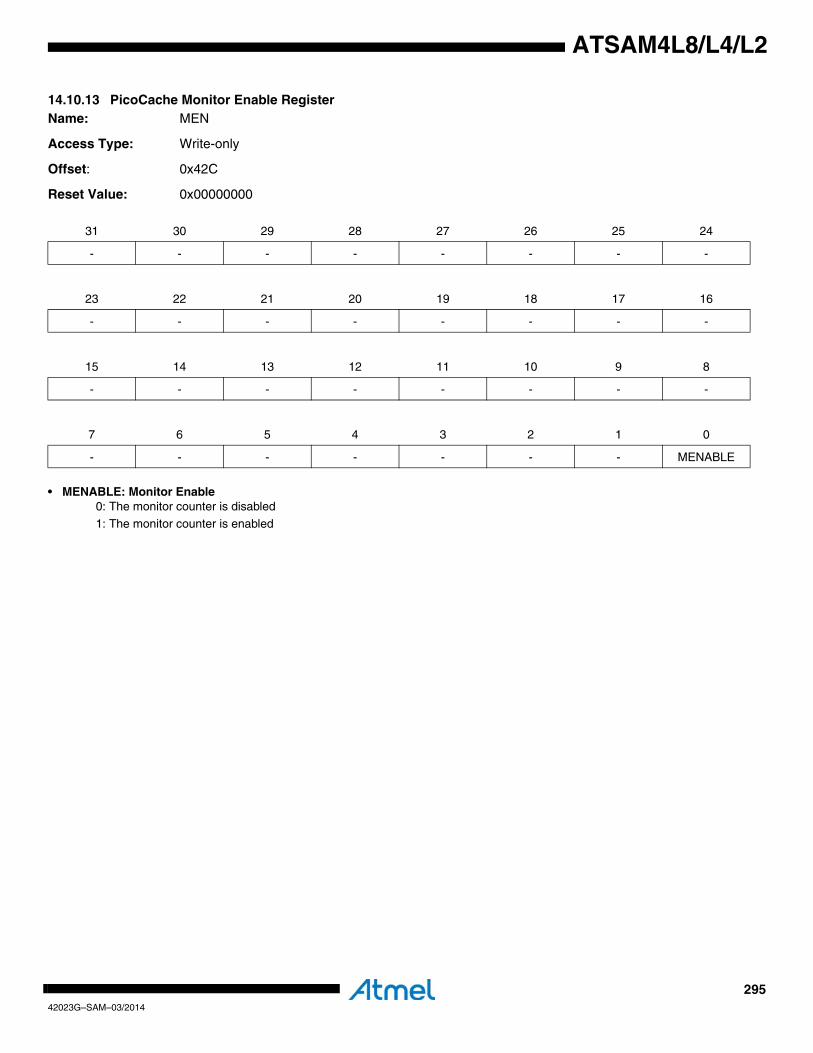
29542023G–SAM–03/2014
ATSAM4L8/L4/L2
14.10.13 PicoCache Monitor Enable RegisterName: MEN
Access Type: Write-only
Offset: 0x42C
Reset Value: 0x00000000
• MENABLE: Monitor Enable0: The monitor counter is disabled
1: The monitor counter is enabled
31 30 29 28 27 26 25 24
- - - - - - - -
23 22 21 20 19 18 17 16
- - - - - - - -
15 14 13 12 11 10 9 8
- - - - - - - -
7 6 5 4 3 2 1 0
- - - - - - - MENABLE
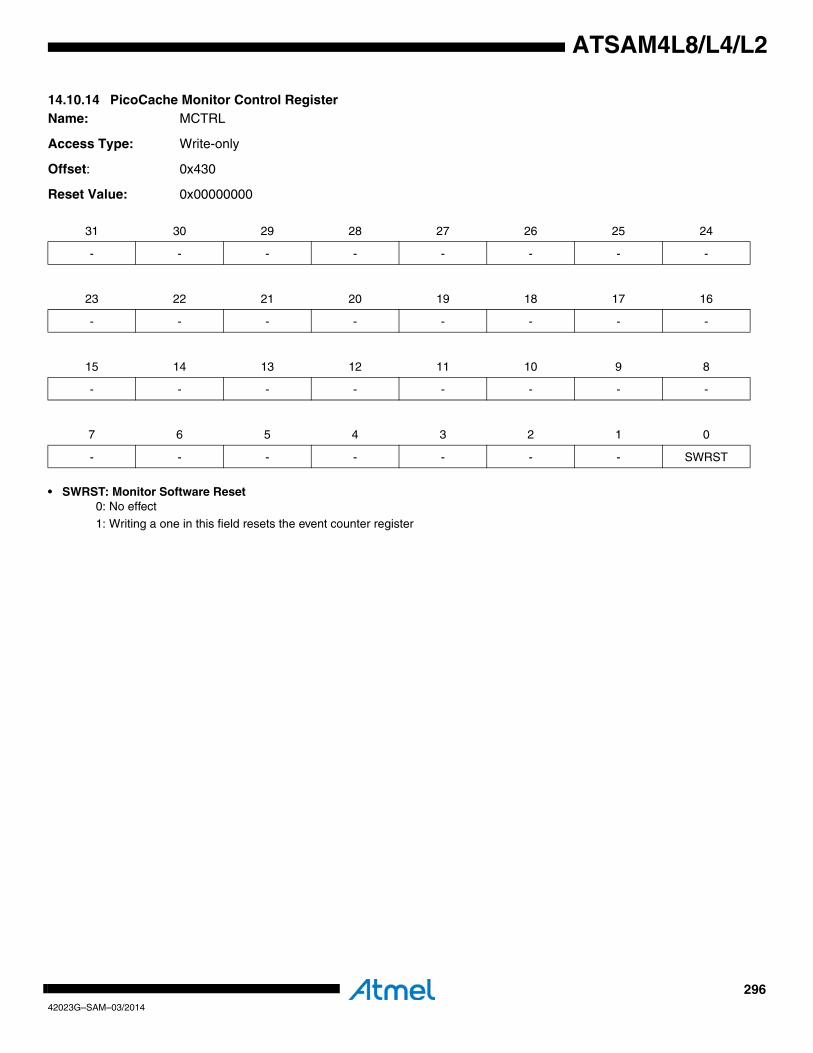
29642023G–SAM–03/2014
ATSAM4L8/L4/L2
14.10.14 PicoCache Monitor Control RegisterName: MCTRL
Access Type: Write-only
Offset: 0x430
Reset Value: 0x00000000
• SWRST: Monitor Software Reset0: No effect
1: Writing a one in this field resets the event counter register
31 30 29 28 27 26 25 24
- - - - - - - -
23 22 21 20 19 18 17 16
- - - - - - - -
15 14 13 12 11 10 9 8
- - - - - - - -
7 6 5 4 3 2 1 0
- - - - - - - SWRST
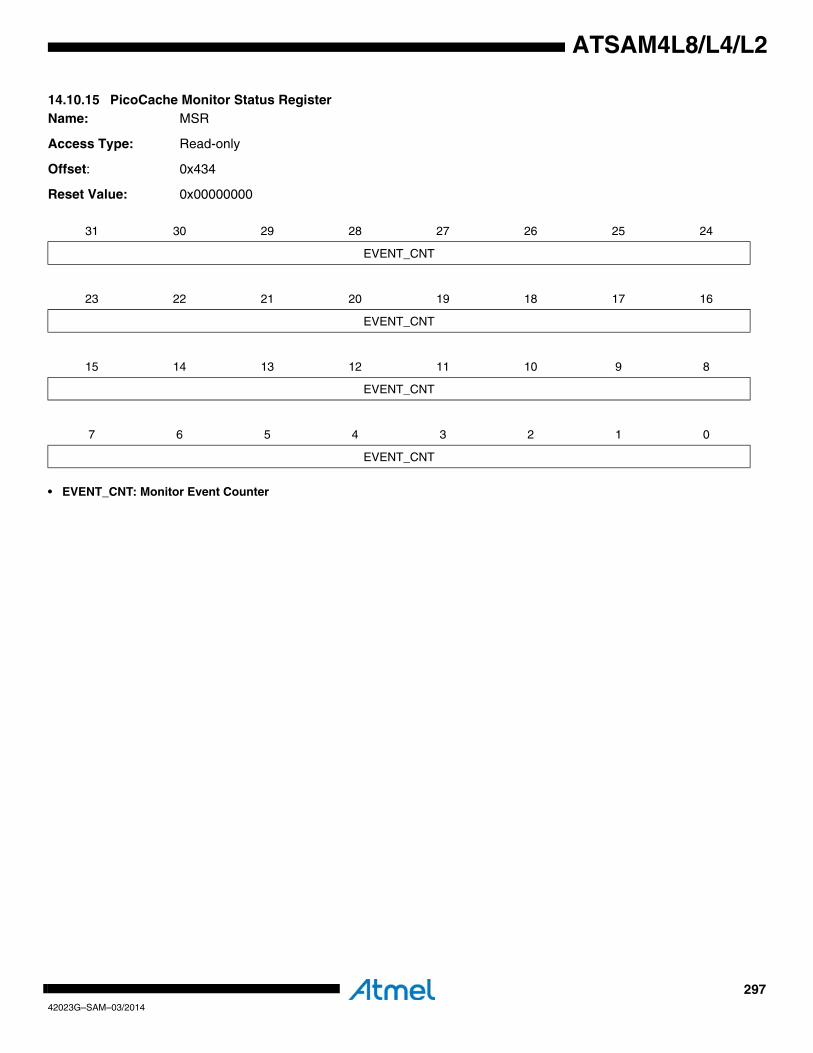
29742023G–SAM–03/2014
ATSAM4L8/L4/L2
14.10.15 PicoCache Monitor Status RegisterName: MSR
Access Type: Read-only
Offset: 0x434
Reset Value: 0x00000000
• EVENT_CNT: Monitor Event Counter
31 30 29 28 27 26 25 24
EVENT_CNT
23 22 21 20 19 18 17 16
EVENT_CNT
15 14 13 12 11 10 9 8
EVENT_CNT
7 6 5 4 3 2 1 0
EVENT_CNT
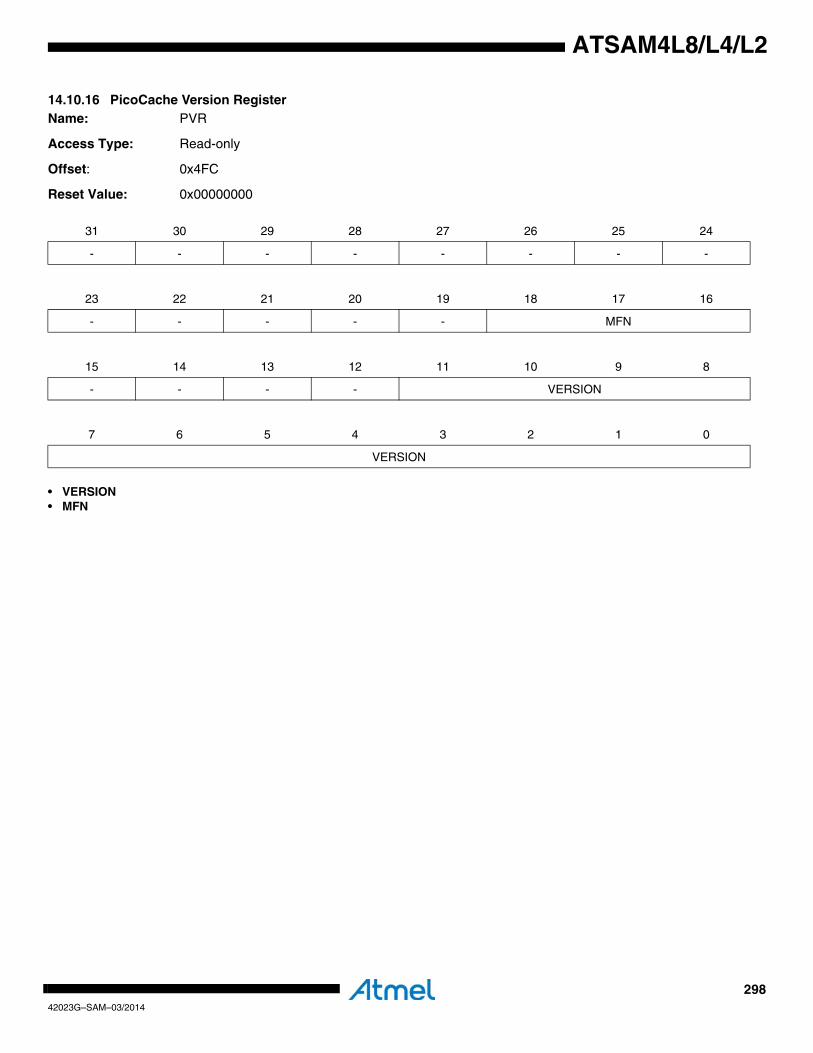
29842023G–SAM–03/2014
ATSAM4L8/L4/L2
14.10.16 PicoCache Version RegisterName: PVR
Access Type: Read-only
Offset: 0x4FC
Reset Value: 0x00000000
• VERSION• MFN
31 30 29 28 27 26 25 24
- - - - - - - -
23 22 21 20 19 18 17 16
- - - - - MFN
15 14 13 12 11 10 9 8
- - - - VERSION
7 6 5 4 3 2 1 0
VERSION
29942023G–SAM–03/2014
ATSAM4L8/L4/L2
14.11 Fuse Settings
The flash contains 32 general purpose fuses. These 32 fuses can be found in the Flash GeneralPurpose Fuse Register Low (FGPFRLO). The Flash General Purpose Fuse Register High(FGPFRHI) is not used. In addition to the general purpose fuses, parts of the flash user pagecan have a defined meaning outside of the flash controller and will also be described in thissection.
Note that when writing to the user page the values do not get loaded by the other modules onthe device until a device reset occurs.
The general purpose fuses are erased by a JTAG chip erase.
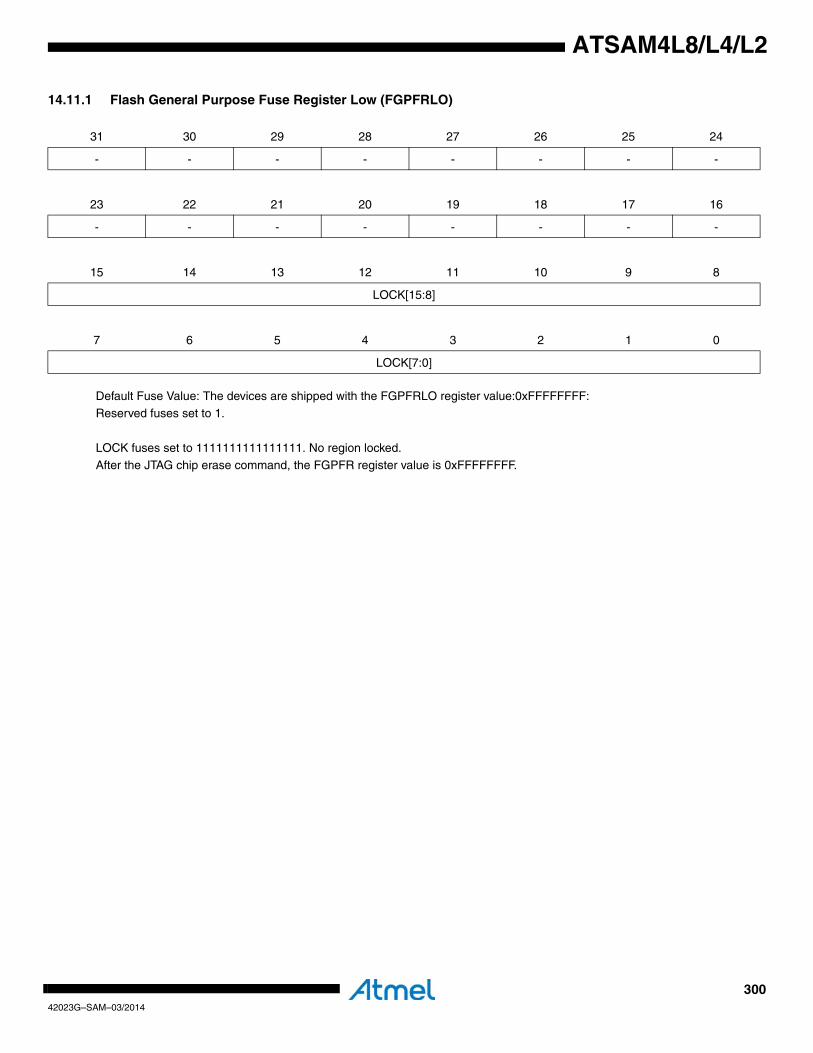
30042023G–SAM–03/2014
ATSAM4L8/L4/L2
14.11.1 Flash General Purpose Fuse Register Low (FGPFRLO)
Default Fuse Value: The devices are shipped with the FGPFRLO register value:0xFFFFFFFF:Reserved fuses set to 1.
LOCK fuses set to 1111111111111111. No region locked.After the JTAG chip erase command, the FGPFR register value is 0xFFFFFFFF.
31 30 29 28 27 26 25 24
- - - - - - - -
23 22 21 20 19 18 17 16
- - - - - - - -
15 14 13 12 11 10 9 8
LOCK[15:8]
7 6 5 4 3 2 1 0
LOCK[7:0]

30142023G–SAM–03/2014
ATSAM4L8/L4/L2
14.11.2 First Word of the User Page (Address 0x808000004)
• BOD18HYST: 1v8 Brown Out Detector Hysteresis0: The Brown out detector hysteresis is disabled
1: The Brown out detector hysteresis is enabled• BOD18ACTION: 1v8 Brown Out Detector Action
• BOD18EN: 1v8 Brown Out Detector Enable0: The Brown out detector is disabled.1: The Brown out detector is enabled.
• BOD18LEVEL: 1v8 Brown Out Detector LevelThis controls the voltage trigger level for the 1v8 Brown out detector. Refer to Section 42. ”Electrical Characteristics” on page 1121
• BOD33HYST: 3v3 Brown Out Detector Hysteresis0: The Brown out detector hysteresis is disabled
1: The Brown out detector hysteresis is enabled• BOD33ACTION: 3v3 Brown Out Detector Action
• BOD33EN: 3v3 Brown Out Detector Enable0: The Brown out detector is disabled.
1: The Brown out detector is enabled.
31 30 29 28 27 26 25 24
- - - - - - - -
23 22 21 20 19 18 17 16
- - - BOD18HYST BOD18ACTION BOD18EN BOD18LEVEL[5]
15 14 13 12 11 10 9 8
BOD18LEVEL[4:0] BOD33HYST BOD33ACTION
7 6 5 4 3 2 1 0
BOD33EN BOD33LEVEL WDTAUTO
Action[1:0] Description
00 No Action.
01 The BOD generates a reset.
10 The BOD generates an interrupt.
11 No Action.
Action[1:0] Description
00 No Action.
01 The BOD generates a reset.
10 The BOD generates an interrupt.
11 No Action.
30242023G–SAM–03/2014
ATSAM4L8/L4/L2
• BOD33LEVEL: 3v3 Brown Out Detector LevelThis controls the voltage trigger level for the 3v3 Brown out detector. Refer to Section 42. ”Electrical Characteristics” on page 1121.
• WDTAUTO: WatchDog Timer Auto Enable at Startup0: The WDT is automatically enabled at startup.1: The WDT is not automatically enabled at startup.
Refer to the WDT chapter for detail about timeout settings when the WDT is automatically enabled.
Default user page first word value:The devices are shipped with the user page erased (all bits 1):
WDTAUTO set to 1, WDT disabled.
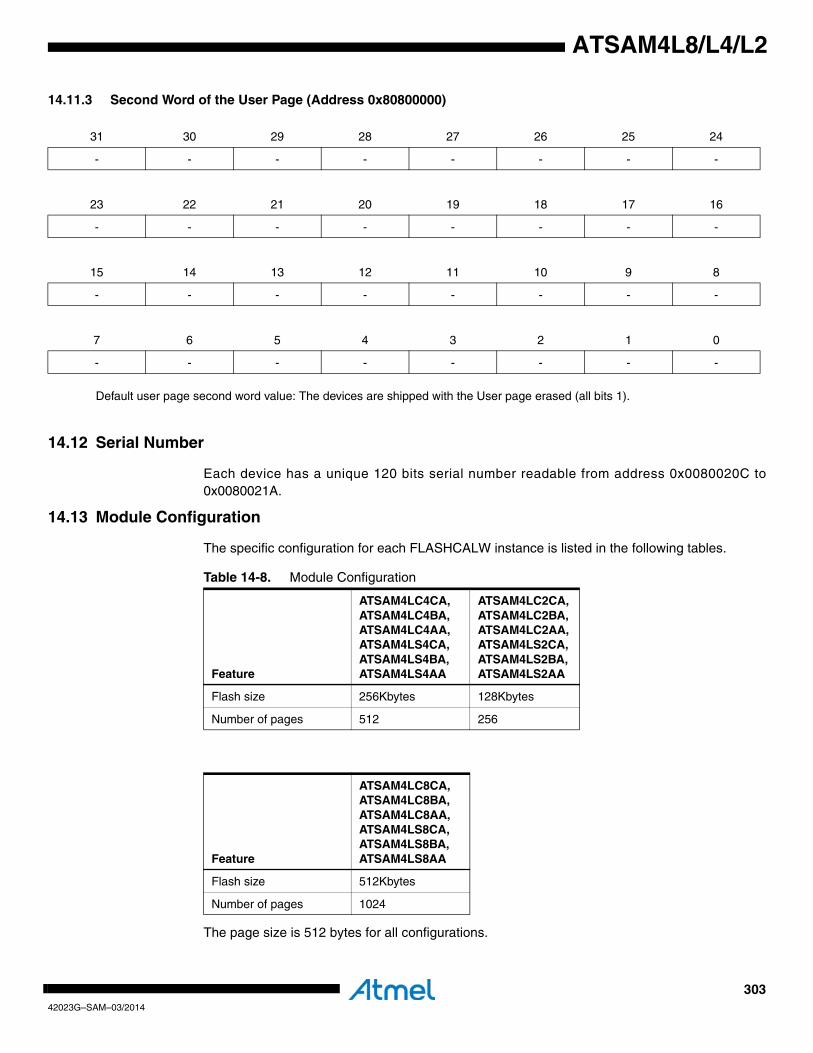
30342023G–SAM–03/2014
ATSAM4L8/L4/L2
14.11.3 Second Word of the User Page (Address 0x80800000)
Default user page second word value: The devices are shipped with the User page erased (all bits 1).
14.12 Serial Number
Each device has a unique 120 bits serial number readable from address 0x0080020C to0x0080021A.
14.13 Module Configuration
The specific configuration for each FLASHCALW instance is listed in the following tables.
The page size is 512 bytes for all configurations.
31 30 29 28 27 26 25 24
- - - - - - - -
23 22 21 20 19 18 17 16
- - - - - - - -
15 14 13 12 11 10 9 8
- - - - - - - -
7 6 5 4 3 2 1 0
- - - - - - - -
Table 14-8. Module Configuration
Feature
ATSAM4LC4CA, ATSAM4LC4BA, ATSAM4LC4AA, ATSAM4LS4CA, ATSAM4LS4BA, ATSAM4LS4AA
ATSAM4LC2CA, ATSAM4LC2BA, ATSAM4LC2AA, ATSAM4LS2CA, ATSAM4LS2BA, ATSAM4LS2AA
Flash size 256Kbytes 128Kbytes
Number of pages 512 256
Feature
ATSAM4LC8CA, ATSAM4LC8BA, ATSAM4LC8AA, ATSAM4LS8CA, ATSAM4LS8BA, ATSAM4LS8AA
Flash size 512Kbytes
Number of pages 1024
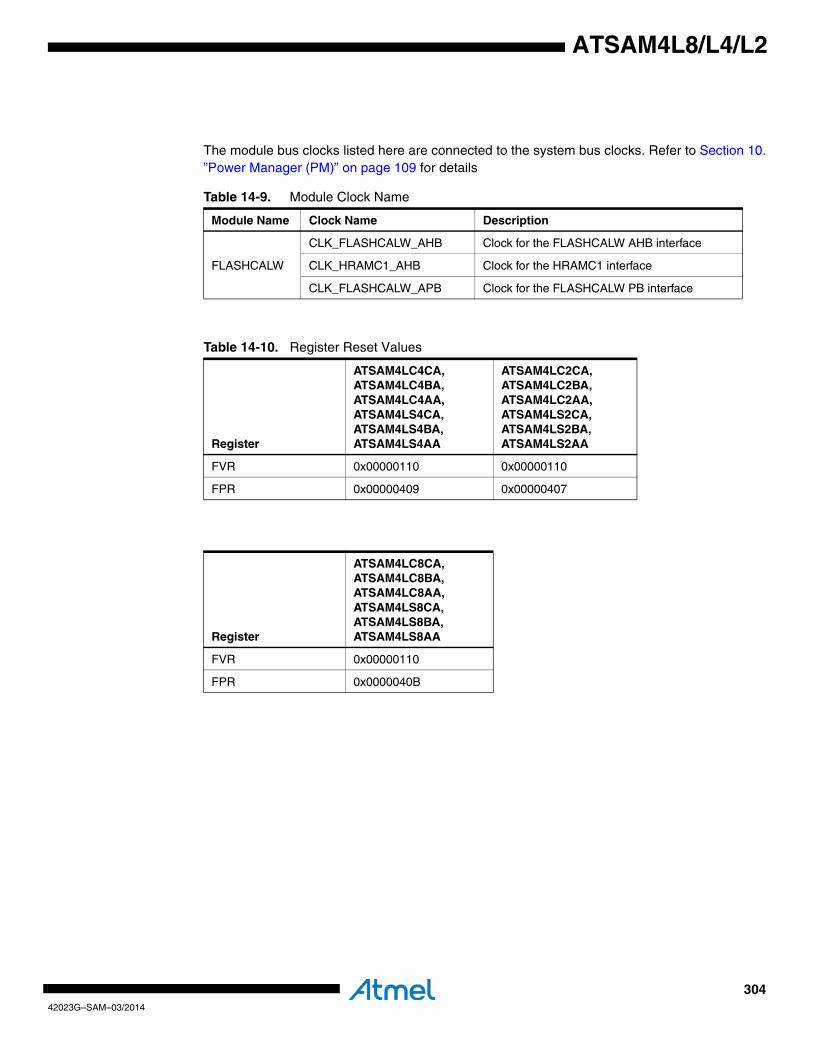
30442023G–SAM–03/2014
ATSAM4L8/L4/L2
The module bus clocks listed here are connected to the system bus clocks. Refer to Section 10.”Power Manager (PM)” on page 109 for details
Table 14-9. Module Clock Name
Module Name Clock Name Description
FLASHCALW
CLK_FLASHCALW_AHB Clock for the FLASHCALW AHB interface
CLK_HRAMC1_AHB Clock for the HRAMC1 interface
CLK_FLASHCALW_APB Clock for the FLASHCALW PB interface
Table 14-10. Register Reset Values
Register
ATSAM4LC4CA, ATSAM4LC4BA, ATSAM4LC4AA, ATSAM4LS4CA, ATSAM4LS4BA, ATSAM4LS4AA
ATSAM4LC2CA, ATSAM4LC2BA, ATSAM4LC2AA, ATSAM4LS2CA, ATSAM4LS2BA, ATSAM4LS2AA
FVR 0x00000110 0x00000110
FPR 0x00000409 0x00000407
Register
ATSAM4LC8CA, ATSAM4LC8BA, ATSAM4LC8AA, ATSAM4LS8CA, ATSAM4LS8BA, ATSAM4LS8AA
FVR 0x00000110
FPR 0x0000040B
30542023G–SAM–03/2014
ATSAM4L8/L4/L2
15. HSB Bus Matrix (HMATRIXB)Rev: 1.3.0.3
15.1 Features• User Interface on peripheral bus• Configurable number of masters (up to 16)• Configurable number of slaves (up to 16)• One decoder for each master• Programmable arbitration for each slave
– Round-Robin– Fixed priority
• Programmable default master for each slave– No default master– Last accessed default master– Fixed default master
• One cycle latency for the first access of a burst• Zero cycle latency for default master• One special function register for each slave (not dedicated)
15.2 OverviewThe Bus Matrix implements a multi-layer bus structure, that enables parallel access pathsbetween multiple High Speed Bus (HSB) masters and slaves in a system, thus increasing theoverall bandwidth. The Bus Matrix interconnects up to 16 HSB Masters to up to 16 HSB Slaves.The normal latency to connect a master to a slave is one cycle except for the default master ofthe accessed slave which is connected directly (zero cycle latency). The Bus Matrix provides 16Special Function Registers (SFR) that allow the Bus Matrix to support application specificfeatures.
15.3 Product DependenciesIn order to configure this module by accessing the user registers, other parts of the system mustbe configured correctly, as described below.
15.3.1 ClocksThe clock for the HMATRIX bus interface (CLK_HMATRIX) is generated by the Power Manager.This clock is disabled at reset, and can be enaabled in the Power Manager.
15.4 Functional Description
15.4.1 Special Bus Granting MechanismThe Bus Matrix provides some speculative bus granting techniques in order to anticipate accessrequests from some masters. This mechanism reduces latency at first access of a burst or singletransfer. This bus granting mechanism sets a different default master for every slave.
At the end of the current access, if no other request is pending, the slave remains connected toits associated default master. A slave can be associated with three kinds of default masters: nodefault master, last access master, and fixed default master.
30642023G–SAM–03/2014
ATSAM4L8/L4/L2
To change from one kind of default master to another, the Bus Matrix user interface provides theSlave Configuration Registers, one for each slave, that set a default master for each slave. TheSlave Configuration Register contains two fields: DEFMSTR_TYPE and FIXED_DEFMSTR. The2-bit DEFMSTR_TYPE field selects the default master type (no default, last access master, fixeddefault master), whereas the 4-bit FIXED_DEFMSTR field selects a fixed default master pro-vided that DEFMSTR_TYPE is set to fixed default master. Refer to the Bus Matrix user interfacedescription.
15.4.1.1 No Default MasterAt the end of the current access, if no other request is pending, the slave is disconnected fromall masters. No Default Master suits low-power mode.
15.4.1.2 Last Access MasterAt the end of the current access, if no other request is pending, the slave remains connected tothe last master that performed an access request.
15.4.1.3 Fixed Default MasterAt the end of the current access, if no other request is pending, the slave connects to its fixeddefault master. Unlike last access master, the fixed master does not change unless the usermodifies it by a software action (field FIXED_DEFMSTR of the related SCFG).
15.4.2 ArbitrationThe Bus Matrix provides an arbitration mechanism that reduces latency when conflict casesoccur, i.e. when two or more masters try to access the same slave at the same time. One arbiterper HSB slave is provided, thus arbitrating each slave differently.
The Bus Matrix provides the user with the possibility of choosing between 2 arbitration types foreach slave:
1. Round-Robin Arbitration (default)
2. Fixed Priority Arbitration
This is selected by the ARBT field in the Slave Configuration Registers (SCFG).
Each algorithm may be complemented by selecting a default master configuration for eachslave.
When a re-arbitration must be done, specific conditions apply. This is described in “ArbitrationRules” .
15.4.2.1 Arbitration RulesEach arbiter has the ability to arbitrate between two or more different master requests. In orderto avoid burst breaking and also to provide the maximum throughput for slave interfaces, arbitra-tion may only take place during the following cycles:
1. Idle Cycles: When a slave is not connected to any master or is connected to a master which is not currently accessing it.
2. Single Cycles: When a slave is currently doing a single access.
3. End of Burst Cycles: When the current cycle is the last cycle of a burst transfer. For defined length burst, predicted end of burst matches the size of the transfer but is man-aged differently for undefined length burst. This is described below.
4. Slot Cycle Limit: When the slot cycle counter has reached the limit value indicating that the current master access is too long and must be broken. This is described below.
30742023G–SAM–03/2014
ATSAM4L8/L4/L2
• Undefined Length Burst Arbitration
In order to avoid long slave handling during undefined length bursts (INCR), the Bus Matrix pro-vides specific logic in order to re-arbitrate before the end of the INCR transfer. A predicted endof burst is used as a defined length burst transfer and can be selected among the following fivepossibilities:
1. Infinite: No predicted end of burst is generated and therefore INCR burst transfer will never be broken.
2. One beat bursts: Predicted end of burst is generated at each single transfer inside the INCP transfer.
3. Four beat bursts: Predicted end of burst is generated at the end of each four beat boundary inside INCR transfer.
4. Eight beat bursts: Predicted end of burst is generated at the end of each eight beat boundary inside INCR transfer.
5. Sixteen beat bursts: Predicted end of burst is generated at the end of each sixteen beat boundary inside INCR transfer.
This selection can be done through the ULBT field in the Master Configuration Registers(MCFG).
• Slot Cycle Limit Arbitration
The Bus Matrix contains specific logic to break long accesses, such as very long bursts on avery slow slave (e.g., an external low speed memory). At the beginning of the burst access, acounter is loaded with the value previously written in the SLOT_CYCLE field of the related SlaveConfiguration Register (SCFG) and decreased at each clock cycle. When the counter reacheszero, the arbiter has the ability to re-arbitrate at the end of the current byte, halfword, or wordtransfer.
15.4.2.2 Round-Robin ArbitrationThis algorithm allows the Bus Matrix arbiters to dispatch the requests from different masters tothe same slave in a round-robin manner. If two or more master requests arise at the same time,the master with the lowest number is first serviced, then the others are serviced in a round-robinmanner.
There are three round-robin algorithms implemented:
1. Round-Robin arbitration without default master
2. Round-Robin arbitration with last default master
3. Round-Robin arbitration with fixed default master
• Round-Robin Arbitration without Default Master
This is the main algorithm used by Bus Matrix arbiters. It allows the Bus Matrix to dispatchrequests from different masters to the same slave in a pure round-robin manner. At the end ofthe current access, if no other request is pending, the slave is disconnected from all masters.This configuration incurs one latency cycle for the first access of a burst. Arbitration withoutdefault master can be used for masters that perform significant bursts.
• Round-Robin Arbitration with Last Default Master
This is a biased round-robin algorithm used by Bus Matrix arbiters. It allows the Bus Matrix toremove the one latency cycle for the last master that accessed the slave. At the end of the cur-
30842023G–SAM–03/2014
ATSAM4L8/L4/L2
rent transfer, if no other master request is pending, the slave remains connected to the lastmaster that performed the access. Other non privileged masters still get one latency cycle if theywant to access the same slave. This technique can be used for masters that mainly perform sin-gle accesses.
• Round-Robin Arbitration with Fixed Default Master
This is another biased round-robin algorithm. It allows the Bus Matrix arbiters to remove the onelatency cycle for the fixed default master per slave. At the end of the current access, the slaveremains connected to its fixed default master. Every request attempted by this fixed default mas-ter will not cause any latency whereas other non privileged masters will still get one latencycycle. This technique can be used for masters that mainly perform single accesses.
15.4.2.3 Fixed Priority ArbitrationThis algorithm allows the Bus Matrix arbiters to dispatch the requests from different masters tothe same slave by using the fixed priority defined by the user. If two or more master requests areactive at the same time, the master with the highest priority number is serviced first. If two ormore master requests with the same priority are active at the same time, the master with thehighest number is serviced first.
For each slave, the priority of each master may be defined through the Priority Registers forSlaves (PRAS and PRBS).
15.4.3 Slave and Master AssignationThe index number assigned to Bus Matrix slaves and masters are described in the Module Con-figuration section at the end of this chapter.
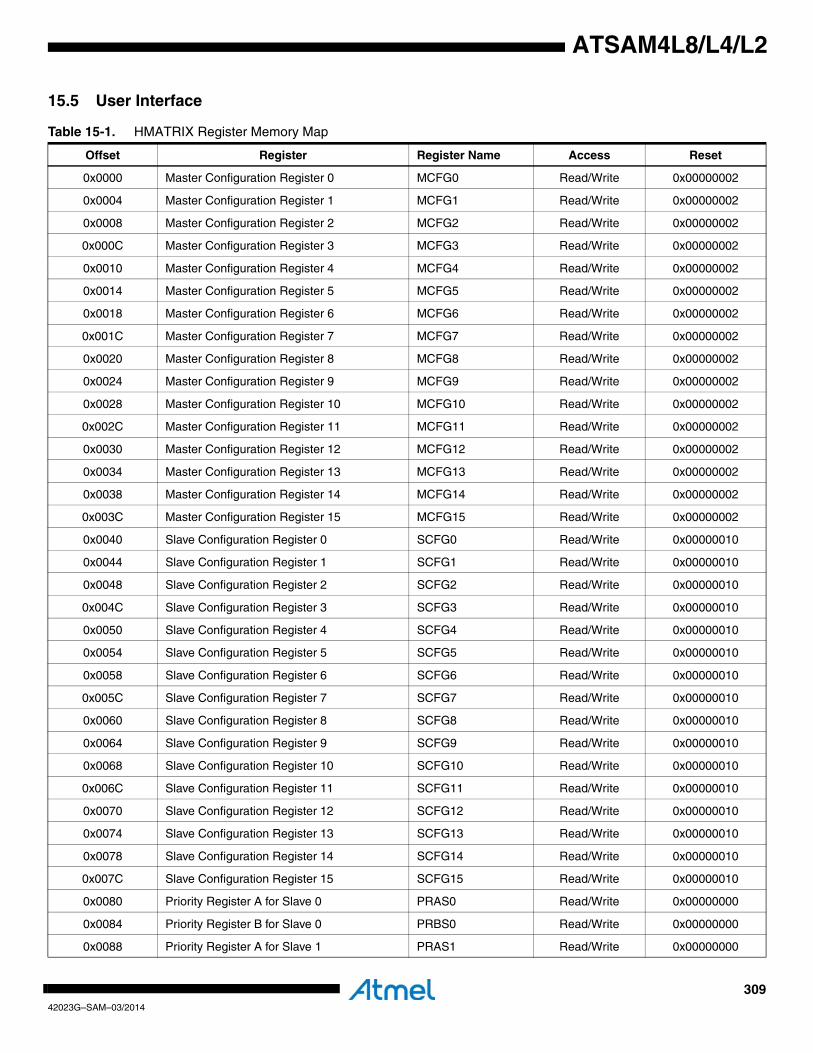
30942023G–SAM–03/2014
ATSAM4L8/L4/L2
15.5 User Interface
Table 15-1. HMATRIX Register Memory Map
Offset Register Register Name Access Reset
0x0000 Master Configuration Register 0 MCFG0 Read/Write 0x00000002
0x0004 Master Configuration Register 1 MCFG1 Read/Write 0x00000002
0x0008 Master Configuration Register 2 MCFG2 Read/Write 0x00000002
0x000C Master Configuration Register 3 MCFG3 Read/Write 0x00000002
0x0010 Master Configuration Register 4 MCFG4 Read/Write 0x00000002
0x0014 Master Configuration Register 5 MCFG5 Read/Write 0x00000002
0x0018 Master Configuration Register 6 MCFG6 Read/Write 0x00000002
0x001C Master Configuration Register 7 MCFG7 Read/Write 0x00000002
0x0020 Master Configuration Register 8 MCFG8 Read/Write 0x00000002
0x0024 Master Configuration Register 9 MCFG9 Read/Write 0x00000002
0x0028 Master Configuration Register 10 MCFG10 Read/Write 0x00000002
0x002C Master Configuration Register 11 MCFG11 Read/Write 0x00000002
0x0030 Master Configuration Register 12 MCFG12 Read/Write 0x00000002
0x0034 Master Configuration Register 13 MCFG13 Read/Write 0x00000002
0x0038 Master Configuration Register 14 MCFG14 Read/Write 0x00000002
0x003C Master Configuration Register 15 MCFG15 Read/Write 0x00000002
0x0040 Slave Configuration Register 0 SCFG0 Read/Write 0x00000010
0x0044 Slave Configuration Register 1 SCFG1 Read/Write 0x00000010
0x0048 Slave Configuration Register 2 SCFG2 Read/Write 0x00000010
0x004C Slave Configuration Register 3 SCFG3 Read/Write 0x00000010
0x0050 Slave Configuration Register 4 SCFG4 Read/Write 0x00000010
0x0054 Slave Configuration Register 5 SCFG5 Read/Write 0x00000010
0x0058 Slave Configuration Register 6 SCFG6 Read/Write 0x00000010
0x005C Slave Configuration Register 7 SCFG7 Read/Write 0x00000010
0x0060 Slave Configuration Register 8 SCFG8 Read/Write 0x00000010
0x0064 Slave Configuration Register 9 SCFG9 Read/Write 0x00000010
0x0068 Slave Configuration Register 10 SCFG10 Read/Write 0x00000010
0x006C Slave Configuration Register 11 SCFG11 Read/Write 0x00000010
0x0070 Slave Configuration Register 12 SCFG12 Read/Write 0x00000010
0x0074 Slave Configuration Register 13 SCFG13 Read/Write 0x00000010
0x0078 Slave Configuration Register 14 SCFG14 Read/Write 0x00000010
0x007C Slave Configuration Register 15 SCFG15 Read/Write 0x00000010
0x0080 Priority Register A for Slave 0 PRAS0 Read/Write 0x00000000
0x0084 Priority Register B for Slave 0 PRBS0 Read/Write 0x00000000
0x0088 Priority Register A for Slave 1 PRAS1 Read/Write 0x00000000
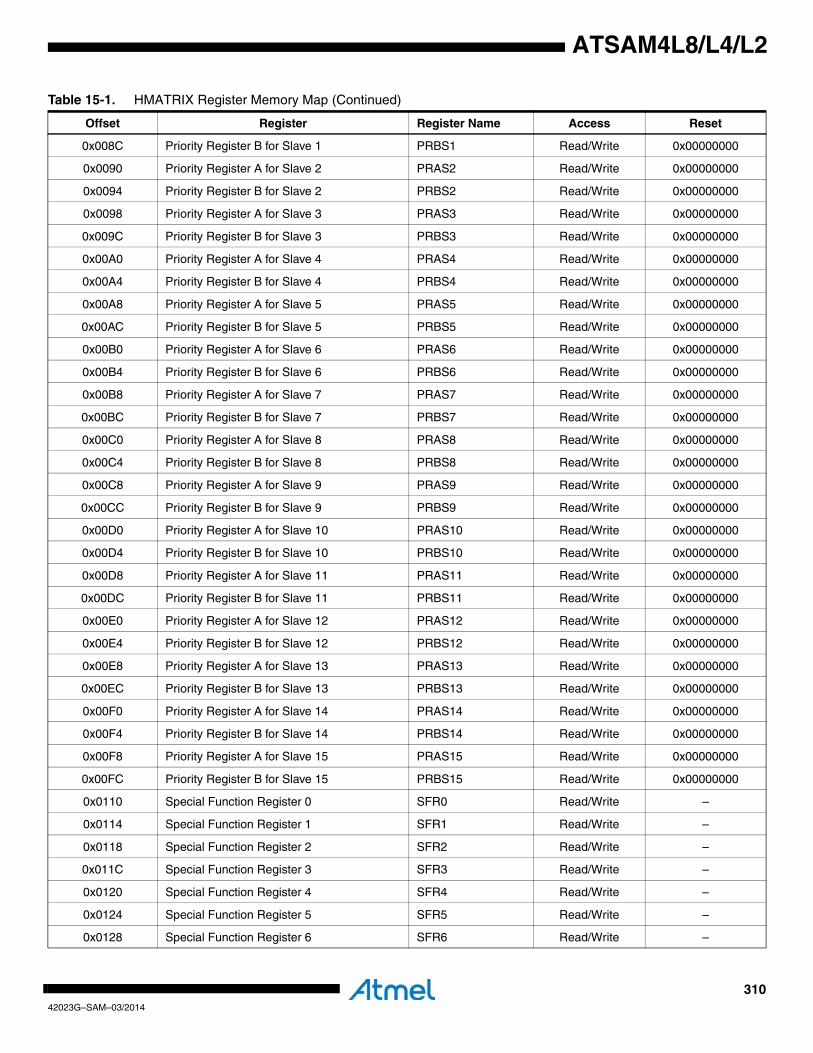
31042023G–SAM–03/2014
ATSAM4L8/L4/L2
0x008C Priority Register B for Slave 1 PRBS1 Read/Write 0x00000000
0x0090 Priority Register A for Slave 2 PRAS2 Read/Write 0x00000000
0x0094 Priority Register B for Slave 2 PRBS2 Read/Write 0x00000000
0x0098 Priority Register A for Slave 3 PRAS3 Read/Write 0x00000000
0x009C Priority Register B for Slave 3 PRBS3 Read/Write 0x00000000
0x00A0 Priority Register A for Slave 4 PRAS4 Read/Write 0x00000000
0x00A4 Priority Register B for Slave 4 PRBS4 Read/Write 0x00000000
0x00A8 Priority Register A for Slave 5 PRAS5 Read/Write 0x00000000
0x00AC Priority Register B for Slave 5 PRBS5 Read/Write 0x00000000
0x00B0 Priority Register A for Slave 6 PRAS6 Read/Write 0x00000000
0x00B4 Priority Register B for Slave 6 PRBS6 Read/Write 0x00000000
0x00B8 Priority Register A for Slave 7 PRAS7 Read/Write 0x00000000
0x00BC Priority Register B for Slave 7 PRBS7 Read/Write 0x00000000
0x00C0 Priority Register A for Slave 8 PRAS8 Read/Write 0x00000000
0x00C4 Priority Register B for Slave 8 PRBS8 Read/Write 0x00000000
0x00C8 Priority Register A for Slave 9 PRAS9 Read/Write 0x00000000
0x00CC Priority Register B for Slave 9 PRBS9 Read/Write 0x00000000
0x00D0 Priority Register A for Slave 10 PRAS10 Read/Write 0x00000000
0x00D4 Priority Register B for Slave 10 PRBS10 Read/Write 0x00000000
0x00D8 Priority Register A for Slave 11 PRAS11 Read/Write 0x00000000
0x00DC Priority Register B for Slave 11 PRBS11 Read/Write 0x00000000
0x00E0 Priority Register A for Slave 12 PRAS12 Read/Write 0x00000000
0x00E4 Priority Register B for Slave 12 PRBS12 Read/Write 0x00000000
0x00E8 Priority Register A for Slave 13 PRAS13 Read/Write 0x00000000
0x00EC Priority Register B for Slave 13 PRBS13 Read/Write 0x00000000
0x00F0 Priority Register A for Slave 14 PRAS14 Read/Write 0x00000000
0x00F4 Priority Register B for Slave 14 PRBS14 Read/Write 0x00000000
0x00F8 Priority Register A for Slave 15 PRAS15 Read/Write 0x00000000
0x00FC Priority Register B for Slave 15 PRBS15 Read/Write 0x00000000
0x0110 Special Function Register 0 SFR0 Read/Write –
0x0114 Special Function Register 1 SFR1 Read/Write –
0x0118 Special Function Register 2 SFR2 Read/Write –
0x011C Special Function Register 3 SFR3 Read/Write –
0x0120 Special Function Register 4 SFR4 Read/Write –
0x0124 Special Function Register 5 SFR5 Read/Write –
0x0128 Special Function Register 6 SFR6 Read/Write –
Table 15-1. HMATRIX Register Memory Map (Continued)
Offset Register Register Name Access Reset
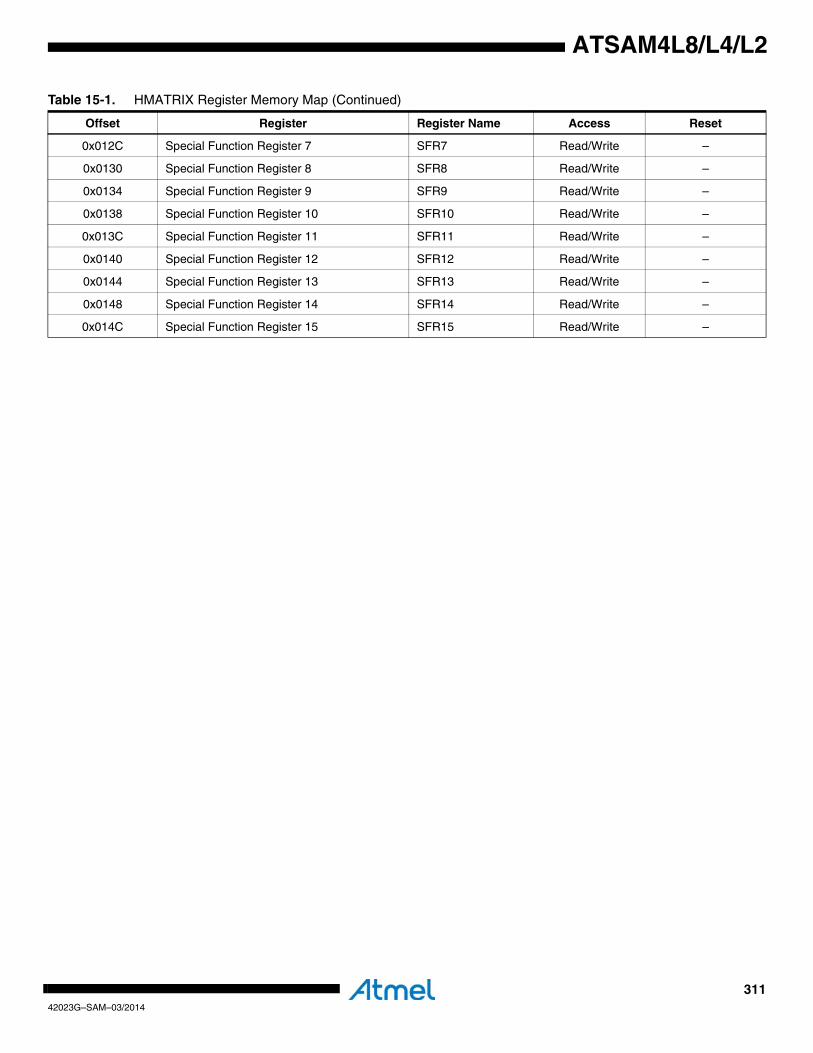
31142023G–SAM–03/2014
ATSAM4L8/L4/L2
0x012C Special Function Register 7 SFR7 Read/Write –
0x0130 Special Function Register 8 SFR8 Read/Write –
0x0134 Special Function Register 9 SFR9 Read/Write –
0x0138 Special Function Register 10 SFR10 Read/Write –
0x013C Special Function Register 11 SFR11 Read/Write –
0x0140 Special Function Register 12 SFR12 Read/Write –
0x0144 Special Function Register 13 SFR13 Read/Write –
0x0148 Special Function Register 14 SFR14 Read/Write –
0x014C Special Function Register 15 SFR15 Read/Write –
Table 15-1. HMATRIX Register Memory Map (Continued)
Offset Register Register Name Access Reset
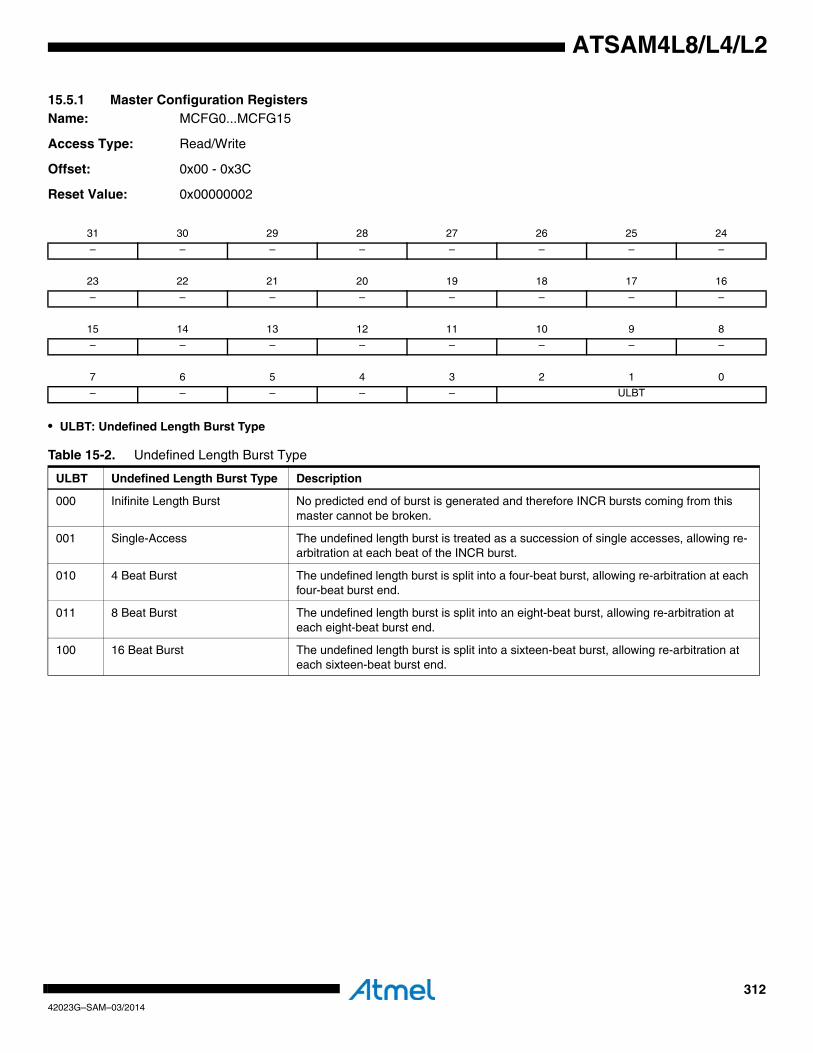
31242023G–SAM–03/2014
ATSAM4L8/L4/L2
15.5.1 Master Configuration RegistersName: MCFG0...MCFG15
Access Type: Read/Write
Offset: 0x00 - 0x3C
Reset Value: 0x00000002
• ULBT: Undefined Length Burst Type
31 30 29 28 27 26 25 24
– – – – – – – –
23 22 21 20 19 18 17 16
– – – – – – – –
15 14 13 12 11 10 9 8
– – – – – – – –
7 6 5 4 3 2 1 0
– – – – – ULBT
Table 15-2. Undefined Length Burst Type
ULBT Undefined Length Burst Type Description
000 Inifinite Length Burst No predicted end of burst is generated and therefore INCR bursts coming from this master cannot be broken.
001 Single-Access The undefined length burst is treated as a succession of single accesses, allowing re-arbitration at each beat of the INCR burst.
010 4 Beat Burst The undefined length burst is split into a four-beat burst, allowing re-arbitration at each four-beat burst end.
011 8 Beat Burst The undefined length burst is split into an eight-beat burst, allowing re-arbitration at each eight-beat burst end.
100 16 Beat Burst The undefined length burst is split into a sixteen-beat burst, allowing re-arbitration at each sixteen-beat burst end.
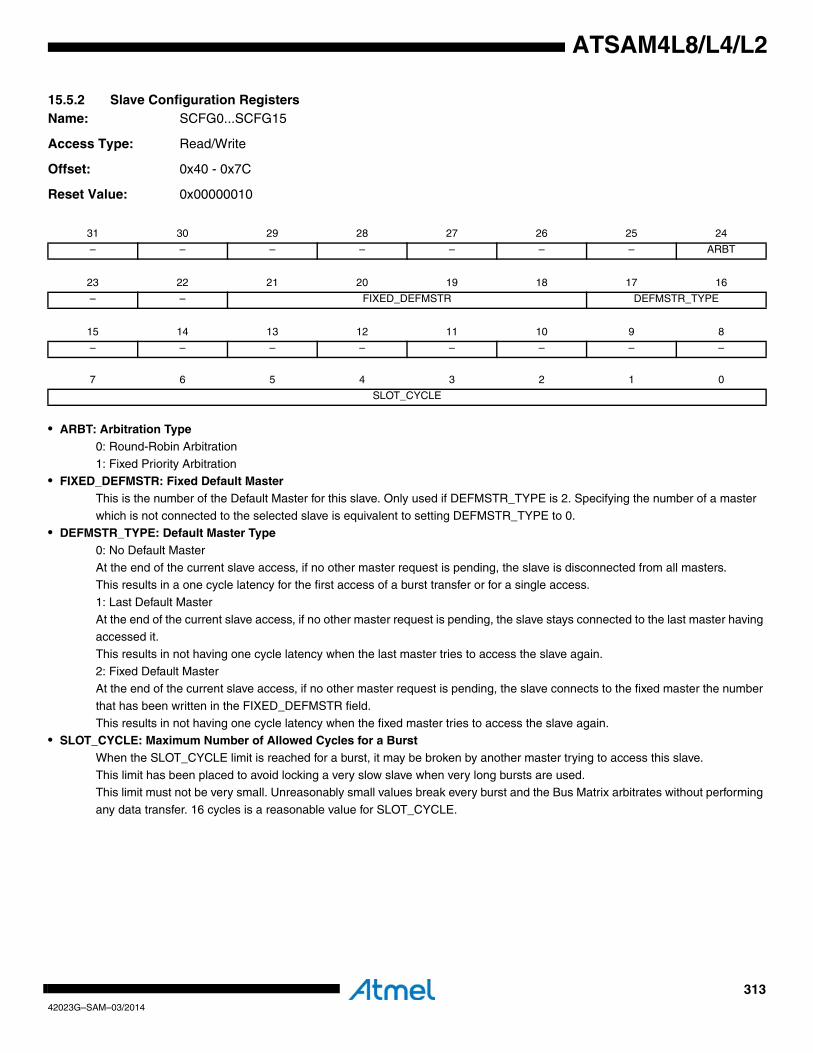
31342023G–SAM–03/2014
ATSAM4L8/L4/L2
15.5.2 Slave Configuration RegistersName: SCFG0...SCFG15
Access Type: Read/Write
Offset: 0x40 - 0x7C
Reset Value: 0x00000010
• ARBT: Arbitration Type0: Round-Robin Arbitration
1: Fixed Priority Arbitration• FIXED_DEFMSTR: Fixed Default Master
This is the number of the Default Master for this slave. Only used if DEFMSTR_TYPE is 2. Specifying the number of a master
which is not connected to the selected slave is equivalent to setting DEFMSTR_TYPE to 0.• DEFMSTR_TYPE: Default Master Type
0: No Default Master
At the end of the current slave access, if no other master request is pending, the slave is disconnected from all masters.This results in a one cycle latency for the first access of a burst transfer or for a single access.
1: Last Default Master
At the end of the current slave access, if no other master request is pending, the slave stays connected to the last master having accessed it.
This results in not having one cycle latency when the last master tries to access the slave again.
2: Fixed Default MasterAt the end of the current slave access, if no other master request is pending, the slave connects to the fixed master the number
that has been written in the FIXED_DEFMSTR field.
This results in not having one cycle latency when the fixed master tries to access the slave again.• SLOT_CYCLE: Maximum Number of Allowed Cycles for a Burst
When the SLOT_CYCLE limit is reached for a burst, it may be broken by another master trying to access this slave.
This limit has been placed to avoid locking a very slow slave when very long bursts are used.This limit must not be very small. Unreasonably small values break every burst and the Bus Matrix arbitrates without performing
any data transfer. 16 cycles is a reasonable value for SLOT_CYCLE.
31 30 29 28 27 26 25 24
– – – – – – – ARBT
23 22 21 20 19 18 17 16
– – FIXED_DEFMSTR DEFMSTR_TYPE
15 14 13 12 11 10 9 8
– – – – – – – –
7 6 5 4 3 2 1 0
SLOT_CYCLE
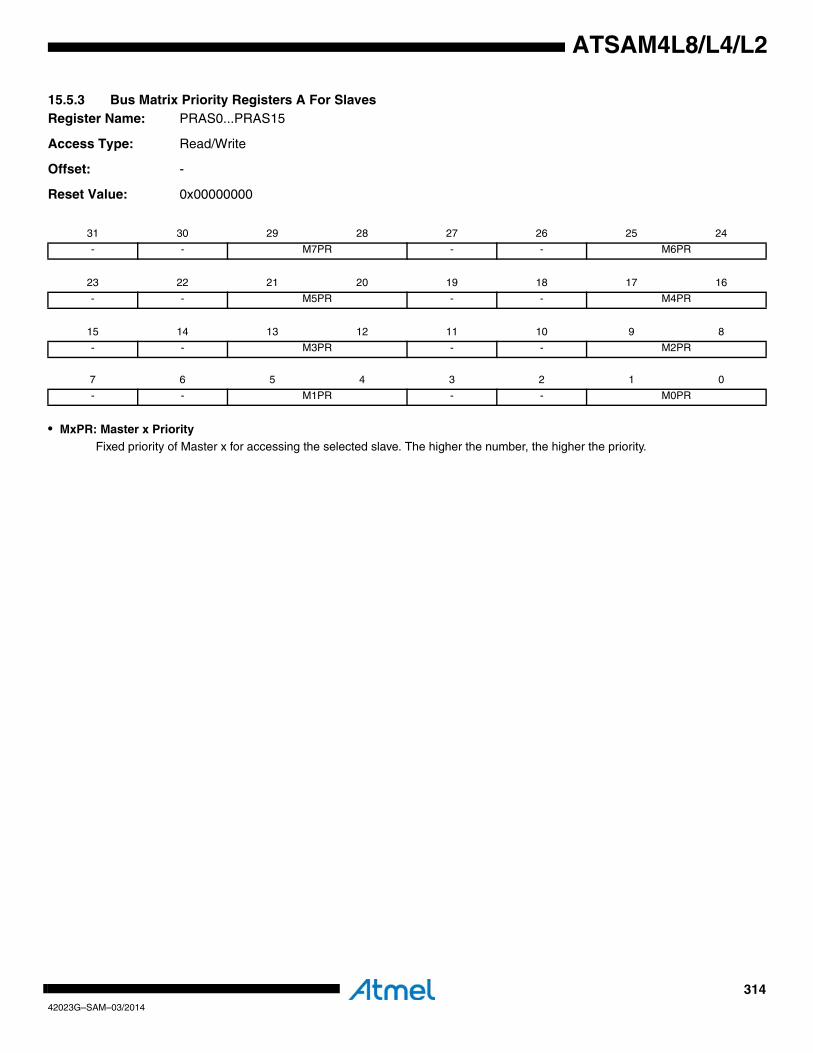
31442023G–SAM–03/2014
ATSAM4L8/L4/L2
15.5.3 Bus Matrix Priority Registers A For SlavesRegister Name: PRAS0...PRAS15
Access Type: Read/Write
Offset: -
Reset Value: 0x00000000
• MxPR: Master x PriorityFixed priority of Master x for accessing the selected slave. The higher the number, the higher the priority.
31 30 29 28 27 26 25 24
- - M7PR - - M6PR
23 22 21 20 19 18 17 16
- - M5PR - - M4PR
15 14 13 12 11 10 9 8
- - M3PR - - M2PR
7 6 5 4 3 2 1 0
- - M1PR - - M0PR
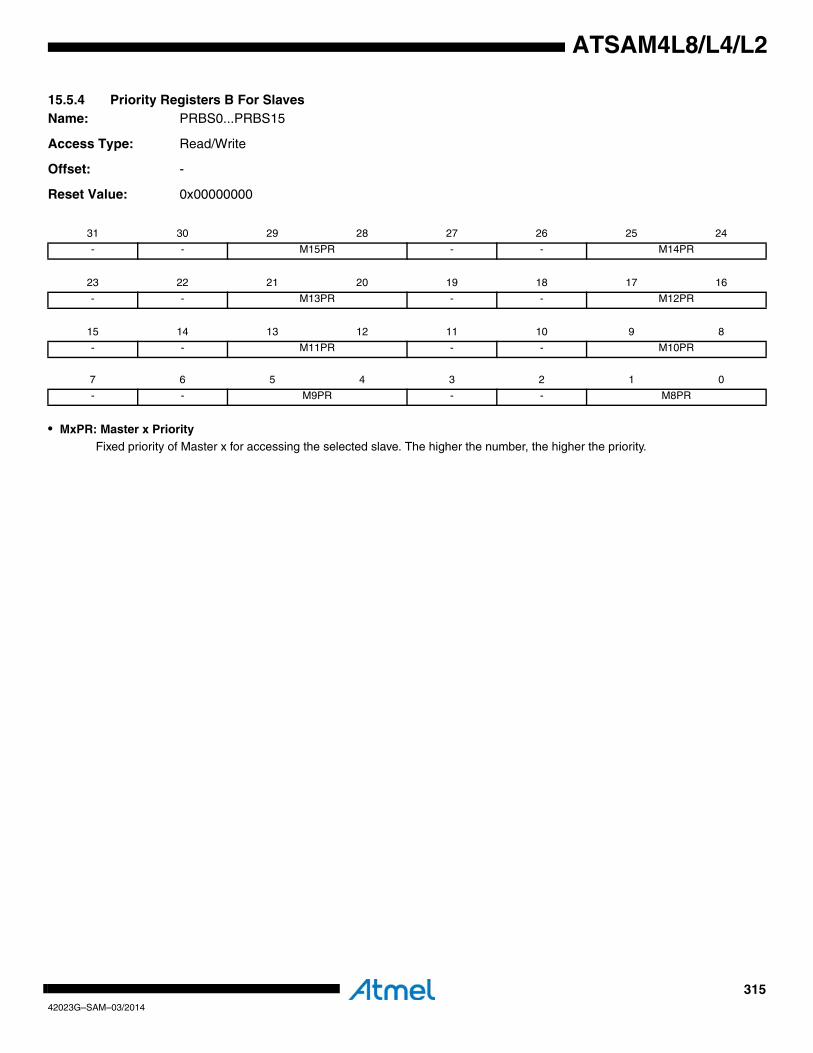
31542023G–SAM–03/2014
ATSAM4L8/L4/L2
15.5.4 Priority Registers B For SlavesName: PRBS0...PRBS15
Access Type: Read/Write
Offset: -
Reset Value: 0x00000000
• MxPR: Master x PriorityFixed priority of Master x for accessing the selected slave. The higher the number, the higher the priority.
31 30 29 28 27 26 25 24
- - M15PR - - M14PR
23 22 21 20 19 18 17 16
- - M13PR - - M12PR
15 14 13 12 11 10 9 8
- - M11PR - - M10PR
7 6 5 4 3 2 1 0
- - M9PR - - M8PR
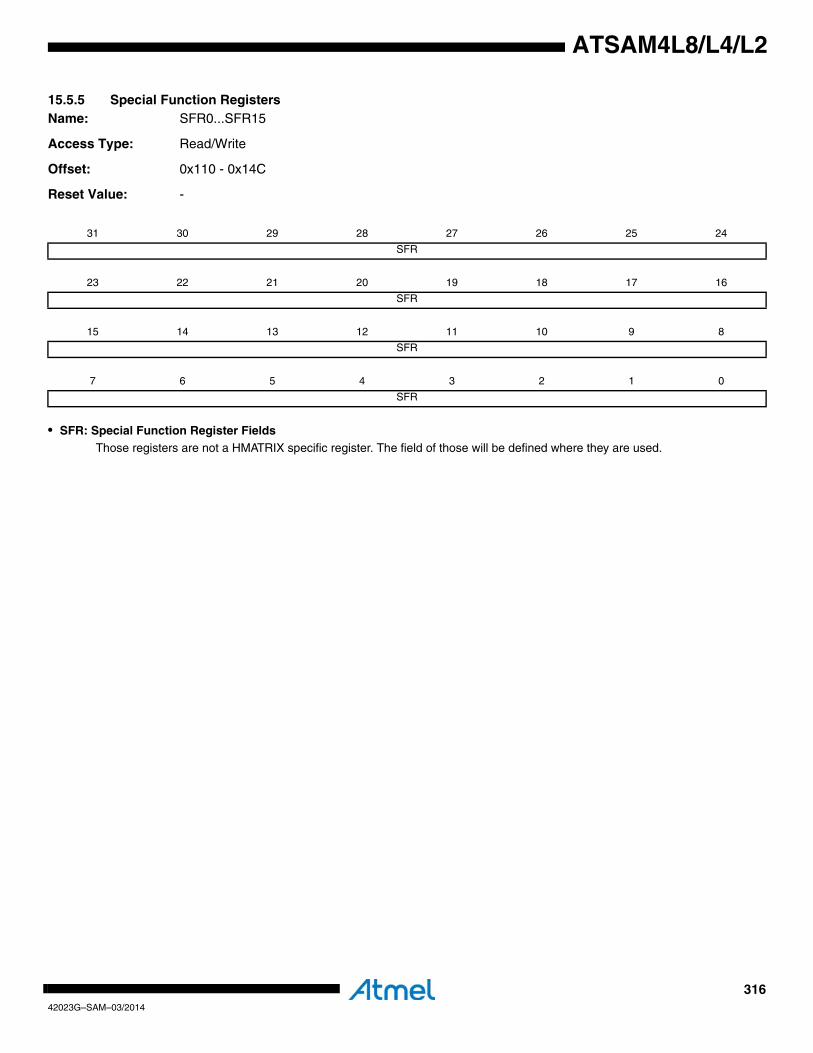
31642023G–SAM–03/2014
ATSAM4L8/L4/L2
15.5.5 Special Function RegistersName: SFR0...SFR15
Access Type: Read/Write
Offset: 0x110 - 0x14C
Reset Value: -
• SFR: Special Function Register FieldsThose registers are not a HMATRIX specific register. The field of those will be defined where they are used.
31 30 29 28 27 26 25 24
SFR
23 22 21 20 19 18 17 16
SFR
15 14 13 12 11 10 9 8
SFR
7 6 5 4 3 2 1 0
SFR
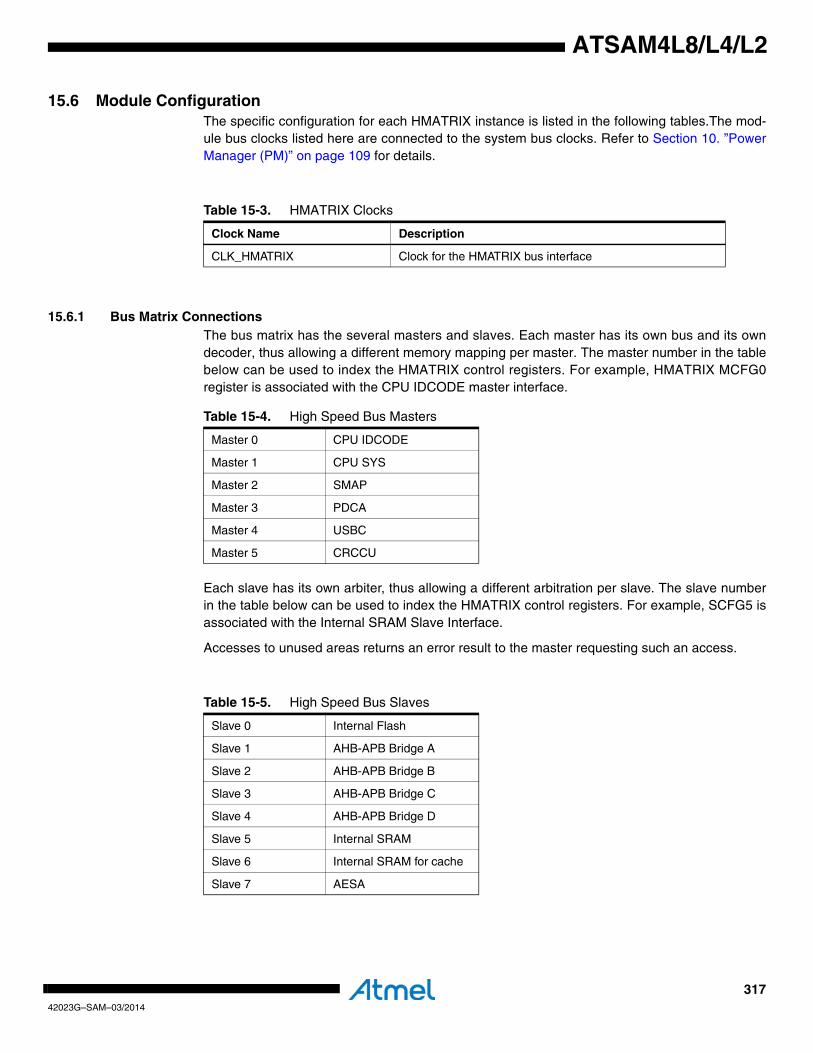
31742023G–SAM–03/2014
ATSAM4L8/L4/L2
15.6 Module ConfigurationThe specific configuration for each HMATRIX instance is listed in the following tables.The mod-ule bus clocks listed here are connected to the system bus clocks. Refer to Section 10. ”PowerManager (PM)” on page 109 for details.
15.6.1 Bus Matrix ConnectionsThe bus matrix has the several masters and slaves. Each master has its own bus and its owndecoder, thus allowing a different memory mapping per master. The master number in the tablebelow can be used to index the HMATRIX control registers. For example, HMATRIX MCFG0register is associated with the CPU IDCODE master interface.
Each slave has its own arbiter, thus allowing a different arbitration per slave. The slave numberin the table below can be used to index the HMATRIX control registers. For example, SCFG5 isassociated with the Internal SRAM Slave Interface.
Accesses to unused areas returns an error result to the master requesting such an access.
Table 15-3. HMATRIX Clocks
Clock Name Description
CLK_HMATRIX Clock for the HMATRIX bus interface
Table 15-4. High Speed Bus Masters
Master 0 CPU IDCODE
Master 1 CPU SYS
Master 2 SMAP
Master 3 PDCA
Master 4 USBC
Master 5 CRCCU
Table 15-5. High Speed Bus Slaves
Slave 0 Internal Flash
Slave 1 AHB-APB Bridge A
Slave 2 AHB-APB Bridge B
Slave 3 AHB-APB Bridge C
Slave 4 AHB-APB Bridge D
Slave 5 Internal SRAM
Slave 6 Internal SRAM for cache
Slave 7 AESA
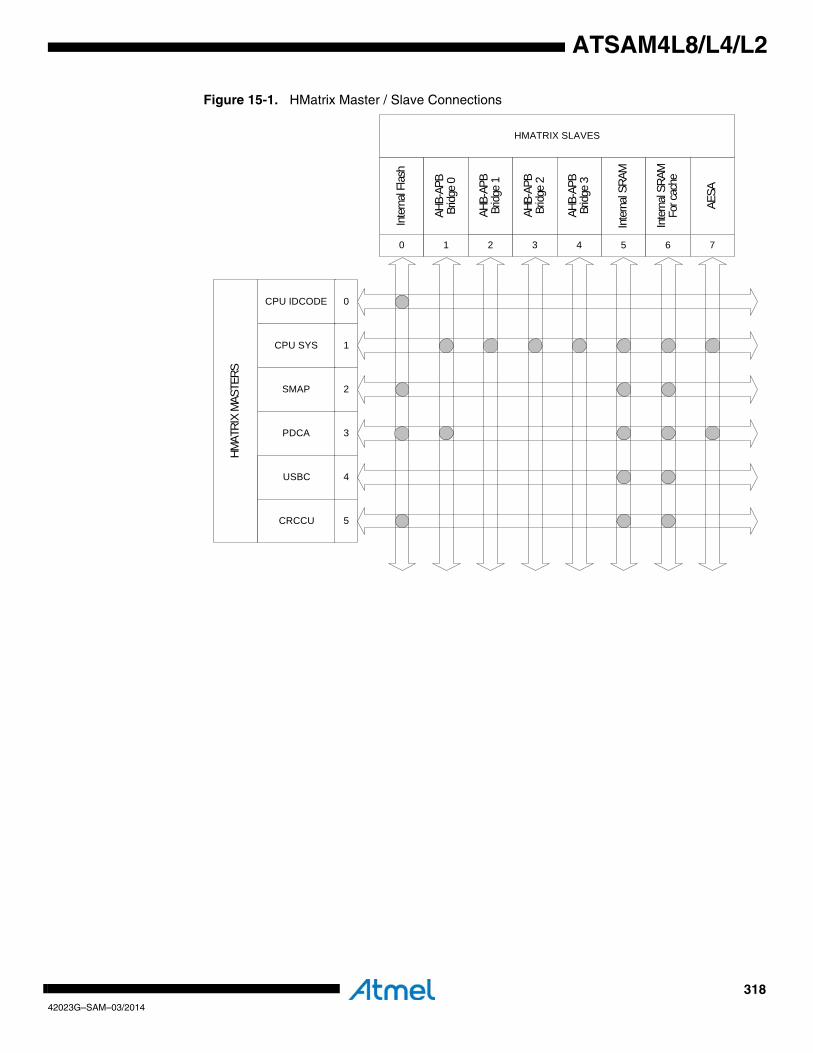
31842023G–SAM–03/2014
ATSAM4L8/L4/L2
Figure 15-1. HMatrix Master / Slave Connections
CPU IDCODE 0
CPU SYS 1
SMAP 2
PDCA 3
HMAT
RIX
MAS
TERS
USBC 4
CRCCU 5
HMATRIX SLAVES
Inte
rnal
Flas
h
0
AHB-
APB
Bridg
e 0
1 2 3 4
Inte
rnal
SRAM
5
Inte
rnal
SRAM
For c
ache
6
AESA
7
AHB-
APB
Bridg
e 1
AHB-
APB
Bridg
e 2
AHB-
APB
Bridg
e 3
31942023G–SAM–03/2014
ATSAM4L8/L4/L2
16. Peripheral DMA Controller (PDCA)Rev: 1.2.4.1
16.1 Features• Multiple channels• Generates transfers between memories and peripherals such as USART and SPI• Two address pointers/counters per channel allowing double buffering• Optional synchronizing of data transfers with extenal peripheral events• Ring buffer functionality
16.2 OverviewThe Peripheral DMA Controller (PDCA) transfers data between on-chip peripheral modules suchas USART, SPI and memories (those memories may be on- and off-chip memories). Using thePDCA avoids CPU intervention for data transfers, improving the performance of the microcon-troller. The PDCA can transfer data from memory to a peripheral or from a peripheral to memory.
The PDCA consists of multiple DMA channels. Each channel has:
• A Peripheral Select Register
• A 32-bit memory pointer
• A 16-bit transfer counter
• A 32-bit memory pointer reload value
• A 16-bit transfer counter reload value
The PDCA communicates with the peripheral modules over a set of handshake interfaces. Theperipheral signals the PDCA when it is ready to receive or transmit data. The PDCA acknowl-edges the request when the transmission has started.
When a transmit buffer is empty or a receive buffer is full, an optional interrupt request can begenerated.

32042023G–SAM–03/2014
ATSAM4L8/L4/L2
16.3 Block Diagram
Figure 16-1. PDCA Block Diagram
16.4 Product DependenciesIn order to use this module, other parts of the system must be configured correctly, as describedbelow.
16.4.1 Power ManagementIf the CPU enters a sleep mode that disables the PDCA clocks, the PDCA will stop functioningand resume operation after the system wakes up from sleep mode.
16.4.2 ClocksThe PDCA has two bus clocks connected: One High Speed Bus clock (CLK_PDCA_HSB) andone Peripheral Bus clock (CLK_PDCA_PB). These clocks are generated by the Power Man-ager. The status of both clocks at reset can be known in the Power Manager section. It isrecommended to disable the PDCA before disabling the clocks, to avoid freezing the PDCA inan undefined state.
16.4.3 InterruptsThe PDCA interrupt request lines are connected to the NVIC. Using the PDCA interruptsrequires the NVIC to be programmed first.
HSB to PBBridge
Peripheral DMA Controller(PDCA)
Peripheral0
High SpeedBus Matrix
Handshake Interfaces
Perip
hera
l Bus
IRQ
HSB
HSB
InterruptController
Peripheral1
Peripheral2
Peripheral(n-1)
...Memory
HSB
32142023G–SAM–03/2014
ATSAM4L8/L4/L2
16.4.4 Peripheral EventsThe PDCA peripheral events are connected via the Peripheral Event System. Refer to Section31. ”Peripheral Event Controller (PEVC)” on page 845 for details.
16.5 Functional Description
16.5.1 Basic OperationThe PDCA consists of multiple independent PDCA channels, each capable of handling DMArequests in parallel. Each PDCA channels contains a set of configuration registers which mustbe configured to start a DMA transfer.
In this section the steps necessary to configure one PDCA channel is outlined.
The peripheral to transfer data to or from must be configured correctly in the Peripheral SelectRegister (PSR). This is performed by writing the Peripheral Identity (PID) value for the corre-sponding peripheral to the PID field in the PSR register. The PID also encodes the transferdirection, i.e. memory to peripheral or peripheral to memory. See Section 16.5.6.
The transfer size must be written to the Transfer Size field in the Mode Register (MR.SIZE). Thesize must match the data size produced or consumed by the selected peripheral. See Section16.5.7.
The memory address to transfer to or from, depending on the PSR, must be written to the Mem-ory Address Register (MAR). For each transfer the memory address is increased by either aone, two or four, depending on the size set in MR. See Section 16.5.2.
The number of data items to transfer is written to the TCR register. If the PDCA channel isenabled, a transfer will start immediately after writing a non-zero value to TCR or the reload ver-sion of TCR, TCRR. After each transfer the TCR value is decreased by one. Both MAR and TCRcan be read while the PDCA channel is active to monitor the DMA progress. See Section 16.5.3.
The channel must be enabled for a transfer to start. A channel is enable by writing a one to theEN bit in the Control Register (CR).
16.5.2 Memory PointerEach channel has a 32-bit Memory Address Register (MAR). This register holds the memoryaddress for the next transfer to be performed. The register is automatically updated after eachtransfer. The address will be increased by either one, two or four depending on the size of theDMA transfer (byte, halfword or word). The MAR can be read at any time during transfer.
16.5.3 Transfer CounterEach channel has a 16-bit Transfer Counter Register (TCR). This register must be written withthe number of transfers to be performed. The TCR register should contain the number of dataitems to be transferred independently of the transfer size. The TCR can be read at any time dur-ing transfer to see the number of remaining transfers.
16.5.4 Reload RegistersBoth the MAR and the TCR have a reload register, respectively Memory Address Reload Regis-ter (MARR) and Transfer Counter Reload Register (TCRR). These registers provide thepossibility for the PDCA to work on two memory buffers for each channel. When one buffer hascompleted, MAR and TCR will be reloaded with the values in MARR and TCRR. The reload logicis always enabled and will trigger if the TCR reaches zero while TCRR holds a non-zero value.After reload, the MARR and TCRR registers are cleared.
32242023G–SAM–03/2014
ATSAM4L8/L4/L2
If TCR is zero when writing to TCRR, the TCR and MAR are automatically updated with thevalue written in TCRR and MARR.
16.5.5 Ring BufferWhen Ring Buffer mode is enabled the TCRR and MARR registers will not be cleared whenTCR and MAR registers reload. This allows the PDCA to read or write to the same memoryregion over and over again until the transfer is actively stopped by the user. Ring Buffer mode isenabled by writing a one to the Ring Buffer bit in the Mode Register (MR.RING).
16.5.6 Peripheral SelectionThe Peripheral Select Register (PSR) decides which peripheral should be connected to thePDCA channel. A peripheral is selected by writing the corresponding Peripheral Identity (PID) tothe PID field in the PSR register. Writing the PID will both select the direction of the transfer(memory to peripheral or peripheral to memory), which handshake interface to use, and theaddress of the peripheral holding register. Refer to the Peripheral Identity (PID) table in the Mod-ule Configuration section for the peripheral PID values.
16.5.7 Transfer SizeThe transfer size can be set individually for each channel to be either byte, halfword or word (8-bit, 16-bit or 32-bit respectively). Transfer size is set by writing the desired value to the TransferSize field in the Mode Register (MR.SIZE).
When the PDCA moves data between peripherals and memory, data is automatically sized andaligned. When memory is accessed, the size specified in MR.SIZE and system alignment isused. When a peripheral register is accessed the data to be transferred is converted to a wordwhere bit n in the data corresponds to bit n in the peripheral register. If the transfer size is byte orhalfword, bits greater than 8 and16 respectively are set to zero.
Refer to the Module Configuration section for information regarding what peripheral registers areused for the different peripherals and then to the peripheral specific chapter for informationabout the size option available for the different registers.
16.5.8 Enabling and DisablingEach DMA channel is enabled by writing a one to the Transfer Enable bit in the Control Register(CR.TEN) and disabled by writing a one to the Transfer Disable bit (CR.TDIS). The current sta-tus can be read from the Status Register (SR).
While the PDCA channel is enabled all DMA request will be handled as long the TCR and TCRRis not zero.
16.5.9 InterruptsInterrupts can be enabled by writing a one to the corresponding bit in the Interrupt Enable Regis-ter (IER) and disabled by writing a one to the corresponding bit in the Interrupt Disable Register(IDR). The Interrupt Mask Register (IMR) can be read to see whether an interrupt is enabled ornot. The current status of an interrupt source can be read through the Interrupt Status Register(ISR).
The PDCA has three interrupt sources:
• Reload Counter Zero - The TCRR register is zero.
• Transfer Finished - Both the TCR and TCRR registers are zero.
• Transfer Error - An error has occurred in accessing memory.
32342023G–SAM–03/2014
ATSAM4L8/L4/L2
16.5.10 PriorityIf more than one PDCA channel is requesting transfer at a given time, the PDCA channels areprioritized by their channel number. Channels with lower numbers have priority over channelswith higher numbers, giving channel zero the highest priority.
16.5.11 Error HandlingIf the Memory Address Register (MAR) is set to point to an invalid location in memory, an errorwill occur when the PDCA tries to perform a transfer. When an error occurs, the Transfer Errorbit in the Interrupt Status Register (ISR.TERR) will be set and the DMA channel that caused theerror will be stopped. In order to restart the channel, the user must program the MemoryAddress Register to a valid address and then write a one to the Error Clear bit in the ControlRegister (CR.ECLR). If the Transfer Error interrupt is enabled, an interrupt request will be gener-ated when a transfer error occurs.
16.5.12 Peripheral Event TriggerPeripheral events can be used to trigger PDCA channel transfers. Peripheral Event synchroniza-tions are enabled by writing a one to the Event Trigger bit in the Mode Register (MR.ETRIG).When set, all DMA requests will be blocked until a peripheral event is received. For each periph-eral event received, only one data item is transferred. If no DMA requests are pending when aperipheral event is received, the PDCA will start a transfer as soon as a peripheral event isdetected. If multiple events are received while the PDCA channel is busy transferring data, anoverflow condition will be signaled in the Peripheral Event System. Refer to Section 31. ”Periph-eral Event Controller (PEVC)” on page 845 for more information.
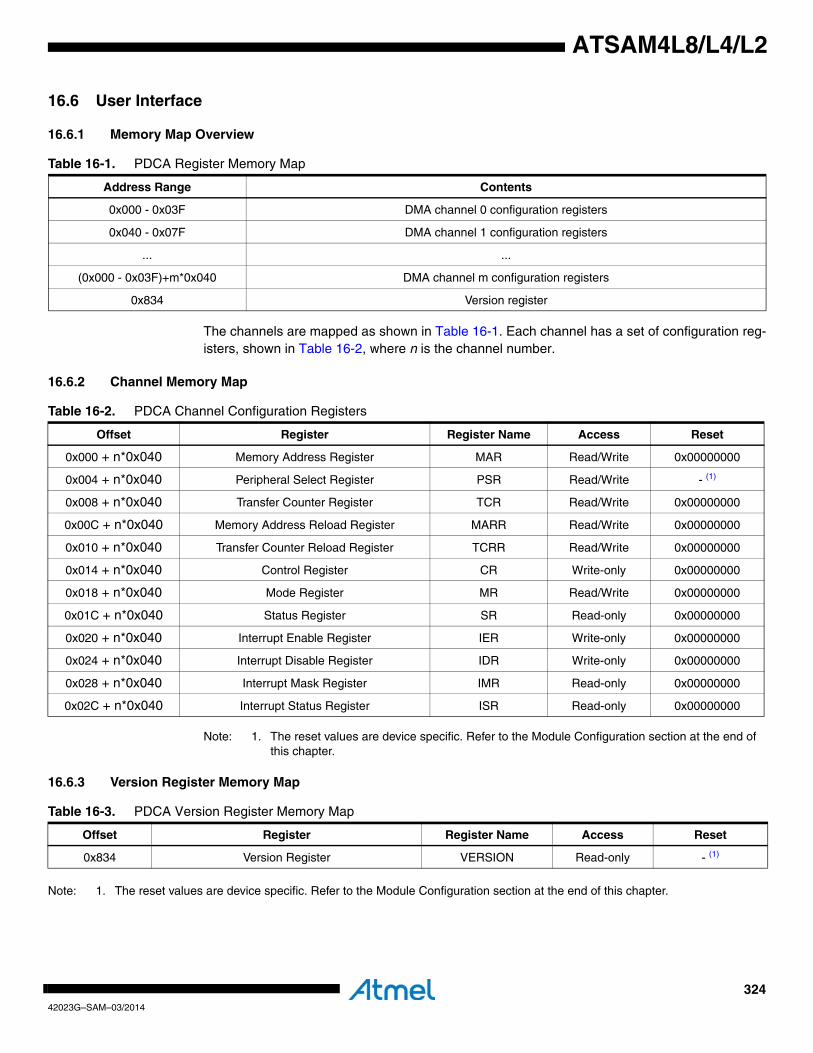
32442023G–SAM–03/2014
ATSAM4L8/L4/L2
16.6 User Interface
16.6.1 Memory Map Overview
The channels are mapped as shown in Table 16-1. Each channel has a set of configuration reg-isters, shown in Table 16-2, where n is the channel number.
16.6.2 Channel Memory Map
Note: 1. The reset values are device specific. Refer to the Module Configuration section at the end of this chapter.
16.6.3 Version Register Memory Map
Note: 1. The reset values are device specific. Refer to the Module Configuration section at the end of this chapter.
Table 16-1. PDCA Register Memory Map
Address Range Contents
0x000 - 0x03F DMA channel 0 configuration registers
0x040 - 0x07F DMA channel 1 configuration registers
... ...
(0x000 - 0x03F)+m*0x040 DMA channel m configuration registers
0x834 Version register
Table 16-2. PDCA Channel Configuration Registers
Offset Register Register Name Access Reset
0x000 + n*0x040 Memory Address Register MAR Read/Write 0x00000000
0x004 + n*0x040 Peripheral Select Register PSR Read/Write - (1)
0x008 + n*0x040 Transfer Counter Register TCR Read/Write 0x00000000
0x00C + n*0x040 Memory Address Reload Register MARR Read/Write 0x00000000
0x010 + n*0x040 Transfer Counter Reload Register TCRR Read/Write 0x00000000
0x014 + n*0x040 Control Register CR Write-only 0x00000000
0x018 + n*0x040 Mode Register MR Read/Write 0x00000000
0x01C + n*0x040 Status Register SR Read-only 0x00000000
0x020 + n*0x040 Interrupt Enable Register IER Write-only 0x00000000
0x024 + n*0x040 Interrupt Disable Register IDR Write-only 0x00000000
0x028 + n*0x040 Interrupt Mask Register IMR Read-only 0x00000000
0x02C + n*0x040 Interrupt Status Register ISR Read-only 0x00000000
Table 16-3. PDCA Version Register Memory Map
Offset Register Register Name Access Reset
0x834 Version Register VERSION Read-only - (1)
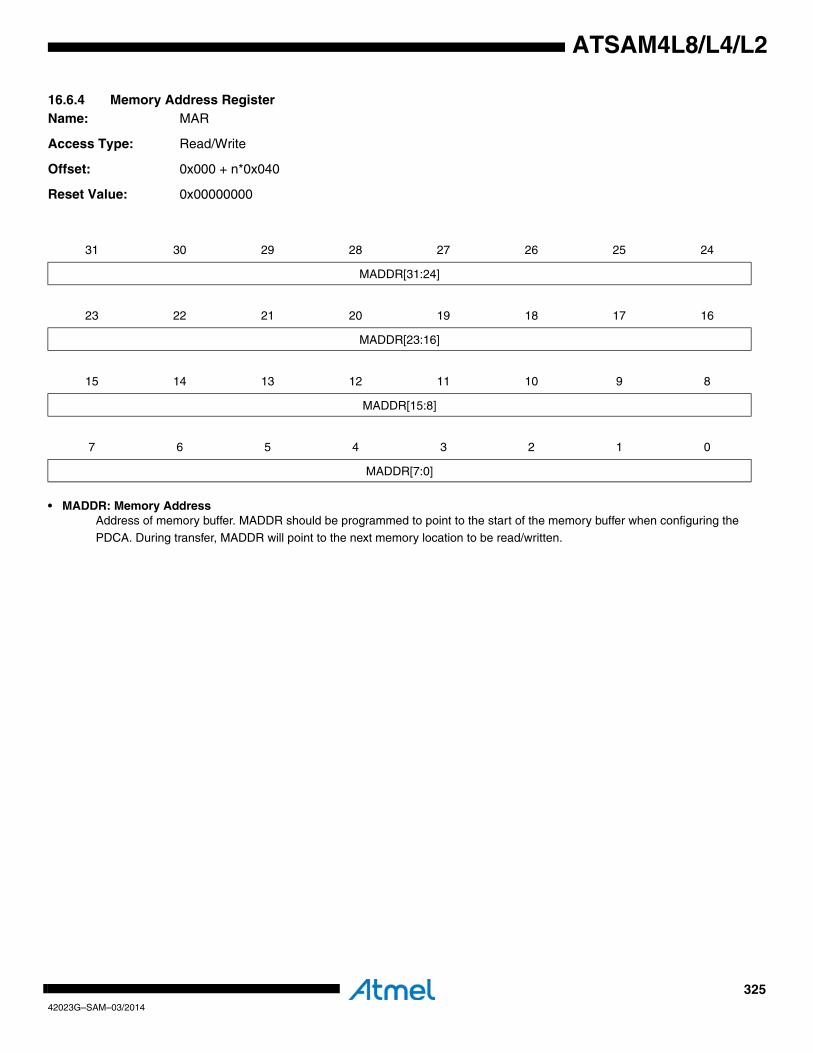
32542023G–SAM–03/2014
ATSAM4L8/L4/L2
16.6.4 Memory Address RegisterName: MAR
Access Type: Read/Write
Offset: 0x000 + n*0x040
Reset Value: 0x00000000
• MADDR: Memory AddressAddress of memory buffer. MADDR should be programmed to point to the start of the memory buffer when configuring the PDCA. During transfer, MADDR will point to the next memory location to be read/written.
31 30 29 28 27 26 25 24
MADDR[31:24]
23 22 21 20 19 18 17 16
MADDR[23:16]
15 14 13 12 11 10 9 8
MADDR[15:8]
7 6 5 4 3 2 1 0
MADDR[7:0]

32642023G–SAM–03/2014
ATSAM4L8/L4/L2
16.6.5 Peripheral Select RegisterName: PSR
Access Type: Read/Write
Offset: 0x004 + n*0x040
Reset Value: -
• PID: Peripheral IdentifierThe Peripheral Identifier selects which peripheral should be connected to the DMA channel. Writing a PID will select both which handshake interface to use, the direction of the transfer and also the address of the Receive/Transfer Holding Register for the
peripheral. See the Module Configuration section of PDCA for details. The width of the PID field is device specific and
dependent on the number of peripheral modules in the device.
31 30 29 28 27 26 25 24
- - - - - - - -
23 22 21 20 19 18 17 16
- - - - - - - -
15 14 13 12 11 10 9 8
- - - - - - - -
7 6 5 4 3 2 1 0
PID
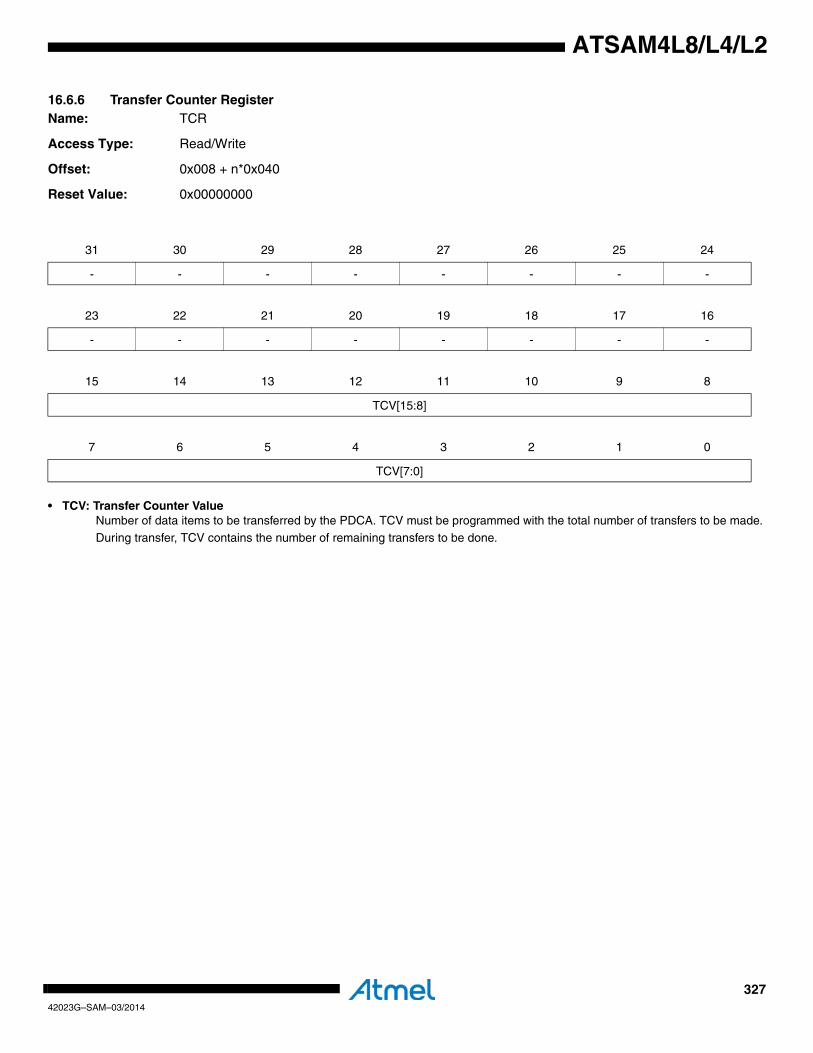
32742023G–SAM–03/2014
ATSAM4L8/L4/L2
16.6.6 Transfer Counter RegisterName: TCR
Access Type: Read/Write
Offset: 0x008 + n*0x040
Reset Value: 0x00000000
• TCV: Transfer Counter ValueNumber of data items to be transferred by the PDCA. TCV must be programmed with the total number of transfers to be made. During transfer, TCV contains the number of remaining transfers to be done.
31 30 29 28 27 26 25 24
- - - - - - - -
23 22 21 20 19 18 17 16
- - - - - - - -
15 14 13 12 11 10 9 8
TCV[15:8]
7 6 5 4 3 2 1 0
TCV[7:0]
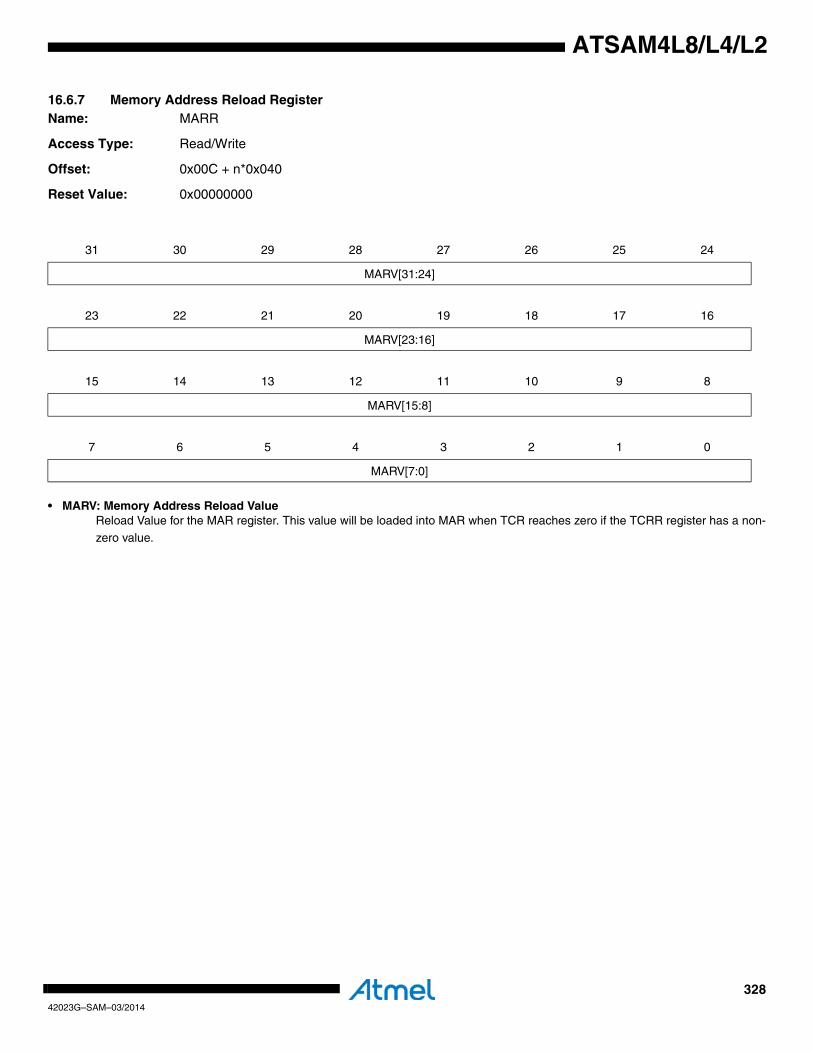
32842023G–SAM–03/2014
ATSAM4L8/L4/L2
16.6.7 Memory Address Reload RegisterName: MARR
Access Type: Read/Write
Offset: 0x00C + n*0x040
Reset Value: 0x00000000
• MARV: Memory Address Reload ValueReload Value for the MAR register. This value will be loaded into MAR when TCR reaches zero if the TCRR register has a non-zero value.
31 30 29 28 27 26 25 24
MARV[31:24]
23 22 21 20 19 18 17 16
MARV[23:16]
15 14 13 12 11 10 9 8
MARV[15:8]
7 6 5 4 3 2 1 0
MARV[7:0]
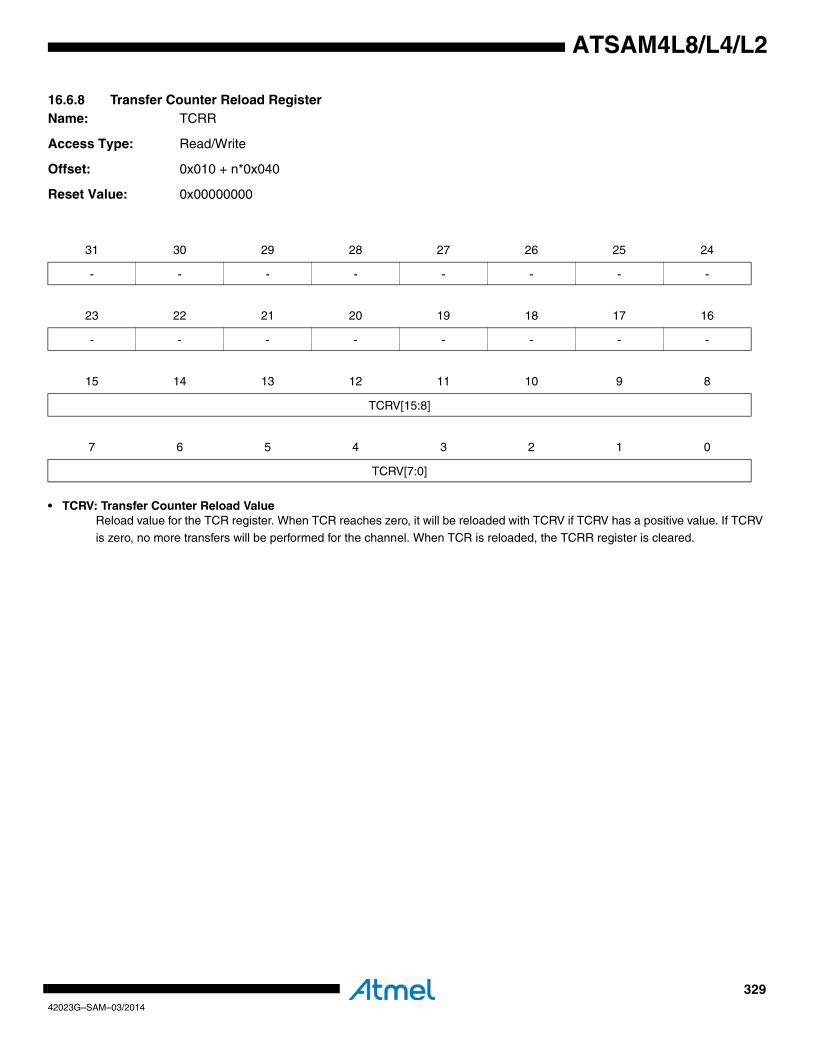
32942023G–SAM–03/2014
ATSAM4L8/L4/L2
16.6.8 Transfer Counter Reload RegisterName: TCRR
Access Type: Read/Write
Offset: 0x010 + n*0x040
Reset Value: 0x00000000
• TCRV: Transfer Counter Reload ValueReload value for the TCR register. When TCR reaches zero, it will be reloaded with TCRV if TCRV has a positive value. If TCRV is zero, no more transfers will be performed for the channel. When TCR is reloaded, the TCRR register is cleared.
31 30 29 28 27 26 25 24
- - - - - - - -
23 22 21 20 19 18 17 16
- - - - - - - -
15 14 13 12 11 10 9 8
TCRV[15:8]
7 6 5 4 3 2 1 0
TCRV[7:0]
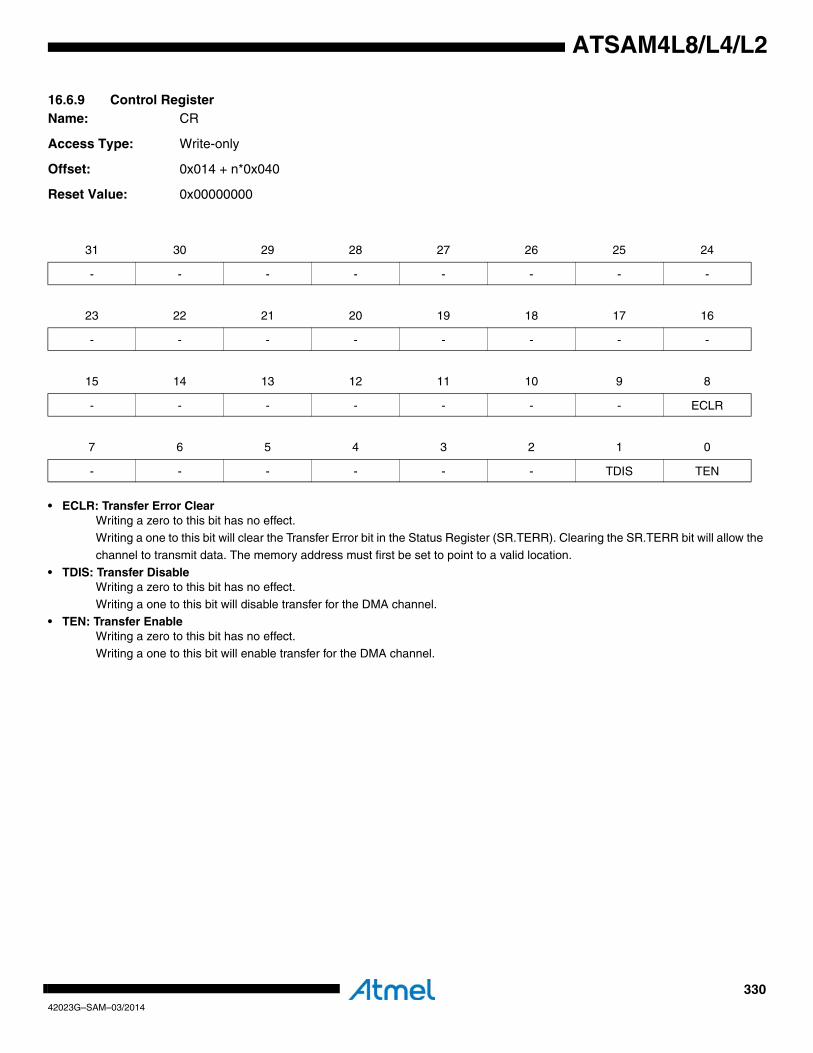
33042023G–SAM–03/2014
ATSAM4L8/L4/L2
16.6.9 Control RegisterName: CR
Access Type: Write-only
Offset: 0x014 + n*0x040
Reset Value: 0x00000000
• ECLR: Transfer Error ClearWriting a zero to this bit has no effect.Writing a one to this bit will clear the Transfer Error bit in the Status Register (SR.TERR). Clearing the SR.TERR bit will allow the
channel to transmit data. The memory address must first be set to point to a valid location.
• TDIS: Transfer DisableWriting a zero to this bit has no effect.
Writing a one to this bit will disable transfer for the DMA channel.• TEN: Transfer Enable
Writing a zero to this bit has no effect.Writing a one to this bit will enable transfer for the DMA channel.
31 30 29 28 27 26 25 24
- - - - - - - -
23 22 21 20 19 18 17 16
- - - - - - - -
15 14 13 12 11 10 9 8
- - - - - - - ECLR
7 6 5 4 3 2 1 0
- - - - - - TDIS TEN
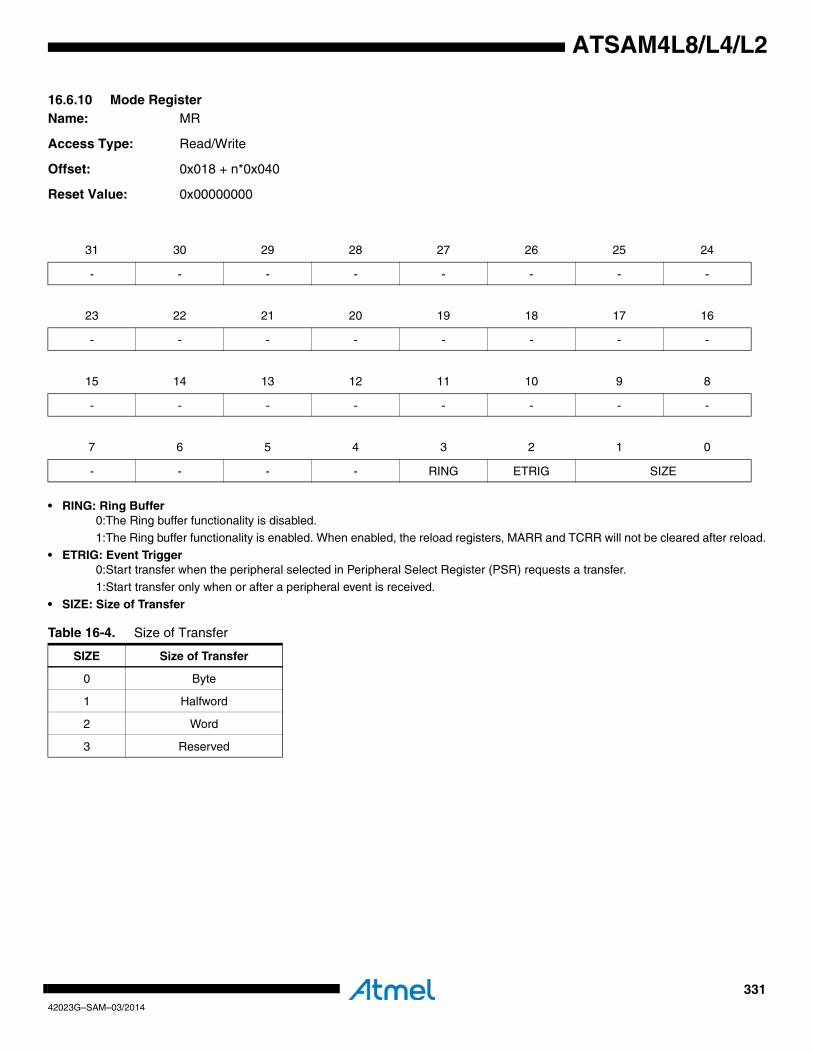
33142023G–SAM–03/2014
ATSAM4L8/L4/L2
16.6.10 Mode RegisterName: MR
Access Type: Read/Write
Offset: 0x018 + n*0x040
Reset Value: 0x00000000
• RING: Ring Buffer0:The Ring buffer functionality is disabled.1:The Ring buffer functionality is enabled. When enabled, the reload registers, MARR and TCRR will not be cleared after reload.
• ETRIG: Event Trigger0:Start transfer when the peripheral selected in Peripheral Select Register (PSR) requests a transfer.
1:Start transfer only when or after a peripheral event is received.
• SIZE: Size of Transfer
31 30 29 28 27 26 25 24
- - - - - - - -
23 22 21 20 19 18 17 16
- - - - - - - -
15 14 13 12 11 10 9 8
- - - - - - - -
7 6 5 4 3 2 1 0
- - - - RING ETRIG SIZE
Table 16-4. Size of Transfer
SIZE Size of Transfer
0 Byte
1 Halfword
2 Word
3 Reserved
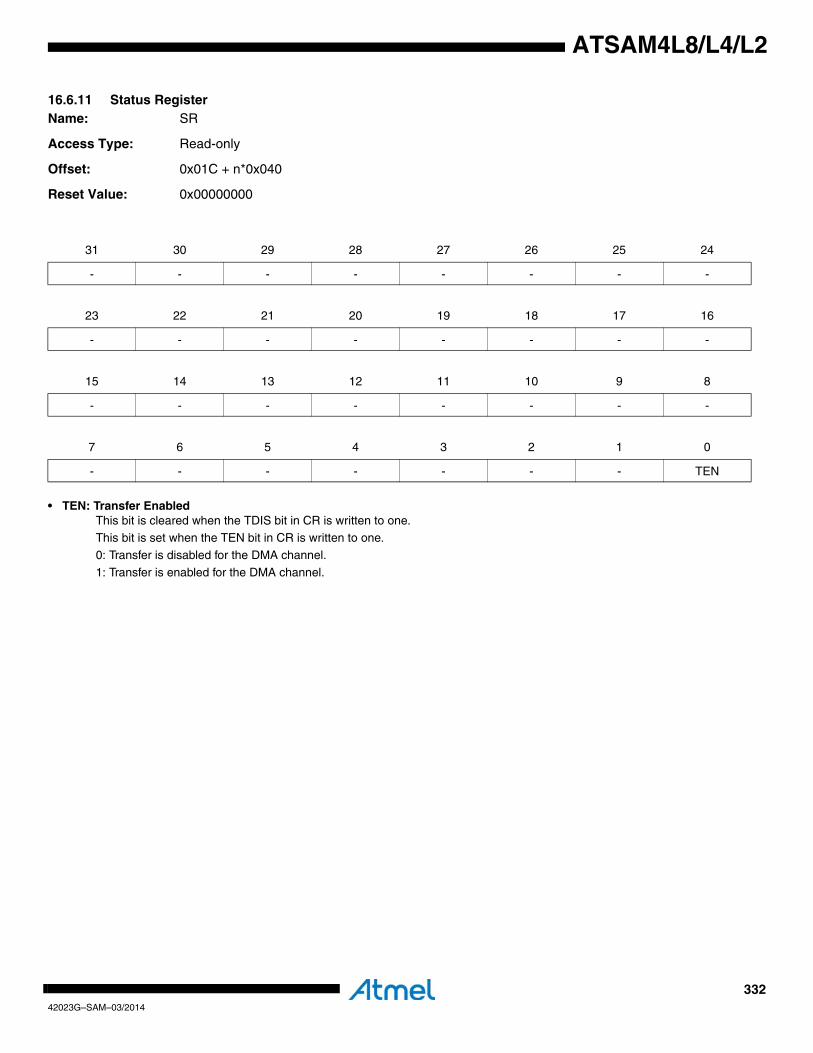
33242023G–SAM–03/2014
ATSAM4L8/L4/L2
16.6.11 Status RegisterName: SR
Access Type: Read-only
Offset: 0x01C + n*0x040
Reset Value: 0x00000000
• TEN: Transfer EnabledThis bit is cleared when the TDIS bit in CR is written to one.This bit is set when the TEN bit in CR is written to one.
0: Transfer is disabled for the DMA channel.
1: Transfer is enabled for the DMA channel.
31 30 29 28 27 26 25 24
- - - - - - - -
23 22 21 20 19 18 17 16
- - - - - - - -
15 14 13 12 11 10 9 8
- - - - - - - -
7 6 5 4 3 2 1 0
- - - - - - - TEN

33342023G–SAM–03/2014
ATSAM4L8/L4/L2
16.6.12 Interrupt Enable RegisterName: IER
Access Type: Write-only
Offset: 0x020 + n*0x040
Reset Value: 0x00000000
Writing a zero to a bit in this register has no effect.
Writing a one to a bit in this register will set the corresponding bit in IMR.
31 30 29 28 27 26 25 24
- - - - - - - -
23 22 21 20 19 18 17 16
- - - - - - - -
15 14 13 12 11 10 9 8
- - - - - - - -
7 6 5 4 3 2 1 0
- - - - - TERR TRC RCZ

33442023G–SAM–03/2014
ATSAM4L8/L4/L2
16.6.13 Interrupt Disable RegisterName: IDR
Access Type: Write-only
Offset: 0x024 + n*0x040
Reset Value: 0x00000000
Writing a zero to a bit in this register has no effect.
Writing a one to a bit in this register will clear the corresponding bit in IMR.
31 30 29 28 27 26 25 24
- - - - - - - -
23 22 21 20 19 18 17 16
- - - - - - - -
15 14 13 12 11 10 9 8
- - - - - - - -
7 6 5 4 3 2 1 0
- - - - - TERR TRC RCZ
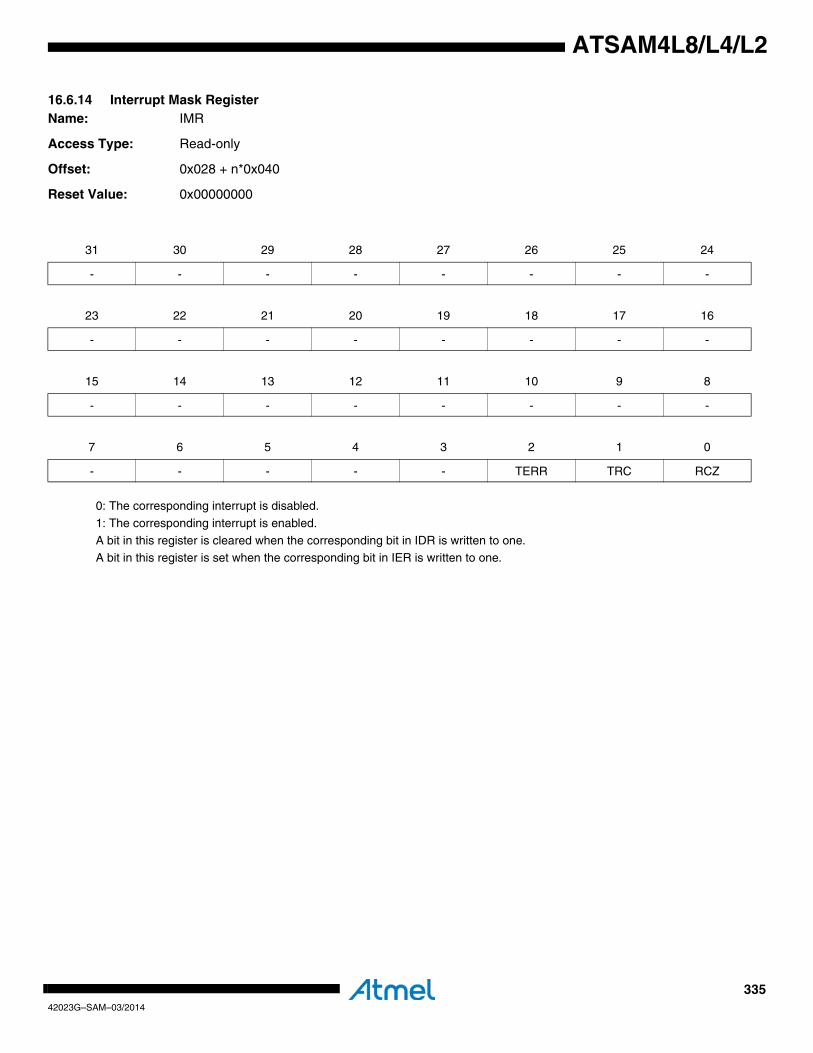
33542023G–SAM–03/2014
ATSAM4L8/L4/L2
16.6.14 Interrupt Mask RegisterName: IMR
Access Type: Read-only
Offset: 0x028 + n*0x040
Reset Value: 0x00000000
0: The corresponding interrupt is disabled.
1: The corresponding interrupt is enabled.
A bit in this register is cleared when the corresponding bit in IDR is written to one.A bit in this register is set when the corresponding bit in IER is written to one.
31 30 29 28 27 26 25 24
- - - - - - - -
23 22 21 20 19 18 17 16
- - - - - - - -
15 14 13 12 11 10 9 8
- - - - - - - -
7 6 5 4 3 2 1 0
- - - - - TERR TRC RCZ
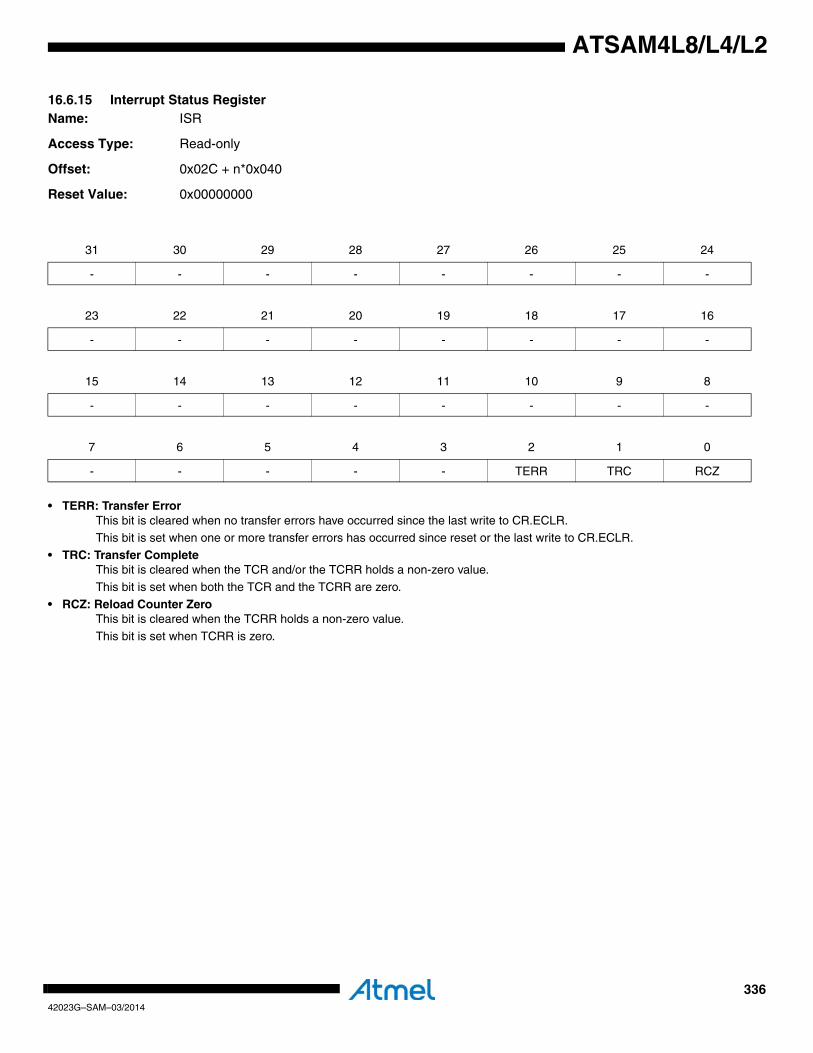
33642023G–SAM–03/2014
ATSAM4L8/L4/L2
16.6.15 Interrupt Status RegisterName: ISR
Access Type: Read-only
Offset: 0x02C + n*0x040
Reset Value: 0x00000000
• TERR: Transfer ErrorThis bit is cleared when no transfer errors have occurred since the last write to CR.ECLR.This bit is set when one or more transfer errors has occurred since reset or the last write to CR.ECLR.
• TRC: Transfer CompleteThis bit is cleared when the TCR and/or the TCRR holds a non-zero value.
This bit is set when both the TCR and the TCRR are zero.
• RCZ: Reload Counter ZeroThis bit is cleared when the TCRR holds a non-zero value.
This bit is set when TCRR is zero.
31 30 29 28 27 26 25 24
- - - - - - - -
23 22 21 20 19 18 17 16
- - - - - - - -
15 14 13 12 11 10 9 8
- - - - - - - -
7 6 5 4 3 2 1 0
- - - - - TERR TRC RCZ
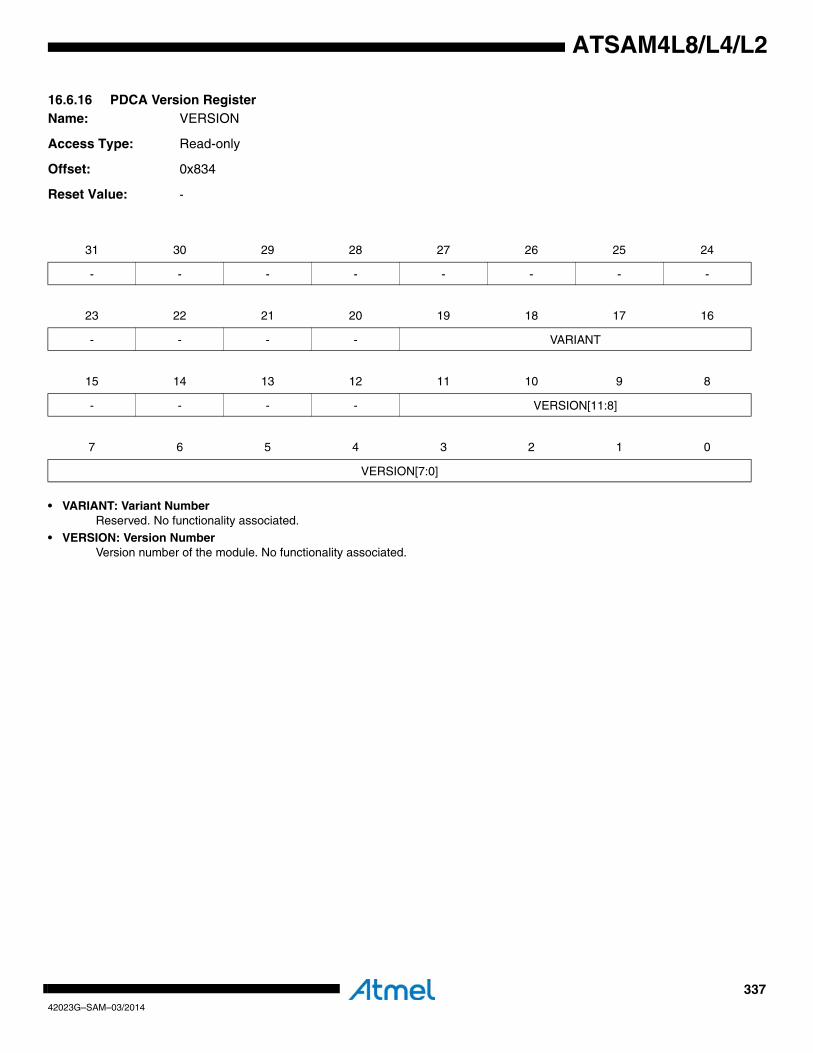
33742023G–SAM–03/2014
ATSAM4L8/L4/L2
16.6.16 PDCA Version RegisterName: VERSION
Access Type: Read-only
Offset: 0x834
Reset Value: -
• VARIANT: Variant NumberReserved. No functionality associated.
• VERSION: Version NumberVersion number of the module. No functionality associated.
31 30 29 28 27 26 25 24
- - - - - - - -
23 22 21 20 19 18 17 16
- - - - VARIANT
15 14 13 12 11 10 9 8
- - - - VERSION[11:8]
7 6 5 4 3 2 1 0
VERSION[7:0]
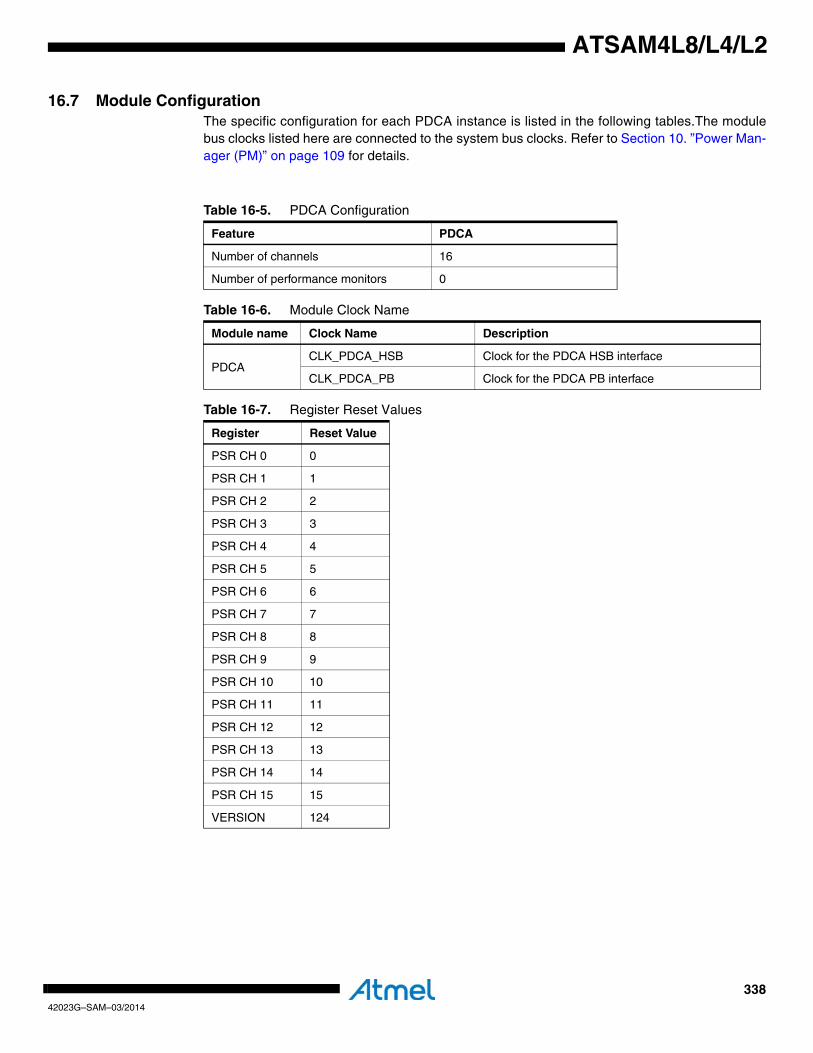
33842023G–SAM–03/2014
ATSAM4L8/L4/L2
16.7 Module ConfigurationThe specific configuration for each PDCA instance is listed in the following tables.The modulebus clocks listed here are connected to the system bus clocks. Refer to Section 10. ”Power Man-ager (PM)” on page 109 for details.
Table 16-5. PDCA Configuration
Feature PDCA
Number of channels 16
Number of performance monitors 0
Table 16-6. Module Clock Name
Module name Clock Name Description
PDCACLK_PDCA_HSB Clock for the PDCA HSB interface
CLK_PDCA_PB Clock for the PDCA PB interface
Table 16-7. Register Reset Values
Register Reset Value
PSR CH 0 0
PSR CH 1 1
PSR CH 2 2
PSR CH 3 3
PSR CH 4 4
PSR CH 5 5
PSR CH 6 6
PSR CH 7 7
PSR CH 8 8
PSR CH 9 9
PSR CH 10 10
PSR CH 11 11
PSR CH 12 12
PSR CH 13 13
PSR CH 14 14
PSR CH 15 15
VERSION 124
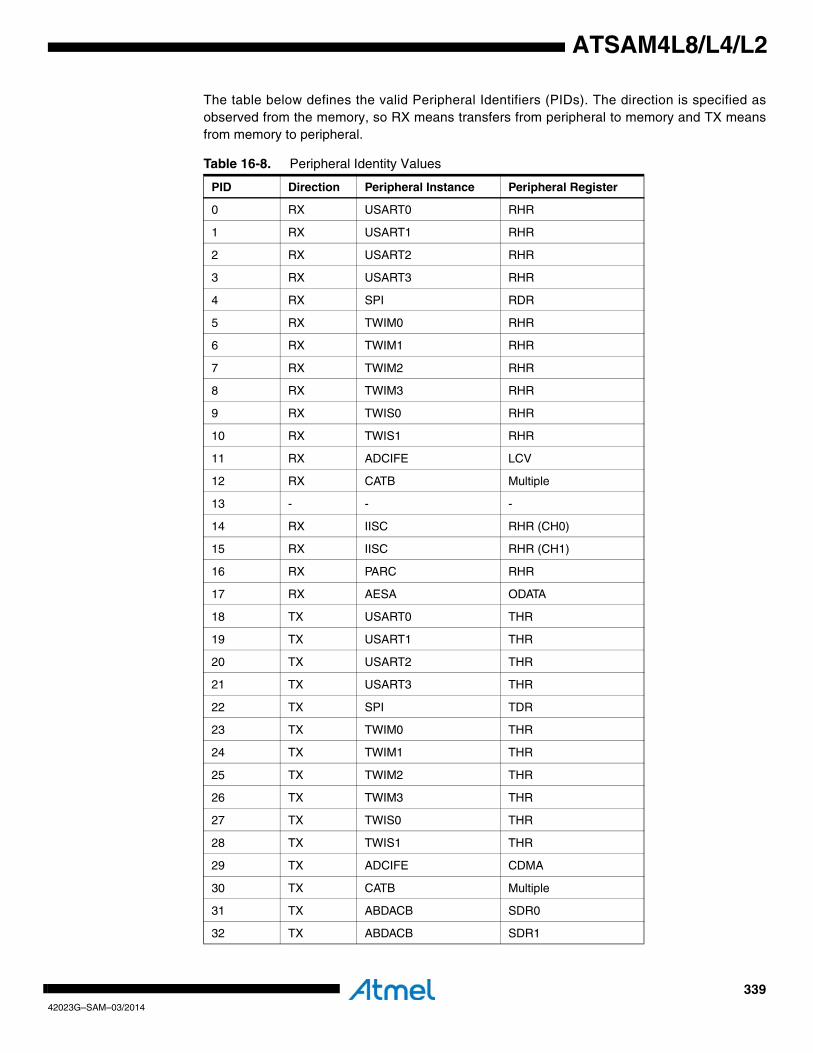
33942023G–SAM–03/2014
ATSAM4L8/L4/L2
The table below defines the valid Peripheral Identifiers (PIDs). The direction is specified asobserved from the memory, so RX means transfers from peripheral to memory and TX meansfrom memory to peripheral.
Table 16-8. Peripheral Identity Values
PID Direction Peripheral Instance Peripheral Register
0 RX USART0 RHR
1 RX USART1 RHR
2 RX USART2 RHR
3 RX USART3 RHR
4 RX SPI RDR
5 RX TWIM0 RHR
6 RX TWIM1 RHR
7 RX TWIM2 RHR
8 RX TWIM3 RHR
9 RX TWIS0 RHR
10 RX TWIS1 RHR
11 RX ADCIFE LCV
12 RX CATB Multiple
13 - - -
14 RX IISC RHR (CH0)
15 RX IISC RHR (CH1)
16 RX PARC RHR
17 RX AESA ODATA
18 TX USART0 THR
19 TX USART1 THR
20 TX USART2 THR
21 TX USART3 THR
22 TX SPI TDR
23 TX TWIM0 THR
24 TX TWIM1 THR
25 TX TWIM2 THR
26 TX TWIM3 THR
27 TX TWIS0 THR
28 TX TWIS1 THR
29 TX ADCIFE CDMA
30 TX CATB Multiple
31 TX ABDACB SDR0
32 TX ABDACB SDR1
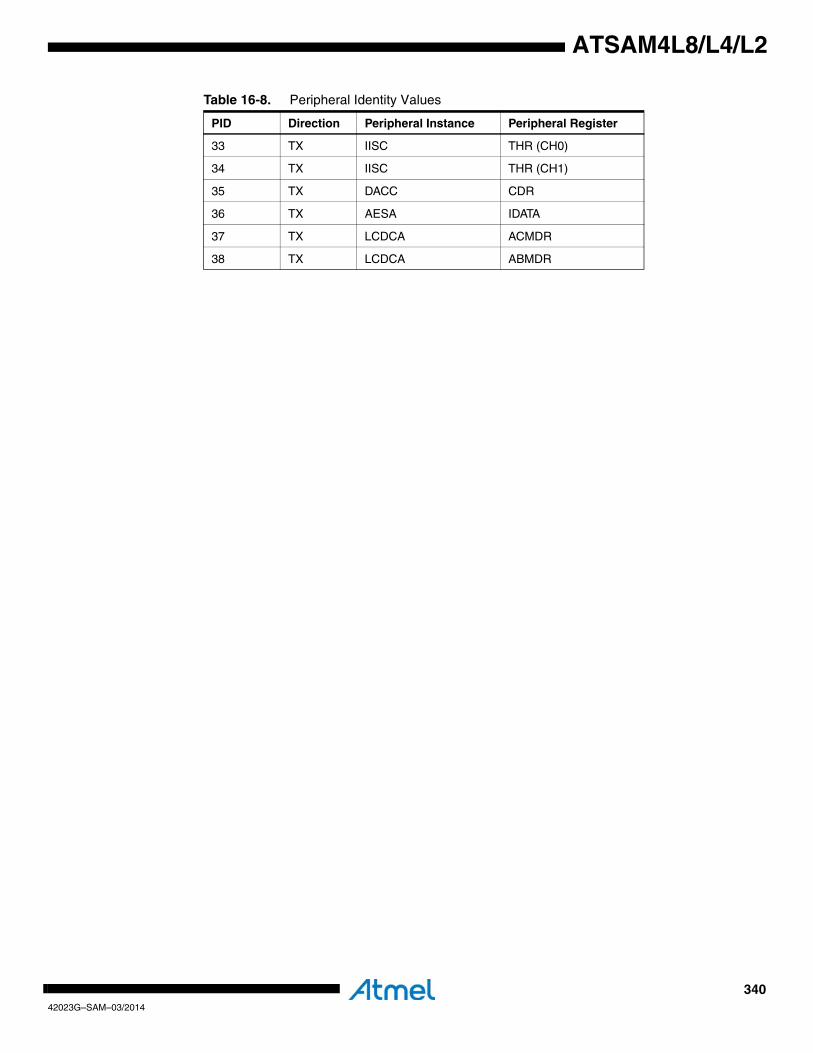
34042023G–SAM–03/2014
ATSAM4L8/L4/L2
33 TX IISC THR (CH0)
34 TX IISC THR (CH1)
35 TX DACC CDR
36 TX AESA IDATA
37 TX LCDCA ACMDR
38 TX LCDCA ABMDR
Table 16-8. Peripheral Identity Values
PID Direction Peripheral Instance Peripheral Register
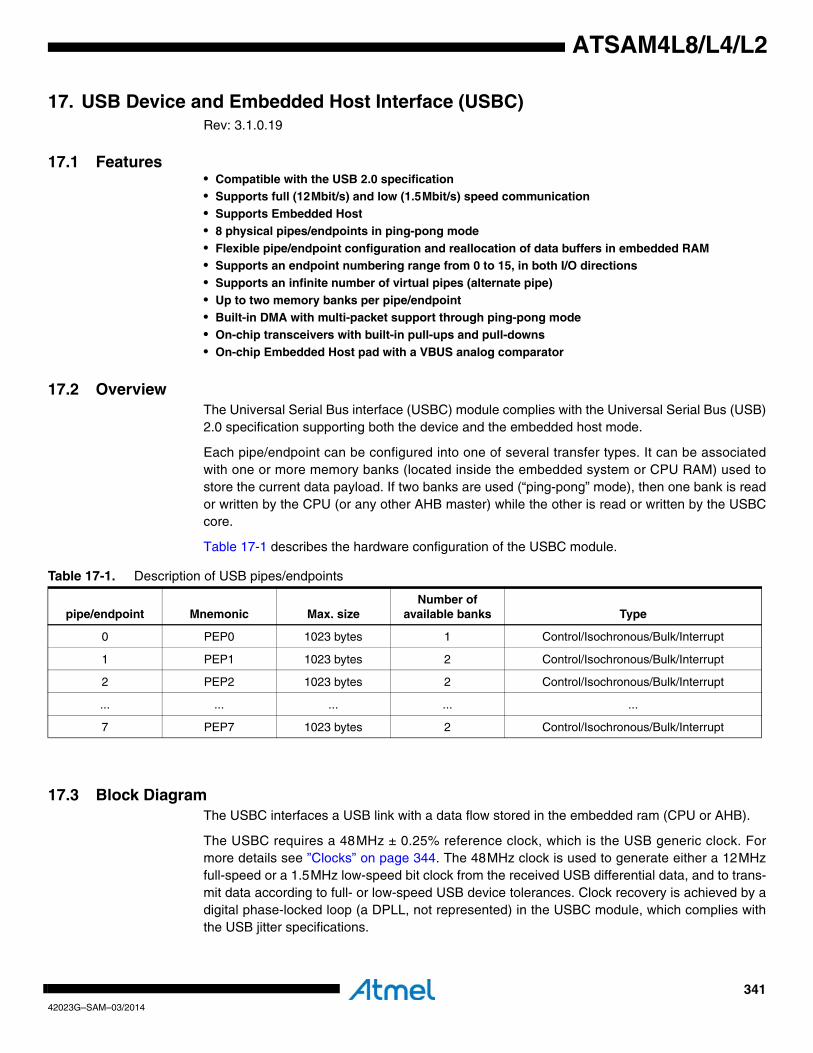
34142023G–SAM–03/2014
ATSAM4L8/L4/L2
17. USB Device and Embedded Host Interface (USBC)Rev: 3.1.0.19
17.1 Features• Compatible with the USB 2.0 specification• Supports full (12Mbit/s) and low (1.5Mbit/s) speed communication• Supports Embedded Host• 8 physical pipes/endpoints in ping-pong mode• Flexible pipe/endpoint configuration and reallocation of data buffers in embedded RAM• Supports an endpoint numbering range from 0 to 15, in both I/O directions• Supports an infinite number of virtual pipes (alternate pipe)• Up to two memory banks per pipe/endpoint• Built-in DMA with multi-packet support through ping-pong mode• On-chip transceivers with built-in pull-ups and pull-downs• On-chip Embedded Host pad with a VBUS analog comparator
17.2 OverviewThe Universal Serial Bus interface (USBC) module complies with the Universal Serial Bus (USB)2.0 specification supporting both the device and the embedded host mode.
Each pipe/endpoint can be configured into one of several transfer types. It can be associatedwith one or more memory banks (located inside the embedded system or CPU RAM) used tostore the current data payload. If two banks are used (“ping-pong” mode), then one bank is reador written by the CPU (or any other AHB master) while the other is read or written by the USBCcore.
Table 17-1 describes the hardware configuration of the USBC module.
17.3 Block DiagramThe USBC interfaces a USB link with a data flow stored in the embedded ram (CPU or AHB).
The USBC requires a 48MHz ± 0.25% reference clock, which is the USB generic clock. Formore details see ”Clocks” on page 344. The 48MHz clock is used to generate either a 12MHzfull-speed or a 1.5MHz low-speed bit clock from the received USB differential data, and to trans-mit data according to full- or low-speed USB device tolerances. Clock recovery is achieved by adigital phase-locked loop (a DPLL, not represented) in the USBC module, which complies withthe USB jitter specifications.
Table 17-1. Description of USB pipes/endpoints
pipe/endpoint Mnemonic Max. sizeNumber of
available banks Type
0 PEP0 1023 bytes 1 Control/Isochronous/Bulk/Interrupt
1 PEP1 1023 bytes 2 Control/Isochronous/Bulk/Interrupt
2 PEP2 1023 bytes 2 Control/Isochronous/Bulk/Interrupt
... ... ... ... ...
7 PEP7 1023 bytes 2 Control/Isochronous/Bulk/Interrupt
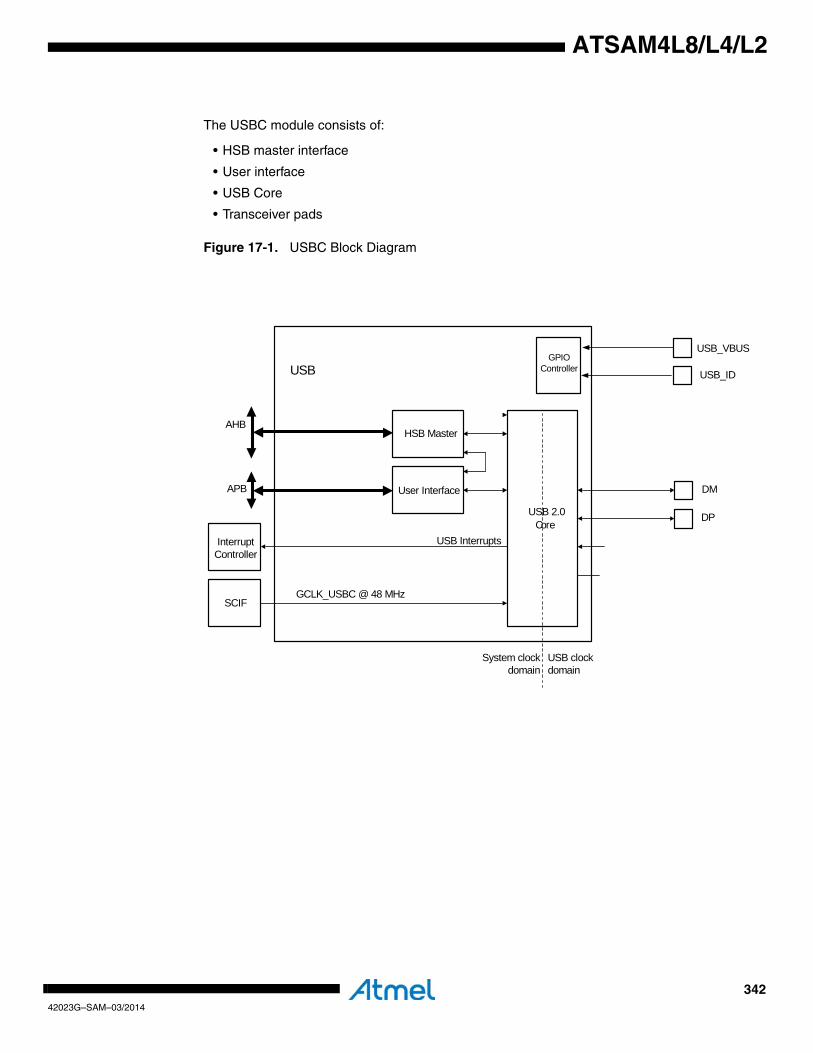
34242023G–SAM–03/2014
ATSAM4L8/L4/L2
The USBC module consists of:
• HSB master interface
• User interface
• USB Core
• Transceiver pads
Figure 17-1. USBC Block Diagram
InterruptController
USB Interrupts
DM
USBGPIO
Controller
DP
User Interface
SCIFGCLK_USBC @ 48 MHz
APB
USB 2.0Core
USB clockdomain
System clock domain
AHBHSB Master
USB_ID
USB_VBUS
34342023G–SAM–03/2014
ATSAM4L8/L4/L2
17.4 I/O Lines Description
Table 17-2. I/O Lines Description
PIn Name Pin Description Type Active Level
DM Data -: Differential Data Line - Port Input/Output
DP Data +: Differential Data Line + Port Input/Output

34442023G–SAM–03/2014
ATSAM4L8/L4/L2
17.5 Product DependenciesIn order to use this module, other parts of the system must be configured correctly, as describedbelow.
17.5.1 I/O LinesThe USBC pins may be multiplexed with the I/O Controller lines. The user must first configurethe I/O Controller to assign the desired USBC pins to their peripheral functions.
The USB VBUS and ID pin lines should be connected to GPIO pins and the user should monitorthis with software.
17.5.2 Power ManagementIf the CPU enters a Power Save Mode that disables clocks used by the USBC, the USBC willstop functioning and resume operation after the system wakes up from Power Save Mode.
17.5.3 ClocksThe USBC has two bus clocks connected: One High Speed Bus clock (CLK_USBC_AHB) andone Peripheral Bus clock (CLK_USBC_APB). These clocks are generated by the Power Man-ager. Both clocks are enabled at reset, and can be disabled by the Power Manager. It isrecommended to disable the USBC before disabling the clocks, to avoid freezing the USBC inan undefined state.
To follow the usb data rate at 12Mbit/s in full-speed mode, the CLK_USBC_AHB clock should beat minimum 12MHz.
The 48MHz USB clock is generated by a dedicated generic clock from the SCIF module. Beforeusing the USB, the user must ensure that the USB generic clock (GCLK_USBC) is enabled at48MHz in the SCIF module.
17.5.4 InterruptsThe USBC interrupt request line is connected to the NVIC. Using the USBC interrupt requiresthe NVIC to be programmed first.
The USBC asynchronous interrupts can wake the CPU from any Power Save Mode:
• The ID Transition Interrupt (IDTI)
• The Wakeup Interrupt (WAKEUP)
• The Host Wakeup Interrupt (HWUPI)
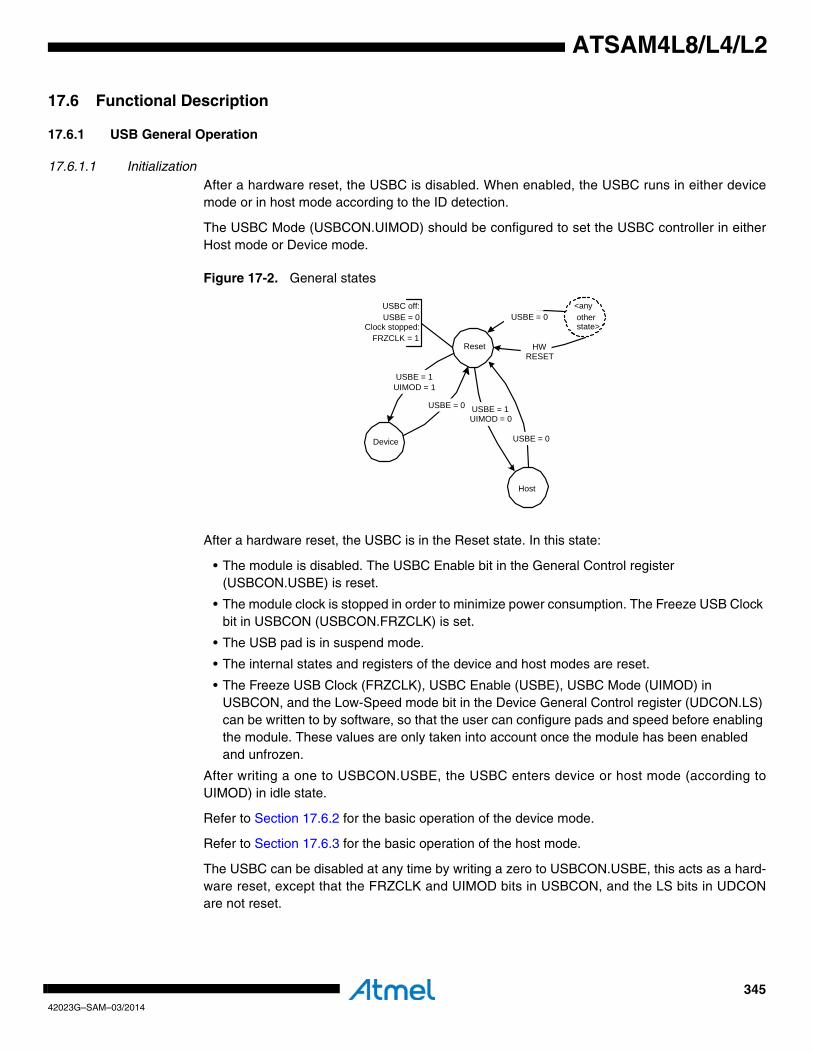
34542023G–SAM–03/2014
ATSAM4L8/L4/L2
17.6 Functional Description
17.6.1 USB General Operation
17.6.1.1 InitializationAfter a hardware reset, the USBC is disabled. When enabled, the USBC runs in either devicemode or in host mode according to the ID detection.
The USBC Mode (USBCON.UIMOD) should be configured to set the USBC controller in eitherHost mode or Device mode.
Figure 17-2. General states
After a hardware reset, the USBC is in the Reset state. In this state:
• The module is disabled. The USBC Enable bit in the General Control register (USBCON.USBE) is reset.
• The module clock is stopped in order to minimize power consumption. The Freeze USB Clock bit in USBCON (USBCON.FRZCLK) is set.
• The USB pad is in suspend mode.
• The internal states and registers of the device and host modes are reset.
• The Freeze USB Clock (FRZCLK), USBC Enable (USBE), USBC Mode (UIMOD) in USBCON, and the Low-Speed mode bit in the Device General Control register (UDCON.LS) can be written to by software, so that the user can configure pads and speed before enabling the module. These values are only taken into account once the module has been enabled and unfrozen.
After writing a one to USBCON.USBE, the USBC enters device or host mode (according toUIMOD) in idle state.
Refer to Section 17.6.2 for the basic operation of the device mode.
Refer to Section 17.6.3 for the basic operation of the host mode.
The USBC can be disabled at any time by writing a zero to USBCON.USBE, this acts as a hard-ware reset, except that the FRZCLK and UIMOD bits in USBCON, and the LS bits in UDCONare not reset.
Device
Reset
USBE = 0<anyotherstate>
USBE = 1UIMOD = 1
USBC off:USBE = 0
Clock stopped:FRZCLK = 1
USBE = 0
Host
USBE = 0
HWRESET
USBE = 1UIMOD = 0
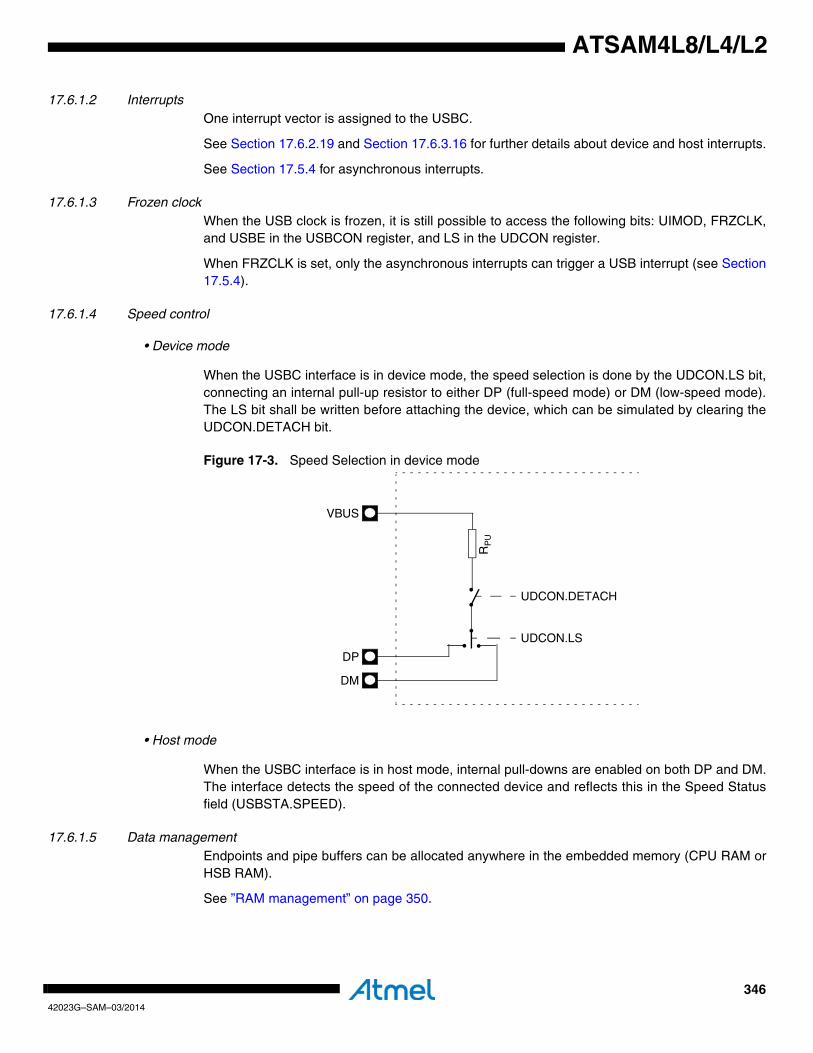
34642023G–SAM–03/2014
ATSAM4L8/L4/L2
17.6.1.2 InterruptsOne interrupt vector is assigned to the USBC.
See Section 17.6.2.19 and Section 17.6.3.16 for further details about device and host interrupts.
See Section 17.5.4 for asynchronous interrupts.
17.6.1.3 Frozen clockWhen the USB clock is frozen, it is still possible to access the following bits: UIMOD, FRZCLK,and USBE in the USBCON register, and LS in the UDCON register.
When FRZCLK is set, only the asynchronous interrupts can trigger a USB interrupt (see Section17.5.4).
17.6.1.4 Speed control
• Device mode
When the USBC interface is in device mode, the speed selection is done by the UDCON.LS bit,connecting an internal pull-up resistor to either DP (full-speed mode) or DM (low-speed mode).The LS bit shall be written before attaching the device, which can be simulated by clearing theUDCON.DETACH bit.
Figure 17-3. Speed Selection in device mode
• Host mode
When the USBC interface is in host mode, internal pull-downs are enabled on both DP and DM.The interface detects the speed of the connected device and reflects this in the Speed Statusfield (USBSTA.SPEED).
17.6.1.5 Data managementEndpoints and pipe buffers can be allocated anywhere in the embedded memory (CPU RAM orHSB RAM).
See ”RAM management” on page 350.
RP
U
UDCON.DETACH
DP
DM
UDCON.LS
VBUS
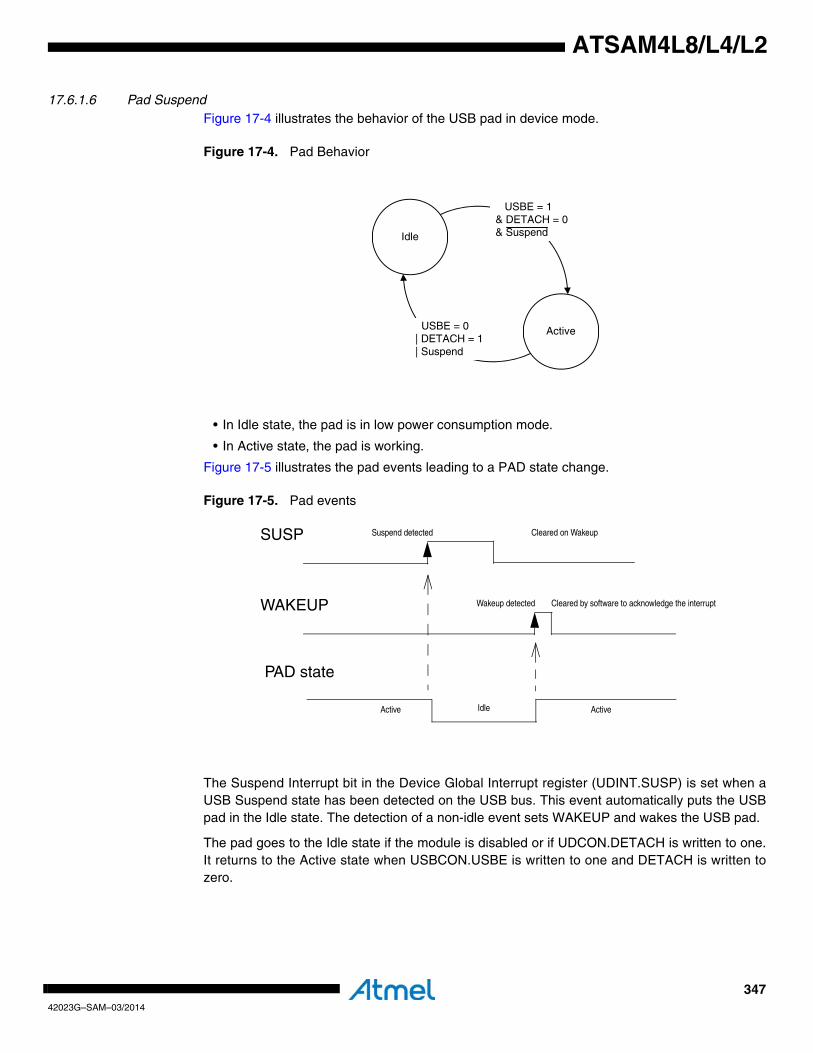
34742023G–SAM–03/2014
ATSAM4L8/L4/L2
17.6.1.6 Pad SuspendFigure 17-4 illustrates the behavior of the USB pad in device mode.
Figure 17-4. Pad Behavior
• In Idle state, the pad is in low power consumption mode.
• In Active state, the pad is working.
Figure 17-5 illustrates the pad events leading to a PAD state change.
Figure 17-5. Pad events
The Suspend Interrupt bit in the Device Global Interrupt register (UDINT.SUSP) is set when aUSB Suspend state has been detected on the USB bus. This event automatically puts the USBpad in the Idle state. The detection of a non-idle event sets WAKEUP and wakes the USB pad.
The pad goes to the Idle state if the module is disabled or if UDCON.DETACH is written to one.It returns to the Active state when USBCON.USBE is written to one and DETACH is written tozero.
Idle
Active
USBE = 1& DETACH = 0& Suspend
USBE = 0| DETACH = 1| Suspend
SUSP Suspend detected Cleared on Wakeup
Wakeup detected Cleared by software to acknowledge the interruptWAKEUP
PAD state
ActiveIdleActive
34842023G–SAM–03/2014
ATSAM4L8/L4/L2
17.6.2 USBC Device Mode Operation
17.6.2.1 Device EnablingIn device mode, the USBC supports full- and low-speed data transfers.
Including the default control endpoint, a total of 8 endpoints are provided. They can be config-ured as isochronous, bulk or interrupt types, as described in Table 17-1 on page 341
After a hardware reset, the USBC device mode is in the reset state (see Section 17.6.1.1). Inthis state, the endpoint banks are disabled and neither DP nor DM are pulled up (DETACH isone).
DP or DM will be pulled up according to the selected speed as soon as the DETACH bit is writ-ten to zero. See “Device mode” for further details.
When the USBC is enabled (USBE is one) in device mode, it enters the Idle state, minimizingpower consumption. Being in Idle state does not require the USB clocks to be activated.
The USBC device mode can be disabled or reset at any time by disabling the USBC (by writinga zero to USBE) or by enabling host mode (ID is zero).
17.6.2.2 USB resetThe USB bus reset is initiated by a connected host and managed by hardware.
When a USB reset state is detected on the USB bus, the following operations are performed bythe controller:
• UDCON register is reset except for the DETACH and SPDCONF bits.
• Device Frame Number Register (UDFNUM), Endpoint n Configuration Register (UECFGn), and Endpoint n Control Register (UECONn) registers are cleared.
• The data toggle sequencing in all the endpoints are cleared.
• At the end of the reset process, the End of Reset (EORST) bit in the UDINT register is set.
17.6.2.3 Endpoint activationWhen an endpoint is disabled (UERST.EPENn = 0) the data toggle sequence, Endpoint n StatusSet (UESTAn), and UECONn registers will be reset. The controller ignores all transactions tothis endpoint as long as it is inactive.
To complete an endpoint activation, the user should fill out the endpoint descriptor: see Figure17-6 on page 351.
17.6.2.4 Endpoint redirectionBy default, the Redirected endpoint number (UECFGn.REPNB) field is zero, and any transactiontargeted to endpoint n will be associated to the physical endpoint n.
By configuring the UECFGn.REPNB field to a value m, any transaction targeted to this endpointm will be redirected to the physical endpoint n. This allows two virtual endpoints, IN and OUT, tobe configured towards the same endpoint number.
17.6.2.5 Data toggle sequenceIn order to respond to a CLEAR_FEATURE USB request without disabling the endpoint, theuser can clear the data toggle sequence by writing a one to the Reset Data Toggle Set bit in theEndpoint n Control Set register (UECONnSET.RSTDTS)
34942023G–SAM–03/2014
ATSAM4L8/L4/L2
17.6.2.6 Busy bank enableIn order to make an endpoint bank look busy regardless of its actual state, the user can write aone to the Busy Bank Enable bit in the Endpoint n Control Register (UECONnSET.BUSY0/1ES).
If a BUSYnE bit is set, any transaction to this bank will be rejected with a NAK reply.
17.6.2.7 Address setupThe USB device address is set up according to the USB protocol.
• After all kinds of resets, the USB device address is 0.
• The host starts a SETUP transaction with a SET_ADDRESS(addr) request.
• The user writes this address to the USB Address field (UDCON.UADD), and writes a zero to the Address Enable bit (UDCON.ADDEN), resulting in the address remaining zero.
• The user sends a zero-length IN packet from the control endpoint.
• The user enables the stored USB device address by writing a one to ADDEN.
Once the USB device address is configured, the controller filters the packets to only acceptthose targeting the address stored in UADD.
UADD and ADDEN should not be written to simultaneously. They should be written sequentially,UADD field first.
If UADD or ADDEN is cleared, the default device address 0 is used. UADD and ADDEN arecleared:
• On a hardware reset.
• When the USBC is disabled (USBE written to zero).
• When a USB reset is detected.
17.6.2.8 Suspend and WakeupWhen an idle USB bus state has been detected for 3 ms, the controller sets the Suspend(SUSP) interrupt bit in UDINT. In this case, the transceiver is suspended, reducing powerconsumption.
To further reduce power consumption it is recommended to freeze the USB clock by writing aone to the Freeze USB Clock (FRZCLK) bit in USBCON when the USB bus is in suspend mode.The MCU can also enter the power save mode mode to further lower power consumption.
To recover from the suspend mode, the user shall wait for the Wakeup (WAKEUP) interrupt bit,which is set when a non-idle event is detected, and then write a zero to FRZCLK.
As the WAKEUP interrupt bit in UDINT is set when a non-idle event is detected, it can occurregardless of whether the controller is in the suspend mode or not.
17.6.2.9 DetachThe reset value of the DETACH bit located in the UDCON register, is one.
It is possible to initiate a device re-enumeration simply by writing a one and then a zero toDETACH.
DETACH acts on the pull-up connections of the DP and DM pads. See “Device mode” for fur-ther details.
35042023G–SAM–03/2014
ATSAM4L8/L4/L2
17.6.2.10 Remote wakeupThe remote wakeup request (also known as upstream resume) is the only request the devicemay send on its own initiative. This should be preceded by a DEVICE_REMOTE_WAKEUPrequest from the host.
• First, the USBC must have detected a “Suspend” state on the bus, i.e. the remote wakeup request can only be sent after a SUSP interrupt has been set.
• The user may then write a one to the remote wakeup (RMWKUP) bit in UDCON to send an Upstream Resume to the host initiating the wakeup. This will automatically be done by the controller after 5ms of inactivity on the USB bus.
• When the controller sends the Upstream Resume, the Upstream Resume (UPRSM) interrupt is set and SUSP is cleared.
• RMWKUP is cleared at the end of the transmitting Upstream Resume.
• In case of a rebroadcast resume initiated by the host, the End of Resume (EORSM) interrupt is set when the rebroadcast resume is completed.
17.6.2.11 RAM managementEndpoint data can be physically allocated anywhere in the embedded RAM. The USBC control-ler accesses these endpoints directly through the HSB master (built-in DMA).
The USBC controller reads the USBC descriptors to know where each endpoint is located. Thebase address of the USBC descriptor (UDESC.UDESCA) needs to be written by the user. Thedescriptors can also be allocated anywhere in the embedded RAM.
Before using an endpoint, the user should setup the endpoint address for each bank. Dependingon the direction, the type, and the packet-mode (single or multi-packet), the user should also ini-tialize the endpoint packet size, and the endpoint control and status fields, so that the USBCcontroller does not compute random values from the RAM.
When using an endpoint the user should read the UESTAX.CURRBK field to know which bankis currently being processed.
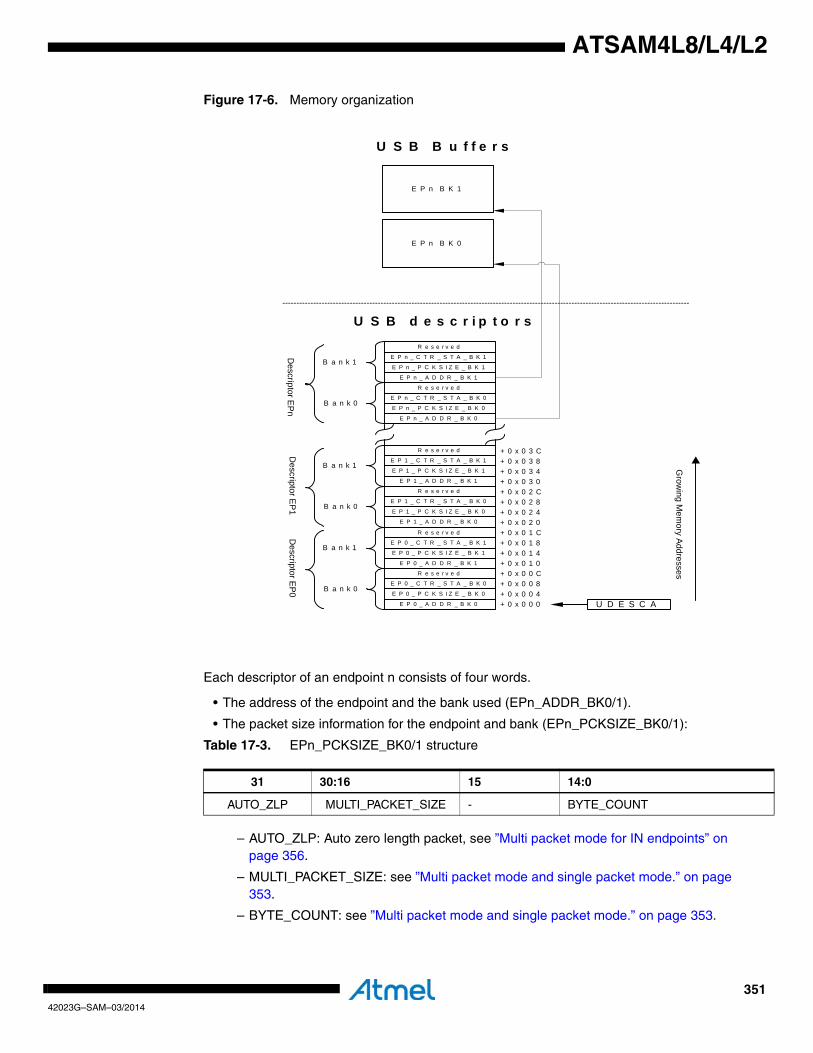
35142023G–SAM–03/2014
ATSAM4L8/L4/L2
Figure 17-6. Memory organization
Each descriptor of an endpoint n consists of four words.
• The address of the endpoint and the bank used (EPn_ADDR_BK0/1).
• The packet size information for the endpoint and bank (EPn_PCKSIZE_BK0/1):
Table 17-3. EPn_PCKSIZE_BK0/1 structure
– AUTO_ZLP: Auto zero length packet, see ”Multi packet mode for IN endpoints” on page 356.
– MULTI_PACKET_SIZE: see ”Multi packet mode and single packet mode.” on page 353.
– BYTE_COUNT: see ”Multi packet mode and single packet mode.” on page 353.
31 30:16 15 14:0
AUTO_ZLP MULTI_PACKET_SIZE - BYTE_COUNT
E P n B K 0
E P 0 _ C T R _ S T A _ B K 0
E P 0 _ P C K S I Z E _ B K 0
E P 0 _ A D D R _ B K 0 U D E S C A
Grow
ing Mem
ory Addresses
Descriptor E
P0
R e s e r v e d
E P 0 _ C T R _ S T A _ B K 1
E P 0 _ P C K S I Z E _ B K 1
E P 0 _ A D D R _ B K 1
R e s e r v e d
B a n k 0
B a n k 1
+ 0 x 0 0 0+ 0 x 0 0 4+ 0 x 0 0 8+ 0 x 0 0 C+ 0 x 0 1 0+ 0 x 0 1 4+ 0 x 0 1 8+ 0 x 0 1 C
E P 1 _ C T R _ S T A _ B K 0
E P 1 _ P C K S I Z E _ B K 0
E P 1 _ A D D R _ B K 0D
escriptor EP
1
R e s e r v e d
E P 1 _ C T R _ S T A _ B K 1
E P 1 _ P C K S I Z E _ B K 1
E P 1 _ A D D R _ B K 1
R e s e r v e d
B a n k 0
B a n k 1
+ 0 x 0 2 0+ 0 x 0 2 4+ 0 x 0 2 8+ 0 x 0 2 C+ 0 x 0 3 0+ 0 x 0 3 4+ 0 x 0 3 8+ 0 x 0 3 C
E P n _ C T R _ S T A _ B K 0
E P n _ P C K S I Z E _ B K 0
E P n _ A D D R _ B K 0
R e s e r v e d
E P n _ C T R _ S T A _ B K 1
E P n _ P C K S I Z E _ B K 1
E P n _ A D D R _ B K 1
R e s e r v e d
B a n k 0
B a n k 1
Descriptor E
Pn
E P n B K 1
U S B d e s c r i p t o r s
U S B B u f f e r s
35242023G–SAM–03/2014
ATSAM4L8/L4/L2
• The control and status fields for the endpoint and bank (EPn_CTR_STA_BK0/1):
Table 17-4. EPn_CTR_STA_BK0/1 structure
– UNDERF: Underflow status for isochronous IN transfer. See ”Data flow error” on page 359.
– OVERF: Overflow status for isochronous OUT transfer. See ”Data flow error” on page 359.
– CRCERR: CRC error status for isochronous OUT transfer. See ”CRC error” on page 359.
– STALLRQ_NEXT: Stall request for the next transfer. See ”STALL request” on page 352.
17.6.2.12 STALL requestFor each endpoint, the STALL management is performed using:
• The STALL Request (STALLRQ) bit in UECONn is set to initiate a STALL request.
• The STALLed Interrupt (STALLEDI) bit in UESTAn is set when a STALL handshake has been sent.
To answer requests with a STALL handshake, STALLRQ has to be set by writing a one to theSTALL Request Set (STALLRQS) bit. All following requests will be discarded (RXOUTI, etc. willnot be set) and handshaked with a STALL until the STALLRQ bit is cleared, by receiving a newSETUP packet (for control endpoints) or by writing a one to the STALL Request Clear (STALL-RQC) bit.
Each time a STALL handshake is sent, the STALLEDI bit is set by the USBC and the EPnINTinterrupt is set.
The user can use the descriptor to manage STALL requests. The USBC controller reads theEPn_CTR_STA_BK0/1.STALLRQ_NEXT bit after successful transactions and if it is one theUSBC controller will set UECON.STALLRQ. The STALL_NEXT bit will be cleared upon receivinga SETUP transaction and the USBC controller will then clear the STALLRQ bit.
• Special considerations for control endpoints
If a SETUP packet is received at a control endpoint where a STALL request is active, theReceived SETUP Interrupt (RXSTPI) bit in UESTAn is set, and the STALLRQ and STALLEDIbits are cleared. It allows the SETUP to be always ACKed as required by the USB standard.
This management simplifies the enumeration process management. If a command is not sup-ported or contains an error, the user requests a STALL and can return to the main task, waitingfor the next SETUP request.
• STALL handshake and retry mechanism
The retry mechanism has priority over the STALL handshake. A STALL handshake is sent if theSTALLRQ bit is set and if there is no retry required.
31:19 18 17 16 15:1 0
Status elements Control elements
- UNDERF OVERF CRCERR - STALLRQ_NEXT
35342023G–SAM–03/2014
ATSAM4L8/L4/L2
17.6.2.13 Multi packet mode and single packet mode.Single packet mode is the default mode where one USB packet is managed per bank.
The multi-packet mode allows the user to manage data exceeding the maximum endpoint size(UECFGn.EPSIZE) for an endpoint bank across multiple packets without software intervention.This mode can also be coupled with the ping-pong mode.
• For an OUT endpoint, the EPn_PCKSIZE_BK0/1.MULTI_PACKET_SIZE field should be configured correctly to enable the multi-packet mode. See ”Multi packet mode for OUT endpoints” on page 358. For single packet mode, the MULTI_PACKET_SIZE should be initialized either to 0 or configured with a packet size less than EPSIZE (called a short packet), in order to allocate the exact amount of memory. In this case, any excessive words will not be written to memory.
• For an IN endpoint, the EPn_PCKSIZE_BK0/1.BYTE_COUNT field should be configured correctly to enable the multi-packet mode. See”Multi packet mode for IN endpoints” on page 356. For single packet mode, the BYTE_COUNT should be less than EPSIZE.
17.6.2.14 Management of control endpoints
• Overview
A SETUP request is always ACKed. When a new SETUP packet is received, the RXSTPI is set,but not the Received OUT Data Interrupt (RXOUTI) bit.
The FIFO Control (FIFOCON) bit in UECONn is irrelevant for control endpoints. The user shouldtherefore never use it for these endpoints. When read, this value is always zero.
Control endpoints are managed using:
• The RXSTPI bit: is set when a new SETUP packet is received. This has to be cleared by firmware in order to acknowledge the packet and to free the bank.
• The RXOUTI bit: is set when a new OUT packet is received. This has to be cleared by firmware in order to acknowledge the packet and to free the bank.
• The Transmitted IN Data Interrupt (TXINI) bit: is set when the current bank is ready to accept a new IN packet. This has to be cleared by firmware in order to send the packet.
• The user can ignore any incoming transaction except SETUP by setting the UECONn.NOREPLY bit. This bit is automatically cleared by hardware when receiving a SETUP packet.
• Control write
Figure 17-7 on page 354 shows a control write transaction. During the status stage, the control-ler will not necessarily send a NAK on the first IN token:
• If the user knows the exact number of descriptor bytes that will be read, the status stage can be predicted, and a zero-length packet can be sent after the next IN token.
• Alternatively the bytes can be read until the NAKed IN Interrupt (NAKINI) is triggered, notifying that all bytes are sent by the host and that the transaction is now in the status stage.
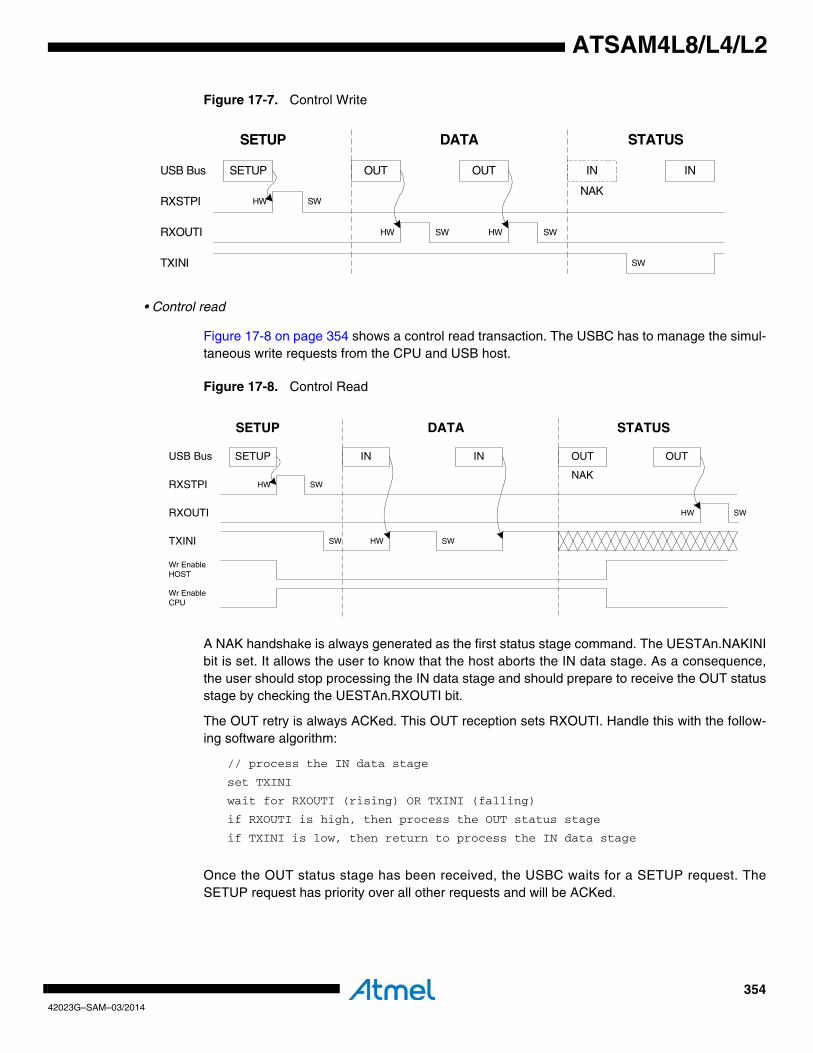
35442023G–SAM–03/2014
ATSAM4L8/L4/L2
Figure 17-7. Control Write
• Control read
Figure 17-8 on page 354 shows a control read transaction. The USBC has to manage the simul-taneous write requests from the CPU and USB host.
Figure 17-8. Control Read
A NAK handshake is always generated as the first status stage command. The UESTAn.NAKINIbit is set. It allows the user to know that the host aborts the IN data stage. As a consequence,the user should stop processing the IN data stage and should prepare to receive the OUT statusstage by checking the UESTAn.RXOUTI bit.
The OUT retry is always ACKed. This OUT reception sets RXOUTI. Handle this with the follow-ing software algorithm:
// process the IN data stage
set TXINI
wait for RXOUTI (rising) OR TXINI (falling)
if RXOUTI is high, then process the OUT status stage
if TXINI is low, then return to process the IN data stage
Once the OUT status stage has been received, the USBC waits for a SETUP request. TheSETUP request has priority over all other requests and will be ACKed.
SETUP
RXSTPI
RXOUTI
TXINI
USB Bus
HW SW
OUT
HW SW
OUT
HW SW
IN IN
NAK
SW
DATASETUP STATUS
SETUP
RXSTPI
RXOUTI
TXINI
USB Bus
HW SW
IN
HW SW
IN OUT OUT
NAK
SW
SW
HW
Wr EnableHOST
Wr EnableCPU
DATASETUP STATUS
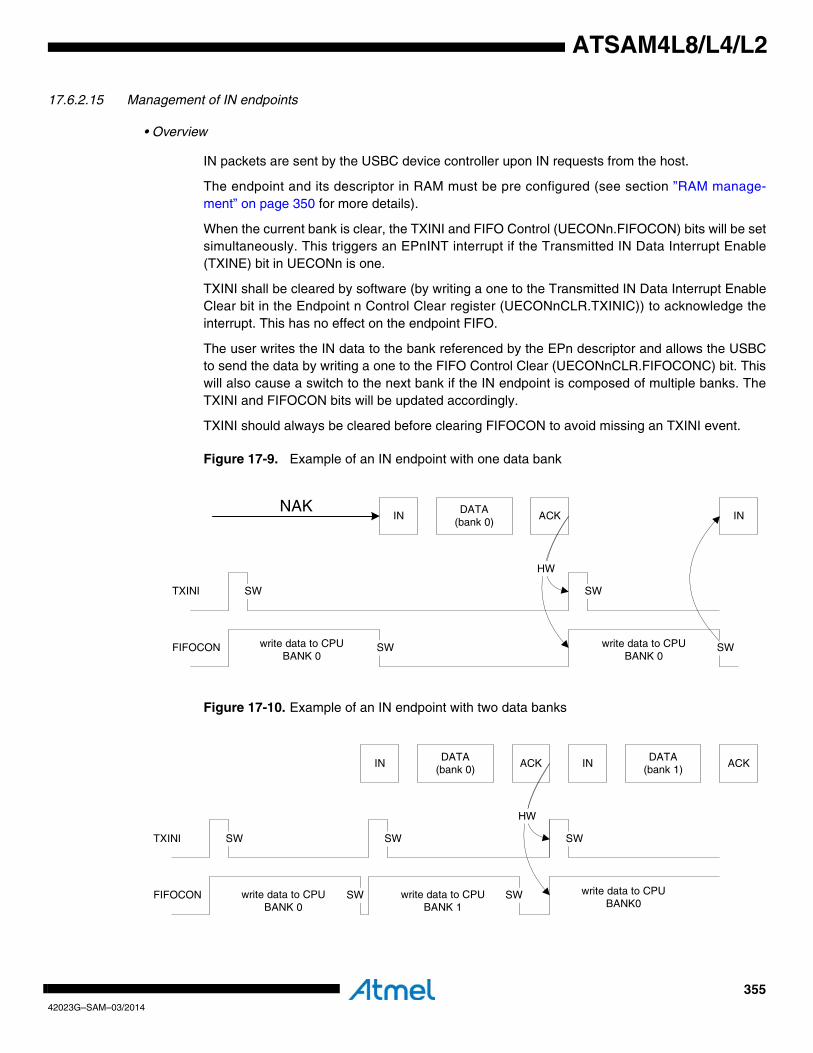
35542023G–SAM–03/2014
ATSAM4L8/L4/L2
17.6.2.15 Management of IN endpoints
• Overview
IN packets are sent by the USBC device controller upon IN requests from the host.
The endpoint and its descriptor in RAM must be pre configured (see section ”RAM manage-ment” on page 350 for more details).
When the current bank is clear, the TXINI and FIFO Control (UECONn.FIFOCON) bits will be setsimultaneously. This triggers an EPnINT interrupt if the Transmitted IN Data Interrupt Enable(TXINE) bit in UECONn is one.
TXINI shall be cleared by software (by writing a one to the Transmitted IN Data Interrupt EnableClear bit in the Endpoint n Control Clear register (UECONnCLR.TXINIC)) to acknowledge theinterrupt. This has no effect on the endpoint FIFO.
The user writes the IN data to the bank referenced by the EPn descriptor and allows the USBCto send the data by writing a one to the FIFO Control Clear (UECONnCLR.FIFOCONC) bit. Thiswill also cause a switch to the next bank if the IN endpoint is composed of multiple banks. TheTXINI and FIFOCON bits will be updated accordingly.
TXINI should always be cleared before clearing FIFOCON to avoid missing an TXINI event.
Figure 17-9. Example of an IN endpoint with one data bank
Figure 17-10. Example of an IN endpoint with two data banks
INDATA
(bank 0)ACK
TXINI
FIFOCON
HW
write data to CPUBANK 0
SW
SW SW
SW
INNAK
write data to CPUBANK 0
INDATA
(bank 0)ACK
TXINI
FIFOCON write data to CPUBANK 0
SW
SW SW
SW
INDATA
(bank 1)ACK
write data to CPUBANK 1
SW
HW
write data to CPUBANK0
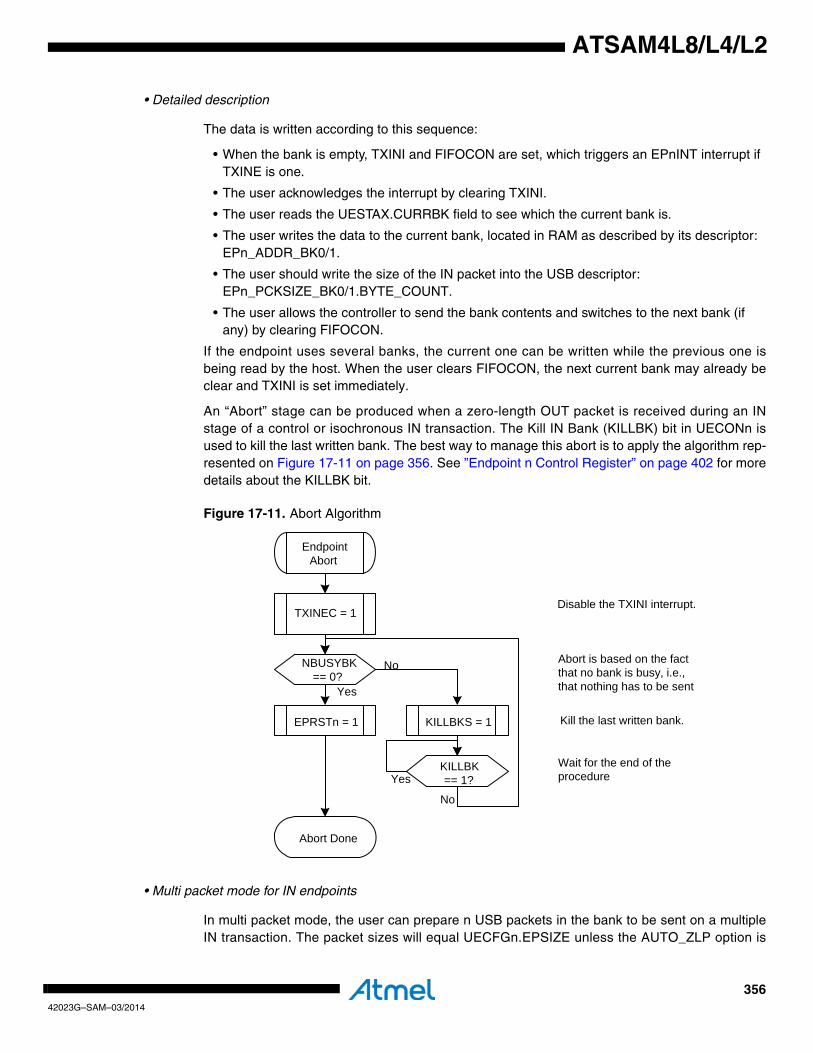
35642023G–SAM–03/2014
ATSAM4L8/L4/L2
• Detailed description
The data is written according to this sequence:
• When the bank is empty, TXINI and FIFOCON are set, which triggers an EPnINT interrupt if TXINE is one.
• The user acknowledges the interrupt by clearing TXINI.
• The user reads the UESTAX.CURRBK field to see which the current bank is.
• The user writes the data to the current bank, located in RAM as described by its descriptor: EPn_ADDR_BK0/1.
• The user should write the size of the IN packet into the USB descriptor: EPn_PCKSIZE_BK0/1.BYTE_COUNT.
• The user allows the controller to send the bank contents and switches to the next bank (if any) by clearing FIFOCON.
If the endpoint uses several banks, the current one can be written while the previous one isbeing read by the host. When the user clears FIFOCON, the next current bank may already beclear and TXINI is set immediately.
An “Abort” stage can be produced when a zero-length OUT packet is received during an INstage of a control or isochronous IN transaction. The Kill IN Bank (KILLBK) bit in UECONn isused to kill the last written bank. The best way to manage this abort is to apply the algorithm rep-resented on Figure 17-11 on page 356. See ”Endpoint n Control Register” on page 402 for moredetails about the KILLBK bit.
Figure 17-11. Abort Algorithm
• Multi packet mode for IN endpoints
In multi packet mode, the user can prepare n USB packets in the bank to be sent on a multipleIN transaction. The packet sizes will equal UECFGn.EPSIZE unless the AUTO_ZLP option is
EndpointAbort
Abort Done
Abort is based on the fact that no bank is busy, i.e., that nothing has to be sent
Disable the TXINI interrupt.
EPRSTn = 1
NBUSYBK== 0?
Yes
TXINEC = 1
No
KILLBKS = 1
KILLBK== 1?Yes
Kill the last written bank.
Wait for the end of the procedure
No
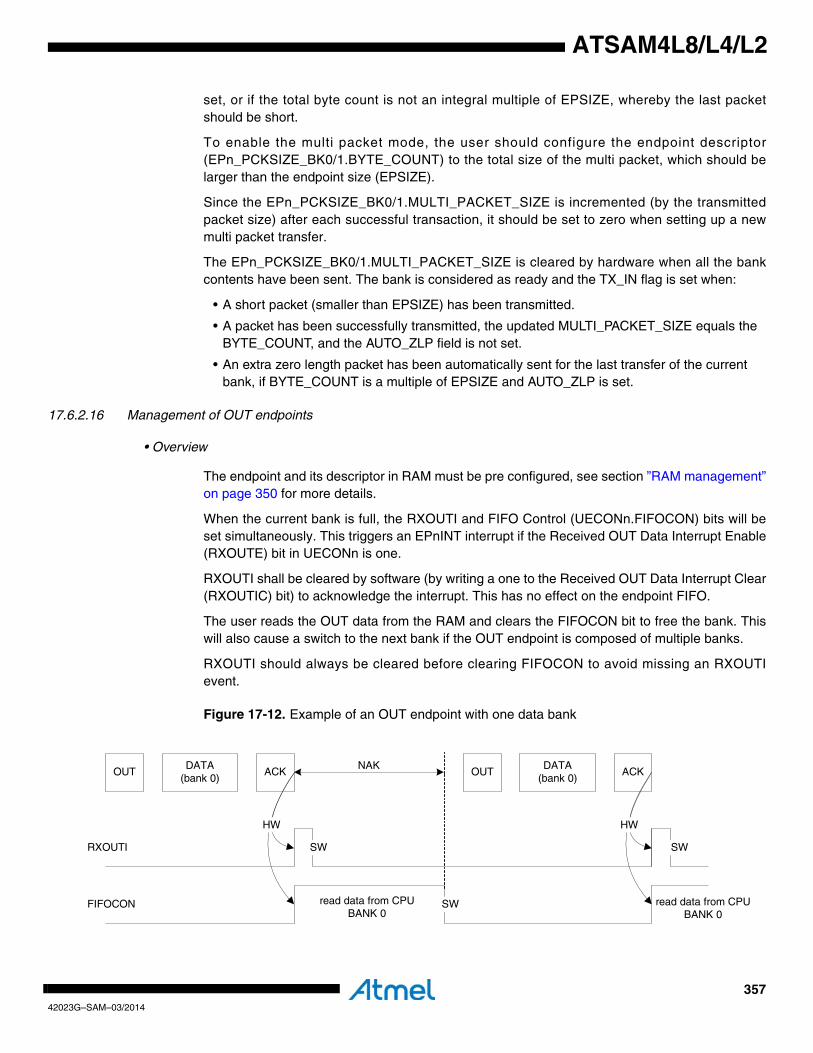
35742023G–SAM–03/2014
ATSAM4L8/L4/L2
set, or if the total byte count is not an integral multiple of EPSIZE, whereby the last packetshould be short.
To enable the multi packet mode, the user should configure the endpoint descriptor(EPn_PCKSIZE_BK0/1.BYTE_COUNT) to the total size of the multi packet, which should belarger than the endpoint size (EPSIZE).
Since the EPn_PCKSIZE_BK0/1.MULTI_PACKET_SIZE is incremented (by the transmittedpacket size) after each successful transaction, it should be set to zero when setting up a newmulti packet transfer.
The EPn_PCKSIZE_BK0/1.MULTI_PACKET_SIZE is cleared by hardware when all the bankcontents have been sent. The bank is considered as ready and the TX_IN flag is set when:
• A short packet (smaller than EPSIZE) has been transmitted.
• A packet has been successfully transmitted, the updated MULTI_PACKET_SIZE equals the BYTE_COUNT, and the AUTO_ZLP field is not set.
• An extra zero length packet has been automatically sent for the last transfer of the current bank, if BYTE_COUNT is a multiple of EPSIZE and AUTO_ZLP is set.
17.6.2.16 Management of OUT endpoints
• Overview
The endpoint and its descriptor in RAM must be pre configured, see section ”RAM management”on page 350 for more details.
When the current bank is full, the RXOUTI and FIFO Control (UECONn.FIFOCON) bits will beset simultaneously. This triggers an EPnINT interrupt if the Received OUT Data Interrupt Enable(RXOUTE) bit in UECONn is one.
RXOUTI shall be cleared by software (by writing a one to the Received OUT Data Interrupt Clear(RXOUTIC) bit) to acknowledge the interrupt. This has no effect on the endpoint FIFO.
The user reads the OUT data from the RAM and clears the FIFOCON bit to free the bank. Thiswill also cause a switch to the next bank if the OUT endpoint is composed of multiple banks.
RXOUTI should always be cleared before clearing FIFOCON to avoid missing an RXOUTIevent.
Figure 17-12. Example of an OUT endpoint with one data bank
OUTDATA
(bank 0)ACK
RXOUTI
FIFOCON
HW
OUTDATA
(bank 0)ACK
HW
SW
SW
SW
read data from CPUBANK 0
read data from CPUBANK 0
NAK
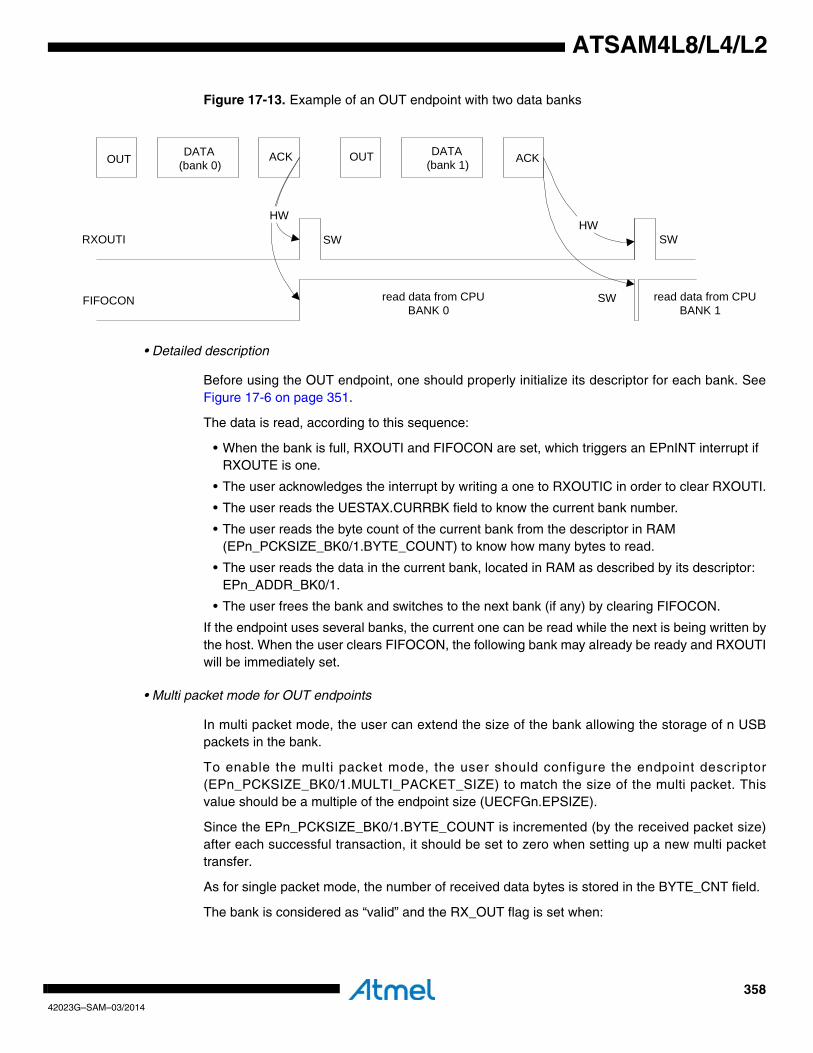
35842023G–SAM–03/2014
ATSAM4L8/L4/L2
Figure 17-13. Example of an OUT endpoint with two data banks
• Detailed description
Before using the OUT endpoint, one should properly initialize its descriptor for each bank. SeeFigure 17-6 on page 351.
The data is read, according to this sequence:
• When the bank is full, RXOUTI and FIFOCON are set, which triggers an EPnINT interrupt if RXOUTE is one.
• The user acknowledges the interrupt by writing a one to RXOUTIC in order to clear RXOUTI.
• The user reads the UESTAX.CURRBK field to know the current bank number.
• The user reads the byte count of the current bank from the descriptor in RAM (EPn_PCKSIZE_BK0/1.BYTE_COUNT) to know how many bytes to read.
• The user reads the data in the current bank, located in RAM as described by its descriptor: EPn_ADDR_BK0/1.
• The user frees the bank and switches to the next bank (if any) by clearing FIFOCON.
If the endpoint uses several banks, the current one can be read while the next is being written bythe host. When the user clears FIFOCON, the following bank may already be ready and RXOUTIwill be immediately set.
• Multi packet mode for OUT endpoints
In multi packet mode, the user can extend the size of the bank allowing the storage of n USBpackets in the bank.
To enable the multi packet mode, the user should configure the endpoint descriptor(EPn_PCKSIZE_BK0/1.MULTI_PACKET_SIZE) to match the size of the multi packet. Thisvalue should be a multiple of the endpoint size (UECFGn.EPSIZE).
Since the EPn_PCKSIZE_BK0/1.BYTE_COUNT is incremented (by the received packet size)after each successful transaction, it should be set to zero when setting up a new multi packettransfer.
As for single packet mode, the number of received data bytes is stored in the BYTE_CNT field.
The bank is considered as “valid” and the RX_OUT flag is set when:
OUT DATA(bank 0)
ACK
RXOUTI
FIFOCON
HW
OUT DATA(bank 1) ACK
SW
SWread data from CPUBANK 0
HWSW
read data from CPUBANK 1
35942023G–SAM–03/2014
ATSAM4L8/L4/L2
• A packet has been successfully received and the updated BYTE_COUNT equals the MULTI_PACKET_SIZE.
• A short packet (smaller than EPSIZE) has been received.
17.6.2.17 Data flow errorThis error exists only for isochronous IN/OUT endpoints. It sets the Errorflow Interrupt(ERRORFI) bit in UESTAn, which triggers an EPnINT interrupt if the Errorflow Interrupt Enable(ERRORFE) bit is one. The user can check the EPn_CTR_STA_BK0/1.UNDERF and OVERFbits in the endpoint descriptor to see which current bank has been affected.
• An underflow can occur during IN stage if the host attempts to read from an empty bank. A zero-length packet is then automatically sent by the USBC. The endpoint descriptor EPn_CTR_STA_BK0/1.UNDERF points out the bank from which the IN data should have originated. If a new successful transaction occurs, the UNDERF bit is overwritten to 0 only if the UESTAn.ERRORFI is cleared.
• An overflow can occur during the OUT stage if the host tries to send a packet while the bank is full. Typically this occurs when a CPU is not fast enough. The packet data is not written to the bank and is lost. The endpoint descriptor EPn_CTR_STA_BK0/1.OVERF points out which bank the OUT data was destined to. If the UESTAn.ERRORFI bit is cleared and a new transaction is successful, the OVERF bit will be overwritten to zero.
17.6.2.18 CRC errorThis error exists only for isochronous OUT endpoints. It sets the CRC Error Interrupt (CRCERRI)bit in UESTAn, which triggers an EPnINT interrupt if the CRC Error Interrupt Enable(CRCERRE) bit is one.
A CRC error can occur during an isochronous OUT stage if the USBC detects a corruptedreceived packet. The OUT packet is stored in the bank as if no CRC error had occurred(RXOUTI is set).
The user can also check the endpoint descriptor to see which current bank is impacted by theCRC error by reading EPn_CTR_STA_BK0/1.CRCERR.
17.6.2.19 InterruptsThere are two kinds of device interrupts: processing, i.e. their generation is part of the normalprocessing, and exception, i.e. errors not related to CPU exceptions.
• Global interrupts
The processing device global interrupts are:
• The Suspend (SUSP) interrupt
• The Start of Frame (SOF) interrupt with no frame number CRC error (the Frame Number CRC Error (FNCERR) bit in the Device Frame Number (UDFNUM) register is zero)
• The End of Reset (EORST) interrupt
• The Wakeup (WAKEUP) interrupt
• The End of Resume (EORSM) interrupt
• The Upstream Resume (UPRSM) interrupt
• The Endpoint n (EPnINT) interrupt
The exception device global interrupts are:
36042023G–SAM–03/2014
ATSAM4L8/L4/L2
• The Start of Frame (SOF) interrupt with a frame number CRC error (FNCERR is one)
• Endpoint interrupts
The processing device endpoint interrupts are:
• The Transmitted IN Data Interrupt (TXINI)
• The Received OUT Data Interrupt (RXOUTI)
• The Received SETUP Interrupt (RXSTPI)
• The Number of Busy Banks (NBUSYBK) interrupt
The exception device endpoint interrupts are:
• The Errorflow Interrupt (ERRORFI)
• The NAKed OUT Interrupt (NAKOUTI)
• The NAKed IN Interrupt (NAKINI)
• The STALLed Interrupt (STALLEDI)
• The CRC Error Interrupt (CRCERRI)
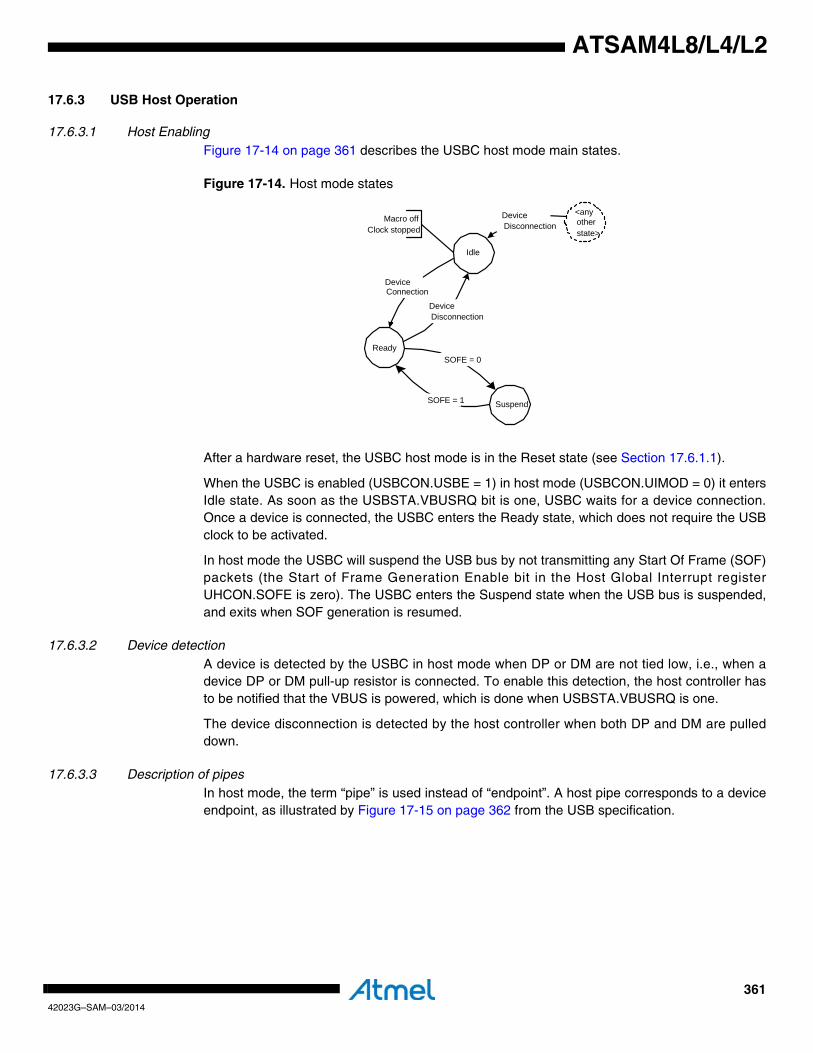
36142023G–SAM–03/2014
ATSAM4L8/L4/L2
17.6.3 USB Host Operation
17.6.3.1 Host EnablingFigure 17-14 on page 361 describes the USBC host mode main states.
Figure 17-14. Host mode states
After a hardware reset, the USBC host mode is in the Reset state (see Section 17.6.1.1).
When the USBC is enabled (USBCON.USBE = 1) in host mode (USBCON.UIMOD = 0) it entersIdle state. As soon as the USBSTA.VBUSRQ bit is one, USBC waits for a device connection.Once a device is connected, the USBC enters the Ready state, which does not require the USBclock to be activated.
In host mode the USBC will suspend the USB bus by not transmitting any Start Of Frame (SOF)packets (the Start of Frame Generation Enable bit in the Host Global Interrupt registerUHCON.SOFE is zero). The USBC enters the Suspend state when the USB bus is suspended,and exits when SOF generation is resumed.
17.6.3.2 Device detectionA device is detected by the USBC in host mode when DP or DM are not tied low, i.e., when adevice DP or DM pull-up resistor is connected. To enable this detection, the host controller hasto be notified that the VBUS is powered, which is done when USBSTA.VBUSRQ is one.
The device disconnection is detected by the host controller when both DP and DM are pulleddown.
17.6.3.3 Description of pipesIn host mode, the term “pipe” is used instead of “endpoint”. A host pipe corresponds to a deviceendpoint, as illustrated by Figure 17-15 on page 362 from the USB specification.
Ready
Idle
DeviceDisconnection
<anyotherstate>
DeviceConnection
Macro offClock stopped
DeviceDisconnection
SuspendSOFE = 1
SOFE = 0
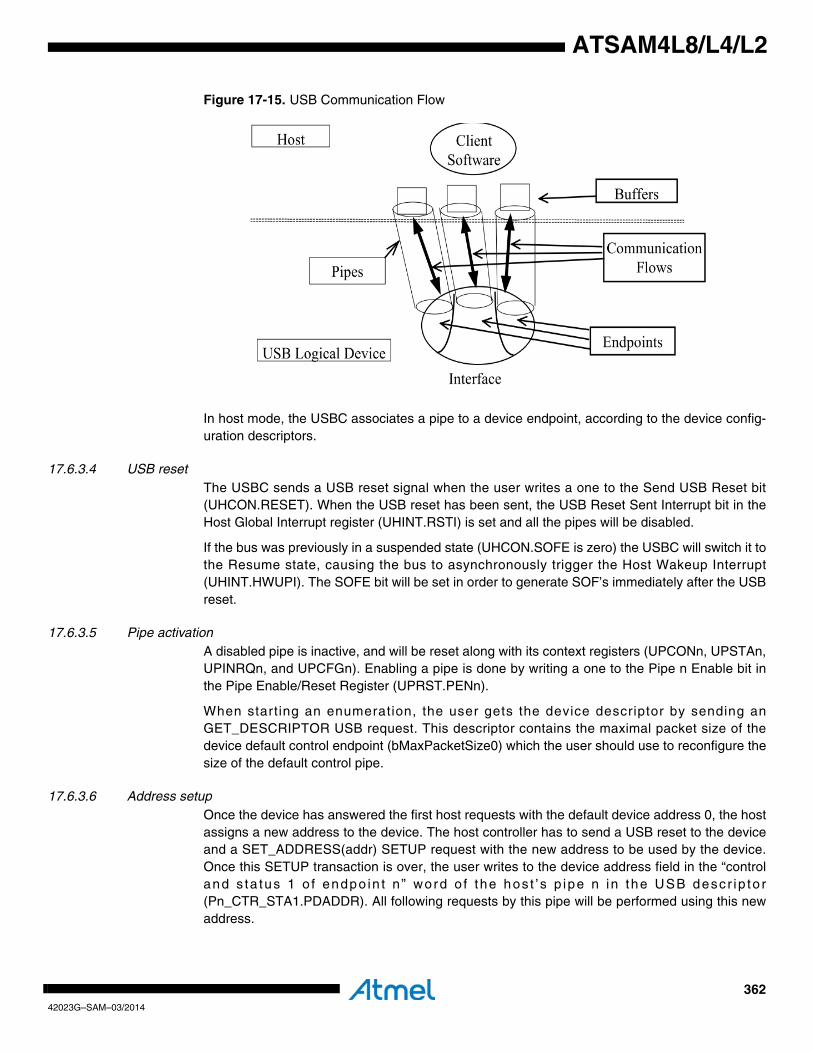
36242023G–SAM–03/2014
ATSAM4L8/L4/L2
Figure 17-15. USB Communication Flow
In host mode, the USBC associates a pipe to a device endpoint, according to the device config-uration descriptors.
17.6.3.4 USB resetThe USBC sends a USB reset signal when the user writes a one to the Send USB Reset bit(UHCON.RESET). When the USB reset has been sent, the USB Reset Sent Interrupt bit in theHost Global Interrupt register (UHINT.RSTI) is set and all the pipes will be disabled.
If the bus was previously in a suspended state (UHCON.SOFE is zero) the USBC will switch it tothe Resume state, causing the bus to asynchronously trigger the Host Wakeup Interrupt(UHINT.HWUPI). The SOFE bit will be set in order to generate SOF’s immediately after the USBreset.
17.6.3.5 Pipe activationA disabled pipe is inactive, and will be reset along with its context registers (UPCONn, UPSTAn,UPINRQn, and UPCFGn). Enabling a pipe is done by writing a one to the Pipe n Enable bit inthe Pipe Enable/Reset Register (UPRST.PENn).
When starting an enumeration, the user gets the device descriptor by sending anGET_DESCRIPTOR USB request. This descriptor contains the maximal packet size of thedevice default control endpoint (bMaxPacketSize0) which the user should use to reconfigure thesize of the default control pipe.
17.6.3.6 Address setupOnce the device has answered the first host requests with the default device address 0, the hostassigns a new address to the device. The host controller has to send a USB reset to the deviceand a SET_ADDRESS(addr) SETUP request with the new address to be used by the device.Once this SETUP transaction is over, the user writes to the device address field in the “controland s ta tus 1 o f endpo in t n ” word o f the hos t ’ s p ipe n in the USB descr ip to r(Pn_CTR_STA1.PDADDR). All following requests by this pipe will be performed using this newaddress.
36342023G–SAM–03/2014
ATSAM4L8/L4/L2
17.6.3.7 Remote wakeupWriting UHCON.SOFE to zero when in host mode will cause the USBC to cease sending SOF’son the USB bus and enter the Suspend state. The USB device will enter the Suspend state 3mslater.
The device can awaken the host by sending an Upstream Resume (remote wakeup feature).When the host detects a non-idle state on the USB bus, it sets the Host Wakeup interrupt bit(UHINT.HWUPI). If the non-idle bus state corresponds to an Upstream Resume (K state), theUpstream Resume Received Interrupt bit (UHINT.RXRSMI) is set and the user has to generatea Downstream Resume within 1ms and for at least 20ms. It is required to first enter the Readystate by writing a one to UHCON.SOFEF and then writing a one to the Send USB Resume bit(UHCON.RESUME).
17.6.3.8 RAM managementPipe data can be physically allocated anywhere in the embedded RAM. The USBC controlleraccesses the pipes directly through the HSB master (built-in DMA).
The USBC controller reads the USBC descriptors to know the location of each pipe. The baseaddress of this USBC descriptor (UDESC.UDESCA) needs to be written by the user. Thedescriptors can also be allocated anywhere in the embedded RAM.
Before using a pipe, the user should setup the data address for each bank. Depending on thedirection, pipe type, targeted device address, targeted endpoint number, and packet-mode (sin-gle or multi-packet), the user should also initialize the pipe packet size and the pipe control andstatus field, so that the USB controller does not compute random values from the RAM.
When using a pipe, the user should read the UPSTAX.CURRBK field to know which bank is cur-rently processed.
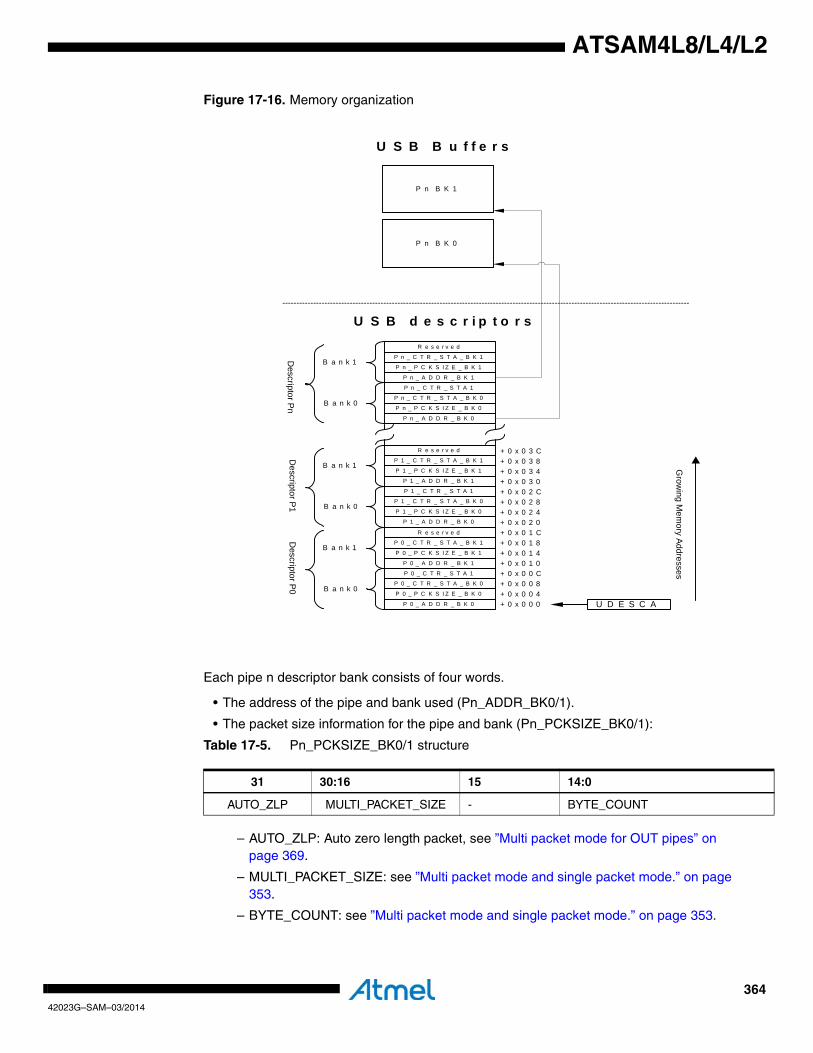
36442023G–SAM–03/2014
ATSAM4L8/L4/L2
Figure 17-16. Memory organization
Each pipe n descriptor bank consists of four words.
• The address of the pipe and bank used (Pn_ADDR_BK0/1).
• The packet size information for the pipe and bank (Pn_PCKSIZE_BK0/1):
Table 17-5. Pn_PCKSIZE_BK0/1 structure
– AUTO_ZLP: Auto zero length packet, see ”Multi packet mode for OUT pipes” on page 369.
– MULTI_PACKET_SIZE: see ”Multi packet mode and single packet mode.” on page 353.
– BYTE_COUNT: see ”Multi packet mode and single packet mode.” on page 353.
31 30:16 15 14:0
AUTO_ZLP MULTI_PACKET_SIZE - BYTE_COUNT
P n B K 0
P 0 _ C T R _ S T A _ B K 0
P 0 _ P C K S I Z E _ B K 0
P 0 _ A D D R _ B K 0 U D E S C A
Grow
ing Mem
ory Addresses
Descriptor P0
P 0 _ C T R _ S T A 1
P 0 _ C T R _ S T A _ B K 1
P 0 _ P C K S I Z E _ B K 1
P 0 _ A D D R _ B K 1
R e s e r v e d
B a n k 0
B a n k 1
+ 0 x 0 0 0+ 0 x 0 0 4+ 0 x 0 0 8+ 0 x 0 0 C+ 0 x 0 1 0+ 0 x 0 1 4+ 0 x 0 1 8+ 0 x 0 1 C
P 1 _ C T R _ S T A _ B K 0
P 1 _ P C K S I Z E _ B K 0
P 1 _ A D D R _ B K 0D
escriptor P1
P 1 _ C T R _ S T A 1
P 1 _ C T R _ S T A _ B K 1
P 1 _ P C K S I Z E _ B K 1
P 1 _ A D D R _ B K 1
R e s e r v e d
B a n k 0
B a n k 1
+ 0 x 0 2 0+ 0 x 0 2 4+ 0 x 0 2 8+ 0 x 0 2 C+ 0 x 0 3 0+ 0 x 0 3 4+ 0 x 0 3 8+ 0 x 0 3 C
P n _ C T R _ S T A _ B K 0
P n _ P C K S I Z E _ B K 0
P n _ A D D R _ B K 0
P n _ C T R _ S T A 1
P n _ C T R _ S T A _ B K 1
P n _ P C K S I Z E _ B K 1
P n _ A D D R _ B K 1
R e s e r v e d
B a n k 0
B a n k 1Descriptor P
n
P n B K 1
U S B d e s c r i p t o r s
U S B B u f f e r s
36542023G–SAM–03/2014
ATSAM4L8/L4/L2
• The control and status fields for the pipe and bank (Pn_CTR_STA_BK0/1):
Table 17-6. Pn_CTR_STA_BK0/1 structure
– UNDERF: Underflow status for isochronous/Interrupt IN transfers. This status bit is set by hardware at the current bank (where the IN packet should have been stored). When a new successful transaction occurs this bit is overwritten to zero if UPSTAX.ERRORFI has previously been cleared by software. See ”Data flow error” on page 369.
– OVERF: Overflow status for isochronous/interrupt OUT transfers. This status bit is set by hardware at the current bank (where the OUT packet should have been loaded). When a new successful transaction occurs this bit is overwritten to zero if UPSTAX.ERRORFI has previously been cleared by software. See ”Data flow error” on page 369.
– CRCERR: CRC error status for isochronous IN transfers. See ”CRC error” on page 369.
• The control and status 1 of endpoint n (Pn_CTR_STA1):
Table 17-7. Pn_CTR_STA1 structure
– PERSTA: Pipe Error Status. See “PERSTA structure” table.
– PERMAX: Should be set by the user. If the Pipe Error Counter (see Figure 17-8 on page 365) is larger than PERMAX, the UPSTAX.PERRI bit is set.
– PEPNUM: Should be set by the user. Endpoint number for this pipe.
– PDADDR: Should be set by the user. Device address for this pipe.
Table 17-8. PERSTA structure
This field can be cleared by software. To avoid read-modify-write issues, the user should: freezethe pipe, wait until the UPSTAX.PFREEZE is one, clear the PERSTA field in memory, and thenunfreeze the pipe.
– ERCNT: Pipe Error Counter.
– CRC16ER: Is set if a CRC16 error occurs during an isochronous IN transaction.
– TOUTER: Is set if a Time-out error occurs during a USB transaction.
– PIDER: Is set if a PID error occurs during a USB transaction.
– DAPIDER: Is set if a Data PID error occurs during a USB transaction.
31:19 18 17 16 15:0
Status Control
- UNDERF OVERF CRCERR -
31:24 23:16 15:12 11:8 7 6:0
Status Control
- PERSTA PERMAX PEPNUM - PDADDR
23:21 20 19 18 17 16
ERCNT CRC16ER TOUTER PIDER DAPIDER DTGLER
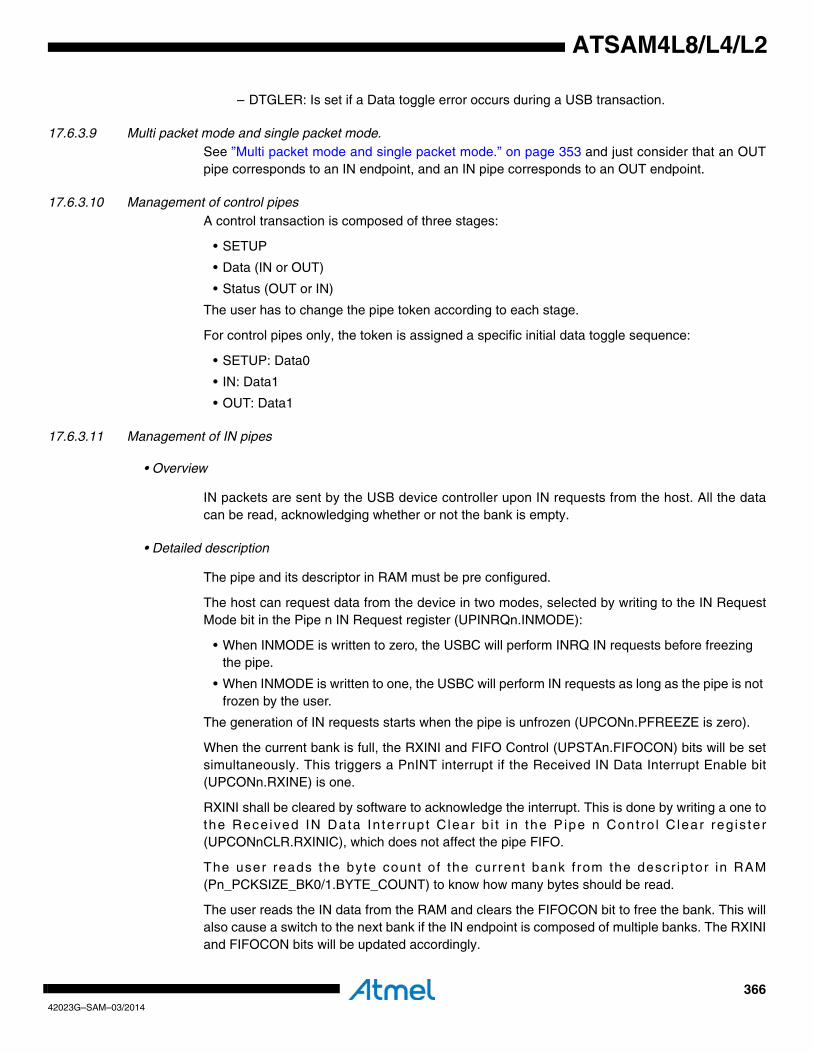
36642023G–SAM–03/2014
ATSAM4L8/L4/L2
– DTGLER: Is set if a Data toggle error occurs during a USB transaction.
17.6.3.9 Multi packet mode and single packet mode.See ”Multi packet mode and single packet mode.” on page 353 and just consider that an OUTpipe corresponds to an IN endpoint, and an IN pipe corresponds to an OUT endpoint.
17.6.3.10 Management of control pipesA control transaction is composed of three stages:
• SETUP
• Data (IN or OUT)
• Status (OUT or IN)
The user has to change the pipe token according to each stage.
For control pipes only, the token is assigned a specific initial data toggle sequence:
• SETUP: Data0
• IN: Data1
• OUT: Data1
17.6.3.11 Management of IN pipes
• Overview
IN packets are sent by the USB device controller upon IN requests from the host. All the datacan be read, acknowledging whether or not the bank is empty.
• Detailed description
The pipe and its descriptor in RAM must be pre configured.
The host can request data from the device in two modes, selected by writing to the IN RequestMode bit in the Pipe n IN Request register (UPINRQn.INMODE):
• When INMODE is written to zero, the USBC will perform INRQ IN requests before freezing the pipe.
• When INMODE is written to one, the USBC will perform IN requests as long as the pipe is not frozen by the user.
The generation of IN requests starts when the pipe is unfrozen (UPCONn.PFREEZE is zero).
When the current bank is full, the RXINI and FIFO Control (UPSTAn.FIFOCON) bits will be setsimultaneously. This triggers a PnINT interrupt if the Received IN Data Interrupt Enable bit(UPCONn.RXINE) is one.
RXINI shall be cleared by software to acknowledge the interrupt. This is done by writing a one tothe Rece ived IN Data In te r rup t C lear b i t in the P ipe n Cont ro l C lear reg is te r(UPCONnCLR.RXINIC), which does not affect the pipe FIFO.
The user reads the byte count of the current bank f rom the descr iptor in RAM(Pn_PCKSIZE_BK0/1.BYTE_COUNT) to know how many bytes should be read.
The user reads the IN data from the RAM and clears the FIFOCON bit to free the bank. This willalso cause a switch to the next bank if the IN endpoint is composed of multiple banks. The RXINIand FIFOCON bits will be updated accordingly.
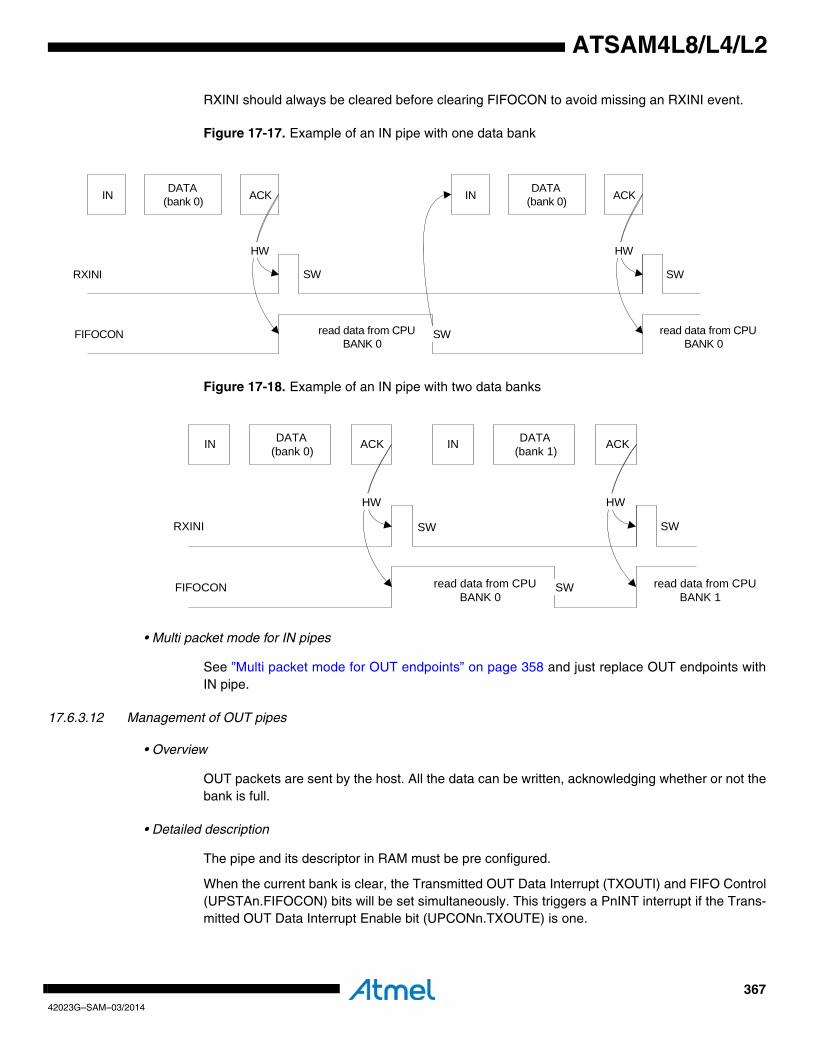
36742023G–SAM–03/2014
ATSAM4L8/L4/L2
RXINI should always be cleared before clearing FIFOCON to avoid missing an RXINI event.
Figure 17-17. Example of an IN pipe with one data bank
Figure 17-18. Example of an IN pipe with two data banks
• Multi packet mode for IN pipes
See ”Multi packet mode for OUT endpoints” on page 358 and just replace OUT endpoints withIN pipe.
17.6.3.12 Management of OUT pipes
• Overview
OUT packets are sent by the host. All the data can be written, acknowledging whether or not thebank is full.
• Detailed description
The pipe and its descriptor in RAM must be pre configured.
When the current bank is clear, the Transmitted OUT Data Interrupt (TXOUTI) and FIFO Control(UPSTAn.FIFOCON) bits will be set simultaneously. This triggers a PnINT interrupt if the Trans-mitted OUT Data Interrupt Enable bit (UPCONn.TXOUTE) is one.
IN DATA(bank 0) ACK
RXINI
FIFOCON
HW
IN DATA(bank 0) ACK
HW
SW
SW
SW
read data from CPUBANK 0
read data from CPUBANK 0
IN DATA(bank 0) ACK
RXINI
FIFOCON
HW
IN DATA(bank 1) ACK
SW
SWread data from CPUBANK 0
HW
SW
read data from CPUBANK 1
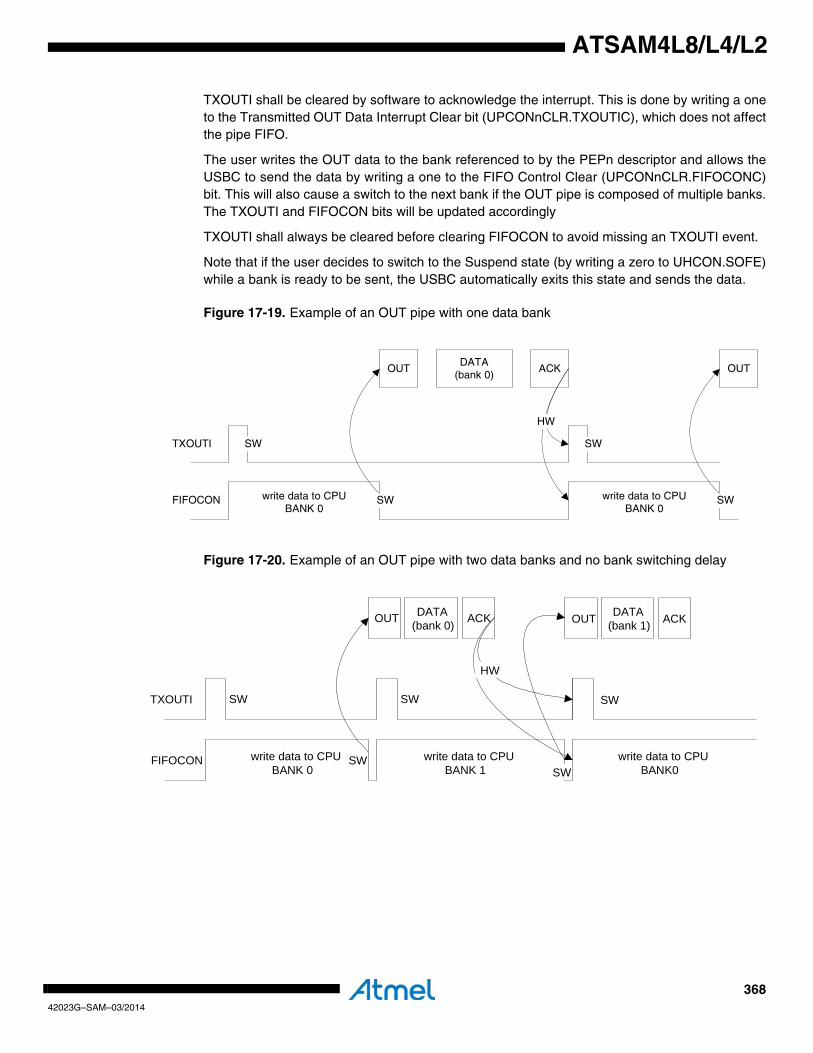
36842023G–SAM–03/2014
ATSAM4L8/L4/L2
TXOUTI shall be cleared by software to acknowledge the interrupt. This is done by writing a oneto the Transmitted OUT Data Interrupt Clear bit (UPCONnCLR.TXOUTIC), which does not affectthe pipe FIFO.
The user writes the OUT data to the bank referenced to by the PEPn descriptor and allows theUSBC to send the data by writing a one to the FIFO Control Clear (UPCONnCLR.FIFOCONC)bit. This will also cause a switch to the next bank if the OUT pipe is composed of multiple banks.The TXOUTI and FIFOCON bits will be updated accordingly
TXOUTI shall always be cleared before clearing FIFOCON to avoid missing an TXOUTI event.
Note that if the user decides to switch to the Suspend state (by writing a zero to UHCON.SOFE)while a bank is ready to be sent, the USBC automatically exits this state and sends the data.
Figure 17-19. Example of an OUT pipe with one data bank
Figure 17-20. Example of an OUT pipe with two data banks and no bank switching delay
OUTDATA
(bank 0)ACK
TXOUTI
FIFOCON
HW
write data to CPUBANK 0
SW
SW SW
SW
OUT
write data to CPUBANK 0
OUT DATA(bank 0) ACK
TXOUTI
FIFOCON write data to CPUBANK 0
SW
SW SW
SWwrite data to CPU
BANK 1
SW
HW
write data to CPUBANK0
OUT DATA(bank 1) ACK

36942023G–SAM–03/2014
ATSAM4L8/L4/L2
Figure 17-21. Example of an OUT pipe with two data banks and a bank switching delay
• Multi packet mode for OUT pipes
See section ”Multi packet mode for IN endpoints” on page 356 and just replace IN endpoints withOUT pipe.
17.6.3.13 Alternate pipeThe user has the possibility to run sequentially several logical pipes on the same physical pipe.
Before switching pipe, the user should save the pipe context (UPCFGn, UPCONn, UPSTAn,and the pipe descriptor table).
After switching pipe, the user should restore the pipe context, current bank number, and the cur-rent data toggle by using the UPCONn.INITDTGL and UPCONn.INITBK bits.
17.6.3.14 Data flow errorThis error exists only for isochronous and interrupt pipes for both IN and OUT directions. It setsthe Errorflow Interrupt (ERRORFI) bit in UPSTAn, which triggers an PnINT interrupt if the Error-f l ow In te r rup t Enab le (ERRORFE) b i t i s one . The user can check thePn_CTR_STA_BK0/1.UNDERF and OVERF bits in the pipe descriptor to see which currentbank has been affected.
• An overflow can occur during an OUT stage if the host attempts to send data from an empty bank. The pipe descriptor Pn_CTR_STA_BK0/1.OVERF points out the bank from which the OUT data should have originated. If the UPSTAn.ERRORFI bit is cleared and a new transaction is successful, the Pn_CTR_STA_BK0/1.OVERF bit will be cleared.
• An underflow can occur during an IN stage if the device tries to send a packet while the bank is full. Typically this occurs when a CPU is not fast enough. The packet data is not written to the bank and is lost. The pipe descriptor Pn_CTR_STA_BK0/1.UNDERF points out which bank the OUT data was destined to. If UPSTAn.UNDERFI is zero and a new successful transaction occurs, Pn_CTR_STA_BK0/1.UNDERF will be cleared.
17.6.3.15 CRC errorThis error exists only for isochronous IN pipes. It sets the CRC Error Interrupt bit (CRCERRI),which triggers a PnINT interrupt if the CRC Error Interrupt Enable bit (UPCONn.CRCERRE) isone.
OUT DATA(bank 0) ACK
TXOUTI
FIFOCON write data to CPUBANK 0
SW
SW SW
SW
OUT DATA(bank 1) ACK
write data to CPUBANK 1
SW
HW
write data to CPUBANK0
37042023G–SAM–03/2014
ATSAM4L8/L4/L2
A CRC error can occur during the IN stage if the USBC detects a corrupted packet. The INpacket will remain stored in the bank and RXINI will be set.
The user can check the Pn_CTR_STA_BK0/1.CRCERR bit in the pipe descriptor to see whichcurrent bank has been affected.
17.6.3.16 InterruptsThere are two kinds of host interrupts: processing, i.e. their generation is part of the normal pro-cessing, and exception, i.e. errors not related to CPU exceptions.
• Global interrupts
The processing host global interrupts are:
• The Device Connection Interrupt (DCONNI)
• The Device Disconnection Interrupt (DDISCI)
• The USB Reset Sent Interrupt (RSTI)
• The Downstream Resume Sent Interrupt (RSMEDI)
• The Upstream Resume Received Interrupt (RXRSMI)
• The Host Start of Frame Interrupt (HSOFI)
• The Host Wakeup Interrupt (HWUPI)
• The Pipe n Interrupt (PnINT)
There is no exception host global interrupt.
• Pipe interrupts
The processing host pipe interrupts are:
• The Received IN Data Interrupt (RXINI)
• The Transmitted OUT Data Interrupt (TXOUTI)
• The Transmitted SETUP Interrupt (TXSTPI)
• The Number of Busy Banks (NBUSYBK) interrupt
The exception host pipe interrupts are:
• The Errorflow Interrupt (ERRORFI)
• The Pipe Error Interrupt (PERRI)
• The NAKed Interrupt (NAKEDI)
• The Received STALLed Interrupt (RXSTALLDI)
• The CRC Error Interrupt (CRCERRI)

37142023G–SAM–03/2014
ATSAM4L8/L4/L2
17.7 User Interface
Table 17-9. USBC Register Memory Map
Offset Register Register Name Access Reset
0x0000 Device General Control Register UDCON Read/Write 0x00000100
0x0004 Device Global Interrupt Register UDINT Read-Only 0x00000000
0x0008 Device Global Interrupt Clear Register UDINTCLR Write-Only 0x00000000
0x000C Device Global Interrupt Set Register UDINTSET Write-Only 0x00000000
0x0010 Device Global Interrupt Enable Register UDINTE Read-Only 0x00000000
0x0014 Device Global Interrupt Enable Clear Register UDINTECLR Write-Only 0x00000000
0x0018 Device Global Interrupt Enable Set Register UDINTESET Write-Only 0x00000000
0x001C Endpoint Enable/Reset Register UERST Read/Write 0x00000000
0x0020 Device Frame Number Register UDFNUM Read-Only 0x00000000
0x0100 + n*4 Endpoint n Configuration Register UECFGn Read/Write 0x00000000
0x0130 + n*4 Endpoint n Status Register UESTAn Read-Only 0x00000100
0x0160 + n*4 Endpoint n Status Clear Register UESTAnCLR Write-Only 0x00000000
0x0190 + n*4 Endpoint n Status Set Register UESTAnSET Write-Only 0x00000000
0x01C0 + n*4 Endpoint n Control Register UECONn Read-Only 0x00000000
0x01F0 + n*4 Endpoint n Control Set Register UECONnSET Write-Only 0x00000000
0x0220 + n*4 Endpoint n Control Clear Register UECONnCLR Write-Only 0x00000000
0x0400 Host General Control Register UHCON Read/Write 0x00000000
0x0404 Host Global Interrupt Register UHINT Read-Only 0x00000000
0x0408 Host Global Interrupt Clear Register UHINTCLR Write-Only 0x00000000
0x040C Host Global Interrupt Set Register UHINTSET Write-Only 0x00000000
0x0410 Host Global Interrupt Enable Register UHINTE Read-Only 0x00000000
0x0414 Host Global Interrupt Enable Clear Register UHINTECLR Write-Only 0x00000000
0x0418 Host Global Interrupt Enable Set Register UHINTESET Write-Only 0x00000000
0x0041C Pipe Enable/Reset Register UPRST Read/Write 0x00000000
0x0420 Host Frame Number Register UHFNUM Read/Write 0x00000000
0x0424 Host Start Of Frame Control Register UHSOFC Read/Write 0x00000000
0x0500 + n*4 Pipe n Configuration Register UPCFGn Read/Write 0x00000000
0x0530 + n*4 Pipe n Status Register UPSTAn Read-Only 0x00000000
0x0560 + n*4 Pipe n Status Clear Register UPSTAnCLR Write-Only 0x00000000
0x0590 + n*4 Pipe n Status Set Register UPSTAnSET Write-Only 0x00000000
0x05C0 + n*4 Pipe n Control Register UPCONn Read-Only 0x00000000
0x05F0 +n*4 Pipe n Control Set Register UPCONnSET Write-Only 0x00000000
0x0620 + n*4 Pipe n Control Clear Register UPCONnCLR Write-Only 0x00000000
0x0650 + n*4 Pipe n IN Request Register UPINRQn Read/Write 0x00000001
0x0800 General Control Register USBCON Read/Write 0x03004000
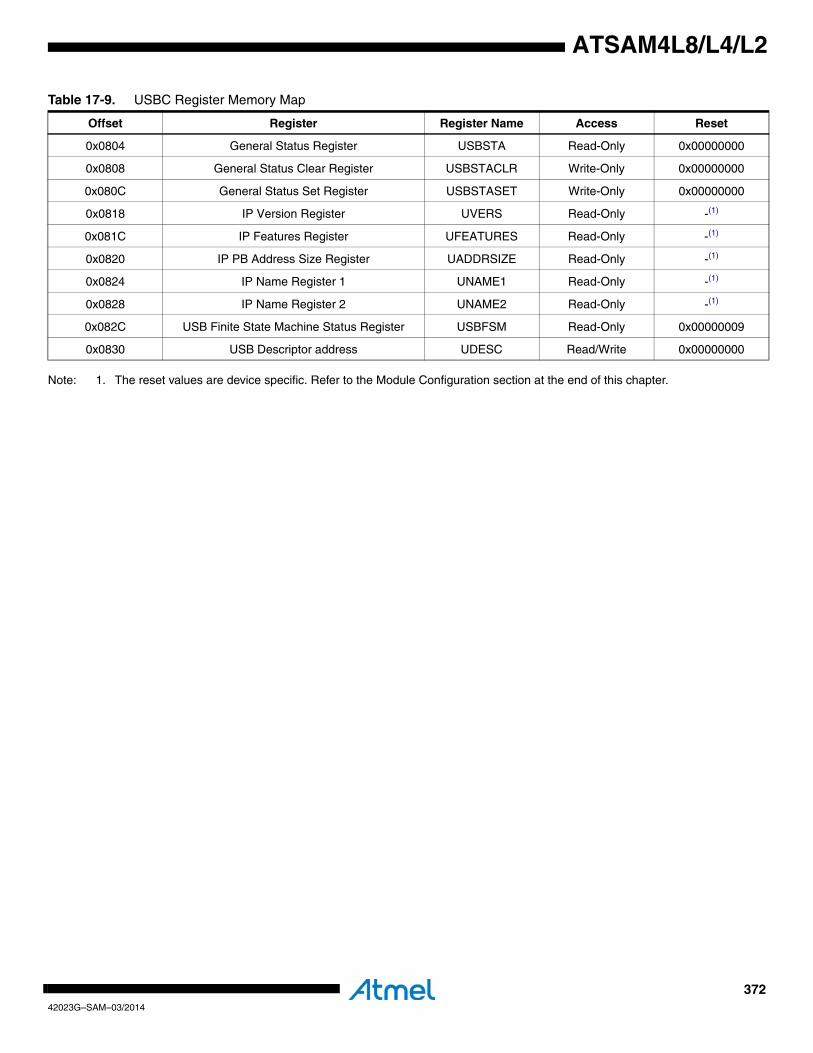
37242023G–SAM–03/2014
ATSAM4L8/L4/L2
Note: 1. The reset values are device specific. Refer to the Module Configuration section at the end of this chapter.
0x0804 General Status Register USBSTA Read-Only 0x00000000
0x0808 General Status Clear Register USBSTACLR Write-Only 0x00000000
0x080C General Status Set Register USBSTASET Write-Only 0x00000000
0x0818 IP Version Register UVERS Read-Only -(1)
0x081C IP Features Register UFEATURES Read-Only -(1)
0x0820 IP PB Address Size Register UADDRSIZE Read-Only -(1)
0x0824 IP Name Register 1 UNAME1 Read-Only -(1)
0x0828 IP Name Register 2 UNAME2 Read-Only -(1)
0x082C USB Finite State Machine Status Register USBFSM Read-Only 0x00000009
0x0830 USB Descriptor address UDESC Read/Write 0x00000000
Table 17-9. USBC Register Memory Map
Offset Register Register Name Access Reset
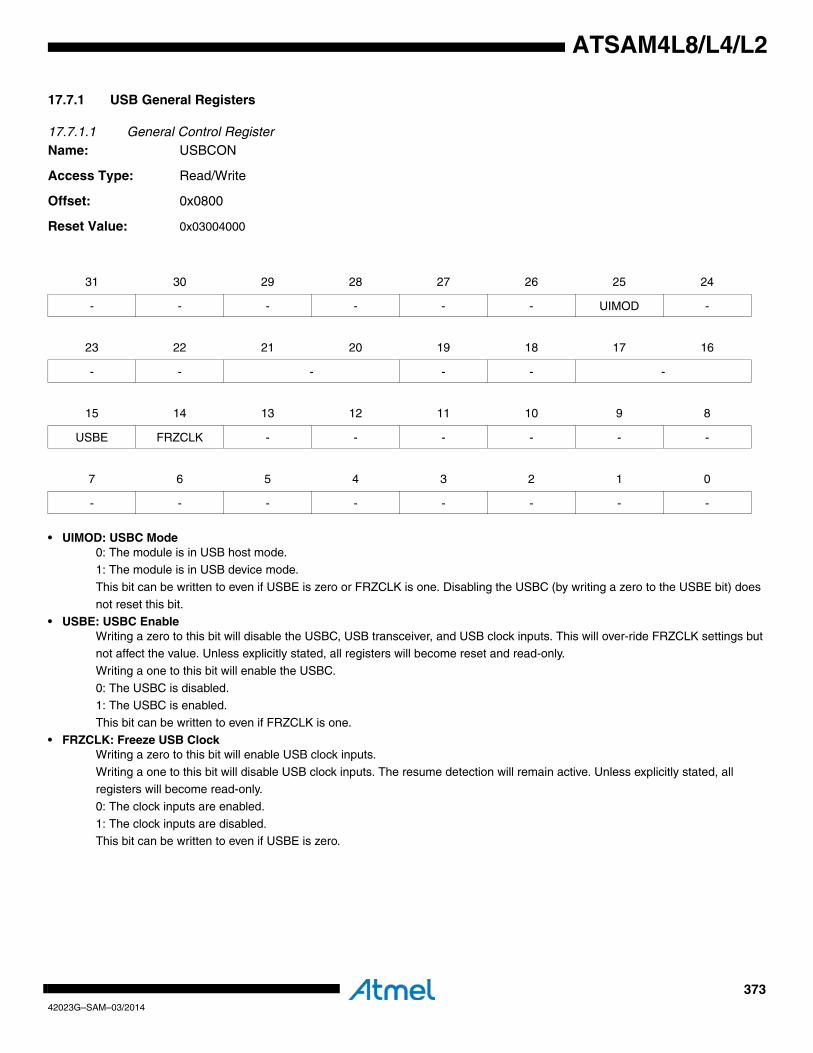
37342023G–SAM–03/2014
ATSAM4L8/L4/L2
17.7.1 USB General Registers
17.7.1.1 General Control RegisterName: USBCON
Access Type: Read/Write
Offset: 0x0800
Reset Value: 0x03004000
• UIMOD: USBC Mode0: The module is in USB host mode.1: The module is in USB device mode.
This bit can be written to even if USBE is zero or FRZCLK is one. Disabling the USBC (by writing a zero to the USBE bit) does
not reset this bit.• USBE: USBC Enable
Writing a zero to this bit will disable the USBC, USB transceiver, and USB clock inputs. This will over-ride FRZCLK settings but not affect the value. Unless explicitly stated, all registers will become reset and read-only.
Writing a one to this bit will enable the USBC.
0: The USBC is disabled.1: The USBC is enabled.
This bit can be written to even if FRZCLK is one.
• FRZCLK: Freeze USB ClockWriting a zero to this bit will enable USB clock inputs.
Writing a one to this bit will disable USB clock inputs. The resume detection will remain active. Unless explicitly stated, all registers will become read-only.
0: The clock inputs are enabled.
1: The clock inputs are disabled. This bit can be written to even if USBE is zero.
31 30 29 28 27 26 25 24
- - - - - - UIMOD -
23 22 21 20 19 18 17 16
- - - - - -
15 14 13 12 11 10 9 8
USBE FRZCLK - - - - - -
7 6 5 4 3 2 1 0
- - - - - - - -
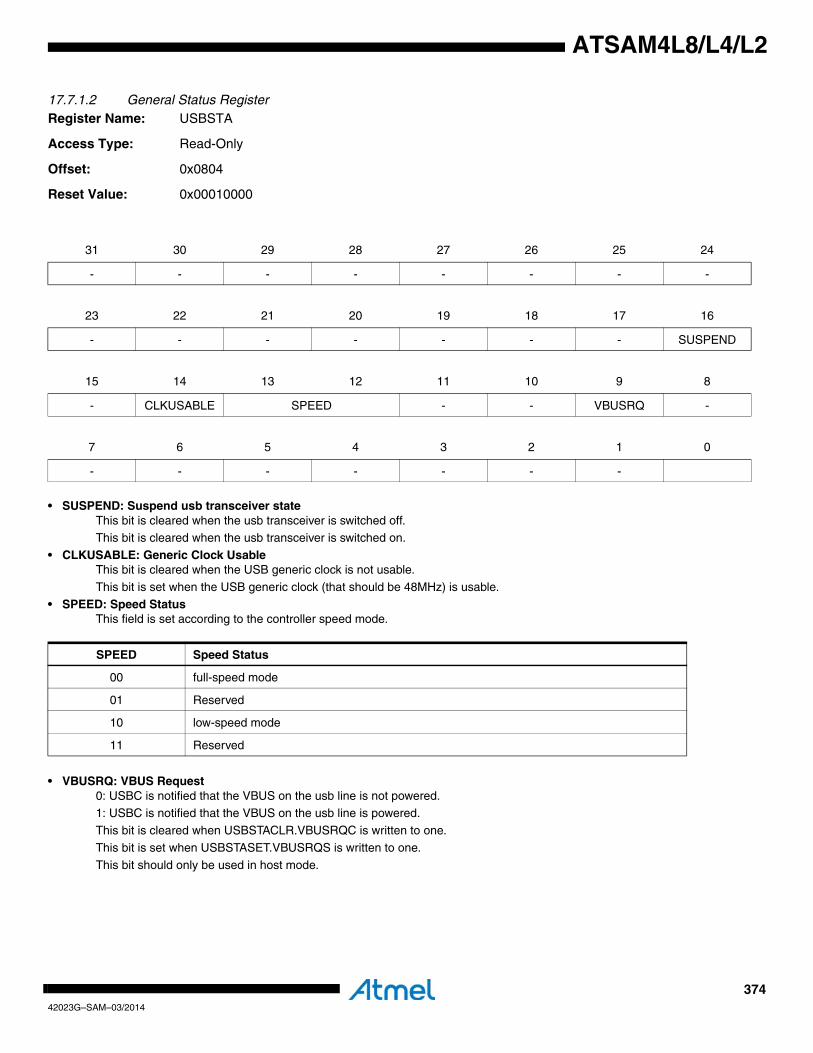
37442023G–SAM–03/2014
ATSAM4L8/L4/L2
17.7.1.2 General Status Register Register Name: USBSTA
Access Type: Read-Only
Offset: 0x0804
Reset Value: 0x00010000
• SUSPEND: Suspend usb transceiver stateThis bit is cleared when the usb transceiver is switched off.This bit is cleared when the usb transceiver is switched on.
• CLKUSABLE: Generic Clock UsableThis bit is cleared when the USB generic clock is not usable.
This bit is set when the USB generic clock (that should be 48MHz) is usable.
• SPEED: Speed StatusThis field is set according to the controller speed mode.
• VBUSRQ: VBUS Request0: USBC is notified that the VBUS on the usb line is not powered.1: USBC is notified that the VBUS on the usb line is powered.
This bit is cleared when USBSTACLR.VBUSRQC is written to one.
This bit is set when USBSTASET.VBUSRQS is written to one.
This bit should only be used in host mode.
31 30 29 28 27 26 25 24
- - - - - - - -
23 22 21 20 19 18 17 16
- - - - - - - SUSPEND
15 14 13 12 11 10 9 8
- CLKUSABLE SPEED - - VBUSRQ -
7 6 5 4 3 2 1 0
- - - - - - -
SPEED Speed Status
00 full-speed mode
01 Reserved
10 low-speed mode
11 Reserved

37542023G–SAM–03/2014
ATSAM4L8/L4/L2
17.7.1.3 General Status Clear RegisterRegister Name: USBSTACLR
Access Type: Write-Only
Offset: 0x0808
Reset Value: 0x00000000
Writing a zero to a bit in this register has no effect.
Writing a one to a bit in this register will clear the corresponding bit in USBSTA.
These bits always read as zero.
31 30 29 28 27 26 25 24
- - - - - - - -
23 22 21 20 19 18 17 16
- - - - - - - -
15 14 13 12 11 10 9 8
- - - - - - VBUSRQC -
7 6 5 4 3 2 1 0
- - - - - - - -

37642023G–SAM–03/2014
ATSAM4L8/L4/L2
17.7.1.4 General Status Set RegisterRegister Name: USBSTASET
Access Type: Write-Only
Offset: 0x080C
Reset Value: 0x00000000
Writing a zero to a bit in this register has no effect.
Writing a one to a bit in this register will set the corresponding bit in USBSTA.
These bits always read as zero.
31 30 29 28 27 26 25 24
- - - - - - - -
23 22 21 20 19 18 17 16
- - - - - - - -
15 14 13 12 11 10 9 8
- - - - - - VBUSRQS -
7 6 5 4 3 2 1 0
- - - - - - - -
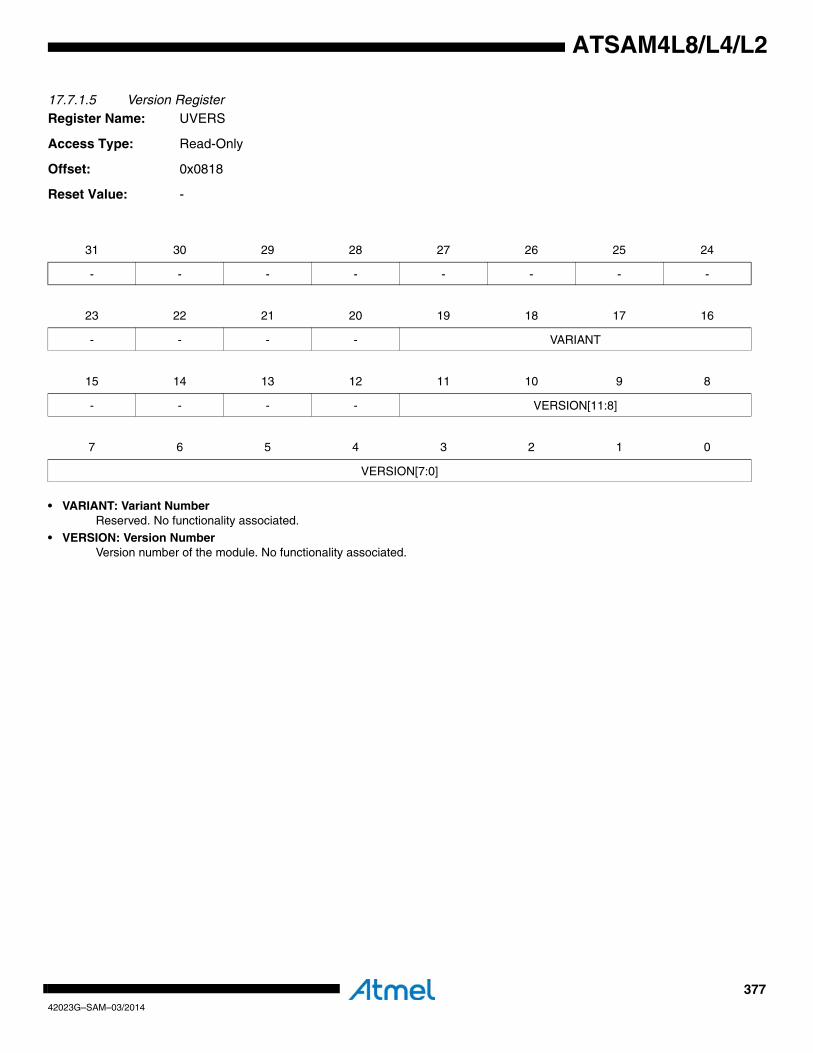
37742023G–SAM–03/2014
ATSAM4L8/L4/L2
17.7.1.5 Version RegisterRegister Name: UVERS
Access Type: Read-Only
Offset: 0x0818
Reset Value: -
• VARIANT: Variant NumberReserved. No functionality associated.
• VERSION: Version NumberVersion number of the module. No functionality associated.
31 30 29 28 27 26 25 24
- - - - - - - -
23 22 21 20 19 18 17 16
- - - - VARIANT
15 14 13 12 11 10 9 8
- - - - VERSION[11:8]
7 6 5 4 3 2 1 0
VERSION[7:0]
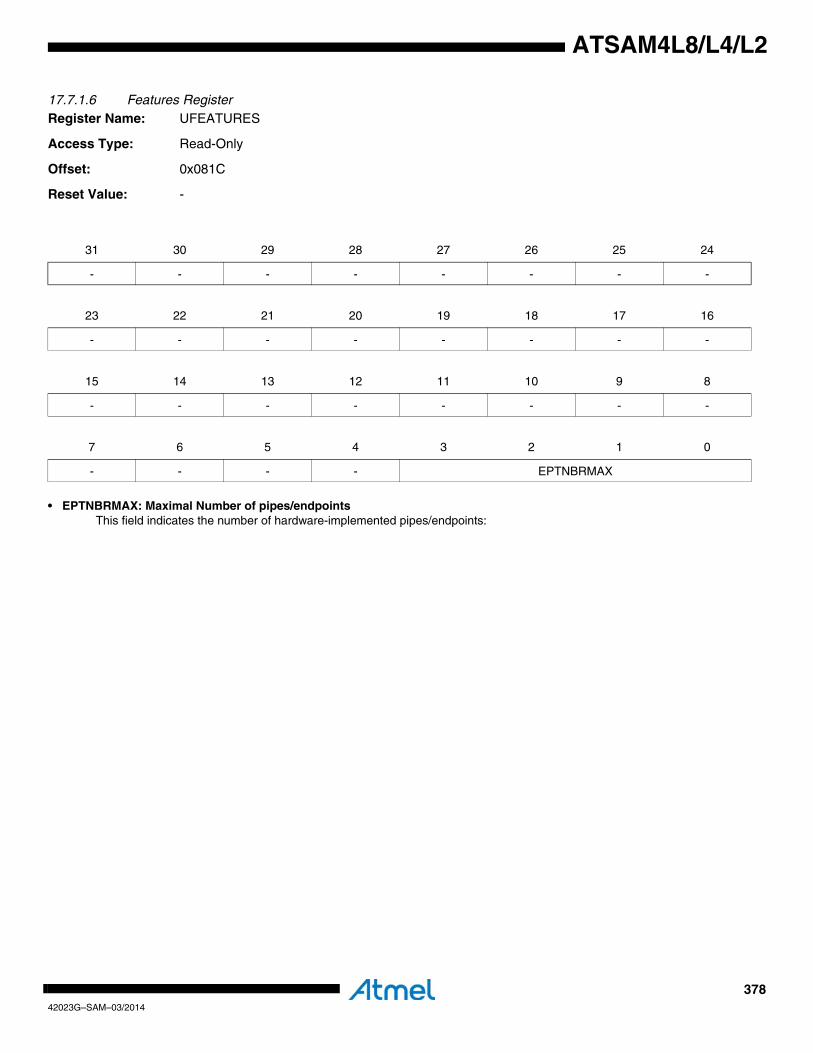
37842023G–SAM–03/2014
ATSAM4L8/L4/L2
17.7.1.6 Features RegisterRegister Name: UFEATURES
Access Type: Read-Only
Offset: 0x081C
Reset Value: -
• EPTNBRMAX: Maximal Number of pipes/endpointsThis field indicates the number of hardware-implemented pipes/endpoints:
31 30 29 28 27 26 25 24
- - - - - - - -
23 22 21 20 19 18 17 16
- - - - - - - -
15 14 13 12 11 10 9 8
- - - - - - - -
7 6 5 4 3 2 1 0
- - - - EPTNBRMAX
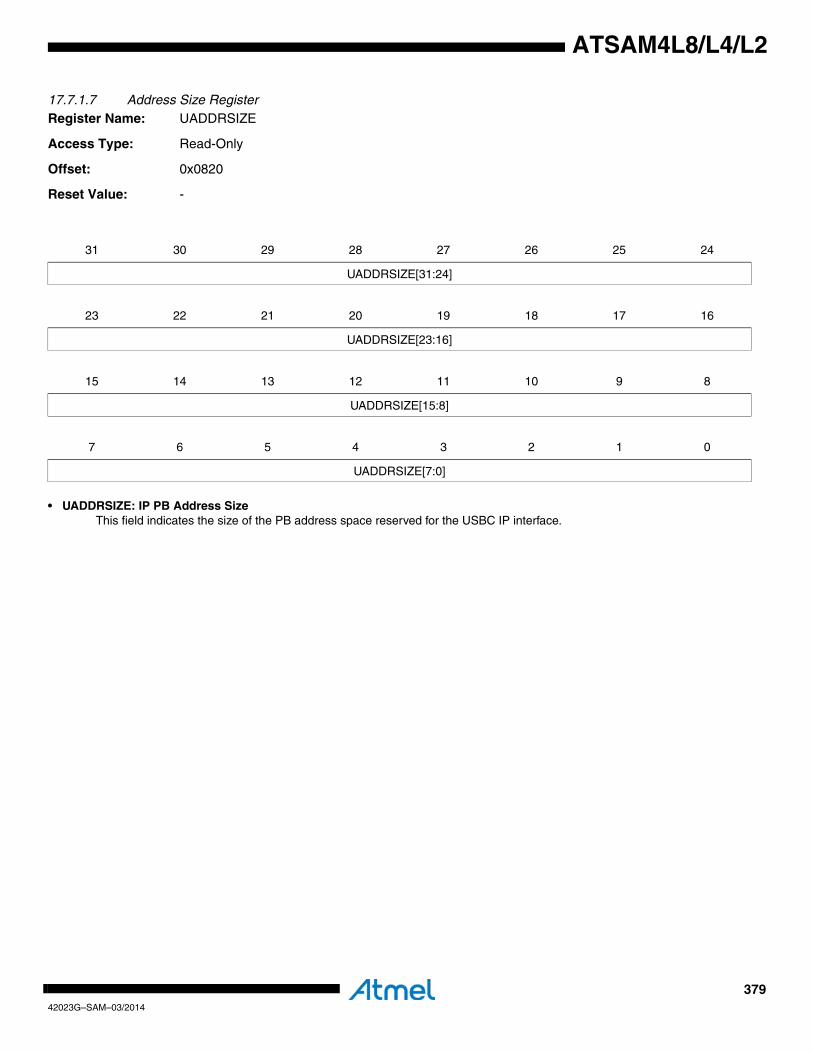
37942023G–SAM–03/2014
ATSAM4L8/L4/L2
17.7.1.7 Address Size RegisterRegister Name: UADDRSIZE
Access Type: Read-Only
Offset: 0x0820
Reset Value: -
• UADDRSIZE: IP PB Address SizeThis field indicates the size of the PB address space reserved for the USBC IP interface.
31 30 29 28 27 26 25 24
UADDRSIZE[31:24]
23 22 21 20 19 18 17 16
UADDRSIZE[23:16]
15 14 13 12 11 10 9 8
UADDRSIZE[15:8]
7 6 5 4 3 2 1 0
UADDRSIZE[7:0]

38042023G–SAM–03/2014
ATSAM4L8/L4/L2
17.7.1.8 IP Name Register 1Register Name: UNAME1
Access Type: Read-Only
Offset: 0x0824
Reset Value: -
• UNAME1: IP Name Part OneThis field indicates the first part of the ASCII-encoded name of the USBC IP.
31 30 29 28 27 26 25 24
UNAME1[31:24]
23 22 21 20 19 18 17 16
UNAME1[23:16]
15 14 13 12 11 10 9 8
UNAME1[15:8]
7 6 5 4 3 2 1 0
UNAME1[7:0]
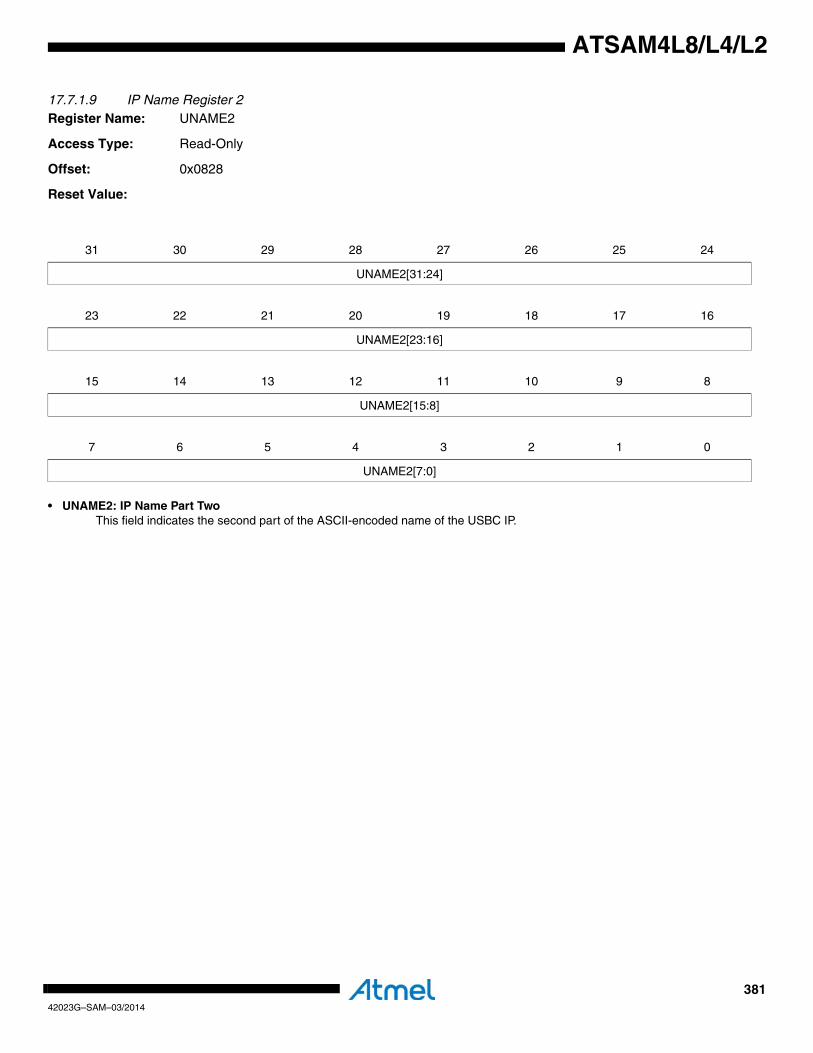
38142023G–SAM–03/2014
ATSAM4L8/L4/L2
17.7.1.9 IP Name Register 2Register Name: UNAME2
Access Type: Read-Only
Offset: 0x0828
Reset Value:
• UNAME2: IP Name Part TwoThis field indicates the second part of the ASCII-encoded name of the USBC IP.
31 30 29 28 27 26 25 24
UNAME2[31:24]
23 22 21 20 19 18 17 16
UNAME2[23:16]
15 14 13 12 11 10 9 8
UNAME2[15:8]
7 6 5 4 3 2 1 0
UNAME2[7:0]
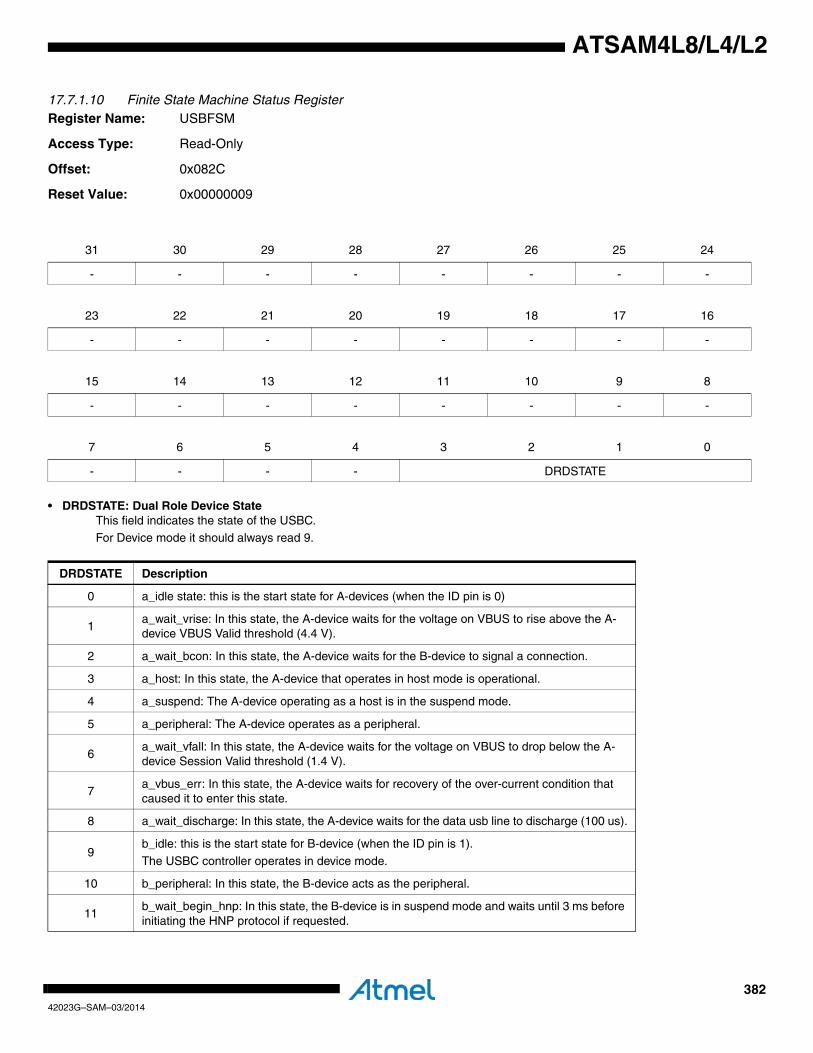
38242023G–SAM–03/2014
ATSAM4L8/L4/L2
17.7.1.10 Finite State Machine Status RegisterRegister Name: USBFSM
Access Type: Read-Only
Offset: 0x082C
Reset Value: 0x00000009
• DRDSTATE: Dual Role Device StateThis field indicates the state of the USBC.For Device mode it should always read 9.
31 30 29 28 27 26 25 24
- - - - - - - -
23 22 21 20 19 18 17 16
- - - - - - - -
15 14 13 12 11 10 9 8
- - - - - - - -
7 6 5 4 3 2 1 0
- - - - DRDSTATE
DRDSTATE Description
0 a_idle state: this is the start state for A-devices (when the ID pin is 0)
1a_wait_vrise: In this state, the A-device waits for the voltage on VBUS to rise above the A-device VBUS Valid threshold (4.4 V).
2 a_wait_bcon: In this state, the A-device waits for the B-device to signal a connection.
3 a_host: In this state, the A-device that operates in host mode is operational.
4 a_suspend: The A-device operating as a host is in the suspend mode.
5 a_peripheral: The A-device operates as a peripheral.
6a_wait_vfall: In this state, the A-device waits for the voltage on VBUS to drop below the A-device Session Valid threshold (1.4 V).
7a_vbus_err: In this state, the A-device waits for recovery of the over-current condition that caused it to enter this state.
8 a_wait_discharge: In this state, the A-device waits for the data usb line to discharge (100 us).
9b_idle: this is the start state for B-device (when the ID pin is 1).
The USBC controller operates in device mode.
10 b_peripheral: In this state, the B-device acts as the peripheral.
11b_wait_begin_hnp: In this state, the B-device is in suspend mode and waits until 3 ms before initiating the HNP protocol if requested.

38342023G–SAM–03/2014
ATSAM4L8/L4/L2
12b_wait_discharge: In this state, the B-device waits for the data usb line to discharge (100 us) before becoming Host.
13b_wait_acon: In this state, the B-device waits for the A-device to signal a connect before becoming B-Host.
14 b_host: In this state, the B-device acts as the Host.
15 b_srp_init: In this state, the B-device attempts to start a session using the SRP protocol.
DRDSTATE Description
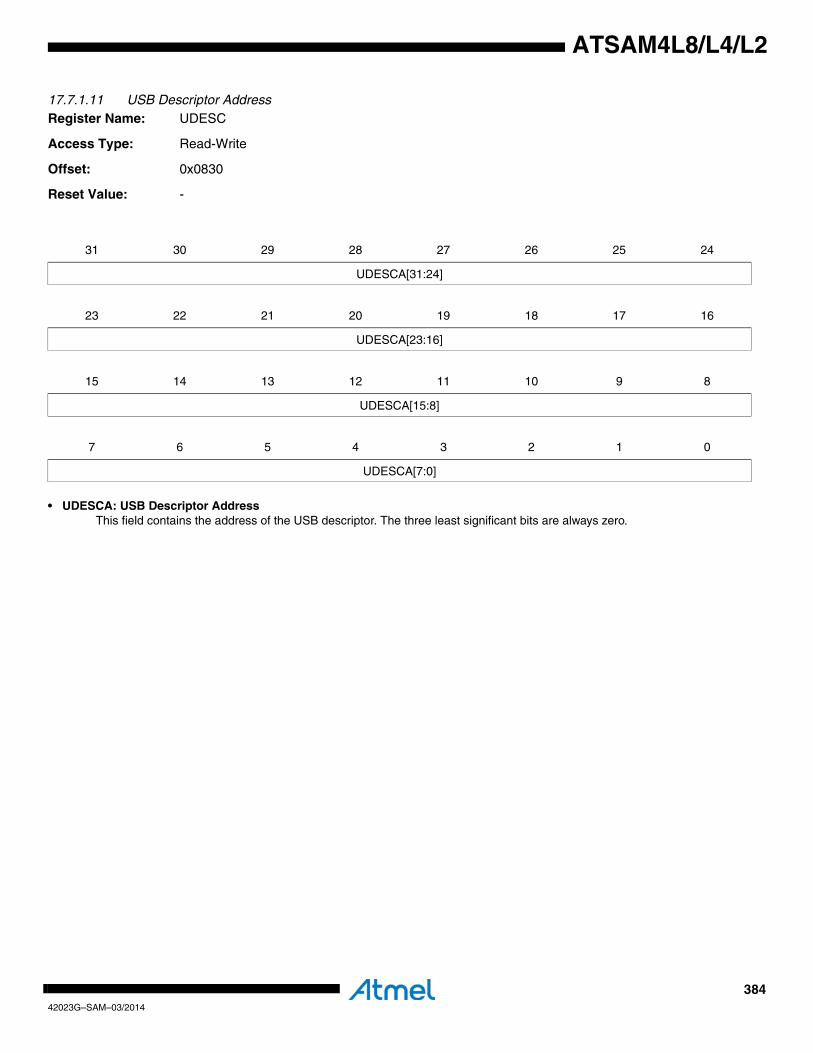
38442023G–SAM–03/2014
ATSAM4L8/L4/L2
17.7.1.11 USB Descriptor AddressRegister Name: UDESC
Access Type: Read-Write
Offset: 0x0830
Reset Value: -
• UDESCA: USB Descriptor AddressThis field contains the address of the USB descriptor. The three least significant bits are always zero.
31 30 29 28 27 26 25 24
UDESCA[31:24]
23 22 21 20 19 18 17 16
UDESCA[23:16]
15 14 13 12 11 10 9 8
UDESCA[15:8]
7 6 5 4 3 2 1 0
UDESCA[7:0]
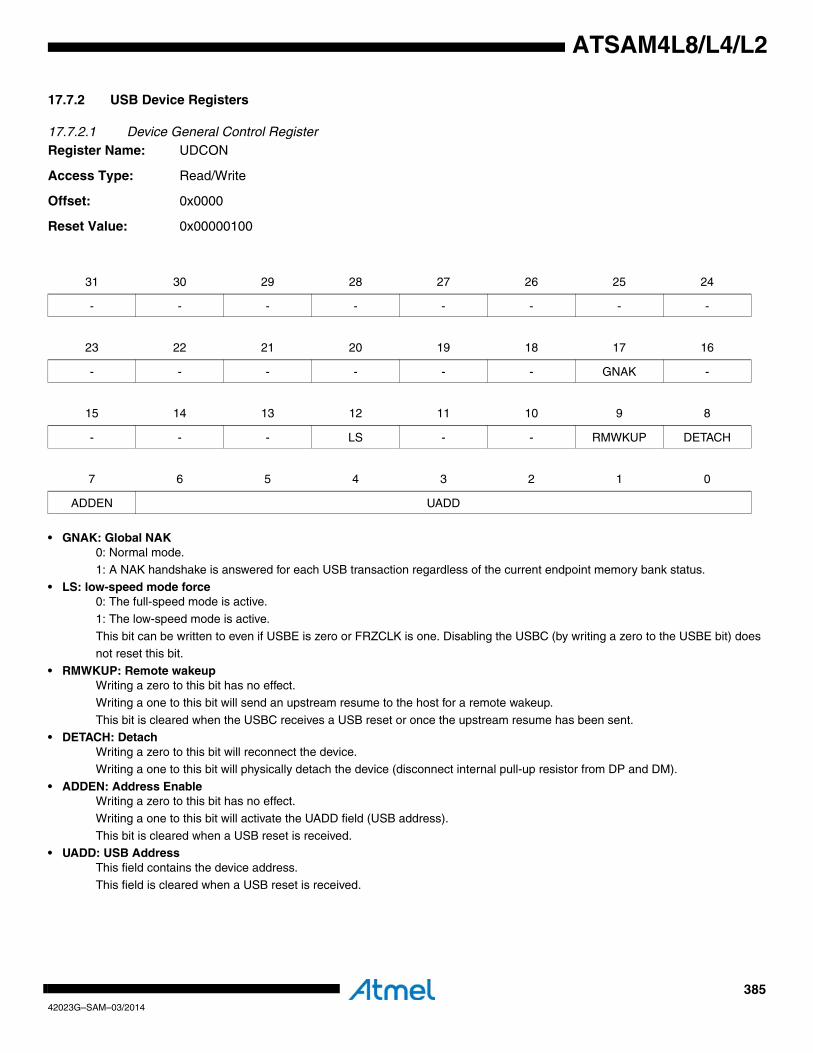
38542023G–SAM–03/2014
ATSAM4L8/L4/L2
17.7.2 USB Device Registers
17.7.2.1 Device General Control Register Register Name: UDCON
Access Type: Read/Write
Offset: 0x0000
Reset Value: 0x00000100
• GNAK: Global NAK0: Normal mode.1: A NAK handshake is answered for each USB transaction regardless of the current endpoint memory bank status.
• LS: low-speed mode force0: The full-speed mode is active.
1: The low-speed mode is active.
This bit can be written to even if USBE is zero or FRZCLK is one. Disabling the USBC (by writing a zero to the USBE bit) does not reset this bit.
• RMWKUP: Remote wakeupWriting a zero to this bit has no effect.
Writing a one to this bit will send an upstream resume to the host for a remote wakeup.
This bit is cleared when the USBC receives a USB reset or once the upstream resume has been sent.• DETACH: Detach
Writing a zero to this bit will reconnect the device.Writing a one to this bit will physically detach the device (disconnect internal pull-up resistor from DP and DM).
• ADDEN: Address EnableWriting a zero to this bit has no effect.
Writing a one to this bit will activate the UADD field (USB address).
This bit is cleared when a USB reset is received.• UADD: USB Address
This field contains the device address.
This field is cleared when a USB reset is received.
31 30 29 28 27 26 25 24
- - - - - - - -
23 22 21 20 19 18 17 16
- - - - - - GNAK -
15 14 13 12 11 10 9 8
- - - LS - - RMWKUP DETACH
7 6 5 4 3 2 1 0
ADDEN UADD
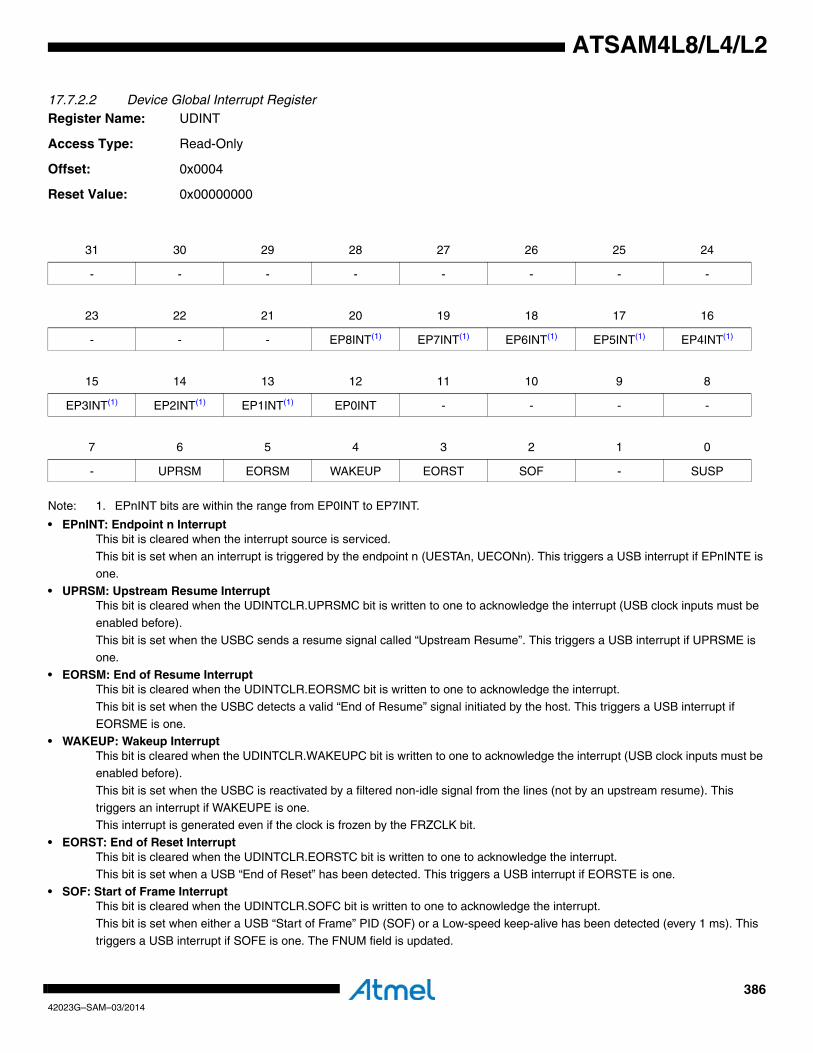
38642023G–SAM–03/2014
ATSAM4L8/L4/L2
17.7.2.2 Device Global Interrupt RegisterRegister Name: UDINT
Access Type: Read-Only
Offset: 0x0004
Reset Value: 0x00000000
Note: 1. EPnINT bits are within the range from EP0INT to EP7INT.
• EPnINT: Endpoint n InterruptThis bit is cleared when the interrupt source is serviced.
This bit is set when an interrupt is triggered by the endpoint n (UESTAn, UECONn). This triggers a USB interrupt if EPnINTE is one.
• UPRSM: Upstream Resume InterruptThis bit is cleared when the UDINTCLR.UPRSMC bit is written to one to acknowledge the interrupt (USB clock inputs must be
enabled before).
This bit is set when the USBC sends a resume signal called “Upstream Resume”. This triggers a USB interrupt if UPRSME is one.
• EORSM: End of Resume InterruptThis bit is cleared when the UDINTCLR.EORSMC bit is written to one to acknowledge the interrupt.
This bit is set when the USBC detects a valid “End of Resume” signal initiated by the host. This triggers a USB interrupt if
EORSME is one.• WAKEUP: Wakeup Interrupt
This bit is cleared when the UDINTCLR.WAKEUPC bit is written to one to acknowledge the interrupt (USB clock inputs must be enabled before).
This bit is set when the USBC is reactivated by a filtered non-idle signal from the lines (not by an upstream resume). This
triggers an interrupt if WAKEUPE is one.This interrupt is generated even if the clock is frozen by the FRZCLK bit.
• EORST: End of Reset InterruptThis bit is cleared when the UDINTCLR.EORSTC bit is written to one to acknowledge the interrupt.This bit is set when a USB “End of Reset” has been detected. This triggers a USB interrupt if EORSTE is one.
• SOF: Start of Frame InterruptThis bit is cleared when the UDINTCLR.SOFC bit is written to one to acknowledge the interrupt.
This bit is set when either a USB “Start of Frame” PID (SOF) or a Low-speed keep-alive has been detected (every 1 ms). This
triggers a USB interrupt if SOFE is one. The FNUM field is updated.
31 30 29 28 27 26 25 24
- - - - - - - -
23 22 21 20 19 18 17 16
- - - EP8INT(1) EP7INT(1) EP6INT(1) EP5INT(1) EP4INT(1)
15 14 13 12 11 10 9 8
EP3INT(1) EP2INT(1) EP1INT(1) EP0INT - - - -
7 6 5 4 3 2 1 0
- UPRSM EORSM WAKEUP EORST SOF - SUSP

38742023G–SAM–03/2014
ATSAM4L8/L4/L2
• SUSP: Suspend InterruptThis bit is cleared when the UDINTCLR.SUSPC bit is written to one to acknowledge the interrupt.
This bit is set when a USB “Suspend” idle bus state has been detected for 3 frame periods (J state for 3 ms). This triggers a USB interrupt if SUSPE is one.
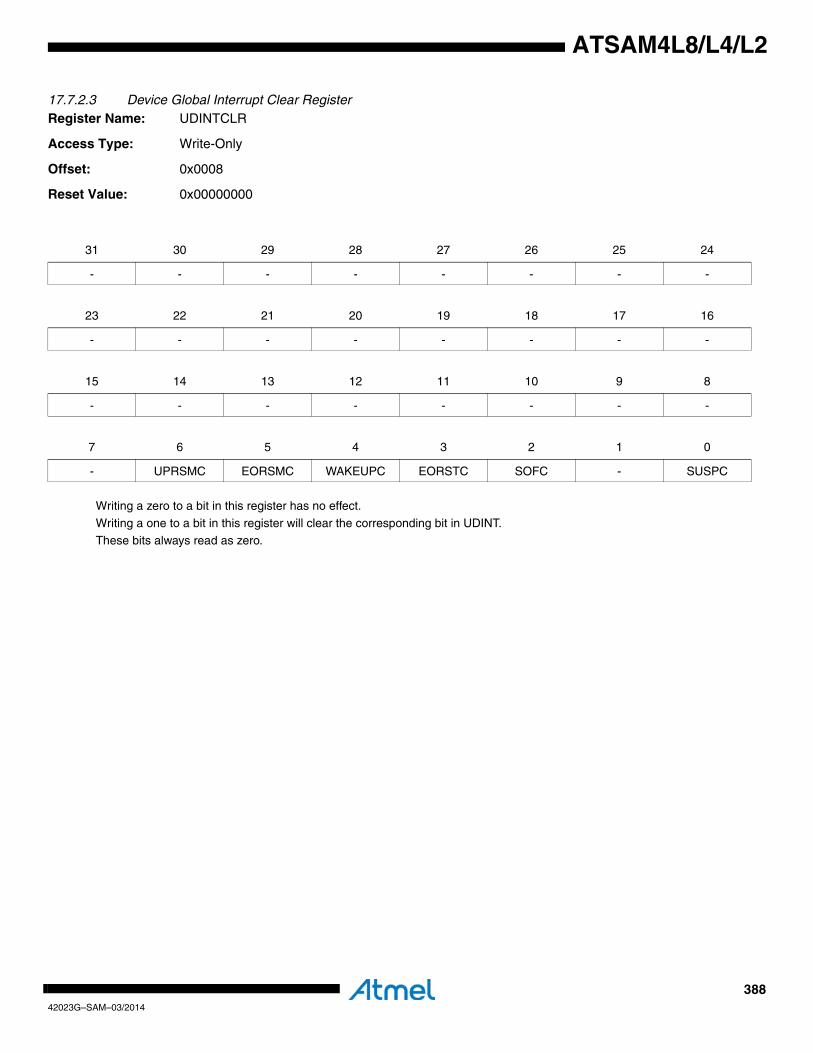
38842023G–SAM–03/2014
ATSAM4L8/L4/L2
17.7.2.3 Device Global Interrupt Clear Register Register Name: UDINTCLR
Access Type: Write-Only
Offset: 0x0008
Reset Value: 0x00000000
Writing a zero to a bit in this register has no effect.
Writing a one to a bit in this register will clear the corresponding bit in UDINT.
These bits always read as zero.
31 30 29 28 27 26 25 24
- - - - - - - -
23 22 21 20 19 18 17 16
- - - - - - - -
15 14 13 12 11 10 9 8
- - - - - - - -
7 6 5 4 3 2 1 0
- UPRSMC EORSMC WAKEUPC EORSTC SOFC - SUSPC
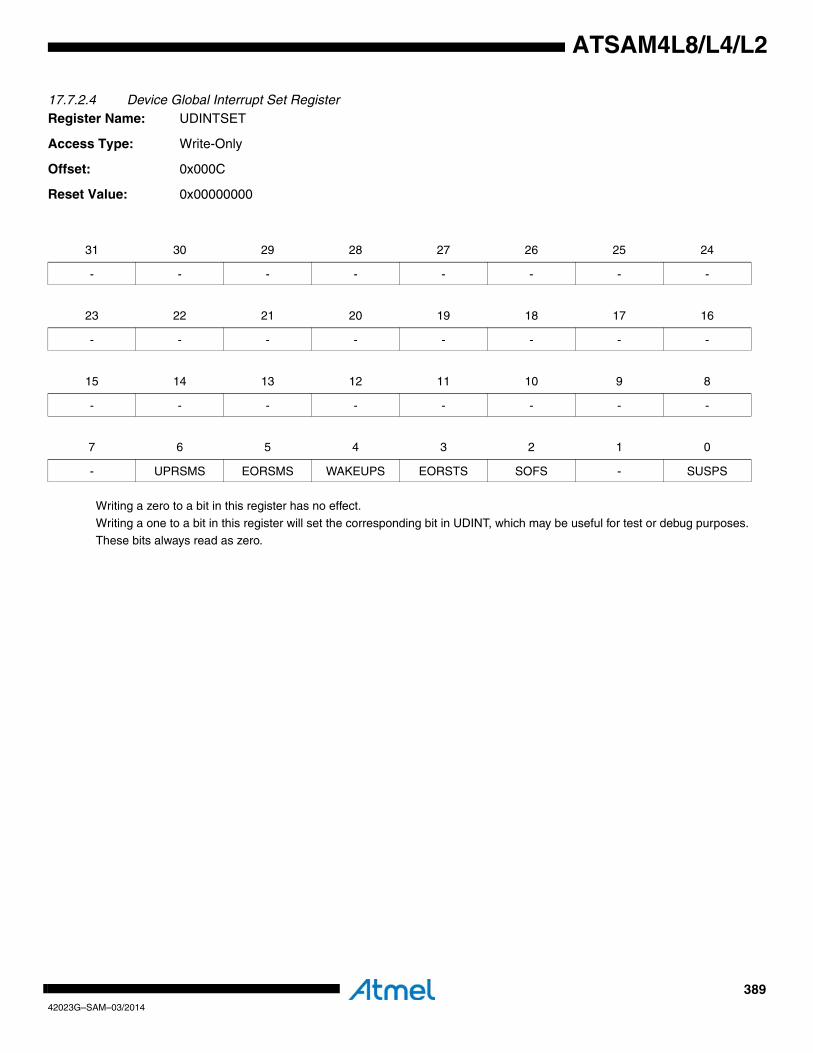
38942023G–SAM–03/2014
ATSAM4L8/L4/L2
17.7.2.4 Device Global Interrupt Set Register Register Name: UDINTSET
Access Type: Write-Only
Offset: 0x000C
Reset Value: 0x00000000
Writing a zero to a bit in this register has no effect.
Writing a one to a bit in this register will set the corresponding bit in UDINT, which may be useful for test or debug purposes.
These bits always read as zero.
31 30 29 28 27 26 25 24
- - - - - - - -
23 22 21 20 19 18 17 16
- - - - - - - -
15 14 13 12 11 10 9 8
- - - - - - - -
7 6 5 4 3 2 1 0
- UPRSMS EORSMS WAKEUPS EORSTS SOFS - SUSPS
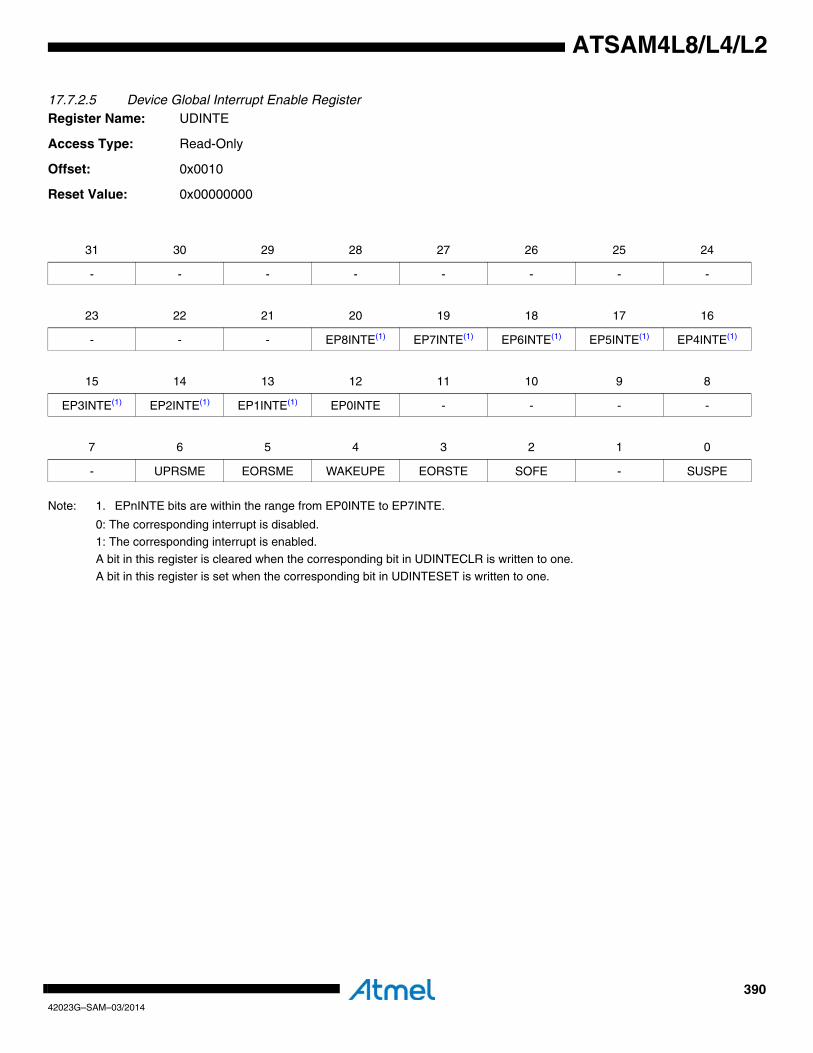
39042023G–SAM–03/2014
ATSAM4L8/L4/L2
17.7.2.5 Device Global Interrupt Enable RegisterRegister Name: UDINTE
Access Type: Read-Only
Offset: 0x0010
Reset Value: 0x00000000
Note: 1. EPnINTE bits are within the range from EP0INTE to EP7INTE.
0: The corresponding interrupt is disabled.1: The corresponding interrupt is enabled.
A bit in this register is cleared when the corresponding bit in UDINTECLR is written to one.
A bit in this register is set when the corresponding bit in UDINTESET is written to one.
31 30 29 28 27 26 25 24
- - - - - - - -
23 22 21 20 19 18 17 16
- - - EP8INTE(1) EP7INTE(1) EP6INTE(1) EP5INTE(1) EP4INTE(1)
15 14 13 12 11 10 9 8
EP3INTE(1) EP2INTE(1) EP1INTE(1) EP0INTE - - - -
7 6 5 4 3 2 1 0
- UPRSME EORSME WAKEUPE EORSTE SOFE - SUSPE
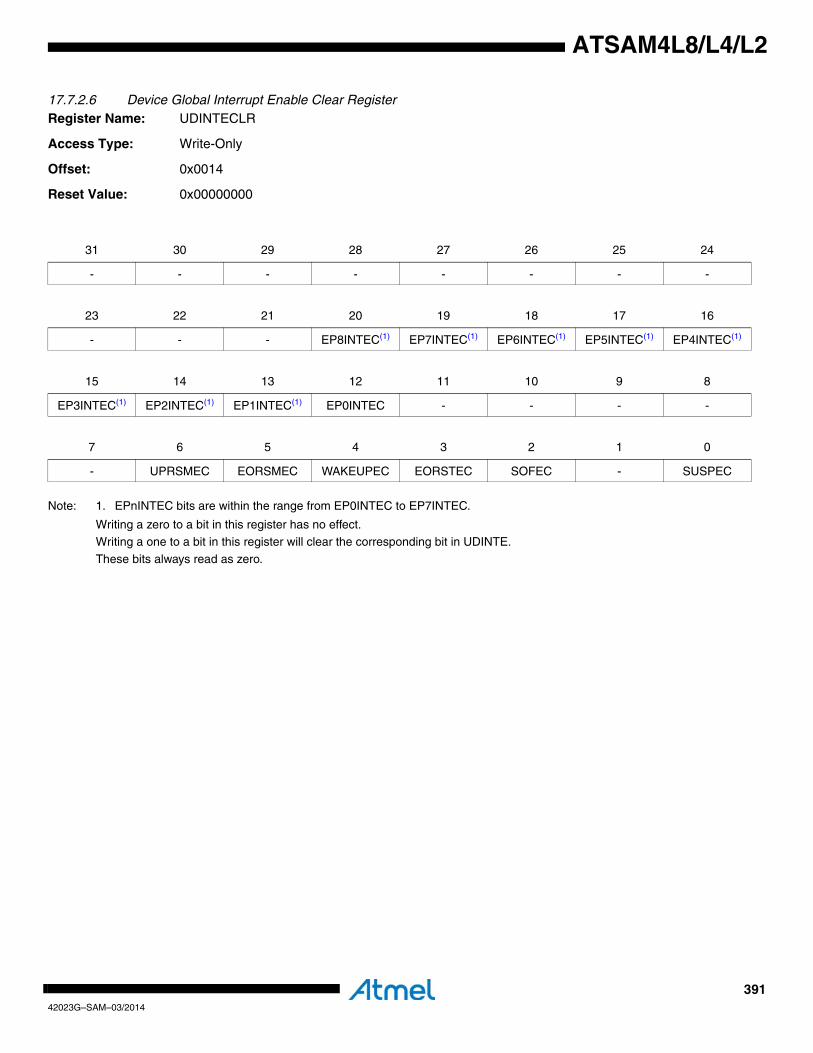
39142023G–SAM–03/2014
ATSAM4L8/L4/L2
17.7.2.6 Device Global Interrupt Enable Clear Register Register Name: UDINTECLR
Access Type: Write-Only
Offset: 0x0014
Reset Value: 0x00000000
Note: 1. EPnINTEC bits are within the range from EP0INTEC to EP7INTEC.
Writing a zero to a bit in this register has no effect.Writing a one to a bit in this register will clear the corresponding bit in UDINTE.
These bits always read as zero.
31 30 29 28 27 26 25 24
- - - - - - - -
23 22 21 20 19 18 17 16
- - - EP8INTEC(1) EP7INTEC(1) EP6INTEC(1) EP5INTEC(1) EP4INTEC(1)
15 14 13 12 11 10 9 8
EP3INTEC(1) EP2INTEC(1) EP1INTEC(1) EP0INTEC - - - -
7 6 5 4 3 2 1 0
- UPRSMEC EORSMEC WAKEUPEC EORSTEC SOFEC - SUSPEC
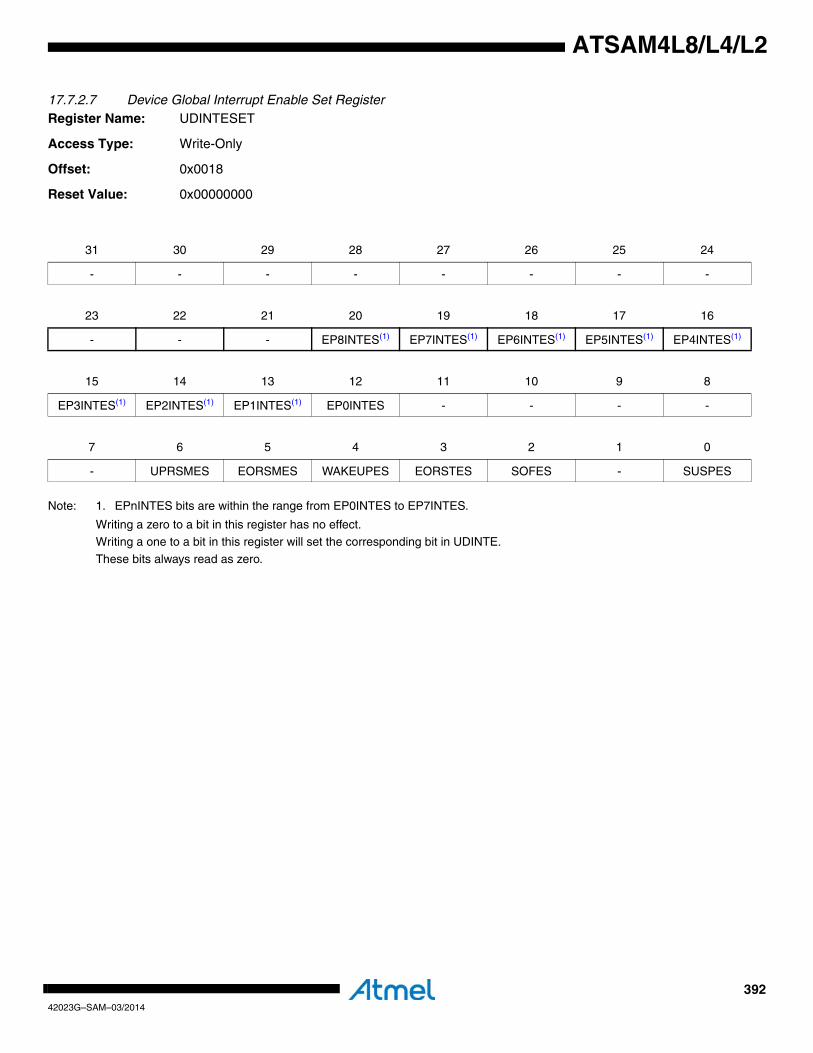
39242023G–SAM–03/2014
ATSAM4L8/L4/L2
17.7.2.7 Device Global Interrupt Enable Set RegisterRegister Name: UDINTESET
Access Type: Write-Only
Offset: 0x0018
Reset Value: 0x00000000
Note: 1. EPnINTES bits are within the range from EP0INTES to EP7INTES.
Writing a zero to a bit in this register has no effect.Writing a one to a bit in this register will set the corresponding bit in UDINTE.
These bits always read as zero.
31 30 29 28 27 26 25 24
- - - - - - - -
23 22 21 20 19 18 17 16
- - - EP8INTES(1) EP7INTES(1) EP6INTES(1) EP5INTES(1) EP4INTES(1)
15 14 13 12 11 10 9 8
EP3INTES(1) EP2INTES(1) EP1INTES(1) EP0INTES - - - -
7 6 5 4 3 2 1 0
- UPRSMES EORSMES WAKEUPES EORSTES SOFES - SUSPES
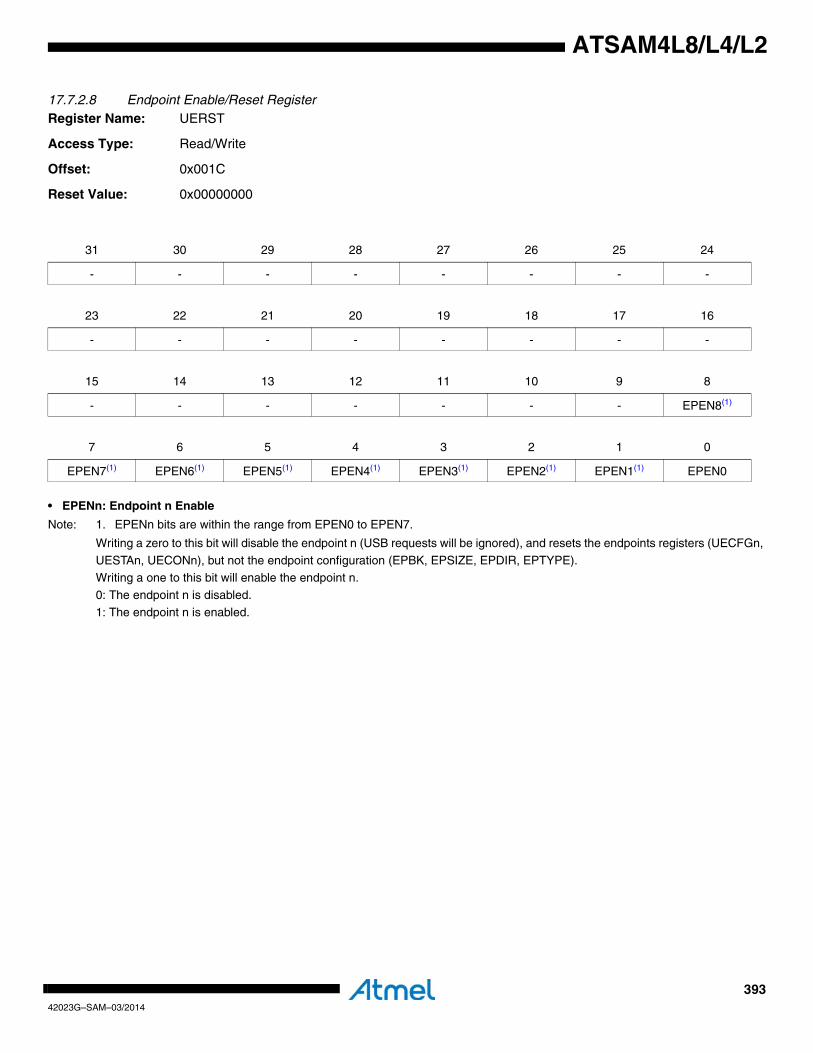
39342023G–SAM–03/2014
ATSAM4L8/L4/L2
17.7.2.8 Endpoint Enable/Reset RegisterRegister Name: UERST
Access Type: Read/Write
Offset: 0x001C
Reset Value: 0x00000000
• EPENn: Endpoint n Enable
Note: 1. EPENn bits are within the range from EPEN0 to EPEN7.
Writing a zero to this bit will disable the endpoint n (USB requests will be ignored), and resets the endpoints registers (UECFGn,
UESTAn, UECONn), but not the endpoint configuration (EPBK, EPSIZE, EPDIR, EPTYPE).Writing a one to this bit will enable the endpoint n.
0: The endpoint n is disabled.
1: The endpoint n is enabled.
31 30 29 28 27 26 25 24
- - - - - - - -
23 22 21 20 19 18 17 16
- - - - - - - -
15 14 13 12 11 10 9 8
- - - - - - - EPEN8(1)
7 6 5 4 3 2 1 0
EPEN7(1) EPEN6(1) EPEN5(1) EPEN4(1) EPEN3(1) EPEN2(1) EPEN1(1) EPEN0
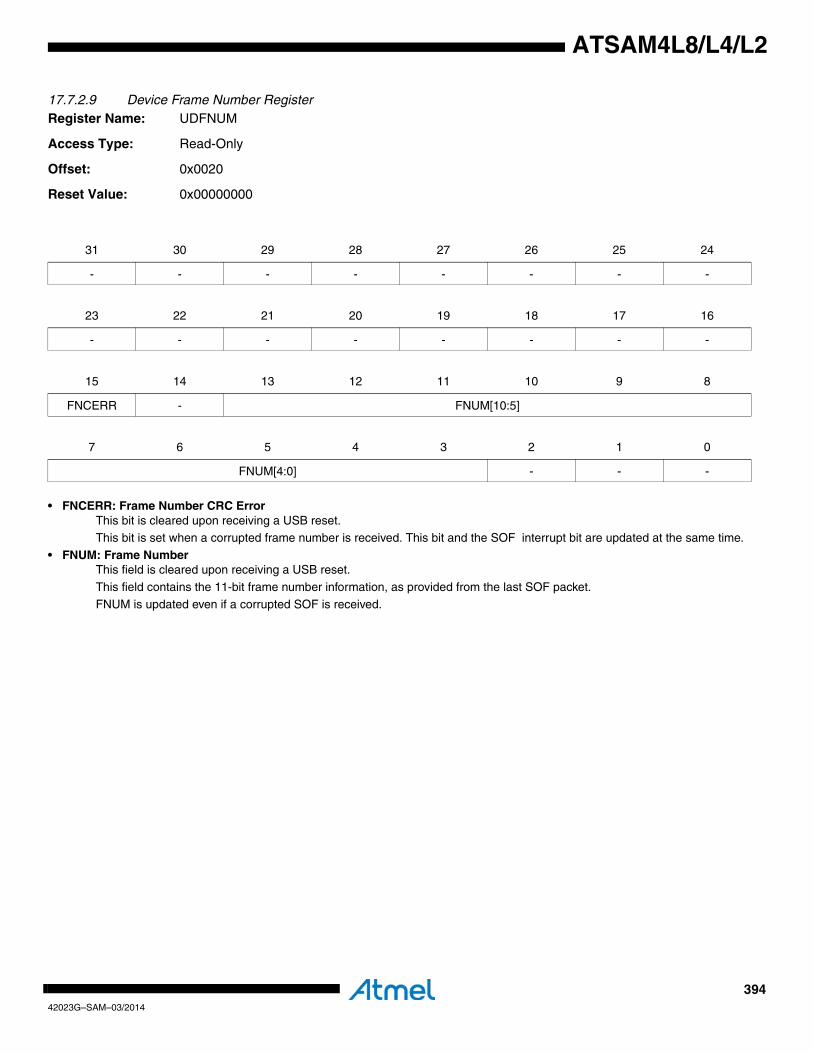
39442023G–SAM–03/2014
ATSAM4L8/L4/L2
17.7.2.9 Device Frame Number RegisterRegister Name: UDFNUM
Access Type: Read-Only
Offset: 0x0020
Reset Value: 0x00000000
• FNCERR: Frame Number CRC ErrorThis bit is cleared upon receiving a USB reset.This bit is set when a corrupted frame number is received. This bit and the SOF interrupt bit are updated at the same time.
• FNUM: Frame NumberThis field is cleared upon receiving a USB reset.
This field contains the 11-bit frame number information, as provided from the last SOF packet.
FNUM is updated even if a corrupted SOF is received.
31 30 29 28 27 26 25 24
- - - - - - - -
23 22 21 20 19 18 17 16
- - - - - - - -
15 14 13 12 11 10 9 8
FNCERR - FNUM[10:5]
7 6 5 4 3 2 1 0
FNUM[4:0] - - -
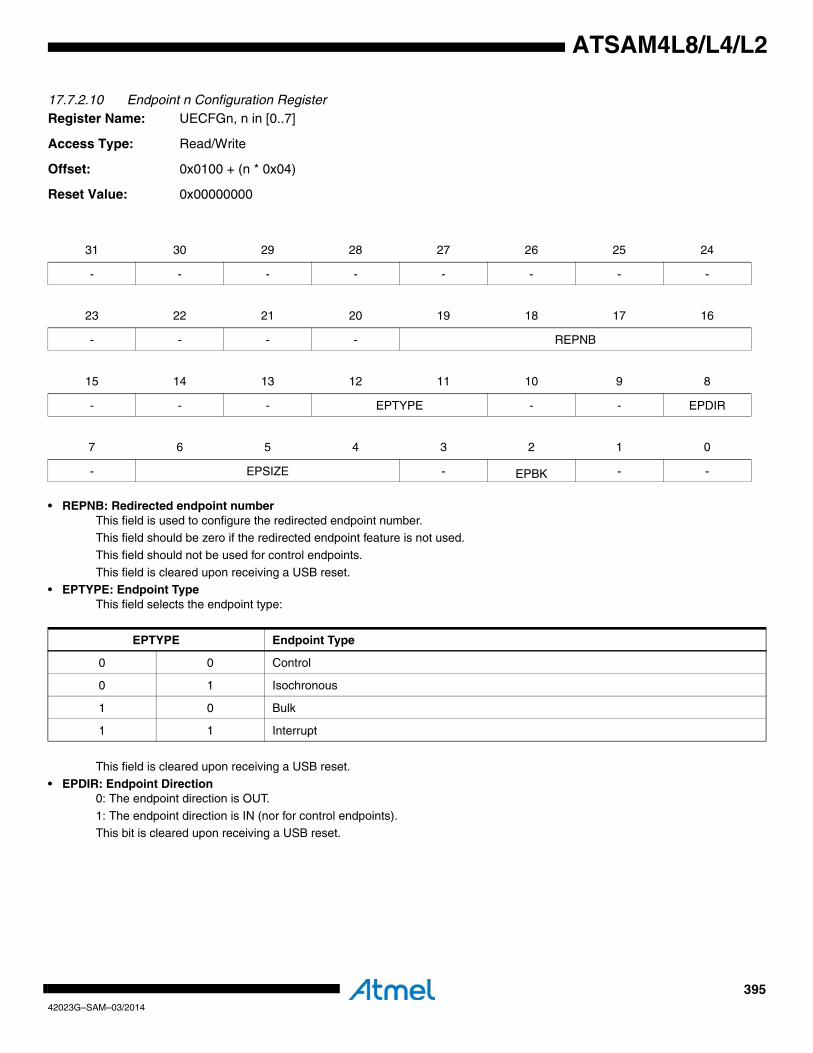
39542023G–SAM–03/2014
ATSAM4L8/L4/L2
17.7.2.10 Endpoint n Configuration RegisterRegister Name: UECFGn, n in [0..7]
Access Type: Read/Write
Offset: 0x0100 + (n * 0x04)
Reset Value: 0x00000000
• REPNB: Redirected endpoint numberThis field is used to configure the redirected endpoint number.This field should be zero if the redirected endpoint feature is not used.
This field should not be used for control endpoints.
This field is cleared upon receiving a USB reset.• EPTYPE: Endpoint Type
This field selects the endpoint type:
This field is cleared upon receiving a USB reset.
• EPDIR: Endpoint Direction0: The endpoint direction is OUT.
1: The endpoint direction is IN (nor for control endpoints).This bit is cleared upon receiving a USB reset.
31 30 29 28 27 26 25 24
- - - - - - - -
23 22 21 20 19 18 17 16
- - - - REPNB
15 14 13 12 11 10 9 8
- - - EPTYPE - - EPDIR
7 6 5 4 3 2 1 0
- EPSIZE - EPBK - -
EPTYPE Endpoint Type
0 0 Control
0 1 Isochronous
1 0 Bulk
1 1 Interrupt
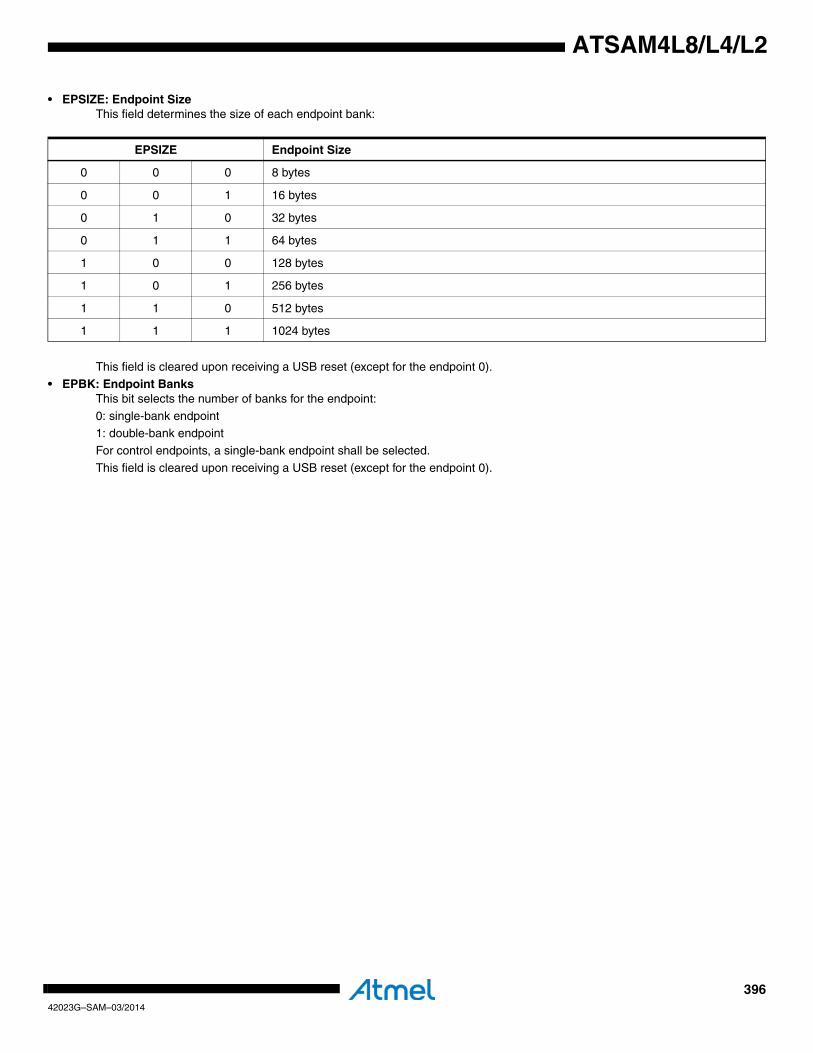
39642023G–SAM–03/2014
ATSAM4L8/L4/L2
• EPSIZE: Endpoint SizeThis field determines the size of each endpoint bank:
This field is cleared upon receiving a USB reset (except for the endpoint 0).
• EPBK: Endpoint BanksThis bit selects the number of banks for the endpoint:
0: single-bank endpoint1: double-bank endpoint
For control endpoints, a single-bank endpoint shall be selected.
This field is cleared upon receiving a USB reset (except for the endpoint 0).
EPSIZE Endpoint Size
0 0 0 8 bytes
0 0 1 16 bytes
0 1 0 32 bytes
0 1 1 64 bytes
1 0 0 128 bytes
1 0 1 256 bytes
1 1 0 512 bytes
1 1 1 1024 bytes
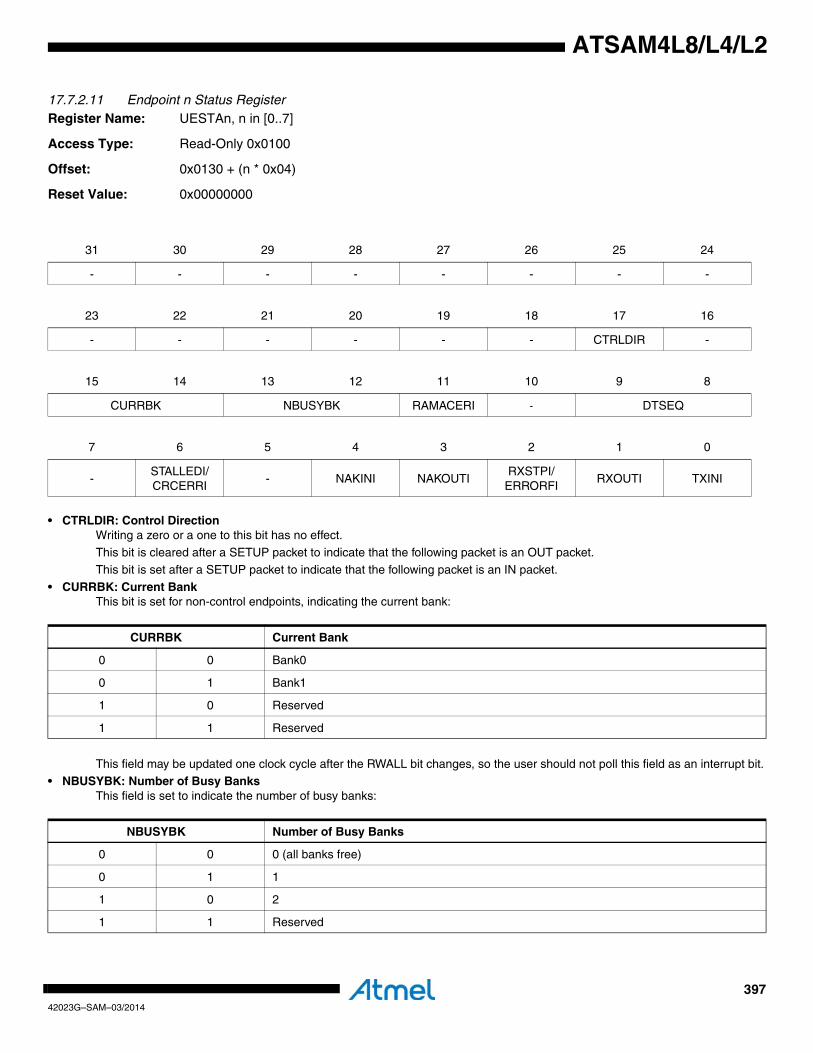
39742023G–SAM–03/2014
ATSAM4L8/L4/L2
17.7.2.11 Endpoint n Status Register Register Name: UESTAn, n in [0..7]
Access Type: Read-Only 0x0100
Offset: 0x0130 + (n * 0x04)
Reset Value: 0x00000000
• CTRLDIR: Control DirectionWriting a zero or a one to this bit has no effect.
This bit is cleared after a SETUP packet to indicate that the following packet is an OUT packet.This bit is set after a SETUP packet to indicate that the following packet is an IN packet.
• CURRBK: Current BankThis bit is set for non-control endpoints, indicating the current bank:
This field may be updated one clock cycle after the RWALL bit changes, so the user should not poll this field as an interrupt bit.• NBUSYBK: Number of Busy Banks
This field is set to indicate the number of busy banks:
31 30 29 28 27 26 25 24
- - - - - - - -
23 22 21 20 19 18 17 16
- - - - - - CTRLDIR -
15 14 13 12 11 10 9 8
CURRBK NBUSYBK RAMACERI - DTSEQ
7 6 5 4 3 2 1 0
-STALLEDI/CRCERRI
- NAKINI NAKOUTIRXSTPI/
ERRORFIRXOUTI TXINI
CURRBK Current Bank
0 0 Bank0
0 1 Bank1
1 0 Reserved
1 1 Reserved
NBUSYBK Number of Busy Banks
0 0 0 (all banks free)
0 1 1
1 0 2
1 1 Reserved
39842023G–SAM–03/2014
ATSAM4L8/L4/L2
For IN endpoints, this indicates the number of banks filled by the user and ready for IN transfers. When all banks are free an EPnINT interrupt will be triggered if NBUSYBKE is one.
For OUT endpoints, this indicates the number of banks filled by OUT transactions from the host. When all banks are busy an
EPnINT interrupt will be triggered if NBUSYBKE is one.• RAMACERI: Ram Access Error Interrupt
This bit is cleared when the RAMACERIC bit is written to one, acknowledging the interrupt.
This bit is set when a RAM access underflow error occurs during an IN data stage.• DTSEQ: Data Toggle Sequence
This field is set to indicate the PID of the current bank:
For IN transfers, this indicates the data toggle sequence that will be used for the next packet to be sent.For OUT transfers, this value indicates the data toggle sequence of the data received in the current bank.
• STALLEDI: STALLed InterruptThis bit is cleared when the STALLEDIC bit is written to one, acknowledging the interrupt.
This bit is set when a STALL handshake has been sent and triggers an EPnINT interrupt if STALLEDE is one.
• CRCERRI: CRC Error InterruptThis bit is cleared when the CRCERRIC bit is written to one, acknowledging the interrupt.
This bit is set when a CRC error has been detected in an isochronous OUT endpoint bank, and triggers an EPnINT interrupt if CRCERRE is one.
• NAKINI: NAKed IN InterruptThis bit is cleared when the NAKINIC bit is written to one, acknowledging the interrupt.
This bit is set when a NAK handshake has been sent in response to an IN request from the host, and triggers an EPnINT
interrupt if NAKINE is one.• NAKOUTI: NAKed OUT Interrupt
This bit is cleared when the NAKOUTIC bit is written to one, acknowledging the interrupt.This bit is set when a NAK handshake has been sent in response to an OUT request from the host, and triggers an EPnINT
interrupt if NAKOUTE is one.
• ERRORFI: Isochronous Error flow InterruptThis bit is cleared when the ERRORFIC bit is written to one, acknowledging the interrupt.
This bit is set, for isochronous IN/OUT endpoints, when an errorflow (underflow or overflow) error occurs, and triggers an EPnINT interrupt if ERRORFE is one.
An underflow can occur during IN stage if the host attempts to read from an empty bank. A zero-length packet is then
automatically sent by the USBC.An overflow can also occur during OUT stage if the host sends a packet while the bank is already full, resulting in the packet
being lost. This is typically due to a CPU not being fast enough.
This bit is inactive (cleared) for bulk and interrupt IN/OUT endpoints and it means RXSTPI for control endpoints.• RXSTPI: Received SETUP Interrupt
This bit is cleared when the RXSTPIC bit is written to one, acknowledging the interrupt and freeing the bank.This bit is set, for control endpoints, to signal that the current bank contains a new valid SETUP packet, and triggers an EPnINT
interrupt if RXSTPE is one.
This bit is inactive (cleared) for bulk and interrupt IN/OUT endpoints and it means UNDERFI for isochronous IN/OUT endpoints.
• RXOUTI: Received OUT Data InterruptThis bit is cleared when the RXOUTIC bit is written to one, acknowledging the interrupt. For control endpoints, it releases the
bank. For other endpoint types, the user should clear the FIFOCON bit to free the bank. RXOUTI shall always be cleared before clearing FIFOCON to avoid missing an interrupt.
DTSEQ Data Toggle Sequence
0 0 Data0
0 1 Data1
1 X Reserved
39942023G–SAM–03/2014
ATSAM4L8/L4/L2
This bit is set, for control endpoints, when the current bank contains a bulk OUT packet (data or status stage). This triggers an EPnINT interrupt if RXOUTE is one.
This bit is set for isochronous, bulk and, interrupt OUT endpoints, at the same time as FIFOCON when the current bank is full.
This triggers an EPnINT interrupt if RXOUTE is one.This bit is inactive (cleared) for isochronous, bulk and interrupt IN endpoints.
• TXINI: Transmitted IN Data InterruptThis bit is cleared when the TXINIC bit is written to one, acknowledging the interrupt. For control endpoints, this will send the packet. For other endpoint types, the user should clear the FIFOCON to allow the USBC to send the data. TXINI shall always be
cleared before clearing FIFOCON to avoid missing an interrupt.
This bit is set for control endpoints, when the current bank is ready to accept a new IN packet. This triggers an EPnINT interrupt if TXINE is one.
This bit is set for isochronous, bulk and interrupt IN endpoints, at the same time as FIFOCON when the current bank is free.
This triggers an EPnINT interrupt if TXINE is one.This bit is inactive (cleared) for isochronous, bulk and interrupt OUT endpoints.
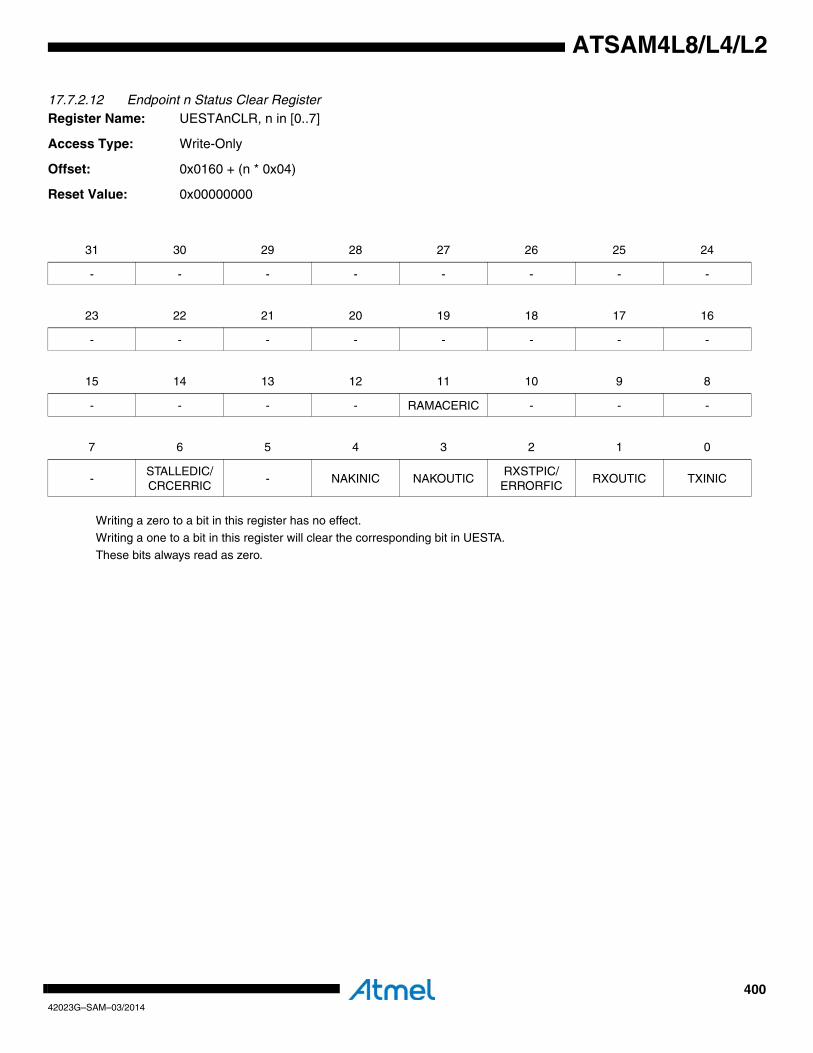
40042023G–SAM–03/2014
ATSAM4L8/L4/L2
17.7.2.12 Endpoint n Status Clear RegisterRegister Name: UESTAnCLR, n in [0..7]
Access Type: Write-Only
Offset: 0x0160 + (n * 0x04)
Reset Value: 0x00000000
Writing a zero to a bit in this register has no effect.Writing a one to a bit in this register will clear the corresponding bit in UESTA.
These bits always read as zero.
31 30 29 28 27 26 25 24
- - - - - - - -
23 22 21 20 19 18 17 16
- - - - - - - -
15 14 13 12 11 10 9 8
- - - - RAMACERIC - - -
7 6 5 4 3 2 1 0
-STALLEDIC/CRCERRIC
- NAKINIC NAKOUTICRXSTPIC/
ERRORFICRXOUTIC TXINIC
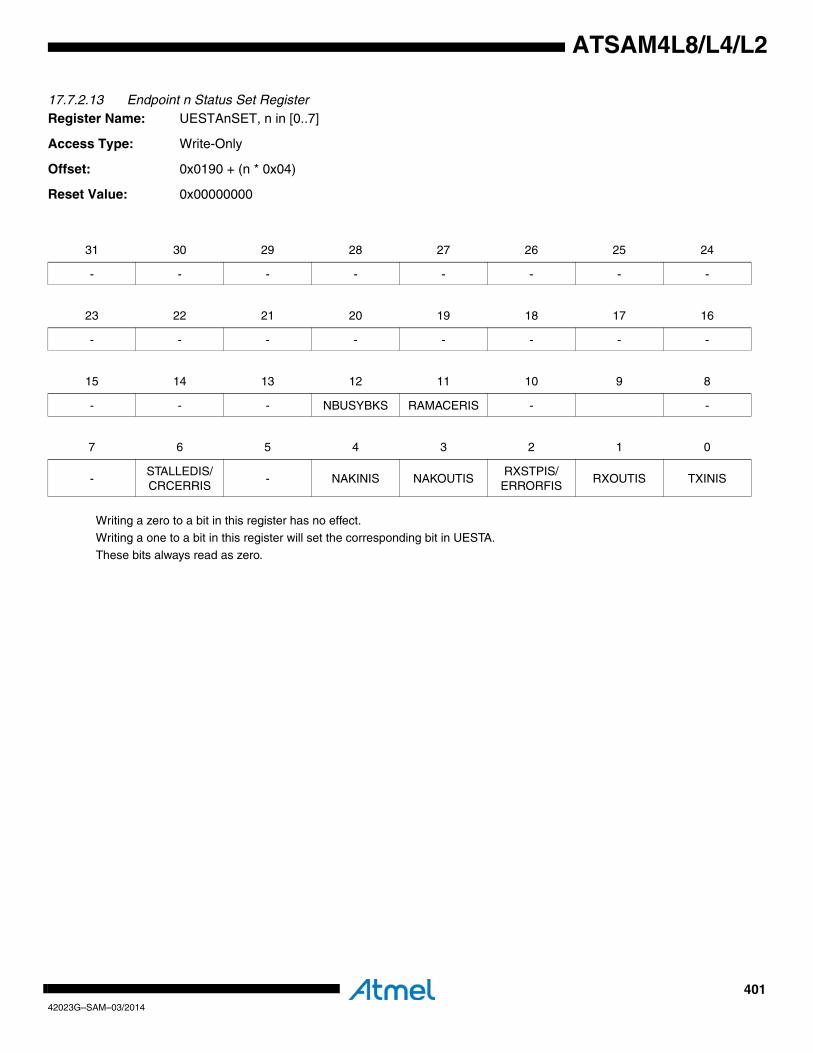
40142023G–SAM–03/2014
ATSAM4L8/L4/L2
17.7.2.13 Endpoint n Status Set RegisterRegister Name: UESTAnSET, n in [0..7]
Access Type: Write-Only
Offset: 0x0190 + (n * 0x04)
Reset Value: 0x00000000
Writing a zero to a bit in this register has no effect.Writing a one to a bit in this register will set the corresponding bit in UESTA.
These bits always read as zero.
31 30 29 28 27 26 25 24
- - - - - - - -
23 22 21 20 19 18 17 16
- - - - - - - -
15 14 13 12 11 10 9 8
- - - NBUSYBKS RAMACERIS - -
7 6 5 4 3 2 1 0
-STALLEDIS/CRCERRIS
- NAKINIS NAKOUTISRXSTPIS/
ERRORFISRXOUTIS TXINIS
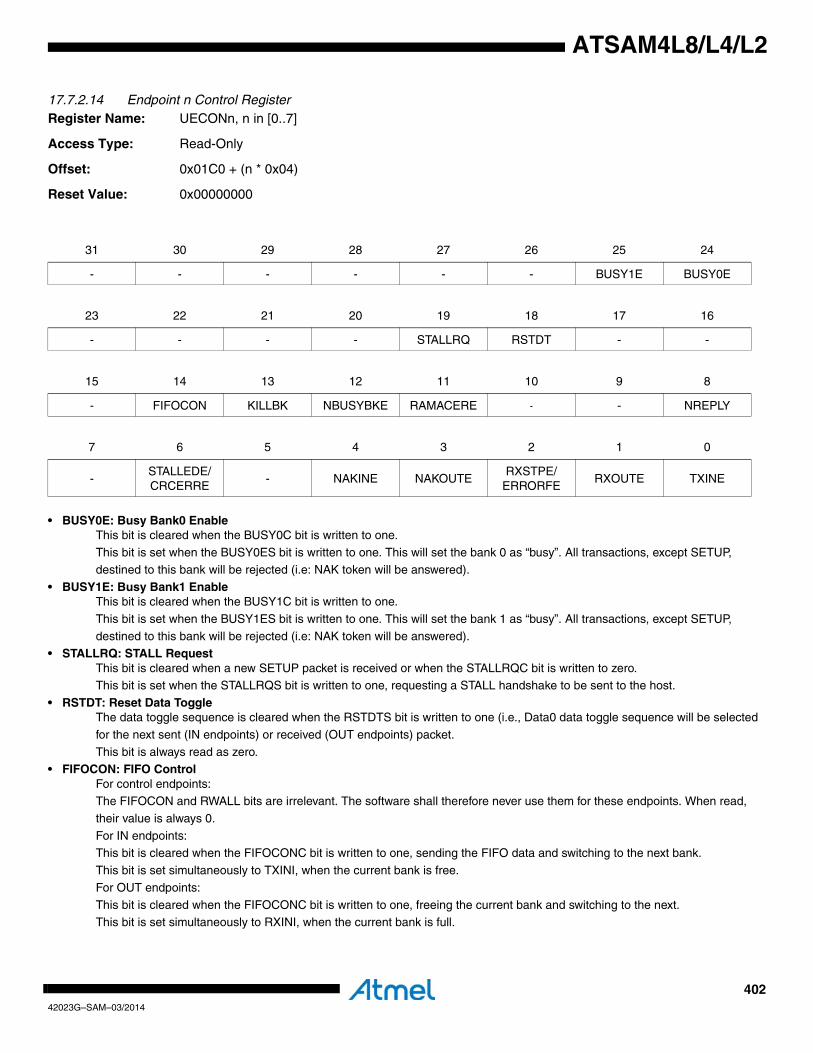
40242023G–SAM–03/2014
ATSAM4L8/L4/L2
17.7.2.14 Endpoint n Control Register Register Name: UECONn, n in [0..7]
Access Type: Read-Only
Offset: 0x01C0 + (n * 0x04)
Reset Value: 0x00000000
• BUSY0E: Busy Bank0 EnableThis bit is cleared when the BUSY0C bit is written to one.
This bit is set when the BUSY0ES bit is written to one. This will set the bank 0 as “busy”. All transactions, except SETUP, destined to this bank will be rejected (i.e: NAK token will be answered).
• BUSY1E: Busy Bank1 EnableThis bit is cleared when the BUSY1C bit is written to one.
This bit is set when the BUSY1ES bit is written to one. This will set the bank 1 as “busy”. All transactions, except SETUP,
destined to this bank will be rejected (i.e: NAK token will be answered).• STALLRQ: STALL Request
This bit is cleared when a new SETUP packet is received or when the STALLRQC bit is written to zero.This bit is set when the STALLRQS bit is written to one, requesting a STALL handshake to be sent to the host.
• RSTDT: Reset Data ToggleThe data toggle sequence is cleared when the RSTDTS bit is written to one (i.e., Data0 data toggle sequence will be selected
for the next sent (IN endpoints) or received (OUT endpoints) packet.
This bit is always read as zero.• FIFOCON: FIFO Control
For control endpoints:The FIFOCON and RWALL bits are irrelevant. The software shall therefore never use them for these endpoints. When read,
their value is always 0.
For IN endpoints:This bit is cleared when the FIFOCONC bit is written to one, sending the FIFO data and switching to the next bank.
This bit is set simultaneously to TXINI, when the current bank is free.
For OUT endpoints:
This bit is cleared when the FIFOCONC bit is written to one, freeing the current bank and switching to the next.This bit is set simultaneously to RXINI, when the current bank is full.
31 30 29 28 27 26 25 24
- - - - - - BUSY1E BUSY0E
23 22 21 20 19 18 17 16
- - - - STALLRQ RSTDT - -
15 14 13 12 11 10 9 8
- FIFOCON KILLBK NBUSYBKE RAMACERE - - NREPLY
7 6 5 4 3 2 1 0
-STALLEDE/CRCERRE
- NAKINE NAKOUTERXSTPE/
ERRORFERXOUTE TXINE
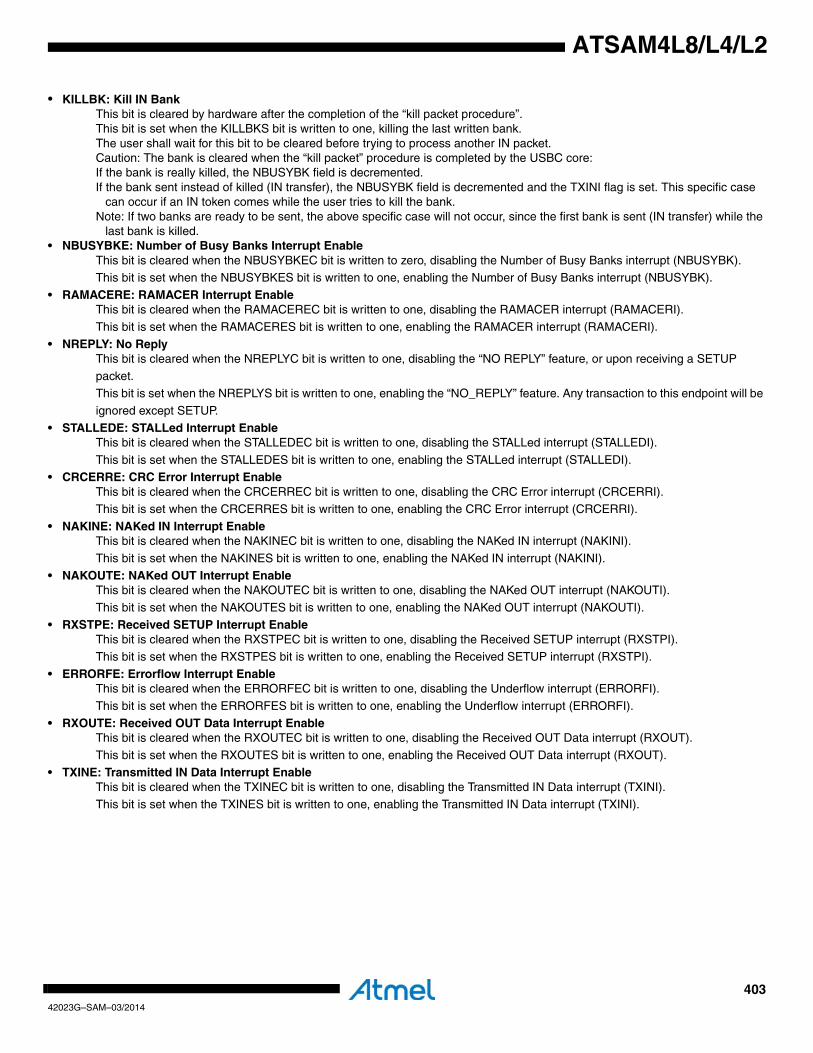
40342023G–SAM–03/2014
ATSAM4L8/L4/L2
• KILLBK: Kill IN BankThis bit is cleared by hardware after the completion of the “kill packet procedure”.This bit is set when the KILLBKS bit is written to one, killing the last written bank.The user shall wait for this bit to be cleared before trying to process another IN packet.Caution: The bank is cleared when the “kill packet” procedure is completed by the USBC core:If the bank is really killed, the NBUSYBK field is decremented.If the bank sent instead of killed (IN transfer), the NBUSYBK field is decremented and the TXINI flag is set. This specific case
can occur if an IN token comes while the user tries to kill the bank.Note: If two banks are ready to be sent, the above specific case will not occur, since the first bank is sent (IN transfer) while the
last bank is killed.• NBUSYBKE: Number of Busy Banks Interrupt Enable
This bit is cleared when the NBUSYBKEC bit is written to zero, disabling the Number of Busy Banks interrupt (NBUSYBK).This bit is set when the NBUSYBKES bit is written to one, enabling the Number of Busy Banks interrupt (NBUSYBK).
• RAMACERE: RAMACER Interrupt EnableThis bit is cleared when the RAMACEREC bit is written to one, disabling the RAMACER interrupt (RAMACERI).
This bit is set when the RAMACERES bit is written to one, enabling the RAMACER interrupt (RAMACERI).
• NREPLY: No ReplyThis bit is cleared when the NREPLYC bit is written to one, disabling the “NO REPLY” feature, or upon receiving a SETUP
packet.This bit is set when the NREPLYS bit is written to one, enabling the “NO_REPLY” feature. Any transaction to this endpoint will be
ignored except SETUP.
• STALLEDE: STALLed Interrupt EnableThis bit is cleared when the STALLEDEC bit is written to one, disabling the STALLed interrupt (STALLEDI).
This bit is set when the STALLEDES bit is written to one, enabling the STALLed interrupt (STALLEDI).• CRCERRE: CRC Error Interrupt Enable
This bit is cleared when the CRCERREC bit is written to one, disabling the CRC Error interrupt (CRCERRI).This bit is set when the CRCERRES bit is written to one, enabling the CRC Error interrupt (CRCERRI).
• NAKINE: NAKed IN Interrupt EnableThis bit is cleared when the NAKINEC bit is written to one, disabling the NAKed IN interrupt (NAKINI).
This bit is set when the NAKINES bit is written to one, enabling the NAKed IN interrupt (NAKINI).
• NAKOUTE: NAKed OUT Interrupt EnableThis bit is cleared when the NAKOUTEC bit is written to one, disabling the NAKed OUT interrupt (NAKOUTI).
This bit is set when the NAKOUTES bit is written to one, enabling the NAKed OUT interrupt (NAKOUTI).• RXSTPE: Received SETUP Interrupt Enable
This bit is cleared when the RXSTPEC bit is written to one, disabling the Received SETUP interrupt (RXSTPI).This bit is set when the RXSTPES bit is written to one, enabling the Received SETUP interrupt (RXSTPI).
• ERRORFE: Errorflow Interrupt EnableThis bit is cleared when the ERRORFEC bit is written to one, disabling the Underflow interrupt (ERRORFI).
This bit is set when the ERRORFES bit is written to one, enabling the Underflow interrupt (ERRORFI).
• RXOUTE: Received OUT Data Interrupt EnableThis bit is cleared when the RXOUTEC bit is written to one, disabling the Received OUT Data interrupt (RXOUT).
This bit is set when the RXOUTES bit is written to one, enabling the Received OUT Data interrupt (RXOUT).• TXINE: Transmitted IN Data Interrupt Enable
This bit is cleared when the TXINEC bit is written to one, disabling the Transmitted IN Data interrupt (TXINI).This bit is set when the TXINES bit is written to one, enabling the Transmitted IN Data interrupt (TXINI).
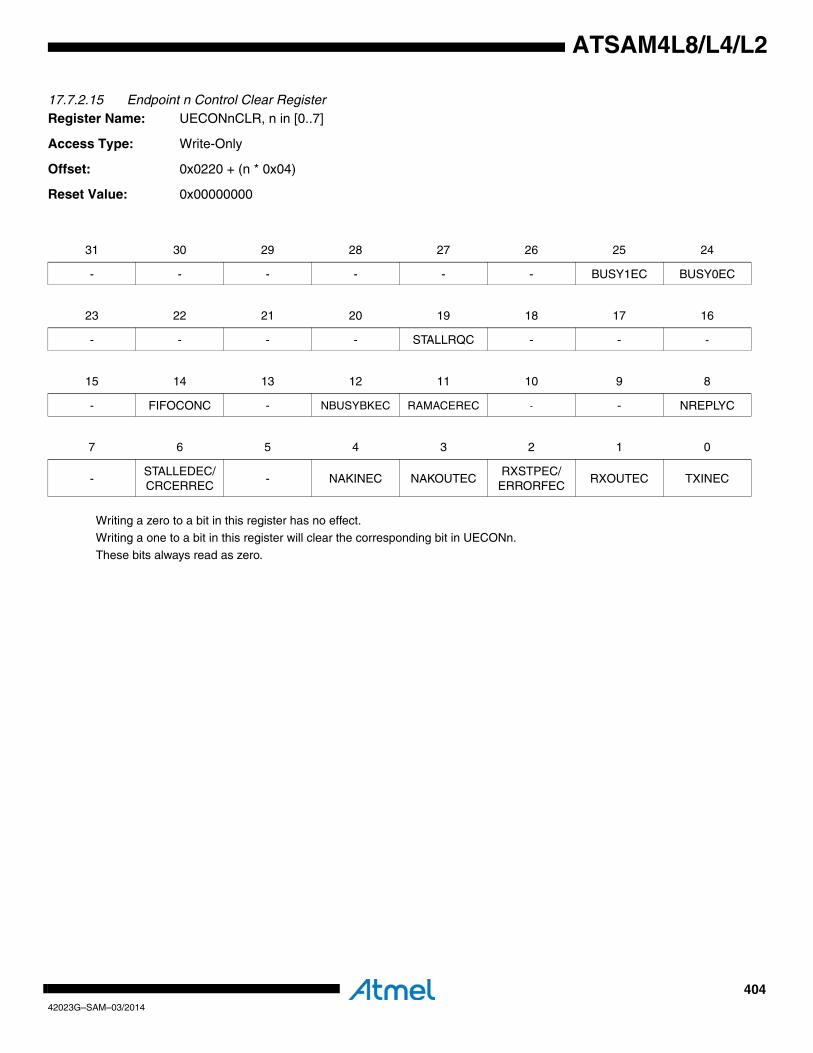
40442023G–SAM–03/2014
ATSAM4L8/L4/L2
17.7.2.15 Endpoint n Control Clear RegisterRegister Name: UECONnCLR, n in [0..7]
Access Type: Write-Only
Offset: 0x0220 + (n * 0x04)
Reset Value: 0x00000000
Writing a zero to a bit in this register has no effect.Writing a one to a bit in this register will clear the corresponding bit in UECONn.
These bits always read as zero.
31 30 29 28 27 26 25 24
- - - - - - BUSY1EC BUSY0EC
23 22 21 20 19 18 17 16
- - - - STALLRQC - - -
15 14 13 12 11 10 9 8
- FIFOCONC - NBUSYBKEC RAMACEREC - - NREPLYC
7 6 5 4 3 2 1 0
-STALLEDEC/CRCERREC
- NAKINEC NAKOUTECRXSTPEC/
ERRORFECRXOUTEC TXINEC
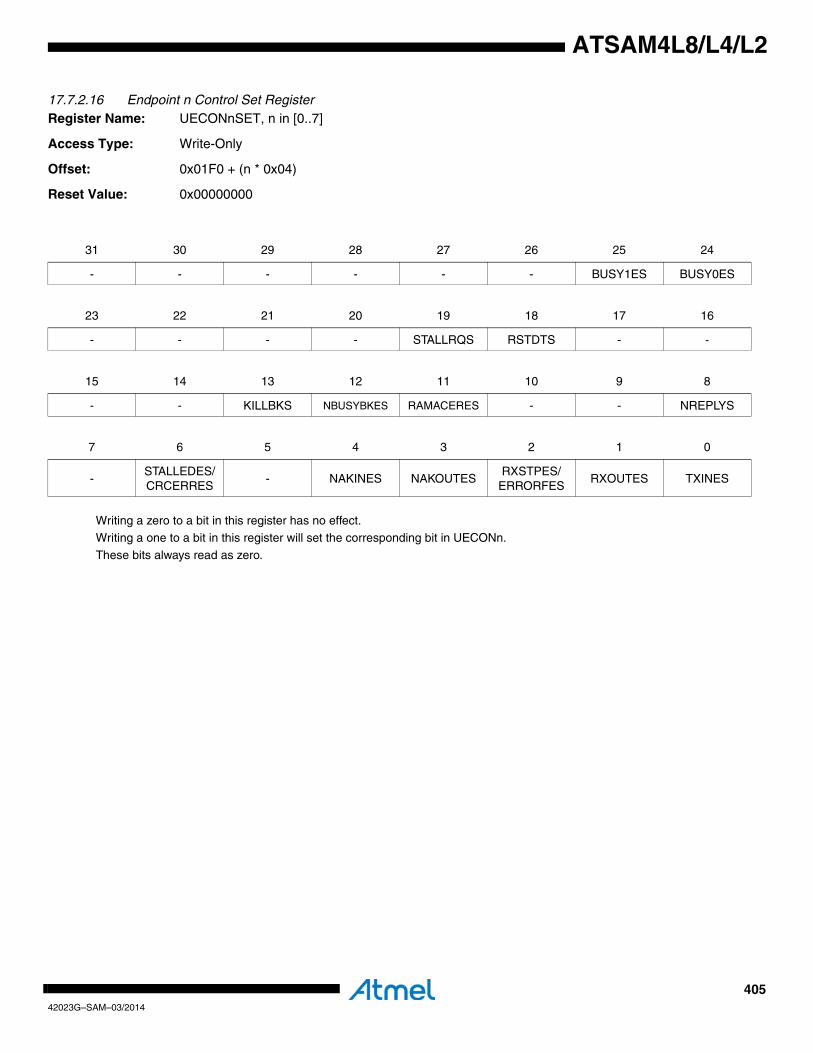
40542023G–SAM–03/2014
ATSAM4L8/L4/L2
17.7.2.16 Endpoint n Control Set RegisterRegister Name: UECONnSET, n in [0..7]
Access Type: Write-Only
Offset: 0x01F0 + (n * 0x04)
Reset Value: 0x00000000
Writing a zero to a bit in this register has no effect.Writing a one to a bit in this register will set the corresponding bit in UECONn.
These bits always read as zero.
31 30 29 28 27 26 25 24
- - - - - - BUSY1ES BUSY0ES
23 22 21 20 19 18 17 16
- - - - STALLRQS RSTDTS - -
15 14 13 12 11 10 9 8
- - KILLBKS NBUSYBKES RAMACERES - - NREPLYS
7 6 5 4 3 2 1 0
-STALLEDES/CRCERRES
- NAKINES NAKOUTESRXSTPES/
ERRORFESRXOUTES TXINES
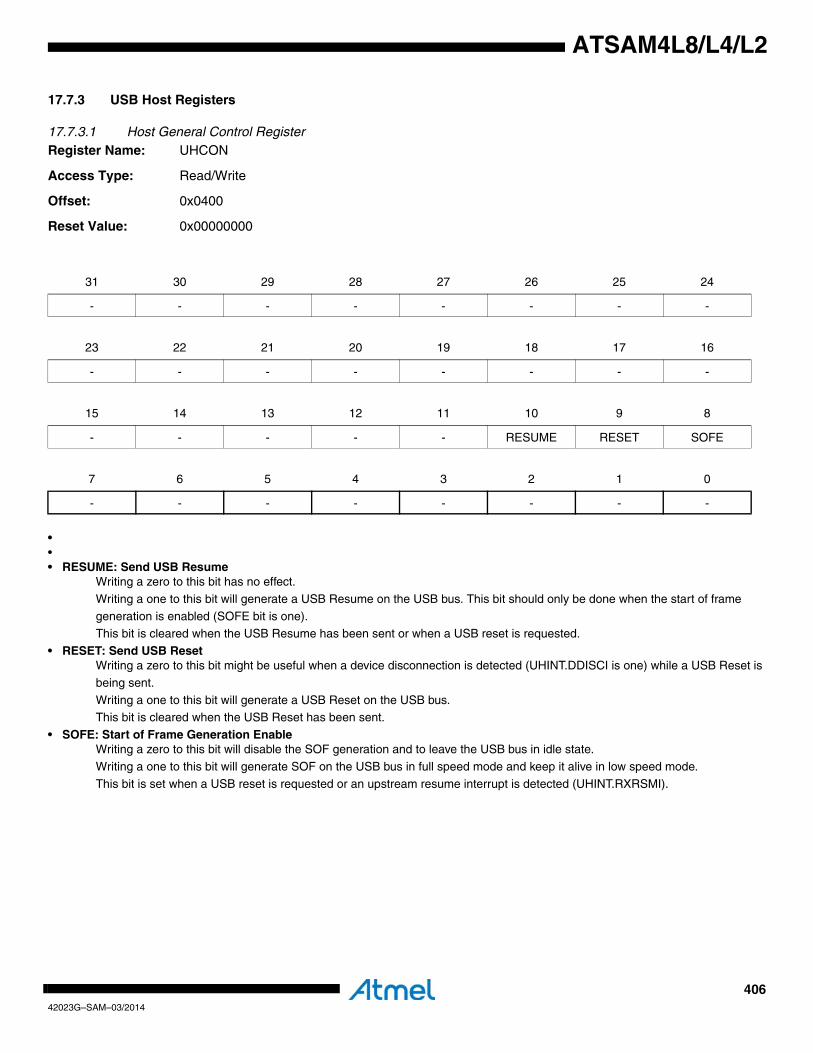
40642023G–SAM–03/2014
ATSAM4L8/L4/L2
17.7.3 USB Host Registers
17.7.3.1 Host General Control RegisterRegister Name: UHCON
Access Type: Read/Write
Offset: 0x0400
Reset Value: 0x00000000
••• RESUME: Send USB Resume
Writing a zero to this bit has no effect.
Writing a one to this bit will generate a USB Resume on the USB bus. This bit should only be done when the start of frame
generation is enabled (SOFE bit is one).This bit is cleared when the USB Resume has been sent or when a USB reset is requested.
• RESET: Send USB ResetWriting a zero to this bit might be useful when a device disconnection is detected (UHINT.DDISCI is one) while a USB Reset is
being sent.
Writing a one to this bit will generate a USB Reset on the USB bus.This bit is cleared when the USB Reset has been sent.
• SOFE: Start of Frame Generation EnableWriting a zero to this bit will disable the SOF generation and to leave the USB bus in idle state.
Writing a one to this bit will generate SOF on the USB bus in full speed mode and keep it alive in low speed mode.
This bit is set when a USB reset is requested or an upstream resume interrupt is detected (UHINT.RXRSMI).
31 30 29 28 27 26 25 24
- - - - - - - -
23 22 21 20 19 18 17 16
- - - - - - - -
15 14 13 12 11 10 9 8
- - - - - RESUME RESET SOFE
7 6 5 4 3 2 1 0
- - - - - - - -
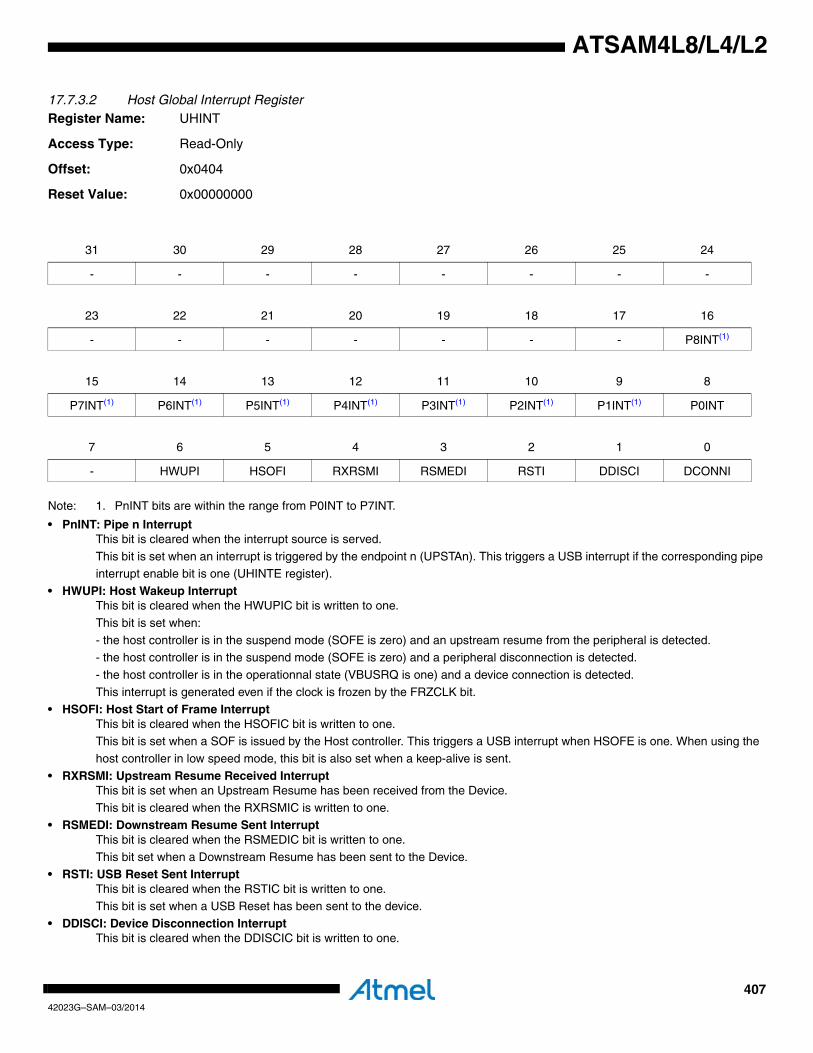
40742023G–SAM–03/2014
ATSAM4L8/L4/L2
17.7.3.2 Host Global Interrupt RegisterRegister Name: UHINT
Access Type: Read-Only
Offset: 0x0404
Reset Value: 0x00000000
Note: 1. PnINT bits are within the range from P0INT to P7INT.
• PnINT: Pipe n Interrupt This bit is cleared when the interrupt source is served.
This bit is set when an interrupt is triggered by the endpoint n (UPSTAn). This triggers a USB interrupt if the corresponding pipe interrupt enable bit is one (UHINTE register).
• HWUPI: Host Wakeup Interrupt This bit is cleared when the HWUPIC bit is written to one.
This bit is set when:
- the host controller is in the suspend mode (SOFE is zero) and an upstream resume from the peripheral is detected.- the host controller is in the suspend mode (SOFE is zero) and a peripheral disconnection is detected.
- the host controller is in the operationnal state (VBUSRQ is one) and a device connection is detected.
This interrupt is generated even if the clock is frozen by the FRZCLK bit.• HSOFI: Host Start of Frame Interrupt
This bit is cleared when the HSOFIC bit is written to one.This bit is set when a SOF is issued by the Host controller. This triggers a USB interrupt when HSOFE is one. When using the
host controller in low speed mode, this bit is also set when a keep-alive is sent.
• RXRSMI: Upstream Resume Received Interrupt This bit is set when an Upstream Resume has been received from the Device.
This bit is cleared when the RXRSMIC is written to one.• RSMEDI: Downstream Resume Sent Interrupt
This bit is cleared when the RSMEDIC bit is written to one.
This bit set when a Downstream Resume has been sent to the Device.• RSTI: USB Reset Sent Interrupt
This bit is cleared when the RSTIC bit is written to one.This bit is set when a USB Reset has been sent to the device.
• DDISCI: Device Disconnection Interrupt This bit is cleared when the DDISCIC bit is written to one.
31 30 29 28 27 26 25 24
- - - - - - - -
23 22 21 20 19 18 17 16
- - - - - - - P8INT(1)
15 14 13 12 11 10 9 8
P7INT(1) P6INT(1) P5INT(1) P4INT(1) P3INT(1) P2INT(1) P1INT(1) P0INT
7 6 5 4 3 2 1 0
- HWUPI HSOFI RXRSMI RSMEDI RSTI DDISCI DCONNI

40842023G–SAM–03/2014
ATSAM4L8/L4/L2
This bit is set when the device has been removed from the USB bus.• DCONNI: Device Connection Interrupt
This bit is cleared when the DCONNIC bit is written to one.This bit is set when a new device has been connected to the USB bus.

40942023G–SAM–03/2014
ATSAM4L8/L4/L2
17.7.3.3 Host Global Interrupt Clear RegisterRegister Name: UHINTCLR
Access Type: Write-Only
Offset: 0x0408
Reset Value: 0x00000000
Writing a zero to a bit in this register has no effect.
Writing a one to a bit in this register will clear the corresponding bit in UHINT.
These bits always read as zero.
31 30 29 28 27 26 25 24
- - - - - - - -
23 22 21 20 19 18 17 16
- - - - - - - -
15 14 13 12 11 10 9 8
- - - - - - - -
7 6 5 4 3 2 1 0
- HWUPIC HSOFIC RXRSMIC RSMEDIC RSTIC DDISCIC DCONNIC

41042023G–SAM–03/2014
ATSAM4L8/L4/L2
17.7.3.4 Host Global Interrupt Set RegisterRegister Name: UHINTSET
Access Type: Write-Only
Offset: 0x040C
Reset Value: 0x00000000
Writing a zero to a bit in this register has no effect.
Writing a one to a bit in this register will set the corresponding bit in UHINT.
These bits always read as zero.
31 30 29 28 27 26 25 24
- - - - - - -
23 22 21 20 19 18 17 16
- - - - - - - -
15 14 13 12 11 10 9 8
- - - - - - - -
7 6 5 4 3 2 1 0
- HWUPIS HSOFIS RXRSMIS RSMEDIS RSTIS DDISCIS DCONNIS
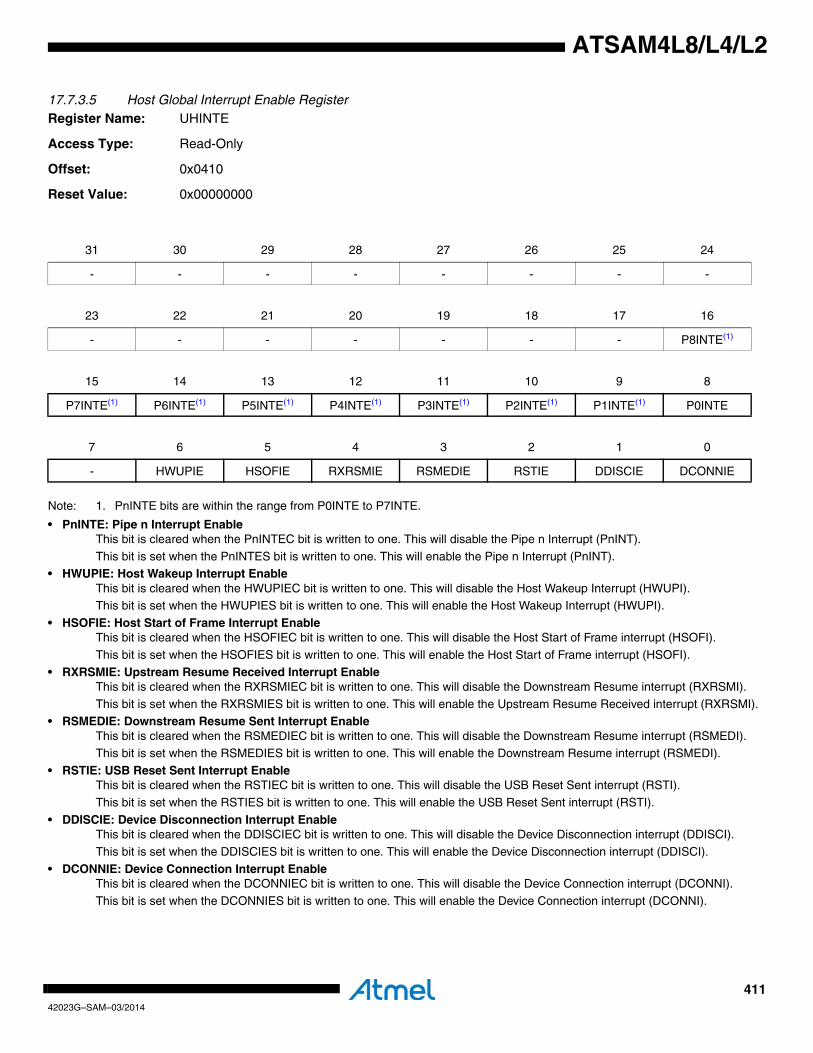
41142023G–SAM–03/2014
ATSAM4L8/L4/L2
17.7.3.5 Host Global Interrupt Enable RegisterRegister Name: UHINTE
Access Type: Read-Only
Offset: 0x0410
Reset Value: 0x00000000
Note: 1. PnINTE bits are within the range from P0INTE to P7INTE.
• PnINTE: Pipe n Interrupt EnableThis bit is cleared when the PnINTEC bit is written to one. This will disable the Pipe n Interrupt (PnINT).
This bit is set when the PnINTES bit is written to one. This will enable the Pipe n Interrupt (PnINT).• HWUPIE: Host Wakeup Interrupt Enable
This bit is cleared when the HWUPIEC bit is written to one. This will disable the Host Wakeup Interrupt (HWUPI).This bit is set when the HWUPIES bit is written to one. This will enable the Host Wakeup Interrupt (HWUPI).
• HSOFIE: Host Start of Frame Interrupt EnableThis bit is cleared when the HSOFIEC bit is written to one. This will disable the Host Start of Frame interrupt (HSOFI).
This bit is set when the HSOFIES bit is written to one. This will enable the Host Start of Frame interrupt (HSOFI).
• RXRSMIE: Upstream Resume Received Interrupt EnableThis bit is cleared when the RXRSMIEC bit is written to one. This will disable the Downstream Resume interrupt (RXRSMI).
This bit is set when the RXRSMIES bit is written to one. This will enable the Upstream Resume Received interrupt (RXRSMI).• RSMEDIE: Downstream Resume Sent Interrupt Enable
This bit is cleared when the RSMEDIEC bit is written to one. This will disable the Downstream Resume interrupt (RSMEDI).This bit is set when the RSMEDIES bit is written to one. This will enable the Downstream Resume interrupt (RSMEDI).
• RSTIE: USB Reset Sent Interrupt EnableThis bit is cleared when the RSTIEC bit is written to one. This will disable the USB Reset Sent interrupt (RSTI).
This bit is set when the RSTIES bit is written to one. This will enable the USB Reset Sent interrupt (RSTI).
• DDISCIE: Device Disconnection Interrupt EnableThis bit is cleared when the DDISCIEC bit is written to one. This will disable the Device Disconnection interrupt (DDISCI).
This bit is set when the DDISCIES bit is written to one. This will enable the Device Disconnection interrupt (DDISCI).
• DCONNIE: Device Connection Interrupt EnableThis bit is cleared when the DCONNIEC bit is written to one. This will disable the Device Connection interrupt (DCONNI).
This bit is set when the DCONNIES bit is written to one. This will enable the Device Connection interrupt (DCONNI).
31 30 29 28 27 26 25 24
- - - - - - - -
23 22 21 20 19 18 17 16
- - - - - - - P8INTE(1)
15 14 13 12 11 10 9 8
P7INTE(1) P6INTE(1) P5INTE(1) P4INTE(1) P3INTE(1) P2INTE(1) P1INTE(1) P0INTE
7 6 5 4 3 2 1 0
- HWUPIE HSOFIE RXRSMIE RSMEDIE RSTIE DDISCIE DCONNIE
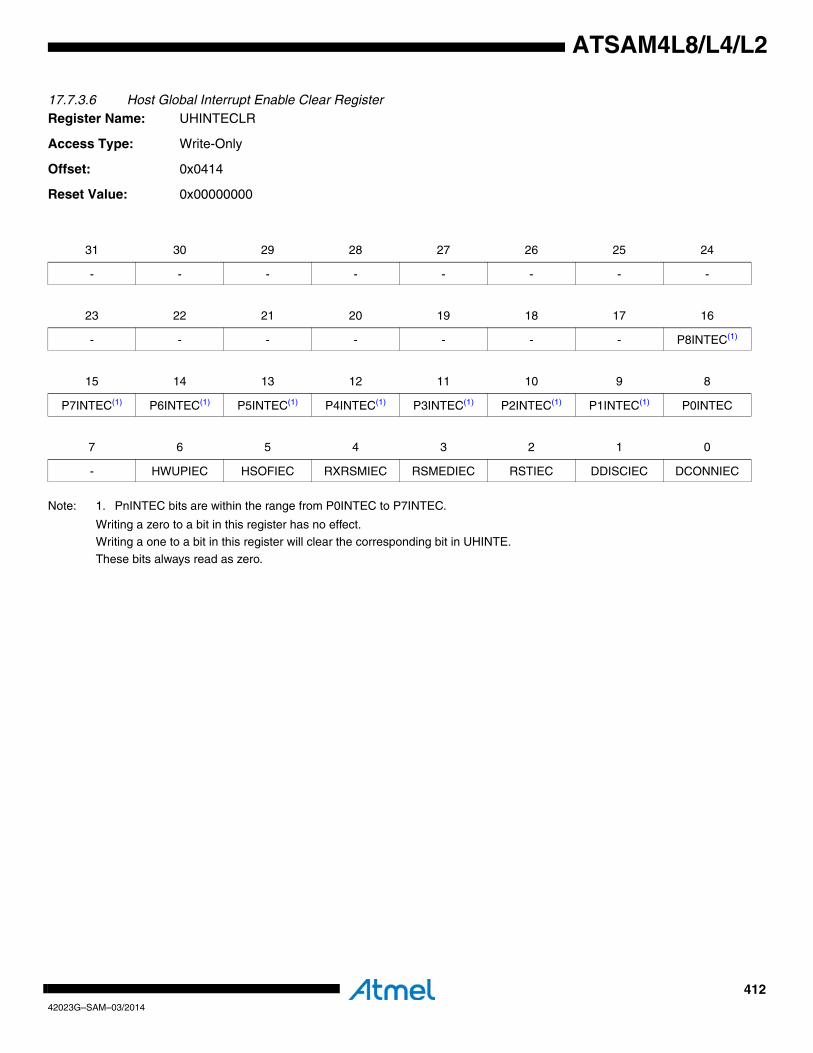
41242023G–SAM–03/2014
ATSAM4L8/L4/L2
17.7.3.6 Host Global Interrupt Enable Clear Register Register Name: UHINTECLR
Access Type: Write-Only
Offset: 0x0414
Reset Value: 0x00000000
Note: 1. PnINTEC bits are within the range from P0INTEC to P7INTEC.
Writing a zero to a bit in this register has no effect.Writing a one to a bit in this register will clear the corresponding bit in UHINTE.
These bits always read as zero.
31 30 29 28 27 26 25 24
- - - - - - - -
23 22 21 20 19 18 17 16
- - - - - - - P8INTEC(1)
15 14 13 12 11 10 9 8
P7INTEC(1) P6INTEC(1) P5INTEC(1) P4INTEC(1) P3INTEC(1) P2INTEC(1) P1INTEC(1) P0INTEC
7 6 5 4 3 2 1 0
- HWUPIEC HSOFIEC RXRSMIEC RSMEDIEC RSTIEC DDISCIEC DCONNIEC

41342023G–SAM–03/2014
ATSAM4L8/L4/L2
17.7.3.7 Host Global Interrupt Enable Set RegisterRegister Name: UHINTESET
Access Type: Write-Only
Offset: 0x0418
Reset Value: 0x00000000
Note: 1. PnINTES bits are within the range from P0INTES to P7INTES.
Writing a zero to a bit in this register has no effect.Writing a one to a bit in this register will set the corresponding bit in UHINT.
These bits always read as zero.
31 30 29 28 27 26 25 24
- - - - - - - -
23 22 21 20 19 18 17 16
- - - - - - - P8INTES(1)
15 14 13 12 11 10 9 8
P7INTES(1) P6INTES(1) P5INTES(1) P4INTES(1) P3INTES(1) P2INTES(1) P1INTES(1) P0INTES
7 6 5 4 3 2 1 0
- HWUPIES HSOFIES RXRSMIES RSMEDIES RSTIES DDISCIES DCONNIES
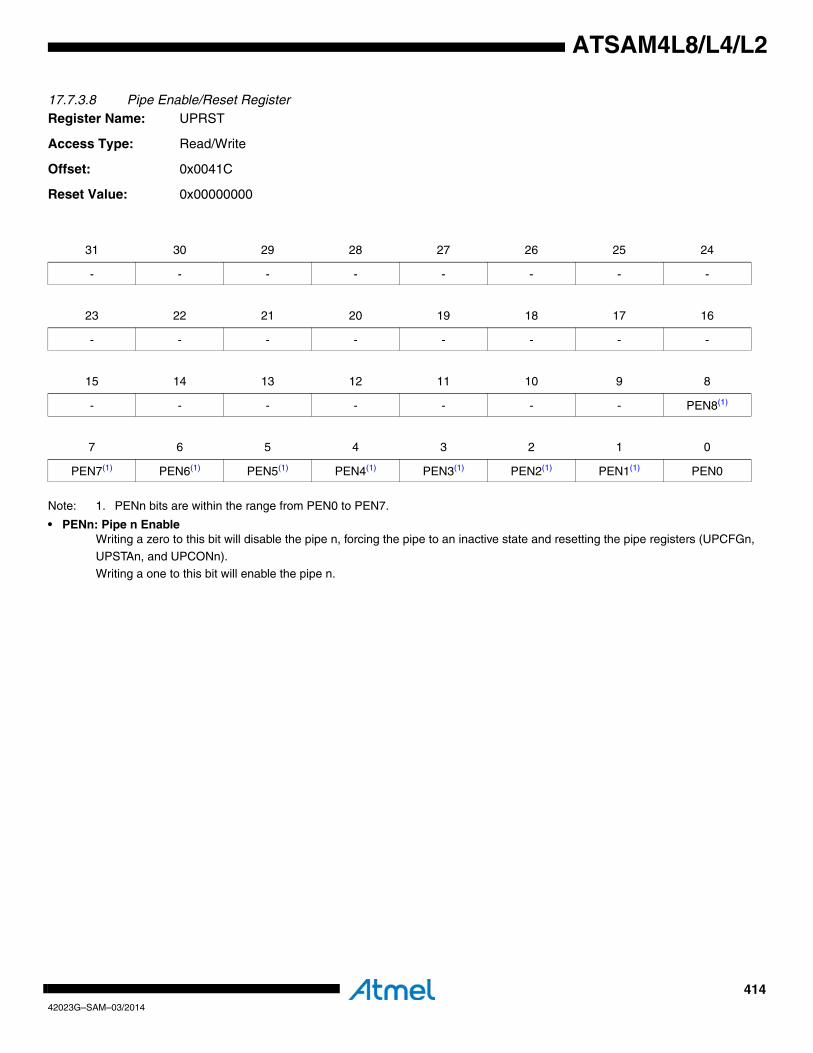
41442023G–SAM–03/2014
ATSAM4L8/L4/L2
17.7.3.8 Pipe Enable/Reset RegisterRegister Name: UPRST
Access Type: Read/Write
Offset: 0x0041C
Reset Value: 0x00000000
Note: 1. PENn bits are within the range from PEN0 to PEN7.
• PENn: Pipe n EnableWriting a zero to this bit will disable the pipe n, forcing the pipe to an inactive state and resetting the pipe registers (UPCFGn,
UPSTAn, and UPCONn).Writing a one to this bit will enable the pipe n.
31 30 29 28 27 26 25 24
- - - - - - - -
23 22 21 20 19 18 17 16
- - - - - - - -
15 14 13 12 11 10 9 8
- - - - - - - PEN8(1)
7 6 5 4 3 2 1 0
PEN7(1) PEN6(1) PEN5(1) PEN4(1) PEN3(1) PEN2(1) PEN1(1) PEN0
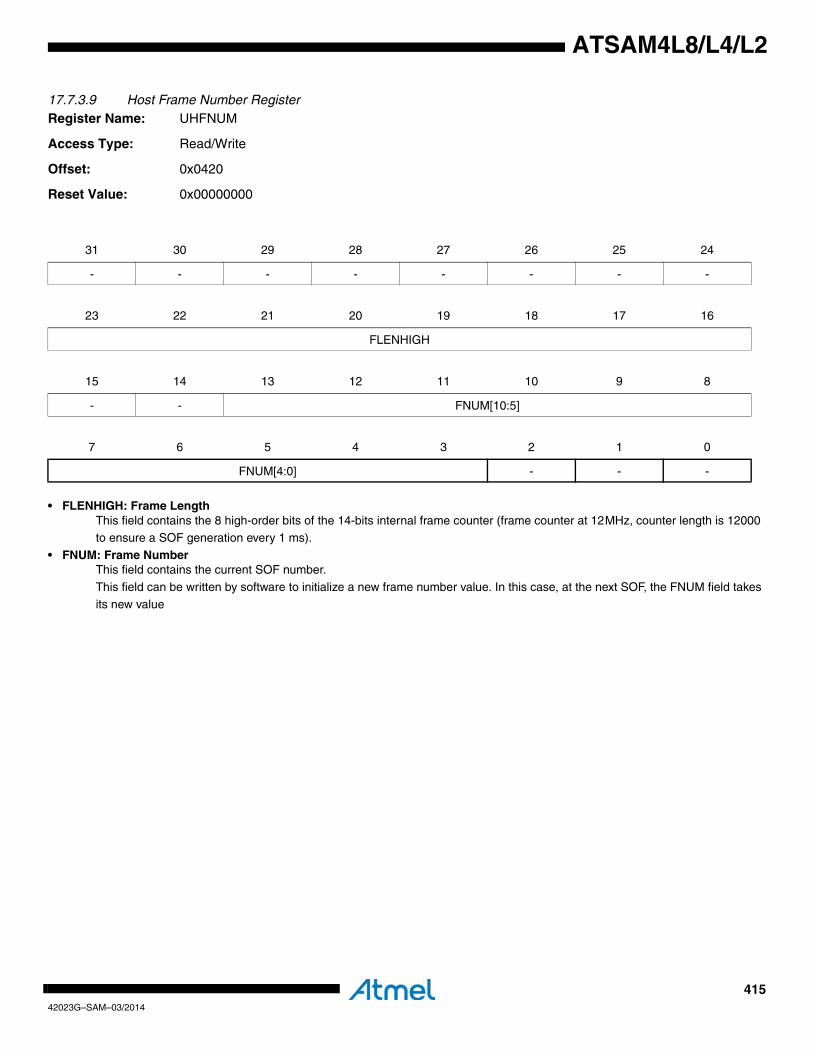
41542023G–SAM–03/2014
ATSAM4L8/L4/L2
17.7.3.9 Host Frame Number RegisterRegister Name: UHFNUM
Access Type: Read/Write
Offset: 0x0420
Reset Value: 0x00000000
• FLENHIGH: Frame LengthThis field contains the 8 high-order bits of the 14-bits internal frame counter (frame counter at 12MHz, counter length is 12000 to ensure a SOF generation every 1 ms).
• FNUM: Frame NumberThis field contains the current SOF number.
This field can be written by software to initialize a new frame number value. In this case, at the next SOF, the FNUM field takes
its new value
31 30 29 28 27 26 25 24
- - - - - - - -
23 22 21 20 19 18 17 16
FLENHIGH
15 14 13 12 11 10 9 8
- - FNUM[10:5]
7 6 5 4 3 2 1 0
FNUM[4:0] - - -
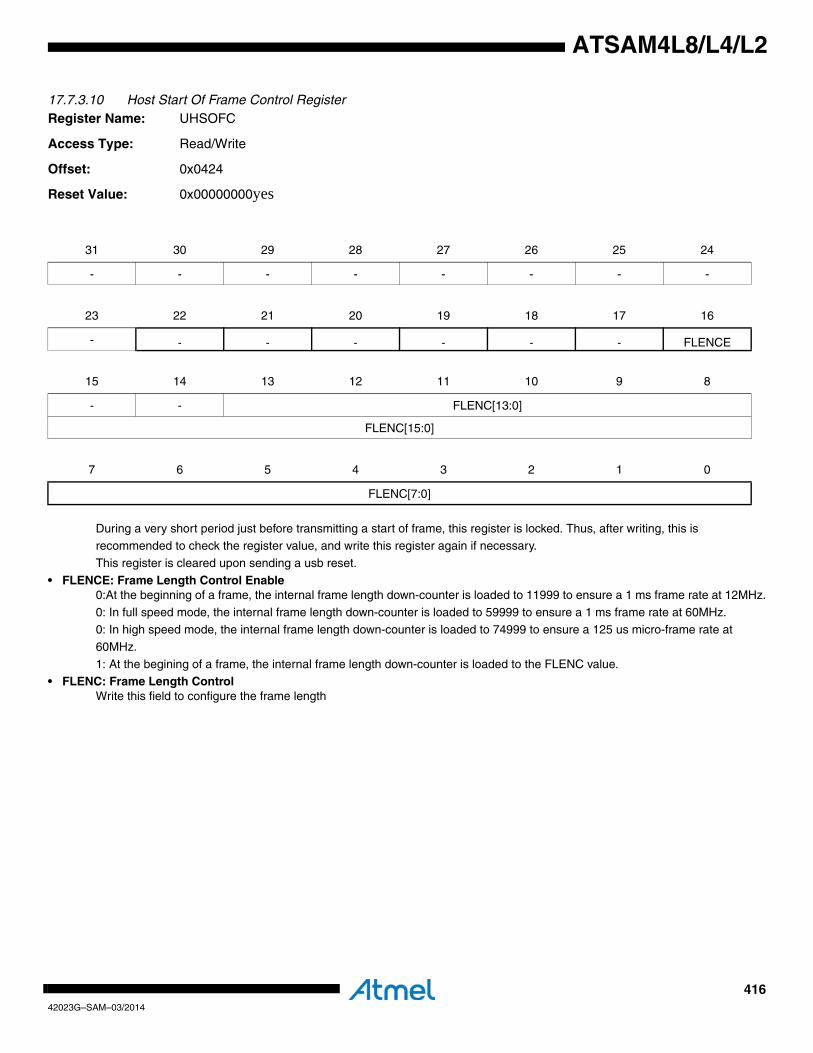
41642023G–SAM–03/2014
ATSAM4L8/L4/L2
17.7.3.10 Host Start Of Frame Control RegisterRegister Name: UHSOFC
Access Type: Read/Write
Offset: 0x0424
Reset Value: 0x00000000yes
During a very short period just before transmitting a start of frame, this register is locked. Thus, after writing, this is recommended to check the register value, and write this register again if necessary.
This register is cleared upon sending a usb reset.
• FLENCE: Frame Length Control Enable0:At the beginning of a frame, the internal frame length down-counter is loaded to 11999 to ensure a 1 ms frame rate at 12MHz.
0: In full speed mode, the internal frame length down-counter is loaded to 59999 to ensure a 1 ms frame rate at 60MHz.0: In high speed mode, the internal frame length down-counter is loaded to 74999 to ensure a 125 us micro-frame rate at
60MHz.
1: At the begining of a frame, the internal frame length down-counter is loaded to the FLENC value.• FLENC: Frame Length Control
Write this field to configure the frame length
31 30 29 28 27 26 25 24
- - - - - - - -
23 22 21 20 19 18 17 16
- - - - - - - FLENCE
15 14 13 12 11 10 9 8
- - FLENC[13:0]
FLENC[15:0]
7 6 5 4 3 2 1 0
FLENC[7:0]
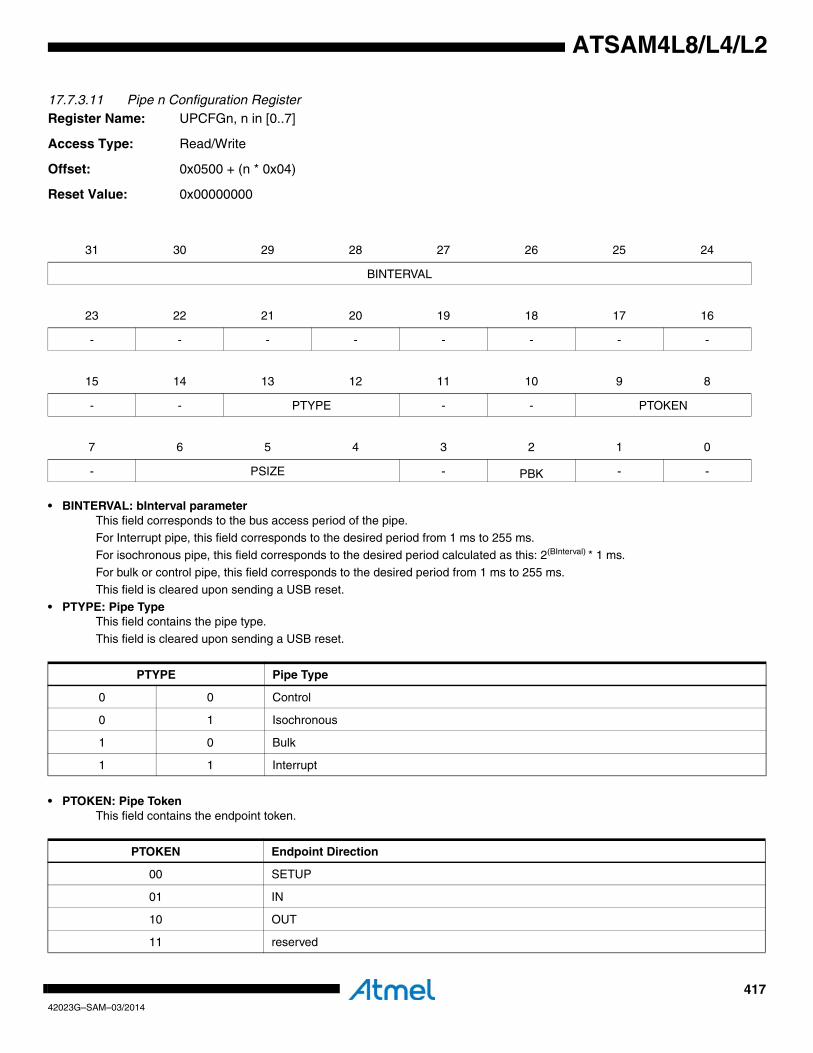
41742023G–SAM–03/2014
ATSAM4L8/L4/L2
17.7.3.11 Pipe n Configuration RegisterRegister Name: UPCFGn, n in [0..7]
Access Type: Read/Write
Offset: 0x0500 + (n * 0x04)
Reset Value: 0x00000000
• BINTERVAL: bInterval parameterThis field corresponds to the bus access period of the pipe.For Interrupt pipe, this field corresponds to the desired period from 1 ms to 255 ms.
For isochronous pipe, this field corresponds to the desired period calculated as this: 2(BInterval) * 1 ms.
For bulk or control pipe, this field corresponds to the desired period from 1 ms to 255 ms.This field is cleared upon sending a USB reset.
• PTYPE: Pipe TypeThis field contains the pipe type.
This field is cleared upon sending a USB reset.
• PTOKEN: Pipe TokenThis field contains the endpoint token.
31 30 29 28 27 26 25 24
BINTERVAL
23 22 21 20 19 18 17 16
- - - - - - - -
15 14 13 12 11 10 9 8
- - PTYPE - - PTOKEN
7 6 5 4 3 2 1 0
- PSIZE - PBK - -
PTYPE Pipe Type
0 0 Control
0 1 Isochronous
1 0 Bulk
1 1 Interrupt
PTOKEN Endpoint Direction
00 SETUP
01 IN
10 OUT
11 reserved
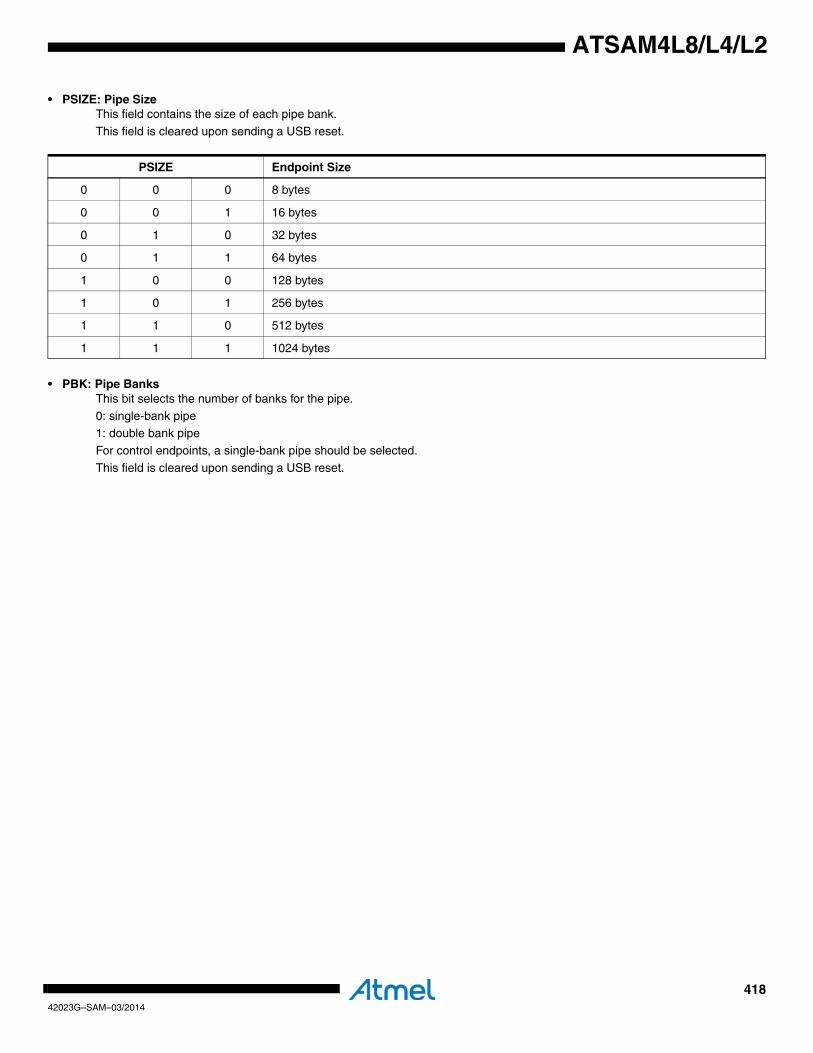
41842023G–SAM–03/2014
ATSAM4L8/L4/L2
• PSIZE: Pipe SizeThis field contains the size of each pipe bank.
This field is cleared upon sending a USB reset.
• PBK: Pipe BanksThis bit selects the number of banks for the pipe.
0: single-bank pipe1: double bank pipe
For control endpoints, a single-bank pipe should be selected.
This field is cleared upon sending a USB reset.
PSIZE Endpoint Size
0 0 0 8 bytes
0 0 1 16 bytes
0 1 0 32 bytes
0 1 1 64 bytes
1 0 0 128 bytes
1 0 1 256 bytes
1 1 0 512 bytes
1 1 1 1024 bytes
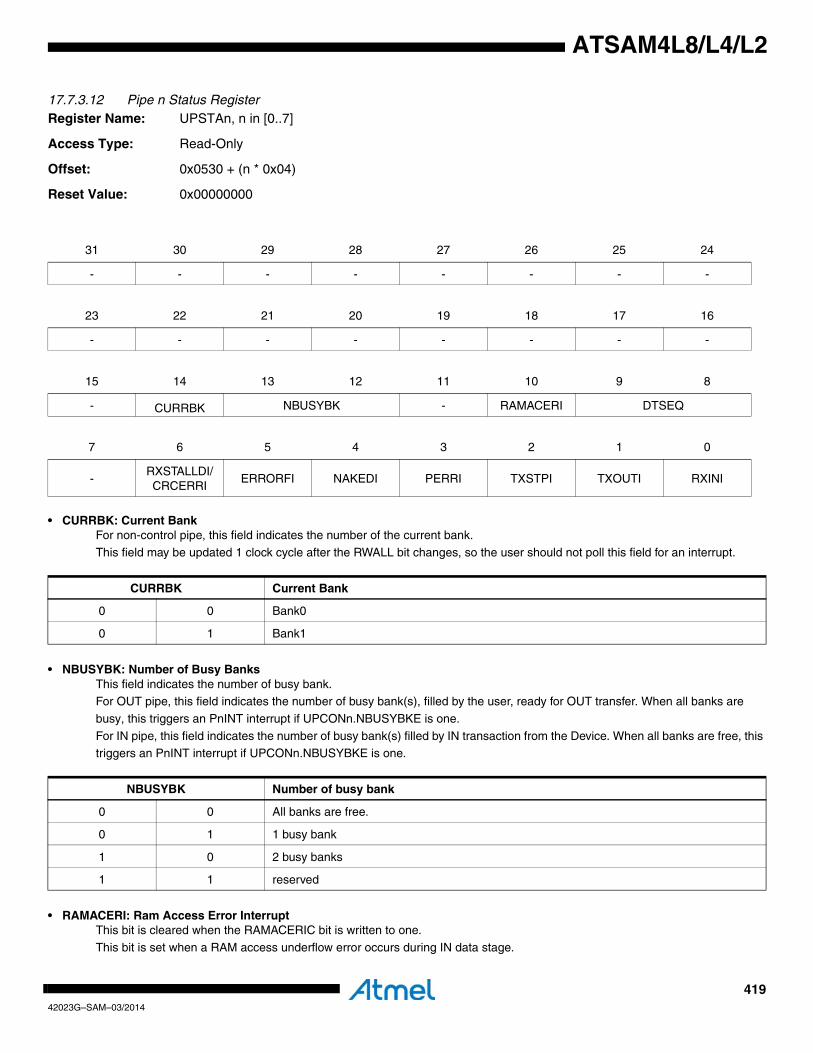
41942023G–SAM–03/2014
ATSAM4L8/L4/L2
17.7.3.12 Pipe n Status RegisterRegister Name: UPSTAn, n in [0..7]
Access Type: Read-Only
Offset: 0x0530 + (n * 0x04)
Reset Value: 0x00000000
• CURRBK: Current BankFor non-control pipe, this field indicates the number of the current bank.
This field may be updated 1 clock cycle after the RWALL bit changes, so the user should not poll this field for an interrupt.
• NBUSYBK: Number of Busy BanksThis field indicates the number of busy bank.For OUT pipe, this field indicates the number of busy bank(s), filled by the user, ready for OUT transfer. When all banks are
busy, this triggers an PnINT interrupt if UPCONn.NBUSYBKE is one.
For IN pipe, this field indicates the number of busy bank(s) filled by IN transaction from the Device. When all banks are free, this triggers an PnINT interrupt if UPCONn.NBUSYBKE is one.
• RAMACERI: Ram Access Error InterruptThis bit is cleared when the RAMACERIC bit is written to one.
This bit is set when a RAM access underflow error occurs during IN data stage.
31 30 29 28 27 26 25 24
- - - - - - - -
23 22 21 20 19 18 17 16
- - - - - - - -
15 14 13 12 11 10 9 8
- CURRBK NBUSYBK - RAMACERI DTSEQ
7 6 5 4 3 2 1 0
-RXSTALLDI/CRCERRI
ERRORFI NAKEDI PERRI TXSTPI TXOUTI RXINI
CURRBK Current Bank
0 0 Bank0
0 1 Bank1
NBUSYBK Number of busy bank
0 0 All banks are free.
0 1 1 busy bank
1 0 2 busy banks
1 1 reserved
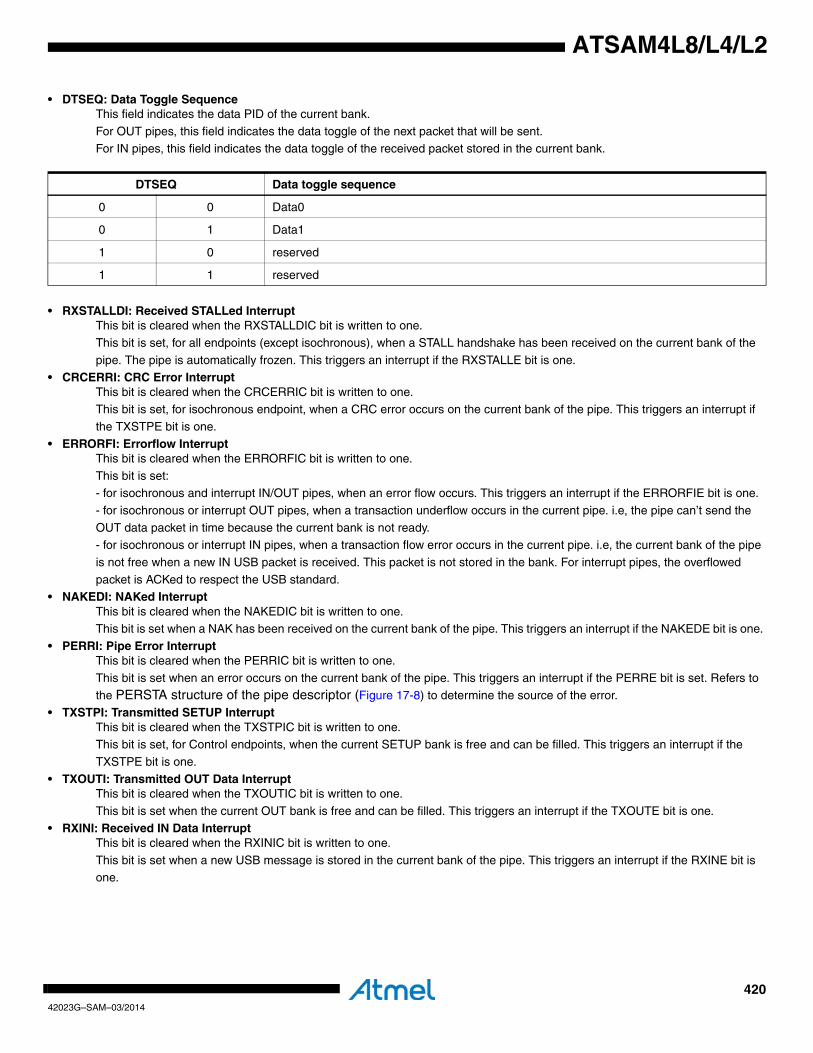
42042023G–SAM–03/2014
ATSAM4L8/L4/L2
• DTSEQ: Data Toggle SequenceThis field indicates the data PID of the current bank.
For OUT pipes, this field indicates the data toggle of the next packet that will be sent.For IN pipes, this field indicates the data toggle of the received packet stored in the current bank.
• RXSTALLDI: Received STALLed InterruptThis bit is cleared when the RXSTALLDIC bit is written to one.
This bit is set, for all endpoints (except isochronous), when a STALL handshake has been received on the current bank of the
pipe. The pipe is automatically frozen. This triggers an interrupt if the RXSTALLE bit is one. • CRCERRI: CRC Error Interrupt
This bit is cleared when the CRCERRIC bit is written to one.This bit is set, for isochronous endpoint, when a CRC error occurs on the current bank of the pipe. This triggers an interrupt if
the TXSTPE bit is one.
• ERRORFI: Errorflow InterruptThis bit is cleared when the ERRORFIC bit is written to one.
This bit is set:- for isochronous and interrupt IN/OUT pipes, when an error flow occurs. This triggers an interrupt if the ERRORFIE bit is one.
- for isochronous or interrupt OUT pipes, when a transaction underflow occurs in the current pipe. i.e, the pipe can’t send the
OUT data packet in time because the current bank is not ready.- for isochronous or interrupt IN pipes, when a transaction flow error occurs in the current pipe. i.e, the current bank of the pipe
is not free when a new IN USB packet is received. This packet is not stored in the bank. For interrupt pipes, the overflowed
packet is ACKed to respect the USB standard.• NAKEDI: NAKed Interrupt
This bit is cleared when the NAKEDIC bit is written to one.This bit is set when a NAK has been received on the current bank of the pipe. This triggers an interrupt if the NAKEDE bit is one.
• PERRI: Pipe Error InterruptThis bit is cleared when the PERRIC bit is written to one.
This bit is set when an error occurs on the current bank of the pipe. This triggers an interrupt if the PERRE bit is set. Refers to
the PERSTA structure of the pipe descriptor (Figure 17-8) to determine the source of the error. • TXSTPI: Transmitted SETUP Interrupt
This bit is cleared when the TXSTPIC bit is written to one.This bit is set, for Control endpoints, when the current SETUP bank is free and can be filled. This triggers an interrupt if the
TXSTPE bit is one.
• TXOUTI: Transmitted OUT Data InterruptThis bit is cleared when the TXOUTIC bit is written to one.
This bit is set when the current OUT bank is free and can be filled. This triggers an interrupt if the TXOUTE bit is one. • RXINI: Received IN Data Interrupt
This bit is cleared when the RXINIC bit is written to one.
This bit is set when a new USB message is stored in the current bank of the pipe. This triggers an interrupt if the RXINE bit is one.
DTSEQ Data toggle sequence
0 0 Data0
0 1 Data1
1 0 reserved
1 1 reserved
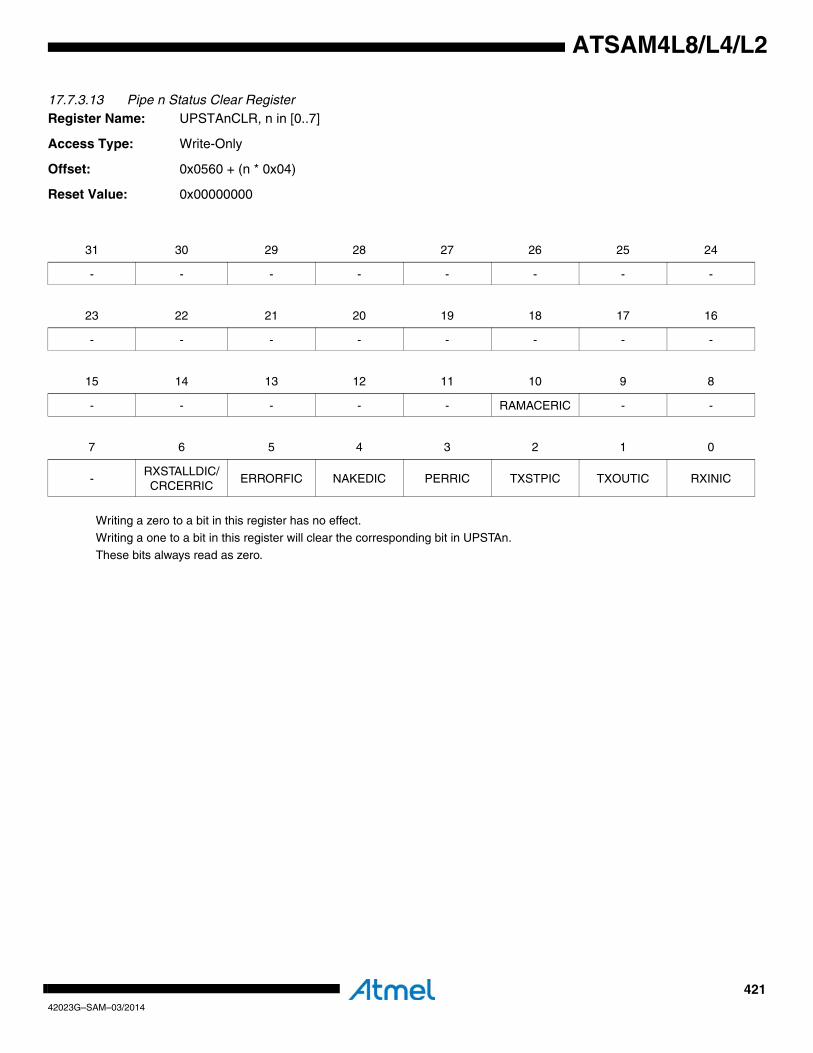
42142023G–SAM–03/2014
ATSAM4L8/L4/L2
17.7.3.13 Pipe n Status Clear RegisterRegister Name: UPSTAnCLR, n in [0..7]
Access Type: Write-Only
Offset: 0x0560 + (n * 0x04)
Reset Value: 0x00000000
Writing a zero to a bit in this register has no effect.Writing a one to a bit in this register will clear the corresponding bit in UPSTAn.
These bits always read as zero.
31 30 29 28 27 26 25 24
- - - - - - - -
23 22 21 20 19 18 17 16
- - - - - - - -
15 14 13 12 11 10 9 8
- - - - - RAMACERIC - -
7 6 5 4 3 2 1 0
-RXSTALLDIC/CRCERRIC
ERRORFIC NAKEDIC PERRIC TXSTPIC TXOUTIC RXINIC
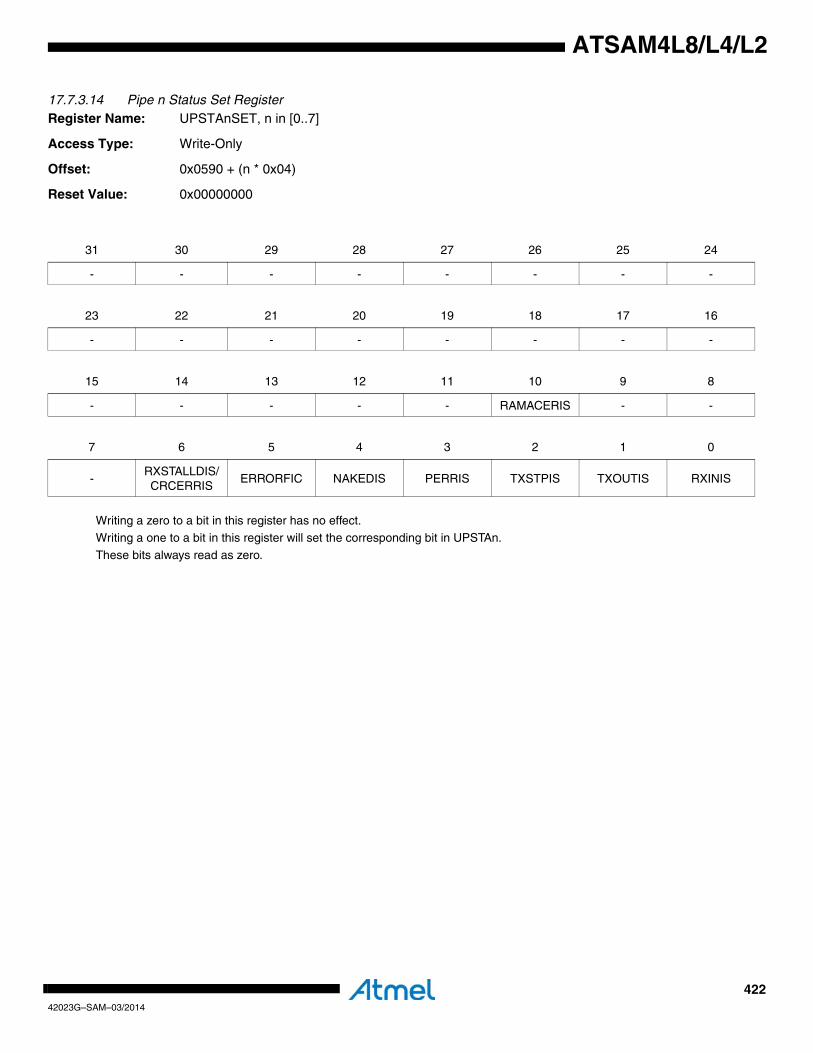
42242023G–SAM–03/2014
ATSAM4L8/L4/L2
17.7.3.14 Pipe n Status Set RegisterRegister Name: UPSTAnSET, n in [0..7]
Access Type: Write-Only
Offset: 0x0590 + (n * 0x04)
Reset Value: 0x00000000
Writing a zero to a bit in this register has no effect.Writing a one to a bit in this register will set the corresponding bit in UPSTAn.
These bits always read as zero.
31 30 29 28 27 26 25 24
- - - - - - - -
23 22 21 20 19 18 17 16
- - - - - - - -
15 14 13 12 11 10 9 8
- - - - - RAMACERIS - -
7 6 5 4 3 2 1 0
-RXSTALLDIS/CRCERRIS
ERRORFIC NAKEDIS PERRIS TXSTPIS TXOUTIS RXINIS
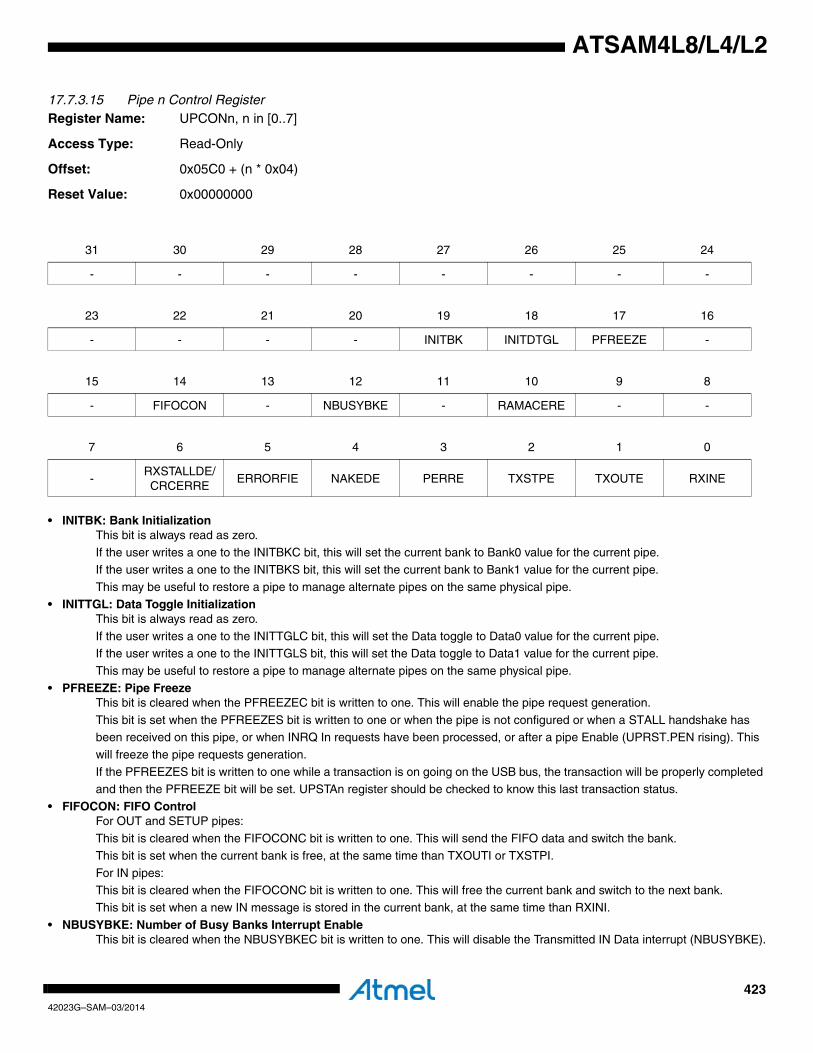
42342023G–SAM–03/2014
ATSAM4L8/L4/L2
17.7.3.15 Pipe n Control RegisterRegister Name: UPCONn, n in [0..7]
Access Type: Read-Only
Offset: 0x05C0 + (n * 0x04)
Reset Value: 0x00000000
• INITBK: Bank InitializationThis bit is always read as zero.
If the user writes a one to the INITBKC bit, this will set the current bank to Bank0 value for the current pipe.If the user writes a one to the INITBKS bit, this will set the current bank to Bank1 value for the current pipe.
This may be useful to restore a pipe to manage alternate pipes on the same physical pipe.
• INITTGL: Data Toggle InitializationThis bit is always read as zero.
If the user writes a one to the INITTGLC bit, this will set the Data toggle to Data0 value for the current pipe.If the user writes a one to the INITTGLS bit, this will set the Data toggle to Data1 value for the current pipe.
This may be useful to restore a pipe to manage alternate pipes on the same physical pipe.
• PFREEZE: Pipe FreezeThis bit is cleared when the PFREEZEC bit is written to one. This will enable the pipe request generation.
This bit is set when the PFREEZES bit is written to one or when the pipe is not configured or when a STALL handshake has been received on this pipe, or when INRQ In requests have been processed, or after a pipe Enable (UPRST.PEN rising). This
will freeze the pipe requests generation.
If the PFREEZES bit is written to one while a transaction is on going on the USB bus, the transaction will be properly completed and then the PFREEZE bit will be set. UPSTAn register should be checked to know this last transaction status.
• FIFOCON: FIFO ControlFor OUT and SETUP pipes:
This bit is cleared when the FIFOCONC bit is written to one. This will send the FIFO data and switch the bank.
This bit is set when the current bank is free, at the same time than TXOUTI or TXSTPI.
For IN pipes:This bit is cleared when the FIFOCONC bit is written to one. This will free the current bank and switch to the next bank.
This bit is set when a new IN message is stored in the current bank, at the same time than RXINI.
• NBUSYBKE: Number of Busy Banks Interrupt EnableThis bit is cleared when the NBUSYBKEC bit is written to one. This will disable the Transmitted IN Data interrupt (NBUSYBKE).
31 30 29 28 27 26 25 24
- - - - - - - -
23 22 21 20 19 18 17 16
- - - - INITBK INITDTGL PFREEZE -
15 14 13 12 11 10 9 8
- FIFOCON - NBUSYBKE - RAMACERE - -
7 6 5 4 3 2 1 0
-RXSTALLDE/CRCERRE
ERRORFIE NAKEDE PERRE TXSTPE TXOUTE RXINE
42442023G–SAM–03/2014
ATSAM4L8/L4/L2
This bit is set when the NBUSYBKES bit is written to one.This will enable the Transmitted IN Data interrupt (NBUSYBKE).• RAMACERE: Ram Access Error Interrupt Enable
This bit is cleared when the NBUSYBKEC bit is written to one. This will disable the Transmitted IN Data interrupt (NBUSYBKE).This bit is set when the NBUSYBKES bit is written to one.This will enable the Transmitted IN Data interrupt (NBUSYBKE).
• RXSTALLDE: Received STALLed Interrupt EnableThis bit is cleared when the RXSTALLDEC bit is written to one. This will disable the Transmitted IN Data interrupt
(RXSTALLDE).
This bit is set when the RXSTALLDES bit is written to one. This will enable the Transmitted IN Data interrupt (RXSTALLDE).
• CRCERRE: CRC Error Interrupt EnableThis bit is cleared when the CRCERREC bit is written to one. This will disable the Transmitted IN Data interrupt (CRCERRE).
This bit is set when the CRCERRES bit is written to one. This will enable the Transmitted IN Data interrupt (CRCERRE).• ERRORFIE: Errorflow Interrupt Enable
This bit is cleared when the ERRORFIEC bit is written to one. This will disable the Transmitted IN Data interrupt (OVERFIE).This bit is set when the ERRORFIES bit is written to one. This will enable the Transmitted IN Data interrupt (OVERFIE).
• NAKEDE: NAKed Interrupt EnableThis bit is cleared when the NAKEDEC bit is written to one. This will disable the Transmitted IN Data interrupt (NAKEDE).
This bit is set when the NAKEDES bit is written to one. This will enable the Transmitted IN Data interrupt (NAKEDE).
• PERRE: Pipe Error Interrupt EnableThis bit is cleared when the PERREC bit is written to one. This will disable the Transmitted IN Data interrupt (PERRE).
This bit is set when the PERRES bit is written to one. This will enable the Transmitted IN Data interrupt (PERRE).• TXSTPE: Transmitted SETUP Interrupt Enable
This bit is cleared when the TXSTPEC bit is written to one. This will disable the Transmitted IN Data interrupt (TXSTPE).This bit is set when the TXSTPES bit is written to one. This will enable the Transmitted IN Data interrupt (TXSTPE).
• TXOUTE: Transmitted OUT Data Interrupt EnableThis bit is cleared when the TXOUTEC bit is written to one. This will disable the Transmitted IN Data interrupt (TXOUTE).
This bit is set when the TXOUTES bit is written to one. This will enable the Transmitted IN Data interrupt (TXOUTE).
• RXINE: Received IN Data Interrupt EnableThis bit is cleared when the RXINEC bit is written to one. This will disable the Transmitted IN Data interrupt (RXINE).
This bit is set when the RXINES bit is written to one. This will enable the Transmitted IN Data interrupt (RXINE).
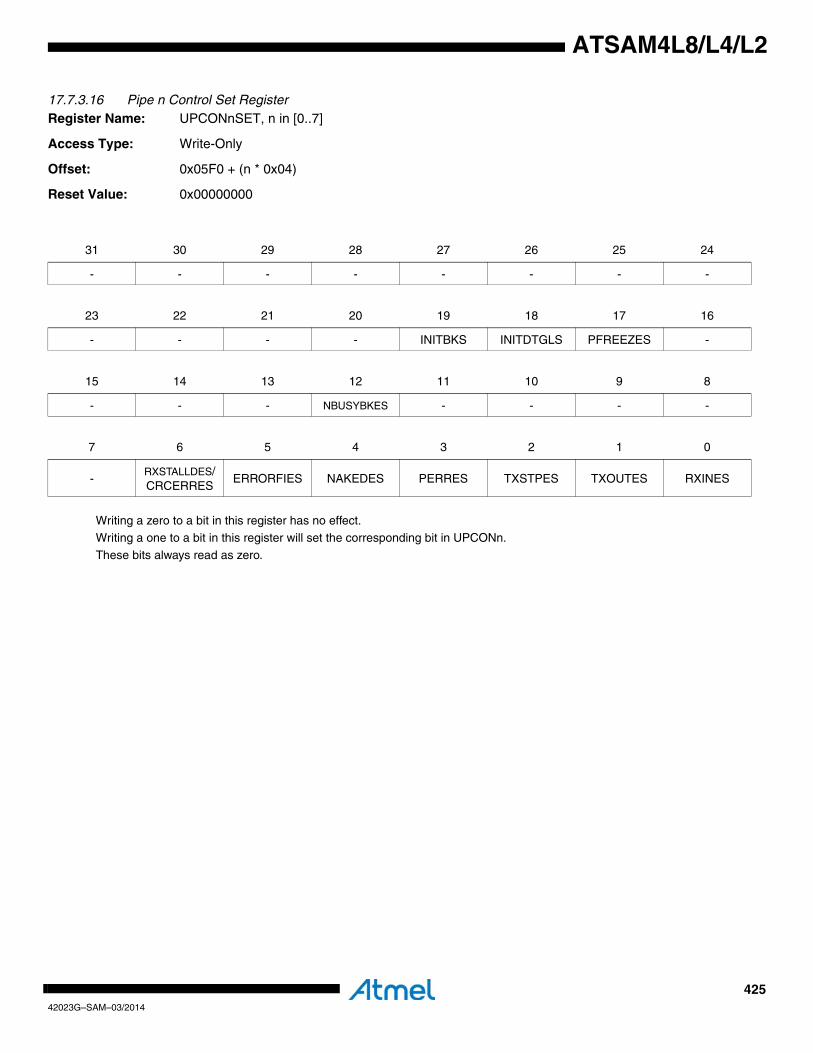
42542023G–SAM–03/2014
ATSAM4L8/L4/L2
17.7.3.16 Pipe n Control Set RegisterRegister Name: UPCONnSET, n in [0..7]
Access Type: Write-Only
Offset: 0x05F0 + (n * 0x04)
Reset Value: 0x00000000
Writing a zero to a bit in this register has no effect.Writing a one to a bit in this register will set the corresponding bit in UPCONn.
These bits always read as zero.
31 30 29 28 27 26 25 24
- - - - - - - -
23 22 21 20 19 18 17 16
- - - - INITBKS INITDTGLS PFREEZES -
15 14 13 12 11 10 9 8
- - - NBUSYBKES - - - -
7 6 5 4 3 2 1 0
-RXSTALLDES/CRCERRES
ERRORFIES NAKEDES PERRES TXSTPES TXOUTES RXINES
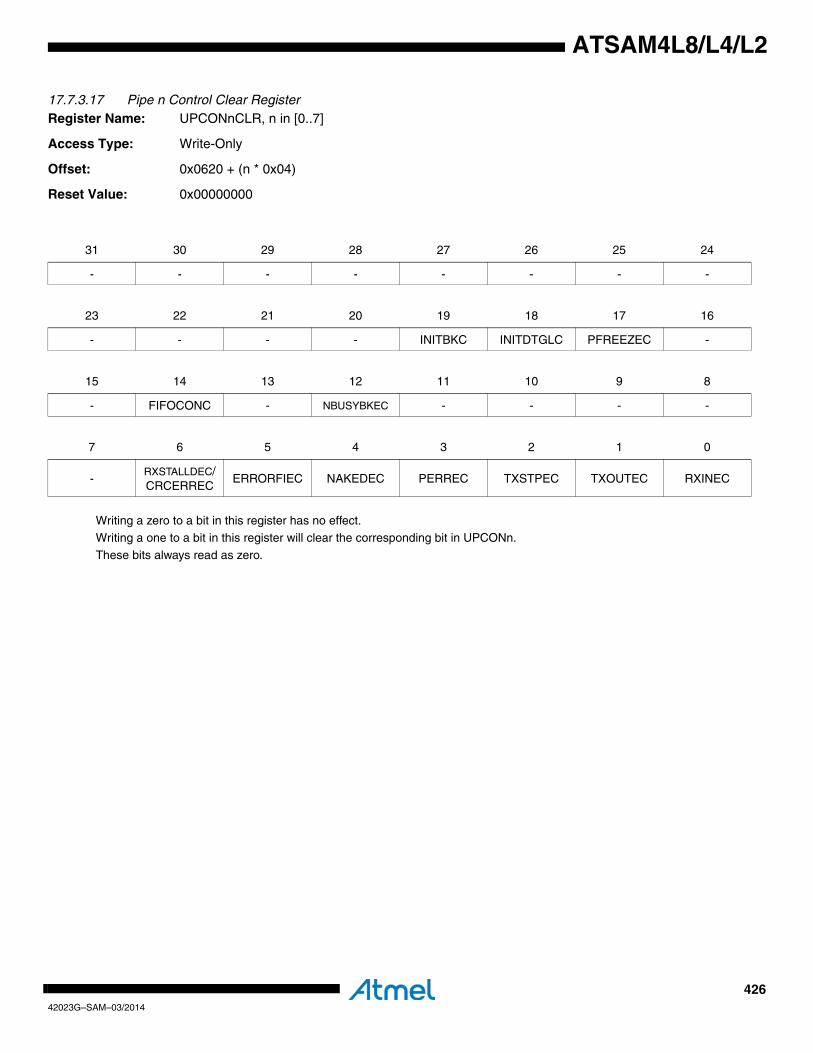
42642023G–SAM–03/2014
ATSAM4L8/L4/L2
17.7.3.17 Pipe n Control Clear RegisterRegister Name: UPCONnCLR, n in [0..7]
Access Type: Write-Only
Offset: 0x0620 + (n * 0x04)
Reset Value: 0x00000000
Writing a zero to a bit in this register has no effect.Writing a one to a bit in this register will clear the corresponding bit in UPCONn.
These bits always read as zero.
31 30 29 28 27 26 25 24
- - - - - - - -
23 22 21 20 19 18 17 16
- - - - INITBKC INITDTGLC PFREEZEC -
15 14 13 12 11 10 9 8
- FIFOCONC - NBUSYBKEC - - - -
7 6 5 4 3 2 1 0
-RXSTALLDEC/CRCERREC
ERRORFIEC NAKEDEC PERREC TXSTPEC TXOUTEC RXINEC

42742023G–SAM–03/2014
ATSAM4L8/L4/L2
17.7.3.18 Pipe n IN Request RegisterRegister Name: UPINRQn, n in [0..7]
Access Type: Read/Write
Offset: 0x0650 + (n * 0x04)
Reset Value: 0x00000001
• INMODE: IN Request ModeWriting a zero to this bit will perform a pre-defined number of IN requests. This number is the INRQ field.Writing a one to this bit will allow the USBC to perform infinite IN requests when the pipe is not frozen.
• INRQ: IN Request Number before FreezeThis field contains the number of IN transactions before the USBC freezes the pipe. The USBC will perform INRQ IN requests
before freezing the pipe. This counter is automatically decreased by 1 each time an IN request has been successfully
performed.This register has no effect when the INMODE bit is 1(infinite IN requests generation till the pipe is not frozen).
31 30 29 28 27 26 25 24
- - - - - - - -
23 22 21 20 19 18 17 16
- - - - - - - -
15 14 13 12 11 10 9 8
- - - - - - - INMODE
7 6 5 4 3 2 1 0
INRQ
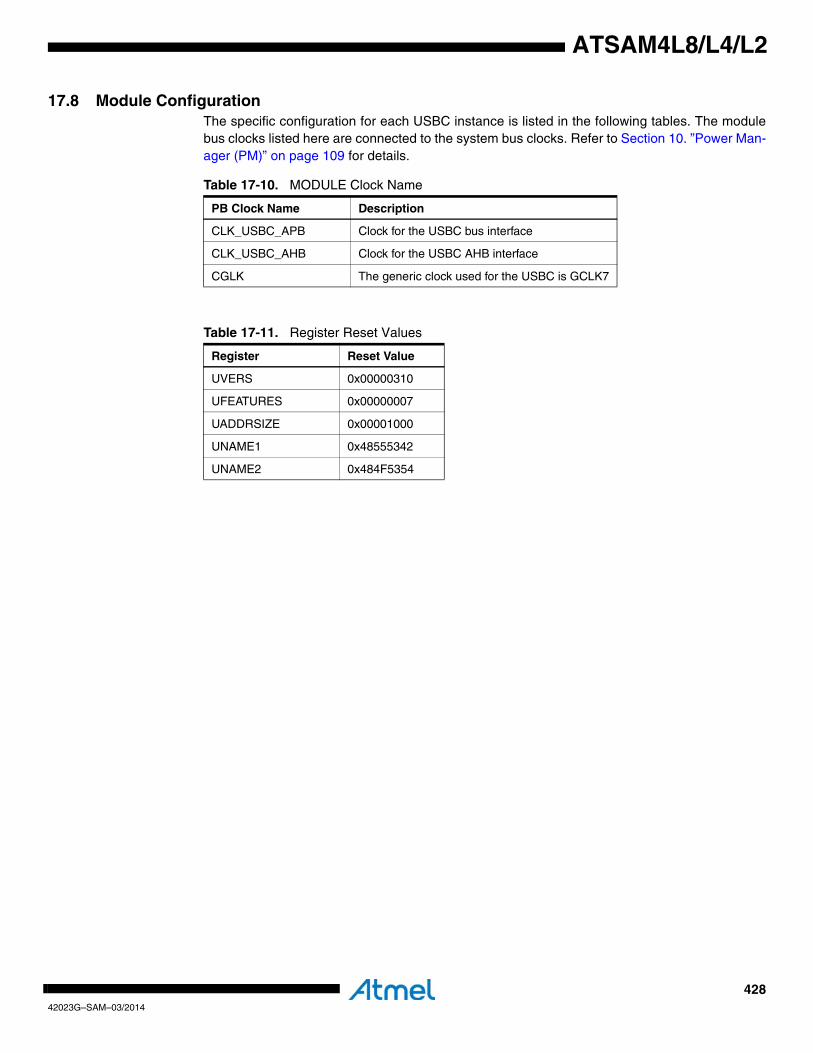
42842023G–SAM–03/2014
ATSAM4L8/L4/L2
17.8 Module ConfigurationThe specific configuration for each USBC instance is listed in the following tables. The modulebus clocks listed here are connected to the system bus clocks. Refer to Section 10. ”Power Man-ager (PM)” on page 109 for details.
Table 17-10. MODULE Clock Name
PB Clock Name Description
CLK_USBC_APB Clock for the USBC bus interface
CLK_USBC_AHB Clock for the USBC AHB interface
CGLK The generic clock used for the USBC is GCLK7
Table 17-11. Register Reset Values
Register Reset Value
UVERS 0x00000310
UFEATURES 0x00000007
UADDRSIZE 0x00001000
UNAME1 0x48555342
UNAME2 0x484F5354
42942023G–SAM–03/2014
ATSAM4L8/L4/L2
18. Advanced Encryption Standard (AESA)Rev: 1.0.2.0
18.1 Features• Compliant with FIPS Publication 197, Advanced Encryption Standard (AES)• 128-bit cryptographic key• Five confidentiality modes of operation as recommended in NIST Special Publication 800-38A,
Recommendation for Block Cipher Modes of Operation - Methods and Techniques:– Electronic Code Book– Cipher Block Chaining– Cipher Feedback– Output Feedback– Counter
• Short encryption and decryption time of 11 clock cycles with 128-bit cryptographic key• Buffering of input and output data for non-stop processing of multiple data blocks• DMA interface for multiple data block processing with minimal CPU intervention• Hardware countermeasures against differential power analysis attacks•
18.2 OverviewThe Advanced Encryption Standard module (AESA) is compliant with the FIPS (Federal Infor-mation Processing Standard) Publication 197, Advanced Encryption Standard (AES), whichspecifies a symmetric block cipher that is used to encrypt and decrypt electronic data. Encryp-tion is the transformation of a usable message, called the plaintext, into an unreadable form,called the ciphertext. On the other hand, decryption is the transformation that recovers the plain-text from the ciphertext.
AESA supports 128 bits cryptographic key size.
AESA supports all five confidentiality modes of operation (Electronic Code Book (ECB), CipherBook Chaining (CBC), Cipher Feedback (CFB), Output Feedback (OFB), and Counter (CTR)) forsymmetric key block cipher algorithms as recommended in the NIST (National Institute of Stan-dards and Technology) Special Publication 800-38A, Recommendation for Block Cipher Modesof Operation - Methods and Techniques (see Section 18.4.2 on page 432). For the CFB mode,AESA supports data segment sizes of 8, 16, 32, 64, and 128 bits.
AESA requires 11 clock cycles to process one block (128 bits) of input data, where Nr is thenumber of rounds required to process one data block and is 10 when the key size is 128 bits.The relationship between the module’s clock frequency and throughput (in bytes per second) isgiven by
AESA is able to process multiple data blocks without stopping. This is due to the buffering of theinput and output data within the module, which allows a new data block to be written to and theprevious data block to be read from it while the current data block is being processed.
AESA is able to interface with a DMA controller, thus allowing the processing of multiple datablocks with minimal CPU intervention. Two channels are supported by the DMA interface - onefor writing data to AESA and one for reading data from AESA.
Clock Frequency Throughput16
------------------------------⎝ ⎠⎛ ⎞ 11( )×=
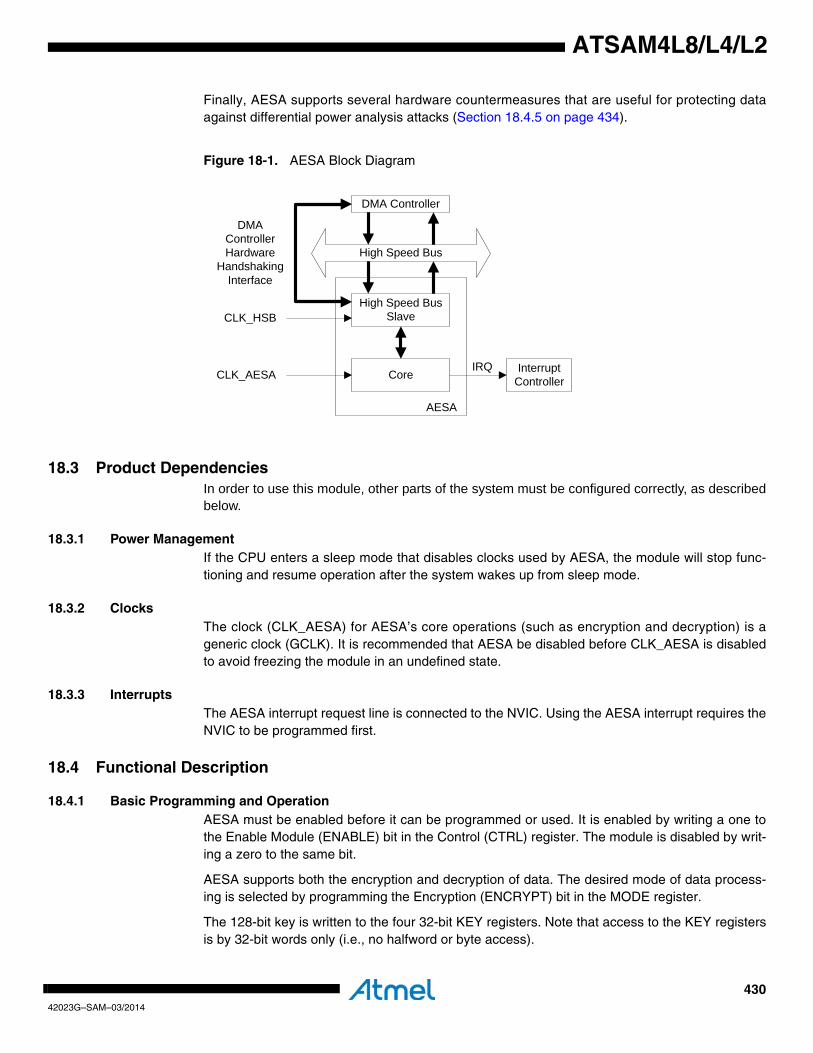
43042023G–SAM–03/2014
ATSAM4L8/L4/L2
Finally, AESA supports several hardware countermeasures that are useful for protecting dataagainst differential power analysis attacks (Section 18.4.5 on page 434).
18.3 Product DependenciesIn order to use this module, other parts of the system must be configured correctly, as describedbelow.
18.3.1 Power ManagementIf the CPU enters a sleep mode that disables clocks used by AESA, the module will stop func-tioning and resume operation after the system wakes up from sleep mode.
18.3.2 ClocksThe clock (CLK_AESA) for AESA’s core operations (such as encryption and decryption) is ageneric clock (GCLK). It is recommended that AESA be disabled before CLK_AESA is disabledto avoid freezing the module in an undefined state.
18.3.3 InterruptsThe AESA interrupt request line is connected to the NVIC. Using the AESA interrupt requires theNVIC to be programmed first.
18.4 Functional Description
18.4.1 Basic Programming and OperationAESA must be enabled before it can be programmed or used. It is enabled by writing a one tothe Enable Module (ENABLE) bit in the Control (CTRL) register. The module is disabled by writ-ing a zero to the same bit.
AESA supports both the encryption and decryption of data. The desired mode of data process-ing is selected by programming the Encryption (ENCRYPT) bit in the MODE register.
The 128-bit key is written to the four 32-bit KEY registers. Note that access to the KEY registersis by 32-bit words only (i.e., no halfword or byte access).
Core
High Speed Bus Slave
High Speed Bus
DMA Controller
AESA
DMA Controller Hardware
Handshaking Interface
CLK_AESA
CLK_HSB
Interrupt Controller
IRQ
Figure 18-1. AESA Block Diagram
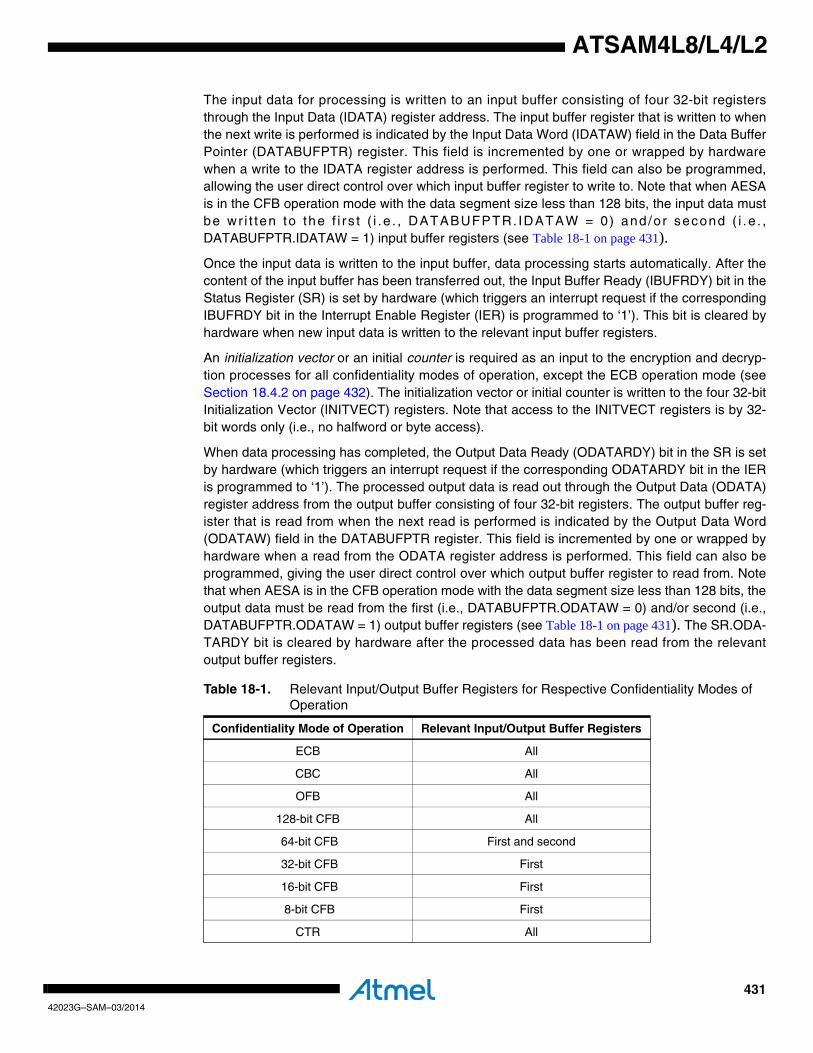
43142023G–SAM–03/2014
ATSAM4L8/L4/L2
The input data for processing is written to an input buffer consisting of four 32-bit registersthrough the Input Data (IDATA) register address. The input buffer register that is written to whenthe next write is performed is indicated by the Input Data Word (IDATAW) field in the Data BufferPointer (DATABUFPTR) register. This field is incremented by one or wrapped by hardwarewhen a write to the IDATA register address is performed. This field can also be programmed,allowing the user direct control over which input buffer register to write to. Note that when AESAis in the CFB operation mode with the data segment size less than 128 bits, the input data mustbe wr i t ten to the f i r s t ( i .e . , DATABUFPTR. IDATAW = 0) and /or second ( i .e . ,DATABUFPTR.IDATAW = 1) input buffer registers (see Table 18-1 on page 431).Once the input data is written to the input buffer, data processing starts automatically. After thecontent of the input buffer has been transferred out, the Input Buffer Ready (IBUFRDY) bit in theStatus Register (SR) is set by hardware (which triggers an interrupt request if the correspondingIBUFRDY bit in the Interrupt Enable Register (IER) is programmed to ‘1’). This bit is cleared byhardware when new input data is written to the relevant input buffer registers.
An initialization vector or an initial counter is required as an input to the encryption and decryp-tion processes for all confidentiality modes of operation, except the ECB operation mode (seeSection 18.4.2 on page 432). The initialization vector or initial counter is written to the four 32-bitInitialization Vector (INITVECT) registers. Note that access to the INITVECT registers is by 32-bit words only (i.e., no halfword or byte access).
When data processing has completed, the Output Data Ready (ODATARDY) bit in the SR is setby hardware (which triggers an interrupt request if the corresponding ODATARDY bit in the IERis programmed to ‘1’). The processed output data is read out through the Output Data (ODATA)register address from the output buffer consisting of four 32-bit registers. The output buffer reg-ister that is read from when the next read is performed is indicated by the Output Data Word(ODATAW) field in the DATABUFPTR register. This field is incremented by one or wrapped byhardware when a read from the ODATA register address is performed. This field can also beprogrammed, giving the user direct control over which output buffer register to read from. Notethat when AESA is in the CFB operation mode with the data segment size less than 128 bits, theoutput data must be read from the first (i.e., DATABUFPTR.ODATAW = 0) and/or second (i.e.,DATABUFPTR.ODATAW = 1) output buffer registers (see Table 18-1 on page 431). The SR.ODA-TARDY bit is cleared by hardware after the processed data has been read from the relevantoutput buffer registers.
Table 18-1. Relevant Input/Output Buffer Registers for Respective Confidentiality Modes of Operation
Confidentiality Mode of Operation Relevant Input/Output Buffer Registers
ECB All
CBC All
OFB All
128-bit CFB All
64-bit CFB First and second
32-bit CFB First
16-bit CFB First
8-bit CFB First
CTR All
43242023G–SAM–03/2014
ATSAM4L8/L4/L2
18.4.2 Confidentiality Modes of OperationAESA supports all five confidentiality modes of operation as recommended by the NIST SpecialPublication 800-38A, Recommendation for Block Cipher Modes of Operation - Methods andTechniques:
• Electronic Code Book (ECB)
• Cipher Block Chaining (CBC)
• Output Feedback (OFB)
• Cipher Feedback (CFB)
– CFB8 (8-bit data segment)
– CFB16 (16-bit data segment)
– CFB32 (32-bit data segment)
– CFB64 (64-bit data segment)
– CFB128 (128-bit data segment)
• CTR: Counter
The pre-processing, post-processing, and chaining of data required in these modes of operationare automatically performed by AESA. For complete information on these modes of operation,refer to the NIST Special Publication 800-38A.
The desired mode of operation is selected by programming the Operation Mode (OPMODE)field in the MODE register. For the CFB mode, the desired data segment size (8, 16, 32, 64, or128 bits) is selected by programming the Cipher Feedback Data Size (CFDS) field in the MODEregister.
With the only exception of the ECB operation mode, an initialization vector or an initial counter isrequired as an input to the encryption and decryption processes for all confidentiality modes ofoperation. The initialization vector or initial counter is stored in the four 32-bit INITVECT regis-ters. The initialization vector or initial counter is only used for processing the first 128-bit datablock of a message. For this reason, it is necessary to notify AESA whenever the next data blockit is going to process is the beginning of a new message. This is done by writing a one to theNew Message (NEWMSG) bit in the CTRL register.
The following paragraphs on the selection of the initialization vector or counter value should benoted to avoid compromising the confidentiality of an operation mode.
For the CBC and CFB modes, the initialization vector must be unpredictable (see NIST SpecialPublication 800-38A, Appendix C: Generation of Initialization Vectors for recommendations forgenerating unpredictable initialization vectors).
For the OFB mode, the initialization vector need not be unpredictable, but it must be unique forevery message ever encrypted under a given key (see NIST Special Publication 800-38A,Appendix C: Generation of Initialization Vectors for recommendations for generating unique ini-tialization vectors).
For the CTR mode, the counter value must be unique for each input data block that is everencrypted under a given key, across all messages. In AESA, a counter value for each input datablock is automatically generated by applying the standard incrementing function on a predefinednumber, m, of LSBs of the counter value (the initial counter value is provided by the user). Thisnumber is specified in the Module Configuration section at the end of this chapter. Note that thenumber of data blocks (128 bits) in the message must be no more than 2m in order for the coun-ter value to be unique for each input data block within the message. The satisfaction of the
43342023G–SAM–03/2014
ATSAM4L8/L4/L2
uniquess requirement for counter values across all messages is dependent on the choices of theinitial counter values for the messages (see NIST Special Publication 800-38A, Appendix B:Generation of Counter Blocks for recommendations for choosing initial couter values).
18.4.3 DMA InterfaceAESA is able to interface with a DMA controller, thus allowing the processing of multiple datablocks with minimal CPU intervention. AESA operates in the DMA mode when the DMA bit in theMODE register is programmed to ‘1’.
Two channels are supported by the DMA interface - an input data channel for writing input datato AESA and an output data channel for reading output data from AESA. The destinationaddress for the input data channel is the IDATA register address, whereas the source addressfor the output data channel is the ODATA register address.
Note that the DMA write transactions must be performed in the ascending word order, i.e., thefirst write transaction is for the first word of the input data, the second write transaction is for thesecond word, and so on. The number of write transactions required depends on the confidential-ity mode of operation that AESA is in and is the same as the number of relevant input bufferregisters as shown in Table 18-1 on page 431.
Likewise, the DMA read transactions must also be performed in the ascending word order, i.e.,the first read transaction is for the first word of the output data, the second read transaction is forthe second word, and so on.
18.4.4 Computation of Last Nk Words of Expanded KeyThe AES algorithm takes the cryptographic key provided by the user and performs a Key Expan-sion routine to generate an expanded key. The expanded key contains a total of 4(Nr + 1) 32-bitwords, where the first Nk (4 for a 128-bit key) words are the user-provided key.
For data encryption, the expanded key is used in the forward direction, i.e., the first four wordsare used in the initial round of data processing, the second four words in the first round, the thirdfour words in the second round, and so on.
On the other hand, for data decryption, the expanded key is used in the reverse direction, i.e.,the last four words are used in the initial round of data processing, the last second four words inthe first round, the last third four words in the second round, and so on.
To reduce gate count, AESA does not generate and store the entire expanded key prior to dataprocessing. Instead, it computes on-the-fly the round key (four 32-bit words) required for the cur-rent round of data processing. In general, the round key for the current round of data processingcan be computed from the Nk words of the expanded key generated in the previous rounds.
When AESA is operating in the encryption mode, the round key for the initial round of data pro-cessing is simply the user-provided key written to the KEY registers.
On the other hand, when AESA is operating in the decryption mode, the round key for the initialround of data processing is the last four words of the expanded key, which is not availableunless AESA has performed at least one encryption process prior to operating in the decryptionmode. In general, the last Nk words of the expanded key must be available before decryptioncan start.
If desired, AESA can be instructed to compute the last Nk words of the expanded key in advanceby writing a one to the Decryption Key Generate (DKEYGEN) bit in the CTRL register. The com-putation takes Nr clock cycles.
43442023G–SAM–03/2014
ATSAM4L8/L4/L2
Alternatively, the last Nk words of the expanded key can be automatically computed by AESAwhen a decryption process is initiated if they have not been computed in advance or havebecome invalid. Note that this will introduce a latency of Nr clock cycles to the first decryptionprocess.
The last Nk words of the expanded key are stored and reused until they are invalidated by one ofthe following events:
• System reset
• Software reset of AESA (by writing a one to the SWRST bit in the CTRL register)
• A change to the MODE.KEYSIZE field
• A write to any of the KEY registers
Note that the last Nk words of the expanded key is automatically generated by AESA during anencryption process, so their explicit computation is not necessary if a decryption process is pre-ceded by an encryption process using the same key.
18.4.5 Security Features
18.4.5.1 Hardware Countermeasures Against Differential Power Analysis AttacksAESA features four types of hardware countermeasures that are useful for protecting dataagainst differential power analysis attacks:
• Type 1: Randomly add one cycle to data processing
• Type 2: Randomly add one cycle to data processing (other version)
• Type 3: Add a random number of clock cycles to data processing, subject to a maximum of 11 clock cycles for key size of 128 bits
• Type 4: Add random spurious power consumption during data processing
By default, all countermeasures are enabled. One or more of the countermeasures can be dis-abled by programming the Countermeasure Type (CTYPE) field in the MODE register.
The countermeasures use random numbers generated by a deterministic random number gen-erator embedded in AESA. The seed for the random number generator is written to theDRNGSEED register. Note that access to the DRNGSEED register is by 32-bit words only (i.e.,no halfword or byte access). Note also that a new seed must be written after a change in the keysize.
Note that enabling countermeasures reduces AESA’s throughput. In short, the throughput ishighest with all the countermeasures disabled. On the other hand, with all of the countermea-sures enabled, the best protection is achieved but the throughput is worst.
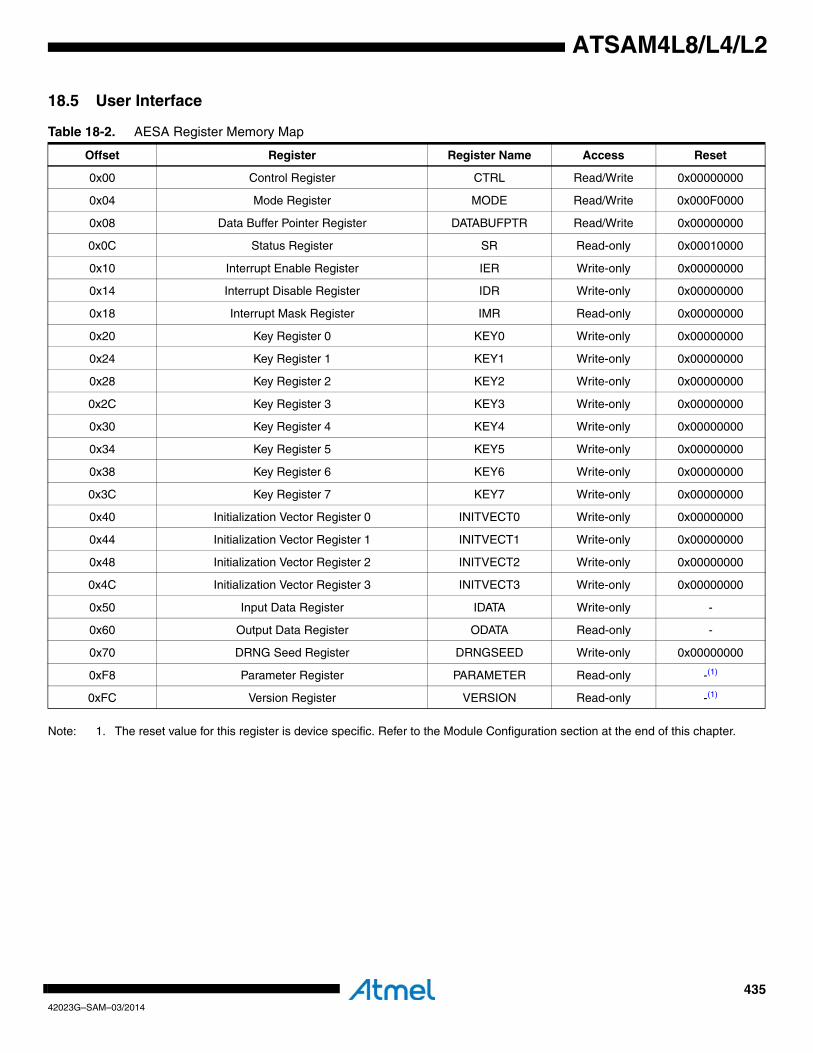
43542023G–SAM–03/2014
ATSAM4L8/L4/L2
18.5 User Interface
Note: 1. The reset value for this register is device specific. Refer to the Module Configuration section at the end of this chapter.
Table 18-2. AESA Register Memory Map
Offset Register Register Name Access Reset
0x00 Control Register CTRL Read/Write 0x00000000
0x04 Mode Register MODE Read/Write 0x000F0000
0x08 Data Buffer Pointer Register DATABUFPTR Read/Write 0x00000000
0x0C Status Register SR Read-only 0x00010000
0x10 Interrupt Enable Register IER Write-only 0x00000000
0x14 Interrupt Disable Register IDR Write-only 0x00000000
0x18 Interrupt Mask Register IMR Read-only 0x00000000
0x20 Key Register 0 KEY0 Write-only 0x00000000
0x24 Key Register 1 KEY1 Write-only 0x00000000
0x28 Key Register 2 KEY2 Write-only 0x00000000
0x2C Key Register 3 KEY3 Write-only 0x00000000
0x30 Key Register 4 KEY4 Write-only 0x00000000
0x34 Key Register 5 KEY5 Write-only 0x00000000
0x38 Key Register 6 KEY6 Write-only 0x00000000
0x3C Key Register 7 KEY7 Write-only 0x00000000
0x40 Initialization Vector Register 0 INITVECT0 Write-only 0x00000000
0x44 Initialization Vector Register 1 INITVECT1 Write-only 0x00000000
0x48 Initialization Vector Register 2 INITVECT2 Write-only 0x00000000
0x4C Initialization Vector Register 3 INITVECT3 Write-only 0x00000000
0x50 Input Data Register IDATA Write-only -
0x60 Output Data Register ODATA Read-only -
0x70 DRNG Seed Register DRNGSEED Write-only 0x00000000
0xF8 Parameter Register PARAMETER Read-only -(1)
0xFC Version Register VERSION Read-only -(1)
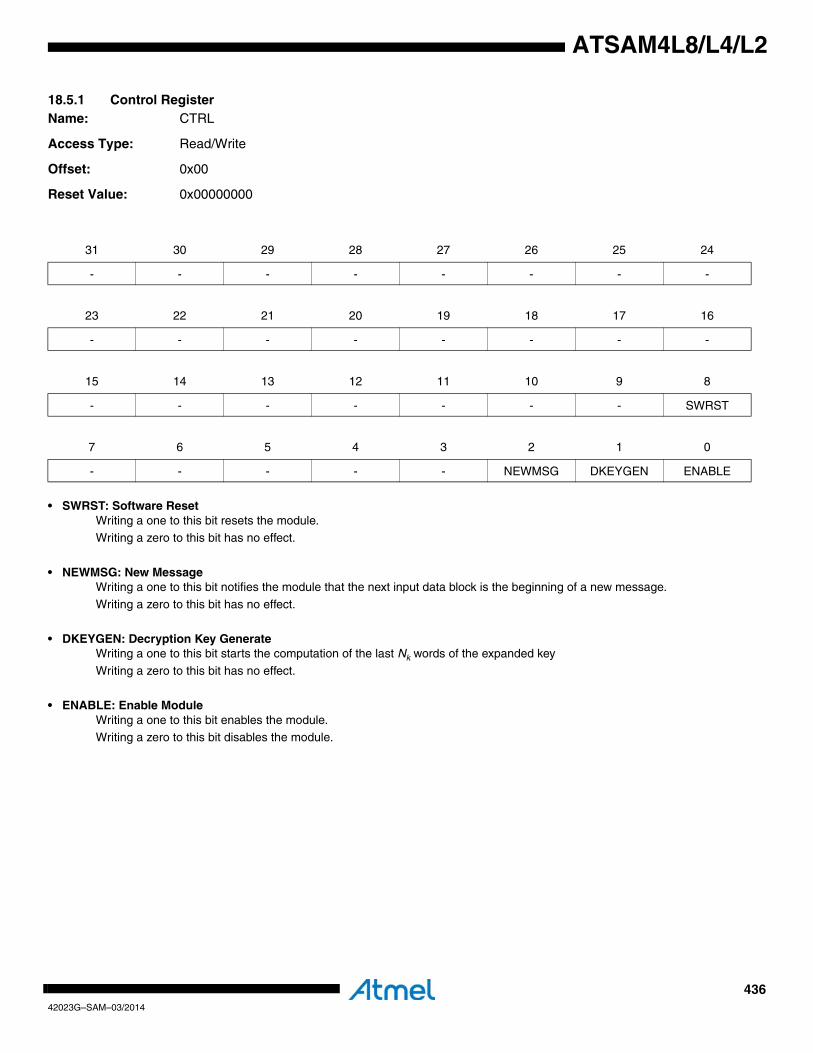
43642023G–SAM–03/2014
ATSAM4L8/L4/L2
18.5.1 Control RegisterName: CTRL
Access Type: Read/Write
Offset: 0x00
Reset Value: 0x00000000
• SWRST: Software ResetWriting a one to this bit resets the module.Writing a zero to this bit has no effect.
• NEWMSG: New MessageWriting a one to this bit notifies the module that the next input data block is the beginning of a new message.
Writing a zero to this bit has no effect.
• DKEYGEN: Decryption Key GenerateWriting a one to this bit starts the computation of the last Nk words of the expanded key
Writing a zero to this bit has no effect.
• ENABLE: Enable ModuleWriting a one to this bit enables the module.Writing a zero to this bit disables the module.
31 30 29 28 27 26 25 24
- - - - - - - -
23 22 21 20 19 18 17 16
- - - - - - - -
15 14 13 12 11 10 9 8
- - - - - - - SWRST
7 6 5 4 3 2 1 0
- - - - - NEWMSG DKEYGEN ENABLE

43742023G–SAM–03/2014
ATSAM4L8/L4/L2
18.5.2 Mode RegisterName: MODE
Access Type: Read/Write
Offset: 0x04
Reset Value: 0x000F0000
• CTYPE: Countermeasure Type
See Section 18.4.5 on page 434 for descriptions of the various countermeasure types.All countermeasures are enabled by default.
31 30 29 28 27 26 25 24
- - - - - - - -
23 22 21 20 19 18 17 16
- - - - CTYPE
15 14 13 12 11 10 9 8
- - - - - CFBS
7 6 5 4 3 2 1 0
- OPMODE DMA - - ENCRYPT
CTYPE Description
X X X 0 Countermeasure type 1 is disabled
X X X 1 Countermeasure type 1 is enabled
X X 0 X Countermeasure type 2 is disabled
X X 1 X Countermeasure type 2 is enabled
X 0 X X Countermeasure type 3 is disabled
X 1 X X Countermeasure type 3 is enabled
0 X X X Countermeasure type 4 is disabled
1 X X X Countermeasure type 4 is enabled
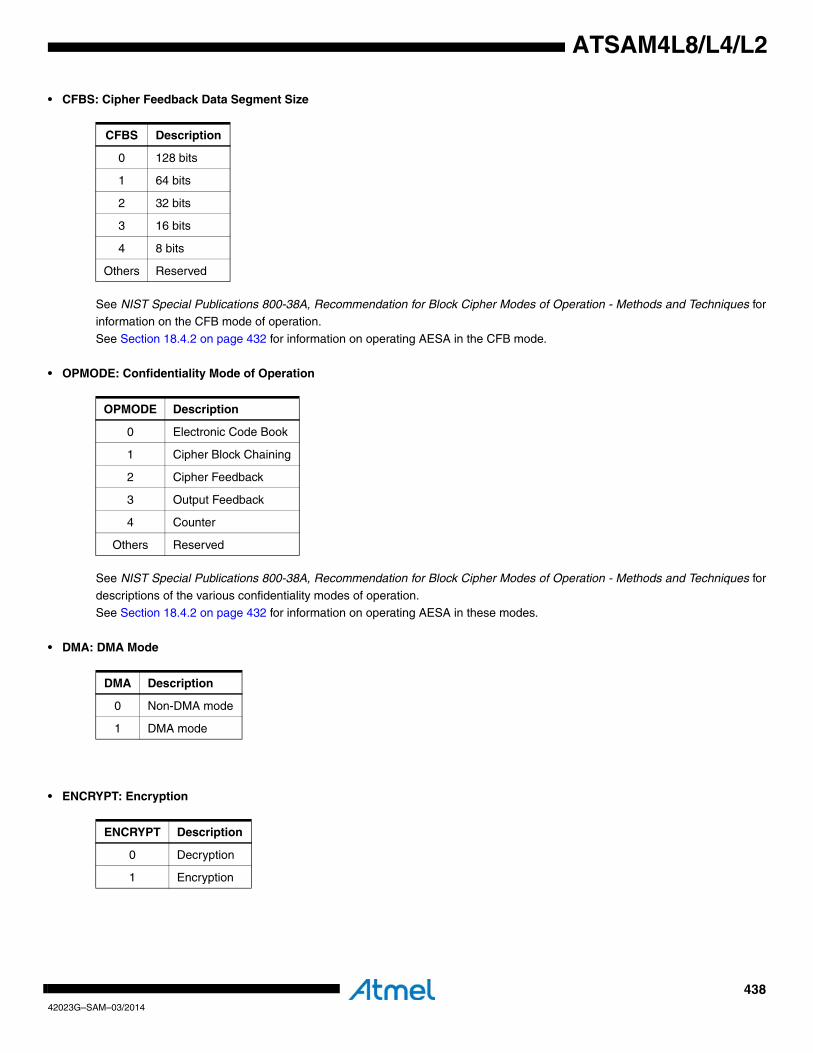
43842023G–SAM–03/2014
ATSAM4L8/L4/L2
• CFBS: Cipher Feedback Data Segment Size
See NIST Special Publications 800-38A, Recommendation for Block Cipher Modes of Operation - Methods and Techniques forinformation on the CFB mode of operation.
See Section 18.4.2 on page 432 for information on operating AESA in the CFB mode.
• OPMODE: Confidentiality Mode of Operation
See NIST Special Publications 800-38A, Recommendation for Block Cipher Modes of Operation - Methods and Techniques for
descriptions of the various confidentiality modes of operation.See Section 18.4.2 on page 432 for information on operating AESA in these modes.
• DMA: DMA Mode
• ENCRYPT: Encryption
CFBS Description
0 128 bits
1 64 bits
2 32 bits
3 16 bits
4 8 bits
Others Reserved
OPMODE Description
0 Electronic Code Book
1 Cipher Block Chaining
2 Cipher Feedback
3 Output Feedback
4 Counter
Others Reserved
DMA Description
0 Non-DMA mode
1 DMA mode
ENCRYPT Description
0 Decryption
1 Encryption
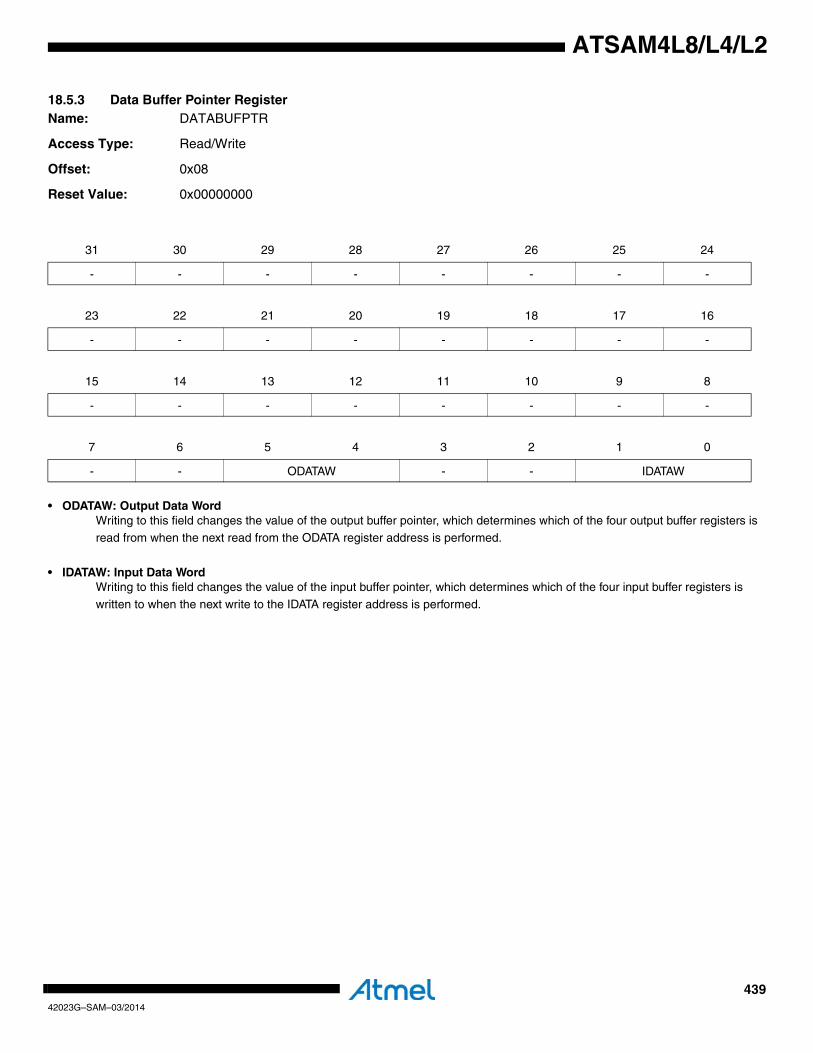
43942023G–SAM–03/2014
ATSAM4L8/L4/L2
18.5.3 Data Buffer Pointer RegisterName: DATABUFPTR
Access Type: Read/Write
Offset: 0x08
Reset Value: 0x00000000
• ODATAW: Output Data WordWriting to this field changes the value of the output buffer pointer, which determines which of the four output buffer registers is read from when the next read from the ODATA register address is performed.
• IDATAW: Input Data WordWriting to this field changes the value of the input buffer pointer, which determines which of the four input buffer registers is
written to when the next write to the IDATA register address is performed.
31 30 29 28 27 26 25 24
- - - - - - - -
23 22 21 20 19 18 17 16
- - - - - - - -
15 14 13 12 11 10 9 8
- - - - - - - -
7 6 5 4 3 2 1 0
- - ODATAW - - IDATAW
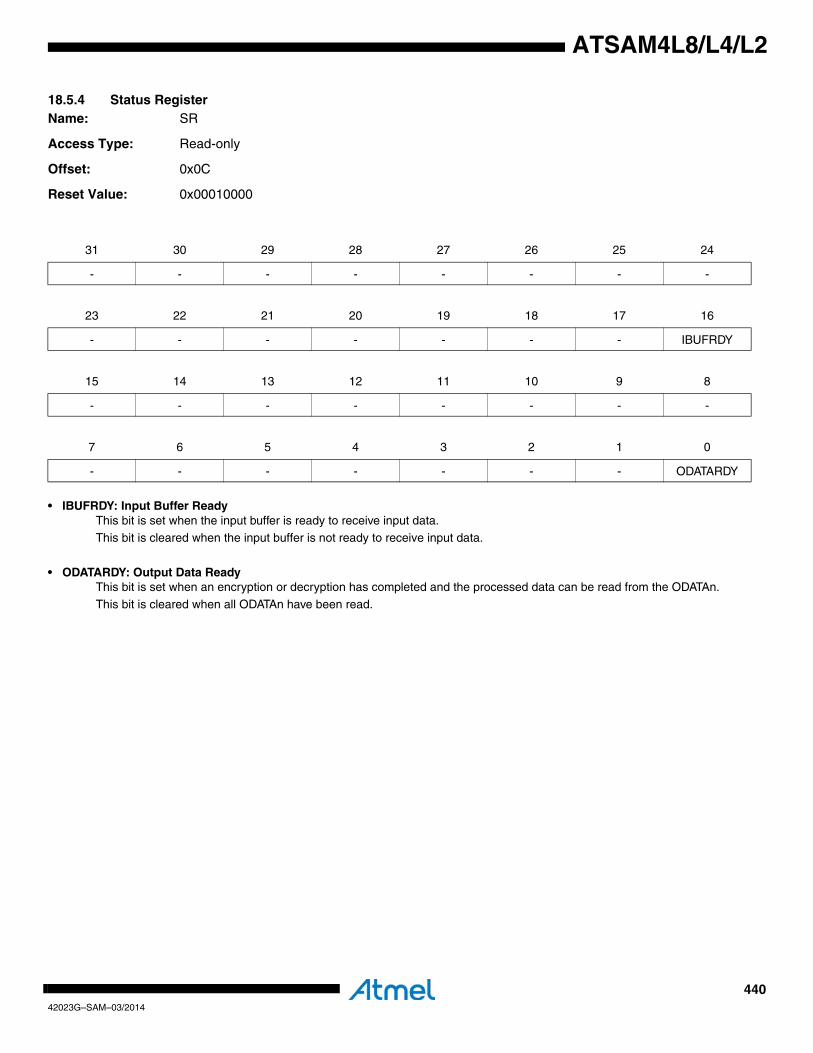
44042023G–SAM–03/2014
ATSAM4L8/L4/L2
18.5.4 Status RegisterName: SR
Access Type: Read-only
Offset: 0x0C
Reset Value: 0x00010000
• IBUFRDY: Input Buffer ReadyThis bit is set when the input buffer is ready to receive input data.This bit is cleared when the input buffer is not ready to receive input data.
• ODATARDY: Output Data ReadyThis bit is set when an encryption or decryption has completed and the processed data can be read from the ODATAn.
This bit is cleared when all ODATAn have been read.
31 30 29 28 27 26 25 24
- - - - - - - -
23 22 21 20 19 18 17 16
- - - - - - - IBUFRDY
15 14 13 12 11 10 9 8
- - - - - - - -
7 6 5 4 3 2 1 0
- - - - - - - ODATARDY

44142023G–SAM–03/2014
ATSAM4L8/L4/L2
18.5.5 Interrupt Enable RegisterName: IER
Access Type: Write-only
Offset: 0x10
Reset Value: 0x00000000
Writing a one to a valid bit in this register sets the corresponding bit in the IMR.
Writing a zero to any bit in this register has no effect.
31 30 29 28 27 26 25 24
- - - - - - - -
23 22 21 20 19 18 17 16
- - - - - - - IBUFRDY
15 14 13 12 11 10 9 8
- - - - - - - -
7 6 5 4 3 2 1 0
- - - - - - - ODATARDY
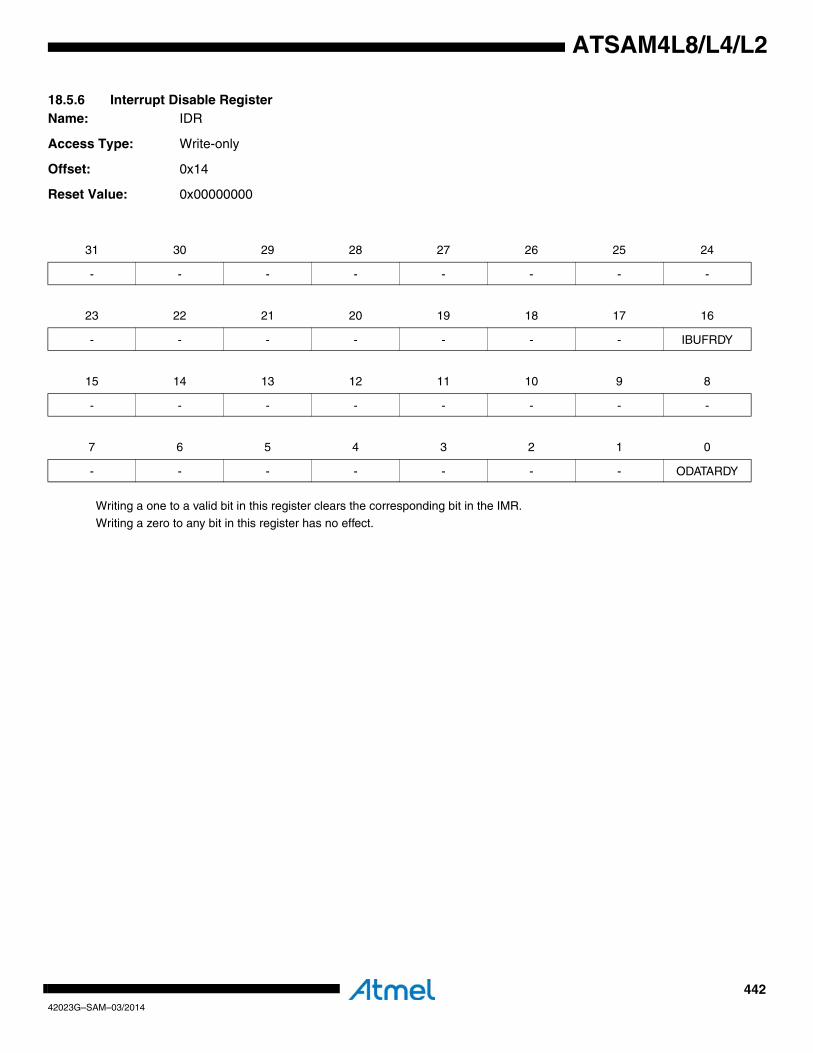
44242023G–SAM–03/2014
ATSAM4L8/L4/L2
18.5.6 Interrupt Disable RegisterName: IDR
Access Type: Write-only
Offset: 0x14
Reset Value: 0x00000000
Writing a one to a valid bit in this register clears the corresponding bit in the IMR.
Writing a zero to any bit in this register has no effect.
31 30 29 28 27 26 25 24
- - - - - - - -
23 22 21 20 19 18 17 16
- - - - - - - IBUFRDY
15 14 13 12 11 10 9 8
- - - - - - - -
7 6 5 4 3 2 1 0
- - - - - - - ODATARDY
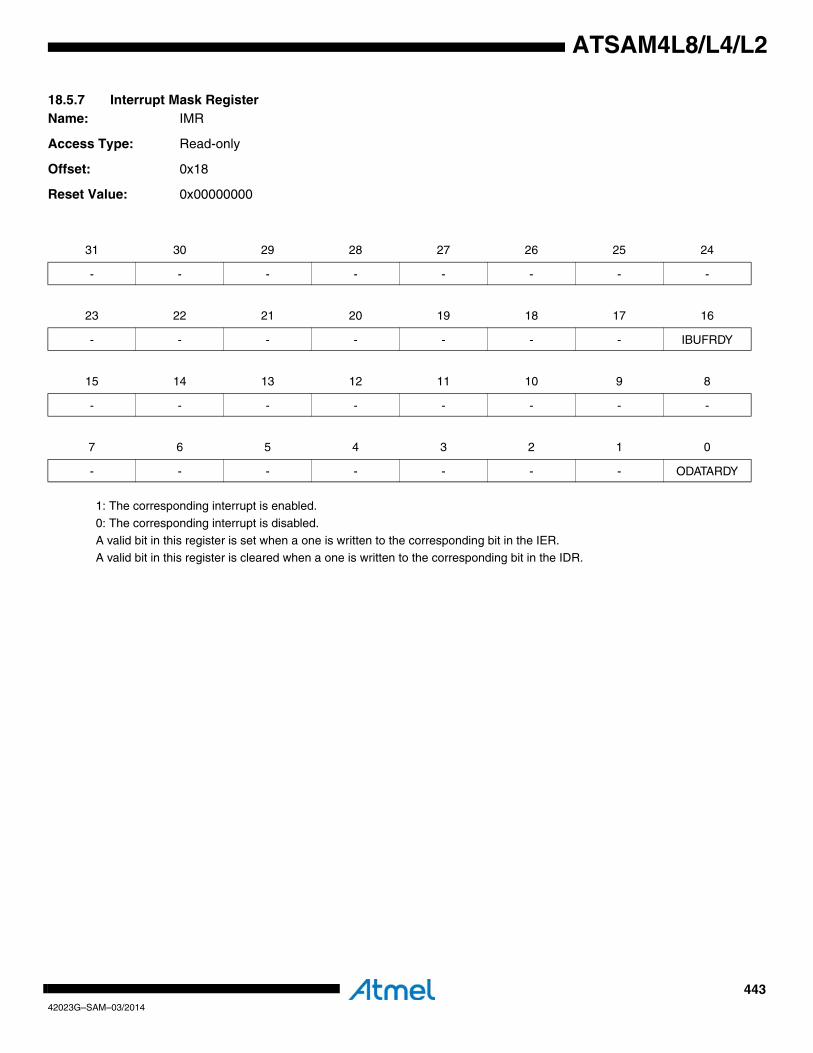
44342023G–SAM–03/2014
ATSAM4L8/L4/L2
18.5.7 Interrupt Mask RegisterName: IMR
Access Type: Read-only
Offset: 0x18
Reset Value: 0x00000000
1: The corresponding interrupt is enabled.
0: The corresponding interrupt is disabled.
A valid bit in this register is set when a one is written to the corresponding bit in the IER.A valid bit in this register is cleared when a one is written to the corresponding bit in the IDR.
31 30 29 28 27 26 25 24
- - - - - - - -
23 22 21 20 19 18 17 16
- - - - - - - IBUFRDY
15 14 13 12 11 10 9 8
- - - - - - - -
7 6 5 4 3 2 1 0
- - - - - - - ODATARDY

44442023G–SAM–03/2014
ATSAM4L8/L4/L2
18.5.8 Key RegistersName: KEYn
Access Type: Write-only
Offset: 0x20 + (n * 0x04)
Reset Value: 0x00000000
• KEYn: Key Word nThis register stores the nth word of the cryptographic key.
31 30 29 28 27 26 25 24
KEYn[31:24]
23 22 21 20 19 18 17 16
KEYn[23:16]
15 14 13 12 11 10 9 8
KEYn[15:8]
7 6 5 4 3 2 1 0
KEYn[7:0]
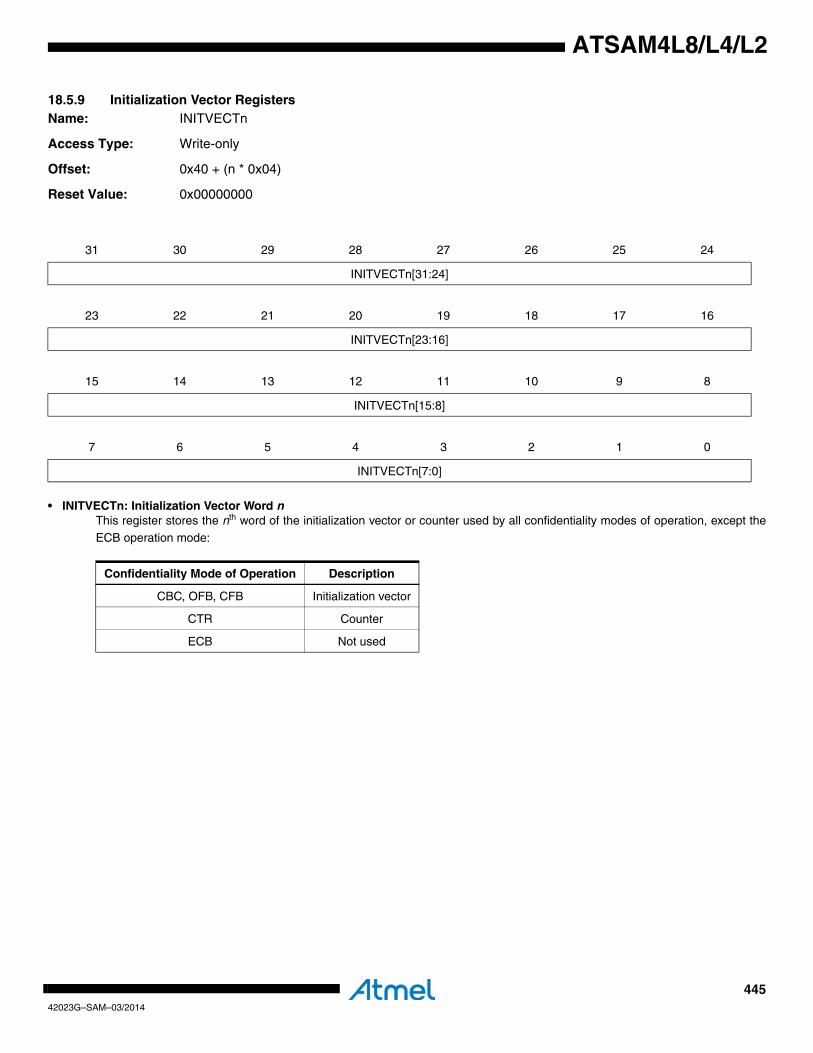
44542023G–SAM–03/2014
ATSAM4L8/L4/L2
18.5.9 Initialization Vector RegistersName: INITVECTn
Access Type: Write-only
Offset: 0x40 + (n * 0x04)
Reset Value: 0x00000000
• INITVECTn: Initialization Vector Word nThis register stores the nth word of the initialization vector or counter used by all confidentiality modes of operation, except theECB operation mode:
31 30 29 28 27 26 25 24
INITVECTn[31:24]
23 22 21 20 19 18 17 16
INITVECTn[23:16]
15 14 13 12 11 10 9 8
INITVECTn[15:8]
7 6 5 4 3 2 1 0
INITVECTn[7:0]
Confidentiality Mode of Operation Description
CBC, OFB, CFB Initialization vector
CTR Counter
ECB Not used
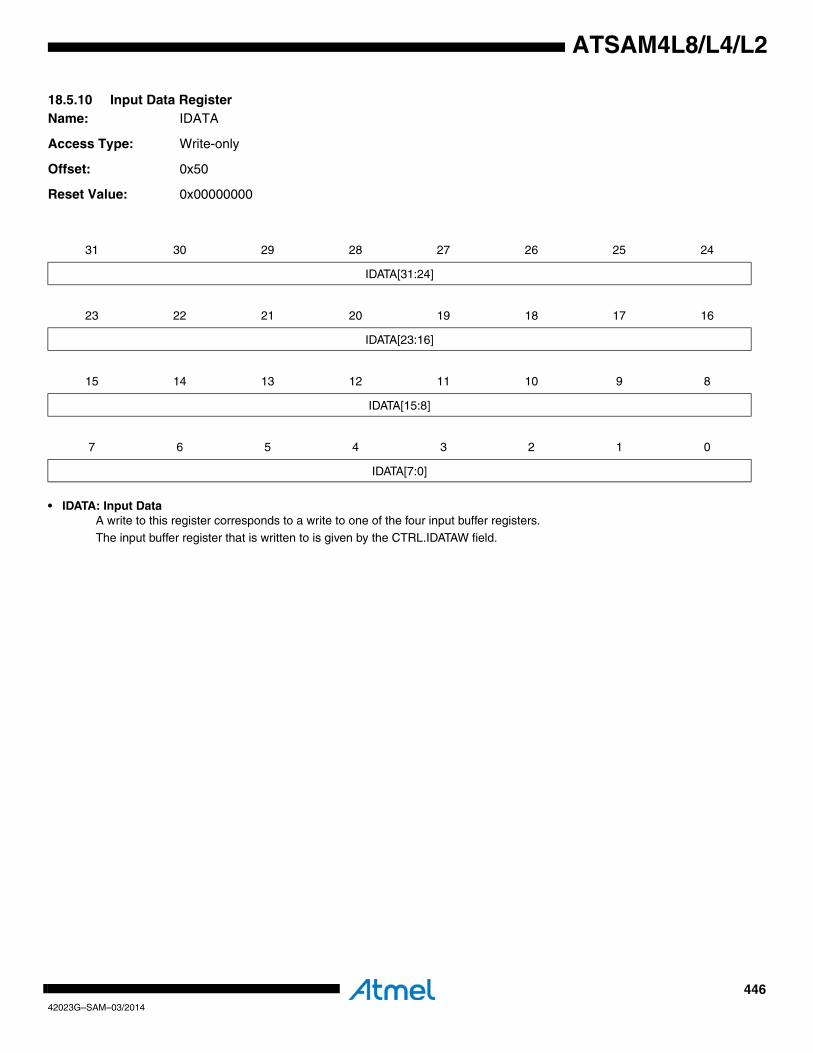
44642023G–SAM–03/2014
ATSAM4L8/L4/L2
18.5.10 Input Data RegisterName: IDATA
Access Type: Write-only
Offset: 0x50
Reset Value: 0x00000000
• IDATA: Input DataA write to this register corresponds to a write to one of the four input buffer registers.The input buffer register that is written to is given by the CTRL.IDATAW field.
31 30 29 28 27 26 25 24
IDATA[31:24]
23 22 21 20 19 18 17 16
IDATA[23:16]
15 14 13 12 11 10 9 8
IDATA[15:8]
7 6 5 4 3 2 1 0
IDATA[7:0]
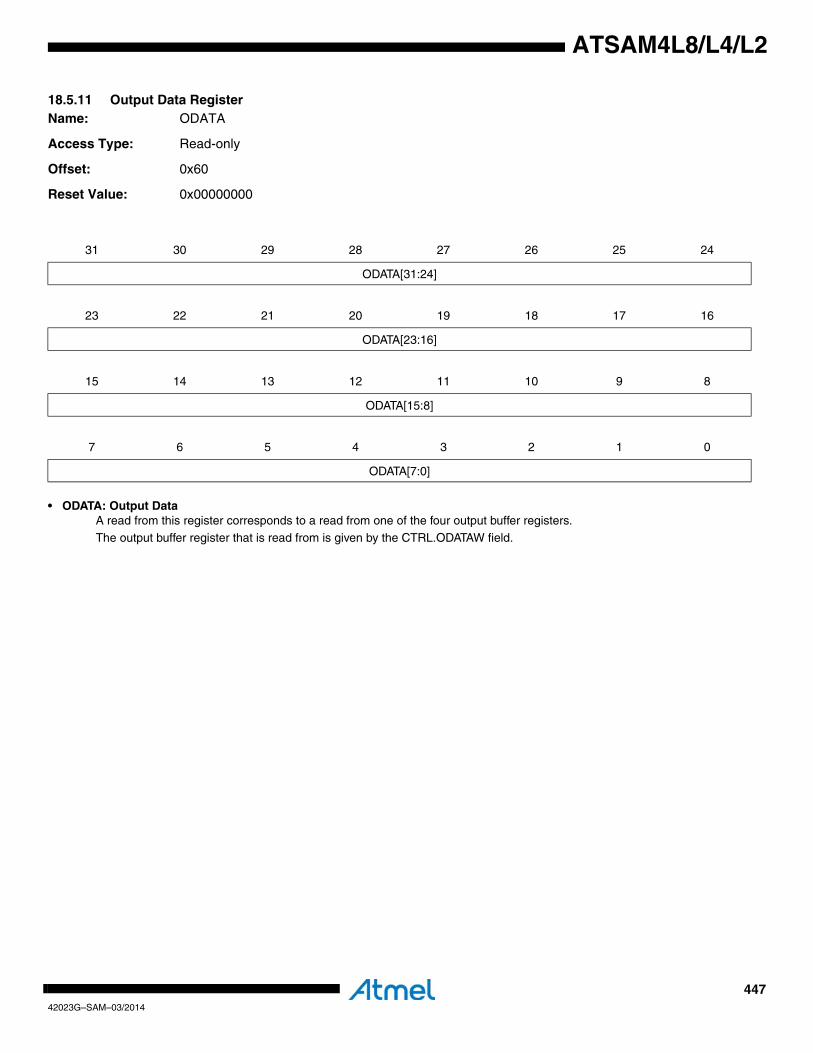
44742023G–SAM–03/2014
ATSAM4L8/L4/L2
18.5.11 Output Data RegisterName: ODATA
Access Type: Read-only
Offset: 0x60
Reset Value: 0x00000000
• ODATA: Output DataA read from this register corresponds to a read from one of the four output buffer registers.The output buffer register that is read from is given by the CTRL.ODATAW field.
31 30 29 28 27 26 25 24
ODATA[31:24]
23 22 21 20 19 18 17 16
ODATA[23:16]
15 14 13 12 11 10 9 8
ODATA[15:8]
7 6 5 4 3 2 1 0
ODATA[7:0]

44842023G–SAM–03/2014
ATSAM4L8/L4/L2
18.5.12 DRNG Seed RegisterName: DRNG Seed
Access Type: Write-only
Offset: 0x70
Reset Value: 0x00000000
• SEED: DRNG SeedA write to this register corresponds to loading a new seed into the DRNG.
31 30 29 28 27 26 25 24
SEED[31:24]
23 22 21 20 19 18 17 16
SEED[23:16]
15 14 13 12 11 10 9 8
SEED[15:8]
7 6 5 4 3 2 1 0
SEED[7:0]
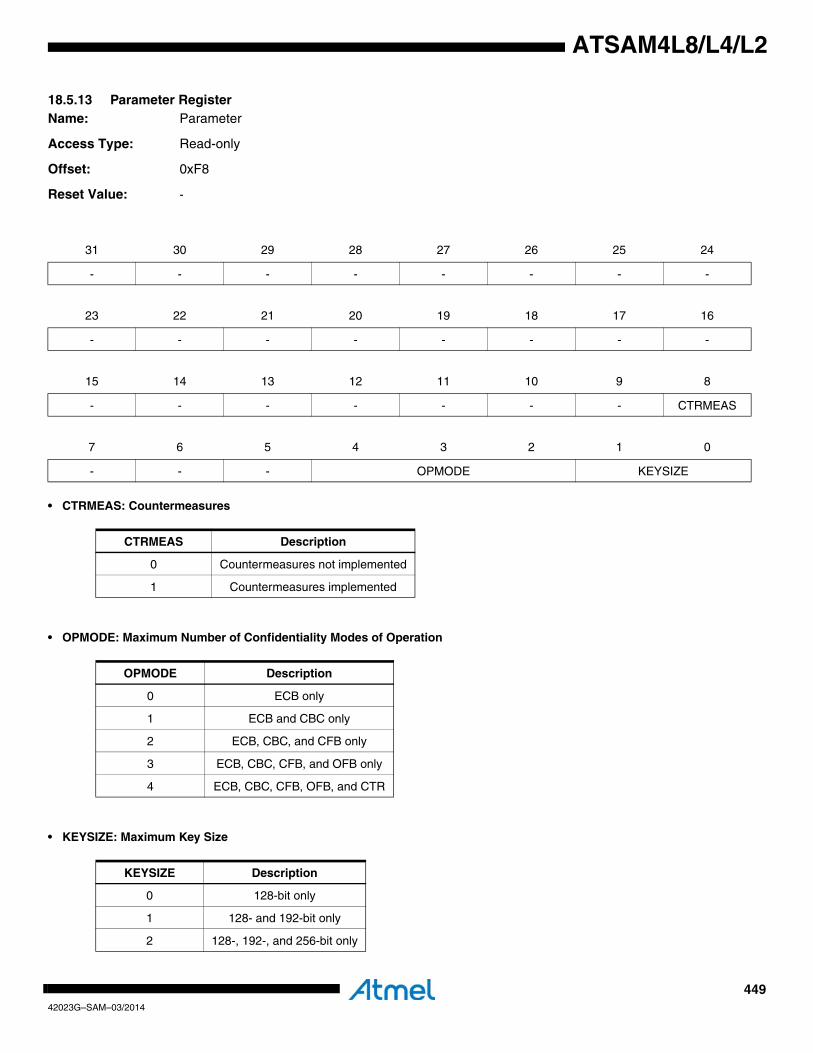
44942023G–SAM–03/2014
ATSAM4L8/L4/L2
18.5.13 Parameter RegisterName: Parameter
Access Type: Read-only
Offset: 0xF8
Reset Value: -
• CTRMEAS: Countermeasures
• OPMODE: Maximum Number of Confidentiality Modes of Operation
• KEYSIZE: Maximum Key Size
31 30 29 28 27 26 25 24
- - - - - - - -
23 22 21 20 19 18 17 16
- - - - - - - -
15 14 13 12 11 10 9 8
- - - - - - - CTRMEAS
7 6 5 4 3 2 1 0
- - - OPMODE KEYSIZE
CTRMEAS Description
0 Countermeasures not implemented
1 Countermeasures implemented
OPMODE Description
0 ECB only
1 ECB and CBC only
2 ECB, CBC, and CFB only
3 ECB, CBC, CFB, and OFB only
4 ECB, CBC, CFB, OFB, and CTR
KEYSIZE Description
0 128-bit only
1 128- and 192-bit only
2 128-, 192-, and 256-bit only
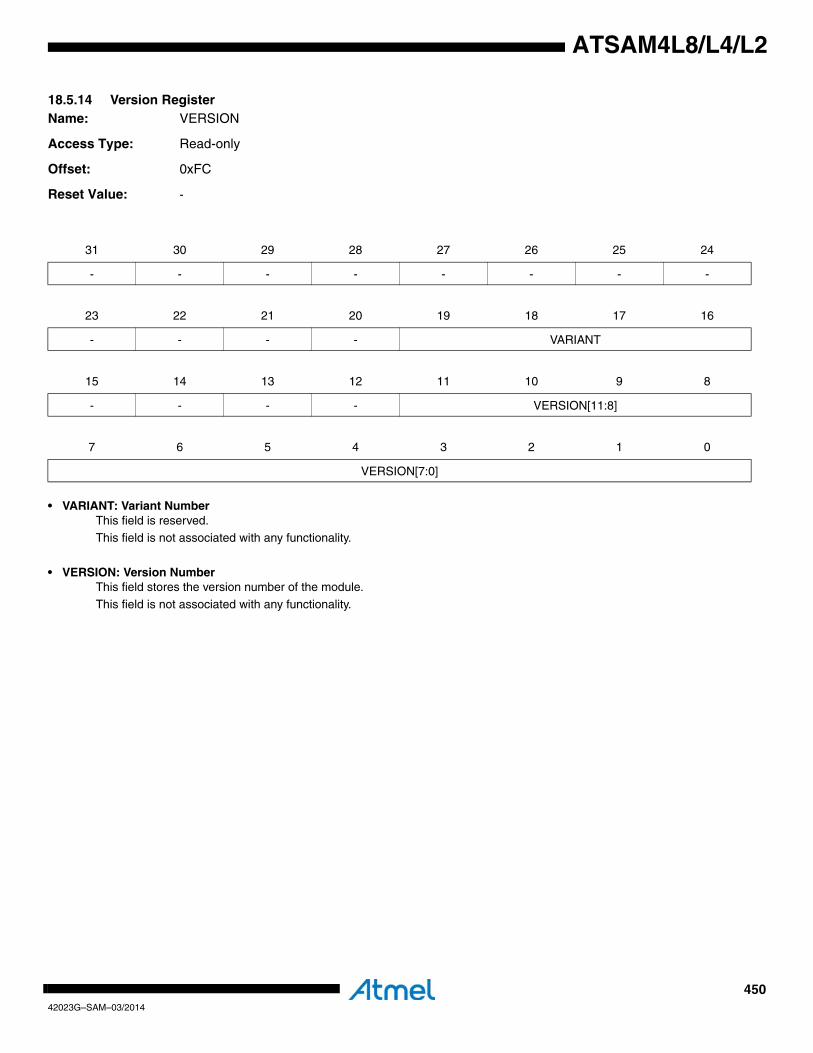
45042023G–SAM–03/2014
ATSAM4L8/L4/L2
18.5.14 Version RegisterName: VERSION
Access Type: Read-only
Offset: 0xFC
Reset Value: -
• VARIANT: Variant NumberThis field is reserved.This field is not associated with any functionality.
• VERSION: Version NumberThis field stores the version number of the module.
This field is not associated with any functionality.
31 30 29 28 27 26 25 24
- - - - - - - -
23 22 21 20 19 18 17 16
- - - - VARIANT
15 14 13 12 11 10 9 8
- - - - VERSION[11:8]
7 6 5 4 3 2 1 0
VERSION[7:0]
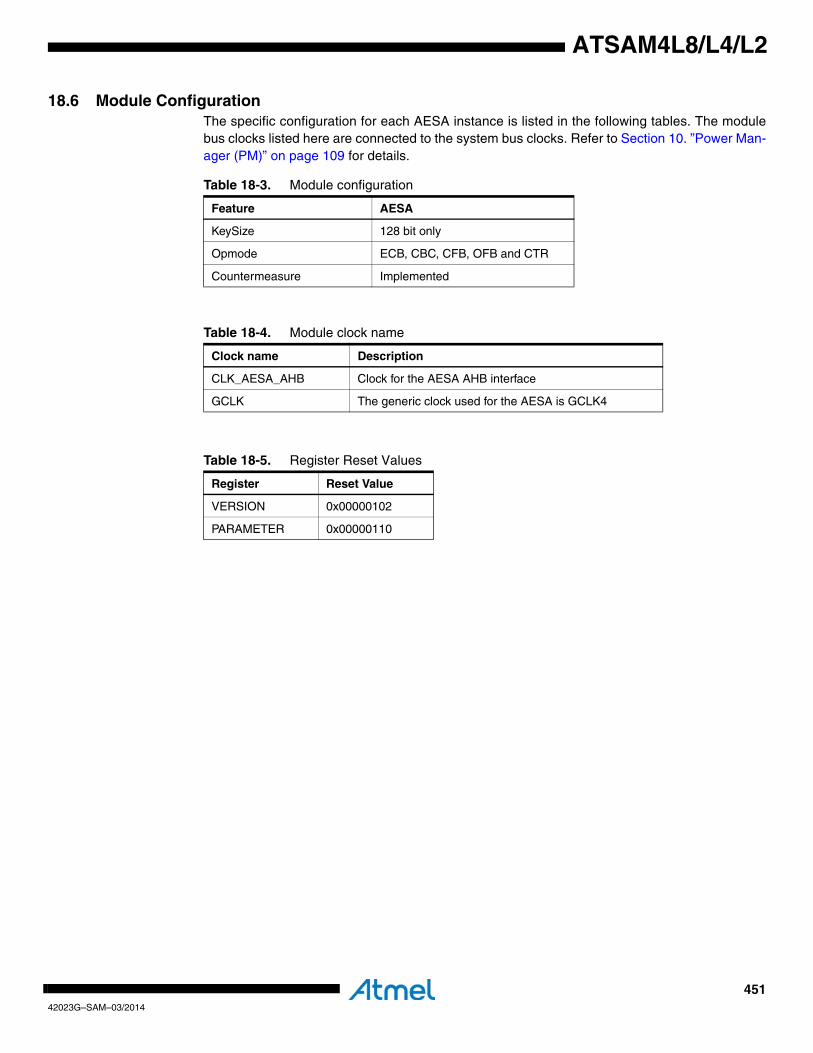
45142023G–SAM–03/2014
ATSAM4L8/L4/L2
18.6 Module ConfigurationThe specific configuration for each AESA instance is listed in the following tables. The modulebus clocks listed here are connected to the system bus clocks. Refer to Section 10. ”Power Man-ager (PM)” on page 109 for details.
Table 18-3. Module configuration
Feature AESA
KeySize 128 bit only
Opmode ECB, CBC, CFB, OFB and CTR
Countermeasure Implemented
Table 18-4. Module clock name
Clock name Description
CLK_AESA_AHB Clock for the AESA AHB interface
GCLK The generic clock used for the AESA is GCLK4
Table 18-5. Register Reset Values
Register Reset Value
VERSION 0x00000102
PARAMETER 0x00000110
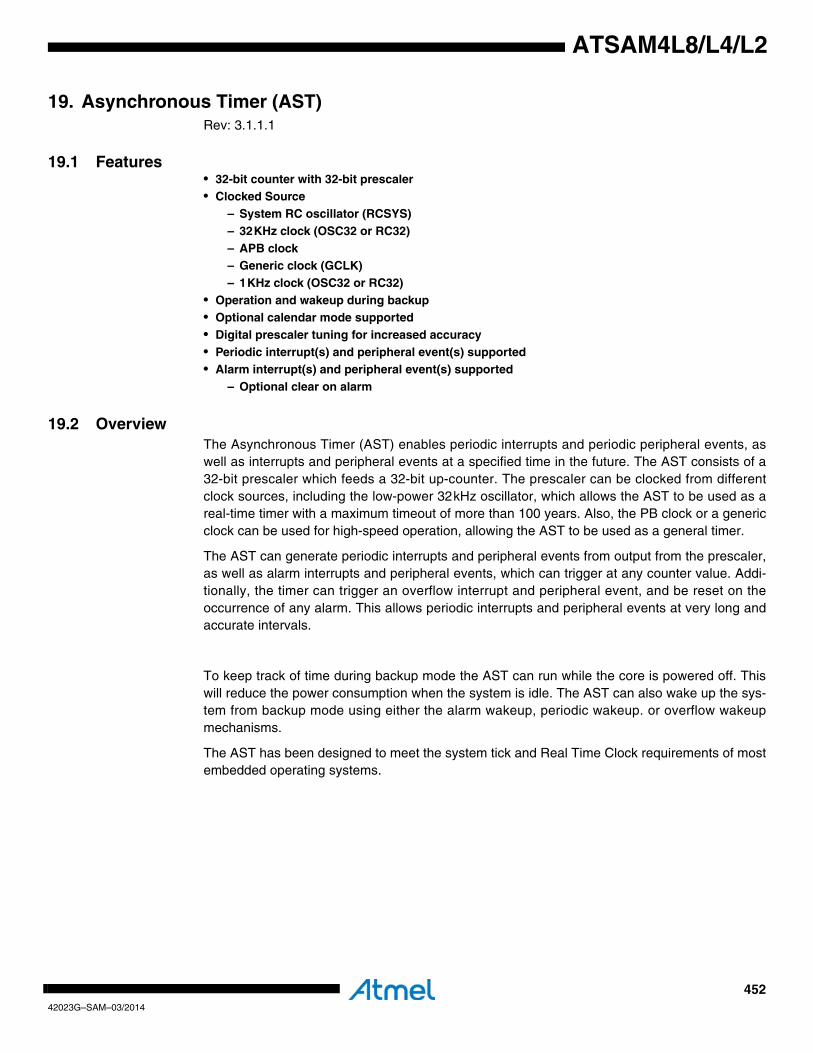
45242023G–SAM–03/2014
ATSAM4L8/L4/L2
19. Asynchronous Timer (AST)Rev: 3.1.1.1
19.1 Features• 32-bit counter with 32-bit prescaler• Clocked Source
– System RC oscillator (RCSYS)– 32KHz clock (OSC32 or RC32)– APB clock– Generic clock (GCLK)– 1KHz clock (OSC32 or RC32)
• Operation and wakeup during backup• Optional calendar mode supported• Digital prescaler tuning for increased accuracy• Periodic interrupt(s) and peripheral event(s) supported• Alarm interrupt(s) and peripheral event(s) supported
– Optional clear on alarm
19.2 OverviewThe Asynchronous Timer (AST) enables periodic interrupts and periodic peripheral events, aswell as interrupts and peripheral events at a specified time in the future. The AST consists of a32-bit prescaler which feeds a 32-bit up-counter. The prescaler can be clocked from differentclock sources, including the low-power 32kHz oscillator, which allows the AST to be used as areal-time timer with a maximum timeout of more than 100 years. Also, the PB clock or a genericclock can be used for high-speed operation, allowing the AST to be used as a general timer.
The AST can generate periodic interrupts and peripheral events from output from the prescaler,as well as alarm interrupts and peripheral events, which can trigger at any counter value. Addi-tionally, the timer can trigger an overflow interrupt and peripheral event, and be reset on theoccurrence of any alarm. This allows periodic interrupts and peripheral events at very long andaccurate intervals.
To keep track of time during backup mode the AST can run while the core is powered off. Thiswill reduce the power consumption when the system is idle. The AST can also wake up the sys-tem from backup mode using either the alarm wakeup, periodic wakeup. or overflow wakeupmechanisms.
The AST has been designed to meet the system tick and Real Time Clock requirements of mostembedded operating systems.
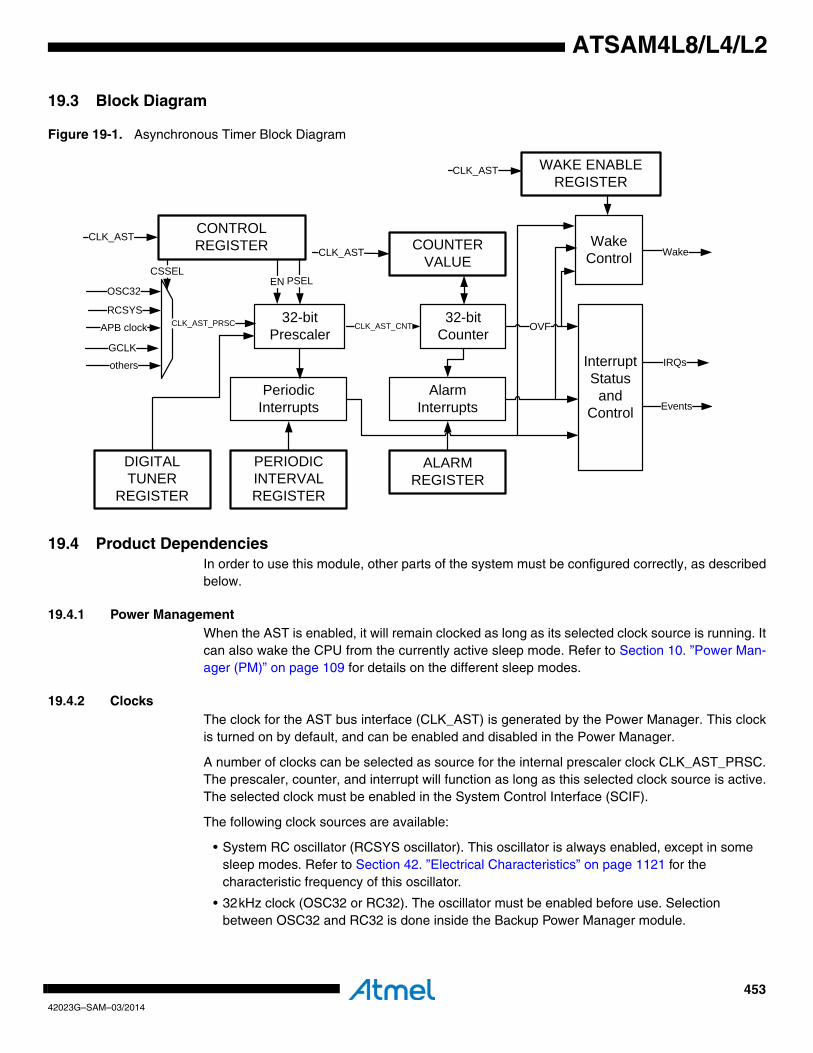
45342023G–SAM–03/2014
ATSAM4L8/L4/L2
19.3 Block Diagram
Figure 19-1. Asynchronous Timer Block Diagram
19.4 Product DependenciesIn order to use this module, other parts of the system must be configured correctly, as describedbelow.
19.4.1 Power ManagementWhen the AST is enabled, it will remain clocked as long as its selected clock source is running. Itcan also wake the CPU from the currently active sleep mode. Refer to Section 10. ”Power Man-ager (PM)” on page 109 for details on the different sleep modes.
19.4.2 ClocksThe clock for the AST bus interface (CLK_AST) is generated by the Power Manager. This clockis turned on by default, and can be enabled and disabled in the Power Manager.
A number of clocks can be selected as source for the internal prescaler clock CLK_AST_PRSC.The prescaler, counter, and interrupt will function as long as this selected clock source is active.The selected clock must be enabled in the System Control Interface (SCIF).
The following clock sources are available:
• System RC oscillator (RCSYS oscillator). This oscillator is always enabled, except in some sleep modes. Refer to Section 42. ”Electrical Characteristics” on page 1121 for the characteristic frequency of this oscillator.
• 32kHz clock (OSC32 or RC32). The oscillator must be enabled before use. Selection between OSC32 and RC32 is done inside the Backup Power Manager module.
32-bit Prescaler
32-bit Counter
AlarmInterrupts
COUNTER VALUE
CLK_AST_CNT OVF
CONTROL REGISTER
ENCSSEL
PSEL
Periodic Interrupts
ALARM REGISTER
Interrupt Status
and Control
IRQs
PERIODIC INTERVAL REGISTER
Events
Wake Control Wake
WAKE ENABLE REGISTER
DIGITAL TUNER
REGISTER
RCSYS
OSC32
APB clock
GCLK
others
CLK_AST
CLK_AST_PRSC
CLK_AST
CLK_AST
45442023G–SAM–03/2014
ATSAM4L8/L4/L2
• Peripheral Bus clock (PB clock). This is the clock of the peripheral bus the AST is connected to.
• Generic clock (GCLK). One of the generic clocks is connected to the AST. This clock must be enabled before use, and remains enabled in sleep modes when the PB clock is active.
• 1kHz clock from the 32kHz oscillator or 32kHz RC Oscillator (CLK_1K). The oscillator must be enabled before use. Selection between OSC32 and RC32 is done inside the Backup Power Manager module.
In backup mode only the 32kHz oscillator and the 32kHz RC Oscillator are available. The 1kHzoutputs of those oscillators are also available. Refer to Section 11. ”Backup Power Manager(BPM)” on page 140 for details.
19.4.3 InterruptsThe AST interrupt request lines are connected to the NVIC. Using the AST interrupts requiresthe NVIC to be programmed first.
19.4.4 Peripheral EventsThe AST peripheral events are connected via the Peripheral Event System. Refer to Section 31.”Peripheral Event Controller (PEVC)” on page 845 for details.
19.4.5 Debug OperationThe AST prescaler and counter is not frozen during debug operation when the Core is halted,unless the bit corresponding to the AST is set in the Peripheral Debug Register (PDBG).
If the AST is configured in a way that requires it to be periodically serviced by the CPU throughinterrupts or similar, improper operation or data loss may result during debugging.
19.5 Functional Description
19.5.1 InitializationBefore enabling the AST, the internal AST clock CLK_AST_PRSC must be enabled, followingthe procedure specified in Section 19.5.1.1. The Clock Source Select field in the Clock register(CLOCK.CSSEL) selects the source for this clock. The Clock Enable bit in the Clock register(CLOCK.CEN) enables the CLK_AST_PRSC.
When CLK_AST_PRSC is enabled, the AST can be enabled by writing a one to the Enable bit inthe Control Register (CR.EN).
19.5.1.1 Enabling and Disabling the AST ClockThe Clock Source Selection field (CLOCK.CSSEL) and the Clock Enable bit (CLOCK.CEN) can-not be changed simultaneously. Special procedures must be followed for enabling and disablingthe CLK_AST_PRSC and for changing the source for this clock.
To enable CLK_AST_PRSC:
• Write the selected value to CLOCK.CSSEL
• Wait until SR.CLKBUSY reads as zero
• Write a one to CLOCK.CEN, without changing CLOCK.CSSEL
• Wait until SR.CLKBUSY reads as zero
To disable the clock:
• Write a zero to CLOCK.CEN to disable the clock, without changing CLOCK.CSSEL
45542023G–SAM–03/2014
ATSAM4L8/L4/L2
• Wait until SR.CLKBUSY reads as zero
19.5.1.2 Changing the Source ClockThe CLK_AST_PRSC must be disabled before switching to another source clock. The ClockBusy bit in the Status Register (SR.CLKBUSY) indicates whether the clock is busy or not. Thisbit is set when the CEN bit in the CLOCK register is changed, and cleared when the CLOCK reg-ister can be changed.
To change the clock:
• Write a zero to CLOCK.CEN to disable the clock, without changing CLOCK.CSSEL
• Wait until SR.CLKBUSY reads as zero
• Write the selected value to CLOCK.CSSEL
• Wait until SR.CLKBUSY reads as zero
• Write a one to CLOCK.CEN to enable the clock, without changing the CLOCK.CSSEL
• Wait until SR.CLKBUSY reads as zero
19.5.2 Basic Operation
19.5.2.1 PrescalerWhen the AST is enabled, the 32-bit prescaler will increment on the rising edge ofCLK_AST_PRSC. The prescaler value cannot be read or written, but it can be reset by writing aone to the Prescaler Clear bit in the Control Register (CR.PCLR).
The Prescaler Select field in the Control Register (CR.PSEL) selects the prescaler bit PSEL assource clock for the counter (CLK_AST_CNT). This results in a counter frequency of:
where fPRSC is the frequency of the internal prescaler clock CLK_AST_PRSC.
19.5.2.2 Counter OperationWhen enabled, the AST will increment on every 0-to-1 transition of the selected prescaler tap-ping. When the Calendar bit in the Control Register (CR.CAL) is zero, the counter operates incounter mode. It will increment until it reaches the top value of 0xFFFFFFFF, and then wrap to0x00000000. This sets the status bit Overflow in the Status Register (SR.OVF). Optionally, thecounter can also be reset when an alarm occurs (see Section 19.5.3.2 on page 457. This willalso set the OVF bit.
The AST counter value can be read from or written to the Counter Value (CV) register. Note thatdue to synchronization, continuous reading of the CV register with the lowest prescaler settingwill skip every third value. In addition, if CLK_AST_PRSC is as fast as, or faster than, theCLK_AST, the prescaler value must be 3 or higher to be able to read the CV without skippingvalues.
fCNTfPRSC
2PSEL 1+
-----------------------=
45642023G–SAM–03/2014
ATSAM4L8/L4/L2
19.5.2.3 Calendar OperationWhen the CAL bit in the Control Register is one, the counter operates in calendar mode. Beforethis mode is enabled, the prescaler should be set up to give a pulse every second. The date andtime can then be read from or written to the Calendar Value (CALV) register.
Time is reported as seconds, minutes, and hours according to the 24-hour clock format. Date isthe numeral date of month (starting on 1). Month is the numeral month of the year (1 = January,2 = February, etc.). Year is a 6-bit field counting the offset from a software-defined leap year(e.g. 2000). The date is automatically compensated for leap years, assuming every year divisibleby 4 is a leap year.
All peripheral events and interrupts work the same way in calendar mode as in counter mode.However, the Alarm Register (ARn) must be written in time/date format for the alarm to triggercorrectly.
19.5.3 InterruptsThe AST can generate five separate interrupt requests:
• OVF: OVF
• PER: PER0
• ALARM: ALARM0
• CLKREADY
• READY
This allows the user to allocate separate handlers and priorities to the different interrupt types.
The generation of the PER interrupt is described in Section 19.5.3.1., and the generation of theALARM interrupt is described in Section 19.5.3.2. The OVF interrupt is generated when thecounter overflows, or when the alarm value is reached, if the Clear on Alarm bit in the ControlRegister is one. The CLKREADY interrupt is generated when SR.CLKBUSY has a 1-to-0 transi-tion, and indicates that the clock synchronization is completed. The READY interrupt isgenerated when SR.BUSY has a 1-to-0 transition, and indicates that the synchronizationdescribed in Section 19.5.8 is completed.
An interrupt request will be generated if the corresponding bit in the Interrupt Mask Register(IMR) is set. Bits in IMR are set by writing a one to the corresponding bit in the Interrupt EnableRegister (IER), and cleared by writing a one to the corresponding bit in the Interrupt DisableRegister (IDR). The interrupt request remains active until the corresponding bit in SR is clearedby writing a one to the corresponding bit in the Status Clear Register (SCR).
The AST interrupts can wake the CPU from any sleep mode where the source clock and theNVIC is active.
19.5.3.1 Periodic InterruptThe AST can generate periodic interrupts. If the PERn bit in the Interrupt Mask Register (IMR) isone, the AST will generate an interrupt request on the 0-to-1 transition of the selected bit in the
45742023G–SAM–03/2014
ATSAM4L8/L4/L2
prescaler when the AST is enabled. The bit is selected by the Interval Select field in the corre-sponding Periodic Interval Register (PIRn.INSEL), resulting in a periodic interrupt frequency of
where fCS is the frequency of the selected clock source.
The corresponding PERn bit in the Status Register (SR) will be set when the selected bit in theprescaler has a 0-to-1 transition.
Because of synchronization, the transfer of the INSEL value will not happen immediately. Whenchanging/setting the INSEL value, the user must make sure that the prescaler bit number INSELwill not have a 0-to-1 transition before the INSEL value is transferred to the register. In that case,the first periodic interrupt after the change will not be triggered.
19.5.3.2 Alarm InterruptThe AST can also generate alarm interrupts. If the ALARMn bit in IMR is one, the AST will gen-erate an interrupt request when the counter value matches the selected alarm value, when theAST is enabled. The alarm value is selected by writing the value to the VALUE field in the corre-sponding Alarm Register (ARn.VALUE).
The corresponding ALARMn bit in SR will be set when the counter reaches the selected alarmvalue.
Because of synchronization, the transfer of the alarm value will not happen immediately. Whenchanging/setting the alarm value, the user must make sure that the counter will not count theselected alarm value before the value is transferred to the register. In that case, the first alarminterrupt after the change will not be triggered.
If the Clear on Alarm bit in the Control Register (CR.CAn) is one, the corresponding alarm inter-rupt will clear the counter and set the OVF bit in the Status Register. This will generate anoverflow interrupt if the OVF bit in IMR is set.
19.5.4 Peripheral EventsThe AST can generate a number of peripheral events:
• OVF
• PER0
• ALARM0
The PERn peripheral event(s) is generated the same way as the PER interrupt, as described inSection 19.5.3.1. The ALARMn peripheral event(s) is generated the same way as the ALARMinterrupt, as described in Section 19.5.3.2. The OVF peripheral event is generated the sameway as the OVF interrupt, as described in Section 19.5.3-
The peripheral event will be generated if the corresponding bit in the Event Mask (EVM) registeris set. Bits in EVM register are set by writing a one to the corresponding bit in the Event Enable
fPAfCS
2INSEL 1+
-------------------------=
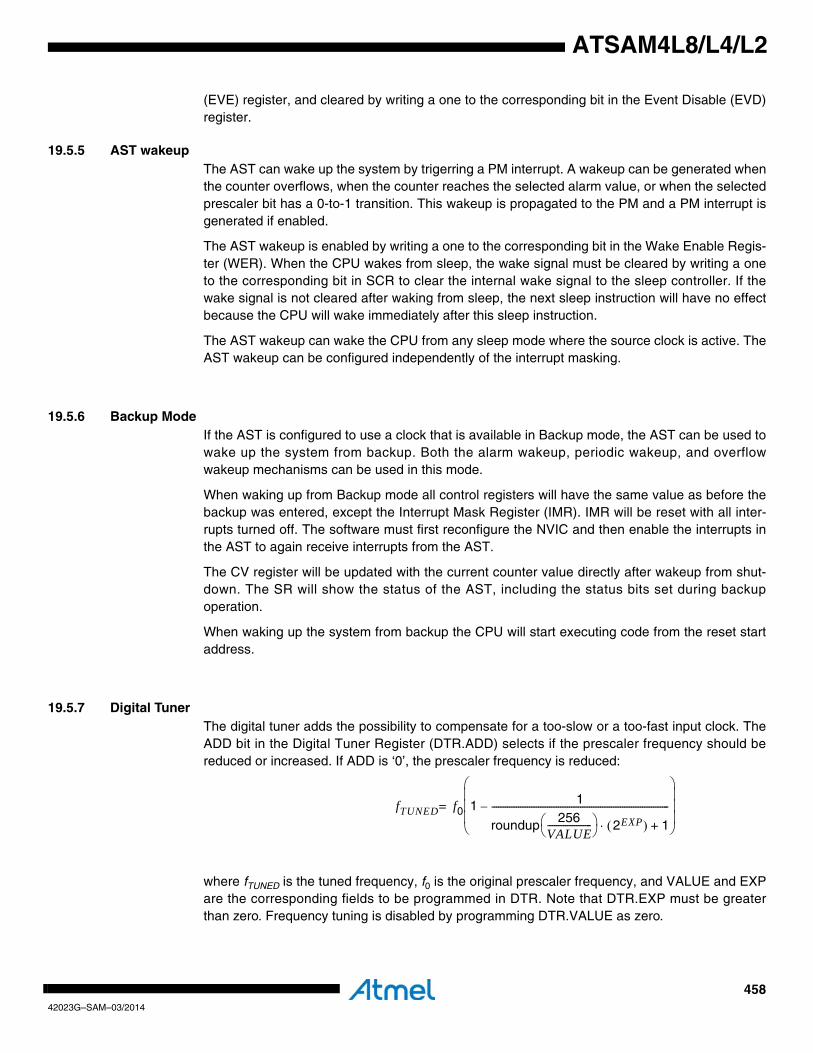
45842023G–SAM–03/2014
ATSAM4L8/L4/L2
(EVE) register, and cleared by writing a one to the corresponding bit in the Event Disable (EVD)register.
19.5.5 AST wakeupThe AST can wake up the system by trigerring a PM interrupt. A wakeup can be generated whenthe counter overflows, when the counter reaches the selected alarm value, or when the selectedprescaler bit has a 0-to-1 transition. This wakeup is propagated to the PM and a PM interrupt isgenerated if enabled.
The AST wakeup is enabled by writing a one to the corresponding bit in the Wake Enable Regis-ter (WER). When the CPU wakes from sleep, the wake signal must be cleared by writing a oneto the corresponding bit in SCR to clear the internal wake signal to the sleep controller. If thewake signal is not cleared after waking from sleep, the next sleep instruction will have no effectbecause the CPU will wake immediately after this sleep instruction.
The AST wakeup can wake the CPU from any sleep mode where the source clock is active. TheAST wakeup can be configured independently of the interrupt masking.
19.5.6 Backup ModeIf the AST is configured to use a clock that is available in Backup mode, the AST can be used towake up the system from backup. Both the alarm wakeup, periodic wakeup, and overflowwakeup mechanisms can be used in this mode.
When waking up from Backup mode all control registers will have the same value as before thebackup was entered, except the Interrupt Mask Register (IMR). IMR will be reset with all inter-rupts turned off. The software must first reconfigure the NVIC and then enable the interrupts inthe AST to again receive interrupts from the AST.
The CV register will be updated with the current counter value directly after wakeup from shut-down. The SR will show the status of the AST, including the status bits set during backupoperation.
When waking up the system from backup the CPU will start executing code from the reset startaddress.
19.5.7 Digital TunerThe digital tuner adds the possibility to compensate for a too-slow or a too-fast input clock. TheADD bit in the Digital Tuner Register (DTR.ADD) selects if the prescaler frequency should bereduced or increased. If ADD is ‘0’, the prescaler frequency is reduced:
where fTUNED is the tuned frequency, f0 is the original prescaler frequency, and VALUE and EXPare the corresponding fields to be programmed in DTR. Note that DTR.EXP must be greaterthan zero. Frequency tuning is disabled by programming DTR.VALUE as zero.
fTUNED f0 1 1
roundup 256VALUE--------------------⎝ ⎠⎛ ⎞ 2EXP( )⋅ 1+
--------------------------------------------------------------------------------–
⎝ ⎠⎜ ⎟⎜ ⎟⎜ ⎟⎛ ⎞
=
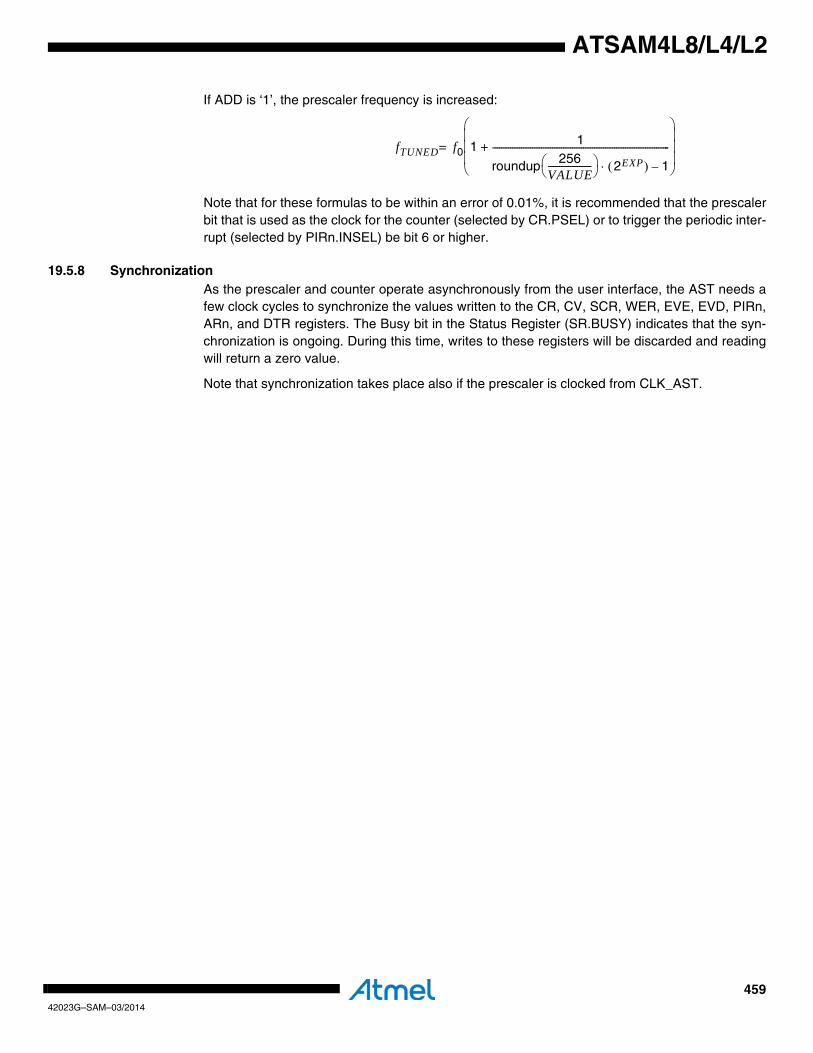
45942023G–SAM–03/2014
ATSAM4L8/L4/L2
If ADD is ‘1’, the prescaler frequency is increased:
Note that for these formulas to be within an error of 0.01%, it is recommended that the prescalerbit that is used as the clock for the counter (selected by CR.PSEL) or to trigger the periodic inter-rupt (selected by PIRn.INSEL) be bit 6 or higher.
19.5.8 SynchronizationAs the prescaler and counter operate asynchronously from the user interface, the AST needs afew clock cycles to synchronize the values written to the CR, CV, SCR, WER, EVE, EVD, PIRn,ARn, and DTR registers. The Busy bit in the Status Register (SR.BUSY) indicates that the syn-chronization is ongoing. During this time, writes to these registers will be discarded and readingwill return a zero value.
Note that synchronization takes place also if the prescaler is clocked from CLK_AST.
fTUNED f0 1 1
roundup 256VALUE--------------------⎝ ⎠⎛ ⎞ 2EXP( )⋅ 1–
--------------------------------------------------------------------------------+
⎝ ⎠⎜ ⎟⎜ ⎟⎜ ⎟⎛ ⎞
=
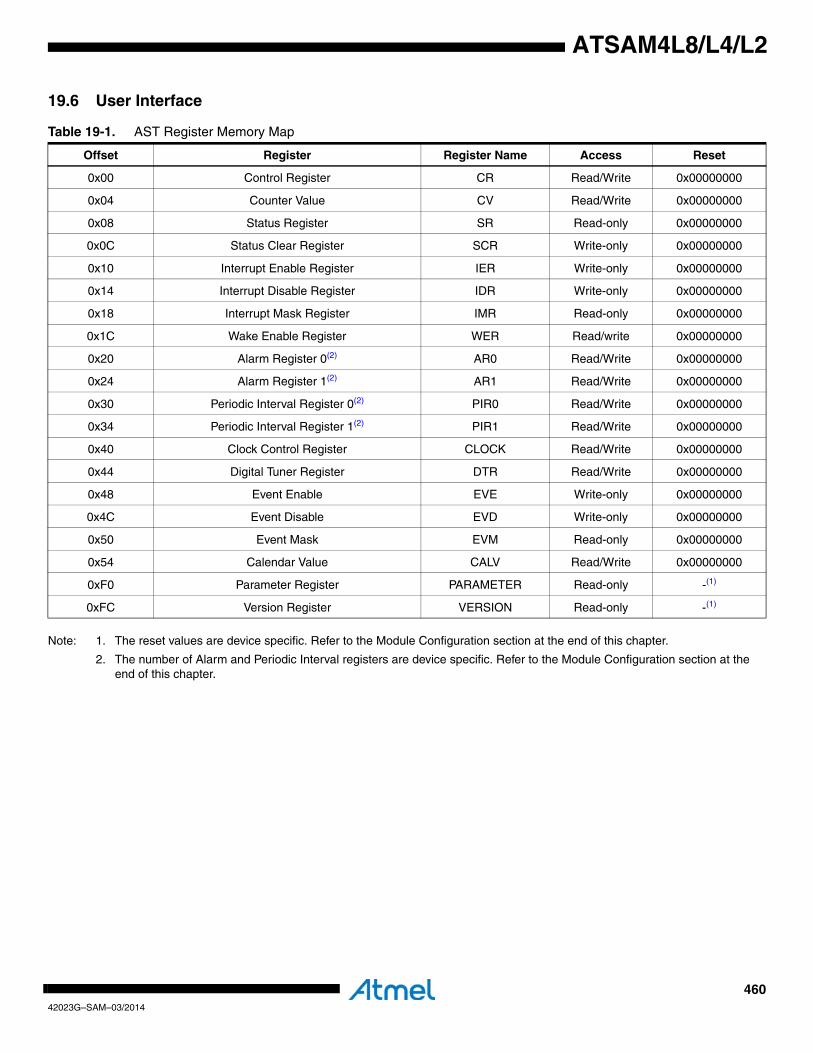
46042023G–SAM–03/2014
ATSAM4L8/L4/L2
19.6 User Interface
Note: 1. The reset values are device specific. Refer to the Module Configuration section at the end of this chapter.
2. The number of Alarm and Periodic Interval registers are device specific. Refer to the Module Configuration section at the end of this chapter.
Table 19-1. AST Register Memory Map
Offset Register Register Name Access Reset
0x00 Control Register CR Read/Write 0x00000000
0x04 Counter Value CV Read/Write 0x00000000
0x08 Status Register SR Read-only 0x00000000
0x0C Status Clear Register SCR Write-only 0x00000000
0x10 Interrupt Enable Register IER Write-only 0x00000000
0x14 Interrupt Disable Register IDR Write-only 0x00000000
0x18 Interrupt Mask Register IMR Read-only 0x00000000
0x1C Wake Enable Register WER Read/write 0x00000000
0x20 Alarm Register 0(2) AR0 Read/Write 0x00000000
0x24 Alarm Register 1(2) AR1 Read/Write 0x00000000
0x30 Periodic Interval Register 0(2) PIR0 Read/Write 0x00000000
0x34 Periodic Interval Register 1(2) PIR1 Read/Write 0x00000000
0x40 Clock Control Register CLOCK Read/Write 0x00000000
0x44 Digital Tuner Register DTR Read/Write 0x00000000
0x48 Event Enable EVE Write-only 0x00000000
0x4C Event Disable EVD Write-only 0x00000000
0x50 Event Mask EVM Read-only 0x00000000
0x54 Calendar Value CALV Read/Write 0x00000000
0xF0 Parameter Register PARAMETER Read-only -(1)
0xFC Version Register VERSION Read-only -(1)

46142023G–SAM–03/2014
ATSAM4L8/L4/L2
19.6.1 Control RegisterName: CR
Access Type: Read/Write
Offset: 0x00
Reset Value: 0x00000000
When the SR.BUSY bit is set, writes to this register will be discarded and this register will read as zero.
• PSEL: Prescaler SelectSelects prescaler bit PSEL as source clock for the counter.
• CAn: Clear on Alarm n0: The corresponding alarm will not clear the counter.
1: The corresponding alarm will clear the counter.
• CAL: Calendar Mode0: The AST operates in counter mode.
1: The AST operates in calendar mode.• PCLR: Prescaler Clear
Writing a zero to this bit has no effect.Writing a one to this bit clears the prescaler.
This bit always reads as zero.
• EN: Enable0: The AST is disabled.
1: The AST is enabled.
31 30 29 28 27 26 25 24
- - - - - - - -
23 22 21 20 19 18 17 16
- - - PSEL
15 14 13 12 11 10 9 8
- - - - - - CA1 CA0
7 6 5 4 3 2 1 0
- - - - - CAL PCLR EN
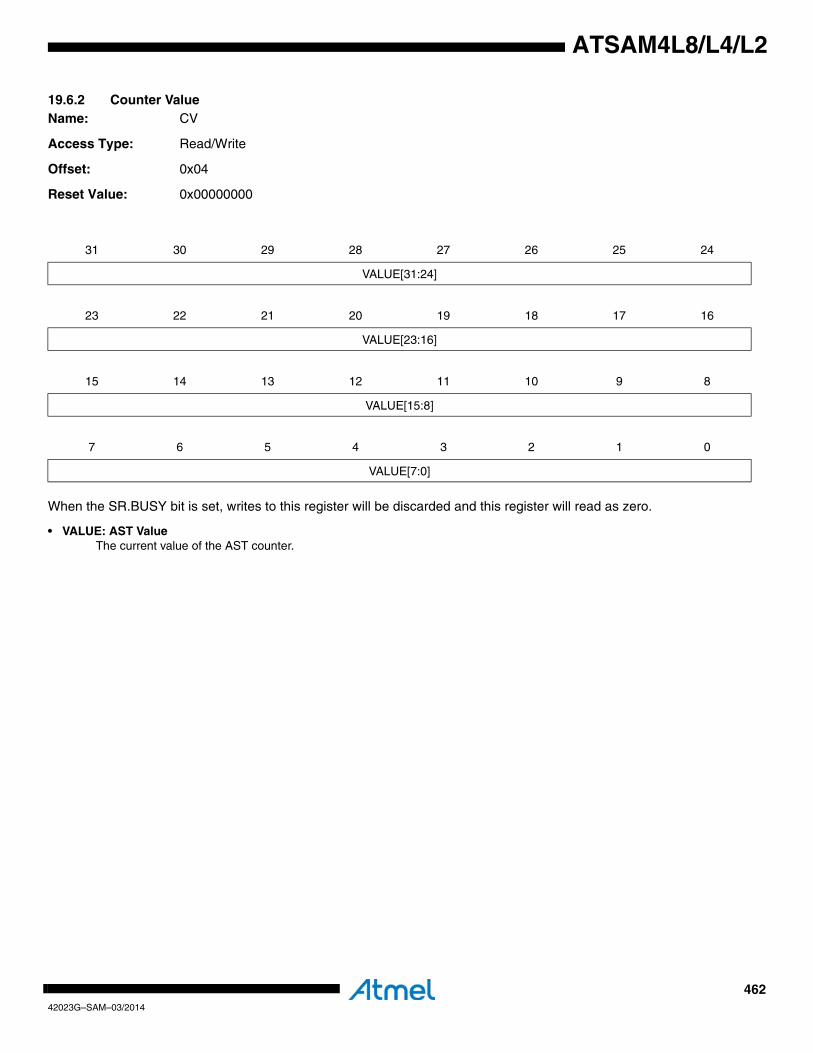
46242023G–SAM–03/2014
ATSAM4L8/L4/L2
19.6.2 Counter ValueName: CV
Access Type: Read/Write
Offset: 0x04
Reset Value: 0x00000000
When the SR.BUSY bit is set, writes to this register will be discarded and this register will read as zero.
• VALUE: AST ValueThe current value of the AST counter.
31 30 29 28 27 26 25 24
VALUE[31:24]
23 22 21 20 19 18 17 16
VALUE[23:16]
15 14 13 12 11 10 9 8
VALUE[15:8]
7 6 5 4 3 2 1 0
VALUE[7:0]
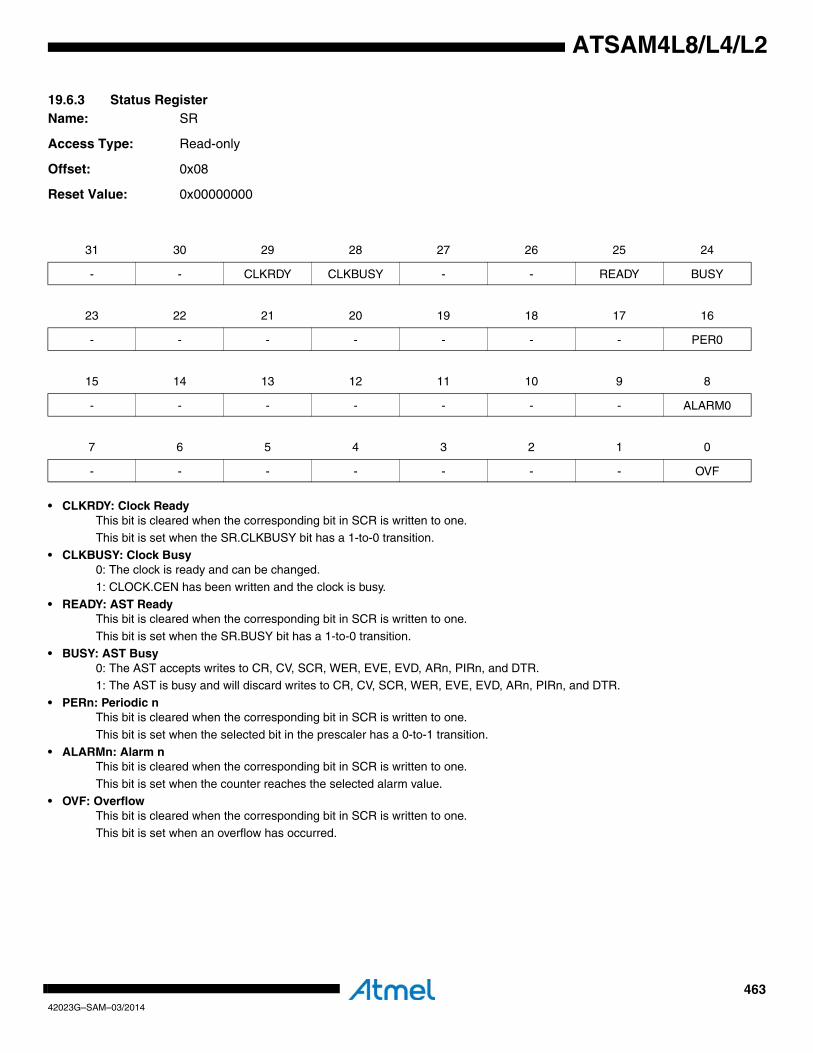
46342023G–SAM–03/2014
ATSAM4L8/L4/L2
19.6.3 Status RegisterName: SR
Access Type: Read-only
Offset: 0x08
Reset Value: 0x00000000
• CLKRDY: Clock ReadyThis bit is cleared when the corresponding bit in SCR is written to one.This bit is set when the SR.CLKBUSY bit has a 1-to-0 transition.
• CLKBUSY: Clock Busy0: The clock is ready and can be changed.
1: CLOCK.CEN has been written and the clock is busy.
• READY: AST ReadyThis bit is cleared when the corresponding bit in SCR is written to one.
This bit is set when the SR.BUSY bit has a 1-to-0 transition.• BUSY: AST Busy
0: The AST accepts writes to CR, CV, SCR, WER, EVE, EVD, ARn, PIRn, and DTR.1: The AST is busy and will discard writes to CR, CV, SCR, WER, EVE, EVD, ARn, PIRn, and DTR.
• PERn: Periodic nThis bit is cleared when the corresponding bit in SCR is written to one.
This bit is set when the selected bit in the prescaler has a 0-to-1 transition.
• ALARMn: Alarm nThis bit is cleared when the corresponding bit in SCR is written to one.
This bit is set when the counter reaches the selected alarm value.• OVF: Overflow
This bit is cleared when the corresponding bit in SCR is written to one.This bit is set when an overflow has occurred.
31 30 29 28 27 26 25 24
- - CLKRDY CLKBUSY - - READY BUSY
23 22 21 20 19 18 17 16
- - - - - - - PER0
15 14 13 12 11 10 9 8
- - - - - - - ALARM0
7 6 5 4 3 2 1 0
- - - - - - - OVF
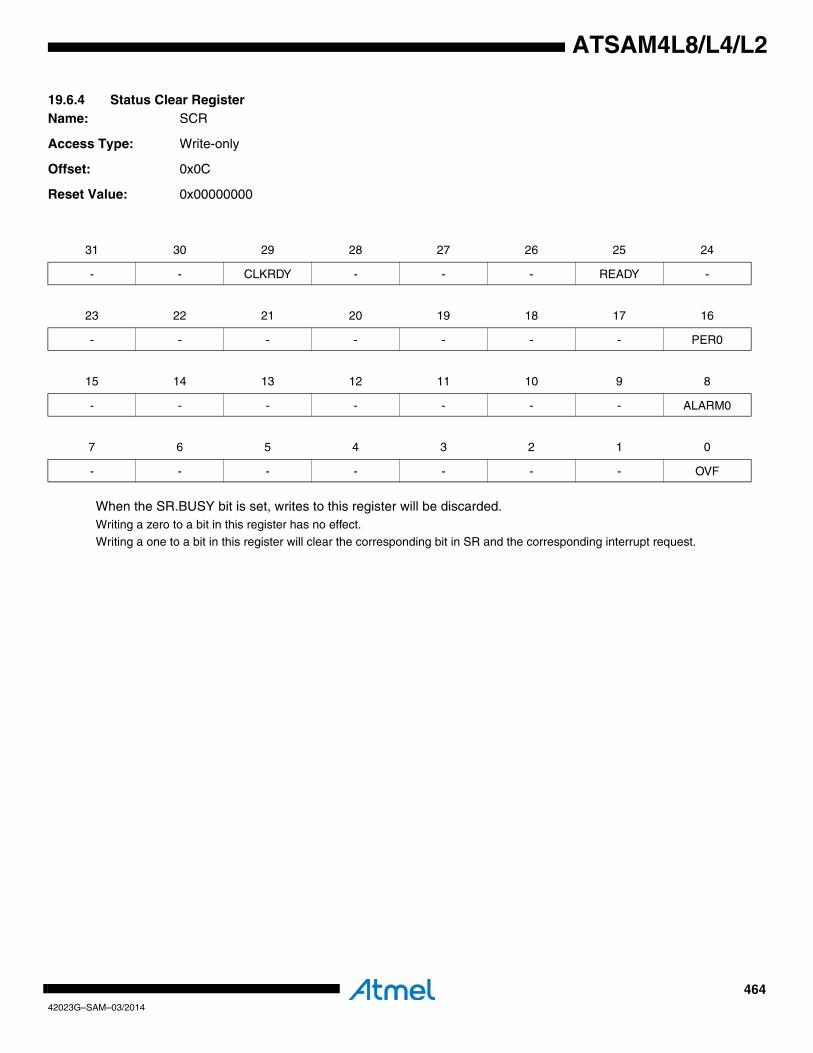
46442023G–SAM–03/2014
ATSAM4L8/L4/L2
19.6.4 Status Clear RegisterName: SCR
Access Type: Write-only
Offset: 0x0C
Reset Value: 0x00000000
When the SR.BUSY bit is set, writes to this register will be discarded.Writing a zero to a bit in this register has no effect.Writing a one to a bit in this register will clear the corresponding bit in SR and the corresponding interrupt request.
31 30 29 28 27 26 25 24
- - CLKRDY - - - READY -
23 22 21 20 19 18 17 16
- - - - - - - PER0
15 14 13 12 11 10 9 8
- - - - - - - ALARM0
7 6 5 4 3 2 1 0
- - - - - - - OVF

46542023G–SAM–03/2014
ATSAM4L8/L4/L2
19.6.5 Interrupt Enable RegisterName: IER
Access Type: Write-only
Offset: 0x10
Reset Value: 0x00000000
Writing a zero to a bit in this register has no effect.
Writing a one to a bit in this register will set the corresponding bit in IMR.
31 30 29 28 27 26 25 24
- - CLKRDY - - - READY -
23 22 21 20 19 18 17 16
- - - - - - - PER0
15 14 13 12 11 10 9 8
- - - - - - - ALARM0
7 6 5 4 3 2 1 0
- - - - - - - OVF
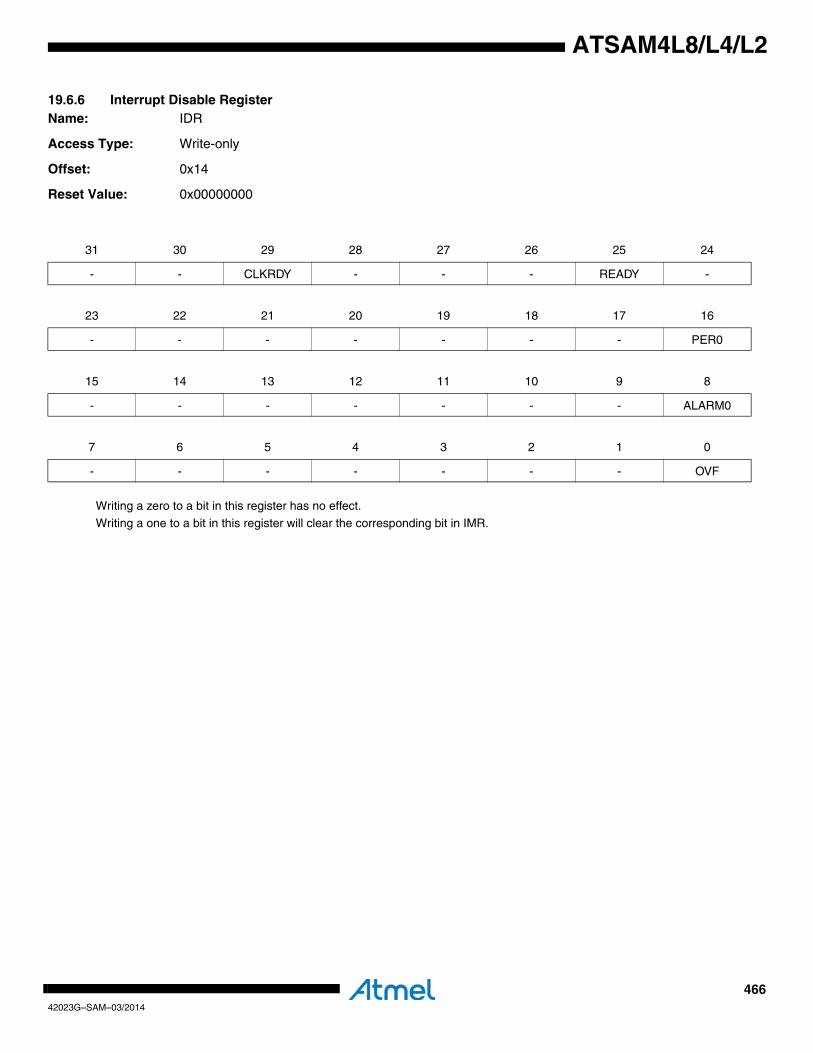
46642023G–SAM–03/2014
ATSAM4L8/L4/L2
19.6.6 Interrupt Disable RegisterName: IDR
Access Type: Write-only
Offset: 0x14
Reset Value: 0x00000000
Writing a zero to a bit in this register has no effect.
Writing a one to a bit in this register will clear the corresponding bit in IMR.
31 30 29 28 27 26 25 24
- - CLKRDY - - - READY -
23 22 21 20 19 18 17 16
- - - - - - - PER0
15 14 13 12 11 10 9 8
- - - - - - - ALARM0
7 6 5 4 3 2 1 0
- - - - - - - OVF
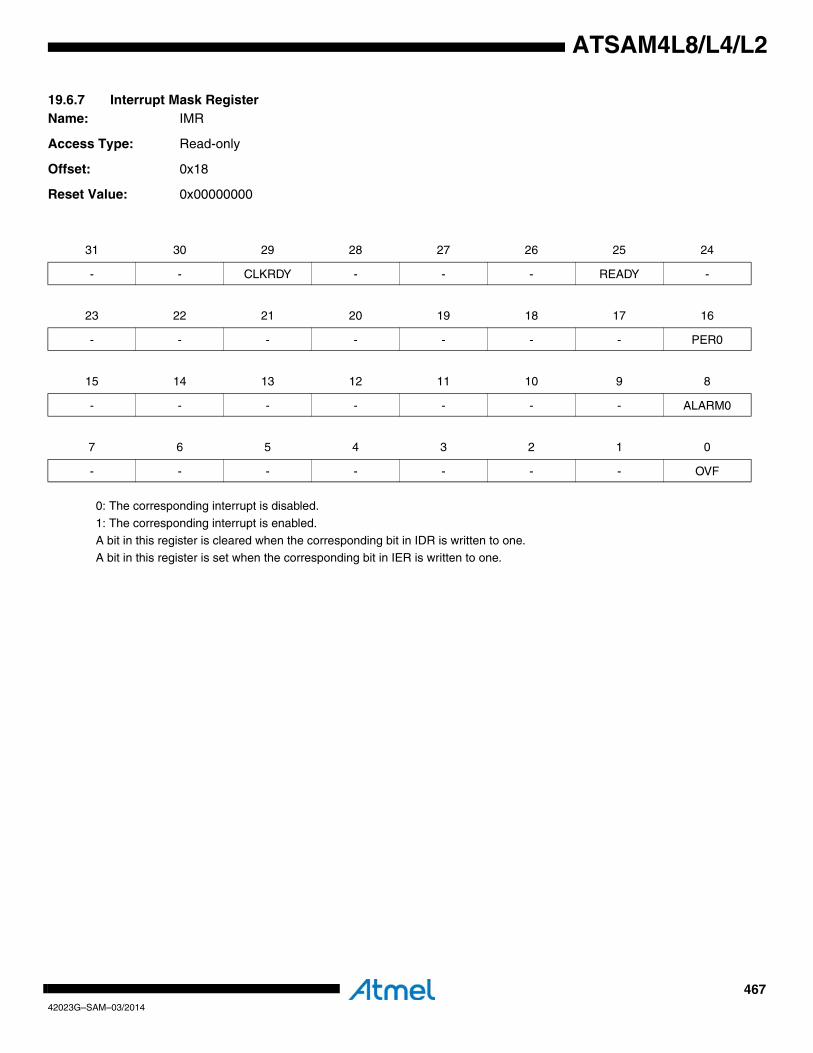
46742023G–SAM–03/2014
ATSAM4L8/L4/L2
19.6.7 Interrupt Mask RegisterName: IMR
Access Type: Read-only
Offset: 0x18
Reset Value: 0x00000000
0: The corresponding interrupt is disabled.
1: The corresponding interrupt is enabled.
A bit in this register is cleared when the corresponding bit in IDR is written to one.A bit in this register is set when the corresponding bit in IER is written to one.
31 30 29 28 27 26 25 24
- - CLKRDY - - - READY -
23 22 21 20 19 18 17 16
- - - - - - - PER0
15 14 13 12 11 10 9 8
- - - - - - - ALARM0
7 6 5 4 3 2 1 0
- - - - - - - OVF
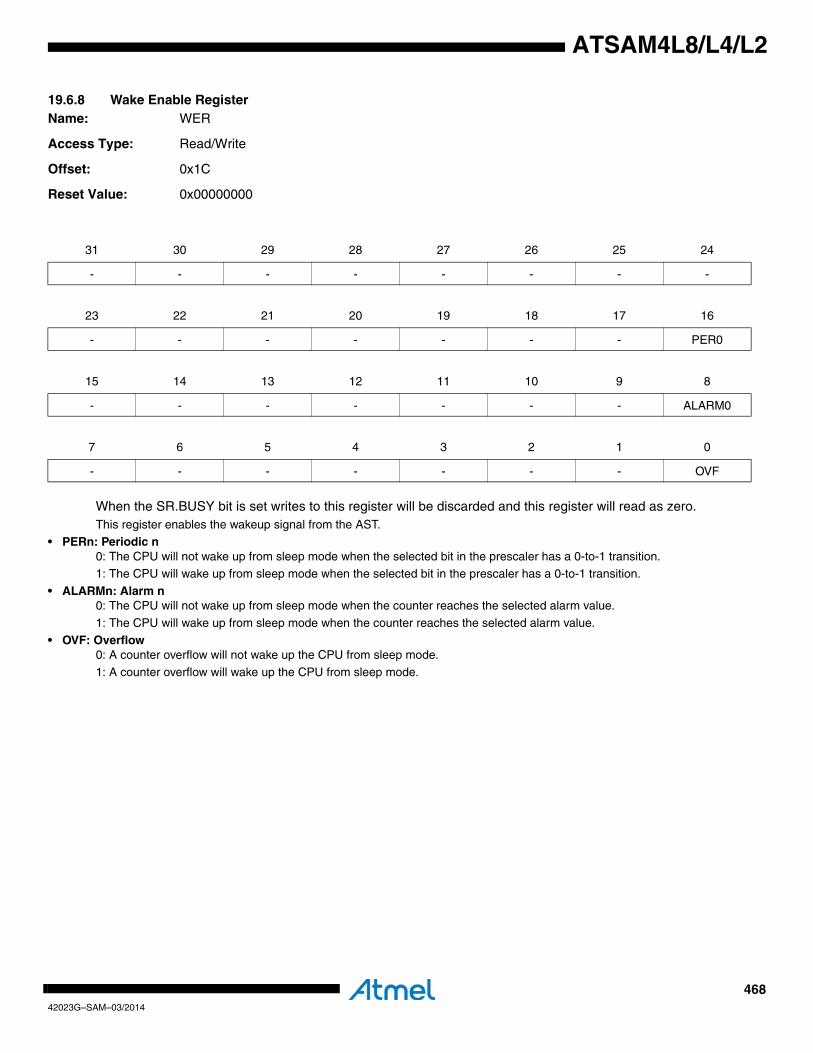
46842023G–SAM–03/2014
ATSAM4L8/L4/L2
19.6.8 Wake Enable RegisterName: WER
Access Type: Read/Write
Offset: 0x1C
Reset Value: 0x00000000
When the SR.BUSY bit is set writes to this register will be discarded and this register will read as zero.This register enables the wakeup signal from the AST.
• PERn: Periodic n0: The CPU will not wake up from sleep mode when the selected bit in the prescaler has a 0-to-1 transition.1: The CPU will wake up from sleep mode when the selected bit in the prescaler has a 0-to-1 transition.
• ALARMn: Alarm n0: The CPU will not wake up from sleep mode when the counter reaches the selected alarm value.
1: The CPU will wake up from sleep mode when the counter reaches the selected alarm value.
• OVF: Overflow0: A counter overflow will not wake up the CPU from sleep mode.
1: A counter overflow will wake up the CPU from sleep mode.
31 30 29 28 27 26 25 24
- - - - - - - -
23 22 21 20 19 18 17 16
- - - - - - - PER0
15 14 13 12 11 10 9 8
- - - - - - - ALARM0
7 6 5 4 3 2 1 0
- - - - - - - OVF

46942023G–SAM–03/2014
ATSAM4L8/L4/L2
19.6.9 Alarm Register 0Name: AR0
Access Type: Read/Write
Offset: 0x20
Reset Value: 0x00000000
When the SR.BUSY bit is set writes to this register will be discarded and this register will read as zero.
• VALUE: Alarm ValueWhen the counter reaches this value, an alarm is generated.
31 30 29 28 27 26 25 24
VALUE[31:24]
23 22 21 20 19 18 17 16
VALUE[23:16]
15 14 13 12 11 10 9 8
VALUE[15:8]
7 6 5 4 3 2 1 0
VALUE[7:0]

47042023G–SAM–03/2014
ATSAM4L8/L4/L2
19.6.10 Alarm Register 1Name: AR1
Access Type: Read/Write
Offset: 0x24
Reset Value: 0x00000000
When the SR.BUSY bit is set writes to this register will be discarded and this register will read as zero.
• VALUE: Alarm ValueWhen the counter reaches this value, an alarm is generated.
31 30 29 28 27 26 25 24
VALUE[31:24]
23 22 21 20 19 18 17 16
VALUE[23:16]
15 14 13 12 11 10 9 8
VALUE[15:8]
7 6 5 4 3 2 1 0
VALUE[7:0]
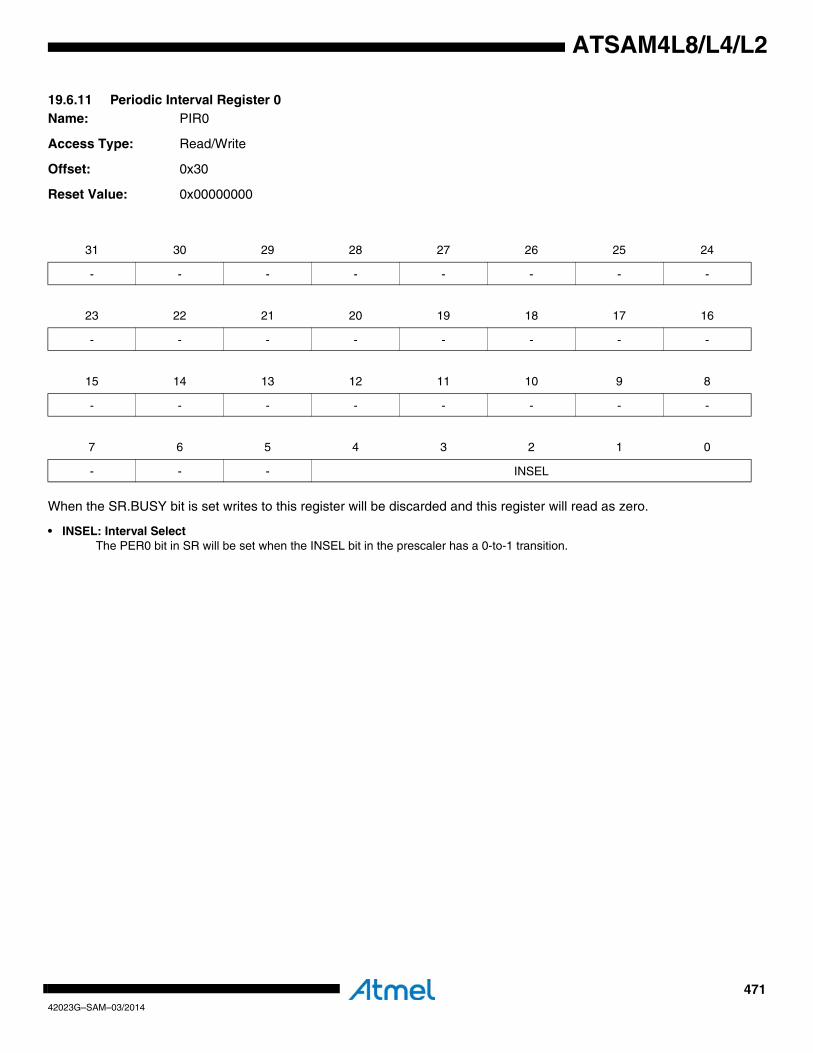
47142023G–SAM–03/2014
ATSAM4L8/L4/L2
19.6.11 Periodic Interval Register 0Name: PIR0
Access Type: Read/Write
Offset: 0x30
Reset Value: 0x00000000
When the SR.BUSY bit is set writes to this register will be discarded and this register will read as zero.
• INSEL: Interval SelectThe PER0 bit in SR will be set when the INSEL bit in the prescaler has a 0-to-1 transition.
31 30 29 28 27 26 25 24
- - - - - - - -
23 22 21 20 19 18 17 16
- - - - - - - -
15 14 13 12 11 10 9 8
- - - - - - - -
7 6 5 4 3 2 1 0
- - - INSEL

47242023G–SAM–03/2014
ATSAM4L8/L4/L2
19.6.12 Periodic Interval Register 1Name: PIR1
Access Type: Read/Write
Offset: 0x34
Reset Value: 0x00000000
When the SR.BUSY bit is set writes to this register will be discarded and this register will read as zero.
• INSEL: Interval SelectThe PER1 bit in SR will be set when the INSEL bit in the prescaler has a 0-to-1 transition.
31 30 29 28 27 26 25 24
- - - - - - - -
23 22 21 20 19 18 17 16
- - - - - - - -
15 14 13 12 11 10 9 8
- - - - - - - -
7 6 5 4 3 2 1 0
- - - INSEL
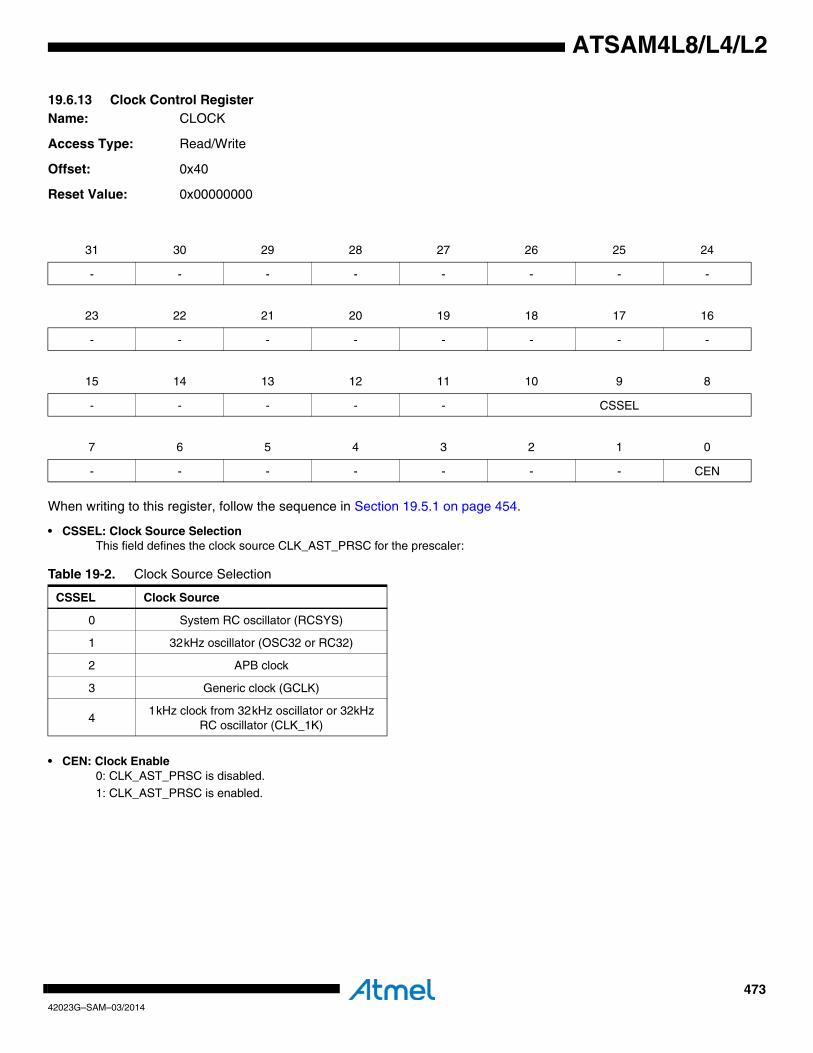
47342023G–SAM–03/2014
ATSAM4L8/L4/L2
19.6.13 Clock Control RegisterName: CLOCK
Access Type: Read/Write
Offset: 0x40
Reset Value: 0x00000000
When writing to this register, follow the sequence in Section 19.5.1 on page 454.
• CSSEL: Clock Source SelectionThis field defines the clock source CLK_AST_PRSC for the prescaler:
• CEN: Clock Enable0: CLK_AST_PRSC is disabled.1: CLK_AST_PRSC is enabled.
31 30 29 28 27 26 25 24
- - - - - - - -
23 22 21 20 19 18 17 16
- - - - - - - -
15 14 13 12 11 10 9 8
- - - - - CSSEL
7 6 5 4 3 2 1 0
- - - - - - - CEN
Table 19-2. Clock Source Selection
CSSEL Clock Source
0 System RC oscillator (RCSYS)
1 32kHz oscillator (OSC32 or RC32)
2 APB clock
3 Generic clock (GCLK)
41kHz clock from 32kHz oscillator or 32kHz
RC oscillator (CLK_1K)

47442023G–SAM–03/2014
ATSAM4L8/L4/L2
19.6.14 Digital Tuner RegisterName: DTR
Access Type: Read/Write
Offset: 0x44
Reset Value: 0x00000000
When the SR.BUSY bit is set writes to this register will be discarded and this register will read as zero.
• VALUE:0: The frequency is unchanged.
1-255: The frequency will be adjusted according to the formula below.
• ADD: 0: The resulting frequency is for .
1: The resulting frequency is
for .
• EXP:The frequency will be adjusted according to the formula above.
31 30 29 28 27 26 25 24
- - - - - - - -
23 22 21 20 19 18 17 16
- - - - - - - -
15 14 13 12 11 10 9 8
VALUE
7 6 5 4 3 2 1 0
- - ADD EXP
f0 1 1
roundup 256VALUE--------------------⎝ ⎠⎛ ⎞ 2 EXP( )⋅ 1+
-------------------------------------------------------------------------------–
⎝ ⎠⎜ ⎟⎜ ⎟⎜ ⎟⎛ ⎞
VALUE 0>
f0 1 1
roundup 256VALUE--------------------⎝ ⎠⎛ ⎞ 2 EXP( )⋅ 1–
-------------------------------------------------------------------------------+
⎝ ⎠⎜ ⎟⎜ ⎟⎜ ⎟⎛ ⎞
VALUE 0>

47542023G–SAM–03/2014
ATSAM4L8/L4/L2
19.6.15 Event Enable RegisterName: EVE
Access Type: Write-only
Offset: 0x48
Reset Value: 0x00000000
When the SR.BUSY bit is set writes to this register will be discarded and this register will read as zero.Writing a zero to a bit in this register has no effect.Writing a one to a bit in this register will set the corresponding bit in EVM.
31 30 29 28 27 26 25 24
- - - - - - - -
23 22 21 20 19 18 17 16
- - - - - - - PER0
15 14 13 12 11 10 9 8
- - - - - - - ALARM0
7 6 5 4 3 2 1 0
- - - - - - - OVF

47642023G–SAM–03/2014
ATSAM4L8/L4/L2
19.6.16 Event Disable RegisterName: EVD
Access Type: Write-only
Offset: 0x4C
Reset Value: 0x00000000
When the SR.BUSY bit is set writes to this register will be discarded and this register will read as zero.Writing a zero to a bit in this register has no effect.Writing a one to a bit in this register will clear the corresponding bit in EVM.
31 30 29 28 27 26 25 24
- - - - - - - -
23 22 21 20 19 18 17 16
- - - - - - - PER0
15 14 13 12 11 10 9 8
- - - - - - - ALARM0
7 6 5 4 3 2 1 0
- - - - - - - OVF
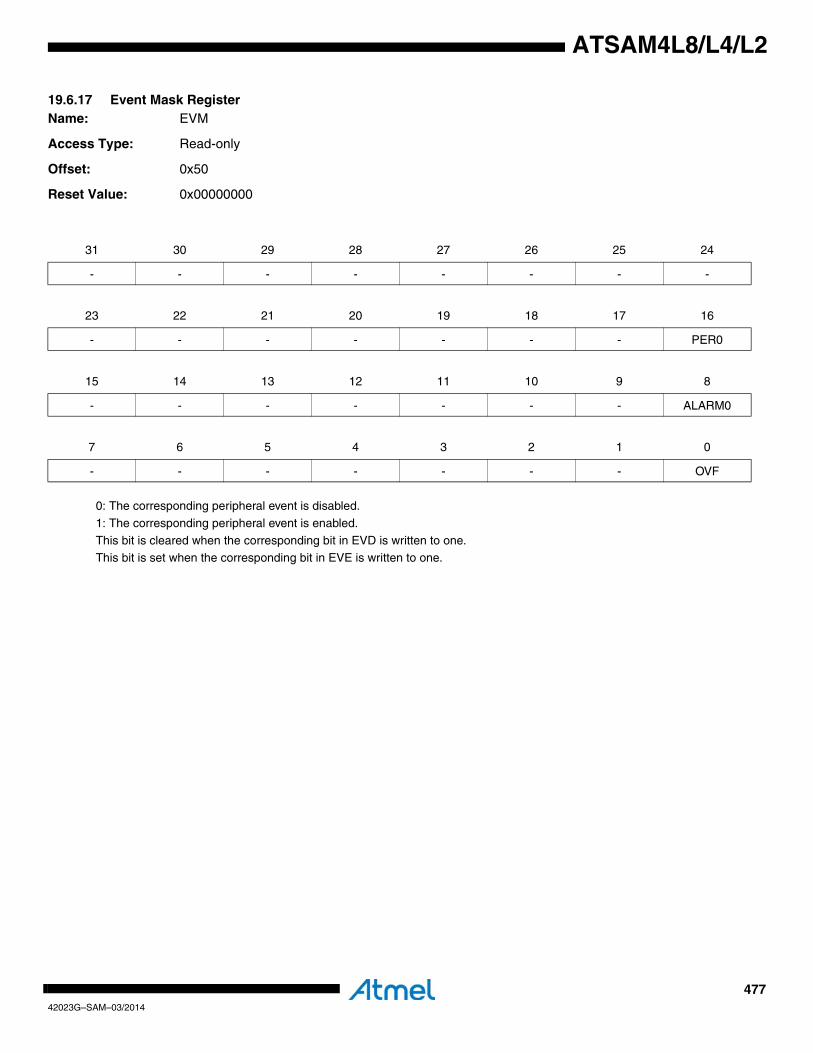
47742023G–SAM–03/2014
ATSAM4L8/L4/L2
19.6.17 Event Mask RegisterName: EVM
Access Type: Read-only
Offset: 0x50
Reset Value: 0x00000000
0: The corresponding peripheral event is disabled.
1: The corresponding peripheral event is enabled.
This bit is cleared when the corresponding bit in EVD is written to one.This bit is set when the corresponding bit in EVE is written to one.
31 30 29 28 27 26 25 24
- - - - - - - -
23 22 21 20 19 18 17 16
- - - - - - - PER0
15 14 13 12 11 10 9 8
- - - - - - - ALARM0
7 6 5 4 3 2 1 0
- - - - - - - OVF
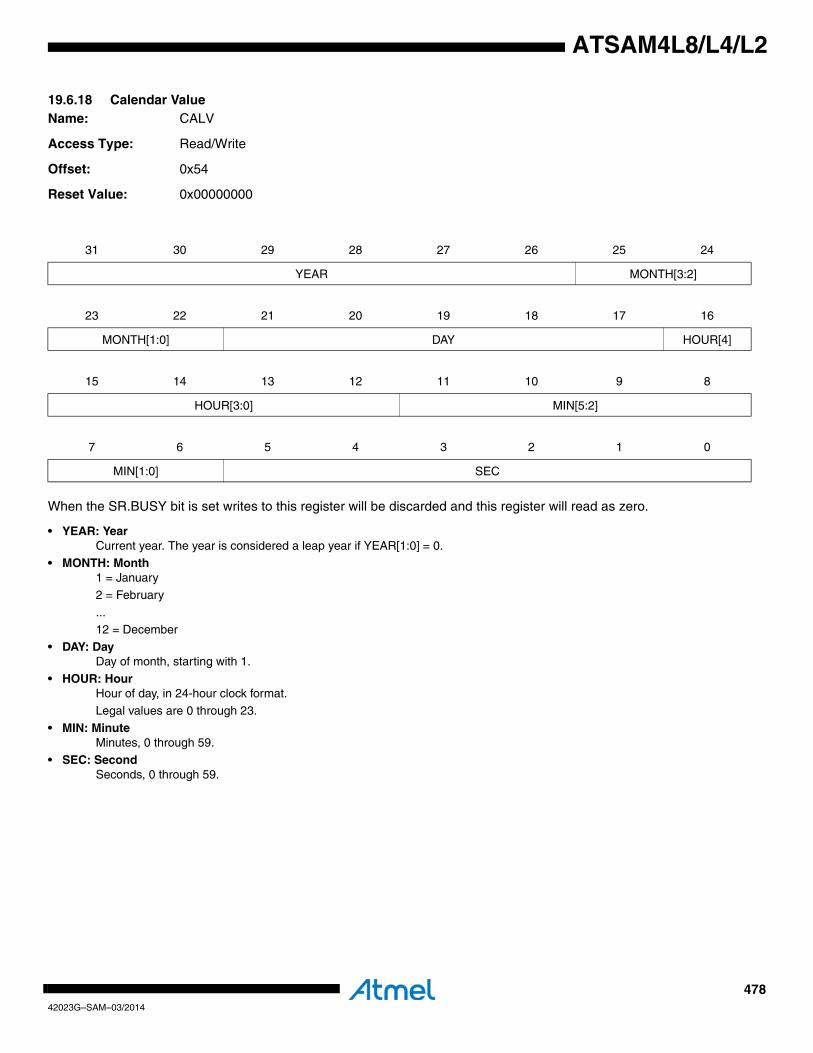
47842023G–SAM–03/2014
ATSAM4L8/L4/L2
19.6.18 Calendar ValueName: CALV
Access Type: Read/Write
Offset: 0x54
Reset Value: 0x00000000
When the SR.BUSY bit is set writes to this register will be discarded and this register will read as zero.
• YEAR: YearCurrent year. The year is considered a leap year if YEAR[1:0] = 0.
• MONTH: Month1 = January
2 = February
...12 = December
• DAY: DayDay of month, starting with 1.
• HOUR: HourHour of day, in 24-hour clock format.
Legal values are 0 through 23.
• MIN: MinuteMinutes, 0 through 59.
• SEC: SecondSeconds, 0 through 59.
31 30 29 28 27 26 25 24
YEAR MONTH[3:2]
23 22 21 20 19 18 17 16
MONTH[1:0] DAY HOUR[4]
15 14 13 12 11 10 9 8
HOUR[3:0] MIN[5:2]
7 6 5 4 3 2 1 0
MIN[1:0] SEC
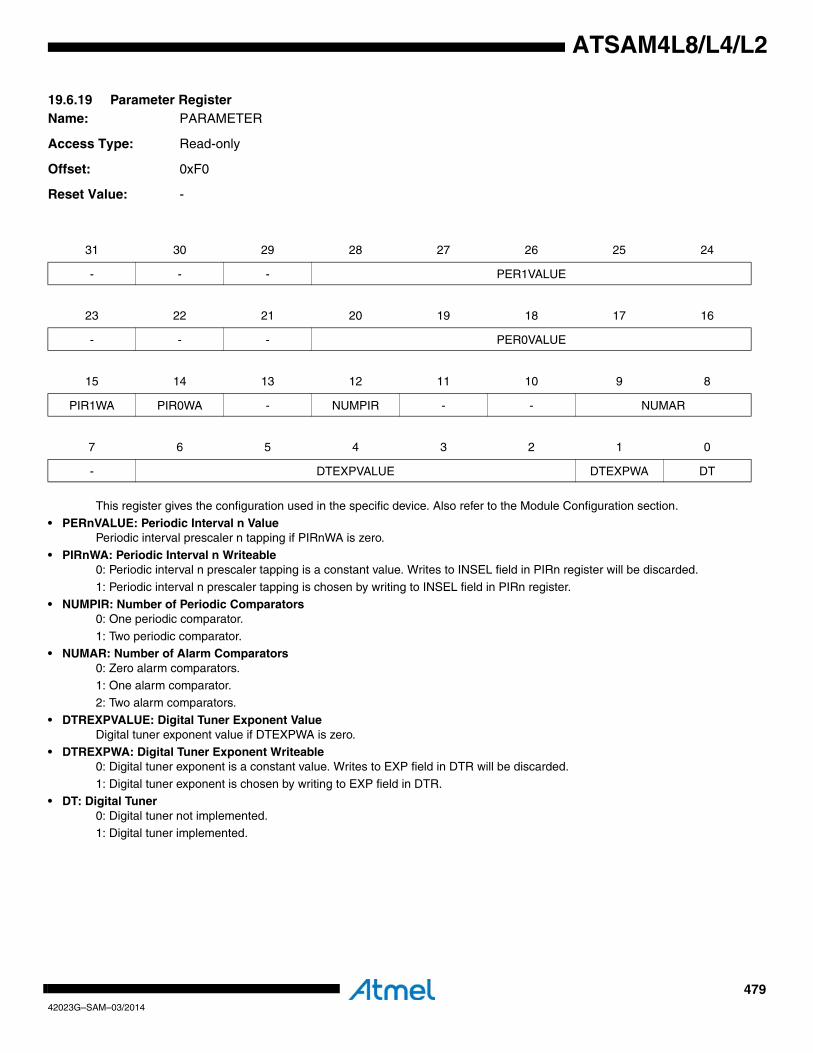
47942023G–SAM–03/2014
ATSAM4L8/L4/L2
19.6.19 Parameter RegisterName: PARAMETER
Access Type: Read-only
Offset: 0xF0
Reset Value: -
This register gives the configuration used in the specific device. Also refer to the Module Configuration section.
• PERnVALUE: Periodic Interval n ValuePeriodic interval prescaler n tapping if PIRnWA is zero.
• PIRnWA: Periodic Interval n Writeable0: Periodic interval n prescaler tapping is a constant value. Writes to INSEL field in PIRn register will be discarded.
1: Periodic interval n prescaler tapping is chosen by writing to INSEL field in PIRn register.
• NUMPIR: Number of Periodic Comparators0: One periodic comparator.
1: Two periodic comparator.• NUMAR: Number of Alarm Comparators
0: Zero alarm comparators.1: One alarm comparator.
2: Two alarm comparators.
• DTREXPVALUE: Digital Tuner Exponent ValueDigital tuner exponent value if DTEXPWA is zero.
• DTREXPWA: Digital Tuner Exponent Writeable0: Digital tuner exponent is a constant value. Writes to EXP field in DTR will be discarded.
1: Digital tuner exponent is chosen by writing to EXP field in DTR.• DT: Digital Tuner
0: Digital tuner not implemented.1: Digital tuner implemented.
31 30 29 28 27 26 25 24
- - - PER1VALUE
23 22 21 20 19 18 17 16
- - - PER0VALUE
15 14 13 12 11 10 9 8
PIR1WA PIR0WA - NUMPIR - - NUMAR
7 6 5 4 3 2 1 0
- DTEXPVALUE DTEXPWA DT

48042023G–SAM–03/2014
ATSAM4L8/L4/L2
19.6.20 Version RegisterName: VERSION
Access Type: Read-only
Offset: 0xFC
Reset Value: -
• VARIANT: Variant NumberReserved. No functionality associated.
• VERSION: Version NumberVersion number of the module. No functionality associated.
31 30 29 28 27 26 25 24
- - - - - - - -
23 22 21 20 19 18 17 16
- - - - VARIANT
15 14 13 12 11 10 9 8
- - - - VERSION[11:8]
7 6 5 4 3 2 1 0
VERSION[7:0]
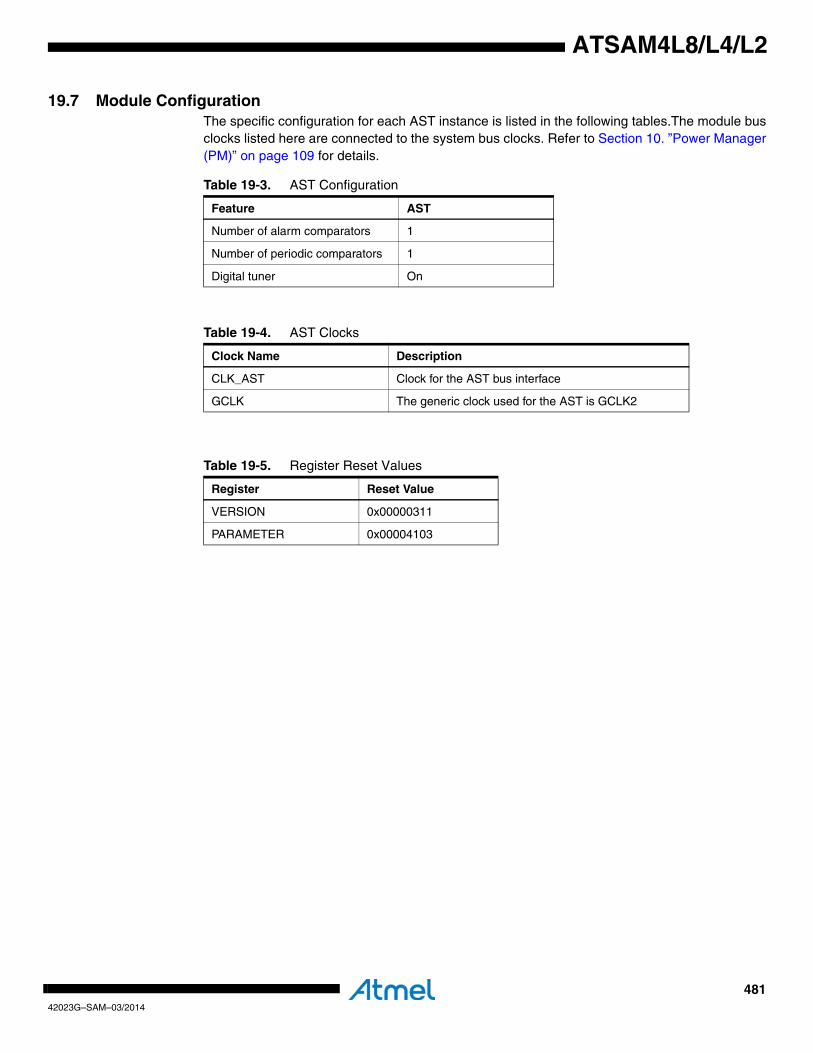
48142023G–SAM–03/2014
ATSAM4L8/L4/L2
19.7 Module ConfigurationThe specific configuration for each AST instance is listed in the following tables.The module busclocks listed here are connected to the system bus clocks. Refer to Section 10. ”Power Manager(PM)” on page 109 for details.
Table 19-3. AST Configuration
Feature AST
Number of alarm comparators 1
Number of periodic comparators 1
Digital tuner On
Table 19-4. AST Clocks
Clock Name Description
CLK_AST Clock for the AST bus interface
GCLK The generic clock used for the AST is GCLK2
Table 19-5. Register Reset Values
Register Reset Value
VERSION 0x00000311
PARAMETER 0x00004103
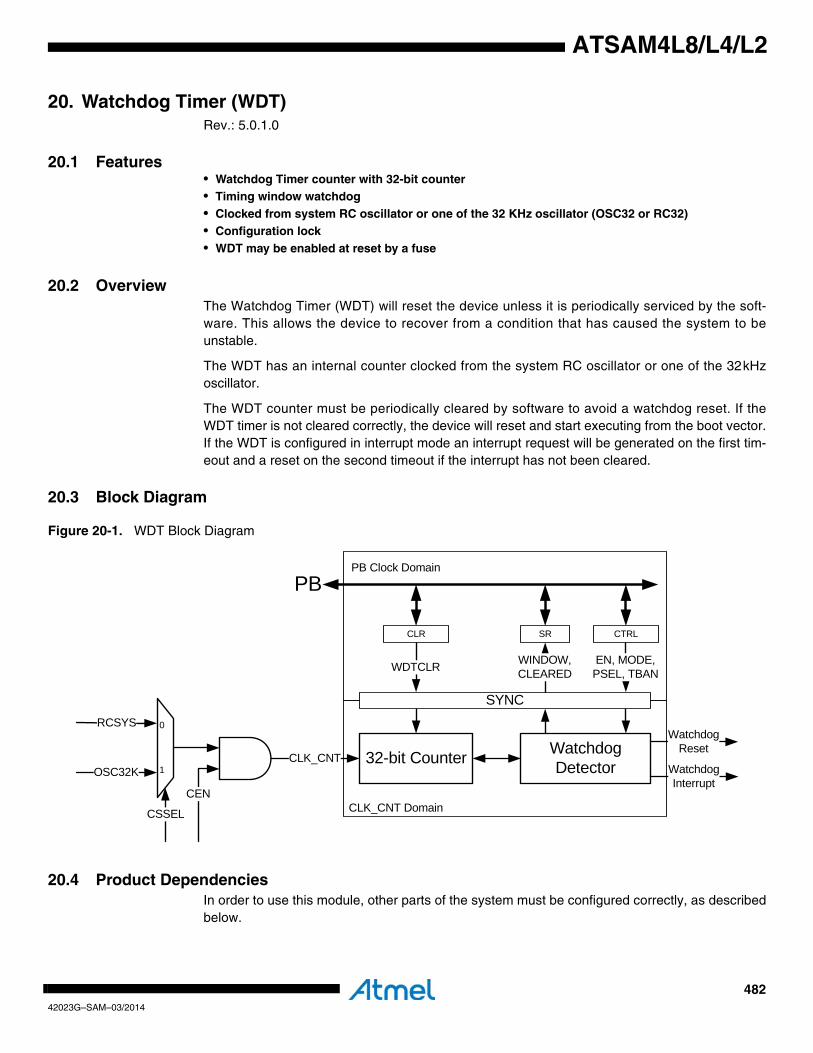
48242023G–SAM–03/2014
ATSAM4L8/L4/L2
20. Watchdog Timer (WDT)Rev.: 5.0.1.0
20.1 Features• Watchdog Timer counter with 32-bit counter• Timing window watchdog• Clocked from system RC oscillator or one of the 32 KHz oscillator (OSC32 or RC32)• Configuration lock• WDT may be enabled at reset by a fuse
20.2 OverviewThe Watchdog Timer (WDT) will reset the device unless it is periodically serviced by the soft-ware. This allows the device to recover from a condition that has caused the system to beunstable.
The WDT has an internal counter clocked from the system RC oscillator or one of the 32kHzoscillator.
The WDT counter must be periodically cleared by software to avoid a watchdog reset. If theWDT timer is not cleared correctly, the device will reset and start executing from the boot vector.If the WDT is configured in interrupt mode an interrupt request will be generated on the first tim-eout and a reset on the second timeout if the interrupt has not been cleared.
20.3 Block Diagram
Figure 20-1. WDT Block Diagram
20.4 Product DependenciesIn order to use this module, other parts of the system must be configured correctly, as describedbelow.
CLK_CNTWatchdog Detector32-bit Counter
WatchdogReset
0
1
RCSYS
OSC32K
CSSEL
CEN
SYNC
CLK_CNT Domain
PB Clock DomainPB
WDTCLR WINDOW,CLEARED
EN, MODE,PSEL, TBAN
CTRLCLR SR
WatchdogInterrupt
48342023G–SAM–03/2014
ATSAM4L8/L4/L2
20.4.1 Power ManagementWhen the WDT is enabled, it remains clocked in all sleep modes. It is not possible to enter sleepmodes where the source clock of CLK_CNT is stopped. Attempting to do so will result in the chipentering the lowest sleep mode where the source clock is running, leaving the WDT operational.Refer to Section 10. ”Power Manager (PM)” on page 109 for details about sleep modes.
After a watchdog reset the WDT bit in the Reset Cause Register (RCAUSE) in the Power Man-ager will be set.
20.4.2 ClocksThe clock for the WDT bus interface (CLK_WDT) is generated by the Power Manager. Thisclock is enabled at reset, and can be disabled in the Power Manager. It is recommended to dis-able the WDT before disabling the clock, to avoid freezing the WDT in an undefined state.
There are two possible clock sources for the Watchdog Timer clock, CLK_CNT:
• System RC oscillator (RCSYS): This oscillator is always enabled when selected as clock source for the WDT. Refer to Section 10. ”Power Manager (PM)” on page 109 for details about the RCSYS and sleep modes. Refer to Section 42. ”Electrical Characteristics” on page 1121 for the characteristic frequency of this oscillator.
• 32 kHz crystal oscillator or RC oscillator (OSC32 or RC32): This oscillator has to be enabled in the Backup System Control Interface (BSCIF) before using it as clock source for the WDT. Selection between OSC32 and RC32 should be done in the Backup Power Manager.The WDT will not be able to detect if this clock is stopped.
20.4.3 InterruptThe WDT interrupt request line is connected to the NVIC. Using the WDT interrupt requires theNVIC to be programmed first.
20.4.4 Debug OperationThe WDT counter is not frozen during debug operation, unless the Core is halted and the bit cor-responding to the WDT is set in the Peripheral Debug Register (PDBG). If the WDT counter isnot frozen during debug operation it will need periodically clearing to avoid a watchdog reset.
20.4.5 FusesThe WDT can be enabled at reset. This is controlled by the WDTAUTO fuse, see Section 20.5.5for details. Refer to the Fuse Settings section in the Flash Controller chapter for details aboutWDTAUTO and how to program the fuses.
20.5 Functional Description
20.5.1 Basic Mode
20.5.1.1 WDT Control Register AccessTo avoid accidental disabling of the watchdog, the Control Register (CTRL) must be writtentwice, first with the KEY field set to 0x55, then 0xAA without changing the other bits. Failure todo so will cause the write operation to be ignored, and the value in the CTRL Register will not bechanged.
20.5.1.2 Changing CLK_CNT Clock SourceAfter any reset, except for watchdog reset, CLK_CNT will be enabled with RCSYS as source.
48442023G–SAM–03/2014
ATSAM4L8/L4/L2
To change the clock source for CLK_CNT the following steps must be taken. Note that the WDTshould always be disabled before changing the CLK_CNT source:
1. Write a zero to the Clock Enable bit in the Control Register (CTRL.CEN), leaving the other bitsas they are in the Control Register. This will stop CLK_CNT.
2. Read back CTRL until CTRL.CEN reads zero. The clock has now been stopped.
3. Modify the Clock Source Select bit in CTRL (CTRL.CSSEL) with your new clock selection andwrite it to CTRL.
4. Write a one to CTRL.CEN, leaving the other bits as they are in CTRL. This will enable theclock.
5. Read back CTRL until CTRL.CEN reads one. The clock has now been enabled.
20.5.1.3 Configuring the WDTIf the MODE bit in the Control Register (CTRL.MODE) is zero, the WDT is in basic mode. TheTime Out Prescale Select (PSEL) field in CTRL (CTRL.PSEL) selects the WDT timeout period:
Ttimeout = Tpsel = 2(PSEL+1) / fclk_cnt
20.5.1.4 Enabling the WDTTo enable the WDT write a one to the Enable bit in the Control Register (CTRL.EN). Due tointernal synchronization, it will take some time for the CTRL.EN bit to read back as one.
20.5.1.5 Clearing the WDT CounterThe WDT counter must be periodically cleared within Tpsel to avoid a watchdog reset to beissued, see Figure 20-2 on page 485. If the WDT counter is not cleared within Tpsel a watchdogreset will be issued at the end of Tpsel, see Figure 20-3 on page 485.
The WDT counter is cleared by writing a one to the Watchdog Clear bit in the Clear Register(CLR.WDTCLR), at any correct write to CTRL, or when the counter reaches Ttimeout and thedevice is reset. In basic mode, CLR.WDTCLR can be written at any time when the WDT CounterCleared bit in the Status Register (SR.CLEARED) is one. Due to internal synchronization, clear-ing the WDT counter takes some time. The SR.CLEARED bit is cleared when writing toCLR.WDTCLR and set when the clearing is done. Any write to the CLR.WDTCLR bit whileSR.CLEARED is zero will not clear the counter.
Writing to the CLR.WDTCLR bit has to be done in a particular sequence to be valid. The ClearRegister must be written twice, first by writing 0x55 to the CLR.KEY field and CLR.WDTCLR setto one, then by writing 0xAA to CLR.KEY without changing the CLR.WDTCLR bit. Writing to theClear Register without the correct sequence has no effect.
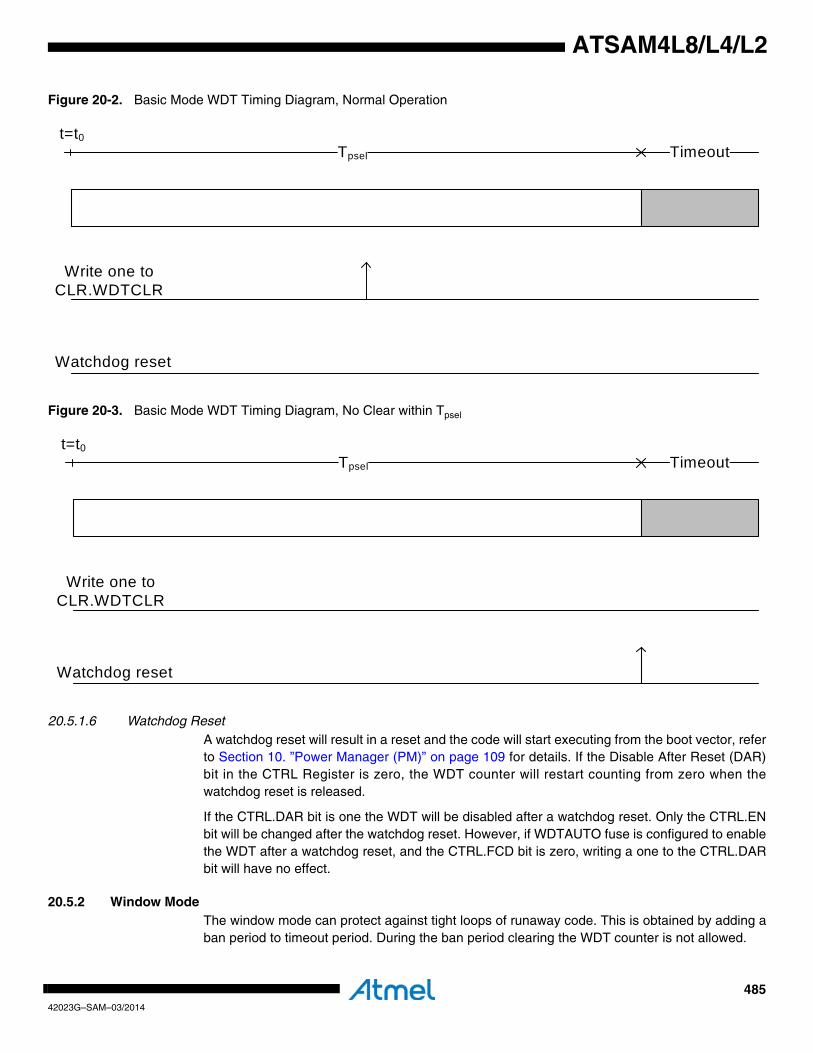
48542023G–SAM–03/2014
ATSAM4L8/L4/L2
Figure 20-2. Basic Mode WDT Timing Diagram, Normal Operation
Figure 20-3. Basic Mode WDT Timing Diagram, No Clear within Tpsel
20.5.1.6 Watchdog ResetA watchdog reset will result in a reset and the code will start executing from the boot vector, referto Section 10. ”Power Manager (PM)” on page 109 for details. If the Disable After Reset (DAR)bit in the CTRL Register is zero, the WDT counter will restart counting from zero when thewatchdog reset is released.
If the CTRL.DAR bit is one the WDT will be disabled after a watchdog reset. Only the CTRL.ENbit will be changed after the watchdog reset. However, if WDTAUTO fuse is configured to enablethe WDT after a watchdog reset, and the CTRL.FCD bit is zero, writing a one to the CTRL.DARbit will have no effect.
20.5.2 Window ModeThe window mode can protect against tight loops of runaway code. This is obtained by adding aban period to timeout period. During the ban period clearing the WDT counter is not allowed.
Tpsel Timeout
Write one to CLR.WDTCLR
Watchdog reset
t=t0
Tpsel Timeout
Write one to CLR.WDTCLR
Watchdog reset
t=t0
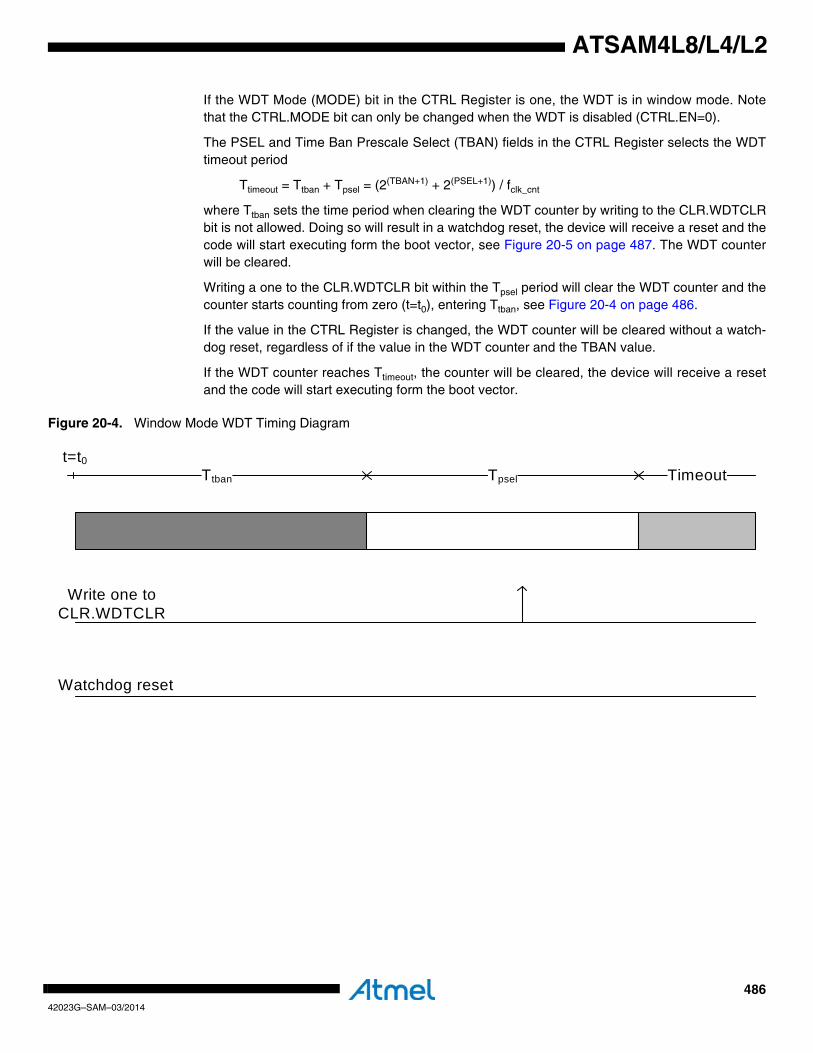
48642023G–SAM–03/2014
ATSAM4L8/L4/L2
If the WDT Mode (MODE) bit in the CTRL Register is one, the WDT is in window mode. Notethat the CTRL.MODE bit can only be changed when the WDT is disabled (CTRL.EN=0).
The PSEL and Time Ban Prescale Select (TBAN) fields in the CTRL Register selects the WDTtimeout period
Ttimeout = Ttban + Tpsel = (2(TBAN+1) + 2(PSEL+1)) / fclk_cnt
where Ttban sets the time period when clearing the WDT counter by writing to the CLR.WDTCLRbit is not allowed. Doing so will result in a watchdog reset, the device will receive a reset and thecode will start executing form the boot vector, see Figure 20-5 on page 487. The WDT counterwill be cleared.
Writing a one to the CLR.WDTCLR bit within the Tpsel period will clear the WDT counter and thecounter starts counting from zero (t=t0), entering Ttban, see Figure 20-4 on page 486.
If the value in the CTRL Register is changed, the WDT counter will be cleared without a watch-dog reset, regardless of if the value in the WDT counter and the TBAN value.
If the WDT counter reaches Ttimeout, the counter will be cleared, the device will receive a resetand the code will start executing form the boot vector.
Figure 20-4. Window Mode WDT Timing Diagram
Ttban Tpsel Timeout
Write one to CLR.WDTCLR
Watchdog reset
t=t0
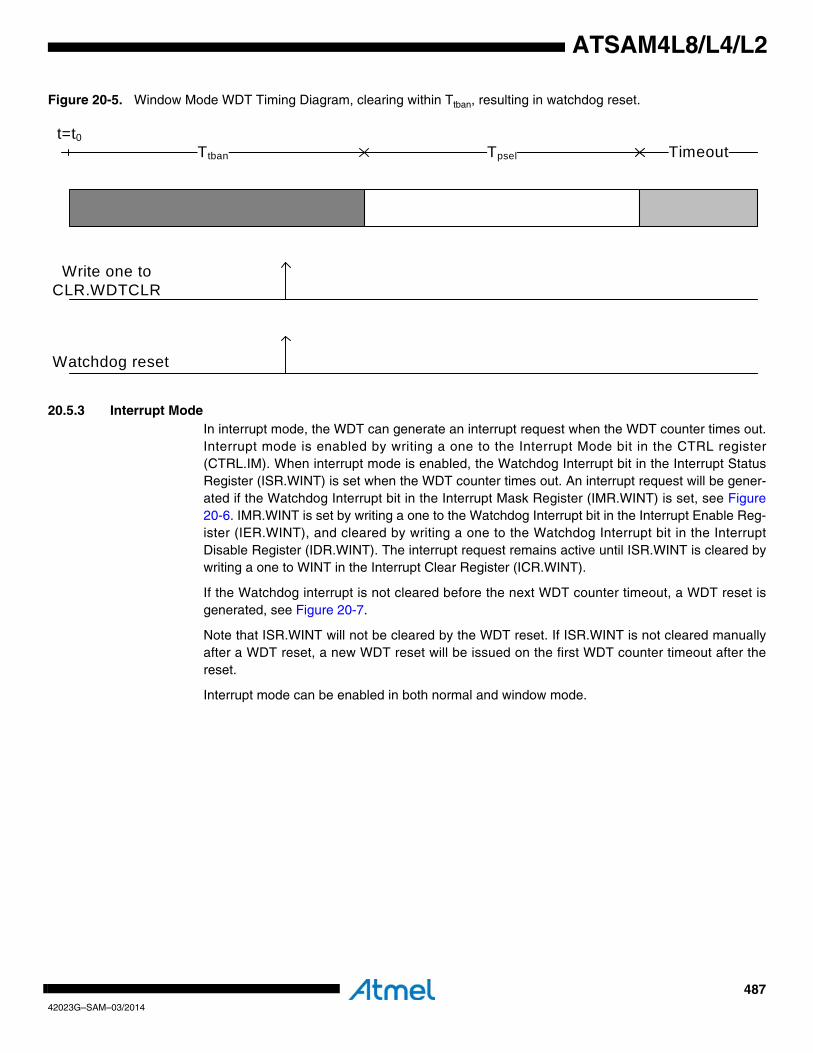
48742023G–SAM–03/2014
ATSAM4L8/L4/L2
Figure 20-5. Window Mode WDT Timing Diagram, clearing within Ttban, resulting in watchdog reset.
20.5.3 Interrupt ModeIn interrupt mode, the WDT can generate an interrupt request when the WDT counter times out.Interrupt mode is enabled by writing a one to the Interrupt Mode bit in the CTRL register(CTRL.IM). When interrupt mode is enabled, the Watchdog Interrupt bit in the Interrupt StatusRegister (ISR.WINT) is set when the WDT counter times out. An interrupt request will be gener-ated if the Watchdog Interrupt bit in the Interrupt Mask Register (IMR.WINT) is set, see Figure20-6. IMR.WINT is set by writing a one to the Watchdog Interrupt bit in the Interrupt Enable Reg-ister (IER.WINT), and cleared by writing a one to the Watchdog Interrupt bit in the InterruptDisable Register (IDR.WINT). The interrupt request remains active until ISR.WINT is cleared bywriting a one to WINT in the Interrupt Clear Register (ICR.WINT).
If the Watchdog interrupt is not cleared before the next WDT counter timeout, a WDT reset isgenerated, see Figure 20-7.
Note that ISR.WINT will not be cleared by the WDT reset. If ISR.WINT is not cleared manuallyafter a WDT reset, a new WDT reset will be issued on the first WDT counter timeout after thereset.
Interrupt mode can be enabled in both normal and window mode.
Ttban Tpsel Timeout
Write one to CLR.WDTCLR
Watchdog reset
t=t0
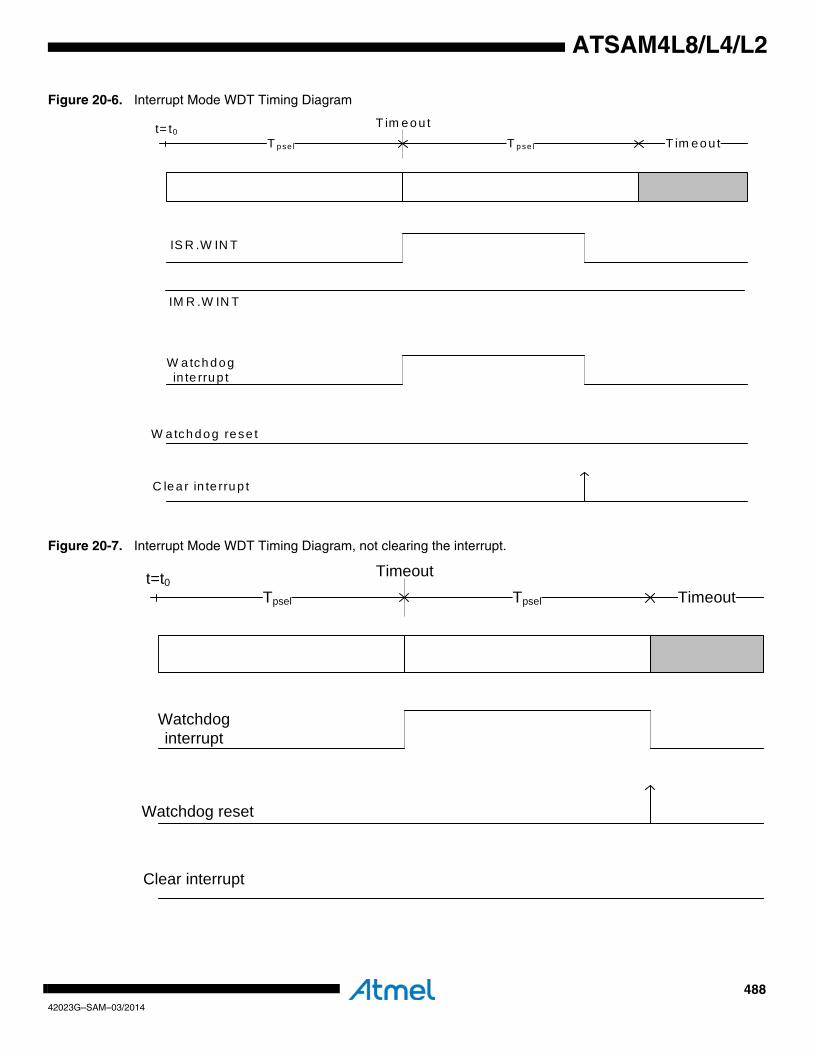
48842023G–SAM–03/2014
ATSAM4L8/L4/L2
Figure 20-6. Interrupt Mode WDT Timing Diagram
Figure 20-7. Interrupt Mode WDT Timing Diagram, not clearing the interrupt.
T p se l T im eou t
W a tch dog in te rrup t
W a tch dog rese t
t= t0T p se l
T im eou t
C le a r in te rrup t
IS R .W IN T
IM R .W IN T
Tpsel Timeout
Watchdog interrupt
Watchdog reset
t=t0Tpsel
Timeout
Clear interrupt
48942023G–SAM–03/2014
ATSAM4L8/L4/L2
20.5.4 Disabling the WDTThe WDT is disabled by writing a zero to the CTRL.EN bit. When disabling the WDT no otherbits in the CTRL Register should be changed until the CTRL.EN bit reads back as zero. If theCTRL.CEN bit is written to zero, the CTRL.EN bit will never read back as zero if changing thevalue from one to zero.
20.5.5 Flash CalibrationThe WDT can be enabled at reset. This is controlled by the WDTAUTO fuse. The WDT will beset in basic mode, RCSYS is set as source for CLK_CNT, and PSEL will be set to a value givingTpsel above 100 ms. Refer to the Fuse Settings chapter for details about WDTAUTO and how toprogram the fuses.
If the Flash Calibration Done (FCD) bit in the CTRL Register is zero at a watchdog reset theflash calibration will be redone, and the CTRL.FCD bit will be set when the calibration is done. IfCTRL.FCD is one at a watchdog reset, the configuration of the WDT will not be changed duringflash calibration. After any other reset the flash calibration will always be done, and theCTRL.FCD bit will be set when the calibration is done.
20.5.6 Special ConsiderationsCare must be taken when selecting the PSEL/TBAN values so that the timeout period is greaterthan the startup time of the chip. Otherwise a watchdog reset will reset the chip before any codehas been run. This can also be avoided by writing the CTRL.DAR bit to one when configuringthe WDT.
If the Store Final Value (SFV) bit in the CTRL Register is one, the CTRL Register is locked forfurther write accesses. All writes to the CTRL Register will be ignored. Once the CTRL Registeris locked, it can only be unlocked by a reset (e.g. POR, OCD, and WDT).
The CTRL.MODE bit can only be changed when the WDT is disabled (CTRL.EN=0).
20.5.7 InterruptsThe WDT has one interrupt:• WINT: Watchdog Interrupt, set if WDT is in Interrupt Mode and the Watchdog timer times out.
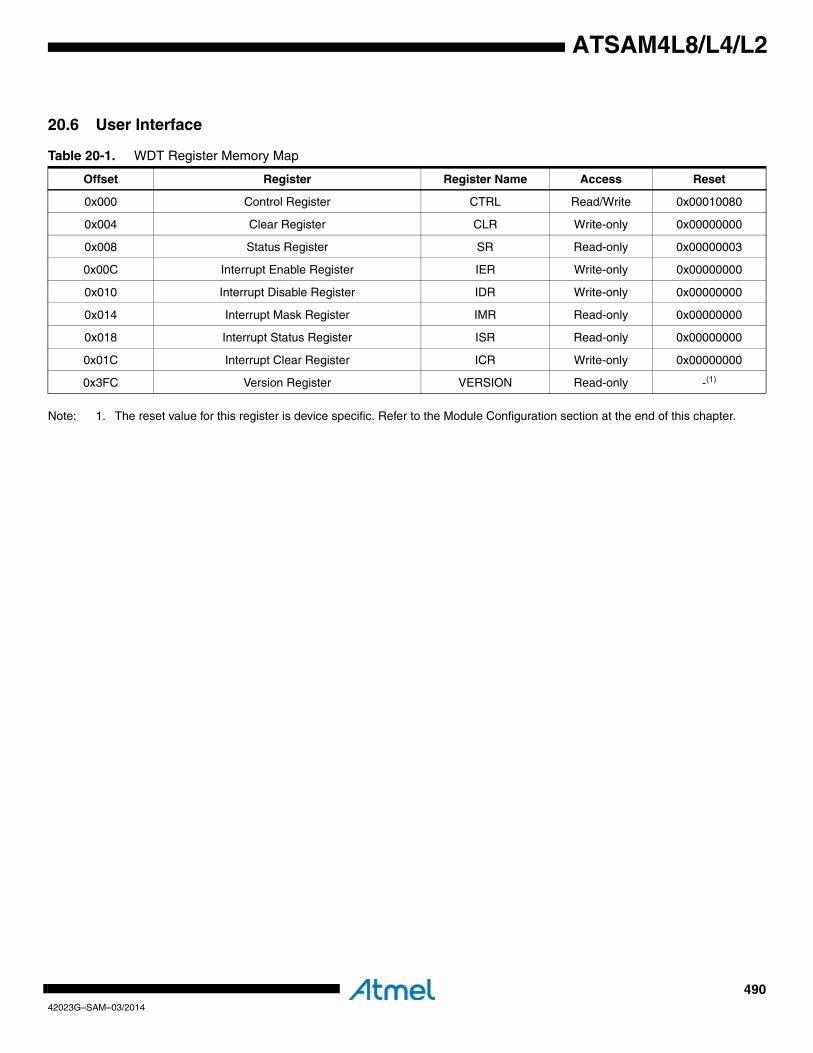
49042023G–SAM–03/2014
ATSAM4L8/L4/L2
20.6 User Interface
Note: 1. The reset value for this register is device specific. Refer to the Module Configuration section at the end of this chapter.
Table 20-1. WDT Register Memory Map
Offset Register Register Name Access Reset
0x000 Control Register CTRL Read/Write 0x00010080
0x004 Clear Register CLR Write-only 0x00000000
0x008 Status Register SR Read-only 0x00000003
0x00C Interrupt Enable Register IER Write-only 0x00000000
0x010 Interrupt Disable Register IDR Write-only 0x00000000
0x014 Interrupt Mask Register IMR Read-only 0x00000000
0x018 Interrupt Status Register ISR Read-only 0x00000000
0x01C Interrupt Clear Register ICR Write-only 0x00000000
0x3FC Version Register VERSION Read-only -(1)
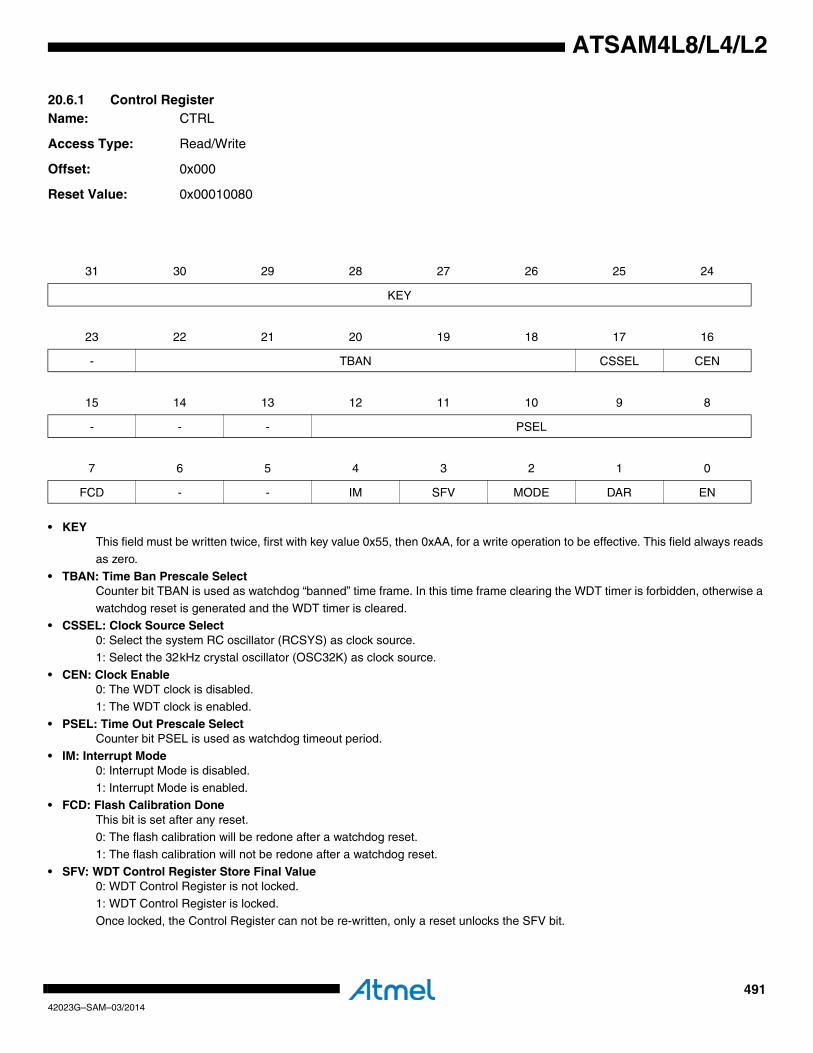
49142023G–SAM–03/2014
ATSAM4L8/L4/L2
20.6.1 Control RegisterName: CTRL
Access Type: Read/Write
Offset: 0x000
Reset Value: 0x00010080
• KEYThis field must be written twice, first with key value 0x55, then 0xAA, for a write operation to be effective. This field always reads
as zero.
• TBAN: Time Ban Prescale SelectCounter bit TBAN is used as watchdog “banned” time frame. In this time frame clearing the WDT timer is forbidden, otherwise a
watchdog reset is generated and the WDT timer is cleared.• CSSEL: Clock Source Select
0: Select the system RC oscillator (RCSYS) as clock source.1: Select the 32kHz crystal oscillator (OSC32K) as clock source.
• CEN: Clock Enable0: The WDT clock is disabled.
1: The WDT clock is enabled.
• PSEL: Time Out Prescale SelectCounter bit PSEL is used as watchdog timeout period.
• IM: Interrupt Mode0: Interrupt Mode is disabled.
1: Interrupt Mode is enabled.• FCD: Flash Calibration Done
This bit is set after any reset. 0: The flash calibration will be redone after a watchdog reset.
1: The flash calibration will not be redone after a watchdog reset.
• SFV: WDT Control Register Store Final Value0: WDT Control Register is not locked.
1: WDT Control Register is locked.
Once locked, the Control Register can not be re-written, only a reset unlocks the SFV bit.
31 30 29 28 27 26 25 24
KEY
23 22 21 20 19 18 17 16
- TBAN CSSEL CEN
15 14 13 12 11 10 9 8
- - - PSEL
7 6 5 4 3 2 1 0
FCD - - IM SFV MODE DAR EN
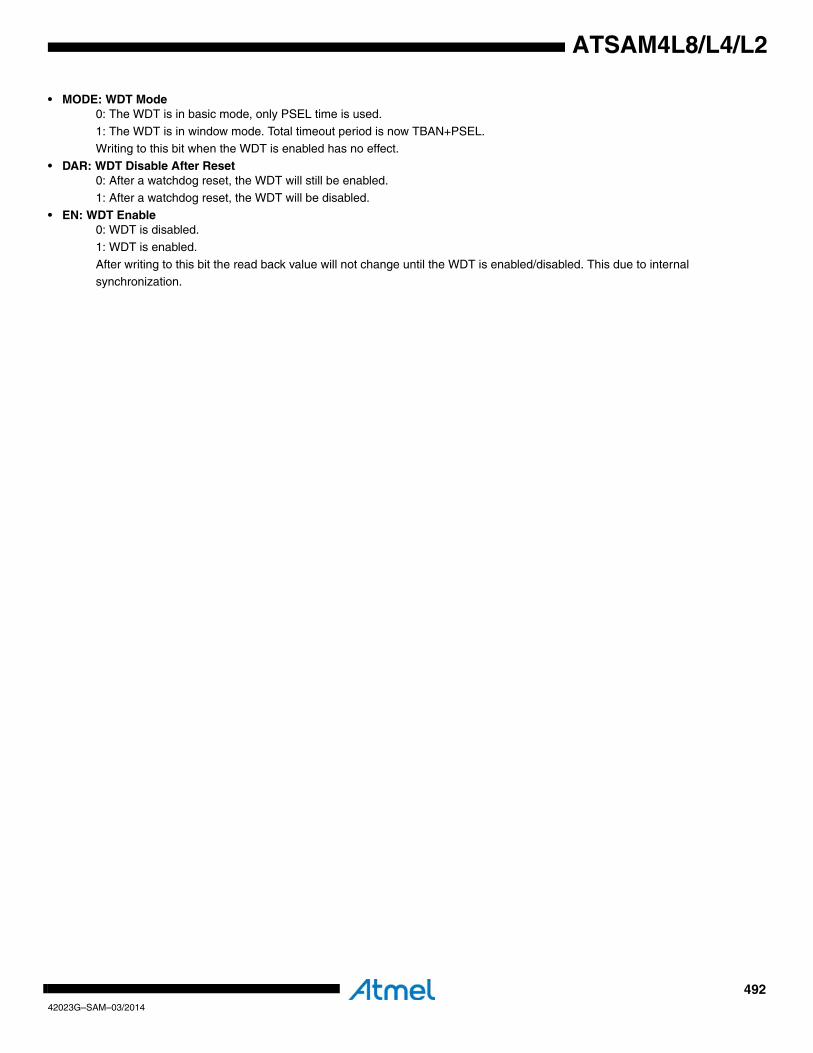
49242023G–SAM–03/2014
ATSAM4L8/L4/L2
• MODE: WDT Mode0: The WDT is in basic mode, only PSEL time is used.
1: The WDT is in window mode. Total timeout period is now TBAN+PSEL.Writing to this bit when the WDT is enabled has no effect.
• DAR: WDT Disable After Reset0: After a watchdog reset, the WDT will still be enabled.
1: After a watchdog reset, the WDT will be disabled.
• EN: WDT Enable0: WDT is disabled.
1: WDT is enabled.
After writing to this bit the read back value will not change until the WDT is enabled/disabled. This due to internal synchronization.

49342023G–SAM–03/2014
ATSAM4L8/L4/L2
20.6.2 Clear RegisterName: CLR
Access Type: Write-only
Offset: 0x004
Reset Value: 0x00000000
When the Watchdog Timer is enabled, this Register must be periodically written within the window time frame or within thewatchdog timeout period, to prevent a watchdog reset.
• KEYThis field must be written twice, first with key value 0x55, then 0xAA, for a write operation to be effective.
• WDTCLR: Watchdog ClearWriting a zero to this bit has no effect.
Writing a one to this bit clears the WDT counter.
31 30 29 28 27 26 25 24
KEY
23 22 21 20 19 18 17 16
- - - - - - - -
15 14 13 12 11 10 9 8
- - - - - - - -
7 6 5 4 3 2 1 0
- - - - - - - WDTCLR
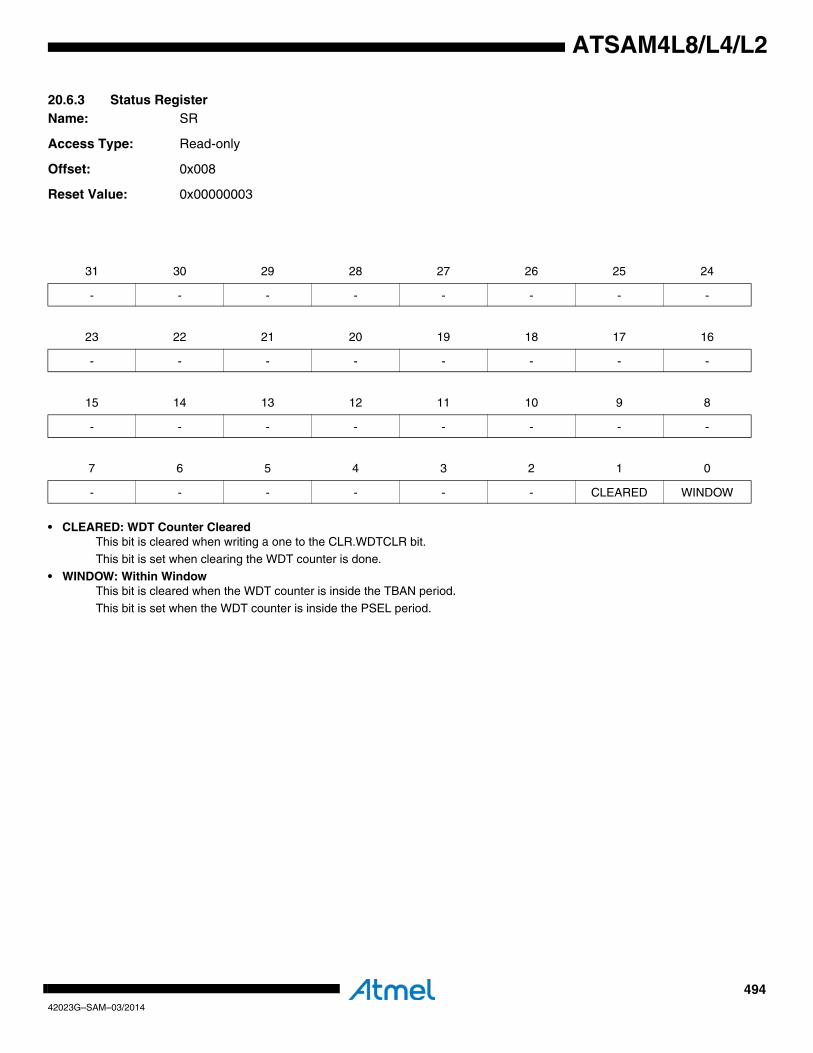
49442023G–SAM–03/2014
ATSAM4L8/L4/L2
20.6.3 Status RegisterName: SR
Access Type: Read-only
Offset: 0x008
Reset Value: 0x00000003
• CLEARED: WDT Counter ClearedThis bit is cleared when writing a one to the CLR.WDTCLR bit.
This bit is set when clearing the WDT counter is done.
• WINDOW: Within WindowThis bit is cleared when the WDT counter is inside the TBAN period.
This bit is set when the WDT counter is inside the PSEL period.
31 30 29 28 27 26 25 24
- - - - - - - -
23 22 21 20 19 18 17 16
- - - - - - - -
15 14 13 12 11 10 9 8
- - - - - - - -
7 6 5 4 3 2 1 0
- - - - - - CLEARED WINDOW

49542023G–SAM–03/2014
ATSAM4L8/L4/L2
20.6.4 Interrupt Enable RegisterName: IER
Access Type: Write-only
Offset: 0x00C
Reset Value: 0x00000000
Writing a zero to a bit in this register has no effect.
Writing a one to a bit in this register will set the corresponding bit in IMR.
31 30 29 28 27 26 25 24
- - - - - - - -
23 22 21 20 19 18 17 16
- - - - - - - -
15 14 13 12 11 10 9 8
- - - - - - - -
7 6 5 4 3 2 1 0
- - - - - WINT - -

49642023G–SAM–03/2014
ATSAM4L8/L4/L2
20.6.5 Interrupt Disable RegisterName: IDR
Access Type: Write-only
Offset: 0x010
Reset Value: 0x00000000
Writing a zero to a bit in this register has no effect.
Writing a one to a bit in this register will clear the corresponding bit in IMR.
31 30 29 28 27 26 25 24
- - - - - - - -
23 22 21 20 19 18 17 16
- - - - - - - -
15 14 13 12 11 10 9 8
- - - - - - - -
7 6 5 4 3 2 1 0
- - - - - WINT - -
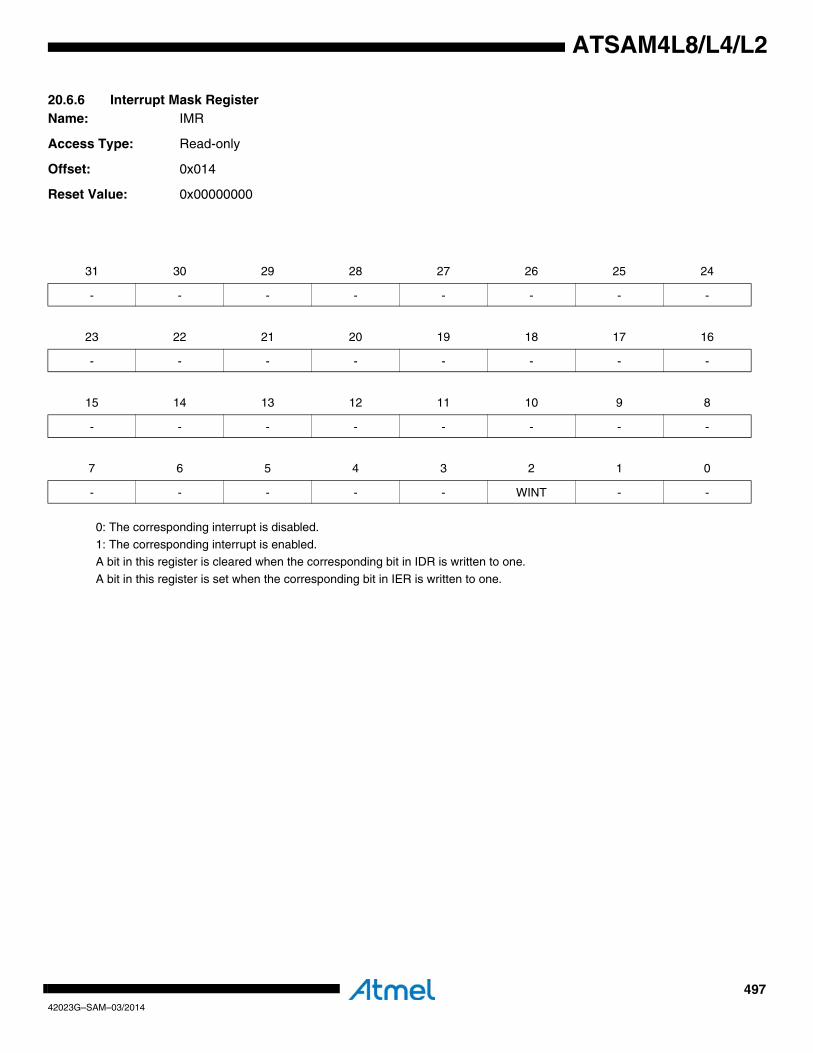
49742023G–SAM–03/2014
ATSAM4L8/L4/L2
20.6.6 Interrupt Mask RegisterName: IMR
Access Type: Read-only
Offset: 0x014
Reset Value: 0x00000000
0: The corresponding interrupt is disabled.
1: The corresponding interrupt is enabled.A bit in this register is cleared when the corresponding bit in IDR is written to one.
A bit in this register is set when the corresponding bit in IER is written to one.
31 30 29 28 27 26 25 24
- - - - - - - -
23 22 21 20 19 18 17 16
- - - - - - - -
15 14 13 12 11 10 9 8
- - - - - - - -
7 6 5 4 3 2 1 0
- - - - - WINT - -
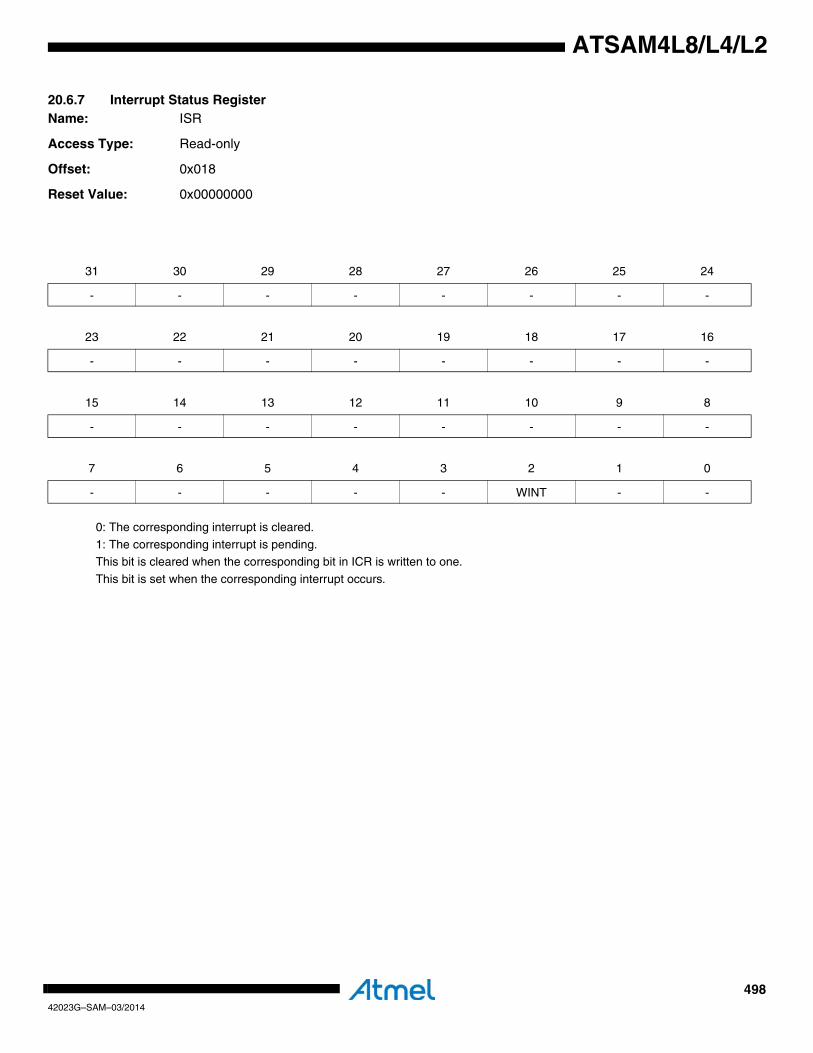
49842023G–SAM–03/2014
ATSAM4L8/L4/L2
20.6.7 Interrupt Status RegisterName: ISR
Access Type: Read-only
Offset: 0x018
Reset Value: 0x00000000
0: The corresponding interrupt is cleared.
1: The corresponding interrupt is pending.This bit is cleared when the corresponding bit in ICR is written to one.
This bit is set when the corresponding interrupt occurs.
31 30 29 28 27 26 25 24
- - - - - - - -
23 22 21 20 19 18 17 16
- - - - - - - -
15 14 13 12 11 10 9 8
- - - - - - - -
7 6 5 4 3 2 1 0
- - - - - WINT - -

49942023G–SAM–03/2014
ATSAM4L8/L4/L2
20.6.8 Interrupt Clear RegisterName: ICR
Access Type: Write-only
Offset: 0x01C
Reset Value: 0x00000000
Writing a zero to a bit in this register has no effect.
Writing a one to a bit in this register will clear the corresponding bit in ISR and the corresponding interrupt request.
31 30 29 28 27 26 25 24
- - - - - - - -
23 22 21 20 19 18 17 16
- - - - - - - -
15 14 13 12 11 10 9 8
- - - - - - - -
7 6 5 4 3 2 1 0
- - - - - WINT - -

50042023G–SAM–03/2014
ATSAM4L8/L4/L2
20.6.9 Version RegisterName: VERSION
Access Type: Read-only
Offset: 0x3FC
Reset Value: -
• VARIANT: Variant numberReserved. No functionality associated.
• VERSION: Version numberVersion number of the module. No functionality associated.
31 30 29 28 27 26 25 24
- - - - - - - -
23 22 21 20 19 18 17 16
- - - - VARIANT
15 14 13 12 11 10 9 8
- - - - VERSION[11:8]
7 6 5 4 3 2 1 0
VERSION[7:0]
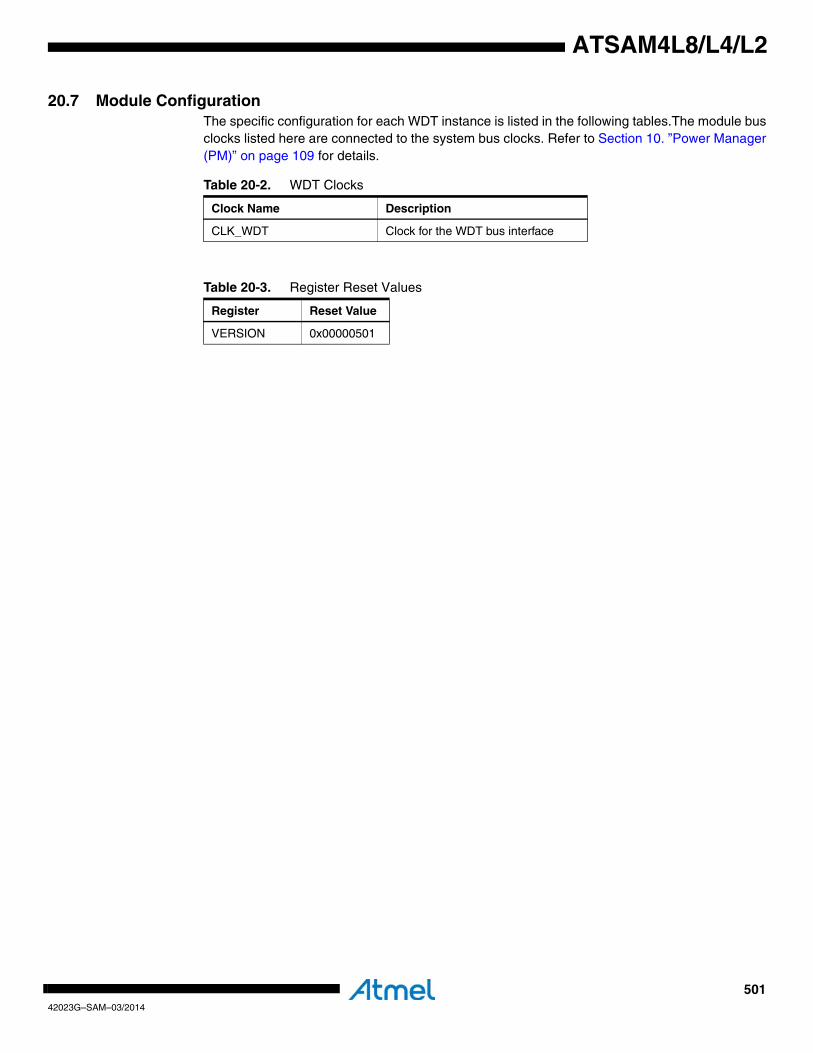
50142023G–SAM–03/2014
ATSAM4L8/L4/L2
20.7 Module ConfigurationThe specific configuration for each WDT instance is listed in the following tables.The module busclocks listed here are connected to the system bus clocks. Refer to Section 10. ”Power Manager(PM)” on page 109 for details.
Table 20-2. WDT Clocks
Clock Name Description
CLK_WDT Clock for the WDT bus interface
Table 20-3. Register Reset Values
Register Reset Value
VERSION 0x00000501
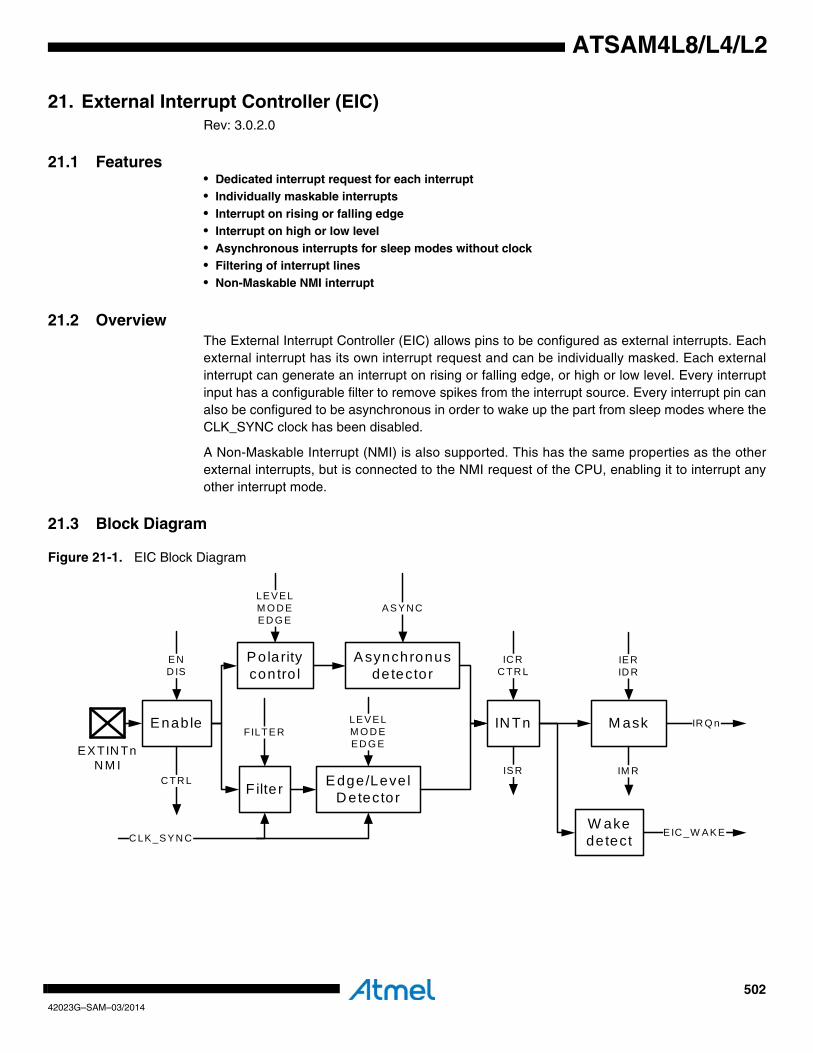
50242023G–SAM–03/2014
ATSAM4L8/L4/L2
21. External Interrupt Controller (EIC)Rev: 3.0.2.0
21.1 Features• Dedicated interrupt request for each interrupt• Individually maskable interrupts• Interrupt on rising or falling edge• Interrupt on high or low level• Asynchronous interrupts for sleep modes without clock• Filtering of interrupt lines• Non-Maskable NMI interrupt
21.2 OverviewThe External Interrupt Controller (EIC) allows pins to be configured as external interrupts. Eachexternal interrupt has its own interrupt request and can be individually masked. Each externalinterrupt can generate an interrupt on rising or falling edge, or high or low level. Every interruptinput has a configurable filter to remove spikes from the interrupt source. Every interrupt pin canalso be configured to be asynchronous in order to wake up the part from sleep modes where theCLK_SYNC clock has been disabled.
A Non-Maskable Interrupt (NMI) is also supported. This has the same properties as the otherexternal interrupts, but is connected to the NMI request of the CPU, enabling it to interrupt anyother interrupt mode.
21.3 Block Diagram
Figure 21-1. EIC Block Diagram
Edge/Level D etector
M ask IR Q n
EXTIN TnN M I
IN TnLEVELM O D EED G E
IERID R
IC RC TR L
ISR IM R
F ilter
FILTER
Polarity contro l
LEVELM O D EED G E
Asynchronus detector
E IC _W AKE
Enable
END IS
C TR L
C LK_SYN CW ake detect
ASYN C
50342023G–SAM–03/2014
ATSAM4L8/L4/L2
21.4 I/O Lines Description
21.5 Product DependenciesIn order to use this module, other parts of the system must be configured correctly, as describedbelow.
21.5.1 I/O LinesThe external interrupt pins (EXTINTn and NMI) may be multiplexed with I/O Controller lines. Theprogrammer must first program the I/O Controller to assign the desired EIC pins to their periph-eral function. If I/O lines of the EIC are not used by the application, they can be used for otherpurposes by the I/O Controller.
It is only required to enable the EIC inputs actually in use. If an application requires two externalinterrupts, then only two I/O lines will be assigned to EIC inputs.
21.5.2 Power ManagementAll interrupts are available in all sleep modes as long as the EIC module is powered. However, insleep modes where CLK_SYNC is stopped, the interrupt must be configured to asynchronousmode.
21.5.3 ClocksThe clock for the EIC bus interface (CLK_EIC) is generated by the Power Manager. This clock isenabled at reset, and can be disabled in the Power Manager.
The filter and synchronous edge/level detector runs on a clock which is stopped in any of thesleep modes where the system RC oscillator (RCSYS) is not running. This clock is referred to asCLK_SYNC.
21.5.4 InterruptsThe external interrupt request lines are connected to the NVIC. Using the external interruptsrequires the NVIC to be programmed first.
Using the Non-Maskable Interrupt does not require the NVIC to be programmed.
21.5.5 Debug Operation
When an external debugger forces the CPU into debug mode, the EIC continues normal opera-tion. If the EIC is configured in a way that requires it to be periodically serviced by the CPUthrough interrupts or similar, improper operation or data loss may result during debugging.
21.6 Functional Description
21.6.1 External InterruptsThe external interrupts are not enabled by default, allowing the proper interrupt vectors to be setup by the CPU before the interrupts are enabled.
Table 21-1. I/O Lines Description
Pin Name Pin Description Type
NMI Non-Maskable Interrupt Input
EXTINTn External Interrupt Input
50442023G–SAM–03/2014
ATSAM4L8/L4/L2
Each external interrupt INTn can be configured to produce an interrupt on rising or falling edge,or high or low level. External interrupts are configured by the MODE, EDGE, and LEVEL regis-ters. Each interrupt has a bit INTn in each of these registers. Writing a zero to the INTn bit in theMODE register enables edge triggered interrupts, while writing a one to the bit enables level trig-gered interrupts.
If INTn is configured as an edge triggered interrupt, writing a zero to the INTn bit in the EDGEregister will cause the interrupt to be triggered on a falling edge on EXTINTn, while writing a oneto the bit will cause the interrupt to be triggered on a rising edge on EXTINTn.
If INTn is configured as a level triggered interrupt, writing a zero to the INTn bit in the LEVELregister will cause the interrupt to be triggered on a low level on EXTINTn, while writing a one tothe bit will cause the interrupt to be triggered on a high level on EXTINTn.
Each interrupt has a corresponding bit in each of the interrupt control and status registers. Writ-ing a one to the INTn bit in the Interrupt Enable Register (IER) enables the external interruptfrom pin EXTINTn to propagate from the EIC to the NVIC, while writing a one to INTn bit in theInterrupt Disable Register (IDR) disables this propagation. The Interrupt Mask Register (IMR)can be read to check which interrupts are enabled. When an interrupt triggers, the correspond-ing bit in the Interrupt Status Register (ISR) will be set. This bit remains set until a one is writtento the corresponding bit in the Interrupt Clear Register (ICR) or the interrupt is disabled.
Writing a one to the INTn bit in the Enable Register (EN) enables the external interrupt on pinEXTINTn, while writing a one to INTn bit in the Disable Register (DIS) disables the external inter-rupt. The Control Register (CTRL) can be read to check which interrupts are enabled. If a bit inthe CTRL register is set, but the corresponding bit in IMR is not set, an interrupt will not propa-gate to the NVIC. However, the corresponding bit in ISR will be set, and EIC_WAKE will be set.Note that an external interrupt should not be enabled before it has been configured correctly.
If the CTRL.INTn bit is zero, the corresponding bit in ISR will always be zero. Disabling an exter-nal interrupt by writing a one to the DIS.INTn bit will clear the corresponding bit in ISR.
Refer to the Module Configuration section for the number of external interrupts.
21.6.2 Synchronization and Filtering of External InterruptsIn synchronous mode the pin value of the EXTINTn pin is synchronized to CLK_SYNC, sospikes shorter than one CLK_SYNC cycle are not guaranteed to produce an interrupt. The syn-chronization of the EXTINTn to CLK_SYNC will delay the propagation of the interrupt to theNVIC by two cycles of CLK_SYNC, see Figure 21-2 and Figure 21-3 for examples (FILTER off).
It is also possible to apply a filter on EXTINTn by writing a one to the INTn bit in the FILTER reg-ister. This filter is a majority voter, if the condition for an interrupt is true for more than one of thelatest three cycles of CLK_SYNC the interrupt will be set. This will additionally delay the propa-gation of the interrupt to the NVIC by one or two cycles of CLK_SYNC, see Figure 21-2 andFigure 21-3 for examples (FILTER on).
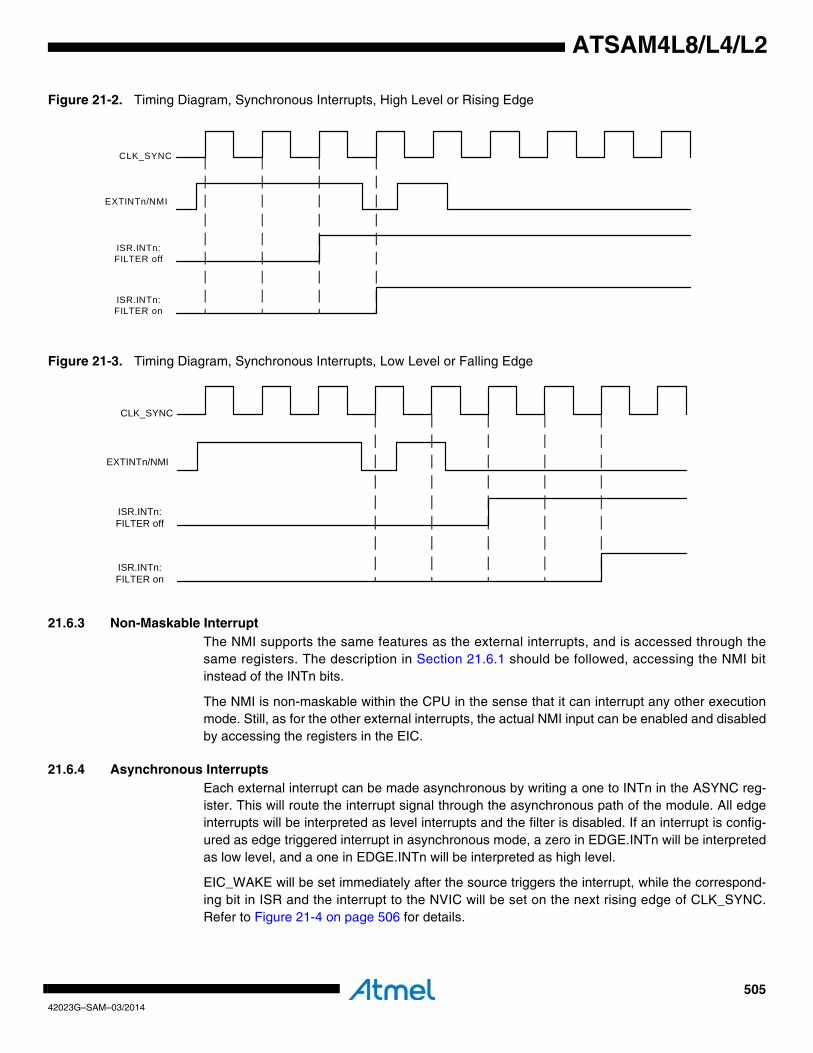
50542023G–SAM–03/2014
ATSAM4L8/L4/L2
Figure 21-2. Timing Diagram, Synchronous Interrupts, High Level or Rising Edge
Figure 21-3. Timing Diagram, Synchronous Interrupts, Low Level or Falling Edge
21.6.3 Non-Maskable InterruptThe NMI supports the same features as the external interrupts, and is accessed through thesame registers. The description in Section 21.6.1 should be followed, accessing the NMI bitinstead of the INTn bits.
The NMI is non-maskable within the CPU in the sense that it can interrupt any other executionmode. Still, as for the other external interrupts, the actual NMI input can be enabled and disabledby accessing the registers in the EIC.
21.6.4 Asynchronous InterruptsEach external interrupt can be made asynchronous by writing a one to INTn in the ASYNC reg-ister. This will route the interrupt signal through the asynchronous path of the module. All edgeinterrupts will be interpreted as level interrupts and the filter is disabled. If an interrupt is config-ured as edge triggered interrupt in asynchronous mode, a zero in EDGE.INTn will be interpretedas low level, and a one in EDGE.INTn will be interpreted as high level.
EIC_WAKE will be set immediately after the source triggers the interrupt, while the correspond-ing bit in ISR and the interrupt to the NVIC will be set on the next rising edge of CLK_SYNC.Refer to Figure 21-4 on page 506 for details.
EXTINTn/NMI
CLK_SYNC
ISR.INTn:FILTER off
ISR.INTn:FILTER on
EXTINTn/NMI
CLK_SYNC
ISR.INTn:FILTER off
ISR.INTn:FILTER on
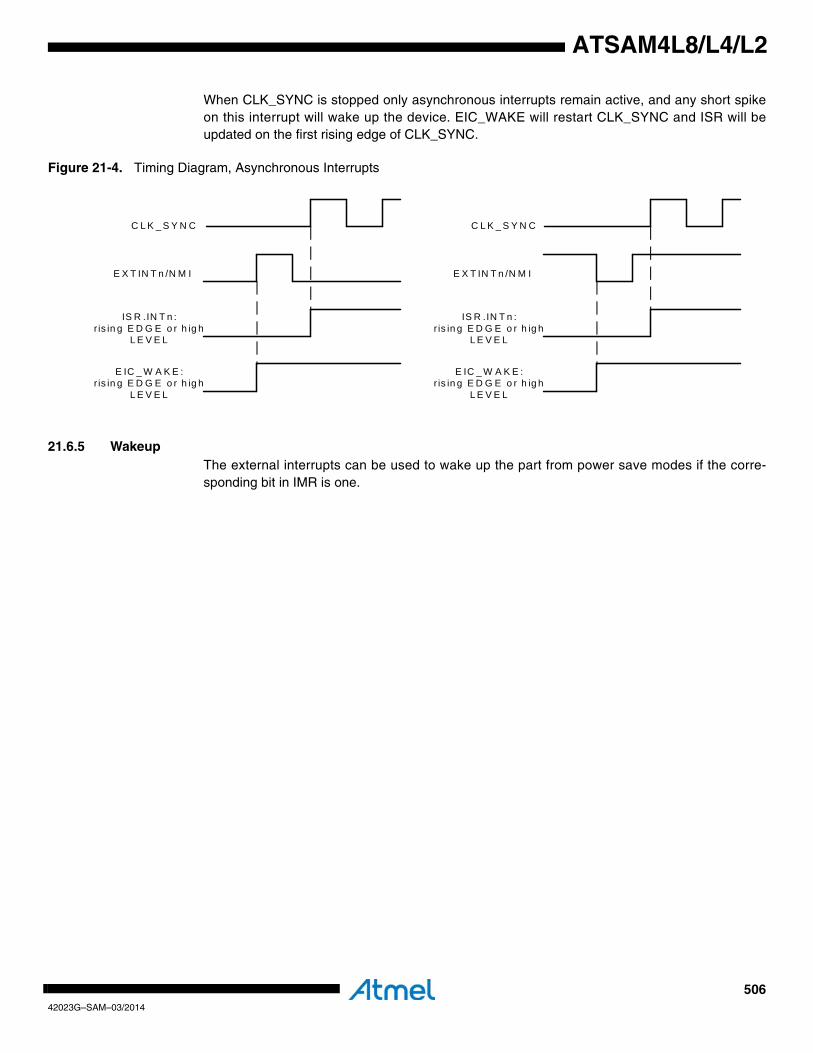
50642023G–SAM–03/2014
ATSAM4L8/L4/L2
When CLK_SYNC is stopped only asynchronous interrupts remain active, and any short spikeon this interrupt will wake up the device. EIC_WAKE will restart CLK_SYNC and ISR will beupdated on the first rising edge of CLK_SYNC.
Figure 21-4. Timing Diagram, Asynchronous Interrupts
21.6.5 WakeupThe external interrupts can be used to wake up the part from power save modes if the corre-sponding bit in IMR is one.
E X T IN T n /N M I
C L K _ S Y N C
IS R .IN T n :r is in g E D G E o r h ig h
L E V E L
E IC _ W A K E :r is in g E D G E o r h ig h
L E V E L
E X T IN T n /N M I
C L K _ S Y N C
IS R .IN T n :r is in g E D G E o r h ig h
L E V E L
E IC _ W A K E :r is in g E D G E o r h ig h
L E V E L
50742023G–SAM–03/2014
ATSAM4L8/L4/L2
21.7 User Interface
Note: 1. The reset value is device specific. Refer to the Module Configuration section at the end of this chapter.
Table 21-2. EIC Register Memory Map
Offset Register Register Name Access Reset
0x000 Interrupt Enable Register IER Write-only 0x00000000
0x004 Interrupt Disable Register IDR Write-only 0x00000000
0x008 Interrupt Mask Register IMR Read-only 0x00000000
0x00C Interrupt Status Register ISR Read-only 0x00000000
0x010 Interrupt Clear Register ICR Write-only 0x00000000
0x014 Mode Register MODE Read/Write 0x00000000
0x018 Edge Register EDGE Read/Write 0x00000000
0x01C Level Register LEVEL Read/Write 0x00000000
0x020 Filter Register FILTER Read/Write 0x00000000
0x024 Test Register TEST Read/Write 0x00000000
0x028 Asynchronous Register ASYNC Read/Write 0x00000000
0x030 Enable Register EN Write-only 0x00000000
0x034 Disable Register DIS Write-only 0x00000000
0x038 Control Register CTRL Read-only 0x00000000
0x3FC Version Register VERSION Read-only - (1)

50842023G–SAM–03/2014
ATSAM4L8/L4/L2
21.7.1 Interrupt Enable RegisterName: IER
Access Type: Write-only
Offset: 0x000
Reset Value: 0x00000000
• INTn: External Interrupt nWriting a zero to this bit has no effect.
Writing a one to this bit will set the corresponding bit in IMR.
Refer to the Module Configuration section for the number of external interrupts.• NMI: Non-Maskable Interrupt
Writing a zero to this bit has no effect.Wrting a one to this bit will set the corresponding bit in IMR.
31 30 29 28 27 26 25 24
- INT30 INT29 INT28 INT27 INT26 INT25 INT24
23 22 21 20 19 18 17 16
INT23 INT22 INT21 INT20 INT19 INT18 INT17 INT16
15 14 13 12 11 10 9 8
INT15 INT14 INT13 INT12 INT11 INT10 INT9 INT8
7 6 5 4 3 2 1 0
INT7 INT6 INT5 INT4 INT3 INT2 INT1 NMI
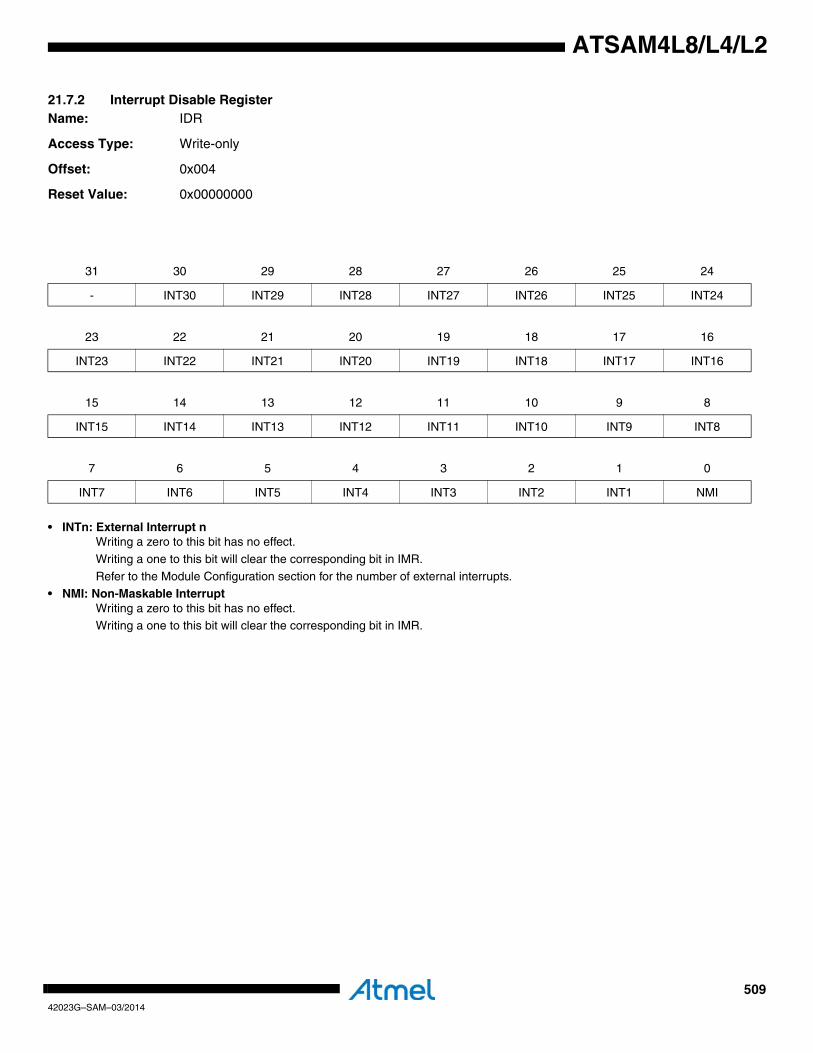
50942023G–SAM–03/2014
ATSAM4L8/L4/L2
21.7.2 Interrupt Disable RegisterName: IDR
Access Type: Write-only
Offset: 0x004
Reset Value: 0x00000000
• INTn: External Interrupt nWriting a zero to this bit has no effect.
Writing a one to this bit will clear the corresponding bit in IMR.
Refer to the Module Configuration section for the number of external interrupts.• NMI: Non-Maskable Interrupt
Writing a zero to this bit has no effect.Writing a one to this bit will clear the corresponding bit in IMR.
31 30 29 28 27 26 25 24
- INT30 INT29 INT28 INT27 INT26 INT25 INT24
23 22 21 20 19 18 17 16
INT23 INT22 INT21 INT20 INT19 INT18 INT17 INT16
15 14 13 12 11 10 9 8
INT15 INT14 INT13 INT12 INT11 INT10 INT9 INT8
7 6 5 4 3 2 1 0
INT7 INT6 INT5 INT4 INT3 INT2 INT1 NMI
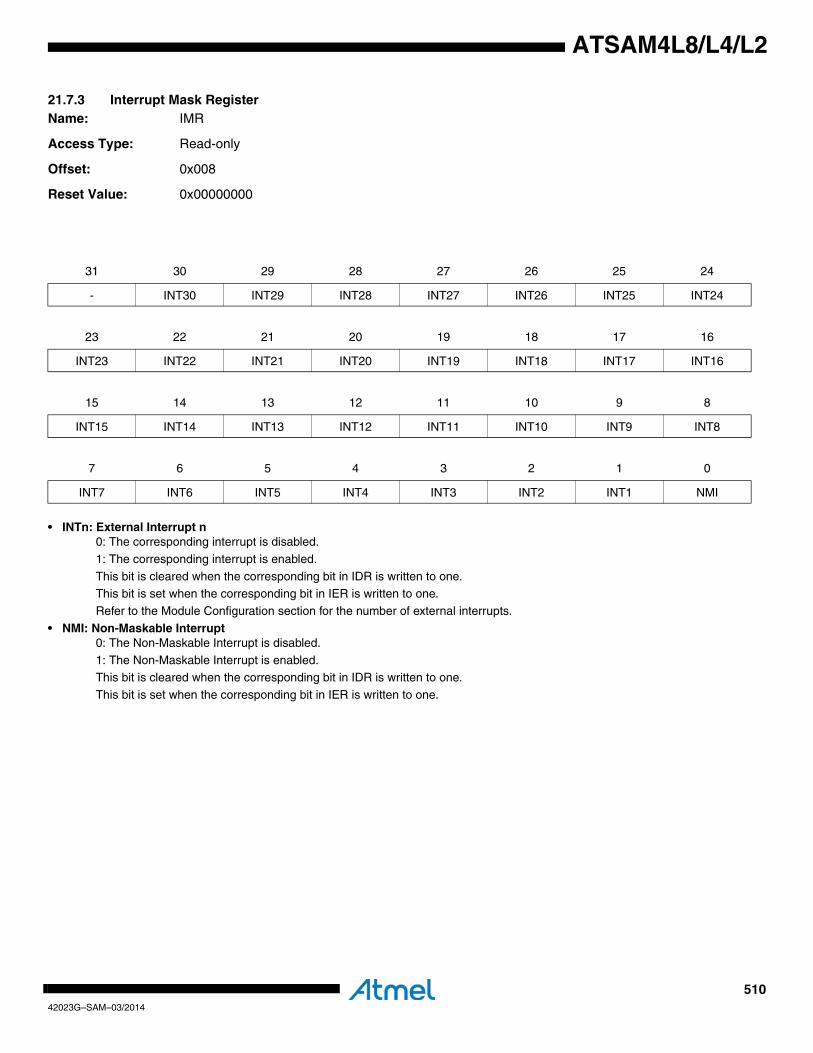
51042023G–SAM–03/2014
ATSAM4L8/L4/L2
21.7.3 Interrupt Mask RegisterName: IMR
Access Type: Read-only
Offset: 0x008
Reset Value: 0x00000000
• INTn: External Interrupt n0: The corresponding interrupt is disabled.
1: The corresponding interrupt is enabled.
This bit is cleared when the corresponding bit in IDR is written to one.This bit is set when the corresponding bit in IER is written to one.
Refer to the Module Configuration section for the number of external interrupts.
• NMI: Non-Maskable Interrupt0: The Non-Maskable Interrupt is disabled.
1: The Non-Maskable Interrupt is enabled.This bit is cleared when the corresponding bit in IDR is written to one.
This bit is set when the corresponding bit in IER is written to one.
31 30 29 28 27 26 25 24
- INT30 INT29 INT28 INT27 INT26 INT25 INT24
23 22 21 20 19 18 17 16
INT23 INT22 INT21 INT20 INT19 INT18 INT17 INT16
15 14 13 12 11 10 9 8
INT15 INT14 INT13 INT12 INT11 INT10 INT9 INT8
7 6 5 4 3 2 1 0
INT7 INT6 INT5 INT4 INT3 INT2 INT1 NMI
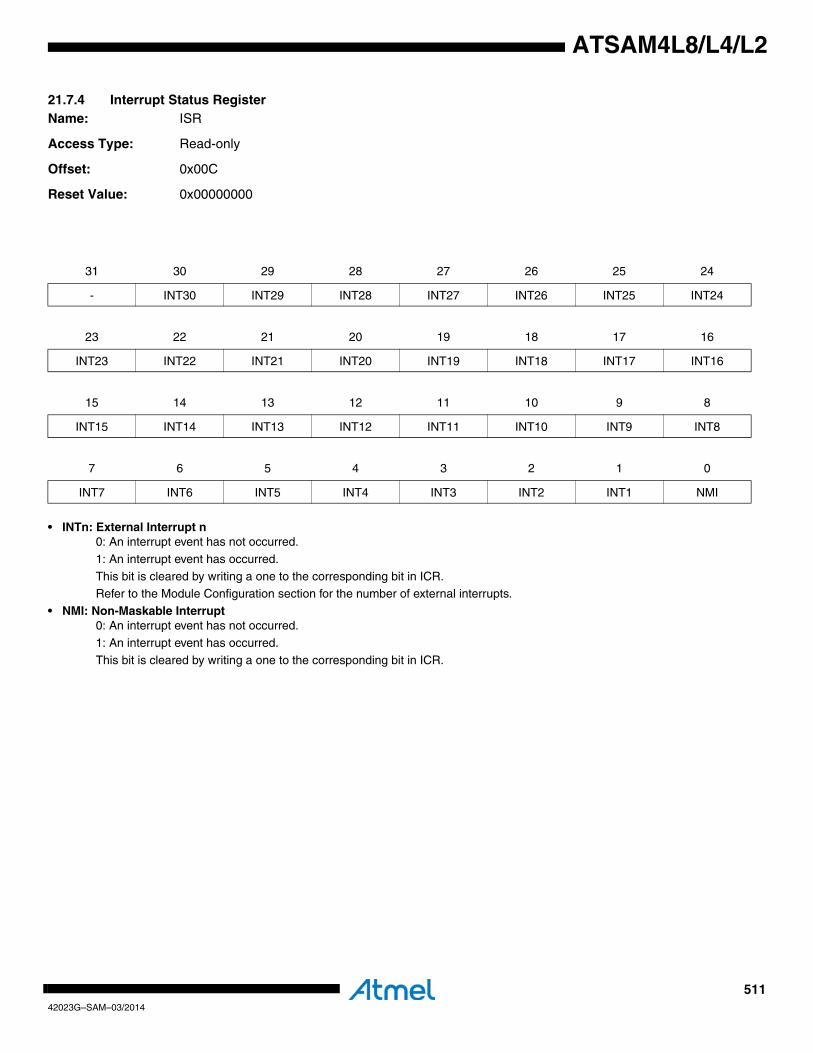
51142023G–SAM–03/2014
ATSAM4L8/L4/L2
21.7.4 Interrupt Status RegisterName: ISR
Access Type: Read-only
Offset: 0x00C
Reset Value: 0x00000000
• INTn: External Interrupt n0: An interrupt event has not occurred.
1: An interrupt event has occurred.
This bit is cleared by writing a one to the corresponding bit in ICR.Refer to the Module Configuration section for the number of external interrupts.
• NMI: Non-Maskable Interrupt0: An interrupt event has not occurred.
1: An interrupt event has occurred.
This bit is cleared by writing a one to the corresponding bit in ICR.
31 30 29 28 27 26 25 24
- INT30 INT29 INT28 INT27 INT26 INT25 INT24
23 22 21 20 19 18 17 16
INT23 INT22 INT21 INT20 INT19 INT18 INT17 INT16
15 14 13 12 11 10 9 8
INT15 INT14 INT13 INT12 INT11 INT10 INT9 INT8
7 6 5 4 3 2 1 0
INT7 INT6 INT5 INT4 INT3 INT2 INT1 NMI
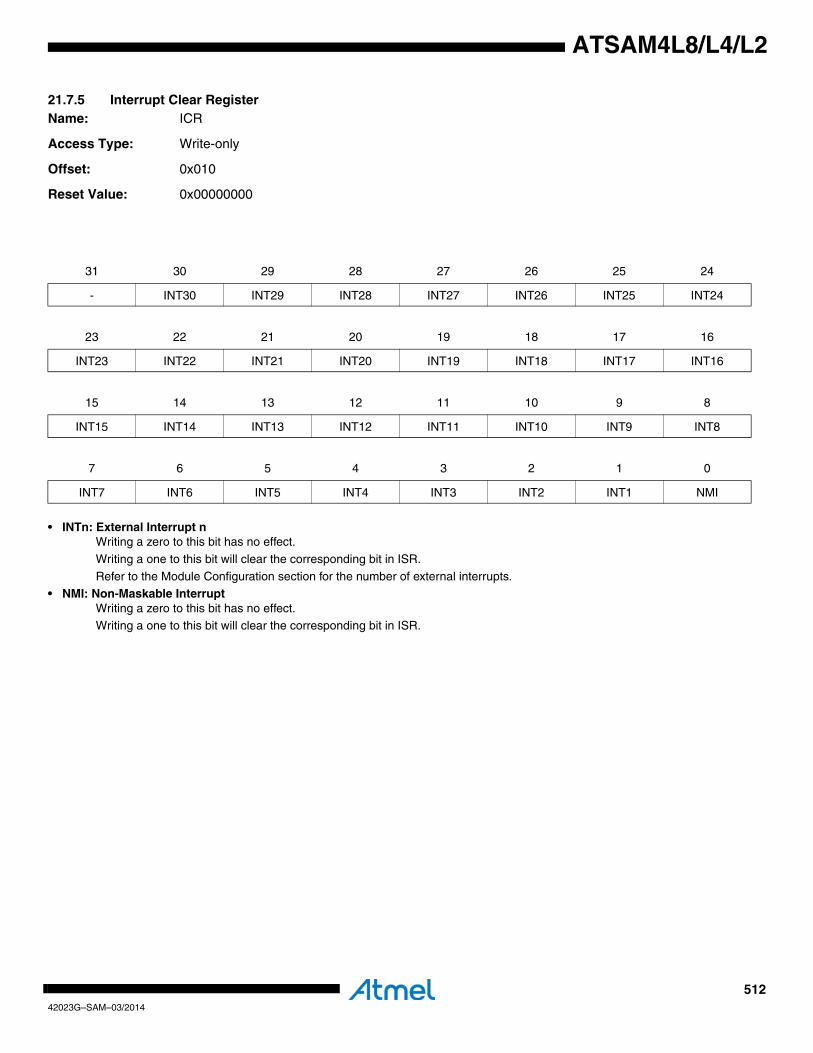
51242023G–SAM–03/2014
ATSAM4L8/L4/L2
21.7.5 Interrupt Clear RegisterName: ICR
Access Type: Write-only
Offset: 0x010
Reset Value: 0x00000000
• INTn: External Interrupt nWriting a zero to this bit has no effect.
Writing a one to this bit will clear the corresponding bit in ISR.
Refer to the Module Configuration section for the number of external interrupts.• NMI: Non-Maskable Interrupt
Writing a zero to this bit has no effect.Writing a one to this bit will clear the corresponding bit in ISR.
31 30 29 28 27 26 25 24
- INT30 INT29 INT28 INT27 INT26 INT25 INT24
23 22 21 20 19 18 17 16
INT23 INT22 INT21 INT20 INT19 INT18 INT17 INT16
15 14 13 12 11 10 9 8
INT15 INT14 INT13 INT12 INT11 INT10 INT9 INT8
7 6 5 4 3 2 1 0
INT7 INT6 INT5 INT4 INT3 INT2 INT1 NMI

51342023G–SAM–03/2014
ATSAM4L8/L4/L2
21.7.6 Mode RegisterName: MODE
Access Type: Read/Write
Offset: 0x014
Reset Value: 0x00000000
• INTn: External Interrupt n0: The external interrupt is edge triggered.
1: The external interrupt is level triggered.
Refer to the Module Configuration section for the number of external interrupts.• NMI: Non-Maskable Interrupt
0: The Non-Maskable Interrupt is edge triggered.1: The Non-Maskable Interrupt is level triggered.
31 30 29 28 27 26 25 24
- INT30 INT29 INT28 INT27 INT26 INT25 INT24
23 22 21 20 19 18 17 16
INT23 INT22 INT21 INT20 INT19 INT18 INT17 INT16
15 14 13 12 11 10 9 8
INT15 INT14 INT13 INT12 INT11 INT10 INT9 INT8
7 6 5 4 3 2 1 0
INT7 INT6 INT5 INT4 INT3 INT2 INT1 NMI
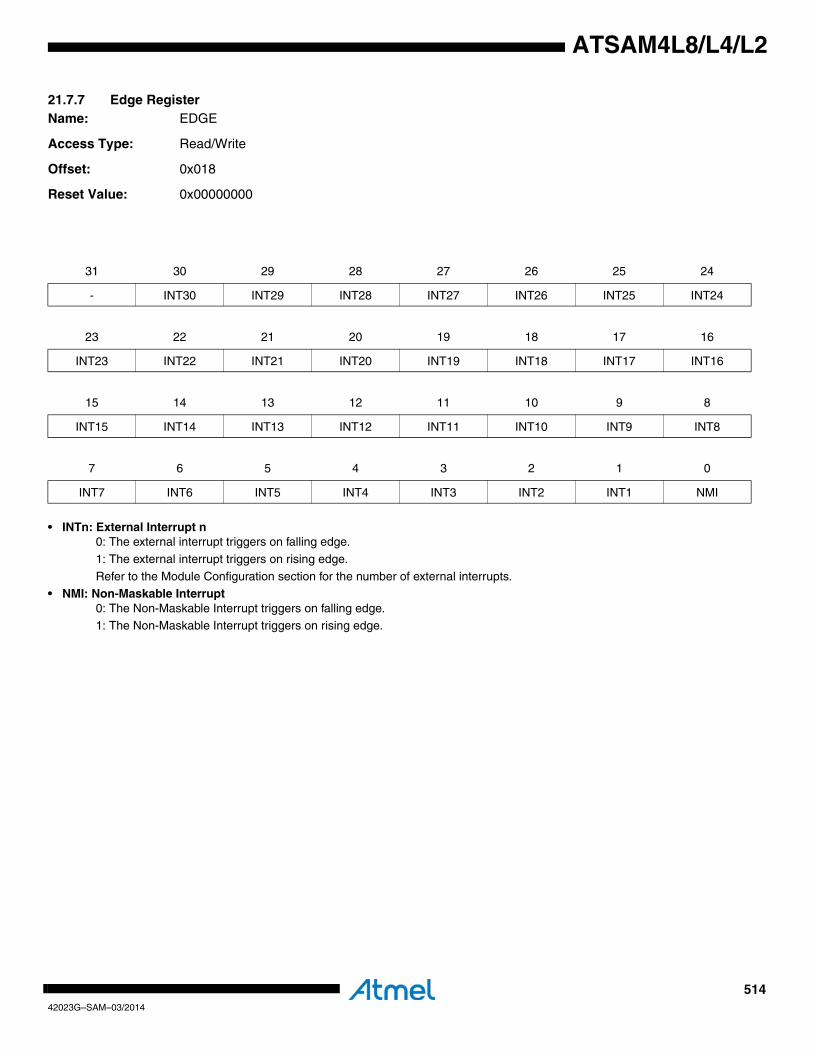
51442023G–SAM–03/2014
ATSAM4L8/L4/L2
21.7.7 Edge RegisterName: EDGE
Access Type: Read/Write
Offset: 0x018
Reset Value: 0x00000000
• INTn: External Interrupt n0: The external interrupt triggers on falling edge.
1: The external interrupt triggers on rising edge.
Refer to the Module Configuration section for the number of external interrupts.• NMI: Non-Maskable Interrupt
0: The Non-Maskable Interrupt triggers on falling edge.1: The Non-Maskable Interrupt triggers on rising edge.
31 30 29 28 27 26 25 24
- INT30 INT29 INT28 INT27 INT26 INT25 INT24
23 22 21 20 19 18 17 16
INT23 INT22 INT21 INT20 INT19 INT18 INT17 INT16
15 14 13 12 11 10 9 8
INT15 INT14 INT13 INT12 INT11 INT10 INT9 INT8
7 6 5 4 3 2 1 0
INT7 INT6 INT5 INT4 INT3 INT2 INT1 NMI

51542023G–SAM–03/2014
ATSAM4L8/L4/L2
21.7.8 Level RegisterName: LEVEL
Access Type: Read/Write
Offset: 0x01C
Reset Value: 0x00000000
• INTn: External Interrupt n0: The external interrupt triggers on low level.
1: The external interrupt triggers on high level.
Refer to the Module Configuration section for the number of external interrupts.• NMI: Non-Maskable Interrupt
0: The Non-Maskable Interrupt triggers on low level.1: The Non-Maskable Interrupt triggers on high level.
31 30 29 28 27 26 25 24
- INT30 INT29 INT28 INT27 INT26 INT25 INT24
23 22 21 20 19 18 17 16
INT23 INT22 INT21 INT20 INT19 INT18 INT17 INT16
15 14 13 12 11 10 9 8
INT15 INT14 INT13 INT12 INT11 INT10 INT9 INT8
7 6 5 4 3 2 1 0
INT7 INT6 INT5 INT4 INT3 INT2 INT1 NMI
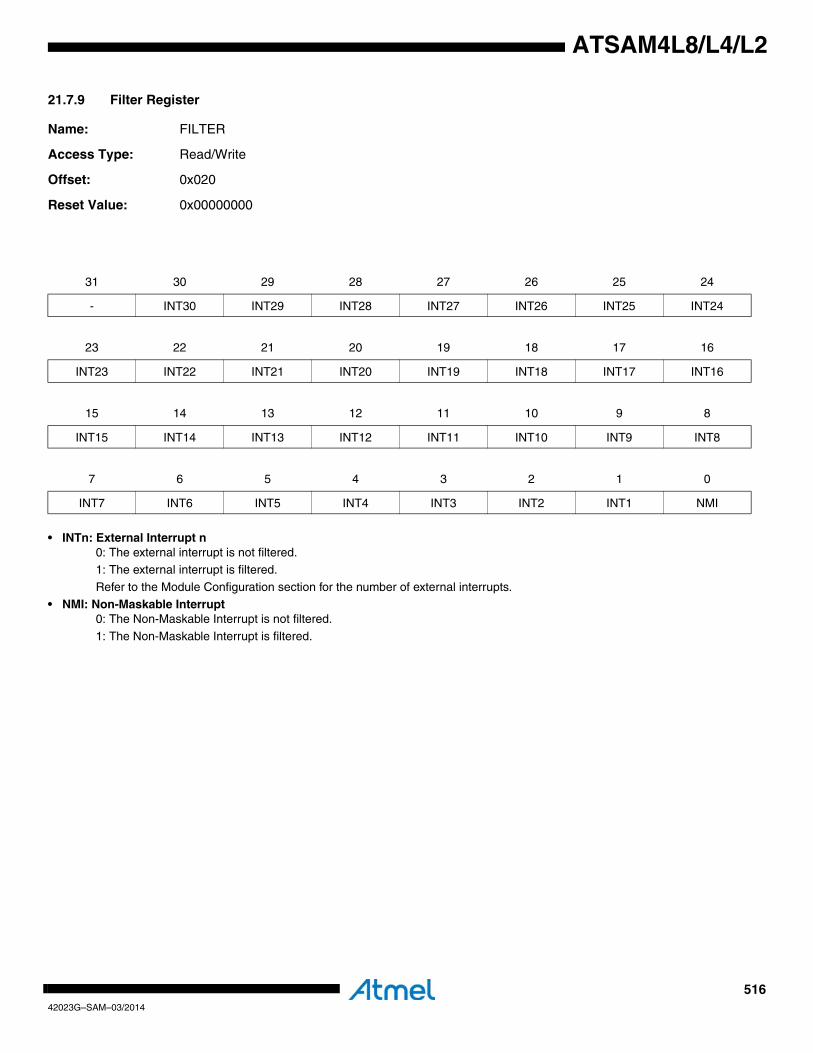
51642023G–SAM–03/2014
ATSAM4L8/L4/L2
21.7.9 Filter Register
Name: FILTER
Access Type: Read/Write
Offset: 0x020
Reset Value: 0x00000000
• INTn: External Interrupt n0: The external interrupt is not filtered.1: The external interrupt is filtered.
Refer to the Module Configuration section for the number of external interrupts.
• NMI: Non-Maskable Interrupt0: The Non-Maskable Interrupt is not filtered.
1: The Non-Maskable Interrupt is filtered.
31 30 29 28 27 26 25 24
- INT30 INT29 INT28 INT27 INT26 INT25 INT24
23 22 21 20 19 18 17 16
INT23 INT22 INT21 INT20 INT19 INT18 INT17 INT16
15 14 13 12 11 10 9 8
INT15 INT14 INT13 INT12 INT11 INT10 INT9 INT8
7 6 5 4 3 2 1 0
INT7 INT6 INT5 INT4 INT3 INT2 INT1 NMI
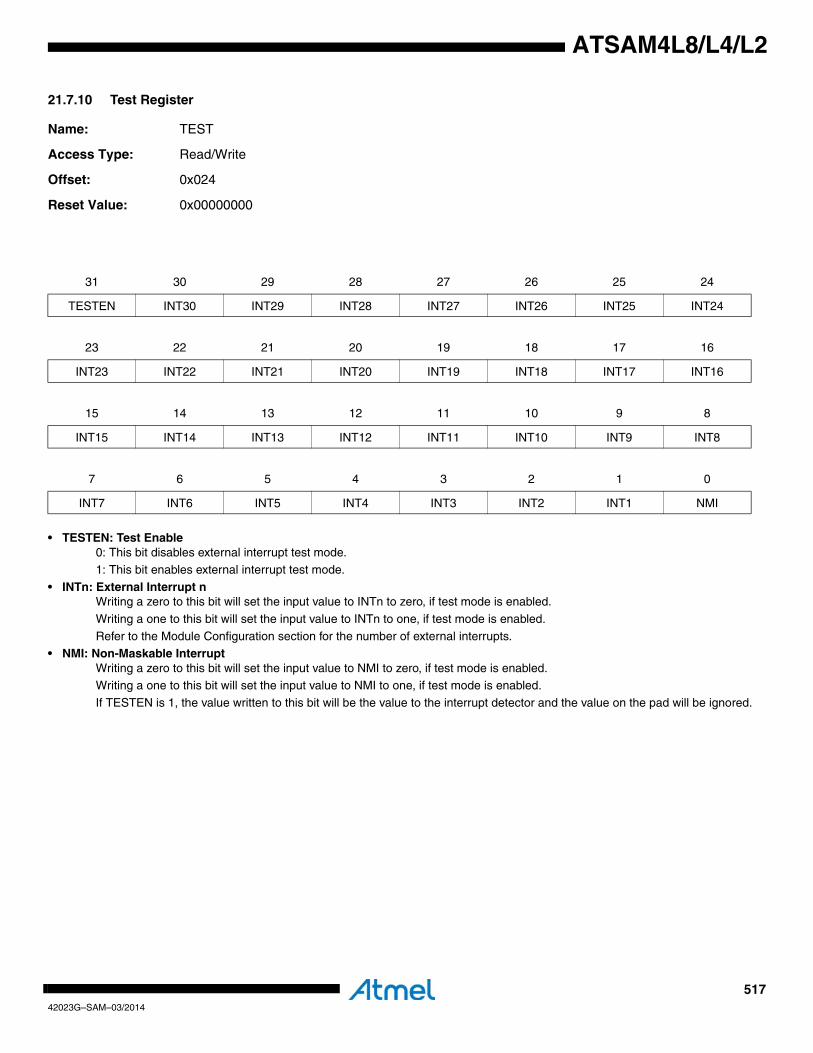
51742023G–SAM–03/2014
ATSAM4L8/L4/L2
21.7.10 Test Register
Name: TEST
Access Type: Read/Write
Offset: 0x024
Reset Value: 0x00000000
• TESTEN: Test Enable0: This bit disables external interrupt test mode.1: This bit enables external interrupt test mode.
• INTn: External Interrupt nWriting a zero to this bit will set the input value to INTn to zero, if test mode is enabled.
Writing a one to this bit will set the input value to INTn to one, if test mode is enabled.
Refer to the Module Configuration section for the number of external interrupts.• NMI: Non-Maskable Interrupt
Writing a zero to this bit will set the input value to NMI to zero, if test mode is enabled.Writing a one to this bit will set the input value to NMI to one, if test mode is enabled.
If TESTEN is 1, the value written to this bit will be the value to the interrupt detector and the value on the pad will be ignored.
31 30 29 28 27 26 25 24
TESTEN INT30 INT29 INT28 INT27 INT26 INT25 INT24
23 22 21 20 19 18 17 16
INT23 INT22 INT21 INT20 INT19 INT18 INT17 INT16
15 14 13 12 11 10 9 8
INT15 INT14 INT13 INT12 INT11 INT10 INT9 INT8
7 6 5 4 3 2 1 0
INT7 INT6 INT5 INT4 INT3 INT2 INT1 NMI
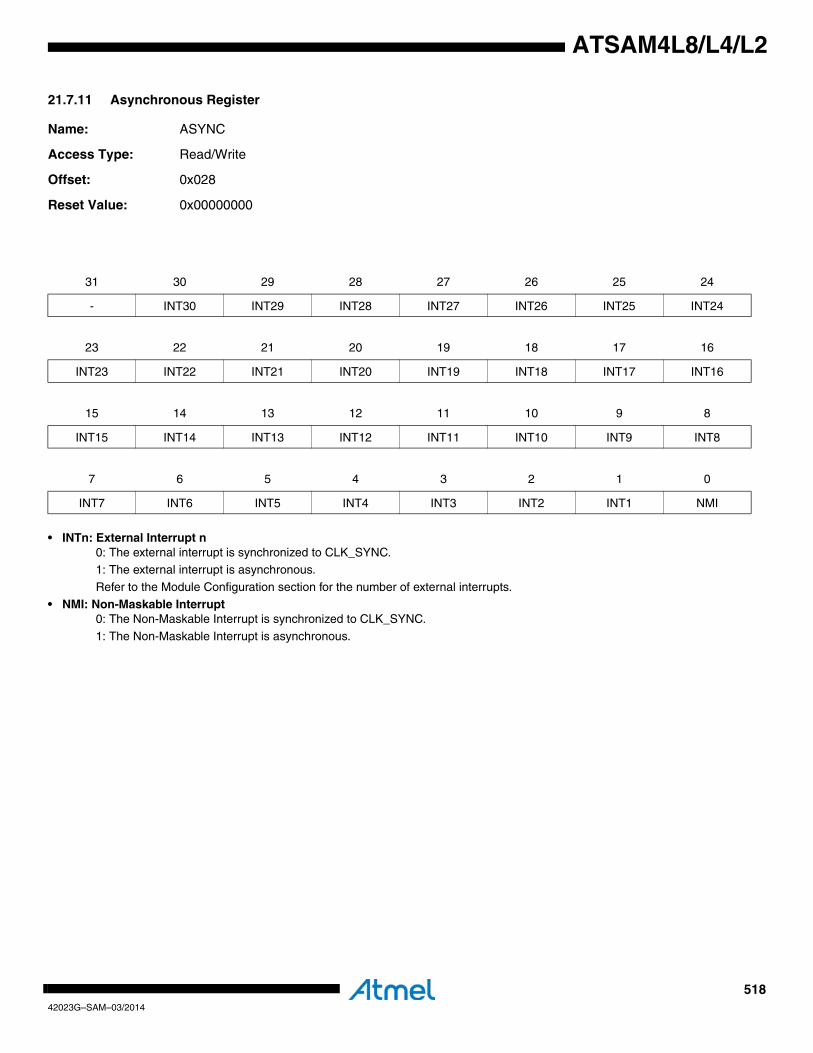
51842023G–SAM–03/2014
ATSAM4L8/L4/L2
21.7.11 Asynchronous Register
Name: ASYNC
Access Type: Read/Write
Offset: 0x028
Reset Value: 0x00000000
• INTn: External Interrupt n0: The external interrupt is synchronized to CLK_SYNC.1: The external interrupt is asynchronous.
Refer to the Module Configuration section for the number of external interrupts.
• NMI: Non-Maskable Interrupt0: The Non-Maskable Interrupt is synchronized to CLK_SYNC.
1: The Non-Maskable Interrupt is asynchronous.
31 30 29 28 27 26 25 24
- INT30 INT29 INT28 INT27 INT26 INT25 INT24
23 22 21 20 19 18 17 16
INT23 INT22 INT21 INT20 INT19 INT18 INT17 INT16
15 14 13 12 11 10 9 8
INT15 INT14 INT13 INT12 INT11 INT10 INT9 INT8
7 6 5 4 3 2 1 0
INT7 INT6 INT5 INT4 INT3 INT2 INT1 NMI
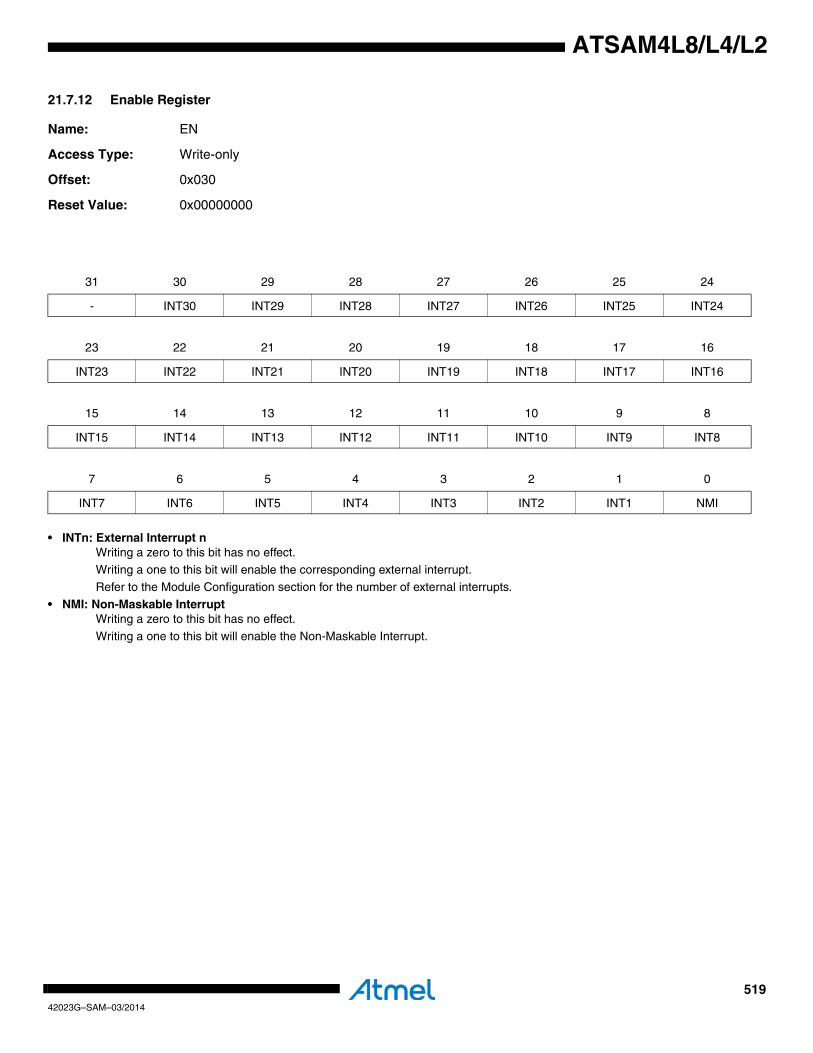
51942023G–SAM–03/2014
ATSAM4L8/L4/L2
21.7.12 Enable Register
Name: EN
Access Type: Write-only
Offset: 0x030
Reset Value: 0x00000000
• INTn: External Interrupt nWriting a zero to this bit has no effect.Writing a one to this bit will enable the corresponding external interrupt.
Refer to the Module Configuration section for the number of external interrupts.
• NMI: Non-Maskable InterruptWriting a zero to this bit has no effect.
Writing a one to this bit will enable the Non-Maskable Interrupt.
31 30 29 28 27 26 25 24
- INT30 INT29 INT28 INT27 INT26 INT25 INT24
23 22 21 20 19 18 17 16
INT23 INT22 INT21 INT20 INT19 INT18 INT17 INT16
15 14 13 12 11 10 9 8
INT15 INT14 INT13 INT12 INT11 INT10 INT9 INT8
7 6 5 4 3 2 1 0
INT7 INT6 INT5 INT4 INT3 INT2 INT1 NMI

52042023G–SAM–03/2014
ATSAM4L8/L4/L2
21.7.13 Disable Register
Name: DIS
Access Type: Write-only
Offset: 0x034
Reset Value: 0x00000000
• INTn: External Interrupt nWriting a zero to this bit has no effect.Writing a one to this bit will disable the corresponding external interrupt.
Refer to the Module Configuration section for the number of external interrupts.
• NMI: Non-Maskable InterruptWriting a zero to this bit has no effect.
Writing a one to this bit will disable the Non-Maskable Interrupt.
31 30 29 28 27 26 25 24
- INT30 INT29 INT28 INT27 INT26 INT25 INT24
23 22 21 20 19 18 17 16
INT23 INT22 INT21 INT20 INT19 INT18 INT17 INT16
15 14 13 12 11 10 9 8
INT15 INT14 INT13 INT12 INT11 INT10 INT9 INT8
7 6 5 4 3 2 1 0
INT7 INT6 INT5 INT4 INT3 INT2 INT1 NMI
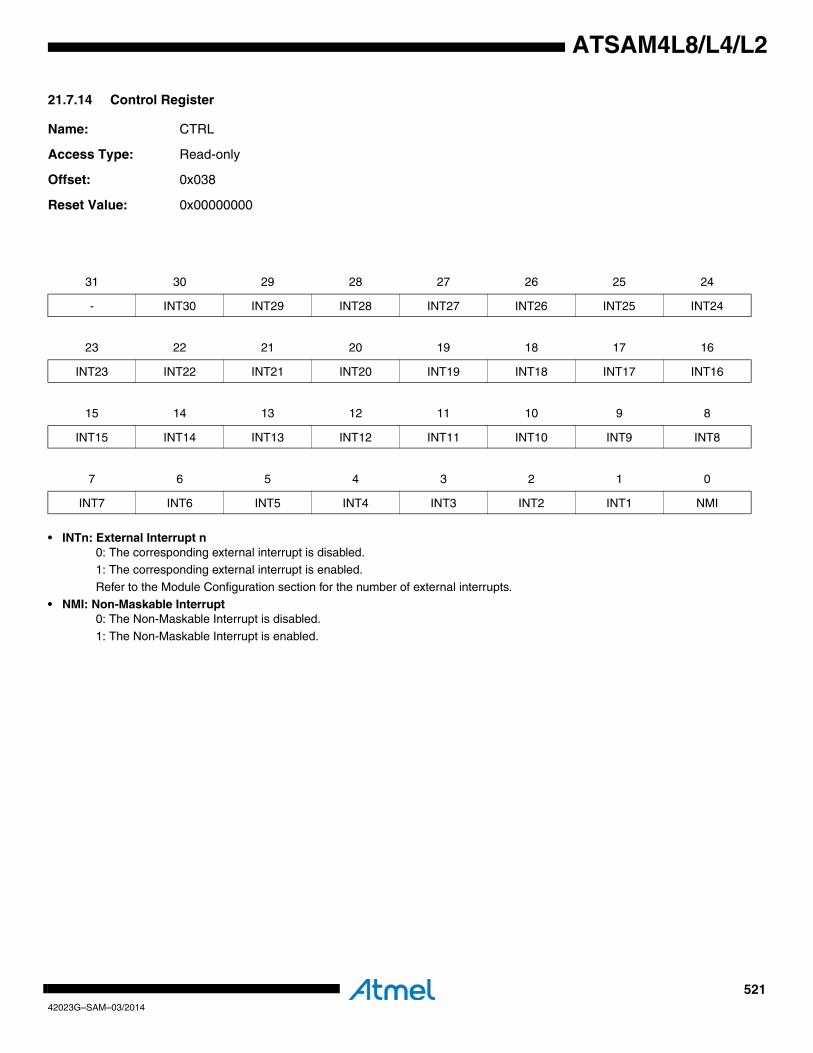
52142023G–SAM–03/2014
ATSAM4L8/L4/L2
21.7.14 Control Register
Name: CTRL
Access Type: Read-only
Offset: 0x038
Reset Value: 0x00000000
• INTn: External Interrupt n0: The corresponding external interrupt is disabled.1: The corresponding external interrupt is enabled.
Refer to the Module Configuration section for the number of external interrupts.
• NMI: Non-Maskable Interrupt0: The Non-Maskable Interrupt is disabled.
1: The Non-Maskable Interrupt is enabled.
31 30 29 28 27 26 25 24
- INT30 INT29 INT28 INT27 INT26 INT25 INT24
23 22 21 20 19 18 17 16
INT23 INT22 INT21 INT20 INT19 INT18 INT17 INT16
15 14 13 12 11 10 9 8
INT15 INT14 INT13 INT12 INT11 INT10 INT9 INT8
7 6 5 4 3 2 1 0
INT7 INT6 INT5 INT4 INT3 INT2 INT1 NMI
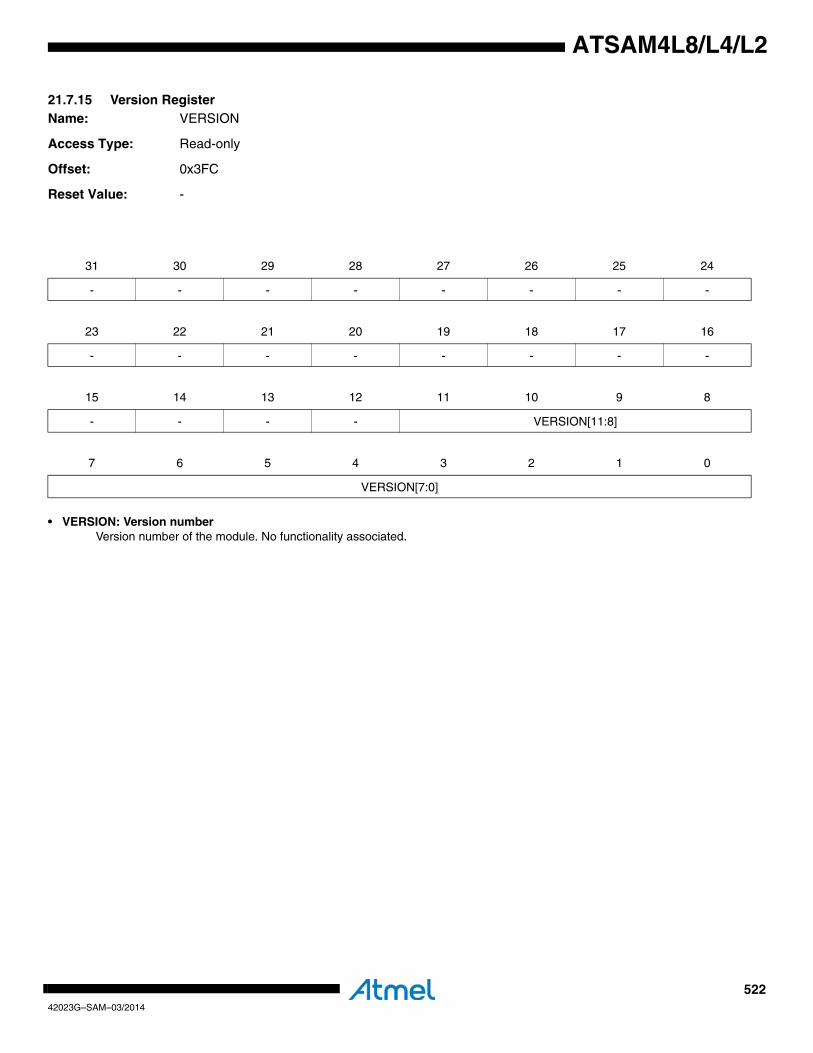
52242023G–SAM–03/2014
ATSAM4L8/L4/L2
21.7.15 Version RegisterName: VERSION
Access Type: Read-only
Offset: 0x3FC
Reset Value: -
• VERSION: Version numberVersion number of the module. No functionality associated.
31 30 29 28 27 26 25 24
- - - - - - - -
23 22 21 20 19 18 17 16
- - - - - - - -
15 14 13 12 11 10 9 8
- - - - VERSION[11:8]
7 6 5 4 3 2 1 0
VERSION[7:0]
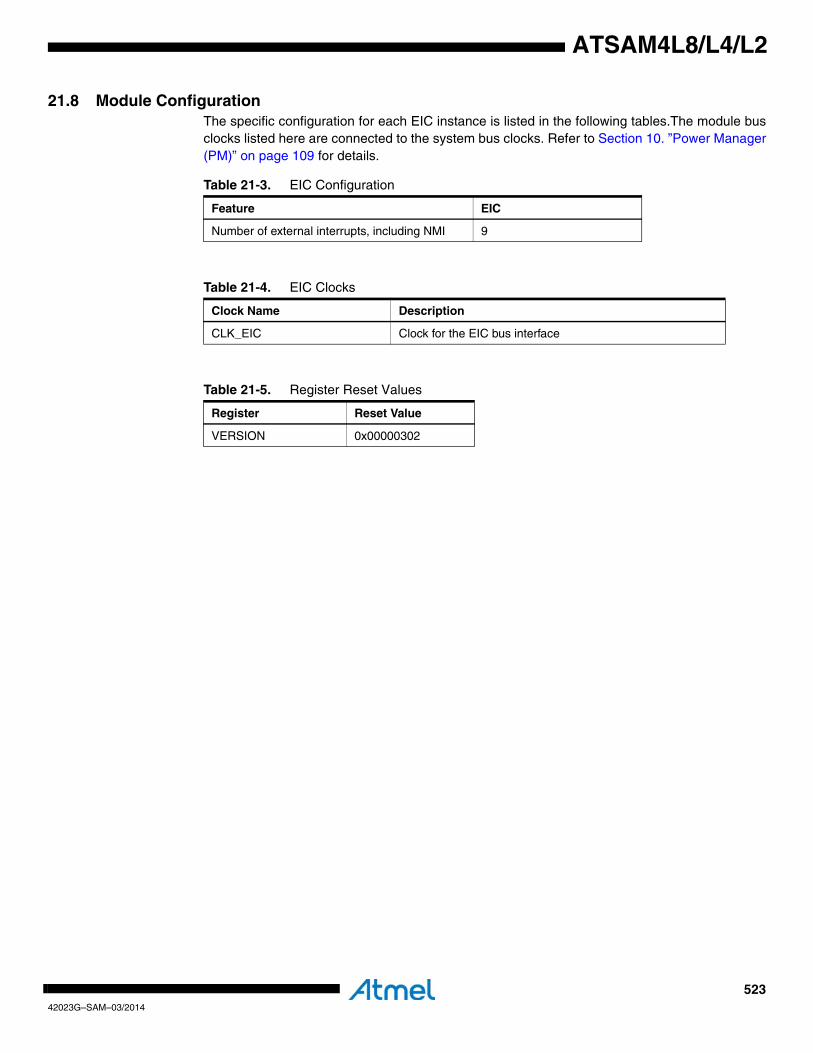
52342023G–SAM–03/2014
ATSAM4L8/L4/L2
21.8 Module ConfigurationThe specific configuration for each EIC instance is listed in the following tables.The module busclocks listed here are connected to the system bus clocks. Refer to Section 10. ”Power Manager(PM)” on page 109 for details.
Table 21-3. EIC Configuration
Feature EIC
Number of external interrupts, including NMI 9
Table 21-4. EIC Clocks
Clock Name Description
CLK_EIC Clock for the EIC bus interface
Table 21-5. Register Reset Values
Register Reset Value
VERSION 0x00000302
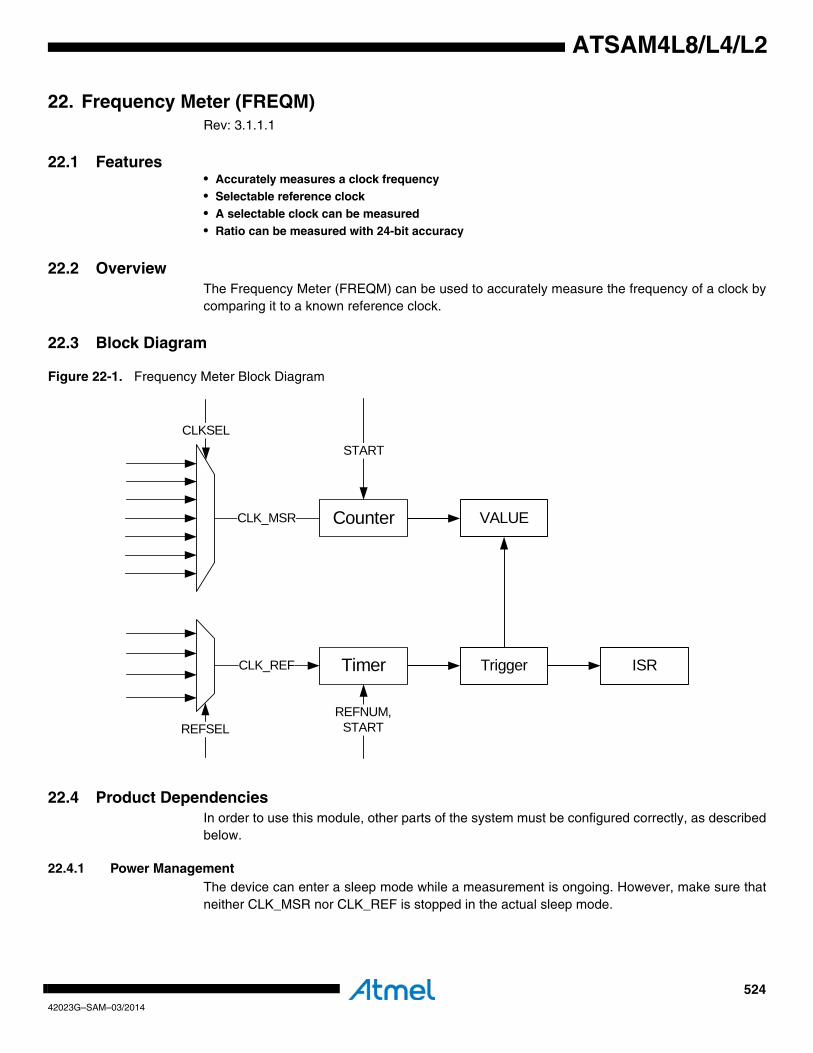
52442023G–SAM–03/2014
ATSAM4L8/L4/L2
22. Frequency Meter (FREQM)Rev: 3.1.1.1
22.1 Features• Accurately measures a clock frequency• Selectable reference clock• A selectable clock can be measured• Ratio can be measured with 24-bit accuracy
22.2 OverviewThe Frequency Meter (FREQM) can be used to accurately measure the frequency of a clock bycomparing it to a known reference clock.
22.3 Block Diagram
Figure 22-1. Frequency Meter Block Diagram
22.4 Product DependenciesIn order to use this module, other parts of the system must be configured correctly, as describedbelow.
22.4.1 Power ManagementThe device can enter a sleep mode while a measurement is ongoing. However, make sure thatneither CLK_MSR nor CLK_REF is stopped in the actual sleep mode.
Counter
CLK_REF
CLK_MSR
REFSELREFNUM,
START
CLKSELSTART
VALUE
Timer Trigger ISR
52542023G–SAM–03/2014
ATSAM4L8/L4/L2
FREQM interrupts can wake up the device from sleep modes when the measurement is done,but only from sleep modes where CLK_FREQM is running. Refer to Section 10. ”Power Man-ager (PM)” on page 109 for details.
22.4.2 ClocksThe clock for the FREQM bus interface (CLK_FREQM) is generated by the Power Manager. It isrecommended to disable the FREQM before disabling the clock, to avoid freezing the FREQM iaan undefined state.
A set of clocks can be selected as reference (CLK_REF) and another set of clocks can beselected for measurement (CLK_MSR). Refer to the CLKSEL and REFSEL tables in the ModuleConfiguration section for details.
22.4.3 Debug OperationWhen an external debugger forces the CPU into debug mode, the FREQM continues normaloperation. If the FREQM is configured in a way that requires it to be periodically serviced by theCPU through interrupts or similar, improper operation or data loss may result during debugging.
22.4.4 InterruptsThe FREQM interrupt request line is connected to the internal source of the NVIC. Using theFREQM interrupt requires the NVIC to be programmed first.
22.5 Functional DescriptionThe FREQM accuratly measures the frequency of a clock by comparing the frequency to aknown frequency:
fCLK_MSR = (VALUE/REFNUM)*fCLK_REF
22.5.1 Reference ClockThe Reference Clock Selection (REFSEL) field in the Mode Register (MODE) selects the clocksource for CLK_REF. The reference clock is enabled by writing a one to the Reference ClockEnable (REFCEN) bit in the Mode Register. This clock should have a known frequency.
CLK_REF needs to be disabled before switching to another clock. The RCLKBUSY bit in theStatus Register (SR) indicates whether the clock is busy or not. This bit is set when theMODE.REFCEN bit is written.
To change CLK_REF:
• Write a zero to the MODE.REFCEN bit to disable the clock, without changing the other bits/fields in the Mode Register.
• Wait until the SR.RCLKBUSY bit reads as zero.
• Change the MODE.REFSEL field.
• Write a one to the MODE.REFCEN bit to enable the clock, without changing the other bits/fields in the Mode Register.
• Wait until the SR.RCLKBUSY bit reads as zero.
To enable CLK_REF:
• Write the correct value to the MODE.REFSEL field.
• Write a one to the MODE.REFCEN to enable the clock, without changing the other bits/fields in the Mode Register.
52642023G–SAM–03/2014
ATSAM4L8/L4/L2
• Wait until the SR.RCLKBUSY bit reads as zero.
To disable CLK_REF:
• Write a zero to the MODE.REFCEN to disable he clock, without changing the other bits/fields in the Mode register.
• Wait until the SR.RCLKBUSY bit reads as zero.
22.5.1.1 Cautionary NoteNote that if clock selected as source for CLK_REF is stopped during a measurement, this willnot be detected by the FREQM. The BUSY bit in the STATUS register will never be cleared, andthe DONE interrupt will never be triggered. If the clock selected as soruce for CLK_REF isstopped, it will not be possible to change the source for the reference clock as long as theselected source is not running.
22.5.2 MeasurementIn the Mode Register the Clock Source Selection (CLKSEL) field selects CLK_MSR and theNumber of Reference Clock Cycles (REFNUM) field selects the duration of the measurement.The duration is given in number of CLK_REF periodes.
Writing a one to the START bit in the Control Register (CTRL) starts the measurement. TheBUSY bit in SR is cleared when the measurement is done.
The result of the measurement can be read from the Value Register (VALUE). The frequency ofthe measured clock CLK_MSR is then:
fCLK_MSR = (VALUE/REFNUM)*fCLK_REF
22.5.3 InterruptsThe FREQM has two interrupt sources:
• DONE: A frequency measurement is done
• RCLKRDY: The reference clock is ready
These will generate an interrupt request if the corresponding bit in the Interrupt Mask Register(IMR) is set. The interrupt sources are ORed together to form one interrupt request. The FREQMwill generate an interrupt request if at least one of the bits in the Interrupt Mask Register (IMR) isset. Bits in IMR are set by writing a one to the corresponding bit in the Interrupt Enable Register(IER) and cleared by writing a one to this bit in the Interrupt Disable Register (IDR). The interruptrequest remains active until the corresponding bit in the Interrupt Status Register (ISR) iscleared by writing a one to this bit in the Interrupt Clear Register (ICR). Because all the interruptsources are ORed together, the interrupt request from the FREQM will remain active until all thebits in ISR are cleared.
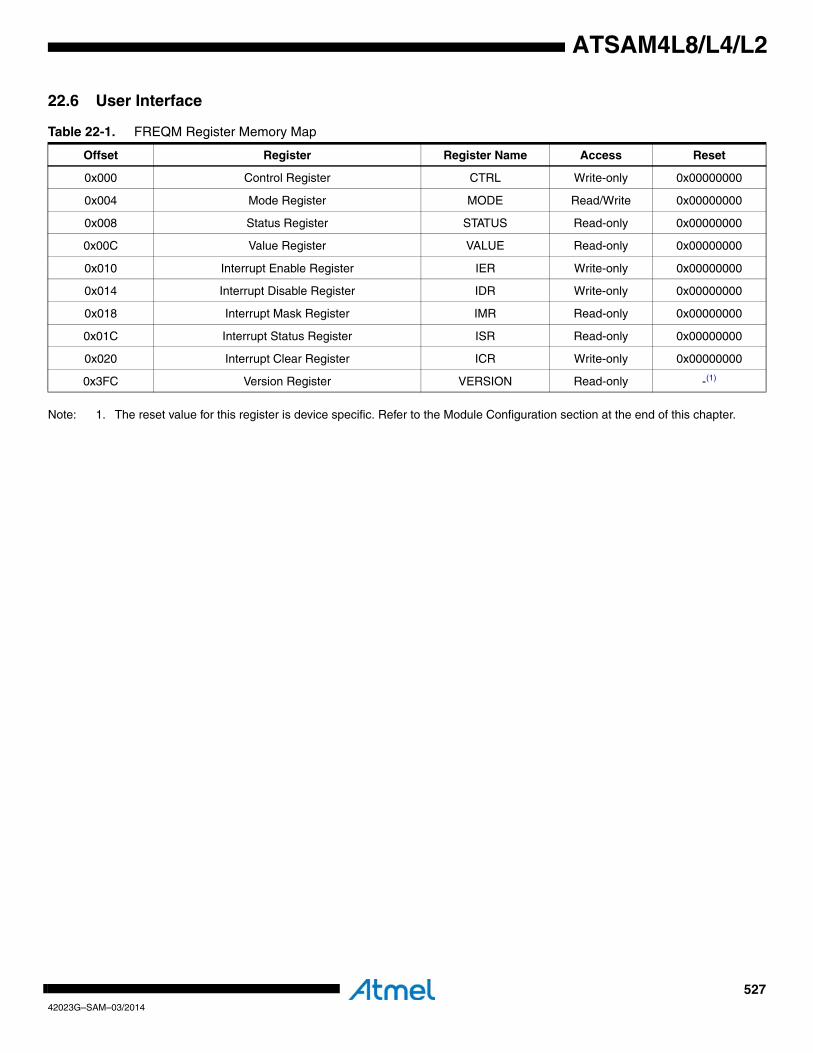
52742023G–SAM–03/2014
ATSAM4L8/L4/L2
22.6 User Interface
Note: 1. The reset value for this register is device specific. Refer to the Module Configuration section at the end of this chapter.
Table 22-1. FREQM Register Memory Map
Offset Register Register Name Access Reset
0x000 Control Register CTRL Write-only 0x00000000
0x004 Mode Register MODE Read/Write 0x00000000
0x008 Status Register STATUS Read-only 0x00000000
0x00C Value Register VALUE Read-only 0x00000000
0x010 Interrupt Enable Register IER Write-only 0x00000000
0x014 Interrupt Disable Register IDR Write-only 0x00000000
0x018 Interrupt Mask Register IMR Read-only 0x00000000
0x01C Interrupt Status Register ISR Read-only 0x00000000
0x020 Interrupt Clear Register ICR Write-only 0x00000000
0x3FC Version Register VERSION Read-only -(1)
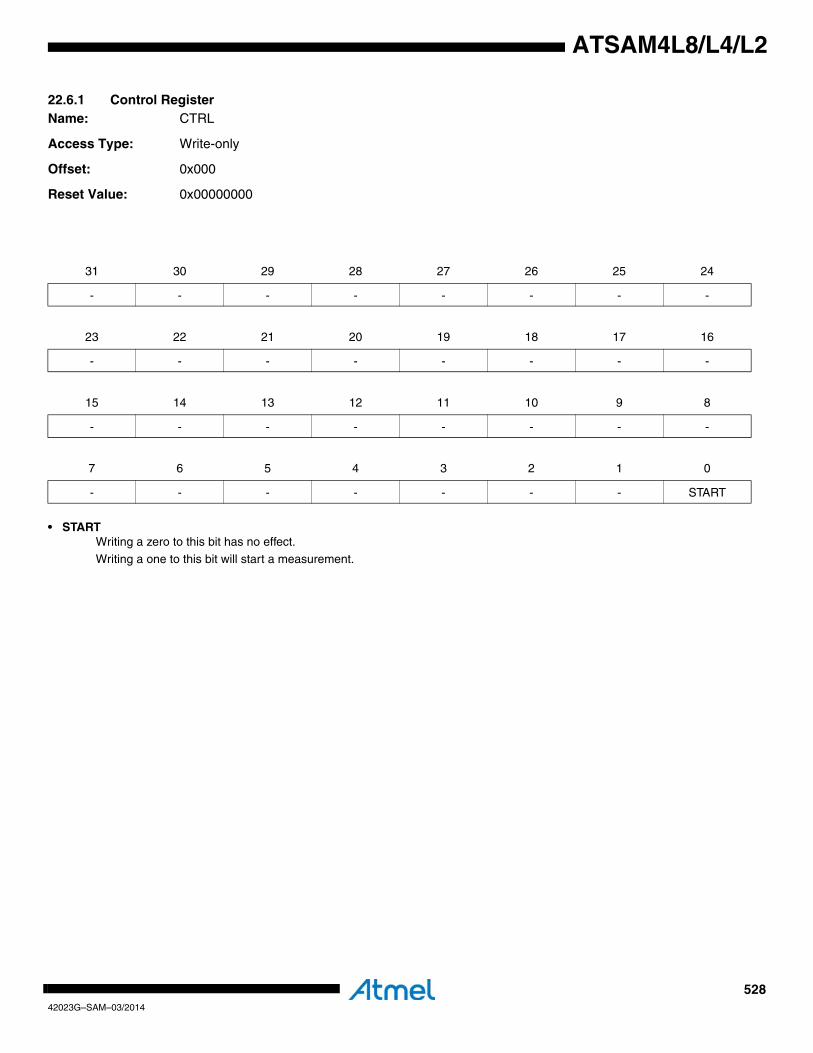
52842023G–SAM–03/2014
ATSAM4L8/L4/L2
22.6.1 Control RegisterName: CTRL
Access Type: Write-only
Offset: 0x000
Reset Value: 0x00000000
• STARTWriting a zero to this bit has no effect.
Writing a one to this bit will start a measurement.
31 30 29 28 27 26 25 24
- - - - - - - -
23 22 21 20 19 18 17 16
- - - - - - - -
15 14 13 12 11 10 9 8
- - - - - - - -
7 6 5 4 3 2 1 0
- - - - - - - START
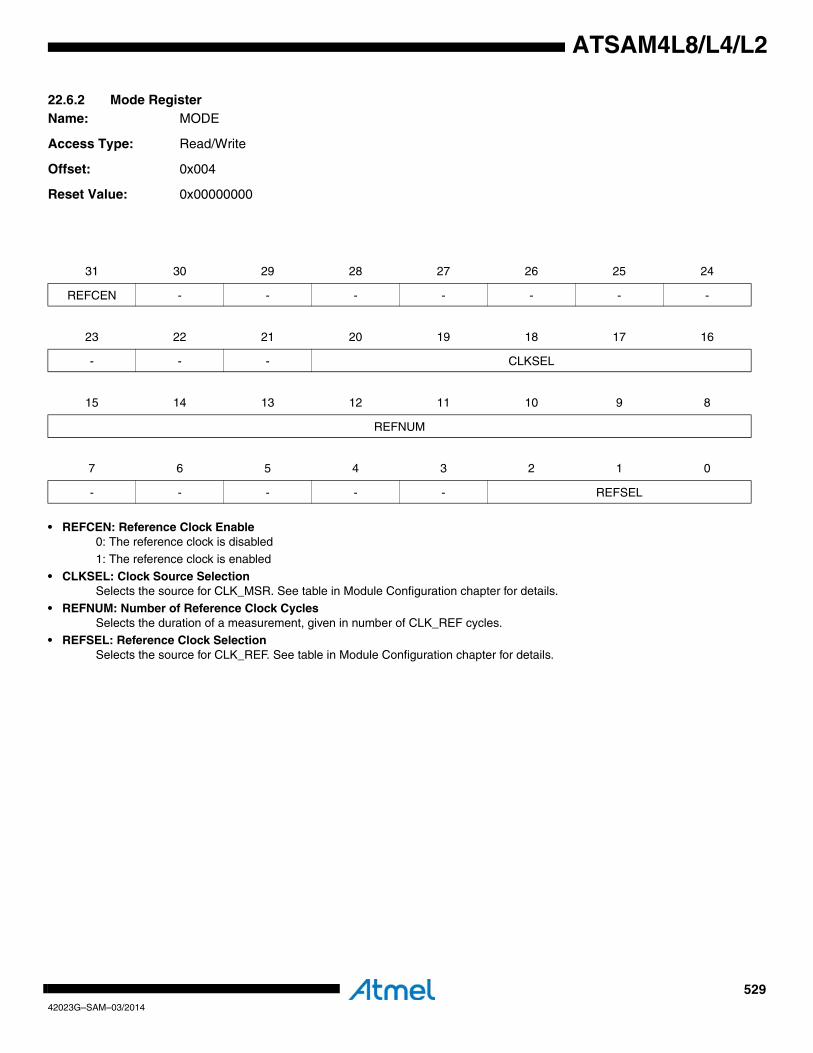
52942023G–SAM–03/2014
ATSAM4L8/L4/L2
22.6.2 Mode RegisterName: MODE
Access Type: Read/Write
Offset: 0x004
Reset Value: 0x00000000
• REFCEN: Reference Clock Enable0: The reference clock is disabled
1: The reference clock is enabled
• CLKSEL: Clock Source SelectionSelects the source for CLK_MSR. See table in Module Configuration chapter for details.
• REFNUM: Number of Reference Clock CyclesSelects the duration of a measurement, given in number of CLK_REF cycles.
• REFSEL: Reference Clock SelectionSelects the source for CLK_REF. See table in Module Configuration chapter for details.
31 30 29 28 27 26 25 24
REFCEN - - - - - - -
23 22 21 20 19 18 17 16
- - - CLKSEL
15 14 13 12 11 10 9 8
REFNUM
7 6 5 4 3 2 1 0
- - - - - REFSEL
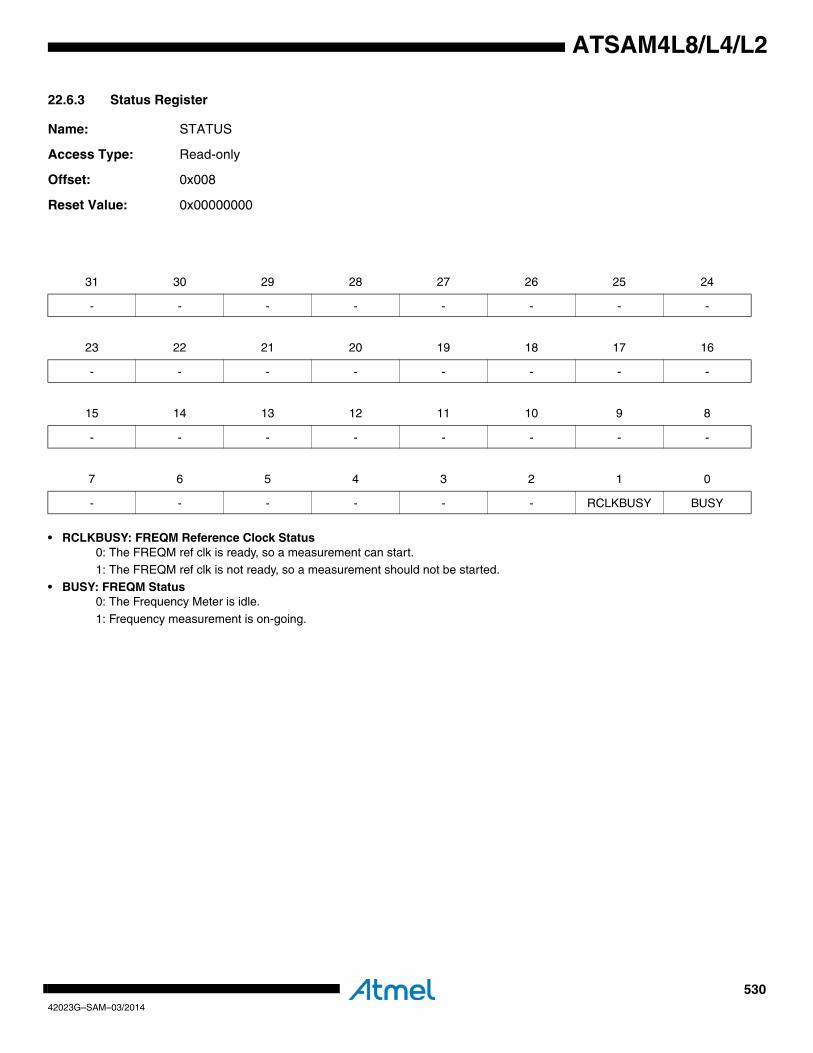
53042023G–SAM–03/2014
ATSAM4L8/L4/L2
22.6.3 Status Register
Name: STATUS
Access Type: Read-only
Offset: 0x008
Reset Value: 0x00000000
• RCLKBUSY: FREQM Reference Clock Status0: The FREQM ref clk is ready, so a measurement can start.1: The FREQM ref clk is not ready, so a measurement should not be started.
• BUSY: FREQM Status0: The Frequency Meter is idle.
1: Frequency measurement is on-going.
31 30 29 28 27 26 25 24
- - - - - - - -
23 22 21 20 19 18 17 16
- - - - - - - -
15 14 13 12 11 10 9 8
- - - - - - - -
7 6 5 4 3 2 1 0
- - - - - - RCLKBUSY BUSY

53142023G–SAM–03/2014
ATSAM4L8/L4/L2
22.6.4 Value Register
Name: VALUE
Access Type: Read-only
Offset: 0x00C
Reset Value: 0x00000000
• VALUE:Result from measurement.
31 30 29 28 27 26 25 24
- - - - - - - -
23 22 21 20 19 18 17 16
VALUE[23:16]
15 14 13 12 11 10 9 8
VALUE[15:8]
7 6 5 4 3 2 1 0
VALUE[7:0]

53242023G–SAM–03/2014
ATSAM4L8/L4/L2
22.6.5 Interrupt Enable Register
Name: IER
Access Type: Write-only
Offset: 0x010
Reset Value: 0x00000000
Writing a zero to a bit in this register has no effect.
Writing a one to a bit in this register will set the corresponding bit in IMR.
31 30 29 28 27 26 25 24
- - - - - - - -
23 22 21 20 19 18 17 16
- - - - - - - -
15 14 13 12 11 10 9 8
- - - - - - - -
7 6 5 4 3 2 1 0
- - - - - - RCLKRDY DONE
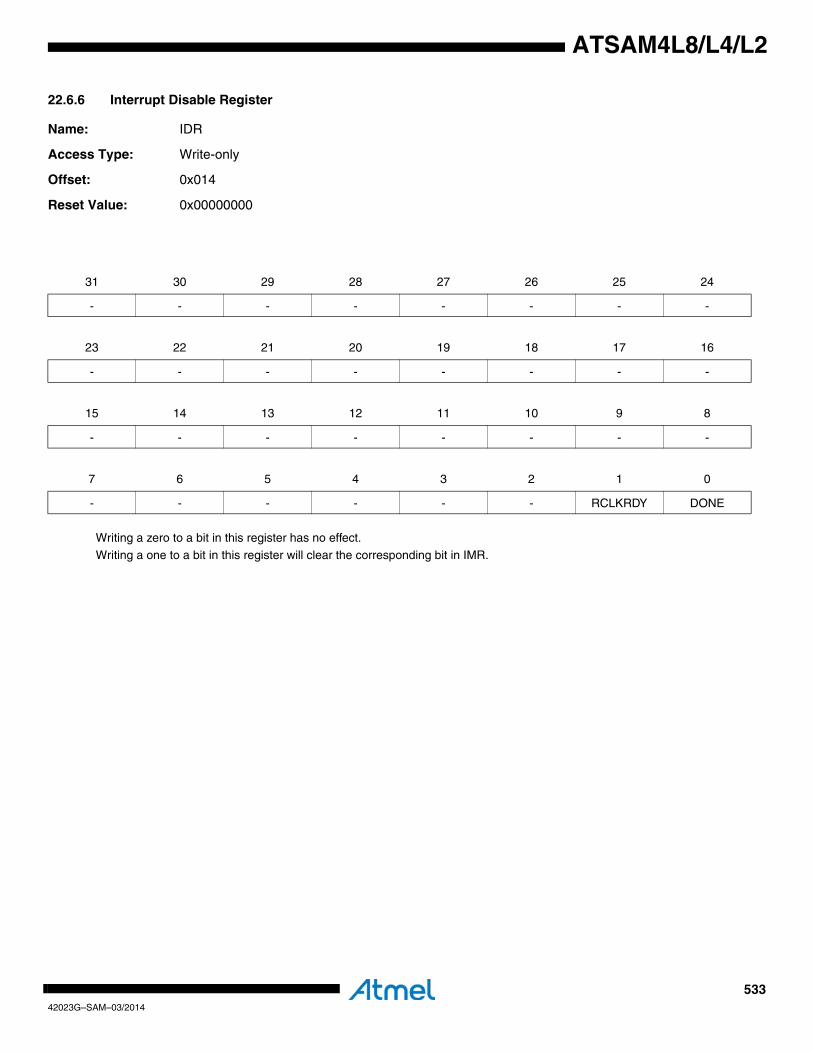
53342023G–SAM–03/2014
ATSAM4L8/L4/L2
22.6.6 Interrupt Disable Register
Name: IDR
Access Type: Write-only
Offset: 0x014
Reset Value: 0x00000000
Writing a zero to a bit in this register has no effect.
Writing a one to a bit in this register will clear the corresponding bit in IMR.
31 30 29 28 27 26 25 24
- - - - - - - -
23 22 21 20 19 18 17 16
- - - - - - - -
15 14 13 12 11 10 9 8
- - - - - - - -
7 6 5 4 3 2 1 0
- - - - - - RCLKRDY DONE
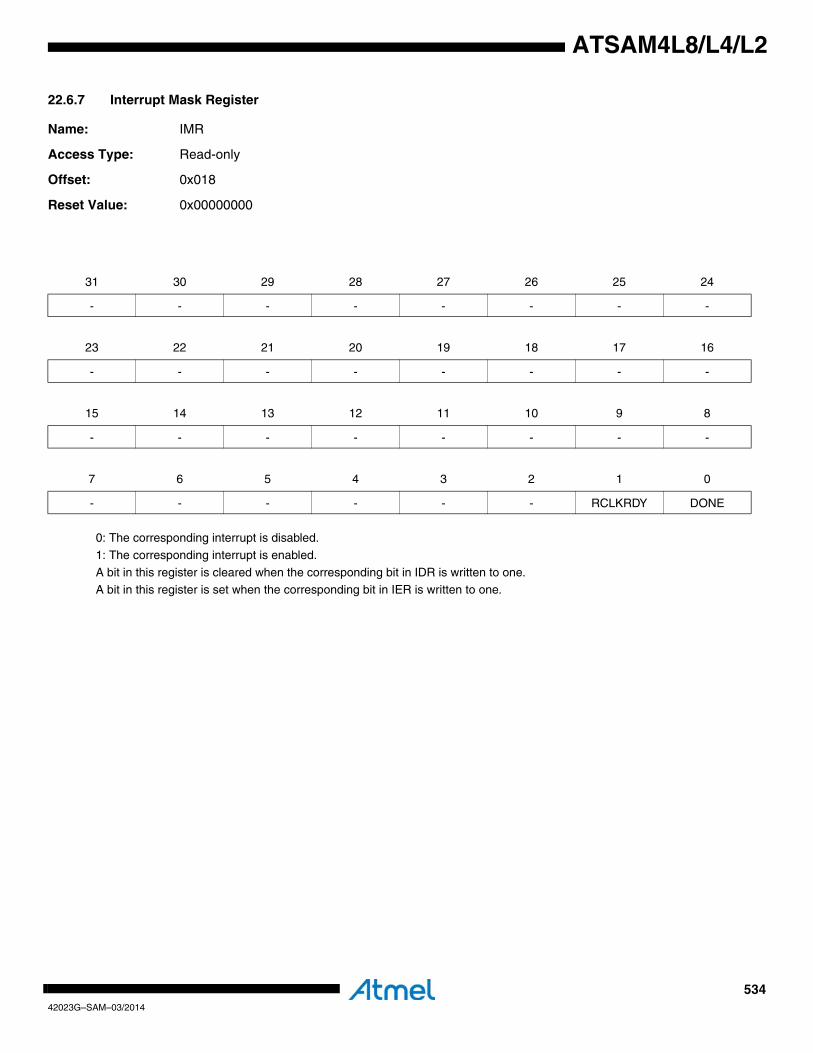
53442023G–SAM–03/2014
ATSAM4L8/L4/L2
22.6.7 Interrupt Mask Register
Name: IMR
Access Type: Read-only
Offset: 0x018
Reset Value: 0x00000000
0: The corresponding interrupt is disabled.
1: The corresponding interrupt is enabled.
A bit in this register is cleared when the corresponding bit in IDR is written to one.A bit in this register is set when the corresponding bit in IER is written to one.
31 30 29 28 27 26 25 24
- - - - - - - -
23 22 21 20 19 18 17 16
- - - - - - - -
15 14 13 12 11 10 9 8
- - - - - - - -
7 6 5 4 3 2 1 0
- - - - - - RCLKRDY DONE
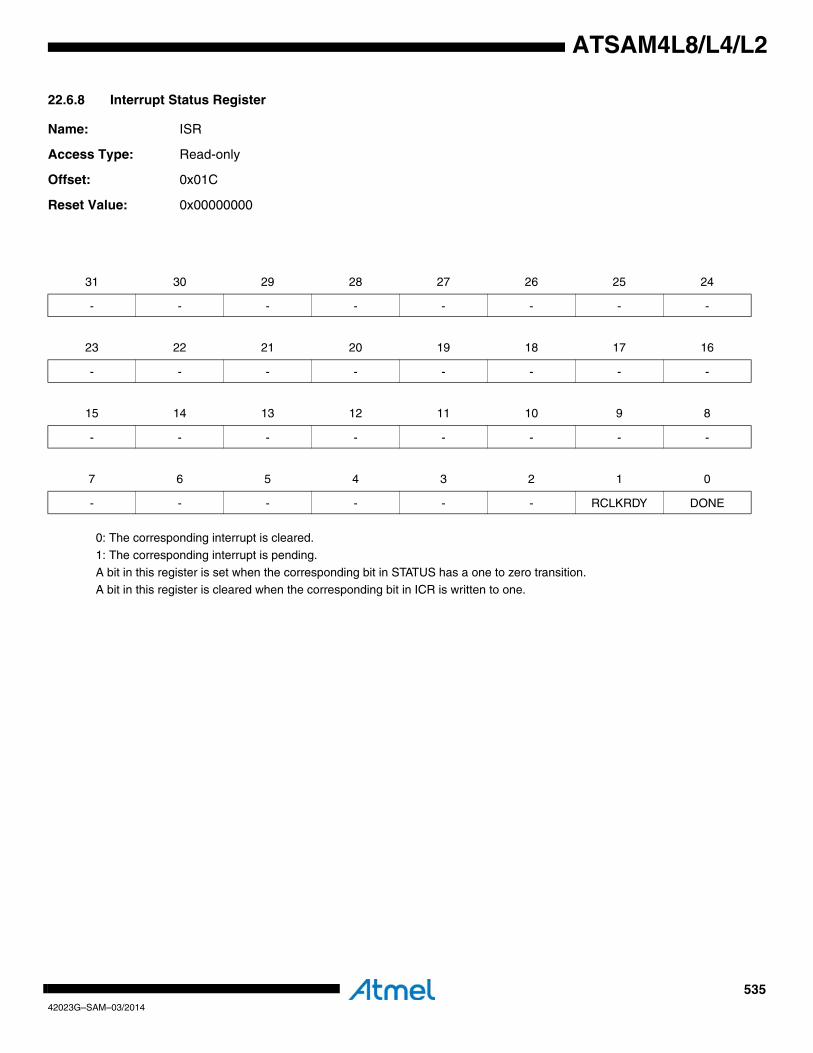
53542023G–SAM–03/2014
ATSAM4L8/L4/L2
22.6.8 Interrupt Status Register
Name: ISR
Access Type: Read-only
Offset: 0x01C
Reset Value: 0x00000000
0: The corresponding interrupt is cleared.
1: The corresponding interrupt is pending.
A bit in this register is set when the corresponding bit in STATUS has a one to zero transition.A bit in this register is cleared when the corresponding bit in ICR is written to one.
31 30 29 28 27 26 25 24
- - - - - - - -
23 22 21 20 19 18 17 16
- - - - - - - -
15 14 13 12 11 10 9 8
- - - - - - - -
7 6 5 4 3 2 1 0
- - - - - - RCLKRDY DONE
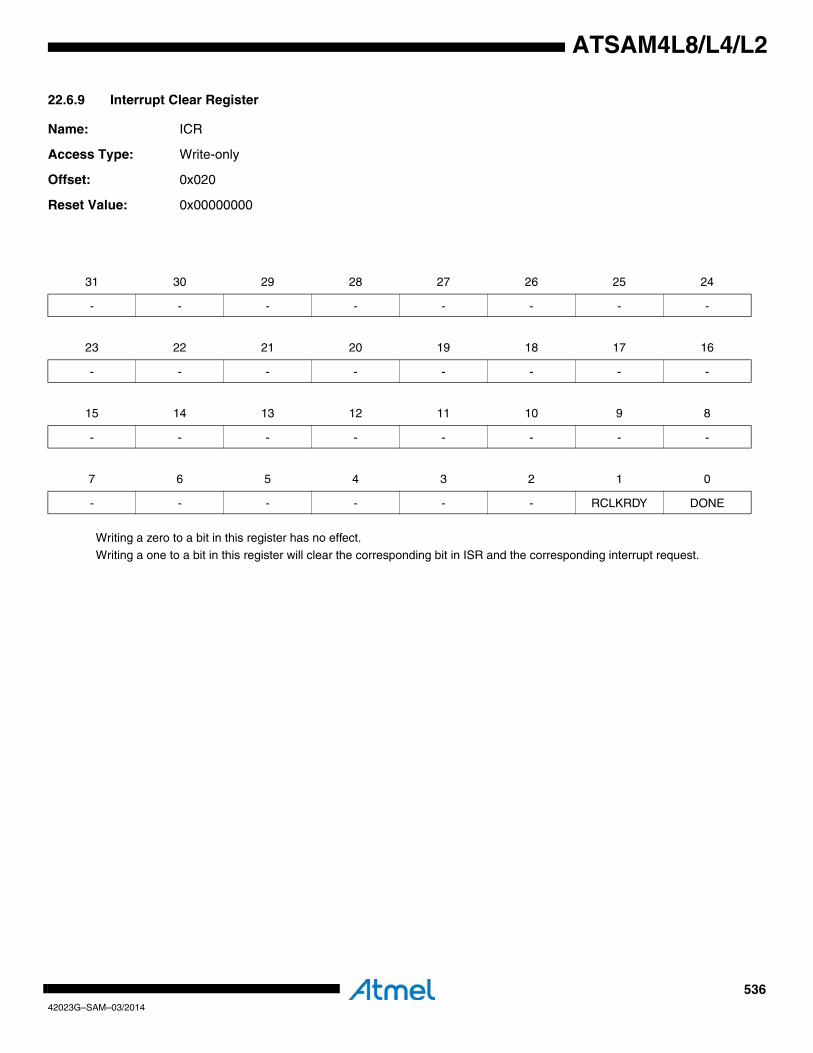
53642023G–SAM–03/2014
ATSAM4L8/L4/L2
22.6.9 Interrupt Clear Register
Name: ICR
Access Type: Write-only
Offset: 0x020
Reset Value: 0x00000000
Writing a zero to a bit in this register has no effect.
Writing a one to a bit in this register will clear the corresponding bit in ISR and the corresponding interrupt request.
31 30 29 28 27 26 25 24
- - - - - - - -
23 22 21 20 19 18 17 16
- - - - - - - -
15 14 13 12 11 10 9 8
- - - - - - - -
7 6 5 4 3 2 1 0
- - - - - - RCLKRDY DONE
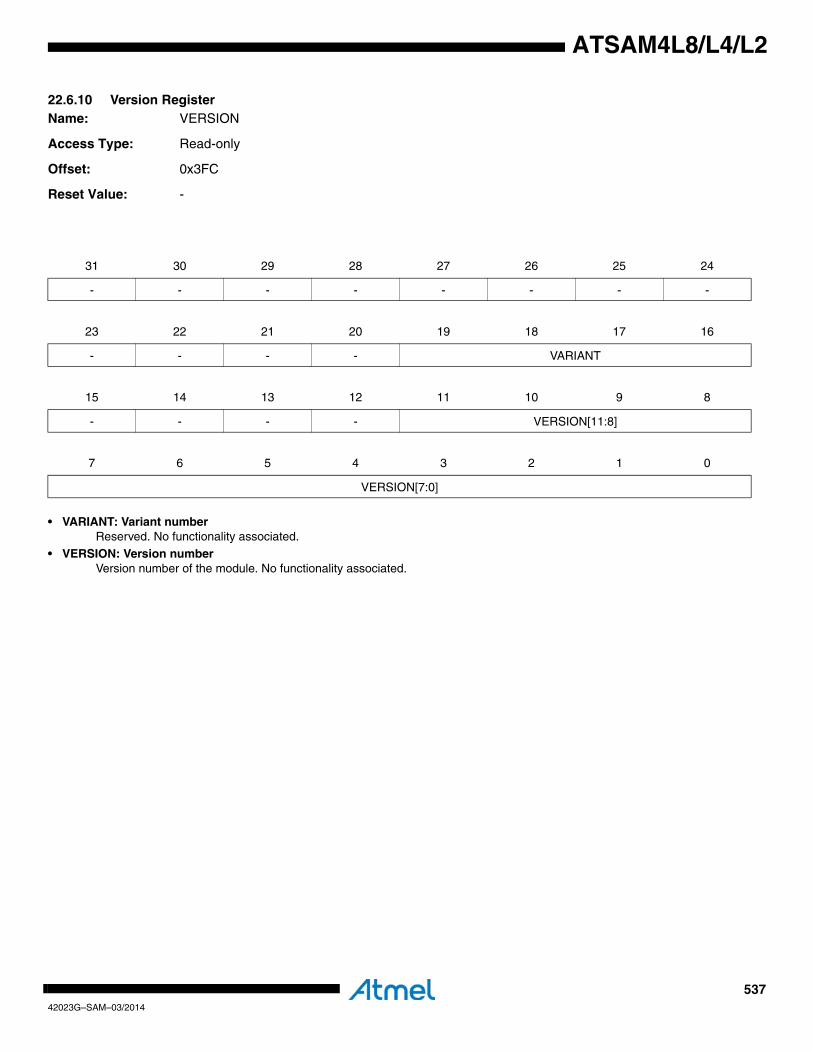
53742023G–SAM–03/2014
ATSAM4L8/L4/L2
22.6.10 Version RegisterName: VERSION
Access Type: Read-only
Offset: 0x3FC
Reset Value: -
• VARIANT: Variant numberReserved. No functionality associated.
• VERSION: Version numberVersion number of the module. No functionality associated.
31 30 29 28 27 26 25 24
- - - - - - - -
23 22 21 20 19 18 17 16
- - - - VARIANT
15 14 13 12 11 10 9 8
- - - - VERSION[11:8]
7 6 5 4 3 2 1 0
VERSION[7:0]
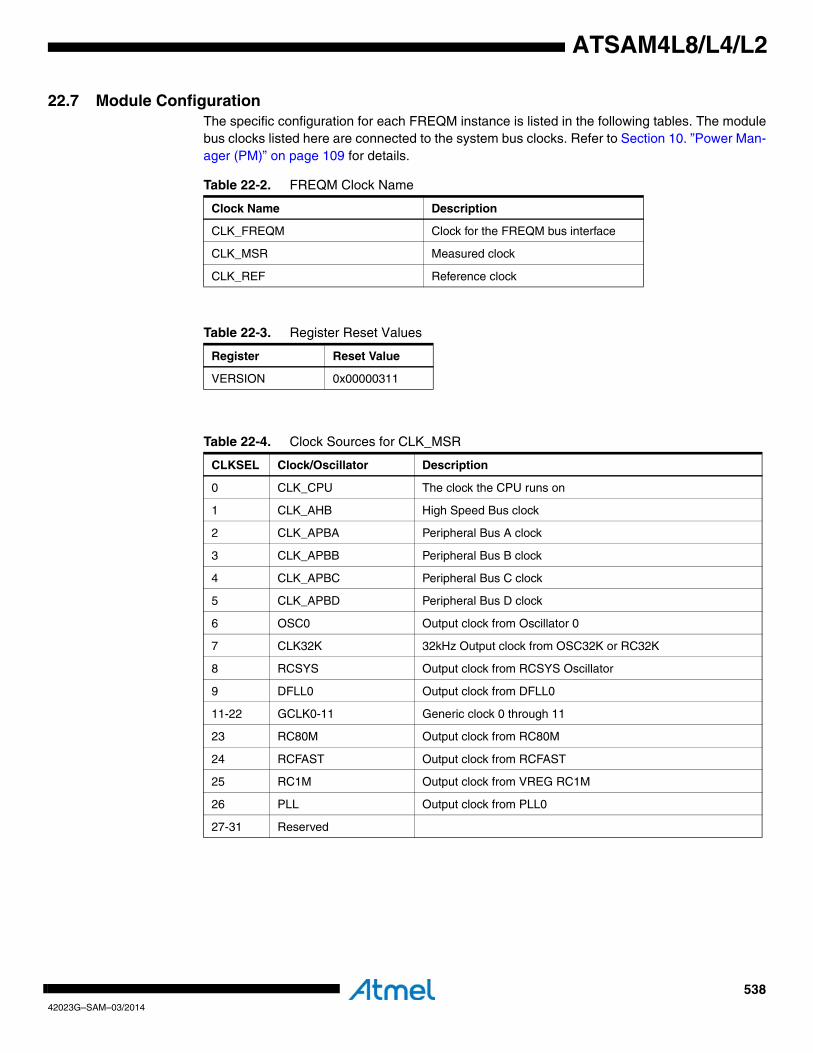
53842023G–SAM–03/2014
ATSAM4L8/L4/L2
22.7 Module ConfigurationThe specific configuration for each FREQM instance is listed in the following tables. The modulebus clocks listed here are connected to the system bus clocks. Refer to Section 10. ”Power Man-ager (PM)” on page 109 for details.
Table 22-2. FREQM Clock Name
Clock Name Description
CLK_FREQM Clock for the FREQM bus interface
CLK_MSR Measured clock
CLK_REF Reference clock
Table 22-3. Register Reset Values
Register Reset Value
VERSION 0x00000311
Table 22-4. Clock Sources for CLK_MSR
CLKSEL Clock/Oscillator Description
0 CLK_CPU The clock the CPU runs on
1 CLK_AHB High Speed Bus clock
2 CLK_APBA Peripheral Bus A clock
3 CLK_APBB Peripheral Bus B clock
4 CLK_APBC Peripheral Bus C clock
5 CLK_APBD Peripheral Bus D clock
6 OSC0 Output clock from Oscillator 0
7 CLK32K 32kHz Output clock from OSC32K or RC32K
8 RCSYS Output clock from RCSYS Oscillator
9 DFLL0 Output clock from DFLL0
11-22 GCLK0-11 Generic clock 0 through 11
23 RC80M Output clock from RC80M
24 RCFAST Output clock from RCFAST
25 RC1M Output clock from VREG RC1M
26 PLL Output clock from PLL0
27-31 Reserved
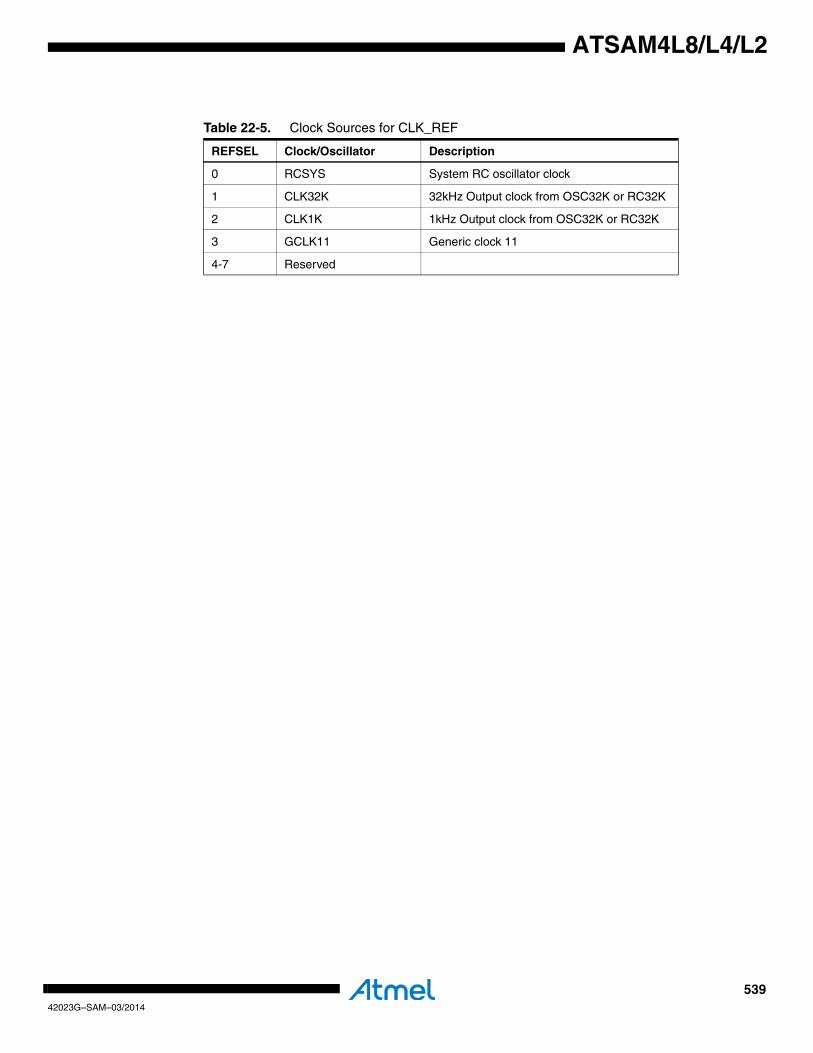
53942023G–SAM–03/2014
ATSAM4L8/L4/L2
Table 22-5. Clock Sources for CLK_REF
REFSEL Clock/Oscillator Description
0 RCSYS System RC oscillator clock
1 CLK32K 32kHz Output clock from OSC32K or RC32K
2 CLK1K 1kHz Output clock from OSC32K or RC32K
3 GCLK11 Generic clock 11
4-7 Reserved
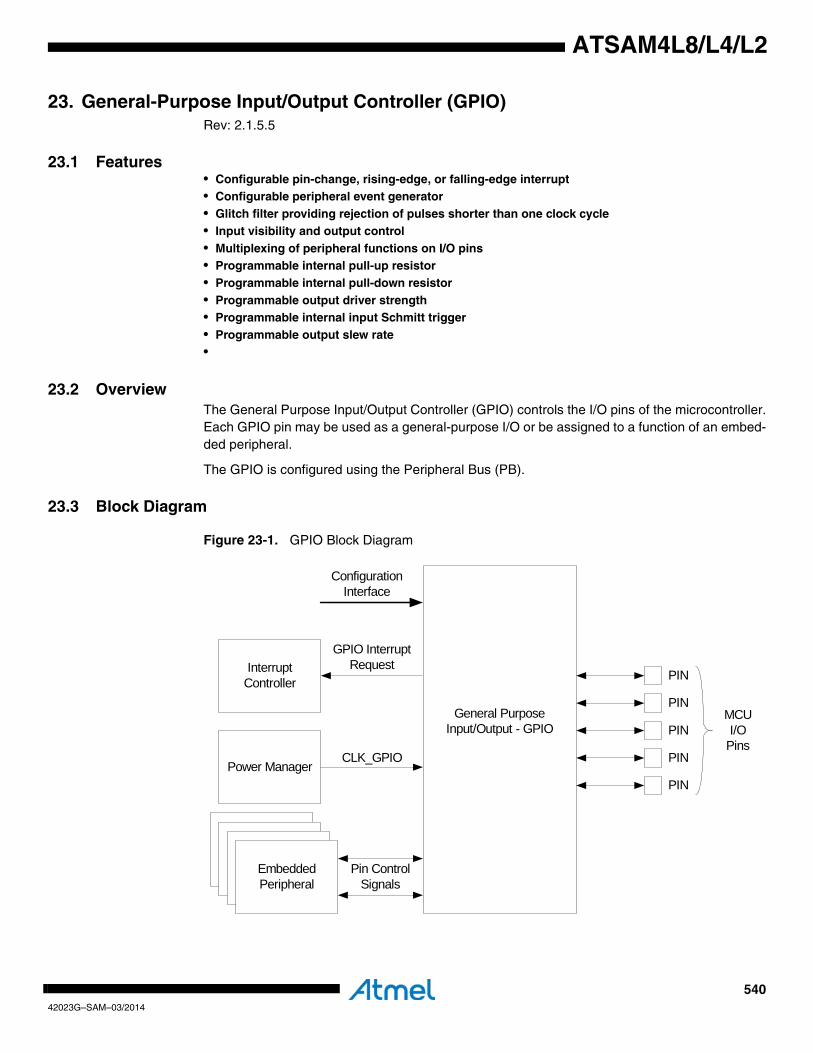
54042023G–SAM–03/2014
ATSAM4L8/L4/L2
23. General-Purpose Input/Output Controller (GPIO)Rev: 2.1.5.5
23.1 Features• Configurable pin-change, rising-edge, or falling-edge interrupt• Configurable peripheral event generator• Glitch filter providing rejection of pulses shorter than one clock cycle• Input visibility and output control• Multiplexing of peripheral functions on I/O pins• Programmable internal pull-up resistor• Programmable internal pull-down resistor• Programmable output driver strength• Programmable internal input Schmitt trigger• Programmable output slew rate•
23.2 OverviewThe General Purpose Input/Output Controller (GPIO) controls the I/O pins of the microcontroller.Each GPIO pin may be used as a general-purpose I/O or be assigned to a function of an embed-ded peripheral.
The GPIO is configured using the Peripheral Bus (PB).
23.3 Block Diagram
Figure 23-1. GPIO Block Diagram
Interrupt Controller
Power Manager
Embedded Peripheral
General Purpose Input/Output - GPIO
GPIO Interrupt Request
CLK_GPIO
Pin Control Signals
PIN
PIN
PIN
PIN
PIN
MCUI/O
Pins
Configuration Interface
54142023G–SAM–03/2014
ATSAM4L8/L4/L2
23.4 I/O Lines Description
23.5 Product DependenciesIn order to use this module, other parts of the system must be configured correctly, as describedbelow.
23.5.1 Power ManagementIf the CPU enters a sleep mode that disables clocks used by the GPIO, the GPIO will stop func-tioning and resume operation after the system wakes up from sleep mode.
If a peripheral function is configured for a GPIO pin, the peripheral will be able to control theGPIO pin even if the GPIO clock is stopped.
23.5.2 ClocksThe GPIO is connected to a Peripheral Bus clock (CLK_GPIO). This clock is generated by thePower Manager. CLK_GPIO is enabled at reset, and can be disabled by writing to the PowerManager. CLK_GPIO must be enabled in order to access the configuration registers of the GPIOor to use the GPIO interrupts. After configuring the GPIO, the CLK_GPIO can be disabled bywriting to the Power Manager if interrupts are not used.
23.5.3 InterruptsThe GPIO interrupt request lines are connected to the NVIC. Using the GPIO interrupts requiresthe NVIC to be programmed first.
23.5.4 Peripheral EventsThe GPIO peripheral events are connected via the Peripheral Event System. Refer to Section31. ”Peripheral Event Controller (PEVC)” on page 845 for details.
23.5.5 Debug OperationWhen an external debugger forces the CPU into debug mode, the GPIO continues normal oper-ation. If the GPIO is configured in a way that requires it to be periodically serviced by the CPUthrough interrupts or similar, improper operation or data loss may result during debugging.
Pin Name Description Type
GPIOn GPIO pin n Digital
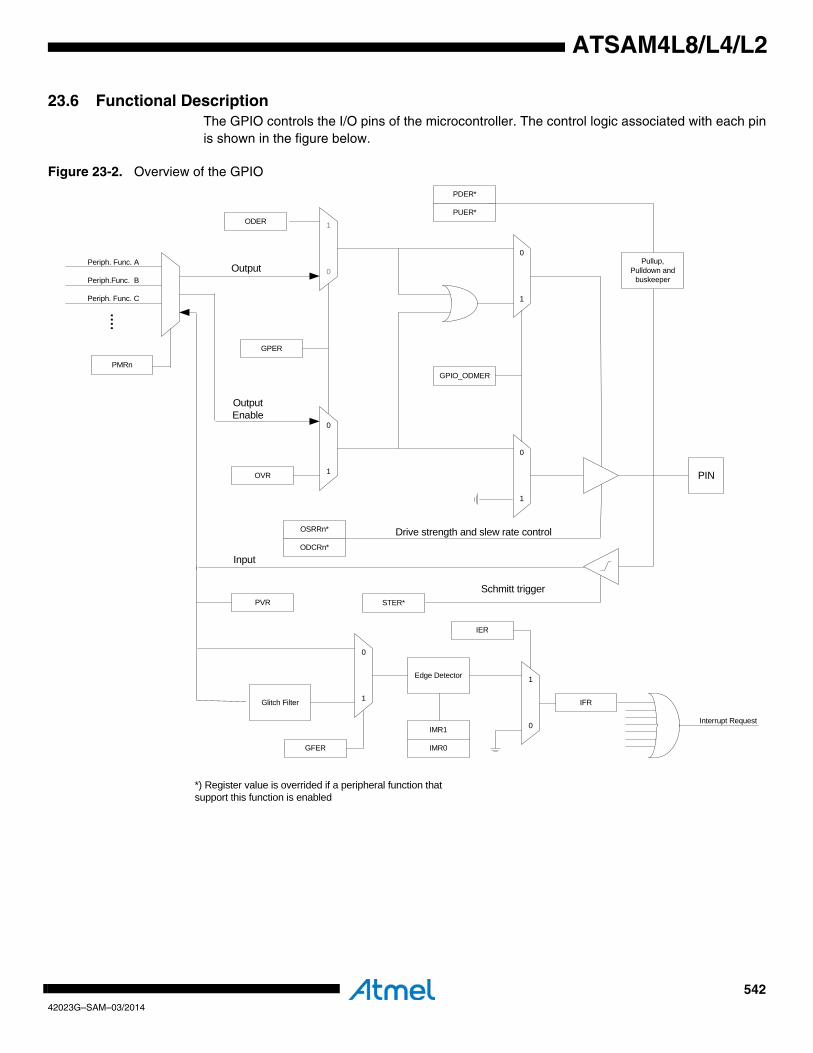
54242023G–SAM–03/2014
ATSAM4L8/L4/L2
23.6 Functional DescriptionThe GPIO controls the I/O pins of the microcontroller. The control logic associated with each pinis shown in the figure below.
Figure 23-2. Overview of the GPIO
0
1
GPIO_ODMER
0
1
0
1
GPER
1
0
OVR
ODER
PMRn
Periph. Func. A
Periph.Func. B
Periph. Func. C
PIN
PUER*
PVR
0
1Glitch Filter
GFER
Edge Detector 1
0 Interrupt RequestIMR1
IMR0
IER
ODCRn*
OSRRn* Drive strength and slew rate control
STER*
Schmitt trigger
PDER*
Pullup, Pulldown and
buskeeper
....
Output
Output Enable
Input
*) Register value is overrided if a peripheral function that support this function is enabled
IFR
54342023G–SAM–03/2014
ATSAM4L8/L4/L2
23.6.1 Basic Operation
23.6.1.1 Module ConfigurationThe GPIO user interface registers are organized into ports and each port controls 32 differentGPIO pins. Most of the registers supports bit wise access operations such as set, clear and tog-gle in addition to the standard word access. For details regarding interface registers, refer toSection 23.7.
23.6.1.2 Available FeaturesThe GPIO features implemented are device dependent, and not all functions are implementedon all pins. The user must refer to the Module Configuration section and the GPIO Function Mul-tiplexing section in the Package and Pinout chapter for the device specific settings used in theATSAM4L8/L4/L2.
Device specific settings includes:
• Number of GPIO pins
• Functions implemented on each pin
• Peripheral function(s) multiplexed on each GPIO pin
• Reset state of registers
23.6.1.3 InputsThe level on each GPIO pin can be read through the Pin Value Register (PVR). This registerindicates the level of the GPIO pins regardless of the pins being driven by the GPIO or by anexternal component. Note that due to power saving measures, the PVR register will only beupdated when the corresponding bit in GPER is one or if an interrupt is enabled for the pin, i.e.IER is one for the corresponding pin.
23.6.1.4 Output ControlWhen the GPIO pin is assigned to a peripheral function, i.e. the corresponding bit in GPER iszero, the peripheral determines whether the pin is driven or not.
When the GPIO pin is controlled by the GPIO, the value of Output Driver Enable Register(ODER) determines whether the pin is driven or not. When a bit in this register is one, the corre-sponding GPIO pin is driven by the GPIO. When the bit is zero, the GPIO does not drive the pin.
The level driven on a GPIO pin can be determined by writing the value to the corresponding bitin the Output Value Register (OVR).
23.6.1.5 Peripheral MuxingThe GPIO allows a single GPIO pin to be shared by multiple peripheral pins and the GPIO itself.Peripheral pins sharing the same GPIO pin are arranged into peripheral functions that can beselected one at a time. Peripheral functions are configured by writing the selected function valueto the Peripheral Mux Registers (PMRn). To allow a peripheral pin access to the shared GPIOpin, GPIO control must be disabled for that pin, i.e. the corresponding bit in GPER must readzero.
A peripheral function value is set by writing bit zero to PMR0 and bit one to the same index posi-tion in PMR1 and so on. In a system with 4 peripheral functions A,B,C, and D, peripheralfunction C for GPIO pin four is selected by writing a zero to bit four in PMR0 and a one to thesame bit index in PMR1. Refer to the GPIO Function Multiplexing chapter for details regardingpin function configuration for each GPIO pin.
54442023G–SAM–03/2014
ATSAM4L8/L4/L2
23.6.2 Advanced Operation
23.6.2.1 Peripheral I/O Pin ControlWhen a GPIO pin is assigned to a peripheral function, i.e. the corresponding bit in GPER is zero,output and output enable is controlled by the selected peripheral pin. In addition the peripheralmay control some or all of the other GPIO pin functions listed in Table 23-1, if the peripheral sup-ports those features. All pin features not controlled by the selected peripheral is controlled by theGPIO.
Refer to the Module Configuration section for details regarding implemented GPIO pin functionsand to the Peripheral chapter for details regarding I/O pin function control.
23.6.2.2 Pull-up Resistor, Pull-down Resistor ControlPull-up and pull-down can be configured for each GPIO pin. Pull-up allows the pin and any con-nected net to be pulled up to VDD if the net is not driven. Pull-down pulls the net to GND.
Pull-up and pull-down are useful for detecting if a pin is unconnected or if a mechanical button ispressed, for various communication protocols and to keep unconnected pins from floating.
Pull-up can be enabled and disabled by writing a one and a zero respectively to the correspond-ing bit in the Pull-up Enable Register (PUER). Pull-down can be enabled and disabled by writinga one and a zero respectively to the corresponding bit in the Pull-down Enable Register (PDER).
23.6.2.3 Output Pin TimingsFigure 23-3 shows the timing of the GPIO pin when writing to the Output Value Register (OVR).The same timing applies when performing a ‘set’ or ‘clear’ access, i.e. writing to OVRS orOVRC. The timing of PVR is also shown.
Table 23-1. I/O Pin function Control
Function name GPIO mode Peripheral mode
Output OVR Peripheral
Output enable ODER Peripheral
Pull-up PUER Peripheral if supported, else GPIO
Pull-down PDER Peripheral if supported, else GPIO
Drive strength ODCRn Peripheral if supported, else GPIO
Slew rate OSRRn Peripheral if supported, else GPIO
Schmitt trigger STER Peripheral if supported, else GPIO
54542023G–SAM–03/2014
ATSAM4L8/L4/L2
Figure 23-3. Output Pin Timings
23.6.2.4 Pin Output Driver ControlThe GPIO has registers for controlling output drive properties of each pin, such as output drivingcapability and slew rate control.
The driving capability is controlled by the Output Driving Capability Registers (ODCRn) and theslew rate settings are controlled by the Output Slew Rate Registers (OSRRn).
For a GPIO pin with four different slew rate settings, a slew rate of two can be selected by writinga zero to the OSRR0 register at the bit position corresponding to the GPIO pin, and a one to theOSRR1 at the same bit position. The ODCRn registers are configured in the same way.
23.6.2.5 Input Schmitt TriggerEach GPIO pin can be configured with an input Schmitt trigger. An input Schmitt trigger filtersinput signal using an hysteresis function, stopping noise from propagation into the system. Theinput Schmitt trigger can be enabled and disabled by writing a one and a zero respectively to theSchmitt Trigger Enable Register (STER).
23.6.2.6 InterruptsThe GPIO can be configured to generate an interrupt when it detects a change on a GPIO pin.Interrupts on a pin are enabled by writing a one to the corresponding bit in the Interrupt EnableRegister (IER). The module can be configured to generate an interrupt whenever a pin changesvalue, or only on rising or falling edges. This is controlled by the Interrupt Mode Registers(IMRn). Interrupts on a pin can be enabled regardless of the GPIO pin being controlled by theGPIO or assigned to a peripheral function.
An interrupt can be generated on each GPIO pin. These interrupt generators are further groupedinto groups of eight and connected to the NVIC. An interrupt request from any of the GPIO pingenerators in the group will result in an interrupt request from that group to the NVIC if the corre-sponding bit for the GPIO pin in the IER is set. By grouping interrupt generators into groups ofeight, four different interrupt handlers can be installed for each GPIO port.
The Interrupt Flag Register (IFR) can be read by software to determine which pin(s) caused theinterrupt. The interrupt flag must be manually cleared by writing a zero to the corresponding bitin IFR.
GPIO interrupts will only be generated when CLK_GPIO is enabled.
23.6.2.7 Input Glitch FilterInput glitch filters can be enabled on each GPIO pin. When the glitch filter is enabled, a glitchwith duration of less than 1 CLK_GPIO cycle is automatically rejected, while a pulse with dura-
PB Access
PB Access
CLK_GPIO
Write OVR to 1
Write OVR to 0
OVR / I/O Line
PVR
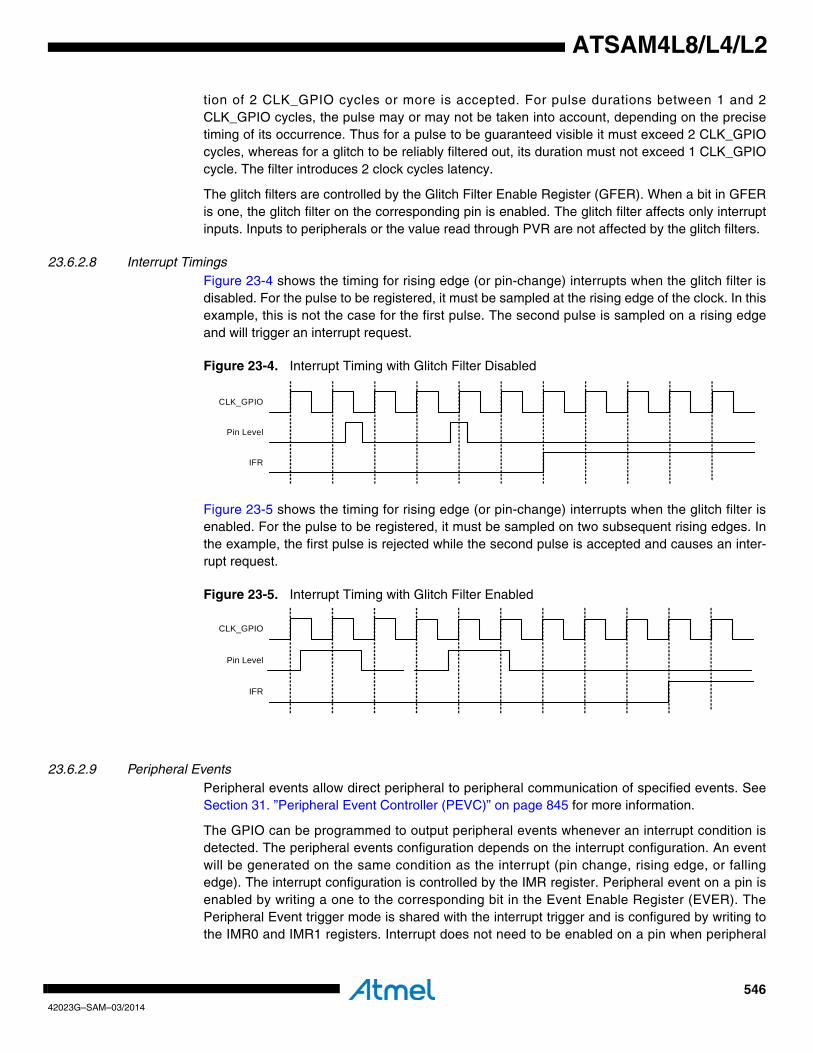
54642023G–SAM–03/2014
ATSAM4L8/L4/L2
tion of 2 CLK_GPIO cycles or more is accepted. For pulse durations between 1 and 2CLK_GPIO cycles, the pulse may or may not be taken into account, depending on the precisetiming of its occurrence. Thus for a pulse to be guaranteed visible it must exceed 2 CLK_GPIOcycles, whereas for a glitch to be reliably filtered out, its duration must not exceed 1 CLK_GPIOcycle. The filter introduces 2 clock cycles latency.
The glitch filters are controlled by the Glitch Filter Enable Register (GFER). When a bit in GFERis one, the glitch filter on the corresponding pin is enabled. The glitch filter affects only interruptinputs. Inputs to peripherals or the value read through PVR are not affected by the glitch filters.
23.6.2.8 Interrupt TimingsFigure 23-4 shows the timing for rising edge (or pin-change) interrupts when the glitch filter isdisabled. For the pulse to be registered, it must be sampled at the rising edge of the clock. In thisexample, this is not the case for the first pulse. The second pulse is sampled on a rising edgeand will trigger an interrupt request.
Figure 23-4. Interrupt Timing with Glitch Filter Disabled
Figure 23-5 shows the timing for rising edge (or pin-change) interrupts when the glitch filter isenabled. For the pulse to be registered, it must be sampled on two subsequent rising edges. Inthe example, the first pulse is rejected while the second pulse is accepted and causes an inter-rupt request.
Figure 23-5. Interrupt Timing with Glitch Filter Enabled
23.6.2.9 Peripheral EventsPeripheral events allow direct peripheral to peripheral communication of specified events. SeeSection 31. ”Peripheral Event Controller (PEVC)” on page 845 for more information.
The GPIO can be programmed to output peripheral events whenever an interrupt condition isdetected. The peripheral events configuration depends on the interrupt configuration. An eventwill be generated on the same condition as the interrupt (pin change, rising edge, or fallingedge). The interrupt configuration is controlled by the IMR register. Peripheral event on a pin isenabled by writing a one to the corresponding bit in the Event Enable Register (EVER). ThePeripheral Event trigger mode is shared with the interrupt trigger and is configured by writing tothe IMR0 and IMR1 registers. Interrupt does not need to be enabled on a pin when peripheral
CLK_GPIO
Pin Level
IFR
CLK_GPIO
Pin Level
IFR

54742023G–SAM–03/2014
ATSAM4L8/L4/L2
events are enabled. Peripheral Events are also affected by the Input Glitch Filter settings. SeeSection 23.6.2.7 for more information.
A peripheral event can be generated on each GPIO pin. Each port can then have up to 32peripheral event generators. Groups of eight peripheral event generators in each port are ORedtogether to form a peripheral event line, so that each port has four peripheral event lines con-nected to the Peripheral Event System.
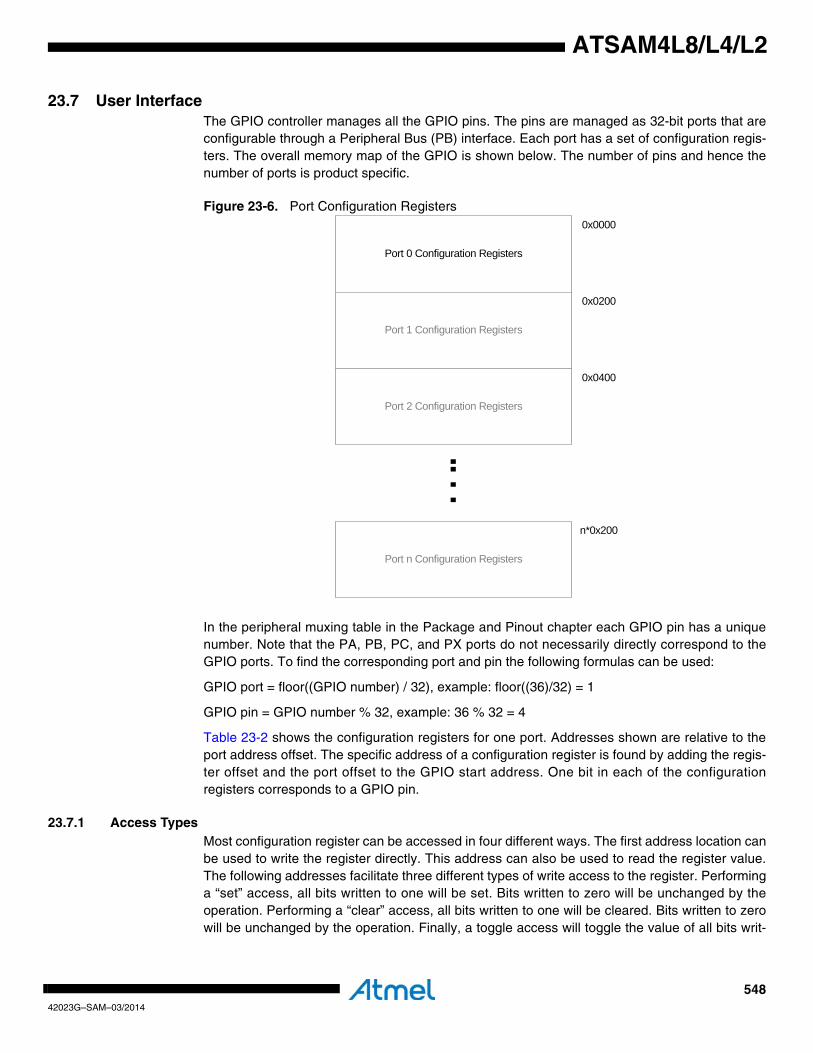
54842023G–SAM–03/2014
ATSAM4L8/L4/L2
23.7 User InterfaceThe GPIO controller manages all the GPIO pins. The pins are managed as 32-bit ports that areconfigurable through a Peripheral Bus (PB) interface. Each port has a set of configuration regis-ters. The overall memory map of the GPIO is shown below. The number of pins and hence thenumber of ports is product specific.
Figure 23-6. Port Configuration Registers
In the peripheral muxing table in the Package and Pinout chapter each GPIO pin has a uniquenumber. Note that the PA, PB, PC, and PX ports do not necessarily directly correspond to theGPIO ports. To find the corresponding port and pin the following formulas can be used:
GPIO port = floor((GPIO number) / 32), example: floor((36)/32) = 1
GPIO pin = GPIO number % 32, example: 36 % 32 = 4
Table 23-2 shows the configuration registers for one port. Addresses shown are relative to theport address offset. The specific address of a configuration register is found by adding the regis-ter offset and the port offset to the GPIO start address. One bit in each of the configurationregisters corresponds to a GPIO pin.
23.7.1 Access TypesMost configuration register can be accessed in four different ways. The first address location canbe used to write the register directly. This address can also be used to read the register value.The following addresses facilitate three different types of write access to the register. Performinga “set” access, all bits written to one will be set. Bits written to zero will be unchanged by theoperation. Performing a “clear” access, all bits written to one will be cleared. Bits written to zerowill be unchanged by the operation. Finally, a toggle access will toggle the value of all bits writ-
Port 0 Configuration Registers
Port 1 Configuration Registers
Port 2 Configuration Registers
Port n Configuration Registers
0x0000
0x0200
0x0400
n*0x200
….
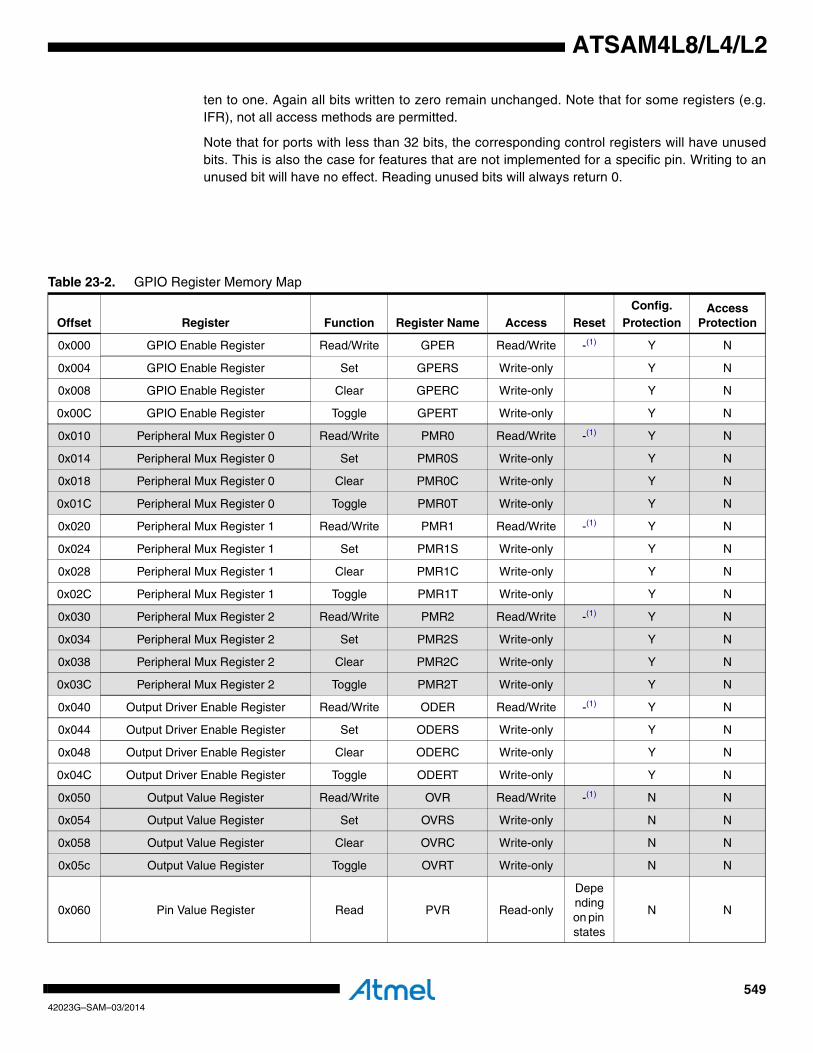
54942023G–SAM–03/2014
ATSAM4L8/L4/L2
ten to one. Again all bits written to zero remain unchanged. Note that for some registers (e.g.IFR), not all access methods are permitted.
Note that for ports with less than 32 bits, the corresponding control registers will have unusedbits. This is also the case for features that are not implemented for a specific pin. Writing to anunused bit will have no effect. Reading unused bits will always return 0.
Table 23-2. GPIO Register Memory Map
Offset Register Function Register Name Access ResetConfig.
ProtectionAccess
Protection
0x000 GPIO Enable Register Read/Write GPER Read/Write -(1) Y N
0x004 GPIO Enable Register Set GPERS Write-only Y N
0x008 GPIO Enable Register Clear GPERC Write-only Y N
0x00C GPIO Enable Register Toggle GPERT Write-only Y N
0x010 Peripheral Mux Register 0 Read/Write PMR0 Read/Write -(1) Y N
0x014 Peripheral Mux Register 0 Set PMR0S Write-only Y N
0x018 Peripheral Mux Register 0 Clear PMR0C Write-only Y N
0x01C Peripheral Mux Register 0 Toggle PMR0T Write-only Y N
0x020 Peripheral Mux Register 1 Read/Write PMR1 Read/Write -(1) Y N
0x024 Peripheral Mux Register 1 Set PMR1S Write-only Y N
0x028 Peripheral Mux Register 1 Clear PMR1C Write-only Y N
0x02C Peripheral Mux Register 1 Toggle PMR1T Write-only Y N
0x030 Peripheral Mux Register 2 Read/Write PMR2 Read/Write -(1) Y N
0x034 Peripheral Mux Register 2 Set PMR2S Write-only Y N
0x038 Peripheral Mux Register 2 Clear PMR2C Write-only Y N
0x03C Peripheral Mux Register 2 Toggle PMR2T Write-only Y N
0x040 Output Driver Enable Register Read/Write ODER Read/Write -(1) Y N
0x044 Output Driver Enable Register Set ODERS Write-only Y N
0x048 Output Driver Enable Register Clear ODERC Write-only Y N
0x04C Output Driver Enable Register Toggle ODERT Write-only Y N
0x050 Output Value Register Read/Write OVR Read/Write -(1) N N
0x054 Output Value Register Set OVRS Write-only N N
0x058 Output Value Register Clear OVRC Write-only N N
0x05c Output Value Register Toggle OVRT Write-only N N
0x060 Pin Value Register Read PVR Read-only
Depending on pin states
N N
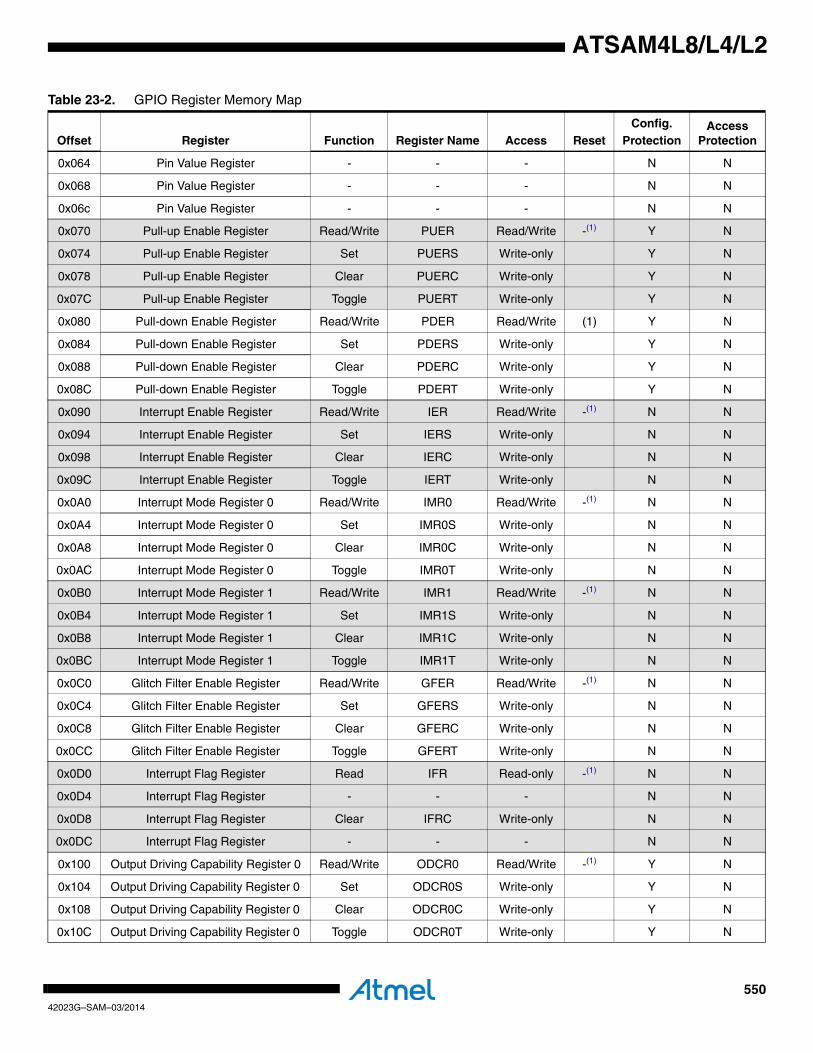
55042023G–SAM–03/2014
ATSAM4L8/L4/L2
0x064 Pin Value Register - - - N N
0x068 Pin Value Register - - - N N
0x06c Pin Value Register - - - N N
0x070 Pull-up Enable Register Read/Write PUER Read/Write -(1) Y N
0x074 Pull-up Enable Register Set PUERS Write-only Y N
0x078 Pull-up Enable Register Clear PUERC Write-only Y N
0x07C Pull-up Enable Register Toggle PUERT Write-only Y N
0x080 Pull-down Enable Register Read/Write PDER Read/Write (1) Y N
0x084 Pull-down Enable Register Set PDERS Write-only Y N
0x088 Pull-down Enable Register Clear PDERC Write-only Y N
0x08C Pull-down Enable Register Toggle PDERT Write-only Y N
0x090 Interrupt Enable Register Read/Write IER Read/Write -(1) N N
0x094 Interrupt Enable Register Set IERS Write-only N N
0x098 Interrupt Enable Register Clear IERC Write-only N N
0x09C Interrupt Enable Register Toggle IERT Write-only N N
0x0A0 Interrupt Mode Register 0 Read/Write IMR0 Read/Write -(1) N N
0x0A4 Interrupt Mode Register 0 Set IMR0S Write-only N N
0x0A8 Interrupt Mode Register 0 Clear IMR0C Write-only N N
0x0AC Interrupt Mode Register 0 Toggle IMR0T Write-only N N
0x0B0 Interrupt Mode Register 1 Read/Write IMR1 Read/Write -(1) N N
0x0B4 Interrupt Mode Register 1 Set IMR1S Write-only N N
0x0B8 Interrupt Mode Register 1 Clear IMR1C Write-only N N
0x0BC Interrupt Mode Register 1 Toggle IMR1T Write-only N N
0x0C0 Glitch Filter Enable Register Read/Write GFER Read/Write -(1) N N
0x0C4 Glitch Filter Enable Register Set GFERS Write-only N N
0x0C8 Glitch Filter Enable Register Clear GFERC Write-only N N
0x0CC Glitch Filter Enable Register Toggle GFERT Write-only N N
0x0D0 Interrupt Flag Register Read IFR Read-only -(1) N N
0x0D4 Interrupt Flag Register - - - N N
0x0D8 Interrupt Flag Register Clear IFRC Write-only N N
0x0DC Interrupt Flag Register - - - N N
0x100 Output Driving Capability Register 0 Read/Write ODCR0 Read/Write -(1) Y N
0x104 Output Driving Capability Register 0 Set ODCR0S Write-only Y N
0x108 Output Driving Capability Register 0 Clear ODCR0C Write-only Y N
0x10C Output Driving Capability Register 0 Toggle ODCR0T Write-only Y N
Table 23-2. GPIO Register Memory Map
Offset Register Function Register Name Access ResetConfig.
ProtectionAccess
Protection
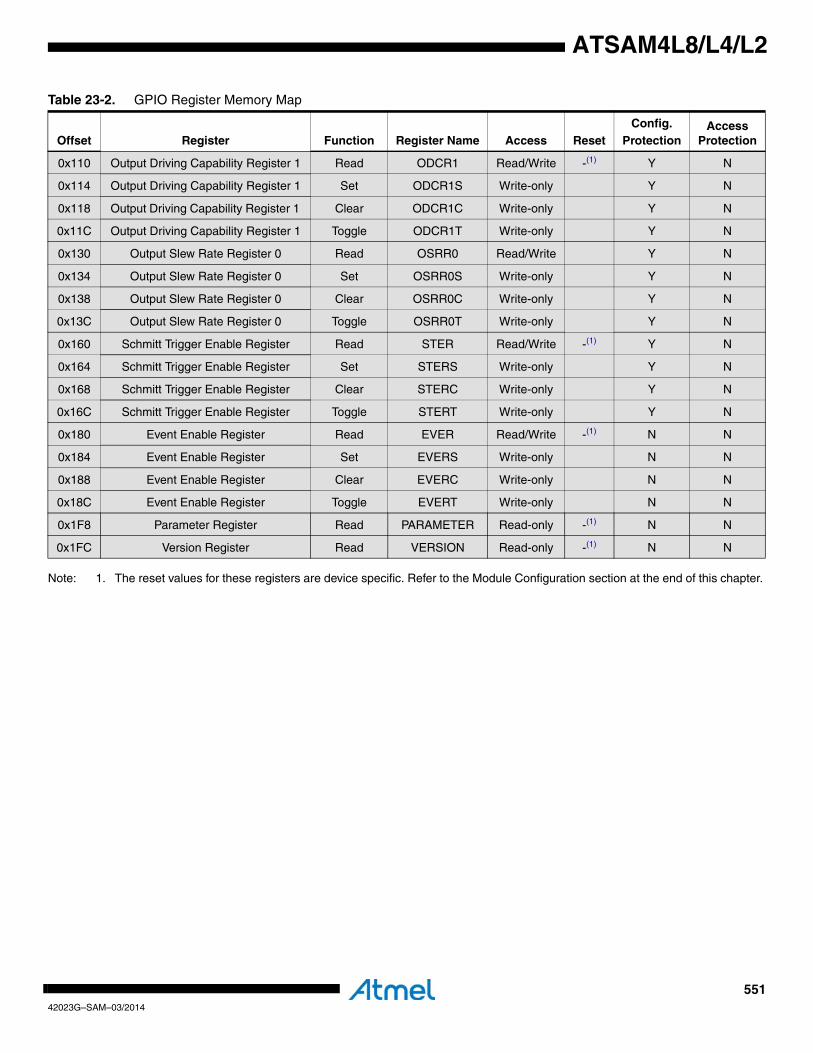
55142023G–SAM–03/2014
ATSAM4L8/L4/L2
Note: 1. The reset values for these registers are device specific. Refer to the Module Configuration section at the end of this chapter.
0x110 Output Driving Capability Register 1 Read ODCR1 Read/Write -(1) Y N
0x114 Output Driving Capability Register 1 Set ODCR1S Write-only Y N
0x118 Output Driving Capability Register 1 Clear ODCR1C Write-only Y N
0x11C Output Driving Capability Register 1 Toggle ODCR1T Write-only Y N
0x130 Output Slew Rate Register 0 Read OSRR0 Read/Write Y N
0x134 Output Slew Rate Register 0 Set OSRR0S Write-only Y N
0x138 Output Slew Rate Register 0 Clear OSRR0C Write-only Y N
0x13C Output Slew Rate Register 0 Toggle OSRR0T Write-only Y N
0x160 Schmitt Trigger Enable Register Read STER Read/Write -(1) Y N
0x164 Schmitt Trigger Enable Register Set STERS Write-only Y N
0x168 Schmitt Trigger Enable Register Clear STERC Write-only Y N
0x16C Schmitt Trigger Enable Register Toggle STERT Write-only Y N
0x180 Event Enable Register Read EVER Read/Write -(1) N N
0x184 Event Enable Register Set EVERS Write-only N N
0x188 Event Enable Register Clear EVERC Write-only N N
0x18C Event Enable Register Toggle EVERT Write-only N N
0x1F8 Parameter Register Read PARAMETER Read-only -(1) N N
0x1FC Version Register Read VERSION Read-only -(1) N N
Table 23-2. GPIO Register Memory Map
Offset Register Function Register Name Access ResetConfig.
ProtectionAccess
Protection
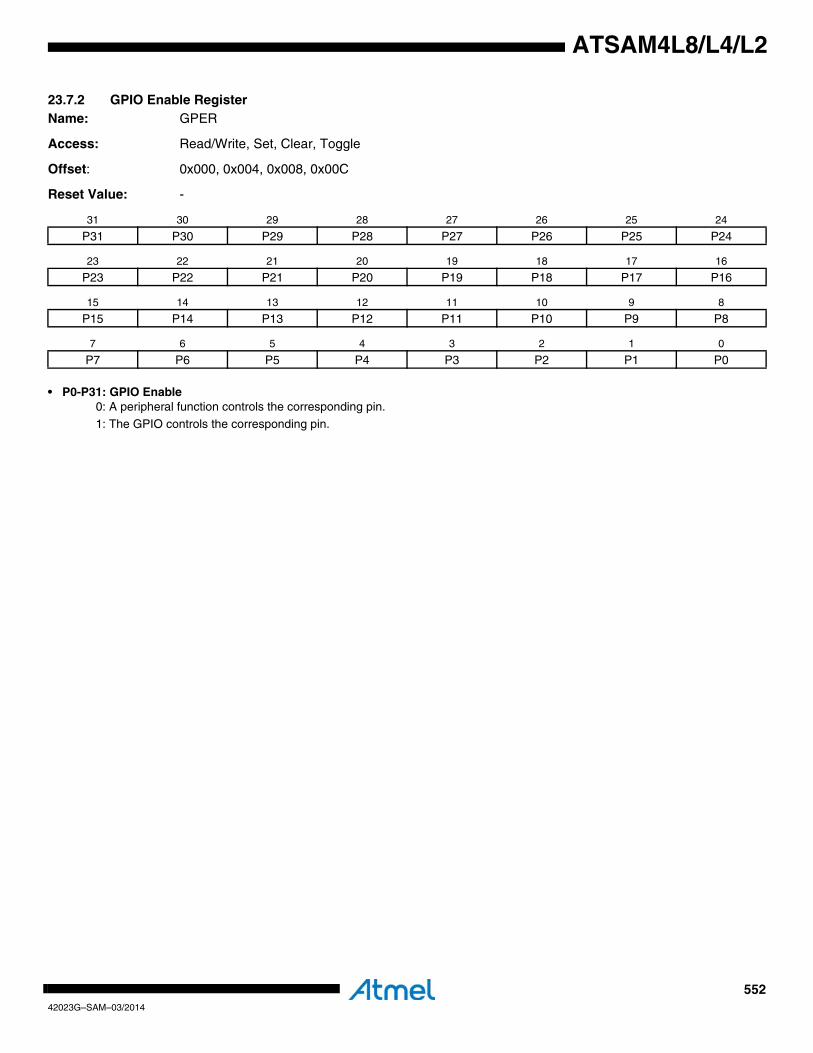
55242023G–SAM–03/2014
ATSAM4L8/L4/L2
23.7.2 GPIO Enable RegisterName: GPER
Access: Read/Write, Set, Clear, Toggle
Offset: 0x000, 0x004, 0x008, 0x00C
Reset Value: -
• P0-P31: GPIO Enable0: A peripheral function controls the corresponding pin.
1: The GPIO controls the corresponding pin.
31 30 29 28 27 26 25 24
P31 P30 P29 P28 P27 P26 P25 P24
23 22 21 20 19 18 17 16
P23 P22 P21 P20 P19 P18 P17 P16
15 14 13 12 11 10 9 8
P15 P14 P13 P12 P11 P10 P9 P8
7 6 5 4 3 2 1 0
P7 P6 P5 P4 P3 P2 P1 P0

55342023G–SAM–03/2014
ATSAM4L8/L4/L2
23.7.3 Peripheral Mux Register 0Name: PMR0
Access: Read/Write, Set, Clear, Toggle
Offset: 0x010, 0x014, 0x018, 0x01C
Reset Value: -
• P0-31: Peripheral Multiplexer Select bit 0
31 30 29 28 27 26 25 24
P31 P30 P29 P28 P27 P26 P25 P24
23 22 21 20 19 18 17 16
P23 P22 P21 P20 P19 P18 P17 P16
15 14 13 12 11 10 9 8
P15 P14 P13 P12 P11 P10 P9 P8
7 6 5 4 3 2 1 0
P7 P6 P5 P4 P3 P2 P1 P0
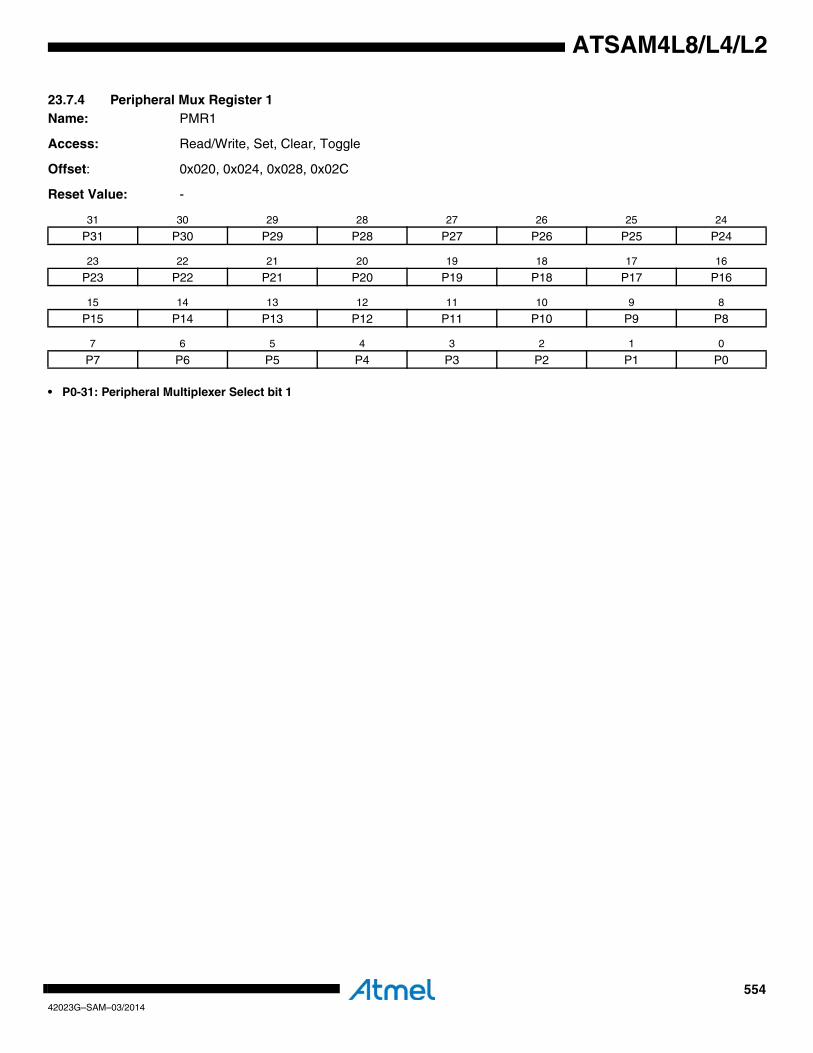
55442023G–SAM–03/2014
ATSAM4L8/L4/L2
23.7.4 Peripheral Mux Register 1Name: PMR1
Access: Read/Write, Set, Clear, Toggle
Offset: 0x020, 0x024, 0x028, 0x02C
Reset Value: -
• P0-31: Peripheral Multiplexer Select bit 1
31 30 29 28 27 26 25 24
P31 P30 P29 P28 P27 P26 P25 P24
23 22 21 20 19 18 17 16
P23 P22 P21 P20 P19 P18 P17 P16
15 14 13 12 11 10 9 8
P15 P14 P13 P12 P11 P10 P9 P8
7 6 5 4 3 2 1 0
P7 P6 P5 P4 P3 P2 P1 P0
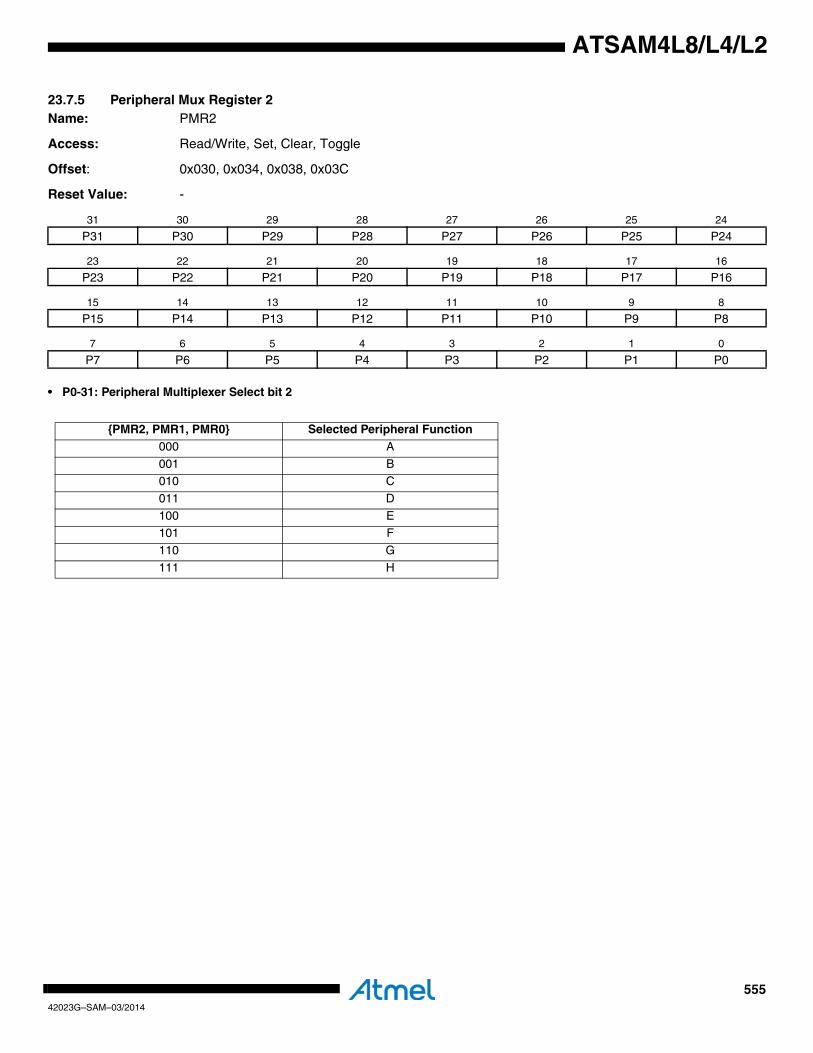
55542023G–SAM–03/2014
ATSAM4L8/L4/L2
23.7.5 Peripheral Mux Register 2Name: PMR2
Access: Read/Write, Set, Clear, Toggle
Offset: 0x030, 0x034, 0x038, 0x03C
Reset Value: -
• P0-31: Peripheral Multiplexer Select bit 2
31 30 29 28 27 26 25 24
P31 P30 P29 P28 P27 P26 P25 P24
23 22 21 20 19 18 17 16
P23 P22 P21 P20 P19 P18 P17 P16
15 14 13 12 11 10 9 8
P15 P14 P13 P12 P11 P10 P9 P8
7 6 5 4 3 2 1 0
P7 P6 P5 P4 P3 P2 P1 P0
{PMR2, PMR1, PMR0} Selected Peripheral Function000 A
001 B010 C
011 D
100 E101 F
110 G
111 H
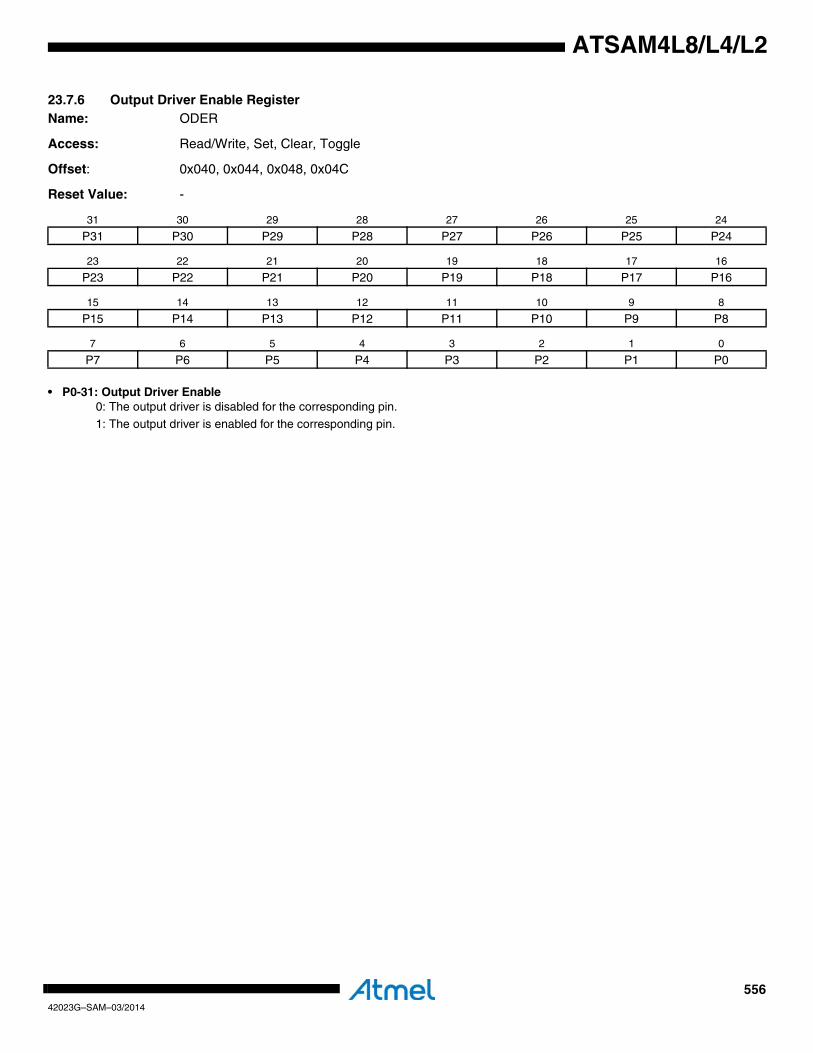
55642023G–SAM–03/2014
ATSAM4L8/L4/L2
23.7.6 Output Driver Enable RegisterName: ODER
Access: Read/Write, Set, Clear, Toggle
Offset: 0x040, 0x044, 0x048, 0x04C
Reset Value: -
• P0-31: Output Driver Enable0: The output driver is disabled for the corresponding pin.
1: The output driver is enabled for the corresponding pin.
31 30 29 28 27 26 25 24
P31 P30 P29 P28 P27 P26 P25 P24
23 22 21 20 19 18 17 16
P23 P22 P21 P20 P19 P18 P17 P16
15 14 13 12 11 10 9 8
P15 P14 P13 P12 P11 P10 P9 P8
7 6 5 4 3 2 1 0
P7 P6 P5 P4 P3 P2 P1 P0
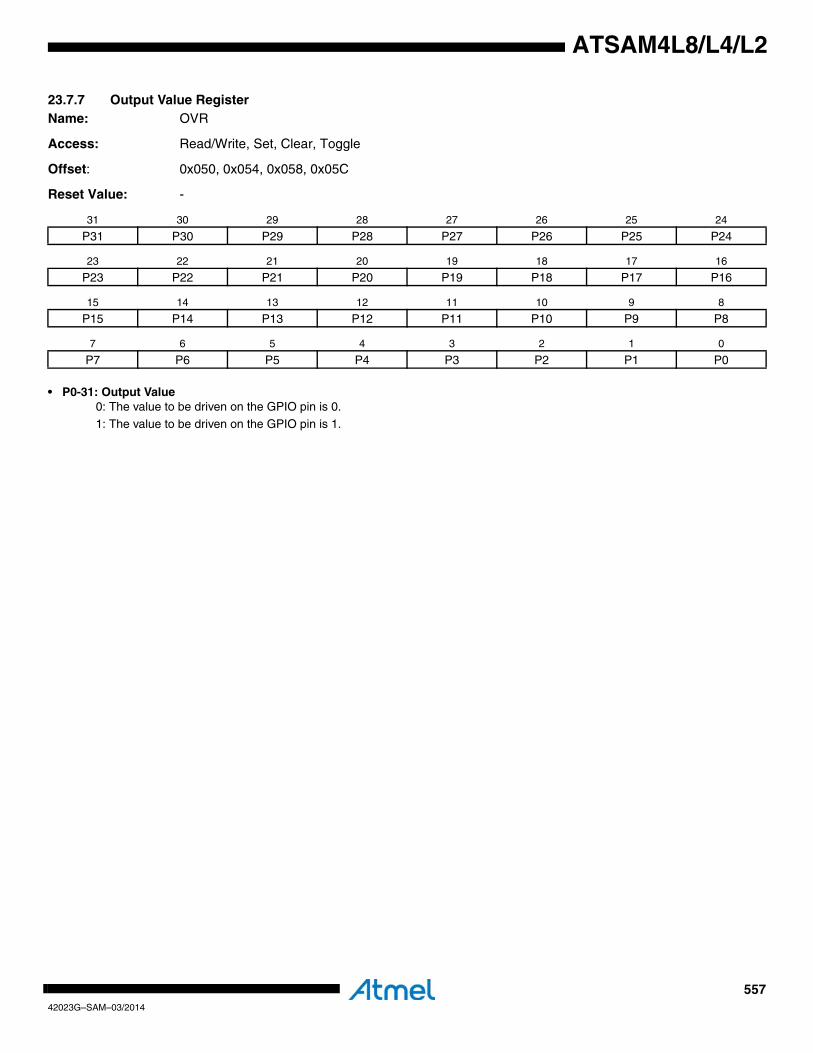
55742023G–SAM–03/2014
ATSAM4L8/L4/L2
23.7.7 Output Value RegisterName: OVR
Access: Read/Write, Set, Clear, Toggle
Offset: 0x050, 0x054, 0x058, 0x05C
Reset Value: -
• P0-31: Output Value0: The value to be driven on the GPIO pin is 0.
1: The value to be driven on the GPIO pin is 1.
31 30 29 28 27 26 25 24
P31 P30 P29 P28 P27 P26 P25 P24
23 22 21 20 19 18 17 16
P23 P22 P21 P20 P19 P18 P17 P16
15 14 13 12 11 10 9 8
P15 P14 P13 P12 P11 P10 P9 P8
7 6 5 4 3 2 1 0
P7 P6 P5 P4 P3 P2 P1 P0
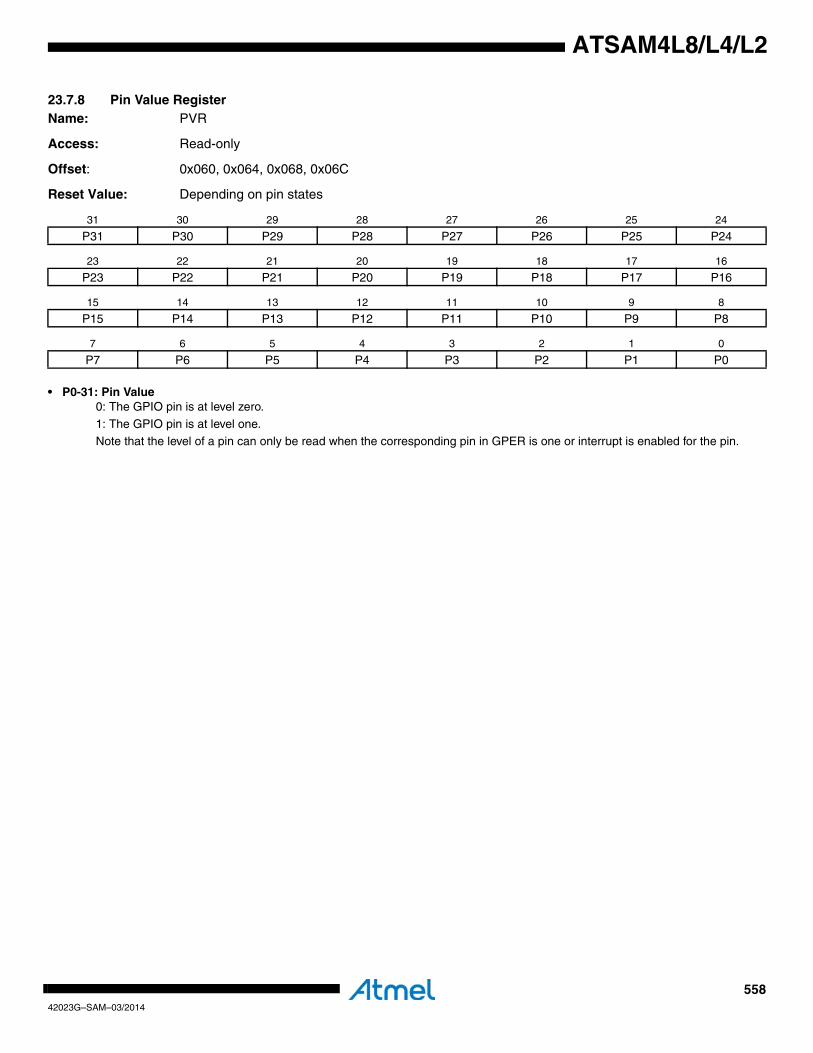
55842023G–SAM–03/2014
ATSAM4L8/L4/L2
23.7.8 Pin Value RegisterName: PVR
Access: Read-only
Offset: 0x060, 0x064, 0x068, 0x06C
Reset Value: Depending on pin states
• P0-31: Pin Value0: The GPIO pin is at level zero.
1: The GPIO pin is at level one.Note that the level of a pin can only be read when the corresponding pin in GPER is one or interrupt is enabled for the pin.
31 30 29 28 27 26 25 24
P31 P30 P29 P28 P27 P26 P25 P24
23 22 21 20 19 18 17 16
P23 P22 P21 P20 P19 P18 P17 P16
15 14 13 12 11 10 9 8
P15 P14 P13 P12 P11 P10 P9 P8
7 6 5 4 3 2 1 0
P7 P6 P5 P4 P3 P2 P1 P0
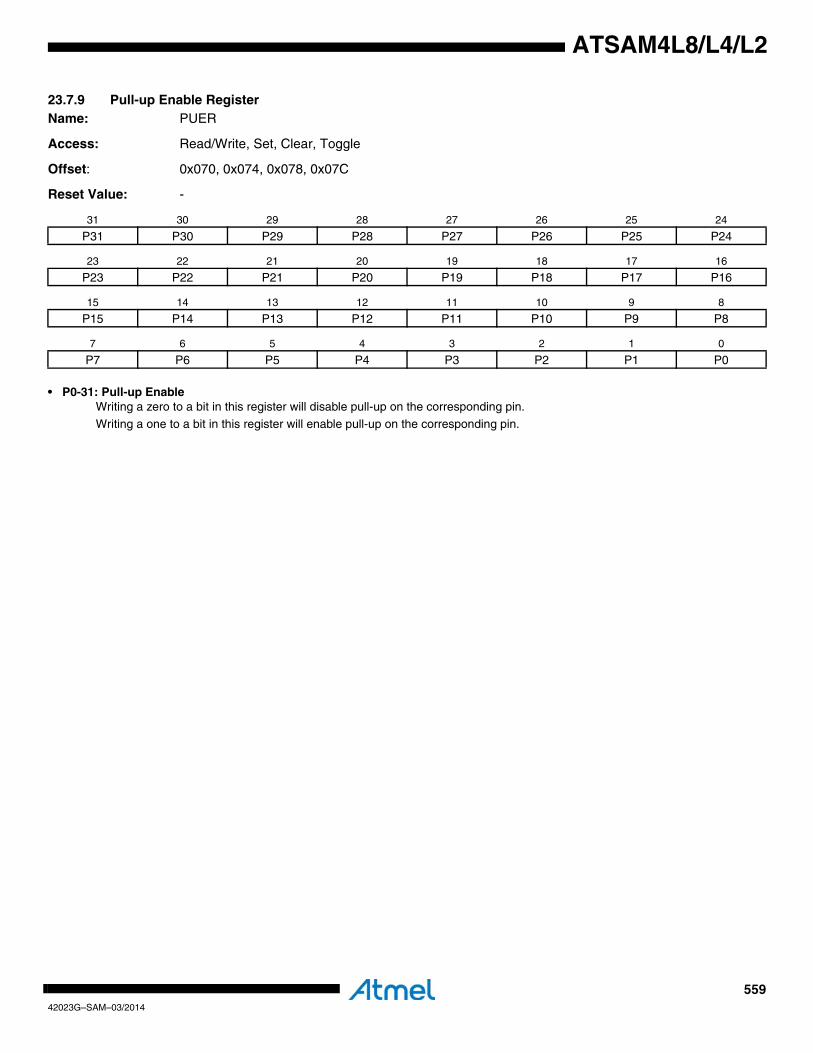
55942023G–SAM–03/2014
ATSAM4L8/L4/L2
23.7.9 Pull-up Enable RegisterName: PUER
Access: Read/Write, Set, Clear, Toggle
Offset: 0x070, 0x074, 0x078, 0x07C
Reset Value: -
• P0-31: Pull-up EnableWriting a zero to a bit in this register will disable pull-up on the corresponding pin.
Writing a one to a bit in this register will enable pull-up on the corresponding pin.
31 30 29 28 27 26 25 24
P31 P30 P29 P28 P27 P26 P25 P24
23 22 21 20 19 18 17 16
P23 P22 P21 P20 P19 P18 P17 P16
15 14 13 12 11 10 9 8
P15 P14 P13 P12 P11 P10 P9 P8
7 6 5 4 3 2 1 0
P7 P6 P5 P4 P3 P2 P1 P0
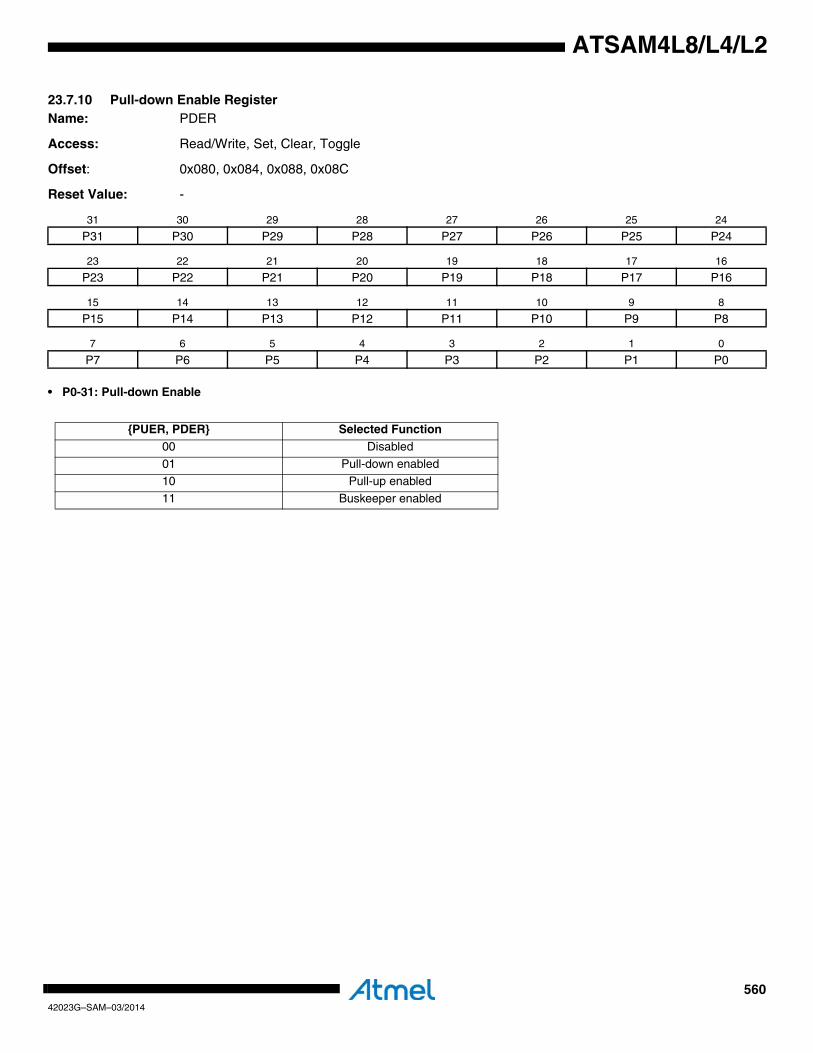
56042023G–SAM–03/2014
ATSAM4L8/L4/L2
23.7.10 Pull-down Enable RegisterName: PDER
Access: Read/Write, Set, Clear, Toggle
Offset: 0x080, 0x084, 0x088, 0x08C
Reset Value: -
• P0-31: Pull-down Enable
31 30 29 28 27 26 25 24
P31 P30 P29 P28 P27 P26 P25 P24
23 22 21 20 19 18 17 16
P23 P22 P21 P20 P19 P18 P17 P16
15 14 13 12 11 10 9 8
P15 P14 P13 P12 P11 P10 P9 P8
7 6 5 4 3 2 1 0
P7 P6 P5 P4 P3 P2 P1 P0
{PUER, PDER} Selected Function00 Disabled
01 Pull-down enabled10 Pull-up enabled
11 Buskeeper enabled

56142023G–SAM–03/2014
ATSAM4L8/L4/L2
23.7.11 Interrupt Enable RegisterName: IER
Access: Read/Write, Set, Clear, Toggle
Offset: 0x090, 0x094, 0x098, 0x09C
Reset Value: -
• P0-31: Interrupt Enable0: Interrupt is disabled for the corresponding pin.
1; Interrupt is enabled for the corresponding pin.
31 30 29 28 27 26 25 24
P31 P30 P29 P28 P27 P26 P25 P24
23 22 21 20 19 18 17 16
P23 P22 P21 P20 P19 P18 P17 P16
15 14 13 12 11 10 9 8
P15 P14 P13 P12 P11 P10 P9 P8
7 6 5 4 3 2 1 0
P7 P6 P5 P4 P3 P2 P1 P0
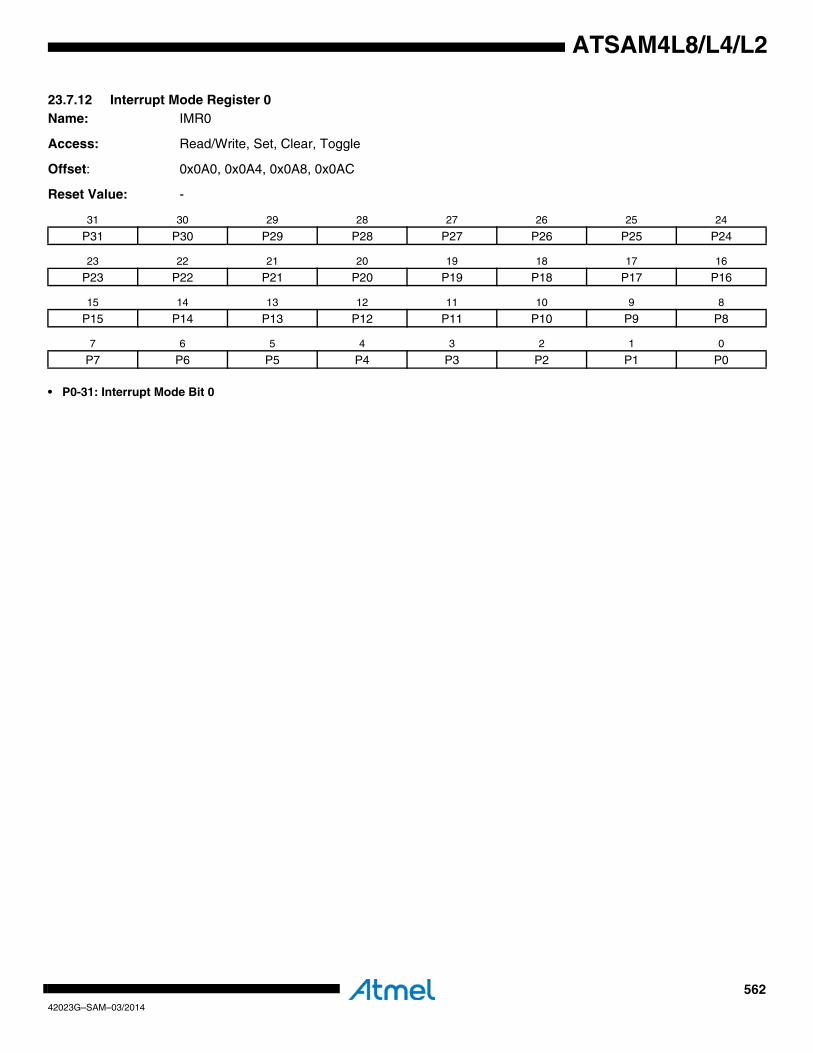
56242023G–SAM–03/2014
ATSAM4L8/L4/L2
23.7.12 Interrupt Mode Register 0Name: IMR0
Access: Read/Write, Set, Clear, Toggle
Offset: 0x0A0, 0x0A4, 0x0A8, 0x0AC
Reset Value: -
• P0-31: Interrupt Mode Bit 0
31 30 29 28 27 26 25 24
P31 P30 P29 P28 P27 P26 P25 P24
23 22 21 20 19 18 17 16
P23 P22 P21 P20 P19 P18 P17 P16
15 14 13 12 11 10 9 8
P15 P14 P13 P12 P11 P10 P9 P8
7 6 5 4 3 2 1 0
P7 P6 P5 P4 P3 P2 P1 P0
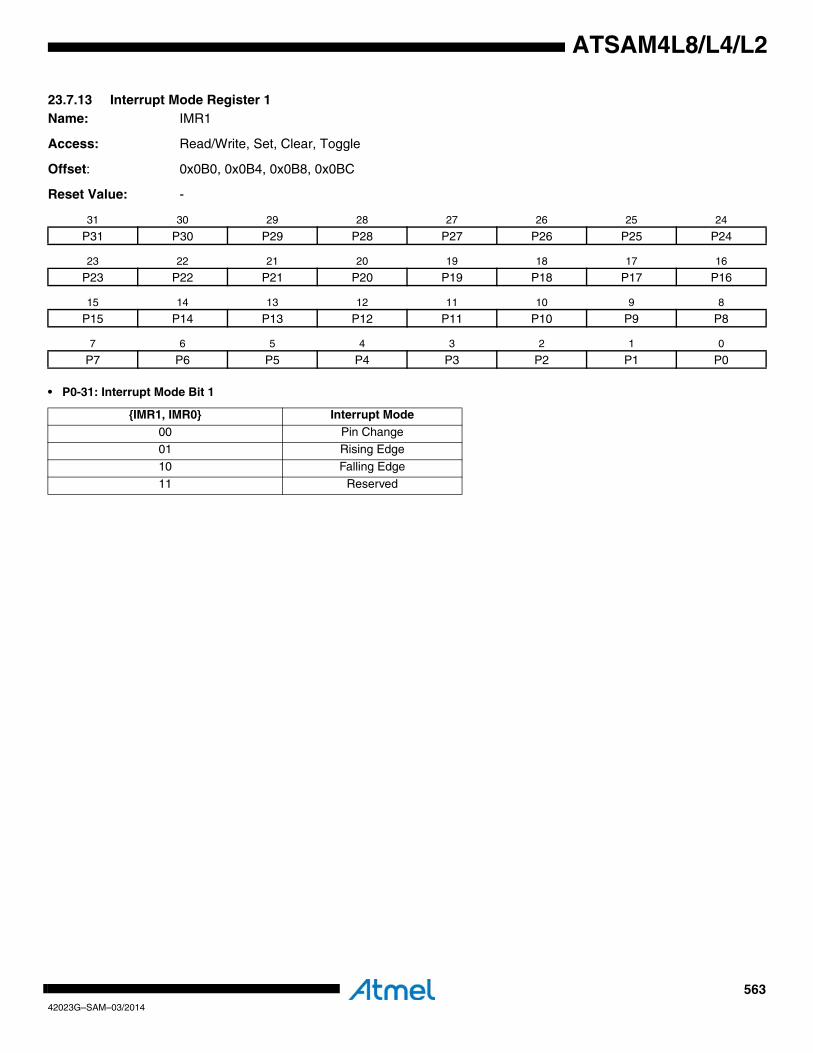
56342023G–SAM–03/2014
ATSAM4L8/L4/L2
23.7.13 Interrupt Mode Register 1Name: IMR1
Access: Read/Write, Set, Clear, Toggle
Offset: 0x0B0, 0x0B4, 0x0B8, 0x0BC
Reset Value: -
• P0-31: Interrupt Mode Bit 1
31 30 29 28 27 26 25 24
P31 P30 P29 P28 P27 P26 P25 P24
23 22 21 20 19 18 17 16
P23 P22 P21 P20 P19 P18 P17 P16
15 14 13 12 11 10 9 8
P15 P14 P13 P12 P11 P10 P9 P8
7 6 5 4 3 2 1 0
P7 P6 P5 P4 P3 P2 P1 P0
{IMR1, IMR0} Interrupt Mode00 Pin Change01 Rising Edge
10 Falling Edge
11 Reserved
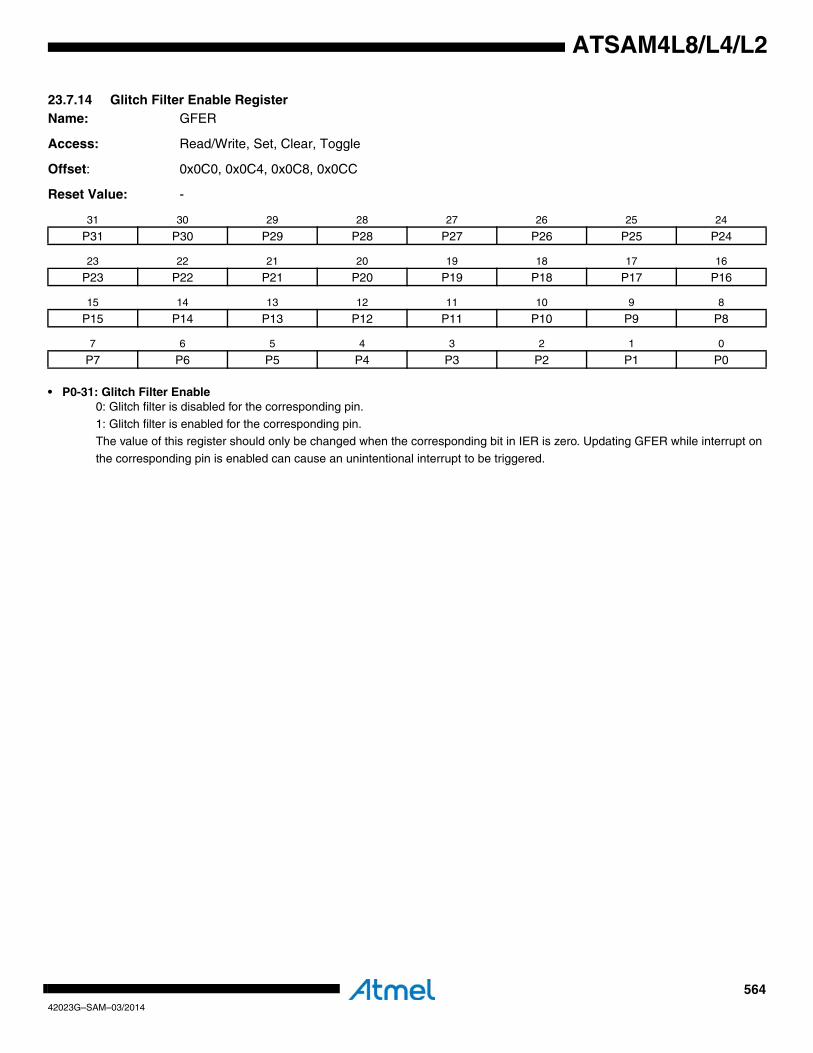
56442023G–SAM–03/2014
ATSAM4L8/L4/L2
23.7.14 Glitch Filter Enable RegisterName: GFER
Access: Read/Write, Set, Clear, Toggle
Offset: 0x0C0, 0x0C4, 0x0C8, 0x0CC
Reset Value: -
• P0-31: Glitch Filter Enable0: Glitch filter is disabled for the corresponding pin.
1: Glitch filter is enabled for the corresponding pin.The value of this register should only be changed when the corresponding bit in IER is zero. Updating GFER while interrupt on
the corresponding pin is enabled can cause an unintentional interrupt to be triggered.
31 30 29 28 27 26 25 24
P31 P30 P29 P28 P27 P26 P25 P24
23 22 21 20 19 18 17 16
P23 P22 P21 P20 P19 P18 P17 P16
15 14 13 12 11 10 9 8
P15 P14 P13 P12 P11 P10 P9 P8
7 6 5 4 3 2 1 0
P7 P6 P5 P4 P3 P2 P1 P0
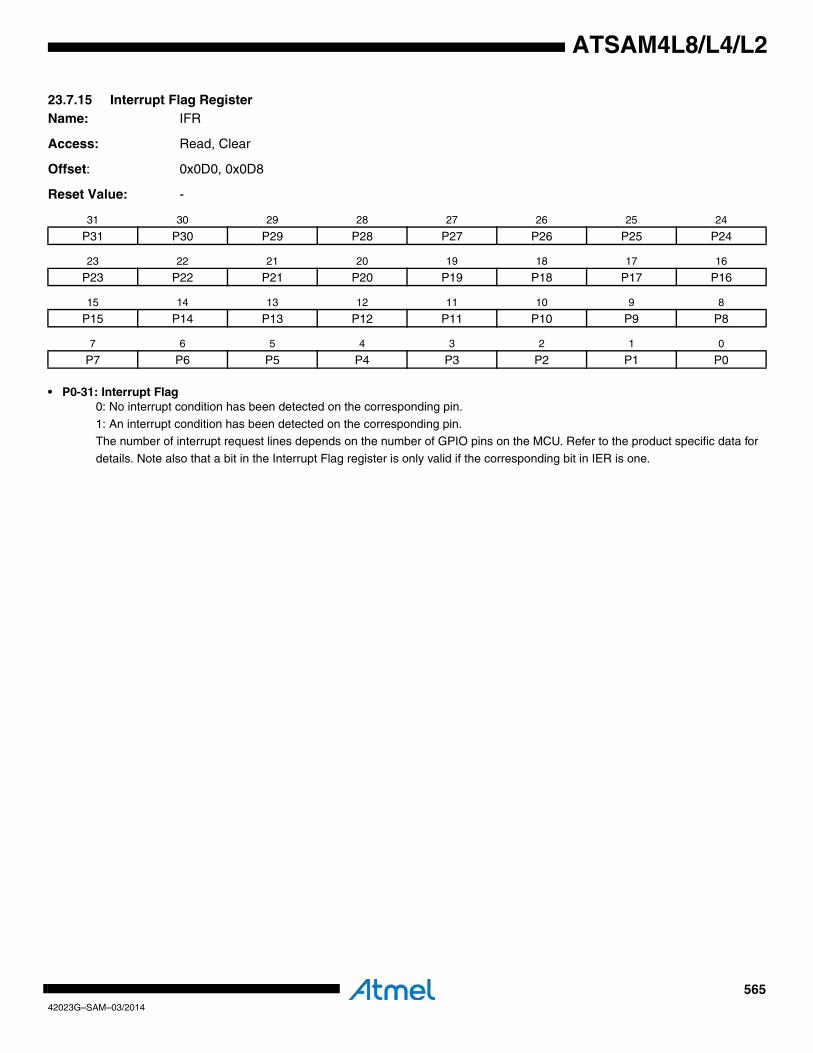
56542023G–SAM–03/2014
ATSAM4L8/L4/L2
23.7.15 Interrupt Flag RegisterName: IFR
Access: Read, Clear
Offset: 0x0D0, 0x0D8
Reset Value: -
• P0-31: Interrupt Flag0: No interrupt condition has been detected on the corresponding pin.
1: An interrupt condition has been detected on the corresponding pin.The number of interrupt request lines depends on the number of GPIO pins on the MCU. Refer to the product specific data for
details. Note also that a bit in the Interrupt Flag register is only valid if the corresponding bit in IER is one.
31 30 29 28 27 26 25 24
P31 P30 P29 P28 P27 P26 P25 P24
23 22 21 20 19 18 17 16
P23 P22 P21 P20 P19 P18 P17 P16
15 14 13 12 11 10 9 8
P15 P14 P13 P12 P11 P10 P9 P8
7 6 5 4 3 2 1 0
P7 P6 P5 P4 P3 P2 P1 P0
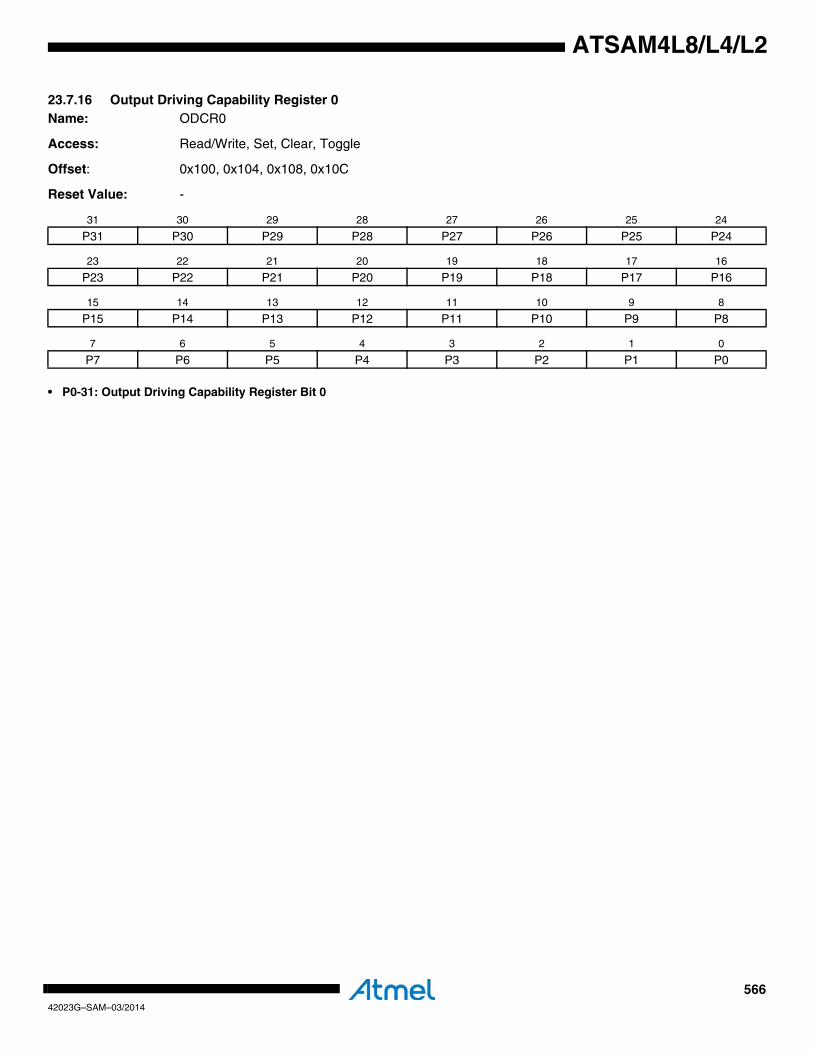
56642023G–SAM–03/2014
ATSAM4L8/L4/L2
23.7.16 Output Driving Capability Register 0Name: ODCR0
Access: Read/Write, Set, Clear, Toggle
Offset: 0x100, 0x104, 0x108, 0x10C
Reset Value: -
• P0-31: Output Driving Capability Register Bit 0
31 30 29 28 27 26 25 24
P31 P30 P29 P28 P27 P26 P25 P24
23 22 21 20 19 18 17 16
P23 P22 P21 P20 P19 P18 P17 P16
15 14 13 12 11 10 9 8
P15 P14 P13 P12 P11 P10 P9 P8
7 6 5 4 3 2 1 0
P7 P6 P5 P4 P3 P2 P1 P0
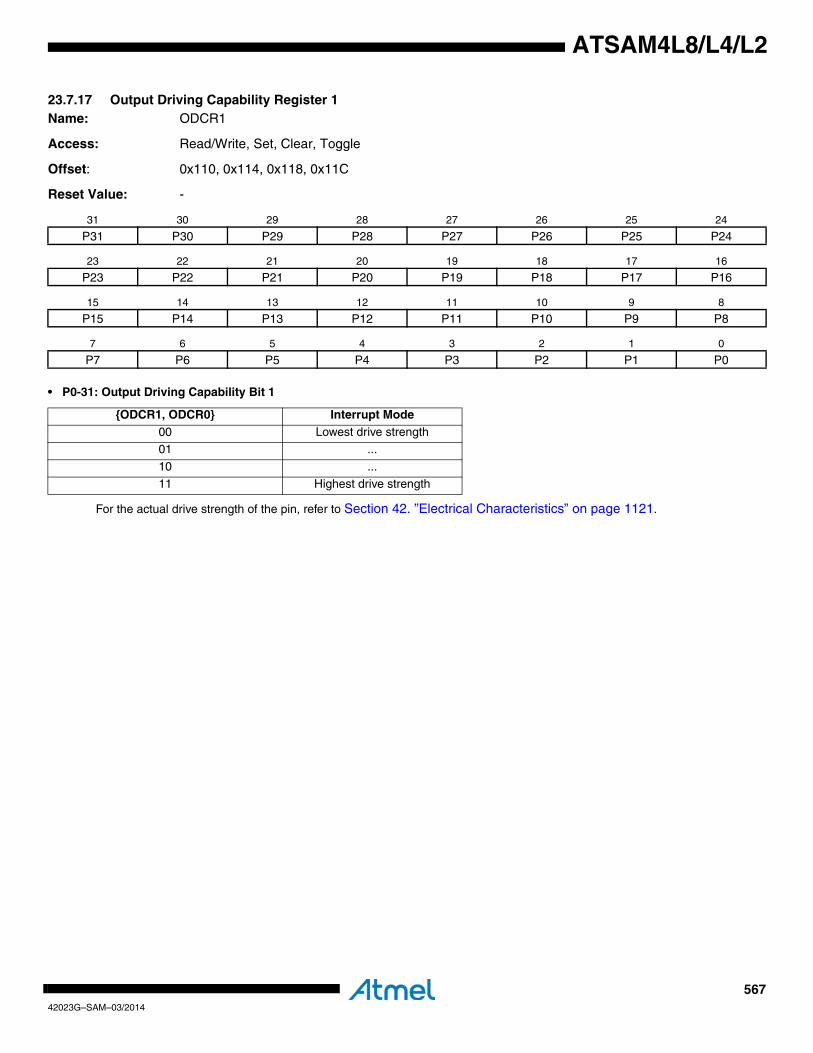
56742023G–SAM–03/2014
ATSAM4L8/L4/L2
23.7.17 Output Driving Capability Register 1Name: ODCR1
Access: Read/Write, Set, Clear, Toggle
Offset: 0x110, 0x114, 0x118, 0x11C
Reset Value: -
• P0-31: Output Driving Capability Bit 1
For the actual drive strength of the pin, refer to Section 42. ”Electrical Characteristics” on page 1121.
31 30 29 28 27 26 25 24
P31 P30 P29 P28 P27 P26 P25 P24
23 22 21 20 19 18 17 16
P23 P22 P21 P20 P19 P18 P17 P16
15 14 13 12 11 10 9 8
P15 P14 P13 P12 P11 P10 P9 P8
7 6 5 4 3 2 1 0
P7 P6 P5 P4 P3 P2 P1 P0
{ODCR1, ODCR0} Interrupt Mode00 Lowest drive strength01 ...
10 ...
11 Highest drive strength
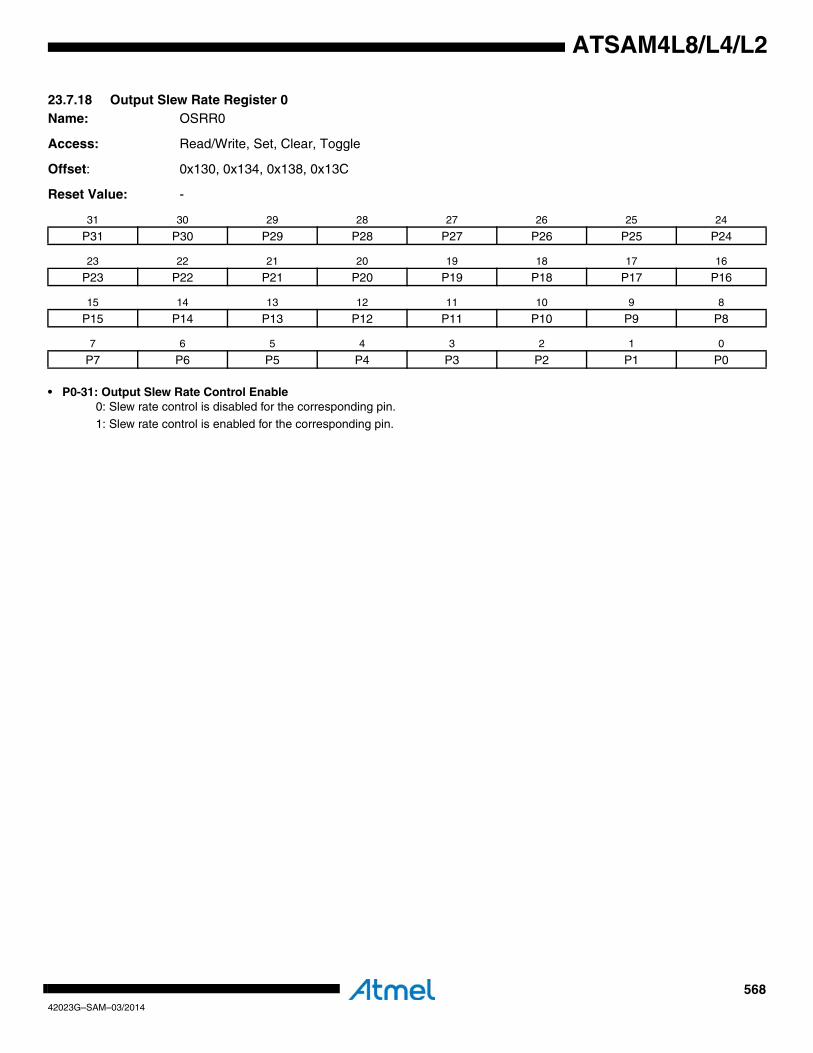
56842023G–SAM–03/2014
ATSAM4L8/L4/L2
23.7.18 Output Slew Rate Register 0Name: OSRR0
Access: Read/Write, Set, Clear, Toggle
Offset: 0x130, 0x134, 0x138, 0x13C
Reset Value: -
• P0-31: Output Slew Rate Control Enable0: Slew rate control is disabled for the corresponding pin.
1: Slew rate control is enabled for the corresponding pin.
31 30 29 28 27 26 25 24
P31 P30 P29 P28 P27 P26 P25 P24
23 22 21 20 19 18 17 16
P23 P22 P21 P20 P19 P18 P17 P16
15 14 13 12 11 10 9 8
P15 P14 P13 P12 P11 P10 P9 P8
7 6 5 4 3 2 1 0
P7 P6 P5 P4 P3 P2 P1 P0

56942023G–SAM–03/2014
ATSAM4L8/L4/L2
23.7.19 Schmitt Trigger Enable RegisterName: STER
Access: Read/Write, Set, Clear, Toggle
Offset: 0x160, 0x164, 0x168, 0x16C
Reset Value: -
• P0-31: Schmitt Trigger Enable0: Schmitt trigger is disabled for the corresponding pin.
1: Schmitt trigger is enabled for the corresponding pin.
31 30 29 28 27 26 25 24
P31 P30 P29 P28 P27 P26 P25 P24
23 22 21 20 19 18 17 16
P23 P22 P21 P20 P19 P18 P17 P16
15 14 13 12 11 10 9 8
P15 P14 P13 P12 P11 P10 P9 P8
7 6 5 4 3 2 1 0
P7 P6 P5 P4 P3 P2 P1 P0
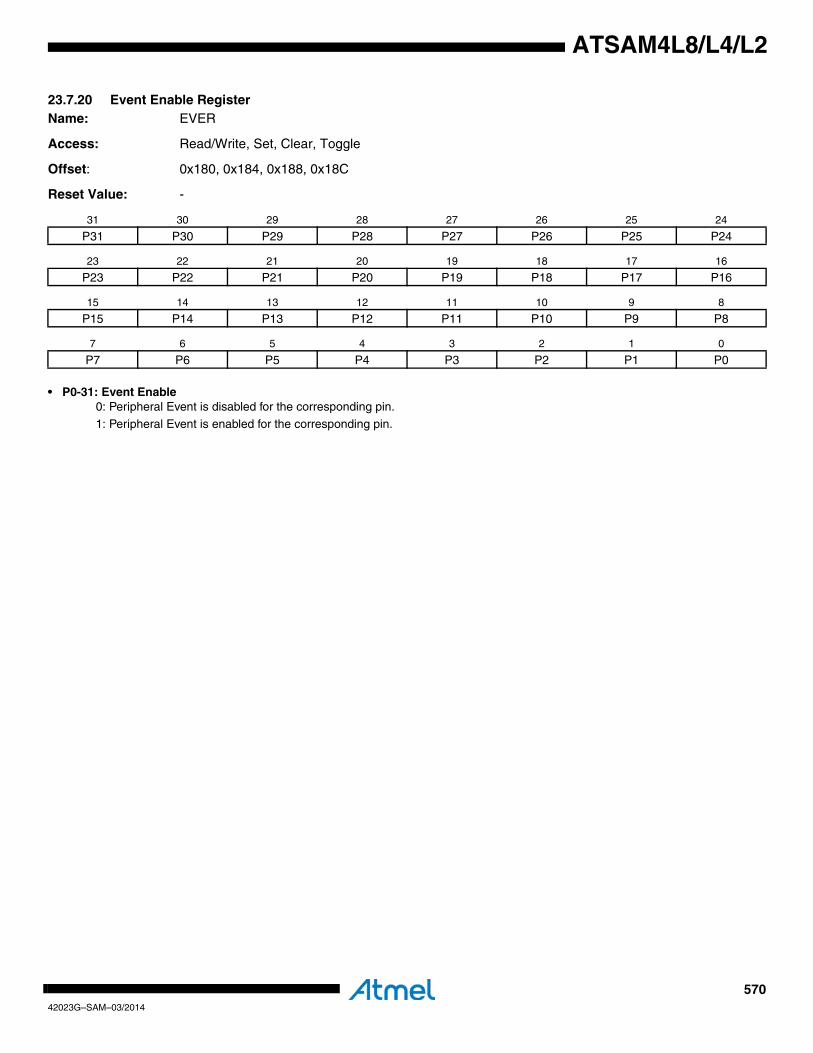
57042023G–SAM–03/2014
ATSAM4L8/L4/L2
23.7.20 Event Enable RegisterName: EVER
Access: Read/Write, Set, Clear, Toggle
Offset: 0x180, 0x184, 0x188, 0x18C
Reset Value: -
• P0-31: Event Enable0: Peripheral Event is disabled for the corresponding pin.
1: Peripheral Event is enabled for the corresponding pin.
31 30 29 28 27 26 25 24
P31 P30 P29 P28 P27 P26 P25 P24
23 22 21 20 19 18 17 16
P23 P22 P21 P20 P19 P18 P17 P16
15 14 13 12 11 10 9 8
P15 P14 P13 P12 P11 P10 P9 P8
7 6 5 4 3 2 1 0
P7 P6 P5 P4 P3 P2 P1 P0
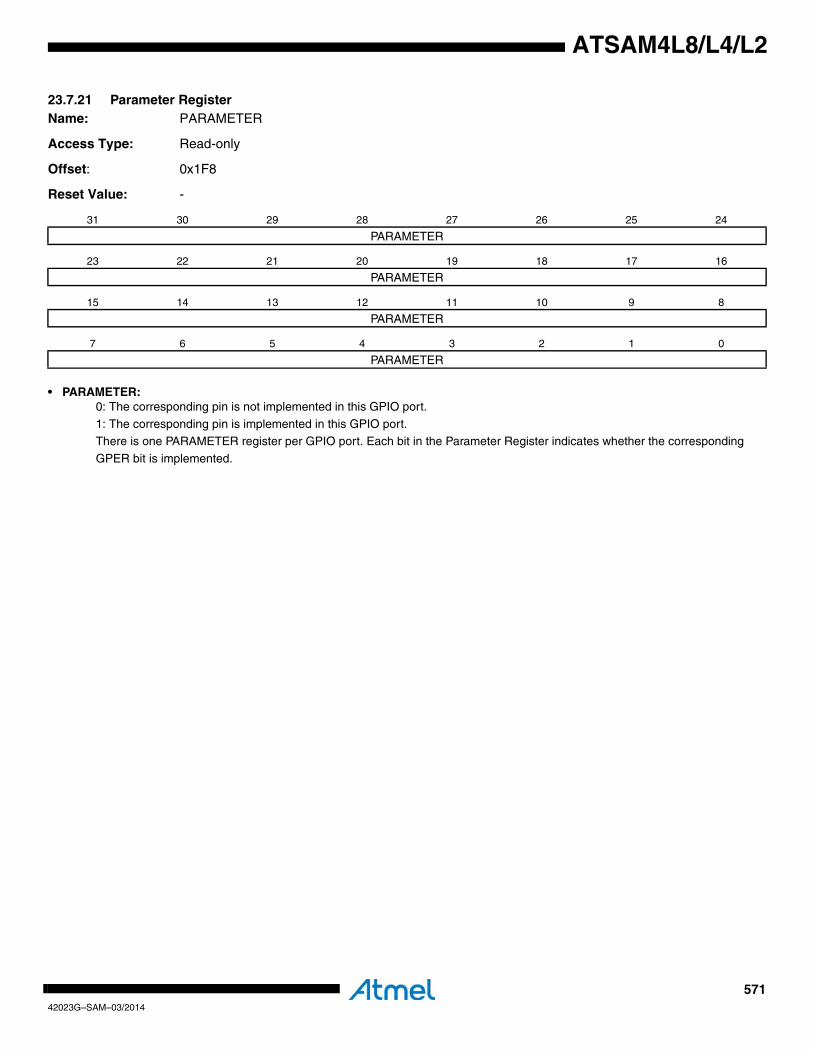
57142023G–SAM–03/2014
ATSAM4L8/L4/L2
23.7.21 Parameter RegisterName: PARAMETER
Access Type: Read-only
Offset: 0x1F8
Reset Value: -
• PARAMETER: 0: The corresponding pin is not implemented in this GPIO port.
1: The corresponding pin is implemented in this GPIO port.There is one PARAMETER register per GPIO port. Each bit in the Parameter Register indicates whether the corresponding
GPER bit is implemented.
31 30 29 28 27 26 25 24
PARAMETER
23 22 21 20 19 18 17 16
PARAMETER
15 14 13 12 11 10 9 8
PARAMETER
7 6 5 4 3 2 1 0
PARAMETER
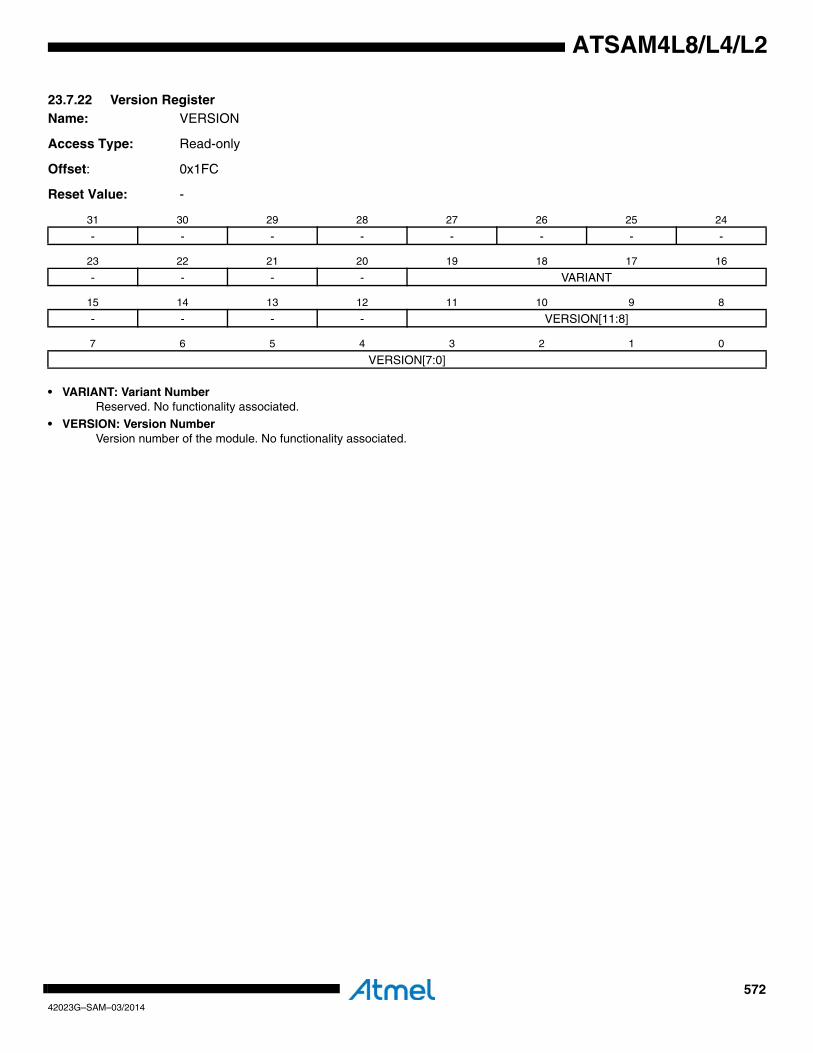
57242023G–SAM–03/2014
ATSAM4L8/L4/L2
23.7.22 Version RegisterName: VERSION
Access Type: Read-only
Offset: 0x1FC
Reset Value: -
• VARIANT: Variant NumberReserved. No functionality associated.
• VERSION: Version NumberVersion number of the module. No functionality associated.
31 30 29 28 27 26 25 24
- - - - - - - -
23 22 21 20 19 18 17 16
- - - - VARIANT
15 14 13 12 11 10 9 8
- - - - VERSION[11:8]
7 6 5 4 3 2 1 0
VERSION[7:0]
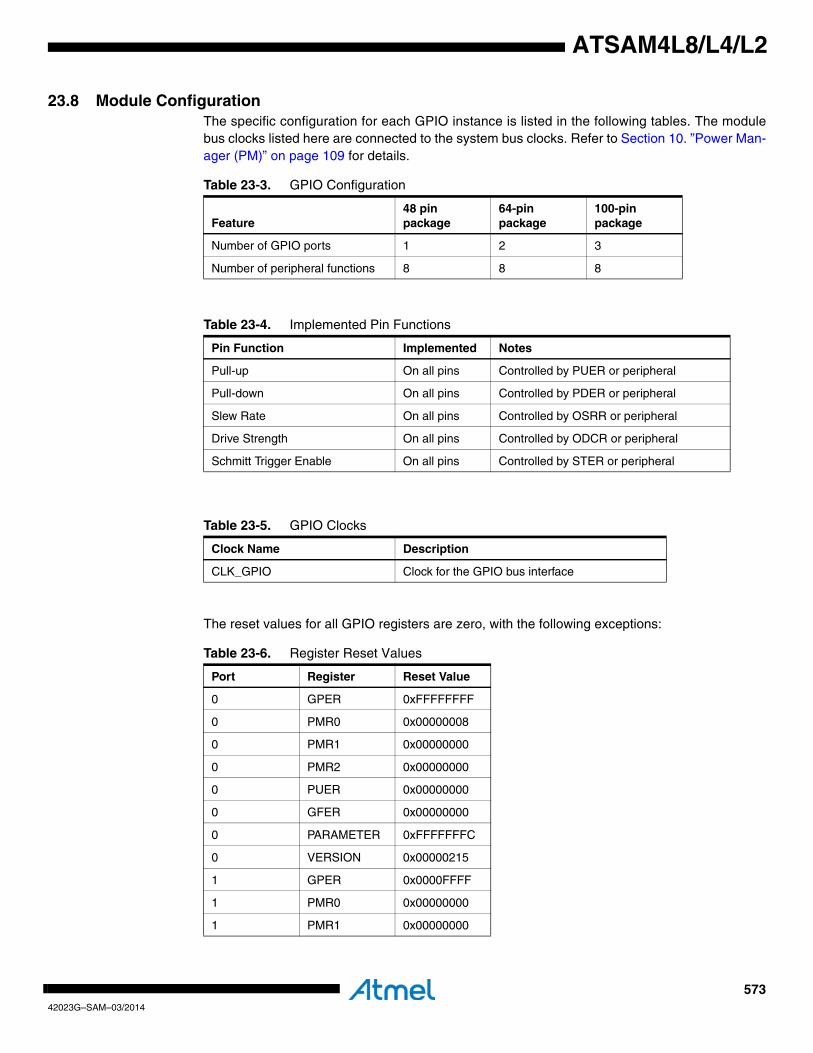
57342023G–SAM–03/2014
ATSAM4L8/L4/L2
23.8 Module ConfigurationThe specific configuration for each GPIO instance is listed in the following tables. The modulebus clocks listed here are connected to the system bus clocks. Refer to Section 10. ”Power Man-ager (PM)” on page 109 for details.
The reset values for all GPIO registers are zero, with the following exceptions:
Table 23-3. GPIO Configuration
Feature48 pin package
64-pin package
100-pin package
Number of GPIO ports 1 2 3
Number of peripheral functions 8 8 8
Table 23-4. Implemented Pin Functions
Pin Function Implemented Notes
Pull-up On all pins Controlled by PUER or peripheral
Pull-down On all pins Controlled by PDER or peripheral
Slew Rate On all pins Controlled by OSRR or peripheral
Drive Strength On all pins Controlled by ODCR or peripheral
Schmitt Trigger Enable On all pins Controlled by STER or peripheral
Table 23-5. GPIO Clocks
Clock Name Description
CLK_GPIO Clock for the GPIO bus interface
Table 23-6. Register Reset Values
Port Register Reset Value
0 GPER 0xFFFFFFFF
0 PMR0 0x00000008
0 PMR1 0x00000000
0 PMR2 0x00000000
0 PUER 0x00000000
0 GFER 0x00000000
0 PARAMETER 0xFFFFFFFC
0 VERSION 0x00000215
1 GPER 0x0000FFFF
1 PMR0 0x00000000
1 PMR1 0x00000000
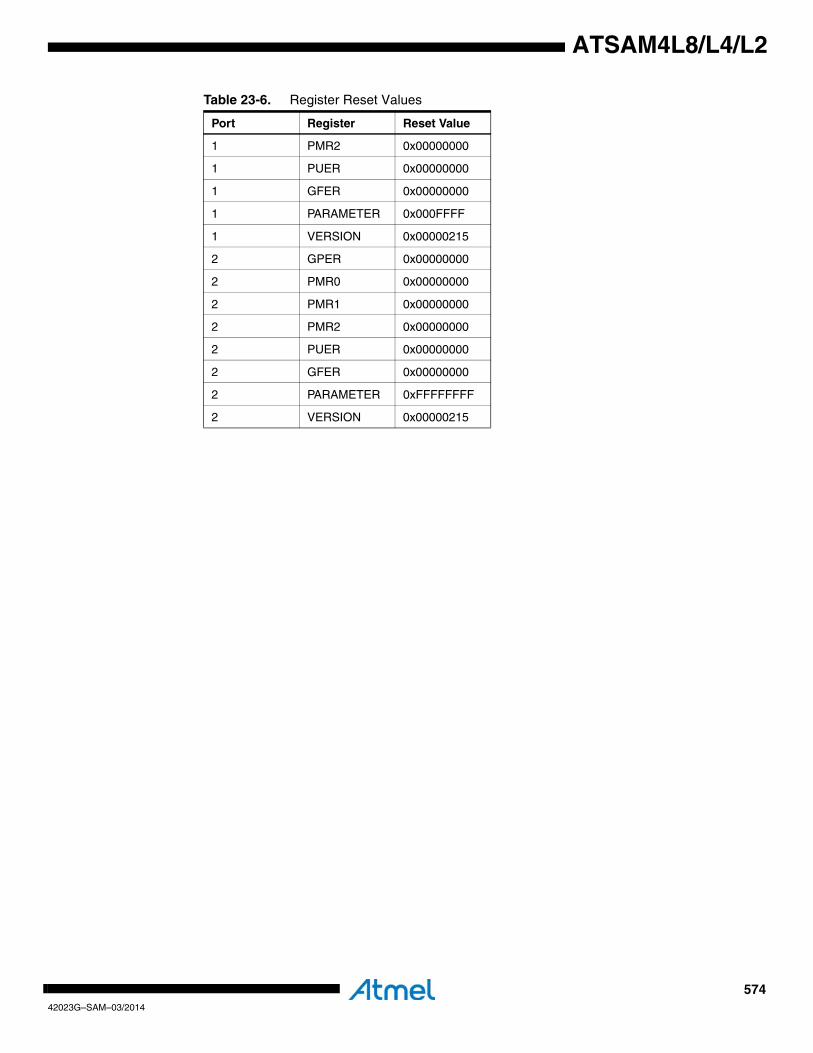
57442023G–SAM–03/2014
ATSAM4L8/L4/L2
1 PMR2 0x00000000
1 PUER 0x00000000
1 GFER 0x00000000
1 PARAMETER 0x000FFFF
1 VERSION 0x00000215
2 GPER 0x00000000
2 PMR0 0x00000000
2 PMR1 0x00000000
2 PMR2 0x00000000
2 PUER 0x00000000
2 GFER 0x00000000
2 PARAMETER 0xFFFFFFFF
2 VERSION 0x00000215
Table 23-6. Register Reset Values
Port Register Reset Value
57542023G–SAM–03/2014
ATSAM4L8/L4/L2
24. Universal Synchronous Asynchronous Receiver Transmitter (USART)Rev: 6.0.2.6
24.1 Features• Configurable baud rate generator• 5- to 9-bit full-duplex, synchronous and asynchronous, serial communication
– 1, 1.5, or 2 stop bits in asynchronous mode, and 1 or 2 in synchronous mode– Parity generation and error detection, with both normal and inverted data streams– Framing- and overrun error detection– MSB- or LSB-first– Optional break generation and detection– Receiver frequency oversampling by 8 or 16 times– Optional RTS-CTS hardware handshaking– Optional DTR-DSR-DCD-RI modem signal management– Receiver Time-out and transmitter Timeguard– Optional Multidrop mode with address generation and detection
• RS485 with line driver control• ISO7816, T=0 and T=1 protocols for Interfacing with smart cards
– Inverted data management, NACK handling, and customizable error counter• IrDA modulation and demodulation
– Communication at up to 115.2Kbit/s• SPI Mode
– Master or slave– Configurable serial clock phase and polarity– CLK SPI serial clock frequency up to a quarter of the CLK_USART internal clock frequency
• LIN Mode– Compliant with LIN 1.3 and LIN 2.0 specifications– Master or slave– Processing of Frames with up to 256 data bytes– Configurable response data length, optionally defined automatically by the Identifier– Self synchronization in slave node configuration– Automatic processing and verification of the “Break Field” and “Sync Field”– The “Break Field” is detected even if it is partially superimposed with a data byte– Optional, automatic identifier parity management– Optional, automatic checksum management– Supports both “Classic” and “Enhanced” checksum types– Full LIN error checking and reporting– Frame Slot Mode: the master allocates slots to scheduled frames automatically.– Wakeup signal generation
• Test Modes– Automatic echo, remote- and local loopback
• Supports two Peripheral DMA Controller channels– Buffer transfers without processor intervention
24.2 OverviewThe Universal Synchronous Asynchronous Receiver Transmitter (USART) provides a fullduplex, universal, synchronous/asynchronous serial link. Data frame format is widely configu-rable, including basic length, parity, and stop bit settings, maximizing standards support. Thereceiver implements parity-, framing-, and overrun error detection, and can handle un-fixed
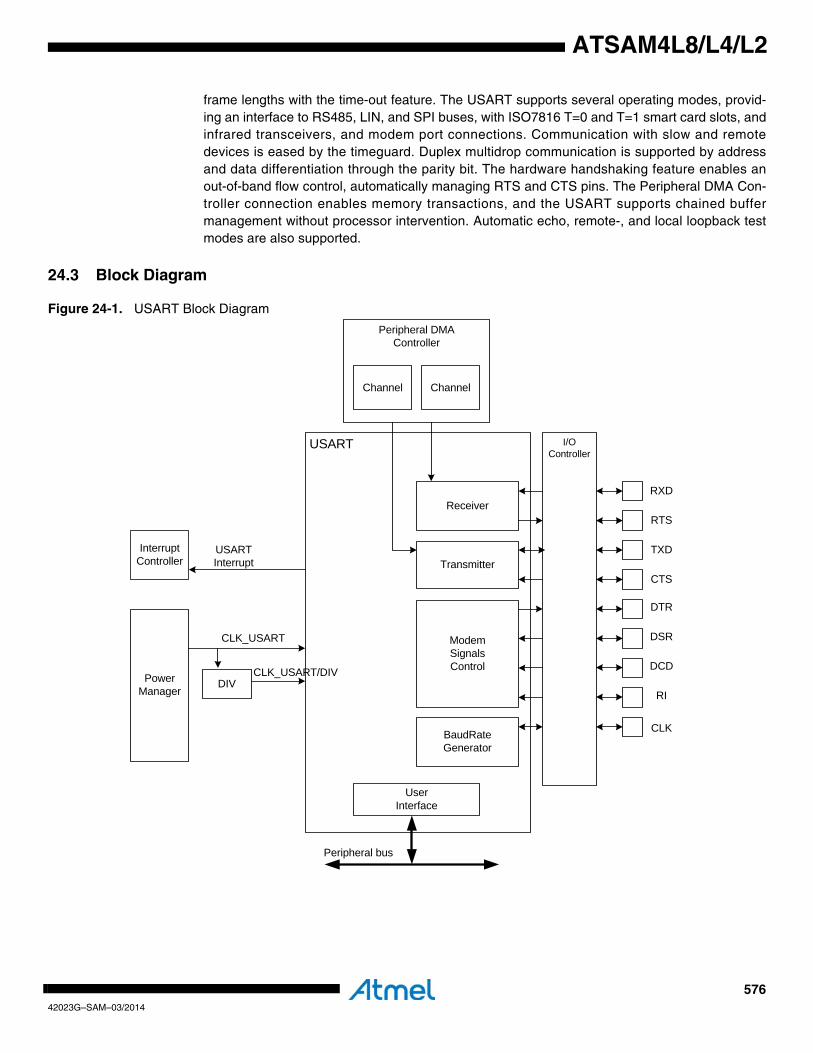
57642023G–SAM–03/2014
ATSAM4L8/L4/L2
frame lengths with the time-out feature. The USART supports several operating modes, provid-ing an interface to RS485, LIN, and SPI buses, with ISO7816 T=0 and T=1 smart card slots, andinfrared transceivers, and modem port connections. Communication with slow and remotedevices is eased by the timeguard. Duplex multidrop communication is supported by addressand data differentiation through the parity bit. The hardware handshaking feature enables anout-of-band flow control, automatically managing RTS and CTS pins. The Peripheral DMA Con-troller connection enables memory transactions, and the USART supports chained buffermanagement without processor intervention. Automatic echo, remote-, and local loopback testmodes are also supported.
24.3 Block Diagram
Figure 24-1. USART Block Diagram
Peripheral DMAController
Channel Channel
Interrupt Controller
PowerManager
DIV
Receiver
Transmitter
ModemSignalsControl
UserInterface
I/OController
RXD
RTS
TXD
CTS
DTR
DSR
DCD
RI
CLKBaudRateGenerator
USARTInterrupt
CLK_USART
CLK_USART/DIV
USART
Peripheral bus
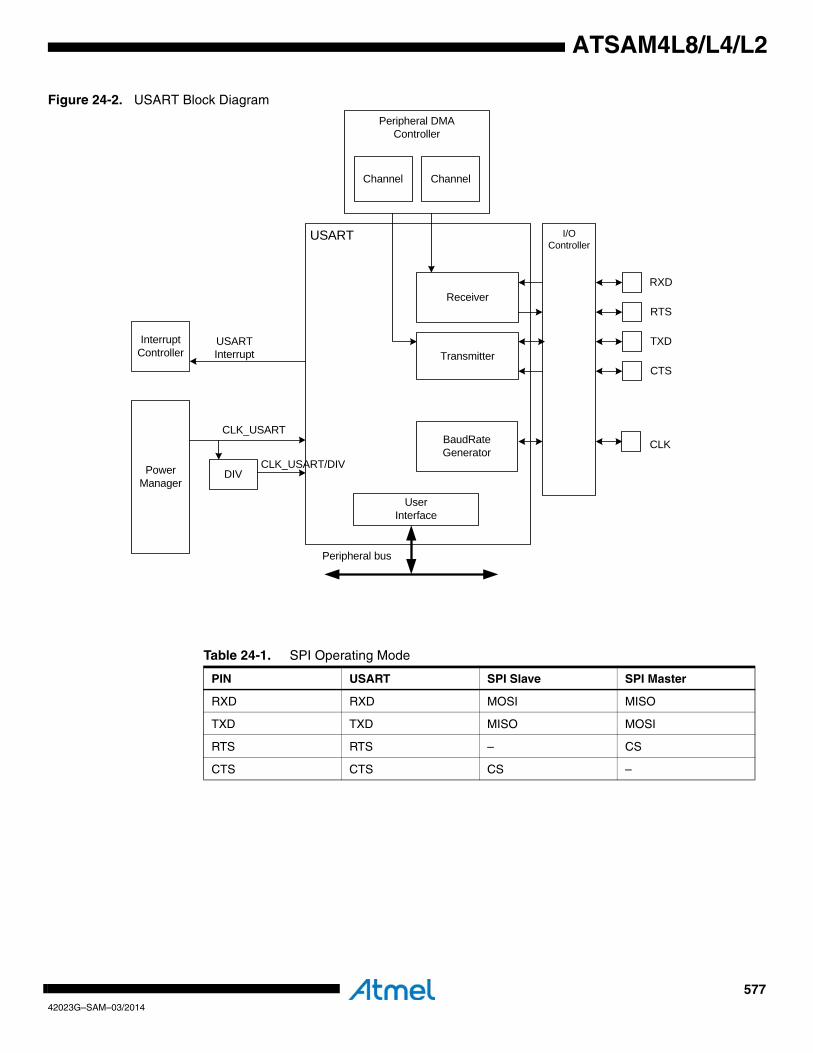
57742023G–SAM–03/2014
ATSAM4L8/L4/L2
Figure 24-2. USART Block Diagram
Peripheral DMAController
Channel Channel
Interrupt Controller
PowerManager
DIV
Receiver
Transmitter
UserInterface
I/OController
RXD
RTS
TXD
CTS
CLKBaudRateGenerator
USARTInterrupt
CLK_USART
CLK_USART/DIV
USART
Peripheral bus
Table 24-1. SPI Operating Mode
PIN USART SPI Slave SPI Master
RXD RXD MOSI MISO
TXD TXD MISO MOSI
RTS RTS – CS
CTS CTS CS –
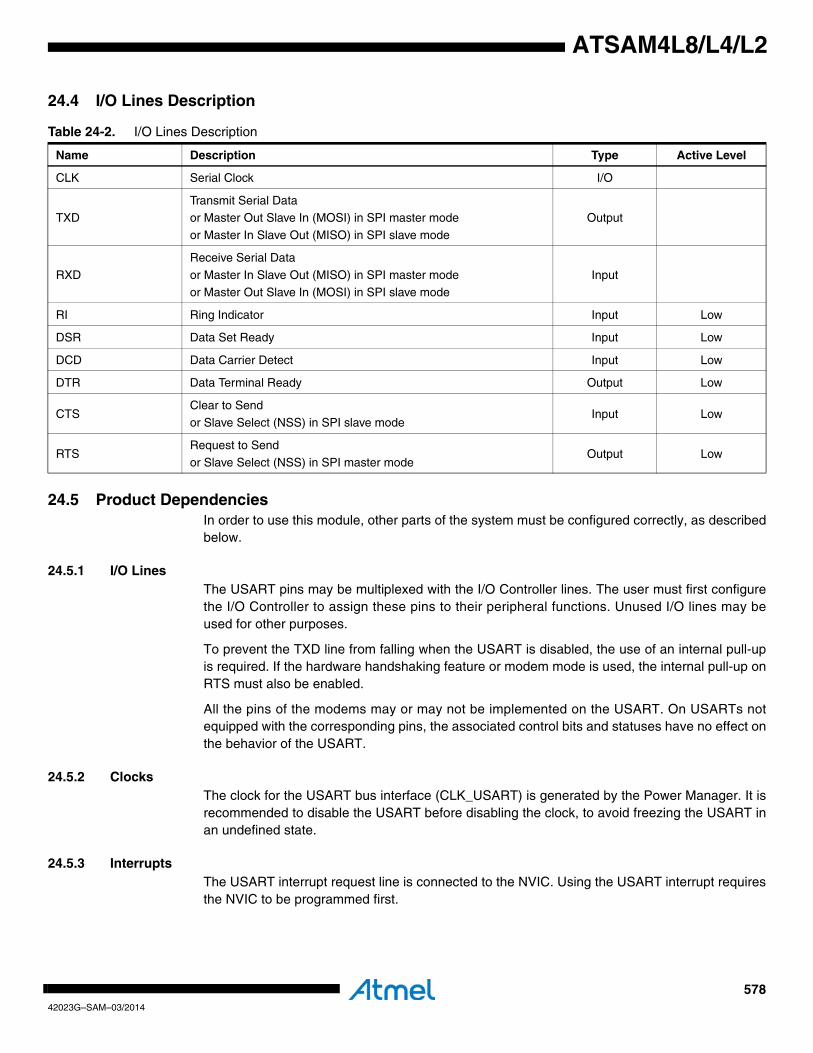
57842023G–SAM–03/2014
ATSAM4L8/L4/L2
24.4 I/O Lines Description
24.5 Product DependenciesIn order to use this module, other parts of the system must be configured correctly, as describedbelow.
24.5.1 I/O LinesThe USART pins may be multiplexed with the I/O Controller lines. The user must first configurethe I/O Controller to assign these pins to their peripheral functions. Unused I/O lines may beused for other purposes.
To prevent the TXD line from falling when the USART is disabled, the use of an internal pull-upis required. If the hardware handshaking feature or modem mode is used, the internal pull-up onRTS must also be enabled.
All the pins of the modems may or may not be implemented on the USART. On USARTs notequipped with the corresponding pins, the associated control bits and statuses have no effect onthe behavior of the USART.
24.5.2 ClocksThe clock for the USART bus interface (CLK_USART) is generated by the Power Manager. It isrecommended to disable the USART before disabling the clock, to avoid freezing the USART inan undefined state.
24.5.3 Interrupts The USART interrupt request line is connected to the NVIC. Using the USART interrupt requiresthe NVIC to be programmed first.
Table 24-2. I/O Lines Description
Name Description Type Active Level
CLK Serial Clock I/O
TXDTransmit Serial Dataor Master Out Slave In (MOSI) in SPI master mode
or Master In Slave Out (MISO) in SPI slave mode
Output
RXD
Receive Serial Data
or Master In Slave Out (MISO) in SPI master mode
or Master Out Slave In (MOSI) in SPI slave mode
Input
RI Ring Indicator Input Low
DSR Data Set Ready Input Low
DCD Data Carrier Detect Input Low
DTR Data Terminal Ready Output Low
CTSClear to Send
or Slave Select (NSS) in SPI slave modeInput Low
RTSRequest to Send
or Slave Select (NSS) in SPI master modeOutput Low
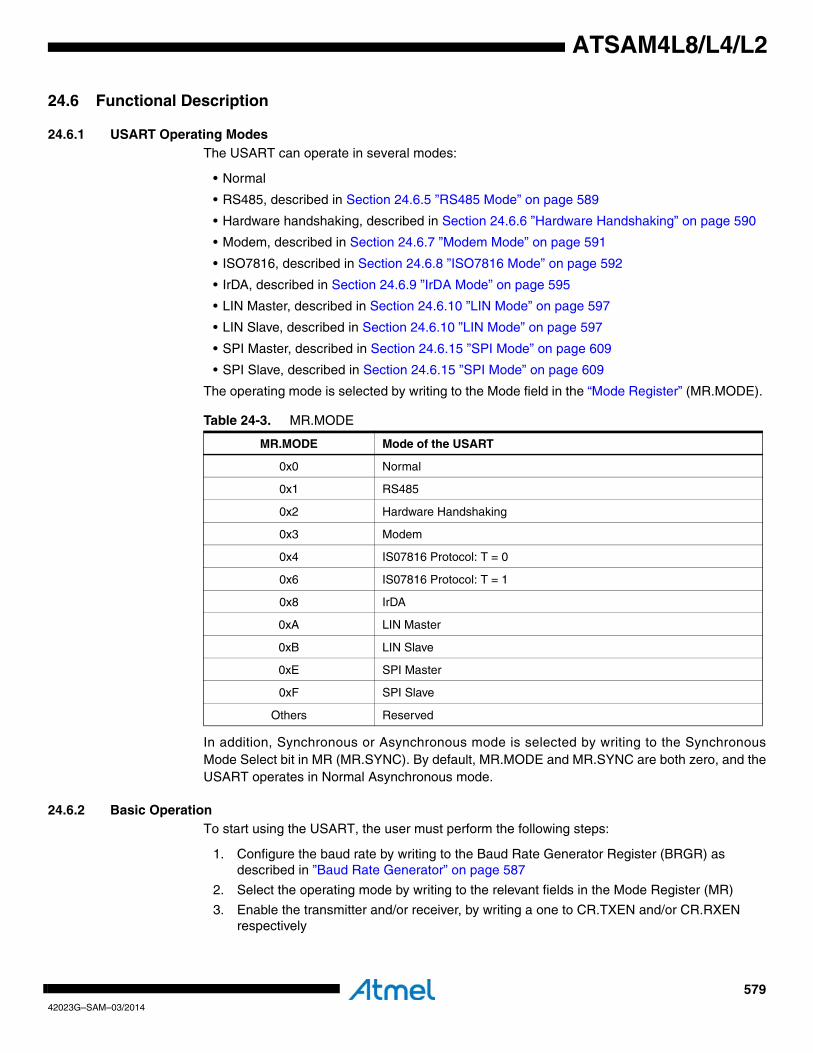
57942023G–SAM–03/2014
ATSAM4L8/L4/L2
24.6 Functional Description
24.6.1 USART Operating ModesThe USART can operate in several modes:
• Normal
• RS485, described in Section 24.6.5 ”RS485 Mode” on page 589
• Hardware handshaking, described in Section 24.6.6 ”Hardware Handshaking” on page 590
• Modem, described in Section 24.6.7 ”Modem Mode” on page 591
• ISO7816, described in Section 24.6.8 ”ISO7816 Mode” on page 592
• IrDA, described in Section 24.6.9 ”IrDA Mode” on page 595
• LIN Master, described in Section 24.6.10 ”LIN Mode” on page 597
• LIN Slave, described in Section 24.6.10 ”LIN Mode” on page 597
• SPI Master, described in Section 24.6.15 ”SPI Mode” on page 609
• SPI Slave, described in Section 24.6.15 ”SPI Mode” on page 609
The operating mode is selected by writing to the Mode field in the “Mode Register” (MR.MODE).
In addition, Synchronous or Asynchronous mode is selected by writing to the SynchronousMode Select bit in MR (MR.SYNC). By default, MR.MODE and MR.SYNC are both zero, and theUSART operates in Normal Asynchronous mode.
24.6.2 Basic OperationTo start using the USART, the user must perform the following steps:
1. Configure the baud rate by writing to the Baud Rate Generator Register (BRGR) as described in ”Baud Rate Generator” on page 587
2. Select the operating mode by writing to the relevant fields in the Mode Register (MR)
3. Enable the transmitter and/or receiver, by writing a one to CR.TXEN and/or CR.RXEN respectively
Table 24-3. MR.MODE
MR.MODE Mode of the USART
0x0 Normal
0x1 RS485
0x2 Hardware Handshaking
0x3 Modem
0x4 IS07816 Protocol: T = 0
0x6 IS07816 Protocol: T = 1
0x8 IrDA
0xA LIN Master
0xB LIN Slave
0xE SPI Master
0xF SPI Slave
Others Reserved
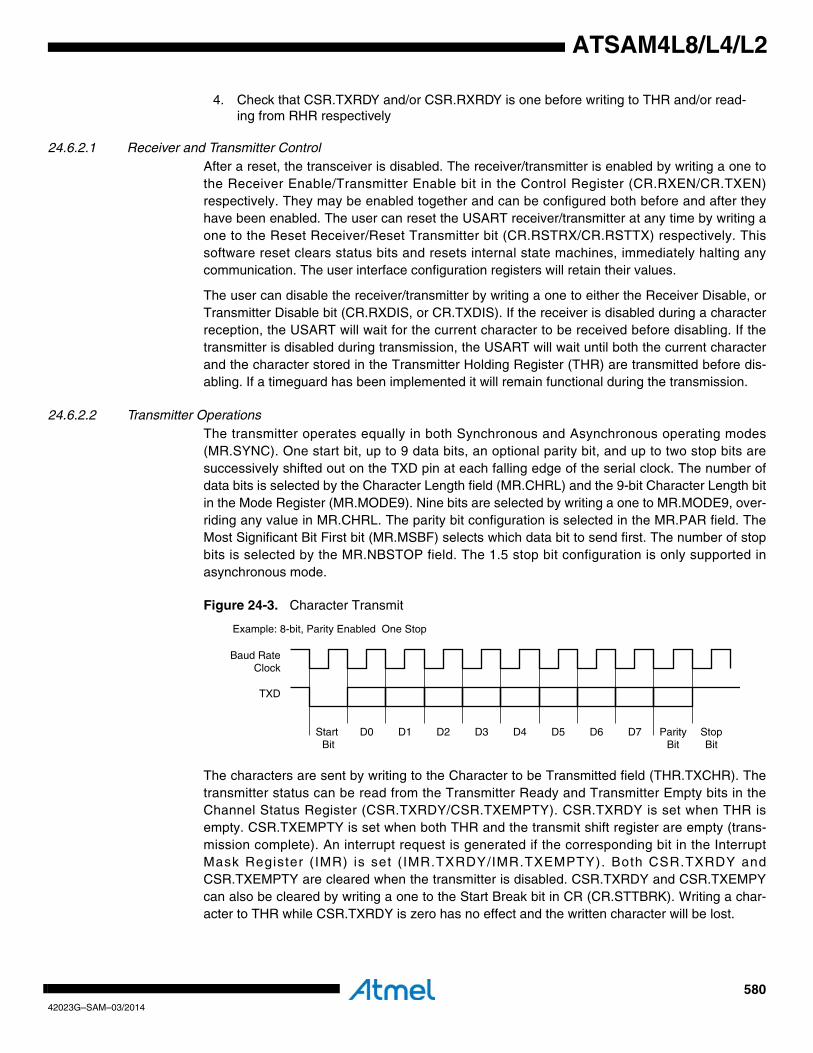
58042023G–SAM–03/2014
ATSAM4L8/L4/L2
4. Check that CSR.TXRDY and/or CSR.RXRDY is one before writing to THR and/or read-ing from RHR respectively
24.6.2.1 Receiver and Transmitter ControlAfter a reset, the transceiver is disabled. The receiver/transmitter is enabled by writing a one tothe Receiver Enable/Transmitter Enable bit in the Control Register (CR.RXEN/CR.TXEN)respectively. They may be enabled together and can be configured both before and after theyhave been enabled. The user can reset the USART receiver/transmitter at any time by writing aone to the Reset Receiver/Reset Transmitter bit (CR.RSTRX/CR.RSTTX) respectively. Thissoftware reset clears status bits and resets internal state machines, immediately halting anycommunication. The user interface configuration registers will retain their values.
The user can disable the receiver/transmitter by writing a one to either the Receiver Disable, orTransmitter Disable bit (CR.RXDIS, or CR.TXDIS). If the receiver is disabled during a characterreception, the USART will wait for the current character to be received before disabling. If thetransmitter is disabled during transmission, the USART will wait until both the current characterand the character stored in the Transmitter Holding Register (THR) are transmitted before dis-abling. If a timeguard has been implemented it will remain functional during the transmission.
24.6.2.2 Transmitter OperationsThe transmitter operates equally in both Synchronous and Asynchronous operating modes(MR.SYNC). One start bit, up to 9 data bits, an optional parity bit, and up to two stop bits aresuccessively shifted out on the TXD pin at each falling edge of the serial clock. The number ofdata bits is selected by the Character Length field (MR.CHRL) and the 9-bit Character Length bitin the Mode Register (MR.MODE9). Nine bits are selected by writing a one to MR.MODE9, over-riding any value in MR.CHRL. The parity bit configuration is selected in the MR.PAR field. TheMost Significant Bit First bit (MR.MSBF) selects which data bit to send first. The number of stopbits is selected by the MR.NBSTOP field. The 1.5 stop bit configuration is only supported inasynchronous mode.
Figure 24-3. Character Transmit
The characters are sent by writing to the Character to be Transmitted field (THR.TXCHR). Thetransmitter status can be read from the Transmitter Ready and Transmitter Empty bits in theChannel Status Register (CSR.TXRDY/CSR.TXEMPTY). CSR.TXRDY is set when THR isempty. CSR.TXEMPTY is set when both THR and the transmit shift register are empty (trans-mission complete). An interrupt request is generated if the corresponding bit in the InterruptMask Register (IMR) is set (IMR.TXRDY/IMR.TXEMPTY). Both CSR.TXRDY andCSR.TXEMPTY are cleared when the transmitter is disabled. CSR.TXRDY and CSR.TXEMPYcan also be cleared by writing a one to the Start Break bit in CR (CR.STTBRK). Writing a char-acter to THR while CSR.TXRDY is zero has no effect and the written character will be lost.
D0 D1 D2 D3 D4 D5 D6 D7
TXD
Start Bit
ParityBit
StopBit
Example: 8-bit, Parity Enabled One Stop
Baud Rate Clock
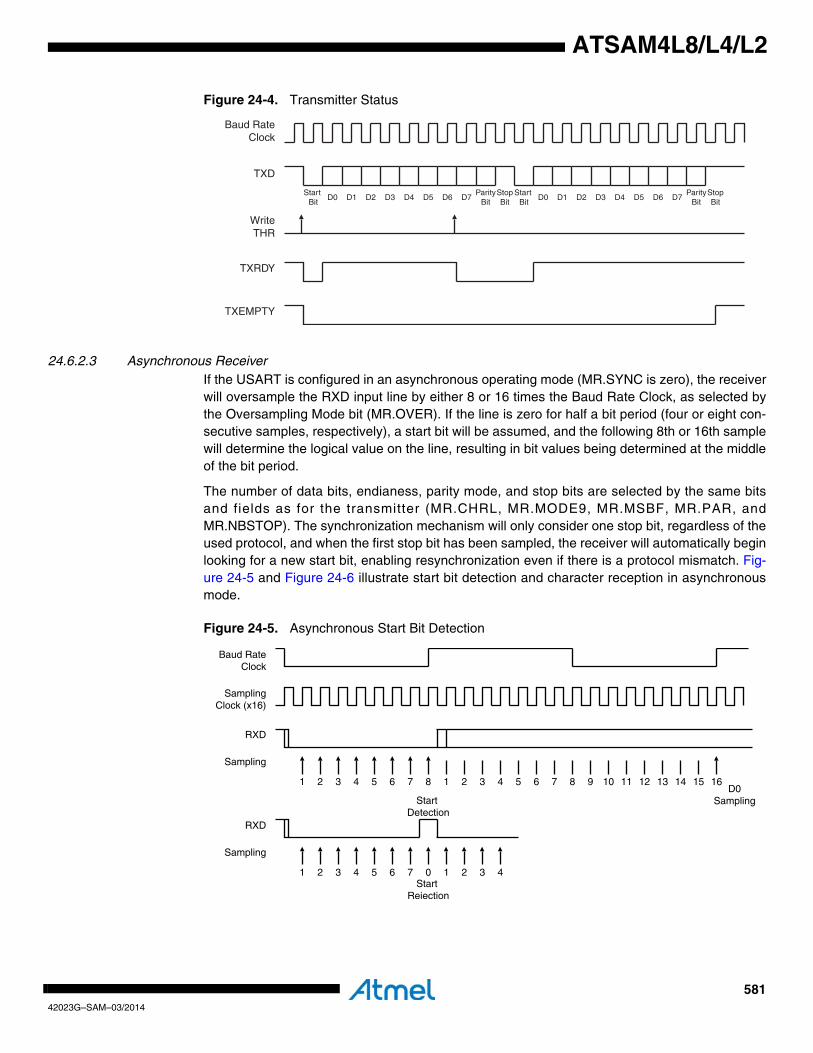
58142023G–SAM–03/2014
ATSAM4L8/L4/L2
Figure 24-4. Transmitter Status
24.6.2.3 Asynchronous ReceiverIf the USART is configured in an asynchronous operating mode (MR.SYNC is zero), the receiverwill oversample the RXD input line by either 8 or 16 times the Baud Rate Clock, as selected bythe Oversampling Mode bit (MR.OVER). If the line is zero for half a bit period (four or eight con-secutive samples, respectively), a start bit will be assumed, and the following 8th or 16th samplewill determine the logical value on the line, resulting in bit values being determined at the middleof the bit period.
The number of data bits, endianess, parity mode, and stop bits are selected by the same bitsand fields as for the transmitter (MR.CHRL, MR.MODE9, MR.MSBF, MR.PAR, andMR.NBSTOP). The synchronization mechanism will only consider one stop bit, regardless of theused protocol, and when the first stop bit has been sampled, the receiver will automatically beginlooking for a new start bit, enabling resynchronization even if there is a protocol mismatch. Fig-ure 24-5 and Figure 24-6 illustrate start bit detection and character reception in asynchronousmode.
Figure 24-5. Asynchronous Start Bit Detection
D0 D1 D2 D3 D4 D5 D6 D7
TXD
Start Bit
ParityBit
StopBit
Baud Rate Clock
Start Bit
WriteTHR
D0 D1 D2 D3 D4 D5 D6 D7Parity
BitStopBit
TXRDY
TXEMPTY
SamplingClock (x16)
RXD
Start Detection
Sampling
Baud RateClock
RXD
Start Rejection
Sampling
1 2 3 4 5 6 7 8
1 2 3 4 5 6 7 0 1 2 3 4
1 2 3 4 5 6 7 8 9 10 11 12 13 14 15 16D0
Sampling
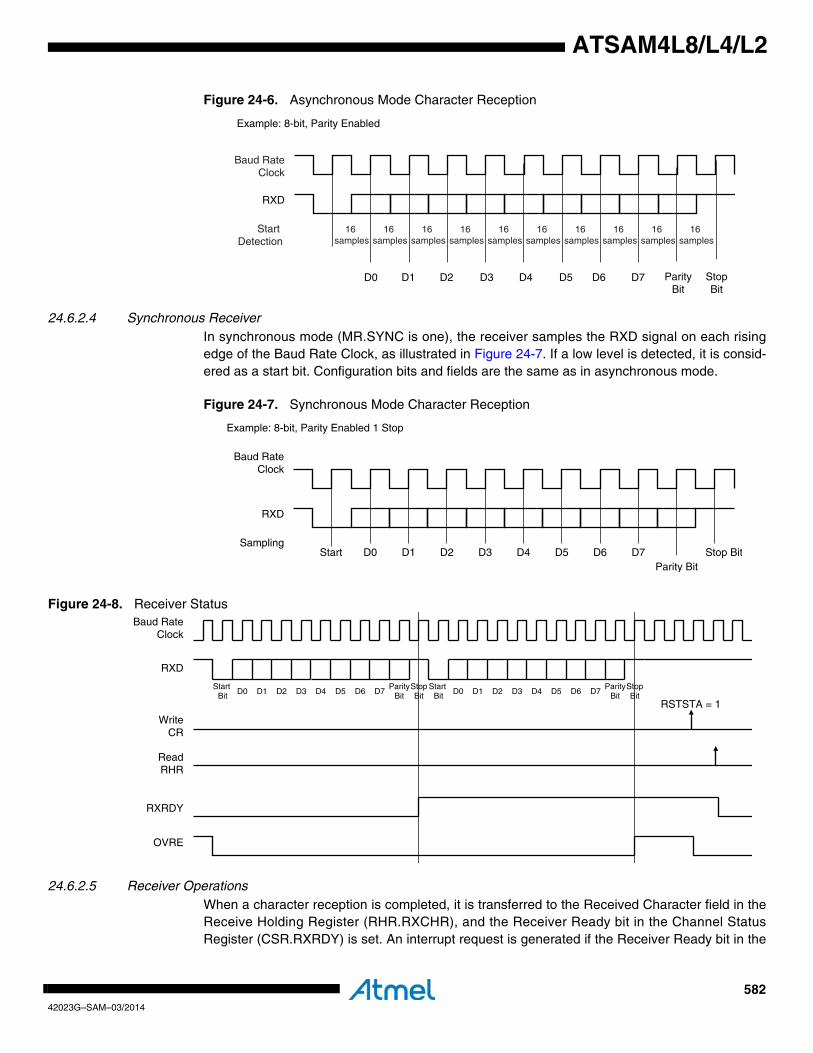
58242023G–SAM–03/2014
ATSAM4L8/L4/L2
Figure 24-6. Asynchronous Mode Character Reception
24.6.2.4 Synchronous ReceiverIn synchronous mode (MR.SYNC is one), the receiver samples the RXD signal on each risingedge of the Baud Rate Clock, as illustrated in Figure 24-7. If a low level is detected, it is consid-ered as a start bit. Configuration bits and fields are the same as in asynchronous mode.
Figure 24-7. Synchronous Mode Character Reception
Figure 24-8. Receiver Status
24.6.2.5 Receiver OperationsWhen a character reception is completed, it is transferred to the Received Character field in theReceive Holding Register (RHR.RXCHR), and the Receiver Ready bit in the Channel StatusRegister (CSR.RXRDY) is set. An interrupt request is generated if the Receiver Ready bit in the
D0 D1 D2 D3 D4 D5 D6 D7
RXD
ParityBit
StopBit
Example: 8-bit, Parity Enabled
Baud RateClock
Start Detection
16 samples
16 samples
16 samples
16 samples
16 samples
16 samples
16 samples
16 samples
16 samples
16 samples
D0 D1 D2 D3 D4 D5 D6 D7
RXD
Start Sampling
Parity BitStop Bit
Example: 8-bit, Parity Enabled 1 Stop
Baud RateClock
D0 D1 D2 D3 D4 D5 D6 D7
RXD
Start Bit
ParityBit
StopBit
Baud Rate Clock
WriteCR
RXRDY
OVRE
D0 D1 D2 D3 D4 D5 D6 D7Start
BitParity
BitStopBit
RSTSTA = 1
ReadRHR
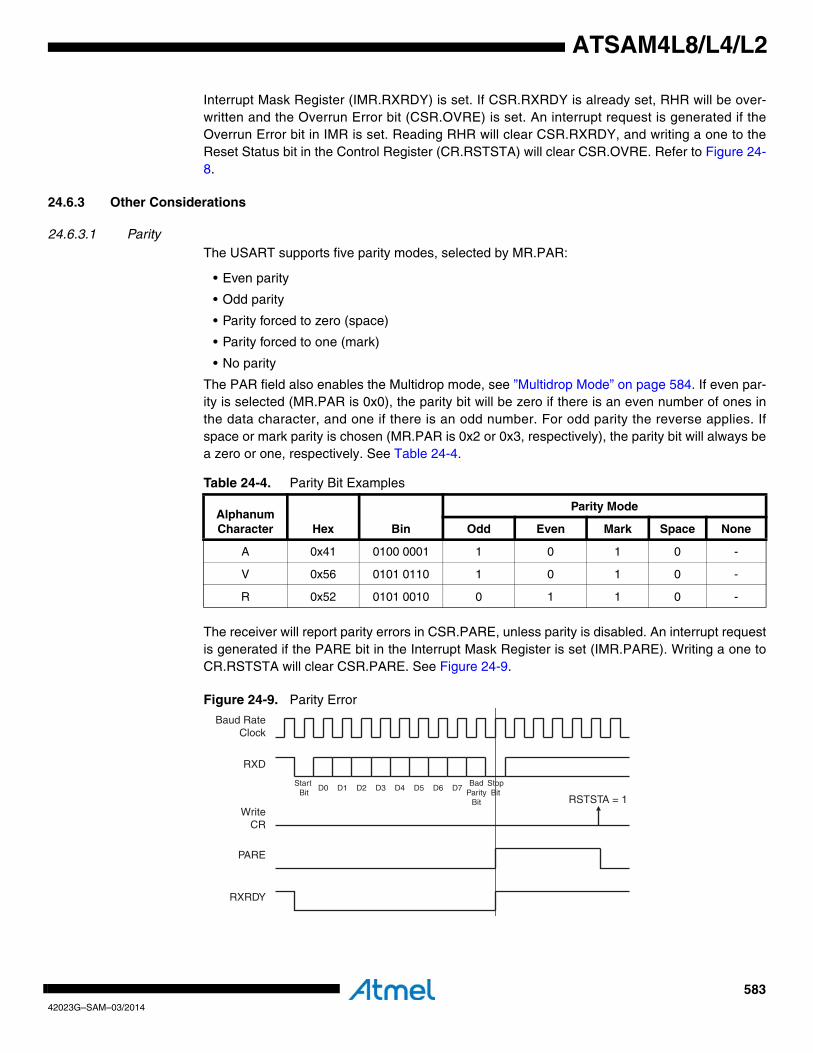
58342023G–SAM–03/2014
ATSAM4L8/L4/L2
Interrupt Mask Register (IMR.RXRDY) is set. If CSR.RXRDY is already set, RHR will be over-written and the Overrun Error bit (CSR.OVRE) is set. An interrupt request is generated if theOverrun Error bit in IMR is set. Reading RHR will clear CSR.RXRDY, and writing a one to theReset Status bit in the Control Register (CR.RSTSTA) will clear CSR.OVRE. Refer to Figure 24-8.
24.6.3 Other Considerations
24.6.3.1 ParityThe USART supports five parity modes, selected by MR.PAR:
• Even parity
• Odd parity
• Parity forced to zero (space)
• Parity forced to one (mark)
• No parity
The PAR field also enables the Multidrop mode, see ”Multidrop Mode” on page 584. If even par-ity is selected (MR.PAR is 0x0), the parity bit will be zero if there is an even number of ones inthe data character, and one if there is an odd number. For odd parity the reverse applies. Ifspace or mark parity is chosen (MR.PAR is 0x2 or 0x3, respectively), the parity bit will always bea zero or one, respectively. See Table 24-4.
The receiver will report parity errors in CSR.PARE, unless parity is disabled. An interrupt requestis generated if the PARE bit in the Interrupt Mask Register is set (IMR.PARE). Writing a one toCR.RSTSTA will clear CSR.PARE. See Figure 24-9.
Figure 24-9. Parity Error
Table 24-4. Parity Bit Examples
Alphanum Character Hex Bin
Parity Mode
Odd Even Mark Space None
A 0x41 0100 0001 1 0 1 0 -
V 0x56 0101 0110 1 0 1 0 -
R 0x52 0101 0010 0 1 1 0 -
D0 D1 D2 D3 D4 D5 D6 D7
RXD
Start Bit
BadParity
Bit
StopBit
Baud Rate Clock
WriteCR
PARE
RXRDY
RSTSTA = 1
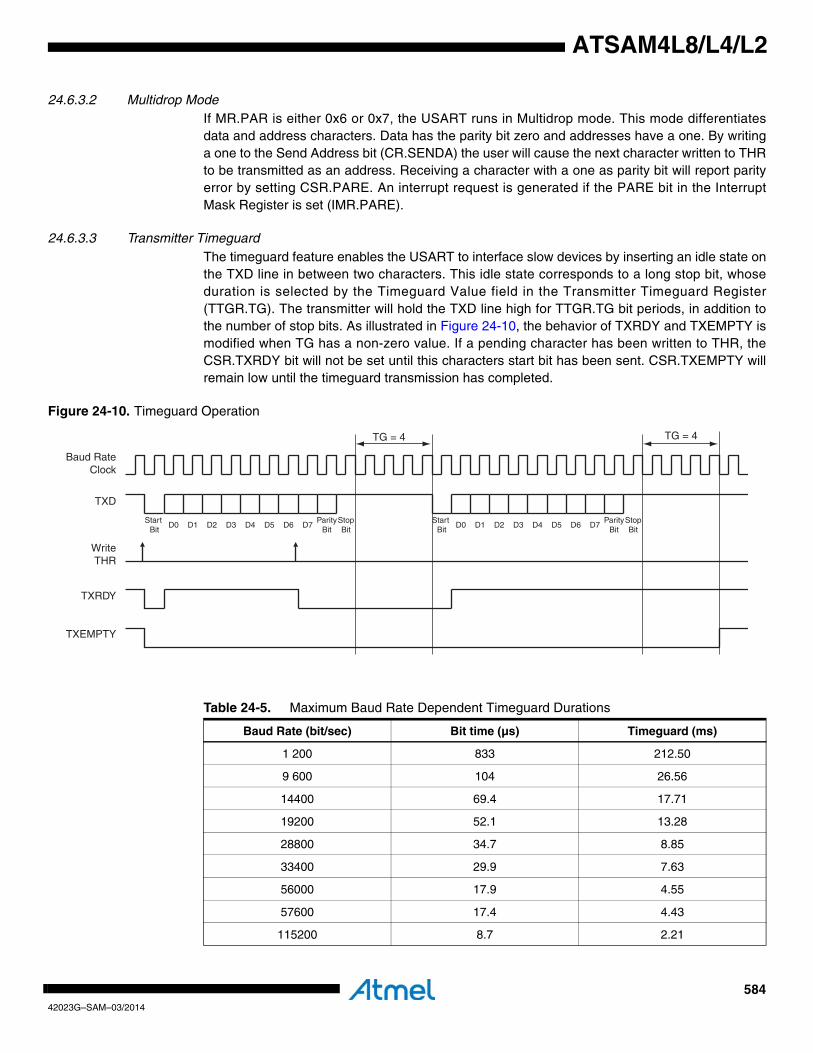
58442023G–SAM–03/2014
ATSAM4L8/L4/L2
24.6.3.2 Multidrop ModeIf MR.PAR is either 0x6 or 0x7, the USART runs in Multidrop mode. This mode differentiatesdata and address characters. Data has the parity bit zero and addresses have a one. By writinga one to the Send Address bit (CR.SENDA) the user will cause the next character written to THRto be transmitted as an address. Receiving a character with a one as parity bit will report parityerror by setting CSR.PARE. An interrupt request is generated if the PARE bit in the InterruptMask Register is set (IMR.PARE).
24.6.3.3 Transmitter TimeguardThe timeguard feature enables the USART to interface slow devices by inserting an idle state onthe TXD line in between two characters. This idle state corresponds to a long stop bit, whoseduration is selected by the Timeguard Value field in the Transmitter Timeguard Register(TTGR.TG). The transmitter will hold the TXD line high for TTGR.TG bit periods, in addition tothe number of stop bits. As illustrated in Figure 24-10, the behavior of TXRDY and TXEMPTY ismodified when TG has a non-zero value. If a pending character has been written to THR, theCSR.TXRDY bit will not be set until this characters start bit has been sent. CSR.TXEMPTY willremain low until the timeguard transmission has completed.
Figure 24-10. Timeguard Operation
D0 D1 D2 D3 D4 D5 D6 D7
TXD
Start Bit
ParityBit
StopBit
Baud Rate Clock
Start Bit
TG = 4
WriteTHR
D0 D1 D2 D3 D4 D5 D6 D7Parity
BitStopBit
TXRDY
TXEMPTY
TG = 4
Table 24-5. Maximum Baud Rate Dependent Timeguard Durations
Baud Rate (bit/sec) Bit time (µs) Timeguard (ms)
1 200 833 212.50
9 600 104 26.56
14400 69.4 17.71
19200 52.1 13.28
28800 34.7 8.85
33400 29.9 7.63
56000 17.9 4.55
57600 17.4 4.43
115200 8.7 2.21
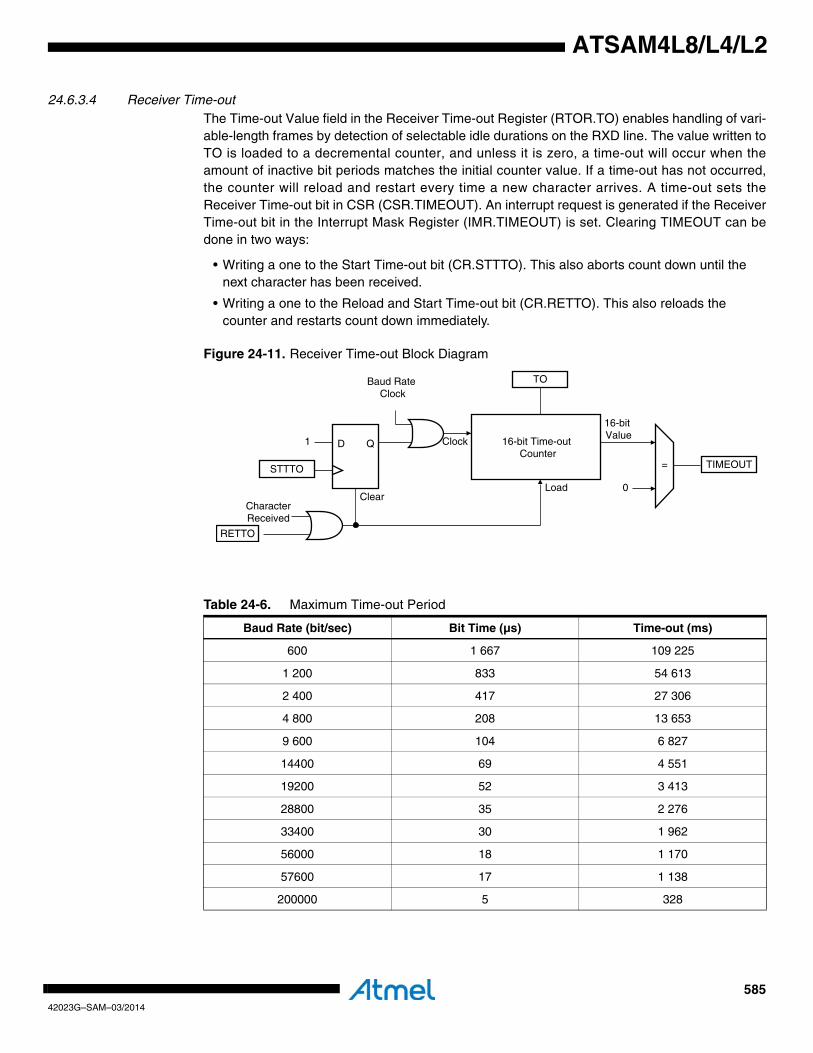
58542023G–SAM–03/2014
ATSAM4L8/L4/L2
24.6.3.4 Receiver Time-out The Time-out Value field in the Receiver Time-out Register (RTOR.TO) enables handling of vari-able-length frames by detection of selectable idle durations on the RXD line. The value written toTO is loaded to a decremental counter, and unless it is zero, a time-out will occur when theamount of inactive bit periods matches the initial counter value. If a time-out has not occurred,the counter will reload and restart every time a new character arrives. A time-out sets theReceiver Time-out bit in CSR (CSR.TIMEOUT). An interrupt request is generated if the ReceiverTime-out bit in the Interrupt Mask Register (IMR.TIMEOUT) is set. Clearing TIMEOUT can bedone in two ways:
• Writing a one to the Start Time-out bit (CR.STTTO). This also aborts count down until the next character has been received.
• Writing a one to the Reload and Start Time-out bit (CR.RETTO). This also reloads the counter and restarts count down immediately.
Figure 24-11. Receiver Time-out Block Diagram
Table 24-6. Maximum Time-out Period
Baud Rate (bit/sec) Bit Time (µs) Time-out (ms)
600 1 667 109 225
1 200 833 54 613
2 400 417 27 306
4 800 208 13 653
9 600 104 6 827
14400 69 4 551
19200 52 3 413
28800 35 2 276
33400 30 1 962
56000 18 1 170
57600 17 1 138
200000 5 328
16-bit Time-out Counter
0
TO
TIMEOUT
Baud Rate Clock
=
CharacterReceived
RETTO
Load
Clock
16-bit Value
STTTO
D Q1
Clear
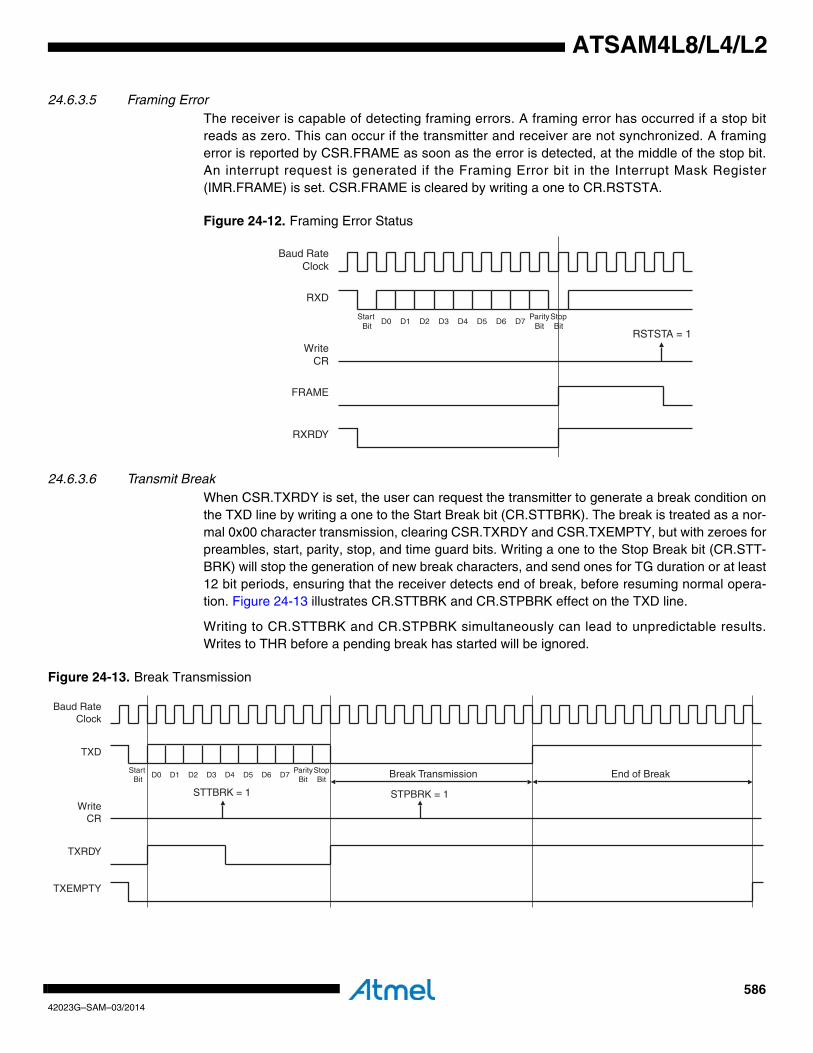
58642023G–SAM–03/2014
ATSAM4L8/L4/L2
24.6.3.5 Framing ErrorThe receiver is capable of detecting framing errors. A framing error has occurred if a stop bitreads as zero. This can occur if the transmitter and receiver are not synchronized. A framingerror is reported by CSR.FRAME as soon as the error is detected, at the middle of the stop bit.An interrupt request is generated if the Framing Error bit in the Interrupt Mask Register(IMR.FRAME) is set. CSR.FRAME is cleared by writing a one to CR.RSTSTA.
Figure 24-12. Framing Error Status
24.6.3.6 Transmit Break When CSR.TXRDY is set, the user can request the transmitter to generate a break condition onthe TXD line by writing a one to the Start Break bit (CR.STTBRK). The break is treated as a nor-mal 0x00 character transmission, clearing CSR.TXRDY and CSR.TXEMPTY, but with zeroes forpreambles, start, parity, stop, and time guard bits. Writing a one to the Stop Break bit (CR.STT-BRK) will stop the generation of new break characters, and send ones for TG duration or at least12 bit periods, ensuring that the receiver detects end of break, before resuming normal opera-tion. Figure 24-13 illustrates CR.STTBRK and CR.STPBRK effect on the TXD line.
Writing to CR.STTBRK and CR.STPBRK simultaneously can lead to unpredictable results.Writes to THR before a pending break has started will be ignored.
Figure 24-13. Break Transmission
D0 D1 D2 D3 D4 D5 D6 D7
RXD
Start Bit
ParityBit
StopBit
Baud Rate Clock
WriteCR
FRAME
RXRDY
RSTSTA = 1
D0 D1 D2 D3 D4 D5 D6 D7
TXD
Start Bit
ParityBit
StopBit
Baud Rate Clock
WriteCR
TXRDY
TXEMPTY
STPBRK = 1STTBRK = 1
Break Transmission End of Break
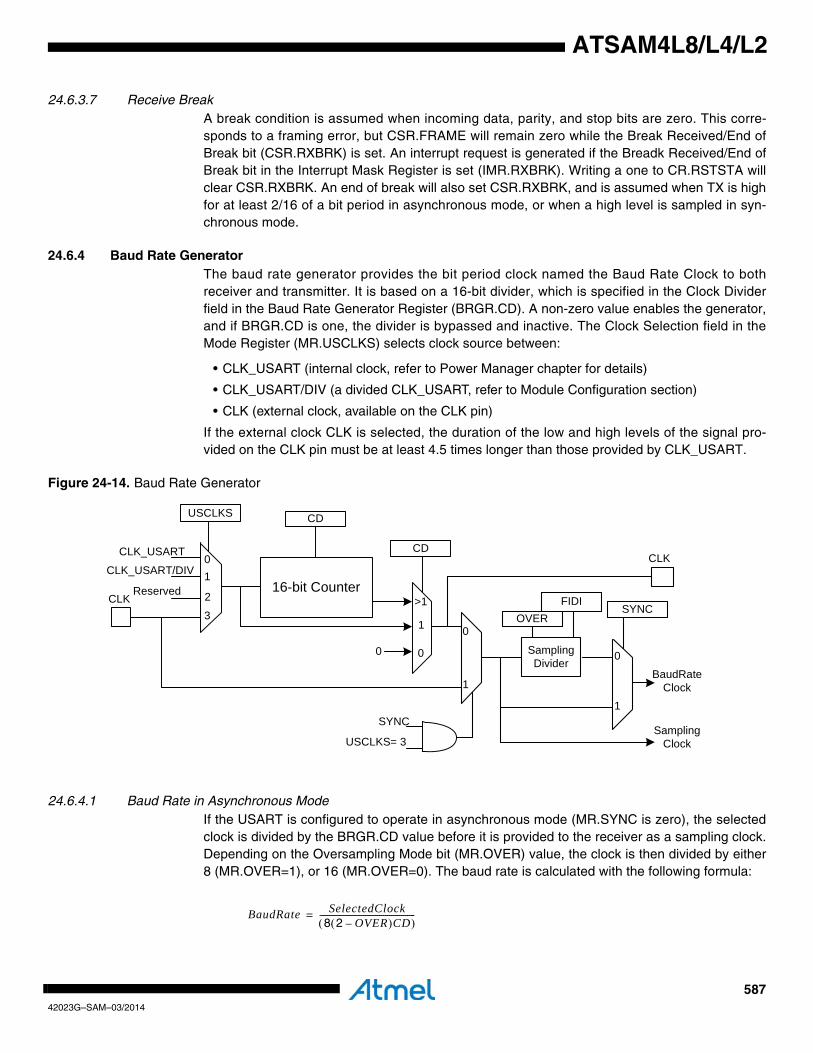
58742023G–SAM–03/2014
ATSAM4L8/L4/L2
24.6.3.7 Receive BreakA break condition is assumed when incoming data, parity, and stop bits are zero. This corre-sponds to a framing error, but CSR.FRAME will remain zero while the Break Received/End ofBreak bit (CSR.RXBRK) is set. An interrupt request is generated if the Breadk Received/End ofBreak bit in the Interrupt Mask Register is set (IMR.RXBRK). Writing a one to CR.RSTSTA willclear CSR.RXBRK. An end of break will also set CSR.RXBRK, and is assumed when TX is highfor at least 2/16 of a bit period in asynchronous mode, or when a high level is sampled in syn-chronous mode.
24.6.4 Baud Rate GeneratorThe baud rate generator provides the bit period clock named the Baud Rate Clock to bothreceiver and transmitter. It is based on a 16-bit divider, which is specified in the Clock Dividerfield in the Baud Rate Generator Register (BRGR.CD). A non-zero value enables the generator,and if BRGR.CD is one, the divider is bypassed and inactive. The Clock Selection field in theMode Register (MR.USCLKS) selects clock source between:
• CLK_USART (internal clock, refer to Power Manager chapter for details)
• CLK_USART/DIV (a divided CLK_USART, refer to Module Configuration section)
• CLK (external clock, available on the CLK pin)
If the external clock CLK is selected, the duration of the low and high levels of the signal pro-vided on the CLK pin must be at least 4.5 times longer than those provided by CLK_USART.
Figure 24-14. Baud Rate Generator
24.6.4.1 Baud Rate in Asynchronous Mode If the USART is configured to operate in asynchronous mode (MR.SYNC is zero), the selectedclock is divided by the BRGR.CD value before it is provided to the receiver as a sampling clock.Depending on the Oversampling Mode bit (MR.OVER) value, the clock is then divided by either8 (MR.OVER=1), or 16 (MR.OVER=0). The baud rate is calculated with the following formula:
16-bit Counter
CDUSCLKS
CDCLK_USART
CLK_USART/DIV
ReservedCLK
SYNC
SYNC
USCLKS= 3
FIDIOVER
SamplingDivider
BaudRateClock
SamplingClock
1
00
CLK01
2
3>1
1
1
0
0
BaudRate SelectedClock8 2 OVER–( )CD( )
------------------------------------------------=
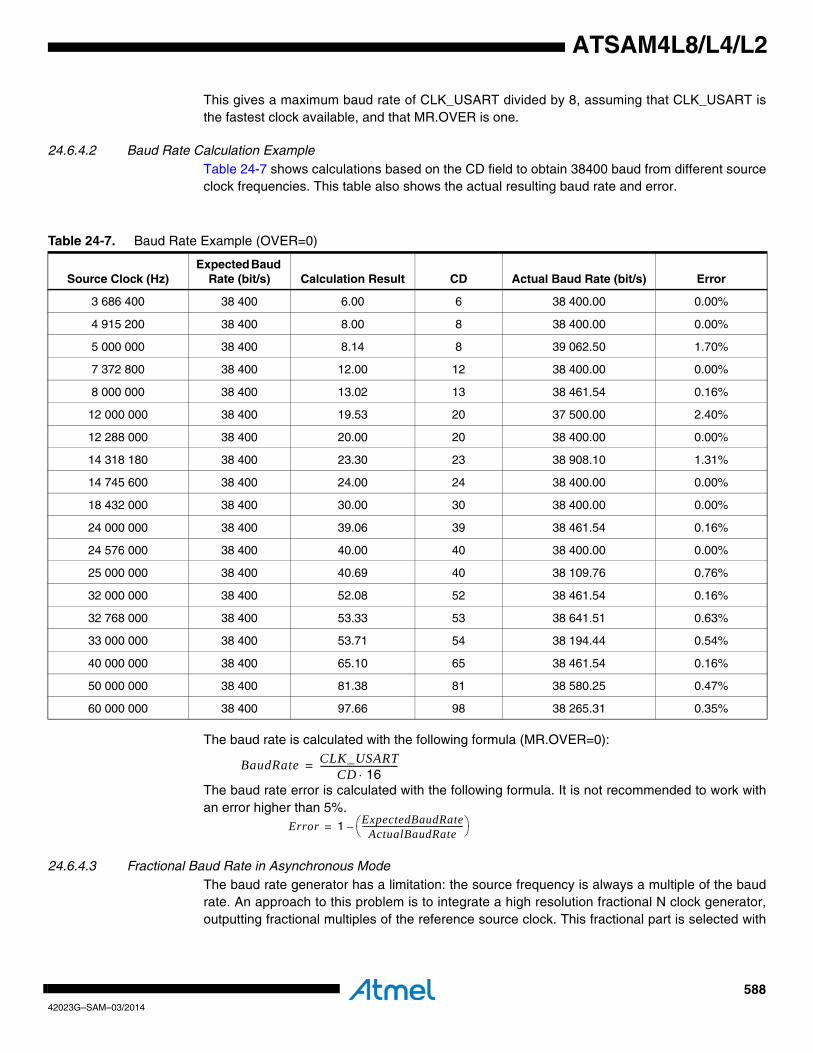
58842023G–SAM–03/2014
ATSAM4L8/L4/L2
This gives a maximum baud rate of CLK_USART divided by 8, assuming that CLK_USART isthe fastest clock available, and that MR.OVER is one.
24.6.4.2 Baud Rate Calculation ExampleTable 24-7 shows calculations based on the CD field to obtain 38400 baud from different sourceclock frequencies. This table also shows the actual resulting baud rate and error.
The baud rate is calculated with the following formula (MR.OVER=0):
The baud rate error is calculated with the following formula. It is not recommended to work withan error higher than 5%.
24.6.4.3 Fractional Baud Rate in Asynchronous ModeThe baud rate generator has a limitation: the source frequency is always a multiple of the baudrate. An approach to this problem is to integrate a high resolution fractional N clock generator,outputting fractional multiples of the reference source clock. This fractional part is selected with
Table 24-7. Baud Rate Example (OVER=0)
Source Clock (Hz)Expected Baud
Rate (bit/s) Calculation Result CD Actual Baud Rate (bit/s) Error
3 686 400 38 400 6.00 6 38 400.00 0.00%
4 915 200 38 400 8.00 8 38 400.00 0.00%
5 000 000 38 400 8.14 8 39 062.50 1.70%
7 372 800 38 400 12.00 12 38 400.00 0.00%
8 000 000 38 400 13.02 13 38 461.54 0.16%
12 000 000 38 400 19.53 20 37 500.00 2.40%
12 288 000 38 400 20.00 20 38 400.00 0.00%
14 318 180 38 400 23.30 23 38 908.10 1.31%
14 745 600 38 400 24.00 24 38 400.00 0.00%
18 432 000 38 400 30.00 30 38 400.00 0.00%
24 000 000 38 400 39.06 39 38 461.54 0.16%
24 576 000 38 400 40.00 40 38 400.00 0.00%
25 000 000 38 400 40.69 40 38 109.76 0.76%
32 000 000 38 400 52.08 52 38 461.54 0.16%
32 768 000 38 400 53.33 53 38 641.51 0.63%
33 000 000 38 400 53.71 54 38 194.44 0.54%
40 000 000 38 400 65.10 65 38 461.54 0.16%
50 000 000 38 400 81.38 81 38 580.25 0.47%
60 000 000 38 400 97.66 98 38 265.31 0.35%
BaudRate CLK_USARTCD 16⋅
-----------------------------------=
Error 1 ExpectedBaudRateActualBaudRate
---------------------------------------------------⎝ ⎠⎛ ⎞–=
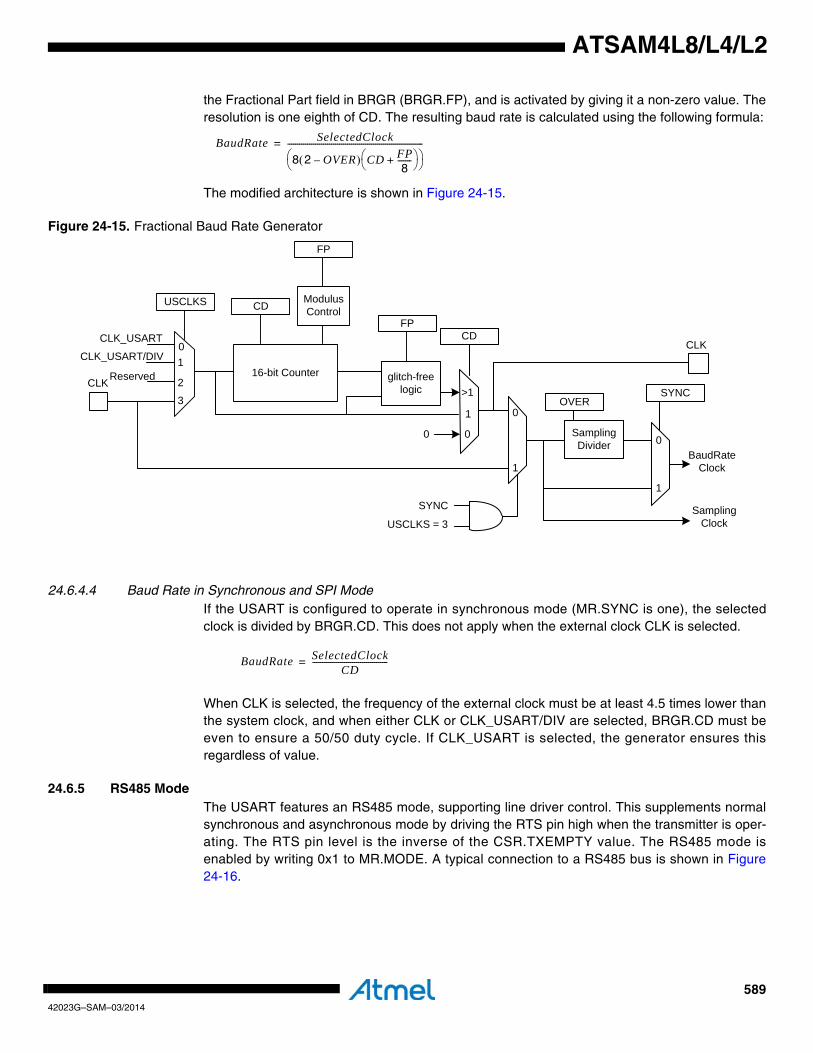
58942023G–SAM–03/2014
ATSAM4L8/L4/L2
the Fractional Part field in BRGR (BRGR.FP), and is activated by giving it a non-zero value. Theresolution is one eighth of CD. The resulting baud rate is calculated using the following formula:
The modified architecture is shown in Figure 24-15.
Figure 24-15. Fractional Baud Rate Generator
24.6.4.4 Baud Rate in Synchronous and SPI ModeIf the USART is configured to operate in synchronous mode (MR.SYNC is one), the selectedclock is divided by BRGR.CD. This does not apply when the external clock CLK is selected.
When CLK is selected, the frequency of the external clock must be at least 4.5 times lower thanthe system clock, and when either CLK or CLK_USART/DIV are selected, BRGR.CD must beeven to ensure a 50/50 duty cycle. If CLK_USART is selected, the generator ensures thisregardless of value.
24.6.5 RS485 ModeThe USART features an RS485 mode, supporting line driver control. This supplements normalsynchronous and asynchronous mode by driving the RTS pin high when the transmitter is oper-ating. The RTS pin level is the inverse of the CSR.TXEMPTY value. The RS485 mode isenabled by writing 0x1 to MR.MODE. A typical connection to a RS485 bus is shown in Figure24-16.
BaudRate SelectedClock
8 2 OVER–( ) CD FP8
-------+⎝ ⎠⎛ ⎞
⎝ ⎠⎛ ⎞--------------------------------------------------------------------=
USCLKS CDModulusControl
FP
FPCD
glitch-freelogic
16-bit Counter
OVERSYNC
SamplingDivider
CLK_USART
CLK_USART/DIV
ReservedCLK
CLK
BaudRateClock
SamplingClock
SYNC
USCLKS = 3
>1
1
2
30
0
1
0
1
1
0
0
BaudRate SelectedClockCD
--------------------------------------=
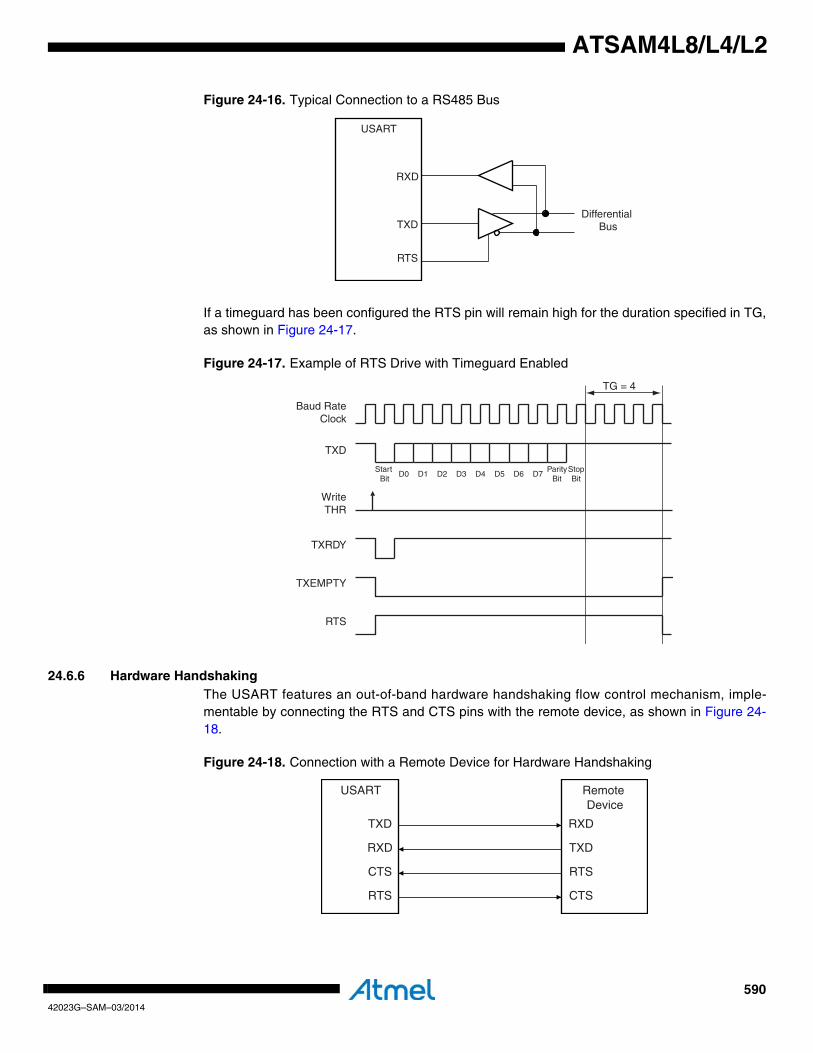
59042023G–SAM–03/2014
ATSAM4L8/L4/L2
Figure 24-16. Typical Connection to a RS485 Bus
If a timeguard has been configured the RTS pin will remain high for the duration specified in TG,as shown in Figure 24-17.
Figure 24-17. Example of RTS Drive with Timeguard Enabled
24.6.6 Hardware HandshakingThe USART features an out-of-band hardware handshaking flow control mechanism, imple-mentable by connecting the RTS and CTS pins with the remote device, as shown in Figure 24-18.
Figure 24-18. Connection with a Remote Device for Hardware Handshaking
USART
RTS
TXD
RXD
Differential Bus
D0 D1 D2 D3 D4 D5 D6 D7
TXD
Start Bit
ParityBit
StopBit
Baud Rate Clock
TG = 4
WriteTHR
TXRDY
TXEMPTY
RTS
USART
TXD
CTS
Remote Device
RXD
TXDRXD
RTS
RTS
CTS
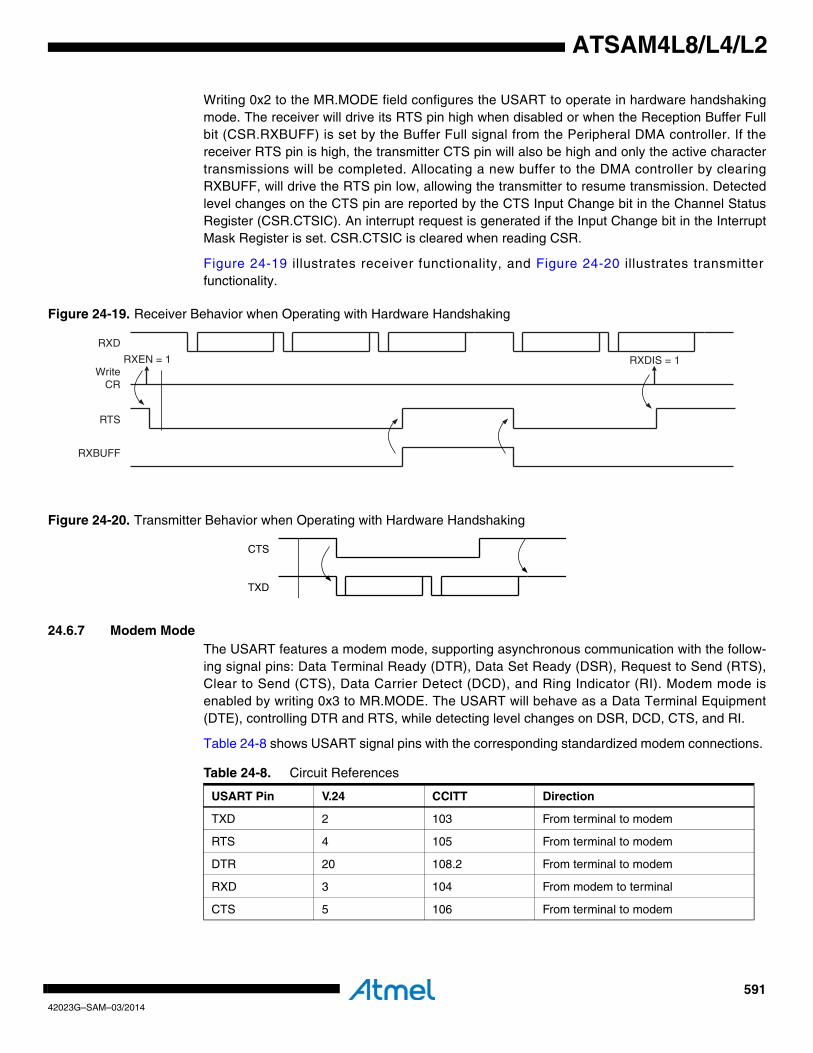
59142023G–SAM–03/2014
ATSAM4L8/L4/L2
Writing 0x2 to the MR.MODE field configures the USART to operate in hardware handshakingmode. The receiver will drive its RTS pin high when disabled or when the Reception Buffer Fullbit (CSR.RXBUFF) is set by the Buffer Full signal from the Peripheral DMA controller. If thereceiver RTS pin is high, the transmitter CTS pin will also be high and only the active charactertransmissions will be completed. Allocating a new buffer to the DMA controller by clearingRXBUFF, will drive the RTS pin low, allowing the transmitter to resume transmission. Detectedlevel changes on the CTS pin are reported by the CTS Input Change bit in the Channel StatusRegister (CSR.CTSIC). An interrupt request is generated if the Input Change bit in the InterruptMask Register is set. CSR.CTSIC is cleared when reading CSR.
Figure 24-19 illustrates receiver functionality, and Figure 24-20 illustrates transmitterfunctionality.
Figure 24-19. Receiver Behavior when Operating with Hardware Handshaking
Figure 24-20. Transmitter Behavior when Operating with Hardware Handshaking
24.6.7 Modem ModeThe USART features a modem mode, supporting asynchronous communication with the follow-ing signal pins: Data Terminal Ready (DTR), Data Set Ready (DSR), Request to Send (RTS),Clear to Send (CTS), Data Carrier Detect (DCD), and Ring Indicator (RI). Modem mode isenabled by writing 0x3 to MR.MODE. The USART will behave as a Data Terminal Equipment(DTE), controlling DTR and RTS, while detecting level changes on DSR, DCD, CTS, and RI.
Table 24-8 shows USART signal pins with the corresponding standardized modem connections.
RTS
RXBUFF
WriteCR
RXEN = 1
RXD
RXDIS = 1
CTS
TXD
Table 24-8. Circuit References
USART Pin V.24 CCITT Direction
TXD 2 103 From terminal to modem
RTS 4 105 From terminal to modem
DTR 20 108.2 From terminal to modem
RXD 3 104 From modem to terminal
CTS 5 106 From terminal to modem
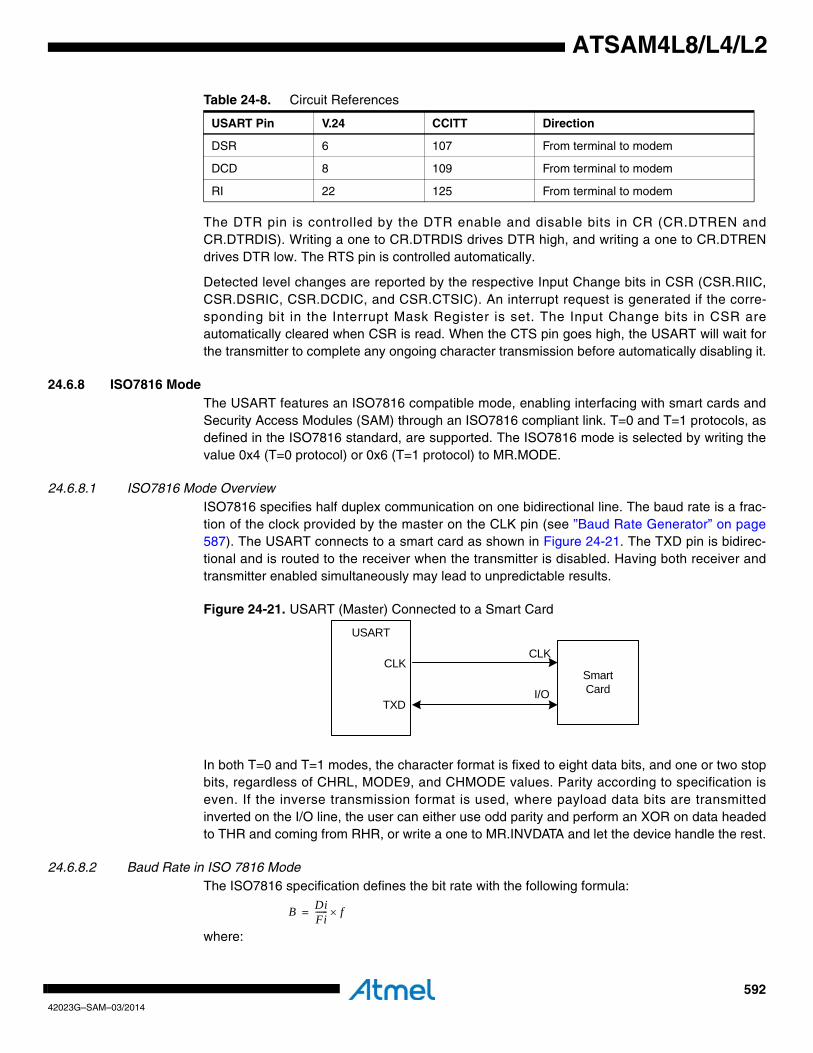
59242023G–SAM–03/2014
ATSAM4L8/L4/L2
The DTR pin is controlled by the DTR enable and disable bits in CR (CR.DTREN andCR.DTRDIS). Writing a one to CR.DTRDIS drives DTR high, and writing a one to CR.DTRENdrives DTR low. The RTS pin is controlled automatically.
Detected level changes are reported by the respective Input Change bits in CSR (CSR.RIIC,CSR.DSRIC, CSR.DCDIC, and CSR.CTSIC). An interrupt request is generated if the corre-sponding bit in the Interrupt Mask Register is set. The Input Change bits in CSR areautomatically cleared when CSR is read. When the CTS pin goes high, the USART will wait forthe transmitter to complete any ongoing character transmission before automatically disabling it.
24.6.8 ISO7816 ModeThe USART features an ISO7816 compatible mode, enabling interfacing with smart cards andSecurity Access Modules (SAM) through an ISO7816 compliant link. T=0 and T=1 protocols, asdefined in the ISO7816 standard, are supported. The ISO7816 mode is selected by writing thevalue 0x4 (T=0 protocol) or 0x6 (T=1 protocol) to MR.MODE.
24.6.8.1 ISO7816 Mode OverviewISO7816 specifies half duplex communication on one bidirectional line. The baud rate is a frac-tion of the clock provided by the master on the CLK pin (see ”Baud Rate Generator” on page587). The USART connects to a smart card as shown in Figure 24-21. The TXD pin is bidirec-tional and is routed to the receiver when the transmitter is disabled. Having both receiver andtransmitter enabled simultaneously may lead to unpredictable results.
Figure 24-21. USART (Master) Connected to a Smart Card
In both T=0 and T=1 modes, the character format is fixed to eight data bits, and one or two stopbits, regardless of CHRL, MODE9, and CHMODE values. Parity according to specification iseven. If the inverse transmission format is used, where payload data bits are transmittedinverted on the I/O line, the user can either use odd parity and perform an XOR on data headedto THR and coming from RHR, or write a one to MR.INVDATA and let the device handle the rest.
24.6.8.2 Baud Rate in ISO 7816 ModeThe ISO7816 specification defines the bit rate with the following formula:
where:
DSR 6 107 From terminal to modem
DCD 8 109 From terminal to modem
RI 22 125 From terminal to modem
Table 24-8. Circuit References
USART Pin V.24 CCITT Direction
CLK
TXD
USART
CLK
I/OSmartCard
B DiFi------ f×=
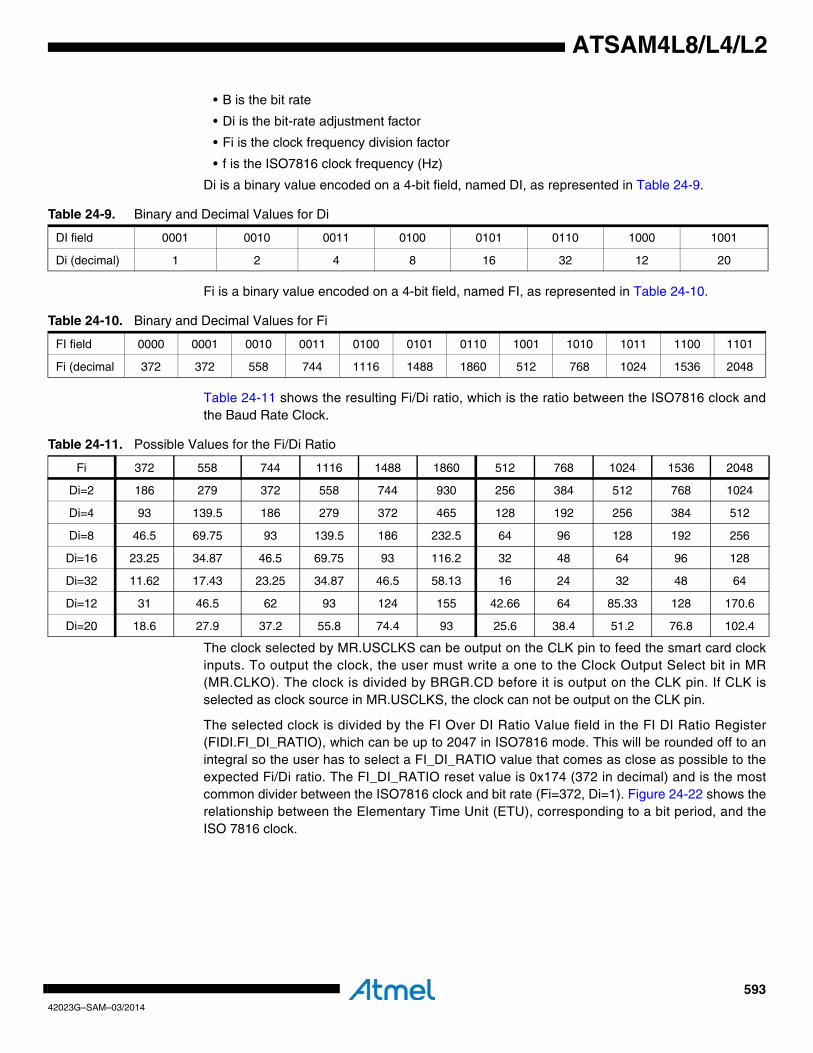
59342023G–SAM–03/2014
ATSAM4L8/L4/L2
• B is the bit rate
• Di is the bit-rate adjustment factor
• Fi is the clock frequency division factor
• f is the ISO7816 clock frequency (Hz)
Di is a binary value encoded on a 4-bit field, named DI, as represented in Table 24-9.
Fi is a binary value encoded on a 4-bit field, named FI, as represented in Table 24-10.
Table 24-11 shows the resulting Fi/Di ratio, which is the ratio between the ISO7816 clock andthe Baud Rate Clock.
The clock selected by MR.USCLKS can be output on the CLK pin to feed the smart card clockinputs. To output the clock, the user must write a one to the Clock Output Select bit in MR(MR.CLKO). The clock is divided by BRGR.CD before it is output on the CLK pin. If CLK isselected as clock source in MR.USCLKS, the clock can not be output on the CLK pin.
The selected clock is divided by the FI Over DI Ratio Value field in the FI DI Ratio Register(FIDI.FI_DI_RATIO), which can be up to 2047 in ISO7816 mode. This will be rounded off to anintegral so the user has to select a FI_DI_RATIO value that comes as close as possible to theexpected Fi/Di ratio. The FI_DI_RATIO reset value is 0x174 (372 in decimal) and is the mostcommon divider between the ISO7816 clock and bit rate (Fi=372, Di=1). Figure 24-22 shows therelationship between the Elementary Time Unit (ETU), corresponding to a bit period, and theISO 7816 clock.
Table 24-9. Binary and Decimal Values for Di
DI field 0001 0010 0011 0100 0101 0110 1000 1001
Di (decimal) 1 2 4 8 16 32 12 20
Table 24-10. Binary and Decimal Values for Fi
FI field 0000 0001 0010 0011 0100 0101 0110 1001 1010 1011 1100 1101
Fi (decimal 372 372 558 744 1116 1488 1860 512 768 1024 1536 2048
Table 24-11. Possible Values for the Fi/Di Ratio
Fi 372 558 744 1116 1488 1860 512 768 1024 1536 2048
Di=2 186 279 372 558 744 930 256 384 512 768 1024
Di=4 93 139.5 186 279 372 465 128 192 256 384 512
Di=8 46.5 69.75 93 139.5 186 232.5 64 96 128 192 256
Di=16 23.25 34.87 46.5 69.75 93 116.2 32 48 64 96 128
Di=32 11.62 17.43 23.25 34.87 46.5 58.13 16 24 32 48 64
Di=12 31 46.5 62 93 124 155 42.66 64 85.33 128 170.6
Di=20 18.6 27.9 37.2 55.8 74.4 93 25.6 38.4 51.2 76.8 102.4
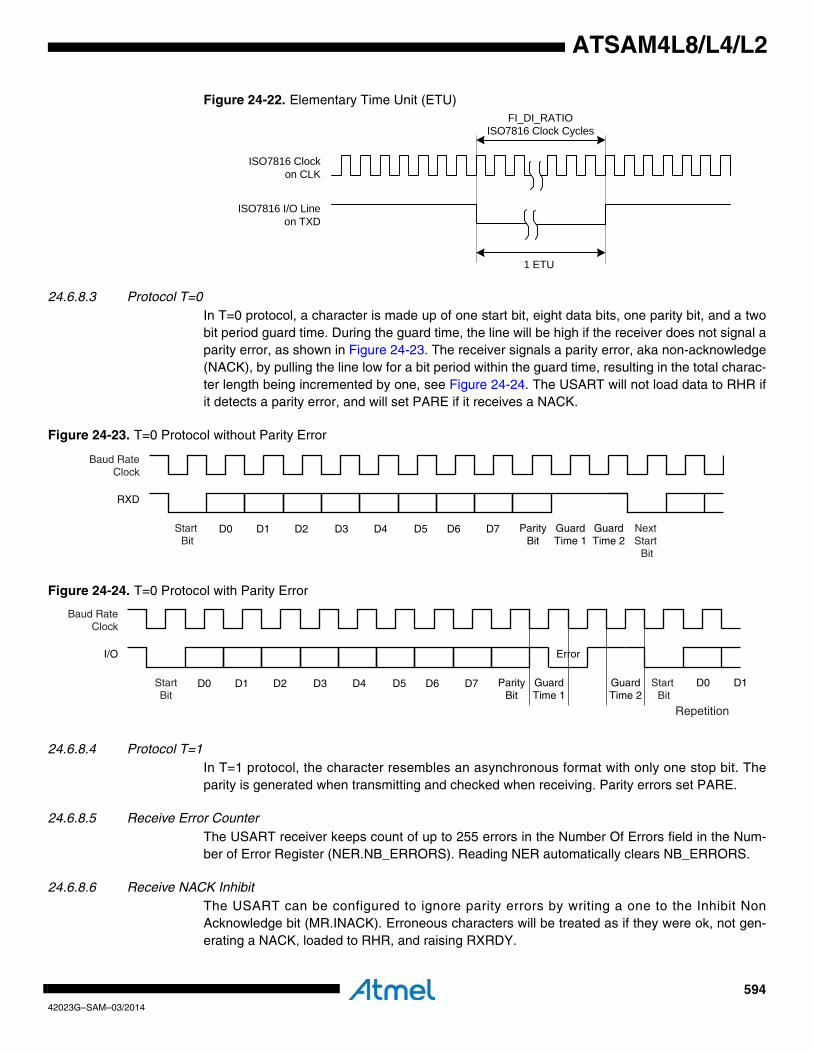
59442023G–SAM–03/2014
ATSAM4L8/L4/L2
Figure 24-22. Elementary Time Unit (ETU)
24.6.8.3 Protocol T=0In T=0 protocol, a character is made up of one start bit, eight data bits, one parity bit, and a twobit period guard time. During the guard time, the line will be high if the receiver does not signal aparity error, as shown in Figure 24-23. The receiver signals a parity error, aka non-acknowledge(NACK), by pulling the line low for a bit period within the guard time, resulting in the total charac-ter length being incremented by one, see Figure 24-24. The USART will not load data to RHR ifit detects a parity error, and will set PARE if it receives a NACK.
Figure 24-23. T=0 Protocol without Parity Error
Figure 24-24. T=0 Protocol with Parity Error
24.6.8.4 Protocol T=1In T=1 protocol, the character resembles an asynchronous format with only one stop bit. Theparity is generated when transmitting and checked when receiving. Parity errors set PARE.
24.6.8.5 Receive Error CounterThe USART receiver keeps count of up to 255 errors in the Number Of Errors field in the Num-ber of Error Register (NER.NB_ERRORS). Reading NER automatically clears NB_ERRORS.
24.6.8.6 Receive NACK InhibitThe USART can be configured to ignore parity errors by writing a one to the Inhibit NonAcknowledge bit (MR.INACK). Erroneous characters will be treated as if they were ok, not gen-erating a NACK, loaded to RHR, and raising RXRDY.
1 ETU
FI_DI_RATIOISO7816 Clock Cycles
ISO7816 Clock on CLK
ISO7816 I/O Line on TXD
D0 D1 D2 D3 D4 D5 D6 D7
RXD
ParityBit
Baud RateClock
Start Bit
GuardTime 1
Next Start
Bit
GuardTime 2
D0 D1 D2 D3 D4 D5 D6 D7
I/O
ParityBit
Baud RateClock
StartBit
GuardTime 1
Start Bit
GuardTime 2
D0 D1
Error
Repetition
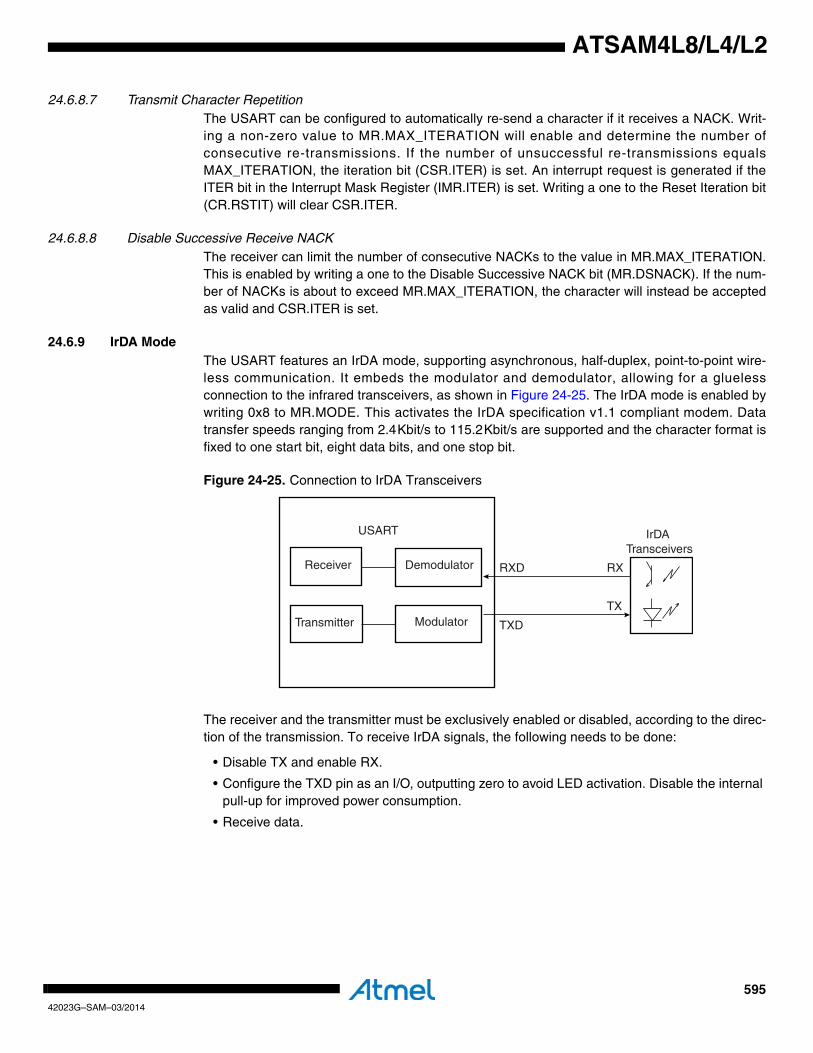
59542023G–SAM–03/2014
ATSAM4L8/L4/L2
24.6.8.7 Transmit Character RepetitionThe USART can be configured to automatically re-send a character if it receives a NACK. Writ-ing a non-zero value to MR.MAX_ITERATION will enable and determine the number ofconsecutive re-transmissions. If the number of unsuccessful re-transmissions equalsMAX_ITERATION, the iteration bit (CSR.ITER) is set. An interrupt request is generated if theITER bit in the Interrupt Mask Register (IMR.ITER) is set. Writing a one to the Reset Iteration bit(CR.RSTIT) will clear CSR.ITER.
24.6.8.8 Disable Successive Receive NACKThe receiver can limit the number of consecutive NACKs to the value in MR.MAX_ITERATION.This is enabled by writing a one to the Disable Successive NACK bit (MR.DSNACK). If the num-ber of NACKs is about to exceed MR.MAX_ITERATION, the character will instead be acceptedas valid and CSR.ITER is set.
24.6.9 IrDA ModeThe USART features an IrDA mode, supporting asynchronous, half-duplex, point-to-point wire-less communication. It embeds the modulator and demodulator, allowing for a gluelessconnection to the infrared transceivers, as shown in Figure 24-25. The IrDA mode is enabled bywriting 0x8 to MR.MODE. This activates the IrDA specification v1.1 compliant modem. Datatransfer speeds ranging from 2.4Kbit/s to 115.2Kbit/s are supported and the character format isfixed to one start bit, eight data bits, and one stop bit.
Figure 24-25. Connection to IrDA Transceivers
The receiver and the transmitter must be exclusively enabled or disabled, according to the direc-tion of the transmission. To receive IrDA signals, the following needs to be done:
• Disable TX and enable RX.
• Configure the TXD pin as an I/O, outputting zero to avoid LED activation. Disable the internal pull-up for improved power consumption.
• Receive data.
IrDA Transceivers
RXD RX
TXD
TX
USART
Demodulator
Modulator
Receiver
Transmitter
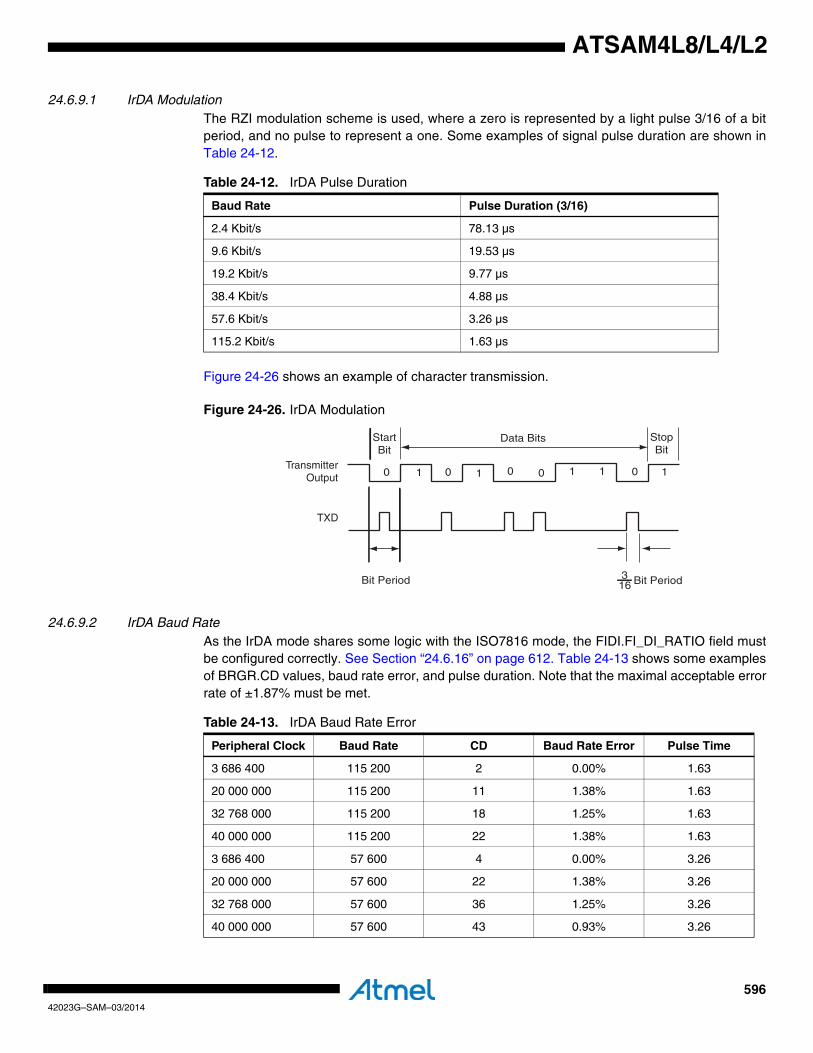
59642023G–SAM–03/2014
ATSAM4L8/L4/L2
24.6.9.1 IrDA ModulationThe RZI modulation scheme is used, where a zero is represented by a light pulse 3/16 of a bitperiod, and no pulse to represent a one. Some examples of signal pulse duration are shown inTable 24-12.
Figure 24-26 shows an example of character transmission.
Figure 24-26. IrDA Modulation
24.6.9.2 IrDA Baud RateAs the IrDA mode shares some logic with the ISO7816 mode, the FIDI.FI_DI_RATIO field mustbe configured correctly. See Section “24.6.16” on page 612. Table 24-13 shows some examplesof BRGR.CD values, baud rate error, and pulse duration. Note that the maximal acceptable errorrate of ±1.87% must be met.
Table 24-12. IrDA Pulse Duration
Baud Rate Pulse Duration (3/16)
2.4 Kbit/s 78.13 µs
9.6 Kbit/s 19.53 µs
19.2 Kbit/s 9.77 µs
38.4 Kbit/s 4.88 µs
57.6 Kbit/s 3.26 µs
115.2 Kbit/s 1.63 µs
Bit Period Bit Period316
StartBit
Data Bits StopBit
0 00 0 01 11 11Transmitter
Output
TXD
Table 24-13. IrDA Baud Rate Error
Peripheral Clock Baud Rate CD Baud Rate Error Pulse Time
3 686 400 115 200 2 0.00% 1.63
20 000 000 115 200 11 1.38% 1.63
32 768 000 115 200 18 1.25% 1.63
40 000 000 115 200 22 1.38% 1.63
3 686 400 57 600 4 0.00% 3.26
20 000 000 57 600 22 1.38% 3.26
32 768 000 57 600 36 1.25% 3.26
40 000 000 57 600 43 0.93% 3.26

59742023G–SAM–03/2014
ATSAM4L8/L4/L2
24.6.9.3 IrDA DemodulatorThe demodulator depends on an 8-bit down counter loaded with the value in the IRDA_Filterfield in the IrDA Filter Register (IFR.IRDA_FILTER). When a falling edge on RXD is detected,the counter starts decrementing at CLK_USART speed. If a rising edge on RXD is detected , thecounter stops and is reloaded with the IrD Filter value. If no rising edge has been detected whenthe counter reaches zero, the receiver input is pulled low during one bit period, see Figure 24-27. Writing a one to the Infrared Receive Line Filter bit (MR.FILTER), enables a noise filter that,instead of using just one sample, will choose the majority value from three consecutive samples.
Figure 24-27. IrDA Demodulator Operations
24.6.10 LIN ModeThe USART features a Local Interconnect Network (LIN) 1.3 and 2.0 compliant mode, embed-ding full error checking and reporting, automatic frame processing with up to 256 data bytes,customizable response data lengths, and requiring minimal CPU resources. The LIN mode isenabled by writing 0xA (master) or 0xB (slave) to MR.MODE.
3 686 400 38 400 6 0.00% 4.88
20 000 000 38 400 33 1.38% 4.88
32 768 000 38 400 53 0.63% 4.88
40 000 000 38 400 65 0.16% 4.88
3 686 400 19 200 12 0.00% 9.77
20 000 000 19 200 65 0.16% 9.77
32 768 000 19 200 107 0.31% 9.77
40 000 000 19 200 130 0.16% 9.77
3 686 400 9 600 24 0.00% 19.53
20 000 000 9 600 130 0.16% 19.53
32 768 000 9 600 213 0.16% 19.53
40 000 000 9 600 260 0.16% 19.53
3 686 400 2 400 96 0.00% 78.13
20 000 000 2 400 521 0.03% 78.13
32 768 000 2 400 853 0.04% 78.13
Table 24-13. IrDA Baud Rate Error (Continued)
Peripheral Clock Baud Rate CD Baud Rate Error Pulse Time
CLK_USART
RXD
Counter Value
ReceiverInput
6 5 4 63Pulse
Rejected
2 6 45 3 2 1 0Pulse
Accepted
Driven Low During 16 Baud Rate Clock Cycles
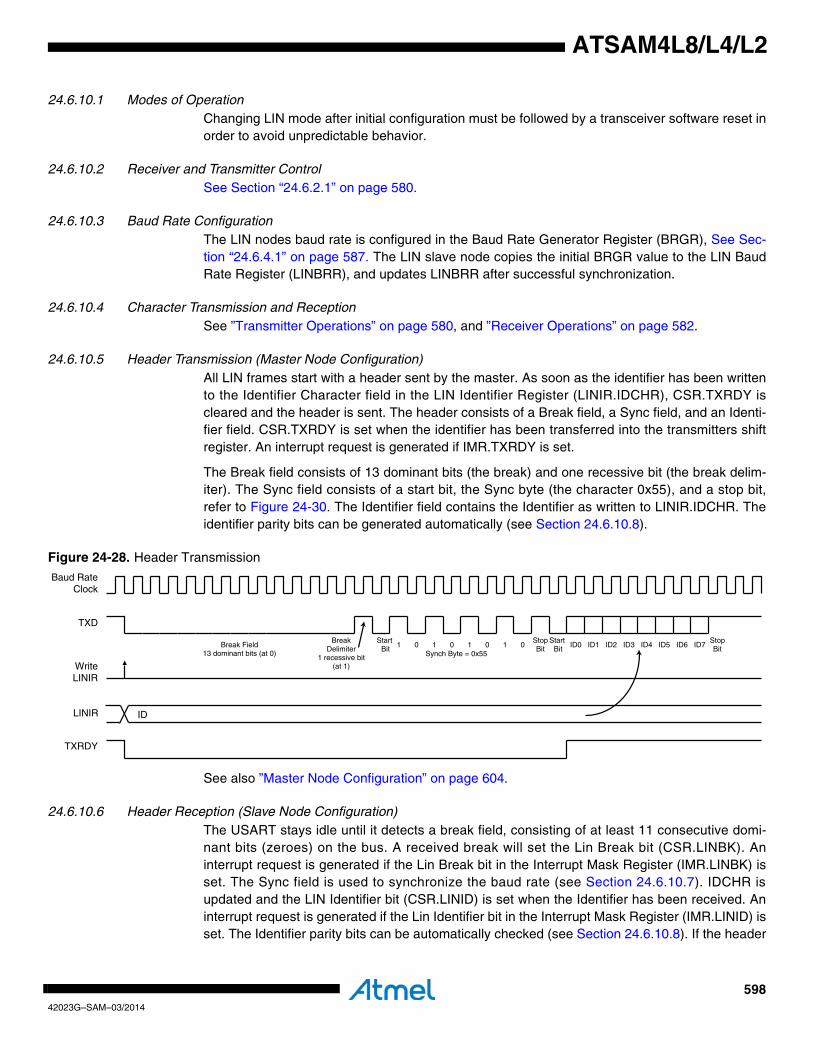
59842023G–SAM–03/2014
ATSAM4L8/L4/L2
24.6.10.1 Modes of OperationChanging LIN mode after initial configuration must be followed by a transceiver software reset inorder to avoid unpredictable behavior.
24.6.10.2 Receiver and Transmitter ControlSee Section “24.6.2.1” on page 580.
24.6.10.3 Baud Rate ConfigurationThe LIN nodes baud rate is configured in the Baud Rate Generator Register (BRGR), See Sec-tion “24.6.4.1” on page 587. The LIN slave node copies the initial BRGR value to the LIN BaudRate Register (LINBRR), and updates LINBRR after successful synchronization.
24.6.10.4 Character Transmission and ReceptionSee ”Transmitter Operations” on page 580, and ”Receiver Operations” on page 582.
24.6.10.5 Header Transmission (Master Node Configuration)All LIN frames start with a header sent by the master. As soon as the identifier has been writtento the Identifier Character field in the LIN Identifier Register (LINIR.IDCHR), CSR.TXRDY iscleared and the header is sent. The header consists of a Break field, a Sync field, and an Identi-fier field. CSR.TXRDY is set when the identifier has been transferred into the transmitters shiftregister. An interrupt request is generated if IMR.TXRDY is set.
The Break field consists of 13 dominant bits (the break) and one recessive bit (the break delim-iter). The Sync field consists of a start bit, the Sync byte (the character 0x55), and a stop bit,refer to Figure 24-30. The Identifier field contains the Identifier as written to LINIR.IDCHR. Theidentifier parity bits can be generated automatically (see Section 24.6.10.8).
Figure 24-28. Header Transmission
See also ”Master Node Configuration” on page 604.
24.6.10.6 Header Reception (Slave Node Configuration)The USART stays idle until it detects a break field, consisting of at least 11 consecutive domi-nant bits (zeroes) on the bus. A received break will set the Lin Break bit (CSR.LINBK). Aninterrupt request is generated if the Lin Break bit in the Interrupt Mask Register (IMR.LINBK) isset. The Sync field is used to synchronize the baud rate (see Section 24.6.10.7). IDCHR isupdated and the LIN Identifier bit (CSR.LINID) is set when the Identifier has been received. Aninterrupt request is generated if the Lin Identifier bit in the Interrupt Mask Register (IMR.LINID) isset. The Identifier parity bits can be automatically checked (see Section 24.6.10.8). If the header
TXD
Baud Rate Clock
Start Bit
WriteLINIR
1 0 1 0 1 0 1 0
TXRDY
StopBit
Start Bit ID0 ID1 ID2 ID3 ID4 ID5 ID6 ID7Break Field
13 dominant bits (at 0)
StopBit
BreakDelimiter
1 recessive bit(at 1)
Synch Byte = 0x55
LINIR ID
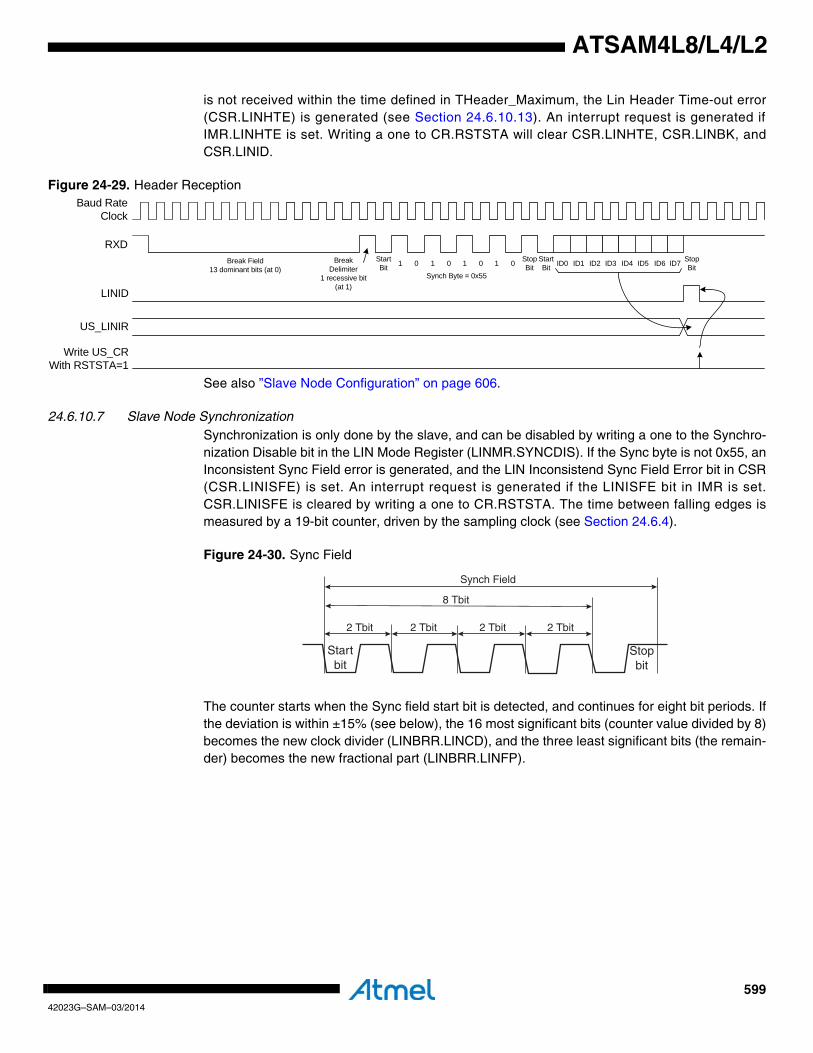
59942023G–SAM–03/2014
ATSAM4L8/L4/L2
is not received within the time defined in THeader_Maximum, the Lin Header Time-out error(CSR.LINHTE) is generated (see Section 24.6.10.13). An interrupt request is generated ifIMR.LINHTE is set. Writing a one to CR.RSTSTA will clear CSR.LINHTE, CSR.LINBK, andCSR.LINID.
Figure 24-29. Header Reception
See also ”Slave Node Configuration” on page 606.
24.6.10.7 Slave Node SynchronizationSynchronization is only done by the slave, and can be disabled by writing a one to the Synchro-nization Disable bit in the LIN Mode Register (LINMR.SYNCDIS). If the Sync byte is not 0x55, anInconsistent Sync Field error is generated, and the LIN Inconsistend Sync Field Error bit in CSR(CSR.LINISFE) is set. An interrupt request is generated if the LINISFE bit in IMR is set.CSR.LINISFE is cleared by writing a one to CR.RSTSTA. The time between falling edges ismeasured by a 19-bit counter, driven by the sampling clock (see Section 24.6.4).
Figure 24-30. Sync Field
The counter starts when the Sync field start bit is detected, and continues for eight bit periods. Ifthe deviation is within ±15% (see below), the 16 most significant bits (counter value divided by 8)becomes the new clock divider (LINBRR.LINCD), and the three least significant bits (the remain-der) becomes the new fractional part (LINBRR.LINFP).
Break Field13 dominant bits (at 0)
BreakDelimiter
1 recessive bit(at 1)
StartBit 1 0 1 0 1 0 1 0 Stop
BitStartBit ID0 ID1 ID2 ID4ID3 ID6ID5 ID7 Stop
BitSynch Byte = 0x55
Baud RateClock
RXD
Write US_CRWith RSTSTA=1
US_LINIR
LINID
Startbit
Stopbit
Synch Field
8 Tbit
2 Tbit 2 Tbit 2 Tbit 2 Tbit
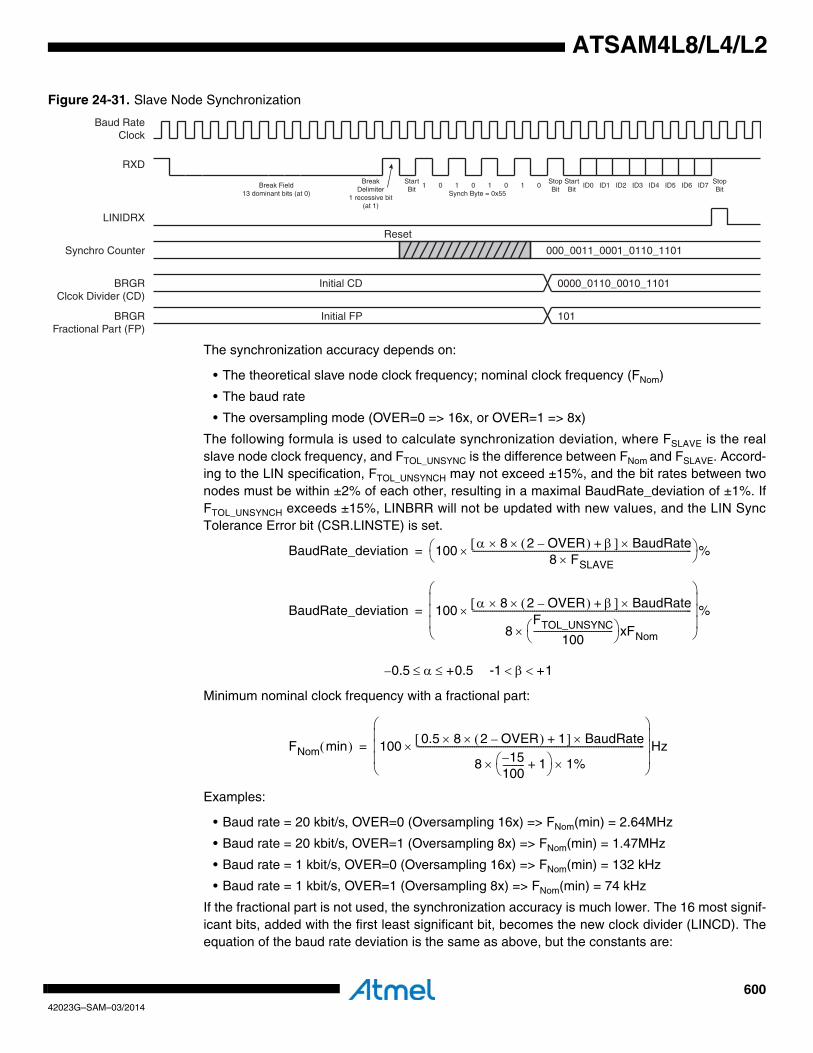
60042023G–SAM–03/2014
ATSAM4L8/L4/L2
Figure 24-31. Slave Node Synchronization
The synchronization accuracy depends on:
• The theoretical slave node clock frequency; nominal clock frequency (FNom)
• The baud rate
• The oversampling mode (OVER=0 => 16x, or OVER=1 => 8x)
The following formula is used to calculate synchronization deviation, where FSLAVE is the realslave node clock frequency, and FTOL_UNSYNC is the difference between FNom and FSLAVE. Accord-ing to the LIN specification, FTOL_UNSYNCH may not exceed ±15%, and the bit rates between twonodes must be within ±2% of each other, resulting in a maximal BaudRate_deviation of ±1%. IfFTOL_UNSYNCH exceeds ±15%, LINBRR will not be updated with new values, and the LIN SyncTolerance Error bit (CSR.LINSTE) is set.
Minimum nominal clock frequency with a fractional part:
Examples:
• Baud rate = 20 kbit/s, OVER=0 (Oversampling 16x) => FNom(min) = 2.64MHz
• Baud rate = 20 kbit/s, OVER=1 (Oversampling 8x) => FNom(min) = 1.47MHz
• Baud rate = 1 kbit/s, OVER=0 (Oversampling 16x) => FNom(min) = 132 kHz
• Baud rate = 1 kbit/s, OVER=1 (Oversampling 8x) => FNom(min) = 74 kHz
If the fractional part is not used, the synchronization accuracy is much lower. The 16 most signif-icant bits, added with the first least significant bit, becomes the new clock divider (LINCD). Theequation of the baud rate deviation is the same as above, but the constants are:
RXD
Baud Rate Clock
LINIDRX
Synchro Counter 000_0011_0001_0110_1101
BRGRClcok Divider (CD)
0000_0110_0010_1101
BRGRFractional Part (FP)
101
Initial CD
Initial FP
Reset
StartBit
1 0 1 0 1 0 1 0StopBit
StartBit
ID0 ID1 ID2 ID3 ID4 ID5 ID6 ID7Break Field13 dominant bits (at 0)
StopBit
BreakDelimiter
1 recessive bit(at 1)
Synch Byte = 0x55
BaudRate_deviation 100 α[ 8 2 OVER–( ) β+ ] BaudRate×××8 FSLAVE×
---------------------------------------------------------------------------------------------------×⎝ ⎠⎛ ⎞%=
BaudRate_deviation 100 α[ 8 2 OVER–( ) β+ ] BaudRate×××
8FTOL_UNSYNC
100------------------------------------⎝ ⎠⎛ ⎞ xFNom×
---------------------------------------------------------------------------------------------------×
⎝ ⎠⎜ ⎟⎜ ⎟⎜ ⎟⎛ ⎞
%=
0.5– α +0.5 -1 β +1< <≤ ≤
FNom min( ) 100 0.5 8 2 OVER–( )×× 1+[ ] BaudRate×
8 15–100---------- 1+⎝ ⎠⎛ ⎞× 1%×
-------------------------------------------------------------------------------------------------------×
⎝ ⎠⎜ ⎟⎜ ⎟⎜ ⎟⎛ ⎞
Hz=

60142023G–SAM–03/2014
ATSAM4L8/L4/L2
Minimum nominal clock frequency without a fractional part:
Examples:
• Baud rate = 20 kbit/s, OVER=0 (Oversampling 16x) => FNom(min) = 19.12MHz
• Baud rate = 20 kbit/s, OVER=1 (Oversampling 8x) => FNom(min) = 9.71MHz
• Baud rate = 1 kbit/s, OVER=0 (Oversampling 16x) => FNom(min) = 956 kHz
• Baud rate = 1 kbit/s, OVER=1 (Oversampling 8x) => FNom(min) = 485 kHz
24.6.10.8 Identifier ParityAn identifier field consists of two sub-fields; the identifier and its parity. Bits 0 to 5 are assignedto the identifier, while bits 6 and 7 are assigned to parity. Automatic parity management isenabled by default, and can be disabled by writing a one to the Parity Disable bit in the LINMode register (LINMR.PARDIS).
• LINMR.PARDIS=0: During header transmission, the parity bits are computed and in the shift register they replace bits 6 and 7 from LINIR.IDCHR. During header reception, the parity bits are checked and can generate a LIN Identifier Parity Error (see Section 24.6.10.13). Bits 6 and 7 in LINIR.IDCHR read as zero when receiving.
• LINMR.PARDIS=1: During header transmission, all the bits in LINIR.IDCHR are sent on the bus. During header reception, all the bits in LINIR.IDCHR are updated with the received Identifier.
24.6.10.9 Node ActionAfter an identifier transaction, a LIN response mode must be selected. This is done in the NodeAction field (LINMR.NACT). Below are some response modes exemplified in a small LIN cluster:
• Response, from master to slave1:
Master: NACT=PUBLISH
Slave1: NACT=SUBSCRIBE
Slave2: NACT=IGNORE
• Response, from slave1 to master:
Master: NACT=SUBSCRIBE
Slave1: NACT=PUBLISH
Slave2: NACT=IGNORE
• Response, from slave1 to slave2:
Master: NACT=IGNORE
Slave1: NACT=PUBLISH
Slave2: NACT=SUBSCRIBE
4– α +4 -1 β +1< <≤ ≤
FNom min( ) 100 4 8 2 OVER–( )×× 1+[ ] Baudrate×
8 15–100---------- 1+⎝ ⎠⎛ ⎞× 1%×
-----------------------------------------------------------------------------------------------×
⎝ ⎠⎜ ⎟⎜ ⎟⎜ ⎟⎛ ⎞
Hz=
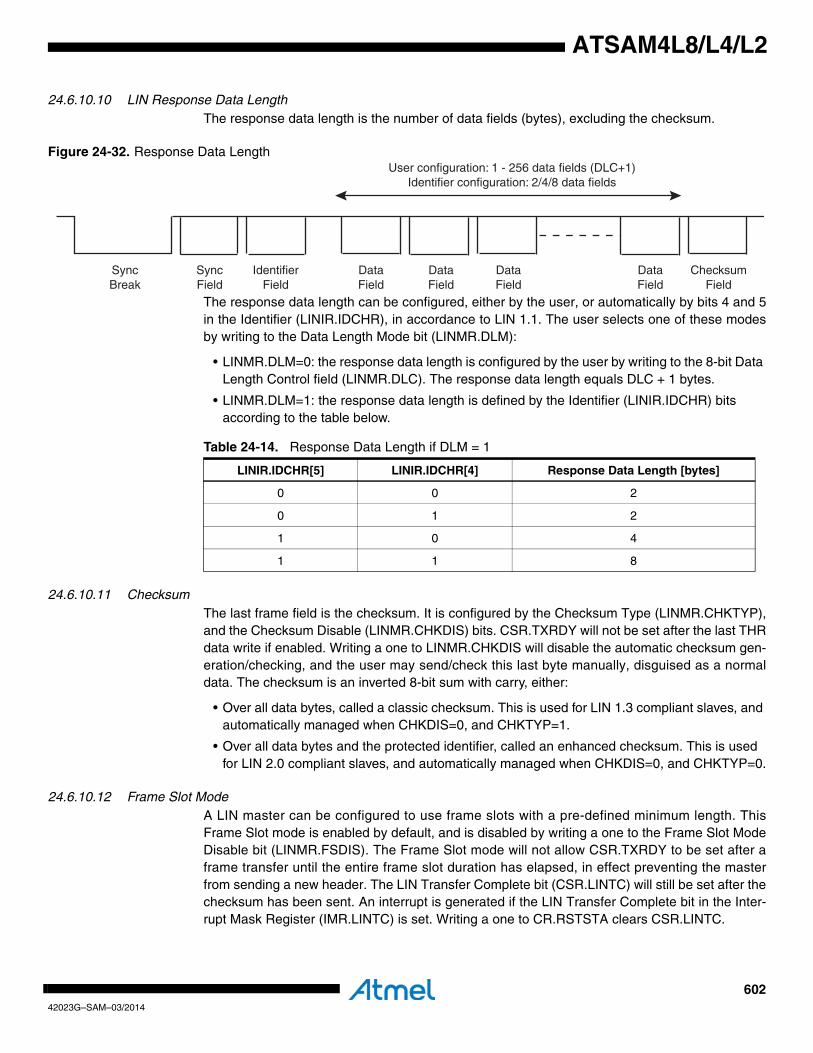
60242023G–SAM–03/2014
ATSAM4L8/L4/L2
24.6.10.10 LIN Response Data LengthThe response data length is the number of data fields (bytes), excluding the checksum.
Figure 24-32. Response Data Length
The response data length can be configured, either by the user, or automatically by bits 4 and 5in the Identifier (LINIR.IDCHR), in accordance to LIN 1.1. The user selects one of these modesby writing to the Data Length Mode bit (LINMR.DLM):
• LINMR.DLM=0: the response data length is configured by the user by writing to the 8-bit Data Length Control field (LINMR.DLC). The response data length equals DLC + 1 bytes.
• LINMR.DLM=1: the response data length is defined by the Identifier (LINIR.IDCHR) bits according to the table below.
24.6.10.11 ChecksumThe last frame field is the checksum. It is configured by the Checksum Type (LINMR.CHKTYP),and the Checksum Disable (LINMR.CHKDIS) bits. CSR.TXRDY will not be set after the last THRdata write if enabled. Writing a one to LINMR.CHKDIS will disable the automatic checksum gen-eration/checking, and the user may send/check this last byte manually, disguised as a normaldata. The checksum is an inverted 8-bit sum with carry, either:
• Over all data bytes, called a classic checksum. This is used for LIN 1.3 compliant slaves, and automatically managed when CHKDIS=0, and CHKTYP=1.
• Over all data bytes and the protected identifier, called an enhanced checksum. This is used for LIN 2.0 compliant slaves, and automatically managed when CHKDIS=0, and CHKTYP=0.
24.6.10.12 Frame Slot ModeA LIN master can be configured to use frame slots with a pre-defined minimum length. ThisFrame Slot mode is enabled by default, and is disabled by writing a one to the Frame Slot ModeDisable bit (LINMR.FSDIS). The Frame Slot mode will not allow CSR.TXRDY to be set after aframe transfer until the entire frame slot duration has elapsed, in effect preventing the masterfrom sending a new header. The LIN Transfer Complete bit (CSR.LINTC) will still be set after thechecksum has been sent. An interrupt is generated if the LIN Transfer Complete bit in the Inter-rupt Mask Register (IMR.LINTC) is set. Writing a one to CR.RSTSTA clears CSR.LINTC.
User configuration: 1 - 256 data fields (DLC+1)Identifier configuration: 2/4/8 data fields
SyncBreak
SyncField
IdentifierField
ChecksumField
DataField
DataField
DataField
DataField
Table 24-14. Response Data Length if DLM = 1
LINIR.IDCHR[5] LINIR.IDCHR[4] Response Data Length [bytes]
0 0 2
0 1 2
1 0 4
1 1 8

60342023G–SAM–03/2014
ATSAM4L8/L4/L2
Figure 24-33. Frame Slot Mode with Automatic Checksum
The minimum frame slot size is determined by TFrame_Maximum, and calculated below (all val-ues in bit periods):
• THeader_Nominal = 34
• TFrame_Maximum = 1.4 x (THeader_Nominal + TResponse_Nominal + 1)
Note: The term “+1” leads to an integer result for TFrame_Max (LIN Specification 1.3)
If the Checksum is sent (CHKDIS=0):
• TResponse_Nominal = 10 x (NData + 1)
• TFrame_Maximum = 1.4 x (34 + 10 x (DLC + 1 + 1) + 1)
• TFrame_Maximum = 77 + 14 x DLC
If the Checksum is not sent (CHKDIS=1):
• TResponse_Nominal = 10 x NData
• TFrame_Maximum = 1.4 x (34 + 10 x (DLC + 1) + 1)
• TFrame_Maximum = 63 + 14 x DLC
24.6.10.13 LIN ErrorsThis section describes the errors generated in LIN mode, and the coresponding error bits inCSR. The error bits are cleared by writing a one to CR.RSTSTA. An interrupt request is gener-ated if the corresponding bit in the Interrupt Mask Register (IMR) is set. This bit is set by writinga one to the corresponding bit in the Interrupt Enable Register (IER).
• Header Time-out Error (CSR.LINHTE)
– This error is generated if the Header is not received within the time specified by THeader_Maximum.
• Sync Tolerance Error (CSR.LINSTE)
– This error is generated if the synchronization baudrate deviation is larger than the maximum tolerance, FTol_Unsync ±15%. The synchronization procedure is aborted.
• Slave Not Responding Error (CSR.LINSNRE)
Break Synch ProtectedIdentifier
Data N Checksum
Header
Inter-framespaceResponse
space
Frame
Frame slot = TFrame_Maximum
Response
TXRDY
WriteTHR
WriteLINID
Data 1 Data 2 Data 3
Data3
Data N-1
Data N
Frame Slot ModeDisabled
Frame Slot ModeEnabled
LINTC
Data 1
60442023G–SAM–03/2014
ATSAM4L8/L4/L2
– This error is generated if no valid message appears within the TFrame_Maximum time frame slot, while the USART is expecting a response from another node (NACT=SUBSCRIBE).
• Checksum Error (CSR.LINCE)
– This error is generated if the received checksum is wrong. This error can only be generated if the checksum feature is enabled (CHKDIS=0).
• Identifier Parity Error (CSR.LINIPE)
– This error is generated if the identifier parity is wrong. This error can only be generated if parity is enabled (PARDIS=0).
• Inconsistent Sync Field Error (CSR.LINISFE)
– This error is generated in slave mode if the Sync Field character received is not 0x55. Synchronization procedure is aborted.
• Bit Error (CSR.LINBE)
– This error is generated if the value transmitted by the USART on Tx differs from the value sampled on Rx. If a bit error is detected, the transmission is aborted at the next byte border.
24.6.11 LIN Frame Handling
24.6.11.1 Master Node Configuration
• Configure the baud rate by writing to BRGR.CD and BRGR.FP
• Configure the frame transfer by writing to the LINMR fields NACT, PARDIS, CHKDIS, CHKTYPE, DLM, FSDIS, and DLC
• Select LIN mode and master node by writing 0xA to MR.MODE
• Write a one to CR.TXEN and CR.RXEN to enable both transmitter and receiver
• Wait until CSR.TXRDY is one
• Send the header by writing to LINIR.IDCHR
The following procedure depends on the LINMR.NACT setting:
• Case 1: LINMR.NACT is 0x0 (PUBLISH, the USART transmits the response)
– Wait until CSR.TXRDY is one
– Send a byte by writing to THR.TXCHR
– Repeat the two previous steps until there is no more data to send
– Wait until CSR.LINTC is one
– Check for LIN errors
• Case 2: LINMR.NACT is 0x1 (SUBSCRIBE, the USART receives the response)
– Wait until CSR.RXRDY is one
– Read RHR.RXCHR
– Repeat the two previous steps until there is no more data to read
– Wait until CSR.LINTC is one
– Check for LIN errors
• Case 3: LINMR.NACT is 0x2 (IGNORE, the USART is not concerned by a response)
– Wait until CSR.LINTC is one
– Check for LIN errors

60542023G–SAM–03/2014
ATSAM4L8/L4/L2
Figure 24-34. Master Node Configuration, LINMR.NACT is 0x0 (PUBLISH)
Figure 24-35. Master Node Configuration, LINMR.NACT is 0x1 (SUBSCRIBE)
Frame
Break Synch ProtectedIdentifier
Data 1 Data N Checksum
TXRDY
WriteTHR
WriteLINIR
Data 1 Data 2 Data 3
Data N-1
Data N
RXRDY
Header
Inter-framespaceResponse
space
Frame slot = TFrame_Maximum
ResponseData3
LINTC
FSDIS=1 FSDIS=0
Break Synch ProtectedIdentifier
Data 1 Data N Checksum
TXRDY
ReadRHR
WriteLINIR
Data 1
Data N-1
Data N-1
RXRDY
Data NData N-2
Header
Inter-framespaceResponse
space
Frame
Frame slot = TFrame_Maximum
ResponseData3
LINTC
FSDIS=0FSDIS=1
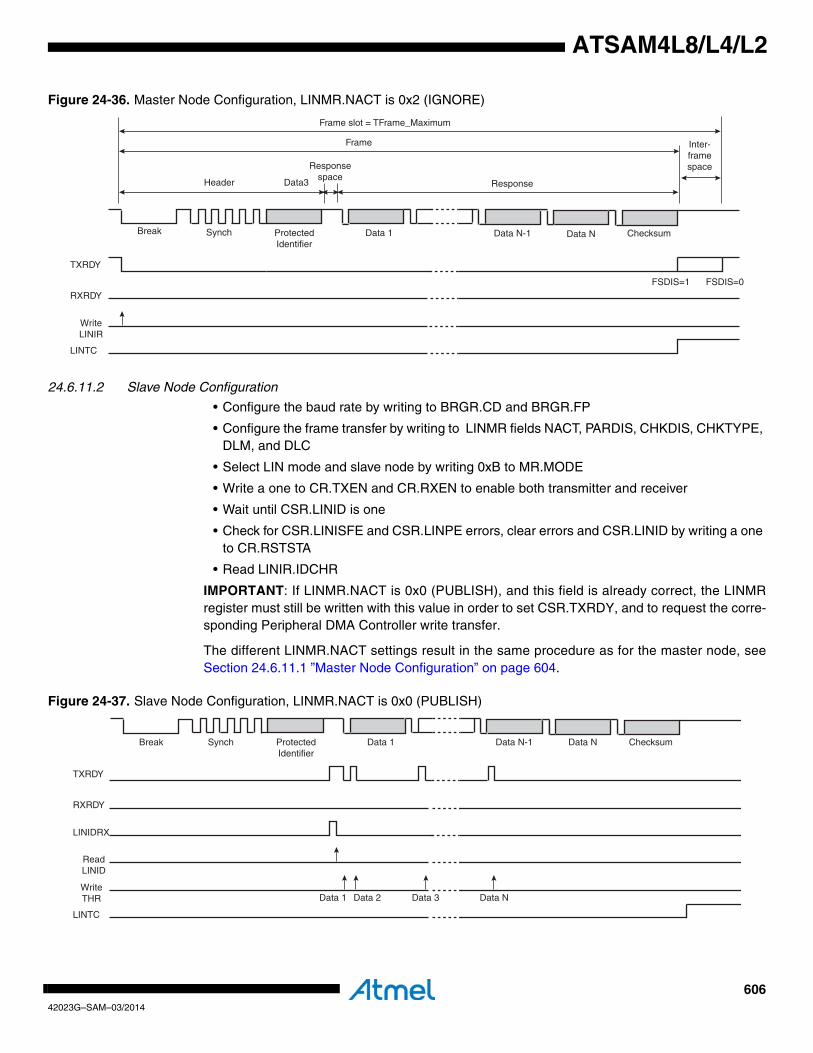
60642023G–SAM–03/2014
ATSAM4L8/L4/L2
Figure 24-36. Master Node Configuration, LINMR.NACT is 0x2 (IGNORE)
24.6.11.2 Slave Node Configuration
• Configure the baud rate by writing to BRGR.CD and BRGR.FP
• Configure the frame transfer by writing to LINMR fields NACT, PARDIS, CHKDIS, CHKTYPE, DLM, and DLC
• Select LIN mode and slave node by writing 0xB to MR.MODE
• Write a one to CR.TXEN and CR.RXEN to enable both transmitter and receiver
• Wait until CSR.LINID is one
• Check for CSR.LINISFE and CSR.LINPE errors, clear errors and CSR.LINID by writing a one to CR.RSTSTA
• Read LINIR.IDCHR
IMPORTANT: If LINMR.NACT is 0x0 (PUBLISH), and this field is already correct, the LINMRregister must still be written with this value in order to set CSR.TXRDY, and to request the corre-sponding Peripheral DMA Controller write transfer.
The different LINMR.NACT settings result in the same procedure as for the master node, seeSection 24.6.11.1 ”Master Node Configuration” on page 604.
Figure 24-37. Slave Node Configuration, LINMR.NACT is 0x0 (PUBLISH)
TXRDY
WriteLINIR
RXRDY
LINTC
Break Synch ProtectedIdentifier
Data 1 Data N ChecksumData N-1
Header
Inter-framespaceResponse
space
Frame
Frame slot = TFrame_Maximum
ResponseData3
FSDIS=1 FSDIS=0
Break Synch ProtectedIdentifier
Data 1 Data N Checksum
TXRDY
WriteTHR
ReadLINID
Data 1 Data 3
Data N-1
Data N
RXRDY
LINIDRX
Data 2
LINTC
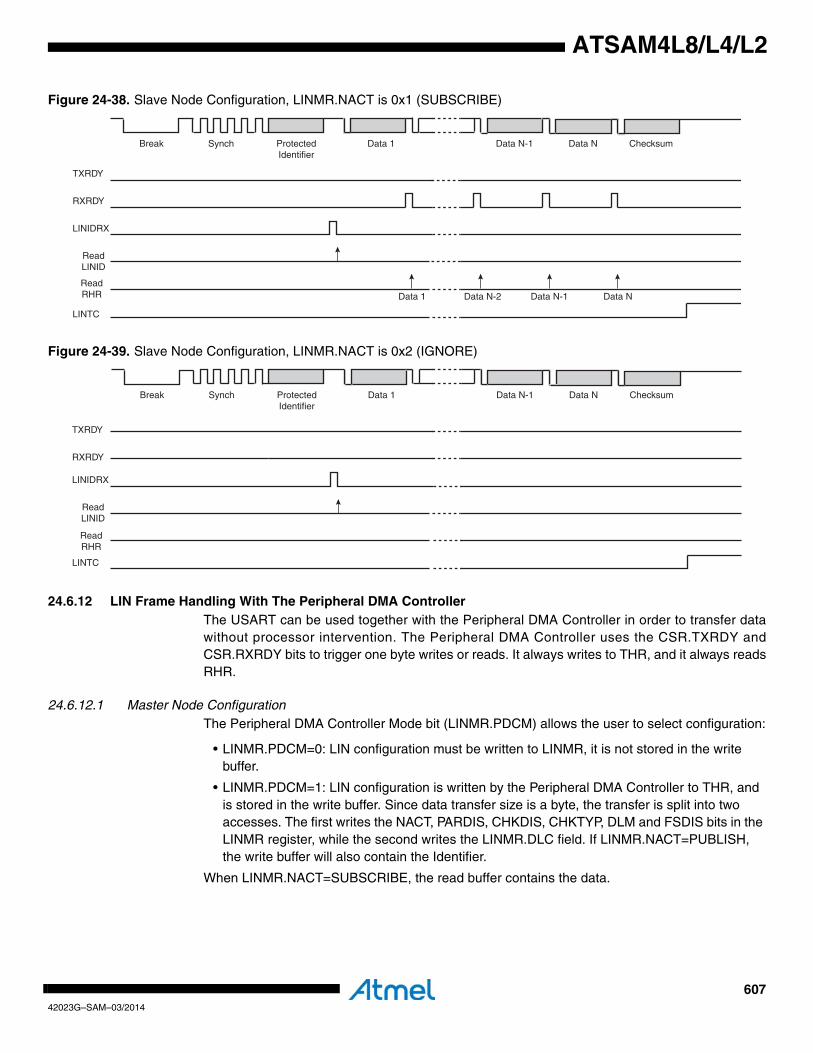
60742023G–SAM–03/2014
ATSAM4L8/L4/L2
Figure 24-38. Slave Node Configuration, LINMR.NACT is 0x1 (SUBSCRIBE)
Figure 24-39. Slave Node Configuration, LINMR.NACT is 0x2 (IGNORE)
24.6.12 LIN Frame Handling With The Peripheral DMA ControllerThe USART can be used together with the Peripheral DMA Controller in order to transfer datawithout processor intervention. The Peripheral DMA Controller uses the CSR.TXRDY andCSR.RXRDY bits to trigger one byte writes or reads. It always writes to THR, and it always readsRHR.
24.6.12.1 Master Node ConfigurationThe Peripheral DMA Controller Mode bit (LINMR.PDCM) allows the user to select configuration:
• LINMR.PDCM=0: LIN configuration must be written to LINMR, it is not stored in the write buffer.
• LINMR.PDCM=1: LIN configuration is written by the Peripheral DMA Controller to THR, and is stored in the write buffer. Since data transfer size is a byte, the transfer is split into two accesses. The first writes the NACT, PARDIS, CHKDIS, CHKTYP, DLM and FSDIS bits in the LINMR register, while the second writes the LINMR.DLC field. If LINMR.NACT=PUBLISH, the write buffer will also contain the Identifier.
When LINMR.NACT=SUBSCRIBE, the read buffer contains the data.
TXRDY
ReadRHR
ReadLINID
RXRDY
LINIDRX
LINTC
Break Synch ProtectedIdentifier
Data 1 Data N Checksum
Data 1
Data N-1
Data N-1 Data NData N-2
TXRDY
ReadRHR
ReadLINID
RXRDY
LINIDRX
LINTC
Break Synch ProtectedIdentifier
Data 1 Data N ChecksumData N-1

60842023G–SAM–03/2014
ATSAM4L8/L4/L2
Figure 24-40. Master Node with Peripheral DMA Controller (LINMR.PDCM=0)
Figure 24-41. Master Node with Peripheral DMA Controller (LINMR.PDCM=1)
24.6.12.2 Slave Node ConfigurationIn this mode, the Peripheral DMA Controller transfers only data. The user reads the Identifierfrom LINIR, and selects LIN mode by writing to LINMR. When NACT=PUBLISH the data is in thewrite buffer, while the read buffer contains the data when NACT=SUBSCRIBE.
IMPORTANT: If in slave mode, LINMR.NACT is already configured correctly as PUBLISH, theLINMR register must still be written with this value in order to set CSR.TXRDY, and to requestthe corresponding Peripheral DMA Controller write transfer.
||||
RXRDY
TXRDY
Peripheral bus
USART LIN CONTROLLER
DATA 0
DATA N
||||
READ BUFFER
NODE ACTION = PUBLISH NODE ACTION = SUBSCRIBE
Peripheral DMA Controller
RXRDY
Peripheral bus
DATA 0
DATA 1
DATA N
WRITE BUFFER
Peripheral DMA Controller
USART LIN CONTROLLER
||||
||||
NACTPARDISCHKDISCHKTYP
DLMFSDIS
DLC
IDENTIFIER
DATA 0
DATA N
WRITE BUFFER
RXRDY
Peripheral bus
DLC
IDENTIFIER
DATA 0
DATA N
WRITE BUFFER
RXRDYREAD BUFFER
NODE ACTION = PUBLISH NODE ACTION = SUBSCRIBE
Peripheral DMA Controller
Peripheral DMA Controller
USART LIN CONTROLLER
NACTPARDISCHKDISCHKTYP
DLMFSDIS
USART LIN CONTROLLER
TXRDY
Peripheral bus
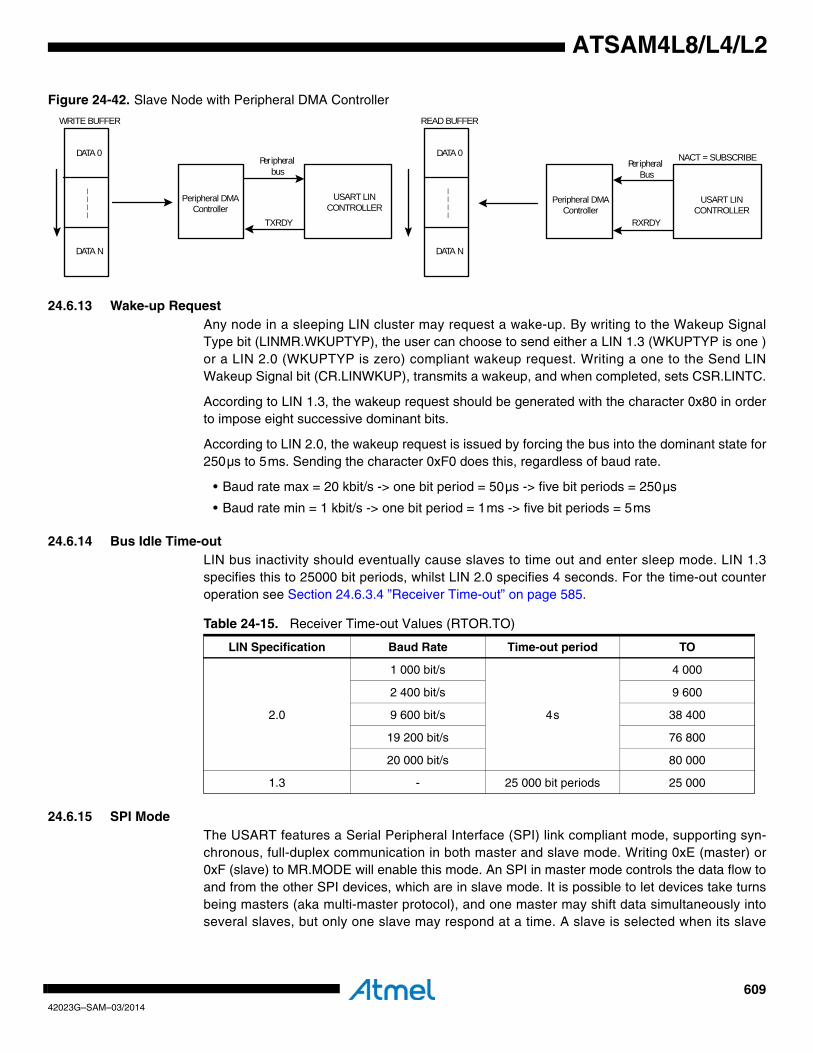
60942023G–SAM–03/2014
ATSAM4L8/L4/L2
Figure 24-42. Slave Node with Peripheral DMA Controller
24.6.13 Wake-up RequestAny node in a sleeping LIN cluster may request a wake-up. By writing to the Wakeup SignalType bit (LINMR.WKUPTYP), the user can choose to send either a LIN 1.3 (WKUPTYP is one )or a LIN 2.0 (WKUPTYP is zero) compliant wakeup request. Writing a one to the Send LINWakeup Signal bit (CR.LINWKUP), transmits a wakeup, and when completed, sets CSR.LINTC.
According to LIN 1.3, the wakeup request should be generated with the character 0x80 in orderto impose eight successive dominant bits.
According to LIN 2.0, the wakeup request is issued by forcing the bus into the dominant state for250µs to 5ms. Sending the character 0xF0 does this, regardless of baud rate.
• Baud rate max = 20 kbit/s -> one bit period = 50µs -> five bit periods = 250µs
• Baud rate min = 1 kbit/s -> one bit period = 1ms -> five bit periods = 5ms
24.6.14 Bus Idle Time-outLIN bus inactivity should eventually cause slaves to time out and enter sleep mode. LIN 1.3specifies this to 25000 bit periods, whilst LIN 2.0 specifies 4 seconds. For the time-out counteroperation see Section 24.6.3.4 ”Receiver Time-out” on page 585.
24.6.15 SPI ModeThe USART features a Serial Peripheral Interface (SPI) link compliant mode, supporting syn-chronous, full-duplex communication in both master and slave mode. Writing 0xE (master) or0xF (slave) to MR.MODE will enable this mode. An SPI in master mode controls the data flow toand from the other SPI devices, which are in slave mode. It is possible to let devices take turnsbeing masters (aka multi-master protocol), and one master may shift data simultaneously intoseveral slaves, but only one slave may respond at a time. A slave is selected when its slave
||||
||||
DATA 0
DATA N
RXRDY
PeripheralBus
READ BUFFER
NACT = SUBSCRIBEDATA 0
DATA N
TXRDY
Peripheralbus
WRITE BUFFER
USART LIN CONTROLLER
USART LIN CONTROLLER
Peripheral DMA Controller
Peripheral DMA Controller
Table 24-15. Receiver Time-out Values (RTOR.TO)
LIN Specification Baud Rate Time-out period TO
2.0
1 000 bit/s
4s
4 000
2 400 bit/s 9 600
9 600 bit/s 38 400
19 200 bit/s 76 800
20 000 bit/s 80 000
1.3 - 25 000 bit periods 25 000
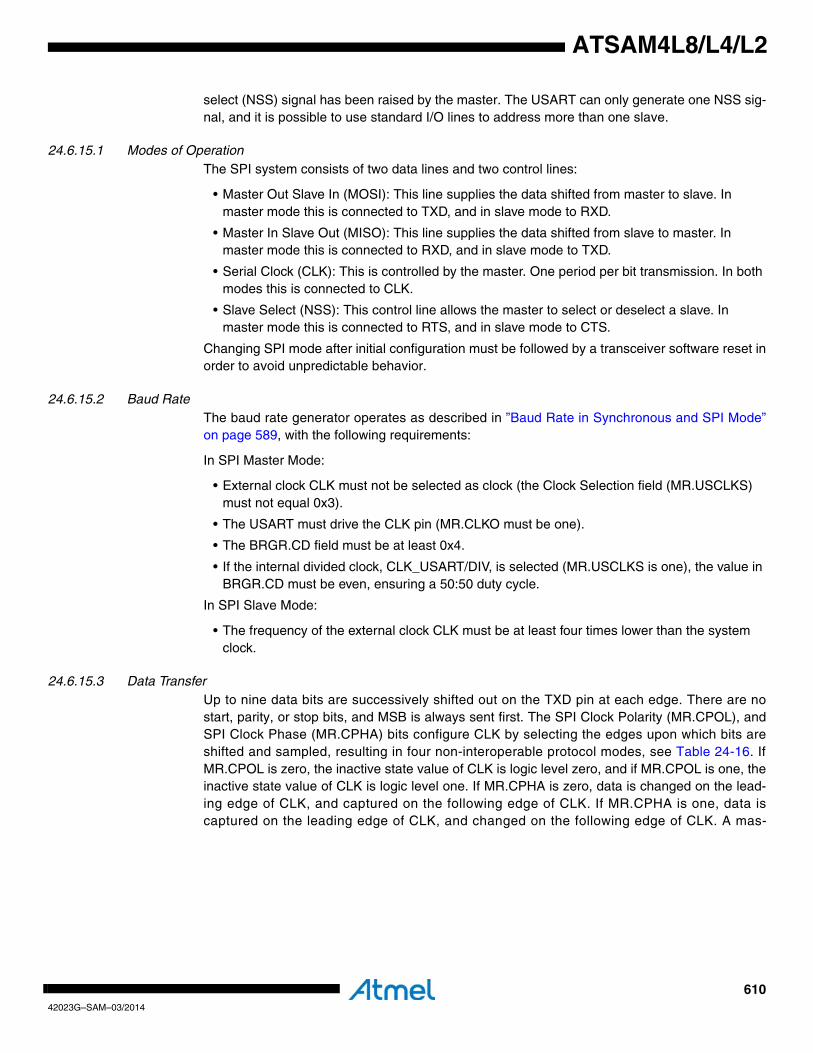
61042023G–SAM–03/2014
ATSAM4L8/L4/L2
select (NSS) signal has been raised by the master. The USART can only generate one NSS sig-nal, and it is possible to use standard I/O lines to address more than one slave.
24.6.15.1 Modes of OperationThe SPI system consists of two data lines and two control lines:
• Master Out Slave In (MOSI): This line supplies the data shifted from master to slave. In master mode this is connected to TXD, and in slave mode to RXD.
• Master In Slave Out (MISO): This line supplies the data shifted from slave to master. In master mode this is connected to RXD, and in slave mode to TXD.
• Serial Clock (CLK): This is controlled by the master. One period per bit transmission. In both modes this is connected to CLK.
• Slave Select (NSS): This control line allows the master to select or deselect a slave. In master mode this is connected to RTS, and in slave mode to CTS.
Changing SPI mode after initial configuration must be followed by a transceiver software reset inorder to avoid unpredictable behavior.
24.6.15.2 Baud RateThe baud rate generator operates as described in ”Baud Rate in Synchronous and SPI Mode”on page 589, with the following requirements:
In SPI Master Mode:
• External clock CLK must not be selected as clock (the Clock Selection field (MR.USCLKS) must not equal 0x3).
• The USART must drive the CLK pin (MR.CLKO must be one).
• The BRGR.CD field must be at least 0x4.
• If the internal divided clock, CLK_USART/DIV, is selected (MR.USCLKS is one), the value in BRGR.CD must be even, ensuring a 50:50 duty cycle.
In SPI Slave Mode:
• The frequency of the external clock CLK must be at least four times lower than the system clock.
24.6.15.3 Data TransferUp to nine data bits are successively shifted out on the TXD pin at each edge. There are nostart, parity, or stop bits, and MSB is always sent first. The SPI Clock Polarity (MR.CPOL), andSPI Clock Phase (MR.CPHA) bits configure CLK by selecting the edges upon which bits areshifted and sampled, resulting in four non-interoperable protocol modes, see Table 24-16. IfMR.CPOL is zero, the inactive state value of CLK is logic level zero, and if MR.CPOL is one, theinactive state value of CLK is logic level one. If MR.CPHA is zero, data is changed on the lead-ing edge of CLK, and captured on the following edge of CLK. If MR.CPHA is one, data iscaptured on the leading edge of CLK, and changed on the following edge of CLK. A mas-
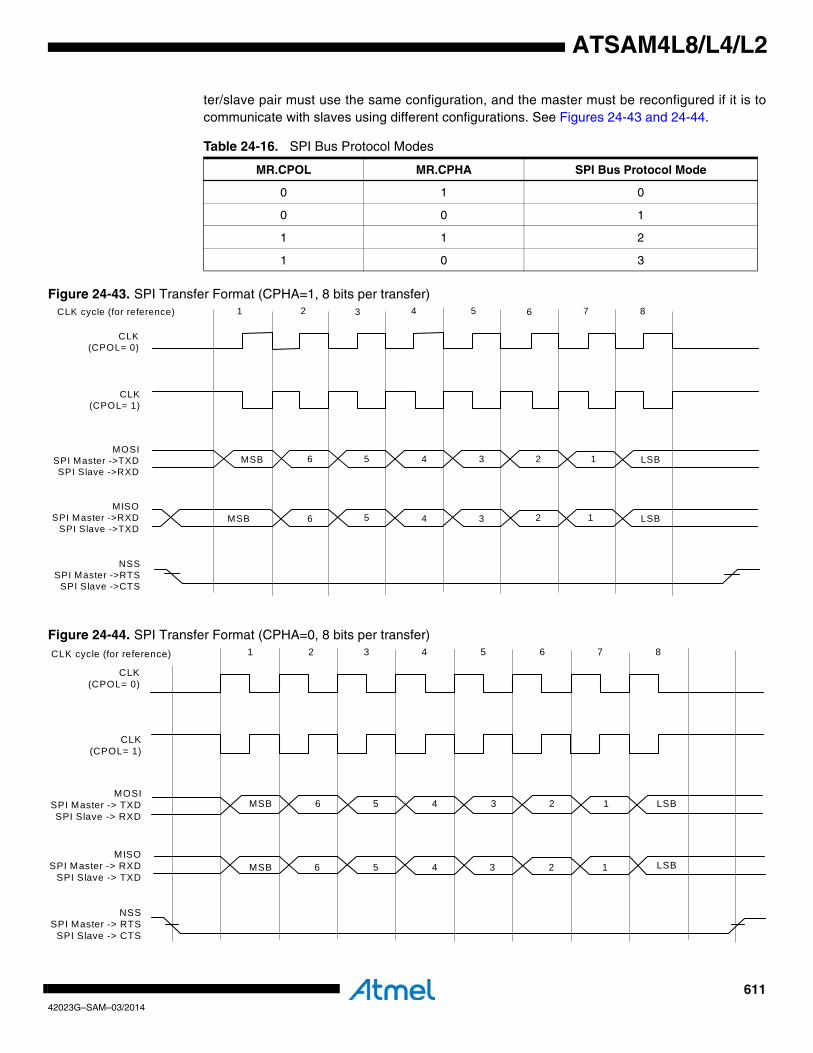
61142023G–SAM–03/2014
ATSAM4L8/L4/L2
ter/slave pair must use the same configuration, and the master must be reconfigured if it is tocommunicate with slaves using different configurations. See Figures 24-43 and 24-44.
Figure 24-43. SPI Transfer Format (CPHA=1, 8 bits per transfer)
Figure 24-44. SPI Transfer Format (CPHA=0, 8 bits per transfer)
Table 24-16. SPI Bus Protocol Modes
MR.CPOL MR.CPHA SPI Bus Protocol Mode
0 1 0
0 0 1
1 1 2
1 0 3
CLK cycle (for reference)
CLK(CPOL= 1)
MOSISPI Master ->TXDSPI Slave ->RXD
MISOSPI Master ->RXD
SPI Slave ->TXD
NSSSPI Master ->RTS
SPI Slave ->CTS
MSB
MSB
1
CLK(CPOL= 0)
3 5 6 7 8
LSB1234
6
6 5
5 4 3 2 1 LSB
2 4
CLK cycle (for reference)
CLK(CPOL= 0)
CLK(CPOL= 1)
MOSISPI Master -> TXDSPI Slave -> RXD
MISOSPI Master -> RXD
SPI Slave -> TXD
NSSSPI Master -> RTS
SPI Slave -> CTS
MSB 6 5
MSB 6 5
4
4 3
3 2
2 1
1 LSB
LSB
87654321
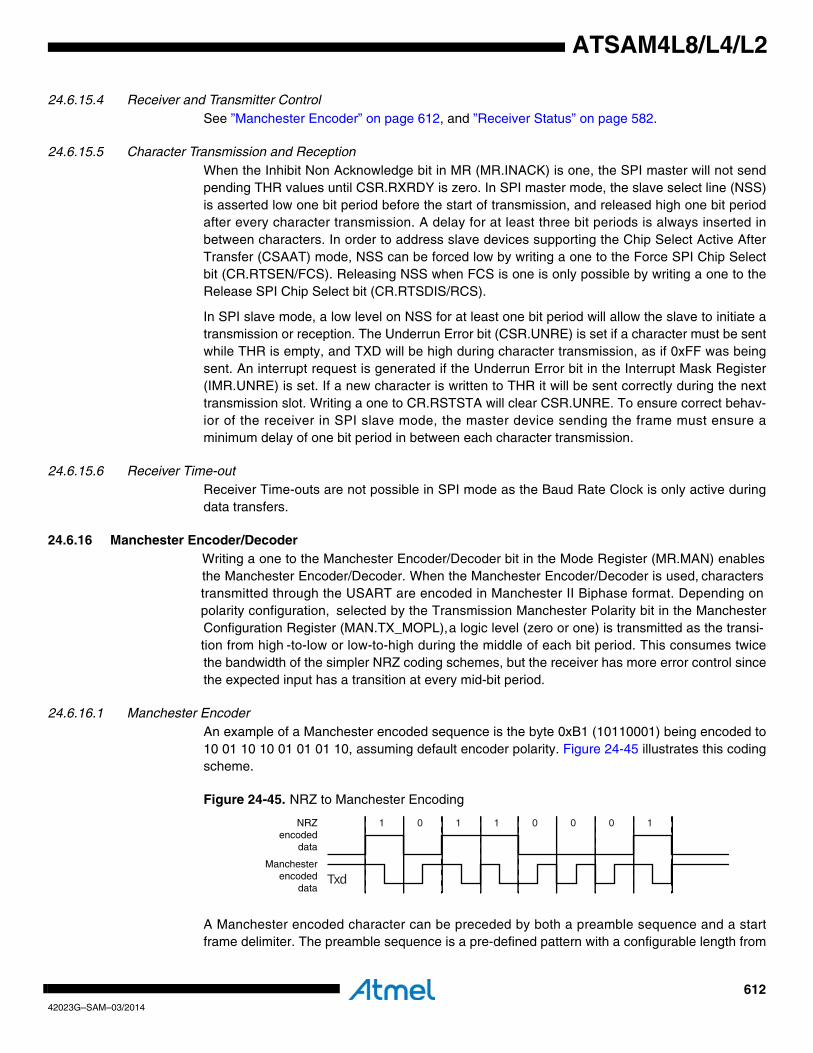
61242023G–SAM–03/2014
ATSAM4L8/L4/L2
24.6.15.4 Receiver and Transmitter ControlSee ”Manchester Encoder” on page 612, and ”Receiver Status” on page 582.
24.6.15.5 Character Transmission and ReceptionWhen the Inhibit Non Acknowledge bit in MR (MR.INACK) is one, the SPI master will not sendpending THR values until CSR.RXRDY is zero. In SPI master mode, the slave select line (NSS)is asserted low one bit period before the start of transmission, and released high one bit periodafter every character transmission. A delay for at least three bit periods is always inserted inbetween characters. In order to address slave devices supporting the Chip Select Active AfterTransfer (CSAAT) mode, NSS can be forced low by writing a one to the Force SPI Chip Selectbit (CR.RTSEN/FCS). Releasing NSS when FCS is one is only possible by writing a one to theRelease SPI Chip Select bit (CR.RTSDIS/RCS).
In SPI slave mode, a low level on NSS for at least one bit period will allow the slave to initiate atransmission or reception. The Underrun Error bit (CSR.UNRE) is set if a character must be sentwhile THR is empty, and TXD will be high during character transmission, as if 0xFF was beingsent. An interrupt request is generated if the Underrun Error bit in the Interrupt Mask Register(IMR.UNRE) is set. If a new character is written to THR it will be sent correctly during the nexttransmission slot. Writing a one to CR.RSTSTA will clear CSR.UNRE. To ensure correct behav-ior of the receiver in SPI slave mode, the master device sending the frame must ensure aminimum delay of one bit period in between each character transmission.
24.6.15.6 Receiver Time-outReceiver Time-outs are not possible in SPI mode as the Baud Rate Clock is only active duringdata transfers.
24.6.16 Manchester Encoder/DecoderWriting a one to the Manchester Encoder/Decoder bit in the Mode Register (MR.MAN) enablesthe Manchester Encoder/Decoder. When the Manchester Encoder/Decoder is used, characterstransmitted through the USART are encoded in Manchester II Biphase format. Depending onpolarity configuration, selected by the Transmission Manchester Polarity bit in the ManchesterConfiguration Register (MAN.TX_MOPL), a logic level (zero or one) is transmitted as the transi-tion from high -to-low or low-to-high during the middle of each bit period. This consumes twicethe bandwidth of the simpler NRZ coding schemes, but the receiver has more error control sincethe expected input has a transition at every mid-bit period.
24.6.16.1 Manchester EncoderAn example of a Manchester encoded sequence is the byte 0xB1 (10110001) being encoded to10 01 10 10 01 01 01 10, assuming default encoder polarity. Figure 24-45 illustrates this codingscheme.
Figure 24-45. NRZ to Manchester Encoding
A Manchester encoded character can be preceded by both a preamble sequence and a startframe delimiter. The preamble sequence is a pre-defined pattern with a configurable length from
NRZencoded
data
Manchesterencoded
data
1 0 1 1 0 0 0 1
Txd
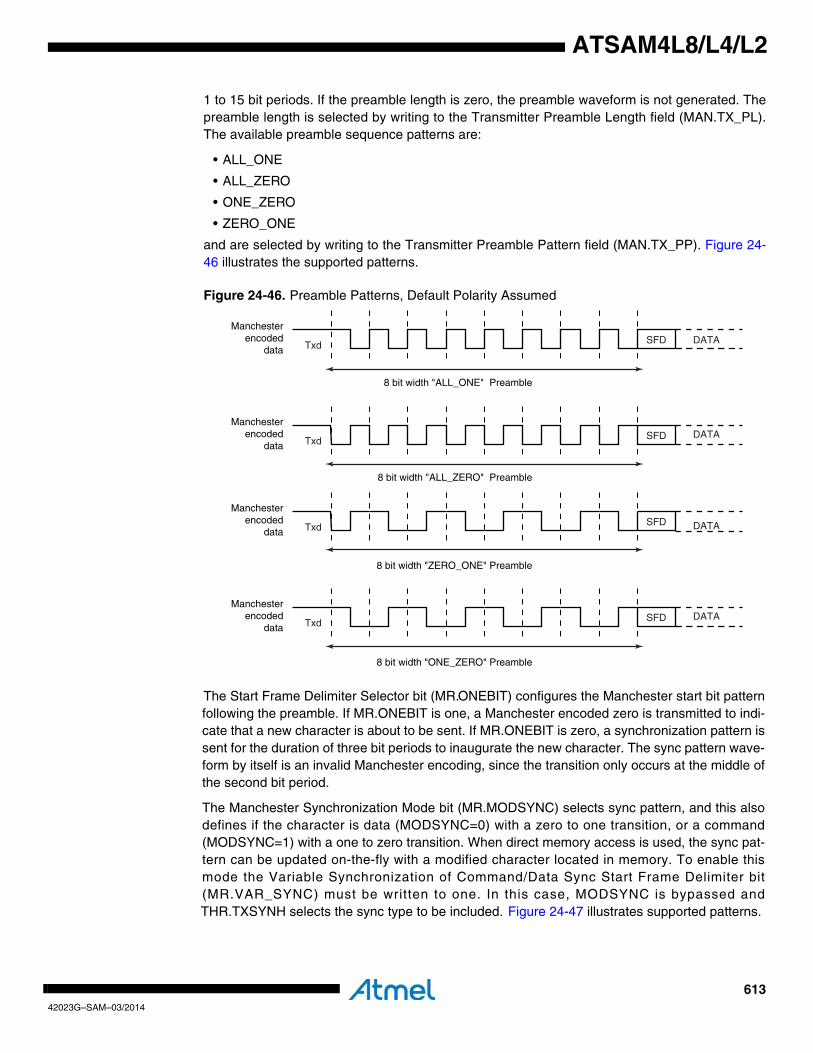
61342023G–SAM–03/2014
ATSAM4L8/L4/L2
1 to 15 bit periods. If the preamble length is zero, the preamble waveform is not generated. Thepreamble length is selected by writing to the Transmitter Preamble Length field (MAN.TX_PL).The available preamble sequence patterns are:
• ALL_ONE
• ALL_ZERO
• ONE_ZERO
• ZERO_ONE
and are selected by writing to the Transmitter Preamble Pattern field (MAN.TX_PP). Figure 24-46 illustrates the supported patterns.
Figure 24-46. Preamble Patterns, Default Polarity Assumed
The Start Frame Delimiter Selector bit (MR.ONEBIT) configures the Manchester start bit patternfollowing the preamble. If MR.ONEBIT is one, a Manchester encoded zero is transmitted to indi-cate that a new character is about to be sent. If MR.ONEBIT is zero, a synchronization pattern issent for the duration of three bit periods to inaugurate the new character. The sync pattern wave-form by itself is an invalid Manchester encoding, since the transition only occurs at the middle ofthe second bit period.
The Manchester Synchronization Mode bit (MR.MODSYNC) selects sync pattern, and this alsodefines if the character is data (MODSYNC=0) with a zero to one transition, or a command(MODSYNC=1) with a one to zero transition. When direct memory access is used, the sync pat-tern can be updated on-the-fly with a modified character located in memory. To enable thismode the Variable Synchronization of Command/Data Sync Start Frame Delimiter bit(MR.VAR_SYNC) must be written to one. In this case, MODSYNC is bypassed andTHR.TXSYNH selects the sync type to be included. Figure 24-47 illustrates supported patterns.
Manchesterencoded
data Txd SFD DATA
8 bit width "ALL_ONE" Preamble
Manchesterencoded
data Txd SFD DATA
8 bit width "ALL_ZERO" Preamble
Manchesterencoded
data Txd SFD DATA
8 bit width "ZERO_ONE" Preamble
Manchesterencoded
data Txd SFD DATA
8 bit width "ONE_ZERO" Preamble

61442023G–SAM–03/2014
ATSAM4L8/L4/L2
Figure 24-47. Start Frame Delimiter
Manchester Drift Compensation
The Drift Compensation bit (MAN.DRIFT) enables a hardware drift compensation and recoverysystem that allows for sub-optimal clock drifts without further user intervention. Drift compensa-tion is only available in 16x oversampling mode (MR.OVER is zero). If the RXD event is one 16thclock cycle from the expected edge, it is considered as normal jitter and no corrective action willbe taken. If the event is two to four 16th’s early, the current period will be shortened by a 16th. Ifthe event is two to three 16th’s after the expected edge, the current period will be prolonged by a16th.
Figure 24-48. Bit Resynchronization
24.6.16.2 Manchester DecoderThe Manchester decoder can detect selectable preamble sequences and start frame delimiters.The Receiver Manchester Polarity bit in the “Manchester Configuration Register”(MAN.RX_MPOL) selects input stream polarity. The Receiver Preamble Length field(MAN.RX_PL) specifies the length characteristics of detectable preambles. If MAN.RX_PL iszero, the preamble pattern detection will be disabled. The Receiver Preamble Pattern field(MAN.RX_PP) selects the pattern to be detected. See Figure 24-46 for available preamble pat-terns. Figure 24-49 illustrates two types of Manchester preamble pattern mismatches.
Manchesterencoded
data Txd
SFD
DATA
One bit start frame delimiter
Preamble Length is set to 0
Manchesterencoded
dataTxd
SFD
DATA
Command Syncstart frame delimiter
Manchesterencoded
data Txd
SFD
DATA
Data Syncstart frame delimiter
RXD
Oversampling 16x Clock
Sampling point
Expected edge
ToleranceSynchro.Jump
SyncJumpSynchro.
Error
Synchro.Error
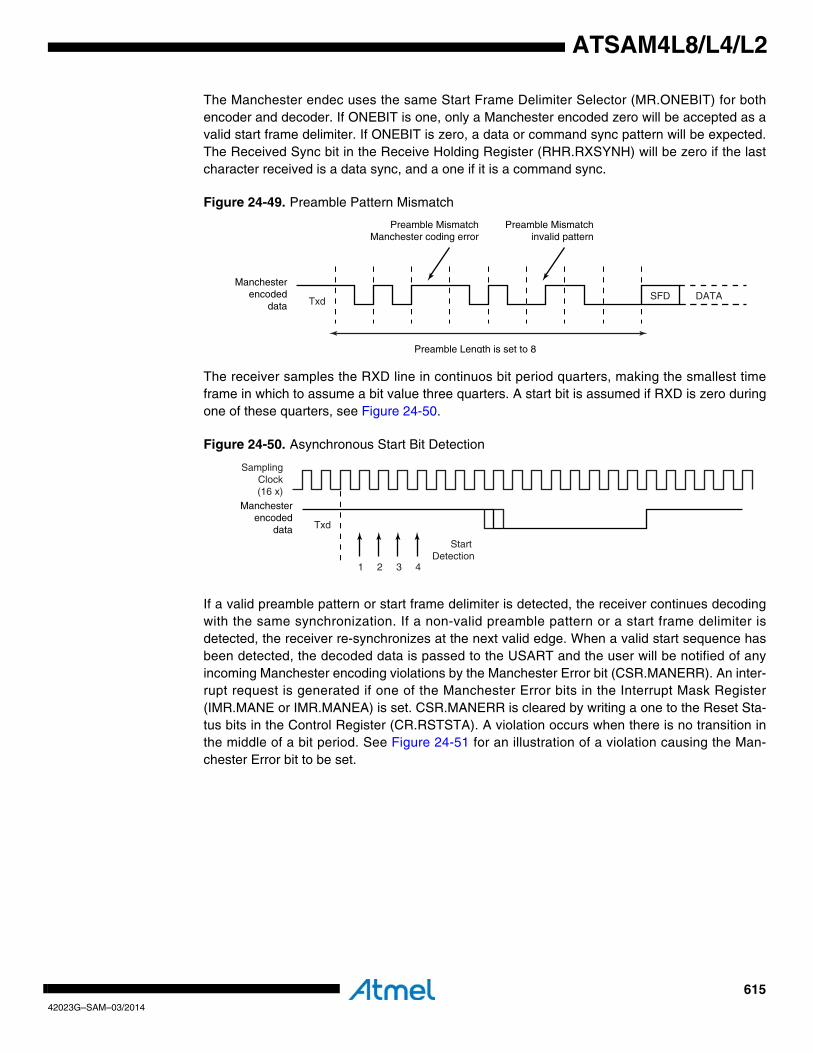
61542023G–SAM–03/2014
ATSAM4L8/L4/L2
The Manchester endec uses the same Start Frame Delimiter Selector (MR.ONEBIT) for bothencoder and decoder. If ONEBIT is one, only a Manchester encoded zero will be accepted as avalid start frame delimiter. If ONEBIT is zero, a data or command sync pattern will be expected.The Received Sync bit in the Receive Holding Register (RHR.RXSYNH) will be zero if the lastcharacter received is a data sync, and a one if it is a command sync.
Figure 24-49. Preamble Pattern Mismatch
The receiver samples the RXD line in continuos bit period quarters, making the smallest timeframe in which to assume a bit value three quarters. A start bit is assumed if RXD is zero duringone of these quarters, see Figure 24-50.
Figure 24-50. Asynchronous Start Bit Detection
If a valid preamble pattern or start frame delimiter is detected, the receiver continues decodingwith the same synchronization. If a non-valid preamble pattern or a start frame delimiter isdetected, the receiver re-synchronizes at the next valid edge. When a valid start sequence hasbeen detected, the decoded data is passed to the USART and the user will be notified of anyincoming Manchester encoding violations by the Manchester Error bit (CSR.MANERR). An inter-rupt request is generated if one of the Manchester Error bits in the Interrupt Mask Register(IMR.MANE or IMR.MANEA) is set. CSR.MANERR is cleared by writing a one to the Reset Sta-tus bits in the Control Register (CR.RSTSTA). A violation occurs when there is no transition inthe middle of a bit period. See Figure 24-51 for an illustration of a violation causing the Man-chester Error bit to be set.
Manchesterencoded
data Txd SFD DATA
Preamble Length is set to 8
Preamble Mismatchinvalid pattern
Preamble MismatchManchester coding error
Manchesterencoded
data Txd
1 2 3 4
SamplingClock(16 x)
Start Detection

61642023G–SAM–03/2014
ATSAM4L8/L4/L2
Figure 24-51. Manchester Error
24.6.16.3 Radio Interface: Manchester Endec ApplicationThis section describes low data rate, full duplex, dual frequency, RF systems integrated with aManchester endec, that support ASK and/or FSK modulation schemes. See Figure 24-52.
Figure 24-52. Manchester Encoded Characters RF Transmission
To transmit downstream, encoded data is sent serially to the RF modulator and then throughspace to the RF receiver. To receive, another frequency carrier is used and the RF demodulatordoes a bit-checking search for valid patterns before it switches to a receiving mode and forwardsdata to the decoder. Defining preambles to help distinguish between noise and valid data has tobe done in conjunction with the RF module, and may sometimes be filtered away from the endecstream. Using the ASK modulation scheme, a one is transmitted as an RF signal at the down-stream frequency, while a zero is transmitted as no signal. See Figure 24-53. The FSKmodulation scheme uses two different frequencies to transmit data. A one is sent as a signal onone frequency, and a zero on the other. See Figure 24-54.
Manchesterencoded
data Txd
SFD
Preamble Length is set to 4
Elementary character bit time
ManchesterCoding Error
detected
sampling points
Preamble subpacketand Start Frame Delimiter
were successfullydecoded
Entering USART character area
LNAVCO
RF filterDemod
controlbi-dir
line
PARF filter
ModVCO
control
Manchesterdecoder
Manchesterencoder
USARTReceiver
USARTEmitter
ASK/FSK Upstream Receiver
ASK/FSKdownstream transmitter
UpstreamEmitter
DownstreamReceiver
SerialConfiguration
Interface
Fup frequency Carrier
Fdown frequency Carrier
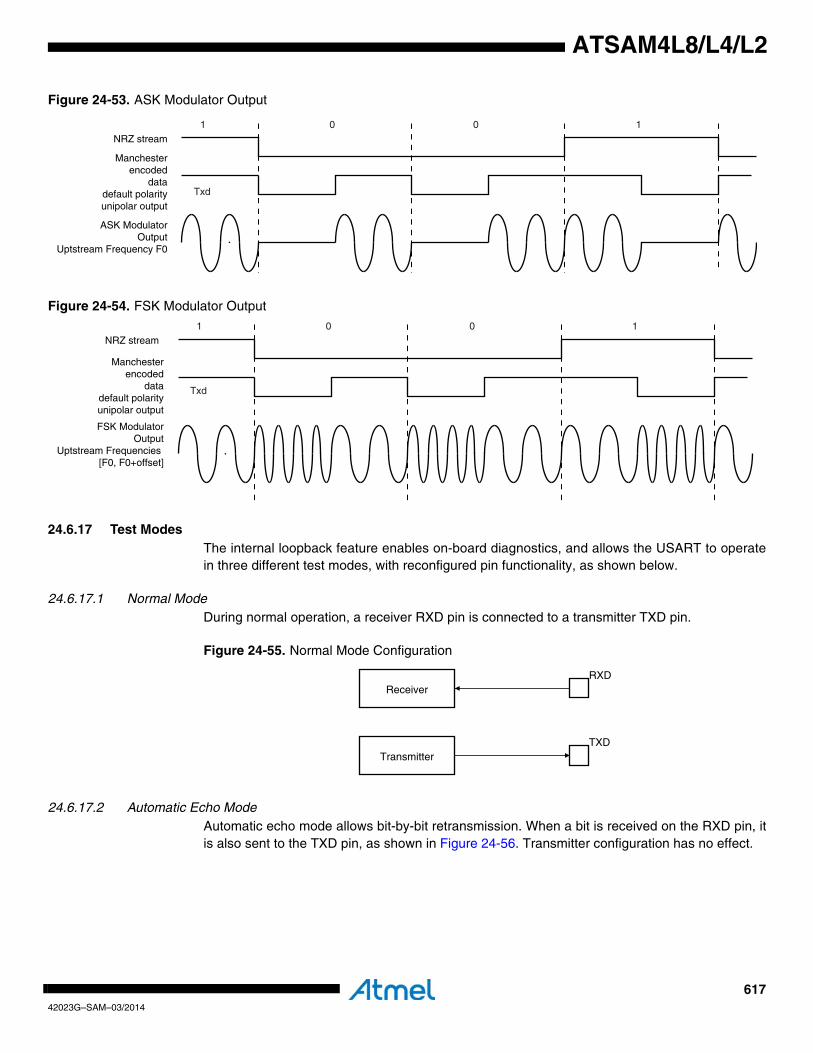
61742023G–SAM–03/2014
ATSAM4L8/L4/L2
Figure 24-53. ASK Modulator Output
Figure 24-54. FSK Modulator Output
24.6.17 Test ModesThe internal loopback feature enables on-board diagnostics, and allows the USART to operatein three different test modes, with reconfigured pin functionality, as shown below.
24.6.17.1 Normal ModeDuring normal operation, a receiver RXD pin is connected to a transmitter TXD pin.
Figure 24-55. Normal Mode Configuration
24.6.17.2 Automatic Echo ModeAutomatic echo mode allows bit-by-bit retransmission. When a bit is received on the RXD pin, itis also sent to the TXD pin, as shown in Figure 24-56. Transmitter configuration has no effect.
Manchesterencoded
datadefault polarityunipolar output
Txd
ASK ModulatorOutput
Uptstream Frequency F0
NRZ stream1 0 0 1
Manchesterencoded
datadefault polarityunipolar output
Txd
FSK ModulatorOutput
Uptstream Frequencies [F0, F0+offset]
NRZ stream1 0 0 1
Receiver
Transmitter
RXD
TXD
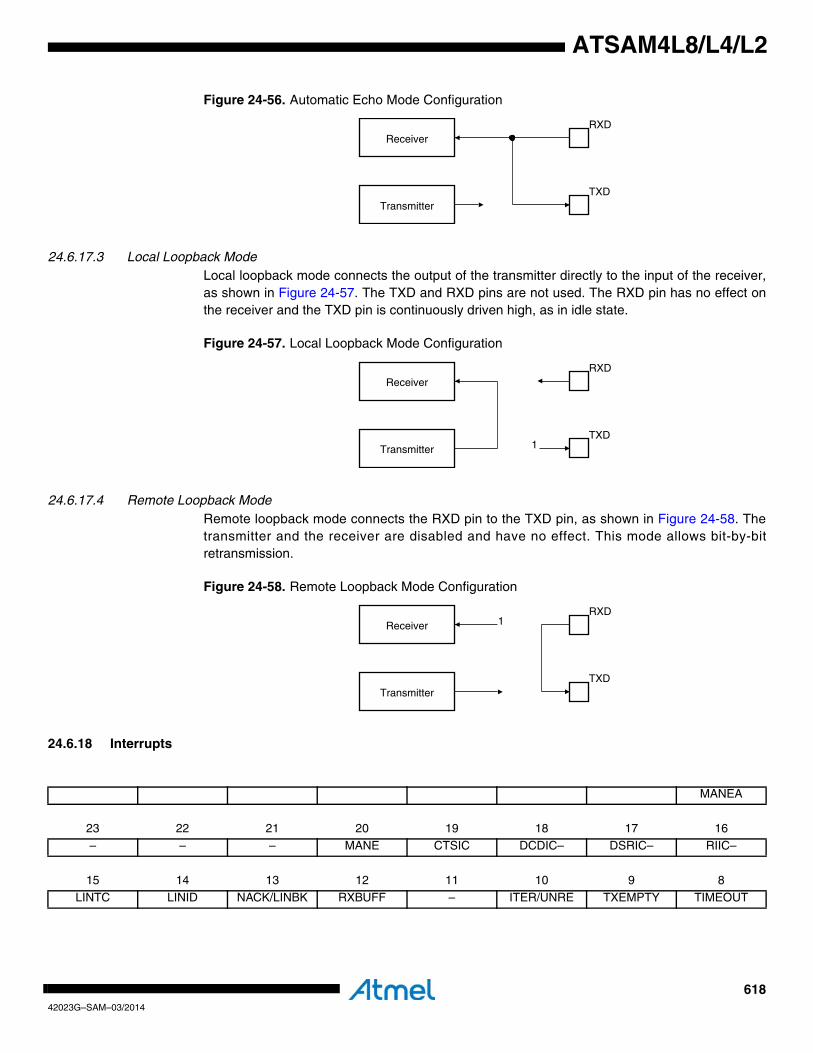
61842023G–SAM–03/2014
ATSAM4L8/L4/L2
Figure 24-56. Automatic Echo Mode Configuration
24.6.17.3 Local Loopback ModeLocal loopback mode connects the output of the transmitter directly to the input of the receiver,as shown in Figure 24-57. The TXD and RXD pins are not used. The RXD pin has no effect onthe receiver and the TXD pin is continuously driven high, as in idle state.
Figure 24-57. Local Loopback Mode Configuration
24.6.17.4 Remote Loopback ModeRemote loopback mode connects the RXD pin to the TXD pin, as shown in Figure 24-58. Thetransmitter and the receiver are disabled and have no effect. This mode allows bit-by-bitretransmission.
Figure 24-58. Remote Loopback Mode Configuration
24.6.18 Interrupts
Receiver
Transmitter
RXD
TXD
Receiver
Transmitter
RXD
TXD1
Receiver
Transmitter
RXD
TXD
1
MANEA
23 22 21 20 19 18 17 16– – – MANE CTSIC DCDIC– DSRIC– RIIC–
15 14 13 12 11 10 9 8LINTC LINID NACK/LINBK RXBUFF – ITER/UNRE TXEMPTY TIMEOUT
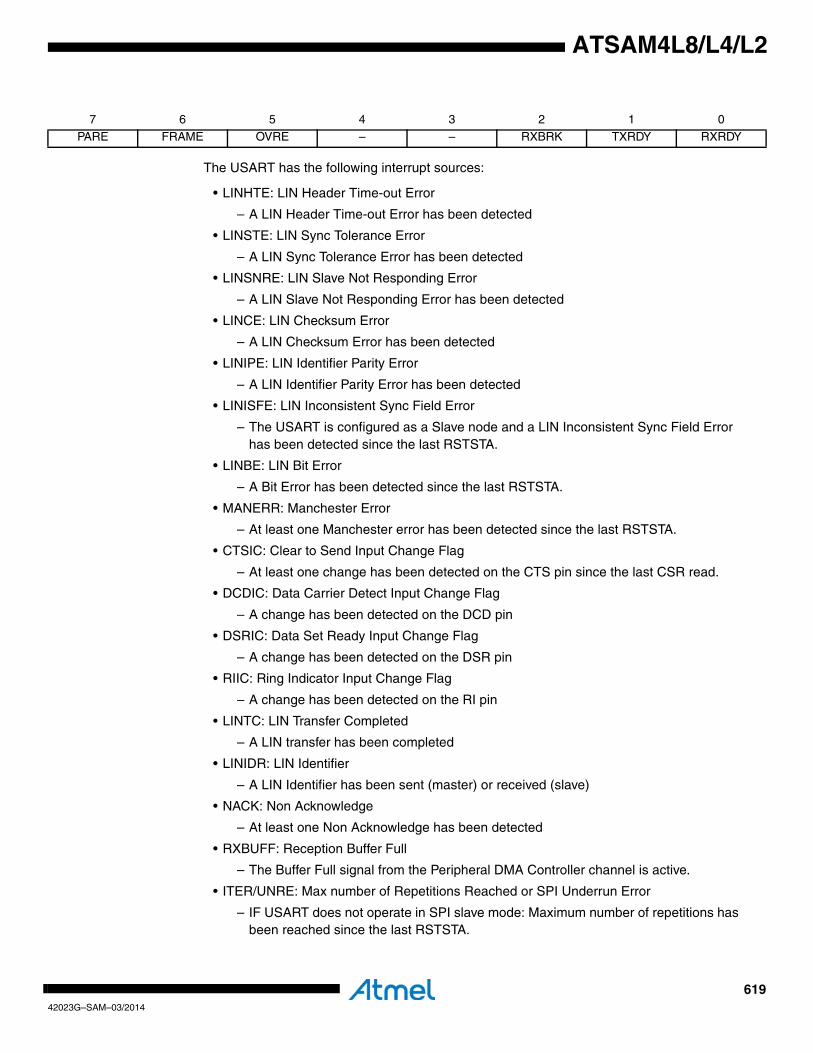
61942023G–SAM–03/2014
ATSAM4L8/L4/L2
The USART has the following interrupt sources:
• LINHTE: LIN Header Time-out Error
– A LIN Header Time-out Error has been detected
• LINSTE: LIN Sync Tolerance Error
– A LIN Sync Tolerance Error has been detected
• LINSNRE: LIN Slave Not Responding Error
– A LIN Slave Not Responding Error has been detected
• LINCE: LIN Checksum Error
– A LIN Checksum Error has been detected
• LINIPE: LIN Identifier Parity Error
– A LIN Identifier Parity Error has been detected
• LINISFE: LIN Inconsistent Sync Field Error
– The USART is configured as a Slave node and a LIN Inconsistent Sync Field Error has been detected since the last RSTSTA.
• LINBE: LIN Bit Error
– A Bit Error has been detected since the last RSTSTA.
• MANERR: Manchester Error
– At least one Manchester error has been detected since the last RSTSTA.
• CTSIC: Clear to Send Input Change Flag
– At least one change has been detected on the CTS pin since the last CSR read.
• DCDIC: Data Carrier Detect Input Change Flag
– A change has been detected on the DCD pin
• DSRIC: Data Set Ready Input Change Flag
– A change has been detected on the DSR pin
• RIIC: Ring Indicator Input Change Flag
– A change has been detected on the RI pin
• LINTC: LIN Transfer Completed
– A LIN transfer has been completed
• LINIDR: LIN Identifier
– A LIN Identifier has been sent (master) or received (slave)
• NACK: Non Acknowledge
– At least one Non Acknowledge has been detected
• RXBUFF: Reception Buffer Full
– The Buffer Full signal from the Peripheral DMA Controller channel is active.
• ITER/UNRE: Max number of Repetitions Reached or SPI Underrun Error
– IF USART does not operate in SPI slave mode: Maximum number of repetitions has been reached since the last RSTSTA.
7 6 5 4 3 2 1 0PARE FRAME OVRE – – RXBRK TXRDY RXRDY
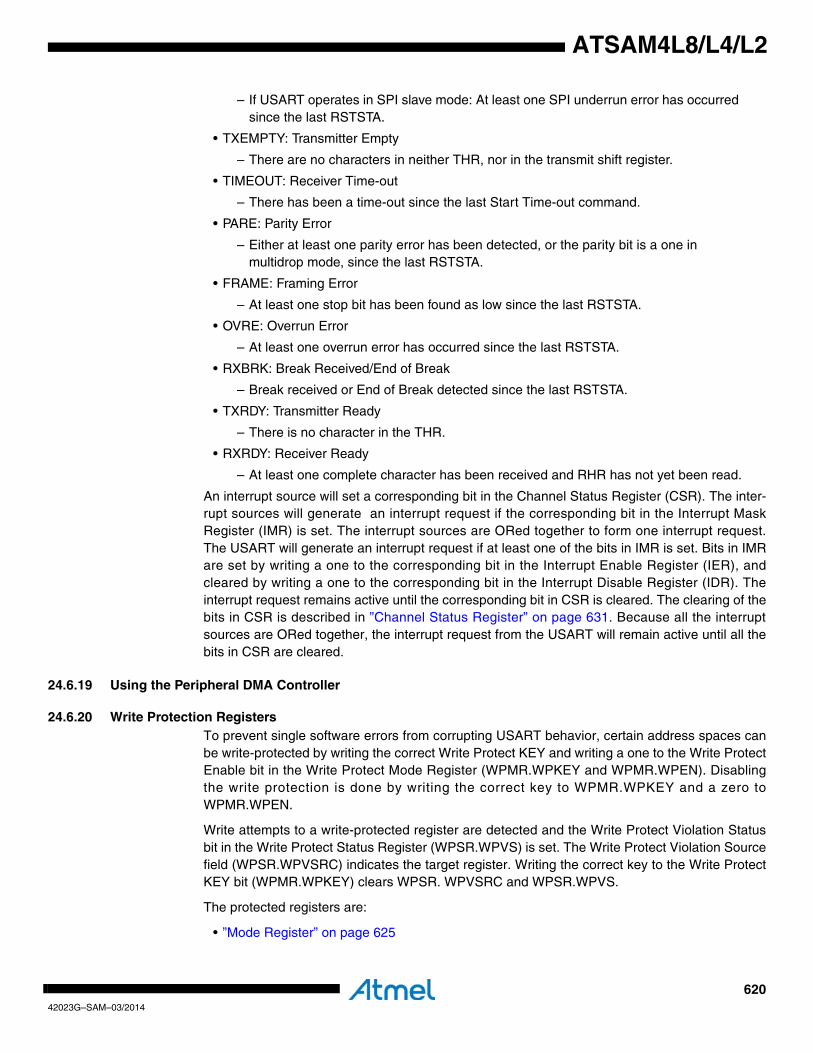
62042023G–SAM–03/2014
ATSAM4L8/L4/L2
– If USART operates in SPI slave mode: At least one SPI underrun error has occurred since the last RSTSTA.
• TXEMPTY: Transmitter Empty
– There are no characters in neither THR, nor in the transmit shift register.
• TIMEOUT: Receiver Time-out
– There has been a time-out since the last Start Time-out command.
• PARE: Parity Error
– Either at least one parity error has been detected, or the parity bit is a one in multidrop mode, since the last RSTSTA.
• FRAME: Framing Error
– At least one stop bit has been found as low since the last RSTSTA.
• OVRE: Overrun Error
– At least one overrun error has occurred since the last RSTSTA.
• RXBRK: Break Received/End of Break
– Break received or End of Break detected since the last RSTSTA.
• TXRDY: Transmitter Ready
– There is no character in the THR.
• RXRDY: Receiver Ready
– At least one complete character has been received and RHR has not yet been read.
An interrupt source will set a corresponding bit in the Channel Status Register (CSR). The inter-rupt sources will generate an interrupt request if the corresponding bit in the Interrupt MaskRegister (IMR) is set. The interrupt sources are ORed together to form one interrupt request.The USART will generate an interrupt request if at least one of the bits in IMR is set. Bits in IMRare set by writing a one to the corresponding bit in the Interrupt Enable Register (IER), andcleared by writing a one to the corresponding bit in the Interrupt Disable Register (IDR). Theinterrupt request remains active until the corresponding bit in CSR is cleared. The clearing of thebits in CSR is described in ”Channel Status Register” on page 631. Because all the interruptsources are ORed together, the interrupt request from the USART will remain active until all thebits in CSR are cleared.
24.6.19 Using the Peripheral DMA Controller
24.6.20 Write Protection RegistersTo prevent single software errors from corrupting USART behavior, certain address spaces canbe write-protected by writing the correct Write Protect KEY and writing a one to the Write ProtectEnable bit in the Write Protect Mode Register (WPMR.WPKEY and WPMR.WPEN). Disablingthe write protection is done by writing the correct key to WPMR.WPKEY and a zero toWPMR.WPEN.
Write attempts to a write-protected register are detected and the Write Protect Violation Statusbit in the Write Protect Status Register (WPSR.WPVS) is set. The Write Protect Violation Sourcefield (WPSR.WPVSRC) indicates the target register. Writing the correct key to the Write ProtectKEY bit (WPMR.WPKEY) clears WPSR. WPVSRC and WPSR.WPVS.
The protected registers are:
• ”Mode Register” on page 625

62142023G–SAM–03/2014
ATSAM4L8/L4/L2
• ”Baud Rate Generator Register” on page 636
• ”Receiver Time-out Register” on page 638
• ”Transmitter Timeguard Register” on page 639
• ”FI DI Ratio Register” on page 640
• ”IrDA Filter Register” on page 642
• ”Manchester Configuration Register” on page 643
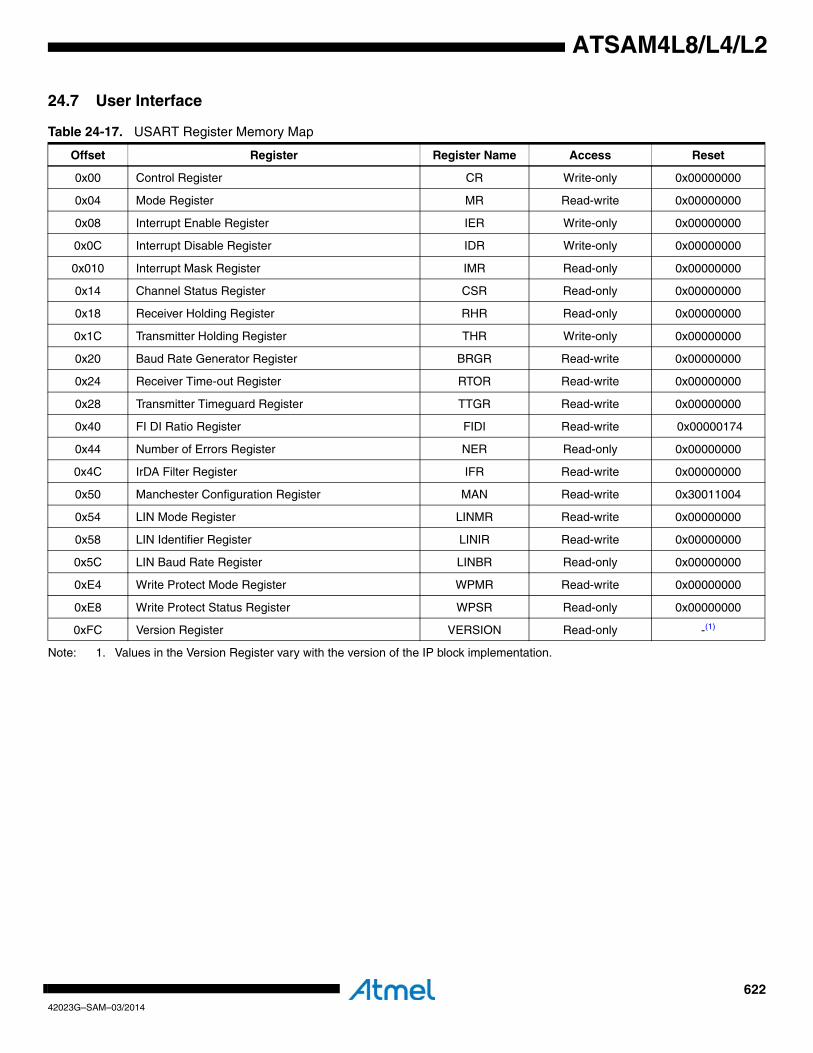
62242023G–SAM–03/2014
ATSAM4L8/L4/L2
24.7 User Interface
Note: 1. Values in the Version Register vary with the version of the IP block implementation.
Table 24-17. USART Register Memory Map
Offset Register Register Name Access Reset
0x00 Control Register CR Write-only 0x00000000
0x04 Mode Register MR Read-write 0x00000000
0x08 Interrupt Enable Register IER Write-only 0x00000000
0x0C Interrupt Disable Register IDR Write-only 0x00000000
0x010 Interrupt Mask Register IMR Read-only 0x00000000
0x14 Channel Status Register CSR Read-only 0x00000000
0x18 Receiver Holding Register RHR Read-only 0x00000000
0x1C Transmitter Holding Register THR Write-only 0x00000000
0x20 Baud Rate Generator Register BRGR Read-write 0x00000000
0x24 Receiver Time-out Register RTOR Read-write 0x00000000
0x28 Transmitter Timeguard Register TTGR Read-write 0x00000000
0x40 FI DI Ratio Register FIDI Read-write 0x00000174
0x44 Number of Errors Register NER Read-only 0x00000000
0x4C IrDA Filter Register IFR Read-write 0x00000000
0x50 Manchester Configuration Register MAN Read-write 0x30011004
0x54 LIN Mode Register LINMR Read-write 0x00000000
0x58 LIN Identifier Register LINIR Read-write 0x00000000
0x5C LIN Baud Rate Register LINBR Read-only 0x00000000
0xE4 Write Protect Mode Register WPMR Read-write 0x00000000
0xE8 Write Protect Status Register WPSR Read-only 0x00000000
0xFC Version Register VERSION Read-only -(1)
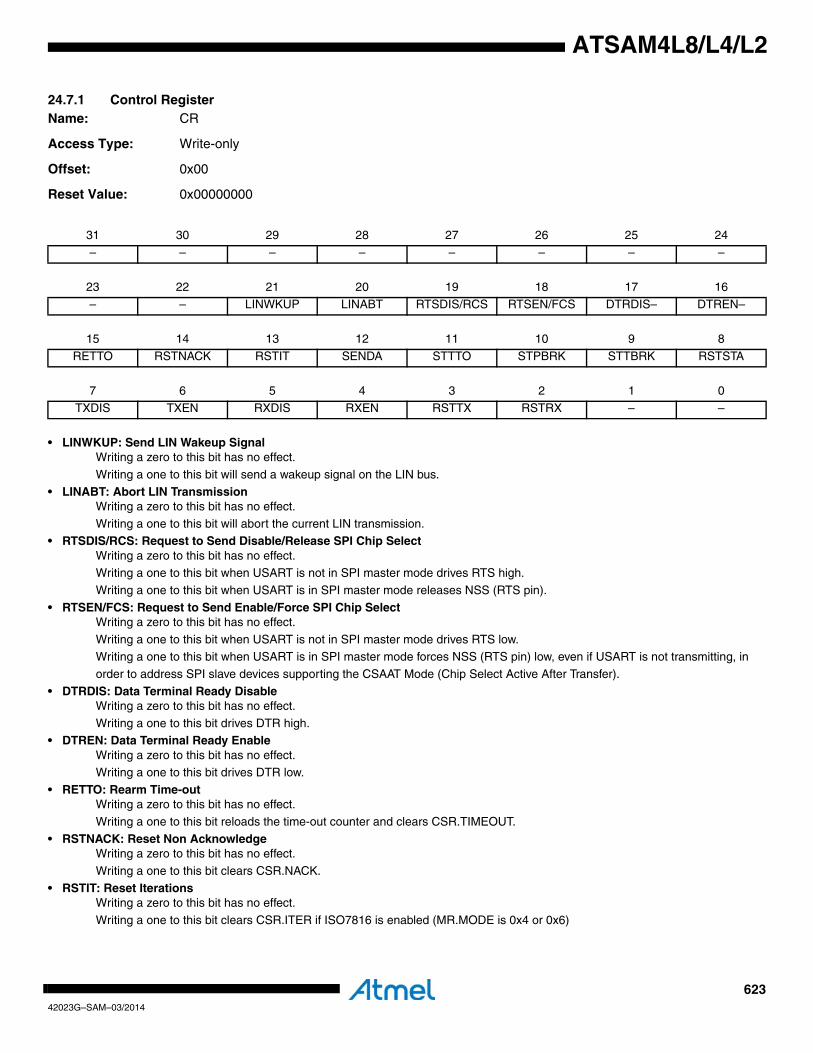
62342023G–SAM–03/2014
ATSAM4L8/L4/L2
24.7.1 Control RegisterName: CR
Access Type: Write-only
Offset: 0x00
Reset Value: 0x00000000
• LINWKUP: Send LIN Wakeup SignalWriting a zero to this bit has no effect.
Writing a one to this bit will send a wakeup signal on the LIN bus.
• LINABT: Abort LIN TransmissionWriting a zero to this bit has no effect.
Writing a one to this bit will abort the current LIN transmission.• RTSDIS/RCS: Request to Send Disable/Release SPI Chip Select
Writing a zero to this bit has no effect.Writing a one to this bit when USART is not in SPI master mode drives RTS high.
Writing a one to this bit when USART is in SPI master mode releases NSS (RTS pin).
• RTSEN/FCS: Request to Send Enable/Force SPI Chip SelectWriting a zero to this bit has no effect.
Writing a one to this bit when USART is not in SPI master mode drives RTS low.Writing a one to this bit when USART is in SPI master mode forces NSS (RTS pin) low, even if USART is not transmitting, in
order to address SPI slave devices supporting the CSAAT Mode (Chip Select Active After Transfer).
• DTRDIS: Data Terminal Ready DisableWriting a zero to this bit has no effect.
Writing a one to this bit drives DTR high.• DTREN: Data Terminal Ready Enable
Writing a zero to this bit has no effect.Writing a one to this bit drives DTR low.
• RETTO: Rearm Time-outWriting a zero to this bit has no effect.
Writing a one to this bit reloads the time-out counter and clears CSR.TIMEOUT.
• RSTNACK: Reset Non AcknowledgeWriting a zero to this bit has no effect.
Writing a one to this bit clears CSR.NACK.
• RSTIT: Reset IterationsWriting a zero to this bit has no effect.
Writing a one to this bit clears CSR.ITER if ISO7816 is enabled (MR.MODE is 0x4 or 0x6)
31 30 29 28 27 26 25 24
– – – – – – – –
23 22 21 20 19 18 17 16
– – LINWKUP LINABT RTSDIS/RCS RTSEN/FCS DTRDIS– DTREN–
15 14 13 12 11 10 9 8
RETTO RSTNACK RSTIT SENDA STTTO STPBRK STTBRK RSTSTA
7 6 5 4 3 2 1 0
TXDIS TXEN RXDIS RXEN RSTTX RSTRX – –

62442023G–SAM–03/2014
ATSAM4L8/L4/L2
• SENDA: Send AddressWriting a zero to this bit has no effect.
Writing a one to this bit will in multidrop mode send the next character written to THR as an address. • STTTO: Start Time-out
Writing a zero to this bit has no effect.Writing a one to this bit will abort any current time-out count down, and trigger a new count down when the next character has
been received. CSR.TIMEOUT is also cleared.
• STPBRK: Stop BreakWriting a zero to this bit has no effect.
Writing a one to this bit will stop the generation of break signal characters, and then send ones for TTGR.TG duration, or at least
12 bit periods. No effect if no break is being transmitted.• STTBRK: Start Break
Writing a zero to this bit has no effect.Writing a one to this bit will start transmission of break characters when current characters present in THR and the transmit shift
register have been sent. No effect if a break signal is already being generated. CSR.TXRDY and CSR.TXEMPTY will be
cleared. • RSTSTA: Reset Status Bits
Writing a zero to this bit has no effect.Writing a one to this bit will clear the following bits in CSR: PARE, FRAME, OVRE, MANERR, LINHTE, LINSTE, LINBE,
LINISFE, LINIPE, LINCE, LINSNRE, LINTC, LINID, UNRE, and RXBRK.
• TXDIS: Transmitter DisableWriting a zero to this bit has no effect.
Writing a one to this bit disables the transmitter.
• TXEN: Transmitter EnableWriting a zero to this bit has no effect.
Writing a one to this bit enables the transmitter if TXDIS is zero.
• RXDIS: Receiver DisableWriting a zero to this bit has no effect.
Writing a one to this bit disables the receiver.
• RXEN: Receiver EnableWriting a zero to this bit has no effect.
Writing a one to this bit enables the receiver if RXDIS is zero.
• RSTTX: Reset TransmitterWriting a zero to this bit has no effect.
Writing a one to this bit will reset the transmitter.
• RSTRX: Reset ReceiverWriting a zero to this bit has no effect.
Writing a one to this bit will reset the receiver.
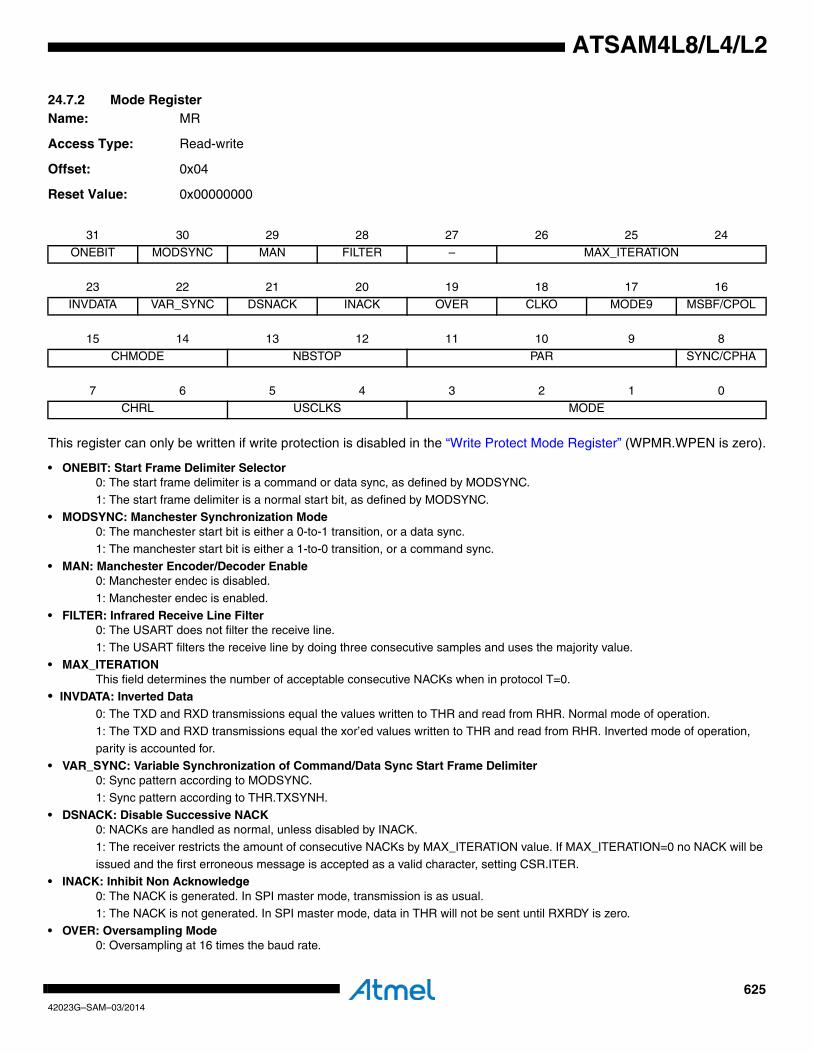
62542023G–SAM–03/2014
ATSAM4L8/L4/L2
24.7.2 Mode RegisterName: MR
Access Type: Read-write
Offset: 0x04
Reset Value: 0x00000000
This register can only be written if write protection is disabled in the “Write Protect Mode Register” (WPMR.WPEN is zero).
• ONEBIT: Start Frame Delimiter Selector0: The start frame delimiter is a command or data sync, as defined by MODSYNC.
1: The start frame delimiter is a normal start bit, as defined by MODSYNC.• MODSYNC: Manchester Synchronization Mode
0: The manchester start bit is either a 0-to-1 transition, or a data sync.1: The manchester start bit is either a 1-to-0 transition, or a command sync.
• MAN: Manchester Encoder/Decoder Enable0: Manchester endec is disabled.
1: Manchester endec is enabled.
• FILTER: Infrared Receive Line Filter0: The USART does not filter the receive line.
1: The USART filters the receive line by doing three consecutive samples and uses the majority value.• MAX_ITERATION
This field determines the number of acceptable consecutive NACKs when in protocol T=0. • INVDATA: Inverted Data
0: The TXD and RXD transmissions equal the values written to THR and read from RHR. Normal mode of operation.
1: The TXD and RXD transmissions equal the xor’ed values written to THR and read from RHR. Inverted mode of operation, parity is accounted for.
• VAR_SYNC: Variable Synchronization of Command/Data Sync Start Frame Delimiter0: Sync pattern according to MODSYNC.
1: Sync pattern according to THR.TXSYNH.
• DSNACK: Disable Successive NACK0: NACKs are handled as normal, unless disabled by INACK.
1: The receiver restricts the amount of consecutive NACKs by MAX_ITERATION value. If MAX_ITERATION=0 no NACK will be
issued and the first erroneous message is accepted as a valid character, setting CSR.ITER.• INACK: Inhibit Non Acknowledge
0: The NACK is generated. In SPI master mode, transmission is as usual.1: The NACK is not generated. In SPI master mode, data in THR will not be sent until RXRDY is zero.
• OVER: Oversampling Mode0: Oversampling at 16 times the baud rate.
31 30 29 28 27 26 25 24
ONEBIT MODSYNC MAN FILTER – MAX_ITERATION
23 22 21 20 19 18 17 16
INVDATA VAR_SYNC DSNACK INACK OVER CLKO MODE9 MSBF/CPOL
15 14 13 12 11 10 9 8
CHMODE NBSTOP PAR SYNC/CPHA
7 6 5 4 3 2 1 0
CHRL USCLKS MODE
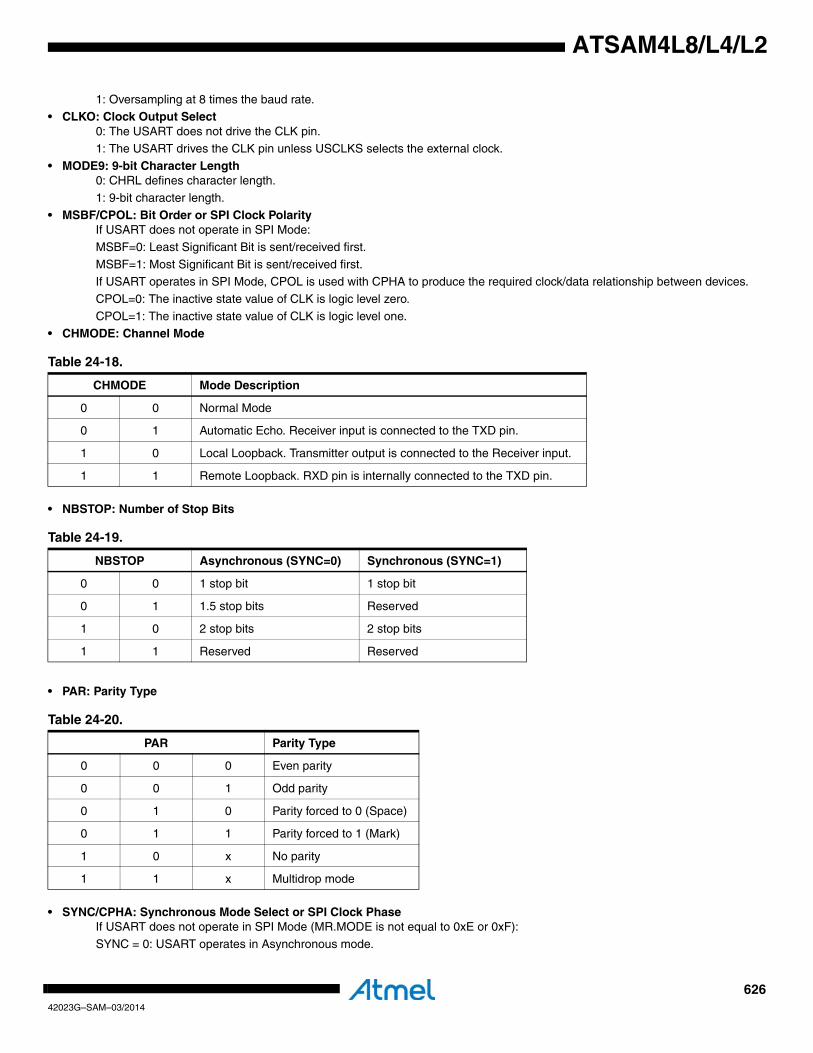
62642023G–SAM–03/2014
ATSAM4L8/L4/L2
1: Oversampling at 8 times the baud rate.• CLKO: Clock Output Select
0: The USART does not drive the CLK pin.1: The USART drives the CLK pin unless USCLKS selects the external clock.
• MODE9: 9-bit Character Length0: CHRL defines character length.
1: 9-bit character length.
• MSBF/CPOL: Bit Order or SPI Clock PolarityIf USART does not operate in SPI Mode:
MSBF=0: Least Significant Bit is sent/received first.
MSBF=1: Most Significant Bit is sent/received first.If USART operates in SPI Mode, CPOL is used with CPHA to produce the required clock/data relationship between devices.
CPOL=0: The inactive state value of CLK is logic level zero.
CPOL=1: The inactive state value of CLK is logic level one.• CHMODE: Channel Mode
• NBSTOP: Number of Stop Bits
• PAR: Parity Type
• SYNC/CPHA: Synchronous Mode Select or SPI Clock PhaseIf USART does not operate in SPI Mode (MR.MODE is not equal to 0xE or 0xF):
SYNC = 0: USART operates in Asynchronous mode.
Table 24-18.
CHMODE Mode Description
0 0 Normal Mode
0 1 Automatic Echo. Receiver input is connected to the TXD pin.
1 0 Local Loopback. Transmitter output is connected to the Receiver input.
1 1 Remote Loopback. RXD pin is internally connected to the TXD pin.
Table 24-19.
NBSTOP Asynchronous (SYNC=0) Synchronous (SYNC=1)
0 0 1 stop bit 1 stop bit
0 1 1.5 stop bits Reserved
1 0 2 stop bits 2 stop bits
1 1 Reserved Reserved
Table 24-20.
PAR Parity Type
0 0 0 Even parity
0 0 1 Odd parity
0 1 0 Parity forced to 0 (Space)
0 1 1 Parity forced to 1 (Mark)
1 0 x No parity
1 1 x Multidrop mode
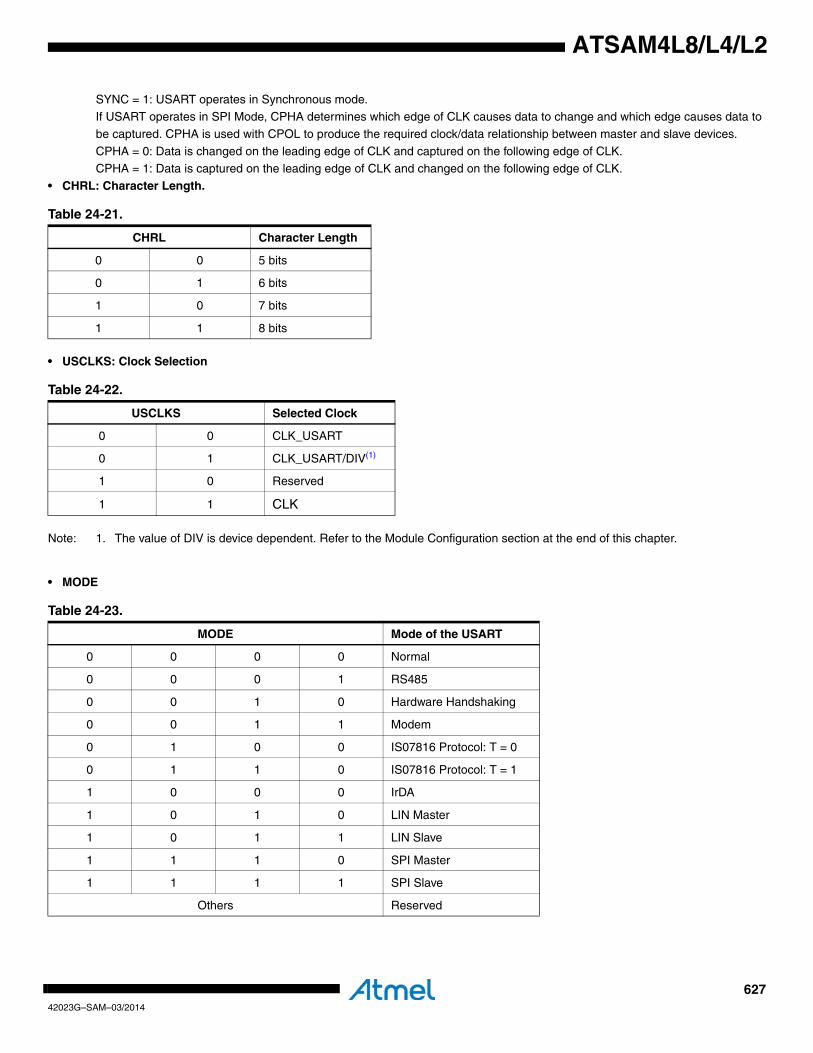
62742023G–SAM–03/2014
ATSAM4L8/L4/L2
SYNC = 1: USART operates in Synchronous mode.If USART operates in SPI Mode, CPHA determines which edge of CLK causes data to change and which edge causes data to
be captured. CPHA is used with CPOL to produce the required clock/data relationship between master and slave devices.
CPHA = 0: Data is changed on the leading edge of CLK and captured on the following edge of CLK.CPHA = 1: Data is captured on the leading edge of CLK and changed on the following edge of CLK.
• CHRL: Character Length.
• USCLKS: Clock Selection
Note: 1. The value of DIV is device dependent. Refer to the Module Configuration section at the end of this chapter.
• MODE
Table 24-21.
CHRL Character Length
0 0 5 bits
0 1 6 bits
1 0 7 bits
1 1 8 bits
Table 24-22.
USCLKS Selected Clock
0 0 CLK_USART
0 1 CLK_USART/DIV(1)
1 0 Reserved
1 1 CLK
Table 24-23.
MODE Mode of the USART
0 0 0 0 Normal
0 0 0 1 RS485
0 0 1 0 Hardware Handshaking
0 0 1 1 Modem
0 1 0 0 IS07816 Protocol: T = 0
0 1 1 0 IS07816 Protocol: T = 1
1 0 0 0 IrDA
1 0 1 0 LIN Master
1 0 1 1 LIN Slave
1 1 1 0 SPI Master
1 1 1 1 SPI Slave
Others Reserved

62842023G–SAM–03/2014
ATSAM4L8/L4/L2
24.7.3 Interrupt Enable RegisterName: IER
Access Type: Write-only
Offset: 0x08
Reset Value: 0x00000000
Writing a zero to a bit in this register has no effect.
Writing a one to a bit in this register will set the corresponding bit in IMR.• LINHTE: LIN Header Time-out Error• LINSTE: LIN Sync Tolerance Error• LINSNRE: LIN Slave Not Responding Error• LINCE: LIN Checksum Error• LINIPE: LIN Identifier Parity Error• LINISFE: LIN Inconsistent Sync Field Error• LINBE: LIN Bit Error• MANEA/MANE: Manchester Error• CTSIC: Clear to Send Input Change Flag• DCDIC: Data Carrier Detect Input Change Flag• DSRIC: Data Set Ready Input Change Flag• RIIC: Ring Indicator Input Change Flag• LINTC: LIN Transfer Completed• LINIDR: LIN Identifier• NACK: Non Acknowledge• RXBUFF: Reception Buffer Full• ITER/UNRE: Max number of Repetitions Reached or SPI Underrun Error• TXEMPTY: Transmitter Empty• TIMEOUT: Receiver Time-out• PARE: Parity Error• FRAME: Framing Error• OVRE: Overrun Error• RXBRK: Break Received/End of Break• TXRDY: Transmitter Ready• RXRDY: Receiver Ready
For backward compatibility the MANE bit has been duplicated to the MANEA bit position. Writing either one or the other hasthe same effect. The corresponding bit in CSR and the corresponding interrupt request are named MANERR.
31 30 29 28 27 26 25 24
LINHTE LINSTE LINSNRE LINCE LINIPE LINISFE LINBE MANEA
23 22 21 20 19 18 17 16
– – – MANE CTSIC DCDIC– DSRIC– RIIC–
15 14 13 12 11 10 9 8
LINTC LINID NACK/LINBK RXBUFF – ITER/UNRE TXEMPTY TIMEOUT
7 6 5 4 3 2 1 0
PARE FRAME OVRE – – RXBRK TXRDY RXRDY
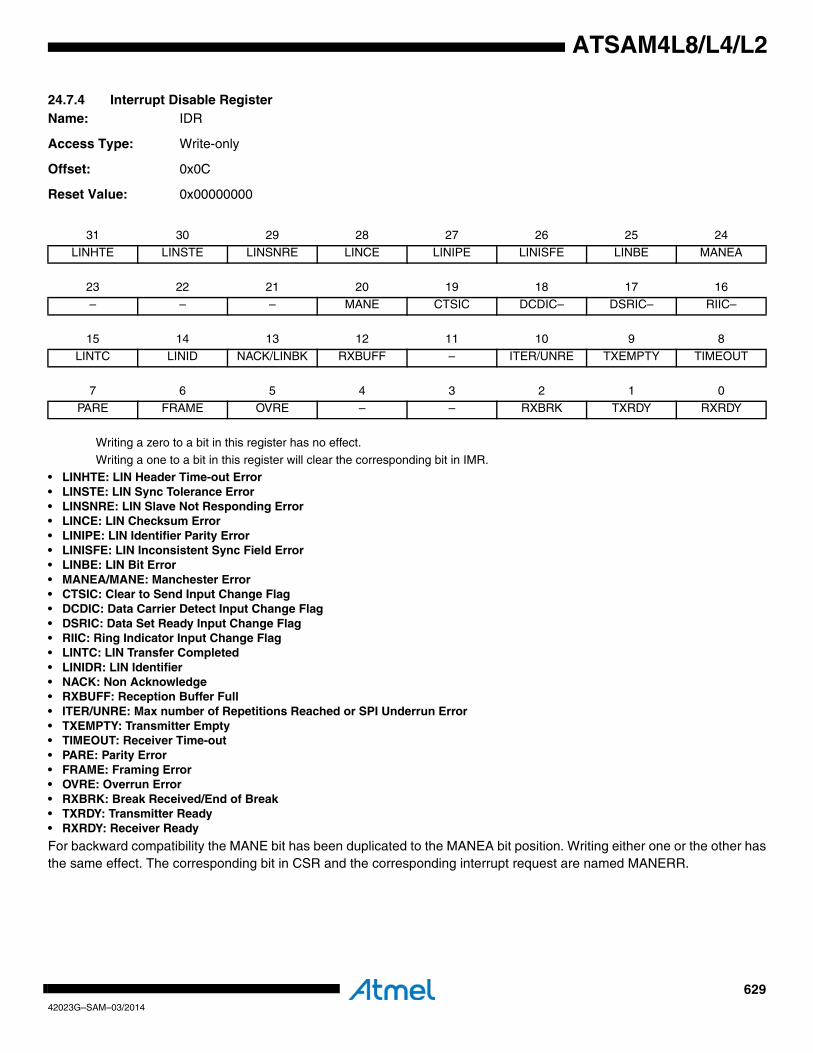
62942023G–SAM–03/2014
ATSAM4L8/L4/L2
24.7.4 Interrupt Disable RegisterName: IDR
Access Type: Write-only
Offset: 0x0C
Reset Value: 0x00000000
Writing a zero to a bit in this register has no effect.
Writing a one to a bit in this register will clear the corresponding bit in IMR.• LINHTE: LIN Header Time-out Error• LINSTE: LIN Sync Tolerance Error• LINSNRE: LIN Slave Not Responding Error• LINCE: LIN Checksum Error• LINIPE: LIN Identifier Parity Error• LINISFE: LIN Inconsistent Sync Field Error• LINBE: LIN Bit Error• MANEA/MANE: Manchester Error• CTSIC: Clear to Send Input Change Flag• DCDIC: Data Carrier Detect Input Change Flag• DSRIC: Data Set Ready Input Change Flag• RIIC: Ring Indicator Input Change Flag• LINTC: LIN Transfer Completed• LINIDR: LIN Identifier• NACK: Non Acknowledge• RXBUFF: Reception Buffer Full• ITER/UNRE: Max number of Repetitions Reached or SPI Underrun Error• TXEMPTY: Transmitter Empty• TIMEOUT: Receiver Time-out• PARE: Parity Error• FRAME: Framing Error• OVRE: Overrun Error• RXBRK: Break Received/End of Break• TXRDY: Transmitter Ready• RXRDY: Receiver Ready
For backward compatibility the MANE bit has been duplicated to the MANEA bit position. Writing either one or the other hasthe same effect. The corresponding bit in CSR and the corresponding interrupt request are named MANERR.
31 30 29 28 27 26 25 24
LINHTE LINSTE LINSNRE LINCE LINIPE LINISFE LINBE MANEA
23 22 21 20 19 18 17 16
– – – MANE CTSIC DCDIC– DSRIC– RIIC–
15 14 13 12 11 10 9 8
LINTC LINID NACK/LINBK RXBUFF – ITER/UNRE TXEMPTY TIMEOUT
7 6 5 4 3 2 1 0
PARE FRAME OVRE – – RXBRK TXRDY RXRDY
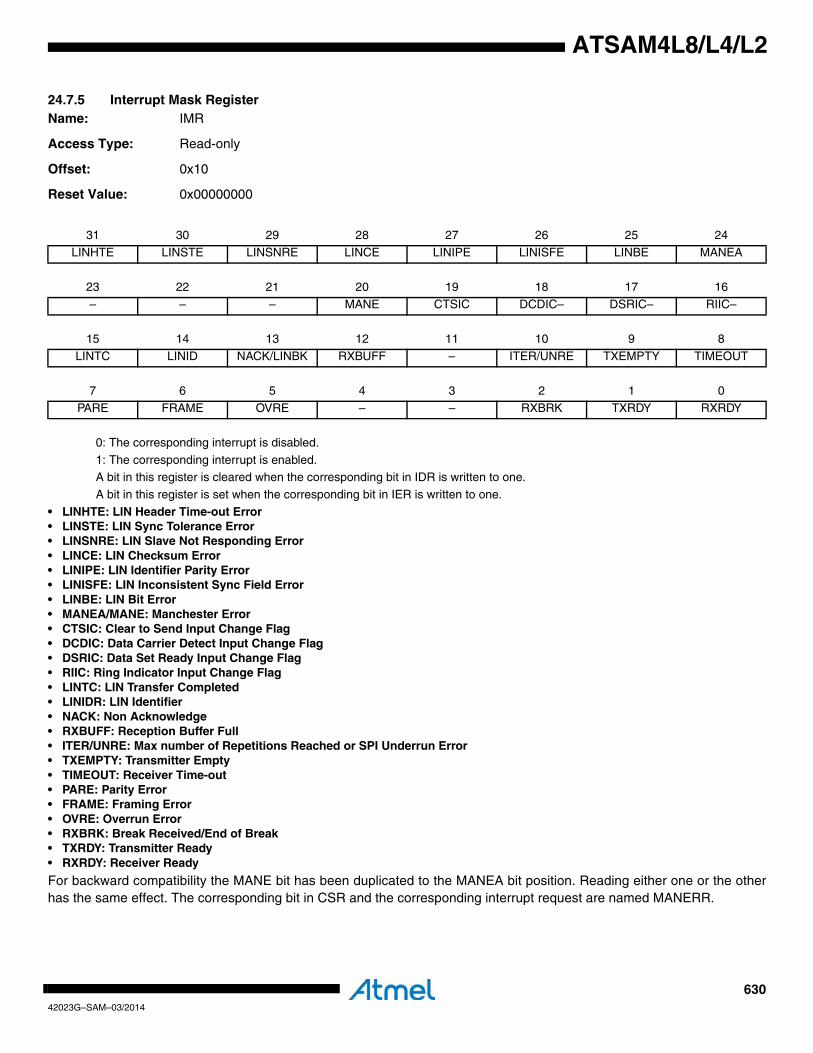
63042023G–SAM–03/2014
ATSAM4L8/L4/L2
24.7.5 Interrupt Mask RegisterName: IMR
Access Type: Read-only
Offset: 0x10
Reset Value: 0x00000000
0: The corresponding interrupt is disabled.
1: The corresponding interrupt is enabled.A bit in this register is cleared when the corresponding bit in IDR is written to one.
A bit in this register is set when the corresponding bit in IER is written to one.
• LINHTE: LIN Header Time-out Error• LINSTE: LIN Sync Tolerance Error• LINSNRE: LIN Slave Not Responding Error• LINCE: LIN Checksum Error• LINIPE: LIN Identifier Parity Error• LINISFE: LIN Inconsistent Sync Field Error• LINBE: LIN Bit Error• MANEA/MANE: Manchester Error• CTSIC: Clear to Send Input Change Flag• DCDIC: Data Carrier Detect Input Change Flag• DSRIC: Data Set Ready Input Change Flag• RIIC: Ring Indicator Input Change Flag• LINTC: LIN Transfer Completed• LINIDR: LIN Identifier• NACK: Non Acknowledge• RXBUFF: Reception Buffer Full• ITER/UNRE: Max number of Repetitions Reached or SPI Underrun Error• TXEMPTY: Transmitter Empty• TIMEOUT: Receiver Time-out• PARE: Parity Error• FRAME: Framing Error• OVRE: Overrun Error• RXBRK: Break Received/End of Break• TXRDY: Transmitter Ready• RXRDY: Receiver Ready
For backward compatibility the MANE bit has been duplicated to the MANEA bit position. Reading either one or the otherhas the same effect. The corresponding bit in CSR and the corresponding interrupt request are named MANERR.
31 30 29 28 27 26 25 24
LINHTE LINSTE LINSNRE LINCE LINIPE LINISFE LINBE MANEA
23 22 21 20 19 18 17 16
– – – MANE CTSIC DCDIC– DSRIC– RIIC–
15 14 13 12 11 10 9 8
LINTC LINID NACK/LINBK RXBUFF – ITER/UNRE TXEMPTY TIMEOUT
7 6 5 4 3 2 1 0
PARE FRAME OVRE – – RXBRK TXRDY RXRDY
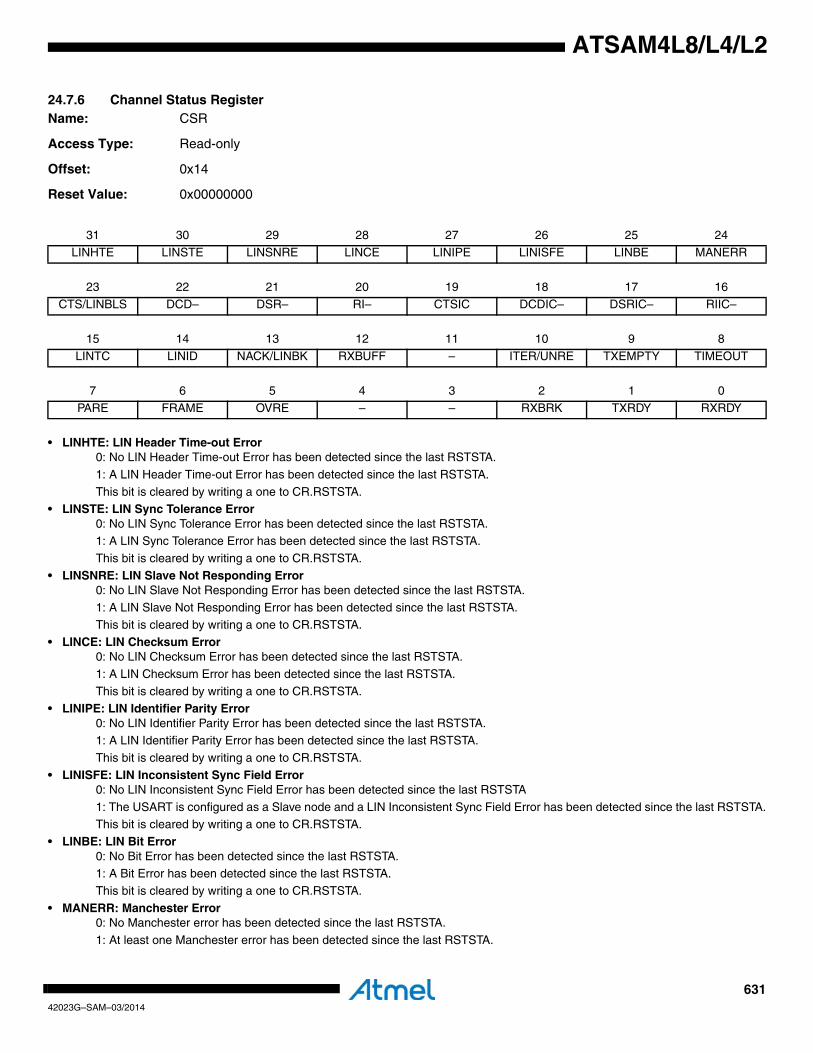
63142023G–SAM–03/2014
ATSAM4L8/L4/L2
24.7.6 Channel Status RegisterName: CSR
Access Type: Read-only
Offset: 0x14
Reset Value: 0x00000000
• LINHTE: LIN Header Time-out Error0: No LIN Header Time-out Error has been detected since the last RSTSTA.
1: A LIN Header Time-out Error has been detected since the last RSTSTA.
This bit is cleared by writing a one to CR.RSTSTA.• LINSTE: LIN Sync Tolerance Error
0: No LIN Sync Tolerance Error has been detected since the last RSTSTA.1: A LIN Sync Tolerance Error has been detected since the last RSTSTA.
This bit is cleared by writing a one to CR.RSTSTA.
• LINSNRE: LIN Slave Not Responding Error0: No LIN Slave Not Responding Error has been detected since the last RSTSTA.
1: A LIN Slave Not Responding Error has been detected since the last RSTSTA.This bit is cleared by writing a one to CR.RSTSTA.
• LINCE: LIN Checksum Error0: No LIN Checksum Error has been detected since the last RSTSTA.
1: A LIN Checksum Error has been detected since the last RSTSTA.
This bit is cleared by writing a one to CR.RSTSTA.• LINIPE: LIN Identifier Parity Error
0: No LIN Identifier Parity Error has been detected since the last RSTSTA.1: A LIN Identifier Parity Error has been detected since the last RSTSTA.
This bit is cleared by writing a one to CR.RSTSTA.
• LINISFE: LIN Inconsistent Sync Field Error0: No LIN Inconsistent Sync Field Error has been detected since the last RSTSTA
1: The USART is configured as a Slave node and a LIN Inconsistent Sync Field Error has been detected since the last RSTSTA.This bit is cleared by writing a one to CR.RSTSTA.
• LINBE: LIN Bit Error0: No Bit Error has been detected since the last RSTSTA.1: A Bit Error has been detected since the last RSTSTA.
This bit is cleared by writing a one to CR.RSTSTA.
• MANERR: Manchester Error0: No Manchester error has been detected since the last RSTSTA.
1: At least one Manchester error has been detected since the last RSTSTA.
31 30 29 28 27 26 25 24
LINHTE LINSTE LINSNRE LINCE LINIPE LINISFE LINBE MANERR
23 22 21 20 19 18 17 16
CTS/LINBLS DCD– DSR– RI– CTSIC DCDIC– DSRIC– RIIC–
15 14 13 12 11 10 9 8
LINTC LINID NACK/LINBK RXBUFF – ITER/UNRE TXEMPTY TIMEOUT
7 6 5 4 3 2 1 0
PARE FRAME OVRE – – RXBRK TXRDY RXRDY
63242023G–SAM–03/2014
ATSAM4L8/L4/L2
• CTS/LINBLS: Image of CTS Input, or LIN Bus Line Status (when in LIN mode)0: CTS or LIN Bus Line is low.
1: CTS or LIN Bus Line is high.• DCD: Image of DCD Input
0: DCD is low.1: DCD is high.
• DSR: Image of DSR Input0: DSR is low.1: DSR is high.
• RI: Image of RI Input0: RI is low.
1: RI is high.
• CTSIC: Clear to Send Input Change Flag0: No change has been detected on the CTS pin since the last CSR read.
1: At least one change has been detected on the CTS pin since the last CSR read.This bit is cleared when reading CSR.
• DCDIC: Data Carrier Detect Input Change Flag0: No change has been detected on the DCD pin since the last CSR read.
1: At least one change has been detected on the DCD pin since the last CSR read.
This bit is cleared when reading CSR. • DSRIC: Data Set Ready Input Change Flag
0: No change has been detected on the DSR pin since the last CSR read.1: At least one change has been detected on the DSR pin since the last CSR read.
This bit is cleared when reading CSR.
• RIIC: Ring Indicator Input Change Flag0: No change has been detected on the RI pin since the last CSR read.
1: At least one change has been detected on the RI pin since the last CSR read.This bit is cleared when reading CSR.
• LINTC: LIN Transfer Completed0: The USART is either idle or a LIN transfer is ongoing.
1: A LIN transfer has been completed since the last RSTSTA.
This bit is cleared by writing a one to CR.RSTSTA: • LINID: LIN Identifier
0: No LIN Identifier has been sent or received.1: A LIN Identifier has been sent (master) or received (slave), since the last RSTSTA.
This bit is cleared by writing a one to CR.RSTSTA:
• NACK: Non Acknowledge0: No Non Acknowledge has been detected since the last RSTNACK.
1: At least one Non Acknowledge has been detected since the last RSTNACK.This bit is cleared by writing a one to CR.RSTNACK.
• RXBUFF: Reception Buffer Full0: The Buffer Full signal from the Peripheral DMA Controller channel is inactive.
1: The Buffer Full signal from the Peripheral DMA Controller channel is active.
• ITER/UNRE: Max Number of Repetitions Reached or SPI Underrun ErrorIf USART operates in SPI Slave Mode:
UNRE = 0: No SPI underrun error has occurred since the last RSTSTA.
UNRE = 1: At least one SPI underrun error has occurred since the last RSTSTA.If USART does not operate in SPI Slave Mode, no functionality is associated to UNRE. The bit will behave as ITER if the USART
is in ISO7816 mode:
ITER = 0: Maximum number of repetitions has not been reached since the last RSTSTA.ITER = 1: Maximum number of repetitions has been reached since the last RSTSTA.
This bit is cleared by writing a one to CR.RSTSTA.
63342023G–SAM–03/2014
ATSAM4L8/L4/L2
• TXEMPTY: Transmitter Empty0: The transmitter is either disabled or there are characters in THR, or in the transmit shift register.
1: There are no characters in neither THR, nor in the transmit shift register.This bit is cleared by writing a one to CR.STTBRK.
• TIMEOUT: Receiver Time-out0: There has not been a time-out since the last Start Time-out command (CR.STTTO), or RTOR.TO is zero.
1: There has been a time-out since the last Start Time-out command.
This bit is cleared by writing a one to CR.STTTO or CR.RETTO.
• PARE: Parity Error0: Either no parity error has been detected, or the parity bit is a zero in multidrop mode, since the last RSTSTA.
1: Either at least one parity error has been detected, or the parity bit is a one in multidrop mode, since the last RSTSTA.This bit is cleared by writing a one to CR.RSTSTA.
• FRAME: Framing Error0: No stop bit has been found as low since the last RSTSTA.
1: At least one stop bit has been found as low since the last RSTSTA.
This bit is cleared by writing a one to CR.RSTSTA.• OVRE: Overrun Error
0: No overrun error has occurred since the last RSTSTA.1: At least one overrun error has occurred since the last RSTSTA.
This bit is cleared by writing a one to CR.RSTSTA.
• RXBRK: Break Received/End of Break0: No Break received or End of Break detected since the last RSTSTA.
1: Break received or End of Break detected since the last RSTSTA.This bit is cleared by writing a one to CR.RSTSTA.
• TXRDY: Transmitter Ready0: The transmitter is either disabled, or a character in THR is waiting to be transferred to the transmit shift register, or an
STTBRK command has been requested. As soon as the transmitter is enabled, TXRDY is set.
1: There is no character in the THR.This bit is cleared by writing a one to CR.STTBRK.
• RXRDY: Receiver Ready0: The receiver is either disabled, or no complete character has been received since the last read of RHR. If characters were
being received when the receiver was disabled, RXRDY is set when the receiver is enabled.
1: At least one complete character has been received and RHR has not yet been read.This bit is cleared when the Receive Holding Register (RHR) is read.

63442023G–SAM–03/2014
ATSAM4L8/L4/L2
24.7.7 Receiver Holding RegisterName: RHR
Access Type: Read-only
Offset: 0x18
Reset Value: 0x00000000
Reading this register will clear the CSR.RXRDY bit.
• RXSYNH: Received Sync0: Last character received is a data sync.
1: Last character received is a command sync.• RXCHR: Received Character
Last received character.
31 30 29 28 27 26 25 24
– – – – – – – –
23 22 21 20 19 18 17 16
– – – – – – – –
15 14 13 12 11 10 9 8
RXSYNH – – – – – – RXCHR[8]
7 6 5 4 3 2 1 0
RXCHR[7:0]
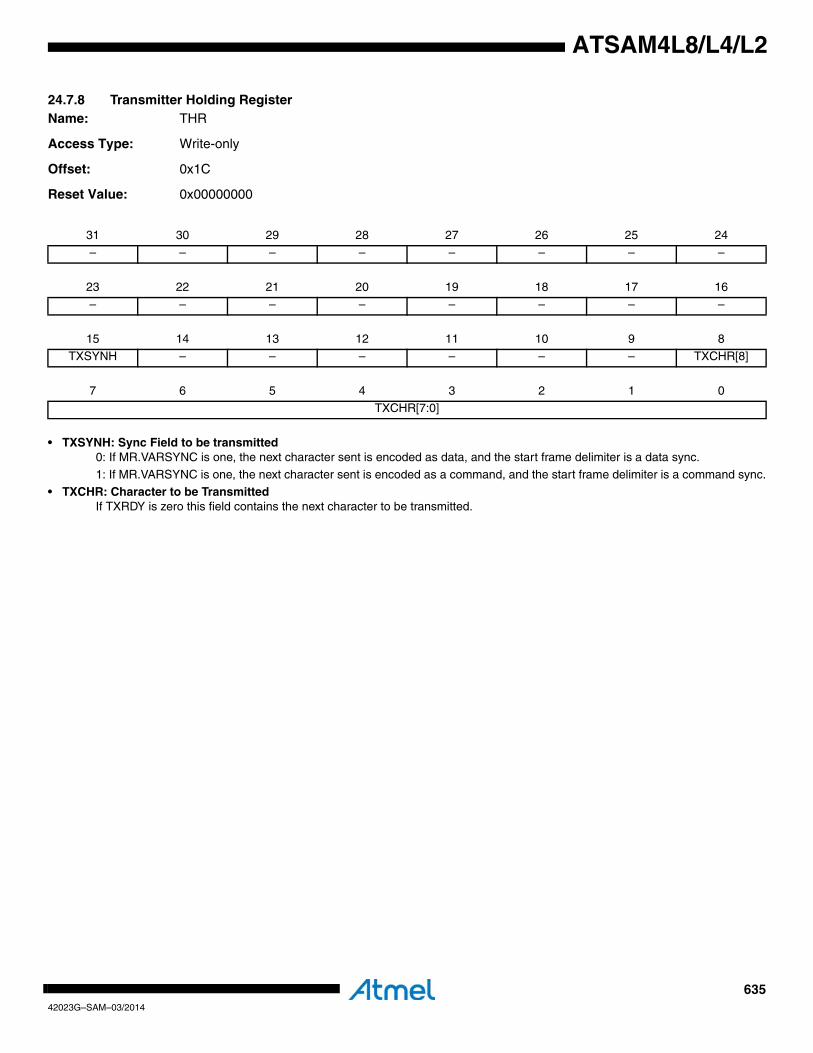
63542023G–SAM–03/2014
ATSAM4L8/L4/L2
24.7.8 Transmitter Holding RegisterName: THR
Access Type: Write-only
Offset: 0x1C
Reset Value: 0x00000000
• TXSYNH: Sync Field to be transmitted0: If MR.VARSYNC is one, the next character sent is encoded as data, and the start frame delimiter is a data sync.
1: If MR.VARSYNC is one, the next character sent is encoded as a command, and the start frame delimiter is a command sync.
• TXCHR: Character to be TransmittedIf TXRDY is zero this field contains the next character to be transmitted.
31 30 29 28 27 26 25 24
– – – – – – – –
23 22 21 20 19 18 17 16
– – – – – – – –
15 14 13 12 11 10 9 8
TXSYNH – – – – – – TXCHR[8]
7 6 5 4 3 2 1 0
TXCHR[7:0]
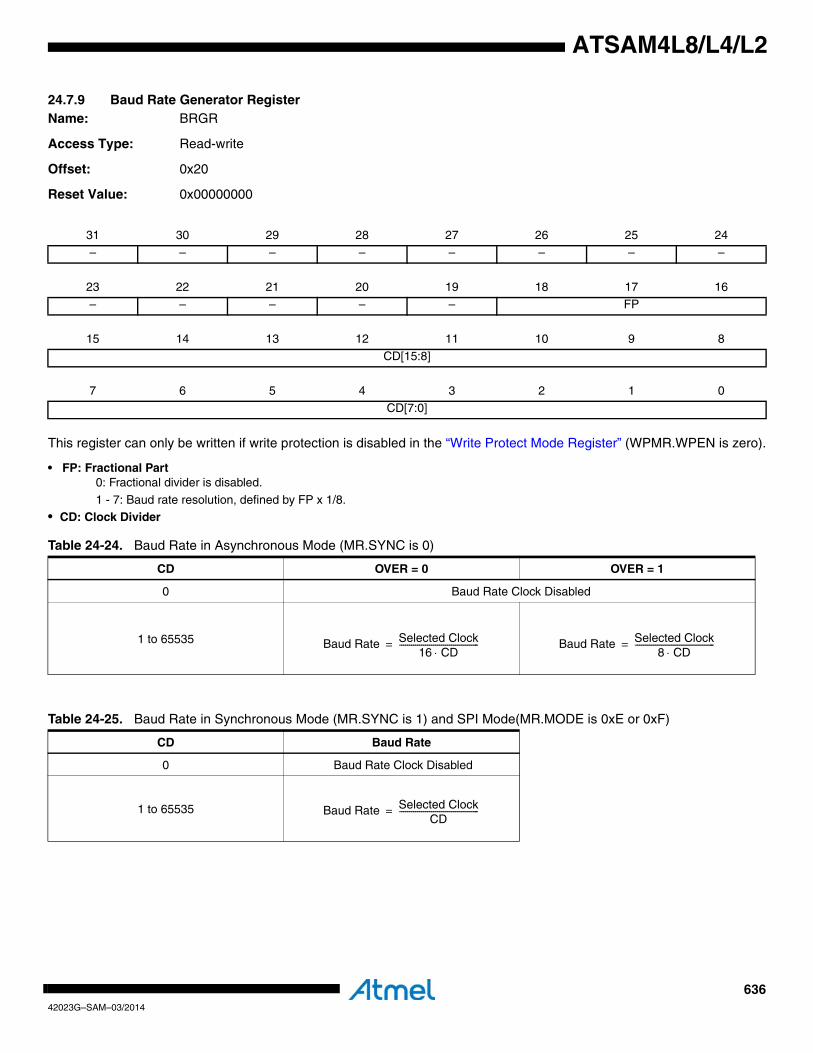
63642023G–SAM–03/2014
ATSAM4L8/L4/L2
24.7.9 Baud Rate Generator RegisterName: BRGR
Access Type: Read-write
Offset: 0x20
Reset Value: 0x00000000
This register can only be written if write protection is disabled in the “Write Protect Mode Register” (WPMR.WPEN is zero).
• FP: Fractional Part0: Fractional divider is disabled.
1 - 7: Baud rate resolution, defined by FP x 1/8.• CD: Clock Divider
31 30 29 28 27 26 25 24
– – – – – – – –
23 22 21 20 19 18 17 16
– – – – – FP
15 14 13 12 11 10 9 8
CD[15:8]
7 6 5 4 3 2 1 0
CD[7:0]
Table 24-24. Baud Rate in Asynchronous Mode (MR.SYNC is 0)
CD OVER = 0 OVER = 1
0 Baud Rate Clock Disabled
1 to 65535
Table 24-25. Baud Rate in Synchronous Mode (MR.SYNC is 1) and SPI Mode(MR.MODE is 0xE or 0xF)
CD Baud Rate
0 Baud Rate Clock Disabled
1 to 65535
Baud Rate Selected Clock16 CD⋅
----------------------------------------= Baud Rate Selected Clock8 CD⋅
----------------------------------------=
Baud Rate Selected ClockCD
----------------------------------------=
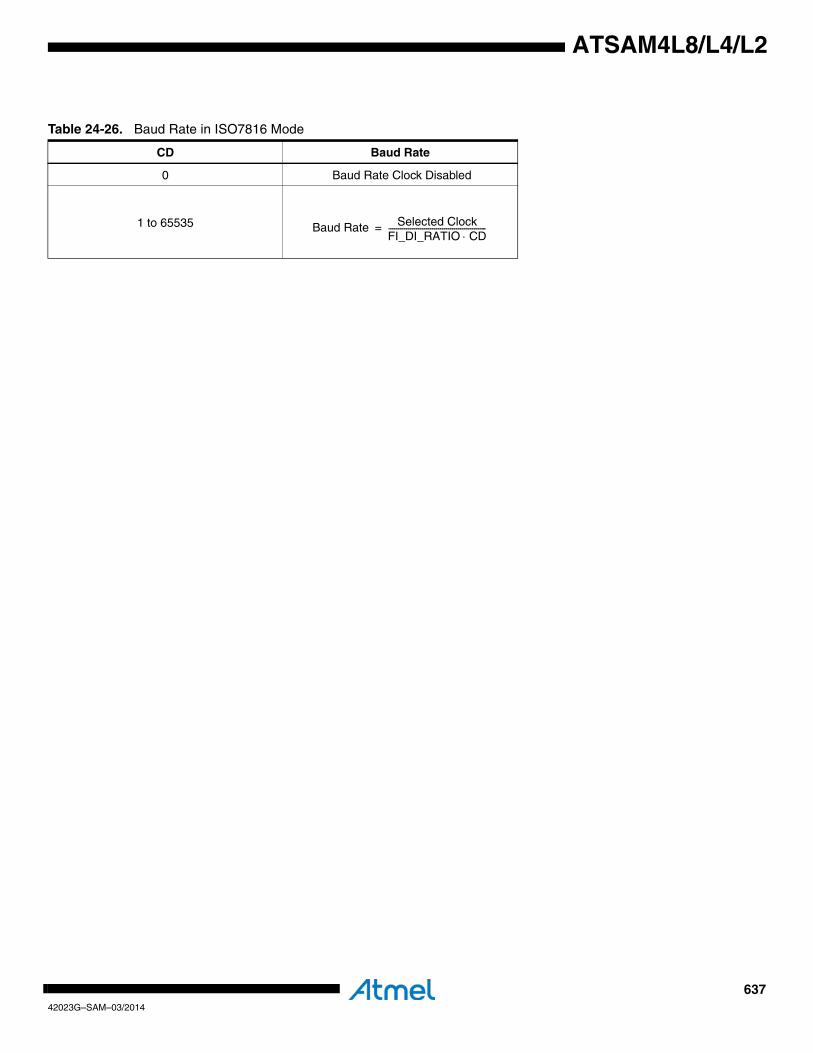
63742023G–SAM–03/2014
ATSAM4L8/L4/L2
Table 24-26. Baud Rate in ISO7816 Mode
CD Baud Rate
0 Baud Rate Clock Disabled
1 to 65535
Baud Rate Selected ClockFI_DI_RATIO CD⋅-------------------------------------------------=
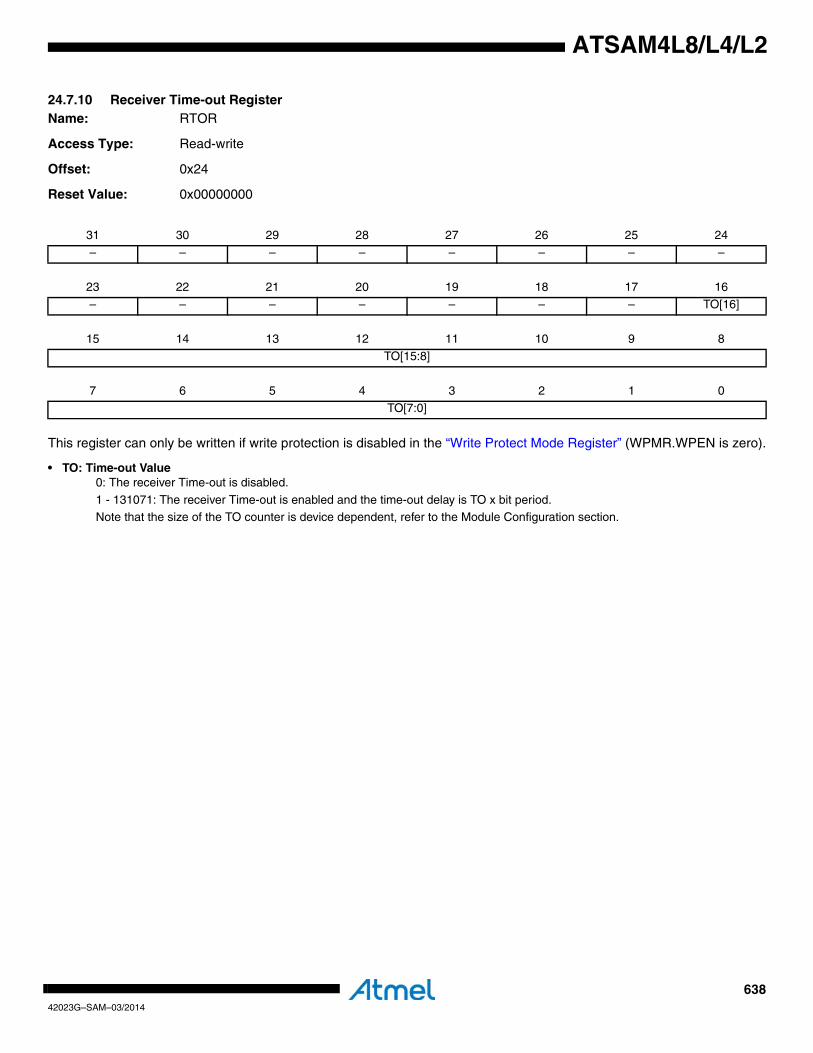
63842023G–SAM–03/2014
ATSAM4L8/L4/L2
24.7.10 Receiver Time-out RegisterName: RTOR
Access Type: Read-write
Offset: 0x24
Reset Value: 0x00000000
This register can only be written if write protection is disabled in the “Write Protect Mode Register” (WPMR.WPEN is zero).
• TO: Time-out Value0: The receiver Time-out is disabled.
1 - 131071: The receiver Time-out is enabled and the time-out delay is TO x bit period.Note that the size of the TO counter is device dependent, refer to the Module Configuration section.
31 30 29 28 27 26 25 24
– – – – – – – –
23 22 21 20 19 18 17 16
– – – – – – – TO[16]
15 14 13 12 11 10 9 8
TO[15:8]
7 6 5 4 3 2 1 0
TO[7:0]
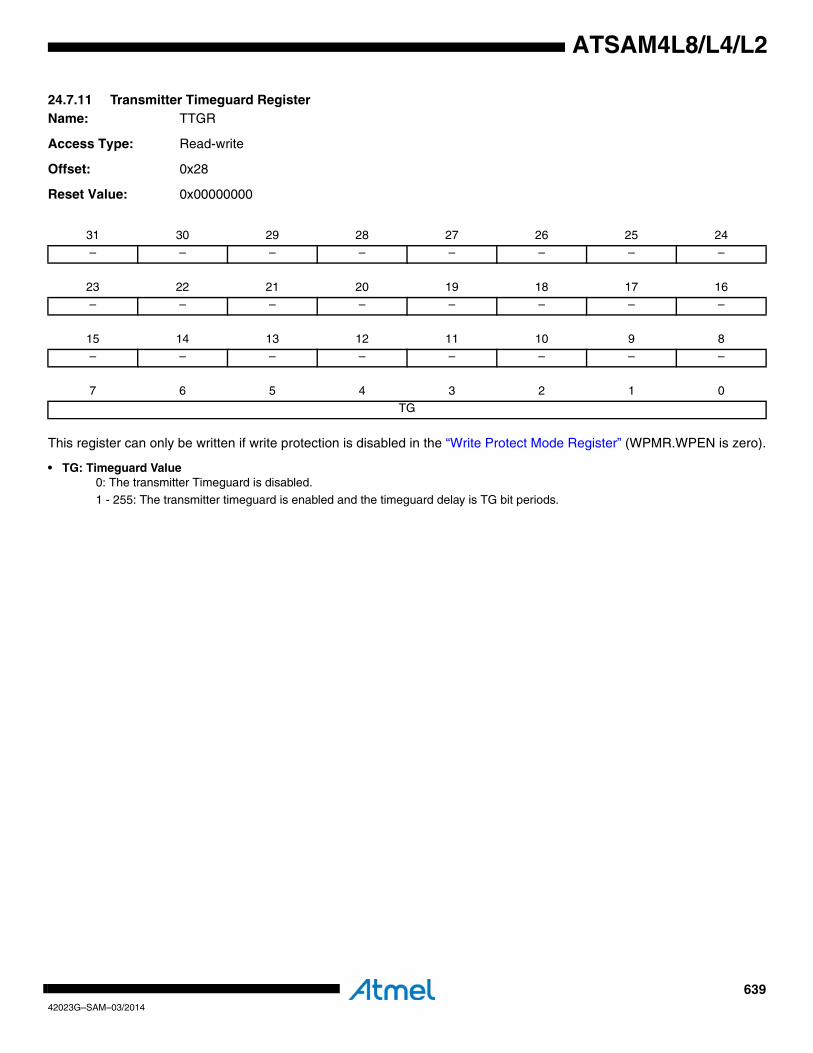
63942023G–SAM–03/2014
ATSAM4L8/L4/L2
24.7.11 Transmitter Timeguard RegisterName: TTGR
Access Type: Read-write
Offset: 0x28
Reset Value: 0x00000000
This register can only be written if write protection is disabled in the “Write Protect Mode Register” (WPMR.WPEN is zero).
• TG: Timeguard Value0: The transmitter Timeguard is disabled.
1 - 255: The transmitter timeguard is enabled and the timeguard delay is TG bit periods.
31 30 29 28 27 26 25 24
– – – – – – – –
23 22 21 20 19 18 17 16
– – – – – – – –
15 14 13 12 11 10 9 8
– – – – – – – –
7 6 5 4 3 2 1 0
TG
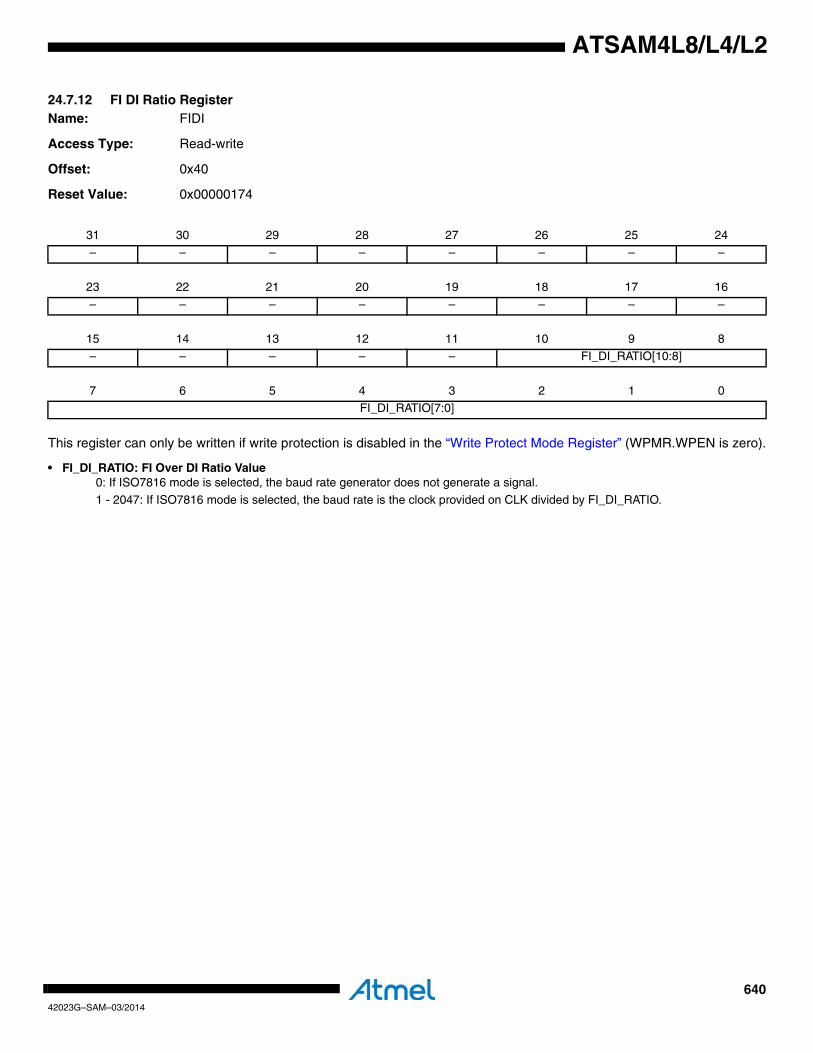
64042023G–SAM–03/2014
ATSAM4L8/L4/L2
24.7.12 FI DI Ratio RegisterName: FIDI
Access Type: Read-write
Offset: 0x40
Reset Value: 0x00000174
This register can only be written if write protection is disabled in the “Write Protect Mode Register” (WPMR.WPEN is zero).
• FI_DI_RATIO: FI Over DI Ratio Value0: If ISO7816 mode is selected, the baud rate generator does not generate a signal.
1 - 2047: If ISO7816 mode is selected, the baud rate is the clock provided on CLK divided by FI_DI_RATIO.
31 30 29 28 27 26 25 24
– – – – – – – –
23 22 21 20 19 18 17 16
– – – – – – – –
15 14 13 12 11 10 9 8
– – – – – FI_DI_RATIO[10:8]
7 6 5 4 3 2 1 0
FI_DI_RATIO[7:0]

64142023G–SAM–03/2014
ATSAM4L8/L4/L2
24.7.13 Number of Errors RegisterName: NER
Access Type: Read-only
Offset: 0x44
Reset Value: 0x00000000
• NB_ERRORS: Number of ErrorsTotal number of errors that occurred during an ISO7816 transfer. This register is automatically cleared when read.
31 30 29 28 27 26 25 24
– – – – – – – –
23 22 21 20 19 18 17 16
– – – – – – – –
15 14 13 12 11 10 9 8
– – – – – – – –
7 6 5 4 3 2 1 0
NB_ERRORS
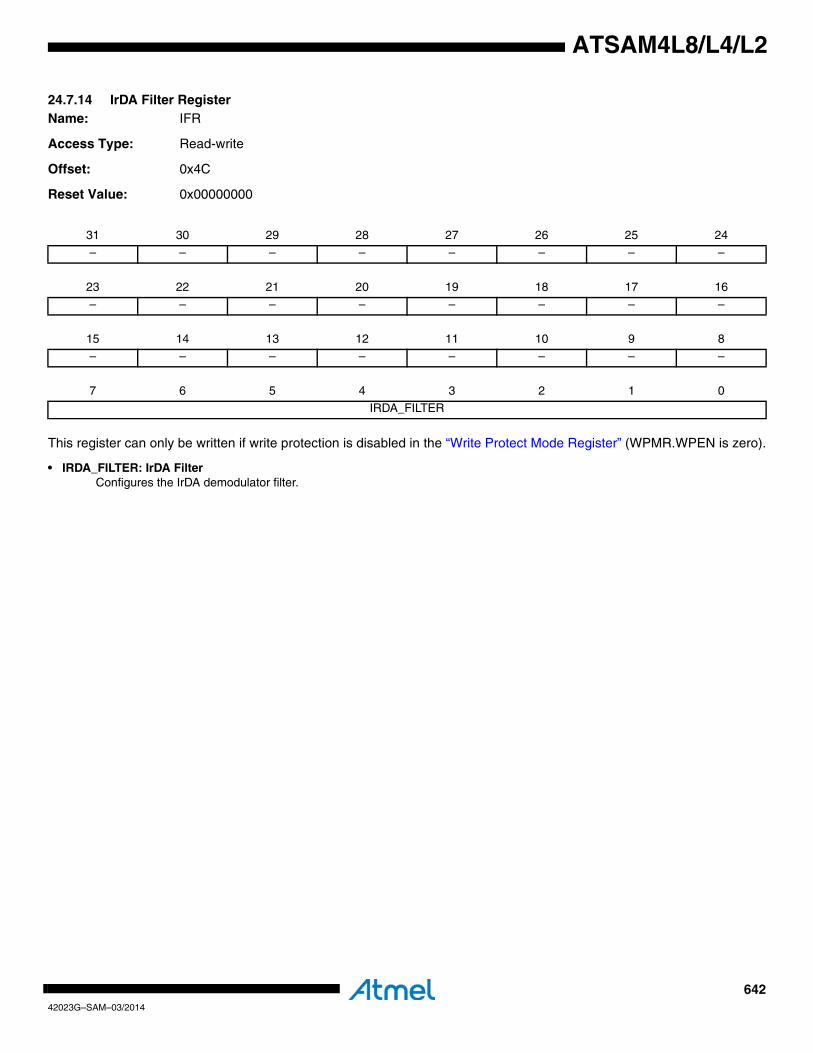
64242023G–SAM–03/2014
ATSAM4L8/L4/L2
24.7.14 IrDA Filter RegisterName: IFR
Access Type: Read-write
Offset: 0x4C
Reset Value: 0x00000000
This register can only be written if write protection is disabled in the “Write Protect Mode Register” (WPMR.WPEN is zero).
• IRDA_FILTER: IrDA FilterConfigures the IrDA demodulator filter.
31 30 29 28 27 26 25 24
– – – – – – – –
23 22 21 20 19 18 17 16
– – – – – – – –
15 14 13 12 11 10 9 8
– – – – – – – –
7 6 5 4 3 2 1 0
IRDA_FILTER
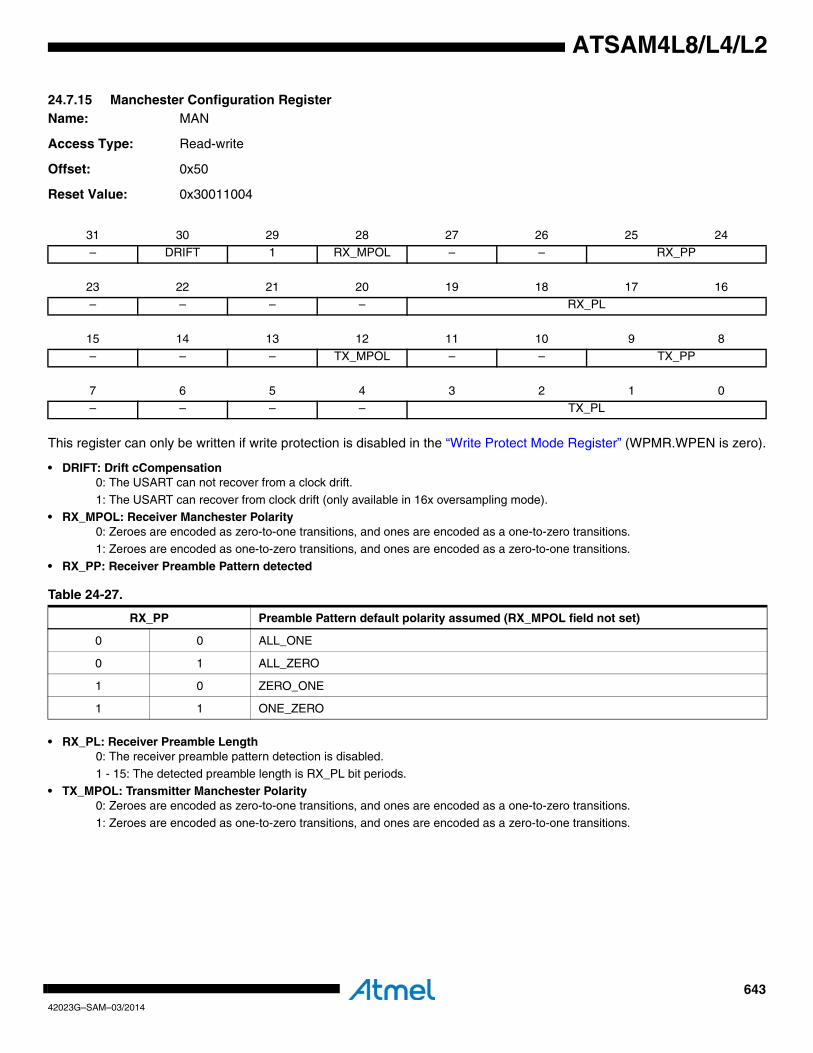
64342023G–SAM–03/2014
ATSAM4L8/L4/L2
24.7.15 Manchester Configuration RegisterName: MAN
Access Type: Read-write
Offset: 0x50
Reset Value: 0x30011004
This register can only be written if write protection is disabled in the “Write Protect Mode Register” (WPMR.WPEN is zero).
• DRIFT: Drift cCompensation0: The USART can not recover from a clock drift.
1: The USART can recover from clock drift (only available in 16x oversampling mode).• RX_MPOL: Receiver Manchester Polarity
0: Zeroes are encoded as zero-to-one transitions, and ones are encoded as a one-to-zero transitions.1: Zeroes are encoded as one-to-zero transitions, and ones are encoded as a zero-to-one transitions.
• RX_PP: Receiver Preamble Pattern detected
• RX_PL: Receiver Preamble Length0: The receiver preamble pattern detection is disabled.
1 - 15: The detected preamble length is RX_PL bit periods.
• TX_MPOL: Transmitter Manchester Polarity0: Zeroes are encoded as zero-to-one transitions, and ones are encoded as a one-to-zero transitions.
1: Zeroes are encoded as one-to-zero transitions, and ones are encoded as a zero-to-one transitions.
31 30 29 28 27 26 25 24
– DRIFT 1 RX_MPOL – – RX_PP
23 22 21 20 19 18 17 16
– – – – RX_PL
15 14 13 12 11 10 9 8
– – – TX_MPOL – – TX_PP
7 6 5 4 3 2 1 0
– – – – TX_PL
Table 24-27.
RX_PP Preamble Pattern default polarity assumed (RX_MPOL field not set)
0 0 ALL_ONE
0 1 ALL_ZERO
1 0 ZERO_ONE
1 1 ONE_ZERO
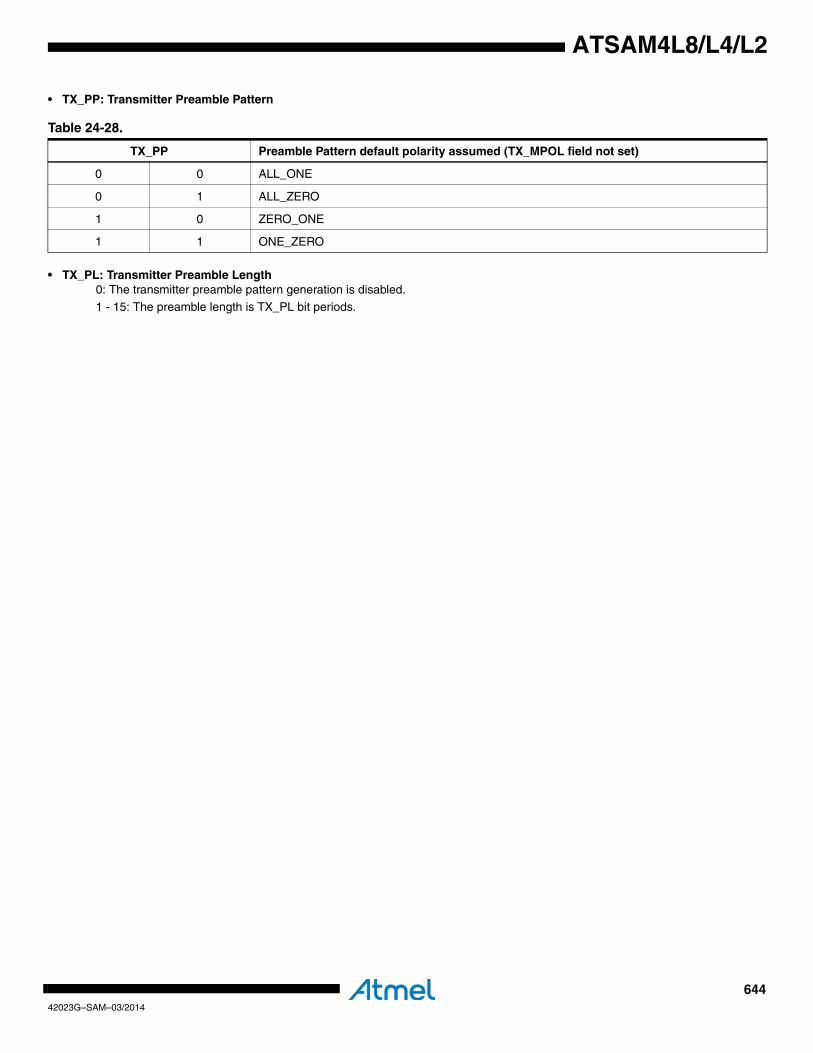
64442023G–SAM–03/2014
ATSAM4L8/L4/L2
• TX_PP: Transmitter Preamble Pattern
• TX_PL: Transmitter Preamble Length0: The transmitter preamble pattern generation is disabled.
1 - 15: The preamble length is TX_PL bit periods.
Table 24-28.
TX_PP Preamble Pattern default polarity assumed (TX_MPOL field not set)
0 0 ALL_ONE
0 1 ALL_ZERO
1 0 ZERO_ONE
1 1 ONE_ZERO
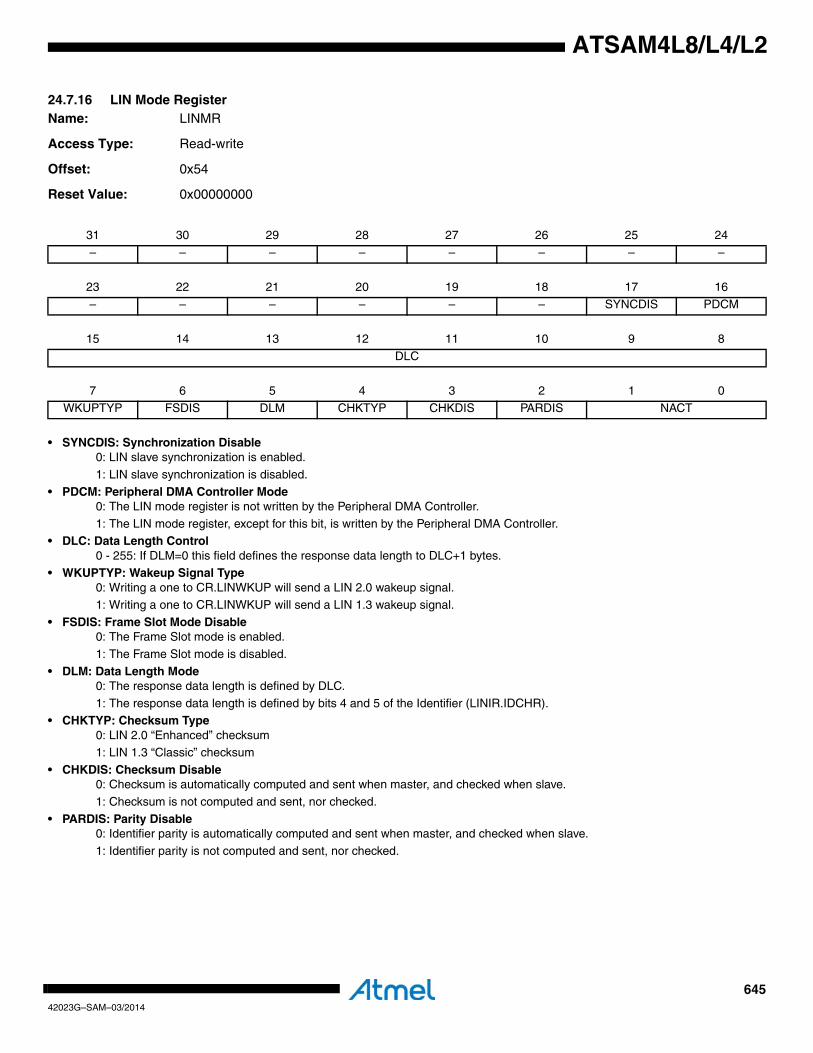
64542023G–SAM–03/2014
ATSAM4L8/L4/L2
24.7.16 LIN Mode RegisterName: LINMR
Access Type: Read-write
Offset: 0x54
Reset Value: 0x00000000
• SYNCDIS: Synchronization Disable0: LIN slave synchronization is enabled.
1: LIN slave synchronization is disabled.
• PDCM: Peripheral DMA Controller Mode0: The LIN mode register is not written by the Peripheral DMA Controller.
1: The LIN mode register, except for this bit, is written by the Peripheral DMA Controller.• DLC: Data Length Control
0 - 255: If DLM=0 this field defines the response data length to DLC+1 bytes.• WKUPTYP: Wakeup Signal Type
0: Writing a one to CR.LINWKUP will send a LIN 2.0 wakeup signal.1: Writing a one to CR.LINWKUP will send a LIN 1.3 wakeup signal.
• FSDIS: Frame Slot Mode Disable0: The Frame Slot mode is enabled.
1: The Frame Slot mode is disabled.
• DLM: Data Length Mode0: The response data length is defined by DLC.
1: The response data length is defined by bits 4 and 5 of the Identifier (LINIR.IDCHR).• CHKTYP: Checksum Type
0: LIN 2.0 “Enhanced” checksum1: LIN 1.3 “Classic” checksum
• CHKDIS: Checksum Disable0: Checksum is automatically computed and sent when master, and checked when slave.
1: Checksum is not computed and sent, nor checked.
• PARDIS: Parity Disable0: Identifier parity is automatically computed and sent when master, and checked when slave.
1: Identifier parity is not computed and sent, nor checked.
31 30 29 28 27 26 25 24
– – – – – – – –
23 22 21 20 19 18 17 16
– – – – – – SYNCDIS PDCM
15 14 13 12 11 10 9 8
DLC
7 6 5 4 3 2 1 0
WKUPTYP FSDIS DLM CHKTYP CHKDIS PARDIS NACT
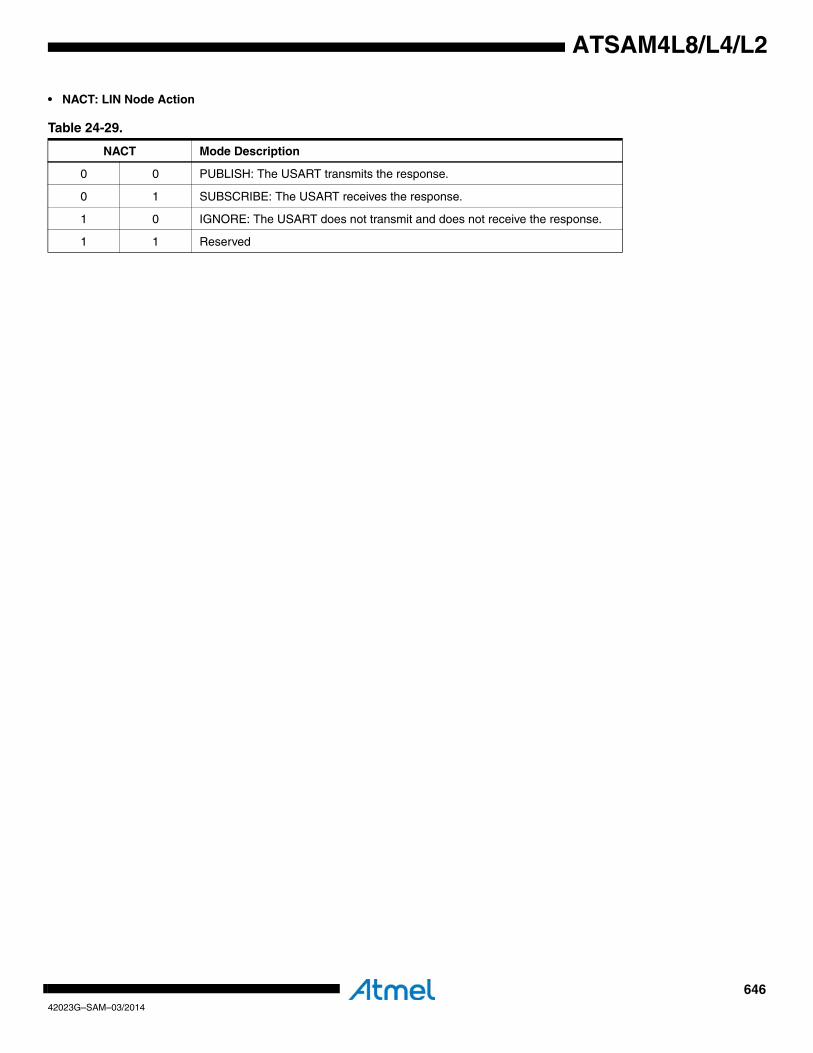
64642023G–SAM–03/2014
ATSAM4L8/L4/L2
• NACT: LIN Node Action
Table 24-29.
NACT Mode Description
0 0 PUBLISH: The USART transmits the response.
0 1 SUBSCRIBE: The USART receives the response.
1 0 IGNORE: The USART does not transmit and does not receive the response.
1 1 Reserved
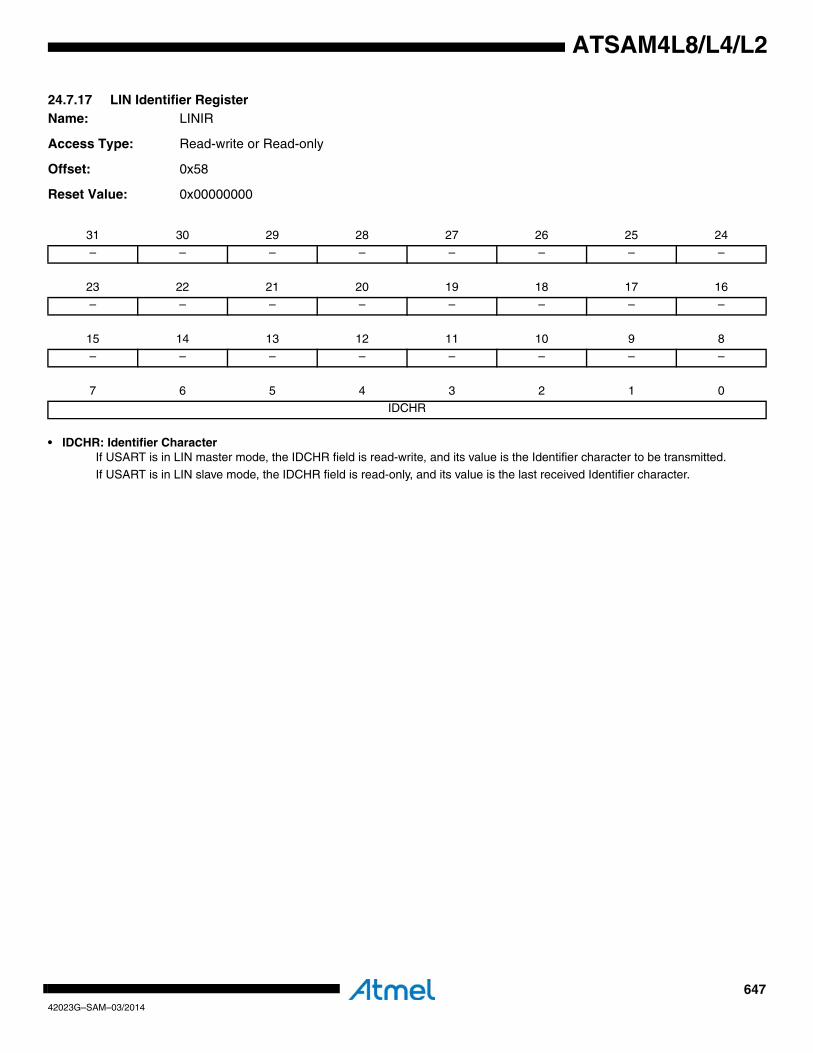
64742023G–SAM–03/2014
ATSAM4L8/L4/L2
24.7.17 LIN Identifier RegisterName: LINIR
Access Type: Read-write or Read-only
Offset: 0x58
Reset Value: 0x00000000
• IDCHR: Identifier CharacterIf USART is in LIN master mode, the IDCHR field is read-write, and its value is the Identifier character to be transmitted.
If USART is in LIN slave mode, the IDCHR field is read-only, and its value is the last received Identifier character.
31 30 29 28 27 26 25 24
– – – – – – – –
23 22 21 20 19 18 17 16
– – – – – – – –
15 14 13 12 11 10 9 8
– – – – – – – –
7 6 5 4 3 2 1 0
IDCHR
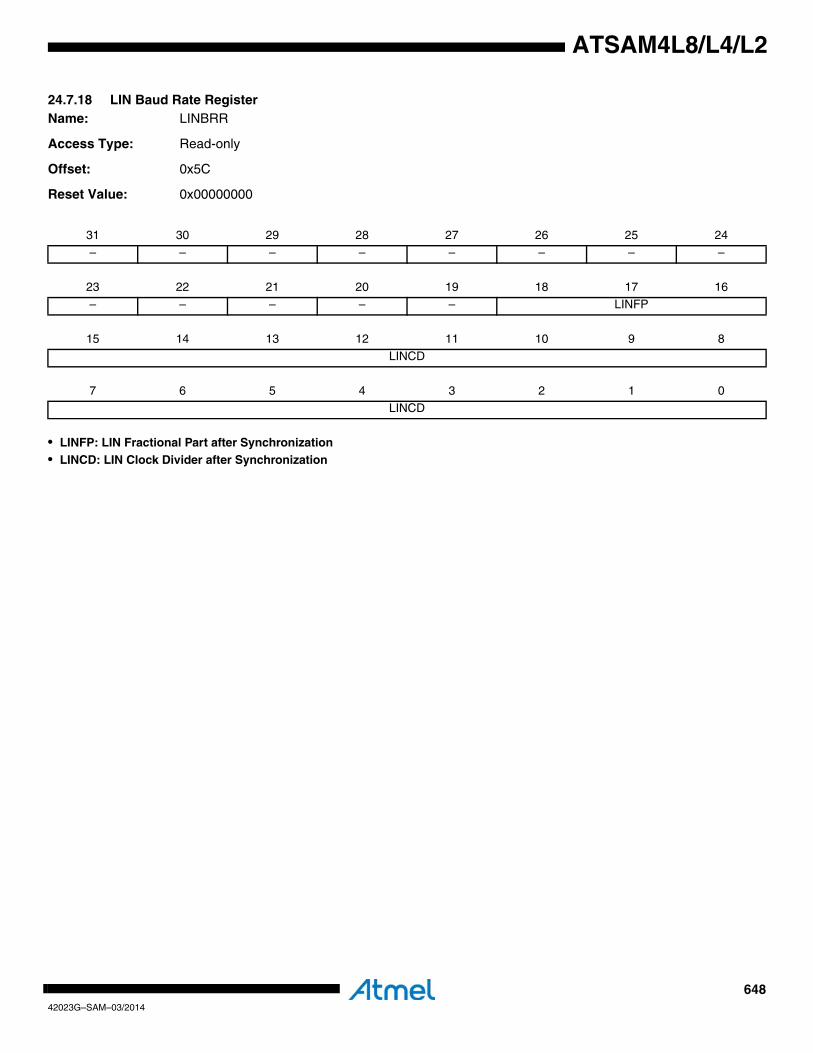
64842023G–SAM–03/2014
ATSAM4L8/L4/L2
24.7.18 LIN Baud Rate RegisterName: LINBRR
Access Type: Read-only
Offset: 0x5C
Reset Value: 0x00000000
• LINFP: LIN Fractional Part after Synchronization• LINCD: LIN Clock Divider after Synchronization
31 30 29 28 27 26 25 24
– – – – – – – –
23 22 21 20 19 18 17 16
– – – – – LINFP
15 14 13 12 11 10 9 8
LINCD
7 6 5 4 3 2 1 0
LINCD
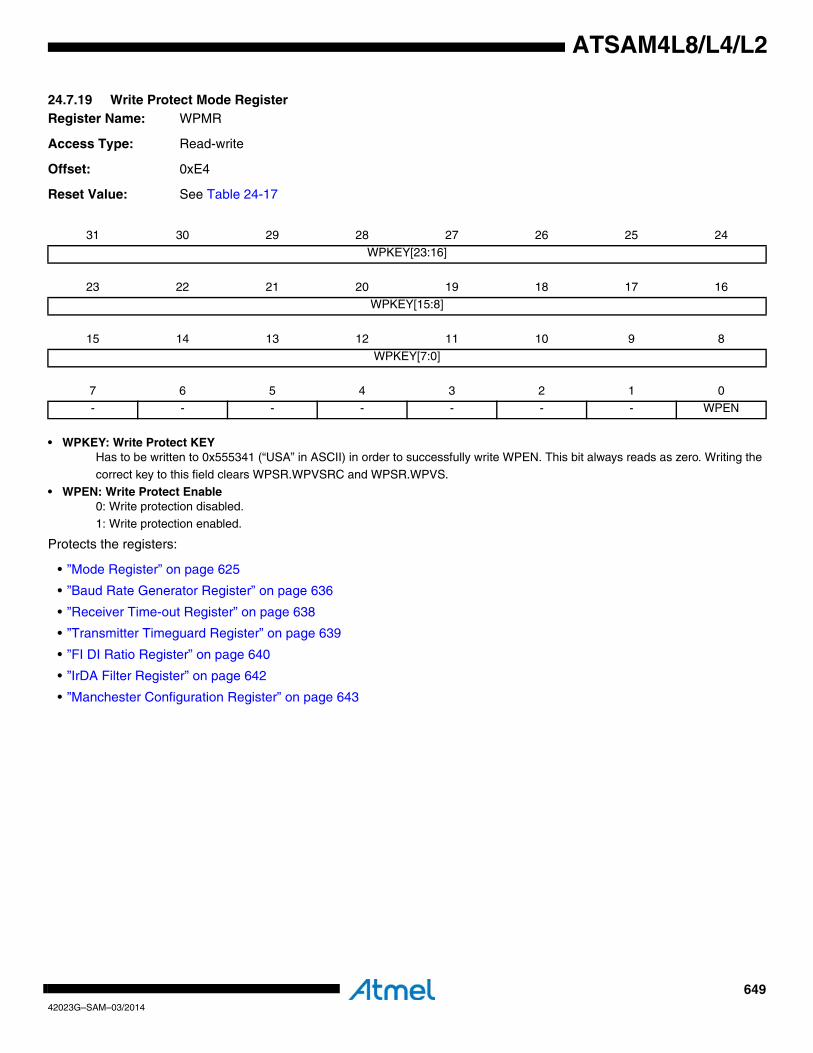
64942023G–SAM–03/2014
ATSAM4L8/L4/L2
24.7.19 Write Protect Mode Register Register Name: WPMR
Access Type: Read-write
Offset: 0xE4
Reset Value: See Table 24-17
• WPKEY: Write Protect KEYHas to be written to 0x555341 (“USA” in ASCII) in order to successfully write WPEN. This bit always reads as zero. Writing the
correct key to this field clears WPSR.WPVSRC and WPSR.WPVS.
• WPEN: Write Protect Enable0: Write protection disabled.
1: Write protection enabled.
Protects the registers:
• ”Mode Register” on page 625
• ”Baud Rate Generator Register” on page 636
• ”Receiver Time-out Register” on page 638
• ”Transmitter Timeguard Register” on page 639
• ”FI DI Ratio Register” on page 640
• ”IrDA Filter Register” on page 642
• ”Manchester Configuration Register” on page 643
31 30 29 28 27 26 25 24
WPKEY[23:16]
23 22 21 20 19 18 17 16
WPKEY[15:8]
15 14 13 12 11 10 9 8
WPKEY[7:0]
7 6 5 4 3 2 1 0
- - - - - - - WPEN
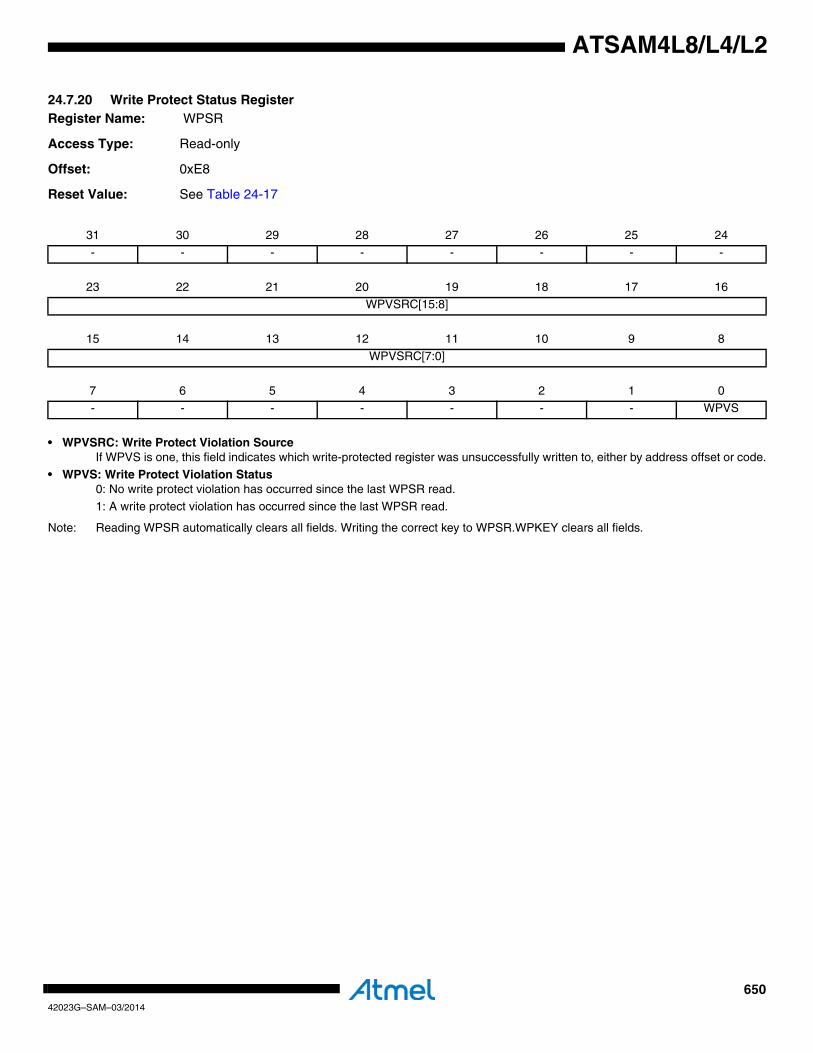
65042023G–SAM–03/2014
ATSAM4L8/L4/L2
24.7.20 Write Protect Status Register Register Name: WPSR
Access Type: Read-only
Offset: 0xE8
Reset Value: See Table 24-17
• WPVSRC: Write Protect Violation SourceIf WPVS is one, this field indicates which write-protected register was unsuccessfully written to, either by address offset or code.
• WPVS: Write Protect Violation Status0: No write protect violation has occurred since the last WPSR read.
1: A write protect violation has occurred since the last WPSR read.
Note: Reading WPSR automatically clears all fields. Writing the correct key to WPSR.WPKEY clears all fields.
31 30 29 28 27 26 25 24
- - - - - - - -
23 22 21 20 19 18 17 16
WPVSRC[15:8]
15 14 13 12 11 10 9 8
WPVSRC[7:0]
7 6 5 4 3 2 1 0
- - - - - - - WPVS

65142023G–SAM–03/2014
ATSAM4L8/L4/L2
24.7.21 Version Register
Name: VERSION
Access Type: Read-only
Offset: 0xFC
Reset Value: -
• MFNReserved. No functionality associated.
• VERSIONVersion of the module. No functionality associated.
31 30 29 28 27 26 25 24
- - - - - - - -
23 22 21 20 19 18 17 16
- - - - MFN
15 14 13 12 11 10 9 8
- - - - VERSION[11:8]
7 6 5 4 3 2 1 0
VERSION[7:0]
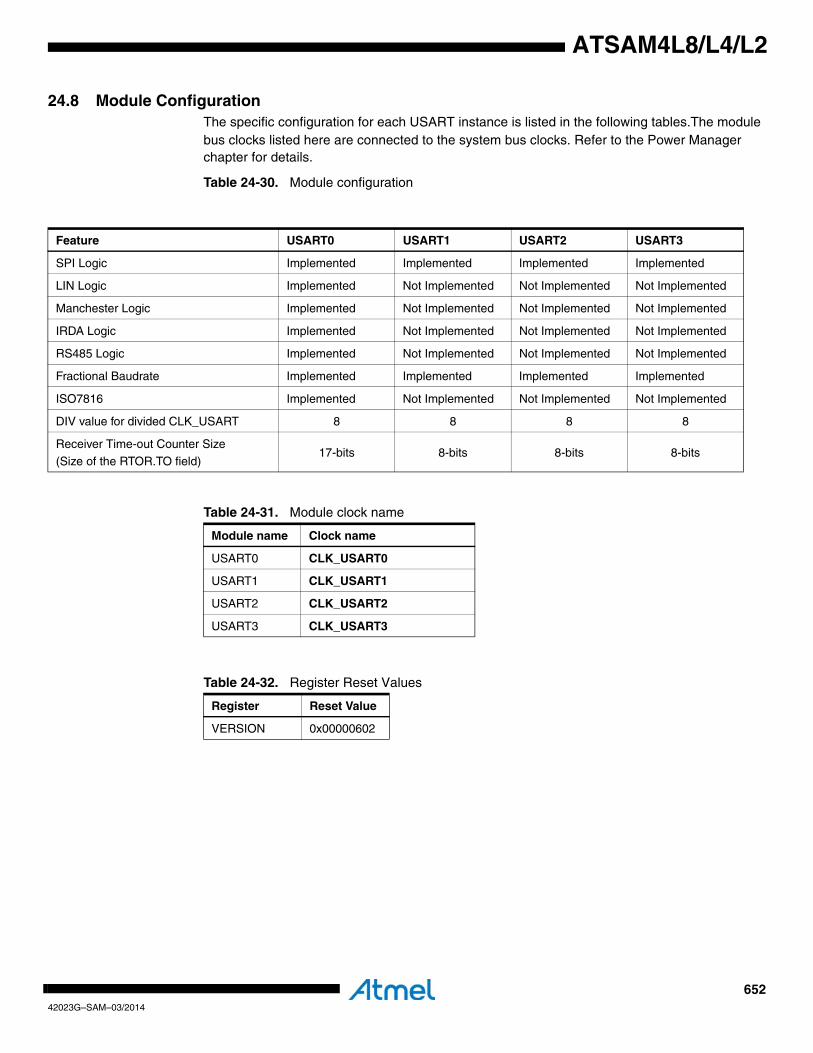
65242023G–SAM–03/2014
ATSAM4L8/L4/L2
24.8 Module ConfigurationThe specific configuration for each USART instance is listed in the following tables.The module bus clocks listed here are connected to the system bus clocks. Refer to the Power Managerchapter for details.
Table 24-30. Module configuration
Feature USART0 USART1 USART2 USART3
SPI Logic Implemented Implemented Implemented Implemented
LIN Logic Implemented Not Implemented Not Implemented Not Implemented
Manchester Logic Implemented Not Implemented Not Implemented Not Implemented
IRDA Logic Implemented Not Implemented Not Implemented Not Implemented
RS485 Logic Implemented Not Implemented Not Implemented Not Implemented
Fractional Baudrate Implemented Implemented Implemented Implemented
ISO7816 Implemented Not Implemented Not Implemented Not Implemented
DIV value for divided CLK_USART 8 8 8 8
Receiver Time-out Counter Size
(Size of the RTOR.TO field)17-bits 8-bits 8-bits 8-bits
Table 24-31. Module clock name
Module name Clock name
USART0 CLK_USART0
USART1 CLK_USART1
USART2 CLK_USART2
USART3 CLK_USART3
Table 24-32. Register Reset Values
Register Reset Value
VERSION 0x00000602
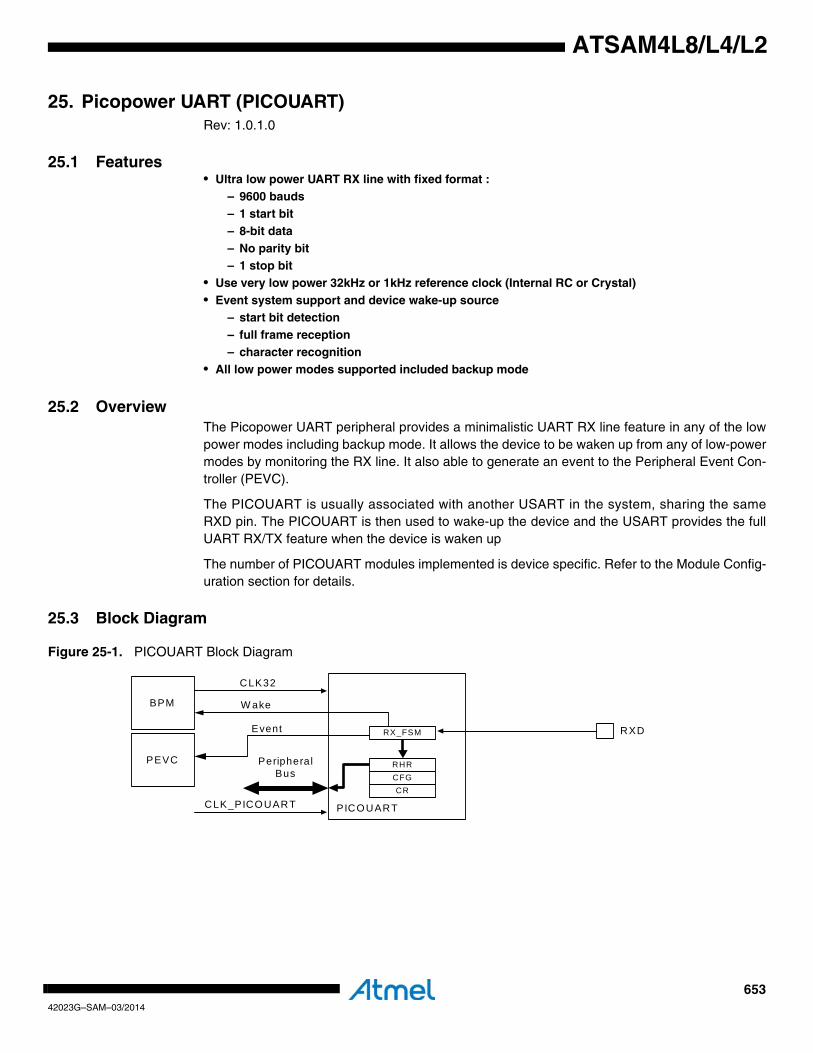
65342023G–SAM–03/2014
ATSAM4L8/L4/L2
25. Picopower UART (PICOUART)Rev: 1.0.1.0
25.1 Features• Ultra low power UART RX line with fixed format :
– 9600 bauds – 1 start bit– 8-bit data– No parity bit– 1 stop bit
• Use very low power 32kHz or 1kHz reference clock (Internal RC or Crystal)• Event system support and device wake-up source
– start bit detection– full frame reception– character recognition
• All low power modes supported included backup mode
25.2 OverviewThe Picopower UART peripheral provides a minimalistic UART RX line feature in any of the lowpower modes including backup mode. It allows the device to be waken up from any of low-powermodes by monitoring the RX line. It also able to generate an event to the Peripheral Event Con-troller (PEVC).
The PICOUART is usually associated with another USART in the system, sharing the sameRXD pin. The PICOUART is then used to wake-up the device and the USART provides the fullUART RX/TX feature when the device is waken up
The number of PICOUART modules implemented is device specific. Refer to the Module Config-uration section for details.
25.3 Block Diagram
Figure 25-1. PICOUART Block Diagram
PICOUART
RXD
CLK32
Peripheral Bus
RHR
RX_FSM
W akeBPM
CFGCR
CLK_PICOUART
PEVC
Event
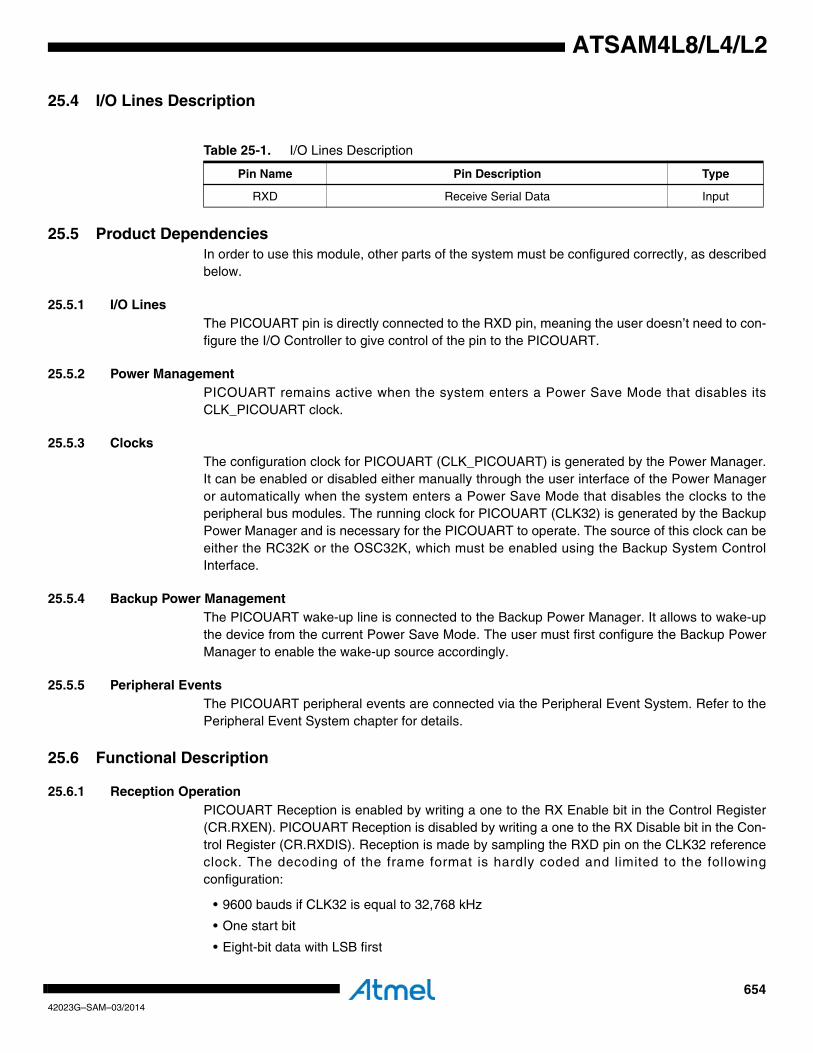
65442023G–SAM–03/2014
ATSAM4L8/L4/L2
25.4 I/O Lines Description
25.5 Product DependenciesIn order to use this module, other parts of the system must be configured correctly, as describedbelow.
25.5.1 I/O LinesThe PICOUART pin is directly connected to the RXD pin, meaning the user doesn’t need to con-figure the I/O Controller to give control of the pin to the PICOUART.
25.5.2 Power ManagementPICOUART remains active when the system enters a Power Save Mode that disables itsCLK_PICOUART clock.
25.5.3 ClocksThe configuration clock for PICOUART (CLK_PICOUART) is generated by the Power Manager.It can be enabled or disabled either manually through the user interface of the Power Manageror automatically when the system enters a Power Save Mode that disables the clocks to theperipheral bus modules. The running clock for PICOUART (CLK32) is generated by the BackupPower Manager and is necessary for the PICOUART to operate. The source of this clock can beeither the RC32K or the OSC32K, which must be enabled using the Backup System ControlInterface.
25.5.4 Backup Power ManagementThe PICOUART wake-up line is connected to the Backup Power Manager. It allows to wake-upthe device from the current Power Save Mode. The user must first configure the Backup PowerManager to enable the wake-up source accordingly.
25.5.5 Peripheral EventsThe PICOUART peripheral events are connected via the Peripheral Event System. Refer to thePeripheral Event System chapter for details.
25.6 Functional Description
25.6.1 Reception OperationPICOUART Reception is enabled by writing a one to the RX Enable bit in the Control Register(CR.RXEN). PICOUART Reception is disabled by writing a one to the RX Disable bit in the Con-trol Register (CR.RXDIS). Reception is made by sampling the RXD pin on the CLK32 referenceclock. The decoding of the frame format is hardly coded and limited to the followingconfiguration:
• 9600 bauds if CLK32 is equal to 32,768 kHz
• One start bit
• Eight-bit data with LSB first
Table 25-1. I/O Lines Description
Pin Name Pin Description Type
RXD Receive Serial Data Input
65542023G–SAM–03/2014
ATSAM4L8/L4/L2
• One Stop bit
• No parity bit
A frame is valid when it matches exactly with this configuration. Valid received byte is extractedfrom the frame and stored in the Receive Holding Register (RHR.CDATA). When a valid databyte is stored, the Data Ready bit is set to one in the Status Register (SR.DRDY). DRDY is set tozero when a new start bit is detected.
There is no overrun detection, meaning that RHR value is valid only when DRDY is equal to one.
25.6.2 Wakeup from Power Save ModePICOUART is able to wakeup the device from any Power Save Mode including Backup Mode.The use should first enable the wakeup source by programming the Configuration register(CFG.SOURCE) and select the source action to be a wake-up by programming the Configura-tion register (CFG.ACTION) .
There are three wakeup sources:
• Start bit detection: As soon as a start bit is detected , the PICOUART wakes up the device and normal PICOUART operations are perfomed, leading to DRDY set to one if a valid frame is finally received.
• Full frame reception: when a valid frame is received, the valid received byte is stored in RHR and DRDY is set to one. Then the device is waken up
• Character recognition: when a valid frame is received, the valid received byte is stored in RHR and DRDY is set to one. If the received byte match the data stored in CFG.MATCH, then the device is waken u.p
Only one wakeup source can be enabled at a time.
25.6.3 Peripheral EventPICOUART is able to generate an event to the PEVC. The use should first enable the eventsource by programming the Configuration register (CFG.SOURCE) and select the source actionto be a wake-up by programming the Configuration register (CFG.ACTION) .
There are three event sources:
• Start bit detection: As soon as a start bit is detected , the PICOUART generates an event and normal PICOUART operations are perfomed, leading to DRDY set to one if a valid frame is finally received.
• Full frame reception: when a valid frame is received, the valid received byte is stored in RHR and DRDY is set to one. Then the event is generated.
• Character recognition: when a valid frame is received, the valid received byte is stored in RHR and DRDY is set to one. If the received byte match the data stored in CFG.MATCH, then the event is generated.
Only one even source can be enabled at a time.
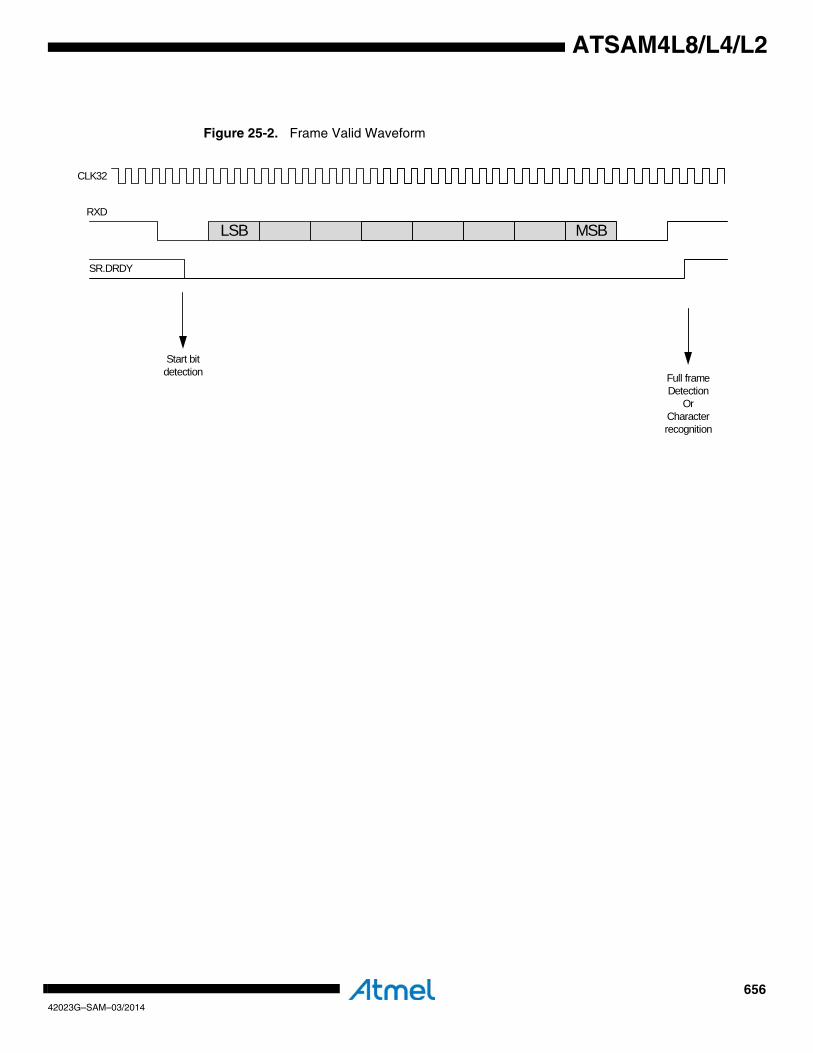
65642023G–SAM–03/2014
ATSAM4L8/L4/L2
Figure 25-2. Frame Valid Waveform
CLK32
LSB MSBRXD
Start bitdetection Full frame
DetectionOr
Character recognition
SR.DRDY
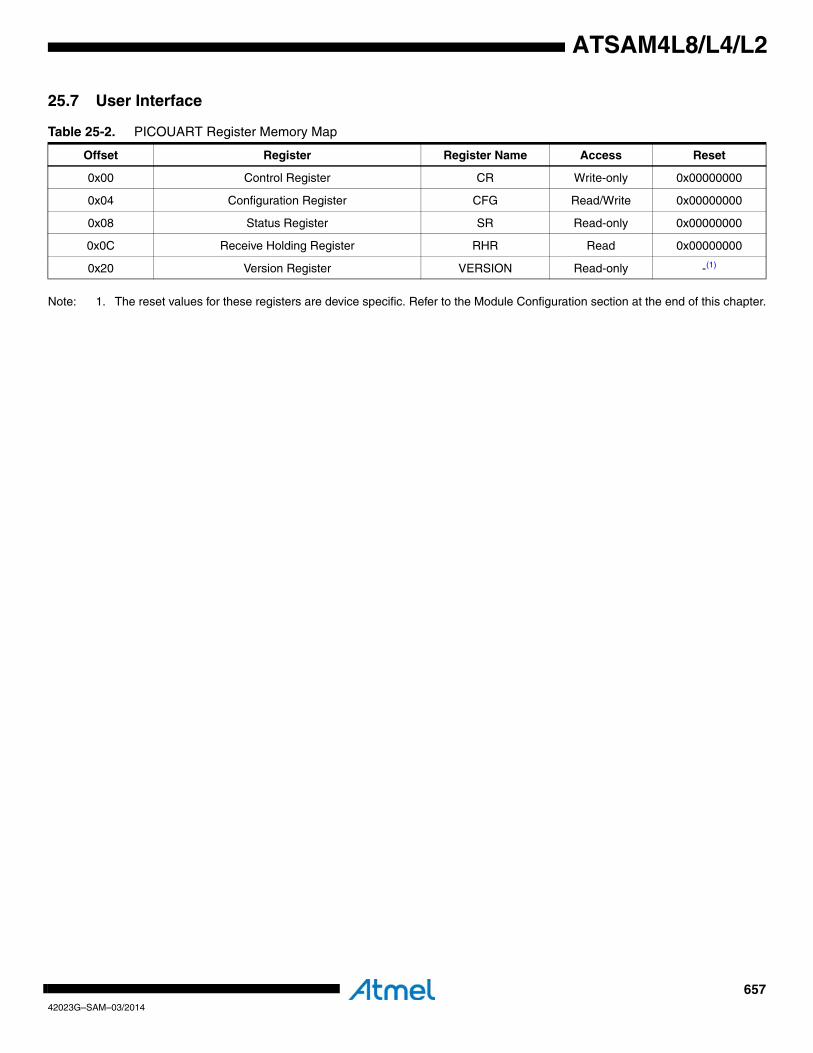
65742023G–SAM–03/2014
ATSAM4L8/L4/L2
25.7 User Interface
Note: 1. The reset values for these registers are device specific. Refer to the Module Configuration section at the end of this chapter.
Table 25-2. PICOUART Register Memory Map
Offset Register Register Name Access Reset
0x00 Control Register CR Write-only 0x00000000
0x04 Configuration Register CFG Read/Write 0x00000000
0x08 Status Register SR Read-only 0x00000000
0x0C Receive Holding Register RHR Read 0x00000000
0x20 Version Register VERSION Read-only -(1)
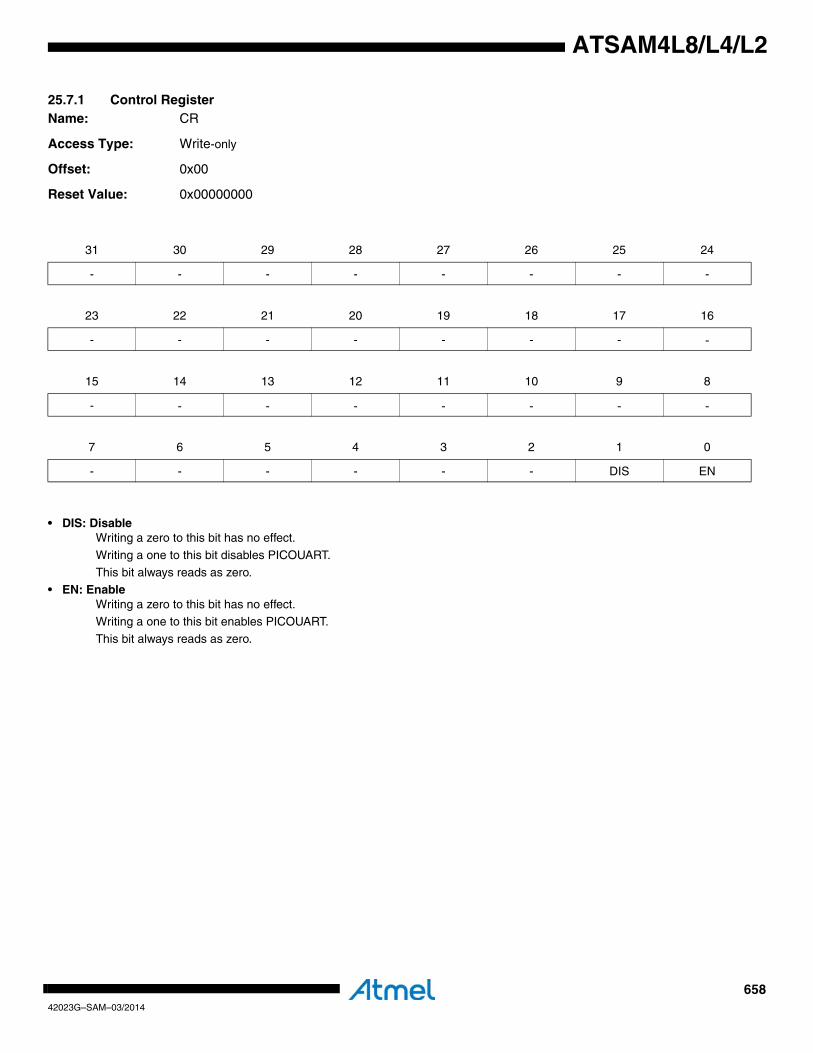
65842023G–SAM–03/2014
ATSAM4L8/L4/L2
25.7.1 Control Register Name: CR
Access Type: Write-only
Offset: 0x00
Reset Value: 0x00000000
• DIS: DisableWriting a zero to this bit has no effect.
Writing a one to this bit disables PICOUART.
This bit always reads as zero.• EN: Enable
Writing a zero to this bit has no effect.Writing a one to this bit enables PICOUART.
This bit always reads as zero.
31 30 29 28 27 26 25 24
- - - - - - - -
23 22 21 20 19 18 17 16
- - - - - - - -
15 14 13 12 11 10 9 8
- - - - - - - -
7 6 5 4 3 2 1 0
- - - - - - DIS EN

65942023G–SAM–03/2014
ATSAM4L8/L4/L2
25.7.2 Configuration Register Name: CFG
Access Type: Read/Write
Offset: 0x04
Reset Value: 0x00000000
To avoid unexpected behavior CFG must be written when PICOUART is disabled.
• MATCH: Data MatchData used in characterer recognition, only used when SOURCE = 11.
• ACTION: Action to performAction to perform when SOURCE is not equal to 00.
0: Wakeup the device.
1: Generate an event.• SOURCE: Source Enable Mode
31 30 29 28 27 26 25 24
- - - - - - - -
23 22 21 20 19 18 17 16
- - - - - - - -
15 14 13 12 11 10 9 8
MATCH
7 6 5 4 3 2 1 0
- - - - - ACTION SOURCE
SOURCE Mode
0 0 Wake up and event disable
0 1 Wake up or event enable on start bit detection
1 0 Wake up or event enable on full frame reception
1 1 Wake up or event enable on character recognition
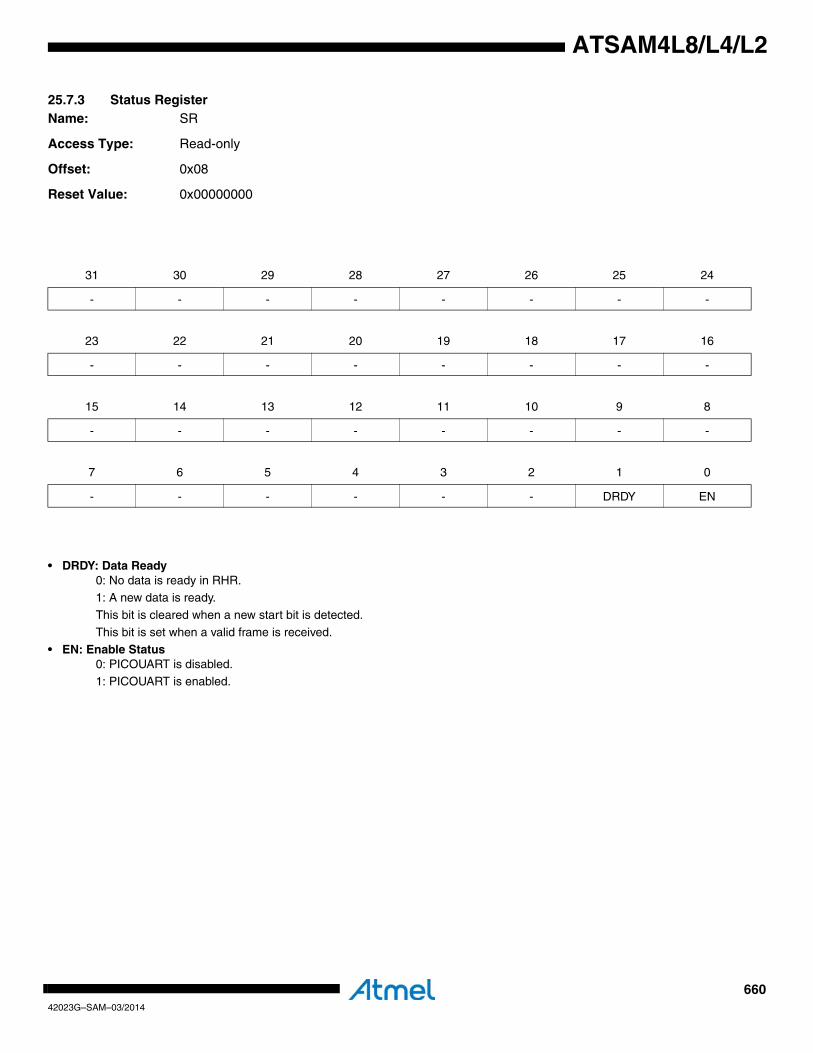
66042023G–SAM–03/2014
ATSAM4L8/L4/L2
25.7.3 Status Register Name: SR
Access Type: Read-only
Offset: 0x08
Reset Value: 0x00000000
• DRDY: Data Ready0: No data is ready in RHR.1: A new data is ready.
This bit is cleared when a new start bit is detected.
This bit is set when a valid frame is received.• EN: Enable Status
0: PICOUART is disabled.1: PICOUART is enabled.
31 30 29 28 27 26 25 24
- - - - - - - -
23 22 21 20 19 18 17 16
- - - - - - - -
15 14 13 12 11 10 9 8
- - - - - - - -
7 6 5 4 3 2 1 0
- - - - - - DRDY EN
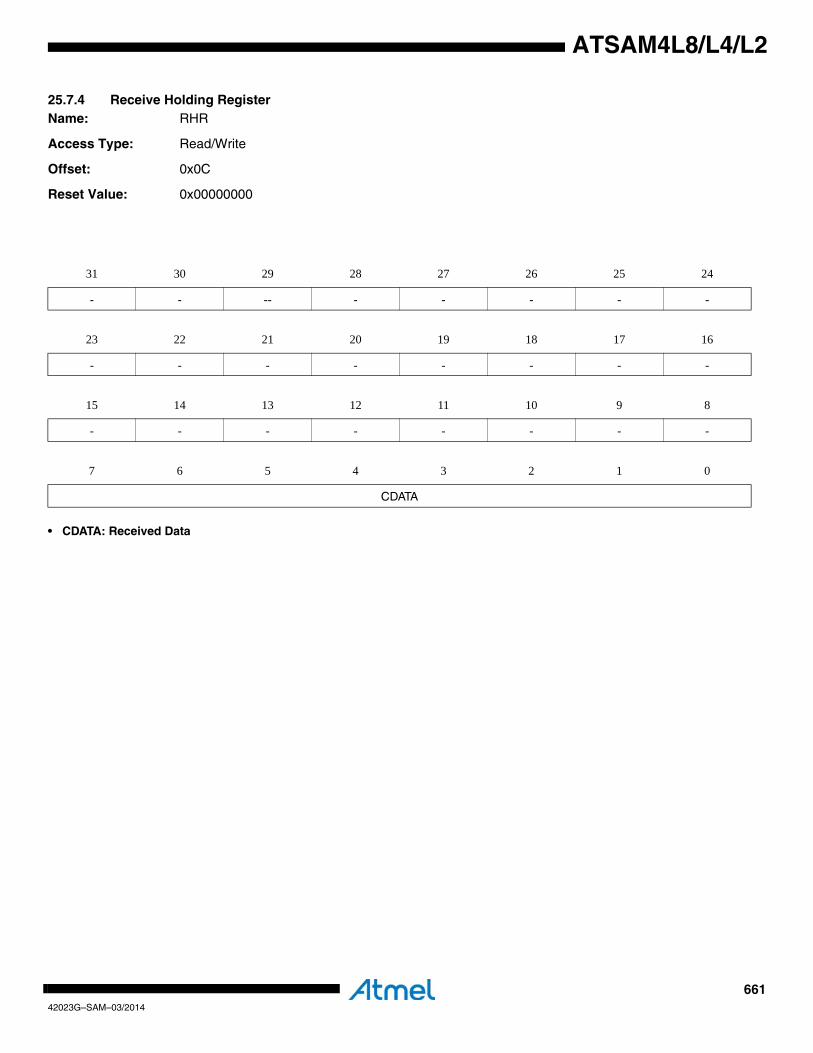
66142023G–SAM–03/2014
ATSAM4L8/L4/L2
25.7.4 Receive Holding Register Name: RHR
Access Type: Read/Write
Offset: 0x0C
Reset Value: 0x00000000
• CDATA: Received Data
31 30 29 28 27 26 25 24
- - -- - - - - -
23 22 21 20 19 18 17 16
- - - - - - - -
15 14 13 12 11 10 9 8
- - - - - - - -
7 6 5 4 3 2 1 0
CDATA

66242023G–SAM–03/2014
ATSAM4L8/L4/L2
25.7.5 Version RegisterName: VERSION
Access Type: Read-only
Offset: 0x20
Reset Value: -
• VARIANT: Variant NumberReserved. No functionality associated.
• VERSION: Version NumberVersion number of the module. No functionality associated.
31 30 29 28 27 26 25 24
- - - - - - - -
23 22 21 20 19 18 17 16
- - - - VARIANT
15 14 13 12 11 10 9 8
- - - - VERSION[11:8]
7 6 5 4 3 2 1 0
VERSION[7:0]
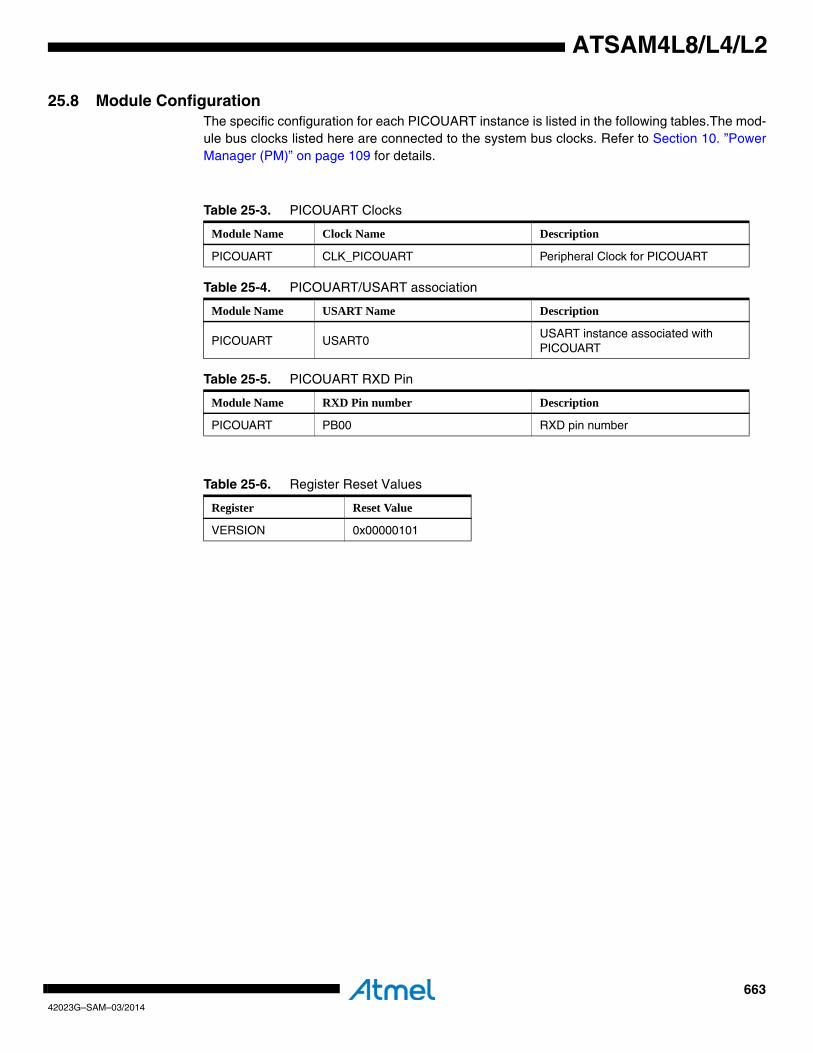
66342023G–SAM–03/2014
ATSAM4L8/L4/L2
25.8 Module ConfigurationThe specific configuration for each PICOUART instance is listed in the following tables.The mod-ule bus clocks listed here are connected to the system bus clocks. Refer to Section 10. ”PowerManager (PM)” on page 109 for details.
Table 25-3. PICOUART Clocks
Module Name Clock Name Description
PICOUART CLK_PICOUART Peripheral Clock for PICOUART
Table 25-4. PICOUART/USART association
Module Name USART Name Description
PICOUART USART0USART instance associated with PICOUART
Table 25-5. PICOUART RXD Pin
Module Name RXD Pin number Description
PICOUART PB00 RXD pin number
Table 25-6. Register Reset Values
Register Reset Value
VERSION 0x00000101
66442023G–SAM–03/2014
ATSAM4L8/L4/L2
26. Serial Peripheral Interface (SPI)Rev: 2.1.1.3
26.1 Features• Compatible with an embedded 32-bit microcontroller • Supports communication with serial external devices
– Four chip selects with external decoder support allow communication with up to 15 peripherals
– Serial memories, such as DataFlash and 3-wire EEPROMs– Serial peripherals, such as ADCs, DACs, LCD controllers, CAN controllers and Sensors– External co-processors
• Master or Slave Serial Peripheral Bus Interface– 4 - to 16-bit programmable data length per chip select– Programmable phase and polarity per chip select– Programmable transfer delays between consecutive transfers and between clock and data
per chip select– Programmable delay between consecutive transfers– Selectable mode fault detection
• Connection to Peripheral DMA Controller channel capabilities optimizes data transfers– One channel for the receiver, one channel for the transmitter– Next buffer support– Four character FIFO in reception
26.2 OverviewThe Serial Peripheral Interface (SPI) circuit is a synchronous serial data link that provides com-munication with external devices in Master or Slave mode. It also enables communicationbetween processors if an external processor is connected to the system.
The Serial Peripheral Interface is essentially a shift register that serially transmits data bits toother SPIs. During a data transfer, one SPI system acts as the “master”' which controls the dataflow, while the other devices act as “slaves'' which have data shifted into and out by the master.Different CPUs can take turn being masters (Multiple Master Protocol opposite to Single MasterProtocol where one CPU is always the master while all of the others are always slaves) and onemaster may simultaneously shift data into multiple slaves. However, only one slave may drive itsoutput to write data back to the master at any given time.
A slave device is selected when the master asserts its NSS signal. If multiple slave devicesexist, the master generates a separate slave select signal for each slave (NPCS).
The SPI system consists of two data lines and two control lines:
• Master Out Slave In (MOSI): this data line supplies the output data from the master shifted into the input(s) of the slave(s).
• Master In Slave Out (MISO): this data line supplies the output data from a slave to the input of the master. There may be no more than one slave transmitting data during any particular transfer.
• Serial Clock (SPCK): this control line is driven by the master and regulates the flow of the data bits. The master may transmit data at a variety of baud rates; the SPCK line cycles once for each bit that is transmitted.
• Slave Select (NSS): this control line allows slaves to be turned on and off by hardware.
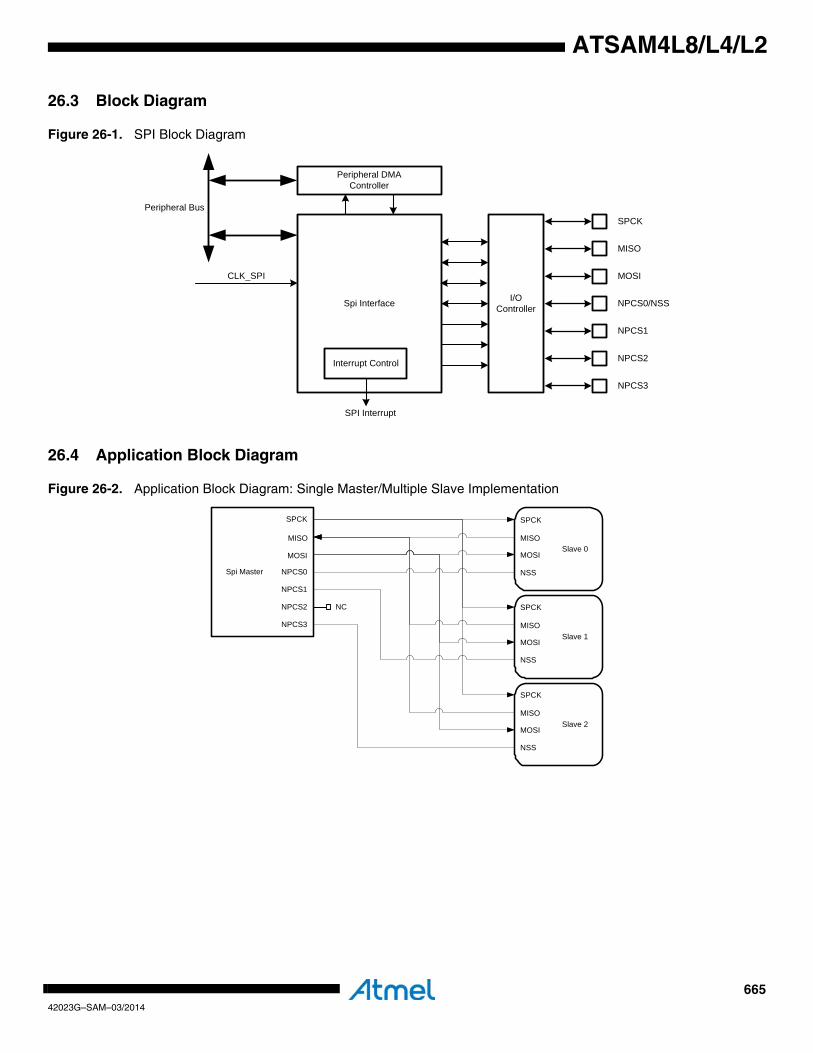
66542023G–SAM–03/2014
ATSAM4L8/L4/L2
26.3 Block Diagram
Figure 26-1. SPI Block Diagram
26.4 Application Block Diagram
Figure 26-2. Application Block Diagram: Single Master/Multiple Slave Implementation
Spi Interface
Interrupt Control
Peripheral DMAController
I/OController
CLK_SPI
Peripheral Bus
SPI Interrupt
SPCK
NPCS3
NPCS2
NPCS1
NPCS0/NSS
MOSI
MISO
Slave 0
Slave 2
Slave 1
SPCK
NPCS3
NPCS2
NPCS1
NPCS0
MOSI
MISO
Spi Master
SPCK
NSS
MOSI
MISO
SPCK
NSS
MOSI
MISO
SPCK
NSS
MOSI
MISO
NC
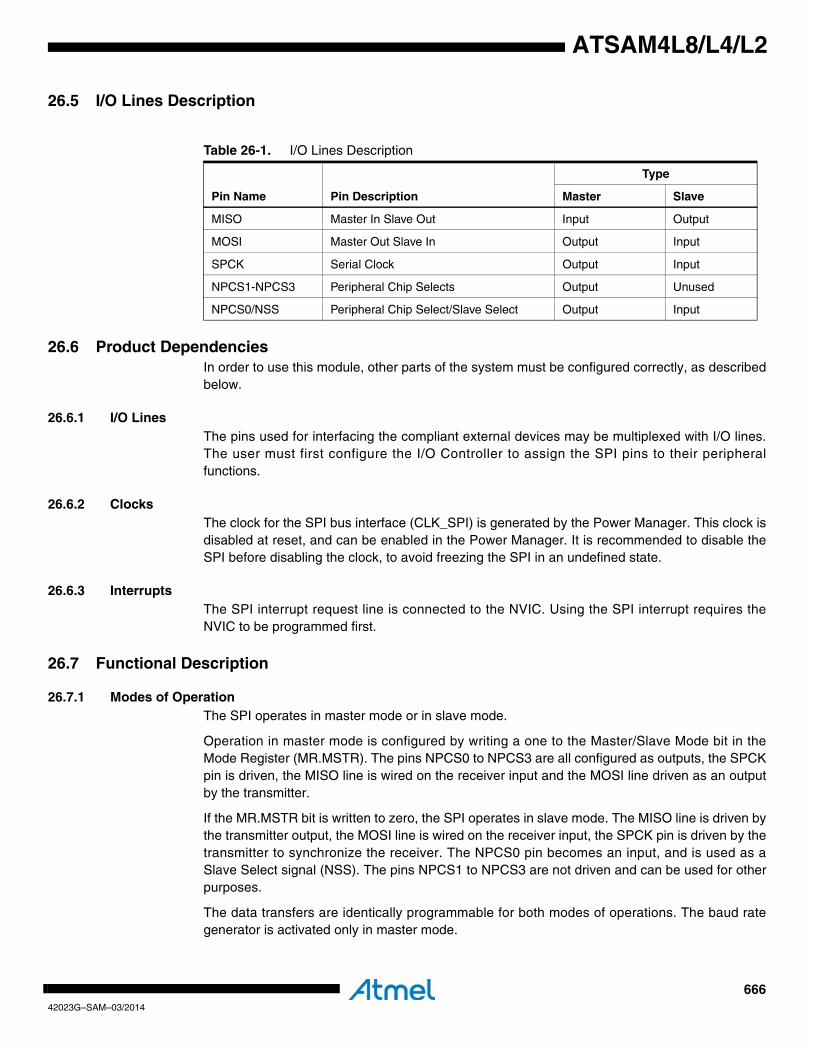
66642023G–SAM–03/2014
ATSAM4L8/L4/L2
26.5 I/O Lines Description
26.6 Product DependenciesIn order to use this module, other parts of the system must be configured correctly, as describedbelow.
26.6.1 I/O LinesThe pins used for interfacing the compliant external devices may be multiplexed with I/O lines.The user must first configure the I/O Controller to assign the SPI pins to their peripheralfunctions.
26.6.2 ClocksThe clock for the SPI bus interface (CLK_SPI) is generated by the Power Manager. This clock isdisabled at reset, and can be enabled in the Power Manager. It is recommended to disable theSPI before disabling the clock, to avoid freezing the SPI in an undefined state.
26.6.3 InterruptsThe SPI interrupt request line is connected to the NVIC. Using the SPI interrupt requires theNVIC to be programmed first.
26.7 Functional Description
26.7.1 Modes of OperationThe SPI operates in master mode or in slave mode.
Operation in master mode is configured by writing a one to the Master/Slave Mode bit in theMode Register (MR.MSTR). The pins NPCS0 to NPCS3 are all configured as outputs, the SPCKpin is driven, the MISO line is wired on the receiver input and the MOSI line driven as an outputby the transmitter.
If the MR.MSTR bit is written to zero, the SPI operates in slave mode. The MISO line is driven bythe transmitter output, the MOSI line is wired on the receiver input, the SPCK pin is driven by thetransmitter to synchronize the receiver. The NPCS0 pin becomes an input, and is used as aSlave Select signal (NSS). The pins NPCS1 to NPCS3 are not driven and can be used for otherpurposes.
The data transfers are identically programmable for both modes of operations. The baud rategenerator is activated only in master mode.
Table 26-1. I/O Lines Description
Pin Name Pin Description
Type
Master Slave
MISO Master In Slave Out Input Output
MOSI Master Out Slave In Output Input
SPCK Serial Clock Output Input
NPCS1-NPCS3 Peripheral Chip Selects Output Unused
NPCS0/NSS Peripheral Chip Select/Slave Select Output Input
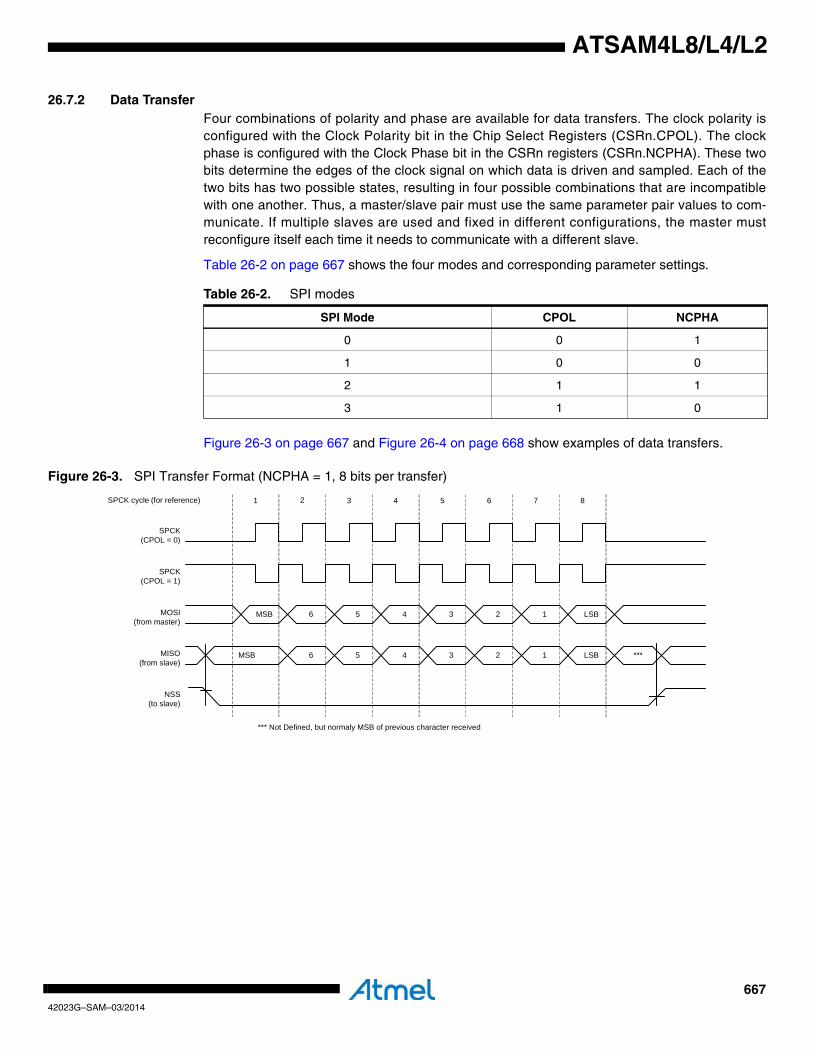
66742023G–SAM–03/2014
ATSAM4L8/L4/L2
26.7.2 Data TransferFour combinations of polarity and phase are available for data transfers. The clock polarity isconfigured with the Clock Polarity bit in the Chip Select Registers (CSRn.CPOL). The clockphase is configured with the Clock Phase bit in the CSRn registers (CSRn.NCPHA). These twobits determine the edges of the clock signal on which data is driven and sampled. Each of thetwo bits has two possible states, resulting in four possible combinations that are incompatiblewith one another. Thus, a master/slave pair must use the same parameter pair values to com-municate. If multiple slaves are used and fixed in different configurations, the master mustreconfigure itself each time it needs to communicate with a different slave.
Table 26-2 on page 667 shows the four modes and corresponding parameter settings.
Figure 26-3 on page 667 and Figure 26-4 on page 668 show examples of data transfers.
Figure 26-3. SPI Transfer Format (NCPHA = 1, 8 bits per transfer)
Table 26-2. SPI modes
SPI Mode CPOL NCPHA
0 0 1
1 0 0
2 1 1
3 1 0
1 432 5 876SPCK cycle (for reference)
SPCK(CPOL = 0)
NSS(to slave)
MISO(from slave)
MOSI(from master)
SPCK(CPOL = 1)
MSB 6 45 LSB123
MSB 6 ***LSB12345
*** Not Defined, but normaly MSB of previous character received
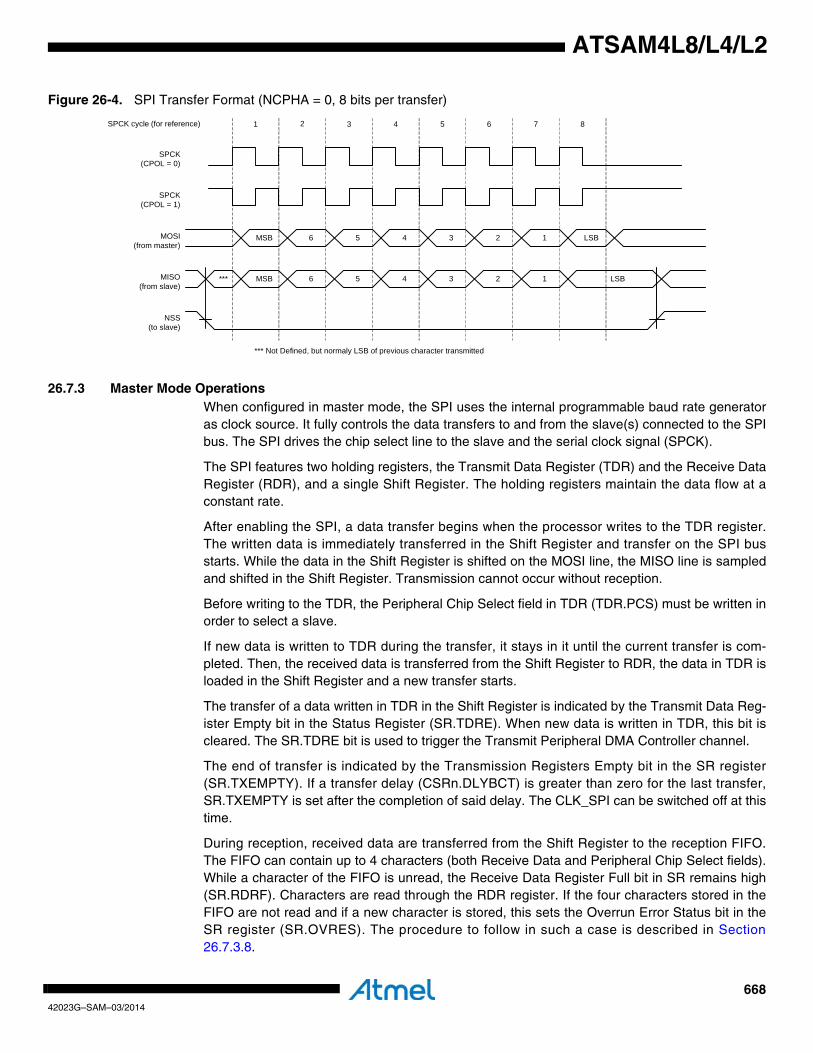
66842023G–SAM–03/2014
ATSAM4L8/L4/L2
Figure 26-4. SPI Transfer Format (NCPHA = 0, 8 bits per transfer)
26.7.3 Master Mode OperationsWhen configured in master mode, the SPI uses the internal programmable baud rate generatoras clock source. It fully controls the data transfers to and from the slave(s) connected to the SPIbus. The SPI drives the chip select line to the slave and the serial clock signal (SPCK).
The SPI features two holding registers, the Transmit Data Register (TDR) and the Receive DataRegister (RDR), and a single Shift Register. The holding registers maintain the data flow at aconstant rate.
After enabling the SPI, a data transfer begins when the processor writes to the TDR register.The written data is immediately transferred in the Shift Register and transfer on the SPI busstarts. While the data in the Shift Register is shifted on the MOSI line, the MISO line is sampledand shifted in the Shift Register. Transmission cannot occur without reception.
Before writing to the TDR, the Peripheral Chip Select field in TDR (TDR.PCS) must be written inorder to select a slave.
If new data is written to TDR during the transfer, it stays in it until the current transfer is com-pleted. Then, the received data is transferred from the Shift Register to RDR, the data in TDR isloaded in the Shift Register and a new transfer starts.
The transfer of a data written in TDR in the Shift Register is indicated by the Transmit Data Reg-ister Empty bit in the Status Register (SR.TDRE). When new data is written in TDR, this bit iscleared. The SR.TDRE bit is used to trigger the Transmit Peripheral DMA Controller channel.
The end of transfer is indicated by the Transmission Registers Empty bit in the SR register(SR.TXEMPTY). If a transfer delay (CSRn.DLYBCT) is greater than zero for the last transfer,SR.TXEMPTY is set after the completion of said delay. The CLK_SPI can be switched off at thistime.
During reception, received data are transferred from the Shift Register to the reception FIFO.The FIFO can contain up to 4 characters (both Receive Data and Peripheral Chip Select fields).While a character of the FIFO is unread, the Receive Data Register Full bit in SR remains high(SR.RDRF). Characters are read through the RDR register. If the four characters stored in theFIFO are not read and if a new character is stored, this sets the Overrun Error Status bit in theSR register (SR.OVRES). The procedure to follow in such a case is described in Section26.7.3.8.
1 432 5 876SPCK cycle (for reference)
SPCK(CPOL = 0)
NSS(to slave)
MISO(from slave)
MOSI(from master)
SPCK(CPOL = 1)
MSB 6 45 LSB123
6 LSB12345
*** Not Defined, but normaly LSB of previous character transmitted
MSB***
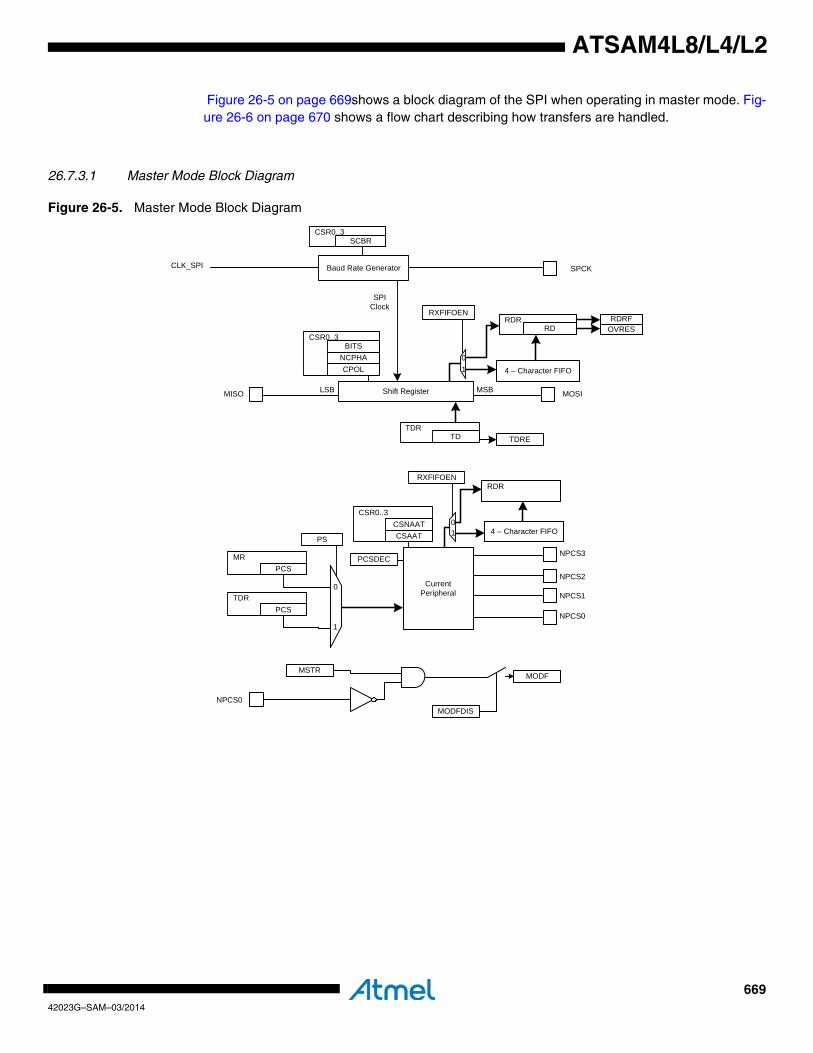
66942023G–SAM–03/2014
ATSAM4L8/L4/L2
Figure 26-5 on page 669shows a block diagram of the SPI when operating in master mode. Fig-ure 26-6 on page 670 shows a flow chart describing how transfers are handled.
26.7.3.1 Master Mode Block Diagram
Figure 26-5. Master Mode Block Diagram
Baud Rate Generator
RXFIFOEN
4 – Character FIFO
Shift Register
TDRE
RXFIFOEN
4 – Character FIFOPS
PCSDEC
Current Peripheral
MODF
MODFDIS
MSTR
SCBRCSR0..3
CSR0..3
CPOLNCPHA
BITS
RDRRD
RDRFOVRES
TDTDR
RDR
CSAATCSNAAT
CSR0..3
PCSMR
PCSTDR
SPCKCLK_SPI
MISO MOSIMSBLSB
NPCS1
NPCS2
NPCS3
NPCS0
SPI Clock
0
1
01
01
NPCS0
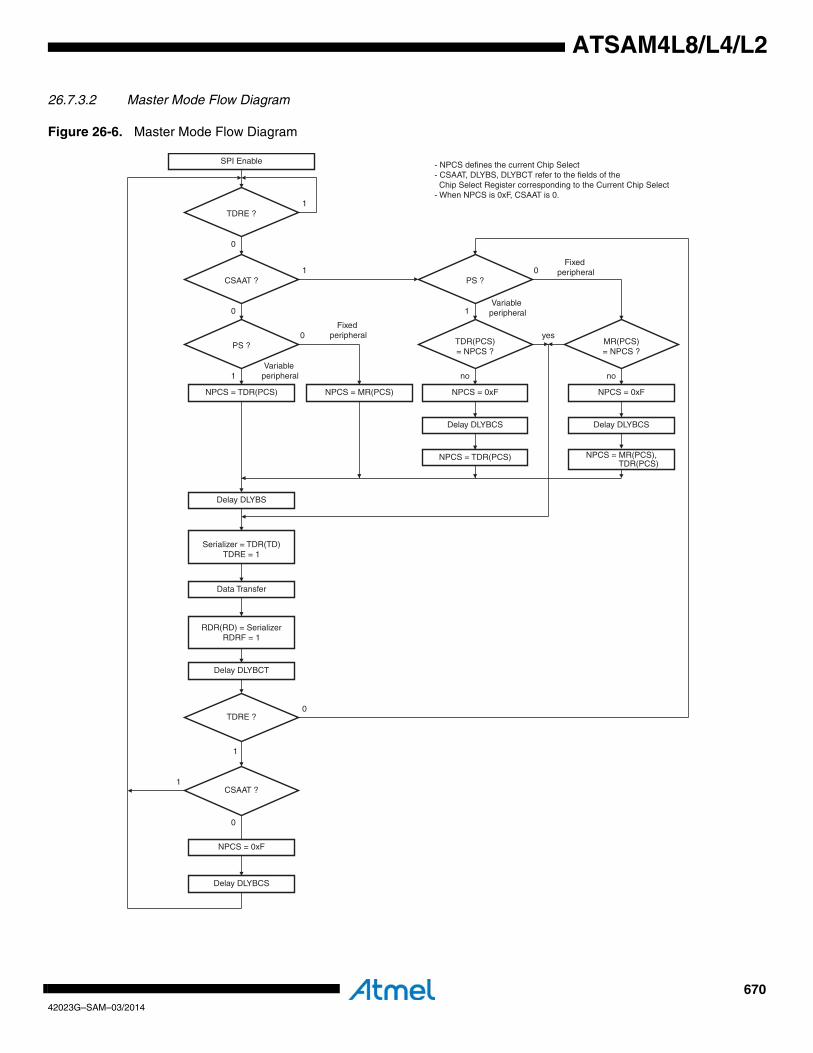
67042023G–SAM–03/2014
ATSAM4L8/L4/L2
26.7.3.2 Master Mode Flow Diagram
Figure 26-6. Master Mode Flow Diagram
SPI Enable
CSAAT ?
PS ?
1
0
0
1
1
NPCS = TDR(PCS) NPCS = MR(PCS)
Delay DLYBS
Serializer = TDR(TD)TDRE = 1
Data Transfer
RDR(RD) = SerializerRDRF = 1
TDRE ?
NPCS = 0xF
Delay DLYBCS
Fixed peripheral
Variable peripheral
Delay DLYBCT
0
1CSAAT ?
0
TDRE ?1
0
PS ?0
1
TDR(PCS)= NPCS ?
no
yesMR(PCS)= NPCS ?
no
NPCS = 0xF
Delay DLYBCS
NPCS = TDR(PCS)
NPCS = 0xF
Delay DLYBCS
NPCS = MR(PCS), TDR(PCS)
Fixed peripheral
Variable peripheral
- NPCS defines the current Chip Select- CSAAT, DLYBS, DLYBCT refer to the fields of the Chip Select Register corresponding to the Current Chip Select- When NPCS is 0xF, CSAAT is 0.
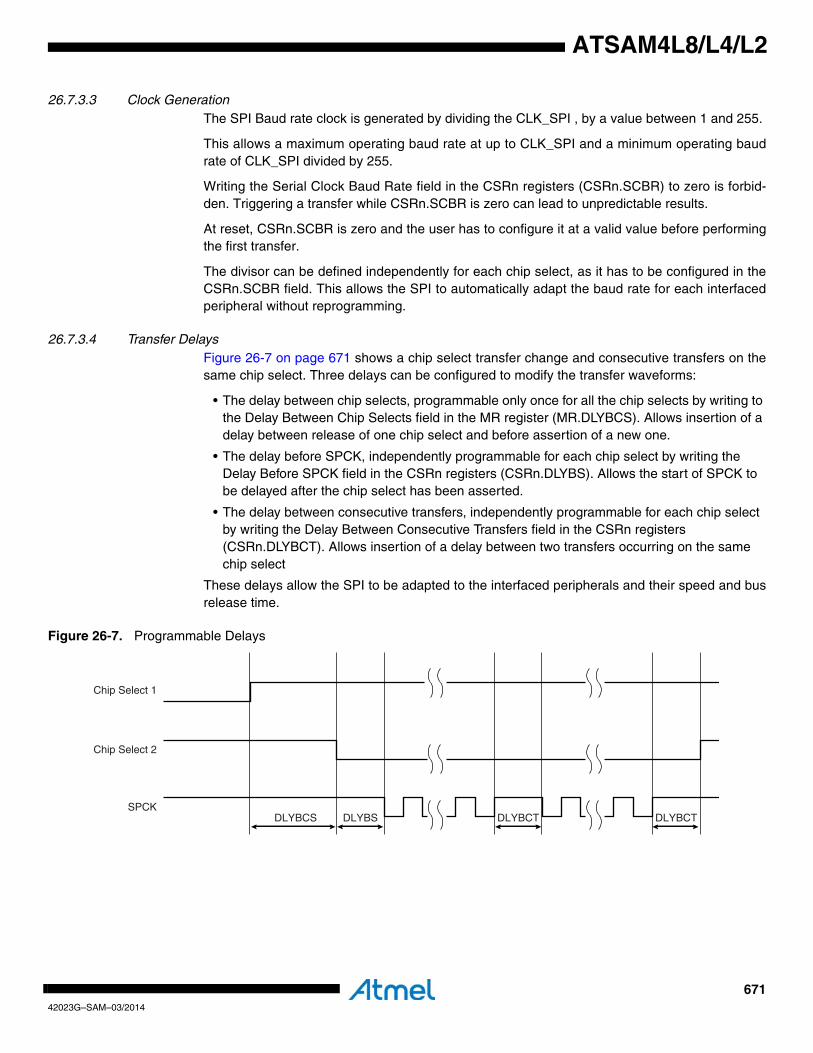
67142023G–SAM–03/2014
ATSAM4L8/L4/L2
26.7.3.3 Clock GenerationThe SPI Baud rate clock is generated by dividing the CLK_SPI , by a value between 1 and 255.
This allows a maximum operating baud rate at up to CLK_SPI and a minimum operating baudrate of CLK_SPI divided by 255.
Writing the Serial Clock Baud Rate field in the CSRn registers (CSRn.SCBR) to zero is forbid-den. Triggering a transfer while CSRn.SCBR is zero can lead to unpredictable results.
At reset, CSRn.SCBR is zero and the user has to configure it at a valid value before performingthe first transfer.
The divisor can be defined independently for each chip select, as it has to be configured in theCSRn.SCBR field. This allows the SPI to automatically adapt the baud rate for each interfacedperipheral without reprogramming.
26.7.3.4 Transfer DelaysFigure 26-7 on page 671 shows a chip select transfer change and consecutive transfers on thesame chip select. Three delays can be configured to modify the transfer waveforms:
• The delay between chip selects, programmable only once for all the chip selects by writing to the Delay Between Chip Selects field in the MR register (MR.DLYBCS). Allows insertion of a delay between release of one chip select and before assertion of a new one.
• The delay before SPCK, independently programmable for each chip select by writing the Delay Before SPCK field in the CSRn registers (CSRn.DLYBS). Allows the start of SPCK to be delayed after the chip select has been asserted.
• The delay between consecutive transfers, independently programmable for each chip select by writing the Delay Between Consecutive Transfers field in the CSRn registers (CSRn.DLYBCT). Allows insertion of a delay between two transfers occurring on the same chip select
These delays allow the SPI to be adapted to the interfaced peripherals and their speed and busrelease time.
Figure 26-7. Programmable Delays
DLYBCS DLYBS DLYBCT DLYBCT
Chip Select 1
Chip Select 2
SPCK
67242023G–SAM–03/2014
ATSAM4L8/L4/L2
26.7.3.5 Peripheral SelectionThe serial peripherals are selected through the assertion of the NPCS0 to NPCS3 signals. Bydefault, all the NPCS signals are high before and after each transfer.
The peripheral selection can be performed in two different ways:
• Fixed Peripheral Select: SPI exchanges data with only one peripheral
• Variable Peripheral Select: Data can be exchanged with more than one peripheral
Fixed Peripheral Select is activated by writing a zero to the Peripheral Select bit in MR (MR.PS).In this case, the current peripheral is defined by the MR.PCS field and the TDR.PCS field has noeffect.
Variable Peripheral Select is activated by writing a one to the MR.PS bit . The TDR.PCS field isused to select the current peripheral. This means that the peripheral selection can be defined foreach new data.
The Fixed Peripheral Selection allows buffer transfers with a single peripheral. Using the Periph-eral DMA Controller is an optimal means, as the size of the data transfer between the memoryand the SPI is either 4 bits or 16 bits. However, changing the peripheral selection requires theMode Register to be reprogrammed.
The Variable Peripheral Selection allows buffer transfers with multiple peripherals without repro-gramming the MR register. Data written to TDR is 32-bits wide and defines the real data to betransmitted and the peripheral it is destined to. Using the Peripheral DMA Controller in this moderequires 32-bit wide buffers, with the data in the LSBs and the PCS and LASTXFER fields in theMSBs, however the SPI still controls the number of bits (8 to16) to be transferred through MISOand MOSI lines with the CSRn registers. This is not the optimal means in term of memory sizefor the buffers, but it provides a very effective means to exchange data with several peripheralswithout any intervention of the processor.
26.7.3.6 Peripheral Chip Select DecodingThe user can configure the SPI to operate with up to 15 peripherals by decoding the four ChipSelect lines, NPCS0 to NPCS3 with an external logic. This can be enabled by writing a one tothe Chip Select Decode bit in the MR register (MR.PCSDEC).
When operating without decoding, the SPI makes sure that in any case only one chip select lineis activated, i.e. driven low at a time. If two bits are defined low in a PCS field, only the lowestnumbered chip select is driven low.
When operating with decoding, the SPI directly outputs the value defined by the PCS field ofeither the MR register or the TDR register (depending on PS).
As the SPI sets a default value of 0xF on the chip select lines (i.e. all chip select lines at one)when not processing any transfer, only 15 peripherals can be decoded.
The SPI has only four Chip Select Registers, not 15. As a result, when decoding is activated,each chip select defines the characteristics of up to four peripherals. As an example, the CRS0register defines the characteristics of the externally decoded peripherals 0 to 3, corresponding tothe PCS values 0x0 to 0x3. Thus, the user has to make sure to connect compatible peripheralson the decoded chip select lines 0 to 3, 4 to 7, 8 to 11 and 12 to 14.
26.7.3.7 Peripheral DeselectionWhen operating normally, as soon as the transfer of the last data written in TDR is completed,the NPCS lines all rise. This might lead to runtime error if the processor is too long in responding
67342023G–SAM–03/2014
ATSAM4L8/L4/L2
to an interrupt, and thus might lead to difficulties for interfacing with some serial peripheralsrequiring the chip select line to remain active during a full set of transfers.
To facilitate interfacing with such devices, the CSRn registers can be configured with the ChipSelect Active After Transfer bit written to one (CSRn.CSAAT) . This allows the chip select linesto remain in their current state (low = active) until transfer to another peripheral is required.
When the CSRn.CSAAT bit is written to qero, the NPCS does not rise in all cases between twotransfers on the same peripheral. During a transfer on a Chip Select, the SR.TDRE bit rises assoon as the content of the TDR is transferred into the internal shifter. When this bit is detectedthe TDR can be reloaded. If this reload occurs before the end of the current transfer and if thenext transfer is performed on the same chip select as the current transfer, the Chip Select is notde-asserted between the two transfers. This might lead to difficulties for interfacing with someserial peripherals requiring the chip select to be de-asserted after each transfer. To facilitateinterfacing with such devices, the CSRn registers can be configured with the Chip Select NotActive After Transfer bit (CSRn.CSNAAT) written to one. This allows to de-assert systematicallythe chip select lines during a time DLYBCS. (The value of the CSRn.CSNAAT bit is taken intoaccount only if the CSRn.CSAAT bit is written to zero for the same Chip Select).
Figure 26-8 on page 674 shows different peripheral deselection cases and the effect of theCSRn.CSAAT and CSRn.CSNAAT bits.
26.7.3.8 FIFO ManagementA FIFO has been implemented in Reception FIFO (both in master and in slave mode), in order tobe able to store up to 4 characters without causing an overrun error. If an attempt is made tostore a fifth character, an overrun error rises. If such an event occurs, the FIFO must be flushed.There are two ways to Flush the FIFO:
• By performing four read accesses of the RDR (the data read must be ignored)
• By writing a one to the Flush Fifo Command bit in the CR register (CR.FLUSHFIFO).
After that, the SPI is able to receive new data.
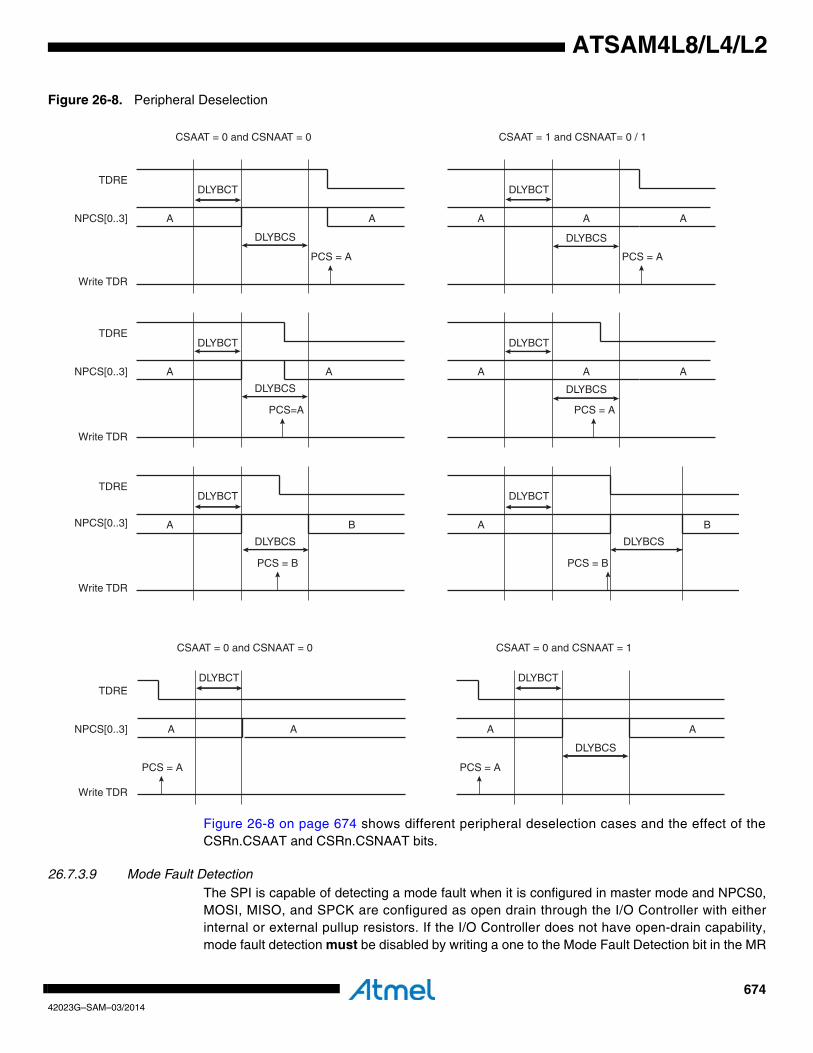
67442023G–SAM–03/2014
ATSAM4L8/L4/L2
Figure 26-8. Peripheral Deselection
Figure 26-8 on page 674 shows different peripheral deselection cases and the effect of theCSRn.CSAAT and CSRn.CSNAAT bits.
26.7.3.9 Mode Fault DetectionThe SPI is capable of detecting a mode fault when it is configured in master mode and NPCS0,MOSI, MISO, and SPCK are configured as open drain through the I/O Controller with eitherinternal or external pullup resistors. If the I/O Controller does not have open-drain capability,mode fault detection must be disabled by writing a one to the Mode Fault Detection bit in the MR
A
NPCS[0..3]
Write TDR
TDRE
NPCS[0..3]
Write TDR
TDRE
NPCS[0..3]
Write TDR
TDRE
DLYBCS
PCS = A
DLYBCS
DLYBCT
A
PCS = B
B
DLYBCS
PCS = A
DLYBCS
DLYBCT
A
PCS = B
B
DLYBCS
DLYBCT
PCS=A
A
DLYBCS
DLYBCT
A
PCS = A
AA
DLYBCT
A A
CSAAT = 0 and CSNAAT = 0
DLYBCT
A A
CSAAT = 1 and CSNAAT= 0 / 1
A
DLYBCS
PCS = A
DLYBCT
A A
CSAAT = 0 and CSNAAT = 1
NPCS[0..3]
Write TDR
TDRE
PCS = A
DLYBCT
A A
CSAAT = 0 and CSNAAT = 0
67542023G–SAM–03/2014
ATSAM4L8/L4/L2
register (MR.MODFDIS). In systems with open-drain I/O lines, a mode fault is detected when alow level is driven by an external master on the NPCS0/NSS signal.
When a mode fault is detected, the Mode Fault Error bit in the SR (SR.MODF) is set until the SRis read and the SPI is automatically disabled until re-enabled by writing a one to the SPI Enablebit in the CR register (CR.SPIEN).
By default, the mode fault detection circuitry is enabled. The user can disable mode fault detec-tion by writing a one to the Mode Fault Detection bit in the MR register (MR.MODFDIS).
26.7.4 SPI Slave ModeWhen operating in slave mode, the SPI processes data bits on the clock provided on the SPIclock pin (SPCK).
The SPI waits for NSS to go active before receiving the serial clock from an external master.When NSS falls, the clock is validated on the serializer, which processes the number of bitsdefined by the Bits Per Transfer field of the Chip Select Register 0 (CSR0.BITS). These bits areprocessed following a phase and a polarity defined respectively by the CSR0.NCPHA andCSR0.CPOL bits. Note that the BITS, CPOL, and NCPHA bits of the other Chip Select Registershave no effect when the SPI is configured in Slave Mode.
The bits are shifted out on the MISO line and sampled on the MOSI line.
When all the bits are processed, the received data is transferred in the Receive Data Registerand the SR.RDRF bit rises. If the RDR register has not been read before new data is received,the SR.OVRES bit is set. Data is loaded in RDR even if this flag is set. The user has to read theSR register to clear the SR.OVRES bit.
When a transfer starts, the data shifted out is the data present in the Shift Register. If no datahas been written in the TDR register, the last data received is transferred. If no data has beenreceived since the last reset, all bits are transmitted low, as the Shift Register resets to zero.
When a first data is written in TDR, it is transferred immediately in the Shift Register and theSR.TDRE bit rises. If new data is written, it remains in TDR until a transfer occurs, i.e. NSS fallsand there is a valid clock on the SPCK pin. When the transfer occurs, the last data written inTDR is transferred in the Shift Register and the SR.TDRE bit rises. This enables frequentupdates of critical variables with single transfers.
Then, a new data is loaded in the Shift Register from the TDR. In case no character is ready tobe transmitted, i.e. no character has been written in TDR since the last load from TDR to theShift Register, the Shift Register is not modified and the last received character is retransmitted.In this case the Underrun Error Status bit is set in SR (SR.UNDES).
Figure 26-9 on page 676 shows a block diagram of the SPI when operating in slave mode.
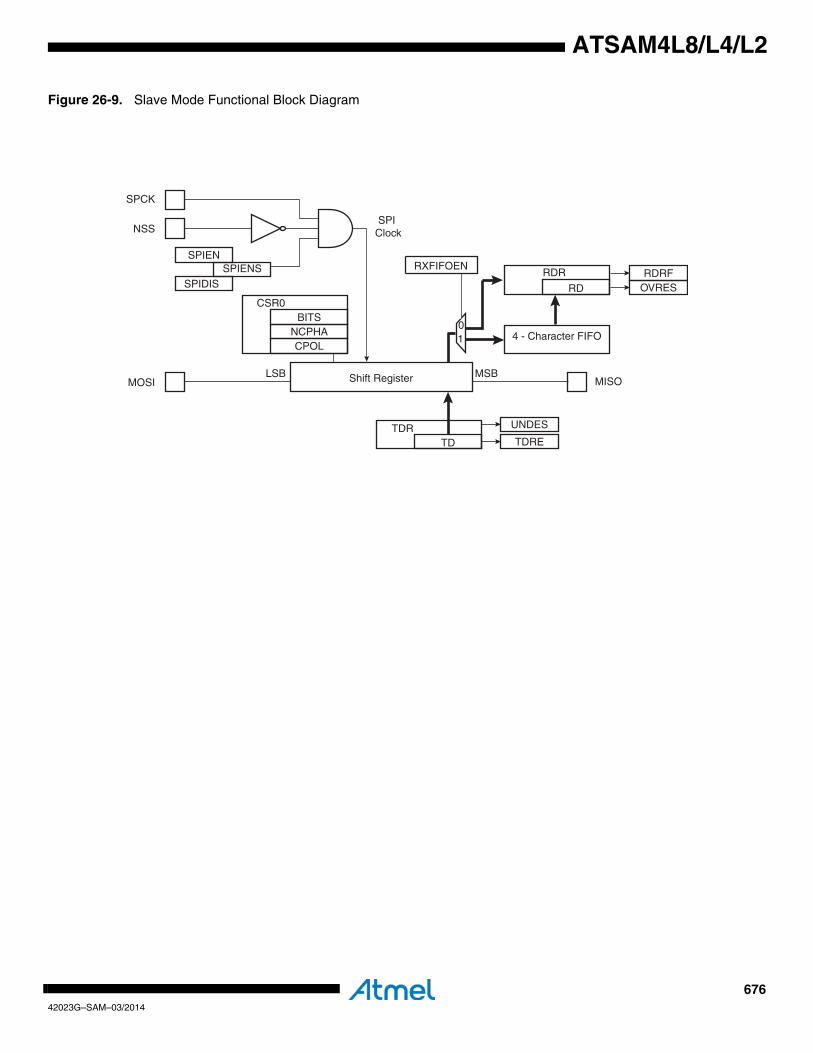
67642023G–SAM–03/2014
ATSAM4L8/L4/L2
Figure 26-9. Slave Mode Functional Block Diagram
Shift Register
SPCK
SPIENS
LSB MSB
NSS
MOSI
SPI Clock
TDRETDR
TD
RDRFOVRES
CSR0
CPOLNCPHA
BITS
SPIEN
SPIDIS
MISO
UNDES
RDR
RD
4 - Character FIFO01
RXFIFOEN
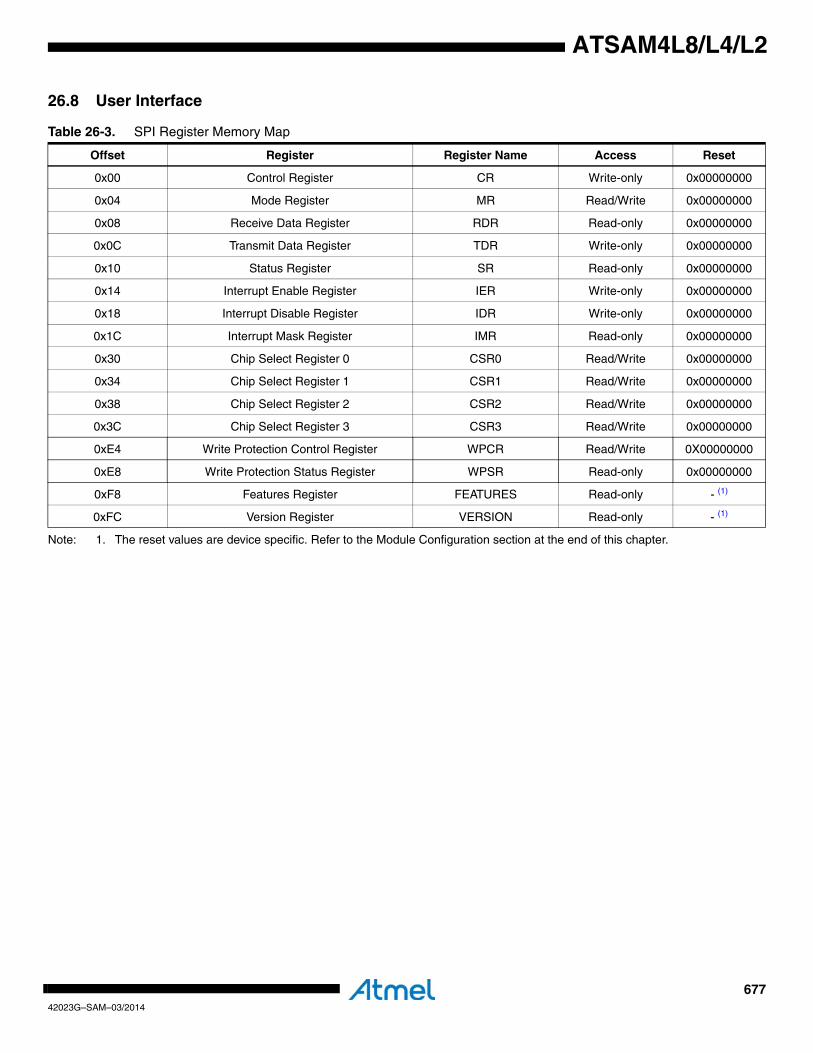
67742023G–SAM–03/2014
ATSAM4L8/L4/L2
26.8 User Interface
Note: 1. The reset values are device specific. Refer to the Module Configuration section at the end of this chapter.
Table 26-3. SPI Register Memory Map
Offset Register Register Name Access Reset
0x00 Control Register CR Write-only 0x00000000
0x04 Mode Register MR Read/Write 0x00000000
0x08 Receive Data Register RDR Read-only 0x00000000
0x0C Transmit Data Register TDR Write-only 0x00000000
0x10 Status Register SR Read-only 0x00000000
0x14 Interrupt Enable Register IER Write-only 0x00000000
0x18 Interrupt Disable Register IDR Write-only 0x00000000
0x1C Interrupt Mask Register IMR Read-only 0x00000000
0x30 Chip Select Register 0 CSR0 Read/Write 0x00000000
0x34 Chip Select Register 1 CSR1 Read/Write 0x00000000
0x38 Chip Select Register 2 CSR2 Read/Write 0x00000000
0x3C Chip Select Register 3 CSR3 Read/Write 0x00000000
0xE4 Write Protection Control Register WPCR Read/Write 0X00000000
0xE8 Write Protection Status Register WPSR Read-only 0x00000000
0xF8 Features Register FEATURES Read-only - (1)
0xFC Version Register VERSION Read-only - (1)
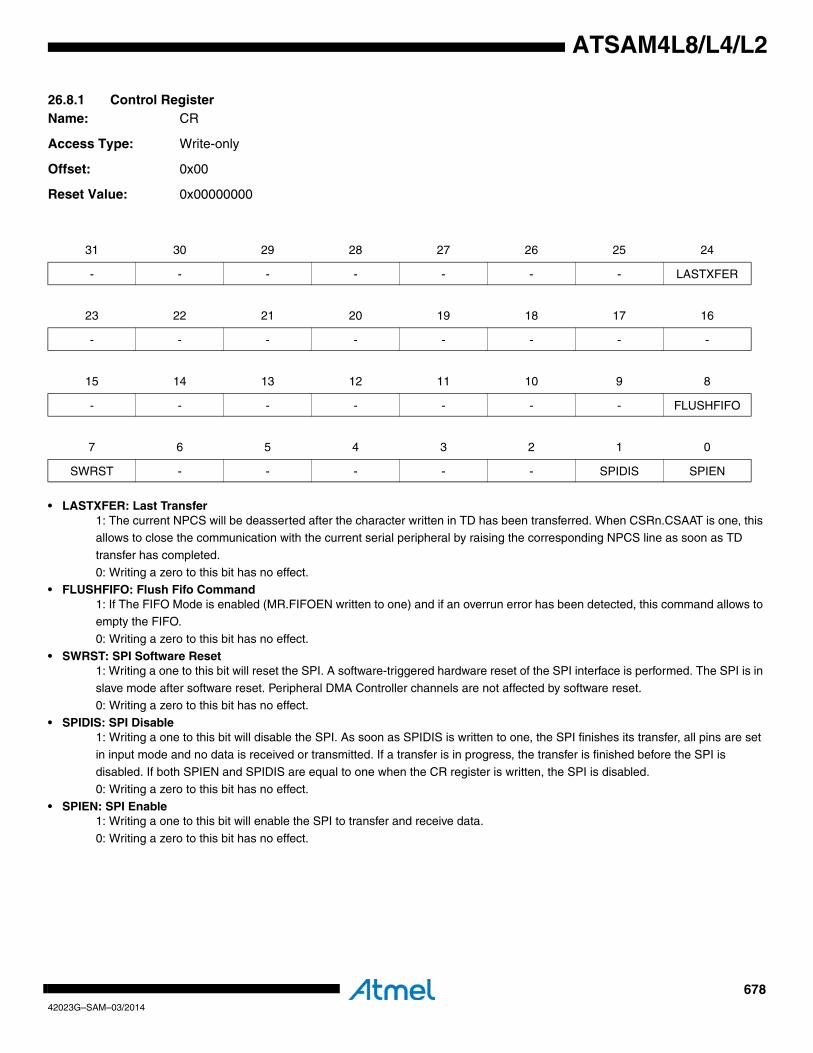
67842023G–SAM–03/2014
ATSAM4L8/L4/L2
26.8.1 Control RegisterName: CR
Access Type: Write-only
Offset: 0x00
Reset Value: 0x00000000
• LASTXFER: Last Transfer1: The current NPCS will be deasserted after the character written in TD has been transferred. When CSRn.CSAAT is one, this allows to close the communication with the current serial peripheral by raising the corresponding NPCS line as soon as TD
transfer has completed.
0: Writing a zero to this bit has no effect.• FLUSHFIFO: Flush Fifo Command
1: If The FIFO Mode is enabled (MR.FIFOEN written to one) and if an overrun error has been detected, this command allows to empty the FIFO.
0: Writing a zero to this bit has no effect.
• SWRST: SPI Software Reset1: Writing a one to this bit will reset the SPI. A software-triggered hardware reset of the SPI interface is performed. The SPI is in
slave mode after software reset. Peripheral DMA Controller channels are not affected by software reset.0: Writing a zero to this bit has no effect.
• SPIDIS: SPI Disable1: Writing a one to this bit will disable the SPI. As soon as SPIDIS is written to one, the SPI finishes its transfer, all pins are set
in input mode and no data is received or transmitted. If a transfer is in progress, the transfer is finished before the SPI is
disabled. If both SPIEN and SPIDIS are equal to one when the CR register is written, the SPI is disabled.0: Writing a zero to this bit has no effect.
• SPIEN: SPI Enable1: Writing a one to this bit will enable the SPI to transfer and receive data.
0: Writing a zero to this bit has no effect.
31 30 29 28 27 26 25 24
- - - - - - - LASTXFER
23 22 21 20 19 18 17 16
- - - - - - - -
15 14 13 12 11 10 9 8
- - - - - - - FLUSHFIFO
7 6 5 4 3 2 1 0
SWRST - - - - - SPIDIS SPIEN
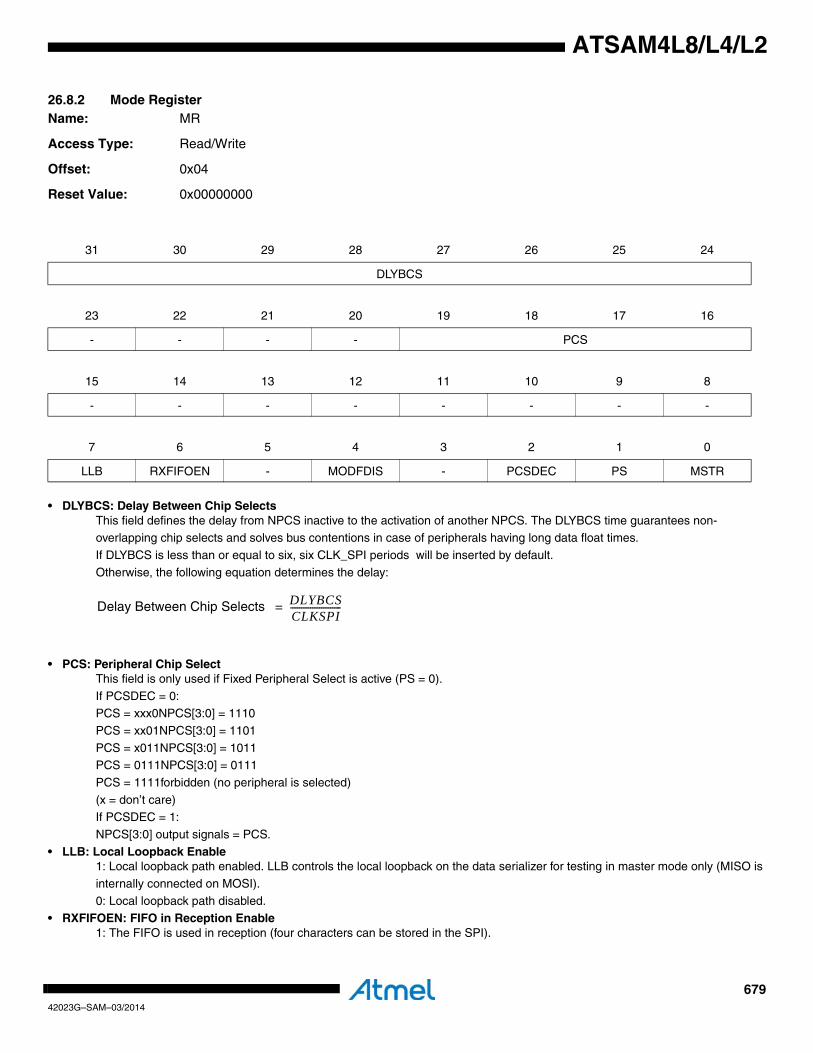
67942023G–SAM–03/2014
ATSAM4L8/L4/L2
26.8.2 Mode RegisterName: MR
Access Type: Read/Write
Offset: 0x04
Reset Value: 0x00000000
• DLYBCS: Delay Between Chip SelectsThis field defines the delay from NPCS inactive to the activation of another NPCS. The DLYBCS time guarantees non-overlapping chip selects and solves bus contentions in case of peripherals having long data float times.
If DLYBCS is less than or equal to six, six CLK_SPI periods will be inserted by default.
Otherwise, the following equation determines the delay:
• PCS: Peripheral Chip SelectThis field is only used if Fixed Peripheral Select is active (PS = 0).
If PCSDEC = 0: PCS = xxx0NPCS[3:0] = 1110
PCS = xx01NPCS[3:0] = 1101
PCS = x011NPCS[3:0] = 1011PCS = 0111NPCS[3:0] = 0111
PCS = 1111forbidden (no peripheral is selected)
(x = don’t care)If PCSDEC = 1:
NPCS[3:0] output signals = PCS.
• LLB: Local Loopback Enable1: Local loopback path enabled. LLB controls the local loopback on the data serializer for testing in master mode only (MISO is
internally connected on MOSI).
0: Local loopback path disabled.• RXFIFOEN: FIFO in Reception Enable
1: The FIFO is used in reception (four characters can be stored in the SPI).
31 30 29 28 27 26 25 24
DLYBCS
23 22 21 20 19 18 17 16
- - - - PCS
15 14 13 12 11 10 9 8
- - - - - - - -
7 6 5 4 3 2 1 0
LLB RXFIFOEN - MODFDIS - PCSDEC PS MSTR
Delay Between Chip Selects DLYBCSCLKSPI-----------------------=

68042023G–SAM–03/2014
ATSAM4L8/L4/L2
0: The FIFO is not used in reception (only one character can be stored in the SPI).• MODFDIS: Mode Fault Detection
1: Mode fault detection is disabled. If the I/O controller does not have open-drain capability, mode fault detection must be disabled for proper operation of the SPI.
0: Mode fault detection is enabled.
• PCSDEC: Chip Select Decode0: The chip selects are directly connected to a peripheral device.
1: The four chip select lines are connected to a 4- to 16-bit decoder.
When PCSDEC equals one, up to 15 Chip Select signals can be generated with the four lines using an external 4- to 16-bit decoder. The CSRn registers define the characteristics of the 15 chip selects according to the following rules:
CSR0 defines peripheral chip select signals 0 to 3.
CSR1 defines peripheral chip select signals 4 to 7.CSR2 defines peripheral chip select signals 8 to 11.
CSR3 defines peripheral chip select signals 12 to 14.
• PS: Peripheral Select1: Variable Peripheral Select.
0: Fixed Peripheral Select.• MSTR: Master/Slave Mode
1: SPI is in master mode.0: SPI is in slave mode.
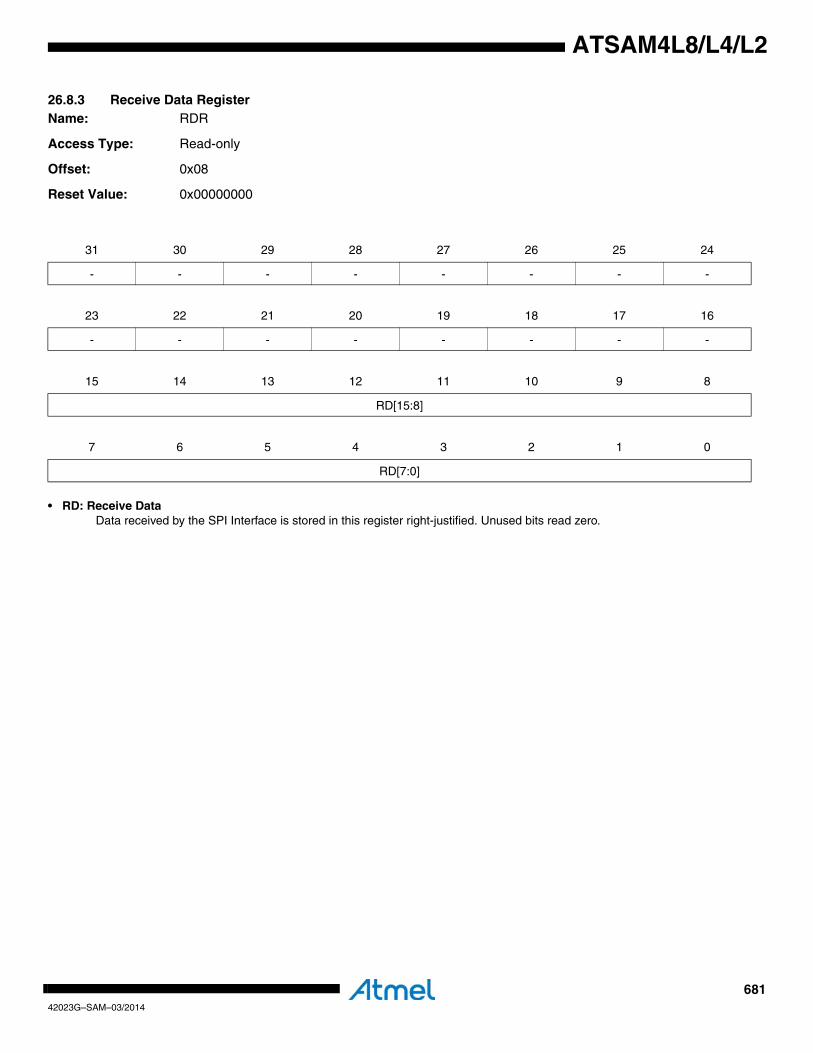
68142023G–SAM–03/2014
ATSAM4L8/L4/L2
26.8.3 Receive Data RegisterName: RDR
Access Type: Read-only
Offset: 0x08
Reset Value: 0x00000000
• RD: Receive DataData received by the SPI Interface is stored in this register right-justified. Unused bits read zero.
31 30 29 28 27 26 25 24
- - - - - - - -
23 22 21 20 19 18 17 16
- - - - - - - -
15 14 13 12 11 10 9 8
RD[15:8]
7 6 5 4 3 2 1 0
RD[7:0]
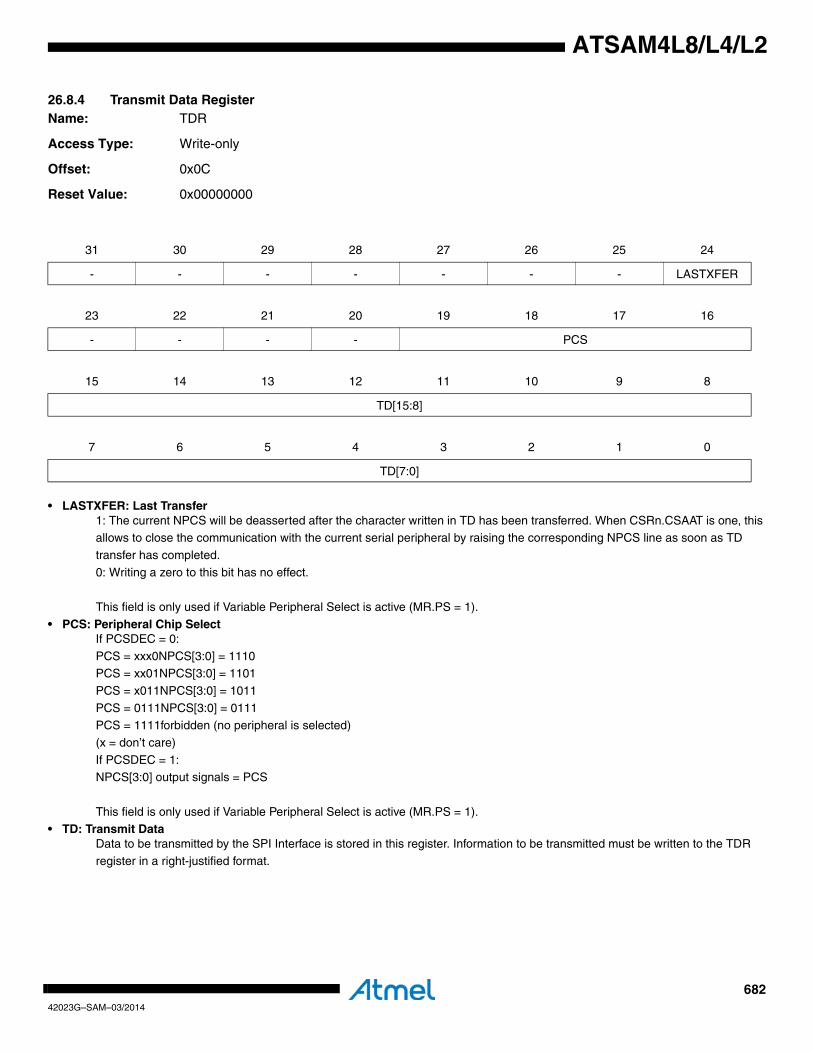
68242023G–SAM–03/2014
ATSAM4L8/L4/L2
26.8.4 Transmit Data RegisterName: TDR
Access Type: Write-only
Offset: 0x0C
Reset Value: 0x00000000
• LASTXFER: Last Transfer1: The current NPCS will be deasserted after the character written in TD has been transferred. When CSRn.CSAAT is one, this allows to close the communication with the current serial peripheral by raising the corresponding NPCS line as soon as TD
transfer has completed.
0: Writing a zero to this bit has no effect.
This field is only used if Variable Peripheral Select is active (MR.PS = 1).
• PCS: Peripheral Chip SelectIf PCSDEC = 0:
PCS = xxx0NPCS[3:0] = 1110PCS = xx01NPCS[3:0] = 1101
PCS = x011NPCS[3:0] = 1011
PCS = 0111NPCS[3:0] = 0111PCS = 1111forbidden (no peripheral is selected)
(x = don’t care)
If PCSDEC = 1:NPCS[3:0] output signals = PCS
This field is only used if Variable Peripheral Select is active (MR.PS = 1).• TD: Transmit Data
Data to be transmitted by the SPI Interface is stored in this register. Information to be transmitted must be written to the TDR
register in a right-justified format.
31 30 29 28 27 26 25 24
- - - - - - - LASTXFER
23 22 21 20 19 18 17 16
- - - - PCS
15 14 13 12 11 10 9 8
TD[15:8]
7 6 5 4 3 2 1 0
TD[7:0]
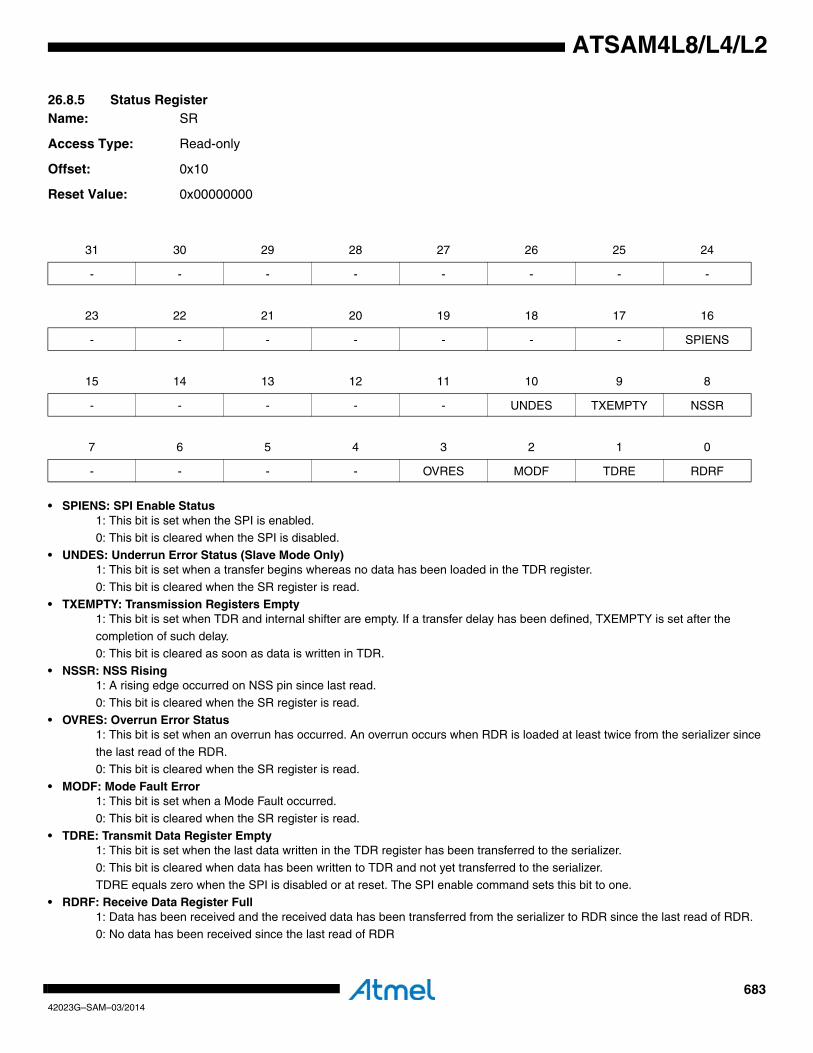
68342023G–SAM–03/2014
ATSAM4L8/L4/L2
26.8.5 Status RegisterName: SR
Access Type: Read-only
Offset: 0x10
Reset Value: 0x00000000
• SPIENS: SPI Enable Status1: This bit is set when the SPI is enabled.0: This bit is cleared when the SPI is disabled.
• UNDES: Underrun Error Status (Slave Mode Only)1: This bit is set when a transfer begins whereas no data has been loaded in the TDR register.
0: This bit is cleared when the SR register is read.
• TXEMPTY: Transmission Registers Empty1: This bit is set when TDR and internal shifter are empty. If a transfer delay has been defined, TXEMPTY is set after the
completion of such delay.0: This bit is cleared as soon as data is written in TDR.
• NSSR: NSS Rising1: A rising edge occurred on NSS pin since last read.
0: This bit is cleared when the SR register is read.
• OVRES: Overrun Error Status1: This bit is set when an overrun has occurred. An overrun occurs when RDR is loaded at least twice from the serializer since
the last read of the RDR.0: This bit is cleared when the SR register is read.
• MODF: Mode Fault Error1: This bit is set when a Mode Fault occurred.
0: This bit is cleared when the SR register is read.
• TDRE: Transmit Data Register Empty1: This bit is set when the last data written in the TDR register has been transferred to the serializer.
0: This bit is cleared when data has been written to TDR and not yet transferred to the serializer.
TDRE equals zero when the SPI is disabled or at reset. The SPI enable command sets this bit to one.• RDRF: Receive Data Register Full
1: Data has been received and the received data has been transferred from the serializer to RDR since the last read of RDR.0: No data has been received since the last read of RDR
31 30 29 28 27 26 25 24
- - - - - - - -
23 22 21 20 19 18 17 16
- - - - - - - SPIENS
15 14 13 12 11 10 9 8
- - - - - UNDES TXEMPTY NSSR
7 6 5 4 3 2 1 0
- - - - OVRES MODF TDRE RDRF
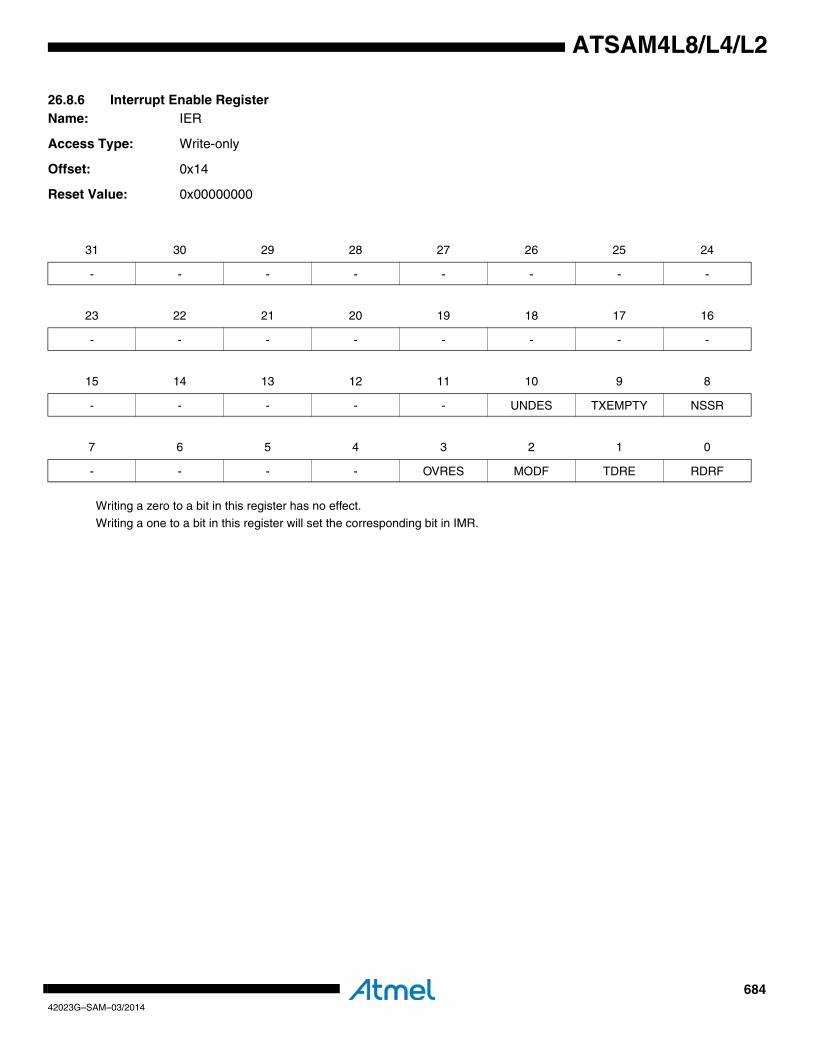
68442023G–SAM–03/2014
ATSAM4L8/L4/L2
26.8.6 Interrupt Enable RegisterName: IER
Access Type: Write-only
Offset: 0x14
Reset Value: 0x00000000
Writing a zero to a bit in this register has no effect.
Writing a one to a bit in this register will set the corresponding bit in IMR.
31 30 29 28 27 26 25 24
- - - - - - - -
23 22 21 20 19 18 17 16
- - - - - - - -
15 14 13 12 11 10 9 8
- - - - - UNDES TXEMPTY NSSR
7 6 5 4 3 2 1 0
- - - - OVRES MODF TDRE RDRF
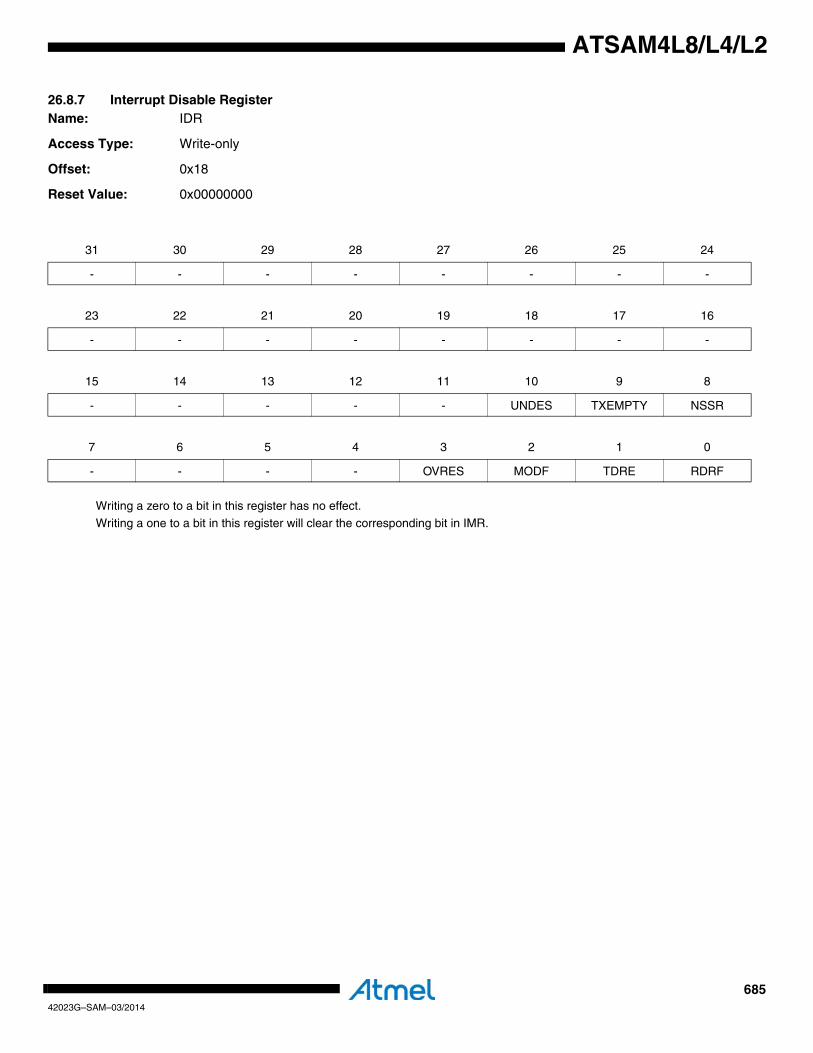
68542023G–SAM–03/2014
ATSAM4L8/L4/L2
26.8.7 Interrupt Disable RegisterName: IDR
Access Type: Write-only
Offset: 0x18
Reset Value: 0x00000000
Writing a zero to a bit in this register has no effect.
Writing a one to a bit in this register will clear the corresponding bit in IMR.
31 30 29 28 27 26 25 24
- - - - - - - -
23 22 21 20 19 18 17 16
- - - - - - - -
15 14 13 12 11 10 9 8
- - - - - UNDES TXEMPTY NSSR
7 6 5 4 3 2 1 0
- - - - OVRES MODF TDRE RDRF
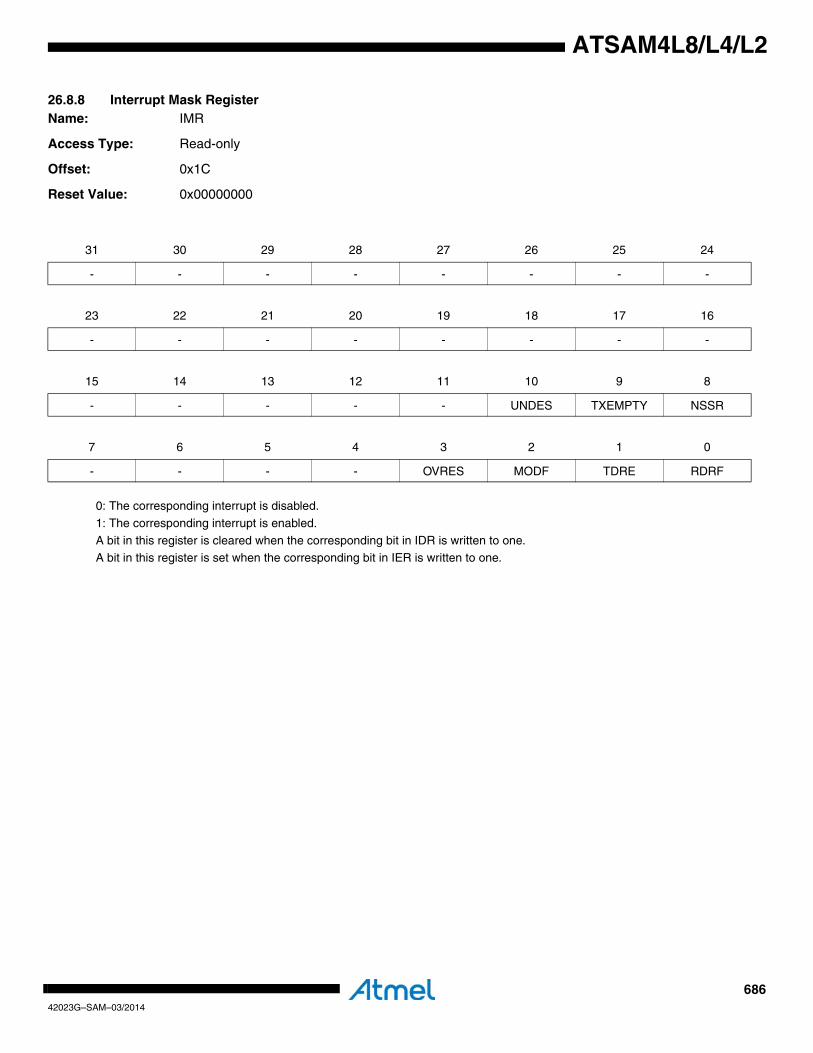
68642023G–SAM–03/2014
ATSAM4L8/L4/L2
26.8.8 Interrupt Mask RegisterName: IMR
Access Type: Read-only
Offset: 0x1C
Reset Value: 0x00000000
0: The corresponding interrupt is disabled.
1: The corresponding interrupt is enabled.
A bit in this register is cleared when the corresponding bit in IDR is written to one.A bit in this register is set when the corresponding bit in IER is written to one.
31 30 29 28 27 26 25 24
- - - - - - - -
23 22 21 20 19 18 17 16
- - - - - - - -
15 14 13 12 11 10 9 8
- - - - - UNDES TXEMPTY NSSR
7 6 5 4 3 2 1 0
- - - - OVRES MODF TDRE RDRF

68742023G–SAM–03/2014
ATSAM4L8/L4/L2
26.8.9 Chip Select Register 0Name: CSR0
Access Type: Read/Write
Offset: 0x30
Reset Value: 0x00000000
• DLYBCT: Delay Between Consecutive TransfersThis field defines the delay between two consecutive transfers with the same peripheral without removing the chip select. The delay is always inserted after each transfer and before removing the chip select if needed.
When DLYBCT equals zero, no delay between consecutive transfers is inserted and the clock keeps its duty cycle over the
character transfers.Otherwise, the following equation determines the delay:
• DLYBS: Delay Before SPCKThis field defines the delay from NPCS valid to the first valid SPCK transition.
When DLYBS equals zero, the NPCS valid to SPCK transition is 1/2 the SPCK clock period.
Otherwise, the following equations determine the delay:
• SCBR: Serial Clock Baud RateIn Master Mode, the SPI Interface uses a modulus counter to derive the SPCK baud rate from the CLK_SPI. The Baud rate is selected by writing a value from 1 to 255 in the SCBR field. The following equations determine the SPCK baud rate:
Writing the SCBR field to zero is forbidden. Triggering a transfer while SCBR is zero can lead to unpredictable results.
At reset, SCBR is zero and the user has to write it to a valid value before performing the first transfer.
If a clock divider (SCBRn) field is set to one and the other SCBR fields differ from one, access on CSn is correct but no correct access will be possible on other CS.
31 30 29 28 27 26 25 24
DLYBCT
23 22 21 20 19 18 17 16
DLYBS
15 14 13 12 11 10 9 8
SCBR
7 6 5 4 3 2 1 0
BITS CSAAT CSNAAT NCPHA CPOL
Delay Between Consecutive Transfers 32 DLYBCT×CLKSPI
------------------------------------=
Delay Before SPCK DLYBSCLKSPI---------------------=
SPCK Baudrate CLKSPISCBR
---------------------=
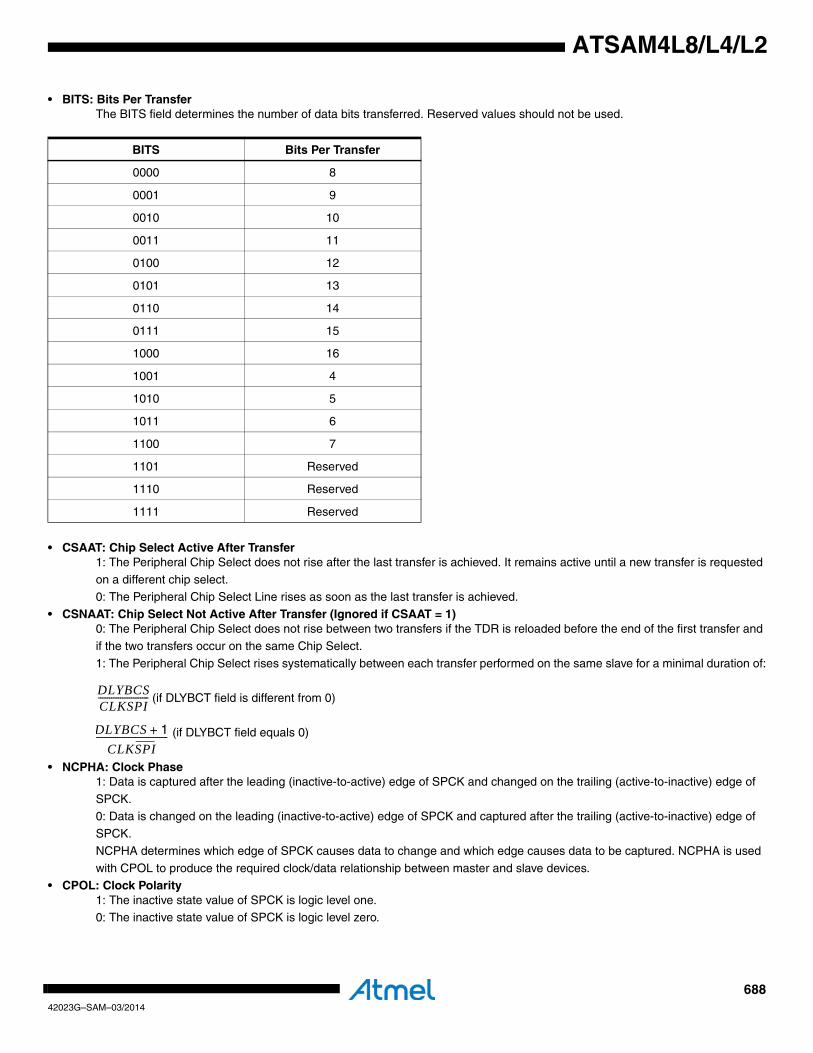
68842023G–SAM–03/2014
ATSAM4L8/L4/L2
• BITS: Bits Per Transfer The BITS field determines the number of data bits transferred. Reserved values should not be used.
• CSAAT: Chip Select Active After Transfer1: The Peripheral Chip Select does not rise after the last transfer is achieved. It remains active until a new transfer is requested
on a different chip select. 0: The Peripheral Chip Select Line rises as soon as the last transfer is achieved.
• CSNAAT: Chip Select Not Active After Transfer (Ignored if CSAAT = 1)0: The Peripheral Chip Select does not rise between two transfers if the TDR is reloaded before the end of the first transfer and
if the two transfers occur on the same Chip Select.
1: The Peripheral Chip Select rises systematically between each transfer performed on the same slave for a minimal duration of:
(if DLYBCT field is different from 0)
(if DLYBCT field equals 0)
• NCPHA: Clock Phase 1: Data is captured after the leading (inactive-to-active) edge of SPCK and changed on the trailing (active-to-inactive) edge of
SPCK. 0: Data is changed on the leading (inactive-to-active) edge of SPCK and captured after the trailing (active-to-inactive) edge of
SPCK.
NCPHA determines which edge of SPCK causes data to change and which edge causes data to be captured. NCPHA is used
with CPOL to produce the required clock/data relationship between master and slave devices.• CPOL: Clock Polarity
1: The inactive state value of SPCK is logic level one. 0: The inactive state value of SPCK is logic level zero.
BITS Bits Per Transfer
0000 8
0001 9
0010 10
0011 11
0100 12
0101 13
0110 14
0111 15
1000 16
1001 4
1010 5
1011 6
1100 7
1101 Reserved
1110 Reserved
1111 Reserved
DLYBCSCLKSPI-----------------------
DLYBCS 1+
CLKSPI---------------------------------

68942023G–SAM–03/2014
ATSAM4L8/L4/L2
CPOL is used to determine the inactive state value of the serial clock (SPCK). It is used with NCPHA to produce the required clock/data relationship between master and slave devices.
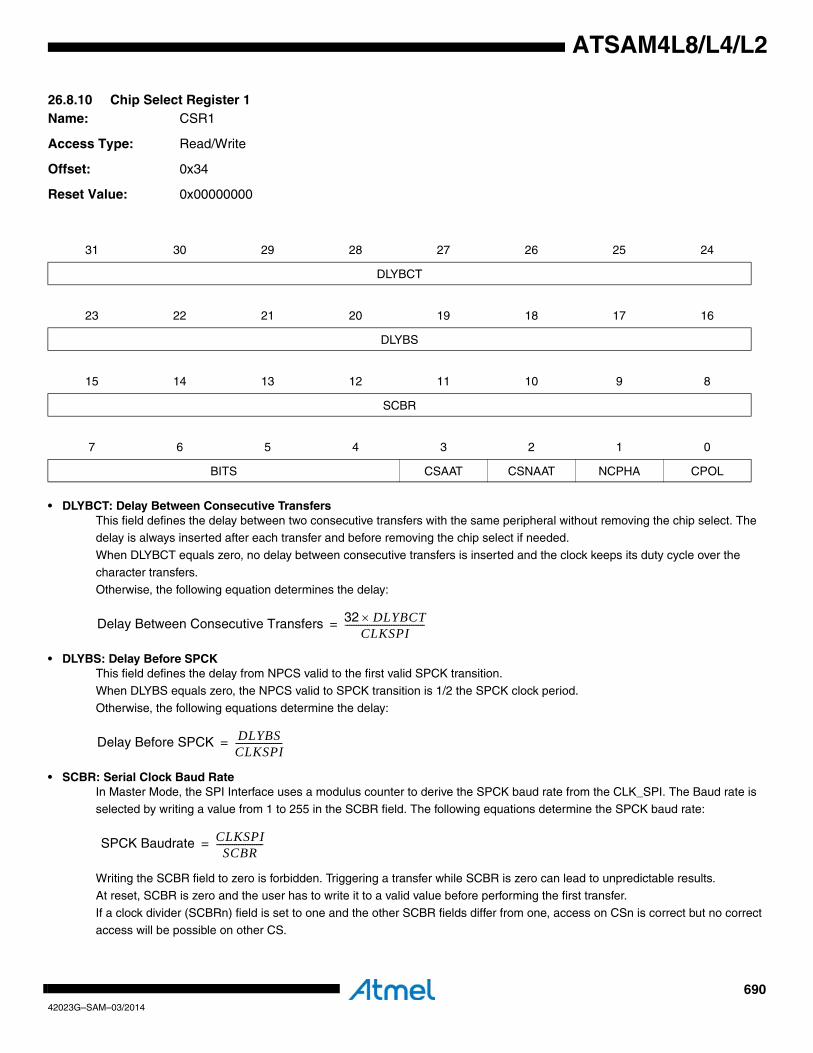
69042023G–SAM–03/2014
ATSAM4L8/L4/L2
26.8.10 Chip Select Register 1Name: CSR1
Access Type: Read/Write
Offset: 0x34
Reset Value: 0x00000000
• DLYBCT: Delay Between Consecutive TransfersThis field defines the delay between two consecutive transfers with the same peripheral without removing the chip select. The delay is always inserted after each transfer and before removing the chip select if needed.
When DLYBCT equals zero, no delay between consecutive transfers is inserted and the clock keeps its duty cycle over the
character transfers.Otherwise, the following equation determines the delay:
• DLYBS: Delay Before SPCKThis field defines the delay from NPCS valid to the first valid SPCK transition.
When DLYBS equals zero, the NPCS valid to SPCK transition is 1/2 the SPCK clock period.
Otherwise, the following equations determine the delay:
• SCBR: Serial Clock Baud RateIn Master Mode, the SPI Interface uses a modulus counter to derive the SPCK baud rate from the CLK_SPI. The Baud rate is selected by writing a value from 1 to 255 in the SCBR field. The following equations determine the SPCK baud rate:
Writing the SCBR field to zero is forbidden. Triggering a transfer while SCBR is zero can lead to unpredictable results.
At reset, SCBR is zero and the user has to write it to a valid value before performing the first transfer.
If a clock divider (SCBRn) field is set to one and the other SCBR fields differ from one, access on CSn is correct but no correct access will be possible on other CS.
31 30 29 28 27 26 25 24
DLYBCT
23 22 21 20 19 18 17 16
DLYBS
15 14 13 12 11 10 9 8
SCBR
7 6 5 4 3 2 1 0
BITS CSAAT CSNAAT NCPHA CPOL
Delay Between Consecutive Transfers 32 DLYBCT×CLKSPI
------------------------------------=
Delay Before SPCK DLYBSCLKSPI---------------------=
SPCK Baudrate CLKSPISCBR
---------------------=
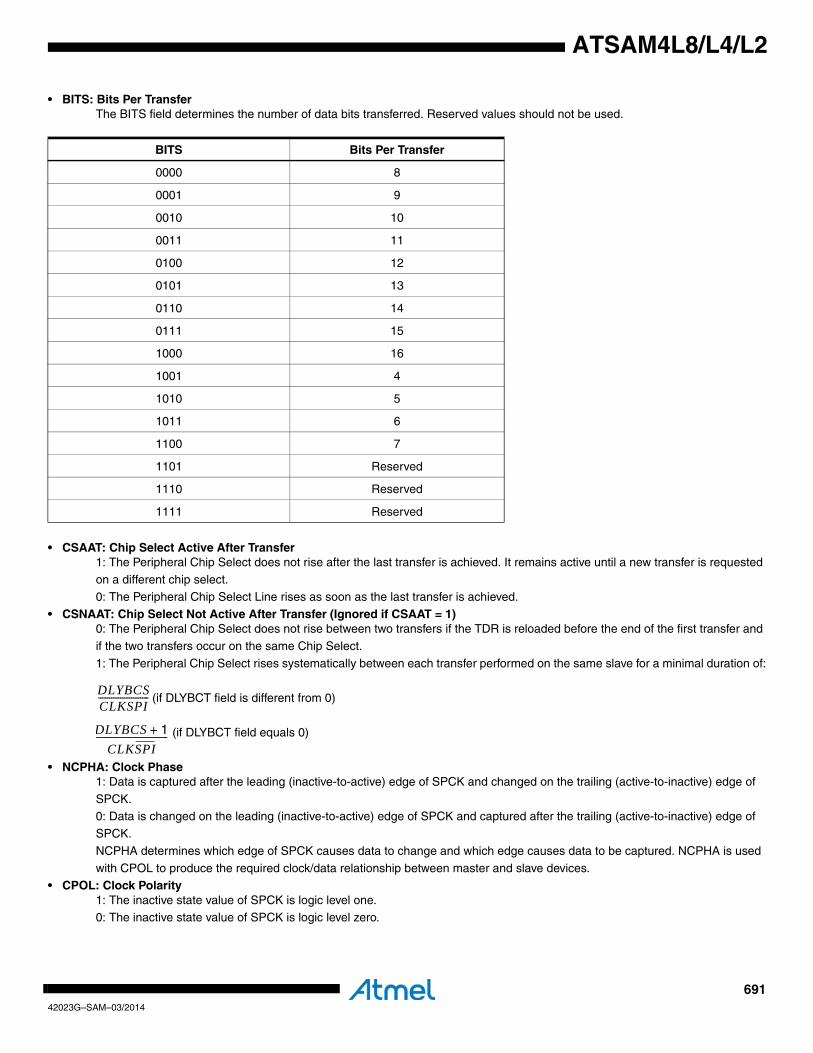
69142023G–SAM–03/2014
ATSAM4L8/L4/L2
• BITS: Bits Per Transfer The BITS field determines the number of data bits transferred. Reserved values should not be used.
• CSAAT: Chip Select Active After Transfer1: The Peripheral Chip Select does not rise after the last transfer is achieved. It remains active until a new transfer is requested
on a different chip select. 0: The Peripheral Chip Select Line rises as soon as the last transfer is achieved.
• CSNAAT: Chip Select Not Active After Transfer (Ignored if CSAAT = 1)0: The Peripheral Chip Select does not rise between two transfers if the TDR is reloaded before the end of the first transfer and
if the two transfers occur on the same Chip Select.
1: The Peripheral Chip Select rises systematically between each transfer performed on the same slave for a minimal duration of:
(if DLYBCT field is different from 0)
(if DLYBCT field equals 0)
• NCPHA: Clock Phase 1: Data is captured after the leading (inactive-to-active) edge of SPCK and changed on the trailing (active-to-inactive) edge of
SPCK. 0: Data is changed on the leading (inactive-to-active) edge of SPCK and captured after the trailing (active-to-inactive) edge of
SPCK.
NCPHA determines which edge of SPCK causes data to change and which edge causes data to be captured. NCPHA is used
with CPOL to produce the required clock/data relationship between master and slave devices.• CPOL: Clock Polarity
1: The inactive state value of SPCK is logic level one. 0: The inactive state value of SPCK is logic level zero.
BITS Bits Per Transfer
0000 8
0001 9
0010 10
0011 11
0100 12
0101 13
0110 14
0111 15
1000 16
1001 4
1010 5
1011 6
1100 7
1101 Reserved
1110 Reserved
1111 Reserved
DLYBCSCLKSPI-----------------------
DLYBCS 1+
CLKSPI---------------------------------

69242023G–SAM–03/2014
ATSAM4L8/L4/L2
CPOL is used to determine the inactive state value of the serial clock (SPCK). It is used with NCPHA to produce the required clock/data relationship between master and slave devices.
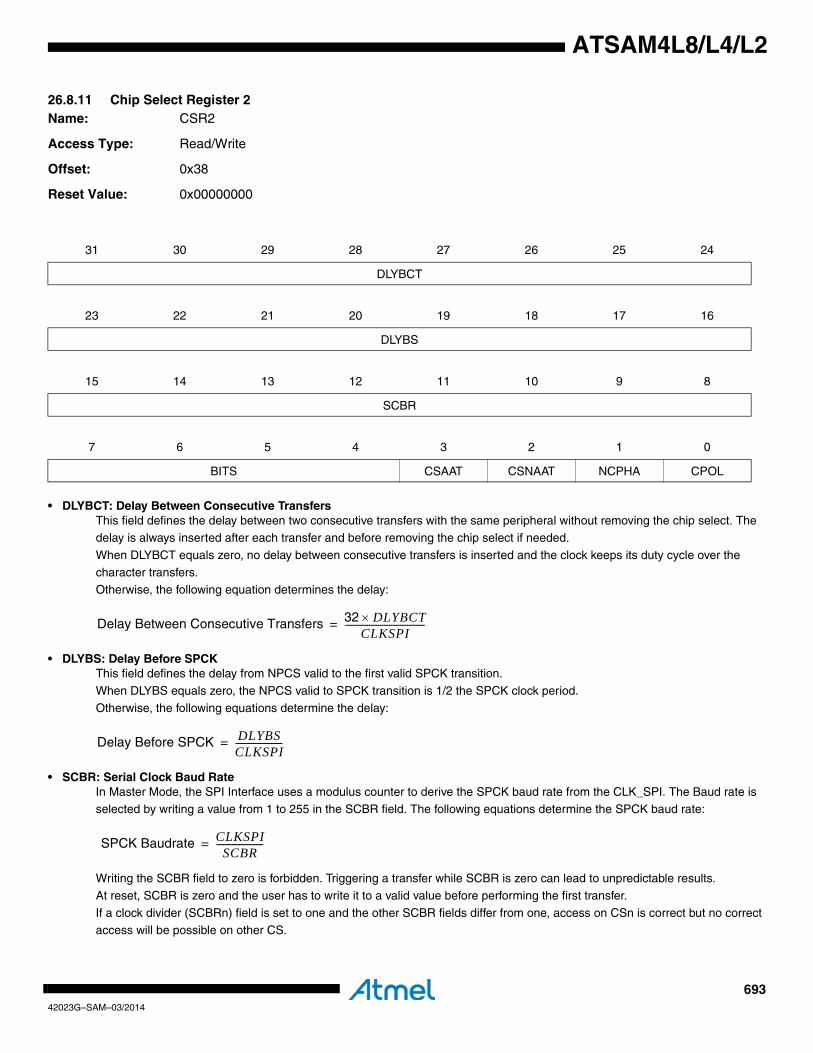
69342023G–SAM–03/2014
ATSAM4L8/L4/L2
26.8.11 Chip Select Register 2Name: CSR2
Access Type: Read/Write
Offset: 0x38
Reset Value: 0x00000000
• DLYBCT: Delay Between Consecutive TransfersThis field defines the delay between two consecutive transfers with the same peripheral without removing the chip select. The delay is always inserted after each transfer and before removing the chip select if needed.
When DLYBCT equals zero, no delay between consecutive transfers is inserted and the clock keeps its duty cycle over the
character transfers.Otherwise, the following equation determines the delay:
• DLYBS: Delay Before SPCKThis field defines the delay from NPCS valid to the first valid SPCK transition.
When DLYBS equals zero, the NPCS valid to SPCK transition is 1/2 the SPCK clock period.
Otherwise, the following equations determine the delay:
• SCBR: Serial Clock Baud RateIn Master Mode, the SPI Interface uses a modulus counter to derive the SPCK baud rate from the CLK_SPI. The Baud rate is selected by writing a value from 1 to 255 in the SCBR field. The following equations determine the SPCK baud rate:
Writing the SCBR field to zero is forbidden. Triggering a transfer while SCBR is zero can lead to unpredictable results.
At reset, SCBR is zero and the user has to write it to a valid value before performing the first transfer.
If a clock divider (SCBRn) field is set to one and the other SCBR fields differ from one, access on CSn is correct but no correct access will be possible on other CS.
31 30 29 28 27 26 25 24
DLYBCT
23 22 21 20 19 18 17 16
DLYBS
15 14 13 12 11 10 9 8
SCBR
7 6 5 4 3 2 1 0
BITS CSAAT CSNAAT NCPHA CPOL
Delay Between Consecutive Transfers 32 DLYBCT×CLKSPI
------------------------------------=
Delay Before SPCK DLYBSCLKSPI---------------------=
SPCK Baudrate CLKSPISCBR
---------------------=
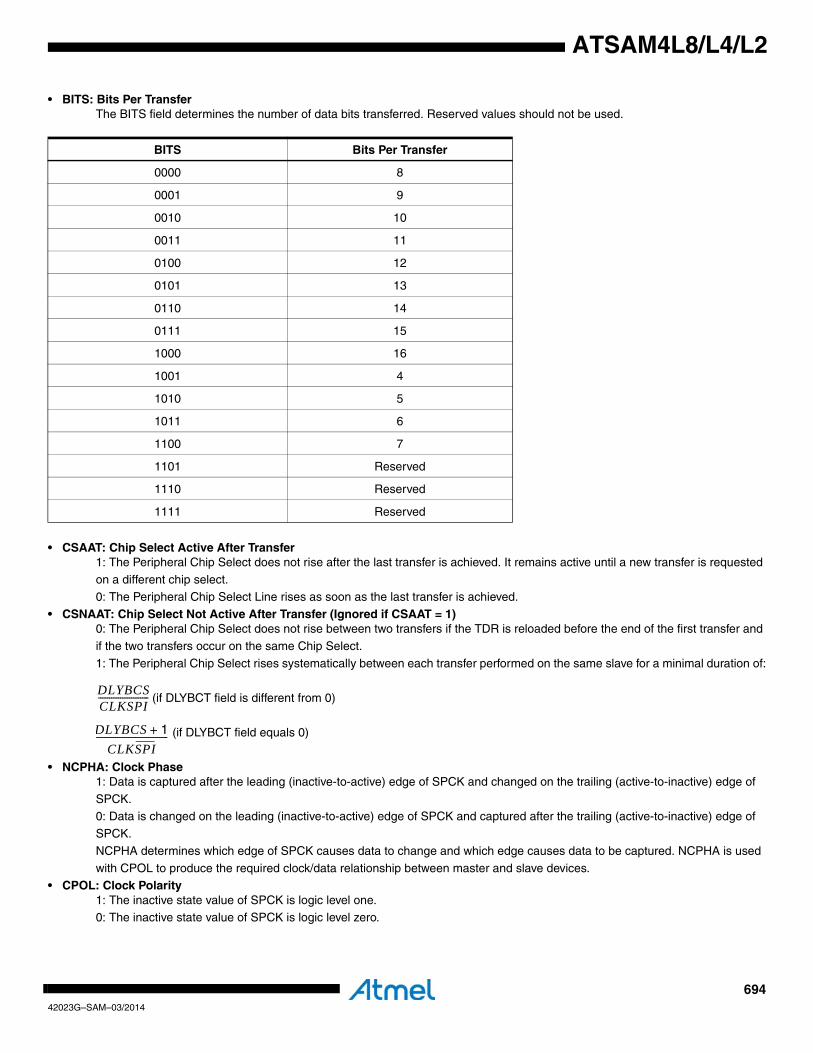
69442023G–SAM–03/2014
ATSAM4L8/L4/L2
• BITS: Bits Per Transfer The BITS field determines the number of data bits transferred. Reserved values should not be used.
• CSAAT: Chip Select Active After Transfer1: The Peripheral Chip Select does not rise after the last transfer is achieved. It remains active until a new transfer is requested
on a different chip select. 0: The Peripheral Chip Select Line rises as soon as the last transfer is achieved.
• CSNAAT: Chip Select Not Active After Transfer (Ignored if CSAAT = 1)0: The Peripheral Chip Select does not rise between two transfers if the TDR is reloaded before the end of the first transfer and
if the two transfers occur on the same Chip Select.
1: The Peripheral Chip Select rises systematically between each transfer performed on the same slave for a minimal duration of:
(if DLYBCT field is different from 0)
(if DLYBCT field equals 0)
• NCPHA: Clock Phase 1: Data is captured after the leading (inactive-to-active) edge of SPCK and changed on the trailing (active-to-inactive) edge of
SPCK. 0: Data is changed on the leading (inactive-to-active) edge of SPCK and captured after the trailing (active-to-inactive) edge of
SPCK.
NCPHA determines which edge of SPCK causes data to change and which edge causes data to be captured. NCPHA is used
with CPOL to produce the required clock/data relationship between master and slave devices.• CPOL: Clock Polarity
1: The inactive state value of SPCK is logic level one. 0: The inactive state value of SPCK is logic level zero.
BITS Bits Per Transfer
0000 8
0001 9
0010 10
0011 11
0100 12
0101 13
0110 14
0111 15
1000 16
1001 4
1010 5
1011 6
1100 7
1101 Reserved
1110 Reserved
1111 Reserved
DLYBCSCLKSPI-----------------------
DLYBCS 1+
CLKSPI---------------------------------

69542023G–SAM–03/2014
ATSAM4L8/L4/L2
CPOL is used to determine the inactive state value of the serial clock (SPCK). It is used with NCPHA to produce the required clock/data relationship between master and slave devices.

69642023G–SAM–03/2014
ATSAM4L8/L4/L2
26.8.12 Chip Select Register 3Name: CSR3
Access Type: Read/Write
Offset: 0x3C
Reset Value: 0x00000000
• DLYBCT: Delay Between Consecutive TransfersThis field defines the delay between two consecutive transfers with the same peripheral without removing the chip select. The delay is always inserted after each transfer and before removing the chip select if needed.
When DLYBCT equals zero, no delay between consecutive transfers is inserted and the clock keeps its duty cycle over the
character transfers.Otherwise, the following equation determines the delay:
• DLYBS: Delay Before SPCKThis field defines the delay from NPCS valid to the first valid SPCK transition.
When DLYBS equals zero, the NPCS valid to SPCK transition is 1/2 the SPCK clock period.
Otherwise, the following equations determine the delay:
• SCBR: Serial Clock Baud RateIn Master Mode, the SPI Interface uses a modulus counter to derive the SPCK baud rate from the CLK_SPI. The Baud rate is selected by writing a value from 1 to 255 in the SCBR field. The following equations determine the SPCK baud rate:
Writing the SCBR field to zero is forbidden. Triggering a transfer while SCBR is zero can lead to unpredictable results.
At reset, SCBR is zero and the user has to write it to a valid value before performing the first transfer.
If a clock divider (SCBRn) field is set to one and the other SCBR fields differ from one, access on CSn is correct but no correct access will be possible on other CS.
31 30 29 28 27 26 25 24
DLYBCT
23 22 21 20 19 18 17 16
DLYBS
15 14 13 12 11 10 9 8
SCBR
7 6 5 4 3 2 1 0
BITS CSAAT CSNAAT NCPHA CPOL
Delay Between Consecutive Transfers 32 DLYBCT×CLKSPI
------------------------------------=
Delay Before SPCK DLYBSCLKSPI---------------------=
SPCK Baudrate CLKSPISCBR
---------------------=

69742023G–SAM–03/2014
ATSAM4L8/L4/L2
• BITS: Bits Per Transfer The BITS field determines the number of data bits transferred. Reserved values should not be used.
• CSAAT: Chip Select Active After Transfer1: The Peripheral Chip Select does not rise after the last transfer is achieved. It remains active until a new transfer is requested
on a different chip select. 0: The Peripheral Chip Select Line rises as soon as the last transfer is achieved.
• CSNAAT: Chip Select Not Active After Transfer (Ignored if CSAAT = 1)0: The Peripheral Chip Select does not rise between two transfers if the TDR is reloaded before the end of the first transfer and
if the two transfers occur on the same Chip Select.
1: The Peripheral Chip Select rises systematically between each transfer performed on the same slave for a minimal duration of:
(if DLYBCT field is different from 0)
(if DLYBCT field equals 0)
• NCPHA: Clock Phase 1: Data is captured after the leading (inactive-to-active) edge of SPCK and changed on the trailing (active-to-inactive) edge of
SPCK. 0: Data is changed on the leading (inactive-to-active) edge of SPCK and captured after the trailing (active-to-inactive) edge of
SPCK.
NCPHA determines which edge of SPCK causes data to change and which edge causes data to be captured. NCPHA is used
with CPOL to produce the required clock/data relationship between master and slave devices.• CPOL: Clock Polarity
1: The inactive state value of SPCK is logic level one. 0: The inactive state value of SPCK is logic level zero.
BITS Bits Per Transfer
0000 8
0001 9
0010 10
0011 11
0100 12
0101 13
0110 14
0111 15
1000 16
1001 4
1010 5
1011 6
1100 7
1101 Reserved
1110 Reserved
1111 Reserved
DLYBCSCLKSPI-----------------------
DLYBCS 1+
CLKSPI---------------------------------

69842023G–SAM–03/2014
ATSAM4L8/L4/L2
CPOL is used to determine the inactive state value of the serial clock (SPCK). It is used with NCPHA to produce the required clock/data relationship between master and slave devices.
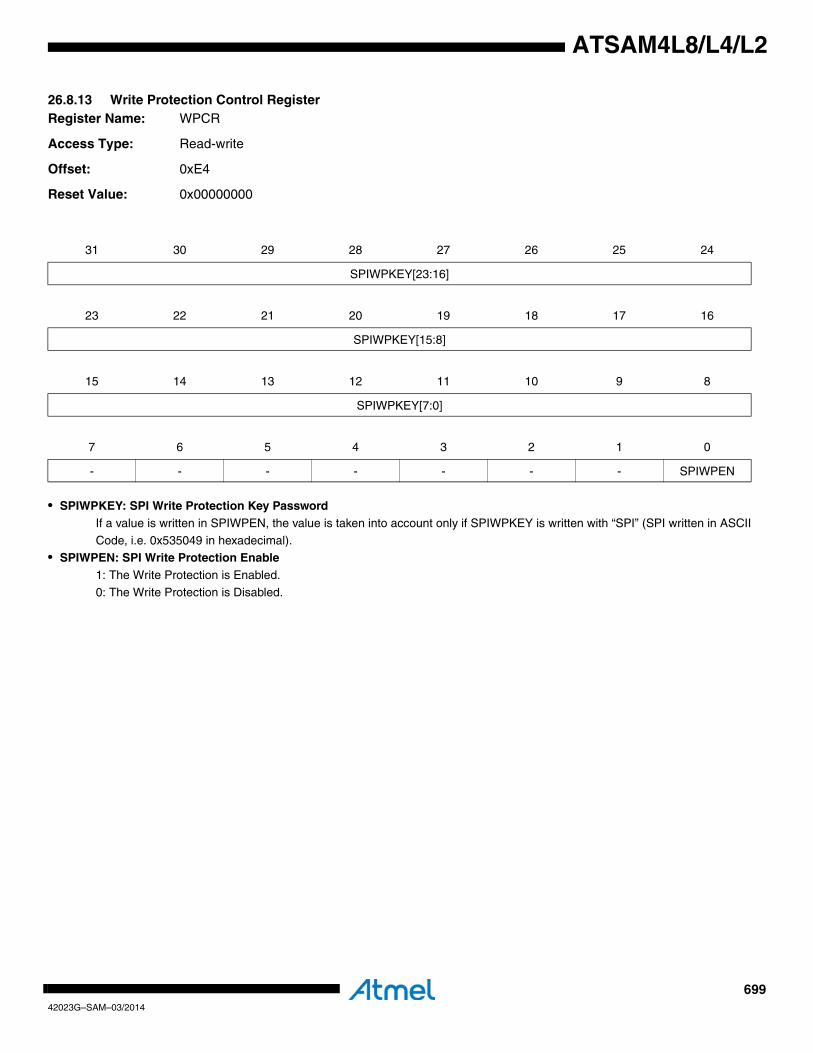
69942023G–SAM–03/2014
ATSAM4L8/L4/L2
26.8.13 Write Protection Control RegisterRegister Name: WPCR
Access Type: Read-write
Offset: 0xE4
Reset Value: 0x00000000
• SPIWPKEY: SPI Write Protection Key PasswordIf a value is written in SPIWPEN, the value is taken into account only if SPIWPKEY is written with “SPI” (SPI written in ASCII
Code, i.e. 0x535049 in hexadecimal).• SPIWPEN: SPI Write Protection Enable
1: The Write Protection is Enabled.
0: The Write Protection is Disabled.
31 30 29 28 27 26 25 24
SPIWPKEY[23:16]
23 22 21 20 19 18 17 16
SPIWPKEY[15:8]
15 14 13 12 11 10 9 8
SPIWPKEY[7:0]
7 6 5 4 3 2 1 0
- - - - - - - SPIWPEN
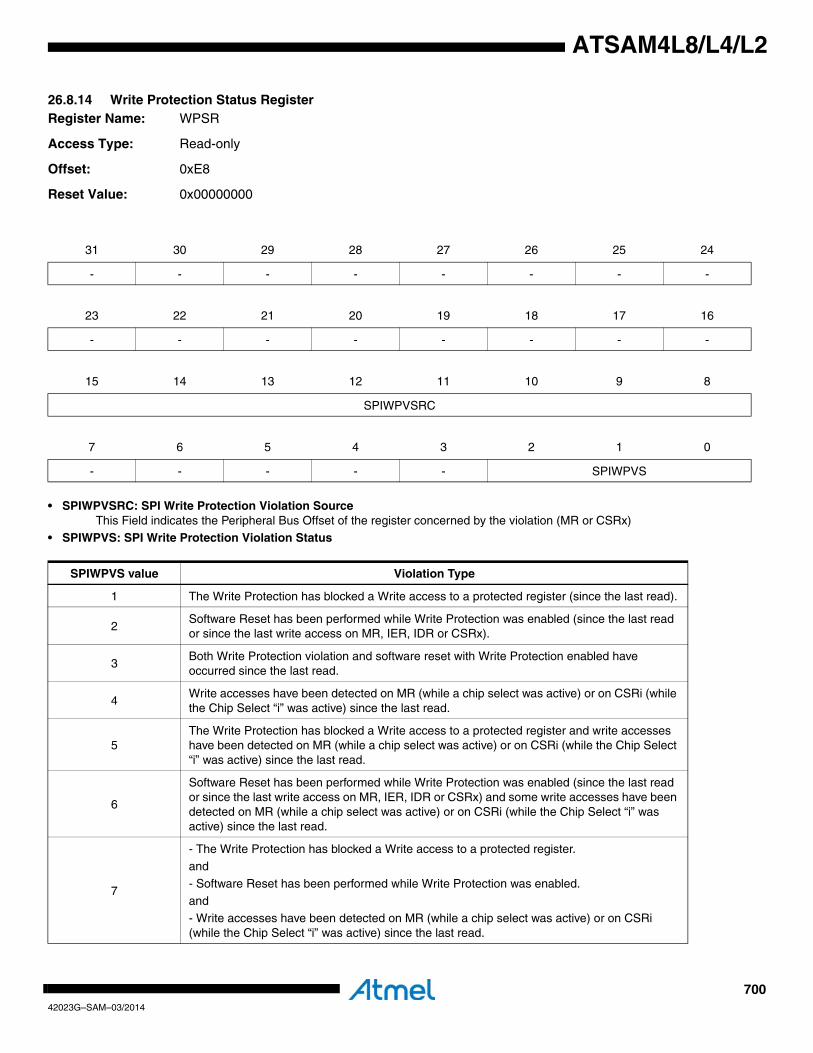
70042023G–SAM–03/2014
ATSAM4L8/L4/L2
26.8.14 Write Protection Status RegisterRegister Name: WPSR
Access Type: Read-only
Offset: 0xE8
Reset Value: 0x00000000
• SPIWPVSRC: SPI Write Protection Violation SourceThis Field indicates the Peripheral Bus Offset of the register concerned by the violation (MR or CSRx)
• SPIWPVS: SPI Write Protection Violation Status
31 30 29 28 27 26 25 24
- - - - - - - -
23 22 21 20 19 18 17 16
- - - - - - - -
15 14 13 12 11 10 9 8
SPIWPVSRC
7 6 5 4 3 2 1 0
- - - - - SPIWPVS
SPIWPVS value Violation Type
1 The Write Protection has blocked a Write access to a protected register (since the last read).
2Software Reset has been performed while Write Protection was enabled (since the last read or since the last write access on MR, IER, IDR or CSRx).
3Both Write Protection violation and software reset with Write Protection enabled have occurred since the last read.
4Write accesses have been detected on MR (while a chip select was active) or on CSRi (while the Chip Select “i” was active) since the last read.
5The Write Protection has blocked a Write access to a protected register and write accesses have been detected on MR (while a chip select was active) or on CSRi (while the Chip Select “i” was active) since the last read.
6
Software Reset has been performed while Write Protection was enabled (since the last read or since the last write access on MR, IER, IDR or CSRx) and some write accesses have been detected on MR (while a chip select was active) or on CSRi (while the Chip Select “i” was active) since the last read.
7
- The Write Protection has blocked a Write access to a protected register.
and
- Software Reset has been performed while Write Protection was enabled.
and- Write accesses have been detected on MR (while a chip select was active) or on CSRi (while the Chip Select “i” was active) since the last read.
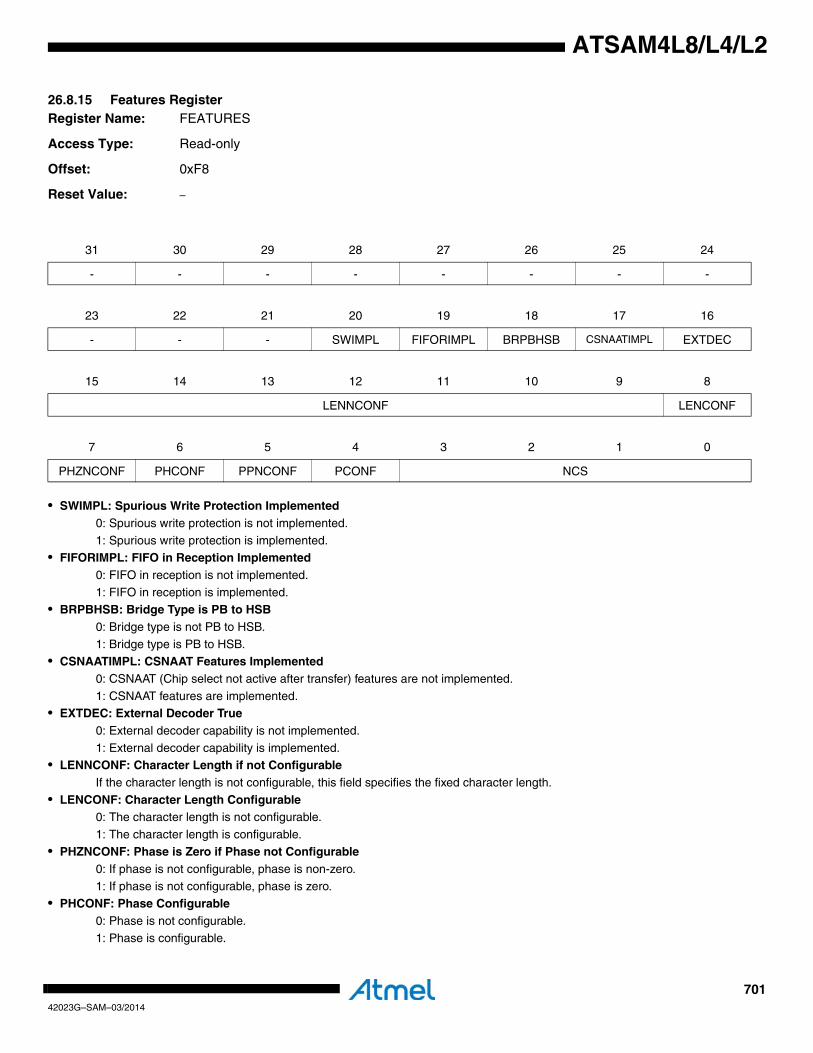
70142023G–SAM–03/2014
ATSAM4L8/L4/L2
26.8.15 Features RegisterRegister Name: FEATURES
Access Type: Read-only
Offset: 0xF8
Reset Value: –
• SWIMPL: Spurious Write Protection Implemented0: Spurious write protection is not implemented.
1: Spurious write protection is implemented.• FIFORIMPL: FIFO in Reception Implemented
0: FIFO in reception is not implemented.
1: FIFO in reception is implemented.• BRPBHSB: Bridge Type is PB to HSB
0: Bridge type is not PB to HSB.
1: Bridge type is PB to HSB.• CSNAATIMPL: CSNAAT Features Implemented
0: CSNAAT (Chip select not active after transfer) features are not implemented.
1: CSNAAT features are implemented.• EXTDEC: External Decoder True
0: External decoder capability is not implemented.
1: External decoder capability is implemented.• LENNCONF: Character Length if not Configurable
If the character length is not configurable, this field specifies the fixed character length.
• LENCONF: Character Length Configurable0: The character length is not configurable.
1: The character length is configurable.
• PHZNCONF: Phase is Zero if Phase not Configurable0: If phase is not configurable, phase is non-zero.1: If phase is not configurable, phase is zero.
• PHCONF: Phase Configurable0: Phase is not configurable.1: Phase is configurable.
31 30 29 28 27 26 25 24
- - - - - - - -
23 22 21 20 19 18 17 16
- - - SWIMPL FIFORIMPL BRPBHSB CSNAATIMPL EXTDEC
15 14 13 12 11 10 9 8
LENNCONF LENCONF
7 6 5 4 3 2 1 0
PHZNCONF PHCONF PPNCONF PCONF NCS

70242023G–SAM–03/2014
ATSAM4L8/L4/L2
• PPNCONF: Polarity Positive if Polarity not Configurable0: If polarity is not configurable, polarity is negative.
1: If polarity is not configurable, polarity is positive.
• PCONF: Polarity Configurable0: Polarity is not configurable.
1: Polarity is configurable.
• NCS: Number of Chip SelectsThis field indicates the number of chip selects implemented.
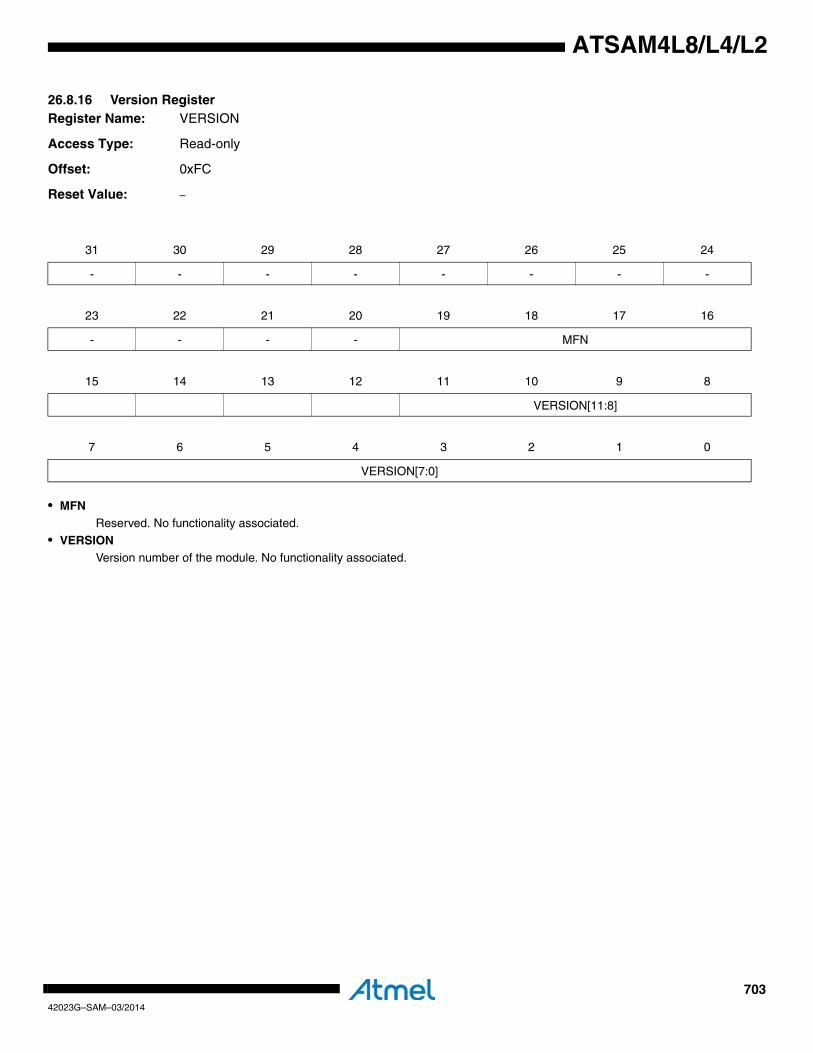
70342023G–SAM–03/2014
ATSAM4L8/L4/L2
26.8.16 Version RegisterRegister Name: VERSION
Access Type: Read-only
Offset: 0xFC
Reset Value: –
• MFNReserved. No functionality associated.
• VERSIONVersion number of the module. No functionality associated.
31 30 29 28 27 26 25 24
- - - - - - - -
23 22 21 20 19 18 17 16
- - - - MFN
15 14 13 12 11 10 9 8
VERSION[11:8]
7 6 5 4 3 2 1 0
VERSION[7:0]
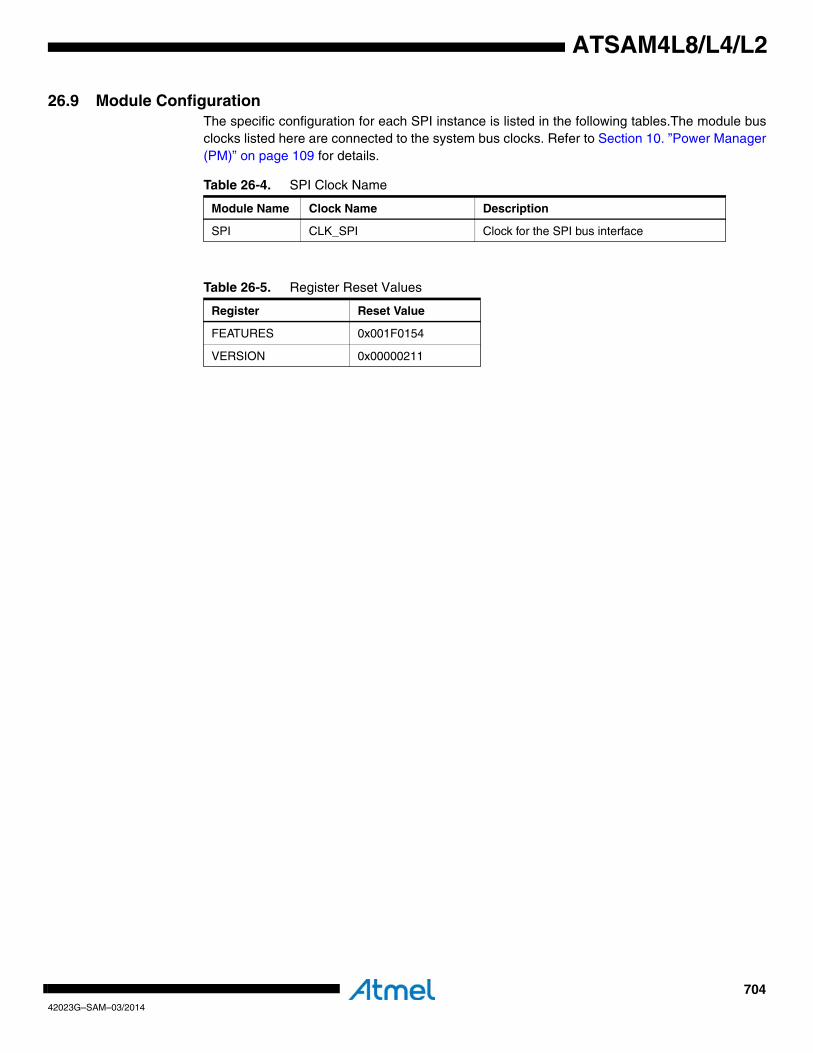
70442023G–SAM–03/2014
ATSAM4L8/L4/L2
26.9 Module ConfigurationThe specific configuration for each SPI instance is listed in the following tables.The module busclocks listed here are connected to the system bus clocks. Refer to Section 10. ”Power Manager(PM)” on page 109 for details.
Table 26-4. SPI Clock Name
Module Name Clock Name Description
SPI CLK_SPI Clock for the SPI bus interface
Table 26-5. Register Reset Values
Register Reset Value
FEATURES 0x001F0154
VERSION 0x00000211
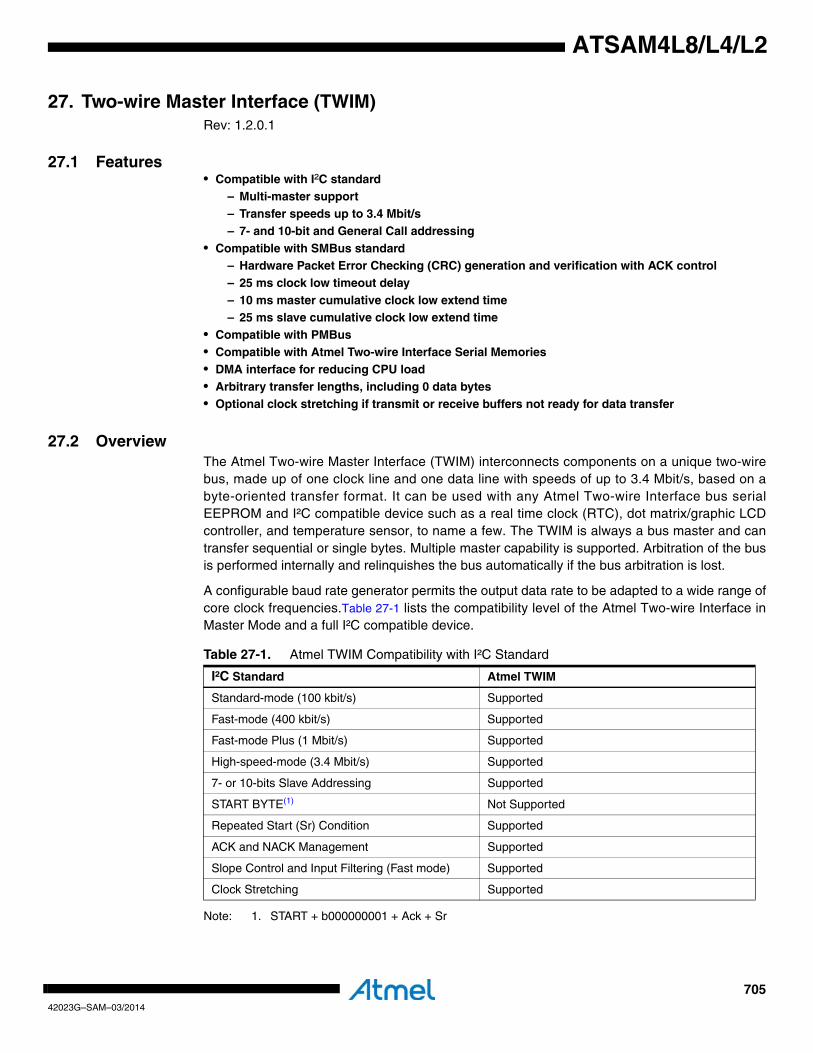
70542023G–SAM–03/2014
ATSAM4L8/L4/L2
27. Two-wire Master Interface (TWIM)Rev: 1.2.0.1
27.1 Features • Compatible with I²C standard
– Multi-master support– Transfer speeds up to 3.4 Mbit/s – 7- and 10-bit and General Call addressing
• Compatible with SMBus standard– Hardware Packet Error Checking (CRC) generation and verification with ACK control– 25 ms clock low timeout delay– 10 ms master cumulative clock low extend time– 25 ms slave cumulative clock low extend time
• Compatible with PMBus• Compatible with Atmel Two-wire Interface Serial Memories• DMA interface for reducing CPU load• Arbitrary transfer lengths, including 0 data bytes• Optional clock stretching if transmit or receive buffers not ready for data transfer
27.2 OverviewThe Atmel Two-wire Master Interface (TWIM) interconnects components on a unique two-wirebus, made up of one clock line and one data line with speeds of up to 3.4 Mbit/s, based on abyte-oriented transfer format. It can be used with any Atmel Two-wire Interface bus serialEEPROM and I²C compatible device such as a real time clock (RTC), dot matrix/graphic LCDcontroller, and temperature sensor, to name a few. The TWIM is always a bus master and cantransfer sequential or single bytes. Multiple master capability is supported. Arbitration of the busis performed internally and relinquishes the bus automatically if the bus arbitration is lost.
A configurable baud rate generator permits the output data rate to be adapted to a wide range ofcore clock frequencies.Table 27-1 lists the compatibility level of the Atmel Two-wire Interface inMaster Mode and a full I²C compatible device.
Note: 1. START + b000000001 + Ack + Sr
Table 27-1. Atmel TWIM Compatibility with I²C Standard
I²C Standard Atmel TWIM
Standard-mode (100 kbit/s) Supported
Fast-mode (400 kbit/s) Supported
Fast-mode Plus (1 Mbit/s) Supported
High-speed-mode (3.4 Mbit/s) Supported
7- or 10-bits Slave Addressing Supported
START BYTE(1) Not Supported
Repeated Start (Sr) Condition Supported
ACK and NACK Management Supported
Slope Control and Input Filtering (Fast mode) Supported
Clock Stretching Supported
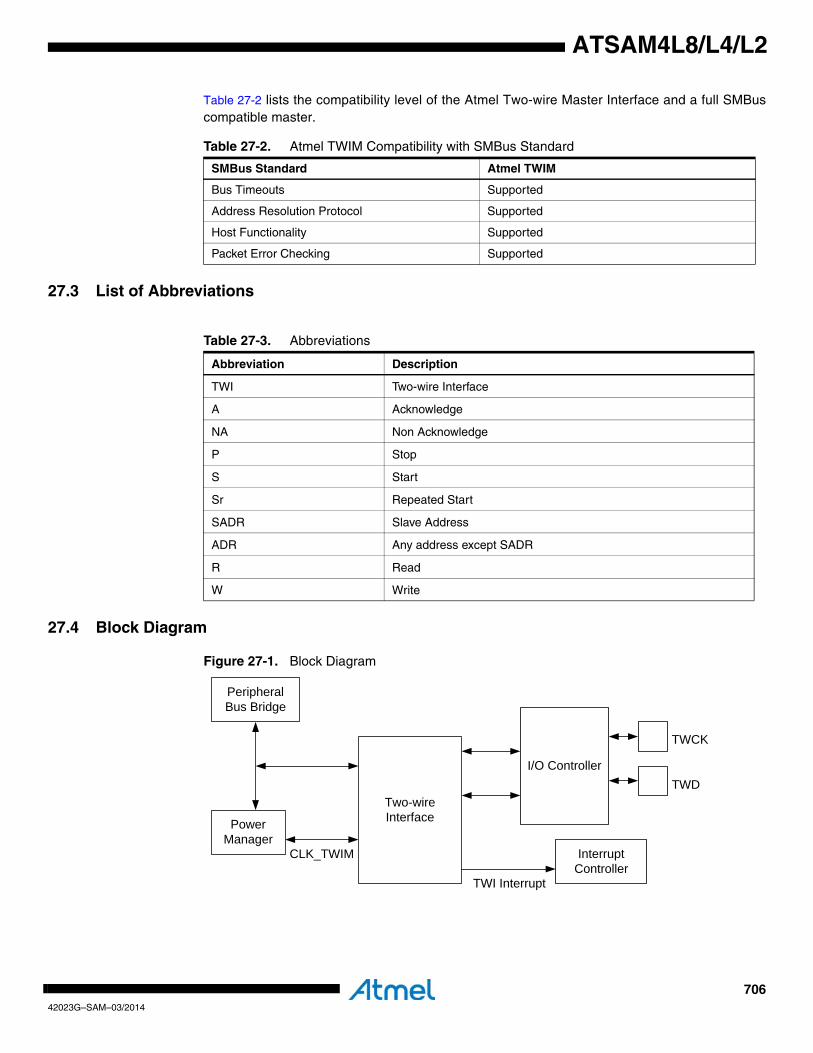
70642023G–SAM–03/2014
ATSAM4L8/L4/L2
Table 27-2 lists the compatibility level of the Atmel Two-wire Master Interface and a full SMBuscompatible master.
27.3 List of Abbreviations
27.4 Block Diagram
Figure 27-1. Block Diagram
Table 27-2. Atmel TWIM Compatibility with SMBus Standard
SMBus Standard Atmel TWIM
Bus Timeouts Supported
Address Resolution Protocol Supported
Host Functionality Supported
Packet Error Checking Supported
Table 27-3. Abbreviations
Abbreviation Description
TWI Two-wire Interface
A Acknowledge
NA Non Acknowledge
P Stop
S Start
Sr Repeated Start
SADR Slave Address
ADR Any address except SADR
R Read
W Write
Peripheral Bus Bridge
Two-wire Interface
I/O Controller
TWCK
TWD
Interrupt Controller
TWI Interrupt
Power Manager
CLK_TWIM
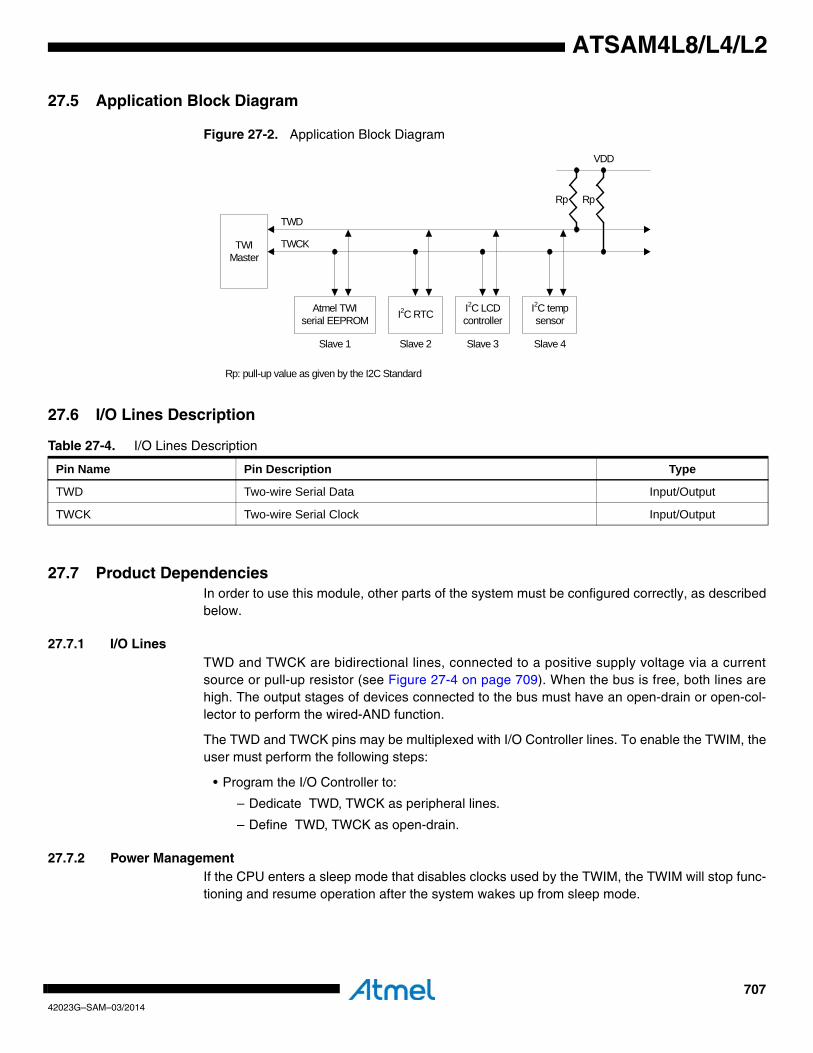
70742023G–SAM–03/2014
ATSAM4L8/L4/L2
27.5 Application Block Diagram
Figure 27-2. Application Block Diagram
27.6 I/O Lines Description
27.7 Product DependenciesIn order to use this module, other parts of the system must be configured correctly, as describedbelow.
27.7.1 I/O LinesTWD and TWCK are bidirectional lines, connected to a positive supply voltage via a currentsource or pull-up resistor (see Figure 27-4 on page 709). When the bus is free, both lines arehigh. The output stages of devices connected to the bus must have an open-drain or open-col-lector to perform the wired-AND function.
The TWD and TWCK pins may be multiplexed with I/O Controller lines. To enable the TWIM, theuser must perform the following steps:
• Program the I/O Controller to:
– Dedicate TWD, TWCK as peripheral lines.
– Define TWD, TWCK as open-drain.
27.7.2 Power ManagementIf the CPU enters a sleep mode that disables clocks used by the TWIM, the TWIM will stop func-tioning and resume operation after the system wakes up from sleep mode.
TWI Master
TWD
TWCK
Atmel TWIserial EEPROM I2C RTC I2C LCD
controllerI2C tempsensor
Slave 2 Slave 3 Slave 4
VDD
Rp: pull-up value as given by the I2C Standard
Slave 1
Rp Rp
Table 27-4. I/O Lines Description
Pin Name Pin Description Type
TWD Two-wire Serial Data Input/Output
TWCK Two-wire Serial Clock Input/Output
70842023G–SAM–03/2014
ATSAM4L8/L4/L2
27.7.3 ClocksThe clock for the TWIM bus interface (CLK_TWIM) is generated by the Power Manager. It is rec-ommended to disable the TWIM before disabling the clock, to avoid freezing the TWIM in anundefined state.
27.7.4 DMAThe TWIM DMA handshake interface is connected to the Peripheral DMA Controller. Using theTWIM DMA functionality requires the Peripheral DMA Controller to be programmed after settingup the TWIM.
27.7.5 InterruptsThe TWIM interrupt request lines are connected to the NVIC. Using the TWIM interrupts requiresthe NVIC to be programmed first.
27.7.6 Debug OperationWhen an external debugger forces the CPU into debug mode, the TWIM continues normal oper-ation. If the TWIM is configured in a way that requires it to be periodically serviced by the CPUthrough interrupts or similar, improper operation or data loss may result during debugging.
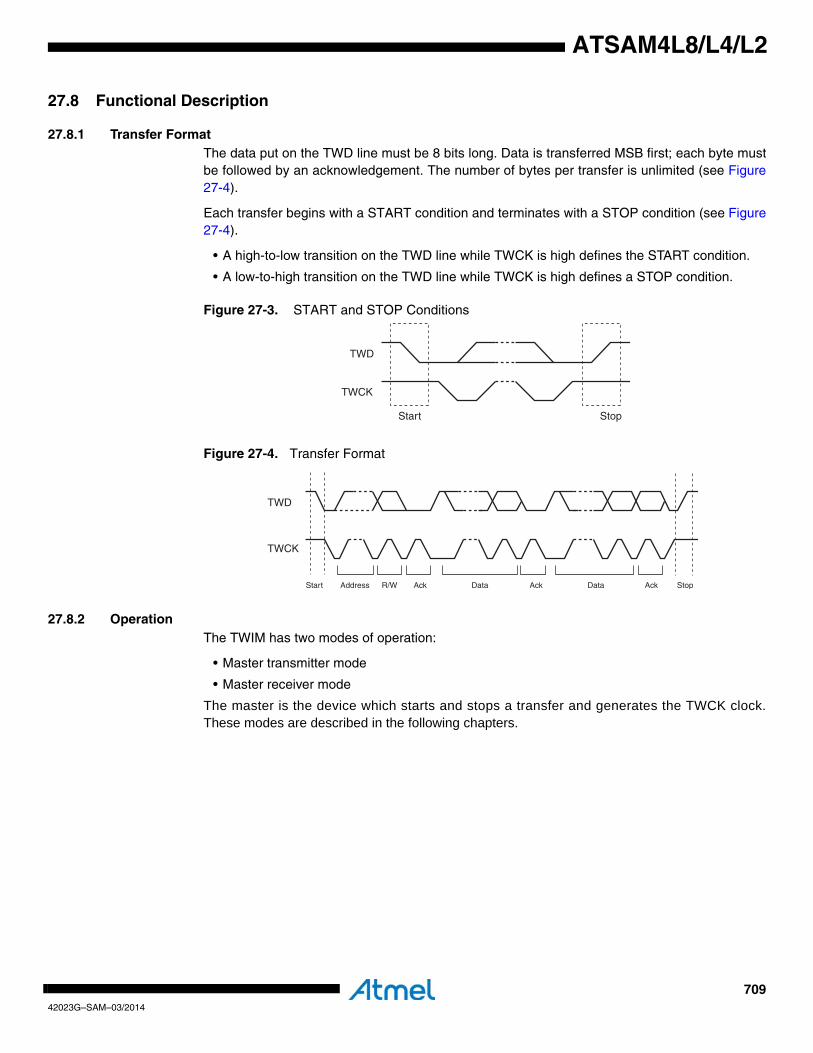
70942023G–SAM–03/2014
ATSAM4L8/L4/L2
27.8 Functional Description
27.8.1 Transfer FormatThe data put on the TWD line must be 8 bits long. Data is transferred MSB first; each byte mustbe followed by an acknowledgement. The number of bytes per transfer is unlimited (see Figure27-4).
Each transfer begins with a START condition and terminates with a STOP condition (see Figure27-4).
• A high-to-low transition on the TWD line while TWCK is high defines the START condition.
• A low-to-high transition on the TWD line while TWCK is high defines a STOP condition.
Figure 27-3. START and STOP Conditions
Figure 27-4. Transfer Format
27.8.2 OperationThe TWIM has two modes of operation:
• Master transmitter mode
• Master receiver mode
The master is the device which starts and stops a transfer and generates the TWCK clock.These modes are described in the following chapters.
TWD
TWCK
Start Stop
TWD
TWCK
Start Address R/W Ack Data Ack Data Ack Stop
71042023G–SAM–03/2014
ATSAM4L8/L4/L2
27.8.2.1 High-speed-modeAfter reset and initialization, the TWIM is in Standard-mode, Fast-mode, or Fast-mode Plus (col-lectively referred to as the F/S-mode). For the TWIM to enter High-speed-mode (HS-mode), theuser must write a one to the HS-mode (HS) bit and write a unique 3-bit code to the HS-modeMaster Code field (HSMCODE) in the Command Register (CMDR) or/and the Next CommandRegister (NCMDR). This instructs the TWIM to initiate a HS-mode transfer, when the bus is free,by transmitting (in F/S-mode) the START condition followed by a unique 8-bit HS-mode mastercode (0x00001XXX), which is formed by prefixing CMDR.HSMCODE with 0b00001. This is thenfollowed by the not-acknowledge bit (NA) on the bus, after which HS-mode transfer commences.In summary, the conditions for initiating HS-mode transfer are:
1. START condition (S)2. 8-bit master code (0000 1XXX)3. Not-acknowledge bit (NA)
HS-mode master codes are reserved 8-bit codes and serve two purposes:1. It allows arbitration and synchronization between competing masters at F/S-mode
speeds, resulting in one winning master.2. It indicates the beginning of an HS-mode transfer.
If the TWIM remains as the active master after the transmission of the master code and the NAbit, it releases the TWCK line and waits for the line to be pulled up to HIGH, during which it doesthe following:
1. Adapt the TWD and TWCK input filters to the spike suppression requirement in HS-mode.
2. Adapt the TWD and TWCK output stages to the slope control requirements in HS-mode.
Once the TWCK line is HIGH, the TWIM operates in HS-mode and only switches back to F/S-mode after a STOP condition. If an acknowledge bit (A) is erroneously placed on the bus afterthe transmission of the master code, the TWIM sets the HSMCACK bit in the Status Register(SR) and transmits the STOP condition on the bus.
With regard to the slope control of the TWD and TWCK outputs, the user can control the rise andfall times of the TWCK output in F/S- and HS-mode by writing the Clock Drive StrengthHIGH/LOW (CLDRIVEH/L) and Clock Slew Limit (CLSLEW) fields of the Slew Rate Register(SRR) and HS-mode Slew Rate Register (HSSRR), respectively. Likewise, the fall times of theTWD output in F/S- and HS-mode can be controlled by writing the Data Drive Strength LOW(DADRIVEL) and Data Slew Limit (DASLEW) fields of SRR and HSSRR, respectively. Refer toSection 42. ”Electrical Characteristics” on page 1121 for appropriates values of these registerfields.
Note that the fall times of the TWD output are also controlled by the corresponding register fieldsin the Two-wire Slave Interface (TWIS) module. In order to correctly control the slew rate of theTWD output, the user must either
1. Write the relevant register fields in the TWIM with appropriate values and leave those in TWIS as zeros, or vice versa; or
2. Write the relevant register fields in both the TWIM and the TWIS with the same values.
During HS-mode transfer, the TWIM enables and controls a current-source pull-up circuit at theoutput stage of its TWCK signal (if it is the active master) to shorten the rise time of the signal.The current-source pull-up circuit is temporarily disabled by the TWIM after a REPEATEDSTART condition and after each acknowledge bit (A) and not-acknowledge bit (NA), thusenabling other devices connected to the bus to delay the serial transfer by stretching the LOW
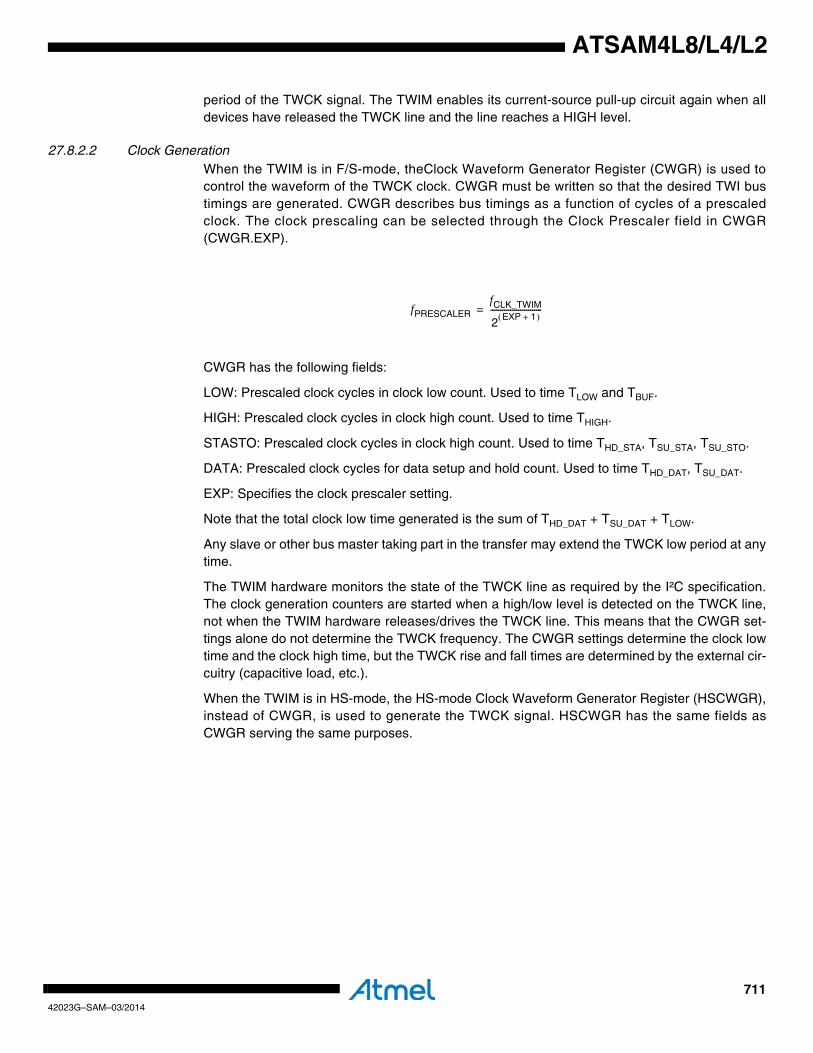
71142023G–SAM–03/2014
ATSAM4L8/L4/L2
period of the TWCK signal. The TWIM enables its current-source pull-up circuit again when alldevices have released the TWCK line and the line reaches a HIGH level.
27.8.2.2 Clock GenerationWhen the TWIM is in F/S-mode, theClock Waveform Generator Register (CWGR) is used tocontrol the waveform of the TWCK clock. CWGR must be written so that the desired TWI bustimings are generated. CWGR describes bus timings as a function of cycles of a prescaledclock. The clock prescaling can be selected through the Clock Prescaler field in CWGR(CWGR.EXP).
CWGR has the following fields:
LOW: Prescaled clock cycles in clock low count. Used to time TLOW and TBUF.
HIGH: Prescaled clock cycles in clock high count. Used to time THIGH.
STASTO: Prescaled clock cycles in clock high count. Used to time THD_STA, TSU_STA, TSU_STO.
DATA: Prescaled clock cycles for data setup and hold count. Used to time THD_DAT, TSU_DAT.
EXP: Specifies the clock prescaler setting.
Note that the total clock low time generated is the sum of THD_DAT + TSU_DAT + TLOW.
Any slave or other bus master taking part in the transfer may extend the TWCK low period at anytime.
The TWIM hardware monitors the state of the TWCK line as required by the I²C specification.The clock generation counters are started when a high/low level is detected on the TWCK line,not when the TWIM hardware releases/drives the TWCK line. This means that the CWGR set-tings alone do not determine the TWCK frequency. The CWGR settings determine the clock lowtime and the clock high time, but the TWCK rise and fall times are determined by the external cir-cuitry (capacitive load, etc.).
When the TWIM is in HS-mode, the HS-mode Clock Waveform Generator Register (HSCWGR),instead of CWGR, is used to generate the TWCK signal. HSCWGR has the same fields asCWGR serving the same purposes.
fPRESCALERfCLK_TWIM
2 EXP 1+( )--------------------------=
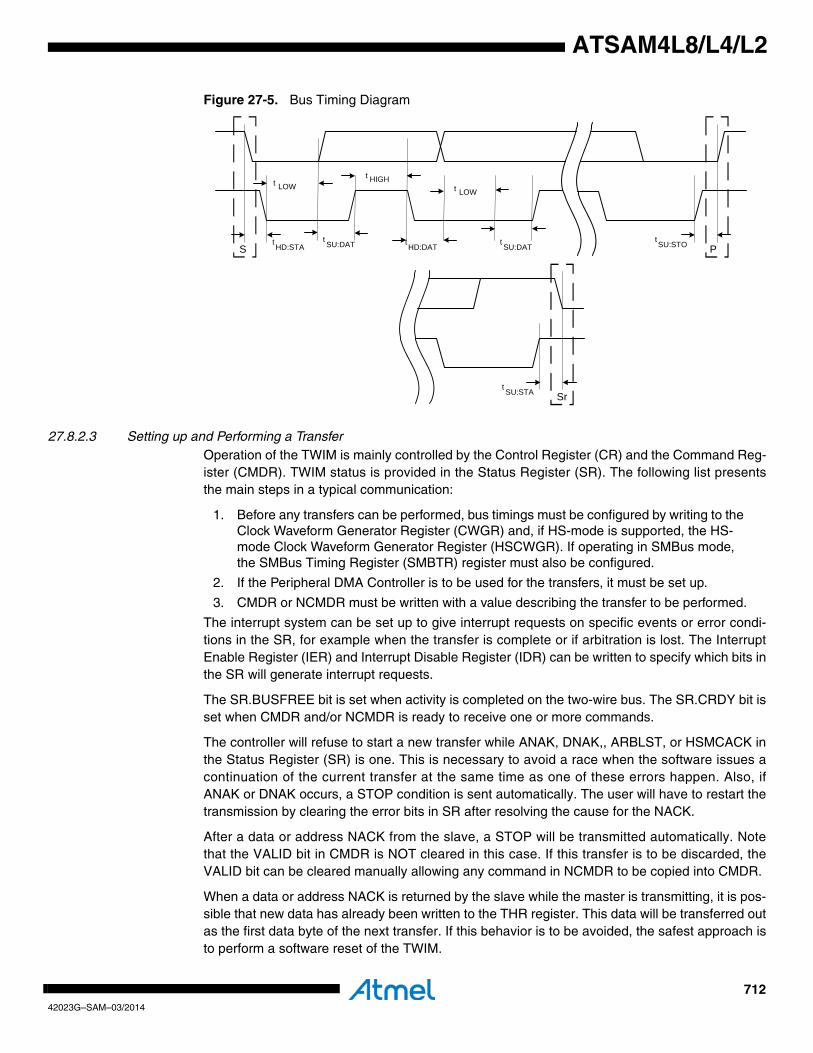
71242023G–SAM–03/2014
ATSAM4L8/L4/L2
Figure 27-5. Bus Timing Diagram
27.8.2.3 Setting up and Performing a Transfer Operation of the TWIM is mainly controlled by the Control Register (CR) and the Command Reg-ister (CMDR). TWIM status is provided in the Status Register (SR). The following list presentsthe main steps in a typical communication:
1. Before any transfers can be performed, bus timings must be configured by writing to the Clock Waveform Generator Register (CWGR) and, if HS-mode is supported, the HS-mode Clock Waveform Generator Register (HSCWGR). If operating in SMBus mode, the SMBus Timing Register (SMBTR) register must also be configured.
2. If the Peripheral DMA Controller is to be used for the transfers, it must be set up.
3. CMDR or NCMDR must be written with a value describing the transfer to be performed.
The interrupt system can be set up to give interrupt requests on specific events or error condi-tions in the SR, for example when the transfer is complete or if arbitration is lost. The InterruptEnable Register (IER) and Interrupt Disable Register (IDR) can be written to specify which bits inthe SR will generate interrupt requests.
The SR.BUSFREE bit is set when activity is completed on the two-wire bus. The SR.CRDY bit isset when CMDR and/or NCMDR is ready to receive one or more commands.
The controller will refuse to start a new transfer while ANAK, DNAK,, ARBLST, or HSMCACK inthe Status Register (SR) is one. This is necessary to avoid a race when the software issues acontinuation of the current transfer at the same time as one of these errors happen. Also, ifANAK or DNAK occurs, a STOP condition is sent automatically. The user will have to restart thetransmission by clearing the error bits in SR after resolving the cause for the NACK.
After a data or address NACK from the slave, a STOP will be transmitted automatically. Notethat the VALID bit in CMDR is NOT cleared in this case. If this transfer is to be discarded, theVALID bit can be cleared manually allowing any command in NCMDR to be copied into CMDR.
When a data or address NACK is returned by the slave while the master is transmitting, it is pos-sible that new data has already been written to the THR register. This data will be transferred outas the first data byte of the next transfer. If this behavior is to be avoided, the safest approach isto perform a software reset of the TWIM.
StHD:STA
t LOW
tSU:DAT
t HIGH
tHD:DAT
t LOW
PtSU:STO
SrtSU:STA
tSU:DAT
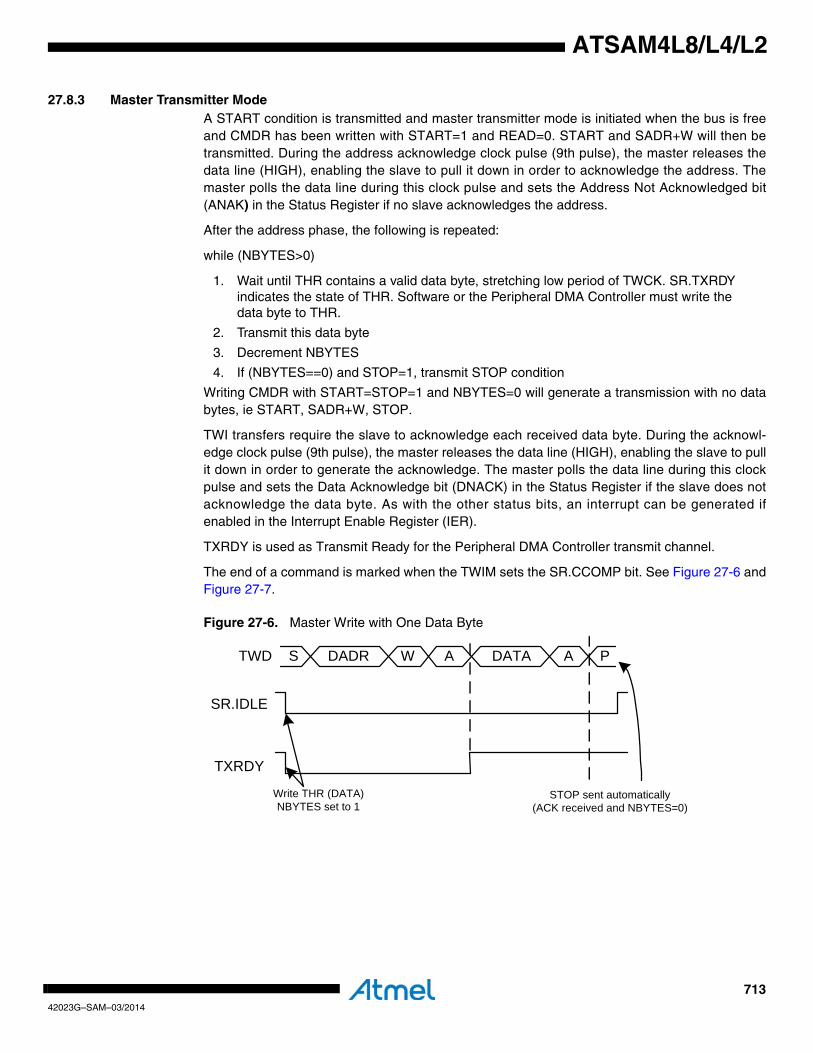
71342023G–SAM–03/2014
ATSAM4L8/L4/L2
27.8.3 Master Transmitter ModeA START condition is transmitted and master transmitter mode is initiated when the bus is freeand CMDR has been written with START=1 and READ=0. START and SADR+W will then betransmitted. During the address acknowledge clock pulse (9th pulse), the master releases thedata line (HIGH), enabling the slave to pull it down in order to acknowledge the address. Themaster polls the data line during this clock pulse and sets the Address Not Acknowledged bit(ANAK) in the Status Register if no slave acknowledges the address.
After the address phase, the following is repeated:
while (NBYTES>0)
1. Wait until THR contains a valid data byte, stretching low period of TWCK. SR.TXRDY indicates the state of THR. Software or the Peripheral DMA Controller must write the data byte to THR.
2. Transmit this data byte
3. Decrement NBYTES
4. If (NBYTES==0) and STOP=1, transmit STOP condition
Writing CMDR with START=STOP=1 and NBYTES=0 will generate a transmission with no databytes, ie START, SADR+W, STOP.
TWI transfers require the slave to acknowledge each received data byte. During the acknowl-edge clock pulse (9th pulse), the master releases the data line (HIGH), enabling the slave to pullit down in order to generate the acknowledge. The master polls the data line during this clockpulse and sets the Data Acknowledge bit (DNACK) in the Status Register if the slave does notacknowledge the data byte. As with the other status bits, an interrupt can be generated ifenabled in the Interrupt Enable Register (IER).
TXRDY is used as Transmit Ready for the Peripheral DMA Controller transmit channel.
The end of a command is marked when the TWIM sets the SR.CCOMP bit. See Figure 27-6 andFigure 27-7.
Figure 27-6. Master Write with One Data Byte
TWD
SR.IDLE
TXRDY
Write THR (DATA)NBYTES set to 1
STOP sent automatically(ACK received and NBYTES=0)
S DADR W A DATA A P
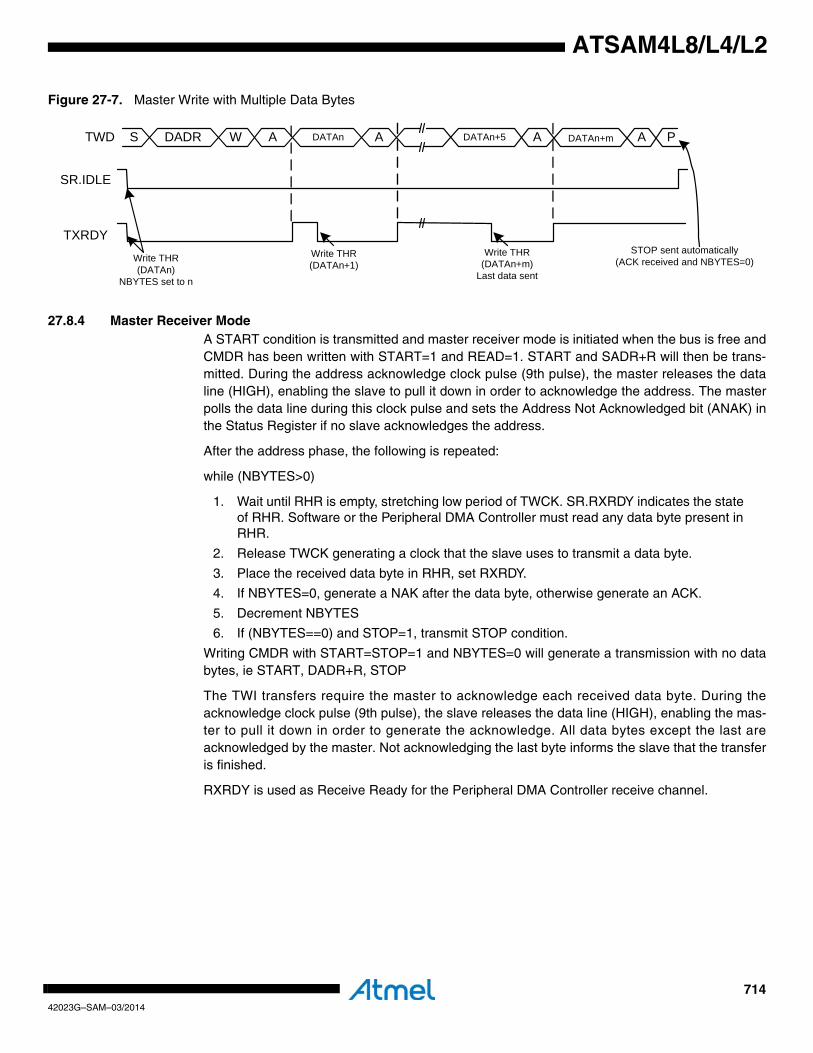
71442023G–SAM–03/2014
ATSAM4L8/L4/L2
Figure 27-7. Master Write with Multiple Data Bytes
27.8.4 Master Receiver ModeA START condition is transmitted and master receiver mode is initiated when the bus is free andCMDR has been written with START=1 and READ=1. START and SADR+R will then be trans-mitted. During the address acknowledge clock pulse (9th pulse), the master releases the dataline (HIGH), enabling the slave to pull it down in order to acknowledge the address. The masterpolls the data line during this clock pulse and sets the Address Not Acknowledged bit (ANAK) inthe Status Register if no slave acknowledges the address.
After the address phase, the following is repeated:
while (NBYTES>0)
1. Wait until RHR is empty, stretching low period of TWCK. SR.RXRDY indicates the state of RHR. Software or the Peripheral DMA Controller must read any data byte present in RHR.
2. Release TWCK generating a clock that the slave uses to transmit a data byte.
3. Place the received data byte in RHR, set RXRDY.
4. If NBYTES=0, generate a NAK after the data byte, otherwise generate an ACK.
5. Decrement NBYTES
6. If (NBYTES==0) and STOP=1, transmit STOP condition.
Writing CMDR with START=STOP=1 and NBYTES=0 will generate a transmission with no databytes, ie START, DADR+R, STOP
The TWI transfers require the master to acknowledge each received data byte. During theacknowledge clock pulse (9th pulse), the slave releases the data line (HIGH), enabling the mas-ter to pull it down in order to generate the acknowledge. All data bytes except the last areacknowledged by the master. Not acknowledging the last byte informs the slave that the transferis finished.
RXRDY is used as Receive Ready for the Peripheral DMA Controller receive channel.
TWD
SR.IDLE
TXRDY
Write THR (DATAn)
NBYTES set to n
STOP sent automatically(ACK received and NBYTES=0)
S DADR W A DATAn A DATAn+5 A ADATAn+m P
Write THR (DATAn+1)
Write THR (DATAn+m)
Last data sent
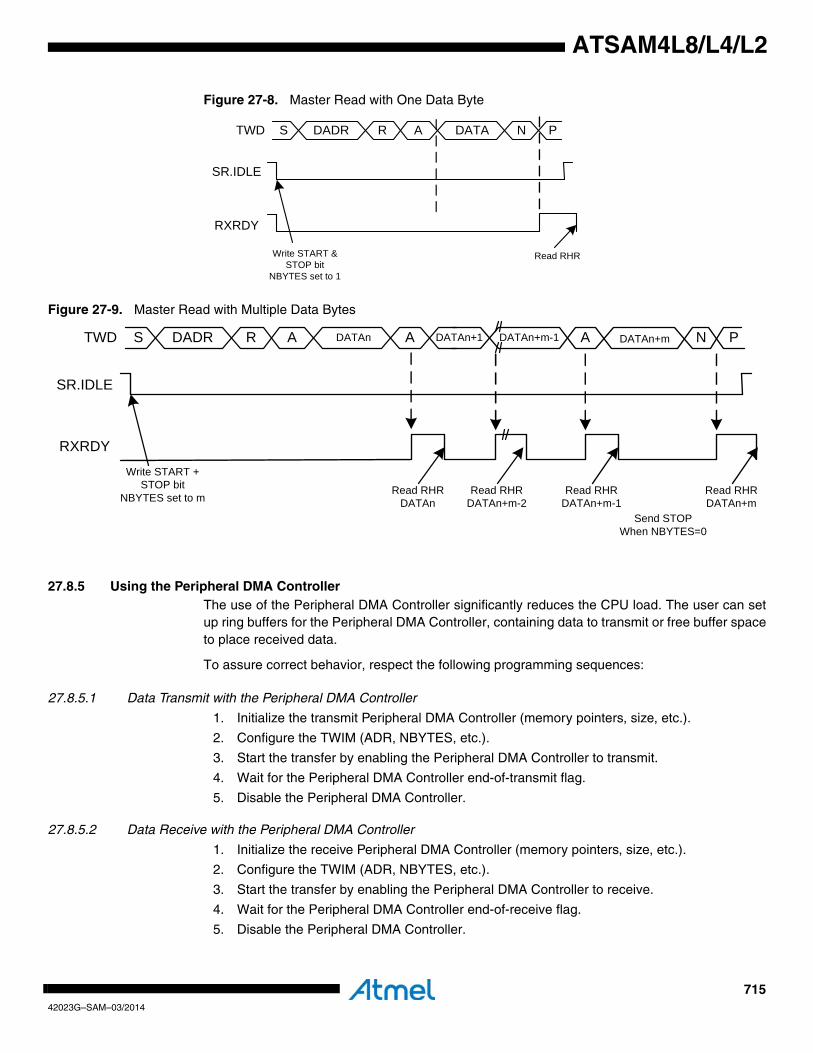
71542023G–SAM–03/2014
ATSAM4L8/L4/L2
Figure 27-8. Master Read with One Data Byte
Figure 27-9. Master Read with Multiple Data Bytes
27.8.5 Using the Peripheral DMA Controller The use of the Peripheral DMA Controller significantly reduces the CPU load. The user can setup ring buffers for the Peripheral DMA Controller, containing data to transmit or free buffer spaceto place received data.
To assure correct behavior, respect the following programming sequences:
27.8.5.1 Data Transmit with the Peripheral DMA Controller
1. Initialize the transmit Peripheral DMA Controller (memory pointers, size, etc.).
2. Configure the TWIM (ADR, NBYTES, etc.).
3. Start the transfer by enabling the Peripheral DMA Controller to transmit.
4. Wait for the Peripheral DMA Controller end-of-transmit flag.
5. Disable the Peripheral DMA Controller.
27.8.5.2 Data Receive with the Peripheral DMA Controller
1. Initialize the receive Peripheral DMA Controller (memory pointers, size, etc.).
2. Configure the TWIM (ADR, NBYTES, etc.).
3. Start the transfer by enabling the Peripheral DMA Controller to receive.
4. Wait for the Peripheral DMA Controller end-of-receive flag.
5. Disable the Peripheral DMA Controller.
TWD
SR.IDLE
RXRDY
Write START & STOP bit
NBYTES set to 1
Read RHR
S DADR R A DATA N P
TWD
SR.IDLE
RXRDY
Write START + STOP bit
NBYTES set to m
S DADR R A DATAn A DATAn+m-1 A NDATAn+m P
Read RHRDATAn
DATAn+1
Read RHRDATAn+m-2
Read RHRDATAn+m-1
Read RHRDATAn+m
Send STOPWhen NBYTES=0

71642023G–SAM–03/2014
ATSAM4L8/L4/L2
27.8.6 Multi-master ModeMore than one master may access the bus at the same time without data corruption by usingarbitration.
Arbitration starts as soon as two or more masters place information on the bus at the same time,and stops (arbitration is lost) for the master that intends to send a logical one while the othermaster sends a logical zero.
As soon as arbitration is lost by a master, it stops sending data and listens to the bus in order todetect a STOP. The SR.ARBLST flag will be set. When the STOP is detected, the master wholost arbitration may reinitiate the data transfer.
Arbitration is illustrated in Figure 27-11.
If the user starts a transfer and if the bus is busy, the TWIM automatically waits for a STOP con-dition on the bus before initiating the transfer (see Figure 27-10).
Note: The state of the bus (busy or free) is not indicated in the user interface.
Figure 27-10. User Sends Data While the Bus is Busy
TWCK
TWD DATA sent by a master
STOP sent by the master START sent by the TWI
DATA sent by the TWI
Bus is busy
Bus is free
A transfer is programmed(DADR + W + START + Write THR) Transfer is initiated
TWI DATA transfer Transfer is kept
Bus is considered as free
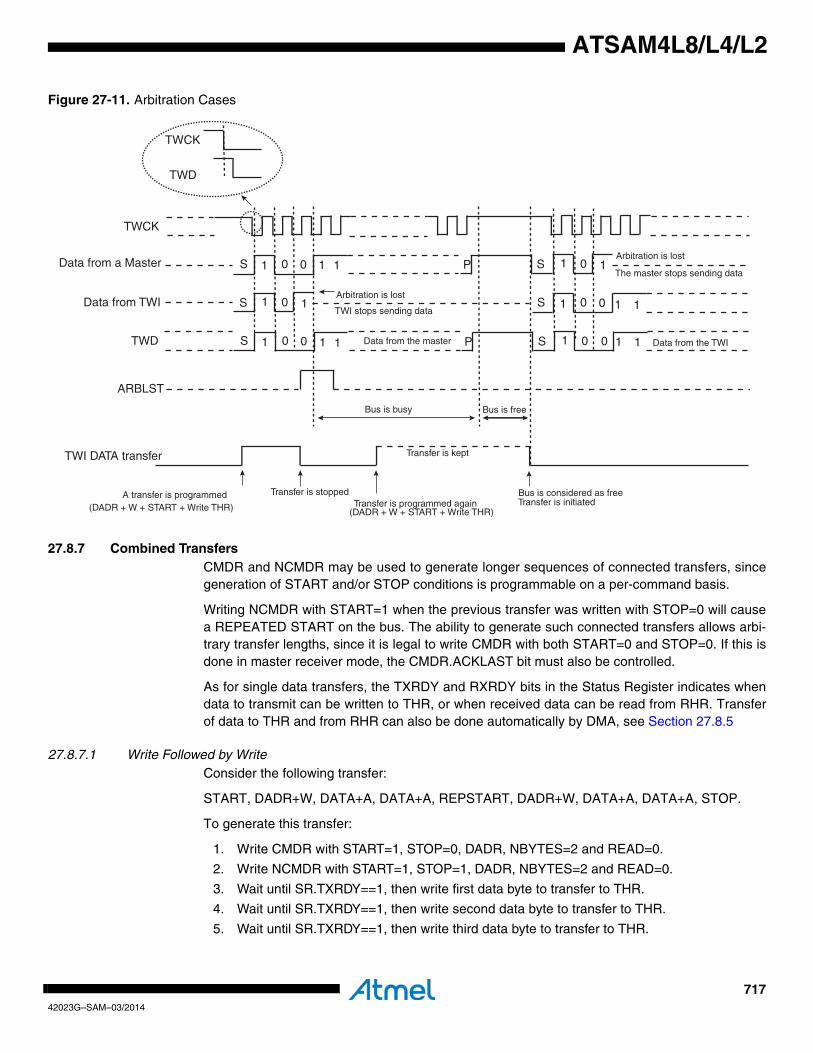
71742023G–SAM–03/2014
ATSAM4L8/L4/L2
Figure 27-11. Arbitration Cases
27.8.7 Combined TransfersCMDR and NCMDR may be used to generate longer sequences of connected transfers, sincegeneration of START and/or STOP conditions is programmable on a per-command basis.
Writing NCMDR with START=1 when the previous transfer was written with STOP=0 will causea REPEATED START on the bus. The ability to generate such connected transfers allows arbi-trary transfer lengths, since it is legal to write CMDR with both START=0 and STOP=0. If this isdone in master receiver mode, the CMDR.ACKLAST bit must also be controlled.
As for single data transfers, the TXRDY and RXRDY bits in the Status Register indicates whendata to transmit can be written to THR, or when received data can be read from RHR. Transferof data to THR and from RHR can also be done automatically by DMA, see Section 27.8.5
27.8.7.1 Write Followed by WriteConsider the following transfer:
START, DADR+W, DATA+A, DATA+A, REPSTART, DADR+W, DATA+A, DATA+A, STOP.
To generate this transfer:
1. Write CMDR with START=1, STOP=0, DADR, NBYTES=2 and READ=0.
2. Write NCMDR with START=1, STOP=1, DADR, NBYTES=2 and READ=0.
3. Wait until SR.TXRDY==1, then write first data byte to transfer to THR.
4. Wait until SR.TXRDY==1, then write second data byte to transfer to THR.
5. Wait until SR.TXRDY==1, then write third data byte to transfer to THR.
TWCK
Bus is busy Bus is free
A transfer is programmed(DADR + W + START + Write THR) Transfer is initiated
TWI DATA transfer Transfer is kept
Bus is considered as free
Data from a Master
Data from TWI S 0
S 0 0
1
1
1
ARBLST
S 0
S 0 0
1
1
1
TWD S 0 01
1 1
1 1
Arbitration is lost
TWI stops sending data
P
S 01P 0
1 1
1 1Data from the master Data from the TWI
Arbitration is lost
The master stops sending data
Transfer is stoppedTransfer is programmed again
(DADR + W + START + Write THR)
TWCK
TWD
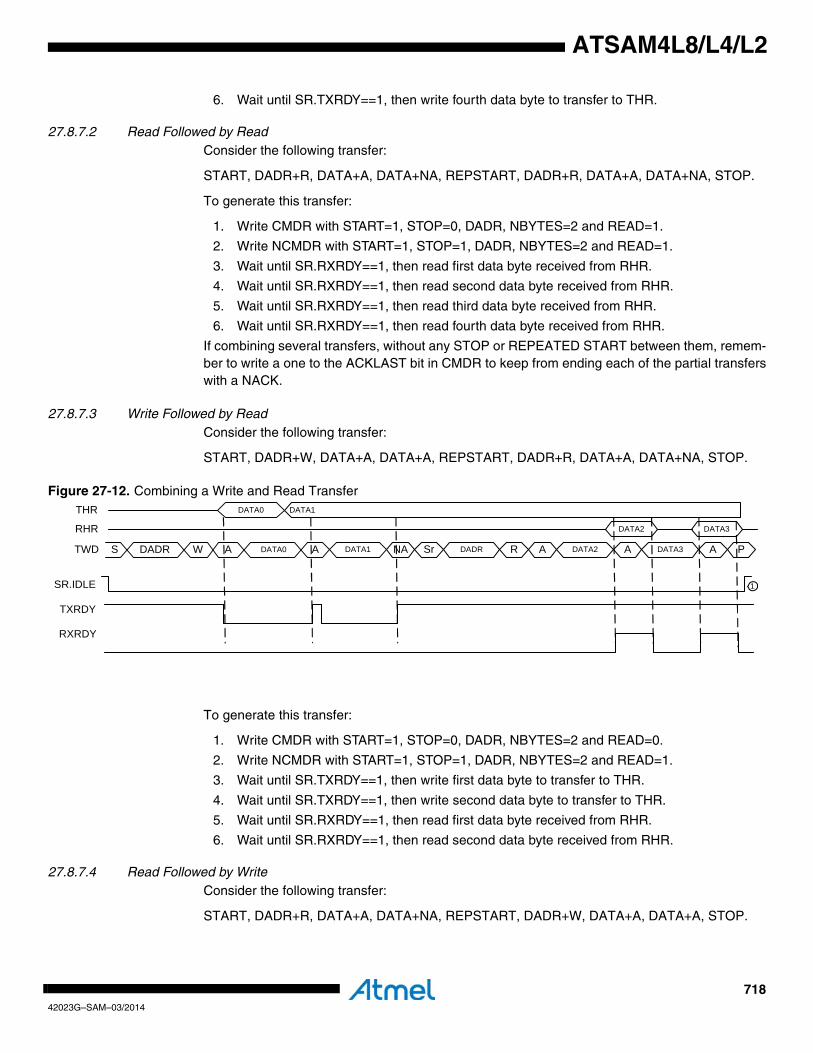
71842023G–SAM–03/2014
ATSAM4L8/L4/L2
6. Wait until SR.TXRDY==1, then write fourth data byte to transfer to THR.
27.8.7.2 Read Followed by ReadConsider the following transfer:
START, DADR+R, DATA+A, DATA+NA, REPSTART, DADR+R, DATA+A, DATA+NA, STOP.
To generate this transfer:
1. Write CMDR with START=1, STOP=0, DADR, NBYTES=2 and READ=1.
2. Write NCMDR with START=1, STOP=1, DADR, NBYTES=2 and READ=1.
3. Wait until SR.RXRDY==1, then read first data byte received from RHR.
4. Wait until SR.RXRDY==1, then read second data byte received from RHR.
5. Wait until SR.RXRDY==1, then read third data byte received from RHR.
6. Wait until SR.RXRDY==1, then read fourth data byte received from RHR.
If combining several transfers, without any STOP or REPEATED START between them, remem-ber to write a one to the ACKLAST bit in CMDR to keep from ending each of the partial transferswith a NACK.
27.8.7.3 Write Followed by ReadConsider the following transfer:
START, DADR+W, DATA+A, DATA+A, REPSTART, DADR+R, DATA+A, DATA+NA, STOP.
Figure 27-12. Combining a Write and Read Transfer
To generate this transfer:
1. Write CMDR with START=1, STOP=0, DADR, NBYTES=2 and READ=0.
2. Write NCMDR with START=1, STOP=1, DADR, NBYTES=2 and READ=1.
3. Wait until SR.TXRDY==1, then write first data byte to transfer to THR.
4. Wait until SR.TXRDY==1, then write second data byte to transfer to THR.
5. Wait until SR.RXRDY==1, then read first data byte received from RHR.
6. Wait until SR.RXRDY==1, then read second data byte received from RHR.
27.8.7.4 Read Followed by WriteConsider the following transfer:
START, DADR+R, DATA+A, DATA+NA, REPSTART, DADR+W, DATA+A, DATA+A, STOP.
TWD
SR.IDLE
TXRDY
S DADR W A DATA0 A DATA1 NA Sr DADR R A DATA2 A DATA3 A P
DATA0 DATA1THR
RXRDY
1
RHR DATA3DATA2
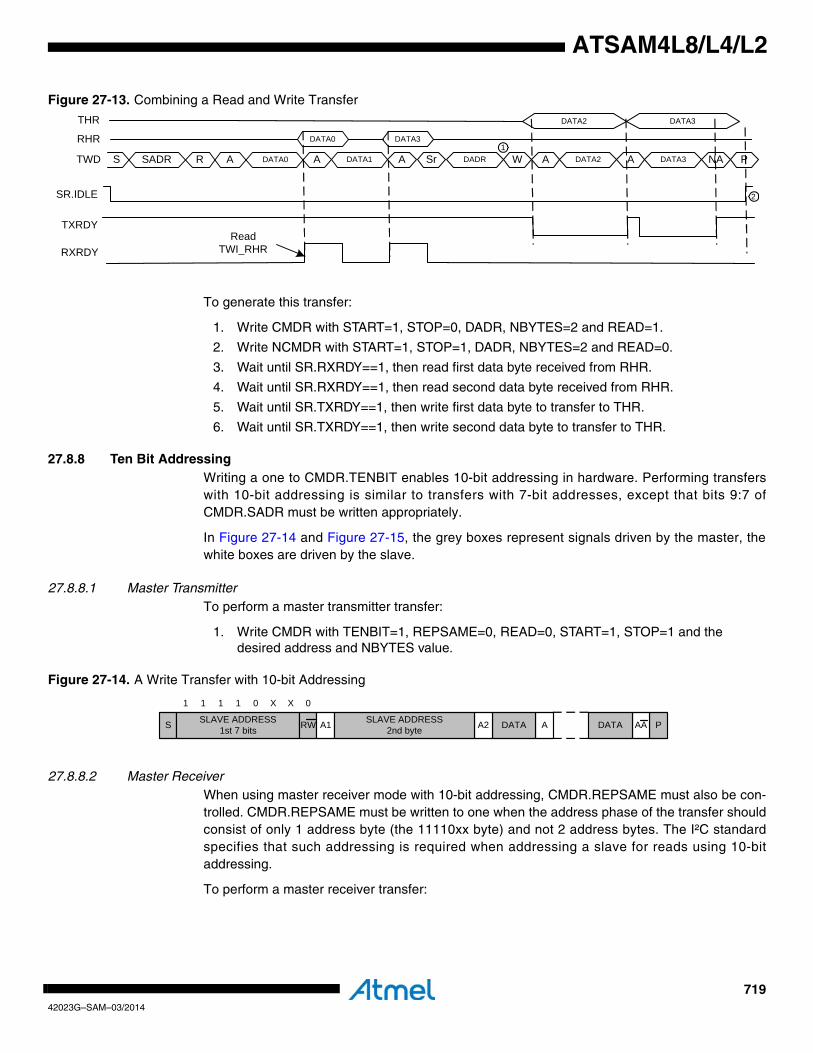
71942023G–SAM–03/2014
ATSAM4L8/L4/L2
Figure 27-13. Combining a Read and Write Transfer
To generate this transfer:
1. Write CMDR with START=1, STOP=0, DADR, NBYTES=2 and READ=1.
2. Write NCMDR with START=1, STOP=1, DADR, NBYTES=2 and READ=0.
3. Wait until SR.RXRDY==1, then read first data byte received from RHR.
4. Wait until SR.RXRDY==1, then read second data byte received from RHR.
5. Wait until SR.TXRDY==1, then write first data byte to transfer to THR.
6. Wait until SR.TXRDY==1, then write second data byte to transfer to THR.
27.8.8 Ten Bit AddressingWriting a one to CMDR.TENBIT enables 10-bit addressing in hardware. Performing transferswith 10-bit addressing is similar to transfers with 7-bit addresses, except that bits 9:7 ofCMDR.SADR must be written appropriately.
In Figure 27-14 and Figure 27-15, the grey boxes represent signals driven by the master, thewhite boxes are driven by the slave.
27.8.8.1 Master TransmitterTo perform a master transmitter transfer:
1. Write CMDR with TENBIT=1, REPSAME=0, READ=0, START=1, STOP=1 and the desired address and NBYTES value.
Figure 27-14. A Write Transfer with 10-bit Addressing
27.8.8.2 Master ReceiverWhen using master receiver mode with 10-bit addressing, CMDR.REPSAME must also be con-trolled. CMDR.REPSAME must be written to one when the address phase of the transfer shouldconsist of only 1 address byte (the 11110xx byte) and not 2 address bytes. The I²C standardspecifies that such addressing is required when addressing a slave for reads using 10-bitaddressing.
To perform a master receiver transfer:
TWD
SR.IDLE
TXRDY
S SADR R A DATA0 A DATA1 Sr DADR W A DATA2 A DATA3 NA P
DATA2THR
RXRDY
RHR DATA3DATA0
A1
2
DATA3
Read TWI_RHR
S SLAVE ADDRESS1st 7 bits PADATARW A1 A2SLAVE ADDRESS
2nd byte AADATA
1 1 1 1 0 X X 0
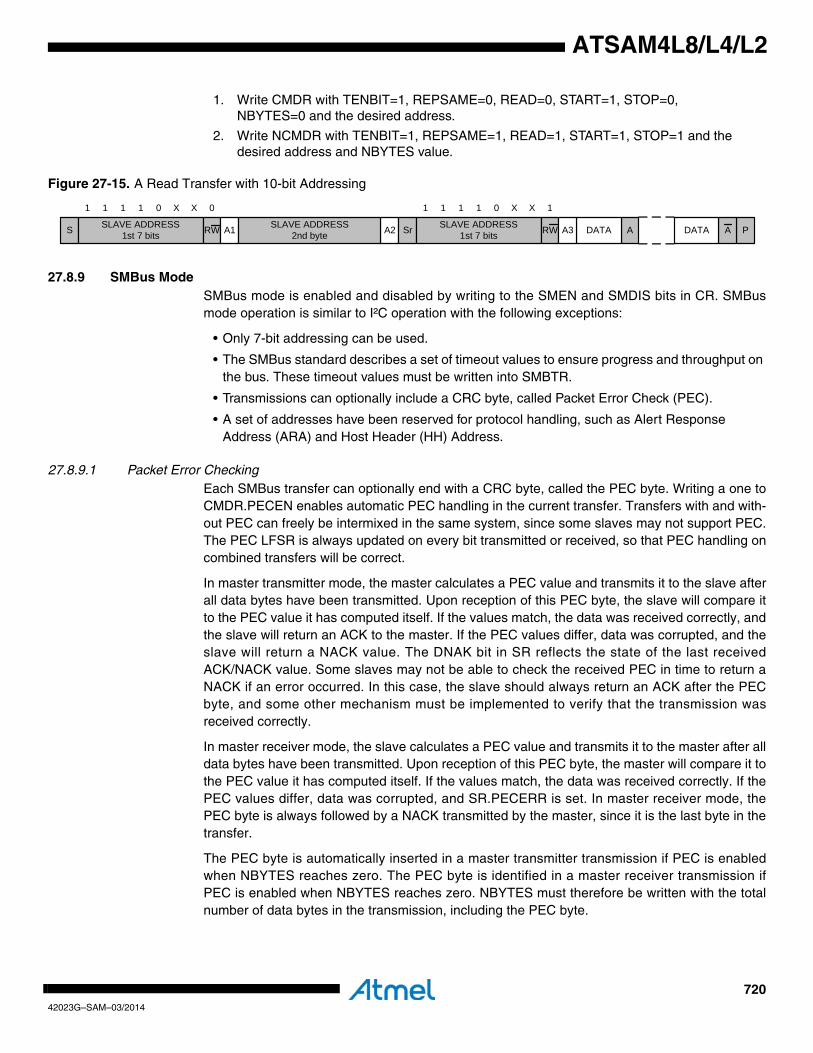
72042023G–SAM–03/2014
ATSAM4L8/L4/L2
1. Write CMDR with TENBIT=1, REPSAME=0, READ=0, START=1, STOP=0, NBYTES=0 and the desired address.
2. Write NCMDR with TENBIT=1, REPSAME=1, READ=1, START=1, STOP=1 and the desired address and NBYTES value.
Figure 27-15. A Read Transfer with 10-bit Addressing
27.8.9 SMBus ModeSMBus mode is enabled and disabled by writing to the SMEN and SMDIS bits in CR. SMBusmode operation is similar to I²C operation with the following exceptions:
• Only 7-bit addressing can be used.
• The SMBus standard describes a set of timeout values to ensure progress and throughput on the bus. These timeout values must be written into SMBTR.
• Transmissions can optionally include a CRC byte, called Packet Error Check (PEC).
• A set of addresses have been reserved for protocol handling, such as Alert Response Address (ARA) and Host Header (HH) Address.
27.8.9.1 Packet Error CheckingEach SMBus transfer can optionally end with a CRC byte, called the PEC byte. Writing a one toCMDR.PECEN enables automatic PEC handling in the current transfer. Transfers with and with-out PEC can freely be intermixed in the same system, since some slaves may not support PEC.The PEC LFSR is always updated on every bit transmitted or received, so that PEC handling oncombined transfers will be correct.
In master transmitter mode, the master calculates a PEC value and transmits it to the slave afterall data bytes have been transmitted. Upon reception of this PEC byte, the slave will compare itto the PEC value it has computed itself. If the values match, the data was received correctly, andthe slave will return an ACK to the master. If the PEC values differ, data was corrupted, and theslave will return a NACK value. The DNAK bit in SR reflects the state of the last receivedACK/NACK value. Some slaves may not be able to check the received PEC in time to return aNACK if an error occurred. In this case, the slave should always return an ACK after the PECbyte, and some other mechanism must be implemented to verify that the transmission wasreceived correctly.
In master receiver mode, the slave calculates a PEC value and transmits it to the master after alldata bytes have been transmitted. Upon reception of this PEC byte, the master will compare it tothe PEC value it has computed itself. If the values match, the data was received correctly. If thePEC values differ, data was corrupted, and SR.PECERR is set. In master receiver mode, thePEC byte is always followed by a NACK transmitted by the master, since it is the last byte in thetransfer.
The PEC byte is automatically inserted in a master transmitter transmission if PEC is enabledwhen NBYTES reaches zero. The PEC byte is identified in a master receiver transmission ifPEC is enabled when NBYTES reaches zero. NBYTES must therefore be written with the totalnumber of data bytes in the transmission, including the PEC byte.
S SLAVE ADDRESS1st 7 bits PADATARW A1 A2SLAVE ADDRESS
2nd byte ADATA
1 1 1 1 0 X X 0
Sr SLAVE ADDRESS1st 7 bits RW A3
1 1 1 1 0 X X 1
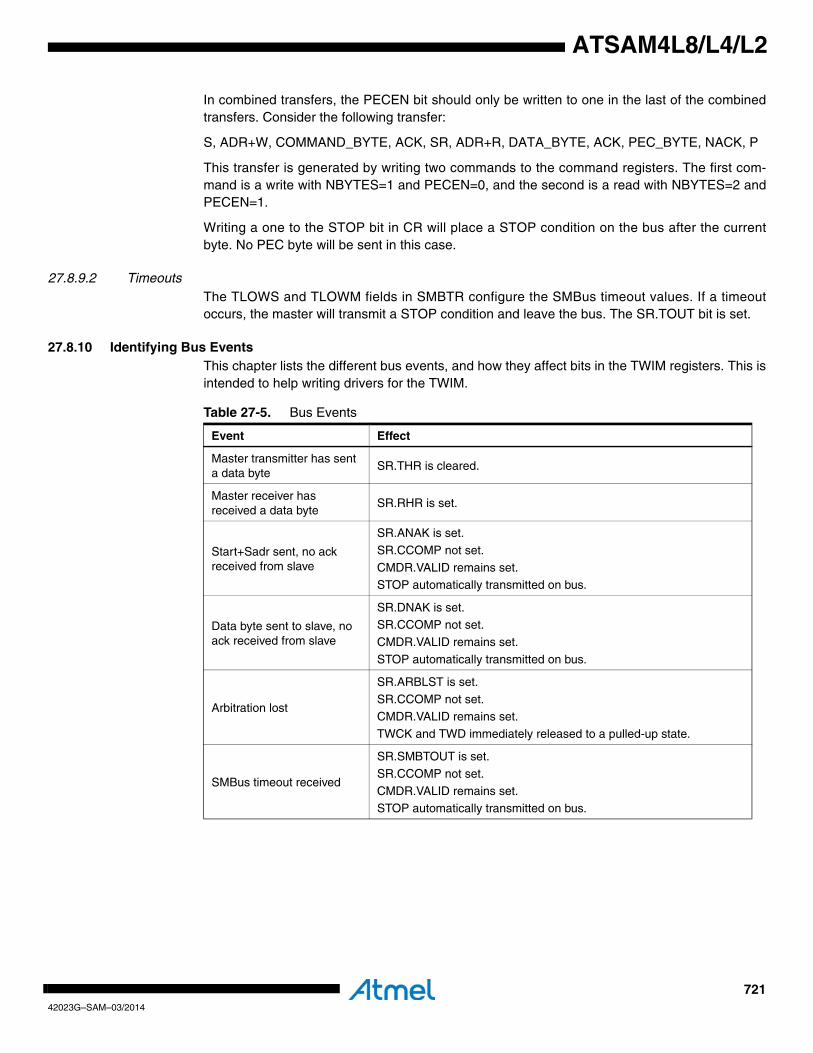
72142023G–SAM–03/2014
ATSAM4L8/L4/L2
In combined transfers, the PECEN bit should only be written to one in the last of the combinedtransfers. Consider the following transfer:
S, ADR+W, COMMAND_BYTE, ACK, SR, ADR+R, DATA_BYTE, ACK, PEC_BYTE, NACK, P
This transfer is generated by writing two commands to the command registers. The first com-mand is a write with NBYTES=1 and PECEN=0, and the second is a read with NBYTES=2 andPECEN=1.
Writing a one to the STOP bit in CR will place a STOP condition on the bus after the currentbyte. No PEC byte will be sent in this case.
27.8.9.2 TimeoutsThe TLOWS and TLOWM fields in SMBTR configure the SMBus timeout values. If a timeoutoccurs, the master will transmit a STOP condition and leave the bus. The SR.TOUT bit is set.
27.8.10 Identifying Bus EventsThis chapter lists the different bus events, and how they affect bits in the TWIM registers. This isintended to help writing drivers for the TWIM.
Table 27-5. Bus Events
Event Effect
Master transmitter has sent a data byte
SR.THR is cleared.
Master receiver has received a data byte
SR.RHR is set.
Start+Sadr sent, no ack received from slave
SR.ANAK is set.
SR.CCOMP not set.
CMDR.VALID remains set.STOP automatically transmitted on bus.
Data byte sent to slave, no ack received from slave
SR.DNAK is set.SR.CCOMP not set.
CMDR.VALID remains set.
STOP automatically transmitted on bus.
Arbitration lost
SR.ARBLST is set.
SR.CCOMP not set.CMDR.VALID remains set.
TWCK and TWD immediately released to a pulled-up state.
SMBus timeout received
SR.SMBTOUT is set.
SR.CCOMP not set.
CMDR.VALID remains set.STOP automatically transmitted on bus.
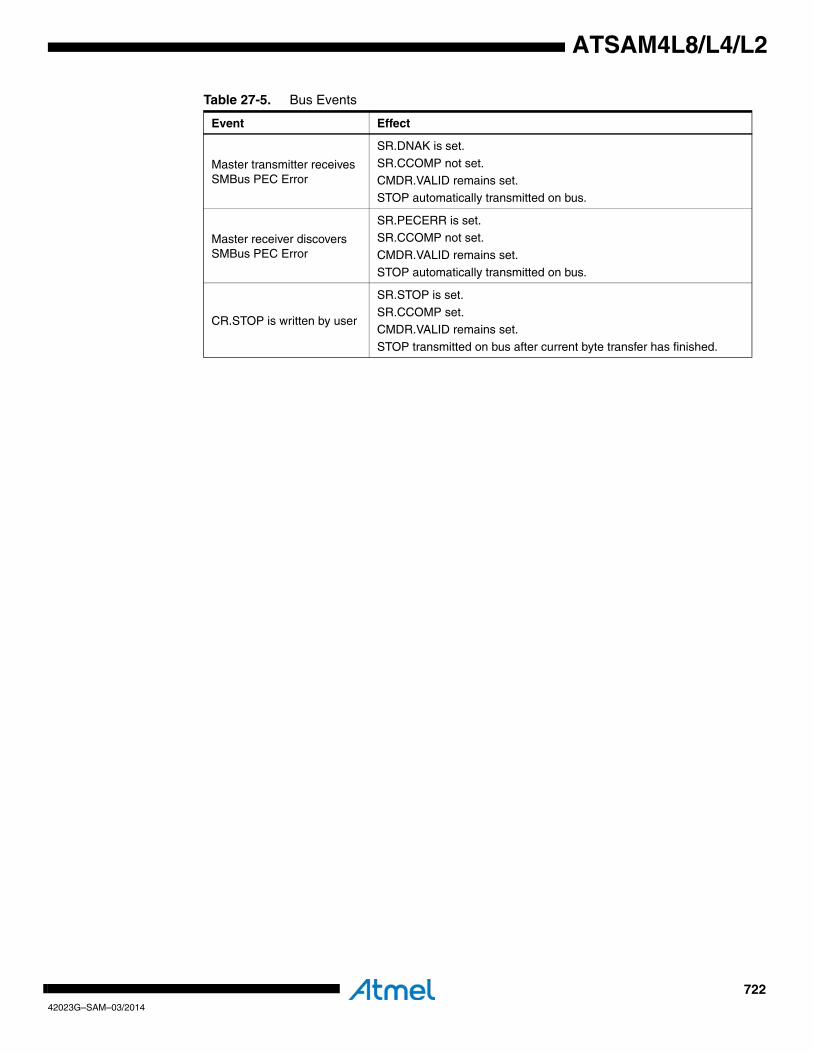
72242023G–SAM–03/2014
ATSAM4L8/L4/L2
Master transmitter receives SMBus PEC Error
SR.DNAK is set.
SR.CCOMP not set.CMDR.VALID remains set.
STOP automatically transmitted on bus.
Master receiver discovers SMBus PEC Error
SR.PECERR is set.SR.CCOMP not set.
CMDR.VALID remains set.
STOP automatically transmitted on bus.
CR.STOP is written by user
SR.STOP is set.
SR.CCOMP set.CMDR.VALID remains set.
STOP transmitted on bus after current byte transfer has finished.
Table 27-5. Bus Events
Event Effect
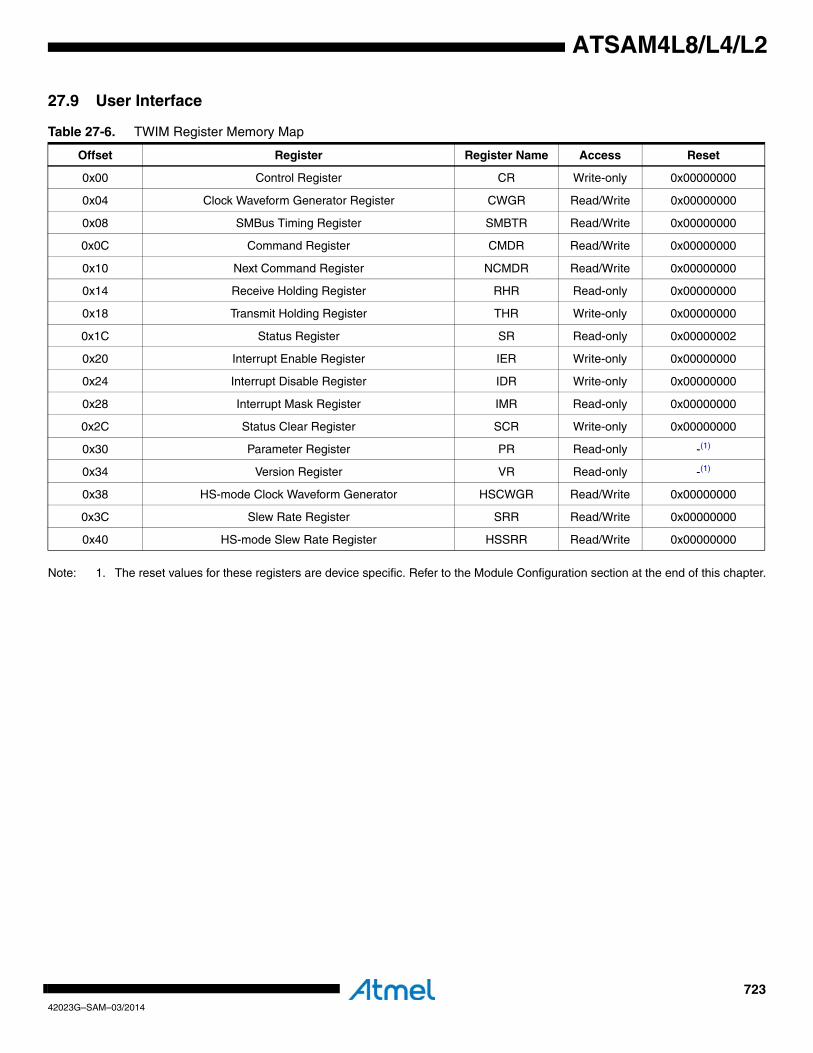
72342023G–SAM–03/2014
ATSAM4L8/L4/L2
27.9 User Interface
Note: 1. The reset values for these registers are device specific. Refer to the Module Configuration section at the end of this chapter.
Table 27-6. TWIM Register Memory Map
Offset Register Register Name Access Reset
0x00 Control Register CR Write-only 0x00000000
0x04 Clock Waveform Generator Register CWGR Read/Write 0x00000000
0x08 SMBus Timing Register SMBTR Read/Write 0x00000000
0x0C Command Register CMDR Read/Write 0x00000000
0x10 Next Command Register NCMDR Read/Write 0x00000000
0x14 Receive Holding Register RHR Read-only 0x00000000
0x18 Transmit Holding Register THR Write-only 0x00000000
0x1C Status Register SR Read-only 0x00000002
0x20 Interrupt Enable Register IER Write-only 0x00000000
0x24 Interrupt Disable Register IDR Write-only 0x00000000
0x28 Interrupt Mask Register IMR Read-only 0x00000000
0x2C Status Clear Register SCR Write-only 0x00000000
0x30 Parameter Register PR Read-only -(1)
0x34 Version Register VR Read-only -(1)
0x38 HS-mode Clock Waveform Generator HSCWGR Read/Write 0x00000000
0x3C Slew Rate Register SRR Read/Write 0x00000000
0x40 HS-mode Slew Rate Register HSSRR Read/Write 0x00000000
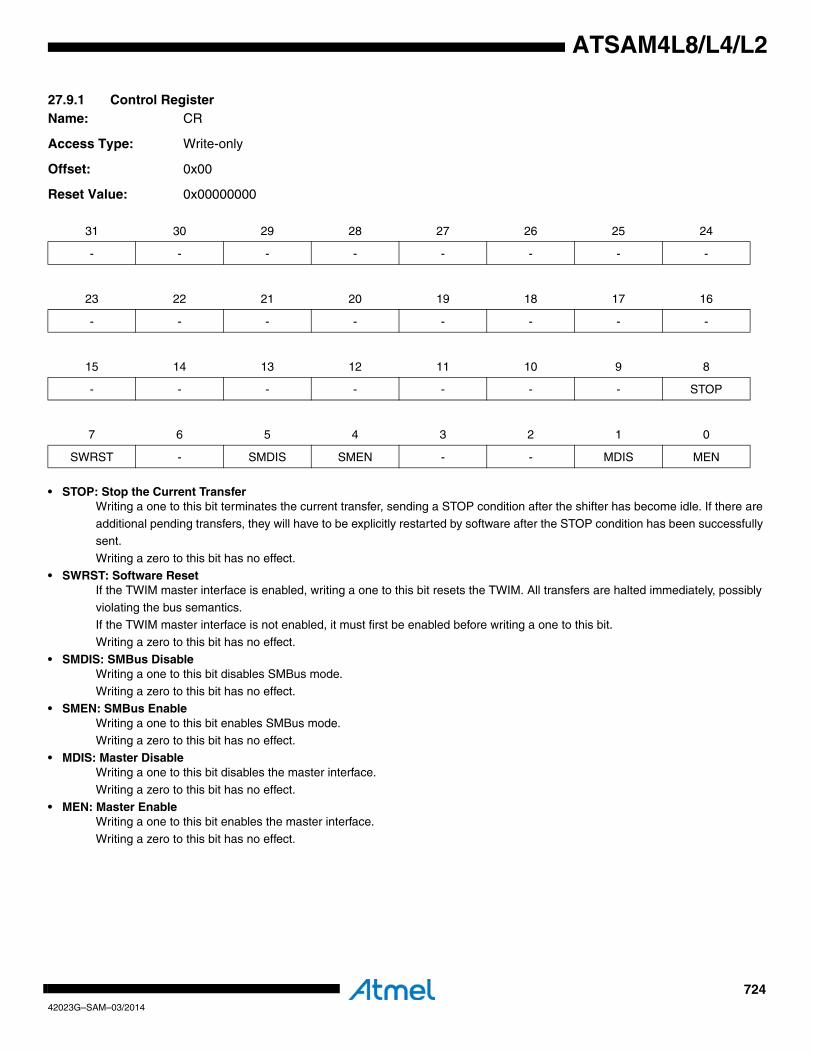
72442023G–SAM–03/2014
ATSAM4L8/L4/L2
27.9.1 Control RegisterName: CR
Access Type: Write-only
Offset: 0x00
Reset Value: 0x00000000
• STOP: Stop the Current TransferWriting a one to this bit terminates the current transfer, sending a STOP condition after the shifter has become idle. If there are
additional pending transfers, they will have to be explicitly restarted by software after the STOP condition has been successfully sent.
Writing a zero to this bit has no effect.
• SWRST: Software ResetIf the TWIM master interface is enabled, writing a one to this bit resets the TWIM. All transfers are halted immediately, possibly
violating the bus semantics.If the TWIM master interface is not enabled, it must first be enabled before writing a one to this bit.
Writing a zero to this bit has no effect.
• SMDIS: SMBus DisableWriting a one to this bit disables SMBus mode.
Writing a zero to this bit has no effect.• SMEN: SMBus Enable
Writing a one to this bit enables SMBus mode.Writing a zero to this bit has no effect.
• MDIS: Master DisableWriting a one to this bit disables the master interface.
Writing a zero to this bit has no effect.
• MEN: Master EnableWriting a one to this bit enables the master interface.
Writing a zero to this bit has no effect.
31 30 29 28 27 26 25 24
- - - - - - - -
23 22 21 20 19 18 17 16
- - - - - - - -
15 14 13 12 11 10 9 8
- - - - - - - STOP
7 6 5 4 3 2 1 0
SWRST - SMDIS SMEN - - MDIS MEN
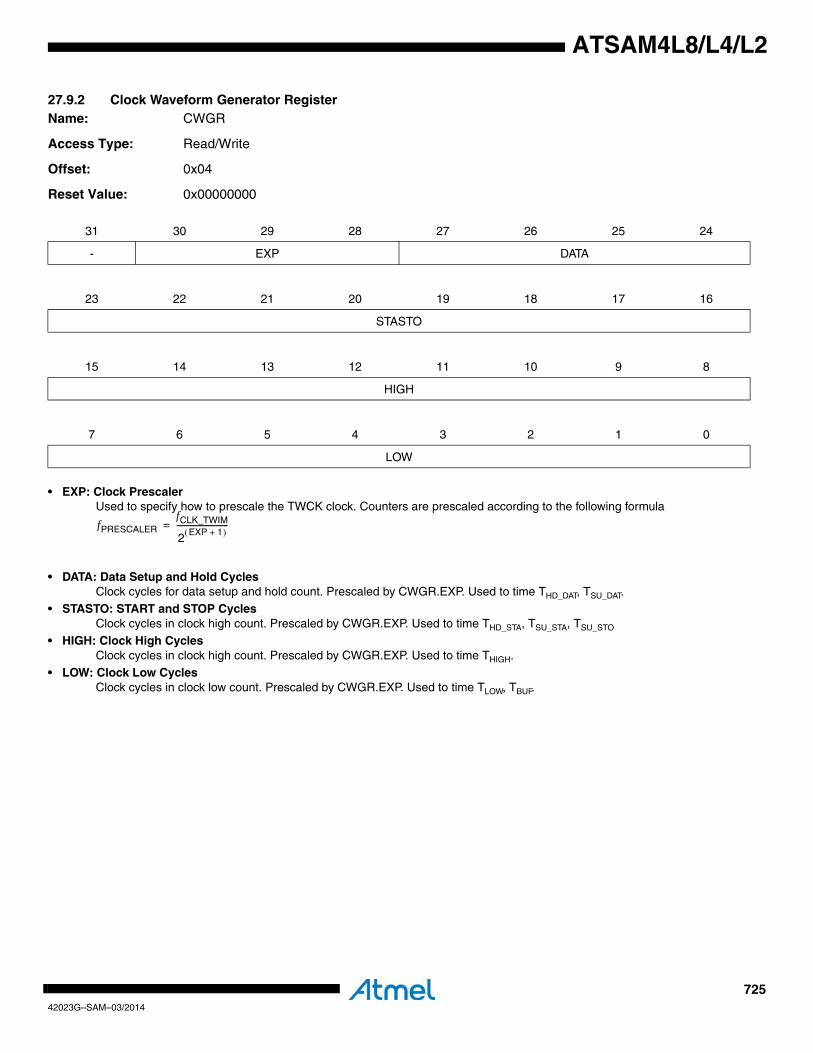
72542023G–SAM–03/2014
ATSAM4L8/L4/L2
27.9.2 Clock Waveform Generator RegisterName: CWGR
Access Type: Read/Write
Offset: 0x04
Reset Value: 0x00000000
• EXP: Clock Prescaler Used to specify how to prescale the TWCK clock. Counters are prescaled according to the following formula
• DATA: Data Setup and Hold CyclesClock cycles for data setup and hold count. Prescaled by CWGR.EXP. Used to time THD_DAT, TSU_DAT.
• STASTO: START and STOP CyclesClock cycles in clock high count. Prescaled by CWGR.EXP. Used to time THD_STA, TSU_STA, TSU_STO
• HIGH: Clock High CyclesClock cycles in clock high count. Prescaled by CWGR.EXP. Used to time THIGH.
• LOW: Clock Low CyclesClock cycles in clock low count. Prescaled by CWGR.EXP. Used to time TLOW, TBUF.
31 30 29 28 27 26 25 24
- EXP DATA
23 22 21 20 19 18 17 16
STASTO
15 14 13 12 11 10 9 8
HIGH
7 6 5 4 3 2 1 0
LOW
fPRESCALERfCLK_TWIM
2 EXP 1+( )--------------------------=
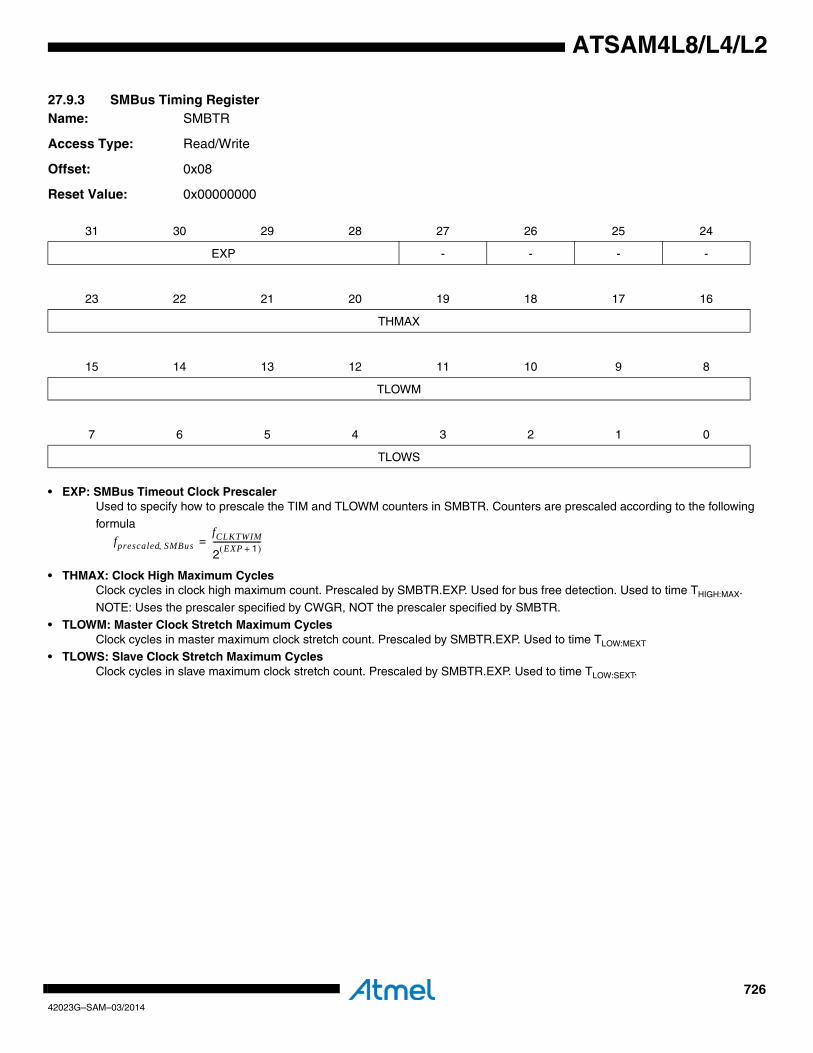
72642023G–SAM–03/2014
ATSAM4L8/L4/L2
27.9.3 SMBus Timing RegisterName: SMBTR
Access Type: Read/Write
Offset: 0x08
Reset Value: 0x00000000
• EXP: SMBus Timeout Clock Prescaler Used to specify how to prescale the TIM and TLOWM counters in SMBTR. Counters are prescaled according to the following
formula
• THMAX: Clock High Maximum CyclesClock cycles in clock high maximum count. Prescaled by SMBTR.EXP. Used for bus free detection. Used to time THIGH:MAX.
NOTE: Uses the prescaler specified by CWGR, NOT the prescaler specified by SMBTR.• TLOWM: Master Clock Stretch Maximum Cycles
Clock cycles in master maximum clock stretch count. Prescaled by SMBTR.EXP. Used to time TLOW:MEXT
• TLOWS: Slave Clock Stretch Maximum CyclesClock cycles in slave maximum clock stretch count. Prescaled by SMBTR.EXP. Used to time TLOW:SEXT.
31 30 29 28 27 26 25 24
EXP - - - -
23 22 21 20 19 18 17 16
THMAX
15 14 13 12 11 10 9 8
TLOWM
7 6 5 4 3 2 1 0
TLOWS
fprescaled SMBus,fCLKTWIM
2 EXP 1+( )------------------------=
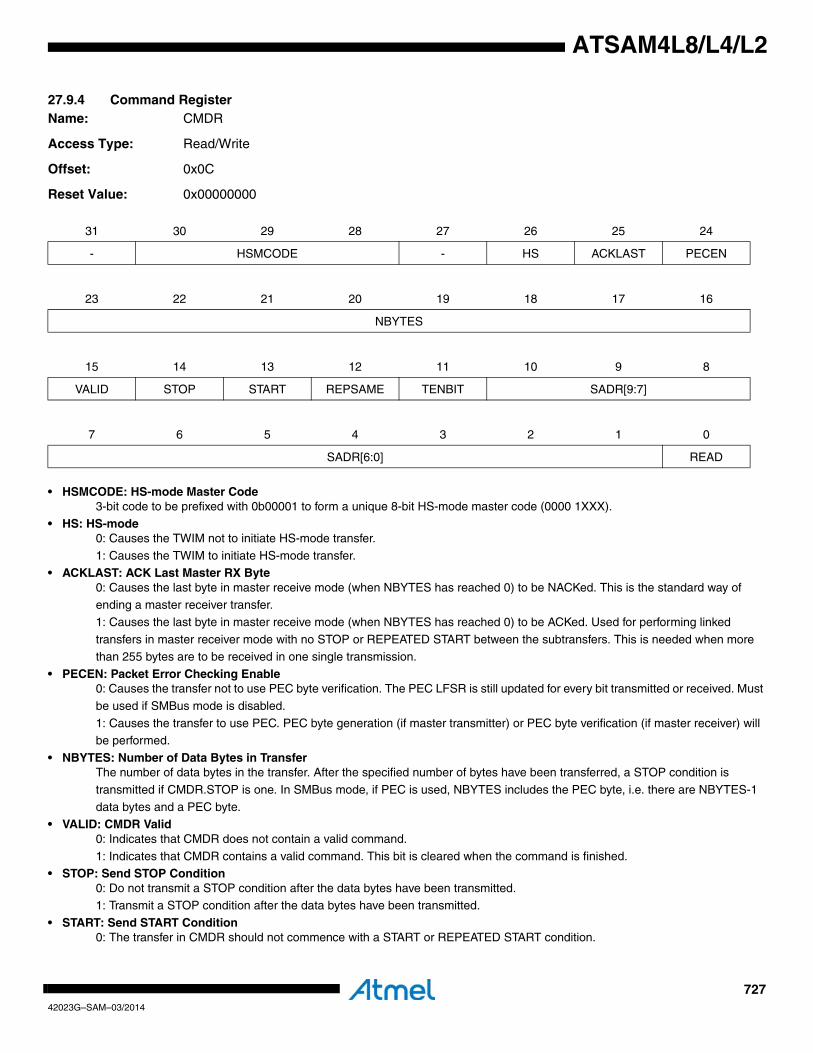
72742023G–SAM–03/2014
ATSAM4L8/L4/L2
27.9.4 Command RegisterName: CMDR
Access Type: Read/Write
Offset: 0x0C
Reset Value: 0x00000000
• HSMCODE: HS-mode Master Code3-bit code to be prefixed with 0b00001 to form a unique 8-bit HS-mode master code (0000 1XXX).
• HS: HS-mode0: Causes the TWIM not to initiate HS-mode transfer.
1: Causes the TWIM to initiate HS-mode transfer.• ACKLAST: ACK Last Master RX Byte
0: Causes the last byte in master receive mode (when NBYTES has reached 0) to be NACKed. This is the standard way of ending a master receiver transfer.
1: Causes the last byte in master receive mode (when NBYTES has reached 0) to be ACKed. Used for performing linked
transfers in master receiver mode with no STOP or REPEATED START between the subtransfers. This is needed when more than 255 bytes are to be received in one single transmission.
• PECEN: Packet Error Checking Enable0: Causes the transfer not to use PEC byte verification. The PEC LFSR is still updated for every bit transmitted or received. Must
be used if SMBus mode is disabled.
1: Causes the transfer to use PEC. PEC byte generation (if master transmitter) or PEC byte verification (if master receiver) will be performed.
• NBYTES: Number of Data Bytes in TransferThe number of data bytes in the transfer. After the specified number of bytes have been transferred, a STOP condition is
transmitted if CMDR.STOP is one. In SMBus mode, if PEC is used, NBYTES includes the PEC byte, i.e. there are NBYTES-1
data bytes and a PEC byte.• VALID: CMDR Valid
0: Indicates that CMDR does not contain a valid command.
1: Indicates that CMDR contains a valid command. This bit is cleared when the command is finished.• STOP: Send STOP Condition
0: Do not transmit a STOP condition after the data bytes have been transmitted.1: Transmit a STOP condition after the data bytes have been transmitted.
• START: Send START Condition0: The transfer in CMDR should not commence with a START or REPEATED START condition.
31 30 29 28 27 26 25 24
- HSMCODE - HS ACKLAST PECEN
23 22 21 20 19 18 17 16
NBYTES
15 14 13 12 11 10 9 8
VALID STOP START REPSAME TENBIT SADR[9:7]
7 6 5 4 3 2 1 0
SADR[6:0] READ
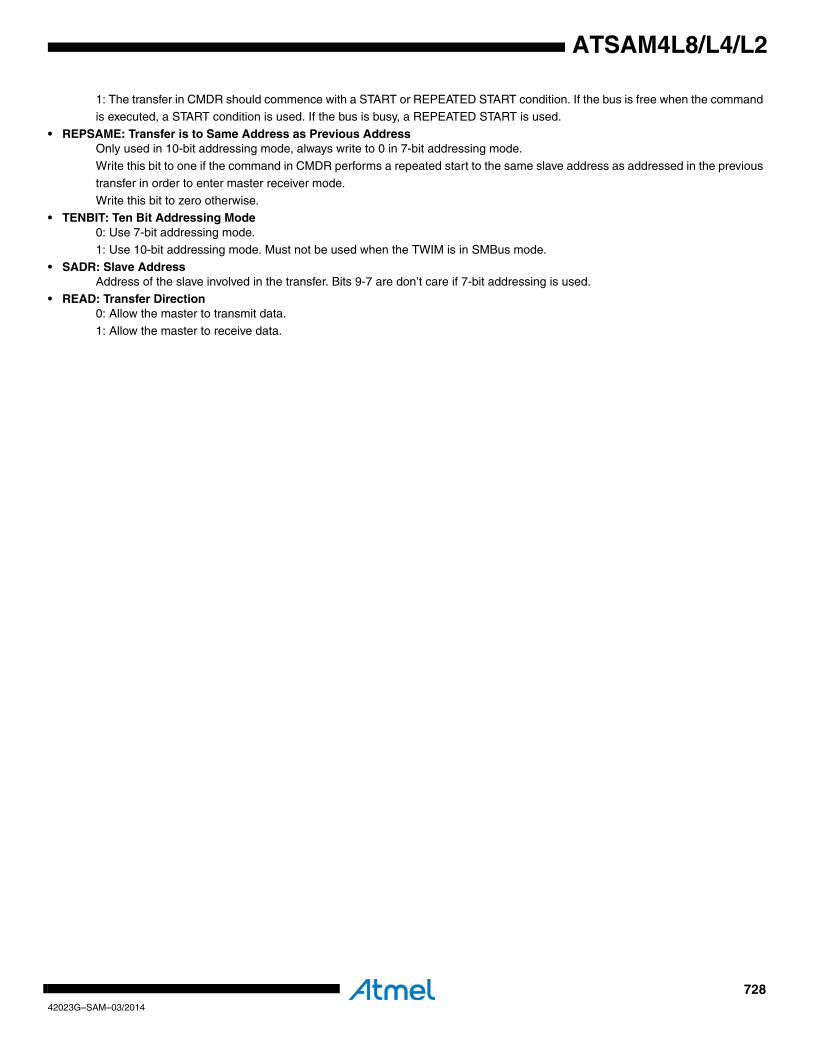
72842023G–SAM–03/2014
ATSAM4L8/L4/L2
1: The transfer in CMDR should commence with a START or REPEATED START condition. If the bus is free when the command is executed, a START condition is used. If the bus is busy, a REPEATED START is used.
• REPSAME: Transfer is to Same Address as Previous AddressOnly used in 10-bit addressing mode, always write to 0 in 7-bit addressing mode.
Write this bit to one if the command in CMDR performs a repeated start to the same slave address as addressed in the previous
transfer in order to enter master receiver mode.
Write this bit to zero otherwise.• TENBIT: Ten Bit Addressing Mode
0: Use 7-bit addressing mode.1: Use 10-bit addressing mode. Must not be used when the TWIM is in SMBus mode.
• SADR: Slave AddressAddress of the slave involved in the transfer. Bits 9-7 are don’t care if 7-bit addressing is used.
• READ: Transfer Direction0: Allow the master to transmit data.
1: Allow the master to receive data.
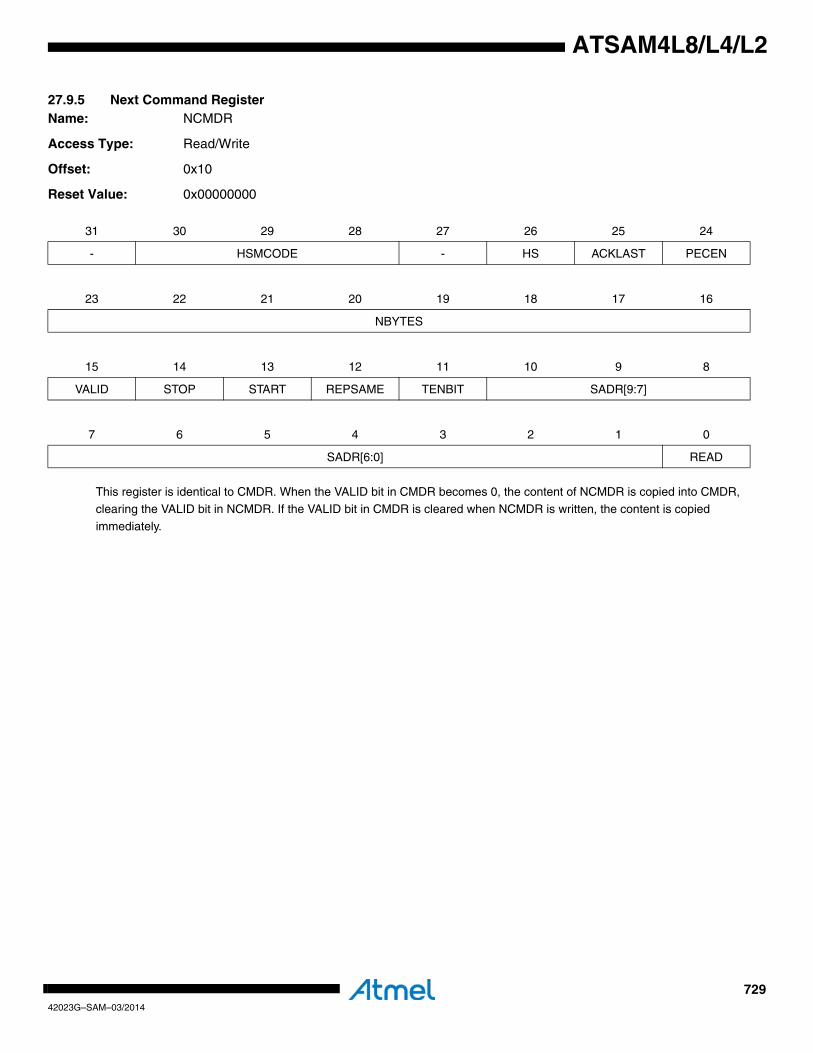
72942023G–SAM–03/2014
ATSAM4L8/L4/L2
27.9.5 Next Command RegisterName: NCMDR
Access Type: Read/Write
Offset: 0x10
Reset Value: 0x00000000
This register is identical to CMDR. When the VALID bit in CMDR becomes 0, the content of NCMDR is copied into CMDR, clearing the VALID bit in NCMDR. If the VALID bit in CMDR is cleared when NCMDR is written, the content is copied
immediately.
31 30 29 28 27 26 25 24
- HSMCODE - HS ACKLAST PECEN
23 22 21 20 19 18 17 16
NBYTES
15 14 13 12 11 10 9 8
VALID STOP START REPSAME TENBIT SADR[9:7]
7 6 5 4 3 2 1 0
SADR[6:0] READ

73042023G–SAM–03/2014
ATSAM4L8/L4/L2
27.9.6 Receive Holding RegisterName: RHR
Access Type: Read-only
Offset: 0x14
Reset Value: 0x00000000
• RXDATA: Received DataWhen the RXRDY bit in the Status Register (SR) is one, this field contains a byte received from the TWI bus.
31 30 29 28 27 26 25 24
- - - - - - - -
23 22 21 20 19 18 17 16
- - - - - - - -
15 14 13 12 11 10 9 8
- - - - - - - -
7 6 5 4 3 2 1 0
RXDATA

73142023G–SAM–03/2014
ATSAM4L8/L4/L2
27.9.7 Transmit Holding RegisterName: THR
Access Type: Write-only
Offset: 0x18
Reset Value: 0x00000000
• TXDATA: Data to TransmitWrite data to be transferred on the TWI bus here.
31 30 29 28 27 26 25 24
- - - - - - - -
23 22 21 20 19 18 17 16
- - - - - - - -
15 14 13 12 11 10 9 8
- - - - - - - -
7 6 5 4 3 2 1 0
TXDATA
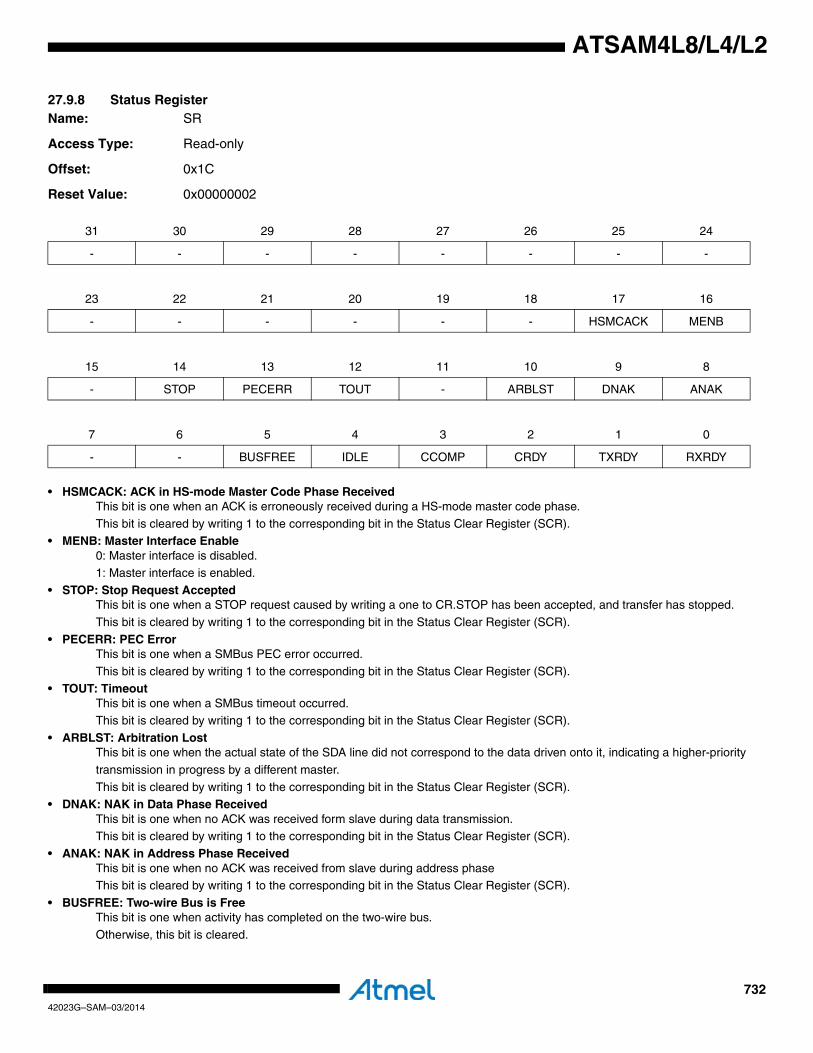
73242023G–SAM–03/2014
ATSAM4L8/L4/L2
27.9.8 Status RegisterName: SR
Access Type: Read-only
Offset: 0x1C
Reset Value: 0x00000002
• HSMCACK: ACK in HS-mode Master Code Phase ReceivedThis bit is one when an ACK is erroneously received during a HS-mode master code phase.
This bit is cleared by writing 1 to the corresponding bit in the Status Clear Register (SCR).• MENB: Master Interface Enable
0: Master interface is disabled. 1: Master interface is enabled.
• STOP: Stop Request AcceptedThis bit is one when a STOP request caused by writing a one to CR.STOP has been accepted, and transfer has stopped.
This bit is cleared by writing 1 to the corresponding bit in the Status Clear Register (SCR).
• PECERR: PEC ErrorThis bit is one when a SMBus PEC error occurred.
This bit is cleared by writing 1 to the corresponding bit in the Status Clear Register (SCR).• TOUT: Timeout
This bit is one when a SMBus timeout occurred.This bit is cleared by writing 1 to the corresponding bit in the Status Clear Register (SCR).
• ARBLST: Arbitration LostThis bit is one when the actual state of the SDA line did not correspond to the data driven onto it, indicating a higher-priority
transmission in progress by a different master.
This bit is cleared by writing 1 to the corresponding bit in the Status Clear Register (SCR).• DNAK: NAK in Data Phase Received
This bit is one when no ACK was received form slave during data transmission.This bit is cleared by writing 1 to the corresponding bit in the Status Clear Register (SCR).
• ANAK: NAK in Address Phase ReceivedThis bit is one when no ACK was received from slave during address phaseThis bit is cleared by writing 1 to the corresponding bit in the Status Clear Register (SCR).
• BUSFREE: Two-wire Bus is FreeThis bit is one when activity has completed on the two-wire bus.
Otherwise, this bit is cleared.
31 30 29 28 27 26 25 24
- - - - - - - -
23 22 21 20 19 18 17 16
- - - - - - HSMCACK MENB
15 14 13 12 11 10 9 8
- STOP PECERR TOUT - ARBLST DNAK ANAK
7 6 5 4 3 2 1 0
- - BUSFREE IDLE CCOMP CRDY TXRDY RXRDY
73342023G–SAM–03/2014
ATSAM4L8/L4/L2
• IDLE: Master Interface is IdleThis bit is one when no command is in progress, and no command waiting to be issued.
Otherwise, this bit is cleared.• CCOMP: Command Complete
This bit is one when the current command has completed successfully.This bit is zero if the command failed due to conditions such as a NAK receved from slave.
This bit is cleared by writing 1 to the corresponding bit in the Status Clear Register (SCR).
• CRDY: Ready for More CommandsThis bit is one when CMDR and/or NCMDR is ready to receive one or more commands.
This bit is cleared when this is no longer true.
• TXRDY: THR Data ReadyThis bit is one when THR is ready for one or more data bytes.
This bit is cleared when this is no longer true (i.e. THR is full or transmission has stopped).• RXRDY: RHR Data Ready
This bit is one when RX data are ready to be read from RHR.This bit is cleared when this is no longer true.

73442023G–SAM–03/2014
ATSAM4L8/L4/L2
27.9.9 Interrupt Enable RegisterName: IER
Access Type: Write-only
Offset: 0x20
Reset Value: 0x00000000
Writing a zero to a bit in this register has no effect.Writing a one to a bit in this register will set the corresponding bit in IMR
31 30 29 28 27 26 25 24
- - - - - - - -
23 22 21 20 19 18 17 16
- - - - - - HSMCACK -
15 14 13 12 11 10 9 8
- STOP PECERR TOUT - ARBLST DNAK ANAK
7 6 5 4 3 2 1 0
- - BUSFREE IDLE CCOMP CRDY TXRDY RXRDY
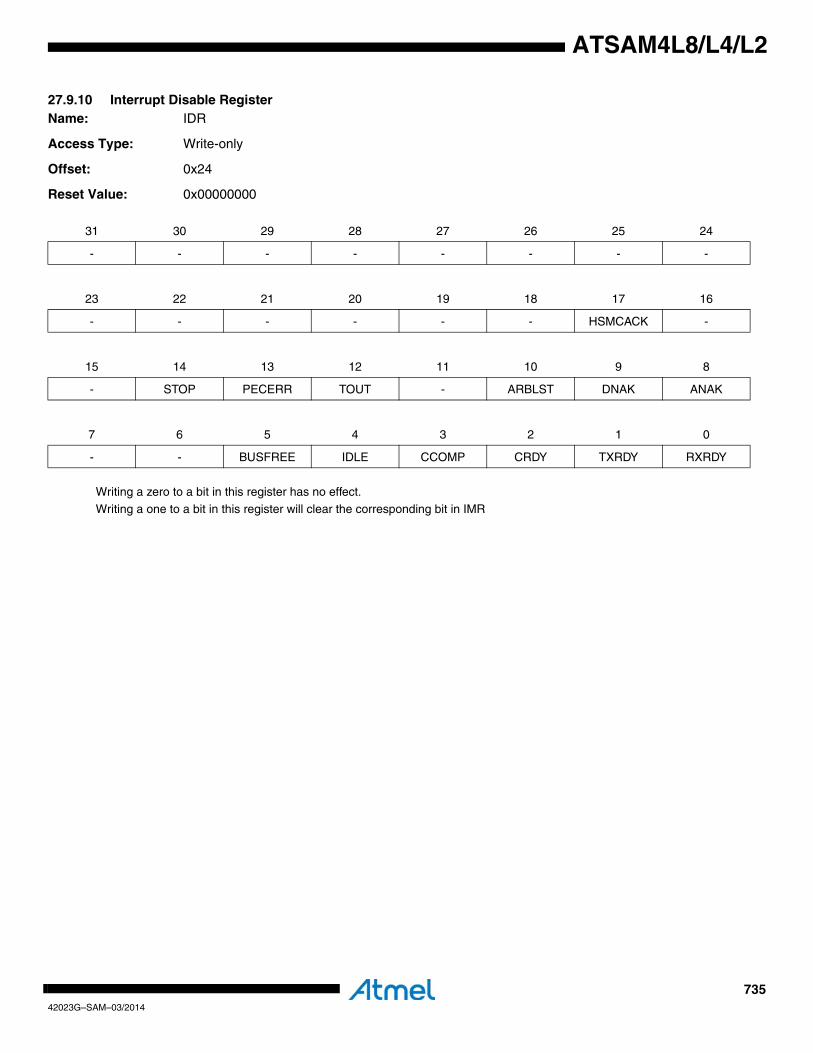
73542023G–SAM–03/2014
ATSAM4L8/L4/L2
27.9.10 Interrupt Disable RegisterName: IDR
Access Type: Write-only
Offset: 0x24
Reset Value: 0x00000000
Writing a zero to a bit in this register has no effect.Writing a one to a bit in this register will clear the corresponding bit in IMR
31 30 29 28 27 26 25 24
- - - - - - - -
23 22 21 20 19 18 17 16
- - - - - - HSMCACK -
15 14 13 12 11 10 9 8
- STOP PECERR TOUT - ARBLST DNAK ANAK
7 6 5 4 3 2 1 0
- - BUSFREE IDLE CCOMP CRDY TXRDY RXRDY
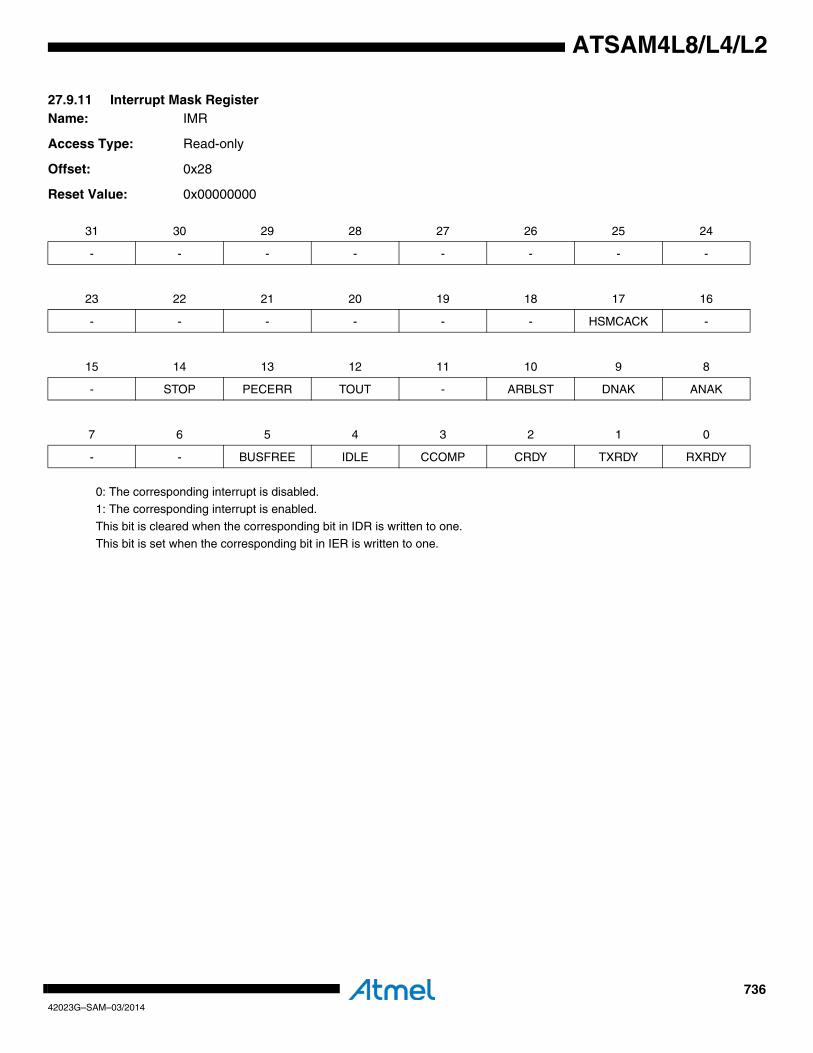
73642023G–SAM–03/2014
ATSAM4L8/L4/L2
27.9.11 Interrupt Mask RegisterName: IMR
Access Type: Read-only
Offset: 0x28
Reset Value: 0x00000000
0: The corresponding interrupt is disabled.1: The corresponding interrupt is enabled.
This bit is cleared when the corresponding bit in IDR is written to one.
This bit is set when the corresponding bit in IER is written to one.
31 30 29 28 27 26 25 24
- - - - - - - -
23 22 21 20 19 18 17 16
- - - - - - HSMCACK -
15 14 13 12 11 10 9 8
- STOP PECERR TOUT - ARBLST DNAK ANAK
7 6 5 4 3 2 1 0
- - BUSFREE IDLE CCOMP CRDY TXRDY RXRDY
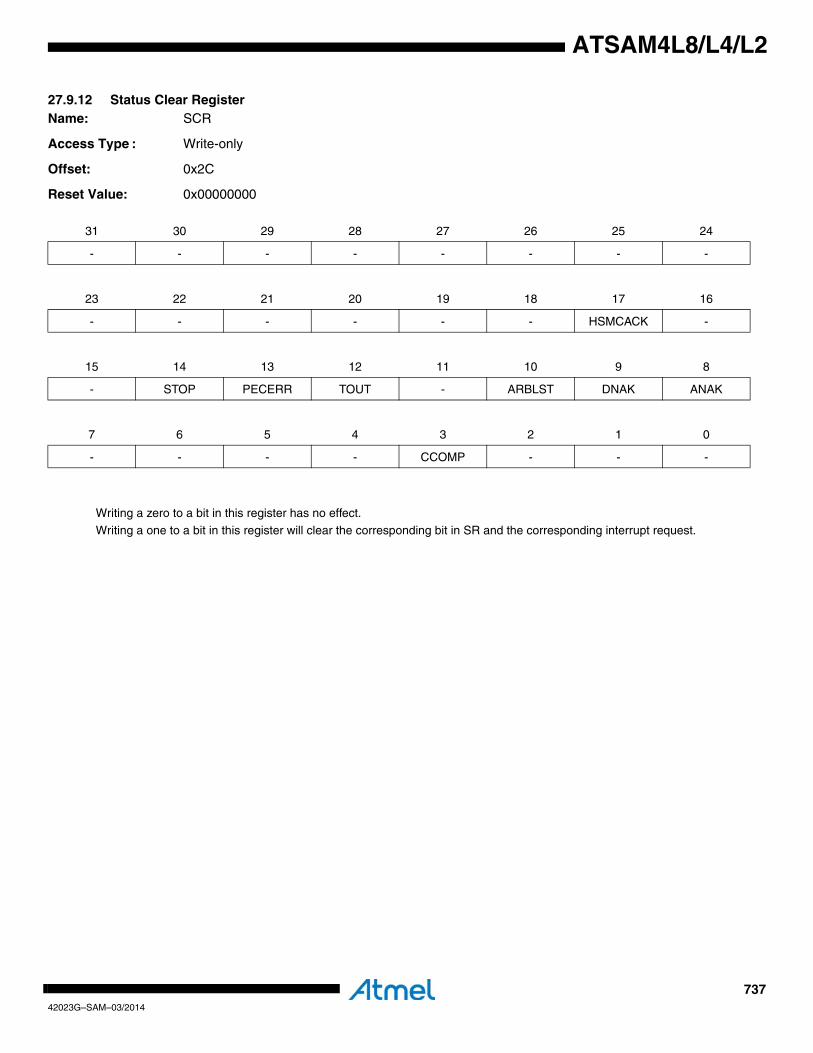
73742023G–SAM–03/2014
ATSAM4L8/L4/L2
27.9.12 Status Clear RegisterName: SCR
Access Type : Write-only
Offset: 0x2C
Reset Value: 0x00000000
Writing a zero to a bit in this register has no effect.
Writing a one to a bit in this register will clear the corresponding bit in SR and the corresponding interrupt request.
31 30 29 28 27 26 25 24
- - - - - - - -
23 22 21 20 19 18 17 16
- - - - - - HSMCACK -
15 14 13 12 11 10 9 8
- STOP PECERR TOUT - ARBLST DNAK ANAK
7 6 5 4 3 2 1 0
- - - - CCOMP - - -
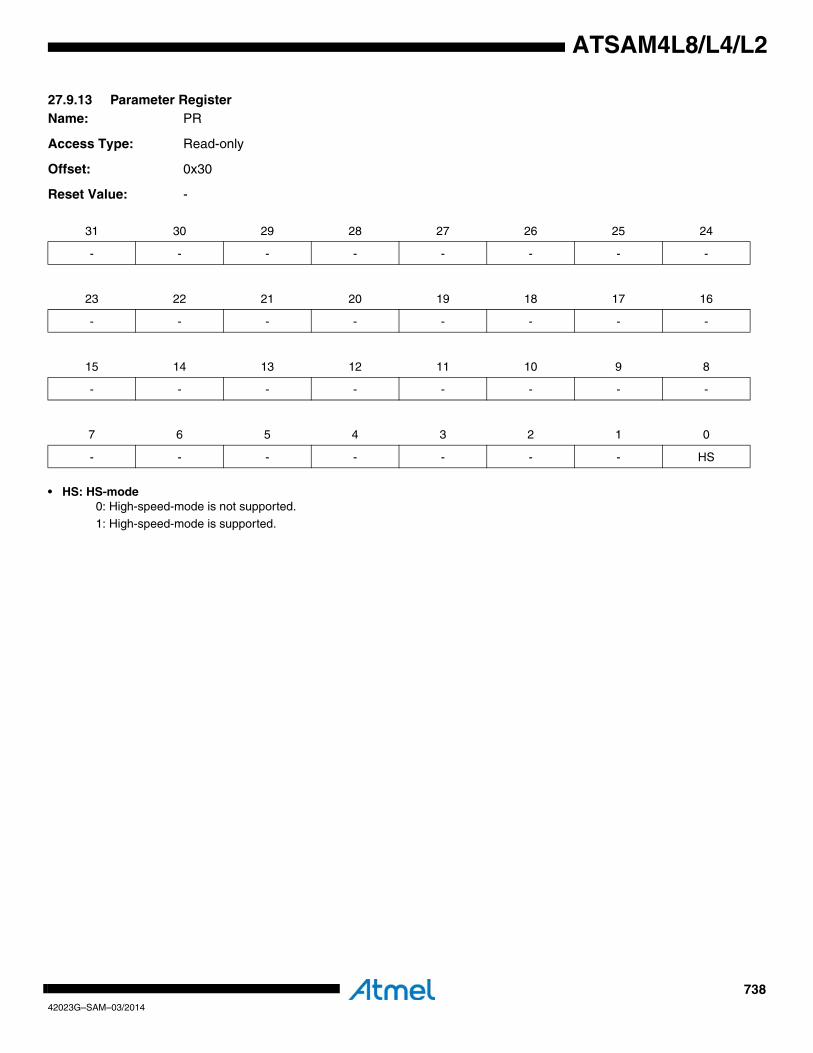
73842023G–SAM–03/2014
ATSAM4L8/L4/L2
27.9.13 Parameter RegisterName: PR
Access Type: Read-only
Offset: 0x30
Reset Value: -
• HS: HS-mode0: High-speed-mode is not supported.
1: High-speed-mode is supported.
31 30 29 28 27 26 25 24
- - - - - - - -
23 22 21 20 19 18 17 16
- - - - - - - -
15 14 13 12 11 10 9 8
- - - - - - - -
7 6 5 4 3 2 1 0
- - - - - - - HS

73942023G–SAM–03/2014
ATSAM4L8/L4/L2
27.9.14 Version RegisterName: VR
Access Type: Read-only
Offset: 0x34
Reset Value: -
• VARIANT: Variant NumberReserved. No functionality associated.
• VERSION: Version NumberVersion number of the module. No functionality associated.
31 30 29 28 27 26 25 24
- - - - - - - -
23 22 21 20 19 18 17 16
- - - - VARIANT
15 14 13 12 11 10 9 8
- - - - VERSION [11:8]
7 6 5 4 3 2 1 0
VERSION [7:0]
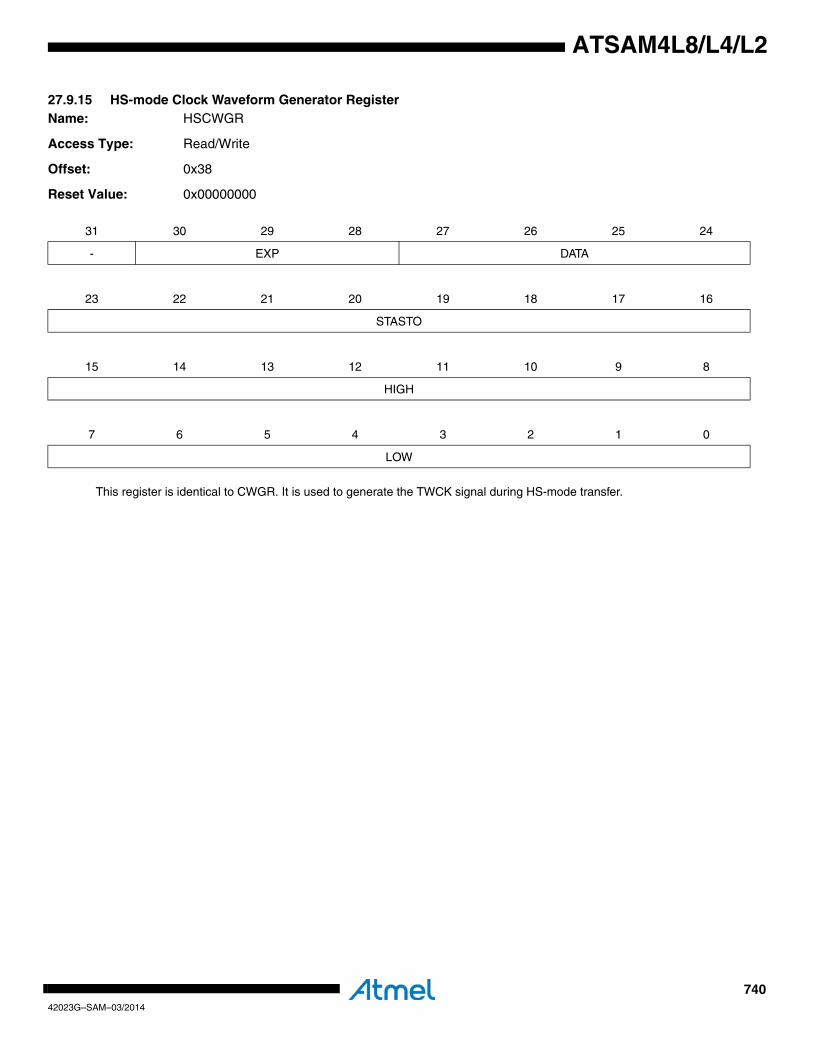
74042023G–SAM–03/2014
ATSAM4L8/L4/L2
27.9.15 HS-mode Clock Waveform Generator RegisterName: HSCWGR
Access Type: Read/Write
Offset: 0x38
Reset Value: 0x00000000
This register is identical to CWGR. It is used to generate the TWCK signal during HS-mode transfer.
31 30 29 28 27 26 25 24
- EXP DATA
23 22 21 20 19 18 17 16
STASTO
15 14 13 12 11 10 9 8
HIGH
7 6 5 4 3 2 1 0
LOW
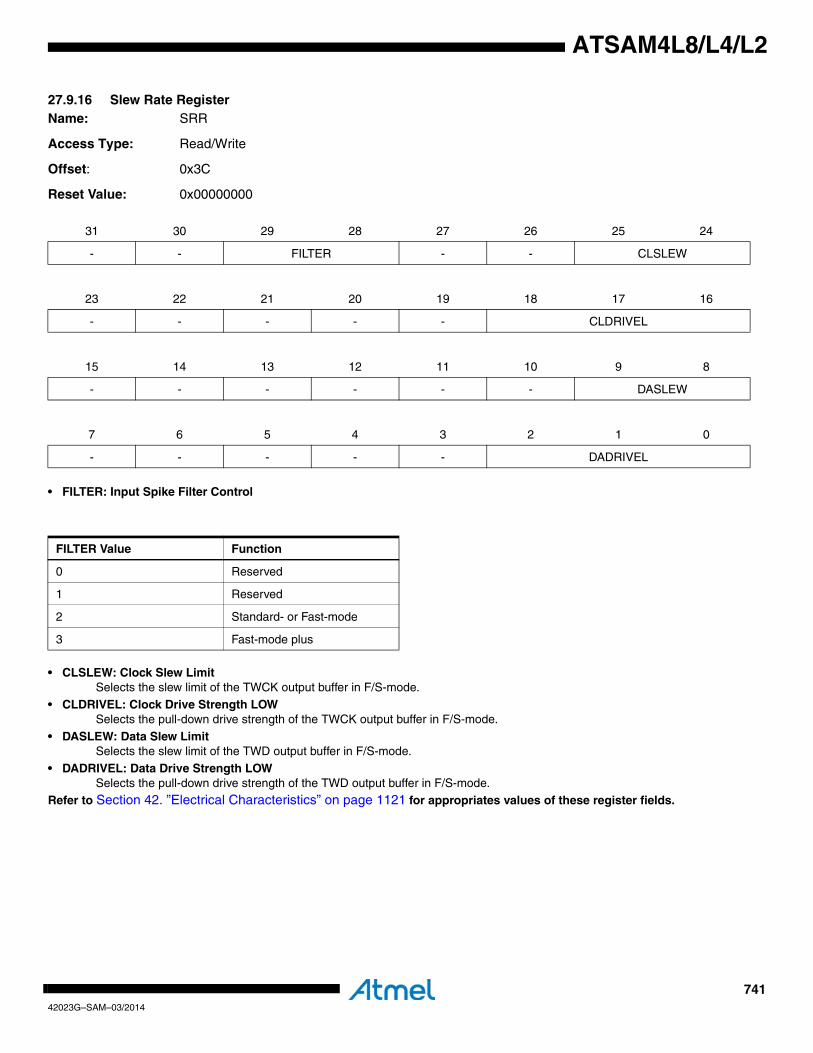
74142023G–SAM–03/2014
ATSAM4L8/L4/L2
27.9.16 Slew Rate RegisterName: SRR
Access Type: Read/Write
Offset: 0x3C
Reset Value: 0x00000000
• FILTER: Input Spike Filter Control
• CLSLEW: Clock Slew LimitSelects the slew limit of the TWCK output buffer in F/S-mode.
• CLDRIVEL: Clock Drive Strength LOWSelects the pull-down drive strength of the TWCK output buffer in F/S-mode.
• DASLEW: Data Slew LimitSelects the slew limit of the TWD output buffer in F/S-mode.
• DADRIVEL: Data Drive Strength LOWSelects the pull-down drive strength of the TWD output buffer in F/S-mode.
Refer to Section 42. ”Electrical Characteristics” on page 1121 for appropriates values of these register fields.
31 30 29 28 27 26 25 24
- - FILTER - - CLSLEW
23 22 21 20 19 18 17 16
- - - - - CLDRIVEL
15 14 13 12 11 10 9 8
- - - - - - DASLEW
7 6 5 4 3 2 1 0
- - - - - DADRIVEL
FILTER Value Function
0 Reserved
1 Reserved
2 Standard- or Fast-mode
3 Fast-mode plus
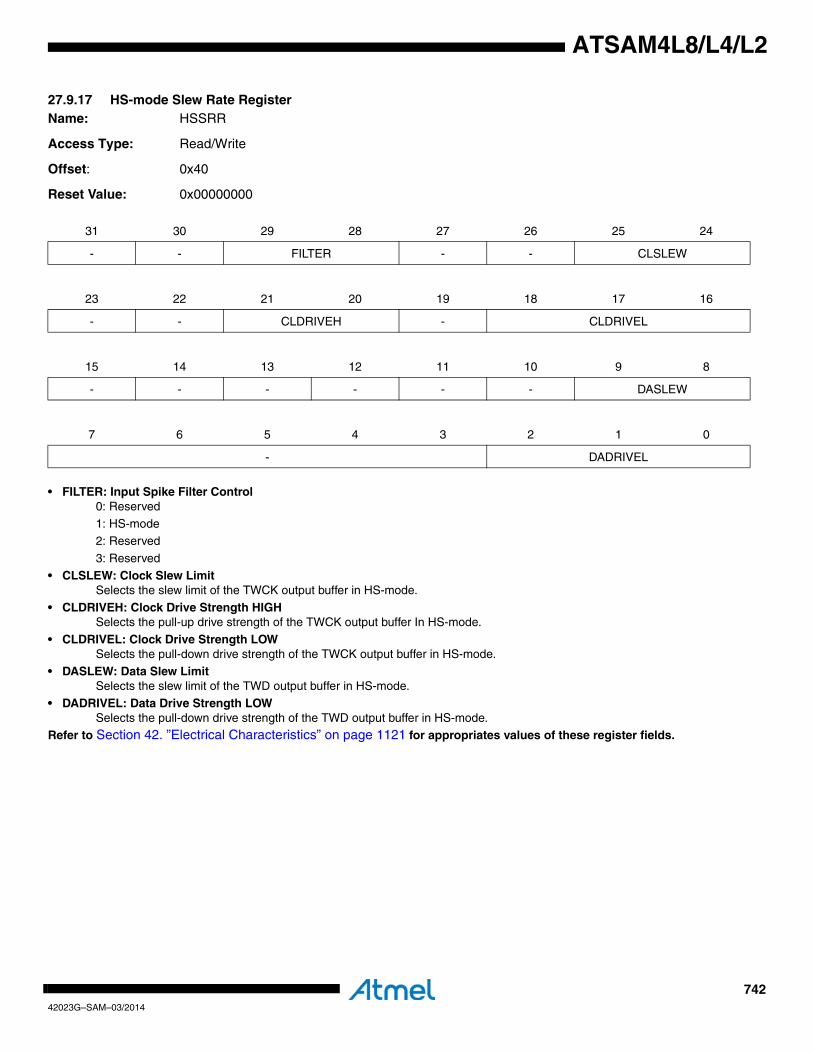
74242023G–SAM–03/2014
ATSAM4L8/L4/L2
27.9.17 HS-mode Slew Rate RegisterName: HSSRR
Access Type: Read/Write
Offset: 0x40
Reset Value: 0x00000000
• FILTER: Input Spike Filter Control0: Reserved
1: HS-mode2: Reserved
3: Reserved
• CLSLEW: Clock Slew LimitSelects the slew limit of the TWCK output buffer in HS-mode.
• CLDRIVEH: Clock Drive Strength HIGHSelects the pull-up drive strength of the TWCK output buffer In HS-mode.
• CLDRIVEL: Clock Drive Strength LOWSelects the pull-down drive strength of the TWCK output buffer in HS-mode.
• DASLEW: Data Slew LimitSelects the slew limit of the TWD output buffer in HS-mode.
• DADRIVEL: Data Drive Strength LOWSelects the pull-down drive strength of the TWD output buffer in HS-mode.
Refer to Section 42. ”Electrical Characteristics” on page 1121 for appropriates values of these register fields.
31 30 29 28 27 26 25 24
- - FILTER - - CLSLEW
23 22 21 20 19 18 17 16
- - CLDRIVEH - CLDRIVEL
15 14 13 12 11 10 9 8
- - - - - - DASLEW
7 6 5 4 3 2 1 0
- DADRIVEL
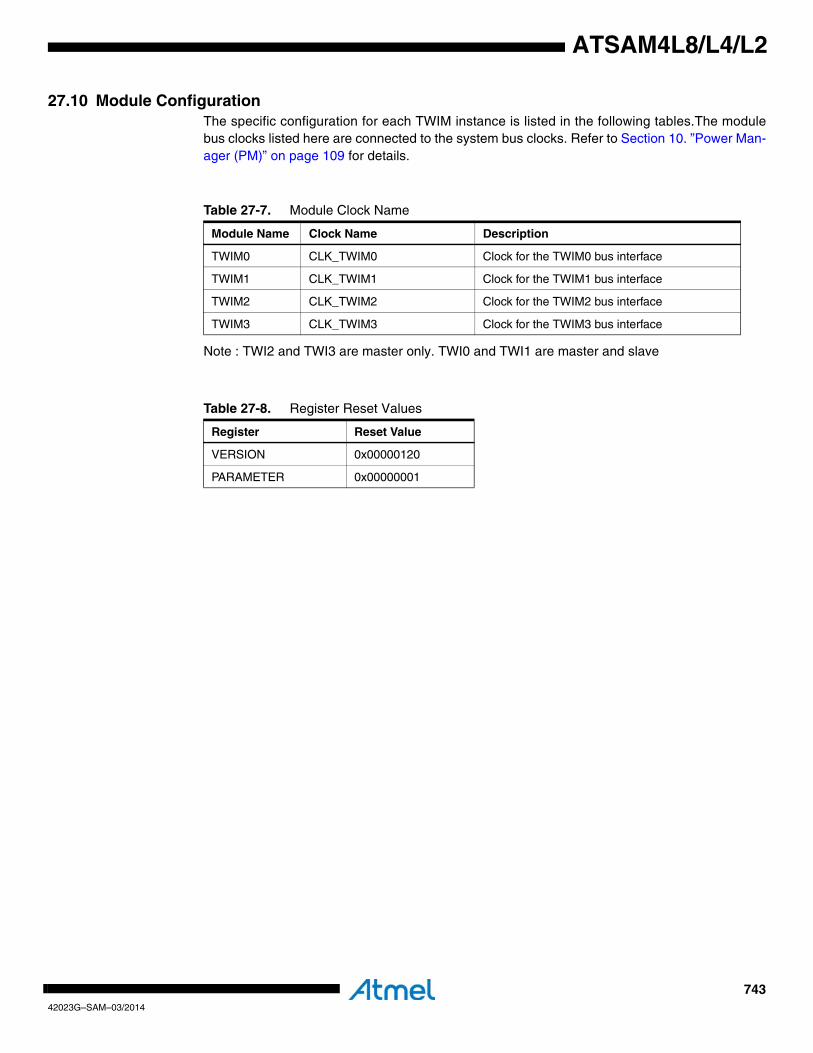
74342023G–SAM–03/2014
ATSAM4L8/L4/L2
27.10 Module ConfigurationThe specific configuration for each TWIM instance is listed in the following tables.The modulebus clocks listed here are connected to the system bus clocks. Refer to Section 10. ”Power Man-ager (PM)” on page 109 for details.
Note : TWI2 and TWI3 are master only. TWI0 and TWI1 are master and slave
Table 27-7. Module Clock Name
Module Name Clock Name Description
TWIM0 CLK_TWIM0 Clock for the TWIM0 bus interface
TWIM1 CLK_TWIM1 Clock for the TWIM1 bus interface
TWIM2 CLK_TWIM2 Clock for the TWIM2 bus interface
TWIM3 CLK_TWIM3 Clock for the TWIM3 bus interface
Table 27-8. Register Reset Values
Register Reset Value
VERSION 0x00000120
PARAMETER 0x00000001
74442023G–SAM–03/2014
ATSAM4L8/L4/L2
28. Two-wire Slave Interface (TWIS)Rev: 1.4.0.1
28.1 Features • Compatible with I²C standard
– Transfer speeds up to 3.4 Mbit/s – 7 and 10-bit and General Call addressing
• Compatible with SMBus standard– Hardware Packet Error Checking (CRC) generation and verification with ACK response– 25 ms clock low timeout delay– 25 ms slave cumulative clock low extend time
• Compatible with PMBus• DMA interface for reducing CPU load• Arbitrary transfer lengths, including 0 data bytes• Optional clock stretching if transmit or receive buffers not ready for data transfer• 32-bit Peripheral Bus interface for configuration of the interface
28.2 OverviewThe Atmel Two-wire Slave Interface (TWIS) interconnects components on a unique two-wirebus, made up of one clock line and one data line with speeds of up to 3.4 Mbit/s, based on abyte-oriented transfer format. It can be used with any Atmel Two-wire Interface bus, I²C, orSMBus-compatible master. The TWIS is always a bus slave and can transfer sequential or sin-gle bytes.
Below, Table 28-1 lists the compatibility level of the Atmel Two-wire Slave Interface and a full I²Ccompatible device.
Note: 1. START + b000000001 + Ack + Sr
Table 28-1. Atmel TWIS Compatibility with I²C Standard
I²C Standard Atmel TWIS
Standard-mode (100 kbit/s) Supported
Fast-mode (400 kbit/s) Supported
High-speed-mode (3.4 Mbit/s) Supported
7 or 10 bits Slave Addressing Supported
START BYTE(1) Not Supported
Repeated Start (Sr) Condition Supported
ACK and NAK Management Supported
Slope control and input filtering (Fast mode) Supported
Clock stretching Supported
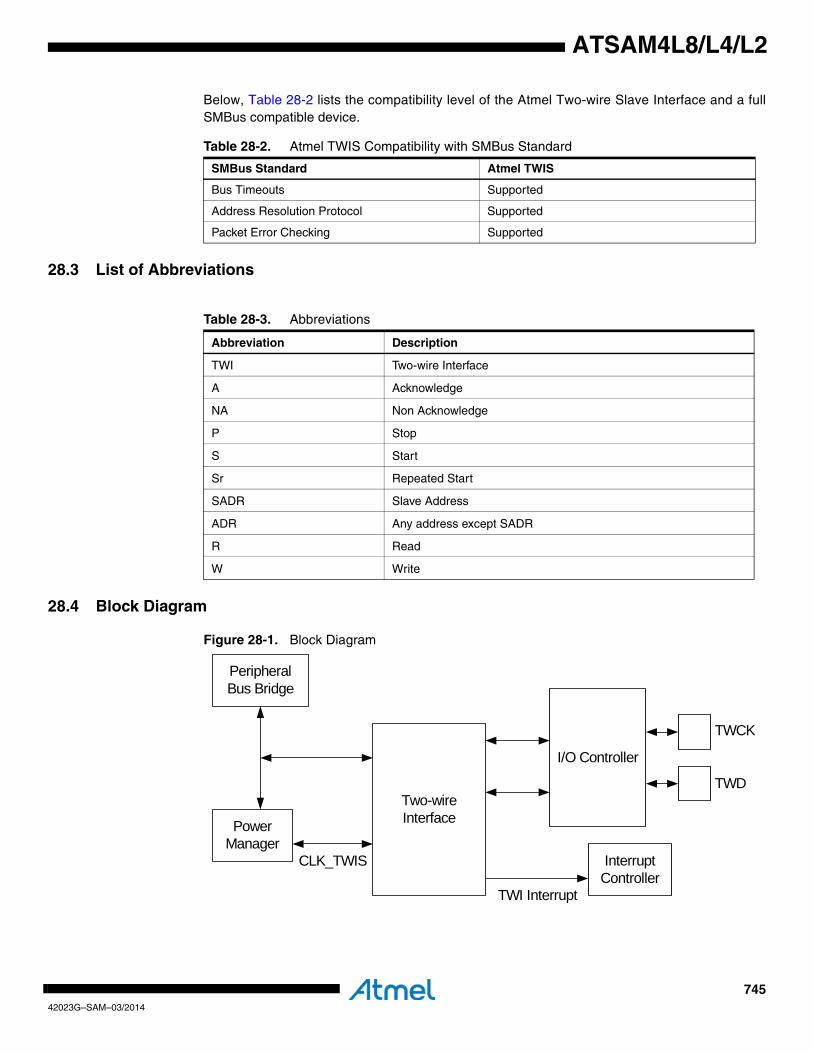
74542023G–SAM–03/2014
ATSAM4L8/L4/L2
Below, Table 28-2 lists the compatibility level of the Atmel Two-wire Slave Interface and a fullSMBus compatible device.
28.3 List of Abbreviations
28.4 Block Diagram
Figure 28-1. Block Diagram
Table 28-2. Atmel TWIS Compatibility with SMBus Standard
SMBus Standard Atmel TWIS
Bus Timeouts Supported
Address Resolution Protocol Supported
Packet Error Checking Supported
Table 28-3. Abbreviations
Abbreviation Description
TWI Two-wire Interface
A Acknowledge
NA Non Acknowledge
P Stop
S Start
Sr Repeated Start
SADR Slave Address
ADR Any address except SADR
R Read
W Write
Peripheral Bus Bridge
Two-wire Interface
I/O Controller
TWCK
TWD
Interrupt Controller
TWI Interrupt
Power Manager
CLK_TWIS
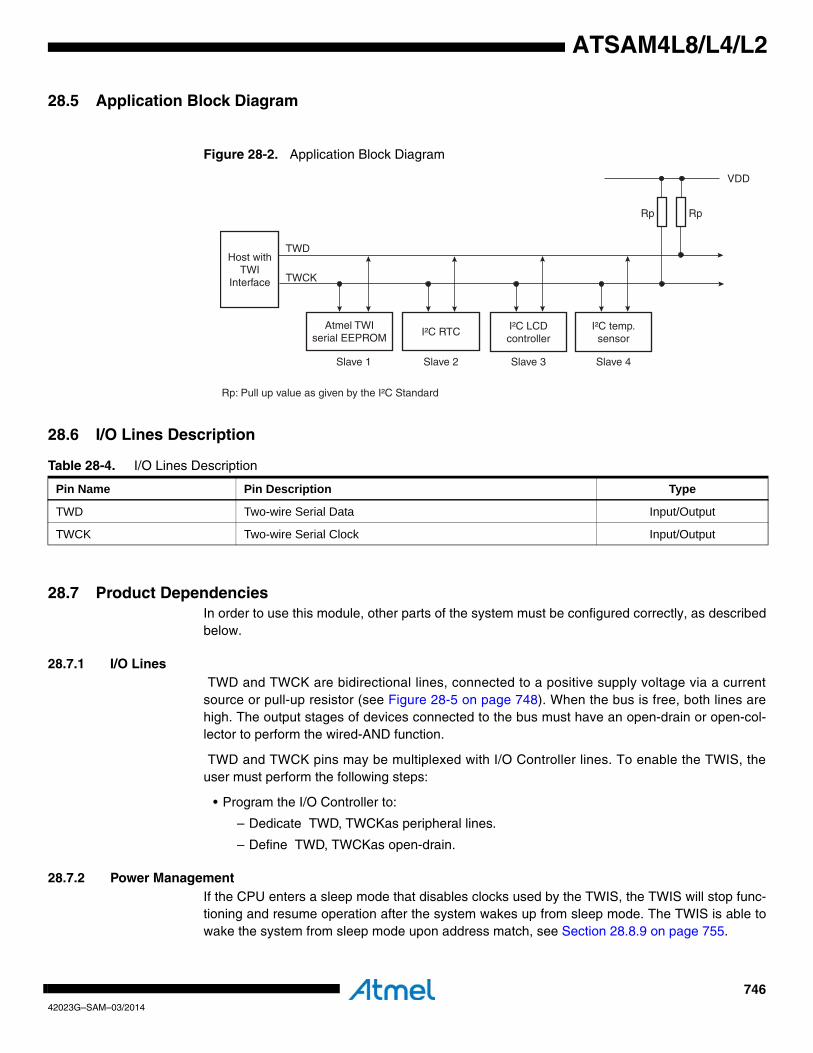
74642023G–SAM–03/2014
ATSAM4L8/L4/L2
28.5 Application Block Diagram
Figure 28-2. Application Block Diagram
28.6 I/O Lines Description
28.7 Product DependenciesIn order to use this module, other parts of the system must be configured correctly, as describedbelow.
28.7.1 I/O Lines TWD and TWCK are bidirectional lines, connected to a positive supply voltage via a currentsource or pull-up resistor (see Figure 28-5 on page 748). When the bus is free, both lines arehigh. The output stages of devices connected to the bus must have an open-drain or open-col-lector to perform the wired-AND function.
TWD and TWCK pins may be multiplexed with I/O Controller lines. To enable the TWIS, theuser must perform the following steps:
• Program the I/O Controller to:
– Dedicate TWD, TWCKas peripheral lines.
– Define TWD, TWCKas open-drain.
28.7.2 Power ManagementIf the CPU enters a sleep mode that disables clocks used by the TWIS, the TWIS will stop func-tioning and resume operation after the system wakes up from sleep mode. The TWIS is able towake the system from sleep mode upon address match, see Section 28.8.9 on page 755.
Host withTWI
Interface
TWD
TWCK
Atmel TWIserial EEPROM
I²C RTC I²C LCDcontroller
Slave 1 Slave 2 Slave 3
VDD
I²C temp.sensor
Slave 4
Rp: Pull up value as given by the I²C Standard
Rp Rp
Table 28-4. I/O Lines Description
Pin Name Pin Description Type
TWD Two-wire Serial Data Input/Output
TWCK Two-wire Serial Clock Input/Output
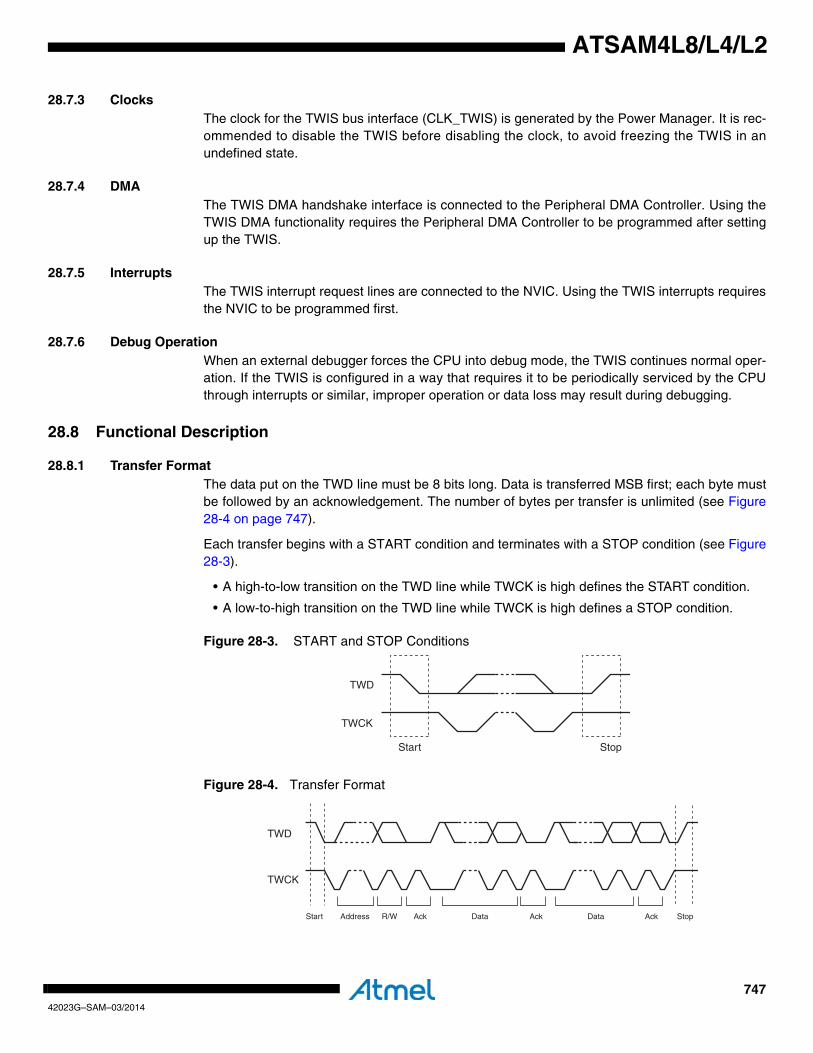
74742023G–SAM–03/2014
ATSAM4L8/L4/L2
28.7.3 ClocksThe clock for the TWIS bus interface (CLK_TWIS) is generated by the Power Manager. It is rec-ommended to disable the TWIS before disabling the clock, to avoid freezing the TWIS in anundefined state.
28.7.4 DMAThe TWIS DMA handshake interface is connected to the Peripheral DMA Controller. Using theTWIS DMA functionality requires the Peripheral DMA Controller to be programmed after settingup the TWIS.
28.7.5 InterruptsThe TWIS interrupt request lines are connected to the NVIC. Using the TWIS interrupts requiresthe NVIC to be programmed first.
28.7.6 Debug OperationWhen an external debugger forces the CPU into debug mode, the TWIS continues normal oper-ation. If the TWIS is configured in a way that requires it to be periodically serviced by the CPUthrough interrupts or similar, improper operation or data loss may result during debugging.
28.8 Functional Description
28.8.1 Transfer FormatThe data put on the TWD line must be 8 bits long. Data is transferred MSB first; each byte mustbe followed by an acknowledgement. The number of bytes per transfer is unlimited (see Figure28-4 on page 747).
Each transfer begins with a START condition and terminates with a STOP condition (see Figure28-3).
• A high-to-low transition on the TWD line while TWCK is high defines the START condition.
• A low-to-high transition on the TWD line while TWCK is high defines a STOP condition.
Figure 28-3. START and STOP Conditions
Figure 28-4. Transfer Format
TWD
TWCK
Start Stop
TWD
TWCK
Start Address R/W Ack Data Ack Data Ack Stop
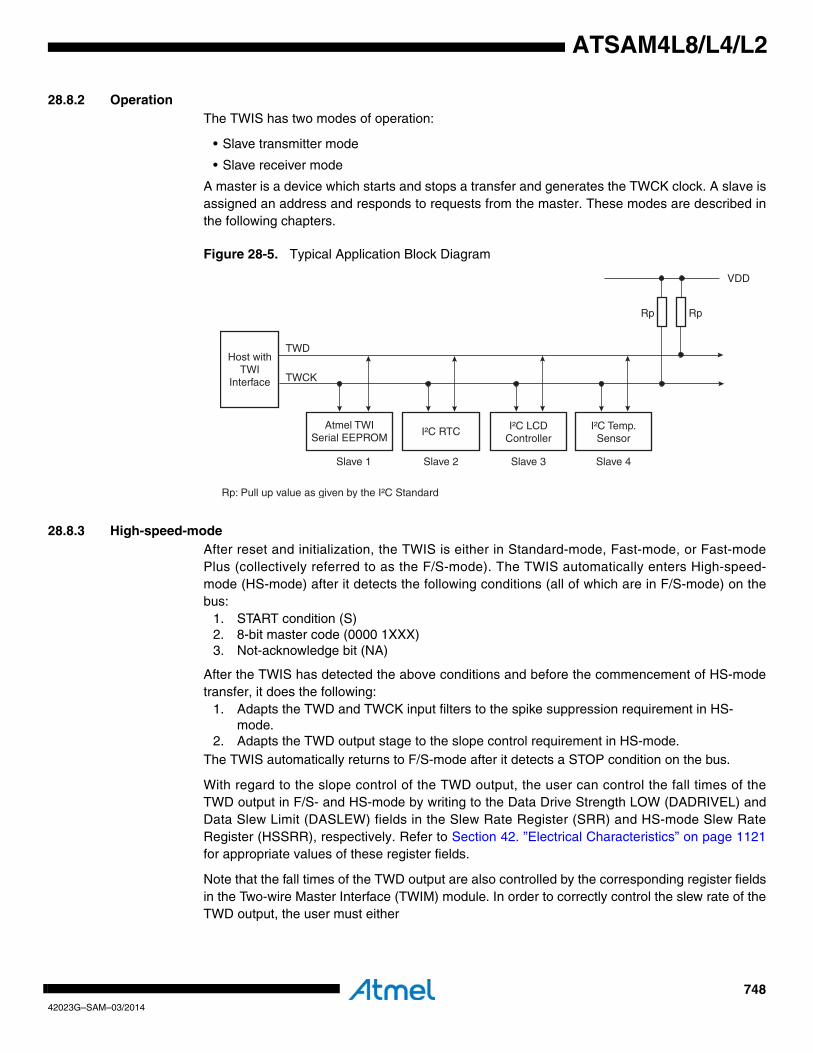
74842023G–SAM–03/2014
ATSAM4L8/L4/L2
28.8.2 OperationThe TWIS has two modes of operation:
• Slave transmitter mode
• Slave receiver mode
A master is a device which starts and stops a transfer and generates the TWCK clock. A slave isassigned an address and responds to requests from the master. These modes are described inthe following chapters.
Figure 28-5. Typical Application Block Diagram
28.8.3 High-speed-modeAfter reset and initialization, the TWIS is either in Standard-mode, Fast-mode, or Fast-modePlus (collectively referred to as the F/S-mode). The TWIS automatically enters High-speed-mode (HS-mode) after it detects the following conditions (all of which are in F/S-mode) on thebus:
1. START condition (S)2. 8-bit master code (0000 1XXX)3. Not-acknowledge bit (NA)
After the TWIS has detected the above conditions and before the commencement of HS-modetransfer, it does the following:
1. Adapts the TWD and TWCK input filters to the spike suppression requirement in HS-mode.
2. Adapts the TWD output stage to the slope control requirement in HS-mode.The TWIS automatically returns to F/S-mode after it detects a STOP condition on the bus.
With regard to the slope control of the TWD output, the user can control the fall times of theTWD output in F/S- and HS-mode by writing to the Data Drive Strength LOW (DADRIVEL) andData Slew Limit (DASLEW) fields in the Slew Rate Register (SRR) and HS-mode Slew RateRegister (HSSRR), respectively. Refer to Section 42. ”Electrical Characteristics” on page 1121for appropriate values of these register fields.
Note that the fall times of the TWD output are also controlled by the corresponding register fieldsin the Two-wire Master Interface (TWIM) module. In order to correctly control the slew rate of theTWD output, the user must either
Host withTWI
Interface
TWD
TWCK
Atmel TWISerial EEPROM
I²C RTC I²C LCDController
Slave 1 Slave 2 Slave 3
VDD
I²C Temp.Sensor
Slave 4
Rp: Pull up value as given by the I²C Standard
Rp Rp
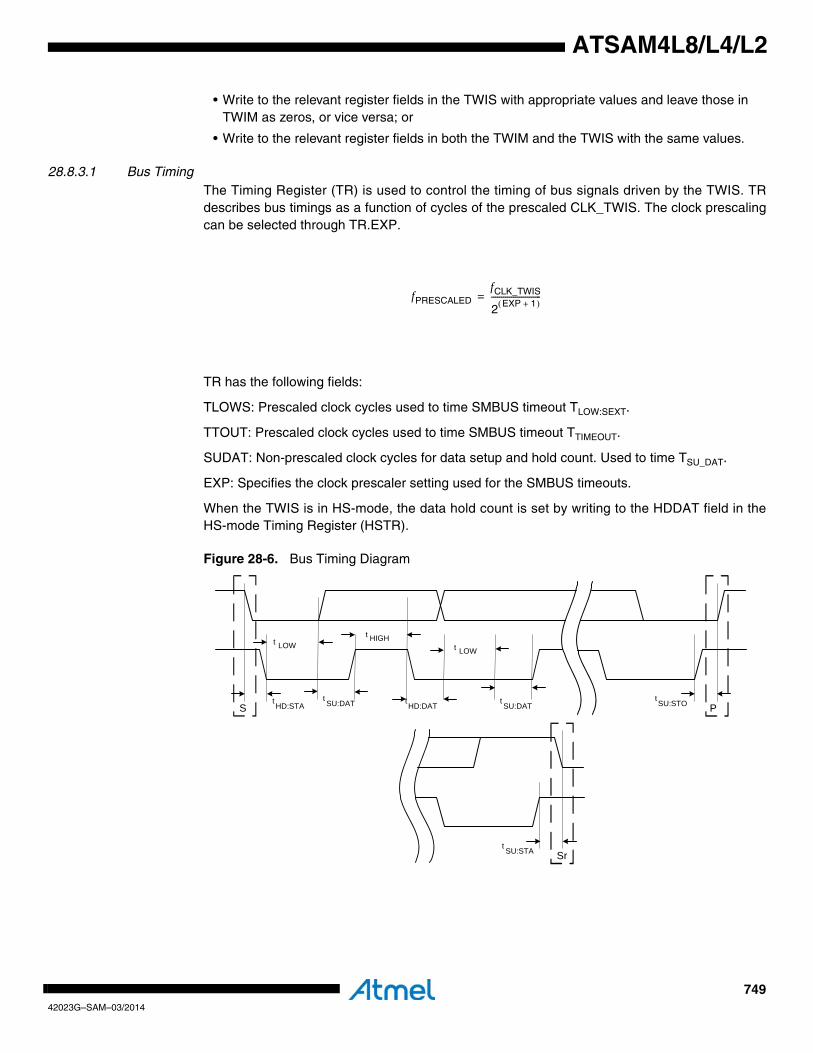
74942023G–SAM–03/2014
ATSAM4L8/L4/L2
• Write to the relevant register fields in the TWIS with appropriate values and leave those in TWIM as zeros, or vice versa; or
• Write to the relevant register fields in both the TWIM and the TWIS with the same values.
28.8.3.1 Bus TimingThe Timing Register (TR) is used to control the timing of bus signals driven by the TWIS. TRdescribes bus timings as a function of cycles of the prescaled CLK_TWIS. The clock prescalingcan be selected through TR.EXP.
TR has the following fields:
TLOWS: Prescaled clock cycles used to time SMBUS timeout TLOW:SEXT.
TTOUT: Prescaled clock cycles used to time SMBUS timeout TTIMEOUT.
SUDAT: Non-prescaled clock cycles for data setup and hold count. Used to time TSU_DAT.
EXP: Specifies the clock prescaler setting used for the SMBUS timeouts.
When the TWIS is in HS-mode, the data hold count is set by writing to the HDDAT field in theHS-mode Timing Register (HSTR).
Figure 28-6. Bus Timing Diagram
fPRESCALEDfCLK_TWIS
2 EXP 1+( )-------------------------=
StHD:STA
t LOW
tSU:DAT
t HIGH
tHD:DAT
t LOW
PtSU:STO
SrtSU:STA
tSU:DAT

75042023G–SAM–03/2014
ATSAM4L8/L4/L2
28.8.3.2 Setting Up and Performing a Transfer Operation of the TWIS is mainly controlled by the Control Register (CR). The following list pres-ents the main steps in a typical communication:
1. Before any transfers can be performed, bus timings must be configured by writing to the Timing Register (TR) and, if HS-mode transfer is supported, the HS-mode Timing Reg-ister (HSTR).
2. If the Peripheral DMA Controller is to be used for the transfers, it must be set up.
3. The Control Register (CR) must be configured with information such as the slave address, SMBus mode, Packet Error Checking (PEC), number of bytes to transfer, and which addresses to match.
The interrupt system can be set up to generate interrupt request on specific events or error con-ditions, for example when a byte has been received.
The NBYTES register is only used in SMBus mode, when PEC is enabled. In I²C mode or inSMBus mode when PEC is disabled, the NBYTES register is not used, and should be written tozero. NBYTES is updated by hardware, so in order to avoid hazards, software updates ofNBYTES can only be done through writes to the NBYTES register.
28.8.3.3 Address MatchingThe TWIS can be set up to match several different addresses. More than one address matchmay be enabled simultaneously, allowing the TWIS to be assigned to several addresses. Theaddress matching phase is initiated after a START or REPEATED START condition. When theTWIS receives an address that generates an address match, an ACK is automatically returnedto the master.
In I²C mode:
• The address in CR.ADR is checked for address match if CR.SMATCH is one.
• The General Call address is checked for address match if CR.GCMATCH is one.
In SMBus mode:
• The address in CR.ADR is checked for address match if CR.SMATCH is one.
• The Alert Response Address is checked for address match if CR.SMAL is one.
• The Default Address is checked for address match if CR.SMDA is one.
• The Host Header Address is checked for address match if CR.SMHH is one.
28.8.3.4 Clock StretchingAny slave or bus master taking part in a transfer may extend the TWCK low period at any time.The TWIS may extend the TWCK low period after each byte transfer if CR.STREN is one and:
• Module is in slave transmitter mode, data should be transmitted, but THR is empty, or
• Module is in slave receiver mode, a byte has been received and placed into the internal shifter, but the Receive Holding Register (RHR) is full, or
• Stretch-on-address-match bit CR.SOAM=1 and slave was addressed. Bus clock remains stretched until all address match bits in the Status Register (SR) have been cleared.
If CR.STREN is zero and:
• Module is in slave transmitter mode, data should be transmitted but THR is empty: Transmit the value present in THR (the last transmitted byte or reset value), and set SR.URUN.
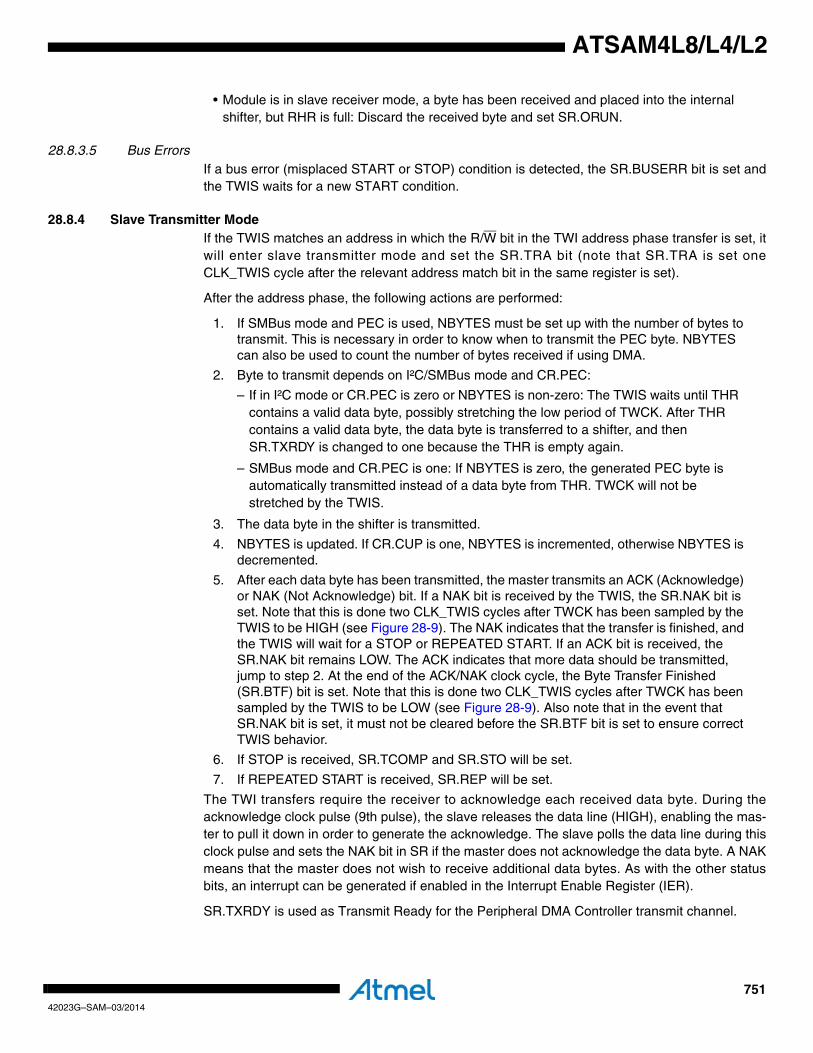
75142023G–SAM–03/2014
ATSAM4L8/L4/L2
• Module is in slave receiver mode, a byte has been received and placed into the internal shifter, but RHR is full: Discard the received byte and set SR.ORUN.
28.8.3.5 Bus ErrorsIf a bus error (misplaced START or STOP) condition is detected, the SR.BUSERR bit is set andthe TWIS waits for a new START condition.
28.8.4 Slave Transmitter ModeIf the TWIS matches an address in which the R/W bit in the TWI address phase transfer is set, itwill enter slave transmitter mode and set the SR.TRA bit (note that SR.TRA is set oneCLK_TWIS cycle after the relevant address match bit in the same register is set).
After the address phase, the following actions are performed:
1. If SMBus mode and PEC is used, NBYTES must be set up with the number of bytes to transmit. This is necessary in order to know when to transmit the PEC byte. NBYTES can also be used to count the number of bytes received if using DMA.
2. Byte to transmit depends on I²C/SMBus mode and CR.PEC:
– If in I²C mode or CR.PEC is zero or NBYTES is non-zero: The TWIS waits until THR contains a valid data byte, possibly stretching the low period of TWCK. After THR contains a valid data byte, the data byte is transferred to a shifter, and then SR.TXRDY is changed to one because the THR is empty again.
– SMBus mode and CR.PEC is one: If NBYTES is zero, the generated PEC byte is automatically transmitted instead of a data byte from THR. TWCK will not be stretched by the TWIS.
3. The data byte in the shifter is transmitted.
4. NBYTES is updated. If CR.CUP is one, NBYTES is incremented, otherwise NBYTES is decremented.
5. After each data byte has been transmitted, the master transmits an ACK (Acknowledge) or NAK (Not Acknowledge) bit. If a NAK bit is received by the TWIS, the SR.NAK bit is set. Note that this is done two CLK_TWIS cycles after TWCK has been sampled by the TWIS to be HIGH (see Figure 28-9). The NAK indicates that the transfer is finished, and the TWIS will wait for a STOP or REPEATED START. If an ACK bit is received, the SR.NAK bit remains LOW. The ACK indicates that more data should be transmitted, jump to step 2. At the end of the ACK/NAK clock cycle, the Byte Transfer Finished (SR.BTF) bit is set. Note that this is done two CLK_TWIS cycles after TWCK has been sampled by the TWIS to be LOW (see Figure 28-9). Also note that in the event that SR.NAK bit is set, it must not be cleared before the SR.BTF bit is set to ensure correct TWIS behavior.
6. If STOP is received, SR.TCOMP and SR.STO will be set.
7. If REPEATED START is received, SR.REP will be set.
The TWI transfers require the receiver to acknowledge each received data byte. During theacknowledge clock pulse (9th pulse), the slave releases the data line (HIGH), enabling the mas-ter to pull it down in order to generate the acknowledge. The slave polls the data line during thisclock pulse and sets the NAK bit in SR if the master does not acknowledge the data byte. A NAKmeans that the master does not wish to receive additional data bytes. As with the other statusbits, an interrupt can be generated if enabled in the Interrupt Enable Register (IER).
SR.TXRDY is used as Transmit Ready for the Peripheral DMA Controller transmit channel.
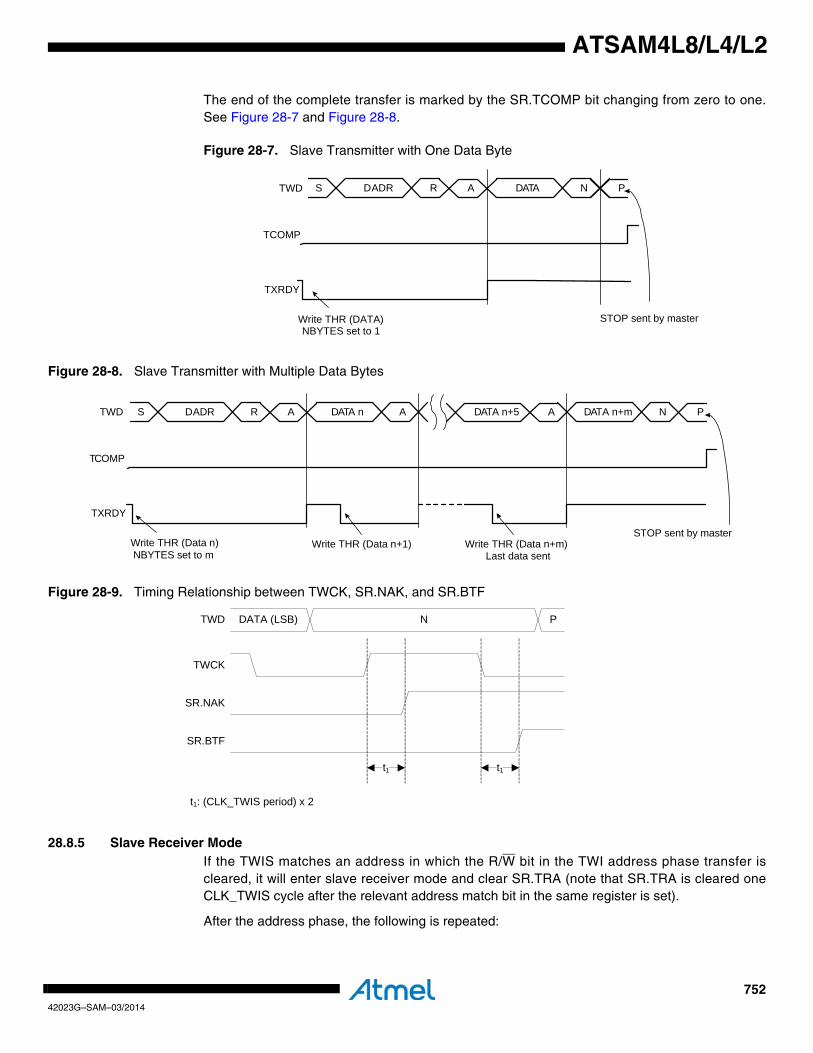
75242023G–SAM–03/2014
ATSAM4L8/L4/L2
The end of the complete transfer is marked by the SR.TCOMP bit changing from zero to one.See Figure 28-7 and Figure 28-8.
Figure 28-7. Slave Transmitter with One Data Byte
Figure 28-8. Slave Transmitter with Multiple Data Bytes
Figure 28-9. Timing Relationship between TWCK, SR.NAK, and SR.BTF
28.8.5 Slave Receiver ModeIf the TWIS matches an address in which the R/W bit in the TWI address phase transfer iscleared, it will enter slave receiver mode and clear SR.TRA (note that SR.TRA is cleared oneCLK_TWIS cycle after the relevant address match bit in the same register is set).
After the address phase, the following is repeated:
TCOMP
TXRDY
Write THR (DATA) STOP sent by master
TWD A DATA NS DADR R P
NBYTES set to 1
A DATA n AS DADR R DATA n+5 A PDATA n+m N
TCOMP
TXRDY
Write THR (Data n)NBYTES set to m
STOP sent by master
TWD
Write THR (Data n+1) Write THR (Data n+m)Last data sent
DATA (LSB) N P
TWCK
SR.NAK
SR.BTF
t1 t1
t1: (CLK_TWIS period) x 2
TWD
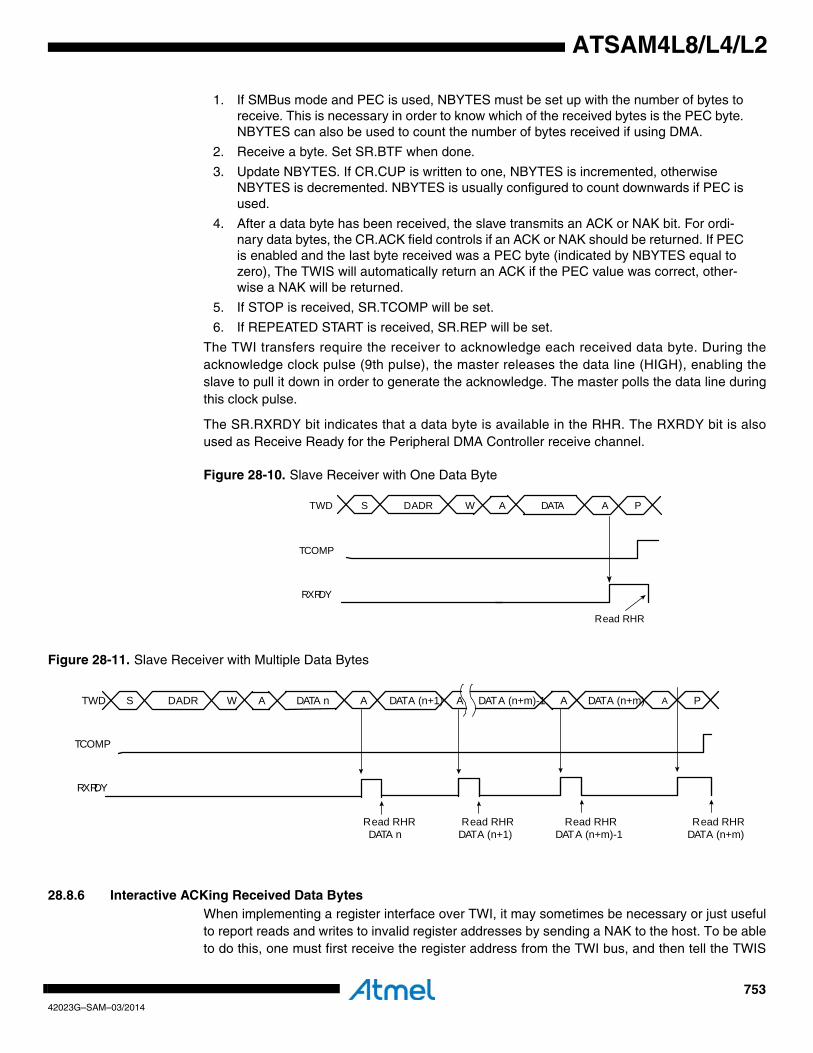
75342023G–SAM–03/2014
ATSAM4L8/L4/L2
1. If SMBus mode and PEC is used, NBYTES must be set up with the number of bytes to receive. This is necessary in order to know which of the received bytes is the PEC byte. NBYTES can also be used to count the number of bytes received if using DMA.
2. Receive a byte. Set SR.BTF when done.
3. Update NBYTES. If CR.CUP is written to one, NBYTES is incremented, otherwise NBYTES is decremented. NBYTES is usually configured to count downwards if PEC is used.
4. After a data byte has been received, the slave transmits an ACK or NAK bit. For ordi-nary data bytes, the CR.ACK field controls if an ACK or NAK should be returned. If PEC is enabled and the last byte received was a PEC byte (indicated by NBYTES equal to zero), The TWIS will automatically return an ACK if the PEC value was correct, other-wise a NAK will be returned.
5. If STOP is received, SR.TCOMP will be set.
6. If REPEATED START is received, SR.REP will be set.
The TWI transfers require the receiver to acknowledge each received data byte. During theacknowledge clock pulse (9th pulse), the master releases the data line (HIGH), enabling theslave to pull it down in order to generate the acknowledge. The master polls the data line duringthis clock pulse.
The SR.RXRDY bit indicates that a data byte is available in the RHR. The RXRDY bit is alsoused as Receive Ready for the Peripheral DMA Controller receive channel.
Figure 28-10. Slave Receiver with One Data Byte
Figure 28-11. Slave Receiver with Multiple Data Bytes
28.8.6 Interactive ACKing Received Data BytesWhen implementing a register interface over TWI, it may sometimes be necessary or just usefulto report reads and writes to invalid register addresses by sending a NAK to the host. To be ableto do this, one must first receive the register address from the TWI bus, and then tell the TWIS
AS DADR W DATA A P
TCOMP
RXRDY
Read RHR
TWD
AAS DADR W DATA n A ADATA (n+1) A DATA (n+m)DATA (n+m)-1 PTWD
TCOMP
RXRDY
Read RHRDATA n
Read RHRDATA (n+1)
Read RHRDATA (n+m)-1
Read RHRDATA (n+m)
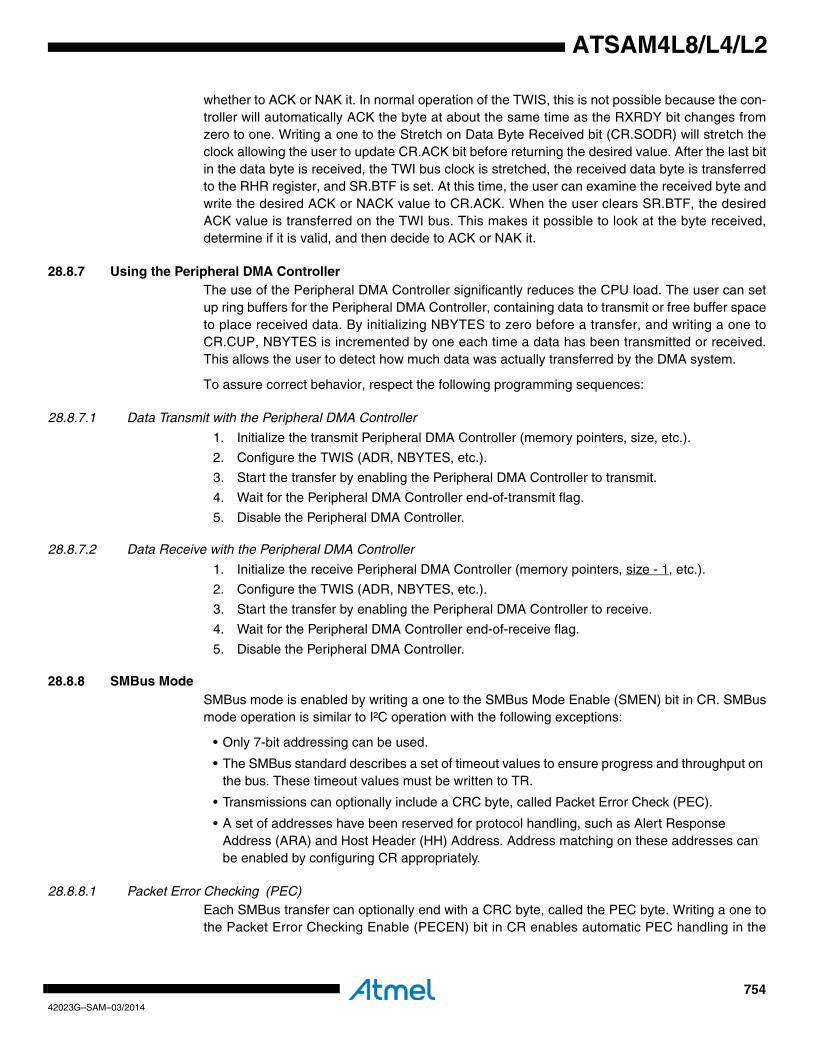
75442023G–SAM–03/2014
ATSAM4L8/L4/L2
whether to ACK or NAK it. In normal operation of the TWIS, this is not possible because the con-troller will automatically ACK the byte at about the same time as the RXRDY bit changes fromzero to one. Writing a one to the Stretch on Data Byte Received bit (CR.SODR) will stretch theclock allowing the user to update CR.ACK bit before returning the desired value. After the last bitin the data byte is received, the TWI bus clock is stretched, the received data byte is transferredto the RHR register, and SR.BTF is set. At this time, the user can examine the received byte andwrite the desired ACK or NACK value to CR.ACK. When the user clears SR.BTF, the desiredACK value is transferred on the TWI bus. This makes it possible to look at the byte received,determine if it is valid, and then decide to ACK or NAK it.
28.8.7 Using the Peripheral DMA ControllerThe use of the Peripheral DMA Controller significantly reduces the CPU load. The user can setup ring buffers for the Peripheral DMA Controller, containing data to transmit or free buffer spaceto place received data. By initializing NBYTES to zero before a transfer, and writing a one toCR.CUP, NBYTES is incremented by one each time a data has been transmitted or received.This allows the user to detect how much data was actually transferred by the DMA system.
To assure correct behavior, respect the following programming sequences:
28.8.7.1 Data Transmit with the Peripheral DMA Controller
1. Initialize the transmit Peripheral DMA Controller (memory pointers, size, etc.).
2. Configure the TWIS (ADR, NBYTES, etc.).
3. Start the transfer by enabling the Peripheral DMA Controller to transmit.
4. Wait for the Peripheral DMA Controller end-of-transmit flag.
5. Disable the Peripheral DMA Controller.
28.8.7.2 Data Receive with the Peripheral DMA Controller
1. Initialize the receive Peripheral DMA Controller (memory pointers, size - 1, etc.).
2. Configure the TWIS (ADR, NBYTES, etc.).
3. Start the transfer by enabling the Peripheral DMA Controller to receive.
4. Wait for the Peripheral DMA Controller end-of-receive flag.
5. Disable the Peripheral DMA Controller.
28.8.8 SMBus ModeSMBus mode is enabled by writing a one to the SMBus Mode Enable (SMEN) bit in CR. SMBusmode operation is similar to I²C operation with the following exceptions:
• Only 7-bit addressing can be used.
• The SMBus standard describes a set of timeout values to ensure progress and throughput on the bus. These timeout values must be written to TR.
• Transmissions can optionally include a CRC byte, called Packet Error Check (PEC).
• A set of addresses have been reserved for protocol handling, such as Alert Response Address (ARA) and Host Header (HH) Address. Address matching on these addresses can be enabled by configuring CR appropriately.
28.8.8.1 Packet Error Checking (PEC)Each SMBus transfer can optionally end with a CRC byte, called the PEC byte. Writing a one tothe Packet Error Checking Enable (PECEN) bit in CR enables automatic PEC handling in the
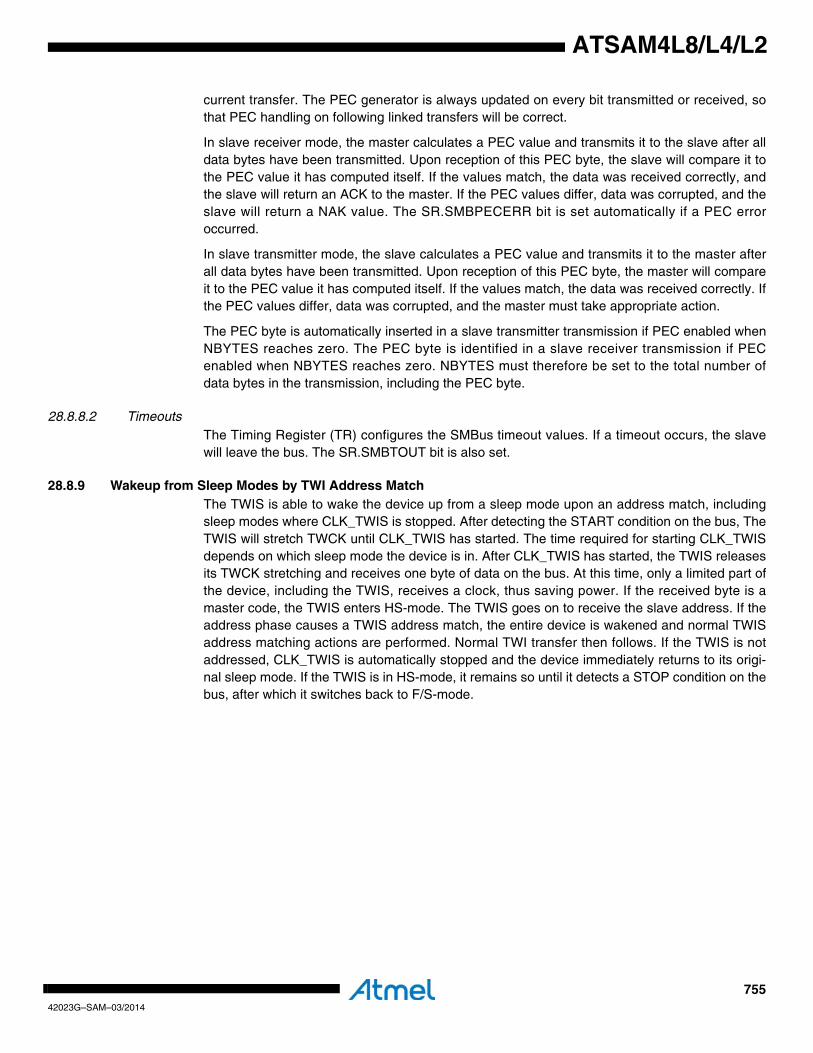
75542023G–SAM–03/2014
ATSAM4L8/L4/L2
current transfer. The PEC generator is always updated on every bit transmitted or received, sothat PEC handling on following linked transfers will be correct.
In slave receiver mode, the master calculates a PEC value and transmits it to the slave after alldata bytes have been transmitted. Upon reception of this PEC byte, the slave will compare it tothe PEC value it has computed itself. If the values match, the data was received correctly, andthe slave will return an ACK to the master. If the PEC values differ, data was corrupted, and theslave will return a NAK value. The SR.SMBPECERR bit is set automatically if a PEC erroroccurred.
In slave transmitter mode, the slave calculates a PEC value and transmits it to the master afterall data bytes have been transmitted. Upon reception of this PEC byte, the master will compareit to the PEC value it has computed itself. If the values match, the data was received correctly. Ifthe PEC values differ, data was corrupted, and the master must take appropriate action.
The PEC byte is automatically inserted in a slave transmitter transmission if PEC enabled whenNBYTES reaches zero. The PEC byte is identified in a slave receiver transmission if PECenabled when NBYTES reaches zero. NBYTES must therefore be set to the total number ofdata bytes in the transmission, including the PEC byte.
28.8.8.2 TimeoutsThe Timing Register (TR) configures the SMBus timeout values. If a timeout occurs, the slavewill leave the bus. The SR.SMBTOUT bit is also set.
28.8.9 Wakeup from Sleep Modes by TWI Address MatchThe TWIS is able to wake the device up from a sleep mode upon an address match, includingsleep modes where CLK_TWIS is stopped. After detecting the START condition on the bus, TheTWIS will stretch TWCK until CLK_TWIS has started. The time required for starting CLK_TWISdepends on which sleep mode the device is in. After CLK_TWIS has started, the TWIS releasesits TWCK stretching and receives one byte of data on the bus. At this time, only a limited part ofthe device, including the TWIS, receives a clock, thus saving power. If the received byte is amaster code, the TWIS enters HS-mode. The TWIS goes on to receive the slave address. If theaddress phase causes a TWIS address match, the entire device is wakened and normal TWISaddress matching actions are performed. Normal TWI transfer then follows. If the TWIS is notaddressed, CLK_TWIS is automatically stopped and the device immediately returns to its origi-nal sleep mode. If the TWIS is in HS-mode, it remains so until it detects a STOP condition on thebus, after which it switches back to F/S-mode.
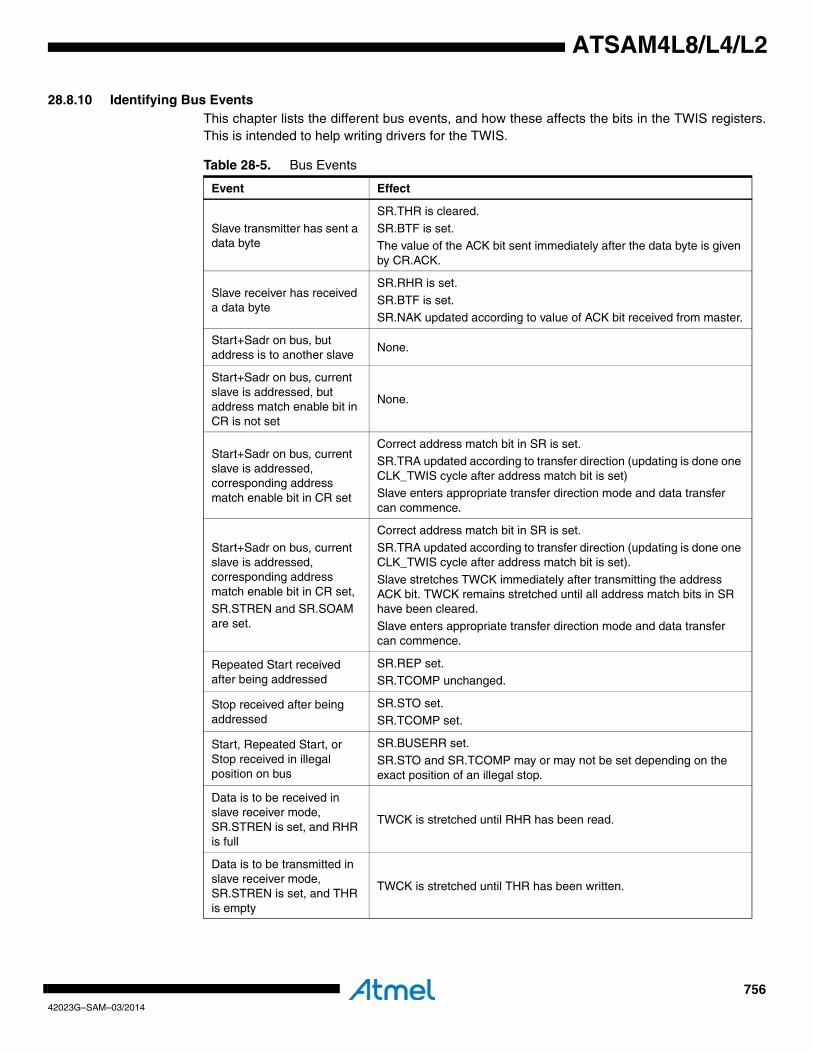
75642023G–SAM–03/2014
ATSAM4L8/L4/L2
28.8.10 Identifying Bus EventsThis chapter lists the different bus events, and how these affects the bits in the TWIS registers.This is intended to help writing drivers for the TWIS.
Table 28-5. Bus Events
Event Effect
Slave transmitter has sent a data byte
SR.THR is cleared.
SR.BTF is set.The value of the ACK bit sent immediately after the data byte is given by CR.ACK.
Slave receiver has received a data byte
SR.RHR is set.
SR.BTF is set.SR.NAK updated according to value of ACK bit received from master.
Start+Sadr on bus, but address is to another slave
None.
Start+Sadr on bus, current slave is addressed, but address match enable bit in CR is not set
None.
Start+Sadr on bus, current slave is addressed, corresponding address match enable bit in CR set
Correct address match bit in SR is set.SR.TRA updated according to transfer direction (updating is done one CLK_TWIS cycle after address match bit is set)Slave enters appropriate transfer direction mode and data transfer can commence.
Start+Sadr on bus, current slave is addressed, corresponding address match enable bit in CR set,SR.STREN and SR.SOAM are set.
Correct address match bit in SR is set.
SR.TRA updated according to transfer direction (updating is done one CLK_TWIS cycle after address match bit is set).
Slave stretches TWCK immediately after transmitting the address ACK bit. TWCK remains stretched until all address match bits in SR have been cleared.
Slave enters appropriate transfer direction mode and data transfer can commence.
Repeated Start received after being addressed
SR.REP set.SR.TCOMP unchanged.
Stop received after being addressed
SR.STO set.SR.TCOMP set.
Start, Repeated Start, or Stop received in illegal position on bus
SR.BUSERR set.SR.STO and SR.TCOMP may or may not be set depending on the exact position of an illegal stop.
Data is to be received in slave receiver mode, SR.STREN is set, and RHR is full
TWCK is stretched until RHR has been read.
Data is to be transmitted in slave receiver mode, SR.STREN is set, and THR is empty
TWCK is stretched until THR has been written.
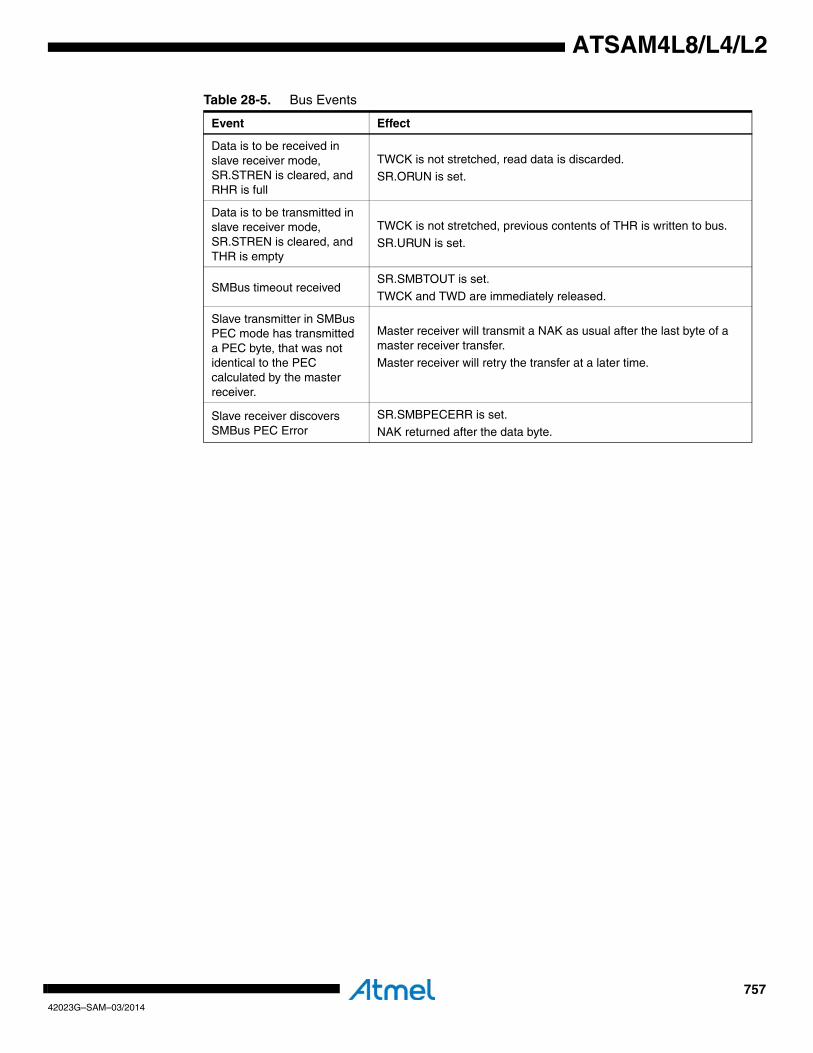
75742023G–SAM–03/2014
ATSAM4L8/L4/L2
Data is to be received in slave receiver mode, SR.STREN is cleared, and RHR is full
TWCK is not stretched, read data is discarded.SR.ORUN is set.
Data is to be transmitted in slave receiver mode, SR.STREN is cleared, and THR is empty
TWCK is not stretched, previous contents of THR is written to bus.
SR.URUN is set.
SMBus timeout receivedSR.SMBTOUT is set.
TWCK and TWD are immediately released.
Slave transmitter in SMBus PEC mode has transmitted a PEC byte, that was not identical to the PEC calculated by the master receiver.
Master receiver will transmit a NAK as usual after the last byte of a master receiver transfer.
Master receiver will retry the transfer at a later time.
Slave receiver discovers SMBus PEC Error
SR.SMBPECERR is set.
NAK returned after the data byte.
Table 28-5. Bus Events
Event Effect
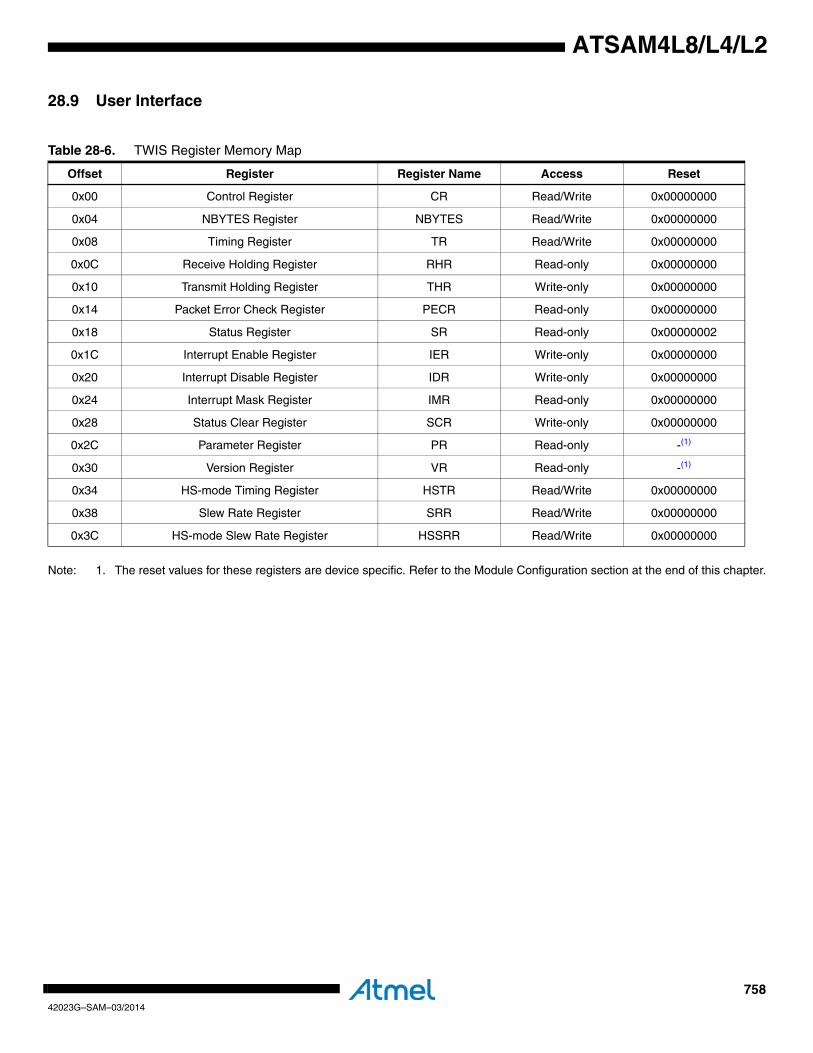
75842023G–SAM–03/2014
ATSAM4L8/L4/L2
28.9 User Interface
Note: 1. The reset values for these registers are device specific. Refer to the Module Configuration section at the end of this chapter.
Table 28-6. TWIS Register Memory Map
Offset Register Register Name Access Reset
0x00 Control Register CR Read/Write 0x00000000
0x04 NBYTES Register NBYTES Read/Write 0x00000000
0x08 Timing Register TR Read/Write 0x00000000
0x0C Receive Holding Register RHR Read-only 0x00000000
0x10 Transmit Holding Register THR Write-only 0x00000000
0x14 Packet Error Check Register PECR Read-only 0x00000000
0x18 Status Register SR Read-only 0x00000002
0x1C Interrupt Enable Register IER Write-only 0x00000000
0x20 Interrupt Disable Register IDR Write-only 0x00000000
0x24 Interrupt Mask Register IMR Read-only 0x00000000
0x28 Status Clear Register SCR Write-only 0x00000000
0x2C Parameter Register PR Read-only -(1)
0x30 Version Register VR Read-only -(1)
0x34 HS-mode Timing Register HSTR Read/Write 0x00000000
0x38 Slew Rate Register SRR Read/Write 0x00000000
0x3C HS-mode Slew Rate Register HSSRR Read/Write 0x00000000

75942023G–SAM–03/2014
ATSAM4L8/L4/L2
28.9.1 Control RegisterName: CR
Access Type: Read/Write
Offset: 0x00
Reset Value: 0x00000000
• TENBIT: Ten Bit Address Match0: Disables Ten Bit Address Match.
1: Enables Ten Bit Address Match.• ADR: Slave Address
Slave address used in slave address match. Bits 9:0 are used if in 10-bit mode, bits 6:0 otherwise.• SODR: Stretch Clock on Data Byte Reception
0: Does not stretch bus clock immediately before ACKing a received data byte.1: Stretches bus clock immediately before ACKing a received data byte.
• SOAM: Stretch Clock on Address Match0: Does not stretch bus clock after address match.
1: Stretches bus clock after address match.
• CUP: NBYTES Count Up0: Causes NBYTES to count down (decrement) per byte transferred.
1: Causes NBYTES to count up (increment) per byte transferred.• ACK: Slave Receiver Data Phase ACK Value
0: Causes a low value to be returned in the ACK cycle of the data phase in slave receiver mode.1: Causes a high value to be returned in the ACK cycle of the data phase in slave receiver mode.
• PECEN: Packet Error Checking Enable0: Disables SMBus PEC (CRC) generation and check.
1: Enables SMBus PEC (CRC) generation and check.
• SMHH: SMBus Host Header0: Causes the TWIS not to acknowledge the SMBus Host Header.
1: Causes the TWIS to acknowledge the SMBus Host Header.
• SMDA: SMBus Default Address0: Causes the TWIS not to acknowledge the SMBus Default Address.
1: Causes the TWIS to acknowledge the SMBus Default Address.• SWRST: Software Reset
This bit will always read as 0.Writing a zero to this bit has no effect.
31 30 29 28 27 26 25 24
- - - - - TENBIT ADR[9:8]
23 22 21 20 19 18 17 16
ADR[7:0]
15 14 13 12 11 10 9 8
SODR SOAM CUP ACK PECEN SMHH SMDA -
7 6 5 4 3 2 1 0
SWRST - - STREN GCMATCH SMATCH SMEN SEN
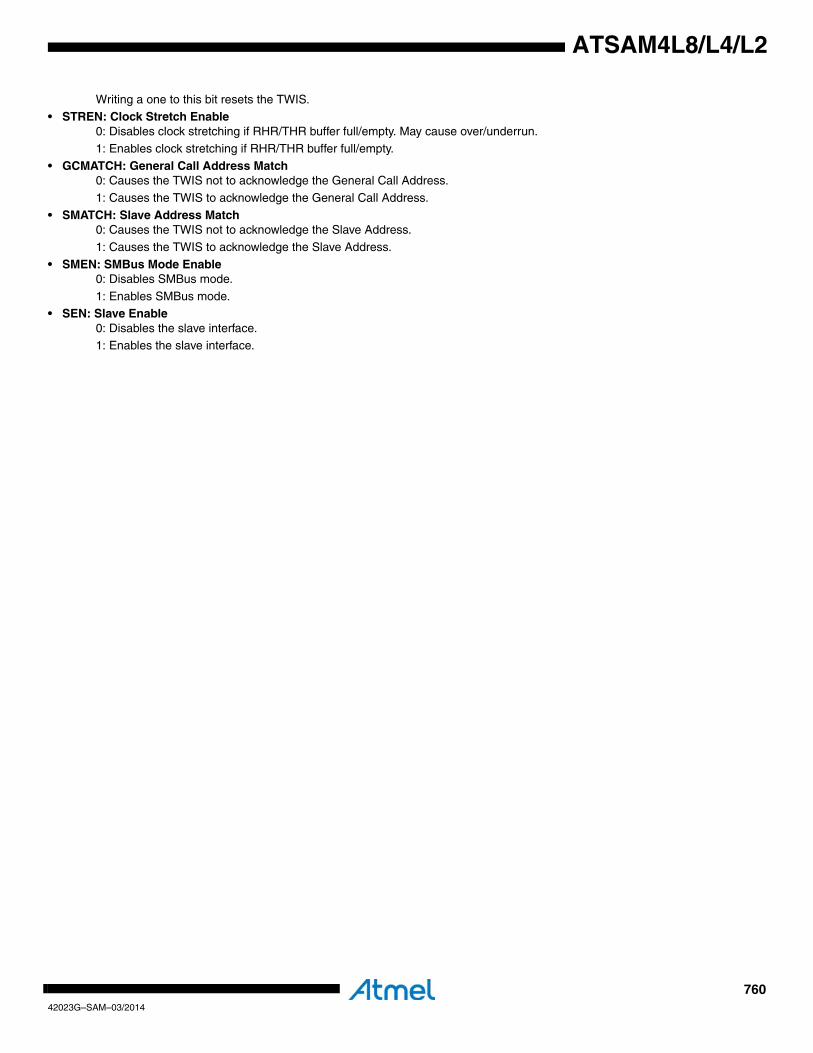
76042023G–SAM–03/2014
ATSAM4L8/L4/L2
Writing a one to this bit resets the TWIS.• STREN: Clock Stretch Enable
0: Disables clock stretching if RHR/THR buffer full/empty. May cause over/underrun.1: Enables clock stretching if RHR/THR buffer full/empty.
• GCMATCH: General Call Address Match0: Causes the TWIS not to acknowledge the General Call Address.
1: Causes the TWIS to acknowledge the General Call Address.
• SMATCH: Slave Address Match0: Causes the TWIS not to acknowledge the Slave Address.
1: Causes the TWIS to acknowledge the Slave Address.
• SMEN: SMBus Mode Enable0: Disables SMBus mode.
1: Enables SMBus mode.• SEN: Slave Enable
0: Disables the slave interface.1: Enables the slave interface.
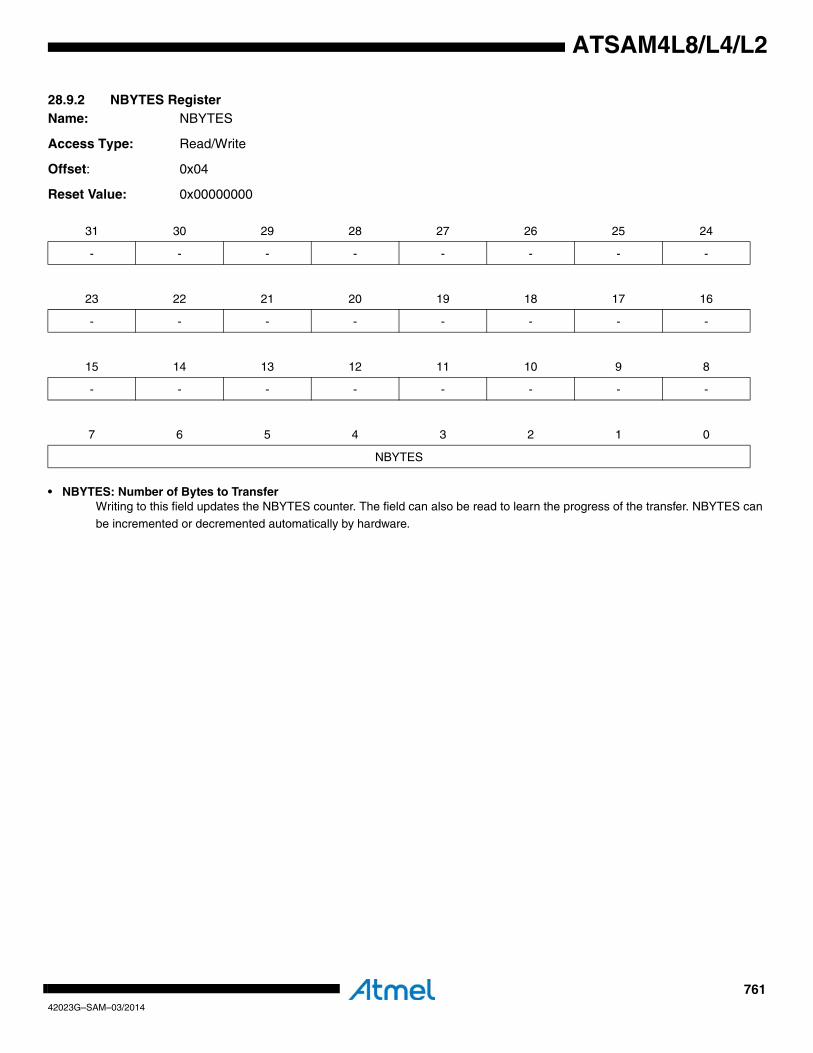
76142023G–SAM–03/2014
ATSAM4L8/L4/L2
28.9.2 NBYTES RegisterName: NBYTES
Access Type: Read/Write
Offset: 0x04
Reset Value: 0x00000000
• NBYTES: Number of Bytes to TransferWriting to this field updates the NBYTES counter. The field can also be read to learn the progress of the transfer. NBYTES can
be incremented or decremented automatically by hardware.
31 30 29 28 27 26 25 24
- - - - - - - -
23 22 21 20 19 18 17 16
- - - - - - - -
15 14 13 12 11 10 9 8
- - - - - - - -
7 6 5 4 3 2 1 0
NBYTES
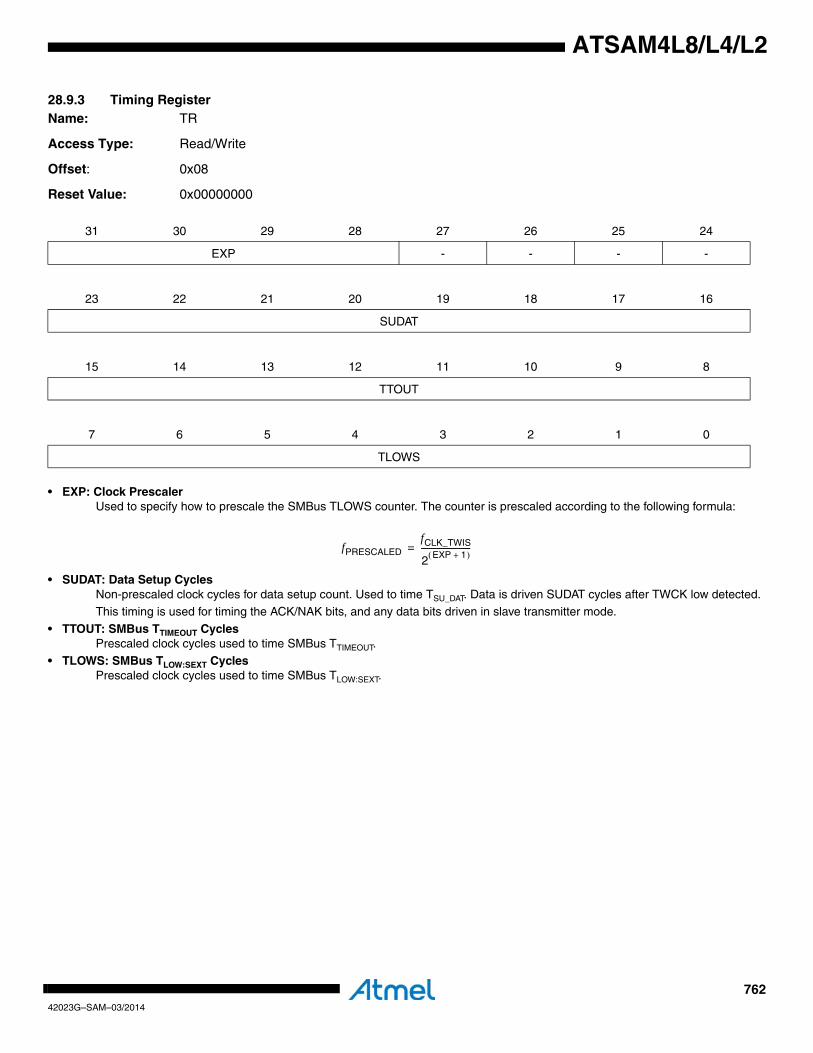
76242023G–SAM–03/2014
ATSAM4L8/L4/L2
28.9.3 Timing RegisterName: TR
Access Type: Read/Write
Offset: 0x08
Reset Value: 0x00000000
• EXP: Clock Prescaler Used to specify how to prescale the SMBus TLOWS counter. The counter is prescaled according to the following formula:
• SUDAT: Data Setup CyclesNon-prescaled clock cycles for data setup count. Used to time TSU_DAT. Data is driven SUDAT cycles after TWCK low detected. This timing is used for timing the ACK/NAK bits, and any data bits driven in slave transmitter mode.
• TTOUT: SMBus TTIMEOUT CyclesPrescaled clock cycles used to time SMBus TTIMEOUT.
• TLOWS: SMBus TLOW:SEXT CyclesPrescaled clock cycles used to time SMBus TLOW:SEXT.
31 30 29 28 27 26 25 24
EXP - - - -
23 22 21 20 19 18 17 16
SUDAT
15 14 13 12 11 10 9 8
TTOUT
7 6 5 4 3 2 1 0
TLOWS
fPRESCALEDfCLK_TWIS
2 EXP 1+( )-------------------------=

76342023G–SAM–03/2014
ATSAM4L8/L4/L2
28.9.4 Receive Holding RegisterName: RHR
Access Type: Read-only
Offset: 0x0C
Reset Value: 0x00000000
• RXDATA: Received Data ByteWhen the RXRDY bit in the Status Register (SR) is one, this field contains a byte received from the TWI bus.
31 30 29 28 27 26 25 24
- - - - - - - -
23 22 21 20 19 18 17 16
- - - - - - - -
15 14 13 12 11 10 9 8
- - - - - - - -
7 6 5 4 3 2 1 0
RXDATA
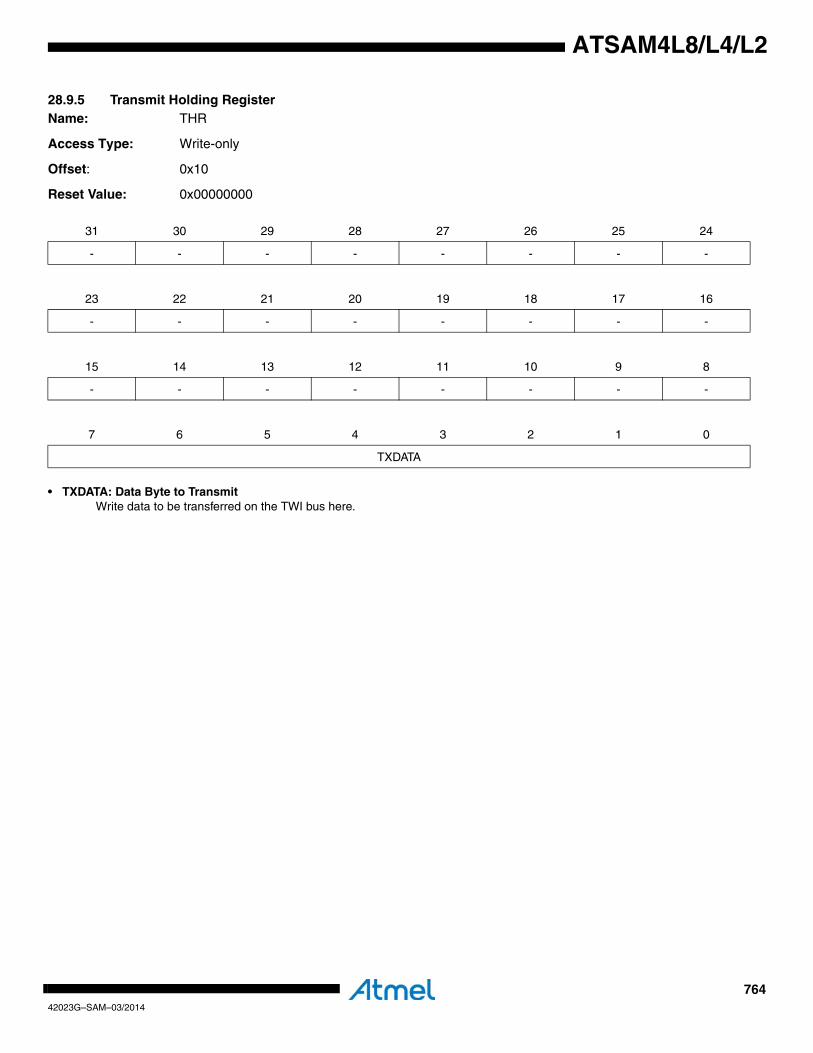
76442023G–SAM–03/2014
ATSAM4L8/L4/L2
28.9.5 Transmit Holding Register Name: THR
Access Type: Write-only
Offset: 0x10
Reset Value: 0x00000000
• TXDATA: Data Byte to TransmitWrite data to be transferred on the TWI bus here.
31 30 29 28 27 26 25 24
- - - - - - - -
23 22 21 20 19 18 17 16
- - - - - - - -
15 14 13 12 11 10 9 8
- - - - - - - -
7 6 5 4 3 2 1 0
TXDATA
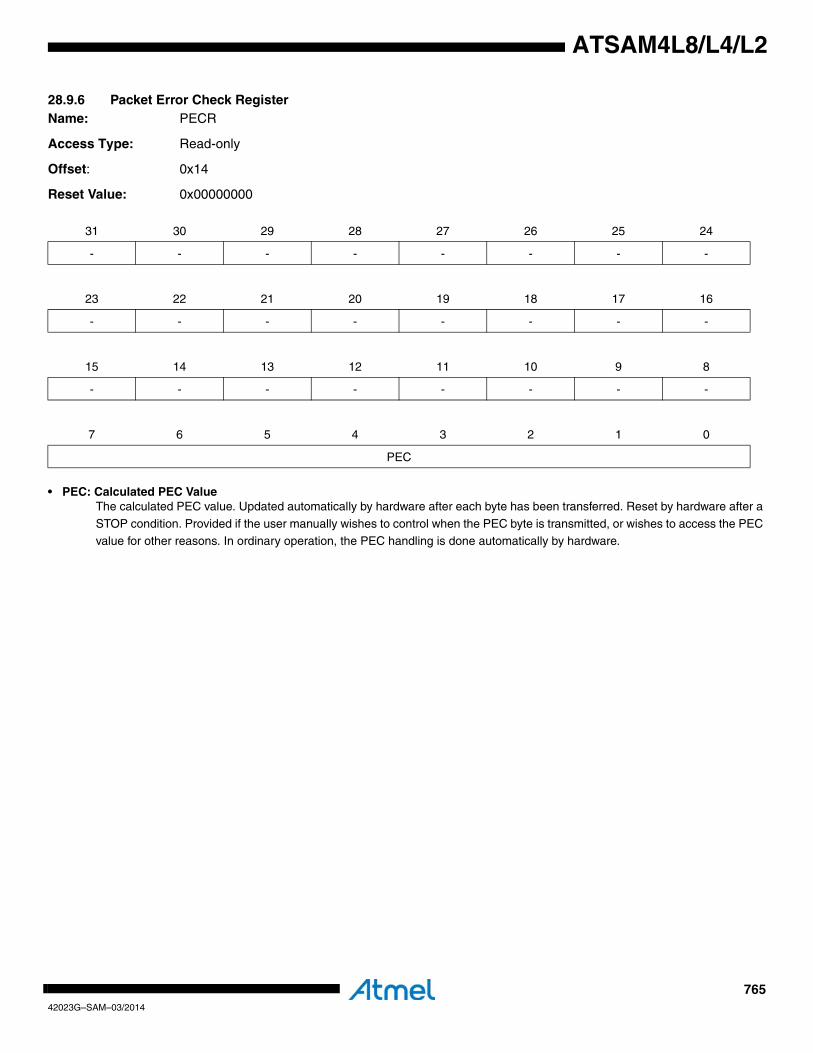
76542023G–SAM–03/2014
ATSAM4L8/L4/L2
28.9.6 Packet Error Check RegisterName: PECR
Access Type: Read-only
Offset: 0x14
Reset Value: 0x00000000
• PEC: Calculated PEC ValueThe calculated PEC value. Updated automatically by hardware after each byte has been transferred. Reset by hardware after a
STOP condition. Provided if the user manually wishes to control when the PEC byte is transmitted, or wishes to access the PEC value for other reasons. In ordinary operation, the PEC handling is done automatically by hardware.
31 30 29 28 27 26 25 24
- - - - - - - -
23 22 21 20 19 18 17 16
- - - - - - - -
15 14 13 12 11 10 9 8
- - - - - - - -
7 6 5 4 3 2 1 0
PEC
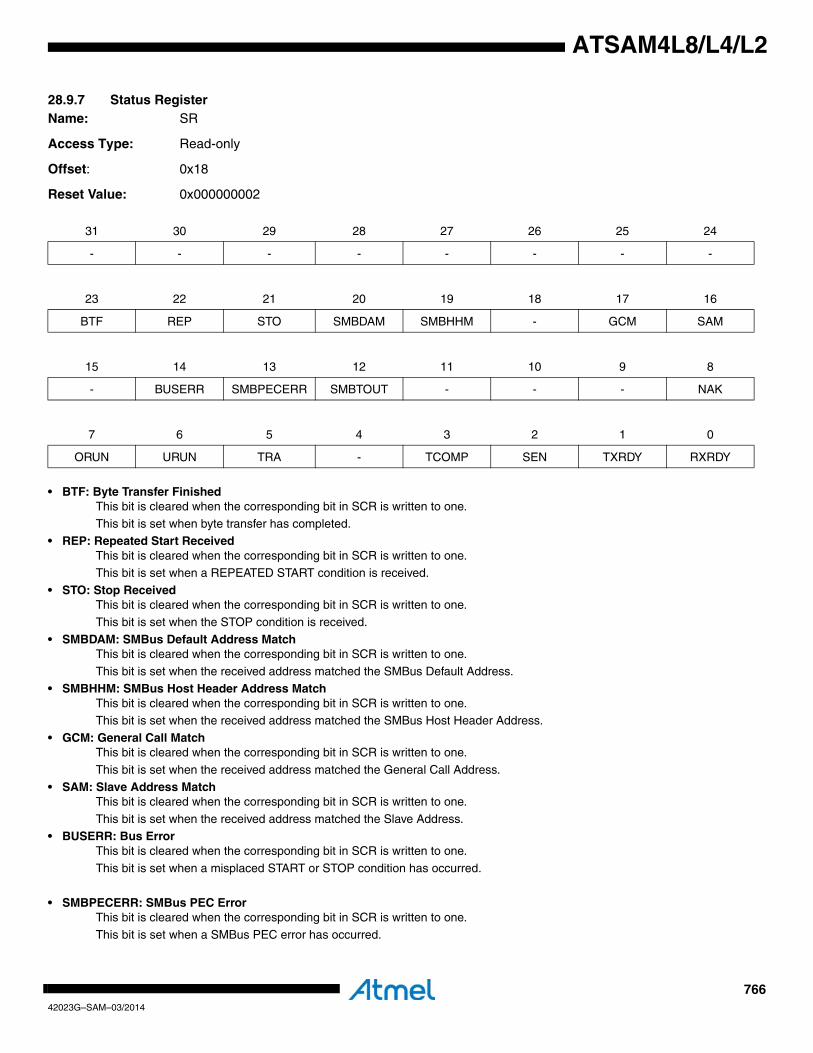
76642023G–SAM–03/2014
ATSAM4L8/L4/L2
28.9.7 Status Register Name: SR
Access Type: Read-only
Offset: 0x18
Reset Value: 0x000000002
• BTF: Byte Transfer FinishedThis bit is cleared when the corresponding bit in SCR is written to one.
This bit is set when byte transfer has completed.• REP: Repeated Start Received
This bit is cleared when the corresponding bit in SCR is written to one.This bit is set when a REPEATED START condition is received.
• STO: Stop ReceivedThis bit is cleared when the corresponding bit in SCR is written to one.
This bit is set when the STOP condition is received.
• SMBDAM: SMBus Default Address MatchThis bit is cleared when the corresponding bit in SCR is written to one.
This bit is set when the received address matched the SMBus Default Address.• SMBHHM: SMBus Host Header Address Match
This bit is cleared when the corresponding bit in SCR is written to one.This bit is set when the received address matched the SMBus Host Header Address.
• GCM: General Call MatchThis bit is cleared when the corresponding bit in SCR is written to one.
This bit is set when the received address matched the General Call Address.
• SAM: Slave Address MatchThis bit is cleared when the corresponding bit in SCR is written to one.
This bit is set when the received address matched the Slave Address.• BUSERR: Bus Error
This bit is cleared when the corresponding bit in SCR is written to one.
This bit is set when a misplaced START or STOP condition has occurred.
• SMBPECERR: SMBus PEC ErrorThis bit is cleared when the corresponding bit in SCR is written to one.
This bit is set when a SMBus PEC error has occurred.
31 30 29 28 27 26 25 24
- - - - - - - -
23 22 21 20 19 18 17 16
BTF REP STO SMBDAM SMBHHM - GCM SAM
15 14 13 12 11 10 9 8
- BUSERR SMBPECERR SMBTOUT - - - NAK
7 6 5 4 3 2 1 0
ORUN URUN TRA - TCOMP SEN TXRDY RXRDY
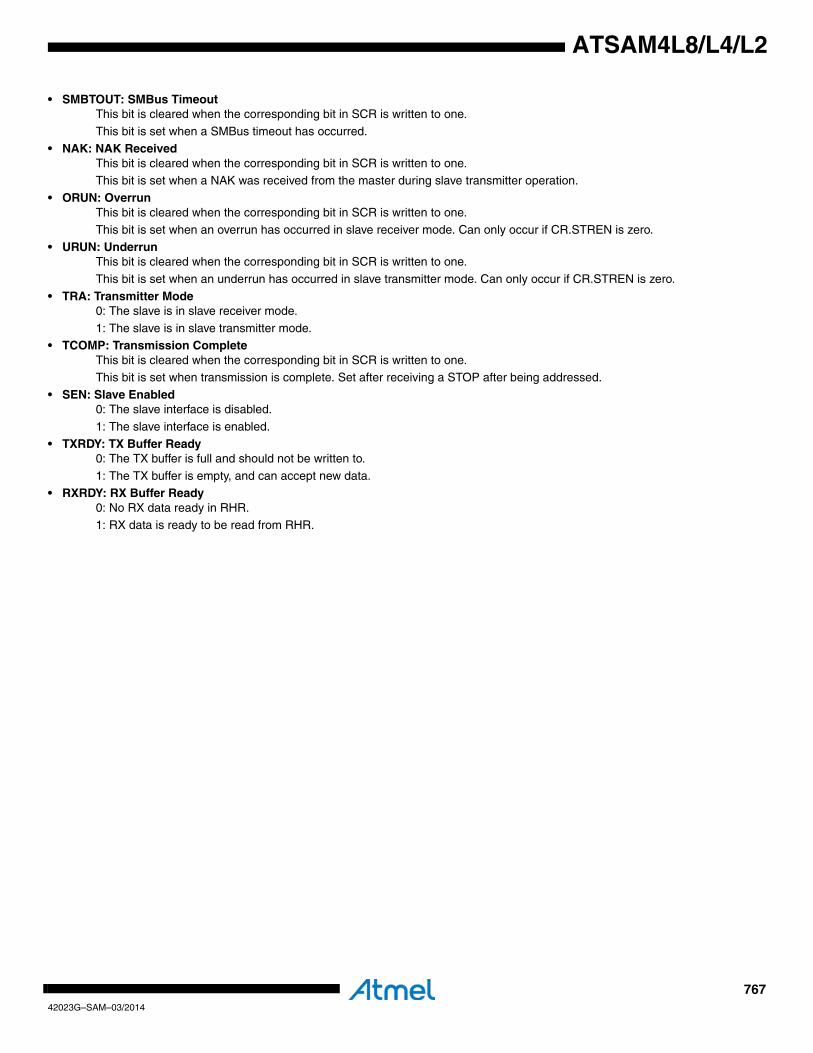
76742023G–SAM–03/2014
ATSAM4L8/L4/L2
• SMBTOUT: SMBus TimeoutThis bit is cleared when the corresponding bit in SCR is written to one.
This bit is set when a SMBus timeout has occurred.• NAK: NAK Received
This bit is cleared when the corresponding bit in SCR is written to one.This bit is set when a NAK was received from the master during slave transmitter operation.
• ORUN: OverrunThis bit is cleared when the corresponding bit in SCR is written to one.This bit is set when an overrun has occurred in slave receiver mode. Can only occur if CR.STREN is zero.
• URUN: UnderrunThis bit is cleared when the corresponding bit in SCR is written to one.
This bit is set when an underrun has occurred in slave transmitter mode. Can only occur if CR.STREN is zero.
• TRA: Transmitter Mode0: The slave is in slave receiver mode.
1: The slave is in slave transmitter mode.• TCOMP: Transmission Complete
This bit is cleared when the corresponding bit in SCR is written to one.This bit is set when transmission is complete. Set after receiving a STOP after being addressed.
• SEN: Slave Enabled0: The slave interface is disabled.
1: The slave interface is enabled.
• TXRDY: TX Buffer Ready0: The TX buffer is full and should not be written to.
1: The TX buffer is empty, and can accept new data.• RXRDY: RX Buffer Ready
0: No RX data ready in RHR.1: RX data is ready to be read from RHR.
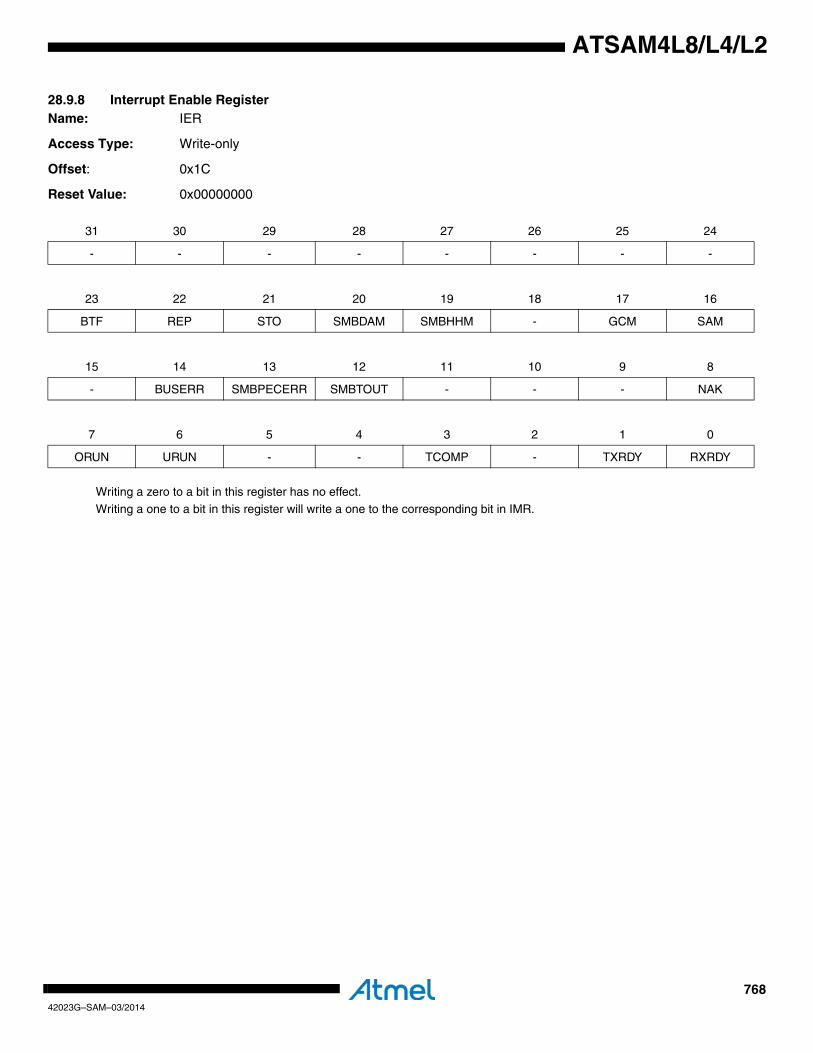
76842023G–SAM–03/2014
ATSAM4L8/L4/L2
28.9.8 Interrupt Enable RegisterName: IER
Access Type: Write-only
Offset: 0x1C
Reset Value: 0x00000000
Writing a zero to a bit in this register has no effect.Writing a one to a bit in this register will write a one to the corresponding bit in IMR.
31 30 29 28 27 26 25 24
- - - - - - - -
23 22 21 20 19 18 17 16
BTF REP STO SMBDAM SMBHHM - GCM SAM
15 14 13 12 11 10 9 8
- BUSERR SMBPECERR SMBTOUT - - - NAK
7 6 5 4 3 2 1 0
ORUN URUN - - TCOMP - TXRDY RXRDY

76942023G–SAM–03/2014
ATSAM4L8/L4/L2
28.9.9 Interrupt Disable RegisterName: IDR
Access Type: Write-only
Offset: 0x20
Reset Value: 0x00000000
Writing a zero to a bit in this register has no effect.Writing a one to a bit in this register will clear the corresponding bit in IMR.
31 30 29 28 27 26 25 24
- - - - - - - -
23 22 21 20 19 18 17 16
BTF REP STO SMBDAM SMBHHM - GCM SAM
15 14 13 12 11 10 9 8
- BUSERR SMBPECERR SMBTOUT - - - NAK
7 6 5 4 3 2 1 0
ORUN URUN - - TCOMP - TXRDY RXRDY

77042023G–SAM–03/2014
ATSAM4L8/L4/L2
28.9.10 Interrupt Mask RegisterName: IMR
Access Type: Read-only
Offset: 0x24
Reset Value: 0x00000000
0: The corresponding interrupt is disabled.1: The corresponding interrupt is enabled.
This bit is cleared when the corresponding bit in IDR is written to one.
This bit is set when the corresponding bit in IER is written to one.
31 30 29 28 27 26 25 24
- - - - - - - -
23 22 21 20 19 18 17 16
BTF REP STO SMBDAM SMBHHM - GCM SAM
15 14 13 12 11 10 9 8
- BUSERR SMBPECERR SMBTOUT - - - NAK
7 6 5 4 3 2 1 0
ORUN URUN - - TCOMP - TXRDY RXRDY
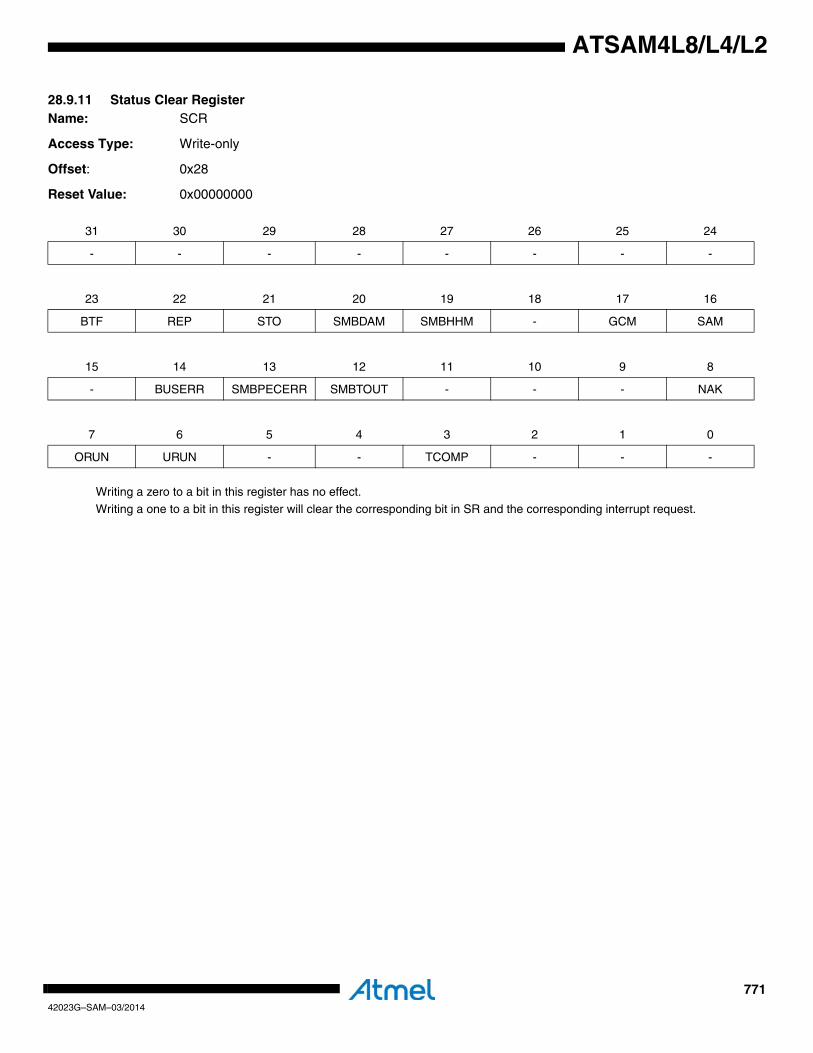
77142023G–SAM–03/2014
ATSAM4L8/L4/L2
28.9.11 Status Clear RegisterName: SCR
Access Type: Write-only
Offset: 0x28
Reset Value: 0x00000000
Writing a zero to a bit in this register has no effect.Writing a one to a bit in this register will clear the corresponding bit in SR and the corresponding interrupt request.
31 30 29 28 27 26 25 24
- - - - - - - -
23 22 21 20 19 18 17 16
BTF REP STO SMBDAM SMBHHM - GCM SAM
15 14 13 12 11 10 9 8
- BUSERR SMBPECERR SMBTOUT - - - NAK
7 6 5 4 3 2 1 0
ORUN URUN - - TCOMP - - -
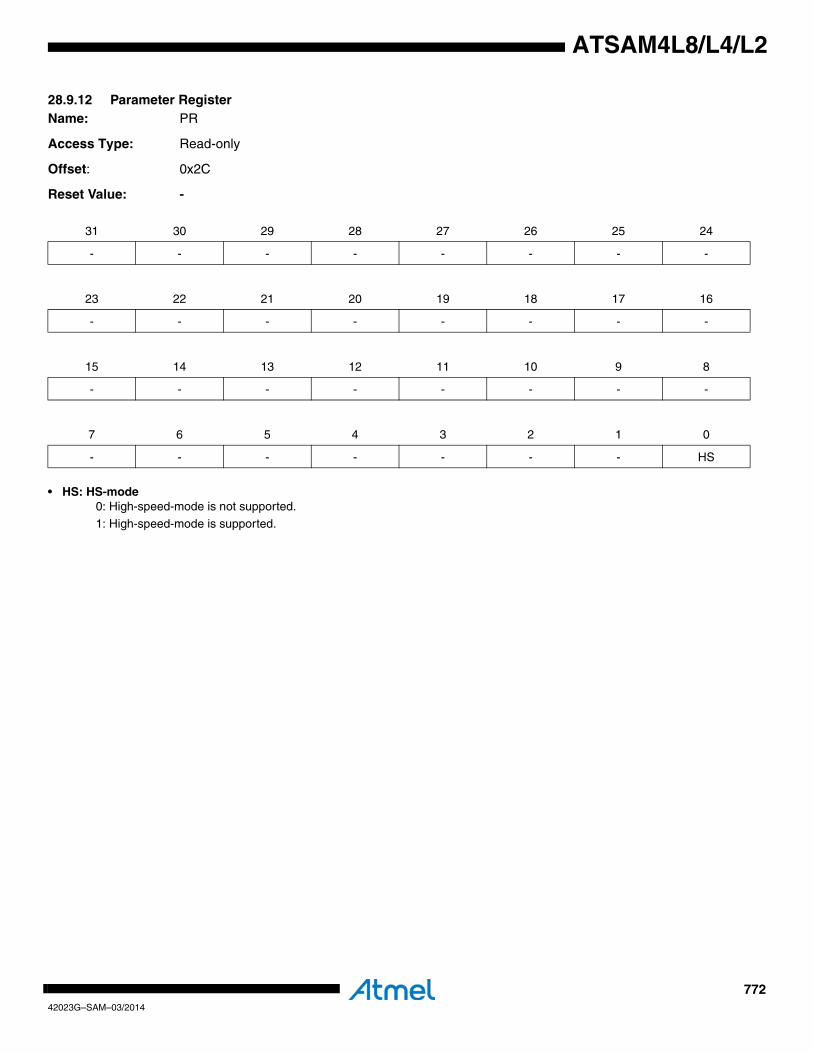
77242023G–SAM–03/2014
ATSAM4L8/L4/L2
28.9.12 Parameter RegisterName: PR
Access Type: Read-only
Offset: 0x2C
Reset Value: -
• HS: HS-mode0: High-speed-mode is not supported.
1: High-speed-mode is supported.
31 30 29 28 27 26 25 24
- - - - - - - -
23 22 21 20 19 18 17 16
- - - - - - - -
15 14 13 12 11 10 9 8
- - - - - - - -
7 6 5 4 3 2 1 0
- - - - - - - HS

77342023G–SAM–03/2014
ATSAM4L8/L4/L2
28.9.13 Version RegisterName: VR
Access Type: Read-only
Offset: 0x30
Reset Value: -
• VARIANT: Variant NumberReserved. No functionality associated.
• VERSION: Version NumberVersion number of the module. No functionality associated.
31 30 29 28 27 26 25 24
- - - - - - - -
23 22 21 20 19 18 17 16
- - - - VARIANT
15 14 13 12 11 10 9 8
- - - - VERSION [11:8]
7 6 5 4 3 2 1 0
VERSION [7:0]
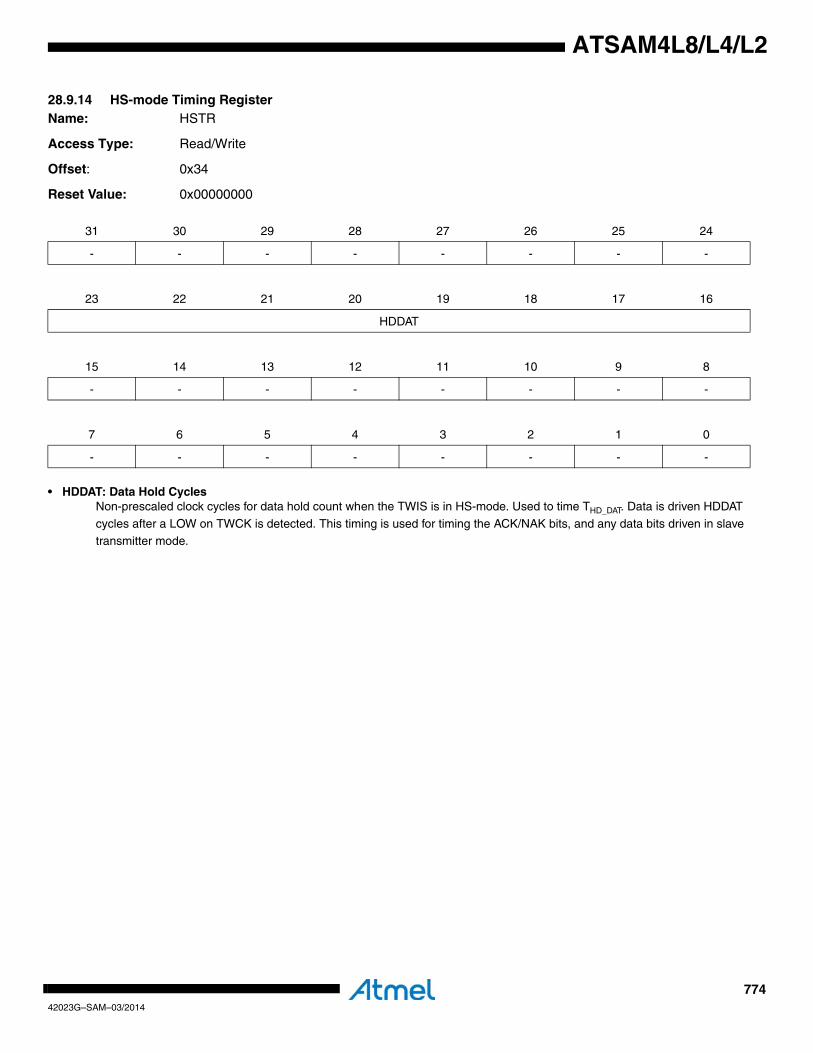
77442023G–SAM–03/2014
ATSAM4L8/L4/L2
28.9.14 HS-mode Timing RegisterName: HSTR
Access Type: Read/Write
Offset: 0x34
Reset Value: 0x00000000
• HDDAT: Data Hold CyclesNon-prescaled clock cycles for data hold count when the TWIS is in HS-mode. Used to time THD_DAT. Data is driven HDDAT
cycles after a LOW on TWCK is detected. This timing is used for timing the ACK/NAK bits, and any data bits driven in slave transmitter mode.
31 30 29 28 27 26 25 24
- - - - - - - -
23 22 21 20 19 18 17 16
HDDAT
15 14 13 12 11 10 9 8
- - - - - - - -
7 6 5 4 3 2 1 0
- - - - - - - -
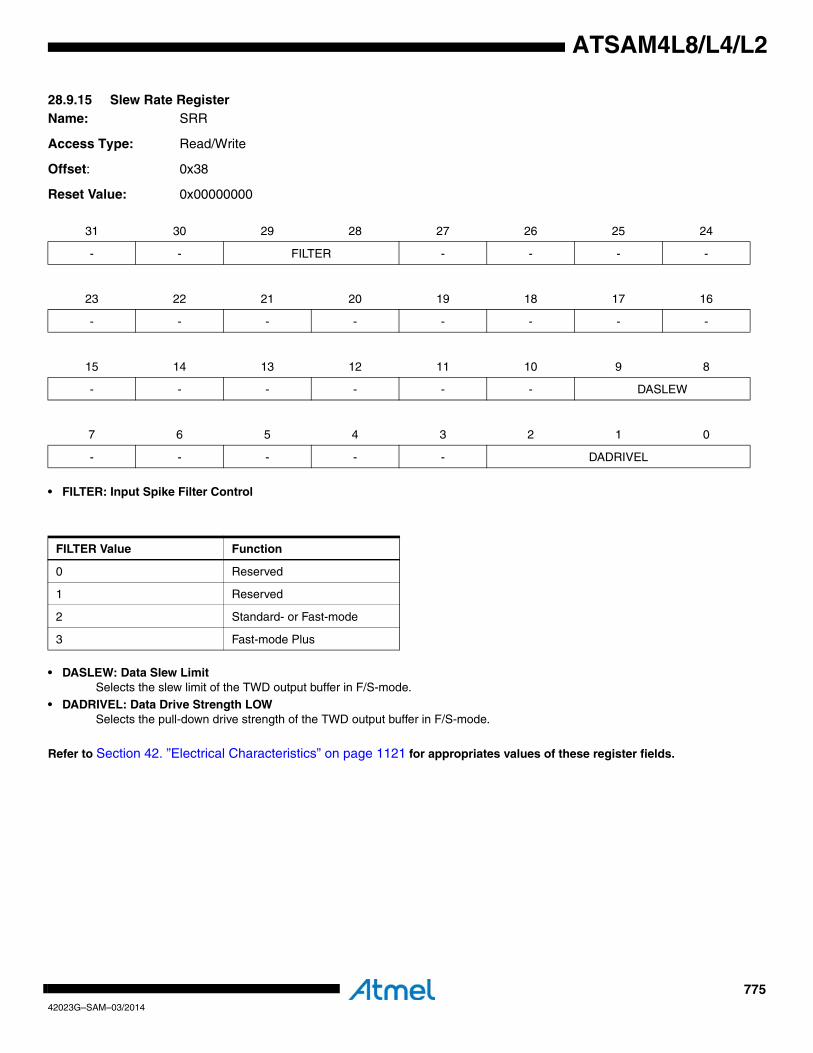
77542023G–SAM–03/2014
ATSAM4L8/L4/L2
28.9.15 Slew Rate RegisterName: SRR
Access Type: Read/Write
Offset: 0x38
Reset Value: 0x00000000
• FILTER: Input Spike Filter Control
• DASLEW: Data Slew LimitSelects the slew limit of the TWD output buffer in F/S-mode.
• DADRIVEL: Data Drive Strength LOWSelects the pull-down drive strength of the TWD output buffer in F/S-mode.
Refer to Section 42. ”Electrical Characteristics” on page 1121 for appropriates values of these register fields.
31 30 29 28 27 26 25 24
- - FILTER - - - -
23 22 21 20 19 18 17 16
- - - - - - - -
15 14 13 12 11 10 9 8
- - - - - - DASLEW
7 6 5 4 3 2 1 0
- - - - - DADRIVEL
FILTER Value Function
0 Reserved
1 Reserved
2 Standard- or Fast-mode
3 Fast-mode Plus

77642023G–SAM–03/2014
ATSAM4L8/L4/L2
28.9.16 HS-mode Slew Rate RegisterName: HSSRR
Access Type: Read/Write
Offset: 0x3C
Reset Value: 0x00000000
• FILTER: Input Spike Filter Control
• DASLEW: Data Slew LimitSelects the slew limit of the TWD output buffer in HS-mode.
• DADRIVEL: Data Drive Strength LOWSelects the pull-down drive strength of the TWD output buffer in HS-mode.
Refer to Section 42. ”Electrical Characteristics” on page 1121 for appropriates values of these register fields.
31 30 29 28 27 26 25 24
- - FILTER - - - -
23 22 21 20 19 18 17 16
- - - - - - - -
15 14 13 12 11 10 9 8
- - - - - - DASLEWL
7 6 5 4 3 2 1 0
- - - - - DADRIVEL
FILTER Value Function
0 Reserved
1 HS-mode
2 Reserved
3 Reserved
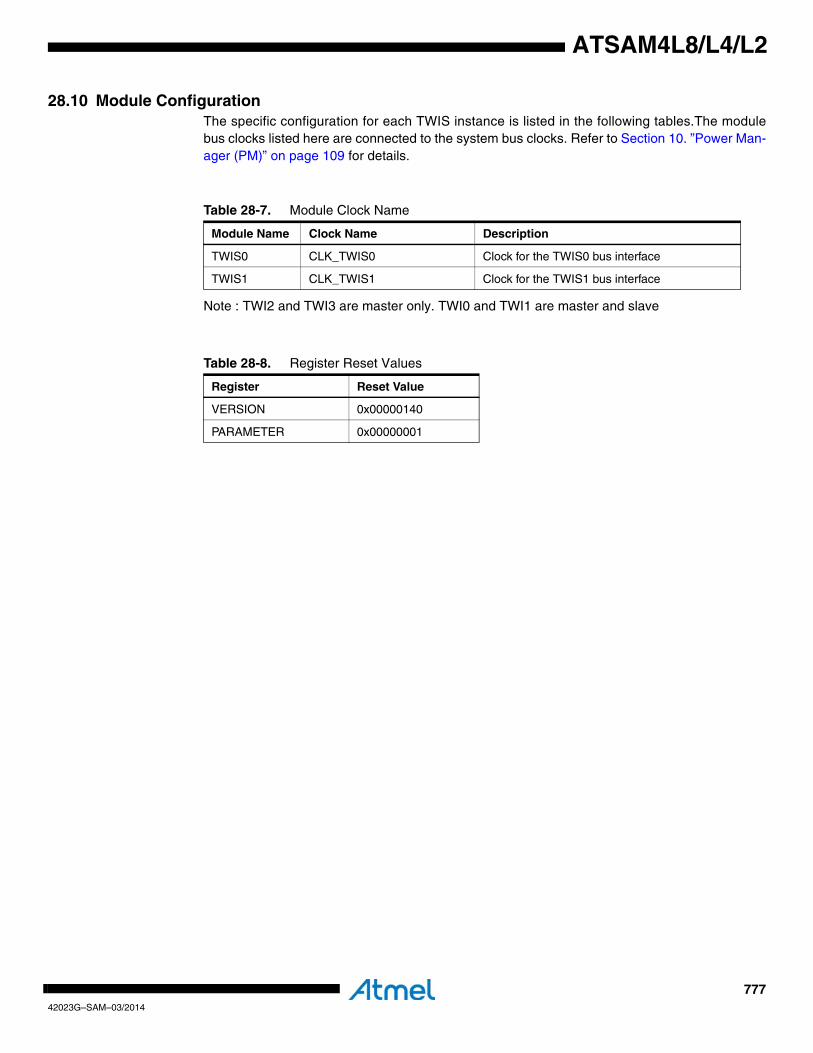
77742023G–SAM–03/2014
ATSAM4L8/L4/L2
28.10 Module ConfigurationThe specific configuration for each TWIS instance is listed in the following tables.The modulebus clocks listed here are connected to the system bus clocks. Refer to Section 10. ”Power Man-ager (PM)” on page 109 for details.
Note : TWI2 and TWI3 are master only. TWI0 and TWI1 are master and slave
Table 28-7. Module Clock Name
Module Name Clock Name Description
TWIS0 CLK_TWIS0 Clock for the TWIS0 bus interface
TWIS1 CLK_TWIS1 Clock for the TWIS1 bus interface
Table 28-8. Register Reset Values
Register Reset Value
VERSION 0x00000140
PARAMETER 0x00000001
77842023G–SAM–03/2014
ATSAM4L8/L4/L2
29. Inter-IC Sound Controller (IISC)Rev: 1.0.0.0
29.1 Features• Compliant with Inter-IC Sound (I2S) bus specification• Master, slave, and controller modes:
– Slave: data received/transmitted– Master: data received/transmitted and clocks generated– Controller: clocks generated
• Individual enable and disable of receiver, transmitter, and clocks• Configurable clock generator common to receiver and transmitter:
– Suitable for a wide range of sample frequencies (fs), including 32kHz, 44.1kHz, 48kHz, 88.2kHz, 96kHz, and 192kHz
– 16fs to 1024fs Master Clock generated for external oversampling ADCs• Several data formats supported:
– 32-, 24-, 20-, 18-, 16-, and 8-bit mono or stereo format– 16- and 8-bit compact stereo format, with left and right samples packed in the same word to
reduce data transfers• DMA interfaces for receiver and transmitter to reduce processor overhead:
– Either one DMA channel for both audio channels, or– One DMA channel per audio channel
• Smart holding registers management to avoid audio channels mix after overrun or underrun
29.2 OverviewThe Inter-IC Sound Controller (IISC) provides a 5-wire, bidirectional, synchronous, digital audiolink with external audio devices: ISDI, ISDO, IWS, ISCK, and IMCK pins.
This controller is compliant with the Inter-IC Sound (I2S) bus specification.
The IISC consists of a Receiver, a Transmitter, and a common Clock Generator, that can beenabled separately, to provide Master, Slave, or Controller modes with Receiver, Transmitter, orboth active.
Peripheral DMA channels, separate for the Receiver and for the Transmitter, allow a continuoushigh bitrate data transfer without processor intervention to the following:
• Audio CODECs in Master, Slave, or Controller mode
• Stereo DAC or ADC through dedicated I2S serial interface
The IISC can use either a single DMA channel for both audio channels or one DMA channel peraudio channel.
The 8- and 16-bit compact stereo format allows reducing the required DMA bandwidth by trans-ferring the left and right samples within the same data word.
In Master Mode, the IISC allows outputting a 16 fs to 1024fs Master Clock, in order to provide anoversampling clock to an external audio codec or digital signal processor (DSP).
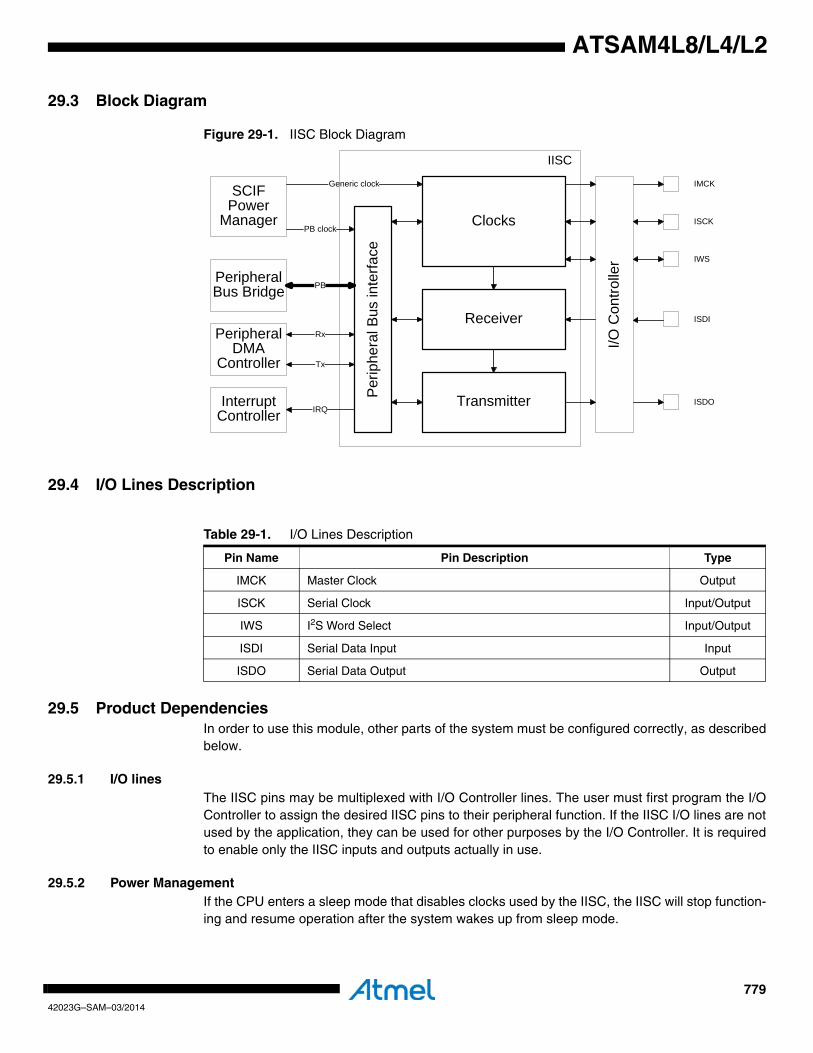
77942023G–SAM–03/2014
ATSAM4L8/L4/L2
29.3 Block Diagram
Figure 29-1. IISC Block Diagram
29.4 I/O Lines Description
29.5 Product DependenciesIn order to use this module, other parts of the system must be configured correctly, as describedbelow.
29.5.1 I/O linesThe IISC pins may be multiplexed with I/O Controller lines. The user must first program the I/OController to assign the desired IISC pins to their peripheral function. If the IISC I/O lines are notused by the application, they can be used for other purposes by the I/O Controller. It is requiredto enable only the IISC inputs and outputs actually in use.
29.5.2 Power ManagementIf the CPU enters a sleep mode that disables clocks used by the IISC, the IISC will stop function-ing and resume operation after the system wakes up from sleep mode.
I/O C
ontro
ller
ISCK
IWS
ISDI
ISDO
IMCK
Receiver
Clocks
TransmitterPer
iphe
ral B
us in
terfa
ce
Generic clock
PBPeripheralBus Bridge
Interrupt Controller
SCIF Power
ManagerPB clock
IRQ
Peripheral DMA
Controller
Rx
Tx
IISC
Table 29-1. I/O Lines Description
Pin Name Pin Description Type
IMCK Master Clock Output
ISCK Serial Clock Input/Output
IWS I2S Word Select Input/Output
ISDI Serial Data Input Input
ISDO Serial Data Output Output
78042023G–SAM–03/2014
ATSAM4L8/L4/L2
29.5.3 ClocksThe clock for the IISC bus interface (CLK_IISC) is generated by the Power Manager. It is recom-mended to disable the IISC before disabling the clock, to avoid freezing the IISC in an undefinedstate.
One of the generic clocks is connected to the IISC. The generic clock (GCLK_IISC) can be set toa wide range of frequencies and clock sources. The GCLK_IISC must be enabled and config-ured before use. Refer to the module configuration section for details on the GCLK_IISC usedfor the IISC. The frequency for this clock has to be set as described in Table.
29.5.4 DMAThe IISC DMA handshake interfaces are connected to the Peripheral DMA Controller. Using theIISC DMA functionality requires the Peripheral DMA Controller to be programmed first.
29.5.5 InterruptsThe IISC interrupt line is connected to the Interrupt Controller. Using the IISC interrupt requiresthe Interrupt Controller to be programmed first.
29.5.6 Debug OperationWhen an external debugger forces the CPU into debug mode, the IISC continues normal opera-tion. If this module is configured in a way that requires it to be periodically serviced by the CPUthrough interrupt requests or similar, improper operation or data loss may result duringdebugging.
29.6 Functional Description
29.6.1 InitializationThe IISC features a Receiver, a Transmitter, and, for Master and Controller modes, a ClockGenerator. Receiver and Transmitter share the same Serial Clock and Word Select.
Before enabling the IISC, the chosen configuration must be written to the Mode Register (MR).The IMCKMODE, MODE, and DATALENGTH fields in the MR register must be written. If theIMCKMODE field is written as one, then the IMCKFS field should be written with the chosenratio, as described in Section 29.6.5 ”Serial Clock and Word Select Generation” on page 782.
Once the Mode Register has been written, the IISC Clock Generator, Receiver, and Transmittercan be enabled by writing a one to the CKEN, RXEN, and TXEN bits in the Control Register(CR). The Clock Generator can be enabled alone, in Controller Mode, to output clocks to theIMCK, ISCK, and IWS pins. The Clock Generator must also be enabled if the Receiver or theTransmitter is enabled.
The Clock Generator, Receiver, and Transmitter can be disabled independently by writing a oneto CR.CXDIS, CR.RXDIS and/or CR.TXDIS respectively. Once requested to stop, they will onlystop when the transmission of the pending frame transmission will be completed.
29.6.2 Basic OperationThe Receiver can be operated by reading the Receiver Holding Register (RHR), whenever theReceive Ready (RXRDY) bit in the Status Register (SR) is set. Successive values read fromRHR will correspond to the samples from the left and right audio channels for the successiveframes.
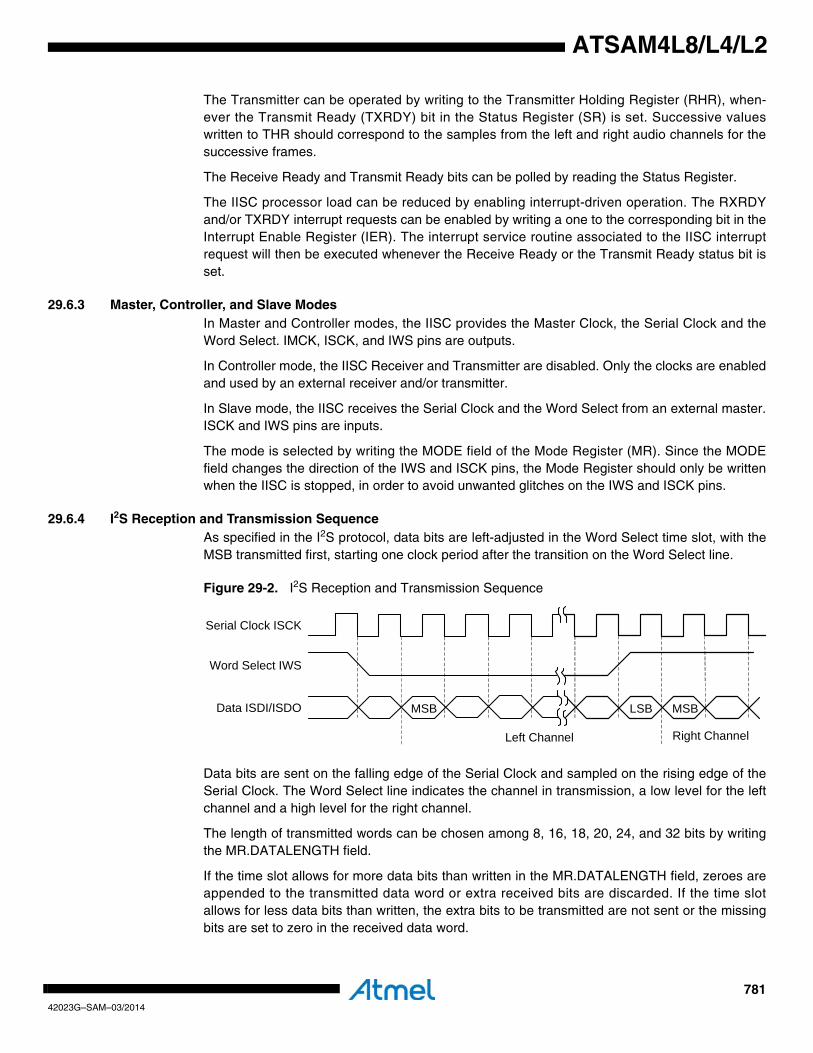
78142023G–SAM–03/2014
ATSAM4L8/L4/L2
The Transmitter can be operated by writing to the Transmitter Holding Register (RHR), when-ever the Transmit Ready (TXRDY) bit in the Status Register (SR) is set. Successive valueswritten to THR should correspond to the samples from the left and right audio channels for thesuccessive frames.
The Receive Ready and Transmit Ready bits can be polled by reading the Status Register.
The IISC processor load can be reduced by enabling interrupt-driven operation. The RXRDYand/or TXRDY interrupt requests can be enabled by writing a one to the corresponding bit in theInterrupt Enable Register (IER). The interrupt service routine associated to the IISC interruptrequest will then be executed whenever the Receive Ready or the Transmit Ready status bit isset.
29.6.3 Master, Controller, and Slave ModesIn Master and Controller modes, the IISC provides the Master Clock, the Serial Clock and theWord Select. IMCK, ISCK, and IWS pins are outputs.
In Controller mode, the IISC Receiver and Transmitter are disabled. Only the clocks are enabledand used by an external receiver and/or transmitter.
In Slave mode, the IISC receives the Serial Clock and the Word Select from an external master.ISCK and IWS pins are inputs.
The mode is selected by writing the MODE field of the Mode Register (MR). Since the MODEfield changes the direction of the IWS and ISCK pins, the Mode Register should only be writtenwhen the IISC is stopped, in order to avoid unwanted glitches on the IWS and ISCK pins.
29.6.4 I2S Reception and Transmission SequenceAs specified in the I2S protocol, data bits are left-adjusted in the Word Select time slot, with theMSB transmitted first, starting one clock period after the transition on the Word Select line.
Figure 29-2. I2S Reception and Transmission Sequence
Data bits are sent on the falling edge of the Serial Clock and sampled on the rising edge of theSerial Clock. The Word Select line indicates the channel in transmission, a low level for the leftchannel and a high level for the right channel.
The length of transmitted words can be chosen among 8, 16, 18, 20, 24, and 32 bits by writingthe MR.DATALENGTH field.
If the time slot allows for more data bits than written in the MR.DATALENGTH field, zeroes areappended to the transmitted data word or extra received bits are discarded. If the time slotallows for less data bits than written, the extra bits to be transmitted are not sent or the missingbits are set to zero in the received data word.
Serial Clock ISCK
Word Select IWS
Data ISDI/ISDO MSB
Left Channel
LSB MSB
Right Channel
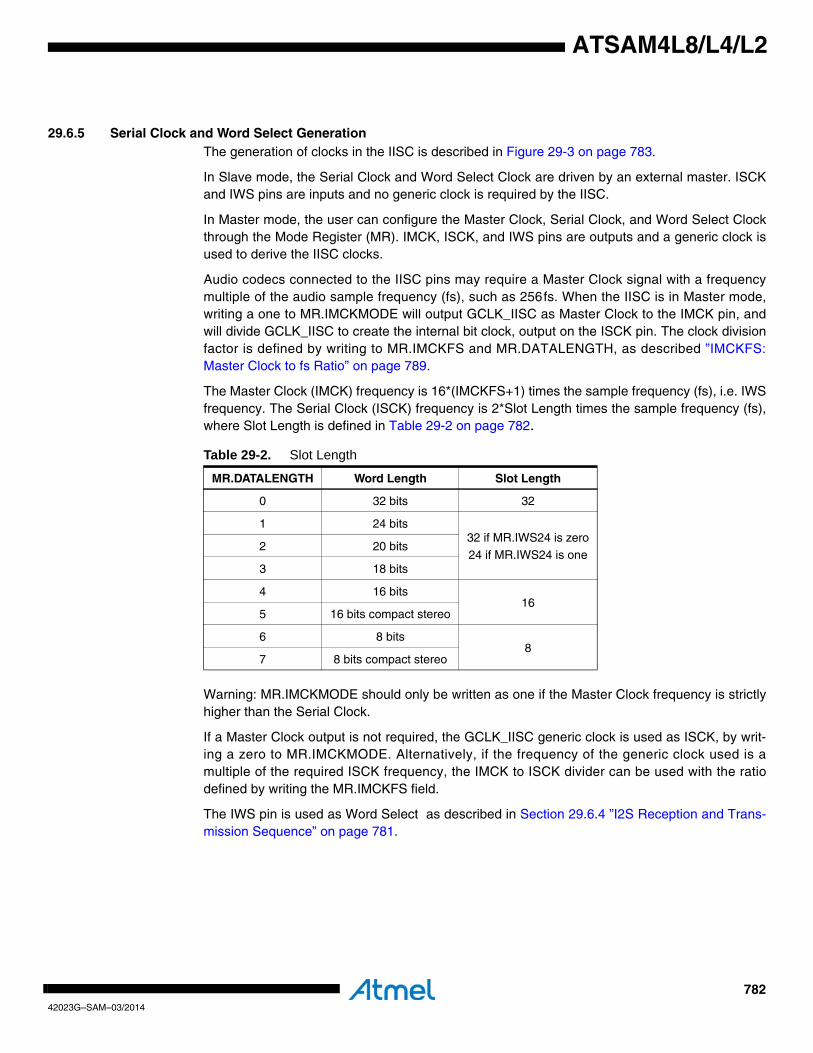
78242023G–SAM–03/2014
ATSAM4L8/L4/L2
29.6.5 Serial Clock and Word Select GenerationThe generation of clocks in the IISC is described in Figure 29-3 on page 783.
In Slave mode, the Serial Clock and Word Select Clock are driven by an external master. ISCKand IWS pins are inputs and no generic clock is required by the IISC.
In Master mode, the user can configure the Master Clock, Serial Clock, and Word Select Clockthrough the Mode Register (MR). IMCK, ISCK, and IWS pins are outputs and a generic clock isused to derive the IISC clocks.
Audio codecs connected to the IISC pins may require a Master Clock signal with a frequencymultiple of the audio sample frequency (fs), such as 256fs. When the IISC is in Master mode,writing a one to MR.IMCKMODE will output GCLK_IISC as Master Clock to the IMCK pin, andwill divide GCLK_IISC to create the internal bit clock, output on the ISCK pin. The clock divisionfactor is defined by writing to MR.IMCKFS and MR.DATALENGTH, as described ”IMCKFS:Master Clock to fs Ratio” on page 789.
The Master Clock (IMCK) frequency is 16*(IMCKFS+1) times the sample frequency (fs), i.e. IWSfrequency. The Serial Clock (ISCK) frequency is 2*Slot Length times the sample frequency (fs),where Slot Length is defined in Table 29-2 on page 782.
Warning: MR.IMCKMODE should only be written as one if the Master Clock frequency is strictlyhigher than the Serial Clock.
If a Master Clock output is not required, the GCLK_IISC generic clock is used as ISCK, by writ-ing a zero to MR.IMCKMODE. Alternatively, if the frequency of the generic clock used is amultiple of the required ISCK frequency, the IMCK to ISCK divider can be used with the ratiodefined by writing the MR.IMCKFS field.
The IWS pin is used as Word Select as described in Section 29.6.4 ”I2S Reception and Trans-mission Sequence” on page 781.
Table 29-2. Slot Length
MR.DATALENGTH Word Length Slot Length
0 32 bits 32
1 24 bits32 if MR.IWS24 is zero24 if MR.IWS24 is one
2 20 bits
3 18 bits
4 16 bits16
5 16 bits compact stereo
6 8 bits8
7 8 bits compact stereo
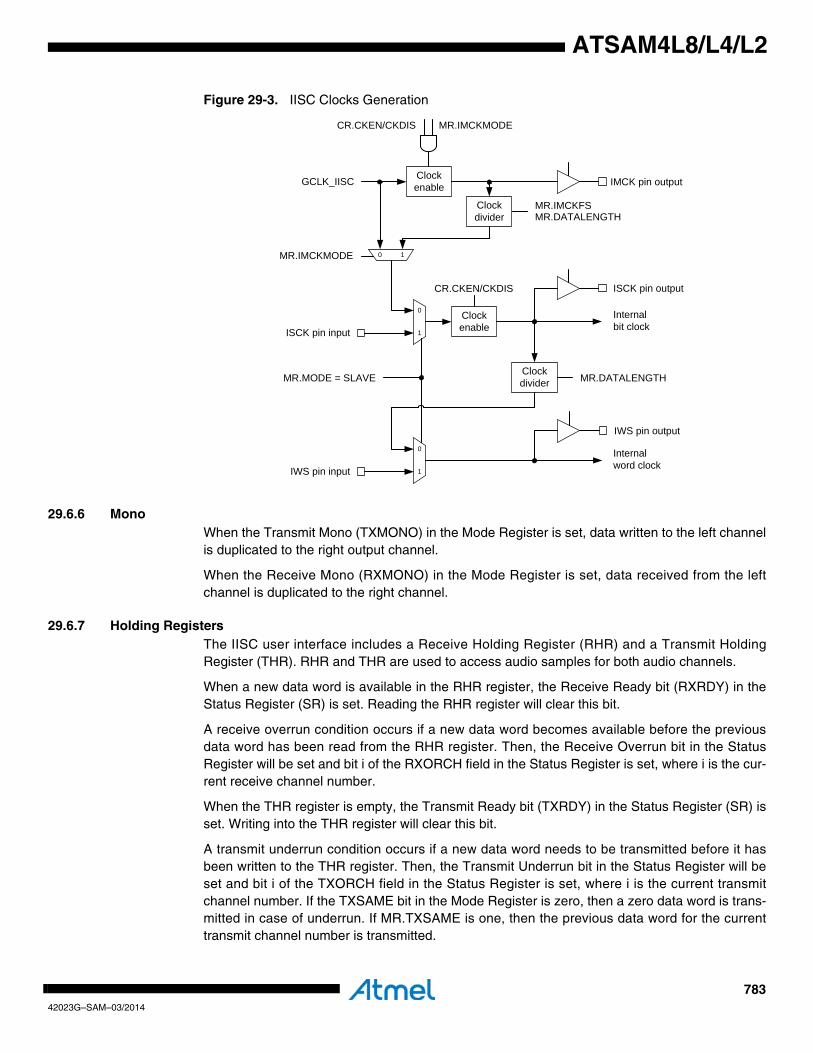
78342023G–SAM–03/2014
ATSAM4L8/L4/L2
Figure 29-3. IISC Clocks Generation
29.6.6 MonoWhen the Transmit Mono (TXMONO) in the Mode Register is set, data written to the left channelis duplicated to the right output channel.
When the Receive Mono (RXMONO) in the Mode Register is set, data received from the leftchannel is duplicated to the right channel.
29.6.7 Holding RegistersThe IISC user interface includes a Receive Holding Register (RHR) and a Transmit HoldingRegister (THR). RHR and THR are used to access audio samples for both audio channels.
When a new data word is available in the RHR register, the Receive Ready bit (RXRDY) in theStatus Register (SR) is set. Reading the RHR register will clear this bit.
A receive overrun condition occurs if a new data word becomes available before the previousdata word has been read from the RHR register. Then, the Receive Overrun bit in the StatusRegister will be set and bit i of the RXORCH field in the Status Register is set, where i is the cur-rent receive channel number.
When the THR register is empty, the Transmit Ready bit (TXRDY) in the Status Register (SR) isset. Writing into the THR register will clear this bit.
A transmit underrun condition occurs if a new data word needs to be transmitted before it hasbeen written to the THR register. Then, the Transmit Underrun bit in the Status Register will beset and bit i of the TXORCH field in the Status Register is set, where i is the current transmitchannel number. If the TXSAME bit in the Mode Register is zero, then a zero data word is trans-mitted in case of underrun. If MR.TXSAME is one, then the previous data word for the currenttransmit channel number is transmitted.
MR.MODE = SLAVEClock divider MR.DATALENGTH
GCLK_IISC Clock enable
Clock divider
CR.CKEN/CKDIS MR.IMCKMODE
MR.DATALENGTHMR.IMCKFS
MR.IMCKMODE 10
IMCK pin output
Clockenable
CR.CKEN/CKDIS
Internalbit clockISCK pin input 1
0
ISCK pin output
Internal word clockIWS pin input 1
0
IWS pin output
78442023G–SAM–03/2014
ATSAM4L8/L4/L2
Data words are right-justified in the RHR and THR registers. For 16-bit compact stereo, the leftsample uses bits 15 through 0 and the right sample uses bits 31 through 16 of the same dataword. For 8-bit compact stereo, the left sample uses bits 7 through 0 and the right sample usesbits 15 through 8 of the same data word.
29.6.8 DMA OperationThe Receiver and the Transmitter can each be connected either to one single Peripheral DMAchannel or to one Peripheral DMA channel per data channel. This is selected by writing to theMR.RXDMA and MR.TXDMA bits. If a single Peripheral DMA channel is selected, all data sam-ples use IISC Receiver or Transmitter DMA channel 0.
The Peripheral DMA reads from the RHR register and writes to the RHR register for both audiochannels, successively.
The Peripheral DMA transfers may use 32-bit word, 16-bit halfword, or 8-bit byte according tothe value of the MR.DATALENGTH field.
29.6.9 Loop-back ModeFor debugging purposes, the IISC can be configured to loop back the Transmitter to theReceiver. Writing a one to the MR.LOOP bit will internally connect ISDO to ISDI, so that thetransmitted data is also received. Writing a zero to MR.LOOP will restore the normal behaviorwith independent Receiver and Transmitter. As for other changes to the Receiver or Transmitterconfiguration, the IISC Receiver and Transmitter must be disabled before writing to the MR reg-ister to update MR.LOOP.
29.6.10 InterruptsAn IISC interrupt request can be triggered whenever one or several of the following bits are setin the Status Register (SR): Receive Ready (RXRDY), Receive Overrun (RXOR), TransmitReady (TXRDY), or Transmit Underrun (TXOR).
The interrupt request will be generated if the corresponding bit in the Interrupt Mask Register(IMR) is set. Bits in IMR are set by writing a one to the corresponding bit in the Interrupt EnableRegister (IER), and cleared by writing a one to the corresponding bit in the Interrupt DisableRegister (IDR). The interrupt request remains active until the corresponding bit in SR is clearedby writing a one the corresponding bit in the Status Clear Register (SCR).
For debugging purposes, interrupt requests can be simulated by writing a one to the correspond-ing bit in the Status Set Register (SSR).
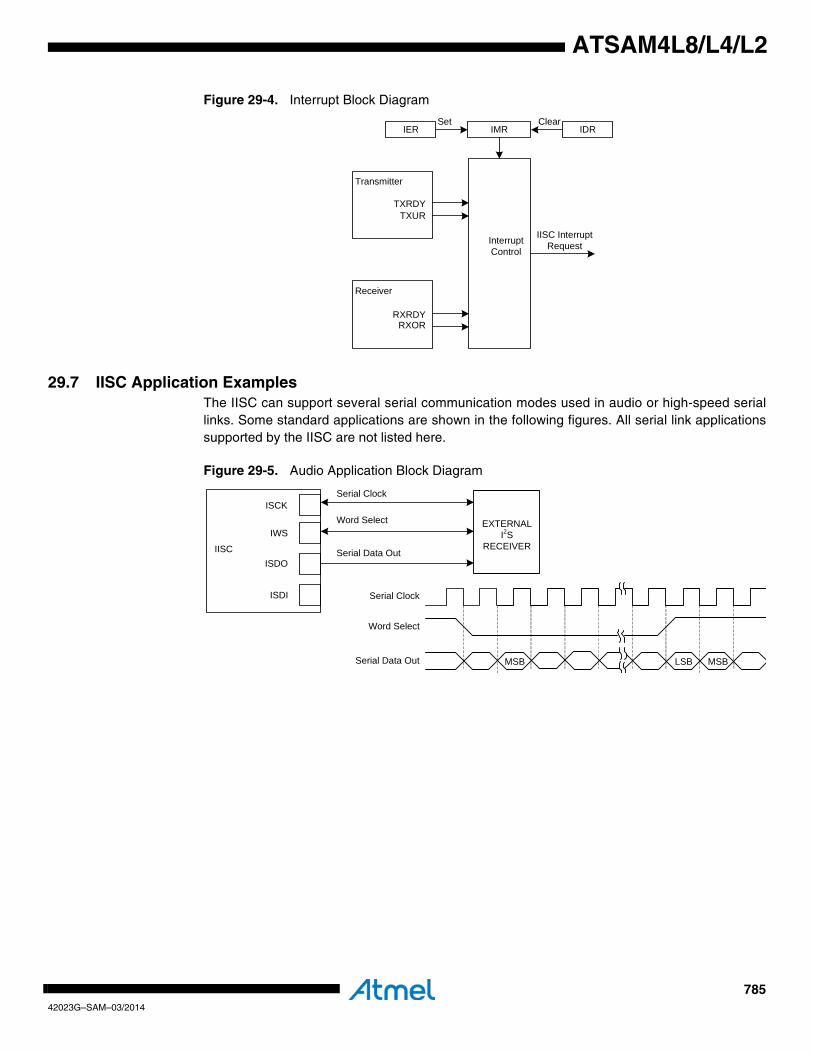
78542023G–SAM–03/2014
ATSAM4L8/L4/L2
Figure 29-4. Interrupt Block Diagram
29.7 IISC Application ExamplesThe IISC can support several serial communication modes used in audio or high-speed seriallinks. Some standard applications are shown in the following figures. All serial link applicationssupported by the IISC are not listed here.
Figure 29-5. Audio Application Block Diagram
IMRIER IDRClearSet
Interrupt Control
IISC Interrupt Request
TXRDYTXUR
Transmitter
Receiver
RXRDYRXOR
Serial Clock
Word Select
Serial Data Out MSB LSB MSB
Serial Data Out
Word Select
Serial Clock
IISC
ISCK
IWS
ISDO
ISDI
EXTERNALI2S
RECEIVER
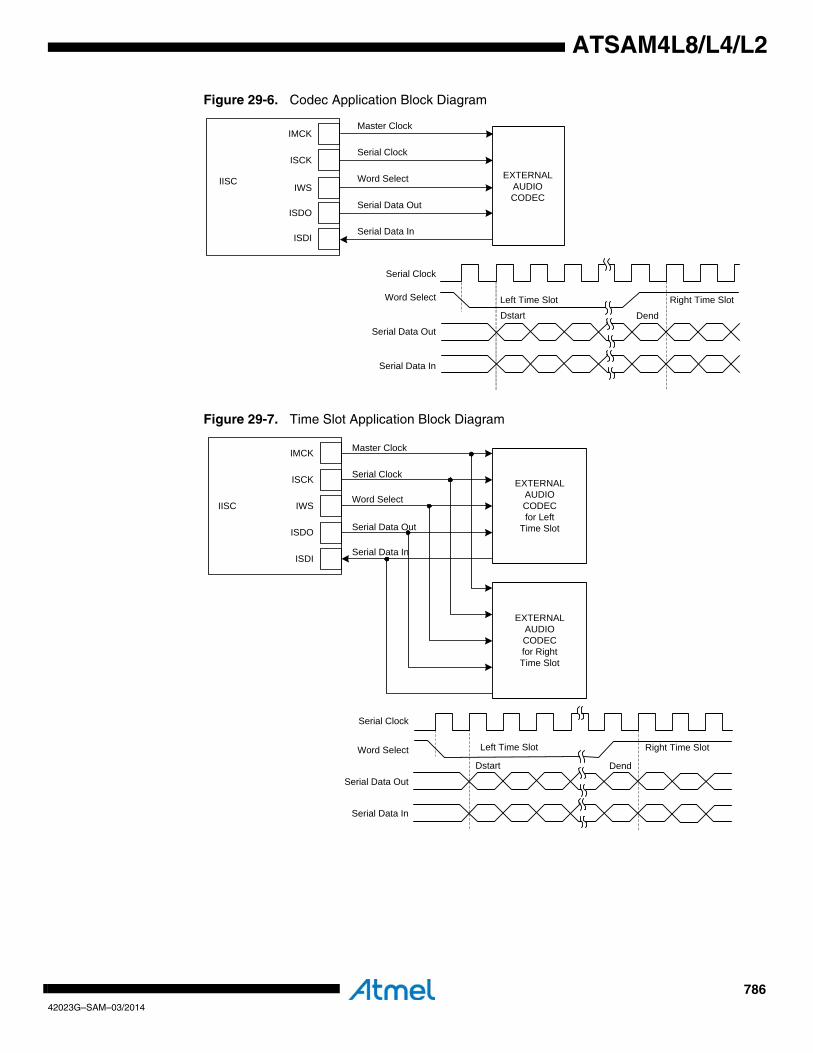
78642023G–SAM–03/2014
ATSAM4L8/L4/L2
Figure 29-6. Codec Application Block Diagram
Figure 29-7. Time Slot Application Block Diagram
IISC Word Select
Serial Data Out
Serial Data In
EXTERNALAUDIOCODEC
IMCK
IWS
ISDO
ISDI
Serial Clock
Master Clock
ISCK
Right Time Slot
Serial Clock
Word Select
Serial Data Out
Serial Data In
Dstart Dend
Left Time Slot
EXTERNAL AUDIO CODECfor Left
Time Slot
EXTERNAL AUDIO CODECfor RightTime Slot
Serial Data In
Serial Data Out
Word Select
Serial Clock
Serial Clock
Word Select
Serial Data Out
Serial Data In
Dstart
Left Time Slot Right Time Slot
Dend
IISC
ISCK
IWS
ISDO
ISDI
Master ClockIMCK
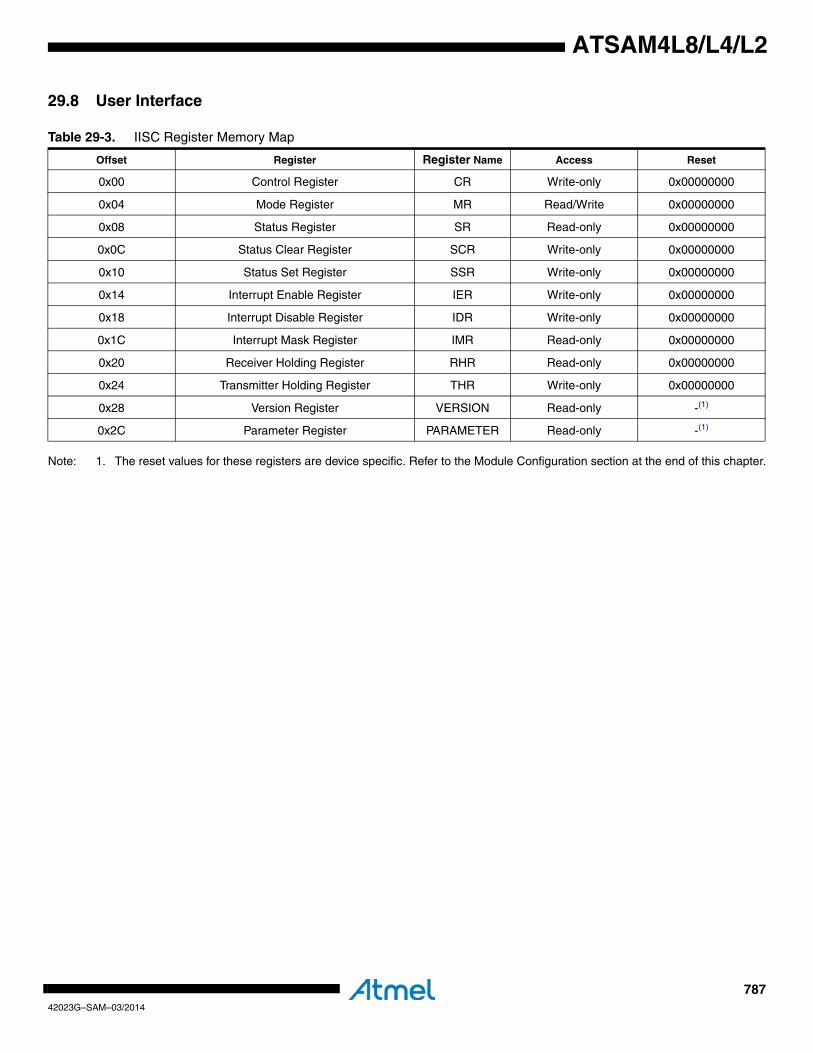
78742023G–SAM–03/2014
ATSAM4L8/L4/L2
29.8 User Interface
Note: 1. The reset values for these registers are device specific. Refer to the Module Configuration section at the end of this chapter.
Table 29-3. IISC Register Memory Map
Offset Register Register Name Access Reset
0x00 Control Register CR Write-only 0x00000000
0x04 Mode Register MR Read/Write 0x00000000
0x08 Status Register SR Read-only 0x00000000
0x0C Status Clear Register SCR Write-only 0x00000000
0x10 Status Set Register SSR Write-only 0x00000000
0x14 Interrupt Enable Register IER Write-only 0x00000000
0x18 Interrupt Disable Register IDR Write-only 0x00000000
0x1C Interrupt Mask Register IMR Read-only 0x00000000
0x20 Receiver Holding Register RHR Read-only 0x00000000
0x24 Transmitter Holding Register THR Write-only 0x00000000
0x28 Version Register VERSION Read-only -(1)
0x2C Parameter Register PARAMETER Read-only -(1)
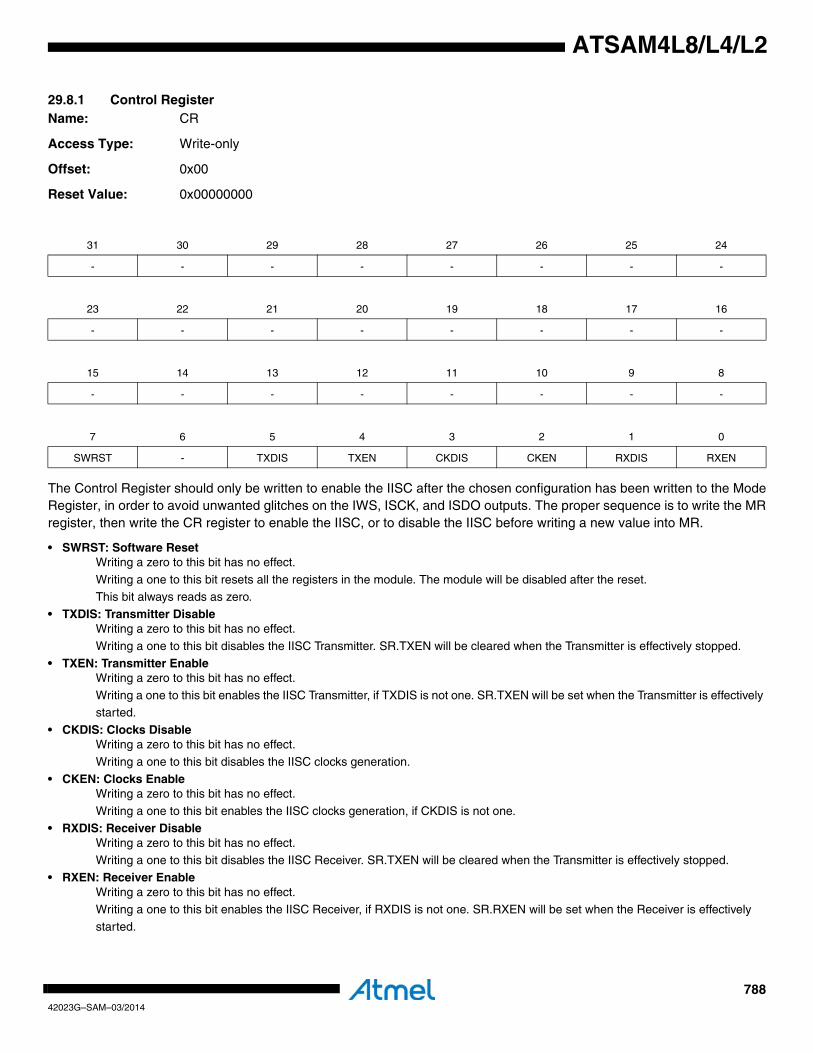
78842023G–SAM–03/2014
ATSAM4L8/L4/L2
29.8.1 Control RegisterName: CR
Access Type: Write-only
Offset: 0x00
Reset Value: 0x00000000
The Control Register should only be written to enable the IISC after the chosen configuration has been written to the ModeRegister, in order to avoid unwanted glitches on the IWS, ISCK, and ISDO outputs. The proper sequence is to write the MRregister, then write the CR register to enable the IISC, or to disable the IISC before writing a new value into MR.
• SWRST: Software ResetWriting a zero to this bit has no effect.
Writing a one to this bit resets all the registers in the module. The module will be disabled after the reset.This bit always reads as zero.
• TXDIS: Transmitter DisableWriting a zero to this bit has no effect.
Writing a one to this bit disables the IISC Transmitter. SR.TXEN will be cleared when the Transmitter is effectively stopped.
• TXEN: Transmitter EnableWriting a zero to this bit has no effect.
Writing a one to this bit enables the IISC Transmitter, if TXDIS is not one. SR.TXEN will be set when the Transmitter is effectively started.
• CKDIS: Clocks DisableWriting a zero to this bit has no effect.
Writing a one to this bit disables the IISC clocks generation.
• CKEN: Clocks EnableWriting a zero to this bit has no effect.
Writing a one to this bit enables the IISC clocks generation, if CKDIS is not one.• RXDIS: Receiver Disable
Writing a zero to this bit has no effect.Writing a one to this bit disables the IISC Receiver. SR.TXEN will be cleared when the Transmitter is effectively stopped.
• RXEN: Receiver EnableWriting a zero to this bit has no effect.Writing a one to this bit enables the IISC Receiver, if RXDIS is not one. SR.RXEN will be set when the Receiver is effectively
started.
31 30 29 28 27 26 25 24
- - - - - - - -
23 22 21 20 19 18 17 16
- - - - - - - -
15 14 13 12 11 10 9 8
- - - - - - - -
7 6 5 4 3 2 1 0
SWRST - TXDIS TXEN CKDIS CKEN RXDIS RXEN
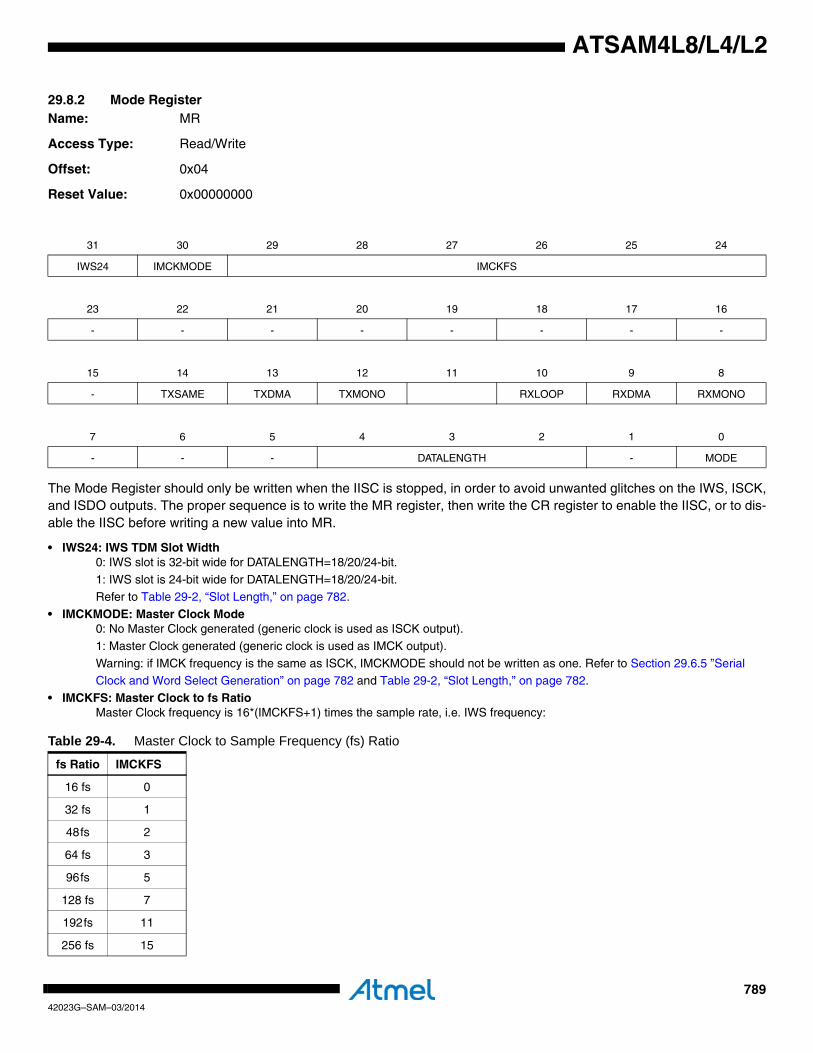
78942023G–SAM–03/2014
ATSAM4L8/L4/L2
29.8.2 Mode RegisterName: MR
Access Type: Read/Write
Offset: 0x04
Reset Value: 0x00000000
The Mode Register should only be written when the IISC is stopped, in order to avoid unwanted glitches on the IWS, ISCK,and ISDO outputs. The proper sequence is to write the MR register, then write the CR register to enable the IISC, or to dis-able the IISC before writing a new value into MR.
• IWS24: IWS TDM Slot Width0: IWS slot is 32-bit wide for DATALENGTH=18/20/24-bit.
1: IWS slot is 24-bit wide for DATALENGTH=18/20/24-bit.Refer to Table 29-2, “Slot Length,” on page 782.
• IMCKMODE: Master Clock Mode0: No Master Clock generated (generic clock is used as ISCK output).
1: Master Clock generated (generic clock is used as IMCK output).
Warning: if IMCK frequency is the same as ISCK, IMCKMODE should not be written as one. Refer to Section 29.6.5 ”Serial Clock and Word Select Generation” on page 782 and Table 29-2, “Slot Length,” on page 782.
• IMCKFS: Master Clock to fs RatioMaster Clock frequency is 16*(IMCKFS+1) times the sample rate, i.e. IWS frequency:
31 30 29 28 27 26 25 24
IWS24 IMCKMODE IMCKFS
23 22 21 20 19 18 17 16
- - - - - - - -
15 14 13 12 11 10 9 8
- TXSAME TXDMA TXMONO RXLOOP RXDMA RXMONO
7 6 5 4 3 2 1 0
- - - DATALENGTH - MODE
Table 29-4. Master Clock to Sample Frequency (fs) Ratio
fs Ratio IMCKFS
16 fs 0
32 fs 1
48fs 2
64 fs 3
96fs 5
128 fs 7
192fs 11
256 fs 15
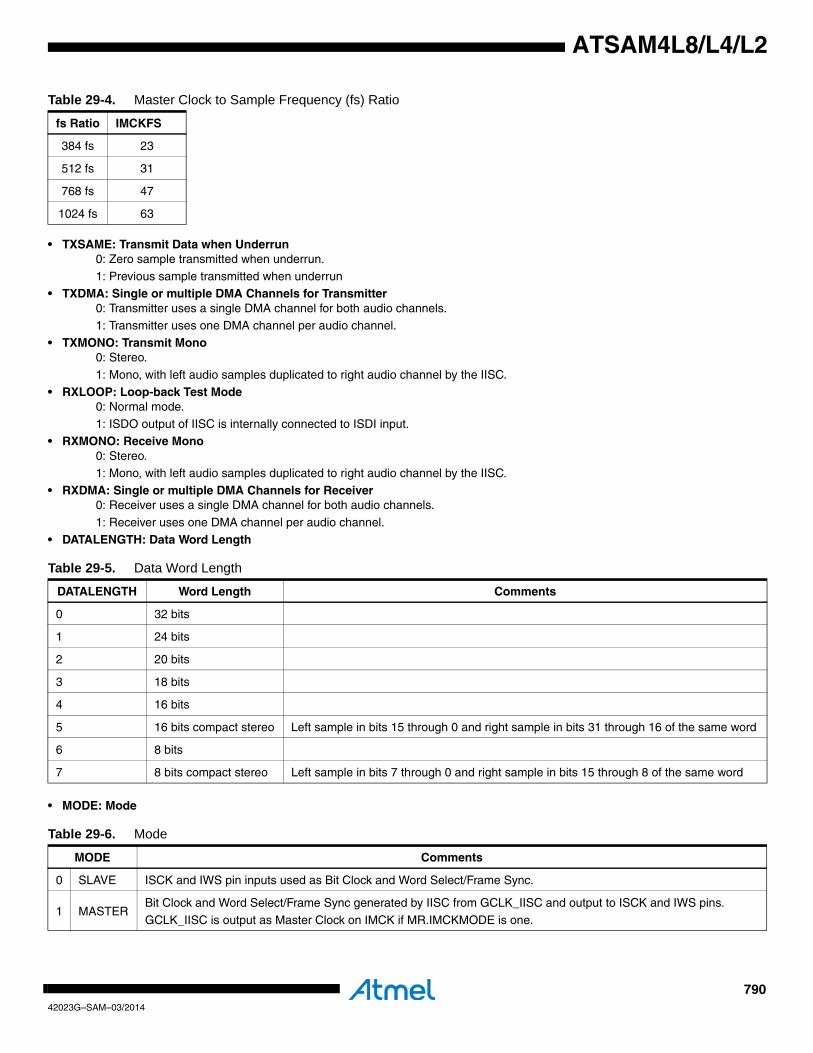
79042023G–SAM–03/2014
ATSAM4L8/L4/L2
• TXSAME: Transmit Data when Underrun0: Zero sample transmitted when underrun.
1: Previous sample transmitted when underrun• TXDMA: Single or multiple DMA Channels for Transmitter
0: Transmitter uses a single DMA channel for both audio channels.1: Transmitter uses one DMA channel per audio channel.
• TXMONO: Transmit Mono0: Stereo.
1: Mono, with left audio samples duplicated to right audio channel by the IISC.
• RXLOOP: Loop-back Test Mode0: Normal mode.
1: ISDO output of IISC is internally connected to ISDI input.• RXMONO: Receive Mono
0: Stereo.1: Mono, with left audio samples duplicated to right audio channel by the IISC.
• RXDMA: Single or multiple DMA Channels for Receiver0: Receiver uses a single DMA channel for both audio channels.
1: Receiver uses one DMA channel per audio channel.
• DATALENGTH: Data Word Length
• MODE: Mode
384 fs 23
512 fs 31
768 fs 47
1024 fs 63
Table 29-5. Data Word Length
DATALENGTH Word Length Comments
0 32 bits
1 24 bits
2 20 bits
3 18 bits
4 16 bits
5 16 bits compact stereo Left sample in bits 15 through 0 and right sample in bits 31 through 16 of the same word
6 8 bits
7 8 bits compact stereo Left sample in bits 7 through 0 and right sample in bits 15 through 8 of the same word
Table 29-6. Mode
MODE Comments
0 SLAVE ISCK and IWS pin inputs used as Bit Clock and Word Select/Frame Sync.
1 MASTERBit Clock and Word Select/Frame Sync generated by IISC from GCLK_IISC and output to ISCK and IWS pins.
GCLK_IISC is output as Master Clock on IMCK if MR.IMCKMODE is one.
Table 29-4. Master Clock to Sample Frequency (fs) Ratio
fs Ratio IMCKFS
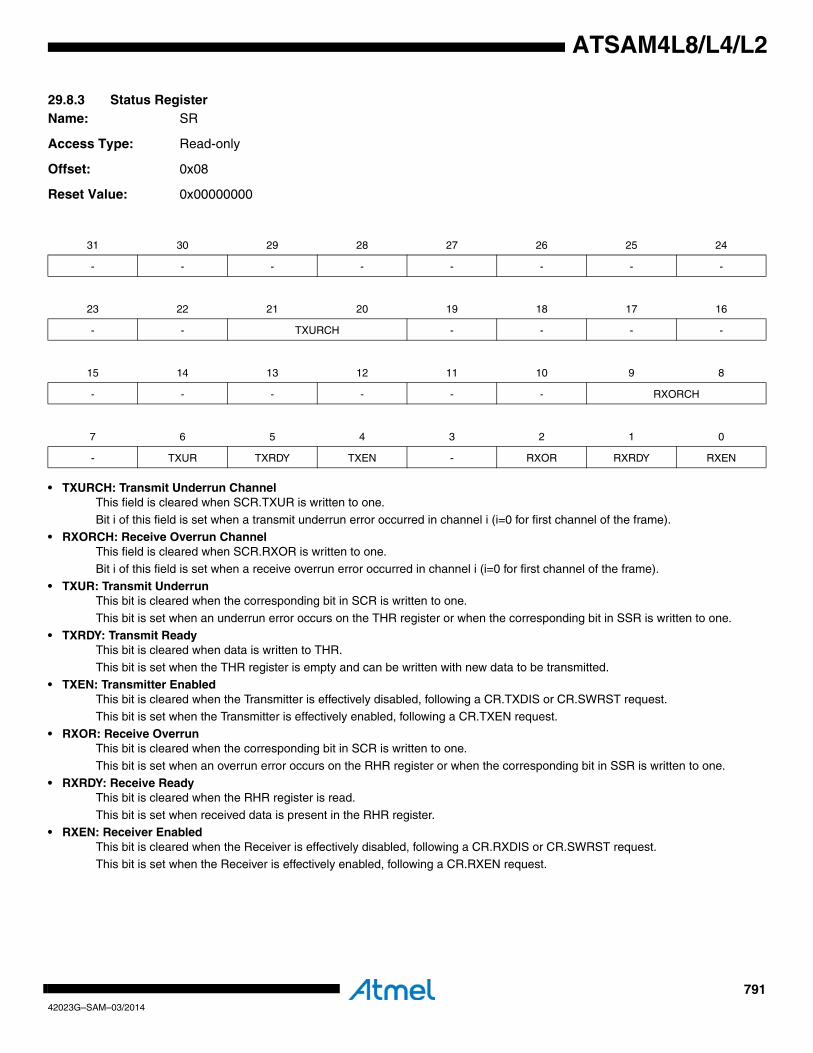
79142023G–SAM–03/2014
ATSAM4L8/L4/L2
29.8.3 Status RegisterName: SR
Access Type: Read-only
Offset: 0x08
Reset Value: 0x00000000
• TXURCH: Transmit Underrun ChannelThis field is cleared when SCR.TXUR is written to one.
Bit i of this field is set when a transmit underrun error occurred in channel i (i=0 for first channel of the frame).• RXORCH: Receive Overrun Channel
This field is cleared when SCR.RXOR is written to one.Bit i of this field is set when a receive overrun error occurred in channel i (i=0 for first channel of the frame).
• TXUR: Transmit Underrun This bit is cleared when the corresponding bit in SCR is written to one.
This bit is set when an underrun error occurs on the THR register or when the corresponding bit in SSR is written to one.
• TXRDY: Transmit ReadyThis bit is cleared when data is written to THR.
This bit is set when the THR register is empty and can be written with new data to be transmitted.• TXEN: Transmitter Enabled
This bit is cleared when the Transmitter is effectively disabled, following a CR.TXDIS or CR.SWRST request.This bit is set when the Transmitter is effectively enabled, following a CR.TXEN request.
• RXOR: Receive Overrun This bit is cleared when the corresponding bit in SCR is written to one.
This bit is set when an overrun error occurs on the RHR register or when the corresponding bit in SSR is written to one.
• RXRDY: Receive ReadyThis bit is cleared when the RHR register is read.
This bit is set when received data is present in the RHR register.• RXEN: Receiver Enabled
This bit is cleared when the Receiver is effectively disabled, following a CR.RXDIS or CR.SWRST request.This bit is set when the Receiver is effectively enabled, following a CR.RXEN request.
31 30 29 28 27 26 25 24
- - - - - - - -
23 22 21 20 19 18 17 16
- - TXURCH - - - -
15 14 13 12 11 10 9 8
- - - - - - RXORCH
7 6 5 4 3 2 1 0
- TXUR TXRDY TXEN - RXOR RXRDY RXEN

79242023G–SAM–03/2014
ATSAM4L8/L4/L2
29.8.4 Status Clear RegisterName: SCR
Access Type: Write-only
Offset: 0x0C
Reset Value: 0x00000000
Writing a zero to a bit in this register has no effect.Writing a one to a bit in this register will clear the corresponding bit in SR and the corresponding interrupt request.
31 30 29 28 27 26 25 24
- - - - - - - -
23 22 21 20 19 18 17 16
- - TXURCH - - - -
15 14 13 12 11 10 9 8
- - - - - - RXORCH
7 6 5 4 3 2 1 0
- TXUR - - - RXOR - -

79342023G–SAM–03/2014
ATSAM4L8/L4/L2
29.8.5 Status Set RegisterName: SSR
Access Type: Write-only
Offset: 0x10
Reset Value: 0x00000000
Writing a zero to a bit in this register has no effect.Writing a one to a bit in this register will set the corresponding bit in SR.
31 30 29 28 27 26 25 24
- - - - - - - -
23 22 21 20 19 18 17 16
- - TXURCH - - - -
15 14 13 12 11 10 9 8
- - - - - - RXORCH
7 6 5 4 3 2 1 0
- TXUR - - - RXOR - -
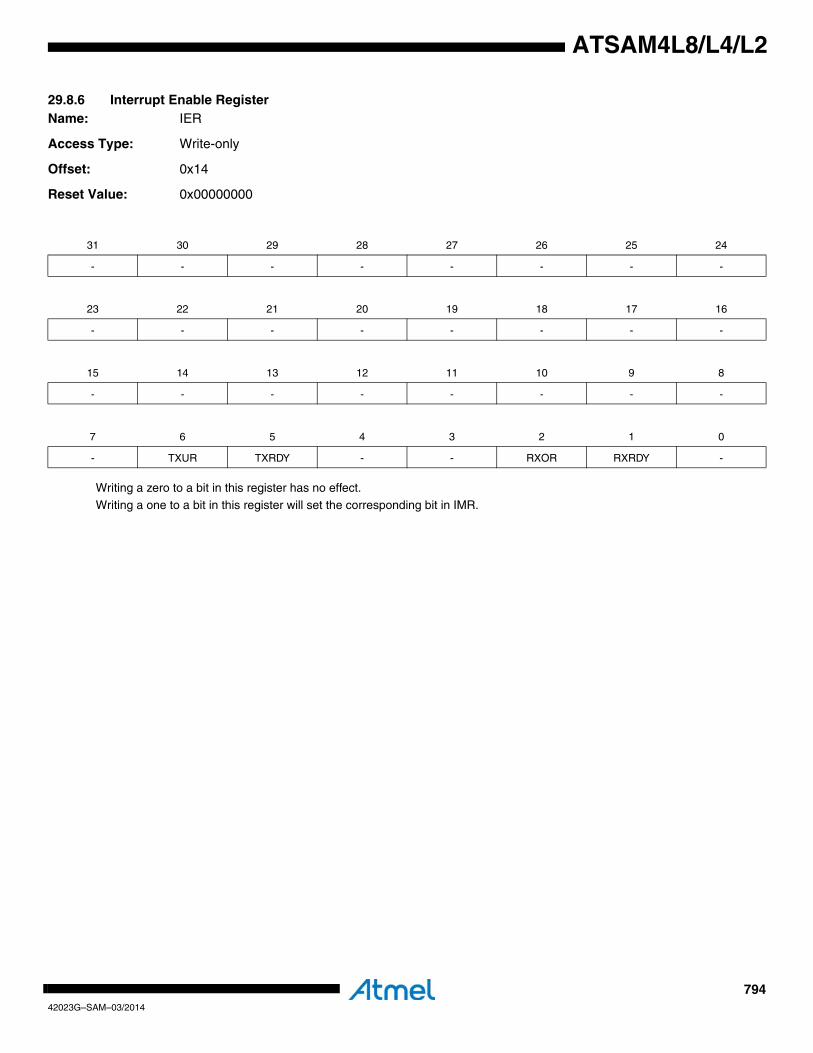
79442023G–SAM–03/2014
ATSAM4L8/L4/L2
29.8.6 Interrupt Enable RegisterName: IER
Access Type: Write-only
Offset: 0x14
Reset Value: 0x00000000
Writing a zero to a bit in this register has no effect.Writing a one to a bit in this register will set the corresponding bit in IMR.
31 30 29 28 27 26 25 24
- - - - - - - -
23 22 21 20 19 18 17 16
- - - - - - - -
15 14 13 12 11 10 9 8
- - - - - - - -
7 6 5 4 3 2 1 0
- TXUR TXRDY - - RXOR RXRDY -

79542023G–SAM–03/2014
ATSAM4L8/L4/L2
29.8.7 Interrupt Disable RegisterName: IDR
Access Type: Write-only
Offset: 0x18
Reset Value: 0x00000000
Writing a zero to a bit in this register has no effect.Writing a one to a bit in this register will clear the corresponding bit in IMR.
31 30 29 28 27 26 25 24
- - - - - - - -
23 22 21 20 19 18 17 16
- - - - - - - -
15 14 13 12 11 10 9 8
- - - - - - - -
7 6 5 4 3 2 1 0
- TXUR TXRDY - - RXOR RXRDY -
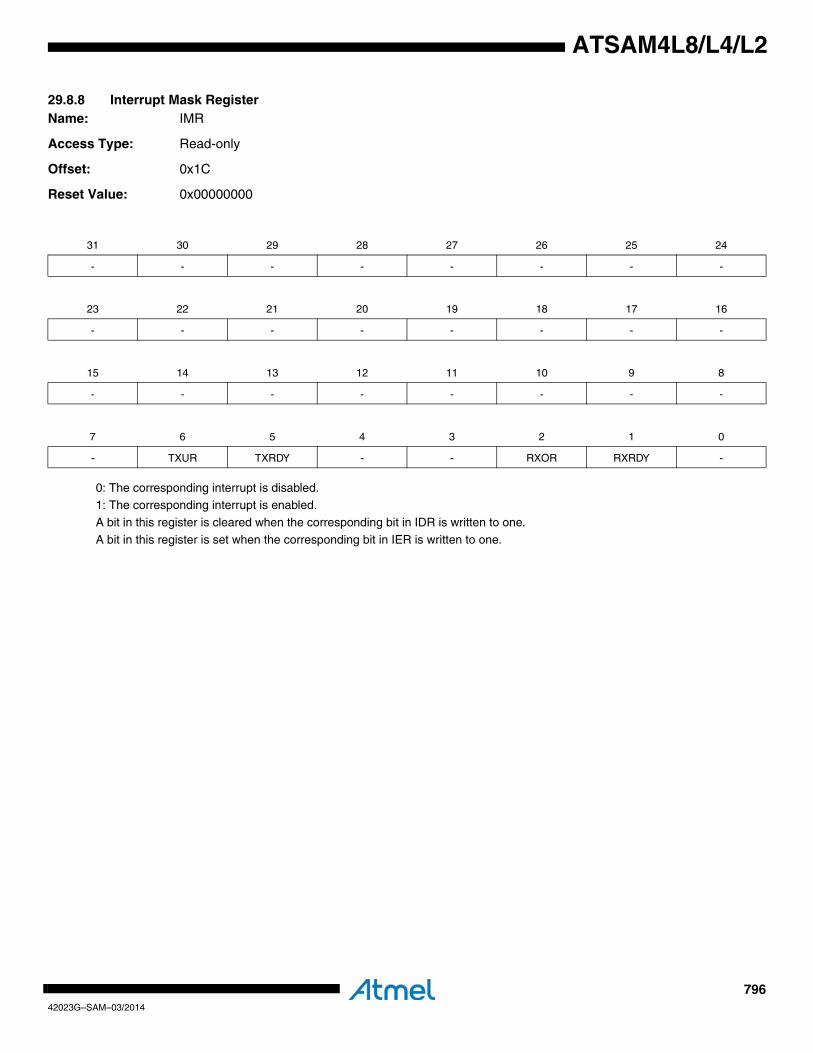
79642023G–SAM–03/2014
ATSAM4L8/L4/L2
29.8.8 Interrupt Mask RegisterName: IMR
Access Type: Read-only
Offset: 0x1C
Reset Value: 0x00000000
0: The corresponding interrupt is disabled.1: The corresponding interrupt is enabled.
A bit in this register is cleared when the corresponding bit in IDR is written to one.
A bit in this register is set when the corresponding bit in IER is written to one.
31 30 29 28 27 26 25 24
- - - - - - - -
23 22 21 20 19 18 17 16
- - - - - - - -
15 14 13 12 11 10 9 8
- - - - - - - -
7 6 5 4 3 2 1 0
- TXUR TXRDY - - RXOR RXRDY -

79742023G–SAM–03/2014
ATSAM4L8/L4/L2
29.8.9 Receive Holding RegisterName: RHR
Access Type: Read-only
Offset: 0x20
Reset Value: 0x00000000
• RHR: Received WordThis field is set by hardware to the last received data word. If MR.DATALENGTH specifies less than 32 bits, data shall be right-
justified into the RHR field.
31 30 29 28 27 26 25 24
RHR[31:24]
23 22 21 20 19 18 17 16
RHR[23:16]
15 14 13 12 11 10 9 8
RHR[15:8]
7 6 5 4 3 2 1 0
RHR[7:0]
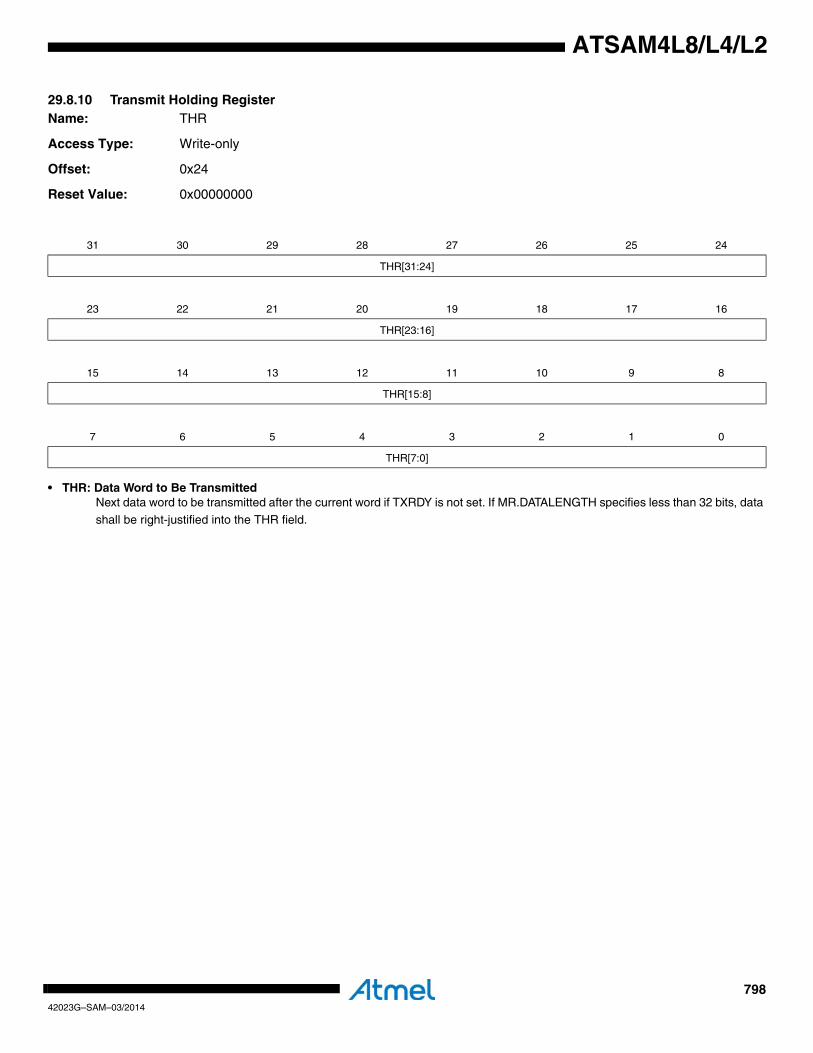
79842023G–SAM–03/2014
ATSAM4L8/L4/L2
29.8.10 Transmit Holding RegisterName: THR
Access Type: Write-only
Offset: 0x24
Reset Value: 0x00000000
• THR: Data Word to Be TransmittedNext data word to be transmitted after the current word if TXRDY is not set. If MR.DATALENGTH specifies less than 32 bits, data
shall be right-justified into the THR field.
31 30 29 28 27 26 25 24
THR[31:24]
23 22 21 20 19 18 17 16
THR[23:16]
15 14 13 12 11 10 9 8
THR[15:8]
7 6 5 4 3 2 1 0
THR[7:0]
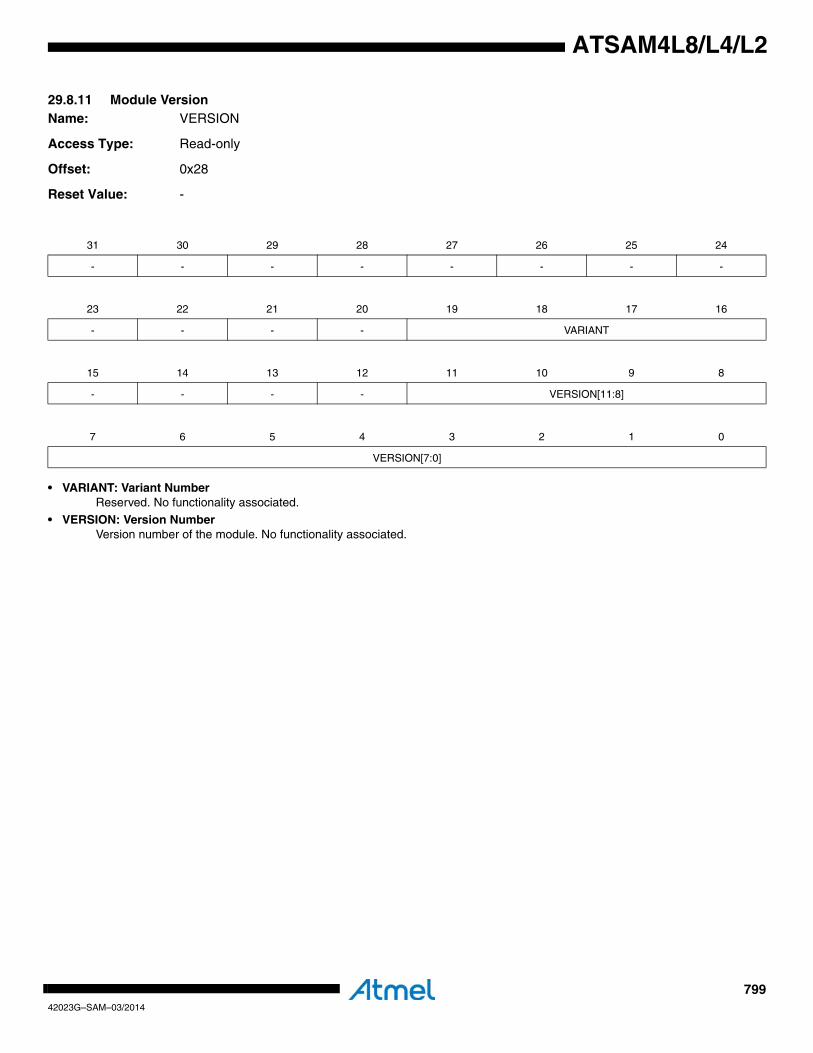
79942023G–SAM–03/2014
ATSAM4L8/L4/L2
29.8.11 Module VersionName: VERSION
Access Type: Read-only
Offset: 0x28
Reset Value: -
• VARIANT: Variant NumberReserved. No functionality associated.
• VERSION: Version NumberVersion number of the module. No functionality associated.
31 30 29 28 27 26 25 24
- - - - - - - -
23 22 21 20 19 18 17 16
- - - - VARIANT
15 14 13 12 11 10 9 8
- - - - VERSION[11:8]
7 6 5 4 3 2 1 0
VERSION[7:0]

80042023G–SAM–03/2014
ATSAM4L8/L4/L2
29.8.12 Module ParametersName: PARAMETER
Access Type: Read-only
Offset: 0x2C
Reset Value: -
Reserved. No functionality associated.
31 30 29 28 27 26 25 24
- - - - - - - -
23 22 21 20 19 18 17 16
- - - - - - - -
15 14 13 12 11 10 9 8
- - - - - - - -
7 6 5 4 3 2 1 0
- - - - - - - -
80142023G–SAM–03/2014
ATSAM4L8/L4/L2
29.9 Module ConfigurationThe specific configuration for each IISC instance is listed in the following tables. The module busclocks listed here are connected to the system bus clocks. Refer to Section 10. ”Power Manager(PM)” on page 109 for details.
Table 29-7. IISC Clocks
Clock Name Description
CLK_IISC Clock for the IISC bus interface
GCLK The generic clock used for the IISC is GCLK6
Table 29-8. Register Reset Values
Register Reset Value
VERSION 0x00000100
80242023G–SAM–03/2014
ATSAM4L8/L4/L2
30. Timer/Counter (TC)Rev: 4.0.2.0
30.1 Features• Three 16-bit Timer Counter channels• A wide range of functions including:
– Frequency measurement– Event counting– Interval measurement– Pulse generation– Delay timing– Pulse width modulation– Up/down capabilities– 2-bit gray up/down count for stepper motor
• Each channel is user-configurable and contains:– Three external clock inputs– Five internal clock inputs– Two multi-purpose input/output signals
• Internal interrupt signal• Two global registers that act on all three TC channels• Configuration registers can be write protected• Peripheral event input on all A/B lines in capture mode
30.2 OverviewThe Timer Counter (TC) includes three identical 16-bit Timer Counter channels.
Each channel can be independently programmed to perform a wide range of functions includingfrequency measurement, event counting, interval measurement, pulse generation, delay timing,and pulse width modulation.
Each channel has three external clock inputs, five internal clock inputs, and two multi-purposeinput/output signals which can be configured by the user. Each channel drives an internal inter-rupt signal which can be programmed to generate processor interrupts.
The TC block has two global registers which act upon all three TC channels.
The Block Control Register (BCR) allows the three channels to be started simultaneously withthe same instruction.
The Block Mode Register (BMR) defines the external clock inputs for each channel, allowingthem to be chained.
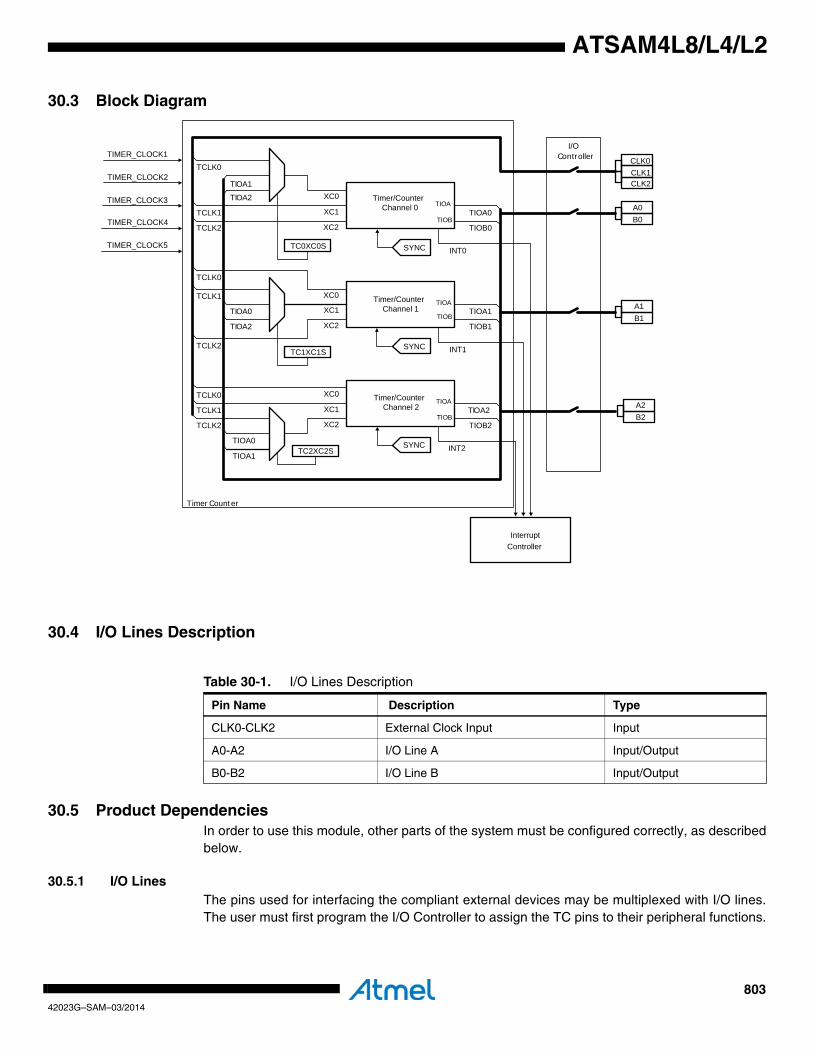
80342023G–SAM–03/2014
ATSAM4L8/L4/L2
30.3 Block Diagram
30.4 I/O Lines Description
30.5 Product DependenciesIn order to use this module, other parts of the system must be configured correctly, as describedbelow.
30.5.1 I/O Lines The pins used for interfacing the compliant external devices may be multiplexed with I/O lines.The user must first program the I/O Controller to assign the TC pins to their peripheral functions.
I/OController
TC2XC2S
INT0
INT1
INT2
TIOA0
TIOA1
TIOA2
TIOB0
TIOB1
TIOB2
XC2
TCLK0
TCLK1
TCLK2
TCLK0
TCLK1
TCLK2
TCLK0
TCLK1
TCLK2
TIOA1
TIOA2
TIOA0
TIOA2
TIOA1
InterruptController
CLK0CLK1CLK2
A0B0
A1B1
A2B2
Timer Count er
TIOB
TIOA
TIOB
SYNC
TIMER_CLOCK1
TIOA
SYNC
SYNC
TIOA
TIOB
TIMER_CLOCK2
TIMER_CLOCK3
TIMER_CLOCK4
TIMER_CLOCK5
XC1
XC0
XC0
XC2
XC1
XC0
XC1
XC2
Timer/CounterChannel 2
Timer/CounterChannel 1
Timer/CounterChannel 0
TC1XC1S
TC0XC0S
TIOA0
Table 30-1. I/O Lines Description
Pin Name Description Type
CLK0-CLK2 External Clock Input Input
A0-A2 I/O Line A Input/Output
B0-B2 I/O Line B Input/Output
80442023G–SAM–03/2014
ATSAM4L8/L4/L2
When using the TIOA/TIOB lines as inputs the user must make sure that no peripheral eventsare generated on the line. Refer to Section 31. ”Peripheral Event Controller (PEVC)” on page845 for details.
30.5.2 Power ManagementIf the CPU enters a sleep mode that disables clocks used by the TC, the TC will stop functioningand resume operation after the system wakes up from sleep mode.
30.5.3 ClocksThe clock for the TC bus interface (CLK_TC) is generated by the Power Manager. This clock isdisabled at reset, and can be enabled in the Power Manager. It is recommended to disable theTC before disabling the clock, to avoid freezing the TC in an undefined state.
30.5.4 InterruptsThe TC interrupt request line is connected to the NVIC. Using the TC interrupt requires the NVICto be programmed first.
30.5.5 Peripheral EventsThe TC peripheral events are connected via the Peripheral Event System. Refer to Section 31.”Peripheral Event Controller (PEVC)” on page 845 for details.
30.5.6 Debug OperationThe Timer Counter clocks are frozen during debug operation, unless the OCD system keepsperipherals running in debug operation.
30.6 Functional Description
30.6.1 TC DescriptionThe three channels of the Timer Counter are independent and identical in operation. The regis-ters for channel programming are listed in Figure 30-3 on page 819.
30.6.1.1 Channel I/O SignalsAs described in Figure 30.3 on page 803, each Channel has the following I/O signals.
30.6.1.2 16-bit counter Each channel is organized around a 16-bit counter. The value of the counter is incremented ateach positive edge of the selected clock. When the counter has reached the value 0xFFFF and
Table 30-2. Channel I/O Signals Description
Block/Channel Signal Name Description
Channel Signal
XC0, XC1, XC2 External Clock Inputs
TIOACapture mode: Timer Counter InputWaveform mode: Timer Counter Output
TIOBCapture mode: Timer Counter InputWaveform mode: Timer Counter Input/Output
INT Interrupt Signal Output
SYNC Synchronization Input Signal
80542023G–SAM–03/2014
ATSAM4L8/L4/L2
passes to 0x0000, an overflow occurs and the Counter Overflow Status bit in the Channel n Sta-tus Register (SRn.COVFS) is set.
The current value of the counter is accessible in real time by reading the Channel n CounterValue Register (CVn). The counter can be reset by a trigger. In this case, the counter valuepasses to 0x0000 on the next valid edge of the selected clock.
30.6.1.3 Clock selectionAt block level, input clock signals of each channel can either be connected to the external inputsTCLK0, TCLK1 or TCLK2, or be connected to the configurable I/O signals A0, A1 or A2 forchaining by writing to the BMR register. See Figure 30-1 on page 806.
Each channel can independently select an internal or external clock source for its counter:
• Internal clock signals: TIMER_CLOCK1, TIMER_CLOCK2, TIMER_CLOCK3, TIMER_CLOCK4, TIMER_CLOCK5. See the Module Configuration Chapter for details about the connection of these clock sources.
• External clock signals: XC0, XC1 or XC2. See the Module Configuration Chapter for details about the connection of these clock sources.
This selection is made by the Clock Selection field in the Channel n Mode Register(CMRn.TCCLKS).
The selected clock can be inverted with the Clock Invert bit in CMRn (CMRn.CLKI). This allowscounting on the opposite edges of the clock.
The burst function allows the clock to be validated when an external signal is high. The BurstSignal Selection field in the CMRn register (CMRn.BURST) defines this signal.
Note: In all cases, if an external clock is used, the duration of each of its levels must be longer than the CLK_TC period. The external clock frequency must be at least 2.5 times lower than the CLK_TC.
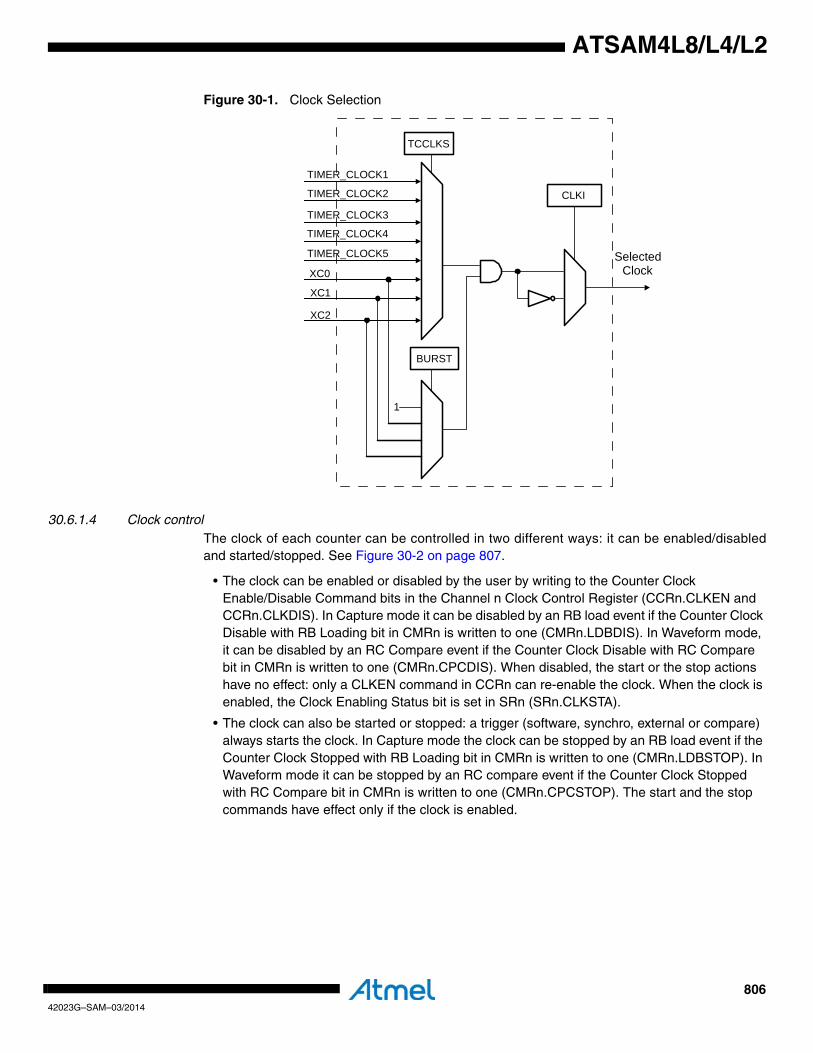
80642023G–SAM–03/2014
ATSAM4L8/L4/L2
Figure 30-1. Clock Selection
30.6.1.4 Clock controlThe clock of each counter can be controlled in two different ways: it can be enabled/disabledand started/stopped. See Figure 30-2 on page 807.
• The clock can be enabled or disabled by the user by writing to the Counter Clock Enable/Disable Command bits in the Channel n Clock Control Register (CCRn.CLKEN and CCRn.CLKDIS). In Capture mode it can be disabled by an RB load event if the Counter Clock Disable with RB Loading bit in CMRn is written to one (CMRn.LDBDIS). In Waveform mode, it can be disabled by an RC Compare event if the Counter Clock Disable with RC Compare bit in CMRn is written to one (CMRn.CPCDIS). When disabled, the start or the stop actions have no effect: only a CLKEN command in CCRn can re-enable the clock. When the clock is enabled, the Clock Enabling Status bit is set in SRn (SRn.CLKSTA).
• The clock can also be started or stopped: a trigger (software, synchro, external or compare) always starts the clock. In Capture mode the clock can be stopped by an RB load event if the Counter Clock Stopped with RB Loading bit in CMRn is written to one (CMRn.LDBSTOP). In Waveform mode it can be stopped by an RC compare event if the Counter Clock Stopped with RC Compare bit in CMRn is written to one (CMRn.CPCSTOP). The start and the stop commands have effect only if the clock is enabled.
TIMER_CLOCK5
XC2
TCCLKS
CLKI
BURST
1
SelectedClock
XC1
XC0
TIMER_CLOCK4
TIMER_CLOCK3
TIMER_CLOCK2
TIMER_CLOCK1
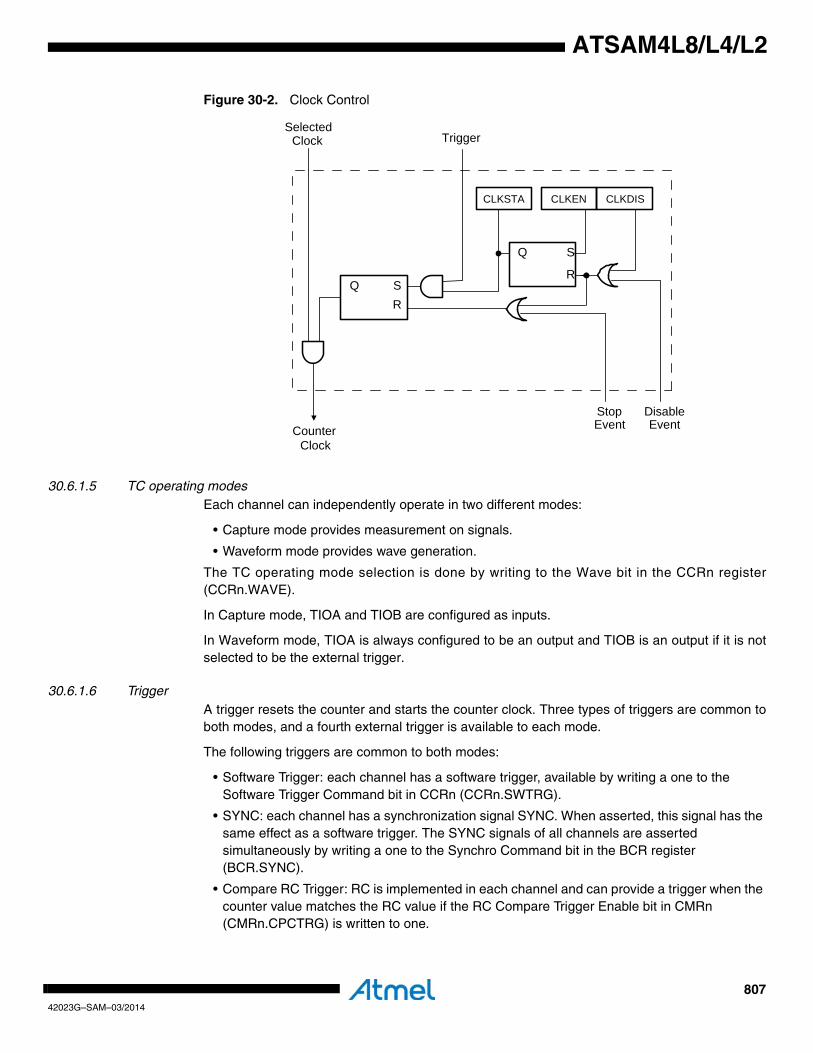
80742023G–SAM–03/2014
ATSAM4L8/L4/L2
Figure 30-2. Clock Control
30.6.1.5 TC operating modesEach channel can independently operate in two different modes:
• Capture mode provides measurement on signals.
• Waveform mode provides wave generation.
The TC operating mode selection is done by writing to the Wave bit in the CCRn register(CCRn.WAVE).
In Capture mode, TIOA and TIOB are configured as inputs.
In Waveform mode, TIOA is always configured to be an output and TIOB is an output if it is notselected to be the external trigger.
30.6.1.6 TriggerA trigger resets the counter and starts the counter clock. Three types of triggers are common toboth modes, and a fourth external trigger is available to each mode.
The following triggers are common to both modes:
• Software Trigger: each channel has a software trigger, available by writing a one to the Software Trigger Command bit in CCRn (CCRn.SWTRG).
• SYNC: each channel has a synchronization signal SYNC. When asserted, this signal has the same effect as a software trigger. The SYNC signals of all channels are asserted simultaneously by writing a one to the Synchro Command bit in the BCR register (BCR.SYNC).
• Compare RC Trigger: RC is implemented in each channel and can provide a trigger when the counter value matches the RC value if the RC Compare Trigger Enable bit in CMRn (CMRn.CPCTRG) is written to one.
Q SR
S
R
Q
CLKSTA CLKEN CLKDIS
StopEvent
DisableCounter
Clock
SelectedClock Trigger
Event
80842023G–SAM–03/2014
ATSAM4L8/L4/L2
The channel can also be configured to have an external trigger. In Capture mode, the externaltrigger signal can be selected between TIOA and TIOB. In Waveform mode, an external eventcan be programmed to be one of the following signals: TIOB, XC0, XC1, or XC2. This externalevent can then be programmed to perform a trigger by writing a one to the External Event Trig-ger Enable bit in CMRn (CMRn.ENETRG).
If an external trigger is used, the duration of the pulses must be longer than the CLK_TC periodin order to be detected.
Regardless of the trigger used, it will be taken into account at the following active edge of theselected clock. This means that the counter value can be read differently from zero just after atrigger, especially when a low frequency signal is selected as the clock.
30.6.1.7 Peripheral events on TIOA/TIOB inputsThe TIOA/TIOB input lines are ored internally with peripheral events from the Peripheral EventSystem. To capture using events the user must ensure that the corresponding pin functions forthe TIOA/TIOB line are disabled. When capturing on the external TIOA/TIOB pin the user mustensure that no peripheral events are generated on this pin.
30.6.2 Capture Operating ModeThis mode is entered by writing a zero to the CMRn.WAVE bit.
Capture mode allows the TC channel to perform measurements such as pulse timing, fre-quency, period, duty cycle and phase on TIOA and TIOB signals which are considered asinputs.
Figure 30-3 on page 809 shows the configuration of the TC channel when programmed in Cap-ture mode.
30.6.2.1 Capture registers A and B Registers A and B (RA and RB) are used as capture registers. This means that they can beloaded with the counter value when a programmable event occurs on the signal TIOA.
The RA Loading Selection field in CMRn (CMRn.LDRA) defines the TIOA edge for the loading ofthe RA register, and the RB Loading Selection field in CMRn (CMRn.LDRB) defines the TIOAedge for the loading of the RB register.
RA is loaded only if it has not been loaded since the last trigger or if RB has been loaded sincethe last loading of RA.
RB is loaded only if RA has been loaded since the last trigger or the last loading of RB.
Loading RA or RB before the read of the last value loaded sets the Load Overrun Status bit inSRn (SRn.LOVRS). In this case, the old value is overwritten.
30.6.2.2 Trigger conditionsIn addition to the SYNC signal, the software trigger and the RC compare trigger, an external trig-ger can be defined.
The TIOA or TIOB External Trigger Selection bit in CMRn (CMRn.ABETRG) selects TIOA orTIOB input signal as an external trigger. The External Trigger Edge Selection bit in CMRn(CMRn.ETREDG) defines the edge (rising, falling or both) detected to generate an external trig-ger. If CMRn.ETRGEDG is zero (none), the external trigger is disabled.
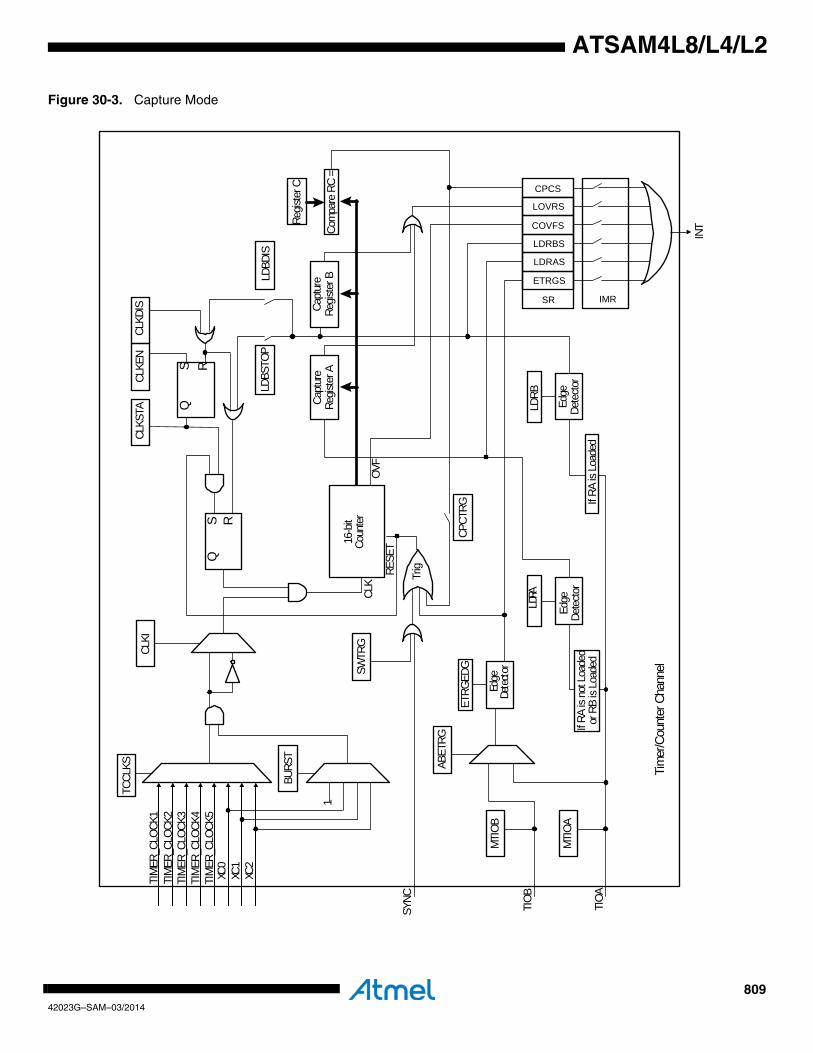
80942023G–SAM–03/2014
ATSAM4L8/L4/L2
Figure 30-3. Capture Mode
TIM
ER_C
LOCK
1
XC0
XC1
XC2
TCCL
KSCL
KI
QS R
S RQ
CLKS
TACL
KEN
CLKD
IS
BURS
T
TIOB
Capt
ure
Regis
ter A
Com
pare
RC
=16
-bit
Coun
ter
ABET
RG
SWTR
G
ETRG
EDG
CPCT
RG
IMR
Trig
LDRBS
LDRAS
ETRGS
SR
LOVRS
COVFS
SYNC
1
MTI
OB
TIOA
MTI
OA
LDRA
LDBS
TOP
If RA
is n
ot L
oade
d or
RB
is Lo
aded
If RA
is L
oade
d
LDBD
IS
CPCS
INT
Edge
Dete
ctor
LDRB
CLK
OVF
RESE
T
Tim
er/C
ount
er C
hann
el
Edge
Dete
ctor
Edge
Dete
ctor
Capt
ure
Regis
ter B
Regis
ter C
TIM
ER_C
LOCK
2TI
MER
_CLO
CK3
TIM
ER_C
LOCK
4TI
MER
_CLO
CK5
81042023G–SAM–03/2014
ATSAM4L8/L4/L2
30.6.3 Waveform Operating ModeWaveform operating mode is entered by writing a one to the CMRn.WAVE bit.
In Waveform operating mode the TC channel generates one or two PWM signals with the samefrequency and independently programmable duty cycles, or generates different types of one-shot or repetitive pulses.
In this mode, TIOA is configured as an output and TIOB is defined as an output if it is not usedas an external event.
Figure 30-4 on page 811 shows the configuration of the TC channel when programmed inWaveform operating mode.
30.6.3.1 Waveform selectionDepending on the Waveform Selection field in CMRn (CMRn.WAVSEL), the behavior of CVnvaries.
With any selection, RA, RB and RC can all be used as compare registers.
RA Compare is used to control the TIOA output, RB Compare is used to control the TIOB output(if correctly configured) and RC Compare is used to control TIOA and/or TIOB outputs.

81142023G–SAM–03/2014
ATSAM4L8/L4/L2
Figure 30-4. Waveform Mode
TCCL
KS
CLKI
QS R
S R
Q
CLKS
TACL
KEN
CLKD
IS
CPCD
IS
BURS
T
TIOB
Regis
ter A
Com
pare
RC
=
CPCS
TOP
16-b
itCo
unte
r
EEVT
EEVT
EDG
SYNC
SWTR
G
ENET
RG
WAV
SEL
IMRTri
g
ACPC
ACPA
AEEV
T
ASW
TRG
BCPC
BCPB
BEEV
T
BSW
TRG
TIOA
MTI
OA TIOB
MTI
OB
CPAS
COVFS
ETRGS
SR
CPCS
CPBSCL
KO
VFRE
SET
OutputController OutputController
INT
1
Edge
Dete
ctor
Tim
er/C
ount
er C
hann
el
TIM
ER_C
LOCK
1
XC0
XC1
XC2
WAV
SEL
Regis
ter B
Regis
ter C
Com
pare
RB
=Co
mpa
re R
A =
TIM
ER_C
LOCK
2TI
MER
_CLO
CK3
TIM
ER_C
LOCK
4TI
MER
_CLO
CK5
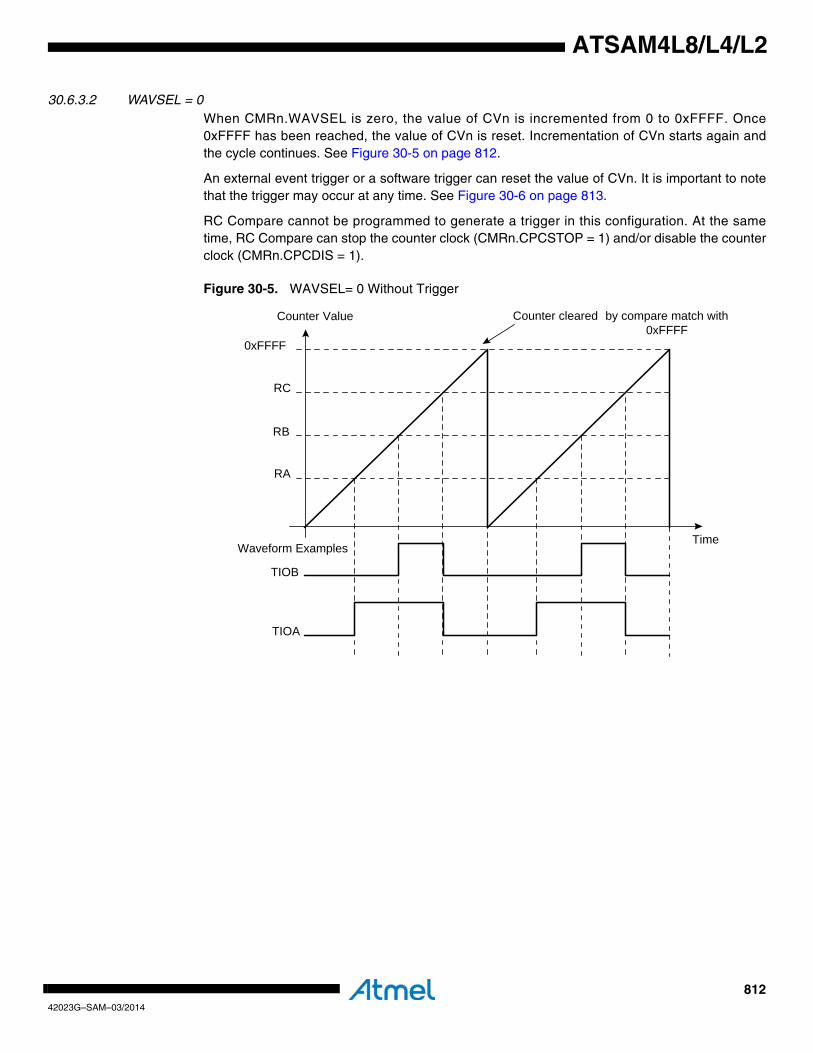
81242023G–SAM–03/2014
ATSAM4L8/L4/L2
30.6.3.2 WAVSEL = 0When CMRn.WAVSEL is zero, the value of CVn is incremented from 0 to 0xFFFF. Once0xFFFF has been reached, the value of CVn is reset. Incrementation of CVn starts again andthe cycle continues. See Figure 30-5 on page 812.
An external event trigger or a software trigger can reset the value of CVn. It is important to notethat the trigger may occur at any time. See Figure 30-6 on page 813.
RC Compare cannot be programmed to generate a trigger in this configuration. At the sametime, RC Compare can stop the counter clock (CMRn.CPCSTOP = 1) and/or disable the counterclock (CMRn.CPCDIS = 1).
Figure 30-5. WAVSEL= 0 Without Trigger
Time
Counter Value
RC
RB
RA
TIOB
TIOA
Counter cleared by compare match with 0xFFFF
0xFFFF
Waveform Examples
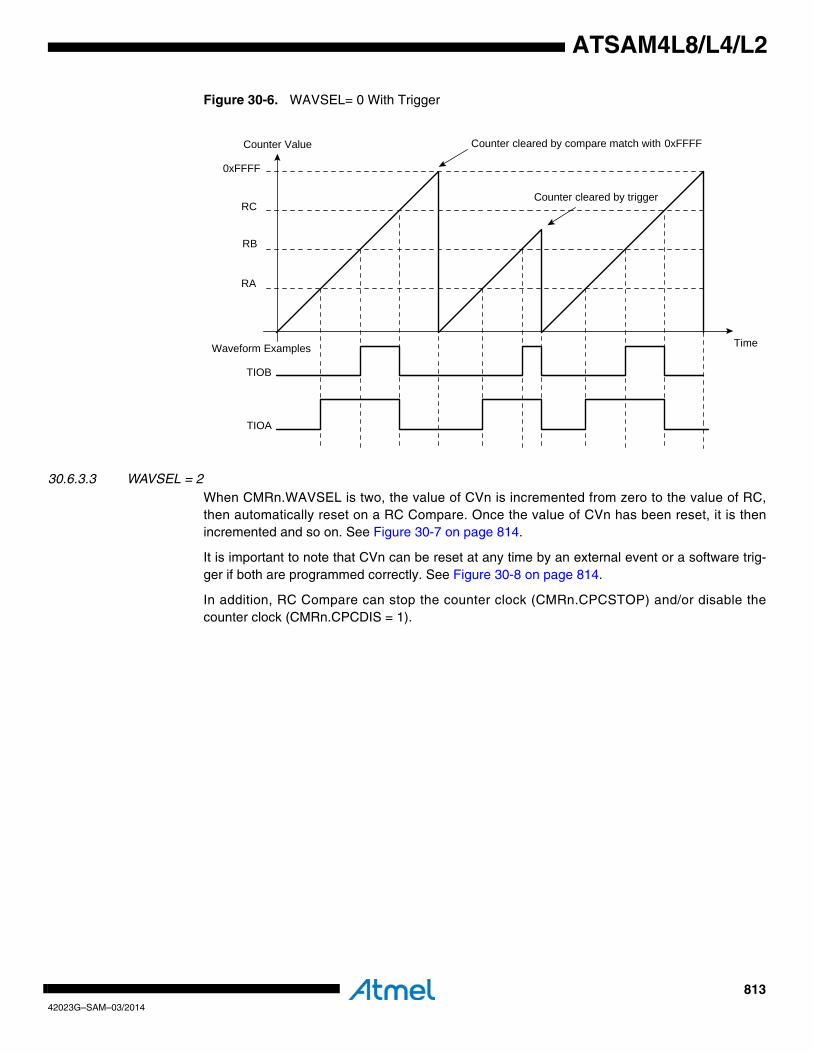
81342023G–SAM–03/2014
ATSAM4L8/L4/L2
Figure 30-6. WAVSEL= 0 With Trigger
30.6.3.3 WAVSEL = 2When CMRn.WAVSEL is two, the value of CVn is incremented from zero to the value of RC,then automatically reset on a RC Compare. Once the value of CVn has been reset, it is thenincremented and so on. See Figure 30-7 on page 814.
It is important to note that CVn can be reset at any time by an external event or a software trig-ger if both are programmed correctly. See Figure 30-8 on page 814.
In addition, RC Compare can stop the counter clock (CMRn.CPCSTOP) and/or disable thecounter clock (CMRn.CPCDIS = 1).
Time
Counter Value
RC
RB
RA
TIOB
TIOA
Counter cleared by compare match with 0xFFFF
0xFFFF
Waveform Examples
Counter cleared by trigger
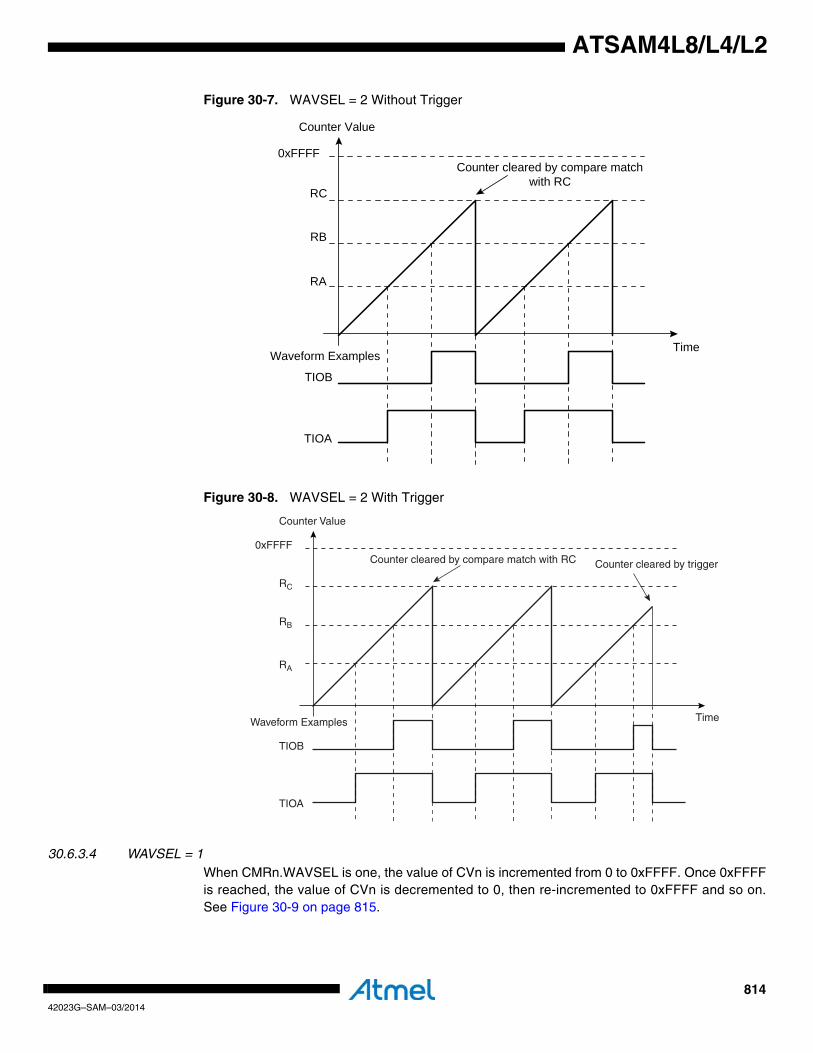
81442023G–SAM–03/2014
ATSAM4L8/L4/L2
Figure 30-7. WAVSEL = 2 Without Trigger
Figure 30-8. WAVSEL = 2 With Trigger
30.6.3.4 WAVSEL = 1When CMRn.WAVSEL is one, the value of CVn is incremented from 0 to 0xFFFF. Once 0xFFFFis reached, the value of CVn is decremented to 0, then re-incremented to 0xFFFF and so on.See Figure 30-9 on page 815.
Time
Counter Value
RC
RB
RA
TIOB
TIOA
Counter cleared by compare match with RC
0xFFFF
Waveform Examples
Time
Counter Value
RC
RB
RA
TIOB
TIOA
Counter cleared by compare match with RC0xFFFF
Waveform Examples
Counter cleared by trigger
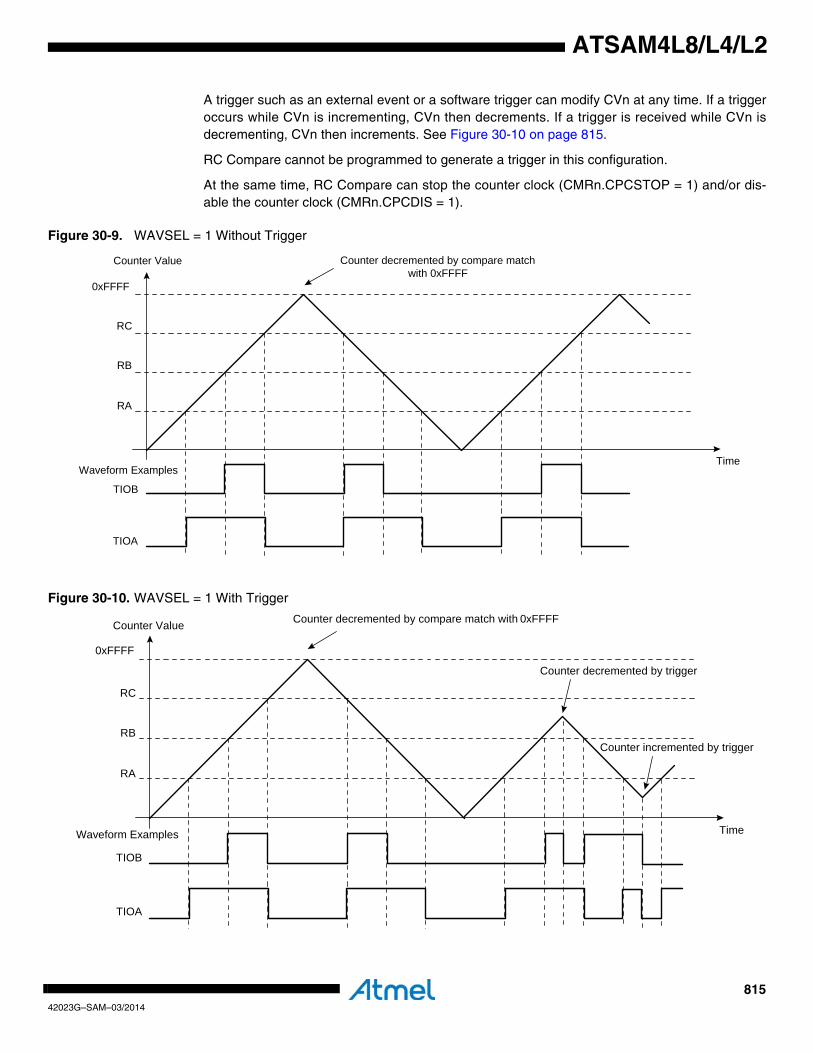
81542023G–SAM–03/2014
ATSAM4L8/L4/L2
A trigger such as an external event or a software trigger can modify CVn at any time. If a triggeroccurs while CVn is incrementing, CVn then decrements. If a trigger is received while CVn isdecrementing, CVn then increments. See Figure 30-10 on page 815.
RC Compare cannot be programmed to generate a trigger in this configuration.
At the same time, RC Compare can stop the counter clock (CMRn.CPCSTOP = 1) and/or dis-able the counter clock (CMRn.CPCDIS = 1).
Figure 30-9. WAVSEL = 1 Without Trigger
Figure 30-10. WAVSEL = 1 With Trigger
Time
Counter Value
RC
RB
RA
TIOB
TIOA
Counter decremented by compare match with 0xFFFF
0xFFFF
Waveform Examples
Time
Counter Value
TIOB
TIOA
Counter decremented by compare match with 0xFFFF
0xFFFF
Waveform Examples
Counter decremented by trigger
RC
RB
RA
Counter incremented by trigger
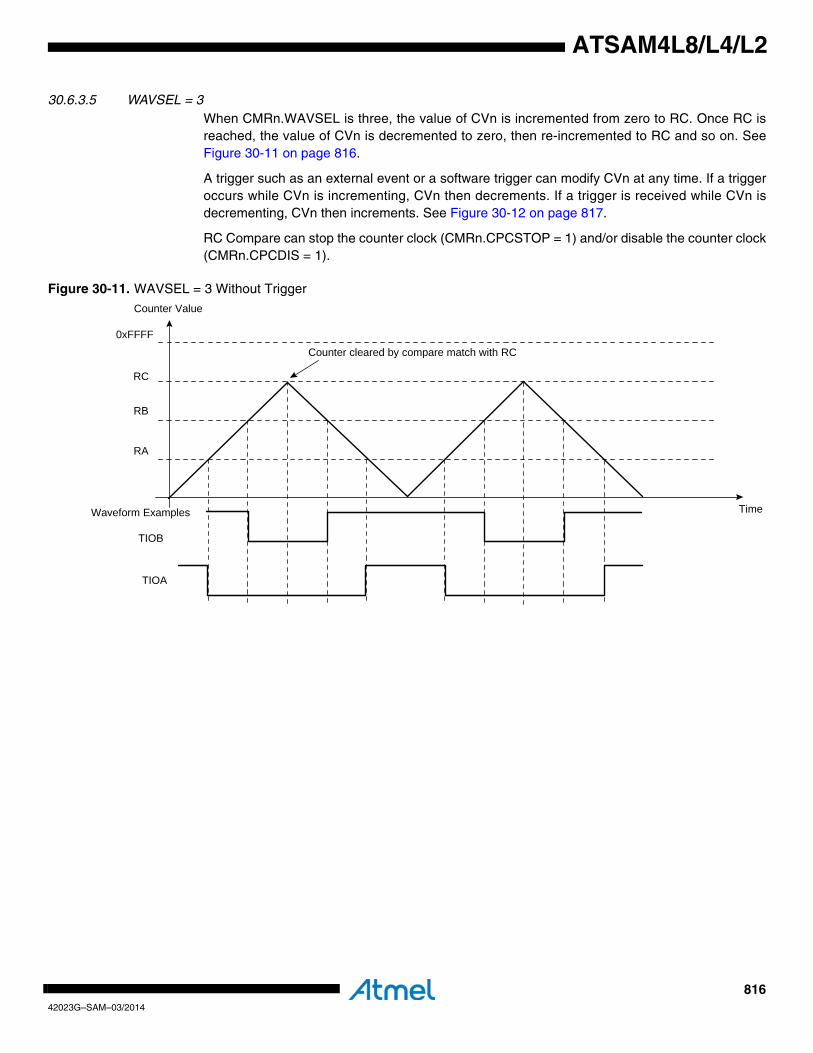
81642023G–SAM–03/2014
ATSAM4L8/L4/L2
30.6.3.5 WAVSEL = 3When CMRn.WAVSEL is three, the value of CVn is incremented from zero to RC. Once RC isreached, the value of CVn is decremented to zero, then re-incremented to RC and so on. SeeFigure 30-11 on page 816.
A trigger such as an external event or a software trigger can modify CVn at any time. If a triggeroccurs while CVn is incrementing, CVn then decrements. If a trigger is received while CVn isdecrementing, CVn then increments. See Figure 30-12 on page 817.
RC Compare can stop the counter clock (CMRn.CPCSTOP = 1) and/or disable the counter clock(CMRn.CPCDIS = 1).
Figure 30-11. WAVSEL = 3 Without Trigger
Time
Counter Value
RC
RB
RA
TIOB
TIOA
Counter cleared by compare match with RC0xFFFF
Waveform Examples
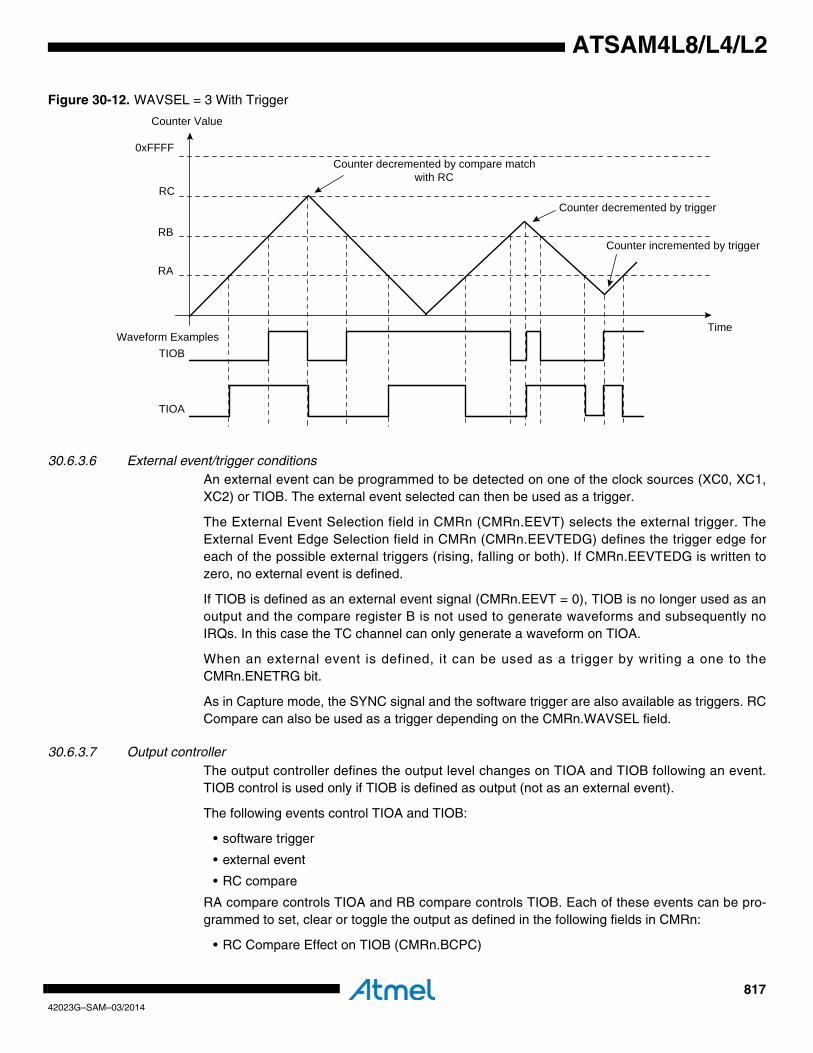
81742023G–SAM–03/2014
ATSAM4L8/L4/L2
Figure 30-12. WAVSEL = 3 With Trigger
30.6.3.6 External event/trigger conditionsAn external event can be programmed to be detected on one of the clock sources (XC0, XC1,XC2) or TIOB. The external event selected can then be used as a trigger.
The External Event Selection field in CMRn (CMRn.EEVT) selects the external trigger. TheExternal Event Edge Selection field in CMRn (CMRn.EEVTEDG) defines the trigger edge foreach of the possible external triggers (rising, falling or both). If CMRn.EEVTEDG is written tozero, no external event is defined.
If TIOB is defined as an external event signal (CMRn.EEVT = 0), TIOB is no longer used as anoutput and the compare register B is not used to generate waveforms and subsequently noIRQs. In this case the TC channel can only generate a waveform on TIOA.
When an external event is defined, it can be used as a trigger by writing a one to theCMRn.ENETRG bit.
As in Capture mode, the SYNC signal and the software trigger are also available as triggers. RCCompare can also be used as a trigger depending on the CMRn.WAVSEL field.
30.6.3.7 Output controllerThe output controller defines the output level changes on TIOA and TIOB following an event.TIOB control is used only if TIOB is defined as output (not as an external event).
The following events control TIOA and TIOB:
• software trigger
• external event
• RC compare
RA compare controls TIOA and RB compare controls TIOB. Each of these events can be pro-grammed to set, clear or toggle the output as defined in the following fields in CMRn:
• RC Compare Effect on TIOB (CMRn.BCPC)
Time
Counter Value
TIOB
TIOA
Counter decremented by compare match with RC
0xFFFF
Waveform Examples
RC
RB
RA
Counter decremented by trigger
Counter incremented by trigger
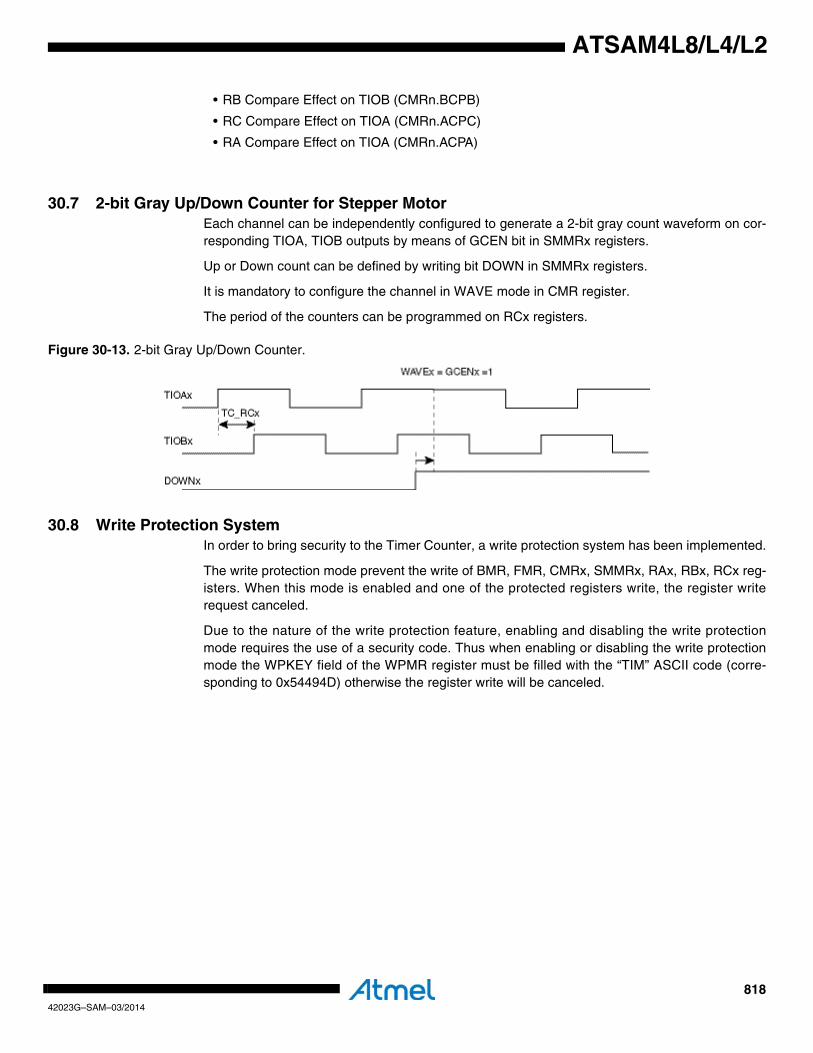
81842023G–SAM–03/2014
ATSAM4L8/L4/L2
• RB Compare Effect on TIOB (CMRn.BCPB)
• RC Compare Effect on TIOA (CMRn.ACPC)
• RA Compare Effect on TIOA (CMRn.ACPA)
30.7 2-bit Gray Up/Down Counter for Stepper MotorEach channel can be independently configured to generate a 2-bit gray count waveform on cor-responding TIOA, TIOB outputs by means of GCEN bit in SMMRx registers.
Up or Down count can be defined by writing bit DOWN in SMMRx registers.
It is mandatory to configure the channel in WAVE mode in CMR register.
The period of the counters can be programmed on RCx registers.
Figure 30-13. 2-bit Gray Up/Down Counter.
30.8 Write Protection SystemIn order to bring security to the Timer Counter, a write protection system has been implemented.
The write protection mode prevent the write of BMR, FMR, CMRx, SMMRx, RAx, RBx, RCx reg-isters. When this mode is enabled and one of the protected registers write, the register writerequest canceled.
Due to the nature of the write protection feature, enabling and disabling the write protectionmode requires the use of a security code. Thus when enabling or disabling the write protectionmode the WPKEY field of the WPMR register must be filled with the “TIM” ASCII code (corre-sponding to 0x54494D) otherwise the register write will be canceled.
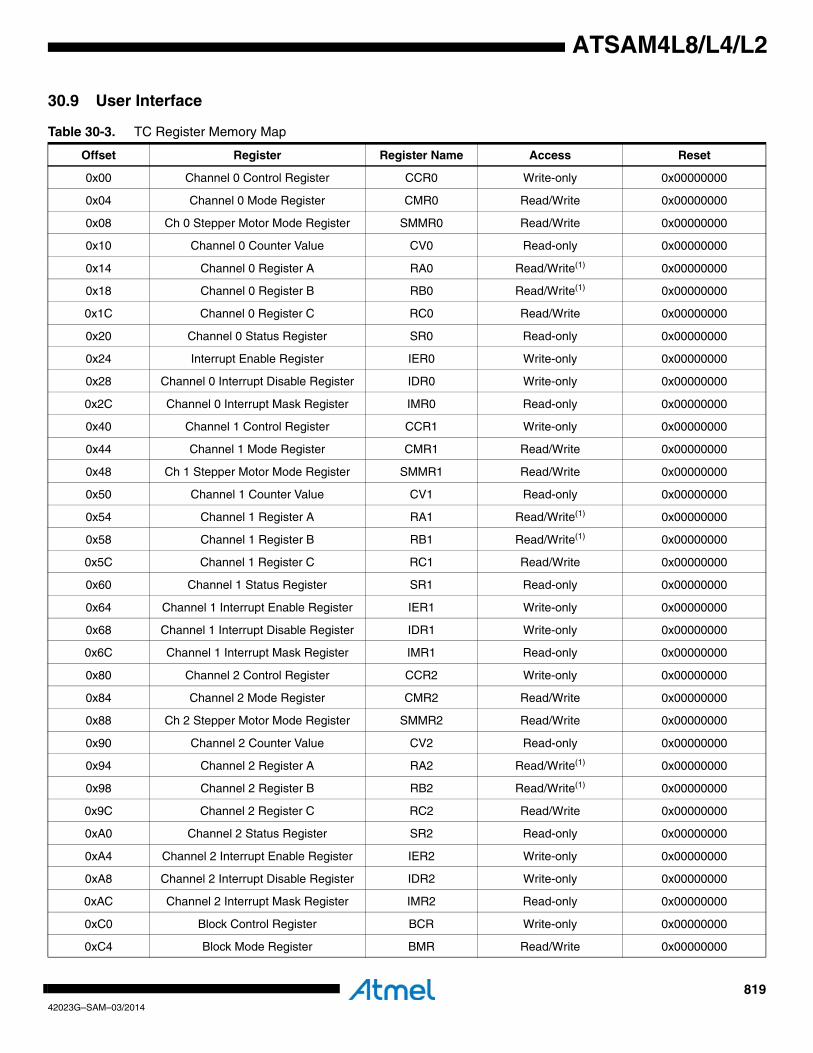
81942023G–SAM–03/2014
ATSAM4L8/L4/L2
30.9 User Interface
Table 30-3. TC Register Memory Map
Offset Register Register Name Access Reset
0x00 Channel 0 Control Register CCR0 Write-only 0x00000000
0x04 Channel 0 Mode Register CMR0 Read/Write 0x00000000
0x08 Ch 0 Stepper Motor Mode Register SMMR0 Read/Write 0x00000000
0x10 Channel 0 Counter Value CV0 Read-only 0x00000000
0x14 Channel 0 Register A RA0 Read/Write(1) 0x00000000
0x18 Channel 0 Register B RB0 Read/Write(1) 0x00000000
0x1C Channel 0 Register C RC0 Read/Write 0x00000000
0x20 Channel 0 Status Register SR0 Read-only 0x00000000
0x24 Interrupt Enable Register IER0 Write-only 0x00000000
0x28 Channel 0 Interrupt Disable Register IDR0 Write-only 0x00000000
0x2C Channel 0 Interrupt Mask Register IMR0 Read-only 0x00000000
0x40 Channel 1 Control Register CCR1 Write-only 0x00000000
0x44 Channel 1 Mode Register CMR1 Read/Write 0x00000000
0x48 Ch 1 Stepper Motor Mode Register SMMR1 Read/Write 0x00000000
0x50 Channel 1 Counter Value CV1 Read-only 0x00000000
0x54 Channel 1 Register A RA1 Read/Write(1) 0x00000000
0x58 Channel 1 Register B RB1 Read/Write(1) 0x00000000
0x5C Channel 1 Register C RC1 Read/Write 0x00000000
0x60 Channel 1 Status Register SR1 Read-only 0x00000000
0x64 Channel 1 Interrupt Enable Register IER1 Write-only 0x00000000
0x68 Channel 1 Interrupt Disable Register IDR1 Write-only 0x00000000
0x6C Channel 1 Interrupt Mask Register IMR1 Read-only 0x00000000
0x80 Channel 2 Control Register CCR2 Write-only 0x00000000
0x84 Channel 2 Mode Register CMR2 Read/Write 0x00000000
0x88 Ch 2 Stepper Motor Mode Register SMMR2 Read/Write 0x00000000
0x90 Channel 2 Counter Value CV2 Read-only 0x00000000
0x94 Channel 2 Register A RA2 Read/Write(1) 0x00000000
0x98 Channel 2 Register B RB2 Read/Write(1) 0x00000000
0x9C Channel 2 Register C RC2 Read/Write 0x00000000
0xA0 Channel 2 Status Register SR2 Read-only 0x00000000
0xA4 Channel 2 Interrupt Enable Register IER2 Write-only 0x00000000
0xA8 Channel 2 Interrupt Disable Register IDR2 Write-only 0x00000000
0xAC Channel 2 Interrupt Mask Register IMR2 Read-only 0x00000000
0xC0 Block Control Register BCR Write-only 0x00000000
0xC4 Block Mode Register BMR Read/Write 0x00000000
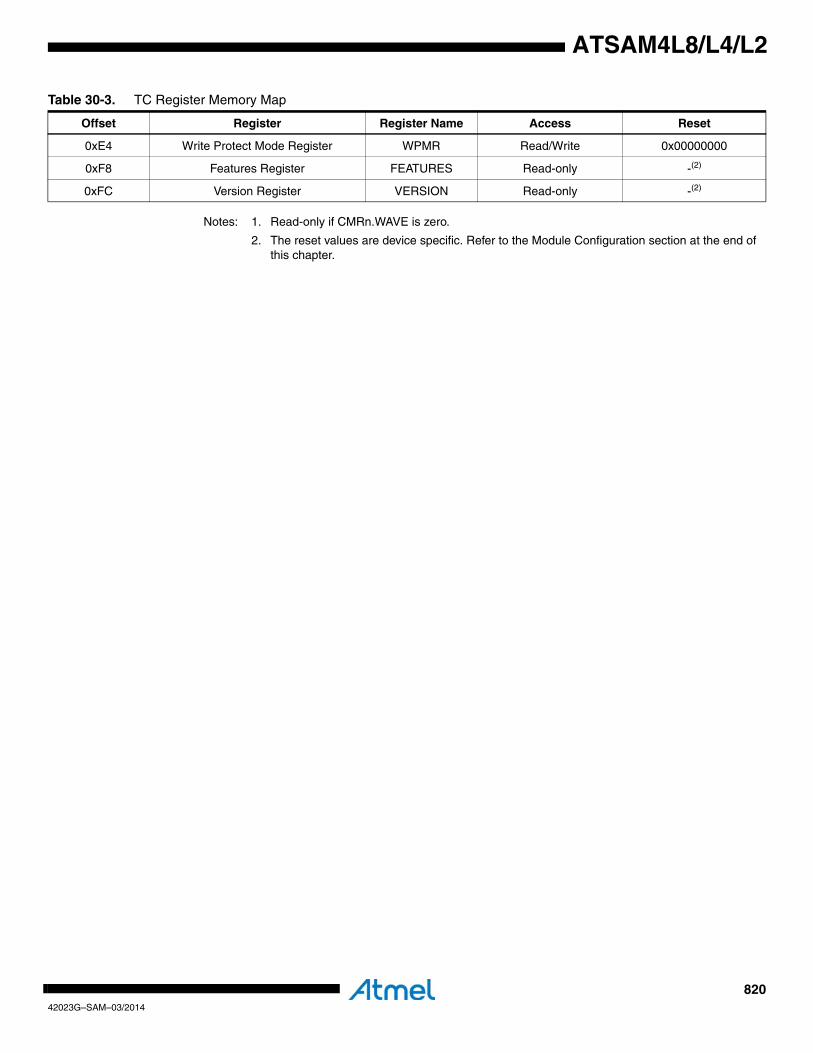
82042023G–SAM–03/2014
ATSAM4L8/L4/L2
Notes: 1. Read-only if CMRn.WAVE is zero.
2. The reset values are device specific. Refer to the Module Configuration section at the end of this chapter.
0xE4 Write Protect Mode Register WPMR Read/Write 0x00000000
0xF8 Features Register FEATURES Read-only -(2)
0xFC Version Register VERSION Read-only -(2)
Table 30-3. TC Register Memory Map
Offset Register Register Name Access Reset
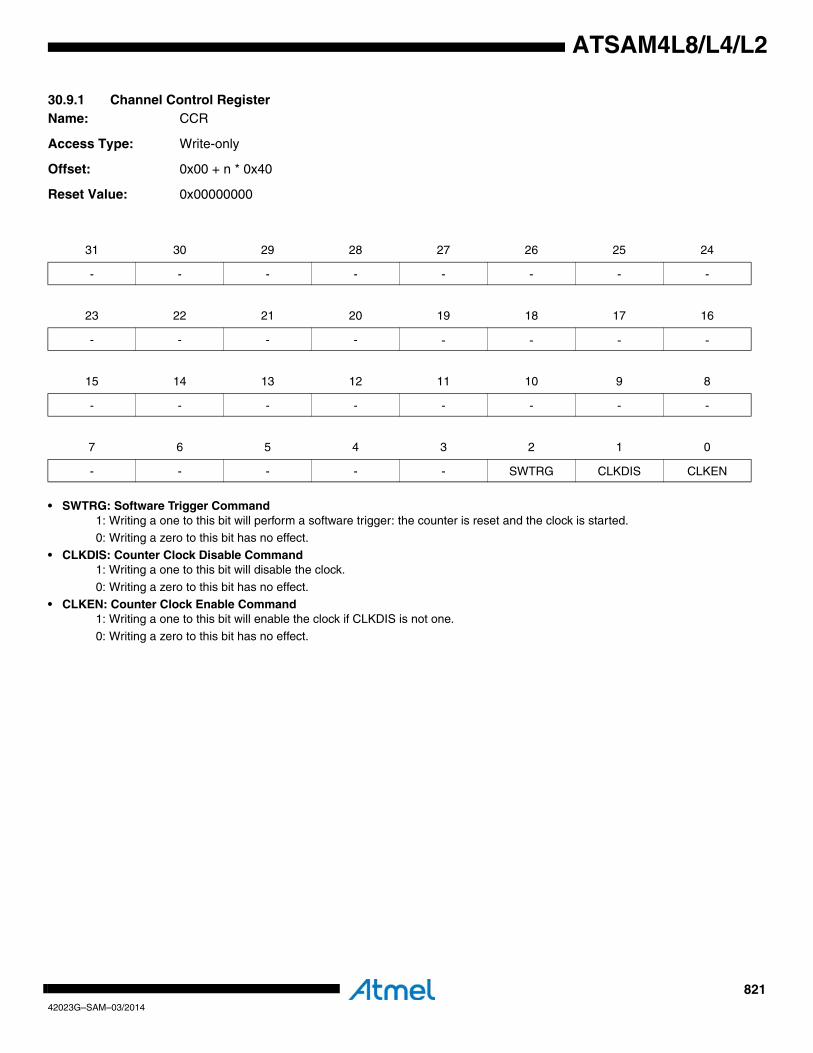
82142023G–SAM–03/2014
ATSAM4L8/L4/L2
30.9.1 Channel Control Register Name: CCR
Access Type: Write-only
Offset: 0x00 + n * 0x40
Reset Value: 0x00000000
• SWTRG: Software Trigger Command1: Writing a one to this bit will perform a software trigger: the counter is reset and the clock is started.0: Writing a zero to this bit has no effect.
• CLKDIS: Counter Clock Disable Command1: Writing a one to this bit will disable the clock.
0: Writing a zero to this bit has no effect.
• CLKEN: Counter Clock Enable Command1: Writing a one to this bit will enable the clock if CLKDIS is not one.
0: Writing a zero to this bit has no effect.
31 30 29 28 27 26 25 24
- - - - - - - -
23 22 21 20 19 18 17 16
- - - - - - - -
15 14 13 12 11 10 9 8
- - - - - - - -
7 6 5 4 3 2 1 0
- - - - - SWTRG CLKDIS CLKEN
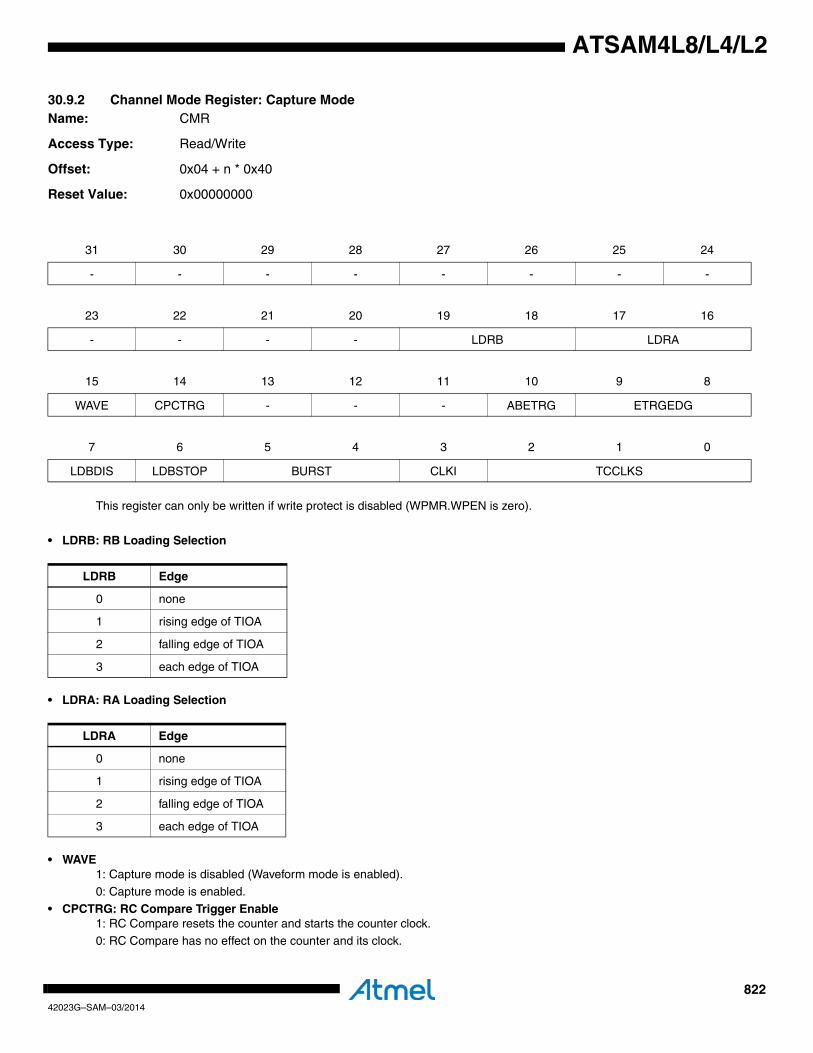
82242023G–SAM–03/2014
ATSAM4L8/L4/L2
30.9.2 Channel Mode Register: Capture ModeName: CMR
Access Type: Read/Write
Offset: 0x04 + n * 0x40
Reset Value: 0x00000000
This register can only be written if write protect is disabled (WPMR.WPEN is zero).
• LDRB: RB Loading Selection
• LDRA: RA Loading Selection
• WAVE1: Capture mode is disabled (Waveform mode is enabled).
0: Capture mode is enabled.
• CPCTRG: RC Compare Trigger Enable1: RC Compare resets the counter and starts the counter clock.
0: RC Compare has no effect on the counter and its clock.
31 30 29 28 27 26 25 24
- - - - - - - -
23 22 21 20 19 18 17 16
- - - - LDRB LDRA
15 14 13 12 11 10 9 8
WAVE CPCTRG - - - ABETRG ETRGEDG
7 6 5 4 3 2 1 0
LDBDIS LDBSTOP BURST CLKI TCCLKS
LDRB Edge
0 none
1 rising edge of TIOA
2 falling edge of TIOA
3 each edge of TIOA
LDRA Edge
0 none
1 rising edge of TIOA
2 falling edge of TIOA
3 each edge of TIOA
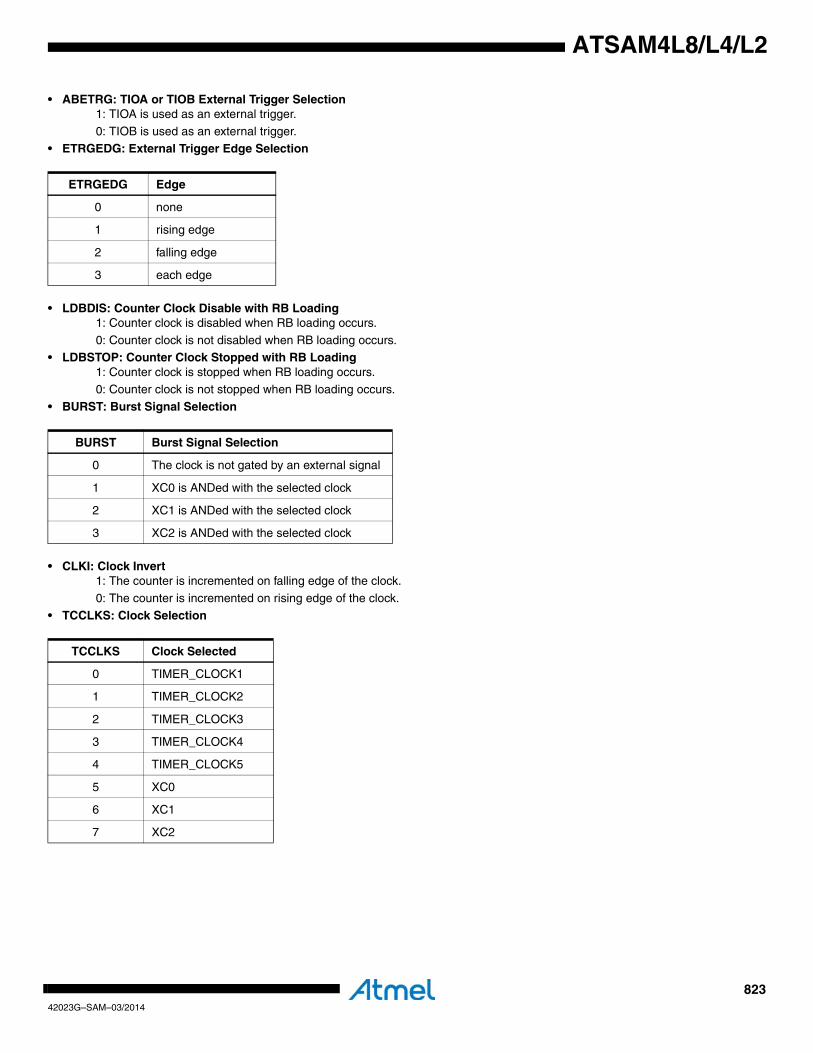
82342023G–SAM–03/2014
ATSAM4L8/L4/L2
• ABETRG: TIOA or TIOB External Trigger Selection1: TIOA is used as an external trigger.
0: TIOB is used as an external trigger.• ETRGEDG: External Trigger Edge Selection
• LDBDIS: Counter Clock Disable with RB Loading1: Counter clock is disabled when RB loading occurs.
0: Counter clock is not disabled when RB loading occurs.• LDBSTOP: Counter Clock Stopped with RB Loading
1: Counter clock is stopped when RB loading occurs.0: Counter clock is not stopped when RB loading occurs.
• BURST: Burst Signal Selection
• CLKI: Clock Invert1: The counter is incremented on falling edge of the clock.
0: The counter is incremented on rising edge of the clock.
• TCCLKS: Clock Selection
ETRGEDG Edge
0 none
1 rising edge
2 falling edge
3 each edge
BURST Burst Signal Selection
0 The clock is not gated by an external signal
1 XC0 is ANDed with the selected clock
2 XC1 is ANDed with the selected clock
3 XC2 is ANDed with the selected clock
TCCLKS Clock Selected
0 TIMER_CLOCK1
1 TIMER_CLOCK2
2 TIMER_CLOCK3
3 TIMER_CLOCK4
4 TIMER_CLOCK5
5 XC0
6 XC1
7 XC2
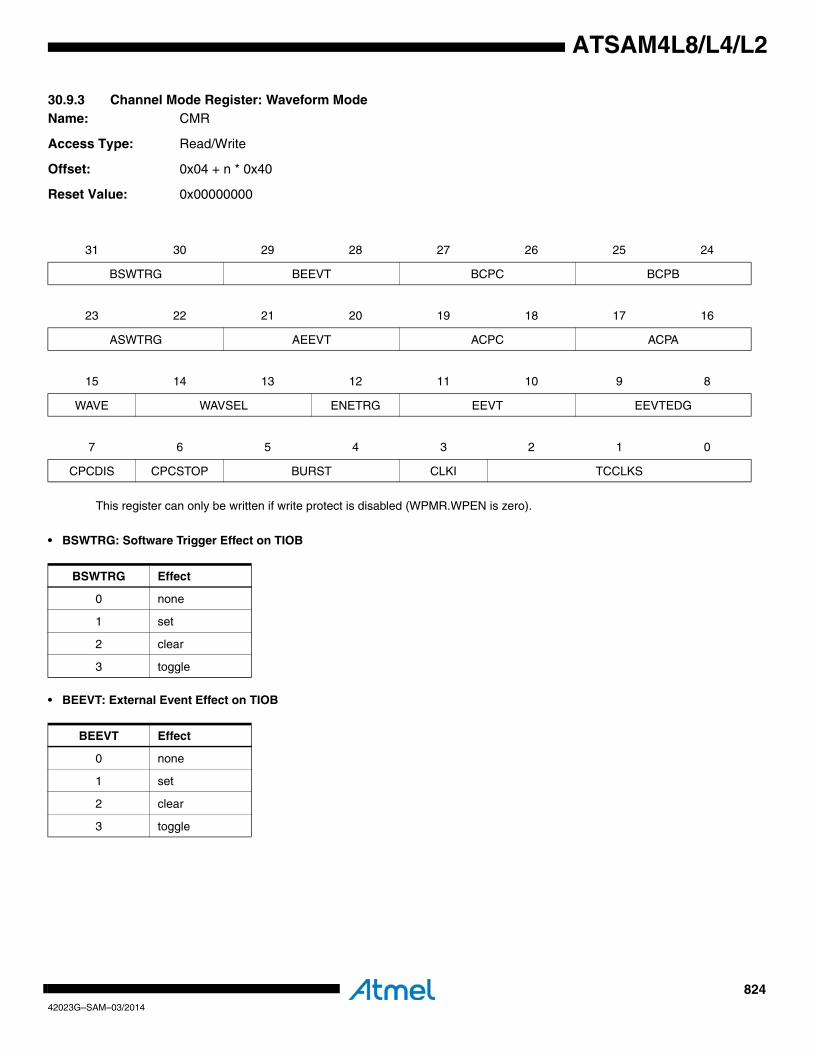
82442023G–SAM–03/2014
ATSAM4L8/L4/L2
30.9.3 Channel Mode Register: Waveform ModeName: CMR
Access Type: Read/Write
Offset: 0x04 + n * 0x40
Reset Value: 0x00000000
This register can only be written if write protect is disabled (WPMR.WPEN is zero).
• BSWTRG: Software Trigger Effect on TIOB
• BEEVT: External Event Effect on TIOB
31 30 29 28 27 26 25 24
BSWTRG BEEVT BCPC BCPB
23 22 21 20 19 18 17 16
ASWTRG AEEVT ACPC ACPA
15 14 13 12 11 10 9 8
WAVE WAVSEL ENETRG EEVT EEVTEDG
7 6 5 4 3 2 1 0
CPCDIS CPCSTOP BURST CLKI TCCLKS
BSWTRG Effect
0 none
1 set
2 clear
3 toggle
BEEVT Effect
0 none
1 set
2 clear
3 toggle
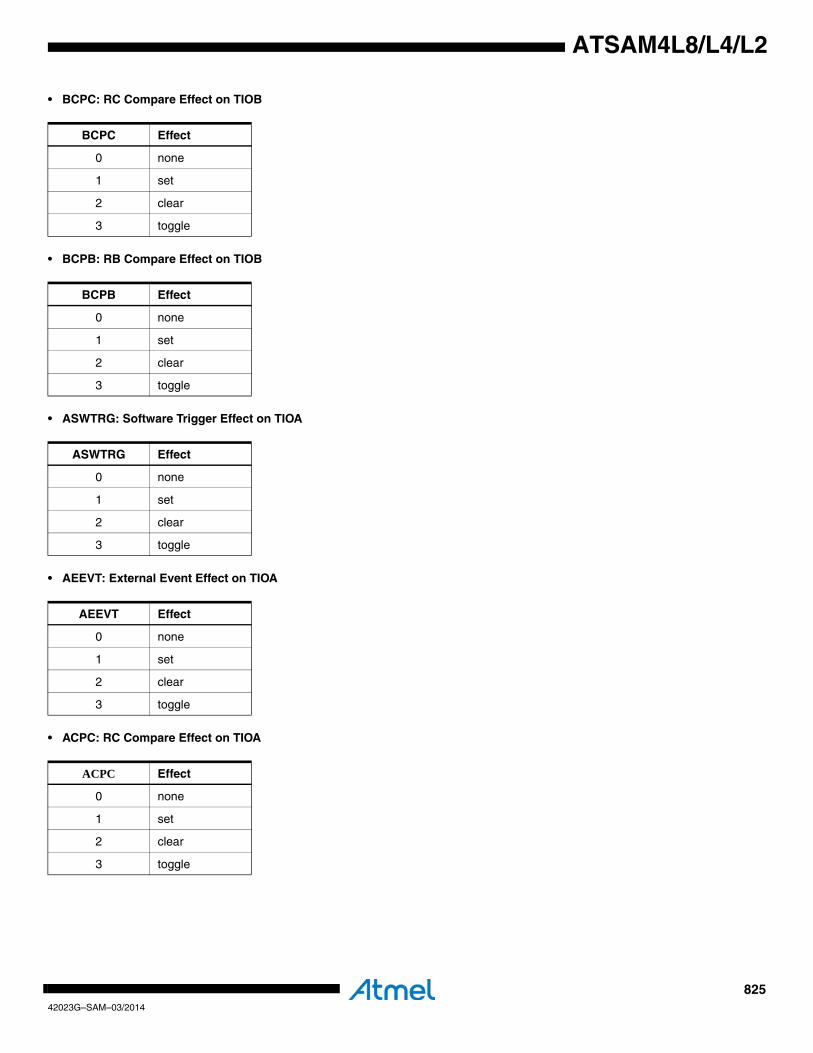
82542023G–SAM–03/2014
ATSAM4L8/L4/L2
• BCPC: RC Compare Effect on TIOB
• BCPB: RB Compare Effect on TIOB
• ASWTRG: Software Trigger Effect on TIOA
• AEEVT: External Event Effect on TIOA
• ACPC: RC Compare Effect on TIOA
BCPC Effect
0 none
1 set
2 clear
3 toggle
BCPB Effect
0 none
1 set
2 clear
3 toggle
ASWTRG Effect
0 none
1 set
2 clear
3 toggle
AEEVT Effect
0 none
1 set
2 clear
3 toggle
ACPC Effect
0 none
1 set
2 clear
3 toggle
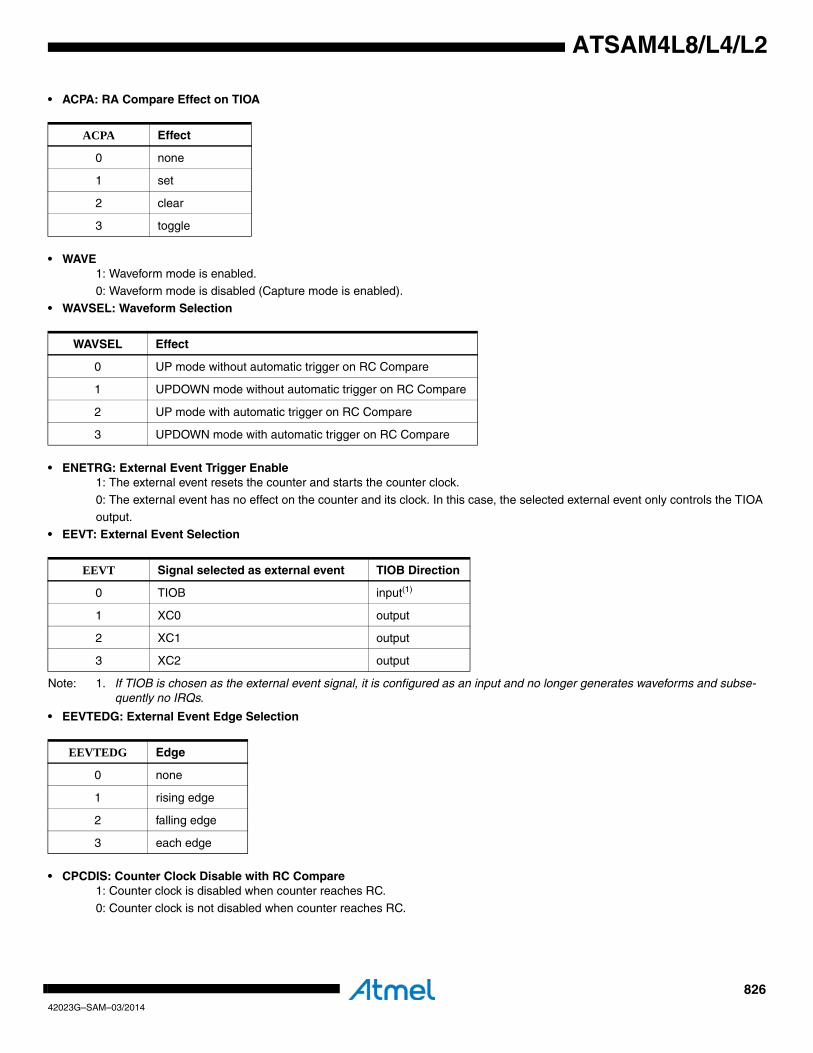
82642023G–SAM–03/2014
ATSAM4L8/L4/L2
• ACPA: RA Compare Effect on TIOA
• WAVE1: Waveform mode is enabled.
0: Waveform mode is disabled (Capture mode is enabled).
• WAVSEL: Waveform Selection
• ENETRG: External Event Trigger Enable1: The external event resets the counter and starts the counter clock.
0: The external event has no effect on the counter and its clock. In this case, the selected external event only controls the TIOA output.
• EEVT: External Event Selection
Note: 1. If TIOB is chosen as the external event signal, it is configured as an input and no longer generates waveforms and subse-quently no IRQs.
• EEVTEDG: External Event Edge Selection
• CPCDIS: Counter Clock Disable with RC Compare1: Counter clock is disabled when counter reaches RC.
0: Counter clock is not disabled when counter reaches RC.
ACPA Effect
0 none
1 set
2 clear
3 toggle
WAVSEL Effect
0 UP mode without automatic trigger on RC Compare
1 UPDOWN mode without automatic trigger on RC Compare
2 UP mode with automatic trigger on RC Compare
3 UPDOWN mode with automatic trigger on RC Compare
EEVT Signal selected as external event TIOB Direction
0 TIOB input(1)
1 XC0 output
2 XC1 output
3 XC2 output
EEVTEDG Edge
0 none
1 rising edge
2 falling edge
3 each edge
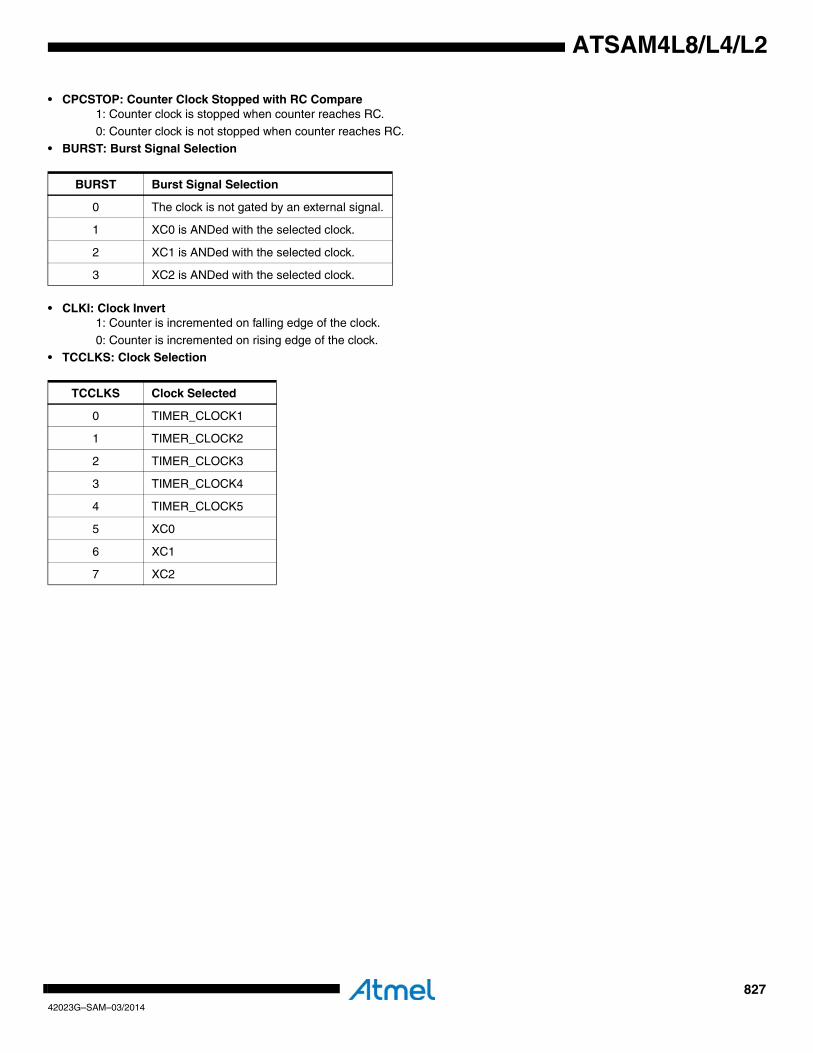
82742023G–SAM–03/2014
ATSAM4L8/L4/L2
• CPCSTOP: Counter Clock Stopped with RC Compare1: Counter clock is stopped when counter reaches RC.
0: Counter clock is not stopped when counter reaches RC.• BURST: Burst Signal Selection
• CLKI: Clock Invert 1: Counter is incremented on falling edge of the clock.
0: Counter is incremented on rising edge of the clock.• TCCLKS: Clock Selection
BURST Burst Signal Selection
0 The clock is not gated by an external signal.
1 XC0 is ANDed with the selected clock.
2 XC1 is ANDed with the selected clock.
3 XC2 is ANDed with the selected clock.
TCCLKS Clock Selected
0 TIMER_CLOCK1
1 TIMER_CLOCK2
2 TIMER_CLOCK3
3 TIMER_CLOCK4
4 TIMER_CLOCK5
5 XC0
6 XC1
7 XC2
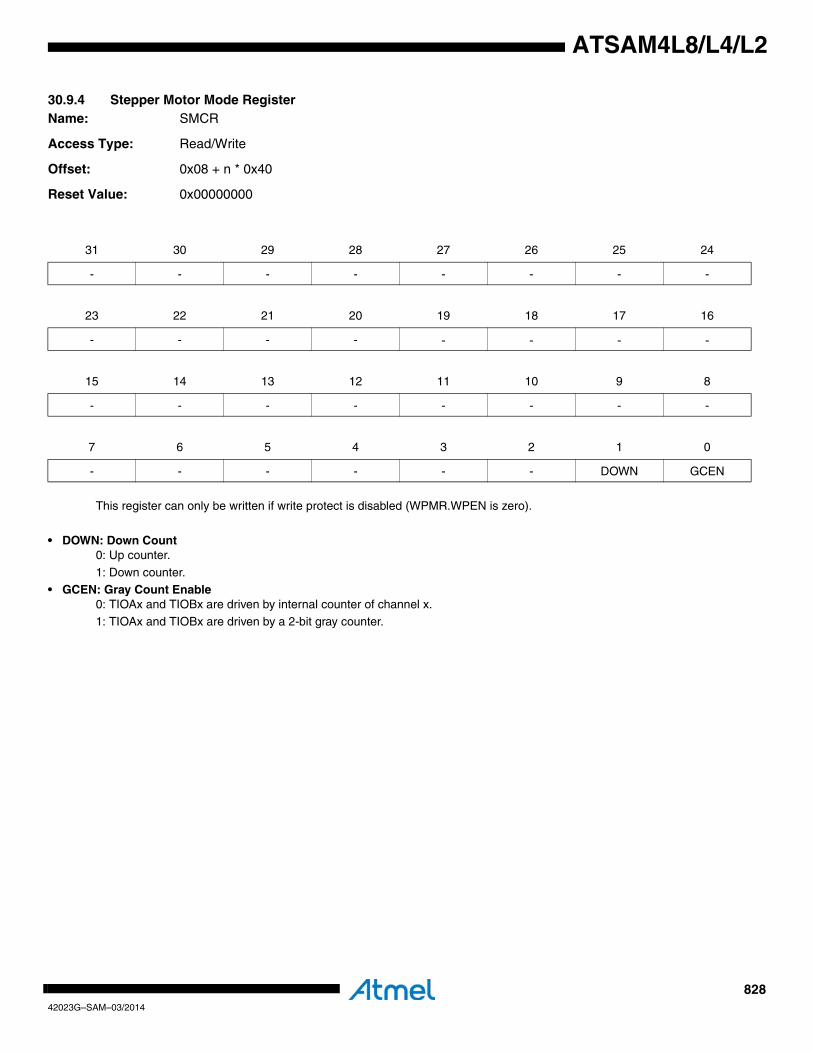
82842023G–SAM–03/2014
ATSAM4L8/L4/L2
30.9.4 Stepper Motor Mode RegisterName: SMCR
Access Type: Read/Write
Offset: 0x08 + n * 0x40
Reset Value: 0x00000000
This register can only be written if write protect is disabled (WPMR.WPEN is zero).
• DOWN: Down Count0: Up counter.
1: Down counter.• GCEN: Gray Count Enable
0: TIOAx and TIOBx are driven by internal counter of channel x.1: TIOAx and TIOBx are driven by a 2-bit gray counter.
31 30 29 28 27 26 25 24
- - - - - - - -
23 22 21 20 19 18 17 16
- - - - - - - -
15 14 13 12 11 10 9 8
- - - - - - - -
7 6 5 4 3 2 1 0
- - - - - - DOWN GCEN

82942023G–SAM–03/2014
ATSAM4L8/L4/L2
30.9.5 Channel Counter Value Register Name: CV
Access Type: Read-only
Offset: 0x10 + n * 0x40
Reset Value: 0x00000000
• CV: Counter ValueCV contains the counter value in real time.
31 30 29 28 27 26 25 24
- - - - - - - -
23 22 21 20 19 18 17 16
- - - - - - - -
15 14 13 12 11 10 9 8
CV[15:8]
7 6 5 4 3 2 1 0
CV[7:0]
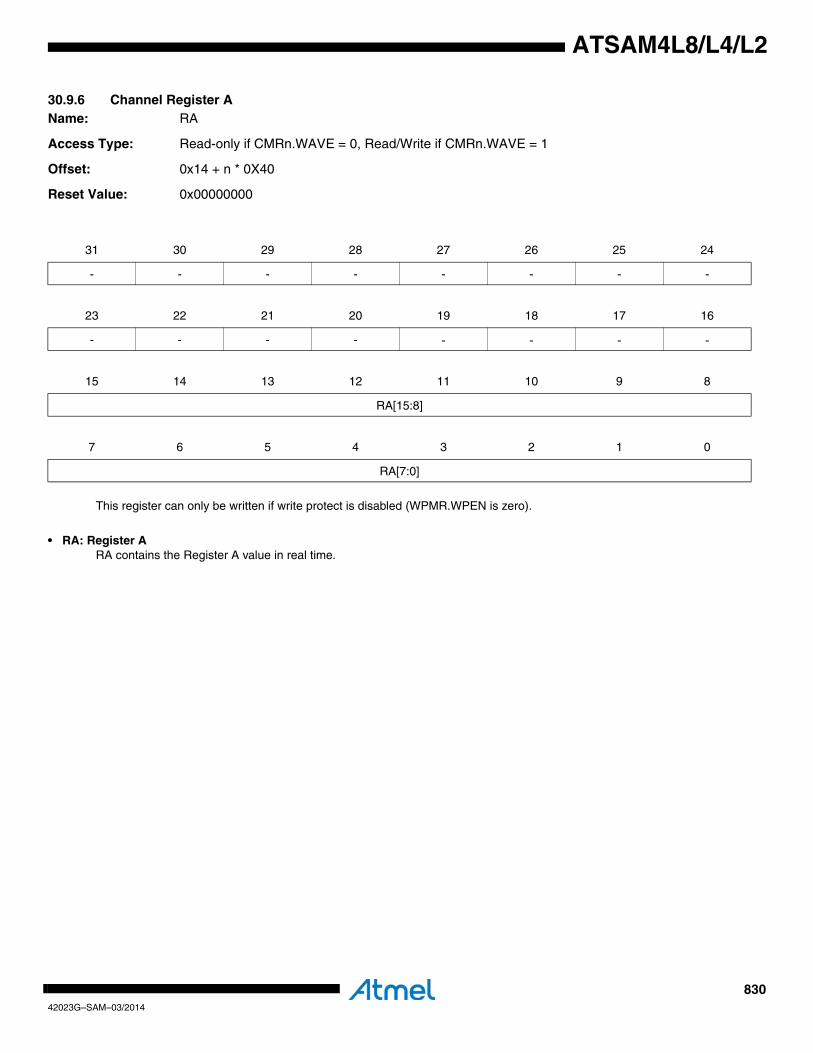
83042023G–SAM–03/2014
ATSAM4L8/L4/L2
30.9.6 Channel Register AName: RA
Access Type: Read-only if CMRn.WAVE = 0, Read/Write if CMRn.WAVE = 1
Offset: 0x14 + n * 0X40
Reset Value: 0x00000000
This register can only be written if write protect is disabled (WPMR.WPEN is zero).
• RA: Register ARA contains the Register A value in real time.
31 30 29 28 27 26 25 24
- - - - - - - -
23 22 21 20 19 18 17 16
- - - - - - - -
15 14 13 12 11 10 9 8
RA[15:8]
7 6 5 4 3 2 1 0
RA[7:0]

83142023G–SAM–03/2014
ATSAM4L8/L4/L2
30.9.7 Channel Register BName: RB
Access Type: Read-only if CMRn.WAVE = 0, Read/Write if CMRn.WAVE = 1
Offset: 0x18 + n * 0x40
Reset Value: 0x00000000
This register can only be written if write protect is disabled (WPMR.WPEN is zero).
• RB: Register BRB contains the Register B value in real time.
31 30 29 28 27 26 25 24
- - - - - - - -
23 22 21 20 19 18 17 16
- - - - - - - -
15 14 13 12 11 10 9 8
RB[15:8]
7 6 5 4 3 2 1 0
RB[7:0]

83242023G–SAM–03/2014
ATSAM4L8/L4/L2
30.9.8 Channel Register CName: RC
Access Type: Read/Write
Offset: 0x1C + n * 0x40
Reset Value: 0x00000000
This register can only be written if write protect is disabled (WPMR.WPEN is zero).
• RC: Register CRC contains the Register C value in real time.
31 30 29 28 27 26 25 24
- - - - - - - -
23 22 21 20 19 18 17 16
- - - - - - - -
15 14 13 12 11 10 9 8
RC[15:8]
7 6 5 4 3 2 1 0
RC[7:0]
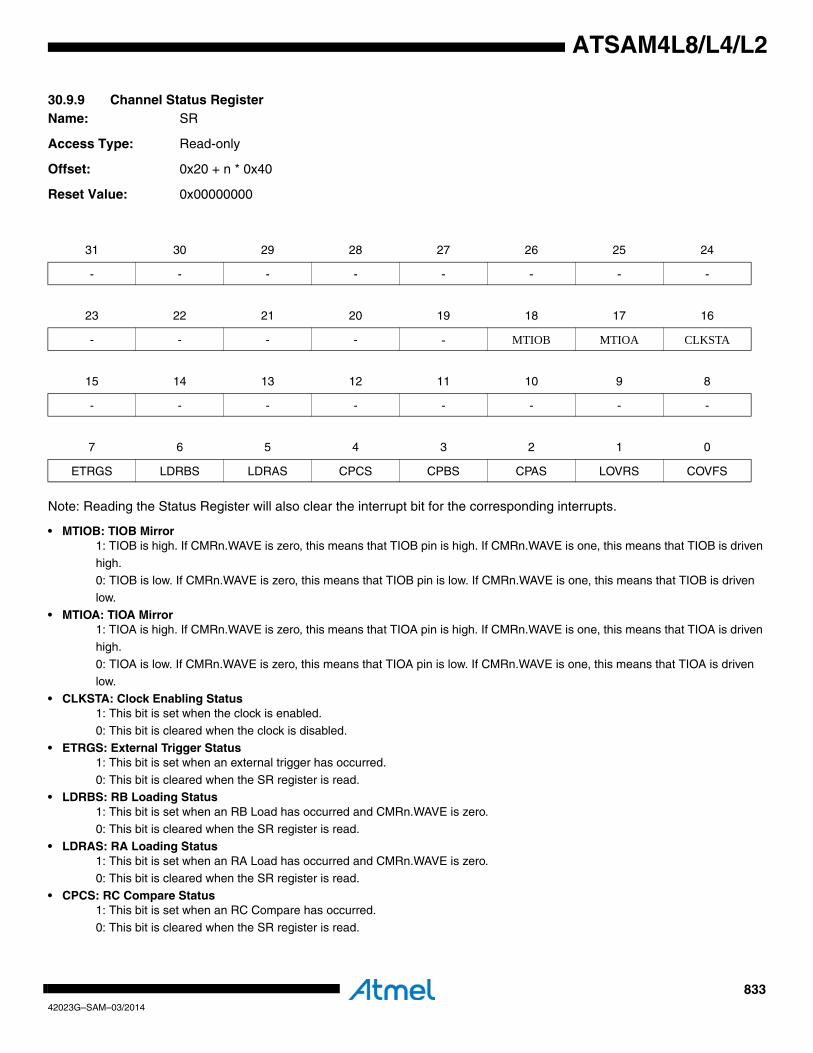
83342023G–SAM–03/2014
ATSAM4L8/L4/L2
30.9.9 Channel Status RegisterName: SR
Access Type: Read-only
Offset: 0x20 + n * 0x40
Reset Value: 0x00000000
Note: Reading the Status Register will also clear the interrupt bit for the corresponding interrupts.
• MTIOB: TIOB Mirror1: TIOB is high. If CMRn.WAVE is zero, this means that TIOB pin is high. If CMRn.WAVE is one, this means that TIOB is driven
high.
0: TIOB is low. If CMRn.WAVE is zero, this means that TIOB pin is low. If CMRn.WAVE is one, this means that TIOB is driven low.
• MTIOA: TIOA Mirror1: TIOA is high. If CMRn.WAVE is zero, this means that TIOA pin is high. If CMRn.WAVE is one, this means that TIOA is driven
high.
0: TIOA is low. If CMRn.WAVE is zero, this means that TIOA pin is low. If CMRn.WAVE is one, this means that TIOA is driven low.
• CLKSTA: Clock Enabling Status1: This bit is set when the clock is enabled.
0: This bit is cleared when the clock is disabled.
• ETRGS: External Trigger Status1: This bit is set when an external trigger has occurred.
0: This bit is cleared when the SR register is read.• LDRBS: RB Loading Status
1: This bit is set when an RB Load has occurred and CMRn.WAVE is zero.0: This bit is cleared when the SR register is read.
• LDRAS: RA Loading Status1: This bit is set when an RA Load has occurred and CMRn.WAVE is zero.0: This bit is cleared when the SR register is read.
• CPCS: RC Compare Status1: This bit is set when an RC Compare has occurred.
0: This bit is cleared when the SR register is read.
31 30 29 28 27 26 25 24
- - - - - - - -
23 22 21 20 19 18 17 16
- - - - - MTIOB MTIOA CLKSTA
15 14 13 12 11 10 9 8
- - - - - - - -
7 6 5 4 3 2 1 0
ETRGS LDRBS LDRAS CPCS CPBS CPAS LOVRS COVFS
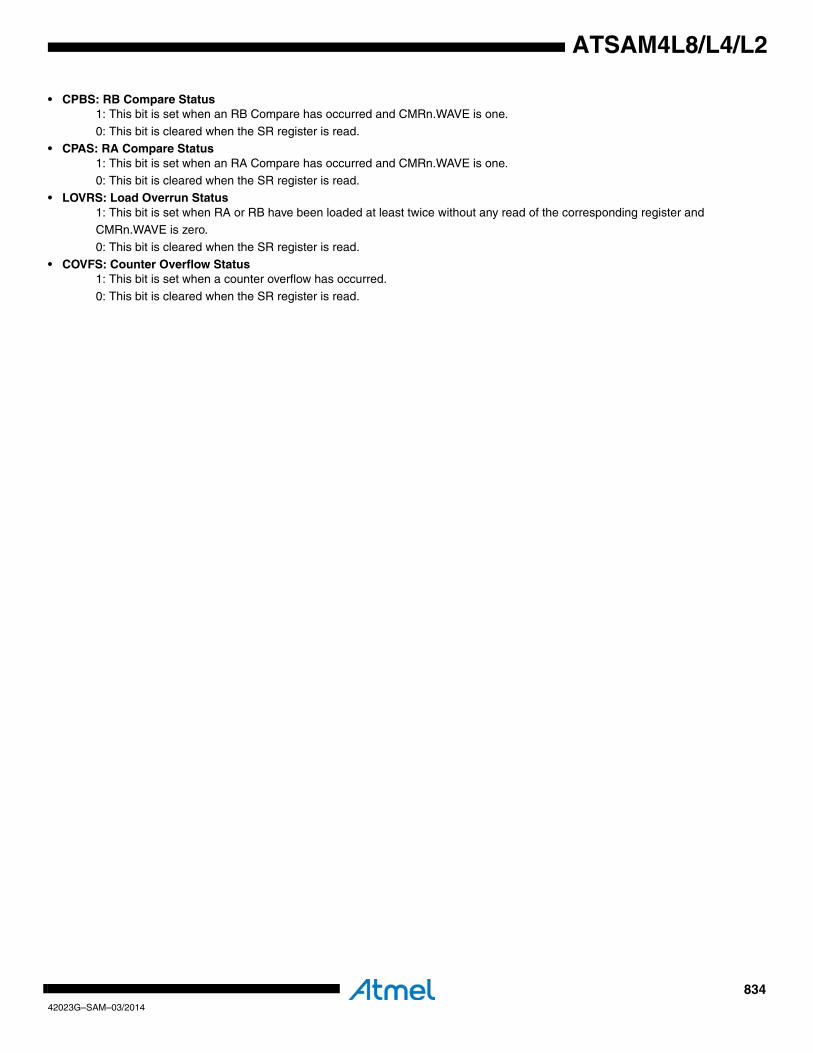
83442023G–SAM–03/2014
ATSAM4L8/L4/L2
• CPBS: RB Compare Status1: This bit is set when an RB Compare has occurred and CMRn.WAVE is one.
0: This bit is cleared when the SR register is read.• CPAS: RA Compare Status
1: This bit is set when an RA Compare has occurred and CMRn.WAVE is one.0: This bit is cleared when the SR register is read.
• LOVRS: Load Overrun Status1: This bit is set when RA or RB have been loaded at least twice without any read of the corresponding register and CMRn.WAVE is zero.
0: This bit is cleared when the SR register is read.
• COVFS: Counter Overflow Status1: This bit is set when a counter overflow has occurred.
0: This bit is cleared when the SR register is read.

83542023G–SAM–03/2014
ATSAM4L8/L4/L2
30.9.10 Channel Interrupt Enable RegisterName: IER
Access Type: Write-only
Offset: 0x24 + n * 0x40
Reset Value: 0x00000000
Writing a zero to a bit in this register has no effect.
Writing a one to a bit in this register will set the corresponding bit in IMR.
31 30 29 28 27 26 25 24
- - - - - - - -
23 22 21 20 19 18 17 16
- - - - - - - -
15 14 13 12 11 10 9 8
- - - - - - - -
7 6 5 4 3 2 1 0
ETRGS LDRBS LDRAS CPCS CPBS CPAS LOVRS COVFS
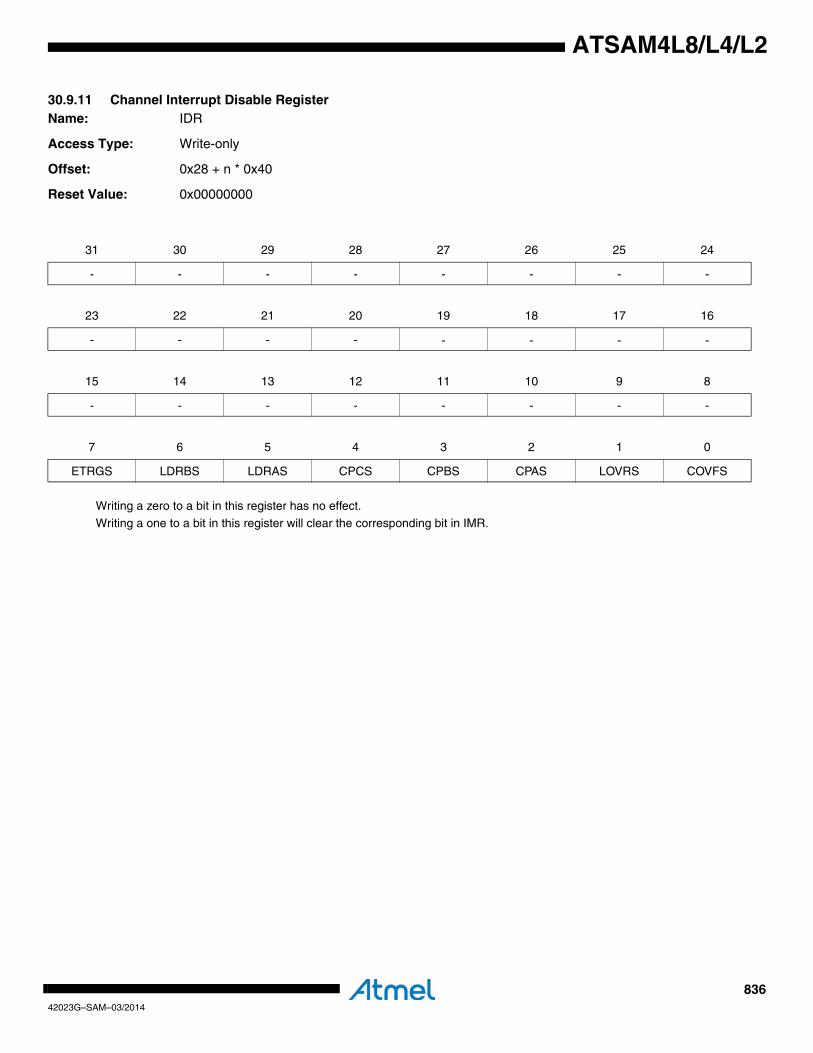
83642023G–SAM–03/2014
ATSAM4L8/L4/L2
30.9.11 Channel Interrupt Disable RegisterName: IDR
Access Type: Write-only
Offset: 0x28 + n * 0x40
Reset Value: 0x00000000
Writing a zero to a bit in this register has no effect.
Writing a one to a bit in this register will clear the corresponding bit in IMR.
31 30 29 28 27 26 25 24
- - - - - - - -
23 22 21 20 19 18 17 16
- - - - - - - -
15 14 13 12 11 10 9 8
- - - - - - - -
7 6 5 4 3 2 1 0
ETRGS LDRBS LDRAS CPCS CPBS CPAS LOVRS COVFS
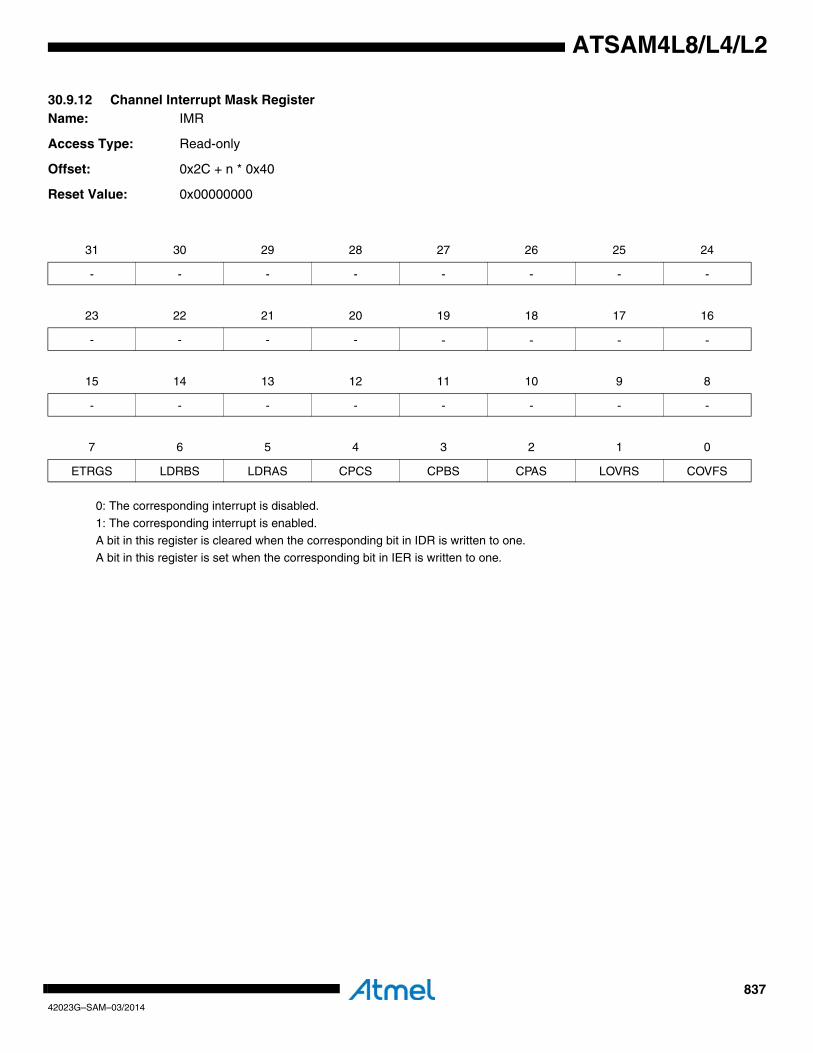
83742023G–SAM–03/2014
ATSAM4L8/L4/L2
30.9.12 Channel Interrupt Mask RegisterName: IMR
Access Type: Read-only
Offset: 0x2C + n * 0x40
Reset Value: 0x00000000
0: The corresponding interrupt is disabled.
1: The corresponding interrupt is enabled.
A bit in this register is cleared when the corresponding bit in IDR is written to one.A bit in this register is set when the corresponding bit in IER is written to one.
31 30 29 28 27 26 25 24
- - - - - - - -
23 22 21 20 19 18 17 16
- - - - - - - -
15 14 13 12 11 10 9 8
- - - - - - - -
7 6 5 4 3 2 1 0
ETRGS LDRBS LDRAS CPCS CPBS CPAS LOVRS COVFS

83842023G–SAM–03/2014
ATSAM4L8/L4/L2
30.9.13 Block Control RegisterName: BCR
Access Type: Write-only
Offset: 0xC0
Reset Value: 0x00000000
• SYNC: Synchro Command1: Writing a one to this bit asserts the SYNC signal which generates a software trigger simultaneously for each of the channels.0: Writing a zero to this bit has no effect.
31 30 29 28 27 26 25 24
- - - - - - - -
23 22 21 20 19 18 17 16
- - - - - - - -
15 14 13 12 11 10 9 8
- - - - - - - -
7 6 5 4 3 2 1 0
- - - - - - - SYNC
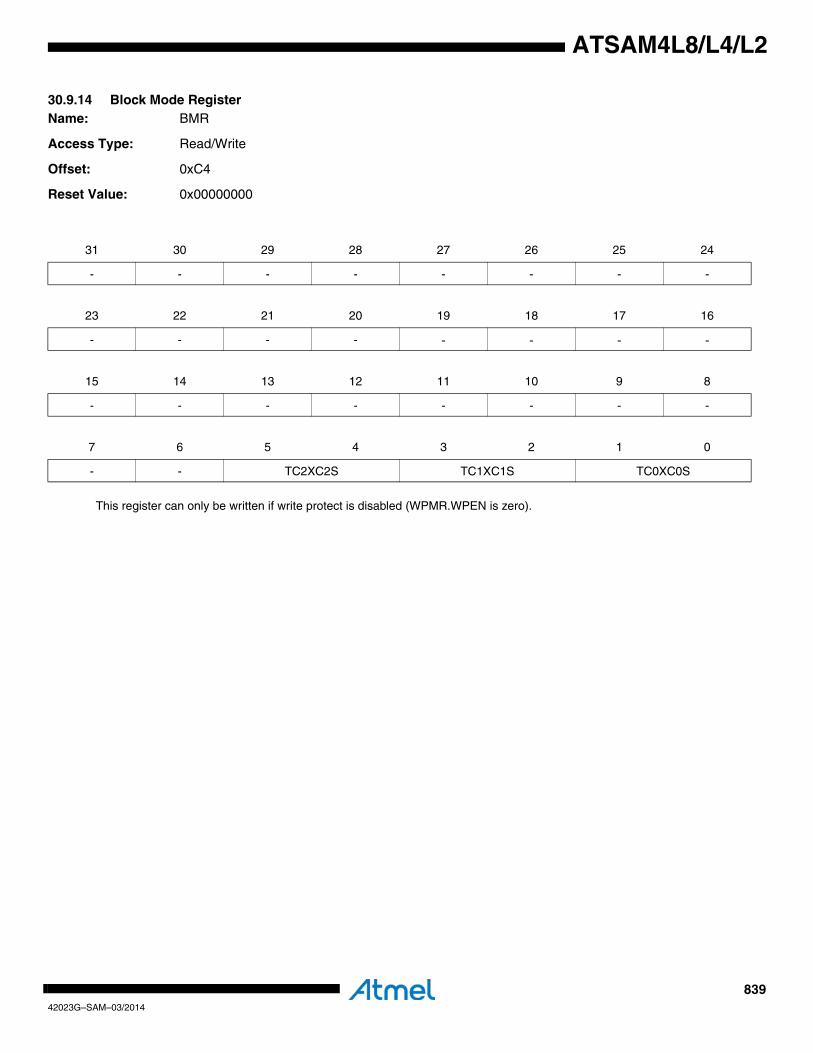
83942023G–SAM–03/2014
ATSAM4L8/L4/L2
30.9.14 Block Mode Register Name: BMR
Access Type: Read/Write
Offset: 0xC4
Reset Value: 0x00000000
This register can only be written if write protect is disabled (WPMR.WPEN is zero).
31 30 29 28 27 26 25 24
- - - - - - - -
23 22 21 20 19 18 17 16
- - - - - - - -
15 14 13 12 11 10 9 8
- - - - - - - -
7 6 5 4 3 2 1 0
- - TC2XC2S TC1XC1S TC0XC0S
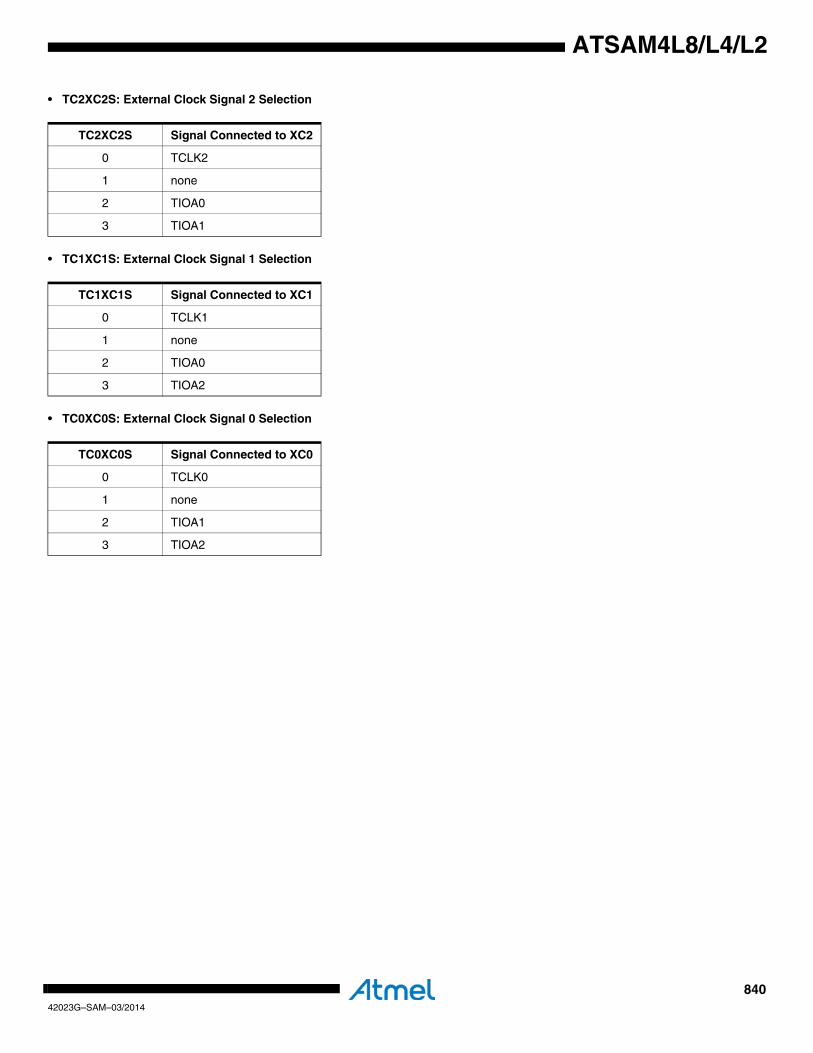
84042023G–SAM–03/2014
ATSAM4L8/L4/L2
• TC2XC2S: External Clock Signal 2 Selection
• TC1XC1S: External Clock Signal 1 Selection
• TC0XC0S: External Clock Signal 0 Selection
TC2XC2S Signal Connected to XC2
0 TCLK2
1 none
2 TIOA0
3 TIOA1
TC1XC1S Signal Connected to XC1
0 TCLK1
1 none
2 TIOA0
3 TIOA2
TC0XC0S Signal Connected to XC0
0 TCLK0
1 none
2 TIOA1
3 TIOA2
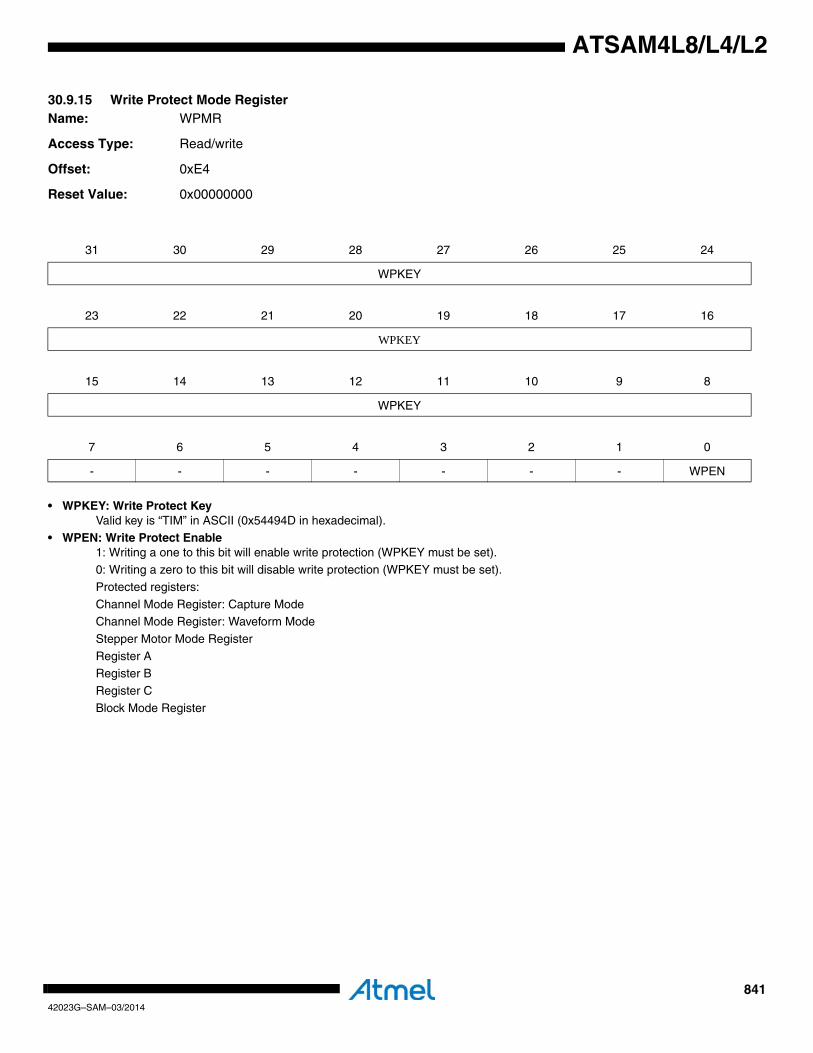
84142023G–SAM–03/2014
ATSAM4L8/L4/L2
30.9.15 Write Protect Mode Register Name: WPMR
Access Type: Read/write
Offset: 0xE4
Reset Value: 0x00000000
• WPKEY: Write Protect KeyValid key is “TIM” in ASCII (0x54494D in hexadecimal).
• WPEN: Write Protect Enable1: Writing a one to this bit will enable write protection (WPKEY must be set).0: Writing a zero to this bit will disable write protection (WPKEY must be set).
Protected registers:
Channel Mode Register: Capture ModeChannel Mode Register: Waveform Mode
Stepper Motor Mode Register
Register ARegister B
Register C
Block Mode Register
31 30 29 28 27 26 25 24
WPKEY
23 22 21 20 19 18 17 16
WPKEY
15 14 13 12 11 10 9 8
WPKEY
7 6 5 4 3 2 1 0
- - - - - - - WPEN
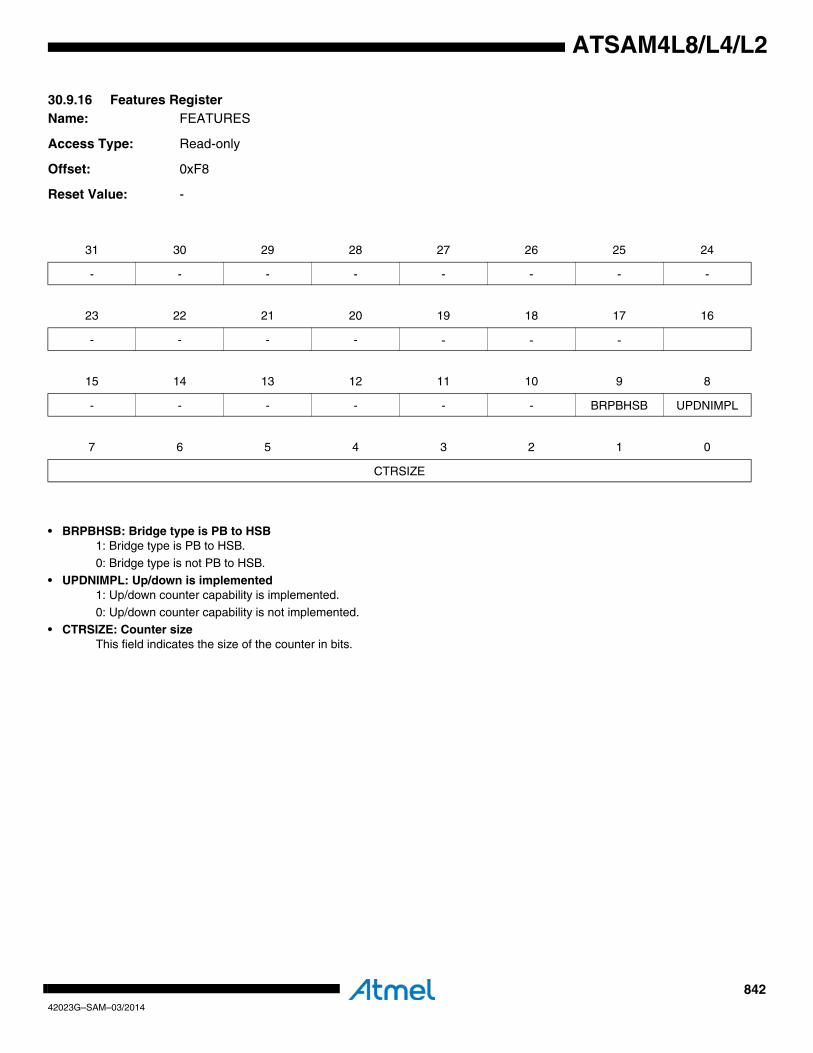
84242023G–SAM–03/2014
ATSAM4L8/L4/L2
30.9.16 Features RegisterName: FEATURES
Access Type: Read-only
Offset: 0xF8
Reset Value: -
• BRPBHSB: Bridge type is PB to HSB1: Bridge type is PB to HSB.
0: Bridge type is not PB to HSB.
• UPDNIMPL: Up/down is implemented1: Up/down counter capability is implemented.
0: Up/down counter capability is not implemented.• CTRSIZE: Counter size
This field indicates the size of the counter in bits.
31 30 29 28 27 26 25 24
- - - - - - - -
23 22 21 20 19 18 17 16
- - - - - - -
15 14 13 12 11 10 9 8
- - - - - - BRPBHSB UPDNIMPL
7 6 5 4 3 2 1 0
CTRSIZE
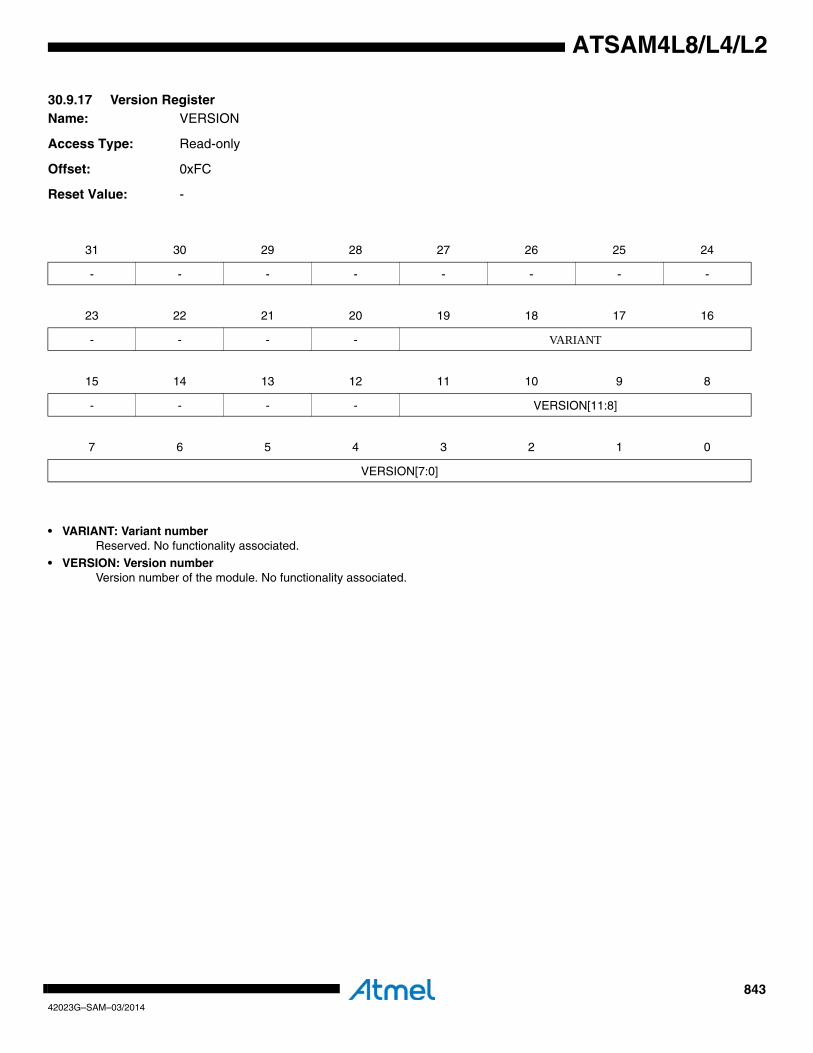
84342023G–SAM–03/2014
ATSAM4L8/L4/L2
30.9.17 Version RegisterName: VERSION
Access Type: Read-only
Offset: 0xFC
Reset Value: -
• VARIANT: Variant numberReserved. No functionality associated.
• VERSION: Version numberVersion number of the module. No functionality associated.
31 30 29 28 27 26 25 24
- - - - - - - -
23 22 21 20 19 18 17 16
- - - - VARIANT
15 14 13 12 11 10 9 8
- - - - VERSION[11:8]
7 6 5 4 3 2 1 0
VERSION[7:0]
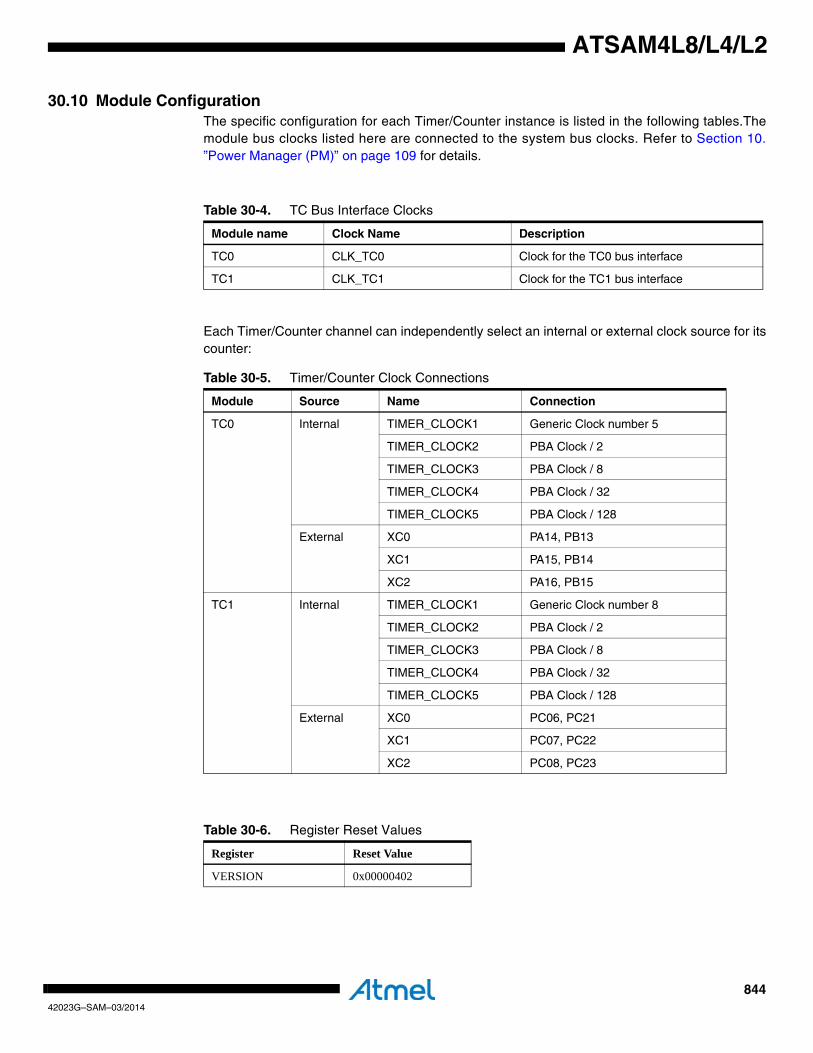
84442023G–SAM–03/2014
ATSAM4L8/L4/L2
30.10 Module ConfigurationThe specific configuration for each Timer/Counter instance is listed in the following tables.Themodule bus clocks listed here are connected to the system bus clocks. Refer to Section 10.”Power Manager (PM)” on page 109 for details.
Each Timer/Counter channel can independently select an internal or external clock source for itscounter:
Table 30-4. TC Bus Interface Clocks
Module name Clock Name Description
TC0 CLK_TC0 Clock for the TC0 bus interface
TC1 CLK_TC1 Clock for the TC1 bus interface
Table 30-5. Timer/Counter Clock Connections
Module Source Name Connection
TC0 Internal TIMER_CLOCK1 Generic Clock number 5
TIMER_CLOCK2 PBA Clock / 2
TIMER_CLOCK3 PBA Clock / 8
TIMER_CLOCK4 PBA Clock / 32
TIMER_CLOCK5 PBA Clock / 128
External XC0 PA14, PB13
XC1 PA15, PB14
XC2 PA16, PB15
TC1 Internal TIMER_CLOCK1 Generic Clock number 8
TIMER_CLOCK2 PBA Clock / 2
TIMER_CLOCK3 PBA Clock / 8
TIMER_CLOCK4 PBA Clock / 32
TIMER_CLOCK5 PBA Clock / 128
External XC0 PC06, PC21
XC1 PC07, PC22
XC2 PC08, PC23
Table 30-6. Register Reset Values
Register Reset Value
VERSION 0x00000402
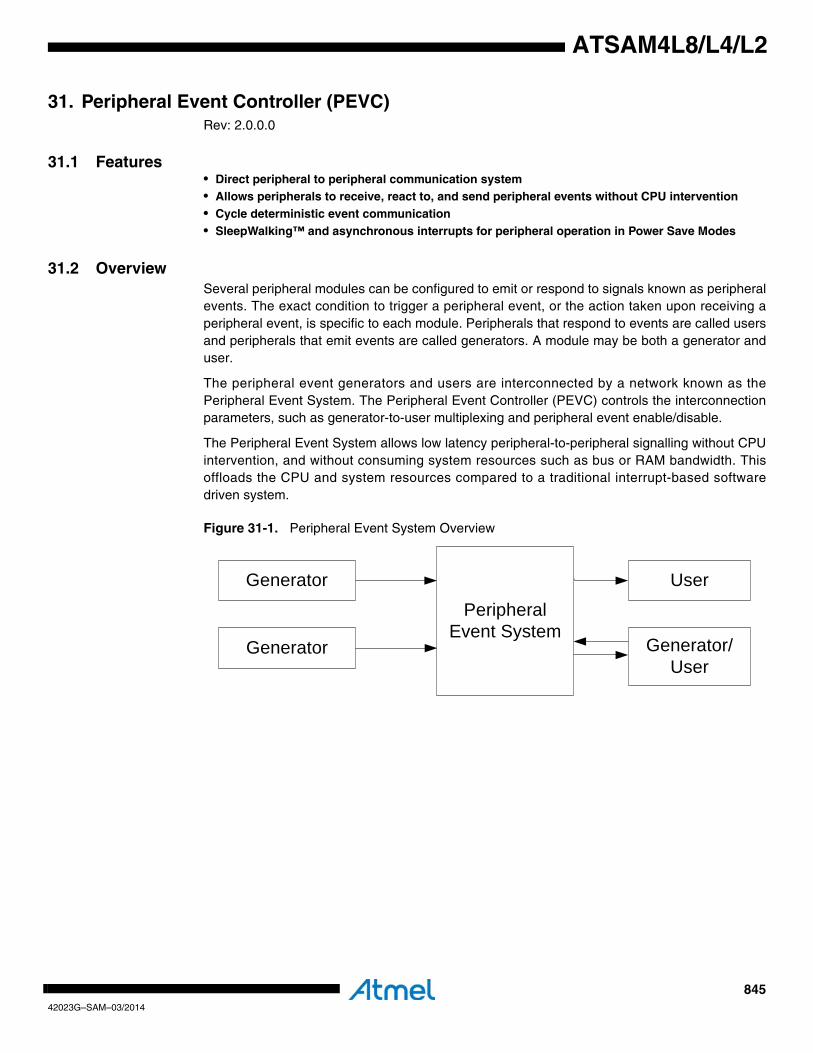
84542023G–SAM–03/2014
ATSAM4L8/L4/L2
31. Peripheral Event Controller (PEVC)Rev: 2.0.0.0
31.1 Features• Direct peripheral to peripheral communication system• Allows peripherals to receive, react to, and send peripheral events without CPU intervention• Cycle deterministic event communication• SleepWalking™ and asynchronous interrupts for peripheral operation in Power Save Modes
31.2 OverviewSeveral peripheral modules can be configured to emit or respond to signals known as peripheralevents. The exact condition to trigger a peripheral event, or the action taken upon receiving aperipheral event, is specific to each module. Peripherals that respond to events are called usersand peripherals that emit events are called generators. A module may be both a generator anduser.
The peripheral event generators and users are interconnected by a network known as thePeripheral Event System. The Peripheral Event Controller (PEVC) controls the interconnectionparameters, such as generator-to-user multiplexing and peripheral event enable/disable.
The Peripheral Event System allows low latency peripheral-to-peripheral signalling without CPUintervention, and without consuming system resources such as bus or RAM bandwidth. Thisoffloads the CPU and system resources compared to a traditional interrupt-based softwaredriven system.
Figure 31-1. Peripheral Event System Overview
Peripheral Event System
Generator
Generator
User
Generator/User
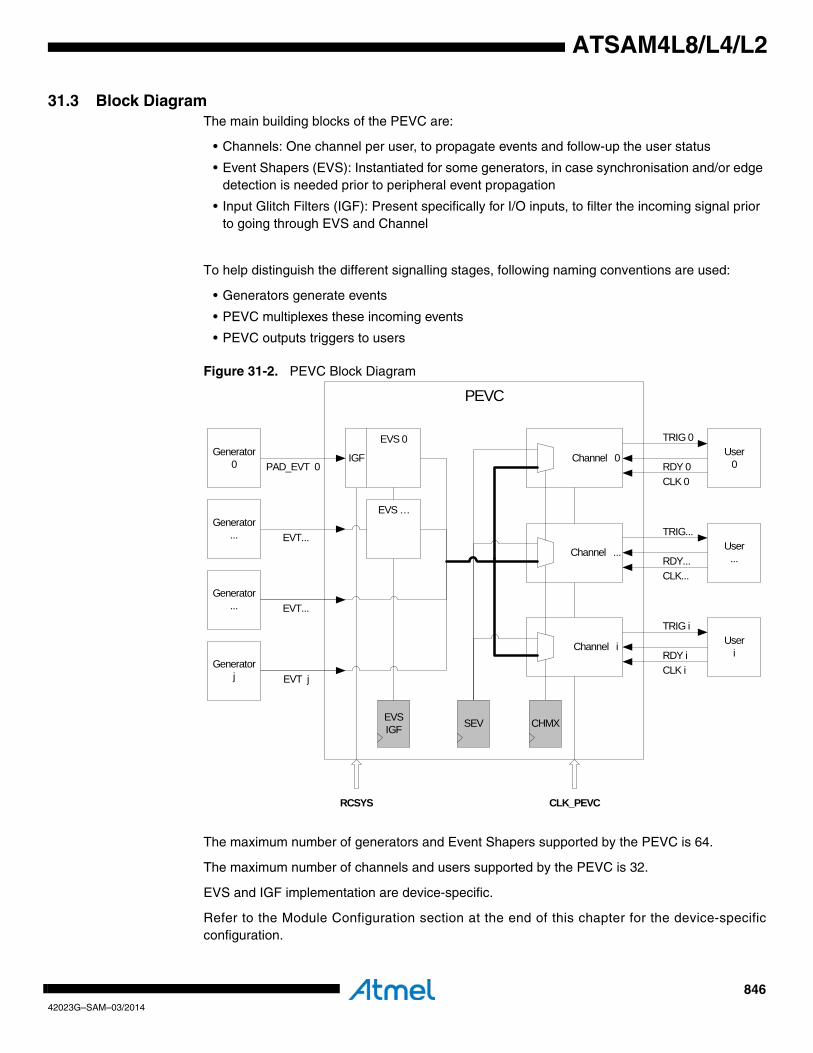
84642023G–SAM–03/2014
ATSAM4L8/L4/L2
31.3 Block DiagramThe main building blocks of the PEVC are:
• Channels: One channel per user, to propagate events and follow-up the user status
• Event Shapers (EVS): Instantiated for some generators, in case synchronisation and/or edge detection is needed prior to peripheral event propagation
• Input Glitch Filters (IGF): Present specifically for I/O inputs, to filter the incoming signal prior to going through EVS and Channel
To help distinguish the different signalling stages, following naming conventions are used:
• Generators generate events
• PEVC multiplexes these incoming events
• PEVC outputs triggers to users
Figure 31-2. PEVC Block Diagram
The maximum number of generators and Event Shapers supported by the PEVC is 64.
The maximum number of channels and users supported by the PEVC is 32.
EVS and IGF implementation are device-specific.
Refer to the Module Configuration section at the end of this chapter for the device-specificconfiguration.
Channel 0
Channel ...
Channel i
User0
Generator...
Generator0
EVS 0
PEVC
User...
PAD_EVT 0
EVS …
Generator...
Generatorj
Useri
RCSYS CLK_PEVC
TRIG 0
TRIG...
TRIG i
EVT...
EVT...
EVT j
SEV CHMX
RDY 0
RDY...
RDY i
CLK 0
CLK...
CLK i
IGF
EVSIGF
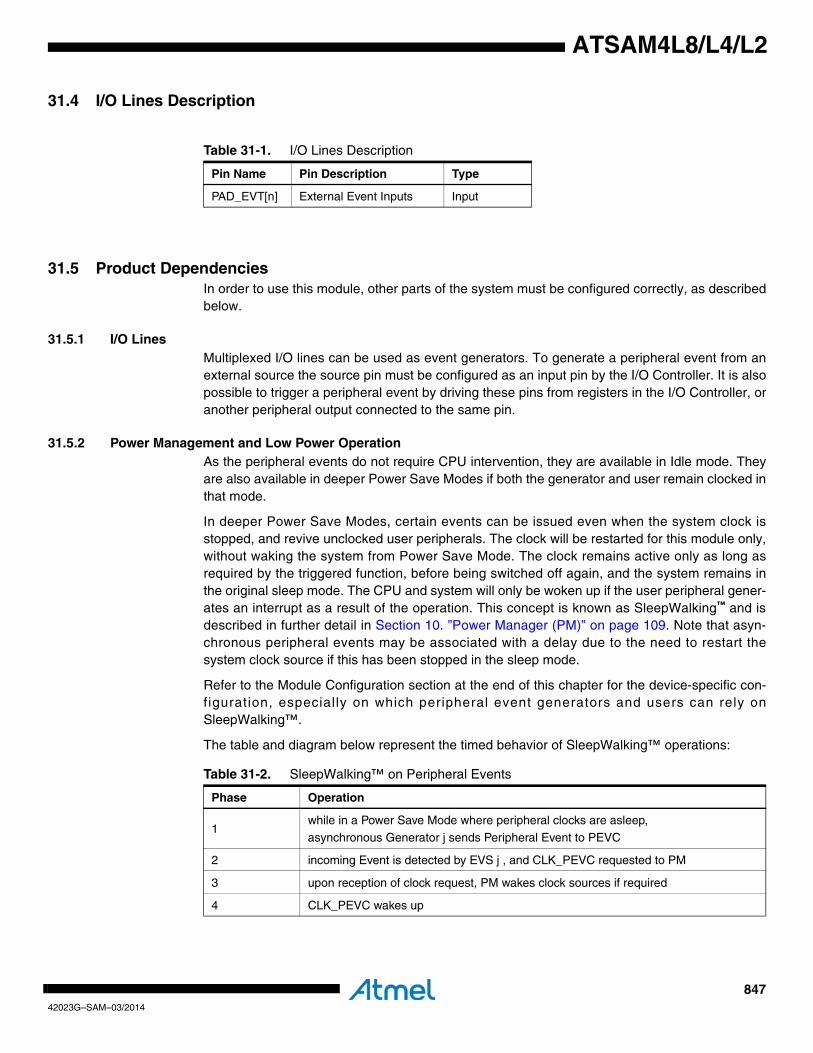
84742023G–SAM–03/2014
ATSAM4L8/L4/L2
31.4 I/O Lines Description
31.5 Product DependenciesIn order to use this module, other parts of the system must be configured correctly, as describedbelow.
31.5.1 I/O LinesMultiplexed I/O lines can be used as event generators. To generate a peripheral event from anexternal source the source pin must be configured as an input pin by the I/O Controller. It is alsopossible to trigger a peripheral event by driving these pins from registers in the I/O Controller, oranother peripheral output connected to the same pin.
31.5.2 Power Management and Low Power OperationAs the peripheral events do not require CPU intervention, they are available in Idle mode. Theyare also available in deeper Power Save Modes if both the generator and user remain clocked inthat mode.
In deeper Power Save Modes, certain events can be issued even when the system clock isstopped, and revive unclocked user peripherals. The clock will be restarted for this module only,without waking the system from Power Save Mode. The clock remains active only as long asrequired by the triggered function, before being switched off again, and the system remains inthe original sleep mode. The CPU and system will only be woken up if the user peripheral gener-ates an interrupt as a result of the operation. This concept is known as SleepWalking™ and isdescribed in further detail in Section 10. ”Power Manager (PM)” on page 109. Note that asyn-chronous peripheral events may be associated with a delay due to the need to restart thesystem clock source if this has been stopped in the sleep mode.
Refer to the Module Configuration section at the end of this chapter for the device-specific con-figuration, especially on which peripheral event generators and users can rely onSleepWalking™.
The table and diagram below represent the timed behavior of SleepWalking™ operations:
Table 31-1. I/O Lines Description
Pin Name Pin Description Type
PAD_EVT[n] External Event Inputs Input
Table 31-2. SleepWalking™ on Peripheral Events
Phase Operation
1while in a Power Save Mode where peripheral clocks are asleep,
asynchronous Generator j sends Peripheral Event to PEVC
2 incoming Event is detected by EVS j , and CLK_PEVC requested to PM
3 upon reception of clock request, PM wakes clock sources if required
4 CLK_PEVC wakes up

84842023G–SAM–03/2014
ATSAM4L8/L4/L2
Figure 31-3. SleepWalking™ on Peripheral Events
31.5.3 ClocksThe PEVC has two clocks connected: one Peripheral Bus clock (CLK_PEVC) and the systemRC oscillator clock (CLK_RCSYS). These clocks are generated by the Power Manager.
CLK_PEVC is required for event propagation and Peripheral Bus operations.
CLK_RCSYS is used for glitch filtering in Event Shapers. It is required for event propagation incase glitch filtering is turned on for a given generator.
5
incoming Event j propagates to Channel i:
• CLK_USER i request to PM
• TRIG i forwarded to User i
6 CLK_USER i wakes up
7 User i handles the incoming Peripheral Event and signals it to PEVC
8depending on the Peripheral’s operation, a CPU wake request occurs in case of Interrupt processing
9alternatively, the Peripheral may simply go back to sleep, in which case PM will silently shut off CLK_USER i and CLK_PEVC
Table 31-2. SleepWalking™ on Peripheral Events
Phase Operation
Channeli
PEVC
EVSj
Generatorj
Useri
TRIG i
EVT j RDY iCLK_USER i
Power Manager
CLK_USER i
Wake CPU
IRQ USER i
1
25
7
8
6
5
4
Wake Clock Sources
CLK_PEVC
3
84942023G–SAM–03/2014
ATSAM4L8/L4/L2
31.5.4 InterruptsPEVC can generate an interrupt request in case of trigger generation or trigger overrun. ThePEVC interrupt request lines are connected to the NVIC. Using the PEVC interrupts requires theNVIC to be programmed first.
31.5.5 Debug OperationPEVC is not frozen during debug operation when the Core is halted, unless the bit correspond-ing to the PEVC is set in the Peripheral Debug Register (PDBG). Refer to the On-Chip Debugchapter for details.
85042023G–SAM–03/2014
ATSAM4L8/L4/L2
31.6 Functional Description
31.6.1 PEVC Channel OperationPEVC routes incoming events to users by means of one channel per user. Channels operate inparallel, allowing multiple users to listen to the same generator.
31.6.1.1 Channel SetupThe Channel Multiplexer Register (CHMXi) is written to allocate a generator to a given channel.The Event Multiplexer field (EVMX) selects between the different generators, while the SoftwareEvent Multiplexer bit (SMX) selects Software Events.
The channel is then enabled by writing a one to the appropriate bit in the Channel Enable Regis-ter (CHER). It is disabled by writing a one to the appropriate bit in the Channel Disable Register(CHDR).
To safely configure a channel, user software must:
• disable the channel by writing a one to CHDR
• configure CHMXi
• enable the channel by writing a one to CHER
31.6.1.2 Channel OperationWhen the channel is enabled, the user signals its busy/ready state to the channel, to determinehow an incoming event will be handled:
• If the user is ready, an incoming event is forwarded. The corresponding Trigger Status Register (TRISR) bit is set to one allowing an interrupt to be generated for tracking PEVC operations.
• If the user is busy (because of a previous event, or for some other cause), the new event is not forwarded. The corresponding Overrun Status Register (OVSR) flag is set allowing an interrupt to be generated.
The Busy Register (BUSY) is used to determine the current activity of a channel/user. A busystatus has one of two causes:
• A peripheral event is being relayed by the channel and handled by the user,
• No event relayed, but user is not ready (e.g. not initialized, or handling some other request).
31.6.1.3 Software EventA Software Event can be initiated by writing to the Software Event Register (SEV). This isintended for application debugging.
The channel must first be configured by writing a one to the Software Event Multiplexer bit(SMX) of CHMXi.
Writing a one to the appropriate bit of SEV will then trigger a Software Event on the channel.
85142023G–SAM–03/2014
ATSAM4L8/L4/L2
31.6.2 Event Shaper (EVS) OperationPEVC contains Event Shapers (EVS) for certain types of generators:
• External inputs
• General-purpose waveforms like timer outputs or Generic Clocks
Refer to the Module Configuration section at the end of this chapter for the device-specific con-figuration of Event Shapers and Input Glitch Filters.
Each Event Shaper is responsible of shaping one input, prior to going through a PEVC channel:
• Optionally apply input-glich-filtering
• Synchronize incoming events
• Request CLK_PEVC when in deeper sleep modes
Write a one to the EN field of the corresponding Event Shaper Register (EVS) to enableoperation.
31.6.2.1 Input Glitch Filter (IGF)Input Glitch Filtering can be turned on or off by writing to the Input Glitch Filter fields (IGFR andIGFF) of the corresponding Event Shaper Register (EVS).
When IGF is on, the incoming event is sampled periodically. The sampling clock is divided fromCLK_RCSYS by the value of the Input Glitch Filter Divider Register (IGFDR). IGF will filter outspikes and propagate only incoming events that respect one of the following two conditions:
• rise event: 2 samples low, followed by 0+ changes, followed by 2 samples high
• fall event: 2 samples high, followed by 0+ changes, followed by 2 samples low
CLK_RCSYS must be enabled to use Input Glitch Filtering.
31.6.3 Event Propagation LatencyOnce a channel is setup, incoming peripheral events are relayed by hardware. Event progationlatency is therefore cycle deterministic. However, its value depends on the exact settings thatapply to a given channel.
When the channel multiplexer CHMXi.EVMX selects a generator without Event Shaper, eventpropagation latency is 0 cycle. Software event is a particular case of 0 cycle propagation.
When the channel multiplexer CHMXi.EVMX selects a generator with Event Shaper, event prop-agation latency depends on Input Glitch Filter setting EVSj.IGF and SleepWalking™:
• IGF off: event propagation latency is less or equal to 2 CLK_PEVC cycles
• IGF on: event propagation latency is less or equal to 3 * 2IGFDR * CLK_RCSYS cycles
• in case of SleepWalking™ operation, an additional delay incurs if the PM needs to revive the clocks sources. In that particular case of Low-Power operation, propagation latency is longer and cannot be predicted.

85242023G–SAM–03/2014
ATSAM4L8/L4/L2
Refer to the Module Configuration section at the end of this chapter for the list of generatorsimplementing Event Shapers.
31.7 Application ExampleThis application example shows how the Peripheral Event System can be used to program theADC Interface to perform ADC conversions at selected intervals.
One of the possible ADC conversion trigger is a peripheral event trigger, allowing the PeripheralEvent System to synchronize conversion with some configured peripheral event source. Oneparticular peripheral event source can be an AST peripheral event, among other types of periph-eral events. The Peripheral Event System can then be used to set up the ADC Interface tosample an analog signal at regular intervals generated by the AST.
The user must enable peripheral events in the AST and in the ADC Interface. Refer to the corre-sponding chapters for how this is accomplished. Next, the AST will generate peripheral eventsperiodically, and the Peripheral Event System will route the peripheral events to the ADC Inter-face, which will perform ADC conversions at the selected intervals.
Figure 31-4. Application Example
Since the AST peripheral event is an asynchronous event, the description above will also workin Power Save Modes where the ADC clock is stopped. In this case, the ADC clock (and clocksource, if needed) will be restarted during the ADC conversion. After the conversion, the ADCclock and clock source will return to the sleep state, unless the ADC generates an interrupt,which in turn will wake up the system. Using asynchronous events thus allows ADC operation inmuch lower power states than would otherwise be possible.
Table 31-3. Event Propagation Latency
GeneratorCHMXi.EVMX
Input Glitch FilterEVSj.IGF
Latency Clock
Software event - 0 -
Generator without Event Shaper - 0 -
Generator with Event Shaper Off 2 CLK_PEVC
Generator with Event Shaper On 3 * 2IGFDR CLK_RCSYS
Asynchronous Generator in SleepWalking™ operation On or Off unpredicted -
Peripheral Event
SystemAST ADC
Interface
Trigger conversion
Periodic peripheral event
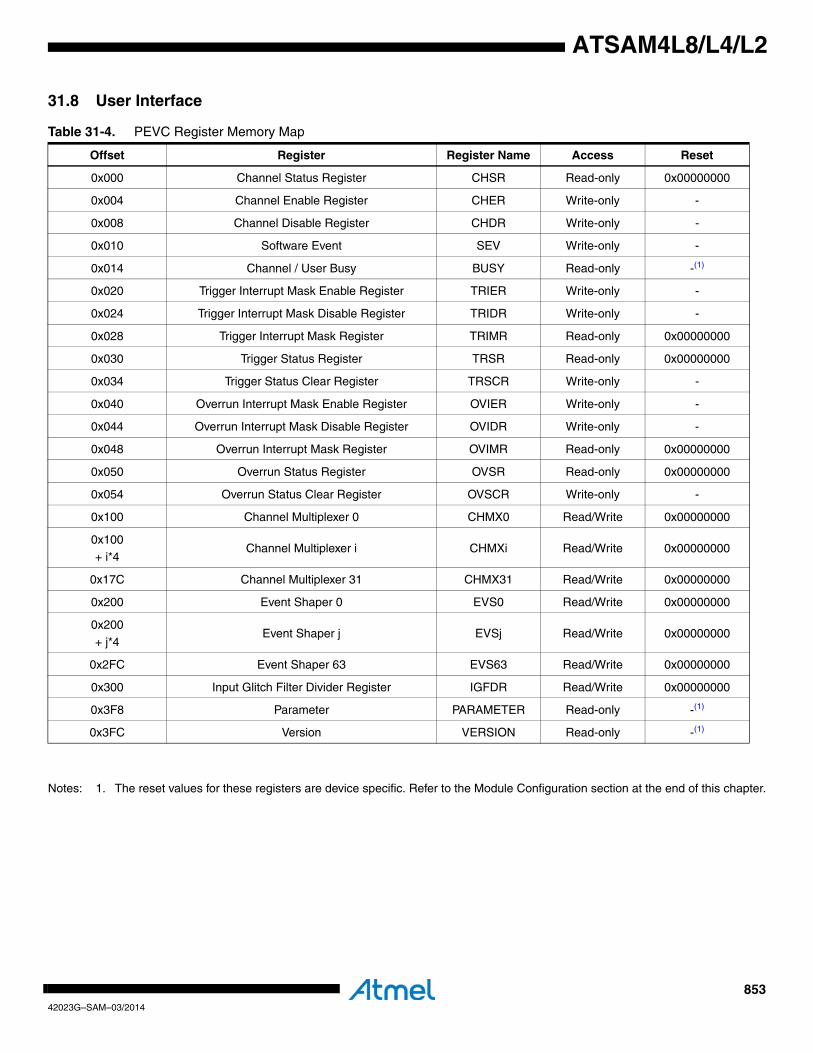
85342023G–SAM–03/2014
ATSAM4L8/L4/L2
31.8 User Interface
Notes: 1. The reset values for these registers are device specific. Refer to the Module Configuration section at the end of this chapter.
Table 31-4. PEVC Register Memory Map
Offset Register Register Name Access Reset
0x000 Channel Status Register CHSR Read-only 0x00000000
0x004 Channel Enable Register CHER Write-only -
0x008 Channel Disable Register CHDR Write-only -
0x010 Software Event SEV Write-only -
0x014 Channel / User Busy BUSY Read-only -(1)
0x020 Trigger Interrupt Mask Enable Register TRIER Write-only -
0x024 Trigger Interrupt Mask Disable Register TRIDR Write-only -
0x028 Trigger Interrupt Mask Register TRIMR Read-only 0x00000000
0x030 Trigger Status Register TRSR Read-only 0x00000000
0x034 Trigger Status Clear Register TRSCR Write-only -
0x040 Overrun Interrupt Mask Enable Register OVIER Write-only -
0x044 Overrun Interrupt Mask Disable Register OVIDR Write-only -
0x048 Overrun Interrupt Mask Register OVIMR Read-only 0x00000000
0x050 Overrun Status Register OVSR Read-only 0x00000000
0x054 Overrun Status Clear Register OVSCR Write-only -
0x100 Channel Multiplexer 0 CHMX0 Read/Write 0x00000000
0x100+ i*4
Channel Multiplexer i CHMXi Read/Write 0x00000000
0x17C Channel Multiplexer 31 CHMX31 Read/Write 0x00000000
0x200 Event Shaper 0 EVS0 Read/Write 0x00000000
0x200
+ j*4Event Shaper j EVSj Read/Write 0x00000000
0x2FC Event Shaper 63 EVS63 Read/Write 0x00000000
0x300 Input Glitch Filter Divider Register IGFDR Read/Write 0x00000000
0x3F8 Parameter PARAMETER Read-only -(1)
0x3FC Version VERSION Read-only -(1)

85442023G–SAM–03/2014
ATSAM4L8/L4/L2
31.8.1 Channel Status RegisterName: CHSR
Access Type: Read-only
Offset: 0x000
Reset Value: 0x00000000
• CHS: Channel Status0: The corresponding channel is disabled.1: The corresponding channel is enabled.
This bit is cleared when the corresponding bit in CHDR is written to one.
This bit is set when the corresponding bit in CHER is written to one.
31 30 29 28 27 26 25 24
CHS
23 22 21 20 19 18 17 16
CHS
15 14 13 12 11 10 9 8
CHS
7 6 5 4 3 2 1 0
CHS
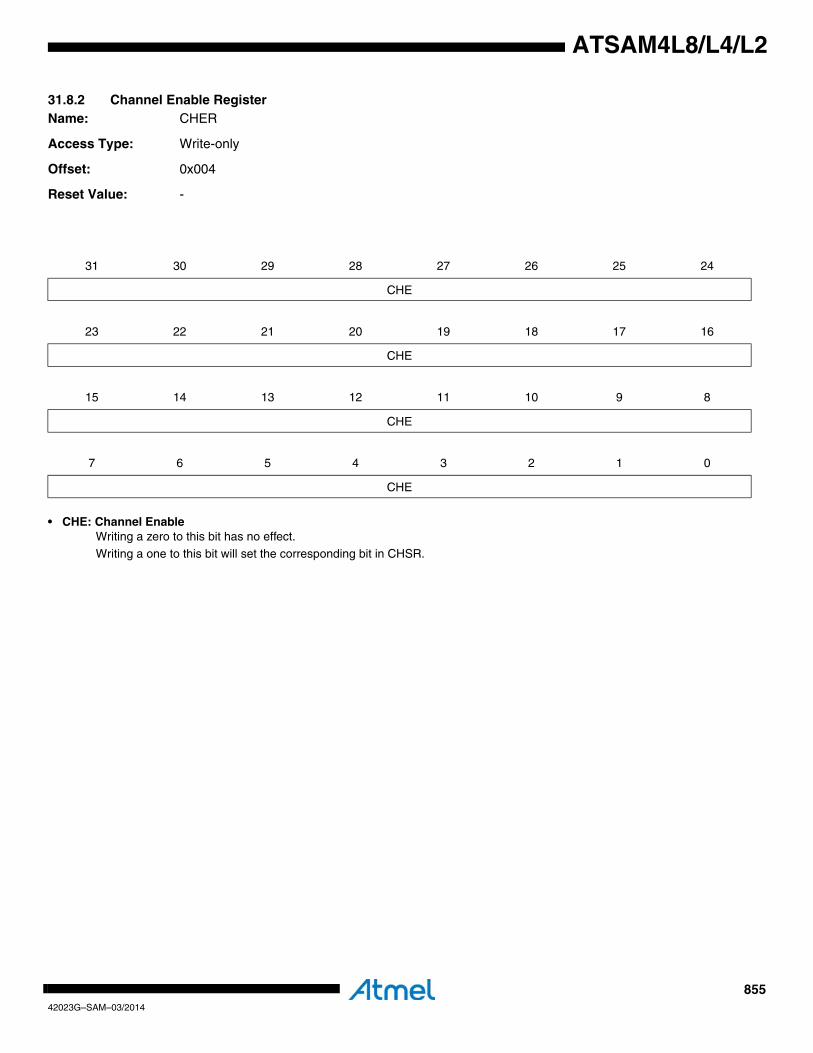
85542023G–SAM–03/2014
ATSAM4L8/L4/L2
31.8.2 Channel Enable RegisterName: CHER
Access Type: Write-only
Offset: 0x004
Reset Value: -
• CHE: Channel EnableWriting a zero to this bit has no effect.Writing a one to this bit will set the corresponding bit in CHSR.
31 30 29 28 27 26 25 24
CHE
23 22 21 20 19 18 17 16
CHE
15 14 13 12 11 10 9 8
CHE
7 6 5 4 3 2 1 0
CHE
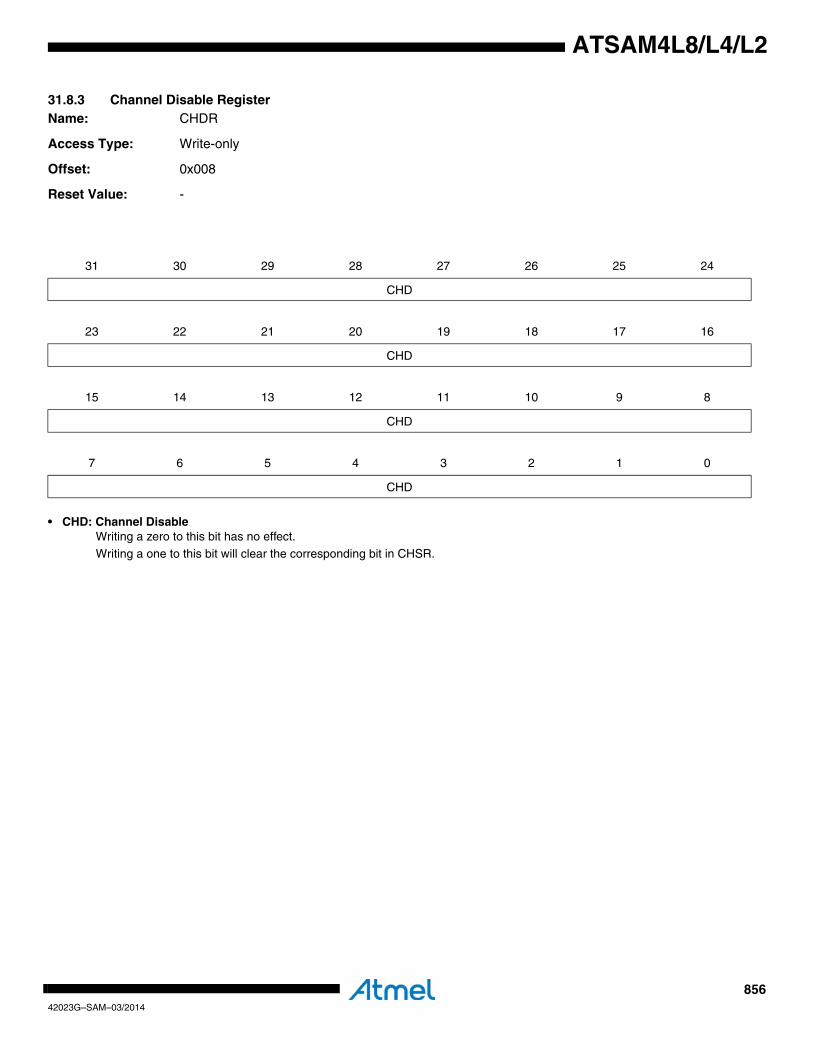
85642023G–SAM–03/2014
ATSAM4L8/L4/L2
31.8.3 Channel Disable RegisterName: CHDR
Access Type: Write-only
Offset: 0x008
Reset Value: -
• CHD: Channel DisableWriting a zero to this bit has no effect.Writing a one to this bit will clear the corresponding bit in CHSR.
31 30 29 28 27 26 25 24
CHD
23 22 21 20 19 18 17 16
CHD
15 14 13 12 11 10 9 8
CHD
7 6 5 4 3 2 1 0
CHD
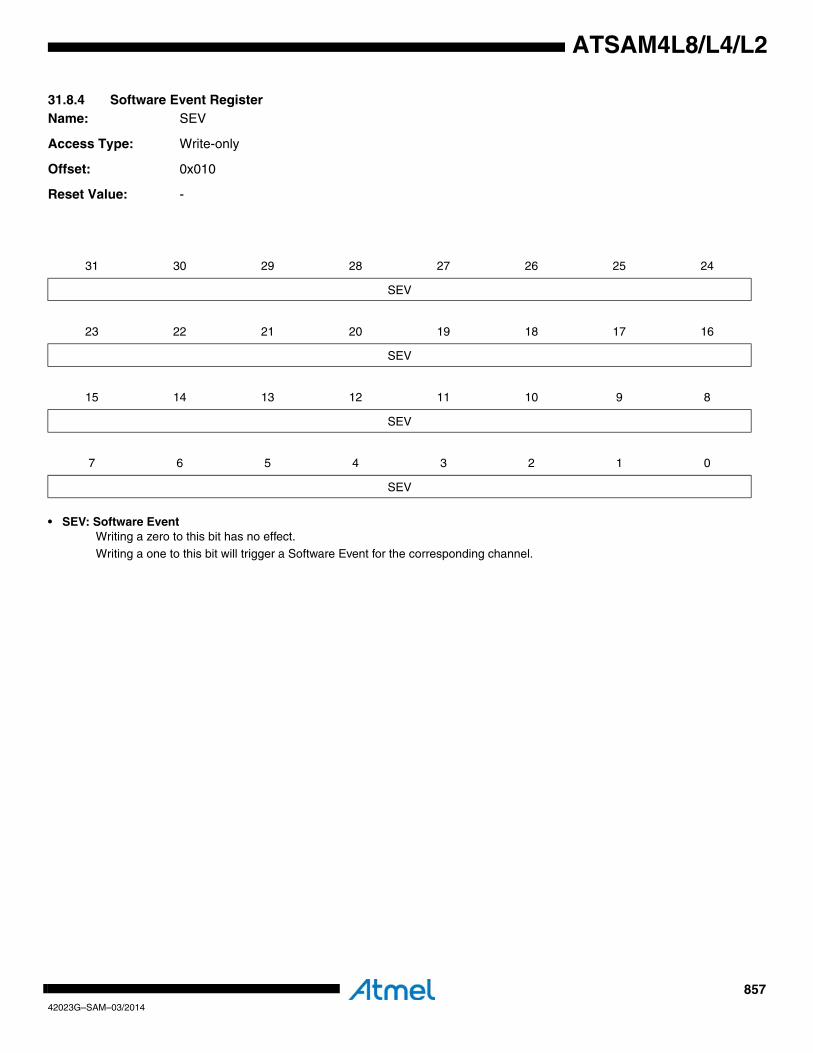
85742023G–SAM–03/2014
ATSAM4L8/L4/L2
31.8.4 Software Event RegisterName: SEV
Access Type: Write-only
Offset: 0x010
Reset Value: -
• SEV: Software EventWriting a zero to this bit has no effect.Writing a one to this bit will trigger a Software Event for the corresponding channel.
31 30 29 28 27 26 25 24
SEV
23 22 21 20 19 18 17 16
SEV
15 14 13 12 11 10 9 8
SEV
7 6 5 4 3 2 1 0
SEV
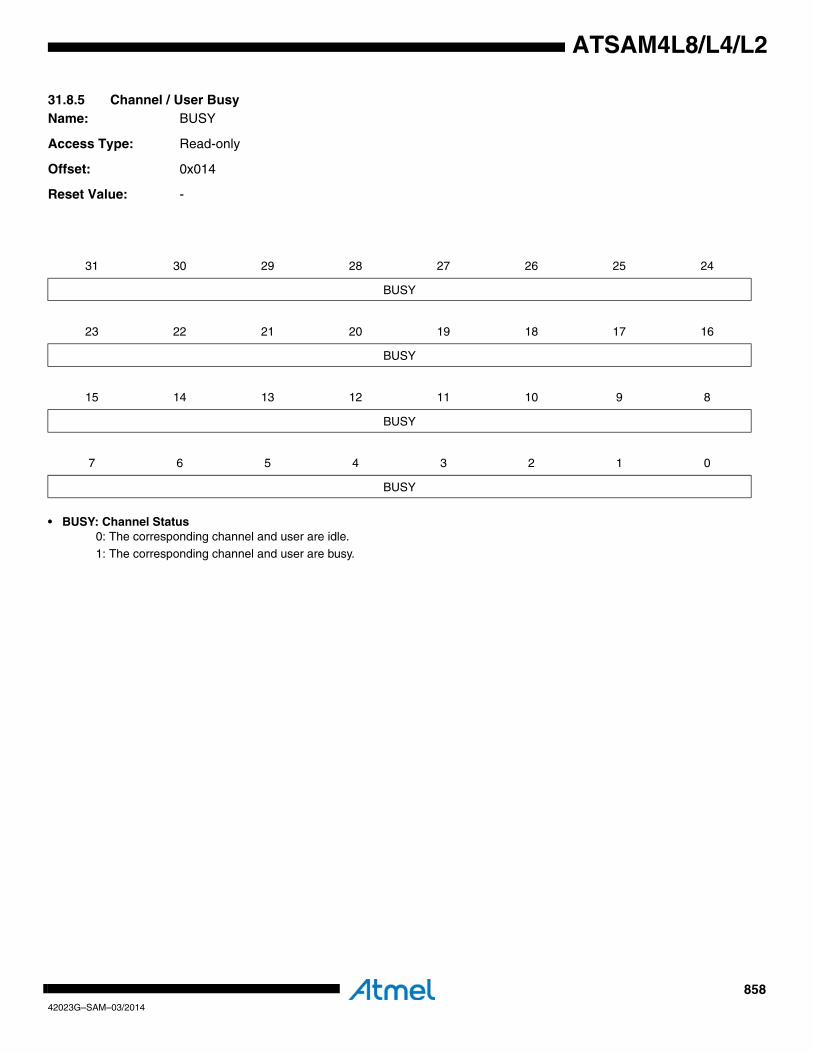
85842023G–SAM–03/2014
ATSAM4L8/L4/L2
31.8.5 Channel / User BusyName: BUSY
Access Type: Read-only
Offset: 0x014
Reset Value: -
• BUSY: Channel Status0: The corresponding channel and user are idle.1: The corresponding channel and user are busy.
31 30 29 28 27 26 25 24
BUSY
23 22 21 20 19 18 17 16
BUSY
15 14 13 12 11 10 9 8
BUSY
7 6 5 4 3 2 1 0
BUSY

85942023G–SAM–03/2014
ATSAM4L8/L4/L2
31.8.6 Trigger Interrupt Enable RegisterName: TRIER
Access Type: Write-only
Offset: 0x020
Reset Value: -
• TRIE: Trigger Interrupt EnableWriting a zero to this bit has no effect.
Writing a one to this bit will set the corresponding bit in TRIMR.
31 30 29 28 27 26 25 24
TRIE
23 22 21 20 19 18 17 16
TRIE
15 14 13 12 11 10 9 8
TRIE
7 6 5 4 3 2 1 0
TRIE

86042023G–SAM–03/2014
ATSAM4L8/L4/L2
31.8.7 Trigger Interrupt Disable RegisterName: TRIDR
Access Type: Write-only
Offset: 0x024
Reset Value: -
• TRID: Trigger Interrupt DisableWriting a zero to this bit has no effect.
Writing a one to this bit will clear the corresponding bit in IMR.
31 30 29 28 27 26 25 24
TRID
23 22 21 20 19 18 17 16
TRID
15 14 13 12 11 10 9 8
TRID
7 6 5 4 3 2 1 0
TRID
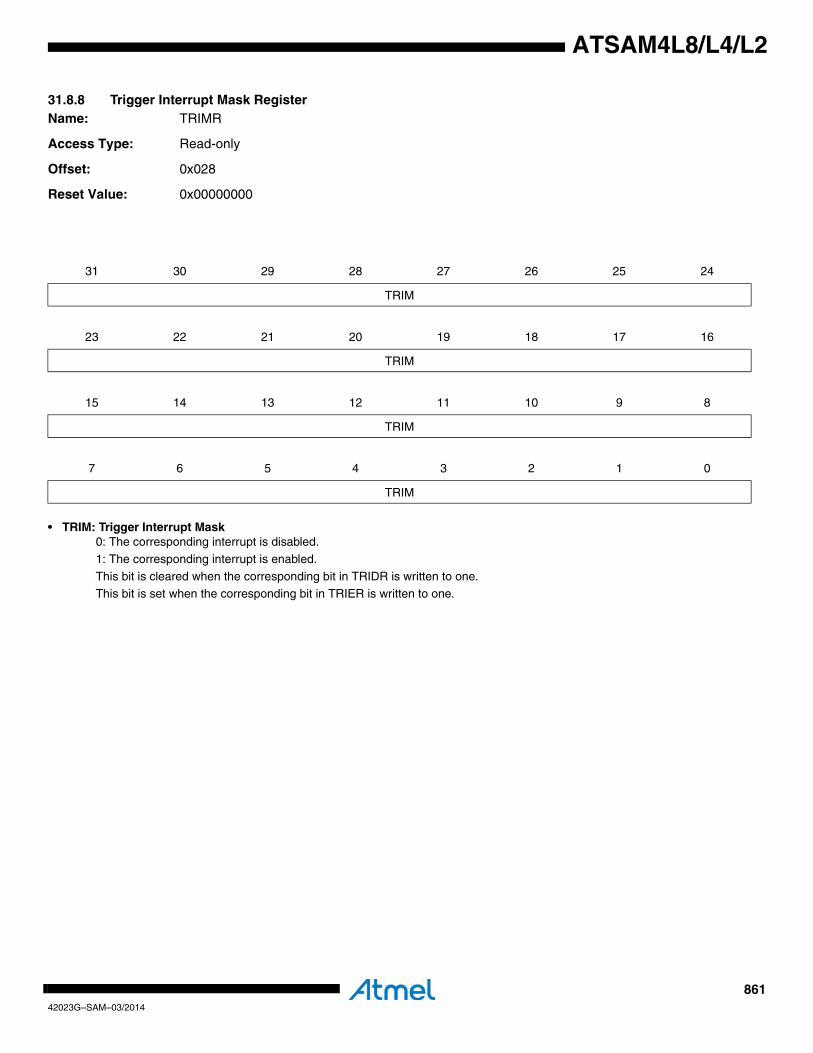
86142023G–SAM–03/2014
ATSAM4L8/L4/L2
31.8.8 Trigger Interrupt Mask RegisterName: TRIMR
Access Type: Read-only
Offset: 0x028
Reset Value: 0x00000000
• TRIM: Trigger Interrupt Mask0: The corresponding interrupt is disabled.
1: The corresponding interrupt is enabled.
This bit is cleared when the corresponding bit in TRIDR is written to one.This bit is set when the corresponding bit in TRIER is written to one.
31 30 29 28 27 26 25 24
TRIM
23 22 21 20 19 18 17 16
TRIM
15 14 13 12 11 10 9 8
TRIM
7 6 5 4 3 2 1 0
TRIM

86242023G–SAM–03/2014
ATSAM4L8/L4/L2
31.8.9 Trigger Status RegisterName: TRSR
Access Type: Read-only
Offset: 0x030
Reset Value: 0x00000000
• TRS: Trigger Interrupt Status0: An interrupt event has not occurred
1: An interrupt event has occurred
This bit is cleared by writing a one to the corresponding bit in TRSCR.
31 30 29 28 27 26 25 24
TRS
23 22 21 20 19 18 17 16
TRS
15 14 13 12 11 10 9 8
TRS
7 6 5 4 3 2 1 0
TRS

86342023G–SAM–03/2014
ATSAM4L8/L4/L2
31.8.10 Trigger Status Clear RegisterName: TRSCR
Access Type: Write-only
Offset: 0x034
Reset Value: -
• TRSC: Trigger Interrupt Status ClearWriting a zero to this bit has no effect.
Writing a one to this bit will clear the corresponding bit in TRSR.
31 30 29 28 27 26 25 24
TRSC
23 22 21 20 19 18 17 16
TRSC
15 14 13 12 11 10 9 8
TRSC
7 6 5 4 3 2 1 0
TRSC

86442023G–SAM–03/2014
ATSAM4L8/L4/L2
31.8.11 Overrun Interrupt Enable RegisterName: OVIER
Access Type: Write-only
Offset: 0x040
Reset Value: -
• OVIE: Overrun Interrupt EnableWriting a zero to this bit has no effect.
Writing a one to this bit will set the corresponding bit in OVIMR.
31 30 29 28 27 26 25 24
OVIE
23 22 21 20 19 18 17 16
OVIE
15 14 13 12 11 10 9 8
OVIE
7 6 5 4 3 2 1 0
OVIE

86542023G–SAM–03/2014
ATSAM4L8/L4/L2
31.8.12 Overrun Interrupt Disable RegisterName: OVIDR
Access Type: Write-only
Offset: 0x044
Reset Value: -
• OVID: Overrun Interrupt DisableWriting a zero to this bit has no effect.
Writing a one to this bit will clear the corresponding bit in IMR.
31 30 29 28 27 26 25 24
OVID
23 22 21 20 19 18 17 16
OVID
15 14 13 12 11 10 9 8
OVID
7 6 5 4 3 2 1 0
OVID
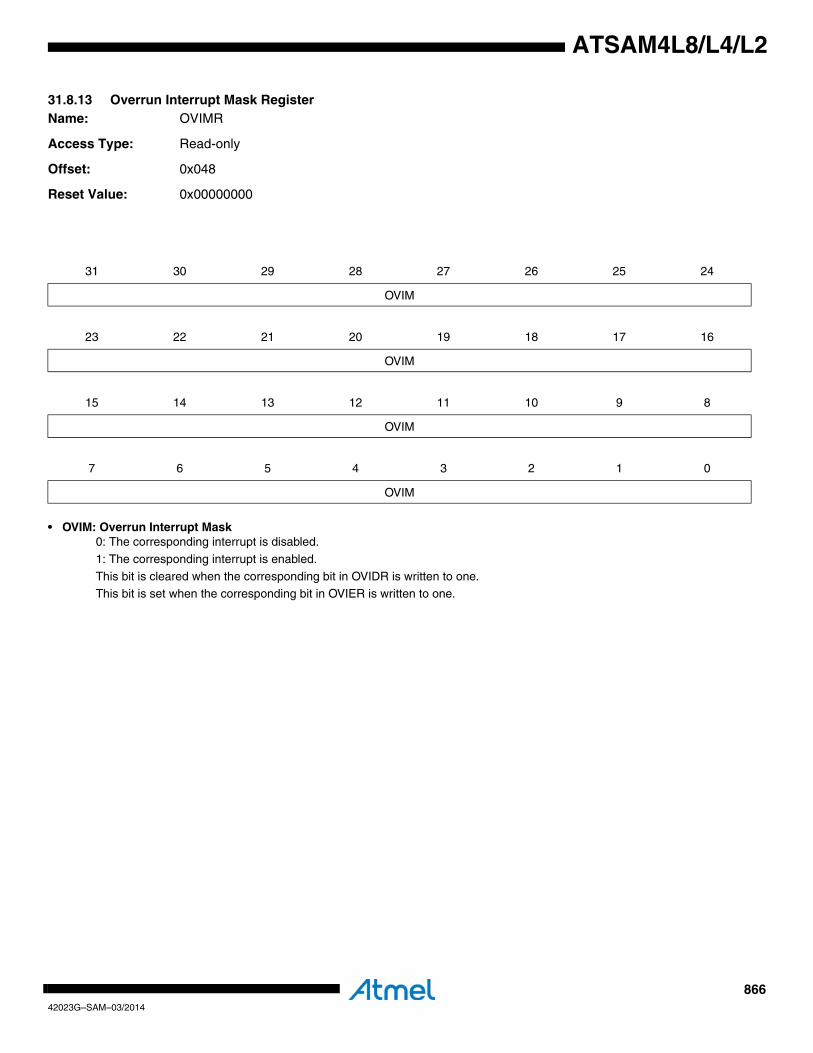
86642023G–SAM–03/2014
ATSAM4L8/L4/L2
31.8.13 Overrun Interrupt Mask RegisterName: OVIMR
Access Type: Read-only
Offset: 0x048
Reset Value: 0x00000000
• OVIM: Overrun Interrupt Mask0: The corresponding interrupt is disabled.
1: The corresponding interrupt is enabled.
This bit is cleared when the corresponding bit in OVIDR is written to one.This bit is set when the corresponding bit in OVIER is written to one.
31 30 29 28 27 26 25 24
OVIM
23 22 21 20 19 18 17 16
OVIM
15 14 13 12 11 10 9 8
OVIM
7 6 5 4 3 2 1 0
OVIM
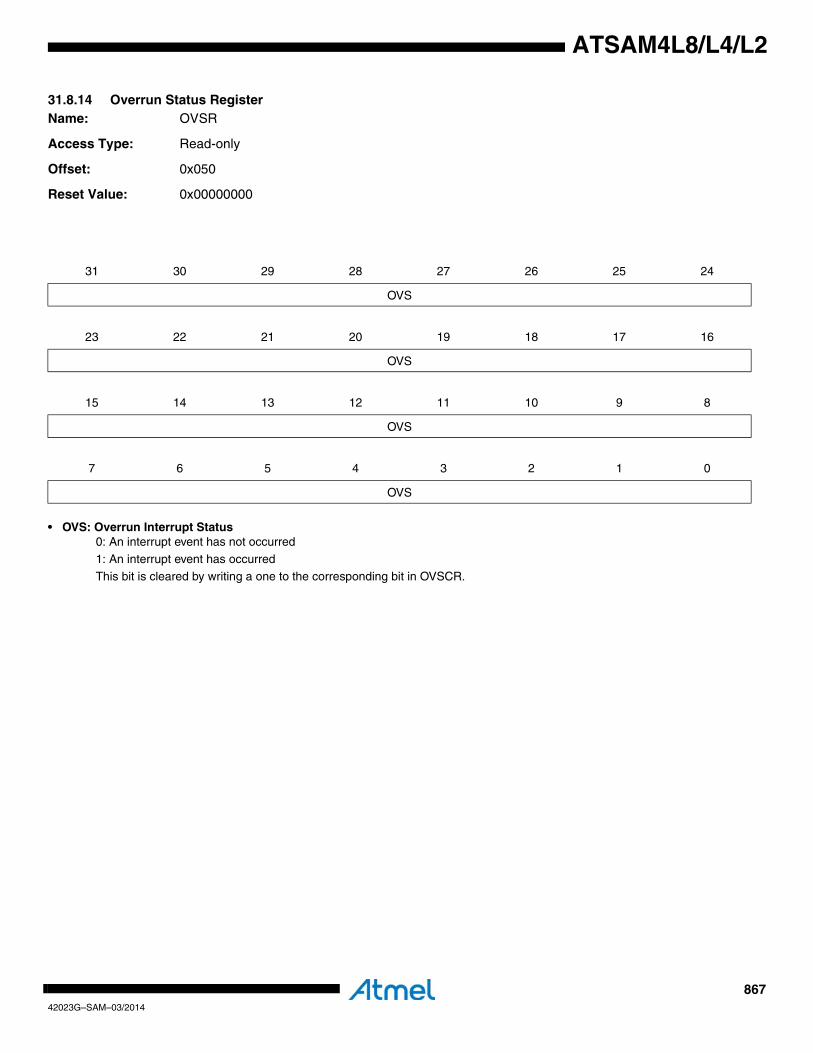
86742023G–SAM–03/2014
ATSAM4L8/L4/L2
31.8.14 Overrun Status RegisterName: OVSR
Access Type: Read-only
Offset: 0x050
Reset Value: 0x00000000
• OVS: Overrun Interrupt Status0: An interrupt event has not occurred
1: An interrupt event has occurred
This bit is cleared by writing a one to the corresponding bit in OVSCR.
31 30 29 28 27 26 25 24
OVS
23 22 21 20 19 18 17 16
OVS
15 14 13 12 11 10 9 8
OVS
7 6 5 4 3 2 1 0
OVS
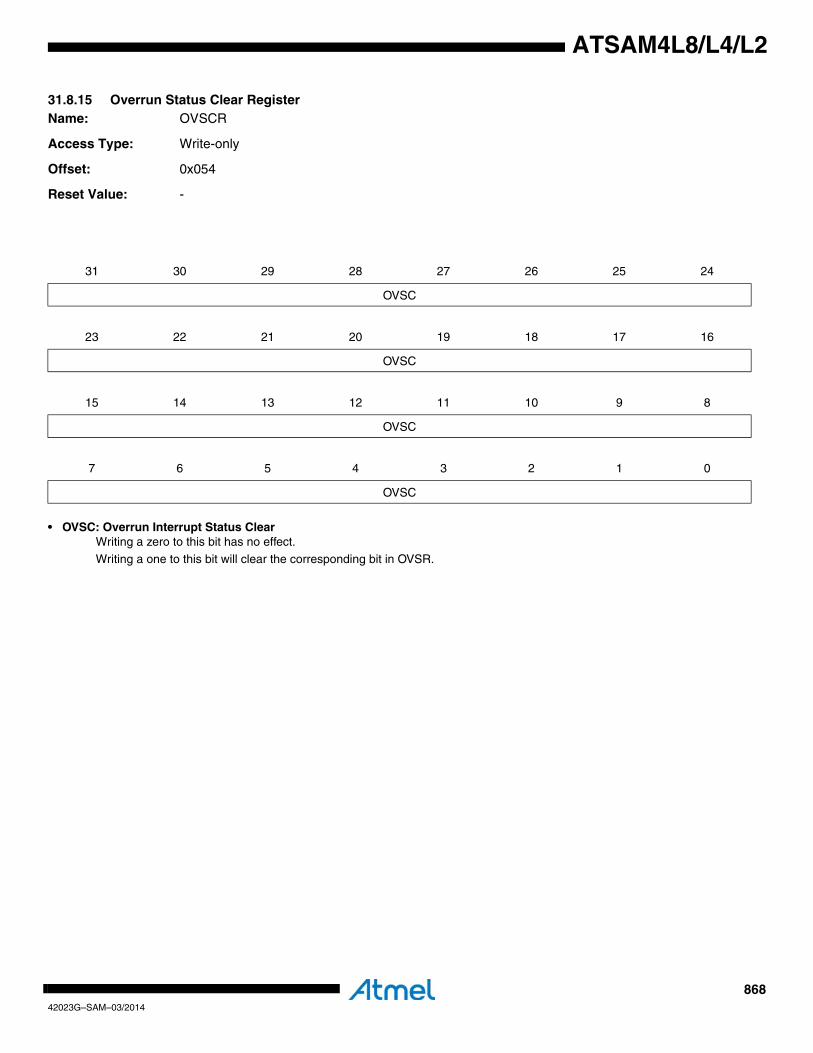
86842023G–SAM–03/2014
ATSAM4L8/L4/L2
31.8.15 Overrun Status Clear RegisterName: OVSCR
Access Type: Write-only
Offset: 0x054
Reset Value: -
• OVSC: Overrun Interrupt Status ClearWriting a zero to this bit has no effect.
Writing a one to this bit will clear the corresponding bit in OVSR.
31 30 29 28 27 26 25 24
OVSC
23 22 21 20 19 18 17 16
OVSC
15 14 13 12 11 10 9 8
OVSC
7 6 5 4 3 2 1 0
OVSC
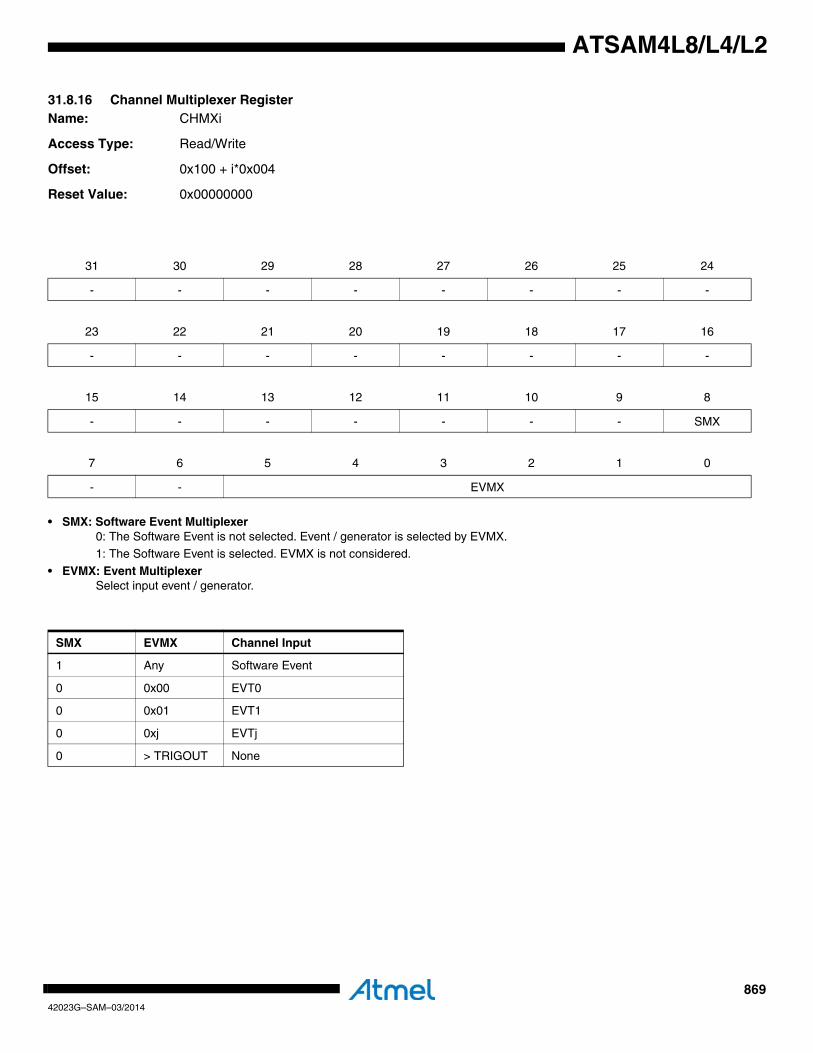
86942023G–SAM–03/2014
ATSAM4L8/L4/L2
31.8.16 Channel Multiplexer RegisterName: CHMXi
Access Type: Read/Write
Offset: 0x100 + i*0x004
Reset Value: 0x00000000
• SMX: Software Event Multiplexer0: The Software Event is not selected. Event / generator is selected by EVMX.1: The Software Event is selected. EVMX is not considered.
• EVMX: Event MultiplexerSelect input event / generator.
31 30 29 28 27 26 25 24
- - - - - - - -
23 22 21 20 19 18 17 16
- - - - - - - -
15 14 13 12 11 10 9 8
- - - - - - - SMX
7 6 5 4 3 2 1 0
- - EVMX
SMX EVMX Channel Input
1 Any Software Event
0 0x00 EVT0
0 0x01 EVT1
0 0xj EVTj
0 > TRIGOUT None
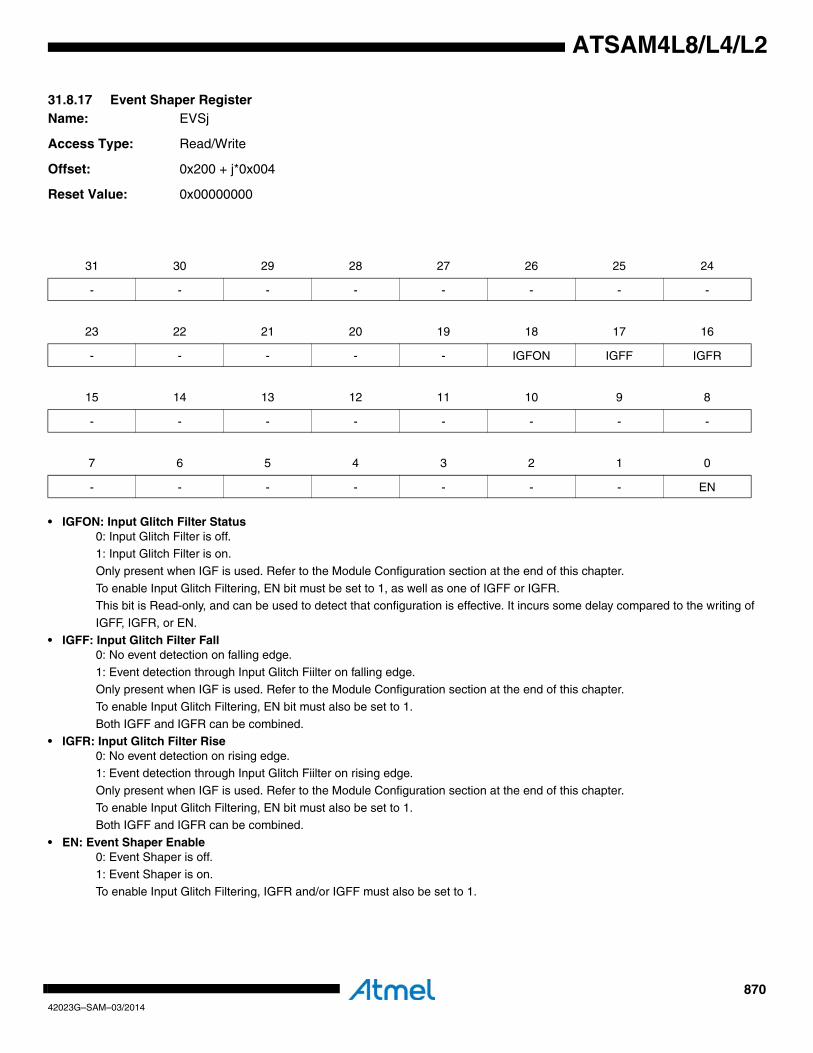
87042023G–SAM–03/2014
ATSAM4L8/L4/L2
31.8.17 Event Shaper RegisterName: EVSj
Access Type: Read/Write
Offset: 0x200 + j*0x004
Reset Value: 0x00000000
• IGFON: Input Glitch Filter Status0: Input Glitch Filter is off.1: Input Glitch Filter is on.
Only present when IGF is used. Refer to the Module Configuration section at the end of this chapter.
To enable Input Glitch Filtering, EN bit must be set to 1, as well as one of IGFF or IGFR.This bit is Read-only, and can be used to detect that configuration is effective. It incurs some delay compared to the writing of
IGFF, IGFR, or EN.
• IGFF: Input Glitch Filter Fall0: No event detection on falling edge.
1: Event detection through Input Glitch Fiilter on falling edge.Only present when IGF is used. Refer to the Module Configuration section at the end of this chapter.
To enable Input Glitch Filtering, EN bit must also be set to 1.
Both IGFF and IGFR can be combined.• IGFR: Input Glitch Filter Rise
0: No event detection on rising edge.1: Event detection through Input Glitch Fiilter on rising edge.
Only present when IGF is used. Refer to the Module Configuration section at the end of this chapter.
To enable Input Glitch Filtering, EN bit must also be set to 1.Both IGFF and IGFR can be combined.
• EN: Event Shaper Enable0: Event Shaper is off.1: Event Shaper is on.
To enable Input Glitch Filtering, IGFR and/or IGFF must also be set to 1.
31 30 29 28 27 26 25 24
- - - - - - - -
23 22 21 20 19 18 17 16
- - - - - IGFON IGFF IGFR
15 14 13 12 11 10 9 8
- - - - - - - -
7 6 5 4 3 2 1 0
- - - - - - - EN
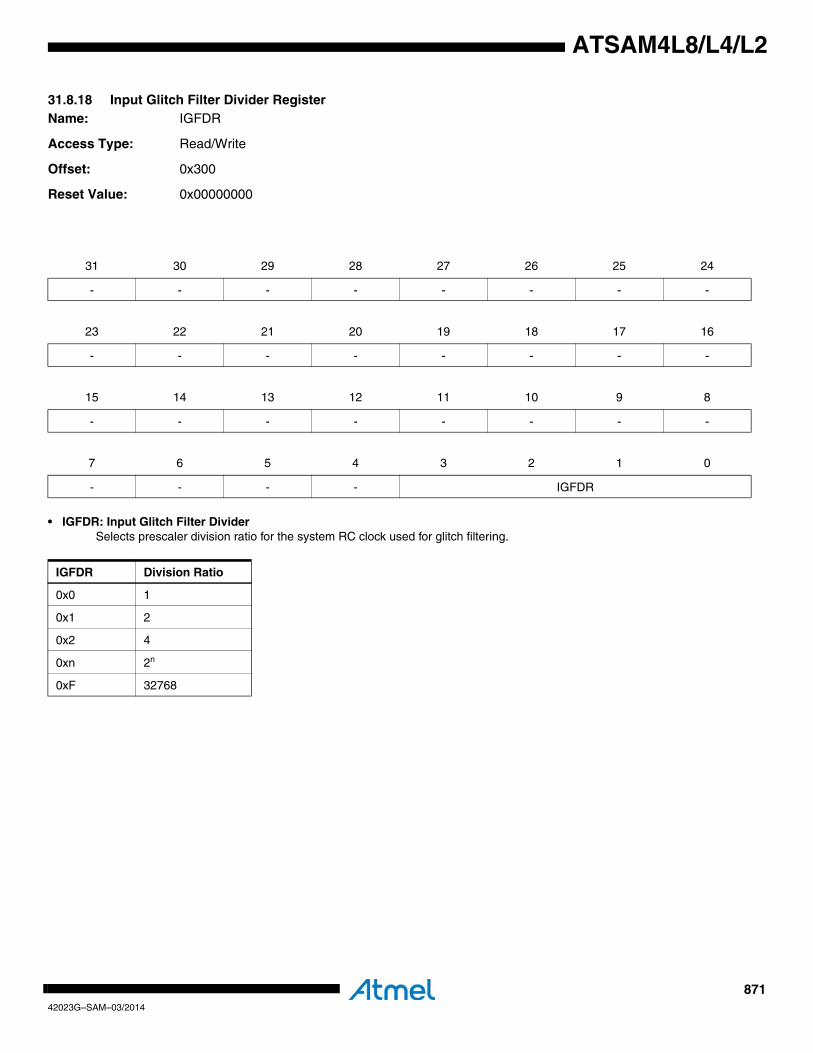
87142023G–SAM–03/2014
ATSAM4L8/L4/L2
31.8.18 Input Glitch Filter Divider RegisterName: IGFDR
Access Type: Read/Write
Offset: 0x300
Reset Value: 0x00000000
• IGFDR: Input Glitch Filter DividerSelects prescaler division ratio for the system RC clock used for glitch filtering.
31 30 29 28 27 26 25 24
- - - - - - - -
23 22 21 20 19 18 17 16
- - - - - - - -
15 14 13 12 11 10 9 8
- - - - - - - -
7 6 5 4 3 2 1 0
- - - - IGFDR
IGFDR Division Ratio
0x0 1
0x1 2
0x2 4
0xn 2n
0xF 32768
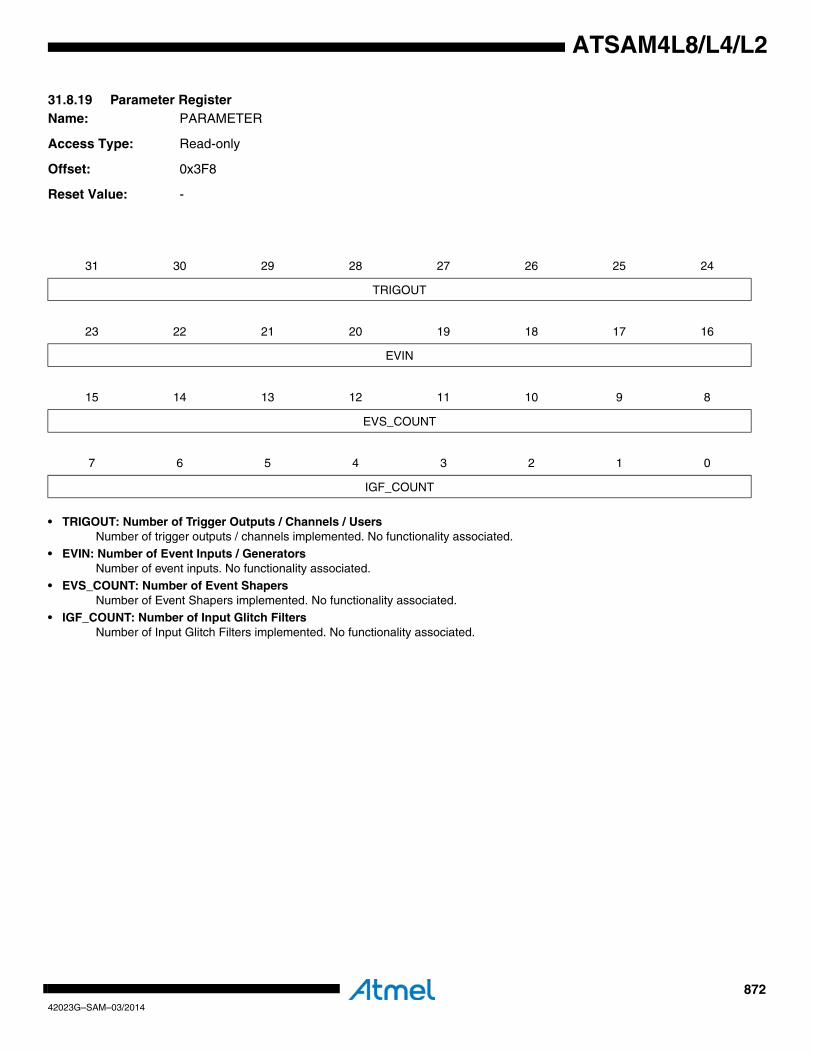
87242023G–SAM–03/2014
ATSAM4L8/L4/L2
31.8.19 Parameter RegisterName: PARAMETER
Access Type: Read-only
Offset: 0x3F8
Reset Value: -
• TRIGOUT: Number of Trigger Outputs / Channels / UsersNumber of trigger outputs / channels implemented. No functionality associated.
• EVIN: Number of Event Inputs / GeneratorsNumber of event inputs. No functionality associated.
• EVS_COUNT: Number of Event ShapersNumber of Event Shapers implemented. No functionality associated.
• IGF_COUNT: Number of Input Glitch FiltersNumber of Input Glitch Filters implemented. No functionality associated.
31 30 29 28 27 26 25 24
TRIGOUT
23 22 21 20 19 18 17 16
EVIN
15 14 13 12 11 10 9 8
EVS_COUNT
7 6 5 4 3 2 1 0
IGF_COUNT
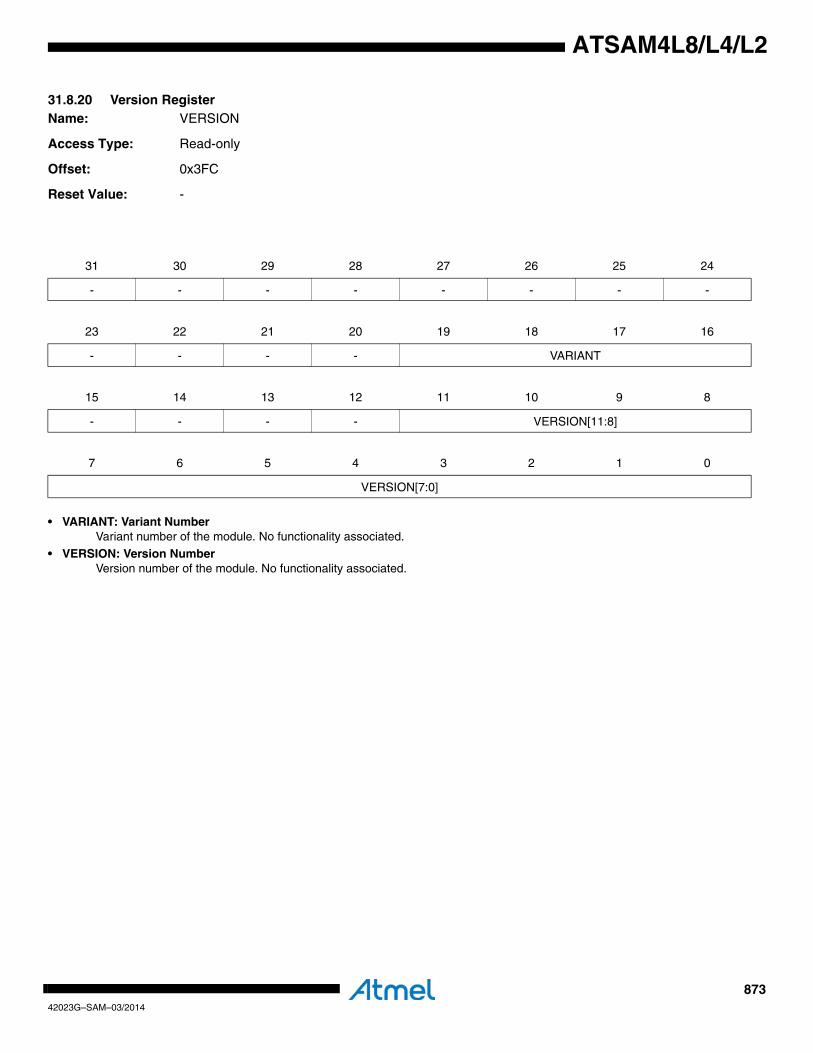
87342023G–SAM–03/2014
ATSAM4L8/L4/L2
31.8.20 Version RegisterName: VERSION
Access Type: Read-only
Offset: 0x3FC
Reset Value: -
• VARIANT: Variant NumberVariant number of the module. No functionality associated.
• VERSION: Version NumberVersion number of the module. No functionality associated.
31 30 29 28 27 26 25 24
- - - - - - - -
23 22 21 20 19 18 17 16
- - - - VARIANT
15 14 13 12 11 10 9 8
- - - - VERSION[11:8]
7 6 5 4 3 2 1 0
VERSION[7:0]
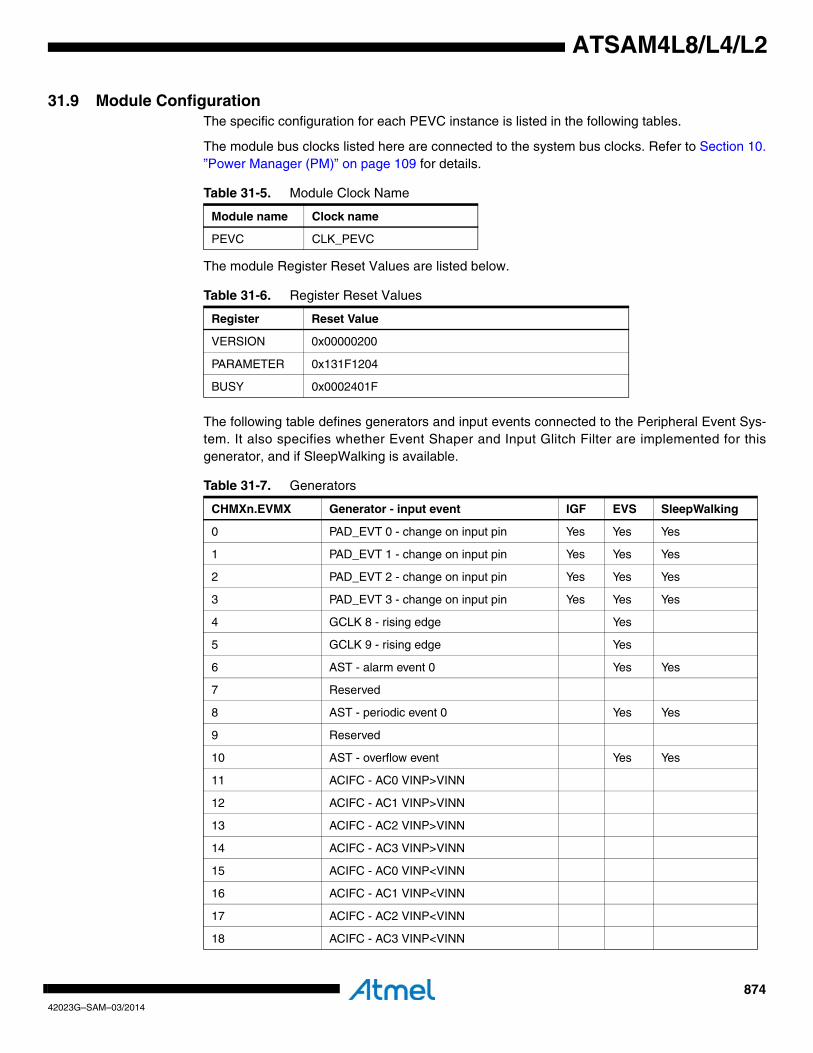
87442023G–SAM–03/2014
ATSAM4L8/L4/L2
31.9 Module ConfigurationThe specific configuration for each PEVC instance is listed in the following tables.
The module bus clocks listed here are connected to the system bus clocks. Refer to Section 10.”Power Manager (PM)” on page 109 for details.
The module Register Reset Values are listed below.
The following table defines generators and input events connected to the Peripheral Event Sys-tem. It also specifies whether Event Shaper and Input Glitch Filter are implemented for thisgenerator, and if SleepWalking is available.
Table 31-5. Module Clock Name
Module name Clock name
PEVC CLK_PEVC
Table 31-6. Register Reset Values
Register Reset Value
VERSION 0x00000200
PARAMETER 0x131F1204
BUSY 0x0002401F
Table 31-7. Generators
CHMXn.EVMX Generator - input event IGF EVS SleepWalking
0 PAD_EVT 0 - change on input pin Yes Yes Yes
1 PAD_EVT 1 - change on input pin Yes Yes Yes
2 PAD_EVT 2 - change on input pin Yes Yes Yes
3 PAD_EVT 3 - change on input pin Yes Yes Yes
4 GCLK 8 - rising edge Yes
5 GCLK 9 - rising edge Yes
6 AST - alarm event 0 Yes Yes
7 Reserved
8 AST - periodic event 0 Yes Yes
9 Reserved
10 AST - overflow event Yes Yes
11 ACIFC - AC0 VINP>VINN
12 ACIFC - AC1 VINP>VINN
13 ACIFC - AC2 VINP>VINN
14 ACIFC - AC3 VINP>VINN
15 ACIFC - AC0 VINP<VINN
16 ACIFC - AC1 VINP<VINN
17 ACIFC - AC2 VINP<VINN
18 ACIFC - AC3 VINP<VINN
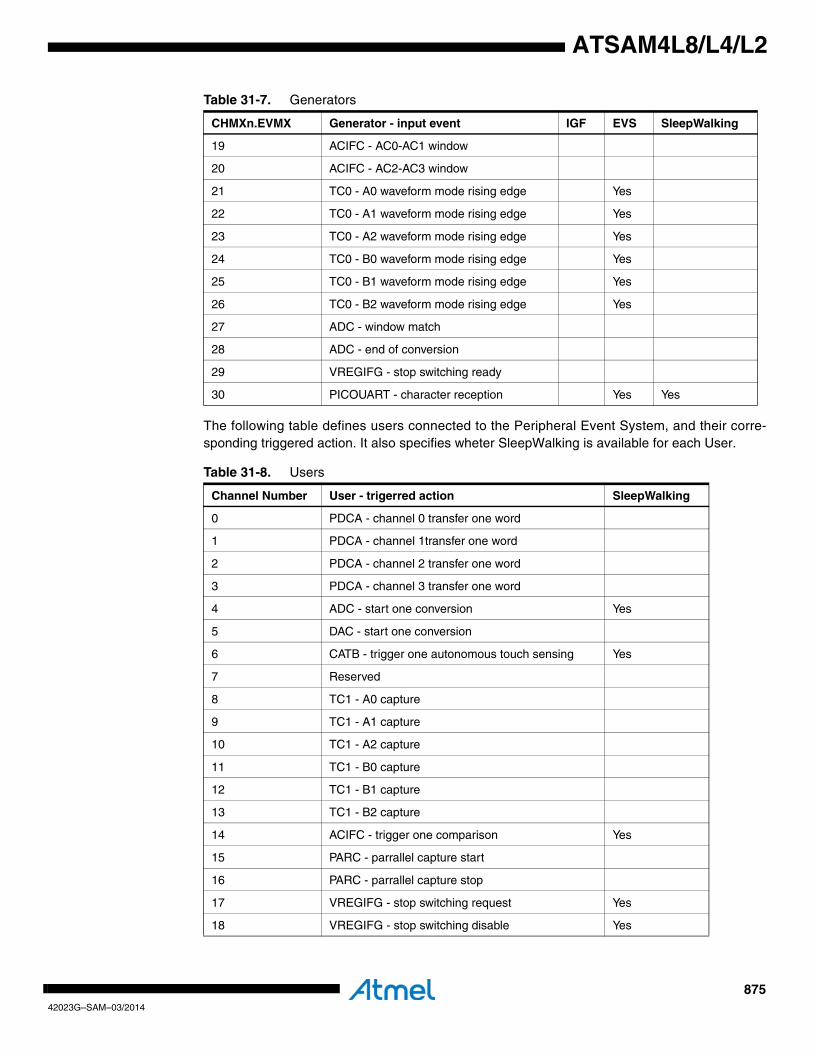
87542023G–SAM–03/2014
ATSAM4L8/L4/L2
The following table defines users connected to the Peripheral Event System, and their corre-sponding triggered action. It also specifies wheter SleepWalking is available for each User.
19 ACIFC - AC0-AC1 window
20 ACIFC - AC2-AC3 window
21 TC0 - A0 waveform mode rising edge Yes
22 TC0 - A1 waveform mode rising edge Yes
23 TC0 - A2 waveform mode rising edge Yes
24 TC0 - B0 waveform mode rising edge Yes
25 TC0 - B1 waveform mode rising edge Yes
26 TC0 - B2 waveform mode rising edge Yes
27 ADC - window match
28 ADC - end of conversion
29 VREGIFG - stop switching ready
30 PICOUART - character reception Yes Yes
Table 31-8. Users
Channel Number User - trigerred action SleepWalking
0 PDCA - channel 0 transfer one word
1 PDCA - channel 1transfer one word
2 PDCA - channel 2 transfer one word
3 PDCA - channel 3 transfer one word
4 ADC - start one conversion Yes
5 DAC - start one conversion
6 CATB - trigger one autonomous touch sensing Yes
7 Reserved
8 TC1 - A0 capture
9 TC1 - A1 capture
10 TC1 - A2 capture
11 TC1 - B0 capture
12 TC1 - B1 capture
13 TC1 - B2 capture
14 ACIFC - trigger one comparison Yes
15 PARC - parrallel capture start
16 PARC - parrallel capture stop
17 VREGIFG - stop switching request Yes
18 VREGIFG - stop switching disable Yes
Table 31-7. Generators
CHMXn.EVMX Generator - input event IGF EVS SleepWalking

87642023G–SAM–03/2014
ATSAM4L8/L4/L2

87742023G–SAM–03/2014
ATSAM4L8/L4/L2
32. Audio Bit Stream DAC (ABDACB)Rev: 1.0.0.0
32.1 Features• 16 bit digital stereo DAC• Oversampling D/A conversion architecture
– Adjustable oversampling ratio– 3rd order Sigma-Delta D/A converters
• Digital bitstream output• Parallel interface• Connects to DMA for background transfer without CPU intervention• Supported sampling frequencies
– 8000Hz, 11025Hz, 12000Hz, 16000Hz, 22050Hz, 24000Hz, 32000Hz, 44100Hz, and 48000Hz• Supported data formats
– 32-, 24-, 20-, 18-, 16-, and 8-bit stereo format– 16- and 8-bit compact stereo format, with left and right sample packed in the same word to
reduce data transfers• Common mode offset control• Volume control
32.2 OverviewThe Audio Bitstream DAC (ABDACB) converts a 16-bit sample value to a digital bitstream withan average value proportional to the sample value. Two channels are supported making theAudio Bitstream DAC particularly suitable for stereo audio. Each channel has a pair of comple-mentary digital outputs, DAC and DACN, which can be connected to an external high inputimpedance amplifier.
The Audio Bitstream DAC is made up of several signal processing blocks and a 3rd order SigmaDelta D/A converter for each channel. The Sigma Delta modulator converts the parallel data to abitstream, while the signal processing blocks perform volume control, offset control, upsampling,and filtering to compensate for the upsampling process. The upsampling is performed by a Cas-caded Integrator-Comb (CIC) filter, and the compensation filter is a Finite Impulse Response(FIR) CIC compensation filter.
32.3 Block Diagram
Figure 32-1. ABDACB Block Diagram
User
Inte
rface
Sync
hron
izer
Volum
e co
ntro
l
Offse
t con
trol
CIC
Com
pens
ation
filt
er (F
IR)
CIC
Com
bSe
ction
CIC
Inte
grat
or
secti
on
C lock divider
Sigma Delta Modulator
Sigma Delta Modulator
clk_abdacb gclk
Signal processing(before up-sampling)
CLK
DAC[0]
DACN[0]
DAC[1]
DACN[1]
PB
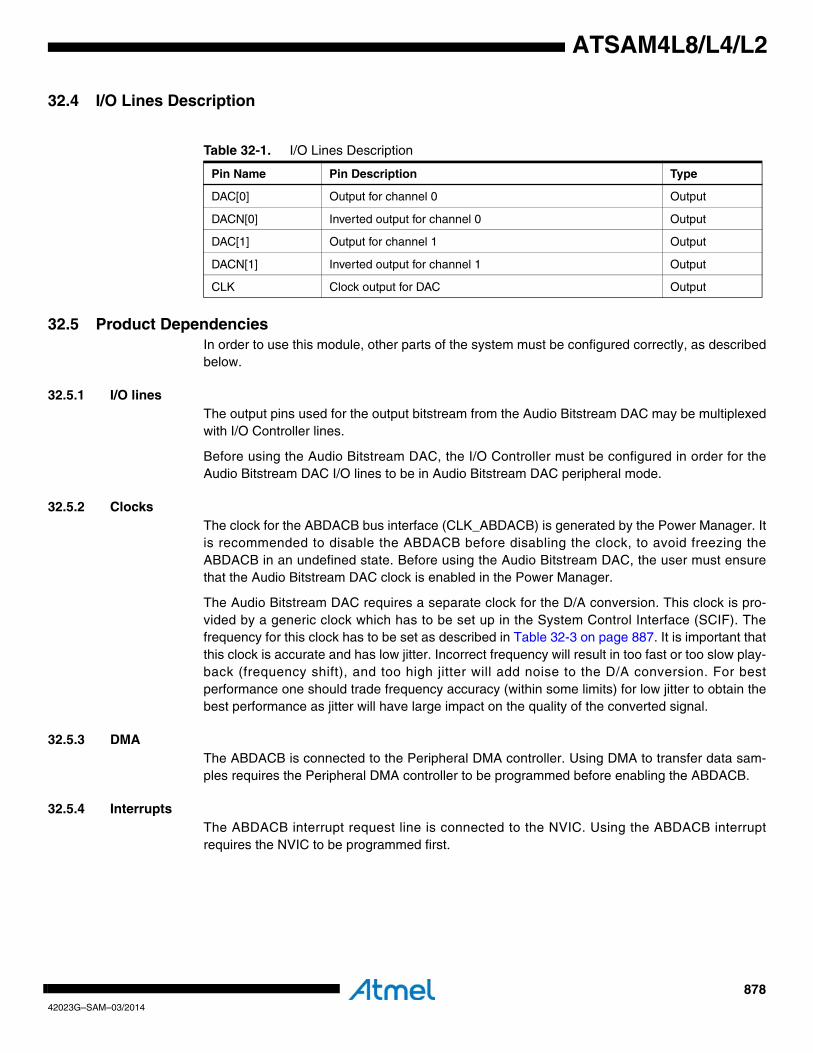
87842023G–SAM–03/2014
ATSAM4L8/L4/L2
32.4 I/O Lines Description
32.5 Product DependenciesIn order to use this module, other parts of the system must be configured correctly, as describedbelow.
32.5.1 I/O linesThe output pins used for the output bitstream from the Audio Bitstream DAC may be multiplexedwith I/O Controller lines.
Before using the Audio Bitstream DAC, the I/O Controller must be configured in order for theAudio Bitstream DAC I/O lines to be in Audio Bitstream DAC peripheral mode.
32.5.2 ClocksThe clock for the ABDACB bus interface (CLK_ABDACB) is generated by the Power Manager. Itis recommended to disable the ABDACB before disabling the clock, to avoid freezing theABDACB in an undefined state. Before using the Audio Bitstream DAC, the user must ensurethat the Audio Bitstream DAC clock is enabled in the Power Manager.
The Audio Bitstream DAC requires a separate clock for the D/A conversion. This clock is pro-vided by a generic clock which has to be set up in the System Control Interface (SCIF). Thefrequency for this clock has to be set as described in Table 32-3 on page 887. It is important thatthis clock is accurate and has low jitter. Incorrect frequency will result in too fast or too slow play-back (frequency shift), and too high jitter will add noise to the D/A conversion. For bestperformance one should trade frequency accuracy (within some limits) for low jitter to obtain thebest performance as jitter will have large impact on the quality of the converted signal.
32.5.3 DMAThe ABDACB is connected to the Peripheral DMA controller. Using DMA to transfer data sam-ples requires the Peripheral DMA controller to be programmed before enabling the ABDACB.
32.5.4 InterruptsThe ABDACB interrupt request line is connected to the NVIC. Using the ABDACB interruptrequires the NVIC to be programmed first.
Table 32-1. I/O Lines Description
Pin Name Pin Description Type
DAC[0] Output for channel 0 Output
DACN[0] Inverted output for channel 0 Output
DAC[1] Output for channel 1 Output
DACN[1] Inverted output for channel 1 Output
CLK Clock output for DAC Output
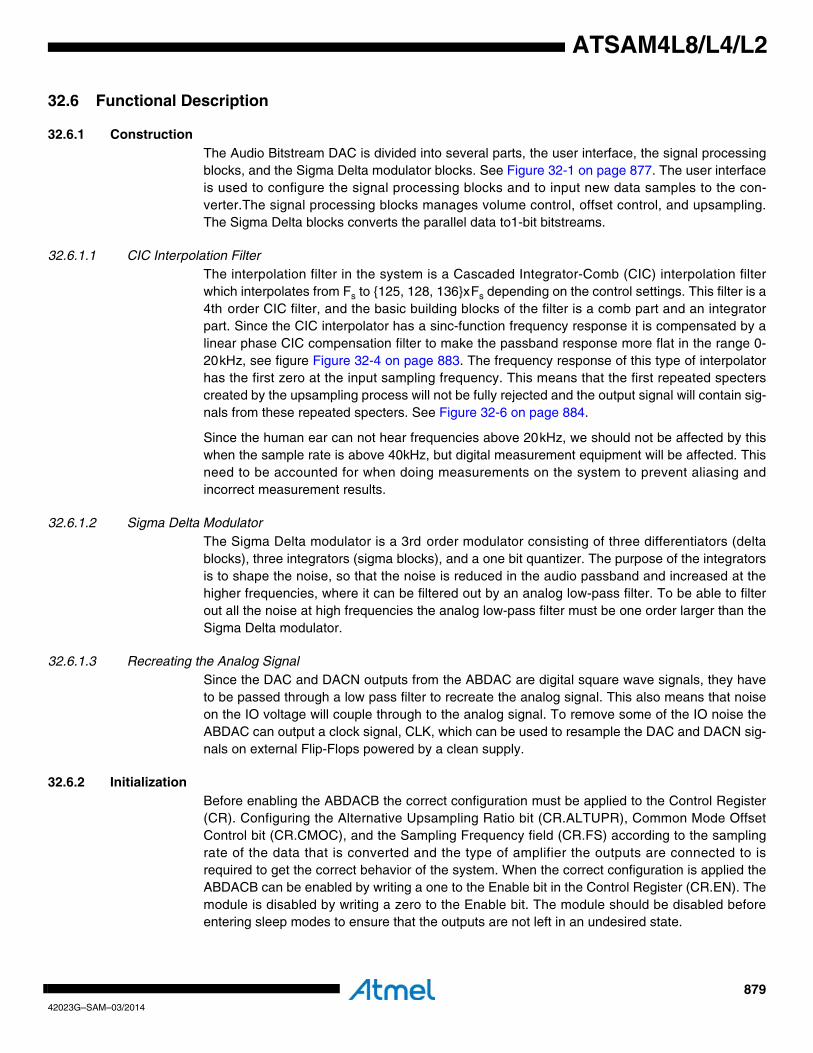
87942023G–SAM–03/2014
ATSAM4L8/L4/L2
32.6 Functional Description
32.6.1 ConstructionThe Audio Bitstream DAC is divided into several parts, the user interface, the signal processingblocks, and the Sigma Delta modulator blocks. See Figure 32-1 on page 877. The user interfaceis used to configure the signal processing blocks and to input new data samples to the con-verter.The signal processing blocks manages volume control, offset control, and upsampling.The Sigma Delta blocks converts the parallel data to1-bit bitstreams.
32.6.1.1 CIC Interpolation FilterThe interpolation filter in the system is a Cascaded Integrator-Comb (CIC) interpolation filterwhich interpolates from Fs to {125, 128, 136}xFs depending on the control settings. This filter is a4th order CIC filter, and the basic building blocks of the filter is a comb part and an integratorpart. Since the CIC interpolator has a sinc-function frequency response it is compensated by alinear phase CIC compensation filter to make the passband response more flat in the range 0-20kHz, see figure Figure 32-4 on page 883. The frequency response of this type of interpolatorhas the first zero at the input sampling frequency. This means that the first repeated specterscreated by the upsampling process will not be fully rejected and the output signal will contain sig-nals from these repeated specters. See Figure 32-6 on page 884.
Since the human ear can not hear frequencies above 20kHz, we should not be affected by thiswhen the sample rate is above 40kHz, but digital measurement equipment will be affected. Thisneed to be accounted for when doing measurements on the system to prevent aliasing andincorrect measurement results.
32.6.1.2 Sigma Delta ModulatorThe Sigma Delta modulator is a 3rd order modulator consisting of three differentiators (deltablocks), three integrators (sigma blocks), and a one bit quantizer. The purpose of the integratorsis to shape the noise, so that the noise is reduced in the audio passband and increased at thehigher frequencies, where it can be filtered out by an analog low-pass filter. To be able to filterout all the noise at high frequencies the analog low-pass filter must be one order larger than theSigma Delta modulator.
32.6.1.3 Recreating the Analog SignalSince the DAC and DACN outputs from the ABDAC are digital square wave signals, they haveto be passed through a low pass filter to recreate the analog signal. This also means that noiseon the IO voltage will couple through to the analog signal. To remove some of the IO noise theABDAC can output a clock signal, CLK, which can be used to resample the DAC and DACN sig-nals on external Flip-Flops powered by a clean supply.
32.6.2 InitializationBefore enabling the ABDACB the correct configuration must be applied to the Control Register(CR). Configuring the Alternative Upsampling Ratio bit (CR.ALTUPR), Common Mode OffsetControl bit (CR.CMOC), and the Sampling Frequency field (CR.FS) according to the samplingrate of the data that is converted and the type of amplifier the outputs are connected to isrequired to get the correct behavior of the system. When the correct configuration is applied theABDACB can be enabled by writing a one to the Enable bit in the Control Register (CR.EN). Themodule is disabled by writing a zero to the Enable bit. The module should be disabled beforeentering sleep modes to ensure that the outputs are not left in an undesired state.
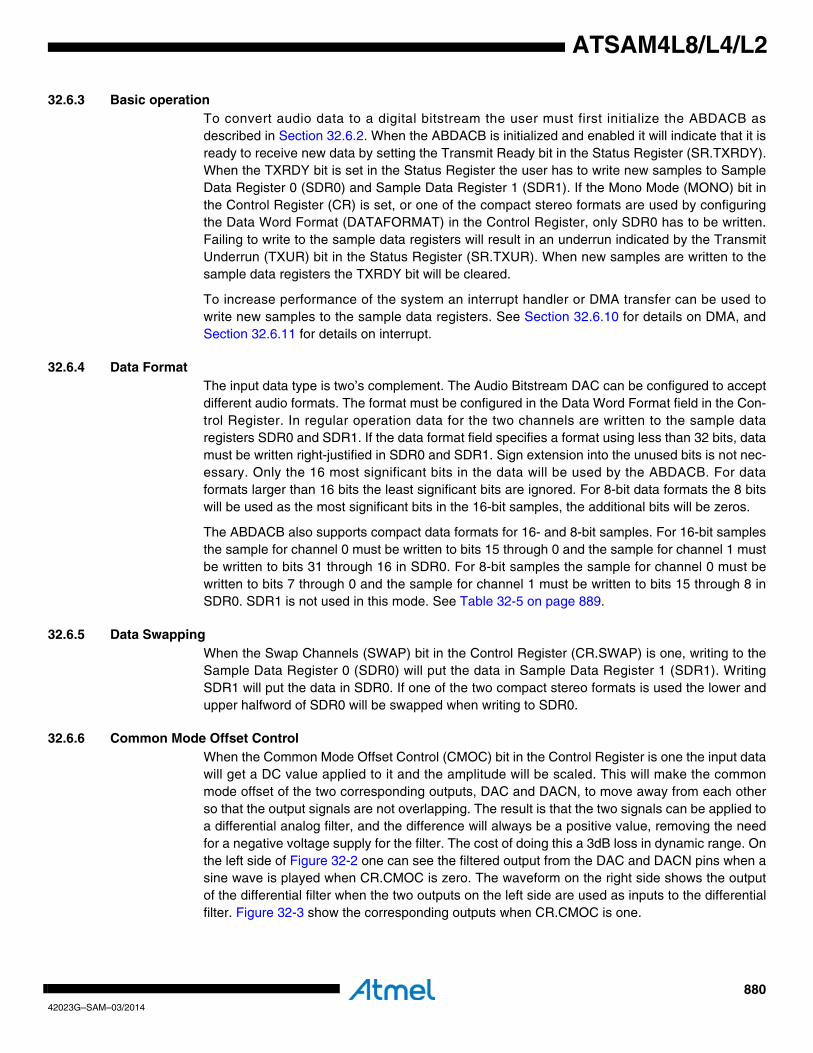
88042023G–SAM–03/2014
ATSAM4L8/L4/L2
32.6.3 Basic operationTo convert audio data to a digital bitstream the user must first initialize the ABDACB asdescribed in Section 32.6.2. When the ABDACB is initialized and enabled it will indicate that it isready to receive new data by setting the Transmit Ready bit in the Status Register (SR.TXRDY).When the TXRDY bit is set in the Status Register the user has to write new samples to SampleData Register 0 (SDR0) and Sample Data Register 1 (SDR1). If the Mono Mode (MONO) bit inthe Control Register (CR) is set, or one of the compact stereo formats are used by configuringthe Data Word Format (DATAFORMAT) in the Control Register, only SDR0 has to be written.Failing to write to the sample data registers will result in an underrun indicated by the TransmitUnderrun (TXUR) bit in the Status Register (SR.TXUR). When new samples are written to thesample data registers the TXRDY bit will be cleared.
To increase performance of the system an interrupt handler or DMA transfer can be used towrite new samples to the sample data registers. See Section 32.6.10 for details on DMA, andSection 32.6.11 for details on interrupt.
32.6.4 Data FormatThe input data type is two’s complement. The Audio Bitstream DAC can be configured to acceptdifferent audio formats. The format must be configured in the Data Word Format field in the Con-trol Register. In regular operation data for the two channels are written to the sample dataregisters SDR0 and SDR1. If the data format field specifies a format using less than 32 bits, datamust be written right-justified in SDR0 and SDR1. Sign extension into the unused bits is not nec-essary. Only the 16 most significant bits in the data will be used by the ABDACB. For dataformats larger than 16 bits the least significant bits are ignored. For 8-bit data formats the 8 bitswill be used as the most significant bits in the 16-bit samples, the additional bits will be zeros.
The ABDACB also supports compact data formats for 16- and 8-bit samples. For 16-bit samplesthe sample for channel 0 must be written to bits 15 through 0 and the sample for channel 1 mustbe written to bits 31 through 16 in SDR0. For 8-bit samples the sample for channel 0 must bewritten to bits 7 through 0 and the sample for channel 1 must be written to bits 15 through 8 inSDR0. SDR1 is not used in this mode. See Table 32-5 on page 889.
32.6.5 Data SwappingWhen the Swap Channels (SWAP) bit in the Control Register (CR.SWAP) is one, writing to theSample Data Register 0 (SDR0) will put the data in Sample Data Register 1 (SDR1). WritingSDR1 will put the data in SDR0. If one of the two compact stereo formats is used the lower andupper halfword of SDR0 will be swapped when writing to SDR0.
32.6.6 Common Mode Offset ControlWhen the Common Mode Offset Control (CMOC) bit in the Control Register is one the input datawill get a DC value applied to it and the amplitude will be scaled. This will make the commonmode offset of the two corresponding outputs, DAC and DACN, to move away from each otherso that the output signals are not overlapping. The result is that the two signals can be applied toa differential analog filter, and the difference will always be a positive value, removing the needfor a negative voltage supply for the filter. The cost of doing this a 3dB loss in dynamic range. Onthe left side of Figure 32-2 one can see the filtered output from the DAC and DACN pins when asine wave is played when CR.CMOC is zero. The waveform on the right side shows the outputof the differential filter when the two outputs on the left side are used as inputs to the differentialfilter. Figure 32-3 show the corresponding outputs when CR.CMOC is one.
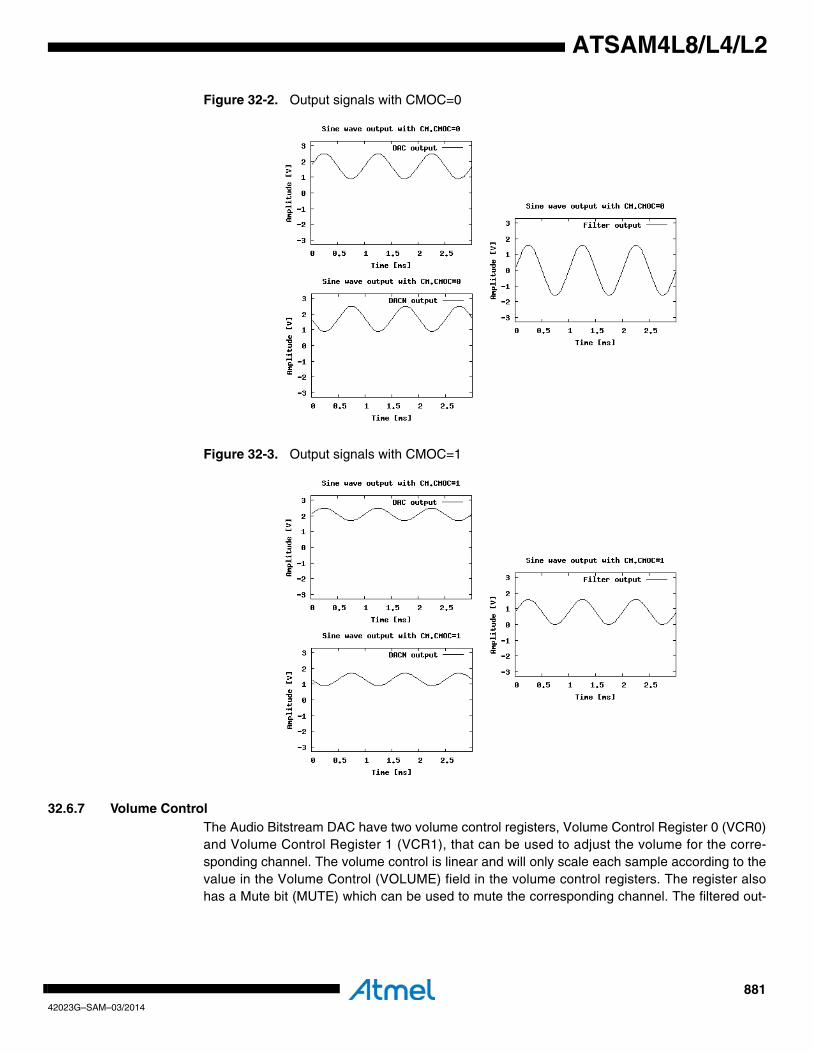
88142023G–SAM–03/2014
ATSAM4L8/L4/L2
Figure 32-2. Output signals with CMOC=0
Figure 32-3. Output signals with CMOC=1
32.6.7 Volume ControlThe Audio Bitstream DAC have two volume control registers, Volume Control Register 0 (VCR0)and Volume Control Register 1 (VCR1), that can be used to adjust the volume for the corre-sponding channel. The volume control is linear and will only scale each sample according to thevalue in the Volume Control (VOLUME) field in the volume control registers. The register alsohas a Mute bit (MUTE) which can be used to mute the corresponding channel. The filtered out-
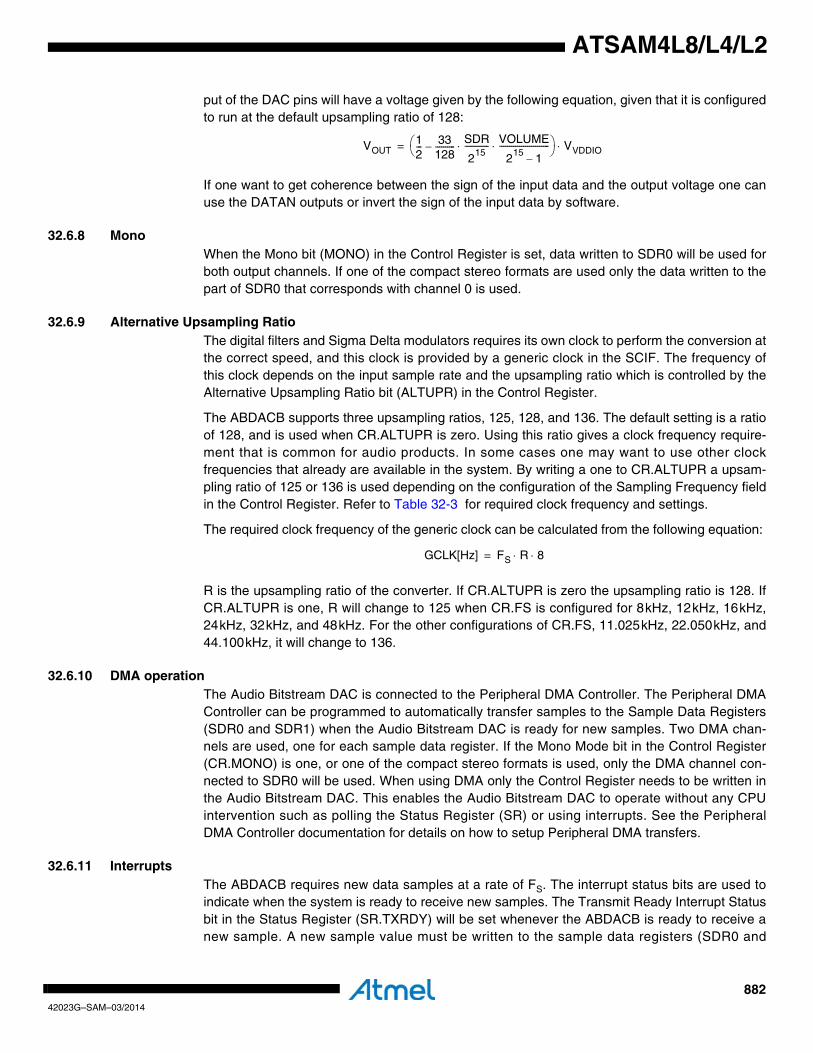
88242023G–SAM–03/2014
ATSAM4L8/L4/L2
put of the DAC pins will have a voltage given by the following equation, given that it is configuredto run at the default upsampling ratio of 128:
If one want to get coherence between the sign of the input data and the output voltage one canuse the DATAN outputs or invert the sign of the input data by software.
32.6.8 MonoWhen the Mono bit (MONO) in the Control Register is set, data written to SDR0 will be used forboth output channels. If one of the compact stereo formats are used only the data written to thepart of SDR0 that corresponds with channel 0 is used.
32.6.9 Alternative Upsampling RatioThe digital filters and Sigma Delta modulators requires its own clock to perform the conversion atthe correct speed, and this clock is provided by a generic clock in the SCIF. The frequency ofthis clock depends on the input sample rate and the upsampling ratio which is controlled by theAlternative Upsampling Ratio bit (ALTUPR) in the Control Register.
The ABDACB supports three upsampling ratios, 125, 128, and 136. The default setting is a ratioof 128, and is used when CR.ALTUPR is zero. Using this ratio gives a clock frequency require-ment that is common for audio products. In some cases one may want to use other clockfrequencies that already are available in the system. By writing a one to CR.ALTUPR a upsam-pling ratio of 125 or 136 is used depending on the configuration of the Sampling Frequency fieldin the Control Register. Refer to Table 32-3 for required clock frequency and settings.
The required clock frequency of the generic clock can be calculated from the following equation:
R is the upsampling ratio of the converter. If CR.ALTUPR is zero the upsampling ratio is 128. IfCR.ALTUPR is one, R will change to 125 when CR.FS is configured for 8kHz, 12kHz, 16kHz,24kHz, 32kHz, and 48kHz. For the other configurations of CR.FS, 11.025kHz, 22.050kHz, and44.100kHz, it will change to 136.
32.6.10 DMA operationThe Audio Bitstream DAC is connected to the Peripheral DMA Controller. The Peripheral DMAController can be programmed to automatically transfer samples to the Sample Data Registers(SDR0 and SDR1) when the Audio Bitstream DAC is ready for new samples. Two DMA chan-nels are used, one for each sample data register. If the Mono Mode bit in the Control Register(CR.MONO) is one, or one of the compact stereo formats is used, only the DMA channel con-nected to SDR0 will be used. When using DMA only the Control Register needs to be written inthe Audio Bitstream DAC. This enables the Audio Bitstream DAC to operate without any CPUintervention such as polling the Status Register (SR) or using interrupts. See the PeripheralDMA Controller documentation for details on how to setup Peripheral DMA transfers.
32.6.11 InterruptsThe ABDACB requires new data samples at a rate of FS. The interrupt status bits are used toindicate when the system is ready to receive new samples. The Transmit Ready Interrupt Statusbit in the Status Register (SR.TXRDY) will be set whenever the ABDACB is ready to receive anew sample. A new sample value must be written to the sample data registers (SDR0 and
VOUT12--- 33
128----------–
SDR
215------------ VOLUME
215 1–-------------------------⋅ ⋅⎝ ⎠
⎛ ⎞ VVDDIO⋅=
GCLK[Hz] FS R 8⋅ ⋅=
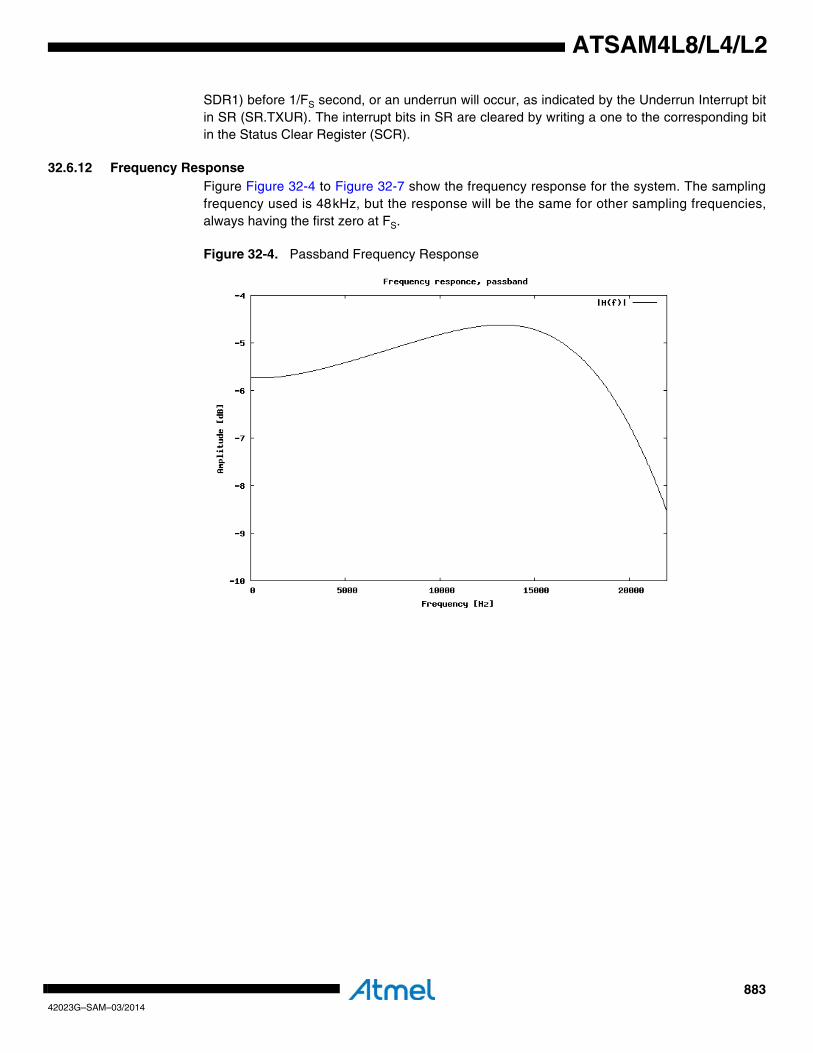
88342023G–SAM–03/2014
ATSAM4L8/L4/L2
SDR1) before 1/FS second, or an underrun will occur, as indicated by the Underrun Interrupt bitin SR (SR.TXUR). The interrupt bits in SR are cleared by writing a one to the corresponding bitin the Status Clear Register (SCR).
32.6.12 Frequency ResponseFigure Figure 32-4 to Figure 32-7 show the frequency response for the system. The samplingfrequency used is 48kHz, but the response will be the same for other sampling frequencies,always having the first zero at FS.
Figure 32-4. Passband Frequency Response
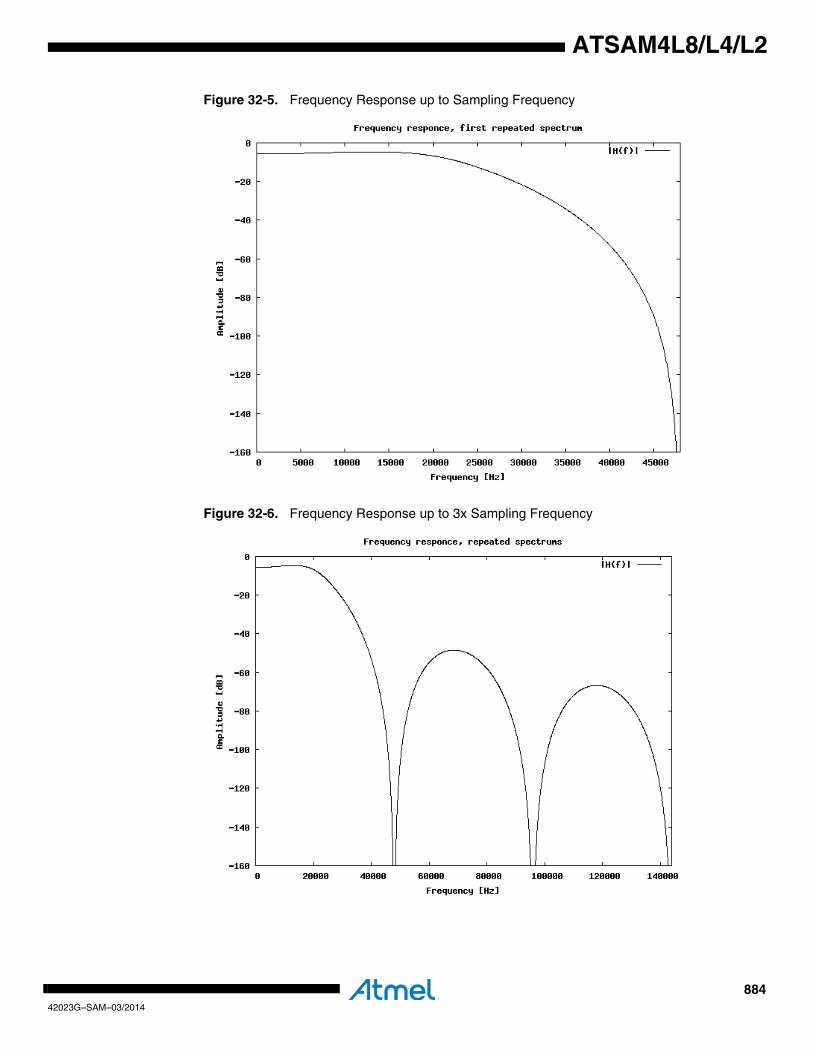
88442023G–SAM–03/2014
ATSAM4L8/L4/L2
Figure 32-5. Frequency Response up to Sampling Frequency
Figure 32-6. Frequency Response up to 3x Sampling Frequency
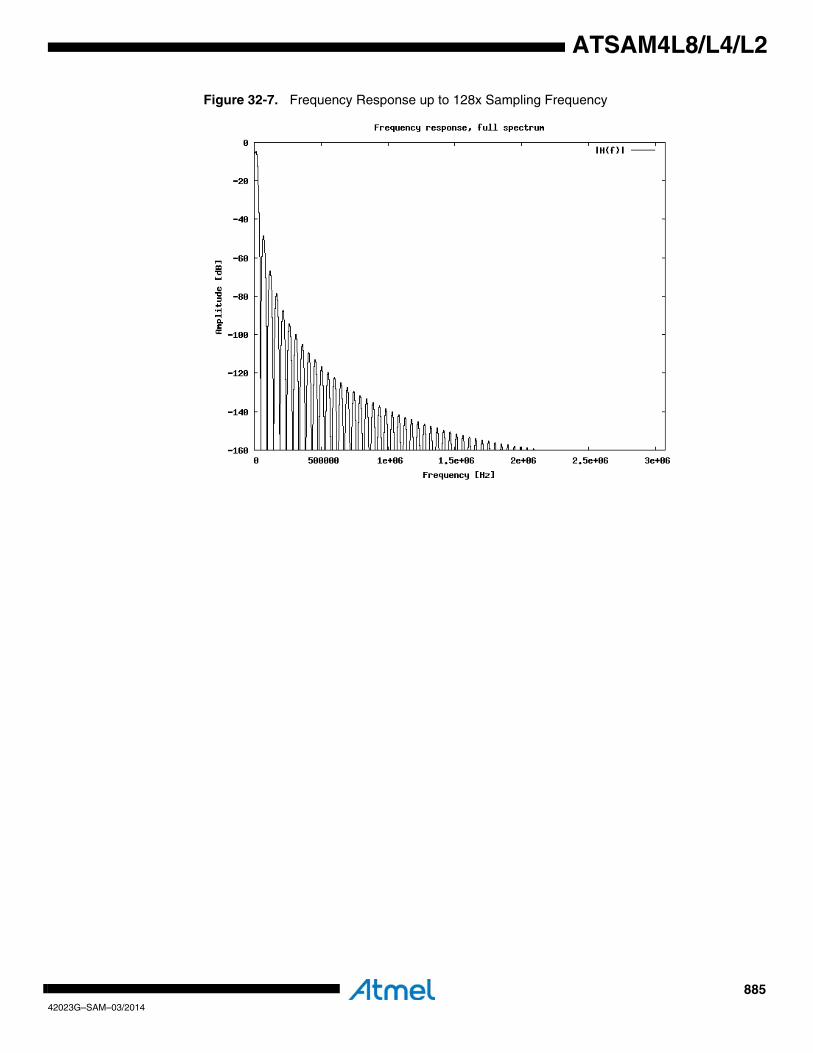
88542023G–SAM–03/2014
ATSAM4L8/L4/L2
Figure 32-7. Frequency Response up to 128x Sampling Frequency
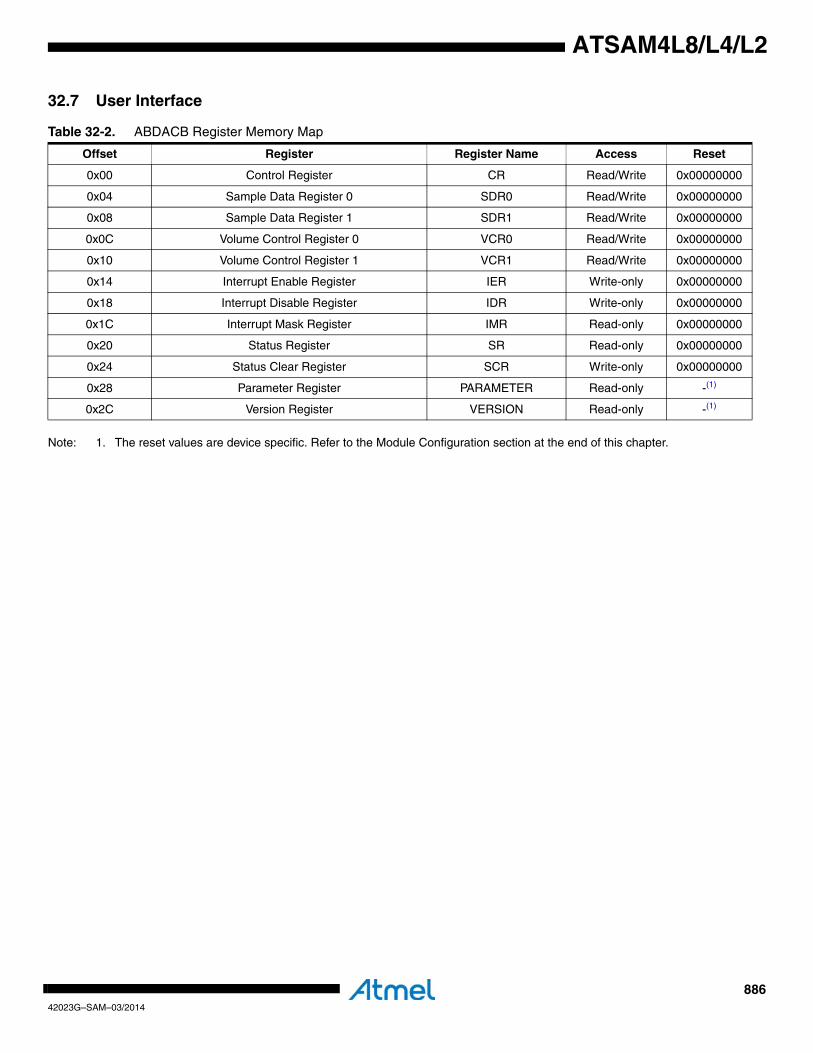
88642023G–SAM–03/2014
ATSAM4L8/L4/L2
32.7 User Interface
Note: 1. The reset values are device specific. Refer to the Module Configuration section at the end of this chapter.
Table 32-2. ABDACB Register Memory Map
Offset Register Register Name Access Reset
0x00 Control Register CR Read/Write 0x00000000
0x04 Sample Data Register 0 SDR0 Read/Write 0x00000000
0x08 Sample Data Register 1 SDR1 Read/Write 0x00000000
0x0C Volume Control Register 0 VCR0 Read/Write 0x00000000
0x10 Volume Control Register 1 VCR1 Read/Write 0x00000000
0x14 Interrupt Enable Register IER Write-only 0x00000000
0x18 Interrupt Disable Register IDR Write-only 0x00000000
0x1C Interrupt Mask Register IMR Read-only 0x00000000
0x20 Status Register SR Read-only 0x00000000
0x24 Status Clear Register SCR Write-only 0x00000000
0x28 Parameter Register PARAMETER Read-only -(1)
0x2C Version Register VERSION Read-only -(1)
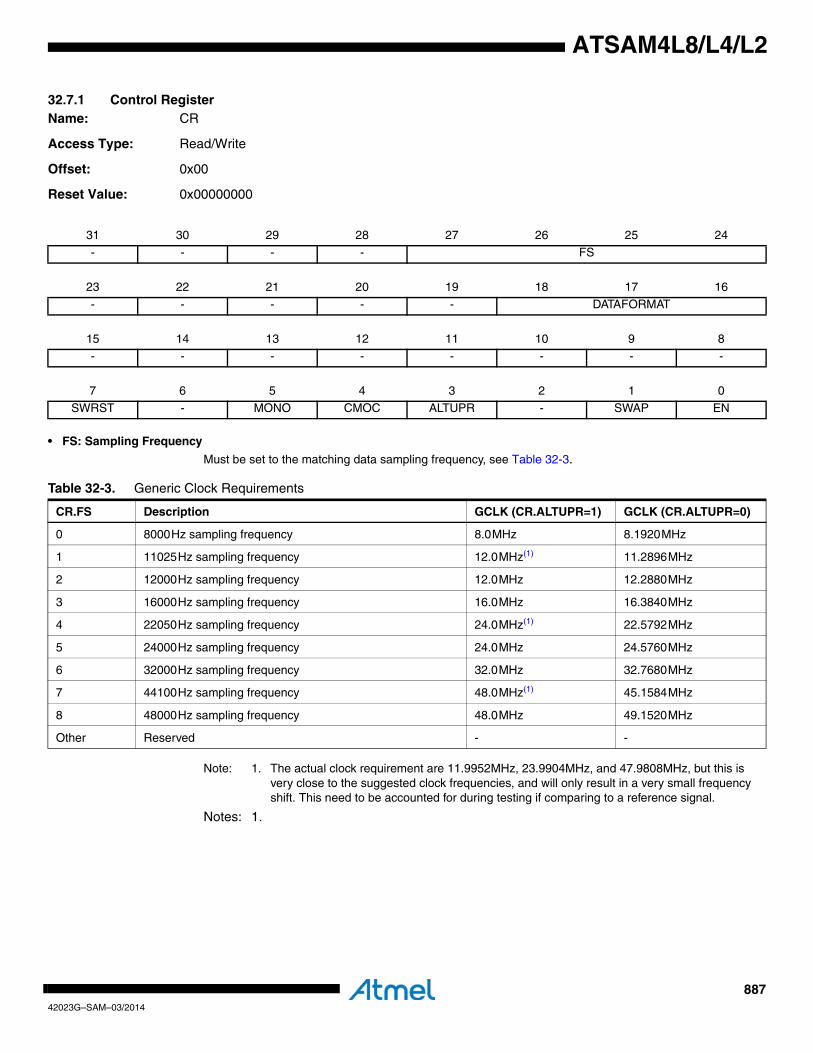
88742023G–SAM–03/2014
ATSAM4L8/L4/L2
32.7.1 Control RegisterName: CR
Access Type: Read/Write
Offset: 0x00
Reset Value: 0x00000000
• FS: Sampling Frequency
Must be set to the matching data sampling frequency, see Table 32-3.
Note: 1. The actual clock requirement are 11.9952MHz, 23.9904MHz, and 47.9808MHz, but this is very close to the suggested clock frequencies, and will only result in a very small frequency shift. This need to be accounted for during testing if comparing to a reference signal.
Notes: 1.
31 30 29 28 27 26 25 24
- - - - FS
23 22 21 20 19 18 17 16
- - - - - DATAFORMAT
15 14 13 12 11 10 9 8
- - - - - - - -
7 6 5 4 3 2 1 0
SWRST - MONO CMOC ALTUPR - SWAP EN
Table 32-3. Generic Clock Requirements
CR.FS Description GCLK (CR.ALTUPR=1) GCLK (CR.ALTUPR=0)
0 8000Hz sampling frequency 8.0MHz 8.1920MHz
1 11025Hz sampling frequency 12.0MHz(1) 11.2896MHz
2 12000Hz sampling frequency 12.0MHz 12.2880MHz
3 16000Hz sampling frequency 16.0MHz 16.3840MHz
4 22050Hz sampling frequency 24.0MHz(1) 22.5792MHz
5 24000Hz sampling frequency 24.0MHz 24.5760MHz
6 32000Hz sampling frequency 32.0MHz 32.7680MHz
7 44100Hz sampling frequency 48.0MHz(1) 45.1584MHz
8 48000Hz sampling frequency 48.0MHz 49.1520MHz
Other Reserved - -

88842023G–SAM–03/2014
ATSAM4L8/L4/L2
• DATAFORMAT: Data Word Format
• SWRST: Software ResetWriting a zero to this bit does not have any effect. Writing a one to this bit will reset the ABDACB as if a hardware reset was done.
• MONO: Mono Mode0: Mono mode is disabled.
1: Mono mode is enabled.
• CMOC: Common Mode Offset Control0: Common mode adjustment is disabled.
1: Common mode adjustment is enabled.• ALTUPR: Alternative Upsampling Ratio
0: Alternative upsampling is disabled.1: Alternative upsampling is enabled.
• SWAP: Swap Channels0: Channel swap is disabled.
1: Channel swap is enabled.
• EN: Enable0: The ABDACB is disabled.
1: The ABDACB is enabled.
Table 32-4. Data Word Format
DATAFORMAT Word length Comment
0 32 bits
1 24 bits
2 20 bits
3 18 bits
4 16 bits
5 16 bits compact stereo Channel 1 sample in bits 31 through 16, channel 0 sample in bits 15 through 0 in SDR0
6 8 bits
7 8 bits compact stereo Channel 1 sample in bits 15 through 8, channel 0 sample in bits 7through 0 in SDR0
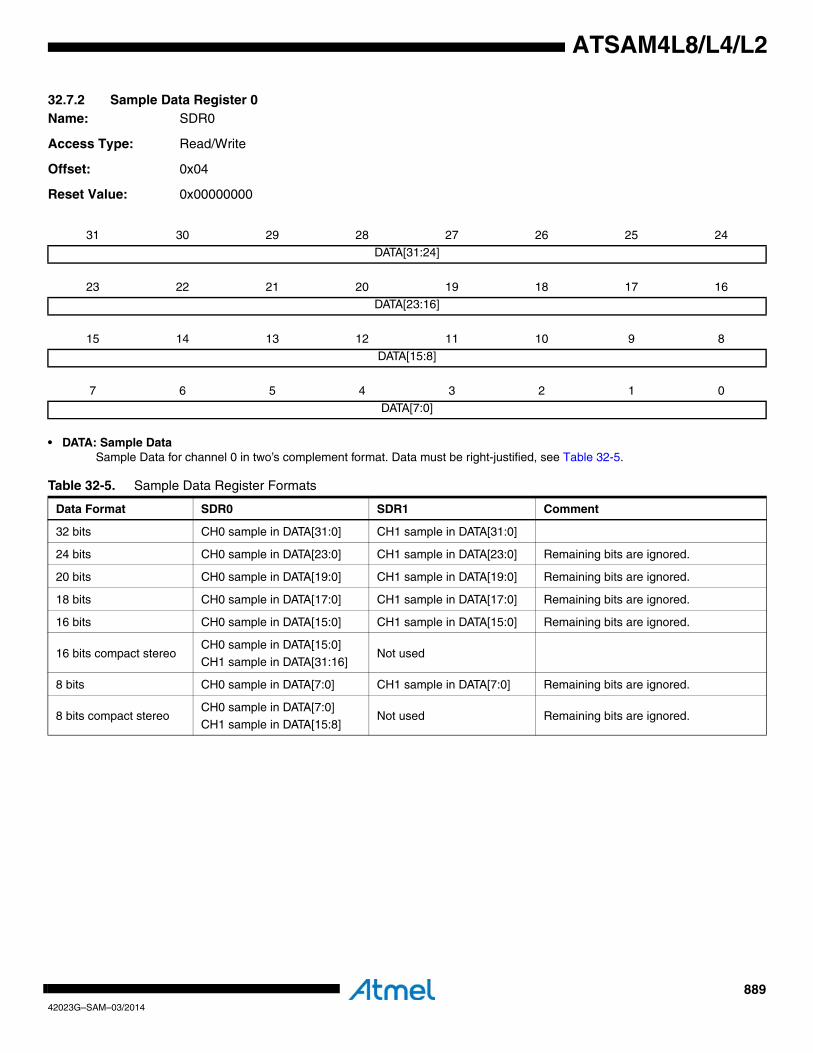
88942023G–SAM–03/2014
ATSAM4L8/L4/L2
32.7.2 Sample Data Register 0Name: SDR0
Access Type: Read/Write
Offset: 0x04
Reset Value: 0x00000000
• DATA: Sample DataSample Data for channel 0 in two’s complement format. Data must be right-justified, see Table 32-5.
31 30 29 28 27 26 25 24
DATA[31:24]
23 22 21 20 19 18 17 16
DATA[23:16]
15 14 13 12 11 10 9 8
DATA[15:8]
7 6 5 4 3 2 1 0
DATA[7:0]
Table 32-5. Sample Data Register Formats
Data Format SDR0 SDR1 Comment
32 bits CH0 sample in DATA[31:0] CH1 sample in DATA[31:0]
24 bits CH0 sample in DATA[23:0] CH1 sample in DATA[23:0] Remaining bits are ignored.
20 bits CH0 sample in DATA[19:0] CH1 sample in DATA[19:0] Remaining bits are ignored.
18 bits CH0 sample in DATA[17:0] CH1 sample in DATA[17:0] Remaining bits are ignored.
16 bits CH0 sample in DATA[15:0] CH1 sample in DATA[15:0] Remaining bits are ignored.
16 bits compact stereoCH0 sample in DATA[15:0]
CH1 sample in DATA[31:16]Not used
8 bits CH0 sample in DATA[7:0] CH1 sample in DATA[7:0] Remaining bits are ignored.
8 bits compact stereoCH0 sample in DATA[7:0]CH1 sample in DATA[15:8]
Not used Remaining bits are ignored.
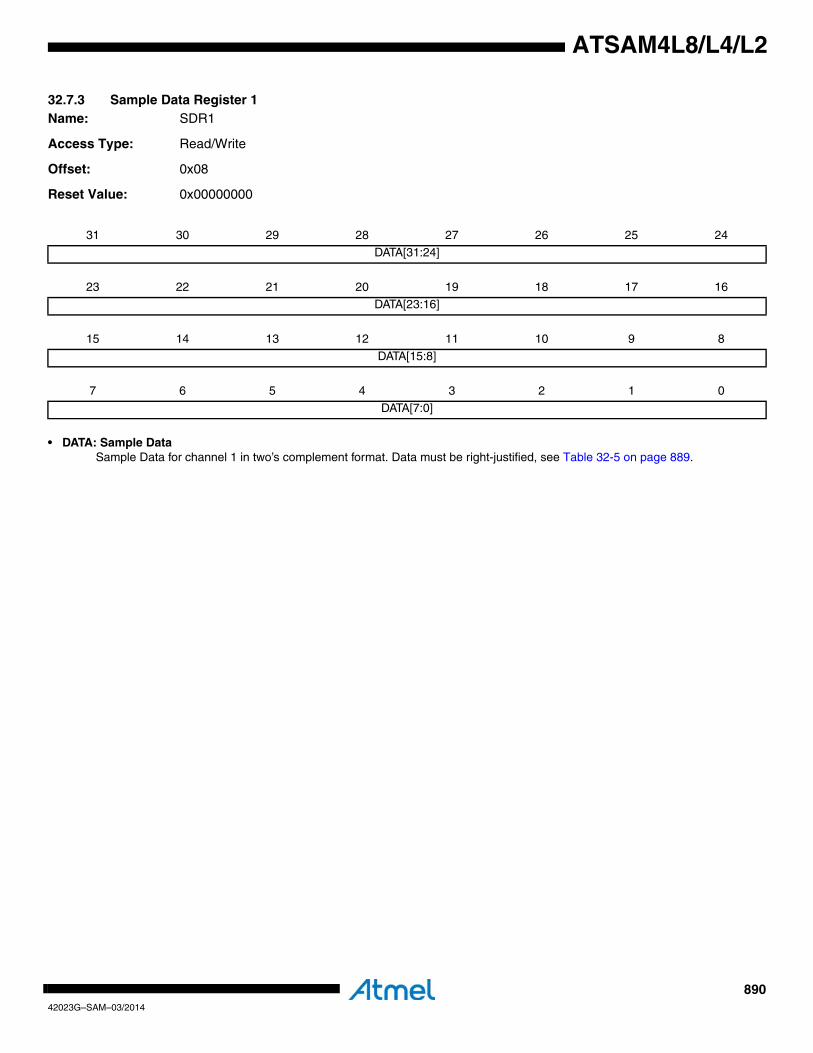
89042023G–SAM–03/2014
ATSAM4L8/L4/L2
32.7.3 Sample Data Register 1Name: SDR1
Access Type: Read/Write
Offset: 0x08
Reset Value: 0x00000000
• DATA: Sample DataSample Data for channel 1 in two’s complement format. Data must be right-justified, see Table 32-5 on page 889.
31 30 29 28 27 26 25 24
DATA[31:24]
23 22 21 20 19 18 17 16
DATA[23:16]
15 14 13 12 11 10 9 8
DATA[15:8]
7 6 5 4 3 2 1 0
DATA[7:0]
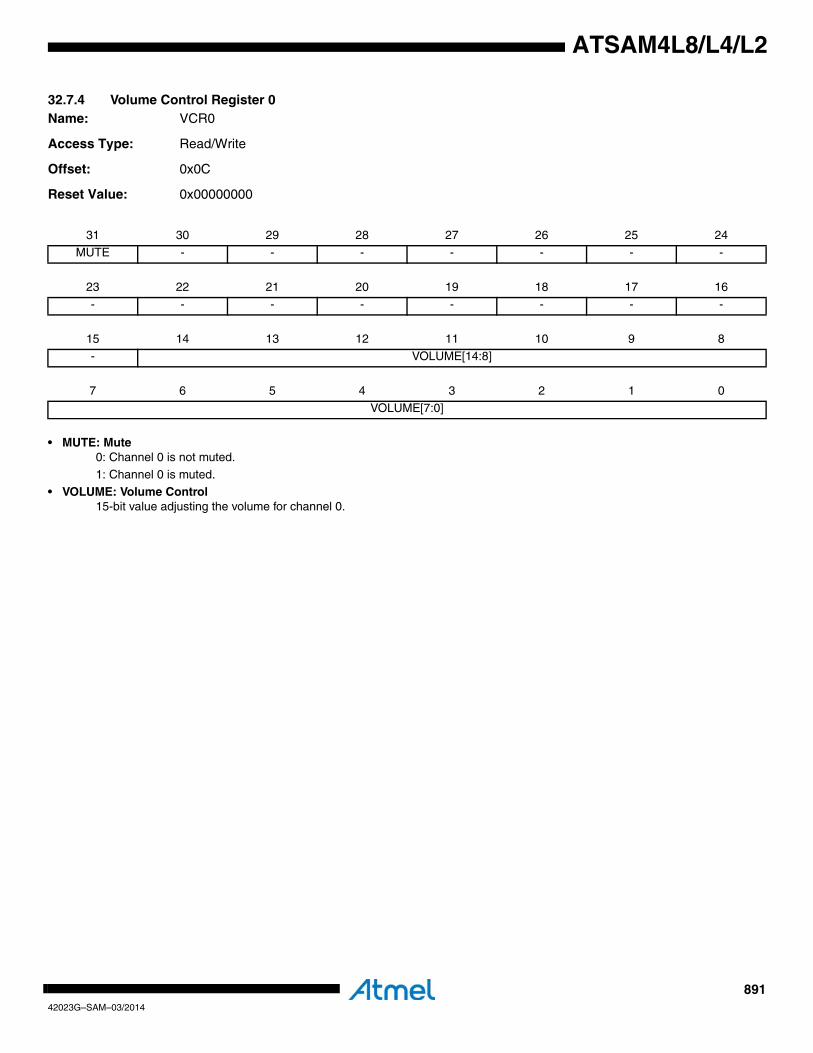
89142023G–SAM–03/2014
ATSAM4L8/L4/L2
32.7.4 Volume Control Register 0Name: VCR0
Access Type: Read/Write
Offset: 0x0C
Reset Value: 0x00000000
• MUTE: Mute0: Channel 0 is not muted.
1: Channel 0 is muted.
• VOLUME: Volume Control15-bit value adjusting the volume for channel 0.
31 30 29 28 27 26 25 24
MUTE - - - - - - -
23 22 21 20 19 18 17 16
- - - - - - - -
15 14 13 12 11 10 9 8
- VOLUME[14:8]
7 6 5 4 3 2 1 0
VOLUME[7:0]
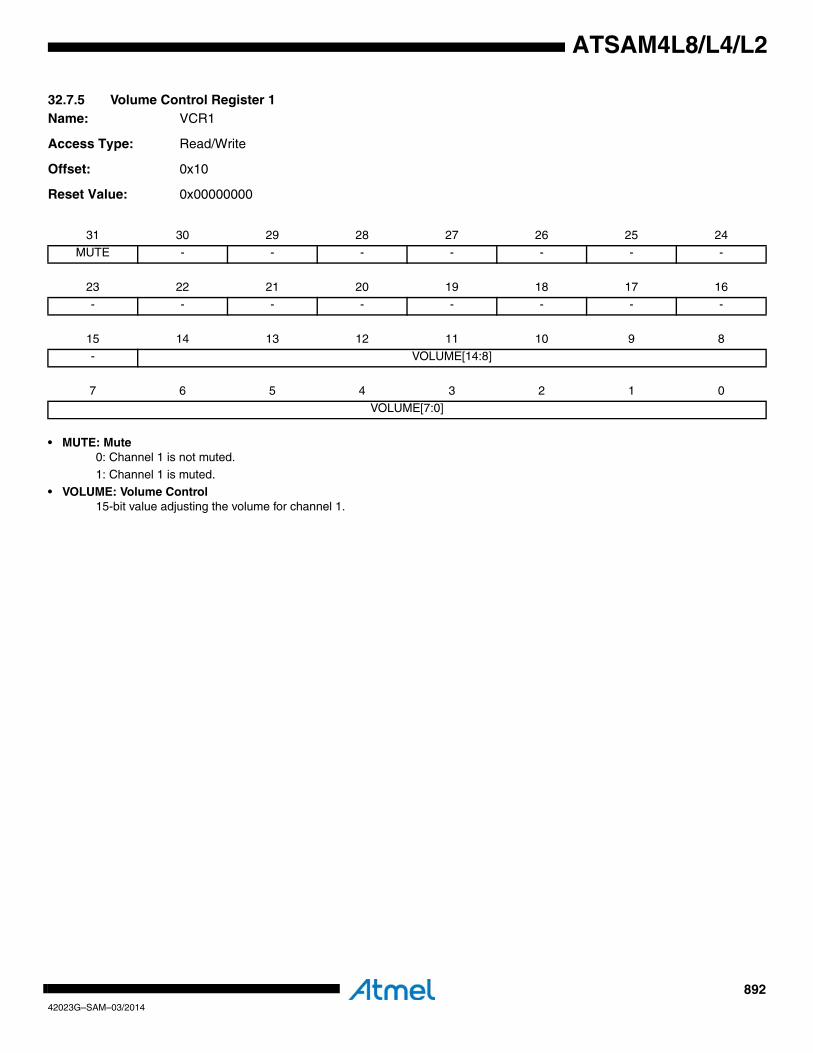
89242023G–SAM–03/2014
ATSAM4L8/L4/L2
32.7.5 Volume Control Register 1Name: VCR1
Access Type: Read/Write
Offset: 0x10
Reset Value: 0x00000000
• MUTE: Mute0: Channel 1 is not muted.
1: Channel 1 is muted.
• VOLUME: Volume Control15-bit value adjusting the volume for channel 1.
31 30 29 28 27 26 25 24
MUTE - - - - - - -
23 22 21 20 19 18 17 16
- - - - - - - -
15 14 13 12 11 10 9 8
- VOLUME[14:8]
7 6 5 4 3 2 1 0
VOLUME[7:0]

89342023G–SAM–03/2014
ATSAM4L8/L4/L2
32.7.6 Interrupt Enable RegisterName: IER
Access Type: Write-only
Offset: 0x14
Reset Value: 0x00000000
Writing a zero to a bit in this register has no effect.
Writing a one to a bit in this register will set the corresponding bit in IMR.
31 30 29 28 27 26 25 24
- - - - - - - -
23 22 21 20 19 18 17 16
- - - - - - - -
15 14 13 12 11 10 9 8
- - - - - - - -
7 6 5 4 3 2 1 0
- - - - - TXUR TXRDY -
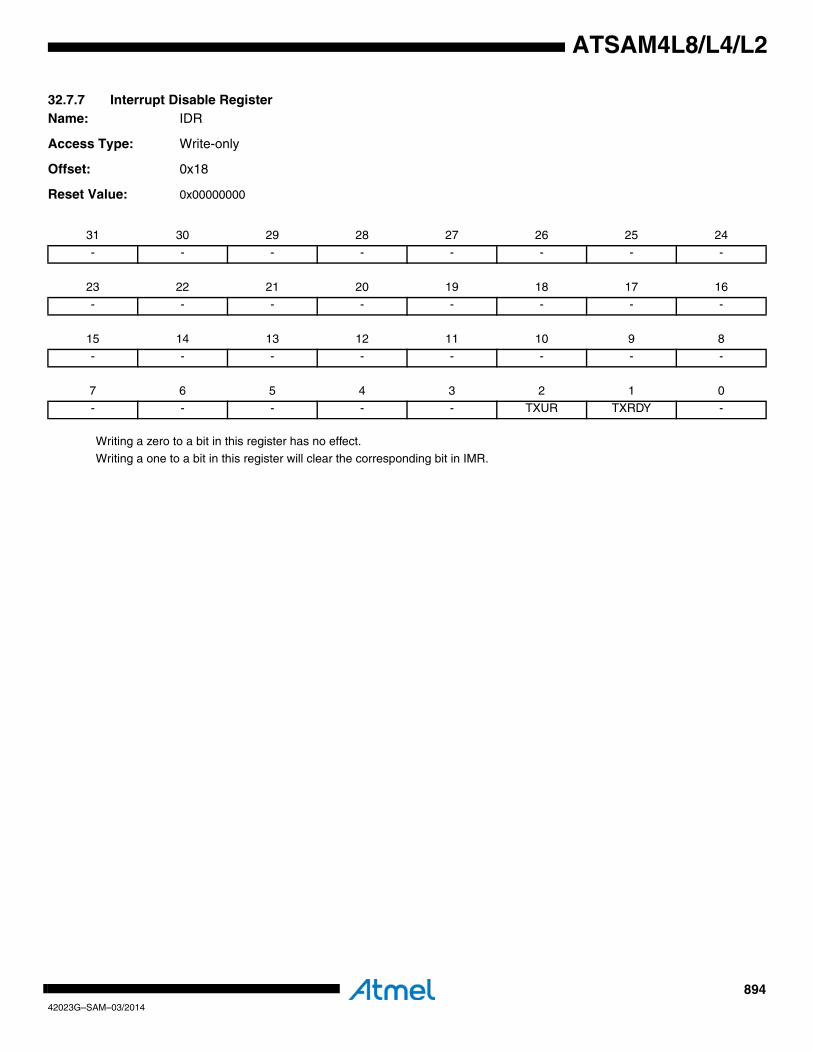
89442023G–SAM–03/2014
ATSAM4L8/L4/L2
32.7.7 Interrupt Disable RegisterName: IDR
Access Type: Write-only
Offset: 0x18
Reset Value: 0x00000000
Writing a zero to a bit in this register has no effect.
Writing a one to a bit in this register will clear the corresponding bit in IMR.
31 30 29 28 27 26 25 24
- - - - - - - -
23 22 21 20 19 18 17 16
- - - - - - - -
15 14 13 12 11 10 9 8
- - - - - - - -
7 6 5 4 3 2 1 0
- - - - - TXUR TXRDY -
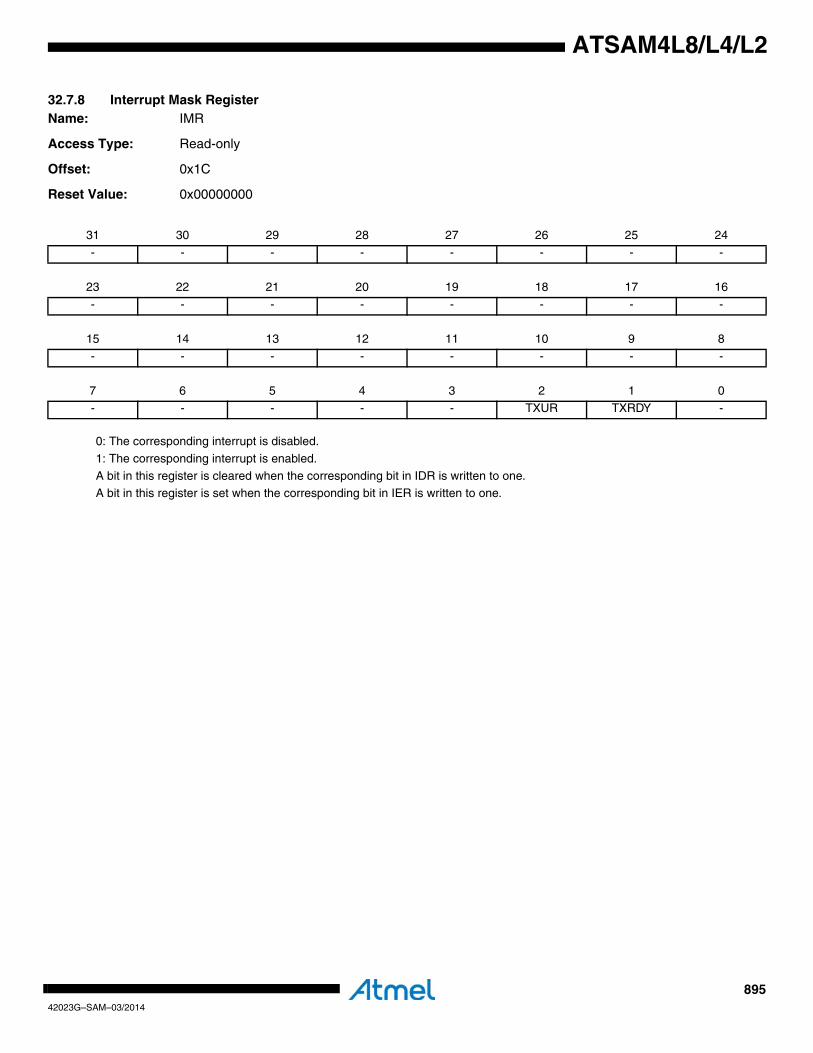
89542023G–SAM–03/2014
ATSAM4L8/L4/L2
32.7.8 Interrupt Mask RegisterName: IMR
Access Type: Read-only
Offset: 0x1C
Reset Value: 0x00000000
0: The corresponding interrupt is disabled.
1: The corresponding interrupt is enabled.
A bit in this register is cleared when the corresponding bit in IDR is written to one.A bit in this register is set when the corresponding bit in IER is written to one.
31 30 29 28 27 26 25 24
- - - - - - - -
23 22 21 20 19 18 17 16
- - - - - - - -
15 14 13 12 11 10 9 8
- - - - - - - -
7 6 5 4 3 2 1 0
- - - - - TXUR TXRDY -
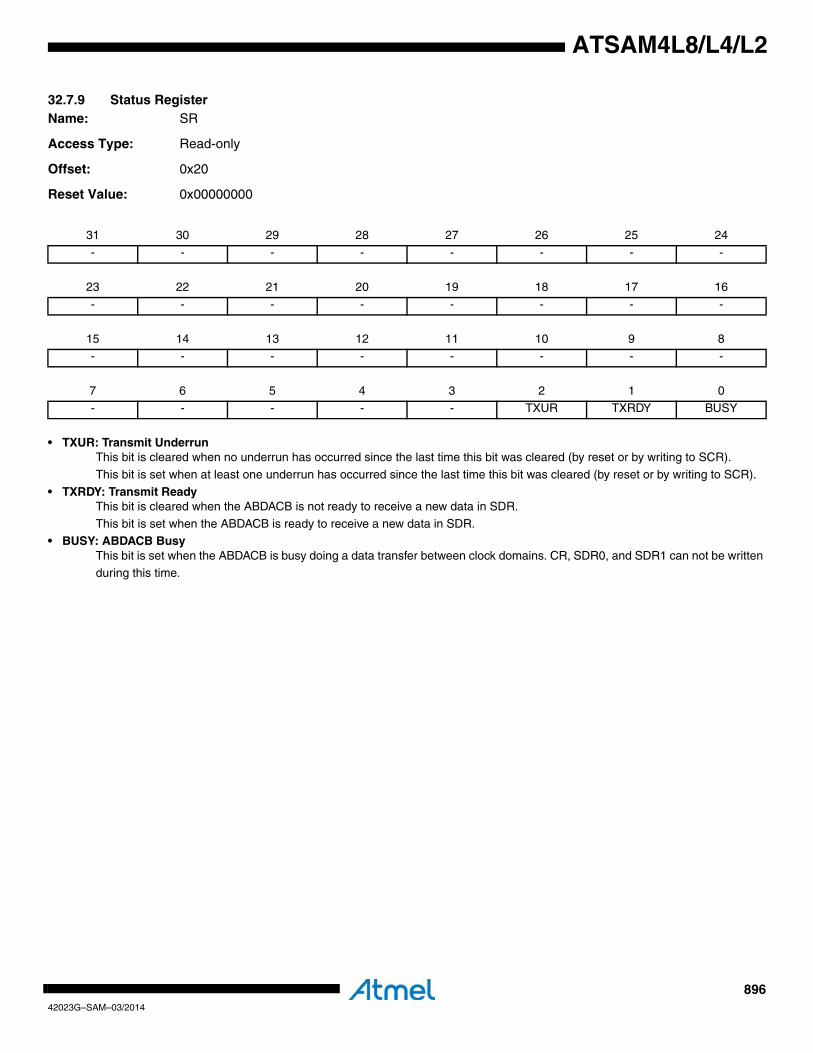
89642023G–SAM–03/2014
ATSAM4L8/L4/L2
32.7.9 Status RegisterName: SR
Access Type: Read-only
Offset: 0x20
Reset Value: 0x00000000
• TXUR: Transmit UnderrunThis bit is cleared when no underrun has occurred since the last time this bit was cleared (by reset or by writing to SCR).
This bit is set when at least one underrun has occurred since the last time this bit was cleared (by reset or by writing to SCR).
• TXRDY: Transmit ReadyThis bit is cleared when the ABDACB is not ready to receive a new data in SDR.
This bit is set when the ABDACB is ready to receive a new data in SDR.• BUSY: ABDACB Busy
This bit is set when the ABDACB is busy doing a data transfer between clock domains. CR, SDR0, and SDR1 can not be written during this time.
31 30 29 28 27 26 25 24
- - - - - - - -
23 22 21 20 19 18 17 16
- - - - - - - -
15 14 13 12 11 10 9 8
- - - - - - - -
7 6 5 4 3 2 1 0
- - - - - TXUR TXRDY BUSY
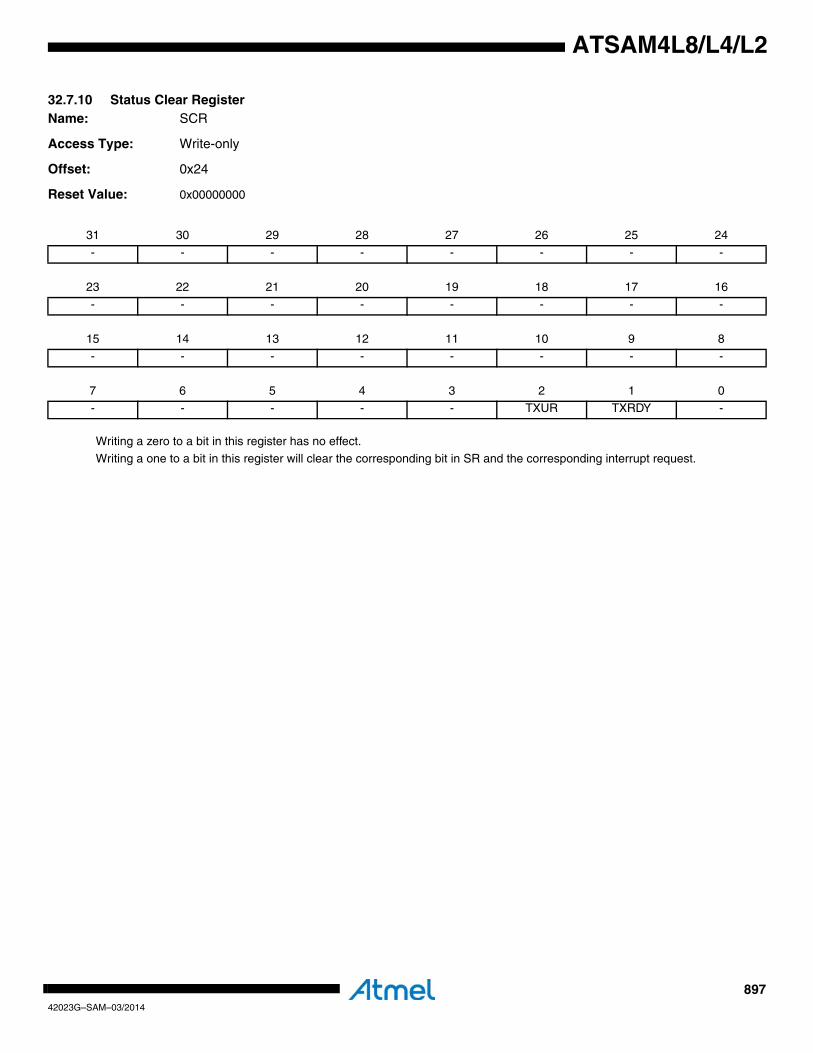
89742023G–SAM–03/2014
ATSAM4L8/L4/L2
32.7.10 Status Clear RegisterName: SCR
Access Type: Write-only
Offset: 0x24
Reset Value: 0x00000000
Writing a zero to a bit in this register has no effect.
Writing a one to a bit in this register will clear the corresponding bit in SR and the corresponding interrupt request.
31 30 29 28 27 26 25 24
- - - - - - - -
23 22 21 20 19 18 17 16
- - - - - - - -
15 14 13 12 11 10 9 8
- - - - - - - -
7 6 5 4 3 2 1 0
- - - - - TXUR TXRDY -
89842023G–SAM–03/2014
ATSAM4L8/L4/L2
32.7.11 Parameter RegisterName: PARAMETER
Access Type: Read-only
Offset: 0x28
Reset Value: 0x00000000
Reserved. No functionality associated.
31 30 29 28 27 26 25 24
- - - - - - - -
23 22 21 20 19 18 17 16
- - - - - - - -
15 14 13 12 11 10 9 8
- - - - - - - -
7 6 5 4 3 2 1 0
- - - - - - - -

89942023G–SAM–03/2014
ATSAM4L8/L4/L2
32.7.12 Version RegisterName: VERSION
Access Type: Read-only
Offset: 0x2C
Reset Value: 0x00000000
• VARIANT: Variant NumberReserved. No functionality associated.
• VERSION: Version NumberVersion number of the module. No functionality associated.
31 30 29 28 27 26 25 24
- - - - - - - -
23 22 21 20 19 18 17 16
- - - - VARIANT
15 14 13 12 11 10 9 8
- - - - VERSION[11:8]
7 6 5 4 3 2 1 0
VERSION[7:0]
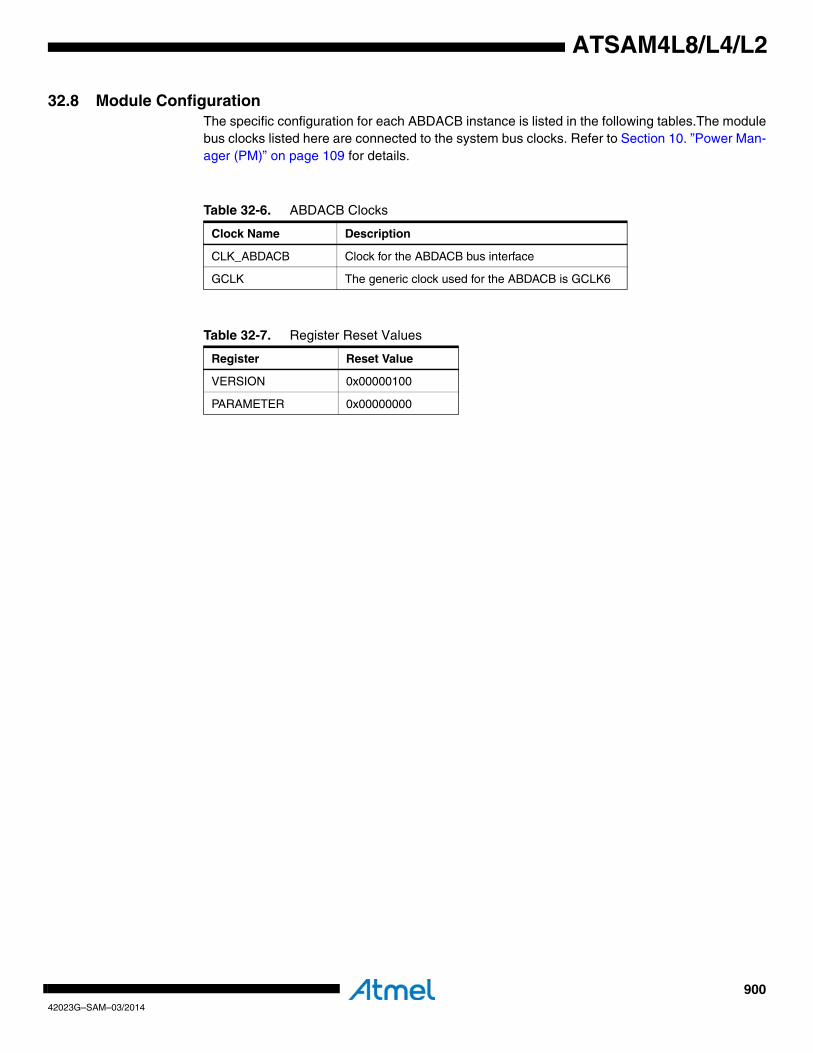
90042023G–SAM–03/2014
ATSAM4L8/L4/L2
32.8 Module ConfigurationThe specific configuration for each ABDACB instance is listed in the following tables.The modulebus clocks listed here are connected to the system bus clocks. Refer to Section 10. ”Power Man-ager (PM)” on page 109 for details.
Table 32-6. ABDACB Clocks
Clock Name Description
CLK_ABDACB Clock for the ABDACB bus interface
GCLK The generic clock used for the ABDACB is GCLK6
Table 32-7. Register Reset Values
Register Reset Value
VERSION 0x00000100
PARAMETER 0x00000000
90142023G–SAM–03/2014
ATSAM4L8/L4/L2
33. Digital to Analog Converter Controller (DACC)Rev. 1.1.1.0
33.1 Features• 10-bit Resolution• Hardware Trigger
– External Trigger Pins– Peripheral Event
• PDCA Support• DACC Timings Configuration• Internal FIFO for flexibility and efficiency
33.2 OverviewThe Digital-to-Analog Converter Controller (DACC) supports 10-bit resolution. Data to be con-verted are sent in a common register. External triggers, through ext_trig pins, and internaltriggers (events) are configurable.
The DACC connects with a PDCA channel reducing and processor intervention.
User can configure DACC timings, such as Startup Time and Internal Trigger Period.
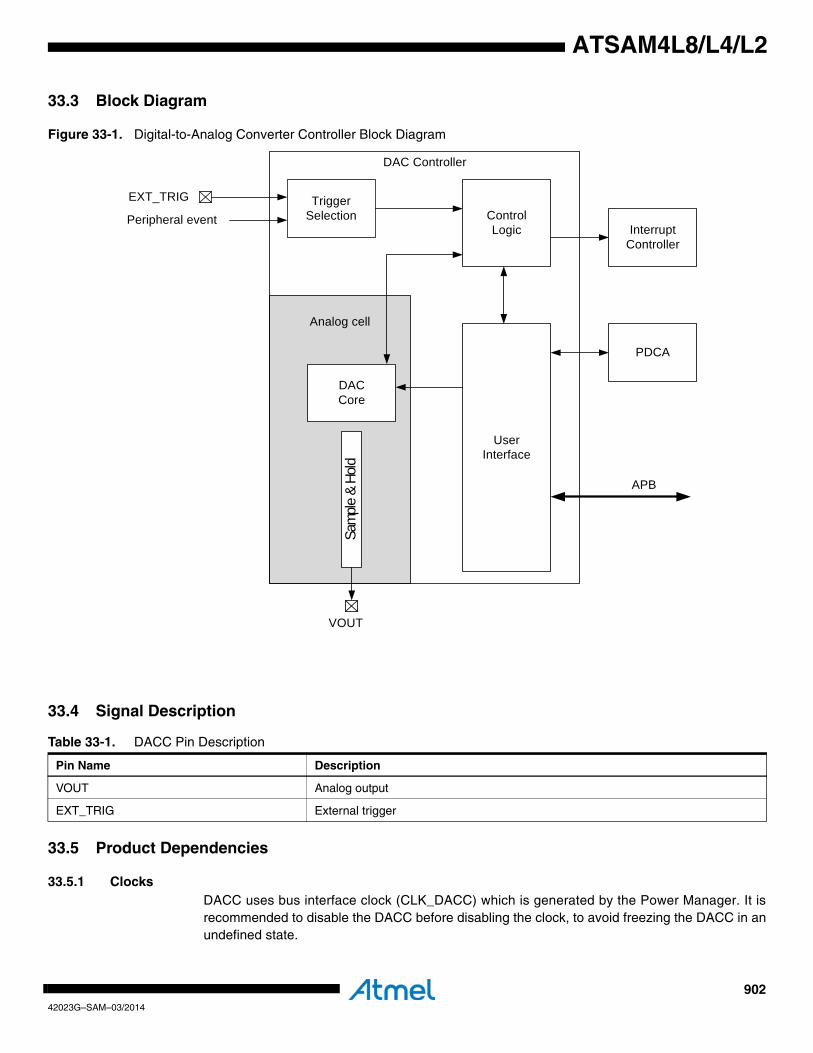
90242023G–SAM–03/2014
ATSAM4L8/L4/L2
33.3 Block Diagram
Figure 33-1. Digital-to-Analog Converter Controller Block Diagram
33.4 Signal Description
33.5 Product Dependencies
33.5.1 ClocksDACC uses bus interface clock (CLK_DACC) which is generated by the Power Manager. It isrecommended to disable the DACC before disabling the clock, to avoid freezing the DACC in anundefined state.
TriggerSelection Control
Logic InterruptController
PDCA
UserInterface
Analog cell
DACCore
EXT_TRIG
Sam
ple &
Hold
VOUT
DAC Controller
APB
Peripheral event
Table 33-1. DACC Pin Description
Pin Name Description
VOUT Analog output
EXT_TRIG External trigger

90342023G–SAM–03/2014
ATSAM4L8/L4/L2
33.5.2 Interrupt SourcesThe DACC interrupt line is connected on one of the internal sources of the NVIC. Using theDACC interrupt requires the NVIC to be programmed first.
33.6 Functional Description
33.6.1 Digital-to-Analog ConversionDACC uses the APB clock (CLK_DACC) to perform conversions.
DAC is enabled by writing a one to DACEN in Mode Register (MR). Once enabled, DAC is readyto operate after a startup time (see electrical characteristics). User must therefore configurestartup time by writing new value in MR.STARTUP, according to APB clcok frequency. Startuptime is therefore (MR.STARTUP+1) * APB clock period.
Once a conversion is started, DAC requires setup time before providing analog result on theanalog pin VOUT (see electrical characteristics).
33.6.2 Conversion FIFOTo provide flexibility and high efficiency, a 4 half-word FIFO is used to handle the data toconvert.
As long as the Transmit Ready bit (TXRDY) in the Interrupt Status Register (ISR) is set to onethe DAC Controller accepts new conversion requests by writing data to the Conversion DataRegister (CDR). Data which cannot be converted immediately are stored in the FIFO.
When the FIFO is full or the DACC is not ready to accept conversion requests, TXRDY is low.Writing to CDR while TXRDY is low corrupts FIFO data.
User can configure transfer data size. When bit WORD in MR is set to one transfer size is 16 bitsand when WORD is set to one transfer size is 32 bits. In 16 bits transfer size, data to convert isCDR[9:0] and in 32 bits transfer size, data to convert are CDR[9:0] (first data to convert) andCDR[25:16] (second data to convert).
33.6.3 Conversion TriggersInternal trigger mode is selected by writing a zero to Trigger Enable (MR.TRGEN). In internaltrigger mode, conversion starts as soon as DAC is enabled, data is written in the ConversionData Register (CDR) and internal trigger event occurs. The internal trigger frequency is configu-rable through the MR.CLKDIV and must not exceed the maximum frequency allowed by theDAC. Trigger period is therefore CLKDIV * APB clock period.
External trigger mode is selected by writing a one to MR.TRGEN. The external event source isconfigured by writing a zero to Trigger Select (MR.TRGSEL) to select external pin EXT_TRGand a one to select the peripheral event (from PEVC). With external pin source, DACC waits fora rising edge to begin conversion. With peripheral event source, DACC waits for event (config-ured by PEVC) to begin conversion.
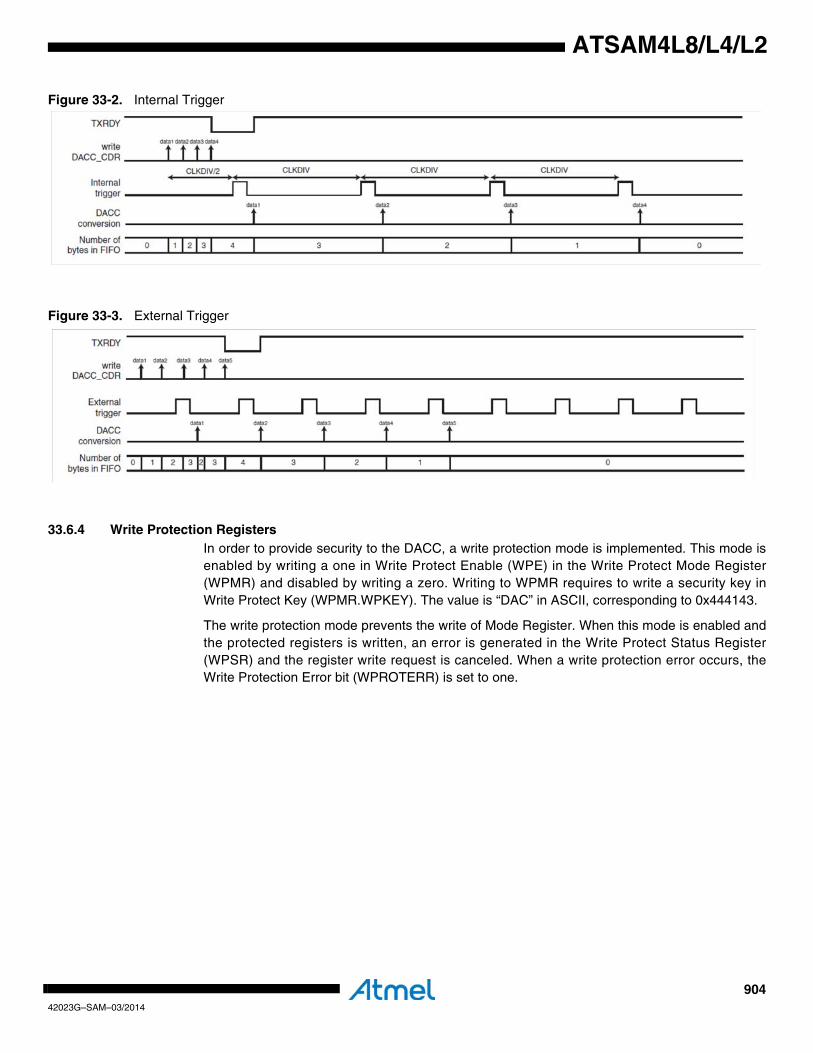
90442023G–SAM–03/2014
ATSAM4L8/L4/L2
Figure 33-2. Internal Trigger
Figure 33-3. External Trigger
33.6.4 Write Protection RegistersIn order to provide security to the DACC, a write protection mode is implemented. This mode isenabled by writing a one in Write Protect Enable (WPE) in the Write Protect Mode Register(WPMR) and disabled by writing a zero. Writing to WPMR requires to write a security key inWrite Protect Key (WPMR.WPKEY). The value is “DAC” in ASCII, corresponding to 0x444143.
The write protection mode prevents the write of Mode Register. When this mode is enabled andthe protected registers is written, an error is generated in the Write Protect Status Register(WPSR) and the register write request is canceled. When a write protection error occurs, theWrite Protection Error bit (WPROTERR) is set to one.
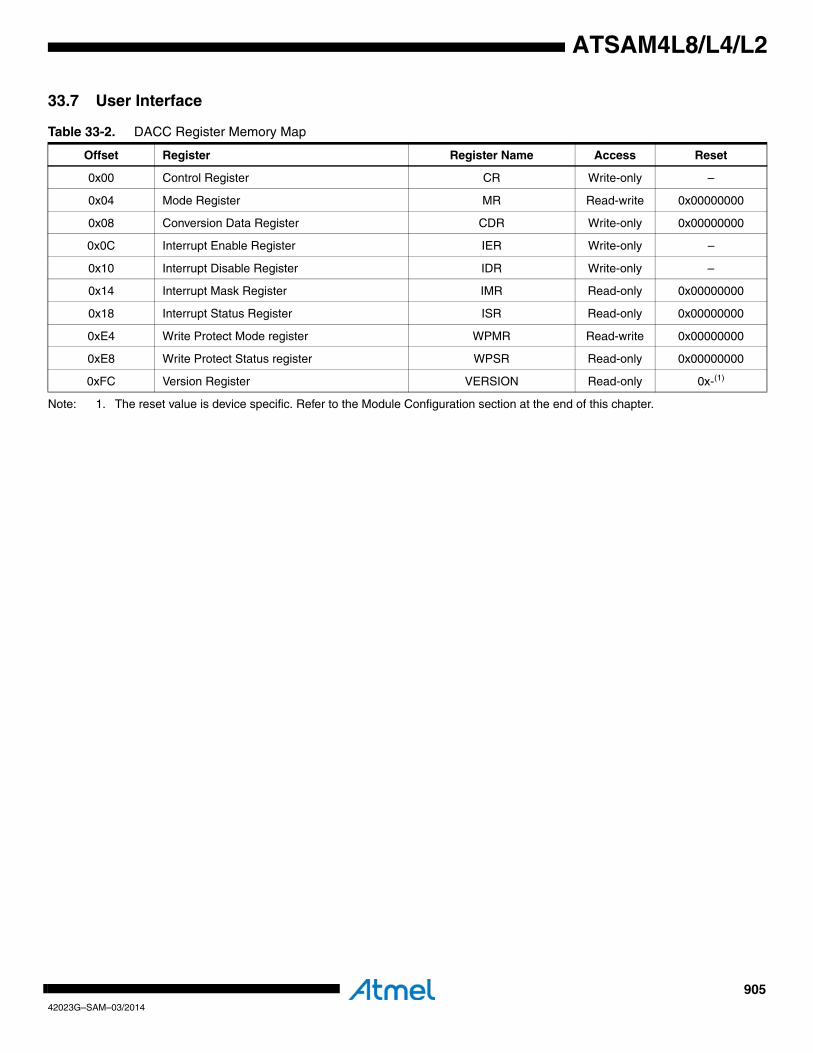
90542023G–SAM–03/2014
ATSAM4L8/L4/L2
33.7 User Interface
Note: 1. The reset value is device specific. Refer to the Module Configuration section at the end of this chapter.
Table 33-2. DACC Register Memory Map
Offset Register Register Name Access Reset
0x00 Control Register CR Write-only –
0x04 Mode Register MR Read-write 0x00000000
0x08 Conversion Data Register CDR Write-only 0x00000000
0x0C Interrupt Enable Register IER Write-only –
0x10 Interrupt Disable Register IDR Write-only –
0x14 Interrupt Mask Register IMR Read-only 0x00000000
0x18 Interrupt Status Register ISR Read-only 0x00000000
0xE4 Write Protect Mode register WPMR Read-write 0x00000000
0xE8 Write Protect Status register WPSR Read-only 0x00000000
0xFC Version Register VERSION Read-only 0x-(1)
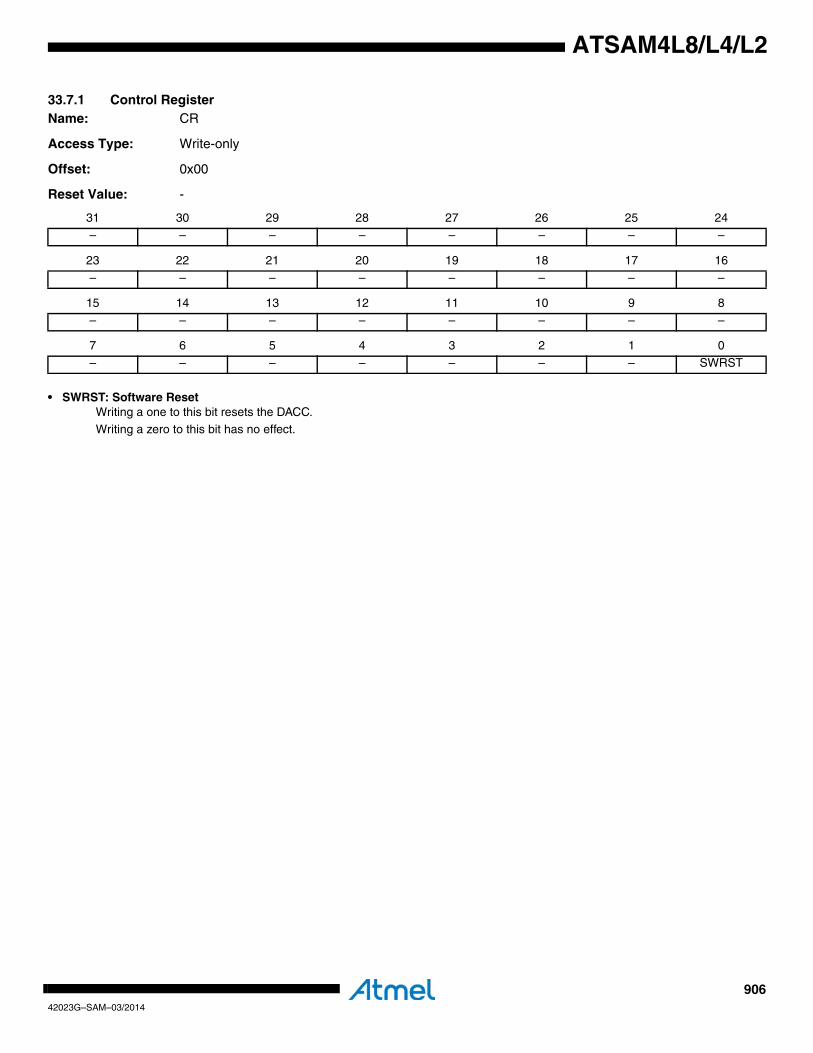
90642023G–SAM–03/2014
ATSAM4L8/L4/L2
33.7.1 Control RegisterName: CR
Access Type: Write-only
Offset: 0x00
Reset Value: -
• SWRST: Software ResetWriting a one to this bit resets the DACC.Writing a zero to this bit has no effect.
31 30 29 28 27 26 25 24
– – – – – – – –
23 22 21 20 19 18 17 16– – – – – – – –
15 14 13 12 11 10 9 8
– – – – – – – –
7 6 5 4 3 2 1 0
– – – – – – – SWRST
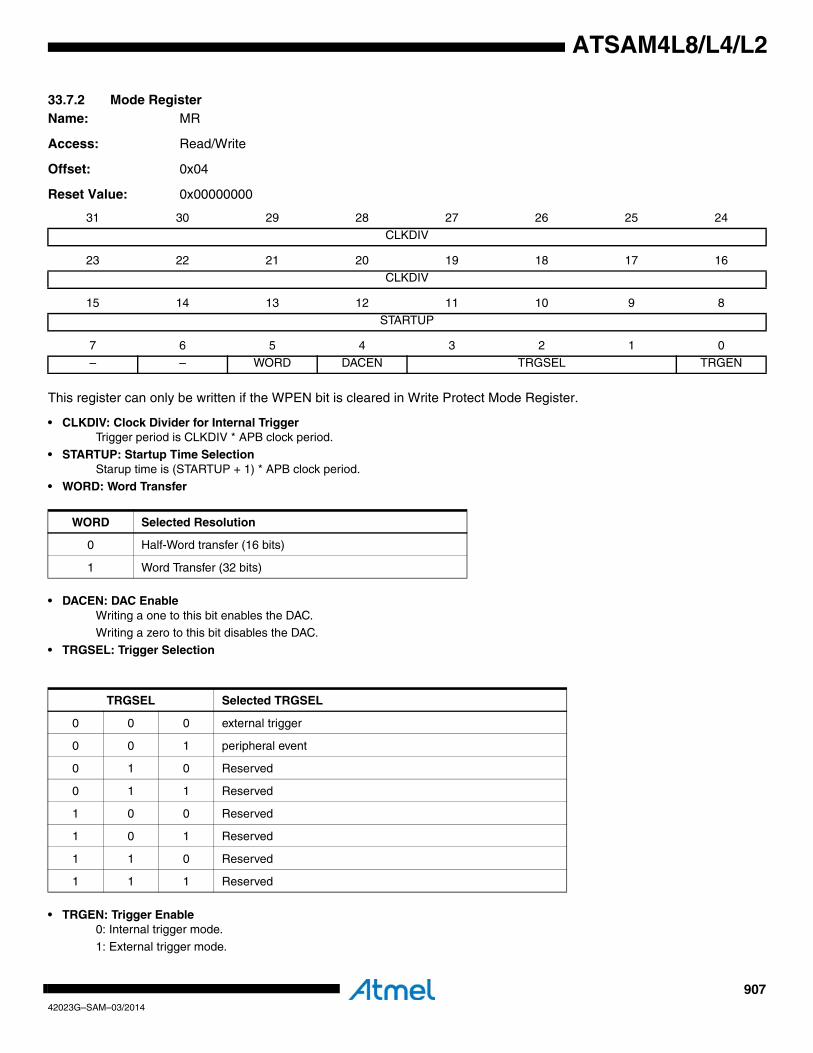
90742023G–SAM–03/2014
ATSAM4L8/L4/L2
33.7.2 Mode RegisterName: MR
Access: Read/Write
Offset: 0x04
Reset Value: 0x00000000
This register can only be written if the WPEN bit is cleared in Write Protect Mode Register.
• CLKDIV: Clock Divider for Internal TriggerTrigger period is CLKDIV * APB clock period.
• STARTUP: Startup Time SelectionStarup time is (STARTUP + 1) * APB clock period.
• WORD: Word Transfer
• DACEN: DAC EnableWriting a one to this bit enables the DAC.Writing a zero to this bit disables the DAC.
• TRGSEL: Trigger Selection
• TRGEN: Trigger Enable0: Internal trigger mode.
1: External trigger mode.
31 30 29 28 27 26 25 24
CLKDIV
23 22 21 20 19 18 17 16CLKDIV
15 14 13 12 11 10 9 8
STARTUP
7 6 5 4 3 2 1 0
– – WORD DACEN TRGSEL TRGEN
WORD Selected Resolution
0 Half-Word transfer (16 bits)
1 Word Transfer (32 bits)
TRGSEL Selected TRGSEL
0 0 0 external trigger
0 0 1 peripheral event
0 1 0 Reserved
0 1 1 Reserved
1 0 0 Reserved
1 0 1 Reserved
1 1 0 Reserved
1 1 1 Reserved
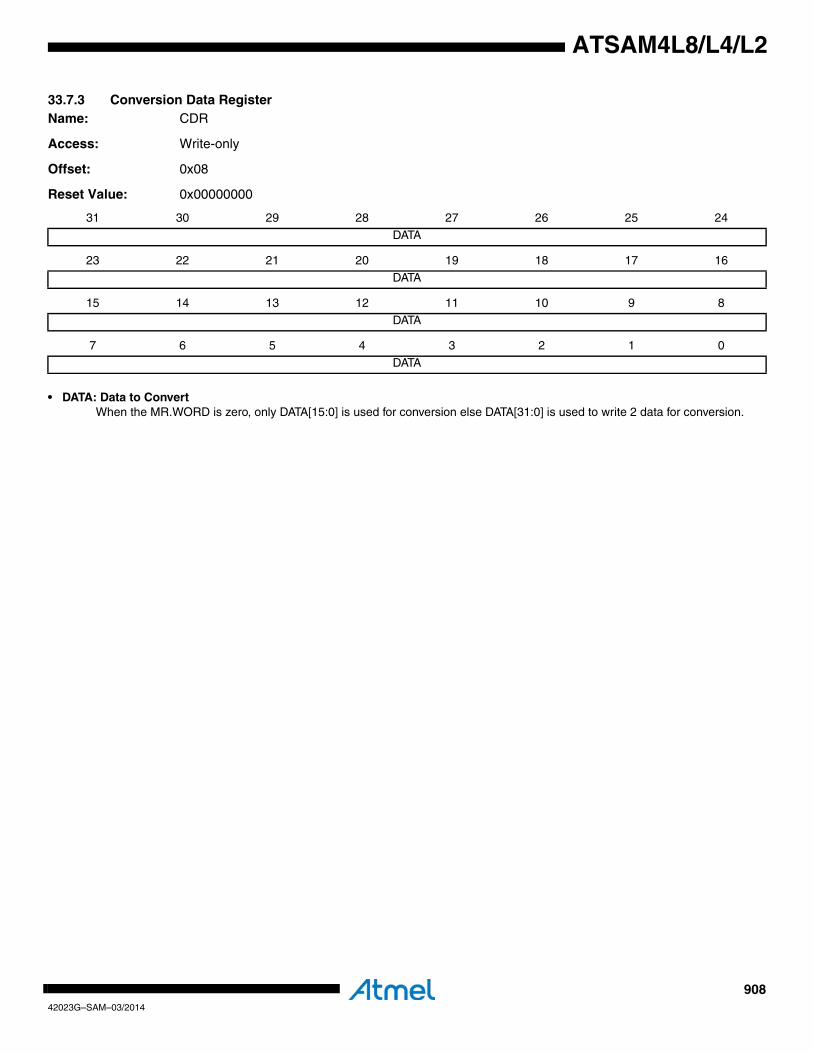
90842023G–SAM–03/2014
ATSAM4L8/L4/L2
33.7.3 Conversion Data Register Name: CDR
Access: Write-only
Offset: 0x08
Reset Value: 0x00000000
• DATA: Data to ConvertWhen the MR.WORD is zero, only DATA[15:0] is used for conversion else DATA[31:0] is used to write 2 data for conversion.
31 30 29 28 27 26 25 24
DATA
23 22 21 20 19 18 17 16DATA
15 14 13 12 11 10 9 8
DATA
7 6 5 4 3 2 1 0
DATA
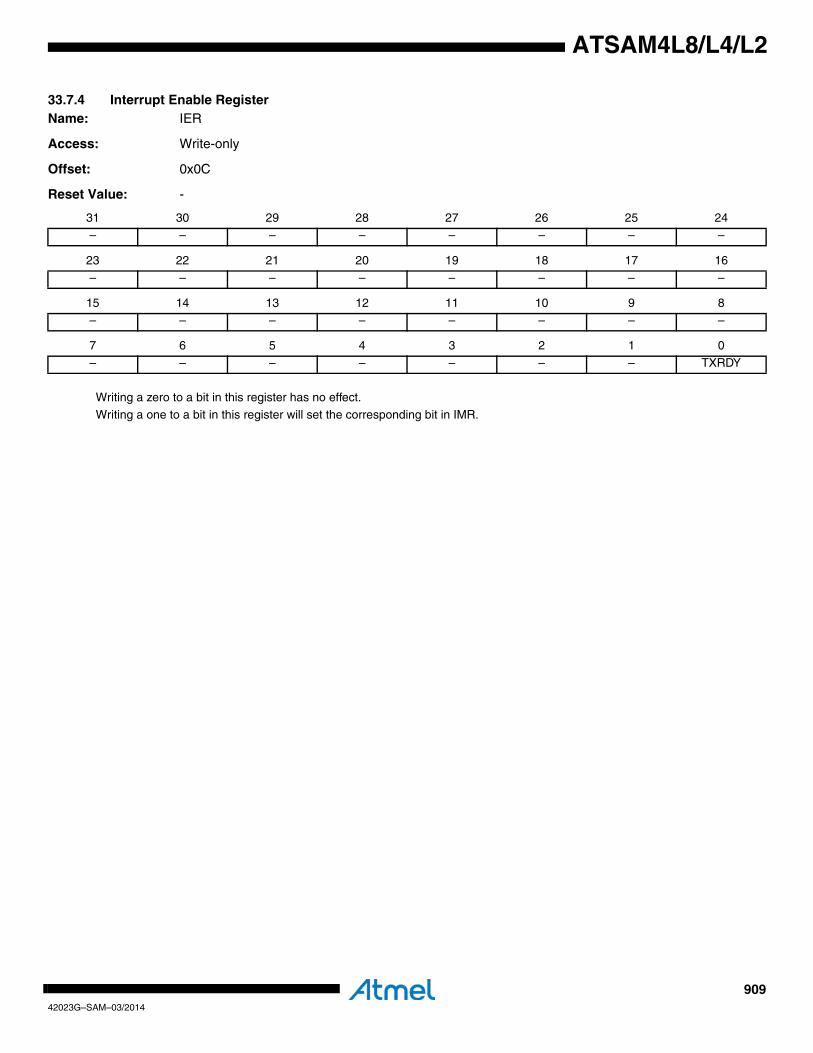
90942023G–SAM–03/2014
ATSAM4L8/L4/L2
33.7.4 Interrupt Enable Register Name: IER
Access: Write-only
Offset: 0x0C
Reset Value: -
Writing a zero to a bit in this register has no effect.
Writing a one to a bit in this register will set the corresponding bit in IMR.
31 30 29 28 27 26 25 24
– – – – – – – –
23 22 21 20 19 18 17 16– – – – – – – –
15 14 13 12 11 10 9 8
– – – – – – – –
7 6 5 4 3 2 1 0
– – – – – – – TXRDY
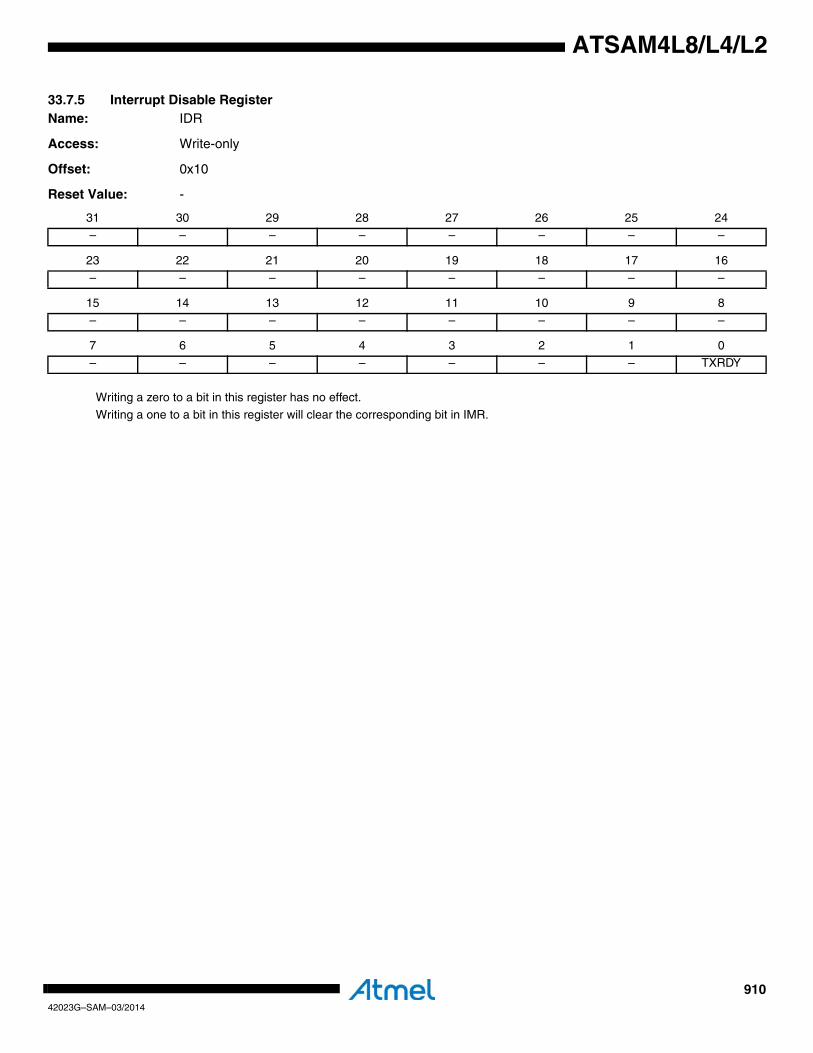
91042023G–SAM–03/2014
ATSAM4L8/L4/L2
33.7.5 Interrupt Disable Register Name: IDR
Access: Write-only
Offset: 0x10
Reset Value: -
Writing a zero to a bit in this register has no effect.
Writing a one to a bit in this register will clear the corresponding bit in IMR.
31 30 29 28 27 26 25 24
– – – – – – – –
23 22 21 20 19 18 17 16– – – – – – – –
15 14 13 12 11 10 9 8
– – – – – – – –
7 6 5 4 3 2 1 0
– – – – – – – TXRDY
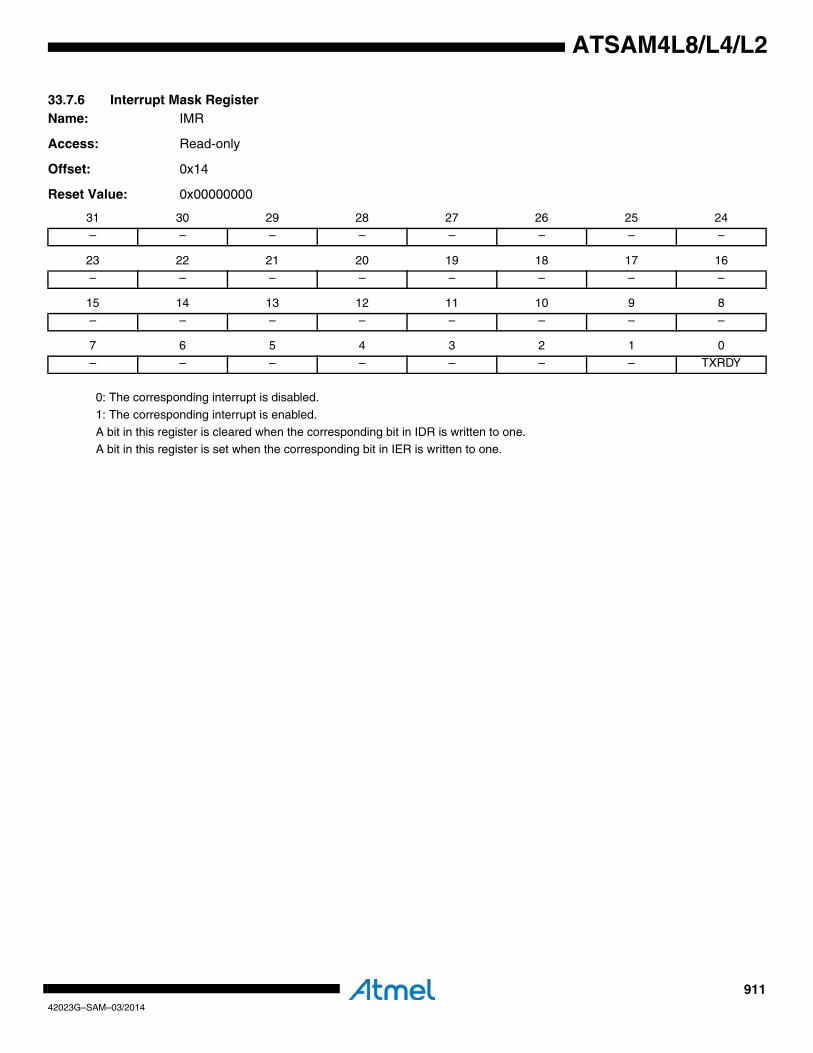
91142023G–SAM–03/2014
ATSAM4L8/L4/L2
33.7.6 Interrupt Mask Register Name: IMR
Access: Read-only
Offset: 0x14
Reset Value: 0x00000000
0: The corresponding interrupt is disabled.
1: The corresponding interrupt is enabled.
A bit in this register is cleared when the corresponding bit in IDR is written to one.A bit in this register is set when the corresponding bit in IER is written to one.
31 30 29 28 27 26 25 24
– – – – – – – –
23 22 21 20 19 18 17 16– – – – – – – –
15 14 13 12 11 10 9 8
– – – – – – – –
7 6 5 4 3 2 1 0
– – – – – – – TXRDY
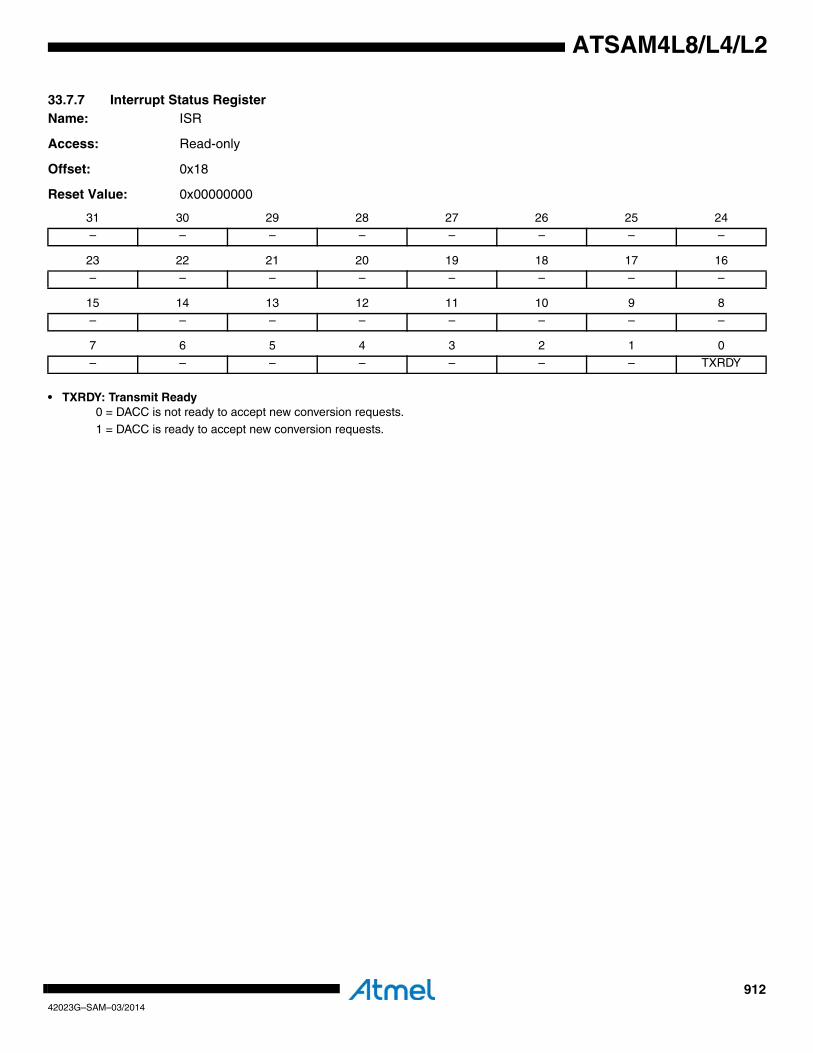
91242023G–SAM–03/2014
ATSAM4L8/L4/L2
33.7.7 Interrupt Status Register Name: ISR
Access: Read-only
Offset: 0x18
Reset Value: 0x00000000
• TXRDY: Transmit Ready0 = DACC is not ready to accept new conversion requests.1 = DACC is ready to accept new conversion requests.
31 30 29 28 27 26 25 24
– – – – – – – –
23 22 21 20 19 18 17 16– – – – – – – –
15 14 13 12 11 10 9 8
– – – – – – – –
7 6 5 4 3 2 1 0
– – – – – – – TXRDY

91342023G–SAM–03/2014
ATSAM4L8/L4/L2
33.7.8 Write Protect Mode Register Name: WPMR
Access: Read/Write
Offset: 0xE4
Reset Value: 0x00000000
• WPKEY: Write Protect KEYThis security code is needed to set/reset the WPEN bit.Must be filled with “DAC” ASCII code (0x444143).
• WPEN: Write Protect Enable0 = Disables the Write Protect.
1 = Enables the Write Protect.
31 30 29 28 27 26 25 24
WPKEY
23 22 21 20 19 18 17 16WPKEY
15 14 13 12 11 10 9 8
WPKEY
7 6 5 4 3 2 1 0
– – – – – – – WPEN
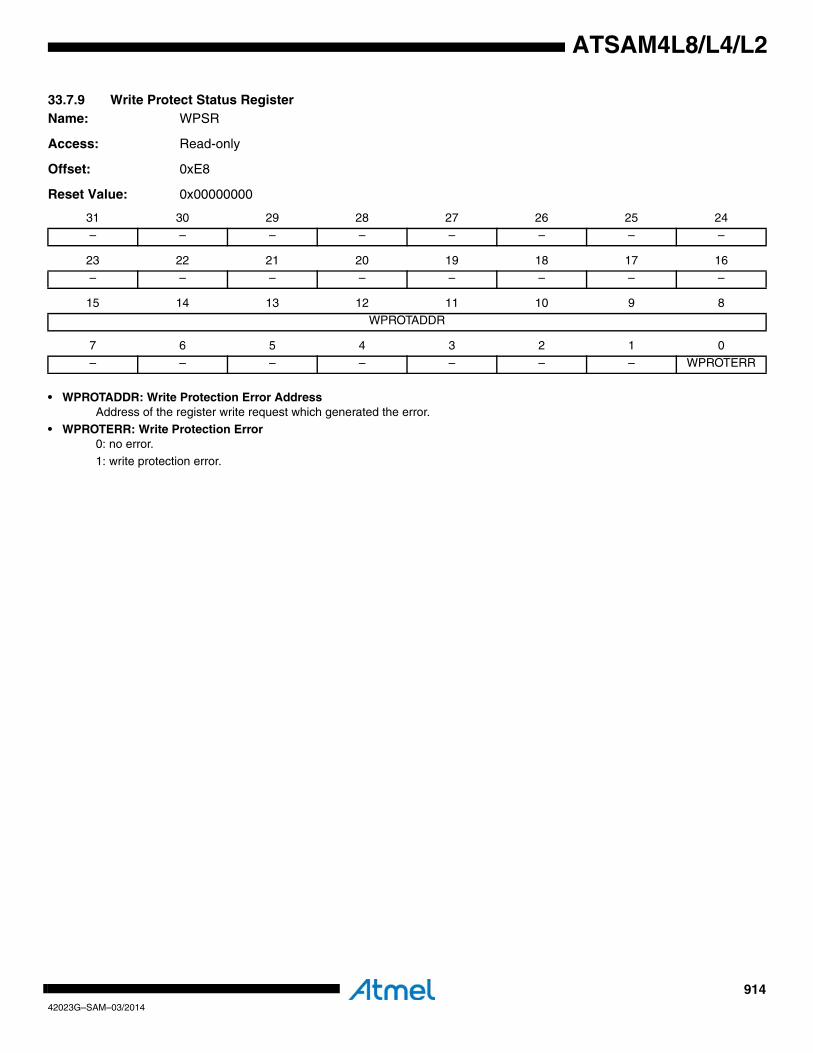
91442023G–SAM–03/2014
ATSAM4L8/L4/L2
33.7.9 Write Protect Status Register Name: WPSR
Access: Read-only
Offset: 0xE8
Reset Value: 0x00000000
• WPROTADDR: Write Protection Error AddressAddress of the register write request which generated the error.
• WPROTERR: Write Protection Error0: no error.1: write protection error.
31 30 29 28 27 26 25 24
– – – – – – – –
23 22 21 20 19 18 17 16– – – – – – – –
15 14 13 12 11 10 9 8
WPROTADDR
7 6 5 4 3 2 1 0
– – – – – – – WPROTERR
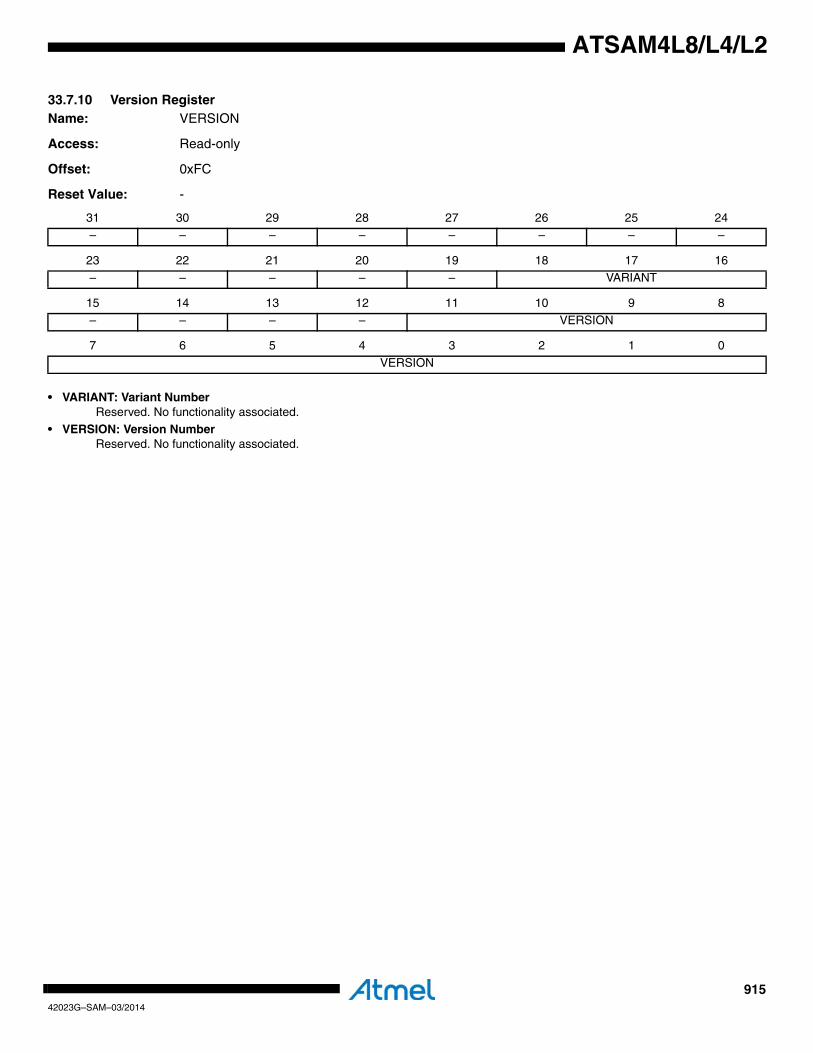
91542023G–SAM–03/2014
ATSAM4L8/L4/L2
33.7.10 Version RegisterName: VERSION
Access: Read-only
Offset: 0xFC
Reset Value: -
• VARIANT: Variant NumberReserved. No functionality associated.
• VERSION: Version NumberReserved. No functionality associated.
31 30 29 28 27 26 25 24
– – – – – – – –
23 22 21 20 19 18 17 16– – – – – VARIANT
15 14 13 12 11 10 9 8
– – – – VERSION
7 6 5 4 3 2 1 0
VERSION
91642023G–SAM–03/2014
ATSAM4L8/L4/L2
33.8 Module ConfigurationThe specific configuration for each DACC instance is listed in the following tables.The modulebus clocks listed here are connected to the system bus clocks. Refer to Section 10. ”Power Man-ager (PM)” on page 109 for details.
Table 33-3. ABDACB Clocks
Clock Name Description
CLK_DACC Clock for the DACC bus interface
Table 33-4. Register Reset Values
Register Reset Value
VERSION 0x00000111
91742023G–SAM–03/2014
ATSAM4L8/L4/L2
34. Capacitive Touch Module (CATB)Rev: 1.0.0.0
34.1 Features• Low-power capacitive proximity and touch detection• Touch filtering without CPU intervention• Capacitance measurement on multiple sensors for button/slider/wheel support• Autonomous interrupt generation on touch and out-of-touch events• Autocalibration provides automatic adaptation to changing operating conditions• Peripheral-event-triggered acquisition for autonomous sleep operation and synchronization• Spread-spectrum operation for EMI compatibility• Differential or single-ended sensing operation for measurement of both mutual and self
capacitance• Support for internal and external discharge resistors
34.2 OverviewThe Capacitive Touch Module (CATB) performs acquisition, filtering, and detection of capacitivetouch sensors. The capacitive touch sensors use no mechanical components, and thereforedemand less maintenance in the user application. The CATB can operate in different capaci-tance discharge modes:
• Single-ended, with one pin per sensor
• Differential, with two pins per sensor
• External discharge resistors, with an extra pin (DIS) in single-ended mode
• Internal discharge resistors
Using DMA, the CATB can sense on multiple sensor pins. Refer to the Module Configurationsection for the number n of supported sensors. The CATB can report measured capacitance val-ues to software algorithms for the implementation of buttons/sliders/wheels, and the user canconfigure thresholds triggering interrupts.
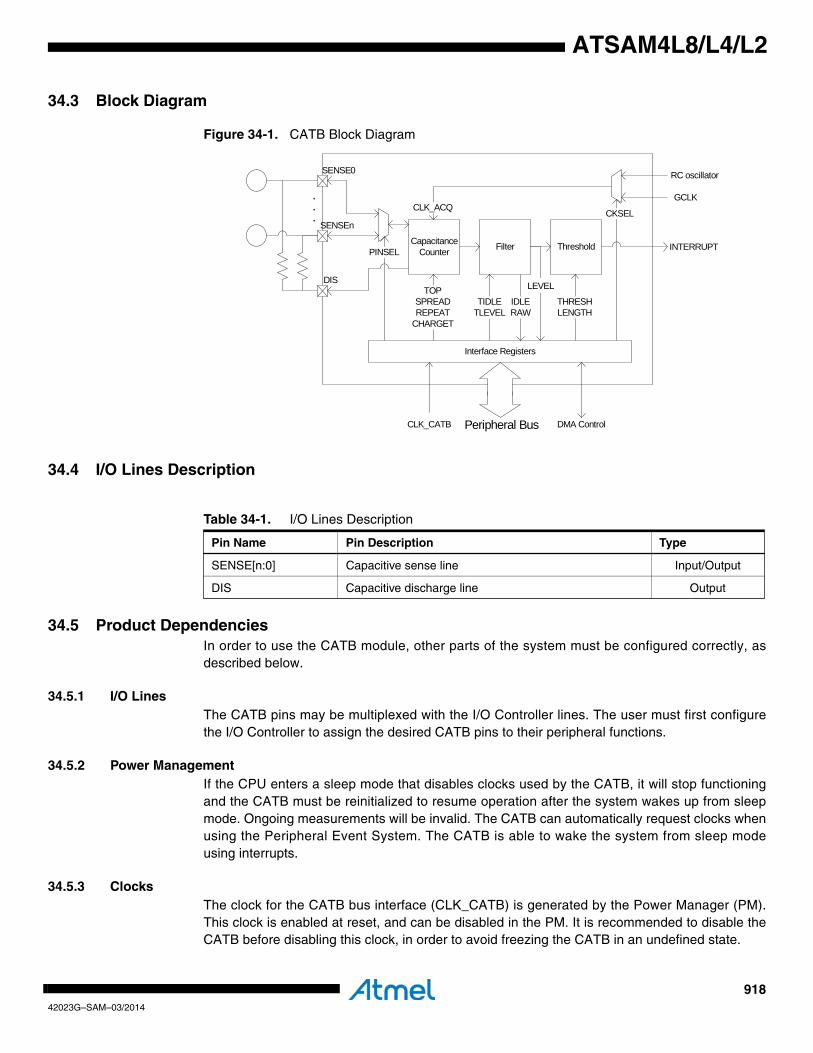
91842023G–SAM–03/2014
ATSAM4L8/L4/L2
34.3 Block Diagram
Figure 34-1. CATB Block Diagram
34.4 I/O Lines Description
34.5 Product DependenciesIn order to use the CATB module, other parts of the system must be configured correctly, asdescribed below.
34.5.1 I/O LinesThe CATB pins may be multiplexed with the I/O Controller lines. The user must first configurethe I/O Controller to assign the desired CATB pins to their peripheral functions.
34.5.2 Power ManagementIf the CPU enters a sleep mode that disables clocks used by the CATB, it will stop functioningand the CATB must be reinitialized to resume operation after the system wakes up from sleepmode. Ongoing measurements will be invalid. The CATB can automatically request clocks whenusing the Peripheral Event System. The CATB is able to wake the system from sleep modeusing interrupts.
34.5.3 ClocksThe clock for the CATB bus interface (CLK_CATB) is generated by the Power Manager (PM).This clock is enabled at reset, and can be disabled in the PM. It is recommended to disable theCATB before disabling this clock, in order to avoid freezing the CATB in an undefined state.
.
.
.
Capacitance Counter Filter Threshold
Interface Registers
TOPSPREADREPEAT
CHARGET
TIDLETLEVEL
IDLERAW
THRESHLENGTH
PINSEL
CKSELCLK_ACQ
RC oscillator
GCLK
INTERRUPT
DIS
SENSEn
SENSE0
Peripheral Bus DMA Control
LEVEL
CLK_CATB
Table 34-1. I/O Lines Description
Pin Name Pin Description Type
SENSE[n:0] Capacitive sense line Input/Output
DIS Capacitive discharge line Output
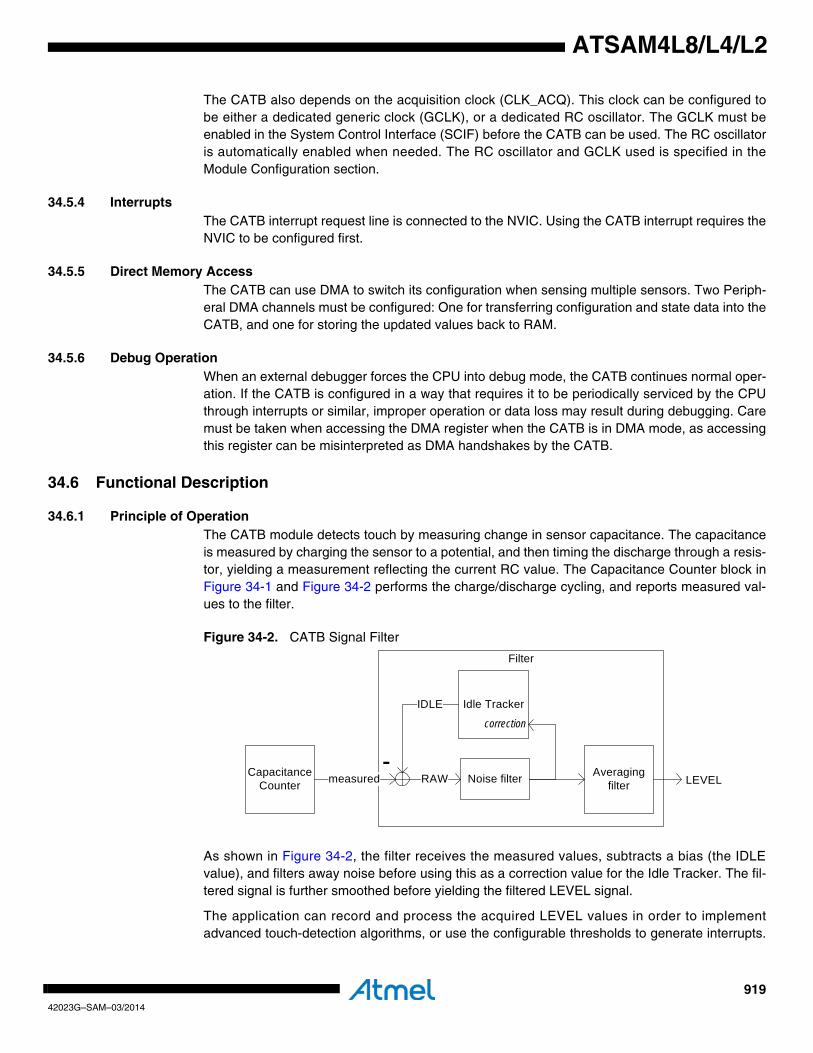
91942023G–SAM–03/2014
ATSAM4L8/L4/L2
The CATB also depends on the acquisition clock (CLK_ACQ). This clock can be configured tobe either a dedicated generic clock (GCLK), or a dedicated RC oscillator. The GCLK must beenabled in the System Control Interface (SCIF) before the CATB can be used. The RC oscillatoris automatically enabled when needed. The RC oscillator and GCLK used is specified in theModule Configuration section.
34.5.4 InterruptsThe CATB interrupt request line is connected to the NVIC. Using the CATB interrupt requires theNVIC to be configured first.
34.5.5 Direct Memory AccessThe CATB can use DMA to switch its configuration when sensing multiple sensors. Two Periph-eral DMA channels must be configured: One for transferring configuration and state data into theCATB, and one for storing the updated values back to RAM.
34.5.6 Debug OperationWhen an external debugger forces the CPU into debug mode, the CATB continues normal oper-ation. If the CATB is configured in a way that requires it to be periodically serviced by the CPUthrough interrupts or similar, improper operation or data loss may result during debugging. Caremust be taken when accessing the DMA register when the CATB is in DMA mode, as accessingthis register can be misinterpreted as DMA handshakes by the CATB.
34.6 Functional Description
34.6.1 Principle of OperationThe CATB module detects touch by measuring change in sensor capacitance. The capacitanceis measured by charging the sensor to a potential, and then timing the discharge through a resis-tor, yielding a measurement reflecting the current RC value. The Capacitance Counter block inFigure 34-1 and Figure 34-2 performs the charge/discharge cycling, and reports measured val-ues to the filter.
Figure 34-2. CATB Signal Filter
As shown in Figure 34-2, the filter receives the measured values, subtracts a bias (the IDLEvalue), and filters away noise before using this as a correction value for the Idle Tracker. The fil-tered signal is further smoothed before yielding the filtered LEVEL signal.
The application can record and process the acquired LEVEL values in order to implementadvanced touch-detection algorithms, or use the configurable thresholds to generate interrupts.
Filter
Capacitance Counter Noise filter
Idle TrackerIDLE
-
correction
Averaging filtermeasured RAW LEVEL
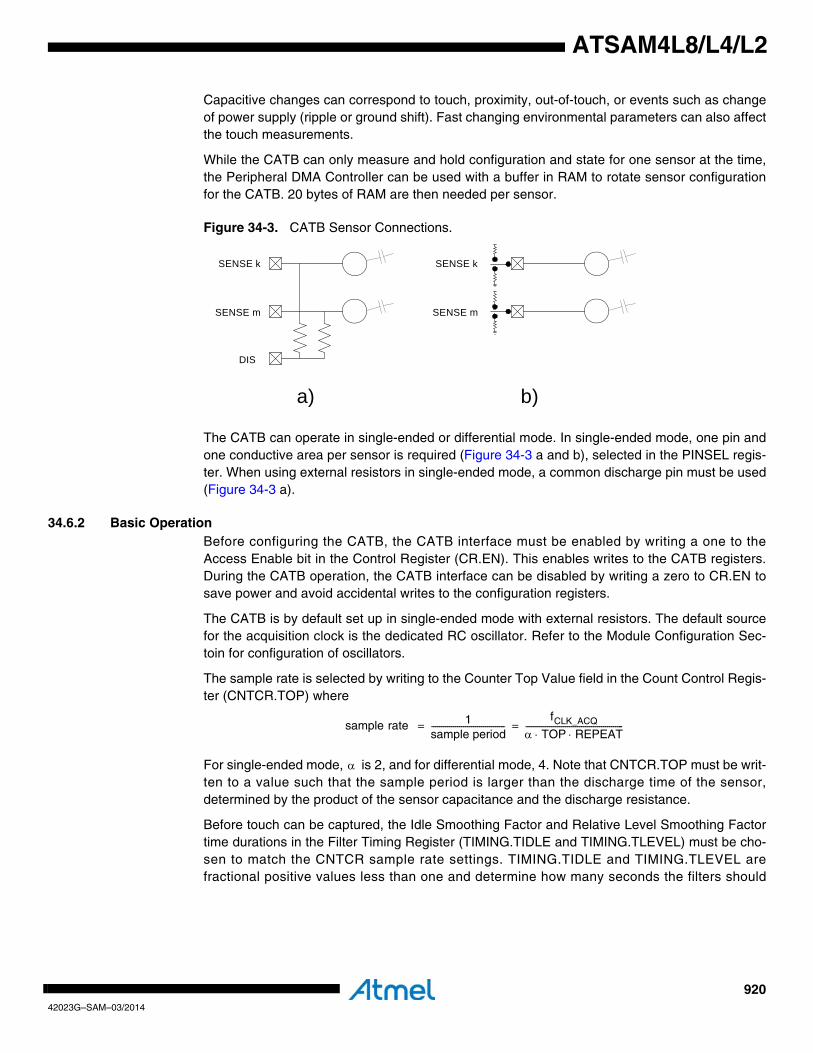
92042023G–SAM–03/2014
ATSAM4L8/L4/L2
Capacitive changes can correspond to touch, proximity, out-of-touch, or events such as changeof power supply (ripple or ground shift). Fast changing environmental parameters can also affectthe touch measurements.
While the CATB can only measure and hold configuration and state for one sensor at the time,the Peripheral DMA Controller can be used with a buffer in RAM to rotate sensor configurationfor the CATB. 20 bytes of RAM are then needed per sensor.
Figure 34-3. CATB Sensor Connections.
The CATB can operate in single-ended or differential mode. In single-ended mode, one pin andone conductive area per sensor is required (Figure 34-3 a and b), selected in the PINSEL regis-ter. When using external resistors in single-ended mode, a common discharge pin must be used(Figure 34-3 a).
34.6.2 Basic OperationBefore configuring the CATB, the CATB interface must be enabled by writing a one to theAccess Enable bit in the Control Register (CR.EN). This enables writes to the CATB registers.During the CATB operation, the CATB interface can be disabled by writing a zero to CR.EN tosave power and avoid accidental writes to the configuration registers.
The CATB is by default set up in single-ended mode with external resistors. The default sourcefor the acquisition clock is the dedicated RC oscillator. Refer to the Module Configuration Sec-toin for configuration of oscillators.
The sample rate is selected by writing to the Counter Top Value field in the Count Control Regis-ter (CNTCR.TOP) where
For single-ended mode, is 2, and for differential mode, 4. Note that CNTCR.TOP must be writ-ten to a value such that the sample period is larger than the discharge time of the sensor,determined by the product of the sensor capacitance and the discharge resistance.
Before touch can be captured, the Idle Smoothing Factor and Relative Level Smoothing Factortime durations in the Filter Timing Register (TIMING.TIDLE and TIMING.TLEVEL) must be cho-sen to match the CNTCR sample rate settings. TIMING.TIDLE and TIMING.TLEVEL arefractional positive values less than one and determine how many seconds the filters should
SENSE k
SENSE m
DIS
SENSE k
SENSE m
a) b)
sample rate 1sample period-------------------------------------
fCLK_ACQ
α TOP REPEAT⋅ ⋅-------------------------------------------------= =
α
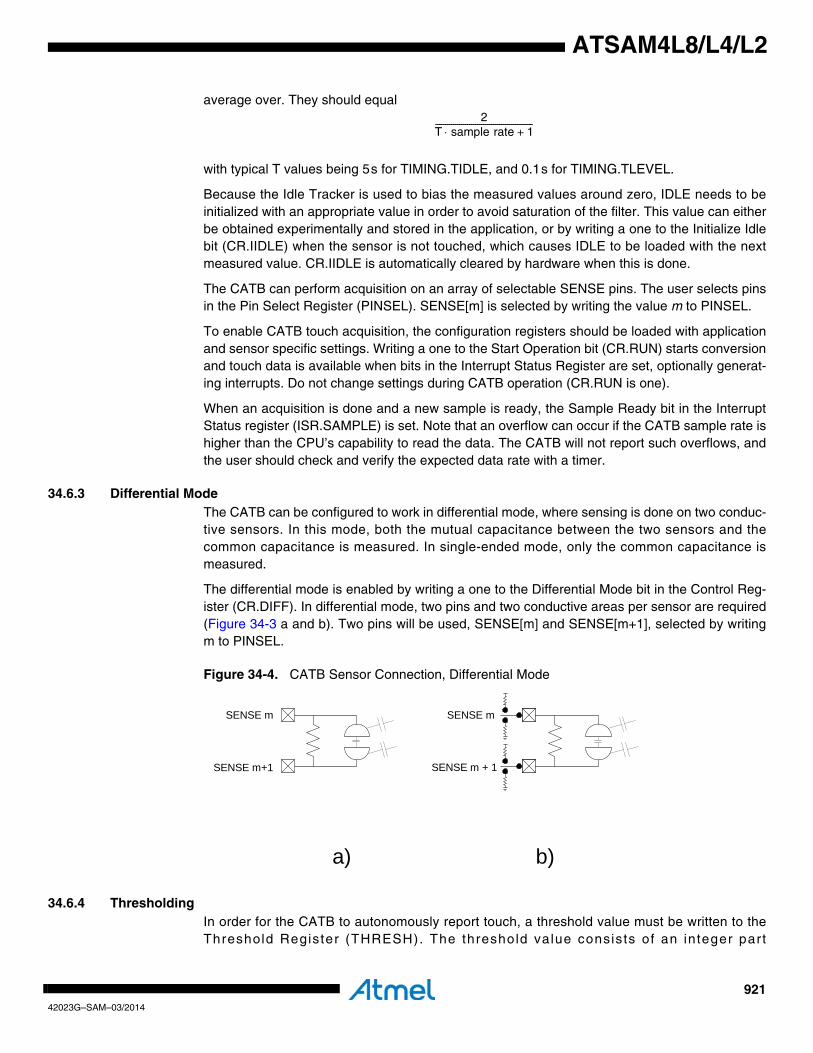
92142023G–SAM–03/2014
ATSAM4L8/L4/L2
average over. They should equal
with typical T values being 5s for TIMING.TIDLE, and 0.1s for TIMING.TLEVEL.
Because the Idle Tracker is used to bias the measured values around zero, IDLE needs to beinitialized with an appropriate value in order to avoid saturation of the filter. This value can eitherbe obtained experimentally and stored in the application, or by writing a one to the Initialize Idlebit (CR.IIDLE) when the sensor is not touched, which causes IDLE to be loaded with the nextmeasured value. CR.IIDLE is automatically cleared by hardware when this is done.
The CATB can perform acquisition on an array of selectable SENSE pins. The user selects pinsin the Pin Select Register (PINSEL). SENSE[m] is selected by writing the value m to PINSEL.
To enable CATB touch acquisition, the configuration registers should be loaded with applicationand sensor specific settings. Writing a one to the Start Operation bit (CR.RUN) starts conversionand touch data is available when bits in the Interrupt Status Register are set, optionally generat-ing interrupts. Do not change settings during CATB operation (CR.RUN is one).
When an acquisition is done and a new sample is ready, the Sample Ready bit in the InterruptStatus register (ISR.SAMPLE) is set. Note that an overflow can occur if the CATB sample rate ishigher than the CPU’s capability to read the data. The CATB will not report such overflows, andthe user should check and verify the expected data rate with a timer.
34.6.3 Differential ModeThe CATB can be configured to work in differential mode, where sensing is done on two conduc-tive sensors. In this mode, both the mutual capacitance between the two sensors and thecommon capacitance is measured. In single-ended mode, only the common capacitance ismeasured.
The differential mode is enabled by writing a one to the Differential Mode bit in the Control Reg-ister (CR.DIFF). In differential mode, two pins and two conductive areas per sensor are required(Figure 34-3 a and b). Two pins will be used, SENSE[m] and SENSE[m+1], selected by writingm to PINSEL.
Figure 34-4. CATB Sensor Connection, Differential Mode
34.6.4 ThresholdingIn order for the CATB to autonomously report touch, a threshold value must be written to theThreshold Register (THRESH). The threshold value consists of an integer part
2T sample rate 1+⋅-------------------------------------------------
SENSE m
SENSE m+1
SENSE m
SENSE m + 1
a) b)
92242023G–SAM–03/2014
ATSAM4L8/L4/L2
(THRESH.RTHRESH), and a fractional part (THRESH.FTHRESH). The user should select athreshold value that corresponds to application typical sensor signal strengths. The thresholdvalues are compared to the LEVEL register values, and the In Touch bit in the Interrupt StatusRegister (ISR.INTCH) is set when the value in the LEVEL register is larger than the value in theTHRESH register, while the Out of Touch bit (ISR.OUTTCH) is set when LEVEL becomes lessthan half of THRESH, in effect creating a hysteresis between in- and out-of-touch events.
During long touches, the value in the IDLE register will slowly increase and eventually cause afalse out-of-touch event. When the touch is released, the measured value will become smallerthan IDLE, causing a negative response on LEVEL. Writing a one to the Threshold Direction bitin THRESH (THRESH.DIR) enables negative thresholding, causing the CATB to compareagainst -THRESH. During negative thresholding, ISR.INTCH is set when LEVEL goes below thenegative THRESH value, and ISR.OUTTCH is set when LEVEL goes above the negativeTHRESH/2 value.
For better noise immunity, a threshold filter can be configured in the Threshold Length field inTHRESH (THRESH.LENGTH). The threshold filter requires a number of samples to be over (orunder, if negative thresholding is used) the threshold before the CATB reports an in- or out-of-touch event.
34.6.5 Acquisition Clock and TimingThe discharge time of the capacitive sensor over the resistor is measured against CLK_ACQ.The source for this clock is selected with the Clock Select bit in the Control Register(CR.CKSEL), and must remain unchanged during CATB operation. The RC oscillator is avail-able on demand, and the GCLK must be enabled before enabling the CATB. Refer to theModule Configuration section for the configuration of the generic clock and the RC oscillator.
Before each discharge measurement, the sensor is charged towards the I/O voltage or ground.Writing to the Charge Time field in CR (CR.CHARGET) selects the charge time duration, if largercharge times are needed, e.g. for large capacitive loads.
If the measured discharge time is too small, the user can either increase the charge time byusing a larger resistance value for the discharge resistor, or configure the CATB to repeat andaccumulate measurements by writing to the Repeat Measurements field in CNTCR(CNTCR.REPEAT). Writing a non-zero value to CNTCR.REPEAT will cause the acquisitionblock to repeat the acquisition REPEAT+1 times, summing the individual measurements beforesending the sum to the filter block.
34.6.6 Filter AlgorithmThe filter in the CATB consists of three main parts: A median3 filter, an Idle tracker, and an aver-aging filter. The data in the CATB is represented in a fixed-point format consisting of an integerpart and a fractional part. Not all of the LSB’s of the fractional bits might be implemented. Referto the Module Configuration section for the number of implemented fractional bits.
The filter in the CATB implements the following recurrence equations:
RAWn measuredn IDLEn–=
mediann median3 RAWn 2– RAWn 1– RAWn, ,( )=
IDLEn 1+ IDLEn TIDLE mediann⋅+=
LEVELn 1+ LEVELn TLEVEL mediann LEVELn–( )⋅+=
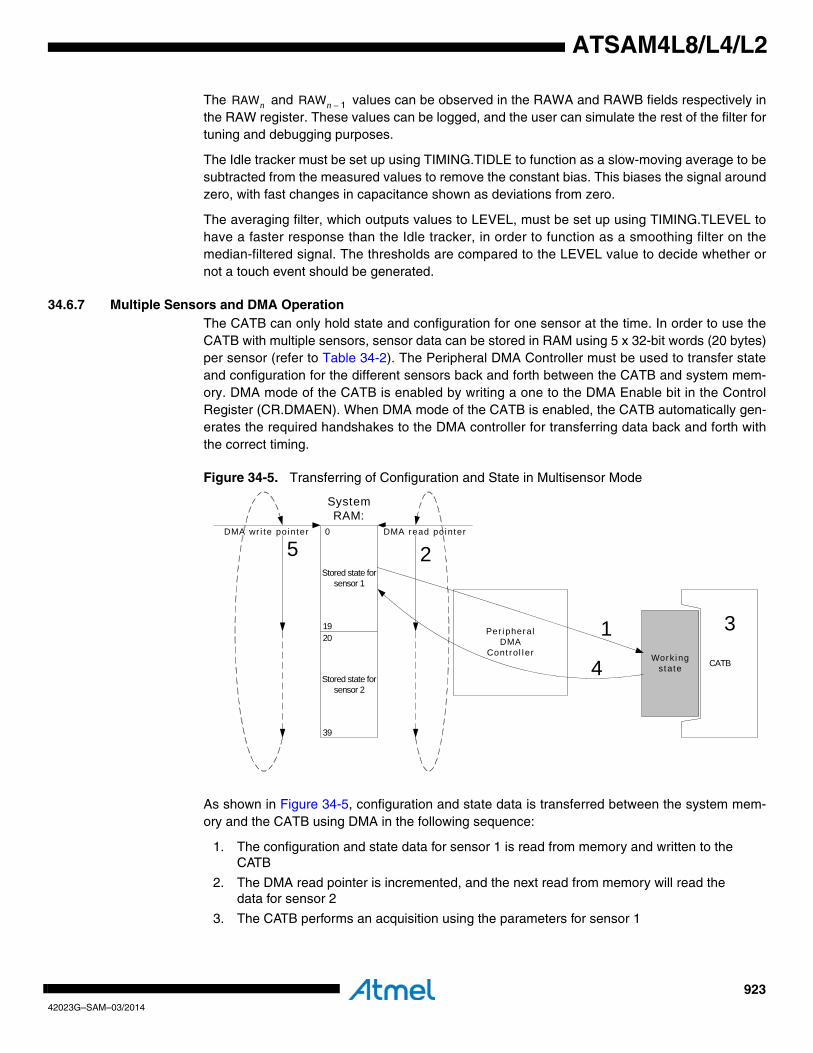
92342023G–SAM–03/2014
ATSAM4L8/L4/L2
The and values can be observed in the RAWA and RAWB fields respectively inthe RAW register. These values can be logged, and the user can simulate the rest of the filter fortuning and debugging purposes.
The Idle tracker must be set up using TIMING.TIDLE to function as a slow-moving average to besubtracted from the measured values to remove the constant bias. This biases the signal aroundzero, with fast changes in capacitance shown as deviations from zero.
The averaging filter, which outputs values to LEVEL, must be set up using TIMING.TLEVEL tohave a faster response than the Idle tracker, in order to function as a smoothing filter on themedian-filtered signal. The thresholds are compared to the LEVEL value to decide whether ornot a touch event should be generated.
34.6.7 Multiple Sensors and DMA OperationThe CATB can only hold state and configuration for one sensor at the time. In order to use theCATB with multiple sensors, sensor data can be stored in RAM using 5 x 32-bit words (20 bytes)per sensor (refer to Table 34-2). The Peripheral DMA Controller must be used to transfer stateand configuration for the different sensors back and forth between the CATB and system mem-ory. DMA mode of the CATB is enabled by writing a one to the DMA Enable bit in the ControlRegister (CR.DMAEN). When DMA mode of the CATB is enabled, the CATB automatically gen-erates the required handshakes to the DMA controller for transferring data back and forth withthe correct timing.
Figure 34-5. Transferring of Configuration and State in Multisensor Mode
As shown in Figure 34-5, configuration and state data is transferred between the system mem-ory and the CATB using DMA in the following sequence:
1. The configuration and state data for sensor 1 is read from memory and written to the CATB
2. The DMA read pointer is incremented, and the next read from memory will read the data for sensor 2
3. The CATB performs an acquisition using the parameters for sensor 1
RAWn RAWn 1–
Stored state for sensor 1
CATBWorkingstate
Stored state for sensor 2
DMA read pointerDMA wr i te pointer
Per ipheralDMA
Cont rol l er
0
1920
39
1
2
3
4
5
System RAM:
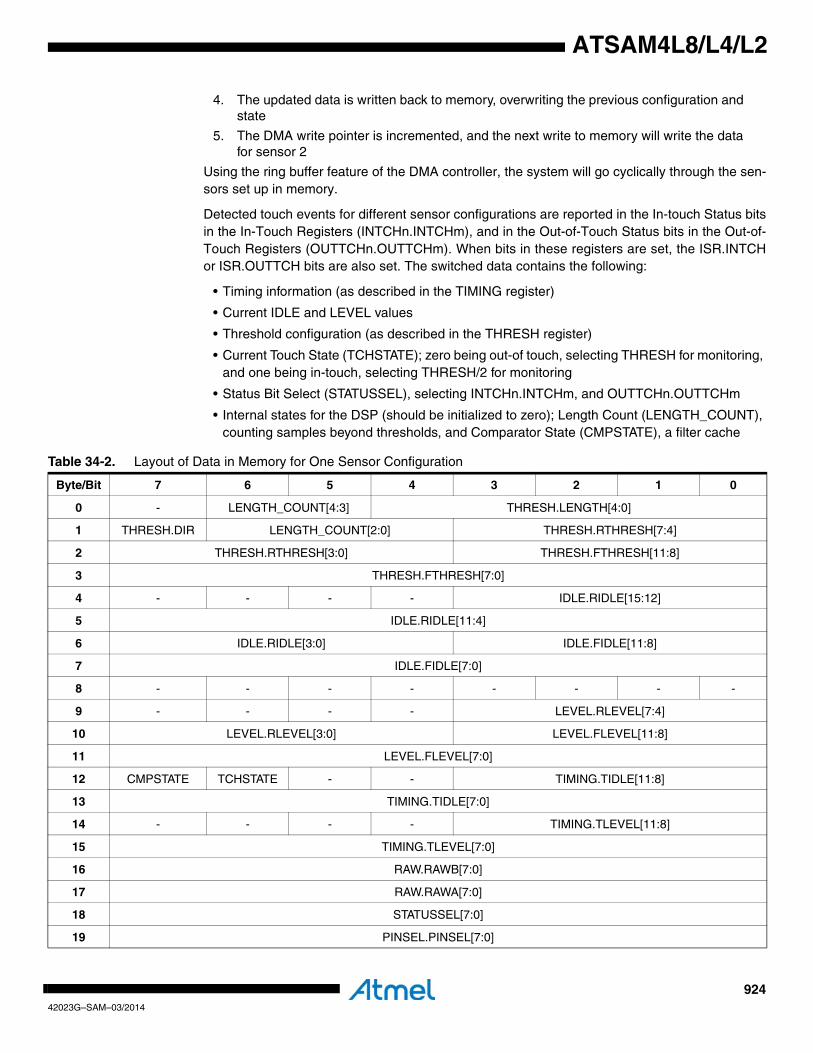
92442023G–SAM–03/2014
ATSAM4L8/L4/L2
4. The updated data is written back to memory, overwriting the previous configuration and state
5. The DMA write pointer is incremented, and the next write to memory will write the data for sensor 2
Using the ring buffer feature of the DMA controller, the system will go cyclically through the sen-sors set up in memory.
Detected touch events for different sensor configurations are reported in the In-touch Status bitsin the In-Touch Registers (INTCHn.INTCHm), and in the Out-of-Touch Status bits in the Out-of-Touch Registers (OUTTCHn.OUTTCHm). When bits in these registers are set, the ISR.INTCHor ISR.OUTTCH bits are also set. The switched data contains the following:
• Timing information (as described in the TIMING register)
• Current IDLE and LEVEL values
• Threshold configuration (as described in the THRESH register)
• Current Touch State (TCHSTATE); zero being out-of touch, selecting THRESH for monitoring, and one being in-touch, selecting THRESH/2 for monitoring
• Status Bit Select (STATUSSEL), selecting INTCHn.INTCHm, and OUTTCHn.OUTTCHm
• Internal states for the DSP (should be initialized to zero); Length Count (LENGTH_COUNT), counting samples beyond thresholds, and Comparator State (CMPSTATE), a filter cache
Table 34-2. Layout of Data in Memory for One Sensor Configuration
Byte/Bit 7 6 5 4 3 2 1 0
0 - LENGTH_COUNT[4:3] THRESH.LENGTH[4:0]
1 THRESH.DIR LENGTH_COUNT[2:0] THRESH.RTHRESH[7:4]
2 THRESH.RTHRESH[3:0] THRESH.FTHRESH[11:8]
3 THRESH.FTHRESH[7:0]
4 - - - - IDLE.RIDLE[15:12]
5 IDLE.RIDLE[11:4]
6 IDLE.RIDLE[3:0] IDLE.FIDLE[11:8]
7 IDLE.FIDLE[7:0]
8 - - - - - - - -
9 - - - - LEVEL.RLEVEL[7:4]
10 LEVEL.RLEVEL[3:0] LEVEL.FLEVEL[11:8]
11 LEVEL.FLEVEL[7:0]
12 CMPSTATE TCHSTATE - - TIMING.TIDLE[11:8]
13 TIMING.TIDLE[7:0]
14 - - - - TIMING.TLEVEL[11:8]
15 TIMING.TLEVEL[7:0]
16 RAW.RAWB[7:0]
17 RAW.RAWA[7:0]
18 STATUSSEL[7:0]
19 PINSEL.PINSEL[7:0]
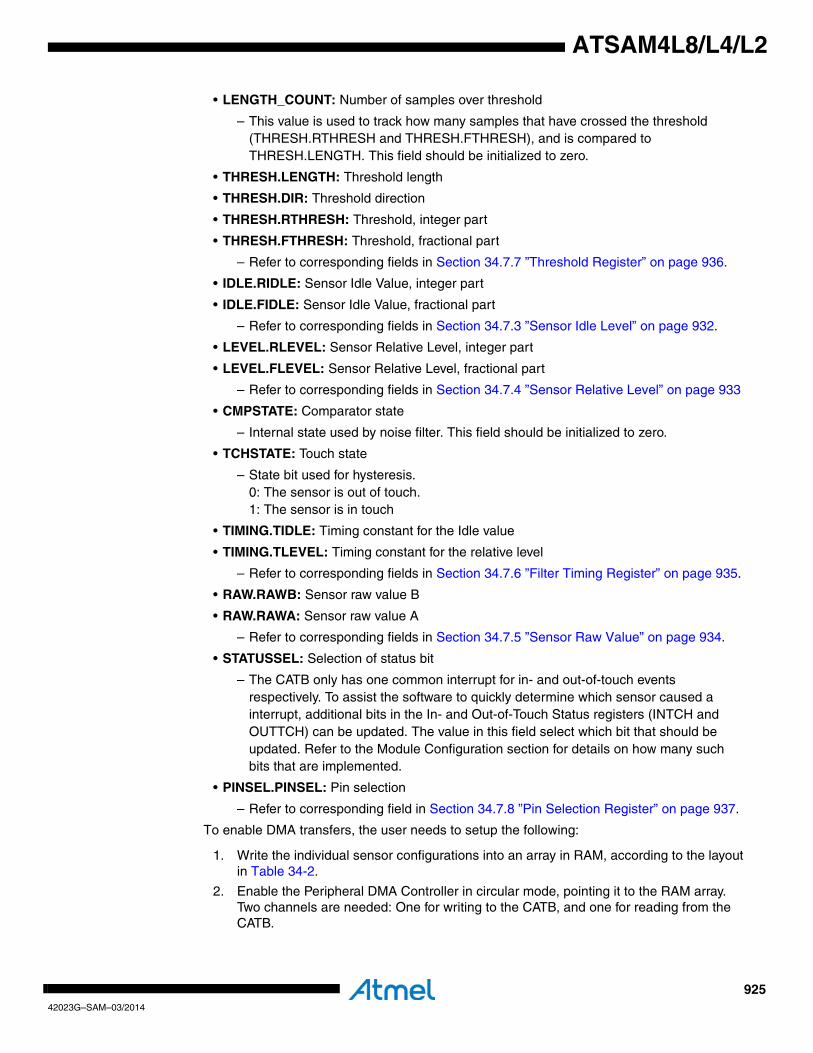
92542023G–SAM–03/2014
ATSAM4L8/L4/L2
• LENGTH_COUNT: Number of samples over threshold
– This value is used to track how many samples that have crossed the threshold (THRESH.RTHRESH and THRESH.FTHRESH), and is compared to THRESH.LENGTH. This field should be initialized to zero.
• THRESH.LENGTH: Threshold length
• THRESH.DIR: Threshold direction
• THRESH.RTHRESH: Threshold, integer part
• THRESH.FTHRESH: Threshold, fractional part
– Refer to corresponding fields in Section 34.7.7 ”Threshold Register” on page 936.
• IDLE.RIDLE: Sensor Idle Value, integer part
• IDLE.FIDLE: Sensor Idle Value, fractional part
– Refer to corresponding fields in Section 34.7.3 ”Sensor Idle Level” on page 932.
• LEVEL.RLEVEL: Sensor Relative Level, integer part
• LEVEL.FLEVEL: Sensor Relative Level, fractional part
– Refer to corresponding fields in Section 34.7.4 ”Sensor Relative Level” on page 933
• CMPSTATE: Comparator state
– Internal state used by noise filter. This field should be initialized to zero.
• TCHSTATE: Touch state
– State bit used for hysteresis.0: The sensor is out of touch.1: The sensor is in touch
• TIMING.TIDLE: Timing constant for the Idle value
• TIMING.TLEVEL: Timing constant for the relative level
– Refer to corresponding fields in Section 34.7.6 ”Filter Timing Register” on page 935.
• RAW.RAWB: Sensor raw value B
• RAW.RAWA: Sensor raw value A
– Refer to corresponding fields in Section 34.7.5 ”Sensor Raw Value” on page 934.
• STATUSSEL: Selection of status bit
– The CATB only has one common interrupt for in- and out-of-touch events respectively. To assist the software to quickly determine which sensor caused a interrupt, additional bits in the In- and Out-of-Touch Status registers (INTCH and OUTTCH) can be updated. The value in this field select which bit that should be updated. Refer to the Module Configuration section for details on how many such bits that are implemented.
• PINSEL.PINSEL: Pin selection
– Refer to corresponding field in Section 34.7.8 ”Pin Selection Register” on page 937.
To enable DMA transfers, the user needs to setup the following:
1. Write the individual sensor configurations into an array in RAM, according to the layout in Table 34-2.
2. Enable the Peripheral DMA Controller in circular mode, pointing it to the RAM array. Two channels are needed: One for writing to the CATB, and one for reading from the CATB.
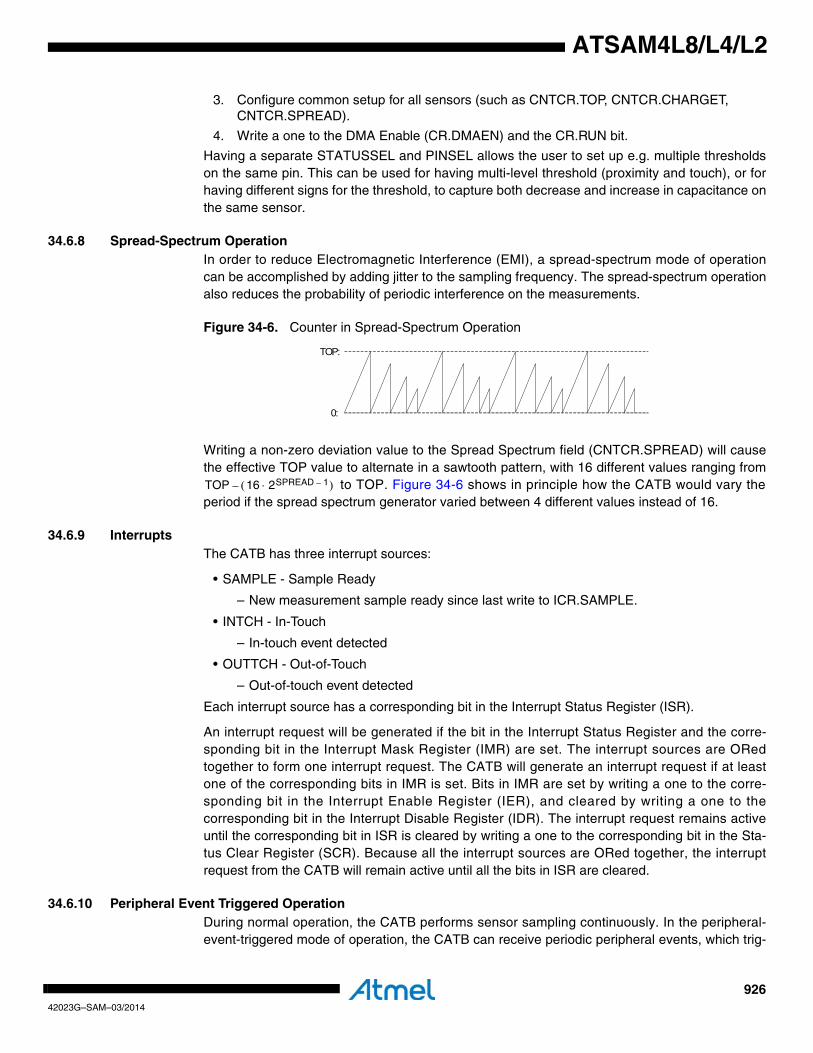
92642023G–SAM–03/2014
ATSAM4L8/L4/L2
3. Configure common setup for all sensors (such as CNTCR.TOP, CNTCR.CHARGET, CNTCR.SPREAD).
4. Write a one to the DMA Enable (CR.DMAEN) and the CR.RUN bit.
Having a separate STATUSSEL and PINSEL allows the user to set up e.g. multiple thresholdson the same pin. This can be used for having multi-level threshold (proximity and touch), or forhaving different signs for the threshold, to capture both decrease and increase in capacitance onthe same sensor.
34.6.8 Spread-Spectrum OperationIn order to reduce Electromagnetic Interference (EMI), a spread-spectrum mode of operationcan be accomplished by adding jitter to the sampling frequency. The spread-spectrum operationalso reduces the probability of periodic interference on the measurements.
Figure 34-6. Counter in Spread-Spectrum Operation
Writing a non-zero deviation value to the Spread Spectrum field (CNTCR.SPREAD) will causethe effective TOP value to alternate in a sawtooth pattern, with 16 different values ranging from
to TOP. Figure 34-6 shows in principle how the CATB would vary theperiod if the spread spectrum generator varied between 4 different values instead of 16.
34.6.9 InterruptsThe CATB has three interrupt sources:
• SAMPLE - Sample Ready
– New measurement sample ready since last write to ICR.SAMPLE.
• INTCH - In-Touch
– In-touch event detected
• OUTTCH - Out-of-Touch
– Out-of-touch event detected
Each interrupt source has a corresponding bit in the Interrupt Status Register (ISR).
An interrupt request will be generated if the bit in the Interrupt Status Register and the corre-sponding bit in the Interrupt Mask Register (IMR) are set. The interrupt sources are ORedtogether to form one interrupt request. The CATB will generate an interrupt request if at leastone of the corresponding bits in IMR is set. Bits in IMR are set by writing a one to the corre-sponding bit in the Interrupt Enable Register (IER), and cleared by writing a one to thecorresponding bit in the Interrupt Disable Register (IDR). The interrupt request remains activeuntil the corresponding bit in ISR is cleared by writing a one to the corresponding bit in the Sta-tus Clear Register (SCR). Because all the interrupt sources are ORed together, the interruptrequest from the CATB will remain active until all the bits in ISR are cleared.
34.6.10 Peripheral Event Triggered OperationDuring normal operation, the CATB performs sensor sampling continuously. In the peripheral-event-triggered mode of operation, the CATB can receive periodic peripheral events, which trig-
TOP:
0:
TOP 16 2SPREAD 1–⋅( )–

92742023G–SAM–03/2014
ATSAM4L8/L4/L2
ger one acquisition per event. The peripheral-event-triggered operation is enabled by writing aone to the Event Triggered Operation bit in the Control Register (CR.ETRIG). In this mode, theCATB will start the required clocks for performing an acquisition, and can thereby operate in allsleep modes where the peripheral event generator is running.
Using the peripheral-event-triggered mode allows the CATB to be used as a low-power wake-upsource for the CPU, as interrupts can be generated on in-touch or out-of-touch events. It is notpossible to use multiple sensors in sleep modes where the Peripheral DMA Controller isdisabled.
Writing a one to the Event Triggered Operation bit in the Control Register (CR.ETRIG) will dis-able the continuous sampling and only sample when the CATB receives a peripheral event. Thenumber of samples per peripheral event can be configured by writing to the Number of EventSamples field in the Control Register (CR.ESAMPLES). One peripheral event causes CR.ESA-MPLES+1 samples to be acquired. If a monitored threshold is passed, the CATB can wake thedevice from sleep.
When the CATB receives a peripheral event during sleep mode, it automatically requests boththe CLK_CATB and the CLK_ACQ clock. Note that it is not possible to use the peripheral-event-triggered operation with the GCLK as a source for CLK_ACQ in sleep modes where the GCLK isdisabled. Refer to Section 10. ”Power Manager (PM)” on page 109 for details. If no touch isdetected after an acquisition, CLK_CATB and CLK_ACQ will be stopped, returning the device tolow power mode.
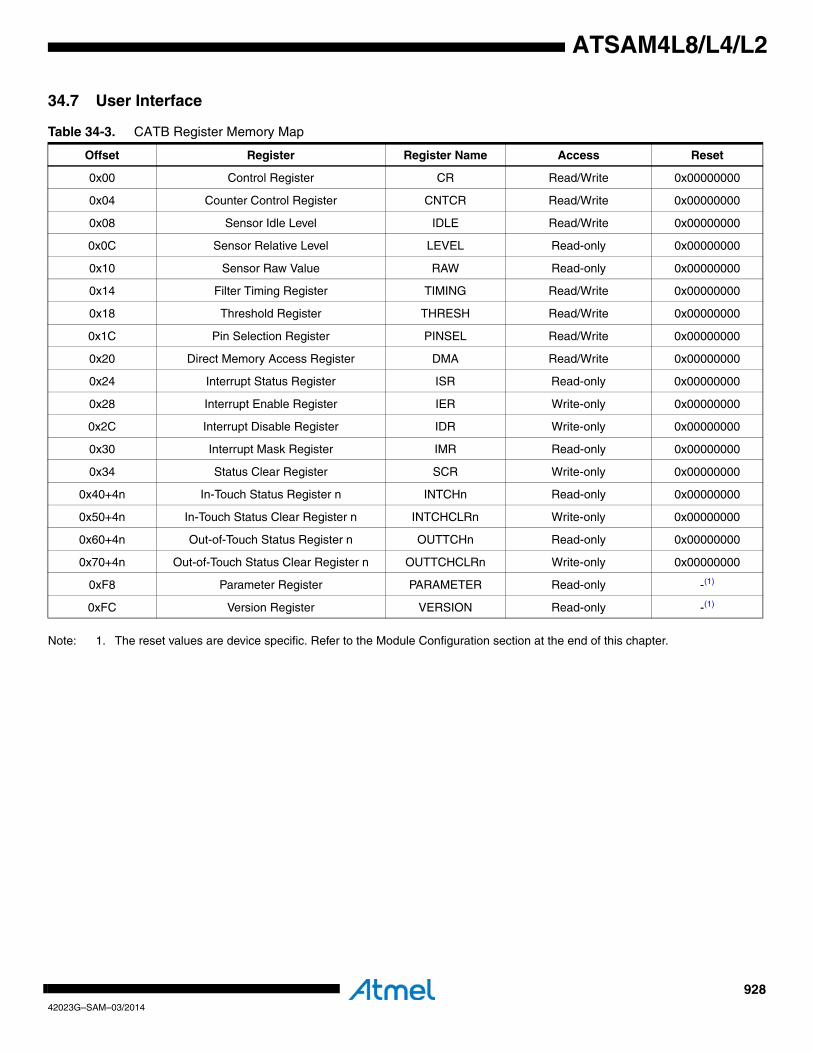
92842023G–SAM–03/2014
ATSAM4L8/L4/L2
34.7 User Interface
Note: 1. The reset values are device specific. Refer to the Module Configuration section at the end of this chapter.
Table 34-3. CATB Register Memory Map
Offset Register Register Name Access Reset
0x00 Control Register CR Read/Write 0x00000000
0x04 Counter Control Register CNTCR Read/Write 0x00000000
0x08 Sensor Idle Level IDLE Read/Write 0x00000000
0x0C Sensor Relative Level LEVEL Read-only 0x00000000
0x10 Sensor Raw Value RAW Read-only 0x00000000
0x14 Filter Timing Register TIMING Read/Write 0x00000000
0x18 Threshold Register THRESH Read/Write 0x00000000
0x1C Pin Selection Register PINSEL Read/Write 0x00000000
0x20 Direct Memory Access Register DMA Read/Write 0x00000000
0x24 Interrupt Status Register ISR Read-only 0x00000000
0x28 Interrupt Enable Register IER Write-only 0x00000000
0x2C Interrupt Disable Register IDR Write-only 0x00000000
0x30 Interrupt Mask Register IMR Read-only 0x00000000
0x34 Status Clear Register SCR Write-only 0x00000000
0x40+4n In-Touch Status Register n INTCHn Read-only 0x00000000
0x50+4n In-Touch Status Clear Register n INTCHCLRn Write-only 0x00000000
0x60+4n Out-of-Touch Status Register n OUTTCHn Read-only 0x00000000
0x70+4n Out-of-Touch Status Clear Register n OUTTCHCLRn Write-only 0x00000000
0xF8 Parameter Register PARAMETER Read-only -(1)
0xFC Version Register VERSION Read-only -(1)
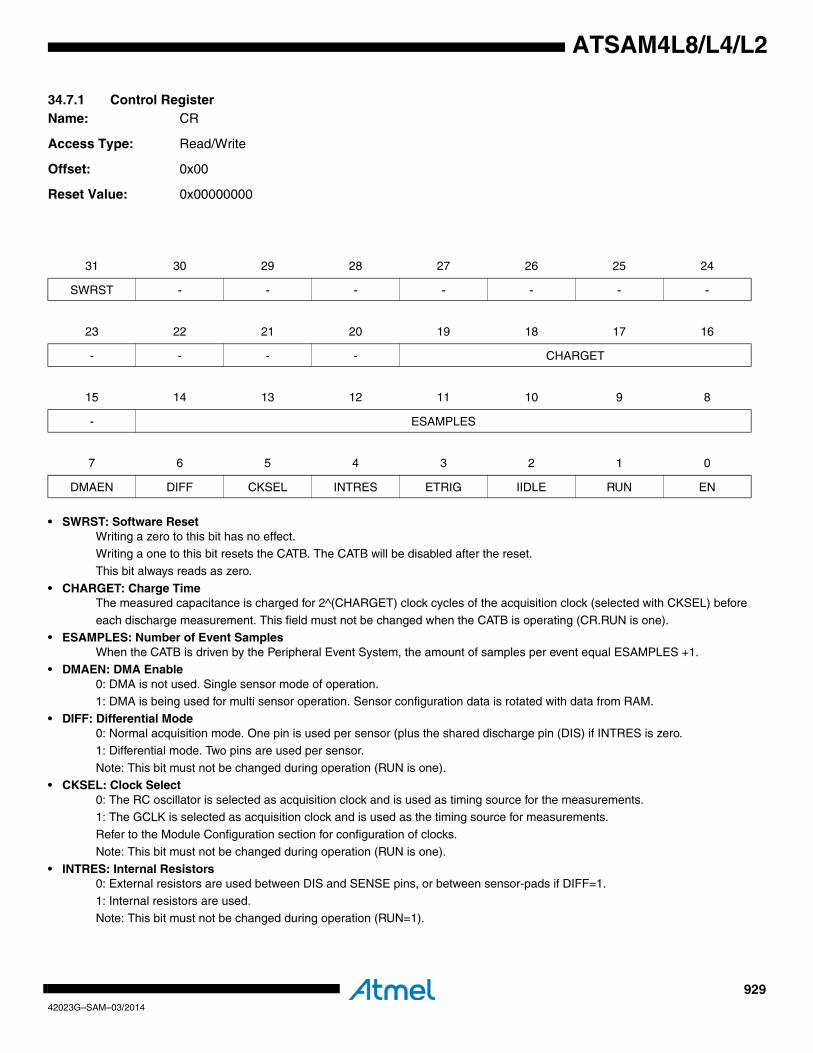
92942023G–SAM–03/2014
ATSAM4L8/L4/L2
34.7.1 Control RegisterName: CR
Access Type: Read/Write
Offset: 0x00
Reset Value: 0x00000000
• SWRST: Software ResetWriting a zero to this bit has no effect.Writing a one to this bit resets the CATB. The CATB will be disabled after the reset.
This bit always reads as zero.
• CHARGET: Charge TimeThe measured capacitance is charged for 2^(CHARGET) clock cycles of the acquisition clock (selected with CKSEL) before
each discharge measurement. This field must not be changed when the CATB is operating (CR.RUN is one).• ESAMPLES: Number of Event Samples
When the CATB is driven by the Peripheral Event System, the amount of samples per event equal ESAMPLES +1.• DMAEN: DMA Enable
0: DMA is not used. Single sensor mode of operation.1: DMA is being used for multi sensor operation. Sensor configuration data is rotated with data from RAM.
• DIFF: Differential Mode0: Normal acquisition mode. One pin is used per sensor (plus the shared discharge pin (DIS) if INTRES is zero.
1: Differential mode. Two pins are used per sensor.
Note: This bit must not be changed during operation (RUN is one).• CKSEL: Clock Select
0: The RC oscillator is selected as acquisition clock and is used as timing source for the measurements.1: The GCLK is selected as acquisition clock and is used as the timing source for measurements.
Refer to the Module Configuration section for configuration of clocks.
Note: This bit must not be changed during operation (RUN is one).
• INTRES: Internal Resistors0: External resistors are used between DIS and SENSE pins, or between sensor-pads if DIFF=1.
1: Internal resistors are used.Note: This bit must not be changed during operation (RUN=1).
31 30 29 28 27 26 25 24
SWRST - - - - - - -
23 22 21 20 19 18 17 16
- - - - CHARGET
15 14 13 12 11 10 9 8
- ESAMPLES
7 6 5 4 3 2 1 0
DMAEN DIFF CKSEL INTRES ETRIG IIDLE RUN EN
93042023G–SAM–03/2014
ATSAM4L8/L4/L2
• ETRIG: Event Triggered Operation0: Normal continuous acquisition mode of operation.
1: CATB acquisitions are triggered by the Peripheral Event System.• IIDLE: Initialize Idle Value
0: The IDLE register will only be updated by the CATB, or if written to.1: The IDLE register is set to the next measured value.
This bit always reads as zero.
• RUN: Start OperationWriting a zero to this bit will stop the CATB.
Writing a one to this bit will usually start acquisitions immediately. If CR.DMAEN is one, the CATB will wait until the first DMA
transfer. If CR.ETRIG is one, the CATB will wait for a peripheral event.0: CATB is stopped.
1: CATB is running.
• EN: Access Enable0: The CATB interface is disabled, register configuration settings can not be changed.
1: The CATB interface is enabled, register configuration settings can be changed.
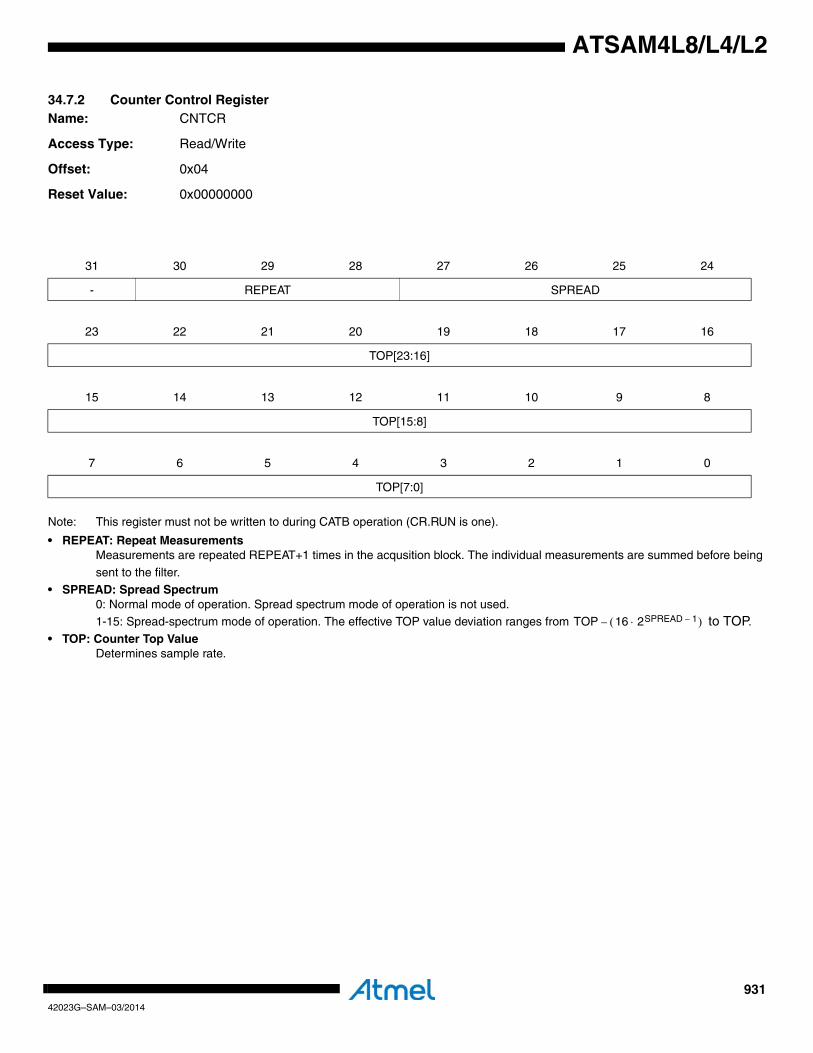
93142023G–SAM–03/2014
ATSAM4L8/L4/L2
34.7.2 Counter Control RegisterName: CNTCR
Access Type: Read/Write
Offset: 0x04
Reset Value: 0x00000000
Note: This register must not be written to during CATB operation (CR.RUN is one).
• REPEAT: Repeat MeasurementsMeasurements are repeated REPEAT+1 times in the acqusition block. The individual measurements are summed before being
sent to the filter.• SPREAD: Spread Spectrum
0: Normal mode of operation. Spread spectrum mode of operation is not used.1-15: Spread-spectrum mode of operation. The effective TOP value deviation ranges from to TOP.
• TOP: Counter Top ValueDetermines sample rate.
31 30 29 28 27 26 25 24
- REPEAT SPREAD
23 22 21 20 19 18 17 16
TOP[23:16]
15 14 13 12 11 10 9 8
TOP[15:8]
7 6 5 4 3 2 1 0
TOP[7:0]
TOP 16 2SPREAD 1–⋅( )–
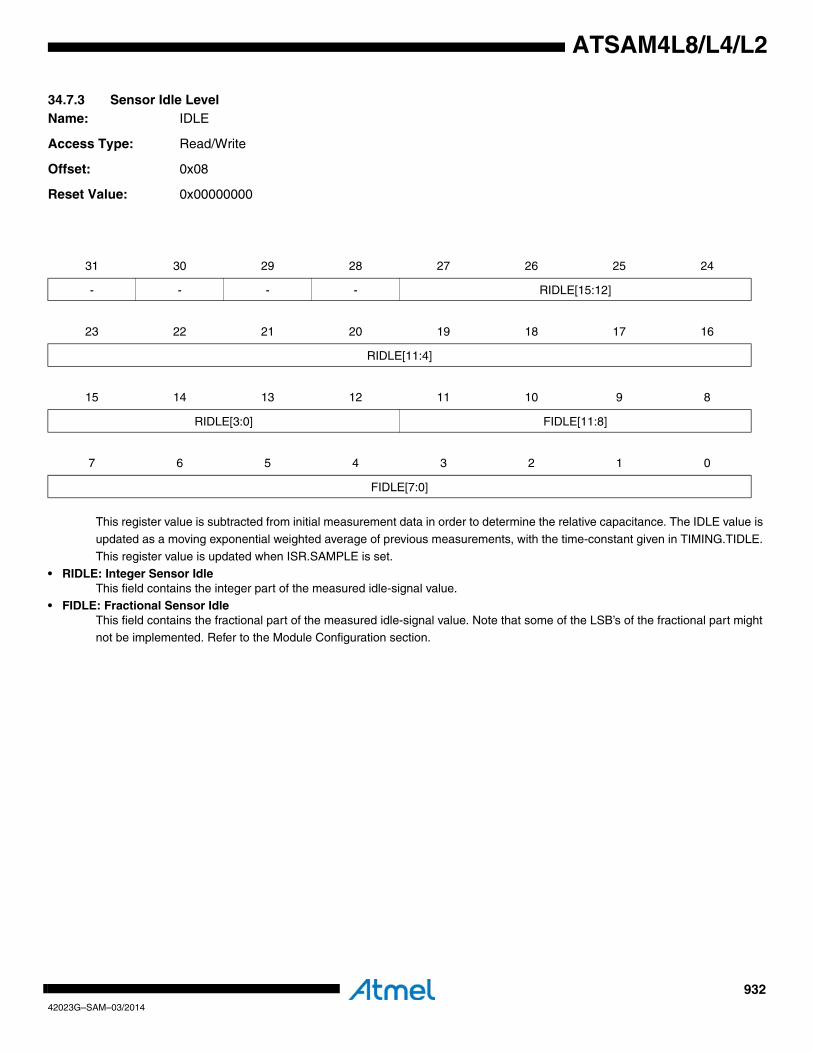
93242023G–SAM–03/2014
ATSAM4L8/L4/L2
34.7.3 Sensor Idle LevelName: IDLE
Access Type: Read/Write
Offset: 0x08
Reset Value: 0x00000000
This register value is subtracted from initial measurement data in order to determine the relative capacitance. The IDLE value is
updated as a moving exponential weighted average of previous measurements, with the time-constant given in TIMING.TIDLE.
This register value is updated when ISR.SAMPLE is set.• RIDLE: Integer Sensor Idle
This field contains the integer part of the measured idle-signal value.• FIDLE: Fractional Sensor Idle
This field contains the fractional part of the measured idle-signal value. Note that some of the LSB’s of the fractional part might not be implemented. Refer to the Module Configuration section.
31 30 29 28 27 26 25 24
- - - - RIDLE[15:12]
23 22 21 20 19 18 17 16
RIDLE[11:4]
15 14 13 12 11 10 9 8
RIDLE[3:0] FIDLE[11:8]
7 6 5 4 3 2 1 0
FIDLE[7:0]
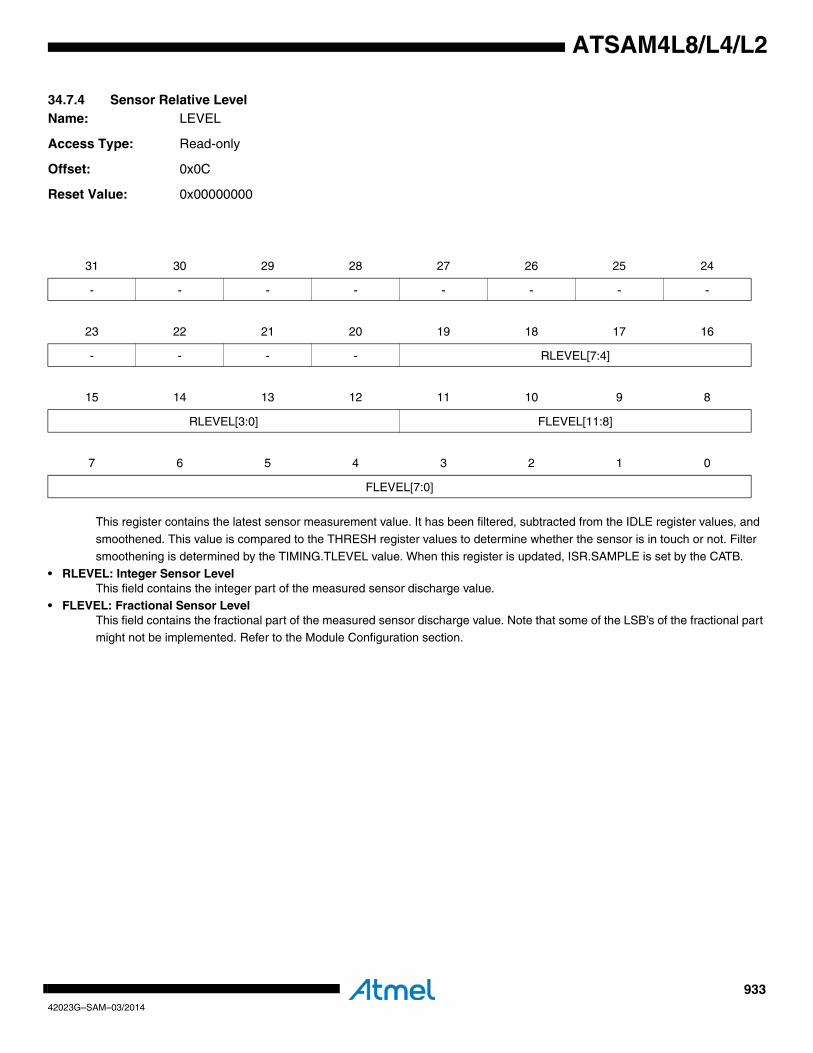
93342023G–SAM–03/2014
ATSAM4L8/L4/L2
34.7.4 Sensor Relative LevelName: LEVEL
Access Type: Read-only
Offset: 0x0C
Reset Value: 0x00000000
This register contains the latest sensor measurement value. It has been filtered, subtracted from the IDLE register values, and
smoothened. This value is compared to the THRESH register values to determine whether the sensor is in touch or not. Filter
smoothening is determined by the TIMING.TLEVEL value. When this register is updated, ISR.SAMPLE is set by the CATB.• RLEVEL: Integer Sensor Level
This field contains the integer part of the measured sensor discharge value.• FLEVEL: Fractional Sensor Level
This field contains the fractional part of the measured sensor discharge value. Note that some of the LSB’s of the fractional part might not be implemented. Refer to the Module Configuration section.
31 30 29 28 27 26 25 24
- - - - - - - -
23 22 21 20 19 18 17 16
- - - - RLEVEL[7:4]
15 14 13 12 11 10 9 8
RLEVEL[3:0] FLEVEL[11:8]
7 6 5 4 3 2 1 0
FLEVEL[7:0]
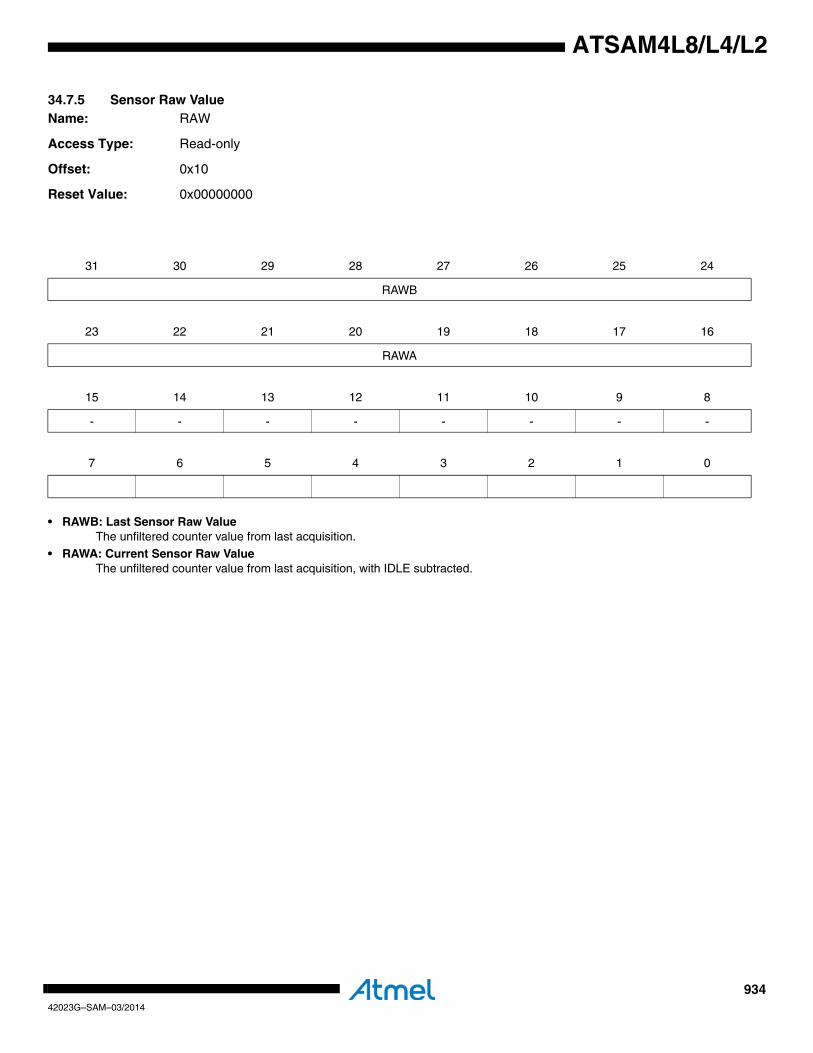
93442023G–SAM–03/2014
ATSAM4L8/L4/L2
34.7.5 Sensor Raw ValueName: RAW
Access Type: Read-only
Offset: 0x10
Reset Value: 0x00000000
• RAWB: Last Sensor Raw ValueThe unfiltered counter value from last acquisition.
• RAWA: Current Sensor Raw ValueThe unfiltered counter value from last acquisition, with IDLE subtracted.
31 30 29 28 27 26 25 24
RAWB
23 22 21 20 19 18 17 16
RAWA
15 14 13 12 11 10 9 8
- - - - - - - -
7 6 5 4 3 2 1 0
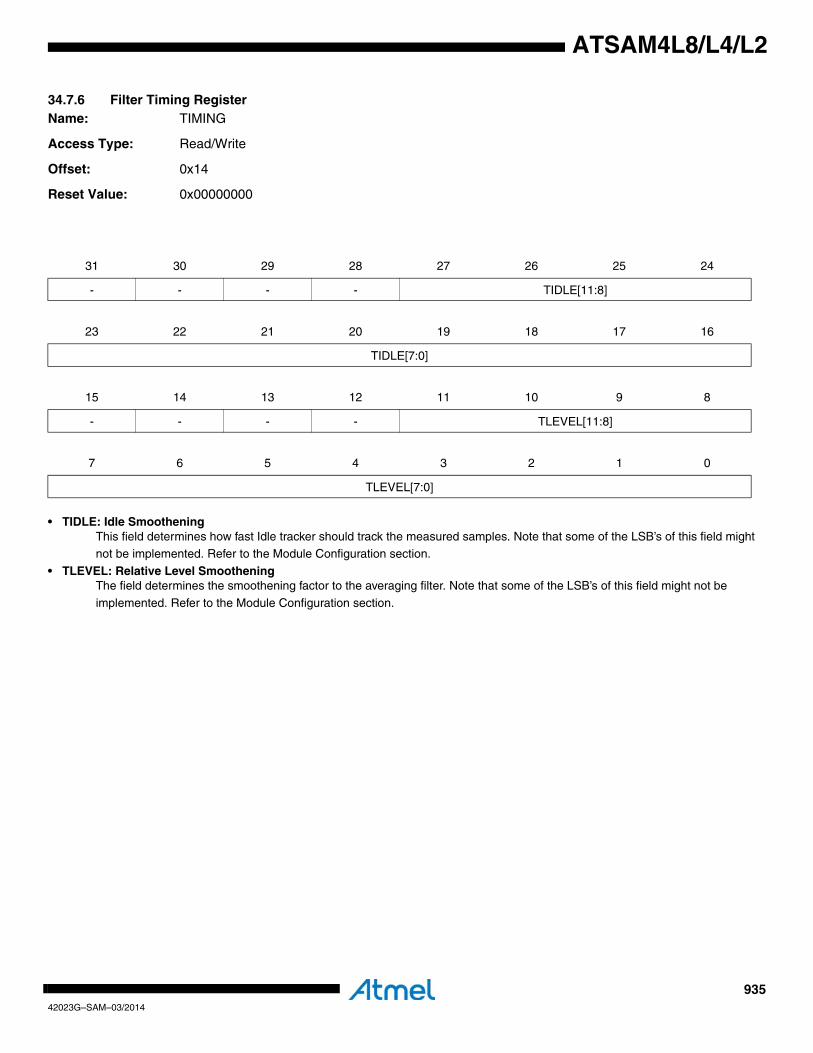
93542023G–SAM–03/2014
ATSAM4L8/L4/L2
34.7.6 Filter Timing RegisterName: TIMING
Access Type: Read/Write
Offset: 0x14
Reset Value: 0x00000000
• TIDLE: Idle SmootheningThis field determines how fast Idle tracker should track the measured samples. Note that some of the LSB’s of this field might not be implemented. Refer to the Module Configuration section.
• TLEVEL: Relative Level SmootheningThe field determines the smoothening factor to the averaging filter. Note that some of the LSB’s of this field might not be
implemented. Refer to the Module Configuration section.
31 30 29 28 27 26 25 24
- - - - TIDLE[11:8]
23 22 21 20 19 18 17 16
TIDLE[7:0]
15 14 13 12 11 10 9 8
- - - - TLEVEL[11:8]
7 6 5 4 3 2 1 0
TLEVEL[7:0]
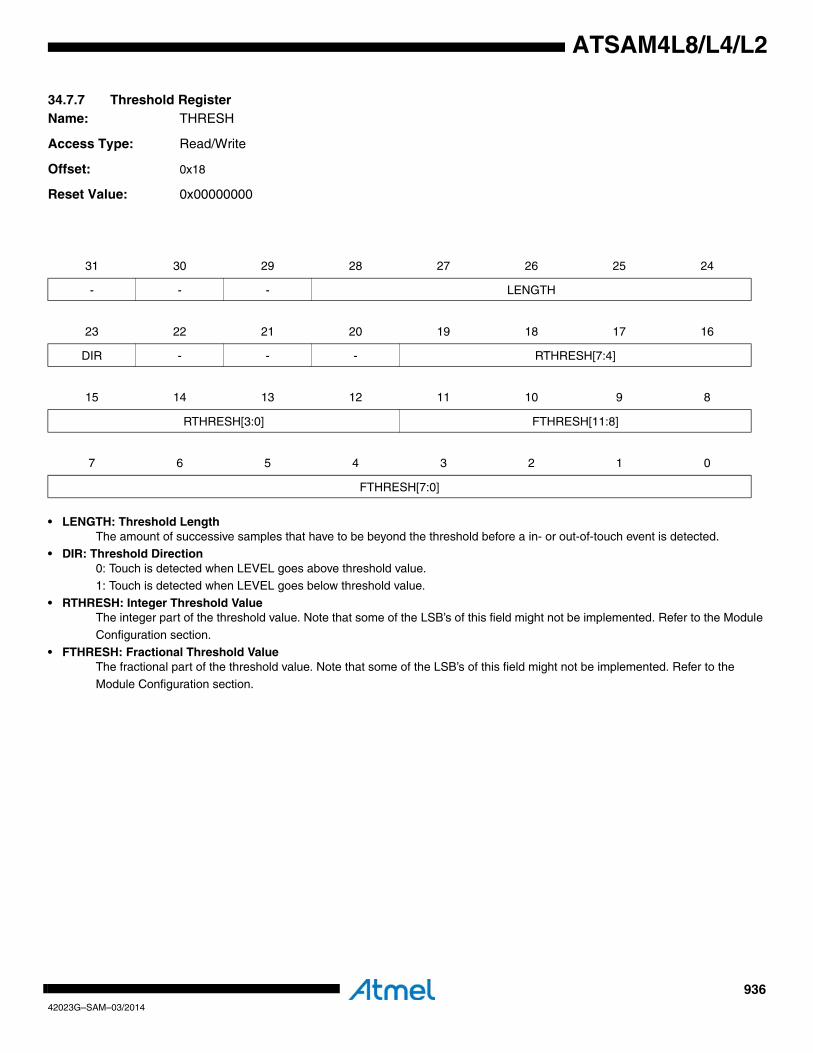
93642023G–SAM–03/2014
ATSAM4L8/L4/L2
34.7.7 Threshold Register Name: THRESH
Access Type: Read/Write
Offset: 0x18
Reset Value: 0x00000000
• LENGTH: Threshold LengthThe amount of successive samples that have to be beyond the threshold before a in- or out-of-touch event is detected.
• DIR: Threshold Direction0: Touch is detected when LEVEL goes above threshold value.1: Touch is detected when LEVEL goes below threshold value.
• RTHRESH: Integer Threshold ValueThe integer part of the threshold value. Note that some of the LSB’s of this field might not be implemented. Refer to the Module
Configuration section.
• FTHRESH: Fractional Threshold ValueThe fractional part of the threshold value. Note that some of the LSB’s of this field might not be implemented. Refer to the
Module Configuration section.
31 30 29 28 27 26 25 24
- - - LENGTH
23 22 21 20 19 18 17 16
DIR - - - RTHRESH[7:4]
15 14 13 12 11 10 9 8
RTHRESH[3:0] FTHRESH[11:8]
7 6 5 4 3 2 1 0
FTHRESH[7:0]
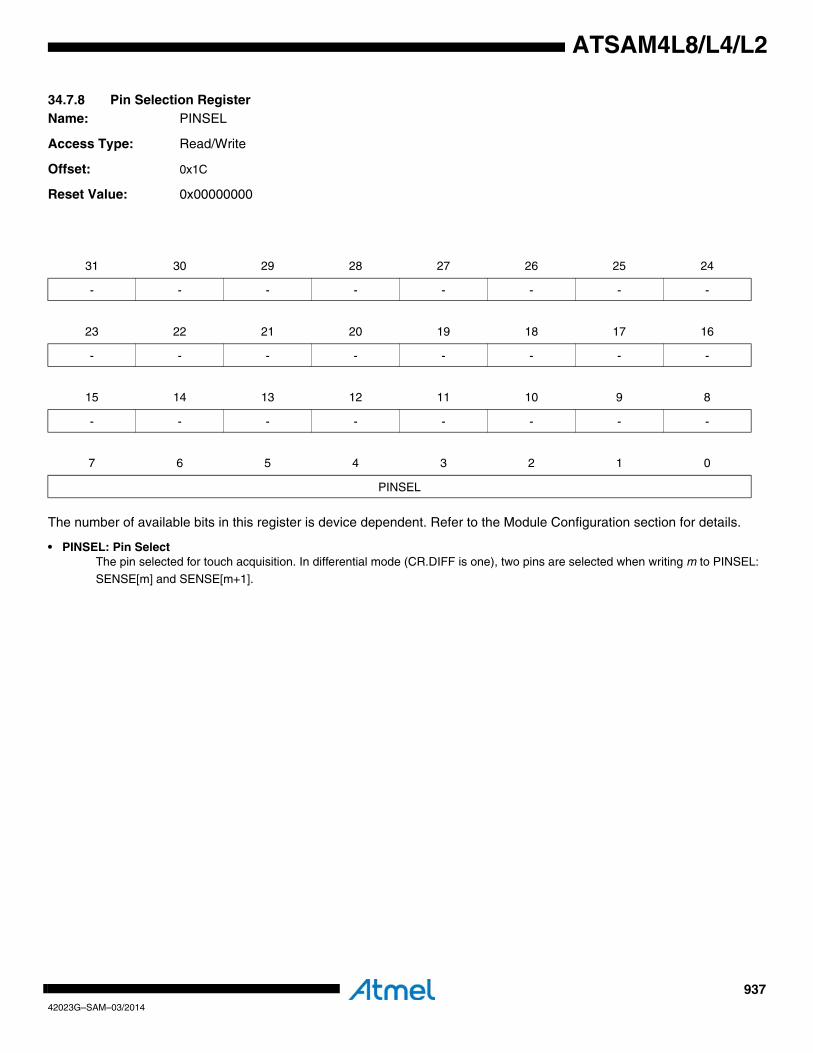
93742023G–SAM–03/2014
ATSAM4L8/L4/L2
34.7.8 Pin Selection RegisterName: PINSEL
Access Type: Read/Write
Offset: 0x1C
Reset Value: 0x00000000
The number of available bits in this register is device dependent. Refer to the Module Configuration section for details.
• PINSEL: Pin SelectThe pin selected for touch acquisition. In differential mode (CR.DIFF is one), two pins are selected when writing m to PINSEL:
SENSE[m] and SENSE[m+1].
31 30 29 28 27 26 25 24
- - - - - - - -
23 22 21 20 19 18 17 16
- - - - - - - -
15 14 13 12 11 10 9 8
- - - - - - - -
7 6 5 4 3 2 1 0
PINSEL
93842023G–SAM–03/2014
ATSAM4L8/L4/L2
34.7.9 Direct Memory Access RegisterName: DMA
Access Type: Read/Write
Offset: 0x20
Reset Value: 0x00000000
Note: This register is used for DMA transfers between the CATB and RAM. This register must not be read or written by the user.
31 30 29 28 27 26 25 24
DMA[31:24]
23 22 21 20 19 18 17 16
DMA[23:16]
15 14 13 12 11 10 9 8
DMA[15:8]
7 6 5 4 3 2 1 0
DMA[7:0]
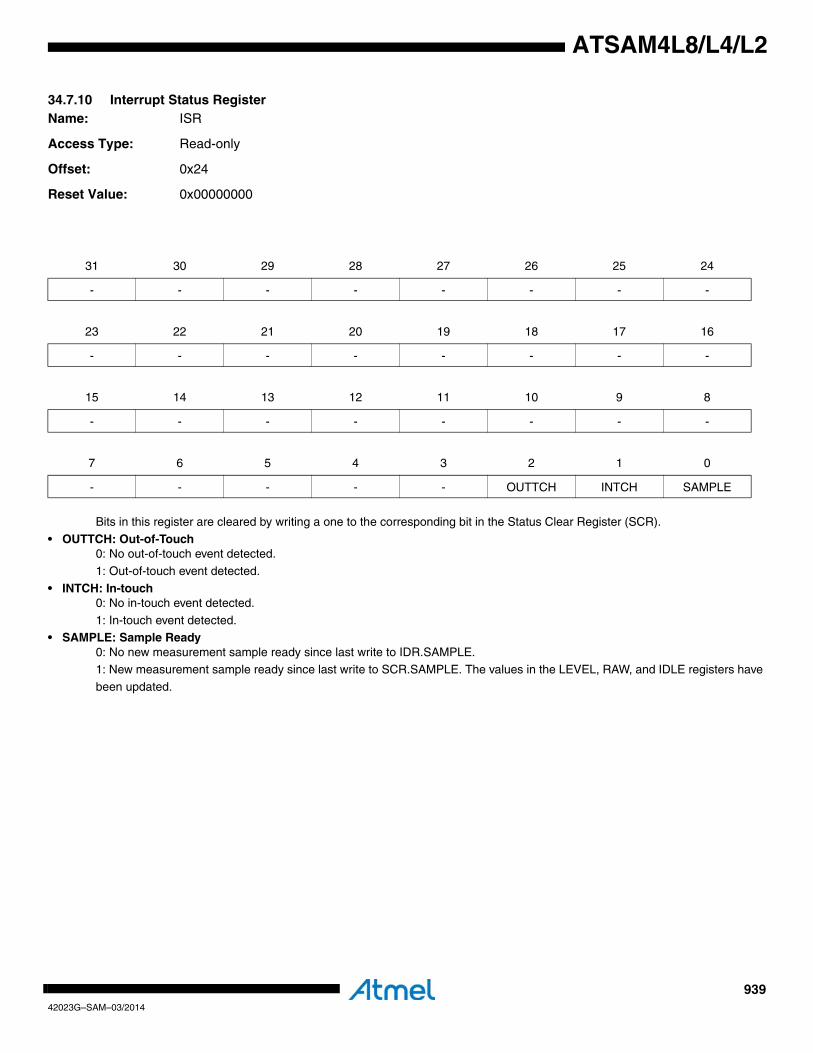
93942023G–SAM–03/2014
ATSAM4L8/L4/L2
34.7.10 Interrupt Status RegisterName: ISR
Access Type: Read-only
Offset: 0x24
Reset Value: 0x00000000
Bits in this register are cleared by writing a one to the corresponding bit in the Status Clear Register (SCR).
• OUTTCH: Out-of-Touch0: No out-of-touch event detected.
1: Out-of-touch event detected.
• INTCH: In-touch0: No in-touch event detected.
1: In-touch event detected.• SAMPLE: Sample Ready
0: No new measurement sample ready since last write to IDR.SAMPLE.1: New measurement sample ready since last write to SCR.SAMPLE. The values in the LEVEL, RAW, and IDLE registers have
been updated.
31 30 29 28 27 26 25 24
- - - - - - - -
23 22 21 20 19 18 17 16
- - - - - - - -
15 14 13 12 11 10 9 8
- - - - - - - -
7 6 5 4 3 2 1 0
- - - - - OUTTCH INTCH SAMPLE

94042023G–SAM–03/2014
ATSAM4L8/L4/L2
34.7.11 Interrupt Enable RegisterName: IER
Access Type: Write-only
Offset: 0x28
Reset Value: 0x00000000
Writing a zero to a bit in this register has no effect.
Writing a one to a bit in this register will set the corresponding bit in IMR.
31 30 29 28 27 26 25 24
- - - - - - - -
23 22 21 20 19 18 17 16
- - - - - - - -
15 14 13 12 11 10 9 8
- - - - - - - -
7 6 5 4 3 2 1 0
- - - - - OUTTCH INTCH SAMPLE

94142023G–SAM–03/2014
ATSAM4L8/L4/L2
34.7.12 Interrupt Disable RegisterName: IDR
Access Type: Write-only
Offset: 0x2C
Reset Value: 0x00000000
Writing a zero to a bit in this register has no effect.
Writing a one to a bit in this register will clear the corresponding bit in IMR.
31 30 29 28 27 26 25 24
- - - - - - - -
23 22 21 20 19 18 17 16
- - - - - - - -
15 14 13 12 11 10 9 8
- - - - - - - -
7 6 5 4 3 2 1 0
- - - - - OUTTCH INTCH SAMPLE
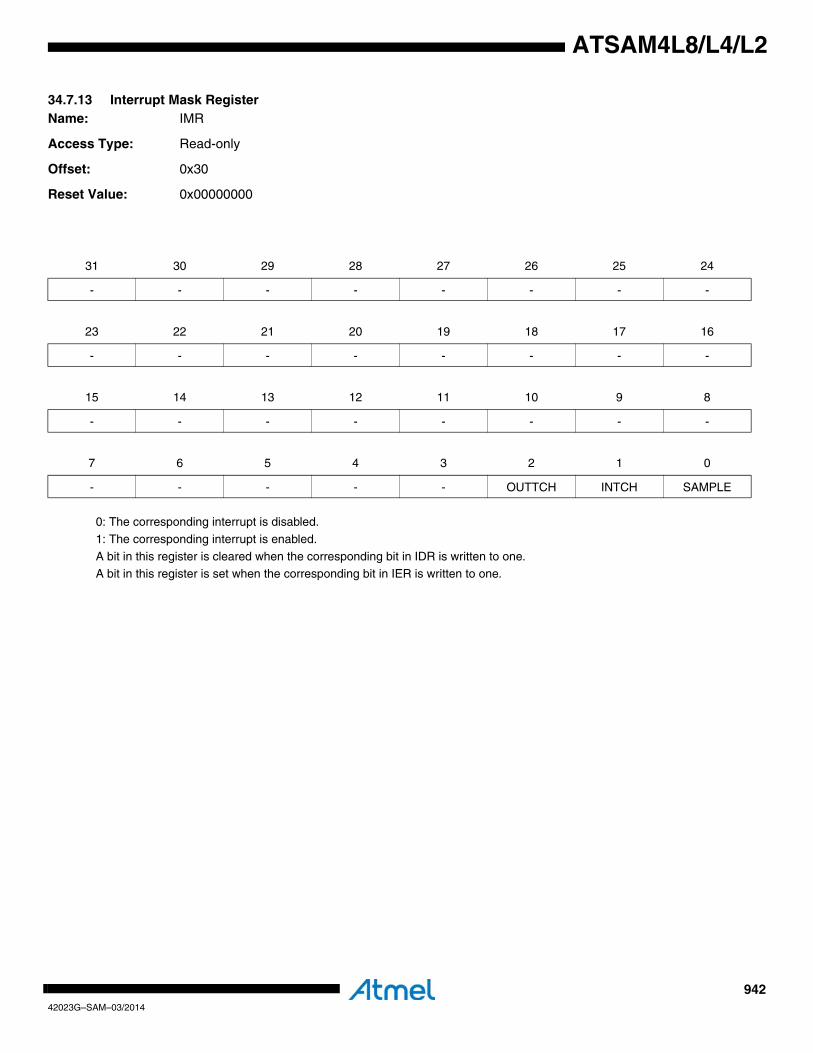
94242023G–SAM–03/2014
ATSAM4L8/L4/L2
34.7.13 Interrupt Mask RegisterName: IMR
Access Type: Read-only
Offset: 0x30
Reset Value: 0x00000000
0: The corresponding interrupt is disabled.
1: The corresponding interrupt is enabled.
A bit in this register is cleared when the corresponding bit in IDR is written to one.A bit in this register is set when the corresponding bit in IER is written to one.
31 30 29 28 27 26 25 24
- - - - - - - -
23 22 21 20 19 18 17 16
- - - - - - - -
15 14 13 12 11 10 9 8
- - - - - - - -
7 6 5 4 3 2 1 0
- - - - - OUTTCH INTCH SAMPLE

94342023G–SAM–03/2014
ATSAM4L8/L4/L2
34.7.14 Status Clear RegisterName: SCR
Access Type: Write-only
Offset: 0x34
Reset Value: 0x00000000
Writing a zero to a bit in this register has no effect.
Writing a one to a bit in this register will clear the corresponding bit in ISR and the corresponding interrupt request.
31 30 29 28 27 26 25 24
- - - - - - - -
23 22 21 20 19 18 17 16
- - - - - - - -
15 14 13 12 11 10 9 8
- - - - - - - -
7 6 5 4 3 2 1 0
- - - - - OUTTCH INTCH SAMPLE
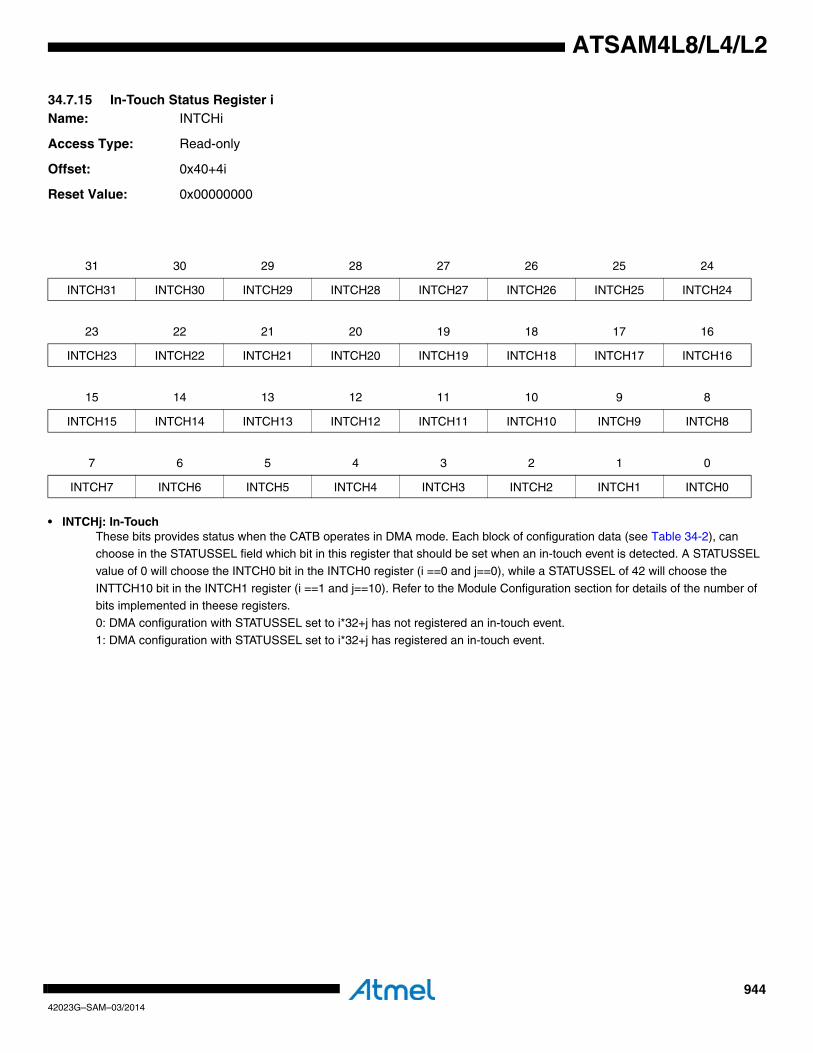
94442023G–SAM–03/2014
ATSAM4L8/L4/L2
34.7.15 In-Touch Status Register iName: INTCHi
Access Type: Read-only
Offset: 0x40+4i
Reset Value: 0x00000000
• INTCHj: In-TouchThese bits provides status when the CATB operates in DMA mode. Each block of configuration data (see Table 34-2), can choose in the STATUSSEL field which bit in this register that should be set when an in-touch event is detected. A STATUSSEL
value of 0 will choose the INTCH0 bit in the INTCH0 register (i ==0 and j==0), while a STATUSSEL of 42 will choose the
INTTCH10 bit in the INTCH1 register (i ==1 and j==10). Refer to the Module Configuration section for details of the number of bits implemented in theese registers.
0: DMA configuration with STATUSSEL set to i*32+j has not registered an in-touch event.
1: DMA configuration with STATUSSEL set to i*32+j has registered an in-touch event.
31 30 29 28 27 26 25 24
INTCH31 INTCH30 INTCH29 INTCH28 INTCH27 INTCH26 INTCH25 INTCH24
23 22 21 20 19 18 17 16
INTCH23 INTCH22 INTCH21 INTCH20 INTCH19 INTCH18 INTCH17 INTCH16
15 14 13 12 11 10 9 8
INTCH15 INTCH14 INTCH13 INTCH12 INTCH11 INTCH10 INTCH9 INTCH8
7 6 5 4 3 2 1 0
INTCH7 INTCH6 INTCH5 INTCH4 INTCH3 INTCH2 INTCH1 INTCH0
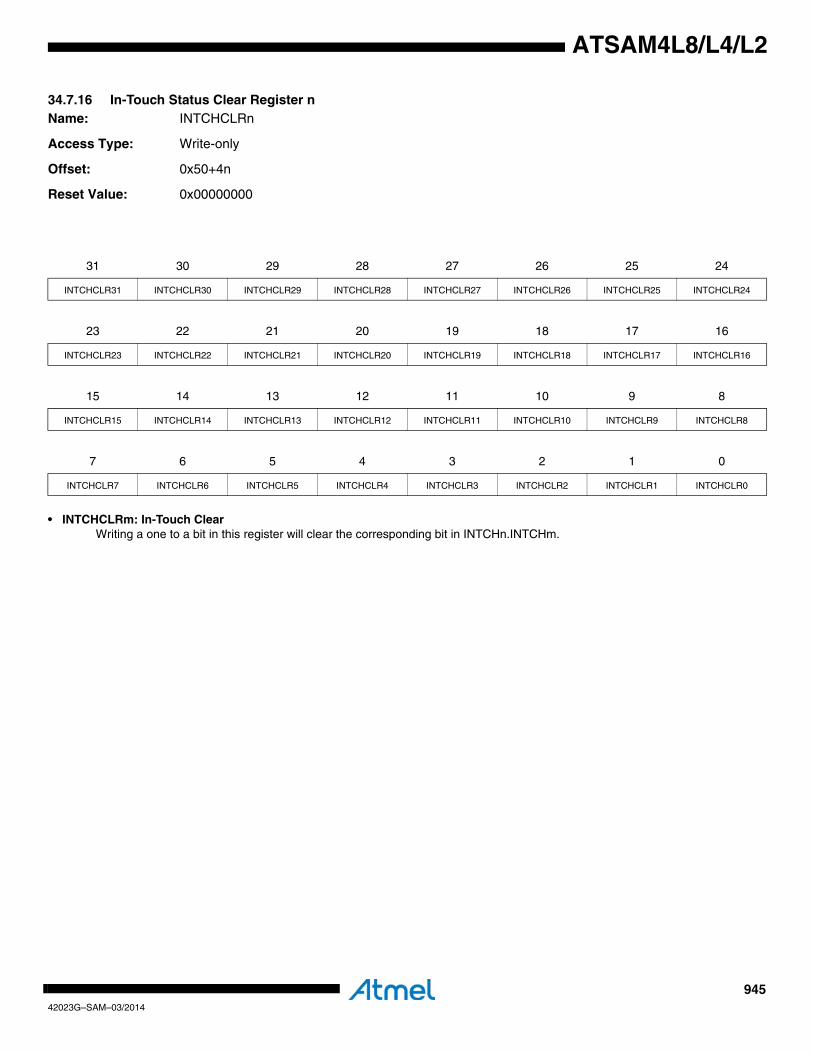
94542023G–SAM–03/2014
ATSAM4L8/L4/L2
34.7.16 In-Touch Status Clear Register nName: INTCHCLRn
Access Type: Write-only
Offset: 0x50+4n
Reset Value: 0x00000000
• INTCHCLRm: In-Touch ClearWriting a one to a bit in this register will clear the corresponding bit in INTCHn.INTCHm.
31 30 29 28 27 26 25 24
INTCHCLR31 INTCHCLR30 INTCHCLR29 INTCHCLR28 INTCHCLR27 INTCHCLR26 INTCHCLR25 INTCHCLR24
23 22 21 20 19 18 17 16
INTCHCLR23 INTCHCLR22 INTCHCLR21 INTCHCLR20 INTCHCLR19 INTCHCLR18 INTCHCLR17 INTCHCLR16
15 14 13 12 11 10 9 8
INTCHCLR15 INTCHCLR14 INTCHCLR13 INTCHCLR12 INTCHCLR11 INTCHCLR10 INTCHCLR9 INTCHCLR8
7 6 5 4 3 2 1 0
INTCHCLR7 INTCHCLR6 INTCHCLR5 INTCHCLR4 INTCHCLR3 INTCHCLR2 INTCHCLR1 INTCHCLR0
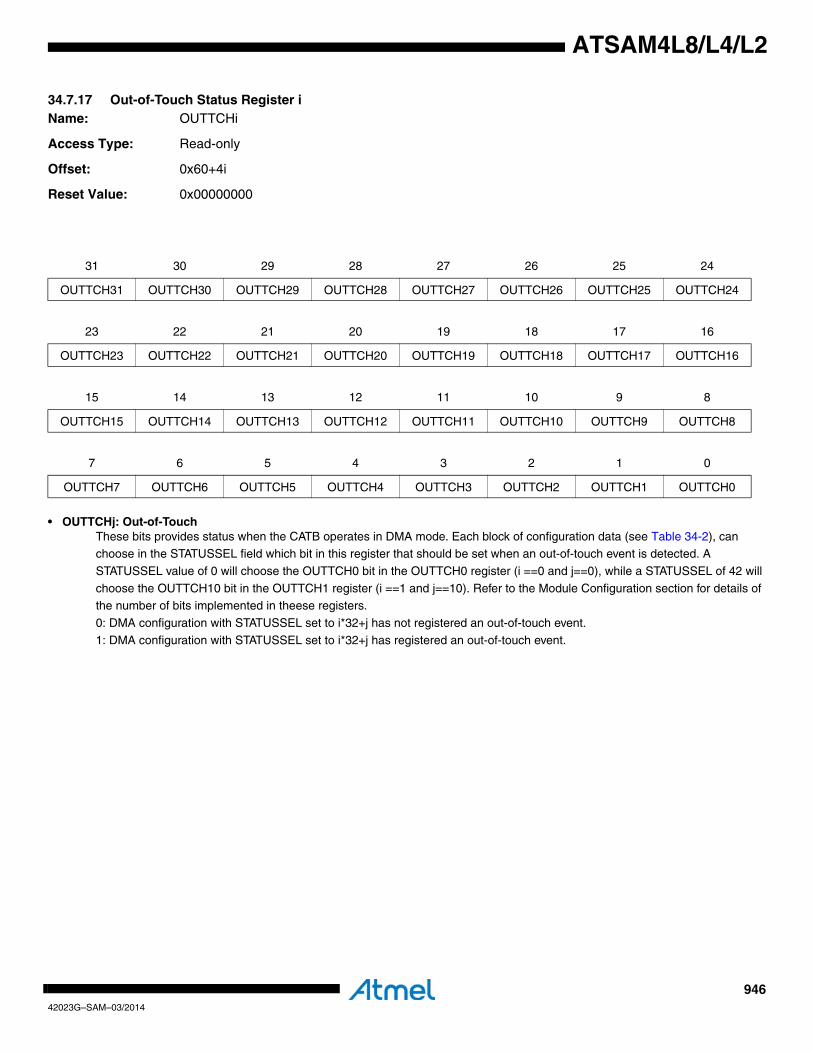
94642023G–SAM–03/2014
ATSAM4L8/L4/L2
34.7.17 Out-of-Touch Status Register iName: OUTTCHi
Access Type: Read-only
Offset: 0x60+4i
Reset Value: 0x00000000
• OUTTCHj: Out-of-TouchThese bits provides status when the CATB operates in DMA mode. Each block of configuration data (see Table 34-2), can choose in the STATUSSEL field which bit in this register that should be set when an out-of-touch event is detected. A
STATUSSEL value of 0 will choose the OUTTCH0 bit in the OUTTCH0 register (i ==0 and j==0), while a STATUSSEL of 42 will
choose the OUTTCH10 bit in the OUTTCH1 register (i ==1 and j==10). Refer to the Module Configuration section for details of the number of bits implemented in theese registers.
0: DMA configuration with STATUSSEL set to i*32+j has not registered an out-of-touch event.
1: DMA configuration with STATUSSEL set to i*32+j has registered an out-of-touch event.
31 30 29 28 27 26 25 24
OUTTCH31 OUTTCH30 OUTTCH29 OUTTCH28 OUTTCH27 OUTTCH26 OUTTCH25 OUTTCH24
23 22 21 20 19 18 17 16
OUTTCH23 OUTTCH22 OUTTCH21 OUTTCH20 OUTTCH19 OUTTCH18 OUTTCH17 OUTTCH16
15 14 13 12 11 10 9 8
OUTTCH15 OUTTCH14 OUTTCH13 OUTTCH12 OUTTCH11 OUTTCH10 OUTTCH9 OUTTCH8
7 6 5 4 3 2 1 0
OUTTCH7 OUTTCH6 OUTTCH5 OUTTCH4 OUTTCH3 OUTTCH2 OUTTCH1 OUTTCH0
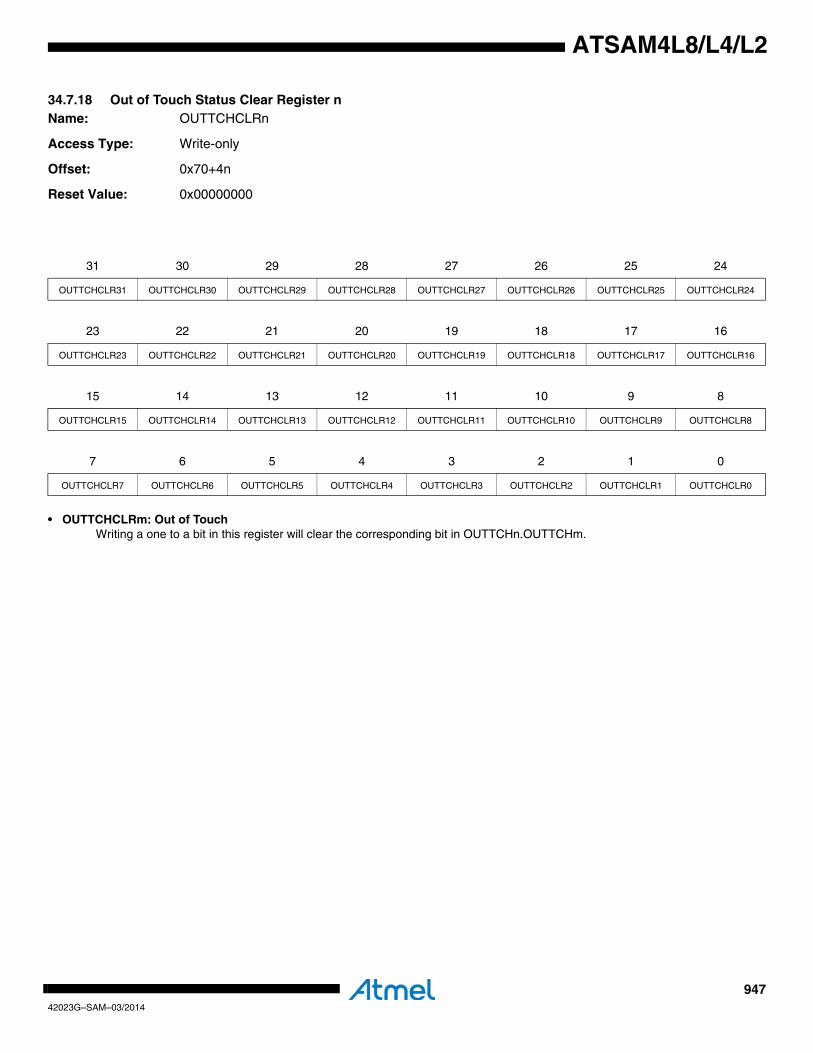
94742023G–SAM–03/2014
ATSAM4L8/L4/L2
34.7.18 Out of Touch Status Clear Register nName: OUTTCHCLRn
Access Type: Write-only
Offset: 0x70+4n
Reset Value: 0x00000000
• OUTTCHCLRm: Out of TouchWriting a one to a bit in this register will clear the corresponding bit in OUTTCHn.OUTTCHm.
31 30 29 28 27 26 25 24
OUTTCHCLR31 OUTTCHCLR30 OUTTCHCLR29 OUTTCHCLR28 OUTTCHCLR27 OUTTCHCLR26 OUTTCHCLR25 OUTTCHCLR24
23 22 21 20 19 18 17 16
OUTTCHCLR23 OUTTCHCLR22 OUTTCHCLR21 OUTTCHCLR20 OUTTCHCLR19 OUTTCHCLR18 OUTTCHCLR17 OUTTCHCLR16
15 14 13 12 11 10 9 8
OUTTCHCLR15 OUTTCHCLR14 OUTTCHCLR13 OUTTCHCLR12 OUTTCHCLR11 OUTTCHCLR10 OUTTCHCLR9 OUTTCHCLR8
7 6 5 4 3 2 1 0
OUTTCHCLR7 OUTTCHCLR6 OUTTCHCLR5 OUTTCHCLR4 OUTTCHCLR3 OUTTCHCLR2 OUTTCHCLR1 OUTTCHCLR0
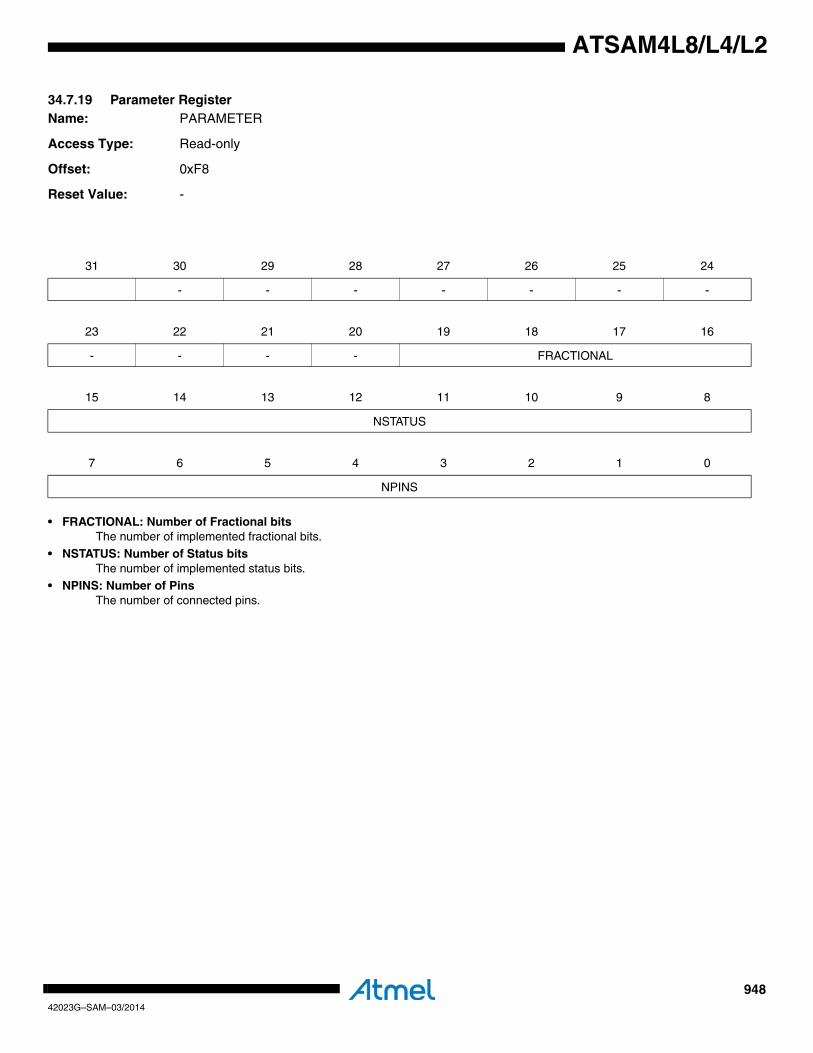
94842023G–SAM–03/2014
ATSAM4L8/L4/L2
34.7.19 Parameter RegisterName: PARAMETER
Access Type: Read-only
Offset: 0xF8
Reset Value: -
• FRACTIONAL: Number of Fractional bitsThe number of implemented fractional bits.
• NSTATUS: Number of Status bitsThe number of implemented status bits.
• NPINS: Number of PinsThe number of connected pins.
31 30 29 28 27 26 25 24
- - - - - - -
23 22 21 20 19 18 17 16
- - - - FRACTIONAL
15 14 13 12 11 10 9 8
NSTATUS
7 6 5 4 3 2 1 0
NPINS
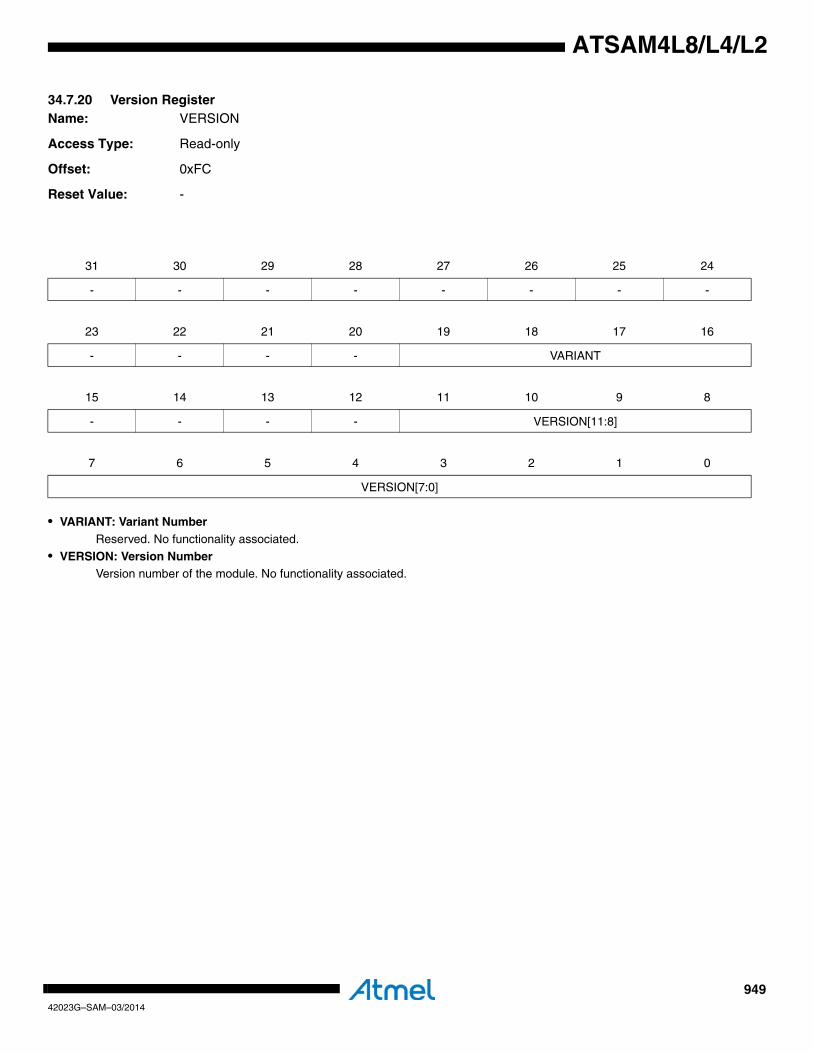
94942023G–SAM–03/2014
ATSAM4L8/L4/L2
34.7.20 Version RegisterName: VERSION
Access Type: Read-only
Offset: 0xFC
Reset Value: -
• VARIANT: Variant NumberReserved. No functionality associated.
• VERSION: Version NumberVersion number of the module. No functionality associated.
31 30 29 28 27 26 25 24
- - - - - - - -
23 22 21 20 19 18 17 16
- - - - VARIANT
15 14 13 12 11 10 9 8
- - - - VERSION[11:8]
7 6 5 4 3 2 1 0
VERSION[7:0]
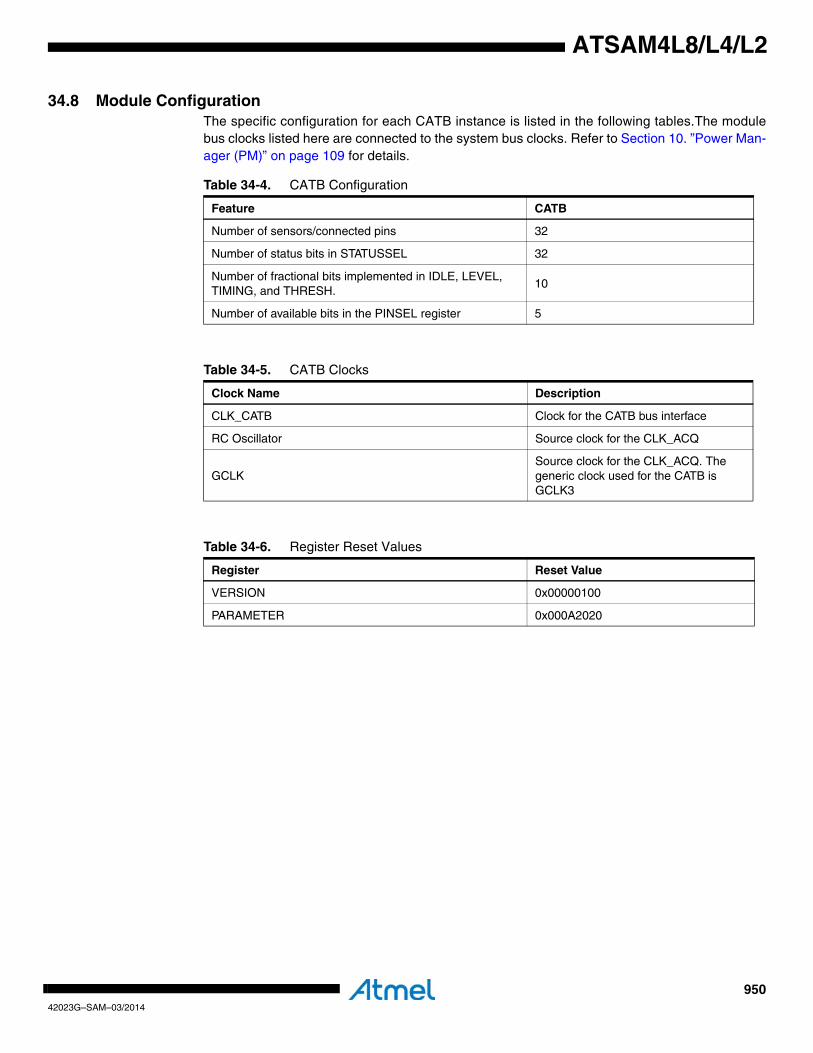
95042023G–SAM–03/2014
ATSAM4L8/L4/L2
34.8 Module ConfigurationThe specific configuration for each CATB instance is listed in the following tables.The modulebus clocks listed here are connected to the system bus clocks. Refer to Section 10. ”Power Man-ager (PM)” on page 109 for details.
Table 34-4. CATB Configuration
Feature CATB
Number of sensors/connected pins 32
Number of status bits in STATUSSEL 32
Number of fractional bits implemented in IDLE, LEVEL, TIMING, and THRESH.
10
Number of available bits in the PINSEL register 5
Table 34-5. CATB Clocks
Clock Name Description
CLK_CATB Clock for the CATB bus interface
RC Oscillator Source clock for the CLK_ACQ
GCLKSource clock for the CLK_ACQ. The generic clock used for the CATB is GCLK3
Table 34-6. Register Reset Values
Register Reset Value
VERSION 0x00000100
PARAMETER 0x000A2020
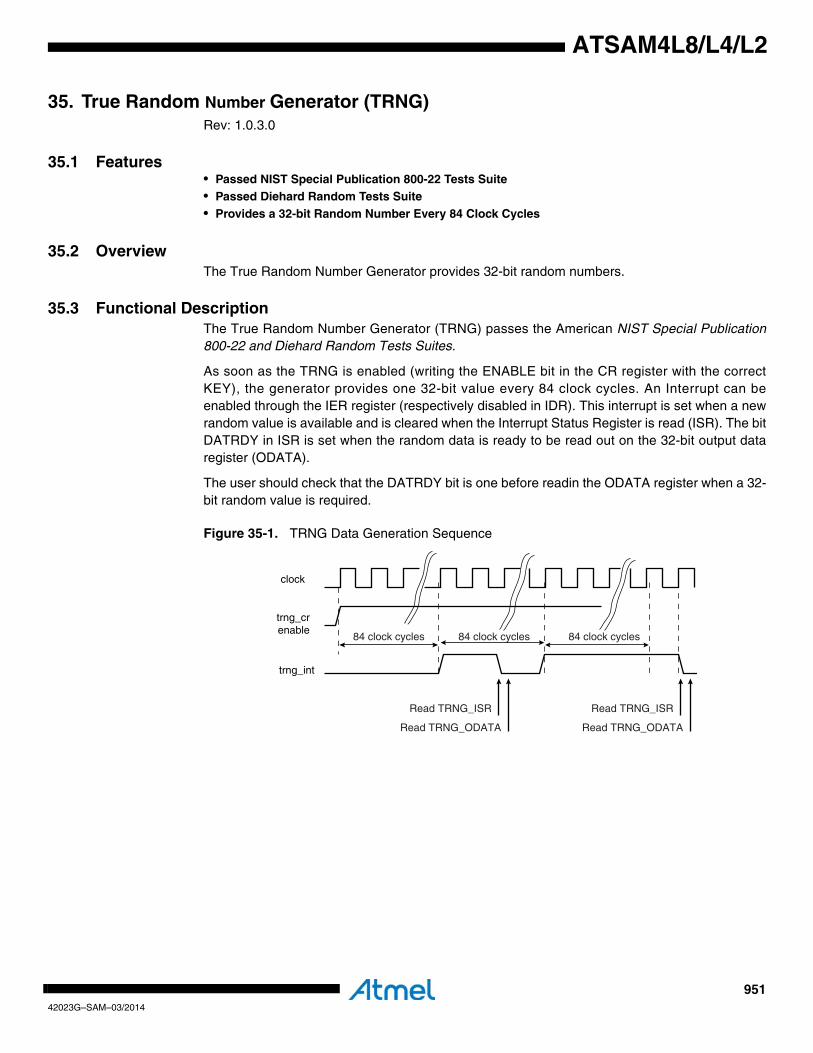
95142023G–SAM–03/2014
ATSAM4L8/L4/L2
35. True Random Number Generator (TRNG)Rev: 1.0.3.0
35.1 Features• Passed NIST Special Publication 800-22 Tests Suite• Passed Diehard Random Tests Suite• Provides a 32-bit Random Number Every 84 Clock Cycles
35.2 OverviewThe True Random Number Generator provides 32-bit random numbers.
35.3 Functional DescriptionThe True Random Number Generator (TRNG) passes the American NIST Special Publication800-22 and Diehard Random Tests Suites.
As soon as the TRNG is enabled (writing the ENABLE bit in the CR register with the correctKEY), the generator provides one 32-bit value every 84 clock cycles. An Interrupt can beenabled through the IER register (respectively disabled in IDR). This interrupt is set when a newrandom value is available and is cleared when the Interrupt Status Register is read (ISR). The bitDATRDY in ISR is set when the random data is ready to be read out on the 32-bit output dataregister (ODATA).
The user should check that the DATRDY bit is one before readin the ODATA register when a 32-bit random value is required.
Figure 35-1. TRNG Data Generation Sequence
84 clock cycles 84 clock cycles84 clock cycles
Read TRNG_ISR
Read TRNG_ODATA
Read TRNG_ISR
Read TRNG_ODATA
clock
trng_int
trng_crenable
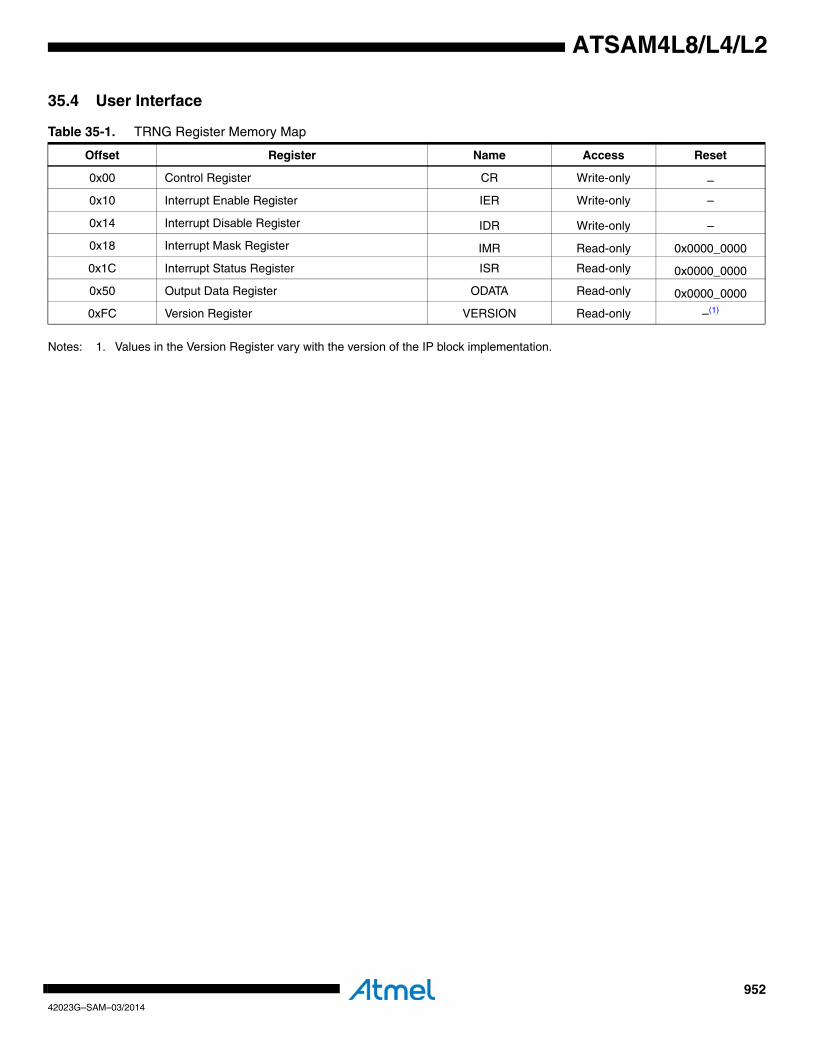
95242023G–SAM–03/2014
ATSAM4L8/L4/L2
35.4 User Interface
Notes: 1. Values in the Version Register vary with the version of the IP block implementation.
Table 35-1. TRNG Register Memory Map
Offset Register Name Access Reset
0x00 Control Register CR Write-only –
0x10 Interrupt Enable Register IER Write-only –
0x14 Interrupt Disable Register IDR Write-only –
0x18 Interrupt Mask Register IMR Read-only 0x0000_0000
0x1C Interrupt Status Register ISR Read-only 0x0000_0000
0x50 Output Data Register ODATA Read-only 0x0000_0000
0xFC Version Register VERSION Read-only –(1)
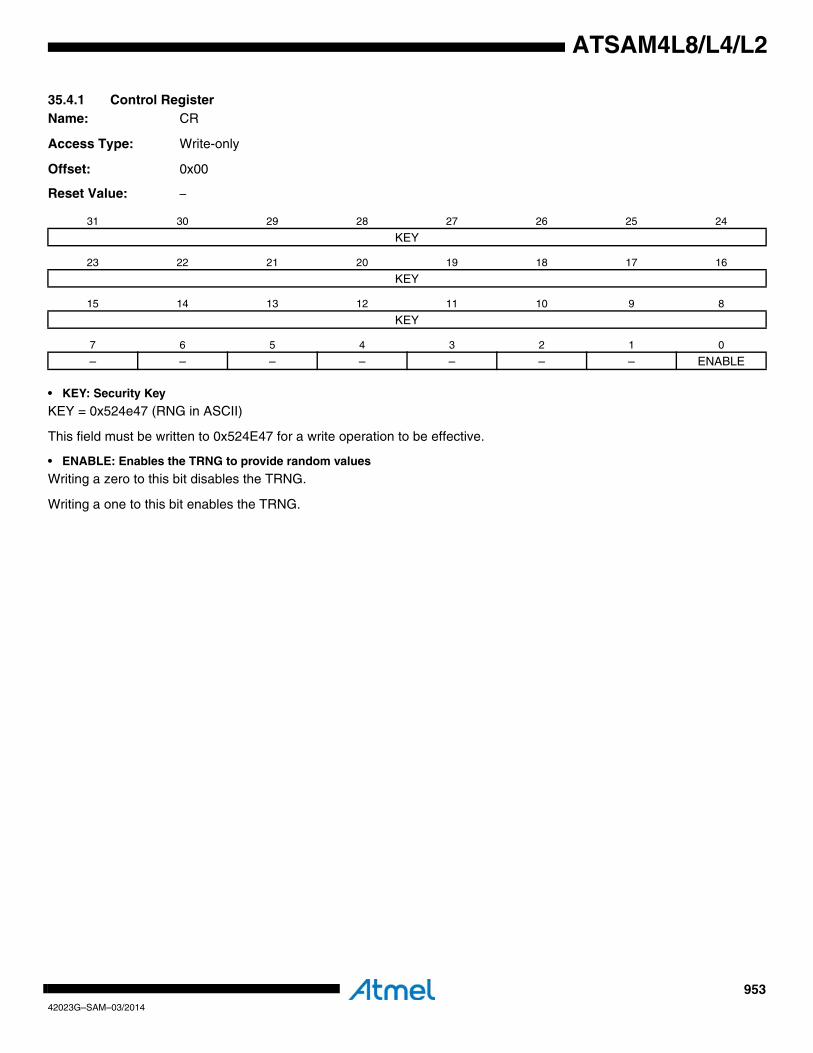
95342023G–SAM–03/2014
ATSAM4L8/L4/L2
35.4.1 Control RegisterName: CR
Access Type: Write-only
Offset: 0x00
Reset Value: –
• KEY: Security Key
KEY = 0x524e47 (RNG in ASCII)
This field must be written to 0x524E47 for a write operation to be effective.
• ENABLE: Enables the TRNG to provide random values
Writing a zero to this bit disables the TRNG.
Writing a one to this bit enables the TRNG.
31 30 29 28 27 26 25 24
KEY
23 22 21 20 19 18 17 16
KEY
15 14 13 12 11 10 9 8
KEY
7 6 5 4 3 2 1 0
– – – – – – – ENABLE
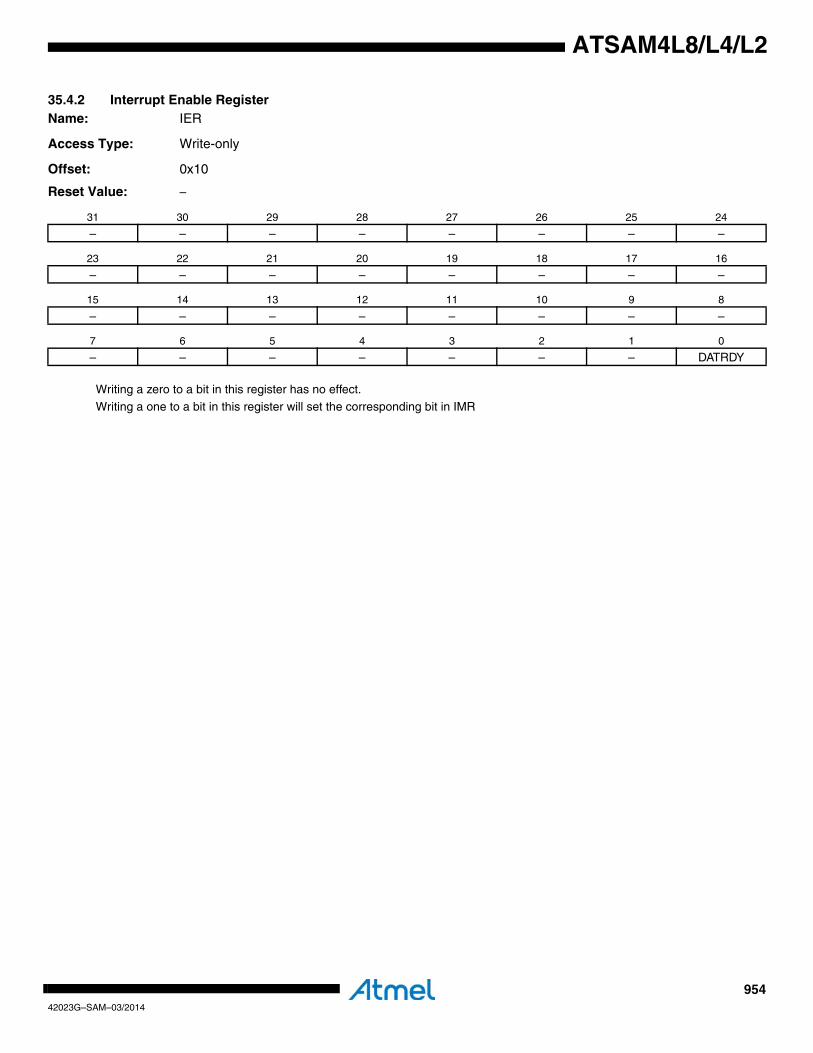
95442023G–SAM–03/2014
ATSAM4L8/L4/L2
35.4.2 Interrupt Enable RegisterName: IER
Access Type: Write-only
Offset: 0x10
Reset Value: –
Writing a zero to a bit in this register has no effect.
Writing a one to a bit in this register will set the corresponding bit in IMR
31 30 29 28 27 26 25 24
– – – – – – – –
23 22 21 20 19 18 17 16
– – – – – – – –
15 14 13 12 11 10 9 8
– – – – – – – –
7 6 5 4 3 2 1 0
– – – – – – – DATRDY

95542023G–SAM–03/2014
ATSAM4L8/L4/L2
35.4.3 Interrupt Disable RegisterName: IDR
Access Type: Write-only
Offset: 0x14
Reset Value: –
Writing a zero to a bit in this register has no effect.Writing a one to a bit in this register will clear the corresponding bit in IMR
31 30 29 28 27 26 25 24
– – – – – – – –
23 22 21 20 19 18 17 16
– – – – – – – –
15 14 13 12 11 10 9 8
– – – – – – – –
7 6 5 4 3 2 1 0
– – – – – – – DATRDY

95642023G–SAM–03/2014
ATSAM4L8/L4/L2
35.4.4 Interrupt Mask RegisterName: IMR
Access Type: Read-only
Offset: 0x18
Reset Value: 0x00000000
0: The corresponding interrupt is disabled.1: The corresponding interrupt is enabled.
This bit is cleared when the corresponding bit in IDR is written to one.
This bit is set when the corresponding bit in IER is written to one.
31 30 29 28 27 26 25 24
– – – – – – – –
23 22 21 20 19 18 17 16
– – – – – – – –
15 14 13 12 11 10 9 8
– – – – – – – –
7 6 5 4 3 2 1 0
– – – – – – – DATRDY

95742023G–SAM–03/2014
ATSAM4L8/L4/L2
35.4.5 Interrupt Status RegisterName: ISR
Access Type: Read-only
Offset: 0x34
Reset Value: 0x00000000
• DATRDY: Data Ready
0 = Output data is not valid or TRNG is disabled.
1 = New Random value is completed.
DATRDY is cleared when this register is read.
31 30 29 28 27 26 25 24
– – – – – – – –
23 22 21 20 19 18 17 16
– – – – – – – –
15 14 13 12 11 10 9 8
– – – – – –
7 6 5 4 3 2 1 0
– – – – – – – DATRDY

95842023G–SAM–03/2014
ATSAM4L8/L4/L2
35.4.6 Output Data RegisterName: ODATA
Access Type: Read-only
Offset: 0x34
Reset Value: 0x00000000
• ODATA: Output Data
The 32-bit Output Data register contains the 32-bit random data.
31 30 29 28 27 26 25 24
ODATA
23 22 21 20 19 18 17 16
ODATA
15 14 13 12 11 10 9 8
ODATA
7 6 5 4 3 2 1 0
ODATA

95942023G–SAM–03/2014
ATSAM4L8/L4/L2
35.4.7 Version RegisterName: VERSION
Access Type: Read-only
Offset: 0xFC
Reset Value: -
• VARIANT: Variant NumberReserved. No functionality associated.
• VERSION: Version Number
Version number of the module. No functionality associated.
31 30 29 28 27 26 25 24
– – – – – – – –
23 22 21 20 19 18 17 16
– – – – – VARIANT
15 14 13 12 11 10 9 8
– – – – VERSION
7 6 5 4 3 2 1 0
VERSION
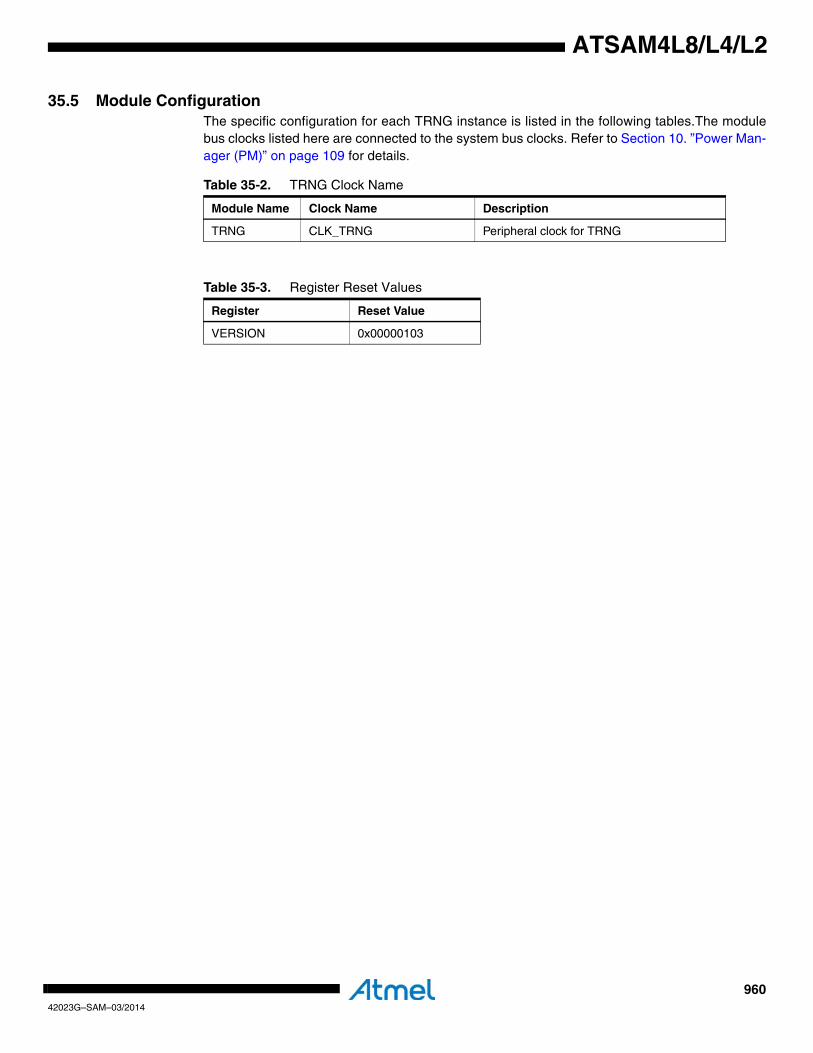
96042023G–SAM–03/2014
ATSAM4L8/L4/L2
35.5 Module ConfigurationThe specific configuration for each TRNG instance is listed in the following tables.The modulebus clocks listed here are connected to the system bus clocks. Refer to Section 10. ”Power Man-ager (PM)” on page 109 for details.
Table 35-2. TRNG Clock Name
Module Name Clock Name Description
TRNG CLK_TRNG Peripheral clock for TRNG
Table 35-3. Register Reset Values
Register Reset Value
VERSION 0x00000103
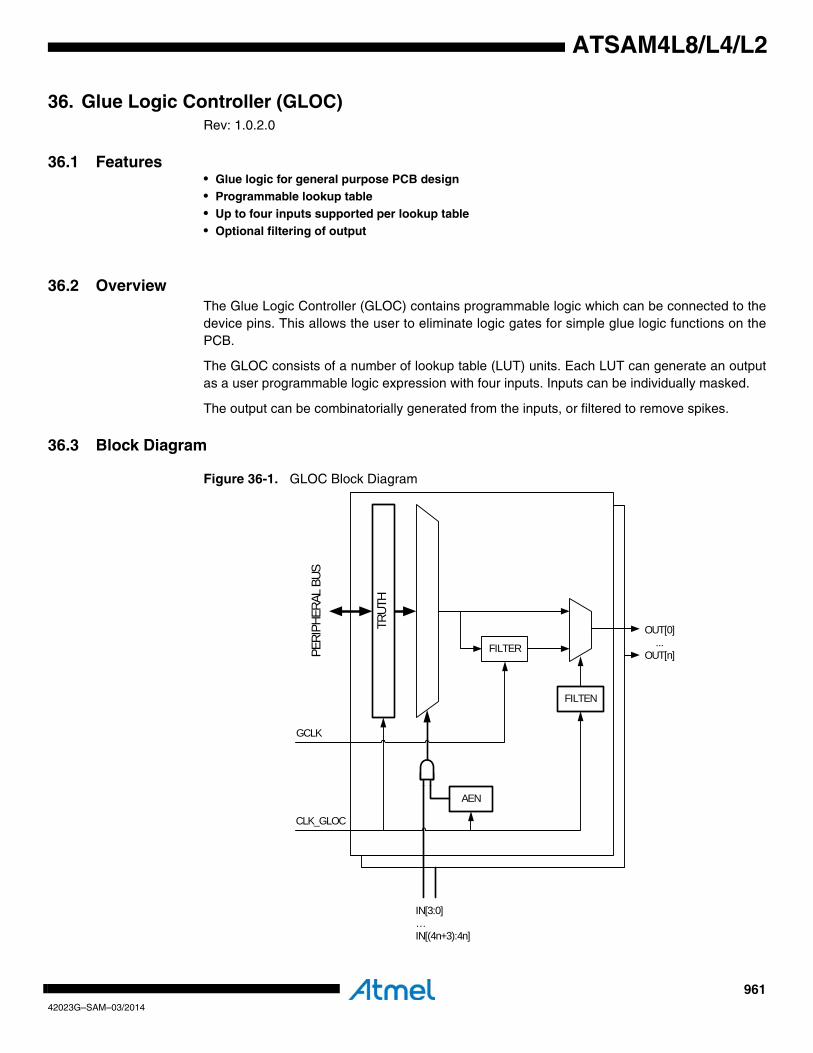
96142023G–SAM–03/2014
ATSAM4L8/L4/L2
36. Glue Logic Controller (GLOC)Rev: 1.0.2.0
36.1 Features• Glue logic for general purpose PCB design• Programmable lookup table• Up to four inputs supported per lookup table• Optional filtering of output
36.2 OverviewThe Glue Logic Controller (GLOC) contains programmable logic which can be connected to thedevice pins. This allows the user to eliminate logic gates for simple glue logic functions on thePCB.
The GLOC consists of a number of lookup table (LUT) units. Each LUT can generate an outputas a user programmable logic expression with four inputs. Inputs can be individually masked.
The output can be combinatorially generated from the inputs, or filtered to remove spikes.
36.3 Block Diagram
Figure 36-1. GLOC Block Diagram
PERI
PHER
AL B
US
TRUT
H
FILTER
OUT[0]...
OUT[n]
FILTEN
IN[3:0]…IN[(4n+3):4n]
AEN
CLK_GLOC
GCLK
96242023G–SAM–03/2014
ATSAM4L8/L4/L2
36.4 I/O Lines Description
Each LUT have 4 inputs and one output. The inputs and outputs for the LUTs are mappedsequentially to the inputs and outputs. This means that LUT0 is connected to IN0 to IN3 andOUT0. LUT1 is connected to IN4 to IN7 and OUT1. In general, LUTn is connected to IN[4n] toIN[4n+3] and OUTn.
36.5 Product DependenciesIn order to use this module, other parts of the system must be configured correctly, as describedbelow.
36.5.1 I/O Lines
The pins used for interfacing the GLOC may be multiplexed with I/O Controller lines. The pro-grammer must first program the I/O Controller to assign the desired GLOC pins to theirperipheral function. If I/O lines of the GLOC are not used by the application, they can be used forother purposes by the I/O Controller.
It is only required to enable the GLOC inputs and outputs in use. Pullups for pins configured tobe used by the GLOC will be disabled.
36.5.2 Clocks
The clock for the GLOC bus interface (CLK_GLOC) is generated by the Power Manager. Thisclock is disabled at reset, and can be enabled in the Power Manager. It is recommended to dis-able the GLOC before disabling the clock, to avoid freezing the module in an undefined state.
Additionally, the GLOC depends on a dedicated Generic Clock (GCLK). The GCLK can be set toa wide range of frequencies and clock sources, and must be enabled by the System ControlInterface (SCIF) before the GLOC filter can be used.
36.5.3 Debug Operation
When an external debugger forces the CPU into debug mode, the GLOC continues normaloperation.
36.6 Functional Description
36.6.1 Enabling the Lookup Table InputsSince the inputs to each lookup table (LUT) unit can be multiplexed with other peripherals, eachinput must be explicitly enabled by writing a one to the corresponding enable bit (AEN) in thecorresponding Control Register (CR).
If no inputs are enabled, the output OUTn will be the least significant bit in the TRUTHn register.
Table 36-1. I/O Lines Description
Pin Name Pin Description Type
IN0-INm Inputs to lookup tables Input
OUT0-OUTn Output from lookup tables Output
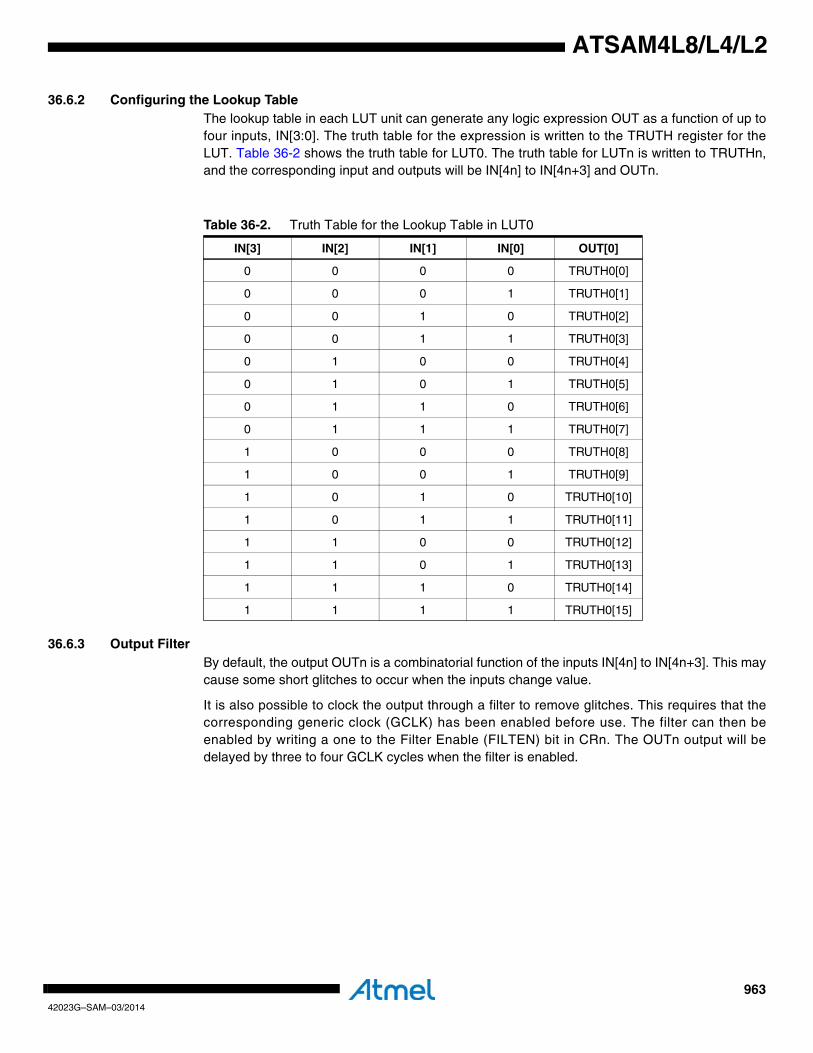
96342023G–SAM–03/2014
ATSAM4L8/L4/L2
36.6.2 Configuring the Lookup TableThe lookup table in each LUT unit can generate any logic expression OUT as a function of up tofour inputs, IN[3:0]. The truth table for the expression is written to the TRUTH register for theLUT. Table 36-2 shows the truth table for LUT0. The truth table for LUTn is written to TRUTHn,and the corresponding input and outputs will be IN[4n] to IN[4n+3] and OUTn.
36.6.3 Output FilterBy default, the output OUTn is a combinatorial function of the inputs IN[4n] to IN[4n+3]. This maycause some short glitches to occur when the inputs change value.
It is also possible to clock the output through a filter to remove glitches. This requires that thecorresponding generic clock (GCLK) has been enabled before use. The filter can then beenabled by writing a one to the Filter Enable (FILTEN) bit in CRn. The OUTn output will bedelayed by three to four GCLK cycles when the filter is enabled.
Table 36-2. Truth Table for the Lookup Table in LUT0
IN[3] IN[2] IN[1] IN[0] OUT[0]
0 0 0 0 TRUTH0[0]
0 0 0 1 TRUTH0[1]
0 0 1 0 TRUTH0[2]
0 0 1 1 TRUTH0[3]
0 1 0 0 TRUTH0[4]
0 1 0 1 TRUTH0[5]
0 1 1 0 TRUTH0[6]
0 1 1 1 TRUTH0[7]
1 0 0 0 TRUTH0[8]
1 0 0 1 TRUTH0[9]
1 0 1 0 TRUTH0[10]
1 0 1 1 TRUTH0[11]
1 1 0 0 TRUTH0[12]
1 1 0 1 TRUTH0[13]
1 1 1 0 TRUTH0[14]
1 1 1 1 TRUTH0[15]
96442023G–SAM–03/2014
ATSAM4L8/L4/L2
36.7 User Interface
Note: 1. The reset values are device specific. Refer to the Module Configuration section at the end of this chapter.
Table 36-3. GLOC Register Memory Map
Offset Register Register Name Access Reset
0x00+n*0x08 Control Register n CRn Read/Write 0x00000000
0x04+n*0x08 Truth Table Register n TRUTHn Read/Write 0x00000000
0x38 Parameter Register PARAMETER Read-only - (1)
0x3C Version Register VERSION Read-only - (1)
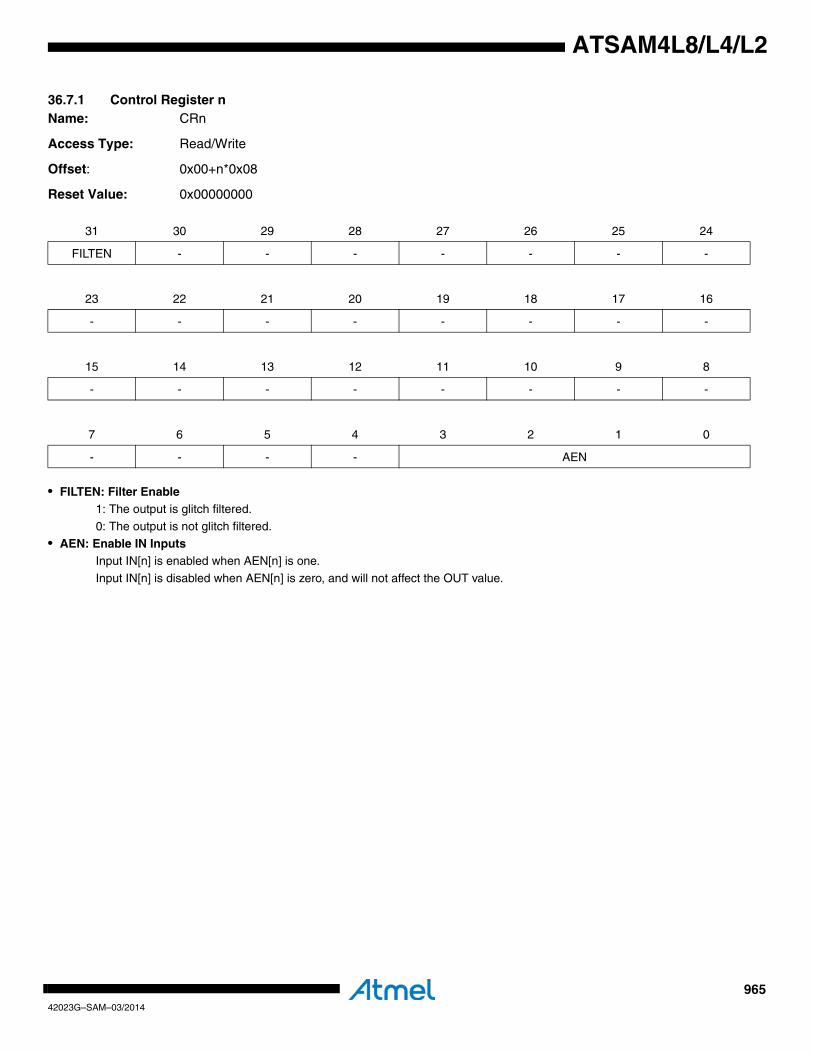
96542023G–SAM–03/2014
ATSAM4L8/L4/L2
36.7.1 Control Register nName: CRn
Access Type: Read/Write
Offset: 0x00+n*0x08
Reset Value: 0x00000000
• FILTEN: Filter Enable1: The output is glitch filtered.
0: The output is not glitch filtered.
• AEN: Enable IN InputsInput IN[n] is enabled when AEN[n] is one.
Input IN[n] is disabled when AEN[n] is zero, and will not affect the OUT value.
31 30 29 28 27 26 25 24
FILTEN - - - - - - -
23 22 21 20 19 18 17 16
- - - - - - - -
15 14 13 12 11 10 9 8
- - - - - - - -
7 6 5 4 3 2 1 0
- - - - AEN
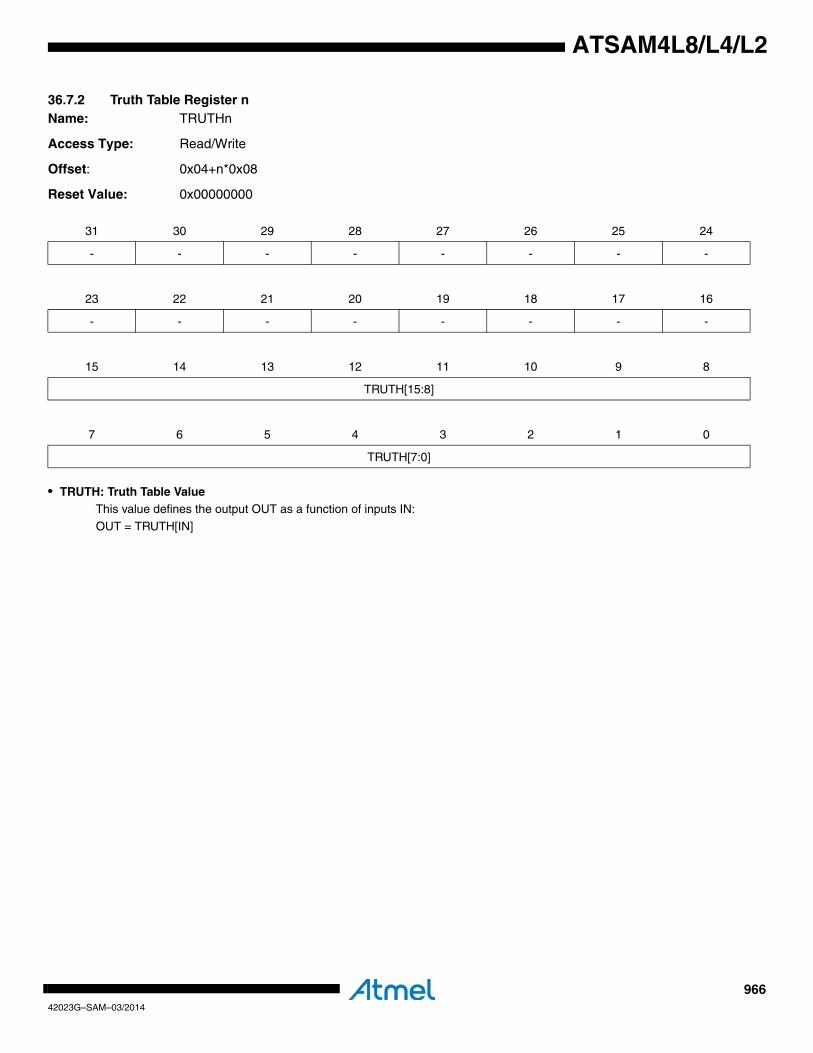
96642023G–SAM–03/2014
ATSAM4L8/L4/L2
36.7.2 Truth Table Register nName: TRUTHn
Access Type: Read/Write
Offset: 0x04+n*0x08
Reset Value: 0x00000000
• TRUTH: Truth Table ValueThis value defines the output OUT as a function of inputs IN:
OUT = TRUTH[IN]
31 30 29 28 27 26 25 24
- - - - - - - -
23 22 21 20 19 18 17 16
- - - - - - - -
15 14 13 12 11 10 9 8
TRUTH[15:8]
7 6 5 4 3 2 1 0
TRUTH[7:0]

96742023G–SAM–03/2014
ATSAM4L8/L4/L2
36.7.3 Parameter RegisterName: PARAMETER
Access Type: Read-only
Offset: 0x38
Reset Value: -
• LUTS: Lookup Table Units ImplementedThis field contains the number of lookup table units implemented in this device.
31 30 29 28 27 26 25 24
- - - - - - - -
23 22 21 20 19 18 17 16
- - - - - - - -
15 14 13 12 11 10 9 8
- - - - - - - -
7 6 5 4 3 2 1 0
LUTS

96842023G–SAM–03/2014
ATSAM4L8/L4/L2
36.7.4 Version RegisterName: VERSION
Access Type: Read-only
Offset: 0x3C
Reset Value: -
• VARIANT: Variant NumberReserved. No functionality associated.
• VERSION: Version NumberVersion number of the module. No functionality associated.
31 30 29 28 27 26 25 24
- - - - - - - -
23 22 21 20 19 18 17 16
- - - - VARIANT
15 14 13 12 11 10 9 8
- - - - VERSION[11:8]
7 6 5 4 3 2 1 0
VERSION[7:0]
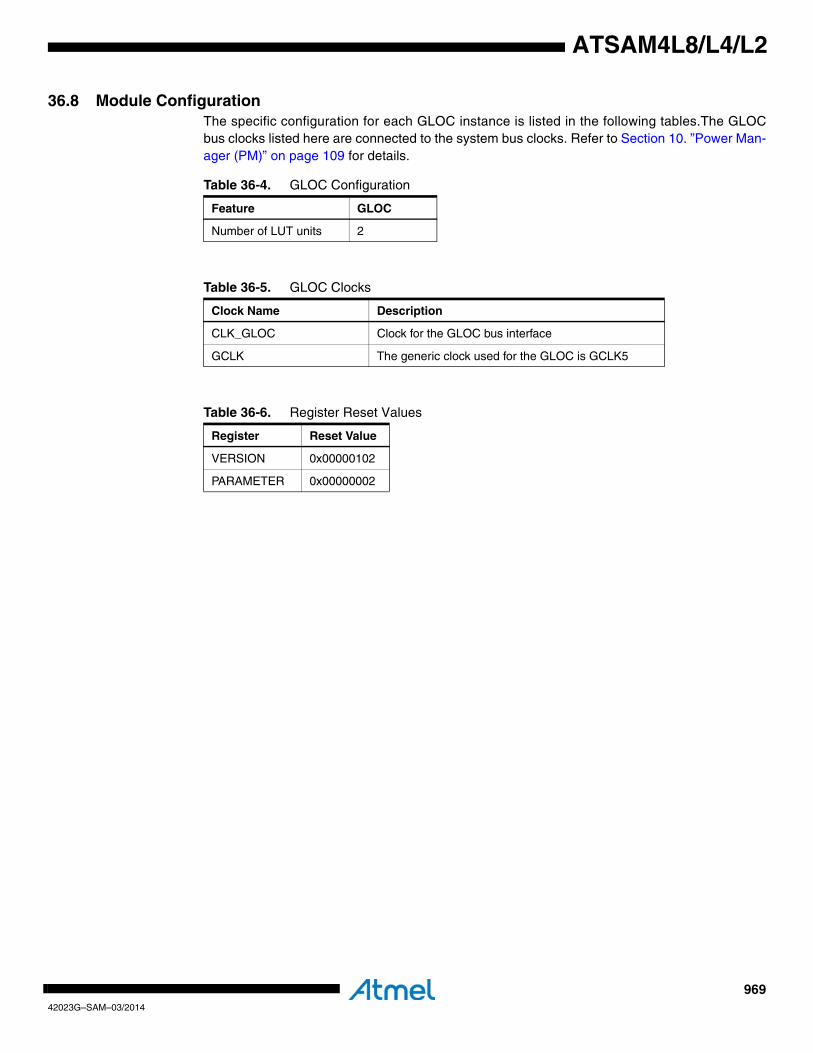
96942023G–SAM–03/2014
ATSAM4L8/L4/L2
36.8 Module ConfigurationThe specific configuration for each GLOC instance is listed in the following tables.The GLOCbus clocks listed here are connected to the system bus clocks. Refer to Section 10. ”Power Man-ager (PM)” on page 109 for details.
Table 36-4. GLOC Configuration
Feature GLOC
Number of LUT units 2
Table 36-5. GLOC Clocks
Clock Name Description
CLK_GLOC Clock for the GLOC bus interface
GCLK The generic clock used for the GLOC is GCLK5
Table 36-6. Register Reset Values
Register Reset Value
VERSION 0x00000102
PARAMETER 0x00000002
97042023G–SAM–03/2014
ATSAM4L8/L4/L2
37. Analog Comparator Interface (ACIFC)Rev: 1.0.0.0
37.1 Features• Controls an array of Analog Comparators• Low power option
– Single shot mode support• Window mode
– Detect inside/outside window– Detect above/below window
• Interrupt– On comparator result rising edge, falling edge, toggle, comparison done– Inside window, outside window, toggle– When startup time is over
• Peripheral events– Comparators triggered by incoming peripheral events– Configurable generated peripheral events
37.2 OverviewThe Analog Comparator Interface (ACIFC) controls a number of Analog Comparators (AC) withidentical behavior. Each Analog Comparator compares two voltages and gives a compare out-put depending on this comparison.
A specific AC is referred to as ACx where x is any number from 0 to n and n is the index of lastAC module (refer to the Module Configuration section at the end of this chapter for details).
The ACIFC can be configured in normal mode using each comparator independently or in win-dow mode using defined comparator pairs (ACx and ACx+1) to observe a window.
The number of Analog Comparators implemented is device specific. Refer to the Module Config-uration section for details.
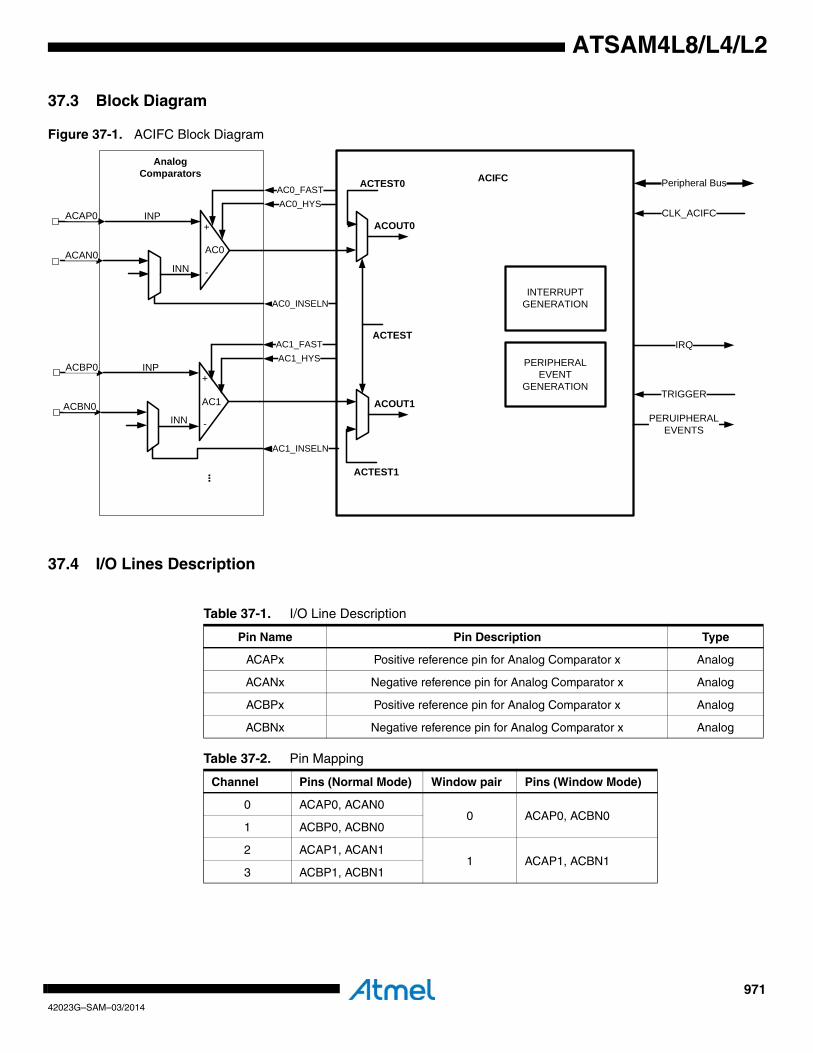
97142023G–SAM–03/2014
ATSAM4L8/L4/L2
37.3 Block Diagram
Figure 37-1. ACIFC Block Diagram
37.4 I/O Lines Description
...
TRIGGER
PERUIPHERAL EVENTS
IRQ
Peripheral BusACIFCAnalog
Comparators
PERIPHERAL EVENT
GENERATION
-
+
AC0
INN
INP
AC0_INSELN
-
+
AC1
INN
INP
AC1_INSELN
INTERRUPTGENERATION
CLK_ACIFC
ACTEST
ACTEST1
ACTEST0
ACAN0
ACAP0
ACBP0
ACBN0
ACOUT0
ACOUT1
AC0_HYSAC0_FAST
AC1_HYSAC1_FAST
Table 37-1. I/O Line Description
Pin Name Pin Description Type
ACAPx Positive reference pin for Analog Comparator x Analog
ACANx Negative reference pin for Analog Comparator x Analog
ACBPx Positive reference pin for Analog Comparator x Analog
ACBNx Negative reference pin for Analog Comparator x Analog
Table 37-2. Pin Mapping
Channel Pins (Normal Mode) Window pair Pins (Window Mode)
0 ACAP0, ACAN00 ACAP0, ACBN0
1 ACBP0, ACBN0
2 ACAP1, ACAN11 ACAP1, ACBN1
3 ACBP1, ACBN1
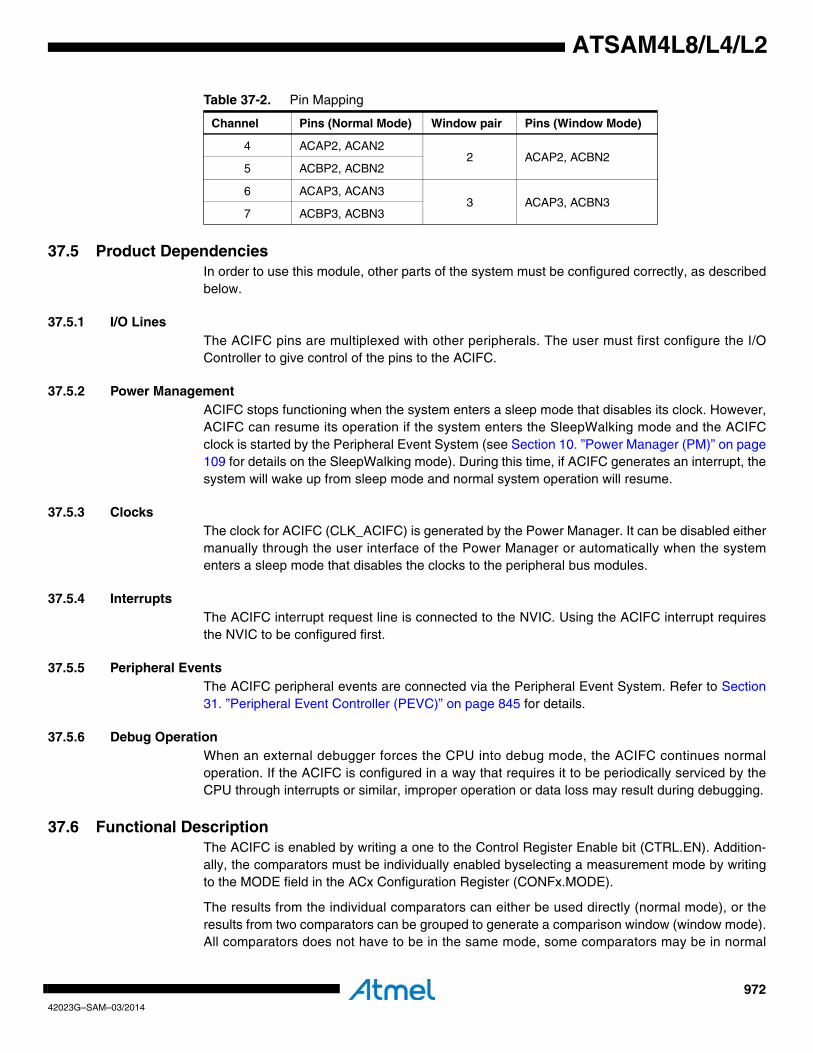
97242023G–SAM–03/2014
ATSAM4L8/L4/L2
37.5 Product DependenciesIn order to use this module, other parts of the system must be configured correctly, as describedbelow.
37.5.1 I/O LinesThe ACIFC pins are multiplexed with other peripherals. The user must first configure the I/OController to give control of the pins to the ACIFC.
37.5.2 Power ManagementACIFC stops functioning when the system enters a sleep mode that disables its clock. However,ACIFC can resume its operation if the system enters the SleepWalking mode and the ACIFCclock is started by the Peripheral Event System (see Section 10. ”Power Manager (PM)” on page109 for details on the SleepWalking mode). During this time, if ACIFC generates an interrupt, thesystem will wake up from sleep mode and normal system operation will resume.
37.5.3 ClocksThe clock for ACIFC (CLK_ACIFC) is generated by the Power Manager. It can be disabled eithermanually through the user interface of the Power Manager or automatically when the systementers a sleep mode that disables the clocks to the peripheral bus modules.
37.5.4 InterruptsThe ACIFC interrupt request line is connected to the NVIC. Using the ACIFC interrupt requiresthe NVIC to be configured first.
37.5.5 Peripheral EventsThe ACIFC peripheral events are connected via the Peripheral Event System. Refer to Section31. ”Peripheral Event Controller (PEVC)” on page 845 for details.
37.5.6 Debug OperationWhen an external debugger forces the CPU into debug mode, the ACIFC continues normaloperation. If the ACIFC is configured in a way that requires it to be periodically serviced by theCPU through interrupts or similar, improper operation or data loss may result during debugging.
37.6 Functional DescriptionThe ACIFC is enabled by writing a one to the Control Register Enable bit (CTRL.EN). Addition-ally, the comparators must be individually enabled byselecting a measurement mode by writingto the MODE field in the ACx Configuration Register (CONFx.MODE).
The results from the individual comparators can either be used directly (normal mode), or theresults from two comparators can be grouped to generate a comparison window (window mode).All comparators does not have to be in the same mode, some comparators may be in normal
4 ACAP2, ACAN22 ACAP2, ACBN2
5 ACBP2, ACBN2
6 ACAP3, ACAN33 ACAP3, ACBN3
7 ACBP3, ACBN3
Table 37-2. Pin Mapping
Channel Pins (Normal Mode) Window pair Pins (Window Mode)
97342023G–SAM–03/2014
ATSAM4L8/L4/L2
mode, while others are in window mode. There are restrictions on which ACs can be grouped ina window mode, see Section 37.6.5.
37.6.1 Analog Comparator OperationEach AC can be in one of four measurement modes, determined by CONFx.MODE:
• No Measurement
• Continuous Measurement mode (CM)
• User Triggered Single Measurement mode (UT)
• Peripheral Event Triggered Single Measurement mode (ET)
An AC is disabled between measurements if the Always On bit in the corresponding CONFx reg-ister (CONFx.ALWAYSON) is zero. This is the default value after reset. This reduces the ACpower dissipation between measurements, but the AC output will not be available until after anAC startup time. If the ACx Ready bit in the Status Register (SR.ACRDYx) is one, the output ofACx is ready. In window mode the result is available when both the comparator outputs areready (SR.ACRDYx=1 and SR.ACRDYx+1=1).
An AC is always enabled (i.e., during and between measurements) if the correspondingCONFx.ALWAYSON bit is one. This allows a measurement on AC to be made quickly after ameasurement is triggered, without waiting for the AC startup time (except for the first startupafter reset).
37.6.1.1 Continuous Measurement ModeIn the CM mode, AC is performing comparisons continuously. Therefore the result of the latestcomparison is always available in the ACx Current Comparison Status bit in the Status Register(SR.ACCSx). Comparisons result are updated on every positive edge of CLK_ACIFC.
CM is enabled by writing CONFx.MODE to one. When the corresponding AC is ready,SR.ACRDYx is set and comparison status is reflected in SR.ACCSx.
Corresponding peripheral events and interrupts are generated if enabled. New comparisons areperformed continuously until the CONFx.MODE field is written to zero.
37.6.1.2 User Triggered Single Measurement Mode In the UT mode, the user starts a single comparison by writing a one to the User Start SingleComparison bit (CTRL.USTART).
This mode is enabled by writing CONFx.MODE to 2. Once the corresponding AC is ready, usercan start a single comparison then SR.ACCSx is updated accordingly. CTRL.USTART iscleared automatically by hardware when the single comparison has been done.
Corresponding peripheral events and interrupts are generated if enabled.
37.6.1.3 Peripheral Event Triggered Single Measurement ModeThis mode is enabled by writing CONFx.MODE to 3 and the Peripheral Event Trigger Enable bitin CTRL (CTRL.EVENTEN) to one. The ET mode is similar to the UT mode, the difference is thata peripheral event from another hardware module causes the hardware to automatically set thePeripheral Event Start Single Comparison bit (CTRL.ESTART). Once the corresponding AC isready, an event starts a single comparison then SR.ACCSx is updated accordingly.CTRL.ESTART is cleared automatically by hardware when the single comparison has beendone.
97442023G–SAM–03/2014
ATSAM4L8/L4/L2
Corresponding peripheral events and interrupts are generated if enabled. No new comparisonswill be performed.
37.6.1.4 Selecting Comparator InputsEach Analog Comparator has one positive (INP) and one negative (INN) input. The positiveinput is fed from an external input pin (ACAPx, ACBPx).
There are several sources for negative input including external input pin ACA/BNx. The NegativeInput Select field (CONFx.INSELN) selects the source for the negative input. SeeCONFx.INSELN: Negative Input Select table in Module Configuration section.
Note that in window mode, the negative input ACANx and positive input ACBPx+1 must havethe same source, as shown in Figure 37-2.
37.6.2 Interrupt GenerationThe ACIFC has several interrupt sources. The status of each interrupt source can be read fromthe Interrupt Status Register (ISR). An interrupt request will be generated if a bit in ISR and thecorresponding bit in the Interrupt Mask Register (IMR) are set. Bits in IMR are set by writing aone to the corresponding bit in the Interrupt Enable Register (IER), and cleared by writing a oneto the corresponding bit in the Interrupt Disable Register (IDR). The interrupt request remainsactive until the corresponding bit in ISR is cleared by writing a one to the corresponding bit in theInterrupt Status Clear Register (ICR).
The interrupt sources are ORed together to form one interrupt request. The ACIFC will generatean interrupt request if at least one the bits in IMR is set. Because all the interrupt sources areORed togheter, the interrupt request from the ACIFC will remain active utnil all the bits in ISR arecleared.
37.6.3 Peripheral Event GenerationThe ACIFC can be set up so that certain comparison results notify other parts of the device viathe Peripheral Event system. Refer to Section 37.6.4.3 and Section 37.6.5.3 for information onwhich comparison results can generate peripheral events, and how to configure the ACIFC toachieve this.
Zero or one peripheral event will be generated per comparison.
37.6.4 Normal ModeIn normal mode all Analog Comparators are operating independently.
37.6.4.1 Normal Mode Output Each Analog Comparator generates one output ACOUT according to the input voltages on INP(AC positive input) and INN (AC negative input):
• ACOUT = 1 if VINP > VINN
• ACOUT = 0 if VINP < VINN
• ACOUT = 0 if the AC output is not available (SR.ACRDY = 0)
The output can optionally be filtered, as described in Section 37.6.6.
37.6.4.2 Normal Mode Interrupt There are two types of interrupt for each AC:
97542023G–SAM–03/2014
ATSAM4L8/L4/L2
• Startup time interrupt (bit ISR.SUTINTx), each AC can generate an interrupt when the startup time is over.
• AC output based interrupt (bit ISR.ACINTx). In normal mode, the following interrupt sources are available:
– When VINP > VINN
– When VINP < VINN
– On toggle of the AC output (ACOUT)
– When comparison has been done
The user selects the interrupt source by writing to the Interrupt Settings field in the ACx Configu-ration Register (CONFx.IS).
37.6.4.3 Normal Mode Peripheral EventsThe ACIFC can generate peripheral events according to the configuration of CONFx.EVENNand CONFx.EVENP.
• When VINP > VINN or
• When VINP < VINN
37.6.5 Window ModeWindow mode is enabled by writing a one to the Window Mode Enable bit in the Window Config-uration Register (CONFWx.WFEN). Two ACs, ACx and ACx+1, (an even and the following oddbuild up a pair) are grouped if window mode is enabled by writing CONFWx.WFEN.
The sources of the negative input of ACx (even) and the positive input of ACx+1 (odd) must beconnected together externally. The Negative Input Select field in the ACx Configuration Register(CONFx.INSELN) must select the corresponding external input pin (ACANx) as the source to thenegative input of ACx. The negative input of ACx+1 can still be selected independently byCONFx+1.INSELN.
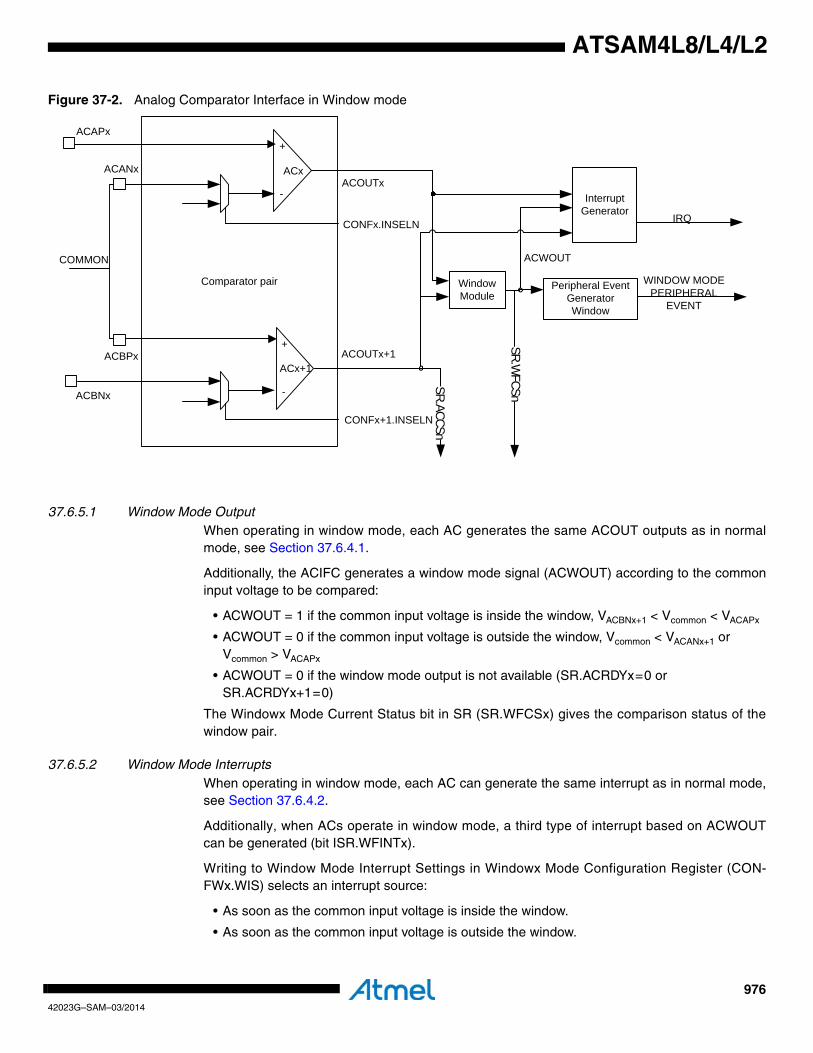
97642023G–SAM–03/2014
ATSAM4L8/L4/L2
Figure 37-2. Analog Comparator Interface in Window mode
37.6.5.1 Window Mode Output When operating in window mode, each AC generates the same ACOUT outputs as in normalmode, see Section 37.6.4.1.
Additionally, the ACIFC generates a window mode signal (ACWOUT) according to the commoninput voltage to be compared:
• ACWOUT = 1 if the common input voltage is inside the window, VACBNx+1 < Vcommon < VACAPx
• ACWOUT = 0 if the common input voltage is outside the window, Vcommon < VACANx+1 or Vcommon > VACAPx
• ACWOUT = 0 if the window mode output is not available (SR.ACRDYx=0 or SR.ACRDYx+1=0)
The Windowx Mode Current Status bit in SR (SR.WFCSx) gives the comparison status of thewindow pair.
37.6.5.2 Window Mode InterruptsWhen operating in window mode, each AC can generate the same interrupt as in normal mode,see Section 37.6.4.2.
Additionally, when ACs operate in window mode, a third type of interrupt based on ACWOUTcan be generated (bit ISR.WFINTx).
Writing to Window Mode Interrupt Settings in Windowx Mode Configuration Register (CON-FWx.WIS) selects an interrupt source:
• As soon as the common input voltage is inside the window.
• As soon as the common input voltage is outside the window.
Comparator pair
-
+
ACx
Interrupt Generator
Window Module
ACOUTx
Peripheral Event Generator Window
WINDOW MODE PERIPHERAL
EVENT
-
+
ACx+1SR.ACCSn
SR.WFCSn
ACAPx
ACANx
ACBPx
COMMON ACWOUT
ACBNx
IRQ
ACOUTx+1
CONFx.INSELN
CONFx+1.INSELN
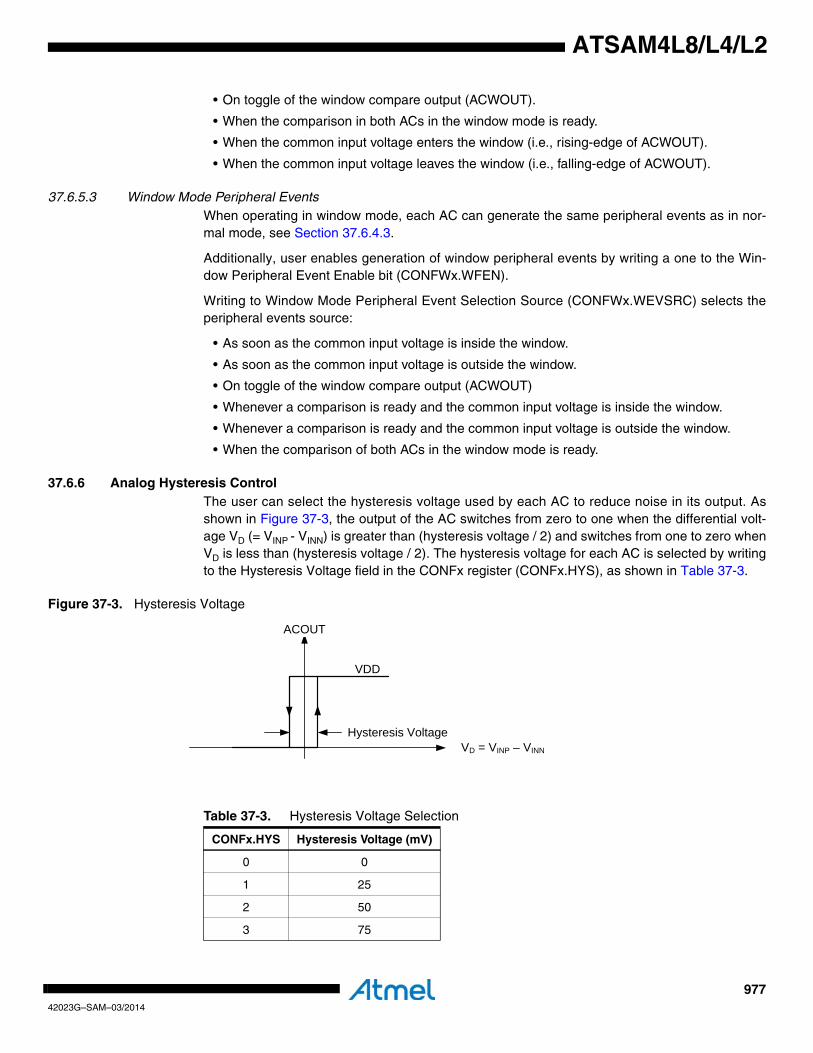
97742023G–SAM–03/2014
ATSAM4L8/L4/L2
• On toggle of the window compare output (ACWOUT).
• When the comparison in both ACs in the window mode is ready.
• When the common input voltage enters the window (i.e., rising-edge of ACWOUT).
• When the common input voltage leaves the window (i.e., falling-edge of ACWOUT).
37.6.5.3 Window Mode Peripheral EventsWhen operating in window mode, each AC can generate the same peripheral events as in nor-mal mode, see Section 37.6.4.3.
Additionally, user enables generation of window peripheral events by writing a one to the Win-dow Peripheral Event Enable bit (CONFWx.WFEN).
Writing to Window Mode Peripheral Event Selection Source (CONFWx.WEVSRC) selects theperipheral events source:
• As soon as the common input voltage is inside the window.
• As soon as the common input voltage is outside the window.
• On toggle of the window compare output (ACWOUT)
• Whenever a comparison is ready and the common input voltage is inside the window.
• Whenever a comparison is ready and the common input voltage is outside the window.
• When the comparison of both ACs in the window mode is ready.
37.6.6 Analog Hysteresis ControlThe user can select the hysteresis voltage used by each AC to reduce noise in its output. Asshown in Figure 37-3, the output of the AC switches from zero to one when the differential volt-age VD (= VINP - VINN) is greater than (hysteresis voltage / 2) and switches from one to zero whenVD is less than (hysteresis voltage / 2). The hysteresis voltage for each AC is selected by writingto the Hysteresis Voltage field in the CONFx register (CONFx.HYS), as shown in Table 37-3.
Figure 37-3. Hysteresis Voltage
ACOUT
VD = VINP – VINN
VDD
Hysteresis Voltage
Table 37-3. Hysteresis Voltage Selection
CONFx.HYS Hysteresis Voltage (mV)
0 0
1 25
2 50
3 75
97842023G–SAM–03/2014
ATSAM4L8/L4/L2
37.6.7 Power Dissipation and Speed Trade-offACIFC is able to control whether an AC operates in fast or low-power mode, allowing a trade-offbetween its active power dissipation and speed. The desired mode is selected by writing to theFAST bit in the CONFx register (CONFx.FAST). When CONFx.FAST is zero (default), the corre-sponding AC operates in low-power mode. When CONFx.FAST is one, it operates in fast mode.In low-power mode, the AC dissipates significantly less active power than when it is in fastmode, but has a longer start-up time and propagation delay. Refer to Section 42. ”ElectricalCharacteristics” on page 1121 for details.
37.6.8 Wake Up from Sleep Modes by InterruptAn AC is able to wake up the system from a sleep mode by its interrupt, including sleep modeswhere CLK_ACIFC is stopped. For an AC to wake up the system, the user must follow this pro-cedure before the system enters a sleep mode:
• Set AC in the Continuous Measurement mode (CONFx.MODE).
• Set the AC’s interrupt setting (CONFx.IS =2) so that it generates an interrupt on the toggling of the corresponding AC output.
• Wait for AC to be ready (SR.ACRDYx = 1).
Once ACIFC detects a transition on the relevant AC output, it sends a request to Power Man-ager for CLK_ACIFC to restart (the corresponding bit in the Power Manager Peripheral PowerControl Register (PPCR) must be set) and sets the corresponding interrupt status bit in ISR afterCLK_ACIFC has restarted. Note that in order for the interrupt from ACIFC to wake up the sys-tem, the ACIFC bit in the Power Manager Asynchronous Wake Up Enable Register (AWEN)must be set.
37.7 Peripheral Event TriggersPeripheral events from other modules can trigger comparisons in the ACIFC. All ACs that areconfigured in peripheral event triggered single measurement mode will be started simultane-ously when a peripheral event is received. ACs operating in continuous measurement mode oruser triggered single measurement mode are unaffected by the received peripheral event. Soft-ware can still operate these ACs independently of ACs in peripheral event triggered singlemeasurement mode.
A peripheral event will trigger one or more comparisons, in normal or window mode.
37.8 AC Test modeBy writing a one to the Analog Comparator Test Mode bit (CR.ACTEST), the outputs from theACs are overridden by the value in the Test Register (TR), see Figure 37-1. This can be usefulfor software tests.
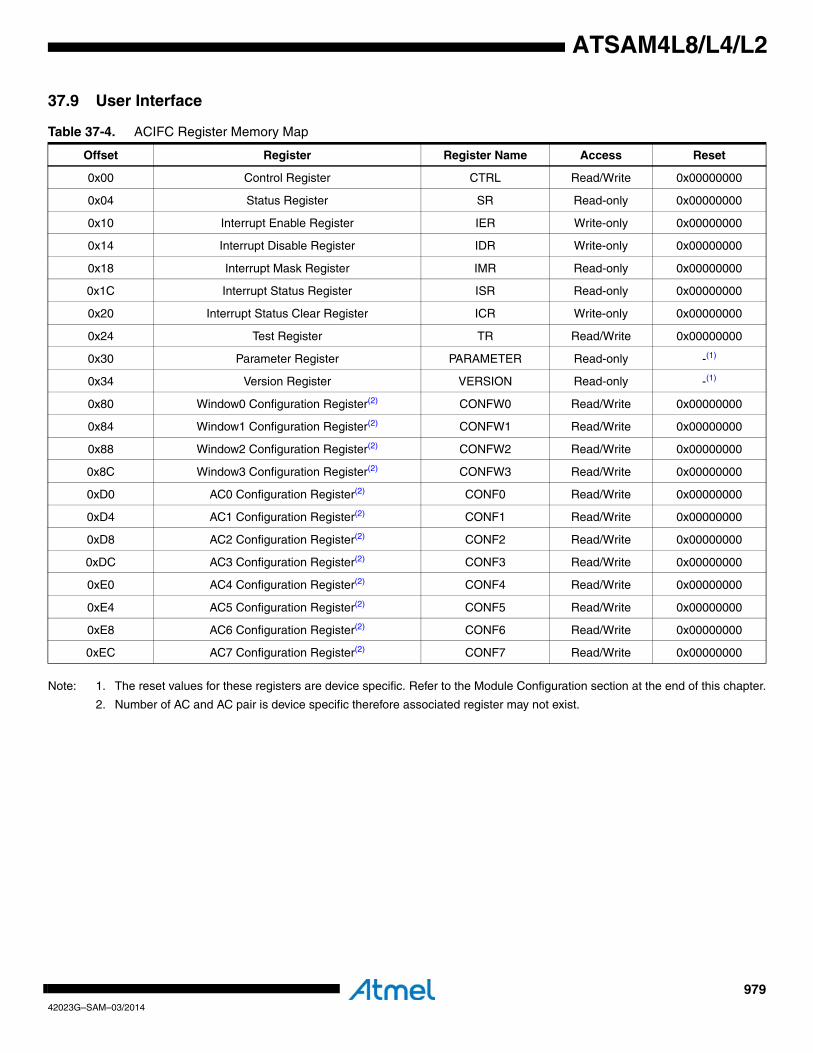
97942023G–SAM–03/2014
ATSAM4L8/L4/L2
37.9 User Interface
Note: 1. The reset values for these registers are device specific. Refer to the Module Configuration section at the end of this chapter.
2. Number of AC and AC pair is device specific therefore associated register may not exist.
Table 37-4. ACIFC Register Memory Map
Offset Register Register Name Access Reset
0x00 Control Register CTRL Read/Write 0x00000000
0x04 Status Register SR Read-only 0x00000000
0x10 Interrupt Enable Register IER Write-only 0x00000000
0x14 Interrupt Disable Register IDR Write-only 0x00000000
0x18 Interrupt Mask Register IMR Read-only 0x00000000
0x1C Interrupt Status Register ISR Read-only 0x00000000
0x20 Interrupt Status Clear Register ICR Write-only 0x00000000
0x24 Test Register TR Read/Write 0x00000000
0x30 Parameter Register PARAMETER Read-only -(1)
0x34 Version Register VERSION Read-only -(1)
0x80 Window0 Configuration Register(2) CONFW0 Read/Write 0x00000000
0x84 Window1 Configuration Register(2) CONFW1 Read/Write 0x00000000
0x88 Window2 Configuration Register(2) CONFW2 Read/Write 0x00000000
0x8C Window3 Configuration Register(2) CONFW3 Read/Write 0x00000000
0xD0 AC0 Configuration Register(2) CONF0 Read/Write 0x00000000
0xD4 AC1 Configuration Register(2) CONF1 Read/Write 0x00000000
0xD8 AC2 Configuration Register(2) CONF2 Read/Write 0x00000000
0xDC AC3 Configuration Register(2) CONF3 Read/Write 0x00000000
0xE0 AC4 Configuration Register(2) CONF4 Read/Write 0x00000000
0xE4 AC5 Configuration Register(2) CONF5 Read/Write 0x00000000
0xE8 AC6 Configuration Register(2) CONF6 Read/Write 0x00000000
0xEC AC7 Configuration Register(2) CONF7 Read/Write 0x00000000
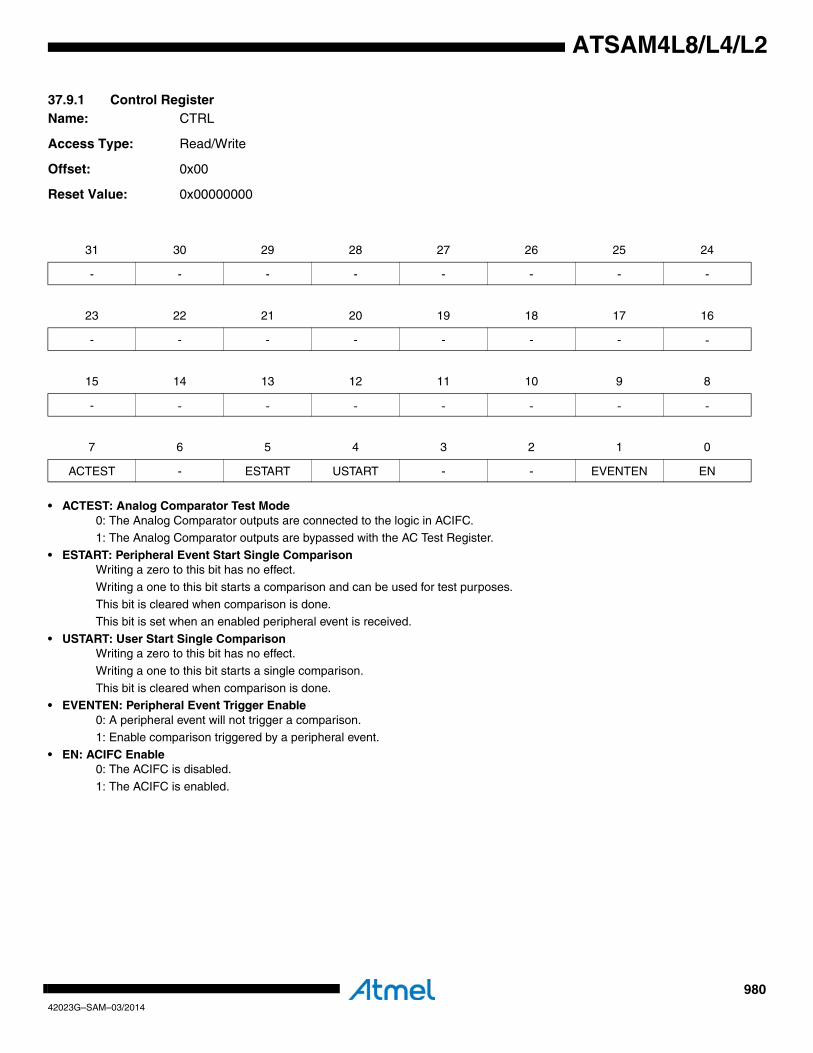
98042023G–SAM–03/2014
ATSAM4L8/L4/L2
37.9.1 Control Register Name: CTRL
Access Type: Read/Write
Offset: 0x00
Reset Value: 0x00000000
• ACTEST: Analog Comparator Test Mode0: The Analog Comparator outputs are connected to the logic in ACIFC.1: The Analog Comparator outputs are bypassed with the AC Test Register.
• ESTART: Peripheral Event Start Single ComparisonWriting a zero to this bit has no effect.
Writing a one to this bit starts a comparison and can be used for test purposes.
This bit is cleared when comparison is done. This bit is set when an enabled peripheral event is received.
• USTART: User Start Single ComparisonWriting a zero to this bit has no effect.
Writing a one to this bit starts a single comparison.
This bit is cleared when comparison is done. • EVENTEN: Peripheral Event Trigger Enable
0: A peripheral event will not trigger a comparison.1: Enable comparison triggered by a peripheral event.
• EN: ACIFC Enable0: The ACIFC is disabled.
1: The ACIFC is enabled.
31 30 29 28 27 26 25 24
- - - - - - - -
23 22 21 20 19 18 17 16
- - - - - - - -
15 14 13 12 11 10 9 8
- - - - - - - -
7 6 5 4 3 2 1 0
ACTEST - ESTART USTART - - EVENTEN EN
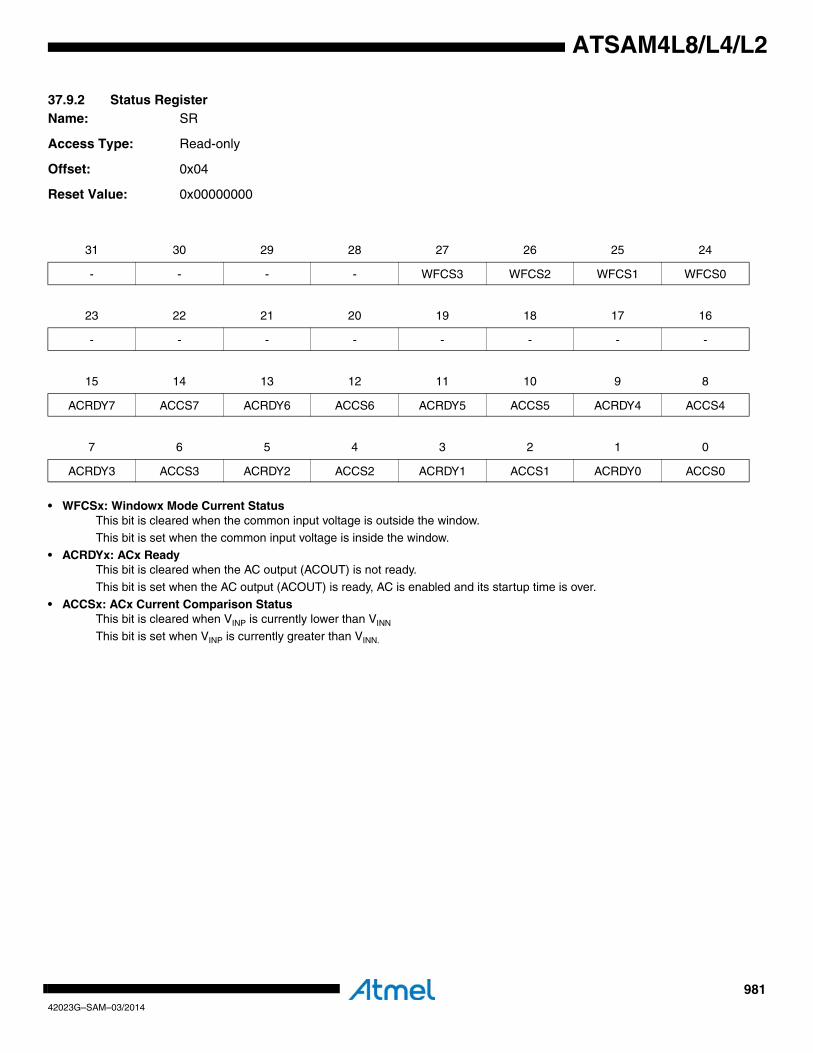
98142023G–SAM–03/2014
ATSAM4L8/L4/L2
37.9.2 Status Register Name: SR
Access Type: Read-only
Offset: 0x04
Reset Value: 0x00000000
• WFCSx: Windowx Mode Current StatusThis bit is cleared when the common input voltage is outside the window.This bit is set when the common input voltage is inside the window.
• ACRDYx: ACx ReadyThis bit is cleared when the AC output (ACOUT) is not ready.
This bit is set when the AC output (ACOUT) is ready, AC is enabled and its startup time is over.
• ACCSx: ACx Current Comparison StatusThis bit is cleared when VINP is currently lower than VINN
This bit is set when VINP is currently greater than VINN.
31 30 29 28 27 26 25 24
- - - - WFCS3 WFCS2 WFCS1 WFCS0
23 22 21 20 19 18 17 16
- - - - - - - -
15 14 13 12 11 10 9 8
ACRDY7 ACCS7 ACRDY6 ACCS6 ACRDY5 ACCS5 ACRDY4 ACCS4
7 6 5 4 3 2 1 0
ACRDY3 ACCS3 ACRDY2 ACCS2 ACRDY1 ACCS1 ACRDY0 ACCS0

98242023G–SAM–03/2014
ATSAM4L8/L4/L2
37.9.3 Interrupt Enable Register Name: IER
Access Type: Write-only
Offset: 0x10
Reset Value: 0x00000000
Writing a zero to a bit in this register has no effect.
Writing a one to a bit in this register will set the corresponding bit in IMR.
31 30 29 28 27 26 25 24
- - - - WFINT3 WFINT2 WFINT1 WFINT0
23 22 21 20 19 18 17 16
- - - - - - - -
15 14 13 12 11 10 9 8
SUTINT7 ACINT7 SUTINT6 ACINT6 SUTINT5 ACINT5 SUTINT4 ACINT4
7 6 5 4 3 2 1 0
SUTINT3 ACINT3 SUTINT2 ACINT2 SUTINT1 ACINT1 SUTINT0 ACINT0

98342023G–SAM–03/2014
ATSAM4L8/L4/L2
37.9.4 Interrupt Disable Register Name: IDR
Access Type: Write-only
Offset: 0x14
Reset Value: 0x00000000
Writing a zero to a bit in this register has no effect.
Writing a one to a bit in this register will clear the corresponding bit in IMR.
31 30 29 28 27 26 25 24
- - - - WFINT3 WFINT2 WFINT1 WFINT0
23 22 21 20 19 18 17 16
- - - - - - - -
15 14 13 12 11 10 9 8
SUTINT7 ACINT7 SUTINT6 ACINT6 SUTINT5 ACINT5 SUTINT4 ACINT4
7 6 5 4 3 2 1 0
SUTINT3 ACINT3 SUTINT2 ACINT2 SUTINT1 ACINT1 SUTINT0 ACINT0
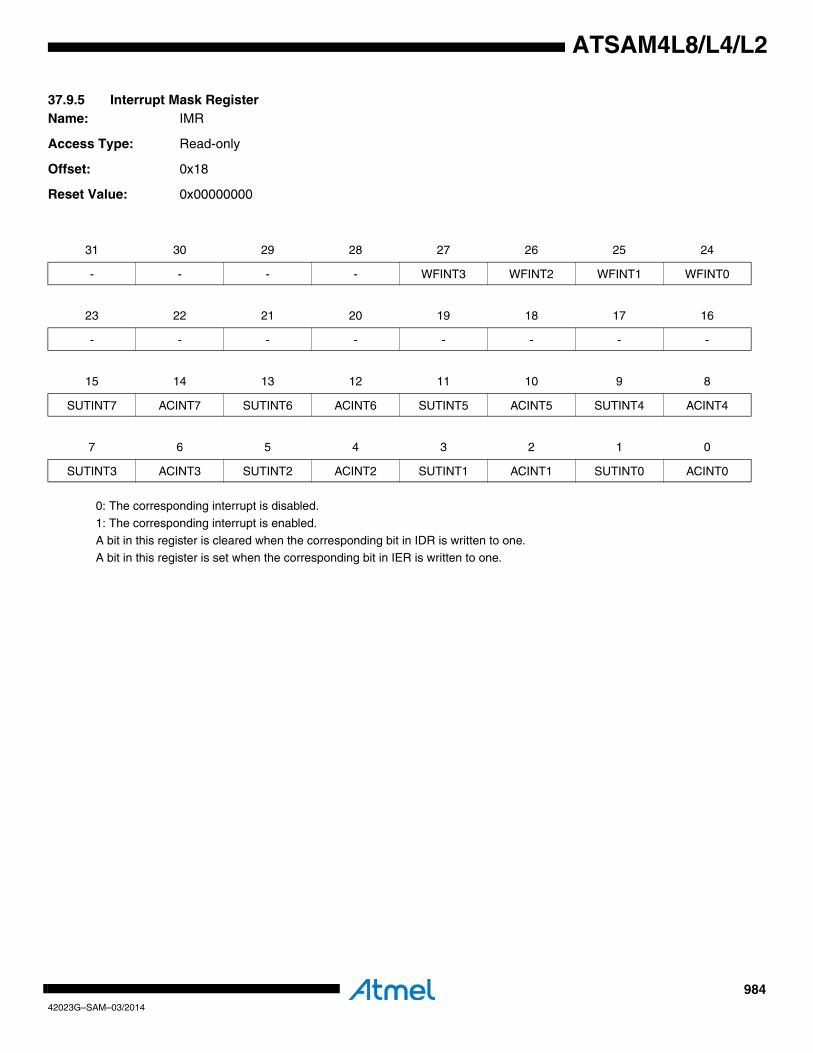
98442023G–SAM–03/2014
ATSAM4L8/L4/L2
37.9.5 Interrupt Mask Register Name: IMR
Access Type: Read-only
Offset: 0x18
Reset Value: 0x00000000
0: The corresponding interrupt is disabled.
1: The corresponding interrupt is enabled.
A bit in this register is cleared when the corresponding bit in IDR is written to one.A bit in this register is set when the corresponding bit in IER is written to one.
31 30 29 28 27 26 25 24
- - - - WFINT3 WFINT2 WFINT1 WFINT0
23 22 21 20 19 18 17 16
- - - - - - - -
15 14 13 12 11 10 9 8
SUTINT7 ACINT7 SUTINT6 ACINT6 SUTINT5 ACINT5 SUTINT4 ACINT4
7 6 5 4 3 2 1 0
SUTINT3 ACINT3 SUTINT2 ACINT2 SUTINT1 ACINT1 SUTINT0 ACINT0
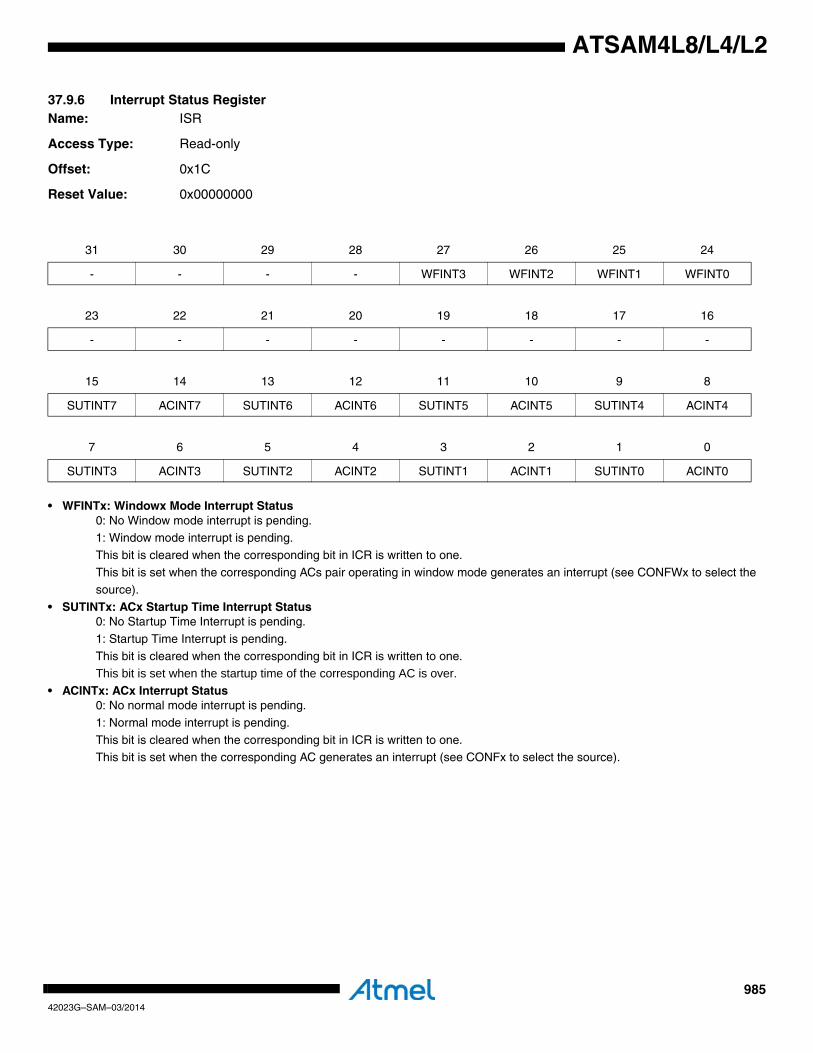
98542023G–SAM–03/2014
ATSAM4L8/L4/L2
37.9.6 Interrupt Status Register Name: ISR
Access Type: Read-only
Offset: 0x1C
Reset Value: 0x00000000
• WFINTx: Windowx Mode Interrupt Status0: No Window mode interrupt is pending.1: Window mode interrupt is pending.
This bit is cleared when the corresponding bit in ICR is written to one.
This bit is set when the corresponding ACs pair operating in window mode generates an interrupt (see CONFWx to select the source).
• SUTINTx: ACx Startup Time Interrupt Status0: No Startup Time Interrupt is pending.
1: Startup Time Interrupt is pending.
This bit is cleared when the corresponding bit in ICR is written to one.This bit is set when the startup time of the corresponding AC is over.
• ACINTx: ACx Interrupt Status0: No normal mode interrupt is pending.
1: Normal mode interrupt is pending.
This bit is cleared when the corresponding bit in ICR is written to one.This bit is set when the corresponding AC generates an interrupt (see CONFx to select the source).
31 30 29 28 27 26 25 24
- - - - WFINT3 WFINT2 WFINT1 WFINT0
23 22 21 20 19 18 17 16
- - - - - - - -
15 14 13 12 11 10 9 8
SUTINT7 ACINT7 SUTINT6 ACINT6 SUTINT5 ACINT5 SUTINT4 ACINT4
7 6 5 4 3 2 1 0
SUTINT3 ACINT3 SUTINT2 ACINT2 SUTINT1 ACINT1 SUTINT0 ACINT0
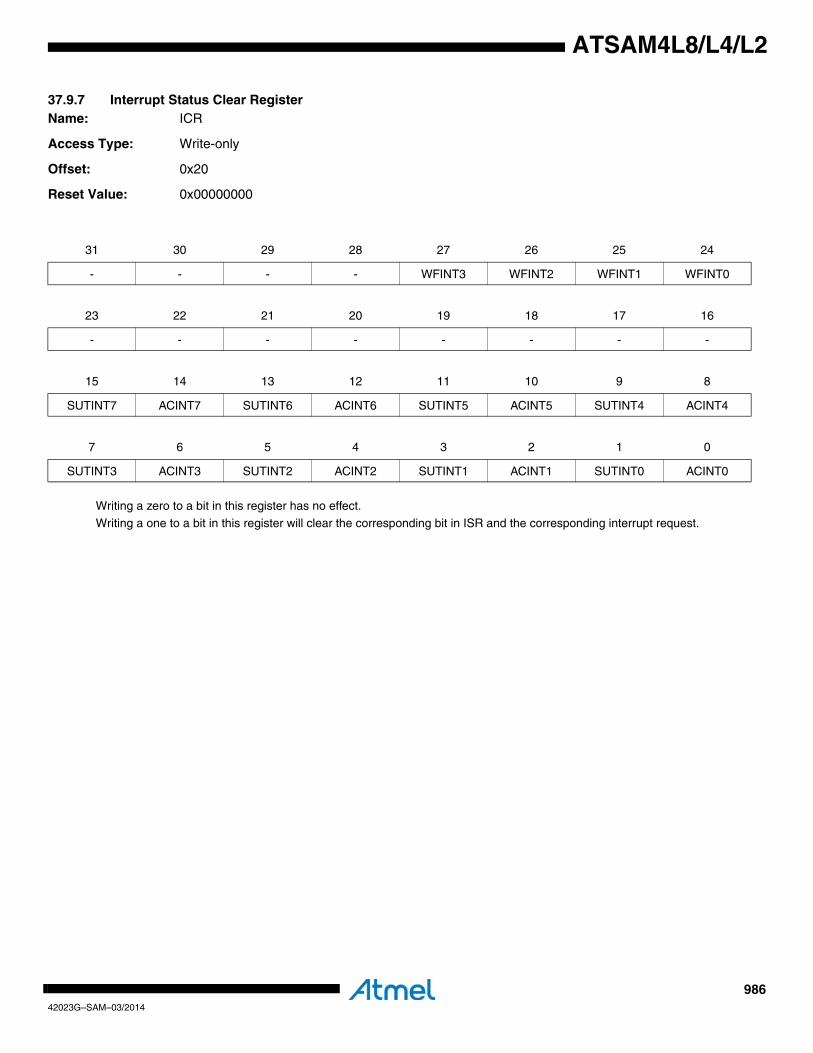
98642023G–SAM–03/2014
ATSAM4L8/L4/L2
37.9.7 Interrupt Status Clear Register Name: ICR
Access Type: Write-only
Offset: 0x20
Reset Value: 0x00000000
Writing a zero to a bit in this register has no effect.
Writing a one to a bit in this register will clear the corresponding bit in ISR and the corresponding interrupt request.
31 30 29 28 27 26 25 24
- - - - WFINT3 WFINT2 WFINT1 WFINT0
23 22 21 20 19 18 17 16
- - - - - - - -
15 14 13 12 11 10 9 8
SUTINT7 ACINT7 SUTINT6 ACINT6 SUTINT5 ACINT5 SUTINT4 ACINT4
7 6 5 4 3 2 1 0
SUTINT3 ACINT3 SUTINT2 ACINT2 SUTINT1 ACINT1 SUTINT0 ACINT0

98742023G–SAM–03/2014
ATSAM4L8/L4/L2
37.9.8 Test Register Name: TR
Access Type: Read/Write
Offset: 0x24
Reset Value: 0x00000000
• ACTESTx: ACx Output Override Value0: Normal operating mode.1: If CTRL.ACTEST is one, ACx output is the bit value ACTESTx.
31 30 29 28 27 26 25 24
- - - - - - - -
23 22 21 20 19 18 17 16
- - - - - - - -
15 14 13 12 11 10 9 8
- - - - - - - -
7 6 5 4 3 2 1 0
ACTEST7 ACTEST6 ACTEST5 ACTEST4 ACTEST3 ACTEST2 ACTEST1 ACTEST0
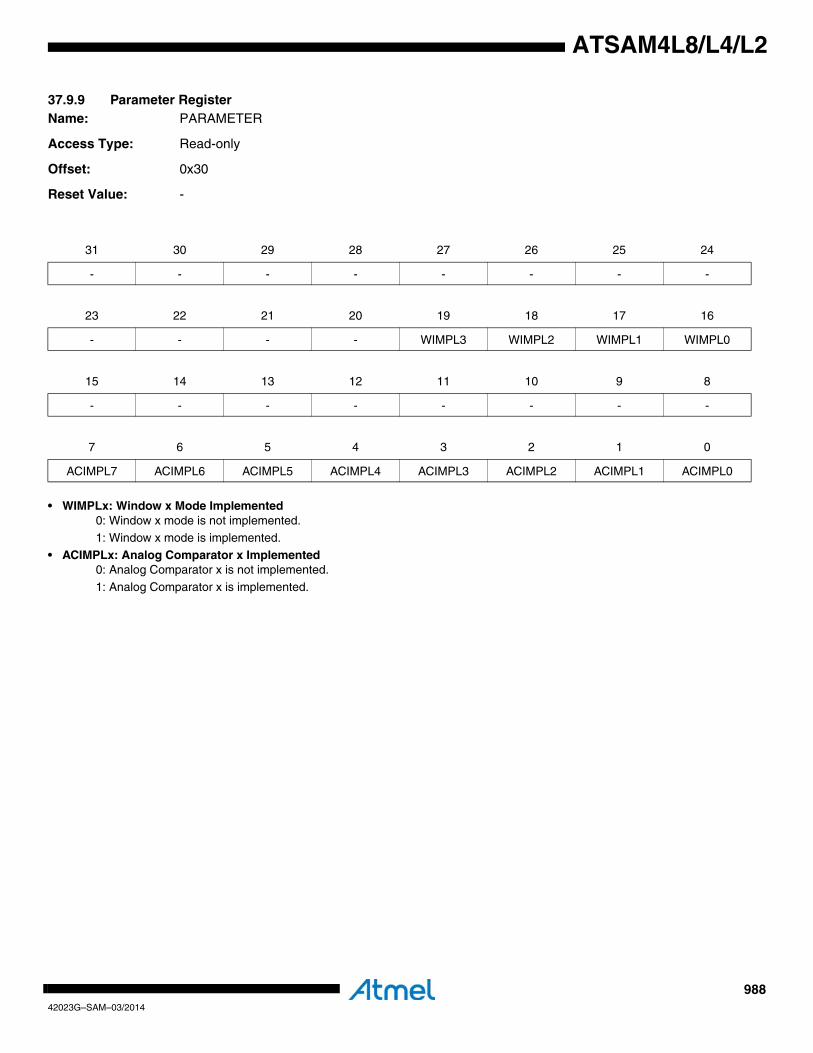
98842023G–SAM–03/2014
ATSAM4L8/L4/L2
37.9.9 Parameter RegisterName: PARAMETER
Access Type: Read-only
Offset: 0x30
Reset Value: -
• WIMPLx: Window x Mode Implemented0: Window x mode is not implemented.1: Window x mode is implemented.
• ACIMPLx: Analog Comparator x Implemented0: Analog Comparator x is not implemented.
1: Analog Comparator x is implemented.
31 30 29 28 27 26 25 24
- - - - - - - -
23 22 21 20 19 18 17 16
- - - - WIMPL3 WIMPL2 WIMPL1 WIMPL0
15 14 13 12 11 10 9 8
- - - - - - - -
7 6 5 4 3 2 1 0
ACIMPL7 ACIMPL6 ACIMPL5 ACIMPL4 ACIMPL3 ACIMPL2 ACIMPL1 ACIMPL0

98942023G–SAM–03/2014
ATSAM4L8/L4/L2
37.9.10 Version RegisterName: VERSION
Access Type: Read-only
Offset: 0x34
Reset Value: -
• VARIANT: Variant NumberReserved. No functionality associated.
• VERSION: Version NumberVersion number of the module. No functionality associated.
31 30 29 28 27 26 25 24
- - - - - - - -
23 22 21 20 19 18 17 16
- - - - VARIANT
15 14 13 12 11 10 9 8
- - - - VERSION[11:8]
7 6 5 4 3 2 1 0
VERSION[7:0]
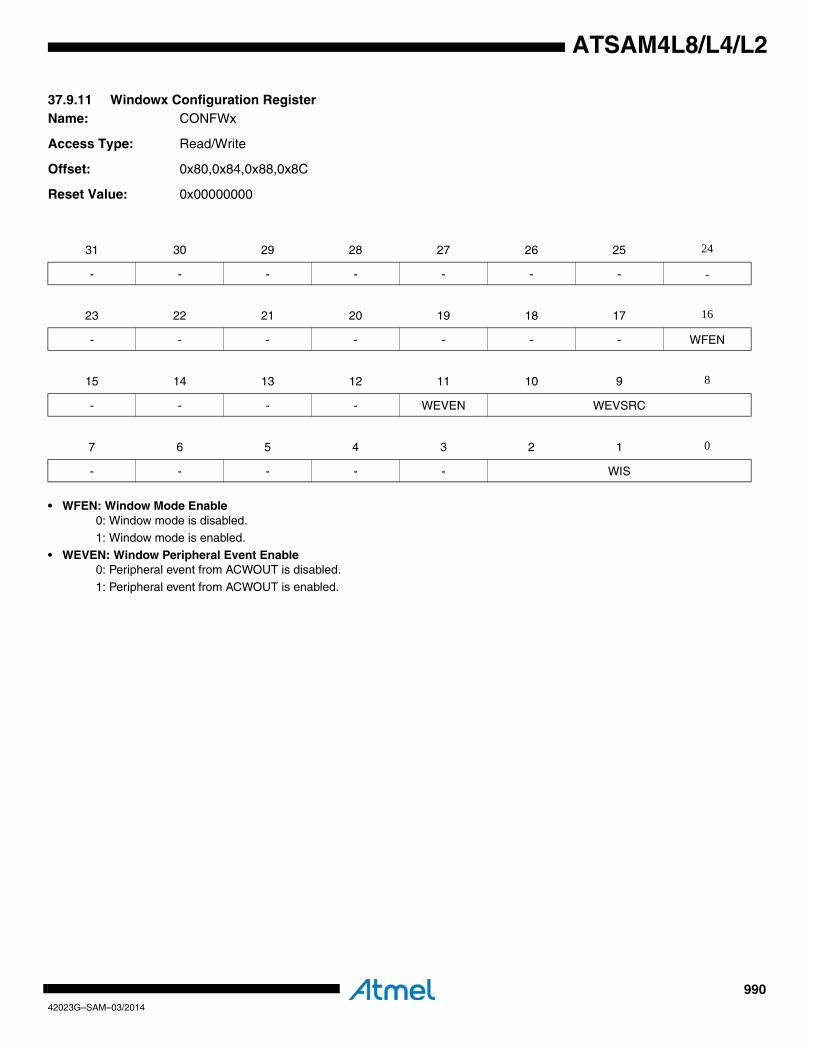
99042023G–SAM–03/2014
ATSAM4L8/L4/L2
37.9.11 Windowx Configuration Register Name: CONFWx
Access Type: Read/Write
Offset: 0x80,0x84,0x88,0x8C
Reset Value: 0x00000000
• WFEN: Window Mode Enable0: Window mode is disabled.1: Window mode is enabled.
• WEVEN: Window Peripheral Event Enable0: Peripheral event from ACWOUT is disabled.
1: Peripheral event from ACWOUT is enabled.
31 30 29 28 27 26 25 24
- - - - - - - -
23 22 21 20 19 18 17 16
- - - - - - - WFEN
15 14 13 12 11 10 9 8
- - - - WEVEN WEVSRC
7 6 5 4 3 2 1 0
- - - - - WIS
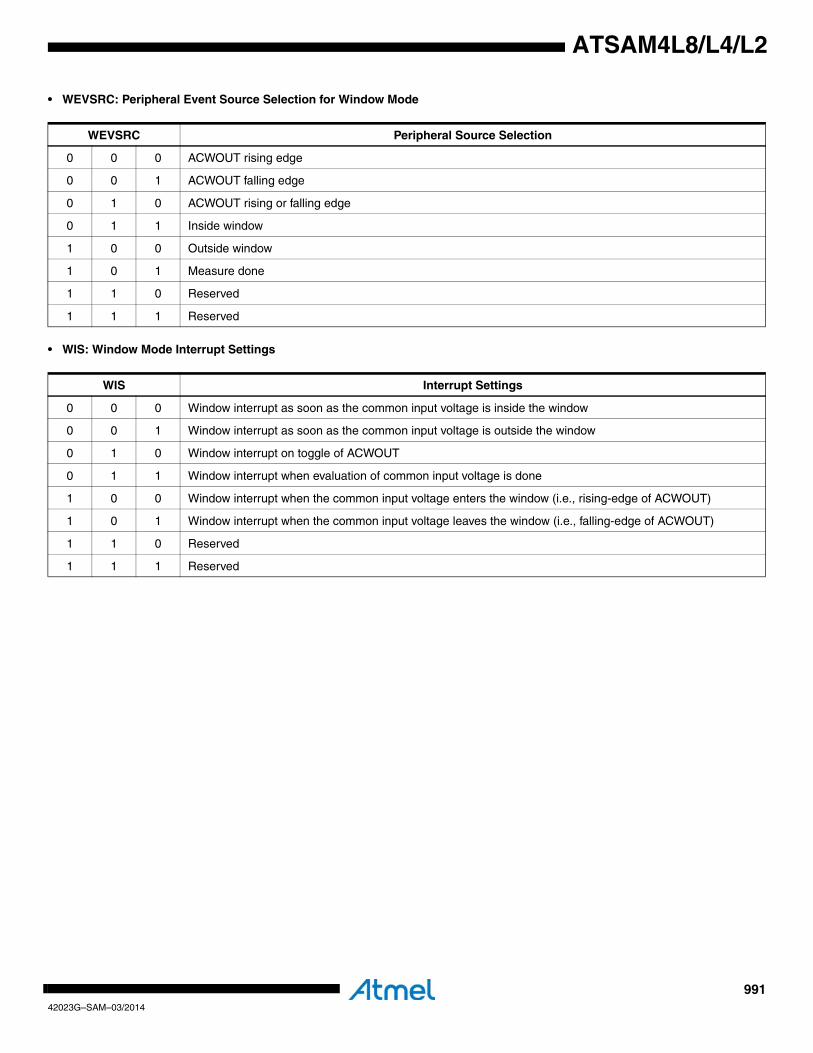
99142023G–SAM–03/2014
ATSAM4L8/L4/L2
• WEVSRC: Peripheral Event Source Selection for Window Mode
• WIS: Window Mode Interrupt Settings
WEVSRC Peripheral Source Selection
0 0 0 ACWOUT rising edge
0 0 1 ACWOUT falling edge
0 1 0 ACWOUT rising or falling edge
0 1 1 Inside window
1 0 0 Outside window
1 0 1 Measure done
1 1 0 Reserved
1 1 1 Reserved
WIS Interrupt Settings
0 0 0 Window interrupt as soon as the common input voltage is inside the window
0 0 1 Window interrupt as soon as the common input voltage is outside the window
0 1 0 Window interrupt on toggle of ACWOUT
0 1 1 Window interrupt when evaluation of common input voltage is done
1 0 0 Window interrupt when the common input voltage enters the window (i.e., rising-edge of ACWOUT)
1 0 1 Window interrupt when the common input voltage leaves the window (i.e., falling-edge of ACWOUT)
1 1 0 Reserved
1 1 1 Reserved
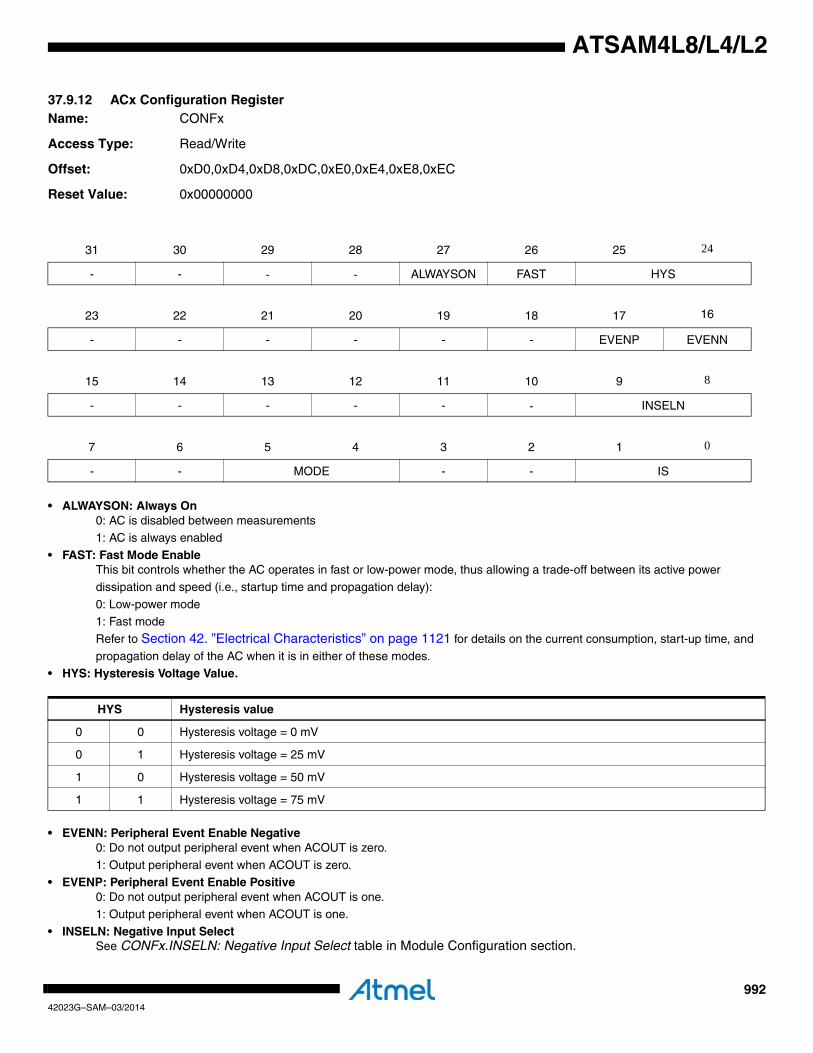
99242023G–SAM–03/2014
ATSAM4L8/L4/L2
37.9.12 ACx Configuration Register Name: CONFx
Access Type: Read/Write
Offset: 0xD0,0xD4,0xD8,0xDC,0xE0,0xE4,0xE8,0xEC
Reset Value: 0x00000000
• ALWAYSON: Always On0: AC is disabled between measurements1: AC is always enabled
• FAST: Fast Mode EnableThis bit controls whether the AC operates in fast or low-power mode, thus allowing a trade-off between its active power
dissipation and speed (i.e., startup time and propagation delay):
0: Low-power mode1: Fast mode
Refer to Section 42. ”Electrical Characteristics” on page 1121 for details on the current consumption, start-up time, and
propagation delay of the AC when it is in either of these modes.• HYS: Hysteresis Voltage Value.
• EVENN: Peripheral Event Enable Negative0: Do not output peripheral event when ACOUT is zero.
1: Output peripheral event when ACOUT is zero.• EVENP: Peripheral Event Enable Positive
0: Do not output peripheral event when ACOUT is one.1: Output peripheral event when ACOUT is one.
• INSELN: Negative Input SelectSee CONFx.INSELN: Negative Input Select table in Module Configuration section.
31 30 29 28 27 26 25 24
- - - - ALWAYSON FAST HYS
23 22 21 20 19 18 17 16
- - - - - - EVENP EVENN
15 14 13 12 11 10 9 8
- - - - - - INSELN
7 6 5 4 3 2 1 0
- - MODE - - IS
HYS Hysteresis value
0 0 Hysteresis voltage = 0 mV
0 1 Hysteresis voltage = 25 mV
1 0 Hysteresis voltage = 50 mV
1 1 Hysteresis voltage = 75 mV

99342023G–SAM–03/2014
ATSAM4L8/L4/L2
• MODE: Analog Comparator Mode
• IS: Interrupt Settings
MODE Mode selected
0 0 Off
0 1 Continuous measurement mode
1 0 User triggered single measurement mode
1 1 Peripheral event triggered single measurement mode
IS Interrpt setting
0 0 When VINP > VINN
0 1 When VINP < VINN
1 0 On toggle of ACOUT
1 1 When comparison of VINP and VINN is done
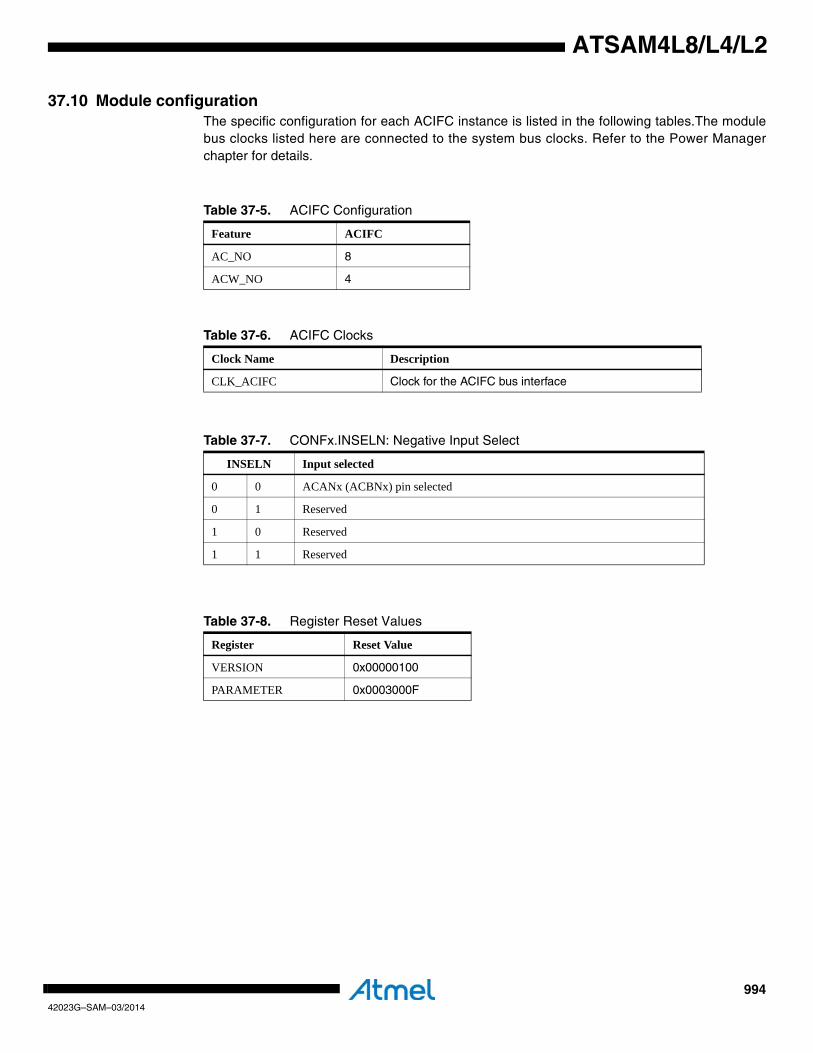
99442023G–SAM–03/2014
ATSAM4L8/L4/L2
37.10 Module configurationThe specific configuration for each ACIFC instance is listed in the following tables.The modulebus clocks listed here are connected to the system bus clocks. Refer to the Power Managerchapter for details.
Table 37-5. ACIFC Configuration
Feature ACIFC
AC_NO 8
ACW_NO 4
Table 37-6. ACIFC Clocks
Clock Name Description
CLK_ACIFC Clock for the ACIFC bus interface
Table 37-7. CONFx.INSELN: Negative Input Select
INSELN Input selected
0 0 ACANx (ACBNx) pin selected
0 1 Reserved
1 0 Reserved
1 1 Reserved
Table 37-8. Register Reset Values
Register Reset Value
VERSION 0x00000100
PARAMETER 0x0003000F
99542023G–SAM–03/2014
ATSAM4L8/L4/L2
38. ADC Interface (ADCIFE)Rev. 1.0.0.0
38.1 Features• Multi-channel Analog-to-Digital Converter with 12-bit resolution• Selectable single ended or differential input voltage• Programmable gain per conversion• selectable ADC voltage input reference per conversion• Numerous trigger sources
– Software– Embedded 16-bit timer for periodic trigger– Continuous trigger– Peripheral Event trigger– External trigger, rising, falling or any-edge trigger
• Multiple sequencer modes:– Run multiple sequences using DMA transfer– Run a single conversion on a start-of-conversion
• Start of conversion or sequence without CPU intervention• ADC Power Reduction Mode for low power ADC applications• Window monitor, with selectable channel per conversion• Programmable Sample & Hold time per conversion
38.2 OverviewThe ADC interface (ADCIFE) converts analog input voltages to digital values. The ADCIFE isbased on a 12-bit Cyclic Pipeline topology to achieve sampling rates up to 300 KSPS (In differ-ential mode without gain).
The ADC conversion results are reported in a common register for all channels. Conversionscan be started for all enabled channels, either by a software trigger, by detection of a levelchange on the external trigger pin or event system, or by an integrated programmable 16-bittimer.
This ADC has selectable single-ended or fully differential inputs and takes benefits from a pro-grammable gain from x0.5 to x64 included.
The conversions extend from -Vref to +Vref. 16 external channels on both positive and negativeinputs can be managed.
The ADCIFE also integrates an Power Reduction mode, a Window Monitor mode, and connectswith two Peripheral DMA Controller channels (One Rx for configuration and one Tx for transfer-ing results). These features reduce both power consumption and processor intervention.
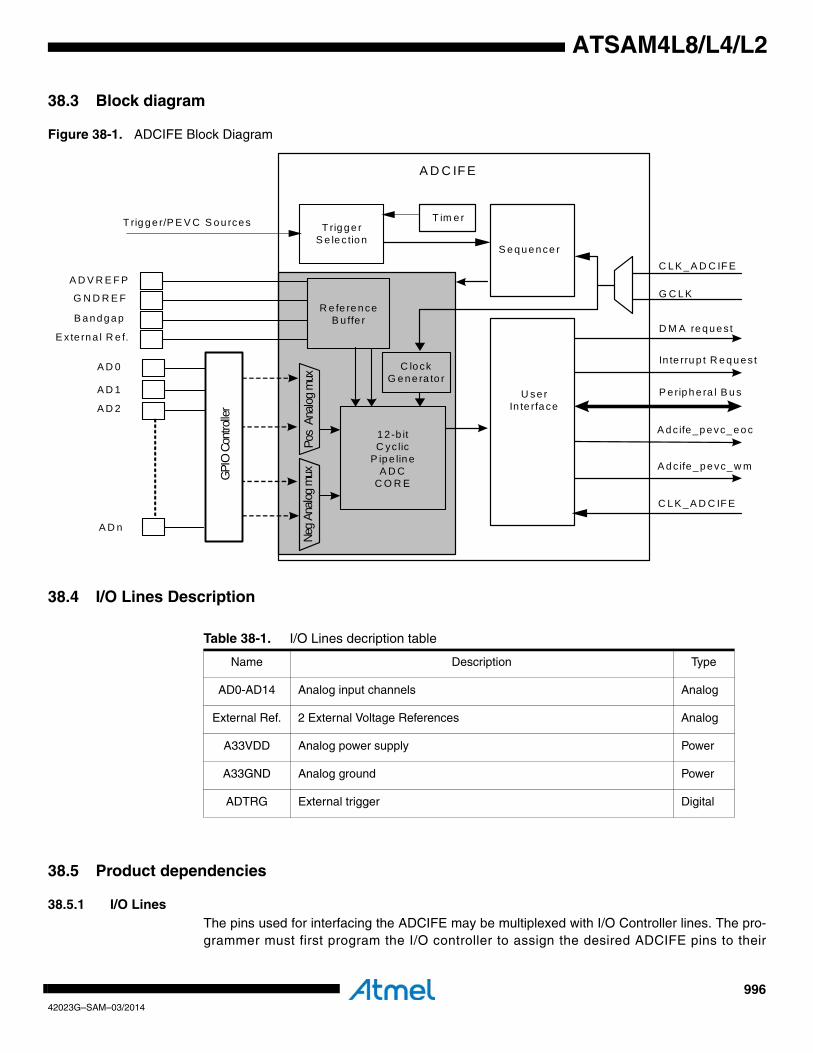
99642023G–SAM–03/2014
ATSAM4L8/L4/L2
38.3 Block diagram
Figure 38-1. ADCIFE Block Diagram
38.4 I/O Lines Description
38.5 Product dependencies
38.5.1 I/O LinesThe pins used for interfacing the ADCIFE may be multiplexed with I/O Controller lines. The pro-grammer must first program the I/O controller to assign the desired ADCIFE pins to their
A D 0
A D 1
A D 2
A D n
S e q u e n ce r
A D C IF E
G C L KG N D R E F
GPIO
Con
trolle
r
Neg
Analo
g m
ux
T r ig g e rS e le c tio n
T rig g e r/P E V C S o u rce s T im e r
In te rru p t R e q u e s t
D M A re q u e s t
A d c ife_p e vc_ e o c
C L K _ A D C IF E
U se rIn te rfa ce
A d c ife_ p e vc_ w m
1 2-b itC yc lic
P ip e lin eA D C
C O R E
A D V R E F P
Pos
Analo
g m
ux
P e rip h e ra l B u s
R e fe re n ceB u ffe r
C lo ckG e n e ra to r
C L K _ A D C IF E
B a n d g a p
E x te rn a l R e f.
Table 38-1. I/O Lines decription table
Name Description Type
AD0-AD14 Analog input channels Analog
External Ref. 2 External Voltage References Analog
A33VDD Analog power supply Power
A33GND Analog ground Power
ADTRG External trigger Digital
99742023G–SAM–03/2014
ATSAM4L8/L4/L2
peripheral function. If I/O lines of the ADCIFE are not used by the application, they can be usedfor other purposes by the I/O controller.
38.5.2 Power ManagementIf the CPU enters a power reduction mode that disables clocks used by the ADCIFE, theADCIFE will stop functioning and resume operation after the system wakes up from powerreduction mode. Before entering a power reduction mode where the clock to the ADCIFE isstopped, make sure the Analog-to-Digital Converter cell is put in an inactive state.
If an event is sent to the ADCIFE and the clocks used by the ADCIFE are stopped, the ADCIFEclock will automatically be requested so that the conversion can be processed.
38.5.3 ClocksThe clock for the ADCIFE bus interface (CLK_ADCIFE) is generated by the Power Manager.This clock is disabled at reset, and can be enabled/disabled in the Power Manager. It is recom-mended to disable the ADCIFE before disabling the clock, to avoid freezing the ADCIFE in anundefined state. Additionally, the ADCIFE depends on a dedicated Generic Clock (GCLK). TheGCLK can be set to a wide range of frequencies and clock sources, and must be enabled by theSystem Control Interface (SCIF) before the ADCIFE can be used.
This GCLK can also be muxed with the CLK_ADCIFE clock by writting the Clock Selection bit inthe Configuration Register (CFG.CLKSEL). It is used during the sleep walking mode.
38.5.4 Interrupt ControllerThe ADCIFE interrupt line is connected on one of the internal sources of the Interrupt Controller.Using the ADCIFE requires the Interrupt Controller to be programmed first.
38.5.5 Event SystemThe event controller provides the ADCIFE a trigger source.
The ADCIFE also behaves as an event source:
• Event on an end of conversion (Figure 38-1 adcife_pevc_eoc signal)
• Event on a window monitor trigger (Figure 38-1 adcife_pevc_wm signal)
To operate correctly, the event source period should not exceed the ADC conversion time plusthe startup time if needed.
Refer to the Peripheral Event System chapter for details.
38.6 Section 42. ”Electrical Characteristics” on page 1121Functional Description
38.6.1 Initializing the ADCIFETo initialize the module the user first needs to configure the ADCIFE clocks (refer to Section38.5.3). Then he needs to wait for the STARTUP time (Refer to Section 38.6.7) (If necessary).Then he can write a one to the Enable (EN) bit in the Control Register (CR). The user mustcheck that ADCIFE has started correctly, firstly by checking that the Enable bit (EN) located inthe Status Register (SR) is set. The Bandgap Buffer Request bit in the Control register(CR.BGREQEN) and the Reference Buffer Enable in the Control register (CR.REFBUFEN) mustbe set. If the reference buffer of the ADC cell is enabled and ready for use, SR.EN can tell if theADCIFE is ready for operation since startup-time will be performed only when a sequencer trig-ger event occurs if necessary.
99842023G–SAM–03/2014
ATSAM4L8/L4/L2
Note that all ADCIFE controls will be ignored until SR.EN goes to ‘1’.
Before the ADCIFE can be used, the Internal Reference Voltage signal must be selected by writ-ing the CFG.REFSEL field and the I/O Controller must be configured correctly. Refer to I/OController section for details. The user must also configure the frequency range by writting theCFG.SPEED field.
Note that once configured, ADCIFE configuration registers should not be written during opera-tion since they are permanently used by the ADCIFE. The user must ensure that ADCIFE isstopped during configuration unless he knows what he is doing.
38.6.2 Basic OperationTo convert analog values to digital values the user must first initialize the ADCIFE as describedin Section 38.6.1. When the ADCIFE is initialized, the sequencer must be configured by writinginto the Sequencer Configuration Register (SEQCFG) all the necessary bits or fields for the nextconversion. This configuration can also be performed by Peripheral DMA Rx channel access.
Configuring channel N for a given conversion instructs the ADCIFE to convert the analog voltageapplied to AD pin N. To start converting data the user can either manually start a conversionsequence by write a one to the sequencer trigger event (STRIG) bit in the Control Register (CR)or configure an automatic trigger to initiate the conversions. The automatic trigger can be config-ured to trig on many different conditions. Refer to Section 38.6.13 for details. The result of theconversions are stored in the Last Converted Value register (LCV) as they become available,overwriting the result from the previous conversion. To avoid data loss, the user must read theconversion results as they become available either by using an interrupt handler or by using aPeripheral DMA channel to copy the results to memory. Failing to do so will result in an OverrunError condition, indicated by the LOVR bit in the Status Register (SR). To use an interrupt han-dler the user must enable the End Of Conversion (EOC) interrupt request by writing a one to thecorresponding bit in the Interrupt Enable Register (IER). To clear the interrupt after the conver-sion result is read, the user must write a one to the corresponding bit in the Status ClearRegister (SCR).
To use a Peripheral DMA Controller Tx channel, the user must configure the Peripheral DMAController appropriately. The DMA Controller will, when configured, automatically read con-verted data as they become available. There is no need to manually clear any bits in theInterrupt Status Register as this is performed by the hardware. If an Overrun Error condition hap-pens during DMA operation, the LOVR bit in the SR will be set.
38.6.3 ADC ResolutionThis ADC is a cyclic pipeline 12-bit or 8-bit resolution.
Resolution can be changed by writing the resolution field (RES) in the Sequencer ConfigurationRegister (SEQCFG). By default, after a reset, the resolution is set to 12-bit.
38.6.4 Differential and Single-Ended Conversion ModesThe ADC has two conversion modes; differential and single-ended. If measuring signals wherethe positive input is always at a higher voltage than the negative input, the single-ended conver-sion mode should be used in order to have full 12-bit resolution in the conversion mode, whichhas only positive values. If however the positive input may go below the negative input creatingsome negative results, the differential mode should be used in order to get correct results. Thecon f igu ra t i on o f the convers ion mode i s se t i n the f i e ld b ipo la r i n SEQCFG(SEQCFG.BIPOLAR).
99942023G–SAM–03/2014
ATSAM4L8/L4/L2
Note that the ADC works differentially in single-ended mode as well, as long as the positive inputhas a higher voltage than the negative.
38.6.5 ADC Clock ConfigurationThe ADCIFE generates an internal clock named CLK_ADC that is used by the Analog-to-DigitalConverter cell to perform conversions. The CLK_ADC is selected by writing to the CLKSEL bit inthe Configuration Register (CFG). The CLK_ADC frequency is the frequency of the clockselected by the CLKSEL bi t d iv ided by the prescaler f ie ld in the Conf igurat ionRegister(CFG.PRESCAL).
The value of th frequency must be defined in order to provide an ADC clock frequency accordingto the maximum sampling rate parameter given in the Electrical Characteristics section. Failingto do so may result in incorrect Analog-to-Digital Converter operation.
The ADC cell converts an input voltage in 6 CLK_ADC periods and takes at least SHTIM+1GCLK periods to sample for a 12-bit resolution.
Thus, the maximum achievable ADC sampling frequency is:
If a 8-bit result is generated, the maximum ADC sampling frequency is
38.6.6 Power Reduction ModeThe Power Reduction Mode maximizes power saving by automatically deactivating the Analog-to-Digital Converter cell when it is not being used for conversions. The Power Reduction Mode isenabled by writing a one to the Disable ADC(DIS) bit in the Control register (CR.DIS).
Before entering power reduction mode the user must make sure the ADCIFE is idle and that theAnalog-to-Digital Converter cell is inactive. To make sure the ADCIFE is idle, write a zero to theTrigger Selection (TRGSEL) field in the Sequencer Configuration Register (SEQCFG) and waitfor the sequencer busy (SBUSY) bit in the Status Register (SR) to be cleared. Note that bydeactivating the Analog-to-Digital Converter cell, a startup time penalty as defined in theSTARTUP field in the timing register (TIM) will apply on the next conversion.
The ADCIFE has the possibility to adjust the power consumption of the ADC cell according tothe frequency range used. The SPEED field in the CFG register must be written to the rightvalue.
38.6.7 Power-up and Startup TimeThe Analog-to-Digital Converter cell has a startup time when the cell is activated for the firsttime. This startup time is at least 12 ADC_CLK. This timing should be manage by the user bysetting the startup time field in the Timing Configuration register (TIM.STARTUP). The enablestartup bit in the Timing Configuration register (TIM.ENSTUP) allows to enable or not the startuptime.
For power-up and startup time values of the ADC cell, refer to the ADC cell chapter.
38.6.8 Operation Start/StopTo reset ADCIFE to its initial state, user can enable the ADCIFE after it was previously disabledthanks to the Enable bit in the Control register (CR.EN) and the Disable bit in the Control register
F CLKADC( )6
----------------------------------
F CLKADC( )4
----------------------------------
100042023G–SAM–03/2014
ATSAM4L8/L4/L2
(CR.DIS). Another way to reset ADCIFE is to write a one in the SWRST field of the Control Reg-ister (CR.SWRST). In both cases configuration registers won’t be affected.
38.6.9 Analog ReferenceRefer to Section 42. ”Electrical Characteristics” on page 1121.
The ADC allows the possibility to select several voltage reference (Vref).
• An internal 1.0V voltage reference derived from the internal 1.1V
• 0.625*Vcc (to get 1.0V when Vcc=1.6V)
• Vcc/2
• 2 external reference inputs
38.6.10 GAINThe ADC cell allows to affect different gain for each conversion by configuring approprietely theGain Factor field GAIN in the SEQCFG register.
The programmable input amplification is from 1x to 64x. Moreover, this amplification can bedivided by 2 by setting all bits in the field GAIN in the SEQCFG register to seven.
38.6.11 Conversion ResultsIf the Half Word Left Adjust (HWLA) bit in the SEQCFG register is set, then the result will be leftadjusted on the 16 lower bits of the LCV register. Otherwise, results will be right-adjusted.
Positive and negative channels used in the last conversion are available both by reading theSequencer Last Converted Value register (LCV).
38.6.12 Operating Modes OverviewTable 38-2. Operating modes description
Operating mode Input range Output code range Conversion time Output decimal code
Differential mode without gain
-Vref to + Vref0 to 4095 (11 bits signednumber)
6 clock_cycles 2047 + (Vin/Vref)*2047
Differential mode with gain=2n
-Vref/2n to +Vref/2n
0 to 4095 (11 bits signednumber)
7 clock_cycles forn=1 (gain=2)
9 clock_cycles forn=6 (gain=64)
2047 + (2n*Vin/Vref)*2047
Differential mode with divi-sion by 2
-2*Vref to +2*Vref
0 to 4095 (11 bits signednumber)
7 clock_cycles 2047 + (Vin/(2*Vref))*2047
Differential mode with zoom and gain =2n (n>0)
-Vref/2n+Vshift, Vref/2n+Vshift
Vshift=Vsup(1/4*zoom-range[1]+1/8*zoomrange[0])
0 to 4095 (11 bits signednumber)
7 clock_cycles forn=1 (gain=2)
10 clock_cyclesfor n=6 (gain=64)
2047+(2 n * (V in -Vshift)/Vref*2047
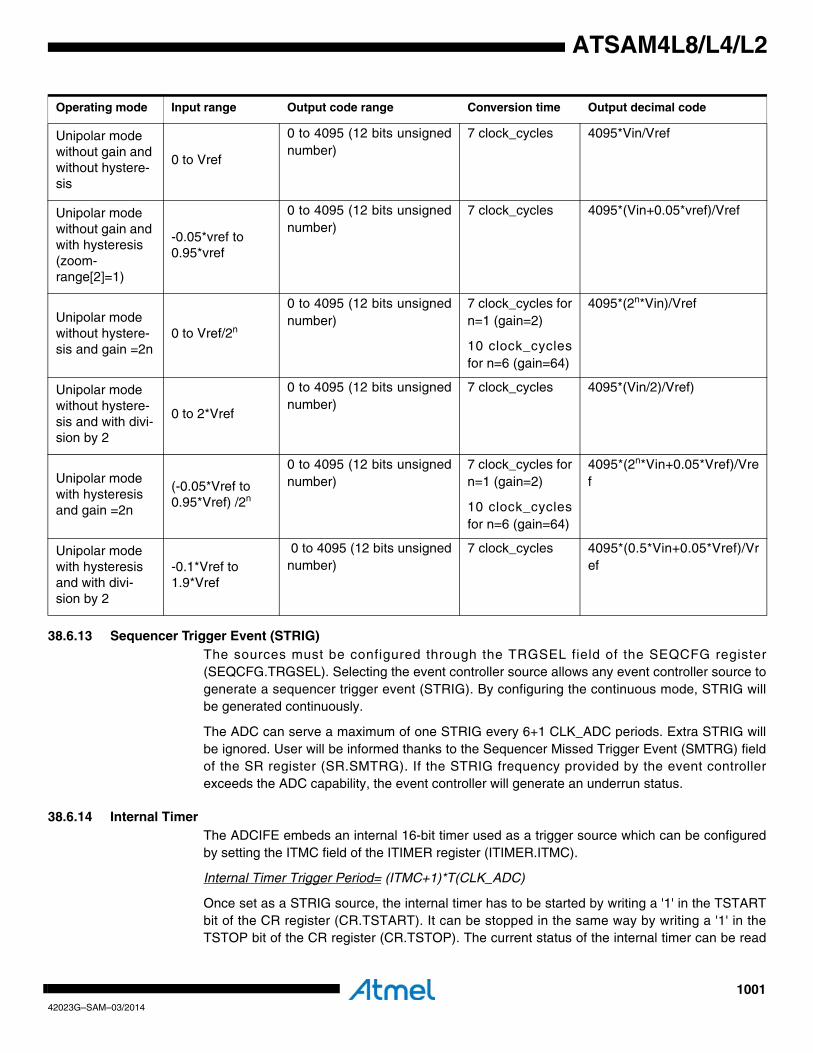
100142023G–SAM–03/2014
ATSAM4L8/L4/L2
38.6.13 Sequencer Trigger Event (STRIG)The sources must be configured through the TRGSEL field of the SEQCFG register(SEQCFG.TRGSEL). Selecting the event controller source allows any event controller source togenerate a sequencer trigger event (STRIG). By configuring the continuous mode, STRIG willbe generated continuously.
The ADC can serve a maximum of one STRIG every 6+1 CLK_ADC periods. Extra STRIG willbe ignored. User will be informed thanks to the Sequencer Missed Trigger Event (SMTRG) fieldof the SR register (SR.SMTRG). If the STRIG frequency provided by the event controllerexceeds the ADC capability, the event controller will generate an underrun status.
38.6.14 Internal TimerThe ADCIFE embeds an internal 16-bit timer used as a trigger source which can be configuredby setting the ITMC field of the ITIMER register (ITIMER.ITMC).
Internal Timer Trigger Period= (ITMC+1)*T(CLK_ADC)
Once set as a STRIG source, the internal timer has to be started by writing a '1' in the TSTARTbit of the CR register (CR.TSTART). It can be stopped in the same way by writing a '1' in theTSTOP bit of the CR register (CR.TSTOP). The current status of the internal timer can be read
Unipolar mode without gain and without hystere-sis
0 to Vref
0 to 4095 (12 bits unsignednumber)
7 clock_cycles 4095*Vin/Vref
Unipolar mode without gain and with hysteresis (zoom-range[2]=1)
-0.05*vref to 0.95*vref
0 to 4095 (12 bits unsignednumber)
7 clock_cycles 4095*(Vin+0.05*vref)/Vref
Unipolar mode without hystere-sis and gain =2n
0 to Vref/2n
0 to 4095 (12 bits unsignednumber)
7 clock_cycles forn=1 (gain=2)
10 clock_cyclesfor n=6 (gain=64)
4095*(2n*Vin)/Vref
Unipolar mode without hystere-sis and with divi-sion by 2
0 to 2*Vref
0 to 4095 (12 bits unsignednumber)
7 clock_cycles 4095*(Vin/2)/Vref)
Unipolar mode with hysteresis and gain =2n
(-0.05*Vref to 0.95*Vref) /2n
0 to 4095 (12 bits unsignednumber)
7 clock_cycles forn=1 (gain=2)
10 clock_cyclesfor n=6 (gain=64)
4095*(2n*Vin+0.05*Vref)/Vref
Unipolar mode with hysteresis and with divi-sion by 2
-0.1*Vref to 1.9*Vref
0 to 4095 (12 bits unsignednumber)
7 clock_cycles 4095*(0.5*Vin+0.05*Vref)/Vref
Operating mode Input range Output code range Conversion time Output decimal code
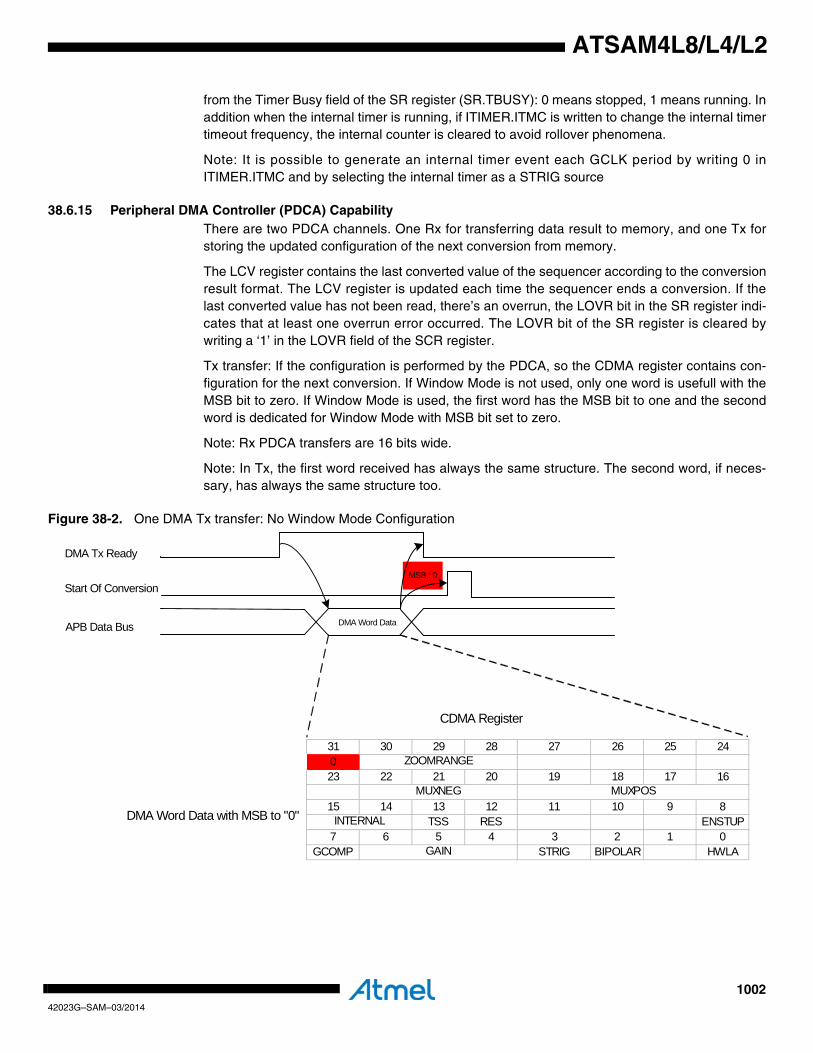
100242023G–SAM–03/2014
ATSAM4L8/L4/L2
from the Timer Busy field of the SR register (SR.TBUSY): 0 means stopped, 1 means running. Inaddition when the internal timer is running, if ITIMER.ITMC is written to change the internal timertimeout frequency, the internal counter is cleared to avoid rollover phenomena.
Note: It is possible to generate an internal timer event each GCLK period by writing 0 inITIMER.ITMC and by selecting the internal timer as a STRIG source
38.6.15 Peripheral DMA Controller (PDCA) CapabilityThere are two PDCA channels. One Rx for transferring data result to memory, and one Tx forstoring the updated configuration of the next conversion from memory.
The LCV register contains the last converted value of the sequencer according to the conversionresult format. The LCV register is updated each time the sequencer ends a conversion. If thelast converted value has not been read, there’s an overrun, the LOVR bit in the SR register indi-cates that at least one overrun error occurred. The LOVR bit of the SR register is cleared bywriting a ‘1’ in the LOVR field of the SCR register.
Tx transfer: If the configuration is performed by the PDCA, so the CDMA register contains con-figuration for the next conversion. If Window Mode is not used, only one word is usefull with theMSB bit to zero. If Window Mode is used, the first word has the MSB bit to one and the secondword is dedicated for Window Mode with MSB bit set to zero.
Note: Rx PDCA transfers are 16 bits wide.
Note: In Tx, the first word received has always the same structure. The second word, if neces-sary, has always the same structure too.
Figure 38-2. One DMA Tx transfer: No Window Mode Configuration
MSB : 0
DMA Tx Ready
APB Data Bus DMA Word Data
Start Of Conversion
31 30 29 28 27 26 25 24023 22 21 20 19 18 17 16
15 14 13 12 11 10 9 8TSS RES ENSTUP
7 6 5 4 3 2 1 0GCOMP STRIG BIPOLAR HWLAGAIN
ZOOMRANGE
MUXNEG
INTERNAL
MUXPOS
DMA Word Data with MSB to "0"
CDMA Register
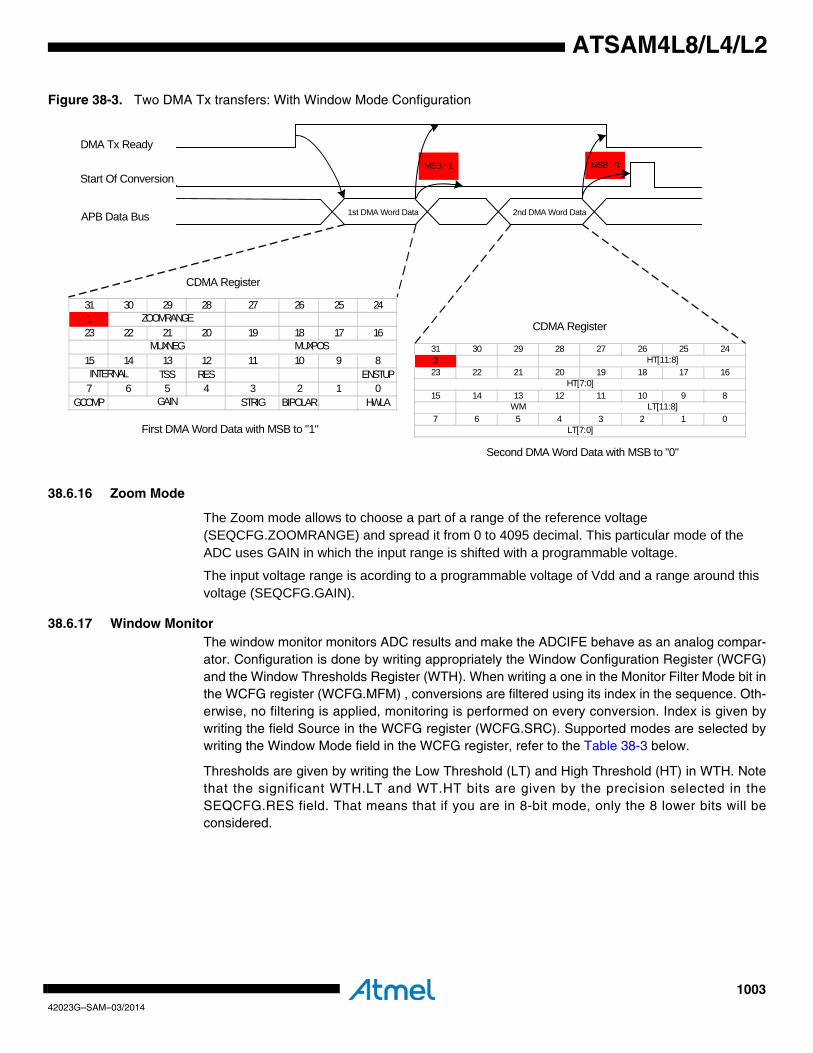
100342023G–SAM–03/2014
ATSAM4L8/L4/L2
Figure 38-3. Two DMA Tx transfers: With Window Mode Configuration
38.6.16 Zoom Mode
The Zoom mode allows to choose a part of a range of the reference voltage (SEQCFG.ZOOMRANGE) and spread it from 0 to 4095 decimal. This particular mode of the ADC uses GAIN in which the input range is shifted with a programmable voltage.
The input voltage range is acording to a programmable voltage of Vdd and a range around this voltage (SEQCFG.GAIN).
38.6.17 Window MonitorThe window monitor monitors ADC results and make the ADCIFE behave as an analog compar-ator. Configuration is done by writing appropriately the Window Configuration Register (WCFG)and the Window Thresholds Register (WTH). When writing a one in the Monitor Filter Mode bit inthe WCFG register (WCFG.MFM) , conversions are filtered using its index in the sequence. Oth-erwise, no filtering is applied, monitoring is performed on every conversion. Index is given bywriting the field Source in the WCFG register (WCFG.SRC). Supported modes are selected bywriting the Window Mode field in the WCFG register, refer to the Table 38-3 below.
Thresholds are given by writing the Low Threshold (LT) and High Threshold (HT) in WTH. Notethat the significant WTH.LT and WT.HT bits are given by the precision selected in theSEQCFG.RES field. That means that if you are in 8-bit mode, only the 8 lower bits will beconsidered.
MSB : 1
DMA Tx Ready
APB Data Bus 1st DMA Word Data
Start Of Conversion
31 30 29 28 27 26 25 24123 22 21 20 19 18 17 16
15 14 13 12 11 10 9 8TSS RES ENSTUP
7 6 5 4 3 2 1 0GCOMP STRIG BIPOLAR HWLAGAIN
ZOOMRANGE
MUXNEG
INTERNAL
MUXPOS
First DMA Word Data with MSB to "1"
CDMA Register
2nd DMA Word Data
MSB : 0
31 30 29 28 27 26 25 24023 22 21 20 19 18 17 16
15 14 13 12 11 10 9 8
7 6 5 4 3 2 1 0LT[7:0]
HT[11:8]
HT[7:0]
WM LT[11:8]
Second DMA Word Data with MSB to "0"
CDMA Register
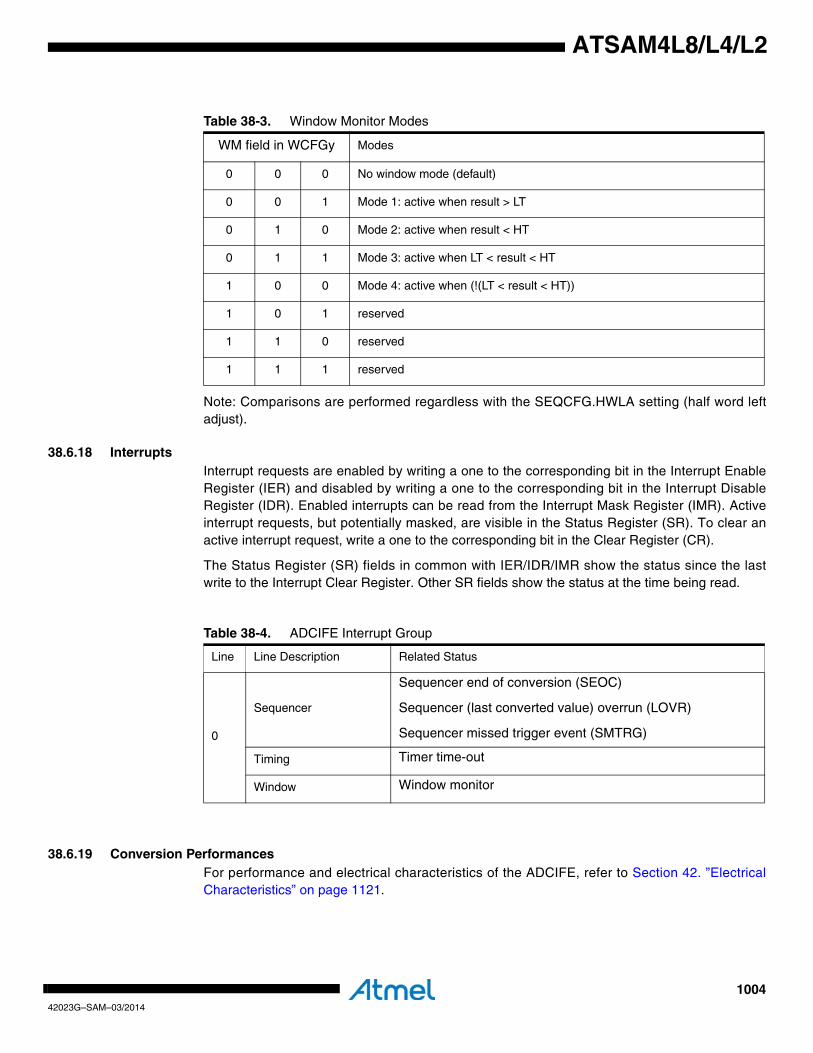
100442023G–SAM–03/2014
ATSAM4L8/L4/L2
Note: Comparisons are performed regardless with the SEQCFG.HWLA setting (half word leftadjust).
38.6.18 InterruptsInterrupt requests are enabled by writing a one to the corresponding bit in the Interrupt EnableRegister (IER) and disabled by writing a one to the corresponding bit in the Interrupt DisableRegister (IDR). Enabled interrupts can be read from the Interrupt Mask Register (IMR). Activeinterrupt requests, but potentially masked, are visible in the Status Register (SR). To clear anactive interrupt request, write a one to the corresponding bit in the Clear Register (CR).
The Status Register (SR) fields in common with IER/IDR/IMR show the status since the lastwrite to the Interrupt Clear Register. Other SR fields show the status at the time being read.
38.6.19 Conversion PerformancesFor performance and electrical characteristics of the ADCIFE, refer to Section 42. ”ElectricalCharacteristics” on page 1121.
Table 38-3. Window Monitor Modes
WM field in WCFGy Modes
0 0 0 No window mode (default)
0 0 1 Mode 1: active when result > LT
0 1 0 Mode 2: active when result < HT
0 1 1 Mode 3: active when LT < result < HT
1 0 0 Mode 4: active when (!(LT < result < HT))
1 0 1 reserved
1 1 0 reserved
1 1 1 reserved
Table 38-4. ADCIFE Interrupt Group
Line Line Description Related Status
0
Sequencer
Sequencer end of conversion (SEOC)
Sequencer (last converted value) overrun (LOVR)
Sequencer missed trigger event (SMTRG)
Timing Timer time-out
Window Window monitor
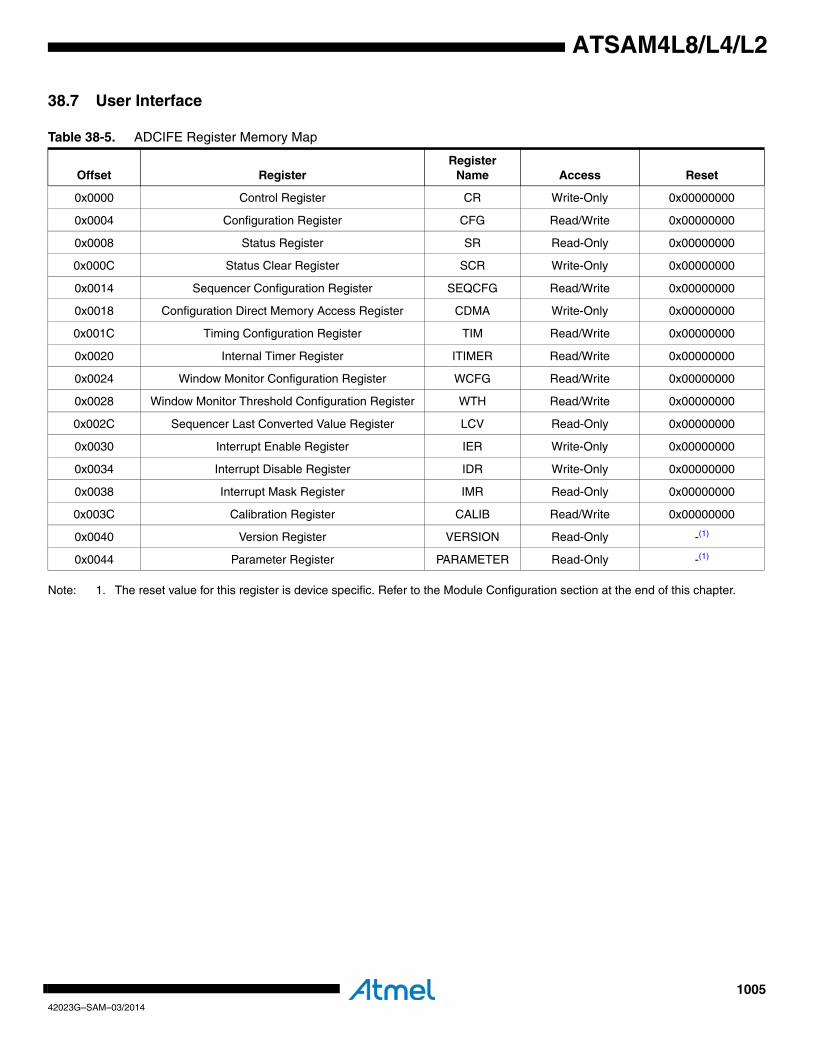
100542023G–SAM–03/2014
ATSAM4L8/L4/L2
38.7 User Interface
Note: 1. The reset value for this register is device specific. Refer to the Module Configuration section at the end of this chapter.
Table 38-5. ADCIFE Register Memory Map
Offset RegisterRegister
Name Access Reset
0x0000 Control Register CR Write-Only 0x00000000
0x0004 Configuration Register CFG Read/Write 0x00000000
0x0008 Status Register SR Read-Only 0x00000000
0x000C Status Clear Register SCR Write-Only 0x00000000
0x0014 Sequencer Configuration Register SEQCFG Read/Write 0x00000000
0x0018 Configuration Direct Memory Access Register CDMA Write-Only 0x00000000
0x001C Timing Configuration Register TIM Read/Write 0x00000000
0x0020 Internal Timer Register ITIMER Read/Write 0x00000000
0x0024 Window Monitor Configuration Register WCFG Read/Write 0x00000000
0x0028 Window Monitor Threshold Configuration Register WTH Read/Write 0x00000000
0x002C Sequencer Last Converted Value Register LCV Read-Only 0x00000000
0x0030 Interrupt Enable Register IER Write-Only 0x00000000
0x0034 Interrupt Disable Register IDR Write-Only 0x00000000
0x0038 Interrupt Mask Register IMR Read-Only 0x00000000
0x003C Calibration Register CALIB Read/Write 0x00000000
0x0040 Version Register VERSION Read-Only -(1)
0x0044 Parameter Register PARAMETER Read-Only -(1)
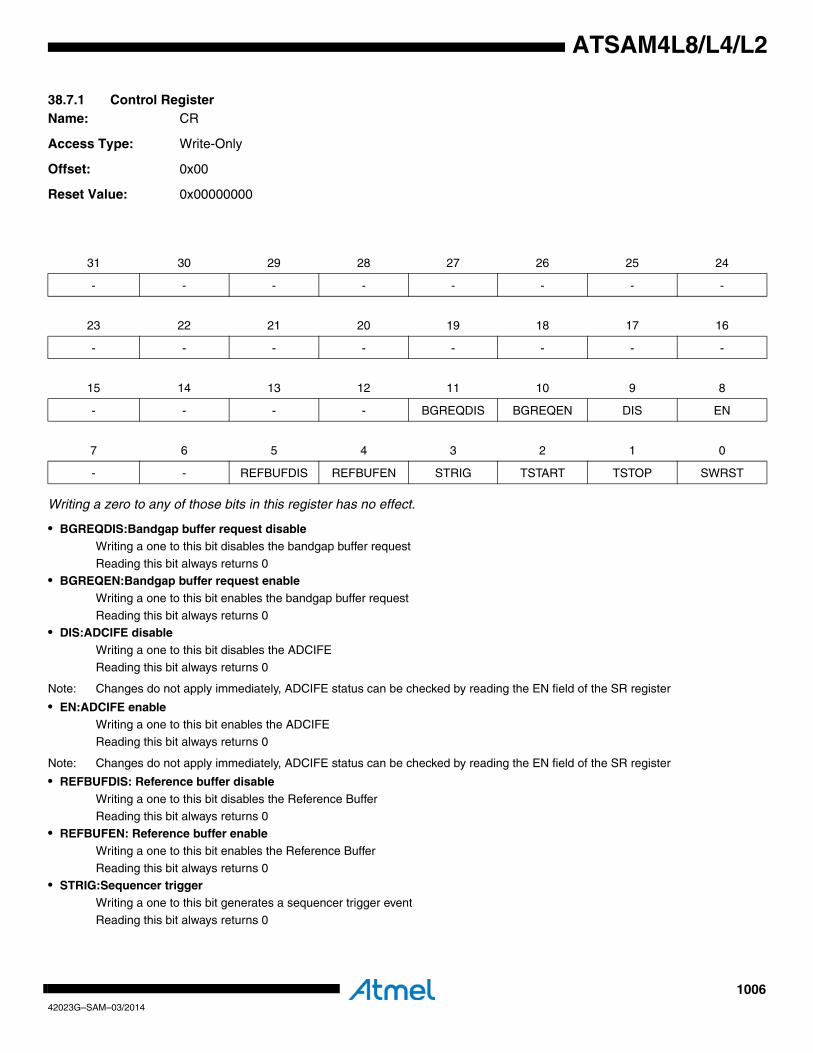
100642023G–SAM–03/2014
ATSAM4L8/L4/L2
38.7.1 Control RegisterName: CR
Access Type: Write-Only
Offset: 0x00
Reset Value: 0x00000000
Writing a zero to any of those bits in this register has no effect.
• BGREQDIS:Bandgap buffer request disableWriting a one to this bit disables the bandgap buffer request
Reading this bit always returns 0• BGREQEN:Bandgap buffer request enable
Writing a one to this bit enables the bandgap buffer request
Reading this bit always returns 0• DIS:ADCIFE disable
Writing a one to this bit disables the ADCIFE
Reading this bit always returns 0
Note: Changes do not apply immediately, ADCIFE status can be checked by reading the EN field of the SR register
• EN:ADCIFE enableWriting a one to this bit enables the ADCIFE
Reading this bit always returns 0
Note: Changes do not apply immediately, ADCIFE status can be checked by reading the EN field of the SR register
• REFBUFDIS: Reference buffer disableWriting a one to this bit disables the Reference BufferReading this bit always returns 0
• REFBUFEN: Reference buffer enableWriting a one to this bit enables the Reference Buffer
Reading this bit always returns 0• STRIG:Sequencer trigger
Writing a one to this bit generates a sequencer trigger event
Reading this bit always returns 0
31 30 29 28 27 26 25 24
- - - - - - - -
23 22 21 20 19 18 17 16
- - - - - - - -
15 14 13 12 11 10 9 8
- - - - BGREQDIS BGREQEN DIS EN
7 6 5 4 3 2 1 0
- - REFBUFDIS REFBUFEN STRIG TSTART TSTOP SWRST
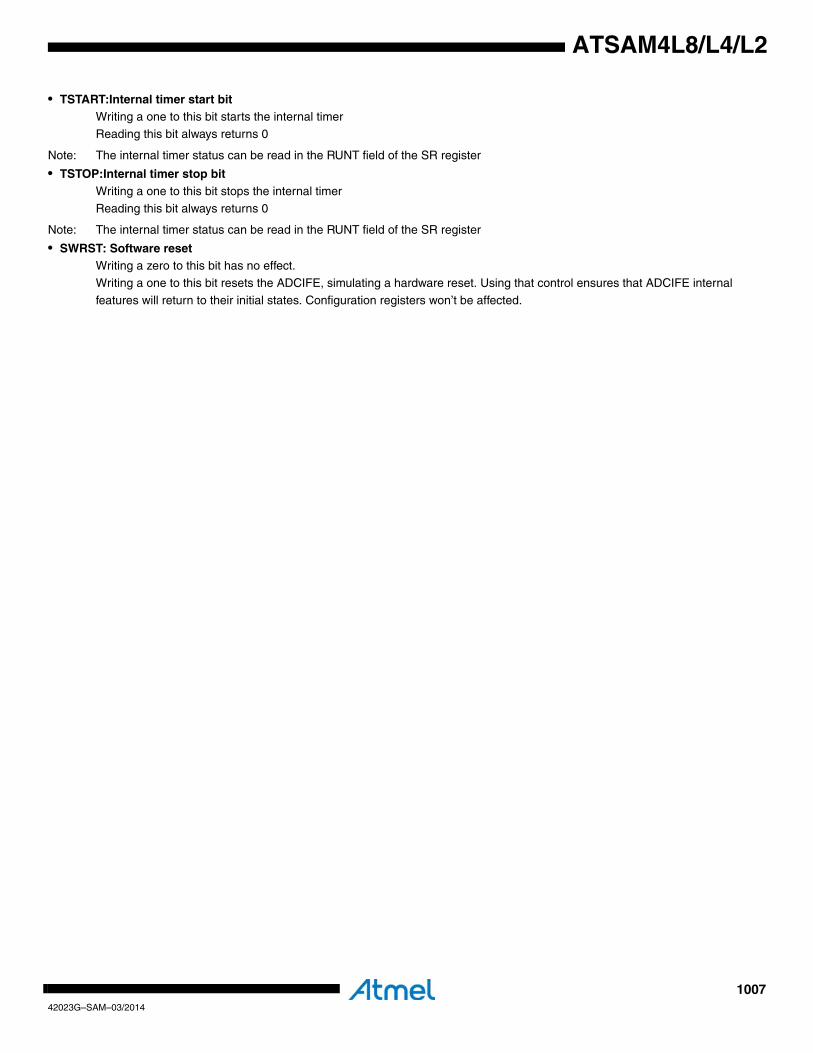
100742023G–SAM–03/2014
ATSAM4L8/L4/L2
• TSTART:Internal timer start bitWriting a one to this bit starts the internal timer
Reading this bit always returns 0
Note: The internal timer status can be read in the RUNT field of the SR register
• TSTOP:Internal timer stop bitWriting a one to this bit stops the internal timer
Reading this bit always returns 0
Note: The internal timer status can be read in the RUNT field of the SR register
• SWRST: Software resetWriting a zero to this bit has no effect.
Writing a one to this bit resets the ADCIFE, simulating a hardware reset. Using that control ensures that ADCIFE internal
features will return to their initial states. Configuration registers won’t be affected.
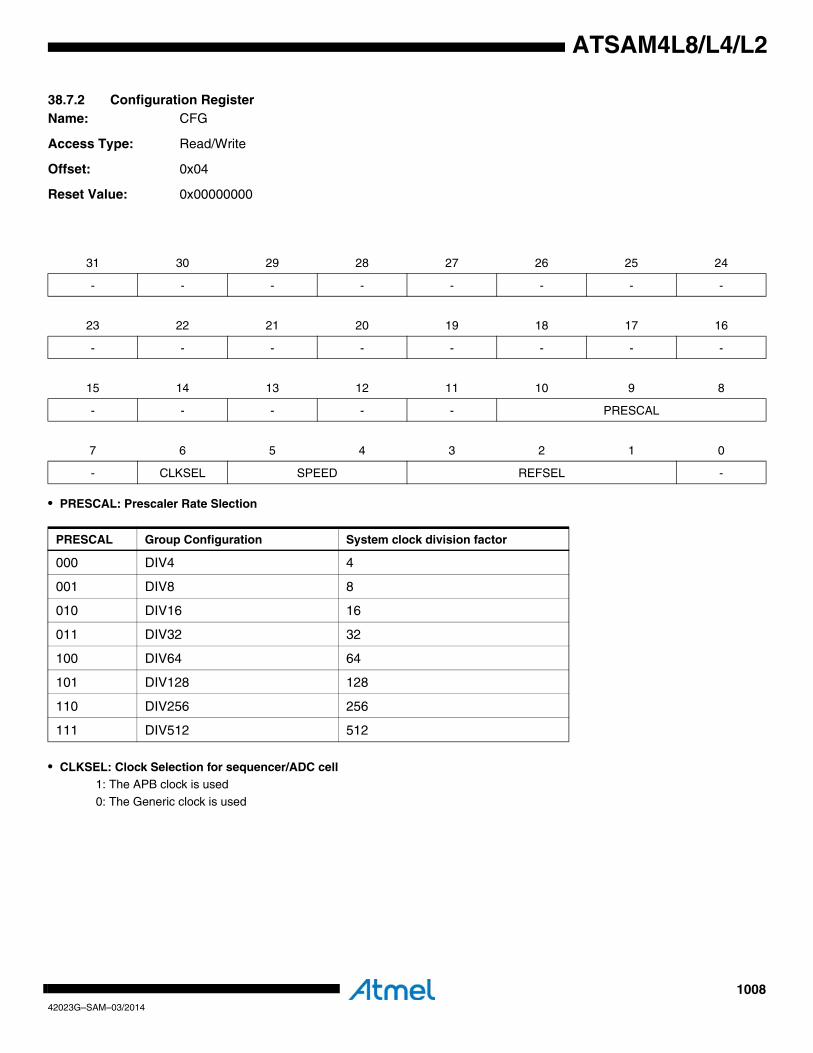
100842023G–SAM–03/2014
ATSAM4L8/L4/L2
38.7.2 Configuration RegisterName: CFG
Access Type: Read/Write
Offset: 0x04
Reset Value: 0x00000000
• PRESCAL: Prescaler Rate Slection
• CLKSEL: Clock Selection for sequencer/ADC cell1: The APB clock is used
0: The Generic clock is used
31 30 29 28 27 26 25 24
- - - - - - - -
23 22 21 20 19 18 17 16
- - - - - - - -
15 14 13 12 11 10 9 8
- - - - - PRESCAL
7 6 5 4 3 2 1 0
- CLKSEL SPEED REFSEL -
PRESCAL Group Configuration System clock division factor
000 DIV4 4
001 DIV8 8
010 DIV16 16
011 DIV32 32
100 DIV64 64
101 DIV128 128
110 DIV256 256
111 DIV512 512
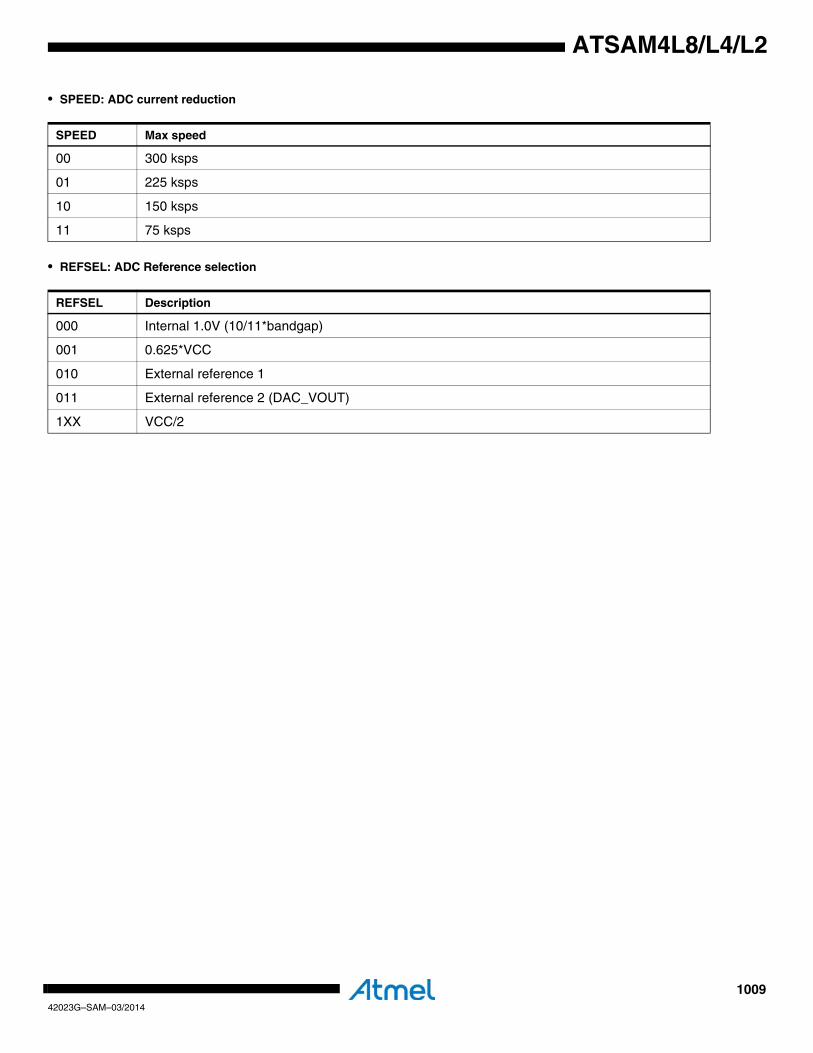
100942023G–SAM–03/2014
ATSAM4L8/L4/L2
• SPEED: ADC current reduction
• REFSEL: ADC Reference selection
SPEED Max speed
00 300 ksps
01 225 ksps
10 150 ksps
11 75 ksps
REFSEL Description
000 Internal 1.0V (10/11*bandgap)
001 0.625*VCC
010 External reference 1
011 External reference 2 (DAC_VOUT)
1XX VCC/2
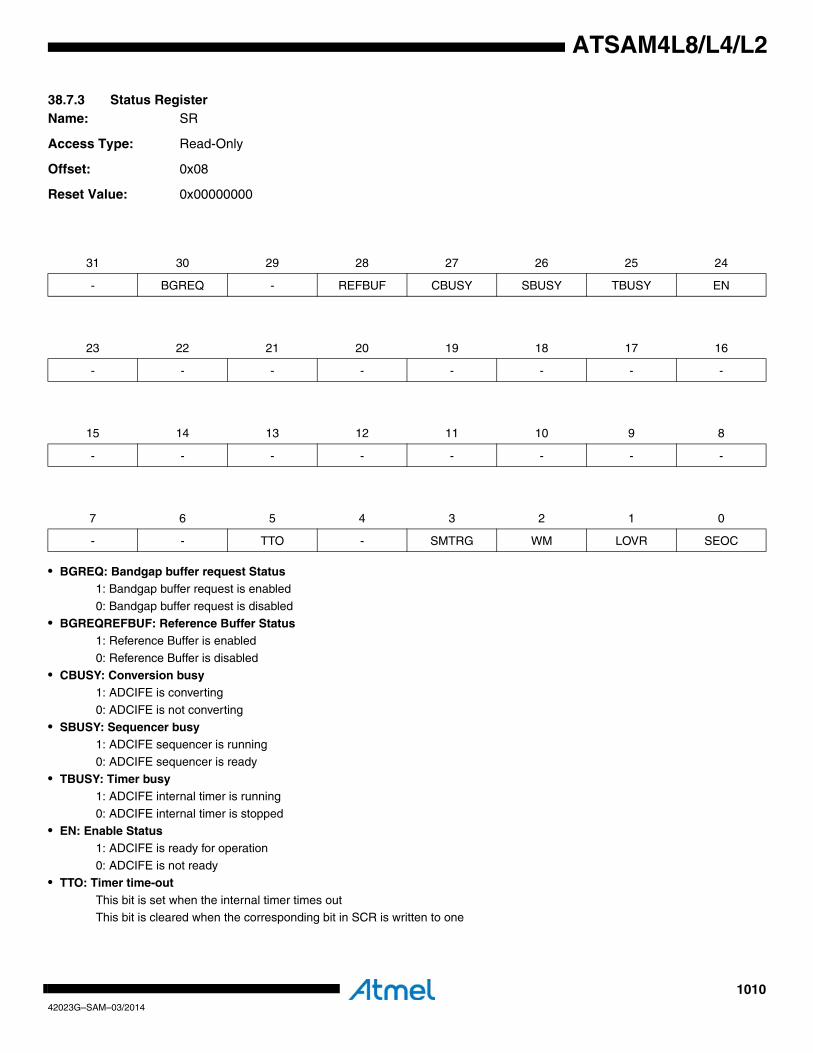
101042023G–SAM–03/2014
ATSAM4L8/L4/L2
38.7.3 Status RegisterName: SR
Access Type: Read-Only
Offset: 0x08
Reset Value: 0x00000000
• BGREQ: Bandgap buffer request Status1: Bandgap buffer request is enabled
0: Bandgap buffer request is disabled
• BGREQREFBUF: Reference Buffer Status1: Reference Buffer is enabled
0: Reference Buffer is disabled
• CBUSY: Conversion busy1: ADCIFE is converting
0: ADCIFE is not converting
• SBUSY: Sequencer busy1: ADCIFE sequencer is running
0: ADCIFE sequencer is ready
• TBUSY: Timer busy1: ADCIFE internal timer is running
0: ADCIFE internal timer is stopped
• EN: Enable Status1: ADCIFE is ready for operation
0: ADCIFE is not ready
• TTO: Timer time-outThis bit is set when the internal timer times outThis bit is cleared when the corresponding bit in SCR is written to one
31 30 29 28 27 26 25 24
- BGREQ - REFBUF CBUSY SBUSY TBUSY EN
23 22 21 20 19 18 17 16
- - - - - - - -
15 14 13 12 11 10 9 8
- - - - - - - -
7 6 5 4 3 2 1 0
- - TTO - SMTRG WM LOVR SEOC
101142023G–SAM–03/2014
ATSAM4L8/L4/L2
• SMTRG:Sequencer missed trigger eventThis bit is set when a sequencer trigger event is missed
This bit is cleared when the corresponding bit in SCR is written to one
• WM:Window monitor This bit is set when the watched result value goes to the defined window
This bit is cleared when the corresponding bit in SCR is written to one
• LOVR:Sequencer last converted value overrunThis bit is set when an overrun error occurs on the LCV registerThis bit is cleared when the corresponding bit in SCR is written to one
• SEOC:Sequencer end of conversionThis bit is set when an end of conversion occursThis bit is cleared when the corresponding bit in SCR is written to one

101242023G–SAM–03/2014
ATSAM4L8/L4/L2
38.7.4 Status Clear RegisterName: SCR
Access Type: Write-Only
Offset: 0x0C
Reset Value: 0x00000000
Writing a zero to a bit in this register has no effect.Writing a one to a bit clears the corresponding SR bit
31 30 29 28 27 26 25 24
- - - - - - - -
23 22 21 20 19 18 17 16
- - - - - - - -
15 14 13 12 11 10 9 8
- - - - - - - -
7 6 5 4 3 2 1 0
- - TTO - SMTRG WM LOVR SEOC
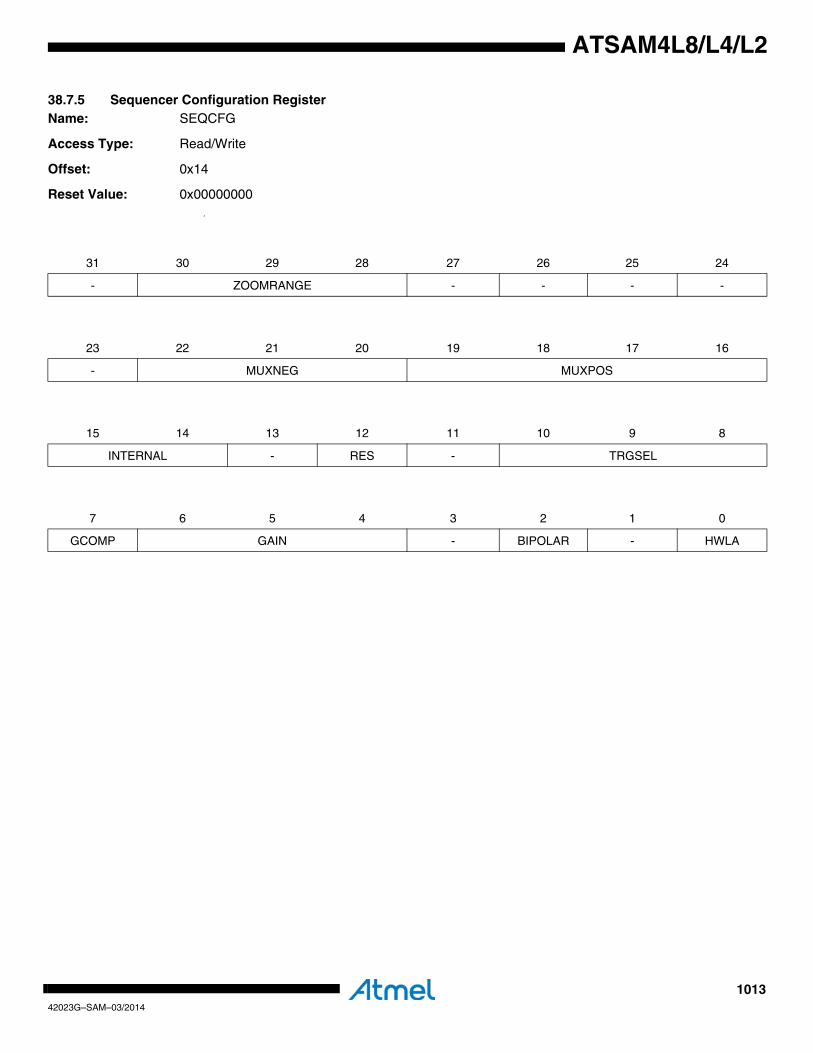
101342023G–SAM–03/2014
ATSAM4L8/L4/L2
38.7.5 Sequencer Configuration RegisterName: SEQCFG
Access Type: Read/Write
Offset: 0x14
Reset Value: 0x000000004
31 30 29 28 27 26 25 24
- ZOOMRANGE - - - -
23 22 21 20 19 18 17 16
- MUXNEG MUXPOS
15 14 13 12 11 10 9 8
INTERNAL - RES - TRGSEL
7 6 5 4 3 2 1 0
GCOMP GAIN - BIPOLAR - HWLA

101442023G–SAM–03/2014
ATSAM4L8/L4/L2
• ZOOMRANGE: Zoom shift/unipolar reference source selection
• MUXNEG: MUX selection on Negative ADC input channel
• MUXPOS: MUX selection on Positive ADC input channel
ZOOMRANGE Mode Comment
000 Select Vref for shift cycle All modes except zoom and unipolar with hysteresis
001 Select Vdd/4 for shift cycle Zoom mode
010 Select Vdd/2 for shift cycle Zoom mode
011 Select 3*Vdd/4 for shift cycle Zoom mode
1XX Select 0.9*Vref for shift cycle Unipolar mode with hysteresis
BIPOLAR INTERNAL MUXNEG Negative input to ADC
0 0X XXX primary_anahot_XXX tied to ground
0 1X 001 or 111 Pad Ground
1 0X 000 primary_anahot_0
1 0X 001 primary_anahot_1
1 0X 010 primary_anahot_2
1 0X 011 primary_anahot_3
1 0X 100 primary_anahot_4
1 0X 101 primary_anahot_5
1 0X 110 primary_anahot_6
1 0X 111 primary_anahot_7
1 1X 000 Vsingle = 0.9*Vref
1 1X 001 Pad Ground
1 1X 010 Vcalib3 = Vref/10
1 1X 011 Reference Ground
1 1v 100 Not used
1 1X 101 Vcalib3 = Vref/10
1 1X 110 Not used
1 1X 111 Pad Ground
BIPOLAR INTERNAL MUXPOS Positive input to ADC
X X0 0000 AD0
X X0 0001 AD1
X X0 0010 AD2
X X0 0011 AD3
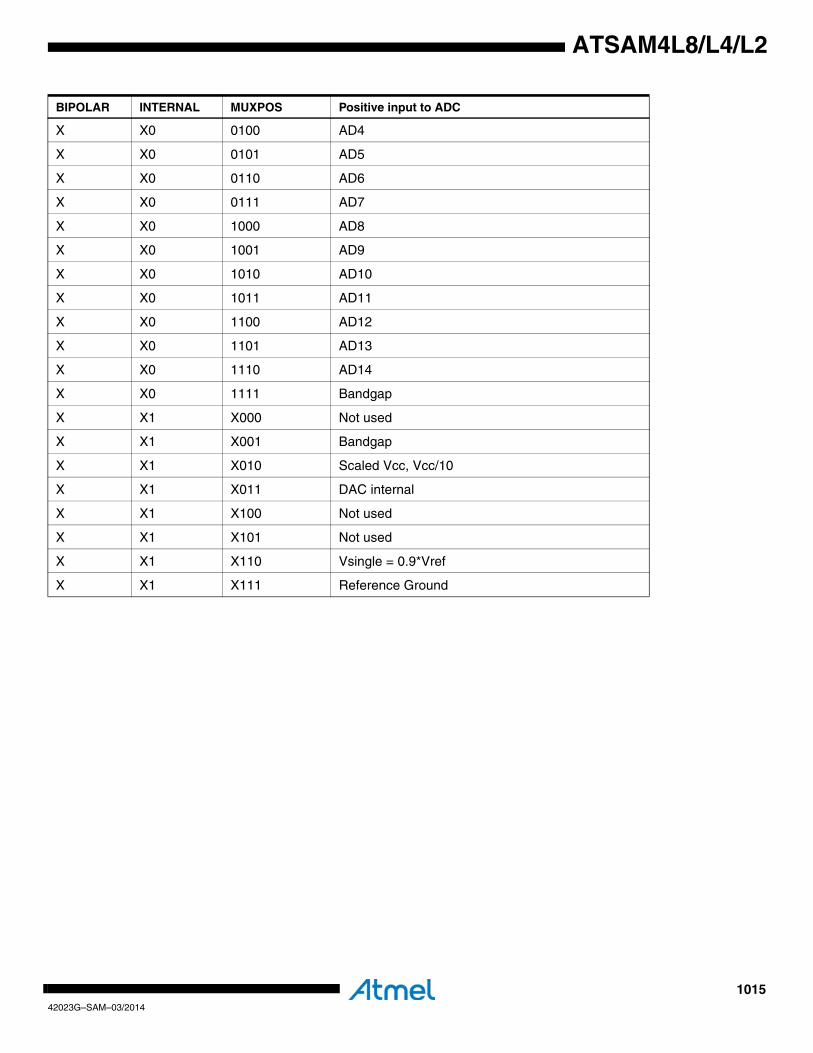
101542023G–SAM–03/2014
ATSAM4L8/L4/L2
X X0 0100 AD4
X X0 0101 AD5
X X0 0110 AD6
X X0 0111 AD7
X X0 1000 AD8
X X0 1001 AD9
X X0 1010 AD10
X X0 1011 AD11
X X0 1100 AD12
X X0 1101 AD13
X X0 1110 AD14
X X0 1111 Bandgap
X X1 X000 Not used
X X1 X001 Bandgap
X X1 X010 Scaled Vcc, Vcc/10
X X1 X011 DAC internal
X X1 X100 Not used
X X1 X101 Not used
X X1 X110 Vsingle = 0.9*Vref
X X1 X111 Reference Ground
BIPOLAR INTERNAL MUXPOS Positive input to ADC
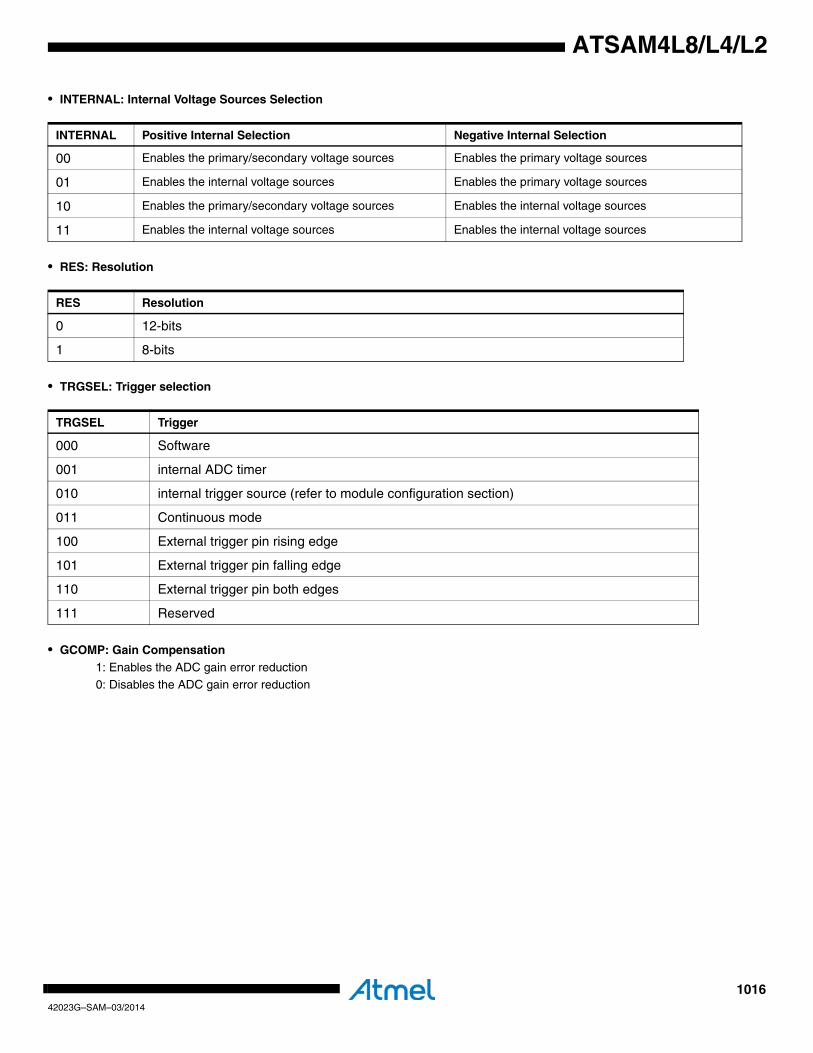
101642023G–SAM–03/2014
ATSAM4L8/L4/L2
• INTERNAL: Internal Voltage Sources Selection
• RES: Resolution
• TRGSEL: Trigger selection
• GCOMP: Gain Compensation1: Enables the ADC gain error reduction0: Disables the ADC gain error reduction
INTERNAL Positive Internal Selection Negative Internal Selection
00 Enables the primary/secondary voltage sources Enables the primary voltage sources
01 Enables the internal voltage sources Enables the primary voltage sources
10 Enables the primary/secondary voltage sources Enables the internal voltage sources
11 Enables the internal voltage sources Enables the internal voltage sources
RES Resolution
0 12-bits
1 8-bits
TRGSEL Trigger
000 Software
001 internal ADC timer
010 internal trigger source (refer to module configuration section)
011 Continuous mode
100 External trigger pin rising edge
101 External trigger pin falling edge
110 External trigger pin both edges
111 Reserved
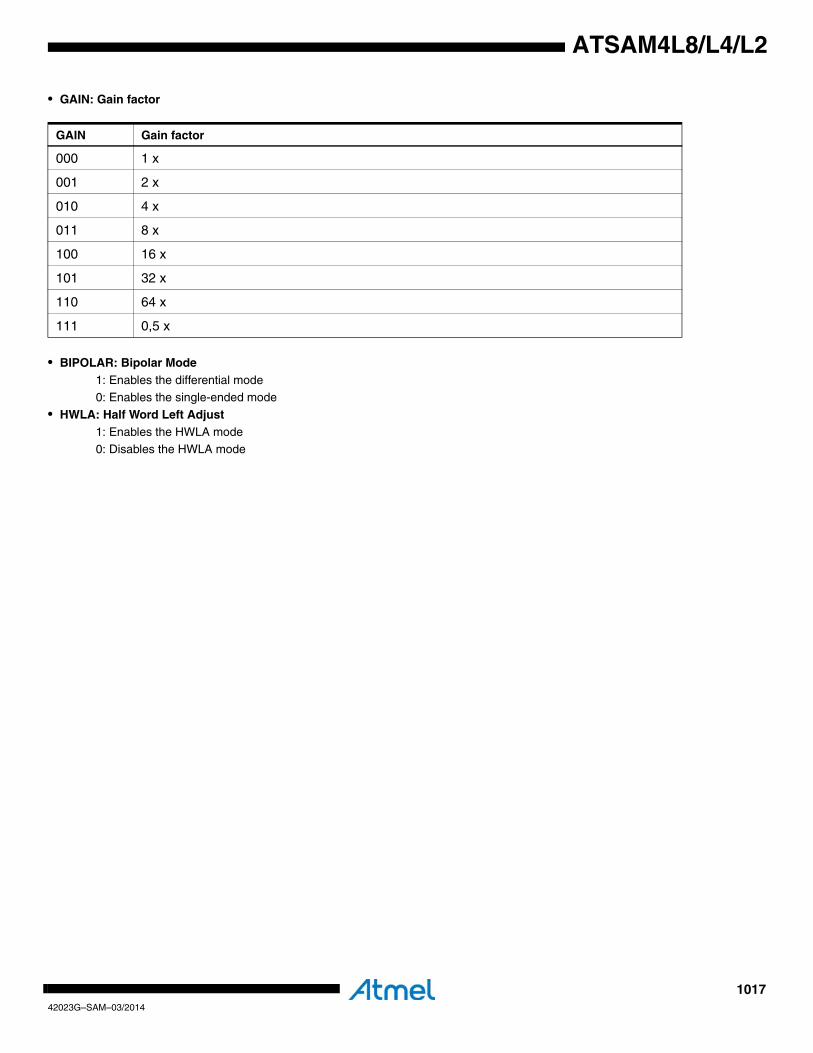
101742023G–SAM–03/2014
ATSAM4L8/L4/L2
• GAIN: Gain factor
• BIPOLAR: Bipolar Mode1: Enables the differential mode0: Enables the single-ended mode
• HWLA: Half Word Left Adjust1: Enables the HWLA mode0: Disables the HWLA mode
GAIN Gain factor
000 1 x
001 2 x
010 4 x
011 8 x
100 16 x
101 32 x
110 64 x
111 0,5 x
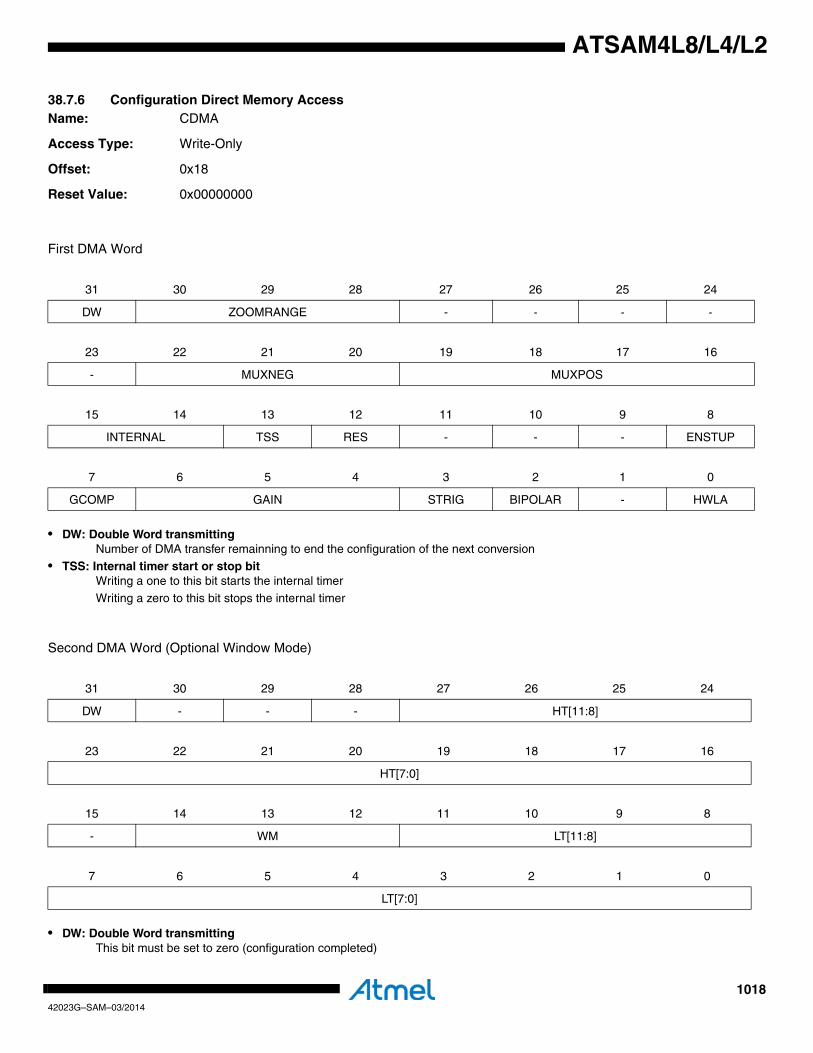
101842023G–SAM–03/2014
ATSAM4L8/L4/L2
38.7.6 Configuration Direct Memory AccessName: CDMA
Access Type: Write-Only
Offset: 0x18
Reset Value: 0x00000000
• DW: Double Word transmittingNumber of DMA transfer remainning to end the configuration of the next conversion
• TSS: Internal timer start or stop bitWriting a one to this bit starts the internal timer
Writing a zero to this bit stops the internal timer
• DW: Double Word transmittingThis bit must be set to zero (configuration completed)
First DMA Word
31 30 29 28 27 26 25 24
DW ZOOMRANGE - - - -
23 22 21 20 19 18 17 16
- MUXNEG MUXPOS
15 14 13 12 11 10 9 8
INTERNAL TSS RES - - - ENSTUP
7 6 5 4 3 2 1 0
GCOMP GAIN STRIG BIPOLAR - HWLA
Second DMA Word (Optional Window Mode)
31 30 29 28 27 26 25 24
DW - - - HT[11:8]
23 22 21 20 19 18 17 16
HT[7:0]
15 14 13 12 11 10 9 8
- WM LT[11:8]
7 6 5 4 3 2 1 0
LT[7:0]

101942023G–SAM–03/2014
ATSAM4L8/L4/L2
This register is used for DMA transfers to the ADCIFE module. The first word transmitted is the general configuration. If theMSB bit is set to one, a second word will be transfered to complete the configuration so that use the Window Mode. If theMSB bit is set to zero, the configuration is completed.
The second word is only used when the window mode is needed. In this case, its MSB bit is always set to zero (configura-tion completed).
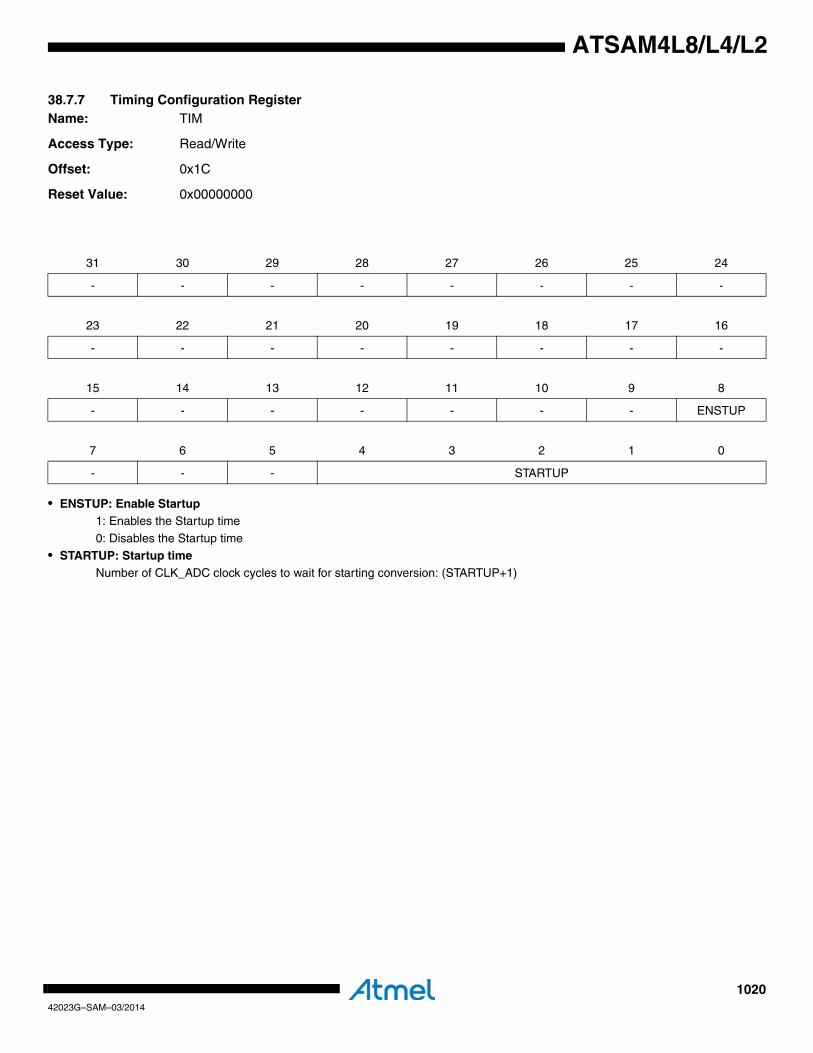
102042023G–SAM–03/2014
ATSAM4L8/L4/L2
38.7.7 Timing Configuration RegisterName: TIM
Access Type: Read/Write
Offset: 0x1C
Reset Value: 0x00000000
• ENSTUP: Enable Startup1: Enables the Startup time
0: Disables the Startup time
• STARTUP: Startup timeNumber of CLK_ADC clock cycles to wait for starting conversion: (STARTUP+1)
31 30 29 28 27 26 25 24
- - - - - - - -
23 22 21 20 19 18 17 16
- - - - - - - -
15 14 13 12 11 10 9 8
- - - - - - - ENSTUP
7 6 5 4 3 2 1 0
- - - STARTUP

102142023G–SAM–03/2014
ATSAM4L8/L4/L2
38.7.8 Internal Timer RegisterName: ITIMER
Access Type: Read/Write
Offset: 0x20
Reset Value: 0x00000000
• ITMC:Internal Timer Max Counterf(itimer_timeout)=f(GCLK)/(ITMC+1)
31 30 29 28 27 26 25 24
- - - - - - - -
23 22 21 20 19 18 17 16
- - - - - - - -
15 14 13 12 11 10 9 8
ITMC[15:8]
7 6 5 4 3 2 1 0
ITMC[7:0]

102242023G–SAM–03/2014
ATSAM4L8/L4/L2
38.7.9 Window Monitor ConfigurationName: WCFG
Access Type: Read/Write
Offset: 0x24
Reset Value: 0x00000000
• WM: Window Monitor Mode
31 30 29 28 27 26 25 24
- - - - - - - -
23 22 21 20 19 18 17 16
- - - - - - - -
15 14 13 12 11 10 9 8
- WM - - - -
7 6 5 4 3 2 1 0
- - - - - - - -
WM Window monitor mode
000 OFF
001 Mode 1: RES(SRC) > LT
010 Mode 2: RES(SRC) < HT
011 Mode 3: LT<RES(SRC)<HT
100 Mode 4: (LT>=RES(SRC)) || (RES(SRC)>=HT)
101 Reserved
110 Reserved
111 Reserved

102342023G–SAM–03/2014
ATSAM4L8/L4/L2
38.7.10 Window Monitor Threshold ConfigurationName: WTH
Access Type: Read/Write
Offset: 0x28
Reset Value: 0x00000000
• HT:High ThresholdHighThreshold value
• LT:Low ThresholdLow Threshold value
31 30 29 28 27 26 25 24
- - - - HT[11:8]
23 22 21 20 19 18 17 16
HT[7:0]
15 14 13 12 11 10 9 8
- - - - LT[11:8]
7 6 5 4 3 2 1 0
LT[7:0]
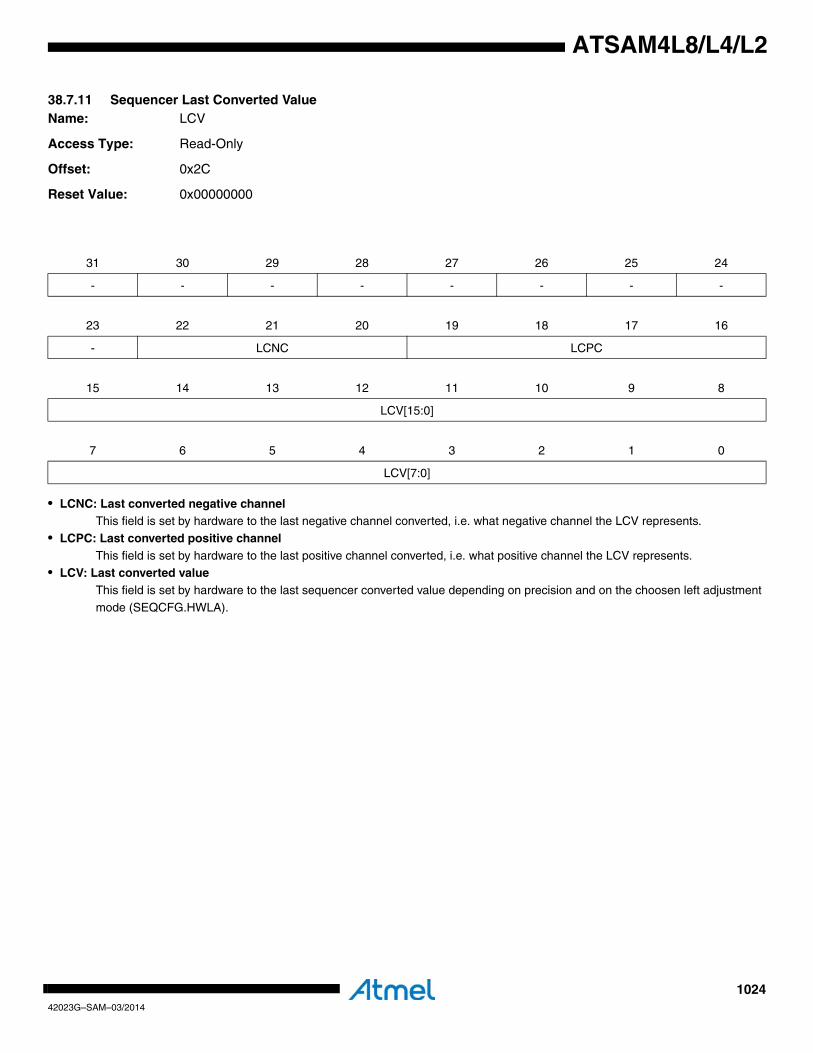
102442023G–SAM–03/2014
ATSAM4L8/L4/L2
38.7.11 Sequencer Last Converted ValueName: LCV
Access Type: Read-Only
Offset: 0x2C
Reset Value: 0x00000000
• LCNC: Last converted negative channelThis field is set by hardware to the last negative channel converted, i.e. what negative channel the LCV represents.
• LCPC: Last converted positive channelThis field is set by hardware to the last positive channel converted, i.e. what positive channel the LCV represents.
• LCV: Last converted valueThis field is set by hardware to the last sequencer converted value depending on precision and on the choosen left adjustment
mode (SEQCFG.HWLA).
31 30 29 28 27 26 25 24
- - - - - - - -
23 22 21 20 19 18 17 16
- LCNC LCPC
15 14 13 12 11 10 9 8
LCV[15:0]
7 6 5 4 3 2 1 0
LCV[7:0]

102542023G–SAM–03/2014
ATSAM4L8/L4/L2
38.7.12 Interrupt Enable RegisterName: IER
Access Type: Write-Only
Offset: 0x30
Reset Value: 0x00000000
Writing a zero to a bit in this register has no effect.Writing a one to a bit in this register will set the corresponding bit in IMR.
31 30 29 28 27 26 25 24
- - - - - - -
23 22 21 20 19 18 17 16
- - - - - - - -
15 14 13 12 11 10 9 8
- - - - - - -
7 6 5 4 3 2 1 0
- - TTO - SMTRG WM LOVR SEOC

102642023G–SAM–03/2014
ATSAM4L8/L4/L2
38.7.13 Interrupt Disable RegisterName: IDR
Access Type: Write-Only
Offset: 0x34
Reset Value: 0x00000000
Writing a zero to a bit in this register has no effect.Writing a one to a bit in this register will clear the corresponding bit in IMR.
31 30 29 28 27 26 25 24
- - - - - - -
23 22 21 20 19 18 17 16
- - - - - - - -
15 14 13 12 11 10 9 8
- - - - - - -
7 6 5 4 3 2 1 0
- - TTO - SMTRG WM LOVR SEOC
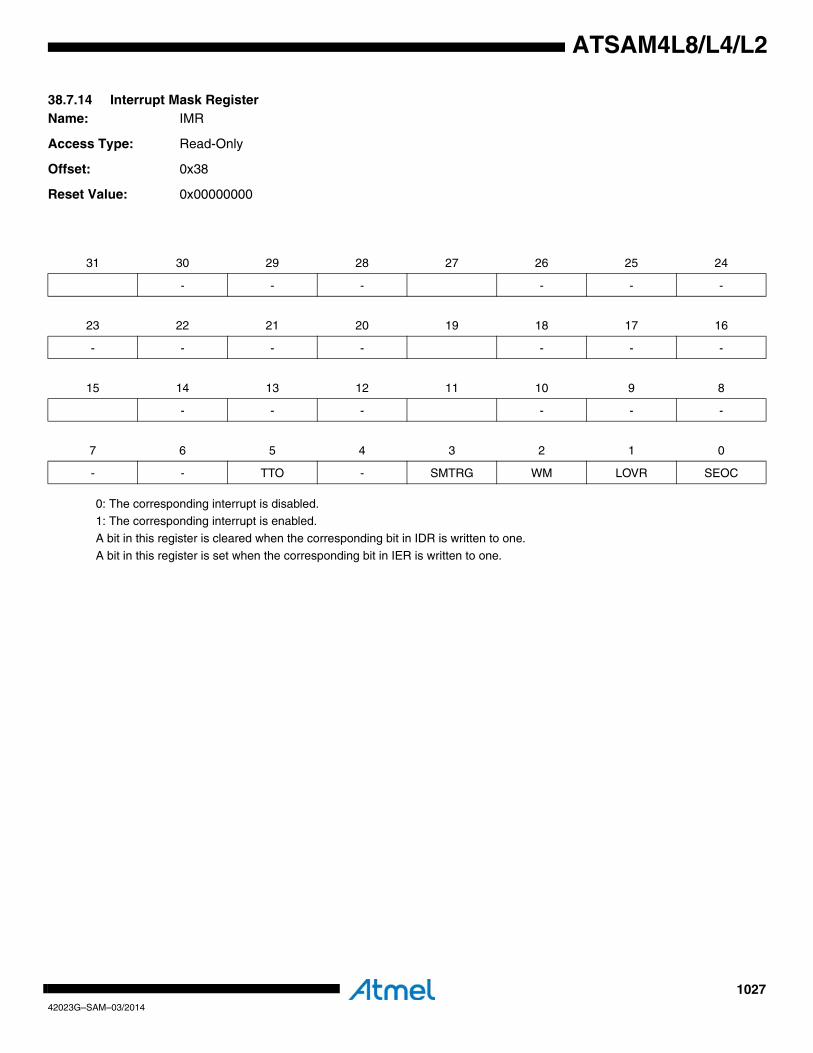
102742023G–SAM–03/2014
ATSAM4L8/L4/L2
38.7.14 Interrupt Mask RegisterName: IMR
Access Type: Read-Only
Offset: 0x38
Reset Value: 0x00000000
0: The corresponding interrupt is disabled.1: The corresponding interrupt is enabled.
A bit in this register is cleared when the corresponding bit in IDR is written to one.
A bit in this register is set when the corresponding bit in IER is written to one.
31 30 29 28 27 26 25 24
- - - - - -
23 22 21 20 19 18 17 16
- - - - - - -
15 14 13 12 11 10 9 8
- - - - - -
7 6 5 4 3 2 1 0
- - TTO - SMTRG WM LOVR SEOC
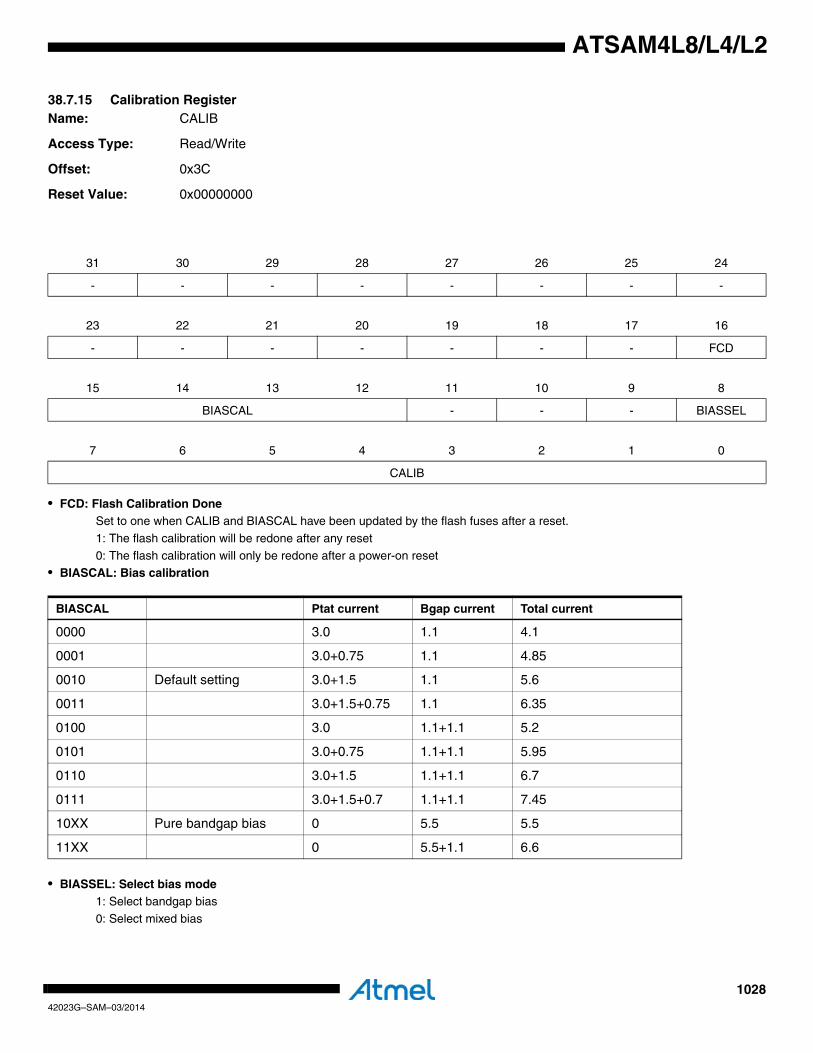
102842023G–SAM–03/2014
ATSAM4L8/L4/L2
38.7.15 Calibration RegisterName: CALIB
Access Type: Read/Write
Offset: 0x3C
Reset Value: 0x00000000
• FCD: Flash Calibration DoneSet to one when CALIB and BIASCAL have been updated by the flash fuses after a reset.
1: The flash calibration will be redone after any reset
0: The flash calibration will only be redone after a power-on reset• BIASCAL: Bias calibration
• BIASSEL: Select bias mode1: Select bandgap bias
0: Select mixed bias
31 30 29 28 27 26 25 24
- - - - - - - -
23 22 21 20 19 18 17 16
- - - - - - - FCD
15 14 13 12 11 10 9 8
BIASCAL - - - BIASSEL
7 6 5 4 3 2 1 0
CALIB
BIASCAL Ptat current Bgap current Total current
0000 3.0 1.1 4.1
0001 3.0+0.75 1.1 4.85
0010 Default setting 3.0+1.5 1.1 5.6
0011 3.0+1.5+0.75 1.1 6.35
0100 3.0 1.1+1.1 5.2
0101 3.0+0.75 1.1+1.1 5.95
0110 3.0+1.5 1.1+1.1 6.7
0111 3.0+1.5+0.7 1.1+1.1 7.45
10XX Pure bandgap bias 0 5.5 5.5
11XX 0 5.5+1.1 6.6
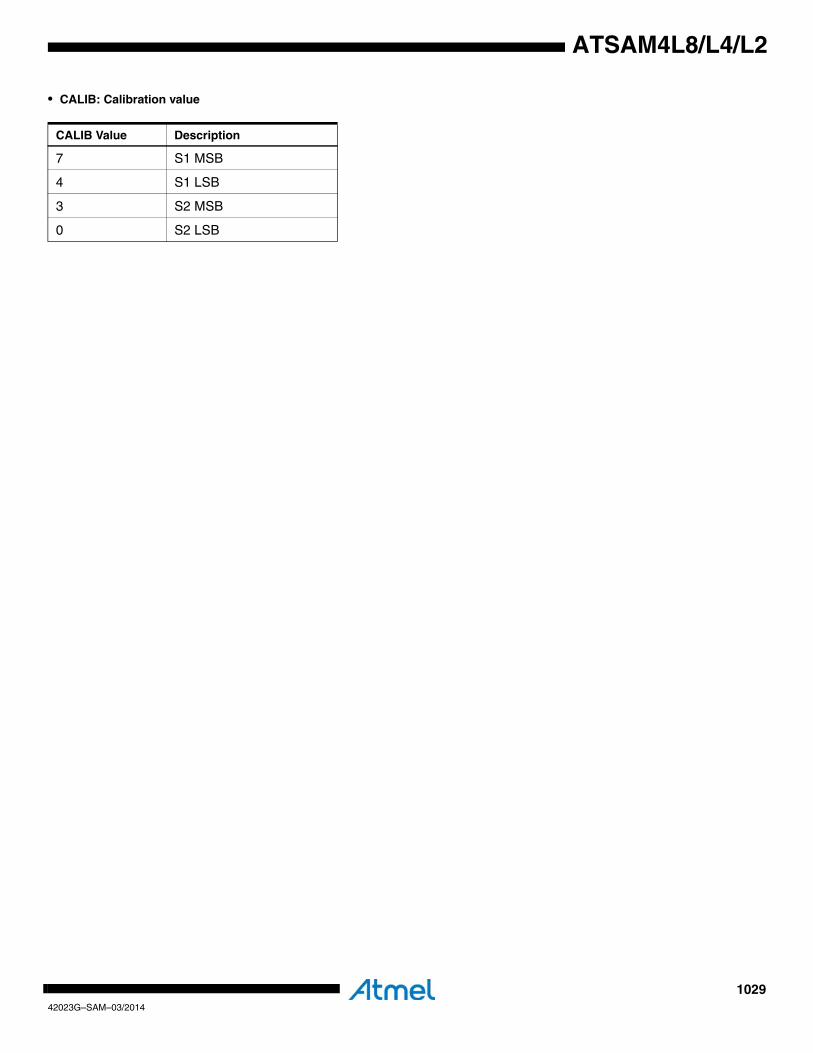
102942023G–SAM–03/2014
ATSAM4L8/L4/L2
• CALIB: Calibration value
CALIB Value Description
7 S1 MSB
4 S1 LSB
3 S2 MSB
0 S2 LSB
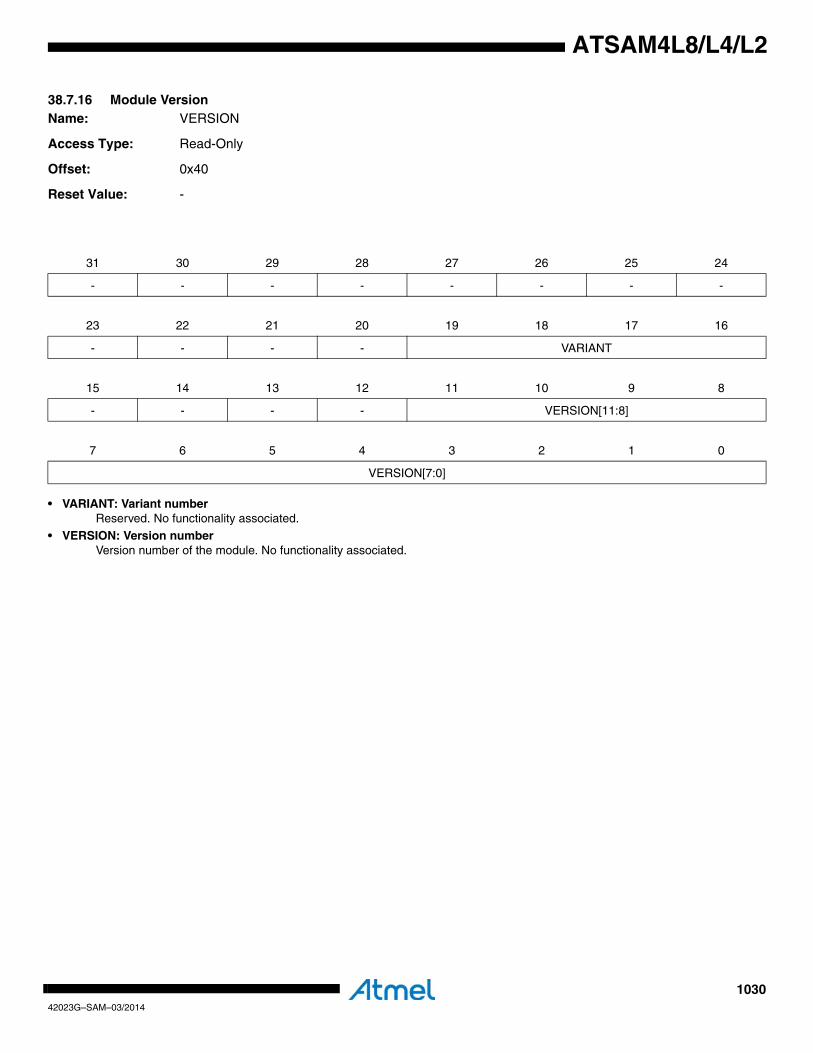
103042023G–SAM–03/2014
ATSAM4L8/L4/L2
38.7.16 Module VersionName: VERSION
Access Type: Read-Only
Offset: 0x40
Reset Value: -
• VARIANT: Variant numberReserved. No functionality associated.
• VERSION: Version numberVersion number of the module. No functionality associated.
31 30 29 28 27 26 25 24
- - - - - - - -
23 22 21 20 19 18 17 16
- - - - VARIANT
15 14 13 12 11 10 9 8
- - - - VERSION[11:8]
7 6 5 4 3 2 1 0
VERSION[7:0]
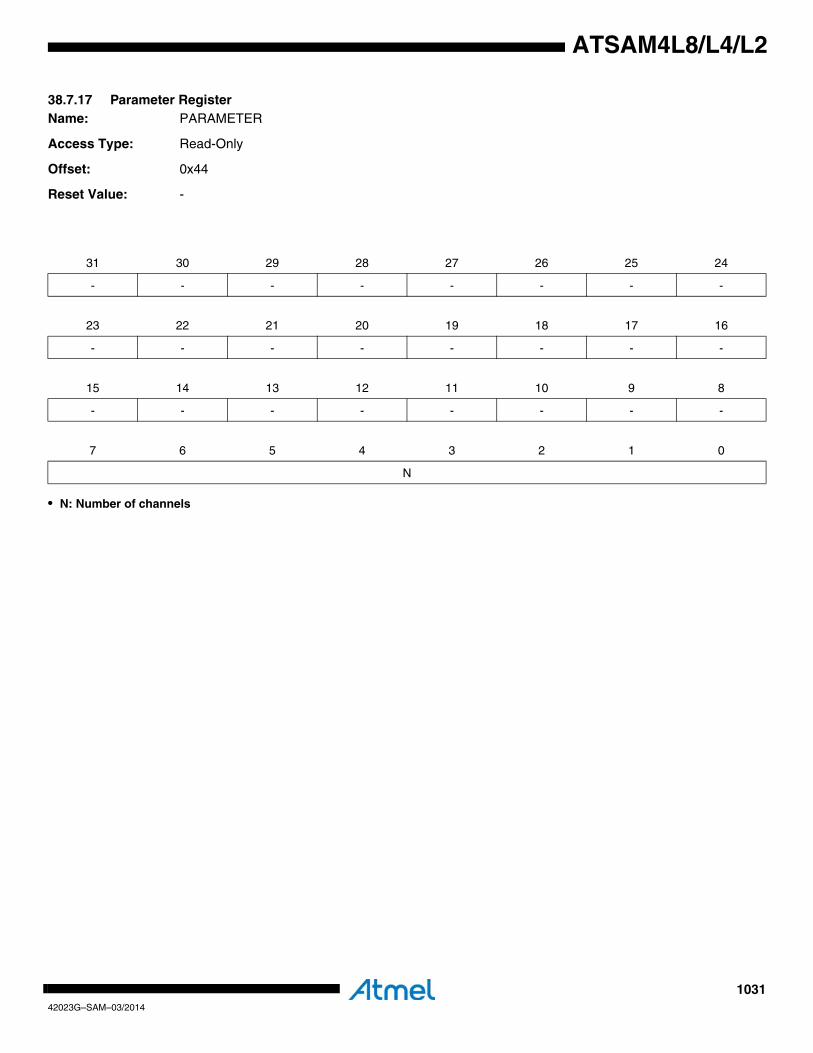
103142023G–SAM–03/2014
ATSAM4L8/L4/L2
38.7.17 Parameter RegisterName: PARAMETER
Access Type: Read-Only
Offset: 0x44
Reset Value: -
• N: Number of channels
31 30 29 28 27 26 25 24
- - - - - - - -
23 22 21 20 19 18 17 16
- - - - - - - -
15 14 13 12 11 10 9 8
- - - - - - - -
7 6 5 4 3 2 1 0
N
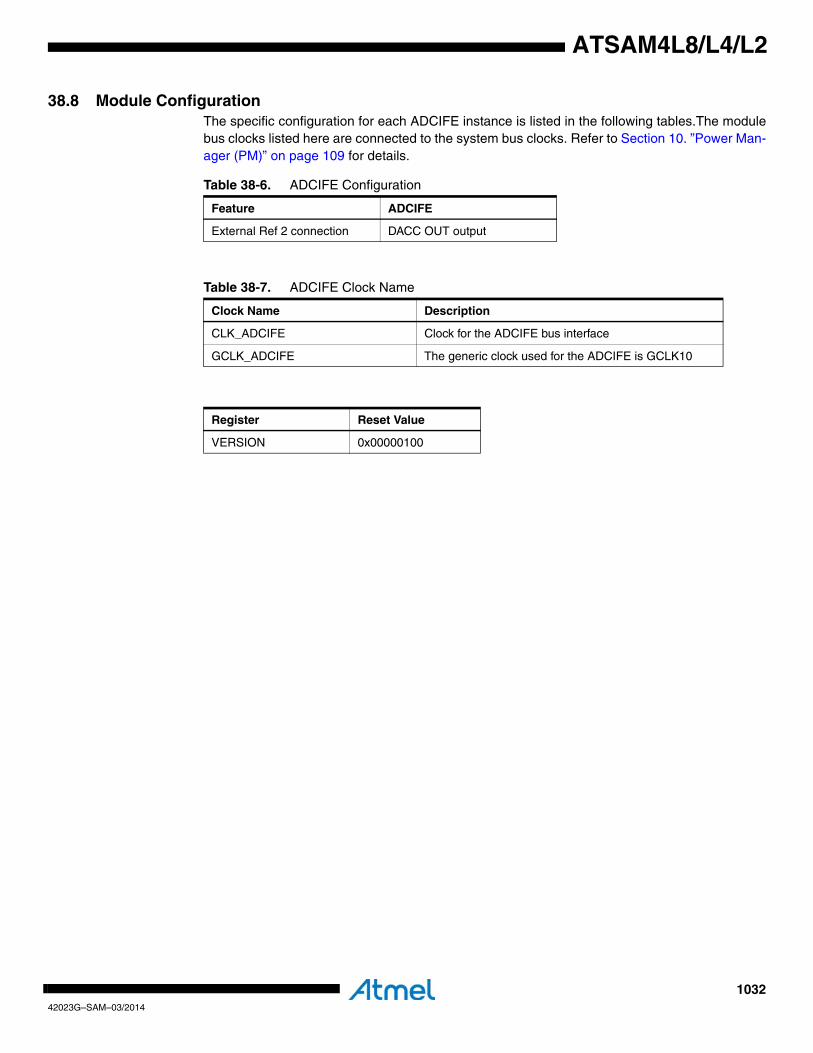
103242023G–SAM–03/2014
ATSAM4L8/L4/L2
38.8 Module ConfigurationThe specific configuration for each ADCIFE instance is listed in the following tables.The modulebus clocks listed here are connected to the system bus clocks. Refer to Section 10. ”Power Man-ager (PM)” on page 109 for details.
Table 38-6. ADCIFE Configuration
Feature ADCIFE
External Ref 2 connection DACC OUT output
Table 38-7. ADCIFE Clock Name
Clock Name Description
CLK_ADCIFE Clock for the ADCIFE bus interface
GCLK_ADCIFE The generic clock used for the ADCIFE is GCLK10
Register Reset Value
VERSION 0x00000100
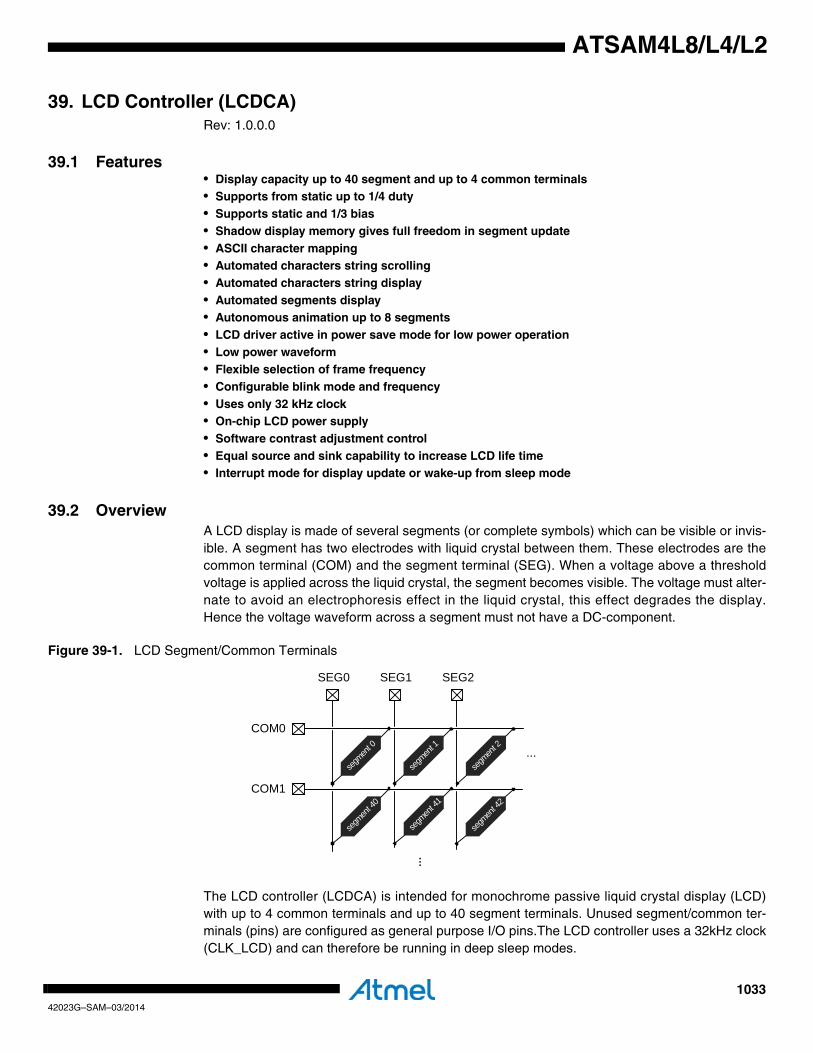
103342023G–SAM–03/2014
ATSAM4L8/L4/L2
39. LCD Controller (LCDCA)Rev: 1.0.0.0
39.1 Features• Display capacity up to 40 segment and up to 4 common terminals• Supports from static up to 1/4 duty• Supports static and 1/3 bias• Shadow display memory gives full freedom in segment update• ASCII character mapping• Automated characters string scrolling• Automated characters string display• Automated segments display• Autonomous animation up to 8 segments• LCD driver active in power save mode for low power operation• Low power waveform • Flexible selection of frame frequency• Configurable blink mode and frequency• Uses only 32 kHz clock• On-chip LCD power supply• Software contrast adjustment control• Equal source and sink capability to increase LCD life time• Interrupt mode for display update or wake-up from sleep mode
39.2 OverviewA LCD display is made of several segments (or complete symbols) which can be visible or invis-ible. A segment has two electrodes with liquid crystal between them. These electrodes are thecommon terminal (COM) and the segment terminal (SEG). When a voltage above a thresholdvoltage is applied across the liquid crystal, the segment becomes visible. The voltage must alter-nate to avoid an electrophoresis effect in the liquid crystal, this effect degrades the display.Hence the voltage waveform across a segment must not have a DC-component.
Figure 39-1. LCD Segment/Common Terminals
The LCD controller (LCDCA) is intended for monochrome passive liquid crystal display (LCD)with up to 4 common terminals and up to 40 segment terminals. Unused segment/common ter-minals (pins) are configured as general purpose I/O pins.The LCD controller uses a 32kHz clock(CLK_LCD) and can therefore be running in deep sleep modes.
segm
ent 0
segm
ent 1
segm
ent 2
segm
ent 4
2
segm
ent 4
1
segm
ent 4
0
COM0
COM1
SEG0 SEG1 SEG2
...
...
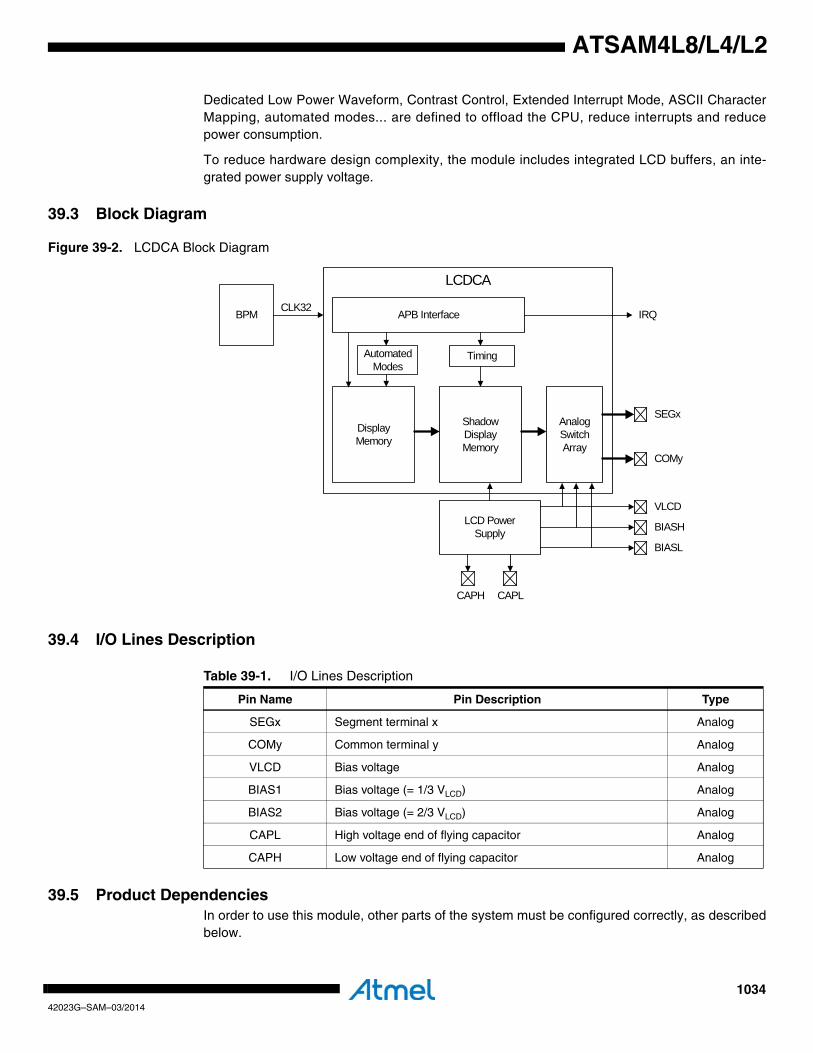
103442023G–SAM–03/2014
ATSAM4L8/L4/L2
Dedicated Low Power Waveform, Contrast Control, Extended Interrupt Mode, ASCII CharacterMapping, automated modes... are defined to offload the CPU, reduce interrupts and reducepower consumption.
To reduce hardware design complexity, the module includes integrated LCD buffers, an inte-grated power supply voltage.
39.3 Block Diagram
Figure 39-2. LCDCA Block Diagram
39.4 I/O Lines Description
39.5 Product DependenciesIn order to use this module, other parts of the system must be configured correctly, as describedbelow.
LCDCA
Analog Switch Array
ShadowDisplayMemory
DisplayMemory
Timing
LCD PowerSupply
AutomatedModes
APB Interface
SEGx
COMy
VLCD
BIASH
BIASL
CAPLCAPH
IRQBPMCLK32
Table 39-1. I/O Lines Description
Pin Name Pin Description Type
SEGx Segment terminal x Analog
COMy Common terminal y Analog
VLCD Bias voltage Analog
BIAS1 Bias voltage (= 1/3 VLCD) Analog
BIAS2 Bias voltage (= 2/3 VLCD) Analog
CAPL High voltage end of flying capacitor Analog
CAPH Low voltage end of flying capacitor Analog
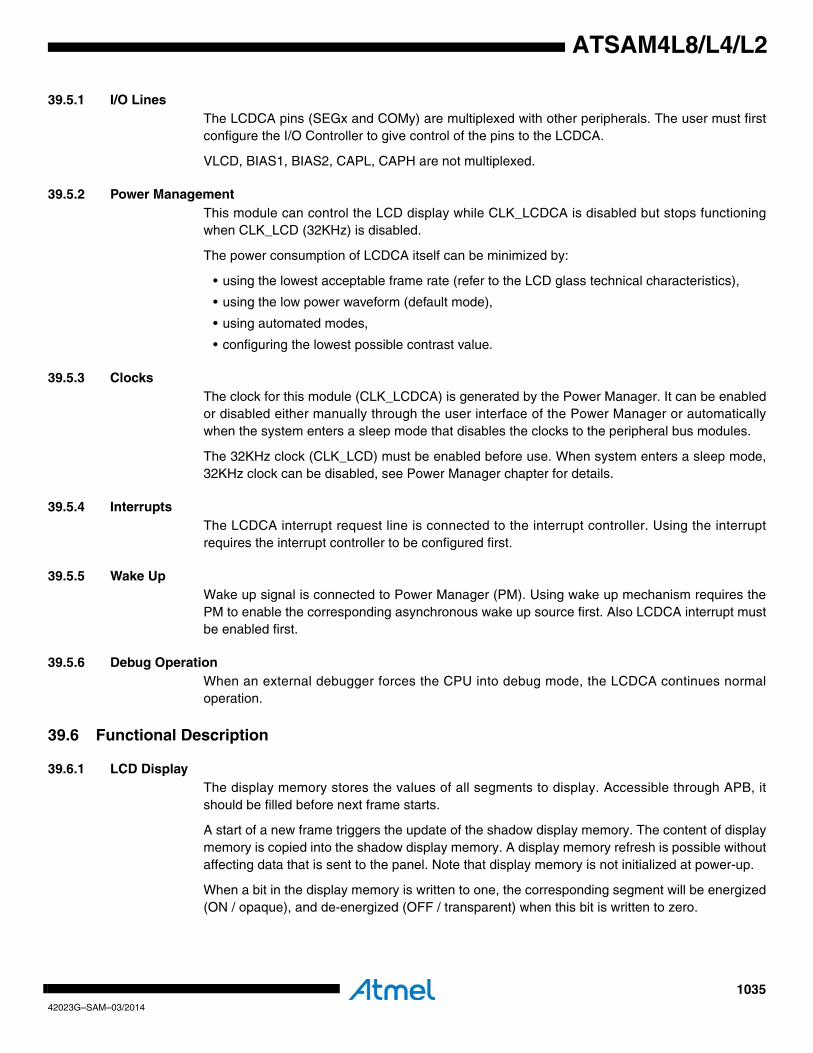
103542023G–SAM–03/2014
ATSAM4L8/L4/L2
39.5.1 I/O LinesThe LCDCA pins (SEGx and COMy) are multiplexed with other peripherals. The user must firstconfigure the I/O Controller to give control of the pins to the LCDCA.
VLCD, BIAS1, BIAS2, CAPL, CAPH are not multiplexed.
39.5.2 Power ManagementThis module can control the LCD display while CLK_LCDCA is disabled but stops functioningwhen CLK_LCD (32KHz) is disabled.
The power consumption of LCDCA itself can be minimized by:
• using the lowest acceptable frame rate (refer to the LCD glass technical characteristics),
• using the low power waveform (default mode),
• using automated modes,
• configuring the lowest possible contrast value.
39.5.3 ClocksThe clock for this module (CLK_LCDCA) is generated by the Power Manager. It can be enabledor disabled either manually through the user interface of the Power Manager or automaticallywhen the system enters a sleep mode that disables the clocks to the peripheral bus modules.
The 32KHz clock (CLK_LCD) must be enabled before use. When system enters a sleep mode,32KHz clock can be disabled, see Power Manager chapter for details.
39.5.4 InterruptsThe LCDCA interrupt request line is connected to the interrupt controller. Using the interruptrequires the interrupt controller to be configured first.
39.5.5 Wake UpWake up signal is connected to Power Manager (PM). Using wake up mechanism requires thePM to enable the corresponding asynchronous wake up source first. Also LCDCA interrupt mustbe enabled first.
39.5.6 Debug OperationWhen an external debugger forces the CPU into debug mode, the LCDCA continues normaloperation.
39.6 Functional Description
39.6.1 LCD DisplayThe display memory stores the values of all segments to display. Accessible through APB, itshould be filled before next frame starts.
A start of a new frame triggers the update of the shadow display memory. The content of displaymemory is copied into the shadow display memory. A display memory refresh is possible withoutaffecting data that is sent to the panel. Note that display memory is not initialized at power-up.
When a bit in the display memory is written to one, the corresponding segment will be energized(ON / opaque), and de-energized (OFF / transparent) when this bit is written to zero.
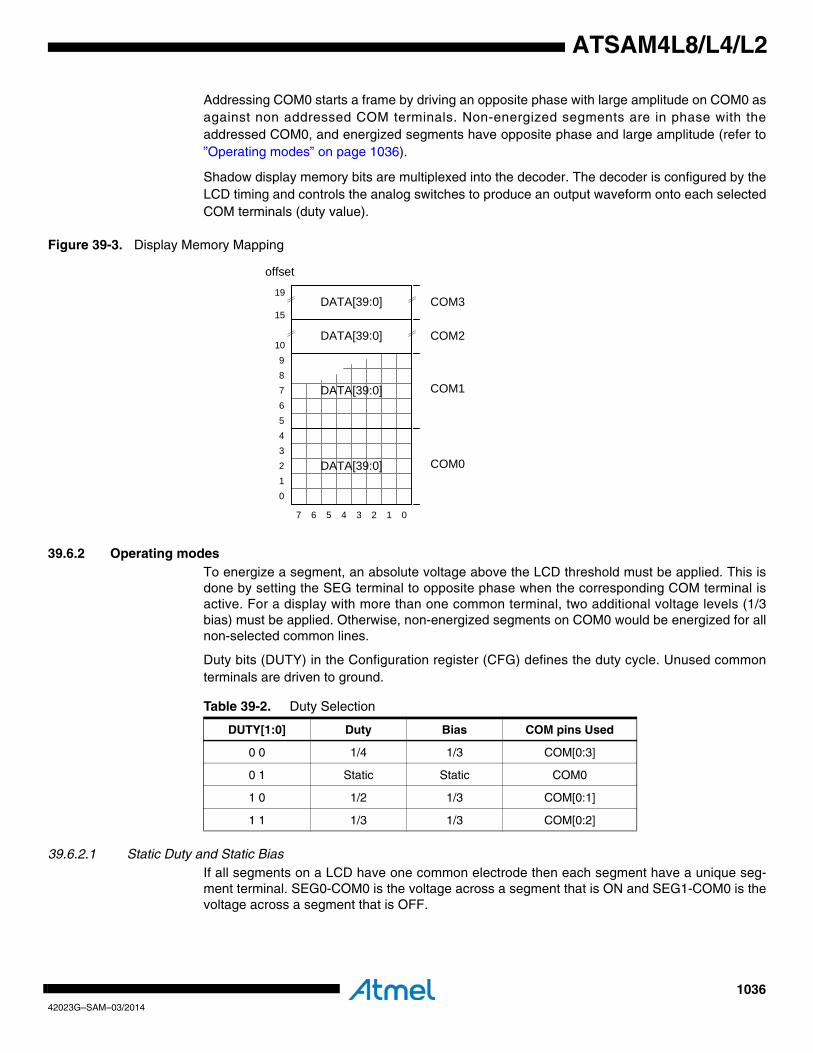
103642023G–SAM–03/2014
ATSAM4L8/L4/L2
Addressing COM0 starts a frame by driving an opposite phase with large amplitude on COM0 asagainst non addressed COM terminals. Non-energized segments are in phase with theaddressed COM0, and energized segments have opposite phase and large amplitude (refer to”Operating modes” on page 1036).
Shadow display memory bits are multiplexed into the decoder. The decoder is configured by theLCD timing and controls the analog switches to produce an output waveform onto each selectedCOM terminals (duty value).
Figure 39-3. Display Memory Mapping
39.6.2 Operating modesTo energize a segment, an absolute voltage above the LCD threshold must be applied. This isdone by setting the SEG terminal to opposite phase when the corresponding COM terminal isactive. For a display with more than one common terminal, two additional voltage levels (1/3bias) must be applied. Otherwise, non-energized segments on COM0 would be energized for allnon-selected common lines.
Duty bits (DUTY) in the Configuration register (CFG) defines the duty cycle. Unused commonterminals are driven to ground.
39.6.2.1 Static Duty and Static BiasIf all segments on a LCD have one common electrode then each segment have a unique seg-ment terminal. SEG0-COM0 is the voltage across a segment that is ON and SEG1-COM0 is thevoltage across a segment that is OFF.
COM0
COM1
COM2
COM3
offset
0123456789
15
19
DATA[39:0]
DATA[39:0]
DATA[39:0]
10
07 123456
DATA[39:0]
Table 39-2. Duty Selection
DUTY[1:0] Duty Bias COM pins Used
0 0 1/4 1/3 COM[0:3]
0 1 Static Static COM0
1 0 1/2 1/3 COM[0:1]
1 1 1/3 1/3 COM[0:2]
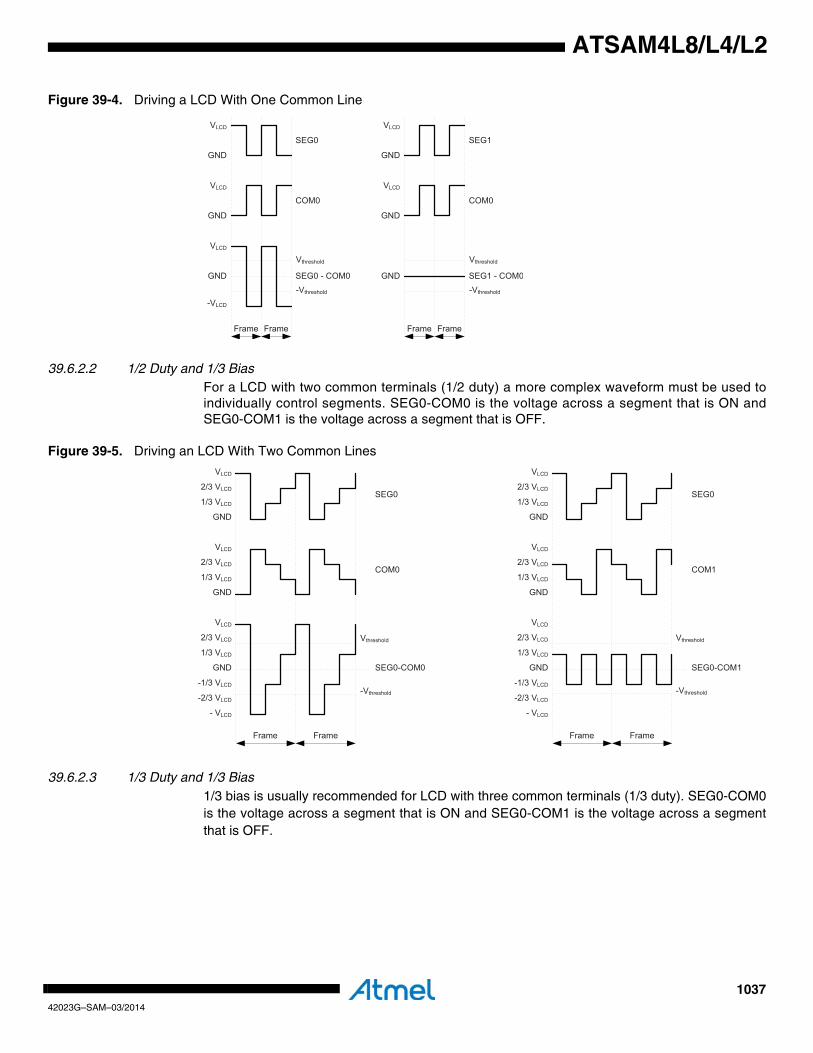
103742023G–SAM–03/2014
ATSAM4L8/L4/L2
Figure 39-4. Driving a LCD With One Common Line
39.6.2.2 1/2 Duty and 1/3 BiasFor a LCD with two common terminals (1/2 duty) a more complex waveform must be used toindividually control segments. SEG0-COM0 is the voltage across a segment that is ON andSEG0-COM1 is the voltage across a segment that is OFF.
Figure 39-5. Driving an LCD With Two Common Lines
39.6.2.3 1/3 Duty and 1/3 Bias1/3 bias is usually recommended for LCD with three common terminals (1/3 duty). SEG0-COM0is the voltage across a segment that is ON and SEG0-COM1 is the voltage across a segmentthat is OFF.
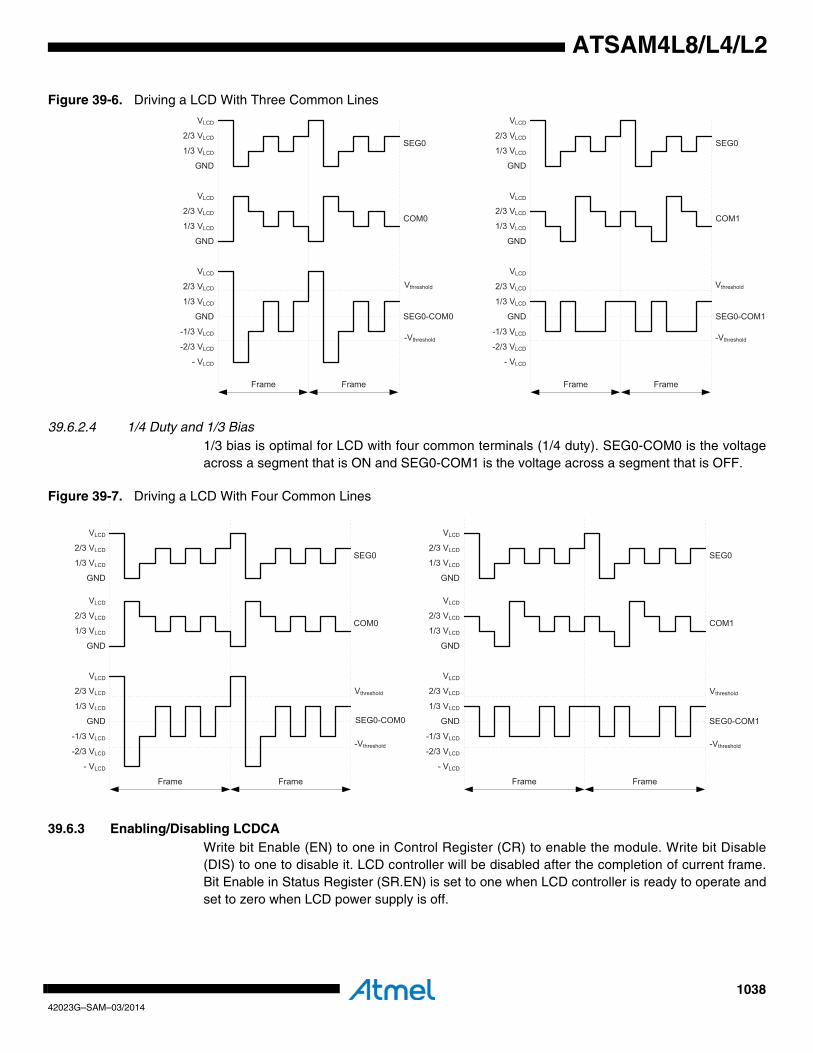
103842023G–SAM–03/2014
ATSAM4L8/L4/L2
Figure 39-6. Driving a LCD With Three Common Lines
39.6.2.4 1/4 Duty and 1/3 Bias1/3 bias is optimal for LCD with four common terminals (1/4 duty). SEG0-COM0 is the voltageacross a segment that is ON and SEG0-COM1 is the voltage across a segment that is OFF.
Figure 39-7. Driving a LCD With Four Common Lines
39.6.3 Enabling/Disabling LCDCAWrite bit Enable (EN) to one in Control Register (CR) to enable the module. Write bit Disable(DIS) to one to disable it. LCD controller will be disabled after the completion of current frame.Bit Enable in Status Register (SR.EN) is set to one when LCD controller is ready to operate andset to zero when LCD power supply is off.
SEG0-COM0
Frame Frame
VLCD
SEG0
COM0
2/3 VLCD
GND
1/3 VLCD
VLCD
2/3 VLCD
GND
1/3 VLCD
VLCD
2/3 VLCD
GND
1/3 VLCD
-1/3 VLCD
-2/3 VLCD
- VLCD
Frame Frame
VLCD
SEG0
COM1
2/3 VLCD
GND
1/3 VLCD
VLCD
2/3 VLCD
GND
1/3 VLCD
VLCD
2/3 VLCD
GND
1/3 VLCD
-1/3 VLCD
-2/3 VLCD
- VLCD
SEG0-COM1
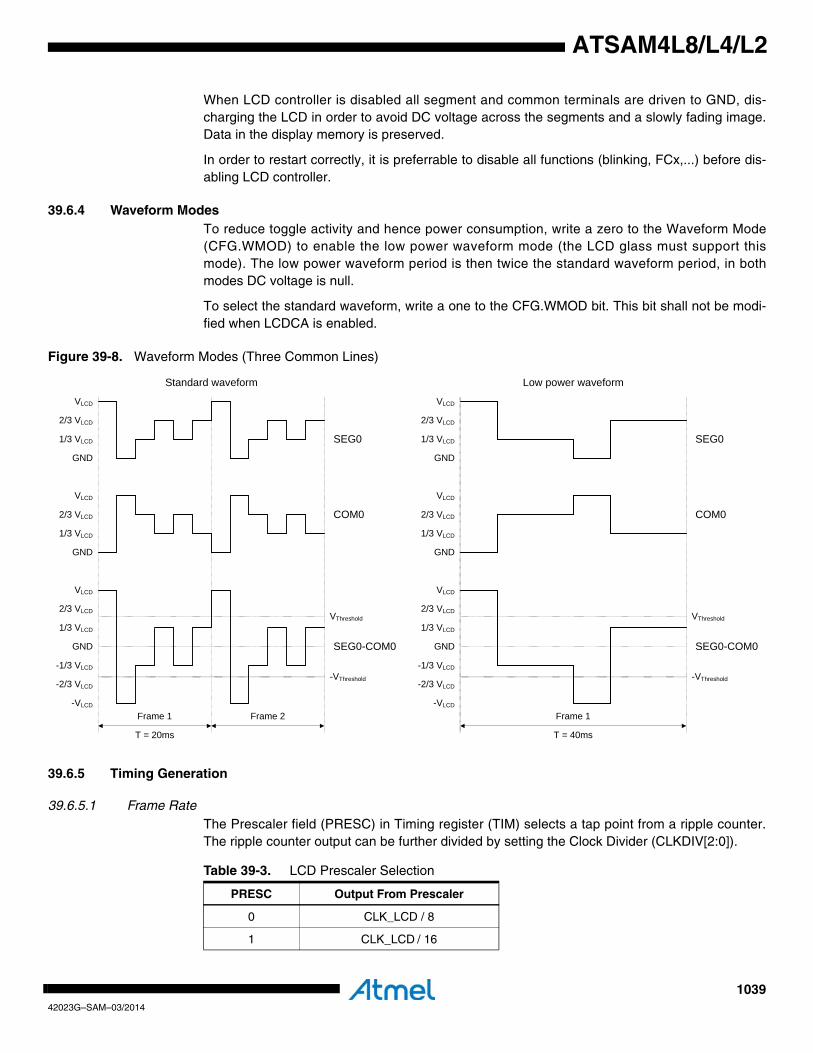
103942023G–SAM–03/2014
ATSAM4L8/L4/L2
When LCD controller is disabled all segment and common terminals are driven to GND, dis-charging the LCD in order to avoid DC voltage across the segments and a slowly fading image.Data in the display memory is preserved.
In order to restart correctly, it is preferrable to disable all functions (blinking, FCx,...) before dis-abling LCD controller.
39.6.4 Waveform ModesTo reduce toggle activity and hence power consumption, write a zero to the Waveform Mode(CFG.WMOD) to enable the low power waveform mode (the LCD glass must support thismode). The low power waveform period is then twice the standard waveform period, in bothmodes DC voltage is null.
To select the standard waveform, write a one to the CFG.WMOD bit. This bit shall not be modi-fied when LCDCA is enabled.
Figure 39-8. Waveform Modes (Three Common Lines)
39.6.5 Timing Generation
39.6.5.1 Frame RateThe Prescaler field (PRESC) in Timing register (TIM) selects a tap point from a ripple counter.The ripple counter output can be further divided by setting the Clock Divider (CLKDIV[2:0]).
VLCD
2/3 VLCD
1/3 VLCD
GND
GND
VLCD
2/3 VLCD
1/3 VLCD
GND
VLCD
2/3 VLCD
1/3 VLCD
-1/3 VLCD
-2/3 VLCD
-VLCD
Frame 1 Frame 2
Standard waveform
VThreshold
-VThreshold
SEG0-COM0
COM0
SEG0
VLCD
2/3 VLCD
1/3 VLCD
GND
GND
VLCD
2/3 VLCD
1/3 VLCD
GND
VLCD
2/3 VLCD
1/3 VLCD
-1/3 VLCD
-2/3 VLCD
-VLCD
Frame 1
Low power waveform
VThreshold
-VThreshold
SEG0-COM0
COM0
SEG0
T = 20ms T = 40ms
Table 39-3. LCD Prescaler Selection
PRESC Output From Prescaler
0 CLK_LCD / 8
1 CLK_LCD / 16
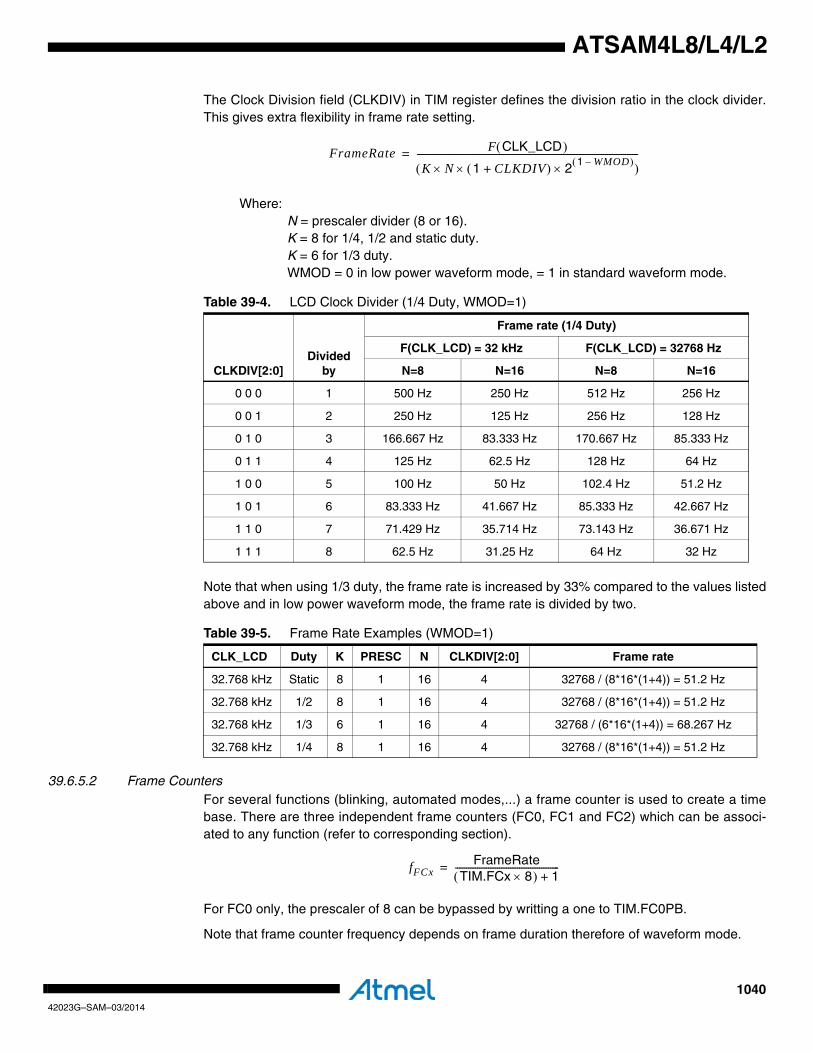
104042023G–SAM–03/2014
ATSAM4L8/L4/L2
The Clock Division field (CLKDIV) in TIM register defines the division ratio in the clock divider.This gives extra flexibility in frame rate setting.
Where:N = prescaler divider (8 or 16).K = 8 for 1/4, 1/2 and static duty.K = 6 for 1/3 duty.WMOD = 0 in low power waveform mode, = 1 in standard waveform mode.
Note that when using 1/3 duty, the frame rate is increased by 33% compared to the values listedabove and in low power waveform mode, the frame rate is divided by two.
39.6.5.2 Frame CountersFor several functions (blinking, automated modes,...) a frame counter is used to create a timebase. There are three independent frame counters (FC0, FC1 and FC2) which can be associ-ated to any function (refer to corresponding section).
For FC0 only, the prescaler of 8 can be bypassed by writting a one to TIM.FC0PB.
Note that frame counter frequency depends on frame duration therefore of waveform mode.
Table 39-4. LCD Clock Divider (1/4 Duty, WMOD=1)
CLKDIV[2:0]Divided
by
Frame rate (1/4 Duty)
F(CLK_LCD) = 32 kHz F(CLK_LCD) = 32768 Hz
N=8 N=16 N=8 N=16
0 0 0 1 500 Hz 250 Hz 512 Hz 256 Hz
0 0 1 2 250 Hz 125 Hz 256 Hz 128 Hz
0 1 0 3 166.667 Hz 83.333 Hz 170.667 Hz 85.333 Hz
0 1 1 4 125 Hz 62.5 Hz 128 Hz 64 Hz
1 0 0 5 100 Hz 50 Hz 102.4 Hz 51.2 Hz
1 0 1 6 83.333 Hz 41.667 Hz 85.333 Hz 42.667 Hz
1 1 0 7 71.429 Hz 35.714 Hz 73.143 Hz 36.671 Hz
1 1 1 8 62.5 Hz 31.25 Hz 64 Hz 32 Hz
Table 39-5. Frame Rate Examples (WMOD=1)
CLK_LCD Duty K PRESC N CLKDIV[2:0] Frame rate
32.768 kHz Static 8 1 16 4 32768 / (8*16*(1+4)) = 51.2 Hz
32.768 kHz 1/2 8 1 16 4 32768 / (8*16*(1+4)) = 51.2 Hz
32.768 kHz 1/3 6 1 16 4 32768 / (6*16*(1+4)) = 68.267 Hz
32.768 kHz 1/4 8 1 16 4 32768 / (8*16*(1+4)) = 51.2 Hz
FrameRate F CLK_LCD( )
K N 1 CLKDIV+( )×× 21 WMOD–( )×( )
----------------------------------------------------------------------------------------------------=
fFCxFrameRate
TIM.FCx 8×( ) 1+-----------------------------------------------=
104142023G–SAM–03/2014
ATSAM4L8/L4/L2
Each frame counter is enabled by writing a one to Frame Counter x Enable (CR.FCxEN) anddisabled by writing a one to Frame Counter x Disable (CR.FCxDIS).Frame counter must be dis-abled (SR.FCxS=0) before the update of its associated TIM.FCx value.
39.6.6 CPU Display Memory Access
39.6.6.1 Direct AccessCPU can access display memory in direct access by writing to Data Register Low x (DRLx) andData Register High x (DRHx). Read-modify-write operation is then required to update few bits.
To modify a segment defined by SEGx / COMy, select register R and bit B:
Where R is the register index in the list {DRL0, DRH0, DRL1, DRH1, DRL2, DRH2, DRL3,DRH3} and B is the bit position in this register.
39.6.6.2 Indirect AccessCPU can also update up to 8 bits in display memory in indirect access by writing to IndirectAccess Data Register (IADR). It allows to modify 1 up to 8 bits in a single operation without mod-ifying masked bits in display memory (no read-modify-write operation). This register requires:
• DATA[7:0], each bit represents the state of a segment,
• DMASK[7:0], each bit is a mask for DATA field. When DMASK[x]=1, DATA[x] is not written to display memory,
• OFF[4:0], byte offset in display memory (see Figure 39-3 on page 1036).
To modify a segment defined by SEGx / COMy, write byte at offset OFF, bit B:
39.6.7 Locking Shadow Display MemoryWriting a one to LOCK bit, in Configuration register (CFG), freezes the shadow display memoryupdate. Then if the display memory is modified, the display remains unchanged. When this bit iscleared, the shadow display memory is updated when a new frame starts.
39.6.8 Blinking Modes
39.6.8.1 Software BlinkingWriting bit BLANK in CFG register to one turns OFF all LCD segments at the next frame. IfBLANK=0 the content of the display memory is output on the LCD. The blink frequency is thensoftware dependant. To avoid unexpected intermediate display, blank command should be writ-ten after the end of the frame (SR.FC0R=1).
LCD controller must be running (frames are generated) to blink segments.
39.6.8.2 Hardware BlinkingTo blink all segments on LCD panel, write a zero to Blink Mode (MODE) in Blink ConfigurationRegister (BCFG). Write a one to MODE to blink selected segments.
R y << 6 x) >> 5+(=
B x & 0x1F=
OFF 5(y << 3) x) >> 3+(=
B x & 0x7=
104242023G–SAM–03/2014
ATSAM4L8/L4/L2
Up to eight segments can be selected individually to blink. Each bit in Blink Segment Selection xfield (BCFG.BSSx) selects a segment for blinking. If BSS0[y]=1, segment connected toSEG0/COMy is selected to blink. If BSS1[y]=1, segment connected to SEG1/COMy is selectedto blink.
A segment will blink if its corresponding bit is one in the display memory, otherwise it remainsOFF.
The blink frequency is defined by the number of frames (FCx in TIM register) between eachstate ON/OFF. So after FCx+1 frames, the segment will change state. Note that blinking fre-quency is also related to waveform mode, see ”Waveform Modes” on page 1039.
The frame counter is selected by writing its number in BCFG.FCS field. BCFG.BSSx andBCFG.MODE should be modified after a frame has ended (SR.FC0R=1), BCFG.FCS shall notbe modified when blinking is running.
The blinking is started by writing a one to CR.BSTART and stopped by writing a one toCR.BSTOP. The status of blinking can be read in SR.BLKS.
39.6.9 Autonomous Segment AnimationUp to eight pixels can be animated by an internal circular shift register. Up to eight states arethen defined to make a running wheel for example. The number of segments used for animationmust be written in SIZE field in Circular Shift Register Configuration (CSRCFG). If SIZE=N, cir-cular shift register uses bits 0 to N-1.
The circular shift register bits are mapped on SEG2 and SEG3 of all common terminals.
Table 39-6. Blinking Modes
BLANK EN BSS1[3:0] BSS0[3:0] Comment
1 x xxxx xxxx All segments are OFF
0 0 xxxx xxxx All segments are driven by the display memory
0 1
0000 0000 All segments are blinking at the blink frequency
Not equal to zeroSelected segment(s) are blinking at the blink frequency
Table 39-7. Circular Shift Register Bit Mapping
Shift Register Bit COM SEG
0 0 2
1 0 3
2 1 2
3 1 3
4 2 2
5 2 3
6 3 2
7 3 3
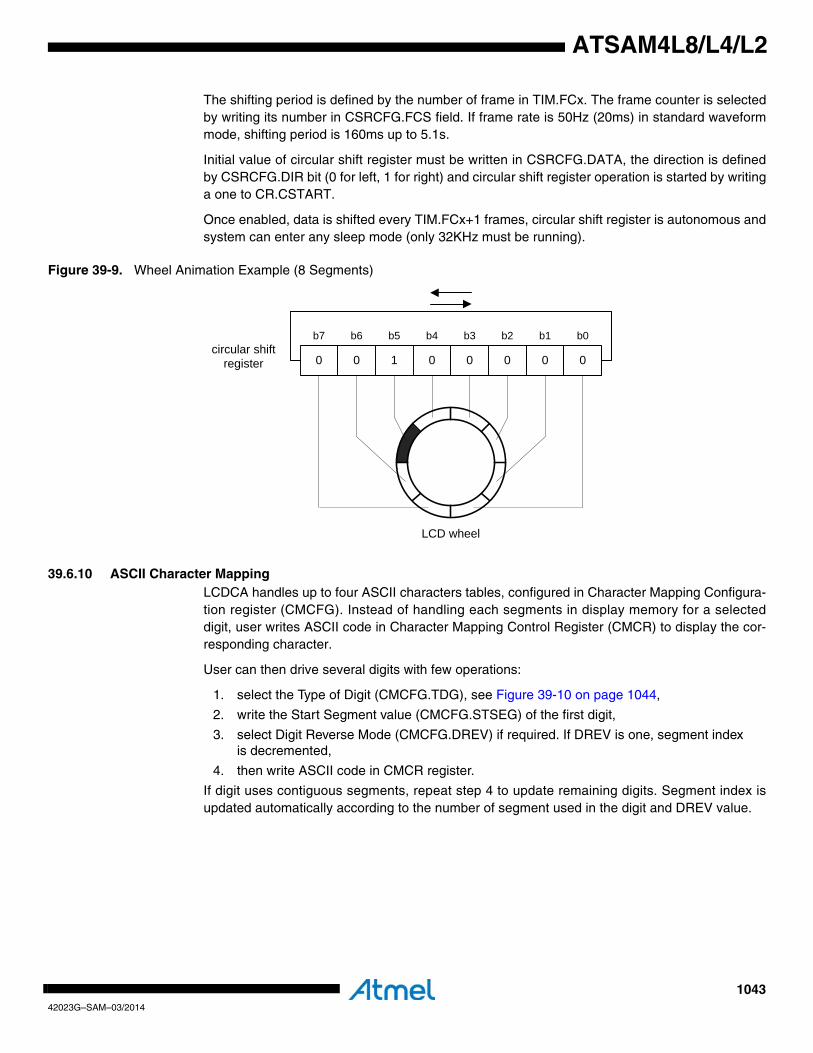
104342023G–SAM–03/2014
ATSAM4L8/L4/L2
The shifting period is defined by the number of frame in TIM.FCx. The frame counter is selectedby writing its number in CSRCFG.FCS field. If frame rate is 50Hz (20ms) in standard waveformmode, shifting period is 160ms up to 5.1s.
Initial value of circular shift register must be written in CSRCFG.DATA, the direction is definedby CSRCFG.DIR bit (0 for left, 1 for right) and circular shift register operation is started by writinga one to CR.CSTART.
Once enabled, data is shifted every TIM.FCx+1 frames, circular shift register is autonomous andsystem can enter any sleep mode (only 32KHz must be running).
Figure 39-9. Wheel Animation Example (8 Segments)
39.6.10 ASCII Character MappingLCDCA handles up to four ASCII characters tables, configured in Character Mapping Configura-tion register (CMCFG). Instead of handling each segments in display memory for a selecteddigit, user writes ASCII code in Character Mapping Control Register (CMCR) to display the cor-responding character.
User can then drive several digits with few operations:
1. select the Type of Digit (CMCFG.TDG), see Figure 39-10 on page 1044,
2. write the Start Segment value (CMCFG.STSEG) of the first digit,
3. select Digit Reverse Mode (CMCFG.DREV) if required. If DREV is one, segment index is decremented,
4. then write ASCII code in CMCR register.
If digit uses contiguous segments, repeat step 4 to update remaining digits. Segment index isupdated automatically according to the number of segment used in the digit and DREV value.
0 0 1 0 0 0 0 0circular shift
register
LCD wheel
b0b1b7 b6 b5 b4 b3 b2
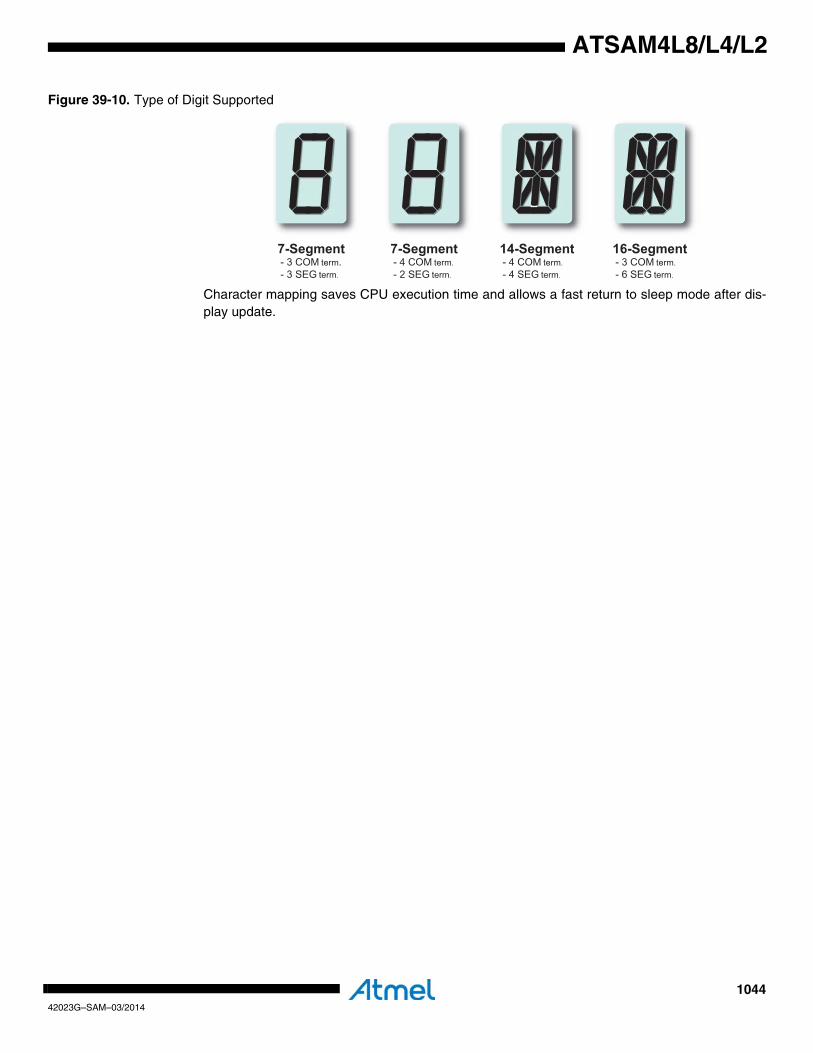
104442023G–SAM–03/2014
ATSAM4L8/L4/L2
Figure 39-10. Type of Digit Supported
Character mapping saves CPU execution time and allows a fast return to sleep mode after dis-play update.
7-Segment - 4 COM term.
- 2 SEG term.
7-Segment - 3 COM term. - 3 SEG term.
16-Segment - 3 COM term.
- 6 SEG term.
14-Segment - 4 COM term.
- 4 SEG term.
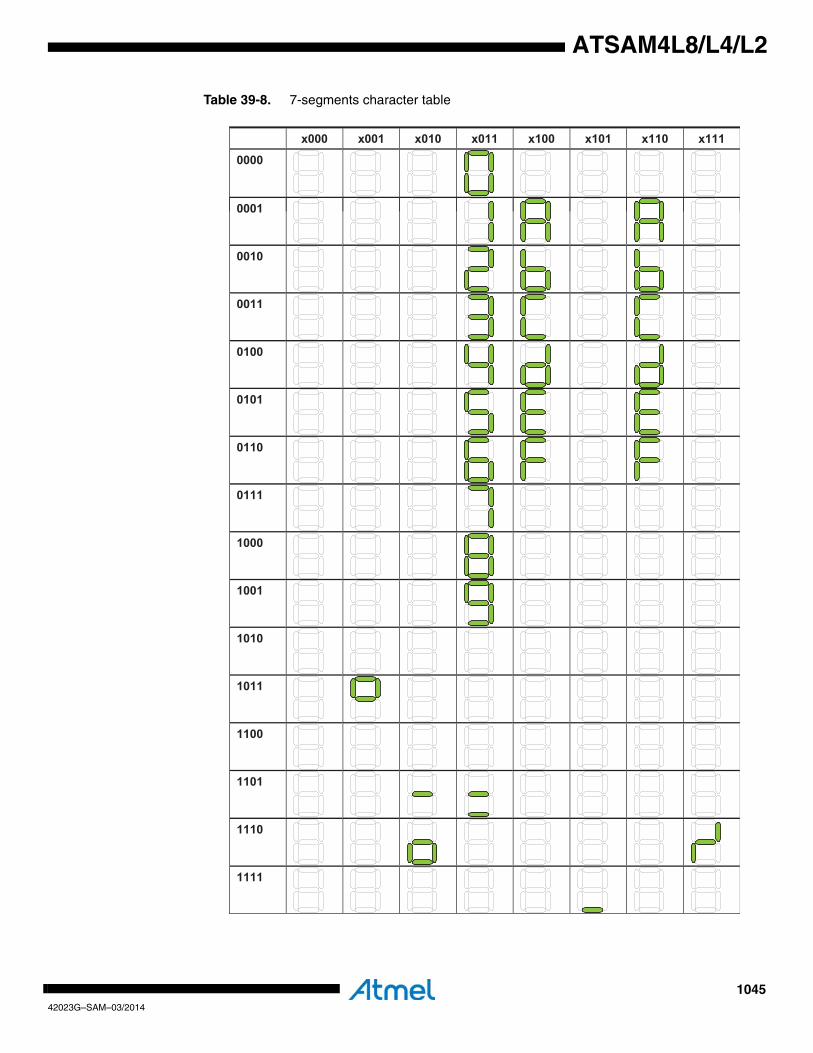
104542023G–SAM–03/2014
ATSAM4L8/L4/L2
Table 39-8. 7-segments character table
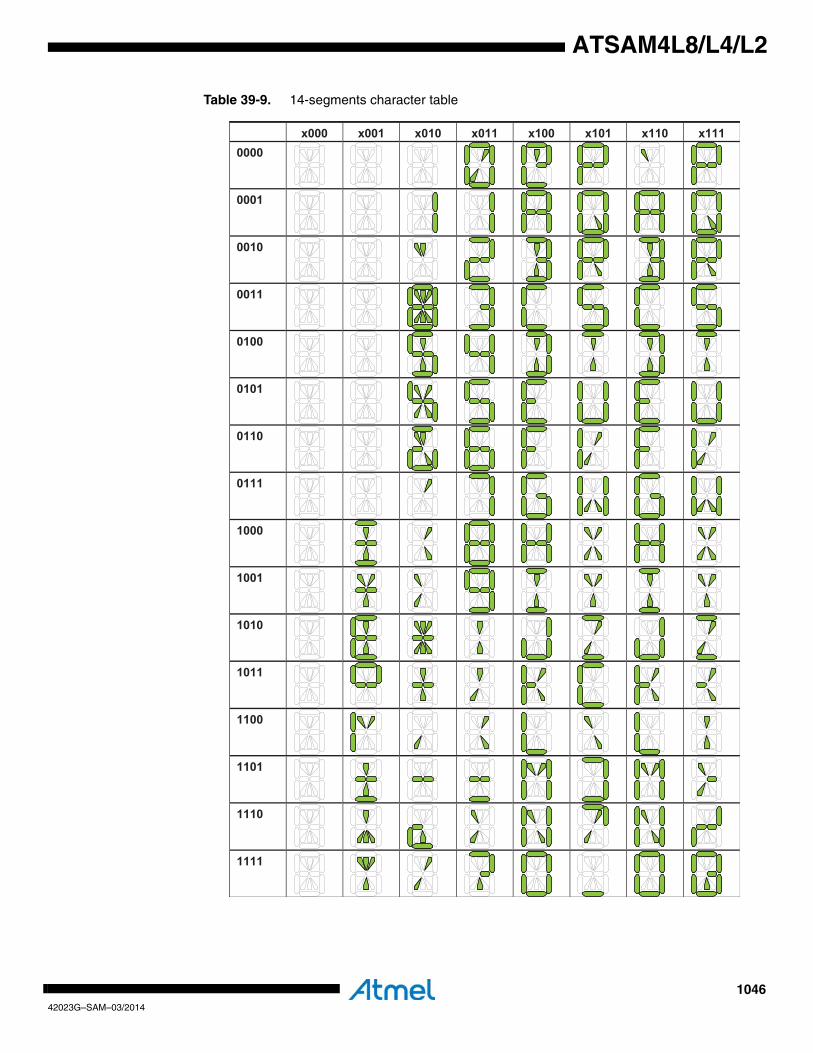
104642023G–SAM–03/2014
ATSAM4L8/L4/L2
Table 39-9. 14-segments character table

104742023G–SAM–03/2014
ATSAM4L8/L4/L2
Table 39-10. 16-segments character table
104842023G–SAM–03/2014
ATSAM4L8/L4/L2
39.6.11 Automated Character MappingDisplaying predefined character strings can be automated using the Peripheral DMA Controller(PDCA). Two modes are available, defined by MODE bit in Automated Character Mapping Con-figuration register (ACMCFG):
• MODE=0, the sequential character string display mode is selected
• MODE=1, the scrolling of character string display mode is selected
39.6.11.1 Sequential Characters String DisplayThis mode displays characters of a string periodically (frame basis).The configuration is:
• specify the number of digits to display (ACMCFG.DIGN),
• specify the type of digit (ACMCFG.TDG), see ”ASCII Character Mapping” on page 1043,
• specify the start segment (ACMCFG.STSEG) of the first character of the string,
• select the digit reverse mode (ACMCFG.DREV) if required. This mode is useful if digits have been inverted on the glass (first digit on the right),
• set the display period by writing the number of frame between each display in Frame Counter x in TIM register (TIM.FCx),
• select a frame counter by writing its number in ACMCFG.FCS,
• enable this mode by writing a one to the ACMCFG.EN bit,
• configure PDCA to transfer an ASCII character string of any size (should a multiple of the number of digit). To repeat the character string display, repeat the PDCA transfer.
TIM.FCx defines the number of frames between each PDCA transfer (display update).
If frame rate is 50Hz (20ms) in standard waveform mode, characters are displayed with a periodfrom 160ms up to 5.1s.
Nframes 8 FCx 1+( )×=
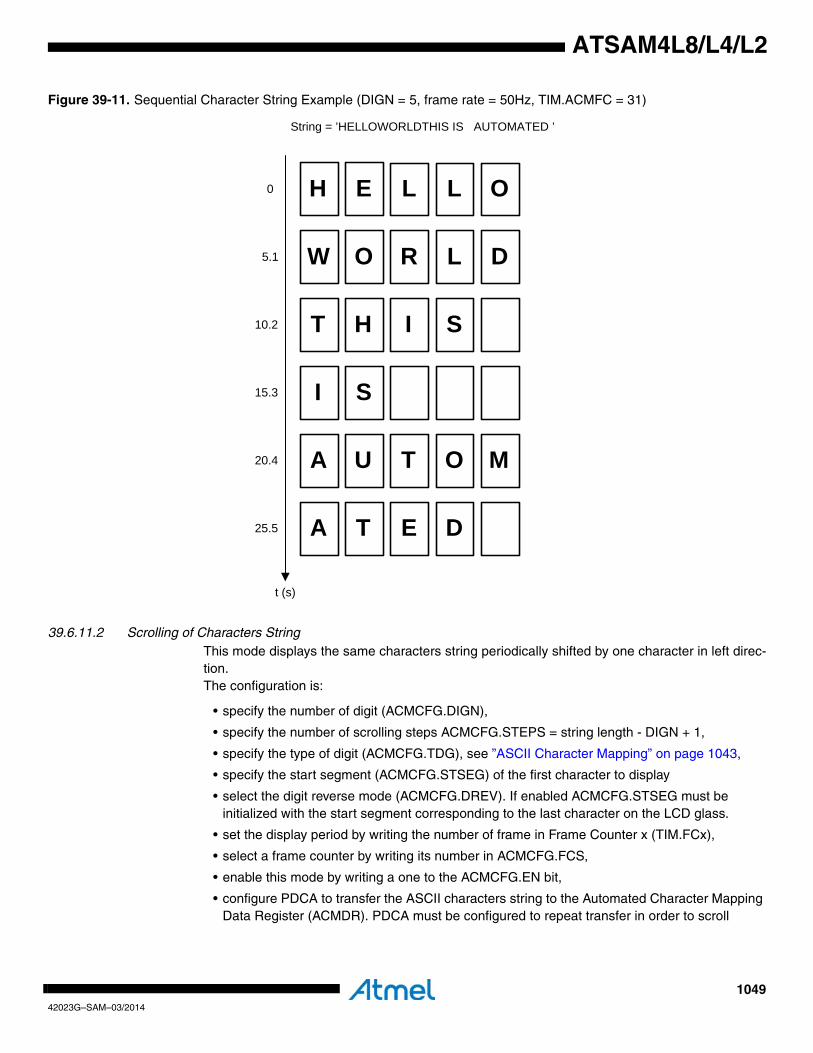
104942023G–SAM–03/2014
ATSAM4L8/L4/L2
Figure 39-11. Sequential Character String Example (DIGN = 5, frame rate = 50Hz, TIM.ACMFC = 31)
39.6.11.2 Scrolling of Characters StringThis mode displays the same characters string periodically shifted by one character in left direc-tion.The configuration is:
• specify the number of digit (ACMCFG.DIGN),
• specify the number of scrolling steps ACMCFG.STEPS = string length - DIGN + 1,
• specify the type of digit (ACMCFG.TDG), see ”ASCII Character Mapping” on page 1043,
• specify the start segment (ACMCFG.STSEG) of the first character to display
• select the digit reverse mode (ACMCFG.DREV). If enabled ACMCFG.STSEG must be initialized with the start segment corresponding to the last character on the LCD glass.
• set the display period by writing the number of frame in Frame Counter x (TIM.FCx),
• select a frame counter by writing its number in ACMCFG.FCS,
• enable this mode by writing a one to the ACMCFG.EN bit,
• configure PDCA to transfer the ASCII characters string to the Automated Character Mapping Data Register (ACMDR). PDCA must be configured to repeat transfer in order to scroll
H E L
W O R
T H I
String = ’HELLOWORLDTHIS IS AUTOMATED ’
L
L
S
O
D
I S
A U T O M
A T E D
0
5.1
10.2
15.3
20.4
25.5
t (s)
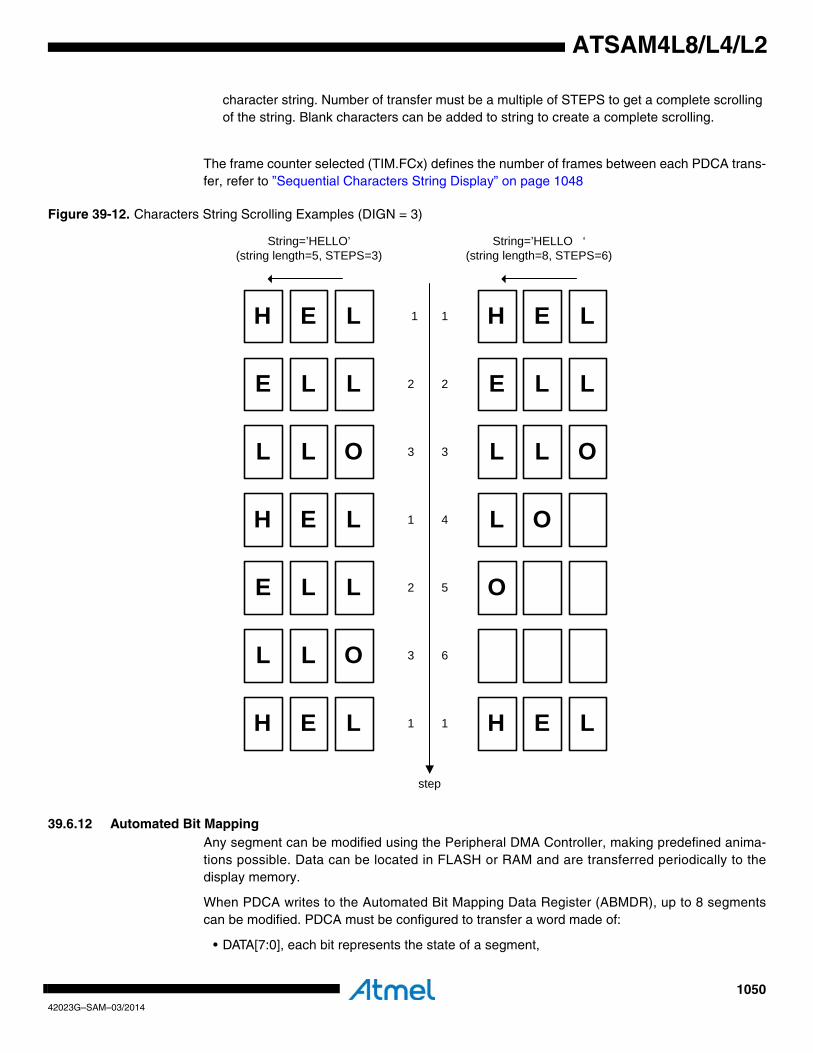
105042023G–SAM–03/2014
ATSAM4L8/L4/L2
character string. Number of transfer must be a multiple of STEPS to get a complete scrolling of the string. Blank characters can be added to string to create a complete scrolling.
The frame counter selected (TIM.FCx) defines the number of frames between each PDCA trans-fer, refer to ”Sequential Characters String Display” on page 1048
Figure 39-12. Characters String Scrolling Examples (DIGN = 3)
39.6.12 Automated Bit MappingAny segment can be modified using the Peripheral DMA Controller, making predefined anima-tions possible. Data can be located in FLASH or RAM and are transferred periodically to thedisplay memory.
When PDCA writes to the Automated Bit Mapping Data Register (ABMDR), up to 8 segmentscan be modified. PDCA must be configured to transfer a word made of:
• DATA[7:0], each bit represents the state of a segment,
String=’HELLO’(string length=5, STEPS=3)
H E L
E L L
String=’HELLO ‘(string length=8, STEPS=6)
L L O
L O
O
H E L
H E L
E L L
L L O
H E L
1
2
3
1
2
3
1
step
1
2
3
4
5
6
1
E L L
L L O
H E L
105142023G–SAM–03/2014
ATSAM4L8/L4/L2
• DMASK[7:0], each bit is a mask for DATA field. When DMASK[x]=1, DATA[x] is not written to display memory,
• OFF[4:0], byte offset in display memory (see Figure 39-3 on page 1036).
To update more than 8 segments, PDCA must transfer multiple words before shadow memory isupdated. This number of words must also be written in SIZE field in Automated Bit MappingConfiguration register (ABMCFG), it indicates the number of writes in display memory to form aframe.
To make an automated animation of N states with M segments, PDCA must be configured totransfer N x SIZE (= M/8 or more) words. Note that if segments are at any position in displaymemory, DMASK is used then PDCA size can be up to N x M.
The display period (animation update) is defined by writing the number of frame in TIM.FCx. Theframe counter is selected by writing its number in ABMCFG.FCS.
Animation can be repeated if PDCA is configured to repeat the whole transfer.
39.6.13 Contrast AdjustmentContrast is defined by the maximum value of VLCD. The higher value the higher contrast.
Fine Contrast value (FCST) in CFG register is a signed value (two’s complement) which definesthe maximum voltage VLCD on segment and common terminals. New value takes effect at thebeginning of next frame.
39.6.14 InterruptsLCDCA can generate an interrupt at the beginning of a frame. When Frame Counter 0 Rolloverbit (SR.FC0R) is set to one and interrupt is not masked, LCDCA interrupt is pending.
Moreover Frame Counter 0 (TIM.FC0) can be used to select the interrupt period generation.This mode can provide a useful time base to update LCD.If TIM.FC0PB=0:
If TIM.FC0PB=1:
Note that in low power waveform mode, frame period is twice the frame period in standard wave-form mode.
An interrupt request will be generated if the corresponding bit in the Interrupt Mask Register(IMR) is set. Bits in IMR are set by writing a one to the corresponding bit in the Interrupt EnableRegister (IER) and cleared by writing a one to the corresponding bit in the Interrupt Disable Reg-ister (IDR). The interrupt request remains active until the corresponding bit in SR is cleared bywriting a one to the corresponding bit in Status Clear Register (SCR).
39.6.15 LCD Wake UpLCD controller can wake up CPU with the interrupt request line. But in sleep modes where APBclocks are off, LCD wake up mechanism must be enabled to wake up CPU.
VLCD 3V FCST(+ 0 016V, )×=
Interrupt Period TIM.FC0 8×( ) 1+( ) Frame Period×=
Interrupt Period TIM.FC0 1+( ) Frame Period×=
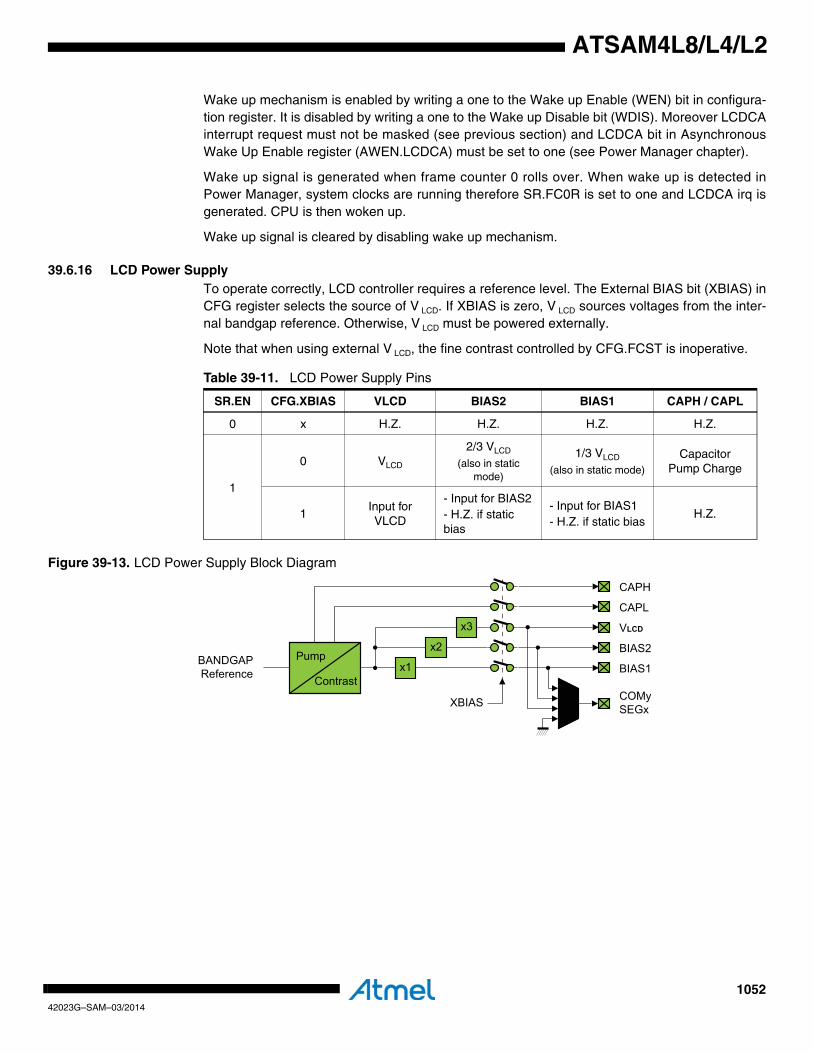
105242023G–SAM–03/2014
ATSAM4L8/L4/L2
Wake up mechanism is enabled by writing a one to the Wake up Enable (WEN) bit in configura-tion register. It is disabled by writing a one to the Wake up Disable bit (WDIS). Moreover LCDCAinterrupt request must not be masked (see previous section) and LCDCA bit in AsynchronousWake Up Enable register (AWEN.LCDCA) must be set to one (see Power Manager chapter).
Wake up signal is generated when frame counter 0 rolls over. When wake up is detected inPower Manager, system clocks are running therefore SR.FC0R is set to one and LCDCA irq isgenerated. CPU is then woken up.
Wake up signal is cleared by disabling wake up mechanism.
39.6.16 LCD Power SupplyTo operate correctly, LCD controller requires a reference level. The External BIAS bit (XBIAS) inCFG register selects the source of V LCD. If XBIAS is zero, V LCD sources voltages from the inter-nal bandgap reference. Otherwise, V LCD must be powered externally.
Note that when using external V LCD, the fine contrast controlled by CFG.FCST is inoperative.
Figure 39-13. LCD Power Supply Block Diagram
Table 39-11. LCD Power Supply Pins
SR.EN CFG.XBIAS VLCD BIAS2 BIAS1 CAPH / CAPL
0 x H.Z. H.Z. H.Z. H.Z.
1
0 VLCD
2/3 VLCD
(also in static mode)
1/3 VLCD
(also in static mode)
CapacitorPump Charge
1Input for VLCD
- Input for BIAS2- H.Z. if static bias
- Input for BIAS1- H.Z. if static bias
H.Z.
BIAS1
BIAS2
VLCD
CAPL
CAPH
COMySEGxXBIAS
x3
x2
x1BANDGAPReference
Pump
Contrast
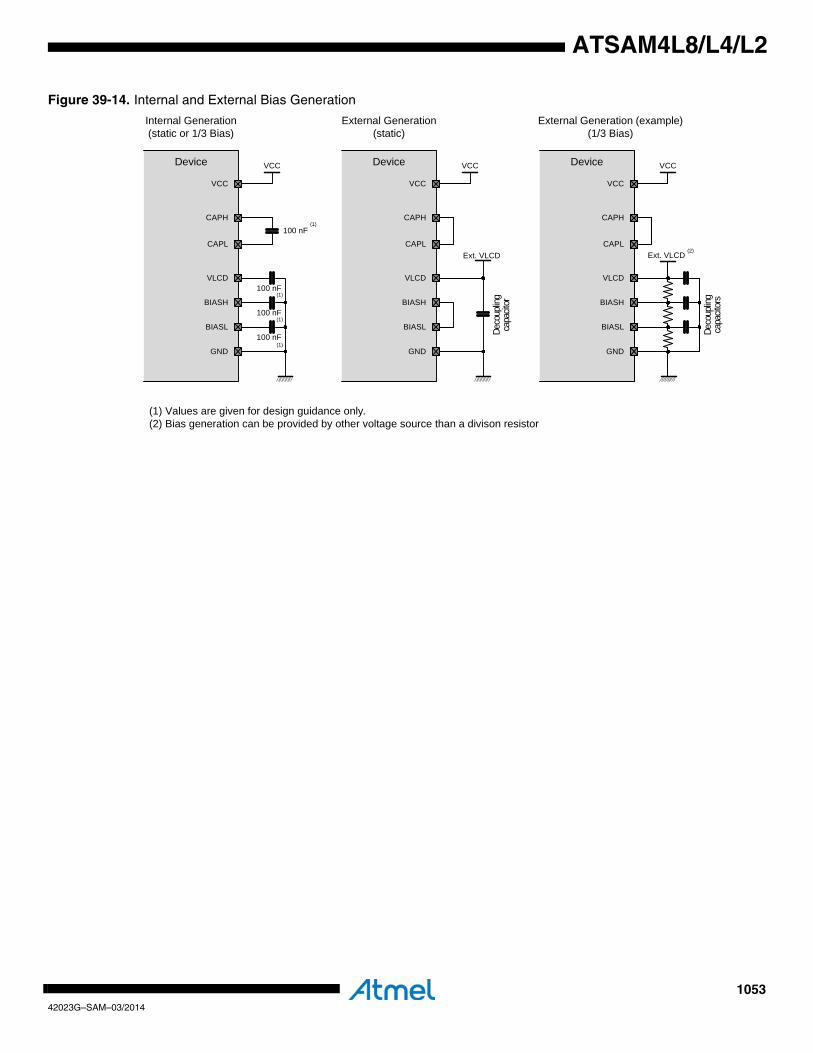
105342023G–SAM–03/2014
ATSAM4L8/L4/L2
Figure 39-14. Internal and External Bias Generation
Device VCC
VCC
CAPH
CAPL
VLCD
BIASH
BIASL
GND
Internal Generation(static or 1/3 Bias)
100 nF
100 nF
100 nF
100 nF
Device VCC
VCC
CAPH
CAPL
VLCD
BIASH
BIASL
GND
External Generation(static)
Ext. VLCD
Deco
uplin
gca
pacit
or
Device VCC
VCC
CAPH
CAPL
VLCD
BIASH
BIASL
GND
External Generation (example)(1/3 Bias)
Ext. VLCD
Deco
uplin
gca
pacit
ors
(1)
(1)
(1)
(1)
(2)
(1) Values are given for design guidance only.(2) Bias generation can be provided by other voltage source than a divison resistor
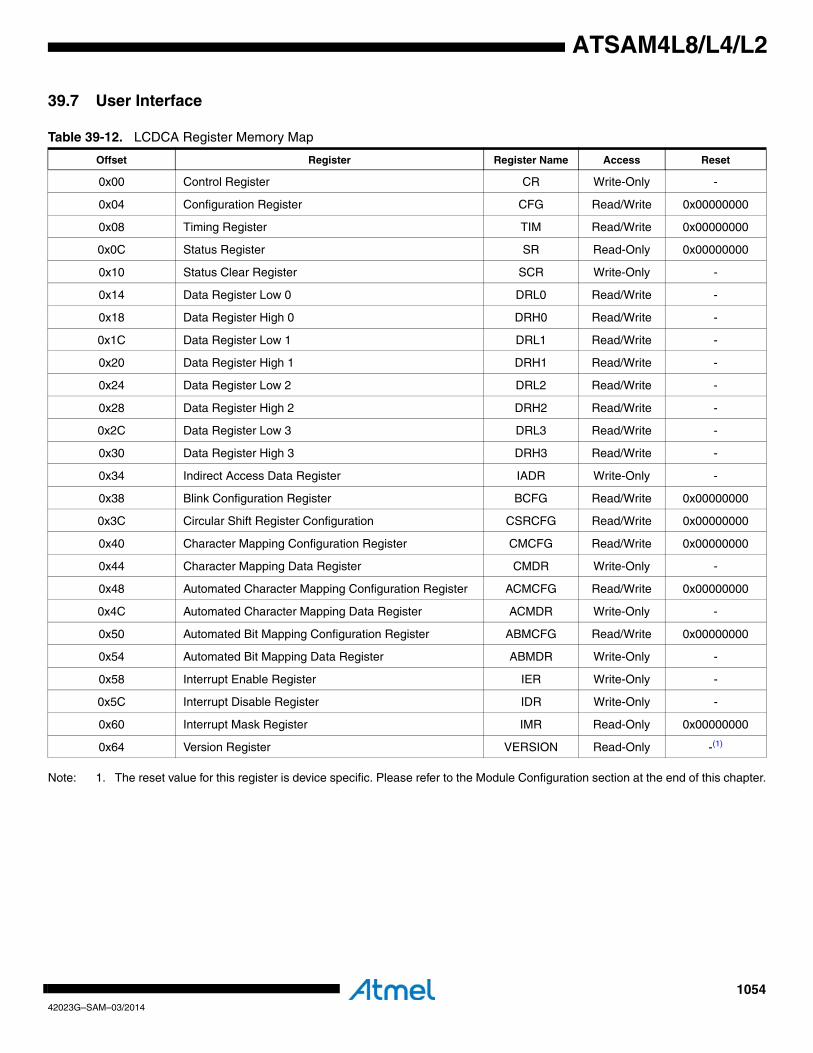
105442023G–SAM–03/2014
ATSAM4L8/L4/L2
39.7 User Interface
Note: 1. The reset value for this register is device specific. Please refer to the Module Configuration section at the end of this chapter.
Table 39-12. LCDCA Register Memory Map
Offset Register Register Name Access Reset
0x00 Control Register CR Write-Only -
0x04 Configuration Register CFG Read/Write 0x00000000
0x08 Timing Register TIM Read/Write 0x00000000
0x0C Status Register SR Read-Only 0x00000000
0x10 Status Clear Register SCR Write-Only -
0x14 Data Register Low 0 DRL0 Read/Write -
0x18 Data Register High 0 DRH0 Read/Write -
0x1C Data Register Low 1 DRL1 Read/Write -
0x20 Data Register High 1 DRH1 Read/Write -
0x24 Data Register Low 2 DRL2 Read/Write -
0x28 Data Register High 2 DRH2 Read/Write -
0x2C Data Register Low 3 DRL3 Read/Write -
0x30 Data Register High 3 DRH3 Read/Write -
0x34 Indirect Access Data Register IADR Write-Only -
0x38 Blink Configuration Register BCFG Read/Write 0x00000000
0x3C Circular Shift Register Configuration CSRCFG Read/Write 0x00000000
0x40 Character Mapping Configuration Register CMCFG Read/Write 0x00000000
0x44 Character Mapping Data Register CMDR Write-Only -
0x48 Automated Character Mapping Configuration Register ACMCFG Read/Write 0x00000000
0x4C Automated Character Mapping Data Register ACMDR Write-Only -
0x50 Automated Bit Mapping Configuration Register ABMCFG Read/Write 0x00000000
0x54 Automated Bit Mapping Data Register ABMDR Write-Only -
0x58 Interrupt Enable Register IER Write-Only -
0x5C Interrupt Disable Register IDR Write-Only -
0x60 Interrupt Mask Register IMR Read-Only 0x00000000
0x64 Version Register VERSION Read-Only -(1)
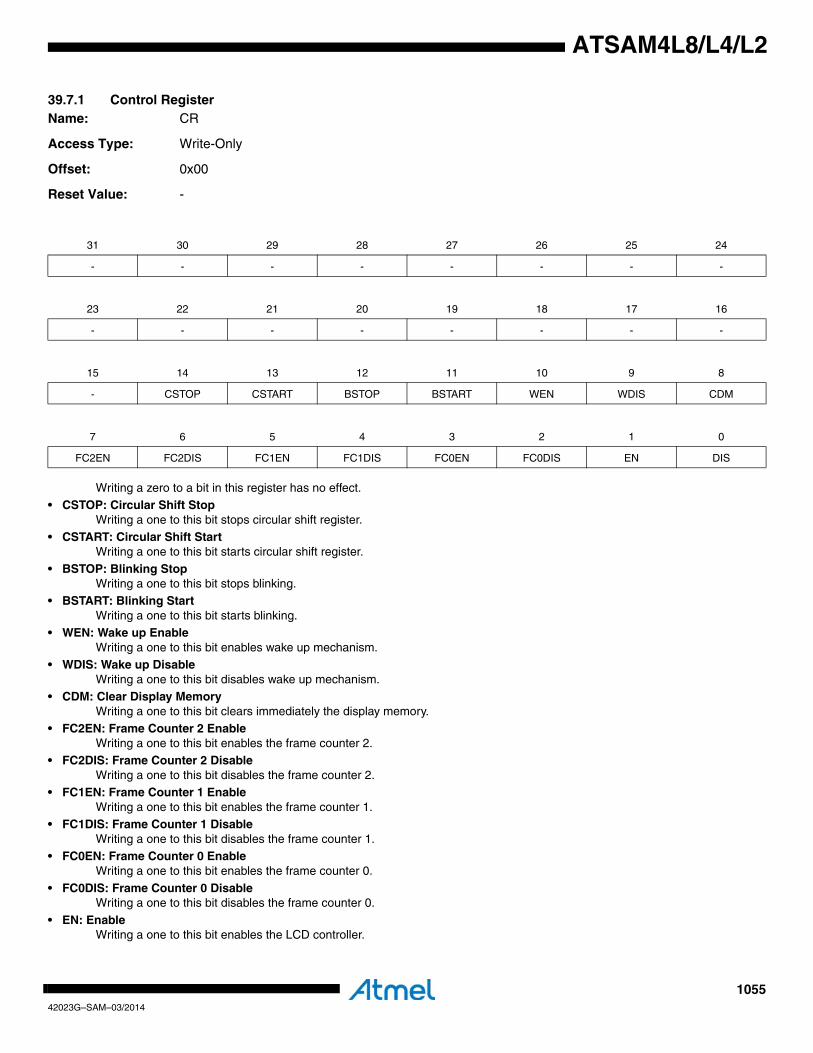
105542023G–SAM–03/2014
ATSAM4L8/L4/L2
39.7.1 Control RegisterName: CR
Access Type: Write-Only
Offset: 0x00
Reset Value: -
Writing a zero to a bit in this register has no effect.• CSTOP: Circular Shift Stop
Writing a one to this bit stops circular shift register.• CSTART: Circular Shift Start
Writing a one to this bit starts circular shift register.• BSTOP: Blinking Stop
Writing a one to this bit stops blinking.• BSTART: Blinking Start
Writing a one to this bit starts blinking.• WEN: Wake up Enable
Writing a one to this bit enables wake up mechanism.• WDIS: Wake up Disable
Writing a one to this bit disables wake up mechanism.• CDM: Clear Display Memory
Writing a one to this bit clears immediately the display memory.• FC2EN: Frame Counter 2 Enable
Writing a one to this bit enables the frame counter 2.• FC2DIS: Frame Counter 2 Disable
Writing a one to this bit disables the frame counter 2.• FC1EN: Frame Counter 1 Enable
Writing a one to this bit enables the frame counter 1.• FC1DIS: Frame Counter 1 Disable
Writing a one to this bit disables the frame counter 1.• FC0EN: Frame Counter 0 Enable
Writing a one to this bit enables the frame counter 0.
• FC0DIS: Frame Counter 0 DisableWriting a one to this bit disables the frame counter 0.
• EN: EnableWriting a one to this bit enables the LCD controller.
31 30 29 28 27 26 25 24
- - - - - - - -
23 22 21 20 19 18 17 16
- - - - - - - -
15 14 13 12 11 10 9 8
- CSTOP CSTART BSTOP BSTART WEN WDIS CDM
7 6 5 4 3 2 1 0
FC2EN FC2DIS FC1EN FC1DIS FC0EN FC0DIS EN DIS

105642023G–SAM–03/2014
ATSAM4L8/L4/L2
• DIS: DisableWriting a one to this bit disables the LCD controller.

105742023G–SAM–03/2014
ATSAM4L8/L4/L2
39.7.2 Configuration RegisterName: CFG
Access Type: Read/Write
Offset: 0x04
Reset Value: 0x00000000
NSU, DUTY, WMOD and XBIAS shall not be modified when LCDCA is enabled (SR.EN=1).• NSU: Number of Segment Terminals in Use
This field indicates the number of segment terminals in use. It prevents any activity on muxes driving the unused segment terminals.
• FCST: Fine ContrastDefines the maximum voltage VLCD on segment and common terminals. FCST is a signed number (two's complement). New
value takes effect at the beginning of next frame.
VLCD = 3.0 V + (FCST[5:0] * 0.016 V)• DUTY: Duty Select
This field defines the duty cycle.
• LOCK: Lock0: Shadow display memory is unlocked.
1: Shadow display memory is locked and can’t be updated.
• BLANK: Blank LCD0: LCD segments value is defined in shadow display memory.
1: Turns OFF all LCD segments.
• WMOD: Waveform Mode0: low power waveform mode.
1: standard waveform mode.
31 30 29 28 27 26 25 24
- - NSU
23 22 21 20 19 18 17 16
- - FCST
15 14 13 12 11 10 9 8
- - - - - - DUTY
7 6 5 4 3 2 1 0
- - - - LOCK BLANK WMOD XBIAS
Table 39-13. Duty Selection
DUTY[1:0] Duty Bias COM pins Used
0 0 1/4 1/3 COM[0:3]
0 1 Static Static COM0
1 0 1/2 1/3 COM[0:1]
1 1 1/3 1/3 COM[0:2]

105842023G–SAM–03/2014
ATSAM4L8/L4/L2
If this bit is modified during display operation the waveform mode is applied at the beginning of next frame.• XBIAS: External Bias Generation
0:Internal bias is used.1:External bias is used.
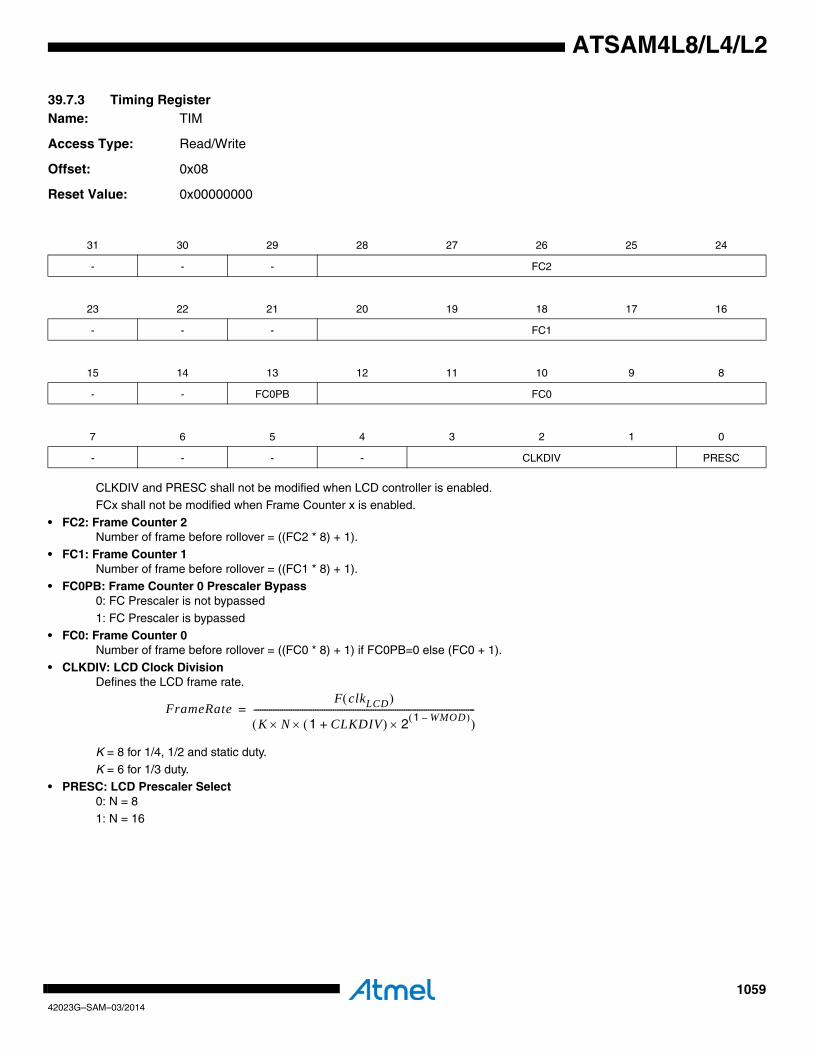
105942023G–SAM–03/2014
ATSAM4L8/L4/L2
39.7.3 Timing RegisterName: TIM
Access Type: Read/Write
Offset: 0x08
Reset Value: 0x00000000
CLKDIV and PRESC shall not be modified when LCD controller is enabled.FCx shall not be modified when Frame Counter x is enabled.
• FC2: Frame Counter 2Number of frame before rollover = ((FC2 * 8) + 1).
• FC1: Frame Counter 1Number of frame before rollover = ((FC1 * 8) + 1).
• FC0PB: Frame Counter 0 Prescaler Bypass0: FC Prescaler is not bypassed
1: FC Prescaler is bypassed
• FC0: Frame Counter 0Number of frame before rollover = ((FC0 * 8) + 1) if FC0PB=0 else (FC0 + 1).
• CLKDIV: LCD Clock DivisionDefines the LCD frame rate.
K = 8 for 1/4, 1/2 and static duty.
K = 6 for 1/3 duty.• PRESC: LCD Prescaler Select
0: N = 81: N = 16
31 30 29 28 27 26 25 24
- - - FC2
23 22 21 20 19 18 17 16
- - - FC1
15 14 13 12 11 10 9 8
- - FC0PB FC0
7 6 5 4 3 2 1 0
- - - - CLKDIV PRESC
FrameRateF clkLCD( )
K N 1 CLKDIV+( )×× 21 WMOD–( )×( )
----------------------------------------------------------------------------------------------------=
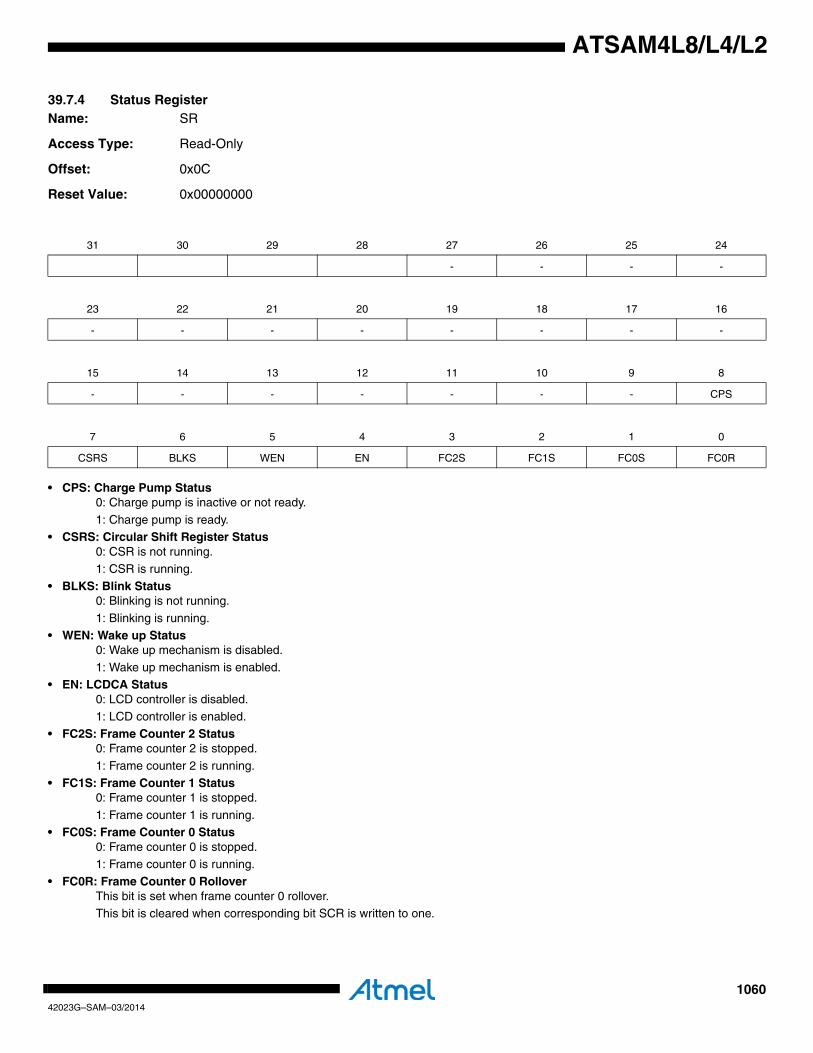
106042023G–SAM–03/2014
ATSAM4L8/L4/L2
39.7.4 Status RegisterName: SR
Access Type: Read-Only
Offset: 0x0C
Reset Value: 0x00000000
• CPS: Charge Pump Status0: Charge pump is inactive or not ready.
1: Charge pump is ready.• CSRS: Circular Shift Register Status
0: CSR is not running.1: CSR is running.
• BLKS: Blink Status0: Blinking is not running.
1: Blinking is running.
• WEN: Wake up Status0: Wake up mechanism is disabled.
1: Wake up mechanism is enabled.• EN: LCDCA Status
0: LCD controller is disabled.1: LCD controller is enabled.
• FC2S: Frame Counter 2 Status0: Frame counter 2 is stopped.
1: Frame counter 2 is running.
• FC1S: Frame Counter 1 Status0: Frame counter 1 is stopped.
1: Frame counter 1 is running.• FC0S: Frame Counter 0 Status
0: Frame counter 0 is stopped.1: Frame counter 0 is running.
• FC0R: Frame Counter 0 RolloverThis bit is set when frame counter 0 rollover.This bit is cleared when corresponding bit SCR is written to one.
31 30 29 28 27 26 25 24
- - - -
23 22 21 20 19 18 17 16
- - - - - - - -
15 14 13 12 11 10 9 8
- - - - - - - CPS
7 6 5 4 3 2 1 0
CSRS BLKS WEN EN FC2S FC1S FC0S FC0R
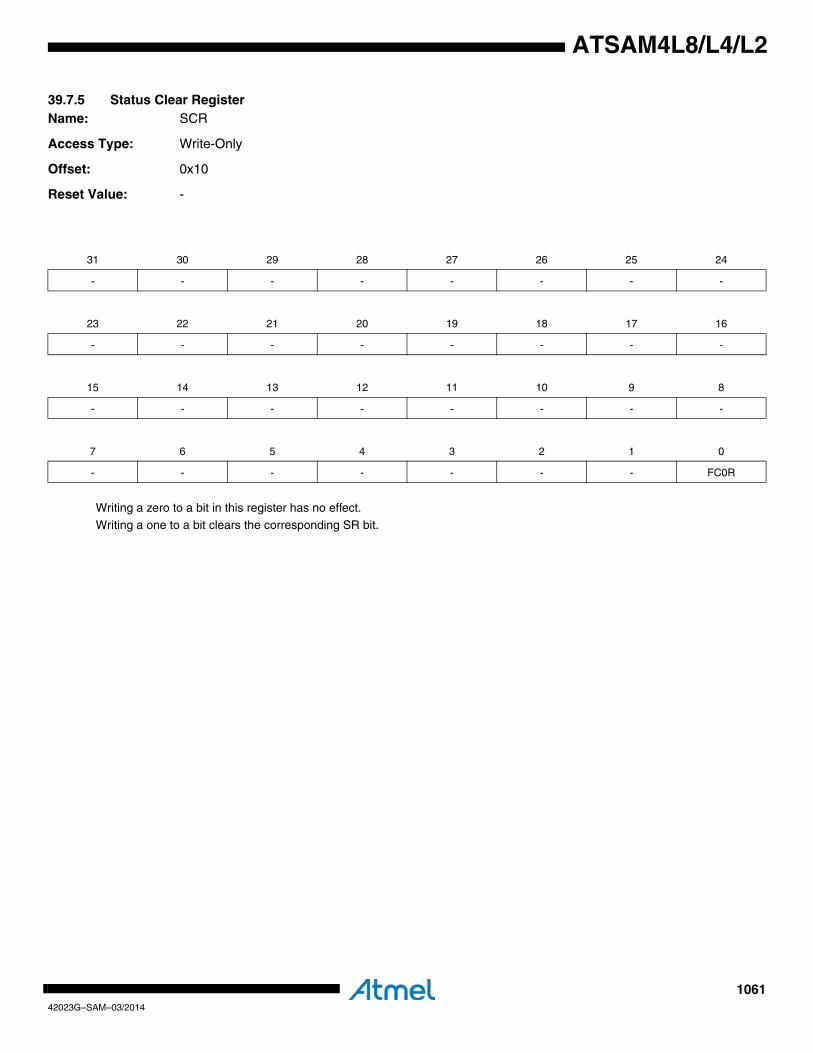
106142023G–SAM–03/2014
ATSAM4L8/L4/L2
39.7.5 Status Clear RegisterName: SCR
Access Type: Write-Only
Offset: 0x10
Reset Value: -
Writing a zero to a bit in this register has no effect.Writing a one to a bit clears the corresponding SR bit.
31 30 29 28 27 26 25 24
- - - - - - - -
23 22 21 20 19 18 17 16
- - - - - - - -
15 14 13 12 11 10 9 8
- - - - - - - -
7 6 5 4 3 2 1 0
- - - - - - - FC0R
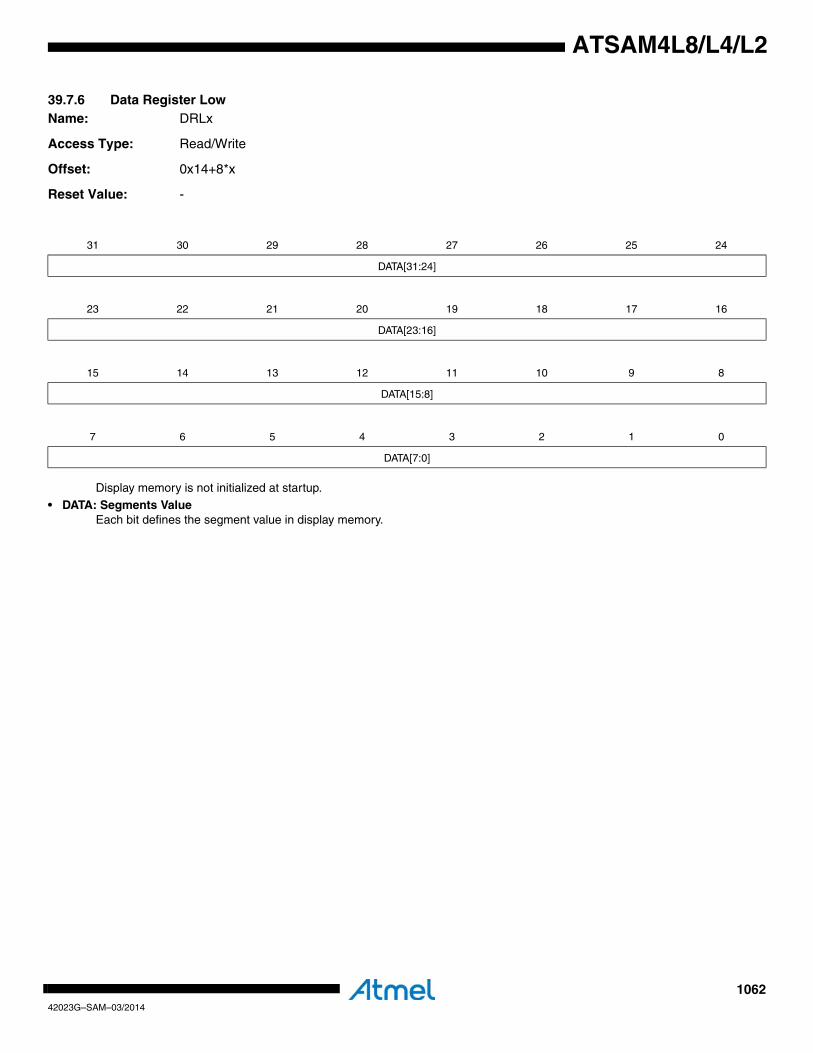
106242023G–SAM–03/2014
ATSAM4L8/L4/L2
39.7.6 Data Register LowName: DRLx
Access Type: Read/Write
Offset: 0x14+8*x
Reset Value: -
Display memory is not initialized at startup.• DATA: Segments Value
Each bit defines the segment value in display memory.
31 30 29 28 27 26 25 24
DATA[31:24]
23 22 21 20 19 18 17 16
DATA[23:16]
15 14 13 12 11 10 9 8
DATA[15:8]
7 6 5 4 3 2 1 0
DATA[7:0]

106342023G–SAM–03/2014
ATSAM4L8/L4/L2
39.7.7 Data Register HighName: DRHx
Access Type: Read/Write
Offset: 0x18+8*x
Reset Value: -
• DATA: Segments ValueEach bit defines the segment value in display memory.
31 30 29 28 27 26 25 24
- - - - - - - -
23 22 21 20 19 18 17 16
- - - - - - - -
15 14 13 12 11 10 9 8
- - - - - - - -
7 6 5 4 3 2 1 0
DATA
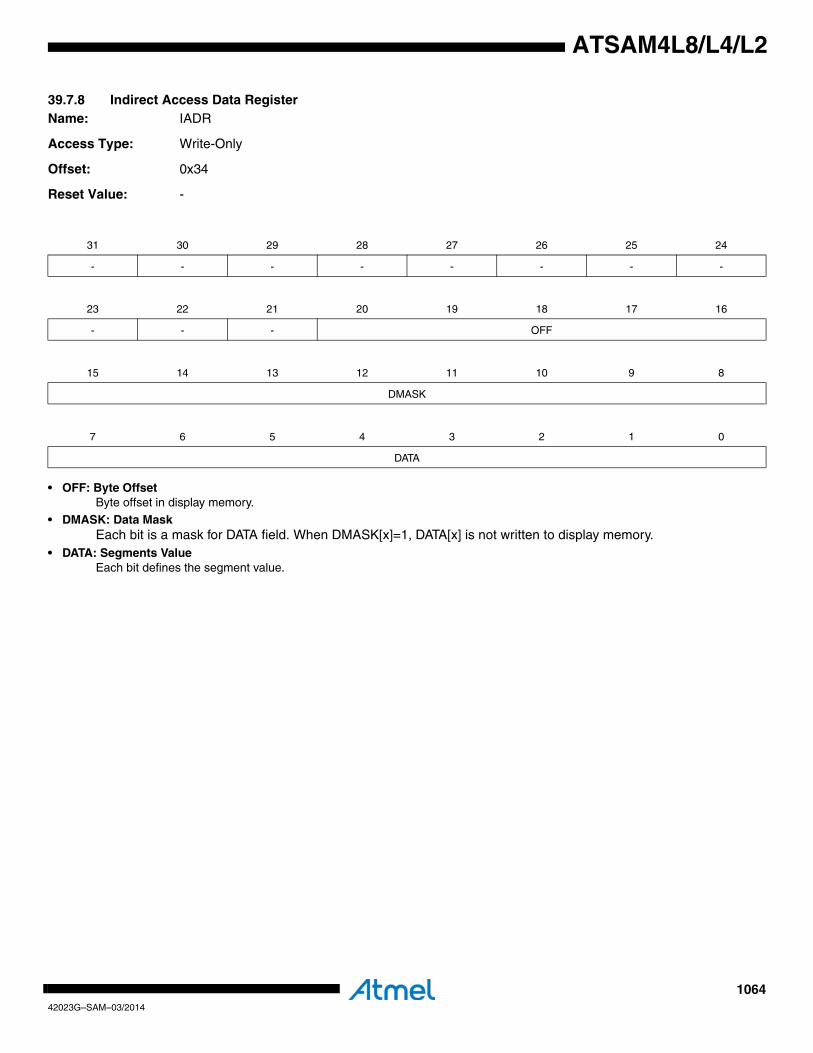
106442023G–SAM–03/2014
ATSAM4L8/L4/L2
39.7.8 Indirect Access Data RegisterName: IADR
Access Type: Write-Only
Offset: 0x34
Reset Value: -
• OFF: Byte OffsetByte offset in display memory.
• DMASK: Data MaskEach bit is a mask for DATA field. When DMASK[x]=1, DATA[x] is not written to display memory.
• DATA: Segments ValueEach bit defines the segment value.
31 30 29 28 27 26 25 24
- - - - - - - -
23 22 21 20 19 18 17 16
- - - OFF
15 14 13 12 11 10 9 8
DMASK
7 6 5 4 3 2 1 0
DATA
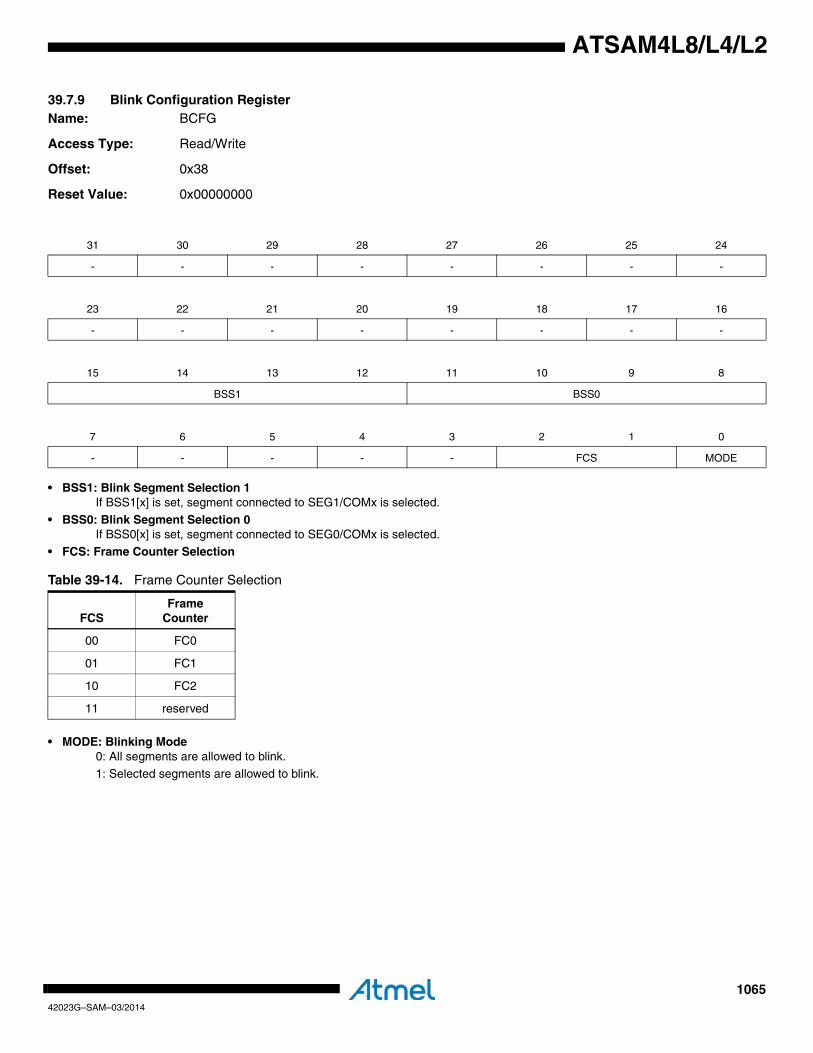
106542023G–SAM–03/2014
ATSAM4L8/L4/L2
39.7.9 Blink Configuration RegisterName: BCFG
Access Type: Read/Write
Offset: 0x38
Reset Value: 0x00000000
• BSS1: Blink Segment Selection 1If BSS1[x] is set, segment connected to SEG1/COMx is selected.
• BSS0: Blink Segment Selection 0If BSS0[x] is set, segment connected to SEG0/COMx is selected.
• FCS: Frame Counter Selection
• MODE: Blinking Mode0: All segments are allowed to blink.
1: Selected segments are allowed to blink.
31 30 29 28 27 26 25 24
- - - - - - - -
23 22 21 20 19 18 17 16
- - - - - - - -
15 14 13 12 11 10 9 8
BSS1 BSS0
7 6 5 4 3 2 1 0
- - - - - FCS MODE
Table 39-14. Frame Counter Selection
FCSFrame
Counter
00 FC0
01 FC1
10 FC2
11 reserved
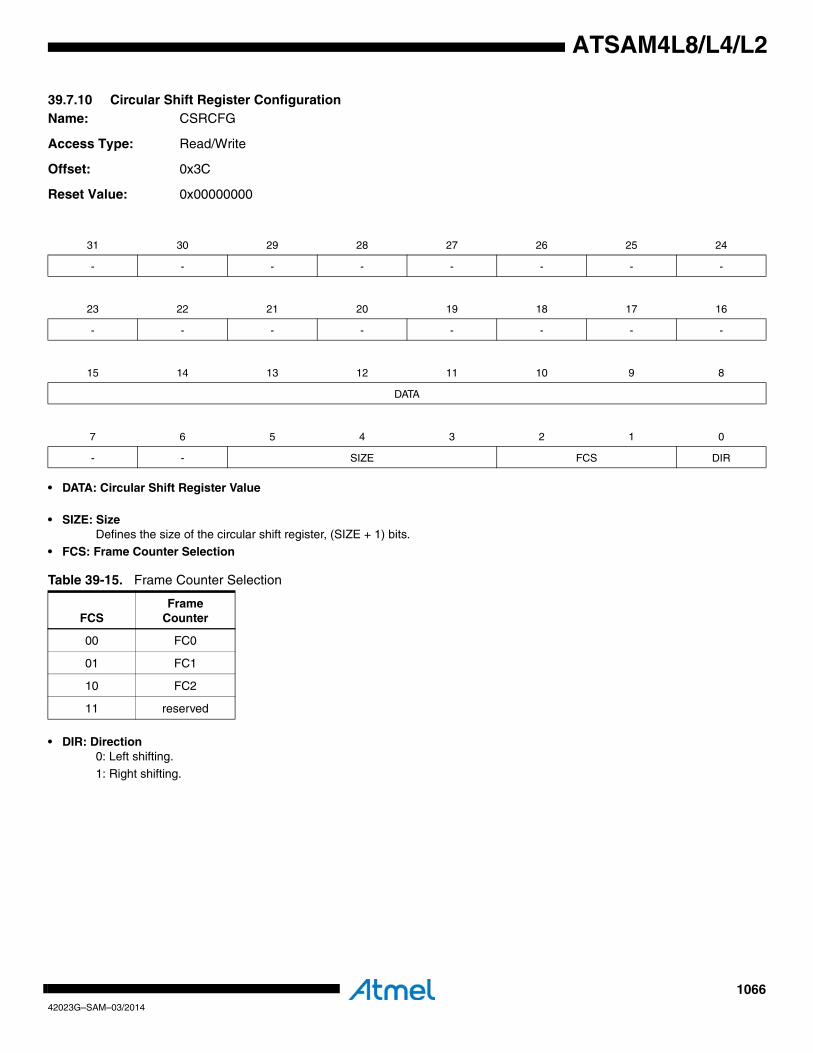
106642023G–SAM–03/2014
ATSAM4L8/L4/L2
39.7.10 Circular Shift Register ConfigurationName: CSRCFG
Access Type: Read/Write
Offset: 0x3C
Reset Value: 0x00000000
• DATA: Circular Shift Register Value
• SIZE: SizeDefines the size of the circular shift register, (SIZE + 1) bits.
• FCS: Frame Counter Selection
• DIR: Direction0: Left shifting.
1: Right shifting.
31 30 29 28 27 26 25 24
- - - - - - - -
23 22 21 20 19 18 17 16
- - - - - - - -
15 14 13 12 11 10 9 8
DATA
7 6 5 4 3 2 1 0
- - SIZE FCS DIR
Table 39-15. Frame Counter Selection
FCSFrame
Counter
00 FC0
01 FC1
10 FC2
11 reserved
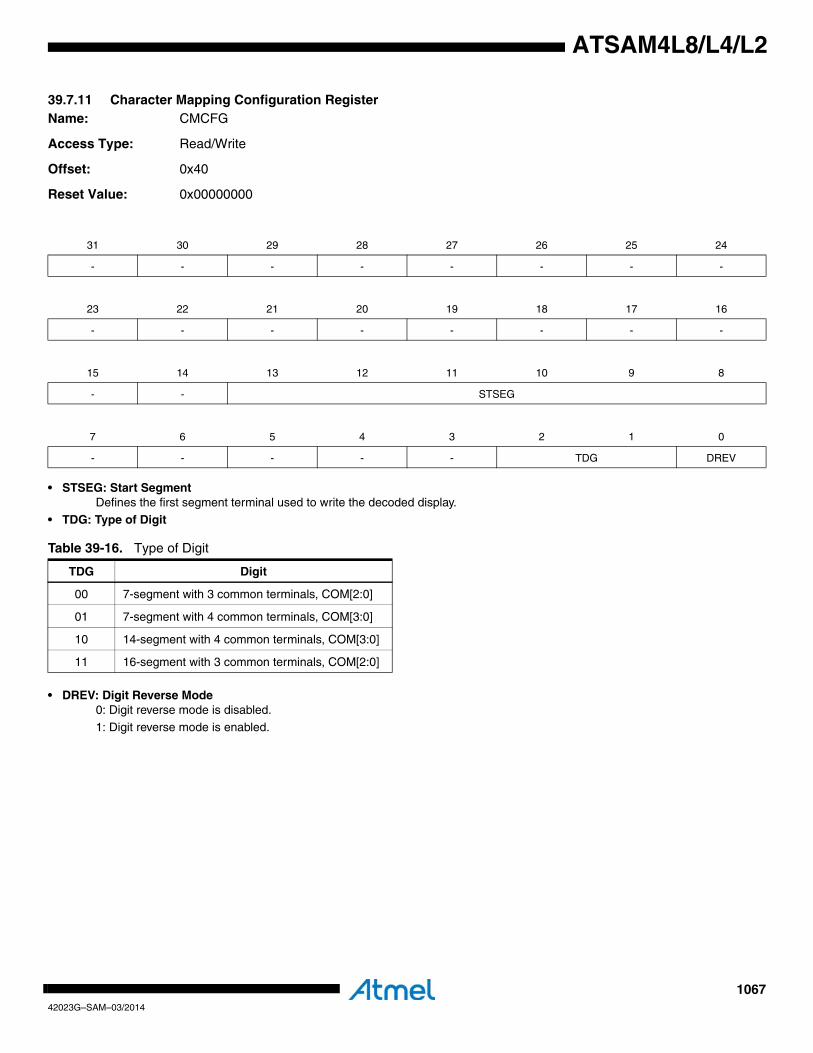
106742023G–SAM–03/2014
ATSAM4L8/L4/L2
39.7.11 Character Mapping Configuration RegisterName: CMCFG
Access Type: Read/Write
Offset: 0x40
Reset Value: 0x00000000
• STSEG: Start SegmentDefines the first segment terminal used to write the decoded display.
• TDG: Type of Digit
• DREV: Digit Reverse Mode0: Digit reverse mode is disabled.
1: Digit reverse mode is enabled.
31 30 29 28 27 26 25 24
- - - - - - - -
23 22 21 20 19 18 17 16
- - - - - - - -
15 14 13 12 11 10 9 8
- - STSEG
7 6 5 4 3 2 1 0
- - - - - TDG DREV
Table 39-16. Type of Digit
TDG Digit
00 7-segment with 3 common terminals, COM[2:0]
01 7-segment with 4 common terminals, COM[3:0]
10 14-segment with 4 common terminals, COM[3:0]
11 16-segment with 3 common terminals, COM[2:0]
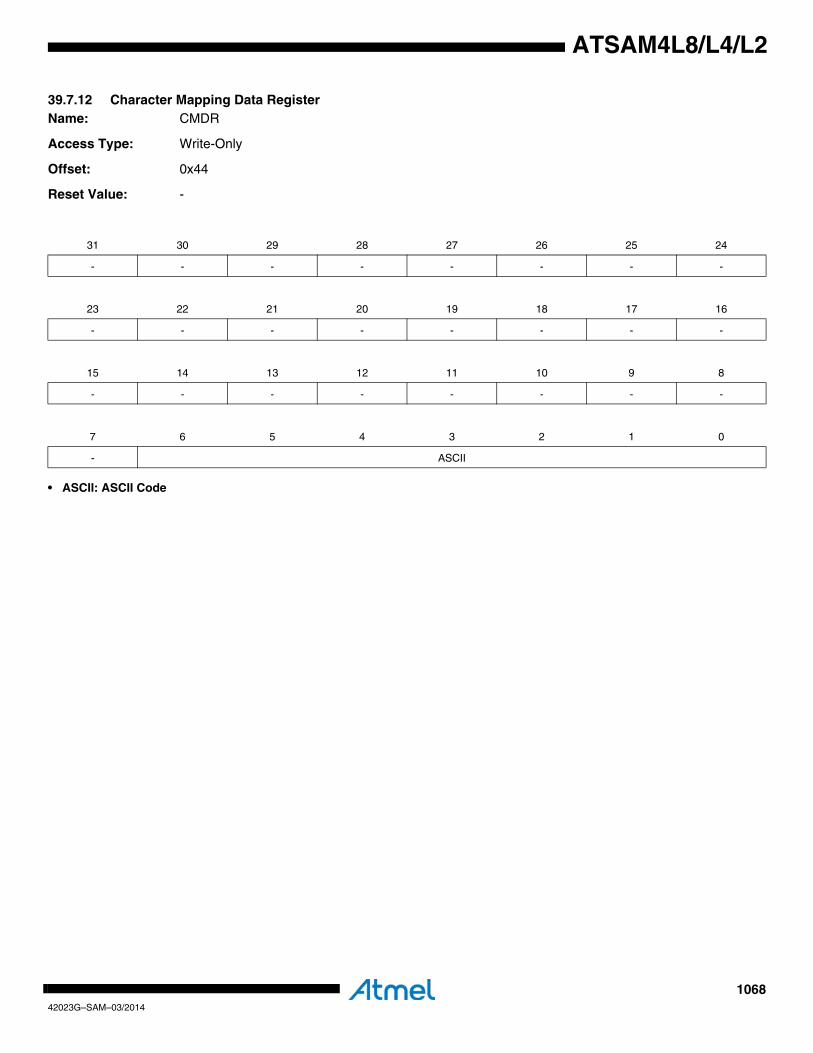
106842023G–SAM–03/2014
ATSAM4L8/L4/L2
39.7.12 Character Mapping Data RegisterName: CMDR
Access Type: Write-Only
Offset: 0x44
Reset Value: -
• ASCII: ASCII Code
31 30 29 28 27 26 25 24
- - - - - - - -
23 22 21 20 19 18 17 16
- - - - - - - -
15 14 13 12 11 10 9 8
- - - - - - - -
7 6 5 4 3 2 1 0
- ASCII
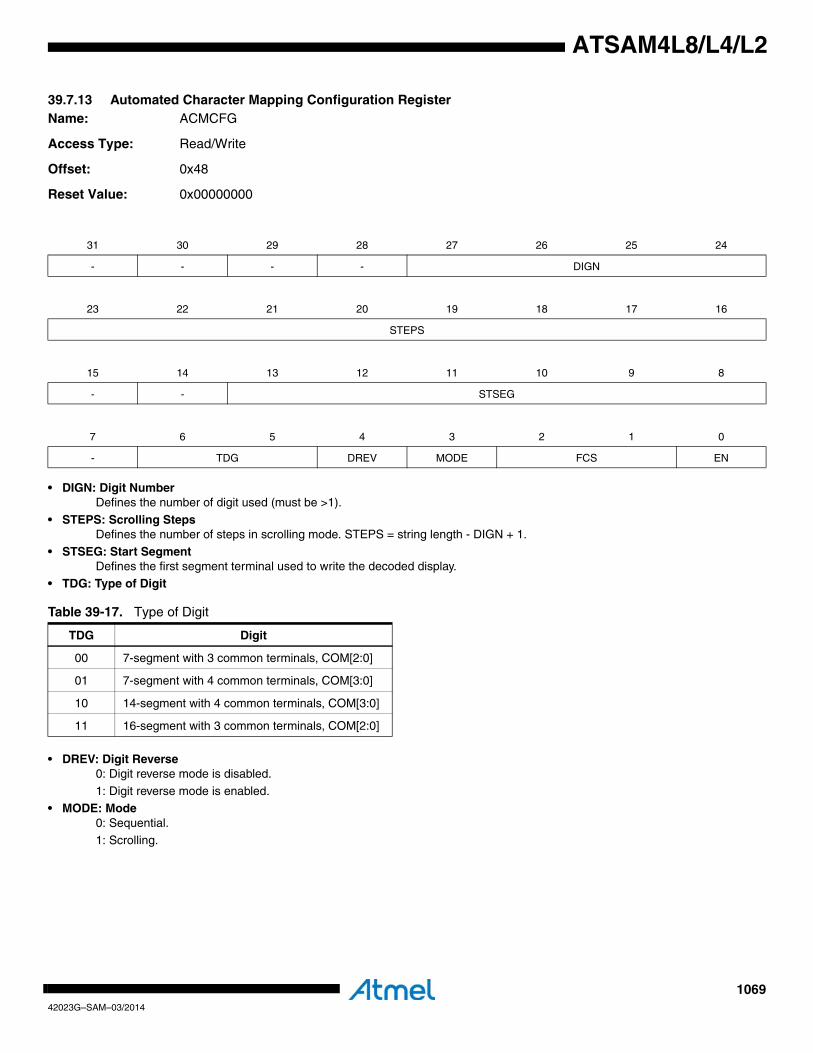
106942023G–SAM–03/2014
ATSAM4L8/L4/L2
39.7.13 Automated Character Mapping Configuration RegisterName: ACMCFG
Access Type: Read/Write
Offset: 0x48
Reset Value: 0x00000000
• DIGN: Digit NumberDefines the number of digit used (must be >1).
• STEPS: Scrolling StepsDefines the number of steps in scrolling mode. STEPS = string length - DIGN + 1.
• STSEG: Start SegmentDefines the first segment terminal used to write the decoded display.
• TDG: Type of Digit
• DREV: Digit Reverse0: Digit reverse mode is disabled.
1: Digit reverse mode is enabled.• MODE: Mode
0: Sequential.1: Scrolling.
31 30 29 28 27 26 25 24
- - - - DIGN
23 22 21 20 19 18 17 16
STEPS
15 14 13 12 11 10 9 8
- - STSEG
7 6 5 4 3 2 1 0
- TDG DREV MODE FCS EN
Table 39-17. Type of Digit
TDG Digit
00 7-segment with 3 common terminals, COM[2:0]
01 7-segment with 4 common terminals, COM[3:0]
10 14-segment with 4 common terminals, COM[3:0]
11 16-segment with 3 common terminals, COM[2:0]
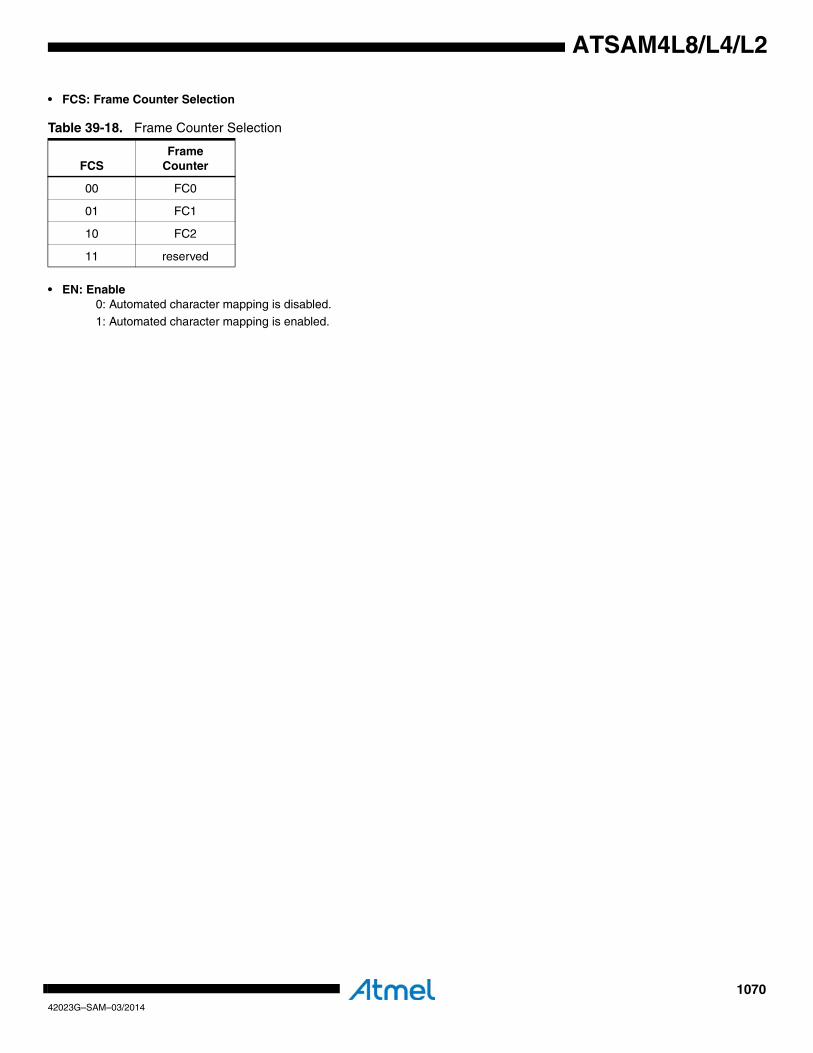
107042023G–SAM–03/2014
ATSAM4L8/L4/L2
• FCS: Frame Counter Selection
• EN: Enable0: Automated character mapping is disabled.1: Automated character mapping is enabled.
Table 39-18. Frame Counter Selection
FCSFrame
Counter
00 FC0
01 FC1
10 FC2
11 reserved
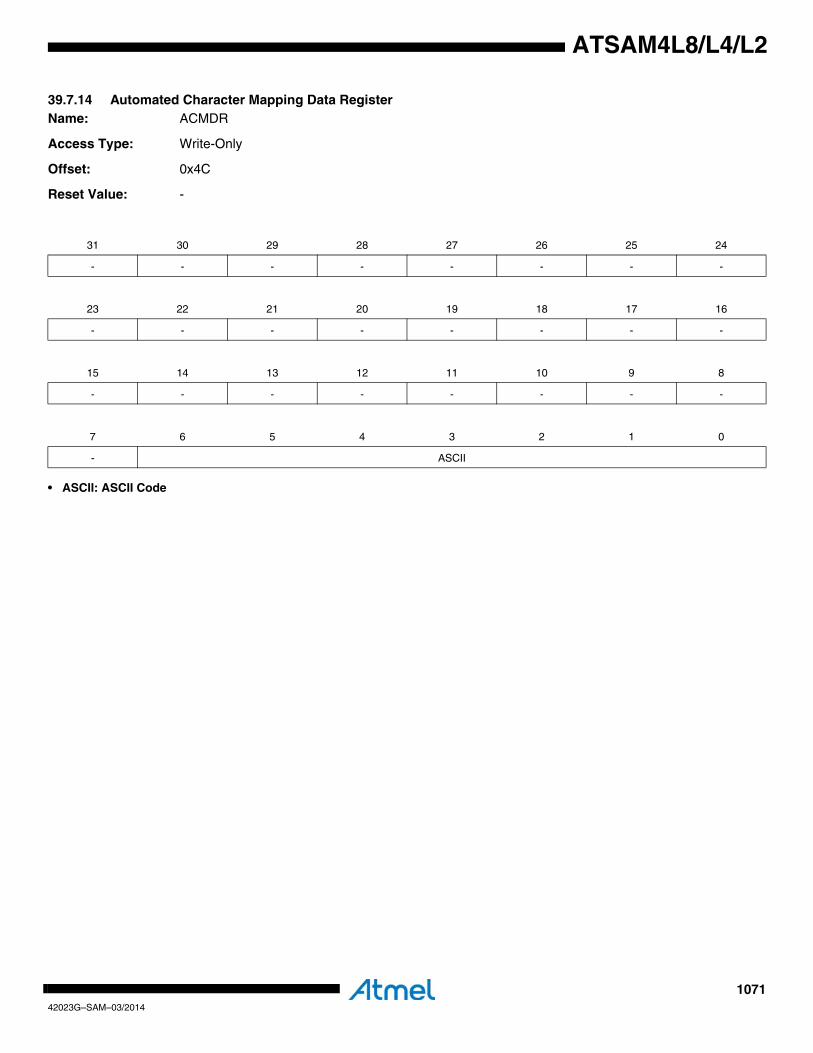
107142023G–SAM–03/2014
ATSAM4L8/L4/L2
39.7.14 Automated Character Mapping Data RegisterName: ACMDR
Access Type: Write-Only
Offset: 0x4C
Reset Value: -
• ASCII: ASCII Code
31 30 29 28 27 26 25 24
- - - - - - - -
23 22 21 20 19 18 17 16
- - - - - - - -
15 14 13 12 11 10 9 8
- - - - - - - -
7 6 5 4 3 2 1 0
- ASCII
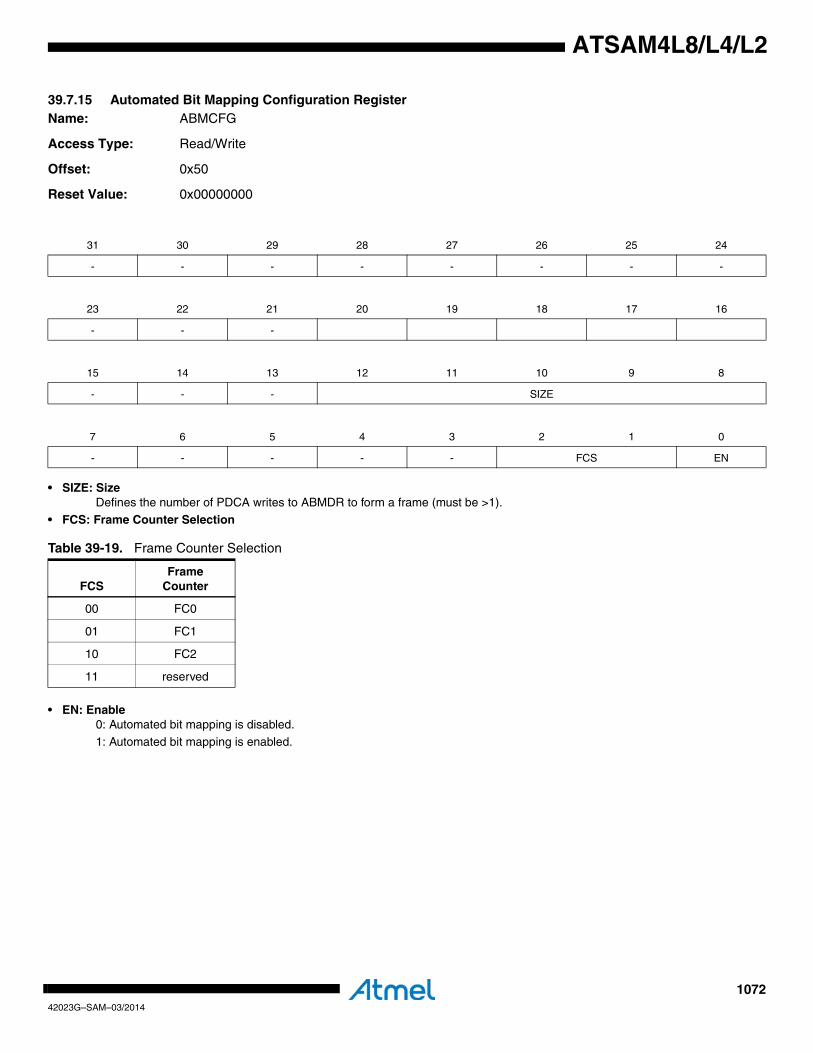
107242023G–SAM–03/2014
ATSAM4L8/L4/L2
39.7.15 Automated Bit Mapping Configuration RegisterName: ABMCFG
Access Type: Read/Write
Offset: 0x50
Reset Value: 0x00000000
• SIZE: SizeDefines the number of PDCA writes to ABMDR to form a frame (must be >1).
• FCS: Frame Counter Selection
• EN: Enable0: Automated bit mapping is disabled.
1: Automated bit mapping is enabled.
31 30 29 28 27 26 25 24
- - - - - - - -
23 22 21 20 19 18 17 16
- - -
15 14 13 12 11 10 9 8
- - - SIZE
7 6 5 4 3 2 1 0
- - - - - FCS EN
Table 39-19. Frame Counter Selection
FCSFrame
Counter
00 FC0
01 FC1
10 FC2
11 reserved
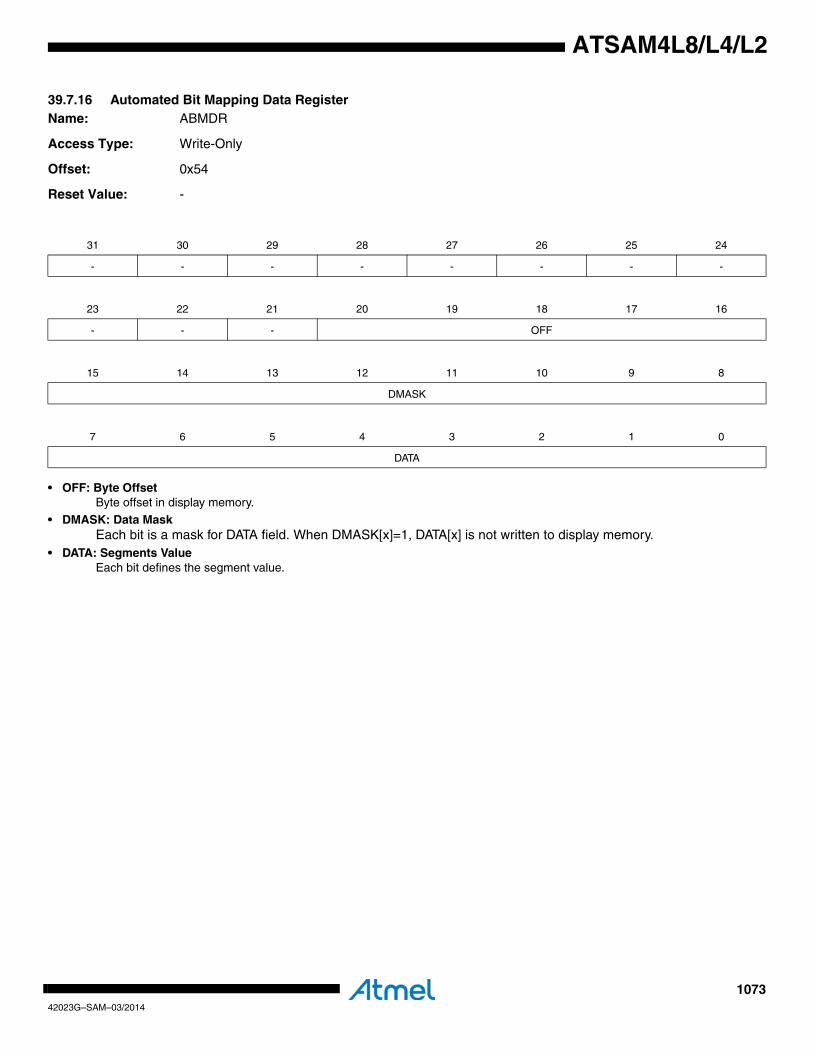
107342023G–SAM–03/2014
ATSAM4L8/L4/L2
39.7.16 Automated Bit Mapping Data RegisterName: ABMDR
Access Type: Write-Only
Offset: 0x54
Reset Value: -
• OFF: Byte OffsetByte offset in display memory.
• DMASK: Data MaskEach bit is a mask for DATA field. When DMASK[x]=1, DATA[x] is not written to display memory.
• DATA: Segments ValueEach bit defines the segment value.
31 30 29 28 27 26 25 24
- - - - - - - -
23 22 21 20 19 18 17 16
- - - OFF
15 14 13 12 11 10 9 8
DMASK
7 6 5 4 3 2 1 0
DATA
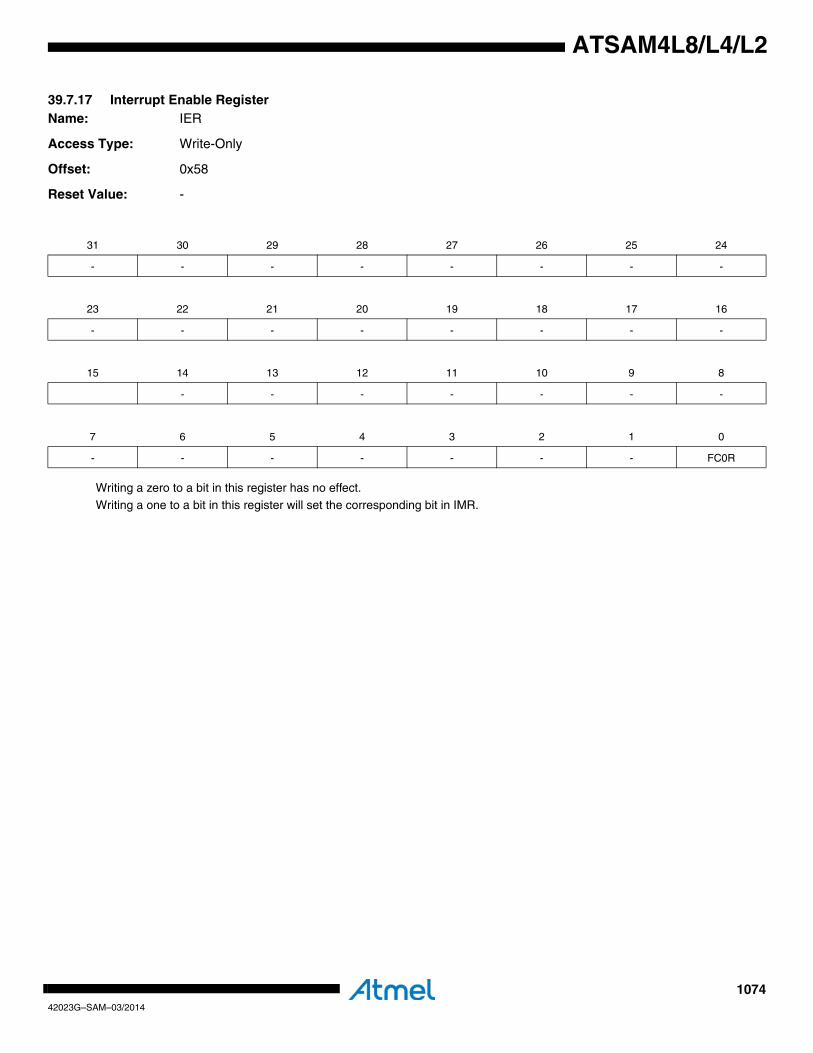
107442023G–SAM–03/2014
ATSAM4L8/L4/L2
39.7.17 Interrupt Enable RegisterName: IER
Access Type: Write-Only
Offset: 0x58
Reset Value: -
Writing a zero to a bit in this register has no effect.Writing a one to a bit in this register will set the corresponding bit in IMR.
31 30 29 28 27 26 25 24
- - - - - - - -
23 22 21 20 19 18 17 16
- - - - - - - -
15 14 13 12 11 10 9 8
- - - - - - -
7 6 5 4 3 2 1 0
- - - - - - - FC0R

107542023G–SAM–03/2014
ATSAM4L8/L4/L2
39.7.18 Interrupt Disable RegisterName: IDR
Access Type: Write-Only
Offset: 0x5C
Reset Value: -
Writing a zero to a bit in this register has no effect.Writing a one to a bit in this register will clear the corresponding bit in IMR.
31 30 29 28 27 26 25 24
- - - - - - -
23 22 21 20 19 18 17 16
- - - - - - - -
15 14 13 12 11 10 9 8
- - - - - - - -
7 6 5 4 3 2 1 0
- - - - - - - FC0R
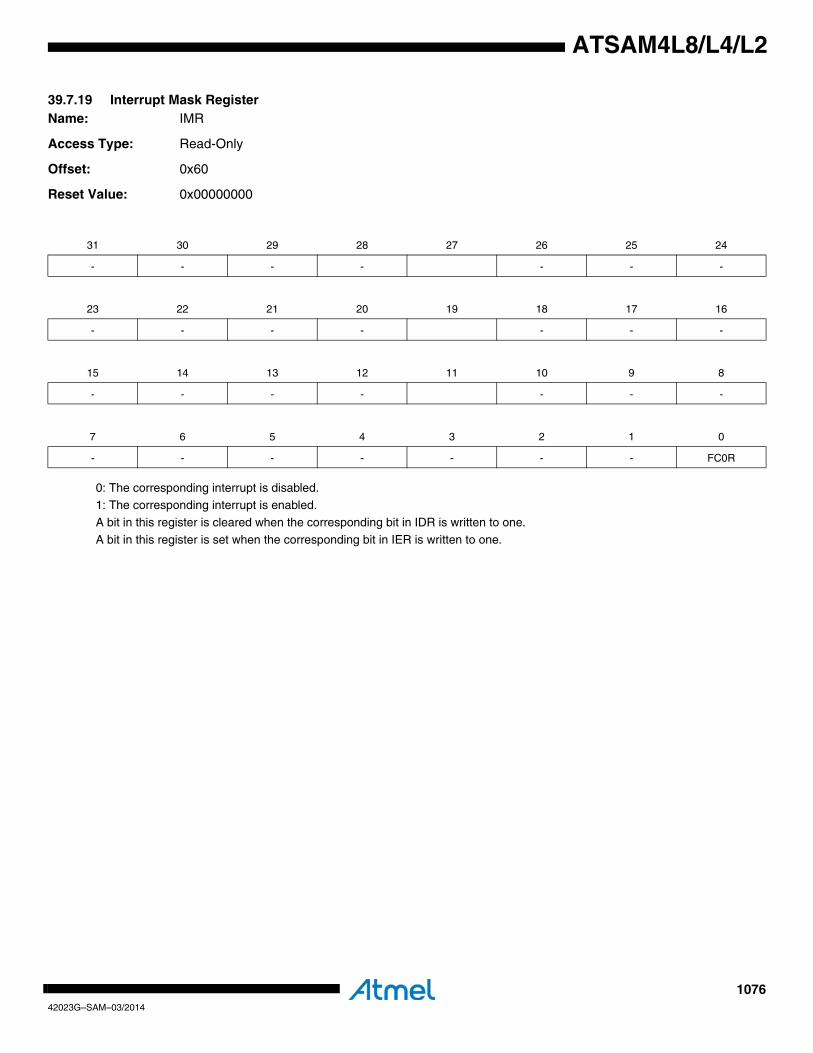
107642023G–SAM–03/2014
ATSAM4L8/L4/L2
39.7.19 Interrupt Mask RegisterName: IMR
Access Type: Read-Only
Offset: 0x60
Reset Value: 0x00000000
0: The corresponding interrupt is disabled.1: The corresponding interrupt is enabled.
A bit in this register is cleared when the corresponding bit in IDR is written to one.
A bit in this register is set when the corresponding bit in IER is written to one.
31 30 29 28 27 26 25 24
- - - - - - -
23 22 21 20 19 18 17 16
- - - - - - -
15 14 13 12 11 10 9 8
- - - - - - -
7 6 5 4 3 2 1 0
- - - - - - - FC0R

107742023G–SAM–03/2014
ATSAM4L8/L4/L2
39.7.20 Module VersionName: VERSION
Access Type: Read-Only
Offset: 0x64
Reset Value: -
• VARIANT: Variant numberReserved. No functionality associated.
• VERSION: Version numberVersion number of the module. No functionality associated.
31 30 29 28 27 26 25 24
- - - - - - - -
23 22 21 20 19 18 17 16
- - - - VARIANT
15 14 13 12 11 10 9 8
- - - - VERSION[11:8]
7 6 5 4 3 2 1 0
VERSION[7:0]
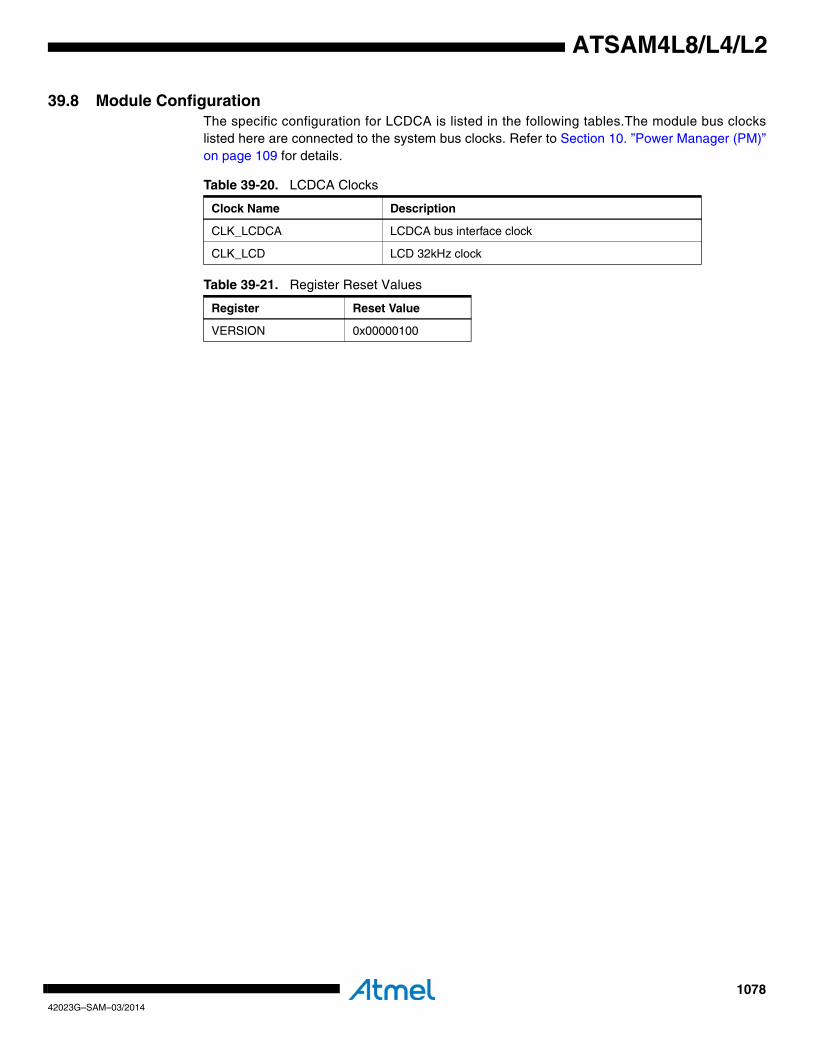
107842023G–SAM–03/2014
ATSAM4L8/L4/L2
39.8 Module ConfigurationThe specific configuration for LCDCA is listed in the following tables.The module bus clockslisted here are connected to the system bus clocks. Refer to Section 10. ”Power Manager (PM)”on page 109 for details.
Table 39-20. LCDCA Clocks
Clock Name Description
CLK_LCDCA LCDCA bus interface clock
CLK_LCD LCD 32kHz clock
Table 39-21. Register Reset Values
Register Reset Value
VERSION 0x00000100
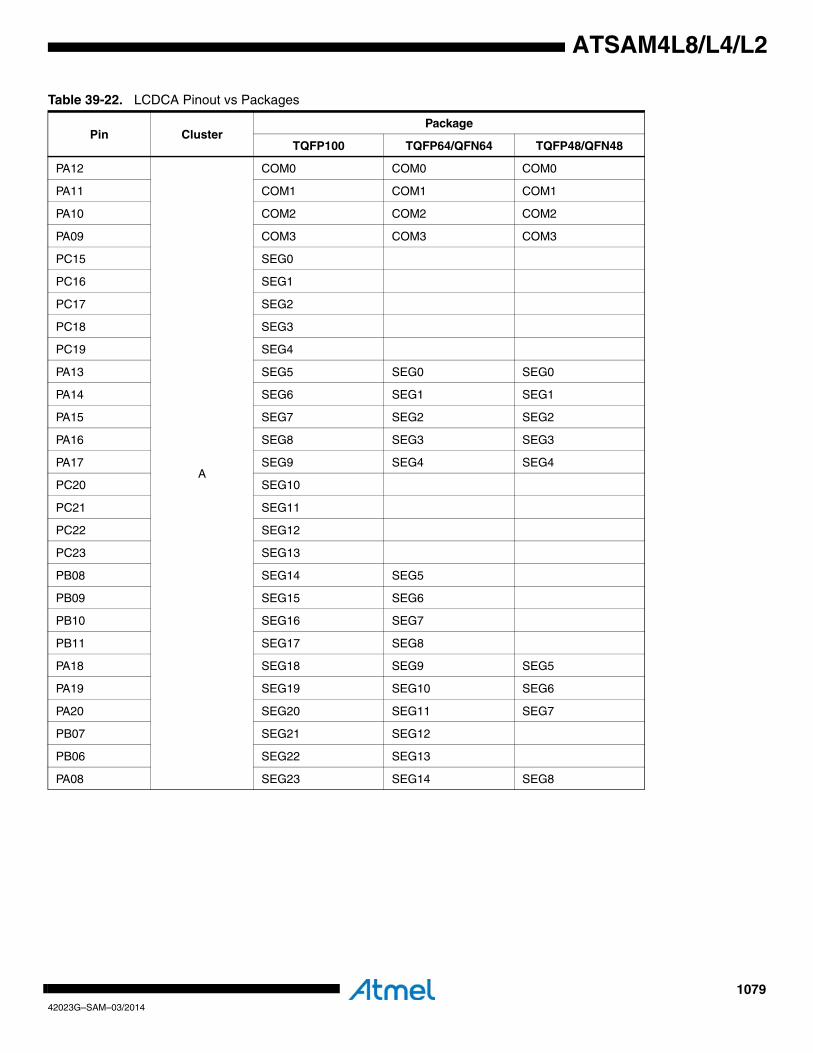
107942023G–SAM–03/2014
ATSAM4L8/L4/L2
Table 39-22. LCDCA Pinout vs Packages
Pin ClusterPackage
TQFP100 TQFP64/QFN64 TQFP48/QFN48
PA12
A
COM0 COM0 COM0
PA11 COM1 COM1 COM1
PA10 COM2 COM2 COM2
PA09 COM3 COM3 COM3
PC15 SEG0
PC16 SEG1
PC17 SEG2
PC18 SEG3
PC19 SEG4
PA13 SEG5 SEG0 SEG0
PA14 SEG6 SEG1 SEG1
PA15 SEG7 SEG2 SEG2
PA16 SEG8 SEG3 SEG3
PA17 SEG9 SEG4 SEG4
PC20 SEG10
PC21 SEG11
PC22 SEG12
PC23 SEG13
PB08 SEG14 SEG5
PB09 SEG15 SEG6
PB10 SEG16 SEG7
PB11 SEG17 SEG8
PA18 SEG18 SEG9 SEG5
PA19 SEG19 SEG10 SEG6
PA20 SEG20 SEG11 SEG7
PB07 SEG21 SEG12
PB06 SEG22 SEG13
PA08 SEG23 SEG14 SEG8
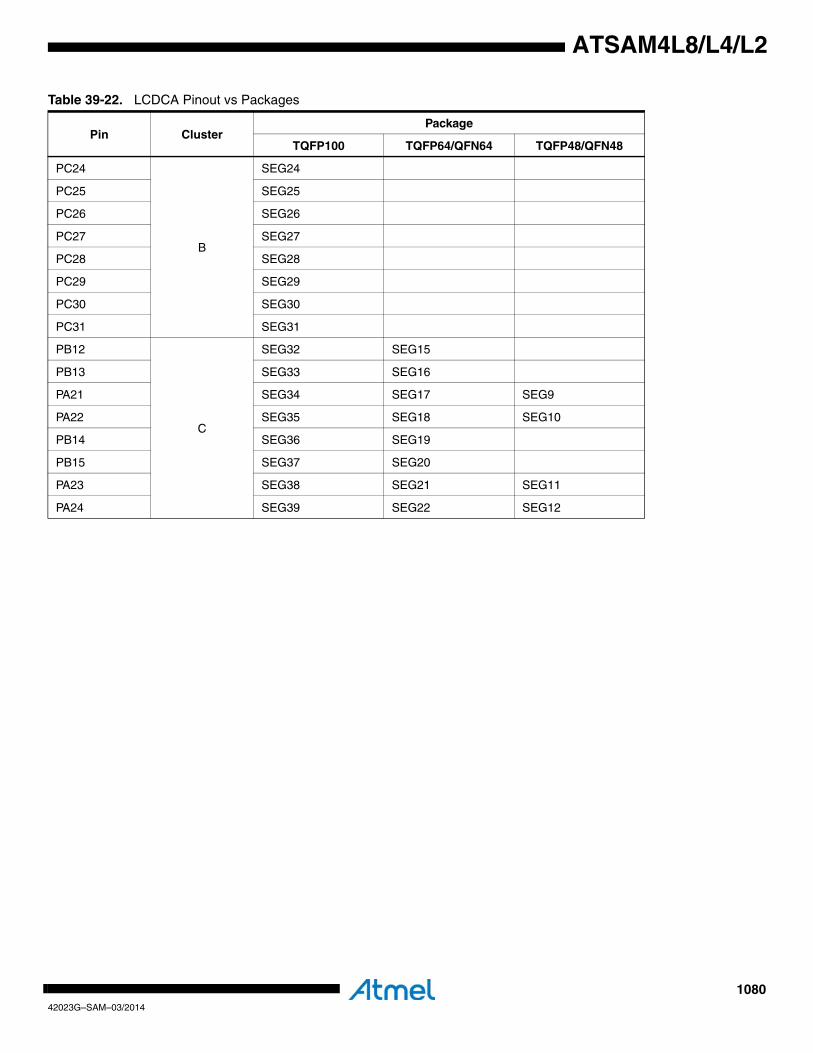
108042023G–SAM–03/2014
ATSAM4L8/L4/L2
PC24
B
SEG24
PC25 SEG25
PC26 SEG26
PC27 SEG27
PC28 SEG28
PC29 SEG29
PC30 SEG30
PC31 SEG31
PB12
C
SEG32 SEG15
PB13 SEG33 SEG16
PA21 SEG34 SEG17 SEG9
PA22 SEG35 SEG18 SEG10
PB14 SEG36 SEG19
PB15 SEG37 SEG20
PA23 SEG38 SEG21 SEG11
PA24 SEG39 SEG22 SEG12
Table 39-22. LCDCA Pinout vs Packages
Pin ClusterPackage
TQFP100 TQFP64/QFN64 TQFP48/QFN48
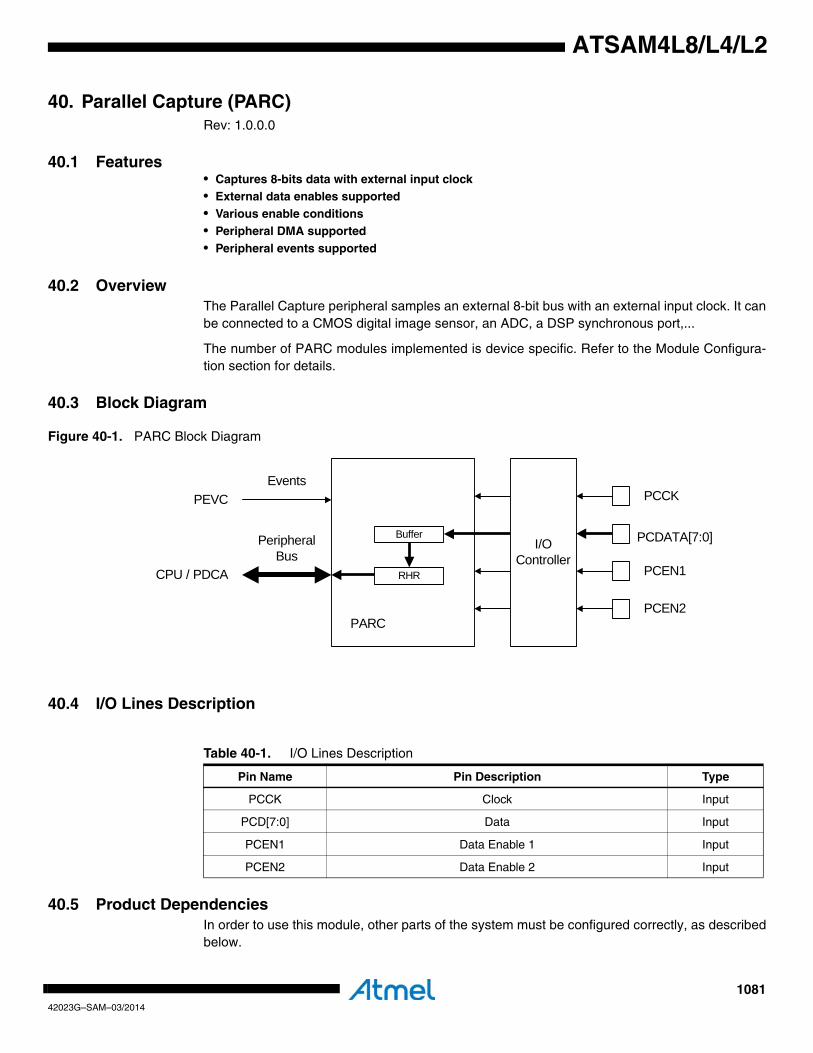
108142023G–SAM–03/2014
ATSAM4L8/L4/L2
40. Parallel Capture (PARC)Rev: 1.0.0.0
40.1 Features• Captures 8-bits data with external input clock• External data enables supported• Various enable conditions• Peripheral DMA supported• Peripheral events supported
40.2 OverviewThe Parallel Capture peripheral samples an external 8-bit bus with an external input clock. It canbe connected to a CMOS digital image sensor, an ADC, a DSP synchronous port,...
The number of PARC modules implemented is device specific. Refer to the Module Configura-tion section for details.
40.3 Block Diagram
Figure 40-1. PARC Block Diagram
40.4 I/O Lines Description
40.5 Product DependenciesIn order to use this module, other parts of the system must be configured correctly, as describedbelow.
PARC
PCCK
PCDATA[7:0]
PCEN1
PCEN2
PEVCEvents
Peripheral Bus
CPU / PDCA RHR
BufferI/O
Controller
Table 40-1. I/O Lines Description
Pin Name Pin Description Type
PCCK Clock Input
PCD[7:0] Data Input
PCEN1 Data Enable 1 Input
PCEN2 Data Enable 2 Input
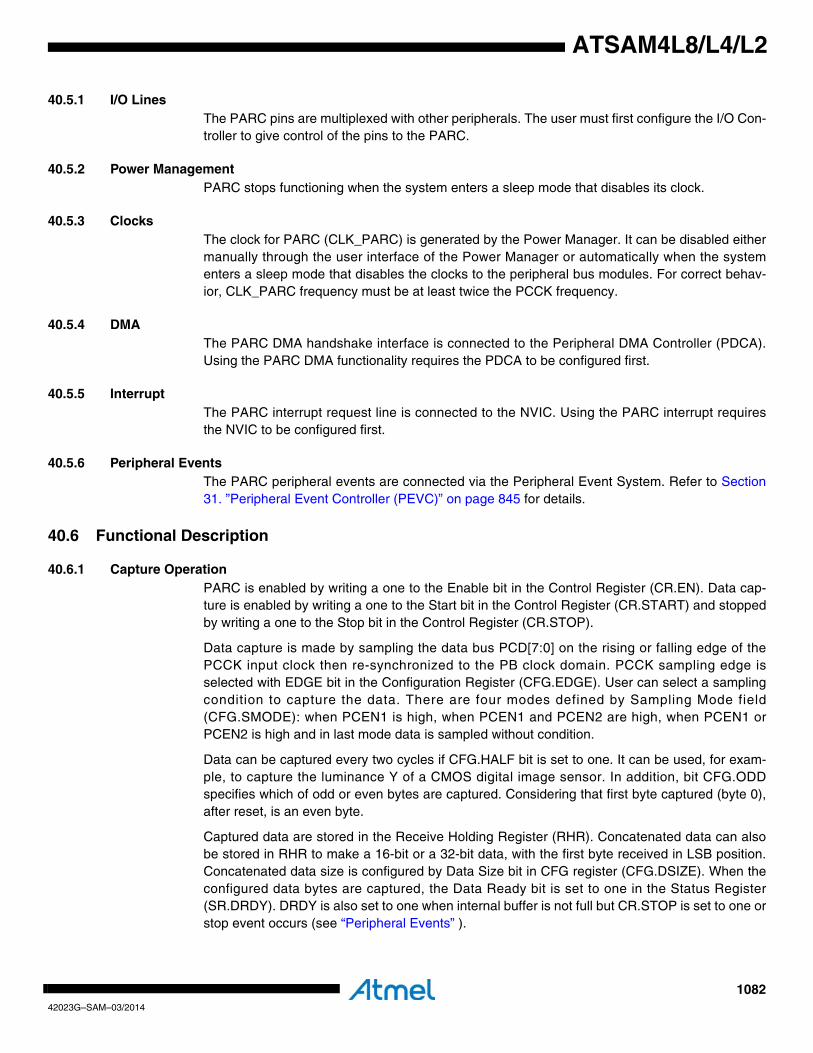
108242023G–SAM–03/2014
ATSAM4L8/L4/L2
40.5.1 I/O LinesThe PARC pins are multiplexed with other peripherals. The user must first configure the I/O Con-troller to give control of the pins to the PARC.
40.5.2 Power ManagementPARC stops functioning when the system enters a sleep mode that disables its clock.
40.5.3 ClocksThe clock for PARC (CLK_PARC) is generated by the Power Manager. It can be disabled eithermanually through the user interface of the Power Manager or automatically when the systementers a sleep mode that disables the clocks to the peripheral bus modules. For correct behav-ior, CLK_PARC frequency must be at least twice the PCCK frequency.
40.5.4 DMAThe PARC DMA handshake interface is connected to the Peripheral DMA Controller (PDCA).Using the PARC DMA functionality requires the PDCA to be configured first.
40.5.5 InterruptThe PARC interrupt request line is connected to the NVIC. Using the PARC interrupt requiresthe NVIC to be configured first.
40.5.6 Peripheral EventsThe PARC peripheral events are connected via the Peripheral Event System. Refer to Section31. ”Peripheral Event Controller (PEVC)” on page 845 for details.
40.6 Functional Description
40.6.1 Capture OperationPARC is enabled by writing a one to the Enable bit in the Control Register (CR.EN). Data cap-ture is enabled by writing a one to the Start bit in the Control Register (CR.START) and stoppedby writing a one to the Stop bit in the Control Register (CR.STOP).
Data capture is made by sampling the data bus PCD[7:0] on the rising or falling edge of thePCCK input clock then re-synchronized to the PB clock domain. PCCK sampling edge isselected with EDGE bit in the Configuration Register (CFG.EDGE). User can select a samplingcondition to capture the data. There are four modes defined by Sampling Mode field(CFG.SMODE): when PCEN1 is high, when PCEN1 and PCEN2 are high, when PCEN1 orPCEN2 is high and in last mode data is sampled without condition.
Data can be captured every two cycles if CFG.HALF bit is set to one. It can be used, for exam-ple, to capture the luminance Y of a CMOS digital image sensor. In addition, bit CFG.ODDspecifies which of odd or even bytes are captured. Considering that first byte captured (byte 0),after reset, is an even byte.
Captured data are stored in the Receive Holding Register (RHR). Concatenated data can alsobe stored in RHR to make a 16-bit or a 32-bit data, with the first byte received in LSB position.Concatenated data size is configured by Data Size bit in CFG register (CFG.DSIZE). When theconfigured data bytes are captured, the Data Ready bit is set to one in the Status Register(SR.DRDY). DRDY is also set to one when internal buffer is not full but CR.STOP is set to one orstop event occurs (see “Peripheral Events” ).

108342023G–SAM–03/2014
ATSAM4L8/L4/L2
An overrun condition is detected if RHR is not read before internal buffer is full. Data in RHR iscorrupted and Overrun bit is set to one in the Status Register (SR.OVR).
40.6.2 Peripheral DMAPARC can be associated to a Peripheral DMA Controller (PDCA) channel. It will then performdata transfer from PARC to a memory buffer without any CPU intervention (see PDCA chapterfor channel configuration). PDCA and PARC data size must be equal, if CFG.DSIZE is 32-bitPDCA must be configured to read 32-bit data size.
PARC requests data transfer when internal buffer is full. When data capture is disabled (withCR.STOP), PARC requests a last data transfer if internal buffer contains at least one byte.
40.6.3 Peripheral EventsData capture can be enabled or disabled by peripheral events if Event Mode is enabled(CFG.EMODE). Start event enables the data capture whereas stop event disables it.
40.6.4 Interrupt GenerationPARC has two interrupt sources, Data Ready (DRDY) and Overrun (OVR). The status of eachinterrupt source can be read from the Status Register. An interrupt request will be generated if abit in SR and the corresponding bit in the Interrupt Mask Register (IMR) are set. Bits in IMR areset by writing a one to the corresponding bit in the Interrupt Enable Register (IER), and clearedby writing a one to the corresponding bit in the Interrupt Disable Register (IDR). The interruptrequest remains active until the corresponding bit in SR is cleared by writing a one to the corre-sponding bit in the Interrupt Status Clear Register (ICR).
The interrupt sources are ORed together to make one interrupt request which remains activeuntil all interrupt bits in SR are cleared.
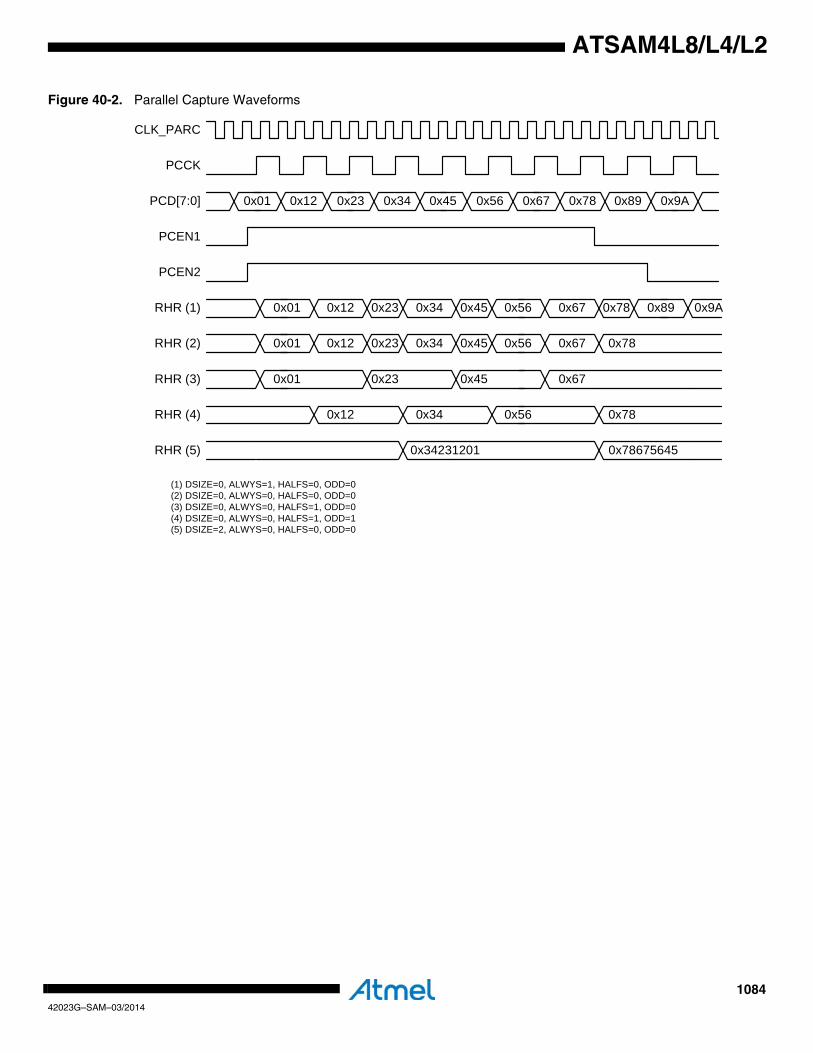
108442023G–SAM–03/2014
ATSAM4L8/L4/L2
Figure 40-2. Parallel Capture Waveforms
0x01 0x12 0x23 0x34 0x45 0x56 0x67 0x78 0x89
0x01 0x12 0x34 0x45 0x56 0x67 0x780x23
0x9A
0x89 0x9A
0x01 0x12 0x34 0x45 0x56 0x67 0x780x23
RHR (1)
RHR (2)
PCEN2
PCEN1
PCD[7:0]
PCCK
CLK_PARC
(1) DSIZE=0, ALWYS=1, HALFS=0, ODD=0(2) DSIZE=0, ALWYS=0, HALFS=0, ODD=0(3) DSIZE=0, ALWYS=0, HALFS=1, ODD=0(4) DSIZE=0, ALWYS=0, HALFS=1, ODD=1(5) DSIZE=2, ALWYS=0, HALFS=0, ODD=0
0x01 0x45 0x670x23RHR (3)
0x12 0x34 0x56 0x78RHR (4)
0x34231201 0x78675645RHR (5)
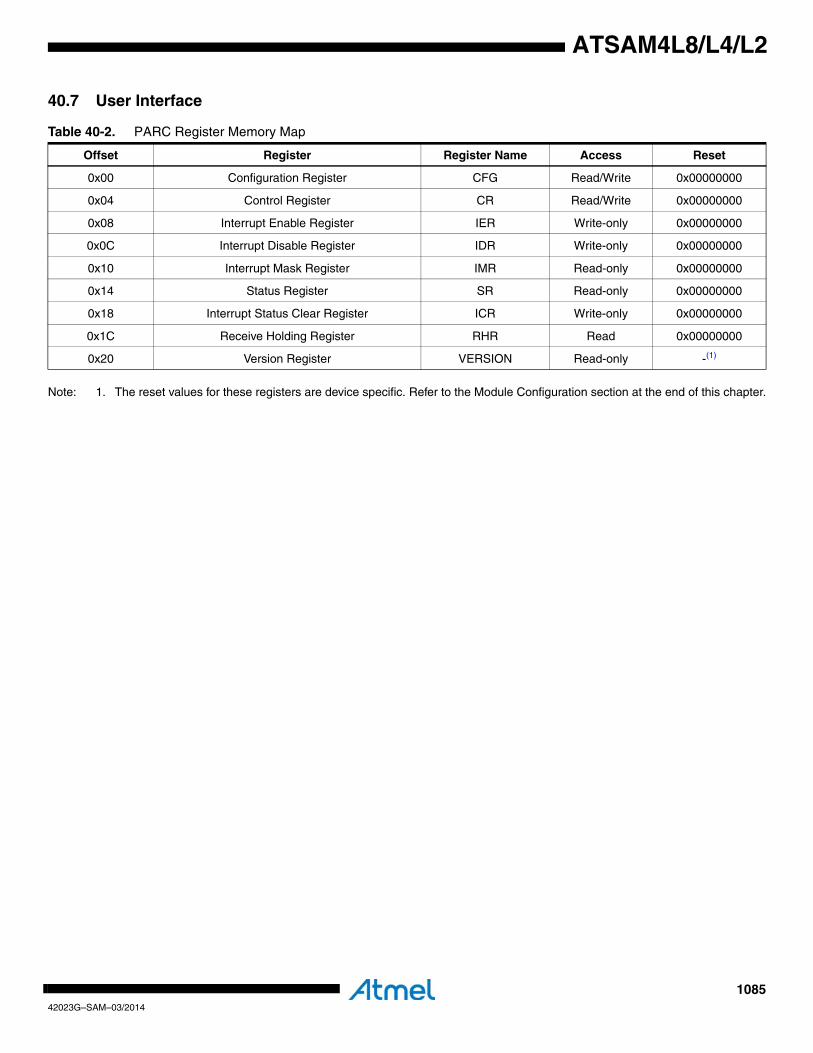
108542023G–SAM–03/2014
ATSAM4L8/L4/L2
40.7 User Interface
Note: 1. The reset values for these registers are device specific. Refer to the Module Configuration section at the end of this chapter.
Table 40-2. PARC Register Memory Map
Offset Register Register Name Access Reset
0x00 Configuration Register CFG Read/Write 0x00000000
0x04 Control Register CR Read/Write 0x00000000
0x08 Interrupt Enable Register IER Write-only 0x00000000
0x0C Interrupt Disable Register IDR Write-only 0x00000000
0x10 Interrupt Mask Register IMR Read-only 0x00000000
0x14 Status Register SR Read-only 0x00000000
0x18 Interrupt Status Clear Register ICR Write-only 0x00000000
0x1C Receive Holding Register RHR Read 0x00000000
0x20 Version Register VERSION Read-only -(1)
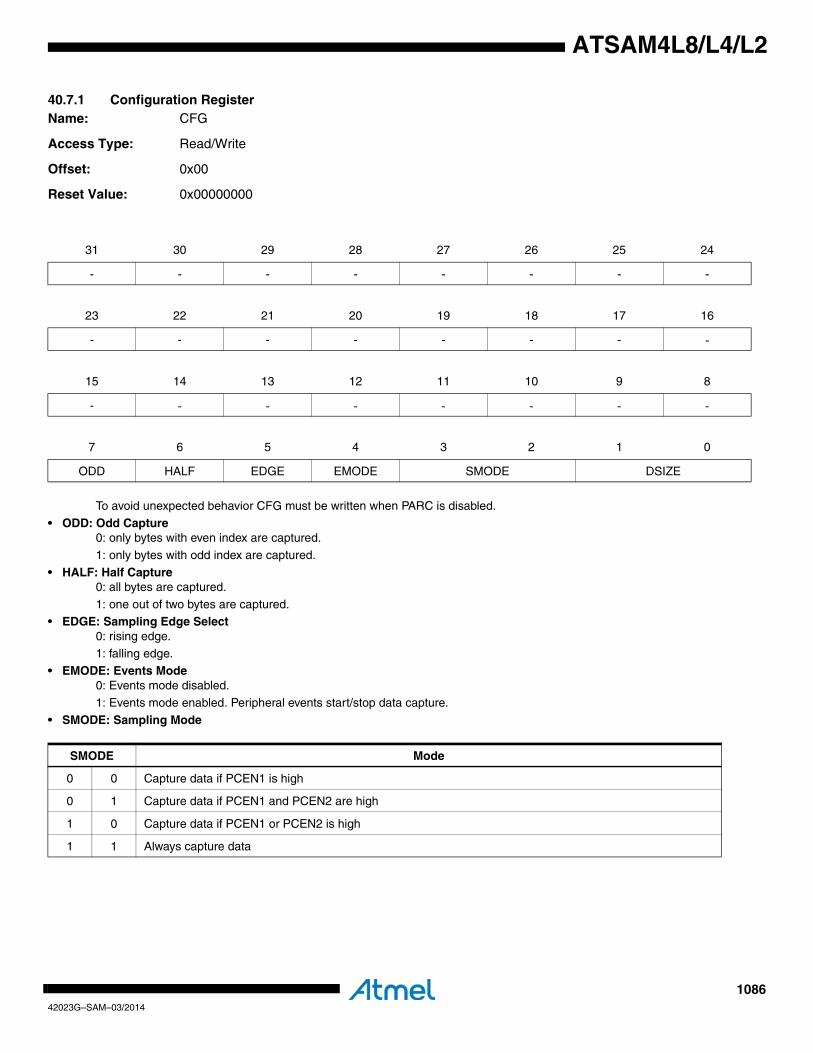
108642023G–SAM–03/2014
ATSAM4L8/L4/L2
40.7.1 Configuration Register Name: CFG
Access Type: Read/Write
Offset: 0x00
Reset Value: 0x00000000
To avoid unexpected behavior CFG must be written when PARC is disabled.
• ODD: Odd Capture0: only bytes with even index are captured.
1: only bytes with odd index are captured.
• HALF: Half Capture0: all bytes are captured.
1: one out of two bytes are captured.• EDGE: Sampling Edge Select
0: rising edge.1: falling edge.
• EMODE: Events Mode0: Events mode disabled.
1: Events mode enabled. Peripheral events start/stop data capture.
• SMODE: Sampling Mode
31 30 29 28 27 26 25 24
- - - - - - - -
23 22 21 20 19 18 17 16
- - - - - - - -
15 14 13 12 11 10 9 8
- - - - - - - -
7 6 5 4 3 2 1 0
ODD HALF EDGE EMODE SMODE DSIZE
SMODE Mode
0 0 Capture data if PCEN1 is high
0 1 Capture data if PCEN1 and PCEN2 are high
1 0 Capture data if PCEN1 or PCEN2 is high
1 1 Always capture data
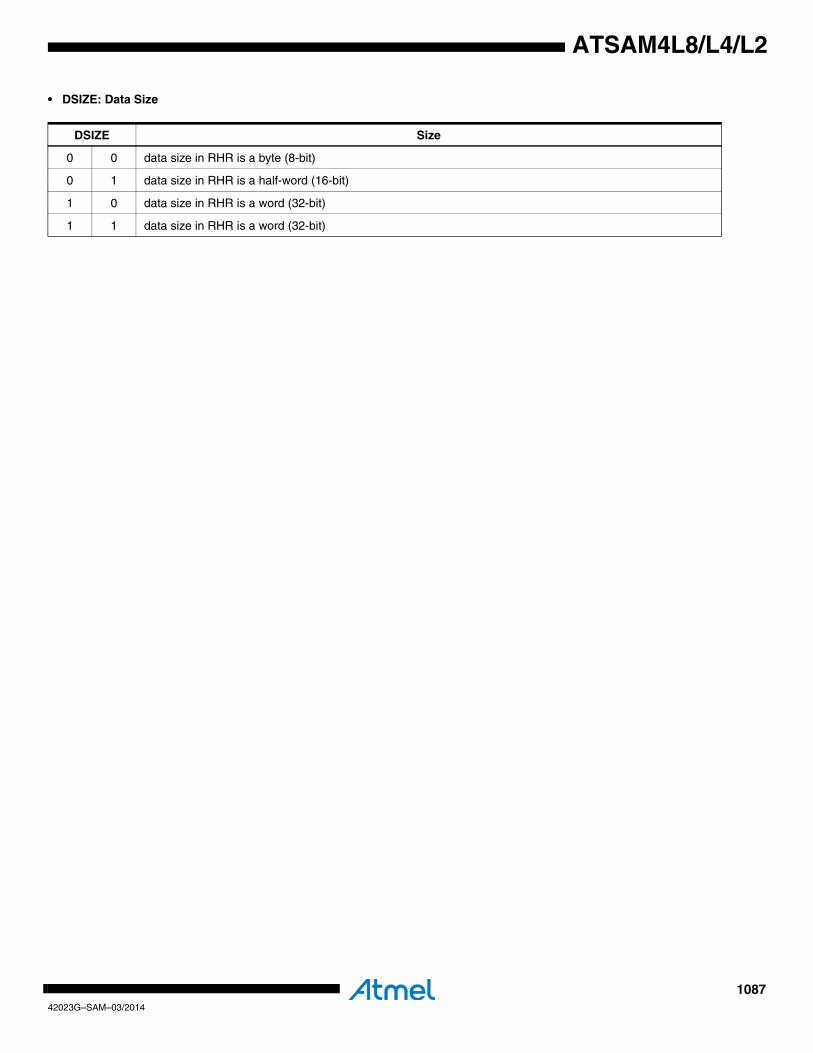
108742023G–SAM–03/2014
ATSAM4L8/L4/L2
• DSIZE: Data Size
DSIZE Size
0 0 data size in RHR is a byte (8-bit)
0 1 data size in RHR is a half-word (16-bit)
1 0 data size in RHR is a word (32-bit)
1 1 data size in RHR is a word (32-bit)
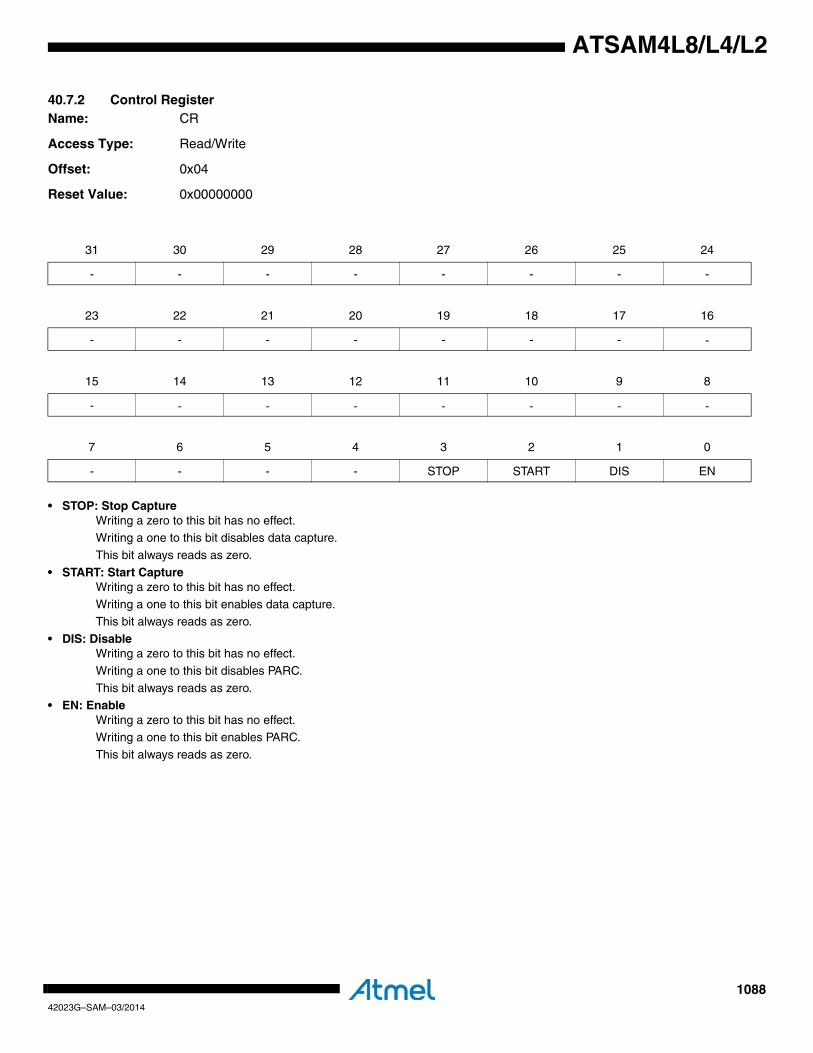
108842023G–SAM–03/2014
ATSAM4L8/L4/L2
40.7.2 Control Register Name: CR
Access Type: Read/Write
Offset: 0x04
Reset Value: 0x00000000
• STOP: Stop CaptureWriting a zero to this bit has no effect.Writing a one to this bit disables data capture.
This bit always reads as zero.
• START: Start CaptureWriting a zero to this bit has no effect.
Writing a one to this bit enables data capture.This bit always reads as zero.
• DIS: DisableWriting a zero to this bit has no effect.
Writing a one to this bit disables PARC.
This bit always reads as zero.• EN: Enable
Writing a zero to this bit has no effect.Writing a one to this bit enables PARC.
This bit always reads as zero.
31 30 29 28 27 26 25 24
- - - - - - - -
23 22 21 20 19 18 17 16
- - - - - - - -
15 14 13 12 11 10 9 8
- - - - - - - -
7 6 5 4 3 2 1 0
- - - - STOP START DIS EN

108942023G–SAM–03/2014
ATSAM4L8/L4/L2
40.7.3 Interrupt Enable Register Name: IER
Access Type: Write-only
Offset: 0x08
Reset Value: 0x00000000
Writing a zero to a bit in this register has no effect.
Writing a one to a bit in this register will set the corresponding bit in IMR.
31 30 29 28 27 26 25 24
- - - - - - - -
23 22 21 20 19 18 17 16
- - - - - - - -
15 14 13 12 11 10 9 8
- - - - - - - -
7 6 5 4 3 2 1 0
- - - - OVR DRDY - -

109042023G–SAM–03/2014
ATSAM4L8/L4/L2
40.7.4 Interrupt Disable Register Name: IDR
Access Type: Write-only
Offset: 0x0C
Reset Value: 0x00000000
Writing a zero to a bit in this register has no effect.
Writing a one to a bit in this register will clear the corresponding bit in IMR.
31 30 29 28 27 26 25 24
- - - - - - - -
23 22 21 20 19 18 17 16
- - - - - - - -
15 14 13 12 11 10 9 8
- - - - - - - -
7 6 5 4 3 2 1 0
- - - - OVR DRDY - -
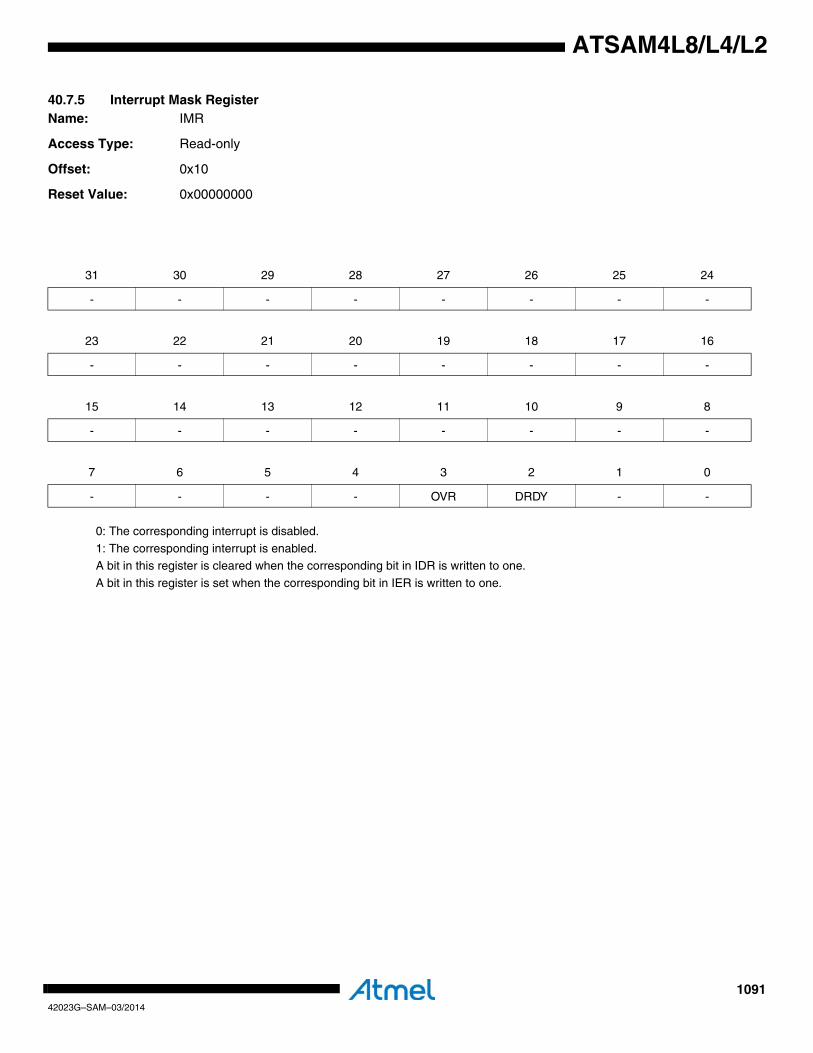
109142023G–SAM–03/2014
ATSAM4L8/L4/L2
40.7.5 Interrupt Mask Register Name: IMR
Access Type: Read-only
Offset: 0x10
Reset Value: 0x00000000
0: The corresponding interrupt is disabled.
1: The corresponding interrupt is enabled.A bit in this register is cleared when the corresponding bit in IDR is written to one.
A bit in this register is set when the corresponding bit in IER is written to one.
31 30 29 28 27 26 25 24
- - - - - - - -
23 22 21 20 19 18 17 16
- - - - - - - -
15 14 13 12 11 10 9 8
- - - - - - - -
7 6 5 4 3 2 1 0
- - - - OVR DRDY - -
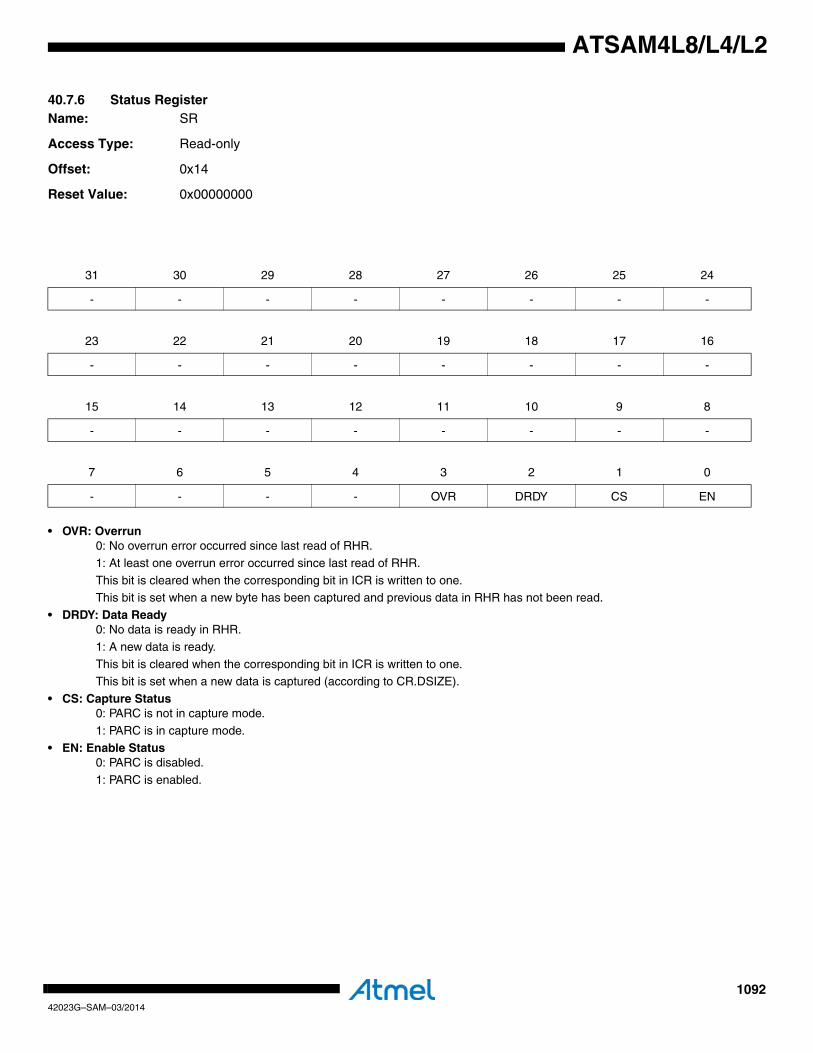
109242023G–SAM–03/2014
ATSAM4L8/L4/L2
40.7.6 Status Register Name: SR
Access Type: Read-only
Offset: 0x14
Reset Value: 0x00000000
• OVR: Overrun0: No overrun error occurred since last read of RHR.
1: At least one overrun error occurred since last read of RHR.
This bit is cleared when the corresponding bit in ICR is written to one.This bit is set when a new byte has been captured and previous data in RHR has not been read.
• DRDY: Data Ready0: No data is ready in RHR.
1: A new data is ready.
This bit is cleared when the corresponding bit in ICR is written to one.This bit is set when a new data is captured (according to CR.DSIZE).
• CS: Capture Status0: PARC is not in capture mode.
1: PARC is in capture mode.
• EN: Enable Status0: PARC is disabled.
1: PARC is enabled.
31 30 29 28 27 26 25 24
- - - - - - - -
23 22 21 20 19 18 17 16
- - - - - - - -
15 14 13 12 11 10 9 8
- - - - - - - -
7 6 5 4 3 2 1 0
- - - - OVR DRDY CS EN
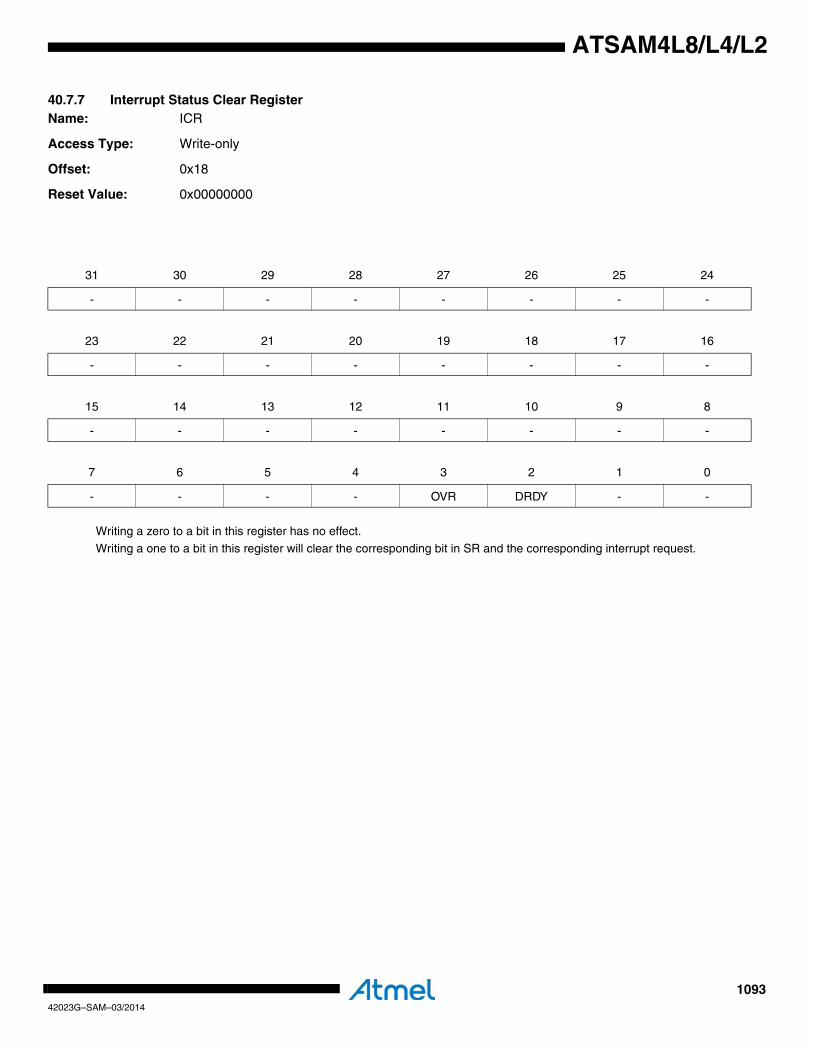
109342023G–SAM–03/2014
ATSAM4L8/L4/L2
40.7.7 Interrupt Status Clear Register Name: ICR
Access Type: Write-only
Offset: 0x18
Reset Value: 0x00000000
Writing a zero to a bit in this register has no effect.
Writing a one to a bit in this register will clear the corresponding bit in SR and the corresponding interrupt request.
31 30 29 28 27 26 25 24
- - - - - - - -
23 22 21 20 19 18 17 16
- - - - - - - -
15 14 13 12 11 10 9 8
- - - - - - - -
7 6 5 4 3 2 1 0
- - - - OVR DRDY - -
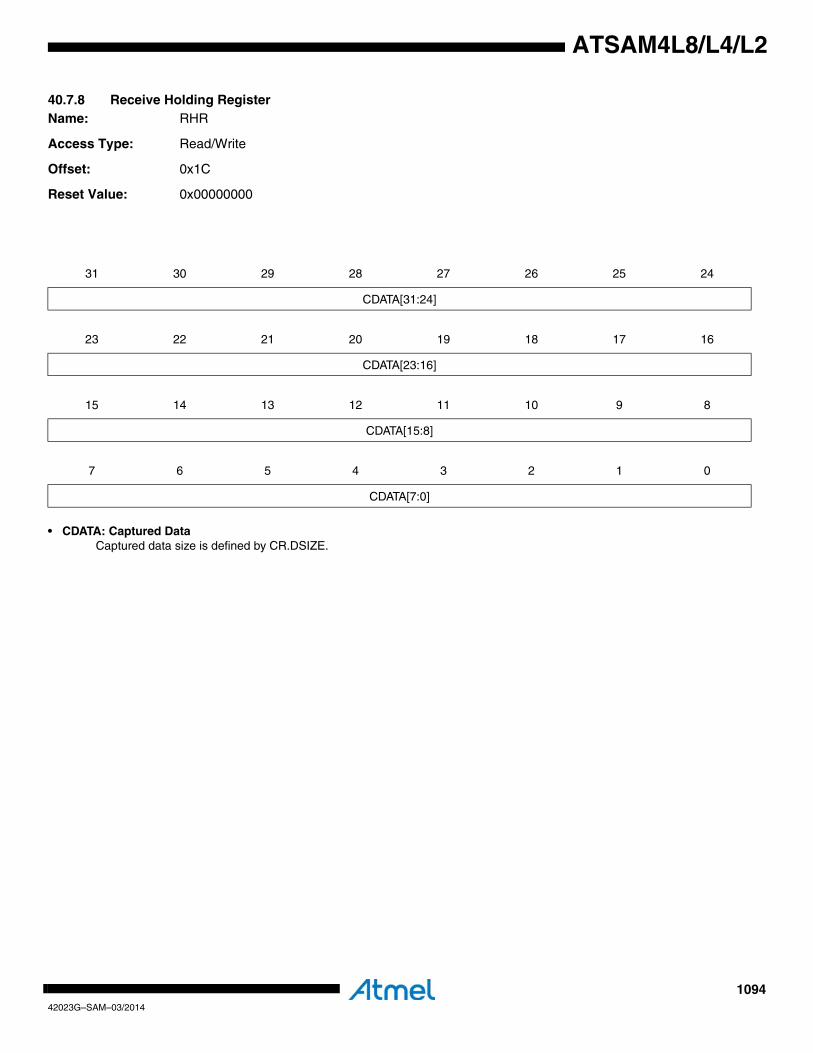
109442023G–SAM–03/2014
ATSAM4L8/L4/L2
40.7.8 Receive Holding Register Name: RHR
Access Type: Read/Write
Offset: 0x1C
Reset Value: 0x00000000
• CDATA: Captured DataCaptured data size is defined by CR.DSIZE.
31 30 29 28 27 26 25 24
CDATA[31:24]
23 22 21 20 19 18 17 16
CDATA[23:16]
15 14 13 12 11 10 9 8
CDATA[15:8]
7 6 5 4 3 2 1 0
CDATA[7:0]
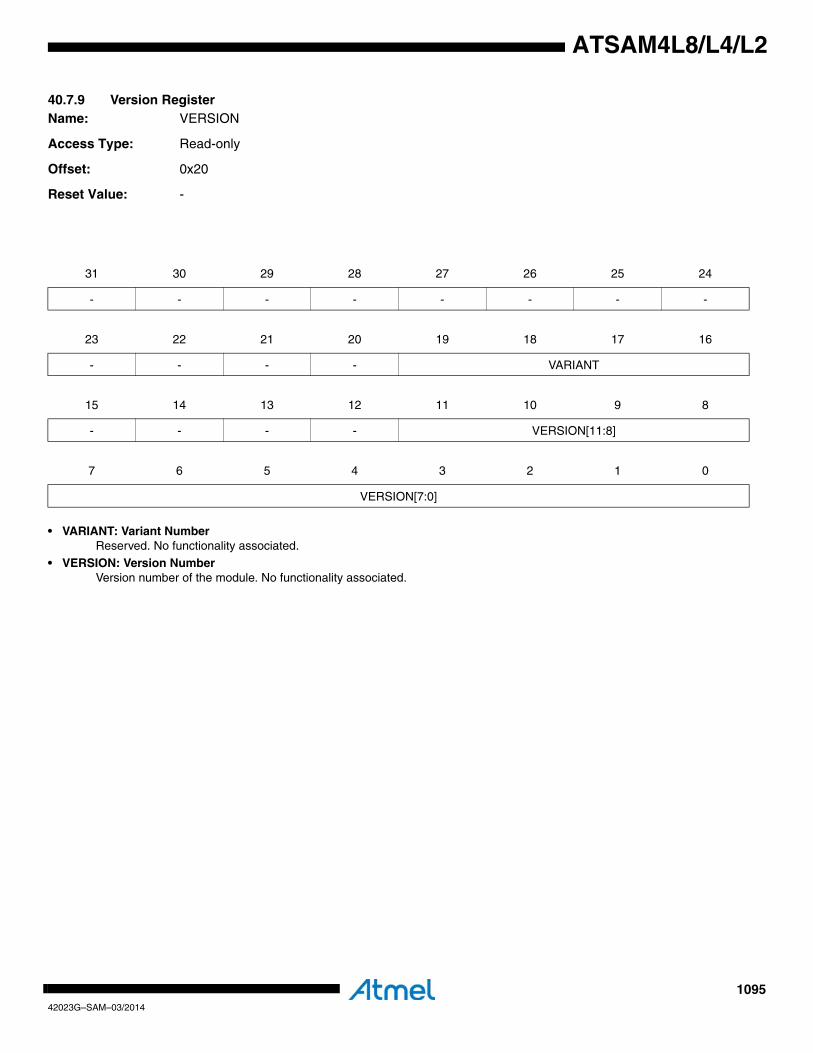
109542023G–SAM–03/2014
ATSAM4L8/L4/L2
40.7.9 Version RegisterName: VERSION
Access Type: Read-only
Offset: 0x20
Reset Value: -
• VARIANT: Variant NumberReserved. No functionality associated.
• VERSION: Version NumberVersion number of the module. No functionality associated.
31 30 29 28 27 26 25 24
- - - - - - - -
23 22 21 20 19 18 17 16
- - - - VARIANT
15 14 13 12 11 10 9 8
- - - - VERSION[11:8]
7 6 5 4 3 2 1 0
VERSION[7:0]

109642023G–SAM–03/2014
ATSAM4L8/L4/L2
40.8 Module ConfigurationThe specific configuration for each PARC instance is listed in the following tables.The modulebus clocks listed here are connected to the system bus clocks. Refer to Section 10. ”Power Man-ager (PM)” on page 109 for details.
Table 40-3. PARC Clock Name
Module Name Clock Name Description
PARC CLK_PARC Peripheral clock for PARC
Table 40-4. Register Reset Values
Register Reset Value
VERSION 0x00000100
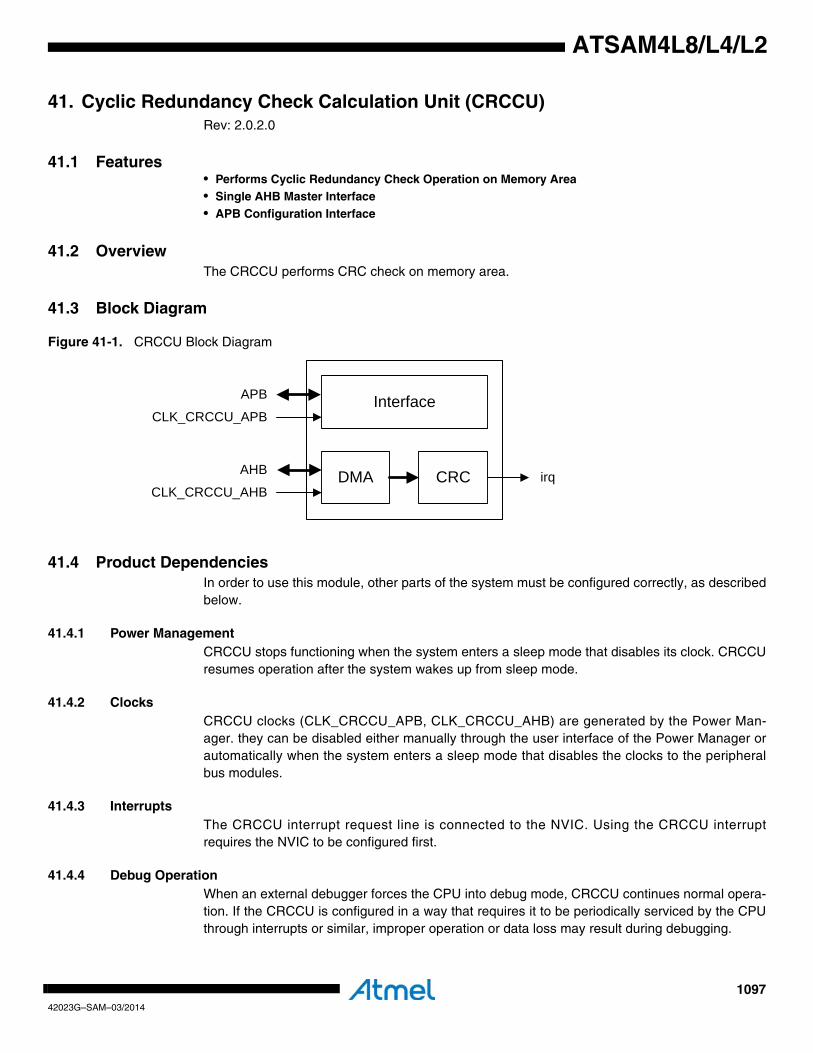
109742023G–SAM–03/2014
ATSAM4L8/L4/L2
41. Cyclic Redundancy Check Calculation Unit (CRCCU)Rev: 2.0.2.0
41.1 Features• Performs Cyclic Redundancy Check Operation on Memory Area• Single AHB Master Interface• APB Configuration Interface
41.2 OverviewThe CRCCU performs CRC check on memory area.
41.3 Block Diagram
Figure 41-1. CRCCU Block Diagram
41.4 Product DependenciesIn order to use this module, other parts of the system must be configured correctly, as describedbelow.
41.4.1 Power ManagementCRCCU stops functioning when the system enters a sleep mode that disables its clock. CRCCUresumes operation after the system wakes up from sleep mode.
41.4.2 ClocksCRCCU clocks (CLK_CRCCU_APB, CLK_CRCCU_AHB) are generated by the Power Man-ager. they can be disabled either manually through the user interface of the Power Manager orautomatically when the system enters a sleep mode that disables the clocks to the peripheralbus modules.
41.4.3 InterruptsThe CRCCU interrupt request line is connected to the NVIC. Using the CRCCU interruptrequires the NVIC to be configured first.
41.4.4 Debug OperationWhen an external debugger forces the CPU into debug mode, CRCCU continues normal opera-tion. If the CRCCU is configured in a way that requires it to be periodically serviced by the CPUthrough interrupts or similar, improper operation or data loss may result during debugging.
DMA CRC
Interface
irqAHB
APB
CLK_CRCCU_APB
CLK_CRCCU_AHB
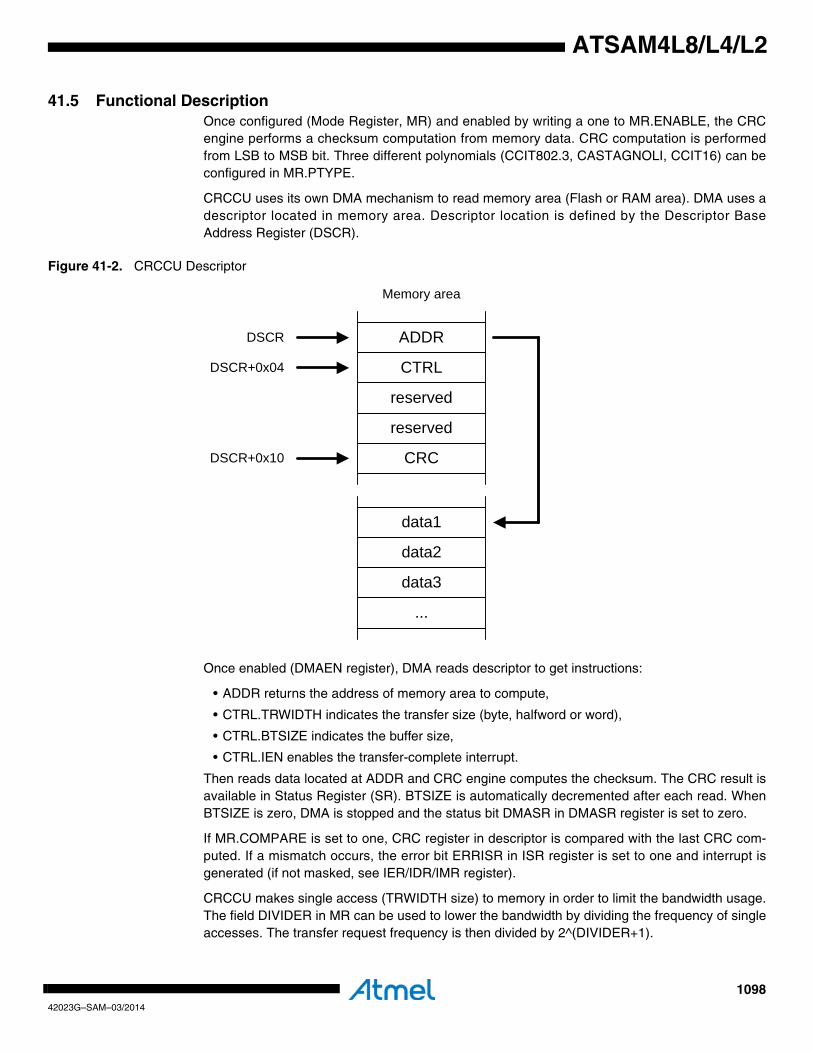
109842023G–SAM–03/2014
ATSAM4L8/L4/L2
41.5 Functional DescriptionOnce configured (Mode Register, MR) and enabled by writing a one to MR.ENABLE, the CRCengine performs a checksum computation from memory data. CRC computation is performedfrom LSB to MSB bit. Three different polynomials (CCIT802.3, CASTAGNOLI, CCIT16) can beconfigured in MR.PTYPE.
CRCCU uses its own DMA mechanism to read memory area (Flash or RAM area). DMA uses adescriptor located in memory area. Descriptor location is defined by the Descriptor BaseAddress Register (DSCR).
Figure 41-2. CRCCU Descriptor
Once enabled (DMAEN register), DMA reads descriptor to get instructions:
• ADDR returns the address of memory area to compute,
• CTRL.TRWIDTH indicates the transfer size (byte, halfword or word),
• CTRL.BTSIZE indicates the buffer size,
• CTRL.IEN enables the transfer-complete interrupt.
Then reads data located at ADDR and CRC engine computes the checksum. The CRC result isavailable in Status Register (SR). BTSIZE is automatically decremented after each read. WhenBTSIZE is zero, DMA is stopped and the status bit DMASR in DMASR register is set to zero.
If MR.COMPARE is set to one, CRC register in descriptor is compared with the last CRC com-puted. If a mismatch occurs, the error bit ERRISR in ISR register is set to one and interrupt isgenerated (if not masked, see IER/IDR/IMR register).
CRCCU makes single access (TRWIDTH size) to memory in order to limit the bandwidth usage.The field DIVIDER in MR can be used to lower the bandwidth by dividing the frequency of singleaccesses. The transfer request frequency is then divided by 2^(DIVIDER+1).
ADDRDSCR
CTRL
reserved
reserved
CRC
DSCR+0x04
DSCR+0x10
Memory area
data1
data2
data3
...

109942023G–SAM–03/2014
ATSAM4L8/L4/L2
To compute CRC for a memory size larger than 256Kbytes of for non-contiguous memory area,CRCCU can be enabled again for a new memory area. CRC will be updated accordingly. Con-versely, set CR.RESET to one to reset the intermediate CRC to its default value (0xFFFFFFFF).
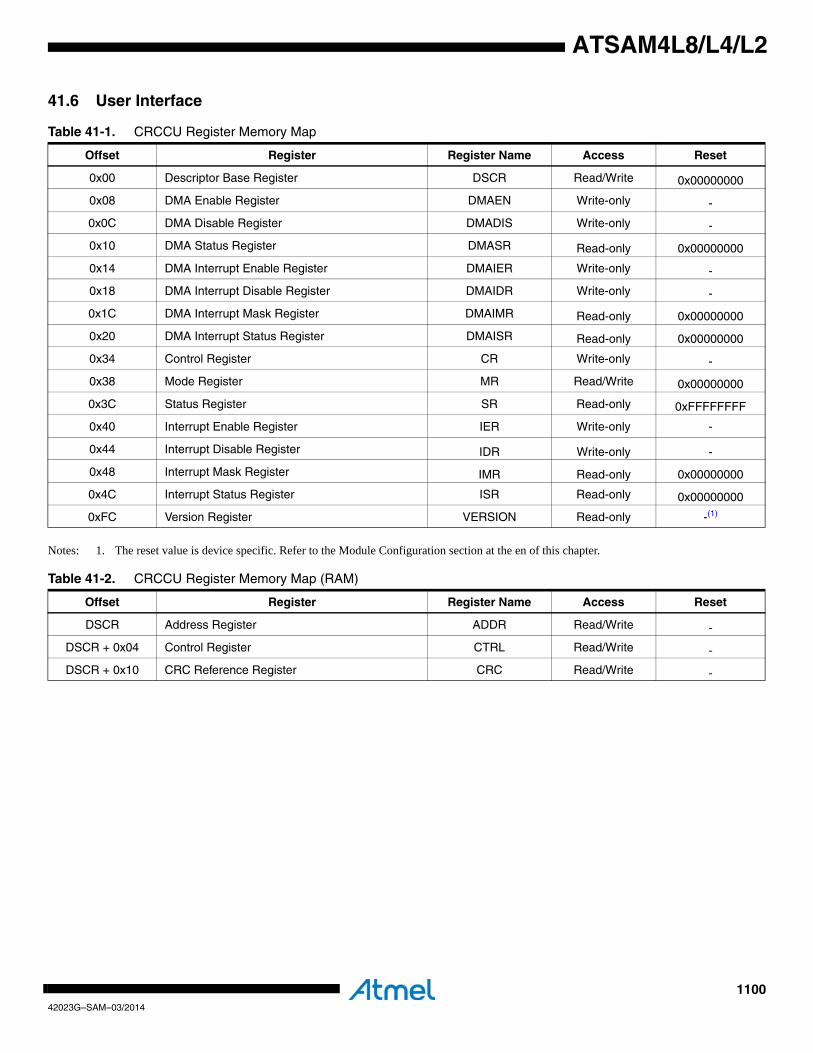
110042023G–SAM–03/2014
ATSAM4L8/L4/L2
41.6 User Interface
Notes: 1. The reset value is device specific. Refer to the Module Configuration section at the en of this chapter.
Table 41-1. CRCCU Register Memory Map
Offset Register Register Name Access Reset
0x00 Descriptor Base Register DSCR Read/Write 0x00000000
0x08 DMA Enable Register DMAEN Write-only -
0x0C DMA Disable Register DMADIS Write-only -
0x10 DMA Status Register DMASR Read-only 0x00000000
0x14 DMA Interrupt Enable Register DMAIER Write-only -
0x18 DMA Interrupt Disable Register DMAIDR Write-only -
0x1C DMA Interrupt Mask Register DMAIMR Read-only 0x00000000
0x20 DMA Interrupt Status Register DMAISR Read-only 0x00000000
0x34 Control Register CR Write-only -
0x38 Mode Register MR Read/Write 0x00000000
0x3C Status Register SR Read-only 0xFFFFFFFF
0x40 Interrupt Enable Register IER Write-only -
0x44 Interrupt Disable Register IDR Write-only -
0x48 Interrupt Mask Register IMR Read-only 0x00000000
0x4C Interrupt Status Register ISR Read-only 0x00000000
0xFC Version Register VERSION Read-only -(1)
Table 41-2. CRCCU Register Memory Map (RAM)
Offset Register Register Name Access Reset
DSCR Address Register ADDR Read/Write -
DSCR + 0x04 Control Register CTRL Read/Write -
DSCR + 0x10 CRC Reference Register CRC Read/Write -
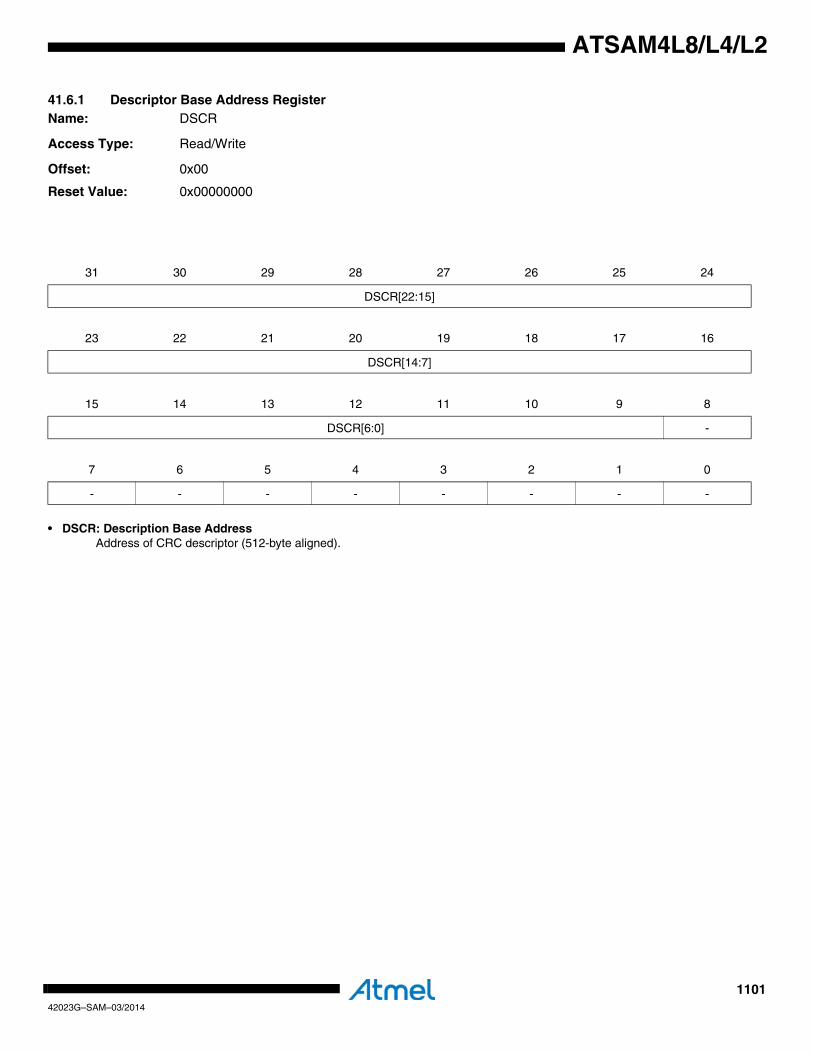
110142023G–SAM–03/2014
ATSAM4L8/L4/L2
41.6.1 Descriptor Base Address RegisterName: DSCR
Access Type: Read/Write
Offset: 0x00
Reset Value: 0x00000000
• DSCR: Description Base AddressAddress of CRC descriptor (512-byte aligned).
31 30 29 28 27 26 25 24
DSCR[22:15]
23 22 21 20 19 18 17 16
DSCR[14:7]
15 14 13 12 11 10 9 8
DSCR[6:0] -
7 6 5 4 3 2 1 0
- - - - - - - -

110242023G–SAM–03/2014
ATSAM4L8/L4/L2
41.6.2 DMA Enable RegisterName: DMAEN
Access Type: Write-only
Offset: 0x08
Reset Value: -
• DMAEN: DMA EnableWrite a one to enable DMA channel.
Writing a zero has no effect.
31 30 29 28 27 26 25 24
- - - - - - - -
23 22 21 20 19 18 17 16
- - - - - - - -
15 14 13 12 11 10 9 8
- - - - - - - -
7 6 5 4 3 2 1 0
- - - - - - - DMAEN

110342023G–SAM–03/2014
ATSAM4L8/L4/L2
41.6.3 DMA Disable RegisterName: DMADIS
Access Type: Write-only
Offset: 0x0C
Reset Value: -
• DMADIS: DMA DisableWrite a one to disable DMA channel.
Writing a zero has no effect.
31 30 29 28 27 26 25 24
- - - - - - - -
23 22 21 20 19 18 17 16
- - - - - - - -
15 14 13 12 11 10 9 8
- - - - - - - -
7 6 5 4 3 2 1 0
- - - - - - - DMADIS
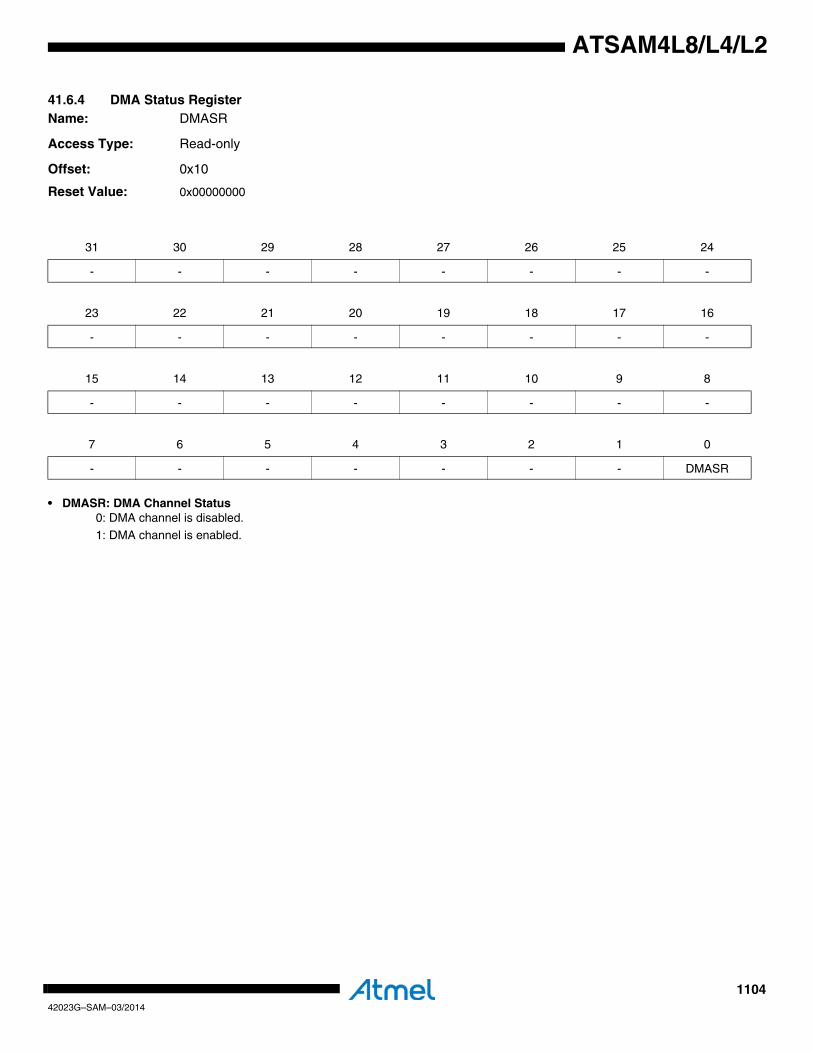
110442023G–SAM–03/2014
ATSAM4L8/L4/L2
41.6.4 DMA Status RegisterName: DMASR
Access Type: Read-only
Offset: 0x10
Reset Value: 0x00000000
• DMASR: DMA Channel Status0: DMA channel is disabled.
1: DMA channel is enabled.
31 30 29 28 27 26 25 24
- - - - - - - -
23 22 21 20 19 18 17 16
- - - - - - - -
15 14 13 12 11 10 9 8
- - - - - - - -
7 6 5 4 3 2 1 0
- - - - - - - DMASR

110542023G–SAM–03/2014
ATSAM4L8/L4/L2
41.6.5 DMA Interrupt Enable RegisterName: DMAIER
Access Type: Write-only
Offset: 0x14
Reset Value: -
• DMAIER: DMA Interrupt EnableWrite a one to enable DMA interrupt.
Writing a zero has no effect.
31 30 29 28 27 26 25 24
- - - - - - - -
23 22 21 20 19 18 17 16
- - - - - - - -
15 14 13 12 11 10 9 8
- - - - - - - -
7 6 5 4 3 2 1 0
- - - - - - - DMAIER
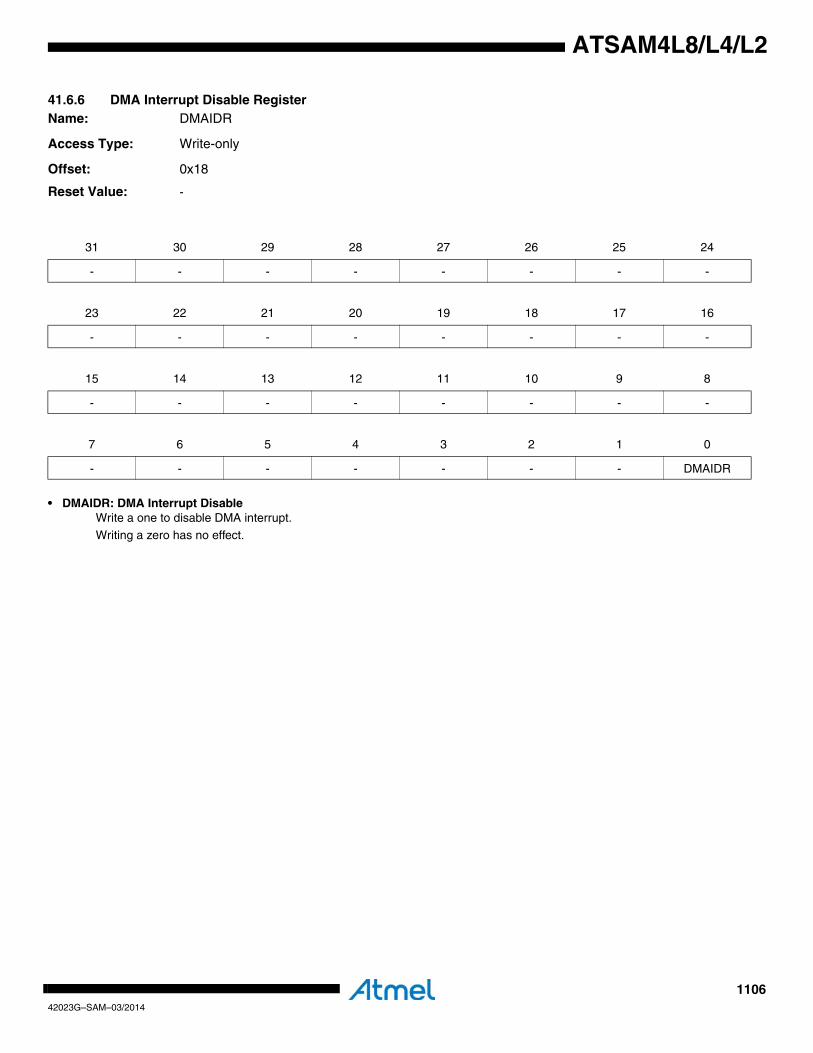
110642023G–SAM–03/2014
ATSAM4L8/L4/L2
41.6.6 DMA Interrupt Disable RegisterName: DMAIDR
Access Type: Write-only
Offset: 0x18
Reset Value: -
• DMAIDR: DMA Interrupt DisableWrite a one to disable DMA interrupt.
Writing a zero has no effect.
31 30 29 28 27 26 25 24
- - - - - - - -
23 22 21 20 19 18 17 16
- - - - - - - -
15 14 13 12 11 10 9 8
- - - - - - - -
7 6 5 4 3 2 1 0
- - - - - - - DMAIDR
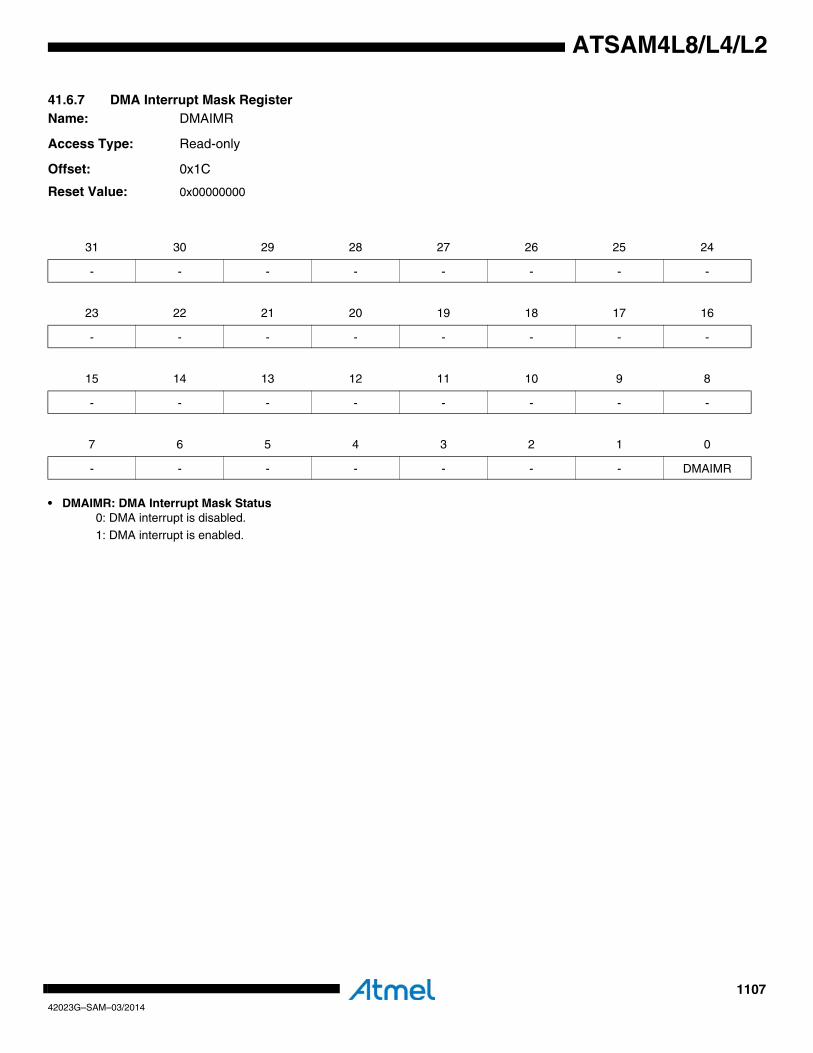
110742023G–SAM–03/2014
ATSAM4L8/L4/L2
41.6.7 DMA Interrupt Mask RegisterName: DMAIMR
Access Type: Read-only
Offset: 0x1C
Reset Value: 0x00000000
• DMAIMR: DMA Interrupt Mask Status0: DMA interrupt is disabled.
1: DMA interrupt is enabled.
31 30 29 28 27 26 25 24
- - - - - - - -
23 22 21 20 19 18 17 16
- - - - - - - -
15 14 13 12 11 10 9 8
- - - - - - - -
7 6 5 4 3 2 1 0
- - - - - - - DMAIMR
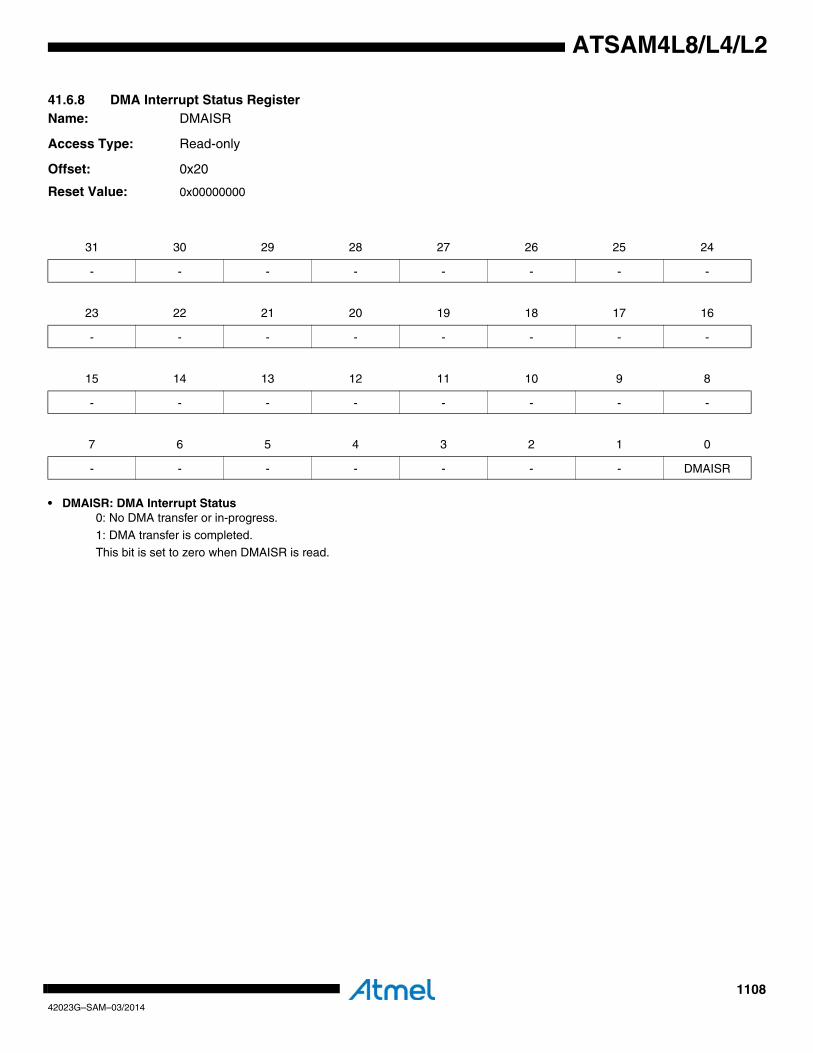
110842023G–SAM–03/2014
ATSAM4L8/L4/L2
41.6.8 DMA Interrupt Status RegisterName: DMAISR
Access Type: Read-only
Offset: 0x20
Reset Value: 0x00000000
• DMAISR: DMA Interrupt Status0: No DMA transfer or in-progress.
1: DMA transfer is completed.
This bit is set to zero when DMAISR is read.
31 30 29 28 27 26 25 24
- - - - - - - -
23 22 21 20 19 18 17 16
- - - - - - - -
15 14 13 12 11 10 9 8
- - - - - - - -
7 6 5 4 3 2 1 0
- - - - - - - DMAISR
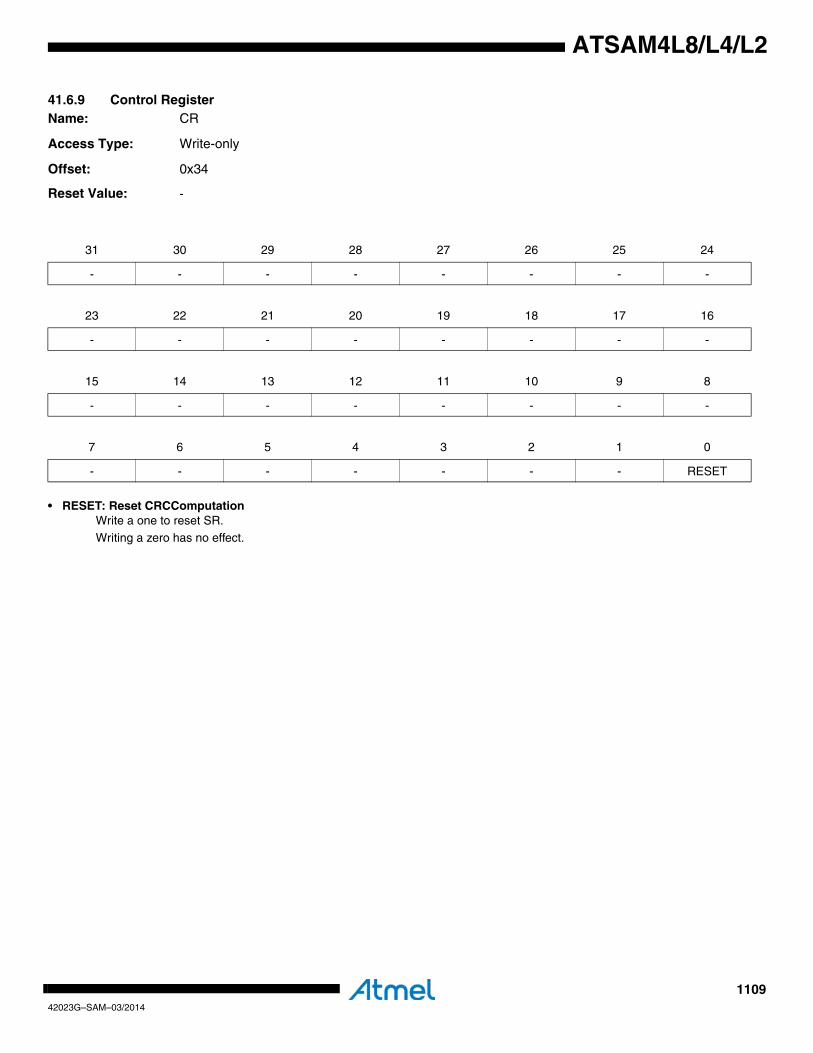
110942023G–SAM–03/2014
ATSAM4L8/L4/L2
41.6.9 Control RegisterName: CR
Access Type: Write-only
Offset: 0x34
Reset Value: -
• RESET: Reset CRCComputationWrite a one to reset SR.Writing a zero has no effect.
31 30 29 28 27 26 25 24
- - - - - - - -
23 22 21 20 19 18 17 16
- - - - - - - -
15 14 13 12 11 10 9 8
- - - - - - - -
7 6 5 4 3 2 1 0
- - - - - - - RESET
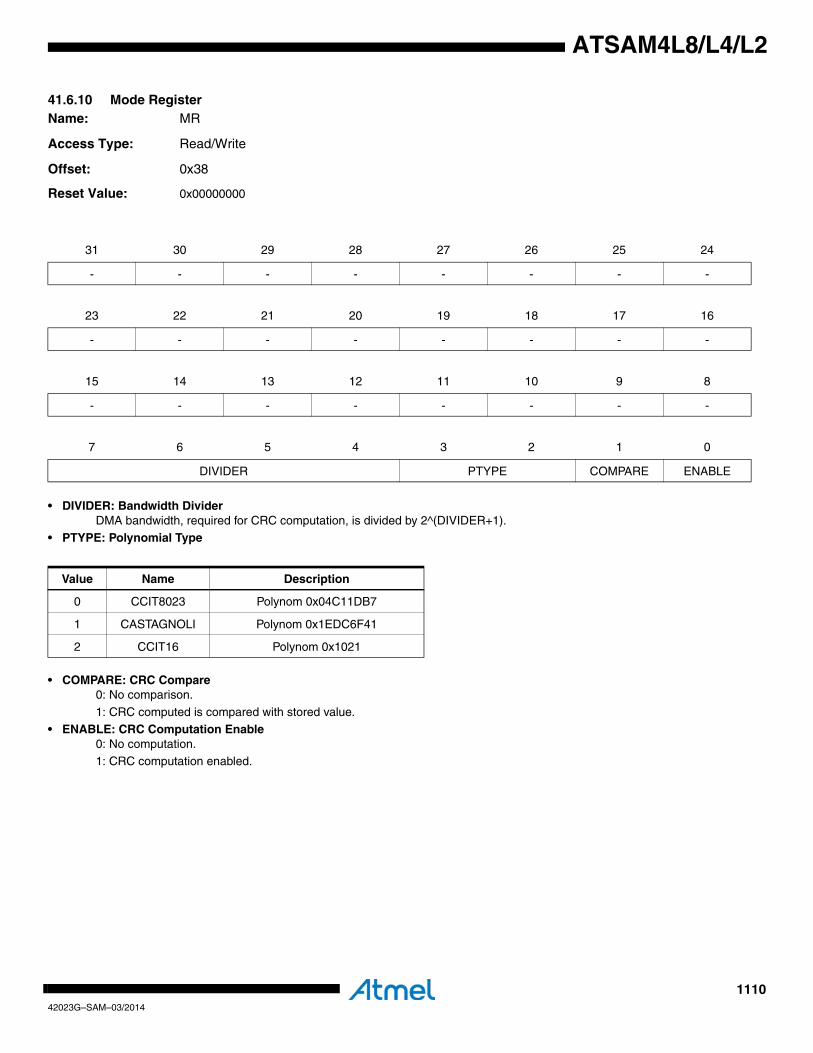
111042023G–SAM–03/2014
ATSAM4L8/L4/L2
41.6.10 Mode RegisterName: MR
Access Type: Read/Write
Offset: 0x38
Reset Value: 0x00000000
• DIVIDER: Bandwidth DividerDMA bandwidth, required for CRC computation, is divided by 2^(DIVIDER+1).
• PTYPE: Polynomial Type
• COMPARE: CRC Compare0: No comparison.
1: CRC computed is compared with stored value.• ENABLE: CRC Computation Enable
0: No computation.1: CRC computation enabled.
31 30 29 28 27 26 25 24
- - - - - - - -
23 22 21 20 19 18 17 16
- - - - - - - -
15 14 13 12 11 10 9 8
- - - - - - - -
7 6 5 4 3 2 1 0
DIVIDER PTYPE COMPARE ENABLE
Value Name Description
0 CCIT8023 Polynom 0x04C11DB7
1 CASTAGNOLI Polynom 0x1EDC6F41
2 CCIT16 Polynom 0x1021
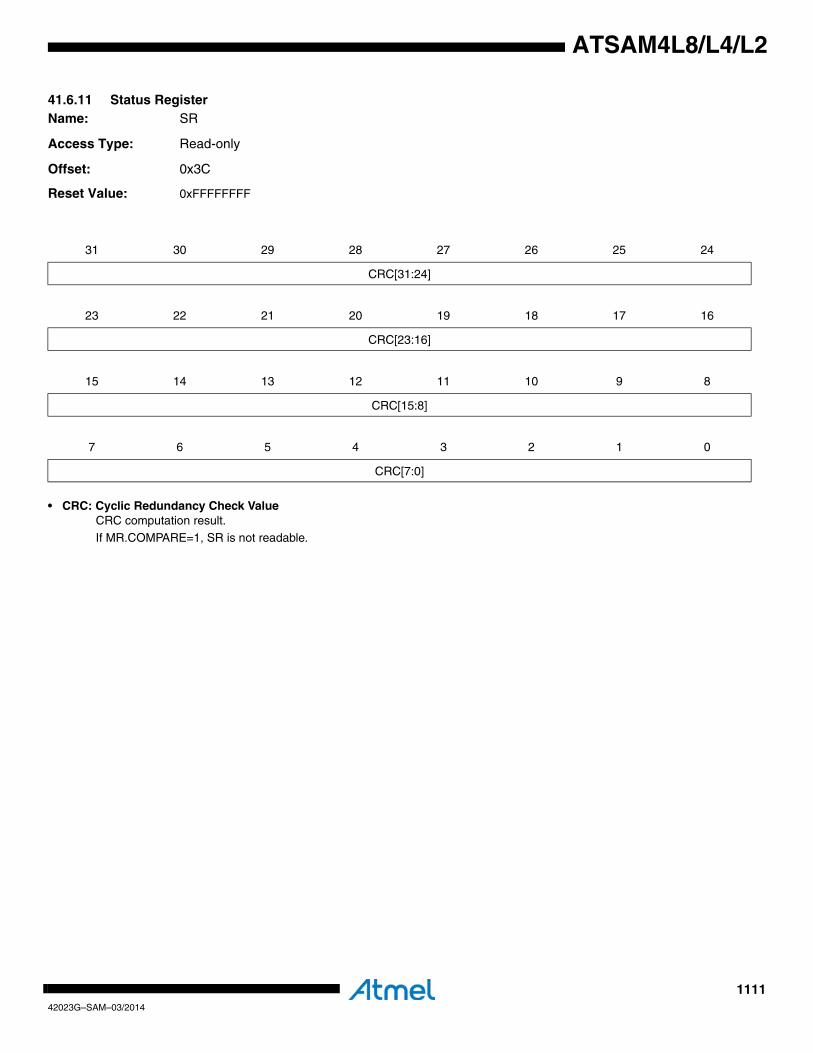
111142023G–SAM–03/2014
ATSAM4L8/L4/L2
41.6.11 Status RegisterName: SR
Access Type: Read-only
Offset: 0x3C
Reset Value: 0xFFFFFFFF
• CRC: Cyclic Redundancy Check ValueCRC computation result.If MR.COMPARE=1, SR is not readable.
31 30 29 28 27 26 25 24
CRC[31:24]
23 22 21 20 19 18 17 16
CRC[23:16]
15 14 13 12 11 10 9 8
CRC[15:8]
7 6 5 4 3 2 1 0
CRC[7:0]
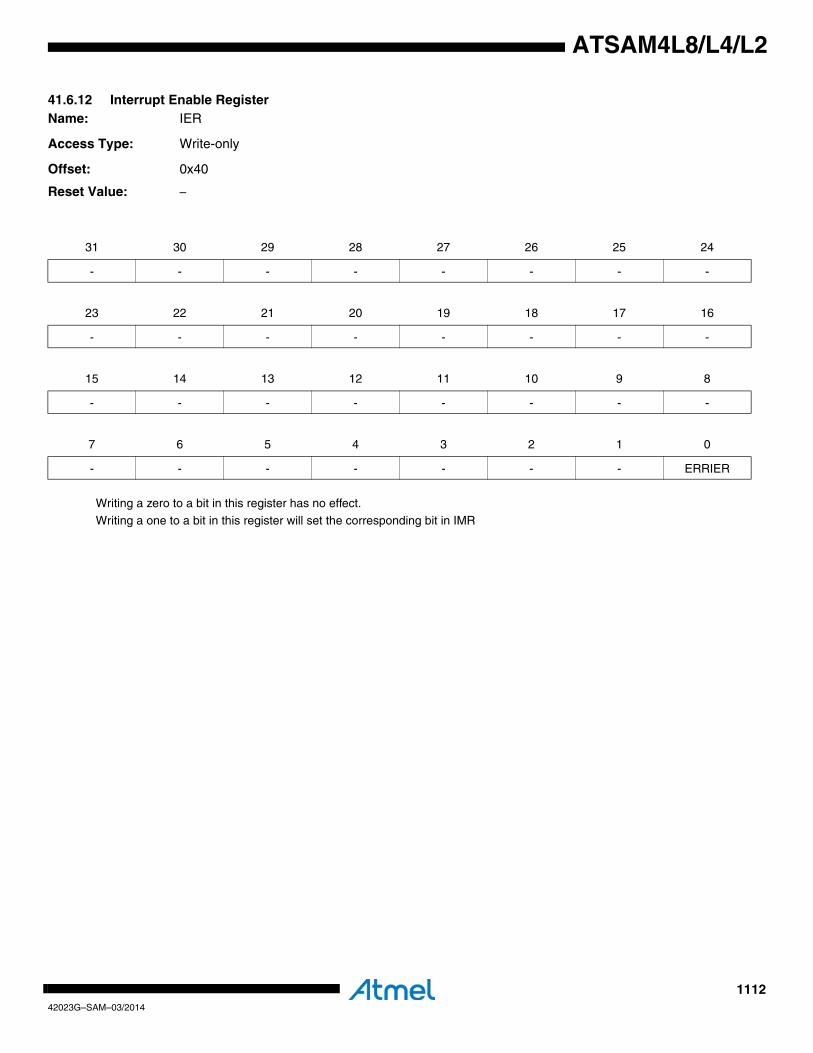
111242023G–SAM–03/2014
ATSAM4L8/L4/L2
41.6.12 Interrupt Enable RegisterName: IER
Access Type: Write-only
Offset: 0x40
Reset Value: –
Writing a zero to a bit in this register has no effect.
Writing a one to a bit in this register will set the corresponding bit in IMR
31 30 29 28 27 26 25 24
- - - - - - - -
23 22 21 20 19 18 17 16
- - - - - - - -
15 14 13 12 11 10 9 8
- - - - - - - -
7 6 5 4 3 2 1 0
- - - - - - - ERRIER

111342023G–SAM–03/2014
ATSAM4L8/L4/L2
41.6.13 Interrupt Disable RegisterName: IDR
Access Type: Write-only
Offset: 0x44
Reset Value: –
Writing a zero to a bit in this register has no effect.
Writing a one to a bit in this register will clear the corresponding bit in IMR
31 30 29 28 27 26 25 24
- - - - - - - -
23 22 21 20 19 18 17 16
- - - - - - - -
15 14 13 12 11 10 9 8
- - - - - - - -
7 6 5 4 3 2 1 0
- - - - - - - ERRIDR
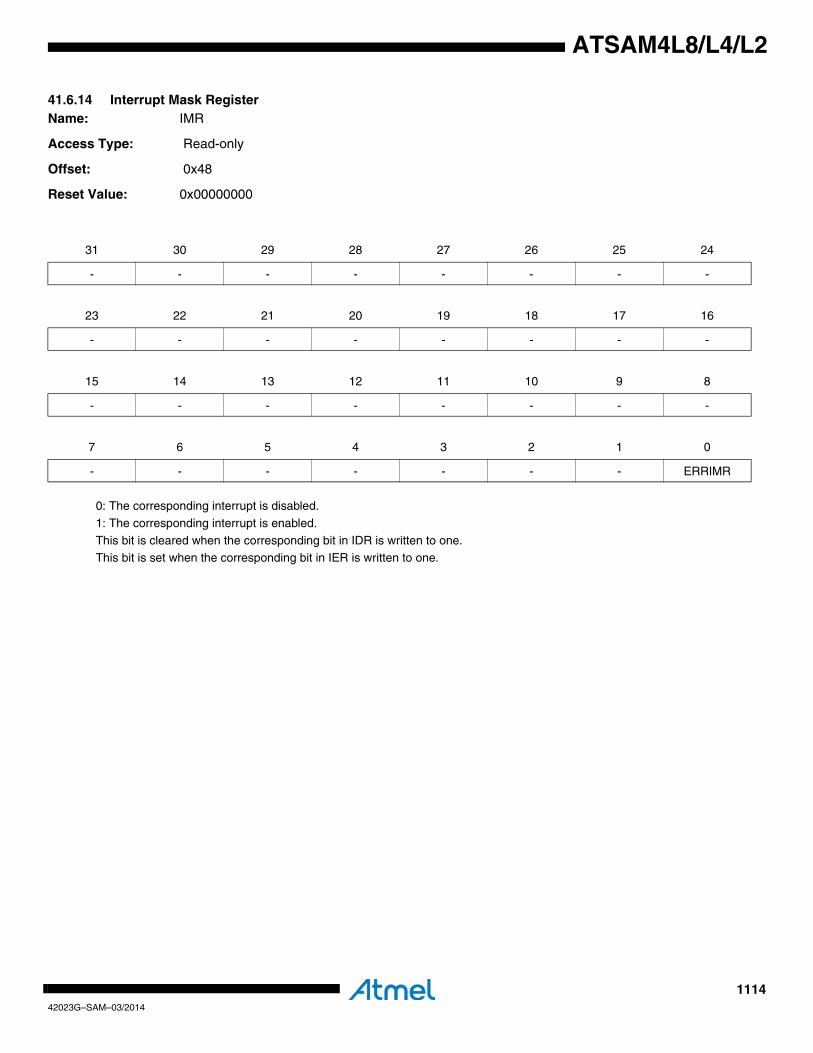
111442023G–SAM–03/2014
ATSAM4L8/L4/L2
41.6.14 Interrupt Mask RegisterName: IMR
Access Type: Read-only
Offset: 0x48
Reset Value: 0x00000000
0: The corresponding interrupt is disabled.
1: The corresponding interrupt is enabled.
This bit is cleared when the corresponding bit in IDR is written to one.This bit is set when the corresponding bit in IER is written to one.
31 30 29 28 27 26 25 24
- - - - - - - -
23 22 21 20 19 18 17 16
- - - - - - - -
15 14 13 12 11 10 9 8
- - - - - - - -
7 6 5 4 3 2 1 0
- - - - - - - ERRIMR
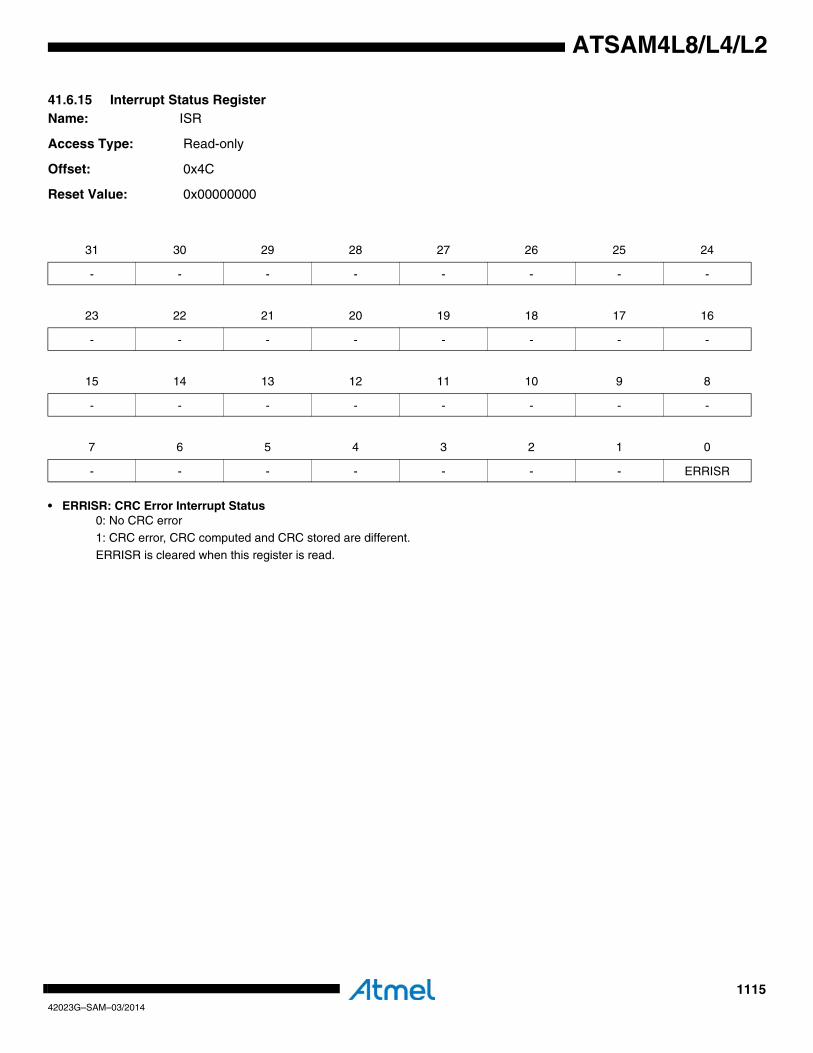
111542023G–SAM–03/2014
ATSAM4L8/L4/L2
41.6.15 Interrupt Status RegisterName: ISR
Access Type: Read-only
Offset: 0x4C
Reset Value: 0x00000000
• ERRISR: CRC Error Interrupt Status0: No CRC error1: CRC error, CRC computed and CRC stored are different.
ERRISR is cleared when this register is read.
31 30 29 28 27 26 25 24
- - - - - - - -
23 22 21 20 19 18 17 16
- - - - - - - -
15 14 13 12 11 10 9 8
- - - - - - - -
7 6 5 4 3 2 1 0
- - - - - - - ERRISR

111642023G–SAM–03/2014
ATSAM4L8/L4/L2
41.6.16 Version RegisterName: VERSION
Access Type: Read-only
Offset: 0xFC
Reset Value: -
• VARIANT: Variant NumberReserved. No functionality associated.
• VERSION: Version NumberVersion number of the module. No functionality associated.
31 30 29 28 27 26 25 24
- - - - - - - -
23 22 21 20 19 18 17 16
- - - - - VARIANT
15 14 13 12 11 10 9 8
- - - - VERSION[11:8]
7 6 5 4 3 2 1 0
VERSION[7:0]

111742023G–SAM–03/2014
ATSAM4L8/L4/L2
41.6.17 Transfer Address RegisterName: ADDR
Access Type: Read/Write
Offset: DSCR
Reset Value: -
• ADDR: Transfer AddressAddress of memory block to compute.
31 30 29 28 27 26 25 24
ADDR[31:24]
23 22 21 20 19 18 17 16
ADDR[23:16]
15 14 13 12 11 10 9 8
ADDR[15:8]
7 6 5 4 3 2 1 0
ADDR[7:0]
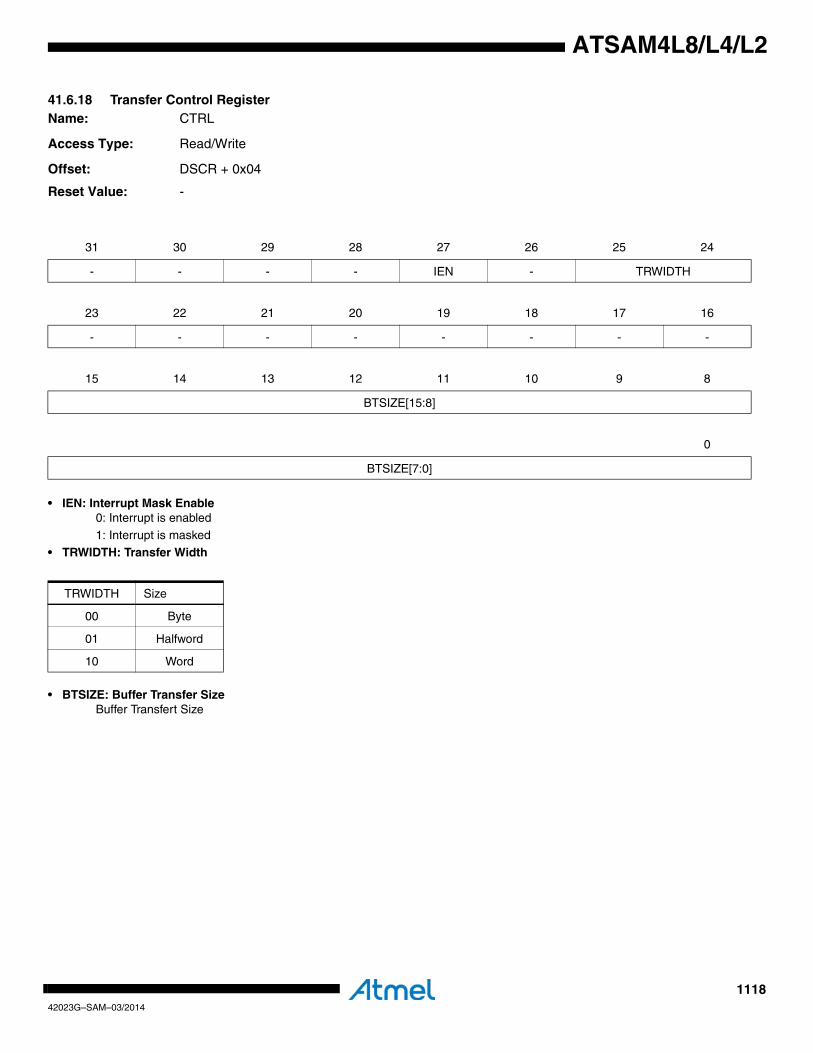
111842023G–SAM–03/2014
ATSAM4L8/L4/L2
41.6.18 Transfer Control RegisterName: CTRL
Access Type: Read/Write
Offset: DSCR + 0x04
Reset Value: -
• IEN: Interrupt Mask Enable0: Interrupt is enabled
1: Interrupt is masked
• TRWIDTH: Transfer Width
• BTSIZE: Buffer Transfer SizeBuffer Transfert Size
31 30 29 28 27 26 25 24
- - - - IEN - TRWIDTH
23 22 21 20 19 18 17 16
- - - - - - - -
15 14 13 12 11 10 9 8
BTSIZE[15:8]
0
BTSIZE[7:0]
TRWIDTH Size
00 Byte
01 Halfword
10 Word
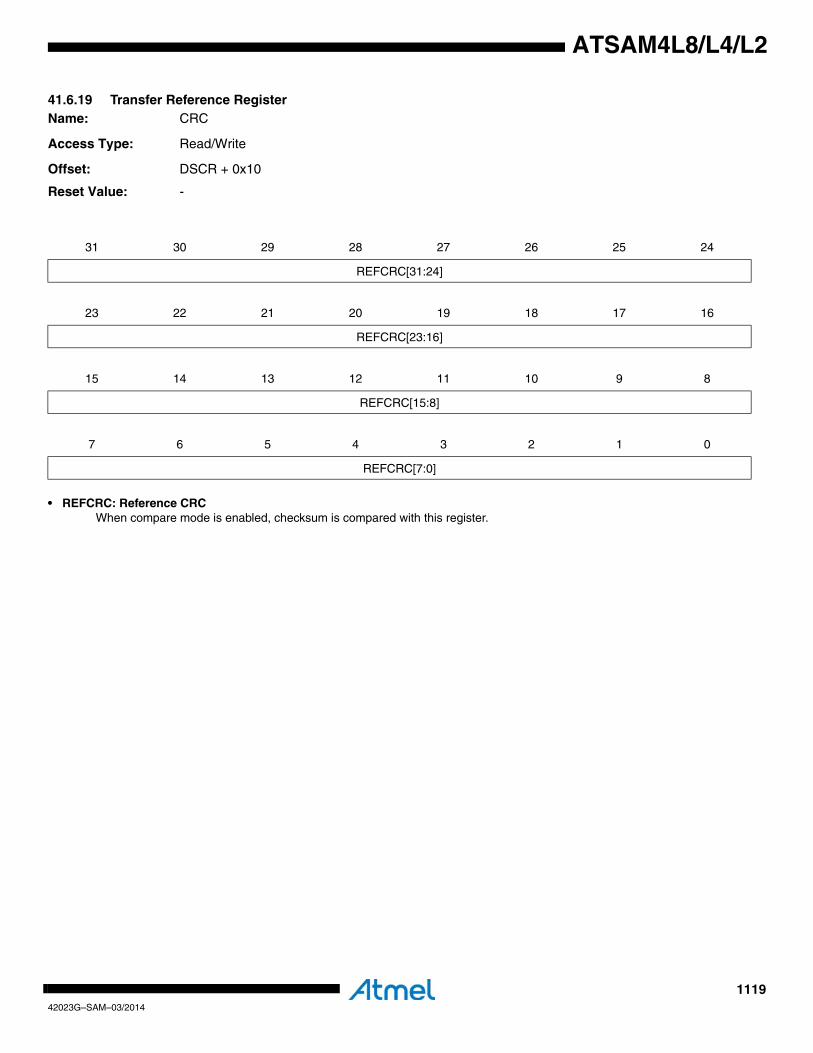
111942023G–SAM–03/2014
ATSAM4L8/L4/L2
41.6.19 Transfer Reference RegisterName: CRC
Access Type: Read/Write
Offset: DSCR + 0x10
Reset Value: -
• REFCRC: Reference CRCWhen compare mode is enabled, checksum is compared with this register.
31 30 29 28 27 26 25 24
REFCRC[31:24]
23 22 21 20 19 18 17 16
REFCRC[23:16]
15 14 13 12 11 10 9 8
REFCRC[15:8]
7 6 5 4 3 2 1 0
REFCRC[7:0]
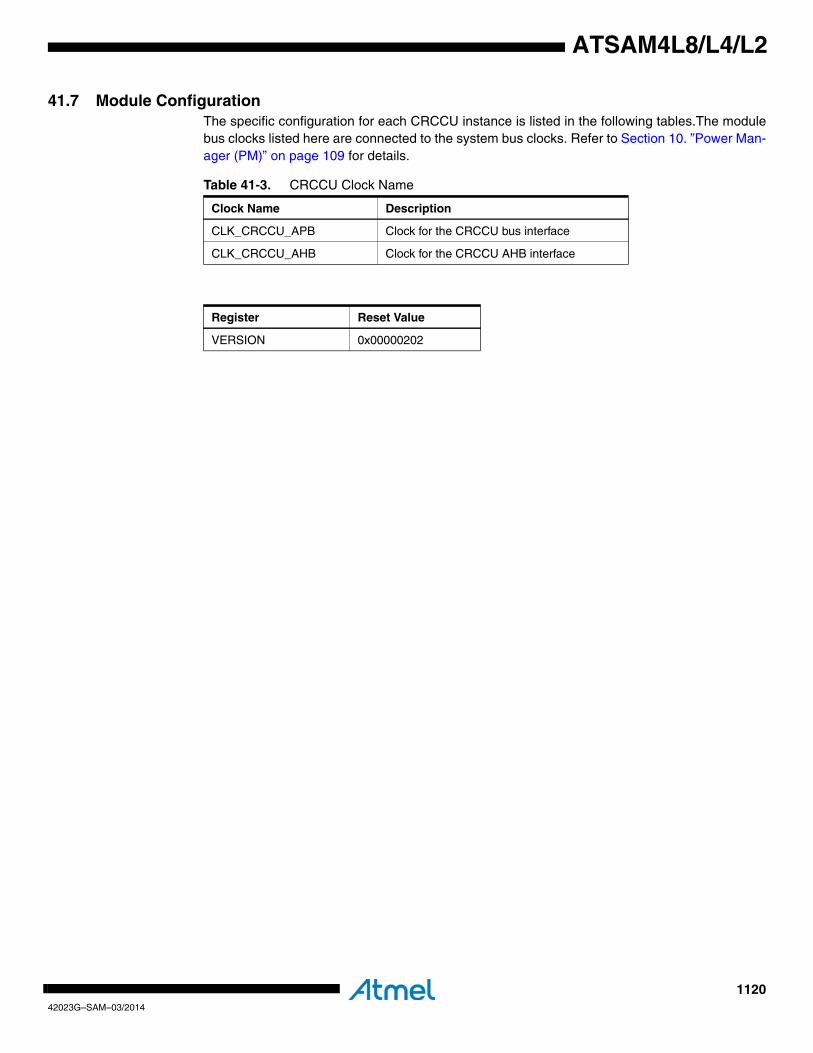
112042023G–SAM–03/2014
ATSAM4L8/L4/L2
41.7 Module ConfigurationThe specific configuration for each CRCCU instance is listed in the following tables.The modulebus clocks listed here are connected to the system bus clocks. Refer to Section 10. ”Power Man-ager (PM)” on page 109 for details.
Table 41-3. CRCCU Clock Name
Clock Name Description
CLK_CRCCU_APB Clock for the CRCCU bus interface
CLK_CRCCU_AHB Clock for the CRCCU AHB interface
Register Reset Value
VERSION 0x00000202
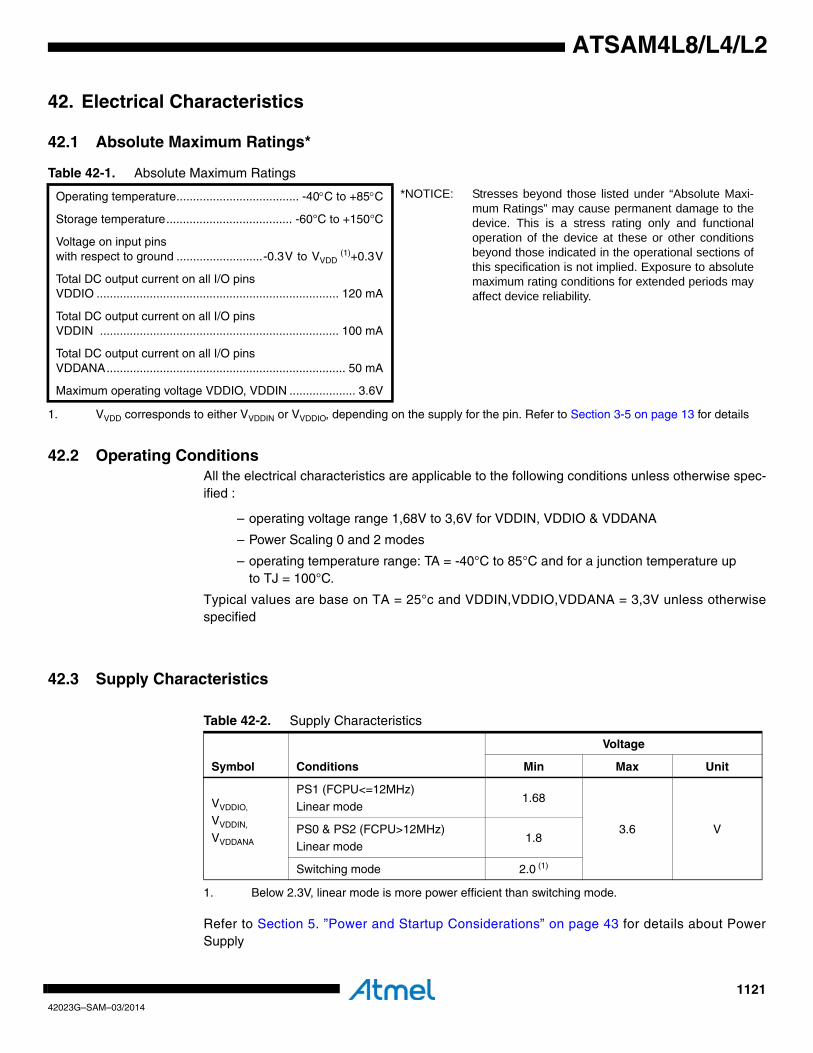
112142023G–SAM–03/2014
ATSAM4L8/L4/L2
42. Electrical Characteristics
42.1 Absolute Maximum Ratings*
42.2 Operating ConditionsAll the electrical characteristics are applicable to the following conditions unless otherwise spec-ified :
– operating voltage range 1,68V to 3,6V for VDDIN, VDDIO & VDDANA
– Power Scaling 0 and 2 modes
– operating temperature range: TA = -40°C to 85°C and for a junction temperature up to TJ = 100°C.
Typical values are base on TA = 25°c and VDDIN,VDDIO,VDDANA = 3,3V unless otherwisespecified
42.3 Supply Characteristics
Refer to Section 5. ”Power and Startup Considerations” on page 43 for details about PowerSupply
Table 42-1. Absolute Maximum Ratings
Operating temperature..................................... -40°C to +85°C *NOTICE: Stresses beyond those listed under “Absolute Maxi-mum Ratings” may cause permanent damage to thedevice. This is a stress rating only and functionaloperation of the device at these or other conditionsbeyond those indicated in the operational sections ofthis specification is not implied. Exposure to absolutemaximum rating conditions for extended periods mayaffect device reliability.
Storage temperature...................................... -60°C to +150°C
Voltage on input pinswith respect to ground ..........................-0.3V to VVDD
(1)+0.3V
1. VVDD corresponds to either VVDDIN or VVDDIO, depending on the supply for the pin. Refer to Section 3-5 on page 13 for details
Total DC output current on all I/O pinsVDDIO ......................................................................... 120 mA
Total DC output current on all I/O pinsVDDIN ........................................................................ 100 mA
Total DC output current on all I/O pinsVDDANA........................................................................ 50 mA
Maximum operating voltage VDDIO, VDDIN .................... 3.6V
Table 42-2. Supply Characteristics
Symbol Conditions
Voltage
Min Max Unit
VVDDIO,
VVDDIN,
VVDDANA
PS1 (FCPU<=12MHz)Linear mode
1.68
3.6 VPS0 & PS2 (FCPU>12MHz)Linear mode
1.8
Switching mode 2.0 (1)
1. Below 2.3V, linear mode is more power efficient than switching mode.
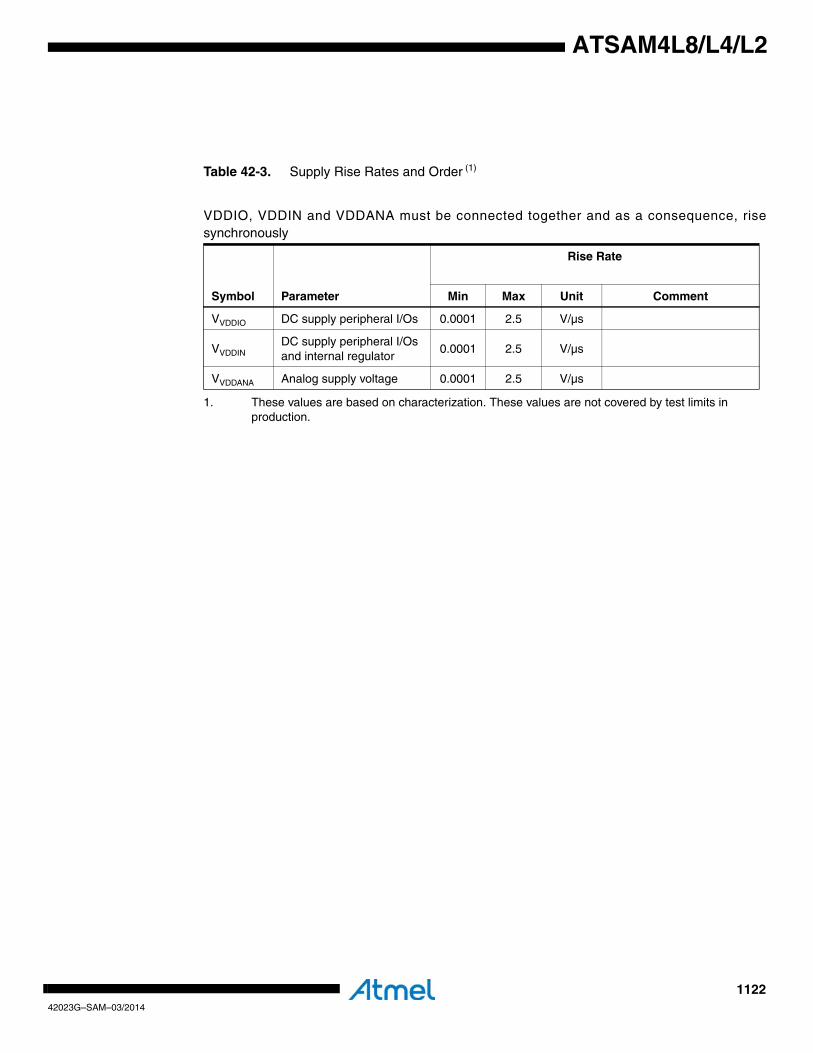
112242023G–SAM–03/2014
ATSAM4L8/L4/L2
Table 42-3. Supply Rise Rates and Order (1)
VDDIO, VDDIN and VDDANA must be connected together and as a consequence, risesynchronously
1. These values are based on characterization. These values are not covered by test limits in production.
Symbol Parameter
Rise Rate
Min Max Unit Comment
VVDDIO DC supply peripheral I/Os 0.0001 2.5 V/µs
VVDDINDC supply peripheral I/Os and internal regulator
0.0001 2.5 V/µs
VVDDANA Analog supply voltage 0.0001 2.5 V/µs
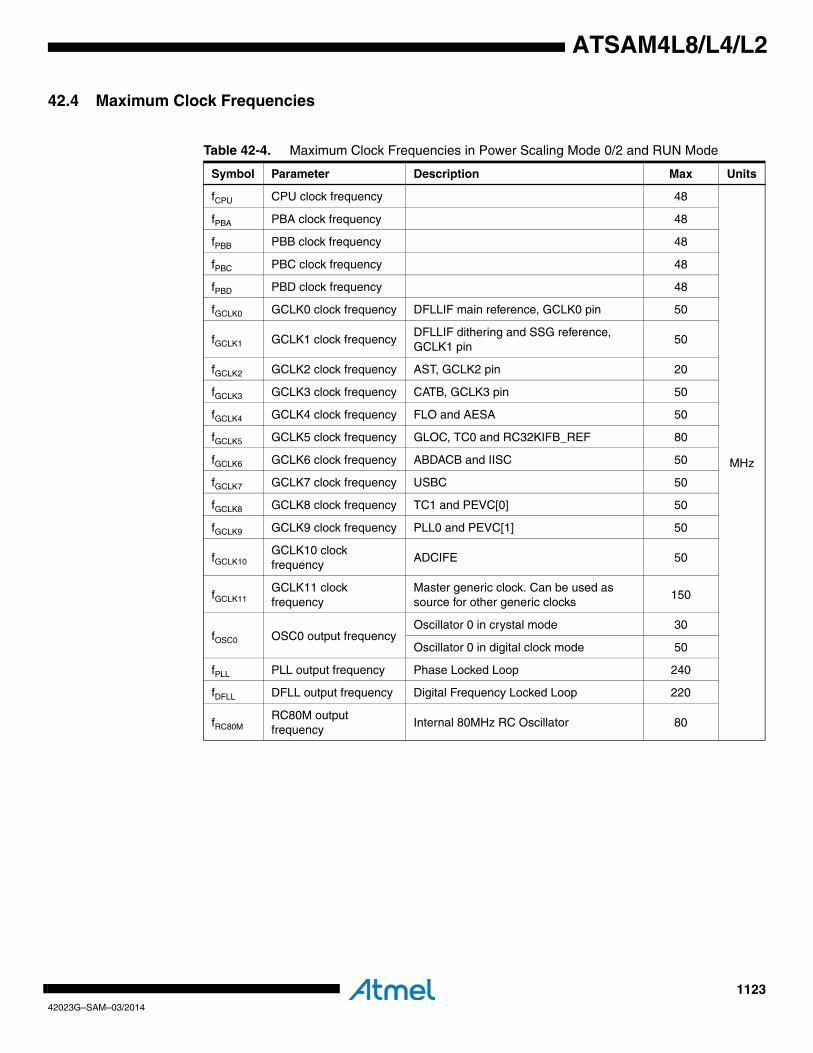
112342023G–SAM–03/2014
ATSAM4L8/L4/L2
42.4 Maximum Clock Frequencies
Table 42-4. Maximum Clock Frequencies in Power Scaling Mode 0/2 and RUN Mode
Symbol Parameter Description Max Units
fCPU CPU clock frequency 48
MHz
fPBA PBA clock frequency 48
fPBB PBB clock frequency 48
fPBC PBC clock frequency 48
fPBD PBD clock frequency 48
fGCLK0 GCLK0 clock frequency DFLLIF main reference, GCLK0 pin 50
fGCLK1 GCLK1 clock frequencyDFLLIF dithering and SSG reference, GCLK1 pin
50
fGCLK2 GCLK2 clock frequency AST, GCLK2 pin 20
fGCLK3 GCLK3 clock frequency CATB, GCLK3 pin 50
fGCLK4 GCLK4 clock frequency FLO and AESA 50
fGCLK5 GCLK5 clock frequency GLOC, TC0 and RC32KIFB_REF 80
fGCLK6 GCLK6 clock frequency ABDACB and IISC 50
fGCLK7 GCLK7 clock frequency USBC 50
fGCLK8 GCLK8 clock frequency TC1 and PEVC[0] 50
fGCLK9 GCLK9 clock frequency PLL0 and PEVC[1] 50
fGCLK10GCLK10 clock frequency
ADCIFE 50
fGCLK11GCLK11 clock frequency
Master generic clock. Can be used as source for other generic clocks
150
fOSC0 OSC0 output frequencyOscillator 0 in crystal mode 30
Oscillator 0 in digital clock mode 50
fPLL PLL output frequency Phase Locked Loop 240
fDFLL DFLL output frequency Digital Frequency Locked Loop 220
fRC80MRC80M output frequency
Internal 80MHz RC Oscillator 80
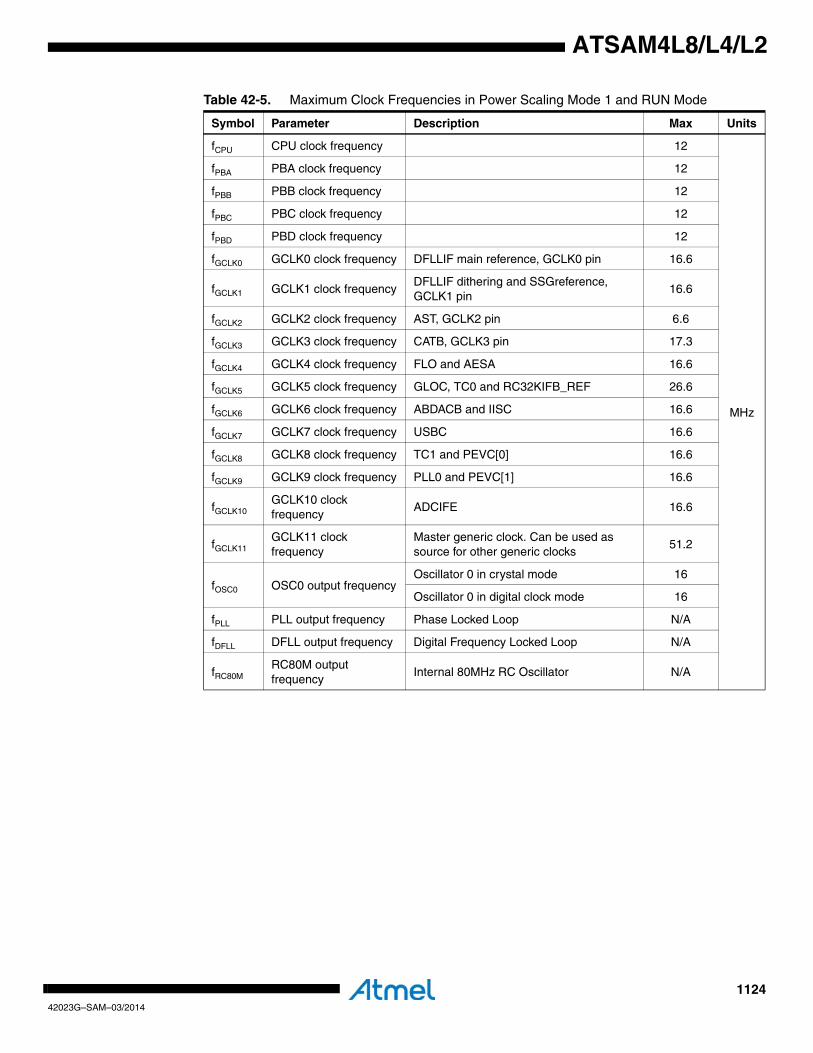
112442023G–SAM–03/2014
ATSAM4L8/L4/L2
Table 42-5. Maximum Clock Frequencies in Power Scaling Mode 1 and RUN Mode
Symbol Parameter Description Max Units
fCPU CPU clock frequency 12
MHz
fPBA PBA clock frequency 12
fPBB PBB clock frequency 12
fPBC PBC clock frequency 12
fPBD PBD clock frequency 12
fGCLK0 GCLK0 clock frequency DFLLIF main reference, GCLK0 pin 16.6
fGCLK1 GCLK1 clock frequencyDFLLIF dithering and SSGreference, GCLK1 pin
16.6
fGCLK2 GCLK2 clock frequency AST, GCLK2 pin 6.6
fGCLK3 GCLK3 clock frequency CATB, GCLK3 pin 17.3
fGCLK4 GCLK4 clock frequency FLO and AESA 16.6
fGCLK5 GCLK5 clock frequency GLOC, TC0 and RC32KIFB_REF 26.6
fGCLK6 GCLK6 clock frequency ABDACB and IISC 16.6
fGCLK7 GCLK7 clock frequency USBC 16.6
fGCLK8 GCLK8 clock frequency TC1 and PEVC[0] 16.6
fGCLK9 GCLK9 clock frequency PLL0 and PEVC[1] 16.6
fGCLK10GCLK10 clock frequency
ADCIFE 16.6
fGCLK11GCLK11 clock frequency
Master generic clock. Can be used as source for other generic clocks
51.2
fOSC0 OSC0 output frequencyOscillator 0 in crystal mode 16
Oscillator 0 in digital clock mode 16
fPLL PLL output frequency Phase Locked Loop N/A
fDFLL DFLL output frequency Digital Frequency Locked Loop N/A
fRC80MRC80M output frequency
Internal 80MHz RC Oscillator N/A
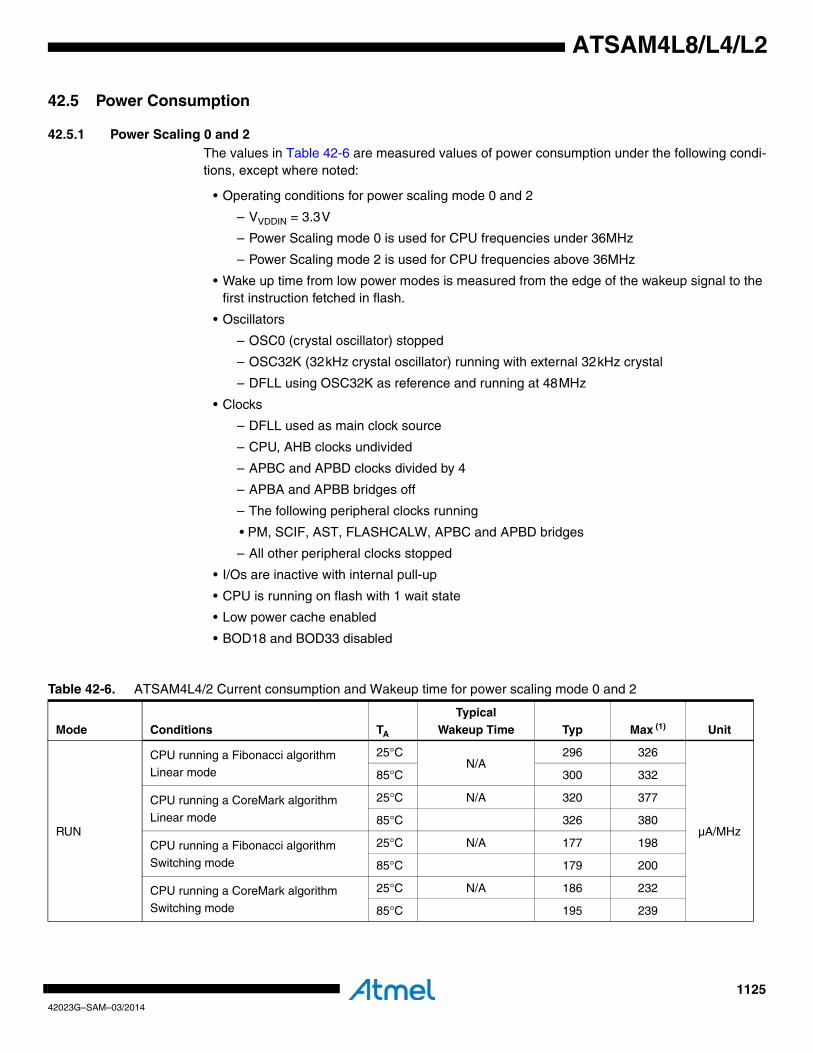
112542023G–SAM–03/2014
ATSAM4L8/L4/L2
42.5 Power Consumption
42.5.1 Power Scaling 0 and 2The values in Table 42-6 are measured values of power consumption under the following condi-tions, except where noted:
• Operating conditions for power scaling mode 0 and 2
– VVDDIN = 3.3V
– Power Scaling mode 0 is used for CPU frequencies under 36MHz
– Power Scaling mode 2 is used for CPU frequencies above 36MHz
• Wake up time from low power modes is measured from the edge of the wakeup signal to the first instruction fetched in flash.
• Oscillators
– OSC0 (crystal oscillator) stopped
– OSC32K (32kHz crystal oscillator) running with external 32kHz crystal
– DFLL using OSC32K as reference and running at 48MHz
• Clocks
– DFLL used as main clock source
– CPU, AHB clocks undivided
– APBC and APBD clocks divided by 4
– APBA and APBB bridges off
– The following peripheral clocks running
• PM, SCIF, AST, FLASHCALW, APBC and APBD bridges
– All other peripheral clocks stopped
• I/Os are inactive with internal pull-up
• CPU is running on flash with 1 wait state
• Low power cache enabled
• BOD18 and BOD33 disabled
Table 42-6. ATSAM4L4/2 Current consumption and Wakeup time for power scaling mode 0 and 2
Mode Conditions TA
Typical Wakeup Time Typ Max (1) Unit
RUN
CPU running a Fibonacci algorithmLinear mode
25°CN/A
296 326
µA/MHz
85°C 300 332
CPU running a CoreMark algorithm
Linear mode
25°C N/A 320 377
85°C 326 380
CPU running a Fibonacci algorithm
Switching mode
25°C N/A 177 198
85°C 179 200
CPU running a CoreMark algorithm
Switching mode
25°C N/A 186 232
85°C 195 239

112642023G–SAM–03/2014
ATSAM4L8/L4/L2
SLEEP0 Switching mode25°C 9 * Main clock
cycles
3817 4033
µA
85°C 3934 4174
SLEEP1 Switching mode25°C 9 * Main clock
cycles + 500ns
2341 2477
85°C 2437 2585
SLEEP2 Switching mode25°C 9 * Main clock
cycles + 500ns
1758 1862
85°C 1847 1971
SLEEP3 Linear mode
25°C
51 60
WAIT
OSC32K and AST running
Fast wake-up enable1.5µs
5.9 8.7
OSC32K and AST stopped
Fast wake-up enable4.7 7.6
RETENTION
OSC32K running
AST running at 1kHz 1.5µs3.1 5.1
AST and OSC32K stopped 2.2 4.2
BACKUP
OSC32K runningAST running at 1kHz
1.5 3.1
AST and OSC32K stopped 0.9 1.7
1. These values are based on characterization. These values are not covered by test limits in production.
Table 42-6. ATSAM4L4/2 Current consumption and Wakeup time for power scaling mode 0 and 2
Mode Conditions TA
Typical Wakeup Time Typ Max (1) Unit
Table 42-7. ATSAM4L8 Current consumption and Wakeup time for power scaling mode 0 and 2
Mode Conditions TA
Typical Wakeup Time Typ Max (1) Unit
RUN
CPU running a Fibonacci algorithmLinear mode
25°CN/A
319 343
µA/MHz
85°C 326 350
CPU running a CoreMark algorithm
Linear mode
25°C N/A 343 387
85°C 351 416
CPU running a Fibonacci algorithm
Switching mode
25°C N/A 181 198
85°C 186 203
CPU running a CoreMark algorithmSwitching mode
25°C N/A 192 232
85°C 202 239
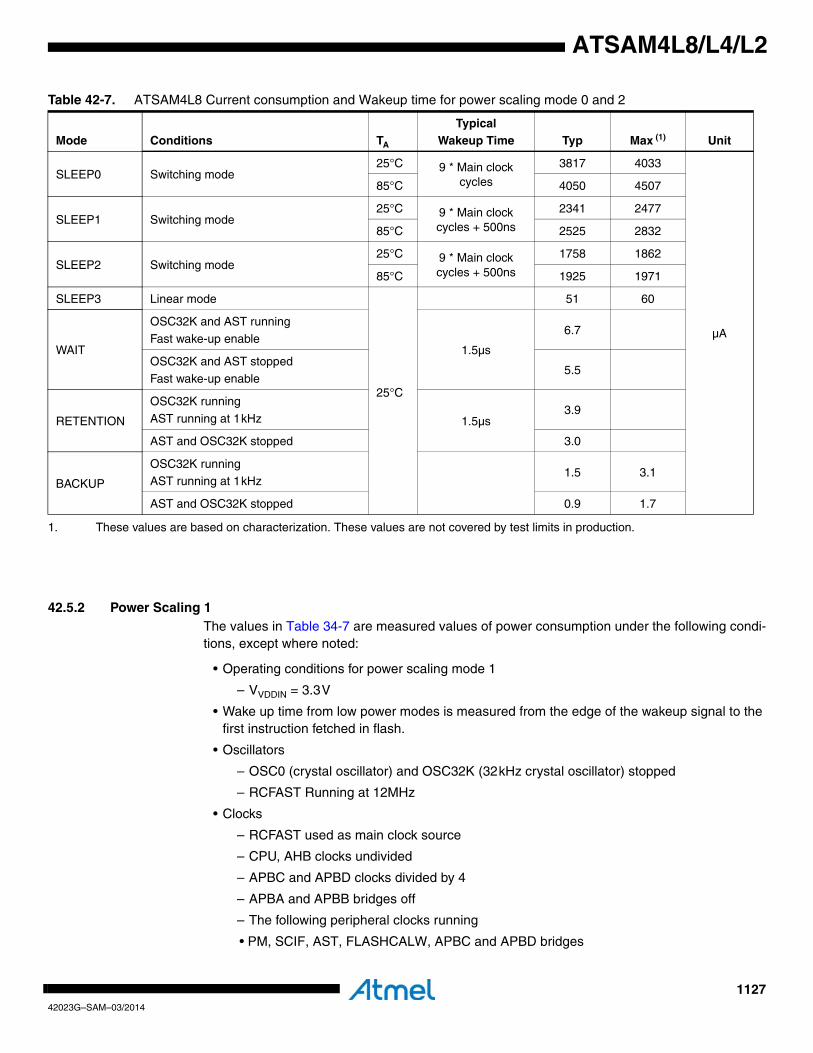
112742023G–SAM–03/2014
ATSAM4L8/L4/L2
42.5.2 Power Scaling 1The values in Table 34-7 are measured values of power consumption under the following condi-tions, except where noted:
• Operating conditions for power scaling mode 1
– VVDDIN = 3.3V
• Wake up time from low power modes is measured from the edge of the wakeup signal to the first instruction fetched in flash.
• Oscillators
– OSC0 (crystal oscillator) and OSC32K (32kHz crystal oscillator) stopped
– RCFAST Running at 12MHz
• Clocks
– RCFAST used as main clock source
– CPU, AHB clocks undivided
– APBC and APBD clocks divided by 4
– APBA and APBB bridges off
– The following peripheral clocks running
• PM, SCIF, AST, FLASHCALW, APBC and APBD bridges
SLEEP0 Switching mode25°C 9 * Main clock
cycles
3817 4033
µA
85°C 4050 4507
SLEEP1 Switching mode25°C 9 * Main clock
cycles + 500ns
2341 2477
85°C 2525 2832
SLEEP2 Switching mode25°C 9 * Main clock
cycles + 500ns
1758 1862
85°C 1925 1971
SLEEP3 Linear mode
25°C
51 60
WAIT
OSC32K and AST running
Fast wake-up enable1.5µs
6.7
OSC32K and AST stopped
Fast wake-up enable5.5
RETENTION
OSC32K running
AST running at 1kHz 1.5µs3.9
AST and OSC32K stopped 3.0
BACKUP
OSC32K runningAST running at 1kHz
1.5 3.1
AST and OSC32K stopped 0.9 1.7
1. These values are based on characterization. These values are not covered by test limits in production.
Table 42-7. ATSAM4L8 Current consumption and Wakeup time for power scaling mode 0 and 2
Mode Conditions TA
Typical Wakeup Time Typ Max (1) Unit
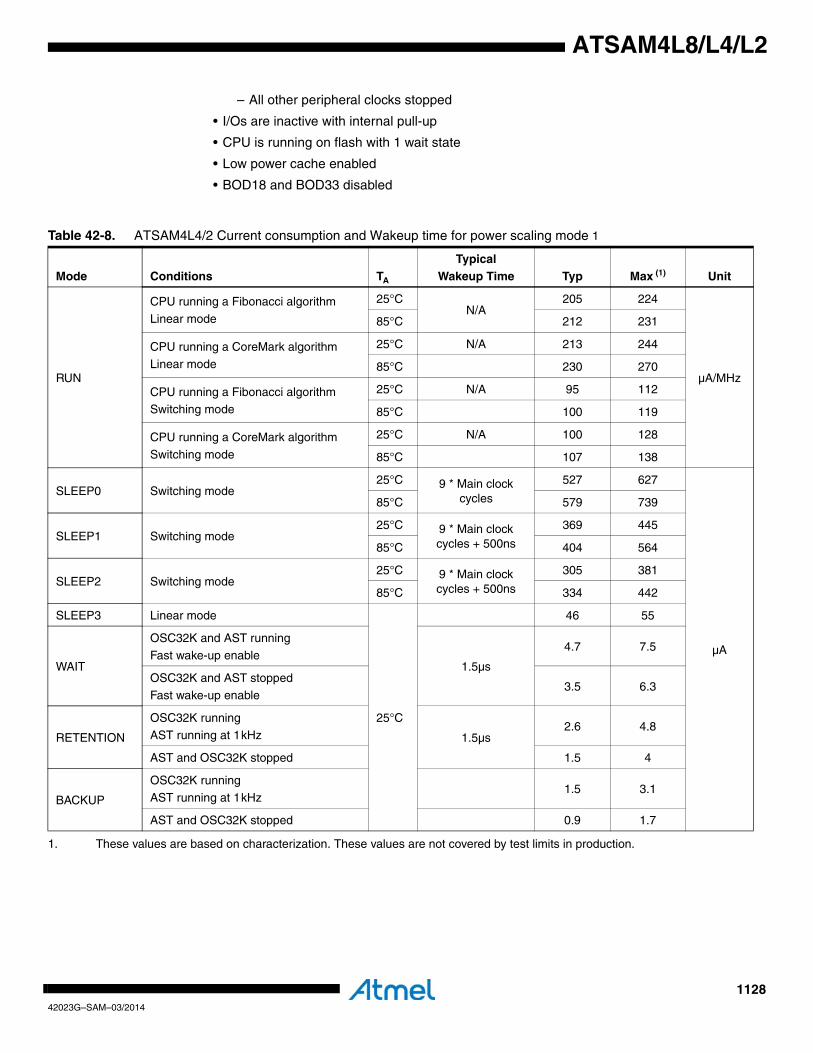
112842023G–SAM–03/2014
ATSAM4L8/L4/L2
– All other peripheral clocks stopped
• I/Os are inactive with internal pull-up
• CPU is running on flash with 1 wait state
• Low power cache enabled
• BOD18 and BOD33 disabled
Table 42-8. ATSAM4L4/2 Current consumption and Wakeup time for power scaling mode 1
Mode Conditions TA
Typical Wakeup Time Typ Max (1) Unit
RUN
CPU running a Fibonacci algorithm
Linear mode
25°CN/A
205 224
µA/MHz
85°C 212 231
CPU running a CoreMark algorithm
Linear mode
25°C N/A 213 244
85°C 230 270
CPU running a Fibonacci algorithmSwitching mode
25°C N/A 95 112
85°C 100 119
CPU running a CoreMark algorithm
Switching mode
25°C N/A 100 128
85°C 107 138
SLEEP0 Switching mode25°C 9 * Main clock
cycles
527 627
µA
85°C 579 739
SLEEP1 Switching mode25°C 9 * Main clock
cycles + 500ns
369 445
85°C 404 564
SLEEP2 Switching mode25°C 9 * Main clock
cycles + 500ns
305 381
85°C 334 442
SLEEP3 Linear mode
25°C
46 55
WAIT
OSC32K and AST running
Fast wake-up enable1.5µs
4.7 7.5
OSC32K and AST stopped
Fast wake-up enable3.5 6.3
RETENTION
OSC32K running
AST running at 1kHz 1.5µs2.6 4.8
AST and OSC32K stopped 1.5 4
BACKUP
OSC32K running
AST running at 1kHz1.5 3.1
AST and OSC32K stopped 0.9 1.7
1. These values are based on characterization. These values are not covered by test limits in production.
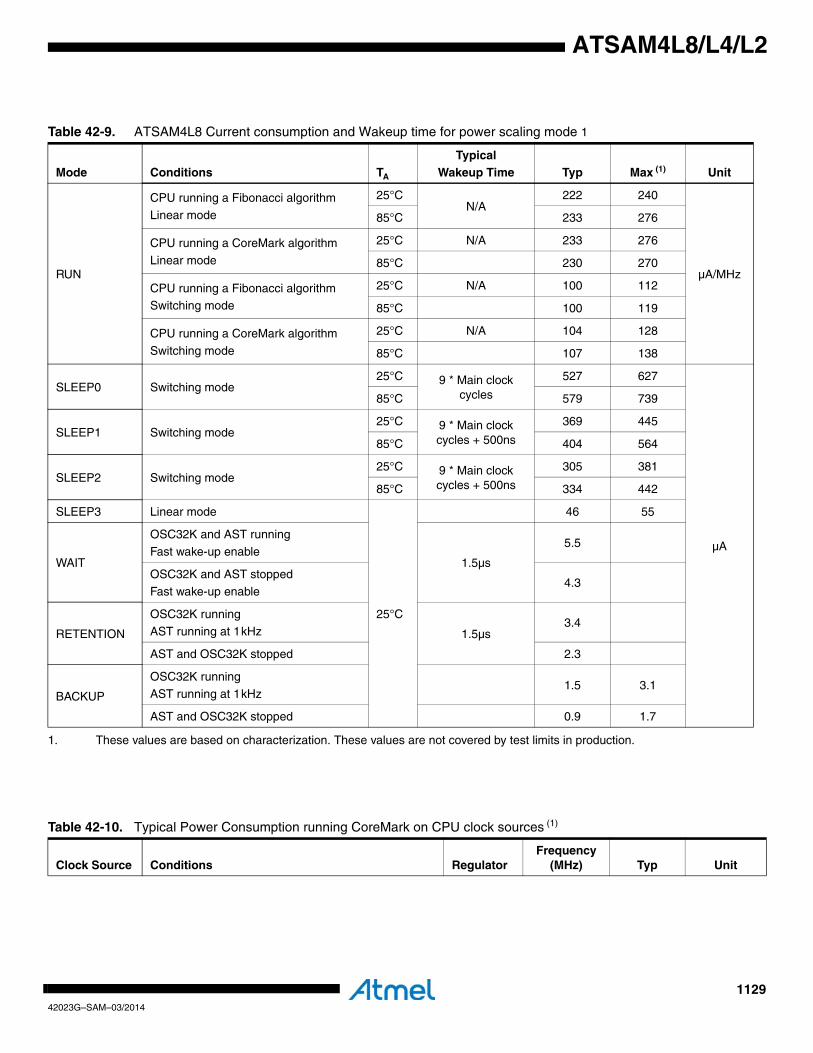
112942023G–SAM–03/2014
ATSAM4L8/L4/L2
Table 42-9. ATSAM4L8 Current consumption and Wakeup time for power scaling mode 1
Mode Conditions TA
Typical Wakeup Time Typ Max (1) Unit
RUN
CPU running a Fibonacci algorithm
Linear mode
25°CN/A
222 240
µA/MHz
85°C 233 276
CPU running a CoreMark algorithm
Linear mode
25°C N/A 233 276
85°C 230 270
CPU running a Fibonacci algorithmSwitching mode
25°C N/A 100 112
85°C 100 119
CPU running a CoreMark algorithm
Switching mode
25°C N/A 104 128
85°C 107 138
SLEEP0 Switching mode25°C 9 * Main clock
cycles
527 627
µA
85°C 579 739
SLEEP1 Switching mode25°C 9 * Main clock
cycles + 500ns
369 445
85°C 404 564
SLEEP2 Switching mode25°C 9 * Main clock
cycles + 500ns
305 381
85°C 334 442
SLEEP3 Linear mode
25°C
46 55
WAIT
OSC32K and AST running
Fast wake-up enable1.5µs
5.5
OSC32K and AST stopped
Fast wake-up enable4.3
RETENTION
OSC32K running
AST running at 1kHz 1.5µs3.4
AST and OSC32K stopped 2.3
BACKUP
OSC32K running
AST running at 1kHz1.5 3.1
AST and OSC32K stopped 0.9 1.7
1. These values are based on characterization. These values are not covered by test limits in production.
Table 42-10. Typical Power Consumption running CoreMark on CPU clock sources (1)
Clock Source Conditions RegulatorFrequency
(MHz) Typ Unit
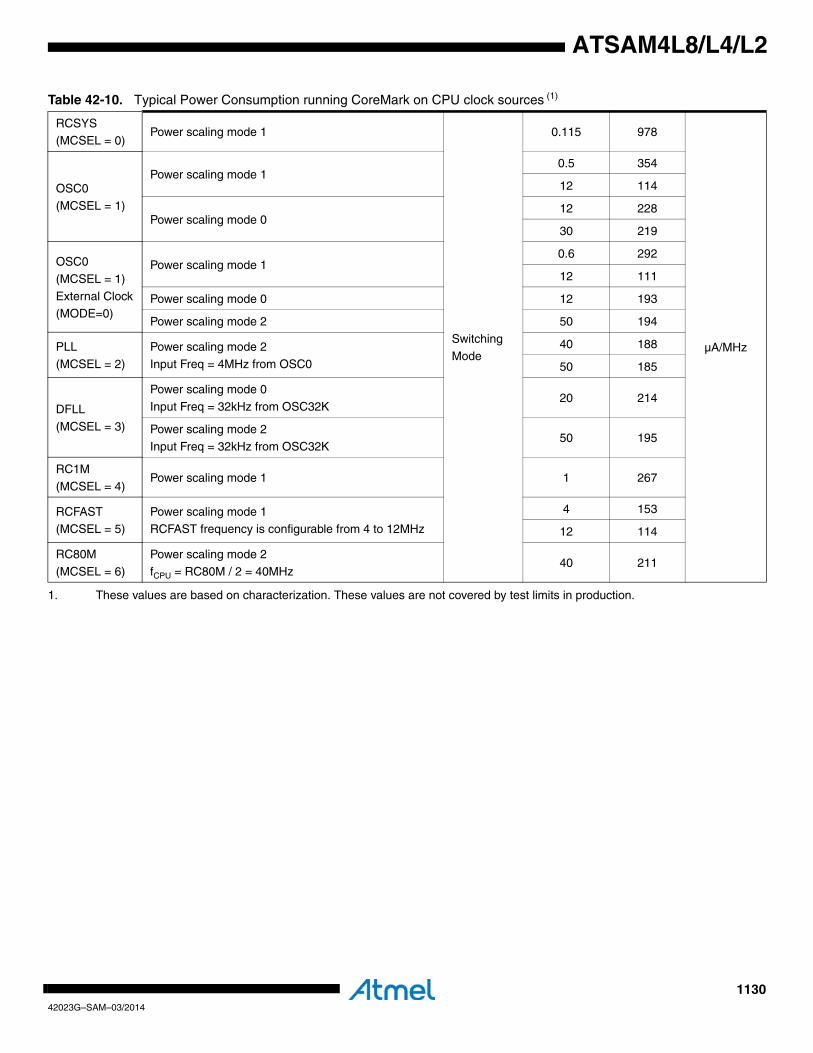
113042023G–SAM–03/2014
ATSAM4L8/L4/L2
RCSYS(MCSEL = 0)
Power scaling mode 1
Switching
Mode
0.115 978
µA/MHz
OSC0
(MCSEL = 1)
Power scaling mode 10.5 354
12 114
Power scaling mode 012 228
30 219
OSC0
(MCSEL = 1)
External Clock(MODE=0)
Power scaling mode 1 0.6 292
12 111
Power scaling mode 0 12 193
Power scaling mode 2 50 194
PLL
(MCSEL = 2)
Power scaling mode 2
Input Freq = 4MHz from OSC0
40 188
50 185
DFLL
(MCSEL = 3)
Power scaling mode 0
Input Freq = 32kHz from OSC32K20 214
Power scaling mode 2
Input Freq = 32kHz from OSC32K50 195
RC1M
(MCSEL = 4)Power scaling mode 1 1 267
RCFAST(MCSEL = 5)
Power scaling mode 1RCFAST frequency is configurable from 4 to 12MHz
4 153
12 114
RC80M
(MCSEL = 6)
Power scaling mode 2
fCPU = RC80M / 2 = 40MHz40 211
1. These values are based on characterization. These values are not covered by test limits in production.
Table 42-10. Typical Power Consumption running CoreMark on CPU clock sources (1)
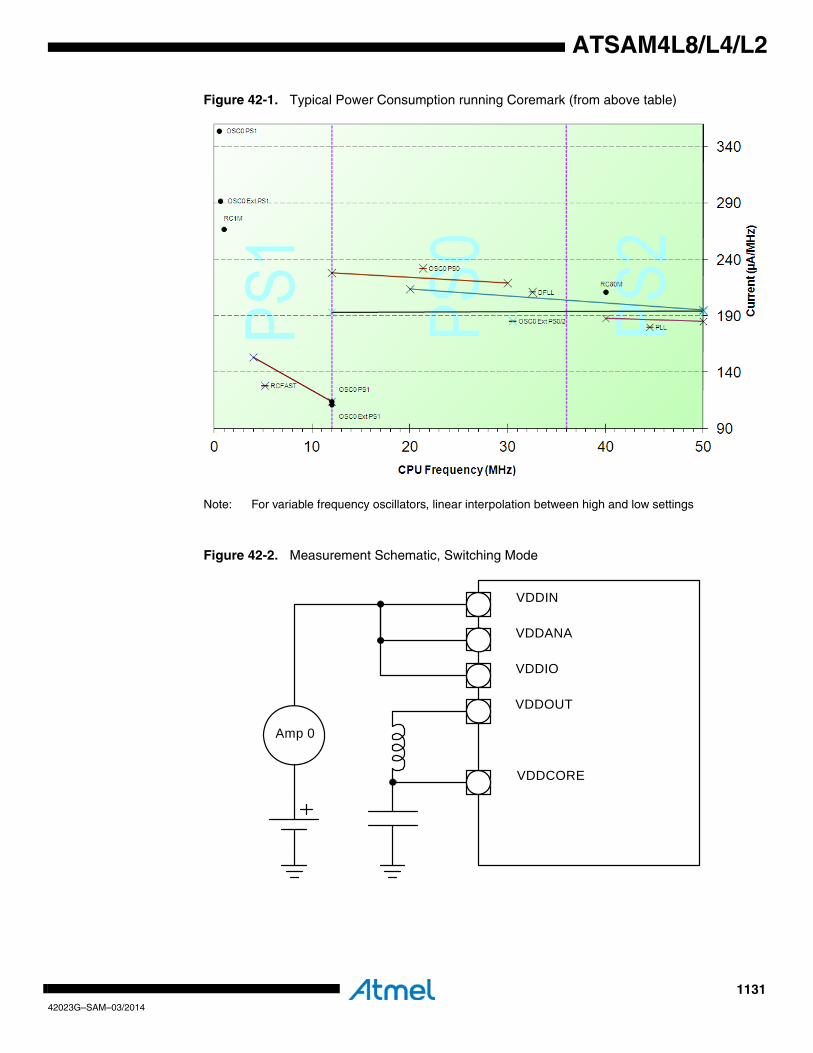
113142023G–SAM–03/2014
ATSAM4L8/L4/L2
Figure 42-1. Typical Power Consumption running Coremark (from above table)
Note: For variable frequency oscillators, linear interpolation between high and low settings
Figure 42-2. Measurement Schematic, Switching Mode
VDDIN
VDDOUT
VDDCORE
VDDIO
VDDANA
Amp 0
113242023G–SAM–03/2014
ATSAM4L8/L4/L2
42.5.3 Peripheral Power Consumption in Power Scaling mode 0 and 2The values in Table 42-11 are measured values of power consumption under the followingconditions:
• Operating conditions, internal core supply (Figure 42-2)
– VVDDIN = 3.3V
– VVDDCORE supplied by the internal regulator in switching mode
• TA = 25°C
• Oscillators
– OSC0 (crystal oscillator) stopped
– OSC32K (32KHz crystal oscillator) running with external 32KHz crystal
– DFLL running at 48MHz with OSC32K as reference clock
• Clocks
– DFLL used as main clock source
– CPU, AHB, and PB clocks undivided
• I/Os are inactive with internal pull-up
• Flash enabled in high speed mode
• CPU in SLEEP0 mode
• BOD18 and BOD33 disabled
Consumption active is the added current consumption when the module clock is turned on.
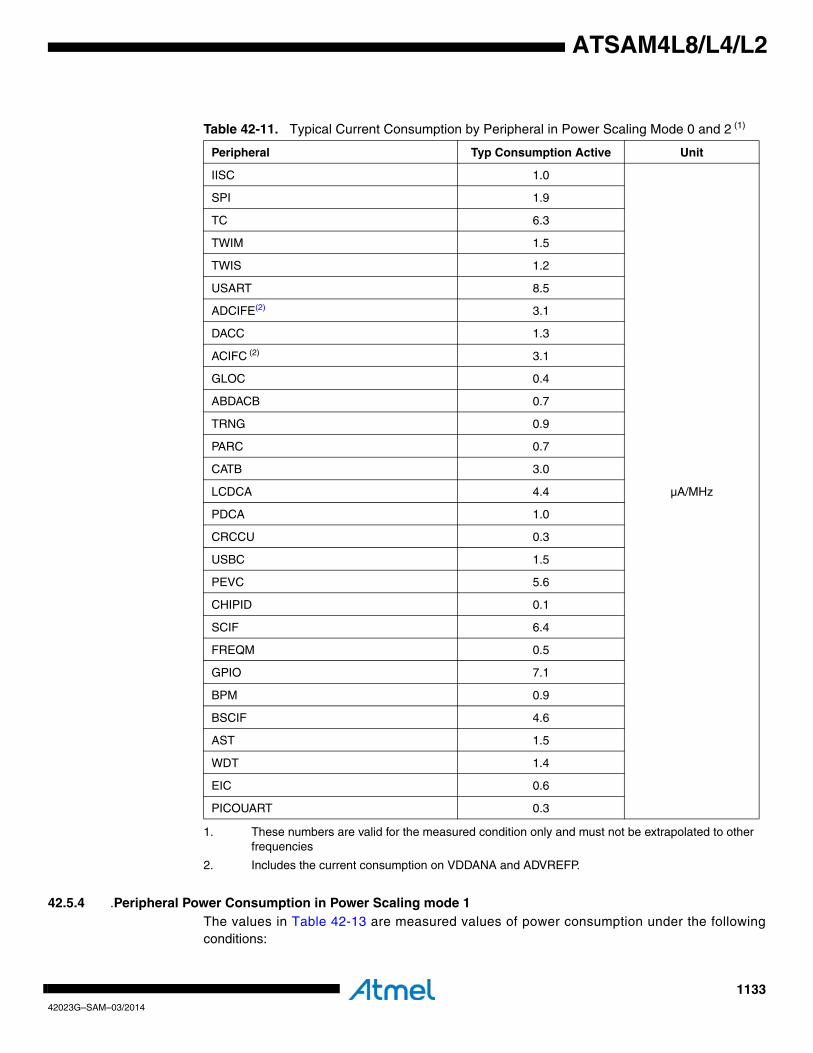
113342023G–SAM–03/2014
ATSAM4L8/L4/L2
42.5.4 .Peripheral Power Consumption in Power Scaling mode 1The values in Table 42-13 are measured values of power consumption under the followingconditions:
Table 42-11. Typical Current Consumption by Peripheral in Power Scaling Mode 0 and 2 (1)
1. These numbers are valid for the measured condition only and must not be extrapolated to other frequencies
Peripheral Typ Consumption Active Unit
IISC 1.0
µA/MHz
SPI 1.9
TC 6.3
TWIM 1.5
TWIS 1.2
USART 8.5
ADCIFE(2) 3.1
DACC 1.3
ACIFC (2)
2. Includes the current consumption on VDDANA and ADVREFP.
3.1
GLOC 0.4
ABDACB 0.7
TRNG 0.9
PARC 0.7
CATB 3.0
LCDCA 4.4
PDCA 1.0
CRCCU 0.3
USBC 1.5
PEVC 5.6
CHIPID 0.1
SCIF 6.4
FREQM 0.5
GPIO 7.1
BPM 0.9
BSCIF 4.6
AST 1.5
WDT 1.4
EIC 0.6
PICOUART 0.3
113442023G–SAM–03/2014
ATSAM4L8/L4/L2
• Operating conditions, internal core supply (Figure 42-2)
– VVDDIN = 3.3V
– VVDDCORE = 1.2 V, supplied by the internal regulator in switching mode
• TA = 25°C
• Oscillators
– OSC0 (crystal oscillator) stopped
– OSC32K (32KHz crystal oscillator) running with external 32KHz crystal
– RCFAST running @ 12MHz
• Clocks
– RCFAST used as main clock source
– CPU, AHB, and PB clocks undivided
• I/Os are inactive with internal pull-up
• Flash enabled in normal mode
• CPU in SLEEP0 mode
• BOD18 and BOD33 disabled
Consumption active is the added current consumption when the module clock is turned on
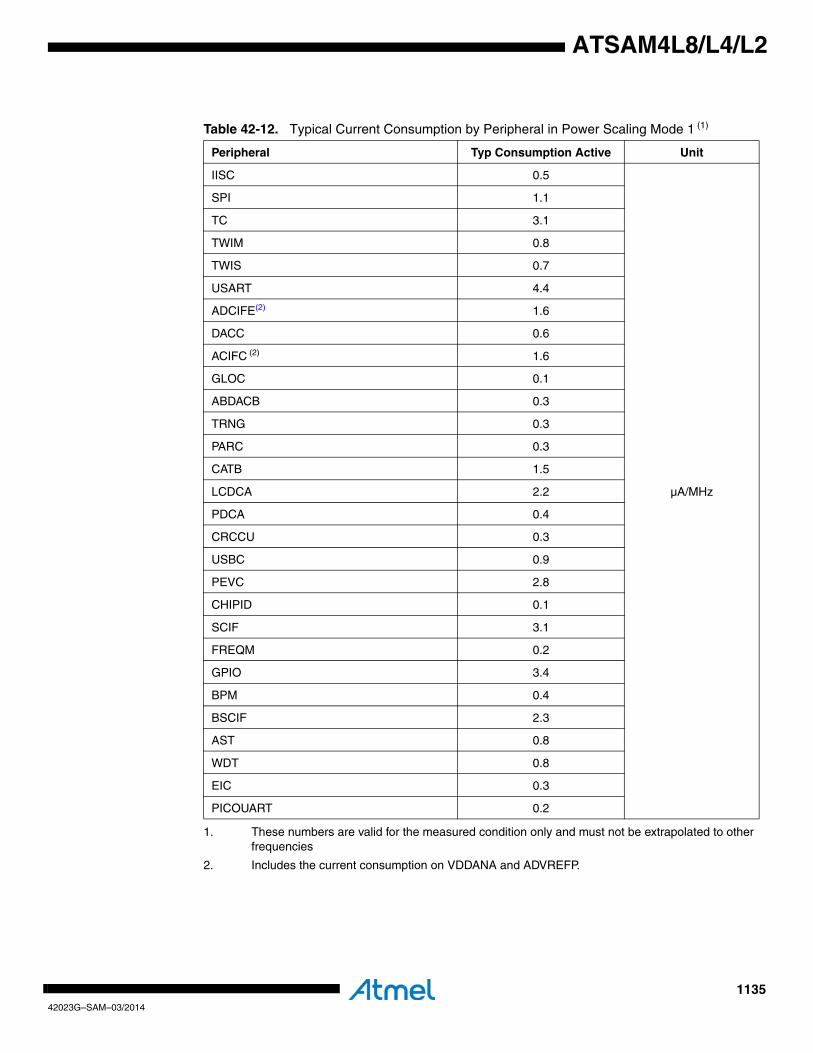
113542023G–SAM–03/2014
ATSAM4L8/L4/L2
Table 42-12. Typical Current Consumption by Peripheral in Power Scaling Mode 1 (1)
1. These numbers are valid for the measured condition only and must not be extrapolated to other frequencies
Peripheral Typ Consumption Active Unit
IISC 0.5
µA/MHz
SPI 1.1
TC 3.1
TWIM 0.8
TWIS 0.7
USART 4.4
ADCIFE(2) 1.6
DACC 0.6
ACIFC (2)
2. Includes the current consumption on VDDANA and ADVREFP.
1.6
GLOC 0.1
ABDACB 0.3
TRNG 0.3
PARC 0.3
CATB 1.5
LCDCA 2.2
PDCA 0.4
CRCCU 0.3
USBC 0.9
PEVC 2.8
CHIPID 0.1
SCIF 3.1
FREQM 0.2
GPIO 3.4
BPM 0.4
BSCIF 2.3
AST 0.8
WDT 0.8
EIC 0.3
PICOUART 0.2
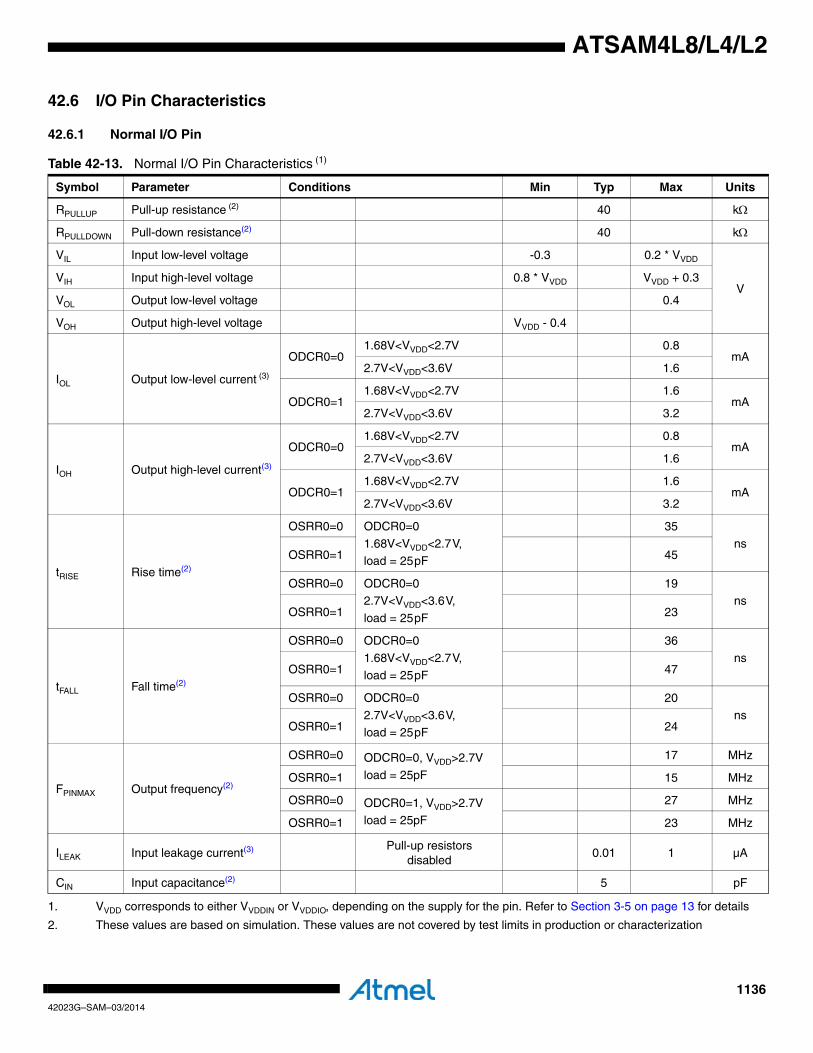
113642023G–SAM–03/2014
ATSAM4L8/L4/L2
42.6 I/O Pin Characteristics
42.6.1 Normal I/O Pin
Table 42-13. Normal I/O Pin Characteristics (1)
1. VVDD corresponds to either VVDDIN or VVDDIO, depending on the supply for the pin. Refer to Section 3-5 on page 13 for details
Symbol Parameter Conditions Min Typ Max Units
RPULLUP Pull-up resistance (2)
2. These values are based on simulation. These values are not covered by test limits in production or characterization
40 kΩ
RPULLDOWN Pull-down resistance(2) 40 kΩ
VIL Input low-level voltage -0.3 0.2 * VVDD
VVIH Input high-level voltage 0.8 * VVDD VVDD + 0.3
VOL Output low-level voltage 0.4
VOH Output high-level voltage VVDD - 0.4
IOL Output low-level current (3)
ODCR0=01.68V<VVDD<2.7V 0.8
mA2.7V<VVDD<3.6V 1.6
ODCR0=11.68V<VVDD<2.7V 1.6
mA2.7V<VVDD<3.6V 3.2
IOH Output high-level current(3)
ODCR0=01.68V<VVDD<2.7V 0.8
mA2.7V<VVDD<3.6V 1.6
ODCR0=11.68V<VVDD<2.7V 1.6
mA2.7V<VVDD<3.6V 3.2
tRISE Rise time(2)
OSRR0=0 ODCR0=0
1.68V<VVDD<2.7V, load = 25pF
35
nsOSRR0=1 45
OSRR0=0 ODCR0=02.7V<VVDD<3.6V,
load = 25pF
19ns
OSRR0=1 23
tFALL Fall time(2)
OSRR0=0 ODCR0=0
1.68V<VVDD<2.7V,
load = 25pF
36
nsOSRR0=1 47
OSRR0=0 ODCR0=0
2.7V<VVDD<3.6V,load = 25pF
20
nsOSRR0=1 24
FPINMAX Output frequency(2)
OSRR0=0 ODCR0=0, VVDD>2.7V
load = 25pF
17 MHz
OSRR0=1 15 MHz
OSRR0=0 ODCR0=1, VVDD>2.7Vload = 25pF
27 MHz
OSRR0=1 23 MHz
ILEAK Input leakage current(3) Pull-up resistors disabled
0.01 1 µA
CIN Input capacitance(2) 5 pF
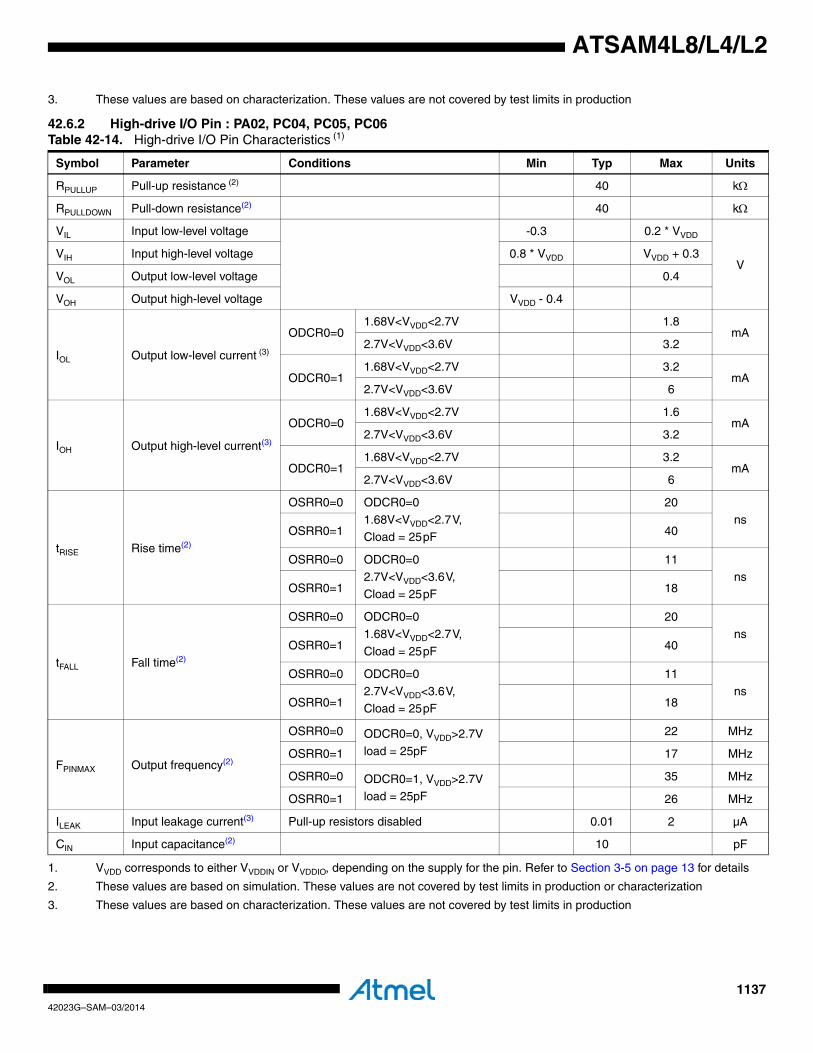
113742023G–SAM–03/2014
ATSAM4L8/L4/L2
3. These values are based on characterization. These values are not covered by test limits in production
42.6.2 High-drive I/O Pin : PA02, PC04, PC05, PC06Table 42-14. High-drive I/O Pin Characteristics (1)
Symbol Parameter Conditions Min Typ Max Units
RPULLUP Pull-up resistance (2) 40 kΩ
RPULLDOWN Pull-down resistance(2) 40 kΩ
VIL Input low-level voltage -0.3 0.2 * VVDD
VVIH Input high-level voltage 0.8 * VVDD VVDD + 0.3
VOL Output low-level voltage 0.4
VOH Output high-level voltage VVDD - 0.4
IOL Output low-level current (3)
ODCR0=01.68V<VVDD<2.7V 1.8
mA2.7V<VVDD<3.6V 3.2
ODCR0=11.68V<VVDD<2.7V 3.2
mA2.7V<VVDD<3.6V 6
IOH Output high-level current(3)
ODCR0=01.68V<VVDD<2.7V 1.6
mA2.7V<VVDD<3.6V 3.2
ODCR0=11.68V<VVDD<2.7V 3.2
mA2.7V<VVDD<3.6V 6
tRISE Rise time(2)
OSRR0=0 ODCR0=0
1.68V<VVDD<2.7V, Cload = 25pF
20
nsOSRR0=1 40
OSRR0=0 ODCR0=02.7V<VVDD<3.6V,
Cload = 25pF
11ns
OSRR0=1 18
tFALL Fall time(2)
OSRR0=0 ODCR0=0
1.68V<VVDD<2.7V,
Cload = 25pF
20
nsOSRR0=1 40
OSRR0=0 ODCR0=0
2.7V<VVDD<3.6V,Cload = 25pF
11
nsOSRR0=1 18
FPINMAX Output frequency(2)
OSRR0=0 ODCR0=0, VVDD>2.7V
load = 25pF
22 MHz
OSRR0=1 17 MHz
OSRR0=0 ODCR0=1, VVDD>2.7Vload = 25pF
35 MHz
OSRR0=1 26 MHz
ILEAK Input leakage current(3) Pull-up resistors disabled 0.01 2 µA
CIN Input capacitance(2) 10 pF
1. VVDD corresponds to either VVDDIN or VVDDIO, depending on the supply for the pin. Refer to Section 3-5 on page 13 for details
2. These values are based on simulation. These values are not covered by test limits in production or characterization
3. These values are based on characterization. These values are not covered by test limits in production
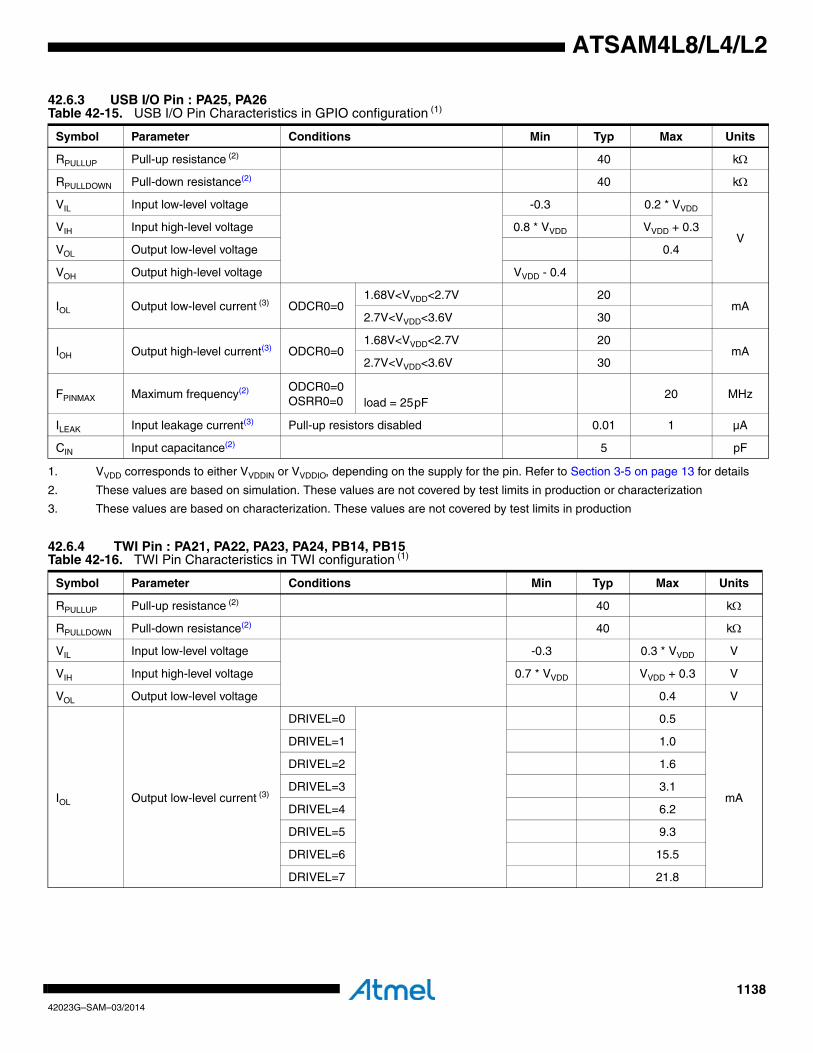
113842023G–SAM–03/2014
ATSAM4L8/L4/L2
42.6.3 USB I/O Pin : PA25, PA26
42.6.4 TWI Pin : PA21, PA22, PA23, PA24, PB14, PB15
Table 42-15. USB I/O Pin Characteristics in GPIO configuration (1)
1. VVDD corresponds to either VVDDIN or VVDDIO, depending on the supply for the pin. Refer to Section 3-5 on page 13 for details
Symbol Parameter Conditions Min Typ Max Units
RPULLUP Pull-up resistance (2)
2. These values are based on simulation. These values are not covered by test limits in production or characterization
40 kΩ
RPULLDOWN Pull-down resistance(2) 40 kΩ
VIL Input low-level voltage -0.3 0.2 * VVDD
VVIH Input high-level voltage 0.8 * VVDD VVDD + 0.3
VOL Output low-level voltage 0.4
VOH Output high-level voltage VVDD - 0.4
IOL Output low-level current (3)
3. These values are based on characterization. These values are not covered by test limits in production
ODCR0=01.68V<VVDD<2.7V 20
mA2.7V<VVDD<3.6V 30
IOH Output high-level current(3) ODCR0=01.68V<VVDD<2.7V 20
mA2.7V<VVDD<3.6V 30
FPINMAX Maximum frequency(2) ODCR0=0OSRR0=0 load = 25pF
20 MHz
ILEAK Input leakage current(3) Pull-up resistors disabled 0.01 1 µA
CIN Input capacitance(2) 5 pF
Table 42-16. TWI Pin Characteristics in TWI configuration (1)
Symbol Parameter Conditions Min Typ Max Units
RPULLUP Pull-up resistance (2) 40 kΩ
RPULLDOWN Pull-down resistance(2) 40 kΩ
VIL Input low-level voltage -0.3 0.3 * VVDD V
VIH Input high-level voltage 0.7 * VVDD VVDD + 0.3 V
VOL Output low-level voltage 0.4 V
IOL Output low-level current (3)
DRIVEL=0 0.5
mA
DRIVEL=1 1.0
DRIVEL=2 1.6
DRIVEL=3 3.1
DRIVEL=4 6.2
DRIVEL=5 9.3
DRIVEL=6 15.5
DRIVEL=7 21.8
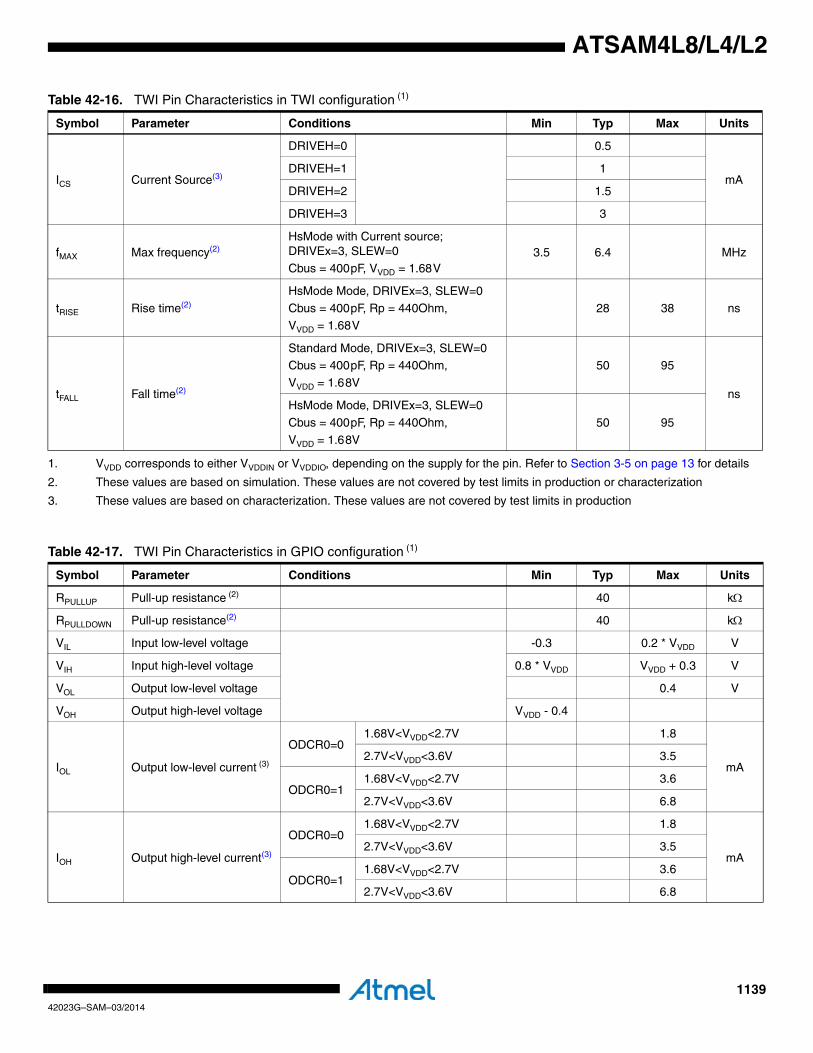
113942023G–SAM–03/2014
ATSAM4L8/L4/L2
ICS Current Source(3)
DRIVEH=0 0.5
mADRIVEH=1 1
DRIVEH=2 1.5
DRIVEH=3 3
fMAX Max frequency(2)HsMode with Current source; DRIVEx=3, SLEW=0
Cbus = 400pF, VVDD = 1.68V3.5 6.4 MHz
tRISE Rise time(2)
HsMode Mode, DRIVEx=3, SLEW=0
Cbus = 400pF, Rp = 440Ohm, VVDD = 1.68V
28 38 ns
tFALL Fall time(2)
Standard Mode, DRIVEx=3, SLEW=0Cbus = 400pF, Rp = 440Ohm,
VVDD = 1.68V
50 95
nsHsMode Mode, DRIVEx=3, SLEW=0
Cbus = 400pF, Rp = 440Ohm,
VVDD = 1.68V
50 95
1. VVDD corresponds to either VVDDIN or VVDDIO, depending on the supply for the pin. Refer to Section 3-5 on page 13 for details
2. These values are based on simulation. These values are not covered by test limits in production or characterization
3. These values are based on characterization. These values are not covered by test limits in production
Table 42-16. TWI Pin Characteristics in TWI configuration (1)
Symbol Parameter Conditions Min Typ Max Units
Table 42-17. TWI Pin Characteristics in GPIO configuration (1)
Symbol Parameter Conditions Min Typ Max Units
RPULLUP Pull-up resistance (2) 40 kΩ
RPULLDOWN Pull-up resistance(2) 40 kΩ
VIL Input low-level voltage -0.3 0.2 * VVDD V
VIH Input high-level voltage 0.8 * VVDD VVDD + 0.3 V
VOL Output low-level voltage 0.4 V
VOH Output high-level voltage VVDD - 0.4
IOL Output low-level current (3)
ODCR0=01.68V<VVDD<2.7V 1.8
mA2.7V<VVDD<3.6V 3.5
ODCR0=11.68V<VVDD<2.7V 3.6
2.7V<VVDD<3.6V 6.8
IOH Output high-level current(3)
ODCR0=01.68V<VVDD<2.7V 1.8
mA2.7V<VVDD<3.6V 3.5
ODCR0=11.68V<VVDD<2.7V 3.6
2.7V<VVDD<3.6V 6.8
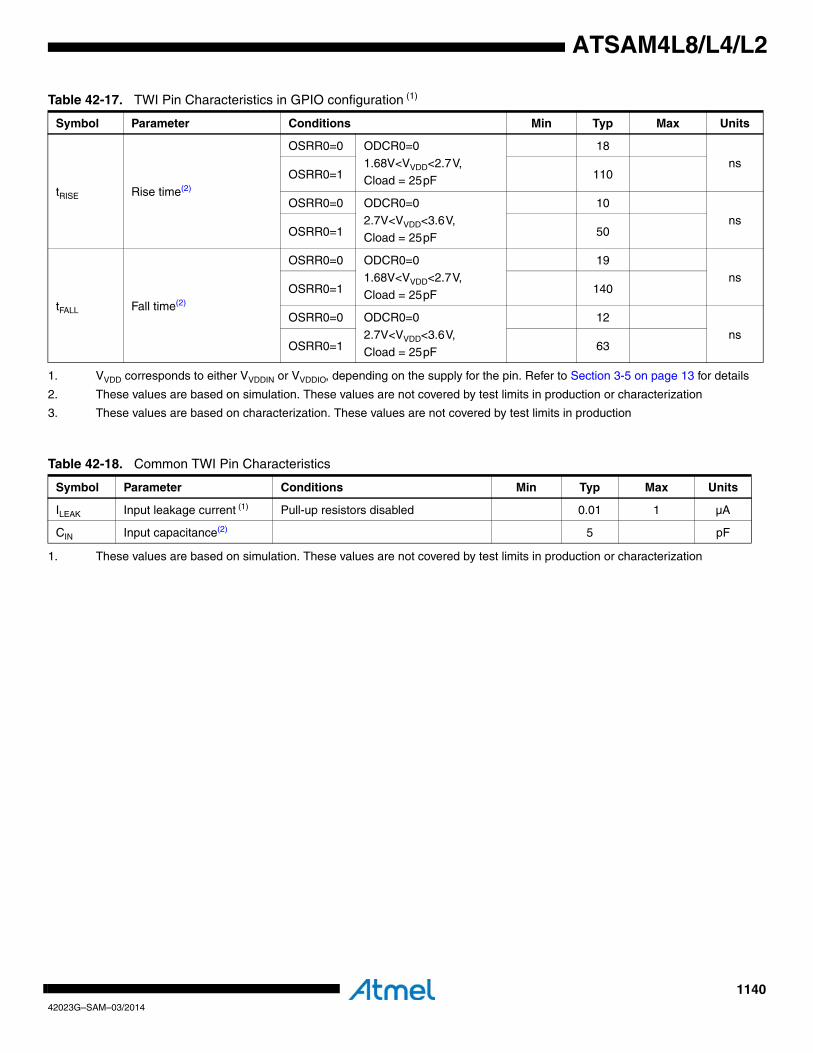
114042023G–SAM–03/2014
ATSAM4L8/L4/L2
tRISE Rise time(2)
OSRR0=0 ODCR0=0
1.68V<VVDD<2.7V, Cload = 25pF
18
nsOSRR0=1 110
OSRR0=0 ODCR0=0
2.7V<VVDD<3.6V,Cload = 25pF
10
nsOSRR0=1 50
tFALL Fall time(2)
OSRR0=0 ODCR0=01.68V<VVDD<2.7V,
Cload = 25pF
19ns
OSRR0=1 140
OSRR0=0 ODCR0=0
2.7V<VVDD<3.6V,
Cload = 25pF
12
nsOSRR0=1 63
1. VVDD corresponds to either VVDDIN or VVDDIO, depending on the supply for the pin. Refer to Section 3-5 on page 13 for details
2. These values are based on simulation. These values are not covered by test limits in production or characterization
3. These values are based on characterization. These values are not covered by test limits in production
Table 42-17. TWI Pin Characteristics in GPIO configuration (1)
Symbol Parameter Conditions Min Typ Max Units
Table 42-18. Common TWI Pin Characteristics
Symbol Parameter Conditions Min Typ Max Units
ILEAK Input leakage current (1) Pull-up resistors disabled 0.01 1 µA
CIN Input capacitance(2) 5 pF
1. These values are based on simulation. These values are not covered by test limits in production or characterization
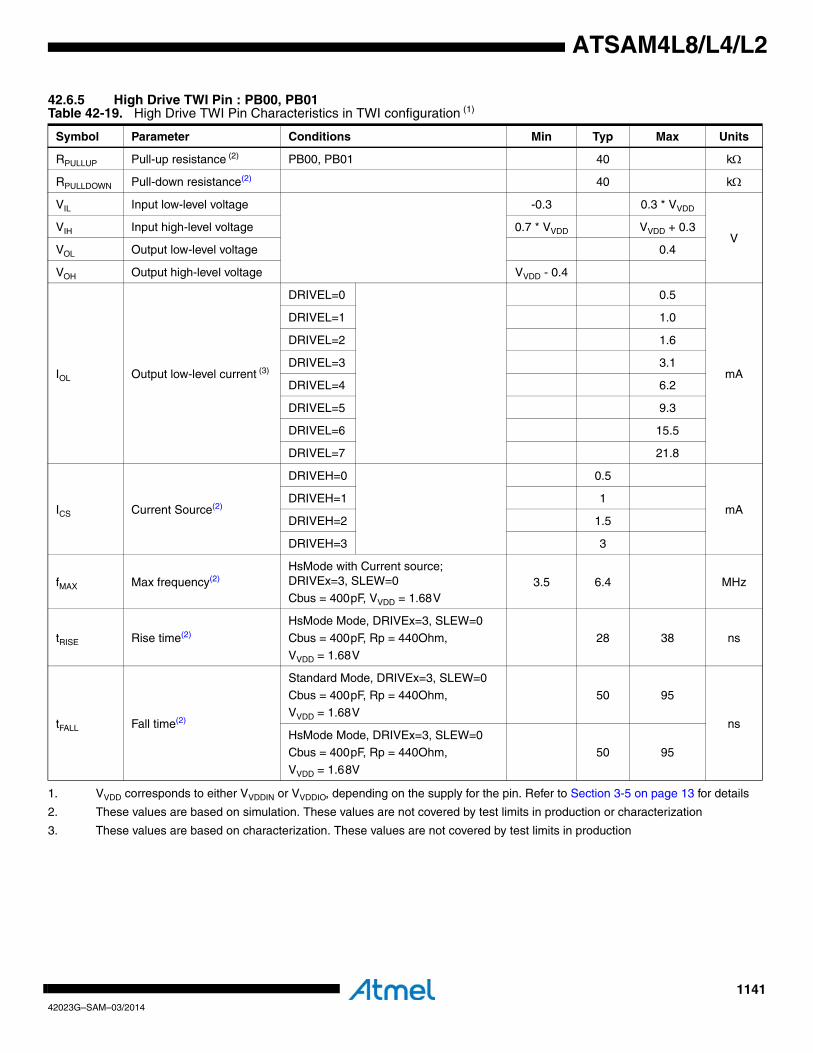
114142023G–SAM–03/2014
ATSAM4L8/L4/L2
42.6.5 High Drive TWI Pin : PB00, PB01Table 42-19. High Drive TWI Pin Characteristics in TWI configuration (1)
1. VVDD corresponds to either VVDDIN or VVDDIO, depending on the supply for the pin. Refer to Section 3-5 on page 13 for details
Symbol Parameter Conditions Min Typ Max Units
RPULLUP Pull-up resistance (2)
2. These values are based on simulation. These values are not covered by test limits in production or characterization
PB00, PB01 40 kΩ
RPULLDOWN Pull-down resistance(2) 40 kΩ
VIL Input low-level voltage -0.3 0.3 * VVDD
VVIH Input high-level voltage 0.7 * VVDD VVDD + 0.3
VOL Output low-level voltage 0.4
VOH Output high-level voltage VVDD - 0.4
IOL Output low-level current (3)
3. These values are based on characterization. These values are not covered by test limits in production
DRIVEL=0 0.5
mA
DRIVEL=1 1.0
DRIVEL=2 1.6
DRIVEL=3 3.1
DRIVEL=4 6.2
DRIVEL=5 9.3
DRIVEL=6 15.5
DRIVEL=7 21.8
ICS Current Source(2)
DRIVEH=0 0.5
mADRIVEH=1 1
DRIVEH=2 1.5
DRIVEH=3 3
fMAX Max frequency(2)HsMode with Current source; DRIVEx=3, SLEW=0
Cbus = 400pF, VVDD = 1.68V3.5 6.4 MHz
tRISE Rise time(2)
HsMode Mode, DRIVEx=3, SLEW=0
Cbus = 400pF, Rp = 440Ohm,
VVDD = 1.68V
28 38 ns
tFALL Fall time(2)
Standard Mode, DRIVEx=3, SLEW=0
Cbus = 400pF, Rp = 440Ohm, VVDD = 1.68V
50 95
nsHsMode Mode, DRIVEx=3, SLEW=0Cbus = 400pF, Rp = 440Ohm,
VVDD = 1.68V
50 95
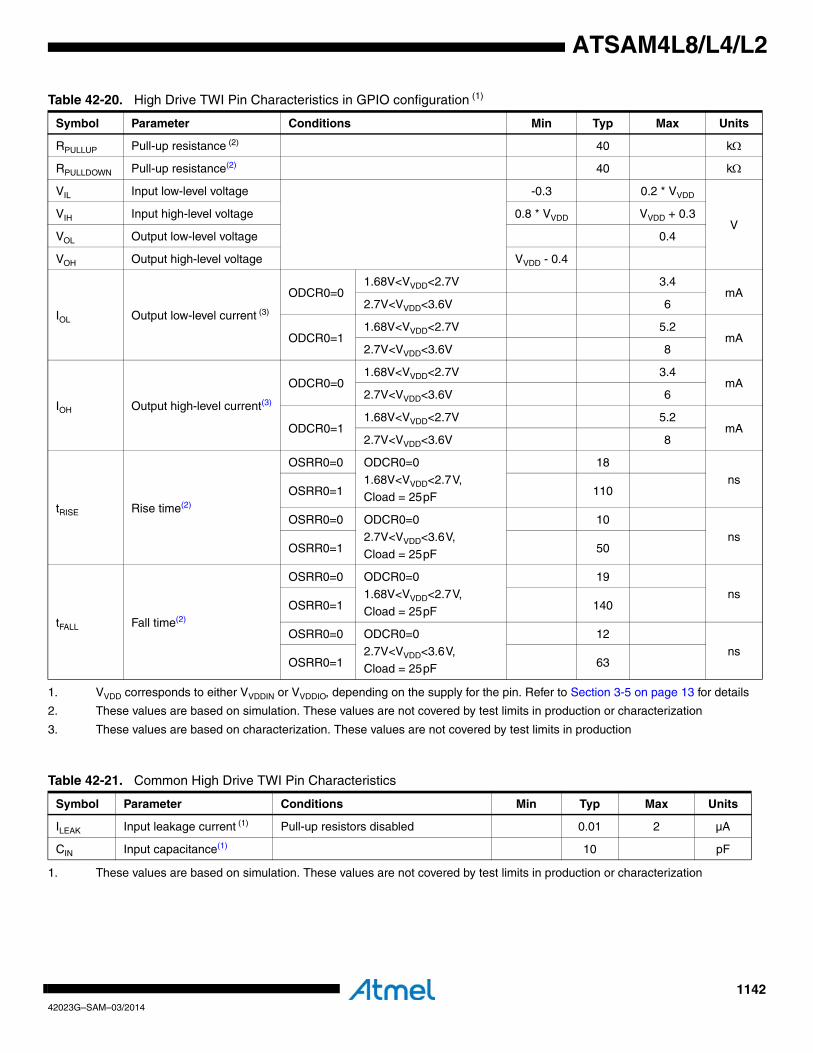
114242023G–SAM–03/2014
ATSAM4L8/L4/L2
Table 42-20. High Drive TWI Pin Characteristics in GPIO configuration (1)
Symbol Parameter Conditions Min Typ Max Units
RPULLUP Pull-up resistance (2) 40 kΩ
RPULLDOWN Pull-up resistance(2) 40 kΩ
VIL Input low-level voltage -0.3 0.2 * VVDD
VVIH Input high-level voltage 0.8 * VVDD VVDD + 0.3
VOL Output low-level voltage 0.4
VOH Output high-level voltage VVDD - 0.4
IOL Output low-level current (3)
ODCR0=01.68V<VVDD<2.7V 3.4
mA2.7V<VVDD<3.6V 6
ODCR0=11.68V<VVDD<2.7V 5.2
mA2.7V<VVDD<3.6V 8
IOH Output high-level current(3)
ODCR0=01.68V<VVDD<2.7V 3.4
mA2.7V<VVDD<3.6V 6
ODCR0=11.68V<VVDD<2.7V 5.2
mA2.7V<VVDD<3.6V 8
tRISE Rise time(2)
OSRR0=0 ODCR0=0
1.68V<VVDD<2.7V, Cload = 25pF
18
nsOSRR0=1 110
OSRR0=0 ODCR0=02.7V<VVDD<3.6V,
Cload = 25pF
10ns
OSRR0=1 50
tFALL Fall time(2)
OSRR0=0 ODCR0=0
1.68V<VVDD<2.7V,
Cload = 25pF
19
nsOSRR0=1 140
OSRR0=0 ODCR0=0
2.7V<VVDD<3.6V,Cload = 25pF
12
nsOSRR0=1 63
1. VVDD corresponds to either VVDDIN or VVDDIO, depending on the supply for the pin. Refer to Section 3-5 on page 13 for details
2. These values are based on simulation. These values are not covered by test limits in production or characterization
3. These values are based on characterization. These values are not covered by test limits in production
Table 42-21. Common High Drive TWI Pin Characteristics
Symbol Parameter Conditions Min Typ Max Units
ILEAK Input leakage current (1) Pull-up resistors disabled 0.01 2 µA
CIN Input capacitance(1) 10 pF
1. These values are based on simulation. These values are not covered by test limits in production or characterization
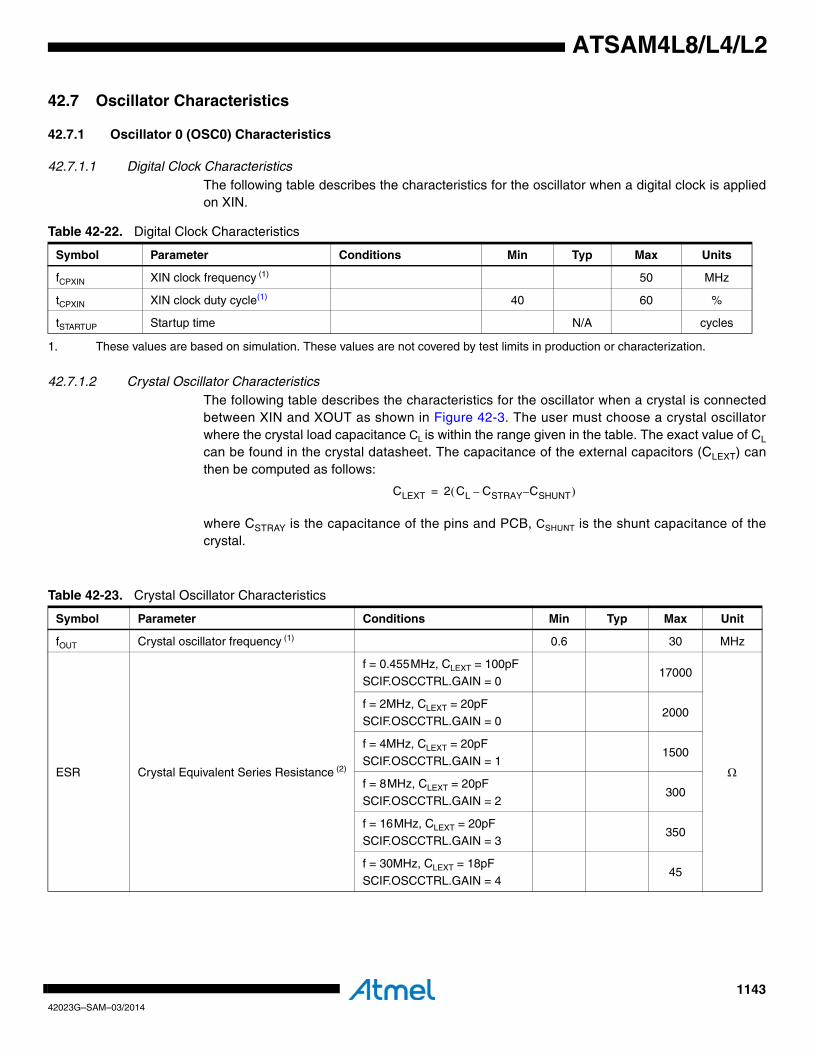
114342023G–SAM–03/2014
ATSAM4L8/L4/L2
42.7 Oscillator Characteristics
42.7.1 Oscillator 0 (OSC0) Characteristics
42.7.1.1 Digital Clock CharacteristicsThe following table describes the characteristics for the oscillator when a digital clock is appliedon XIN.
42.7.1.2 Crystal Oscillator CharacteristicsThe following table describes the characteristics for the oscillator when a crystal is connectedbetween XIN and XOUT as shown in Figure 42-3. The user must choose a crystal oscillatorwhere the crystal load capacitance CL is within the range given in the table. The exact value of CL
can be found in the crystal datasheet. The capacitance of the external capacitors (CLEXT) canthen be computed as follows:
where CSTRAY is the capacitance of the pins and PCB, CSHUNT is the shunt capacitance of thecrystal.
Table 42-22. Digital Clock Characteristics
Symbol Parameter Conditions Min Typ Max Units
fCPXIN XIN clock frequency (1) 50 MHz
tCPXIN XIN clock duty cycle(1) 40 60 %
tSTARTUP Startup time N/A cycles
1. These values are based on simulation. These values are not covered by test limits in production or characterization.
CLEXT 2 CL CSTRAY CSHUNT––( )=
Table 42-23. Crystal Oscillator Characteristics
Symbol Parameter Conditions Min Typ Max Unit
fOUT Crystal oscillator frequency (1) 0.6 30 MHz
ESR Crystal Equivalent Series Resistance (2)
f = 0.455MHz, CLEXT = 100pF
SCIF.OSCCTRL.GAIN = 017000
Ω
f = 2MHz, CLEXT = 20pF
SCIF.OSCCTRL.GAIN = 02000
f = 4MHz, CLEXT = 20pF
SCIF.OSCCTRL.GAIN = 11500
f = 8MHz, CLEXT = 20pF
SCIF.OSCCTRL.GAIN = 2300
f = 16MHz, CLEXT = 20pF
SCIF.OSCCTRL.GAIN = 3350
f = 30MHz, CLEXT = 18pF
SCIF.OSCCTRL.GAIN = 445
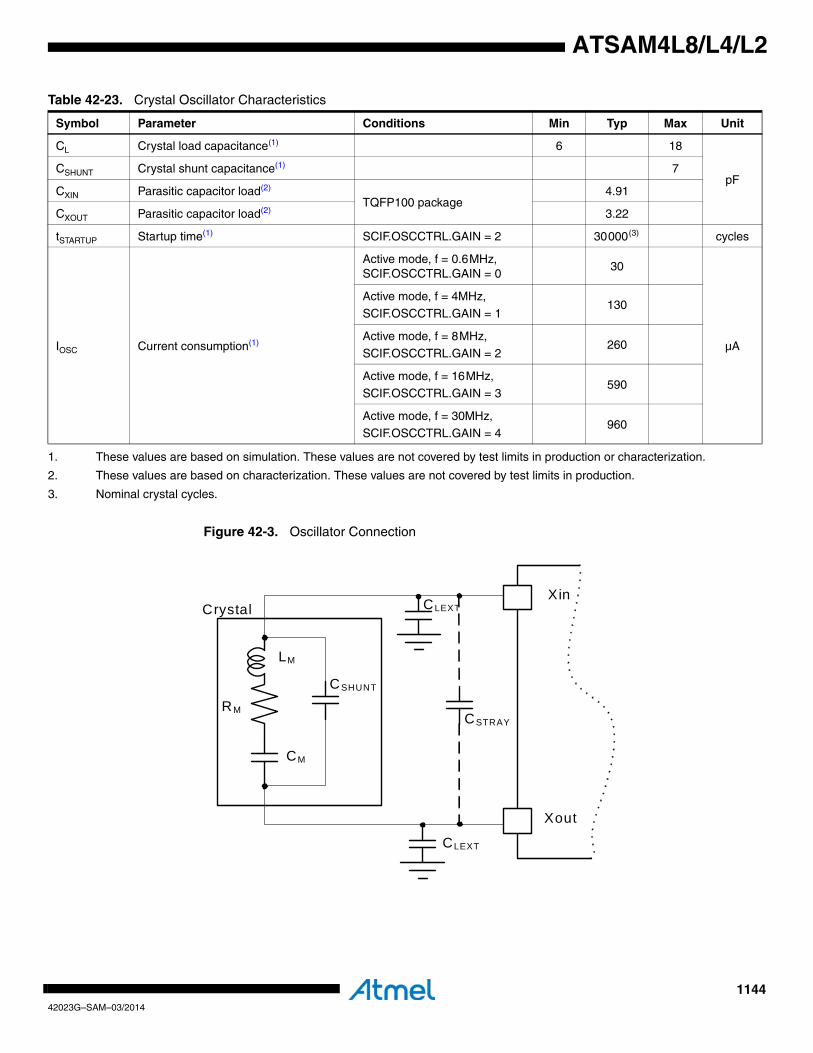
114442023G–SAM–03/2014
ATSAM4L8/L4/L2
Figure 42-3. Oscillator Connection
CL Crystal load capacitance(1) 6 18
pFCSHUNT Crystal shunt capacitance(1) 7
CXIN Parasitic capacitor load(2)
TQFP100 package4.91
CXOUT Parasitic capacitor load(2) 3.22
tSTARTUP Startup time(1) SCIF.OSCCTRL.GAIN = 2 30 000 (3) cycles
IOSC Current consumption(1)
Active mode, f = 0.6MHz, SCIF.OSCCTRL.GAIN = 0
30
µA
Active mode, f = 4MHz,SCIF.OSCCTRL.GAIN = 1
130
Active mode, f = 8MHz,SCIF.OSCCTRL.GAIN = 2
260
Active mode, f = 16MHz,SCIF.OSCCTRL.GAIN = 3
590
Active mode, f = 30MHz,SCIF.OSCCTRL.GAIN = 4
960
1. These values are based on simulation. These values are not covered by test limits in production or characterization.
2. These values are based on characterization. These values are not covered by test limits in production.
3. Nominal crystal cycles.
Table 42-23. Crystal Oscillator Characteristics
Symbol Parameter Conditions Min Typ Max Unit
CSHUNT
LM
RM
CM
CSTRAY
CLEXT
CLEXT
Xin
Xout
Crystal
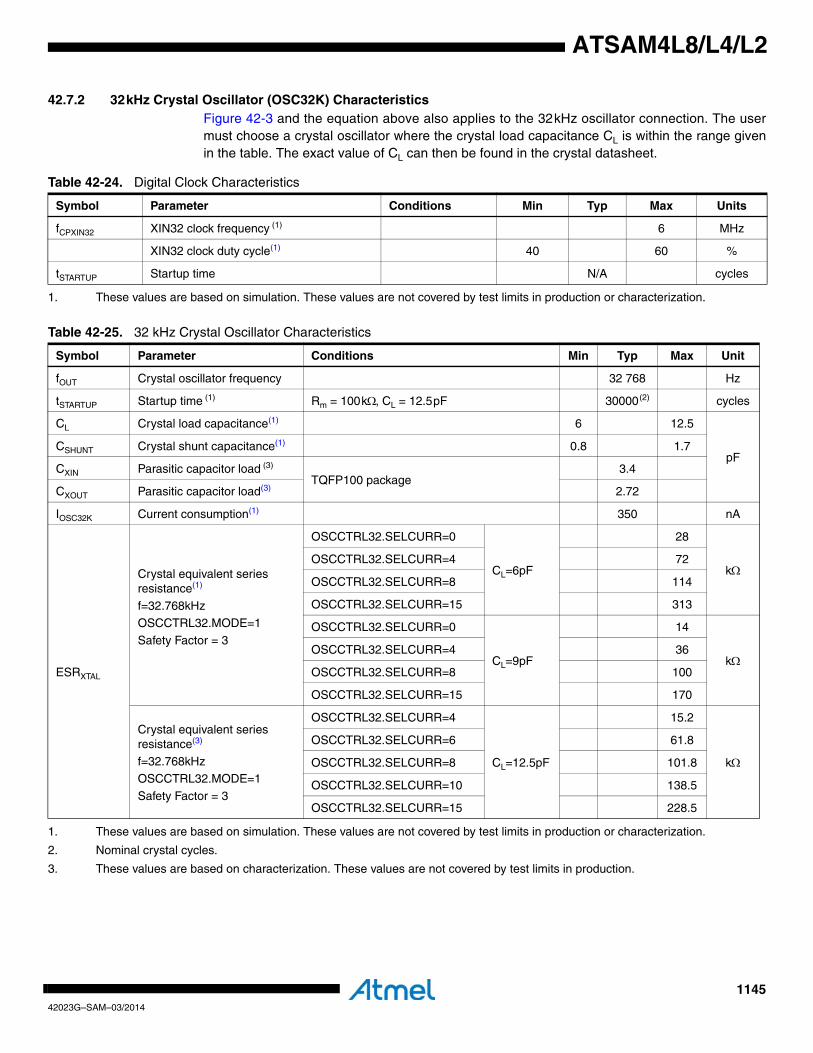
114542023G–SAM–03/2014
ATSAM4L8/L4/L2
42.7.2 32kHz Crystal Oscillator (OSC32K) CharacteristicsFigure 42-3 and the equation above also applies to the 32kHz oscillator connection. The usermust choose a crystal oscillator where the crystal load capacitance CL is within the range givenin the table. The exact value of CL can then be found in the crystal datasheet.
Table 42-24. Digital Clock Characteristics
Symbol Parameter Conditions Min Typ Max Units
fCPXIN32 XIN32 clock frequency (1) 6 MHz
XIN32 clock duty cycle(1) 40 60 %
tSTARTUP Startup time N/A cycles
1. These values are based on simulation. These values are not covered by test limits in production or characterization.
Table 42-25. 32 kHz Crystal Oscillator Characteristics
Symbol Parameter Conditions Min Typ Max Unit
fOUT Crystal oscillator frequency 32 768 Hz
tSTARTUP Startup time (1) Rm = 100kΩ, CL = 12.5pF 30000 (2) cycles
CL Crystal load capacitance(1) 6 12.5
pFCSHUNT Crystal shunt capacitance(1) 0.8 1.7
CXIN Parasitic capacitor load (3)
TQFP100 package3.4
CXOUT Parasitic capacitor load(3) 2.72
IOSC32K Current consumption(1) 350 nA
ESRXTAL
Crystal equivalent series resistance(1)
f=32.768kHzOSCCTRL32.MODE=1
Safety Factor = 3
OSCCTRL32.SELCURR=0
CL=6pF
28
kΩOSCCTRL32.SELCURR=4 72
OSCCTRL32.SELCURR=8 114
OSCCTRL32.SELCURR=15 313
OSCCTRL32.SELCURR=0
CL=9pF
14
kΩOSCCTRL32.SELCURR=4 36
OSCCTRL32.SELCURR=8 100
OSCCTRL32.SELCURR=15 170
Crystal equivalent series resistance(3)
f=32.768kHzOSCCTRL32.MODE=1
Safety Factor = 3
OSCCTRL32.SELCURR=4
CL=12.5pF
15.2
kΩ
OSCCTRL32.SELCURR=6 61.8
OSCCTRL32.SELCURR=8 101.8
OSCCTRL32.SELCURR=10 138.5
OSCCTRL32.SELCURR=15 228.5
1. These values are based on simulation. These values are not covered by test limits in production or characterization.
2. Nominal crystal cycles.
3. These values are based on characterization. These values are not covered by test limits in production.
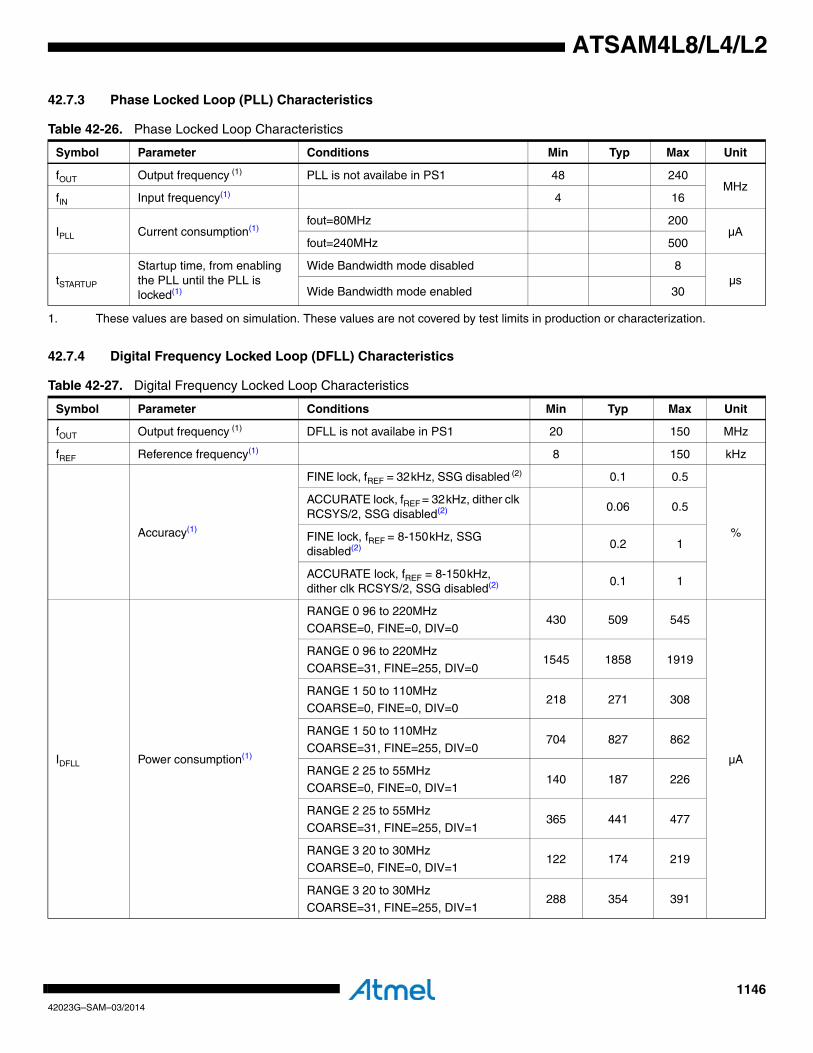
114642023G–SAM–03/2014
ATSAM4L8/L4/L2
42.7.3 Phase Locked Loop (PLL) Characteristics
42.7.4 Digital Frequency Locked Loop (DFLL) Characteristics
Table 42-26. Phase Locked Loop Characteristics
Symbol Parameter Conditions Min Typ Max Unit
fOUT Output frequency (1)
1. These values are based on simulation. These values are not covered by test limits in production or characterization.
PLL is not availabe in PS1 48 240MHz
fIN Input frequency(1) 4 16
IPLL Current consumption(1)fout=80MHz 200
µAfout=240MHz 500
tSTARTUP
Startup time, from enabling the PLL until the PLL is locked(1)
Wide Bandwidth mode disabled 8µs
Wide Bandwidth mode enabled 30
Table 42-27. Digital Frequency Locked Loop Characteristics
Symbol Parameter Conditions Min Typ Max Unit
fOUT Output frequency (1) DFLL is not availabe in PS1 20 150 MHz
fREF Reference frequency(1) 8 150 kHz
Accuracy(1)
FINE lock, fREF = 32kHz, SSG disabled (2) 0.1 0.5
%
ACCURATE lock, fREF = 32kHz, dither clk RCSYS/2, SSG disabled(2) 0.06 0.5
FINE lock, fREF = 8-150kHz, SSG disabled(2) 0.2 1
ACCURATE lock, fREF = 8-150kHz, dither clk RCSYS/2, SSG disabled(2) 0.1 1
IDFLL Power consumption(1)
RANGE 0 96 to 220MHz
COARSE=0, FINE=0, DIV=0430 509 545
µA
RANGE 0 96 to 220MHz
COARSE=31, FINE=255, DIV=01545 1858 1919
RANGE 1 50 to 110MHz
COARSE=0, FINE=0, DIV=0218 271 308
RANGE 1 50 to 110MHz
COARSE=31, FINE=255, DIV=0704 827 862
RANGE 2 25 to 55MHz
COARSE=0, FINE=0, DIV=1140 187 226
RANGE 2 25 to 55MHz
COARSE=31, FINE=255, DIV=1365 441 477
RANGE 3 20 to 30MHz
COARSE=0, FINE=0, DIV=1122 174 219
RANGE 3 20 to 30MHz
COARSE=31, FINE=255, DIV=1288 354 391
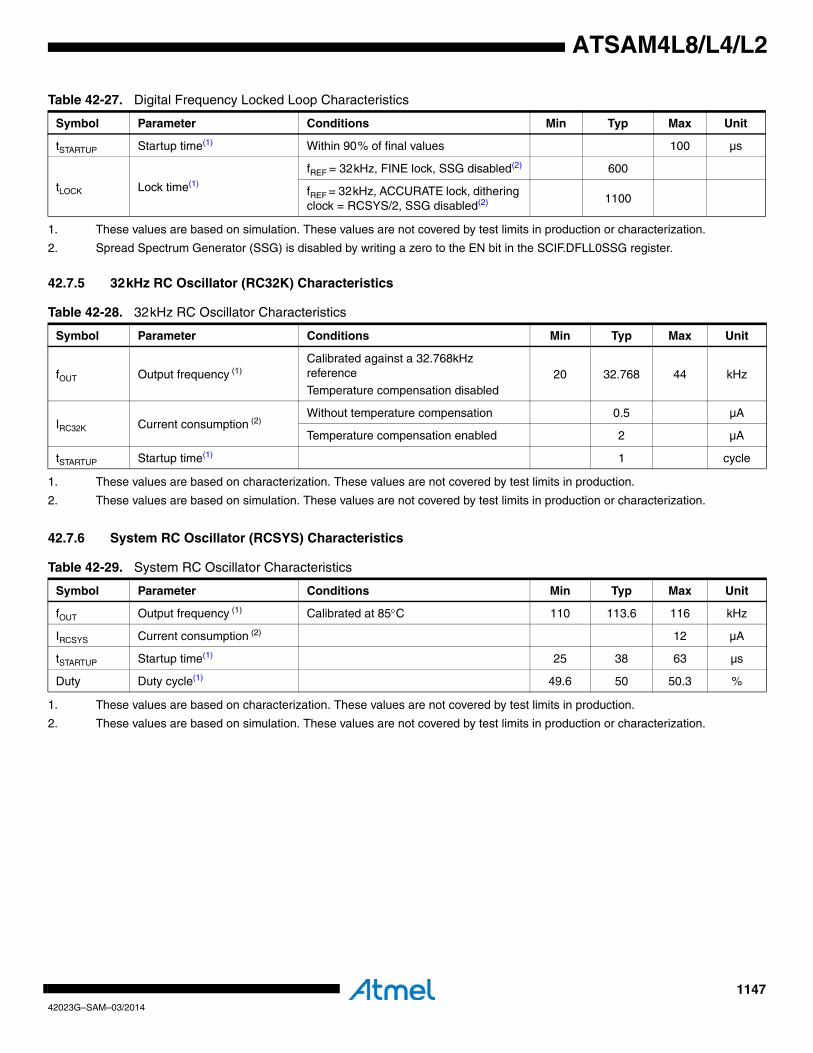
114742023G–SAM–03/2014
ATSAM4L8/L4/L2
42.7.5 32kHz RC Oscillator (RC32K) Characteristics
42.7.6 System RC Oscillator (RCSYS) Characteristics
tSTARTUP Startup time(1) Within 90% of final values 100 µs
tLOCK Lock time(1)
fREF = 32kHz, FINE lock, SSG disabled(2) 600
fREF = 32kHz, ACCURATE lock, dithering clock = RCSYS/2, SSG disabled(2) 1100
1. These values are based on simulation. These values are not covered by test limits in production or characterization.
2. Spread Spectrum Generator (SSG) is disabled by writing a zero to the EN bit in the SCIF.DFLL0SSG register.
Table 42-28. 32kHz RC Oscillator Characteristics
Symbol Parameter Conditions Min Typ Max Unit
fOUT Output frequency (1)
1. These values are based on characterization. These values are not covered by test limits in production.
Calibrated against a 32.768kHz reference
Temperature compensation disabled20 32.768 44 kHz
IRC32K Current consumption (2)
2. These values are based on simulation. These values are not covered by test limits in production or characterization.
Without temperature compensation 0.5 µA
Temperature compensation enabled 2 µA
tSTARTUP Startup time(1) 1 cycle
Table 42-29. System RC Oscillator Characteristics
Symbol Parameter Conditions Min Typ Max Unit
fOUT Output frequency (1)
1. These values are based on characterization. These values are not covered by test limits in production.
Calibrated at 85°C 110 113.6 116 kHz
IRCSYS Current consumption (2)
2. These values are based on simulation. These values are not covered by test limits in production or characterization.
12 µA
tSTARTUP Startup time(1) 25 38 63 µs
Duty Duty cycle(1) 49.6 50 50.3 %
Table 42-27. Digital Frequency Locked Loop Characteristics
Symbol Parameter Conditions Min Typ Max Unit
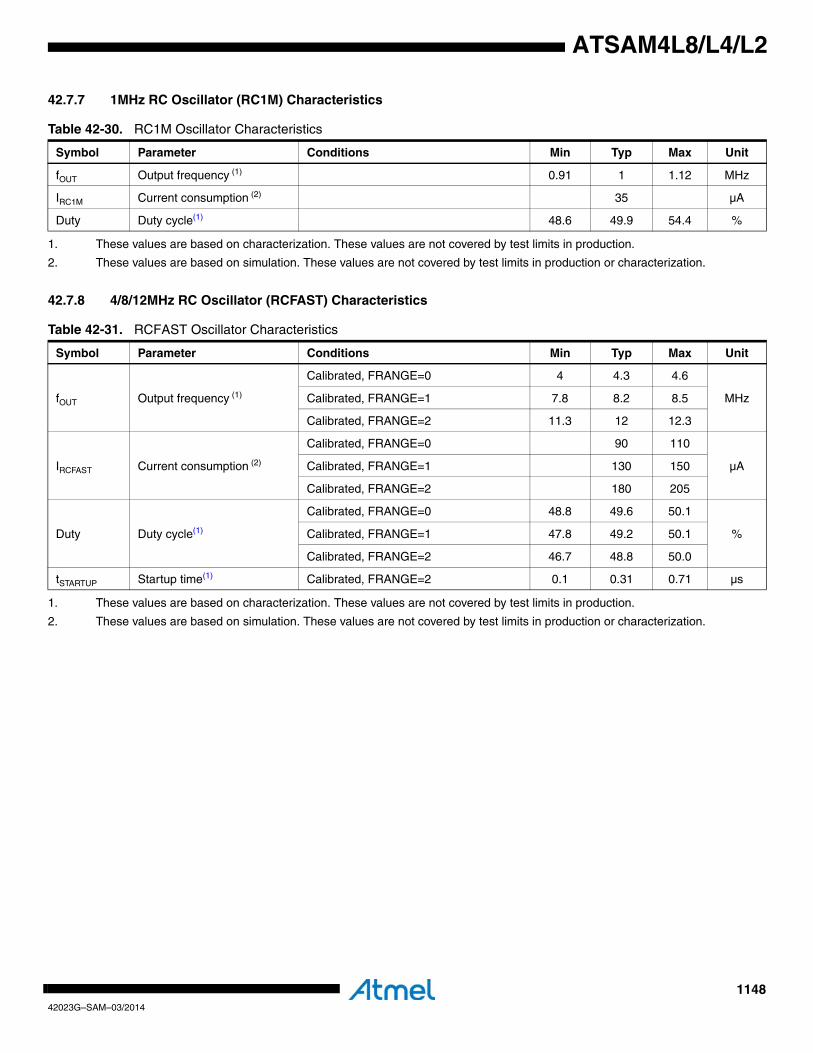
114842023G–SAM–03/2014
ATSAM4L8/L4/L2
42.7.7 1MHz RC Oscillator (RC1M) Characteristics
42.7.8 4/8/12MHz RC Oscillator (RCFAST) Characteristics
Table 42-30. RC1M Oscillator Characteristics
Symbol Parameter Conditions Min Typ Max Unit
fOUT Output frequency (1)
1. These values are based on characterization. These values are not covered by test limits in production.
0.91 1 1.12 MHz
IRC1M Current consumption (2)
2. These values are based on simulation. These values are not covered by test limits in production or characterization.
35 µA
Duty Duty cycle(1) 48.6 49.9 54.4 %
Table 42-31. RCFAST Oscillator Characteristics
Symbol Parameter Conditions Min Typ Max Unit
fOUT Output frequency (1)
1. These values are based on characterization. These values are not covered by test limits in production.
Calibrated, FRANGE=0 4 4.3 4.6
MHzCalibrated, FRANGE=1 7.8 8.2 8.5
Calibrated, FRANGE=2 11.3 12 12.3
IRCFAST Current consumption (2)
2. These values are based on simulation. These values are not covered by test limits in production or characterization.
Calibrated, FRANGE=0 90 110
µACalibrated, FRANGE=1 130 150
Calibrated, FRANGE=2 180 205
Duty Duty cycle(1)
Calibrated, FRANGE=0 48.8 49.6 50.1
%Calibrated, FRANGE=1 47.8 49.2 50.1
Calibrated, FRANGE=2 46.7 48.8 50.0
tSTARTUP Startup time(1) Calibrated, FRANGE=2 0.1 0.31 0.71 µs
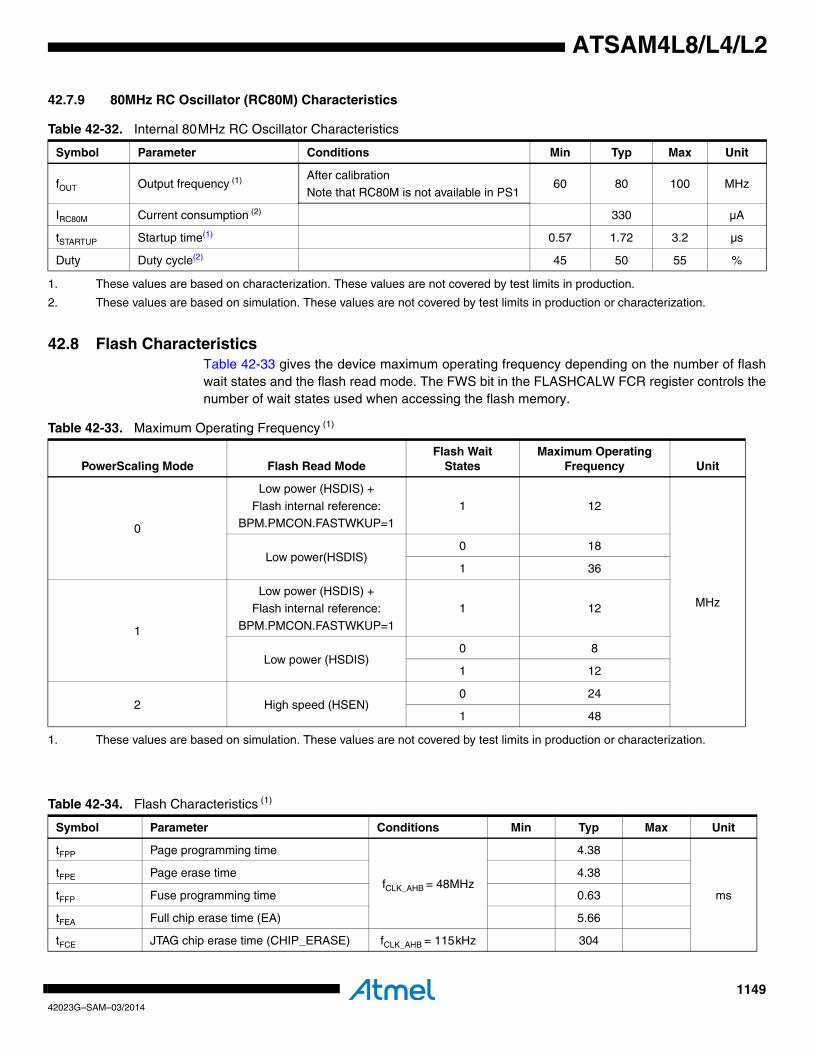
114942023G–SAM–03/2014
ATSAM4L8/L4/L2
42.7.9 80MHz RC Oscillator (RC80M) Characteristics
42.8 Flash CharacteristicsTable 42-33 gives the device maximum operating frequency depending on the number of flashwait states and the flash read mode. The FWS bit in the FLASHCALW FCR register controls thenumber of wait states used when accessing the flash memory.
Table 42-32. Internal 80MHz RC Oscillator Characteristics
Symbol Parameter Conditions Min Typ Max Unit
fOUT Output frequency (1)
1. These values are based on characterization. These values are not covered by test limits in production.
After calibrationNote that RC80M is not available in PS1
60 80 100 MHz
IRC80M Current consumption (2)
2. These values are based on simulation. These values are not covered by test limits in production or characterization.
330 µA
tSTARTUP Startup time(1) 0.57 1.72 3.2 µs
Duty Duty cycle(2) 45 50 55 %
Table 42-33. Maximum Operating Frequency (1)
PowerScaling Mode Flash Read ModeFlash Wait
StatesMaximum Operating
Frequency Unit
0
Low power (HSDIS) +
Flash internal reference:BPM.PMCON.FASTWKUP=1
1 12
MHz
Low power(HSDIS)0 18
1 36
1
Low power (HSDIS) +
Flash internal reference:
BPM.PMCON.FASTWKUP=1
1 12
Low power (HSDIS)0 8
1 12
2 High speed (HSEN)0 24
1 48
1. These values are based on simulation. These values are not covered by test limits in production or characterization.
Table 42-34. Flash Characteristics (1)
Symbol Parameter Conditions Min Typ Max Unit
tFPP Page programming time
fCLK_AHB = 48MHz
4.38
ms
tFPE Page erase time 4.38
tFFP Fuse programming time 0.63
tFEA Full chip erase time (EA) 5.66
tFCE JTAG chip erase time (CHIP_ERASE) fCLK_AHB = 115kHz 304
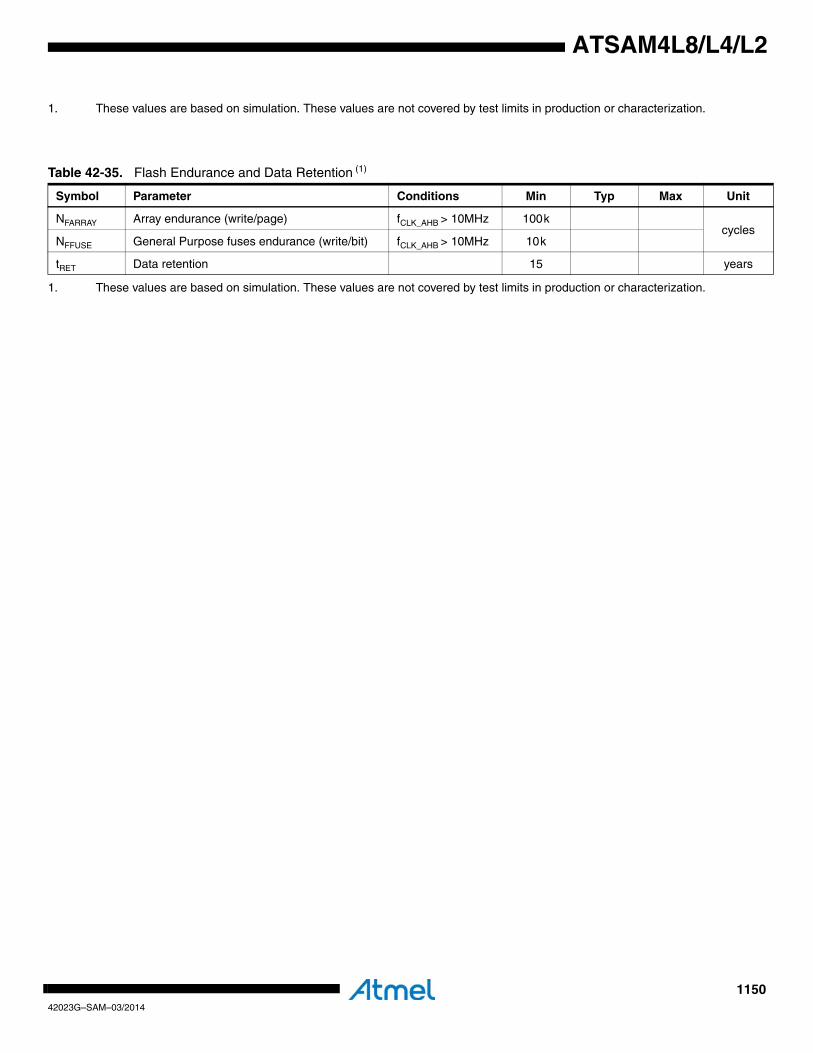
115042023G–SAM–03/2014
ATSAM4L8/L4/L2
1. These values are based on simulation. These values are not covered by test limits in production or characterization.
Table 42-35. Flash Endurance and Data Retention (1)
Symbol Parameter Conditions Min Typ Max Unit
NFARRAY Array endurance (write/page) fCLK_AHB > 10MHz 100kcycles
NFFUSE General Purpose fuses endurance (write/bit) fCLK_AHB > 10MHz 10k
tRET Data retention 15 years
1. These values are based on simulation. These values are not covered by test limits in production or characterization.
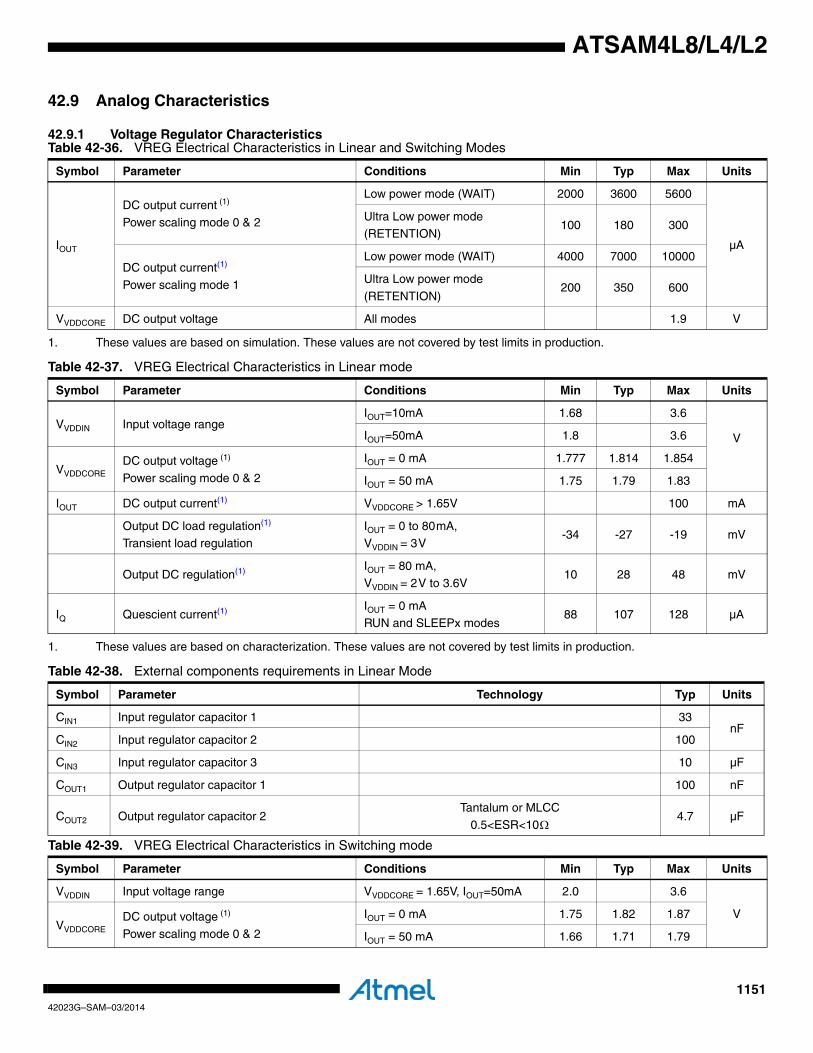
115142023G–SAM–03/2014
ATSAM4L8/L4/L2
42.9 Analog Characteristics
42.9.1 Voltage Regulator CharacteristicsTable 42-36. VREG Electrical Characteristics in Linear and Switching Modes
Symbol Parameter Conditions Min Typ Max Units
IOUT
DC output current (1)
Power scaling mode 0 & 2
1. These values are based on simulation. These values are not covered by test limits in production.
Low power mode (WAIT) 2000 3600 5600
µA
Ultra Low power mode(RETENTION)
100 180 300
DC output current(1)
Power scaling mode 1
Low power mode (WAIT) 4000 7000 10000
Ultra Low power mode
(RETENTION)200 350 600
VVDDCORE DC output voltage All modes 1.9 V
Table 42-37. VREG Electrical Characteristics in Linear mode
Symbol Parameter Conditions Min Typ Max Units
VVDDIN Input voltage rangeIOUT=10mA 1.68 3.6
VIOUT=50mA 1.8 3.6
VVDDCORE DC output voltage (1)
Power scaling mode 0 & 2
1. These values are based on characterization. These values are not covered by test limits in production.
IOUT = 0 mA 1.777 1.814 1.854
IOUT = 50 mA 1.75 1.79 1.83
IOUT DC output current(1) VVDDCORE > 1.65V 100 mA
Output DC load regulation(1)
Transient load regulationIOUT = 0 to 80mA,VVDDIN = 3V
-34 -27 -19 mV
Output DC regulation(1) IOUT = 80 mA,VVDDIN = 2V to 3.6V
10 28 48 mV
IQ Quescient current(1) IOUT = 0 mARUN and SLEEPx modes
88 107 128 µA
Table 42-38. External components requirements in Linear Mode
Symbol Parameter Technology Typ Units
CIN1 Input regulator capacitor 1 33nF
CIN2 Input regulator capacitor 2 100
CIN3 Input regulator capacitor 3 10 µF
COUT1 Output regulator capacitor 1 100 nF
COUT2 Output regulator capacitor 2Tantalum or MLCC
0.5<ESR<10Ω4.7 µF
Table 42-39. VREG Electrical Characteristics in Switching mode
Symbol Parameter Conditions Min Typ Max Units
VVDDIN Input voltage range VVDDCORE = 1.65V, IOUT=50mA 2.0 3.6
VVVDDCORE
DC output voltage (1)
Power scaling mode 0 & 2
IOUT = 0 mA 1.75 1.82 1.87
IOUT = 50 mA 1.66 1.71 1.79
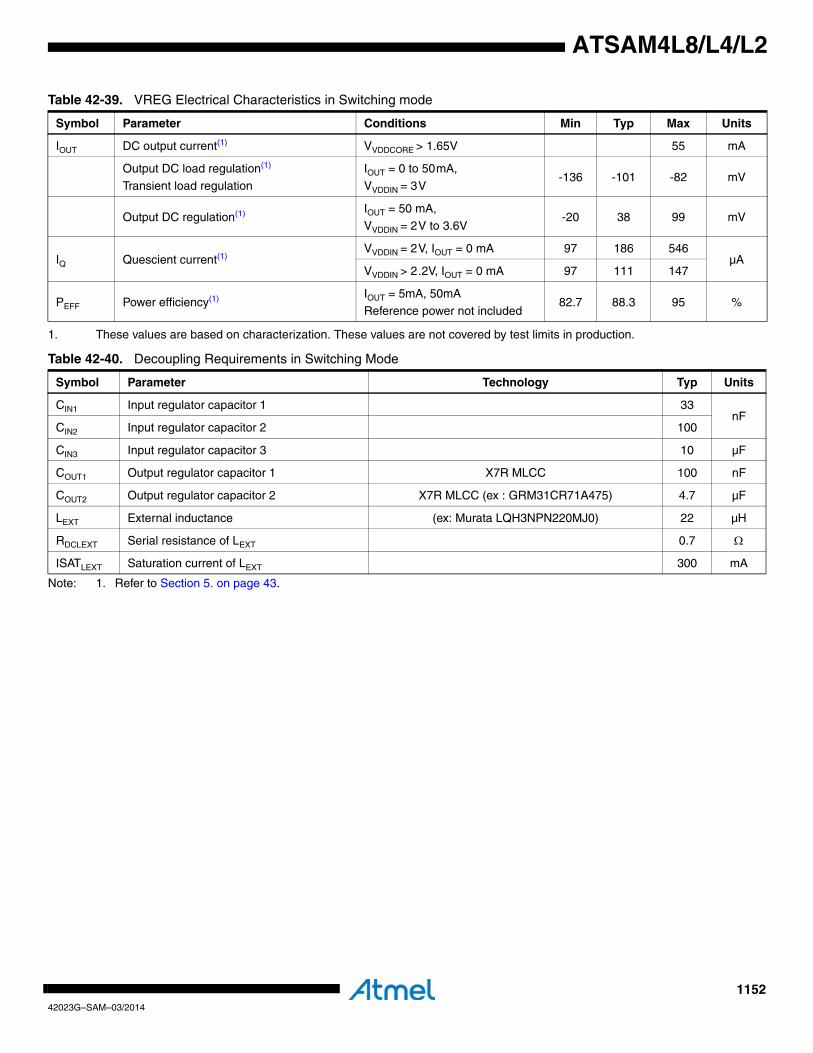
115242023G–SAM–03/2014
ATSAM4L8/L4/L2
Note: 1. Refer to Section 5. on page 43.
IOUT DC output current(1) VVDDCORE > 1.65V 55 mA
Output DC load regulation(1)
Transient load regulation
IOUT = 0 to 50mA,
VVDDIN = 3V-136 -101 -82 mV
Output DC regulation(1) IOUT = 50 mA,VVDDIN = 2V to 3.6V
-20 38 99 mV
IQ Quescient current(1)VVDDIN = 2V, IOUT = 0 mA 97 186 546
µAVVDDIN > 2.2V, IOUT = 0 mA 97 111 147
PEFF Power efficiency(1) IOUT = 5mA, 50mA
Reference power not included82.7 88.3 95 %
1. These values are based on characterization. These values are not covered by test limits in production.
Table 42-40. Decoupling Requirements in Switching Mode
Symbol Parameter Technology Typ Units
CIN1 Input regulator capacitor 1 33nF
CIN2 Input regulator capacitor 2 100
CIN3 Input regulator capacitor 3 10 µF
COUT1 Output regulator capacitor 1 X7R MLCC 100 nF
COUT2 Output regulator capacitor 2 X7R MLCC (ex : GRM31CR71A475) 4.7 µF
LEXT External inductance (ex: Murata LQH3NPN220MJ0) 22 µH
RDCLEXT Serial resistance of LEXT 0.7 Ω
ISATLEXT Saturation current of LEXT 300 mA
Table 42-39. VREG Electrical Characteristics in Switching mode
Symbol Parameter Conditions Min Typ Max Units
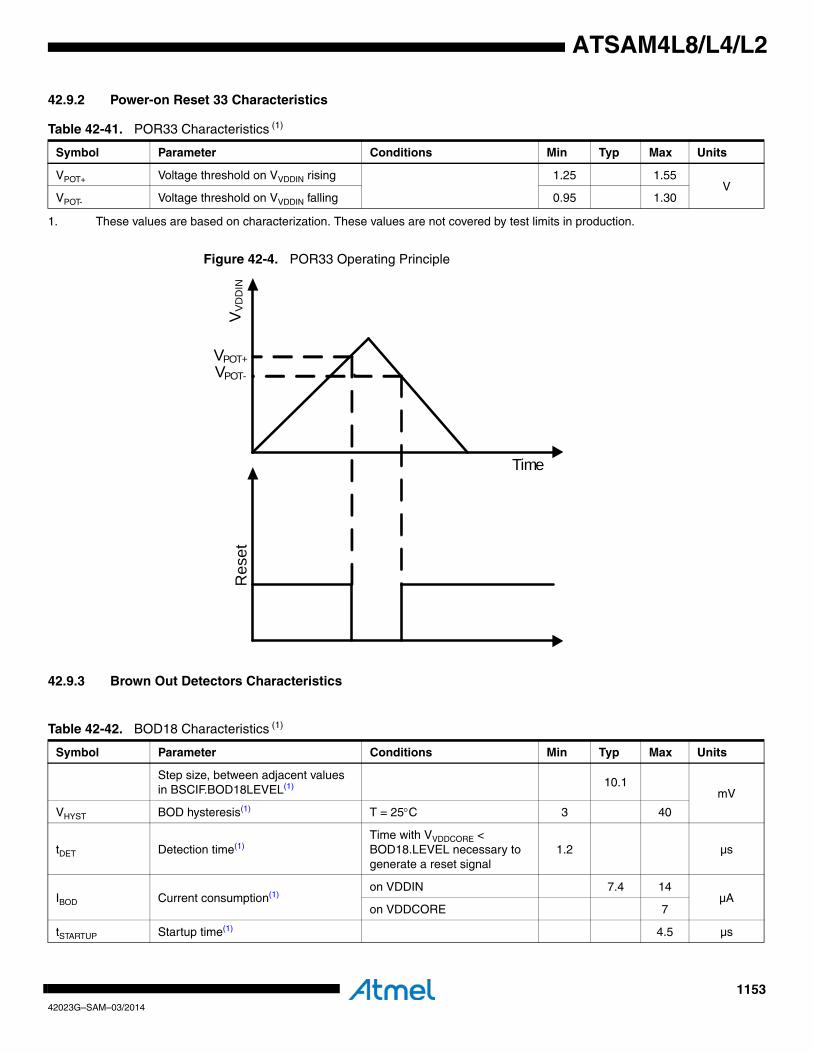
115342023G–SAM–03/2014
ATSAM4L8/L4/L2
42.9.2 Power-on Reset 33 Characteristics
Figure 42-4. POR33 Operating Principle
42.9.3 Brown Out Detectors Characteristics
Table 42-41. POR33 Characteristics (1)
1. These values are based on characterization. These values are not covered by test limits in production.
Symbol Parameter Conditions Min Typ Max Units
VPOT+ Voltage threshold on VVDDIN rising 1.25 1.55V
VPOT- Voltage threshold on VVDDIN falling 0.95 1.30
Res
etV
VD
DIN
VPOT+VPOT-
Time
Table 42-42. BOD18 Characteristics (1)
Symbol Parameter Conditions Min Typ Max Units
Step size, between adjacent values in BSCIF.BOD18LEVEL(1) 10.1
mV
VHYST BOD hysteresis(1) T = 25°C 3 40
tDET Detection time(1)Time with VVDDCORE < BOD18.LEVEL necessary to generate a reset signal
1.2 µs
IBOD Current consumption(1)on VDDIN 7.4 14
µAon VDDCORE 7
tSTARTUP Startup time(1) 4.5 µs
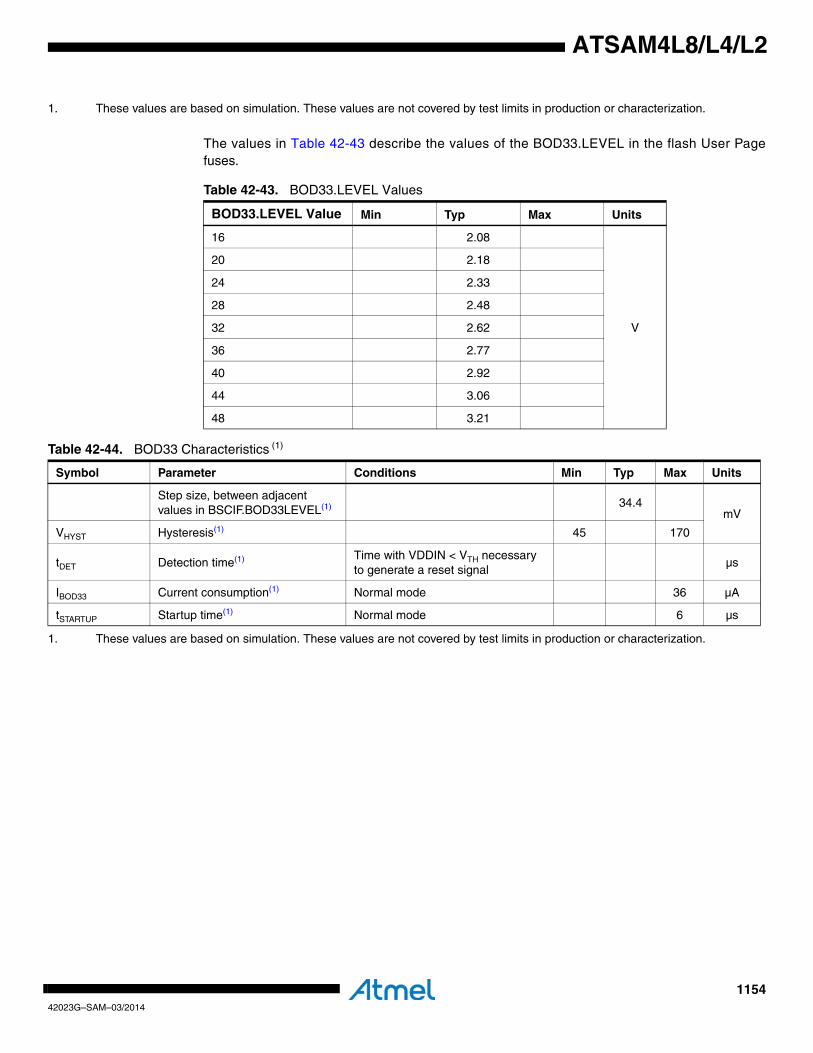
115442023G–SAM–03/2014
ATSAM4L8/L4/L2
The values in Table 42-43 describe the values of the BOD33.LEVEL in the flash User Pagefuses.
1. These values are based on simulation. These values are not covered by test limits in production or characterization.
Table 42-43. BOD33.LEVEL Values
BOD33.LEVEL Value Min Typ Max Units
16 2.08
V
20 2.18
24 2.33
28 2.48
32 2.62
36 2.77
40 2.92
44 3.06
48 3.21
Table 42-44. BOD33 Characteristics (1)
Symbol Parameter Conditions Min Typ Max Units
Step size, between adjacent values in BSCIF.BOD33LEVEL(1) 34.4
mV
VHYST Hysteresis(1) 45 170
tDET Detection time(1) Time with VDDIN < VTH necessary to generate a reset signal
µs
IBOD33 Current consumption(1) Normal mode 36 µA
tSTARTUP Startup time(1) Normal mode 6 µs
1. These values are based on simulation. These values are not covered by test limits in production or characterization.
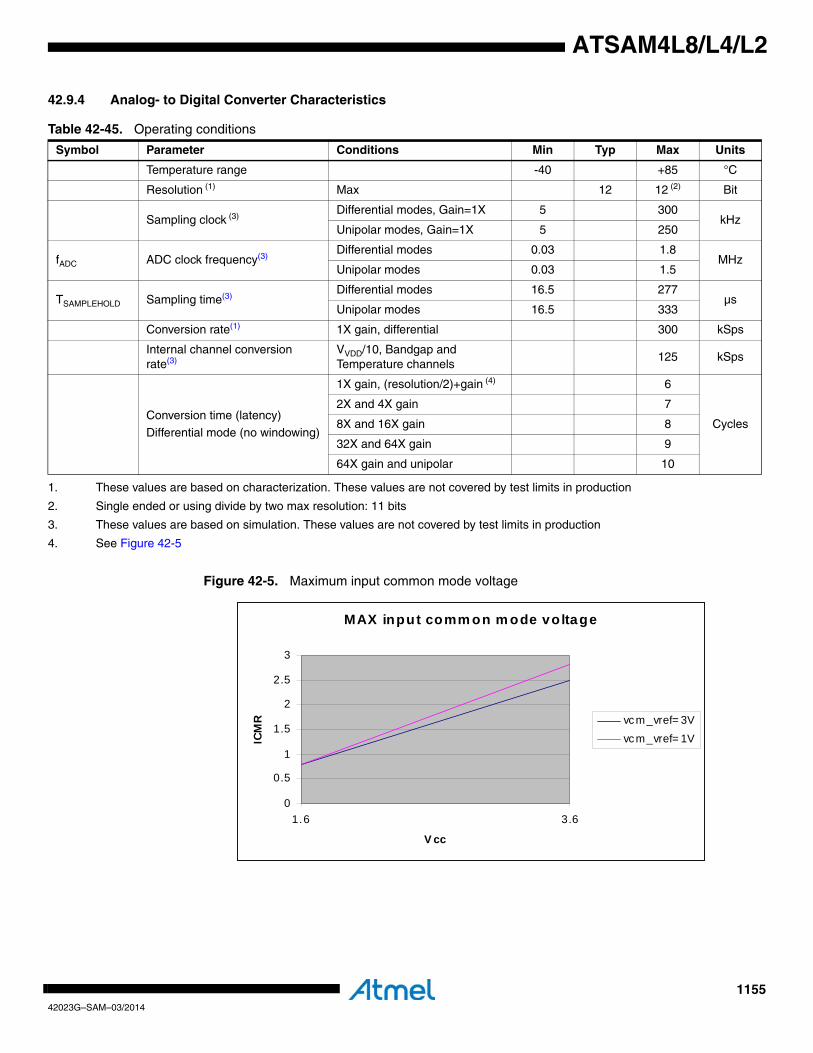
115542023G–SAM–03/2014
ATSAM4L8/L4/L2
42.9.4 Analog- to Digital Converter Characteristics
Figure 42-5. Maximum input common mode voltage
Table 42-45. Operating conditions
Symbol Parameter Conditions Min Typ Max Units
Temperature range -40 +85 °C
Resolution (1)
1. These values are based on characterization. These values are not covered by test limits in production
Max 12 12 (2)
2. Single ended or using divide by two max resolution: 11 bits
Bit
Sampling clock (3)
3. These values are based on simulation. These values are not covered by test limits in production
Differential modes, Gain=1X 5 300kHz
Unipolar modes, Gain=1X 5 250
fADC ADC clock frequency(3)Differential modes 0.03 1.8
MHzUnipolar modes 0.03 1.5
TSAMPLEHOLD Sampling time(3)Differential modes 16.5 277
µsUnipolar modes 16.5 333
Conversion rate(1) 1X gain, differential 300 kSps
Internal channel conversion rate(3)
VVDD/10, Bandgap and Temperature channels
125 kSps
Conversion time (latency)
Differential mode (no windowing)
1X gain, (resolution/2)+gain (4)
4. See Figure 42-5
6
Cycles
2X and 4X gain 7
8X and 16X gain 8
32X and 64X gain 9
64X gain and unipolar 10
MAX input comm on m ode voltage
0
0.5
1
1.5
2
2.5
3
1.6 3.6
V cc
ICM
R vcm_vref= 3V
vcm_vref= 1V
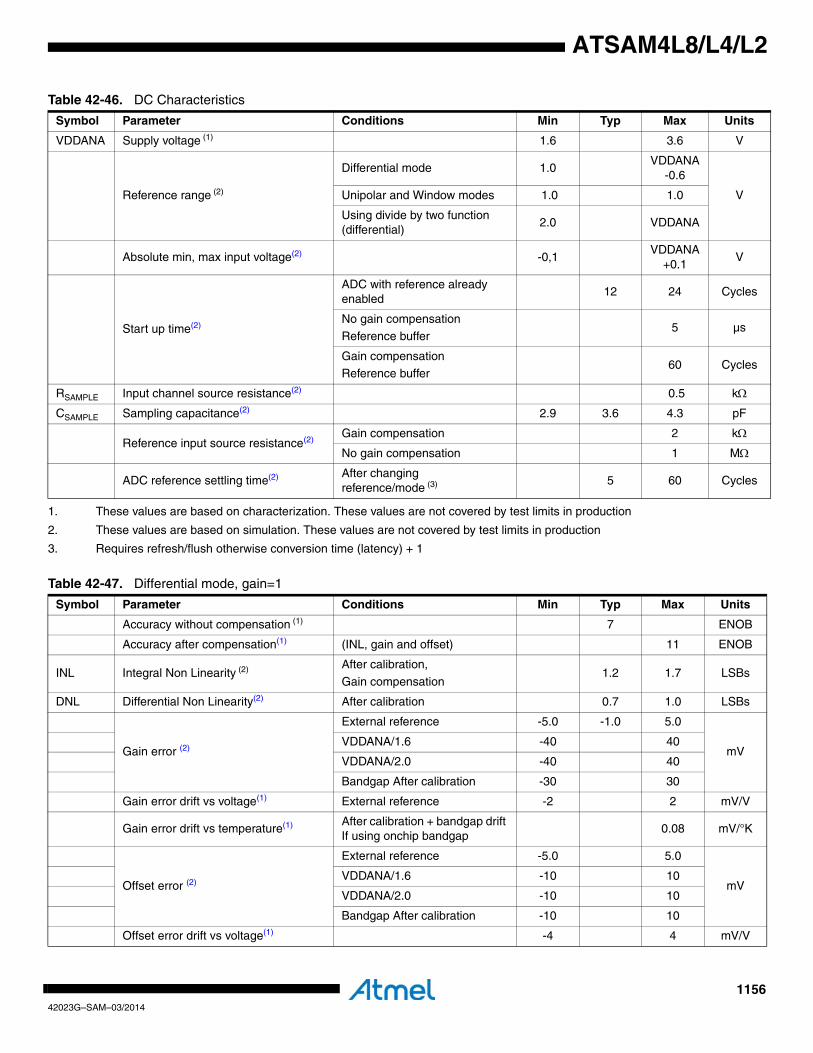
115642023G–SAM–03/2014
ATSAM4L8/L4/L2
Table 42-46. DC Characteristics
Symbol Parameter Conditions Min Typ Max Units
VDDANA Supply voltage (1) 1.6 3.6 V
Reference range (2)
Differential mode 1.0VDDANA
-0.6
VUnipolar and Window modes 1.0 1.0
Using divide by two function (differential)
2.0 VDDANA
Absolute min, max input voltage(2) -0,1VDDANA
+0.1V
Start up time(2)
ADC with reference already enabled
12 24 Cycles
No gain compensation
Reference buffer5 µs
Gain compensationReference buffer
60 Cycles
RSAMPLE Input channel source resistance(2) 0.5 kΩ
CSAMPLE Sampling capacitance(2) 2.9 3.6 4.3 pF
Reference input source resistance(2)Gain compensation 2 kΩ
No gain compensation 1 MΩ
ADC reference settling time(2) After changing reference/mode (3) 5 60 Cycles
1. These values are based on characterization. These values are not covered by test limits in production
2. These values are based on simulation. These values are not covered by test limits in production
3. Requires refresh/flush otherwise conversion time (latency) + 1
Table 42-47. Differential mode, gain=1
Symbol Parameter Conditions Min Typ Max Units
Accuracy without compensation (1) 7 ENOB
Accuracy after compensation(1) (INL, gain and offset) 11 ENOB
INL Integral Non Linearity (2) After calibration,
Gain compensation1.2 1.7 LSBs
DNL Differential Non Linearity(2) After calibration 0.7 1.0 LSBs
Gain error (2)
External reference -5.0 -1.0 5.0
mVVDDANA/1.6 -40 40
VDDANA/2.0 -40 40
Bandgap After calibration -30 30
Gain error drift vs voltage(1) External reference -2 2 mV/V
Gain error drift vs temperature(1) After calibration + bandgap drift If using onchip bandgap
0.08 mV/°K
Offset error (2)
External reference -5.0 5.0
mVVDDANA/1.6 -10 10
VDDANA/2.0 -10 10
Bandgap After calibration -10 10
Offset error drift vs voltage(1) -4 4 mV/V
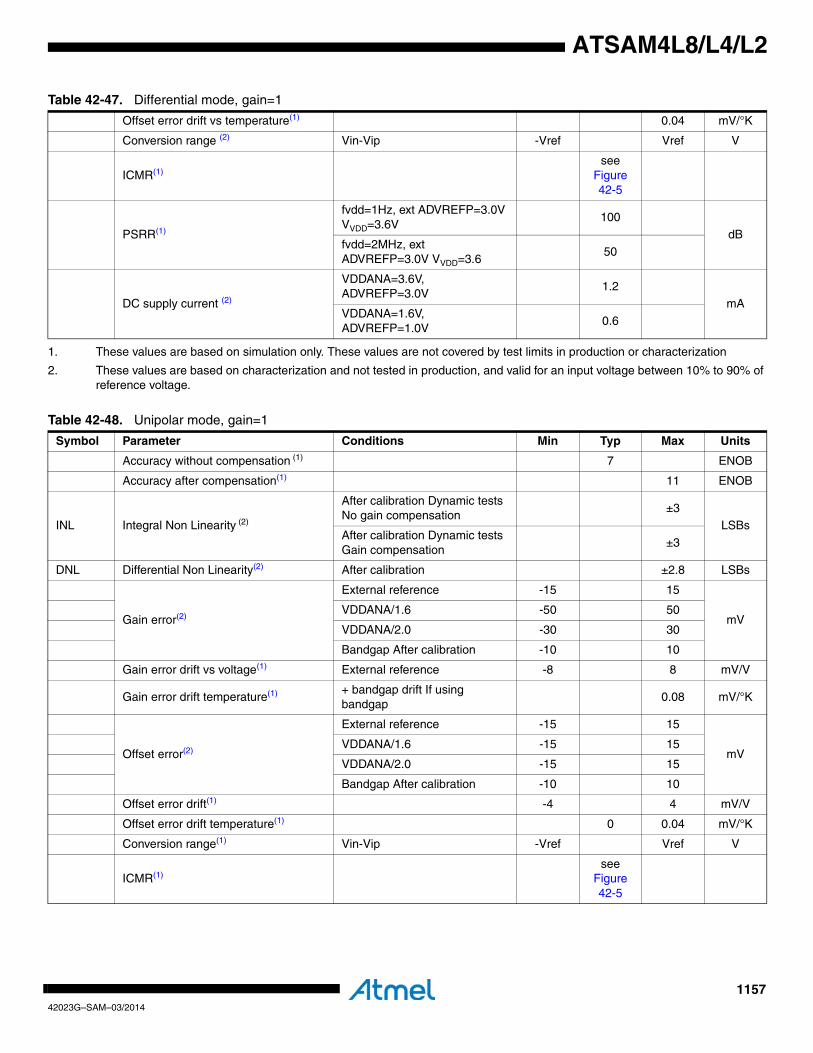
115742023G–SAM–03/2014
ATSAM4L8/L4/L2
Offset error drift vs temperature(1) 0.04 mV/°K
Conversion range (2) Vin-Vip -Vref Vref V
ICMR(1)see
Figure 42-5
PSRR(1)
fvdd=1Hz, ext ADVREFP=3.0V VVDD=3.6V
100
dBfvdd=2MHz, ext ADVREFP=3.0V VVDD=3.6
50
DC supply current (2)
VDDANA=3.6V, ADVREFP=3.0V
1.2mA
VDDANA=1.6V, ADVREFP=1.0V
0.6
1. These values are based on simulation only. These values are not covered by test limits in production or characterization
2. These values are based on characterization and not tested in production, and valid for an input voltage between 10% to 90% of reference voltage.
Table 42-48. Unipolar mode, gain=1
Symbol Parameter Conditions Min Typ Max Units
Accuracy without compensation (1) 7 ENOB
Accuracy after compensation(1) 11 ENOB
INL Integral Non Linearity (2)
After calibration Dynamic tests No gain compensation
±3LSBs
After calibration Dynamic tests Gain compensation
±3
DNL Differential Non Linearity(2) After calibration ±2.8 LSBs
Gain error(2)
External reference -15 15
mVVDDANA/1.6 -50 50
VDDANA/2.0 -30 30
Bandgap After calibration -10 10
Gain error drift vs voltage(1) External reference -8 8 mV/V
Gain error drift temperature(1) + bandgap drift If using bandgap
0.08 mV/°K
Offset error(2)
External reference -15 15
mVVDDANA/1.6 -15 15
VDDANA/2.0 -15 15
Bandgap After calibration -10 10
Offset error drift(1) -4 4 mV/V
Offset error drift temperature(1) 0 0.04 mV/°K
Conversion range(1) Vin-Vip -Vref Vref V
ICMR(1)see
Figure 42-5
Table 42-47. Differential mode, gain=1
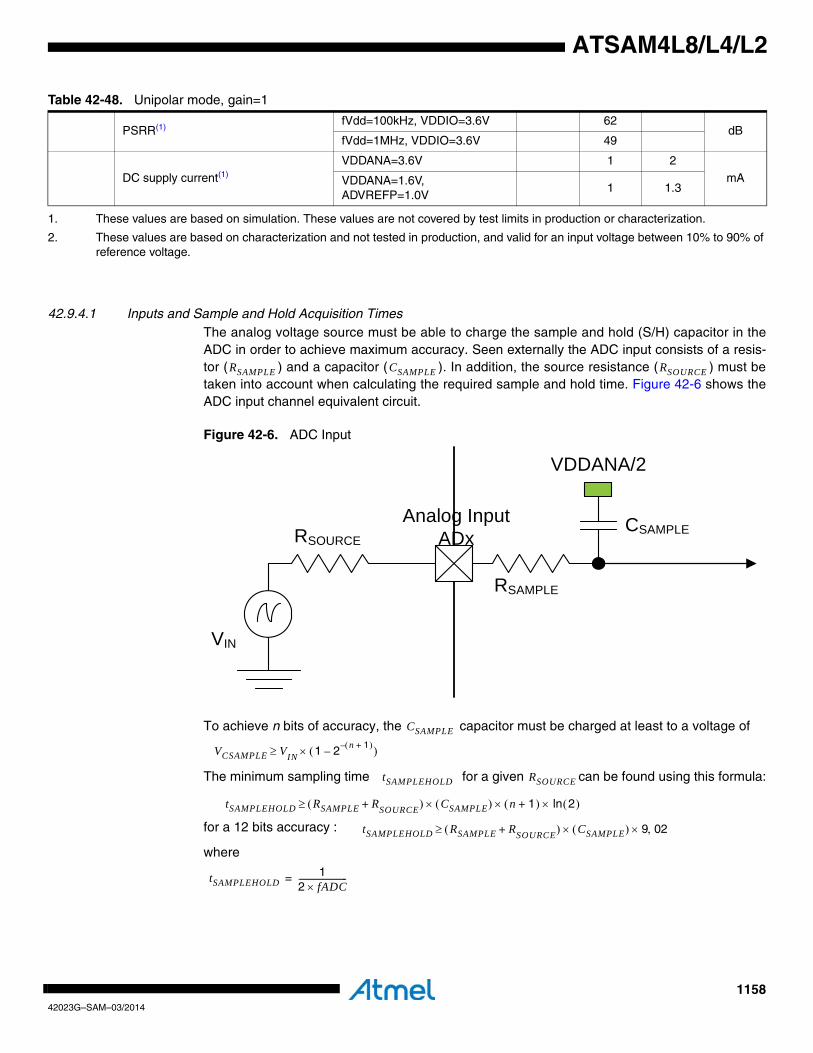
115842023G–SAM–03/2014
ATSAM4L8/L4/L2
42.9.4.1 Inputs and Sample and Hold Acquisition TimesThe analog voltage source must be able to charge the sample and hold (S/H) capacitor in theADC in order to achieve maximum accuracy. Seen externally the ADC input consists of a resis-tor ( ) and a capacitor ( ). In addition, the source resistance ( ) must betaken into account when calculating the required sample and hold time. Figure 42-6 shows theADC input channel equivalent circuit.
Figure 42-6. ADC Input
To achieve n bits of accuracy, the capacitor must be charged at least to a voltage of
The minimum sampling time for a given can be found using this formula:
for a 12 bits accuracy :
where
PSRR(1)fVdd=100kHz, VDDIO=3.6V 62
dBfVdd=1MHz, VDDIO=3.6V 49
DC supply current(1)
VDDANA=3.6V 1 2
mAVDDANA=1.6V, ADVREFP=1.0V
1 1.3
1. These values are based on simulation. These values are not covered by test limits in production or characterization.
2. These values are based on characterization and not tested in production, and valid for an input voltage between 10% to 90% of reference voltage.
Table 42-48. Unipolar mode, gain=1
RSAMPLE CSAMPLE RSOURCE
RSOURCE
RSAMPLE
Analog Input ADx
CSAMPLE
VIN
VDDANA/2
CSAMPLE
VCSAMPLE V≥ IN 1 2 n 1+( )––( )×
tSAMPLEHOLD RSOURCE
tSAMPLEHOLD RSAMPLE R+ SOURCE( ) CSAMPLE( )× n 1+( ) 2( )ln××≥
tSAMPLEHOLD RSAMPLE R+ SOURCE( ) CSAMPLE( )× 9× 02,≥
tSAMPLEHOLD1
2 fADC×------------------------=
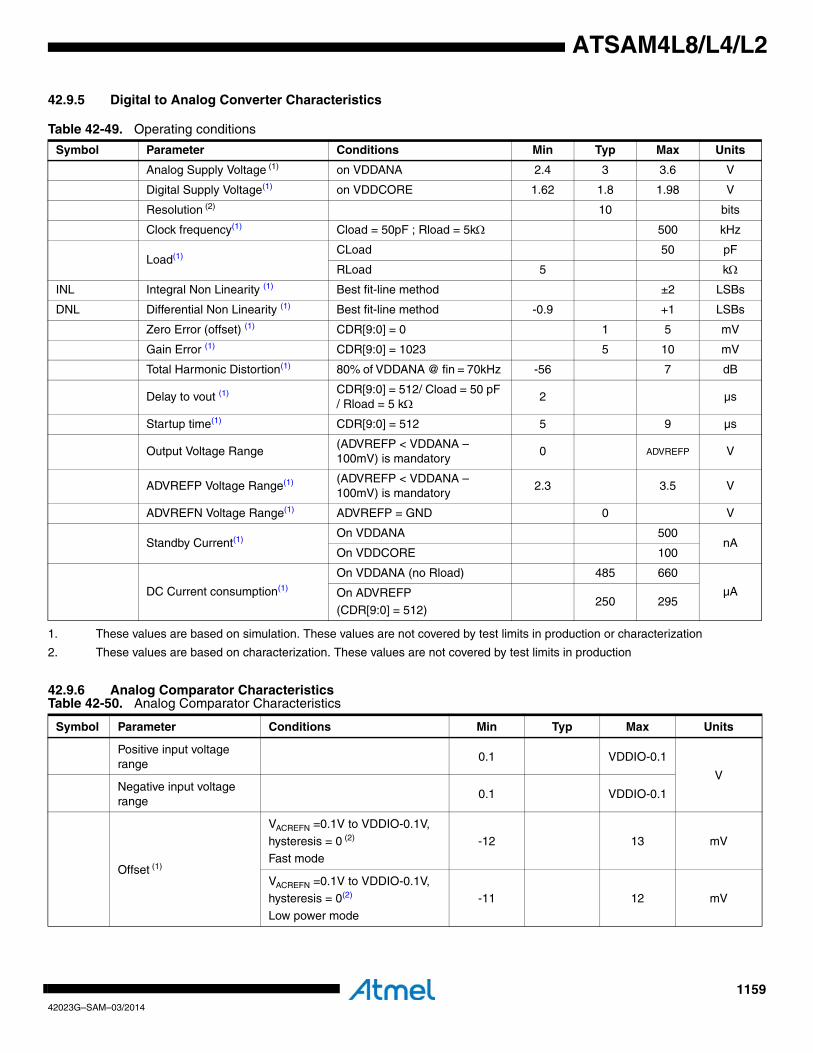
115942023G–SAM–03/2014
ATSAM4L8/L4/L2
42.9.5 Digital to Analog Converter Characteristics
42.9.6 Analog Comparator Characteristics
Table 42-49. Operating conditions
Symbol Parameter Conditions Min Typ Max Units
Analog Supply Voltage (1)
1. These values are based on simulation. These values are not covered by test limits in production or characterization
on VDDANA 2.4 3 3.6 V
Digital Supply Voltage(1) on VDDCORE 1.62 1.8 1.98 V
Resolution (2)
2. These values are based on characterization. These values are not covered by test limits in production
10 bits
Clock frequency(1) Cload = 50pF ; Rload = 5kΩ 500 kHz
Load(1)CLoad 50 pF
RLoad 5 kΩ
INL Integral Non Linearity (1) Best fit-line method ±2 LSBs
DNL Differential Non Linearity (1) Best fit-line method -0.9 +1 LSBs
Zero Error (offset) (1) CDR[9:0] = 0 1 5 mV
Gain Error (1) CDR[9:0] = 1023 5 10 mV
Total Harmonic Distortion(1) 80% of VDDANA @ fin = 70kHz -56 7 dB
Delay to vout (1) CDR[9:0] = 512/ Cload = 50 pF / Rload = 5 kΩ
2 µs
Startup time(1) CDR[9:0] = 512 5 9 µs
Output Voltage Range(ADVREFP < VDDANA – 100mV) is mandatory
0 ADVREFP V
ADVREFP Voltage Range(1) (ADVREFP < VDDANA – 100mV) is mandatory
2.3 3.5 V
ADVREFN Voltage Range(1) ADVREFP = GND 0 V
Standby Current(1) On VDDANA 500
nAOn VDDCORE 100
DC Current consumption(1)
On VDDANA (no Rload) 485 660
µAOn ADVREFP
(CDR[9:0] = 512) 250 295
Table 42-50. Analog Comparator Characteristics
Symbol Parameter Conditions Min Typ Max Units
Positive input voltage range
0.1 VDDIO-0.1
VNegative input voltage range
0.1 VDDIO-0.1
Offset (1)
VACREFN =0.1V to VDDIO-0.1V,
hysteresis = 0 (2)
Fast mode-12 13 mV
VACREFN =0.1V to VDDIO-0.1V, hysteresis = 0(2)
Low power mode
-11 12 mV
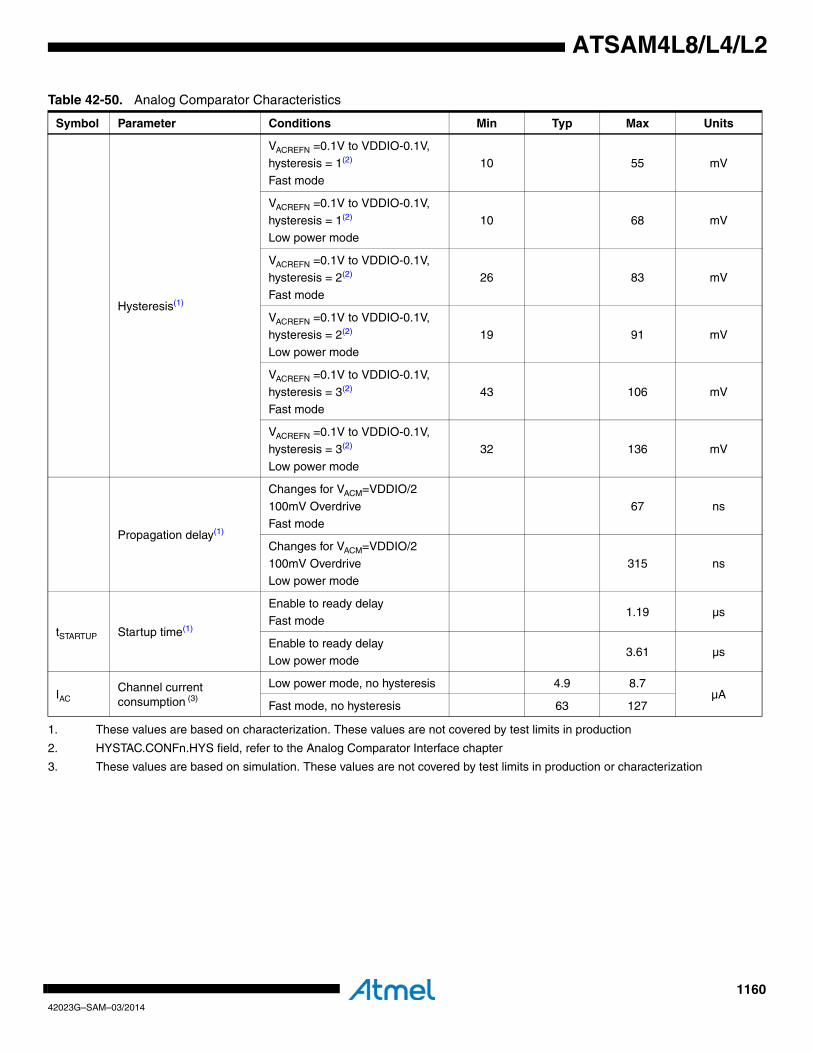
116042023G–SAM–03/2014
ATSAM4L8/L4/L2
Hysteresis(1)
VACREFN =0.1V to VDDIO-0.1V,
hysteresis = 1(2)
Fast mode10 55 mV
VACREFN =0.1V to VDDIO-0.1V,
hysteresis = 1(2)
Low power mode10 68 mV
VACREFN =0.1V to VDDIO-0.1V, hysteresis = 2(2)
Fast mode
26 83 mV
VACREFN =0.1V to VDDIO-0.1V,
hysteresis = 2(2)
Low power mode
19 91 mV
VACREFN =0.1V to VDDIO-0.1V,
hysteresis = 3(2)
Fast mode43 106 mV
VACREFN =0.1V to VDDIO-0.1V, hysteresis = 3(2)
Low power mode
32 136 mV
Propagation delay(1)
Changes for VACM=VDDIO/2
100mV Overdrive
Fast mode
67 ns
Changes for VACM=VDDIO/2
100mV OverdriveLow power mode
315 ns
tSTARTUP Startup time(1)
Enable to ready delayFast mode
1.19 µs
Enable to ready delayLow power mode
3.61 µs
IACChannel current consumption (3)
Low power mode, no hysteresis 4.9 8.7µA
Fast mode, no hysteresis 63 127
1. These values are based on characterization. These values are not covered by test limits in production
2. HYSTAC.CONFn.HYS field, refer to the Analog Comparator Interface chapter
3. These values are based on simulation. These values are not covered by test limits in production or characterization
Table 42-50. Analog Comparator Characteristics
Symbol Parameter Conditions Min Typ Max Units
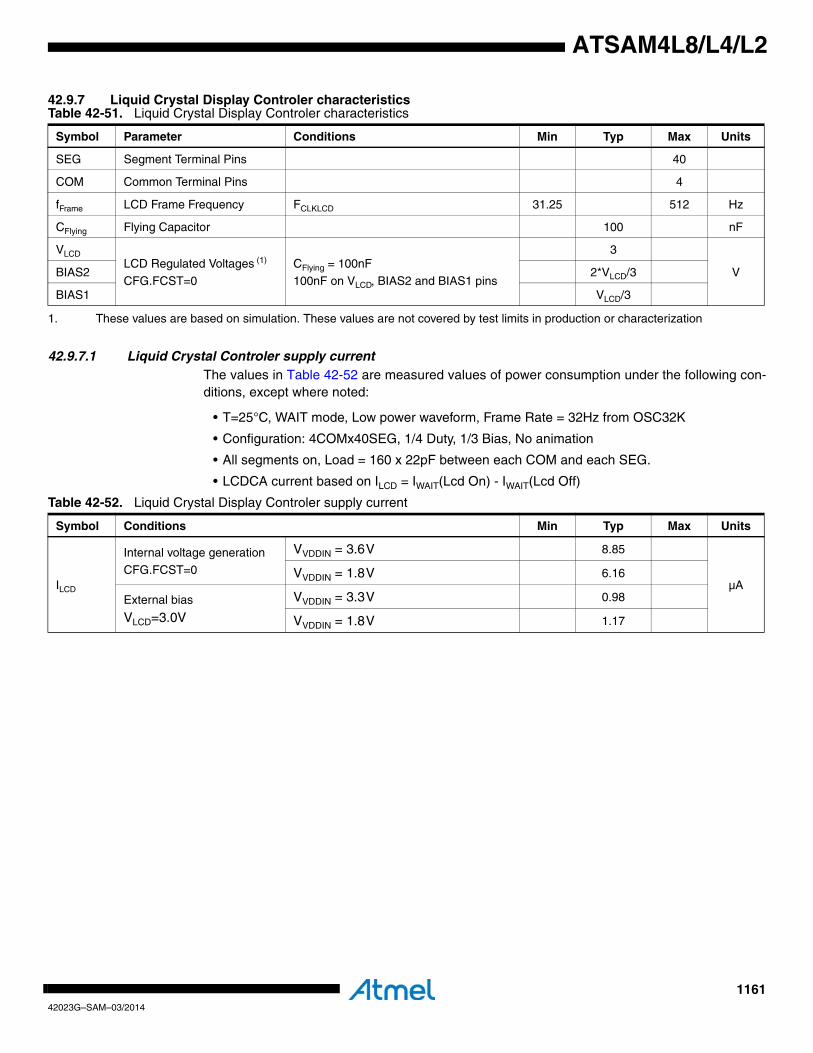
116142023G–SAM–03/2014
ATSAM4L8/L4/L2
42.9.7 Liquid Crystal Display Controler characteristics
42.9.7.1 Liquid Crystal Controler supply currentThe values in Table 42-52 are measured values of power consumption under the following con-ditions, except where noted:
• T=25°C, WAIT mode, Low power waveform, Frame Rate = 32Hz from OSC32K
• Configuration: 4COMx40SEG, 1/4 Duty, 1/3 Bias, No animation
• All segments on, Load = 160 x 22pF between each COM and each SEG.
• LCDCA current based on ILCD = IWAIT(Lcd On) - IWAIT(Lcd Off)
Table 42-51. Liquid Crystal Display Controler characteristics
Symbol Parameter Conditions Min Typ Max Units
SEG Segment Terminal Pins 40
COM Common Terminal Pins 4
fFrame LCD Frame Frequency FCLKLCD 31.25 512 Hz
CFlying Flying Capacitor 100 nF
VLCDLCD Regulated Voltages (1)
CFG.FCST=0
1. These values are based on simulation. These values are not covered by test limits in production or characterization
CFlying = 100nF
100nF on VLCD, BIAS2 and BIAS1 pins
3
VBIAS2 2*VLCD/3
BIAS1 VLCD/3
Table 42-52. Liquid Crystal Display Controler supply current
Symbol Conditions Min Typ Max Units
ILCD
Internal voltage generation
CFG.FCST=0
VVDDIN = 3.6V 8.85
µAVVDDIN = 1.8V 6.16
External bias
VLCD=3.0V
VVDDIN = 3.3V 0.98
VVDDIN = 1.8V 1.17
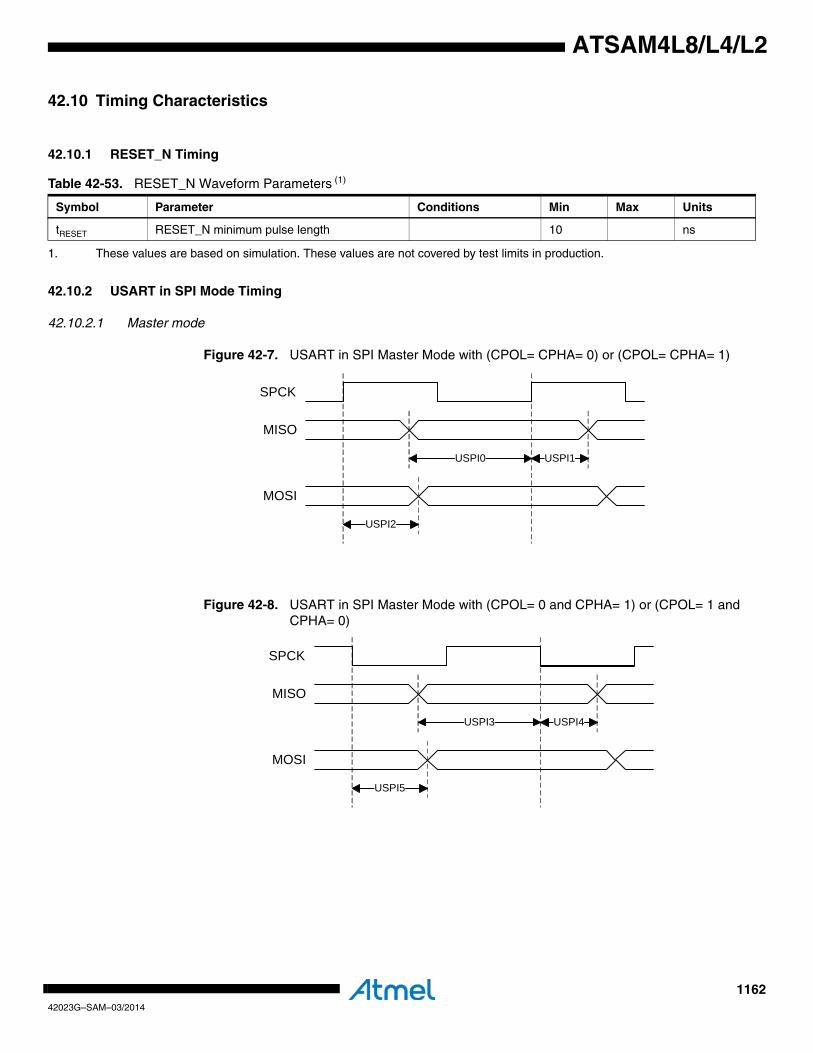
116242023G–SAM–03/2014
ATSAM4L8/L4/L2
42.10 Timing Characteristics
42.10.1 RESET_N Timing
42.10.2 USART in SPI Mode Timing
42.10.2.1 Master mode
Figure 42-7. USART in SPI Master Mode with (CPOL= CPHA= 0) or (CPOL= CPHA= 1)
Figure 42-8. USART in SPI Master Mode with (CPOL= 0 and CPHA= 1) or (CPOL= 1 and CPHA= 0)
Table 42-53. RESET_N Waveform Parameters (1)
1. These values are based on simulation. These values are not covered by test limits in production.
Symbol Parameter Conditions Min Max Units
tRESET RESET_N minimum pulse length 10 ns
USPI0 USPI1
MISO
SPCK
MOSI
USPI2
USPI3 USPI4
MISO
SPCK
MOSI
USPI5
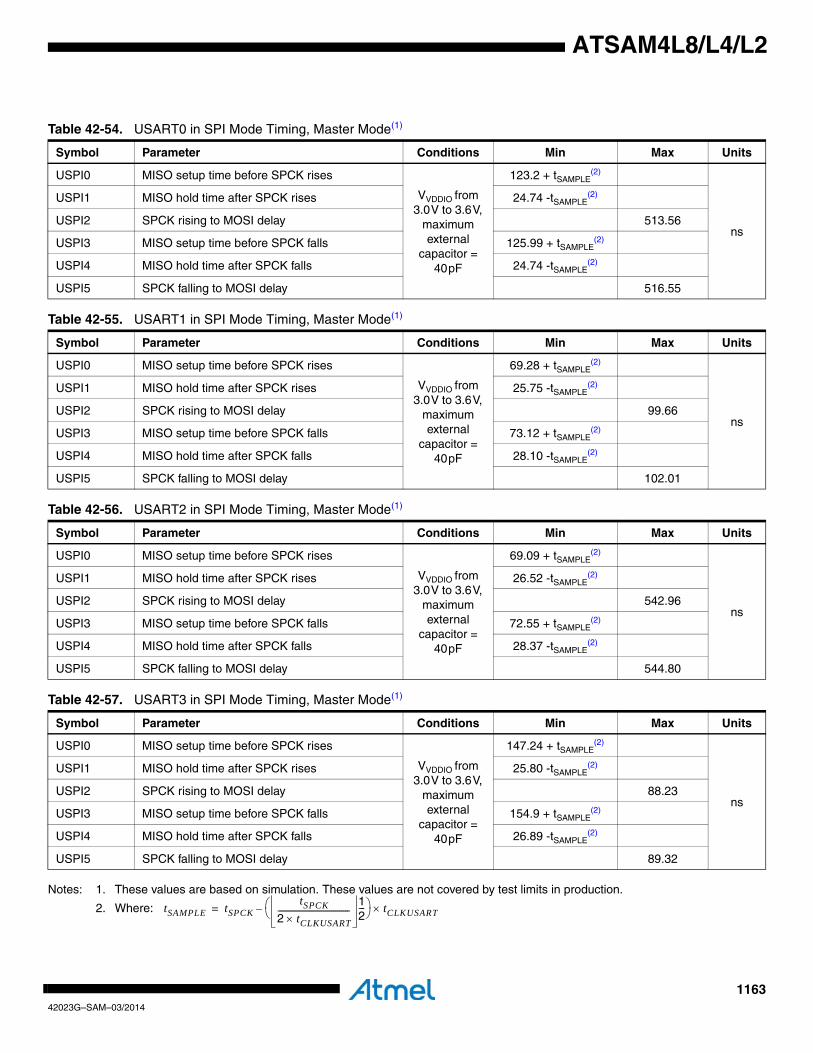
116342023G–SAM–03/2014
ATSAM4L8/L4/L2
Notes: 1. These values are based on simulation. These values are not covered by test limits in production.
2. Where:
Table 42-54. USART0 in SPI Mode Timing, Master Mode(1)
Symbol Parameter Conditions Min Max Units
USPI0 MISO setup time before SPCK rises
VVDDIO from 3.0V to 3.6V,
maximum external
capacitor = 40pF
123.2 + tSAMPLE(2)
ns
USPI1 MISO hold time after SPCK rises 24.74 -tSAMPLE(2)
USPI2 SPCK rising to MOSI delay 513.56
USPI3 MISO setup time before SPCK falls 125.99 + tSAMPLE(2)
USPI4 MISO hold time after SPCK falls 24.74 -tSAMPLE(2)
USPI5 SPCK falling to MOSI delay 516.55
Table 42-55. USART1 in SPI Mode Timing, Master Mode(1)
Symbol Parameter Conditions Min Max Units
USPI0 MISO setup time before SPCK rises
VVDDIO from 3.0V to 3.6V,
maximum external
capacitor = 40pF
69.28 + tSAMPLE(2)
ns
USPI1 MISO hold time after SPCK rises 25.75 -tSAMPLE(2)
USPI2 SPCK rising to MOSI delay 99.66
USPI3 MISO setup time before SPCK falls 73.12 + tSAMPLE(2)
USPI4 MISO hold time after SPCK falls 28.10 -tSAMPLE(2)
USPI5 SPCK falling to MOSI delay 102.01
Table 42-56. USART2 in SPI Mode Timing, Master Mode(1)
Symbol Parameter Conditions Min Max Units
USPI0 MISO setup time before SPCK rises
VVDDIO from 3.0V to 3.6V,
maximum external
capacitor = 40pF
69.09 + tSAMPLE(2)
ns
USPI1 MISO hold time after SPCK rises 26.52 -tSAMPLE(2)
USPI2 SPCK rising to MOSI delay 542.96
USPI3 MISO setup time before SPCK falls 72.55 + tSAMPLE(2)
USPI4 MISO hold time after SPCK falls 28.37 -tSAMPLE(2)
USPI5 SPCK falling to MOSI delay 544.80
Table 42-57. USART3 in SPI Mode Timing, Master Mode(1)
Symbol Parameter Conditions Min Max Units
USPI0 MISO setup time before SPCK rises
VVDDIO from 3.0V to 3.6V,
maximum external
capacitor = 40pF
147.24 + tSAMPLE(2)
ns
USPI1 MISO hold time after SPCK rises 25.80 -tSAMPLE(2)
USPI2 SPCK rising to MOSI delay 88.23
USPI3 MISO setup time before SPCK falls 154.9 + tSAMPLE(2)
USPI4 MISO hold time after SPCK falls 26.89 -tSAMPLE(2)
USPI5 SPCK falling to MOSI delay 89.32
tSAMPLE tSPCKtSPCK
2 tCLKUSART×------------------------------------
12---⎝ ⎠
⎛ ⎞ tCLKUSART×–=
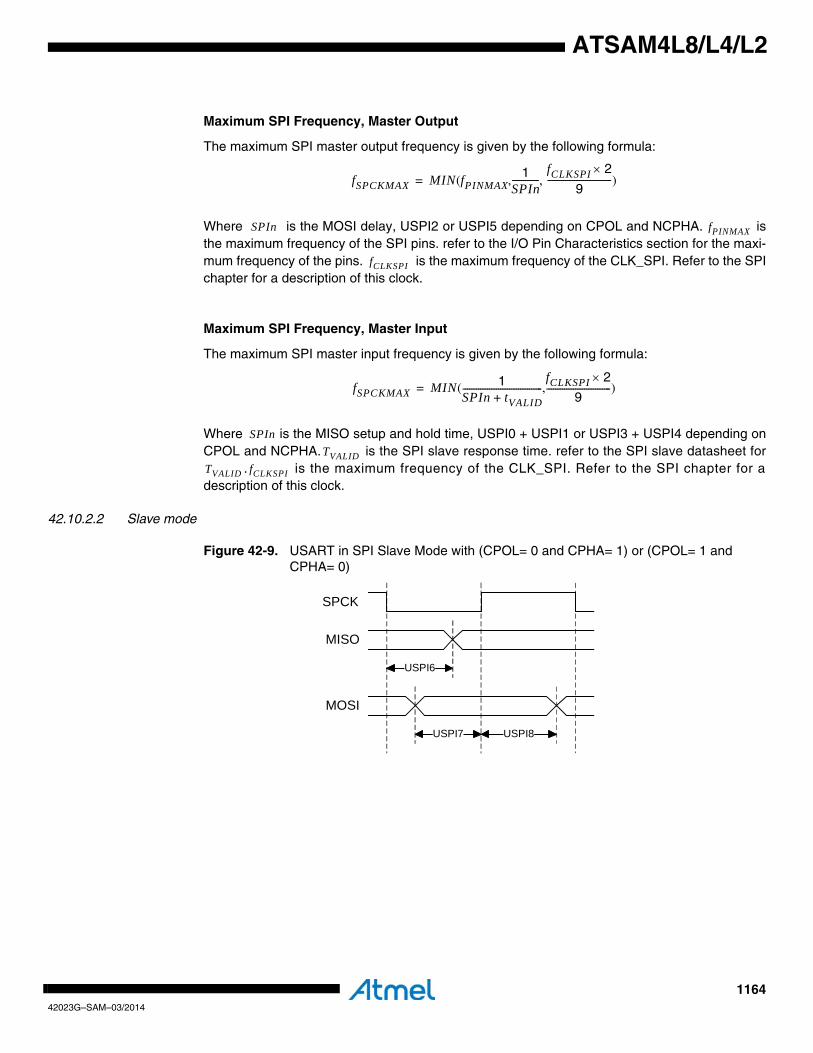
116442023G–SAM–03/2014
ATSAM4L8/L4/L2
Maximum SPI Frequency, Master Output
The maximum SPI master output frequency is given by the following formula:
Where is the MOSI delay, USPI2 or USPI5 depending on CPOL and NCPHA. isthe maximum frequency of the SPI pins. refer to the I/O Pin Characteristics section for the maxi-mum frequency of the pins. is the maximum frequency of the CLK_SPI. Refer to the SPIchapter for a description of this clock.
Maximum SPI Frequency, Master Input
The maximum SPI master input frequency is given by the following formula:
Where is the MISO setup and hold time, USPI0 + USPI1 or USPI3 + USPI4 depending onCPOL and NCPHA. is the SPI slave response time. refer to the SPI slave datasheet for
. is the maximum frequency of the CLK_SPI. Refer to the SPI chapter for adescription of this clock.
42.10.2.2 Slave mode
Figure 42-9. USART in SPI Slave Mode with (CPOL= 0 and CPHA= 1) or (CPOL= 1 and CPHA= 0)
fSPCKMAX MIN fPINMAX1
SPIn------------
fCLKSPI 2×9
-----------------------------,( , )=
SPIn fPINMAX
fCLKSPI
fSPCKMAX MIN 1SPIn tVALID+------------------------------------
fCLKSPI 2×9
-----------------------------( , )=
SPInTVALID
TVALID fCLKSPI
USPI7 USPI8
MISO
SPCK
MOSI
USPI6
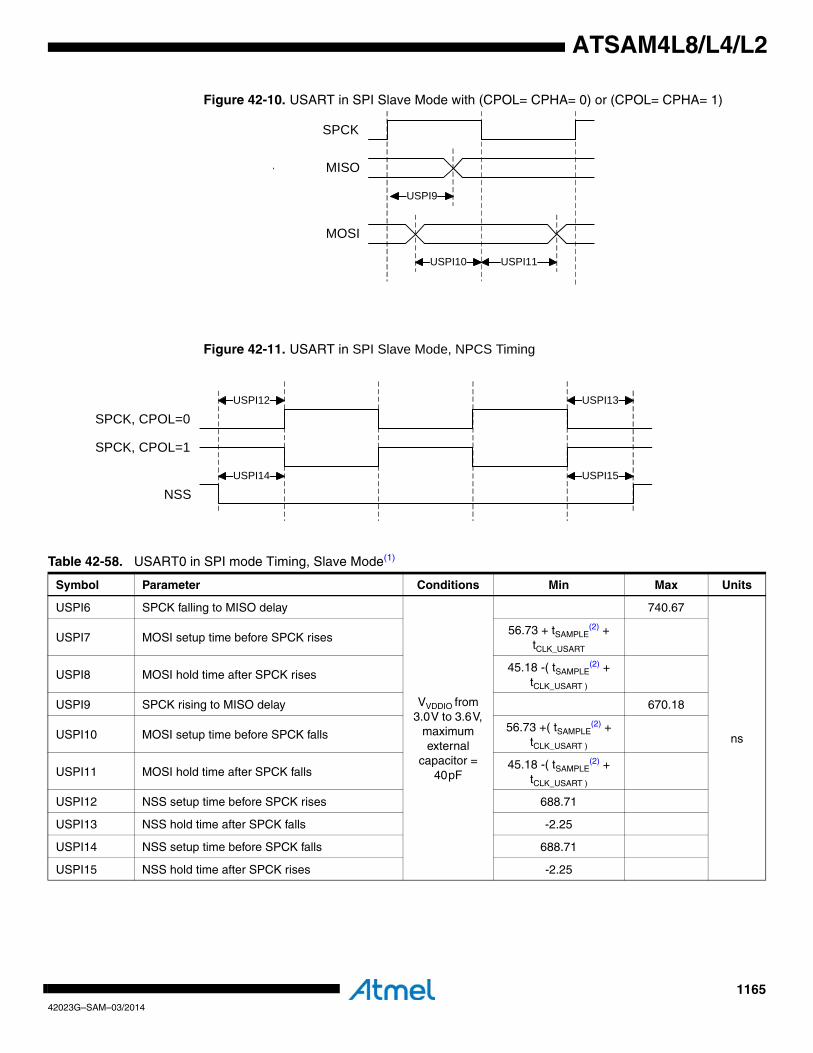
116542023G–SAM–03/2014
ATSAM4L8/L4/L2
Figure 42-10. USART in SPI Slave Mode with (CPOL= CPHA= 0) or (CPOL= CPHA= 1)
Figure 42-11. USART in SPI Slave Mode, NPCS Timing
USPI10 USPI11
MISO
SPCK
MOSI
USPI9
USPI14
USPI12
USPI15
USPI13
NSS
SPCK, CPOL=0
SPCK, CPOL=1
Table 42-58. USART0 in SPI mode Timing, Slave Mode(1)
Symbol Parameter Conditions Min Max Units
USPI6 SPCK falling to MISO delay
VVDDIO from 3.0V to 3.6V,
maximum external
capacitor = 40pF
740.67
ns
USPI7 MOSI setup time before SPCK rises56.73 + tSAMPLE
(2) + tCLK_USART
USPI8 MOSI hold time after SPCK rises45.18 -( tSAMPLE
(2) + tCLK_USART )
USPI9 SPCK rising to MISO delay 670.18
USPI10 MOSI setup time before SPCK falls56.73 +( tSAMPLE
(2) + tCLK_USART )
USPI11 MOSI hold time after SPCK falls45.18 -( tSAMPLE
(2) + tCLK_USART )
USPI12 NSS setup time before SPCK rises 688.71
USPI13 NSS hold time after SPCK falls -2.25
USPI14 NSS setup time before SPCK falls 688.71
USPI15 NSS hold time after SPCK rises -2.25
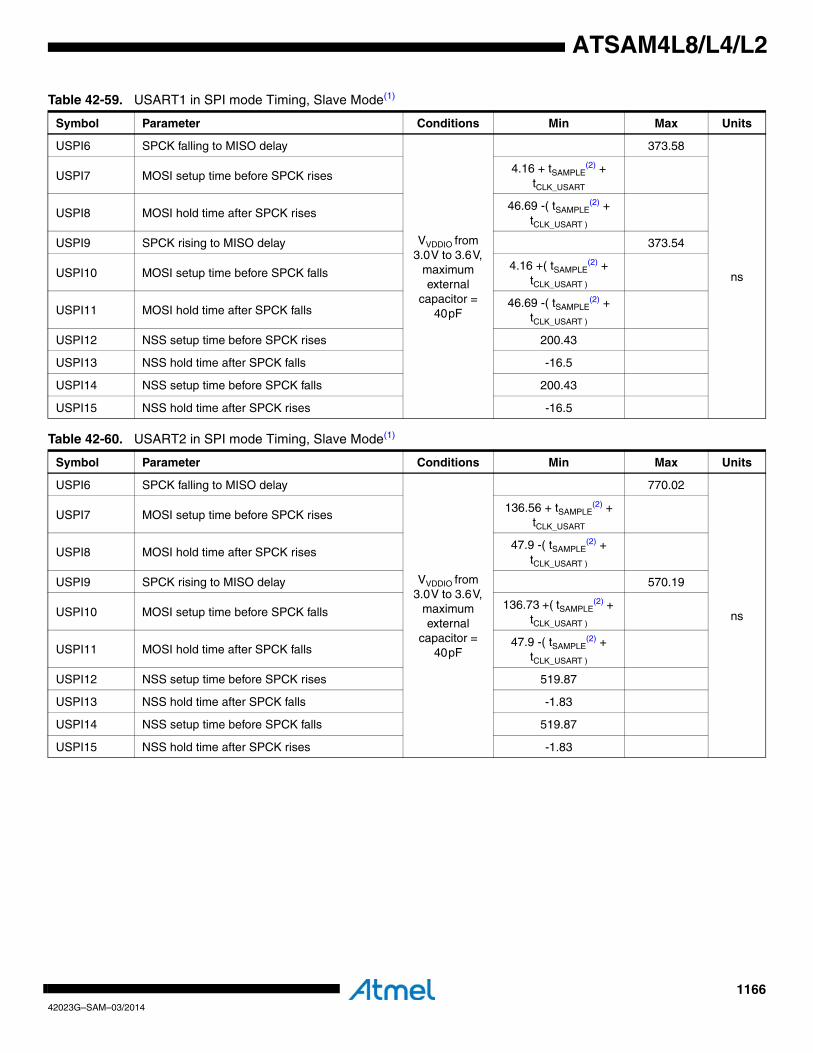
116642023G–SAM–03/2014
ATSAM4L8/L4/L2
Table 42-59. USART1 in SPI mode Timing, Slave Mode(1)
Symbol Parameter Conditions Min Max Units
USPI6 SPCK falling to MISO delay
VVDDIO from 3.0V to 3.6V,
maximum external
capacitor = 40pF
373.58
ns
USPI7 MOSI setup time before SPCK rises4.16 + tSAMPLE
(2) + tCLK_USART
USPI8 MOSI hold time after SPCK rises46.69 -( tSAMPLE
(2) + tCLK_USART )
USPI9 SPCK rising to MISO delay 373.54
USPI10 MOSI setup time before SPCK falls4.16 +( tSAMPLE
(2) + tCLK_USART )
USPI11 MOSI hold time after SPCK falls46.69 -( tSAMPLE
(2) + tCLK_USART )
USPI12 NSS setup time before SPCK rises 200.43
USPI13 NSS hold time after SPCK falls -16.5
USPI14 NSS setup time before SPCK falls 200.43
USPI15 NSS hold time after SPCK rises -16.5
Table 42-60. USART2 in SPI mode Timing, Slave Mode(1)
Symbol Parameter Conditions Min Max Units
USPI6 SPCK falling to MISO delay
VVDDIO from 3.0V to 3.6V,
maximum external
capacitor = 40pF
770.02
ns
USPI7 MOSI setup time before SPCK rises136.56 + tSAMPLE
(2) + tCLK_USART
USPI8 MOSI hold time after SPCK rises47.9 -( tSAMPLE
(2) + tCLK_USART )
USPI9 SPCK rising to MISO delay 570.19
USPI10 MOSI setup time before SPCK falls136.73 +( tSAMPLE
(2) + tCLK_USART )
USPI11 MOSI hold time after SPCK falls47.9 -( tSAMPLE
(2) + tCLK_USART )
USPI12 NSS setup time before SPCK rises 519.87
USPI13 NSS hold time after SPCK falls -1.83
USPI14 NSS setup time before SPCK falls 519.87
USPI15 NSS hold time after SPCK rises -1.83
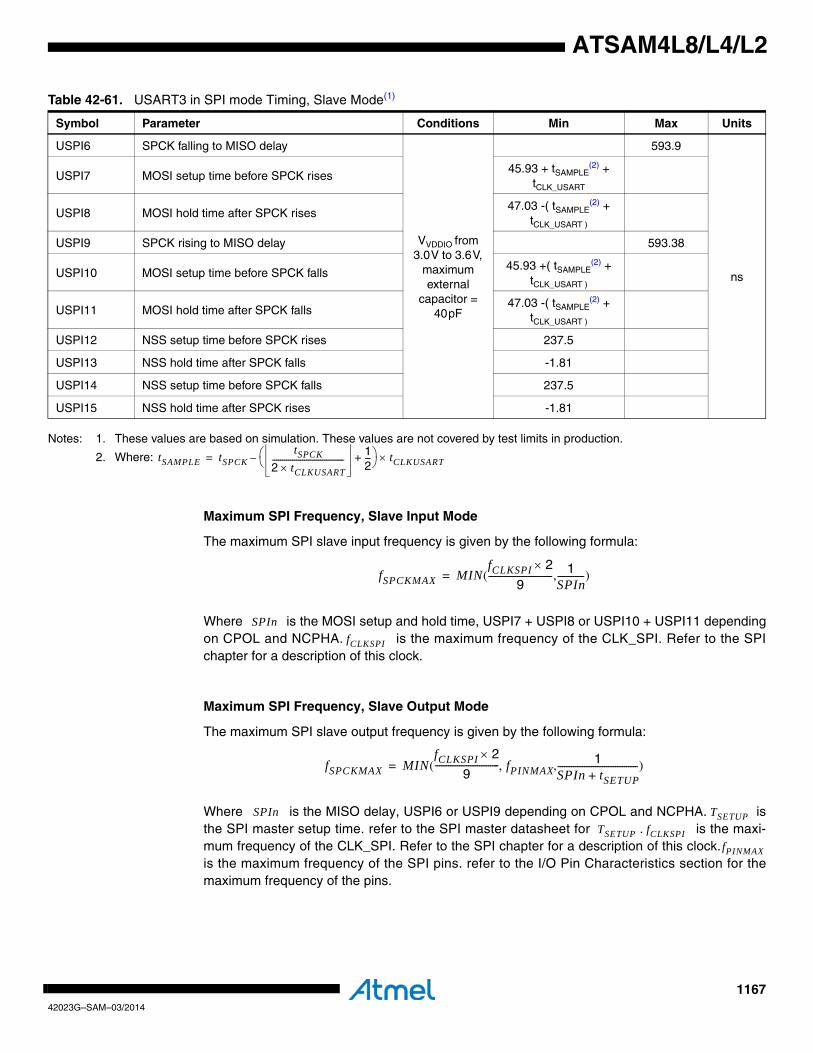
116742023G–SAM–03/2014
ATSAM4L8/L4/L2
Notes: 1. These values are based on simulation. These values are not covered by test limits in production.
2. Where:
Maximum SPI Frequency, Slave Input Mode
The maximum SPI slave input frequency is given by the following formula:
Where is the MOSI setup and hold time, USPI7 + USPI8 or USPI10 + USPI11 dependingon CPOL and NCPHA. is the maximum frequency of the CLK_SPI. Refer to the SPIchapter for a description of this clock.
Maximum SPI Frequency, Slave Output Mode
The maximum SPI slave output frequency is given by the following formula:
Where is the MISO delay, USPI6 or USPI9 depending on CPOL and NCPHA. isthe SPI master setup time. refer to the SPI master datasheet for . is the maxi-mum frequency of the CLK_SPI. Refer to the SPI chapter for a description of this clock.is the maximum frequency of the SPI pins. refer to the I/O Pin Characteristics section for themaximum frequency of the pins.
Table 42-61. USART3 in SPI mode Timing, Slave Mode(1)
Symbol Parameter Conditions Min Max Units
USPI6 SPCK falling to MISO delay
VVDDIO from 3.0V to 3.6V,
maximum external
capacitor = 40pF
593.9
ns
USPI7 MOSI setup time before SPCK rises45.93 + tSAMPLE
(2) + tCLK_USART
USPI8 MOSI hold time after SPCK rises47.03 -( tSAMPLE
(2) + tCLK_USART )
USPI9 SPCK rising to MISO delay 593.38
USPI10 MOSI setup time before SPCK falls45.93 +( tSAMPLE
(2) + tCLK_USART )
USPI11 MOSI hold time after SPCK falls47.03 -( tSAMPLE
(2) + tCLK_USART )
USPI12 NSS setup time before SPCK rises 237.5
USPI13 NSS hold time after SPCK falls -1.81
USPI14 NSS setup time before SPCK falls 237.5
USPI15 NSS hold time after SPCK rises -1.81
tSAMPLE tSPCKtSPCK
2 tCLKUSART×------------------------------------
12---+⎝ ⎠
⎛ ⎞ tCLKUSART×–=
fSPCKMAX MINfCLKSPI 2×
9----------------------------- 1
SPIn------------( , )=
SPInfCLKSPI
fSPCKMAX MINfCLKSPI 2×
9----------------------------- fPINMAX, 1
SPIn tSETUP+------------------------------------( , )=
SPIn TSETUPTSETUP fCLKSPI
fPINMAX
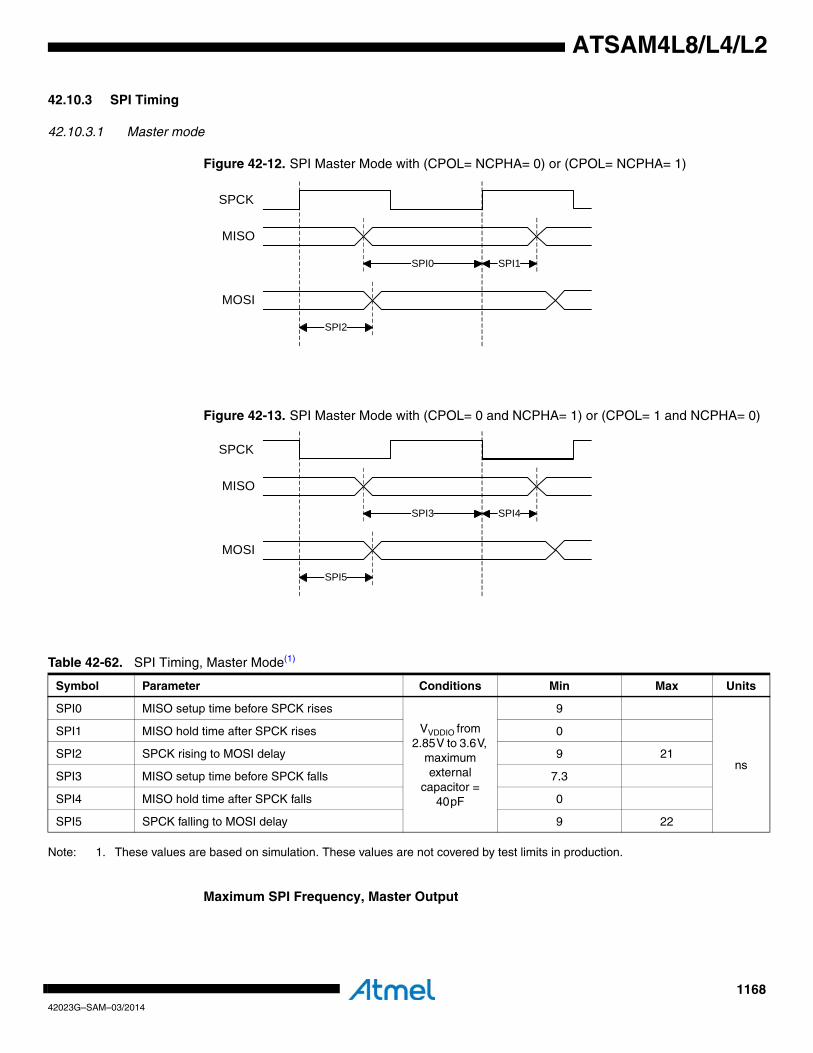
116842023G–SAM–03/2014
ATSAM4L8/L4/L2
42.10.3 SPI Timing
42.10.3.1 Master mode
Figure 42-12. SPI Master Mode with (CPOL= NCPHA= 0) or (CPOL= NCPHA= 1)
Figure 42-13. SPI Master Mode with (CPOL= 0 and NCPHA= 1) or (CPOL= 1 and NCPHA= 0)
Note: 1. These values are based on simulation. These values are not covered by test limits in production.
Maximum SPI Frequency, Master Output
SPI0 SPI1
MISO
SPCK
MOSI
SPI2
SPI3 SPI4
MISO
SPCK
MOSI
SPI5
Table 42-62. SPI Timing, Master Mode(1)
Symbol Parameter Conditions Min Max Units
SPI0 MISO setup time before SPCK rises
VVDDIO from 2.85V to 3.6V,
maximum external
capacitor = 40pF
9
ns
SPI1 MISO hold time after SPCK rises 0
SPI2 SPCK rising to MOSI delay 9 21
SPI3 MISO setup time before SPCK falls 7.3
SPI4 MISO hold time after SPCK falls 0
SPI5 SPCK falling to MOSI delay 9 22
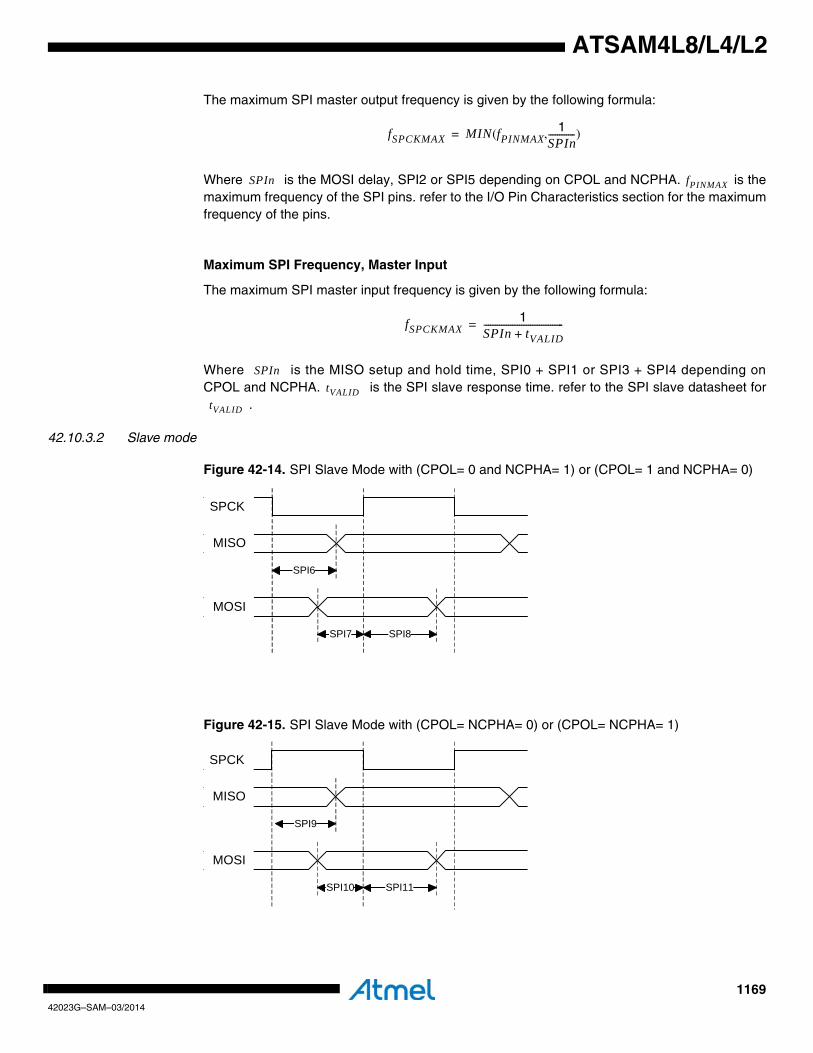
116942023G–SAM–03/2014
ATSAM4L8/L4/L2
The maximum SPI master output frequency is given by the following formula:
Where is the MOSI delay, SPI2 or SPI5 depending on CPOL and NCPHA. is themaximum frequency of the SPI pins. refer to the I/O Pin Characteristics section for the maximumfrequency of the pins.
Maximum SPI Frequency, Master Input
The maximum SPI master input frequency is given by the following formula:
Where is the MISO setup and hold time, SPI0 + SPI1 or SPI3 + SPI4 depending onCPOL and NCPHA. is the SPI slave response time. refer to the SPI slave datasheet for
.
42.10.3.2 Slave mode
Figure 42-14. SPI Slave Mode with (CPOL= 0 and NCPHA= 1) or (CPOL= 1 and NCPHA= 0)
Figure 42-15. SPI Slave Mode with (CPOL= NCPHA= 0) or (CPOL= NCPHA= 1)
fSPCKMAX MIN fPINMAX1
SPIn------------( , )=
SPIn fPINMAX
fSPCKMAX1
SPIn tVALID+------------------------------------=
SPIntVALID
tVALID
SPI7 SPI8
MISO
SPCK
MOSI
SPI6
SPI10 SPI11
MISO
SPCK
MOSI
SPI9

117042023G–SAM–03/2014
ATSAM4L8/L4/L2
Figure 42-16. SPI Slave Mode, NPCS Timing
Note: 1. These values are based on simulation. These values are not covered by test limits in production.
Maximum SPI Frequency, Slave Input Mode
The maximum SPI slave input frequency is given by the following formula:
Where is the MOSI setup and hold time, SPI7 + SPI8 or SPI10 + SPI11 depending onCPOL and NCPHA. is the maximum frequency of the CLK_SPI. Refer to the SPI chap-ter for a description of this clock.
Maximum SPI Frequency, Slave Output Mode
The maximum SPI slave output frequency is given by the following formula:
SPI14
SPI12
SPI15
SPI13
NPCS
SPCK, CPOL=0
SPCK, CPOL=1
Table 42-63. SPI Timing, Slave Mode(1)
Symbol Parameter Conditions Min Max Units
SPI6 SPCK falling to MISO delay
VVDDIO from 2.85V to 3.6V,
maximum external
capacitor = 40pF
19 47
ns
SPI7 MOSI setup time before SPCK rises 0
SPI8 MOSI hold time after SPCK rises 5.4
SPI9 SPCK rising to MISO delay 19 46
SPI10 MOSI setup time before SPCK falls 0
SPI11 MOSI hold time after SPCK falls 5.3
SPI12 NPCS setup time before SPCK rises 4
SPI13 NPCS hold time after SPCK falls 2.5
SPI14 NPCS setup time before SPCK falls 6
SPI15 NPCS hold time after SPCK rises 1.1
fSPCKMAX MIN fCLKSPI1
SPIn------------( , )=
SPInfCLKSPI
fSPCKMAX MIN fPINMAX1
SPIn tSETUP+------------------------------------( , )=
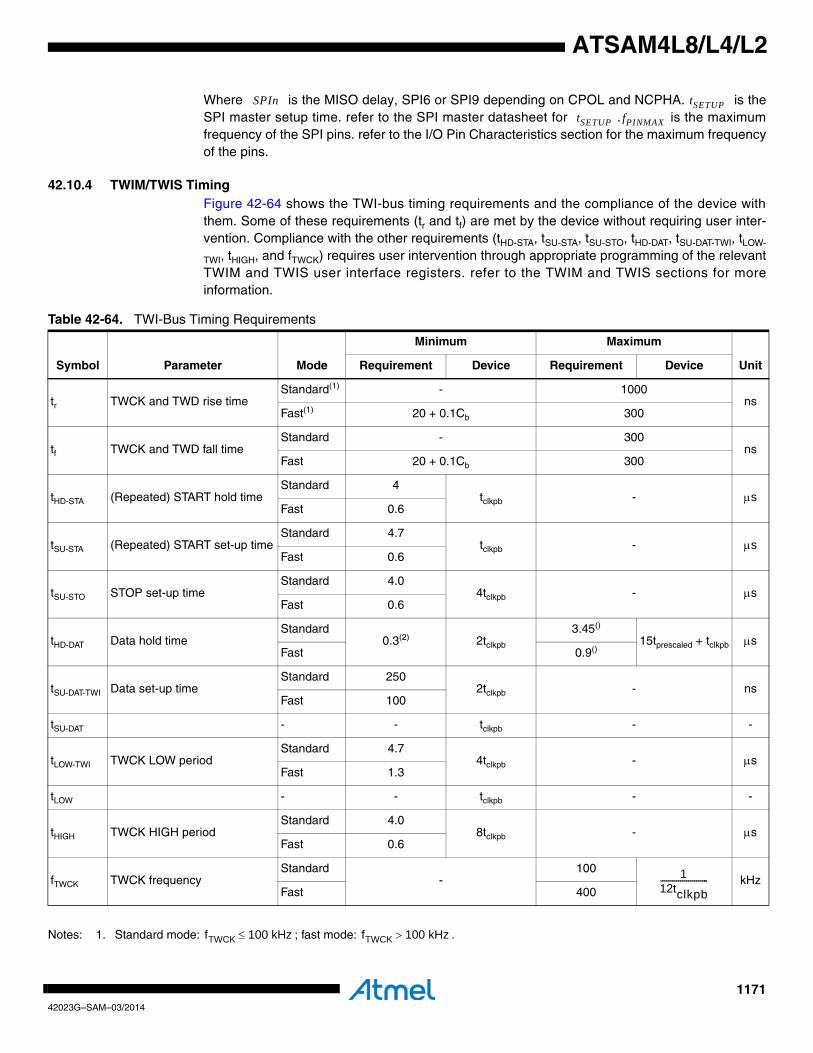
117142023G–SAM–03/2014
ATSAM4L8/L4/L2
Where is the MISO delay, SPI6 or SPI9 depending on CPOL and NCPHA. is theSPI master setup time. refer to the SPI master datasheet for . is the maximumfrequency of the SPI pins. refer to the I/O Pin Characteristics section for the maximum frequencyof the pins.
42.10.4 TWIM/TWIS TimingFigure 42-64 shows the TWI-bus timing requirements and the compliance of the device withthem. Some of these requirements (tr and tf) are met by the device without requiring user inter-vention. Compliance with the other requirements (tHD-STA, tSU-STA, tSU-STO, tHD-DAT, tSU-DAT-TWI, tLOW-
TWI, tHIGH, and fTWCK) requires user intervention through appropriate programming of the relevantTWIM and TWIS user interface registers. refer to the TWIM and TWIS sections for moreinformation.
Notes: 1. Standard mode: ; fast mode: .
SPIn tSETUPtSETUP fPINMAX
Table 42-64. TWI-Bus Timing Requirements
Symbol Parameter Mode
Minimum Maximum
UnitRequirement Device Requirement Device
tr TWCK and TWD rise timeStandard(1) - 1000
nsFast(1) 20 + 0.1Cb 300
tf TWCK and TWD fall timeStandard - 300
nsFast 20 + 0.1Cb 300
tHD-STA (Repeated) START hold timeStandard 4
tclkpb - μsFast 0.6
tSU-STA (Repeated) START set-up timeStandard 4.7
tclkpb - μsFast 0.6
tSU-STO STOP set-up timeStandard 4.0
4tclkpb - μsFast 0.6
tHD-DAT Data hold timeStandard
0.3(2) 2tclkpb
3.45()
15tprescaled + tclkpb μsFast 0.9()
tSU-DAT-TWI Data set-up timeStandard 250
2tclkpb - nsFast 100
tSU-DAT - - tclkpb - -
tLOW-TWI TWCK LOW periodStandard 4.7
4tclkpb - μsFast 1.3
tLOW - - tclkpb - -
tHIGH TWCK HIGH periodStandard 4.0
8tclkpb - μsFast 0.6
fTWCK TWCK frequencyStandard
-100
kHzFast 400
112tclkpb------------------------
fTWCK 100 kHz≤ fTWCK 100 kHz>
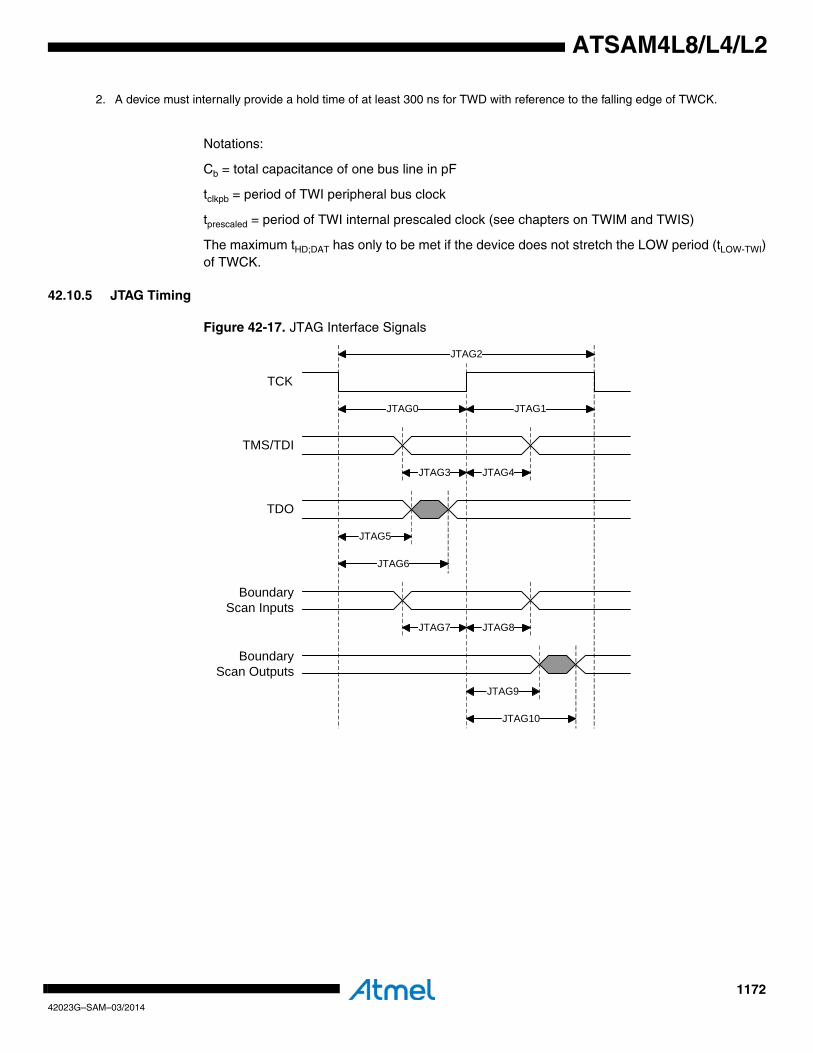
117242023G–SAM–03/2014
ATSAM4L8/L4/L2
2. A device must internally provide a hold time of at least 300 ns for TWD with reference to the falling edge of TWCK.
Notations:
Cb = total capacitance of one bus line in pF
tclkpb = period of TWI peripheral bus clock
tprescaled = period of TWI internal prescaled clock (see chapters on TWIM and TWIS)
The maximum tHD;DAT has only to be met if the device does not stretch the LOW period (tLOW-TWI)of TWCK.
42.10.5 JTAG Timing
Figure 42-17. JTAG Interface Signals
JTAG2
JTAG3
JTAG1
JTAG4
JTAG0
TMS/TDI
TCK
TDO
JTAG5
JTAG6
JTAG7 JTAG8
JTAG9
JTAG10
BoundaryScan Inputs
BoundaryScan Outputs
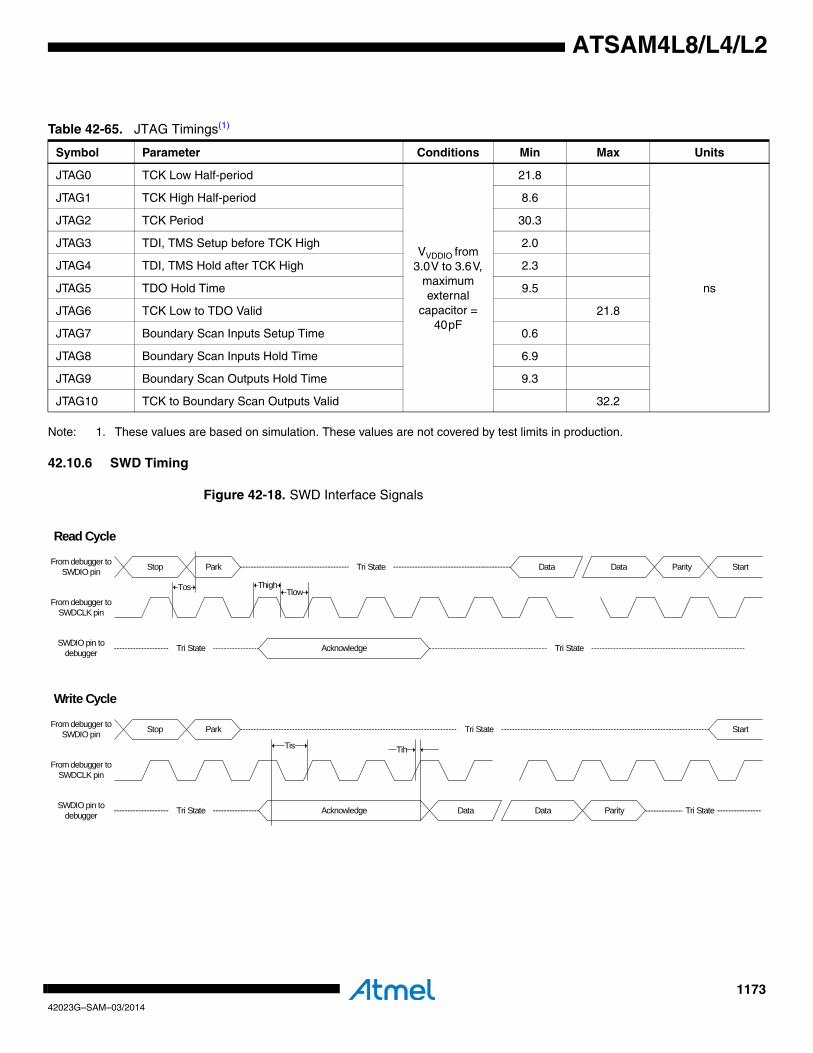
117342023G–SAM–03/2014
ATSAM4L8/L4/L2
Note: 1. These values are based on simulation. These values are not covered by test limits in production.
42.10.6 SWD Timing
Figure 42-18. SWD Interface Signals
Table 42-65. JTAG Timings(1)
Symbol Parameter Conditions Min Max Units
JTAG0 TCK Low Half-period
VVDDIO from 3.0V to 3.6V,
maximum external
capacitor = 40pF
21.8
ns
JTAG1 TCK High Half-period 8.6
JTAG2 TCK Period 30.3
JTAG3 TDI, TMS Setup before TCK High 2.0
JTAG4 TDI, TMS Hold after TCK High 2.3
JTAG5 TDO Hold Time 9.5
JTAG6 TCK Low to TDO Valid 21.8
JTAG7 Boundary Scan Inputs Setup Time 0.6
JTAG8 Boundary Scan Inputs Hold Time 6.9
JTAG9 Boundary Scan Outputs Hold Time 9.3
JTAG10 TCK to Boundary Scan Outputs Valid 32.2
Stop Park Tri State
AcknowledgeTri State Tri State
Parity StartData Data
Stop Park Tri State
AcknowledgeTri State
Start
Read Cycle
Write Cycle
Tos ThighTlow
Tis
Data Data Parity Tri State
Tih
From debugger to SWDIO pin
From debugger to SWDCLK pin
SWDIO pin to debugger
From debugger to SWDIO pin
From debugger to SWDCLK pin
SWDIO pin to debugger
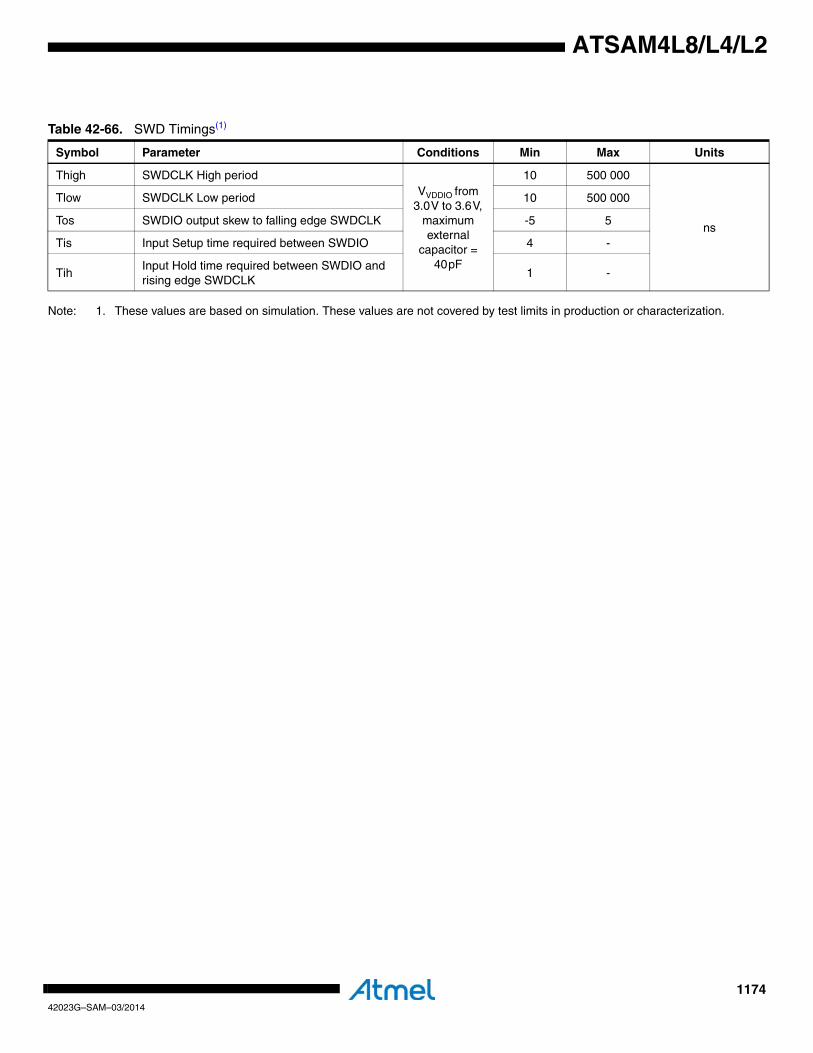
117442023G–SAM–03/2014
ATSAM4L8/L4/L2
Note: 1. These values are based on simulation. These values are not covered by test limits in production or characterization.
Table 42-66. SWD Timings(1)
Symbol Parameter Conditions Min Max Units
Thigh SWDCLK High periodVVDDIO from
3.0V to 3.6V, maximum external
capacitor = 40pF
10 500 000
ns
Tlow SWDCLK Low period 10 500 000
Tos SWDIO output skew to falling edge SWDCLK -5 5
Tis Input Setup time required between SWDIO 4 -
TihInput Hold time required between SWDIO and rising edge SWDCLK
1 -
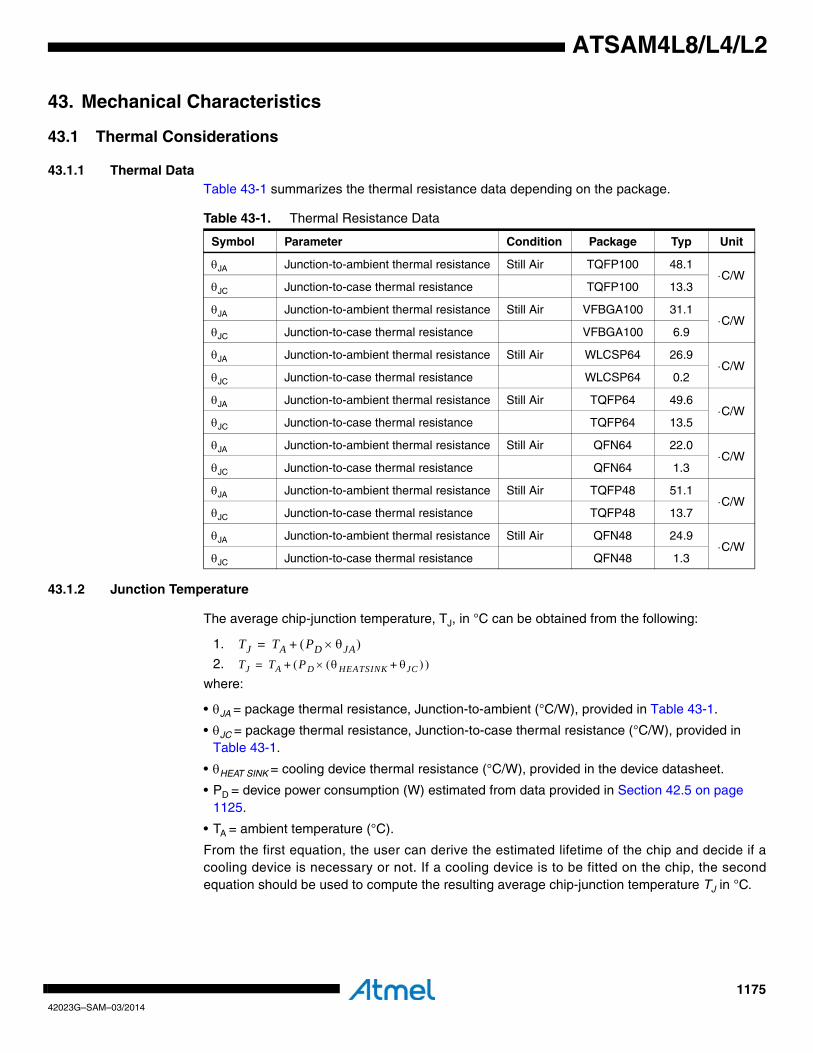
117542023G–SAM–03/2014
ATSAM4L8/L4/L2
43. Mechanical Characteristics
43.1 Thermal Considerations
43.1.1 Thermal DataTable 43-1 summarizes the thermal resistance data depending on the package.
43.1.2 Junction Temperature
The average chip-junction temperature, TJ, in °C can be obtained from the following:
1.
2.
where:
• θJA = package thermal resistance, Junction-to-ambient (°C/W), provided in Table 43-1.
• θJC = package thermal resistance, Junction-to-case thermal resistance (°C/W), provided in Table 43-1.
• θHEAT SINK = cooling device thermal resistance (°C/W), provided in the device datasheet.
• PD = device power consumption (W) estimated from data provided in Section 42.5 on page 1125.
• TA = ambient temperature (°C).
From the first equation, the user can derive the estimated lifetime of the chip and decide if acooling device is necessary or not. If a cooling device is to be fitted on the chip, the secondequation should be used to compute the resulting average chip-junction temperature TJ in °C.
Table 43-1. Thermal Resistance Data
Symbol Parameter Condition Package Typ Unit
θJA Junction-to-ambient thermal resistance Still Air TQFP100 48.1⋅C/W
θJC Junction-to-case thermal resistance TQFP100 13.3
θJA Junction-to-ambient thermal resistance Still Air VFBGA100 31.1⋅C/W
θJC Junction-to-case thermal resistance VFBGA100 6.9
θJA Junction-to-ambient thermal resistance Still Air WLCSP64 26.9⋅C/W
θJC Junction-to-case thermal resistance WLCSP64 0.2
θJA Junction-to-ambient thermal resistance Still Air TQFP64 49.6⋅C/W
θJC Junction-to-case thermal resistance TQFP64 13.5
θJA Junction-to-ambient thermal resistance Still Air QFN64 22.0⋅C/W
θJC Junction-to-case thermal resistance QFN64 1.3
θJA Junction-to-ambient thermal resistance Still Air TQFP48 51.1⋅C/W
θJC Junction-to-case thermal resistance TQFP48 13.7
θJA Junction-to-ambient thermal resistance Still Air QFN48 24.9⋅C/W
θJC Junction-to-case thermal resistance QFN48 1.3
TJ TA PD θJA×( )+=
TJ TA P( D θ( HEATSINK× θJC ) )+ +=
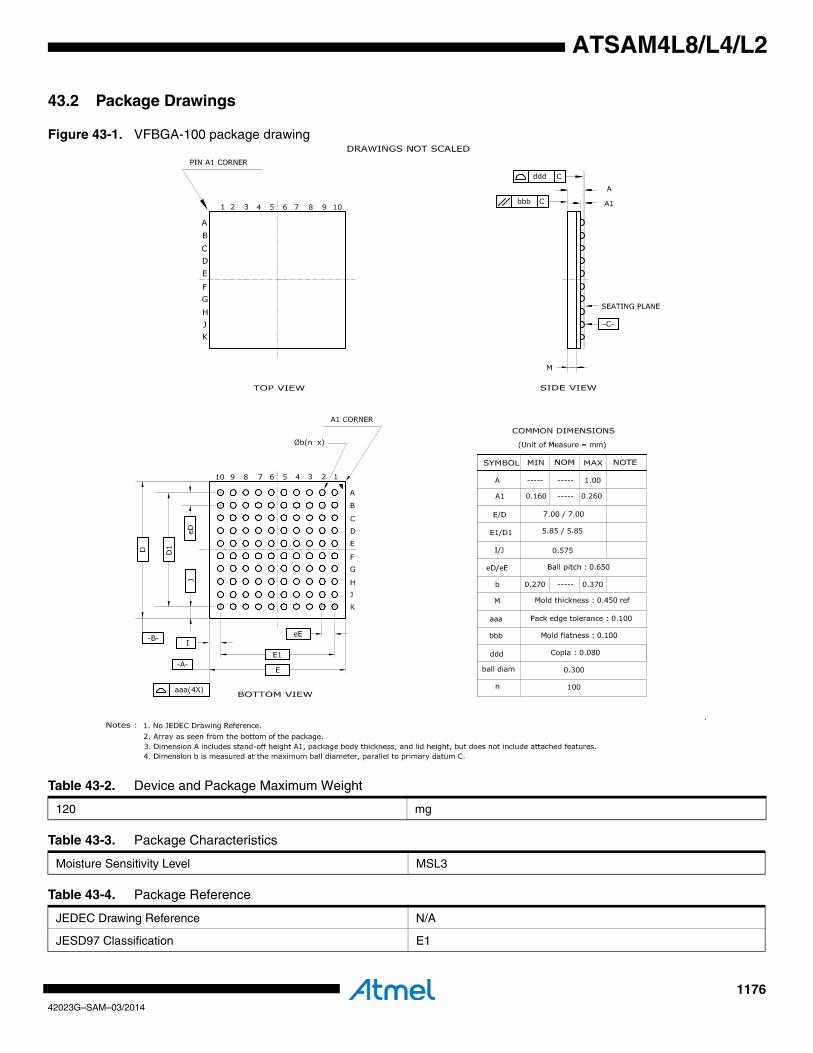
117642023G–SAM–03/2014
ATSAM4L8/L4/L2
43.2 Package Drawings
Figure 43-1. VFBGA-100 package drawing
Table 43-2. Device and Package Maximum Weight
120 mg
Table 43-3. Package Characteristics
Moisture Sensitivity Level MSL3
Table 43-4. Package Reference
JEDEC Drawing Reference N/A
JESD97 Classification E1
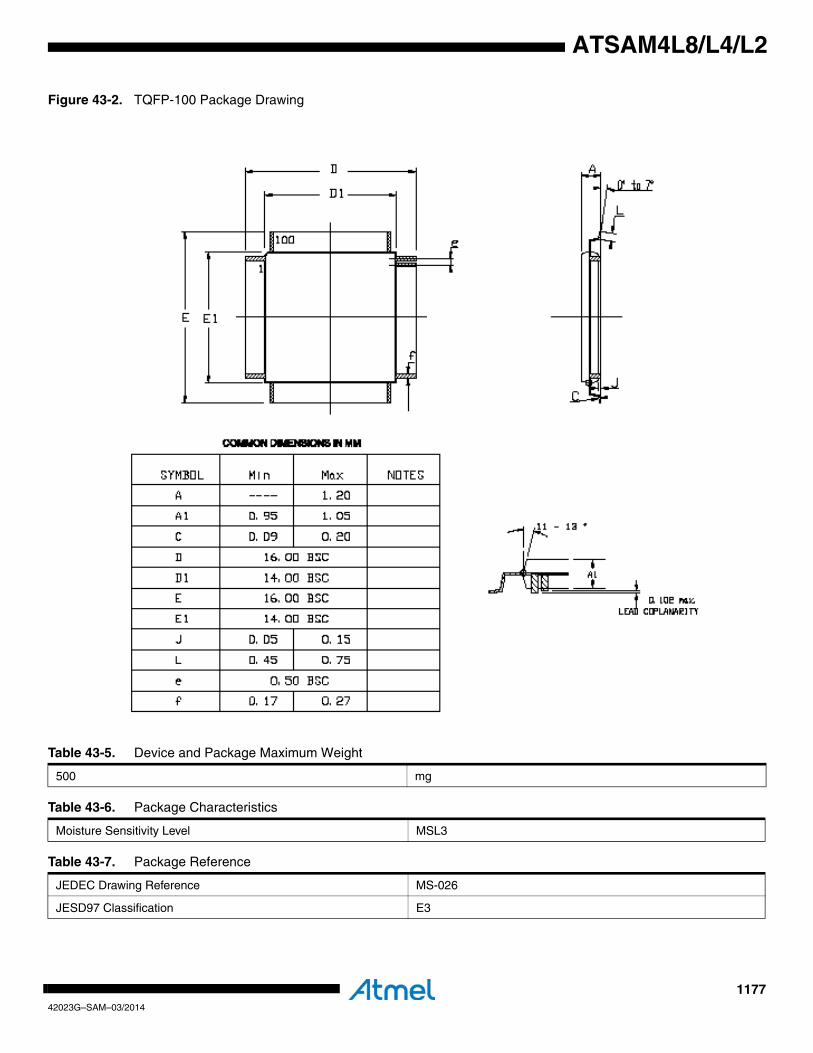
117742023G–SAM–03/2014
ATSAM4L8/L4/L2
Figure 43-2. TQFP-100 Package Drawing
Table 43-5. Device and Package Maximum Weight
500 mg
Table 43-6. Package Characteristics
Moisture Sensitivity Level MSL3
Table 43-7. Package Reference
JEDEC Drawing Reference MS-026
JESD97 Classification E3
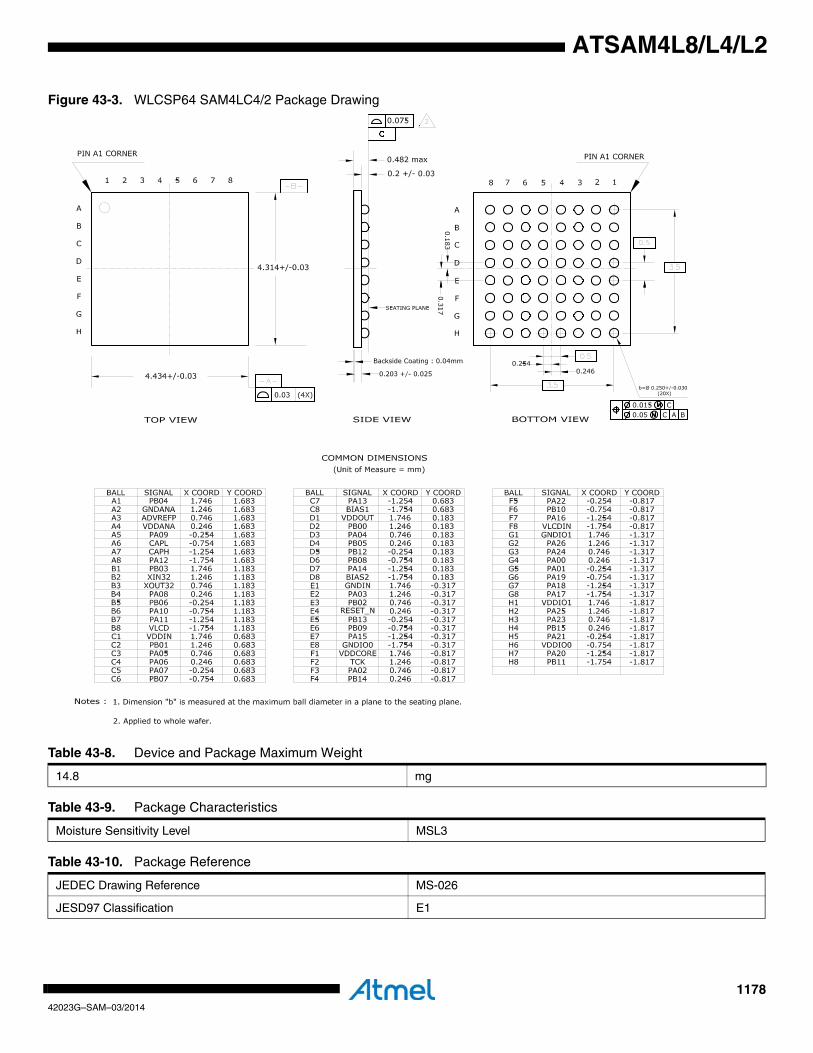
117842023G–SAM–03/2014
ATSAM4L8/L4/L2
Figure 43-3. WLCSP64 SAM4LC4/2 Package Drawing
Table 43-8. Device and Package Maximum Weight
14.8 mg
Table 43-9. Package Characteristics
Moisture Sensitivity Level MSL3
Table 43-10. Package Reference
JEDEC Drawing Reference MS-026
JESD97 Classification E1
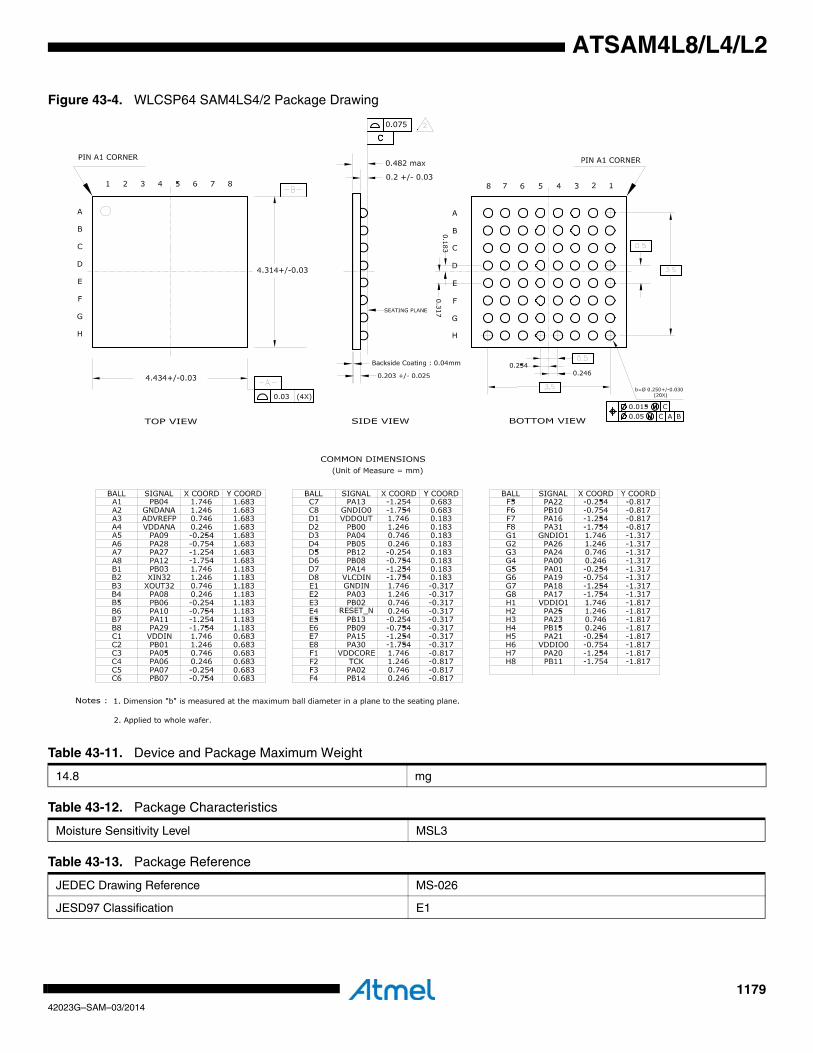
117942023G–SAM–03/2014
ATSAM4L8/L4/L2
Figure 43-4. WLCSP64 SAM4LS4/2 Package Drawing
Table 43-11. Device and Package Maximum Weight
14.8 mg
Table 43-12. Package Characteristics
Moisture Sensitivity Level MSL3
Table 43-13. Package Reference
JEDEC Drawing Reference MS-026
JESD97 Classification E1
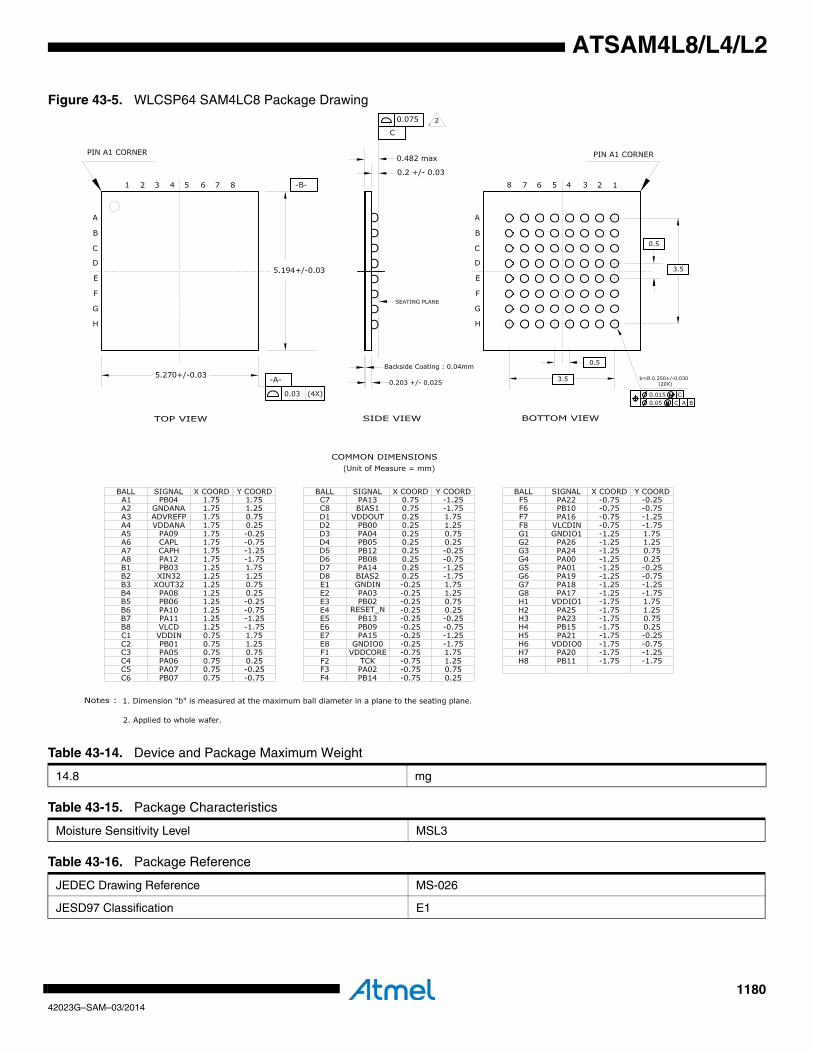
118042023G–SAM–03/2014
ATSAM4L8/L4/L2
Figure 43-5. WLCSP64 SAM4LC8 Package Drawing
Table 43-14. Device and Package Maximum Weight
14.8 mg
Table 43-15. Package Characteristics
Moisture Sensitivity Level MSL3
Table 43-16. Package Reference
JEDEC Drawing Reference MS-026
JESD97 Classification E1

118142023G–SAM–03/2014
ATSAM4L8/L4/L2
Figure 43-6. WLCSP64 SAM4LS8 Package Drawing
Table 43-17. Device and Package Maximum Weight
14.8 mg
Table 43-18. Package Characteristics
Moisture Sensitivity Level MSL3
Table 43-19. Package Reference
JEDEC Drawing Reference MS-026
JESD97 Classification E1

118242023G–SAM–03/2014
ATSAM4L8/L4/L2
Figure 43-7. TQFP-64 Package Drawing
Table 43-20. Device and Package Maximum Weight
300 mg
Table 43-21. Package Characteristics
Moisture Sensitivity Level MSL3
Table 43-22. Package Reference
JEDEC Drawing Reference MS-026
JESD97 Classification E3

118342023G–SAM–03/2014
ATSAM4L8/L4/L2
Figure 43-8. QFN-64 Package Drawing
Note: The exposed pad is not connected to anything internally, but should be soldered to ground to increase board level reliability.
Table 43-23. Device and Package Maximum Weight
200 mg
Table 43-24. Package Characteristics
Moisture Sensitivity Level MSL3
Table 43-25. Package Reference
JEDEC Drawing Reference MO-220
JESD97 Classification E3

118442023G–SAM–03/2014
ATSAM4L8/L4/L2
Figure 43-9. TQFP-48 (ATSAM4LC4/2 and ATSAM4LS4/2 Only) Package Drawing
Table 43-26. Device and Package Maximum Weight
140 mg
Table 43-27. Package Characteristics
Moisture Sensitivity Level MSL3
Table 43-28. Package Reference
JEDEC Drawing Reference MS-026
JESD97 Classification E3
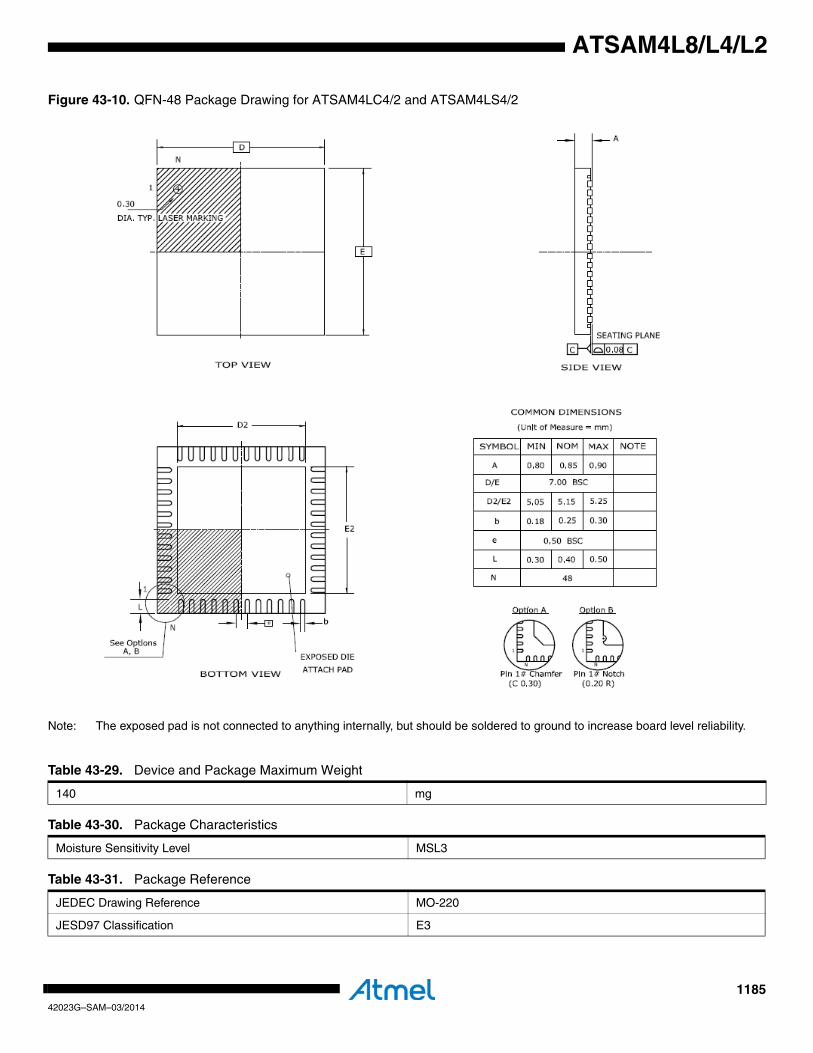
118542023G–SAM–03/2014
ATSAM4L8/L4/L2
Figure 43-10. QFN-48 Package Drawing for ATSAM4LC4/2 and ATSAM4LS4/2
Note: The exposed pad is not connected to anything internally, but should be soldered to ground to increase board level reliability.
Table 43-29. Device and Package Maximum Weight
140 mg
Table 43-30. Package Characteristics
Moisture Sensitivity Level MSL3
Table 43-31. Package Reference
JEDEC Drawing Reference MO-220
JESD97 Classification E3
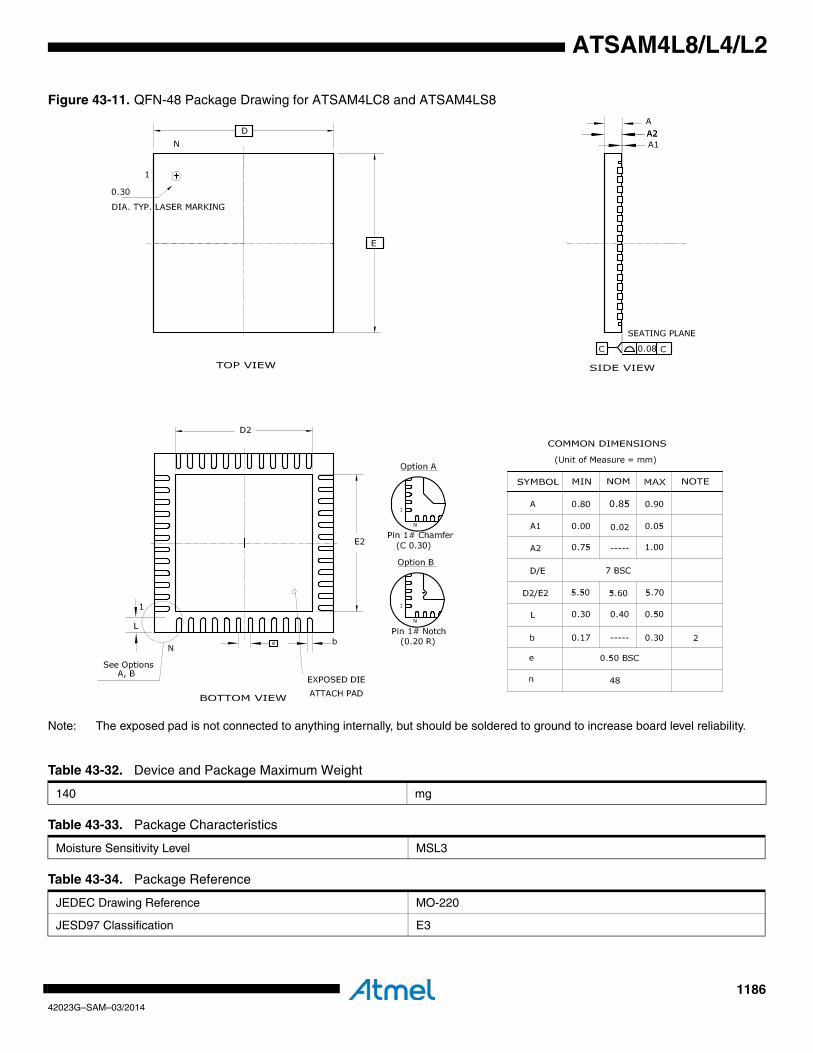
118642023G–SAM–03/2014
ATSAM4L8/L4/L2
Figure 43-11. QFN-48 Package Drawing for ATSAM4LC8 and ATSAM4LS8
Note: The exposed pad is not connected to anything internally, but should be soldered to ground to increase board level reliability.
Table 43-32. Device and Package Maximum Weight
140 mg
Table 43-33. Package Characteristics
Moisture Sensitivity Level MSL3
Table 43-34. Package Reference
JEDEC Drawing Reference MO-220
JESD97 Classification E3

118742023G–SAM–03/2014
ATSAM4L8/L4/L2
43.3 Soldering ProfileTable 43-35 gives the recommended soldering profile from J-STD-20.
A maximum of three reflow passes is allowed per component.
Table 43-35. Soldering Profile
Profile Feature Green Package
Average Ramp-up Rate (217°C to Peak) 3°C/s max
Preheat Temperature 175°C ±25°C 150-200°C
Time Maintained Above 217°C 60-150 s
Time within 5⋅C of Actual Peak Temperature 30 s
Peak Temperature Range 260°C
Ramp-down Rate 6°C/s max
Time 25⋅C to Peak Temperature 8 minutes max
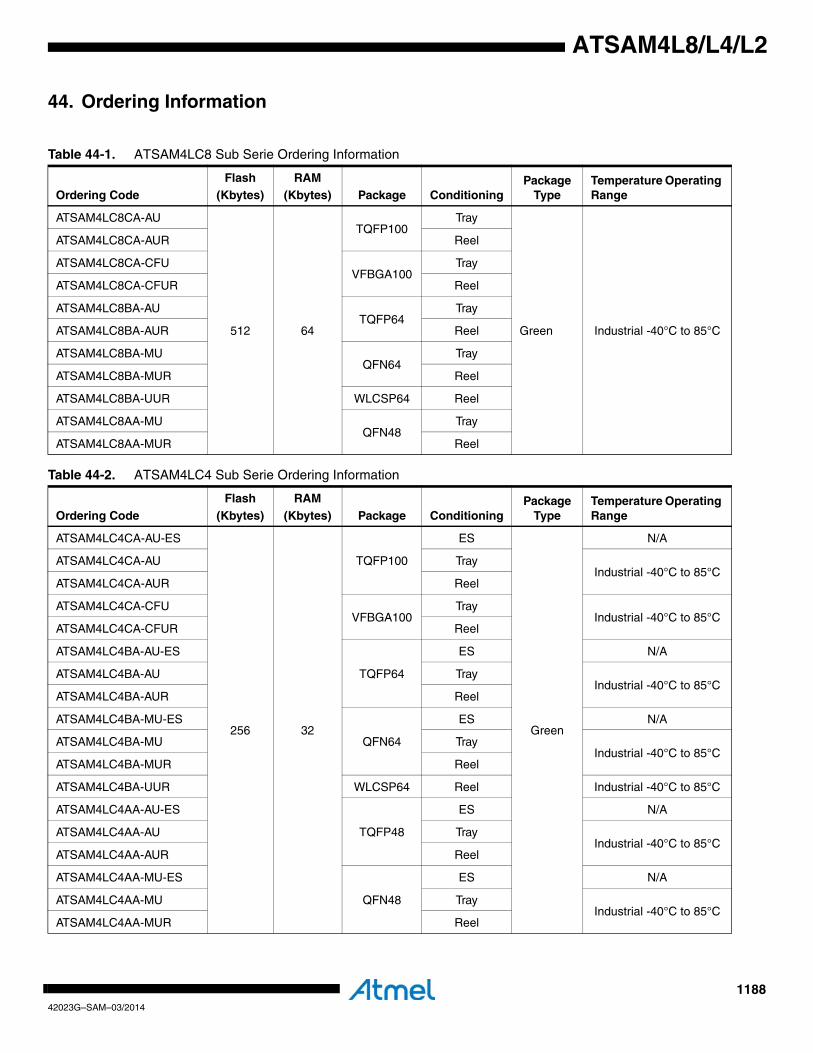
118842023G–SAM–03/2014
ATSAM4L8/L4/L2
44. Ordering Information
Table 44-1. ATSAM4LC8 Sub Serie Ordering Information
Ordering CodeFlash
(Kbytes)RAM
(Kbytes) Package ConditioningPackage
TypeTemperature Operating Range
ATSAM4LC8CA-AU
512 64
TQFP100Tray
Green Industrial -40°C to 85°C
ATSAM4LC8CA-AUR Reel
ATSAM4LC8CA-CFUVFBGA100
Tray
ATSAM4LC8CA-CFUR Reel
ATSAM4LC8BA-AUTQFP64
Tray
ATSAM4LC8BA-AUR Reel
ATSAM4LC8BA-MUQFN64
Tray
ATSAM4LC8BA-MUR Reel
ATSAM4LC8BA-UUR WLCSP64 Reel
ATSAM4LC8AA-MUQFN48
Tray
ATSAM4LC8AA-MUR Reel
Table 44-2. ATSAM4LC4 Sub Serie Ordering Information
Ordering CodeFlash
(Kbytes)RAM
(Kbytes) Package ConditioningPackage
TypeTemperature Operating Range
ATSAM4LC4CA-AU-ES
256 32
TQFP100
ES
Green
N/A
ATSAM4LC4CA-AU TrayIndustrial -40°C to 85°C
ATSAM4LC4CA-AUR Reel
ATSAM4LC4CA-CFUVFBGA100
TrayIndustrial -40°C to 85°C
ATSAM4LC4CA-CFUR Reel
ATSAM4LC4BA-AU-ES
TQFP64
ES N/A
ATSAM4LC4BA-AU TrayIndustrial -40°C to 85°C
ATSAM4LC4BA-AUR Reel
ATSAM4LC4BA-MU-ES
QFN64
ES N/A
ATSAM4LC4BA-MU TrayIndustrial -40°C to 85°C
ATSAM4LC4BA-MUR Reel
ATSAM4LC4BA-UUR WLCSP64 Reel Industrial -40°C to 85°C
ATSAM4LC4AA-AU-ES
TQFP48
ES N/A
ATSAM4LC4AA-AU TrayIndustrial -40°C to 85°C
ATSAM4LC4AA-AUR Reel
ATSAM4LC4AA-MU-ES
QFN48
ES N/A
ATSAM4LC4AA-MU TrayIndustrial -40°C to 85°C
ATSAM4LC4AA-MUR Reel
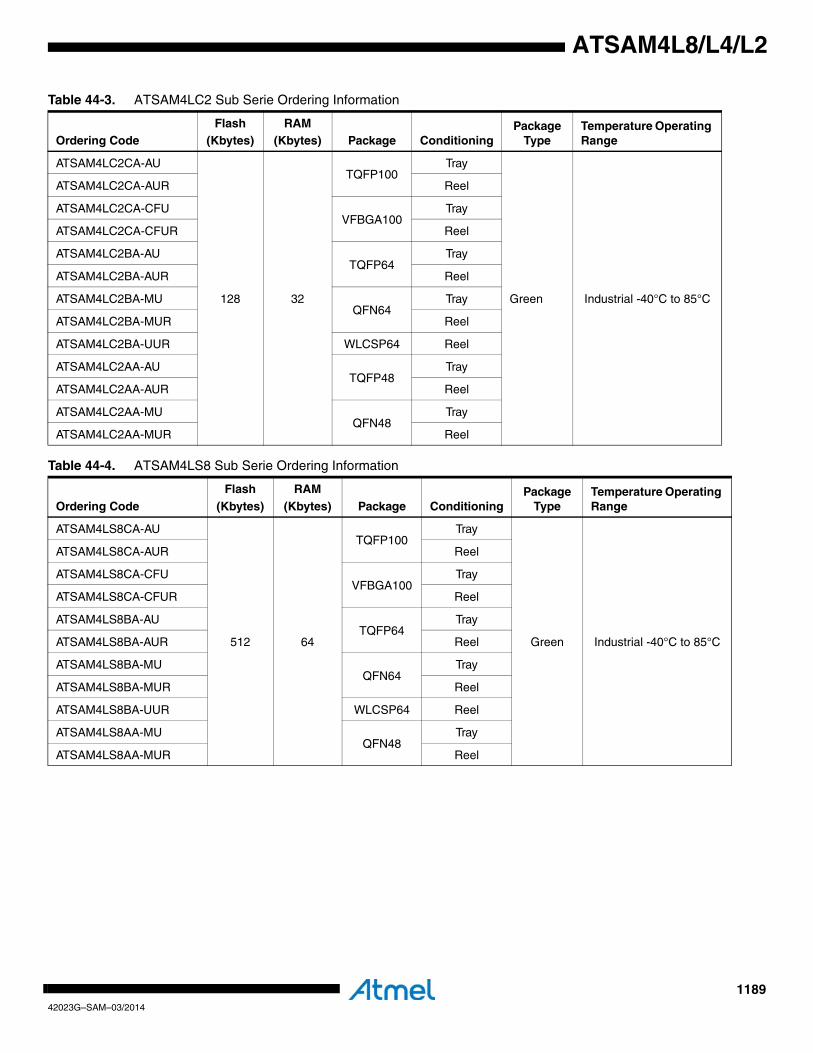
118942023G–SAM–03/2014
ATSAM4L8/L4/L2
Table 44-3. ATSAM4LC2 Sub Serie Ordering Information
Ordering CodeFlash
(Kbytes)RAM
(Kbytes) Package ConditioningPackage
TypeTemperature Operating Range
ATSAM4LC2CA-AU
128 32
TQFP100Tray
Green Industrial -40°C to 85°C
ATSAM4LC2CA-AUR Reel
ATSAM4LC2CA-CFUVFBGA100
Tray
ATSAM4LC2CA-CFUR Reel
ATSAM4LC2BA-AUTQFP64
Tray
ATSAM4LC2BA-AUR Reel
ATSAM4LC2BA-MUQFN64
Tray
ATSAM4LC2BA-MUR Reel
ATSAM4LC2BA-UUR WLCSP64 Reel
ATSAM4LC2AA-AUTQFP48
Tray
ATSAM4LC2AA-AUR Reel
ATSAM4LC2AA-MUQFN48
Tray
ATSAM4LC2AA-MUR Reel
Table 44-4. ATSAM4LS8 Sub Serie Ordering Information
Ordering CodeFlash
(Kbytes)RAM
(Kbytes) Package ConditioningPackage
TypeTemperature Operating Range
ATSAM4LS8CA-AU
512 64
TQFP100Tray
Green Industrial -40°C to 85°C
ATSAM4LS8CA-AUR Reel
ATSAM4LS8CA-CFUVFBGA100
Tray
ATSAM4LS8CA-CFUR Reel
ATSAM4LS8BA-AUTQFP64
Tray
ATSAM4LS8BA-AUR Reel
ATSAM4LS8BA-MUQFN64
Tray
ATSAM4LS8BA-MUR Reel
ATSAM4LS8BA-UUR WLCSP64 Reel
ATSAM4LS8AA-MUQFN48
Tray
ATSAM4LS8AA-MUR Reel
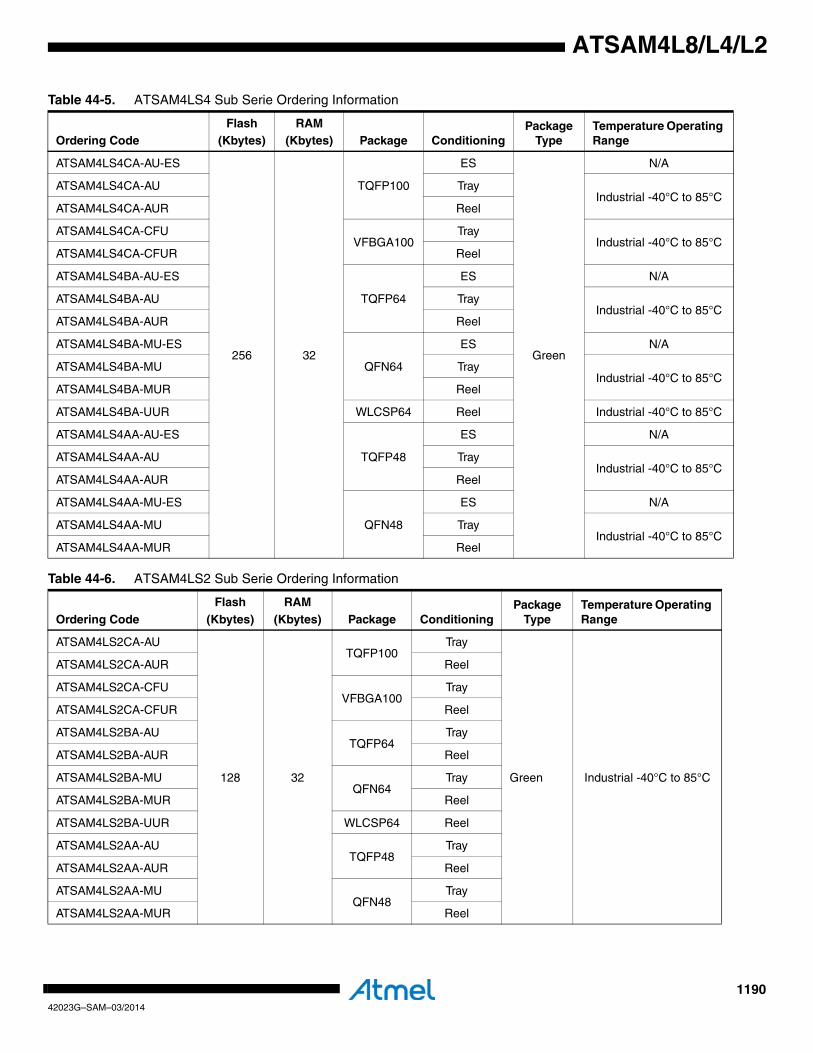
119042023G–SAM–03/2014
ATSAM4L8/L4/L2
Table 44-5. ATSAM4LS4 Sub Serie Ordering Information
Ordering CodeFlash
(Kbytes)RAM
(Kbytes) Package ConditioningPackage
TypeTemperature Operating Range
ATSAM4LS4CA-AU-ES
256 32
TQFP100
ES
Green
N/A
ATSAM4LS4CA-AU TrayIndustrial -40°C to 85°C
ATSAM4LS4CA-AUR Reel
ATSAM4LS4CA-CFUVFBGA100
TrayIndustrial -40°C to 85°C
ATSAM4LS4CA-CFUR Reel
ATSAM4LS4BA-AU-ES
TQFP64
ES N/A
ATSAM4LS4BA-AU TrayIndustrial -40°C to 85°C
ATSAM4LS4BA-AUR Reel
ATSAM4LS4BA-MU-ES
QFN64
ES N/A
ATSAM4LS4BA-MU TrayIndustrial -40°C to 85°C
ATSAM4LS4BA-MUR Reel
ATSAM4LS4BA-UUR WLCSP64 Reel Industrial -40°C to 85°C
ATSAM4LS4AA-AU-ES
TQFP48
ES N/A
ATSAM4LS4AA-AU TrayIndustrial -40°C to 85°C
ATSAM4LS4AA-AUR Reel
ATSAM4LS4AA-MU-ES
QFN48
ES N/A
ATSAM4LS4AA-MU TrayIndustrial -40°C to 85°C
ATSAM4LS4AA-MUR Reel
Table 44-6. ATSAM4LS2 Sub Serie Ordering Information
Ordering CodeFlash
(Kbytes)RAM
(Kbytes) Package ConditioningPackage
TypeTemperature Operating Range
ATSAM4LS2CA-AU
128 32
TQFP100Tray
Green Industrial -40°C to 85°C
ATSAM4LS2CA-AUR Reel
ATSAM4LS2CA-CFUVFBGA100
Tray
ATSAM4LS2CA-CFUR Reel
ATSAM4LS2BA-AUTQFP64
Tray
ATSAM4LS2BA-AUR Reel
ATSAM4LS2BA-MUQFN64
Tray
ATSAM4LS2BA-MUR Reel
ATSAM4LS2BA-UUR WLCSP64 Reel
ATSAM4LS2AA-AUTQFP48
Tray
ATSAM4LS2AA-AUR Reel
ATSAM4LS2AA-MUQFN48
Tray
ATSAM4LS2AA-MUR Reel
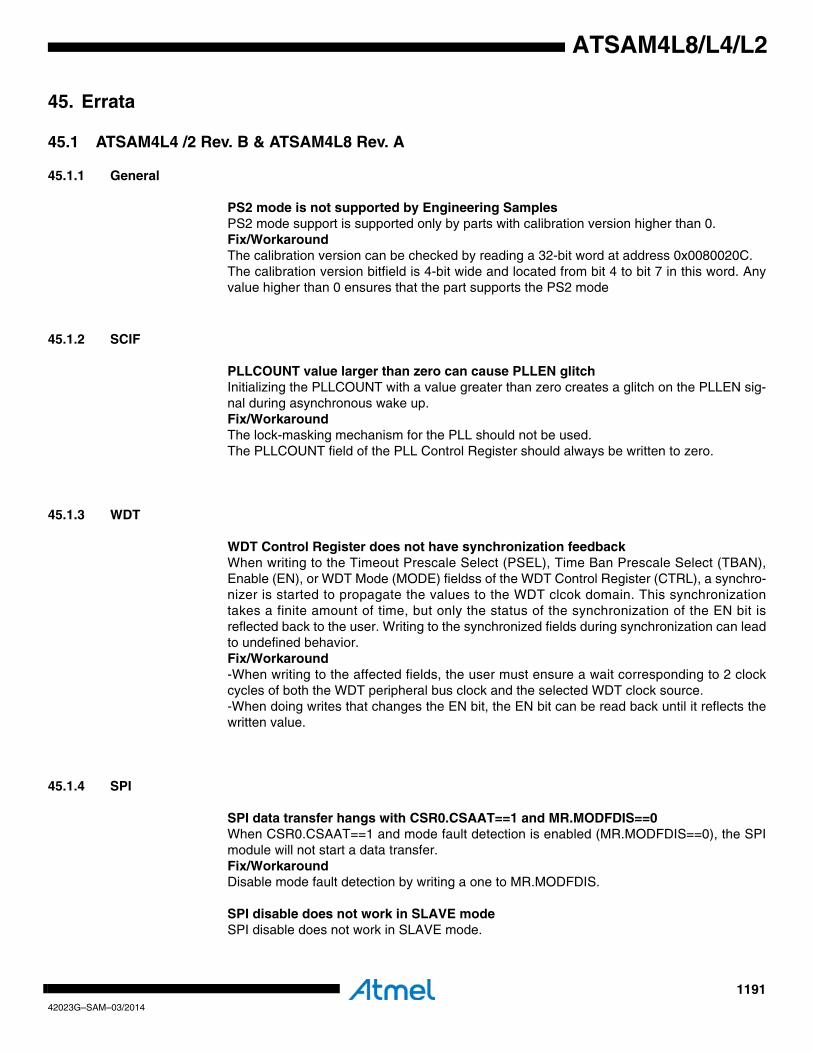
119142023G–SAM–03/2014
ATSAM4L8/L4/L2
45. Errata
45.1 ATSAM4L4 /2 Rev. B & ATSAM4L8 Rev. A
45.1.1 General
PS2 mode is not supported by Engineering SamplesPS2 mode support is supported only by parts with calibration version higher than 0.Fix/WorkaroundThe calibration version can be checked by reading a 32-bit word at address 0x0080020C.The calibration version bitfield is 4-bit wide and located from bit 4 to bit 7 in this word. Anyvalue higher than 0 ensures that the part supports the PS2 mode
45.1.2 SCIF
PLLCOUNT value larger than zero can cause PLLEN glitchInitializing the PLLCOUNT with a value greater than zero creates a glitch on the PLLEN sig-nal during asynchronous wake up.Fix/WorkaroundThe lock-masking mechanism for the PLL should not be used.The PLLCOUNT field of the PLL Control Register should always be written to zero.
45.1.3 WDT
WDT Control Register does not have synchronization feedbackWhen writing to the Timeout Prescale Select (PSEL), Time Ban Prescale Select (TBAN),Enable (EN), or WDT Mode (MODE) fieldss of the WDT Control Register (CTRL), a synchro-nizer is started to propagate the values to the WDT clcok domain. This synchronizationtakes a finite amount of time, but only the status of the synchronization of the EN bit isreflected back to the user. Writing to the synchronized fields during synchronization can leadto undefined behavior. Fix/Workaround-When writing to the affected fields, the user must ensure a wait corresponding to 2 clockcycles of both the WDT peripheral bus clock and the selected WDT clock source.-When doing writes that changes the EN bit, the EN bit can be read back until it reflects thewritten value.
45.1.4 SPI
SPI data transfer hangs with CSR0.CSAAT==1 and MR.MODFDIS==0When CSR0.CSAAT==1 and mode fault detection is enabled (MR.MODFDIS==0), the SPImodule will not start a data transfer.Fix/WorkaroundDisable mode fault detection by writing a one to MR.MODFDIS.
SPI disable does not work in SLAVE modeSPI disable does not work in SLAVE mode.
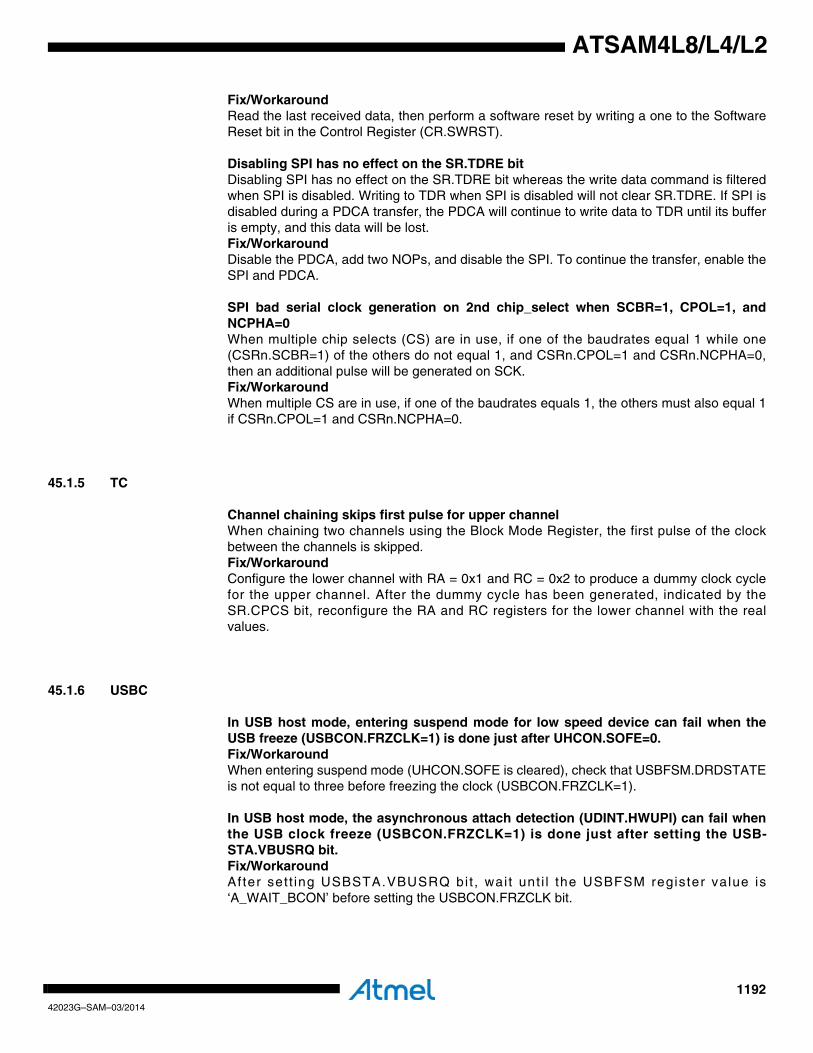
119242023G–SAM–03/2014
ATSAM4L8/L4/L2
Fix/WorkaroundRead the last received data, then perform a software reset by writing a one to the SoftwareReset bit in the Control Register (CR.SWRST).
Disabling SPI has no effect on the SR.TDRE bitDisabling SPI has no effect on the SR.TDRE bit whereas the write data command is filteredwhen SPI is disabled. Writing to TDR when SPI is disabled will not clear SR.TDRE. If SPI isdisabled during a PDCA transfer, the PDCA will continue to write data to TDR until its bufferis empty, and this data will be lost.Fix/WorkaroundDisable the PDCA, add two NOPs, and disable the SPI. To continue the transfer, enable theSPI and PDCA.
SPI bad serial clock generation on 2nd chip_select when SCBR=1, CPOL=1, andNCPHA=0When multiple chip selects (CS) are in use, if one of the baudrates equal 1 while one(CSRn.SCBR=1) of the others do not equal 1, and CSRn.CPOL=1 and CSRn.NCPHA=0,then an additional pulse will be generated on SCK.Fix/WorkaroundWhen multiple CS are in use, if one of the baudrates equals 1, the others must also equal 1if CSRn.CPOL=1 and CSRn.NCPHA=0.
45.1.5 TC
Channel chaining skips first pulse for upper channelWhen chaining two channels using the Block Mode Register, the first pulse of the clockbetween the channels is skipped.Fix/WorkaroundConfigure the lower channel with RA = 0x1 and RC = 0x2 to produce a dummy clock cyclefor the upper channel. After the dummy cycle has been generated, indicated by theSR.CPCS bit, reconfigure the RA and RC registers for the lower channel with the realvalues.
45.1.6 USBC
In USB host mode, entering suspend mode for low speed device can fail when theUSB freeze (USBCON.FRZCLK=1) is done just after UHCON.SOFE=0.Fix/WorkaroundWhen entering suspend mode (UHCON.SOFE is cleared), check that USBFSM.DRDSTATEis not equal to three before freezing the clock (USBCON.FRZCLK=1).
In USB host mode, the asynchronous attach detection (UDINT.HWUPI) can fail whenthe USB clock freeze (USBCON.FRZCLK=1) is done just after setting the USB-STA.VBUSRQ bit.Fix/WorkaroundAfter set t ing USBSTA.VBUSRQ bi t , wai t unt i l the USBFSM register value is‘A_WAIT_BCON’ before setting the USBCON.FRZCLK bit.
119342023G–SAM–03/2014
ATSAM4L8/L4/L2
45.1.7 FLASHCALW
Corrupted data in flash may happen after flash page write operations.After a flash page write operation, reading (data read or code fetch) in flash may fail. Thismay lead to an expecption or to others errors derived from this corrupted read access.Fix/WorkaroundBefore any flash page write operation, each 64-bit doublewords write in the page buffer mustpreceded by a 64-bit doublewords write in the page buffer with 0xFFFFFFFF_FFFFFFFFcontent at any address in the page. Note that special care is required when loading pagebuffer, refer to Section 14.5.8 ”Page Buffer Operations” on page 271.
119442023G–SAM–03/2014
ATSAM4L8/L4/L2
46. Datasheet Revision HistoryNote that the referring page numbers in this section are referred to this document. The referringrevision in this section are referring to the document revision.
46.1 Rev. A – 09/12
46.2 Rev. B – 10/12
46.3 Rev. C – 02/13
46.4 Rev. D – 03/13
1. Initial revision.
1. Fixed ordering code
2. Changed BOD18CTRL and BOD33CTRL ACTION field from “Reserved” to ‘No action”
1. Fixed ball pitch for VFBGA100 package
2. Added VFBGA100 and WLCSP64 pinouts
3. Added Power Scaling Mode 2 for high frequency support
4. Minor update on several modules chapters
5. Major update on Electrical characteristics
6. Updated errata
7. Fixed GPIO multiplexing pin numbers
1. Removed WLCSP package information
2. Added errata text for detecting whether a part supports PS2 mode or not
3. Removed temperature sensor feature (not supported by production flow)
4. Fixed MUX selection on Positive ADC input channel table
5. Added information about TWI instances capabilities
6. Added some details on errata Corrupted data in flash may happen after flash page write operations.1193
119542023G–SAM–03/2014
ATSAM4L8/L4/L2
46.5 Rev. E – 07/13
46.6 Rev. F– 12/13
46.7 Rev. G– 03/14
1. Added ATSAM4L8 derivatives and WLCSP packages for ATSAM4L4/2
2. Added operating conditions details in Electrical Characteristics Chapter
3. Fixed “Supply Rise Rates and Order”
4. Added number of USART available in sub-series
5. Fixed IO line considerations for USB pins
6. Removed useless information about CPU local bus which is not implemented
7. Removed useless information about Modem support which is not implemented
8. Added information about unsupported features in Power Scaling mode 1
9. Fixed SPI timings
1. Fixed table 3-6 - TDI is connected to pin G3 in WLCSP package
2. Changed table 42-48 -ADCIFE Electricals in unipolar mode : PSRR & DC supply current typical values
3. Fixed SPI timing characteristics
4. Fixed BOD33 typical step size value
1. Added WLCSP64 packages for SAM4LC8 and SAM4LS8 sub-series
2. Removed unsuppported SWAP feature in LCD module
3. Added mnimal value for ADC Reference range
119642023G–SAM–03/2014
ATSAM4L8/L4/L2
Table of Contents
Summary.................................................................................................... 1
Features ..................................................................................................... 1
1 Description ............................................................................................... 3
2 Overview ................................................................................................... 5
2.1 Block Diagram ...................................................................................................5
2.2 Configuration Summary .....................................................................................6
3 Package and Pinout ................................................................................. 9
3.1 Package .............................................................................................................9
3.2 Peripheral Multiplexing on I/O lines .................................................................19
3.3 Signals Description ..........................................................................................31
3.4 I/O Line Considerations ...................................................................................34
4 Cortex-M4 processor and core peripherals ......................................... 36
4.1 Cortex-M4 ........................................................................................................36
4.2 System level interface .....................................................................................37
4.3 Integrated configurable debug .........................................................................37
4.4 Cortex-M4 processor features and benefits summary .....................................38
4.5 Cortex-M4 core peripherals .............................................................................38
4.6 Cortex-M4 implementations options ................................................................39
4.7 Cortex-M4 Interrupts map ................................................................................39
4.8 Peripheral Debug .............................................................................................42
5 Power and Startup Considerations ...................................................... 43
5.1 Power Domain Overview .................................................................................43
5.2 Power Supplies ................................................................................................45
5.3 Startup Considerations ....................................................................................50
5.4 Power-on-Reset, Brownout and Supply Monitor .............................................50
6 Low Power Techniques ......................................................................... 52
6.1 Power Save Modes .........................................................................................52
6.2 Power Scaling ..................................................................................................57
7 Memories ................................................................................................ 59
7.1 Product Mapping .............................................................................................59
7.2 Embedded Memories ......................................................................................60
7.3 Physical Memory Map .....................................................................................60
119742023G–SAM–03/2014
ATSAM4L8/L4/L2
8 Debug and Test ...................................................................................... 62
8.1 Features ..........................................................................................................62
8.2 Overview ..........................................................................................................62
8.3 Block Diagram .................................................................................................63
8.4 I/O Lines Description .......................................................................................63
8.5 Product Dependencies ....................................................................................64
8.6 Core Debug .....................................................................................................64
8.7 Enhanced Debug Port (EDP) ..........................................................................67
8.8 System Manager Access Port (SMAP) ............................................................77
8.9 AHB-AP Access Port .......................................................................................92
8.10 Available Features in Protected State .............................................................93
8.11 Functional Description .....................................................................................94
9 Chip Identifier (CHIPID) ......................................................................... 99
9.1 Description .......................................................................................................99
9.2 Embedded Characteristics ..............................................................................99
9.3 User Interface ...............................................................................................101
10 Power Manager (PM) ............................................................................ 109
10.1 Features ........................................................................................................109
10.2 Overview ........................................................................................................109
10.3 Block Diagram ...............................................................................................109
10.4 I/O Lines Description .....................................................................................110
10.5 Product Dependencies ..................................................................................110
10.6 Functional Description ...................................................................................110
10.7 User Interface ................................................................................................116
10.8 Module Configuration ....................................................................................139
11 Backup Power Manager (BPM) ........................................................... 140
11.1 Features ........................................................................................................140
11.2 Overview ........................................................................................................140
11.3 Block Diagram ...............................................................................................141
11.4 Product Dependencies ..................................................................................141
11.5 Functional Description ...................................................................................142
11.6 User Interface ................................................................................................145
11.7 Module Configuration ....................................................................................160
12 Backup System Control Interface (BSCIF) ........................................ 161
12.1 Features ........................................................................................................161
119842023G–SAM–03/2014
ATSAM4L8/L4/L2
12.2 Overview ........................................................................................................161
12.3 Block Diagram ...............................................................................................162
12.4 I/O Lines Description .....................................................................................162
12.5 Product Dependencies ..................................................................................163
12.6 Functional Description ...................................................................................163
12.7 User Interface ................................................................................................172
12.8 Module Configuration ....................................................................................202
13 System Control Interface (SCIF) ......................................................... 203
13.1 Features ........................................................................................................203
13.2 Overview ........................................................................................................203
13.3 Block Diagram ...............................................................................................203
13.4 I/O Lines Description .....................................................................................204
13.5 Product Dependencies ..................................................................................204
13.6 Functional Description ...................................................................................204
13.7 User Interface ................................................................................................220
13.8 Module Configuration ....................................................................................259
14 Flash Controller (FLASHCALW) ......................................................... 263
14.1 Features ........................................................................................................263
14.2 Overview ........................................................................................................263
14.3 Block Diagram ...............................................................................................264
14.4 Product Dependencies ..................................................................................264
14.5 Functional Description ...................................................................................266
14.6 Flash Commands ..........................................................................................275
14.7 General-purpose Fuse Bits ............................................................................277
14.8 Security Fuses ...............................................................................................278
14.9 Error Correcting Code ...................................................................................278
14.10 User Interface ................................................................................................280
14.11 Fuse Settings .................................................................................................299
14.12 Serial Number ................................................................................................303
14.13 Module Configuration ....................................................................................303
15 HSB Bus Matrix (HMATRIXB) .............................................................. 305
15.1 Features ........................................................................................................305
15.2 Overview ........................................................................................................305
15.3 Product Dependencies ..................................................................................305
15.4 Functional Description ...................................................................................305
119942023G–SAM–03/2014
ATSAM4L8/L4/L2
15.5 User Interface ................................................................................................309
15.6 Module Configuration ....................................................................................317
16 Peripheral DMA Controller (PDCA) .................................................... 319
16.1 Features ........................................................................................................319
16.2 Overview ........................................................................................................319
16.3 Block Diagram ...............................................................................................320
16.4 Product Dependencies ..................................................................................320
16.5 Functional Description ...................................................................................321
16.6 User Interface ................................................................................................324
16.7 Module Configuration ....................................................................................338
17 USB Device and Embedded Host Interface (USBC) .......................... 341
17.1 Features ........................................................................................................341
17.2 Overview ........................................................................................................341
17.3 Block Diagram ...............................................................................................341
17.4 I/O Lines Description .....................................................................................343
17.5 Product Dependencies ..................................................................................344
17.6 Functional Description ...................................................................................345
17.7 User Interface ................................................................................................371
17.8 Module Configuration ....................................................................................428
18 Advanced Encryption Standard (AESA) ............................................ 429
18.1 Features ........................................................................................................429
18.2 Overview ........................................................................................................429
18.3 Product Dependencies ..................................................................................430
18.4 Functional Description ...................................................................................430
18.5 User Interface ................................................................................................435
18.6 Module Configuration ....................................................................................451
19 Asynchronous Timer (AST) ................................................................ 452
19.1 Features ........................................................................................................452
19.2 Overview ........................................................................................................452
19.3 Block Diagram ...............................................................................................453
19.4 Product Dependencies ..................................................................................453
19.5 Functional Description ...................................................................................454
19.6 User Interface ................................................................................................460
19.7 Module Configuration ....................................................................................481
120042023G–SAM–03/2014
ATSAM4L8/L4/L2
20 Watchdog Timer (WDT) ....................................................................... 482
20.1 Features ........................................................................................................482
20.2 Overview ........................................................................................................482
20.3 Block Diagram ...............................................................................................482
20.4 Product Dependencies ..................................................................................482
20.5 Functional Description ...................................................................................483
20.6 User Interface ................................................................................................490
20.7 Module Configuration ....................................................................................501
21 External Interrupt Controller (EIC) ..................................................... 502
21.1 Features ........................................................................................................502
21.2 Overview ........................................................................................................502
21.3 Block Diagram ...............................................................................................502
21.4 I/O Lines Description .....................................................................................503
21.5 Product Dependencies ..................................................................................503
21.6 Functional Description ...................................................................................503
21.7 User Interface ................................................................................................507
21.8 Module Configuration ....................................................................................523
22 Frequency Meter (FREQM) .................................................................. 524
22.1 Features ........................................................................................................524
22.2 Overview ........................................................................................................524
22.3 Block Diagram ...............................................................................................524
22.4 Product Dependencies ..................................................................................524
22.5 Functional Description ...................................................................................525
22.6 User Interface ................................................................................................527
22.7 Module Configuration ....................................................................................538
23 General-Purpose Input/Output Controller (GPIO) ............................. 540
23.1 Features ........................................................................................................540
23.2 Overview ........................................................................................................540
23.3 Block Diagram ...............................................................................................540
23.4 I/O Lines Description .....................................................................................541
23.5 Product Dependencies ..................................................................................541
23.6 Functional Description ...................................................................................542
23.7 User Interface ................................................................................................548
23.8 Module Configuration ....................................................................................573
24 Universal Synchronous Asynchronous Receiver Transmitter (USART)
120142023G–SAM–03/2014
ATSAM4L8/L4/L2
575
24.1 Features ........................................................................................................575
24.2 Overview ........................................................................................................575
24.3 Block Diagram ...............................................................................................576
24.4 I/O Lines Description ....................................................................................578
24.5 Product Dependencies ..................................................................................578
24.6 Functional Description ...................................................................................579
24.7 User Interface ................................................................................................622
24.8 Module Configuration ....................................................................................652
25 Picopower UART (PICOUART) ............................................................ 653
25.1 Features ........................................................................................................653
25.2 Overview ........................................................................................................653
25.3 Block Diagram ...............................................................................................653
25.4 I/O Lines Description .....................................................................................654
25.5 Product Dependencies ..................................................................................654
25.6 Functional Description ...................................................................................654
25.7 User Interface ................................................................................................657
25.8 Module Configuration ....................................................................................663
26 Serial Peripheral Interface (SPI) ......................................................... 664
26.1 Features ........................................................................................................664
26.2 Overview ........................................................................................................664
26.3 Block Diagram ...............................................................................................665
26.4 Application Block Diagram .............................................................................665
26.5 I/O Lines Description .....................................................................................666
26.6 Product Dependencies ..................................................................................666
26.7 Functional Description ...................................................................................666
26.8 User Interface ................................................................................................677
26.9 Module Configuration ....................................................................................704
27 Two-wire Master Interface (TWIM) ...................................................... 705
27.1 Features ........................................................................................................705
27.2 Overview ........................................................................................................705
27.3 List of Abbreviations ......................................................................................706
27.4 Block Diagram ...............................................................................................706
27.5 Application Block Diagram .............................................................................707
27.6 I/O Lines Description .....................................................................................707
120242023G–SAM–03/2014
ATSAM4L8/L4/L2
27.7 Product Dependencies ..................................................................................707
27.8 Functional Description ...................................................................................709
27.9 User Interface ................................................................................................723
27.10 Module Configuration ....................................................................................743
28 Two-wire Slave Interface (TWIS) ......................................................... 744
28.1 Features ........................................................................................................744
28.2 Overview ........................................................................................................744
28.3 List of Abbreviations ......................................................................................745
28.4 Block Diagram ...............................................................................................745
28.5 Application Block Diagram .............................................................................746
28.6 I/O Lines Description .....................................................................................746
28.7 Product Dependencies ..................................................................................746
28.8 Functional Description ...................................................................................747
28.9 User Interface ................................................................................................758
28.10 Module Configuration ....................................................................................777
29 Inter-IC Sound Controller (IISC) .......................................................... 778
29.1 Features ........................................................................................................778
29.2 Overview ........................................................................................................778
29.3 Block Diagram ...............................................................................................779
29.4 I/O Lines Description .....................................................................................779
29.5 Product Dependencies ..................................................................................779
29.6 Functional Description ...................................................................................780
29.7 IISC Application Examples ............................................................................785
29.8 User Interface ................................................................................................787
29.9 Module Configuration ....................................................................................801
30 Timer/Counter (TC) .............................................................................. 802
30.1 Features ........................................................................................................802
30.2 Overview ........................................................................................................802
30.3 Block Diagram ..............................................................................................803
30.4 I/O Lines Description .....................................................................................803
30.5 Product Dependencies ..................................................................................803
30.6 Functional Description ...................................................................................804
30.7 2-bit Gray Up/Down Counter for Stepper Motor ............................................818
30.8 Write Protection System ................................................................................818
30.9 User Interface ................................................................................................819
120342023G–SAM–03/2014
ATSAM4L8/L4/L2
30.10 Module Configuration ....................................................................................844
31 Peripheral Event Controller (PEVC) ................................................... 845
31.1 Features ........................................................................................................845
31.2 Overview ........................................................................................................845
31.3 Block Diagram ...............................................................................................846
31.4 I/O Lines Description .....................................................................................847
31.5 Product Dependencies ..................................................................................847
31.6 Functional Description ...................................................................................850
31.7 Application Example ......................................................................................852
31.8 User Interface ................................................................................................853
31.9 Module Configuration ....................................................................................874
32 Audio Bit Stream DAC (ABDACB) ...................................................... 877
32.1 Features ........................................................................................................877
32.2 Overview ........................................................................................................877
32.3 Block Diagram ...............................................................................................877
32.4 I/O Lines Description .....................................................................................878
32.5 Product Dependencies ..................................................................................878
32.6 Functional Description ...................................................................................879
32.7 User Interface ................................................................................................886
32.8 Module Configuration ....................................................................................900
33 Digital to Analog Converter Controller (DACC) ................................. 901
33.1 Features ........................................................................................................901
33.2 Overview ........................................................................................................901
33.3 Block Diagram ...............................................................................................902
33.4 Signal Description ..........................................................................................902
33.5 Product Dependencies ..................................................................................902
33.6 Functional Description ...................................................................................903
33.7 User Interface ................................................................................................905
33.8 Module Configuration ....................................................................................916
34 Capacitive Touch Module (CATB) ...................................................... 917
34.1 Features ........................................................................................................917
34.2 Overview ........................................................................................................917
34.3 Block Diagram ...............................................................................................918
34.4 I/O Lines Description .....................................................................................918
34.5 Product Dependencies ..................................................................................918
120442023G–SAM–03/2014
ATSAM4L8/L4/L2
34.6 Functional Description ...................................................................................919
34.7 User Interface ................................................................................................928
34.8 Module Configuration ....................................................................................950
35 True Random Number Generator (TRNG) .......................................... 951
35.1 Features ........................................................................................................951
35.2 Overview ........................................................................................................951
35.3 Functional Description ...................................................................................951
35.4 User Interface ................................................................................................952
35.5 Module Configuration ....................................................................................960
36 Glue Logic Controller (GLOC) ............................................................ 961
36.1 Features ........................................................................................................961
36.2 Overview ........................................................................................................961
36.3 Block Diagram ...............................................................................................961
36.4 I/O Lines Description .....................................................................................962
36.5 Product Dependencies ..................................................................................962
36.6 Functional Description ...................................................................................962
36.7 User Interface ................................................................................................964
36.8 Module Configuration ....................................................................................969
37 Analog Comparator Interface (ACIFC) ............................................... 970
37.1 Features ........................................................................................................970
37.2 Overview ........................................................................................................970
37.3 Block Diagram ...............................................................................................971
37.4 I/O Lines Description .....................................................................................971
37.5 Product Dependencies ..................................................................................972
37.6 Functional Description ...................................................................................972
37.7 Peripheral Event Triggers ..............................................................................978
37.8 AC Test mode ................................................................................................978
37.9 User Interface ................................................................................................979
37.10 Module configuration .....................................................................................994
38 ADC Interface (ADCIFE) ...................................................................... 995
38.1 Features ........................................................................................................995
38.2 Overview ........................................................................................................995
38.3 Block diagram ................................................................................................996
38.4 I/O Lines Description .....................................................................................996
38.5 Product dependencies ...................................................................................996
120542023G–SAM–03/2014
ATSAM4L8/L4/L2
38.6 Section 42. ”Electrical Characteristics” on page 1121Functional Description .....997
38.7 User Interface ..............................................................................................1005
38.8 Module Configuration ..................................................................................1032
39 LCD Controller (LCDCA) ................................................................... 1033
39.1 Features ......................................................................................................1033
39.2 Overview ......................................................................................................1033
39.3 Block Diagram .............................................................................................1034
39.4 I/O Lines Description ...................................................................................1034
39.5 Product Dependencies ................................................................................1034
39.6 Functional Description .................................................................................1035
39.7 User Interface ..............................................................................................1054
39.8 Module Configuration ..................................................................................1078
40 Parallel Capture (PARC) .................................................................... 1081
40.1 Features ......................................................................................................1081
40.2 Overview ......................................................................................................1081
40.3 Block Diagram .............................................................................................1081
40.4 I/O Lines Description ...................................................................................1081
40.5 Product Dependencies ................................................................................1081
40.6 Functional Description .................................................................................1082
40.7 User Interface ..............................................................................................1085
40.8 Module Configuration ..................................................................................1096
41 Cyclic Redundancy Check Calculation Unit (CRCCU) ................... 1097
41.1 Features ......................................................................................................1097
41.2 Overview ......................................................................................................1097
41.3 Block Diagram .............................................................................................1097
41.4 Product Dependencies ................................................................................1097
41.5 Functional Description .................................................................................1098
41.6 User Interface ..............................................................................................1100
41.7 Module Configuration ..................................................................................1120
42 Electrical Characteristics .................................................................. 1121
42.1 Absolute Maximum Ratings* .......................................................................1121
42.2 Operating Conditions ...................................................................................1121
42.3 Supply Characteristics .................................................................................1121
42.4 Maximum Clock Frequencies ......................................................................1123
120642023G–SAM–03/2014
ATSAM4L8/L4/L2
42.5 Power Consumption ....................................................................................1125
42.6 I/O Pin Characteristics .................................................................................1136
42.7 Oscillator Characteristics .............................................................................1143
42.8 Flash Characteristics ...................................................................................1149
42.9 Analog Characteristics .................................................................................1151
42.10 Timing Characteristics .................................................................................1162
43 Mechanical Characteristics ............................................................... 1175
43.1 Thermal Considerations ..............................................................................1175
43.2 Package Drawings .......................................................................................1176
43.3 Soldering Profile ..........................................................................................1187
44 Ordering Information ......................................................................... 1188
45 Errata ................................................................................................... 1191
45.1 ATSAM4L4 /2 Rev. B & ATSAM4L8 Rev. A ................................................1191
46 Datasheet Revision History .............................................................. 1194
46.1 Rev. A – 09/12 .............................................................................................1194
46.2 Rev. B – 10/12 .............................................................................................1194
46.3 Rev. C – 02/13 .............................................................................................1194
46.4 Rev. D – 03/13 .............................................................................................1194
46.5 Rev. E – 07/13 .............................................................................................1195
46.6 Rev. F– 12/13 ..............................................................................................1195
46.7 Rev. G– 03/14 .............................................................................................1195
Table of Contents................................................................................ 1196

42023G–SAM–03/2014
Atmel Corporation2325 Orchard ParkwaySan Jose, CA 95131USATel: (+1)(408) 441-0311Fax: (+1)(408) 487-2600 www.atmel.com
Atmel Asia LimitedUnit 1-5 & 16, 19/FBEA Tower, Millennium City 5418 Kwun Tong RoadKwun Tong, KowloonHONG KONGTel: (+852) 2245-6100Fax: (+852) 2722-1369
Atmel Munich GmbHBusiness CampusParkring 4D-85748 Garching b. MunichGERMANYTel: (+49) 89-31970-0Fax: (+49) 89-3194621
Atmel Japan16F, Shin Osaki Kangyo Bldg.1-6-4 Osaka Shinagawa-kuTokyo 104-0032JAPANTel: (+81) 3-6417-0300Fax: (+81) 3-6417-0370
© 2013 Atmel Corporation. All rights reserved. 124152
Atmel®, Atmel logo and combinations thereof, picoPower®, Adjacent Key Suppression® ,AKS®, Qtouch®, and others are registered trademarks or trademarks of Atmel Corporation or its subsidiaries. ARM®, AMBA®,Thumb®, CortexTM are registered trademarks or trademarks of ARM Ltd. Other terms and product names may be trademarks of others.
Disclaimer: The information in this document is provided in connection with Atmel products. No license, express or implied, by estoppel or otherwise, to any intellectual property right is granted by this document or in connection with the sale of Atmel products. EXCEPT AS SET FORTH IN THE ATMEL TERMS AND CONDITIONS OF SALES LOCATED ON THE ATMEL WEBSITE, ATMEL ASSUMES NO LIABILITY WHATSOEVER AND DISCLAIMS ANY EXPRESS, IMPLIED OR STATUTORY WARRANTY RELATING TO ITS PRODUCTS INCLUDING, BUT NOT LIMITED TO, THE IMPLIED WARRANTY OF MERCHANTABILITY, FITNESS FOR A PARTICULAR PURPOSE, OR NON-INFRINGEMENT. IN NO EVENT SHALL ATMEL BE LIABLE FOR ANY DIRECT, INDIRECT, CONSEQUENTIAL, PUNITIVE, SPECIAL OR INCIDENTAL DAMAGES (INCLUDING, WITHOUT LIMITATION, DAMAGES FOR LOSS AND PROF-ITS, BUSINESS INTERRUPTION, OR LOSS OF INFORMATION) ARISING OUT OF THE USE OR INABILITY TO USE THIS DOCUMENT, EVEN IF ATMEL HAS BEEN ADVISED OF THE POSSIBILITY OF SUCH DAMAGES. Atmel makes no representations or warranties with respect to the accuracy or com-pleteness of the contents of this document and reserves the right to make changes to specifications and product descriptions at any time without notice. Atmel does not make any commitment to update the information contained herein. Unless specifically provided otherwise, Atmel products are not suit-able for, and shall not be used in, automotive applications. Atmel products are not intended, authorized, or warranted for use as components in applica-tions intended to support or sustain life.