Embed Size (px)
Citation preview
Au fil de l’epee Page 1
Au fil de l’épée !
By the Edge of the Sword!
Version 2010
"What have the French people contributed to world history? In my view, it is not the revolution of
1789, but the spirit of chivalry." Dai Sijie
Au fil de l'épée -By the Edge of the Sword! -is a rules system dedicated to battles of the high Middle Ages at the tactical level. It is used
for the 32 battles of the series: Poitiers 1356 and Formigny 1450 (Vae Victis #26), Muret 1213, Bouvines 1214, Lac Peïpous 1242, and
Benevento 1266 (By the Edge of the Sword, Vae Victis #45), Cocherel 1364, Auray 1364, Patay 1429, and Castillon 1453 (Swords of
France, Canons en Carton,), Las Navas de Tolosa, 1212 (The Cross and the Sword, Vae Victis #62), Brémule 1119, Taillebourg 1242,
Mons-en-Pévèle 1304 and Cassel 1328 (Royal Swords, Canons en Cartons), Anthon 1430 (Vae Victis Hors Série #6), Varey 1325, Baugé
1421, Verneuil 1424 and Montlhéry 1465 (Swords and Crown, Canons en Carton), Otterburn 1388 (Vae Victis #78), Morgarten 1315,
Sempach 1386 and Grandson 1476 (Swords and halberds, Vae Victis #81), Neville's Cross 1346 (Vae Victis Hors Série #10) Dorylée 1097
and Ascalon 1099 (Swords and Crusade, Canons en Carton), Val ès dunes 1047, Varaville 1057 and Hastings 1066 (Norman Swords,
Canons en Carton), and now Trémithoussia 1191 and Arsouf 1191 (Vae Victis Collection Jeux d’Histoire).
Rules by Frédéric Bey, translated by Stephen Neuville
0 -General rules The game is designed for two players, each controlling
one of the two opposing armies. However, it is possible
to play solitaire or with more than two players (by
distributing the banners of each side among the
players).
0.1 - Abbreviations Hex = Hexagon SP = Strength Point MP = Movement
Point LOS = Line of Sight
0.2 - Game Scale
A game turn represents half an hour of real time. A hex
on the map corresponds to about 200 meters. A strength
point represents 100 men.
Game Scale may be modified in some scenarios in
order to adapt it to the specific situation.
0.3 - Dice
The game requires the use of two six-sided dice
(referred to as d6) and one ten-sided die (referred to as
d10). In the case of the latter, 0 means zero and not 10.
The ten-sided die is used to resolve fire and mêlées and
to make rally tests. The six-sided dice are used to
determine initiative.
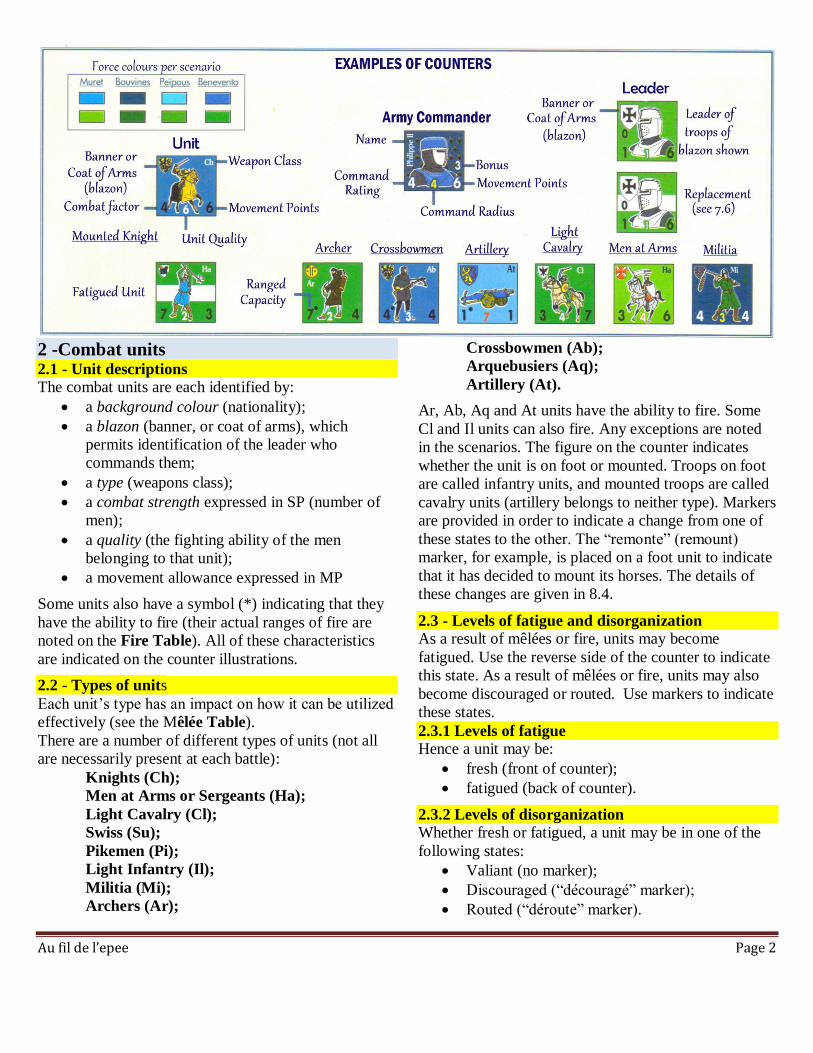
1 -Leaders and army commanders 1.1 - Characteristics of leaders & army commanders Each leader possesses:
a background colour (nationality);
a blazon (banner, or coat of arms) allowing
identification of units belonging to his banner;
a bonus (a die roll modifier);
a command rating (command ability);
a command radius;
a movement allowance.
Army commanders possess the same characteristics and
are identified by a specific background. All of these
characteristics are indicated on the counter illustrations.
1.2 - Leaders and banners
A leader can command only the combat units of his
own banner, which are those with the same blazon as
his. The army commanders can command not only the
units of their own banner but also all units of their army
that are situated within their command radius.
Au fil de l’epee Page 2
2 -Combat units 2.1 - Unit descriptions The combat units are each identified by:
a background colour (nationality);
a blazon (banner, or coat of arms), which
permits identification of the leader who
commands them;
a type (weapons class);
a combat strength expressed in SP (number of
men);
a quality (the fighting ability of the men
belonging to that unit);
a movement allowance expressed in MP
Some units also have a symbol (*) indicating that they
have the ability to fire (their actual ranges of fire are
noted on the Fire Table). All of these characteristics
are indicated on the counter illustrations.
2.2 - Types of units
Each unit’s type has an impact on how it can be utilized
effectively (see the Mêlée Table).
There are a number of different types of units (not all
are necessarily present at each battle):
Knights (Ch);
Men at Arms or Sergeants (Ha);
Light Cavalry (Cl);
Swiss (Su);
Pikemen (Pi);
Light Infantry (Il);
Militia (Mi);
Archers (Ar);
Crossbowmen (Ab);
Arquebusiers (Aq);
Artillery (At).
Ar, Ab, Aq and At units have the ability to fire. Some
Cl and Il units can also fire. Any exceptions are noted
in the scenarios. The figure on the counter indicates
whether the unit is on foot or mounted. Troops on foot
are called infantry units, and mounted troops are called
cavalry units (artillery belongs to neither type). Markers
are provided in order to indicate a change from one of
these states to the other. The ―remonte‖ (remount)
marker, for example, is placed on a foot unit to indicate
that it has decided to mount its horses. The details of
these changes are given in 8.4.
2.3 - Levels of fatigue and disorganization As a result of mêlées or fire, units may become
fatigued. Use the reverse side of the counter to indicate
this state. As a result of mêlées or fire, units may also
become discouraged or routed. Use markers to indicate
these states.
2.3.1 Levels of fatigue Hence a unit may be:
fresh (front of counter);
fatigued (back of counter).
2.3.2 Levels of disorganization Whether fresh or fatigued, a unit may be in one of the
following states:
Valiant (no marker);
Discouraged (―découragé‖ marker);
Routed (―déroute‖ marker).

Au fil de l’epee Page 3
3 -Facing All units, except routed units, must comply with the
facing rules (indicating which direction the unit is
facing), which affect movement, fire and mêlées. Units
must be oriented so as to face one of their six hexsides.
3.1 - Infantry and cavalry These units have three front hexes and three rear hexes.
3.2 - Artillery These units have one front hex and five rear hexes.
3.3 - Leaders and army commanders Facing makes no difference to these units.
4 – Zones of control There are no Zones of Control in this game.
It is not necessary for a unit to stop on contacting an
enemy unit. All that is required is the
payment of the extra movement costs to change facing
and to leave the hex (see 8.2 and 8.3).
It is always possible, during movement or as the result
of a mêlée, to enter or retreat into the front
hex of an enemy unit (even when leaving the front hex
of an enemy unit). There is an extra
movement point cost to do so (see 8.3).
5 -Stacking 5.1 - Stacking in general Stacking in a hex is limited to one unit, plus any
number of leaders.
Stacking is checked only at the end of movement. It is
thus possible to move through a friendly unit during
movement.
A leader’s counter must always be stacked with a
combat unit at the end of his movement. An army
commander can be stacked with any combat unit of his
army, but all other leaders can only stack with a unit of
their banner.
5.2 - Specific cases
5.2.1 Artillery and stacking One artillery counter can stack with one infantry
counter.
When artillery is stacked with infantry, its combat
strength is added to that of the infantry when
resolving mêlées (but only when defending). To
determine the die roll modifier for unit quality,
use the unit with the weaker quality of the two when
defending, but use the infantry unit’s quality when
attacking.
5.2.2 Stacking rules specific to certain battles
Some scenarios permit more than one counter to stack
in a single hex. These special cases are dealt with in the
specific rules for those scenarios.
Retroactive note: As a reminder (since this was not part
of the scenario information, but was instead contained
in an earlier version of the rules), it is possible to stack
two Militia (Mi) combat units from the same banner per
hex in Bouvines, and two combat units of the same type
and banner -whatever their type - per hex in Las Navas
de Tolosa.
5.2.3 Stacking and facing.
When an unrouted unit intends to stack with another
unit, it automatically assumes the facing of that unit.
Two stacked units must always have the same facing.
5.2.4 Stacking and movement.
A unit intending to stack with another unit (either
above or beneath it, at the player’s choice) or a unit
leaving a stack of two units must expend one additional
movement point to do so. Once stacked, two units can
move together without penalty, as if they were a single
counter, as long as they remain stacked for their entire
move (same starting hex, same movement path, same
ending hex). They can change their stacking order
freely during movement, but can’t do so if they don’t
move.
5.2.5 Effects of stacking on fire and mêlées. If two units with fire capability are stacked together,
only the top unit can fire. In mêlées, stacked units add
their SPs together and use the weaker quality rating of
the two units in the stack. While stacked, two units are
considered as a single counter for the effects of mêlées,
the effects of charges and the results of fire. If a unit
becomes stacked with another unit as a result of a
mêlée and is attacked there during the same activation
phase, it does not participate in the new mêlée but does
Au fil de l’epee Page 4
suffer all the consequences of it (see 10.). When
involved in retreat or advance after mêlée, two stacked
units must retreat or advance together (unless prevented
by the stacking limit, in the case of retreat).
Example: the player can retreat one of the two units
into a hex already occupied by one other unit of the
same type, leaving the other unit in place and thereby
causing it to suffer one extra level of disorganization.
5.2.6 Effects of stacking on discouragement & rout. If two stacked units rout, they can rout together or they
can separate, at the owner’s choice. While stacked, two
units are considered as a single counter for rally
attempts (a single die roll is made, using the higher
quality rating of the two; see 12.3). A routed unit can
stack with an unrouted unit if this does not contradict
the stacking rules of the scenario. In such a case, there
is no quality test by the traversed unit as normally
required by 12.2.
6 -Sequence of play The battles in the series By the Edge of the Sword last
for the number of turns specified in each scenario. Each
game turn consists of five phases referred to as Phases
A through E. Each scenario specifies which side is the
attacker and which side is the defender; this concept is
important only for the activation of archers and artillery
(Phase B).
Retroactive note: in Poitiers and Formigny, the French
player is the attacker. For the other battles in the series,
the attacking and defending sides are noted in the
scenarios.
A. Command check
When checking command, the army commanders are
considered as ordinary leaders of a banner.
They decide only the status of units of their own
banner.
The two players verify that the units of each banner are
within the command radius of their leader. Units that
are not within command radius are out of command for
the remainder of the game turn. Place a ―non
commandé‖ (―out-of-command‖) marker on them. All
other units are in command for the remainder of the
game turn.
Each player places ―au repos‖ markers on units that he
hopes to allow to rest during that turn (see 11.2).
B. Artillery and archer fire (see 9.) If either player has archer or artillery units, he can
choose to have them fire in this phase (without
moving them), if and only if they are not adjacent to
enemy units.
If present, they can fire in the following order:
the attacking player executes his artillery fire
and immediately applies the results;
the defending player executes his artillery fire
and immediately applies the results;
the defending player executes his archer fire and
immediately applies the results;
the attacking player executes his archer fire and
immediately applies the results
Note: Only artillery and archers can fire in this phase.
All other units with fire capability— whatever their
type—can’t fire.
C. Initiative and leader activation (see 7.)
As a general rule, the leaders of the two sides are
activated alternately based on their command rating,
starting from the lowest command rating and ascending
to the highest. Leaders entering the game as
reinforcements on a particular turn are included in this
activation process on that turn. Players take turns
activating their leaders when both sides have leaders
with the same command rating to activate (see the
example).
Specific cases:
If several leaders of the same army have the
same command rating, the player who controls
them chooses the order of their activation;
If a number of leaders of both armies have the
same command rating, activate them starting
with the side whose army commander has the
smaller bonus (if there is still a tie, first activate
the leader belonging to the attacking player).
However, this order of activation may be modified by
the concept of initiative. Each player rolls two d6 and
adds the bonus of his army commander. They then
compare the results:
C.1. If the results are equal: neither player has
the initiative. The leaders of the two armies are
activated normally, alternating activations, in ascending
order of their command ratings;
C.2. If the difference is between 1 and 3: the
player with the higher result obtains the initiative and
Au fil de l’epee Page 5
immediately activates one of his leaders of his choice.
Then return to activation in ascending order of
command ratings. (The leader who was activated first
can’t be activated a second time);
C.3. If the difference is between 4 and 7: the
player with the higher result obtains the initiative and
activates one of his leaders of his choice. Then he
chooses any enemy leader (even the army commander),
which its owner must activate immediately. Then return
to activation in ascending order of command ratings.
(The leaders activated first can’t be activated a second
time);
C.4. If the difference is 8 or more: the player
with the higher result obtains the initiative and activates
one of his leaders of his choice. Then he chooses any
enemy leader (even the army commander), which its
owner must activate immediately, and one other enemy
leader (even the army commander), which can’t
activate at all during the turn. Place an ―inactif‖
(―inactive‖) marker on this leader. Then return to
activation in ascending order of command ratings. (The
leaders activated first can’t be activated a second time).
D. Movement and combat (see 8., 9. and 10) The players proceed to activate their leaders alternately
in the order determined in Phase C. An active leader’s
units can move and engage in combat. When all leaders
have been activated, the movement and combat phase is
over. For each activated leader, the owning player
(called the active player, while his opponent is called
the inactive player) proceeds in the following manner:
D.1 Movement of the leader and of his in-
command units within the limit of their movement
allowance, and determination of charges.
D.2 Ranged Fire by units of the active player
which have the capability to fire and are not adjacent to
an enemy unit.
D.3 Declaration of mêlées against adjacent
enemy units.
D.4 Resolution of mêlées in the order desired
by the active player, but starting with charges; resolve
each mêlée in the following sequence (see the detailed
sequence in 10.5):
Defensive fire by units of the inactive player
that have fire capability, targeting an enemy unit
that is attacking them by mêlée.
Offensive fire by units of the active player that
have fire capability, targeting an enemy unit that
they are attacking by mêlée.
Mêlée.
The effects of each of these three steps are applied
immediately.
D.5 Movement by non-commanded units, if
desired, up to half of their movement allowance
(rounded up) in the direction of their leader. They can’t
engage in fire or mêlée (see 7.4).
E. Rally (see 11. and 12.) Fatigued units that have neither moved, fired nor
engaged in mêlée, and have not been the target
of fire, can be turned over to their normal side. These
units are identified by the ―au repos‖
markers which were placed on them during Phase A
and which would have been removed during
the turn if any event had occurred which would cancel
them (see 11.2).
Then:
Discouraged and routed units make rally tests;
Routed units that failed their rally test make a
rout move;
The turn is then over, and the turn marker is
advanced one box.
Example for Phases C. and D.: Battle of Arsuf, Turn 5.
Command was checked during Phase A. Then a die is
rolled to determine who has the initiative. The
Crusader player rolls 2d6 and gets a 9, and then adds 3
for Richard the Lionheart’s bonus, for a total of 12. The
Ayyoubid player rolls 2d6 and gets a 2, and then adds 2
for Saladin’s bonus, for a total of 4. The difference
between the two results is 8, and this falls under case
C.4., with the Crusader player gaining the initiative.
Therefore the Crusader player may activate a leader of
his choice immediately. He chooses Robert de Sablé
and may move and engage in combat with all the units
of that leader’s banner in accordance with the rules
(see the abilities of in-command and out-of-command
units in 7). The Crusader player then designates
Saladin as the leader whom the opposing player will
have to activate next and Mir Arkhur Aslam as the
leader who can’t be activated during the current turn
(place the “chef inactif” [“inactive leader”] marker on
Au fil de l’epee Page 6
Mir Arkhur Aslam). The player in charge of the
Ayyoubid army therefore activates Saladin and may
move and engage in combat in accordance with the
rules, with all the units of his army (whether or not they
belong to Saladin’s banner) that are within Saladin’s
command range of 3 hexes, because he is the army
commander.
Then the normal order of activations is resumed,
determined by the command ratings of the leaders.
There is only one leader left with a command rating of
1, Alam al-Dîn Sulaymân. The Ayyoubid player may
move and engage in combat with all units of that
leader’s banner. Then go on to the three remaining
leaders with a command rating of 2 that are still
available: Henri de Champagne, Garnier de Naplouse
and Al-Afdal. Since there are leaders from both sides,
the side which goes first is the one whose army
commander has the smaller bonus: that of Saladin’s
Ayyoubids. The Ayyoubid player therefore activates Al-
Afdal. Then the Crusader player activates Henri de
Champagne and Garnier de Naplouse in any order he
desires. Next come the activations of the remaining
leaders with a command rating of 3: Guy de Lusignan,
Jacques d'Avesnes, Al-'Âdil and Ala al-Dîn. Since there
are leaders from both sides, the side that goes first is
the one whose army commander has the smaller bonus:
that of Saladin’s Ayyoubids. The Ayyoubid player may
therefore freely choose between Al-'Âdil and Ala al-
Dîn; for example, he decides to activate Ala al-Dîn.
Then the Crusader player may freely choose between
Guy de Lusignan and Jacques d'Avesnes. For example,
he decides to activate Guy de Lusignan. Next, the
Ayyoubid player activates Al-'Âdil, and after that the
Crusader player activates Jacques d'Avesnes. Next, go
on to the activation of the only leader with a command
rating of 4, Richard Cœur de Lion. The Crusader
player may move and engage in combat in accordance
with the rules, with all units of his army (whether or not
they belong to Richard’s banner) that are within
Richard’s command range of 4 hexes, because he is the
army commander. The turn ends after the activation of
the only leader with a command rating of 5, Hugues de
Bourgogne.
7 -Command 7.1 - Command in general
A leader can move only when he is activated. The
leader must end his movement stacked with a
unit of his banner (or of his army if he is an army
commander).
If all units of his banner have been eliminated, a
leader—unless he is the army commander—is
removed from the game:
If his last unit was eliminated by mêlée, the
leader is captured;
If his last unit was eliminated by fire, the leader
is captured if the unit is surrounded; otherwise
he is killed (see 7.5).
If he leaves the map with the last unit of his banner, he
is considered safe and sound (neither captured nor
killed), even if that unit was routed.
Exception: when an army commander activates a unit
which does not belong to his banner and which is
stacked with a leader, then that leader must move with
the unit in question. Thus it can happen that a leader
may move twice in a turn. However, if the army
commander is stacked with a unit of another leader’s
banner, and that leader activates that unit for firing,
mêlée, rallying, or placing an “au repos” marker on it,
he cannot move that unit.
7.2 - Command of units A combat unit is in command for the entire game turn if
during the command check in Phase A it is located
within the command radius of the leader of its banner.
For example, a command radius of five hexes means
that there can be more no than four hexes between the
unit and its leader (do not count the hex the leader is
in). This radius is never affected by the presence of
enemy units or by any type of terrain. In all other cases,
a combat unit is considered out of command.
Activation: When a leader is activated (see 6.C), all units of his
banner can undertake actions. They undertake different
actions depending on whether they are in command or
not (see 7.3 and 7.4) ;
When an army commander is activated, all units
of his banner and all units of his army that are
within his command radius can undertake
actions. They undertake different actions
depending on whether they are in command or
not (see 7.3 and 7.4).
It is therefore possible for combat units to
undertake actions twice in a turn, once during
Au fil de l’epee Page 7
the activation of their leader and once during
that of their army commander ;
A unit that is out of command can’t undertake
the actions permitted to a unit that is in
command, even if it is within the command
radius of the army commander. However, in the
latter case it can undertake a second time those
actions permitted to out-of-command units (see
7.4).
Clarification: During his activation, an army
commander can activate all the units within his radius
of command, before his own movement.
7.3 - In-command units
During the activation of its leader (or of its army
commander if the unit is within his command radius),
an in-command combat unit can, during Phase D,
undertake actions in the following order:
move up to the limit of its movement allowance;
fire, if it has the capability and is not adjacent to
an enemy unit;
execute offensive fire and initiate mêlée, if it is
adjacent to an enemy unit. Units entering play
as reinforcements are always in command for
their first activation.
7.4 - Out-of-command units During the activation of its leader, an out-of-command
unit can do one of the following:
move up to half of its movement allowance
(rounded up) toward the leader of its banner
(not its army commander, unless the unit
belongs to his banner). The unit must end its
movement closer to its leader than it was at the
beginning;
not move at all. A unit that is out of command
can’t fire or initiate mêlée (Phases B. and D.).
However, it can execute defensive fire if it is
attacked by mêlée, and it can defend itself
normally.
7.5 - Capture, wounding and death of leaders
As a result of fire or mêlée, a leader can be captured,
wounded or killed (see results on the Fire and Mêlée
Tables).
The status of the unit with which the leader is stacked
can also have an effect:
if the unit with which a leader is stacked is
destroyed as a result of mêlée, the leader is
immediately captured by the enemy unit which
caused its elimination;
if the unit with which a leader is stacked is
destroyed as a result of fire, the leader is
immediately placed with the nearest unit of his
banner (or the nearest unit of his army, for an
army commander). If the unit with which he is
stacked is surrounded, he is captured. If there
are no more units of his banner left in play, he is
considered killed (see 7.1);
if the unit with which a leader is stacked routs,
the leader accompanies it in its rout movement.
He can’t leave the unit until his next activation;
if a routed unit, accompanied by a leader, is
eliminated because rout movement is not
possible, and the unit is completely surrounded,
the leader is automatically captured.
Clarification: When a unit with which a leader is
stacked routs off the map and is therefore eliminated,
the leader in question is placed on the nearest unit of
his banner (or, for an army commander, on the nearest
unit of his side, if his banner has been entirely
destroyed). If there is no such unit available, the leader
is removed from play and is considered safe and sound
(neither killed nor captured). The same procedure is
applied to a leader stacked with a unit that is
eliminated due to being unable to retreat, except when
the unit is completely surrounded. If a captured leader
exits the map because the unit which captured him has
routed off the map, he is considered permanently
captured and does not return to the game. Finally, if
there are several leaders in a stack, the player checks
their status individually.
7.5.1 Capture:
A captured leader is stacked under the enemy unit that
captured him. He can’t leave that unit. The leader can
be freed only if that enemy unit is eliminated later by a
friendly unit (reversing the process). If a leader (other
than the army commander) is freed after his banner has
been completely destroyed, he is removed from play
and considered safe and sound (neither killed nor
captured).
7.5.2 Wounding:
Place a ―chef blessé‖ (―leader wounded‖) marker on the
counter. The leader’s new abilities are listed on the
Au fil de l’epee Page 8
marker and are applied immediately. A further wound
will cause the death of the leader in question.
7.5.3 Death: Immediately remove the leader’s counter from the
game.
7.6 - Leader and army commander replacement
Replacement of leaders takes place immediately.
Proceed as follows:
when a leader is wounded, place a ―chef blessé‖
(―leader wounded‖) marker (with a movement
allowance and a command radius lower than
they were originally) on his counter.
when a leader is killed, use the reverse side of
the counter as a replacement for the leader. The
replacement leader is immediately placed on
any unit of the banner. If all units of the banner
have been eliminated, the replacement leader
does not enter the game.
when a leader is captured, use a generic leader
replacement marker with the same movement
allowance and a lower command radius than the
captured leader, taken from the reserve counters
(the original captured leader is placed with the
enemy unit that took him prisoner), and place it
immediately on any unit of the banner.
if a replacement leader is killed or captured, an
identical counter replaces him (simply record
the victory points and reuse the counter already
in place).
when an army commander is killed or captured,
proceed as above to replace him as commander
of his banner only. The friendly leader with the
highest command rating takes his place as the
army commander (to indicate his new status,
place the replacement army commander marker
on that leader). From this point on, the new
army commander has all the capabilities of an
army commander in terms of commanding
combat units.
Clarification: When a replacement leader enters the
game after the death or capture of a leader, he will not
have the same command rating as the original leader.
He must be activated immediately after the currently
activated leader has completed his Phase D. (except, of
course, when the leader he is replacing has already
been activated).
8 -Movement 8.1 - Movement in general An active leader and the combat units that he
commands can move all or part of their movement
allowance. Entering a hex costs the moving unit a
specific number of movement points (MPs). The costs
of terrain are given on the Terrain Chart. Movement
points are not cumulative from one turn to another.
Movement of one unit must be completed before
starting that of another unit. Movement can only be
made through one of a unit’s three front hexes
(artillery, however, has only one front hex and can only
move through it).
Exception: this restriction does not apply to leader
counters.
Units only need to be in compliance with the stacking
rules at the end of movement (no illegal stacking at the
end of movement). So long as the stacking limit is
obeyed, a move of one hex, without changing facing, is
always allowed, no matter what the terrain cost is,
unless that kind of terrain is prohibited to that unit type
(i.e., unless the Terrain Chart lists it as ―NA‖).
8.2 - Change of facing
A unit can change its facing at the beginning, during, or
at the end of movement at the cost of one movement
point per hexside. A change of facing within a hex is
considered movement under the rules (especially with
reference to the fire rules).
A change of facing in the front hex of an enemy combat
unit costs two movement points per hexside.
A change of facing by leaders does not cost any
movement points.
8.3 - Disengagement and retreat
A unit located in one of the front hexes of an enemy
unit must spend one extra movement point to leave the
hex, in addition to any cost for changing facing if
necessary. A unit can always, whether adjacent to an
enemy unit or not, retreat one hex (i.e., move into one
of its rear hexes) while retaining its original facing. It
must obey the stacking limit but can ignore the terrain
cost unless that kind of terrain is prohibited to that unit
type (i.e., unless the Terrain Chart lists it as ―NA‖).
This movement costs the unit’s entire movement
allowance.
8.4 - Mounting and dismounting
Before movement, a player can change his infantry into
Au fil de l’epee Page 9
cavalry (―remount‖) or his cavalry into infantry
(―dismount‖) by using the ―remonte‖ and ―démonte‖
markers provided for this purpose. In each battle the
players have a fixed limit on the number of markers to
use for mounting and dismounting. Mounting or
dismounting costs two movement points. Newly
mounted or dismounted units can then spend the
remaining movement points of their new movement
allowance. Discouraged units can mount or dismount,
but routed units can’t.
Clarification: Mounting and dismounting are not
allowed if the unit is adjacent to an enemy unit.
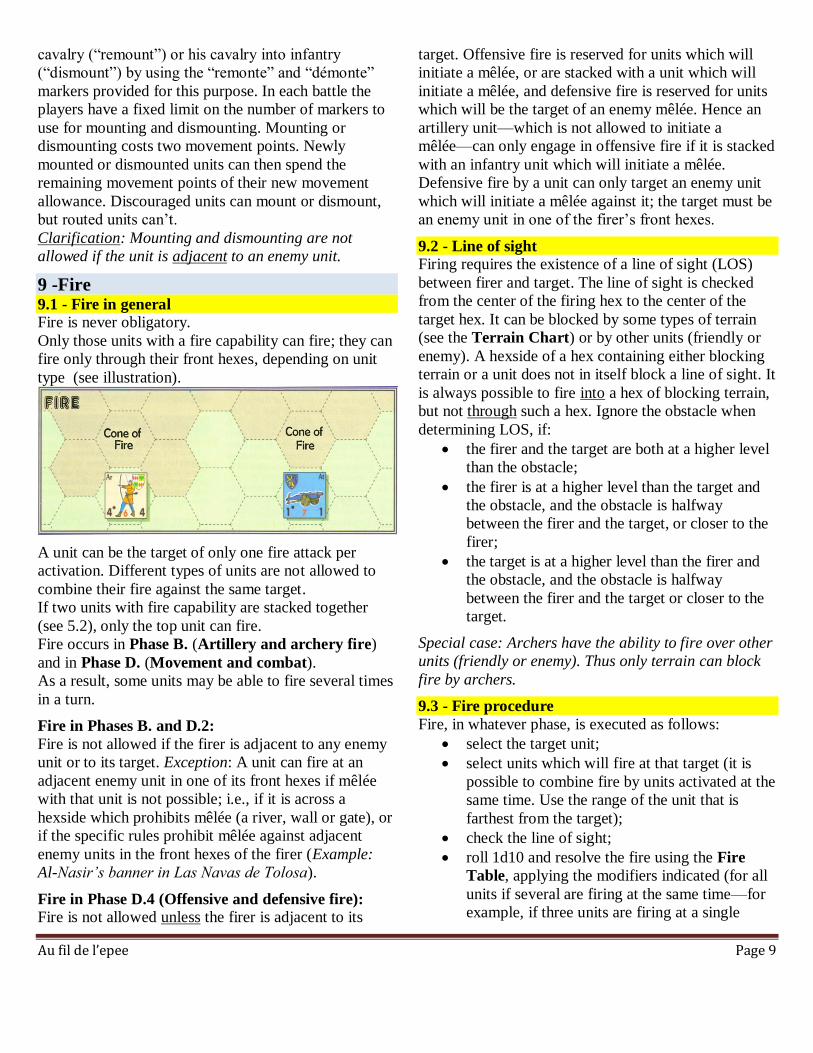
9 -Fire 9.1 - Fire in general Fire is never obligatory.
Only those units with a fire capability can fire; they can
fire only through their front hexes, depending on unit
type (see illustration).
A unit can be the target of only one fire attack per
activation. Different types of units are not allowed to
combine their fire against the same target.
If two units with fire capability are stacked together
(see 5.2), only the top unit can fire.
Fire occurs in Phase B. (Artillery and archery fire)
and in Phase D. (Movement and combat).
As a result, some units may be able to fire several times
in a turn.
Fire in Phases B. and D.2:
Fire is not allowed if the firer is adjacent to any enemy
unit or to its target. Exception: A unit can fire at an
adjacent enemy unit in one of its front hexes if mêlée
with that unit is not possible; i.e., if it is across a
hexside which prohibits mêlée (a river, wall or gate), or
if the specific rules prohibit mêlée against adjacent
enemy units in the front hexes of the firer (Example:
Al-Nasir’s banner in Las Navas de Tolosa).
Fire in Phase D.4 (Offensive and defensive fire): Fire is not allowed unless the firer is adjacent to its
target. Offensive fire is reserved for units which will
initiate a mêlée, or are stacked with a unit which will
initiate a mêlée, and defensive fire is reserved for units
which will be the target of an enemy mêlée. Hence an
artillery unit—which is not allowed to initiate a
mêlée—can only engage in offensive fire if it is stacked
with an infantry unit which will initiate a mêlée.
Defensive fire by a unit can only target an enemy unit
which will initiate a mêlée against it; the target must be
an enemy unit in one of the firer’s front hexes.
9.2 - Line of sight Firing requires the existence of a line of sight (LOS)
between firer and target. The line of sight is checked
from the center of the firing hex to the center of the
target hex. It can be blocked by some types of terrain
(see the Terrain Chart) or by other units (friendly or
enemy). A hexside of a hex containing either blocking
terrain or a unit does not in itself block a line of sight. It
is always possible to fire into a hex of blocking terrain,
but not through such a hex. Ignore the obstacle when
determining LOS, if:
the firer and the target are both at a higher level
than the obstacle;
the firer is at a higher level than the target and
the obstacle, and the obstacle is halfway
between the firer and the target, or closer to the
firer;
the target is at a higher level than the firer and
the obstacle, and the obstacle is halfway
between the firer and the target or closer to the
target.
Special case: Archers have the ability to fire over other
units (friendly or enemy). Thus only terrain can block
fire by archers.
9.3 - Fire procedure
Fire, in whatever phase, is executed as follows:
select the target unit;
select units which will fire at that target (it is
possible to combine fire by units activated at the
same time. Use the range of the unit that is
farthest from the target);
check the line of sight;
roll 1d10 and resolve the fire using the Fire
Table, applying the modifiers indicated (for all
units if several are firing at the same time—for
example, if three units are firing at a single
Au fil de l’epee Page 10
target, and one of those units has moved, that
unit’s movement suffices to cause a 1 die roll
modifier);
apply the results to the target unit. The
maximum ranges for fire are shown on the Fire
Table.
Special cases:
An artillery unit only suffers the results of
enemy fire if it is alone in a hex. Otherwise, only
the unit with which the artillery unit is stacked
suffers the results of fire;
But an artillery unit stacked with another unit
does suffer the results of fire if the firer is an
artillery unit;
An artillery unit which suffers a “Rout” result is
automatically eliminated;
Mounted archers and crossbowmen can fire.
They incur a fire penalty (malus), as shown on
the Fire Table. If the scenario allows them to
dismount, they no longer suffer the fire penalty
when they are dismounted.
10 -Mêlées 10.1 - Mêlées in general
Mêlée is never obligatory.
A mêlée can occur where opposing units are in contact
with each other. Only routed units, out-of-command
units and artillery units are unable to initiate mêlée
(however, they can defend themselves when attacked).
A unit can be attacked by mêlée only once during the
activation of an enemy leader (Phase D.), but pursuits
(see 10.9) are not subject to this restriction.
Note: if it defends itself successfully, a routed unit
could conceivably capture an enemy leader.
10.2 - Charges A charge is a special kind of mêlée carried out by
mounted units of the types Ch and Ha only,
provided they are in command and are not routed.
Clarification: Ch and Ha on foot can’t charge, nor can
Cl or mounted Ab or mounted Ar.
The charging unit must move at least one hex, and it
can’t expend more than four movement points before it
charges. The target of the charge is designated during
Phase D.1 (movement). To indicate this, ―Charge‖
markers are placed on the charging unit and the unit
being charged.
If a cavalry unit is already in contact with the enemy,
then it can’t charge but can still initiate a normal mêlée.
If a unit passes through a friendly unit during its charge
movement, the friendly unit is immediately routed (see
12.2).
A unit must charge in a straight line. There must
already be an enemy unit directly ahead of its central
front hex at the start of its movement (i.e., it can’t
change its facing before charging), and the target of its
charge must be in its central front hex when the charge
is resolved. When charging, a unit is not required
(unlike other friendly units) to attack enemy units
located in its other front hexes.
Charges are resolved individually, and no other
attacking unit can participate in the same combat with a
charging unit unless also charging that same defender.
Charges provide a special die roll modifier in mêlée
(see the Mêlée Table).
A cavalry unit that doesn’t charge can still initiate a
mêlée normally, but without benefitting from a
modifier linked to charging.
10.3 - Counter charges Whether it is in command or not, an unrouted cavalry
unit of type Ch or Ha that is the target of a charge can
attempt a counter charge just before the charge is
resolved. The counter charge is allowed only if the unit
is being charged through one of its three front hexes.
To execute a counter charge, the player rolls a d10: if
the score is less than or equal to the quality of the unit,
then the counter charge succeeds and all the die roll
modifiers for charging are disregarded when the
attacker resolves the mêlée. The defender must change
facing so that its central front hexside faces the unit that
is the target of its counter charge. The attacker can’t
cancel his charge when faced with a successful counter
charge by the defender.
Clarification: In a situation where several enemy units
are charging it, a unit which attempts a counter charge
must choose a single enemy unit to be the target of the
counter charge. If the latter is successful, only the die
roll modifiers linked to the charge of that enemy unit
will be disregarded.
10.4 - Determination of mêlées
During each leader’s activation phase (Phase D.), the
active player, after movement, determines the targets of
any charges and ranged fire (i.e., fire on non-adjacent
targets), and decides on the mêlées which he wishes to
initiate. The active player is called the attacker, and the
Au fil de l’epee Page 11
inactive player is called the defender. An attacking unit
can only initiate a mêlée through one or more of its
three front hexes. If it chooses to initiate a mêlée, it
must attack all enemy units situated in its front hexes,
with the exception of those already being attacked by
other friendly units in the same Phase D activation.
Several units can attack a single enemy unit, and
conversely one unit can attack several enemy units.
The attacker must declare all mêlées before resolving
them:
• he places a ―Mêlée‖ marker on each enemy unit
that he must attack in the current activation,
except for those that already have a ―Charge‖
marker.
• once declared, each mêlée must be resolved. A
mêlée can’t be cancelled because of the results
of other mêlées during the same Phase D
activation.
Special case: in the case of charges, at the end of the
process of pursuit – élan – dispersion (see 10.9) it can
happen that a designated attacker no longer has any
defenders in its front hexes. In such a case, that attack
is cancelled.
However, it is permissible for the attacker to modify the
allocation of units participating in mêlées (but not
charges) at any time, on condition that all the defenders
marked with a ―Mêlée‖ marker are attacked in the
current Phase D. activation.
10.5 - Sequence of steps in a mêlée Each mêlée is resolved, and its results applied, in the
order desired by the attacker, but he must
resolve all charges before resolving the other mêlées.
He removes the ―Charge‖ or ―Mêlée‖
marker from the defending unit after each combat.
A mêlée is resolved as follows:
specify the attacking and defending units;
each defending unit with fire capability executes
defensive fire against one unit attacking it in
that mêlée;
each attacking unit with fire capability can
execute offensive fire (not obligatory) against
one unit which it is attacking in mêlée;
determine the die roll modifiers linked to terrain
(see the Terrain Chart) with reference to the
hex containing the defender. Take the
combination most advantageous for the
defender where there are several attackers and
one defender, or several defenders and one
attacker;
determine the die roll modifier linked to the
strength ratio (the odds ratio). Always round the
strength ratio in favour of the defender (see the
Mêlée Table);
determine the die roll modifier linked to the
types of units engaging in mêlée (see the Mêlée
Table);
determine the die roll modifier linked to the
quality of units engaging in mêlée (see the
Mêlée Table);
determine any other die roll modifiers (see the
list on the Mêlée Table).
10.6 - Results of mêlées
Results are listed on the Mêlée Table. The results are
applied immediately after each mêlée and in the order
of effects indicated on the Mêlée Table. Results are
obtained by rolling a d10 and adding or subtracting the
modifiers noted on the Tables.
Special case: an artillery unit which incurs a result of
“Retreat” or “Rout” is automatically eliminated.
10.7 - Retreat after mêlée
The result of a mêlée may require the defenders or
attackers to retreat one hex (an R result on the Mêlée
Table). Passing through a friendly unit during this
retreat is not allowed. When this is not possible
(because of the stacking limit or a map edge, for
example) the defender can remain in position and
replace the retreat by suffering an additional level of
disorganisation.
Examples: if the unit was valiant, it becomes
discouraged. If it was already discouraged, it becomes
routed. If it was already routed, it is eliminated.
When retreating, a unit can change its facing by one
hexside. There is no required direction of retreat in the
chaos of battle, and therefore a unit can retreat into any
available hex (it is even possible to retreat forward).
However, a unit which retreats into one of its front
hexes loses an additional level of disorganization as a
penalty.
10.8 - Advance after mêlée Advance by the attacker is obligatory after a mêlée that
causes the defender to retreat (exceptions: see 12.1). A
defender that wins a combat can advance only if the
Au fil de l’epee Page 12
Mêlée Table indicates that it can, and this advance is
not obligatory. If several units are participating in a
mêlée, the player chooses which of his units will
advance.
Advance after mêlée must obey the stacking limit.
A leader can advance after combat only if the unit with
which he is stacked also advances.
A unit that advances after mêlée can freely change its
facing.
Exception: a cavalry unit that charges can only change
its facing one hexside when advancing
after mêlée.
10. 9 - Pursuit, élan and dispersion After a charge, pursuit may lead to as many as two
additional charges.
If the charging unit was not already fatigued at
the start, and if the initial charge results in an advance
after mêlée without ―fatigue‖ for the attacking unit, the
latter must execute an Elan: it must advance into the
vacated hex, while changing facing by one hexside if
desired, and execute a new charge against the unit
currently in its central front hex.
If the result of the Elan involves a new advance
after mêlée without ―fatigue‖ for the attacking unit, the
latter can choose to execute a Dispersion: it must
advance again into the vacated hex, while changing
facing by one hexside if desired, and then it may
choose to execute a new charge against the unit
currently in its central front hex. Whatever the result of
its charge, the attacking unit which executed the
Dispersion suffers a ―fatigue‖ result in addition to the
results of the charge, and the pursuit ends.
Elan and Dispersion are completely separate mêlées,
with their own potential defensive and offensive fire
phases (see 6. D.3 and D.4).
Special cases:
Elan and Dispersion do not take place if there is
not an enemy unit in the central front hex of
the charging unit;
if, when charged, the unit being attacked has to
remain in place and suffer the loss of an
additional level of disorganization (10.7), then
there is no pursuit (or no Dispersion if this
occurs after an Elan);
if a defending unit is attacked by a charge, and
is still in contact with the attacking units after
the result of the charge and the pursuit have
been determined, it can be attacked again in
Elan or Dispersion;
if a defending unit which must be attacked in
mêlée is attacked via Elan or Dispersion before
the intended attack can take place, the initially
intended mêlée does not occur, in compliance
with 10.1.
Example of charge, élan and dispersion: Battle of
Tremetousia, Turn 3.
Richard Cœur de Lion’s banner is activated;
Phase D1. The Crusader player makes his
moves and decides on his charges. The Ch unit (4 7 6)
and Richard advance into hex 1315. The Ch unit (3 6 6)
makes a charge move into 1214 to attack the enemy Cl
unit (place a Charge marker on the two counters). The
charge move is legal because the unit moved at least
one hex in a straight line (into its front central hex) and
did not expend more than 4 MP (see 10.2);
Phase D2. No action is taken. The active
player’s units do not have the ability to fire;
Phase D3. The mêlée resulting from the charge
is declared;
Phase D4. Defensive Fire. The Cl unit has the
ability to fire and can therefore execute defensive fire.
The Byzantine player rolls a d10 and gets a 7; he has to
apply a -1 because the firing unit has less than 4 SP
and another -1 because the firing unit is mounted. Thus
the final result is 5. The fire has no effect (See the Fire
Table). Offensive Fire. No action is taken. The active
player’s unit does not have the ability to fire. Mêlée.
Resolution of the charge. Note: All charges must be
resolved before any other mêlées (see 10.5). The unit
that is the target of the charge is neither a Ch nor an
Ha, so it can not attempt a counter charge (see 10.3).
The Crusader player rolls a d10 and gets a 4, which he
must adjust by +1 (modifier for the odds ratio, which in
this case is 1 to 1), +2 (modifier for unit type, Ch vs.
Cl), +1 (modifier for unit quality) and +3 for a charge
against a unit’s front hex. The final result is 11, which
translates to D+R for the defender (see the Mêlée
Table). The Cl unit retreats into hex 1015 and the
Byzantine player places a "découragée" marker on his
unit. The Ch unit must occupy hex 1116 and may
change its facing if desired, but the Crusader player
opts not to do so and retains his unit’s original facing
(see 10.8); Elan. Since the initial charge resulted in an
advance after mêlée without fatigue, the Crusader
Au fil de l’epee Page 13
player must execute an Elan (see 10.9) against the Cl
unit which is again in his victorious Ch unit’s front
central hex. This Elan is resolved immediately. The Cl
unit’s defensive fire again produces no effect. The
Crusader player rolls a d10 and gets a 7, which he
must adjust by +1 (modifier for odds ratio, which in
this case is 1 to 1), +2 (modifier for unit type, Ch vs.
Cl), +1 (modifier for unit quality), +2 because the
defender is discouraged and +3 for a charge against a
unit’s front hex. The final result is 14 (as the modifiers
are limited up to the limit of + or – 7), which translates
to Dr+R for the defender (see the Mêlée Table). The Cl
unit is therefore routed (the Byzantine player places a
Déroute marker on it) and retreats two hexes into hex
0816 (because of the Dr result), and then it retreats
another hex into 0717 (because of the R result). The Ch
unit must advance one hex into hex 1015. The Crusader
player chooses to reface it toward 0915, so as to face
the Ha unit; Dispersion. Dispersion is not obligatory
(see 10.9), but the Crusader player chooses to do it.
There is no defensive or offensive fire. The Crusader
player rolls a d10 and gets a 2, which he must adjust by
+1 (modifier for odds ratio, which in this case is 1 to
1), +1 (modifier for unit type, Ch vs. Ha), +1 (modifier
for unit quality), +3 for a charge against a unit’s front
hex and +1 for the difference in terrain levels. The final
result is 9, which translates to F+R for the defender
(see the Mêlée Table). The Ha is flipped to its reverse
side and retreats into hex 0814, and the Ch must
advance into hex 0915. The pursuit phase ends. The Ch
unit is flipped to its reverse side because it is
automatically fatigued (see 10.9).
11 -Fatigue Due to fire or mêlée, a unit may suffer a change of
status from ―fresh‖ (front of the counter) to ―fatigued‖
(back of the counter). The counter is turned over to
indicate this change of status. A fatigued unit which
suffers a further ―fatigued‖ result remains fatigued with
no additional effect.
11.1 - Effects of fatigue The effects of fatigue are indicated by the new
characteristics of the unit which are printed on the back
of its counter.
11.2 - Resting units To be placed ―au repos‖ (―resting‖), a unit can be in
command or out of command (see 7.2). To rest a unit,
the player places an ―au repos‖ marker it at the
beginning of the turn, during Phase A.
A player can place as many units as he wishes ―au
repos‖ during the same turn. He can place discouraged
units ―au repos‖, but not routed units (they must first be
rallied).
In order for a unit to regain its ―fresh‖ status, it must
remain ―au repos‖ for an entire game turn.
To do this:
it must not be adjacent to an enemy unit either
at the beginning or at the end of a turn. An
enemy unit which moves into contact with it
only momentarily during the turn has no effect.
Clarification: when determining whether a unit
can be placed “au repos”, note that two
opposing units separated by an impassable
hexside are still considered adjacent, so they
are not allowed to be placed “au repos”;
it must not be the target of any fire, even
ineffective fire, or any mêlée, during the turn;
it must not move during the turn.
If these conditions are fulfilled, the marker is removed
and the unit is turned over to its ―fresh‖ side during
Phase E of the turn. The unit then regains its full
capabilities for the following turn.
On the other hand, if the unit moves or is the target of
fire or mêlée during the turn, the ―au repos‖ marker is
immediately removed. In Phase E, the unit will thus
remain on its ―fatigued‖ side.
Returning a discouraged unit to its ―fresh‖ side still
leaves it discouraged.
12 -Discouragement and rout The status of a unit with respect to fatigue (fresh or
fatigued) does not affect its level of disorganisation
(valiant, discouraged, or routed).
12.1 - Discouragement
a unit may become discouraged as the result of
fire or mêlée. When this occurs, the player
places a ―découragé‖ (―discouraged‖) marker on
the unit;
a unit which is already discouraged, but still
fresh, remains discouraged but becomes
fatigued if it receives a new discouraged result;
Au fil de l’epee Page 14
a unit which is already discouraged, and also
fatigued, will rout if it receives a new
discouraged result;
a unit which is already discouraged, whether
fatigued or not, is simply routed (not
eliminated) if it receives a rout result;
a discouraged unit is penalized when involved
in fire and mêlée (see the Fire and Mêlée
Tables). Also, it can no longer advance after a
victorious mêlée (and that includes charges).
12.2 - Rout
12.2.1 – Becoming routed A unit may be routed as the result of fire, mêlée or
friendly charge movement (a Dr result on the Mêlée
Table or a rout result on the Fire Table). The player
places a ―déroute‖ (―routed‖) marker on the unit, which
must immediately retreat two hexes in a straight line
towards the map edge indicated in the scenario. The
routing unit is not allowed to pass through an enemy
unit during its two-hex retreat. If the routing unit has no
hex available to it after the obligatory two-hex retreat
(due to the stacking limit), it is eliminated.
Clarification: thus a unit which suffers a Dr + R result
is eliminated after applying the Dr result,
but before applying the R result, if it is in violation of
the stacking limit.
After its obligatory retreat of two hexes, a unit which
routs must be faced toward the map edge
indicated as its rout direction in that scenario. This
facing change, like the two-hex retreat
movement, is made automatically without having to
pay movement point costs.
12.2.2 Rout movement during Phase E
During Phase E, a unit that is already routed must
expend its entire movement allowance by moving in the
direction of the map edge indicated as its rout direction
in that scenario. This movement is made in a straight
line, the only allowed deviations to another hex column
being such as are necessary in order to avoid either
being eliminated or moving adjacent to enemy units, or
in order to reach the map edge as rapidly as possible
(via the least costly hexes in terms of movement points,
counting terrain costs normally).
A routed unit can pass through a friendly unit during its
rout movement in Phase E. When this happens, the
player rolls a d10 and compares the result to the quality
of the unit being passed through. If the result is higher
than that unit’s quality, it too immediately makes a rout
move. The unit being passed through makes its rout
move after the unit that caused it to rout has finished its
own rout move. If this second routing unit now passes
through the unit which has just passed through it, the
latter does not make another test with the d10.
12.2.3 Restrictions on routs Units being passed through:
a unit which routs can pass through a friendly
unit during its two-hex retreat or during its rout
movement in Phase E. Whenever this happens, the
player rolls a d10 and compares the result to the quality
of the unit being passed through. If the result is higher
than its quality, it immediately routs (see 12.2.1). If the
unit being passed through was already routed, it
automatically makes a rout move without making the
d10 test;
The unit being passed through makes its rout
move after the unit that caused it to rout has finished its
own rout move. If this second routing unit now passes
through the unit that has just passed through it, the
latter does not make another test with the d10.
The other restrictions are as follows:
a routed unit, whether fresh or fatigued, which
receives a ―discouraged‖ result must make a
further two-hex move in its rout direction and
remain in a routed state. If it is unable to
execute this movement, it suffers an additional
level of disorganization and is thus eliminated;
a routed unit, whether fresh or fatigued, which
receives an R (Retreat) result must make a one-
hex move in its rout direction. If this is not
possible, it suffers an additional level of
disorganization and is thus eliminated;
a routed unit, whether fresh or fatigued, which
receives another rout result is eliminated;
a routed unit can no longer attack and can move
only in Phase E;
a routed unit that leaves the map is eliminated.
12.3 - Rally rally occurs in Phase E, after any ―au repos‖
markers have been removed and the rested units have
been returned to their fresh side, and just before rout
movement;
rally is only possible if the unit is not adjacent
to an enemy unit.

Au fil de l’epee Page 15
Clarification: when determining whether a unit can
rally, note that two opposing units separated by an
impassable hexside are still considered to be adjacent,
so they are not allowed to rally;
rally is attempted by rolling a d10 for each unit
that needs to be rallied;
the rally attempt succeeds if the modified die
roll result is less than or equal to the quality of
the unit, otherwise it fails;
an unmodified roll of 0 on the d10 automatically
results in a successful rally attempt.
Modifiers:
if the unit is fatigued: use the quality on the
back of the counter (see 2.3.1)
if the unit is routed: +1
if the unit is stacked with or adjacent to its
banner leader: subtract the leader bonus
if the unit is stacked with or adjacent to its army
commander: subtract the leader bonus
if a unit could benefit from the bonus of both its
banner leader and its army commander, only the
more favorable bonus of the two is used (they
are not cumulative).
Effects of rallying:
a discouraged unit which rallies becomes valiant
again and can be refaced freely (remove the
―découragé‖ marker).
a routed unit which rallies becomes discouraged
and can be refaced freely (turn the ―déroute‖
marker over to its ―découragé‖ side).
when all rally attempts have been made, units
that are still routed perform rout movement (see
12.2.2).
Thanks to: Angel Ballesteros, Pascal Henri, Stephen Neuville, Dominique Pitaud, Olivier
Revenu, Denis Sauvage and Amaury de Vandière for their proofreading and playtesting of
the rules for the series Au fil de l’Epée ! / By the Edge of the Sword!
Au Fil de l'Epée /By the Edge of the Sword
Au fil de l’epee Page 16
Table of Contents 0 – General rules
0.1 – Abbreviations
0.2 – Game scale
0.3 – Dice
1 – Leaders and army commanders 1.1 – Characteristics of leaders and army
commanders
1.2 – Leaders and banners
2 – Combat units 2.1 – Unit descriptions
2.2 – Types of units
2.3 – Levels of fatigue and disorganization
3 – Facing
3.1 – Infantry and cavalry
3.2 – Artillery
3.3 – Leaders and army commanders
4 – Zones of control
5 – Stacking
5.1 – Stacking in general
5.2 – Specific cases
6 – Sequence of play
7 – Command 7.1 – Command in general
7.2 – Command of units
7.3 – In-command units
7.4 – Out-of-command units
7.5 – Capture, wounding and death of leaders
7.6 – Leader and army commander
replacement
8 – Movement 8.1 – Movement in general
8.2 – Change of facing
8.3 – Disengagement and retreat
8.4 – Mounting and dismounting
9 – Fire
9.1 – Fire in general
9.2 – Line of sight
9.3 – Fire procedure
10 – Mêlées
10.1 – Mêlées in general
10.2 – Charges
10.3 – Counter charges
10.4 – Determination of mêlées
10.5 – Order of the steps in a mêlée
10.6 – Results of mêlées
10.7 – Retreat after mêlée
10.8 – Advance after mêlée
10.9 – Pursuit, élan and dispersion
11 – Fatigue 11.1 – Effects of fatigue
11.2 – Resting units
12 – Discouragement and rout 12.1 – Discouragement
12.2 – Rout
12.3 – Rally
Au fil de l’epee Page 17
Au Fil de l’Epée / By the Edge of the Sword Version 2010 Tables:
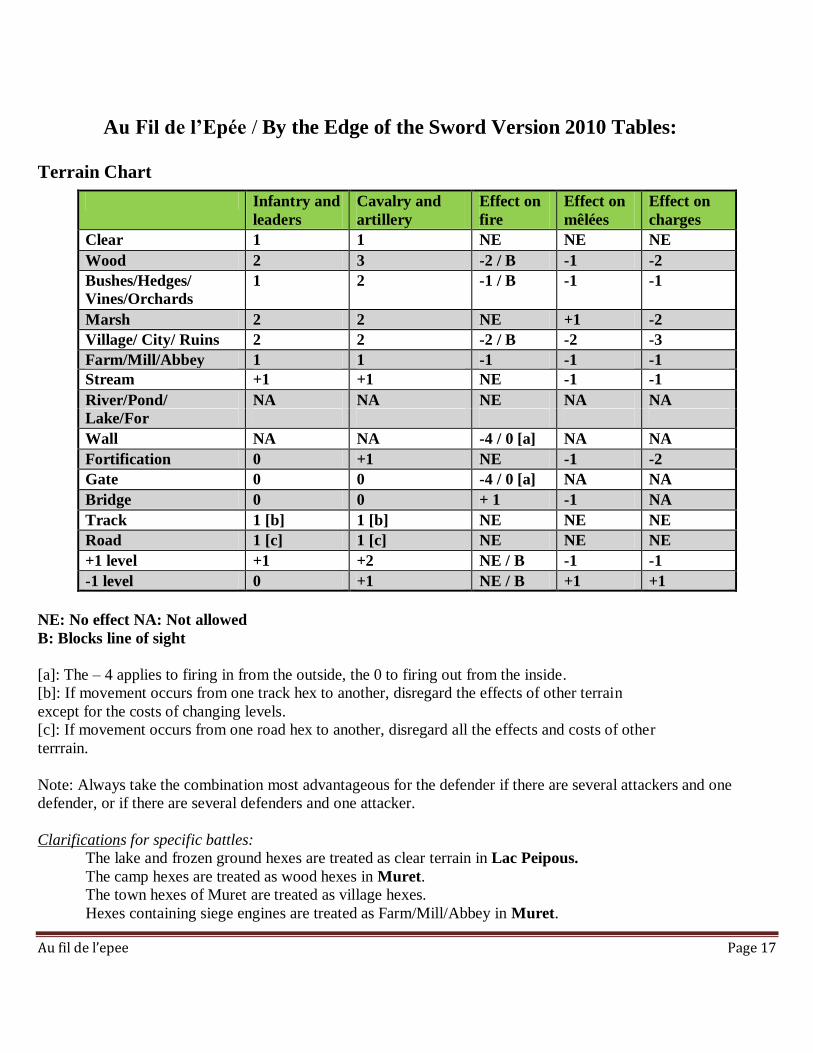
Terrain Chart
Infantry and
leaders
Cavalry and
artillery
Effect on
fire
Effect on
mêlées
Effect on
charges
Clear 1 1 NE NE NE
Wood 2 3 -2 / B -1 -2
Bushes/Hedges/
Vines/Orchards
1 2 -1 / B -1 -1
Marsh 2 2 NE +1 -2
Village/ City/ Ruins 2 2 -2 / B -2 -3
Farm/Mill/Abbey 1 1 -1 -1 -1
Stream +1 +1 NE -1 -1
River/Pond/ NA NA NE NA NA
Lake/For
Wall NA NA -4 / 0 [a] NA NA
Fortification 0 +1 NE -1 -2
Gate 0 0 -4 / 0 [a] NA NA
Bridge 0 0 + 1 -1 NA
Track 1 [b] 1 [b] NE NE NE
Road 1 [c] 1 [c] NE NE NE
+1 level +1 +2 NE / B -1 -1
-1 level 0 +1 NE / B +1 +1
NE: No effect NA: Not allowed
B: Blocks line of sight
[a]: The – 4 applies to firing in from the outside, the 0 to firing out from the inside.
[b]: If movement occurs from one track hex to another, disregard the effects of other terrain
except for the costs of changing levels.
[c]: If movement occurs from one road hex to another, disregard all the effects and costs of other
terrrain.
Note: Always take the combination most advantageous for the defender if there are several attackers and one
defender, or if there are several defenders and one attacker.
Clarifications for specific battles:
The lake and frozen ground hexes are treated as clear terrain in Lac Peipous.
The camp hexes are treated as wood hexes in Muret.
The town hexes of Muret are treated as village hexes.
Hexes containing siege engines are treated as Farm/Mill/Abbey in Muret.
Au fil de l’epee Page 18
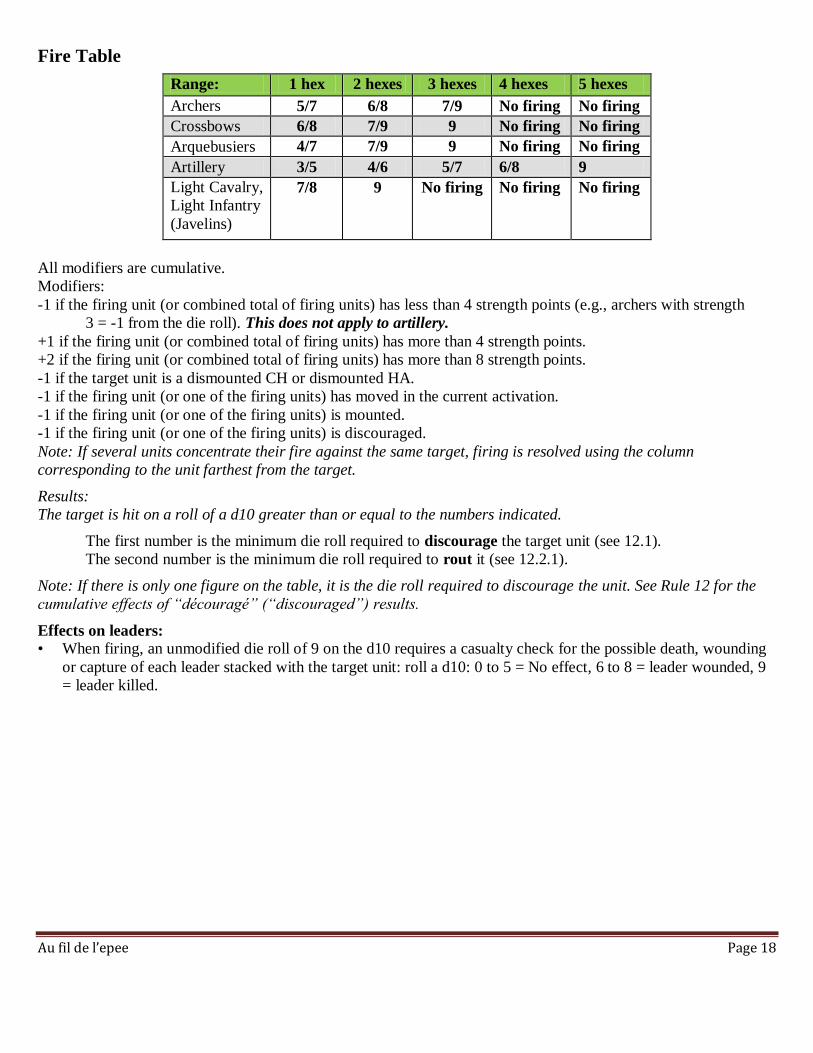
Fire Table
Range: 1 hex 2 hexes 3 hexes 4 hexes 5 hexes
Archers 5/7 6/8 7/9 No firing No firing
Crossbows 6/8 7/9 9 No firing No firing
Arquebusiers 4/7 7/9 9 No firing No firing
Artillery 3/5 4/6 5/7 6/8 9
Light Cavalry,
Light Infantry
(Javelins)
7/8 9 No firing No firing No firing
All modifiers are cumulative.
Modifiers:
-1 if the firing unit (or combined total of firing units) has less than 4 strength points (e.g., archers with strength
3 = -1 from the die roll). This does not apply to artillery.
+1 if the firing unit (or combined total of firing units) has more than 4 strength points.
+2 if the firing unit (or combined total of firing units) has more than 8 strength points.
-1 if the target unit is a dismounted CH or dismounted HA.
-1 if the firing unit (or one of the firing units) has moved in the current activation.
-1 if the firing unit (or one of the firing units) is mounted.
-1 if the firing unit (or one of the firing units) is discouraged.
Note: If several units concentrate their fire against the same target, firing is resolved using the column
corresponding to the unit farthest from the target.
Results:
The target is hit on a roll of a d10 greater than or equal to the numbers indicated.
The first number is the minimum die roll required to discourage the target unit (see 12.1).
The second number is the minimum die roll required to rout it (see 12.2.1).
Note: If there is only one figure on the table, it is the die roll required to discourage the unit. See Rule 12 for the
cumulative effects of “découragé” (“discouraged”) results.
Effects on leaders: • When firing, an unmodified die roll of 9 on the d10 requires a casualty check for the possible death, wounding
or capture of each leader stacked with the target unit: roll a d10: 0 to 5 = No effect, 6 to 8 = leader wounded, 9
= leader killed.
Au fil de l’epee Page 19
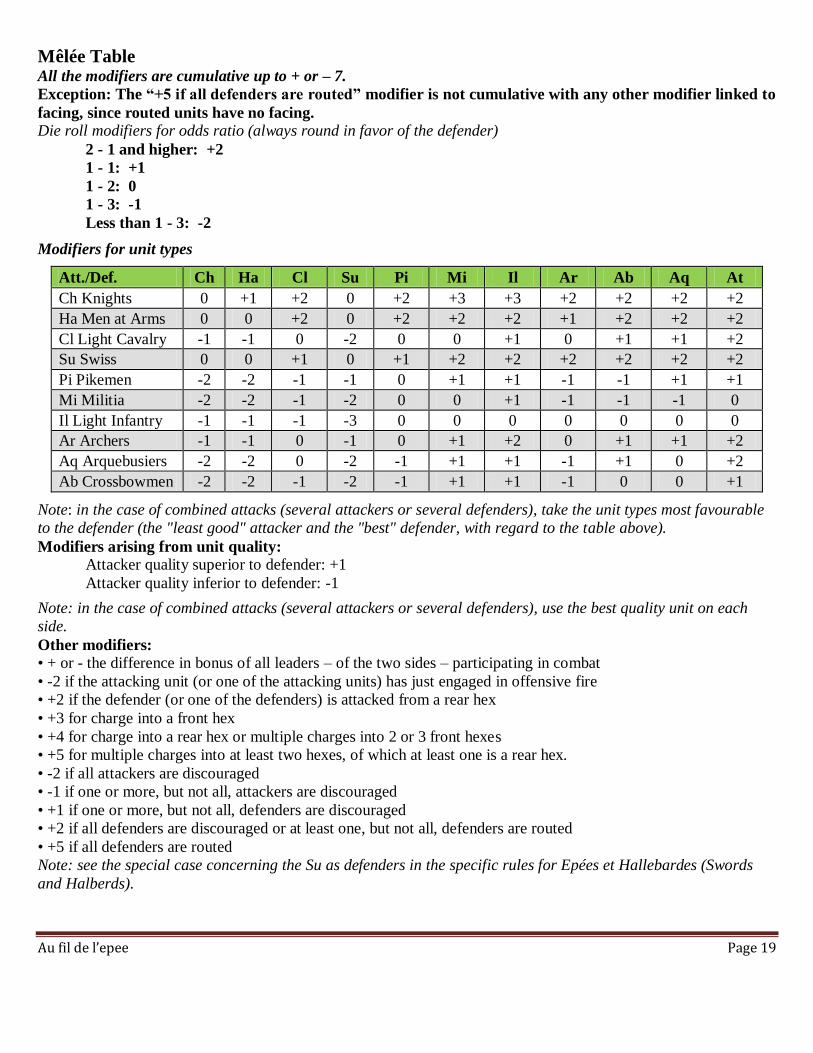
Mêlée Table All the modifiers are cumulative up to + or – 7.
Exception: The “+5 if all defenders are routed” modifier is not cumulative with any other modifier linked to
facing, since routed units have no facing. Die roll modifiers for odds ratio (always round in favor of the defender)
2 - 1 and higher: +2
1 - 1: +1
1 - 2: 0
1 - 3: -1
Less than 1 - 3: -2
Modifiers for unit types
Att./Def. Ch Ha Cl Su Pi Mi Il Ar Ab Aq At
Ch Knights 0 +1 +2 0 +2 +3 +3 +2 +2 +2 +2
Ha Men at Arms 0 0 +2 0 +2 +2 +2 +1 +2 +2 +2
Cl Light Cavalry -1 -1 0 -2 0 0 +1 0 +1 +1 +2
Su Swiss 0 0 +1 0 +1 +2 +2 +2 +2 +2 +2
Pi Pikemen -2 -2 -1 -1 0 +1 +1 -1 -1 +1 +1
Mi Militia -2 -2 -1 -2 0 0 +1 -1 -1 -1 0
Il Light Infantry -1 -1 -1 -3 0 0 0 0 0 0 0
Ar Archers -1 -1 0 -1 0 +1 +2 0 +1 +1 +2
Aq Arquebusiers -2 -2 0 -2 -1 +1 +1 -1 +1 0 +2
Ab Crossbowmen -2 -2 -1 -2 -1 +1 +1 -1 0 0 +1
Note: in the case of combined attacks (several attackers or several defenders), take the unit types most favourable
to the defender (the "least good" attacker and the "best" defender, with regard to the table above).
Modifiers arising from unit quality: Attacker quality superior to defender: +1
Attacker quality inferior to defender: -1
Note: in the case of combined attacks (several attackers or several defenders), use the best quality unit on each
side.
Other modifiers: • + or - the difference in bonus of all leaders – of the two sides – participating in combat
• -2 if the attacking unit (or one of the attacking units) has just engaged in offensive fire
• +2 if the defender (or one of the defenders) is attacked from a rear hex
• +3 for charge into a front hex
• +4 for charge into a rear hex or multiple charges into 2 or 3 front hexes
• +5 for multiple charges into at least two hexes, of which at least one is a rear hex.
• -2 if all attackers are discouraged
• -1 if one or more, but not all, attackers are discouraged
• +1 if one or more, but not all, defenders are discouraged
• +2 if all defenders are discouraged or at least one, but not all, defenders are routed
• +5 if all defenders are routed
Note: see the special case concerning the Su as defenders in the specific rules for Epées et Hallebardes (Swords
and Halberds).
Au fil de l’epee Page 20
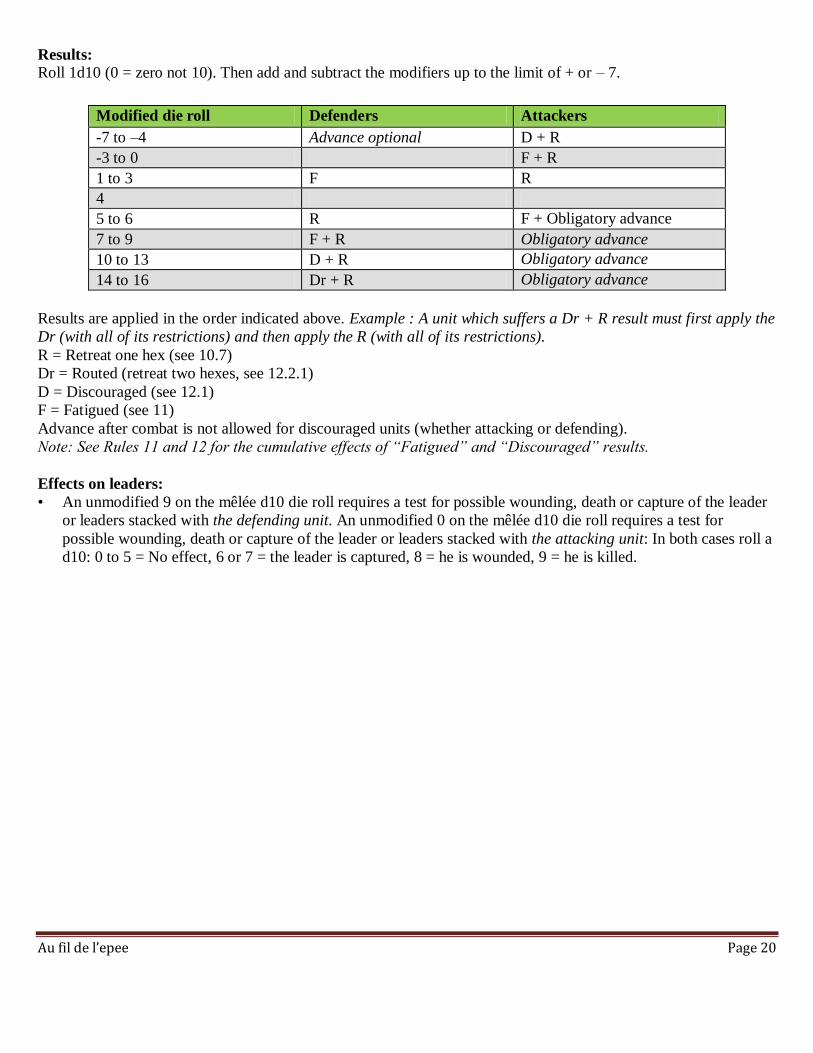
Results: Roll 1d10 (0 = zero not 10). Then add and subtract the modifiers up to the limit of + or – 7.
Modified die roll Defenders Attackers
-7 to –4 Advance optional D + R
-3 to 0 F + R
1 to 3 F R
4
5 to 6 R F + Obligatory advance
7 to 9 F + R Obligatory advance
10 to 13 D + R Obligatory advance
14 to 16 Dr + R Obligatory advance
Results are applied in the order indicated above. Example : A unit which suffers a Dr + R result must first apply the
Dr (with all of its restrictions) and then apply the R (with all of its restrictions).
R = Retreat one hex (see 10.7)
Dr = Routed (retreat two hexes, see 12.2.1)
D = Discouraged (see 12.1)
F = Fatigued (see 11)
Advance after combat is not allowed for discouraged units (whether attacking or defending).
Note: See Rules 11 and 12 for the cumulative effects of “Fatigued” and “Discouraged” results.
Effects on leaders:
• An unmodified 9 on the mêlée d10 die roll requires a test for possible wounding, death or capture of the leader
or leaders stacked with the defending unit. An unmodified 0 on the mêlée d10 die roll requires a test for
possible wounding, death or capture of the leader or leaders stacked with the attacking unit: In both cases roll a
d10: 0 to 5 = No effect, 6 or 7 = the leader is captured, 8 = he is wounded, 9 = he is killed.