Embed Size (px)
Citation preview
Australian Cherry
Production Guide
July 2011

2
This publication has been compiled by
Paul James
Rural Solutions SA
C/- Lenswood Centre
Lenswood
South Australia 5240
Phone (08) 8389 8800
Mobile 0419 826 956
Fax (08) 8389 8899
E-mail [email protected]
A special acknowledgement is given to Ms Penelope Measham and Ms Penny Domeney from the Tasmanian Institute of Agricultural Research for their contributions to this manual as co authors of the “Rain and it’s Impacts” and the “Pest and Diseases” sections.
The assistance of Ken Tobutt, Infruitec, Stellenbosch, South Africa (formerly East Malling) for information on pollen incompatibility is also gratefully acknowledged.
A special acknowledgement is given to Ms Karen Watson and Mr Allan Mayne for their diligent editing of this publication.
Other key personnel who assisted with the compilation of this manual are listed in the acknowledgements section.
Funding Sources & Collaborative Institutions

3
Disclaimer
This publication has been prepared only as a general information guide for cherry production in Australia. Whilst all reasonable care has been taken in the preparation of this document, Rural Solutions SA, the Department of Primary Industries and Resources South Australia, and the crown in the right of South Australia do not accept any liability for any damage caused by, or economic loss arising from reliance upon information contained in this publication. Users should note that the information given is of a general nature and does not necessarily reflect a specific set of industry conditions. No part of this publication may be reproduced, stored in a retrieval system, or transmitted in any form or by any means, electronic, mechanical, photocopying or otherwise without the prior permission of Cherry Growers Australia Inc. For any corrections or suggestions on information contained in this publication, please contact Cherry Growers of Australia Inc.

4
Preface
By World standards the Australian Cherry Industry is a small produce of cherries but the opportunities for growth in production and productivity exists. Over the years since cherry production commenced Australian growers have been inventive and innovative. At times they have been quick to take up new ideas, research and varieties and at other times they have been world leaders in their ‘craft’. The Australian Cherry industry has a mix of older established businesses and some new and at times inexperienced operators. No matter when growers entered the business of growing, harvesting and marketing cherries the one constant has been the desire to learn more about their ‘craft’. The new edition of the Australian Cherry Production Guide is now the most up to date and practical guide for past, current and future cherry growers to assist them in understanding and improving their ‘craft’. The Australian Cherry Production Guide has been developed over many years starting with some work undertaken by Wayne Boucher from Tasmania. This information was then used as the basis of the Cherry Manual produced by the Cherry Growers of South Australia. Through some funding from the Australian Government, Cherry Growers of Australia Inc has been able to build on the sound base of this past work, expand the contribution of information from specific researchers and mould the information into a truly national manual. The work undertaken by Paul James, Senior Horticultural Consultant from Rural Solutions SA should not be under-estimated. The time and effort to write and re-write sections, add new information and format this into a most useable ‘tool’ has been immense. All endeavors have been made to make this manual as inclusive of relevant and accurate information that could be found within Australia and across the world. The team of experts that have collaborated on this manual are most impressive. Support from growers from within South Australia and across Australia has also been most valuable. The Australian Cherry Industry is indebted to all who have contributed their time, skills and knowledge to the tasks allotted within the production of the Australian Cherry Production Guide. The Manual is a ‘tool’ to be used by all Australian Cherry growers in the production of high quality cherries sought by consumers with Australia and all points of the globe. Most importantly this is not a static document because as of today some of this information has been superseded by new and more relevant information. The challenge for Cherry Growers of Australia Inc is to maintain this document as a ‘fluid’ document ensuring that it is regularly up-dated and kept current. The Australian Cherry Production Guide is one of the last components of the Australian Cherry Industry ‘toolkit’. All involved should be proud of the work undertaken to achieve such a comprehensive and useable document. I commend the 2010 Australian Cherry Production Guide to ALL Australian Cherry Growers. Use it to become the best cherry growers in the International markets. Tim Reid - Cherry Growers Australia Inc. April 2010 Trevor M Ranford – CEO, Cherry Growers Australia until December 2010. Simon Boughey – CEO, Cherry Growers Australia from January 2011.
5
Acknowledgements The following people and organisations are sincerely and gratefully acknowledged for their contributions to this publication. Grower Reference Group Simon Cornish Andrew Flavell Kym Green John Jeffs David Leonard Nick Noske Ian Sparnon Michael Stafford Grant Wotton Allan Mayne Co-authors The invaluable assistance of Penelope Measham and Penny Domeney from the Tasmanian Institute of Agricultural Research is sincerely acknowledged for their contributions to this publication as co-authors of the “Rain and it’s Impacts” section and the “Pest and Diseases” section. Contributors National Simon Boughey CEO Cherry Growers Australia Inc from January 2011
Trevor Ranford CEO - Cherry Growers Australia Inc to December 2010 Elisa Tseng Horticulture Australia Ltd New South Wales Jeremy Bright New South Wales Department of Primary Industries Sean Brindle New South Wales Department of Primary Industries Queensland
Clinton McGrath Queensland Department of Employment, Economic Development and Innovation
Dougal Russell Queensland Department of Employment, Economic Development and Innovation
South Australia Darren Graetz South Australian Research & Development Institute Danny Le Feuvre Australian Bee Services Brian Hughes Rural Solutions SA Tasmania Anna Steinhauser Fruit Growers Tasmania / Cherry Growers of Australia Inc Karen Watson Fruit Growers Tasmania / Cherry Growers of Australia Inc
Nick Hansen Cherries Tasmania Orchards Andrew Hall Top Qual Victoria Tony Allen Victorian Cherry Association Bas van den Ende Advanced Horticulture Cliff Reisborough CherryHill Orchards Ken Gauldion Horticultural Advisor Western Australia
Max Arif, Cherry Growers Association of Western Australia Inc. Martine Combret Department of Agriculture and Food Western Australia
International Dr Kenneth Tobutt Infruitec Stellenbosch, South Africa
6
CONTENTS
Disclaimer ...................................................................................................................... 3
Preface ............................................................................................................................ 4
Acknowledgements........................................................................................................5 CONTENTS .............................................................................................................................. 6 INTRODUCTION ................................................................................................................... 12 AUSTRALIAN CHERRY PRODUCTION ............................................................................ 13
Overview – global context .................................................................................... 13
Australian Cherry Production and Consumption ............................................. 14 CHARACTERISTICS OF AUSTRALIAN CHERRY PRODUCTION ................................ 15
Cherry Production in New South Wales ............................................................ 16 Cherry Production in Victoria ............................................................................. 18
Cherry Production in South Australia ................................................................ 20
Cherry Production in Tasmania .......................................................................... 23
Cherry Production in Western Australia ........................................................... 25 Cherry Production in Queensland ...................................................................... 27
CHARACTERISTICS OF SWEET CHERRIES .................................................................... 29 CLIMATIC REQUIREMENTS .............................................................................................. 30
Climate and its Impact on Cherry Production .................................................. 30 Introduction ....................................................................................................... 30
Temperature Summation ................................................................................. 30 Climatic Conditions Needed for Commercial Cherry Production .................. 31
Rainfall ................................................................................................................ 31
Temperature ...................................................................................................... 31 Winter temperatures..................................................................................... 31
Chilling Requirements .................................................................................. 32
Calculation of Chilling .................................................................................. 32
Spring Temperatures .................................................................................... 33
Frosts............................................................................................................... 34 Maximum and Minimum Temperatures ....................................................... 34
Temperature Assessments ........................................................................... 35 Growing Season Climatic Conditions ............................................................. 35 Wind .................................................................................................................... 35
PRODUCTION ASPECTS OF SWEET CHERRIES ............................................................. 37 Planning Your Orchard ........................................................................................ 37
Introduction ....................................................................................................... 37 Orchard Profitability ......................................................................................... 39
Site Selection ...................................................................................................... 39 Regional Location ......................................................................................... 39 Rain Susceptibility ........................................................................................ 40
Soil Drainage .................................................................................................. 40 Soil Type and Fertility .................................................................................. 40
Topography .................................................................................................... 40 Water Quality ................................................................................................. 40
Other Factors to Consider ............................................................................ 41 Varieties (Cultivars) .............................................................................................. 42
Variety Descriptions and Trends .................................................................... 44
Early Maturing Regions ............................................................................... 44
Newer early season varieties ........................................................................ 45 Mid - Late Maturing Regions ...................................................................... 46
Australian Bred Varieties ................................................................................. 49
Future releases: ............................................................................................. 50
7
Rootstocks .............................................................................................................. 51 Factors to consider in selecting a cherry rootstock .................................. 51
Rootstocks currently used in Australia ...................................................... 56 Dwarfing and Semi-dwarfing rootstocks ....................................................... 57
Flowering, Pollination and Fruit Set........................................................................................ 60 Flowering of Sweet Cherries ................................................................................ 60
Flower Structure ................................................................................................ 60
Floral Initiation ................................................................................................. 61
Cultural factors influencing floral initiation ................................................. 61 Factors that affect flower development .......................................................... 61
Pollination and Fruit Set ...................................................................................... 63 Pollen Sources .................................................................................................... 63
Pollen Incompatibility Groups ........................................................................ 63 Flowering times ................................................................................................. 66
Providing for Pollination ...................................................................................... 67 Placement of Pollenisers .................................................................................. 67
Bees ......................................................................................................................... 69
Strength and number of hives ......................................................................... 70 Grower assessments of hive activity ............................................................... 71
Timing of Hive introduction ............................................................................ 72 Using introduced hives ..................................................................................... 72
Warning .............................................................................................................. 73
Hive removal ...................................................................................................... 73 Chemical spray applications and bees............................................................ 73
Useful websites .............................................................................................. 74 Effective pollination period ................................................................................. 74
Plant nutrition and fruit set ................................................................................. 75 Cherry Fruit Development ................................................................................... 76
Nursery tree quality .............................................................................................. 78 What is a quality tree? ...................................................................................... 78 Tree price vs quality (low cost vs “cheap” trees) ........................................... 78
Tree Specifications ............................................................................................ 79
Nurseries Supplying Cherry Trees .................................................................. 80
Tree Training Systems .......................................................................................... 81 Traditional vase systems (Low density vs high density).............................. 82
“Bush” systems .................................................................................................. 82 Development of “Bush” systems for Australian conditions ........................ 83
The KGB System ............................................................................................ 83
Hedged Spanish Bush ................................................................................... 86
Aussie Bush system ....................................................................................... 87
Axis-Centre Leader System .............................................................................. 88 Using Cytolin® to develop a Centre leader tree ....................................... 90
Tatura trellis ....................................................................................................... 91 Constructing the trellis ................................................................................. 91 Establishing trees on the Trellis .................................................................. 95
Training sweet cherries on Tatura trellis ....................................................... 97
Standard Tatura trellis ................................................................................. 97
Photo: The Boag Family, Ashbourne, South Australia Mini Tatura trellis ............................................................................................................... 99 Mini Tatura trellis ....................................................................................... 100
Enhancing fruit quality ....................................................................................... 101
Quality of flower buds ..................................................................................... 101 Enhancing leaf to fruit ratios ......................................................................... 101 Annual renewal pruning ................................................................................. 101
8
Cherry Crop Loading .......................................................................................... 102 Use of Plant Growth Regulators ........................................................................ 104
Plant growth regulator use in Australian cherry production .................... 106 Gibberellic acid (GA3) applications to fruit ............................................ 106
CULTURAL PRACTICES ................................................................................................... 108 Strategies in Replanting/Planting New Orchard Blocks ............................... 108
Replanting orchards ....................................................................................... 108
Specific replant disease (SRD) ...................................................................... 109
Nematodes........................................................................................................ 109 Basic soil requirements .................................................................................. 109
Soil pH: ......................................................................................................... 109 Alkaline soils ................................................................................................ 111
Sub soil pH ................................................................................................... 111 Other soil amendments .............................................................................. 111
Soil mulches ................................................................................................. 111 Fumigation ................................................................................................... 112
Best practice guidelines .................................................................................. 113
Phases of replanting ........................................................................................ 113 Step 1: Pre Removal Planning ................................................................. 113
Step 2: Tree removal .................................................................................. 114 Step 3: Site and soil preparation .............................................................. 114
Step 4: Replanting – plant wisely ............................................................ 115
Step 5: Post planting care ......................................................................... 116 Tree establishment .............................................................................................. 118
Nursery tree handling - from delivery to planting ..................................... 118 Tree planting .................................................................................................... 118
Planting time ................................................................................................ 118 Final soil preparation ................................................................................. 119
Pegging out (marking out) ......................................................................... 119 Handling trees during planting ..................................................................... 120 Mechanical versus hand planting ................................................................. 120
Planting depth ................................................................................................. 121
‘Watering in’ ................................................................................................. 121
Support systems .............................................................................................. 122
Pruning at planting ......................................................................................... 122
Summary ...................................................................................................... 123 Young tree management .................................................................................... 123
Useful Conversions ......................................................................................... 124
Formula for calculating trees / hectare .................................................... 124 Nutrition and fertilisers ...................................................................................... 125
How do nutrients get into plants? ................................................................ 125
The movement of nutrients into the root ................................................ 125 Inorganic versus organic fertilisers .............................................................. 126 Basic nutritional requirements ..................................................................... 127
Additional nutrients ........................................................................................ 128
Trace elements ............................................................................................. 129 When should fertilisers be applied? ............................................................. 131 Methods of applying fertilisers ...................................................................... 132
Quantities of Fertilisers to Apply .................................................................. 133 Fertiliser program for Mature, Bearing Trees ......................................... 133
Working out a fertiliser program .............................................................. 134
Fertiliser programs for young trees .......................................................... 136 Fertigation ........................................................................................................ 137
Foliar application of nutrients ................................................................... 141
9
Interpreting soil and leaf analyses ................................................................ 142 Taking a representative sample of soil ..................................................... 142
Interpreting soil analyses ........................................................................... 142 Taking a representative leaf sample ............................................................. 148
Interpreting leaf analyses ........................................................................... 148 Fruitlet analysis ............................................................................................... 149
Irrigation .............................................................................................................. 150
Water requirements ........................................................................................ 150 How much water is needed for a cherry orchard? ...................................... 150
Soil water relationships .................................................................................. 150 Irrigation scheduling using tensiometers .................................................... 152
Using gypsum blocks for irrigation scheduling .......................................... 154 Installation ................................................................................................... 155
Avoid irrigating for prolonged periods ........................................................ 157
Water quality.................................................................................................... 157
Water pH .......................................................................................................... 157 Salinity .............................................................................................................. 158 Iron and other trace elements ....................................................................... 158
Irrigation systems ........................................................................................... 159 Pests and Diseases ................................................................................................................. 161
Integrated Pest and Disease Management (IPDM) ........................................ 161
Export market requirements ......................................................................... 161
Integrated pest and disease management information ............................. 161 Monitoring ....................................................................................................... 162
Cultural practices ............................................................................................ 162 Biological control............................................................................................. 162
Beneficial insects and mites ....................................................................... 163 Bacterial insecticides .................................................................................. 163
Protecting biological control agents ......................................................... 163 Crown gall control ....................................................................................... 163
Chemical control ............................................................................................. 164
Diseases ................................................................................................................ 166
Bacterial Gummosis (canker) ........................................................................ 166
Brown rot - Blossom blight and Twig blight ............................................... 169 Leaf Curl ........................................................................................................... 170
Shot-hole .......................................................................................................... 170 Viruses and Virus-like diseases ..................................................................... 171
Insect Pests ........................................................................................................... 172
Mites .................................................................................................................. 172
Light brown apple moth (LBAM).................................................................. 172
Pear and Cherry Slug ...................................................................................... 174 Aphids ............................................................................................................... 175
Thrips ................................................................................................................ 176 European Earwigs ........................................................................................... 177 Weevils .............................................................................................................. 178
Garden Weevil ............................................................................................. 178
Chemicals for pest and disease control ............................................................ 180 Chemical resistance ........................................................................................ 180
Brown rot / Blossom blight ........................................................................ 180
Aphids ........................................................................................................... 180
Basic Spray Schedules .................................................................................... 182
Pest and disease control for non-bearing cherries ..................................... 183 Bacterial canker, Brown rot, Shot hole, Leaf curl ................................... 183
Pear and cherry slug ................................................................................... 183
10
Aphids ........................................................................................................... 183 Crown gall ..................................................................................................... 183
Scale insects ................................................................................................. 183 Rabbits and hares ........................................................................................ 183
Weed Management ................................................................................................................ 184 Control measures ................................................................................................ 184
Chemical weed control ................................................................................... 184
Herbicide resistance and tolerance .............................................................. 185
Resistant weeds ........................................................................................... 185 Signs of herbicide resistance ..................................................................... 185
Prevention of herbicide resistance problems .......................................... 186 Herbicide groups ......................................................................................... 186
Alternative weed control methods ................................................................ 187 Cultivation .................................................................................................... 187
Grazing animals ........................................................................................... 187 Flame or thermal weeding ......................................................................... 187 Mulching ....................................................................................................... 188
Sod culture ................................................................................................... 188 Weed control in young orchards ................................................................... 188
Using Chemicals .................................................................................................. 189 Permits .......................................................................................................... 189
Safety precautions ....................................................................................... 189
Spray residues .............................................................................................. 190 Compatibilities............................................................................................. 190
Spares and Repairs...................................................................................... 190 Bird Protection ...................................................................................................................... 191
Bird scarers ...................................................................................................... 191 Effective scaring .............................................................................................. 191
Destruction of pest bird species .................................................................... 192 Encouragement of natural predators ........................................................... 193
Chemical deterrents ........................................................................................ 193
Netting .............................................................................................................. 193
Netting supply and construction ................................................................... 195 Rain and its’ impacts ............................................................................................................. 196
Factors influencing rain induced fruit cracking ......................................... 197 Skin ................................................................................................................ 197
Fruit ............................................................................................................... 197 Soil wetness .................................................................................................. 197
Environment ................................................................................................ 198 Variety ........................................................................................................... 198
Minimisation of rain damage ........................................................................ 198
Site selection ................................................................................................ 198 Variety ........................................................................................................... 198
Physical protection ...................................................................................... 199 Spray protection .......................................................................................... 199
Summary .......................................................................................................... 200 Appendix 1 ............................................................................................................ 202
Australian Nursery Contact Details .............................................................. 202
Appendix 2 ........................................................................................................... 205 Insecticide and Miticide Groups ................................................................... 205
Appendix 3 ........................................................................................................... 206 Fungicide Groups ............................................................................................ 206
Appendix 4 ........................................................................................................... 207
Netting and Rain Cover Supply and Construction Service Providers ...... 207

11
Appendix 5 ........................................................................................................... 208 Obtaining biological control agents .............................................................. 208
Appendix 6 ........................................................................................................... 209 Tree Numbers – Ready Reckoner ................................................................. 209
12
INTRODUCTION This publication has been prepared by Mr Paul James, Senior Horticultural Consultant – Temperate Fruits with the financial assistance of Cherry Growers of Australia Inc and the Australian Federal Government through a Farm Ready grant. The publication is intended to be a reference guide for commercial Australian cherry producers to assist and improve their orchard management practices, economic performance and orchard sustainability. Whilst it is intended to be a comprehensive guide, cherry growers are also encouraged to seek qualified professional assistance where appropriate. The manual covers most aspects of producing quality cherries in the orchard and is set out in an easy to follow design. The list of contents is extensive, reflecting the complexity of producing good quality cherries commercially. At the beginning of the publication there is a range of information designed to provide a detailed perspective of the Australian cherry industry in its current situation. Each section is written as comprehensively as possible and in some situations information may appear to be duplicated; this is a reflection of the importance of this information to the specific topic.
13
AUSTRALIAN CHERRY PRODUCTION
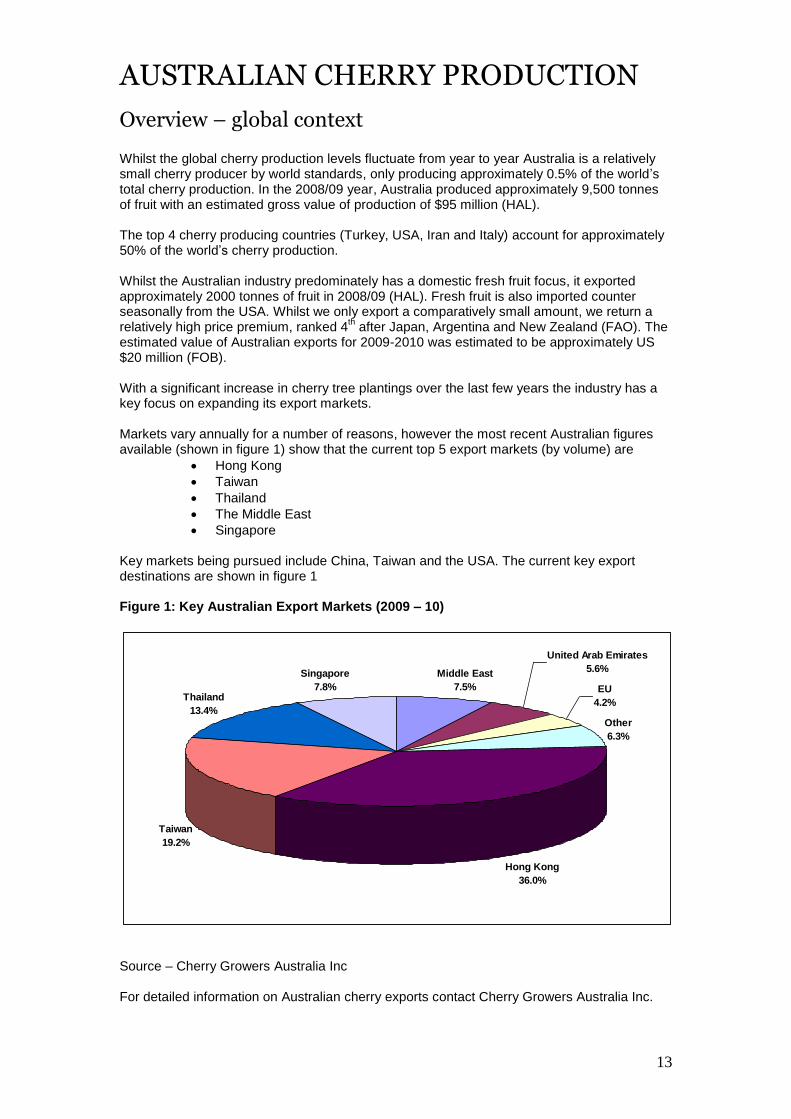
Overview – global context Whilst the global cherry production levels fluctuate from year to year Australia is a relatively small cherry producer by world standards, only producing approximately 0.5% of the world’s total cherry production. In the 2008/09 year, Australia produced approximately 9,500 tonnes of fruit with an estimated gross value of production of $95 million (HAL). The top 4 cherry producing countries (Turkey, USA, Iran and Italy) account for approximately 50% of the world’s cherry production. Whilst the Australian industry predominately has a domestic fresh fruit focus, it exported approximately 2000 tonnes of fruit in 2008/09 (HAL). Fresh fruit is also imported counter seasonally from the USA. Whilst we only export a comparatively small amount, we return a relatively high price premium, ranked 4
th after Japan, Argentina and New Zealand (FAO). The
estimated value of Australian exports for 2009-2010 was estimated to be approximately US $20 million (FOB). With a significant increase in cherry tree plantings over the last few years the industry has a key focus on expanding its export markets. Markets vary annually for a number of reasons, however the most recent Australian figures available (shown in figure 1) show that the current top 5 export markets (by volume) are
Hong Kong
Taiwan
Thailand
The Middle East
Singapore
Key markets being pursued include China, Taiwan and the USA. The current key export destinations are shown in figure 1 Figure 1: Key Australian Export Markets (2009 – 10)
United Arab Emirates
5.6%
EU
4.2%
Other
6.3%
Hong Kong
36.0%
Taiwan
19.2%
Thailand
13.4%
Singapore
7.8%
Middle East
7.5%
Source – Cherry Growers Australia Inc For detailed information on Australian cherry exports contact Cherry Growers Australia Inc.
14
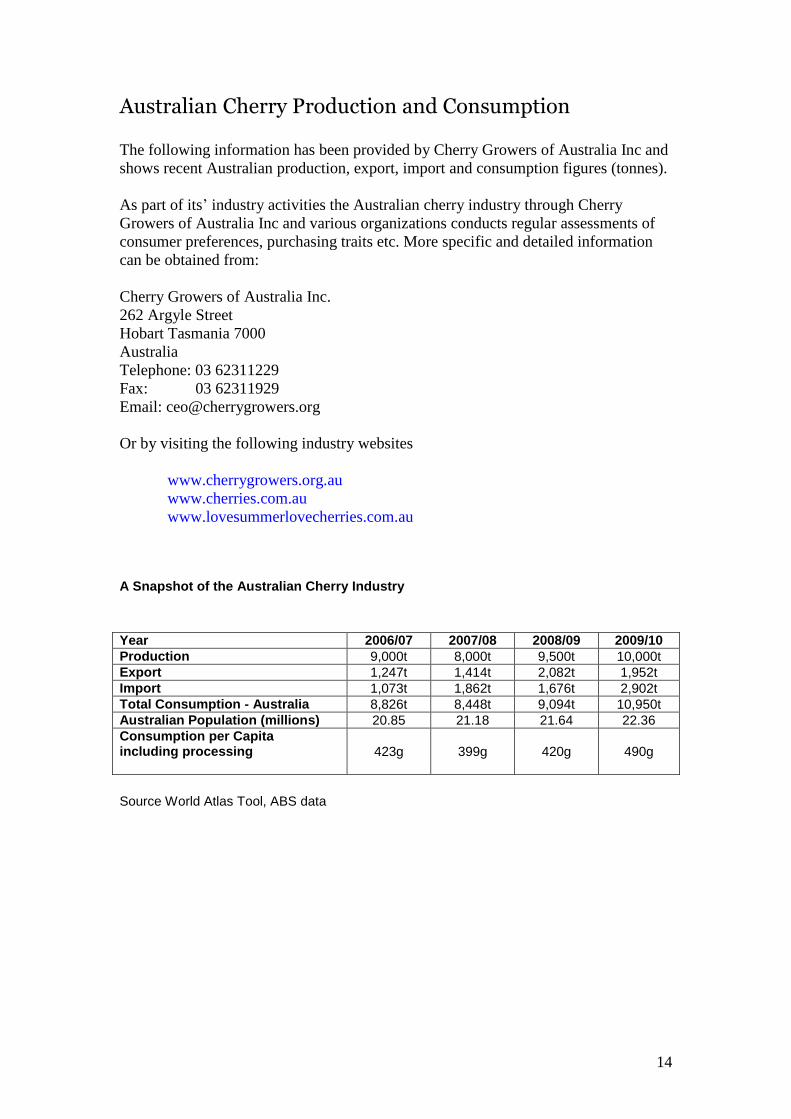
Australian Cherry Production and Consumption
The following information has been provided by Cherry Growers of Australia Inc and
shows recent Australian production, export, import and consumption figures (tonnes).
As part of its’ industry activities the Australian cherry industry through Cherry
Growers of Australia Inc and various organizations conducts regular assessments of
consumer preferences, purchasing traits etc. More specific and detailed information
can be obtained from:
Cherry Growers of Australia Inc.
262 Argyle Street
Hobart Tasmania 7000
Australia
Telephone: 03 62311229
Fax: 03 62311929
Email: [email protected]
Or by visiting the following industry websites
www.cherrygrowers.org.au
www.cherries.com.au
www.lovesummerlovecherries.com.au
A Snapshot of the Australian Cherry Industry
Year 2006/07 2007/08 2008/09 2009/10
Production 9,000t 8,000t 9,500t 10,000t
Export 1,247t 1,414t 2,082t 1,952t
Import 1,073t 1,862t 1,676t 2,902t
Total Consumption - Australia 8,826t 8,448t 9,094t 10,950t
Australian Population (millions) 20.85 21.18 21.64 22.36
Consumption per Capita including processing
423g
399g
420g
490g
Source World Atlas Tool, ABS data
15
CHARACTERISTICS OF AUSTRALIAN CHERRY PRODUCTION
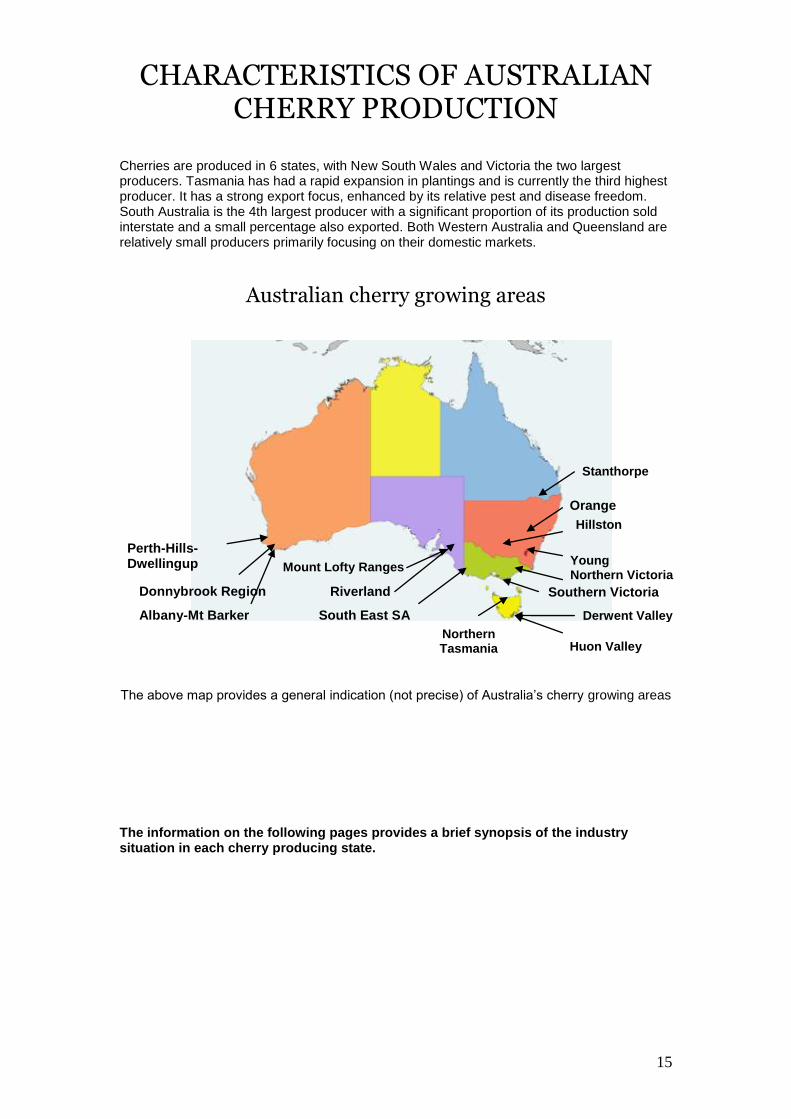
Cherries are produced in 6 states, with New South Wales and Victoria the two largest producers. Tasmania has had a rapid expansion in plantings and is currently the third highest producer. It has a strong export focus, enhanced by its relative pest and disease freedom. South Australia is the 4th largest producer with a significant proportion of its production sold interstate and a small percentage also exported. Both Western Australia and Queensland are relatively small producers primarily focusing on their domestic markets.
Australian cherry growing areas
The above map provides a general indication (not precise) of Australia’s cherry growing areas The information on the following pages provides a brief synopsis of the industry situation in each cherry producing state.
Stanthorpe
Orange
Young Northern Victoria
Derwent Valley
Huon Valley Northern Tasmania
Mount Lofty Ranges
Riverland
South East SA
Perth-Hills-Dwellingup
Donnybrook Region
Albany-Mt Barker
Hillston
Southern Victoria
16
Cherry Production in New South Wales
ew South Wales (NSW) have traditionally been
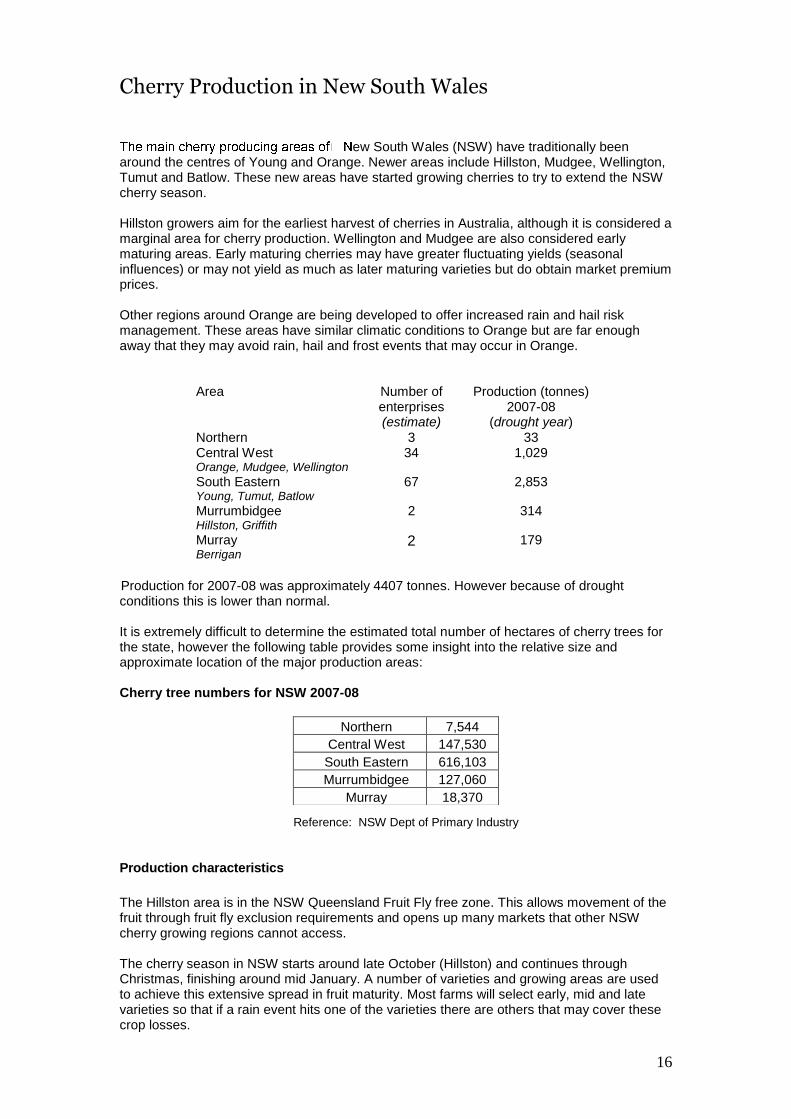
around the centres of Young and Orange. Newer areas include Hillston, Mudgee, Wellington, Tumut and Batlow. These new areas have started growing cherries to try to extend the NSW cherry season. Hillston growers aim for the earliest harvest of cherries in Australia, although it is considered a marginal area for cherry production. Wellington and Mudgee are also considered early maturing areas. Early maturing cherries may have greater fluctuating yields (seasonal influences) or may not yield as much as later maturing varieties but do obtain market premium prices. Other regions around Orange are being developed to offer increased rain and hail risk management. These areas have similar climatic conditions to Orange but are far enough away that they may avoid rain, hail and frost events that may occur in Orange.
Area Number of enterprises (estimate)
Production (tonnes) 2007-08
(drought year) Northern 3 33 Central West Orange, Mudgee, Wellington
34 1,029
South Eastern Young, Tumut, Batlow
67 2,853
Murrumbidgee Hillston, Griffith
2 314
Murray Berrigan
2 179
Production for 2007-08 was approximately 4407 tonnes. However because of drought conditions this is lower than normal. It is extremely difficult to determine the estimated total number of hectares of cherry trees for the state, however the following table provides some insight into the relative size and approximate location of the major production areas: Cherry tree numbers for NSW 2007-08
Reference: NSW Dept of Primary Industry
Production characteristics
The Hillston area is in the NSW Queensland Fruit Fly free zone. This allows movement of the fruit through fruit fly exclusion requirements and opens up many markets that other NSW cherry growing regions cannot access. The cherry season in NSW starts around late October (Hillston) and continues through Christmas, finishing around mid January. A number of varieties and growing areas are used to achieve this extensive spread in fruit maturity. Most farms will select early, mid and late varieties so that if a rain event hits one of the varieties there are others that may cover these crop losses.
Northern 7,544
Central West 147,530
South Eastern 616,103
Murrumbidgee 127,060
Murray 18,370

17
The principal industry organisation is the NSW Cherry Growers Association. Further information on the organisation can be found at
www.nswcga.com.au
The early, warmer areas of NSW (Young, Hillston, Wellington and Mudgee) all use vase or “bush” systems due to the extreme summer temperatures. The Orange region has milder summers and uses a range of systems including central leader. Production per tree is limited because of the commercial focus on fruit size not just total production (by weight). The main varieties grown vary by district. The Orange variety mix predominantly comes from Summerland (Canada). Young also grows similar varieties but Ron’s Seedling is the dominant variety. Orange: Merchant, Van, Kordia, Lapins, Stella, Simone, Sweetheart, Ranier and Bing. Young: Empress, Burlat, Supreme, Ron’s Seedling, Stella, Lapins, Sweetheart. Less widely grown varieties include Simone, Sylvia and Black Star.
Because of the varied environmental, water and soil conditions in NSW there are some differences in the rootstocks used. Young predominantly uses Mahaleb, whilst Orange uses Colt™ and Mazzard. The Gisela range of rootstocks is being evaluated, but currently there are no major plantings on these rootstocks.
Emerging trends in production
Protective rain covers have been installed in Young, which have been relatively successful in preventing losses due to rain splitting. Fine mesh hail netting is also being trialled in Orange, with varying success. In the Orange region an emerging trend is controlling growth through allowing a dominant central leader. Once established in the early years it is then a matter of removing the larger branches on a yearly basis to control vigour.
Industry "issues"
Amongst the issues facing the industry are; market access and perceived industry benefits of accessing the Taiwan market. Market access to Asia already exists to Hong Kong, Singapore and several other countries.
Water availability and quality is an important issue. In Young the irrigation water is mainly sourced through bores. The drought has contributed to deteriorating water quality and quantity from ground and dam water reserves. European earwig is an increasing problem in the Young area. Monitoring the numbers of earwigs and identifying control treatments is a priority for the local industry. Queensland Fruit Fly (QFF) (commonly referred to as ‘Q Fly”) is a major issue for the movement of NSW cherries into various markets. There are currently several projects underway to find dis-infestation solutions that comply with overseas and domestic market requirements.
18
Cherry Production in Victoria
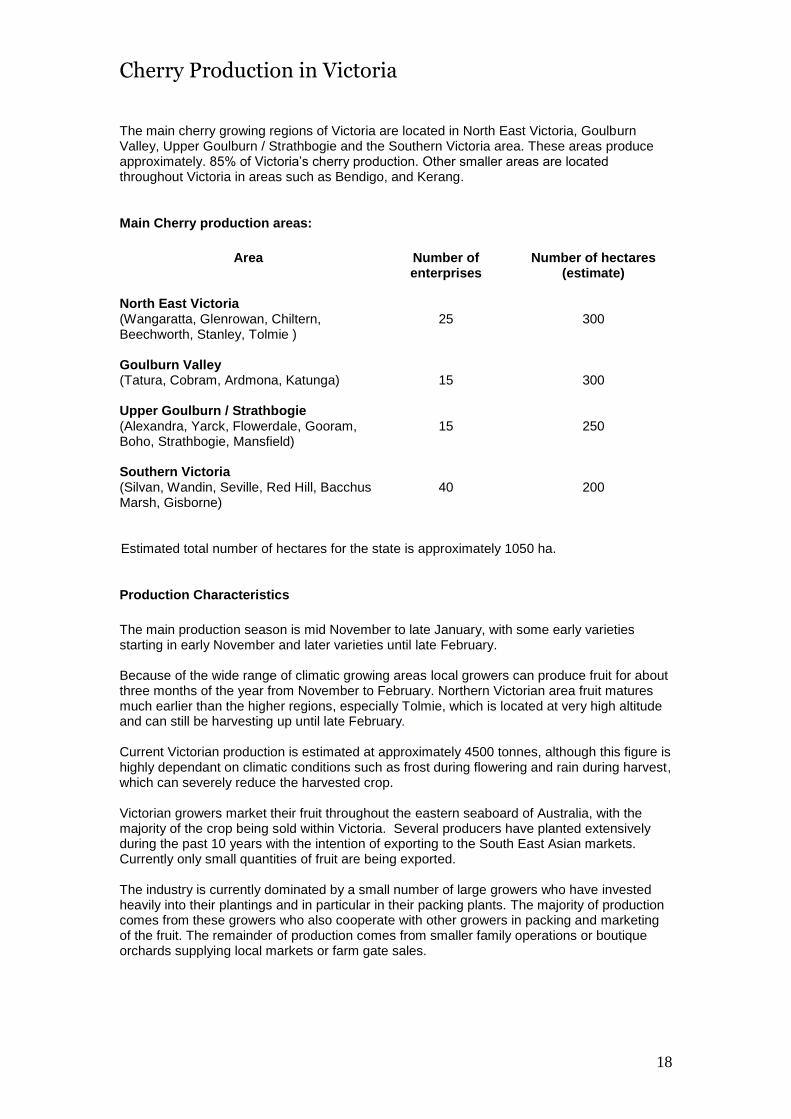
The main cherry growing regions of Victoria are located in North East Victoria, Goulburn Valley, Upper Goulburn / Strathbogie and the Southern Victoria area. These areas produce approximately. 85% of Victoria’s cherry production. Other smaller areas are located throughout Victoria in areas such as Bendigo, and Kerang.
Main Cherry production areas:
Area Number of
enterprises
Number of hectares (estimate)
North East Victoria (Wangaratta, Glenrowan, Chiltern, Beechworth, Stanley, Tolmie )
25
300
Goulburn Valley (Tatura, Cobram, Ardmona, Katunga)
15
300
Upper Goulburn / Strathbogie (Alexandra, Yarck, Flowerdale, Gooram, Boho, Strathbogie, Mansfield)
15
250
Southern Victoria (Silvan, Wandin, Seville, Red Hill, Bacchus Marsh, Gisborne)
40
200
Estimated total number of hectares for the state is approximately 1050 ha.
Production Characteristics
The main production season is mid November to late January, with some early varieties starting in early November and later varieties until late February. Because of the wide range of climatic growing areas local growers can produce fruit for about three months of the year from November to February. Northern Victorian area fruit matures much earlier than the higher regions, especially Tolmie, which is located at very high altitude and can still be harvesting up until late February. Current Victorian production is estimated at approximately 4500 tonnes, although this figure is highly dependant on climatic conditions such as frost during flowering and rain during harvest, which can severely reduce the harvested crop. Victorian growers market their fruit throughout the eastern seaboard of Australia, with the majority of the crop being sold within Victoria. Several producers have planted extensively during the past 10 years with the intention of exporting to the South East Asian markets. Currently only small quantities of fruit are being exported. The industry is currently dominated by a small number of large growers who have invested heavily into their plantings and in particular in their packing plants. The majority of production comes from these growers who also cooperate with other growers in packing and marketing of the fruit. The remainder of production comes from smaller family operations or boutique orchards supplying local markets or farm gate sales.
19
Industry groups
The main organisation is the Victorian Cherry Association Inc. The Association was started in 1964 and is very proactive in assisting growers develop their industry. Further information can be obtained from the following website:
www.cherries.org.au
Production Systems
Modern production systems are used in orchards with most of the newer plantings being trained to open bush systems. Orchards are irrigated using low flow systems and growers are extremely conscious of the need to improve their management practices related to orchard soil management. More than 50 varieties are currently being grown. However as buyers are starting to demand improved quality and longer shelf life, many of the older and poorer performing varieties are being replaced. Merchant, Bing, Stella, Lapins and Van are the main varieties currently grown. Other varieties currently grown include Ron’s, Ulster, Kristin, Simone, Sweetheart, Vic and Nordwunder. Empress, Supreme and Vista are on the decline. A large number of other varieties have been introduced recently. The best performing of these are Earlise, Earlisweet, Sweet Early, Chelan, Kordia, Regina, Royal Dawn and Sweet Georgia. There have also been many new and untried varieties planted in trial plots across the growing regions. To date many have proven to be unsuccessful Mazzard and Colt™, are the main rootstocks used with some Gisela 6. There are many higher density plantings. Colt is the preferred rootstock with the majority of the plantings undertaken in the last 5 years planted on Colt™. The Gisela 6 dwarfing rootstock is also gaining favour. The F12 Mazzard rootstock is no longer favoured as it is susceptible to bacterial canker. The Gisela 5 Rootstock is not favoured as the trees remain too small and don’t have good vigour. An increasing number of growers are covering their trees with permanent or throw over netting for bird damage control.
Industry issues
The main issue faced by the industry is losses caused by rain during or preceding harvest. In recent seasons up to 40% of the crop has been lost to rain splitting the fruit. Growers are now giving serious consideration to the installation of rain covers. In the orchards where rain covers have been installed, the economic returns have proven to be a worthwhile investment. Water has been a major issue in the past 5 years with most production areas suffering from a drought. Growers now have to carefully manage their water supplies, which may in turn affect the volume and quality of their production.
20
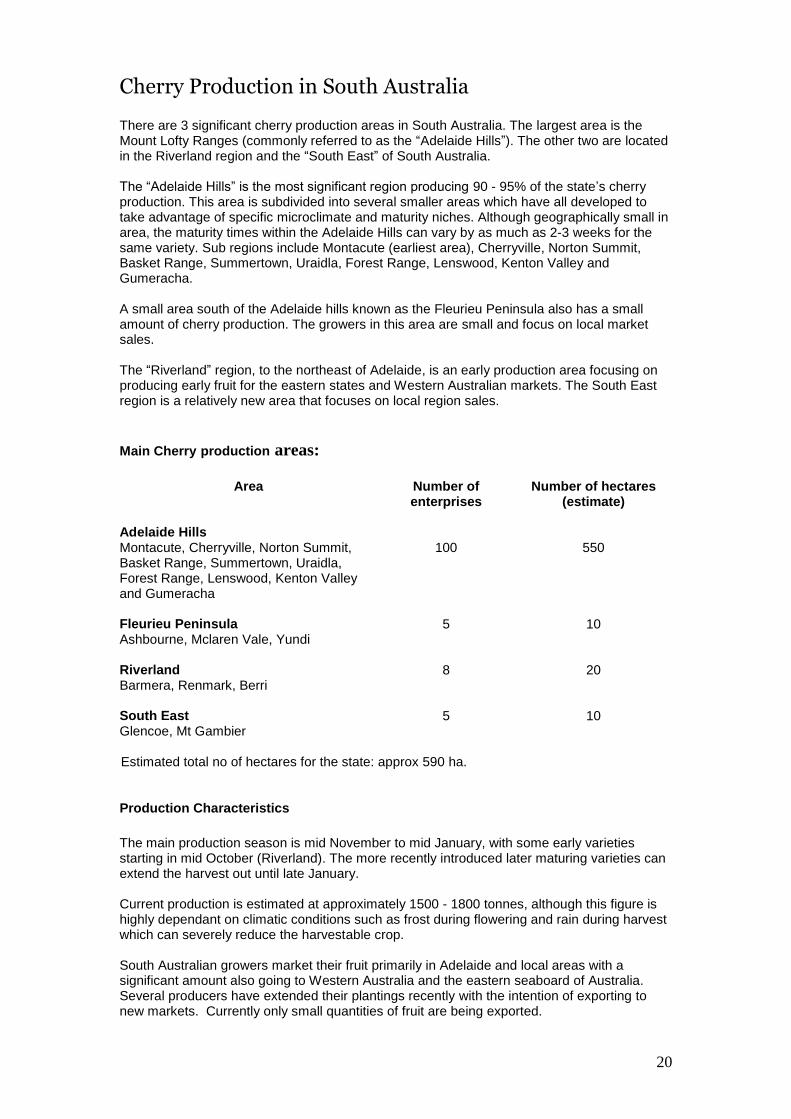
Cherry Production in South Australia There are 3 significant cherry production areas in South Australia. The largest area is the Mount Lofty Ranges (commonly referred to as the “Adelaide Hills”). The other two are located in the Riverland region and the “South East” of South Australia. The “Adelaide Hills” is the most significant region producing 90 - 95% of the state’s cherry production. This area is subdivided into several smaller areas which have all developed to take advantage of specific microclimate and maturity niches. Although geographically small in area, the maturity times within the Adelaide Hills can vary by as much as 2-3 weeks for the same variety. Sub regions include Montacute (earliest area), Cherryville, Norton Summit, Basket Range, Summertown, Uraidla, Forest Range, Lenswood, Kenton Valley and Gumeracha. A small area south of the Adelaide hills known as the Fleurieu Peninsula also has a small amount of cherry production. The growers in this area are small and focus on local market sales. The “Riverland” region, to the northeast of Adelaide, is an early production area focusing on producing early fruit for the eastern states and Western Australian markets. The South East region is a relatively new area that focuses on local region sales.
Main Cherry production areas:
Area Number of
enterprises
Number of hectares (estimate)
Adelaide Hills Montacute, Cherryville, Norton Summit, Basket Range, Summertown, Uraidla, Forest Range, Lenswood, Kenton Valley and Gumeracha
100
550
Fleurieu Peninsula Ashbourne, Mclaren Vale, Yundi
5 10
Riverland Barmera, Renmark, Berri
8 20
South East Glencoe, Mt Gambier
5 10
Estimated total no of hectares for the state: approx 590 ha.
Production Characteristics
The main production season is mid November to mid January, with some early varieties starting in mid October (Riverland). The more recently introduced later maturing varieties can extend the harvest out until late January. Current production is estimated at approximately 1500 - 1800 tonnes, although this figure is highly dependant on climatic conditions such as frost during flowering and rain during harvest which can severely reduce the harvestable crop. South Australian growers market their fruit primarily in Adelaide and local areas with a significant amount also going to Western Australia and the eastern seaboard of Australia. Several producers have extended their plantings recently with the intention of exporting to new markets. Currently only small quantities of fruit are being exported.

21
The industry has a wide range of property sizes with one large producer accounting for nearly fifty percent of the total area grown sales. A number of growers have their produce graded and packed through a large cooperative pack house. Marketing is still primarily handled by individual growers. There is a significant amount of production from smaller family operations or boutique orchards supplying local markets or farm gate sales.
Industry groups
The main organisation is the “Cherry Growers of South Australia Inc”. The association is very proactive in assisting growers develop their industry. There is also an industry website where further information can be obtained from
www.cherriessa.com.au
Production Systems
Modern production systems are used in South Australian orchards. Most of the newer plantings are being trained to bush systems, primarily the KGB System (Kym Green Bush), however a number of other systems are also being used. Orchards are irrigated using low flow systems or drip systems and growers are extremely conscious of their water management practices. More than 50 varieties are currently being grown. However as buyers are starting to demand improved quality and longer shelf life, many of the older and poorer performing varieties are being replaced. Stella and Lapins are the dominant varieties grown. There is a wide range of other varieties grown based primarily on the market niche a region or grower has. Overall Merchant, Stella, Lapins, Sweetheart, Simone are the main varieties grown. Bing, Supreme, Empress, Van, Summit, Sunburst, Kordia, Vista and Lambert have reached variable levels of production but are now declining in popularity. Rainier is only grown by a few specialist growers. Ron’s Seedling is still grown by a number of growers. A large number of other varieties have been introduced recently. The best performing of these include Black Star, Earlisweet, Sweet Georgia, Chelan, Earlise, Australise, Santina, Samba, Sylvia and Regina. There have also been many new varieties and selections planted in trial plots across the regions, but it is too early to make any comments about their performance. Mazzard and Colt™ are the main rootstocks used with some Gisela 6 now being planted. There are many higher density bush plantings of which Mazzard F12-1 has been the preferred rootstock. The Gisela 6 dwarfing rootstock is gaining favour. The choice of rootstock is now linked directly to the variety and production system used. Several growers are looking forward to testing Krymsk 5 and 6. Most growers cover their trees with permanent or throw over netting for bird damage control. The Adelaide Hills has some very specific bird problems to handle
Industry issues
The main issues faced by the industry are
Water availability - Water has been a major issue with most production areas suffering from reduced water availability. Growers have to carefully manage their water supplies, which in turn affects the volume and quality of their production.
The Mount Lofty Ranges is currently being put under stricter water collection and distribution controls, all growers are currently waiting on the relevant authorities to

22
provide water allocations. Until these allocations are provided there are strict limitations on what new plantings a grower can undertake.
Rain damage at harvest – In recent seasons up to 40 - 75% of the crop has been lost to rain splitting. Growers are now giving serious consideration to the installation of rain covers.
Weevils and Earwigs – these insect pests have been increasing in significance.
Others – a number of other issues are also affecting the industry or causing significant economic loss. These include heat waves, birds, export market development, fruit fly (market access issues), Light brown apple moth and Oriental fruit moth (market access issues)
23
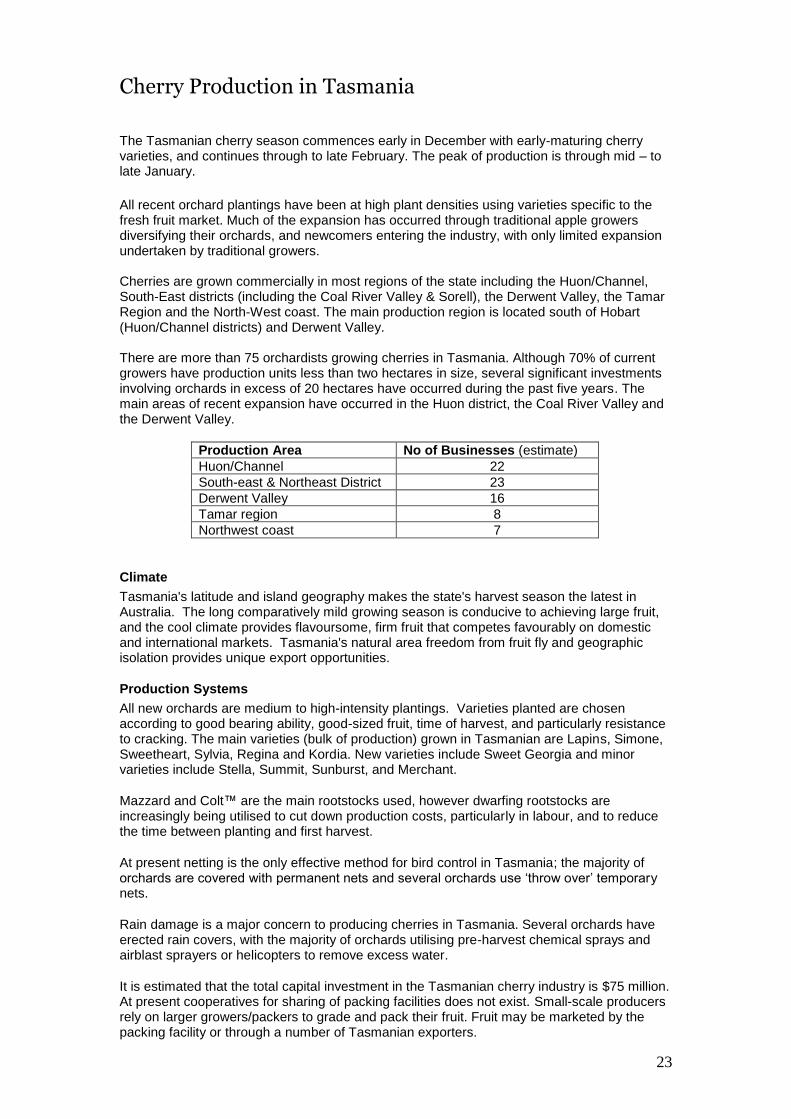
Cherry Production in Tasmania The Tasmanian cherry season commences early in December with early-maturing cherry varieties, and continues through to late February. The peak of production is through mid – to late January.
All recent orchard plantings have been at high plant densities using varieties specific to the fresh fruit market. Much of the expansion has occurred through traditional apple growers diversifying their orchards, and newcomers entering the industry, with only limited expansion undertaken by traditional growers. Cherries are grown commercially in most regions of the state including the Huon/Channel, South-East districts (including the Coal River Valley & Sorell), the Derwent Valley, the Tamar Region and the North-West coast. The main production region is located south of Hobart (Huon/Channel districts) and Derwent Valley. There are more than 75 orchardists growing cherries in Tasmania. Although 70% of current growers have production units less than two hectares in size, several significant investments involving orchards in excess of 20 hectares have occurred during the past five years. The main areas of recent expansion have occurred in the Huon district, the Coal River Valley and the Derwent Valley.
Production Area No of Businesses (estimate)
Huon/Channel 22
South-east & Northeast District 23
Derwent Valley 16
Tamar region 8
Northwest coast 7
Climate
Tasmania's latitude and island geography makes the state's harvest season the latest in Australia. The long comparatively mild growing season is conducive to achieving large fruit, and the cool climate provides flavoursome, firm fruit that competes favourably on domestic and international markets. Tasmania's natural area freedom from fruit fly and geographic isolation provides unique export opportunities.
Production Systems
All new orchards are medium to high-intensity plantings. Varieties planted are chosen according to good bearing ability, good-sized fruit, time of harvest, and particularly resistance to cracking. The main varieties (bulk of production) grown in Tasmanian are Lapins, Simone, Sweetheart, Sylvia, Regina and Kordia. New varieties include Sweet Georgia and minor varieties include Stella, Summit, Sunburst, and Merchant.
Mazzard and Colt™ are the main rootstocks used, however dwarfing rootstocks are increasingly being utilised to cut down production costs, particularly in labour, and to reduce the time between planting and first harvest.
At present netting is the only effective method for bird control in Tasmania; the majority of orchards are covered with permanent nets and several orchards use ‘throw over’ temporary nets.
Rain damage is a major concern to producing cherries in Tasmania. Several orchards have erected rain covers, with the majority of orchards utilising pre-harvest chemical sprays and airblast sprayers or helicopters to remove excess water.
It is estimated that the total capital investment in the Tasmanian cherry industry is $75 million. At present cooperatives for sharing of packing facilities does not exist. Small-scale producers rely on larger growers/packers to grade and pack their fruit. Fruit may be marketed by the packing facility or through a number of Tasmanian exporters.

24
Production and Markets
The Tasmanian cherry industry collates production and export statistics annually. The 2009-2010 season produced 3600 tonnes of fresh cherries. Production is expected to increase to 4000 tonnes in 2010-2011, and plateau at potentially 6000 tonnes in the next 5 years (excluding any future plantings). The Tasmanian cherry industry calculates it needs to export at least 50% of its’ production to reduce pressure on the domestic market, with an expected value to state GDP of approximately $95 million.
Season – by year Crop Tonnage Export Tonnage
2006-2007 2000 300
2007-2008 3200 790
2008-2009 2900 1000
2009-2010 3600 1200
2010-2011 Estimated 4000 Estimated 1500-1800
The greatest opportunity for Tasmanian cherries is in the export of first class fresh fruit.
Tasmania’s unique position of having ‘area freedom status’ for fruit fly presents an opportunity for export into South-east Asian and Northern hemisphere markets. As well as supplying local and mainland Australia demand, the Tasmanian industry exports to Taiwan, Korea, Hong Kong, Japan, the USA, the United Kingdom and Europe.
Research, Development and Extension
Fruit Growers Tasmania’s industry extension officer is the coordinator for applied research, development and extension within the Tasmanian cherry industry. Research is done primarily by growers themselves or by the Tasmanian Institute of Agricultural Research (TIAR).
Industry Organisations
Fruit Growers Tasmania Ltd (FGT) 262 Argyle St Hobart TAS 7000 Phone: (03) 62311944 Fax: (03) 62311929
Mobile: 0407 331 728 Email: [email protected],
[email protected] Web: www.fruitgrowerstas.com.au
25
Cherry Production in Western Australia
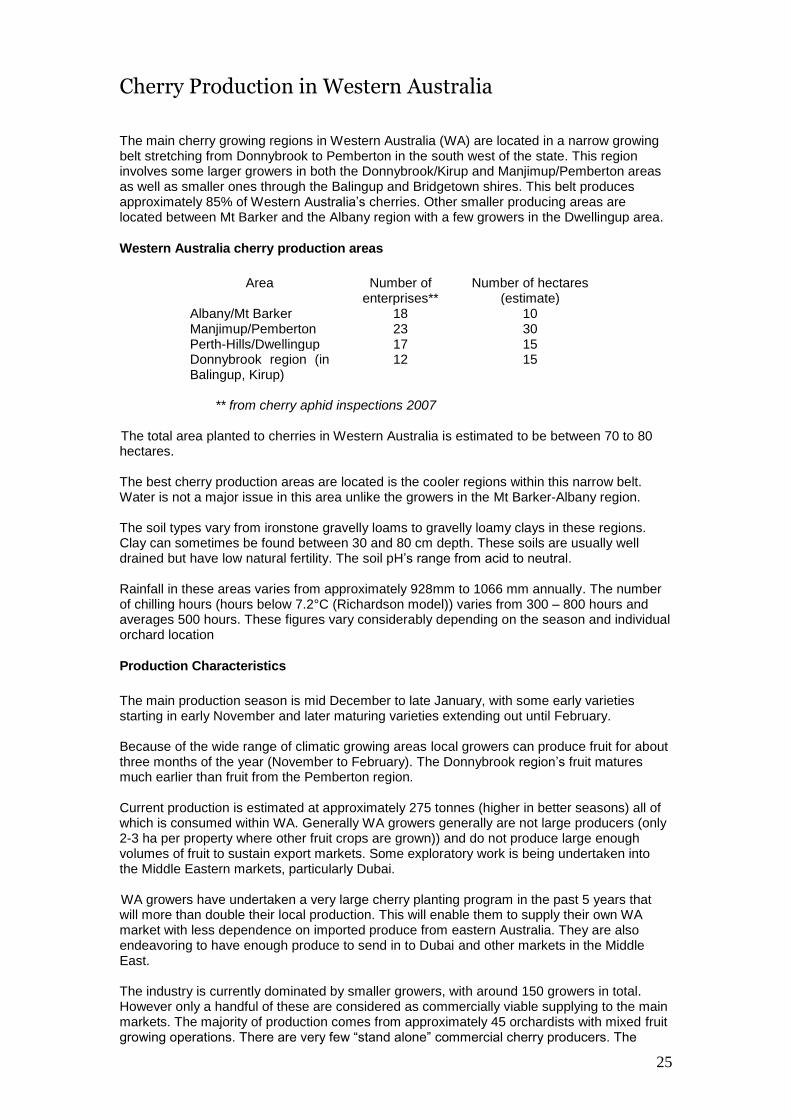
The main cherry growing regions in Western Australia (WA) are located in a narrow growing belt stretching from Donnybrook to Pemberton in the south west of the state. This region involves some larger growers in both the Donnybrook/Kirup and Manjimup/Pemberton areas as well as smaller ones through the Balingup and Bridgetown shires. This belt produces approximately 85% of Western Australia’s cherries. Other smaller producing areas are located between Mt Barker and the Albany region with a few growers in the Dwellingup area.
Western Australia cherry production areas
Area Number of
enterprises** Number of hectares
(estimate) Albany/Mt Barker 18 10 Manjimup/Pemberton 23 30 Perth-Hills/Dwellingup 17 15 Donnybrook region (in Balingup, Kirup)
12 15
** from cherry aphid inspections 2007
The total area planted to cherries in Western Australia is estimated to be between 70 to 80 hectares. The best cherry production areas are located is the cooler regions within this narrow belt. Water is not a major issue in this area unlike the growers in the Mt Barker-Albany region. The soil types vary from ironstone gravelly loams to gravelly loamy clays in these regions. Clay can sometimes be found between 30 and 80 cm depth. These soils are usually well drained but have low natural fertility. The soil pH’s range from acid to neutral. Rainfall in these areas varies from approximately 928mm to 1066 mm annually. The number of chilling hours (hours below 7.2°C (Richardson model)) varies from 300 – 800 hours and averages 500 hours. These figures vary considerably depending on the season and individual orchard location
Production Characteristics
The main production season is mid December to late January, with some early varieties starting in early November and later maturing varieties extending out until February. Because of the wide range of climatic growing areas local growers can produce fruit for about three months of the year (November to February). The Donnybrook region’s fruit matures much earlier than fruit from the Pemberton region. Current production is estimated at approximately 275 tonnes (higher in better seasons) all of which is consumed within WA. Generally WA growers generally are not large producers (only 2-3 ha per property where other fruit crops are grown)) and do not produce large enough volumes of fruit to sustain export markets. Some exploratory work is being undertaken into the Middle Eastern markets, particularly Dubai. WA growers have undertaken a very large cherry planting program in the past 5 years that will more than double their local production. This will enable them to supply their own WA market with less dependence on imported produce from eastern Australia. They are also endeavoring to have enough produce to send in to Dubai and other markets in the Middle East. The industry is currently dominated by smaller growers, with around 150 growers in total. However only a handful of these are considered as commercially viable supplying to the main markets. The majority of production comes from approximately 45 orchardists with mixed fruit growing operations. There are very few “stand alone” commercial cherry producers. The

26
remainder are smaller family operations or boutique orchards supplying local markets or farm gate sales.
Industry Groups
The main organisation is the Cherry Growers Association of Western Australia Inc. The current Secretary/Treasurer is - Maria Vellios, Manjimup, Phone: (08) 9777 2216 (A/H) Mobile: 0418 931 024
Production Systems
Free standing open vase is the main production system used, with some newer plantings using the open Tatura system. Bing, Stella, Lapins, Sweetheart and Van are the main varieties grown. Other “older” varieties grown include Merchant, Supreme and Empress A large number of other varieties have been introduced recently. The best performing of these are Ferprime, Simone, Early Sweet, Royal Rainier, Sweet Georgia, Kordia, Stella, Chelan, Earlise and Australise. There have been a lot of new and untried varieties planted across the growing regions. These include Sandra Rose, Sweet Early, Red Crystal, Celeste, Samba, Index and Symphony. There have been large plantings of late season varieties in the past few years due to changing weather patterns with heavy rains during spring and well in to December. Mazzard and Colt™ are the main rootstocks used, with some Gisela 6. There are not many higher density plantings. Colt™ is the preferred rootstock, with the majority of the plantings undertaken on this rootstock in the last 5 years. The Gisela 6 dwarfing rootstock is also gaining favour. The F12 Mazzard rootstock is no longer favoured in WA as it is susceptible to bacterial canker and late maturity. The Gisela 5 Rootstock is not favoured as the trees remain too small and lack vigour. An increasing number of growers are covering their trees with permanent or “throw over” netting for bird damage control. Growers have moved away from the growth regulators such as Waken to advance the flowering process due mainly due to the continuous rain pattern the Western Australian areas have been experiencing during recent springs. Growers are embracing the pruning techniques used in the eastern states and the United States orchards, with more and more workshops helping to educate growers on better pruning techniques. There has been a lot of pruning in the major WA orchards which was totally non existent until a few years ago.
Industry Issues
Main issues faced by the industry are losses caused by:
Bird damage (the better performing orchards are under netting)
Rain near harvest (splitting). W.A. was free of Brown rot until about 10 years ago. Although it is generally well controlled, it has put added pressure on all stone fruit growers. Water has not been a major issue in the wetter growing areas however the Mt Barker and Albany regions have to ration their water, which in turn affects the volume and quality of their production. The main threats to the Western Australian cherry industry are considered to be the introduction of more pests and diseases from the eastern states.
27
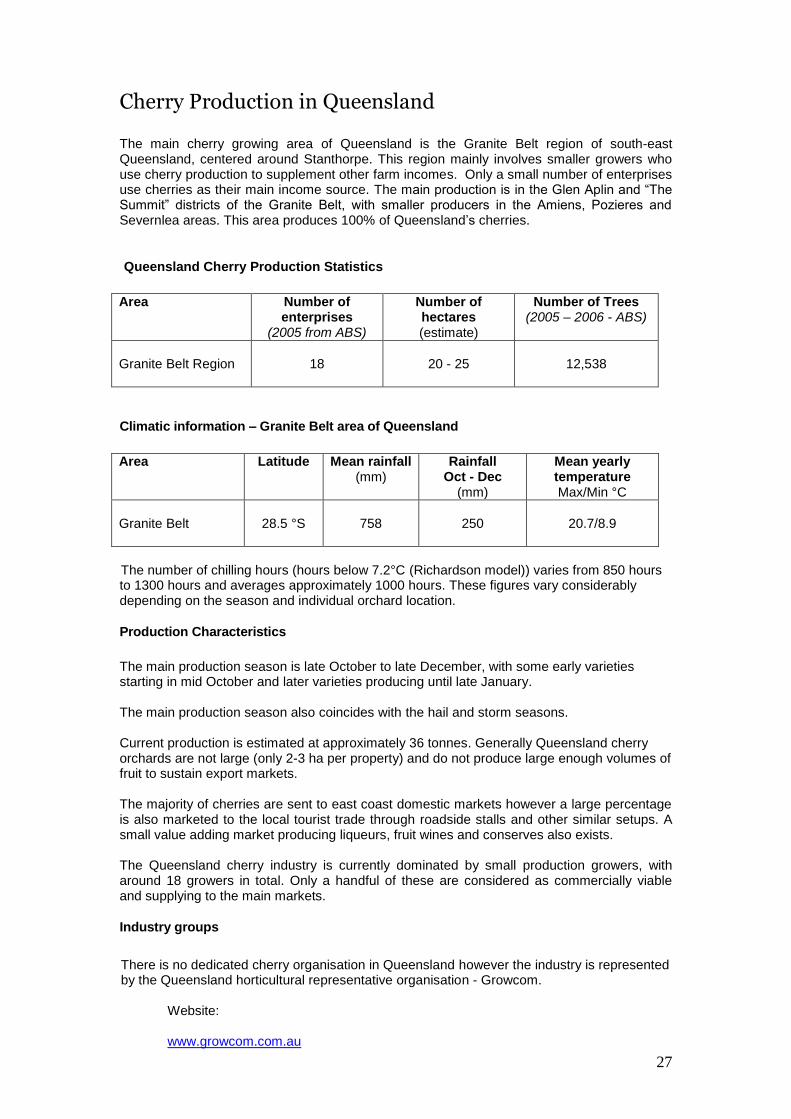
Cherry Production in Queensland The main cherry growing area of Queensland is the Granite Belt region of south-east Queensland, centered around Stanthorpe. This region mainly involves smaller growers who use cherry production to supplement other farm incomes. Only a small number of enterprises use cherries as their main income source. The main production is in the Glen Aplin and “The Summit” districts of the Granite Belt, with smaller producers in the Amiens, Pozieres and Severnlea areas. This area produces 100% of Queensland’s cherries.
Queensland Cherry Production Statistics
Area Number of enterprises
(2005 from ABS)
Number of hectares (estimate)
Number of Trees (2005 – 2006 - ABS)
Granite Belt Region
18
20 - 25
12,538
Climatic information – Granite Belt area of Queensland
Area Latitude Mean rainfall (mm)
Rainfall Oct - Dec
(mm)
Mean yearly temperature Max/Min °C
Granite Belt
28.5 °S
758
250
20.7/8.9
The number of chilling hours (hours below 7.2°C (Richardson model)) varies from 850 hours to 1300 hours and averages approximately 1000 hours. These figures vary considerably depending on the season and individual orchard location.
Production Characteristics
The main production season is late October to late December, with some early varieties starting in mid October and later varieties producing until late January. The main production season also coincides with the hail and storm seasons. Current production is estimated at approximately 36 tonnes. Generally Queensland cherry orchards are not large (only 2-3 ha per property) and do not produce large enough volumes of fruit to sustain export markets. The majority of cherries are sent to east coast domestic markets however a large percentage is also marketed to the local tourist trade through roadside stalls and other similar setups. A small value adding market producing liqueurs, fruit wines and conserves also exists. The Queensland cherry industry is currently dominated by small production growers, with around 18 growers in total. Only a handful of these are considered as commercially viable and supplying to the main markets.
Industry groups
There is no dedicated cherry organisation in Queensland however the industry is represented by the Queensland horticultural representative organisation - Growcom.
Website: www.growcom.com.au
28
Production Systems
The main production system used is the free standing open vase system, with some newer plantings using the open Tatura trellis system. Some growers are experimenting with other trellising systems. Bing, Stella, Lapins, Brooks and Early Sweet, are the main varieties grown. Other varieties grown include Early Burlat, Burgsdorf, Supreme and Empress. Varieties under trial include Australise, Earlise, Kordia, and some of the varieties from the Australian Breeding program including Sir Tom, Sir Don, Dame Nancy and Dame Roma. A large number of other varieties have been introduced by growers but there is little information available on their production quality.
Mazzard F12-1, Mahaleb and Colt™, are the main rootstocks used. Anecdotal information suggests that Mahaleb is more productive than F12-1 and that Colt™ can be very vigorous on the Granite Belt. About half of the Queensland growers have covered their trees with hail netting, which also keeps out birds. Throw over bird netting is also popular on farms not covered with hail net. Growers are experimenting with different coloured hail nets and rain-covers.
Industry Issues
Main issues faced by the industry are losses caused by:
Bird damage
Hail damage
Bacterial canker (Pseudomonas syringae)
Brown rot
Rain near harvest (splitting)
Pollination and crop precocity issues
Cherries are not well suited to the Granite Belt because of the summer rainfall environment. This severely restricts production with rainfall events during the late spring and early summer period (middle of the harvest period). Fruit splitting is an issue for growers without some form of rain protection. Common diseases are Brown rot and Bacterial canker, which prosper in Queensland’s weather conditions.
29
CHARACTERISTICS OF SWEET CHERRIES
The sweet cherry is considered to be a native to the Caspian and Black Sea regions and perhaps to parts of Asia as far east as northern India.
Sweet cherries, Prunus avium L., are inherently very vigorous and become large trees with strong central leaders and an upright growth habit when untrained and unpruned.
Varieties can be separated according to the physical characteristics of their fruits: Bigarreau are firm fleshed while Guigne are soft and tender. Only Bigarreau cherries are firm enough to withstand commercial handling and long distance transport.
Both types have fruit with either dark or light coloured flesh. Dark cherries are reddish-purple or mahogany in colour whereas light cherries are yellow, usually with a pink to red skin blush.
Leaves of sweet cherries are larger than those of other cherry species and have large prominent glands, often bright red in colour at the base of the leaf blades and on the leaf stalks (petioles).
Most sweet cherry varieties currently grown in Australia flower during September and October. Some varieties such as Lapins, reach full bloom early whilst others are still in flower during October. Flowers have white petals and are usually single. Flower buds contain one to five flowers, with two or three flowers per bud the most common.
Fruits vary in shape from round to oval to heart-shaped. Fruit stalks vary in length with variety, from 20 mm to 75 mm.
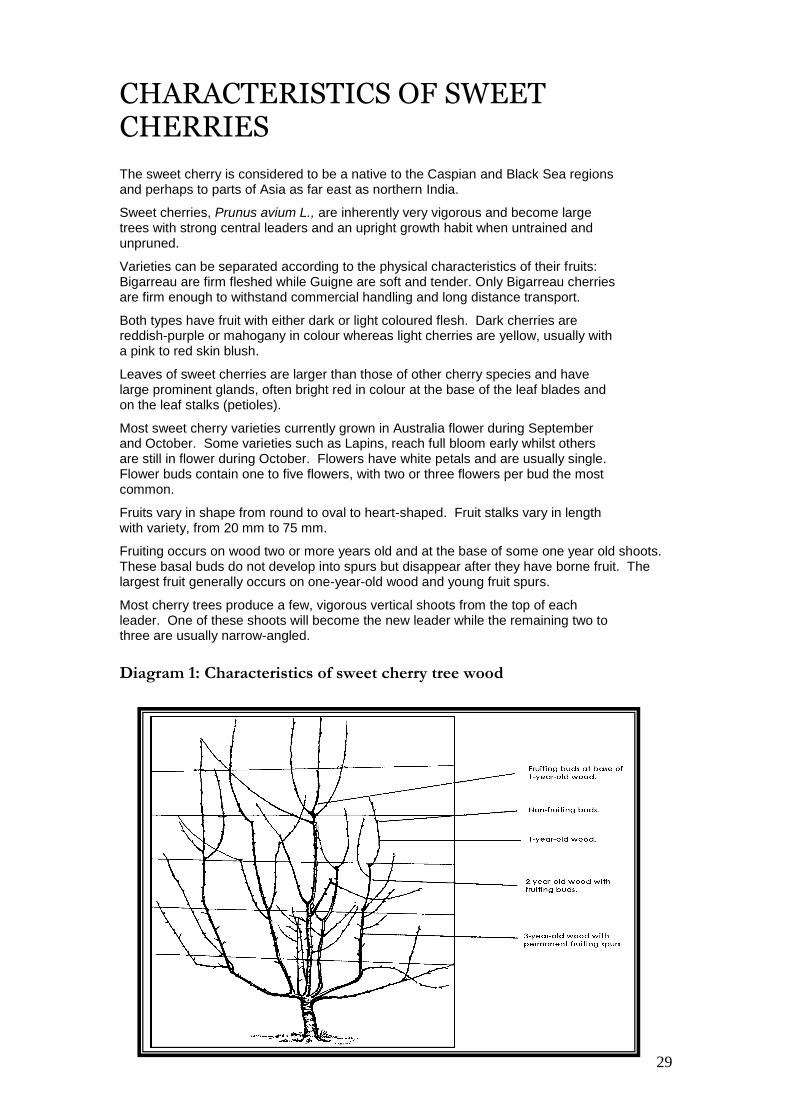
Fruiting occurs on wood two or more years old and at the base of some one year old shoots. These basal buds do not develop into spurs but disappear after they have borne fruit. The largest fruit generally occurs on one-year-old wood and young fruit spurs.
Most cherry trees produce a few, vigorous vertical shoots from the top of each leader. One of these shoots will become the new leader while the remaining two to three are usually narrow-angled.
Diagram 1: Characteristics of sweet cherry tree wood
30
Figure 1 Temperature Summation Graphs for
Selected Stone Fruit Production Centres of SE
Australia
0
500
1000
1500
2000
2500
3000
3500
4000
4500
Sept Oct Nov Dec Jan Feb Mar Apr
Month
Dayd
eg
ree
Su
mm
atio
n
Cambridge
Manjimup (WA)
Lenswood (SA)
Loxton (SA)
Stanthorpe (Qld)
Bathurst (NSW)
Young (NSW)
Orange (NSW)
Shepparton (Vic)
Swan Hill (Vic)
Mornington (Vic)
CLIMATIC REQUIREMENTS
Climate and its Impact on Cherry Production
Introduction
The cherry is an interesting fruit; the fruit itself has a very short period of time on the tree from flowering to maturity, much shorter than most other fruit crops. As such it is influenced very significantly by the climatic conditions during this time. Adverse weather conditions at the wrong time can dramatically influence the performance of cherries often leading to downgrades in fruit yields and/or fruit quality.
However, the climate doesn’t just influence the fruiting period; it also has an impact on the tree all year. This section endeavors to describe how the climate affects the cherry tree, site selection, tree and fruit growth
Temperature Summation
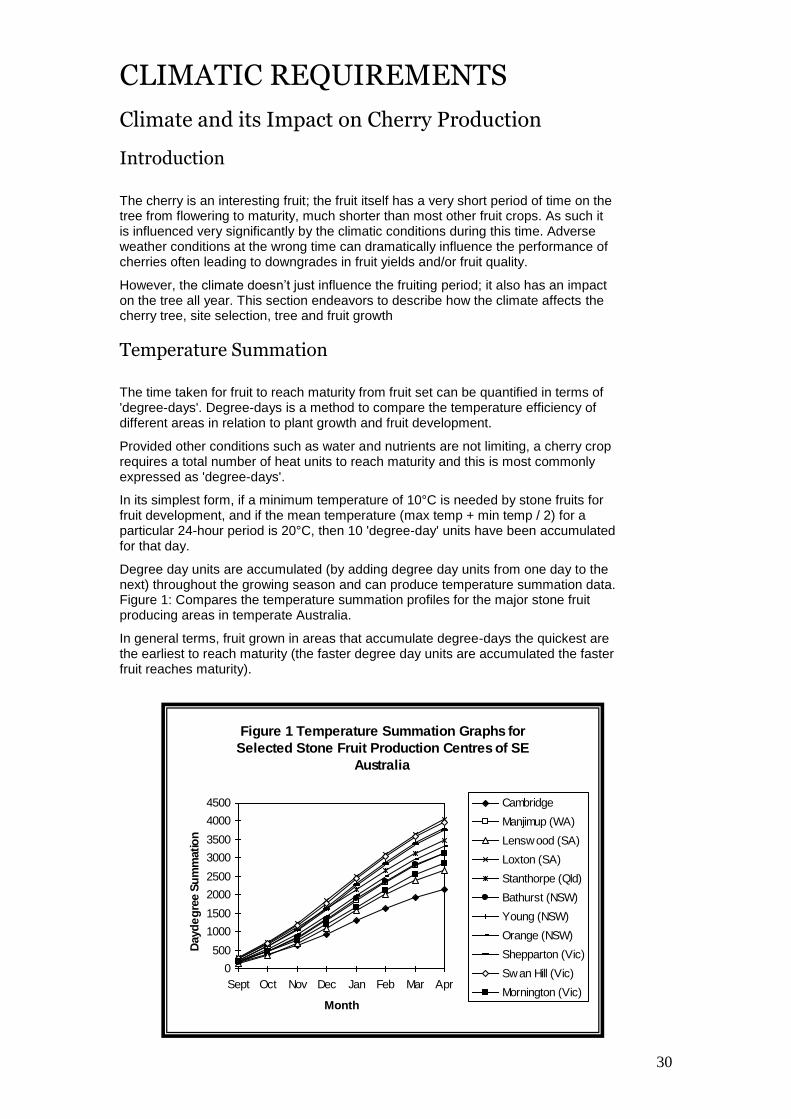
The time taken for fruit to reach maturity from fruit set can be quantified in terms of 'degree-days'. Degree-days is a method to compare the temperature efficiency of different areas in relation to plant growth and fruit development.
Provided other conditions such as water and nutrients are not limiting, a cherry crop requires a total number of heat units to reach maturity and this is most commonly expressed as 'degree-days'.
In its simplest form, if a minimum temperature of 10°C is needed by stone fruits for fruit development, and if the mean temperature (max temp + min temp / 2) for a particular 24-hour period is 20°C, then 10 'degree-day' units have been accumulated for that day.
Degree day units are accumulated (by adding degree day units from one day to the next) throughout the growing season and can produce temperature summation data. Figure 1: Compares the temperature summation profiles for the major stone fruit producing areas in temperate Australia.
In general terms, fruit grown in areas that accumulate degree-days the quickest are the earliest to reach maturity (the faster degree day units are accumulated the faster fruit reaches maturity).
31
Climatic Conditions Needed for Commercial Cherry Production
The major components of climate directly affect the profitability of commercial cherry production. A cherry enterprise should not be contemplated without prior consideration of the full impact of the regions climate. Furthermore, some aspects of climatic variation between regions can be exploited to provide new opportunities for markets.
Sweet cherries are more sensitive to climatic variables than other fruit crops.
The ideal climatic conditions for growing cherries are:
Sufficient winter chilling to ensure even and full bud break in spring.
No severe frosts and little rainfall from late August to late October to ensure maximum pollination (by bees) and maximum fruit set.
Temperatures above 13°C during the blossoming period to ensure adequate bee activity.
Low summer rainfall to minimize fruit damage and reduce disease pressure.
Low humidity throughout the growing season to minimize disease outbreaks.
Low to moderate winds to minimize physical injury to trees and fruit while providing sufficient aeration to reduce humidity within the crop.
Adequate access to water for irrigation requirements
The microclimate of an area being selected for cherry production needs careful consideration as it affects the time of harvest, which in turn determines market choice and variety selection.
Rainfall
For cherry production, the pattern of rainfall throughout the year is more important than the actual total annual rainfall for any locality. The two wet periods in the yearly pattern that are of most concern are when the trees are in blossom and when fruit is ripening. Varieties vary in their sensitivity to both of these periods.
Cherries suffer reduced fruit set if rain persists during the blossoming period.
Persistent rainfall during the fruit maturity period can increase disease pressure and directly damage fruit. This has been an increasing problem in several of the major growing regions in recent seasons
Temperature
Different cherry varieties are affected by different temperature effects. These include winter temperatures, chilling requirements, spring temperatures, frosts and maximum and minimum temperatures.
Winter temperatures
The range and duration of winter temperatures is extremely important in cherry production. Temperatures should be low enough to enable the accumulation of adequate chilling units but not cold enough to cause injury to the trees.
The topic of chilling is discussed further in this section.

32
Most of Australia’s cherry production areas generally do not experience winters cold enough to cause tree damage or in severe cases tree deaths. Fully dormant cherry trees can withstand temperatures as low as minus 29º C (Proebsting, E.L, Jr 1970)
Cherry tree roots are more susceptible to cold damage than the above ground parts of the tree, and rootstocks may differ in their sensitivity to cold (Longstroth & Perry in Webster & Looney 1996). The killing temperatures of rootstocks are reported as
Mazzard – below minus 11º C
Mahaleb - below minus 15º C
Colt™ – less cold tolerant than either Mahleb or Mazzard.
Krymsk™ - one of their principal selection criteria was tolerance to cold damage
Cold tolerance is also affected by interactions between the rootstock and scion. A cold hardy rootstock can increase the cold tolerance of the scion while a more sensitive rootstock such as Colt™ may reduce cold hardiness.
Chilling Requirements
Cherry trees need a period of rest or dormancy to produce fruit. Dormancy is broken once a variety's chilling requirement has been met. Every variety has its own individual chilling requirement. Most varieties recommended for Australia have a chilling requirement of more than 800 hrs at temperatures between 2°C and 12°C.
High temperatures during winter can alter the length of the dormant period but production will be satisfactory if the overall chilling requirement is met. Insufficient chilling results in delayed and prolonged bud burst. This can cause uneven shoot development, flowering and fruit maturity. In extreme cases the number of flowers is substantially reduced and buds are shed.
Calculation of Chilling
Many different models and variations of these models have been developed to determine how much chilling has occurred. Unfortunately there are no relatively simple ways for orchardists to calculate chilling hours themselves. Most of the models require hourly temperature records and a computer to do the calculations required. These records can be obtained from the automatic weather stations now located throughout the state's cherry growing areas.
The model most commonly referred to is called "the Richardson Model" and is based on a technique developed by a Dr E.A Richardson and colleagues at Utah State University in the 1970's. Specific details about the model can be obtained from the following reference;
Richardson, E.A., Seeley, S.D. and Walker, R.D (1974) A model for estimating the completion of rest for 'Redhaven' and 'Elberta' peach trees. Science, Vol 9(4) August 1974 pp 331-332.
The model is based on the accumulation of chill units where "I chill unit = I hour exposure at 7°C". The chilling contribution becomes less than 1 as the temperature drops below or rises above the optimum value. A negative value is attributed to chilling when the temperature rises above 15°C and a 0 value is attributed to temperatures at or below 0°C.
The following table lists the relationship between temperatures and chilling units used in the "Richardson" model.
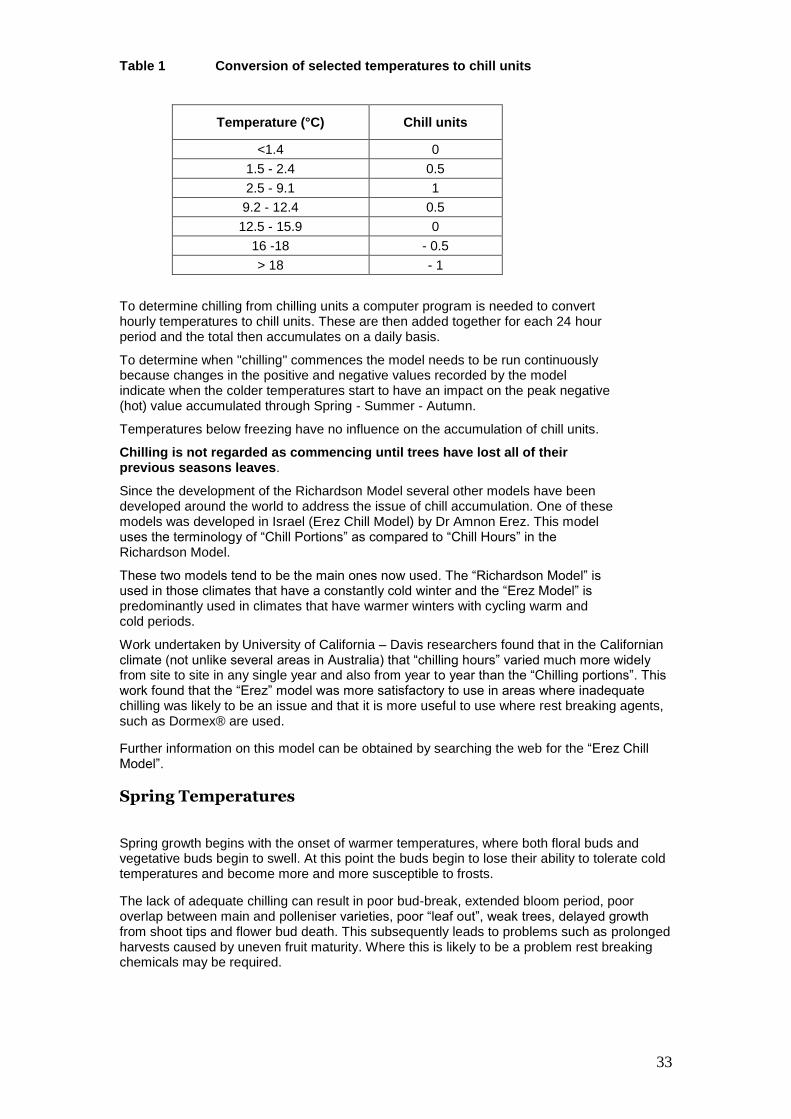
33
Table 1 Conversion of selected temperatures to chill units
Temperature (°C) Chill units
<1.4 0
1.5 - 2.4 0.5
2.5 - 9.1 1
9.2 - 12.4 0.5
12.5 - 15.9 0
16 -18 - 0.5
> 18 - 1
To determine chilling from chilling units a computer program is needed to convert hourly temperatures to chill units. These are then added together for each 24 hour period and the total then accumulates on a daily basis.
To determine when "chilling" commences the model needs to be run continuously because changes in the positive and negative values recorded by the model indicate when the colder temperatures start to have an impact on the peak negative (hot) value accumulated through Spring - Summer - Autumn.
Temperatures below freezing have no influence on the accumulation of chill units.
Chilling is not regarded as commencing until trees have lost all of their previous seasons leaves.
Since the development of the Richardson Model several other models have been developed around the world to address the issue of chill accumulation. One of these models was developed in Israel (Erez Chill Model) by Dr Amnon Erez. This model uses the terminology of “Chill Portions” as compared to “Chill Hours” in the Richardson Model.
These two models tend to be the main ones now used. The “Richardson Model” is used in those climates that have a constantly cold winter and the “Erez Model” is predominantly used in climates that have warmer winters with cycling warm and cold periods.
Work undertaken by University of California – Davis researchers found that in the Californian climate (not unlike several areas in Australia) that “chilling hours” varied much more widely from site to site in any single year and also from year to year than the “Chilling portions”. This work found that the “Erez” model was more satisfactory to use in areas where inadequate chilling was likely to be an issue and that it is more useful to use where rest breaking agents, such as Dormex® are used.
Further information on this model can be obtained by searching the web for the “Erez Chill Model”.
Spring Temperatures
Spring growth begins with the onset of warmer temperatures, where both floral buds and vegetative buds begin to swell. At this point the buds begin to lose their ability to tolerate cold temperatures and become more and more susceptible to frosts.
The lack of adequate chilling can result in poor bud-break, extended bloom period, poor overlap between main and polleniser varieties, poor “leaf out”, weak trees, delayed growth from shoot tips and flower bud death. This subsequently leads to problems such as prolonged harvests caused by uneven fruit maturity. Where this is likely to be a problem rest breaking chemicals may be required.
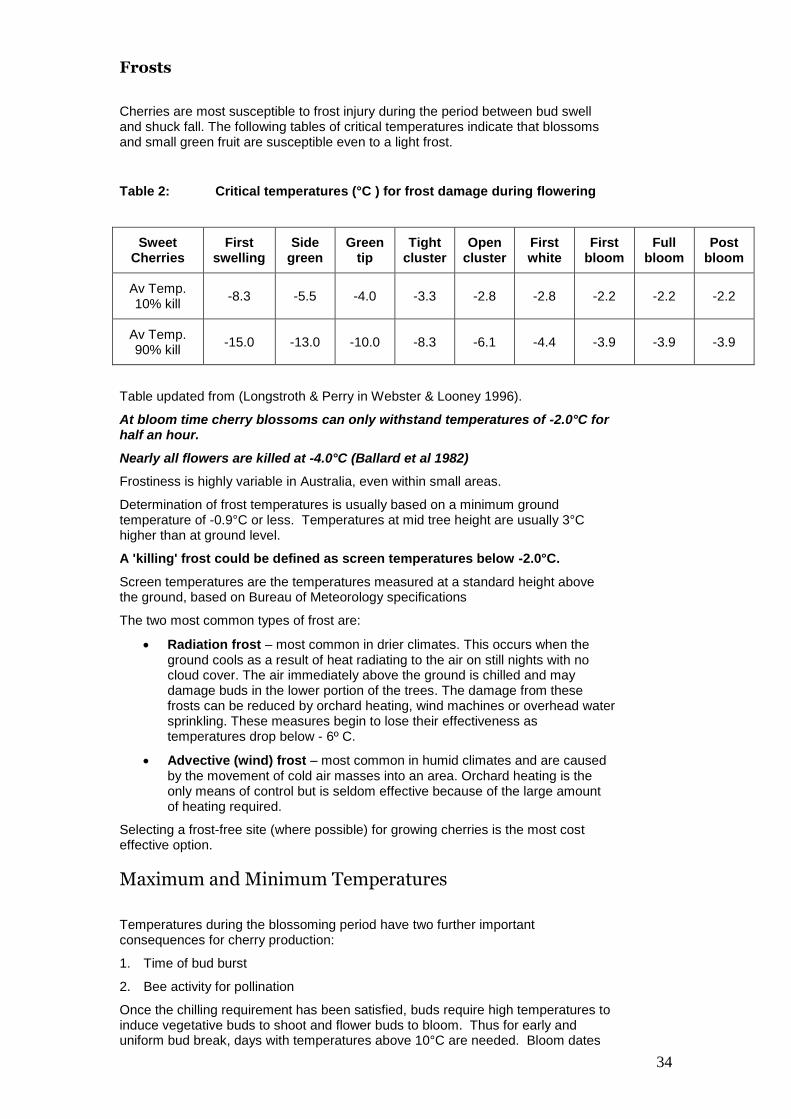
34
Frosts
Cherries are most susceptible to frost injury during the period between bud swell and shuck fall. The following tables of critical temperatures indicate that blossoms and small green fruit are susceptible even to a light frost.
Table 2: Critical temperatures (°C ) for frost damage during flowering
Sweet Cherries
First swelling
Side green
Green tip
Tight cluster
Open cluster
First white
First bloom
Full bloom
Post bloom
Av Temp. 10% kill
-8.3 -5.5 -4.0 -3.3 -2.8 -2.8 -2.2 -2.2 -2.2
Av Temp. 90% kill
-15.0 -13.0 -10.0 -8.3 -6.1 -4.4 -3.9 -3.9 -3.9
Table updated from (Longstroth & Perry in Webster & Looney 1996).
At bloom time cherry blossoms can only withstand temperatures of -2.0°C for half an hour.
Nearly all flowers are killed at -4.0°C (Ballard et al 1982)
Frostiness is highly variable in Australia, even within small areas.
Determination of frost temperatures is usually based on a minimum ground temperature of -0.9°C or less. Temperatures at mid tree height are usually 3°C higher than at ground level.
A 'killing' frost could be defined as screen temperatures below -2.0°C.
Screen temperatures are the temperatures measured at a standard height above the ground, based on Bureau of Meteorology specifications
The two most common types of frost are:
Radiation frost – most common in drier climates. This occurs when the ground cools as a result of heat radiating to the air on still nights with no cloud cover. The air immediately above the ground is chilled and may damage buds in the lower portion of the trees. The damage from these frosts can be reduced by orchard heating, wind machines or overhead water sprinkling. These measures begin to lose their effectiveness as temperatures drop below - 6º C.
Advective (wind) frost – most common in humid climates and are caused by the movement of cold air masses into an area. Orchard heating is the only means of control but is seldom effective because of the large amount of heating required.
Selecting a frost-free site (where possible) for growing cherries is the most cost effective option.
Maximum and Minimum Temperatures
Temperatures during the blossoming period have two further important consequences for cherry production:
1. Time of bud burst
2. Bee activity for pollination
Once the chilling requirement has been satisfied, buds require high temperatures to induce vegetative buds to shoot and flower buds to bloom. Thus for early and uniform bud break, days with temperatures above 10°C are needed. Bloom dates

35
vary from year to year depending on temperatures following the winter chilling period.
Bee activity falls dramatically as the temperature drops below 13°C.
Temperature Assessments
The variation in microclimates within the states can best be appreciated by comparing temperature summations for various localities. Such graphs indicate the relative length of the growing season and hence the relative fruit maturing times
Growing Season Climatic Conditions
Each variety has its own growing period requirement from blossom to fruit maturity.
Rain, wind or cold weather during the blossom period can result in poor bee activity, poor pollinisation, poor pollen growth or germination or growth, which all results in reduced fruit set and yields. Rain during bloom can lead to reduced pollination and blossom infection by fungi or bacteria.
Rain before or during harvest can result in fruit splitting and infection with Brown rot or a number of other fungal diseases. It can also lead to the development of leaf diseases and other fungal and bacterial diseases. Fortunately many of the more serious diseases are not present in Australia.
Following harvest cherries require a period of good growing conditions to enable the tree to generate and store reserves for the next growing season. Poor growing conditions or stress (particularly drought stress) in this period can adversely affect the next season’s performance.
Extremely warm temperatures during the growing season can lead to a high proportion of “twin” fruits where the flower pistils have doubled during flower formation. This can be a significant problem in the warmer growing regions of Australia (WA, SA Riverland, Victoria’s Goulburn Valley) in some seasons.
Wind
Wind has both direct and indirect effects on cherry production. Direct effects due to strong winds include tree damage (breakage, leaf damage), fruit damage (limb rub, leaf rub) and reduced fruit set. Indirect effects include reduced temperatures, less pleasant work environment and increased water loss from plants and soil.
Not all wind effects are deleterious. For example, the cooling effects of sea-breezes in December and January slow the rate of fruit ripening, thus delaying maturity. Wind also helps to reduce humidity within a crop and therefore limits disease and pest pressure.
Winds in Australia are described as either prevailing or local.
Prevailing Winds –
Winds that predominate throughout most of a season
Local Winds
For cherry production, breezes are the most important local wind. Breezes have a significant influence on the ripening dates of sweet cherries as these cooling winds coincide with the harvest season of sweet cherries.
Wind Protection
Shelter from prevailing winds is most important. To some extent, trellis tree training systems provide some protection against the direct damaging effects of winds. However, to ensure optimum tree growth and high fruit pack-out, some form of wind shelter should be provided. Remember, wind barriers, either natural or artificial, are

36
only effective if properly sited, correctly spaced, correctly constructed and chosen from recommended plant species or man made materials.
Before establishing either a natural or artificial wind barrier the following points should be noted:
Seek advice from local authorities or consultants
Plan well in advance of the orchard planting.
References
Ballard, J.K. Proebsting, E.L and Tukey, R.B (1982) Critical Temperatures for Blossom Buds: Cherries. Washington State University Extension Bulletinn1128, Washington State University, Pullman, Washington State, USA Longstroth, M. & Perry, R.L Selecting the Orchard Site, in Webster, A.D & Looney, N.E. (1996) Cherries: Crop Physiology, Production and Uses. CAB International, pp 203 –221 Proebsting, E.L, Jr (1970) Relation of Fall and Winter Temperatures to Flower Bud Behaviour and Wood Hardiness of Deciduous Trees. HortScience 9, pp 331-332

37
PRODUCTION ASPECTS OF SWEET CHERRIES
Planning Your Orchard
Introduction
Setting up a profitable orchard is no longer the relatively easy task it once was. Today’s orchards are complex, expensive and risky to establish. Planting an orchard is not just a matter of preparing a site, planting the trees and then looking after them. Today’s orchards have developed into an “integrated system” that requires careful decisions to ensure that all of the system components fit together correctly. One of the major issues with today’s modern integrated orchard systems is that there is no single right answer for any grower and/or specific site; there are multiple options that can be put together quite successfully for each orchard site. What is critical is that orchardists carefully consider their situation, preferences, marketing options and orchard system options carefully with careful preplanting planning In an effort to simplify the information required to develop an “integrated orchard system” Dr Bruce Barritt from Washington State University, USA, has derived and developed the term the “Orchard Systems Puzzle”. This is a term now widely used throughout the world and represented in a diagram. This is shown in by figure 2 on the following page.
Barritt (2003) describes an orchard system or “puzzle” as “…a comprehensive program (a strategy and recipe) for the establishment and management of trees in an orchard. An orchard system is an integration of components that must be selected based on physiological principles of tree growth and cropping…” He further states that “There are seven components that must be considered when selecting an existing or designing a new orchard system.” These 7 components are:
1. Rootstock 2. Tree density 3. Tree quality 4. Tree arrangement 5. Support Systems 6. Tree training (by limb position) 7. Tree training (by pruning)
For any given site these 7 components and their interactions must be carefully considered. If one component is wrong then you potentially get the whole orchard wrong. Figure 2 represents these 7 components as parts of a jigsaw puzzle (the cherry) however these components must be considered in close coordination with the specific site attributes, grower management skills and attitudes and the other issues (represented outside of the cherry) that influence the decision making process. This section will discuss these “components” in detail to assist growers in developing an understanding of the basic principles of cherry crop physiology before decisions can be reliably made.

38
Figure 2: The Orchard Systems Puzzle
The Orchard System “Jigsaw Puzzle”
The Orchard Systems “Jigsaw Puzzle” has seven major components. Each of these has to be considered carefully for each individual orchard site by each individual orchardist or company. Many other issues also need to be considered in conjunction with these 7 factors, including (amongst many more)
Grower management skills Current Equipment Ability to change or modify equipment to suit new systems Labour availability
39
System establishment costs Pest and disease management options Market options and requirements
All will be influenced by an individual orchardists’ confidence, willingness to change and attitude to risk.
Orchard Profitability
The profitability of any orchard is linked to its market returns. These in turn are directly linked to
Yield / Marketable packout Price
Any factor that affects marketable packout (saleable fruit) needs careful consideration. Price is directly influenced by fruit quality, market timing and market conditions. Total yield is very important but is not the major driver of orchard profitability. Profitability is linked to dollars returned per hectare not total fruit yield per hectare
Site Selection
Site selection is the key factor around which all other planning decisions are made.
The key factors to consider in the site selection of any cherry orchard in Australia are:
Regional location
Rain susceptibility
Soil drainage
Soil type & fertility
Water quality
Other factors to consider include
Winter chilling
Frost
Wind
Verticillium wilt
Regional Location
The regional location of an orchard has large implications for market options and variety selection. Within a region there can be up to 2-3 weeks variation in the maturity dates of any specific variety due to microclimate aspects.
The location of an orchard will also influence the types and extent of pests and diseases present. Generally the higher the rainfall of an area the better the approach to disease control needs to be. Hot dry areas tend to have more pest problems.
40
Rain Susceptibility
The ideal site for cherry growing would have no rainfall during the fruit ripening period from approximately the end of October to the middle of January. Rain damage ie splitting and cracking is one of the 2 major problems affecting cherry profitability. Unfortunately, very few areas in Australia usually escape rain at harvest time. Growers are increasingly investigating the use of rain covers as a commercial option to protect their crops. Currently growers need to rely on variety selection as their main protective measure.
Soil Drainage
Cherry trees are very susceptible to damage caused through poor drainage. It is critical to ensure that any site selected for cherries has good surface and sub-surface drainage
Soil Type and Fertility
Sweet cherries tolerate 'heavy soils' provided they are well structured to allow good drainage. Cherry root systems are sensitive to wet or poorly drained soils. Trees inundated with surface water for over a week may never recover. Even short term flooding can have long term damaging effects. Wet soils also encourage the development of potentially lethal Phytophthora root rots.
Light, sandy soils can be used provided a sprinkler irrigation system is used or such soils are underlain by a clay sub-soil. Avoid planting on sand hills.
The rootstock most commonly used in Australia Mazzard (F12-1) prefers a medium textured soil with good drainage. Mahaleb rootstock is better suited to light textured deep soils but may not be compatible with all sweet cherry varieties. Colt™ rootstock is recommended for soils where drainage may be a problem.
Highly fertile soils should be avoided due to the vigorous growth habit of most sweet cherry varieties unless more dwarfing rootstocks are used. Those of lower fertility are generally preferred as tree vigour can be regulated through nutrition and irrigation management to an extent.
Topography
Sites with a gentle, even slope are ideal for cherries as they provide for easy run-off of surplus surface water, simplify erection of trellis systems or protective coverings and influence labour productivity.
Slopes of over 10º require additional preparation and may reduce the efficiency of machinery operation. Slopes of this level are also more prone to erosion problems during the orchard establishment phase and need additional management practices implemented to minimise these problems. Seek professional local advice prior to any land preparation.
Uneven soils also create problems for tree growth. Practices to fill in and even out these sites may result in localised nutrient problems.
Mounding of soil may be required to avoid water logging in low lying areas.
Water Quality
The water quality throughout Australia varies considerably depending on its source (river, rainfall or bore). It is also considered essential that sweet cherries receive supplementary irrigation under most Australian environmental and soil conditions.
Water quality should be checked prior to establishment of any cherry orchard.
41
Water of less than 500 mg/litre of total dissolved salts is desirable. Water qualities between 500 -750 mg/litre can be used with careful irrigation management. Water above 750 mg/litre should be avoided or "shandied" with good quality water before use.
Other Factors to Consider
Verticillium Wilt
Cherries are very susceptible to verticillium wilt fungus. This fungus is often found in old vegetable production paddocks. Old apple orchard soils may need to be fumigated prior to planting.
Site’s previous crop history
It is preferable to avoid planting in soils that have had a tomato, potato or other solanaceous crop in the previous ten years.
Land that has been used for vegetable production for an extended period of time may have cultivation/compaction zones in the soil profile. These areas can cause several problems and should be broken up prior to planting with cherries.
Intensely cropped soils may also have specific nutrient deficiencies/toxicities. These soils must have an appropriate soil test undertaken prior to planting and any specific nutrient problems rectified as part of the soil preparation activities.
Previous plantings of cherry trees may result in “replant” problems. These replant problems may be caused by a number of possible causes and if a site has to be replanted there are a range of appropriate soil and tree management activities that should be undertaken. See details in the “Site Preparation” section.
If a site has not been used for several years the type of plants growing can give an indication of potential problems. The presence of Dock and/or Reed species indicates the presence of poorly drained soils. Sorrel indicates soils of low pH and fertility.
Avoid areas where Red Gums (Eucalyptus camaldulensis) species are the dominant tree type as they are indicative of soils that are particularly wet in the late winter to early spring.
If a site has previously had an orchard with significant tree deaths due to wet soils the drainage of the site must be addressed before planting cherries. This may require the installation of agricultural drains or other measures.
Row Orientation
Considerable debate centres around what the best row orientation is. There is a perception amongst growers that row orientation is not as critical here in Australia as it is in the northern hemisphere because of Australia’s relatively high light levels Throughout the world there has been considerable research undertaken on the row orientation issue, particularly in relation to higher density orchards. Many factors interact to complicate the issue, such as latitude, the time of the year, the time of day, tree height and shape and row spacing. In reality planting rows in a north – south direction is not always practical because of property layouts, shape, slopes or aspects. For practical reasons other factors such as operator safety, machinery use and management efficiencies need to be considered when planting the orchard. As a general guide all orchards should be planted with as close to north-south row orientation as possible except where site constraints or operator safety prevent this occurring.

42
Varieties (Cultivars)
Commercial cherry production is all about producing good quality fruit that meets market demand and consumer acceptance in a profitable way. Variety selection is one of the most critical aspects of any sweet cherry orchard's profitability. Before establishing any orchard it is essential to consider what market niche you believe is going to provide you with the best returns. To do this you will need to discuss market opportunities with wholesale agents, packing sheds, exporters and the like
The targeted market niche (farm gate, local, interstate or export) will influence what varieties to grow. Growing varieties that are suitable for export generally provides the greatest flexibility as these varieties can be sold in any market. Varieties that only have local market or farm gate potential offer the least amount of marketing flexibility.
Variety selection will also be influenced by an area's fruit maturity characteristics, in particular early maturing varieties should be grown in the early districts. There are limited advantages in growing early maturing varieties in mid - late maturing districts. Additionally there are marketing advantages from growing late maturing varieties in later maturing districts. The Riverland region of South Australia specialises in growing early to mid season varieties because of its early maturing climate. Tasmania has forged a reputation for growing later maturing varieties due to its climatic conditions.
Different growing regions tend to grow differing mixtures of varieties. The following table provides a summary of the major varieties currently being grown commercially in Australia.
At present there are over 80 varieties or selections being grown commercially or evaluated in Australia. Growers will need to seek as much information as possible from a range of different sources to help them make appropriate selections for their market options and growing conditions.
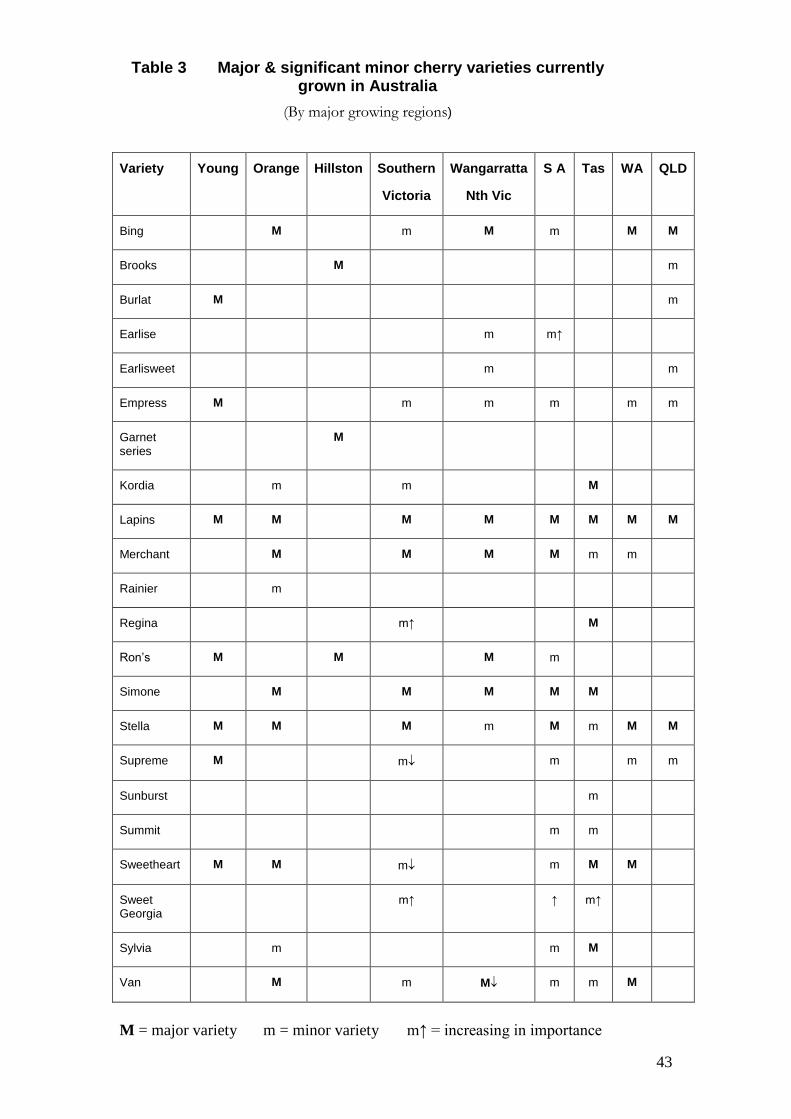
43
Table 3 Major & significant minor cherry varieties currently grown in Australia
(By major growing regions)
Variety Young Orange Hillston Southern
Victoria
Wangarratta
Nth Vic
S A Tas WA QLD
Bing M m M m M M
Brooks M m
Burlat M m
Earlise m m↑
Earlisweet m m
Empress M m m m m m
Garnet series
M
Kordia m m M
Lapins M M M M M M M M
Merchant M M M M m m
Rainier m
Regina m↑ M
Ron’s M M M m
Simone M M M M M
Stella M M M m M m M M
Supreme M m m m m
Sunburst m
Summit m m
Sweetheart M M m m M M
Sweet Georgia
m↑ ↑ m↑
Sylvia m m M
Van M m M m m M
M = major variety m = minor variety m↑ = increasing in importance
44
Variety Descriptions and Trends
The variety descriptions provided here are of the major varieties currently grown or varieties of increasing or specialist interest. It is not intended to be a comprehensive list of all varieties grown in Australia.
Early Maturing Regions
Chelan:
Chelan was developed and tested at Prosser, Washington State USA. It can be harvested as early as 10 to 12 days before Bing (US comparator variety). The cherry is similar to Bing in appearance with mahogany red skin and medium to dark red flesh. Fruit is very firm with tolerance to cracking. There is considerable variation in views of its flavour.
Reportedly of Bing size or slightly smaller, however, young trees have consistently produced fruit of equal or larger size.
Self-infertile, compatibility Group V (S3S5). First bloom is a few days before Bing. However bloom is prolific and generally overlaps Bing. Cross-pollinators include Rainier, Bing, Van, Lapins and Sweetheart. It is incompatible with Tieton and Burlat.
Chelan is a relatively new variety in Australia and has had variable reports on performance from growers. In the USA, Chelan reportedly fruits heavily and requires good management to achieve optimal fruit size however one of the major problems with Chelan in Australia is light crop loads.
Overseas reports suggest precocious rootstocks are generally not needed, however this may not be the situation in many Australian soils. A Chelan/Gisela combination may be a suitable combination in some growing regions. Local testing is required.
It is recommended not to use Mahaleb rootstock with this variety.
Subject to Plant Breeders rights protection, a royalty on the purchased tree and a non-propagation agreement must be signed.
Early Burlat:
Early Burlat produces medium-sized, firm fruit. Fruit ripens before Supreme. Fruit is somewhat Van-shaped (kidney-shaped) with short stems. It is a precocious variety but the fruit is susceptible to rain cracking.
Although this is an older European variety it is relatively new to Australia. So far cracking susceptibility and soft fruit has been a problem
Empress:
The very early flowering and maturing variety Empress is originally from Young, NSW. Fruit is rounded in shape and the colour ranges from deep red to mahogany. Optimum flavour is with reached when it has a mahogany colour. Empress has reported erratic performance and suffers increasing competition from better early season varieties. Subject to Plant Breeders rights protection, a royalty on the purchased tree and a non-propagation agreement must be signed.
45
Merchant:
Merchant is a United Kingdom bred variety. The fruit is dark-fleshed and softer than mid and late season maturing varieties, however its fruit is still firm enough to withstand transporting. Best flavour is attained when the fruit is allowed to fully mature
Merchant trees have a good resistance to bacterial canker and better resistance to rain cracking than Vista. It can have problems with uneven maturity.
Merchant is subject to a royalty on the purchased tree and a non-propagation agreement must be signed.
Supreme:
This is a reasonable quality, dark-fleshed heart-shaped cherry with good size and firmness. It ripens just before Ron's Seedling but unfortunately is very sensitive to rain cracking. It is also susceptible to bacterial canker.
Its performance in Australia has been variable and it is considered an extremely vigorous variety, creating problems with excessive tree size if not managed carefully.
Supreme is an Australian selection, unfortunately there are no virus-free trees currently available. Budwood selection from 'good' trees is essential to ensure that this variety reaches its full potential.
Vista:
The Vista variety matures in the same season as Supreme. It is reported to have good size and firmness but is also highly susceptible to rain cracking. It is a dark-fleshed cherry, bred in Canada. This variety is declining in importance.
Newer early season varieties
Brooks:
This variety was developed by the University of California. It has a large and firm dark red cherry, similar in appearance to Bing. Brooks reportedly has a low chilling requirement (of 400 hours) and tolerates hot climates but is very susceptible to rain cracking.
This variety is subject to Plant Breeders rights protection. A royalty on the purchased tree and a non-propagation agreement must be signed.
Earlise:
Earlise is a new early season variety from the French Delbard program. It has kidney shaped fruit on a short stem, is dark crimson in colour and has reasonable fruit size and fruit firmness. It is relatively new to Australia and is still under evaluation. The trees have a strong semi upright growth habit. It is reported to have a similar sensitivity to rain cracking as Burlat. Pollinators are listed as Van or Lapins.
Earlise is subject to Plant Breeders rights protection and a royalty on the purchased tree and a non-propagation agreement must be signed.
46
Earlisweet:
This variety is a Plant Patented variety from the US based Zaiger Breeding program. It is a medium - large red coloured early maturing variety with slight heart shape. It has uniform maturity and reasonable flavour. Stella is one of its parents
The trees are vigorous and upright. Fruit can develop rain cracks depending on the stage of fruit maturity.
Earlisweet is a new variety to Australia and commercial evaluations are being conducted
It is subject to Plant Breeders rights protection and a royalty on the purchased tree and a non-propagation agreement must be signed.
Mid - Late Maturing Regions
Varieties chosen for mid - late maturing districts should be selected for the following criteria:
Large, firm-fleshed fruit
Dark fleshed fruit, because they are preferred by the Australian and most overseas markets
Resistance to cracking
Precocious fruit behaviour (early, heavy bearing)
Pollination compatibility
The following varieties are listed in general order of maturity, but this may vary by region and season.
Van:
This is a dark, firm cherry with a short stalk. The trees are precocious (heavy bearing) and very prone to cracking in wet conditions. The fruit is 'squat' shaped, having a breadth greater than depth, and can be picked earlier than most other varieties due to its high sugar content. Overcropping in some years can lead to a reduction in the size of fruit. Van is moderately susceptible to bacterial canker and fruit is susceptible to 'pitting' injury. Van requires other varieties for cross-pollination.
This variety is reducing in importance because of increasing market requirements for large fruit.
Bing
Bing is the most dominant cultivar in the Pacific Northwest of the USA and is frequently used as the base variety for comparisons. It is widely adaptable to a range of growing conditions except very cold or hot climates and is reported to require approximately 800 - 900 hours of chilling. The Bing cherry is large and dark red, it is firm and juicy with good flavour. It is prone to rain cracking and its popularity is declining in Australia
Rons Seedling
Ron’s seedling is a NSW variety, it is medium sized, round to heart shaped, and firm with a tough skin. The fruit colour ranges from mahogany to dark mahogany. This cherry has good handling and shipping characteristics. It is a consistent and reliable producer but is not suited to all growing areas
47
Summit:
The variety Summit produces large, firm, heart-shaped fruit of excellent eating quality. It has good resistance to rain cracking, however, low yields and low precocity are the major problems of this variety (believed to be because of a high chilling requirement and cross pollination problems). It has a mid to late flowering season.
Sunburst:
Sunburst is a Canadian bred variety. The fruit is large (can be greater than 30 mm), round and softer than most commercial varieties. The trees growth habit is more open and spreading compared with Van or Lapins. Fruit firmness may be improved with gibberellic acid (GA) applications. It has only moderate resistance to rain-cracking. Sunburst is susceptible to Brown rot and requires a good control program. Trees are moderately susceptible to bacterial canker.
It is considered self fertile but benefits from cross pollination
Although its large fruit size achieves a premium price in markets, Sunburst has been variable in its performance throughout Australia. It is considered one of the harder varieties to pollinate and commercially crop.
Stella:
The varieties Stella and Compact Stella are self fertile and excellent general polleniser’s. They generally do not require cross-pollination to set fruit, However their commercial cropping performance is enhanced by cross pollination. Both varieties produce large attractive fruit that markets well. Maturity is later than Van but before Lapins. Stella has much more commercial production (than Compact Stella) but it only has moderate fruit firmness and is declining in popularity, particularly in export markets
Sylvia:
Sylvia is a Canadian-bred variety that matures later than Van and slightly earlier Lapins. The trees appear to have a compact growth habit due to the short distance between the buds and have a dense leafy appearance.
Sylvia has large and firm, mahogany red coloured fruit. Its fruit is well covered by the leaves, resulting in good protection from rain; however its tolerance to rain cracking is of concern. Sylvia is considered to have a high chill requirement and is not suitable for all growing areas
If left unpruned, trees purportedly develop into a natural bushy shape. Flowering is mid to late season, requiring later-flowering varieties (Regina, Sam) as pollinisers.
Rainier:
This is a light-fleshed variety with fruit that develops a high sugar content. Its eating quality is excellent but the fruit is very susceptible to rain damage and the light coloured skin bruises easily.
Simone:
The fruit maturity and appearance of Simone is similar to Lapins. The trees have a better branching behaviour than Lapins and young Simone trees are precocious bearers. This variety flowers early, at the same time as Lapins.
48
Lapins:
Lapins are highly regarded. The fruit is large and firm and has good resistance to rain-cracking. It has better sized fruit and quality than Lambert and matures three to seven days later than Lambert. Lapin flower early and can be a useful polleniser for early flowering varieties. The variety is self-pollinating.
The fruit develops colour early, giving the appearance that maturity is earlier than stated, however, fruit should not be picked until it is mahogany in colour and the flesh becomes coloured around the stone. The Lapins fruit is firm, even under wet conditions, but is susceptible to pitting injury and heat damage in hot conditions.
Sweet Georgia:
Sweet Georgia is a late maturing Tasmanian selection of Lapins (whole tree mutation). It is very similar in appearance and performance to Lapins with reports of some resistance to rain cracking. It matures 10 – 14 days later than Lapins There is currently limited information on evaluation of this variety. Sweet Georgia is subject to Plant Breeders rights protection. There is a royalty on the purchased tree and a non-propagation agreement must be signed.
Kordia:
The fruit of Kordia are large, firm and mahogany red in colour with very long stems. This variety is highly regarded for its firmness and excellent flavour. It is mid to late flowering and has good rain cracking tolerance. The flowers are very frost sensitive. The main problem in Australia has been Kordia’s variable cropping performance. It appears more suited to higher chill climates and possibly dwarfing rootstocks.
Regina:
Regina fruit matures just after Lapins (up to one week later). Its fruit is medium-large, heart shaped fruit and has a high resistance to rain cracking (reported to be better than Lapins). The trees have a natural branching habit. It flowers late and requires cross-pollination. At this time the question of suitable polleniser varieties is still to be determined. The flowers are very temperature sensitive (particularly to higher temperatures)
Its’ inconsistency in cropping is a significant problem.
Sweetheart:
Sweetheart is an early to mid season flowering variety but also a very late maturing, self-pollinating variety. It is a red coloured (but not dark) heart shaped fruit. The fruit size is slightly smaller than Lapins but matures up to 10 days later than Lapins. It has precocious bearing and may overset in some years, so this needs careful management. Fruit from early districts will clash with Lapins from later districts.
Some growing regions report susceptibility to nose cracking.
This variety is protected by Plant Breeders rights in Australia and is subject to royalty payments and a non-propagation agreement.
New and promising varieties are continuously becoming available for commercial evaluation and planting.
To find out more information on varieties contact your state cherry growers association or the various nurseries (contact details can be found in Appendix 1).
49
Australian Bred Varieties
New Australian varieties are being bred by the National Cherry Breeding Program based in Lenswood, South Australia. To date, the program has released 6 varieties: Sir Tom and Sir Don (1998), Dame Roma (2001) and Sir Douglas, Sir Hans and Dame Nancy (2002).
Sir Don, Sir Tom and Dame Roma are large fruited, self-fertile, late maturing Stella and Black Douglas crosses. Sir Tom and Sir Don show reduced rain cracking susceptibility while Dame Roma is largely susceptible to cracking. All are firm and have good post harvest storage capacities and long thick green stems.
All varieties are protected by Plant Breeders rights in Australia and subject to royalty payments and the signing of non-propagation agreements.
Sir Don:
The Sir Don variety is late maturing, self fertile and considered to produce medium to large mahogany coloured, kidney shaped fruit. While slightly susceptible to rain cracking and nose cracking it is rated as more resistant to rain cracking than most currently available varieties. Full Bloom is 7 days later than Stella
It has been widely evaluated throughout Australia on a limited number of rootstocks. In general it is a heavy cropping variety in most areas on vigorous rootstocks like Mazzard. It is a vigorous upright tree with heavy crops and it is relatively easy to control and train. It is regarded as a reliable and heavy cropping in marginal and lower chill areas. Sir Don has a tendency to overcrop in more favourable conditions making it difficult to maintain commercial fruit size.
The fruit flavour profile is sweet with a refreshing acidic tang if allowed to fully mature. Care must be taken to get harvest maturities correct or fruit will taste quite acidic. This can be difficult as fruit colours early and needs to be deep mahogany to nearly black for best flavour results. Fruit has long, green but very robust stems that handle post harvest and storage well. Stem length can cause difficulties with cluster cutting.
Sir Tom:
This variety is late maturing, self fertile and considered to produce extremely large mahogany coloured, cordate shaped fruit. While slightly susceptible to rain cracking it is rated as more resistant to rain cracking than most currently available varieties. Full Bloom is approximately 7 days later than Stella
It has been widely evaluated throughout Australia on a limited number of rootstocks. In general it is a light cropping variety in all but the highest chill areas on vigorous rootstocks like Mazzard. Sir Tom is a very vigorous upright tree with light crops and it can be difficult to control and train. Although unproven it may benefit from the use of newer dwarfing and more precocious stocks such as Giesla 6.
The fruit flavour profile of Sir Tom is sweet with a refreshing acidic tang if allowed to fully mature. Care must be taken to get harvest maturities correct or the fruit will taste quite acidic. This can be difficult as fruit colours early and needs to be deep mahogany to nearly black for best flavour results. Fruit has long, green but very robust stems that handle post harvest and storage well. Stem length can cause difficulties with cluster cutting.
Dame Roma:
This variety is late maturing, self fertile and produces large mahogany coloured, cordate shaped fruit. While it is susceptible to rain cracking it does display more resistance to rain cracking than several currently available varieties. Full Bloom is 7 days later than Stella
Dame Roma has not been extensively evaluated throughout Australia. Information to date suggests it is a moderate cropping variety producing its heaviest crops in higher chill areas on vigorous rootstocks like Mazzard. As a vigorous upright to spreading tree it is relatively easy to control and train. Although unproven it may benefit from the use of newer dwarfing and more precocious stocks such as Giesla 6.

50
The fruit flavour profile is sweet with a well balanced acidity if allowed to fully mature. Care must be taken to get harvest maturities correct although this is not as critical as it is for Sir Tom and Sir Don. Obtaining correct harvest maturity can be difficult as the fruit develops colour early and needs to be a deep mahogany for best flavour results. Dame Roma fruit has long, green but very robust stems that handle post harvest and storage well.
As a late variety that has handled late season heatwaves relatively well it has produced good market reviews. Recent trial results from New Zealand are good and larger commercial plantings are planned.
Sir Douglas:
Sir Douglas is a early to mid-season maturing variety, self fertile produces medium to large mahogany coloured, cordate shaped fruit. While relatively new and not widely evaluated throughout Australia trials indicate the variety to have a vigorous upright growth habit producing good crops of medium to large sized fruit on vigorous rootstocks such as Mazzard. Full Bloom is mid-season, 5 days before Stella. Although unproven it may benefit from the use of newer dwarfing and more precocious stocks such as Giesla 6.
While susceptible to rain cracking, Sir Douglas does offer some resistance to rain cracking damage over many current commercial varieties such as Stella. The early to mid season harvest window of approximately 5 days prior to Stella also offers a commercial advantage. Fruit is firm and glossy with a good sweet flavour profile and medium stem length. Early trial reports from both South Australia and Victoria are positive.
Dame Nancy:
This variety is early to mid-season maturing, self fertile and considered to produce very large kidney shaped, white fleshed fruit with a red blush. While relatively new and not widely evaluated throughout Australia trials indicate the variety to have a vigorous upright growth habit producing moderate crops of very large sized fruit on vigorous rootstocks such as Mazzard. Full Bloom is mid-season with Stella. Although unproven it may benefit from the use of newer dwarfing and more precocious stocks such as Giesla 6.
Dame Nancy is susceptible to rain cracking and in particular nose cracking presumably due to its impressive size. Fruit are firm, glossy and attractive with medium length stems and a good flavour profile. Early- mid season timing could make it an attractive prospect for those interested in good quality blushed cherries. More testing in a range of locations is required.
Sir Hans:
This variety is mid-season maturing, self fertile and considered to produce large mahogany coloured, kidney shaped fruit. Trials indicate the variety to have a vigorous upright growth habit producing consistently good crops of large to very large sized fruit even on vigorous rootstocks such as Mazzard. Full bloom is mid-season with Stella
Sir Hans is susceptible to rain cracking, in particular nose cracking. Fruit firmness also looks to be doubtful with trial results producing large amounts of relatively soft fruit unlikely to be acceptable to export markets. Long and relatively fragile stems make this variety an unlikely commercial prospect.
Future releases:
The breeding program has currently selected a number of promising lines with good rain cracking resistance, large size and good fruit firmness demonstrating a range of harvest maturities. These lines will be considered for commercial release after participation in the national variety evaluation program at multiple trial sites in various cherry growing areas across Australia. This joint initiative is run in conjunction with Cherry Growers of Australia (CGA). Information from the trials will be used to support the commercialisation of varieties.
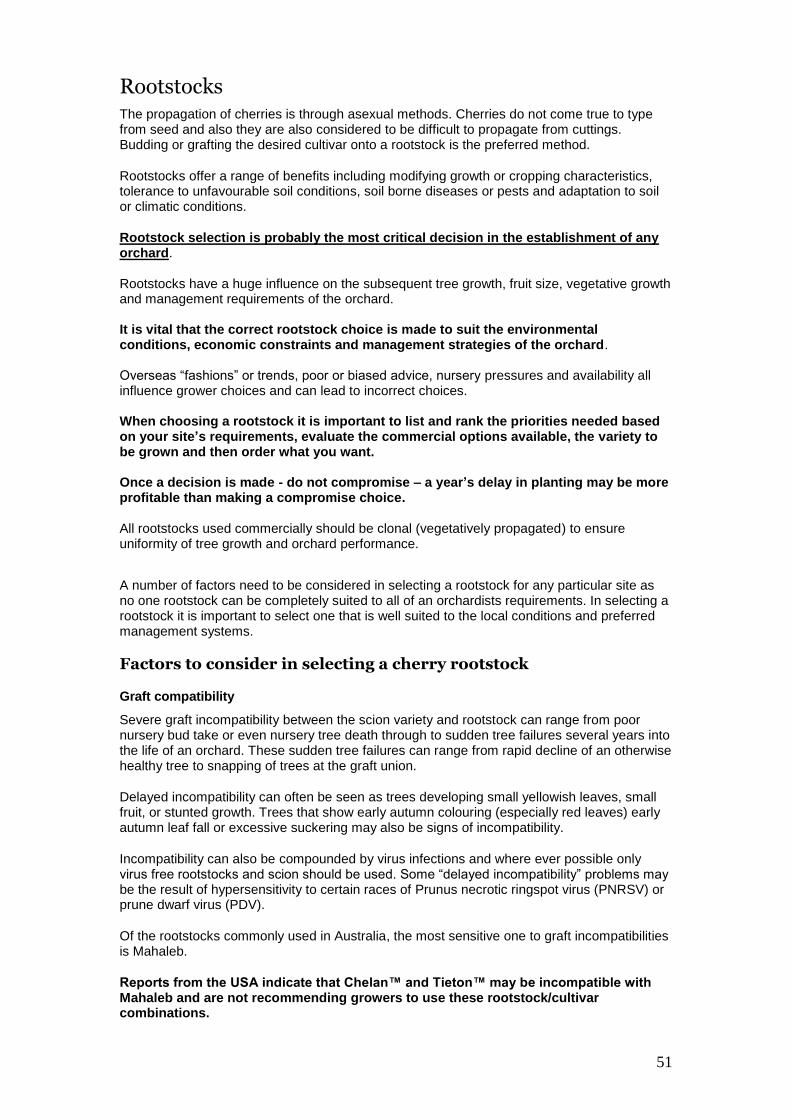
51
Rootstocks The propagation of cherries is through asexual methods. Cherries do not come true to type from seed and also they are also considered to be difficult to propagate from cuttings. Budding or grafting the desired cultivar onto a rootstock is the preferred method.
Rootstocks offer a range of benefits including modifying growth or cropping characteristics, tolerance to unfavourable soil conditions, soil borne diseases or pests and adaptation to soil or climatic conditions.
Rootstock selection is probably the most critical decision in the establishment of any orchard. Rootstocks have a huge influence on the subsequent tree growth, fruit size, vegetative growth and management requirements of the orchard. It is vital that the correct rootstock choice is made to suit the environmental conditions, economic constraints and management strategies of the orchard. Overseas “fashions” or trends, poor or biased advice, nursery pressures and availability all influence grower choices and can lead to incorrect choices. When choosing a rootstock it is important to list and rank the priorities needed based on your site’s requirements, evaluate the commercial options available, the variety to be grown and then order what you want. Once a decision is made - do not compromise – a year’s delay in planting may be more profitable than making a compromise choice. All rootstocks used commercially should be clonal (vegetatively propagated) to ensure uniformity of tree growth and orchard performance.
A number of factors need to be considered in selecting a rootstock for any particular site as no one rootstock can be completely suited to all of an orchardists requirements. In selecting a rootstock it is important to select one that is well suited to the local conditions and preferred management systems.
Factors to consider in selecting a cherry rootstock
Graft compatibility
Severe graft incompatibility between the scion variety and rootstock can range from poor nursery bud take or even nursery tree death through to sudden tree failures several years into the life of an orchard. These sudden tree failures can range from rapid decline of an otherwise healthy tree to snapping of trees at the graft union.
Delayed incompatibility can often be seen as trees developing small yellowish leaves, small fruit, or stunted growth. Trees that show early autumn colouring (especially red leaves) early autumn leaf fall or excessive suckering may also be signs of incompatibility.
Incompatibility can also be compounded by virus infections and where ever possible only virus free rootstocks and scion should be used. Some “delayed incompatibility” problems may be the result of hypersensitivity to certain races of Prunus necrotic ringspot virus (PNRSV) or prune dwarf virus (PDV).
Of the rootstocks commonly used in Australia, the most sensitive one to graft incompatibilities is Mahaleb.
Reports from the USA indicate that Chelan™ and Tieton™ may be incompatible with Mahaleb and are not recommending growers to use these rootstock/cultivar combinations.
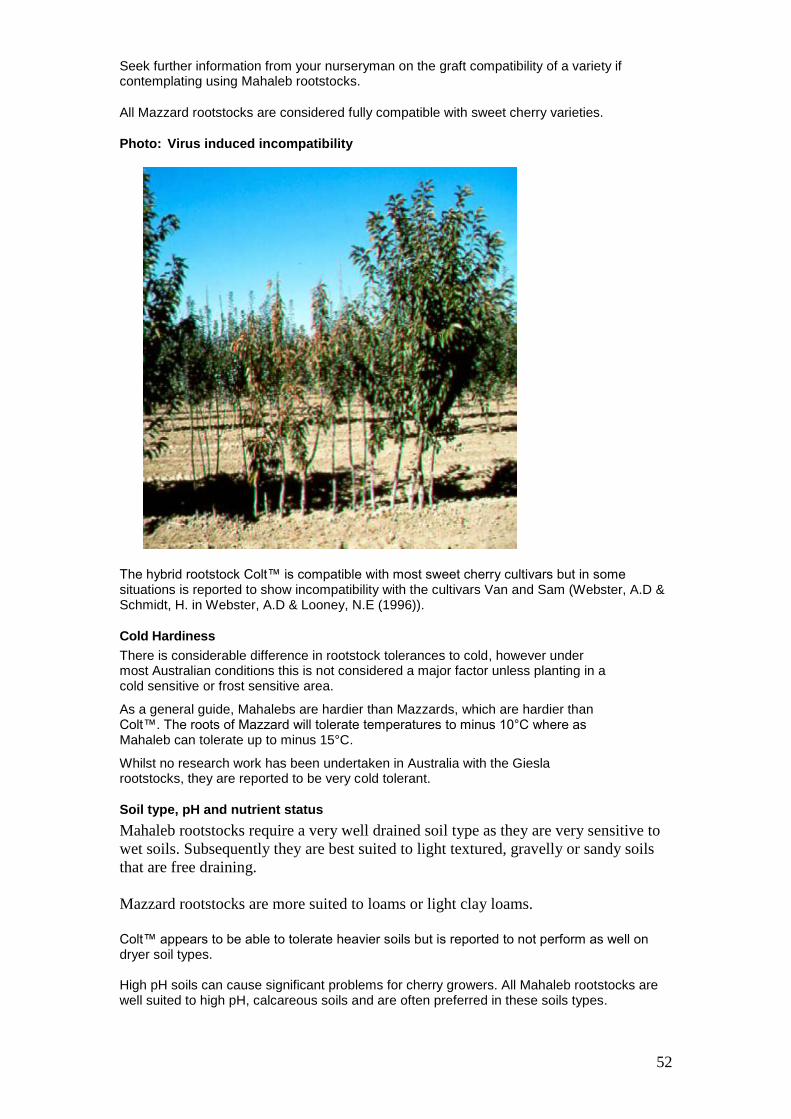
52
Seek further information from your nurseryman on the graft compatibility of a variety if contemplating using Mahaleb rootstocks. All Mazzard rootstocks are considered fully compatible with sweet cherry varieties.
Photo: Virus induced incompatibility
The hybrid rootstock Colt™ is compatible with most sweet cherry cultivars but in some situations is reported to show incompatibility with the cultivars Van and Sam (Webster, A.D & Schmidt, H. in Webster, A.D & Looney, N.E (1996)).
Cold Hardiness
There is considerable difference in rootstock tolerances to cold, however under most Australian conditions this is not considered a major factor unless planting in a cold sensitive or frost sensitive area.
As a general guide, Mahalebs are hardier than Mazzards, which are hardier than Colt™. The roots of Mazzard will tolerate temperatures to minus 10°C where as Mahaleb can tolerate up to minus 15°C.
Whilst no research work has been undertaken in Australia with the Giesla rootstocks, they are reported to be very cold tolerant.
Soil type, pH and nutrient status
Mahaleb rootstocks require a very well drained soil type as they are very sensitive to
wet soils. Subsequently they are best suited to light textured, gravelly or sandy soils
that are free draining.
Mazzard rootstocks are more suited to loams or light clay loams.
Colt™ appears to be able to tolerate heavier soils but is reported to not perform as well on dryer soil types. High pH soils can cause significant problems for cherry growers. All Mahaleb rootstocks are well suited to high pH, calcareous soils and are often preferred in these soils types.
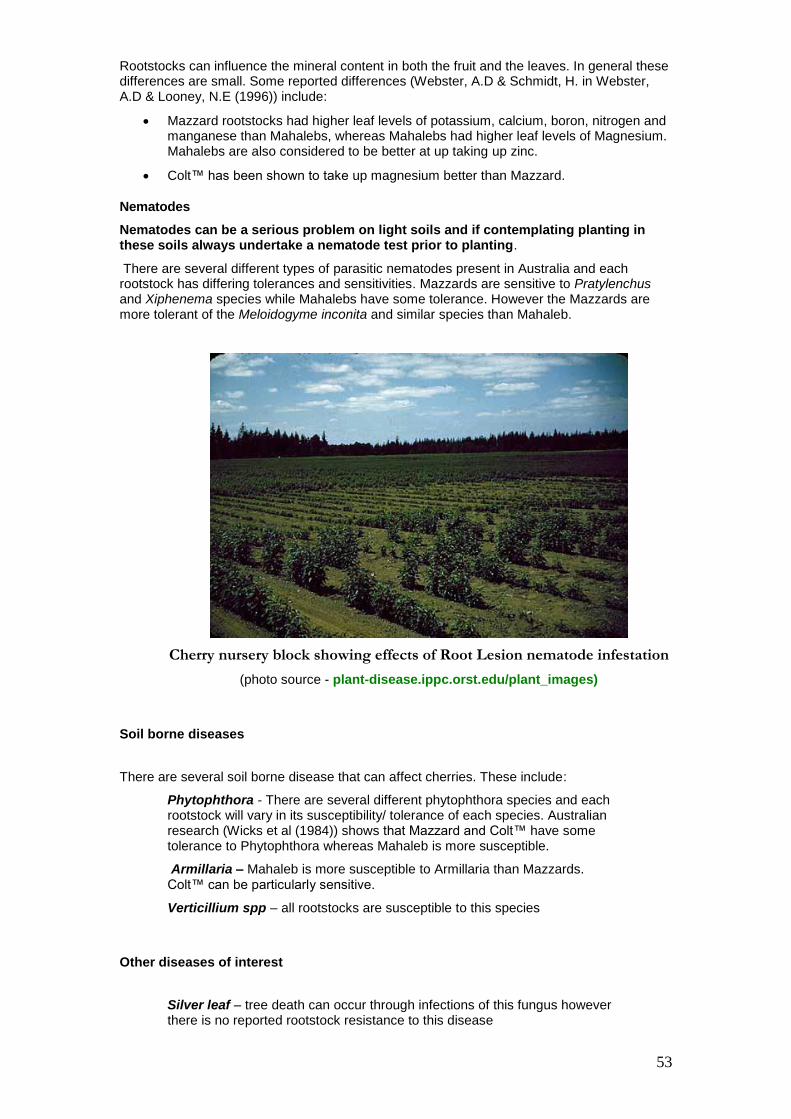
53
Rootstocks can influence the mineral content in both the fruit and the leaves. In general these differences are small. Some reported differences (Webster, A.D & Schmidt, H. in Webster, A.D & Looney, N.E (1996)) include:
Mazzard rootstocks had higher leaf levels of potassium, calcium, boron, nitrogen and manganese than Mahalebs, whereas Mahalebs had higher leaf levels of Magnesium. Mahalebs are also considered to be better at up taking up zinc.
Colt™ has been shown to take up magnesium better than Mazzard.
Nematodes
Nematodes can be a serious problem on light soils and if contemplating planting in these soils always undertake a nematode test prior to planting.
There are several different types of parasitic nematodes present in Australia and each rootstock has differing tolerances and sensitivities. Mazzards are sensitive to Pratylenchus and Xiphenema species while Mahalebs have some tolerance. However the Mazzards are more tolerant of the Meloidogyme inconita and similar species than Mahaleb.
Cherry nursery block showing effects of Root Lesion nematode infestation
(photo source - plant-disease.ippc.orst.edu/plant_images)
Soil borne diseases
There are several soil borne disease that can affect cherries. These include:
Phytophthora - There are several different phytophthora species and each rootstock will vary in its susceptibility/ tolerance of each species. Australian research (Wicks et al (1984)) shows that Mazzard and Colt™ have some tolerance to Phytophthora whereas Mahaleb is more susceptible.
Armillaria – Mahaleb is more susceptible to Armillaria than Mazzards. Colt™ can be particularly sensitive.
Verticillium spp – all rootstocks are susceptible to this species
Other diseases of interest
Silver leaf – tree death can occur through infections of this fungus however there is no reported rootstock resistance to this disease
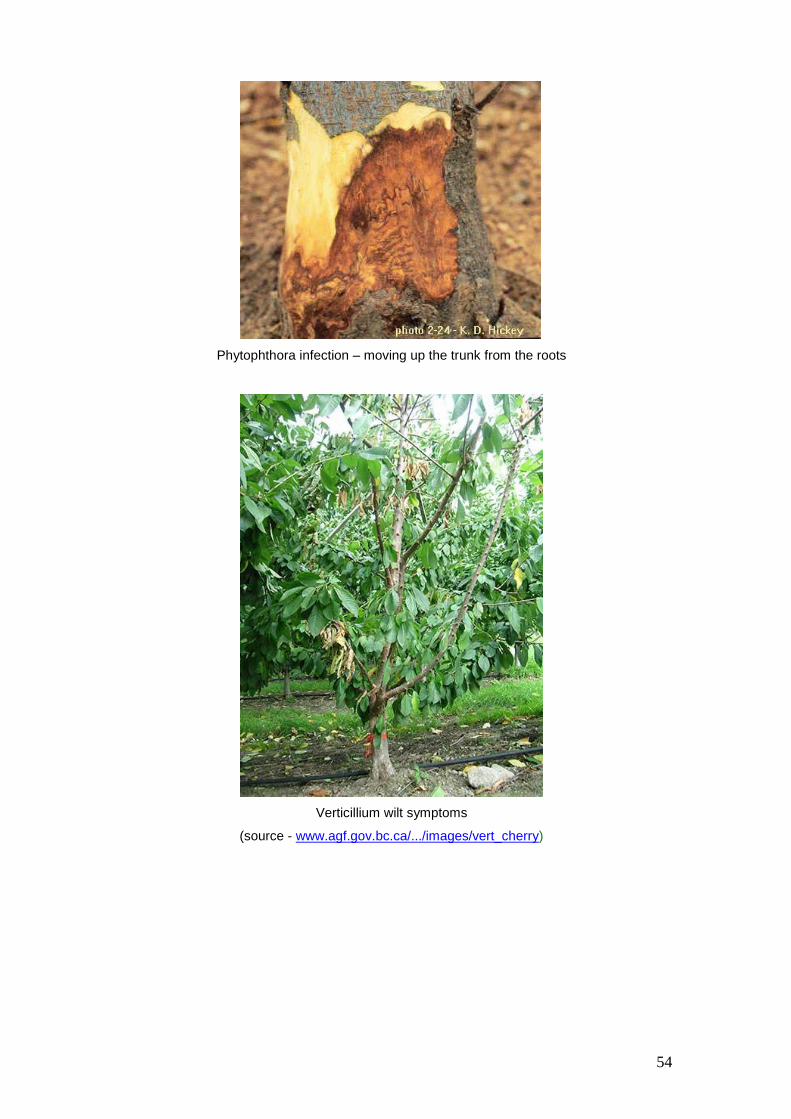
54
Phytophthora infection – moving up the trunk from the roots
Verticillium wilt symptoms
(source - www.agf.gov.bc.ca/.../images/vert_cherry)

55
Bacterial Pathogens
Crown Gall – Mazzard F12/1 and Colt™ are particularly sensitive to crown gall infections of the roots. Mahalebs are less sensitive.
Crown gall on trunk
Crown Gall on root system
Bacterial Canker – Mazzard F12/1, Colt™, and Mahaleb are tolerant of Bacterial Canker however this tolerance may be influenced by the scion cultivar sensitivity.
Gumming on trunk of young trees
(photo source - plant-disease.ippc.orst.edu/plant_images)
56
Virus diseases
It is reported that there are not any major differences in virus tolerance between the main rootstocks currently available, however with the newer hybrid rootstocks such as Giesla 6® there can be some serious hypersensitivity issues.
It is important that only virus free Giesla 6® rootstocks and scion varieties are used to minimise potential problems
Control of vigour
The ability of the “traditional” cherry rootstocks to control the vigour of the scion variety is significantly influenced by the soil and environmental conditions under which it is grown. There are many conflicting trials showing that one rootstock is more or less vigorous than another. One of the most consistent observations in these trials is that the better the soil the larger the tree.
The introduction of the new hybrid rootstocks offers considerable optimism that more dwarfing rootstocks will become commercially available. A number of these hybrids have been introduced into Australia for evaluation however their commercial availability is currently restricted.
Altering the height of budding on cherry trees to reduce tree size, as is commonly seen in apples, has not been shown to be a useful tool. Some limited studies have shown some influence in specific scion varieties not usually grown in Australia.
Drought tolerance
Mahaleb rootstocks are generally considered much more drought tolerant than Mazzards. Colt is reported to be particularly sensitive to drought conditions. Many of the shallow rooted dwarfing rootstocks are also reported as exhibiting poor drought tolerance
Rootstocks currently used in Australia
Mazzard - F12-1
The most widely planted rootstock in Australia is the clonal Mazzard selection F12-1. This is a vigorous rootstock with resistance to bacterial canker and is well suited to a range of soil textures. Its’ vigour can be excessive on fertile soils such as black clays, alluvial loams, and krasnozems. It is compatible with all commercially grown sweet cherry varieties. The rootstock will not tolerate ‘wet feet’ (poor soil drainage) and good soil drainage is essential for this rootstock.
It is often the preferred rootstock for use in bush training systems although readily branching cultivars can cause problems.
The two main rootstocks currently used in Australia are Mazzard F12-1 and Colt™, there
appears to be regionally based preferences for one instead of the other.
Mahaleb
The rootstock Mahaleb (Prunus mahaleb) is widely used in the Young district of NSW where it performs well on deep, freely draining soils. Trees on Mahaleb are generally smaller than trees on F12-1. In Australia Mahaleb should only be preferred to F12-1 on sites with deep sandy soils. Most varieties tend to have a shorter life on Mahaleb and there are reports of incompatibility with some varieties.
Colt™
Colt™ rootstock performs well on most soil types in Australia, except very light or freely
draining soils. Although originally released as a ‘semi-dwarfing’ stock, vigour is generally similar to F12-1. Australian experience shows that mature trees can be similar in size to those on F12-1; however orchards on Colt™ can be more consistent in size and performance than
57
those on F12-1. Colt is better suited to heavier soil conditions than F12-1 and appears compatible with most commercial sweet cherry cultivars (except Van and Sam)
The vigour of trees grown on Colt™ rootstocks vary considerably depending on the scion
cultivar and site.
Colt™ propagates easily and is usually grown from cuttings.
Although not eligible for Plant breeders rights protection in Australia, Colt™ has a trademark protection and trees on Colt™ are subject to a royalty payment.
Sour Cherries
Sour cherries such as Kentish and Stockton Morello have been used as dwarfing stocks for cherries. Trees propagated on these stocks are generally earlier cropping and more resistant to poor drainage. Unfortunately Kentish stocks are prone to heavy suckering. Some selections of sour cherries such as Stockton Morello are less prone to suckering. Most sour cherry rootstocks are not well suited to calcareous or freely draining/drought sensitive soils.
The use of ‘sour cherries’ as inter-stems has been evaluated overseas, but their effectiveness in reducing vigour has not been consistent.
They are not widely used in Australia
Dwarfing and Semi-dwarfing rootstocks
Overseas, in recent years, much effort has been devoted to producing vigour-controlling rootstocks for cherries. Several stocks are now commercially available overseas. Many have been produced from crossings between different Prunus species (interspecific hybrids) and include: M x M series, Gembloux selections (Inmil, Damil, and Camil), Giessen series (e.g. Gisela 1, 4, 5, 6, 10 etc), the Dresden-Pillnitz stocks and the P-HL series.
Other stocks have been based on selections of sour cherries (Prunus cerasus) and include: the Weiroot selections, the Danish DAN selections and Adara.
Although many of the above stocks are now in Australia they have not been released for commercial orchard use yet.
The Giesla™ (Giessen) Series
The “Giesla” rootstock series are the products of a cherry rootstock breeding program which began in Giessen Germany. A wide range of genetic material was introduced into the program producing a wide range of hybrids to be produced. The selections were screened for their propagation characteristics and for their effects on tree vigour and cropping performance. After extensive studies 13 selections were initially released for evaluation in Europe and the USA, several more were released later. From these evaluations the most promising selections were named and released.
These selections have shown varying results in different areas with Giesla 5 and 6 gaining the most widespread acceptance.
Giesla 5™ is the most dwarfing of the selections (50% of F12/1 – German trials), it does not tolerate wet soil conditions or phytophthora. Use of this rootstock needs considerable changes in orchard management practices and design. It has some sensitivity to virus infection and a tendency to overcrop. Overcropping can affect fruit size. Its use with self fertile varieties should be avoided as oversetting can be a problem (Long et al 2005).
Overseas experience indicates that this rootstock should only be used in good soils and growing conditions, good management and nutrition is also considered essential. If grown in poor soil conditions the trees can be very small and produce poor quality fruit
It is not expected to be widely planted in Australia.
Giesla 6™ is not as dwarfing as Giesla 5™ growing to 70-90% of the size of Mazzard (Long et al 2005). It has a tendency for wider branch angles than other rootstocks and is considered to produce “easy” trees to grow and manage. Careful pruning and management is required to maintain fruit size. This rootstock is expected to be widely used by Australian growers.
The Krymsk Rootstocks
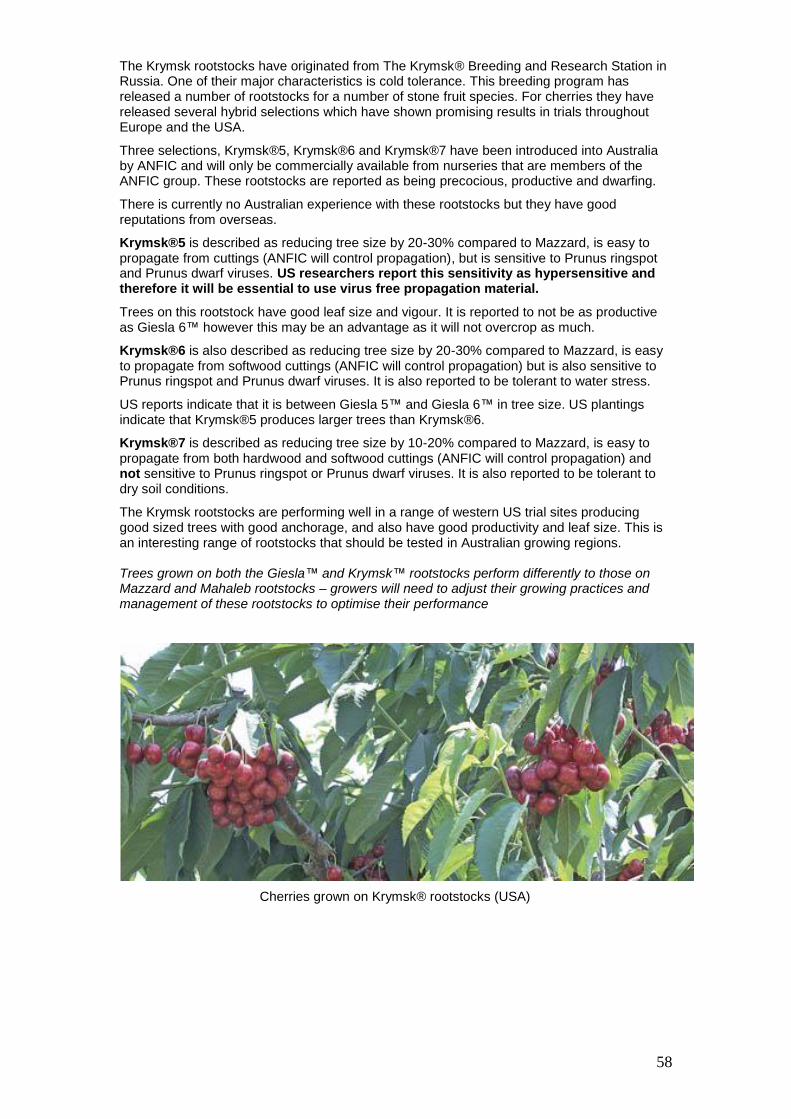
58
The Krymsk rootstocks have originated from The Krymsk® Breeding and Research Station in Russia. One of their major characteristics is cold tolerance. This breeding program has released a number of rootstocks for a number of stone fruit species. For cherries they have released several hybrid selections which have shown promising results in trials throughout Europe and the USA.
Three selections, Krymsk®5, Krymsk®6 and Krymsk®7 have been introduced into Australia by ANFIC and will only be commercially available from nurseries that are members of the ANFIC group. These rootstocks are reported as being precocious, productive and dwarfing.
There is currently no Australian experience with these rootstocks but they have good reputations from overseas.
Krymsk®5 is described as reducing tree size by 20-30% compared to Mazzard, is easy to propagate from cuttings (ANFIC will control propagation), but is sensitive to Prunus ringspot and Prunus dwarf viruses. US researchers report this sensitivity as hypersensitive and therefore it will be essential to use virus free propagation material.
Trees on this rootstock have good leaf size and vigour. It is reported to not be as productive as Giesla 6™ however this may be an advantage as it will not overcrop as much.
Krymsk®6 is also described as reducing tree size by 20-30% compared to Mazzard, is easy to propagate from softwood cuttings (ANFIC will control propagation) but is also sensitive to Prunus ringspot and Prunus dwarf viruses. It is also reported to be tolerant to water stress.
US reports indicate that it is between Giesla 5™ and Giesla 6™ in tree size. US plantings indicate that Krymsk®5 produces larger trees than Krymsk®6.
Krymsk®7 is described as reducing tree size by 10-20% compared to Mazzard, is easy to propagate from both hardwood and softwood cuttings (ANFIC will control propagation) and not sensitive to Prunus ringspot or Prunus dwarf viruses. It is also reported to be tolerant to dry soil conditions.
The Krymsk rootstocks are performing well in a range of western US trial sites producing good sized trees with good anchorage, and also have good productivity and leaf size. This is an interesting range of rootstocks that should be tested in Australian growing regions. Trees grown on both the Giesla™ and Krymsk™ rootstocks perform differently to those on Mazzard and Mahaleb rootstocks – growers will need to adjust their growing practices and management of these rootstocks to optimise their performance
Cherries grown on Krymsk® rootstocks (USA)

59
References
Long, L.E, Nunez-Elisea, R and Cahn, H (2005) Producing Premium Cherries, Pacific Northwest Fruit School – cherry short-course proceedings, Good Fruit Grower, Yakima, Washington State pp 3-8 Webster, A.D & Schmidt, H. in Webster, A.D. & Looney, N.E (1996) Cherries: Crop Physiology, Production and Uses CAB International
Wicks, T.J, Bumbieris, M., Warcup, J.H, and Wallace, H.R (1984) Phytophthora in fruit orchards in South Australia Biennial Report of the Waite Agricultural Research Institute 1982 -1983, 1984, p-147.
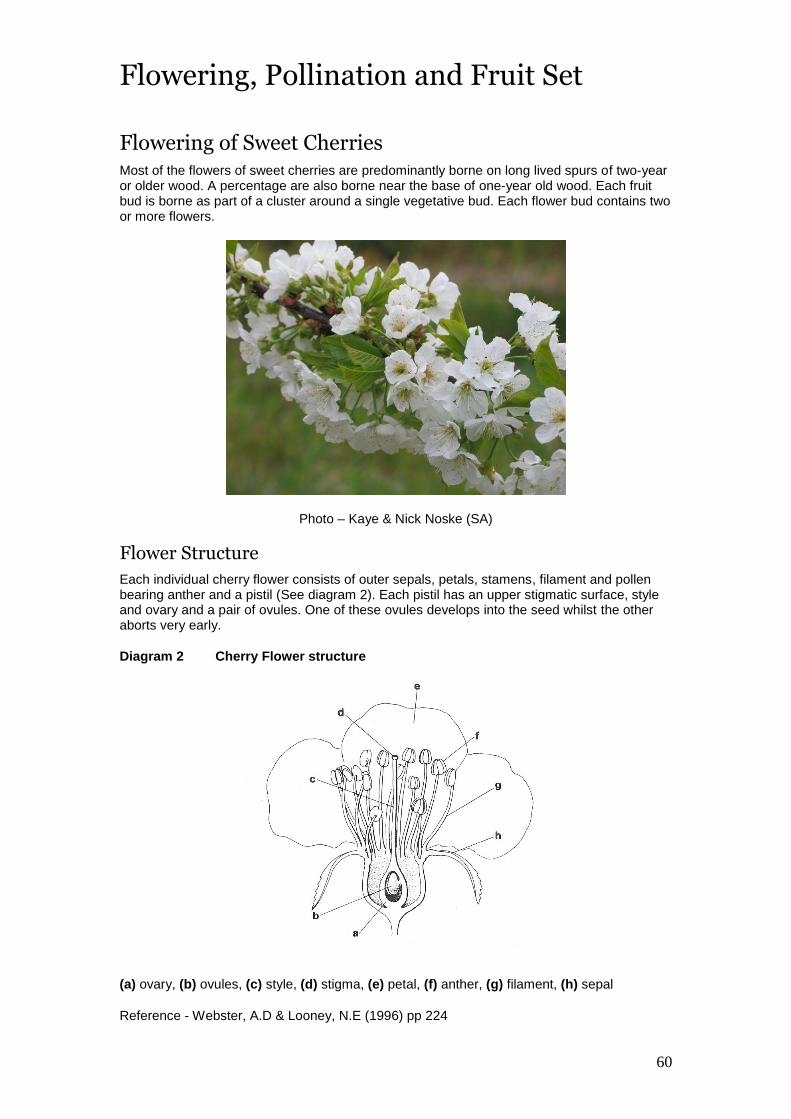
60
Flowering, Pollination and Fruit Set
Flowering of Sweet Cherries Most of the flowers of sweet cherries are predominantly borne on long lived spurs of two-year or older wood. A percentage are also borne near the base of one-year old wood. Each fruit bud is borne as part of a cluster around a single vegetative bud. Each flower bud contains two or more flowers.
Photo – Kaye & Nick Noske (SA)
Flower Structure
Each individual cherry flower consists of outer sepals, petals, stamens, filament and pollen bearing anther and a pistil (See diagram 2). Each pistil has an upper stigmatic surface, style and ovary and a pair of ovules. One of these ovules develops into the seed whilst the other aborts very early.
Diagram 2 Cherry Flower structure
(a) ovary, (b) ovules, (c) style, (d) stigma, (e) petal, (f) anther, (g) filament, (h) sepal
Reference - Webster, A.D & Looney, N.E (1996) pp 224

61
Following pollination, the pollen germinates on the stigma; pollen tubes then grow down the style into the ovary.
Adequate fruit set is absolutely dependant upon normal flower development, effective pollination and successful fertilisation with subsequent seed development (Thompson, M in Webster, A.D & Looney, N.E (1996)).
Floral Initiation
Whilst bud burst and flowering occur in spring the initiation of floral buds commences in the preceding summer. The commencement of this initiation depends on the cultivar, physiological condition of the tree, weather and cultural practices. Throughout the summer physiological changes are being undertaken which morphologically show as developing flower buds in late autumn.
Once dormant there is no obvious external change in the buds however they continue to develop physiologically during winter.
Once the chilling requirement is met and the temperatures increase (in spring), the buds swell and the floral parts mature rapidly.
Cultural factors influencing floral initiation
The onset of floral initiation is triggered by internal signals believed to involve a balance of endogenous hormones and various assimilates. (Thompson, M in Webster, A.D & Looney, N.E (1996)).
There are several cultural practices that influence the time of floral initiation and the number of buds initiated, these include
Low vigour (initiate too many flowers)
Severe pruning (stimulates vigour, delays and reduces flower development
Irrigation practices
o Too much - promotes excessive growth – delays the onset of floral initiation
o Too little = stress – leads to the initiation of too many flowers.
Rootstocks (influence when buds first appear and subsequent flowering)
Growth regulating chemicals
Factors that affect flower development
A number of factors can influence flower development. These include summer temperatures, winter chilling and cold damage.
Summer Temperatures
Unusually hot temperatures during the early stages of floral initiation may lead to abnormal flower development. This stage of the floral initiation is critical. These temperature events can lead to a high incidence of “double fruit”. The susceptibility to “doubles” varies with the variety. Bing is particularly susceptible to forming double fruits.
Inadequate winter chilling
Normal bud break and blossoming is dependant on the accumulation of the required amount of chill-hours, followed by temperatures warm enough to stimulate growth. Insufficient chilling may occur in mild winters.
Insufficient chilling leads to a delayed and unusual bloom, abscission of some buds and poor synchronisation between the main cultivar and its polliniser cultivars. This ultimately results in
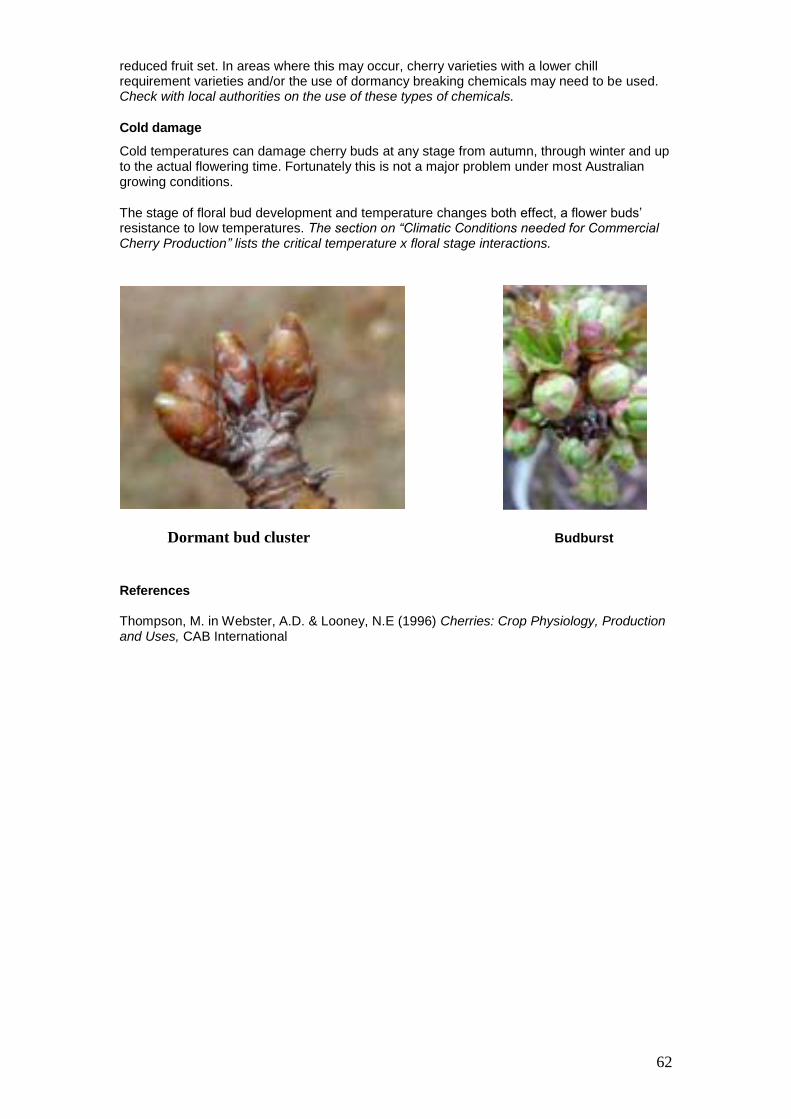
62
reduced fruit set. In areas where this may occur, cherry varieties with a lower chill requirement varieties and/or the use of dormancy breaking chemicals may need to be used. Check with local authorities on the use of these types of chemicals.
Cold damage
Cold temperatures can damage cherry buds at any stage from autumn, through winter and up to the actual flowering time. Fortunately this is not a major problem under most Australian growing conditions.
The stage of floral bud development and temperature changes both effect, a flower buds’ resistance to low temperatures. The section on “Climatic Conditions needed for Commercial Cherry Production” lists the critical temperature x floral stage interactions.
Dormant bud cluster Budburst
References Thompson, M. in Webster, A.D. & Looney, N.E (1996) Cherries: Crop Physiology, Production and Uses, CAB International
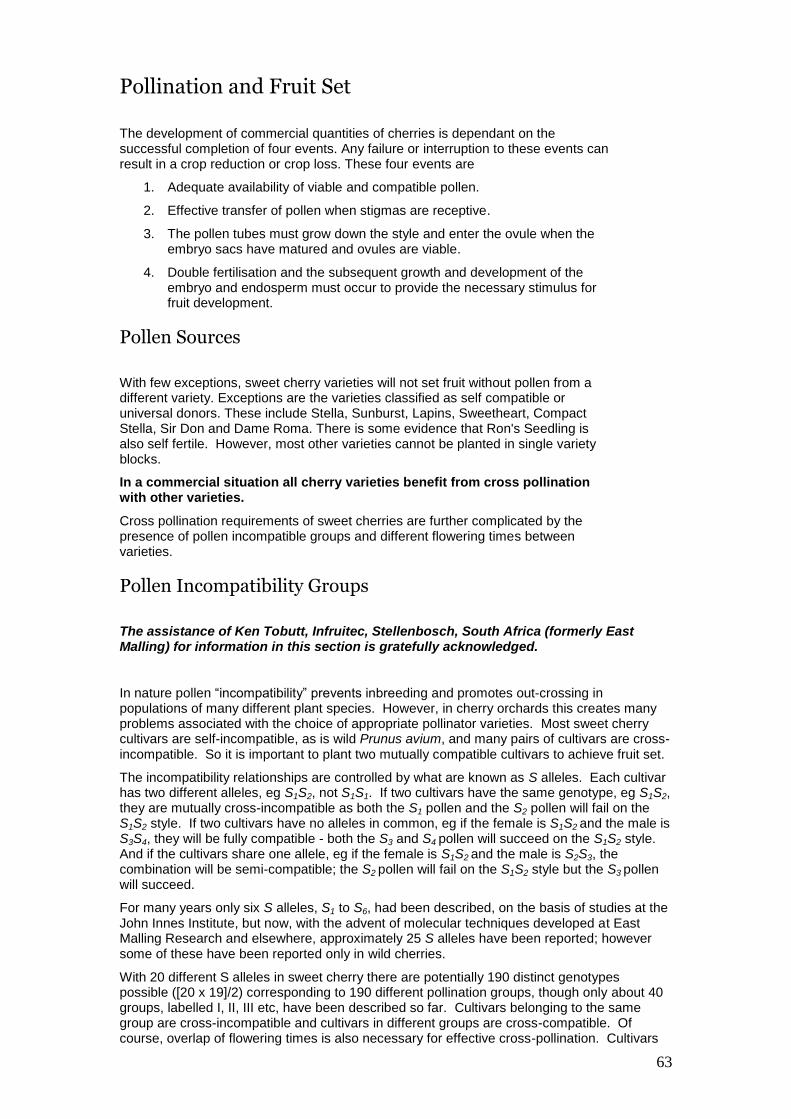
63
Pollination and Fruit Set
The development of commercial quantities of cherries is dependant on the successful completion of four events. Any failure or interruption to these events can result in a crop reduction or crop loss. These four events are
1. Adequate availability of viable and compatible pollen.
2. Effective transfer of pollen when stigmas are receptive.
3. The pollen tubes must grow down the style and enter the ovule when the embryo sacs have matured and ovules are viable.
4. Double fertilisation and the subsequent growth and development of the embryo and endosperm must occur to provide the necessary stimulus for fruit development.
Pollen Sources
With few exceptions, sweet cherry varieties will not set fruit without pollen from a different variety. Exceptions are the varieties classified as self compatible or universal donors. These include Stella, Sunburst, Lapins, Sweetheart, Compact Stella, Sir Don and Dame Roma. There is some evidence that Ron's Seedling is also self fertile. However, most other varieties cannot be planted in single variety blocks.
In a commercial situation all cherry varieties benefit from cross pollination with other varieties.
Cross pollination requirements of sweet cherries are further complicated by the presence of pollen incompatible groups and different flowering times between varieties.
Pollen Incompatibility Groups
The assistance of Ken Tobutt, Infruitec, Stellenbosch, South Africa (formerly East Malling) for information in this section is gratefully acknowledged.
In nature pollen “incompatibility” prevents inbreeding and promotes out-crossing in populations of many different plant species. However, in cherry orchards this creates many problems associated with the choice of appropriate pollinator varieties. Most sweet cherry cultivars are self-incompatible, as is wild Prunus avium, and many pairs of cultivars are cross-incompatible. So it is important to plant two mutually compatible cultivars to achieve fruit set.
The incompatibility relationships are controlled by what are known as S alleles. Each cultivar has two different alleles, eg S1S2, not S1S1. If two cultivars have the same genotype, eg S1S2, they are mutually cross-incompatible as both the S1 pollen and the S2 pollen will fail on the S1S2 style. If two cultivars have no alleles in common, eg if the female is S1S2 and the male is S3S4, they will be fully compatible - both the S3 and S4 pollen will succeed on the S1S2 style. And if the cultivars share one allele, eg if the female is S1S2 and the male is S2S3, the combination will be semi-compatible; the S2 pollen will fail on the S1S2 style but the S3 pollen will succeed.
For many years only six S alleles, S1 to S6, had been described, on the basis of studies at the John Innes Institute, but now, with the advent of molecular techniques developed at East Malling Research and elsewhere, approximately 25 S alleles have been reported; however some of these have been reported only in wild cherries.
With 20 different S alleles in sweet cherry there are potentially 190 distinct genotypes possible ([20 x 19]/2) corresponding to 190 different pollination groups, though only about 40 groups, labelled I, II, III etc, have been described so far. Cultivars belonging to the same group are cross-incompatible and cultivars in different groups are cross-compatible. Of course, overlap of flowering times is also necessary for effective cross-pollination. Cultivars

64
with unique genotypes are assigned to Group O; they are compatible with each other and with all other groups and so are universal pollen donors. Over 200 self-incompatible cultivars have now been genotyped and assigned to groups.
The John Innes Institute made a major breakthrough in sweet cherry incompatibility in 1954 when they used X-irradiation of pollen to induce a mutation which allows pollen to succeed on its own style. The S4 allele mutated to S4'. Cultivars bearing this new allele are self-compatible and can successfully pollinate any variety that flowers at the same time; so they are universal pollen donors. Stella was the first variety commercially released with this allele and most of the 30 or more self-compatible cultivars are derived from Stella.
A word of caution; whilst several cultivars are now designated self-compatible, this means that they set fruit in equally high numbers with either their own pollen or pollen from another variety. It does not mean that they will necessarily set commercial crops without adequate attention being paid by growers to other aspects such as the provision of pollinating insects. Their advantage is that larger blocks of the same variety can be planted without the need for a range of pollinator varieties.
Incompatibility groupings for sweet cherries of interest to Australian growers are shown in Table 4 on the following page. This information has been derived from a number of sources, primarily from Tobutt et al (2004).
References
Lewis, D. and Crowe, L.D. (1954) The induction of self-fertility in tree fruits. Journal of Horticultural Science 29, 220-225. Tobutt, K.R. Sonneveld, T., Bekefi, Z. and Bošković, R. (2004) Cherry (in)compatibility genotypes – an updated cultivar table. Acta Horticulturae 663, pp 667-671.
65
Table 4 Pollen Incompatibility Groups - for a range of varieties grown in or of interest in Australia
Group I (S1S2)
Group II (S1S3)
Group III (S3S4)
Group IV (S2S3)
Group V (S4S5)
Group VI (S3S6)
Bedford Prolific Van Bing Sue Kordia
Early Rivers Venus Lambert Vega Hartland
Knight’s Early Regina Kristin Victor
Summit Cristalina Napoleon
Samba Spur Lambert
Star
Vernon
Ulster
Group VII (S3S5)
Group VIII (S2S5)
Group IX (S1S4)
Group X (S6S9)
Group XI (S2S7)
Group XII (S6S13)
Hedelfinger Vista Early Lyons* Early Lyons* Noble
Hudson
Merton Late
Rainier
Salmo
Sylvia
* Two different Early Lyons have been genotyped.
Group XIII (S2S4)
Group XIV (S1S5)
Group XV (S5S6)
Group XVI (S3S9)
Group XVII (S4S6)
Group XVIII (S1S9)
Sam Seneca Chelan Merton Glory Brooks
Vic Valera Tieton Earlise
Group XIX (S3S13)
Group XX (S1S6)
Group XXI (S4S9)
Group XXII (S3S12)
Group XXIII (S3S16)
Group XXIV (S6S12)
Sir Tom Empress Merchant Nordwunder
Group XXV (S2S6)
Group XXVI (S5S13)
Group O – Universal donors Compatible with Groups I - XXVI
Group SC – Self compatible (also universal donors)
Celeste (S1S4') Skeena (S1S4')
Cristobalina (S3S6) Sonata (S3S4')
Early Star (S4'S9) Staccato (S3S4')
Lapins (S1S4') Starkrimson (S3S4')
Newstar (S3S4') Stella (S3S4')
Sandra Rose (S3S4') Sunburst (S3S4')
Santina (S1S4') Sweetheart (S3S4')
Sir Don (S4'S13) Benton
66
Flowering times
Cross compatibility itself is not enough to ensure good fruit set. The flowering period of two varieties must coincide sufficiently to ensure that pollen is available as flowers open. This is especially critical with varieties such as Bing and Hedelfingen whose embryo sacs degenerate rapidly after the blossoms open.
To ensure adequate pollination in commercial orchards the choice of varieties is determined from an understanding of incompatibility groupings and blossom dates. The following table (5) gives some examples of varieties and potentially suitable pollinators.
(Please note for pollenisation to occur there must be an over lap of the flowering times of the selected varieties in your district).
Table 5 Potential Pollinators
Main variety Potential Pollenisers
Bing Van, Stella, Rainier, Lapins
Brooks Early Burlat, Rainier
Burlat Bing, Van, Stella, Rainier
Chelan Lapins, Sweetheart, Bing, Rainier
Earlise Van, Lapins
Earlisweet Lapins, Simone, Sweetheart
Empress Ron’s Seedling, Lapins, Supreme
Kordia* Regina, Sylvia, Summit
Lapins (and Simone) Self fertile
Merchant Vista, Sunburst, Vega, Lewis, Stella
Rainier Lambert, Napoleon, Van, Bing
Regina* Sylvia, Late Noble, Spur Lambert, Sam, Kordia
Ron's Seedling Supreme, Early Lyons
Stella Self fertile
Supreme Ron's Seedling, Early Lyons
Sunburst Vista, Merchant, Stella
Summit Lambert, Sam
Sweetheart Self fertile
Sweet Georgia (Lapins) Similar to Lapins
Sylvia Spur Lambert, Late Noble, Sam, Regina
Van Lambert, Bing, Rainier, Stella, Early Burlat
Vista Vega, Merton Glory, Merchant
* Under Australian conditions Kordia and Regina are considered difficult to pollinate
Please note that varieties in different microclimates may have differing flowering times – always seek local advice on variety flowering times. Also flowering times may vary from season to season
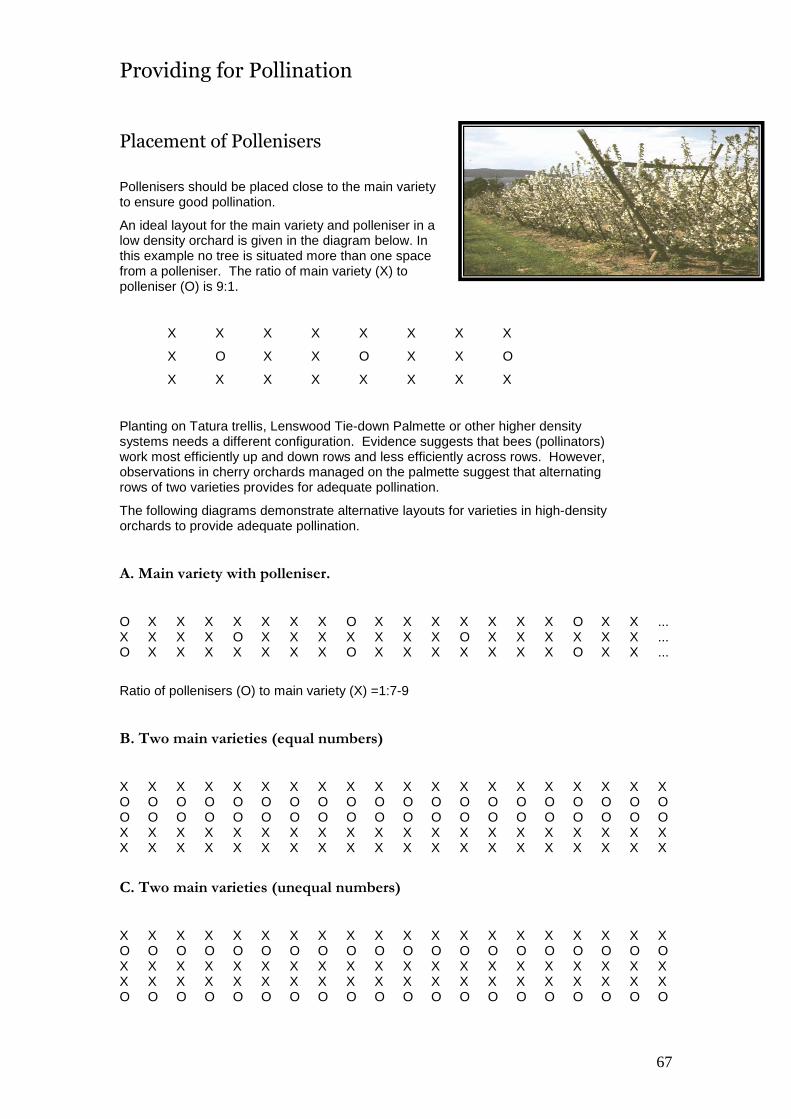
67
Providing for Pollination
Placement of Pollenisers
Pollenisers should be placed close to the main variety to ensure good pollination.
An ideal layout for the main variety and polleniser in a low density orchard is given in the diagram below. In this example no tree is situated more than one space from a polleniser. The ratio of main variety (X) to polleniser (O) is 9:1.
X X X X X X X X
X O X X O X X O
X X X X X X X X
Planting on Tatura trellis, Lenswood Tie-down Palmette or other higher density systems needs a different configuration. Evidence suggests that bees (pollinators) work most efficiently up and down rows and less efficiently across rows. However, observations in cherry orchards managed on the palmette suggest that alternating rows of two varieties provides for adequate pollination.
The following diagrams demonstrate alternative layouts for varieties in high-density orchards to provide adequate pollination.
A. Main variety with polleniser.
O X X X X X X X O X X X X X X X O X X ... X X X X O X X X X X X X O X X X X X X ... O X X X X X X X O X X X X X X X O X X ...
Ratio of pollenisers (O) to main variety (X) =1:7-9
B. Two main varieties (equal numbers)
X X X X X X X X X X X X X X X X X X X X O O O O O O O O O O O O O O O O O O O O O O O O O O O O O O O O O O O O O O O O X X X X X X X X X X X X X X X X X X X X X X X X X X X X X X X X X X X X X X X X
C. Two main varieties (unequal numbers)
X X X X X X X X X X X X X X X X X X X X O O O O O O O O O O O O O O O O O O O O X X X X X X X X X X X X X X X X X X X X X X X X X X X X X X X X X X X X X X X X O O O O O O O O O O O O O O O O O O O O

68
D. Palmette trellis (4 m x 2 m) - main variety with polleniser
O X X X X X O X X X X X O X X X X X O X X X X O X X X X X O X X X X X O X X X X O X X X X X O X X X X X O X X X X X O X
Ratio of polleniser (O) to main Variety = 1:5
E. Palmette trellis (4 m x 2 m) - two main varieties
O O O O O O O O O O O O O O O O O O O O X X X X X X X X X X X X X X X X X X X X O O O O O O O O O O O O O O O O O O O O
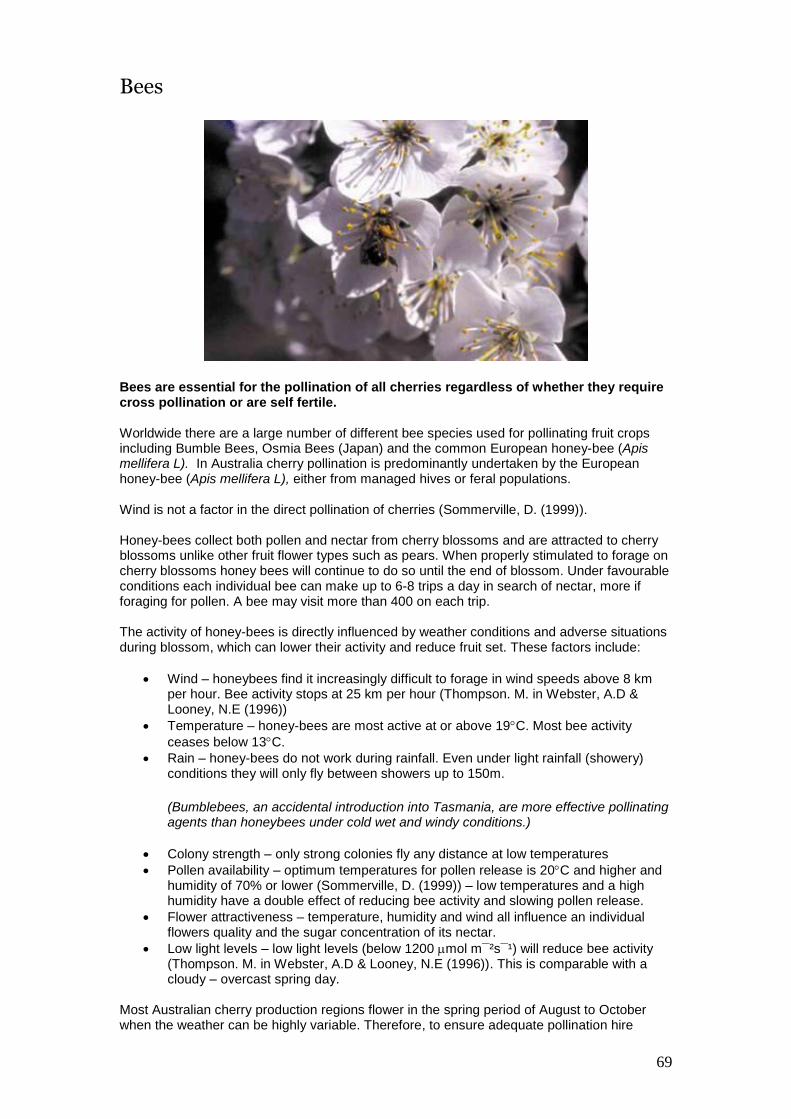
69
Bees
Bees are essential for the pollination of all cherries regardless of whether they require cross pollination or are self fertile. Worldwide there are a large number of different bee species used for pollinating fruit crops including Bumble Bees, Osmia Bees (Japan) and the common European honey-bee (Apis mellifera L). In Australia cherry pollination is predominantly undertaken by the European honey-bee (Apis mellifera L), either from managed hives or feral populations. Wind is not a factor in the direct pollination of cherries (Sommerville, D. (1999)). Honey-bees collect both pollen and nectar from cherry blossoms and are attracted to cherry blossoms unlike other fruit flower types such as pears. When properly stimulated to forage on cherry blossoms honey bees will continue to do so until the end of blossom. Under favourable conditions each individual bee can make up to 6-8 trips a day in search of nectar, more if foraging for pollen. A bee may visit more than 400 on each trip. The activity of honey-bees is directly influenced by weather conditions and adverse situations during blossom, which can lower their activity and reduce fruit set. These factors include:
Wind – honeybees find it increasingly difficult to forage in wind speeds above 8 km per hour. Bee activity stops at 25 km per hour (Thompson. M. in Webster, A.D & Looney, N.E (1996))
Temperature – honey-bees are most active at or above 19C. Most bee activity
ceases below 13C.
Rain – honey-bees do not work during rainfall. Even under light rainfall (showery) conditions they will only fly between showers up to 150m.
(Bumblebees, an accidental introduction into Tasmania, are more effective pollinating agents than honeybees under cold wet and windy conditions.)
Colony strength – only strong colonies fly any distance at low temperatures
Pollen availability – optimum temperatures for pollen release is 20C and higher and humidity of 70% or lower (Sommerville, D. (1999)) – low temperatures and a high humidity have a double effect of reducing bee activity and slowing pollen release.
Flower attractiveness – temperature, humidity and wind all influence an individual flowers quality and the sugar concentration of its nectar.
Low light levels – low light levels (below 1200 mol m¯²s¯¹) will reduce bee activity (Thompson. M. in Webster, A.D & Looney, N.E (1996)). This is comparable with a cloudy – overcast spring day.
Most Australian cherry production regions flower in the spring period of August to October when the weather can be highly variable. Therefore, to ensure adequate pollination hire

70
beehives from a reputable beekeeper or pollination service and distribute them within the orchard so that all trees are within 150m of a hive. The cost of beehives, at any price is small compared to a crop failure. Reliance on feral (wild) bee colonies to be effective pollination agents is a high risk strategy and should be avoided. Wild bee populations are dwindling due to various bee pests and diseases. Additionally they may not be located within suitable foraging distance and there is no way of effectively gauging their hive strength or foraging ability. Australia currently is the only country in the world free of the very serious bee pest – Varroa mite. If this parasitic pest becomes established in Australia there will be very serious problems for both the beekeeping industry and those crops (such as cherries) that rely on bees for pollination. Based on overseas experience one of the most serious expectations of a Varroa mite incursion is that feral bee populations in a region or area may be reduced by up to 100%. Any grower relying on feral bees for pollination will be at serious risk. This risk is compounded by the fact that the beekeeping industry itself will need to restructure and change its management practices leading to a expected, extensive short term unavailability to provide hives for pollination (at any cost). No bees no crop!
Strength and number of hives There is considerable debate on how many hives should be used and what strength they should be. The general recommendation for Australian orchards is up to 3 to 5 hives per hectare, more if poor weather conditions persist during flowering. New orchards are being netted to protect the crop from a range of environmental and pest concerns. Careful attention must be made to the use and placement of hives under these nets. In relation to hive strength, it is important that the hives are set up for pollination purposes. Bee colony strength is expressed as the number of frames of bees per hive, with a healthy frame at least 2/3 covered by bees. Each hive must have a healthy queen bee. For optimum hive performance the bees must maintain the temperature in the middle of the colony at 35°C, so the smaller the hive strength the harder this temperature is to maintain. Hives with 8 or less healthy frames will focus on hive temperature. As the frame number or outside temperature increases more of the bees are available for pollination work. Hive’s set up for pollination purposes should have no less than 8 frames per colony. A good, strong colony suitable for orchard pollination consists of 20,000 – 30,000 adult bees (Thompson. M. in Webster, A.D & Looney, N.E (1996)). Please note: because cherries flower so early in the spring it may not be possible to obtain hives in optimal pollinating condition, so even more hives may be required per hectare to offset the lower numbers of active bees per hive.
Understanding the general life cycle of a worker bee is important to determine how useful a hive will be for pollination purposes. After a female bee hatches she is a hive worker for the first 10 days (approx). During the next 5 days she learns how to fly and becomes a water gatherer. During the following 2 weeks she is a pollen gatherer and during the last 2 weeks of her life she is a nectar gather. Both pollen (a protein source) and nectar (a carbohydrate source) are essential for good hive development. If a flower source does not provide a good nectar source the bees will forage anywhere to obtain it. Some beekeepers specialising in pollination services will provide hives with a readily available source of carbohydrates (usually sugar) to enable the hive to focus more on pollen collection. A male bee’s major role is mating and they do not do any pollination work.
A split hive is a hive that has been split in half (into 2 hives) to increase the number of hives available for pollination. This increases the number of hives available but reduces the number of bees available for pollen and nectar gathering. These hives are often offered cheaper than full strength hives but beware you only get what you
71
are prepared to pay for. Beware of using “split” hives as they have poor pollination capacity.
Investing dollars in high strength hives is one of a grower’s most important financial risk management tools. A general beekeepers principal source of income is honey production and the spring period is a crucial period in hive management. For a beekeeper to provide a pollination service during this period they have costs to consider. These include:
Loss of honey production.
Transport costs.
Extra labour.
Hive management.
Potential hive losses, such as spray deaths etc.
Hives suitable for pollination services can take up to 12 weeks to prepare. Many growers do not know the intricate workings of a bee hive so it is important to establish a good working relationship with a reputable beekeeper. The website www.honeybee.com.au provides a link into the major bee keeping organisations in Australia. The NSW Department of Primary Industries has an Agnote “Best Practice in a honey bee pollination service” Agnote DAI-28 which provides useful information on entering into a pollination service and is found at the following address. http://www.dpi.nsw.gov.au/agriculture/livestock/honey-bees/pollination/best-practice The Rural Industries Research and Development Corporation (RIRDC) has recently undertaken significant research on Australian agricultural and horticultural industries Pollination requirements. As part of this research several case studies on the pollination requirements of various fruit and agricultural crops have been prepared. A case study on cherries is available from the RIRDC website - www.rirdc.gov.au
Grower assessments of hive activity Cherry growers are generally not beekeepers so how do you know if the hives you are using are working effectively? There are a number of ways to check hive activity, these include:
Develop a good working relationship with a reliable beekeeper
Get your beekeeper to open up his hives and show you. Alternatively
Observe bee activity o Option 1
Count the number of bees entering the hive in a minute – over 100 bees per minute (at 18ºC in sunny conditions and low winds) is considered a good pollinating unit
o Option 2 In optimal weather conditions slowly move around a tree and count the number of bees in a 1 minute period. An average of 25 –35 bees per tree for each of 10 trees counted indicates enough bees are present
Hive uniformity o Similar bee activity at the entrance of each hive indicates uniform hive
strength. If a hive has noticeably lower bee activity, it may indicate a potential problem.
72
Timing of Hive introduction Foraging bees fall into 2 categories - nectar and pollen gatherers. Both are important for the pollination of cherries Bees hives should be moved into cherry orchards when up to 10% of the blossoms are open (Mayer et al., 1986). If hives are introduced any earlier the bees may establish their foraging habit on other species. If brought in later, some of the cherry blossoms may already have become non-functional. There is debate on whether other flowering plant species in an orchard should be left in the orchard during flowering. The general view is that the flowers on all flowering plants such as ground covers and weeds (especially dandelions) should be removed (mowed) so that the foraging bees will focus on the cherry blossoms. A recent report by Olsen, E (2009) suggests that dandelion flowers should not be removed from the orchard as they “are extremely beneficial in the orchard and will actually assist in pollination”. He states that they are a good source of nectar and will assist in keeping the nectar-seeking bees working within the orchard and not looking elsewhere. Nectar laden bees are too heavy to fly directly to the hive so they will flower hop back to their hives, in doing so will spread pollen from flower to flower. The pollen gathering bees prefer the pollen rich cherry flowers to the nectar rich dandelions. Bees are like people, they will not travel any further than they have to in order to satisfy their needs.
Using introduced hives There are several ways growers can improve the use of bee hives for the pollination of cherries, which include:
Contacting beekeepers about your requirements well in advance. There is an increasing demand for bees in agriculture
Check on the disease status of the hives to be delivered
Many beekeepers have their hives palletised for ease of handling – make fork lifts available for use if necessary
Provide clear and unobstructed truck access to your orchard. Access for a three tonne truck should be considered a minimum requirement.
Make provision for a truck to turn or park if hives have to be relocated to other parts of the orchard
When travelling with hives on sloping ground, ensure they are secured so they do not fall off
Ideally hives should be distributed uniformly throughout the orchard at distances of 150 m or less. (For a better overlap of foraging bees)
Avoid placing large numbers of hives in a single location
Preferably do not place hives on the edge of properties as a percentage of the bees will not work in your orchard
Mow grass at hive locations prior to delivery
Ensure all hive entrances are not obstructed in anyway.
Place hives in sunny locations away from prevailing winds
Ensure the hives have access to clean water sources
Do not place hives within 100 metres of high human or animal traffic
If using water for frost protection ensure that the hives are located out of the sprinklers’ distribution range
Colonies work better when competing for pollen or nectar, therefore, place the hives in small groups not as single hives
Check your hives – the grower pays for every hive so every hive should have pollinating bees in it.
Be aware bees tend to work along tree rows as opposed to between rows.
73
Discuss your likely spray program with the bee keeper , including the use of potentially damaging sprays. (arrange for the hives to be removed before applying these chemicals).
Give the beekeeper at least several days notice before hive removal or spray application
Ensure you have clear communication processes with your beekeeper (including urgent contact details).
Avoid spraying insecticides and some fungicides during daylight hours.
The Australian beekeeping industry is currently establishing quality assurance guidelines for ensuring that beekeepers providing pollination services for growers are providing quality services. Growers are encouraged to use the services of those beekeepers providing professional services.
Warning Some people have allergic reactions to bee stings – ensure appropriate clothing is worn and if family members or staff are allergic have appropriate medical response strategies in place to handle stings. People with severe allergic reactions should avoid handling bees and/or have appropriate medication with them to respond to any sting. Property owners and managers should be aware of staff with allergic reactions to bees (and other insects).
Hive removal Because of different varietal flowering times, bee removal may need to be staggered or have their locations changed during the flowering period. Have a clear communication process with your beekeeper and a proposed removal strategy. Be conscious that your neighbours may still have bees present – check with them before applying any chemicals.
Chemical spray applications and bees Agricultural chemicals vary in their toxicity to bees. Some chemicals are highly toxic while other chemicals can be applied while bees are actively foraging. The choice of the chemicals used during flowering time should be carefully considered and take in to account their potential effects on managed and feral bee colonies. Prior to the introduction of any hives, discuss your potential spray program with your beekeeper and mutually agree on the use of chemicals in that program. Where you or the beekeeper is unsure of a particular chemical’s potential impact actively seek the appropriate information required to make an informed decision. A chemical should not be used during the blossoming period unless its toxicity to bees is known.
Follow the warnings on pesticide labels and dispose of waste chemical and/or containers correctly. Contact your local council for advice on appropriate disposal or recycling options.
Do not spray in conditions where spray may drift onto adjacent blocks with foraging bees.
74
Useful websites
Australian Honeybee Organisations – www.honeybee.com.au/beeinfo/assoc
References
Mayer, D.F, Johansen, C.A and Burgett, D.M. (1986) Bee Pollination of Tree Fruits, Pacific Northwest Cooperative Extension Bulletin 0282, Washington State University Extension Service, Oregon State University Extension Service and University of Idaho Cooperative Extension Service, Pullman, Washington Olsen. E (2009) Is your orchard bee friendly? Good Fruit Grower, Vol 60, no 6 Sommerville, D. (1999) Honey bees in cherry and plum pollination, NSW Agriculture Agnote DAI/126 Webster, A.D & Looney, N.E (1996) Cherries: Crop Physiology, Production and Uses, CAB International
Effective pollination period
The concept of the effective pollination period (EPP) has been developed to express the period when pollination must occur in order to achieve fruit set. It represents the period of ovule longevity minus the time for pollen tube growth to effect fertilisation. The longer the EPP, the longer the pollination period may be. The shorter the EPP, the more important it is for pollination to occur immediately after anthesis. Under optimal conditions for fruit set the pollen tubes grow fast enough for fertilisation to occur in a high percentage of the ovules. Cool temperatures prolong the viability of the ovules but reduce the growth rate of the pollen tubes. Moderately cool temperatures can prolong the EPP but they do not necessarily result in higher fruit set. Warmer temperatures reduce the EPP because of shortened ovule longevity. Under warm conditions, it is extremely important to have pollinisers (bees) in the orchard as the first flowers open to ensure there is rapid pollen transfer.
75
Plant nutrition and fruit set
It is important that there is an optimal balance of tree nutrient levels (which influence vegetative and reproductive growth) for sustained annual fruit production.. Specific nutrient issues that influence floral development and fruit set are:
Boron
Floral tissues appear to have a high demand for Boron. Work by Hanson (1991) showed that foliar applications of Boron just before leaf fall resulted in greatly increased boron levels in flower buds and increased fruit set. According to midsummer leaf level standards a positive response to boron may occur in trees not considered deficient in boron - Thompson, M. in Webster, A.D. & Looney, N.E (1996)
Nitrogen
Further research is required on nitrogen applications and it’s impact on the development of floral tissues. Excessive applications can induce plant vigour at the expense of flower bud initiation and development.
References
Hanson, E.J. (1991) Sour Cherries respond to foliar boron applications, HortScience 26 pp 1142-1145
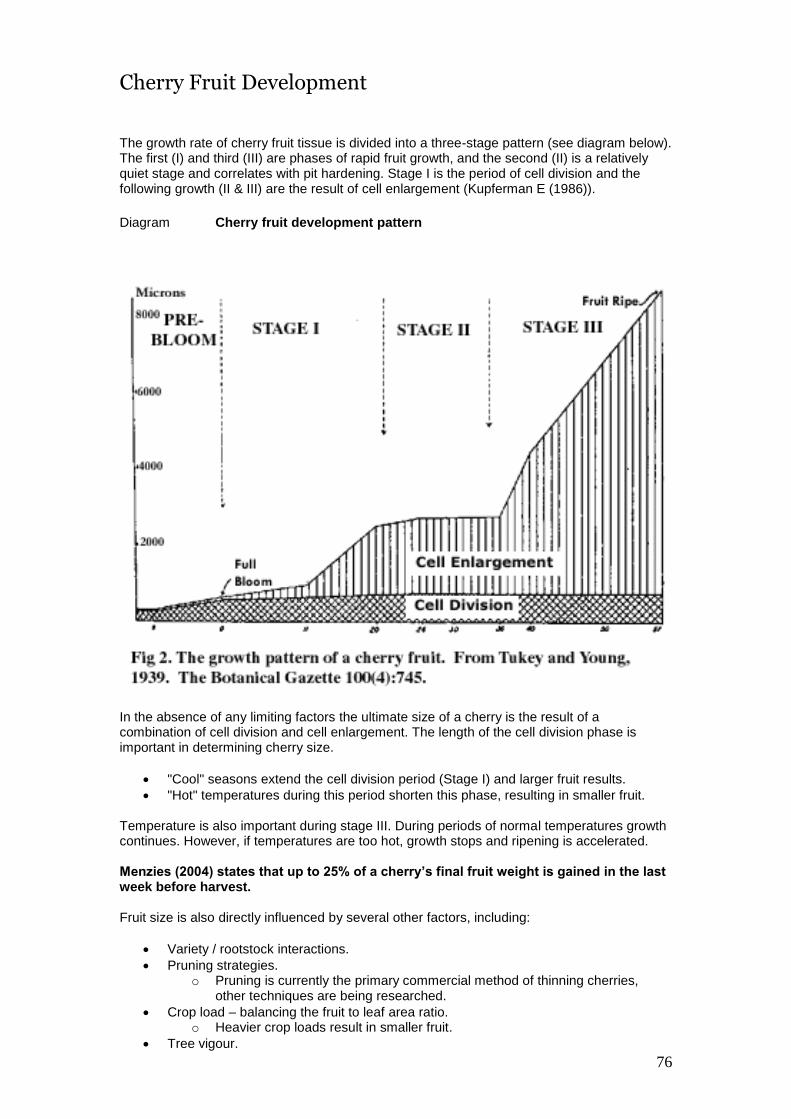
76
Cherry Fruit Development
The growth rate of cherry fruit tissue is divided into a three-stage pattern (see diagram below). The first (I) and third (III) are phases of rapid fruit growth, and the second (II) is a relatively quiet stage and correlates with pit hardening. Stage I is the period of cell division and the following growth (II & III) are the result of cell enlargement (Kupferman E (1986)).
Diagram Cherry fruit development pattern
In the absence of any limiting factors the ultimate size of a cherry is the result of a combination of cell division and cell enlargement. The length of the cell division phase is important in determining cherry size.
"Cool" seasons extend the cell division period (Stage I) and larger fruit results.
"Hot" temperatures during this period shorten this phase, resulting in smaller fruit. Temperature is also important during stage III. During periods of normal temperatures growth continues. However, if temperatures are too hot, growth stops and ripening is accelerated. Menzies (2004) states that up to 25% of a cherry’s final fruit weight is gained in the last week before harvest. Fruit size is also directly influenced by several other factors, including:
Variety / rootstock interactions.
Pruning strategies. o Pruning is currently the primary commercial method of thinning cherries,
other techniques are being researched.
Crop load – balancing the fruit to leaf area ratio. o Heavier crop loads result in smaller fruit.
Tree vigour.
77
Irrigation practices – particularly lack of water at critical times. o Bloom o Cell division o Stage III
Nutrition.
Heat stress.
Leaf size and health. o Cherry leaves become “photosynthetically” active early in the growing
season. This is what enables the tree to mature the crop in a (comparably) very short growing period.
o Shaded leaves tend to be longer and thinner than normal leaves.
Good light interception and distribution. o Full canopy leaf development occurs within 30 days of bud burst (Menzies
(2004)). o Shading occurs from 30 days after bud burst, reaching its peak at 60 days
(Menzies (2004)). o Lack of light is very detrimental in cherries, even a 10-15% reduction can
reduce fruit set and impact fruit quality (sugars and flavour). o Reduced light can impact on fruit size by delaying fruit maturity by up to five
to seven days. If strip picked this shaded fruit will not reach its full fruit size potential or optimum sugars leading to reduced fruit flavour (tart or sour taste).
o Long thin leaves and shoots are an indication of poor light interception or shading.
o A dappled light under trees instead of a solid dense shadow is an indicator of good light penetration.
References
Kupferman E (1986), An Introduction to Cherry Quality and Handling Post Harvest Pomology Newsletter, Vol. 4, No. 1 Menzies, R (2004). Increasing Cherry Fruit size, Agfact H5.4.2
78
Nursery tree quality “An orchard starts in the nursery. The quality of nursery trees can have a significant effect on orchard profitability” Bas van den Ende (August 2002) Establishing a new orchard is an expensive investment and tree costs can be the single most expensive component. To ensure an orchards’ long term profitability and suitability for export, growers can no longer afford to “put up with whatever they get”. However it is not always the fault of the nurseryman, growers are notorious for making last minute decisions and expecting to get the best quality trees. An orchard success in many ways is dependant on the quality of the “building blocks” such as the young trees which are planted in it. Australia currently does not have a certified nursery tree quality system, this is considered to have major impacts on our tree productivity and therefore orchard profitability. Individual nurseries have initiated their own virus tested propagation schemes. Growers should always ask any nursery about the virus status of trees supplied by them. Wherever possible growers should purchase trees which have been propagated with virus tested propagation material.
What is a quality tree? What constitutes a quality tree is hard to define because of the many different perspectives and of expectations and what is a “good quality” tree. A “good quality” tree for one system may be “poor quality” for another. Varieties differ in their growth habits and this further complicates the situation. To determine what type of tree you want produced by your nursery you must first determine what type of growing/training system you intend to use in your orchard. Optimum nursery tree quality will not be the same for different orchard systems. The type of orchard system you decide to use will determine the best type of nursery tree to use. However there are some specific guidelines that may be followed
Know what type of tree you want o Number of leaders o Whip (single leader tree with no side branches) o Small/medium/large trees
Order early - order from the nursery at least 12 months prior to planting
Develop a good working relationship with your nurseryman
Check the trees while they are growing in the nursery (if practical)
Cheap trees do not necessarily mean a bargain.
Do the trees have a good healthy root system.
Ordering trees during the year of planting does not generally allow you to obtain the best nursery trees for your needs. Compromises generally experienced include, the wrong rootstock, variety, tree size or tree type, all of which can have a significant impact on the quality of your orchard, the fruit it produces and your subsequent profit.
Tree price vs quality (low cost vs “cheap” trees) Although trees are the major cost of any new orchard and most growers want to purchase them as cheaply as possible it is not necessarily good economics to focus on price alone. The higher the planting density, the more important the initial cost of each tree is in the profitability of the orchard.
79
The conundrum for growers is, the higher the planting density the higher the initial orchard establishment costs. However, the lower the planting density the more crucial the quality of the nursery trees is to the performance and profitability of the orchard. The objective is to find the planting density (and orchard system) that suits the individual grower and then carefully budget to identify the desirable tree price range for that orchard. Obviously the lower the tree price the better it is for the grower as long as tree quality is not compromised and you know exactly what you are getting for the price you are paying. A small tree at a “cheap” price may take as much as two years longer to develop properly in the orchard and may extend the orchards’ pay back period by four years (because of the delayed cropping effects). To set up an orchard to produce quality fruit you must start with good quality trees; produced to the right specifications for the orchard system you want. Price is a very important consideration but it is not the only consideration.
Tree Specifications While many nurseries put considerable effort into producing good nursery trees, each nursery tends to have its own specifications and quality controls. In the absence of general Australia wide standards for nursery trees it is currently a “buyer beware” scenario. Some of the key starting considerations on nursery tree specifications and tree type descriptions are that they are:
Produced from bud and graft wood from trees tested for and free of viruses.
Rootstocks used in the production of nursery trees come from production units that have been indexed and free of viruses
Produced from trees that are true to type (meets pomological specification of the variety)
A minimum calliper size (trunk diameter) – negotiated
Root system minimally trimmed so that it can adequately support the tree, where possible the main roots to be a minimum of 250mm in length. The tree is to be free of residual soil.
The tree has minimal damage from mechanical harvest or other operations.
Free of obvious lesions, pests, diseases
Treatment for pests and diseases can only be undertaken with chemicals registered for that purpose
Trees are not treated with any chemicals to accelerate defoliation of leaves other than low biuret urea, zinc and copper formulations. Hand stripping of leaves should be restricted to the growing tips only
The trees should be grown and supplied in accordance with the phytosanitary requirements of the state where the trees are to be planted.
Bundled and transported to ensure that absolute minimal damage can occur
Tree roots to remain moist (damp) during transport
Editors comment:
Unless orchardists specify their requirements to their nursery and only accept trees up to those specifications, they will continue to have arguments with nurserymen and problems in their orchards. If you don’t specify it then you can’t measure it accurately.
Reference
Van den Ende B. (August 2002) Seek Quality Nursery Trees, Pome Fruit Australia pp 29-31
80
Nurseries Supplying Cherry Trees There are several commercial nurseries supplying cherry trees to Australian orchardists. Two of the main suppliers are
ANFIC (Australian Nurseryman’s Fruit Improvement Company)
Graham’s Factree These two organisations between them have the largest and widest availability of varieties and rootstocks. A number of the varieties and rootstocks available through these organisations are subject to exclusive arrangements and only available under specific conditions. Contact the organisations direct for details of these arrangements. A comprehensive list of the varieties (cultivars) and rootstocks available from these organisations is available on their respective websites (see appendix 1). Specific information and contact details for the major nurseries is listed in Appendix 1.
81
Tree Training Systems
The majority of sweet cherry varieties are vigorous-growing trees with an upright growth. They become tall without pruning or training and this leads to most of the fruit being unable to be harvested from the ground.
In the past sweet cherry trees were planted at wide spacings and initially pruned to the multiple leader (vase) system. They generally did not crop consistently until year five and did not reach maximum yields for a considerable period of time.
Since the mid 1980's most sweet cherry trees in Australia have been planted at much higher densities with or without trellises as training aids and tree support. These higher density orchards are aimed at the filling of the available orchard space with early cropping, productive trees. The additional benefits of these systems include;
Earlier cash flow and economic returns
More uniform productivity (reduced use of seed produced rootstocks)
Simplified tree structures that better utilise and distribute light
Better crop loads and productivity per hectare
More efficient use of labour
More efficient use of all orchard inputs
Better structured orchards able to provide better protection from environmental (i.e. rain cracking) and biological (i.e. birds) problems
Decreased potential environmental problems through more targeted chemical applications and reduce spray drift potential.
However to optimise these benefits orchardists need to increase their knowledge of tree physiology and orchard management practices.
Australia’s cherry producing areas are characterised by wide ranging differences in industry development, soil types, topography, environments, water availability, grower preferences and market requirements. Subsequently there is no single “Australian cherry production system”. Several different cherry production systems have evolved to meet these different considerations.
The main high-density planting systems currently being used commercially in Australia are:
Bush Systems – KGB, Aussie Bush
Tatura Trellis
Central Leader
Lenswood Tie-down - Palmette

82
Traditional vase systems (Low density vs high density)
The traditional vase tree training system has lower establishment costs compared to the higher density systems. However, the lower productivity of these systems (demonstrated in several trials) results in lower economic returns over a 15-year orchard life when compared to the higher density systems.
The higher density systems have higher establishment costs due to the capital costs of support systems and greater tree numbers. However, higher early yields and increased productivity generally offset these costs over the life of the orchard.
Tasmanian and South Australian research has shown that the yields on these higher density systems will vary depending on the mixture of varieties, precocity of these varieties and management inputs.
As a guide - the more intensive the system;
the higher the management inputs required.
High and early yields require a high input of labour, especially during years two, three and four. Lack of attention to training, application of growth regulators, bud nicking to lateral buds, nutrition, irrigation and weed control will result in significantly lower yields.
the higher the financial risk early in the orchard's life.
Crop failures early in the life of an intensive orchard affect cash flow and the ability to service debt
the more important the precocity of the varieties used
“Bush” systems
The traditional Spanish Bush training system has been grown in the Mora D’Ebre region (about 25 km from the east Spanish coast) for more than 25 years. The region is typified by low rainfall (280 mm), calcareous soils and low soil fertility.
The traditional Spanish bush is a free-standing multiple-leader (vase) shaped tree with 14-32 leaders depending on tree spacing’s (1.5 - 3.0 m x 4-5 m) and “strength” of soils. Trees spaced 1.5 x 4 m are developed with 14-16 leaders. For spacing’s of 3 x 4.5 m - 20-24 leaders are developed. In many orchards lateral growth hanging from fewer leaders is popular. The use of green pruning is a feature of the bush systems. This encourages quick branching.
A semi-vigorous to vigorous rootstock is considered essential.
In northern Spain, the combination of high summer temperatures and adequate irrigation water results in strong, vigorous growth of young trees and strong regrowth following summer pruning. Once trees have filled their allotted space, the combination of low soil fertility, summer pruning and regulated irrigation combine to control excessive vigour. The semi-vigorous rootstock St. Lucie 64 (Mahaleb) is also used in northern Spain. On more fertile soils, the growth regulator Cultar® is used to help control vigour.
In Australia, tree vigour influences the early pruning requirements when establishing bush type trees. Low vigour trees may only allow one summer pruning, thereby increasing the time to develop the full tree size.
For cooler climates, such as Tasmania, closer tree spacing’s are recommended.
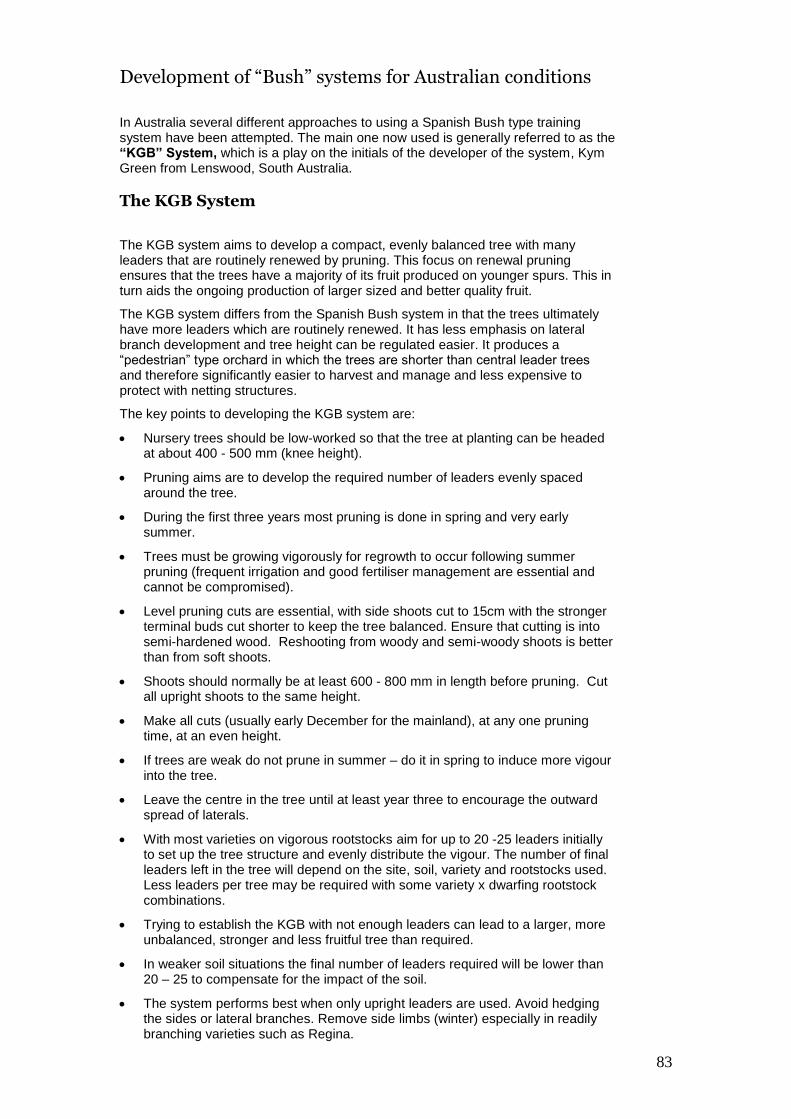
83
Development of “Bush” systems for Australian conditions
In Australia several different approaches to using a Spanish Bush type training system have been attempted. The main one now used is generally referred to as the “KGB” System, which is a play on the initials of the developer of the system, Kym Green from Lenswood, South Australia.
The KGB System
The KGB system aims to develop a compact, evenly balanced tree with many leaders that are routinely renewed by pruning. This focus on renewal pruning ensures that the trees have a majority of its fruit produced on younger spurs. This in turn aids the ongoing production of larger sized and better quality fruit.
The KGB system differs from the Spanish Bush system in that the trees ultimately have more leaders which are routinely renewed. It has less emphasis on lateral branch development and tree height can be regulated easier. It produces a “pedestrian” type orchard in which the trees are shorter than central leader trees and therefore significantly easier to harvest and manage and less expensive to protect with netting structures.
The key points to developing the KGB system are:
Nursery trees should be low-worked so that the tree at planting can be headed at about 400 - 500 mm (knee height).
Pruning aims are to develop the required number of leaders evenly spaced around the tree.
During the first three years most pruning is done in spring and very early summer.
Trees must be growing vigorously for regrowth to occur following summer pruning (frequent irrigation and good fertiliser management are essential and cannot be compromised).
Level pruning cuts are essential, with side shoots cut to 15cm with the stronger terminal buds cut shorter to keep the tree balanced. Ensure that cutting is into semi-hardened wood. Reshooting from woody and semi-woody shoots is better than from soft shoots.
Shoots should normally be at least 600 - 800 mm in length before pruning. Cut all upright shoots to the same height.
Make all cuts (usually early December for the mainland), at any one pruning time, at an even height.
If trees are weak do not prune in summer – do it in spring to induce more vigour into the tree.
Leave the centre in the tree until at least year three to encourage the outward spread of laterals.
With most varieties on vigorous rootstocks aim for up to 20 -25 leaders initially to set up the tree structure and evenly distribute the vigour. The number of final leaders left in the tree will depend on the site, soil, variety and rootstocks used. Less leaders per tree may be required with some variety x dwarfing rootstock combinations.
Trying to establish the KGB with not enough leaders can lead to a larger, more unbalanced, stronger and less fruitful tree than required.
In weaker soil situations the final number of leaders required will be lower than 20 – 25 to compensate for the impact of the soil.
The system performs best when only upright leaders are used. Avoid hedging the sides or lateral branches. Remove side limbs (winter) especially in readily branching varieties such as Regina.
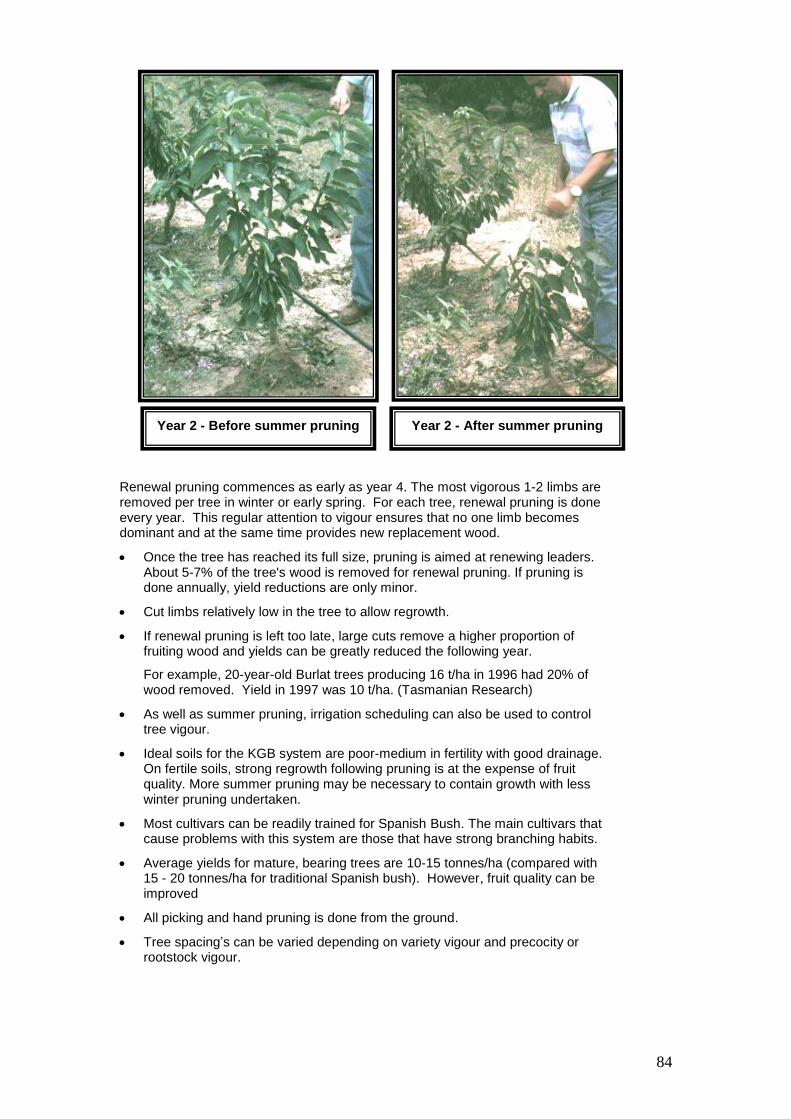
84
Year 2 - Before summer pruning Year 2 - After summer pruning
Renewal pruning commences as early as year 4. The most vigorous 1-2 limbs are removed per tree in winter or early spring. For each tree, renewal pruning is done every year. This regular attention to vigour ensures that no one limb becomes dominant and at the same time provides new replacement wood.
Once the tree has reached its full size, pruning is aimed at renewing leaders. About 5-7% of the tree's wood is removed for renewal pruning. If pruning is done annually, yield reductions are only minor.
Cut limbs relatively low in the tree to allow regrowth.
If renewal pruning is left too late, large cuts remove a higher proportion of fruiting wood and yields can be greatly reduced the following year.
For example, 20-year-old Burlat trees producing 16 t/ha in 1996 had 20% of wood removed. Yield in 1997 was 10 t/ha. (Tasmanian Research)
As well as summer pruning, irrigation scheduling can also be used to control tree vigour.
Ideal soils for the KGB system are poor-medium in fertility with good drainage. On fertile soils, strong regrowth following pruning is at the expense of fruit quality. More summer pruning may be necessary to contain growth with less winter pruning undertaken.
Most cultivars can be readily trained for Spanish Bush. The main cultivars that cause problems with this system are those that have strong branching habits.
Average yields for mature, bearing trees are 10-15 tonnes/ha (compared with 15 - 20 tonnes/ha for traditional Spanish bush). However, fruit quality can be improved
All picking and hand pruning is done from the ground.
Tree spacing’s can be varied depending on variety vigour and precocity or rootstock vigour.
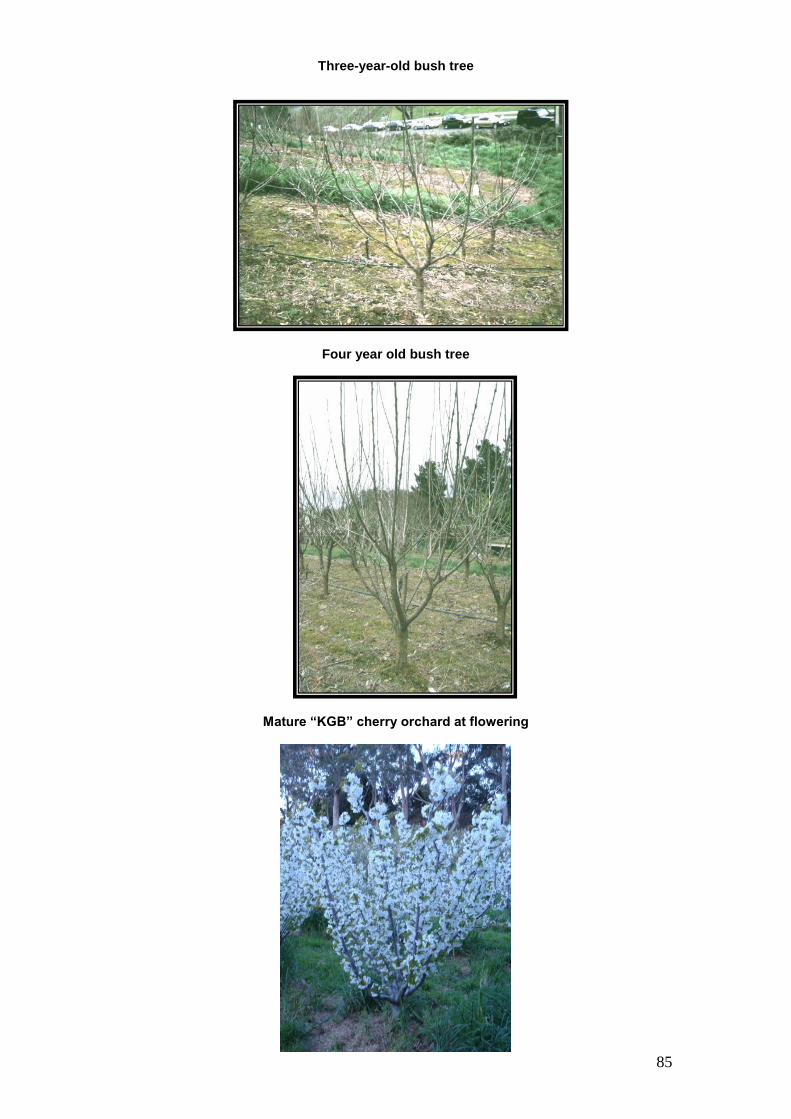
85
Three-year-old bush tree
Four year old bush tree
Mature “KGB” cherry orchard at flowering
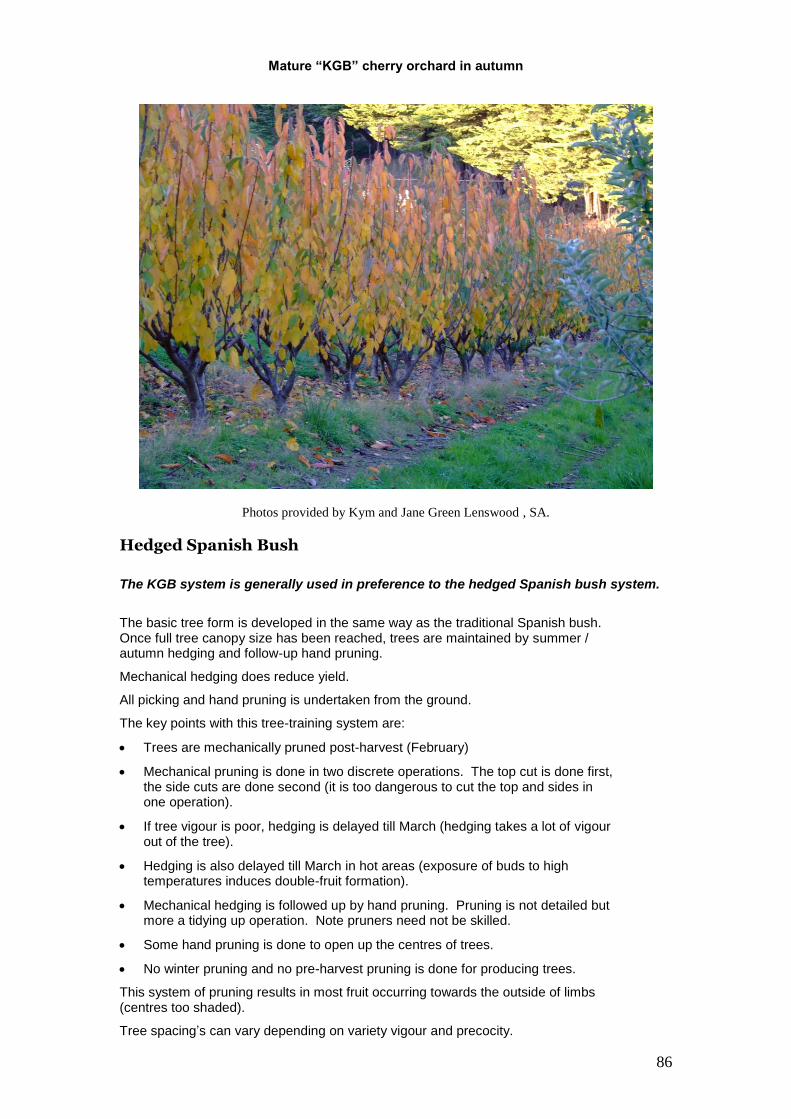
86
Mature “KGB” cherry orchard in autumn
Photos provided by Kym and Jane Green Lenswood , SA.
Hedged Spanish Bush
The KGB system is generally used in preference to the hedged Spanish bush system.
The basic tree form is developed in the same way as the traditional Spanish bush. Once full tree canopy size has been reached, trees are maintained by summer / autumn hedging and follow-up hand pruning.
Mechanical hedging does reduce yield.
All picking and hand pruning is undertaken from the ground.
The key points with this tree-training system are:
Trees are mechanically pruned post-harvest (February)
Mechanical pruning is done in two discrete operations. The top cut is done first, the side cuts are done second (it is too dangerous to cut the top and sides in one operation).
If tree vigour is poor, hedging is delayed till March (hedging takes a lot of vigour out of the tree).
Hedging is also delayed till March in hot areas (exposure of buds to high temperatures induces double-fruit formation).
Mechanical hedging is followed up by hand pruning. Pruning is not detailed but more a tidying up operation. Note pruners need not be skilled.
Some hand pruning is done to open up the centres of trees.
No winter pruning and no pre-harvest pruning is done for producing trees.
This system of pruning results in most fruit occurring towards the outside of limbs (centres too shaded).
Tree spacing’s can vary depending on variety vigour and precocity.

87
Aussie Bush system
The Aussie Bush system is a relatively new cherry training system developed by the originator of the Tatura trellis Bas van den Ende.
This system revolves around developing a simple 4 limbed structure with horizontal fruiting limbs developed off these main structural limbs. The creation and selection of the horizontal limbs is an important aspect of this system. It allows for the formal development of a tree without the need for a trellis structure.
Heading of the upright leaders (for height restriction) is only done in summer when the trees have reached their maximum desired height. As with other systems deficit irrigation can be an important tool in containing tree vigour and maintaining fruitfulness.
The horizontal limbs are restricted to approx 90cm in length and the tree centres are maintained open to allow good light penetration.
Tree spacing’s will vary depending on the site but are generally 4.5 m x 2 - 2.5m. Mature heights can be restricted to around 3m if desired.
This is a comparatively new system with the first plantings made in 1998. Attention to detail is required in the first years to develop the structure properly.
Further details on this system can be obtained from the “Tree Fruit” website
www.treefruit.com.au
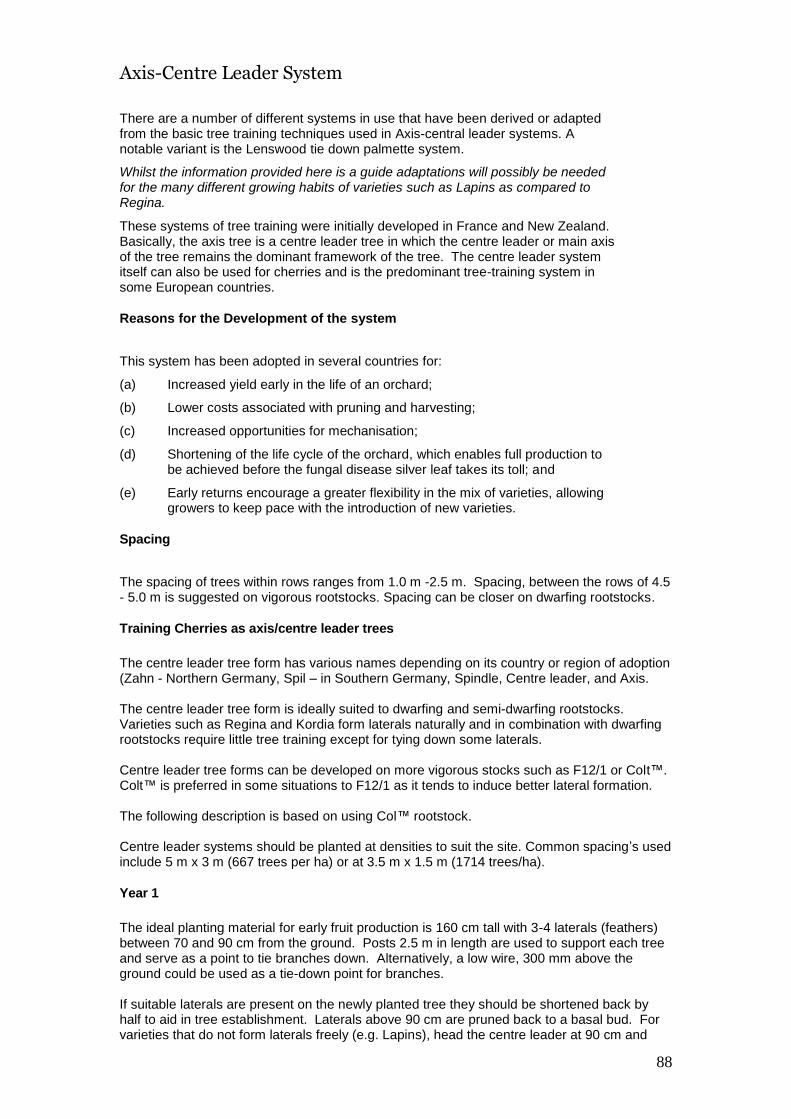
88
Axis-Centre Leader System
There are a number of different systems in use that have been derived or adapted from the basic tree training techniques used in Axis-central leader systems. A notable variant is the Lenswood tie down palmette system.
Whilst the information provided here is a guide adaptations will possibly be needed for the many different growing habits of varieties such as Lapins as compared to Regina.
These systems of tree training were initially developed in France and New Zealand. Basically, the axis tree is a centre leader tree in which the centre leader or main axis of the tree remains the dominant framework of the tree. The centre leader system itself can also be used for cherries and is the predominant tree-training system in some European countries.
Reasons for the Development of the system
This system has been adopted in several countries for:
(a) Increased yield early in the life of an orchard;
(b) Lower costs associated with pruning and harvesting;
(c) Increased opportunities for mechanisation;
(d) Shortening of the life cycle of the orchard, which enables full production to be achieved before the fungal disease silver leaf takes its toll; and
(e) Early returns encourage a greater flexibility in the mix of varieties, allowing growers to keep pace with the introduction of new varieties.
Spacing
The spacing of trees within rows ranges from 1.0 m -2.5 m. Spacing, between the rows of 4.5 - 5.0 m is suggested on vigorous rootstocks. Spacing can be closer on dwarfing rootstocks.
Training Cherries as axis/centre leader trees
The centre leader tree form has various names depending on its country or region of adoption (Zahn - Northern Germany, Spil – in Southern Germany, Spindle, Centre leader, and Axis. The centre leader tree form is ideally suited to dwarfing and semi-dwarfing rootstocks. Varieties such as Regina and Kordia form laterals naturally and in combination with dwarfing rootstocks require little tree training except for tying down some laterals. Centre leader tree forms can be developed on more vigorous stocks such as F12/1 or Colt™. Colt™ is preferred in some situations to F12/1 as it tends to induce better lateral formation. The following description is based on using Col™ rootstock. Centre leader systems should be planted at densities to suit the site. Common spacing’s used include 5 m x 3 m (667 trees per ha) or at 3.5 m x 1.5 m (1714 trees/ha).
Year 1
The ideal planting material for early fruit production is 160 cm tall with 3-4 laterals (feathers) between 70 and 90 cm from the ground. Posts 2.5 m in length are used to support each tree and serve as a point to tie branches down. Alternatively, a low wire, 300 mm above the ground could be used as a tie-down point for branches. If suitable laterals are present on the newly planted tree they should be shortened back by half to aid in tree establishment. Laterals above 90 cm are pruned back to a basal bud. For varieties that do not form laterals freely (e.g. Lapins), head the centre leader at 90 cm and
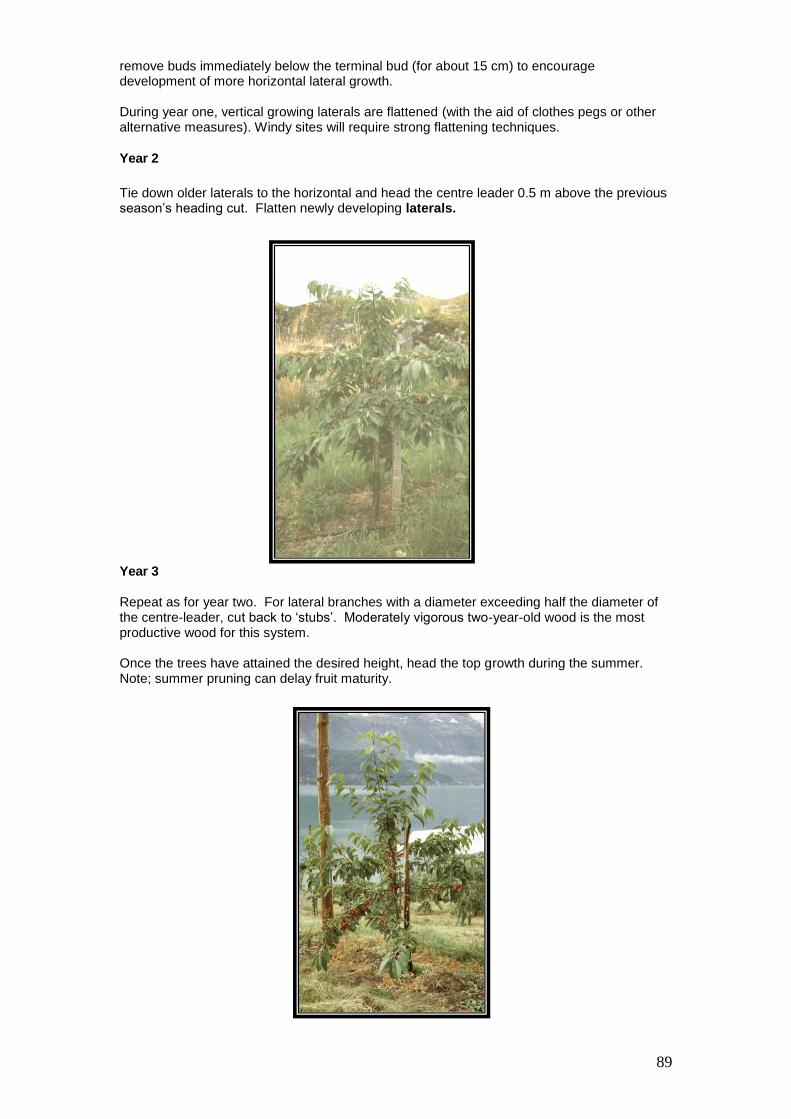
89
remove buds immediately below the terminal bud (for about 15 cm) to encourage development of more horizontal lateral growth. During year one, vertical growing laterals are flattened (with the aid of clothes pegs or other alternative measures). Windy sites will require strong flattening techniques.
Year 2
Tie down older laterals to the horizontal and head the centre leader 0.5 m above the previous season’s heading cut. Flatten newly developing laterals.
Year 3 Repeat as for year two. For lateral branches with a diameter exceeding half the diameter of the centre-leader, cut back to ‘stubs’. Moderately vigorous two-year-old wood is the most productive wood for this system. Once the trees have attained the desired height, head the top growth during the summer. Note; summer pruning can delay fruit maturity.
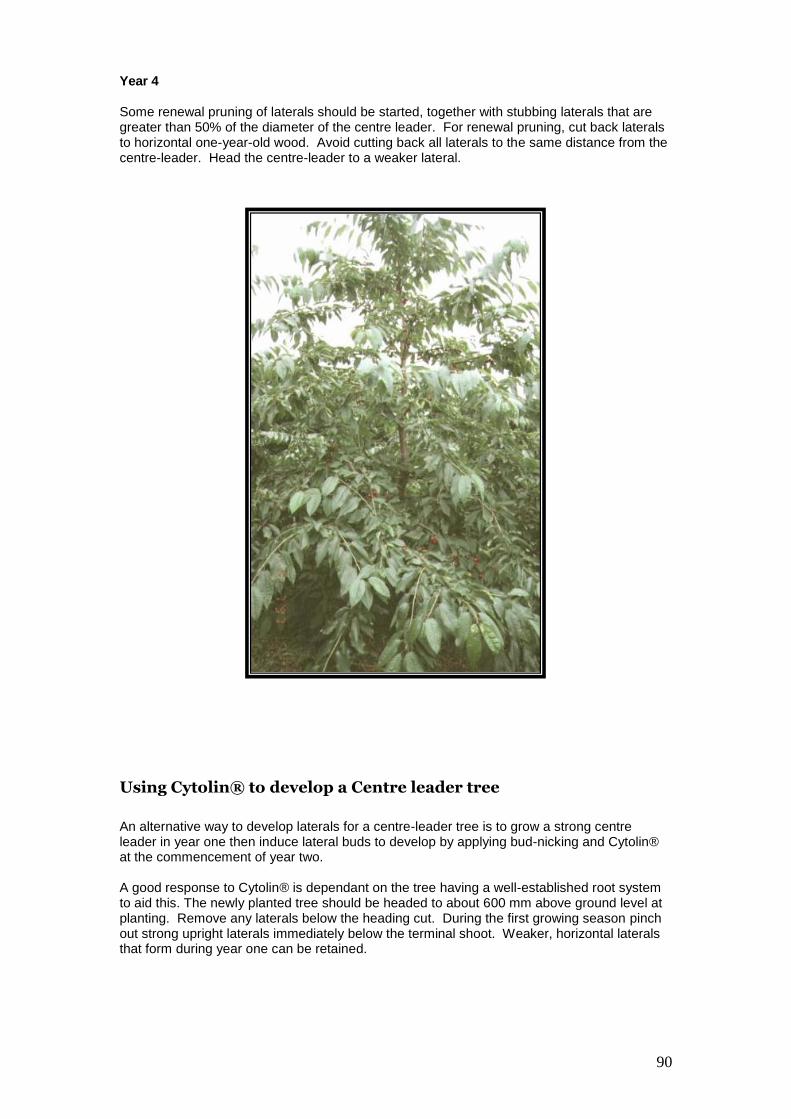
90
Year 4 Some renewal pruning of laterals should be started, together with stubbing laterals that are greater than 50% of the diameter of the centre leader. For renewal pruning, cut back laterals to horizontal one-year-old wood. Avoid cutting back all laterals to the same distance from the centre-leader. Head the centre-leader to a weaker lateral.
Using Cytolin® to develop a Centre leader tree
An alternative way to develop laterals for a centre-leader tree is to grow a strong centre leader in year one then induce lateral buds to develop by applying bud-nicking and Cytolin® at the commencement of year two. A good response to Cytolin® is dependant on the tree having a well-established root system to aid this. The newly planted tree should be headed to about 600 mm above ground level at planting. Remove any laterals below the heading cut. During the first growing season pinch out strong upright laterals immediately below the terminal shoot. Weaker, horizontal laterals that form during year one can be retained.
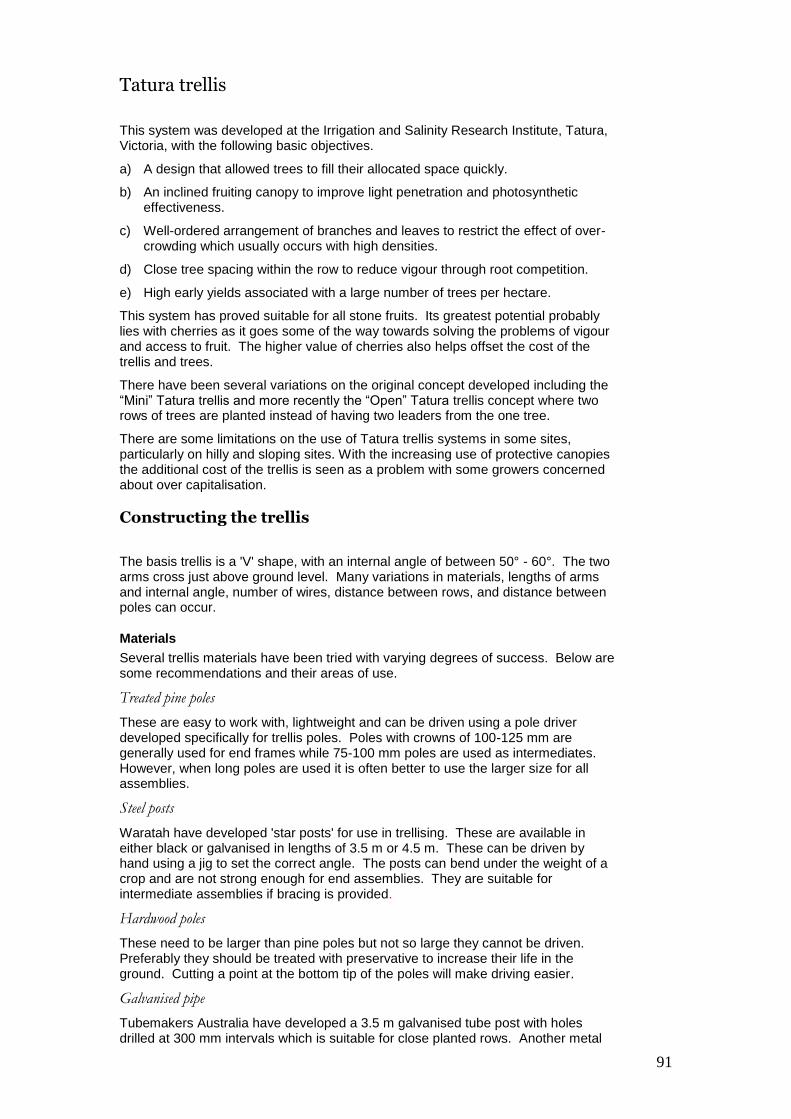
91
Tatura trellis
This system was developed at the Irrigation and Salinity Research Institute, Tatura, Victoria, with the following basic objectives.
a) A design that allowed trees to fill their allocated space quickly.
b) An inclined fruiting canopy to improve light penetration and photosynthetic effectiveness.
c) Well-ordered arrangement of branches and leaves to restrict the effect of over-crowding which usually occurs with high densities.
d) Close tree spacing within the row to reduce vigour through root competition.
e) High early yields associated with a large number of trees per hectare.
This system has proved suitable for all stone fruits. Its greatest potential probably lies with cherries as it goes some of the way towards solving the problems of vigour and access to fruit. The higher value of cherries also helps offset the cost of the trellis and trees.
There have been several variations on the original concept developed including the “Mini” Tatura trellis and more recently the “Open” Tatura trellis concept where two rows of trees are planted instead of having two leaders from the one tree.
There are some limitations on the use of Tatura trellis systems in some sites, particularly on hilly and sloping sites. With the increasing use of protective canopies the additional cost of the trellis is seen as a problem with some growers concerned about over capitalisation.
Constructing the trellis
The basis trellis is a 'V' shape, with an internal angle of between 50° - 60°. The two arms cross just above ground level. Many variations in materials, lengths of arms and internal angle, number of wires, distance between rows, and distance between poles can occur.
Materials
Several trellis materials have been tried with varying degrees of success. Below are some recommendations and their areas of use.
Treated pine poles
These are easy to work with, lightweight and can be driven using a pole driver developed specifically for trellis poles. Poles with crowns of 100-125 mm are generally used for end frames while 75-100 mm poles are used as intermediates. However, when long poles are used it is often better to use the larger size for all assemblies.
Steel posts
Waratah have developed 'star posts' for use in trellising. These are available in either black or galvanised in lengths of 3.5 m or 4.5 m. These can be driven by hand using a jig to set the correct angle. The posts can bend under the weight of a crop and are not strong enough for end assemblies. They are suitable for intermediate assemblies if bracing is provided.
Hardwood poles
These need to be larger than pine poles but not so large they cannot be driven. Preferably they should be treated with preservative to increase their life in the ground. Cutting a point at the bottom tip of the poles will make driving easier.
Galvanised pipe
Tubemakers Australia have developed a 3.5 m galvanised tube post with holes drilled at 300 mm intervals which is suitable for close planted rows. Another metal

92
section has been developed for trellising grapes. This section is designed to slide neatly over steel ‘star’ posts. ‘Star’ posts are driven into the ground at the correct angle and the metal sections fitted over them. Metal sections are suitable for internal assemblies if cross-bracing is added.
Other materials
Channel iron, railway iron and a combination of vertical poles with sawn timber arms can also be used.
The material chosen will ultimately depend on what growers can afford or obtain. Growers should use the cheapest material available to them provided it will do the job safely and last long enough. Don't forget, the unexpected will almost always happen.
Figure 3: Basic configuration of Tatura Trellis.
The Jig
A jig makes life much easier in establishing the 'V' shape of the trellis correctly.
Figure 4 shows the dimensions of a jig that will produce a 60° internal angle. Figure 5 demonstrates the positions of the poles and the jig.
Figure 4: Guide Jig
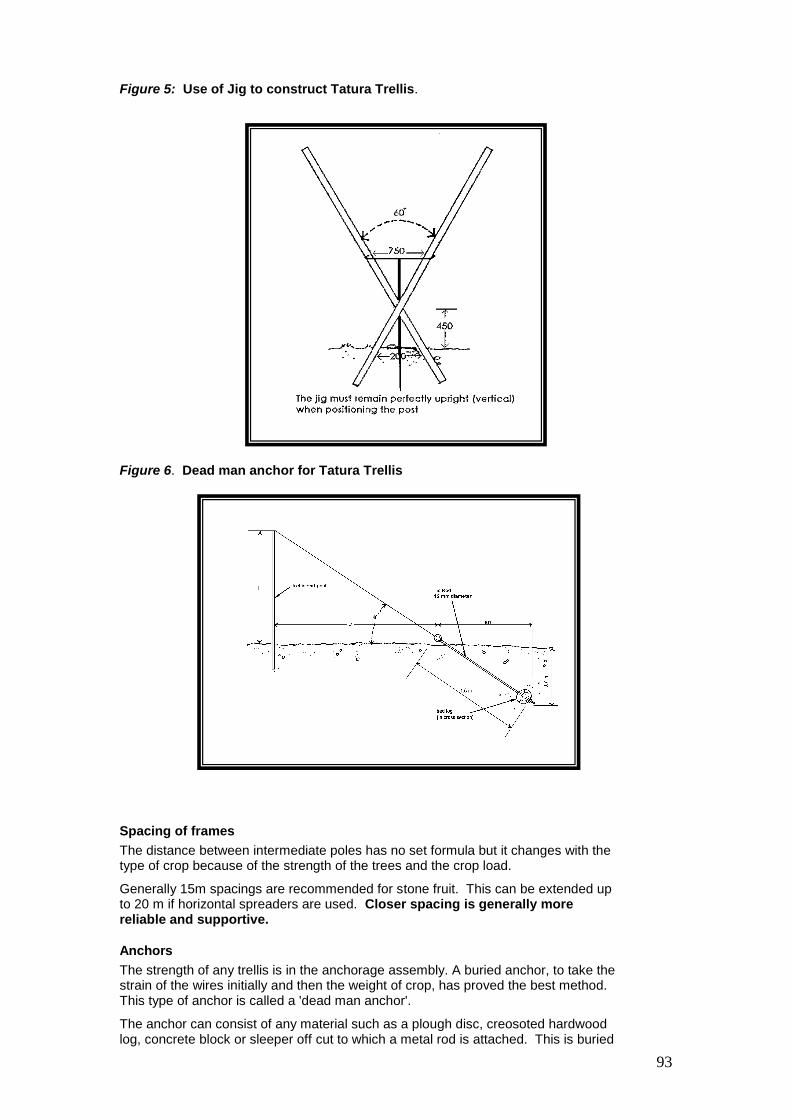
93
Figure 5: Use of Jig to construct Tatura Trellis.
Figure 6. Dead man anchor for Tatura Trellis
Spacing of frames
The distance between intermediate poles has no set formula but it changes with the type of crop because of the strength of the trees and the crop load.
Generally 15m spacings are recommended for stone fruit. This can be extended up to 20 m if horizontal spreaders are used. Closer spacing is generally more reliable and supportive.
Anchors
The strength of any trellis is in the anchorage assembly. A buried anchor, to take the strain of the wires initially and then the weight of crop, has proved the best method. This type of anchor is called a 'dead man anchor'.
The anchor can consist of any material such as a plough disc, creosoted hardwood log, concrete block or sleeper off cut to which a metal rod is attached. This is buried

94
with the rod pointed toward the trellis. An eye in the top of the rod allows attachment of the wires. The placement of anchors is shown in Figure 6.
Anchor assembly
The top trellis wire should not form an angle greater than 45° with the ground once it is tied to the anchor bolt. To accommodate this using the least ground for the ends, use the following table;
Distance from trellis to top of eye-bolt
Height of trellis 3.8 m 3.5 m 3.0 m 2.5 m 2.0 m 1.7 m
Distance to eyebolt 4.5 m 4.2 m 3.6 m 3.0 m 2.4 m 2.0 m
The end assembly frames should be tied to the anchor rod before straining the trellis wires to prevent them moving away from the anchor during straining.
Wires
Wires are used initially to train the trees but later they support the crop. ‘Tyeasy’, 2.5 mm high tensile wire has proved satisfactory in all trellis construction. All wires should be tied to the eye-bolt and not the end post. Pine poles in particular can be cut when wires tighten under the load of the crop.
It is preferable to run the wires on the inside of poles as this allows the poles to take the weight. A barbed staple will maintain the wire in position. This is adequate on fixed wire systems but where wires will be moved upwards they should be tied with wire to the inside of the post. A staple can hold the tie wire in position.
In large trellis plantings growers have mechanised the running of wire by using a multi-wire spinner. These wires are generally attached to the outside of the poles. If this is the case the following points should be noted.
(a) Placing the wire outside the posts effectively lowers the cross over point on the poles. To avoid spreading the newly developing opposite shoots of the young tree to too great an angle, establish the crotch of the tree below the bottom of the cross in the trellis frame.
(b) Wires can be held using barbed staples but these may pull under crop load and wire ties should also be used.
End posts should always be drilled to take the wires as other methods invariably fail due to the combined effects of angle and pressure.
Row spacing
The original Tatura Trellis had row spacing’s of 6 m. However, with the trend toward reducing tree height, the distances between rows have been reduced to 3.5 - 4.5 m. Growers should remember that it is necessary to leave a gap of at least 1.0 m between the tops of adjacent rows to allow light into the underside of the canopy.
The minimum distance to leave between rows can be determined by the following table.
Relationship between trellis height and row spacing
Distance between row 3.00 m 4.00 m 5.00 m 6.00 m
Vertical height of trellis 1.95 m 2.45 m 2.86 m 3.48 m
Length of trellis arm out of the ground
2.20 m 2.75 m 3.20 m 3.90 m
Note: This is only applicable to a 60° angle. Closing the angle to 50° will allow even closer rows.
Commercially, two configurations for Tatura trellis are most commonly used. The standard trellis nowadays uses post 3.0 - 3.3 m long that give a trellis height of 2.4 - 2.7 m high and a row width of 4.0 - 4.5 m. The ‘mini’ Tatura trellis is designed around a post 2.4 m in length. This produces a trellis height of 1.6 m and a row
95
width of 3.0 m. A row width of 3.5 m may be necessary to allow access by standard orchard tractors.
Aids to trellising and training
In loose soils trellis arms may 'open out' under the weight of a crop. To prevent this, it is advisable to tie the arms where they join with a wire twitch and then further up the 'V; using either timber or twitched wire. The timber also prevents the main and opposite 'leaders' of the trees pushing in with strong upright growing trees. The higher it is braced the stronger the trellis. All end assemblies should be solidly braced.
Running bale twine from the lowest wire to the top wire, looping around each wire, provides a stable string to which the developing main leaders of the trees can be attached. This results in straight, strong leaders, capable of producing and supporting large crops.
Establishing trees on the Trellis
Tree spacing
Trees are spaced 1.0 m apart within the row. The spacing between rows varies from 3.0 - 4.5 m depending on the height of the trellis.
Crotch height
The arms of the Tatura trellis normally cross 300 mm above the surface of the ground. This height corresponds to the height at which the two main fruiting arms branch from the trunk. There is evidence to suggest that a lower crotch height of 150-200 mm may be advantageous because access within the V of the trellis is better. The Tatura trellis was designed for mechanical hedging within the V but pruning out the summer and spring growth inside the V is usually done manually. A lower crotch height makes walking inside the V easier.
The height where the two poles of the trellis cross each other must be the same as the average height of the tree crotches.
Developing the main shoots
Young trees can be developed on the trellis in two ways:
(a) Heading back the nursery tree
(b) Angle planting the nursery tree
Heading back
It is most important when ordering trees from a nursery to ask for trees that are budded or grafted about 15 cm above the ground. Any higher than this and the height of the crotch will make it difficult to work inside the V for pruning. If they are worked too high either the crossover height of the trellis will have to be higher or the trees will have to be planted on an angle.
If the trees received from the nursery are well feathered with wide-angled laterals, two laterals opposite each other can be selected. The trees are headed to these two laterals and the laterals shortened to form two 'stubs' opposite each other. However, if the trees supplied from the nursery are single rods as in some sweet cherry varieties, they need to be headed back to four or five buds above the graft union.
Note: The shoots selected for main shoots should not be directly opposite each other on the trunk, but should be about 50 mm apart to prevent the crotch from splitting.
Trees can be 'headed' before or after planting but in each case it is important to position every tree in the planting hole with the two remaining stubs of the crotch facing in the direction that the limbs will grow.
Dormant buds can be used instead of 1 year old nursery trees.
96
Alternatively, rootstocks can be planted and either grafted or budded in situ. This method has been used successfully for both cherries and apricots.
Young growth emerging from the trunk below the crotch or graft must be removed. Four to five buds should be left on each graft or stub. This number is progressively reduced over three weeks to two shoots by removing any young growths that do not face in the direction that the limbs will grow. By this time the two remaining shoots should be about 100 mm long.
The bottom wire of the trellis should be about 250 mm away from the emerging shoot. This shoot is allowed to grow past the bottom wire on the inside, and it should be bent behind the wire only when strong enough. It is then held against the wire by plastic tape dispensed from a “Max Tapener” or held in place with a plastic tie. This procedure is repeated for the second and third wires.
Angle planting
An alternative to heading back young trees is to plant them at the same angle as the trellis arms. The trellis and at least one wire on each side should be in place to ensure that trees are planted at the correct angle.
Trees should be planted 1.0 m apart within the row with alternate trees trained to opposite sides of the trellis. Therefore, trees will be spaced 2.0 m apart on any one side of the trellis.
Trials conducted overseas suggest that yields for peaches, nectarines, plums and apricots are not lowered and early yields may even be higher. However, for cherries, a delay of one year may occur to reach maximum yield as lateral branch development in cherries is more difficult to achieve.
Training the various stone fruits on the trellis differs but some operations are common:
The main branch on each side of the trellis is essentially developed as a centre leader. Its dominance must be maintained until the trellis is filled.
Growth inside the V must be pruned out. This involves at least two summer pruning’s.
The base of each tree should be clear of limbs to a height of about 400 mm. This allows herbicides to be applied to the tree line.
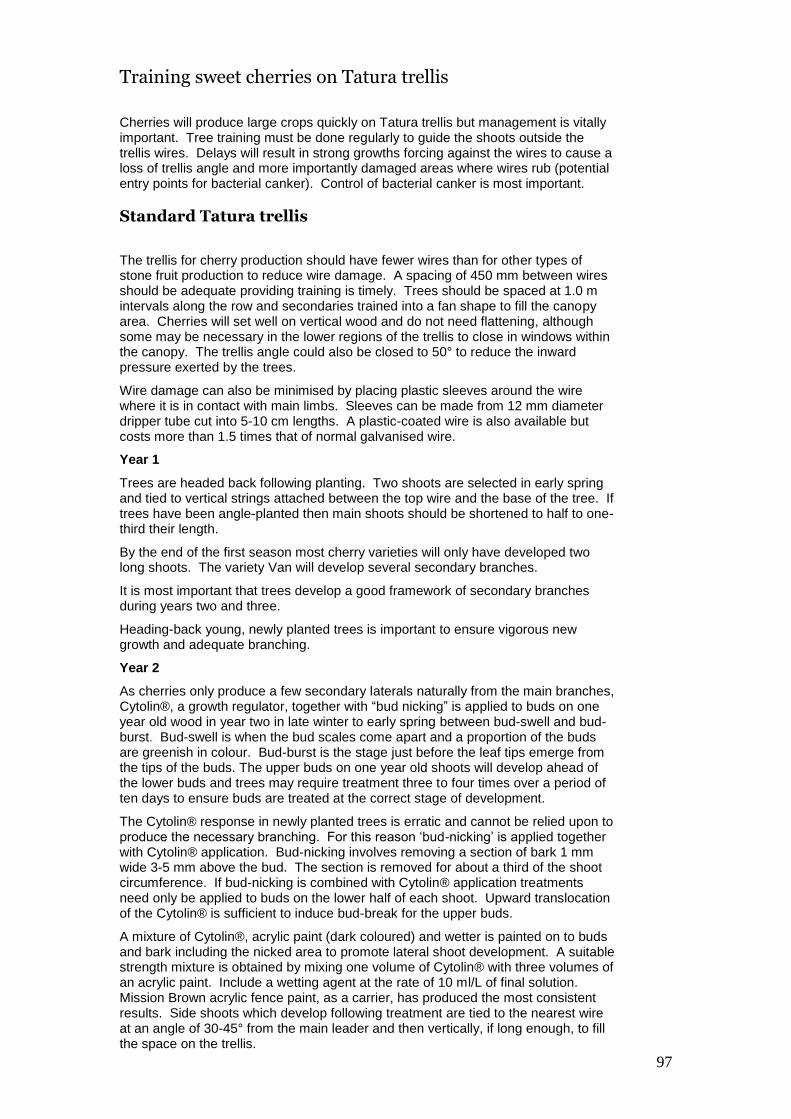
97
Training sweet cherries on Tatura trellis
Cherries will produce large crops quickly on Tatura trellis but management is vitally important. Tree training must be done regularly to guide the shoots outside the trellis wires. Delays will result in strong growths forcing against the wires to cause a loss of trellis angle and more importantly damaged areas where wires rub (potential entry points for bacterial canker). Control of bacterial canker is most important.
Standard Tatura trellis
The trellis for cherry production should have fewer wires than for other types of stone fruit production to reduce wire damage. A spacing of 450 mm between wires should be adequate providing training is timely. Trees should be spaced at 1.0 m intervals along the row and secondaries trained into a fan shape to fill the canopy area. Cherries will set well on vertical wood and do not need flattening, although some may be necessary in the lower regions of the trellis to close in windows within the canopy. The trellis angle could also be closed to 50° to reduce the inward pressure exerted by the trees.
Wire damage can also be minimised by placing plastic sleeves around the wire where it is in contact with main limbs. Sleeves can be made from 12 mm diameter dripper tube cut into 5-10 cm lengths. A plastic-coated wire is also available but costs more than 1.5 times that of normal galvanised wire.
Year 1
Trees are headed back following planting. Two shoots are selected in early spring and tied to vertical strings attached between the top wire and the base of the tree. If trees have been angle-planted then main shoots should be shortened to half to one-third their length.
By the end of the first season most cherry varieties will only have developed two long shoots. The variety Van will develop several secondary branches.
It is most important that trees develop a good framework of secondary branches during years two and three.
Heading-back young, newly planted trees is important to ensure vigorous new growth and adequate branching.
Year 2
As cherries only produce a few secondary laterals naturally from the main branches, Cytolin®, a growth regulator, together with “bud nicking” is applied to buds on one year old wood in year two in late winter to early spring between bud-swell and bud-burst. Bud-swell is when the bud scales come apart and a proportion of the buds are greenish in colour. Bud-burst is the stage just before the leaf tips emerge from the tips of the buds. The upper buds on one year old shoots will develop ahead of the lower buds and trees may require treatment three to four times over a period of ten days to ensure buds are treated at the correct stage of development.
The Cytolin® response in newly planted trees is erratic and cannot be relied upon to produce the necessary branching. For this reason ‘bud-nicking’ is applied together with Cytolin® application. Bud-nicking involves removing a section of bark 1 mm wide 3-5 mm above the bud. The section is removed for about a third of the shoot circumference. If bud-nicking is combined with Cytolin® application treatments need only be applied to buds on the lower half of each shoot. Upward translocation of the Cytolin® is sufficient to induce bud-break for the upper buds.
A mixture of Cytolin®, acrylic paint (dark coloured) and wetter is painted on to buds and bark including the nicked area to promote lateral shoot development. A suitable strength mixture is obtained by mixing one volume of Cytolin® with three volumes of an acrylic paint. Include a wetting agent at the rate of 10 ml/L of final solution. Mission Brown acrylic fence paint, as a carrier, has produced the most consistent results. Side shoots which develop following treatment are tied to the nearest wire at an angle of 30-45° from the main leader and then vertically, if long enough, to fill the space on the trellis.
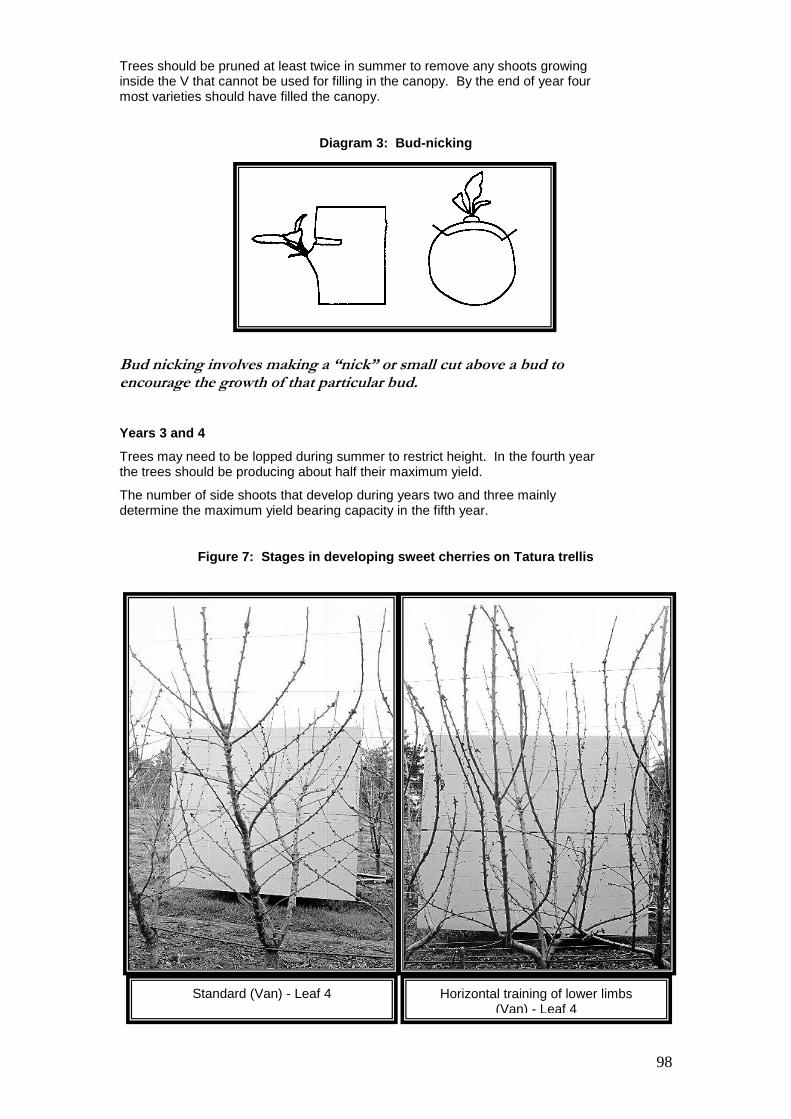
98
Trees should be pruned at least twice in summer to remove any shoots growing inside the V that cannot be used for filling in the canopy. By the end of year four most varieties should have filled the canopy.
Diagram 3: Bud-nicking
Bud nicking involves making a “nick” or small cut above a bud to encourage the growth of that particular bud.
Years 3 and 4
Trees may need to be lopped during summer to restrict height. In the fourth year the trees should be producing about half their maximum yield.
The number of side shoots that develop during years two and three mainly determine the maximum yield bearing capacity in the fifth year.
Figure 7: Stages in developing sweet cherries on Tatura trellis
Standard (Van) - Leaf 4 Horizontal training of lower limbs (Van) - Leaf 4
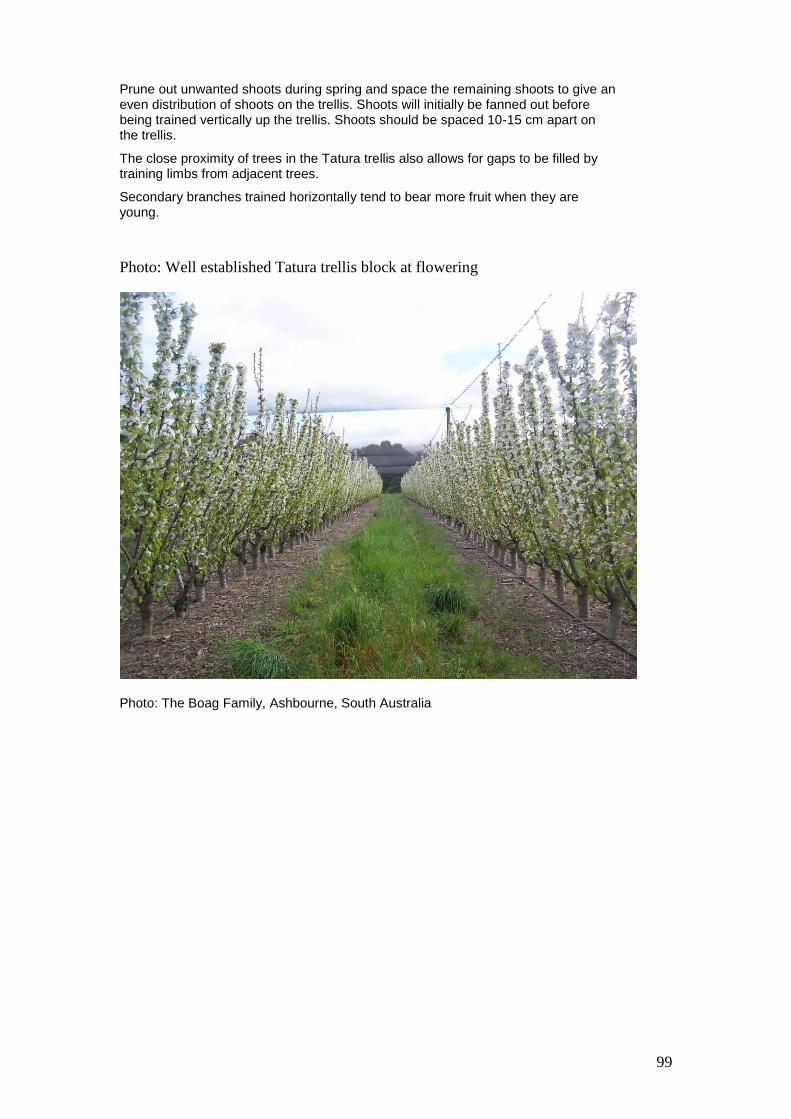
99
Prune out unwanted shoots during spring and space the remaining shoots to give an even distribution of shoots on the trellis. Shoots will initially be fanned out before being trained vertically up the trellis. Shoots should be spaced 10-15 cm apart on the trellis.
The close proximity of trees in the Tatura trellis also allows for gaps to be filled by training limbs from adjacent trees.
Secondary branches trained horizontally tend to bear more fruit when they are young.
Photo: Well established Tatura trellis block at flowering
Photo: The Boag Family, Ashbourne, South Australia
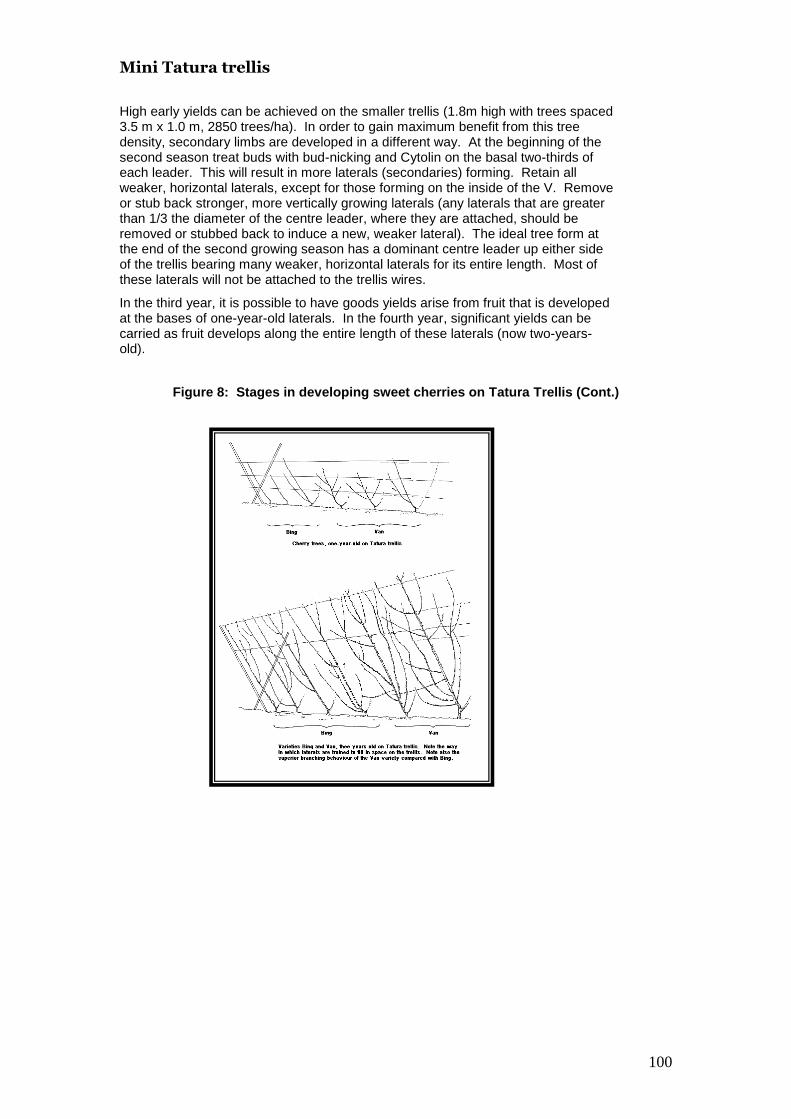
100
Mini Tatura trellis
High early yields can be achieved on the smaller trellis (1.8m high with trees spaced 3.5 m x 1.0 m, 2850 trees/ha). In order to gain maximum benefit from this tree density, secondary limbs are developed in a different way. At the beginning of the second season treat buds with bud-nicking and Cytolin on the basal two-thirds of each leader. This will result in more laterals (secondaries) forming. Retain all weaker, horizontal laterals, except for those forming on the inside of the V. Remove or stub back stronger, more vertically growing laterals (any laterals that are greater than 1/3 the diameter of the centre leader, where they are attached, should be removed or stubbed back to induce a new, weaker lateral). The ideal tree form at the end of the second growing season has a dominant centre leader up either side of the trellis bearing many weaker, horizontal laterals for its entire length. Most of these laterals will not be attached to the trellis wires.
In the third year, it is possible to have goods yields arise from fruit that is developed at the bases of one-year-old laterals. In the fourth year, significant yields can be carried as fruit develops along the entire length of these laterals (now two-years-old).
Figure 8: Stages in developing sweet cherries on Tatura Trellis (Cont.)

101
Enhancing fruit quality
Large, firm cherries with high sugar levels are produced from strong flower buds developed on trees with good vigour, good light penetration throughout the canopy and a high leaf to fruit ratio.
A number of management strategies can be adopted to enhance fruit quality.
Quality of flower buds
The quality of flower buds is influenced by conditions before and after harvest the previous season. It is during this period that flower buds are formed.
Factors that influence flower bud quality include, nitrogen nutrition, tree health, irrigation, light intensity within the canopy, number of spur leaves near the buds, and previous cropping level.
Light penetration can be improved by pruning trees immediately following harvest. One-year old shoots that create a shading problem should be removed. Older wood, carrying fruiting spurs should be spaced no closer than 100-200 mm apart.
Enhancing leaf to fruit ratios
Fruit quality is dependent on the leaves, which supply the sugars retained by fruit. Therefore, pruning practices should encourage retention of leafy shoots until harvest. Young fruiting spurs also have a better ratio of spur leaves.
Annual renewal pruning
The best quality fruit is produced on the bases of one year old wood and on young fruit spurs. Annual renewal pruning should be adopted on trees that have attained their maximum level of cropping to ensure that fruit quality is maintained. Older wood should be headed back to encourage new growth. If such pruning is done on an annual cyclical basis, trees should remain near their full fruit bearing potential. If renewal pruning is delayed for several years after full bearing has been reached then the level of pruning required to rejuvenate the tree will potentially reduce yields.
Trees should be pruned in late summer to early autumn while conditions are conducive to wound healing and disease pressure is low.
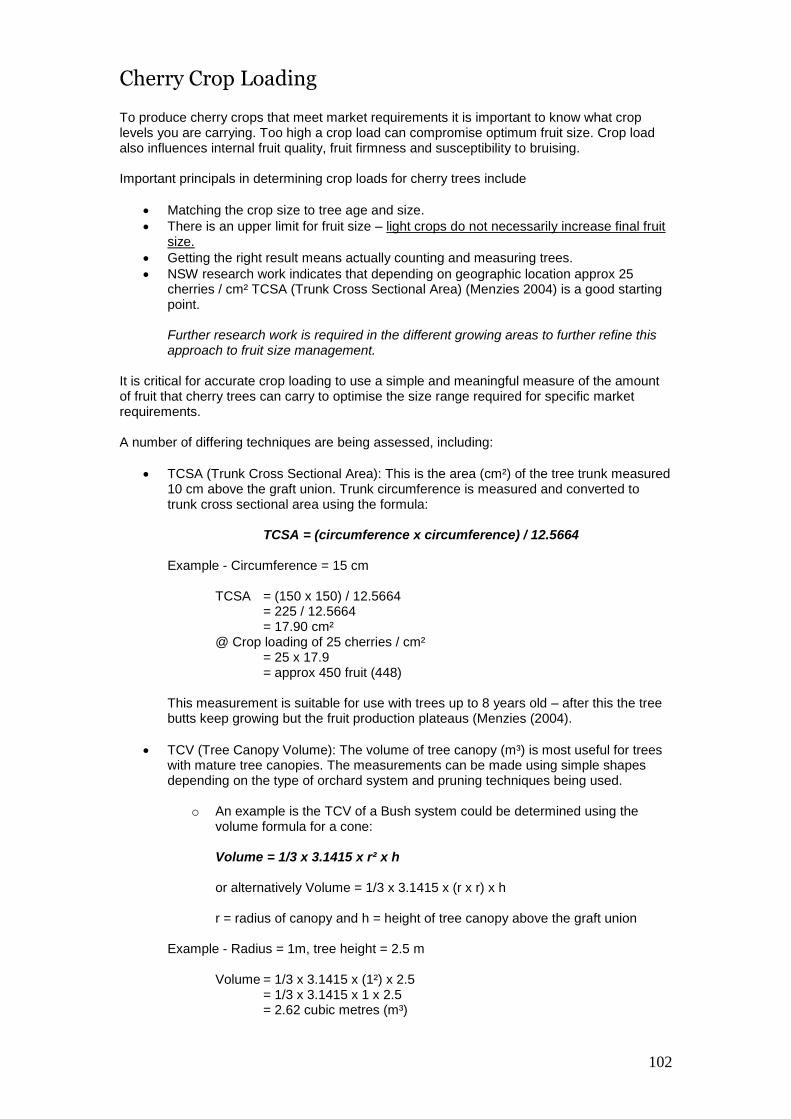
102
Cherry Crop Loading To produce cherry crops that meet market requirements it is important to know what crop levels you are carrying. Too high a crop load can compromise optimum fruit size. Crop load also influences internal fruit quality, fruit firmness and susceptibility to bruising. Important principals in determining crop loads for cherry trees include
Matching the crop size to tree age and size.
There is an upper limit for fruit size – light crops do not necessarily increase final fruit size.
Getting the right result means actually counting and measuring trees.
NSW research work indicates that depending on geographic location approx 25 cherries / cm² TCSA (Trunk Cross Sectional Area) (Menzies 2004) is a good starting point.
Further research work is required in the different growing areas to further refine this approach to fruit size management.
It is critical for accurate crop loading to use a simple and meaningful measure of the amount of fruit that cherry trees can carry to optimise the size range required for specific market requirements. A number of differing techniques are being assessed, including:
TCSA (Trunk Cross Sectional Area): This is the area (cm²) of the tree trunk measured 10 cm above the graft union. Trunk circumference is measured and converted to trunk cross sectional area using the formula:
TCSA = (circumference x circumference) / 12.5664
Example - Circumference = 15 cm
TCSA = (150 x 150) / 12.5664 = 225 / 12.5664 = 17.90 cm² @ Crop loading of 25 cherries / cm² = 25 x 17.9 = approx 450 fruit (448)
This measurement is suitable for use with trees up to 8 years old – after this the tree butts keep growing but the fruit production plateaus (Menzies (2004).
TCV (Tree Canopy Volume): The volume of tree canopy (m³) is most useful for trees with mature tree canopies. The measurements can be made using simple shapes depending on the type of orchard system and pruning techniques being used.
o An example is the TCV of a Bush system could be determined using the
volume formula for a cone:
Volume = 1/3 x 3.1415 x r² x h or alternatively Volume = 1/3 x 3.1415 x (r x r) x h r = radius of canopy and h = height of tree canopy above the graft union
Example - Radius = 1m, tree height = 2.5 m
Volume = 1/3 x 3.1415 x (1²) x 2.5 = 1/3 x 3.1415 x 1 x 2.5 = 2.62 cubic metres (m³)
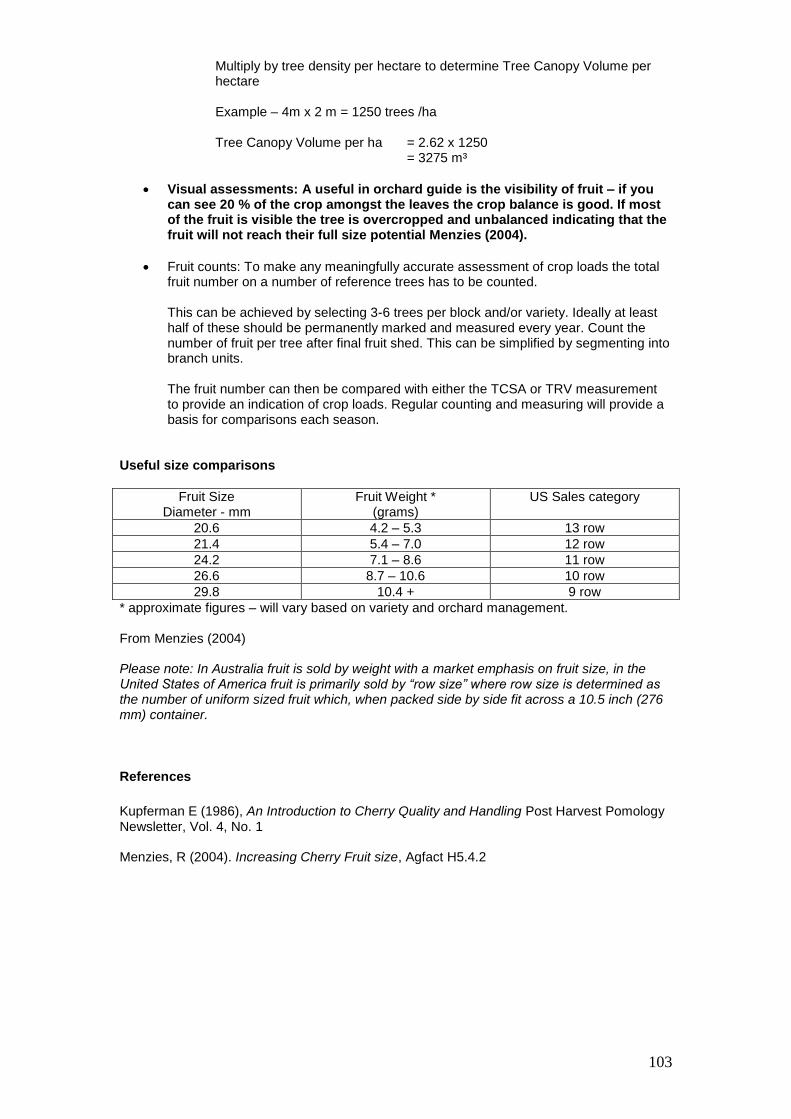
103
Multiply by tree density per hectare to determine Tree Canopy Volume per hectare
Example – 4m x 2 m = 1250 trees /ha Tree Canopy Volume per ha = 2.62 x 1250 = 3275 m³
Visual assessments: A useful in orchard guide is the visibility of fruit – if you can see 20 % of the crop amongst the leaves the crop balance is good. If most of the fruit is visible the tree is overcropped and unbalanced indicating that the fruit will not reach their full size potential Menzies (2004).
Fruit counts: To make any meaningfully accurate assessment of crop loads the total fruit number on a number of reference trees has to be counted.
This can be achieved by selecting 3-6 trees per block and/or variety. Ideally at least half of these should be permanently marked and measured every year. Count the number of fruit per tree after final fruit shed. This can be simplified by segmenting into branch units. The fruit number can then be compared with either the TCSA or TRV measurement to provide an indication of crop loads. Regular counting and measuring will provide a basis for comparisons each season.
Useful size comparisons
Fruit Size Diameter - mm
Fruit Weight * (grams)
US Sales category
20.6 4.2 – 5.3 13 row
21.4 5.4 – 7.0 12 row
24.2 7.1 – 8.6 11 row
26.6 8.7 – 10.6 10 row
29.8 10.4 + 9 row
* approximate figures – will vary based on variety and orchard management. From Menzies (2004) Please note: In Australia fruit is sold by weight with a market emphasis on fruit size, in the United States of America fruit is primarily sold by “row size” where row size is determined as the number of uniform sized fruit which, when packed side by side fit across a 10.5 inch (276 mm) container.
References
Kupferman E (1986), An Introduction to Cherry Quality and Handling Post Harvest Pomology Newsletter, Vol. 4, No. 1 Menzies, R (2004). Increasing Cherry Fruit size, Agfact H5.4.2
104
Use of Plant Growth Regulators
Plant growth regulating chemicals are more officially referred to in scientific publications as plant bioregulators (PBRs) but are more commonly referred by commercial orchardiststo as plant growth regulators (PGR’s).
There are a large number of plant growth regulators used in tree fruit production, with uses ranging from assisting plant propagation, controlling tree growth and development through to improving cropping performance and fruit quality. Some PGR’s are used extensively, some are used very sparingly.
Local climates have a large effect on the performance of plant growth regulators and the use of PGR’s needs to be carefully considered before being used in any area. Also there are variety (cultivar) differences in their response to different PGR’s therefore growers also need to take care in PGR use, especially with new cherry varieties.
Plant growth regulators are generally described as either “..natural or synthetic chemicals that either augment or duplicate a natural plant growth substance (such as the plant hormones ethylene, abscisic acid or various natural gibberellins) or they accelerate or inhibit a normal physiological process that involves natural growth substances.”
Looney, N.E in Webster and Looney (1996)
By using plant growth regulators growers can regulate specific plant growth events and enable plants to adjust or adapt to their environment.
Uses for plant growth regulators include;
Nursery propagation
Nursery feathering (side branching)
Defoliation of nursery plants – restricted to specific cold regions and purposes only
Influencing tree growth and development in the orchard including:
o Lateral branch promotion
o Suppression of shoot growth and tree size
Promotion of flower initiation
Improving flower bud hardiness and delaying flowering
Advancing flowering time
Influencing fruit set
Assisting mechanical harvesting
Influencing fruit ripening, firmness and quality
Table 5: Lists several of the major plant growth regulators commonly used in cherry production.
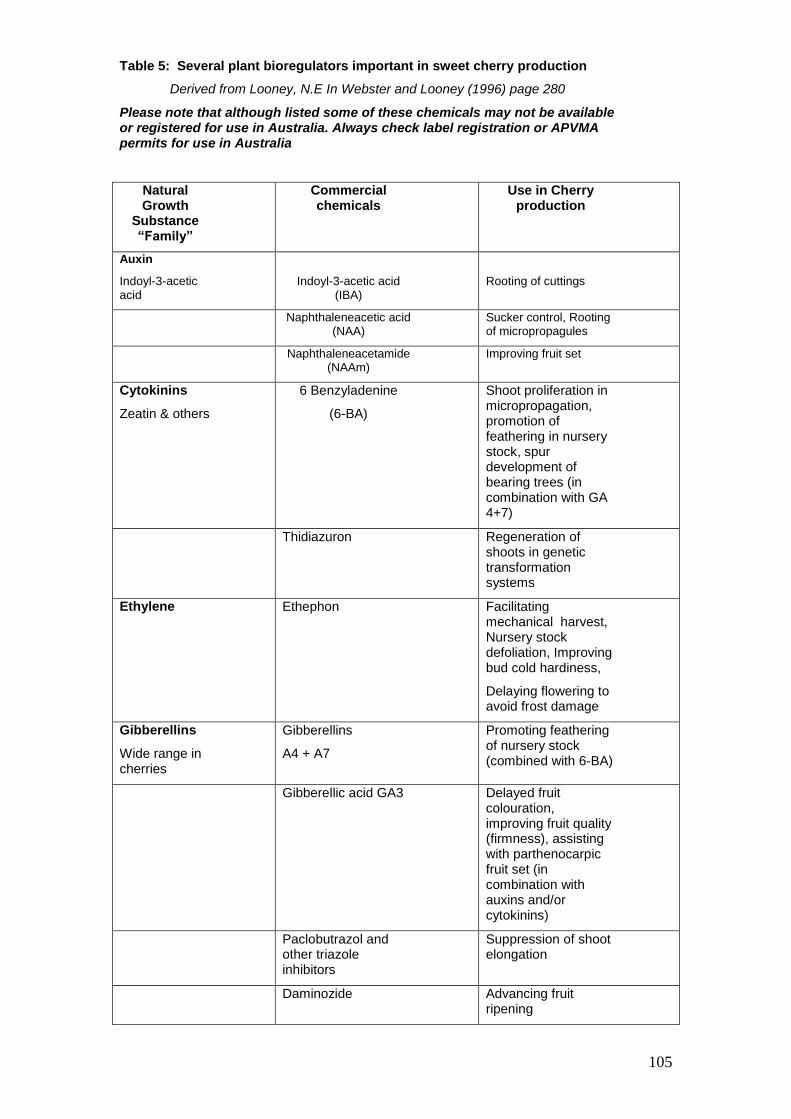
105
Table 5: Several plant bioregulators important in sweet cherry production
Derived from Looney, N.E In Webster and Looney (1996) page 280
Please note that although listed some of these chemicals may not be available or registered for use in Australia. Always check label registration or APVMA permits for use in Australia
Natural Growth
Substance “Family”
Commercial chemicals
Use in Cherry production
Auxin
Indoyl-3-acetic acid
Indoyl-3-acetic acid (IBA)
Rooting of cuttings
Naphthaleneacetic acid (NAA)
Sucker control, Rooting of micropropagules
Naphthaleneacetamide (NAAm)
Improving fruit set
Cytokinins
Zeatin & others
6 Benzyladenine
(6-BA)
Shoot proliferation in micropropagation, promotion of feathering in nursery stock, spur development of bearing trees (in combination with GA 4+7)
Thidiazuron Regeneration of shoots in genetic transformation systems
Ethylene Ethephon Facilitating mechanical harvest, Nursery stock defoliation, Improving bud cold hardiness,
Delaying flowering to avoid frost damage
Gibberellins
Wide range in cherries
Gibberellins
A4 + A7
Promoting feathering of nursery stock (combined with 6-BA)
Gibberellic acid GA3 Delayed fruit colouration, improving fruit quality (firmness), assisting with parthenocarpic fruit set (in combination with auxins and/or cytokinins)
Paclobutrazol and other triazole inhibitors
Suppression of shoot elongation
Daminozide Advancing fruit ripening

106
Plant growth regulator use in Australian cherry production
Australia has very few plant growth regulators currently registered for use with the APVMA. These include ethephon, 6-benzyladenine, gibberellins A4 & A7, paclabutrazol and gibberellic acid (GA3)
Ethephon
Whilst this active ingredient has a wide range of uses it is currently only registered for use in NSW and only on a small number of label specified varieties.
6-benzyladenine
Usually used in conjunction with Gibberellins A4 + A, it is currently registered for Australia wide use in cherries, with label recommendations for improving fruit shape, stimulating plant growth and for fruit thinning (when used in conjunction with NAA).
Its major use is in stimulating plant growth. In some circumstances, increased susceptibility to diseases such as Bacterial canker have been reported with its use.
Gibberellins A4 + A7
Gibberellins are used in conjunction with 6-benzyladenine for the stimulation of vegetative growth, however some commercial products do not contain 6-benzyladenine. Read the label carefully.
Increased susceptibility to bacterial diseases such as Bacterial canker have been reported with some formulations.
Paclabutrazol
There are products available with label registrations for use of this PGR in all Australian states for use in reducing vegetative growth.
Before use please check the label for specific use conditions and constraints. Some overseas markets have MRL restrictions on paclabutrazol so also check the Cherry Export Manual for more detailed information if intending to export fruit.
Incorrect use of paclabutrazol can lead to significant problems in the orchard. Its use can alter flowering times so it is important to consider its use on main crop varieties and their pollenizers.
Although soil applications can be very effective, they need to be considered carefully because soil type and texture can significantly influence its’ uptake into the tree. It also creates issues with the long term retention of the chemical in certain soil types (high clay or organic matter soils). Irrigation practices may also influence plant uptake of paclabutrazol.
Gibberellic acid (GA3) applications to fruit
In several overseas production areas application of Gibberellin A3 to fresh fruit markets has become a common practice.
These GA3 sprays (applied at straw colour and in 1-2 applications) have several benefits, including
Slow red colour development
Extend harvest time – very district and variety specific
Increase fruit size
Improve fruit firmness
Reduce pitting in storage / post harvest handling.
It has become common practice to use these treatments in several Australian production areas, however, this can only be done legally if there is a current APVMA permit available or current label registrations are altered to allow its’ use. Growers
107
should verify that a current permit is available for its use in the industry before they apply it to their crops.
Problems associated with applications of GA3 include
Increased potential for rain cracking (changing susceptibility times and larger fruit).
Issues with decreased return bloom in some cultivars, especially if high rates are used.
Delayed fruit maturity may lead to commercial marketing issues for early production areas.
Dormex®
Dormex® (a.i. Cyanamide) is registered for use in several crops in Australia for the “Regulation of bud dormancy” and is particularly useful in lower chill areas for inducing and synchronising earlier flowering.
Whilst it has been tried on cherries it is currently not registered or covered by a permit for use on cherries in Australia.
References
Webster, A.D & Looney, N.E (1996) Cherries: Crop Physiology, Production and Uses, CAB International
108
CULTURAL PRACTICES
Strategies in Replanting/Planting New Orchard Blocks In today’s modern orchards, it is essential to ensure that the orchard gets the best possible preparation and start. The economic potential of the orchard is dictated by its performance in the first three years. The first season’s growth is critical, particularly in a replanted orchard.
There are many approaches to trying to minimise replant/establishment problems in orchards, however these approaches need to be used in combination with each other as there is definitely no one single approach that will overcome all the potential problems. The best methods available to minimise replant problems all involve planning before planting and making adjustments. Once an orchard has been planted the management options available to an orchardist reduce drastically. Many practices or more importantly lack of practices (shortcuts), being used by Australian orchardists in replanting/developing orchards put themselves at risk of serious economic losses.
Replanting orchards
Whilst planting an orchard in to a “virgin” site is what most orchardists prefer the reality is that most “new” orchards will be replanted into old orchard land. Through experience with vigorous rootstocks many orchardists are cautious about excessive vigour in their trees and often make decisions about new orchard set ups based on this problem. Small trees that don’t grow or take a long time to fill their allocated space are generally more of a problem to orchard productivity and profitability than vigorous trees. In a replanted orchard there are a range of problems that can lead to small under performing trees. If young trees are stunted they generally don’t fully recover. The second, third and subsequent years do not financially overcome the problems of the first year. Modern higher density orchards depend on obtaining good early economic yields to maximise their capital investment, risk and profitability - stunted trees are a liability. In a replanted orchard poor tree growth may be the result of one or more factors. It may be due to any of the following (either as the primary problem or in combination with another problem): Specific replant disease (SRD), nematodes, fungi or bacteria, poor nutrition, poor soil characteristics, build up of unwanted chemicals (residual herbicides) and minerals such as copper. Research still has not clearly defined what causes all replant problems.
To successfully redevelop old orchard blocks, orchardists need to consider many questions and make a number of interlinked decisions. For example: • Do I have or am I likely to have SRD? • Do I need to fumigate? • What rootstocks do I use? • How quickly can I get the old trees out? • Should I rip? • What fertilisers do I need? • Do I need lime, gypsum or dolomite? • How can I do this economically? While seeking answers it is easy to obtain misleading, conflicting or irrelevant information. Each orchard is unique; many techniques work well in specific situations but may not be suitable for your situation.
109
Specific replant disease (SRD)
Specific replant disease (SRD) is the common name used for the phenomenon of reduced vigour in young trees when planted back in to ground that has previously been used for similar crop types. It is a worldwide problem and despite decades of research no specific cause of the problem has been identified. A diverse range of factors has been implicated in SRD, including soil structure and texture, pH, nutrient status and plant toxins. Fortunately the problem is not as serious in cherries as it is in some other orchard crops. It is a particularly serious problem in apples. There does not seem to be a consistent relationship between soil physical factors and the incidence of SRD. In some areas lighter soils are more prone to the problem than heavier soils and in other soils the reverse applies. Soils with a lower pH have been shown to be less prone than those with a higher pH, however as there is a very narrow preferred pH range for cherries so there is very little practical use of this characteristic. Despite a widely held view, there is little evidence that toxins derived from the previous crop induce SRD in subsequent plantings. Only the use of mono-ammonium phosphate (MAP) has provided any consistent positive growth responses to nutrient trials. A wide range of soil microorganisms including bacteria, fungi, actinomycetes, and mycorrhiza have been implicated in SRD but there is no conclusive evidence of any specific species being involved. The positive responses to the use of broad-spectrum fumigants and steam provide circumstantial evidence that there may be a microbial cause. Recognising SRD is often not easy initially, a range of factors need to be considered. Above ground the main symptom is a general lack of tree vigour and a failure to thrive. SRD is generally non-lethal but tree deaths can occur in newly planted trees, often another pathogen is also associated with the tree death. Trees affected by SRD tend to recover and make normal growth after 2-3 years however the economic impact of the delayed production and low early year yields can be very serious. It can turn a potentially profitable orchard into a poor or negative investment.
Nematodes
Nematodes can be the cause of severe growth problems in both replant and new orchards, however these can be readily tested for. Nematodes are usually considered a separate problem to SRD and are generally more severe in lighter sandier soils. Orchardists with these soil types should always test for nematodes when developing a
new orchard block.
Basic soil requirements
Soil pH:
The optimum soil pH (measured in water) for cherries is 6.5 – 7.0 Below pH 5.5 the solubility of manganese and aluminium ions increase rapidly in most soils, and can readily reach toxic levels. Manganese toxicity can reduce the vigour of newly planted trees. Aluminium toxicity is a problem for most plants; cherries are no exception. High levels of aluminium inhibit root elongation and branching. In alkaline soils where the pH values exceed 7.0 tree growth can be limited by decreased availability of phosphorous, iron, zinc and manganese. In soils above pH 8.0 with high sodium contents, soil structure can be adversely affected.
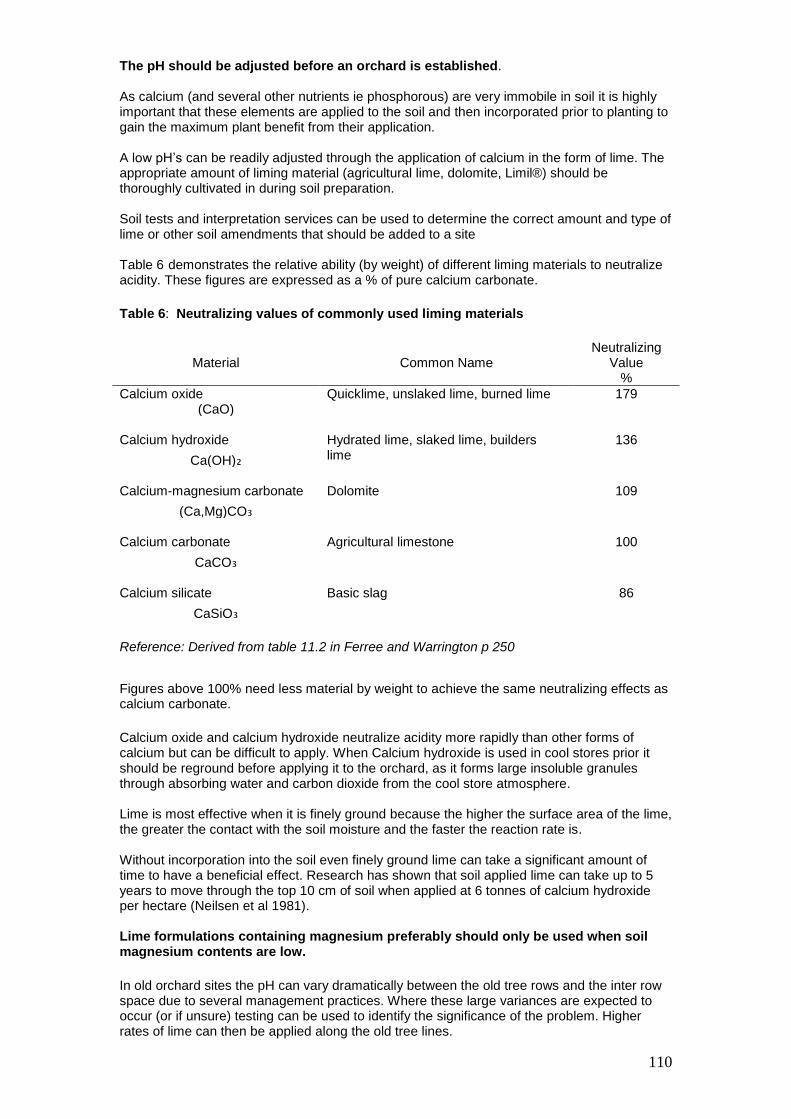
110
The pH should be adjusted before an orchard is established. As calcium (and several other nutrients ie phosphorous) are very immobile in soil it is highly important that these elements are applied to the soil and then incorporated prior to planting to gain the maximum plant benefit from their application. A low pH’s can be readily adjusted through the application of calcium in the form of lime. The appropriate amount of liming material (agricultural lime, dolomite, Limil®) should be thoroughly cultivated in during soil preparation. Soil tests and interpretation services can be used to determine the correct amount and type of lime or other soil amendments that should be added to a site Table 6 demonstrates the relative ability (by weight) of different liming materials to neutralize acidity. These figures are expressed as a % of pure calcium carbonate.
Table 6: Neutralizing values of commonly used liming materials
Material
Common Name Neutralizing
Value %
Calcium oxide (CaO)
Quicklime, unslaked lime, burned lime 179
Calcium hydroxide Hydrated lime, slaked lime, builders 136
Ca(OH)₂ lime
Calcium-magnesium carbonate Dolomite 109
(Ca,Mg)CO₃
Calcium carbonate Agricultural limestone 100
CaCO₃
Calcium silicate Basic slag 86
CaSiO₃
Reference: Derived from table 11.2 in Ferree and Warrington p 250
Figures above 100% need less material by weight to achieve the same neutralizing effects as calcium carbonate.
Calcium oxide and calcium hydroxide neutralize acidity more rapidly than other forms of calcium but can be difficult to apply. When Calcium hydroxide is used in cool stores prior it should be reground before applying it to the orchard, as it forms large insoluble granules through absorbing water and carbon dioxide from the cool store atmosphere. Lime is most effective when it is finely ground because the higher the surface area of the lime, the greater the contact with the soil moisture and the faster the reaction rate is. Without incorporation into the soil even finely ground lime can take a significant amount of time to have a beneficial effect. Research has shown that soil applied lime can take up to 5 years to move through the top 10 cm of soil when applied at 6 tonnes of calcium hydroxide per hectare (Neilsen et al 1981). Lime formulations containing magnesium preferably should only be used when soil magnesium contents are low.
In old orchard sites the pH can vary dramatically between the old tree rows and the inter row space due to several management practices. Where these large variances are expected to occur (or if unsure) testing can be used to identify the significance of the problem. Higher rates of lime can then be applied along the old tree lines.
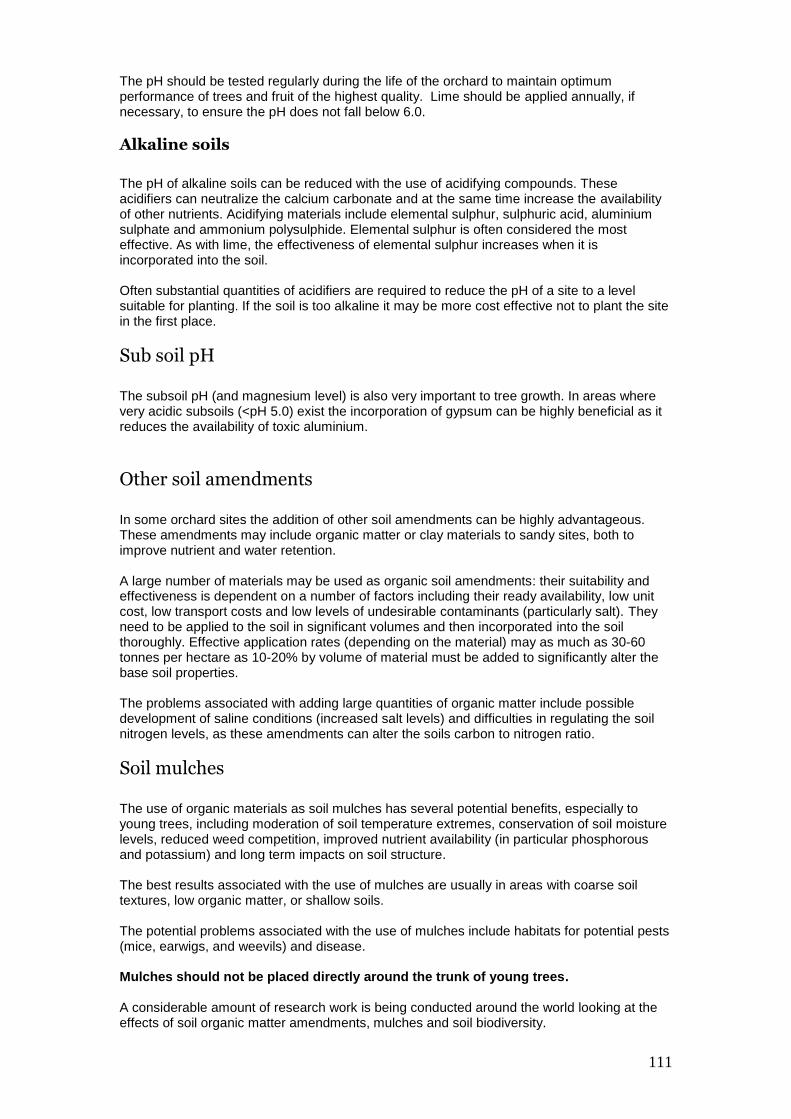
111
The pH should be tested regularly during the life of the orchard to maintain optimum performance of trees and fruit of the highest quality. Lime should be applied annually, if necessary, to ensure the pH does not fall below 6.0.
Alkaline soils
The pH of alkaline soils can be reduced with the use of acidifying compounds. These acidifiers can neutralize the calcium carbonate and at the same time increase the availability of other nutrients. Acidifying materials include elemental sulphur, sulphuric acid, aluminium sulphate and ammonium polysulphide. Elemental sulphur is often considered the most effective. As with lime, the effectiveness of elemental sulphur increases when it is incorporated into the soil. Often substantial quantities of acidifiers are required to reduce the pH of a site to a level suitable for planting. If the soil is too alkaline it may be more cost effective not to plant the site in the first place.
Sub soil pH
The subsoil pH (and magnesium level) is also very important to tree growth. In areas where very acidic subsoils (<pH 5.0) exist the incorporation of gypsum can be highly beneficial as it reduces the availability of toxic aluminium.
Other soil amendments
In some orchard sites the addition of other soil amendments can be highly advantageous. These amendments may include organic matter or clay materials to sandy sites, both to improve nutrient and water retention. A large number of materials may be used as organic soil amendments: their suitability and effectiveness is dependent on a number of factors including their ready availability, low unit cost, low transport costs and low levels of undesirable contaminants (particularly salt). They need to be applied to the soil in significant volumes and then incorporated into the soil thoroughly. Effective application rates (depending on the material) may as much as 30-60 tonnes per hectare as 10-20% by volume of material must be added to significantly alter the base soil properties. The problems associated with adding large quantities of organic matter include possible development of saline conditions (increased salt levels) and difficulties in regulating the soil nitrogen levels, as these amendments can alter the soils carbon to nitrogen ratio.
Soil mulches
The use of organic materials as soil mulches has several potential benefits, especially to young trees, including moderation of soil temperature extremes, conservation of soil moisture levels, reduced weed competition, improved nutrient availability (in particular phosphorous and potassium) and long term impacts on soil structure. The best results associated with the use of mulches are usually in areas with coarse soil textures, low organic matter, or shallow soils. The potential problems associated with the use of mulches include habitats for potential pests (mice, earwigs, and weevils) and disease. Mulches should not be placed directly around the trunk of young trees. A considerable amount of research work is being conducted around the world looking at the effects of soil organic matter amendments, mulches and soil biodiversity.
112
Fumigation There is a common belief that fumigation will fix all problems. Soil fumigation addresses some but not all of the problems associated with redeveloping old orchard soils. It is one of a range of tools a grower has at their disposal, but it may not always be a viable solution. In some cases fumigation may address the symptoms but not the underlying causes of a problem. Soil fumigants such as chloropicrin have been proven to be very effective in minimising the effects of Specific replant diseas (SRD) and enhancing young tree growth. Chloropicrin has been shown in research to be particularly effective. Other soil fumigants such as dazomet (ai) and metam sodium (ai), which act by releasing methylisothiocyanate, have also been shown to be effective against SRD. However these chemicals are dangerous to handle and need expertise and specialised equipment to apply. Growers should develop strategies that do not necessarily rely on fumigation. Methyl bromide, a chemical widely used in orchard fumigation in the past has been phased out of commercial use as part of an international strategy and it is no longer available for use in Australian orchards. Research is being undertaken in the use of bio-fumigants, natural plants that when ploughed into the ground at an appropriate growth stage release natural chemicals as they decompose that have fumigation effects in the soil.
New Zealand research has shown that while the use of post planting phosphite treatments such as Aliette® help against phytophthora they have no effect on hastening recovery from SRD. Where nematodes are the major problem, fumigation with milder chemical treatments (nematicides) or pasteurisation may be used. Soil fumigants kill or reduce the numbers of nematodes, fungi and bacteria severely, by sterilising the soil. A newly planted tree has a better chance to get established in clean soil, to grow well and produce fruit quickly depending on rootstock, variety and training system chosen. An additional benefit from the use of soil fumigants is an associated nutrient “burst” (increased availability of soil nutrients). Unfortunately it is not always easy to separate the benefits of the fumigation from the nutrient burst.

113
Best practice guidelines During 2001 a best practice guideline publication titled “Successfully Replanting Orchards—5 easy steps” was produced and distributed to orchardists around Australia. These guidelines are the result of a national workshop of growers, researchers and extension specialists. They have been designed to provide orchardists with a clear idea of what is currently considered the best approaches to maximise the success of redeveloping an orchard. Orchardists often focus on how much they can save and not on how much money they can make. What is the cost of spending a few extra dollars now, if it is going to generate significantly more dollars in the future? Remember, it costs as much to manage a bad orchard as it does a good one and you will never maximise the returns from your investment if the trees don’t fill the space you allocate them.
Phases of replanting
Please note that with the major exception of fumigation and some of the points directly attributable to an old orchard, the following information is as applicable to the development of a new orchard as it is to replanting an old orchard. The guidelines identify five distinct steps involved in the replanting of an orchard:
Step 1. Pre removal planning Step 2. Orchard removal Step 3. Site preparation Step 4. Replanting Step 5. After planting care
Step 1: Pre Removal Planning
The importance of this phase cannot be over-emphasised, yet it is often overlooked. Proper attention to detail in this phase allows you to plan and budget in advance, ensuring that you have the right equipment, fertilisers and trees ready when you want them. Key aspects include analysis, diagnostic tests, orchard design, pre removal mapping and budget. • Analyse the past history and/or performance of the orchard. Was it cropping consistently? Were there problem areas or trees? • Diagnostic tests for: reduced tree growth; nematodes (where necessary); soil borne diseases (if a concern); pH/soil fertility; salinity; organic matter; gypsum response; heavy metal issues (cadmium, arsenic, and copper). Soil bioassays may not always be a reliable guide to predicting potential SRD problems but there are no more conclusive tests available. Planting seedlings or clonal rootstocks in pots of both untreated soil from the orchard and new or fumigated soil and then observing the plant growth is one way of testing for possible problems – the larger the difference in plant growth the higher the risk of SRD problems. One of the major problems with using these types of tests is that they should be done during spring or early summer, any later and the reliability of the results decreases. Undertaking the appropriate tests for your production area will provide valuable information on what soil additives or adjustments are necessary in your orchard. • Orchard design. Key questions to ask are: What orchard system are you going to use? Have you ordered the right variety and rootstock? Have you ordered it from the nursery early enough to get what you want? When you want it? and is it the right tree structure for the system you intend to use?
114
There are two critical factors to remember: 1. Just because it is a replant site does not mean you need a vigorous rootstock. 2. The quickest way to ruin a new orchard is to compromise on the trees you plant. • Pre removal mapping - Before removing trees accurately map the old orchard. Identify problem areas (disease or drainage), old tree rows and any site adjustments (i.e. slope) that are needed. • Budget - Prepare an accurate budget for the redevelopment. • Other factors to consider: If using pre-emergent herbicide stop using it prior to tree removal and then assess and plan to correct any likely problem spots (especially if planning to use dwarfing rootstocks).
Step 2: Tree removal
The cost and equipment available will ultimately determine the removal technique used. Key issues are:
Remove the trees when soil conditions enable easy removal of trees and roots. Avoid removing trees when soil conditions are dry and hard or excessively wet.
Endeavour to remove as many roots as possible (or poison trees prior to removal). Where practical remove all root pieces longer that 30 cm and/or larger than 4 cm in diameter. Use a disc plough to cut roots up if they cannot be removed economically.
Remove trees from the block wherever possible
Avoid burning trees on land to be replanted. Heat generated from the burning piles affects soil micro-organisms and nutrient availability under the pile and can result in uneven tree growth and uneven orchard blocks. If trees cannot be removed, several small heaps are better than 1 large one
Take proper precautions to avoid erosion problems. Use interceptor drains, temporary contour banks or roughly plough the land to slow down the speed of any water running through the block. Establish cover crops if the land is to be left bare for any length of time, especially over winter
Step 3: Site and soil preparation
Site and soil preparation is the critical step in redeveloping an orchard. The greater the attention to detail in this phase the greater the long-term benefits Key aspects to consider include:
Ripping the site to improve aeration, drainage, root removal, reduce soil compaction problems and improve nutrient incorporation into the soil.
Roughly cultivate the site and remove any visible roots. The more roots removed the better.
Mark out new rows, taking care to minimise the number of new rows in old row positions.
Cultivate and fumigate if required. Remember fumigation is only one tool that can be used to prepare the site, often many of the cultural practices such as adjusting nutrition and soil structure can reduce the need to fumigate.
115
If fumigation is required prepare the soil to the right tilth and ensure that there is adequate soil moisture (dry soils minimise the effectiveness of fumigation). Depending on the chemical used to fumigate soil covers may be needed. These covers can greatly increase erosion problems on steeper sites so install appropriate erosion minimisation actions, such as interceptor drains. Fumigation is most successful in warm moist soils with temperatures over 16°C – Autumn fumigation is preferred to spring fumigation because the chemical must have decomposed before planting can proceed. One test to check whether the chemical has been properly removed from the soil is to sow quick sprouting vegetable seeds in the fumigated areas. If the seeds germinate then the fumigant has lost its effect and it is safe to plant the trees.
Even out the site (if it is required and practical). Some minor site earthworks may be
needed to fill in low spots or make the site more manageable. If major earthworks are required this should be done prior to fumigation.
Apply and incorporate any fertiliser, lime, gypsum, dolomite or organic matter required. These requirements should have been determined in step 1. Prior to mounding and/or final soil preparation, broadcast any soil amendments and fertilisers and incorporate by cultivation to a depth of 15-20cm. Where significant quantities of phosphorous and trace elements are required, apply and incorporate the soil amendments first then apply the fertilisers and incorporate them separately.
If there are problems with subsoil acidity or sodicity add gypsum to the rip lines
Prepare soil mounds where soil depth or drainage is a potential problem. Mounds are generally formed by moving topsoil from the inter-row space into raised areas along the planting row.
In undulating areas ensure the mounds do not impede the natural drainage from the site.
Final soil cultivation should only be done when all fertiliser, soil amendments, mounds and grassed waterways (surface drainage) are in place. It should preferably be done on the day of planting.
Plant cover crops or sod culture. When the rows and mounds have been defined an orchard sod culture or cover crop should be planted as soon as possible (preferably in autumn) to stabilise the soil over and provide a firm surface for vehicle movement
Step 4: Replanting – plant wisely
Don’t stop managing the process once the site is prepared. The effort put into planting and caring for the trees is critical. Additional information is provided in the section on planting young trees Key issues to consider include
Ensure the nursery trees have been handled and stored properly
Plant as early as practical – (June to mid August). Early planting reduces stress on nursery trees and allows the roots to settle and recommence growth prior to shoot growth.
Late planting can significantly affect the first year performance. Planting late,
especially late spring increases plant competition stresses that can lead to retarded shoot growth, desiccation problems and increased tree losses. Late planting should be avoided particularly in replant sites
Avoid putting fertiliser in the planting hole. Young roots can be burnt severely, impeding tree growth and can lead to tree deaths. Fertiliser requirements are best added as part of the soil preparations.
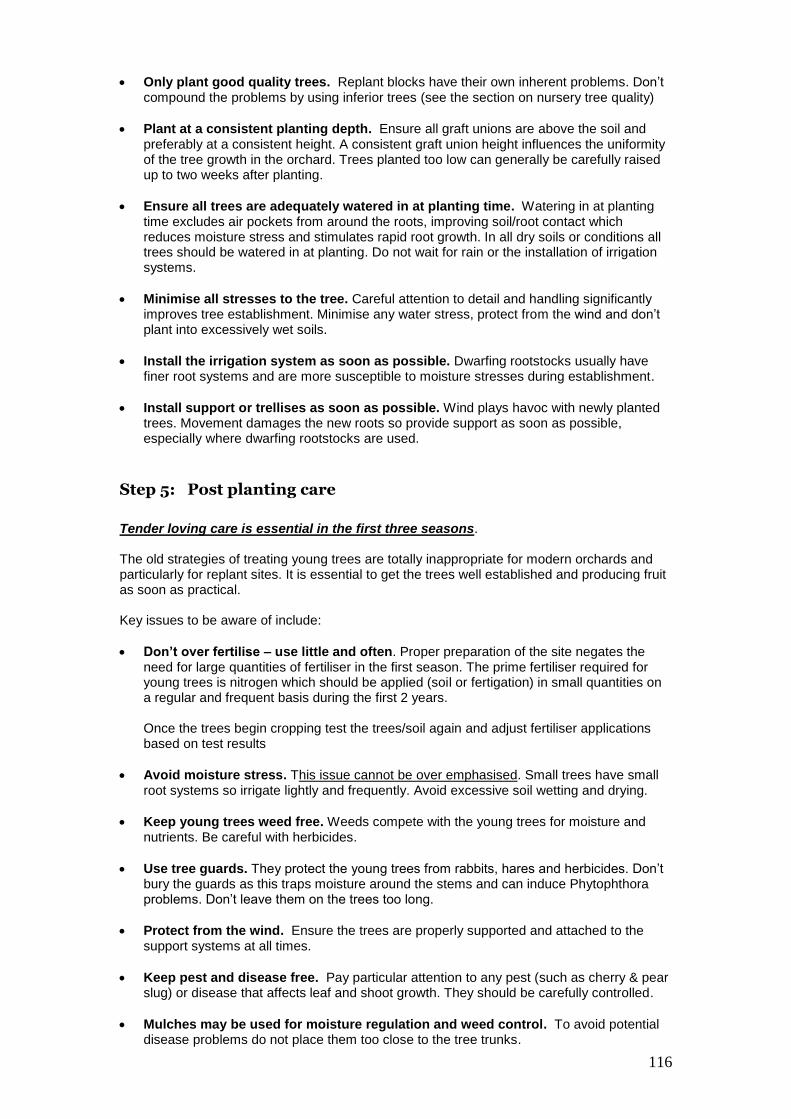
116
Only plant good quality trees. Replant blocks have their own inherent problems. Don’t compound the problems by using inferior trees (see the section on nursery tree quality)
Plant at a consistent planting depth. Ensure all graft unions are above the soil and preferably at a consistent height. A consistent graft union height influences the uniformity of the tree growth in the orchard. Trees planted too low can generally be carefully raised up to two weeks after planting.
Ensure all trees are adequately watered in at planting time. Watering in at planting time excludes air pockets from around the roots, improving soil/root contact which reduces moisture stress and stimulates rapid root growth. In all dry soils or conditions all trees should be watered in at planting. Do not wait for rain or the installation of irrigation systems.
Minimise all stresses to the tree. Careful attention to detail and handling significantly improves tree establishment. Minimise any water stress, protect from the wind and don’t plant into excessively wet soils.
Install the irrigation system as soon as possible. Dwarfing rootstocks usually have finer root systems and are more susceptible to moisture stresses during establishment.
Install support or trellises as soon as possible. Wind plays havoc with newly planted trees. Movement damages the new roots so provide support as soon as possible, especially where dwarfing rootstocks are used.
Step 5: Post planting care
Tender loving care is essential in the first three seasons. The old strategies of treating young trees are totally inappropriate for modern orchards and particularly for replant sites. It is essential to get the trees well established and producing fruit as soon as practical. Key issues to be aware of include:
Don’t over fertilise – use little and often. Proper preparation of the site negates the need for large quantities of fertiliser in the first season. The prime fertiliser required for young trees is nitrogen which should be applied (soil or fertigation) in small quantities on a regular and frequent basis during the first 2 years.
Once the trees begin cropping test the trees/soil again and adjust fertiliser applications based on test results
Avoid moisture stress. This issue cannot be over emphasised. Small trees have small root systems so irrigate lightly and frequently. Avoid excessive soil wetting and drying.
Keep young trees weed free. Weeds compete with the young trees for moisture and nutrients. Be careful with herbicides.
Use tree guards. They protect the young trees from rabbits, hares and herbicides. Don’t bury the guards as this traps moisture around the stems and can induce Phytophthora problems. Don’t leave them on the trees too long.
Protect from the wind. Ensure the trees are properly supported and attached to the support systems at all times.
Keep pest and disease free. Pay particular attention to any pest (such as cherry & pear slug) or disease that affects leaf and shoot growth. They should be carefully controlled.
Mulches may be used for moisture regulation and weed control. To avoid potential disease problems do not place them too close to the tree trunks.

117
Avoid the temptation to overcrop early. Nothing will stop the growth of trees quicker than over cropping, particularly when using precocious dwarfing rootstocks.
Don’t neglect young trees. Neglect affects the orchard’s development and affects your viability
It is important to begin preparations for a cherry orchard early
References
Ferree, D.C and Warrington, I.J (2003) Apples, Botany, Production and Uses,
CABI Publishing, Oxford, UK . Nielsen, G.H, Hogue, E.J, and Drought, B.G (1981) The effects of soil applied calcium on soil and mature Spartan apple trees. Canadian Journal of Soil Science 61(2) pp 295 – 302.

118
Tree establishment
Nursery tree handling - from delivery to planting Obtaining the right tree from your nursery is the first part of getting your orchard established. From delivery onwards it is the orchardists’ responsibility to look after the trees carefully and get them planted as quickly as practical. Ideally the best option for orchardists is to pick up the trees from the nursery themselves on the day or day before planting. This situation allows the orchardist to closely inspect the trees prior to collection and then control the transport conditions of the trees and ensure that they are then planted as quickly as possible reducing the potential problems of transplant shock. In many circumstances this situation is not achievable, so the following is a guide to what should be done to handle nursery trees delivered to your property.
Only accept what is up to specification or negotiated with the nurseryman. As soon as the trees arrive inspect the trees for trueness to order, type, general specification, drying out and physical damage. Unpack several bundles from their containers and ensure that the roots are moist. If you are not satisfied contact the nurseryman and discuss the situation. If you decide to accept trees that are not up to your specification, requirements or are damaged then carefully grade them prior to planting. Once they are graded plant the trees according to grades. This strategy increases the uniformity of the planted orchard and puts the potential problems in to areas that can be managed individually.
Root systems Ensure that the root systems are kept damp,
o Do not keep them too wet or disease problems can develop. Do not allow roots to dry out under any circumstances
o Do not leave them uncovered or exposed to the wind If planting relatively quickly - ideally “heal” (temporarily plant) into a well-drained area of soil and/or sand. If planting is to be delayed for any reason, place the trees in a bulk bin, cover the roots with moist sand or sawdust and store in a cool room so that they remain completely dormant. Do not store fruit trees in the same cool store as fruit because ethylene can severely damage or kill the trees. Properly vent coolrooms that have had fruit in them well before storing any fruit trees.
Tree planting
Planting time
Ideally, nursery trees should be planted into the orchard as early as practical after delivery and as early in the winter/spring period as practical. Early planting minimises transplant problems and enables the trees to “settle in” and begin root growth well before the spring shoot growth places extra stress on the trees. Regional issues, weather and soil conditions influence decisions in each individual site however, trees should be planted by the end of August or early September. If trees have to be planted later, keep them as dormant as possible in a cool room (see above) until planting.
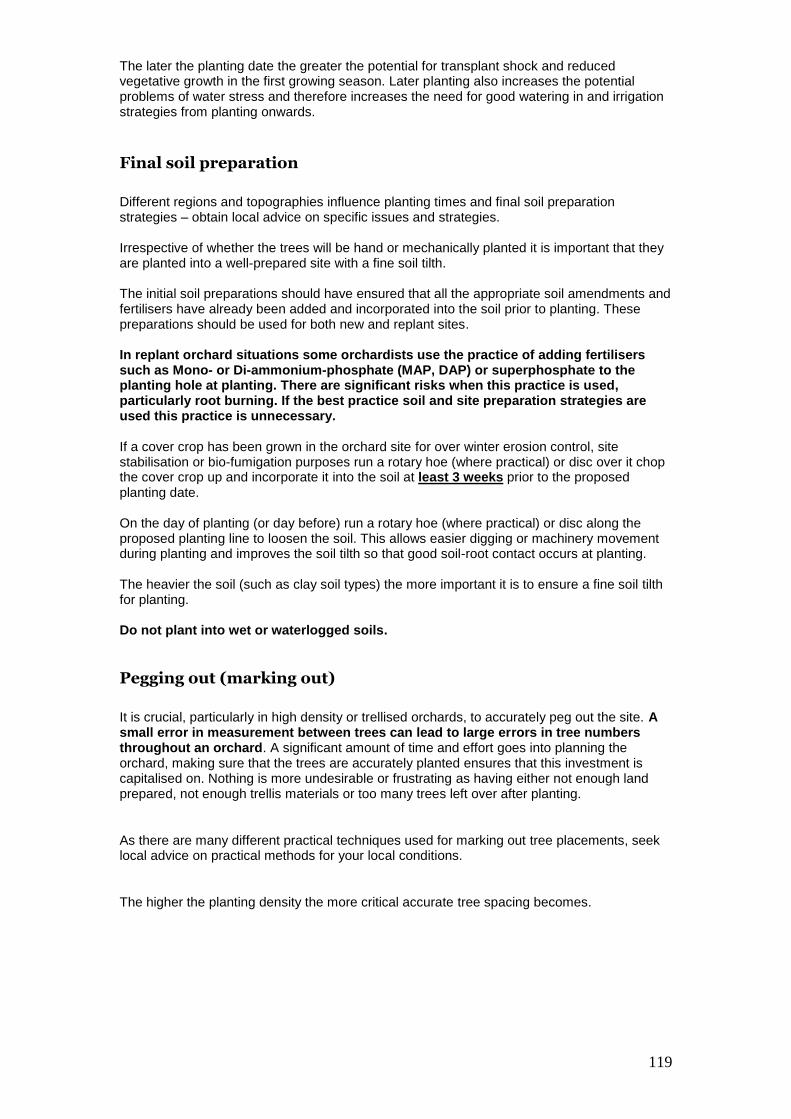
119
The later the planting date the greater the potential for transplant shock and reduced vegetative growth in the first growing season. Later planting also increases the potential problems of water stress and therefore increases the need for good watering in and irrigation strategies from planting onwards.
Final soil preparation
Different regions and topographies influence planting times and final soil preparation strategies – obtain local advice on specific issues and strategies. Irrespective of whether the trees will be hand or mechanically planted it is important that they are planted into a well-prepared site with a fine soil tilth. The initial soil preparations should have ensured that all the appropriate soil amendments and fertilisers have already been added and incorporated into the soil prior to planting. These preparations should be used for both new and replant sites. In replant orchard situations some orchardists use the practice of adding fertilisers such as Mono- or Di-ammonium-phosphate (MAP, DAP) or superphosphate to the planting hole at planting. There are significant risks when this practice is used, particularly root burning. If the best practice soil and site preparation strategies are used this practice is unnecessary. If a cover crop has been grown in the orchard site for over winter erosion control, site stabilisation or bio-fumigation purposes run a rotary hoe (where practical) or disc over it chop the cover crop up and incorporate it into the soil at least 3 weeks prior to the proposed planting date. On the day of planting (or day before) run a rotary hoe (where practical) or disc along the proposed planting line to loosen the soil. This allows easier digging or machinery movement during planting and improves the soil tilth so that good soil-root contact occurs at planting. The heavier the soil (such as clay soil types) the more important it is to ensure a fine soil tilth for planting.
Do not plant into wet or waterlogged soils.
Pegging out (marking out)
It is crucial, particularly in high density or trellised orchards, to accurately peg out the site. A small error in measurement between trees can lead to large errors in tree numbers throughout an orchard. A significant amount of time and effort goes into planning the orchard, making sure that the trees are accurately planted ensures that this investment is capitalised on. Nothing is more undesirable or frustrating as having either not enough land prepared, not enough trellis materials or too many trees left over after planting.
As there are many different practical techniques used for marking out tree placements, seek local advice on practical methods for your local conditions.
The higher the planting density the more critical accurate tree spacing becomes.
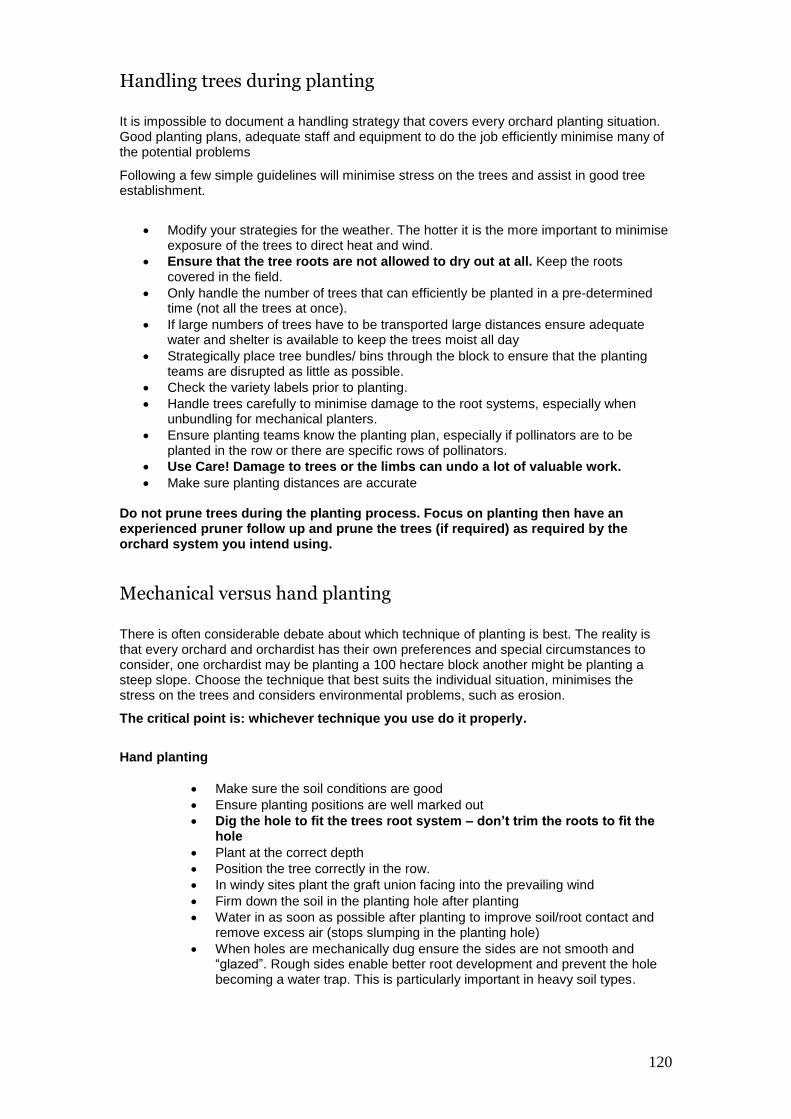
120
Handling trees during planting It is impossible to document a handling strategy that covers every orchard planting situation. Good planting plans, adequate staff and equipment to do the job efficiently minimise many of the potential problems
Following a few simple guidelines will minimise stress on the trees and assist in good tree establishment.
Modify your strategies for the weather. The hotter it is the more important to minimise exposure of the trees to direct heat and wind.
Ensure that the tree roots are not allowed to dry out at all. Keep the roots covered in the field.
Only handle the number of trees that can efficiently be planted in a pre-determined time (not all the trees at once).
If large numbers of trees have to be transported large distances ensure adequate water and shelter is available to keep the trees moist all day
Strategically place tree bundles/ bins through the block to ensure that the planting teams are disrupted as little as possible.
Check the variety labels prior to planting.
Handle trees carefully to minimise damage to the root systems, especially when unbundling for mechanical planters.
Ensure planting teams know the planting plan, especially if pollinators are to be planted in the row or there are specific rows of pollinators.
Use Care! Damage to trees or the limbs can undo a lot of valuable work.
Make sure planting distances are accurate Do not prune trees during the planting process. Focus on planting then have an experienced pruner follow up and prune the trees (if required) as required by the orchard system you intend using.
Mechanical versus hand planting
There is often considerable debate about which technique of planting is best. The reality is that every orchard and orchardist has their own preferences and special circumstances to consider, one orchardist may be planting a 100 hectare block another might be planting a steep slope. Choose the technique that best suits the individual situation, minimises the stress on the trees and considers environmental problems, such as erosion.
The critical point is: whichever technique you use do it properly.
Hand planting
Make sure the soil conditions are good
Ensure planting positions are well marked out
Dig the hole to fit the trees root system – don’t trim the roots to fit the hole
Plant at the correct depth
Position the tree correctly in the row.
In windy sites plant the graft union facing into the prevailing wind
Firm down the soil in the planting hole after planting
Water in as soon as possible after planting to improve soil/root contact and remove excess air (stops slumping in the planting hole)
When holes are mechanically dug ensure the sides are not smooth and “glazed”. Rough sides enable better root development and prevent the hole becoming a water trap. This is particularly important in heavy soil types.
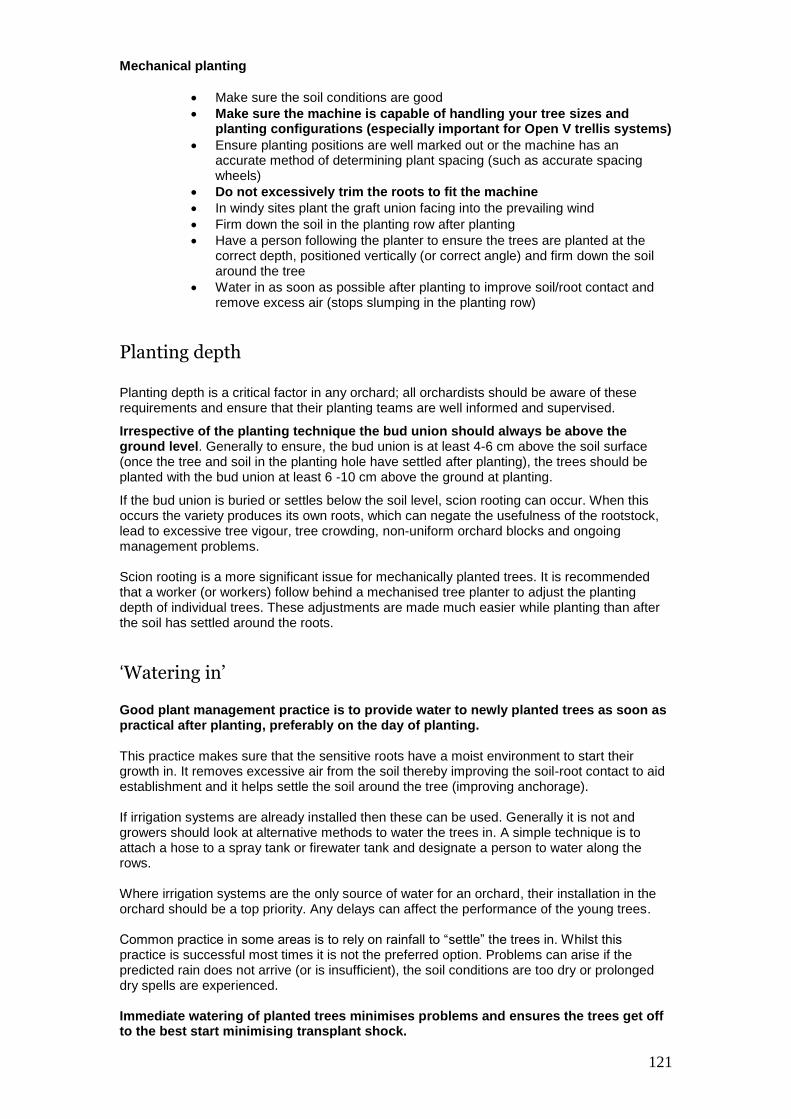
121
Mechanical planting
Make sure the soil conditions are good
Make sure the machine is capable of handling your tree sizes and planting configurations (especially important for Open V trellis systems)
Ensure planting positions are well marked out or the machine has an accurate method of determining plant spacing (such as accurate spacing wheels)
Do not excessively trim the roots to fit the machine
In windy sites plant the graft union facing into the prevailing wind
Firm down the soil in the planting row after planting
Have a person following the planter to ensure the trees are planted at the correct depth, positioned vertically (or correct angle) and firm down the soil around the tree
Water in as soon as possible after planting to improve soil/root contact and remove excess air (stops slumping in the planting row)
Planting depth Planting depth is a critical factor in any orchard; all orchardists should be aware of these requirements and ensure that their planting teams are well informed and supervised.
Irrespective of the planting technique the bud union should always be above the ground level. Generally to ensure, the bud union is at least 4-6 cm above the soil surface (once the tree and soil in the planting hole have settled after planting), the trees should be planted with the bud union at least 6 -10 cm above the ground at planting.
If the bud union is buried or settles below the soil level, scion rooting can occur. When this occurs the variety produces its own roots, which can negate the usefulness of the rootstock, lead to excessive tree vigour, tree crowding, non-uniform orchard blocks and ongoing management problems. Scion rooting is a more significant issue for mechanically planted trees. It is recommended that a worker (or workers) follow behind a mechanised tree planter to adjust the planting depth of individual trees. These adjustments are made much easier while planting than after the soil has settled around the roots.
‘Watering in’
Good plant management practice is to provide water to newly planted trees as soon as practical after planting, preferably on the day of planting. This practice makes sure that the sensitive roots have a moist environment to start their growth in. It removes excessive air from the soil thereby improving the soil-root contact to aid establishment and it helps settle the soil around the tree (improving anchorage). If irrigation systems are already installed then these can be used. Generally it is not and growers should look at alternative methods to water the trees in. A simple technique is to attach a hose to a spray tank or firewater tank and designate a person to water along the rows. Where irrigation systems are the only source of water for an orchard, their installation in the orchard should be a top priority. Any delays can affect the performance of the young trees. Common practice in some areas is to rely on rainfall to “settle” the trees in. Whilst this practice is successful most times it is not the preferred option. Problems can arise if the predicted rain does not arrive (or is insufficient), the soil conditions are too dry or prolonged dry spells are experienced. Immediate watering of planted trees minimises problems and ensures the trees get off to the best start minimising transplant shock.

122
Support systems
Where a tree support system is to be used as part of the orchard system it should also be installed with minimum delay, particularly in areas with light soils, strong winds or potential problems with anchorage.
Careful planning of the support systems can have significant effects on early yields, crop support and therefore financial performance of the new orchard.
Pruning at planting
“The first pruning cuts you make are the most important cuts in the life of the tree”
Bas van den Ende (August 2002)
If everything has been planned and carried out properly an orchardist should be planting trees specifically propagated for the orchard system they wish to use. Ideally the trees should be of the right quality and specifications for the orchardist’s requirements and therefore very little pruning should be required. In this situation the main problems to consider will be transport damage to leaders, branches too low and inappropriate branches such as those with poor crutch angles or size. It is extremely difficult to make generalisations about the pruning of newly planted trees as there are so many different factors to consider. The following points are provided as initial factors to consider.
Grade the trees first, get them all planted then assess and properly determine what pruning is then required.
Always consider the type of tree required for the selected system and prune accordingly, while always considering the basic principles of tree growth for the selected system.
Pruning whilst planting may save time initially but may not necessarily save time or money in the longer term. An incorrect cut made in the haste of planting may actually lead to significantly more pruning and tree management problems in the future.
If pruning at planting is preferred have a designated person trained and assigned to the task, not just anyone it.
The amount of pruning will depend on the quality of the trees. If significant damage is evident plant all the trees of similar quality/damage in the same rows (this will allow for any subsequent pruning to be focussed on the same types of trees).
If necessary obtain advice or guidance on how to prune/train the young trees for the selected system.
If trees of incorrect specification or quality are provided for the selected system either return them to the nurseryman (this is not always a possible solution) or re-evaluate your orchard design (obtain professional assistance if necessary). Proper consideration at this point may retain the viability of your new orchard. A hasty decision may reduce the viability of your new orchard.
123
Summary
“It is clear that tree performance over the first 3 years has a large impact on early yields and orchard profitability”
Hoying, S.A, Robinson, T.L in Barritt (2003) p 21
To ensure that the large financial investment in any new orchard is maximised, whether it is in a new or replant site, it is critical that everything possible is undertaken to ensure that the optimise the trees growth to fill their allocated space quickly with the right balance of structural and fruitful wood.
How the trees grow in this time is directly related to the decisions and management practices used by the orchardist, it is in the orchardists hands to ensure that all the appropriate practices are utilised such as those outlined in this section. Short cuts may be made but at what financial cost later in the life of the orchard.
References
Barritt B.H (2003) Apple Orchard Systems, International Dwarf Fruit Tree Association,
Compact Fruit Tree Vol 36 Special issue
Van den Ende B. (August 2002) Seek Quality Nursery Trees, Pome Fruit Australia pp 29-31
Young tree management “The fruiting structure of an efficient fruit tree is developed during the formative years. This fruiting structure should have several characteristics; it should be developed rapidly, make efficient use of the allotted space, efficiently intercept the available sunlight and possess a structure that encourages the development of an appropriate balance between fruiting and vegetative growth.”
Adapted from Forshey et al (1992)
Anything that disrupts this development will affect an orchard’s development, productivity and ultimately profitability. This is particularly important with higher density production systems, where a lost years growth or production can significantly delay productivity.
It is therefore important that the management of young trees is directly linked to the practice of TLC – tender loving care. All efforts in the early life of the trees should be aimed at maximising tree development and minimising growth problems and the various stresses that can affect the trees. Particular attention should be given to irrigation and nutrition management, pest and diseases and weed control. Tender loving care is essential in the first three seasons. See the information provided in the section Step 5: Post planting care
Reference
Forshey, C.G., Elving, D.C. and Stebbins, R.L (1992) Training and Pruning Apple and Pear
Trees, American Society for Horticultural Science, Alexandria, Virginia p166
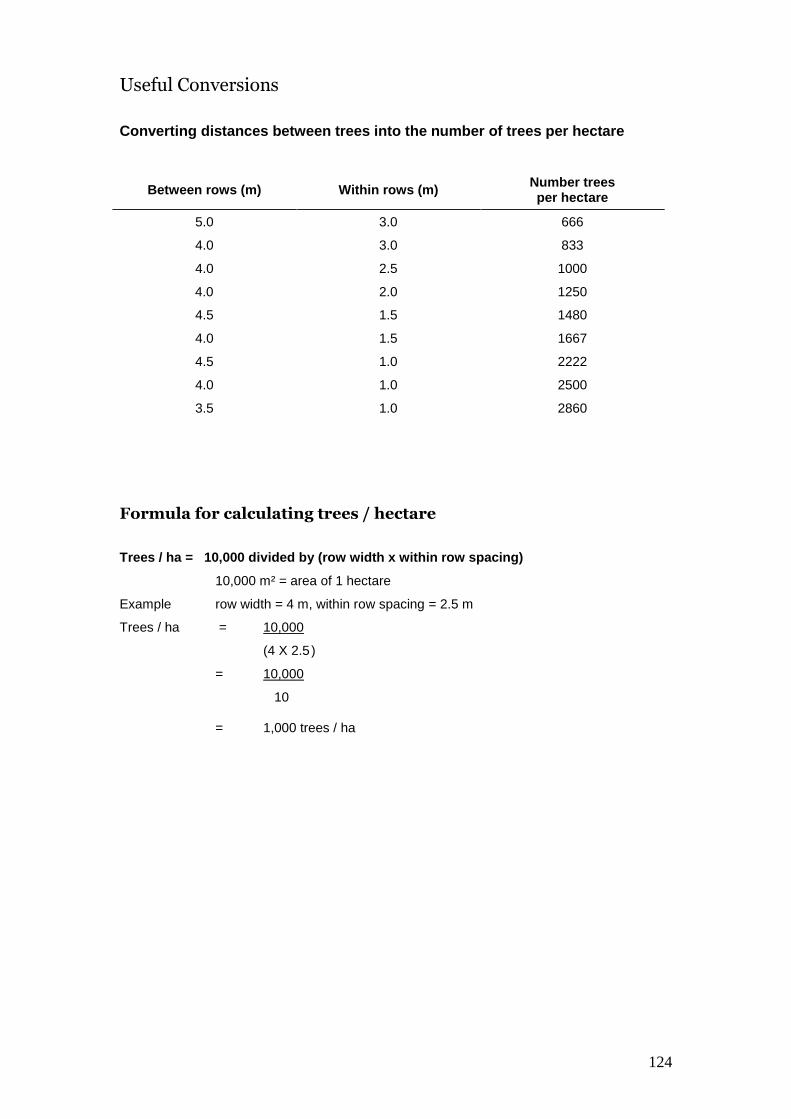
124
Useful Conversions
Converting distances between trees into the number of trees per hectare
Between rows (m) Within rows (m) Number trees per hectare
5.0 3.0 666
4.0 3.0 833
4.0 2.5 1000
4.0 2.0 1250
4.5 1.5 1480
4.0 1.5 1667
4.5 1.0 2222
4.0 1.0 2500
3.5 1.0 2860
Formula for calculating trees / hectare
Trees / ha = 10,000 divided by (row width x within row spacing)
10,000 m² = area of 1 hectare
Example row width = 4 m, within row spacing = 2.5 m
Trees / ha = 10,000
(4 X 2.5 )
= 10,000
10
= 1,000 trees / ha
125
Nutrition and fertilisers
Natural soil fertility, especially in many regions of Australia, is generally not sufficient to meet the requirements of a highly productive orchard. Additional nutrients will be needed prior to planting and on an annual basis to sustain yields of commercial quality fruit.
How do nutrients get into plants? In legumes nitrogen from the atmosphere is converted to nitrate in the root nodules. In all other cases nutrients must enter through the roots or foliage. There are three main sources of nutrients for roots:
soil solution
the exchangeable ions
readily decomposable minerals There are strong interactions between these sources. Some ions are largely in the soil solution for example nitrite, chloride and sodium, while others are held more as exchangeable ions, for example potassium, bicarbonate and phosphorus.
The movement of nutrients into the root Nutrients move into plants root systems through a number of methods, including mass flow, diffusion, root extension and root hairs and selective uptake.
Mass flow
Mass flow of nutrients is caused by plant transpiration. Plants take up water with its nutrients to replace the water that has transpired from the leaves.
Diffusion
Diffusion of nutrients into the roots occurs when ions are taken up faster than when carried by mass flow, resulting in an increased concentration gradient in which the ions will diffuse. Generally the movement of water via mass flow on a fertile soil will bring too much calcium and sodium (by 7-10 times), about the right amount of magnesium (by 1-2 times) but not enough phosphorus and sometimes potassium (about 1/20th-1/10th) that is required by the tops of the plant. Nutrients diffuse at different rates depending on the ion and the release from exchangeable and adsorbed areas on soil particles.
Root extension and root hairs
The growth and movement of roots through the soil matrix is important particularly for those nutrients which have poor diffusion rates such as phosphorous. Improved nutrient access will stimulate extra root growth. Root hairs increase the roots surface area and therefore its ability to take up nutrients increases substantially compared to root nutrient uptake alone.
Selectivity in uptake
The movement of nutrient through the soil solution to the root tissue can also limit uptake particularly if some nutrients are in over supply.
126
Roots have the ability to be selective to some extent
The ionic concentration within the root will be different to the soil solution
Two methods of selectivity 1. Selectivity of uptake by the amount taken up by roots. It is translocated, used, stored
and exuded. Ionic transfer across the root membrane can occur by cation exchange, diffusion or special ionic carriers.
2. Selectivity of translocation, that is the amount translocated to other parts of plant
These processes are not well understood although we do know
Interactions occur between some elements, for example potassium, calcium and magnesium
Different plant species have different nutrient selectivity. For example boron, some plants accumulate boron whilst other plants prevent boron uptake or exude it.
Roots can exude nutrients.
Inorganic versus organic fertilisers
Generally, the nutrients in solid organic fertilisers and soil conditioners are not immediately available for plant uptake. Their availability depends on degradation of the material by soil micro-organisms. If soil conditions are not favourable for soil micro-organisms to be active such as low pH, too wet, too dry or too cold, very little nutrient may be available for plant growth.
Although organic materials may not be the best source of readily available nutrients for plant growth, they are important in a long-term management program. Organic matter plays an important role in maintaining good soil structure improving the soil nutrient holding capacity, moisture retention and improves drainage.
Most Australian soils have low levels of organic matter. In addition,some of the soil management techniques currently used in orchards do not favour the build up of organic matter. If the soil is maintained bare through the use of herbicides and is combined with a high input of inorganic fertilisers it can lead to a depletion of soil organic matter and an absence of soil fauna, such as earthworms. In the long-term this results in poor infiltration of water and poor drainage. Researchers now recommend practices that build up soil organic matter levels. The two most common practices for improving the level of soil organic matter are:
(a) Surface mulches of straw or other organic material.
(b) Establishment of a green cover crop along the tree lines during winter and subsequent spraying off, during early spring, with a desiccant herbicide.
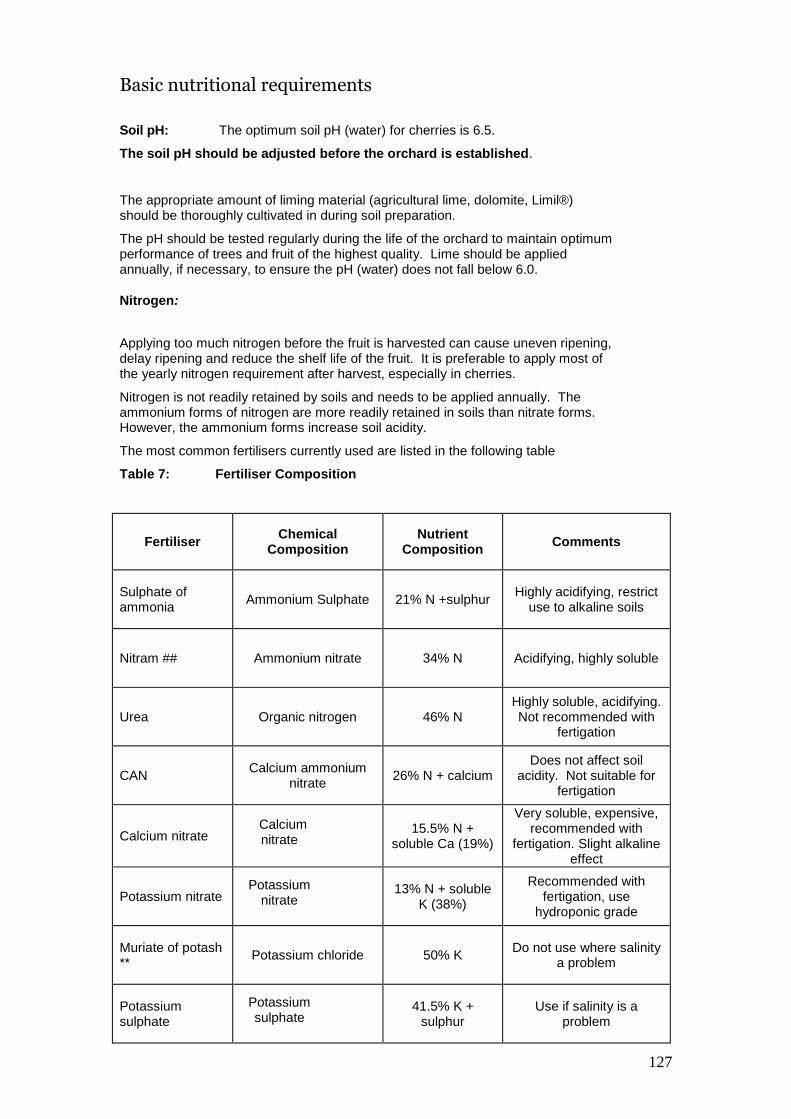
127
Basic nutritional requirements
Soil pH: The optimum soil pH (water) for cherries is 6.5.
The soil pH should be adjusted before the orchard is established.
The appropriate amount of liming material (agricultural lime, dolomite, Limil®) should be thoroughly cultivated in during soil preparation.
The pH should be tested regularly during the life of the orchard to maintain optimum performance of trees and fruit of the highest quality. Lime should be applied annually, if necessary, to ensure the pH (water) does not fall below 6.0.
Nitrogen:
Applying too much nitrogen before the fruit is harvested can cause uneven ripening, delay ripening and reduce the shelf life of the fruit. It is preferable to apply most of the yearly nitrogen requirement after harvest, especially in cherries.
Nitrogen is not readily retained by soils and needs to be applied annually. The ammonium forms of nitrogen are more readily retained in soils than nitrate forms. However, the ammonium forms increase soil acidity.
The most common fertilisers currently used are listed in the following table
Table 7: Fertiliser Composition
Fertiliser Chemical
Composition Nutrient
Composition Comments
Sulphate of ammonia
Ammonium Sulphate 21% N +sulphur Highly acidifying, restrict
use to alkaline soils
Nitram ## Ammonium nitrate 34% N Acidifying, highly soluble
Urea Organic nitrogen 46% N Highly soluble, acidifying. Not recommended with
fertigation
CAN Calcium ammonium
nitrate 26% N + calcium
Does not affect soil acidity. Not suitable for
fertigation
Calcium nitrate Calcium
nitrate 15.5% N +
soluble Ca (19%)
Very soluble, expensive, recommended with
fertigation. Slight alkaline effect
Potassium nitrate Potassium
nitrate 13% N + soluble
K (38%)
Recommended with fertigation, use
hydroponic grade
Muriate of potash **
Potassium chloride 50% K Do not use where salinity
a problem
Potassium sulphate
Potassium sulphate
41.5% K + sulphur
Use if salinity is a problem
128
## - access to this fertiliser is strictly controlled – specific requirements must be met
** Use of this fertiliser is not encouraged except for specific purposes
Most mixed NPK fertilisers contain ammonium sulphate or ammonium nitrate.
Phosphorus and Potassium:
Phosphorus and potassium are retained in soils that have a reasonable clay and/or organic matter level.
Phosphorus is relatively immobile and tends to remain near the soil surface following application. It is better to incorporate the phosphorous source (superphosphate, reactive rock phosphate etc) into the soil during site preparation.
The quantity of fertilizer depends on the previous history of the site and should be checked with a soil test. Up to 1000 kg/ha of superphosphate can be incorporated, but this amount of superphosphate would normally supply the trees (particularly young trees) with their requirement of phosphorus for at least five years.
Potassium is normally applied as potash (potassium chloride) or alternatively potassium sulphate. Potash is the most common form of potassium.
Additional nutrients
Other important elements for plant growth include magnesium, calcium and sulphur. Provided soil pH (water) is in the recommended range of 6.0-6.5, calcium and sulphur wouldn’t normally applied because sufficient reserves exist within the soil. Care must be taken with magnesium levels as over-liming with pure lime can create magnesium deficiencies. Over-liming with lime or dolomite on sandy soils can also lead to trace element issues, particularly manganese deficiency.
Deficiencies can be induced by upsetting the soil balance of other nutrients. For example, heavy applications of ammonium-based fertilisers or potash can induce magnesium deficiency. Cherries are particularly sensitive to magnesium interactions in the soil.
Calcium:
The need for calcium is often only thought of in terms of pH readings. Such thinking relates calcium only to the availability of other nutrients, but it is an essential element for plant and fruit growth in its own right.
Low levels of calcium result in a poor root system resulting in a poor ability to forage for other nutrients. Calcium is less mobile in the plant than most other nutrients.
While the roots are affected first, the symptoms of calcium deficiency in the above ground portions of the tree can be seen as die-back in the tips of shoots, ragged leaf margins and dead areas in mature leaves which then progress to the younger leaves.
Fruit containing high levels of calcium are associated with improved quality and storage life.
Calcium nitrate is a soluble form of calcium readily available to trees.
Limestone is only slightly soluble in acid soils. The rate at which the neutralisation process proceeds depends on how finely the limestone is ground and how thoroughly it is incorporated and mixed in the soil.
129
Magnesium:
Magnesium is often in deficiency through man made changes. Excessive amounts of potassium and possibly high levels of calcium reduce the availability of magnesium. Magnesium may also be deficient when the pH is low. Both the pH and magnesium status can be best corrected by applying dolomite lime or magnesium oxide. Dolomite needs to be incorporated into the root zone for the best results. Where this is not practical, magnesium oxide can be surface applied.
Severe magnesium deficiency results in the loss of leaves from the lower sections of the current season's shoots. Magnesium deficiency is first seen when the area between the large veins of the older leaves fade to a yellow colour.
Sweet cherries are especially prone to magnesium deficiency, particularly young trees. Symptoms vary from inter-veinal yellowing to an orange-red discolouration and inter-veinal and leaf margin scorching.
Epsom salts (magnesium sulphate) could also be included in a fertiliser program, especially for young, high-density cherry blocks.
Avoid applying readily available sources of magnesium, such as epsom salts, during the six to ten week period before harvest. Magnesium may antagonise calcium uptake. This may mean that for early maturing varieties, very little magnesium is applied until after harvest.
Trace elements
Other elements are also essential for plant growth but only in minute amounts. These elements are called trace elements. They should only be applied if a deficiency is suspected and confirmed by soil or plant tissue analysis.
Boron:
Boron deficiency can cause a range of symptoms in cherries.
Cracks in the fruit tend to become surrounded with corky tissue. When the fruit is cut the corky areas may be seen in the flesh beneath the skin.
A disorder known as 'star crack' has been reported in cherries in Australia. A star-like crack develops at the blossom-end of the fruit. Some varieties are more susceptible than others, for example Ron's Seedling.
Other disorders associated with boron deficiency are premature fruit drop, poor fruit set and bud drop. A boron deficiency can also impede calcium uptake.
Any conditions that result in water stress can cause a transient boron deficiency. Such a deficiency is usually corrected when the normal water balance has been restored. This type of induced deficiency is often not detected by leaf analysis later in the season.
Boron deficiency can be corrected by a foliar spray applied either late autumn or pre-bud burst. Either Borax™ at 2.25 kg/1000 L or Solubor® at 1.25 kg/1000 L may be used. Deficiencies may also be corrected by soil applications of borax at 10-15 grams per mature bearing tree.
If you have or suspect a boron deficiency, take appropriate tests and discus with an appropriately trained agronomist or consultant.
Molybdenum:
Limited information is available on this element. Generally, low available soil molybdenum is common on soils affected by soil acidity. Liming will increase the available soil Molybdenum.
Plants require molybdenum for nitrogen metabolism within the plant. Symptoms of molybdenum deficiency are usually associated with symptoms of nitrogen deficiency
130
even though plants have been supplied with adequate nitrogen and the soil pH is in the optimum range.
Iron:
Iron is normally found in the soil in ample quantities to meet the needs of trees.
An iron deficiency causes a severe chlorosis (a removal of chlorophyll) in the leaves. It has a bleaching effect on all but the main veins of the leaves. As the season progresses these leaves may turn brown at the margins and in between the veins. In severe cases the shoots may be stunted and even dieback.
Soils with a high pH and/or calcareous nature are likely to induce the symptoms of deficiency as does waterlogged conditions. Iron-containing compounds such as ferrous sulphate tend to lower the soil pH and therefore increase acidity. Iron chelates are generally preferred for correcting iron deficiency as they cause fewer disturbances to the soil chemistry. Chelated iron can be used for either ground or foliar dressings.
Copper:
Where copper sprays are applied as part of a disease control program, deficiencies are not normally a problem.
Copper can be deficient on light, sandy soils. Mild cases of deficiency can be corrected with the normal dormant copper spray program. For severe deficiency, found in light textured soils, an application to the soil of 30 grams of copper sulphate (blue stone) per tree may be needed.
Common symptoms of deficiency are seen as dieback from the tips of young shoots which often turn a blackish colour, a lack of springiness in the stems, blotchy leaves and poor and spindly growth.
Toxic amounts of copper in soils or in solution may reduce plant growth and reduce plant uptake of iron. This can occur where an excessive copper spray program is used in disease control programs.
Zinc:
The use of superphosphate generally provides enough zinc to restrict any problems caused by the lack of zinc. However, in light textured soils, alkaline soils or after heavy applications of lime, zinc can become deficient.
A deficiency causes leaves to be narrow (often wrongly diagnosed as small rather than narrow leaves), leaf chlorosis and poor fruit set.
Deficiencies may be corrected by using zinc sulphate. Regular use of zinc-based fungicides will often correct mild deficiencies. Zinc can be applied as a zinc sulphate foliar spray late autumn or as a pre bud burst spray.
Sulphur:
The use of superphosphate together with sprays containing sulphate compounds should maintain adequate levels of soil sulphur for plants.
Manganese:
Manganese deficiency can occur following heavy applications of lime. Symptoms are interveinal yellowing of older leaves while the young leaves appear normal.
The regular use of manganese-based fungicides, such as fungicides based on Mancozeb® and Maneb® is often sufficient to correct mild deficiencies. Where severe deficiencies occur, apply 50 grams of manganese sulphate at the base of each tree. Severe deficiencies can also be corrected following 'shuck fall' by spraying manganese sulphate up to 4 kg / 1000 Litres of water.

131
When should fertilisers be applied?
Previously NPK fertilisers were generally applied as a single dressing during late winter to early spring. A single application was cheap to apply and rain was expected to wash the fertiliser into the soil. This approach has a number of disadvantages:
(a) Some fertilisers, especially nitrogen, are leached through the soil before the onset of new shoot growth. Commencement of new shoot growth is generally considered to coincide with soil uptake of nutrients.
(b) Large quantities of fertiliser can cause mineral imbalances in the soil.
(c) Nutrients that are not readily held in soils are often depleted by mid summer, however plants have requirements for nutrients after that time.
Research in the United States of America has shown the importance of nitrogen applications in late summer for strong flower bud formation and early spring growth. Initial leaf development, flower development, early fruit and shoot growth, all depend mainly on nitrogen reserves, established within the tree during the previous summer and autumn.
Applications of fertiliser should coincide with the demand for nutrients by the trees.
The tree’s requirement for nutrients varies throughout the growing season.
The following major growth stages of a bearing tree and the role of nutrients can be identified.
Stage 1: Flowering and fruit set
Cherry trees begin growth after winter dormancy. The nutrients required for early root growth, early leaf production, flowering, and early fruit development come from stored nutrient reserves within the tree. Most of these reserves are accumulated in the previous season after harvest. Good nutrient reserves assist early fruit sizing by ensuring high early cell numbers per fruitlet.
It is not until leaves and new shoots are actually growing that there is active uptake of soil nutrients. Soil applied fertilisers are not readily utilised during the first thirty days or so after full bloom.
Stage 2: New shoot growth
During the stage of rapid shoot growth, fruit growth slows but does not stop.
During this period, nutrients taken up from the soil are used primarily for shoot growth. Excessive nitrogen during this period (except for young trees) can reduce fruit quality (colour, firmness), reduce the amount of fruitful wood lower in the tree and increase summer and winter pruning costs.
Stage 3: Rapid fruit enlargement
This is the period 3-4 weeks before harvest when fruit increases rapidly in size. The most important tree management during this stage is to prevent water stress.
Fertilisers, especially nitrogen, should not be applied during this period.
Stage 4: Postharvest
During this period nutrients are stored for next spring. Once growth has stopped, approximately 50% of the tree’s fertiliser requirements can be applied. These nutrients are stored in the tree’s leaves, buds and wood. Prior to leaf fall nutrients move from the leaves back into the tree.
132
Phosphorus and potassium are readily fixed within the soil and a single application in spring may be adequate. Potassium may benefit from split applications. Nitrogen will definitely benefit from split applications because it is not fixed in the soil. At least three applications are needed.
As a general recommendation for mature, bearing trees, nitrogen and potassium should be applied as split applications, 50% in early spring and 50% post-harvest (after current season’s growth has ceased and hardened off). Phosphorus can be applied as a single band along the tree line or broadcast along the tree line in autumn.
Recent research in Chile has shown that fertiliser applications immediately after harvest have the greatest effects on tree and cropping performance
Methods of applying fertilisers
Hand broadcast:
This may be the most efficient way of applying fertilisers to young trees, especially in low density plantings. Accurate placement of the fertiliser enables smaller quantities of fertiliser to be used to achieve optimum growth. Where a drip irrigation system is used, fertiliser should be placed at the drip point.
Mechanically broadcast:
For high density plantings and for larger trees occupying a greater area of soil, mechanical broadcasting of the fertiliser is more practical.
Fertigation - drip irrigation systems:
When fertiliser is applied to each tree individually, less fertiliser is needed for optimum growth. This method also simplifies split applications of fertilisers and makes it possible to feed trees continually throughout the growing season.
Only fertilisers that will not drastically alter the soil chemistry should be distributed through the irrigation system. Suitable fertilisers are: calcium nitrate, potassium nitrate, potassium chloride, potassium sulphate, magnesium sulphate, ammonium phosphate, ammonium nitrate. Urea can be used in certain circumstances but only low biuret forms should be used.
The sulphate form of most trace elements can also be applied through the irrigation system.
Seek professional advice before applying nutrients through the irrigation system, some nutrient combinations react to form insoluble substances and may block nozzles and pipes
(Do not mix calcium fertilisers with sulphate or phosphate containing fertilisers).
Foliar:
A range of nutrients and other plant growth promotants can be provided as foliar applications. They are often used to apply relatively small amounts of nutrient either frequently or as single applications.
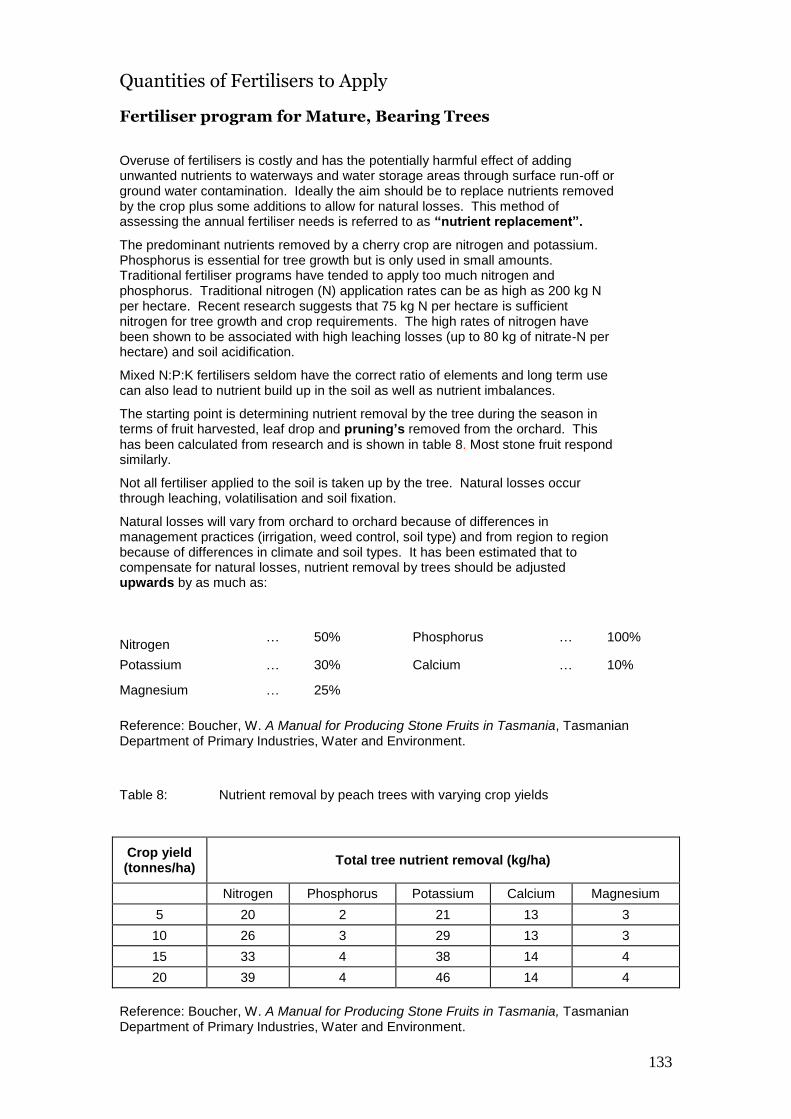
133
Quantities of Fertilisers to Apply
Fertiliser program for Mature, Bearing Trees
Overuse of fertilisers is costly and has the potentially harmful effect of adding unwanted nutrients to waterways and water storage areas through surface run-off or ground water contamination. Ideally the aim should be to replace nutrients removed by the crop plus some additions to allow for natural losses. This method of assessing the annual fertiliser needs is referred to as “nutrient replacement”.
The predominant nutrients removed by a cherry crop are nitrogen and potassium. Phosphorus is essential for tree growth but is only used in small amounts. Traditional fertiliser programs have tended to apply too much nitrogen and phosphorus. Traditional nitrogen (N) application rates can be as high as 200 kg N per hectare. Recent research suggests that 75 kg N per hectare is sufficient nitrogen for tree growth and crop requirements. The high rates of nitrogen have been shown to be associated with high leaching losses (up to 80 kg of nitrate-N per hectare) and soil acidification.
Mixed N:P:K fertilisers seldom have the correct ratio of elements and long term use can also lead to nutrient build up in the soil as well as nutrient imbalances.
The starting point is determining nutrient removal by the tree during the season in terms of fruit harvested, leaf drop and pruning’s removed from the orchard. This has been calculated from research and is shown in table 8. Most stone fruit respond similarly.
Not all fertiliser applied to the soil is taken up by the tree. Natural losses occur through leaching, volatilisation and soil fixation.
Natural losses will vary from orchard to orchard because of differences in management practices (irrigation, weed control, soil type) and from region to region because of differences in climate and soil types. It has been estimated that to compensate for natural losses, nutrient removal by trees should be adjusted upwards by as much as:
Nitrogen
… 50% Phosphorus … 100%
Potassium … 30% Calcium … 10%
Magnesium … 25%
Reference: Boucher, W. A Manual for Producing Stone Fruits in Tasmania, Tasmanian Department of Primary Industries, Water and Environment.
Table 8: Nutrient removal by peach trees with varying crop yields
Crop yield (tonnes/ha)
Total tree nutrient removal (kg/ha)
Nitrogen Phosphorus Potassium Calcium Magnesium
5 20 2 21 13 3
10 26 3 29 13 3
15 33 4 38 14 4
20 39 4 46 14 4
Reference: Boucher, W. A Manual for Producing Stone Fruits in Tasmania, Tasmanian Department of Primary Industries, Water and Environment.

134
Working out a fertiliser program
A “whole system” approach to the nutrition of a cherry crop is required. It is divided into 3 sections.
post harvest
dormancy
pre harvest (The timing of these sections will depend on your local microclimate) It is then further divided into application type
granular for ground applications
foliar
Fertigation through drip lines Then nutrition is allocated into the appropriate months and by the different methods of application to determine a total nutrition budget outlined for the year
in each element of nutrition
in every month
for every application method
Overall the nutrient replacement method is a good starting point for working out the orchard’s fertiliser needs. It is not the only way to start but it provides a basic program based on the crops use of nutrients that can then be further refined.
As estimates of natural losses are orchard specific, the fertiliser program should be developed in conjunction with soil and leaf analysis. Rates can be adjusted upwards or downwards according to analysis results.
Calcium, magnesium and trace elements should be applied according to leaf and soil analysis results.
Table 9 is an example of a fertiliser program based on total nutrient replacement assuming the maximum level of natural losses in addition to tree nutrient removals.
How do we calculate the numbers in the table 9 example? e.g. the amount of calcium ammonium nitrate (CAN) required for 1250 trees/ha:
From the table with ‘Total nutrient replacement’, for a yield of 12.5 tonnes/ha, the amount of nitrogen per hectare is 35 kg. Divide this by the number of trees per hectare (1250) to find the amount of nitrogen per tree. Dividing this number by the proportion of nitrogen in CAN (0.26) will give the amount of actual fertiliser (CAN) required per tree (106 g). By using the table for ‘Total nutrient replacement’ and the conversions at the start of this section, the amounts of actual fertiliser needed per tree can be calculated.
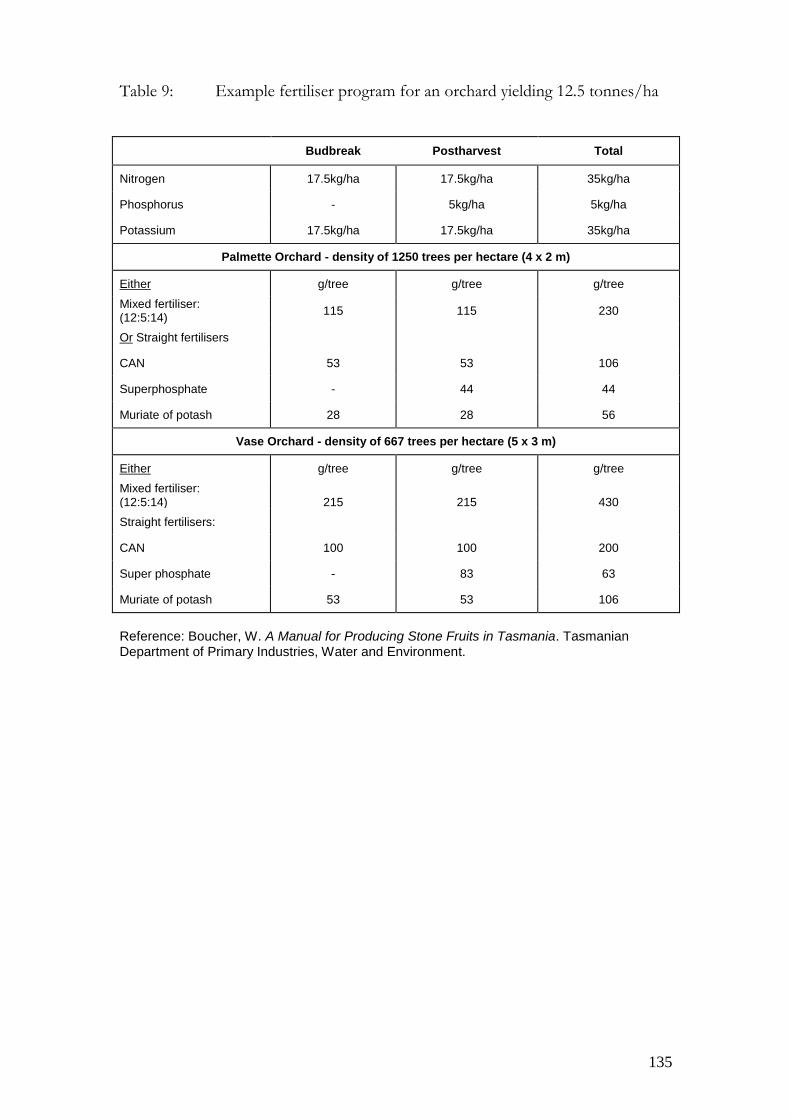
135
Table 9: Example fertiliser program for an orchard yielding 12.5 tonnes/ha
Budbreak Postharvest Total
Nitrogen 17.5kg/ha 17.5kg/ha 35kg/ha
Phosphorus - 5kg/ha 5kg/ha
Potassium 17.5kg/ha 17.5kg/ha 35kg/ha
Palmette Orchard - density of 1250 trees per hectare (4 x 2 m)
Either g/tree g/tree g/tree
Mixed fertiliser: (12:5:14)
115 115 230
Or Straight fertilisers
CAN 53 53 106
Superphosphate - 44 44
Muriate of potash 28 28 56
Vase Orchard - density of 667 trees per hectare (5 x 3 m)
Either g/tree g/tree g/tree
Mixed fertiliser: (12:5:14)
215
215
430
Straight fertilisers:
CAN 100 100 200
Super phosphate - 83 63
Muriate of potash 53 53 106
Reference: Boucher, W. A Manual for Producing Stone Fruits in Tasmania. Tasmanian Department of Primary Industries, Water and Environment.
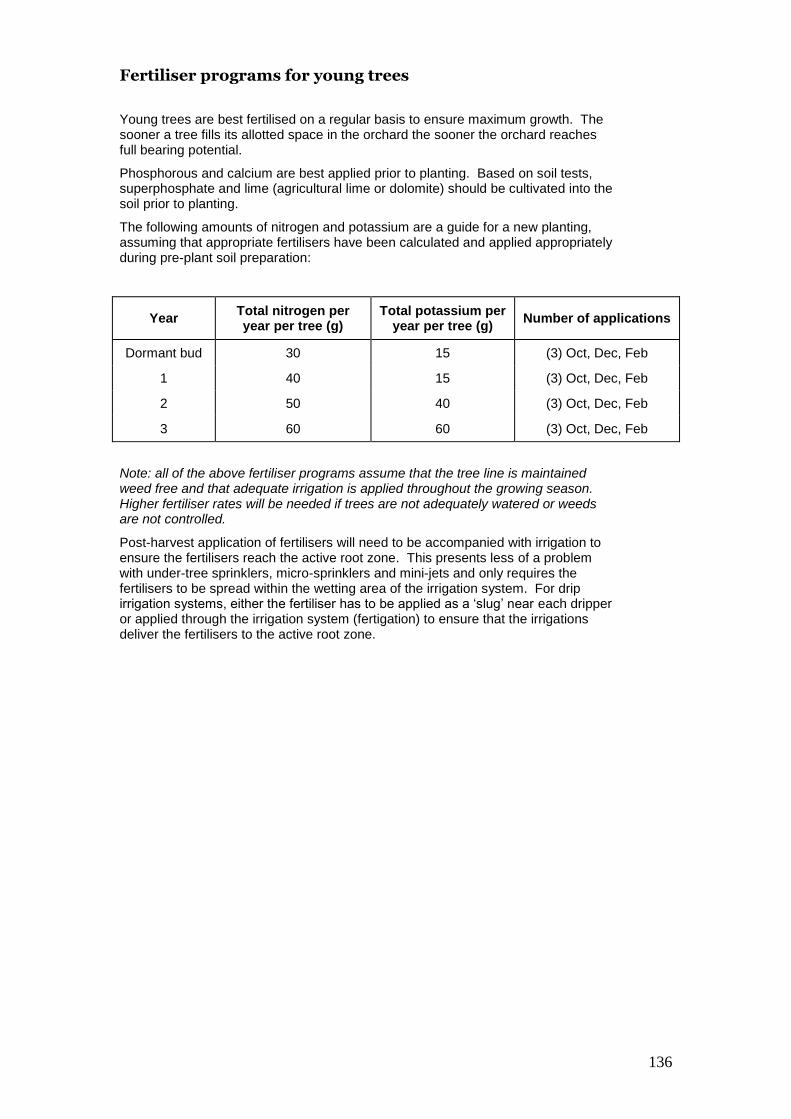
136
Fertiliser programs for young trees
Young trees are best fertilised on a regular basis to ensure maximum growth. The sooner a tree fills its allotted space in the orchard the sooner the orchard reaches full bearing potential.
Phosphorous and calcium are best applied prior to planting. Based on soil tests, superphosphate and lime (agricultural lime or dolomite) should be cultivated into the soil prior to planting.
The following amounts of nitrogen and potassium are a guide for a new planting, assuming that appropriate fertilisers have been calculated and applied appropriately during pre-plant soil preparation:
Year Total nitrogen per year per tree (g)
Total potassium per year per tree (g)
Number of applications
Dormant bud 30 15 (3) Oct, Dec, Feb
1 40 15 (3) Oct, Dec, Feb
2 50 40 (3) Oct, Dec, Feb
3 60 60 (3) Oct, Dec, Feb
Note: all of the above fertiliser programs assume that the tree line is maintained weed free and that adequate irrigation is applied throughout the growing season. Higher fertiliser rates will be needed if trees are not adequately watered or weeds are not controlled.
Post-harvest application of fertilisers will need to be accompanied with irrigation to ensure the fertilisers reach the active root zone. This presents less of a problem with under-tree sprinklers, micro-sprinklers and mini-jets and only requires the fertilisers to be spread within the wetting area of the irrigation system. For drip irrigation systems, either the fertiliser has to be applied as a ‘slug’ near each dripper or applied through the irrigation system (fertigation) to ensure that the irrigations deliver the fertilisers to the active root zone.

137
Fertigation
Fertigation is the application of fertilisers through the irrigation system.
Fertigation offers a number of advantages over conventional broadcast fertiliser placement:
Precise positioning of nutrients.
Nutrients are applied where the root system is most active (wetted soil zone).
Facilitates split applications.
Rapid adjustments to the fertiliser program can occur when it is actually needed, such as during the later stages of fruit development, nitrogen nutrition levels can be reduced and calcium and potassium levels raised.
The effects of some nitrogen fertilisers on soil pH can be reduced. Supplying regular but small amounts of nitrogen ensures most of the nitrogen is utilised by the trees.
Factors to consider
Fertigation is just one part of the whole yearly nutrition programme.
Mixing has got to be simple and quick.
Do your calculations correctly.
Carefully consider the method of injection and application you require.
Consider your system requirements – do you want a dedicated fertigation line in your orchard separate from the normal irrigation system or an integrated system?
Irrigation uniformity = fertigation uniformity. Make sure your delivery systems are working uniformly.
How does your nutrition and in particular fertigation program affect the final nutritional balance of the harvested cherries?
Fertilisers suitable for fertigation
Fertilisers suitable for use in irrigation systems include ammonium nitrate, potassium nitrate, calcium nitrate and magnesium sulphate (Epsom salts). Urea should only be used in low biuret form and in specific circumstances as it is highly soluble, acidifying and readily leached from the soil.
Other fertilisers like muriate of potash and potassium sulphate can be used but they take considerable time to dissolve in cold water. Some forms of potassium nitrate also take a long time to dissolve.
Fertilisers generally used in fertigation include calcium nitrate, potassium nitrate and magnesium sulphate. These fertilisers do not interfere with soil pH.
Mixing Fertilisers
Most combinations and mixtures are compatible, however, do not mix calcium-containing fertilisers with sulphate-containing fertilisers. These combinations will result in the formation of insoluble calcium sulphate. If these two groups of fertilisers are to be applied in the one program, two separate solutions will have to be prepared and applied through the irrigation system. If the two solutions are applied the same day, ensure that the irrigation lines are thoroughly flushed with water between applications.
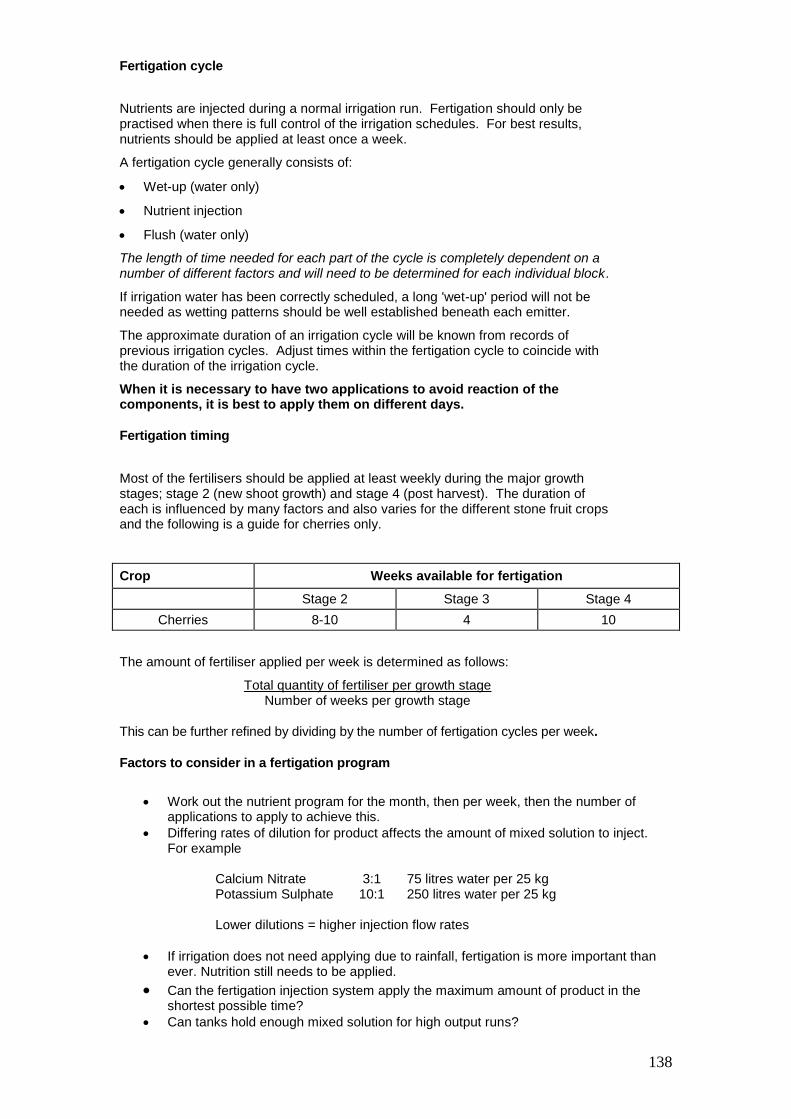
138
Fertigation cycle
Nutrients are injected during a normal irrigation run. Fertigation should only be practised when there is full control of the irrigation schedules. For best results, nutrients should be applied at least once a week.
A fertigation cycle generally consists of:
Wet-up (water only)
Nutrient injection
Flush (water only)
The length of time needed for each part of the cycle is completely dependent on a number of different factors and will need to be determined for each individual block.
If irrigation water has been correctly scheduled, a long 'wet-up' period will not be needed as wetting patterns should be well established beneath each emitter.
The approximate duration of an irrigation cycle will be known from records of previous irrigation cycles. Adjust times within the fertigation cycle to coincide with the duration of the irrigation cycle.
When it is necessary to have two applications to avoid reaction of the components, it is best to apply them on different days.
Fertigation timing
Most of the fertilisers should be applied at least weekly during the major growth stages; stage 2 (new shoot growth) and stage 4 (post harvest). The duration of each is influenced by many factors and also varies for the different stone fruit crops and the following is a guide for cherries only.
Crop Weeks available for fertigation
Stage 2 Stage 3 Stage 4
Cherries 8-10 4 10
The amount of fertiliser applied per week is determined as follows:
Total quantity of fertiliser per growth stage Number of weeks per growth stage
This can be further refined by dividing by the number of fertigation cycles per week.
Factors to consider in a fertigation program
Work out the nutrient program for the month, then per week, then the number of
applications to apply to achieve this.
Differing rates of dilution for product affects the amount of mixed solution to inject. For example
Calcium Nitrate 3:1 75 litres water per 25 kg Potassium Sulphate 10:1 250 litres water per 25 kg
Lower dilutions = higher injection flow rates
If irrigation does not need applying due to rainfall, fertigation is more important than ever. Nutrition still needs to be applied.
Can the fertigation injection system apply the maximum amount of product in the shortest possible time?
Can tanks hold enough mixed solution for high output runs?
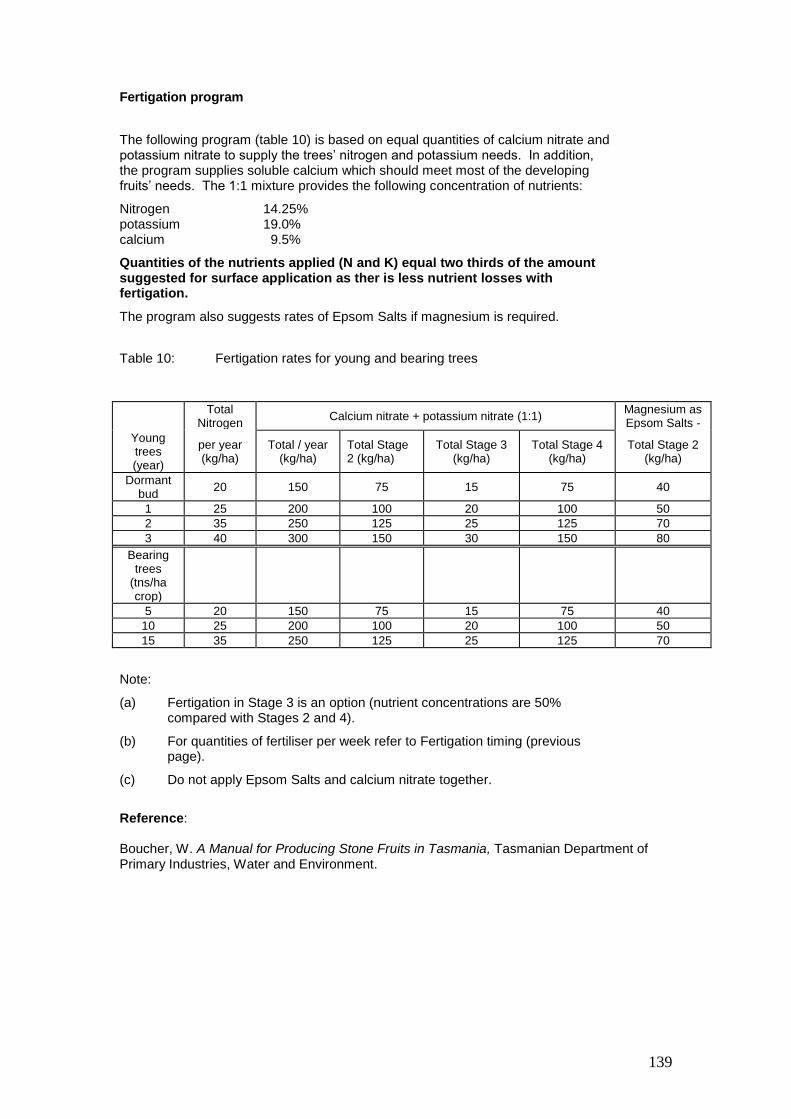
139
Fertigation program
The following program (table 10) is based on equal quantities of calcium nitrate and potassium nitrate to supply the trees’ nitrogen and potassium needs. In addition, the program supplies soluble calcium which should meet most of the developing fruits’ needs. The 1:1 mixture provides the following concentration of nutrients:
Nitrogen 14.25% potassium 19.0% calcium 9.5%
Quantities of the nutrients applied (N and K) equal two thirds of the amount suggested for surface application as ther is less nutrient losses with fertigation.
The program also suggests rates of Epsom Salts if magnesium is required.
Table 10: Fertigation rates for young and bearing trees
Total
Nitrogen Calcium nitrate + potassium nitrate (1:1)
Magnesium as Epsom Salts -
Young trees (year)
per year (kg/ha)
Total / year (kg/ha)
Total Stage 2 (kg/ha)
Total Stage 3 (kg/ha)
Total Stage 4 (kg/ha)
Total Stage 2 (kg/ha)
Dormant bud
20 150 75 15 75 40
1 25 200 100 20 100 50
2 35 250 125 25 125 70
3 40 300 150 30 150 80
Bearing trees
(tns/ha crop)
5 20 150 75 15 75 40
10 25 200 100 20 100 50
15 35 250 125 25 125 70
Note:
(a) Fertigation in Stage 3 is an option (nutrient concentrations are 50% compared with Stages 2 and 4).
(b) For quantities of fertiliser per week refer to Fertigation timing (previous page).
(c) Do not apply Epsom Salts and calcium nitrate together.
Reference: Boucher, W. A Manual for Producing Stone Fruits in Tasmania, Tasmanian Department of Primary Industries, Water and Environment.
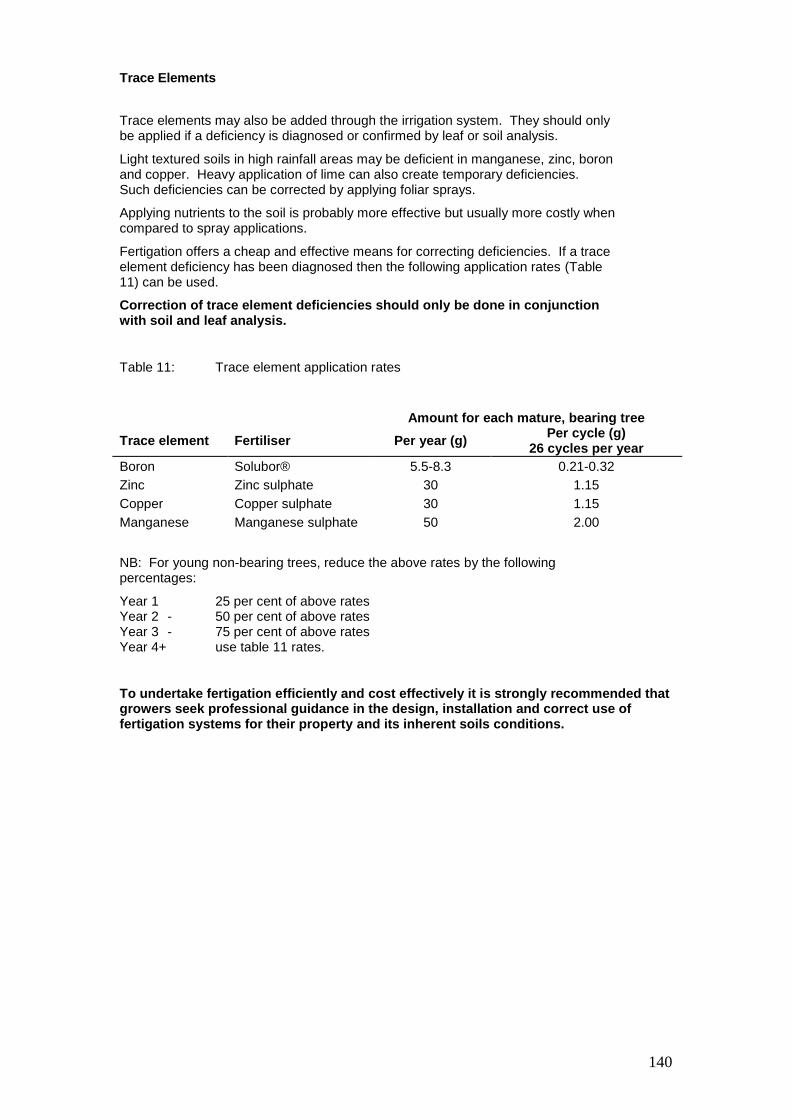
140
Trace Elements
Trace elements may also be added through the irrigation system. They should only be applied if a deficiency is diagnosed or confirmed by leaf or soil analysis.
Light textured soils in high rainfall areas may be deficient in manganese, zinc, boron and copper. Heavy application of lime can also create temporary deficiencies. Such deficiencies can be corrected by applying foliar sprays.
Applying nutrients to the soil is probably more effective but usually more costly when compared to spray applications.
Fertigation offers a cheap and effective means for correcting deficiencies. If a trace element deficiency has been diagnosed then the following application rates (Table 11) can be used.
Correction of trace element deficiencies should only be done in conjunction with soil and leaf analysis.
Table 11: Trace element application rates
Amount for each mature, bearing tree
Trace element Fertiliser Per year (g) Per cycle (g)
26 cycles per year
Boron Solubor® 5.5-8.3 0.21-0.32
Zinc Zinc sulphate 30 1.15
Copper Copper sulphate 30 1.15
Manganese Manganese sulphate 50 2.00
NB: For young non-bearing trees, reduce the above rates by the following percentages:
Year 1 25 per cent of above rates Year 2 - 50 per cent of above rates Year 3 - 75 per cent of above rates Year 4+ use table 11 rates.
To undertake fertigation efficiently and cost effectively it is strongly recommended that growers seek professional guidance in the design, installation and correct use of fertigation systems for their property and its inherent soils conditions.
141
Foliar application of nutrients
Foliar application of nutrients can be important to supplement soil applications. Apart from correcting nutrient deficiencies, foliar applications can be useful during growth stages 2 (period of rapid shoot growth) and 4 (postharvest).
Growth stage 2
The period of rapid shoot growth often coincides with periods of intermittent warm and cool weather. Cool, overcast conditions associated with cold southerly air movements can result in reduced plant water uptake at a time when new shoots are rapidly growing. Under these conditions, mobilisation of nutrients from older leaves and developing fruits to developing shoots may occur. This may contribute to or exacerbate fruit drop. Highly mobile nutrients such as magnesium and boron may be involved. A foliar nutrient program containing at least these two nutrients should be considered.
Growth stage 4
The period following harvest is important for building up the nutrient reserves of the tree. Nitrogen, boron and zinc are especially important for ensuring development of strong flower buds and early shoot and leaf growth the following spring. A postharvest foliar spray program based on nitrogen (1% urea, biuret-free) boron and zinc needs to be associated with some postharvest irrigation to ensure that trees are still active.

142
Interpreting soil and leaf analyses
Information obtained from soil and leaf analyses is used in conjunction with the ‘nutrient replacement rates’ discussed previously.
Taking a representative sample of soil
Many companies providing a soil testing service will take the soil samples.
Sampling a new site prior to soil preparation can be done with a soil auger. Take about 15 - 20 samples over the area to be planted. Avoid unrepresentative sites such as stock camps as these will often contain large amounts of animal manure.
Either a soil auger or spade with parallel sides is preferred for sampling; otherwise the proportions of soil from the different depths can be disproportionate and lead to errors in results and interpretation.
The following steps should be followed when taking soil samples:
Select a representative area.
Use a clean spade (no rust) or hand auger.
Use clean buckets and sample bags.
Avoid sampling residual fertiliser. Scrape away a thin layer of soil (the top 2-4 cm) before sampling.
Sample to a depth of 20 cm or the depth of the active root zone (if shallow).
Take uniform samples within the orchard or new site.
Sample underneath the tree and within the wetter areas of the water emitters.
Mix all the soil samples together and take a sub-sample of approximately 600 grams.
Dispatch to the laboratory or soil testing service within 24 hours.
Interpreting soil analyses
Test results differ with different laboratories or testing services, some are easier to understand than others. Some laboratories or testing services do not give recommendations.
Although the following should assist in interpreting the information, there should be a backup to this broad interpretation with advice from a specialist horticulturist or agronomist.
Soil pH:
Soil pH measures the acidity or alkalinity of the soil on a scale of 0 to 14 with 7 being considered neutral, lower numbers indicate increasing acidity whereas higher numbers indicate increasing alkalinity. The pH of soil samples can be measured in water or in calcium chloride. The optimum pH (in calcium chloride) is 6.0. The pH readings measured in water are generally considered to be up to 0.5 to 0.8 higher than the pH measured in calcium chloride.
The pH affects the availability of nutrients in the soil. It can be raised by the addition of lime. The amounts needed depends on the soil type (heavy soils need more lime than sandy soils with the same pH) and degree of acidity. Soil pH can be lowered by long term use of acidifying nitrogen fertilisers, such as ammonium sulphate and urea.
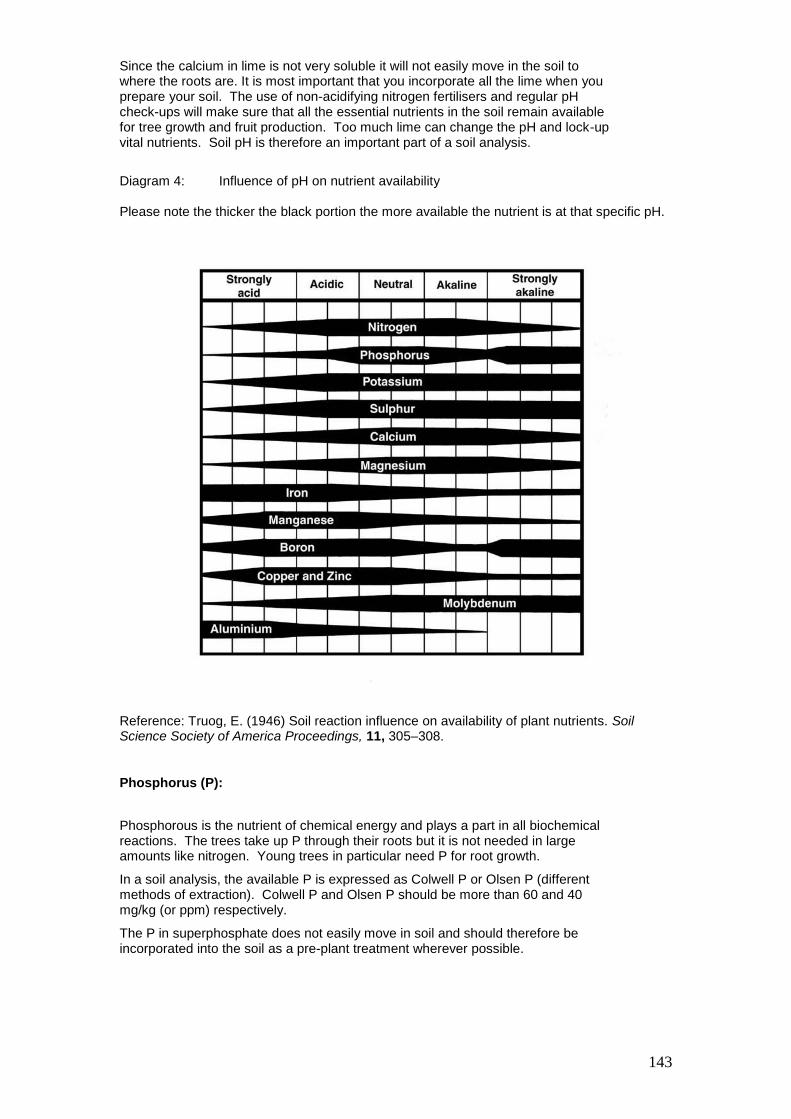
143
Since the calcium in lime is not very soluble it will not easily move in the soil to where the roots are. It is most important that you incorporate all the lime when you prepare your soil. The use of non-acidifying nitrogen fertilisers and regular pH check-ups will make sure that all the essential nutrients in the soil remain available for tree growth and fruit production. Too much lime can change the pH and lock-up vital nutrients. Soil pH is therefore an important part of a soil analysis.
Diagram 4: Influence of pH on nutrient availability Please note the thicker the black portion the more available the nutrient is at that specific pH.
Reference: Truog, E. (1946) Soil reaction influence on availability of plant nutrients. Soil Science Society of America Proceedings, 11, 305–308.
Phosphorus (P):
Phosphorous is the nutrient of chemical energy and plays a part in all biochemical reactions. The trees take up P through their roots but it is not needed in large amounts like nitrogen. Young trees in particular need P for root growth.
In a soil analysis, the available P is expressed as Colwell P or Olsen P (different methods of extraction). Colwell P and Olsen P should be more than 60 and 40 mg/kg (or ppm) respectively.
The P in superphosphate does not easily move in soil and should therefore be incorporated into the soil as a pre-plant treatment wherever possible.
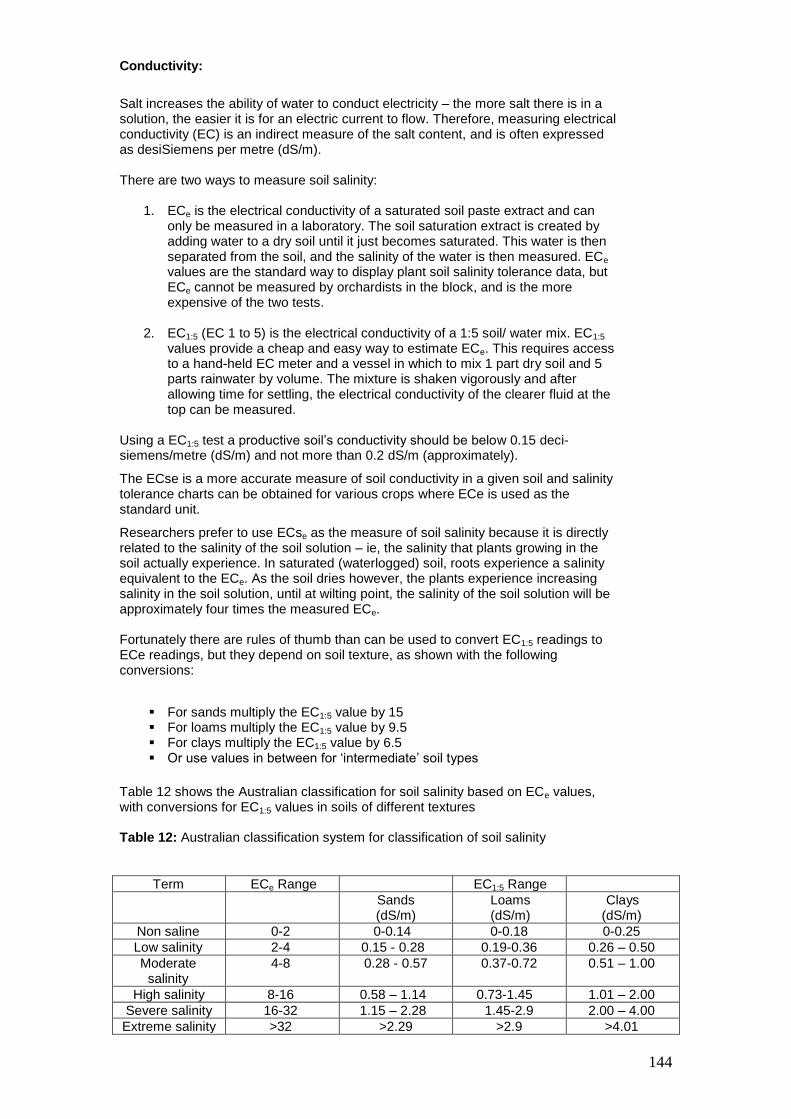
144
Conductivity:
Salt increases the ability of water to conduct electricity – the more salt there is in a solution, the easier it is for an electric current to flow. Therefore, measuring electrical conductivity (EC) is an indirect measure of the salt content, and is often expressed as desiSiemens per metre (dS/m). There are two ways to measure soil salinity:
1. ECe is the electrical conductivity of a saturated soil paste extract and can only be measured in a laboratory. The soil saturation extract is created by adding water to a dry soil until it just becomes saturated. This water is then separated from the soil, and the salinity of the water is then measured. ECe values are the standard way to display plant soil salinity tolerance data, but ECe cannot be measured by orchardists in the block, and is the more expensive of the two tests.
2. EC1:5 (EC 1 to 5) is the electrical conductivity of a 1:5 soil/ water mix. EC1:5 values provide a cheap and easy way to estimate ECe. This requires access to a hand-held EC meter and a vessel in which to mix 1 part dry soil and 5 parts rainwater by volume. The mixture is shaken vigorously and after allowing time for settling, the electrical conductivity of the clearer fluid at the top can be measured.
Using a EC1:5 test a productive soil’s conductivity should be below 0.15 deci-siemens/metre (dS/m) and not more than 0.2 dS/m (approximately).
The ECse is a more accurate measure of soil conductivity in a given soil and salinity tolerance charts can be obtained for various crops where ECe is used as the standard unit.
Researchers prefer to use ECse as the measure of soil salinity because it is directly related to the salinity of the soil solution – ie, the salinity that plants growing in the soil actually experience. In saturated (waterlogged) soil, roots experience a salinity equivalent to the ECe. As the soil dries however, the plants experience increasing salinity in the soil solution, until at wilting point, the salinity of the soil solution will be approximately four times the measured ECe. Fortunately there are rules of thumb than can be used to convert EC1:5 readings to ECe readings, but they depend on soil texture, as shown with the following conversions:
For sands multiply the EC1:5 value by 15 For loams multiply the EC1:5 value by 9.5 For clays multiply the EC1:5 value by 6.5 Or use values in between for ‘intermediate’ soil types
Table 12 shows the Australian classification for soil salinity based on ECe values, with conversions for EC1:5 values in soils of different textures Table 12: Australian classification system for classification of soil salinity
Term ECe Range EC1:5 Range
Sands (dS/m)
Loams (dS/m)
Clays (dS/m)
Non saline 0-2 0-0.14 0-0.18 0-0.25
Low salinity 2-4 0.15 - 0.28 0.19-0.36 0.26 – 0.50
Moderate salinity
4-8 0.28 - 0.57 0.37-0.72 0.51 – 1.00
High salinity 8-16 0.58 – 1.14 0.73-1.45 1.01 – 2.00
Severe salinity 16-32 1.15 – 2.28 1.45-2.9 2.00 – 4.00
Extreme salinity >32 >2.29 >2.9 >4.01
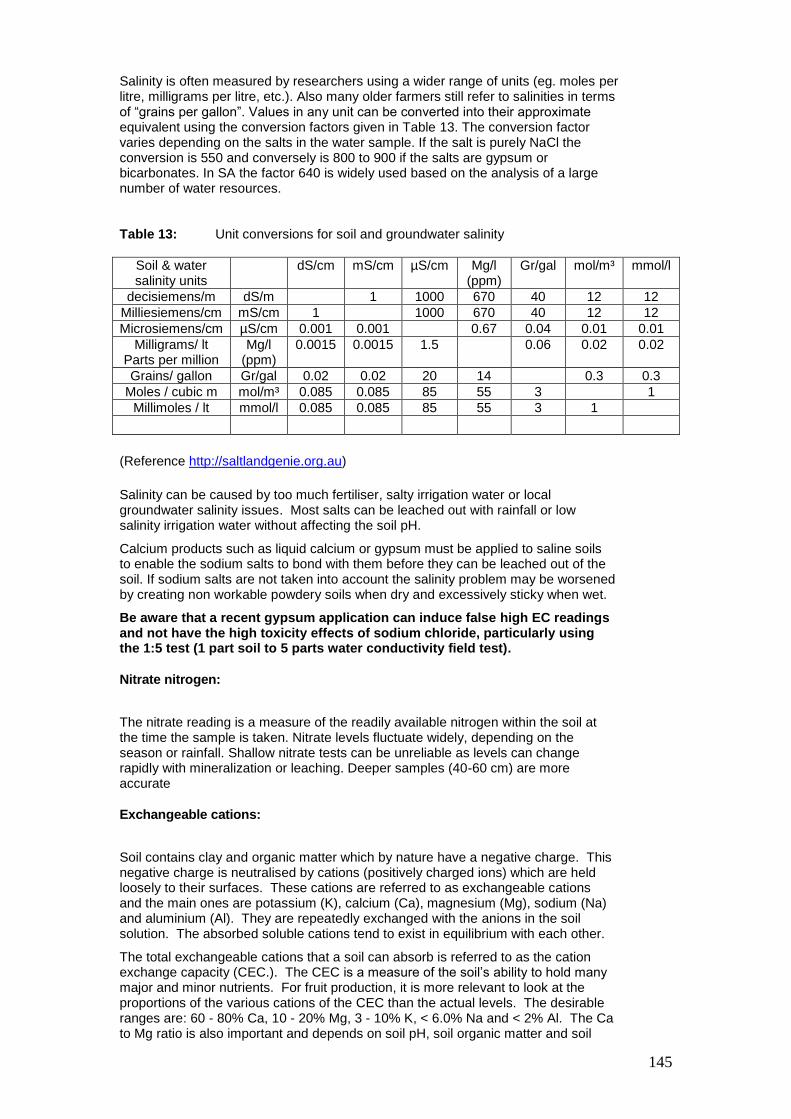
145
Salinity is often measured by researchers using a wider range of units (eg. moles per litre, milligrams per litre, etc.). Also many older farmers still refer to salinities in terms of “grains per gallon”. Values in any unit can be converted into their approximate equivalent using the conversion factors given in Table 13. The conversion factor varies depending on the salts in the water sample. If the salt is purely NaCl the conversion is 550 and conversely is 800 to 900 if the salts are gypsum or bicarbonates. In SA the factor 640 is widely used based on the analysis of a large number of water resources. Table 13: Unit conversions for soil and groundwater salinity
Soil & water salinity units
dS/cm mS/cm µS/cm Mg/l (ppm)
Gr/gal mol/m³ mmol/l
decisiemens/m dS/m 1 1000 670 40 12 12
Milliesiemens/cm mS/cm 1 1000 670 40 12 12
Microsiemens/cm µS/cm 0.001 0.001 0.67 0.04 0.01 0.01
Milligrams/ lt Parts per million
Mg/l (ppm)
0.0015 0.0015 1.5 0.06 0.02 0.02
Grains/ gallon Gr/gal 0.02 0.02 20 14 0.3 0.3
Moles / cubic m mol/m³ 0.085 0.085 85 55 3 1
Millimoles / lt mmol/l 0.085 0.085 85 55 3 1
(Reference http://saltlandgenie.org.au)
Salinity can be caused by too much fertiliser, salty irrigation water or local groundwater salinity issues. Most salts can be leached out with rainfall or low salinity irrigation water without affecting the soil pH.
Calcium products such as liquid calcium or gypsum must be applied to saline soils to enable the sodium salts to bond with them before they can be leached out of the soil. If sodium salts are not taken into account the salinity problem may be worsened by creating non workable powdery soils when dry and excessively sticky when wet.
Be aware that a recent gypsum application can induce false high EC readings and not have the high toxicity effects of sodium chloride, particularly using the 1:5 test (1 part soil to 5 parts water conductivity field test).
Nitrate nitrogen:
The nitrate reading is a measure of the readily available nitrogen within the soil at the time the sample is taken. Nitrate levels fluctuate widely, depending on the season or rainfall. Shallow nitrate tests can be unreliable as levels can change rapidly with mineralization or leaching. Deeper samples (40-60 cm) are more accurate
Exchangeable cations:
Soil contains clay and organic matter which by nature have a negative charge. This negative charge is neutralised by cations (positively charged ions) which are held loosely to their surfaces. These cations are referred to as exchangeable cations and the main ones are potassium (K), calcium (Ca), magnesium (Mg), sodium (Na) and aluminium (Al). They are repeatedly exchanged with the anions in the soil solution. The absorbed soluble cations tend to exist in equilibrium with each other.
The total exchangeable cations that a soil can absorb is referred to as the cation exchange capacity (CEC.). The CEC is a measure of the soil’s ability to hold many major and minor nutrients. For fruit production, it is more relevant to look at the proportions of the various cations of the CEC than the actual levels. The desirable ranges are: 60 - 80% Ca, 10 - 20% Mg, 3 - 10% K, < 6.0% Na and < 2% Al. The Ca to Mg ratio is also important and depends on soil pH, soil organic matter and soil
146
texture. Soils Ca:Mg ratios should be at least a 3 - 6:1 (meq/100g) The exchangeable Ca is an important soil structure builder. If the proportion of the exchangeable Na and Mg is too high, using gypsum or liquid calcium will restore the balance. A soil analysis will generally tell you how much gypsum to apply to make this exchange.
When interpreting exchangeable cations it is important to recognise levels outside these ranges may indicate the possibility of an issue or soil structural problems and nutrient deficiencies may need to be further confirmed by plant testing. Also cation levels will vary considerably down through a soil profile especially in subsoil clays. It is also important to recognise these tests have limitations in saline or calcareous soils.
Cation exchange capacity (CEC)
The total number of cation sites is referred to as the cation exchange capacity. The CEC varies depending on a number of factors but broad ranges of what you would expect in different soils types are: Sands 1-4 Sandy loams 4-10 Loams 10-15 Clay loams 15-20 Clays 20-60 These figures must be treated with caution. Calcareous or sodic soils will show higher CEC’s than other similarly textured soils. Also, different methods of measuring CEC can lead to different results, which is particularly important when using tests developed in other countries which may not be designed for Australian soils.
Organic matter:
Organic matter in soil forms an important part of the total CEC. Levels of 2 to 3% are the minimum desirable levels. Less than 1% is very low and may cause soil structural problems. Permanent swards and mulches can increase the organic carbon content of a soil. There are many different forms of organic matter which can be applied to the soil to increase the organic content of the soil. Look for local suppliers who produce good quality materials. Be particularly aware of weed seed potential and salinity levels of these products.
Trace elements:
Trace element figures in soil reports require specialist interpretation based on regional experience. In acid-neutral soils the trace elements - rron, manganese, zinc, copper and boron are all readily available. However, zinc can be fixed by iron in red basalt soils and boron can be easily leached from soils. Copper can also be deficient in red basalt soils.
Plant tissue tests are usually a better test for trace elements.
Table 14 is a broad guideline to interpreting soil test results. Adequate levels will vary with soil type, climate and local conditions and the type of tests used.
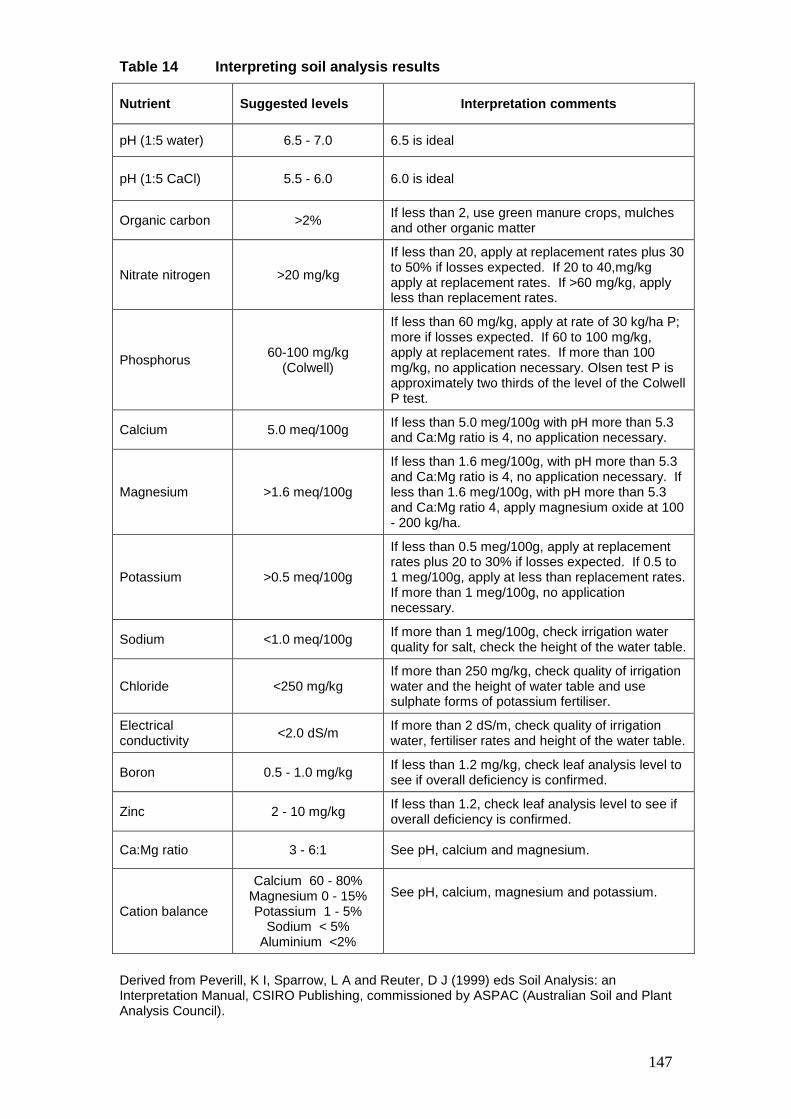
147
Table 14 Interpreting soil analysis results
Nutrient Suggested levels Interpretation comments
pH (1:5 water) 6.5 - 7.0 6.5 is ideal
pH (1:5 CaCl) 5.5 - 6.0 6.0 is ideal
Organic carbon >2% If less than 2, use green manure crops, mulches and other organic matter
Nitrate nitrogen >20 mg/kg
If less than 20, apply at replacement rates plus 30 to 50% if losses expected. If 20 to 40,mg/kg apply at replacement rates. If >60 mg/kg, apply less than replacement rates.
Phosphorus 60-100 mg/kg
(Colwell)
If less than 60 mg/kg, apply at rate of 30 kg/ha P; more if losses expected. If 60 to 100 mg/kg, apply at replacement rates. If more than 100 mg/kg, no application necessary. Olsen test P is approximately two thirds of the level of the Colwell P test.
Calcium 5.0 meq/100g If less than 5.0 meg/100g with pH more than 5.3 and Ca:Mg ratio is 4, no application necessary.
Magnesium >1.6 meq/100g
If less than 1.6 meg/100g, with pH more than 5.3 and Ca:Mg ratio is 4, no application necessary. If less than 1.6 meg/100g, with pH more than 5.3 and Ca:Mg ratio 4, apply magnesium oxide at 100 - 200 kg/ha.
Potassium >0.5 meq/100g
If less than 0.5 meg/100g, apply at replacement rates plus 20 to 30% if losses expected. If 0.5 to 1 meg/100g, apply at less than replacement rates. If more than 1 meg/100g, no application necessary.
Sodium <1.0 meq/100g If more than 1 meg/100g, check irrigation water quality for salt, check the height of the water table.
Chloride <250 mg/kg If more than 250 mg/kg, check quality of irrigation water and the height of water table and use sulphate forms of potassium fertiliser.
Electrical conductivity
<2.0 dS/m If more than 2 dS/m, check quality of irrigation water, fertiliser rates and height of the water table.
Boron 0.5 - 1.0 mg/kg If less than 1.2 mg/kg, check leaf analysis level to see if overall deficiency is confirmed.
Zinc 2 - 10 mg/kg If less than 1.2, check leaf analysis level to see if overall deficiency is confirmed.
Ca:Mg ratio 3 - 6:1 See pH, calcium and magnesium.
Cation balance
Calcium 60 - 80% Magnesium 0 - 15% Potassium 1 - 5%
Sodium < 5% Aluminium <2%
See pH, calcium, magnesium and potassium.
Derived from Peverill, K I, Sparrow, L A and Reuter, D J (1999) eds Soil Analysis: an Interpretation Manual, CSIRO Publishing, commissioned by ASPAC (Australian Soil and Plant Analysis Council).
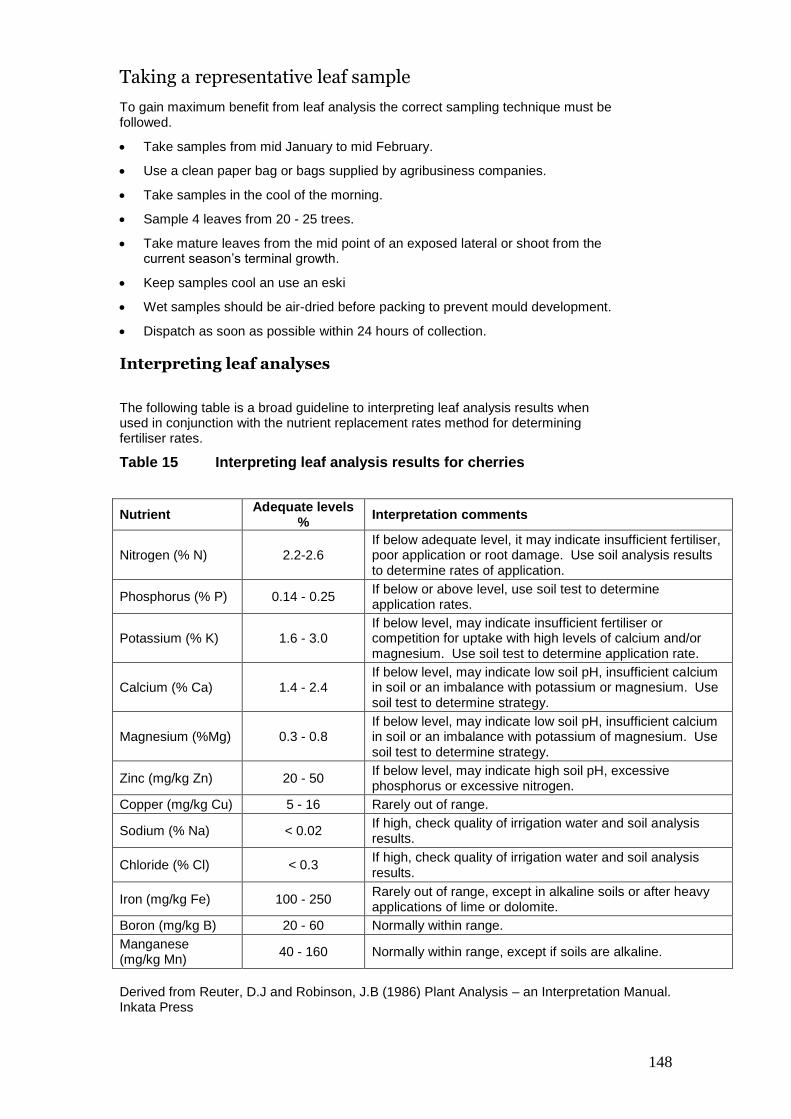
148
Taking a representative leaf sample
To gain maximum benefit from leaf analysis the correct sampling technique must be followed.
Take samples from mid January to mid February.
Use a clean paper bag or bags supplied by agribusiness companies.
Take samples in the cool of the morning.
Sample 4 leaves from 20 - 25 trees.
Take mature leaves from the mid point of an exposed lateral or shoot from the current season’s terminal growth.
Keep samples cool an use an eski
Wet samples should be air-dried before packing to prevent mould development.
Dispatch as soon as possible within 24 hours of collection.
Interpreting leaf analyses
The following table is a broad guideline to interpreting leaf analysis results when used in conjunction with the nutrient replacement rates method for determining fertiliser rates.
Table 15 Interpreting leaf analysis results for cherries
Nutrient Adequate levels
% Interpretation comments
Nitrogen (% N) 2.2-2.6 If below adequate level, it may indicate insufficient fertiliser, poor application or root damage. Use soil analysis results to determine rates of application.
Phosphorus (% P) 0.14 - 0.25 If below or above level, use soil test to determine application rates.
Potassium (% K) 1.6 - 3.0 If below level, may indicate insufficient fertiliser or competition for uptake with high levels of calcium and/or magnesium. Use soil test to determine application rate.
Calcium (% Ca) 1.4 - 2.4 If below level, may indicate low soil pH, insufficient calcium in soil or an imbalance with potassium or magnesium. Use soil test to determine strategy.
Magnesium (%Mg) 0.3 - 0.8 If below level, may indicate low soil pH, insufficient calcium in soil or an imbalance with potassium of magnesium. Use soil test to determine strategy.
Zinc (mg/kg Zn) 20 - 50 If below level, may indicate high soil pH, excessive phosphorus or excessive nitrogen.
Copper (mg/kg Cu) 5 - 16 Rarely out of range.
Sodium (% Na) < 0.02 If high, check quality of irrigation water and soil analysis results.
Chloride (% Cl) < 0.3 If high, check quality of irrigation water and soil analysis results.
Iron (mg/kg Fe) 100 - 250 Rarely out of range, except in alkaline soils or after heavy applications of lime or dolomite.
Boron (mg/kg B) 20 - 60 Normally within range.
Manganese (mg/kg Mn)
40 - 160 Normally within range, except if soils are alkaline.
Derived from Reuter, D.J and Robinson, J.B (1986) Plant Analysis – an Interpretation Manual. Inkata Press
149
Fruitlet analysis Recently the use of fruitlet analysis techniques to measure fruit uptake of nutrients has been increasing in popularity. This is particularly evident in Tasmania with growers using significant fertigation applications. This method of nutrient analysis is comparatively new and there are no published standards to make general comparisons. At present there are limited laboratories or companies offering services in this area, the majority are based in or associated with Tasmanian companies. Further work in this area is needed to develop this into commercial services for growers Australia wide.
References
Peverill, K I, Sparrow, L A and Reuter, D J (1999) eds Soil Analysis: an Interpretation Manual CSIRO Publishing, commissioned by ASPAC (Australian Soil and Plant Analysis Council) Reuter, D J and Robinson, J B (1997) eds Plant Analysis: an Interpretation Manual - 2nd edition, CSIRO Publishing, commissioned by ASPAC

150
Irrigation
No commercial cherry venture should be considered before an adequate supply of good quality irrigation water has been secured.
Water requirements
Water is essential for all stages in the growth and development of trees. If soil moisture falls below critical levels during the four to five months following bud break and bloom the growth of shoots and leaves is reduced, especially in young trees,.
Low soil moisture affects flower bud formation, bloom and fruit set. Flower buds of deciduous fruits are initiated in early summer, develop slowly in autumn and winter and bloom in spring up to eight to nine months after bud initiation.
Larger fruits are obtained when trees are irrigated regularly throughout the growing season. Frequent irrigations also make more nutrients available from the soil, further contributing to larger fruit size. Good irrigation practices can minimise the need for large annual fertiliser applications (which can lead to environmental problems and inefficient uptake of the applied nutrients).
Fruit quality (flavour, firmness and colour) is better when trees receive sufficient but not excessive irrigation.
How much water is needed for a cherry orchard?
The irrigation requirements of sweet cherries vary depending on many factors including the climate they are grown in, soil type, crop load, tree age and the types of irrigation systems used.
It is extremely difficult to place a specific figure on the amount of water required for any specific orchard. As a general guide and for planning purposes they require a minimum of 4 ML/ha when using under-tree/micro sprinklers. Dryer growing areas and dwarfing rootstocks may require considerably more.
Droughting (or deficit irrigation) trees after harvest will not reduce next season’s bloom as flower bud initiation occurs prior to harvest. This practice is regularly used as a vegetative vigour control technique. Care should be taken to avoid excessive stress which can have a detrimental affect on the following season’s crop.
Soil water relationships
Some understanding of water retention in soil is needed to appreciate the importance of correct scheduling of irrigation water.
Soil consists of solid particles and the spaces (pores) between them. The proportion of soil made up of pores varies from 40-55 per cent. The pores hold the water and the air required by plant roots. Water is held in the pores by forces of attraction between the water and the solid particles. These forces are greater close to the surface of the solid particles. Thus water is held very securely in small pores because most of the water is close to solid soil particles.
The average pore size of a soil depends on soil texture. Fine-textured soils, such as clays, are made up of very small particles and hence the pores between the particles are small. Much of the water held in a clay soil is held very tightly. Coarse-textured soils, such as sands, consist mainly of large particles. The pores between these particles are large and most of the water in sandy soils is held weakly. Sandy soil generally contains less readily available water (RAW).
How tightly water is held by soil is usually expressed in pressure units of “kilopascals” (Kpa) or 'bars' or 'atmospheres' and is called 'soil suction' or 'soil moisture tension'. As soils dry out, soil suction and the soil moisture tension becomes more negative.
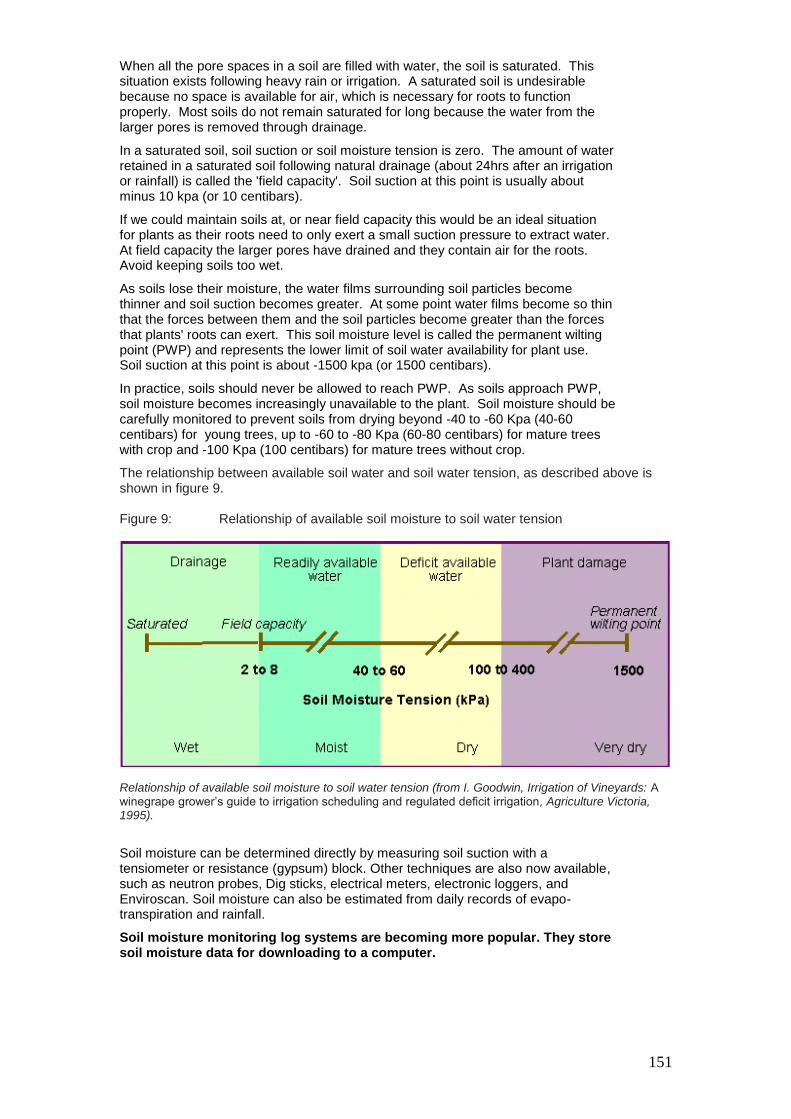
151
When all the pore spaces in a soil are filled with water, the soil is saturated. This situation exists following heavy rain or irrigation. A saturated soil is undesirable because no space is available for air, which is necessary for roots to function properly. Most soils do not remain saturated for long because the water from the larger pores is removed through drainage.
In a saturated soil, soil suction or soil moisture tension is zero. The amount of water retained in a saturated soil following natural drainage (about 24hrs after an irrigation or rainfall) is called the 'field capacity'. Soil suction at this point is usually about minus 10 kpa (or 10 centibars).
If we could maintain soils at, or near field capacity this would be an ideal situation for plants as their roots need to only exert a small suction pressure to extract water. At field capacity the larger pores have drained and they contain air for the roots. Avoid keeping soils too wet.
As soils lose their moisture, the water films surrounding soil particles become thinner and soil suction becomes greater. At some point water films become so thin that the forces between them and the soil particles become greater than the forces that plants' roots can exert. This soil moisture level is called the permanent wilting point (PWP) and represents the lower limit of soil water availability for plant use. Soil suction at this point is about -1500 kpa (or 1500 centibars).
In practice, soils should never be allowed to reach PWP. As soils approach PWP, soil moisture becomes increasingly unavailable to the plant. Soil moisture should be carefully monitored to prevent soils from drying beyond -40 to -60 Kpa (40-60 centibars) for young trees, up to -60 to -80 Kpa (60-80 centibars) for mature trees with crop and -100 Kpa (100 centibars) for mature trees without crop.
The relationship between available soil water and soil water tension, as described above is shown in figure 9. Figure 9: Relationship of available soil moisture to soil water tension
Relationship of available soil moisture to soil water tension (from I. Goodwin, Irrigation of Vineyards: A winegrape grower’s guide to irrigation scheduling and regulated deficit irrigation, Agriculture Victoria, 1995).
Soil moisture can be determined directly by measuring soil suction with a tensiometer or resistance (gypsum) block. Other techniques are also now available, such as neutron probes, Dig sticks, electrical meters, electronic loggers, and Enviroscan. Soil moisture can also be estimated from daily records of evapo-transpiration and rainfall.
Soil moisture monitoring log systems are becoming more popular. They store soil moisture data for downloading to a computer.

152
Irrigation scheduling using tensiometers
The tensiometer is essentially a tube filled with water. At one end it has a porous ceramic tip that is buried in the soil. Water is able to move in and out of the device. At the other end of the tube is a vacuum gauge. When installed correctly, the tensiometer will give a direct measure of soil suction (tension). As the soil dries out, soil suction increases and water is withdrawn from the tensiometer. The suction pressure created within the tensiometer is indicated on the gauge. (figure 11).
The relationship between soil moisture percentage and soil suction is illustrated by figure 10
Figure 10. Relationship between soil moisture and soil suction.
Tensiometers should be read early in the morning and at the same time each day. Start with daily readings, then extend the interval until changes between the reading are about five Kpa or centibars (cB). Keep the tensiometers filled with water.
If water is needed frequently in instruments whose readings do not go above -50 Kpa (50 cb), they are not working properly: a small leak exists that should be corrected.
Figure 11: Tensiometers for scheduling irrigation water.
T yp ica l S o il M o is tu re re lea seR e a d ily A va ila b le W a te r
R A W typ ica lly 6 0 m m /m b e tw 8 & 4 0 kP a
0
1 0 0
2 0 0
3 0 0
4 0 0
5 0 0
0 1 0 2 0 3 0 4 0 5 0 6 0
T e n s io m e te r su c tio n kP a
VOLUMETRIc
water
mm/m
G ra p h T o n y T ho m p so n P IR S A R u ra l S o lu tio n s
R A W = 6 0m m /m
app rox 260 m m /m a t 8 kP a
app ro x 2 0 0m m /m a t 40kP a
F ie ld C ap a c ity
R e -irrig a te p o in t

153
At least two tensiometers should be installed at each testing site (each one at a different depth). If the soil type in the orchard is uniform, a pair of tensiometers per hectare should be sufficient. If dramatic soil changes occur in the block, then a pair of tensiometers will be needed for each major soil type. For most soil types a 30 cm and 60 cm tensiometer should be installed at each site.
Different aspects may also require additional tensiometers
Canopy area also need to be considered. Sites with trees of differing sizes will need to be treated differently.
Where each instrument should be located depends on the age of the trees. Tensiometers should be installed with the porous tip in the middle of the active root zone. Tensiometers should also be installed within 15 cm of a drip emitter.
Tensiometers provide information on when to irrigate. If a chart is kept of irrigation dates and amount of water or hours of application, the tensiometer can also indicate how much water to apply.
Figure 12: Interpreting tensiometer records.
Point
A = Shortly after a good irrigation.
B = soil drying out (from this point it is possible, by extending line AB, to predict when an irrigation will be needed.
C = Just before irrigation.
D = After an irrigation which did not adequately refill the soil.
F = Rapidly drying soil (because of inadequate irrigation) – irrigation needed.
E = Soil moisture levels restored after an adequate irrigation.
Figure 13 is an actual record taken from tensiometers in an irrigated orchard block in the northern hemisphere. By using tensiometers of two different lengths, the sub-soil moisture can also be monitored.
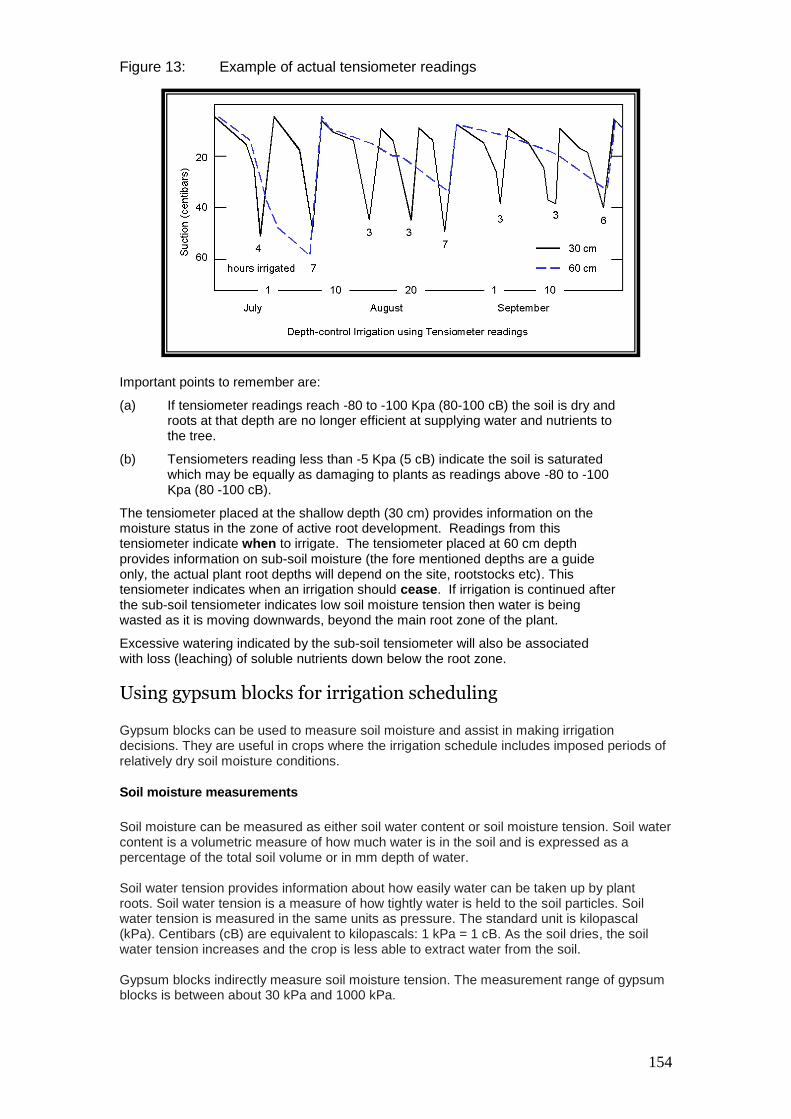
154
Figure 13: Example of actual tensiometer readings
Important points to remember are:
(a) If tensiometer readings reach -80 to -100 Kpa (80-100 cB) the soil is dry and roots at that depth are no longer efficient at supplying water and nutrients to the tree.
(b) Tensiometers reading less than -5 Kpa (5 cB) indicate the soil is saturated which may be equally as damaging to plants as readings above -80 to -100 Kpa (80 -100 cB).
The tensiometer placed at the shallow depth (30 cm) provides information on the moisture status in the zone of active root development. Readings from this tensiometer indicate when to irrigate. The tensiometer placed at 60 cm depth provides information on sub-soil moisture (the fore mentioned depths are a guide only, the actual plant root depths will depend on the site, rootstocks etc). This tensiometer indicates when an irrigation should cease. If irrigation is continued after the sub-soil tensiometer indicates low soil moisture tension then water is being wasted as it is moving downwards, beyond the main root zone of the plant.
Excessive watering indicated by the sub-soil tensiometer will also be associated with loss (leaching) of soluble nutrients down below the root zone.
Using gypsum blocks for irrigation scheduling Gypsum blocks can be used to measure soil moisture and assist in making irrigation decisions. They are useful in crops where the irrigation schedule includes imposed periods of relatively dry soil moisture conditions.
Soil moisture measurements
Soil moisture can be measured as either soil water content or soil moisture tension. Soil water content is a volumetric measure of how much water is in the soil and is expressed as a percentage of the total soil volume or in mm depth of water. Soil water tension provides information about how easily water can be taken up by plant roots. Soil water tension is a measure of how tightly water is held to the soil particles. Soil water tension is measured in the same units as pressure. The standard unit is kilopascal (kPa). Centibars (cB) are equivalent to kilopascals: 1 kPa = 1 cB. As the soil dries, the soil water tension increases and the crop is less able to extract water from the soil. Gypsum blocks indirectly measure soil moisture tension. The measurement range of gypsum blocks is between about 30 kPa and 1000 kPa.
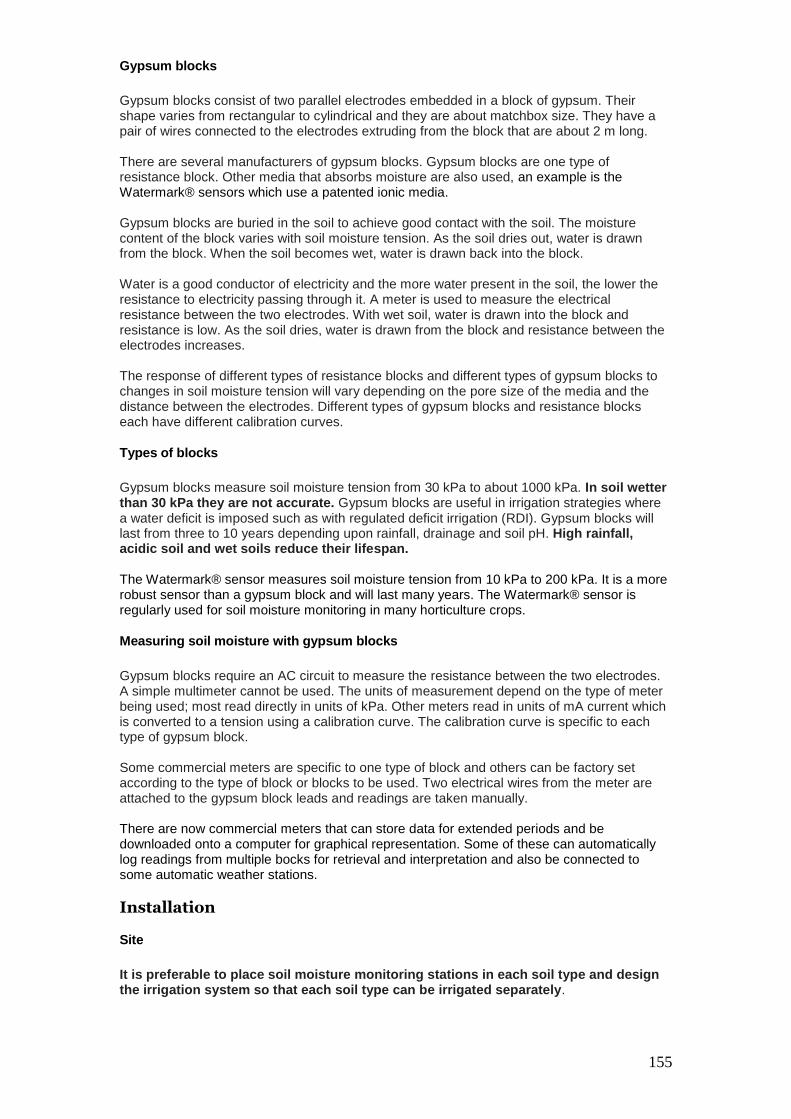
155
Gypsum blocks
Gypsum blocks consist of two parallel electrodes embedded in a block of gypsum. Their shape varies from rectangular to cylindrical and they are about matchbox size. They have a pair of wires connected to the electrodes extruding from the block that are about 2 m long. There are several manufacturers of gypsum blocks. Gypsum blocks are one type of resistance block. Other media that absorbs moisture are also used, an example is the Watermark® sensors which use a patented ionic media. Gypsum blocks are buried in the soil to achieve good contact with the soil. The moisture content of the block varies with soil moisture tension. As the soil dries out, water is drawn from the block. When the soil becomes wet, water is drawn back into the block. Water is a good conductor of electricity and the more water present in the soil, the lower the resistance to electricity passing through it. A meter is used to measure the electrical resistance between the two electrodes. With wet soil, water is drawn into the block and resistance is low. As the soil dries, water is drawn from the block and resistance between the electrodes increases. The response of different types of resistance blocks and different types of gypsum blocks to changes in soil moisture tension will vary depending on the pore size of the media and the distance between the electrodes. Different types of gypsum blocks and resistance blocks each have different calibration curves.
Types of blocks
Gypsum blocks measure soil moisture tension from 30 kPa to about 1000 kPa. In soil wetter than 30 kPa they are not accurate. Gypsum blocks are useful in irrigation strategies where a water deficit is imposed such as with regulated deficit irrigation (RDI). Gypsum blocks will last from three to 10 years depending upon rainfall, drainage and soil pH. High rainfall, acidic soil and wet soils reduce their lifespan. The Watermark® sensor measures soil moisture tension from 10 kPa to 200 kPa. It is a more robust sensor than a gypsum block and will last many years. The Watermark® sensor is regularly used for soil moisture monitoring in many horticulture crops.
Measuring soil moisture with gypsum blocks
Gypsum blocks require an AC circuit to measure the resistance between the two electrodes. A simple multimeter cannot be used. The units of measurement depend on the type of meter being used; most read directly in units of kPa. Other meters read in units of mA current which is converted to a tension using a calibration curve. The calibration curve is specific to each type of gypsum block. Some commercial meters are specific to one type of block and others can be factory set according to the type of block or blocks to be used. Two electrical wires from the meter are attached to the gypsum block leads and readings are taken manually. There are now commercial meters that can store data for extended periods and be downloaded onto a computer for graphical representation. Some of these can automatically log readings from multiple bocks for retrieval and interpretation and also be connected to some automatic weather stations.
Installation
Site
It is preferable to place soil moisture monitoring stations in each soil type and design the irrigation system so that each soil type can be irrigated separately.
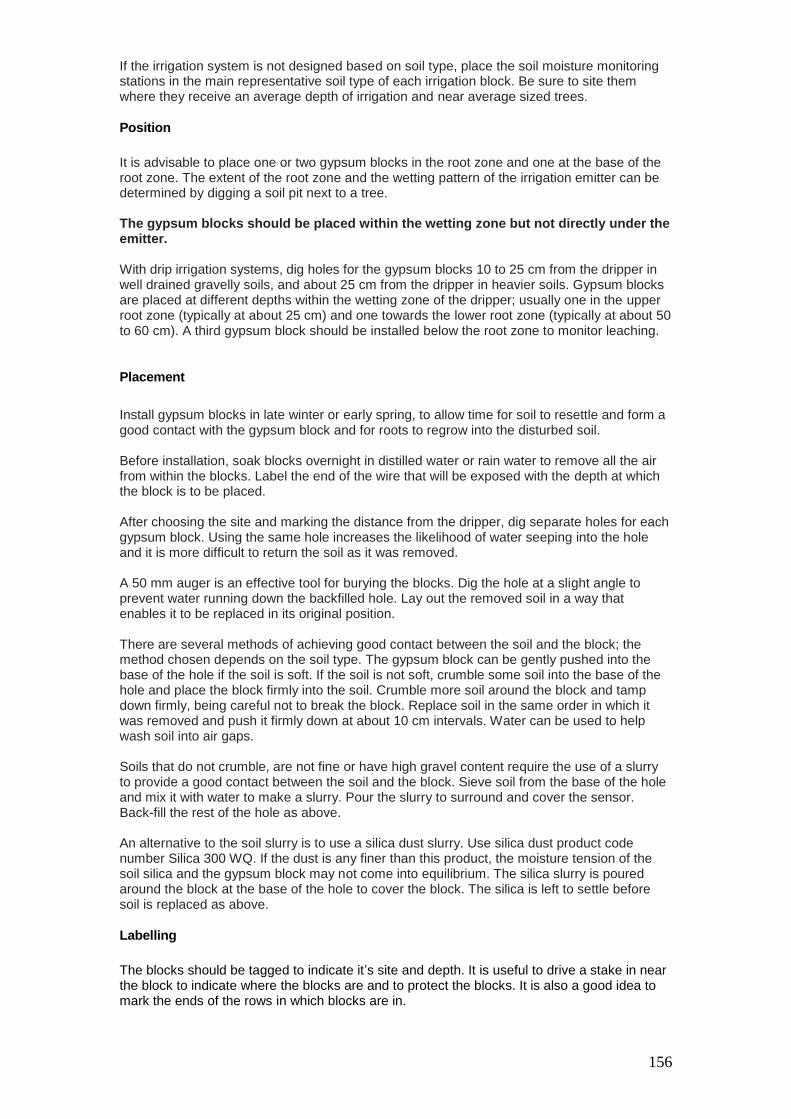
156
If the irrigation system is not designed based on soil type, place the soil moisture monitoring stations in the main representative soil type of each irrigation block. Be sure to site them where they receive an average depth of irrigation and near average sized trees.
Position
It is advisable to place one or two gypsum blocks in the root zone and one at the base of the root zone. The extent of the root zone and the wetting pattern of the irrigation emitter can be determined by digging a soil pit next to a tree. The gypsum blocks should be placed within the wetting zone but not directly under the emitter. With drip irrigation systems, dig holes for the gypsum blocks 10 to 25 cm from the dripper in well drained gravelly soils, and about 25 cm from the dripper in heavier soils. Gypsum blocks are placed at different depths within the wetting zone of the dripper; usually one in the upper root zone (typically at about 25 cm) and one towards the lower root zone (typically at about 50 to 60 cm). A third gypsum block should be installed below the root zone to monitor leaching.
Placement
Install gypsum blocks in late winter or early spring, to allow time for soil to resettle and form a good contact with the gypsum block and for roots to regrow into the disturbed soil. Before installation, soak blocks overnight in distilled water or rain water to remove all the air from within the blocks. Label the end of the wire that will be exposed with the depth at which the block is to be placed. After choosing the site and marking the distance from the dripper, dig separate holes for each gypsum block. Using the same hole increases the likelihood of water seeping into the hole and it is more difficult to return the soil as it was removed. A 50 mm auger is an effective tool for burying the blocks. Dig the hole at a slight angle to prevent water running down the backfilled hole. Lay out the removed soil in a way that enables it to be replaced in its original position. There are several methods of achieving good contact between the soil and the block; the method chosen depends on the soil type. The gypsum block can be gently pushed into the base of the hole if the soil is soft. If the soil is not soft, crumble some soil into the base of the hole and place the block firmly into the soil. Crumble more soil around the block and tamp down firmly, being careful not to break the block. Replace soil in the same order in which it was removed and push it firmly down at about 10 cm intervals. Water can be used to help wash soil into air gaps. Soils that do not crumble, are not fine or have high gravel content require the use of a slurry to provide a good contact between the soil and the block. Sieve soil from the base of the hole and mix it with water to make a slurry. Pour the slurry to surround and cover the sensor. Back-fill the rest of the hole as above. An alternative to the soil slurry is to use a silica dust slurry. Use silica dust product code number Silica 300 WQ. If the dust is any finer than this product, the moisture tension of the soil silica and the gypsum block may not come into equilibrium. The silica slurry is poured around the block at the base of the hole to cover the block. The silica is left to settle before soil is replaced as above.
Labelling
The blocks should be tagged to indicate it’s site and depth. It is useful to drive a stake in near the block to indicate where the blocks are and to protect the blocks. It is also a good idea to mark the ends of the rows in which blocks are in.
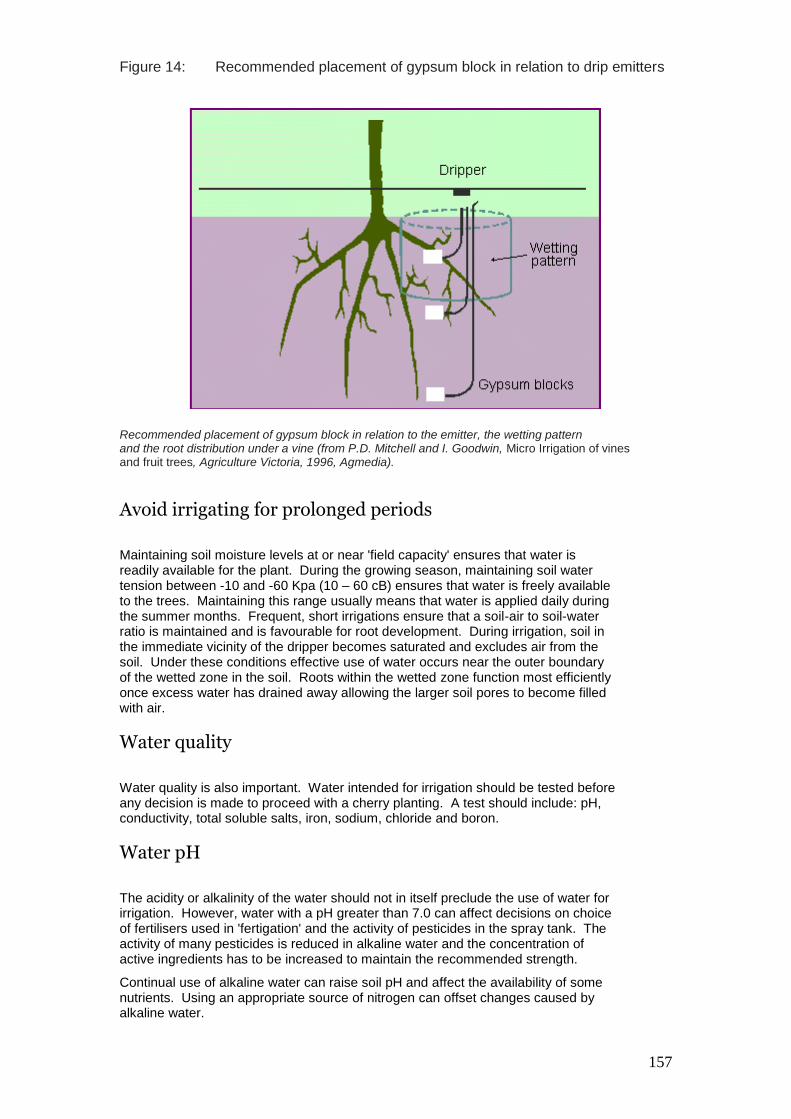
157
Figure 14: Recommended placement of gypsum block in relation to drip emitters
Recommended placement of gypsum block in relation to the emitter, the wetting pattern and the root distribution under a vine (from P.D. Mitchell and I. Goodwin, Micro Irrigation of vines and fruit trees, Agriculture Victoria, 1996, Agmedia).
Avoid irrigating for prolonged periods
Maintaining soil moisture levels at or near 'field capacity' ensures that water is readily available for the plant. During the growing season, maintaining soil water tension between -10 and -60 Kpa (10 – 60 cB) ensures that water is freely available to the trees. Maintaining this range usually means that water is applied daily during the summer months. Frequent, short irrigations ensure that a soil-air to soil-water ratio is maintained and is favourable for root development. During irrigation, soil in the immediate vicinity of the dripper becomes saturated and excludes air from the soil. Under these conditions effective use of water occurs near the outer boundary of the wetted zone in the soil. Roots within the wetted zone function most efficiently once excess water has drained away allowing the larger soil pores to become filled with air.
Water quality
Water quality is also important. Water intended for irrigation should be tested before any decision is made to proceed with a cherry planting. A test should include: pH, conductivity, total soluble salts, iron, sodium, chloride and boron.
Water pH
The acidity or alkalinity of the water should not in itself preclude the use of water for irrigation. However, water with a pH greater than 7.0 can affect decisions on choice of fertilisers used in 'fertigation' and the activity of pesticides in the spray tank. The activity of many pesticides is reduced in alkaline water and the concentration of active ingredients has to be increased to maintain the recommended strength.
Continual use of alkaline water can raise soil pH and affect the availability of some nutrients. Using an appropriate source of nitrogen can offset changes caused by alkaline water.
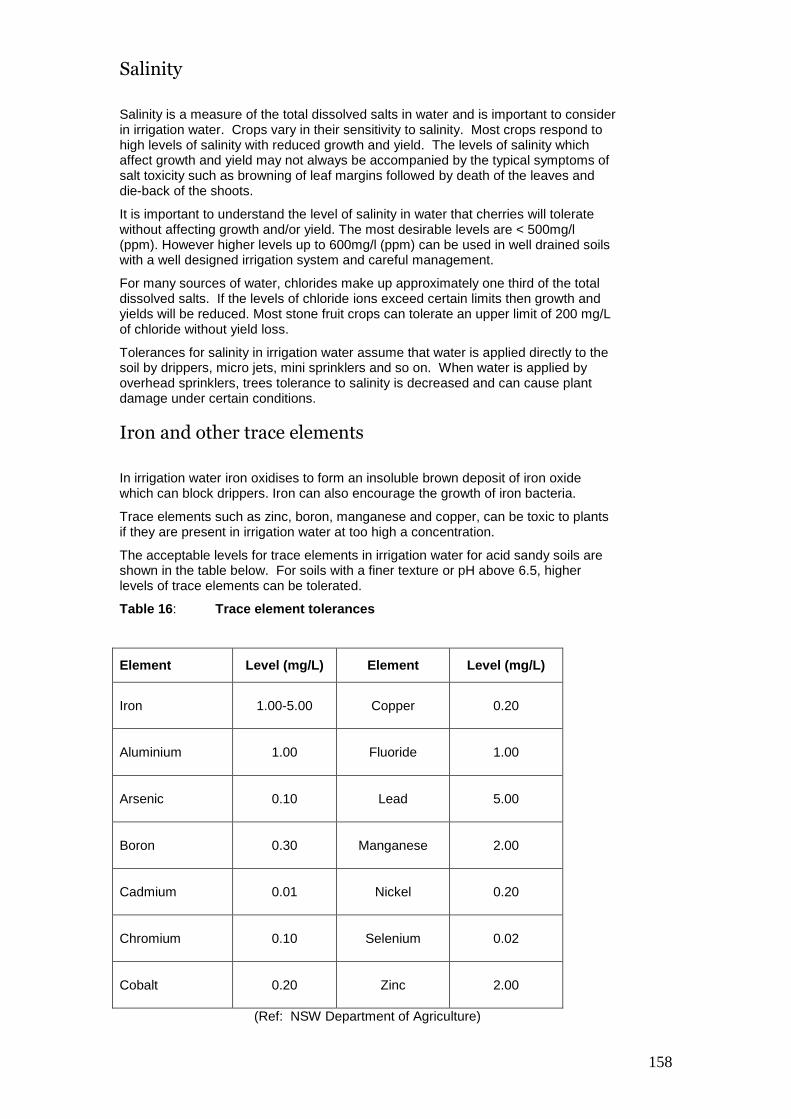
158
Salinity
Salinity is a measure of the total dissolved salts in water and is important to consider in irrigation water. Crops vary in their sensitivity to salinity. Most crops respond to high levels of salinity with reduced growth and yield. The levels of salinity which affect growth and yield may not always be accompanied by the typical symptoms of salt toxicity such as browning of leaf margins followed by death of the leaves and die-back of the shoots.
It is important to understand the level of salinity in water that cherries will tolerate without affecting growth and/or yield. The most desirable levels are < 500mg/l (ppm). However higher levels up to 600mg/l (ppm) can be used in well drained soils with a well designed irrigation system and careful management.
For many sources of water, chlorides make up approximately one third of the total dissolved salts. If the levels of chloride ions exceed certain limits then growth and yields will be reduced. Most stone fruit crops can tolerate an upper limit of 200 mg/L of chloride without yield loss.
Tolerances for salinity in irrigation water assume that water is applied directly to the soil by drippers, micro jets, mini sprinklers and so on. When water is applied by overhead sprinklers, trees tolerance to salinity is decreased and can cause plant damage under certain conditions.
Iron and other trace elements
In irrigation water iron oxidises to form an insoluble brown deposit of iron oxide which can block drippers. Iron can also encourage the growth of iron bacteria.
Trace elements such as zinc, boron, manganese and copper, can be toxic to plants if they are present in irrigation water at too high a concentration.
The acceptable levels for trace elements in irrigation water for acid sandy soils are shown in the table below. For soils with a finer texture or pH above 6.5, higher levels of trace elements can be tolerated.
Table 16: Trace element tolerances
Element Level (mg/L) Element Level (mg/L)
Iron
1.00-5.00
Copper
0.20
Aluminium
1.00
Fluoride
1.00
Arsenic
0.10
Lead
5.00
Boron
0.30
Manganese
2.00
Cadmium
0.01
Nickel
0.20
Chromium
0.10
Selenium
0.02
Cobalt
0.20
Zinc
2.00
(Ref: NSW Department of Agriculture)
159
Irrigation systems
Seek expert advice when designing an irrigation system. To obtain an effective, efficient irrigation system it is essential that it is designed properly.
Factors that must be considered during the design phase include:
Pump characteristics and size.
Main and sub main pipes.
Length and diameter of dripper-carrying laterals.
Filtration, and
Water pressure changes across the block.
There are many different types of irrigation systems, each with its’ own relative advantages and disadvantages. For cherry orchards two systems are generally preferred over all others, these are mini-sprinkler and drip irrigation.
Mini-sprinklers vs dripper irrigation
There are many factors that need to be considered when choosing which system to use, such as water source, water quality, soil type, training system, topography, temperatures, factors affecting sprinkler/dripper blockage and maintenance and personal preference.
In situations where water quality or quantity is an issue a drip irrigation system may be preferable. Where freestanding trees are grown (eg bush training systems) a mini-sprinkler system may be preferred because of its beneficial effects on radial root development.
A drip system will give you more control over tree vigour such as limiting the root zone with vigorous rootstocks or applying nitrogen via fertigation to promote growth.
As a general guide, a well designed drip system will use up to 30% less water than a mini-sprinkler system. However compare the systems carefully in line with your orchard site requirements. A drip system may ultimately end up more expensive to install because of filtration requirements and an increased number of drippers.
Mini-sprinklers
A well designed mini-sprinkler system should aim to wet most of the potential root area (up to 70% of available area). This is because:
It encourages radial root development (anchorage).
Active roots will only grow in soil kept at optimum moisture by irrigation.
The area of wetted soil determines the volume of water stored in the soil – the larger the volume the lower the risk of water stress.
Dry soil will not be explored by the roots thereby restricting root access to the full availability of soil nutrients.
Mini-sprinklers invariably require more maintenance because of their plastic composition; they are above ground and are prone to “picker” damage.
Drip Irrigation
The palmette, axis and Tatura trellis systems can be simply serviced by drippers providing 4 L/hr spaced appropriately along the tree line. Typically, in-line drippers are used with discharge rates from 1 to 3.5 l/hr and spacing’s ranging from 0.3m to 1.0m
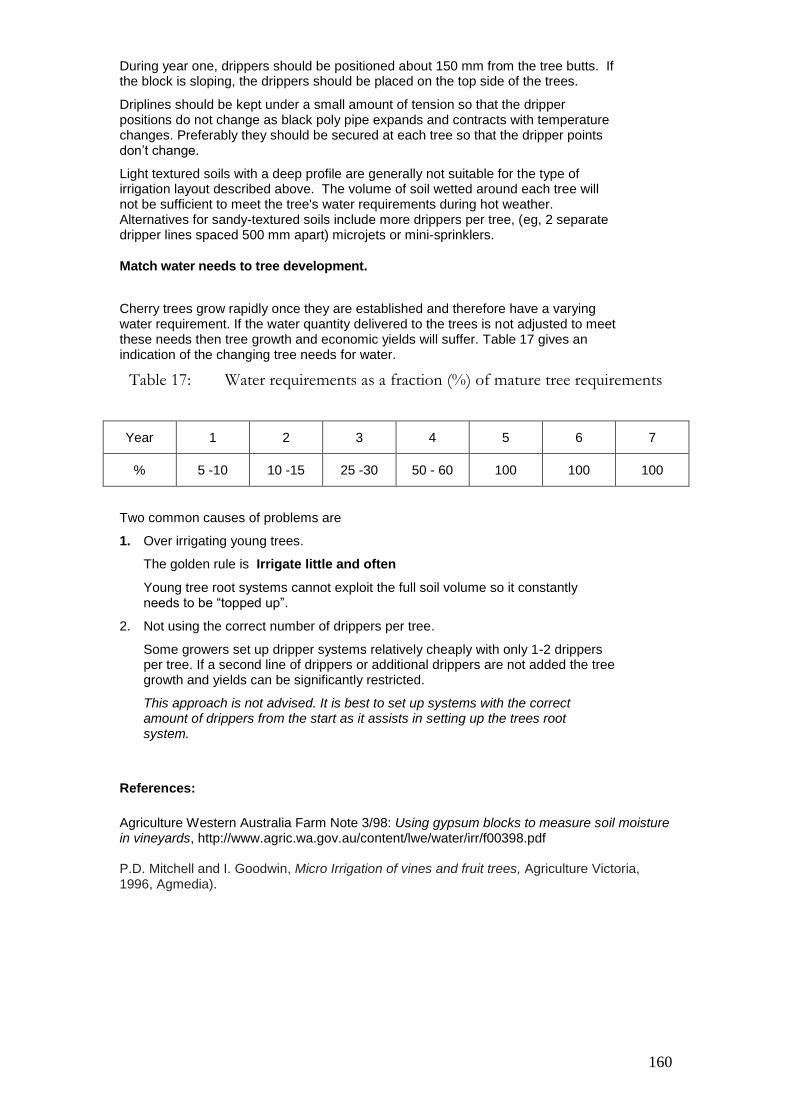
160
During year one, drippers should be positioned about 150 mm from the tree butts. If the block is sloping, the drippers should be placed on the top side of the trees.
Driplines should be kept under a small amount of tension so that the dripper positions do not change as black poly pipe expands and contracts with temperature changes. Preferably they should be secured at each tree so that the dripper points don’t change.
Light textured soils with a deep profile are generally not suitable for the type of irrigation layout described above. The volume of soil wetted around each tree will not be sufficient to meet the tree's water requirements during hot weather. Alternatives for sandy-textured soils include more drippers per tree, (eg, 2 separate dripper lines spaced 500 mm apart) microjets or mini-sprinklers.
Match water needs to tree development.
Cherry trees grow rapidly once they are established and therefore have a varying water requirement. If the water quantity delivered to the trees is not adjusted to meet these needs then tree growth and economic yields will suffer. Table 17 gives an indication of the changing tree needs for water.
Table 17: Water requirements as a fraction (%) of mature tree requirements
Year 1 2 3 4 5 6 7
% 5 -10 10 -15 25 -30 50 - 60 100 100 100
Two common causes of problems are
1. Over irrigating young trees.
The golden rule is Irrigate little and often
Young tree root systems cannot exploit the full soil volume so it constantly needs to be “topped up”.
2. Not using the correct number of drippers per tree.
Some growers set up dripper systems relatively cheaply with only 1-2 drippers per tree. If a second line of drippers or additional drippers are not added the tree growth and yields can be significantly restricted.
This approach is not advised. It is best to set up systems with the correct amount of drippers from the start as it assists in setting up the trees root system.
References:
Agriculture Western Australia Farm Note 3/98: Using gypsum blocks to measure soil moisture in vineyards, http://www.agric.wa.gov.au/content/lwe/water/irr/f00398.pdf P.D. Mitchell and I. Goodwin, Micro Irrigation of vines and fruit trees, Agriculture Victoria, 1996, Agmedia).
161
Pests and Diseases
This section has been co-authored by Ms Penelope Domeney, from the Tasmanian Institute of Agricultural Research.
This section describes the major pests and diseases of cherries and outlines the basic control measures available for them.
Assistance to the NSW Department of Primary Industries is acknowledged for information from “Orchard Plant Protection Guide for Deciduous fruits in NSW 2009 - 2010” – NSW DPI Management Guide – 19
th edition
Integrated Pest and Disease Management (IPDM)
The Australian cherry industry advocates the use of an Integrated Pest Management (IPDM) approach to the control and management of pests and diseases. IPDM does not rely on a single method of pest control but involves the use of a number of different approaches, which collectively provide a more sustainable approach than the reliance on a single method of control such as chemicals.
An integrated approach places less reliance on chemicals and increases their value to the industry through a reduced potential for resistance build up.
IPDM uses a number of integrated control measures such as the use of monitoring, cultural, biological, and chemical control measures.
There are some pests and diseases where their actual presence is a serious problem (particularly in export fruit) so proactive control measures are put in place at the appropriate times during the trees growing season. Some of these controls may be chemically based. These proactive control programs have been developed from scientific studies and are refined as new research and development program results are provided.
Export market requirements
Each overseas market has its own specific pest and disease concerns and chemical residue requirements. These concerns and requirements may be different to those required in Australia and subsequently may require additional or different control measures to those required for the domestic market.
A detailed summary of these overseas market requirements is published regularly by the Industry in the “Cherry Export Manual”.
This manual is provided to all levy paying members of the Australian cherry industry. If additional copies are required they can be obtained from Fruit Growers Tasmania Web: www.fruitgrowerstas.com.au Email: [email protected] Phone: 03 6231 1944
Integrated pest and disease management information
To assist the industry with information on the appropriate IPDM control measures for the major pest and diseases an IPDM poster is routinely updated and provided to the growers.
A copy of the IPDM calendar is posted to all members of the industry.
162
Monitoring
Rather than implement control measures on a preset timetable as historically practiced the industry now uses monitoring techniques (wherever possible) as the basic step in its control programs.
Monitoring systems are undertaken by a range of people depending on the type of monitoring required and the purpose of that monitoring.
Growers and/or trained staff can undertake monitoring in individual orchards. Specialised monitoring programs are also offered by trained service providers in some regions.
Government Departments or independent service providers may also provide specialised monitoring for district/state/industry level requirements. Examples of these services include, fruit fly and oriental fruit moth monitoring. This large scale monitoring is usually carried out to verify area freedom to enable access to overseas markets and in some situations domestic markets (such as Western Australia)
Monitoring techniques vary depending on the specific pest or disease and can be as simple as a quick observation in the orchard to specialised monitoring traps that need to be observed on a regular basis (often weekly). Specific monitoring information is provided in the following sections.
Cultural practices
Cultural practices generally involve either physical or management activities undertaken at a specific time to minimise the potential build up of a pest population or disease outbreak. These practices are usually very time specific (have to be carried out at the correct time) and vary for each individual pest or disease.
Biological control Biological control plays an important role in the success of IPDM and modern pest control in orchards. Biological control agents are the natural enemies of orchard pests. They include insect predators and parasites, predatory mites and bacterial pesticides. It is important to use biological control agents in the right way as they have both strengths and weaknesses. They are comparatively weak in situations where there is a rapid increase or explosion in pest numbers. They are rarely useful in an emergency situation. Their strength lies in maintaining equilibrium in normal pest numbers, keeping them at levels which do not cause serious economic damage to crops. They are primarily used in the control of insect pests where a population of beneficial insects or other animals is carefully managed to provide beneficial control of a target pest species. The management of the beneficial insects usually requires a monitoring program also to routinely assess the relative populations of both beneficial and pest species. For a number of pests an action threshold may have been developed for your region. This action threshold is basically the point at which additional control measures may be required because the level of pest numbers has reached a level at which serious economic damage may occur. If pest numbers are held below this level then additional control measures are not necessarily required because significant economic damage is not likely to occur. In some cases an animals may be used as an adjunct control to minimise pest numbers such as poultry. This adjunct control may not control the pest species on its own but may keep or reduce the level of a pest population to a level where other control measures are effective.
163
Beneficial insects and mites
A range of beneficial insects and mites are available commercially for a number of pest species (see Appendix 5). Consider your pest species and whether there is an appropriate beneficial insect or mite that is suitable. If it is necessary to apply a pesticide consider the full range of control options and choose one that has the least impact on the beneficial insects living (both introduced and natural) living in your orchard.
Bacterial insecticides
Bacillus thuringiensis (Bt) is a bacterium that affects the caterpillar stage of certain insects. It acts as a natural stomach poison preventing the caterpillar from feeding. It is the active ingredient of several products registered for control of insect pests. Its main use in cherries is for the control of light brown apple moth (LBAM). If it is applied before the infestation becomes significant it can provide a level of control that is non disruptive to other beneficial insects.
Protecting biological control agents
There are some simple tools to help growers to protect their biological control agents. These include:
Know your orchard pests and beneficial insects and mites. Be able to recognise them. References and commercial services are available to help.
Monitor your orchard pests and beneficial insects to effectively time spray applications
Use chemicals less toxic to beneficial insects. o Check the label or references material (The Good Bug Book or the Mite
Management Manual ) for chemical toxicity information.
Crown gall control
Crown Gall is a bacterial disease of many woody plants caused by the soil inhabiting bacterium, Agrobacterium tumefaciens. Infected plants become weak and unproductive due to their damaged root systems. In severe infestations trees can be killed. The bacterium is believed to be widely present in most soils and can be spread by a number of methods including water, cultivation, insects and propagation tools. There are no control measures available once infected with crown gall. Wounds on a susceptible tree may be colonised and infected by the pathogen which initiates the formation of galls on the root system. The only control measure commercially available is through the use of another antagonistic species of bacterium named Agrobacterium radiobacter strain K1026. When applied to a wound first A radiobacter inhibits the development of crown gall caused by A tumefaciens. This antagonistic bacterium is available commercially in a product called NOGALL™. This product is manufactured and distributed by:
Becker Underwood P/L RMB 1084 Pacific Highway Somersby, NSW, 2250 Ph 02 4340 2246 Fax 02 4340 2243 Toll Free 1800 558 399 Email [email protected]

164
NOGALL™ is to be used as a preventative treatment, preferably applied to the roots of susceptible trees at planting. Nursery trees have the highest potential for root system damage. To be as effective as possible a combination of practices needs to be used in conjunction with the use of NOGALL™. These include:
Good site selection to avoid water logging.
Avoid unnecessary damage to nursery tree root systems.
Disinfect pruning and propagation equipment.
Avoid soils known to have pathogenic agrobacterium or heavy nematode infestations.
Careful choice of rootstocks.
Chemical control The use of chemicals is an important part of pest and disease programs, but is only a part of the control strategies now used as has been previously outlined. In some situations the use of agricultural chemicals may be the only option available. In some circumstances it may be essential because of legal or market specifications. The regulation and use of agricultural chemicals in Australia is complex. It is linked to an integrated system of
National legislation
National and state permits for chemical usage
State legislation & regulation
State quarantine regulations
Market requirements o Export – both chemical use and MRL requirements o Domestic – Individual requirements
Production systems o Conventional o IPM o Organic o Biodynamic
Each of the above influences which chemicals can be used as well as when and where they can be used. It is beyond the scope of this manual to specify chemical use recommendations. Before using a chemical, check your market requirements and state registration authorities.
Contact details
The national registration of chemicals is the responsibility of the Australian Pesticides and Veterinary Medicines Authority (APVMA) http://www.apvma.gov.au State legislation and registration of chemicals is the responsibility of each state Department of Primary Industries or equivalent. To contact them either check the government section of your states telephone directory or use the Government websites. Some states provide a service to growers and for a subscription you can be provided with either DVD or electronic updates on the chemicals currently registered for use and permits authorised for specific uses. Some contact details are South Australia - http://www.pir.sa.gov.au/infinder Queensland - www.dpi.qld.gov.au › Plants › Agvet chemicals & residues

165
For details on chemicals suitable for organic production go to www.ofa.org.au and follow the links to the certification authorities. For details on chemicals suitable for biodynamic production go to www.biodynamics.net.au and follow the links to the certification authorities. Chemical resellers or wholesalers can also provide local advice For specific information on export markets check the Cherry Export Manual. This manual is provided to all levy paying members of the Australian cherry industry. If additional copies are required they can be obtained from Fruit Growers Tasmania Web: www.fruitgrowerstas.com.au Email: [email protected] Phone: 03 6231 1944
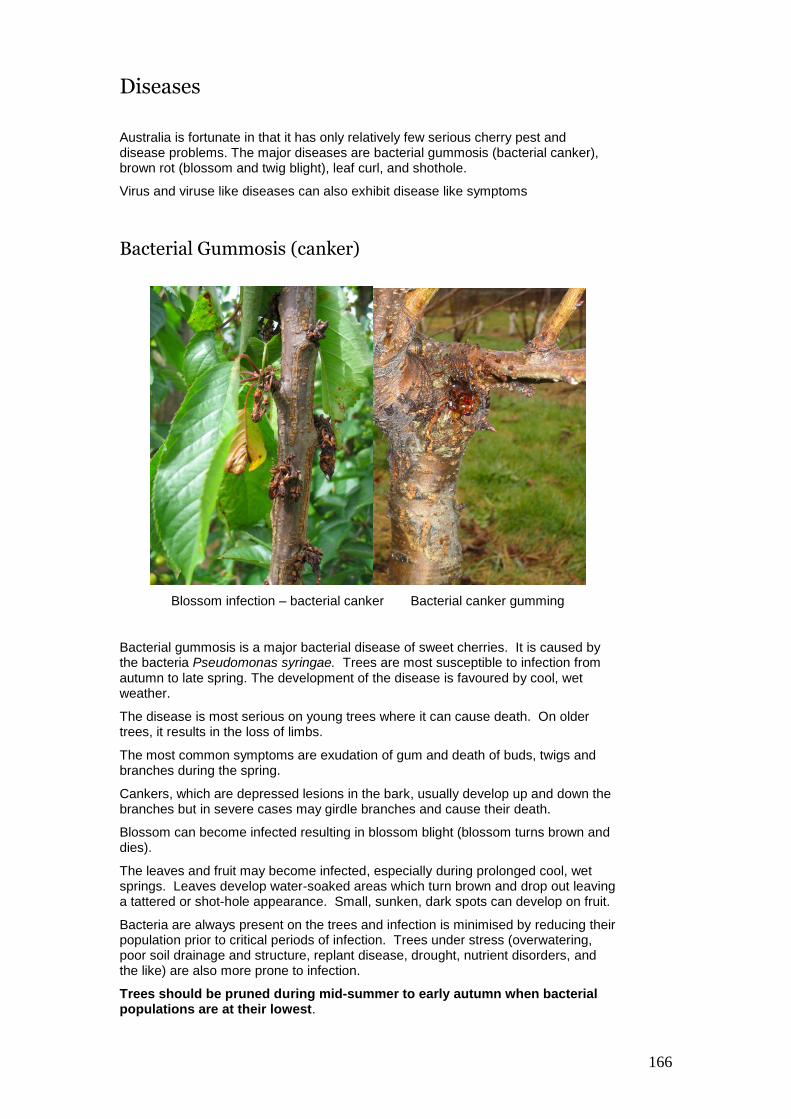
166
Diseases
Australia is fortunate in that it has only relatively few serious cherry pest and disease problems. The major diseases are bacterial gummosis (bacterial canker), brown rot (blossom and twig blight), leaf curl, and shothole.
Virus and viruse like diseases can also exhibit disease like symptoms
Bacterial Gummosis (canker)
Blossom infection – bacterial canker Bacterial canker gumming
Bacterial gummosis is a major bacterial disease of sweet cherries. It is caused by the bacteria Pseudomonas syringae. Trees are most susceptible to infection from autumn to late spring. The development of the disease is favoured by cool, wet weather.
The disease is most serious on young trees where it can cause death. On older trees, it results in the loss of limbs.
The most common symptoms are exudation of gum and death of buds, twigs and branches during the spring.
Cankers, which are depressed lesions in the bark, usually develop up and down the branches but in severe cases may girdle branches and cause their death.
Blossom can become infected resulting in blossom blight (blossom turns brown and dies).
The leaves and fruit may become infected, especially during prolonged cool, wet springs. Leaves develop water-soaked areas which turn brown and drop out leaving a tattered or shot-hole appearance. Small, sunken, dark spots can develop on fruit.
Bacteria are always present on the trees and infection is minimised by reducing their population prior to critical periods of infection. Trees under stress (overwatering, poor soil drainage and structure, replant disease, drought, nutrient disorders, and the like) are also more prone to infection.
Trees should be pruned during mid-summer to early autumn when bacterial populations are at their lowest.
167
Chemical Control
Copper-based chemicals are the only sprays registered for the control of this disease in Australia.
Copper compounds registered for control include:
Copper oxychloride
Cupric hydroxide
Copper oxide
Bordeaux, a mixture of ‘Limil’ (calcium hydroxide) and copper sulphate is an effective copper-based spray for the control of bacterial canker. However, it is not registered for use against this disease. Copper sulphate, a basic component of Bordeaux mixture, is highly soluble and toxic.
Bordeaux is difficult and time consuming to prepare but is very rain-fast once it dries on the tree.
Chemical control measures:
For cherries in high risk areas, a thorough program of copper-based sprays during autumn, winter and spring will considerably reduce the incidence of bacterial canker. Trees may still die in the first two to four years after planting, particularly if trees infected in the nursery have been planted in the orchard, or trees are under some form of physical stress.
At least two sprays in spring are preferred. As time of bud burst varies between varieties it is not possible to follow the program precisely but remember the earlier sprays are more beneficial than the late ones. At least one spray in autumn is also suggested.
All copper sprays can defoliate trees. Using lower rates (half or less) will minimise the danger of premature leaf fall. However, premature leaf fall may occur if sprays are followed by cool, overcast, wet or foggy conditions.
Copper must be applied at the lower rates after flowering otherwise leaf and fruit burn may occur. Plant injury can be minimised by including ‘Limil’ with the spray (200 g/100 L). Also apply copper-based sprays before rain, not after. Copper applied to wet foliage will cause some injury and provide new sites for bacteria to enter.
It is important to spray the main trunk, limbs and crotch of the tree.
Other copper compounds are less persistent than Bordeaux mixture unless mixed with chemicals that enhance adhesion to the tree (e.g. ‘Limil’, and spray oil).
Table 18: Possible program of copper sprays to minimise incidence of bacterial canker
Spray time Rate (g/100L) Bordeaux ***
copper sulphate : limil
Cupric hydroxide
(g/100 L)
Usage *
See below
Early budswell 600 : 800 250 a b c
7-10 days later 600 : 800 250 a b c
7-10 days after petal fall 200 : 400 100 (25)** c
7-10 days later 200 : 400 100 (25) b c
10-14 day intervals, post harvest 300 : 400 100 (25) c
25-50 % leaf fall 600 : 800 250 b c
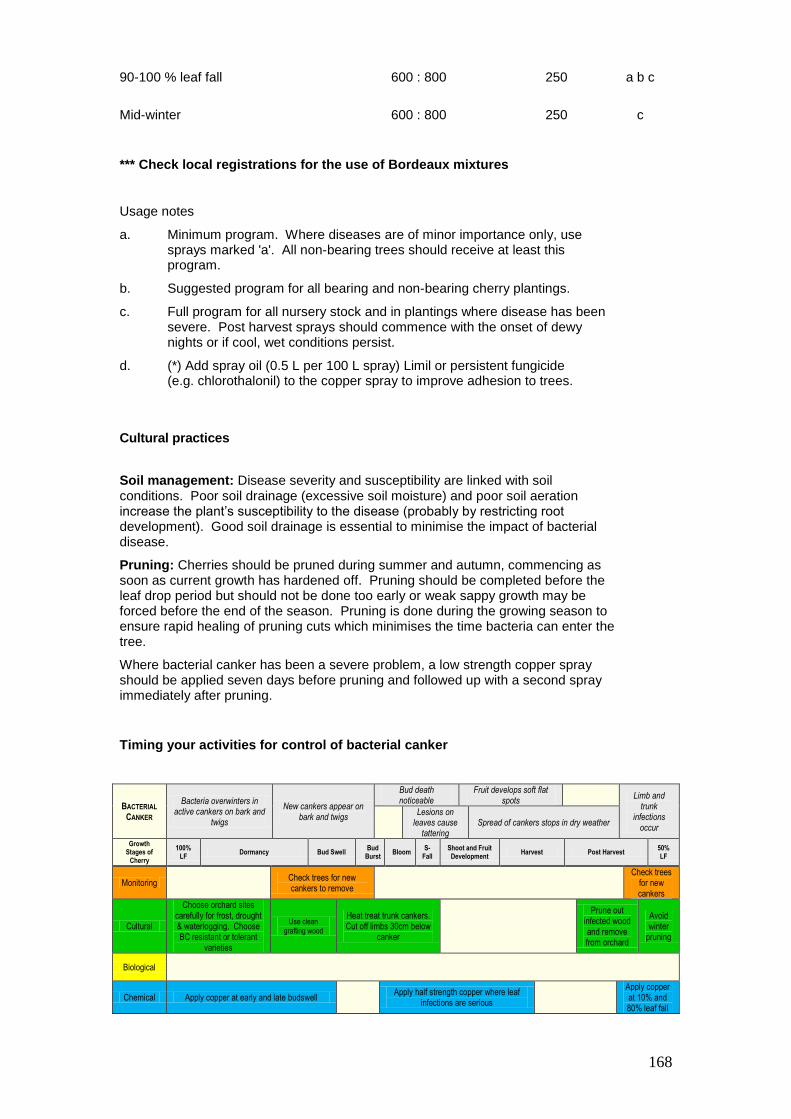
168
90-100 % leaf fall 600 : 800 250 a b c
Mid-winter 600 : 800 250 c
*** Check local registrations for the use of Bordeaux mixtures
Usage notes
a. Minimum program. Where diseases are of minor importance only, use sprays marked 'a'. All non-bearing trees should receive at least this program.
b. Suggested program for all bearing and non-bearing cherry plantings.
c. Full program for all nursery stock and in plantings where disease has been severe. Post harvest sprays should commence with the onset of dewy nights or if cool, wet conditions persist.
d. (*) Add spray oil (0.5 L per 100 L spray) Limil or persistent fungicide (e.g. chlorothalonil) to the copper spray to improve adhesion to trees.
Cultural practices
Soil management: Disease severity and susceptibility are linked with soil conditions. Poor soil drainage (excessive soil moisture) and poor soil aeration increase the plant’s susceptibility to the disease (probably by restricting root development). Good soil drainage is essential to minimise the impact of bacterial disease.
Pruning: Cherries should be pruned during summer and autumn, commencing as soon as current growth has hardened off. Pruning should be completed before the leaf drop period but should not be done too early or weak sappy growth may be forced before the end of the season. Pruning is done during the growing season to ensure rapid healing of pruning cuts which minimises the time bacteria can enter the tree.
Where bacterial canker has been a severe problem, a low strength copper spray should be applied seven days before pruning and followed up with a second spray immediately after pruning.
Timing your activities for control of bacterial canker
BACTERIAL
CANKER
Bacteria overwinters in active cankers on bark and
twigs
New cankers appear on bark and twigs
Bud death noticeable
Fruit develops soft flat spots
Limb and trunk
infections occur
Lesions on leaves cause
tattering Spread of cankers stops in dry weather
Growth Stages of
Cherry
100% LF
Dormancy Bud Swell Bud
Burst Bloom
S- Fall
Shoot and Fruit Development
Harvest Post Harvest 50% LF
Monitoring Check trees for new cankers to remove
Check trees
for new cankers
Cultural
Choose orchard sites carefully for frost, drought & waterlogging. Choose BC resistant or tolerant
varieties
Use clean grafting wood
Heat treat trunk cankers. Cut off limbs 30cm below
canker
Prune out infected wood and remove from orchard
Avoid winter
pruning
Biological
Chemical Apply copper at early and late budswell Apply half strength copper where leaf
infections are serious
Apply copper at 10% and 80% leaf fall
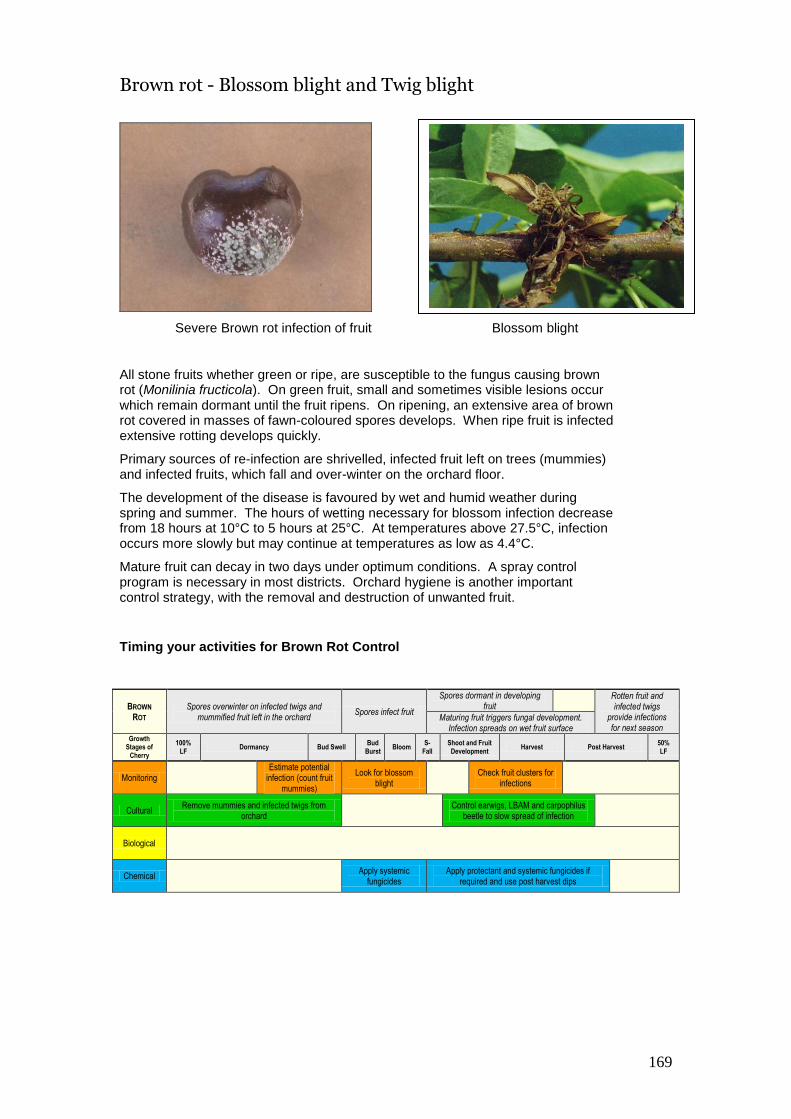
169
Brown rot - Blossom blight and Twig blight
Severe Brown rot infection of fruit Blossom blight
All stone fruits whether green or ripe, are susceptible to the fungus causing brown rot (Monilinia fructicola). On green fruit, small and sometimes visible lesions occur which remain dormant until the fruit ripens. On ripening, an extensive area of brown rot covered in masses of fawn-coloured spores develops. When ripe fruit is infected extensive rotting develops quickly.
Primary sources of re-infection are shrivelled, infected fruit left on trees (mummies) and infected fruits, which fall and over-winter on the orchard floor.
The development of the disease is favoured by wet and humid weather during spring and summer. The hours of wetting necessary for blossom infection decrease from 18 hours at 10°C to 5 hours at 25°C. At temperatures above 27.5°C, infection occurs more slowly but may continue at temperatures as low as 4.4°C.
Mature fruit can decay in two days under optimum conditions. A spray control program is necessary in most districts. Orchard hygiene is another important control strategy, with the removal and destruction of unwanted fruit.
Timing your activities for Brown Rot Control
BROWN
ROT Spores overwinter on infected twigs and
mummified fruit left in the orchard Spores infect fruit
Spores dormant in developing fruit
Rotten fruit and infected twigs
provide infections for next season
Maturing fruit triggers fungal development. Infection spreads on wet fruit surface
Growth Stages of
Cherry
100% LF
Dormancy Bud Swell Bud
Burst Bloom
S- Fall
Shoot and Fruit Development
Harvest Post Harvest 50% LF
Monitoring Estimate potential
infection (count fruit mummies)
Look for blossom blight
Check fruit clusters for
infections
Cultural Remove mummies and infected twigs from
orchard
Control earwigs, LBAM and carpophilus beetle to slow spread of infection
Biological
Chemical Apply systemic
fungicides Apply protectant and systemic fungicides if
required and use post harvest dips
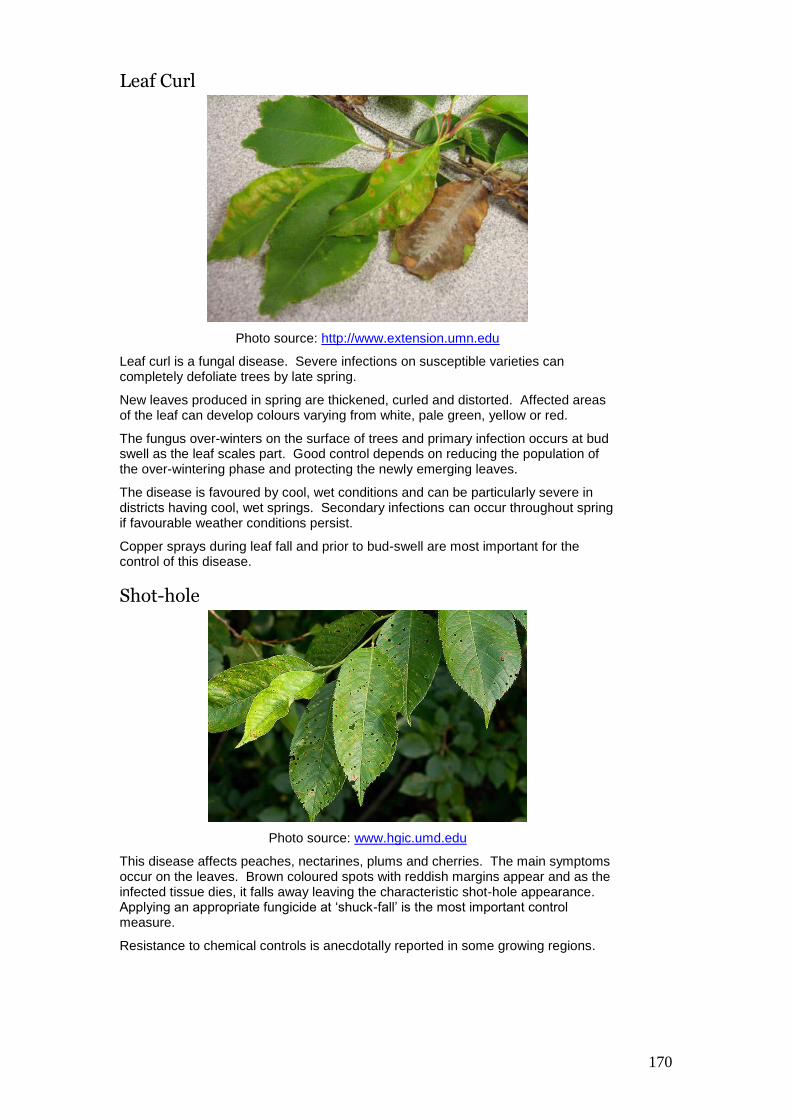
170
Leaf Curl
Photo source: http://www.extension.umn.edu
Leaf curl is a fungal disease. Severe infections on susceptible varieties can completely defoliate trees by late spring.
New leaves produced in spring are thickened, curled and distorted. Affected areas of the leaf can develop colours varying from white, pale green, yellow or red.
The fungus over-winters on the surface of trees and primary infection occurs at bud swell as the leaf scales part. Good control depends on reducing the population of the over-wintering phase and protecting the newly emerging leaves.
The disease is favoured by cool, wet conditions and can be particularly severe in districts having cool, wet springs. Secondary infections can occur throughout spring if favourable weather conditions persist.
Copper sprays during leaf fall and prior to bud-swell are most important for the control of this disease.
Shot-hole
Photo source: www.hgic.umd.edu
This disease affects peaches, nectarines, plums and cherries. The main symptoms occur on the leaves. Brown coloured spots with reddish margins appear and as the infected tissue dies, it falls away leaving the characteristic shot-hole appearance. Applying an appropriate fungicide at ‘shuck-fall’ is the most important control measure.
Resistance to chemical controls is anecdotally reported in some growing regions.

171
Viruses and Virus-like diseases
A number of viruses can infect stone fruit trees. Many viruses are pollen transmitted which means most orchards will eventually become infected. The effects of viruses on growth and yield of fruit are likely to be less severe when mature trees become infected compared with young trees infected in the nursery. For this reason, establishing an orchard from virus-free sources is most important. If propagating trees, obtain virus-free budwood and propagate onto virus-free stocks.
Wherever possible, only purchase trees that are certified as virus-free.
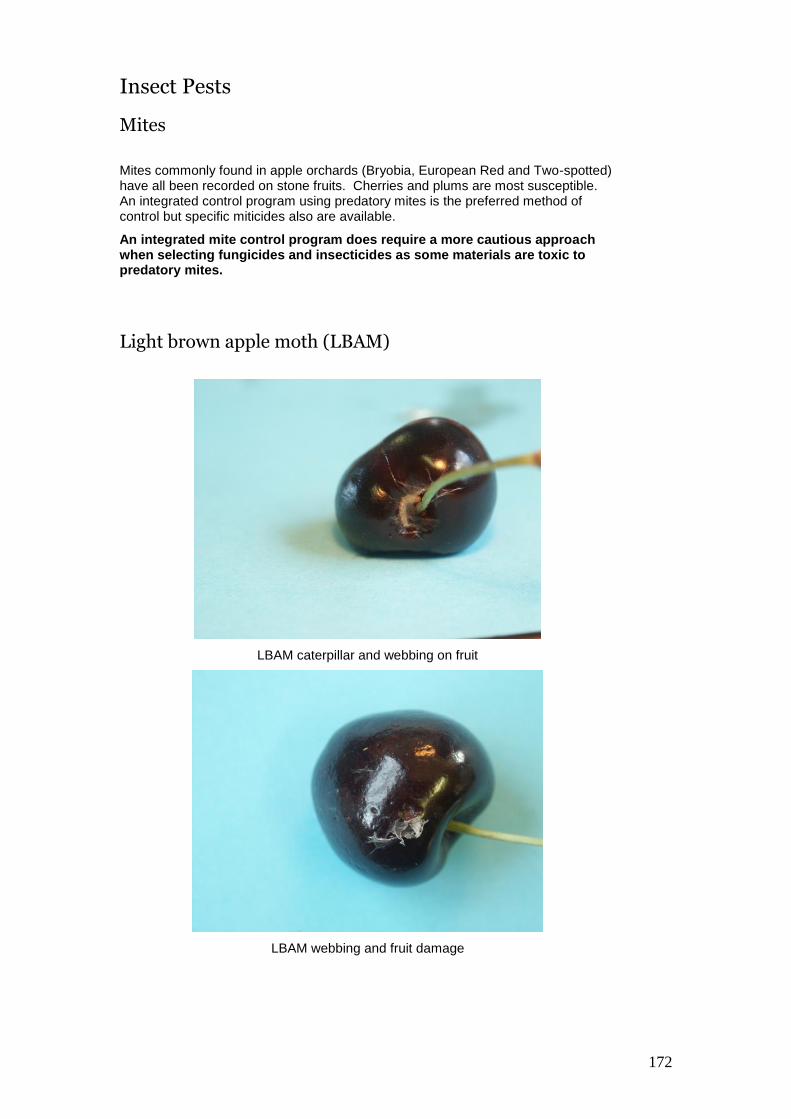
172
Insect Pests
Mites
Mites commonly found in apple orchards (Bryobia, European Red and Two-spotted) have all been recorded on stone fruits. Cherries and plums are most susceptible. An integrated control program using predatory mites is the preferred method of control but specific miticides also are available.
An integrated mite control program does require a more cautious approach when selecting fungicides and insecticides as some materials are toxic to predatory mites.
Light brown apple moth (LBAM)
LBAM caterpillar and webbing on fruit
LBAM webbing and fruit damage
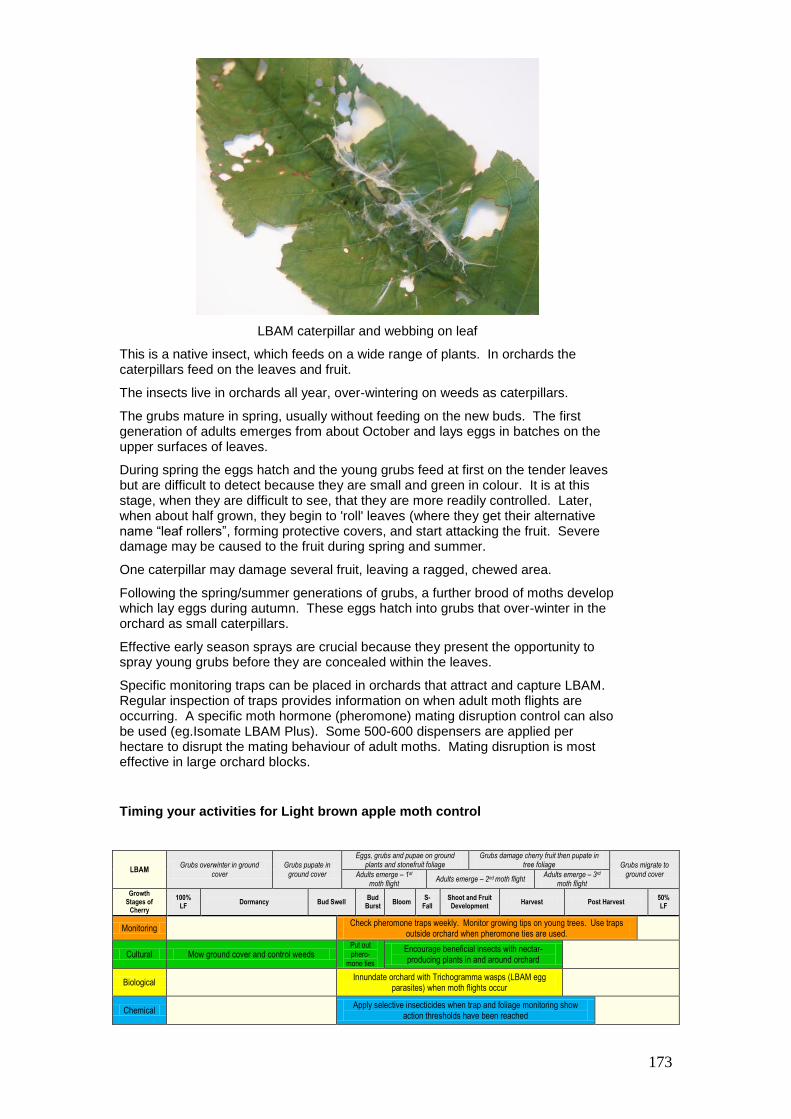
173
LBAM caterpillar and webbing on leaf
This is a native insect, which feeds on a wide range of plants. In orchards the caterpillars feed on the leaves and fruit.
The insects live in orchards all year, over-wintering on weeds as caterpillars.
The grubs mature in spring, usually without feeding on the new buds. The first generation of adults emerges from about October and lays eggs in batches on the upper surfaces of leaves.
During spring the eggs hatch and the young grubs feed at first on the tender leaves but are difficult to detect because they are small and green in colour. It is at this stage, when they are difficult to see, that they are more readily controlled. Later, when about half grown, they begin to 'roll' leaves (where they get their alternative name “leaf rollers”, forming protective covers, and start attacking the fruit. Severe damage may be caused to the fruit during spring and summer.
One caterpillar may damage several fruit, leaving a ragged, chewed area.
Following the spring/summer generations of grubs, a further brood of moths develop which lay eggs during autumn. These eggs hatch into grubs that over-winter in the orchard as small caterpillars.
Effective early season sprays are crucial because they present the opportunity to spray young grubs before they are concealed within the leaves.
Specific monitoring traps can be placed in orchards that attract and capture LBAM. Regular inspection of traps provides information on when adult moth flights are occurring. A specific moth hormone (pheromone) mating disruption control can also be used (eg.Isomate LBAM Plus). Some 500-600 dispensers are applied per hectare to disrupt the mating behaviour of adult moths. Mating disruption is most effective in large orchard blocks.
Timing your activities for Light brown apple moth control
LBAM Grubs overwinter in ground
cover Grubs pupate in
ground cover
Eggs, grubs and pupae on ground plants and stonefruit foliage
Grubs damage cherry fruit then pupate in tree foliage Grubs migrate to
ground cover Adults emerge – 1st moth flight
Adults emerge – 2nd moth flight Adults emerge – 3rd
moth flight
Growth Stages of
Cherry
100% LF
Dormancy Bud Swell Bud
Burst Bloom
S- Fall
Shoot and Fruit Development
Harvest Post Harvest 50% LF
Monitoring Check pheromone traps weekly. Monitor growing tips on young trees. Use traps
outside orchard when pheromone ties are used.
Cultural Mow ground cover and control weeds Put out phero-
mone ties
Encourage beneficial insects with nectar-producing plants in and around orchard
Biological Innundate orchard with Trichogramma wasps (LBAM egg
parasites) when moth flights occur
Chemical Apply selective insecticides when trap and foliage monitoring show
action thresholds have been reached
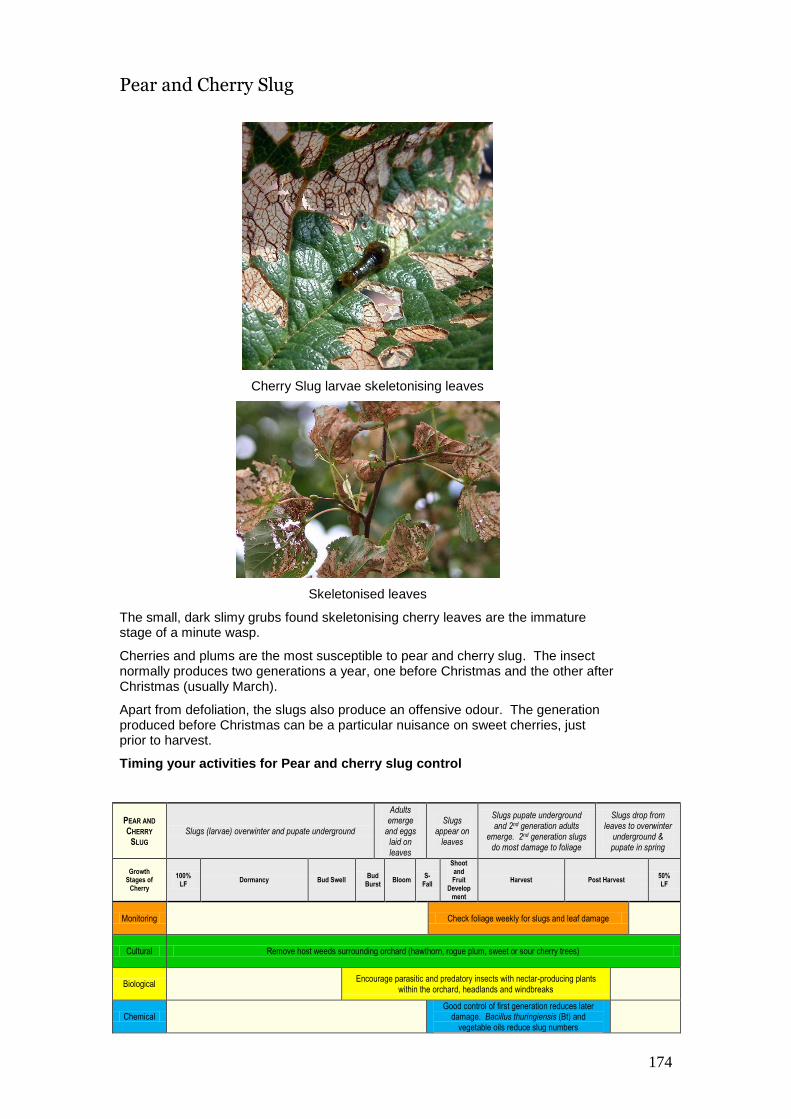
174
Pear and Cherry Slug
Cherry Slug larvae skeletonising leaves
Skeletonised leaves
The small, dark slimy grubs found skeletonising cherry leaves are the immature stage of a minute wasp.
Cherries and plums are the most susceptible to pear and cherry slug. The insect normally produces two generations a year, one before Christmas and the other after Christmas (usually March).
Apart from defoliation, the slugs also produce an offensive odour. The generation produced before Christmas can be a particular nuisance on sweet cherries, just prior to harvest.
Timing your activities for Pear and cherry slug control
PEAR AND
CHERRY
SLUG Slugs (larvae) overwinter and pupate underground
Adults emerge
and eggs laid on leaves
Slugs appear on
leaves
Slugs pupate underground and 2nd generation adults
emerge. 2nd generation slugs do most damage to foliage
Slugs drop from leaves to overwinter
underground & pupate in spring
Growth Stages of
Cherry
100% LF
Dormancy Bud Swell Bud
Burst Bloom
S- Fall
Shoot and Fruit
Development
Harvest Post Harvest 50% LF
Monitoring Check foliage weekly for slugs and leaf damage
Cultural Remove host weeds surrounding orchard (hawthorn, rogue plum, sweet or sour cherry trees)
Biological Encourage parasitic and predatory insects with nectar-producing plants
within the orchard, headlands and windbreaks
Chemical Good control of first generation reduces later
damage. Bacillus thuringiensis (Bt) and vegetable oils reduce slug numbers
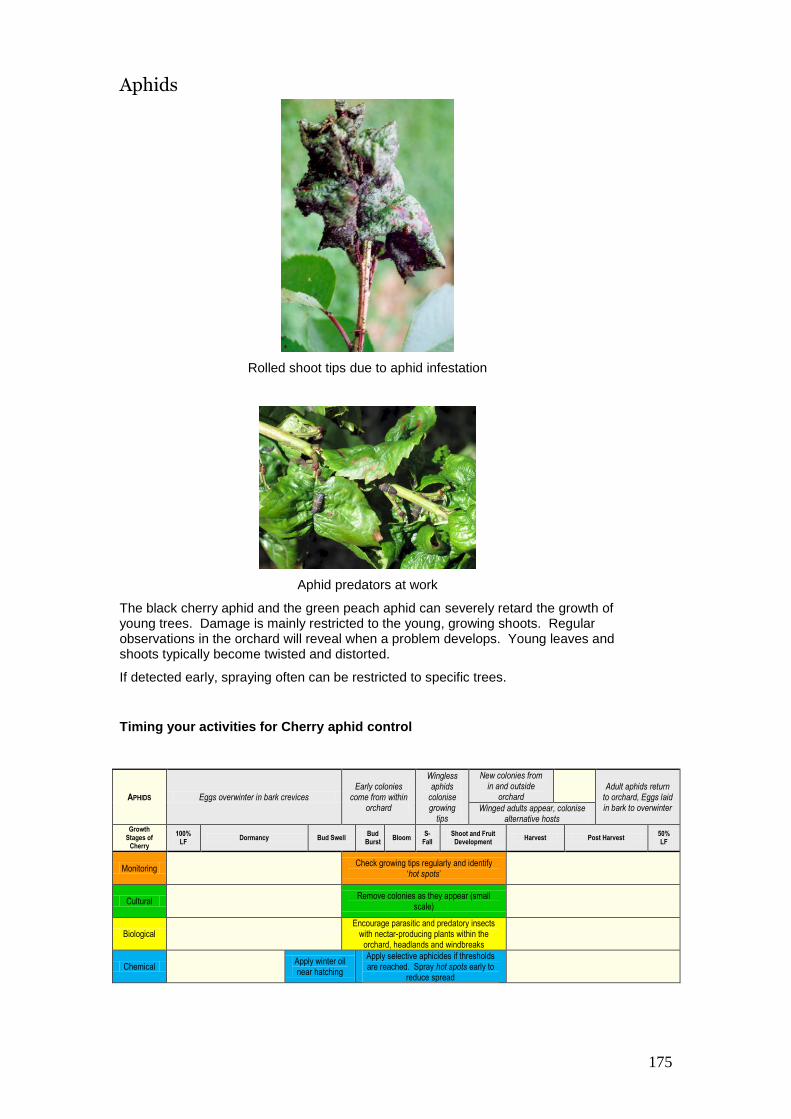
175
Aphids
Rolled shoot tips due to aphid infestation
Aphid predators at work
The black cherry aphid and the green peach aphid can severely retard the growth of young trees. Damage is mainly restricted to the young, growing shoots. Regular observations in the orchard will reveal when a problem develops. Young leaves and shoots typically become twisted and distorted.
If detected early, spraying often can be restricted to specific trees.
Timing your activities for Cherry aphid control
APHIDS Eggs overwinter in bark crevices Early colonies
come from within orchard
Wingless aphids
colonise growing
tips
New colonies from in and outside
orchard Adult aphids return
to orchard, Eggs laid in bark to overwinter Winged adults appear, colonise
alternative hosts Growth
Stages of Cherry
100% LF
Dormancy Bud Swell Bud
Burst Bloom
S- Fall
Shoot and Fruit Development
Harvest Post Harvest 50% LF
Monitoring Check growing tips regularly and identify
‘hot spots’
Cultural Remove colonies as they appear (small
scale)
Biological Encourage parasitic and predatory insects
with nectar-producing plants within the orchard, headlands and windbreaks
Chemical Apply winter oil near hatching
Apply selective aphicides if thresholds are reached. Spray hot spots early to
reduce spread
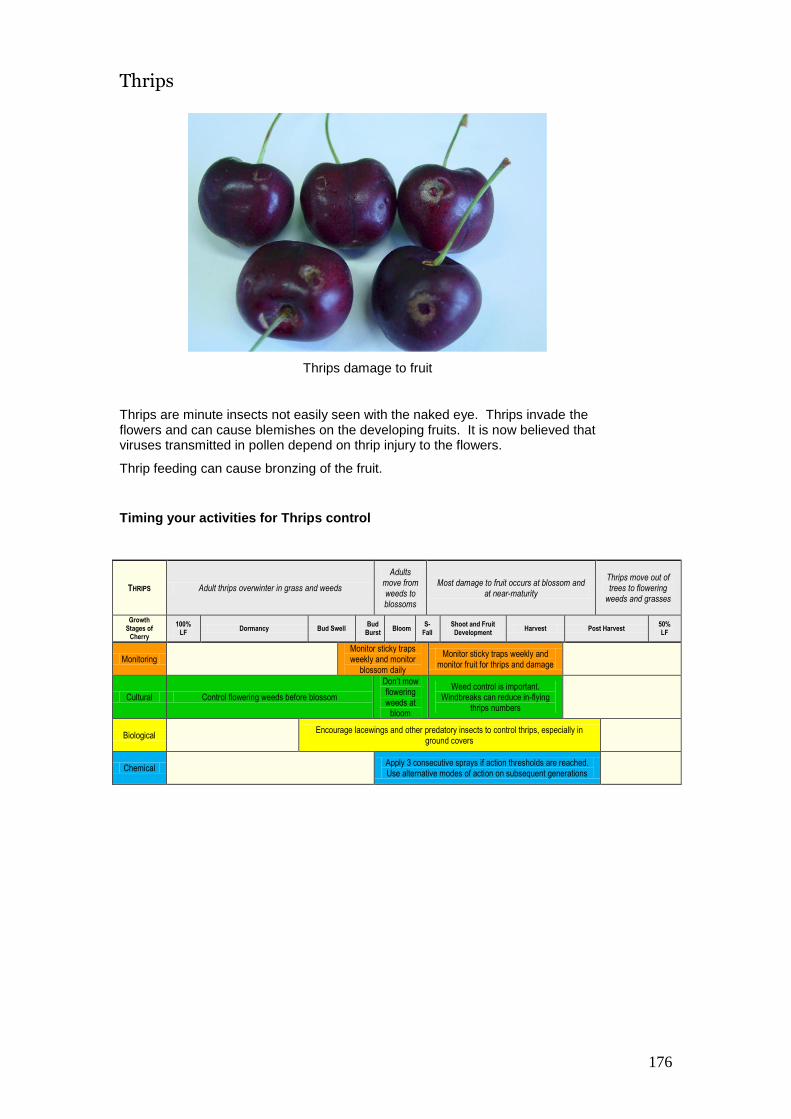
176
Thrips
Thrips damage to fruit
Thrips are minute insects not easily seen with the naked eye. Thrips invade the flowers and can cause blemishes on the developing fruits. It is now believed that viruses transmitted in pollen depend on thrip injury to the flowers.
Thrip feeding can cause bronzing of the fruit.
Timing your activities for Thrips control
THRIPS Adult thrips overwinter in grass and weeds
Adults move from weeds to blossoms
Most damage to fruit occurs at blossom and at near-maturity
Thrips move out of trees to flowering
weeds and grasses
Growth Stages of
Cherry
100% LF
Dormancy Bud Swell Bud
Burst Bloom
S- Fall
Shoot and Fruit Development
Harvest Post Harvest 50% LF
Monitoring Monitor sticky traps weekly and monitor
blossom daily
Monitor sticky traps weekly and monitor fruit for thrips and damage
Cultural Control flowering weeds before blossom
Don’t mow flowering weeds at
bloom
Weed control is important. Windbreaks can reduce in-flying
thrips numbers
Biological Encourage lacewings and other predatory insects to control thrips, especially in
ground covers
Chemical Apply 3 consecutive sprays if action thresholds are reached. Use alternative modes of action on subsequent generations
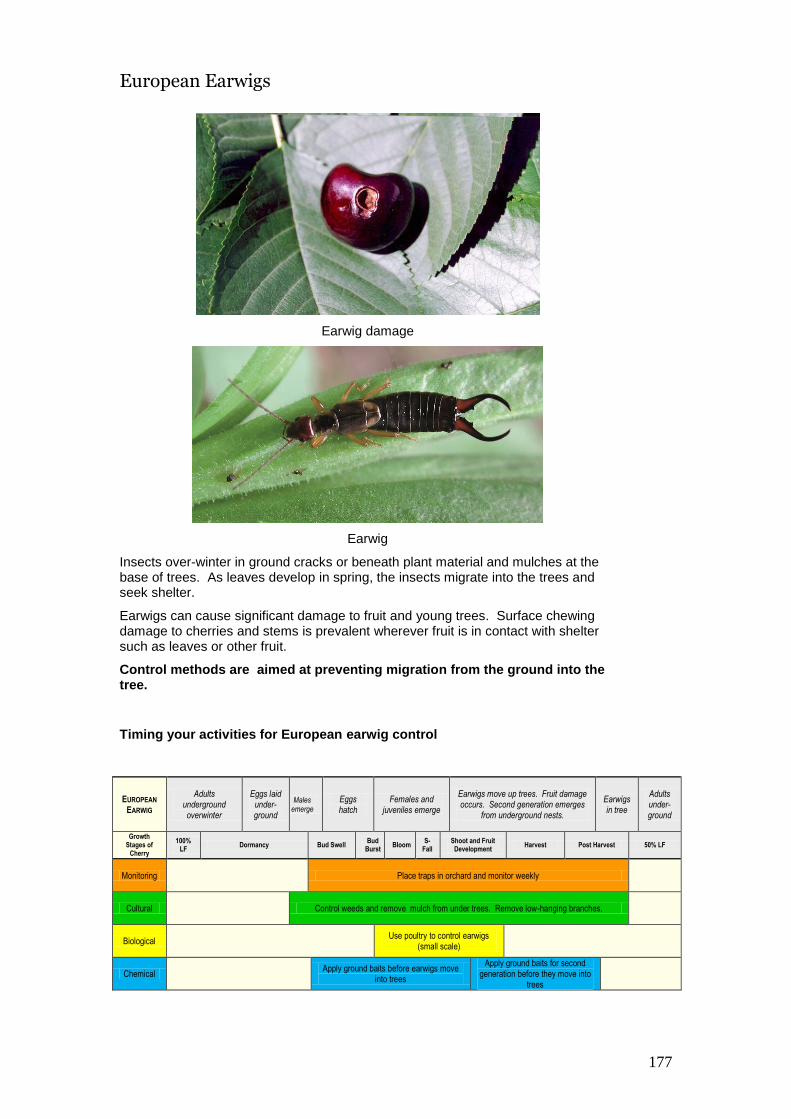
177
European Earwigs
Earwig damage
Earwig
Insects over-winter in ground cracks or beneath plant material and mulches at the base of trees. As leaves develop in spring, the insects migrate into the trees and seek shelter.
Earwigs can cause significant damage to fruit and young trees. Surface chewing damage to cherries and stems is prevalent wherever fruit is in contact with shelter such as leaves or other fruit.
Control methods are aimed at preventing migration from the ground into the tree.
Timing your activities for European earwig control
EUROPEAN
EARWIG
Adults underground overwinter
Eggs laid under-ground
Males emerge
Eggs hatch
Females and juveniles emerge
Earwigs move up trees. Fruit damage occurs. Second generation emerges
from underground nests.
Earwigs in tree
Adults under-ground
Growth Stages of
Cherry
100% LF
Dormancy Bud Swell Bud
Burst Bloom
S- Fall
Shoot and Fruit Development
Harvest Post Harvest 50% LF
Monitoring Place traps in orchard and monitor weekly
Cultural Control weeds and remove mulch from under trees. Remove low-hanging branches.
Biological Use poultry to control earwigs
(small scale)
Chemical Apply ground baits before earwigs move
into trees
Apply ground baits for second generation before they move into
trees

178
Weevils
Garden weevil damage
There are 2 main Weevil species that infest cherries. These are
Fuller's rose weevil
Garden weevil.
Each weevil has a different life cycle and can cause varying levels of damage.
Fuller's rose weevil tends to cause damage to leaves, flowers and buds and they generally do not eat the fruit. This weevil will lay its eggs in sprinklers leading to blockages and uneven irrigation.
Check sprinklers regularly.
Garden Weevil
Adult garden weevil
The main weevil affecting cherries is Garden weevil. This pest varies in colour from dull grey to grey-brown or grey-black. It is about 8-12mm long and has a pale V mark on its rear abdomen.
The larvae live in the soil as white - cream, legless grubs which emerge as adults throughout spring, summer and autumn. The adults cause the main damage eating leaves, leaf petioles, fruit stems and fruit.
Fruit damage is usually seen as a chewed section of the skin and close underlying flesh. This feeding damage can resemble shallow lesions with a scooped out appearance.
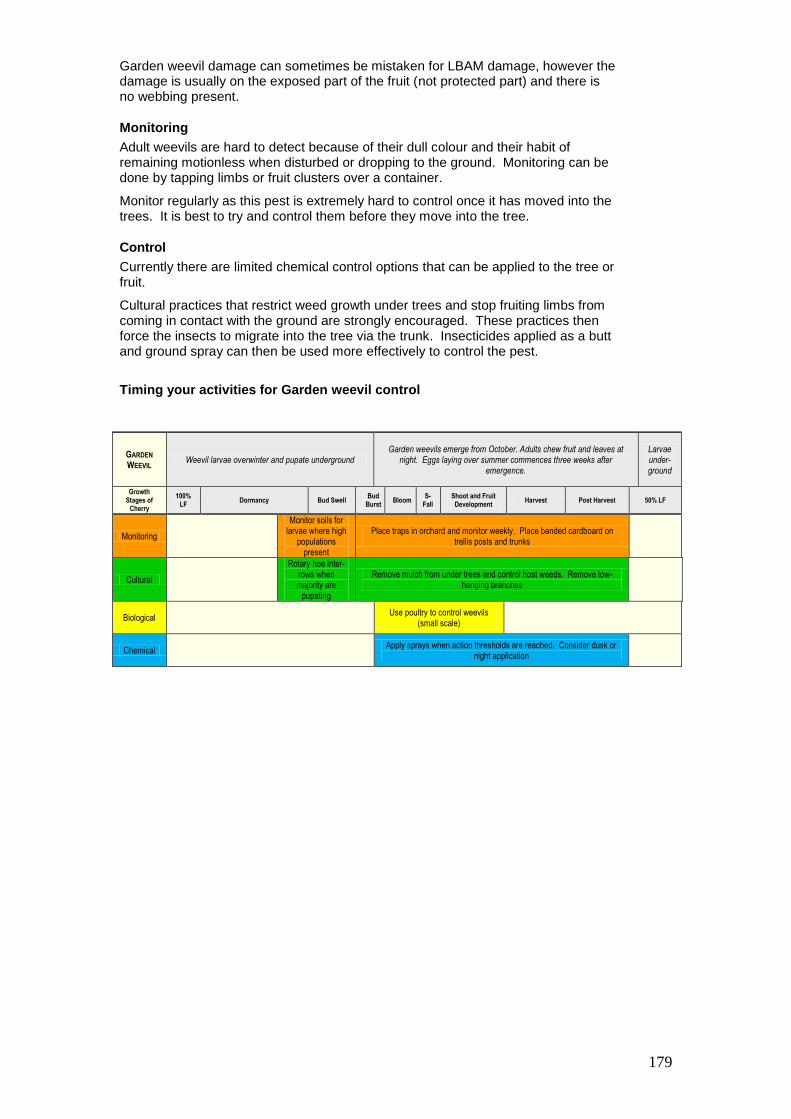
179
Garden weevil damage can sometimes be mistaken for LBAM damage, however the damage is usually on the exposed part of the fruit (not protected part) and there is no webbing present.
Monitoring
Adult weevils are hard to detect because of their dull colour and their habit of remaining motionless when disturbed or dropping to the ground. Monitoring can be done by tapping limbs or fruit clusters over a container.
Monitor regularly as this pest is extremely hard to control once it has moved into the trees. It is best to try and control them before they move into the tree.
Control
Currently there are limited chemical control options that can be applied to the tree or fruit.
Cultural practices that restrict weed growth under trees and stop fruiting limbs from coming in contact with the ground are strongly encouraged. These practices then force the insects to migrate into the tree via the trunk. Insecticides applied as a butt and ground spray can then be used more effectively to control the pest.
Timing your activities for Garden weevil control
GARDEN
WEEVIL Weevil larvae overwinter and pupate underground
Garden weevils emerge from October. Adults chew fruit and leaves at night. Eggs laying over summer commences three weeks after
emergence.
Larvae under-ground
Growth Stages of
Cherry
100% LF
Dormancy Bud Swell Bud
Burst Bloom
S- Fall
Shoot and Fruit Development
Harvest Post Harvest 50% LF
Monitoring
Monitor soils for larvae where high
populations present
Place traps in orchard and monitor weekly. Place banded cardboard on trellis posts and trunks
Cultural
Rotary hoe inter-rows when majority are
pupating
Remove mulch from under trees and control host weeds. Remove low-hanging branches
Biological Use poultry to control weevils
(small scale)
Chemical Apply sprays when action thresholds are reached. Consider dusk or
night application
180
Chemicals for pest and disease control
Under Australian Federal Government legislation the registration of agricultural chemical or pest control agents for use in Australia is managed by the Australian Pesticides & Veterinary Medicines Authority (APMVA).
This Authority has the responsibility of authorising the use of chemicals for use as either a registered chemical on a crop or through a temporary permit authorisation (usually for minor crops).
Detailed information on the registered chemicals or permits can be obtained from the APMVA website: http://www.apvma.gov.au) or from state Departments of Primary Industries (or Agriculture)
Chemical resistance
Development of disease and pest resistance to spray chemicals has been most prevalent in Australia with Brown rot and aphids. Strategies for combating development of resistance differ for each.
Brown rot / Blossom blight
Several of the newer fungicide groups, although highly effective against Brown rot, have a very specific mode of action against the fungus. If any one particular chemical is used repeatedly and consecutively, sooner or later races of fungus will develop that have natural resistance to the chemical. The problem is made worse by ‘cross resistance’. Because all chemicals in the same chemical group have a similar mode of action against the fungus, once resistance develops against one chemical, that resistance will extend to other chemicals in the same chemical group. Chemical groups at most risk are: benzimidazoles, demethylation inhibitors and dicarboximides.
Control strategies:
Never use chemicals in the same chemical group as consecutive sprays.
Either
alternate chemicals from different chemical groups
Or
use a ‘multi-site’ chemical in combination with a chemical from a susceptible group
Aphids
Resistance of green peach aphid (GPA) to demeton-s-methyl, was first detected in NSW in 1976. By 1979, resistance to pirimicarb had been found in aphids from Queensland, Victoria and NSW. For these resistant populations of GPA, resistance to demeton-s-methyl has also conferred resistance to other organophosphate insecticides (dimethoate, diazinon, etc).
An interesting phenonenom with GPA is that resistant types to pirimicarb can revert to susceptible populations if pirimicarb is removed from the spray program for a while. However, organophosphate-resistant aphids are unlikely to lose their resistance.

181
Control strategies for Green peach aphid (GPA):
Winter treatment - reduce overwintering aphid populations by use of winter or
dormant oil at early buds-well. Check product labels for recommended rates
Spring treatment - apply registered chemicals at label rate. Rotate the chemicals used using chemicals of different groups to minimise resistance build up
Biological control - beneficial insects such as ladybirds and parasitic wasps can help control GPA in spring, however, reasonable populations of aphids are needed to attract the beneficial insects to the trees. If a pesticide has to be used to control aphid numbers use one that is “relatively safe” to use on beneficial insects.
Cherry aphids
Unlike GPA, cherry aphids only attack cherry trees. Resistance to organophosphates has not been reported to date so they can be used in a control program. However, organophosphates are toxic to most beneficial insects.
It is suggested that a similar strategy to PGA control be adopted for cherry aphid.
To assist with minimising chemical resistance development lists of the various insecticide, miticide and the fungicide chemical groups are provided as appendices 2
and 3.
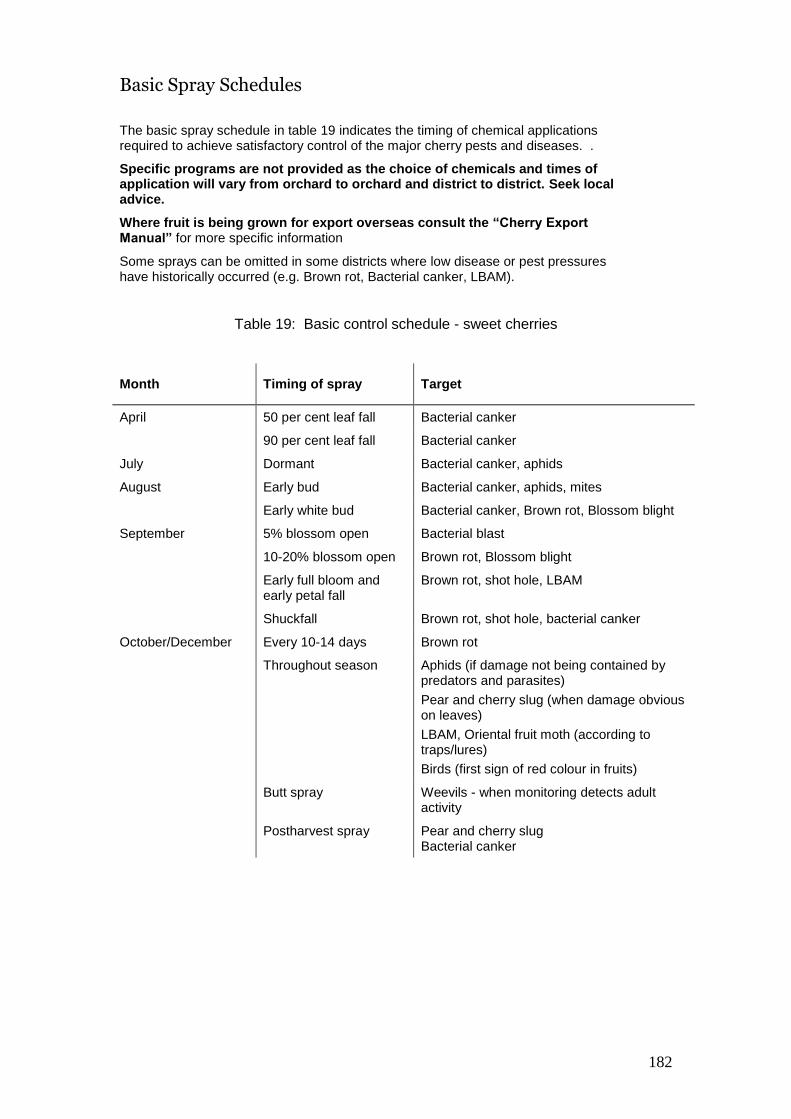
182
Basic Spray Schedules
The basic spray schedule in table 19 indicates the timing of chemical applications required to achieve satisfactory control of the major cherry pests and diseases. .
Specific programs are not provided as the choice of chemicals and times of application will vary from orchard to orchard and district to district. Seek local advice.
Where fruit is being grown for export overseas consult the “Cherry Export Manual” for more specific information
Some sprays can be omitted in some districts where low disease or pest pressures have historically occurred (e.g. Brown rot, Bacterial canker, LBAM).
Table 19: Basic control schedule - sweet cherries
Month Timing of spray Target
April 50 per cent leaf fall Bacterial canker
90 per cent leaf fall Bacterial canker
July Dormant Bacterial canker, aphids
August Early bud Bacterial canker, aphids, mites
Early white bud Bacterial canker, Brown rot, Blossom blight
September 5% blossom open Bacterial blast
10-20% blossom open Brown rot, Blossom blight
Early full bloom and early petal fall
Brown rot, shot hole, LBAM
Shuckfall Brown rot, shot hole, bacterial canker
October/December Every 10-14 days Brown rot
Throughout season Aphids (if damage not being contained by predators and parasites)
Pear and cherry slug (when damage obvious on leaves)
LBAM, Oriental fruit moth (according to traps/lures)
Birds (first sign of red colour in fruits)
Butt spray Weevils - when monitoring detects adult activity
Postharvest spray Pear and cherry slug Bacterial canker

183
Pest and disease control for non-bearing cherries
Bacterial canker, Brown rot, Shot hole, Leaf curl
For sweet cherries, control of bacterial canker is important as this disease can kill young trees. See notes under bacterial canker. A routine copper spray when the buds are swollen but before they burst, will generally assist the control of leaf curl, brown rot and shot hole. Leaf curl is a common disease and can seriously affect tree development, particularly in the first season of growth. Spraying newly planted trees should not be overlooked. Apply a second copper spray 7-10 days later for control of bacterial canker.
Pear and cherry slug
Spray with an appropriate chemical as soon as an infestation is noticed.
Aphids
Infestations occur in autumn but may become a problem from late September onwards. Spray as soon as an infestation is noticed and if action is warranted.
Crown gall
Grown gall can cause significant losses by infection of the root system. Rootstocks and bare rooted trees should be treated prior to planting with a biological control agent (see the Biological control section)
Scale insects
Scale infestations can lead to week un performing trees and even tree death. Make sure nursery trees are not infested. Treat trees if infestations are observed, preferably spot treat in preference to whole orchard treatments (if possible).
Rabbits and hares
Young trees may be severely damaged from early May through to late August. Protect with a sound fence made from netting. Apple or plum prunings round headlands are very attractive to pests and help to divert them from trees. Scatter a fresh lot of prunings every two to three weeks. Damage by rabbits and hares can also be minimised by painting tree butts with a mixture of white acrylic paint (5 L) plus 1.4 kg of 800 g/kg Thiram™ plus 5 L water. Alternatively, cover the butts with plastic guards.
References
Mooney AM, Hetherington SD and Bright JD 2009. Orchard plant protection guide for deciduous fruits in NSW 2009-10. Industry and Investment New South Wales. .
184
Weed Management
Assistance from the NSW Department of Primary Industries is acknowledged for use of information in this section from their “Orchard Plant Protection Guide for Deciduous fruits in NSW 2009-2010” – NSW DPI Management Guide – 19
th edition
Cherry trees, particularly young trees do not compete with weeds well. Managing weeds in an orchard is a constant and ever changing situation. Weeds are very adept at reacting to changing environmental conditions and control measures used. Consequently control measures and management strategies must be regularly adjusted to account for the weed species present, population density, weed growth stages and environmental conditions. The failure to continually adjust management and control strategies can lead to shifts in weed populations and increased problems in control. This is particularly important in relation to the control of perennial weeds and development of herbicide resistance.
Control measures Chemical weed control has been the predominant method of weed control used in orchards, however there are a number of other options that can be used either separately or in conjunction with chemical (herbicides) strategies.
Chemical weed control The main periods for targeting weeds are autumn, when the bulk of winter growing weeds germinate and spring, when there is rapid weed growth and the summer growing weeds germinate. Targeting weed control whilst the weeds are small and more sensitive allows for more effective control. Weed control becomes much harder and more complex if weeds are allowed to become large or in some cases lignified. There are two main types of chemical herbicides registered for use in orchards. These are:
Residual or pre emergent herbicides
These are generally applied to bare soil where their mode of action is to generally prevent the germination or emergence of the weeds
“Knockdown herbicides
These types of herbicides are applied to growing plants where their generally non selective nature kills green growing material or the weeds root systems. Some knock down herbicides are very specific in the types of weed species they control. Selective grass herbicides can be used to target grass species where they are a significant problem.
A third type of chemical has a hormonal mode of action. None of these types of chemicals are registered for use in orchard situations and can cause serious problems if applied to orchard trees. Weed control programs can be utilised using a combination of herbicides from each type. The actual program used will depend on the weed species to be controlled, herbicides available (and registered for use on cherries) and the orchardist’s preferences. Orchardists in some production areas prefer to avoid the use of residual or pre emergent herbicides because of concerns of their impact on soil health. Specific information on what herbicides are registered or permitted for use in your growing region can be obtained from the APMVA, local Department of Primary Industries or chemical resellers.
185
Glyphosate use in cherry orchards should be avoided or undertaken very carefully in autumn to prevent absorption into the trees root systems. Autumn up take of glyphosate into trees may only become evident during the new flush of tree growth in spring.
Herbicide resistance and tolerance As with pest and disease control pesticide resistance can also become a problem with continuous herbicide usage. Resistance develops when a population of plants which was initially controlled with a commercial rate of chemical is no longer controlled by that herbicide. Within every population of weeds there are genetic differences. One of these differences is the ability to withstand a specific herbicide. With continued use the susceptible plants are selectively removed leaving the non susceptible (resistant) plants to dominate, if no other action is taken to prevent seed set in the weeds. This is particularly important where there is a reliance on chemical control only. Once developed herbicide resistance will persist for many years and a number of other control measures will be necessary to control the resistant weeds. These options may be more expensive and less effective Herbicide tolerance is different to herbicide resistance whereby a specific weed species was never adequately controlled by commercial rates of a particular herbicide. (for example Sedges with glyphosate). Tolerance can also be a problem if there is continuous use of a particular chemical that is effective against certain species but not others. Shifts in weed populations to the more tolerant species can cause serious control problems. Always use a combination of weed control options in any control or management program.
Resistant weeds
At present there are ever increasing populations of glyphosate resistant annual ryegrass populations. There has been a national task force set up to address the problem of glyphosate resistance (www.glyphosateresistance.org.au). There may be localised problems that have not been reported to authorities.
Signs of herbicide resistance
Strategies to monitor and watch for any resistance problems include the following:
Keep accurate records.
Monitor problems and record effectiveness of herbicide applications.
If a herbicide application has not worked, find out why.
Check any control problems were not due to operator or spraying error.
Where practical conduct your own orchard tests to confirm herbicide failure and which herbicides are still effective.
Where herbicide resistance is detected or suspected prevent seed set on the weeds. This may require mechanical methods ie mowing, slashing or hoeing.
Get a herbicide resistance test carried out by qualified service providers (seek information from your local chemical reseller or Department of Primary Industries)
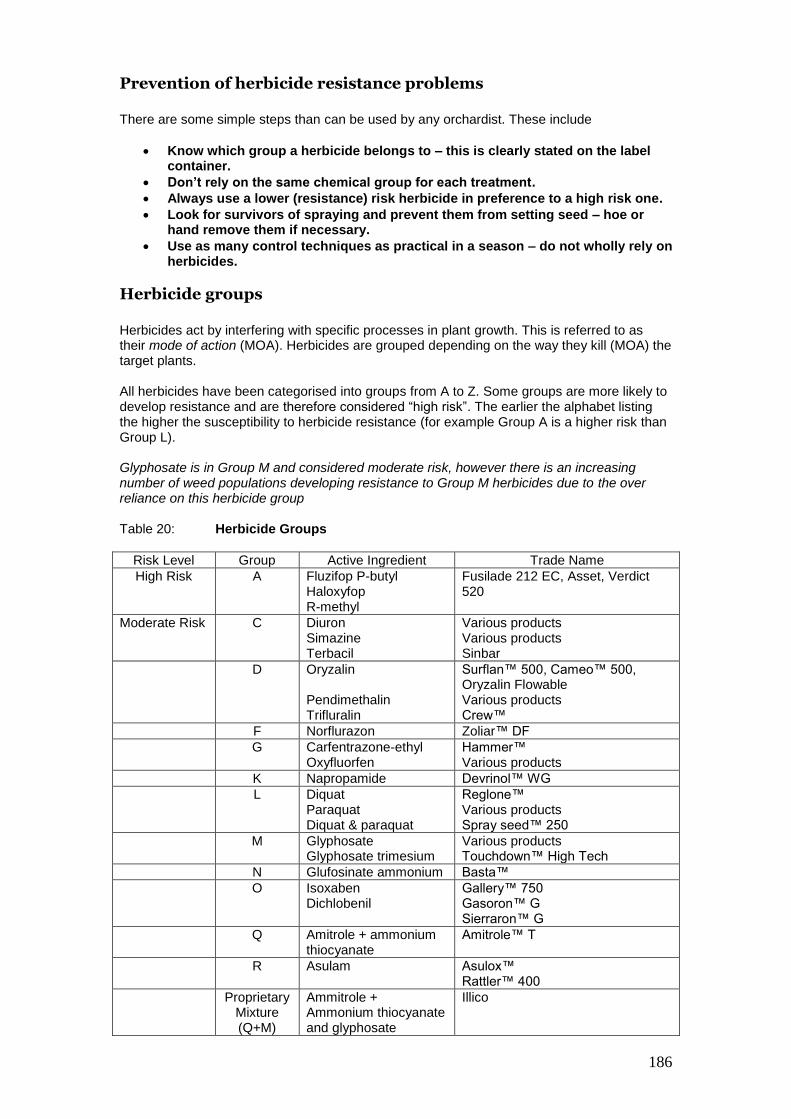
186
Prevention of herbicide resistance problems
There are some simple steps than can be used by any orchardist. These include
Know which group a herbicide belongs to – this is clearly stated on the label container.
Don’t rely on the same chemical group for each treatment.
Always use a lower (resistance) risk herbicide in preference to a high risk one.
Look for survivors of spraying and prevent them from setting seed – hoe or hand remove them if necessary.
Use as many control techniques as practical in a season – do not wholly rely on herbicides.
Herbicide groups
Herbicides act by interfering with specific processes in plant growth. This is referred to as their mode of action (MOA). Herbicides are grouped depending on the way they kill (MOA) the target plants. All herbicides have been categorised into groups from A to Z. Some groups are more likely to develop resistance and are therefore considered “high risk”. The earlier the alphabet listing the higher the susceptibility to herbicide resistance (for example Group A is a higher risk than Group L). Glyphosate is in Group M and considered moderate risk, however there is an increasing number of weed populations developing resistance to Group M herbicides due to the over reliance on this herbicide group Table 20: Herbicide Groups
Risk Level Group Active Ingredient Trade Name
High Risk A Fluzifop P-butyl Haloxyfop R-methyl
Fusilade 212 EC, Asset, Verdict 520
Moderate Risk C Diuron Simazine Terbacil
Various products Various products Sinbar
D Oryzalin Pendimethalin Trifluralin
Surflan™ 500, Cameo™ 500, Oryzalin Flowable Various products Crew™
F Norflurazon Zoliar™ DF
G Carfentrazone-ethyl Oxyfluorfen
Hammer™ Various products
K Napropamide Devrinol™ WG
L Diquat Paraquat Diquat & paraquat
Reglone™ Various products Spray seed™ 250
M Glyphosate Glyphosate trimesium
Various products Touchdown™ High Tech
N Glufosinate ammonium Basta™
O Isoxaben Dichlobenil
Gallery™ 750 Gasoron™ G Sierraron™ G
Q Amitrole + ammonium thiocyanate
Amitrole™ T
R Asulam Asulox™ Rattler™ 400
Proprietary Mixture (Q+M)
Ammitrole + Ammonium thiocyanate and glyphosate
Illico
187
Recent changes to herbicide modes of action groups by Croplife Australia have categorised herbicides as either high or moderate risk of developing resistance. There are no longer any references to herbicides being in a low risk group
Please note that not all the chemicals listed in table 20 (Herbicide groups) may be registered for use in cherry orchards. Always check the label registration. The list has been included in its entirety because an orchard may have more than 1 crop species or there may be areas with no cropping that require weed control measures. The table on herbicide groups was referenced from: Mooney AM, Hetherington SD and Bright JD 2009. Orchard plant protection guide for deciduous fruits in NSW 2009 -10. Industry and Investment New South Wales.
Alternative weed control methods Listed below are some of the alternative weed control options available. The list is not complete but concentrates on those techniques widely used. These include
Cultivation
Grazing animals
Flame or thermal weeding
Mulching
Sod culture
Cultivation
Where a permanent plant sod is grown down the tree row shallow cultivation may be used but limited to the weed strip. Be careful to keep it shallow as damage to the trees root system may restrict tree performance and/or lead to the growth of suckers from the damaged roots. Hand cultivation (with hoes) can be useful in removing hard to control weeds or localised problems despite being labour intensive. It is an alternative to the spot spraying of weeds.
Grazing animals
A common practice in some orchards is the use of grazing animals, such as sheep, geese and fowls to manage weeds. This is often done during the dormant winter period. Geese are significant weed feeders, particularly grasses and they also can be helpful in removing windfall or unharvested fruit. Sheep are effective in weed control but need to be carefully managed to avoid damage to the trees. If weeds are scarce or the sheep are left in an orchard for too long they can graze on the trees causing significant damage. Electric fences may be useful in controlling stock movement. If animals are intended for sale after grazing in an orchard be aware of chemical residue issues. Check the animal grazing recommendations on labels (where possible). Cattle and other large animals can cause damage to both trees and irrigation equipment. Their use in orchards is not recommended.
Flame or thermal weeding
Heat, can be used to singe weeds, particularly small seedlings and usually achieved by the use of propane burners. Its effect on large annual or perennial weeds is minimal. There are a number of issues associated with the use of this technique, including staff, occupational, health and safety precautions and local fire restrictions. Severe crop damage can occur if used on young trees less than 3 years old.
188
Overseas research has shown that hot air and water can also be effective although it can be problematic in large scale orchards..
Mulching
The spreading of large amounts of organic matter (such as straw, hay, wood chips or compost) along the tree line is becoming increasingly favoured in orchards. The benefits of these additions include regulation of soil temperature and moisture, weed suppression and the addition of organic matter to the soil. The downside of of applying organic matter is that it can provide favourable habits for earwigs and weevils. Orchardists with problems with these pests should consider the use of these additives carefully. Seek further information if possible. Straw and hay are particularly attractive to earwigs.
Sod culture
This method of orchard management combines the use of herbicide in a strip along the planted tree row and a cover of various grasses and other plants in the inter tree row. The width of the herbicide strip can vary depending on orchard conditions but should be as narrow as practical. Plant material from the inter row strip can be mowed and thrown up under the trees on the herbicide strip. This can be used to help suppress weeds and improve the physical and chemical conditions of the soil.
Weed control in young orchards Young cherry orchards are particularly sensitive to weed competition in the first three to four years. Additionally because of their immature green bark, they can be sensitive to the use of certain herbicides (particularly glyphosate) so careful herbicide selection and application is essential. Tree guards or sleeves can be used to minimise spray application to the immature bark, however careful management is also essential during application. There are often specific warnings about the use of a chemical around young trees. Read the chemical label carefully and only use those herbicides registered for use on young trees.
References
Mooney, A.M. Hetherington, S.D. and Bright, J.D. (2009) Orchard plant protection guide for deciduous fruits in NSA 2009 -10. NSW DPI Management Guide – 19
th Edition.

189
Using Chemicals
Read the label
No pesticide can be offered for sale, sold or traded unless it has been officially registered with the APVMA.
All registered pesticides must carry prescribed labels which show information such as the nature and content of the products active constituents, appropriate warnings and directions for use and handling information.
The label must also state the specific purposes for which the pesticide is intended to be used, such as the name of the relevant pests and crops.
It is illegal to use a pesticide for any purpose not specified on the label or the package in which the pesticide is sold, unless an authorised permit is made available by the APVMA.
Misuse of a pesticide is liable to be detected by State and Federal Health Departments in routine checking of produce for pesticide residues.
Permits
In certain circumstances the APVMA may issue permits for use when a new pest is identified or no alternative effective chemicals are registered for use on a specific pest or disease. These permits allow for the authorised use of these chemicals.
These permits are usually only issued for a specified period of time and for specific uses. Applications for a permit are generally only accepted when applied for by industry organisations through a specified process.
Details of most current permits are available either through the APMVA or
through industry organisations and chemical resellers.
Safety precautions
Always READ THE LABEL before using a pesticide.
To comply with the Pesticide Regulations (as approved by the Registrar) the label must carry directions on:
Precautions to be observed by persons handling the pesticide to avoid harm.
and
First aid for persons who have swallowed or inhaled, or have been contaminated by the pesticide.
Appropriate safety clothing must be worn when using any agricultural chemical, particularly when handling the concentrate out of the container.
190
Spray residues
Residue tolerance levels: There are tolerance levels set for most pesticides in common use. These are prescribed and listed in pesticide regulations.
Use of the recommended dose rates and withholding periods will ensure that these tolerance levels are not exceeded.
To minimise residue problems:
(a) Recommendations on dosage rates and time of application should be followed.
(b) Chemicals should not be applied close to harvest and at all times the withholding periods for specific materials should be observed.
(c) Visible residues on fruit should be removed.
Compatibilities
Sprays should not be mixed together unless they are compatible, that is, safe and effective when combined.
Read the label and consult the supplier's compatibility information.
A general guide is also available in the “Orchard plant protection guide for deciduous orchards in NSW”
Spares and Repairs
Parts which are likely to wear with normal use should be kept on hand to ensure no delays occur when replacements are needed.
These should include:
Valves and seats for pumps.
Glands and packing for pumps.
Filter gauzes.
A complete set of swirl plates and discs.
Replacement hose, couplings and clamps.
191
Bird Protection Birds can do considerable of damage to cherries. The main problem species varies from region to region based on the species present in each region. Both native and introduced species can cause damage. This damage can range from damaged fruit to in severe cases total fruit bud removal (Adelaide Rosella damage in Adelaide Hills orchards). Parrots, Wattle birds, Lorikeets, Blackbirds, Silver-eyes and Crows can all cause damage.
The damage caused by birds varies on whether they are territorial species such as Rosellas or transitory species such as Wattle birds. Territorial birds tend to develop regular orchard feeding habits where as the transitory move into the orchards from other areas when their normal native flora is not abundant.
Protective devices used against birds range from bird scarers to total protective netting cover.
Bird scarers
Bird scarers range in complexity from flapping plastic bags and scarecrows to more sophisticated devices that may be brightly coloured and/or emit sound.
Visual devices consist of plastic streamers, plastic bags, scarecrows, kites, and rotating items such as windmills and vanes with contrasting colours.
Kites are available in the shape of predatory birds, which are suspended above the crop. Helikites helium filled balloons with hawk like faces are also used.
Sound devices include gas guns, ultra sound machines and units that emit bird distress calls or a range of electronic sounds.
Effective scaring
Birds are persistent - they will want to stay if they feel happy and comfortable. The goal is to make an area undesirable and unappealing (via sound, odour, taste, visually or physically).
Birds can eventually become familiar with visual or sound devices until finally they are ignored.
The effectiveness of any scare device can be prolonged if:
Scarers are used as infrequently as possible. Generally use scarers before the fruit is at its most vulnerable (first sign of red colouration).
A variety of scarers are used. The more often birds encounter a particular device the shorter will be its effective life.
Remove any scarer that has lost is effectiveness immediately
The position of scarers is changed as frequently as possible.
The effects of scarers are reinforced by occasionally discharging guns (if you have the proper licences and permits) in their vicinity. This associates the device with real danger.
Sound emitting devices that have no visual effects are camouflaged. If such devices are to continue to scare, birds should acquire as little information as possible about them.
Sound emitters are positioned to produce the maximum noise. Such devices should point downwind.
Times of use and operating rate of sound devices are controlled. Such devices should operate to coincide with the feeding behaviour of birds. If operated continuously birds will become used to them.
192
Alternative food is provided for the birds. If no other food is available for the birds the urge to enter the orchard will be greater.
Increasingly complex (incorporating radar and sound) bird scaring systems are now becoming available. These systems can be costly and producers should carefully consider their appropriateness for their own orchard situation before their purchase.
Always remember that if sound-emitting devices are used, neighbours will be affected. Different district councils have by-laws relating to the use of gas guns and other sound-emitting devices. Check with your local council before purchasing any of these devices as the by-laws may minimise their effective use.
Destruction of pest bird species
A wide range of different bird species can be found in cherry orchards, not all are considered pest species. Effective control strategies may require the destruction of pest bird species. The destruction of any bird is a highly emotive issue and therefore before destroying any bird, producers need to
1. Correctly identify the pest species.
2. Obtain a permit for the shooting of protected species.
The onus is on land owners to correctly identify the bird species damaging their crops. Persons who kill or injure a protected species without an appropriate permit may be liable for prosecution.
References that can be used to assist in accurate identification include
Readers Digest, Complete Book of Australian Birds.
Simpson and Day, Field Guide to the birds of Australia, Viking O'Neil
Pizzey and Knight, Field Guide to the birds of Australia, Angus & Robertson
Slater, Field Guide to the birds of Australia, Rigby
A large proportion of the Australian Parrot and Lorikeet species are protected under various National Parks and Wildlife legislations.
These species can only be destroyed if a destruction permit is obtained from the appropriate government department in each region.
Contact details of state regulatory authorities can be obtained from the various state government websites or telephone directory. Most of these authorities are connected to state Departments of Environment and Heritage.
Introduced bird species such as starlings and blackbirds, are considered environmental and commercial pests and may be humanely destroyed.
A number of native bird species that may be unprotected in a state and may be controlled without the need for a permit may include crows, ravens, galahs, silver-eyes.
Check with local authorities (as above) to determine which species require a permit and those that don’t in your area.
Some species, although they do not require a destruction permit may have special conditions on how they can be destroyed. Check with local authorities
Any method of destruction other than shooting, such as trapping requires specific approval under legislation.
Destruction of any bird (or pest animal) must be performed in a humane and safe manner and in accordance with various legislations such as Prevention of Cruelty to Animals, any relevant firearms legislation, Occupational Health and Safety and all other pertinent legislation.
A "code of practice for the humane destruction of birds” is obtainable from you state authority or possibly local district council.
193
Be aware of safe gun use practices and where any off target shots may eventually land.
Encouragement of natural predators
Nothing puts a bird off eating quicker than the sight or presence of a bird of prey. Using a natural predator to combat a bird problem in your area is an environmental and consumer win-win situation.
Common species include Goshawks, Collared sparrow hawks, Falcons and Kites. Each species has a specific niche in the food chain and different hunting and feeding characteristics.
Birds of prey have 3 basic requirements
Roosting sites.
Nesting sites.
Regular food supply.
Roosting sites can be as simple as old dead trees left standing or may be poles, specifically erected in orchard trouble spots. Many birds of prey roost whilst looking for prey.
Positioning old nests in tall trees will help encourage young birds to stay in an area.
A regular food supply is the most critical factor in encouraging birds of prey to stay and breed in an area. If this food is not available naturally it can be provided for birds at designated sites on a regular basis. These feeding sites can be as simple as poles and platforms in the orchard. Different feeding sites of different heights will encourage different species to the area.
Birds of prey will follow migratory birds but they are more effective if they breed in your area. Supplemental feeding when pest birds are not present helps achieve this. Rabbits, hares, dead birds or simply meat are all suitable.
Chemical deterrents
At present there are very few chemicals that can be applied to fruit to prevent birds feeding. The chemical methiocarb was used up till the early 1980s when its national registration was adjusted to prevent its use as a bird deterrent.
Multicrop - Scat® is registered Australia wide as a bird deterrent for use on fruit and vegetable crops. It is available in commercial sized packs. It is also highly soluble and needs reapplication after rainfall events.
Netting
Nets are increasingly being used world-wide to protect cherries from birds. At present netting is largely considered the only effective method for bird control in cherries. It is regarded as an economical option when the increase in returns due to excluding birds and not having to carry out other forms of bird control exceeds the cost of the netting.
There are two basic ways to net an orchard;
Permanent and enclosed structure.
Temporary drop nets.
Drop nets are put out each season and can be moved from row to row, and then collected and stored for further use in following seasons. Permanent nets cover the

194
orchard all season and are designed so that all operations in the orchard can be carried out under them.
Each system has its own relative advantages and disadvantages; these need to be carefully considered before making a decision on which system to use. The use of fully covered permanent structures in areas prone to snow is not advised. New designs of orchard protection systems, such as retractable nets and design to fail systems may provide an alternative option.
It is generally considered that drop nets protect the crop that you have and permanent nets ensure that you get a crop to protect.
Well designed and carefully constructed permanent netting structures will provide many years effective bird control provided the nets are well maintained. In the future, netting may be the only way of controlling birds in many situations because of increasing concerns about the use of chemicals, animal welfare issues and new restrictions introduced on the use of noise generating devices.
The basic design of a permanent netting structure is fairly simple, it involves a pole and wire or cable framework supporting separate roof and side panels of net.
The roof is made up of a number of individual panels of netting joined together with plastic or wire clips. Each panel is stretched tightly between wires inserted down strengthened selvedged edges. The most common poles used are CCA-treated pine although hardwood or steel poles can also be used.
Loads that develop in the structure (such as wind and rain) are transferred back through the wire rigging to ground anchors guying back the perimeter poles. It is essential that adequate anchors for each individual site and its relevant conditions are installed. The 'dead-man' anchoring system is preferred, using a substantial 'dead-man' (such as railway sleeper or a railway iron). Screw anchors can also be used in selected sites.
Even a substantial anchoring system may not be enough to support the weight of snow or hail. The weight of hail can force the net down, over the trees and result in considerable damage. On the other hand netting may also give the crop some protection from less severe hail events.
The most common mistake growers make when planting out an orchard they intend to cover, is not leaving sufficient free space around the outside or the orchard, particularly at the ends of the rows. A space of up to 16m is required for:
The last tree in the row to spread at least 2m out from the base.
A tractor (fitted with a spray unit) to turn out of one row into the next or second row without running into the wall net (usually requires 6-8m).
Anchors to be placed behind the perimeter poles a distance equal to but no less than the height of the perimeter poles from the ground to the top (4-6m).
Some structures have used angled guys to support the wall net (rather than having it hang vertically) making a small saving in this 'lost' space. However, an angled wall catches more wind increasing the loads on the structure and thereby increasing the costs because a more substantial structure is required. For the same reason, using wind cloth on the sidewalls significantly increases costs.
Please note that local councils are increasingly placing restrictions or requirements on the way nets can be used and constructed. Seek information from your local council or planning authority before constructing a netting structure.
The cost of a commercially built structure varies considerably depending on the topography, local construction requirements and specifications, net type and design and construction materials.
Consider all of the available options and do your homework prior to committing to a permanent netting structure.
Significant reductions in cost can be achieved with economies of scale. The per hectare cost for a 4 ha block can be up to 25% cheaper compared with a one hectare block.

195
Both knitted and knotted nets are suitable for permanent covers. Extruded nets (welded joins) are also available, but are not suitable for permanent covers.
Properly installed nets should have a life expectancy exceeding 10 years depending on the net construction and use of UV treatments. Nets are now available in a range of colours however there may be some local restrictions on which colours can be used.
The supporting framework should outlast 2-3 nets with a minimum of maintenance if initially well-designed and constructed.
A number of cost/benefit analyses for netting have been undertaken. Most show a positive response. These analyses show that the benefits of netting are basically a function of the annual return to the grower and the level of damage his crop sustains. As bird damage increase the benefits obviously increase significantly.
Netting supply and construction
A number of commercial companies now offer net design and construction services. Growers can reduce the cost of structures by erecting the systems themselves. Building nets does not require special expertise or overly sophisticated equipment. However self constructed systems do not have any warranty protection. It is important to seek advice, particularly on anchor specifications. The size and design of anchors depends on the length of unsupported spans, soil type, wind loads, rain loads and snow if applicable. It is better to over-design anchors.
Throughout Australia there are a large number of net suppliers and contractors, all providing a range of services. It is impractical to list them all and it is suggested that you seek local advice.
There are a number of companies that provide a comprehensive range of services including, net design, supply of components and the construction and maintenance of netted structures on a national basis. Details of some of these companies are provided in appendix 4.
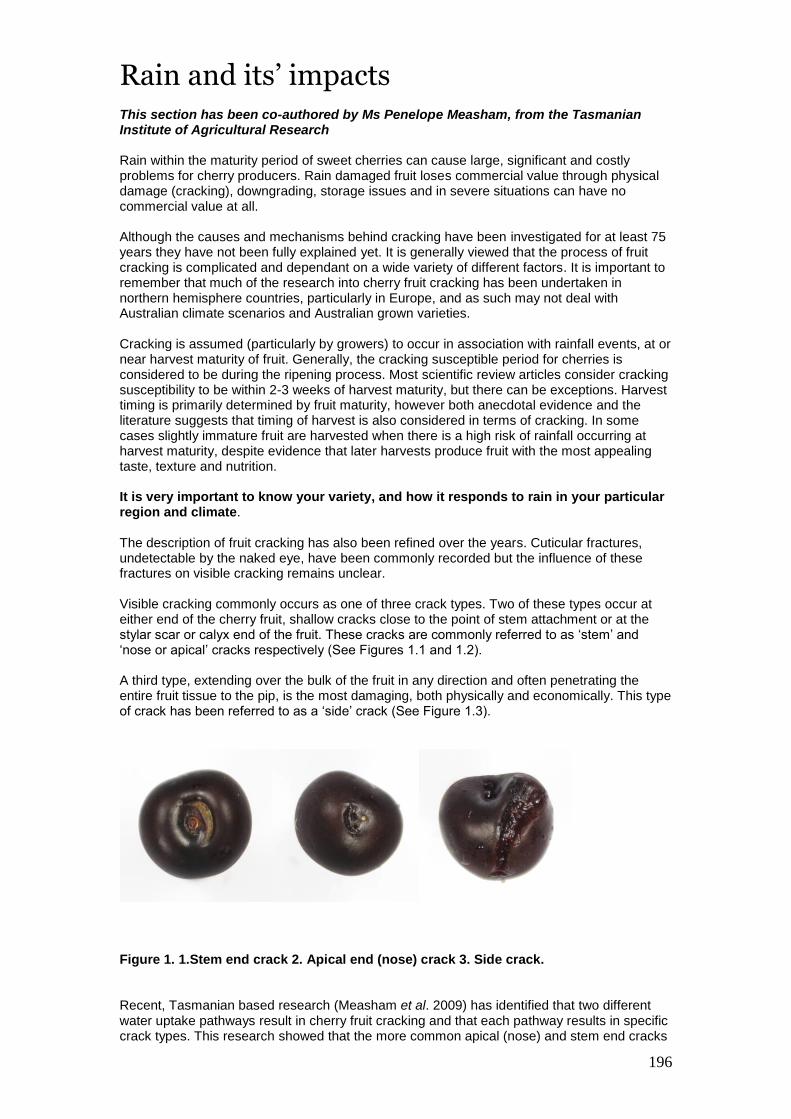
196
Rain and its’ impacts This section has been co-authored by Ms Penelope Measham, from the Tasmanian Institute of Agricultural Research Rain within the maturity period of sweet cherries can cause large, significant and costly problems for cherry producers. Rain damaged fruit loses commercial value through physical damage (cracking), downgrading, storage issues and in severe situations can have no commercial value at all. Although the causes and mechanisms behind cracking have been investigated for at least 75 years they have not been fully explained yet. It is generally viewed that the process of fruit cracking is complicated and dependant on a wide variety of different factors. It is important to remember that much of the research into cherry fruit cracking has been undertaken in northern hemisphere countries, particularly in Europe, and as such may not deal with Australian climate scenarios and Australian grown varieties. Cracking is assumed (particularly by growers) to occur in association with rainfall events, at or near harvest maturity of fruit. Generally, the cracking susceptible period for cherries is considered to be during the ripening process. Most scientific review articles consider cracking susceptibility to be within 2-3 weeks of harvest maturity, but there can be exceptions. Harvest timing is primarily determined by fruit maturity, however both anecdotal evidence and the literature suggests that timing of harvest is also considered in terms of cracking. In some cases slightly immature fruit are harvested when there is a high risk of rainfall occurring at harvest maturity, despite evidence that later harvests produce fruit with the most appealing taste, texture and nutrition. It is very important to know your variety, and how it responds to rain in your particular region and climate. The description of fruit cracking has also been refined over the years. Cuticular fractures, undetectable by the naked eye, have been commonly recorded but the influence of these fractures on visible cracking remains unclear. Visible cracking commonly occurs as one of three crack types. Two of these types occur at either end of the cherry fruit, shallow cracks close to the point of stem attachment or at the stylar scar or calyx end of the fruit. These cracks are commonly referred to as ‘stem’ and ‘nose or apical’ cracks respectively (See Figures 1.1 and 1.2). A third type, extending over the bulk of the fruit in any direction and often penetrating the entire fruit tissue to the pip, is the most damaging, both physically and economically. This type of crack has been referred to as a ‘side’ crack (See Figure 1.3).
Figure 1. 1.Stem end crack 2. Apical end (nose) crack 3. Side crack. Recent, Tasmanian based research (Measham et al. 2009) has identified that two different water uptake pathways result in cherry fruit cracking and that each pathway results in specific crack types. This research showed that the more common apical (nose) and stem end cracks
197
are induced by fruit skin surface wetting. The most commercially damaging “side” cracks are actually induced by water uptake through the plants vascular system. Thus for orchard management, it is important to know how your varieties respond to rain, taking particular note of tendencies for crack type.
Factors influencing rain induced fruit cracking The published literature shows that many factors influence cherry fruit cracking including
Skin and fruit characteristics o Cuticle o Skin strength o Fruit size o Fruit shape o Fruit firmness o Fruit sugars o Maturity
Soil wetness
Environment
Variety
Skin
The cherry fruit skin is covered by a thin cuticle layer, which is a potential route for water uptake and is seen to be the first barrier or resistance to water flow. Cuticle thickness decreases but conductance increases with fruit maturity. Cuticular structure also decreases with high temperatures and direct sunlight. Fruit firmness is further compromised in fruit with ineffective cuticular protection. Being a soft fruit cherries rely primarily on the mechanical properties of the skin to avoid rupture. There are varietal differences in stress and strain capabilities of fruit skin, with research in Tasmania (Measham et al. 2009) showing that a combination of fruit skin thickness, fruit size and turgor best explains the cracking levels of different varieties seen in the field.
Fruit
Fruit size and fruit shape are assumed to influence the incidence of cracking. Christensen (1975) confirms that size is only influential within varieties. Fruit shape is assumed to influence the incidence of cracking as water will pool in either the stem cavity or the apical (nose) depression of an individual fruit after rainfall. However recent research found no effect of anatomical properties (fruit shape) in a study of low, medium and high susceptibility varieties of sweet cherry. Fruit firmness has logically been suggested as influencing fruit cracking. A recent review of cracking literature claims the influence of firmness on cracking is an accepted opinion, but no recent supporting evidence has emerged. Rainfall is said to induce softening of tissue from surface moisture, but it must be remembered that natural tissue softening is occurring as a normal physiological change in ripening. Ripening is also associated with increasing sugar levels. Fruit with higher sugar levels are considered more susceptible to cracking as the increased osmotic potential provides a driving force behind water uptake and movement across the fruit skin. However, not all studies support this statement.
Soil wetness
Given that side cracks have been found to be associated with soil water uptake, soil moisture levels and irrigation may have a role in cracking management. It is generally agreed that even, consistent irrigation is desirable. A few studies have further suggested that the rate of water uptake through the internal vascular system of the tree will influence the amount of
198
cracking (Sekse 1995) therefore it is important that soil moisture is evenly maintained, and trees are not put under water stress.
Environment
Few studies have considered the Australian climate in cherry cracking research. There is a clear link between rainfall and crack development, however, the total amount of rain pre-harvest is not strongly related to cracking levels. The impact of duration of fruit surface wetness could better explain cracking levels and is currently under investigation. Many studies support a strong environmental rather than anatomical influence on cracking susceptibility. Each season is different, and climate over the entire growing season may influence cracking in response to late season rainfall. Cuticular structure is influenced by climate, as is fruit set and ultimate crop load. A relationship between crop load and cracking has been demonstrated within varieties. Heavier crop loads have been found less likely to experience cracking in response to rainfall.
Variety
As yet, no one variety has successfully been shown to be completely resistant to fruit cracking. Selection of resistant varieties has largely been subjective due to a lack of supporting literature and reliance on a cracking index which cannot effectively be used for different regions. The cracking index is a measure of varietal cracking determined by laboratory methods. The test is not always reliable for different regions, climates and seasons. Generally, varietal cracking susceptibility is discussed in terms of being low, medium and high, but even these categories can vary considerably by region and season. The choice of rootstock used has traditionally been limited to availability, suitability to production systems and site selection, but more recently the effect of rootstock has been suggested as influencing cracking. Thus, it is important to know which varieties and which rootstocks perform well in your particular region when selecting varieties to produce.
Minimisation of rain damage
The current available management strategies are all based on minimising water uptake across the fruit surface, by either complete exclusion (harvesting fruit prior to rainfall or use rain covers) or providing a resistance of some kind (spray applications). The use of wind or displaced air (spray machines and helicopters) to physically remove moisture from the trees and fruit is another technique however there does not appear to be a lot of experimental work to conclusively comment on its effectiveness. The main strategies to protect against rain induced cracking are
Site selection
Variety
Physical protection
Spray protection
Site selection
Select sites with no rain over the harvest period. Whilst desirable this is not always feasible for most Australian cherry growers.
Variety
Grow cultivars with demonstrated resistance to rain induced cracking in your region and climate.

199
Physical protection
The use of rain covers on support structures over rows is becoming increasingly common despite its comparatively high cost. Extensive research has been undertaken into the use of rain covers, particularly in Norway and the USA. Covers generally protect the whole tree from rain and have been designed to prevent the fruit surface getting wet. For permanent structures growth retardants or dwarfing rootstocks may be needed to limit the height of canopies. Covers have shown to have variable effects on the incidence of cracking. Results from Norway showed a 10% decrease in cracking compared to uncovered fruit, when covers were applied at the onset of ripening. Using varieties ‘Ulster’, ‘Sam’ and ‘Van’ a reduction in cracking under covers was dependant on rootstock, suggesting factors other than just fruit surface wetness exert an influence on susceptibility. Even with excellent cover from rain, cracking can still occur, which further suggests another mechanism, or a combination of mechanisms are involved in inducing cherry fruit cracking other than water uptake directly across the fruit skin. The use of protective coverings can provide economic benefit compared to non protected orchards but in dry years the costs may not outweigh the benefits. No rigorous economic assessments have been published on the economic performance of covers over cherries in Australia at this stage however, individual grower assessments are leading to their increased use. A large number of different types of covers are now available and growers need to do their own assessments into which ones are the most suitable for their own situation. Issues to consider when contemplating the use of rain covers include:
Suitability for individual sites and locations.
Wind incidence, direction and strength.
Environmental conditions affecting fruit quality not just rain incidence.
Drainage capability of soils.
Economic importance of individual blocks.
Varieties and their marketable returns.
Tree system, rootstocks and management practices.
Airflow movement to minimise high temperatures and humidity.
Potential for increased disease incidence.
Potential to delay fruit maturity and colour development.
Cross pollination requirements and possible need for increased bee numbers.
Cost.
Integration with other crop protection systems i.e. bird protection.
Spray protection
Many comments and claims are made amongst growers on the use of spraying fruit with minerals and other chemicals. According to a recent review, to be considered effective sprays have to possess at least one of the following characteristics;
Delay or reduce the amount of water uptake into the fruit.
Increase transpiration of free water from the fruits surface.
Improve the fruit skin (strength, elasticity, cuticle). Calcium is the major mineral applied in orchards because of its ability to reduce the incidence of cracking in some situations. Calcium is known to increase bond strength of cell walls, increase epidermal thickness and alter cuticular membranes. Most physiological disease and storage disorders of fruits are correlated positively with calcium deficits. Adequate irrigation is vital in early fruit growth because calcium uptake is highly affected by water supply and fruit maturity. When added later as a spray application, calcium chloride (CaCl2) is the main form used, with application rates of between 0.35 – 1%.
200
Research into the use of calcium to manage cracking has shown that calcium needs to be applied in response to rain (before and during) but its effectiveness varies between orchards, seasons and varieties. Enhanced calcium uptake rates in the sweet cherry variety Van is reported when the calcium is combined with thickeners and surfactants. Applications of calcium do not appear to affect the maturity, fruit size or storage properties of fruit, however residues can be left on the fruit by the concentrated sprays. Brown et al. (1995) showed calcium applications in conjunction with copper applications were more effective in reducing cracking than calcium alone. When applied as Copper Sulphate (CuSO4) copper has also been shown to reduce cracking at specific concentrations. Aluminium salts have been shown to be more effective than calcium, particularly aluminium phosphate, but are not used commercially because of visible fruit deposits and phytotoxicity issues. Borax (Boron) has also been trialled but was found to be variety specific in its response. In Poland, an extensive study of boron nutrition showed no reduction in cracking of soil or foliar applied boron. Several studies have reported no significant reduction in cracking using iron chloride, iron nitrate, magnesium, zinc, manganese, or iron sulphate. Research has found that the use of wetting agents can increase the amount of cracked fruit if applied before rain but decreased the incidence of cracked fruit if applied soon after the rain had ceased. Further research in this area is needed, in combination with modern formulations of wetting agents, before it can be suggested as a commercial technique. Antitranspirants are commonly used to reduce plant stress and have been trialed for fruit cracking on the premise that they will limit water uptake and loss from the fruit. To date results have been inconsistent and unable to be reliably reproduced, as well as having a tendency to leave residues on the fruit. There is a renewed interest in this area, with new research currently underway. The effect of giberellic acid (GA3) applications on fruit cracking has been well documented. No reduction in cracking was found with GA3 application to the fruit surface when fruit was already wet from rain. An increase in cracked fruit has been reported in fruit that remained wet for four hours after application. Other studies revealed that GA3 treated fruit had thickened cuticles, but a similar level of cracking to untreated fruit. One study found that GA3 reduced the occurrence of stem cracks but not side cracks.
Summary Although decades of research around the phenomenon of rain induced sweet cherry fruit cracking has been undertaken around the world (mainly in the northern hemisphere), information relating directly to conditions in Australia is scarce. Recent Australian research has provided an answer to the long standing question about water uptake pathways resulting in cracking. This now provides the base from which future cherry cracking research can progress, focussing on targeted management strategies. It is important to continue cracking research in Australia, in Australian climates, and for Australian grown varieties.
201
References
Brown, G. R., Wilson, S. J., Boucher, W., Graham, B., McGlason, B. (1995) Effects of copper-calcium sprays on fruit cracking in sweet cherry (Prunus avium), Scientia Horticulturae, 62: 75-80.
Christensen, J. V. (1972). Cracking in cherries. IV. Physiological studies of the mechanism of cracking. Acta Agriculturae Scandinavica 22: 153-162.
Christensen, J. V. (1996). Rain-induced cracking of sweet cherries: Its causes and prevention. Cherries: Crop physiology, production and uses. A. D. Webster and N. E. Looney, CAB International: 297-330.
Cline, J. A., Meland, M. Webster, A. D. (1995). Rain Cracking of Sweet Cherries .2. Influence of Rain Covers and Rootstocks on Cracking and Fruit-Quality. Acta Agriculturae Scandinavica Section B-Soil and Plant Science 45(3): 224-230.
Cline, J. A., Sekse, L., Meland, M. Webster, A. D. (1995). Rain-Induced Fruit Cracking of Sweet Cherries .1. Influence of Cultivar and Rootstock on Fruit Water-Absorption, Cracking and Quality. Acta Agriculturae Scandinavica Section B-Soil and Plant Science 45(3): 213-223.
Faust, M. (1989) Physiology of temperate zone fruit trees. John Wiley and Sons Inc, New York,
Singapore Glenn, G. M. and B. W. Poovaiah (1989). Cuticular Properties and Postharvest Calcium Applications Influence Cracking of Sweet Cherries. Journal of the American Society for Horticultural Science 114(5):
781-788. Knoche, M., Beyer, M., Peschel, S., Oparlokov, B., Bukovac, M. J. (2004). Changes in strain and deposition of cuticle in developing sweet cherry fruit. Physiologia Plantarum 120(4): 667-677.
Lidster, P. D., Tung, M. A., Yada, R. G. (1979). Effects of preharvest and postharvest calium treatments on fruit calcium content and the susceptibility of 'Van' cherry to impact damage. Journal of the American Society for Horticultural Science. 104(6): 790-793.
Measham, P. F., Bound, S. A., Gracie, A. J., Wilson, S. J. (2009) Incidence and type of cracking in sweet cherry (Prunus aviuim L.) are affected by genotype and season. Crop & Pasture Science, 60:
1002-1008. Measham, P. F., Gracie, A. J., Bound, S. A., Wilson, S. J. (2009) An alternative view on rain-induced cracking of sweet cherries (Prunus avium L.)’, Proceedings of the 6th International Cherry Symposium, Reñaca, Viña del Mar, Chile Moing, A., Renaud, C., Christmann, H., Fouilhaux, L., Tauzin, Y., Zanetto, A., Gaudillere, M., Laigret, F., Claverie, J. (2004). Is there a relation between changes in osmolarity of cherry fruit flesh or skin and fruit cracking susceptibility? Journal of the American Society for Horticultural Science. 129(5): 635-641.
Sawada, E. (1934). A physiological consideration of the mechanism of the cracking of sweet cherries. Trans. Sapporo Nat. Hist. Soc. 13(3): 365-376.
Sekse, L. (1995). Cuticular Fracturing in Fruits of Sweet Cherry (Prunus-Avium L) Resulting from Changing Soil-Water Contents. Journal of Horticultural Science 70(4): 631-635.
Sekse, L. (1995). Fruit cracking in sweet cherries (Prunus avium L.) - Some physiological aspects - a mini review. Scientia Horticulturae 63(3-4): 135-141.
Sekse, L., Bjerke, K. L., Vangdal, E. (2005). Fruit cracking in sweet cherries - An integrated approach. Acta Horticulturae 667.
Simon, G. (2006) Review on rain induced fruit cracking of sweet cherries (Prunus avium L.) its causes and the possibilities of prevention. International Journal of Horticultural Science 12(3): 27-35.
Webster, A. D. and J. A. Cline (1994). All about cherry cracking. Tree Fruit Leader 3(2).
Wermund, U., Holland, A., Reardon, S. (2005). Cracking susceptibility of sweet cherries in the United Kingdom in relation to calcium application and covering systems. Acta Horticulturae 667.
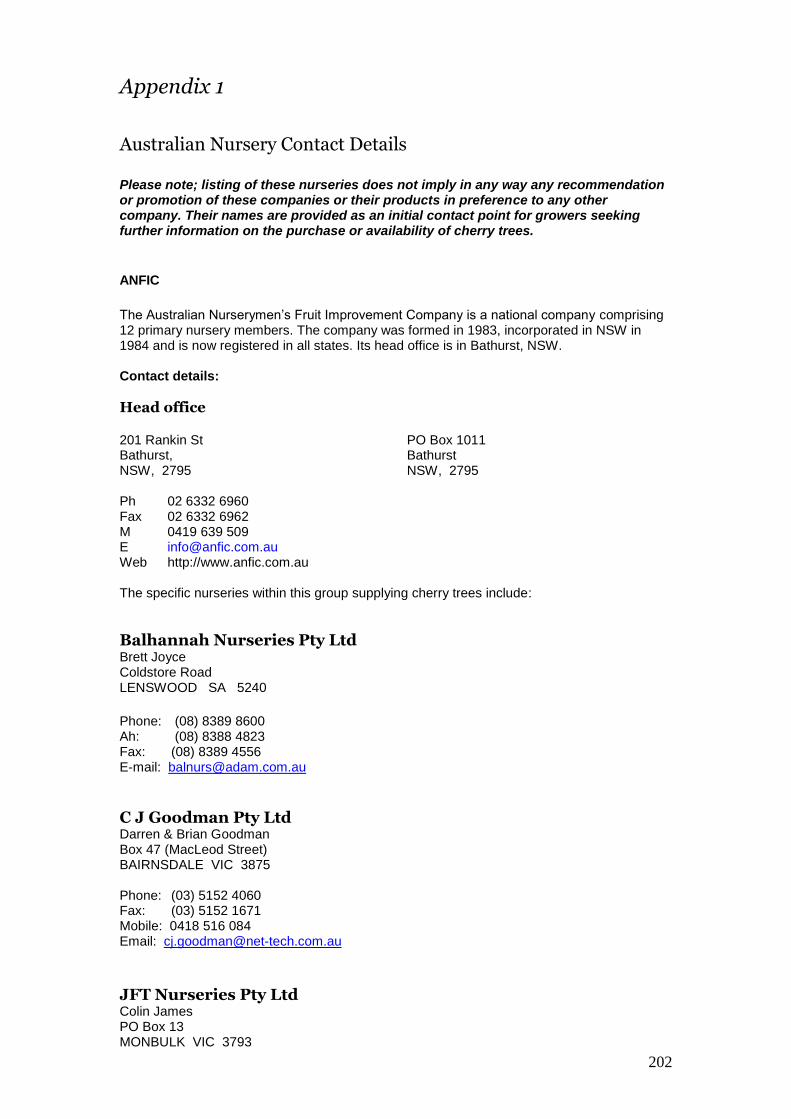
202
Appendix 1
Australian Nursery Contact Details Please note; listing of these nurseries does not imply in any way any recommendation or promotion of these companies or their products in preference to any other company. Their names are provided as an initial contact point for growers seeking further information on the purchase or availability of cherry trees.
ANFIC
The Australian Nurserymen’s Fruit Improvement Company is a national company comprising 12 primary nursery members. The company was formed in 1983, incorporated in NSW in 1984 and is now registered in all states. Its head office is in Bathurst, NSW. Contact details:
Head office 201 Rankin St PO Box 1011 Bathurst, Bathurst NSW, 2795 NSW, 2795 Ph 02 6332 6960 Fax 02 6332 6962 M 0419 639 509 E [email protected] Web http://www.anfic.com.au The specific nurseries within this group supplying cherry trees include:
Balhannah Nurseries Pty Ltd Brett Joyce Coldstore Road LENSWOOD SA 5240 Phone: (08) 8389 8600 Ah: (08) 8388 4823 Fax: (08) 8389 4556 E-mail: [email protected]
C J Goodman Pty Ltd Darren & Brian Goodman Box 47 (MacLeod Street) BAIRNSDALE VIC 3875 Phone: (03) 5152 4060 Fax: (03) 5152 1671 Mobile: 0418 516 084 Email: [email protected]
JFT Nurseries Pty Ltd Colin James PO Box 13 MONBULK VIC 3793

203
Phone: (03) 9737 9633 Fax: (03) 9737 9755 E-mail: [email protected]
Forest Home Nursery Wesley Hazell/Mark Hankin 799 Huon Road JUDBURY, TASMANIA 7109 Phone: (03) 6266-6272 Fax: (03) 6266-6372 Mobile: 0419 102 477 E-mail: [email protected]
W A Shepherd & Sons Pty Ltd Andrew & Jacquie Shepherd 141-143 Balnarring Road MERRICKS NTH VIC 3926 Phone & Fax: (03) 5989 7347 Mobile: 0417 324 105 E-mail: [email protected]
D & Y Pike Pty Ltd (specialist cherry nursery) T/A Neerim Hi-Plains Growers David & Yvonne Pike C/- PO Neerim Junction (Main Road) NEERIM JUNCTION VIC 3821 Phone: (03) 5628 4216 Fax: (03) 5628 4248 Mobile: 0407 048 480 E-mail: [email protected]
Olea Nurseries David & Leanne Bazzani RMB 44 West Manjimup Mitchelldean Road WEST MANJIMUP WA 6258 Phone: (08) 9772 1207 Fax: (08) 9772 1333 E-mail: [email protected]
Oak Enterprises/Tahune Fields Nursery John Paton (CEO – Oak Enterprises) 56 Clydesdale Avenue, Glenorchy, TAS, 7010 Brendan Francis (Tahune Fields Nursery) 106 Lucaston Road, Lucaston, TAS 7109 Phone: Oak Enterprises (03) 6272 8244 Tahune Fields Nursery (03) 6266 4474 Fax: (03) 6266 4451 Mobile: 0418 123 429 E-mail [email protected] or [email protected]

204
Graham’s FacTree
Graham’s FacTree has been operating at Hoddles Creek in the Yarra Valley since January 2009 when the family owned and operated company Fleming’s Nurseries underwent a change in structure. The contact details are Graham Fleming 160 Thonemans Rd Hoddles Creek Victoria, 3139 Phone: 03 9999 1999 Fax: 03 5967 4645 E-mail: [email protected] Web: http://www.factree.com.au/ This list is not necessarily a complete list, for further information contact you local Cherry Growers Association or local Department of Primary Industries/Agriculture
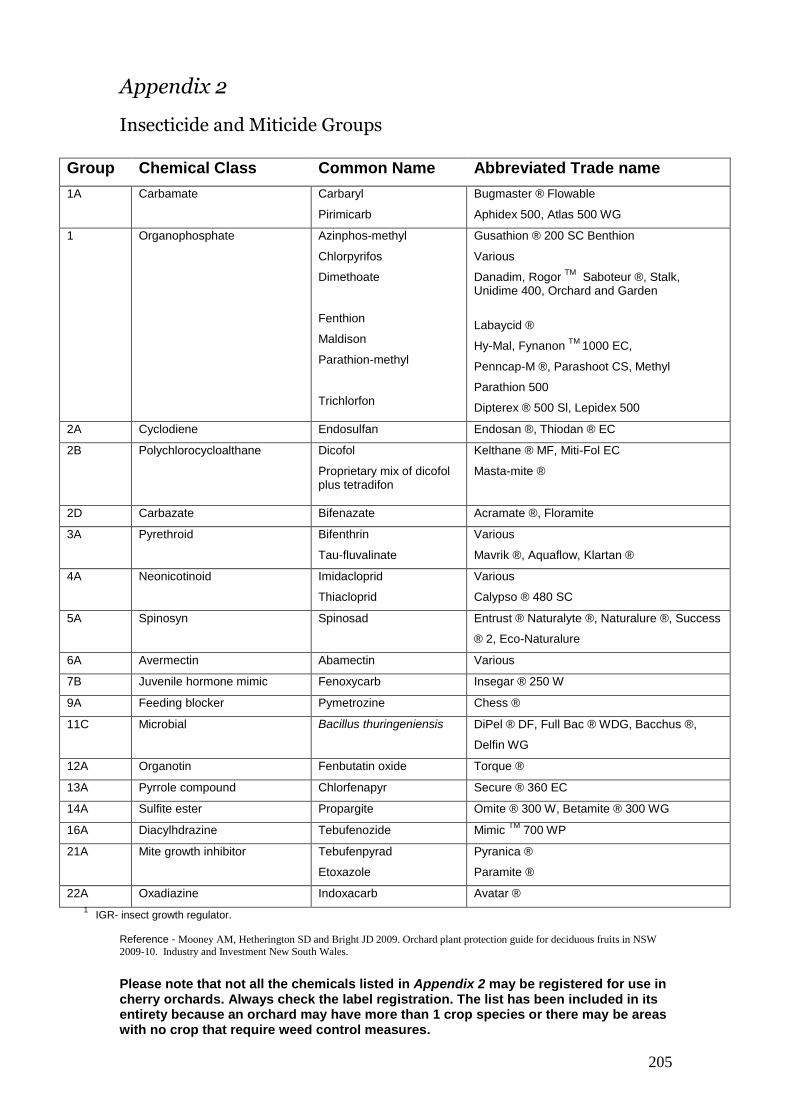
205
Appendix 2
Insecticide and Miticide Groups
Group Chemical Class Common Name Abbreviated Trade name
1A Carbamate Carbaryl
Pirimicarb
Bugmaster ® Flowable
Aphidex 500, Atlas 500 WG
1 Organophosphate
Azinphos-methyl
Chlorpyrifos
Dimethoate
Fenthion
Maldison
Parathion-methyl
Trichlorfon
Gusathion ® 200 SC Benthion
Various
Danadim, Rogor TM
Saboteur ®, Stalk, Unidime 400, Orchard and Garden
Labaycid ®
Hy-Mal, Fynanon TM
1000 EC,
Penncap-M ®, Parashoot CS, Methyl
Parathion 500
Dipterex ® 500 Sl, Lepidex 500
2A Cyclodiene Endosulfan Endosan ®, Thiodan ® EC
2B Polychlorocycloalthane Dicofol
Proprietary mix of dicofol plus tetradifon
Kelthane ® MF, Miti-Fol EC
Masta-mite ®
2D Carbazate Bifenazate Acramate ®, Floramite
3A Pyrethroid Bifenthrin
Tau-fluvalinate
Various
Mavrik ®, Aquaflow, Klartan ®
4A Neonicotinoid Imidacloprid
Thiacloprid
Various
Calypso ® 480 SC
5A Spinosyn Spinosad Entrust ® Naturalyte ®, Naturalure ®, Success
® 2, Eco-Naturalure
6A Avermectin Abamectin Various
7B Juvenile hormone mimic Fenoxycarb Insegar ® 250 W
9A Feeding blocker Pymetrozine Chess ®
11C Microbial Bacillus thuringeniensis DiPel ® DF, Full Bac ® WDG, Bacchus ®,
Delfin WG
12A Organotin Fenbutatin oxide Torque ®
13A Pyrrole compound Chlorfenapyr Secure ® 360 EC
14A Sulfite ester Propargite Omite ® 300 W, Betamite ® 300 WG
16A Diacylhdrazine Tebufenozide Mimic TM
700 WP
21A Mite growth inhibitor Tebufenpyrad
Etoxazole
Pyranica ®
Paramite ®
22A Oxadiazine Indoxacarb Avatar ®
1 IGR- insect growth regulator.
Reference - Mooney AM, Hetherington SD and Bright JD 2009. Orchard plant protection guide for deciduous fruits in NSW
2009-10. Industry and Investment New South Wales.
Please note that not all the chemicals listed in Appendix 2 may be registered for use in cherry orchards. Always check the label registration. The list has been included in its entirety because an orchard may have more than 1 crop species or there may be areas with no crop that require weed control measures.

206
Appendix 3
Fungicide Groups
Group Activity Group Common Name Trade Name
1 Benzimidazoles Carbendazim
Thiabendazole
Various
Tecto ® Flowable SC, Storite ® Flowable
SC
2 Dicarboximides Iprodione
Procymidone
Various
Fortress 500, Proflex 500, Rumble 500,
Spiral Aquaflo, Sumisclex 500
3 DMIs (demethylation inhibitors) Difeneconazole
Fenarimol
Fluquinconazole + pyrimethanil Flusilazole
Hexaconazole
Imazalil
Myclobutanil
Penconazole
Propiconazole
Triforine
Bogard ® 100 WG
Rubigan TM
120 SC
Vision ® 250 SC
Nustar TM
DF
Hex 50 SC, Hexacon 500 SC, Viva ®, Hostile 500 SC
Various
Systhane TM
400 WP
Topas ® 100 EC
Various
Saprol ®
8 Hydroxypyrimidine Bupirimate Nimrod ®
9 Anilinipyrimidine Cyprodinil
Fluquinconazole +
Pyrimethanil
Chorus ®
Vision 250 SC
11 Quinone outside inhibitors Kresoxim-methyl
Trifloxystrobin
Stroby ® WG
Flint ® 500 WG
33 Phosphonate Fosetyl Aliette ® WG
M1 Inorganic Copper fungicides Various
M3 Dithiocarbonate Mancozeb
Metiram
Thiram
Zineb
Ziram
Various
Polyram ® DF
Thiragranz
Ziragranz
M4 Phthalimide Captan Orthicide ® WG, Merpan
M5 Chloronitrile Chlorothalonil Various
M7 Guanadine Dodine Syllit ® 400 SC
M9 Quinone Dithianon Delan ® 700 WG
Reference - Mooney AM, Hetherington SD and Bright JD 2009. Orchard plant protection guide for deciduous fruits in NSW 2009-10. Industry and Investment New South Wales.
Please note that not all the chemicals listed in appendix 3 may be registered for use in cherry orchards. Always check the label registration. The list has been included in its entirety because an orchard may have more than 1 crop species or there may be areas with no crop that require weed control measures.

207
Appendix 4
Netting and Rain Cover Supply and Construction Service Providers Please note the listing of these companies does not imply in any way any recommendation or promotion of these companies or their products in preference to any other company . Their names are provided as an initial contact point for growers seeking further information on this topic. Netpro – based in Stanthorpe, Queensland
Contact details
www.netprocanopies.com.
Ph 07 4681 6666 or 1300 Netpro (1300 638 776)
Email: [email protected]
ToughNet - based in Batlow NSW
Contact details
www.toughnet.com.au
Ph 0427 708 458 or 1300 toughnet (1300 8684 4638)
Email: [email protected] or [email protected]
Peter Smith Constructions – based in Tumut, NSW
Contact details
www.petersmithcontractors.com.au
Ph 02 6947 4477 or free call 1800 078 708
Mobile 0428 365 180
Fax 02 6947 4479
Email: [email protected]
J.A. Grigson Trading Pty. Ltd - based in Adelaide
Contact details
www.jag.net.au
Ph 08 8384 3177
Mobile 0419 853 216
Email: [email protected]
OakSun Consulting
Rain cover systems for cherries, raspberries and strawberries Contact details
www.oaksuncherries.com.au
Ph Nos 0419552720
Fax 03 5961 9131
Email: [email protected]

208
Appendix 5
Obtaining biological control agents
A number of companies provide a range of biological control agents around Australia. These include:
The Beneficial Bug Company
Ph (02) 4570 1331
Fax (02) 4578 3979
Email [email protected]
Biological Services
Loxton SA
Ph (08) 8584 6977
Fax (08) 8584 5057
Email [email protected]
Bio Protection
Kilmore, Victoria
Ph (03) 5781 0033
Fax (03) 5781 0044
Email [email protected]
Bio Works
Nambucca Heads, NSW
Ph (02) 6568 3555
Email [email protected]
Horticultural Crop Monitoring
Ph (07) 5491 4662
Fax (07) 5491 4662
Email [email protected]
Please note this list may not be fully comprehensive of all those companies providing biological control agents in Australia and the listing these companies is not to be interpreted as any specific form of recommendation.
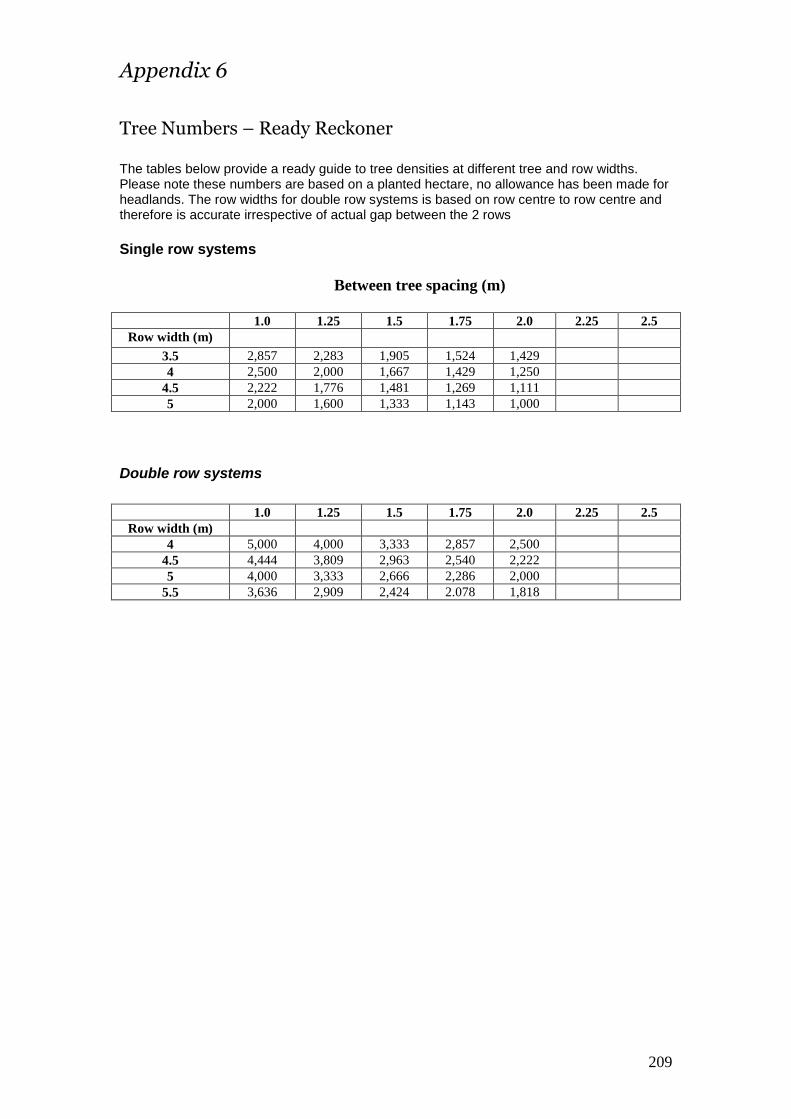
209
Appendix 6
Tree Numbers – Ready Reckoner The tables below provide a ready guide to tree densities at different tree and row widths. Please note these numbers are based on a planted hectare, no allowance has been made for headlands. The row widths for double row systems is based on row centre to row centre and therefore is accurate irrespective of actual gap between the 2 rows
Single row systems
Between tree spacing (m)
1.0 1.25 1.5 1.75 2.0 2.25 2.5
Row width (m) 3.5 2,857 2,283 1,905 1,524 1,429
4 2,500 2,000 1,667 1,429 1,250
4.5 2,222 1,776 1,481 1,269 1,111
5 2,000 1,600 1,333 1,143 1,000
Double row systems
1.0 1.25 1.5 1.75 2.0 2.25 2.5
Row width (m)
4 5,000 4,000 3,333 2,857 2,500
4.5 4,444 3,809 2,963 2,540 2,222
5 4,000 3,333 2,666 2,286 2,000
5.5 3,636 2,909 2,424 2.078 1,818