Embed Size (px)
Citation preview
Body Shop User Guide
Auto PartsBridge
Toyota
Getting started
Contents
Getting started 2
Log on and off 2
Configure settings 3
Modify settings 5
Processing an order 5
Access the list of estimates 7
Send an order directly to the dealer 8
View an order 9
View or add labor items 10
Validate parts 11
Add new parts 13
Accessing and managing orders 17
Accept a quote 18
Reimport an order 19
Print an order 20
Save an order 20
Search for an order 21
Complete an order 21
1 | © Infomedia Ltd 2009
Getting started
Getting started
Welcome to Auto PartsBridge!
Auto PartsBridge is an electronic ordering and part validation system for body shops and dealerships.
Some of the advantages for the body shop are:
Imports estimates from estimating systems
Provides the option to validate the Original Equipment Manufacturer (OEM) part numbers
Provides full OEM catalog searching
Turns estimates into orders and quotes
Log on and off
Auto PartsBridge is a web-based application that is accessed from the Auto PartsBridge website. To start using Auto PartsBridge, you will need to log on with your assigned user name and password.
To log on to Auto PartsBridge:
1 Go to the AutoParts Bridge website at www.autopartsbridge.com.
2 Click the Body Shops enter here button on the website.
3 Type your user name in the Username field.
4 Type your password in the Password field.
5 Click the Log On button or press the Enter key.
To log off from Auto PartsBridge, click the Log Off button on the navigation bar.
© Infomedia Ltd 2009 | 2
Getting started
Configure settings
When you log onto Auto PartsBridge for the first time, you will need to complete the Configuration Wizard to configure the settings for your Body Shop.
For Administrators to set up Auto PartsBridge complete each step of the Wizard:
1 Introduction: View the Welcome window and click the Next button.
2 End User Licence Agreement: Read the EULA and privacy policy, select the required checkboxes and click the Next button.
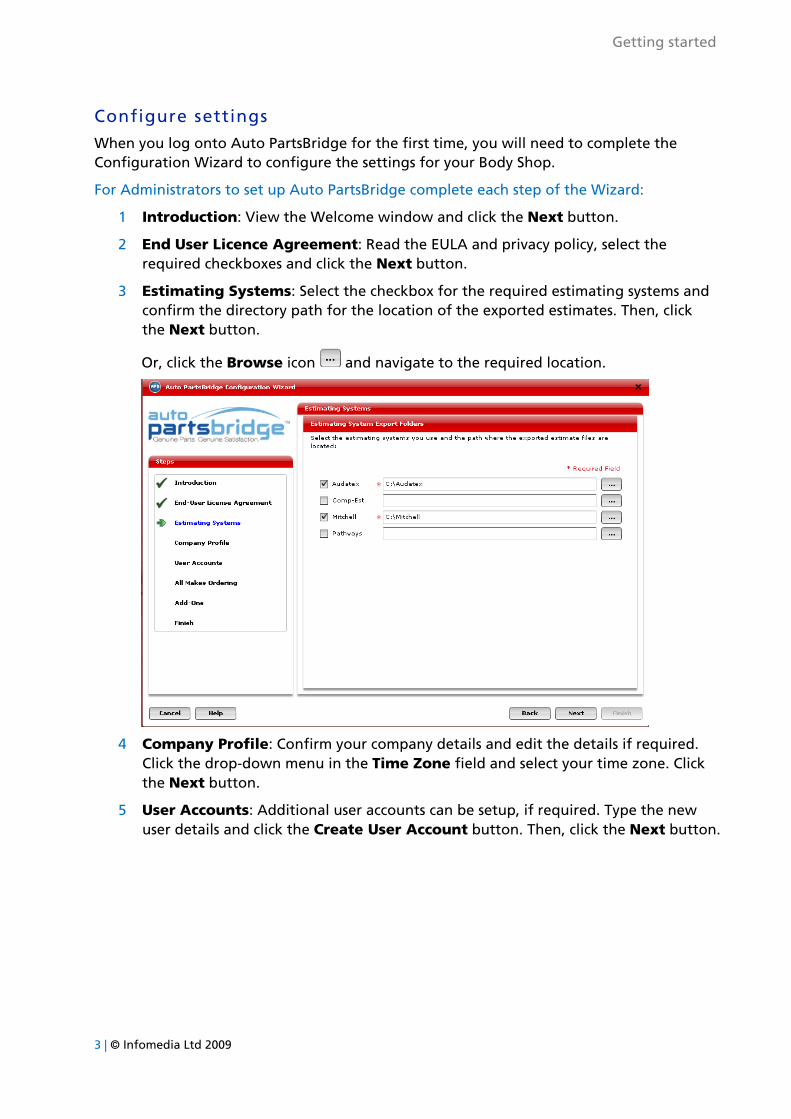
3 Estimating Systems: Select the checkbox for the required estimating systems and confirm the directory path for the location of the exported estimates. Then, click the Next button.
Or, click the Browse icon and navigate to the required location.
4 Company Profile: Confirm your company details and edit the details if required. Click the drop-down menu in the Time Zone field and select your time zone. Click the Next button.
5 User Accounts: Additional user accounts can be setup, if required. Type the new user details and click the Create User Account button. Then, click the Next button.
3 | © Infomedia Ltd 2009
Getting started
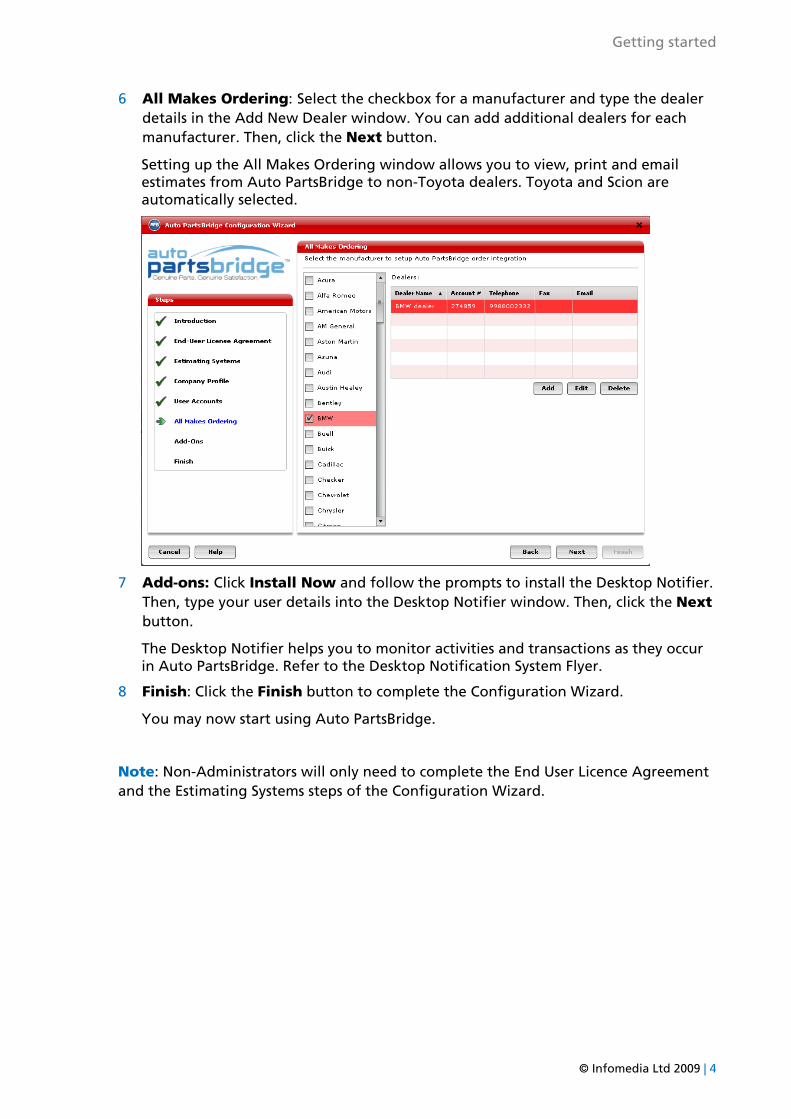
6 All Makes Ordering: Select the checkbox for a manufacturer and type the dealer details in the Add New Dealer window. You can add additional dealers for each manufacturer. Then, click the Next button.
Setting up the All Makes Ordering window allows you to view, print and email estimates from Auto PartsBridge to non-Toyota dealers. Toyota and Scion are automatically selected.
7 Add-ons: Click Install Now and follow the prompts to install the Desktop Notifier. Then, type your user details into the Desktop Notifier window. Then, click the Next button.
The Desktop Notifier helps you to monitor activities and transactions as they occur in Auto PartsBridge. Refer to the Desktop Notification System Flyer.
8 Finish: Click the Finish button to complete the Configuration Wizard.
You may now start using Auto PartsBridge.
Note: Non-Administrators will only need to complete the End User Licence Agreement and the Estimating Systems steps of the Configuration Wizard.
© Infomedia Ltd 2009 | 4
Getting started
Modify settings
After you have initially logged on to Auto PartsBridge and set up the Configuration Wizard, you can modify the configuration settings in the Preferences window. You can modify details in the Estimating Systems, Company Profile, User Accounts and All Makes Ordering tabs. In addition, you can install the Desktop Notifier in the Add-Ons tab to improve efficiencies in your Dealership.
To add additional user accounts within the dealership:
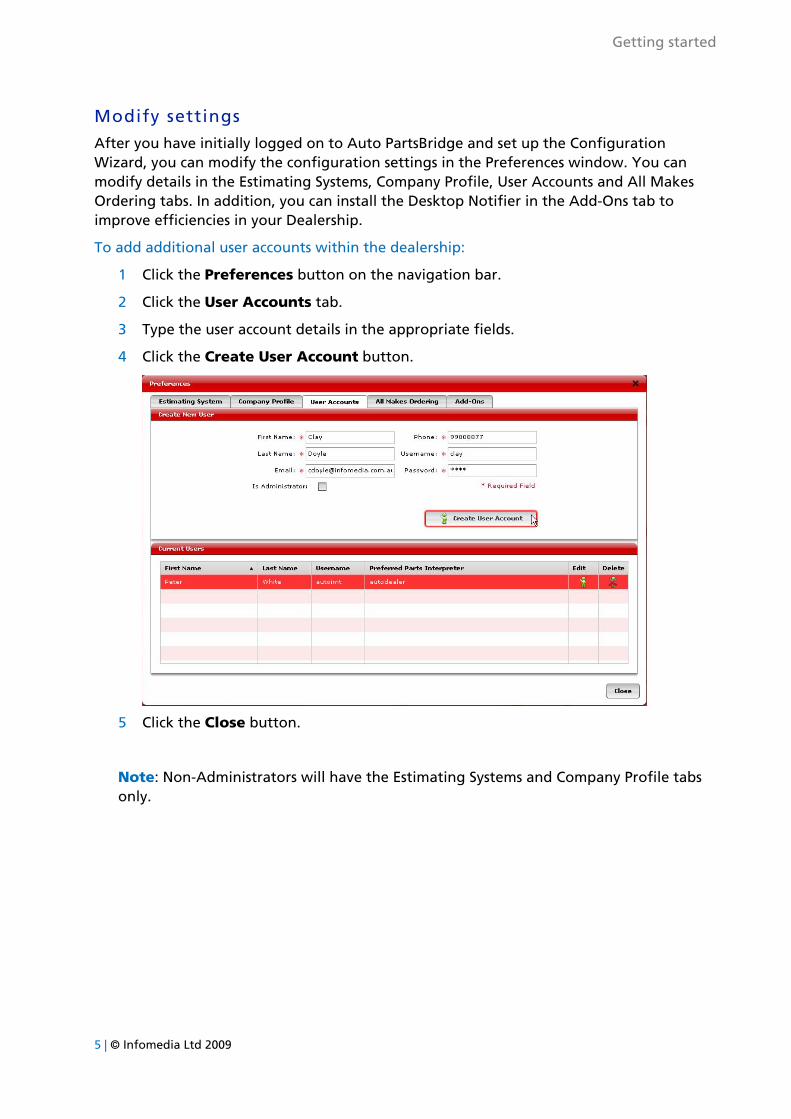
1 Click the Preferences button on the navigation bar.
2 Click the User Accounts tab.
3 Type the user account details in the appropriate fields.
4 Click the Create User Account button.
5 Click the Close button.
Note: Non-Administrators will have the Estimating Systems and Company Profile tabs only.
5 | © Infomedia Ltd 2009
Processing an order
Processing an order
The orders from the estimating system are displayed in the Orders to be Processed panel.
The estimates consist of OEM parts only, aftermarket parts only or a combination of both OEM and aftermarket parts. When an order is sent to the dealer, OEM parts are automatically ordered and the dealer can provide a quote for the OEM equivalent of the aftermarket parts.
To process an order the estimate can be sent directly to the dealer or the estimate can be viewed and modified prior to sending to the dealer.
When processing orders, the following steps can be performed:
Access the list of estimates
Send an order directly to the dealer
View and modify an order
© Infomedia Ltd 2009 | 6
Processing an order
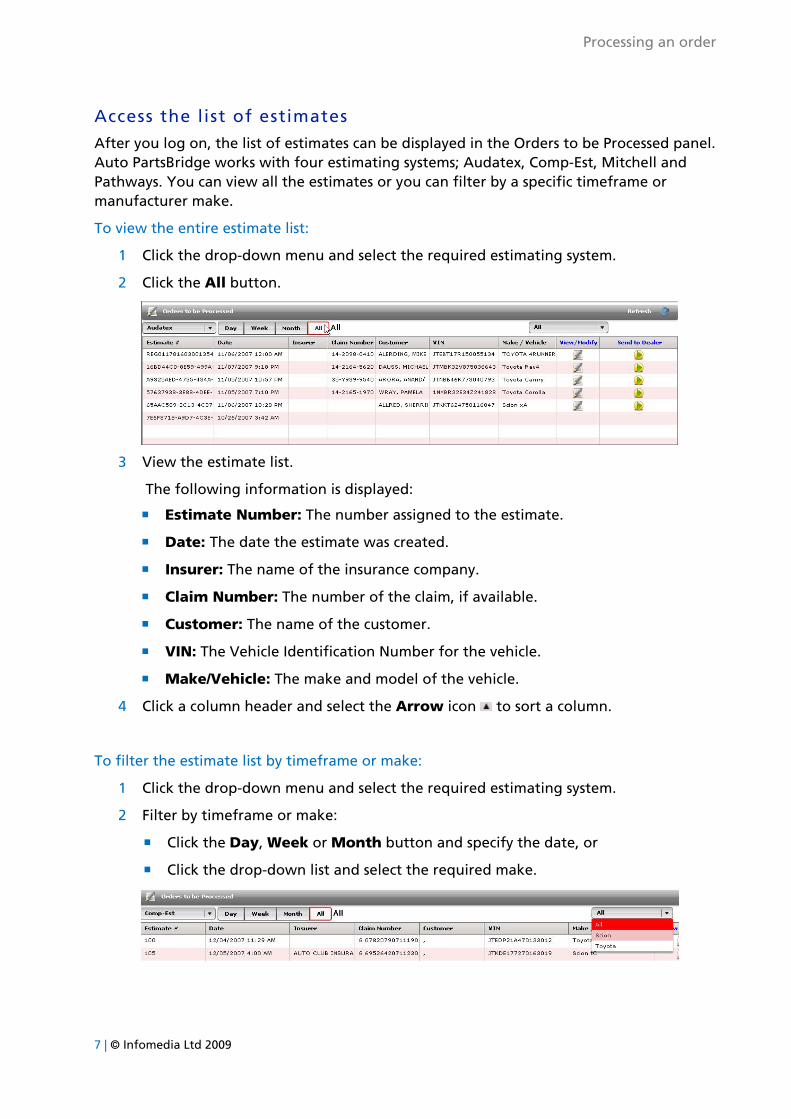
Access the list of estimates
After you log on, the list of estimates can be displayed in the Orders to be Processed panel. Auto PartsBridge works with four estimating systems; Audatex, Comp-Est, Mitchell and Pathways. You can view all the estimates or you can filter by a specific timeframe or manufacturer make.
To view the entire estimate list:
1 Click the drop-down menu and select the required estimating system.
2 Click the All button.
3 View the estimate list.
The following information is displayed:
Estimate Number: The number assigned to the estimate.
Date: The date the estimate was created.
Insurer: The name of the insurance company.
Claim Number: The number of the claim, if available.
Customer: The name of the customer.
VIN: The Vehicle Identification Number for the vehicle.
Make/Vehicle: The make and model of the vehicle.
4 Click a column header and select the Arrow icon to sort a column.
To filter the estimate list by timeframe or make:
1 Click the drop-down menu and select the required estimating system.
2 Filter by timeframe or make:
Click the Day, Week or Month button and specify the date, or
Click the drop-down list and select the required make.
7 | © Infomedia Ltd 2009

Processing an order
Send an order directly to the dealer
The estimate can be sent directly to the dealer as an order. The dealer will automatically order the OEM parts and will provide a quote for the OEM equivalent of the aftermarket parts.
To send an order directly to the dealer:
1 View the list of estimates.
2 Select the order you wish to send to the dealer.
3 Click the Send to Dealer icon on the selected order.
The order and an email notification will be sent directly to the dealer.
4 Type the purchase order number in the Purchase Order Number field (if required), and click the OK button.
5 Click the OK button to confirm.
The order will be moved to the Orders Sent folder.
© Infomedia Ltd 2009 | 8
Processing an order
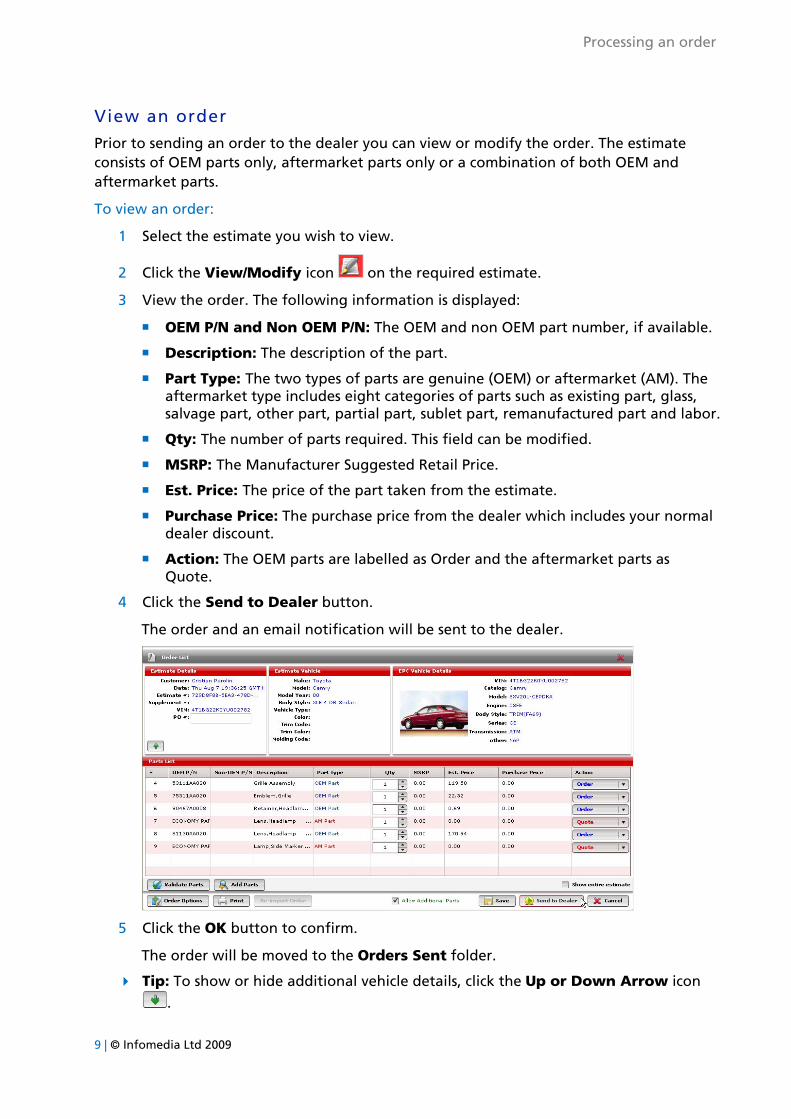
View an order
Prior to sending an order to the dealer you can view or modify the order. The estimate consists of OEM parts only, aftermarket parts only or a combination of both OEM and aftermarket parts.
To view an order:
1 Select the estimate you wish to view.
2 Click the View/Modify icon on the required estimate.
3 View the order. The following information is displayed:
OEM P/N and Non OEM P/N: The OEM and non OEM part number, if available.
Description: The description of the part.
Part Type: The two types of parts are genuine (OEM) or aftermarket (AM). The aftermarket type includes eight categories of parts such as existing part, glass, salvage part, other part, partial part, sublet part, remanufactured part and labor.
Qty: The number of parts required. This field can be modified.
MSRP: The Manufacturer Suggested Retail Price.
Est. Price: The price of the part taken from the estimate.
Purchase Price: The purchase price from the dealer which includes your normal dealer discount.
Action: The OEM parts are labelled as Order and the aftermarket parts as Quote.
4 Click the Send to Dealer button.
The order and an email notification will be sent to the dealer.
5 Click the OK button to confirm.
The order will be moved to the Orders Sent folder.
Tip: To show or hide additional vehicle details, click the Up or Down Arrow icon
.
9 | © Infomedia Ltd 2009
Processing an order
View or add labor items
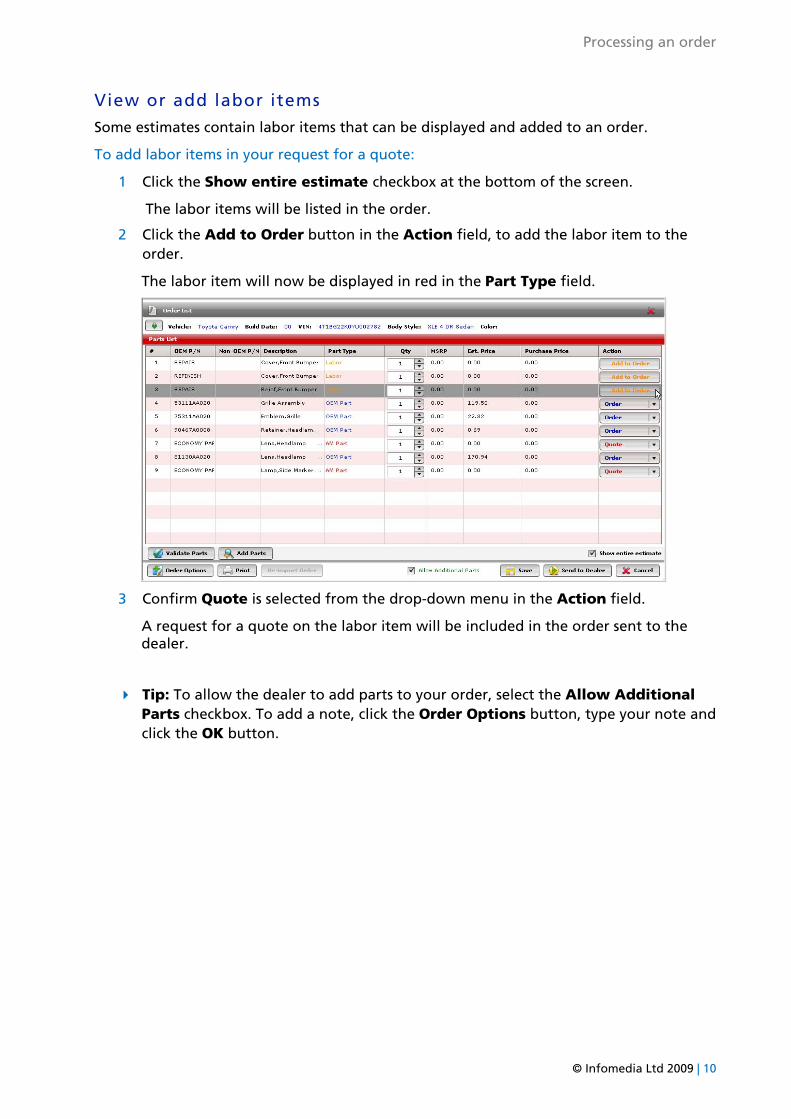
Some estimates contain labor items that can be displayed and added to an order.
To add labor items in your request for a quote:
1 Click the Show entire estimate checkbox at the bottom of the screen.
The labor items will be listed in the order.
2 Click the Add to Order button in the Action field, to add the labor item to the order.
The labor item will now be displayed in red in the Part Type field.
3 Confirm Quote is selected from the drop-down menu in the Action field.
A request for a quote on the labor item will be included in the order sent to the dealer.
Tip: To allow the dealer to add parts to your order, select the Allow Additional Parts checkbox. To add a note, click the Order Options button, type your note and click the OK button.
© Infomedia Ltd 2009 | 10
Processing an order
Validate parts
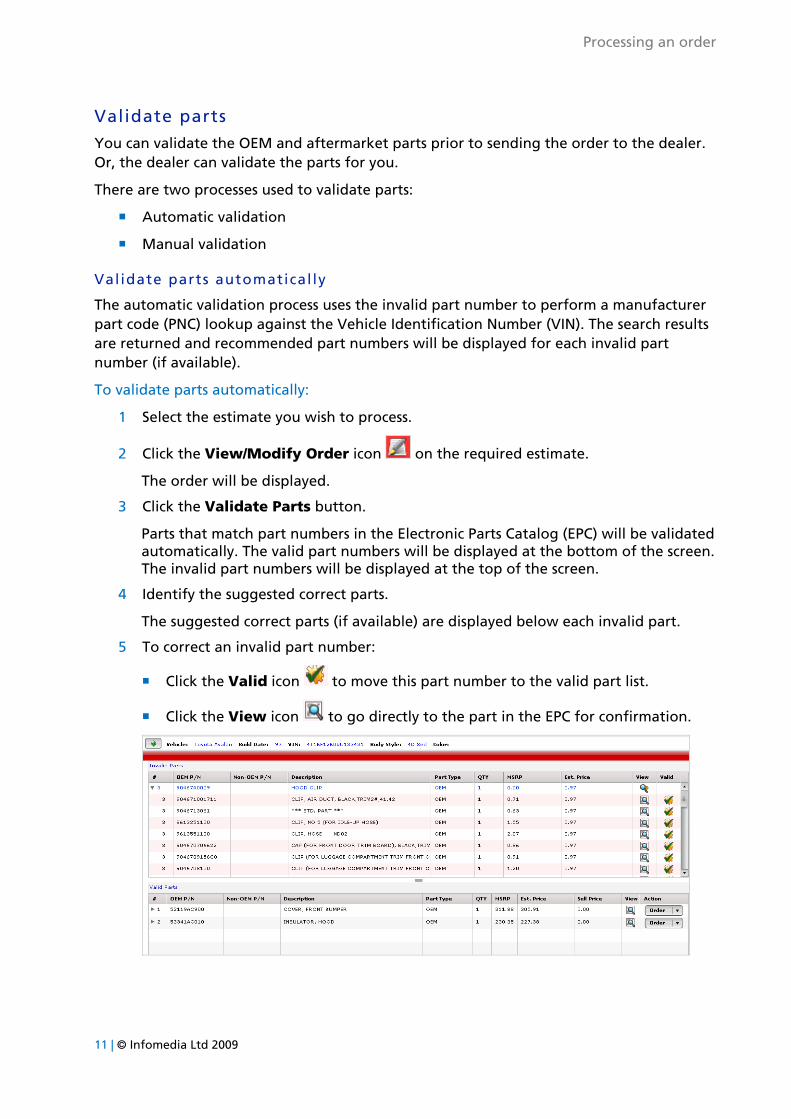
You can validate the OEM and aftermarket parts prior to sending the order to the dealer. Or, the dealer can validate the parts for you.
There are two processes used to validate parts:
Automatic validation
Manual validation
Validate parts automatical ly
The automatic validation process uses the invalid part number to perform a manufacturer part code (PNC) lookup against the Vehicle Identification Number (VIN). The search results are returned and recommended part numbers will be displayed for each invalid part number (if available).
To validate parts automatically:
1 Select the estimate you wish to process.
2 Click the View/Modify Order icon on the required estimate.
The order will be displayed.
3 Click the Validate Parts button.
Parts that match part numbers in the Electronic Parts Catalog (EPC) will be validated automatically. The valid part numbers will be displayed at the bottom of the screen. The invalid part numbers will be displayed at the top of the screen.
4 Identify the suggested correct parts.
The suggested correct parts (if available) are displayed below each invalid part.
5 To correct an invalid part number:
Click the Valid icon to move this part number to the valid part list.
Click the View icon to go directly to the part in the EPC for confirmation.
11 | © Infomedia Ltd 2009
Processing an order
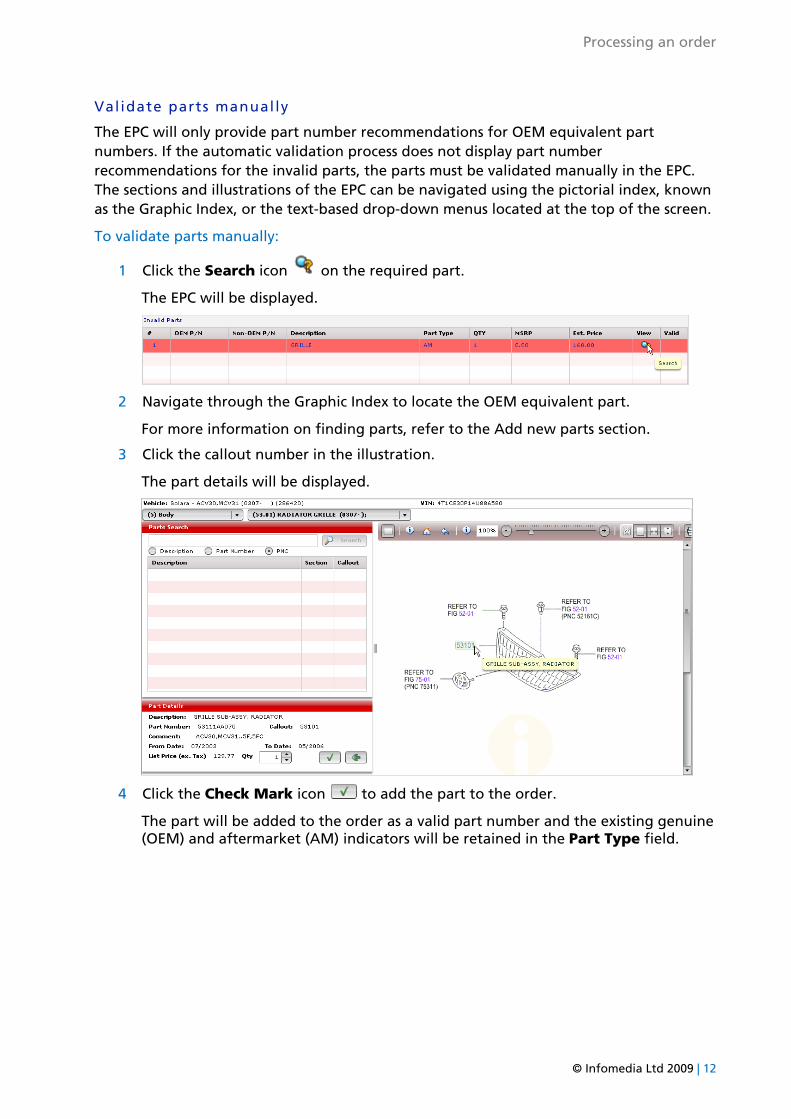
Validate parts manually
The EPC will only provide part number recommendations for OEM equivalent part numbers. If the automatic validation process does not display part number recommendations for the invalid parts, the parts must be validated manually in the EPC. The sections and illustrations of the EPC can be navigated using the pictorial index, known as the Graphic Index, or the text-based drop-down menus located at the top of the screen.
To validate parts manually:
1 Click the Search icon on the required part.
The EPC will be displayed.
2 Navigate through the Graphic Index to locate the OEM equivalent part.
For more information on finding parts, refer to the Add new parts section.
3 Click the callout number in the illustration.
The part details will be displayed.
4 Click the Check Mark icon to add the part to the order.
The part will be added to the order as a valid part number and the existing genuine (OEM) and aftermarket (AM) indicators will be retained in the Part Type field.
© Infomedia Ltd 2009 | 12
Processing an order
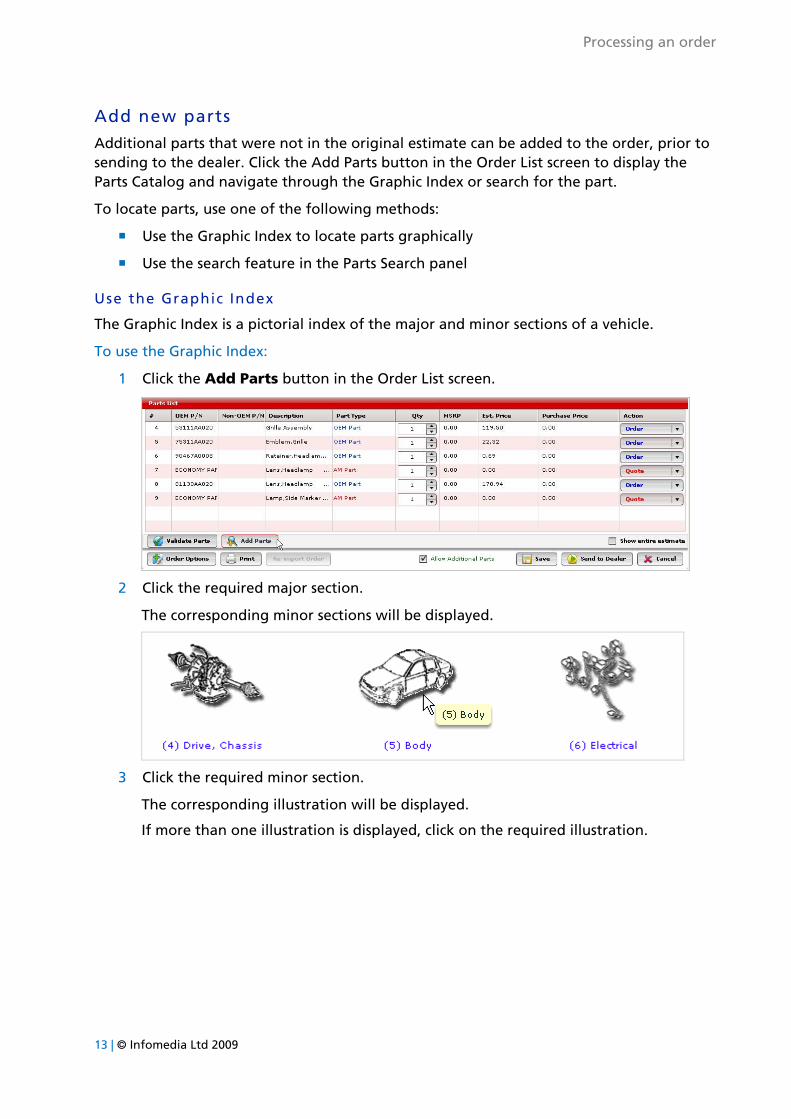
Add new parts
Additional parts that were not in the original estimate can be added to the order, prior to sending to the dealer. Click the Add Parts button in the Order List screen to display the Parts Catalog and navigate through the Graphic Index or search for the part.
To locate parts, use one of the following methods:
Use the Graphic Index to locate parts graphically
Use the search feature in the Parts Search panel
Use the Graphic Index
The Graphic Index is a pictorial index of the major and minor sections of a vehicle.
To use the Graphic Index:
1 Click the Add Parts button in the Order List screen.
2 Click the required major section.
The corresponding minor sections will be displayed.
3 Click the required minor section.
The corresponding illustration will be displayed.
If more than one illustration is displayed, click on the required illustration.
13 | © Infomedia Ltd 2009
Processing an order
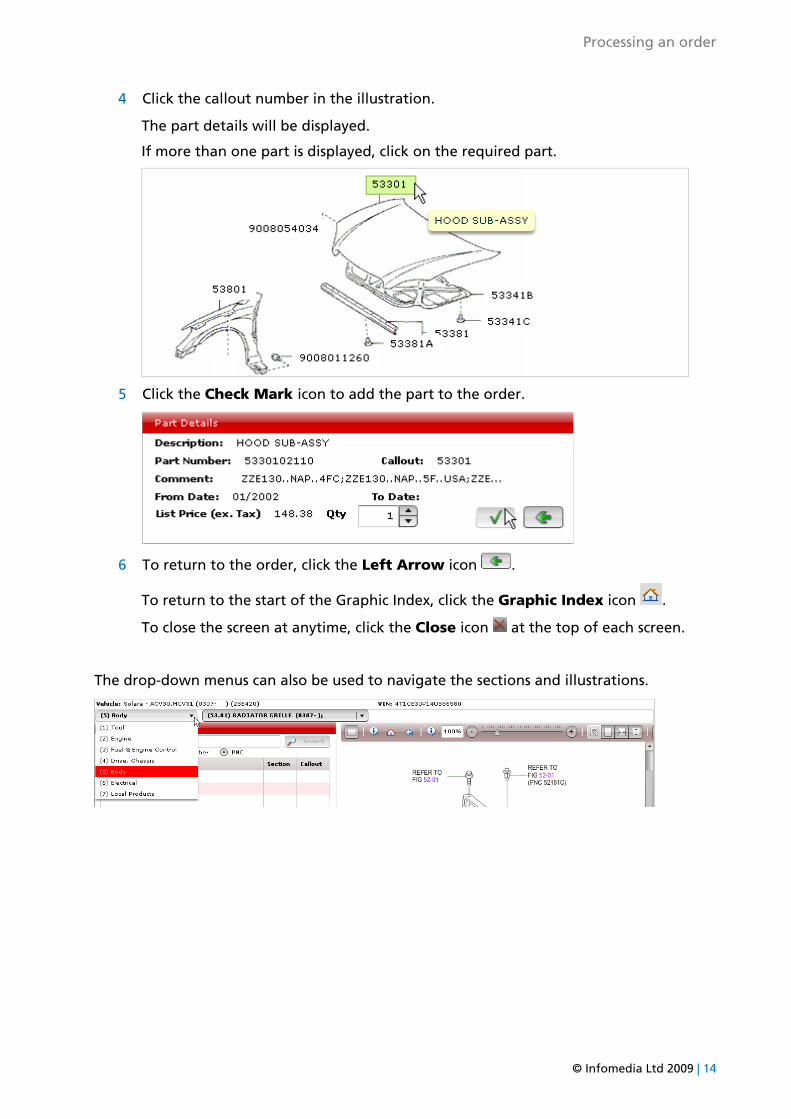
4 Click the callout number in the illustration.
The part details will be displayed.
If more than one part is displayed, click on the required part.
5 Click the Check Mark icon to add the part to the order.
6 To return to the order, click the Left Arrow icon .
To return to the start of the Graphic Index, click the Graphic Index icon .
To close the screen at anytime, click the Close icon at the top of each screen.
The drop-down menus can also be used to navigate the sections and illustrations.
© Infomedia Ltd 2009 | 14
Processing an order
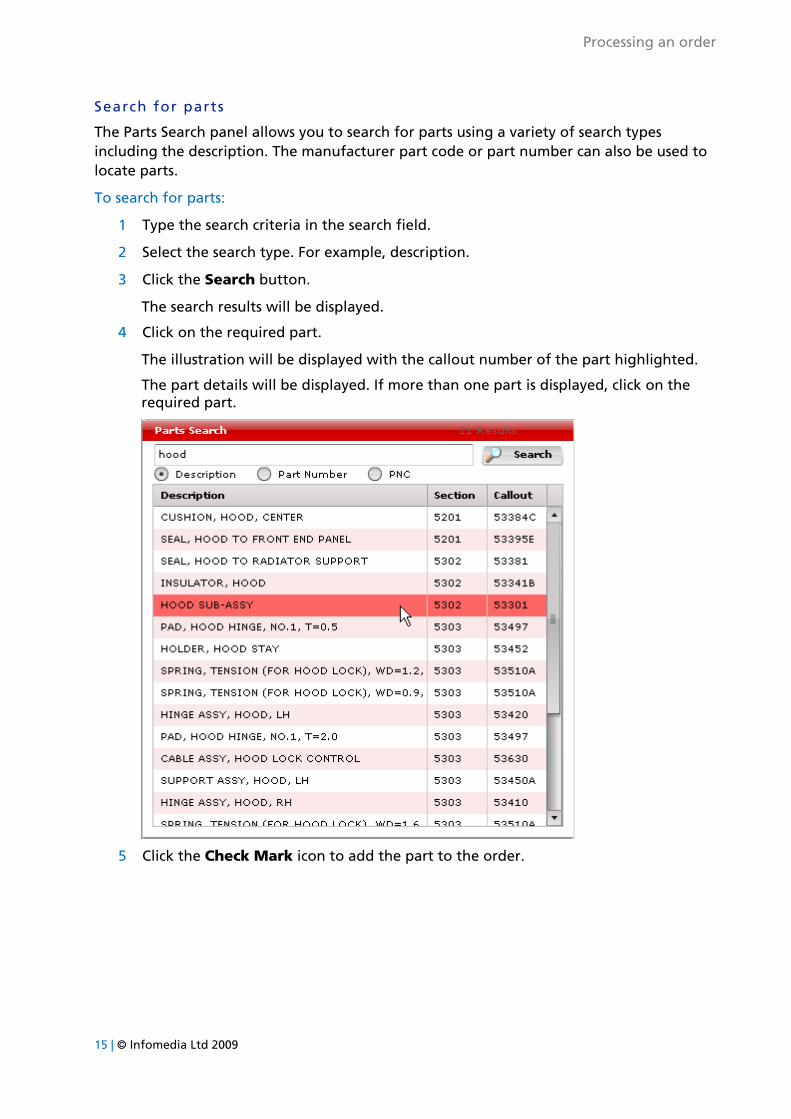
Search for parts
The Parts Search panel allows you to search for parts using a variety of search types including the description. The manufacturer part code or part number can also be used to locate parts.
To search for parts:
1 Type the search criteria in the search field.
2 Select the search type. For example, description.
3 Click the Search button.
The search results will be displayed.
4 Click on the required part.
The illustration will be displayed with the callout number of the part highlighted.
The part details will be displayed. If more than one part is displayed, click on the required part.
5 Click the Check Mark icon to add the part to the order.
15 | © Infomedia Ltd 2009
Processing an order
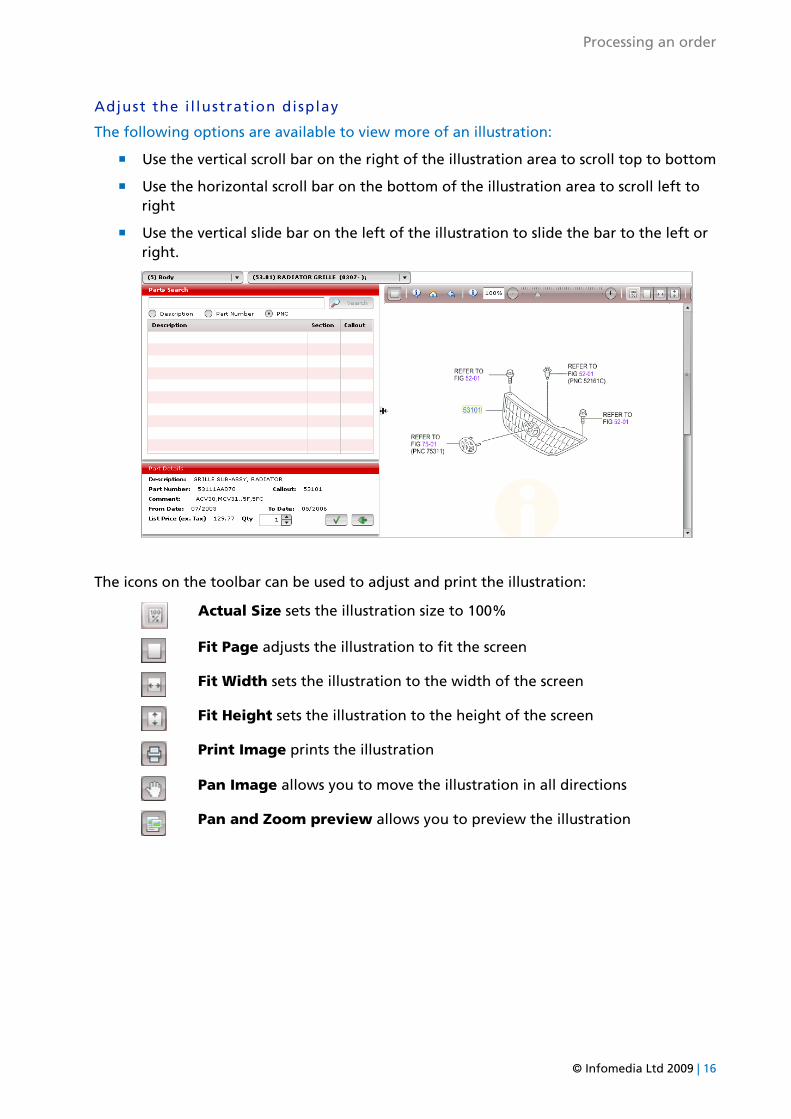
Adjust the i l lustration display
The following options are available to view more of an illustration:
Use the vertical scroll bar on the right of the illustration area to scroll top to bottom
Use the horizontal scroll bar on the bottom of the illustration area to scroll left to right
Use the vertical slide bar on the left of the illustration to slide the bar to the left or right.
The icons on the toolbar can be used to adjust and print the illustration:
Actual Size sets the illustration size to 100%
Fit Page adjusts the illustration to fit the screen
Fit Width sets the illustration to the width of the screen
Fit Height sets the illustration to the height of the screen
Print Image prints the illustration
Pan Image allows you to move the illustration in all directions
Pan and Zoom preview allows you to preview the illustration
© Infomedia Ltd 2009 | 16
Accessing and managing orders
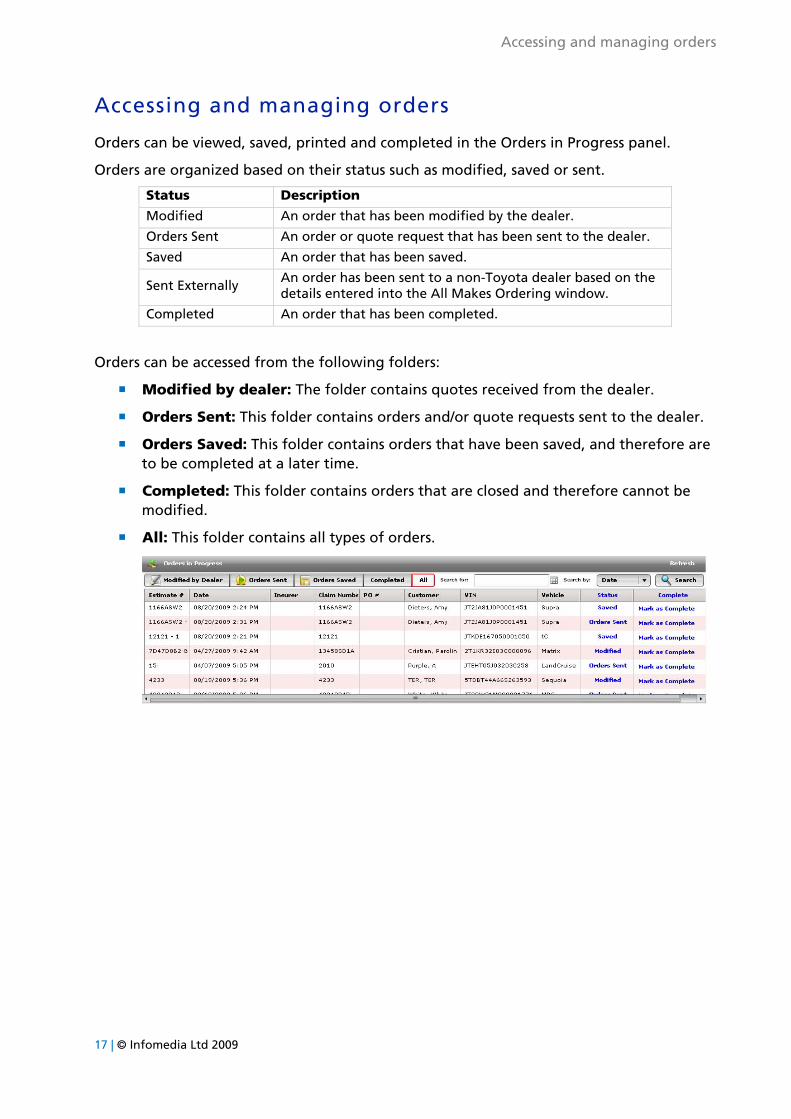
Accessing and managing orders
Orders can be viewed, saved, printed and completed in the Orders in Progress panel.
Orders are organized based on their status such as modified, saved or sent.
Status Description
Modified An order that has been modified by the dealer.
Orders Sent An order or quote request that has been sent to the dealer.
Saved An order that has been saved.
Sent Externally An order has been sent to a non-Toyota dealer based on the details entered into the All Makes Ordering window.
Completed An order that has been completed.
Orders can be accessed from the following folders:
Modified by dealer: The folder contains quotes received from the dealer.
Orders Sent: This folder contains orders and/or quote requests sent to the dealer.
Orders Saved: This folder contains orders that have been saved, and therefore are to be completed at a later time.
Completed: This folder contains orders that are closed and therefore cannot be modified.
All: This folder contains all types of orders.
17 | © Infomedia Ltd 2009
Accessing and managing orders
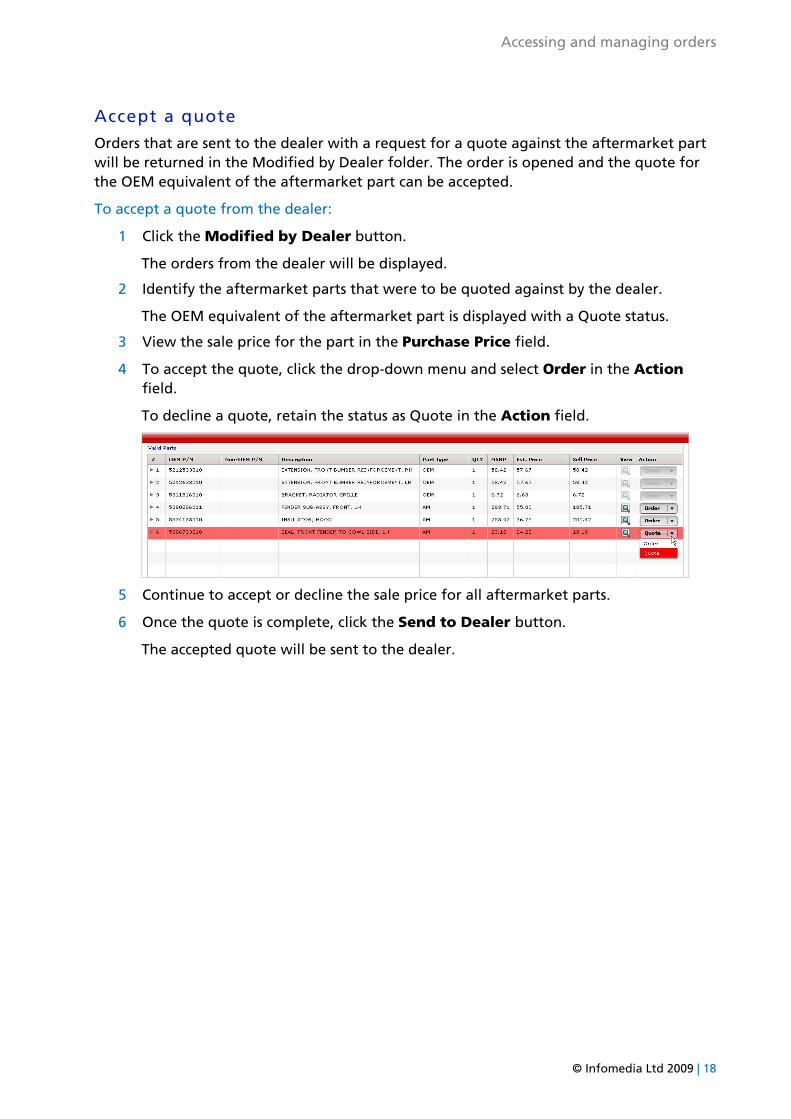
Accept a quote
Orders that are sent to the dealer with a request for a quote against the aftermarket part will be returned in the Modified by Dealer folder. The order is opened and the quote for the OEM equivalent of the aftermarket part can be accepted.
To accept a quote from the dealer:
1 Click the Modified by Dealer button.
The orders from the dealer will be displayed.
2 Identify the aftermarket parts that were to be quoted against by the dealer.
The OEM equivalent of the aftermarket part is displayed with a Quote status.
3 View the sale price for the part in the Purchase Price field.
4 To accept the quote, click the drop-down menu and select Order in the Action field.
To decline a quote, retain the status as Quote in the Action field.
5 Continue to accept or decline the sale price for all aftermarket parts.
6 Once the quote is complete, click the Send to Dealer button.
The accepted quote will be sent to the dealer.
© Infomedia Ltd 2009 | 18
Accessing and managing orders
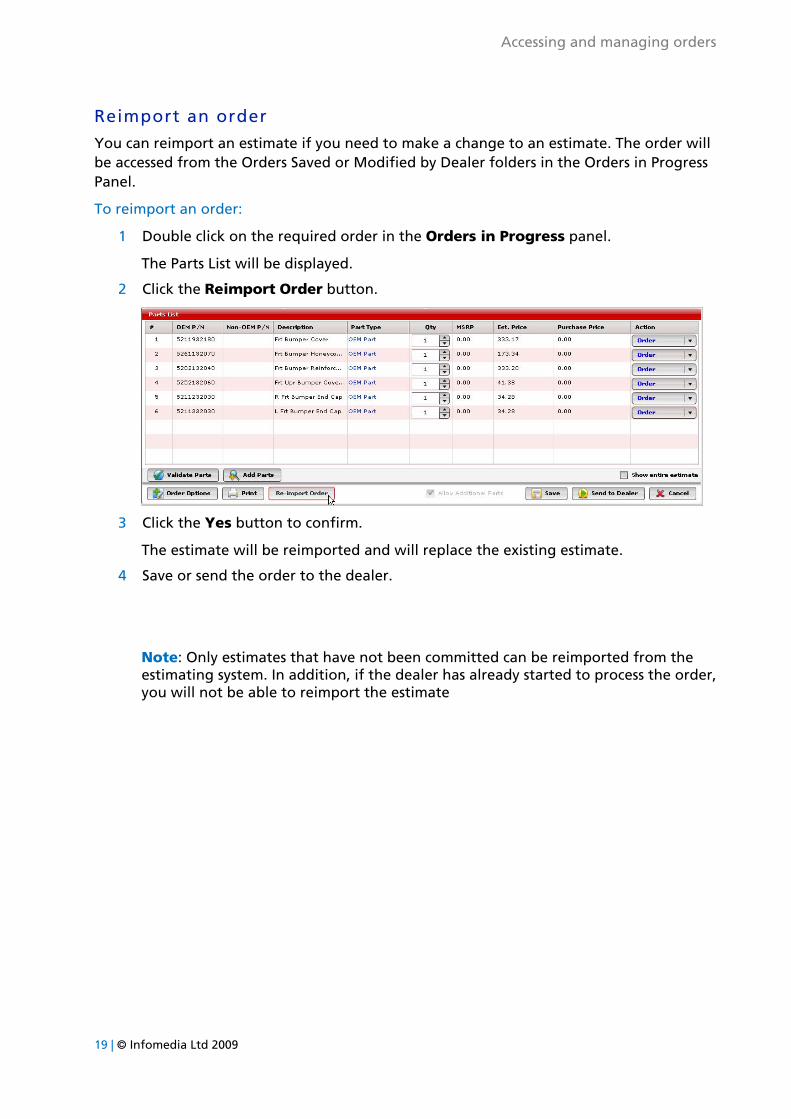
Reimport an order
You can reimport an estimate if you need to make a change to an estimate. The order will be accessed from the Orders Saved or Modified by Dealer folders in the Orders in Progress Panel.
To reimport an order:
1 Double click on the required order in the Orders in Progress panel.
The Parts List will be displayed.
2 Click the Reimport Order button.
3 Click the Yes button to confirm.
The estimate will be reimported and will replace the existing estimate.
4 Save or send the order to the dealer.
Note: Only estimates that have not been committed can be reimported from the estimating system. In addition, if the dealer has already started to process the order, you will not be able to reimport the estimate
19 | © Infomedia Ltd 2009
Accessing and managing orders
Print an order
Orders can be printed from the Order List screen.
To print an order:
1 Select the order you wish to print.
2 Click the View/Modify icon in the Orders to be Processed panel.
3 View the order.
4 Click the Print button.
The order will be printed.
Save an order
Orders can be saved from the Order List screen.
To save an order:
1 Select the order you wish to save.
2 Click the View/Modify icon in the Orders to be Processed panel.
3 View the order.
4 Click the Save button.
The order will be saved and will be moved to the Orders Saved folder.
© Infomedia Ltd 2009 | 20
Accessing and managing orders
21 | © Infomedia Ltd 2009
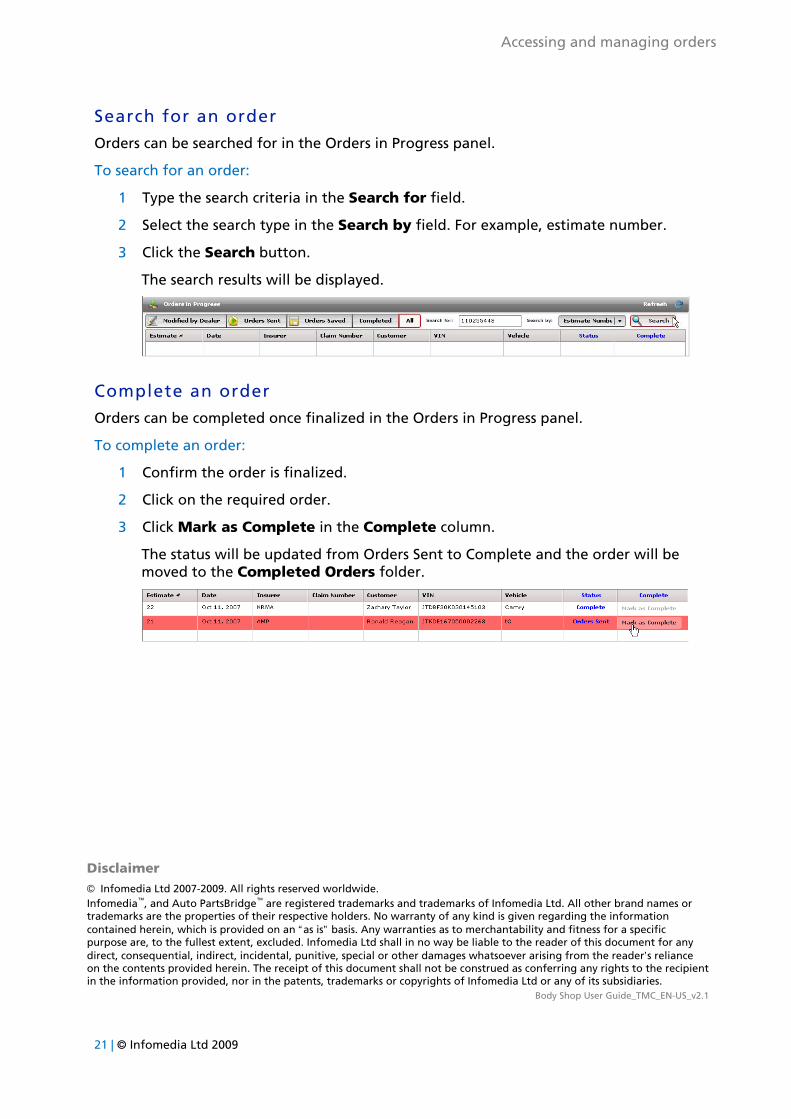
Search for an order
Orders can be searched for in the Orders in Progress panel.
To search for an order:
1 Type the search criteria in the Search for field.
2 Select the search type in the Search by field. For example, estimate number.
3 Click the Search button.
The search results will be displayed.
Complete an order
Orders can be completed once finalized in the Orders in Progress panel.
To complete an order:
1 Confirm the order is finalized.
2 Click on the required order.
3 Click Mark as Complete in the Complete column.
The status will be updated from Orders Sent to Complete and the order will be moved to the Completed Orders folder.
Disclaimer © Infomedia Ltd 2007-2009. All rights reserved worldwide. Infomedia™, and Auto PartsBridge™ are registered trademarks and trademarks of Infomedia Ltd. All other brand names or trademarks are the properties of their respective holders. No warranty of any kind is given regarding the information contained herein, which is provided on an “as is” basis. Any warranties as to merchantability and fitness for a specific purpose are, to the fullest extent, excluded. Infomedia Ltd shall in no way be liable to the reader of this document for any direct, consequential, indirect, incidental, punitive, special or other damages whatsoever arising from the reader’s reliance on the contents provided herein. The receipt of this document shall not be construed as conferring any rights to the recipient in the information provided, nor in the patents, trademarks or copyrights of Infomedia Ltd or any of its subsidiaries.
Body Shop User Guide_TMC_EN-US_v2.1