Embed Size (px)
Citation preview

Autodesk® Revit Building®’s Secret Gardens Part 2:
Generating Branching in the Family Tree
David Driver’s It’s Stupid I hate it Guide to BIM series

xlii
Reference Lesson SeriesA bit about the series. This is the Reference Lesson Series. Most books you will purchase on Revit Building are very process based. The complete set of tutorials for Revit Building are process based. These process based learning materials are good in their own way. They enable the new user to start with nothing and end with a building. However, necessary to process based courseware is the process itself. Any defined path from point A to point D through points B and C will leave out points B1 and C1. (i.e. a process based course that uses a 1 story flat roof building will probably not address complex roofs or stairs). So, that said, we have put together this reference lesson series with the intent of putting in one place a feature based reference point for the topic at hand. Somewhere between a tutorial and a reference exists the contents of the document
VersioningOriginally created as an Autodesk University class for release 7, I have posted parts of this to various news groups. In preparing for publication and updating for the Revit 8/8.1 re-lease I have substantially added and reorganized the information.
About the AuthorDavid is the principal of 4D Architects Ltd.. During his 20 years of practicing architecture, David has served as architectural project manager and computer manager. His company provides consulting on CAD standards and implementation to architects throughout the U.S. He also offers training on Autodesk® products. David has coauthored Designing Me-chanical Systems with Autodesk® Building Systems and is contributing editor to the CDV Revit® Courseware series. When not out fishing on the Rogue, David can usually be contacted at the e-mail address: [email protected]
DisclaimerAnything we say in this document may be false, don’t quote me, don’t sue me. If you use the information in this book, you do so with the this in mind. Neither the author, 4D Architects, Ltd, or 4D Press shall have any liability to any person or entity with respect to loss or dam-age caused or alleged to be caused directly or indirectly by the information or instructions contained in this document.
TrademarksWe discuss many different software’s here. If we had to put the little ™ or © or ® after every time we mentioned a software name, we would never get this thing out the door. Instead, we state here that our intent is only to the benefit of the trademark owner with no infringement of the trademark. All trademarks or service marks are property of their respective owners.
Copyright:©2005 David D. Driver and 4D Architects, Ltd.Yep, I wrote it. I don’t charge a bunch but would like to be compensated for the time it takes to put this information down and maintain it through the releases. So, you cannot copy or distribute in whole or any part of it without my permission. Should you wish to do so, you can contact me at the e-mail address [email protected]. Thanks.

xliii
DeDIcATIon:
This work is dedicated to my wife Cantrell who thinks all I do is sit at the computer, all the BIM pioneers plowing the fertile grounds of this new paradigm, and all the fish yet to catch in the Rogue.
PReFAce
My purpose in creating this document is twofold. This is a document for my training class-es, as well as to give users a reference source when they go about creating plants in Revit Building. Originally, this was an Autodesk University class I put together to share some ideas on the use of plant families in a Revit Building project. While I am not a landscape architect, I find that rendering the architecture of a building without the context leaves much to be desired in the way of expression of design intent. Revit Building gives you several ways of creat-ing the landscape context for the model. As I was putting together the original class, I had intended to spend most of the time focusing on creating new plant types using the Accuren-der plant generator. As it evolved, it turned into an extensive discussion on Revit Building plant families and how to replace that annoying cluster of twigs used to represent trees in 3D and elevation views. I have since split this information into two documents, one for the plant families and one to focus on Accurender’s plant family generator. The first part, Creating a Family Tree focuses on the generation and manipulation of plant families from simple to complex. It takes you through creating a couple of families from scratch, including integrating either 3D solid geometry or 2D symbolic lines. Other ways to get plantings into the project such as RCP families are covered toward the end of the lesson.This is Part 2, Generating Branching in the Family Tree the companion document. It will focus primarily on the Accurender Plant Library and the plant editor explaining some of the options available to create your own vegetation types. The Accurender procedural plant editor is a powerful tool that will allow you to place two of the same types of trees near each other. If the height of the two trees is different, the procedural trees will have dif-ferent branching, making a more realistic type of tree. While the procedural Plant Editor is a very sweet tool, it does take a bit to get used to.
AcknowleDGeMenTS
Thanks go to: Steve Stafford, Bruce Gow, and the other AUGI dogs in the news group who hacked through this before me and posted those questions that always help to shape the things I write.I would also like to thank you for purchasing this document. I hope you find the information contained within beneficial to your practice and use of Revit Building and its information model.

xliv
contentsDedication: ..................................................................................................................... iiiPreface ............................................................................................................................ iiiAcknowledgements ...................................................................................................... iii
Introduction ..................................................................................................................... viHow to use this document .......................................................................................... vi
Systems Thinking .................................................................................................................................... vi
Pre-requisites ................................................................................................................vii Goals .............................................................................................................................vii
kit of PartsTerminology .....................................................................................................................10Accurender vocabulary ...............................................................................................10Botany Terms .................................................................................................................11Revit vocabulary ...........................................................................................................12
Plant editor Tools ...........................................................................................................13Plant libraries ................................................................................................................13
Accessing the Plant Library ................................................................................................................. 13Navigating the Plant Library ................................................................................................................ 14Creating New Plant Libraries ............................................................................................................. 15
Plant editor ....................................................................................................................15Algorithmically Speaking ...................................................................................................................... 16Preview and Size .................................................................................................................................... 16Trees and Ground Cover .................................................................................................................... 16
Branch editor ................................................................................................................17Geometry ............................................................................................................................................... 17Branching................................................................................................................................................. 18Settings .................................................................................................................................................... 19
Foliage editor.................................................................................................................20Ground cover ................................................................................................................21
Set of Rulesconcepts ..........................................................................................................................24
General Workflow ................................................................................................................................ 24Miscellaneous ......................................................................................................................................... 25
Tips and Tricks .................................................................................................................26Paths and Plant library files ........................................................................................26
Pathing Oddities .................................................................................................................................... 26Network Plants ...................................................................................................................................... 26Project Specific Libraries ..................................................................................................................... 27Crash and Burn Blues ........................................................................................................................... 27
Time Savers...................................................................................................................27In the editor ..................................................................................................................27
Multiple Trunks ....................................................................................................................................... 27
At Render time .............................................................................................................28Render Trees Separately ...................................................................................................................... 28

xlv
Interiors ................................................................................................................................................... 28Test Render in Winter.......................................................................................................................... 28
exercisesIntroduction .....................................................................................................................30
In the back of the potting shed other Resourses ............................................................................................................34web sites ........................................................................................................................34newsgroups ...................................................................................................................34Appendix 1 - help file ...................................................................................................35

xlvi
No town can fail of beauty, though its walks were gutters and its houses hov-els, if venerable trees make magnificent colonnades along its streets. -HenryWardBeecher,Proverbs,1887
InTRoDucTIon
Welcome to Gardening with Revit Building Part 2 Generating Branching in the Family TreeI consider one of Revit Building’s strengths to the ability to render the building model without spend-ing weeks in a learning curve. The use of the Accurender rendering engine allows those with no expo-sure to rendering to get out a rendered image of the building. I see with the advent of the plug-ins for MAX and VIZ Autodesk the possibility of Revit Building moving away from the Accurender engine. I hope they never pull the plug entirely for I would sorely miss is the Accurender plants generator. This document is dedicated to this one small portion of the Revit Building Software.
How To uSe THIS DocuMenT
If you are an end user, and are not in control of your office plant libraries, and don’t care, don’t go any further, just pass this on to your BIM manager. If you are an end user and are curious what your BIM manager has to deal with or are just curious, feel free to read on. If you are the BIM manager or responsible for creating renderings using just the Accurender engine in Revit Building, do read on.
Systems Thinking
Most of my documents are divided roughly into these two sections. This idea of a kit of parts and set of rules is from systems theory. I don’t exactly know who to attribute it to, but it is the methodology I take when I am learning new software. First, I have to figure out the Kit of Parts. What is in the tool box I have been given? How do each of the tools work? What is their specific functions as the developers thought it would be used. Once I have a fairly good grip on the tool box, I set out to explore the Set of Rules: First - How/when to use it in the overall workflow of getting a larger task done? How was this tool designed to be used? How does it interact with other tools/objects? Secondly, What are the eccentricities, cautions, thinking outside of the box, fishing with peanut butter sandwiches etc... This roughly trans-lates into an outline that looks like

xlvii
Kit of parts:
Terminology
Features (expanded and in depth coverage of each of the terminology topics)
Set of Rules:
Concepts and workflow
Tips Tricks and Just for Kicks
Exercises.
So if have worked with Accurender before and are familiar with the Accurender interface you might just skip down to the tips and trick along with the exercises. If you have never been exposed to the Accurender plant generator or plant libraries then you probably want to at least skim the first section that establishes the vocabulary for the Accurender tools.
PRe-RequISITeS
This lesson is unique in that it’s focus is on Accurender functions as provided within the Revit Building environment. As such it does not focus on Revit commands or terminol-ogy. However, it does makes the assumption that you can make your way around the Re-vit Building environment. If you have less than a weeks worth of experience in Revit, we suggest you take on some more experience with Revit before tackling the exercises in this lesson.While not absolutely necessary, it will be helpful to have a base working knowledge of both Revit Building’s Family definitions and Rendering functions. If you feel you need some review, for families, Part 1 of this lesson should be fine. For rendering base knowledge, we suggest either the rendering tutorial or purchase the rendering modules from www.david-ddriver.com.
GoAlS
My goals are 1) To familiarize you with the Accurender plant generator, its terms, eccentricities and power.2) To introduce you to Twiggy - the Accurender plant learning stump.3) To walk you through creation of a plant that does not exist in the plant libraryI leave your goals up to you. Whether it be to create a better yucca, monkey tree or acacia, or simply to replace the default pile of twigs that show up in 3D for the default trees, the answer is here,
Happy Gardening!

xlviii

kIT oF PARTS
.
This section is broken down into two main parts.
TerminologyFeatures: Plant editor Tools

Page 50Page 50
A well maintained landscape with mature trees can increase property values up to 25 percent. Trees can cool houses in the summer. A city lot with 30 percent plant cover provides the equivalent cooling neces-sary to air condition two moderately sized houses 12 hours a day in the summer. TheValueofTreesAroundYourHome.
AccuRenDeR vocABulARy
This is a list of terms that are specific to Accurender. Most the these terms are specific to Accurender and are better explained with screen captures and examples. Refer to the fea-tures section for more in depth explanation. AccurenderTerms DefinitionAccurender Plant Definition An Accurender plant is an render time plant. The
plant is just a symbolic representation until ren-dered.
Branch Within an Accurender plant definition, a branch holds the information about how the tree will grow and expand. There will be one branch control per set of branches in the tree. A straight saguaro would only have 1 branch. A Saguaro with arms like in the road runner cartoons will have only 2 branches.
Branch 0:0 The trunk of the tree. Because this branch origi-nates from a single source, manipulating the parameters in the editor give different results than other branches in the plant.
Ground Cover Primary plant type
Ground Cover is a type of Accurender plant that has multiple branches that are spread over a 3 - 4 square foot area (approximately).
TeRMInoloGyBecause Accurender is a completely different software that has been integrated into Revit, it has it’s own terminology. In the learning curve it helps to keep them separate, and so I have pulled them out here in this list.

Term
inol
ogy
Page 51www.davidddriver.com
AccurenderTerms DefinitionMin and Max trunk diameter.
Tree Setting This setting determines the maximum diameter of the base of a tree. Most of the other parameters for a tree are derived from this one value. Limiting this value will also limit the height of your tree.
Plant Library 1 External file This file stores all of the settings for a group of plants including their seasonal settings, branching, leaves, fruits and flowers. This file has the exten-sion .plib
Plant Library 2 Interface The Plant Library is also the name of the interface for browsing, selecting, and editing plant defini-tions
Tree Primary plant type
There are two types of plants in Accurender that all other plants are derived from. Trees are a cen-tral core base that all branches flowers flow from.
BoTAny TeRMS
While describing the plant editor, I cannot get around using some botanical terms to describe the plant we are making. Because my dad was a forester, I had this repeat-edly reinforced. Most of us had this in high school biology, but well... if might be a good idea to print this out and carry it around. Take a walk in the arboretum or just a park and take a close look at the lovely greenery! Though the plant editor does not use these exact terms all the time, the more familiar you are with the terminology of plant structure the easier using the plant editor will be.Term DefinitionSimple leaf Leave configu-
rationOne stem (petiol), one leaf
Compound leaf Leaf Configura-tion
Multiple leaves on 1 leaf stem (rachis) - walnuts, sumac, mesquite.
Alternating Geometry Just as it sounds, out one side a bit of a space then out the other side. Makes for a generally flat structure. Applied to either leaf pattern or stem configuration
Opposite Geometry Just as it sounds, one side then the other. Applied to either leaf pattern or stem configuration
Whorl Geometry Think of the branches of your Christmas tree as they meet the main trunk
Serrate Leaf With teeth (beach, walnut)Pinnately Com-pound
Compound leaves
Leaflets are attached laterally along the rachis or stalk; leaves may be once, twice, or three-times pinnately compound.
Palmately com-pound
Compound leaves
Several leaflets radiate from the end of a stalk (ra-chis); like the fingers around the palm of a hand.

Term
inol
ogy
Page 52www.davidddriver.com
Term DefinitionDeciduous Leaves drop in winterEvergreen Keeps leaves in winter
RevIT vocABulARy
Term Description
Plant Name Type Setting - Path
This is the setting in a plant family type that points to the Accurender plant definition used by the family. This is a path, not a variable.
Family Definition Plants are component families. The family holds the geometry of the symbolic line work seen in plan, elevation and 3D
Type Definition Families are broken down into types. The Accuren-der plant is assigned at the type level. A Revit fam-ily might contain the geometry to represent a pine tree, and the types within that family be assigned different Accurender plants ponderosa pine, Jack pine etc. A more common usage is that a family is one type of plant and the types are used to store different height values to the same Accurender plant definition.
Component Object and/ or tool
Components in Revit is a classification of object. (Simplification - almost anything that is not part of the building envelope (walls, doors, floors, roof) is a component. Component is also the name of the tool to place such objects.
Site Component Subset of components in the Revit Building Model that more or less have a similar set of behaviors.

Gro
win
g an
Acc
uren
der
Pla
nt
Page 53www.davidddriver.com
In creating, the only hard thing’s to begin; a grass-blade’s no easier to make than an oak.
- James Russell Lowell
In this section, we rip apart a few plants to see how they are put together. The definition of an Accurender plant is not quite entirely unlike a regular plant. However instead of water fertil-izer and sun, you feed your plant with parameters that grow the plant. Many of the illustra-tions in this next section are screen captures of an Accurender plant I call Twiggy, or Stumpy depending on the mood. Twiggy is an Accurender seedling. You will create Twiggy in the first exercise. The reason to create Twiggy is that when you adjust a variable on a plant that only has a few branches, it is easier to see the effects changing a parameter has on the fundamental structure.
PlAnT lIBRARIeS
A plant library could be equated to the seed catalog. This is were you will store the definitions of your plants
Accessing the Plant Library
When you are working in Revit Building, you access the Accurender Plant library through the type properties of a plant type.
Place a Plant in a Revit Building project file. Select the plant and open it’s proper-ties.
PlAnT eDIToR ToolS
GENETIC ENGINEERING MADE SIMPLE

Gro
win
g an
Acc
uren
der
Pla
nt
Page 54www.davidddriver.com
In the type properties, click on the value field of the parameter Other: Plant Name (Click on the text ACCURENDER\Trees and Shrubs\Deciduous\Oak, Black). Once you click on this value you will see the small browse button at the right of this line. Pick this button to access the plant library.
Navigating the Plant Library
Once you are in the library, the interface is much like windows explorer. The menu pulldowns are fairly minimal and most of the functions are available with a right click context menu. On the left is the navigation or browser pane. In the middle is the plant list and on the right are previews of each of the plants.The previews get filled out sequentially as you click on plants in the plant list.
Browsing Installed LibrariesThere are three levels to the browser portion on the left. The root level is the plant library and a default install provides two different libraries, the Accurender and the AR_2Plants. Use the small boxes on the left to expand any minimized libraries. Libraries are subdivided into folders. When you select a folder that has plants in it, the plant list shows up in the plant list under Name giving you access to select, edit, delete or modify each of the plants in the library.
Previewing PlantsWhen a plant is selected in the name list, a preview will ap-pear on the right side of the window. Each time you pick a plant, a new preview will fill in an empty preview pane. This will repeat until all 9 preview panes are full. After all the preview panes are full, it cycles through to the number 1 slot and overrides the preview there. The previews are persistent until you end the Revit session and start a new one. The Pre-view plants panes have a season at the top of each one. Each Accurender plant has seasonal parameters. Because of the limited information in the preview panes, we don’t use this for much other than to see if a plant seasonally flowers or has foli-age that changes color in the fall

Gro
win
g an
Acc
uren
der
Pla
nt
Page 55www.davidddriver.com
Creating New Plant Libraries
You can create new plant libraries either with the file pull down, or a right click anywhere in the left browser pane. It is a good idea to create an office standard plant library for several reasons. As Revit Building does its Revit thing and new releases are installed, it is too easy to lose track of the default installed plant libraries. The office standard plant library can exist out on a network drive so that everyone has access to it. The network path should be the same for everyone in the office so that if someone else opens your Revit project and renders it, the rendering engine will not hit a broken link to the definition of the plant.
Library FilesWhen you create a new library, you are creating a file with a .plib extension. The library file must exist on a path set in Revit Building’s Rendering Options. The parameter Additional rendering material directories allows you to add more paths to the list.
PathsWhen you create a new plant li-brary, a new path will automatically be created to its container folder in Additional rendering material directories. Be careful however. If you create a new plant family in a folder that already in the path list, Revit add this path again. The du-plicate path this creates will cause two of each library to appear in the
plant library browser window.The only time you really need to add a path is on a new install to pick out the path to the office standard plant library.
PlAnT eDIToR
The plant editor is the business end of growing Accurender plants. To ac-cess the plant editor select any plant in the Name list. Right click>Edit. The plant editor has its own inter-face. On the left is a navigation pane of the plant that describes the struc-tural framework of the plant. The list includes branches, leaves and flowers and their relationship to each other. At the lower portion of this dialog box are some innocuous settings that are fairly important. On the this pages you can give your plant a botani-cal name. There is no link to the Revit family or type, but you can copy and paste if needed.
RenderingOptionsfromtheSettings>Optionsmenu

Gro
win
g an
Acc
uren
der
Pla
nt
Page 56www.davidddriver.com
Algorithmically Speaking
The Minimum and Maximum trunk diameters on the base plant editor page control many things. Remember that Ac-curender trees are algorithms each setting you change may or may not effect another part of the tree. In this case, the maximum diameter of the trunk will ultimately affect the maximum height of the tree. You can think of it this way. The height of the tree is a variable X time the diameter of the trunk. While a bit simplistic if you were just to look at lodge-pole pines you might say the height of a tree could be determined by multiplying the diameter at the base of the tree 40. The values are fractions of feet. You will not be able to set a diameter wider than the max setting. In Accurender, this value is used to calculate taper on the trunk as well as the size to the branches that come off of the trunk. Somehow Revit might override this value. In Revit the family also has a height parameters. I am think the Revit parameter controls the geometry of the stick in the unrendered representation, but this height you see on this page repre-sents what the rendered algorithm sees.
Preview and Size
Also on the opening page of the editor are some figures in the lower right corner of the dialog box. As you will see, every branch in the tree is derived from the one pa-rameter here - the diameter. As you increase this number you will see the tree grows in height. Additionally you are making the branches longer as well. As the branches grow, there will be more sub branches, and more leaves. This area is a testing ground. As you increase the size of the tree, you also see the size in memory that a tree of those dimensions takes up. Keep this in mind. A tree that takes up only 800k memory will render quite a bit more quickly than one that takes up 12 megs. Also
keep in mind that you probably will not have just one tree in your project but several. If you put fifteen to twenty 12 meg trees in your project you might regret it when you finally push the render button. If you find yourself designing a 25 meg monster, go back and trim out part of the definition before you finalize the tree.
The No Medium Level of Detail prevents Accurender from giving a “rough estimate” of the tree when using draft or lower quality render settings. If you render a tree and it looks a bit off, check this setting
Trees and Ground Cover
All plants in the plant list will be either classified as a tree or a ground cover. The difference between these two is not how you would use them in real life as much as how they are defined in
the plant editor
TreesTrees will generally have a hierarchical branching sys-tem. Branch 0:0 is usually the trunk with second level branches (Branch 1:0) radiat-ing out from it. The definition
Lilac
Cedar
GroundCover(petunia)showingmultipleleafassignments

Gro
win
g an
Acc
uren
der
Pla
nt
Page 57www.davidddriver.com
of branch 0:00 determines the number and spacing of any child branches (Branch 1:0). Third level branching 2:0 then is anchored to and derived from its parent branch. While this structure is common, there are other structures to create differ-ent overall plant shapes or effects. The Lilac is a tree shape that uses a more com-plex hierarchy.
Ground CoverGround cover is defined very similarly to trees. The three main differences are:1) Ground cover cannot have branches 2) Ground cover can only have one level of hierarchy (no putting flow-ers at the end of leaves). 3) When rendered ground covers apply the definition to approximately a 1 meter square.Ground cover definitions cannot have branches, You can push this rule by making really long leaves with a custom opacity map for the leaf.
BRAncH eDIToR
Branch definitions appear in the plant editor. Click on a branch in the plant editor’s browser window, then pick the edit button. The branch editor has three main tabs; Geometry, Branching and Settings. To roughly describe them:Geometry tells the individual branch you are work-ing on how to grow, bend twist and otherwise assume a shape beyond my childhood drawing lessons.Branching tells THIS BRANCH how to leave the par-ent branch - spacing, departure angles etc.Settings contain the control over the bark of that branch and determine if this is seasonal or not.
Geometry
ElongationAny positive value. This is multiplier applied to the base of the branch. For Branch0:0 this is applied to the diameter set on the main plant page, and will deter-mine the overall tree height more or less if there is no bending applied. For second-ary branches this number is applied to the base as it leaves its parent branch.
TaperRatio of end diameter to start diameter. From the Start of the branch to the end of the branch, how much width is lost. Valid 0 - 1. Values of 0.10 create conical form, values of .99 do not taper. Be careful with this setting. Each child branch that comes off of the one your are working on will look at its attachment point to get it’s start-ing diameter. This is how secondary branches toward the end of a parent branch are shorter than those at the beginning of the parent branch.
Segments Per BranchSegmenting a branch is used for the gnarl (spiral deform) and wiggle (side to side deform) settings below it. Many desert trees such as olive, mesquite and Palo Verde are highly deformed. Use this setting to get gnarly with it. I use adjust this spar-

Page 58www.davidddriver.com
Gro
win
g an
Acc
uren
der
Pla
nt
ingly and usually reserve tweaking into upper ranges for a special plant that is in the foreground of a rendering. For trees in the background mostly you are seeing the overall shape and this setting is not visible. I don’t find high values (above 8) do much except increase the memory use of the plant.
Branching
The branching controls the how THIS branch comes out of its parent. For the first branch (0:0) this is a mute point. For branch 1:0 (the second), this has some meaning.
Vertical Base and TopWhat angle should the branch leave the parent branch? Here this value will depend on if you are designing a secondary or tertiary branch. For Secondary branches, generally the lower limbs are heavier and have dropped from gravity over time so will have a bigger departure angle than those limbs at the top.
Horizontal IncrementHow often this branch will appear on the parent.
PatternsThe pattern you choose will determine the effects (if any) the rest of the values on this page have. I would be nice if those that did not apply to a selected pattern grayed out, but this is not the case. An obvious example is the branches per whorl setting. This only affects the branch if the pattern is set to whorl. Otherwise it does not do anything.
SpiralThe image shows how spiral branches show up on a tree (albeit a small compact one). For the Spiral the main controls are: Horizontal Increment - in this case horizontal increment controls the rotation around the parent to the next branch.Spacing – how far from 1 branch to the nextWhorlThink of your Christmas trees branches as they leave the trunk…Horizontal increment is of no use. Use Branches/whorl to get the number of branches for each right around the tree.
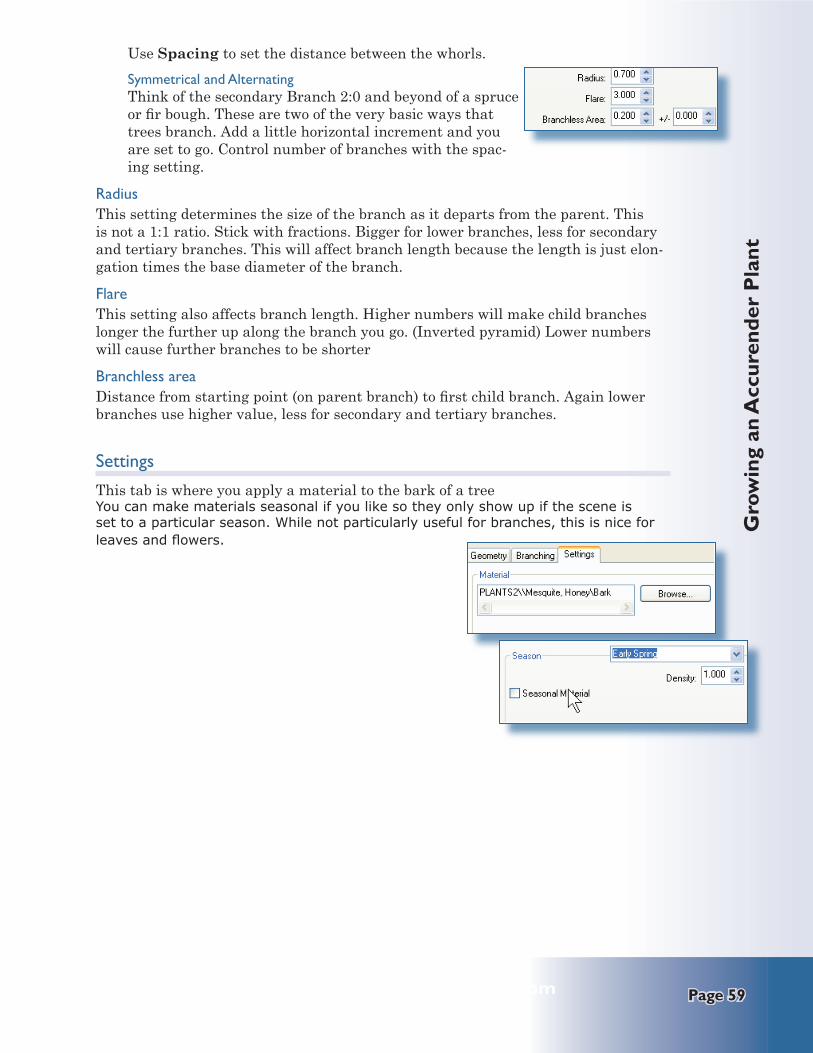
Page 59www.davidddriver.com
Gro
win
g an
Acc
uren
der
Pla
nt
Use Spacing to set the distance between the whorls.Symmetrical and AlternatingThink of the secondary Branch 2:0 and beyond of a spruce or fir bough. These are two of the very basic ways that trees branch. Add a little horizontal increment and you are set to go. Control number of branches with the spac-ing setting.
Radius This setting determines the size of the branch as it departs from the parent. This is not a 1:1 ratio. Stick with fractions. Bigger for lower branches, less for secondary and tertiary branches. This will affect branch length because the length is just elon-gation times the base diameter of the branch.
FlareThis setting also affects branch length. Higher numbers will make child branches longer the further up along the branch you go. (Inverted pyramid) Lower numbers will cause further branches to be shorter
Branchless area Distance from starting point (on parent branch) to first child branch. Again lower branches use higher value, less for secondary and tertiary branches.
Settings
This tab is where you apply a material to the bark of a tree You can make materials seasonal if you like so they only show up if the scene is set to a particular season. While not particularly useful for branches, this is nice for leaves and flowers.

Gro
win
g an
Acc
uren
der
Pla
nt
Page 60www.davidddriver.com
FolIAGe eDIToR
The foliage editor works much in the same way as the branch editor. Most of the settings react in the same way. The major difference is the set of patterns to select from. In this dialog box, length, width and stem length are all feet. Or fractions of feet. The shape set-tings are Planar, Disk, Crossed Plate, Cone, Sphere, Hemisphere, Cup, Flare and Bent Plate.
OK you get the point. Stem length just sets the leaf image away from the branch by that amount. Height and length or radius will distort the Opacity map to the specified size.The opacity map is just a black and white bitmap uses to mask whatever material you assign to the leaf on the materials page.

Gro
win
g an
Acc
uren
der
Pla
nt
Page 61www.davidddriver.com
GRounD coveR
Ground cover covers about an area 4’x4’The ground cover will be rendered to an area upper right of the insertion point (the 4x4 area is lower left justified, more or less If you want more diffuse ground cover you can increase the stem length…the longer you make the stems, the more round the rendered plant area will be.Blue petunias rfa has a solid (5’x5’ OD) that is created lower left justified at the ref lines in the Planting.rfa I used to create this
In the project file, the plants will render a little off of center. The left image is shade mode that shows the solid (mid grey) described at left in the plant family. I put a small CMU planter wall also (4’x4’ inside, 4” wide CMU) – shows up as lighter color. The right shows the rendered image, that illustrates the ground cover is off from center a bit and about 4x4 foot square.

62

SeT oF RuleS
This section contains two sections.
conceptsTips and Tricks

Page 64Page 64
General Workflow
When working with the plant editor, always set up your library and folder structure before you start working with the editor itself.Because of the isolated nature of the plant editor it does not really matter if you create the Revit families/types before or after you create your Accurender plants.Generally in Schematic phase before I am doing rendering, I find that I will lay out the landscaping using what families and plants are on hand. As I go into preparation for a ren-dering where the landscape is going to be discussed, I will then set out to create the plants I need specific for the project. I then assign these to new Revit plant types and just replace the ones that are in the current project.As far as the actual process of creating a tree goes I would summarize it like this
Close any current project and start a new project with a default template (so if it crashes you are not out of luck)Get into the plant generator and start with what you think is the closest looking plant to what you desire. You are looking for plant structure more than leave type. Leaves are changed more easily than branching structure.Start editing the plant and make some rough guesses. Often times I will remove any leaves so that I can just see the branching. This saves rendering time (setting the render-ing season does the same thing) as you are doing the test renderings.Assign the plant to a Revit family, place it in the blank project and render it. In your test renders, be sure to do a test check render in each season. Both leaves and flowers are possibly assigned different colors in each season. Nothing like working with a plant, then switching seasons before the final rendering (say from summer to spring) and having all your plants bloom in a completely inappropriate color.
◘
◘
◘
◘◘
concePTS
AND IDEAS ABOuT WORKFLOW
Autumn is a second spring when every leaf is a flower. AlbertCamus:
While this section is usually about the intended workflow of the feature, I am finding that be-cause of the micro focused nature of this topic there is not much to write here. That said...

Page 65www.davidddriver.com
Con
cept
s an
d W
orkfl
ow
Miscellaneous
Camera View Specific PlantsOn most projects I find myself tweaking a plant definition to get the tree to grow in a way that compliments the rendering composition. Sometime changing the elongation or the taper variable on a branch will do the trick to push the limbs out or make the tree more condensed. Other times, I will thin out the leaves a bit to see more of the building through the foliage.
Variations on the Theme.If there are many of the same type of tree or bush in a view, I will not only vary the height (causing different branching), for foreground plants, I will create several Accurender copies of the plant to make slight variations of the same tree species. I then assign these to either different families or just different types within the same family depending entirely on my mood.
Multiple Separate Plant Project FilesI will often keep the site in a separate project file. I then create a third project file that links in the site and I place my entourage and trees in this third project file - See tips and tricks section for more explanation on this. Having multiple “landscape project files” allows me to switch out the entourage and landscaping for specific views I am rendering. I find that if I am setting up a camera to emphasize a specific architectural feature, often times a tree will need to be adjusted just a smidgen to the right or left (OK, sometimes it need to move quite a bit). While I could use Options

Page 66Page 66
This section is a true record of my brain noise. This is where I keep the random news group articles and other odd thoughts on Accurender oddities
PATHS AnD PlAnT lIBRARy FIleS
Pathing Oddities
The default plant library files are installed in C:\Documents and Settings\All Users\Application Data\Autodesk\Revit Building 8\Rendering\AccuRenderRedist\SUPPORTIf you look in the Settings> Option, [Rendering] >paths you will not find this path. It is taken care of with the lineC:\Documents and Settings\All Users\Application Data\Autodesk\Revit Building 8\Rendering\AccuRenderRedistIf you are familiar with Accurender you will probably also be looking for a bunch more paths. The only thing I can figure out is that anything below this point is hard coded into either Revit, or the modified version of Accurender. In particular, I have on occasion needed to add leaf patterns to the library. In Revit Building this hard coded to the path;C:\Documents and Settings\All Users\Application Data\Autodesk\Revit Building 8\Rendering\AccuRenderRedist\SUPPORT\Plants\opacity While you can browse to different locations, you can not truly set this path anywhere other than here, so be careful with your office standards.
Network Plants
Anyone using Revit Building in a networked environment will probably figure this one out as they beat their heads against the material library. Keep the office standard plant library out on the network so if you assign a custom plant to a plant family, when your coworker renders the project it has a definition to use to render with.Keep in mind that although multiple people can access a workset based project file, only 1 person at a time making changes in the plant library. There is some discussion about ac-cessing plant and material libraries by more than 1 person at the same time leading to a crash, but I have seen nothing documented to this extent. In working with material librar-ies, I recommend that there is an interior and an exterior material library. So that more than one person can be working on creating materials for a project. With plant libraries, I don’t see that need unless your primary work is landscaping. In that case I might add a
Suburbia is where the developer bulldozes out the trees, then names the streets after them.
Bill Vaughan
TIPS AnD TRIckS
AND JuST FOR KICKS

Page 67www.davidddriver.com
Tip
s, Tr
icks
and
Just
for
kic
ks
project specific library in addition to the office standard plant library, or break up the office standard into several different libraries i.e. one for deciduous trees, one for ground cover, and yet another for shrubs etc.
Project Specific Libraries
If my finished product is a rendering (as opposed to construction drawings) and I anticipate modifying or creating several plants, I will create a project specific plant library so that I can archive the plant library with the final version of the project. If you create a project spe-cific library make sure to add the path to the Options, rendering tab on any machine that will render the project.
Crash and Burn Blues
Libraries
In release 7 and prior, I found myself crashing when manipulating libraries - either plant libraries or material libraries. I was never able to reproduce this consistently enough to sub-mit it as a bug, but always save your work before heading to the plant library.
Folders and New Plants
Always have your folders and libraries set up before you edit or create new plants. This is also an area I have had difficulties in the past with.
TIMe SAveRS
Always start with a tree that has the approximate shape and size of what you want. So much easier to modify a few settings than to start from scratch, Any time you edit a plant that already exists in the library it will prompt and allow you to saveas a different name.
In THe eDIToR
Working with the branch editor
Arrange the open windows you can see the branch you are editing in red in the preview window of the plant library dialog box. This does give some visual clues
Multiple Trunks
Many types of trees such as mesquites Acacias are often pruned in the nursery for multiple trunks. To create a multiple trunk, set the Min/Max trunk size to something small like .1 to 0.30 and set the elongation adjust the Branch 0:0 to be something like 1 or 2. This will cre-ate just a little nubbin at the ground base. The base trunk diameter varies between .10 an

Page 68www.davidddriver.com
Tip
s, Tr
icks
and
Just
for
kic
ks
.30, so this will only be ¾ of that height. Then set the taper to .25 percent of the trunk value. Adjust your second level (Branch 1:0) values to be the main trunks. Branches use the width of the parent branch at the location where they branch to determine their starting values, so, any branches that come off this compacted “Trunk” will be different sizes
AT RenDeR TIMe
Render Trees Separately
Rendering foliage is time intensive. Here are two different ways to think about rendering.
Separate Tree ModelsInstead of rendering all of the trees in one project, create two Revit files and link them to-gether. Render the building open ground. Create three separate Revit files. 1 project has the building. A second project contains the building. A third project contains the trees. These are linked together in different ways. Link the trees into the site and render just the trees. Link the site into the building project and render just the building. Combine the two renderings with Photoshop.
Render Trees on Blue BackgroundI use this technique to create decals that I can use to place on a flat plane, or images of indi-vidual trees that I can use in Photoshop to add to renderings.
Create a project that has a blue wall and floor.Place a tree on the floorRender the tree at eye levelOutput the rendering as a TIFF file.Open the TIFF in Photoshop and delete all the blue
You now have a file that has just the rendered tree in it. Use it in Photoshop or as the basis for an RPC tree.
Interiors
Create your trees in a separate model project file. Create one with all the trees and another with a subset of just the trees you can see through the window. When rendering the interior, swap out the linked tree file for the smaller one to help with rendering, or, apply the decal from above to an invisible “billboard” outside the window. Rendering will be quicker if Ac-curender does not have to calculate each leaf.
Test Render in Winter
For early test renderings and walkthroughs create a scene that uses the Accurender winter season. It does not affect the light, you can set the sun for June and the Accurender season for winter. Any Deciduous trees will drop their leaves (hence are not taking up rendering process-ing time). if the scene set for winter.
◘◘◘◘◘

exeRcISeS
This section contains just one exercise for now:
The making of Twiggy

Page 70Page 70
TwIGGy
Twiggy is an Accurender plant definition. Twiggy allows you to see in the preview window the results of changing parameters on the branch settings of the plant definition. The general tasks involved in creating twiggy are:
Open the plant library and editor to edit any tree based plantEliminate all the branches and set the parameters to their minimally visible settingsSave the new plant definition with a new name into a library.
◘◘◘
Access the Plant Editor
Twiggy Access the Plant editor
1 Open a Revit project and place a site tree site component. Open its prop-erties to access the type properties.
2 Click the Plant Name parameter value and then click the browse icon that appears in this line
The Plant Library should open.
3 Expand Trees and Shrubs in the library browser tree.
Select Conifers to list the plants on the right.
Select Cedar, White in the name list and Right Click >Edit
Prune the Tree. Now that you have the Plant Editor open you have access to the branches and leaves. To create the simplest useful plant, you will delete the leave and last branch definition.
Twiggy Prune the Tree
1 Select Leaf 3:0 then click the Delete button.

Page 71www.davidddriver.com
Twig
gy
Twiggy Prune the Tree
3 Delete Branch 2:0 also leaving only Branch 0:0 and 1:0
4 Select Branch 1:0. Right Click > Edit (or click the Edit button).
5 On the geometry tab, set the elonga-tion to some thing small like 4.
6 Repeat for Branch 0:0 setting the elongation to 8
Depending on the trunk diameter setting (there on the first page of the plant editor) you should end up with something that looks like a boojum tree or an alien.
Save the tree for future useTwiggy Save the Trees (!)
1 Click OK in the Plant Editor dialog box. A new dialog Overwrite warning will appear. Click the SaveAs button
3 Go ahead and give your new plant a name.
4 If you have already created your of-fice standard plant library, go ahead and browse to this location and save your plant.
Note: there is no right click menu in the save plant as dialog box. I would tactfully suggest that you do not use the menu to create new libraries or folders at this point. It is a bit touchy. You can save into one of the provided libraries and then copy or move it later.
Now you have twiggy, you can modify any of the settings in the branch editor and see the resulting change in the preview window of the plant editor.

72

In THe BAck oF THe PoTTInG SHeD
Topics for further ExplorationEnd TestConclusion
This section contains the end material that did not fit anywhere else.
other ResourcesAppendix 1 - help file

Page 74Page 74
God is the experience of looking at a tree and saying, “Ah!”
- Joseph Campbell
oTHeR ReSouRSeS
weB SITeS
http://www.Accurender.com/Home of Accurender. As of July 2005, the last sighting of R4 was over a year ago in march. It does not really matter all that much. Whenever they get it done it will still be a long way from getting into Revit. The specifications for Revit 9 are probably mostly complete as 8.1 releases. So even if R4 Accurender came out tomorrow we would not see it for some time - if at all.
http://www.accustudio.com/This one is more useful. Not only can you download materials and textures, you can also find plant libraries here.They also maintain some tips and tricks along with some tutorials that are mostly for the ACAD environment.
newSGRouPS
www.augi.comAUGI Revit groups of course.
news.mcneel.com/ar3This news group is fairly active, but mostly ACAD based. It is good for specific questions that deal just with the plant editor or material libraries. You can get to this news group with a click from mcneels site. This is not web based, so you need a news reader such as outlook express.

Page 75www.davidddriver.com
In t
he P
otti
ng S
hed
APPenDIx 1 - HelP FIle
The following is just the contents of the help file. I think I took this from my ACAD in-stalled version because I was having difficulty accessing it through Revit’s cauterized Ac-curender interface. If you are an employee of Accurender (or their lawyer) my aim here is to help folks out, not make money - so please don’t sue me.
From the help file:Branch geometry controls the shape of the branches produced by this branch definition. To edit the branch geometry1 In the Plant Editor dialog box, under Plant Structure, select a Branch level and click Edit. 2 In the Edit Branch dialog box, on the Geometry tab, use the con-trols to customize the branch geometry.BasicElongation +/-This quantity is the ratio of the length of a branch to its radius. Higher numbers produce longer, thinner branches. The +/- control adds variability to this quantity, producing branches of varying lengths.TaperAccurender branches are made up of tapered cylinders in nature. Taper represents the ratio of the cylinder’s radius at the end of the branch to the radius at the start of the branch. A taper of 1.0 produces a straight-sided cylinder. A taper of 0.0 produces a branch that tapers to a point.Segments/BranchBent or gnarled branches are represented by subdividing the branch into segments. You can control this subdivision by varying this quantity. Higher numbers produce better approximations, such as smoother appearing bends, but use more memory.InvisibleIt is sometimes useful to make branches invisible. Invisible branch-es will not appear in your rendering, and require no more memory for generated objects. Invisible branches can still be used as parent branches for spawning more branches and foliage.BendingYou can make your branch appear to bend in several ways. The de-fault bending, None, produces a straight branch. Up and Down bending branches tend toward vertical, and Horizontal bending branches tend to grow parallel to the ground. The Attraction control determines the strength of this effect. Higher numbers produce more sudden, strong bending.TwistingYou can make your branch appear to have a more complex, random, shape by using the controls in this section. Both of these quanti-ties add some random rotation between branch segments. Gnarl rotates your branch about its own X axis, and Wiggle rotates the branch about its Y axis. Values of 0.0, the default, produce no twisting. Higher values produce more pronounced gnarl and wiggle.Spherical BaseBy default, the base of the branch cone is open, and the top is capped by a sphere. Under certain circumstances, this behavior can lead to small gaps between the base of a branch and its parent. In addition, check Spherical Base to cap the base of the branch cone with a sphere.XxxxBranching controls how branches produced by the current branch defi-nition depart from their parent. To edit the branch branching

Page 76www.davidddriver.com
In t
he P
otti
ng S
hed
1 In the Plant Editor dialog box, under Plant Structure, select a Branch level and click Edit.2 In the Edit Branch dialog box, on the Branching tab, use the controls to customize the branching.PatternBranches can depart from their parent using one of the follow-ing patterns. In a Spiral pattern, the default, the branches come off the parent one at a time. Each subsequent branch comes off both higher up the parent, and rotated in a dif-ferent direction. In the Whorl pattern, more than one branch departs from a single point. After the whorl is complete, the next branch departs higher up the tree. A Symmetrical branch departs in pairs, each member a mirror image of its twin. The Alternating branch pattern is similar, with the exception that rather than depart in pairs, each branch departs singly, and the subsequent branch departs higher up the parent. The Apical Only pattern produces a single branch that departs from the end of the parent branch.Branch at ApexChecking this box produces a branch that departs from the end of the parent branch. This box has no effect if the Apical Only branch pattern was selected.Departure AnglesThe controls in this section determine the angles at which the current branch departs from its parent. The Vertical angles determine the “droop”, of a branch. Vertical angles of 90 degrees departs perpendicular to the parent. Larger values appear to droop, smaller values depart more upright, follow-ing the parent more closely. Accurender lets you specify two Vertical angles, one for the Base and one for the Top of the parent branch. The actual vertical angle will be interpolated between these two values. In addition, the +/- control lets you add variability to the specified values. Horizontal angles specify, in degrees from 0 to 360, how the branch departs from the XY plane of its parent. The Initial Horizontal provides a starting point, and the Horizontal Increment is used when a Spiral pattern has been selected to determine how much to rotate before spawning the next branch. The +/- controls al-low variability to be added, breaking up the regularity of the plants branch structure.Branches/WhorlIf the Whorl pattern has been selected, this number determines how many branches depart from a single point along the parent branch. SpacingThis control, along with its +/- variability, determine how much to move up along the parent branch before beginning a new branch or whorl cluster.RadiusThis quantity represents the ratio between the parent branch’s radius and the current branch’s radius. FlareFlare is useful for modifying the length of child branches as they depart from their parent. A value of 1.0, the default, has no effect. Larger numbers tend to cause the child branch-es to elongate as they depart further up the parent. Smaller number cause the child branches to be shorter. This parameter is often used on the first child branch definition (the branch definition directly descendent from the trunk), to help control the shape of the plant. In these situations, higher numbers, such as 3.0 or more, produce plants that look like inverted pyramids.Branchless Area

Page 77www.davidddriver.com
In t
he P
otti
ng S
hed
This is the area at the bottom of the parent branch where no child branches occur. The default value of 0.2 means that the bottom 20% of the parent branch has no child branches.To edit the branch settings
1 In the Plant Editor dialog box, under Plant Structure, select a Branch level and click Edit.2 In the Edit Branch dialog box, on the Settings tab, use the controls to customize the branch settings.
Material
You can assign a material to your branch by selecting Browse. Make your selection from the Material Library.
Season
If you wish your branch definition to show seasonal variation, you can change either the density of the generated branches, or their material. In either case, you must set the Season to the season whose attributes you wish to change. The Density control lets you change how many of your branches are gener-ated for a given season. For example, if your branch is rep-resenting a leaf stem of a deciduous tree—set the season to Winter and the density to 0.0 to prevent the branch from gen-erating at all during the winter season. In the same example, setting the season to Spring and the density to 0.5 causes only half the possible number of branches to be generated. Similarly, selecting the correct season, checking Seasonal Material, and choosing Browse will allow you to select a mate-rial for that season.Leaves, flowers, and fruit are defined by using a combination of simple geometric shapes and an optional opacity map. The opac-ity map is an image, generally black and white, that further defines the shape of your foliage by excluding black areas of the map.