Embed Size (px)
Citation preview

7/28/2019 AutoMoto Owners Manual
http://slidepdf.com/reader/full/automoto-owners-manual 1/22
Table of Contents
Safety and operational precautions
Technical specifications
Main components of your vehicle 3
VIN locations
Functions and uses of the components 6
Starting to drive your new vehicle 1
Checks and adjustments
Breaking in your new vehicle
Routine inspections and maintenance 2
Troubleshooting chart 3
Lubrication timetable
Regular inspection timetable
7/28/2019 AutoMoto Owners Manual
http://slidepdf.com/reader/full/automoto-owners-manual 2/22
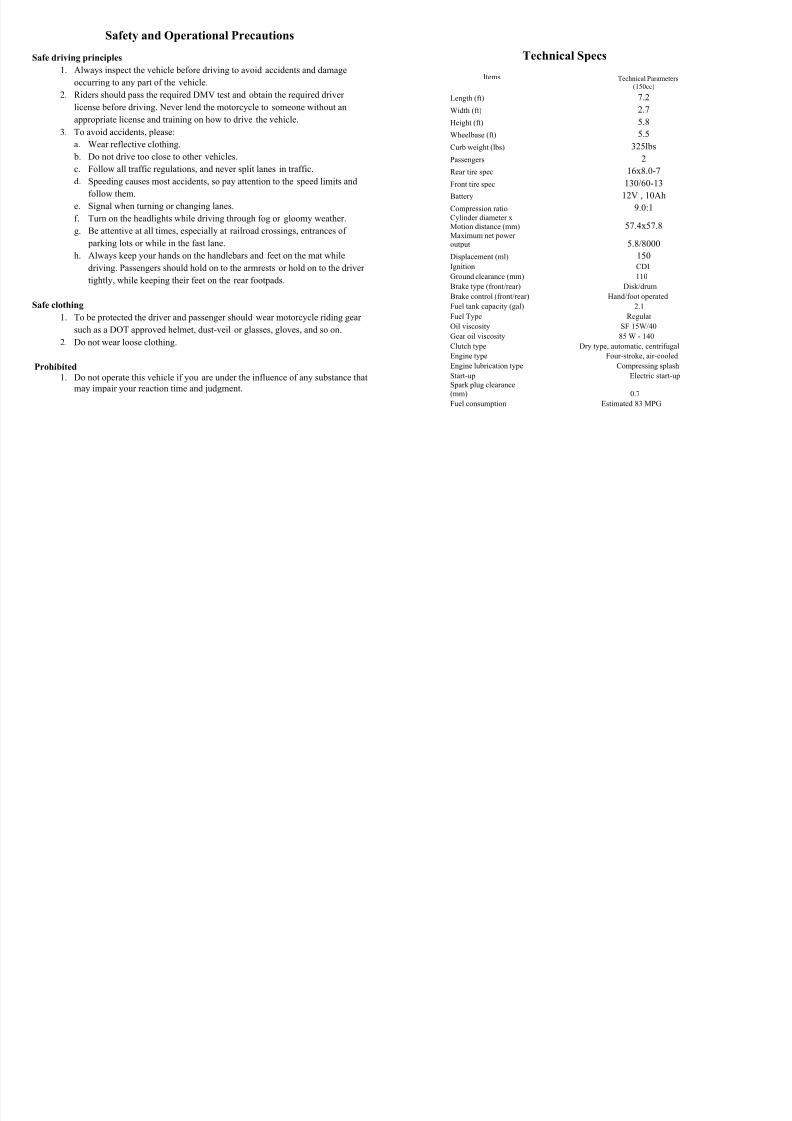
Safety and Operational Precautions
Safe driving principles
1. Always inspect the vehicle before driving to avoid accidents and damage
occurring to any part of the vehicle.
2. Riders should pass the required DMV test and obtain the required driver
license before driving. Never lend the motorcycle to someone without an
appropriate license and training on how to drive the vehicle.
3. To avoid accidents, please:
a. Wear reflective clothing.
b. Do not drive too close to other vehicles.
c. Follow all traffic regulations, and never split lanes in traffic.
d. Speeding causes most accidents, so pay attention to the speed limits and
follow them.
e. Signal when turning or changing lanes.
f. Turn on the headlights while driving through fog or gloomy weather.
g. Be attentive at all times, especially at railroad crossings, entrances of
parking lots or while in the fast lane.
h. Always keep your hands on the handlebars and feet on the mat while
driving. Passengers should hold on to the armrests or hold on to the driver
tightly, while keeping their feet on the rear footpads.
Safe clothing
1. To be protected the driver and passenger should wear motorcycle riding gear
such as a DOT approved helmet, dust-veil or glasses, gloves, and so on.
2. Do not wear loose clothing.
Prohibited 1. Do not operate this vehicle if you are under the influence of any substance that
may impair your reaction time and judgment.
Technical Specs
Items Technical Parameters(150cc)
Length (ft) 7.2
Width (ft) 2.7
Height (ft) 5.8
Wheelbase (ft) 5.5Curb weight (lbs) 325lbs
Passengers 2
Rear tire spec 16x8.0-7
Front tire spec 130/60-13
Battery 12V , 10Ah
Compression ratio 9.0:1Cylinder diameter xMotion distance (mm) 57.4x57.8Maximum net power output 5.8/8000
Displacement (ml) 150Ignition CDI
Ground clearance (mm) 110Brake type (front/rear) Disk/drum
Brake control (front/rear) Hand/foot operated
Fuel tank capacity (gal) 2.1
Fuel Type Regular
Oil viscosity SF 15W/40
Gear oil viscosity 85 W - 140
Clutch type Dry type, automatic, centrifugal
Engine type Four-stroke, air-cooled
Engine lubrication type Compressing splash
Start-up Electric start-up
Spark plug clearance(mm) 0.7
Fuel consumption Estimated 83 MPG

7/28/2019 AutoMoto Owners Manual
http://slidepdf.com/reader/full/automoto-owners-manual 3/22
Main Components
1. Windshield wiper and sprayer
2. Side mirrors
3. Front turn signal
4. Battery charging port
5. Engine serial number
6. Rear turn signal
7. Seat
8. Manual parking lock
9. VIN number
Main Components
10. Engine family number
11. Rear cargo box
12. Front brake
13. Rear wheel
14. Rear brake pedal
15. Front wheel
16. Accelerator grip

7/28/2019 AutoMoto Owners Manual
http://slidepdf.com/reader/full/automoto-owners-manual 4/22
VIN Locations
There are three statutory inscription plates. One statutory inscription plate is in the
center of the front box near the foot brake; the other one is on the crossed tube of the
front forks. The engine statutory inscription plate is on the right cover of engine.
Functions and Uses of the Components
(1) Instrument Board
1. Turn signal indicator: ( ).
2. Odometer: Shows the total mileage accumulated by the vehicle. (Miles)
3. Voltage meter
4. Speedometer: Indicates your driving speed in Miles and Kilometers per ho
5. High beam indicator: ( ) When lit the high beams are on.
6. Radio/ MP3 indicator: When the VCD signal is lit; it indicates that the mu
powered on.
7. Fuel Gauge: ( ) When the needle points at “F” the fuel tank is full. Wh
reaches the red area the vehicle should be refueled as soon as possible.

7/28/2019 AutoMoto Owners Manual
http://slidepdf.com/reader/full/automoto-owners-manual 5/22
(2) Ignition Switch
For your convenience, two keys are provided with your vehicle.
1.On position
-The engine is ready to be started.
-Signals are functional.
-The key can’t be removed.
2. Accessory position
-The engine cannot be started.
-Signals don’t work.
-The key can be removed.
-The parking lock handle can be released
and the vehicle can be maneuvered.
3. Lock position
-Move the key into the “ ” accessory
position. At this time pull up the parking
lock handle then turn the key to the “Lock”
position and then the key can be pulled out.
The engine can’t be started and signals
won’t work.
(3) Left and Right Handlebar Control Switch
1. High beam switch. Daytime running lights are always on while the vehicl
To turn the high beams on, press the high beam button; doing so will a
illuminate the indicator on the dashboard.
2. Turn signal switch ( ). Switch the button to the left to signal left. Swi
button to the right to signal right. Switch the button to the middle to power o
will flash on the dash for the corresponding direction that you are signaling.
3. Horn.
4. Front brake handle. Compress the handle to activate the front wheel brake
5. Windshield wiper switch.
6. Flameout switch. When the switch is at ( ) position, the electricity is o
engine can be started; when the switch is at ( ), the electricity is off, and
flames out immediately.
7. Startup button ( ). The startup button starts the vehicle. Grip the fr
handle while simultaneously pressing the startup button to start the
8. Accelerator handle. The accelerator handle controls the speed of the vehic
towards the driver to accelerate, and release gradually to slow down.

7/28/2019 AutoMoto Owners Manual
http://slidepdf.com/reader/full/automoto-owners-manual 6/22
9. Hazard lights switch. When pushed all six turn lights will flash.
10. Sprayer switch. When pushed water will be sprayed to clean the windshield.
(4) Accessing the Gas Tank and Windshield Wiper Fluid Tank
1. Cushion Lock. To access the gas tank and the windshield wiper fluid tank, insert the
key into the keyhole located on the side of the vehicle and turn it to the right to unlock
the seat cushion. You can now lift the seat cushion. Unscrew the aluminum cap to access
the gas tank. Remove the rubber cap to access the windshield wiper fluid tank. When
done inserting fluids, press the seat down to lock it in place.
WARNING: Please check that the cushion is locked after pressing it down.
WARNING: Do not overfill the gasoline and overflow the tank. When pumping gas,
make sure the engine is not running. Keep the key in the off position until finished
pumping.
(5) Rocker and Parking System
1. The rocker (tilting mechanism) is activated by the parking lock handle. When the
parking lock handle is unlocked (down position) as shown in figure 1, the rocker isoperational and the vehicle can be rocked from left to right. When the parking lock
handle is locked (up position) as shown in figure 2, the rocker is locked.
CAUTION: Check that the rocker is working properly before riding.
2. When parking, step on the brake pedal while pulling the parking lock han
lock position as shown in figure 2. Then, turn the ignition switch to the
and pull out the key. If done correctly, the brakes are applied and will hold t
stationary to an 18% grade or 10˚ incline.
(6) AM/FM & MP3 System
The operation of the AM/FM & MP3 system is explained in detail through t
specifications booklet included with the purchase of your Auto Moto unit.
(7) Battery Charging Port
If the battery does die or doesn’t have enough power to start the vehicle, plu
provided cable in to the socket shown in the picture and then plug the other
wall socket to charge the battery. If the battery is completely dead the chargi
should be ~10 hours.
7/28/2019 AutoMoto Owners Manual
http://slidepdf.com/reader/full/automoto-owners-manual 7/22
Starting To Drive Your New Vehicle
(1) Engine Startup
1. Insert the key into the ignition switch, and turn it to the “ON” position
2. Hold the front brake handle down tightly when starting the vehicle.
3. Press the start button to start the engine. (If the vehicle has not been used for a long time, it may
not start immediately. Slightly twisti ng the accelerator handle while pressing the start button will help start
the vehicle – if this doesn’t work try charging the battery).
4. Release the parking lock handle so that the vehicle can rock freely.
5. Release the rear brake pedal and let go of the front brake handle.
6. Slowly twist the accelerator handle towards the driver to move the vehicle forward.
When starting up in cold weather, it is highly recommended to leave the vehicle on at idle
(1700±100r/min) for 3 minutes.
Caution:
- Press the startup button for no longer than 5 seconds to start the vehicle. The interval
between attempts should be at least 15 seconds.
- Release the startup button immediately after the engine has started. Do not press the
startup button while the engine is running; doing so may cause damage to the starter.
- When idling/stopped while applying the brakes, do not throttle up. The lack of cool air
may cause damage to the engine and other relative accessories because you are not
moving.
- Don’t start the engine in narrow places or in areas that are not well ventilated.
Checks and Adjustments
Caution:
-Correct the malfunctions found during inspection in a timely fashion. P
professional help from a licensed technician if you can’t repair it yourse
-Please inspect your vehicle (every time) before driving to ensure your s
(1) Pre-check of the vehicle
Thoroughly check the vehicle before driving; this may reduce the chances o
problems arising during operation.
Items Contents
Gas quantity Is there enough
Oil quantity Is there enough
Brakes Efficiency, smooth response
Rocker Rock freely from left to right
Accelerator handle Twists smoothly
Wipers Work properly
Tires Air pressure, wear & tear Lights and indicators All lights work properly
Battery Check voltage level
Connections & fittings Check for loose connections
Mirrors Position correctly

7/28/2019 AutoMoto Owners Manual
http://slidepdf.com/reader/full/automoto-owners-manual 8/22
(2) Checking the Engine Oil
Engine oil is regarded as the life blood of the engine. If the oil is low or too dirty the life
of the engine may be shortened. Check the oil regularly and replace it when necessary.
1. Make sure the vehicle is parked on a flat surface when checking the oil.
2. For the most accurate reading, wait at least 2 hours after the engine stops before
checking the oil.
3. The oil filling port is located on the right side of the crank case cover. Remove the
dipstick from the port, wipe it clean, plug it back into the port, and remove it once more
to check the oil level.
4. If the oil level is close to the lower limit line on the dipstick, refill the oil immediately
to reach the upper limit line on the dipstick. When complete, screw the cover on tightly
and check for possible oil leaks.
(3) Checks and Adjustments for the Braking System
Warning
- If you find that the soft brake hose and the joining
piece are distorted, cracked, or broken and fluid is
leaking, please ask a professional technician to
check and repair the problem immediately.
- Please use high quality braking fluid.
- Please add braking fluid of the same specification.
(Mixing braking fluids of different specifications
may lead to a toxic chemical reaction and result in
brake system failure).
- When adding braking fluid, make sure that no
water enters the master cylinder, as this will cause
the boiling point of the braking fluid to be lowered.
- Clean spilled braking fluid immediately. (Braking
fluid will erode painted surfaces or rubber parts).
- If the braking fluid level cannot reach the standard
position, please ask the service center to check and
diagnose the problem.
Front Brake
- Check the brake pads regular
determine whether they have w
the caution line. If so, see a te
change both brake pads.
- If the brake handle feels soft
pads are still in good conditioresult of low brake fluid or the
leak in the system.
- To check for fluid leakage ho
handle tightly for several minu
doing so, check to see whether
fluid leaking from the any of t
connections along the brake li
the reservoir.
Refilling the Brake Fluid:a. Position the handlebar horiz
that the brake fluid reservoir i
b. Remove both the cover of t
and the membrane.
c. Fill the reservoir with the sp
to the upper oil level, then put
membrane and cover back.
**This vehicle uses DOT #3 o
brake fluid**

7/28/2019 AutoMoto Owners Manual
http://slidepdf.com/reader/full/automoto-owners-manual 9/22
Rear Brake
- Turn the nut on the brake arm to the right.
- Make sure the end of the nut fits flush with the brake arm.
- Step on the braking pedal. If the abrasion mark “>” on the rear brake hoof meets
with the worn mark “<” on the cover of the brake, replace the brake pads in a
timely fashion as the rear brake pads have almost worn out.
The vehicle is equipped with a linkage braking system; the free stroke of the braking
pedal should be 20-30mm.
(4) Checks and Adjustments for the Rocker and Parking Lock
1. Rocker (Tilting Mechanism)
If you have difficulty locking the rocker, you can adjust the compression stroke of the
spring, according to figure 1.
2. Parking Lock
If the parking lock handle does not work properly, please follow the step
inspect and adjust it.
- Remove the floor mat and loosen the three screws on the floorboard
small plastic cover. (Figure 2)
- Hold nut #1 stationary and turn nut #2 clockwise to tighten. (Figure 3
- If you have adjusted the nuts, and the parking lock still does not work
please inspect whether spring 1, spring 2, pawl, or pawl-wheel is not
properly. If there are any issues found with the springs replace the sp
immediately.
7/28/2019 AutoMoto Owners Manual
http://slidepdf.com/reader/full/automoto-owners-manual 10/22
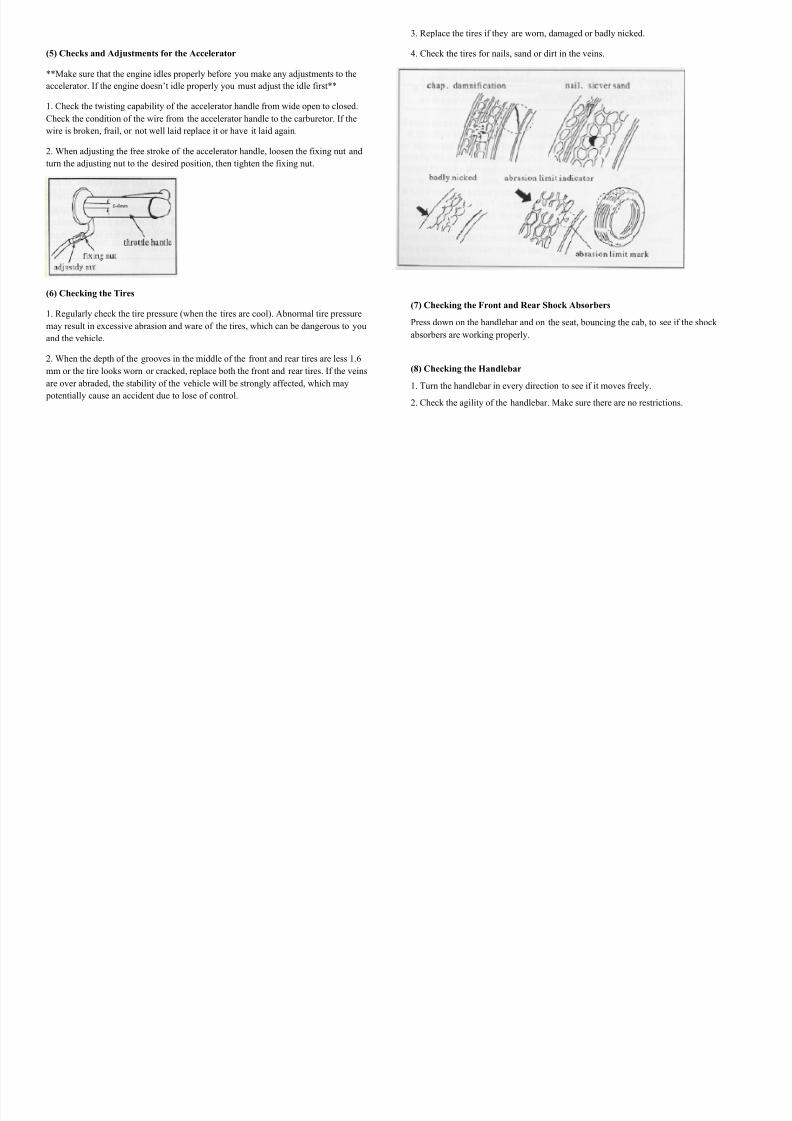
(5) Checks and Adjustments for the Accelerator
**Make sure that the engine idles properly before you make any adjustments to the
accelerator. If the engine doesn’t idle properly you must adjust the idle first**
1. Check the twisting capability of the accelerator handle from wide open to closed.
Check the condition of the wire from the accelerator handle to the carburetor. If the
wire is broken, frail, or not well laid replace it or have it laid again.
2. When adjusting the free stroke of the accelerator handle, loosen the fixing nut and
turn the adjusting nut to the desired position, then tighten the fixing nut.
(6) Checking the Tires
1. Regularly check the tire pressure (when the tires are cool). Abnormal tire pressure
may result in excessive abrasion and ware of the tires, which can be dangerous to you
and the vehicle.
2. When the depth of the grooves in the middle of the front and rear tires are less 1.6
mm or the tire looks worn or cracked, replace both the front and rear tires. If the veins
are over abraded, the stability of the vehicle will be strongly affected, which may
potentially cause an accident due to lose of control.
3. Replace the tires if they are worn, damaged or badly nicked.
4. Check the tires for nails, sand or dirt in the veins.
(7) Checking the Front and Rear Shock Absorbers
Press down on the handlebar and on the seat, bouncing the cab, to see if
absorbers are working properly.
(8) Checking the Handlebar
1. Turn the handlebar in every direction to see if it moves freely.
2. Check the agility of the handlebar. Make sure there are no restrictions

7/28/2019 AutoMoto Owners Manual
http://slidepdf.com/reader/full/automoto-owners-manual 11/22
3. If the handlebar is crooked when the front wheel is pointing foreword, the
handlebar is out of alignment. Consult a technician immediately and refrain from
driving until corrected.
(9) Checking the Lights and Indicators
1. Turn the ignition switch to the “ON” position and start the vehicle. The low
beams should illuminate along with the instrument panel.
2. Turn on the left and the right turn signals to make sure that the front and rear
indicator lights flash in unison.
3. Hold the front brake and push the rear brake pedal to see if the brake lights work.
4. Turn on the high beam light switch and check if the high beams work properly.
5. Press the horn to see if it sounds.
(10) Checking the Instrument Board
Turn the ignition switch to the “ON” position, and start the engine.
1. Check if the hands of the instrument cluster work properly.
2. Drive slowly to check if the odometer works.
(11) Checking the Side Mirrors
1. While seated in driving position, manually adjust each of the side mirrors to your
eye level.
(12) Checking the License Plate
1. Check if the license plate is damaged or missing.
Breaking in Your New Vehicle
The engine in a new vehicle needs to be properly broken in. When parts
are worn in correctly a natural clearance is produced in the cylinder, whi
extend the life of the engine. Proper break in procedures should be follow
the first 600 miles. The essentials of a proper break in are as follows:
1. Maximum speed during break in should not exceed 40mph.
2. After starting the vehicle, idle the engine adequately to let the oil flow
important parts of the engine before driving.
3. While driving; vary your speed frequently so that the vehicle does not
remain at the same RPM. Avoid running the engine at low speeds for ext
periods of time. Don’t drive the vehicle at a high speed or at wide open t
4. Try to stay on level roads while driving.
** It is recommended that a professional technician inspect the vehicle a
the first 600 miles to ensure that the engine has been properly broken in*
Routine Inspections and Maintenance
In order to extend the life of your vehicle, please execute timely inspecti
maintenance according to the attached timetables.
(1) Inspecting and Cleaning the Spark Plug
1. Inspecting the spark plug:

7/28/2019 AutoMoto Owners Manual
http://slidepdf.com/reader/full/automoto-owners-manual 12/22
- Disassemble the spark plug and keep it connected to the coil.
- Hold the spark plug while in the coil so that it touches the metal frame of the vehicle.
-Turn the ignition switch to the “ON” position and push the start button. If the
ignition system is functioning correctly, you will notice a spark arcing from the plug to
the frame. If there is no spark, replace the plug.
** If a new spark plug is needed please use spark plug # CR7HSA**
Warning:
DO NOT inspect the spark plug around the cylinder cover, because the spark being
produced may ignite the flammable gases in the cylinder.
In order to reduce the possibility of being shocked, make certain that you touch the tip of
the spark plug to a location on the frame that is not painted, where the metal is exposed.
Warning:
People with heart conditions (or with a pace maker) should not perform this inspection.
2. Cleaning the spark plug:
- Carbon deposit or an oversized clearance in the plug will lead to a malfunctioning
ignition. Use a spark plug cleaner to clean the carbon deposits.
- Make sure that the pole clearance of the plug is 0.7 mm.
.
Caution:
- Tightening the plug excessively may cause damage to the thread of t
cover.- Please avoid impurities entering the engine through the plughole whi
disassembling the plug.
(2) Inspecting and Replacing of Fuse
Turn off the ignition switch before inspecting if the fuse is blown. Make sure
power to the vehicle is cut before inspecting the fuse pipe. To inspect the fu
and remove the small door that houses the battery. Next, locate the fuse that
to the positive side of the battery and open the small plastic case that contain
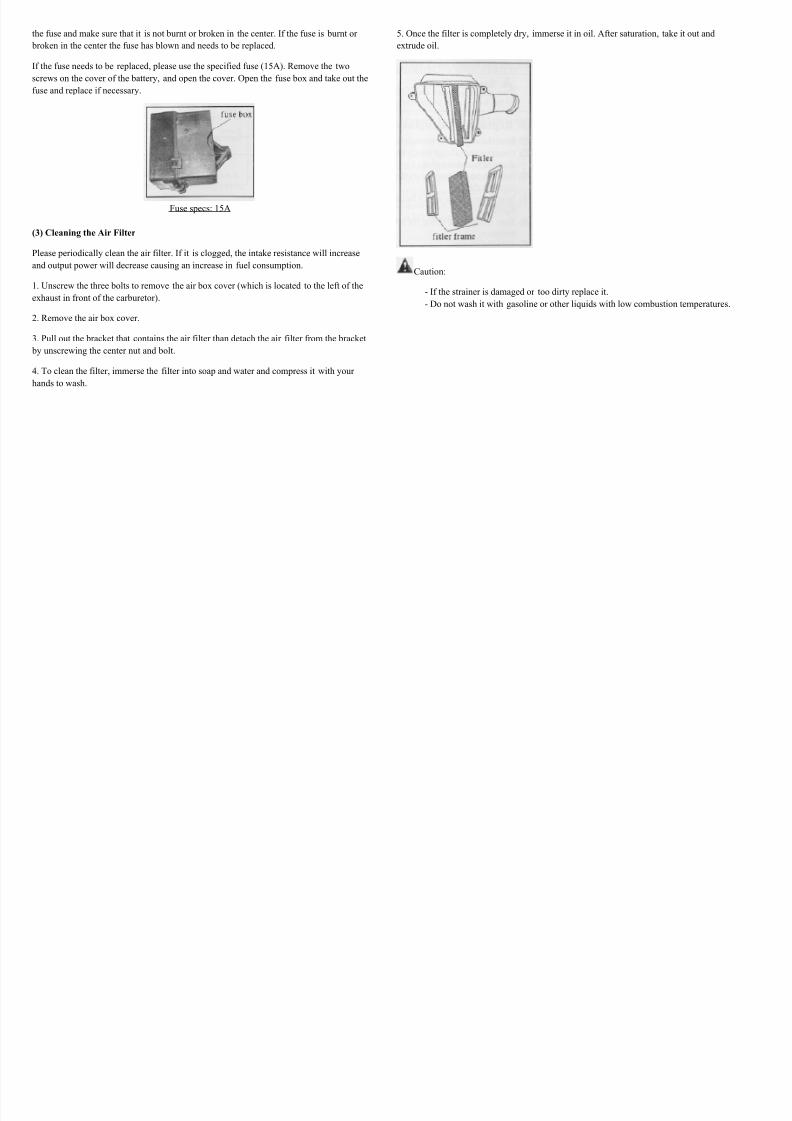
7/28/2019 AutoMoto Owners Manual
http://slidepdf.com/reader/full/automoto-owners-manual 13/22
the fuse and make sure that it is not burnt or broken in the center. If the fuse is burnt or
broken in the center the fuse has blown and needs to be replaced.
If the fuse needs to be replaced, please use the specified fuse (15A). Remove the two
screws on the cover of the battery, and open the cover. Open the fuse box and take out the
fuse and replace if necessary.
Fuse specs: 15A
(3) Cleaning the Air Filter
Please periodically clean the air filter. If it is clogged, the intake resistance will increase
and output power will decrease causing an increase in fuel consumption.
1. Unscrew the three bolts to remove the air box cover (which is located to the left of the
exhaust in front of the carburetor).
2. Remove the air box cover.
3. Pull out the bracket that contains the air filter than detach the air filter from the bracket
by unscrewing the center nut and bolt.
4. To clean the filter, immerse the filter into soap and water and compress it with your
hands to wash.
5. Once the filter is completely dry, immerse it in oil. After saturation, take i
extrude oil.
Caution:
- If the strainer is damaged or too dirty replace it.
- Do not wash it with gasoline or other liquids with low combustion t
7/28/2019 AutoMoto Owners Manual
http://slidepdf.com/reader/full/automoto-owners-manual 14/22
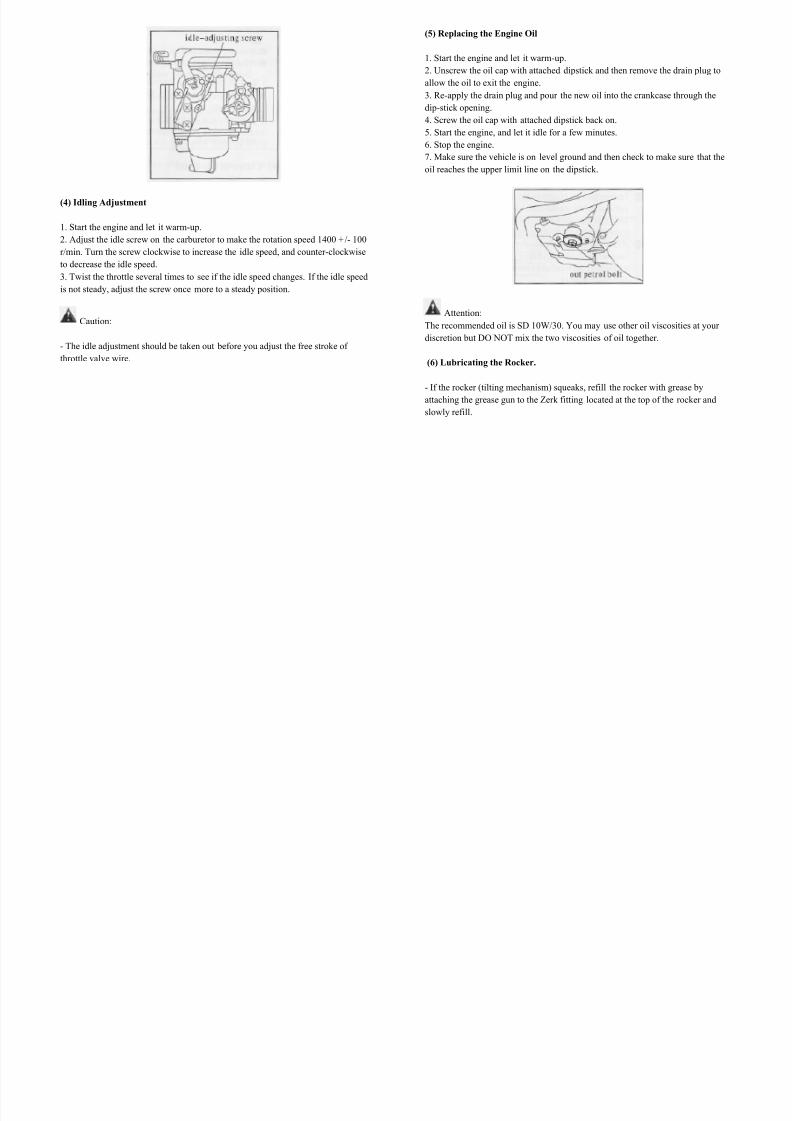
(4) Idling Adjustment
1. Start the engine and let it warm-up.
2. Adjust the idle screw on the carburetor to make the rotation speed 1400 +/- 100
r/min. Turn the screw clockwise to increase the idle speed, and counter-clockwise
to decrease the idle speed.
3. Twist the throttle several times to see if the idle speed changes. If the idle speedis not steady, adjust the screw once more to a steady position.
Caution:
- The idle adjustment should be taken out before you adjust the free stroke of
throttle valve wire.
(5) Replacing the Engine Oil
1. Start the engine and let it warm-up.
2. Unscrew the oil cap with attached dipstick and then remove the dr
allow the oil to exit the engine.
3. Re-apply the drain plug and pour the new oil into the crankcase th
dip-stick opening.
4. Screw the oil cap with attached dipstick back on.
5. Start the engine, and let it idle for a few minutes.
6. Stop the engine.
7. Make sure the vehicle is on level ground and then check to make s
oil reaches the upper limit line on the dipstick.
Attention:
The recommended oil is SD 10W/30. You may use other oil viscosit
discretion but DO NOT mix the two viscosities of oil together.
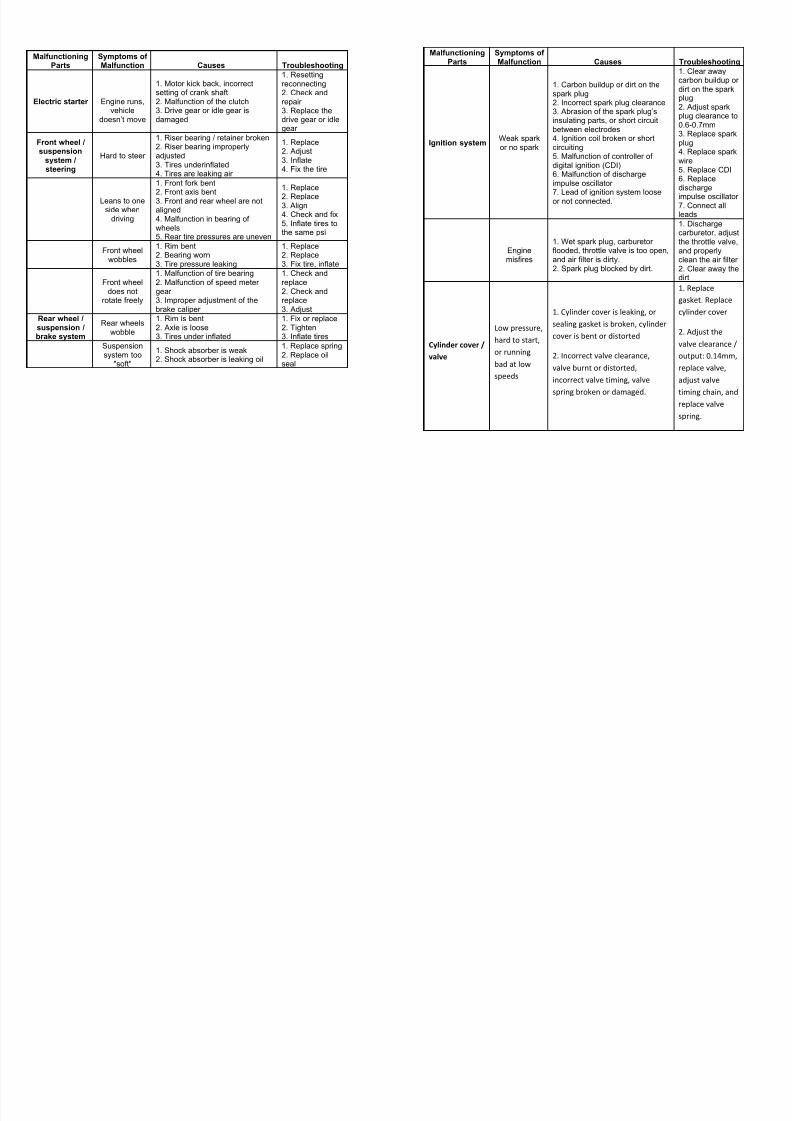
(6) Lubricating the Rocker.
- If the rocker (tilting mechanism) squeaks, refill the rocker with grea
attaching the grease gun to the Zerk fitting located at the top of the ro
slowly refill.

7/28/2019 AutoMoto Owners Manual
http://slidepdf.com/reader/full/automoto-owners-manual 15/22
(7) Cleaning the Vehicle
- The vehicle should be cleaned every time it comes in contact with salt water, or
heavy dust / dirt.
1. Preparation for cleaning
- Wrap the exhaust pipe with a plastic bag or similar covering (make sure that the
exhaust pipe is not hot before doing so).
- Wrap the brake, handlebar, and the control switches on the handlebar with
plastic bags.
- Cover the ignition (key hole) with adhesive tape.
- Block the entrance of the air-filter with plastic, cloth, or adhesive tape.
2. Do not spray the following parts directly with water.
- Instruments
- Front brake
- Rear hub
- Spark plug
- Engine
- Front hub
- Front fork bearing- Bottom of the fuel tank
3. When finished washing
- Take the plastic, cloth, and/or adhesive tape off.
- Clean the entrance of the air filter.
- Lubricate the axles, nuts and bolts.
- Start the engine and allow it to idle for a few minutes.
- Check the brakes before driving the vehicle.
Danger:
- Do not lubricate the brake disc by waxing it or oiling it as this may
lose control of the brakes causing an accident.
- Use cleansers that do not contain oil to clean the brakes. Cleansers
include trichloroethylene or acetone.
- Do not spray the brakes with high-pressure water when washing the
(8) Long-term Storage of the Vehicle
1. Storing of the vehicle
When storing the vehicle for longer than a month, especially in winter, it is r
that you perform the following steps to protect the longevity of your vehicle
- Clean the vehicle before storing.
-Start the engine and let it run for 5 minutes, then turn off the vehicle and em
oil in the engine.
Caution: Engine oil is poisonous, and must be dealt with carefully and
disposed of.
- Refill new oil into the engine.
- Empty all of the fuel from the fuel tank; unscrew the fuel drain plug at the
carburetor to drain the left over fuel in the carburetor.
- Remove the empty fuel tank; add in about 250 ml of oil. Shake the tank sev
for the oil to coat fuel tank evenly from the inside and then pour the left ove
you may spray the inside of the tank with anti-corrosion spray. When finishe
cap back on.

7/28/2019 AutoMoto Owners Manual
http://slidepdf.com/reader/full/automoto-owners-manual 16/22
- Take the spark plug out and spray the inside cylinder with fogging oil, through the spark
plug hole. Press the startup button several times to get the oil to cover the inner surface
of the cylinder wall evenly. Then screw the spark plug back in.
- Inflate the tires to the rated pressure. Lay some pads under the tires in order to keep the
tires from touching the ground directly.
- Spray oil on unpainted metal parts to prevent them from rusting. Make sure that the
brakes and the plastic accessories don’t come in contact with the oil.
-Wrap a thin film around the exhaust muffler in order to prevent water and fog from
entering the exhaust pipe.
- Cover the vehicle with cloth or a well-ventilated material and store the vehicle in a
place where the temperature doesn’t fluctuate often.
2. Driving the vehicle after a long storage period.
- Take the cover and the thin film off the vehicle and clean the vehicle.
- Check the battery voltage. If the voltage is below 10.8v charge the battery.
- Check whether the spark plug is tight; tighten if loose.
-Rinse the inside of the fuel tank with fuel then empty all of the fuel from the tank before
refilling.
-Check the vehicle according to the “Pre-check of the vehicle” section.
-Lubricate the bearings.
-Perform a test drive in a safe place to check whether the vehicle is in good working
condition.
Troubleshooting Chart
MalfunctioningParts
Symptoms of Malfunction Causes Tro
Driving gear /clutch / driven
gear / kickstarter
Vehicledoesn’t moveafter start up
1. CVT belt worn or broken2. Variator plate broken3. Clutch bushing worn or broken4. Clutch spring worn or broken
1. 2. var3. bu4.
Engine stops,or runs slowly
Clutch spring is broken Re
Doesn’tsustain highspeeds or is
underpowered
1. Driving belt worn2. Worn clutch spring3. Clutch roller is worn4. Variator surface is dirty
1. 2. 3. 4. survar
Reduction gear Vehicle
doesn’t moveafter starting
1. Transmission gears are broken2. Transmission is locked
1. trage2.Creptra
Abnormalnoise
1. Gear worn, blocked or cracked2. Bearing worn or broken
1. 2. be
Oil leakage1. Too much oil2. Oil seal abraded3. Crank case cracked
1. ove2. sea3. cas
Flywheel /starter
Engine wontstart
1. Flywheel teeth are broken2. Idle gear of the starter isbroken3. Blown fuse in the starter system
1. cheflyw2. ge3.
4. Bad Battery5. Bad connection of cables at thebinding post of the battery6. Bad connection of groundcable
4. rep5.
6.
7/28/2019 AutoMoto Owners Manual
http://slidepdf.com/reader/full/automoto-owners-manual 17/22
MalfunctioningParts
Symptoms of Malfunction Causes Troubleshooting
Electric starter Engine runs,vehicle
doesn’t move
1. Motor kick back, incorrectsetting of crank shaft2. Malfunction of the clutch3. Drive gear or idle gear isdamaged
1. Resettingreconnecting2. Check andrepair 3. Replace thedrive gear or idlegear
Front wheel /suspension
system /steering
Hard to steer
1. Riser bearing / retainer broken2. Riser bearing improperlyadjusted3. Tires underinflated4. Tires are leaking air
1. Replace2. Adjust3. Inflate4. Fix the tire
Leans to oneside when
driving
1. Front fork bent2. Front axis bent3. Front and rear wheel are notaligned4. Malfunction in bearing of wheels5. Rear tire pressures are uneven
1. Replace2. Replace3. Align4. Check and fix5. Inflate tires tothe same psi
Front wheelwobbles
1. Rim bent2. Bearing worn3. Tire pressure leaking
1. Replace2. Replace3. Fix tire, inflate
Front wheeldoes not
rotate freely
1. Malfunction of tire bearing
2. Malfunction of speed meter gear 3. Improper adjustment of thebrake caliper
1. Check and
replace2. Check andreplace3. Adjust
Rear wheel /suspension /brake system
Rear wheelswobble
1. Rim is bent2. Axle is loose3. Tires under inflated
1. Fix or replace2. Tighten3. Inflate tires
Suspensionsystem too
"soft"
1. Shock absorber is weak2. Shock absorber is leaking oil
1. Replace spring2. Replace oilseal
MalfunctioningParts
Symptoms of Malfunction Causes T
Ignition systemWeak sparkor no spark
1. Carbon buildup or dirt on thespark plug2. Incorrect spark plug clearance3. Abrasion of the spark plug’sinsulating parts, or short circuitbetween electrodes4. Ignition coil broken or shortcircuiting5. Malfunction of controller of digital ignition (CDI)6. Malfunction of dischargeimpulse oscillator 7. Lead of ignition system looseor not connected.
1cdp2p03
p4w56di7l
Enginemisfires
1. Wet spark plug, carburetor flooded, throttle valve is too open,and air filter is dirty.2. Spark plug blocked by dirt.
1ctac2
d
Cylindercover/
valve
Lowpressure,
hardtostart,
orrunning
badatlow
speeds
1.Cylindercoverisleaking,or
sealinggasketisbroken,cylinder
coverisbentordistorted
2.Incorrectvalveclearance,
valveburntordistorted,
incorrectvalvetiming,valve
springbrokenordamaged.
1
g
c
2
v
o
r
a
t
r
s

7/28/2019 AutoMoto Owners Manual
http://slidepdf.com/reader/full/automoto-owners-manual 18/22
MalfunctioningParts
Symptoms of Malfunction Causes Troubleshooting
Cylinder cover / valve
HighPressure /
overheating
Too much carbon deposited onthe piston crown or cylinder cover
Clear away carbonbuild up.
Loud Noise
1. Incorrect valve clearance2. Valve burnt or valve spring is
broken3. Cam chain loose or worn4. Tensioner worn or broken5. Cam timing chain gear worn6. Rocker / axis worn7. Cylinder / piston worn
1. Adjust the valveclearance2. Replace valvespring3. Adjust tensioner
or replace chain4. Replacetensioner 5. Replace the camtiming chain6. Replace rocker /axis7. Repair cylinder /piston
Crankshaft /crankcase
Loud Noise
1. Piston pin hole and piston pinworn2. Connecting rod ends worn3. Connecting rod bent4. Bearing of crankshaft worn
5. Lacking oil in running parts of the engine6. Camshaft / axle box worn
1. Replace pistonand pin2. Replace bearing3. Replace crankconnecting rodassembly
4. Replace bearing5. Add oil6. Replacecamshaft / bearing
Temporarilyunderpowered
1. Bad spark plug2. Engine overheating
1. Replace sparkplug2. Cool the engine;don’t run theengine for a longtime at highspeeds.
Frequentlyunderpowered
1. Fuel system is bloked2. Improper fuel-air ratio3. Carbon deposit on cylinder and
exhaust pipe4. Piston (ring) / cylinder worn
1. Unblock the fuelpipe2. Adjust the ratio3. Clear away thecarbon deposit4. Replace cylinder,and replace piston(ring)
MalfunctioningParts
Symptoms of Malfunction Causes Troubl
Fuel supplyingsystem
Engine won'tstart
1. Fuel cant reach the carburetor * fuel tank vent is blocked* fuel valve is blocked* fuel filter is blocked* fuel pipe is blocked* vacuum tube is blocked2. Fuel is dirty or deteriorated3. Rich fuel in engine
*air filter is blocked*carburetor flooded with fuel*air intake is leaking
1. Cleablockedparts2. Cha3. Increclean telemen
the fueairprooinput p
Bad idlespeed, hard tostart, blowing
during thespeedup after
starting
1. Carburetor is blocked2. Incorrect fuel to air ratio3. Throttle abrasion4. Fuel is dirty or deteriorated
1. Cleacarbure2. Adjuratio bo3. Rep4. Cleaand ref
Piston /cylinder
Low pressureor unstablepressure
Cylinder or piston ware Replacpiston
Cylinder cover or body
overheating
Carbon deposit buildup on pistonor combustion chamber
Clean ocarbon
Muffler issmoking
1. Cylinder, piston or piston ring isworn2. Incorrect piston ring setting3. Piston or cylinder wall isscraped or worn4. Valve stem or valve pipe isworn
1. Reppiston 2. Rese3. Repor cylin4. Repstem o

7/28/2019 AutoMoto Owners Manual
http://slidepdf.com/reader/full/automoto-owners-manual 19/22
Lubrication Timetable
Parts
At thebeginningand every3500MI or
every 6months
Every7500MI or every 12months
Throttle wire Oil -
Throttle controlhandlebar - Grease
Brake wire Oil -Speedometer cable - Grease
Speedometer wheelgear - Grease
Brake caliper Oil or
Grease -
Brake camshaft - Grease
Steering bearing Every 1200ML or 2 years
MalfunctioningParts
Symptoms of Malfunction Causes Troubleshooting
Rear wheel /suspension /brake system
Suspensionsystem too
"hard"Damping rod bent or broken
Replace dampingrod
Suspensionnoise
1. malfunction of shock absorber 2. retainer is loose
1. Check and fix2. Tighten
Bad brakes
1. Improper adjustment of brakeshoes2. Brake shoes worn or dirty
3. Brake drum worn or dirty4. Brake cam worn5. Incorrect setting of brakeshoes6. Brake rod is getting stuck7. The contact area of brake shoeand cam is worn8. Brake arm and brake cam arerubbing
1. Adjust2. Replace /
clean3. Replace /clean4. Replace5. Reset6. Lubricate7. Replace8. Adjust or replace
Exhaustsystem
Loud exhaustnoise
1. Muffler is broken2. Muffler is perforated3. Gasket is burnt, worn, or missing
1. Replace2. Check and fix3. ReplaceGasket
Exhaustmalfunctioning
1. Muffler is perforated2. Muffler is blocked
1. Check and fix2. Clean or
replace
Lights /instruments
Vehicle isrunning but
the lights arestill off
1. Bulb is burnt2. Lead is disconnected3. Lead is connected incorrectly
Check and repair
Accelerator grip is
malfunctioning
1. Accelerator wire is broken or frayed
1. Replace

7/28/2019 AutoMoto Owners Manual
http://slidepdf.com/reader/full/automoto-owners-manual 20/22
Regular Inspection TimetableClean lubricate, fix, mend or replace if necessary
I = inspect, A = adjust, C = clean, R = replace, T = tighten, L = lubricate
Applicable Road Mileage
300 1,000 2,000 3,000 4,000 5,000 6,000 7,000 8,000 9,000 10,000 11,000 12,000daily drive
check
Gasoline filter I C R
Oil filter C C C
Spark plug I R I R I R
Tire pressure & ware I I
Braking system I I I I I I I I I I I I I
Carburetor* A I I I I I
Steering wheel loose I I I I I
Front fork, steering device I I I I
Rear shock absorber I I I I
Lubrication of wires I I
Starter I
Nuts and bolts T T T
Magneto I I
Oil R R R R R I
Valve clearance A A A A AIdle adjusting I I I I I
Lights / instruments /electric devices I I I I I I I
Gasoline shut off & pipe I I I I I I
Accessory lubrication I L L
Clutch I I I I I
CVT Belt I I R I R
Air Filter Remove and clean every 600MI; replace if necessary
Battery Remove and inspect the battery every 6 months

7/28/2019 AutoMoto Owners Manual
http://slidepdf.com/reader/full/automoto-owners-manual 21/22
Wiring Diagram(Click Here to Enlarge)

7/28/2019 AutoMoto Owners Manual
http://slidepdf.com/reader/full/automoto-owners-manual 22/22