Embed Size (px)
Citation preview

AUTOPILOT DLM Satellite Downlink Manager
USER GUIDE
AUTOPILOT User Guide Rev 3.70 Nov. 2004. Broadcast Automation Systems, Inc. 35 Sunnypoint Crescent, Scarborough, ON, Canada M1M 1B8 tel: 416-264-8415 fax: 416-264-8417 e-mail: [email protected]

TABLE OF CONTENTS
INTRODUCTION............................................................................................................................1 AUTOPILOT ENVIROMENT........................................................................................................2
Main Screen Display............................................................................................................2 Device Control .....................................................................................................................3 PULL DOWN MENUS .......................................................................................................4
System Menu............................................................................................................4 Message Menu .........................................................................................................5 Window Menu .........................................................................................................5 View Menu...............................................................................................................6 Help Menu ...............................................................................................................6 Schedule Menu.........................................................................................................7 Antenna Menu..........................................................................................................8
GETTING STARTED .....................................................................................................................9
System Status .......................................................................................................................9 Status Window Pull Down Menus and Controls ...............................................................10 Status Window Control Panel Access................................................................................11 Direct Device Control ........................................................................................................12
Moving a Satellite Dish .........................................................................................12 Controlling A Satellite Receiver ............................................................................13
Scheduling Events (Automated Control) ...........................................................................14 Schedule Controls ..................................................................................................15 Scheduling Events..................................................................................................15 Conflict Checking ..................................................................................................15
System Log.........................................................................................................................16 Current Messages...............................................................................................................16
SYSTEM CONFIGURATION ......................................................................................................17
Device Setup Window .......................................................................................................17 Adding Satellite Names to AUTOPILOT..........................................................................18 Cross Referencing Satellite Names....................................................................................19 Editing the Satellite Tables ................................................................................................20 Antenna Menu Options ......................................................................................................22
AUTOPILOT DLM SATELLITE DOWNLINK MANAGER USER GUIDE 0
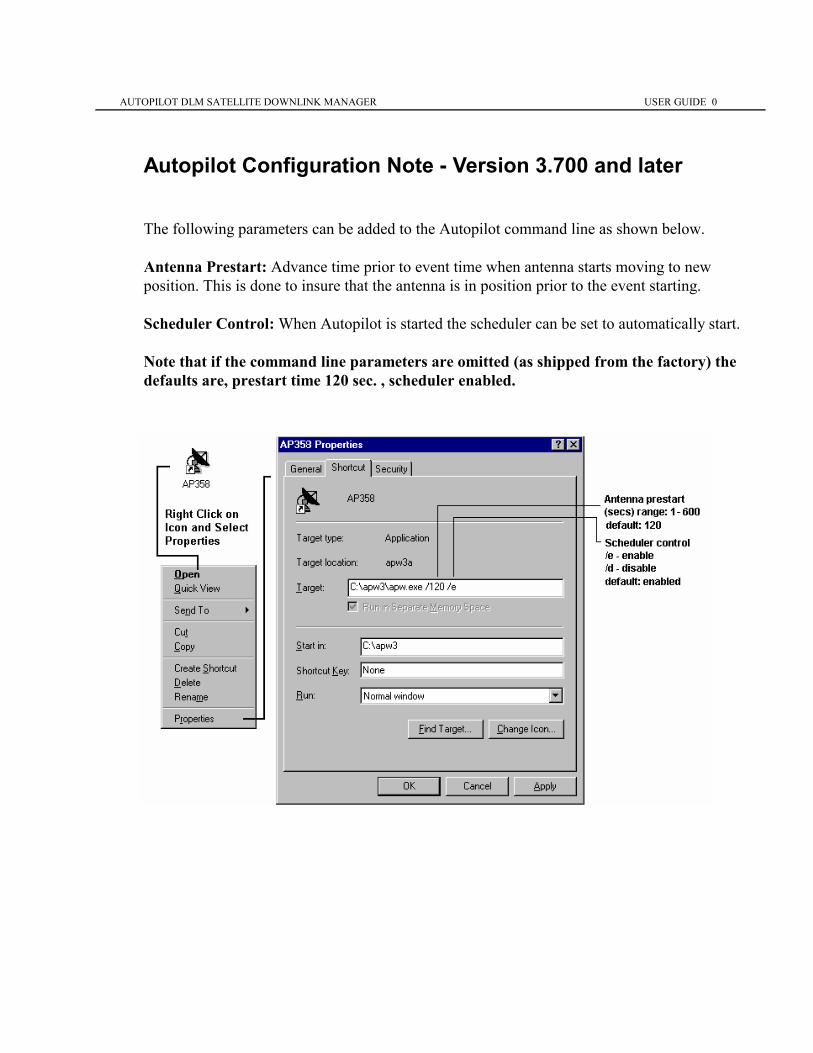
Autopilot Configuration Note - Version 3.700 and later The following parameters can be added to the Autopilot command line as shown below. Antenna Prestart: Advance time prior to event time when antenna starts moving to new position. This is done to insure that the antenna is in position prior to the event starting. Scheduler Control: When Autopilot is started the scheduler can be set to automatically start. Note that if the command line parameters are omitted (as shipped from the factory) the defaults are, prestart time 120 sec. , scheduler enabled.

AUTOPILOT DLM SATELLITE DOWNLINK MANAGER USER GUIDE 1
AUTOPILOT DLM Satellite Downlink Manager Introduction AUTOPILOT is a Windows based Satellite Program Acquisition System designed to automate satellite recording by controlling steerable antenna systems, satellite receivers, routing switches and video recording devices. Satellite delivered programming can be recorded simply by scheduling an entry on the event list. AUTOPILOT will then automatically position the satellite antenna, tune the receiver, and with the installed options, select routing switch source and destination and recording device control. AUTOPILOT is an interactive, user friendly system featuring icons, moveable and re-sizeable windows, pull down menus and point and click selection of desired operations. Simple on screen controls enable the user to easily adjust and control device parameters. A Main Display Screen provides an overview of the entire system. Icons or custom on-screen controls depict all resources on the system. The operator can click on various points on the screen to open individual windows or pull-down menus for device status and control. All devices are polled on a continuous basis with updated status information displayed on screen. A system log is maintained to record all commands and actions initiated by the system. A status window lists all of the devices connected to the system and an event scheduler provides the capability of automated recording. In addition, each device has an individual control panel associated with it. Menu options are provided for configuring the system and for setting up and maintaining a satellite parameter database.

AUTOPILOT DLM SATELLITE DOWNLINK MANAGER USER GUIDE 2
AUTOPILOT ENVIROMENT Main Screen Display The Main Screen Display consists of a Main Menu Bar at the top of the screen and three windows, System Status Window - displays the status information for each device on the system. Schedule Window - displays the event list for automated operation. Current Messages - information about the current state of the AUTOPILOT program.
Additional windows can be opened by selecting various options from the Menu Bar or double-clicking on specific areas of the screen.

AUTOPILOT DLM SATELLITE DOWNLINK MANAGER USER GUIDE 3
Device Control Device Control Windows are provided for antenna and receiver control.

AUTOPILOT DLM SATELLITE DOWNLINK MANAGER USER GUIDE 4
PULL DOWN MENUS
System Menu
This menu is used for system administration and provides options for configuring the system.
FUNCTION Description
Configure The configure option is used to enter information on the devices to be controlled by AUTOPILOT. Device names, addresses and communication parameters are entered with this option.
Sat Table The Sat Table option enables the user to enter and maintain a list of programming information for each satellite. This option is used to enter new satellite data and to modify existing transponder information.
Cross Ref This option is used to cross reference the satellite position names
entered into the antenna controller with the satellite tables used by AUTOPILOT. This option is normally only used during initial system configuration or when a new antenna controller is added to the system.
Exit End program operation

AUTOPILOT DLM SATELLITE DOWNLINK MANAGER USER GUIDE 5
Message Menu
FUNCTION Description
Clear All Clear all messages in the Current Message window. Window Menu
FUNCTION Description
Cascade Standard windows function to cascade windows on the screen Arrange Icons Arranges any minimized windows on the screen. ___________ 1 2 This section lists open windows with a check beside the active 3 window.
AUTOPILOT DLM SATELLITE DOWNLINK MANAGER USER GUIDE 6
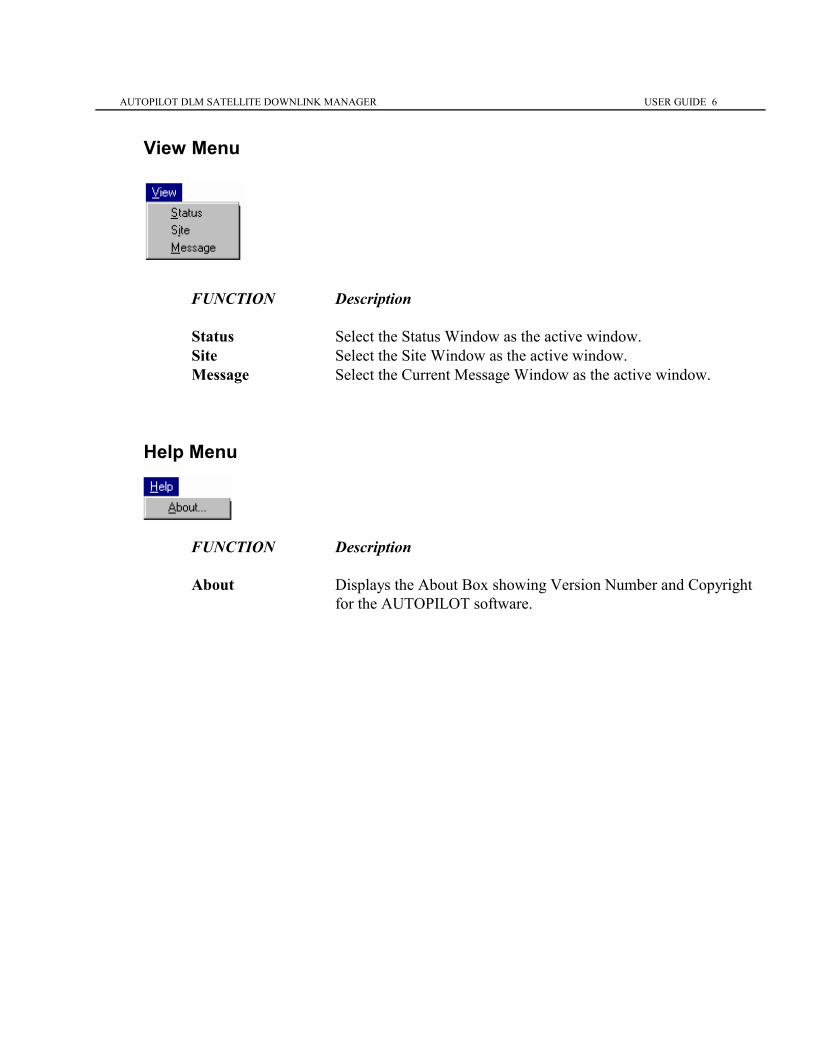
View Menu
FUNCTION Description
Status Select the Status Window as the active window. Site Select the Site Window as the active window. Message Select the Current Message Window as the active window.
Help Menu
FUNCTION Description About Displays the About Box showing Version Number and Copyright
for the AUTOPILOT software.

AUTOPILOT DLM SATELLITE DOWNLINK MANAGER USER GUIDE 7
Schedule Menu
This menu appears when the Schedule window is open.
FUNCTION Description
New Create new schedule file.
Open... Open an existing schedule file.
Save Save the currently open file.
Save as.. Save the currently open schedule file to a user specified file name.
Delete Delete the currently open schedule file.
Enabled Enable/Disable scheduler: the scheduler will only run if this option is
checked.

AUTOPILOT DLM SATELLITE DOWNLINK MANAGER USER GUIDE 8
Antenna Menu
*** NOTE: This menu appears ONLY when an antenna control panel is opened. ***
FUNCTION Description
Jog Duration Enter Jog duration parameters for antenna fine tuning.
Reset Reset Antenna Controller. (RC2000 ONLY)
Query Enabled Enable/Disable Remote mode (RC2000 ONLY)
Upload Sats Upload list of pre-programmed satellite names from controller. RCI Edit Remote Satellite position editor (RC2000 ONLY)
Refer to Antenna Menu Options in this User Guide for more detail. (pages 22 & 23)

AUTOPILOT DLM SATELLITE DOWNLINK MANAGER USER GUIDE 9
Getting Started This section provides an introduction to the features of AUTOPILOT and outlines the procedures for starting the program and basic operation. System Status The system status window displays current settings for all devices on the system and provides a launching point for accessing control functions.

AUTOPILOT DLM SATELLITE DOWNLINK MANAGER USER GUIDE 10
Status Window Pull Down Menus and Controls The Status Window provides quick access to the following functions:
- Antenna Position (Satellite) - Satellite Receiver Channel Number or Transponder (Channel) - Satellite Receiver Audio Frequencies (Audio1, 2, 3) - Antenna/Receiver Lock Out (LOCK)
These functions provide rapid control of key functions and enable the operator to perform last minute changes quickly. The LOCK function enables an operator to manually override scheduled events and lock an antenna / receiver chain on a satellite channel.

AUTOPILOT DLM SATELLITE DOWNLINK MANAGER USER GUIDE 11
Access to Device Control Panels For more detailed device control, individual control windows can be opened for each device by double-clicking on the device name in the status window. A detailed description of these control panels is described in the Direct Device Control section.

AUTOPILOT DLM SATELLITE DOWNLINK MANAGER USER GUIDE 12
Direct Device Control MOVING A SATELLITE DISH
1. FROM THE STATUS WINDOW, Double-Click on the antenna you wish to move. The Antenna Control Window will open. 2. Click on the Satellite List down arrow button to display a list of satellites and click on the desired satellite. 3. Click on the "MOVE TO" button to initiate action. An "IN MOTION" indicator will appear to confirm that the dish is moving. 4. The position data will update as the dish moves to the new position. 5. Use the JOG controls to fine-tune the antenna position. NOTE that the ‘S’ button will stop antenna motion at any time.

AUTOPILOT DLM SATELLITE DOWNLINK MANAGER USER GUIDE 13
CONTROLLING A SATELLITE RECEIVER
1. FROM THE STATUS WINDOW, Click on a Receiver Name to open the Receiver Control
Window. 2. Select a channel by clicking on the Ch/Tpndr down arrow button and then click on the
desired channel. NOTE that the up/down arrow keys can also be used to scroll through the channels.
3. Once selected, AUTOPILOT will update the receiver with the desired transponder
information including all settings for frequency, polarization, band, IF bandwidth, video level and all audio settings. These settings are defined in the Satellite Table for each satellite format.
4. Other parameters such as IF bandwidth or video level can be changed by pointing and
clicking on the desired function.

AUTOPILOT DLM SATELLITE DOWNLINK MANAGER USER GUIDE 14
Scheduling Events (Automated Control)
Recording of satellite programming can be automated using the scheduling function. If the schedule window is not currently open, select the Schedule option from the View Menu. Once open, events can be entered via the Event window. Click on the Add button to enter new events or use the Update button to edit events (or just double-click on the event line to be edited)

AUTOPILOT DLM SATELLITE DOWNLINK MANAGER USER GUIDE 15
Schedule Controls Add - Add an event to the list. Update - Update an event already in the schedule. Delete - Delete an event from the schedule. Hold - Hold the selected event (do not execute). Now - Execute the event immediately. Stop - Stop the event immediately. Scheduling Events The events can be scheduled on a weekly basis by clicking on the days of the week. One Time Only (OTO) events are scheduled by selecting a Start and Stop date for the event. To schedule an event the following fields are required: Event Name, Antenna , Satellite, Receiver, and Channel The receiver parameters shown in the Event window (Frequency, IF BW, etc.)can also be adjusted. The Disable function allows an event to be entered but will ignore the time and date entries. In effect this event will not be scheduled. The Disable function can be used to create at set of ‘Macros’. In other words, events with no times associated with them. These events can be executed manually by an operator by using the ‘NOW’ button in the Schedule Window. Conflict Checking Event conflicts are automatically checked by AUTOPILOT and a warning displayed indicating the conflicting event name.

AUTOPILOT DLM SATELLITE DOWNLINK MANAGER USER GUIDE 16
System Log
A daily system log is maintained on disk as filename <date> log. This file records all activities on the system including record events, channel changes and error messages. The daily log can be viewed by selecting System Log on the View Menu. Current Messages The Current Message window displays recent activity by the AUTOPILOT system and indicates error conditions by a RED highlight. Normal messages are displayed in GREEN.

AUTOPILOT DLM SATELLITE DOWNLINK MANAGER USER GUIDE 17
SYSTEM CONFIGURATION Device Setup Window The Device Setup Window provides access to parameters used to setup devices in the system.
1. Select Configure on the System Menu to open the Device Control window.
2. Click on the NEW button to bring up the Device Window. 3. Enter the Name, Type, Address, Port and Communication parameters (Rate,Bit,Parity,Stop). Click on OK when complete. Repeat for all devices to be controlled by AUTOPILOT.
For satellite receivers, enter the antenna to which the receiver is connected and a router input number if the receiver output is to be switched via a routing switch. 4. To modify an existing entry, use the Settings option or double-click on the entry. 5. Entries can be deleted by clicking on the item to be removed and selecting the Delete option.

AUTOPILOT DLM SATELLITE DOWNLINK MANAGER USER GUIDE 18
Adding Satellite Names to AUTOPILOT When the AUTOPILOT system is first setup or when adding new satellite names to the list, the names must be entered into AUTOPILOT. To Add New Satellites: 1. Program each antenna controller connected to AUTOPILOT with the new satellite position information. (Refer to the manufacturers’ documentation for information on programming new satellite positions.) 2. Open the Antenna control window for the antenna controller just programmed. (Double click on the controller name on the status window.)
3. Select Upload Sats from the Antenna Menu to upload the new position information to AUTOPILOT. 4. Follow the procedure outlined in the following section to cross-reference the satellite names.

AUTOPILOT DLM SATELLITE DOWNLINK MANAGER USER GUIDE 19
Cross Referencing Satellite Names The satellite names programmed into each antenna controller must be cross-referenced or ‘linked’ to the corresponding satellite table in AUTOPILOT. This is necessary to ensure that when a satellite position is chosen the antenna will automatically move to the correct position AND the receiver(s) connected to that dish will be automatically set up for the correct format.
Cross-reference the names programmed into each controller with the satellite names in the AUTOPILOT Satellite Table as follows: 1. Select Cross Ref on the System Menu to display the Satellite Cross Reference Window. 2. Double-click on a satellite name. 3. The Satellites window will appear. Using the pull down list for each dish on the system,
select the appropriate satellite name on the list. Click OK when complete. 4. Repeat item 2 and 3 for each satellite that you wish to access with AUTOPILOT.
AUTOPILOT DLM SATELLITE DOWNLINK MANAGER USER GUIDE 20
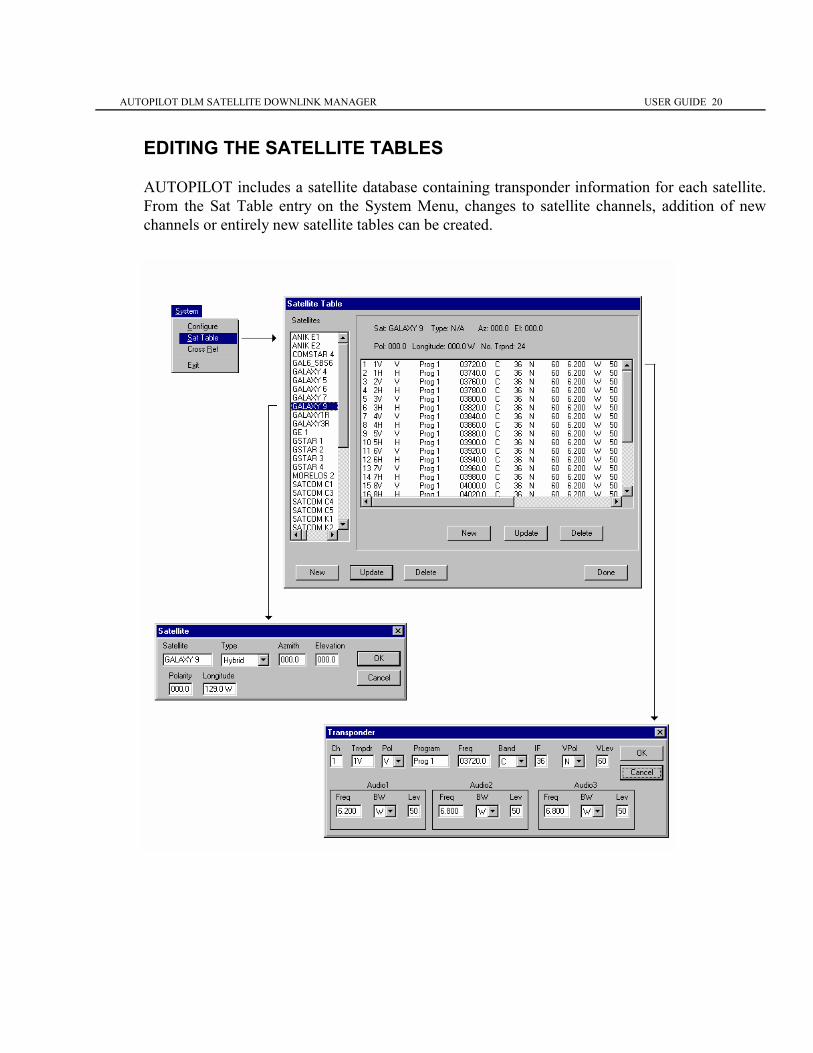
EDITING THE SATELLITE TABLES AUTOPILOT includes a satellite database containing transponder information for each satellite. From the Sat Table entry on the System Menu, changes to satellite channels, addition of new channels or entirely new satellite tables can be created.

AUTOPILOT DLM SATELLITE DOWNLINK MANAGER USER GUIDE 21
EDITING THE SATELLITE TABLES (cont’d) 1. Select the Sat Table option on the System Menu. 2. The Satellite Table window will appear showing a list of satellites on the left side with a corresponding list of transponder information displayed for each satellite. 3. For new satellite names, click on the NEW button in the bottom left corner of the window. To modify an existing name, click on UPDATE. The Satellite window will appear. 4. Enter the satellite name, type and longitude (The azimuth, elevation and polarization fields may be left blank). Click OK when complete. 5. For Transponder information, click on the New or Update buttons in the transponder section. The Transponder window will appear. 6. To modify an existing table, double-click on the line to be changed. A window will appear
that allows entry of channel name, frequency, etc. Type in the desired frequency for that transponder and change any other relevant parameters. Click on the OK button when complete. Repeat this procedure for other transponder entries.
7. Click on the DONE button when all transponders have been modified.
AUTOPILOT DLM SATELLITE DOWNLINK MANAGER USER GUIDE 22
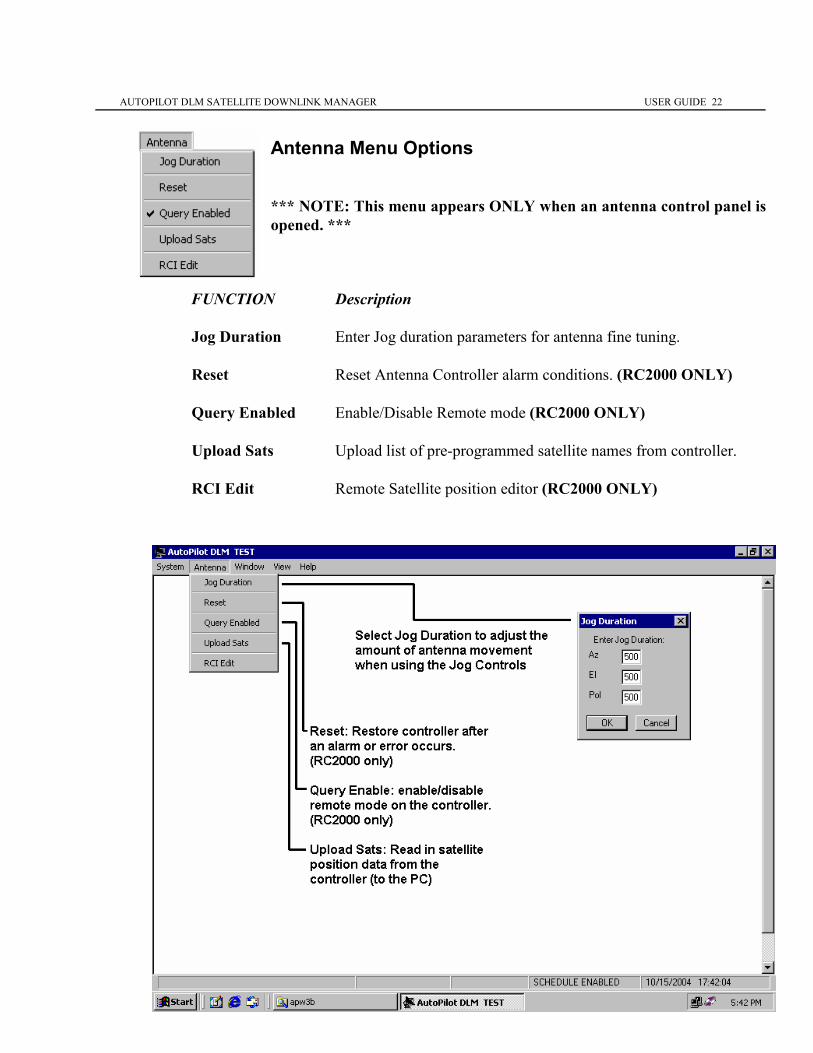
Antenna Menu Options *** NOTE: This menu appears ONLY when an antenna control panel is opened. ***
FUNCTION Description
Jog Duration Enter Jog duration parameters for antenna fine tuning.
Reset Reset Antenna Controller alarm conditions. (RC2000 ONLY) Query Enabled Enable/Disable Remote mode (RC2000 ONLY)
Upload Sats Upload list of pre-programmed satellite names from controller. RCI Edit Remote Satellite position editor (RC2000 ONLY)

AUTOPILOT DLM SATELLITE DOWNLINK MANAGER USER GUIDE 23
RCI Edit Menu The following functions are used to enter and update positions in the RC2000 controller.
FUNCTION Description Upload Upload satellite position parameters from the antenna controller.
Download Download satellite position parameters to the antenna controller.
Load Load list of pre-programmed satellite names and positions from hard drive.
Save Save list of pre-programmed satellite names and positions to hard drive.