Embed Size (px)
Citation preview
Page 1 of 135
Avaya Communication Manager Release 6.3 using SIP
trunk to Cisco Unified Communications Manager
Release 10.5.2
Application Note
Application Note
Page 2 of 135
Table of Contents Introduction .................................................................................................................................................. 4
The following items were tested: ............................................................................................................. 4
Listed below are the highlights of the integration issues: ........................................................................ 4
Below are the key results: ......................................................................................................................... 5
Network Topology ........................................................................................................................................ 5
Basic Call Setup ............................................................................................................................................. 5
Limitations .................................................................................................................................................... 6
System Components..................................................................................................................................... 7
Hardware Requirements ........................................................................................................................... 7
Software Requirements ............................................................................................................................ 7
Features ........................................................................................................................................................ 8
Features Not Supported or Not Tested .................................................................................................... 9
Configuration ................................................................................................................................................ 9
Configuring Sequence and Tasks: ............................................................................................................. 9
Configuring the Avaya PBX ........................................................................................................................ 10
Avaya Software Version and Hardware Configuration List ..................................................................... 10
Add Domains ........................................................................................................................................... 30
Add Location ........................................................................................................................................... 31
Add Adaptations ..................................................................................................................................... 32
Adaptation for Cisco CUCM ................................................................................................................ 32
Adaptation for Avaya Aura CM ........................................................................................................... 34
Add SIP Entities and Entity Link .............................................................................................................. 35
SIP Entity for Session Manager ........................................................................................................... 35
SIP Entity and entity Link for CUCM .................................................................................................... 36
SIP Entity and Entity Link for Avaya Aura Communication Manager .................................................. 37
Add Routing Polices ................................................................................................................................ 41
Routing policy for call to go to Cisco CUCM ........................................................................................ 41
Routing Policy for calls to go to Avaya Aura Communication Manager ............................................. 42
Configuring the Cisco Unified Communications Manager ........................................................................ 44
Page 3 of 135
Cisco Unified Communications Manager SIP Trunk Security Profile ...................................................... 45
Cisco Unified Communications Manager SIP Trunk Security Profile for Unity Connection .................... 46
Cisco Unified Communications Manager SIP Profile .............................................................................. 47
Cisco Unified Communications Manager SIP Trunk to Avaya Configuration .......................................... 52
Cisco Unified Communications Manager SIP Trunk Normalization Script .............................................. 59
Cisco Unified Communications Manager SIP Trunk to Cisco Unity Configuration ................................. 61
Cisco Unity Connection User Configuration............................................................................................ 66
Cisco Unity Connection Telephony Integration ...................................................................................... 70
Cisco Unified Communications Manager Service Parameter ................................................................. 74
Cisco Unified Communications Manager Media Resource Group.......................................................... 75
Cisco Unified Communications Manager Media Resource Group List ................................................... 78
Cisco Unified Communications Manager Route Pattern to Avaya ......................................................... 81
Cisco Unified Communications Manager Translations Pattern to Avaya ............................................... 83
Cisco Unified Communications Manager SIP Phone Device Level Configuration ................................... 84
Cisco Unified Communications Manager SCCP Phone Device Level Configuration ............................... 99
Cisco Unified Communications Manager Audio Codec Preference List Configuration ........................ 106
Cisco Unified Communications Manager Region Configuration ........................................................... 110
Cisco Unified Communications Manager Device Pool Configuration ................................................... 113
Cisco UCM Extent and Connect ............................................................................................................ 120
Cisco UCM end user configuration ....................................................................................................... 120
Add Phone: CTI Remote Device ........................................................................................................ 124
Remote Destination Configuration ................................................................................................... 126
Cisco UCM UC service Configuration ................................................................................................ 127
Cisco UCM service Profile Configuration .......................................................................................... 128
Cisco Unified CM IM Presence – CCMCIP Profile Configuration ....................................................... 130
Cisco UCM – SIP trunk to Cisco IM&Presence Trunk Configuration ................................................. 131
Acronyms .................................................................................................................................................. 135
Page 4 of 135
Introduction This document describes the steps and configurations necessary for Cisco Unified Communications
Manager (Cisco UCM) release 10.5.2 to interoperate with the Avaya Communication Manager Release
6.3 and Avaya Aura Session Manager Release 6.3 using SIP Early-Offer.
The following items were tested: Basic call between the two systems and verification of voice path, using both SIP and H323 on the
Avaya side, and SIP and SCCP IP phones on the Cisco side
CLIP/CLIR/CNIP/CNIR features: calling party Name and number delivery (allowed and restricted)
COLP/CONP/COLR/CONR features: connected Name and number delivery (allowed and restricted)
Call transfer: attended, early attended and blind transfer(see caveats for details)
Alerting Name Identification
Call forwarding: call forward unconditional(CFU), call forward busy (CFB), and call forward no answer (CFNA)
Hold and resume with music on hold
Three-way conferencing
Voice messaging and MWI activation-deactivation
Audio Codec Preference List
Extend and Connect
Call Park
Video
Listed below are the highlights of the integration issues: Basic calls worked from Cisco UCM to Avaya PBX and vice versa. Avaya’s Media Shuffling feature
was enabled throughout this testing exercise.
CLIR/CNIR—The Avaya SIP trunk does not support calling/connected Name and number restriction. Restriction of calling number on Avaya H323 and SIP phones is achieved by configuring the Avaya station configuration page and not the SIP trunk page. This restriction is honored by Cisco UCM.
COLR/CONR—as with calling Name and number presentation restrictions, the Avaya PBX does not support connected Name and number restriction on SIP trunks.
Page 5 of 135
Below are the key results: Basic call, call transfer, call forwarding, conference call, and hold and resume work successfully
Centralized voicemail, using Unity Connection server integrated to Cisco UCM via SIP was used for testing. This voicemail solution can provide centralized voicemail services, supporting both Avaya and Cisco end-users
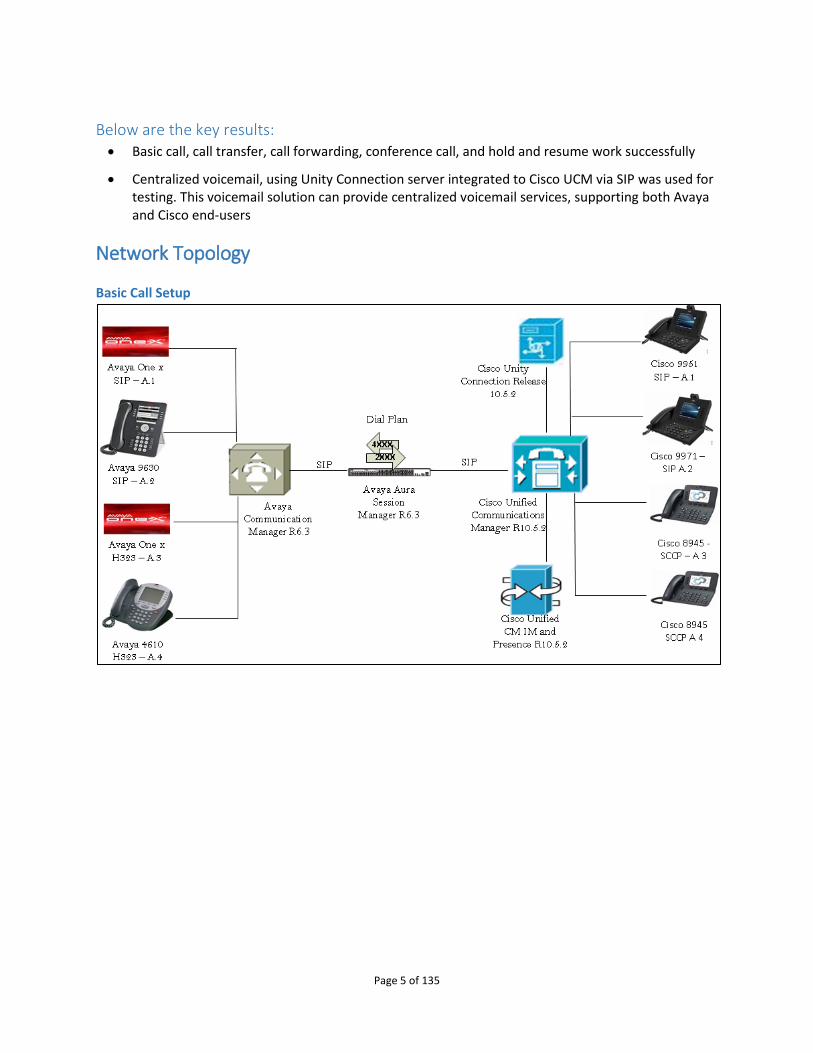
Network Topology
Basic Call Setup
Page 6 of 135
Limitations These are the known limitations, caveats, or integration issues:
Avaya doesn’t support Alerting Name feature
Avaya couldn’t block caller id when calls were local (internal)
Although the Codec Preference List was used and the INVITE message displayed the right codec, Avaya would respond with the INVITE with their preferred Codec Preference for the call
Avaya one-X@Communicator in H323 mode does not update the caller ID (connected Name) nor privacy call from Cisco UCM
Avaya one-X@Communicator in SIP mode updated the caller ID as Avaya SIP trunk description for privacy call from Cisco UCM
Avaya one-X@Communicator can do blind transfer. Avaya 9630G and 4610 phones do not support blind call transfer
Calling/Connected Name un-available feature is not supported by Avaya
One way video between Avaya one-X@Communicator H323 phones with Cisco 8945 skinny phone. Cisco UCM sends payload type 115 but Avaya responds with payload type 100 causing the issue.
One way audio between Avaya video phones when Cisco UCM transfers the video Call. Cisco UCM sends re-INVITE after the redirection and updates SDP but Avaya is not updating the SDP resulting is one way audio and two way video between Avaya video end points.
Page 7 of 135
System Components
Hardware Requirements The following hardware was used
Cisco UCS-C240-M3S VMWare Host
Cisco 8945, 9951, and 9971 IP phones
G6430 Media Gateway
Software Requirements The following software is required:
Cisco UCSC-C240-M3S VMware vSphere Image Profile: ESXi-5.5.0-1331820-standard
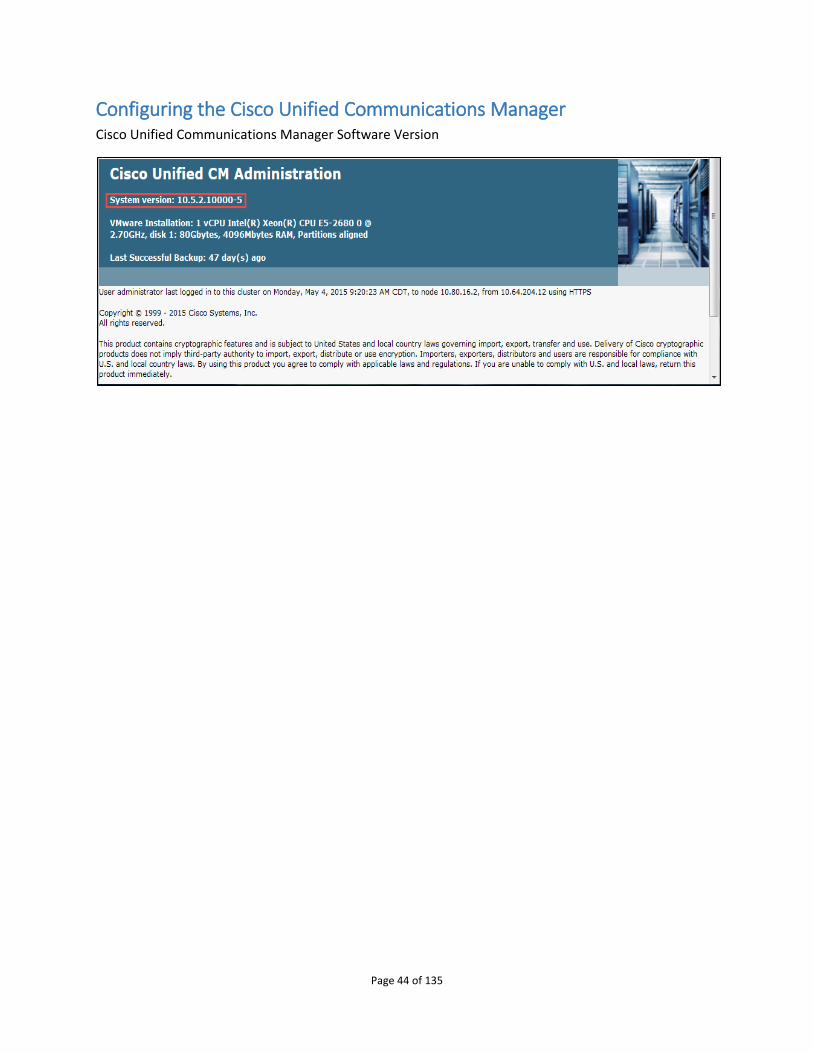
Cisco Unified Communications Manager release 10.5.2.10000-5
Cisco Unified Communications Manager IM & P release 10.5.2.10000-9
Cisco Unity Connection release 10.5.2.10000-5
Cisco Jabber 10.5.0 Build 37889
Avaya Communication Manager release 6.3 Service Pack 10(patch 22147)
Avaya G430 Media Gateway firmware release 34.5.1
Avaya Aura® Session Manager R6.3 (6.3.12.0.631208) Service Pack 12
Avaya Aura® System Manager R6.3.12. Build No. - 6.3.0.8.5682-6.3.8.4903, Software Update Revision No: 6.3.12.9.3022
Avaya one-X@Communicator Release 6.1.9.04-SP9-132
Page 8 of 135
Features This section lists supported and unsupported features. No deviation from the configuration presented in
this document will be supported by Cisco. Please see the Limitations section on page 6 for more
information.
Features Supported
CLIP—calling line (number) identification presentation
CLIR—calling line (number) identification restriction
CNIP—calling Name identification presentation
CNIR—calling Name identification restriction
Alerting Name
Attended call transfer
Early attended call transfer
Blind call transfer(see limitation section)
CFU—call forwarding unconditional
CFB—call forwarding busy
CFNA—call forwarding no answer
COLP—connected line (number) identification presentation
COLR—connected line (number) identification restriction
CONP—connected Name identification presentation
CONR—connected Name identification restriction
Hold and resume.
Conference call
MWI—Message Waiting Indicator (lamp ON, lamp OFF)
Audio Codec Preference List
Call Park/Pickup
Extend and Connect
Video
Page 9 of 135
Features Not Supported or Not Tested
Call completion (callback, automatic callback)
Shared Line - Hold & Resume with MOH
Configuration The goal of this guide is to provide an overview of the integration between Cisco Unified Communication
Manager and Avaya (CM, SM) PBX’s. The deployment will interconnect the UC systems using SIP. No
PSTN connectivity has been tested with this integration. The following sections provide the required
configurations for a successful integration.
Configuring Sequence and Tasks:
Avaya CM:
Configure the IP-Codec-Set, and IP-Network-Region. Configure the IP interface for C-LAN and IP Media Processor cards. Configure Cisco UCM as an IP node-Name. Configure the signaling group for the SIP trunk to Cisco UCM. Configure the trunk group for the SIP trunk to Cisco UCM. Configure the SIP and digital station phone extension. Configure the uniform dialing plan to the Cisco UCM extensions. Configure the route pattern to the Cisco UCM extensions.
Cisco Unified Communications Manager:
1. SIP trunk security profile 2. Device setting SIP profile 3. Media resource group and media resource group list 4. Assign media resource group list (MRGL) in the default device pool 5. SIP trunk to Avaya PBX 6. SIP Trunk Normalization Script 7. SIP Trunk to Cisco Unity 8. Assign User in Cisco Unity 9. SIP and SCCP phones device configuration 10. Route pattern to the Avaya PBX 11. Call Manager Service Parameter “Duplex Streaming Enabled” set to “True” 12. Audio Codec Preference, Region and device pool Configuration 13. Extend and Connect Feature configuration
Page 10 of 135
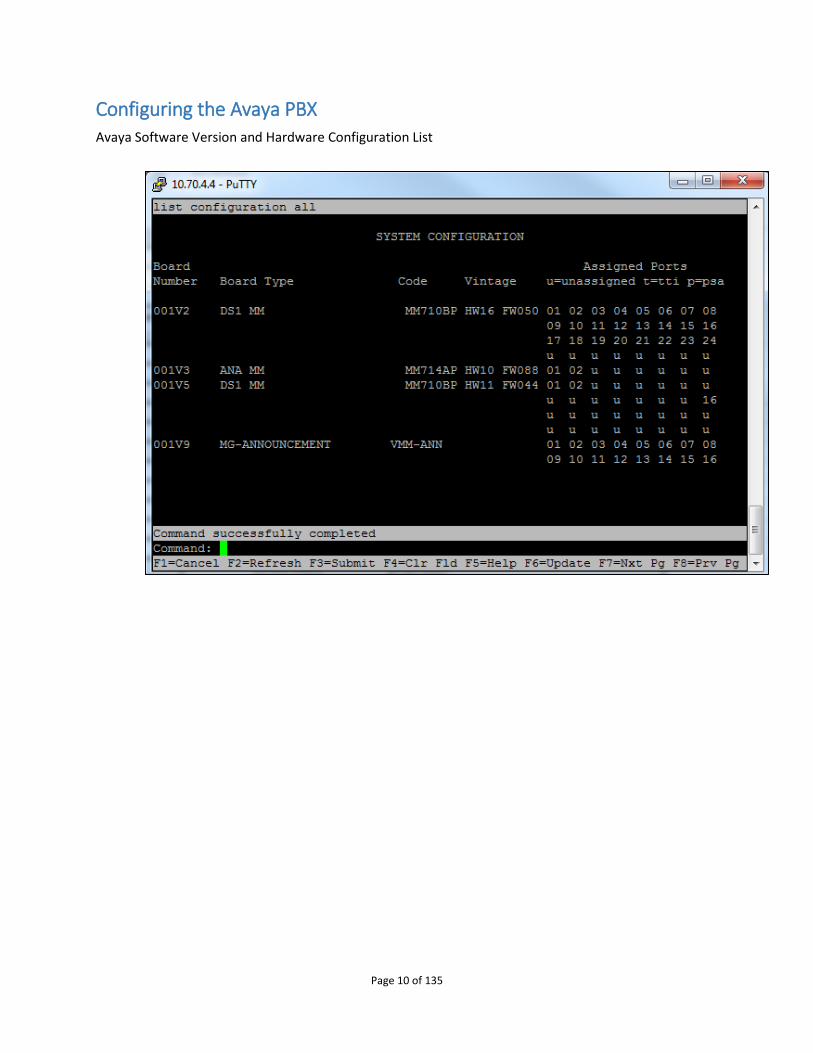
Configuring the Avaya PBX Avaya Software Version and Hardware Configuration List
Page 11 of 135
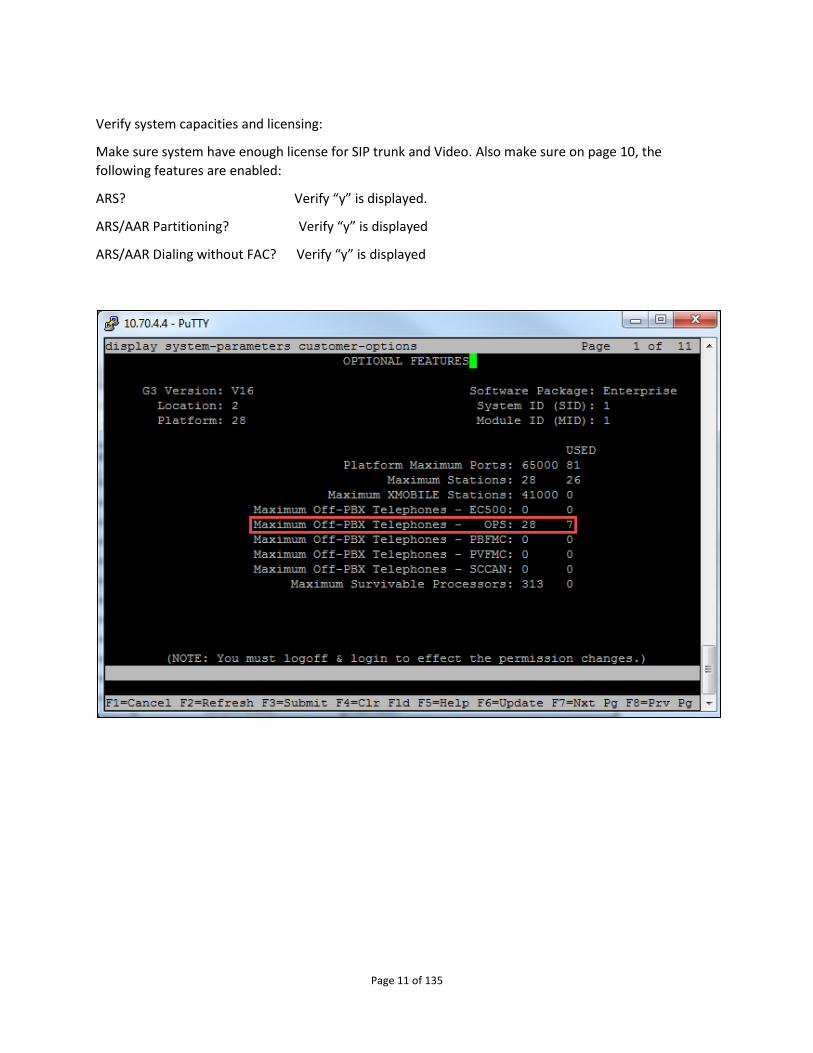
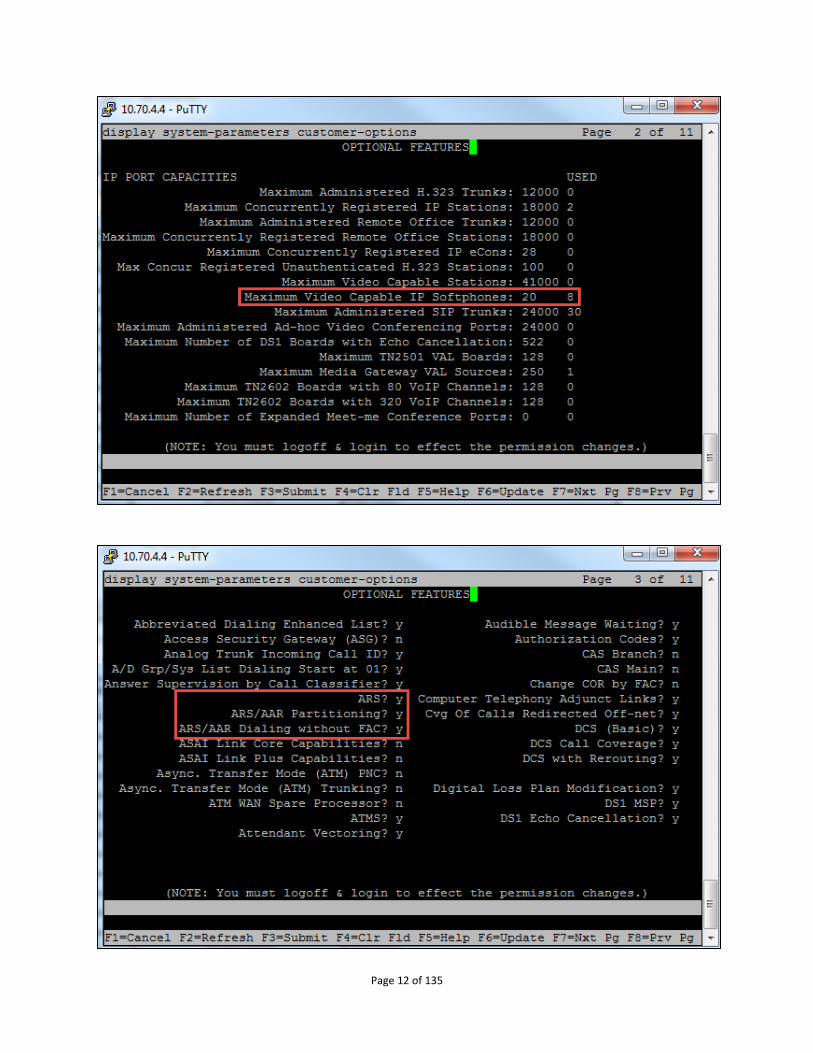
Verify system capacities and licensing:
Make sure system have enough license for SIP trunk and Video. Also make sure on page 10, the
following features are enabled:
ARS? Verify “y” is displayed.
ARS/AAR Partitioning? Verify “y” is displayed
ARS/AAR Dialing without FAC? Verify “y” is displayed
Page 12 of 135
Page 13 of 135
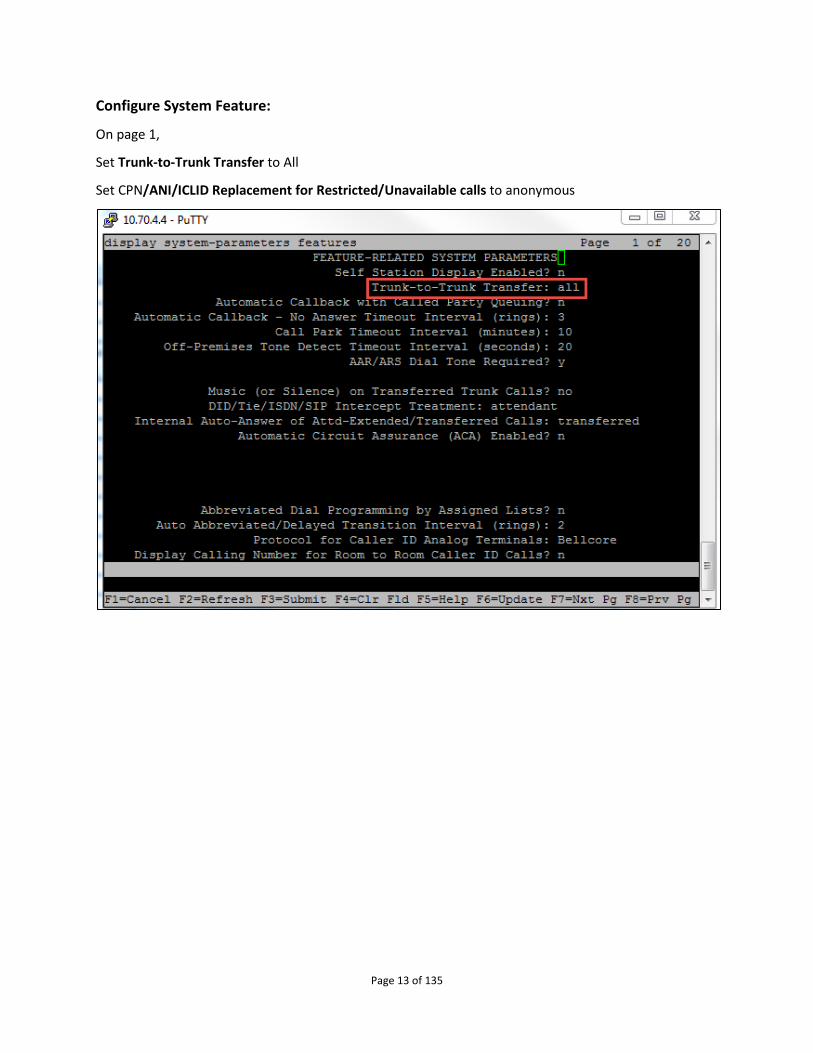
Configure System Feature:
On page 1,
Set Trunk-to-Trunk Transfer to All
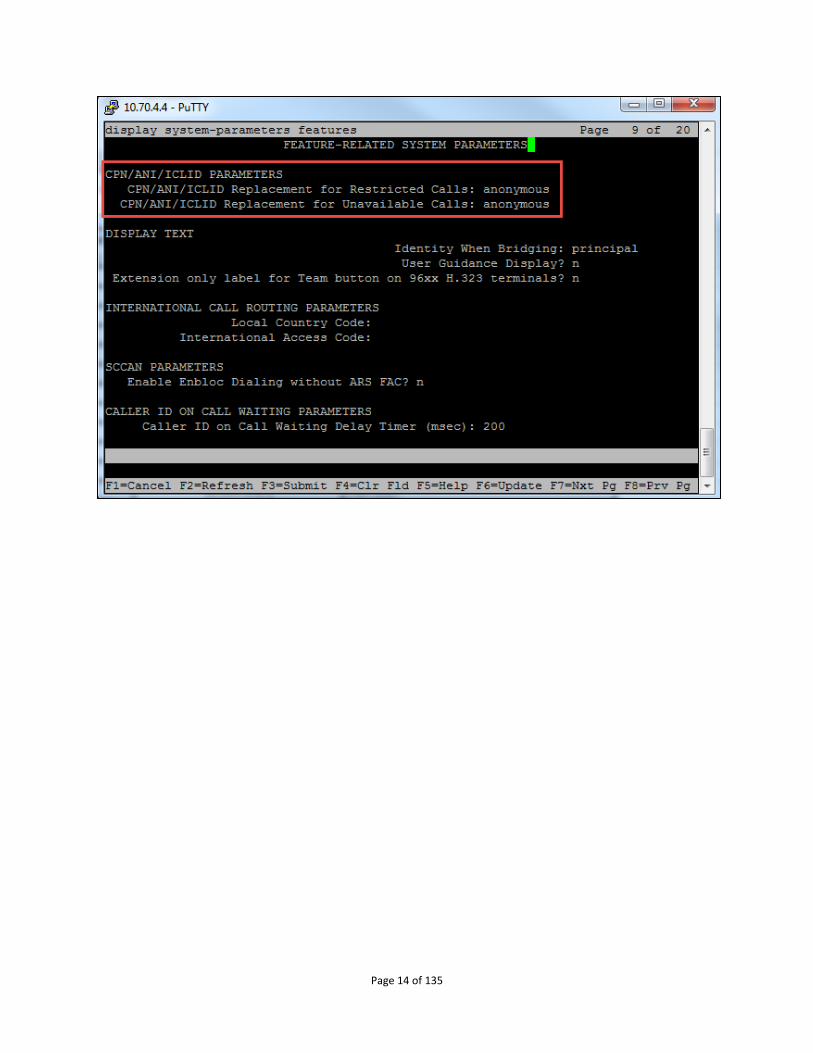
Set CPN/ANI/ICLID Replacement for Restricted/Unavailable calls to anonymous
Page 14 of 135
Page 15 of 135
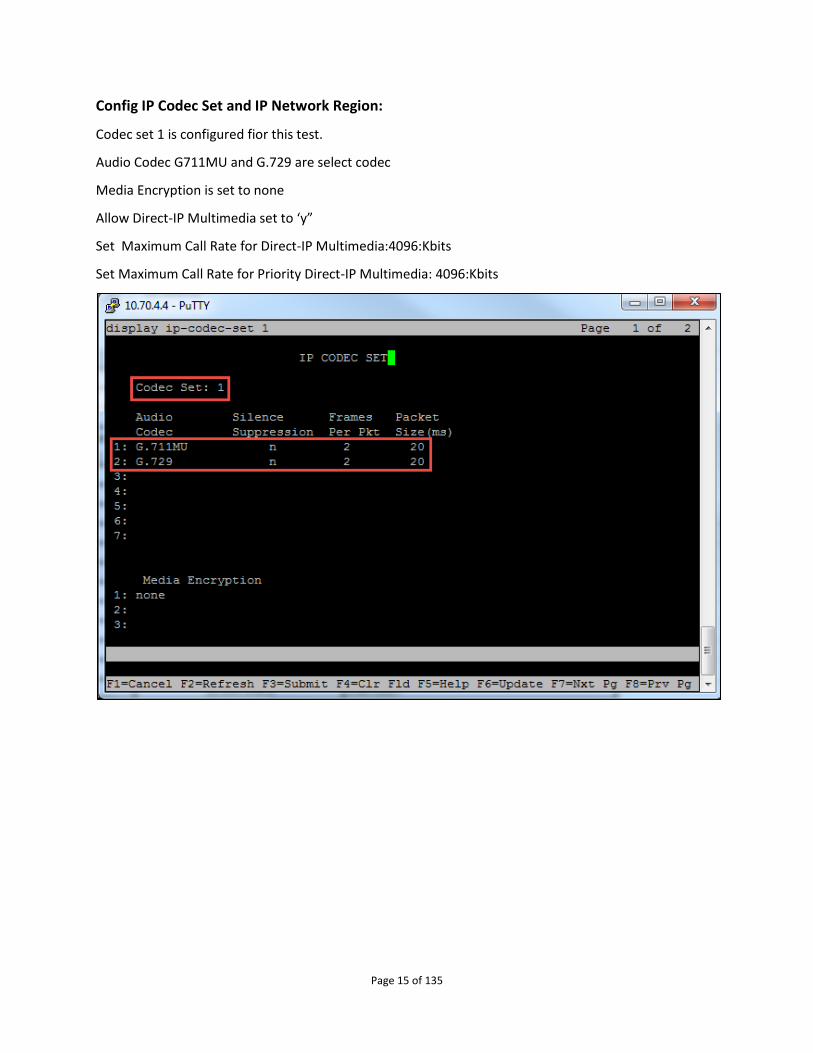
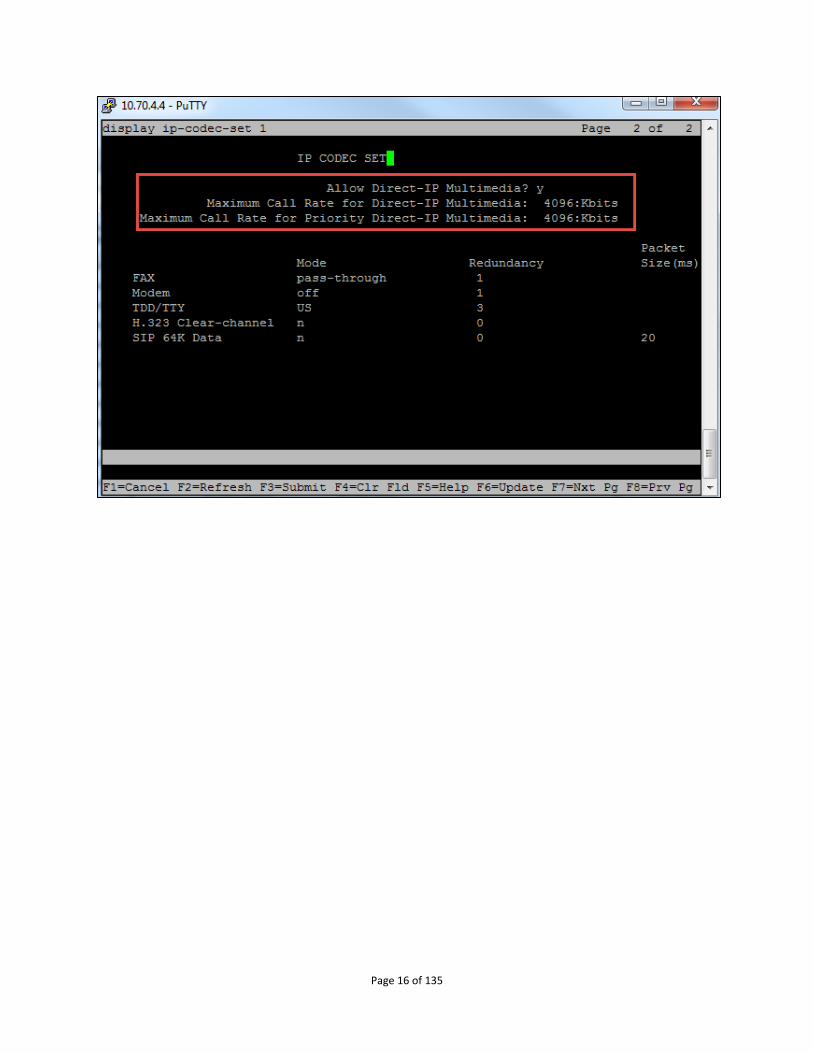
Config IP Codec Set and IP Network Region:
Codec set 1 is configured fior this test.
Audio Codec G711MU and G.729 are select codec
Media Encryption is set to none
Allow Direct-IP Multimedia set to ‘y”
Set Maximum Call Rate for Direct-IP Multimedia:4096:Kbits
Set Maximum Call Rate for Priority Direct-IP Multimedia: 4096:Kbits
Page 16 of 135

Page 17 of 135
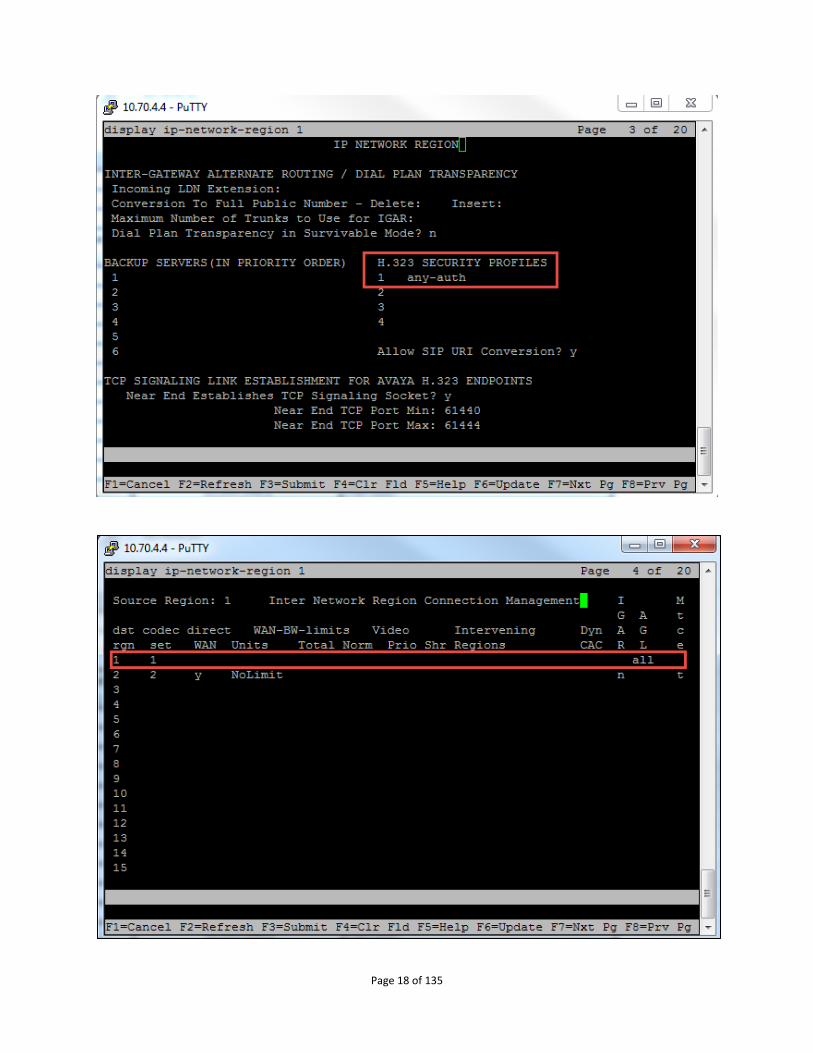
Configure IP-Network-region 1:
Location:1
Authoritative Dimain:lab.tekvizion.com used for this testing
Name:tekvizion Lab
Codec Set: 1 which programmed in previous step
Inter/Intra-region IP-IP Direct Audio:YES
H.323 SECURITY PROFILES: any-auth
Page 18 of 135
Page 19 of 135
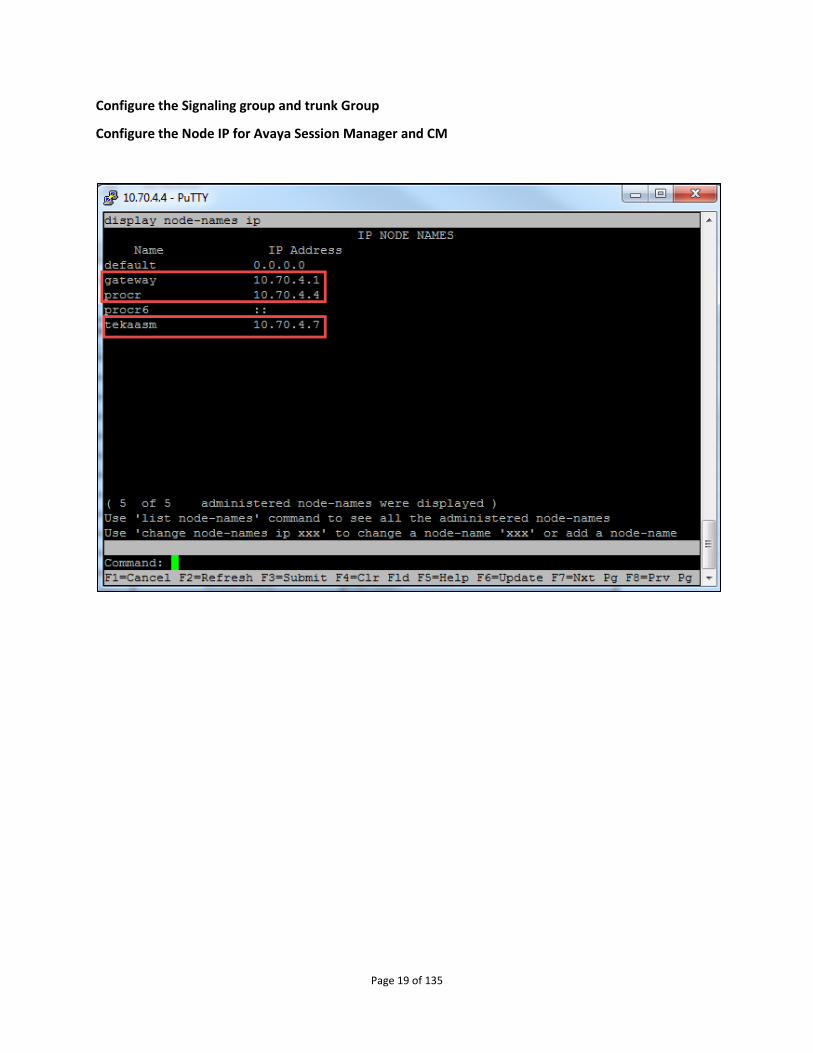
Configure the Signaling group and trunk Group
Configure the Node IP for Avaya Session Manager and CM
Page 20 of 135
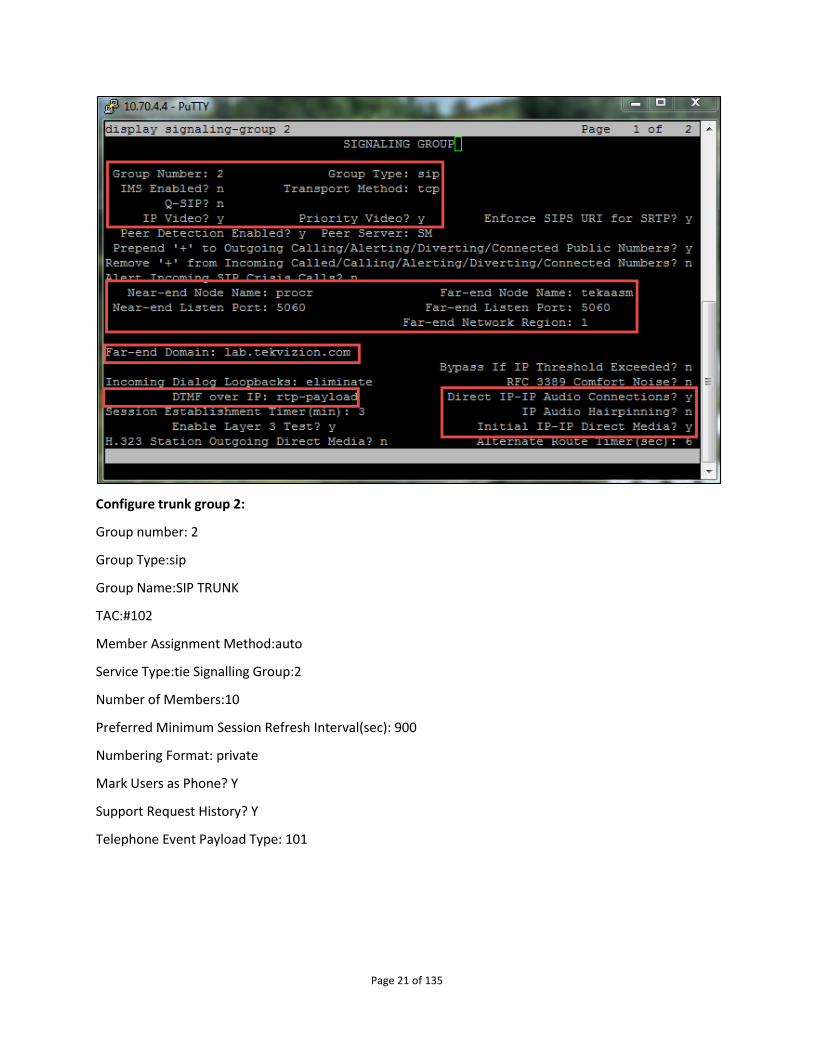
Configure the Signaling Group 2:
Set Group Type: sip
IMS Enabled? N
Transport Method: tcp
IP Video? Y
Priority Video? Y
Peer Detection Enabled? Y
Near-end Node Name: procr
Far-end Node Name: tekaasm
Near-end Listen Port: 5060
Far-end Listen Port: 5060
Far-end Domain: lab.tekvizion.com This is used for this testing
Far-end Network Region: 1
DTMF over IP: rtp-payload
Direct IP-IP Audio Connections? Y
Initial IP-IP Direct Media? Y This is used for this testing
Page 21 of 135
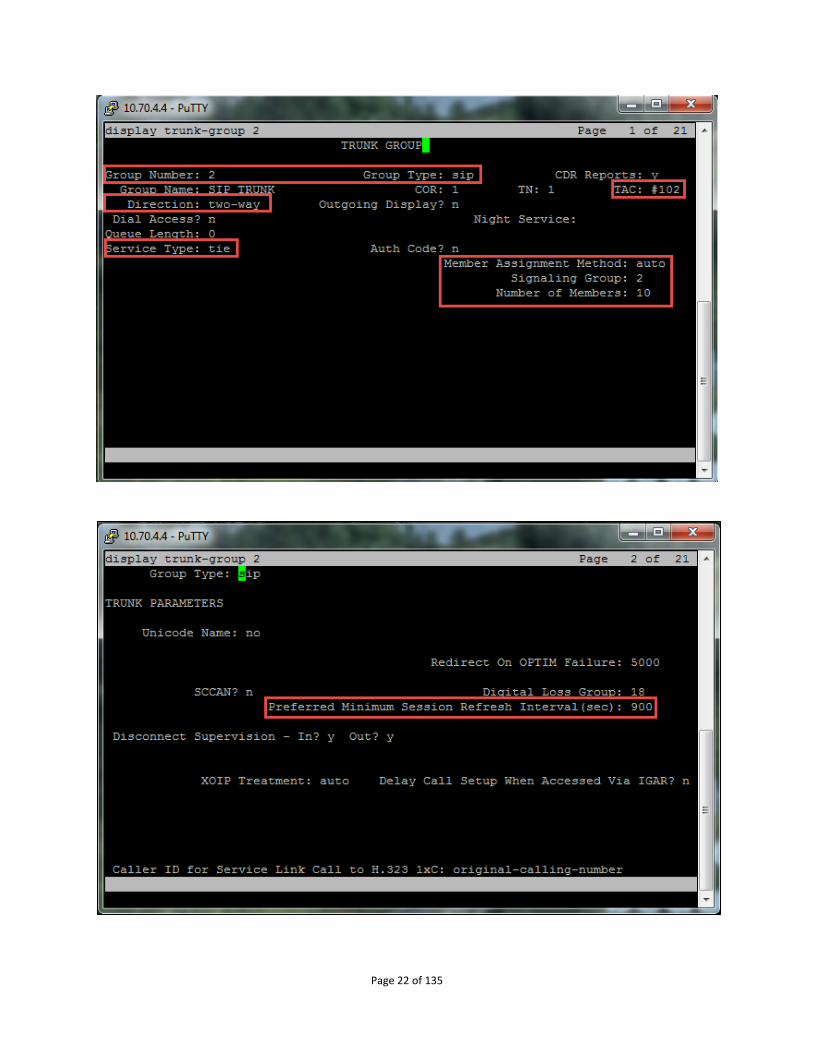
Configure trunk group 2:
Group number: 2
Group Type:sip
Group Name:SIP TRUNK
TAC:#102
Member Assignment Method:auto
Service Type:tie Signalling Group:2
Number of Members:10
Preferred Minimum Session Refresh Interval(sec): 900
Numbering Format: private
Mark Users as Phone? Y
Support Request History? Y
Telephone Event Payload Type: 101
Page 22 of 135

Page 23 of 135
Page 24 of 135
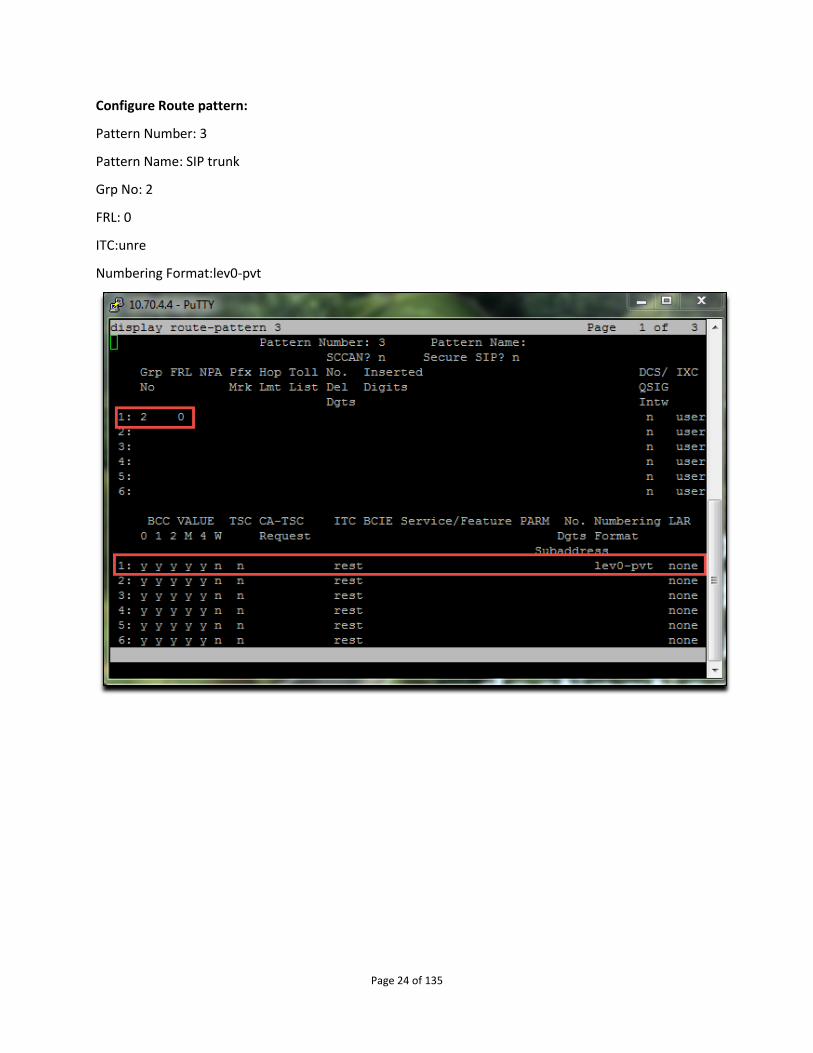
Configure Route pattern:
Pattern Number: 3
Pattern Name: SIP trunk
Grp No: 2
FRL: 0
ITC:unre
Numbering Format:lev0-pvt
Page 25 of 135
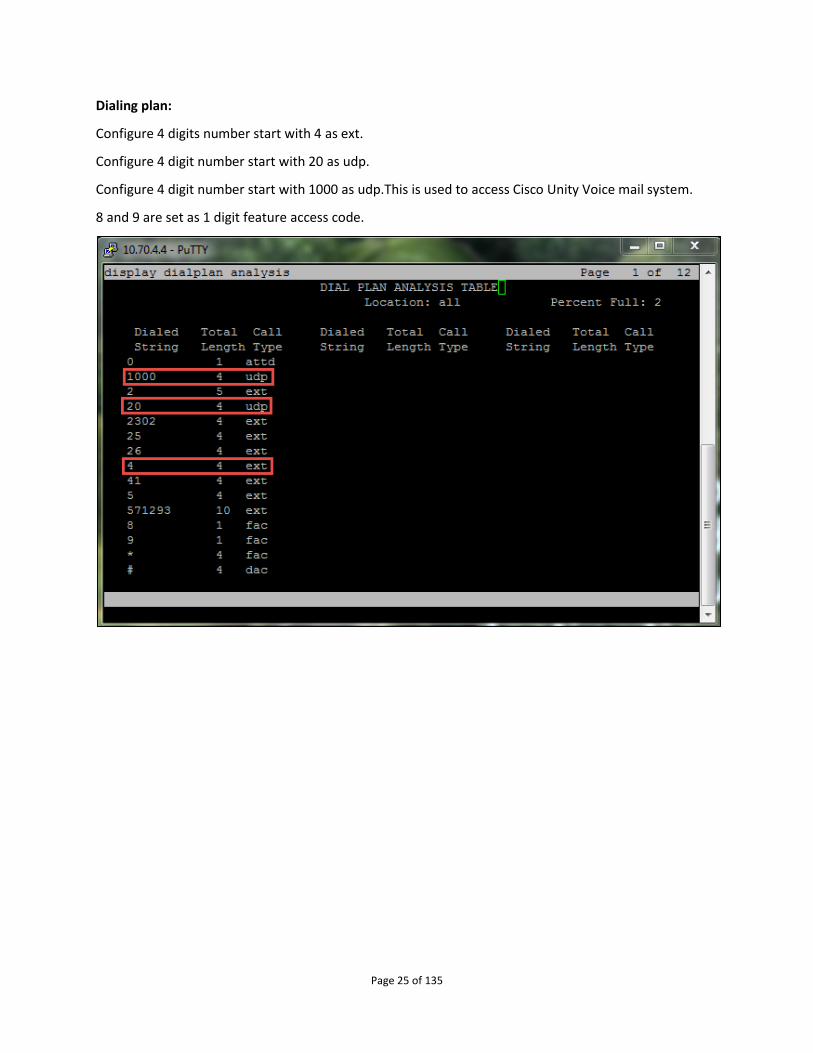
Dialing plan:
Configure 4 digits number start with 4 as ext.
Configure 4 digit number start with 20 as udp.
Configure 4 digit number start with 1000 as udp.This is used to access Cisco Unity Voice mail system.
8 and 9 are set as 1 digit feature access code.
Page 26 of 135
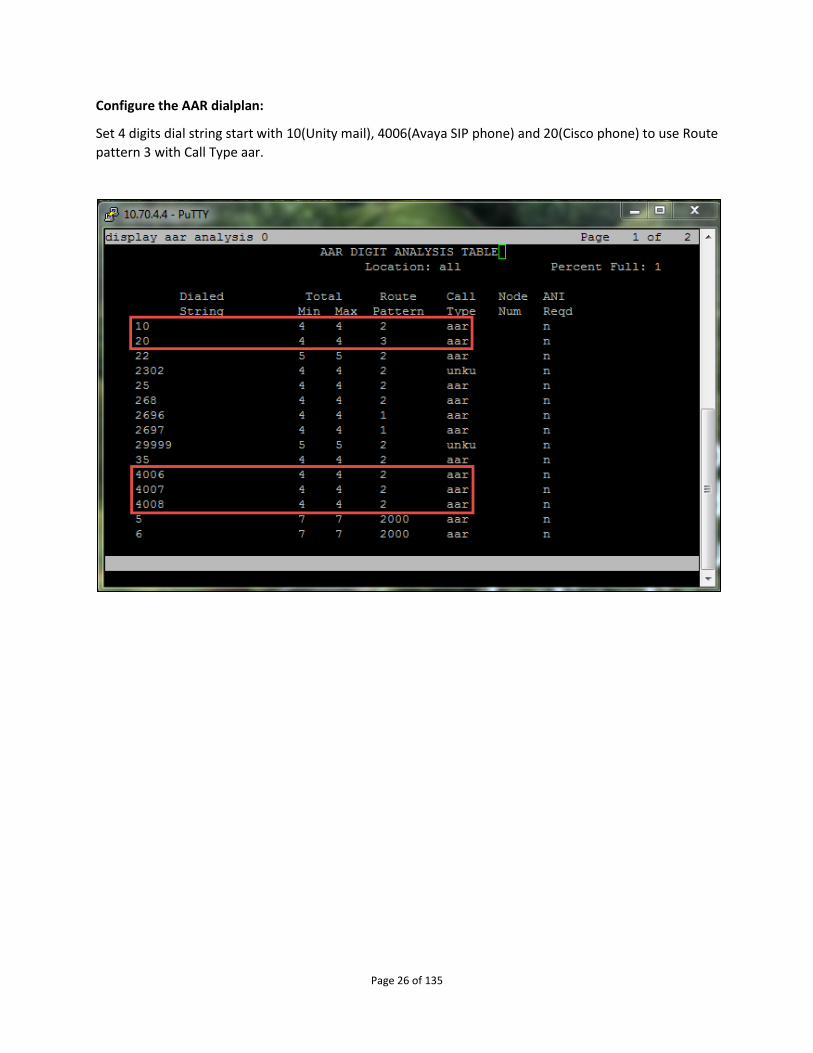
Configure the AAR dialplan:
Set 4 digits dial string start with 10(Unity mail), 4006(Avaya SIP phone) and 20(Cisco phone) to use Route
pattern 3 with Call Type aar.
Page 27 of 135
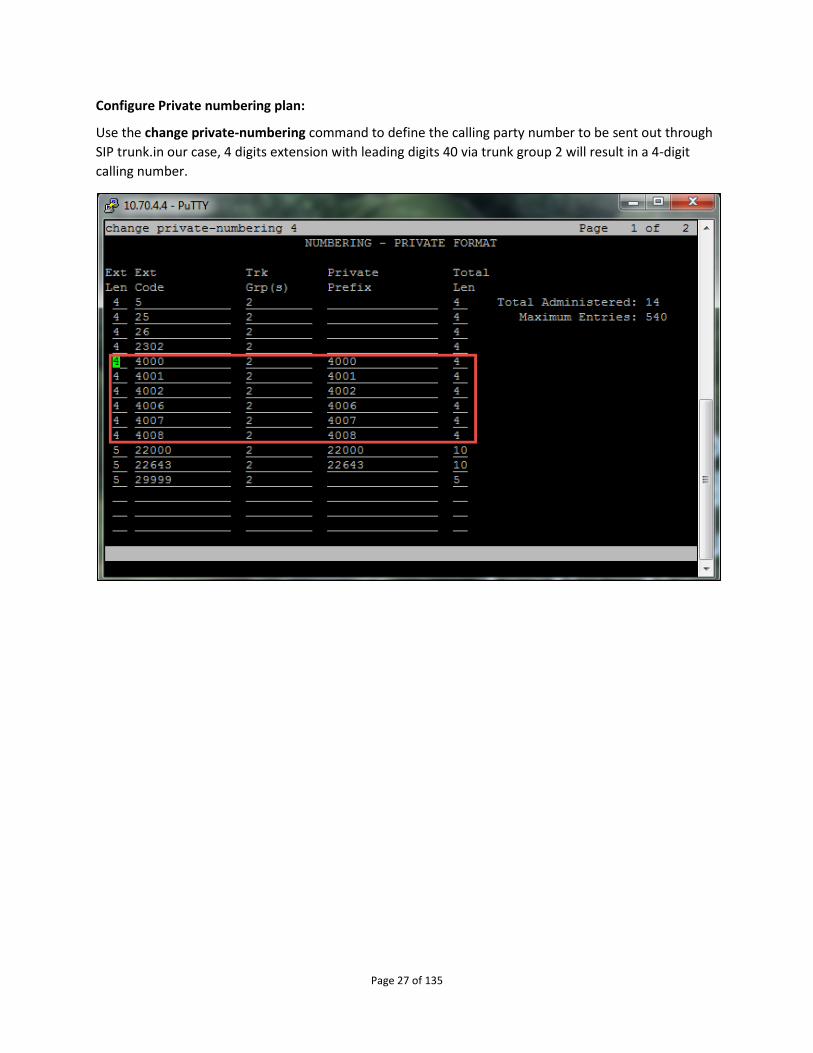
Configure Private numbering plan:
Use the change private-numbering command to define the calling party number to be sent out through
SIP trunk.in our case, 4 digits extension with leading digits 40 via trunk group 2 will result in a 4-digit
calling number.
Page 28 of 135
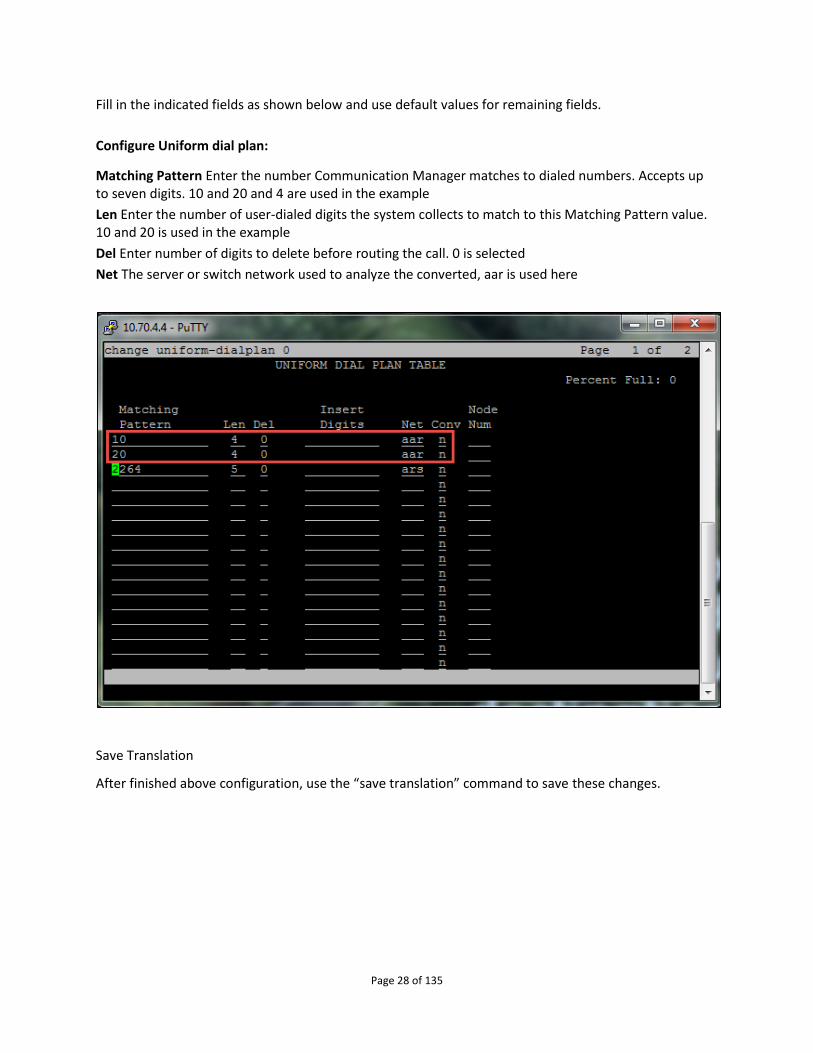
Fill in the indicated fields as shown below and use default values for remaining fields.
Configure Uniform dial plan:
Matching Pattern Enter the number Communication Manager matches to dialed numbers. Accepts up to seven digits. 10 and 20 and 4 are used in the example
Len Enter the number of user-dialed digits the system collects to match to this Matching Pattern value. 10 and 20 is used in the example
Del Enter number of digits to delete before routing the call. 0 is selected
Net The server or switch network used to analyze the converted, aar is used here
Save Translation
After finished above configuration, use the “save translation” command to save these changes.

Page 29 of 135
Configure Avaya Aura Session Manager
Access Avaya Aura System Manager Web login screen via https://<IP Address/FQDN>, for this test, IP
address used is 10.70.4.3. Use admin as User ID and associated password, and then “Log on”
Navigation: HomeElementsRouting
Page 30 of 135
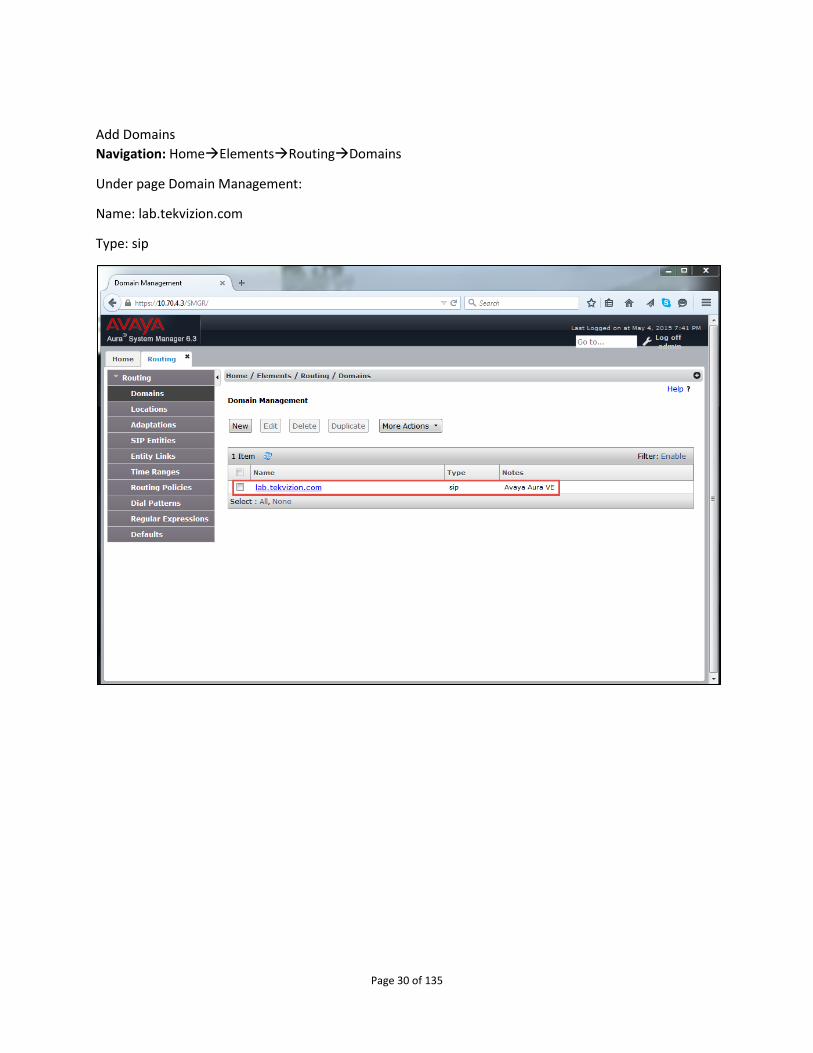
Add Domains
Navigation: HomeElementsRoutingDomains
Under page Domain Management:
Name: lab.tekvizion.com
Type: sip
Page 31 of 135
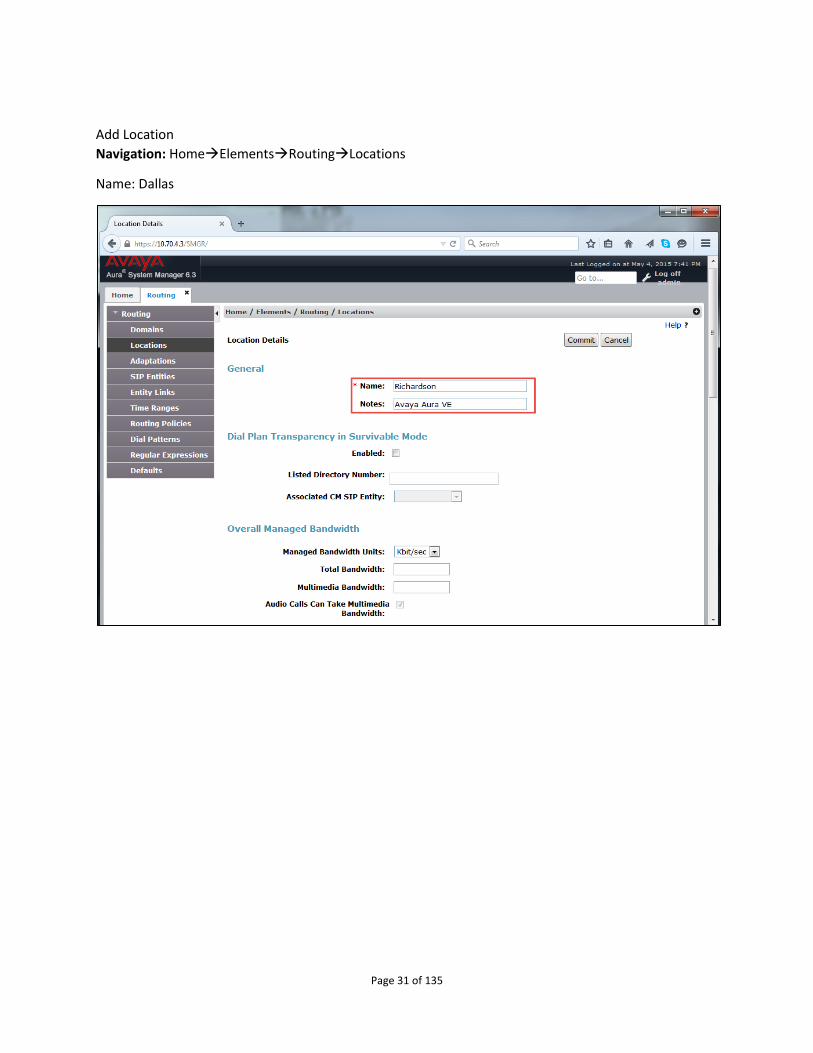
Add Location
Navigation: HomeElementsRoutingLocations
Name: Dallas
Page 32 of 135
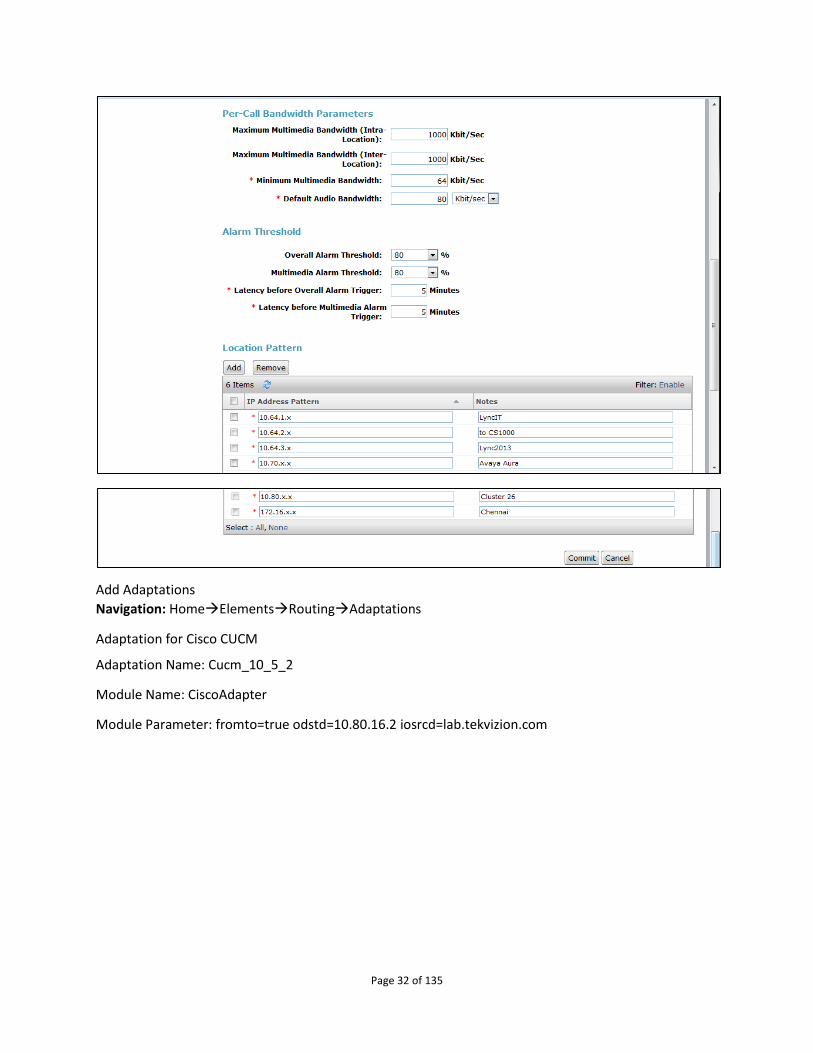
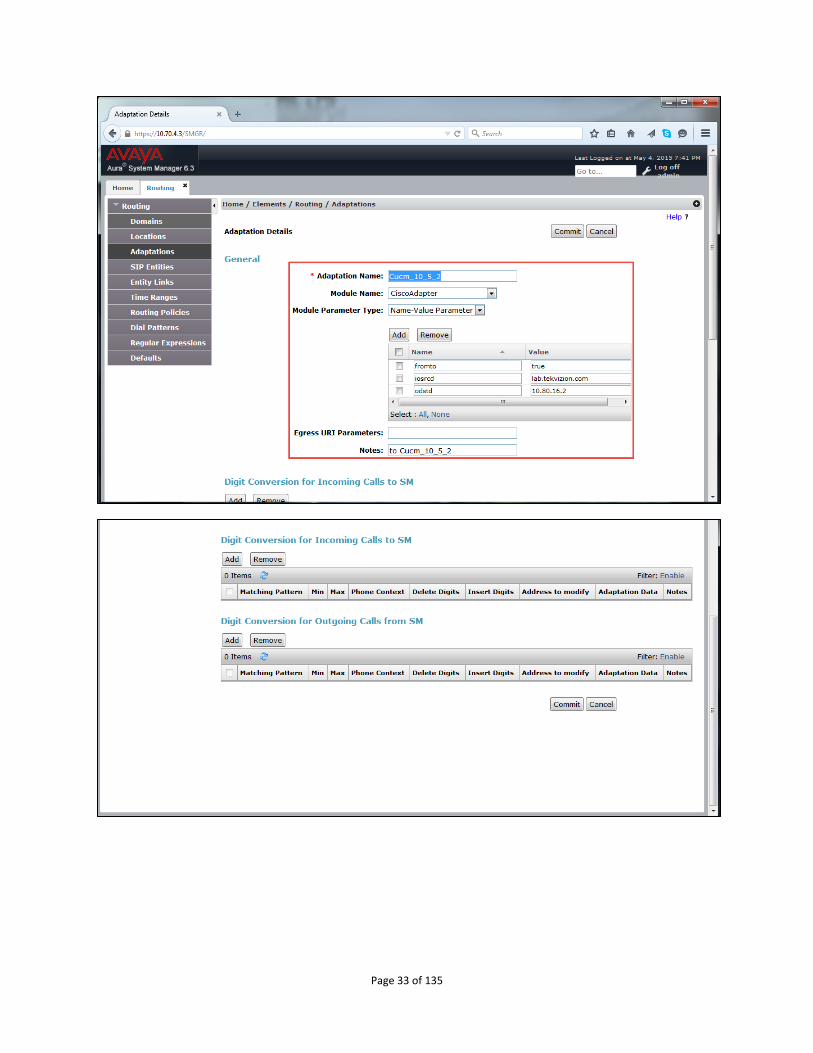
Add Adaptations
Navigation: HomeElementsRoutingAdaptations
Adaptation for Cisco CUCM
Adaptation Name: Cucm_10_5_2
Module Name: CiscoAdapter
Module Parameter: fromto=true odstd=10.80.16.2 iosrcd=lab.tekvizion.com
Page 33 of 135
Page 34 of 135
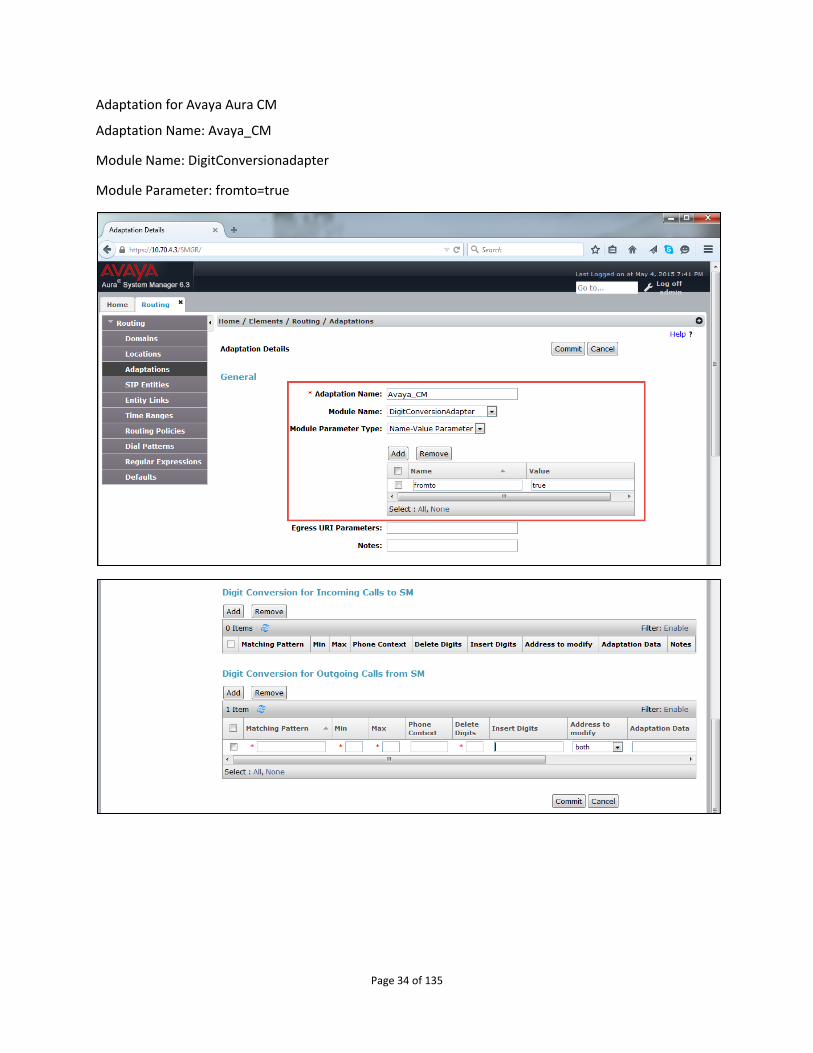
Adaptation for Avaya Aura CM
Adaptation Name: Avaya_CM
Module Name: DigitConversionadapter
Module Parameter: fromto=true
Page 35 of 135
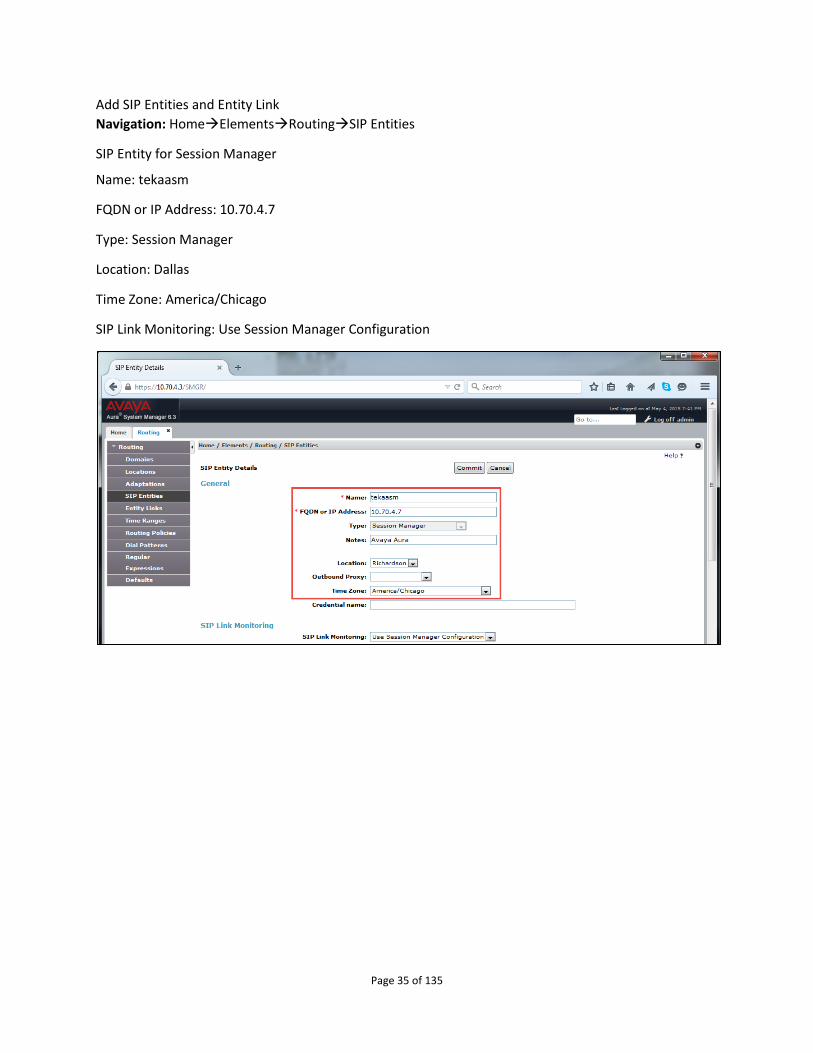
Add SIP Entities and Entity Link
Navigation: HomeElementsRoutingSIP Entities
SIP Entity for Session Manager
Name: tekaasm
FQDN or IP Address: 10.70.4.7
Type: Session Manager
Location: Dallas
Time Zone: America/Chicago
SIP Link Monitoring: Use Session Manager Configuration
Page 36 of 135
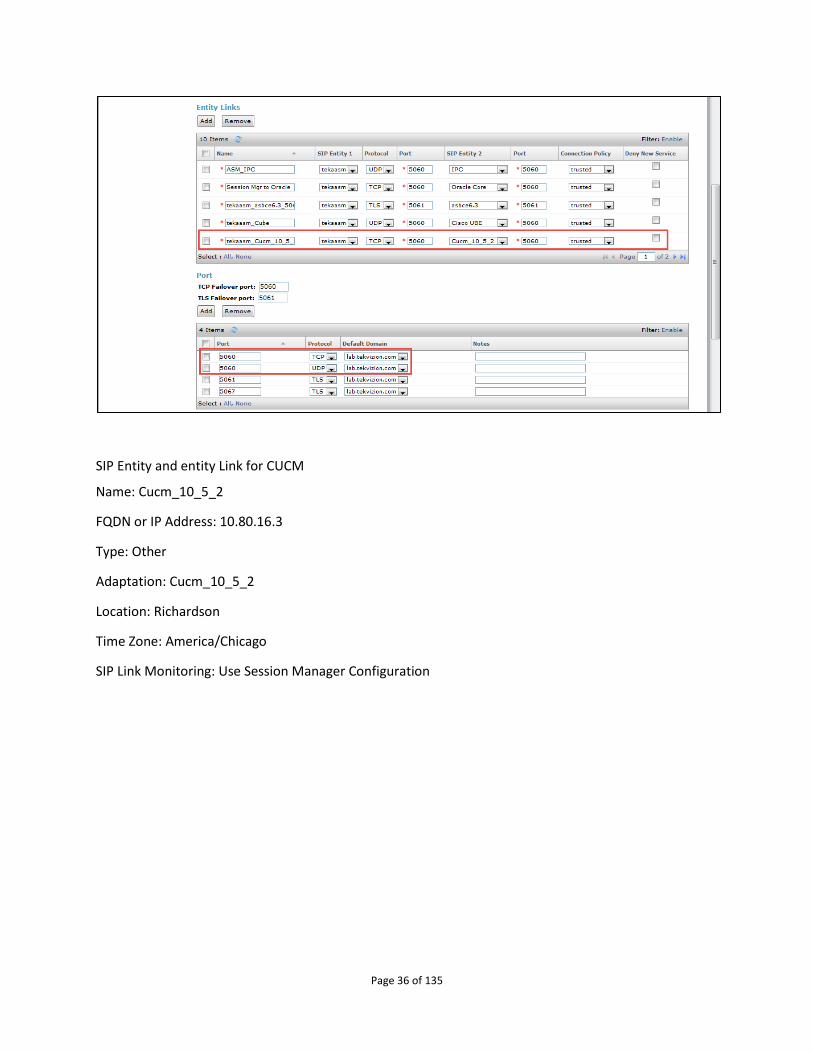
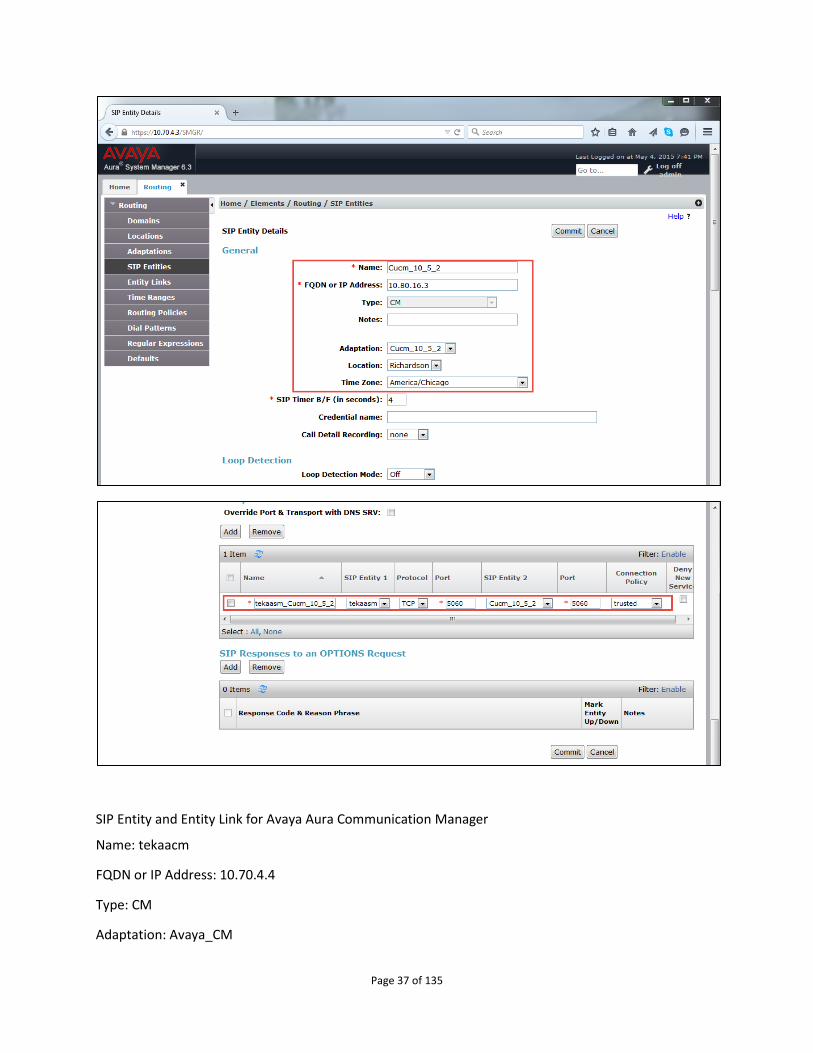
SIP Entity and entity Link for CUCM
Name: Cucm_10_5_2
FQDN or IP Address: 10.80.16.3
Type: Other
Adaptation: Cucm_10_5_2
Location: Richardson
Time Zone: America/Chicago
SIP Link Monitoring: Use Session Manager Configuration
Page 37 of 135
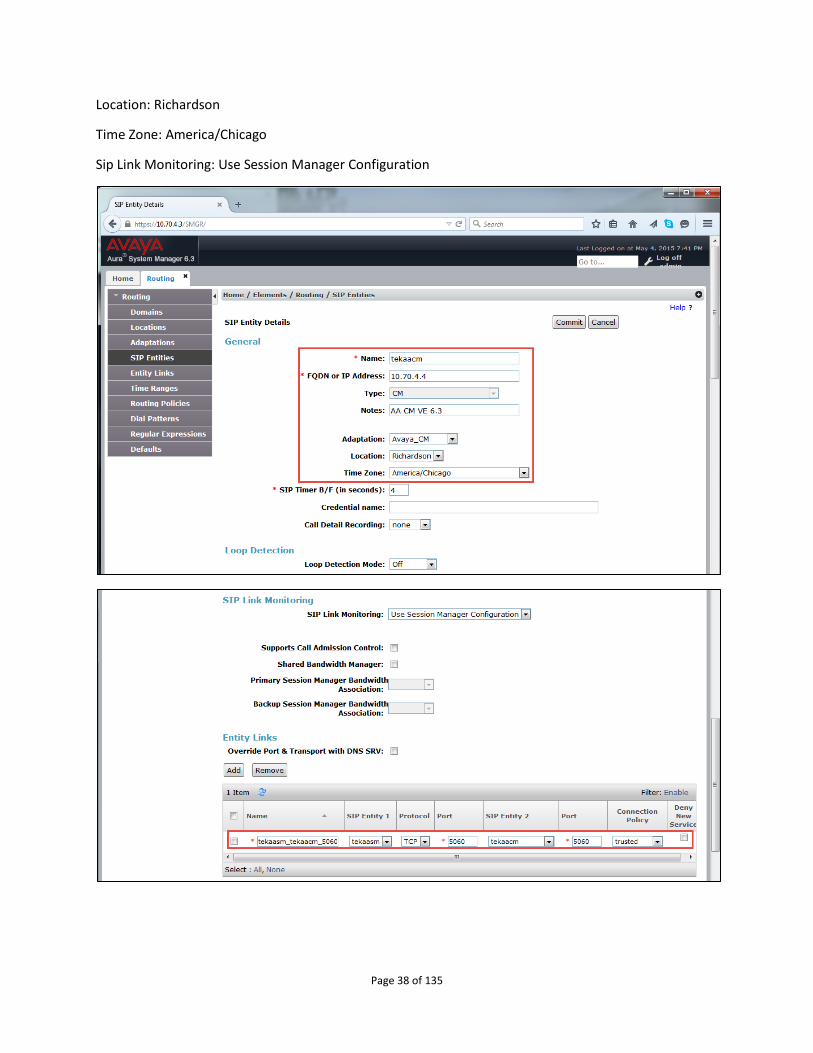
SIP Entity and Entity Link for Avaya Aura Communication Manager
Name: tekaacm
FQDN or IP Address: 10.70.4.4
Type: CM
Adaptation: Avaya_CM
Page 38 of 135
Location: Richardson
Time Zone: America/Chicago
Sip Link Monitoring: Use Session Manager Configuration

Page 39 of 135
Add Entity Links
Navigation: HomeElementsRoutingEntity Links
Add entity link between Avaya Session Manager and Cisco CUCM:
Name: ASM tekaasm_tekaacm_5060_TCP
SIP Entity 1: teaaksm
Protocol: tcp
Port 5060
SIP Entity 2:Cucm_10_5_2
Port 5060
Connection Policy: trusted
Page 40 of 135
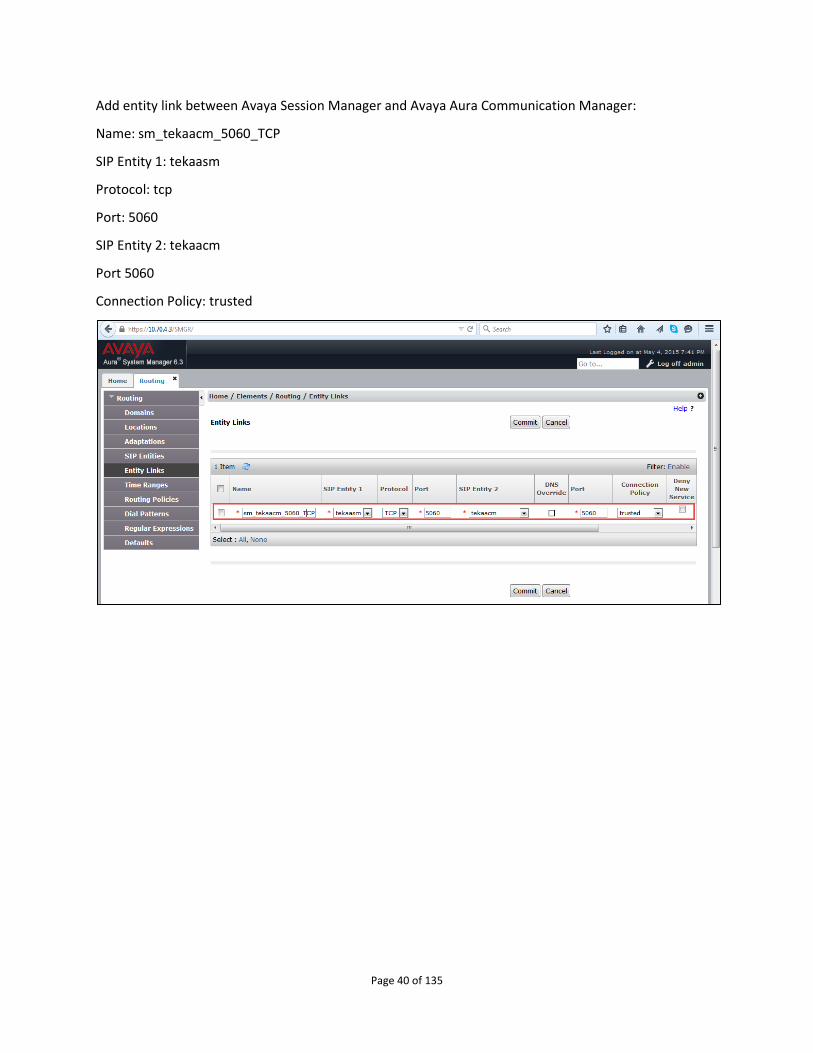
Add entity link between Avaya Session Manager and Avaya Aura Communication Manager:
Name: sm_tekaacm_5060_TCP
SIP Entity 1: tekaasm
Protocol: tcp
Port: 5060
SIP Entity 2: tekaacm
Port 5060
Connection Policy: trusted
Page 41 of 135
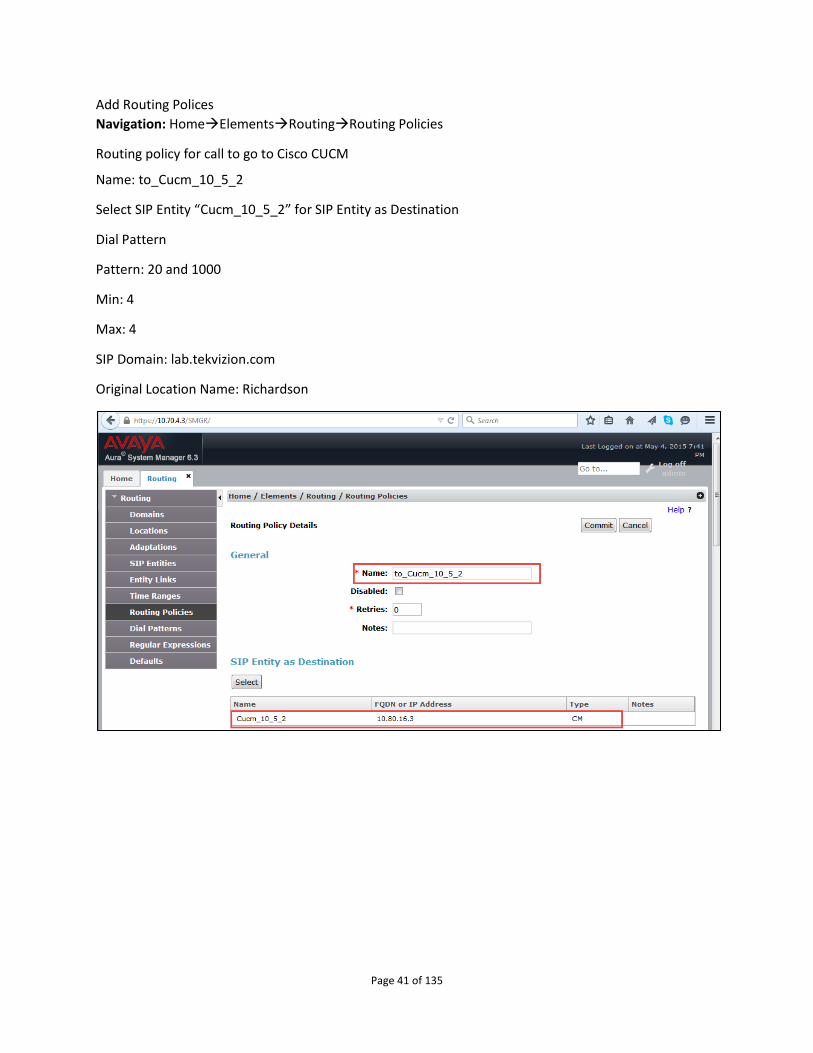
Add Routing Polices
Navigation: HomeElementsRoutingRouting Policies
Routing policy for call to go to Cisco CUCM
Name: to_Cucm_10_5_2
Select SIP Entity “Cucm_10_5_2” for SIP Entity as Destination
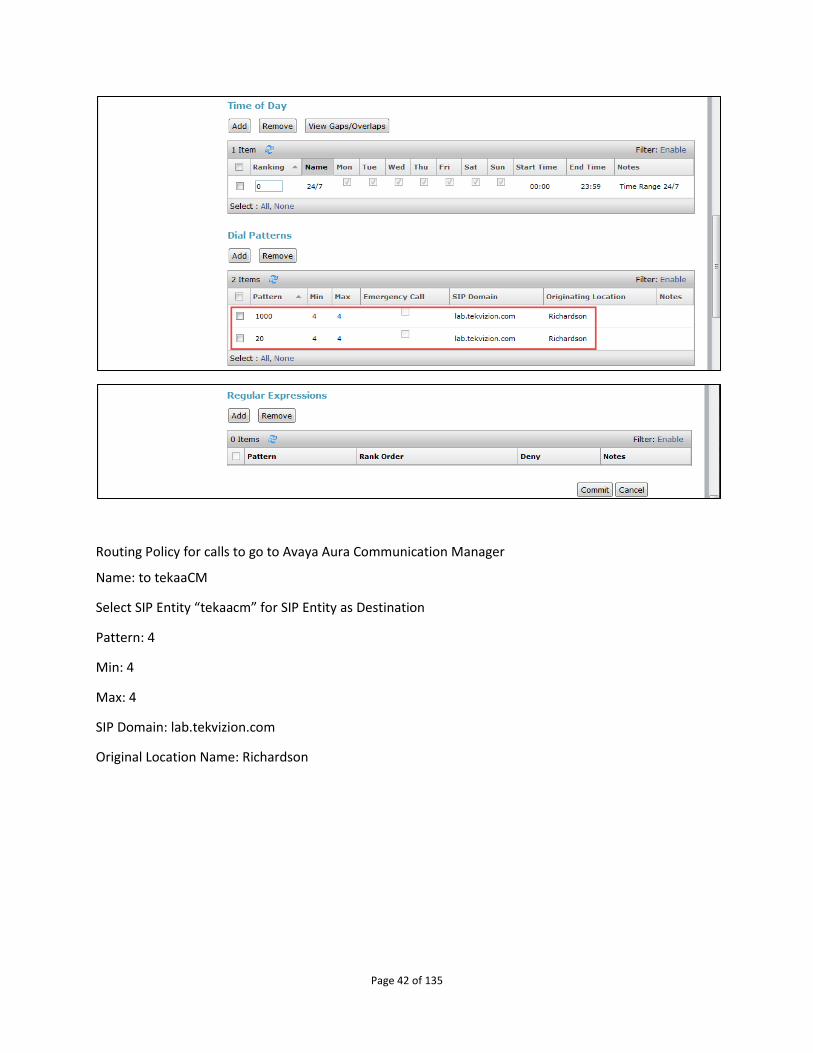
Dial Pattern
Pattern: 20 and 1000
Min: 4
Max: 4
SIP Domain: lab.tekvizion.com
Original Location Name: Richardson
Page 42 of 135
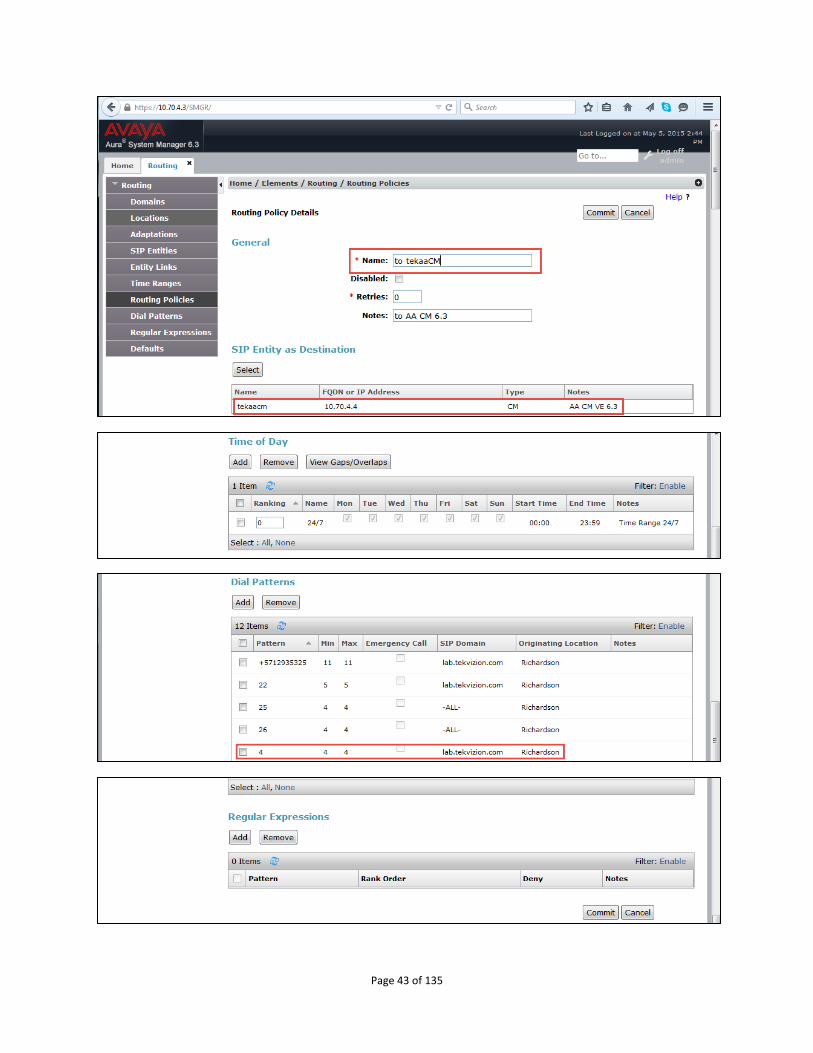
Routing Policy for calls to go to Avaya Aura Communication Manager
Name: to tekaaCM
Select SIP Entity “tekaacm” for SIP Entity as Destination
Pattern: 4
Min: 4
Max: 4
SIP Domain: lab.tekvizion.com
Original Location Name: Richardson
Page 43 of 135
Page 44 of 135
Configuring the Cisco Unified Communications Manager Cisco Unified Communications Manager Software Version
Page 45 of 135
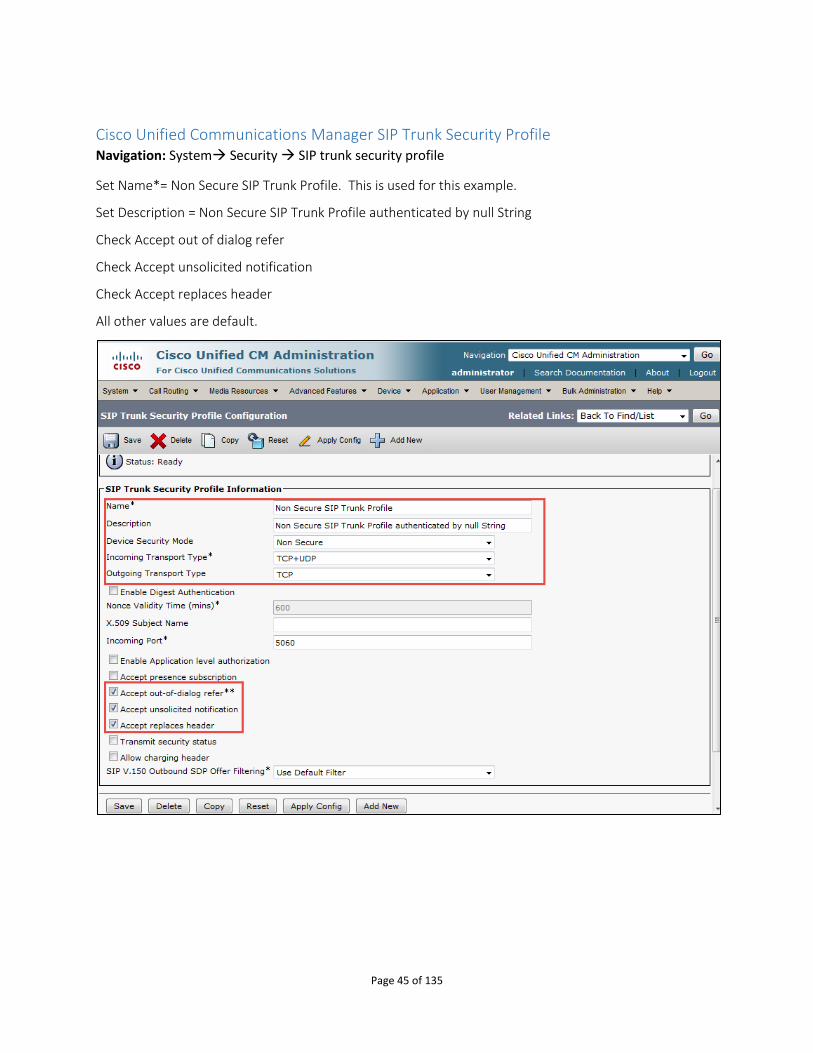
Cisco Unified Communications Manager SIP Trunk Security Profile Navigation: System Security SIP trunk security profile
Set Name*= Non Secure SIP Trunk Profile. This is used for this example.
Set Description = Non Secure SIP Trunk Profile authenticated by null String
Check Accept out of dialog refer
Check Accept unsolicited notification
Check Accept replaces header
All other values are default.
Page 46 of 135
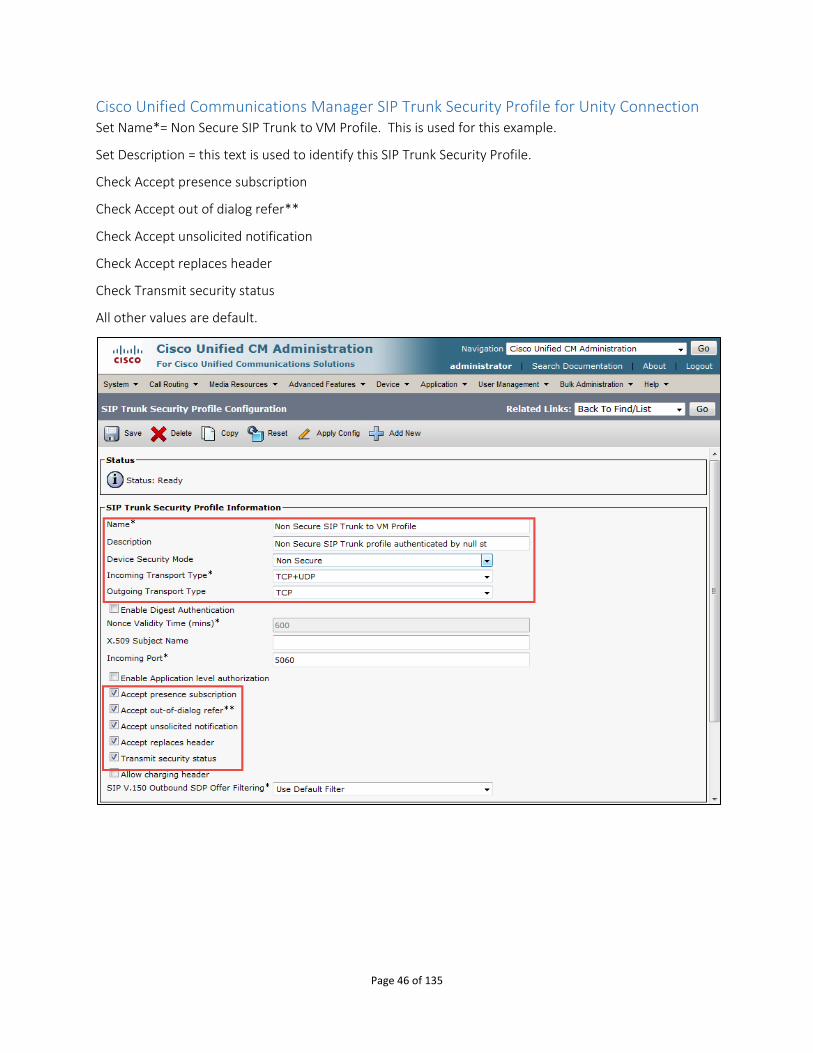
Cisco Unified Communications Manager SIP Trunk Security Profile for Unity Connection Set Name*= Non Secure SIP Trunk to VM Profile. This is used for this example.
Set Description = this text is used to identify this SIP Trunk Security Profile.
Check Accept presence subscription
Check Accept out of dialog refer**
Check Accept unsolicited notification
Check Accept replaces header
Check Transmit security status
All other values are default.
Page 47 of 135
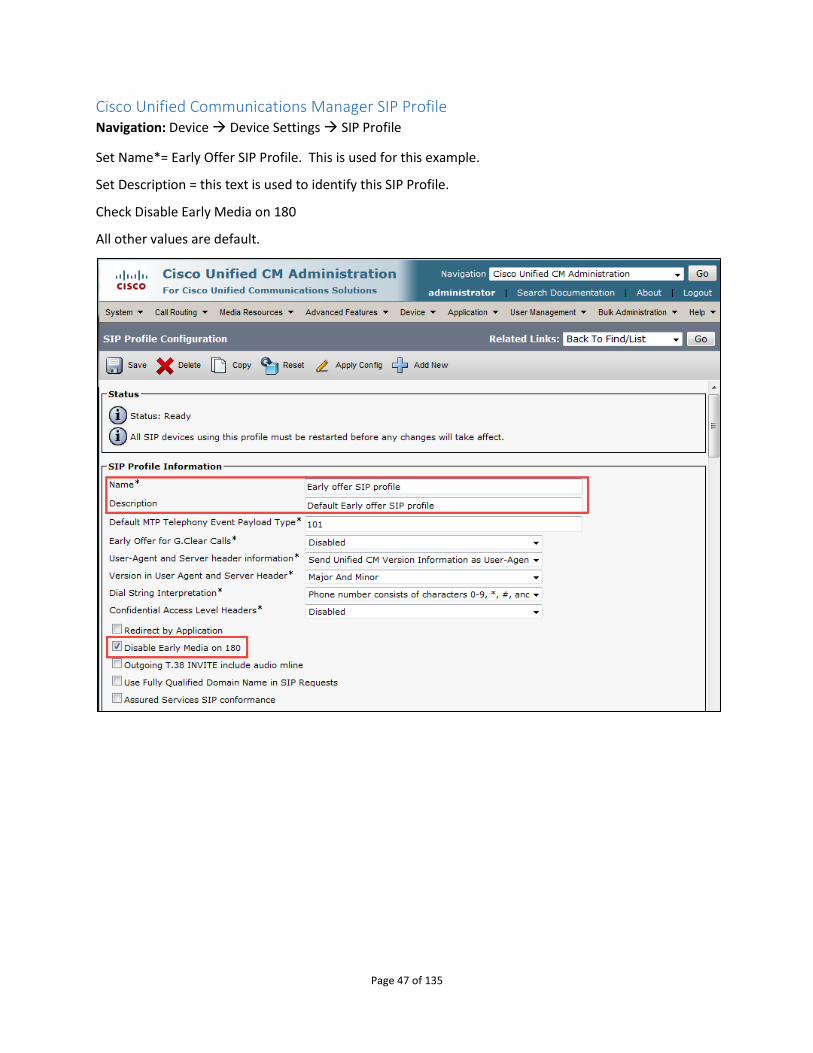
Cisco Unified Communications Manager SIP Profile Navigation: Device Device Settings SIP Profile
Set Name*= Early Offer SIP Profile. This is used for this example.
Set Description = this text is used to identify this SIP Profile.
Check Disable Early Media on 180
All other values are default.
Page 48 of 135
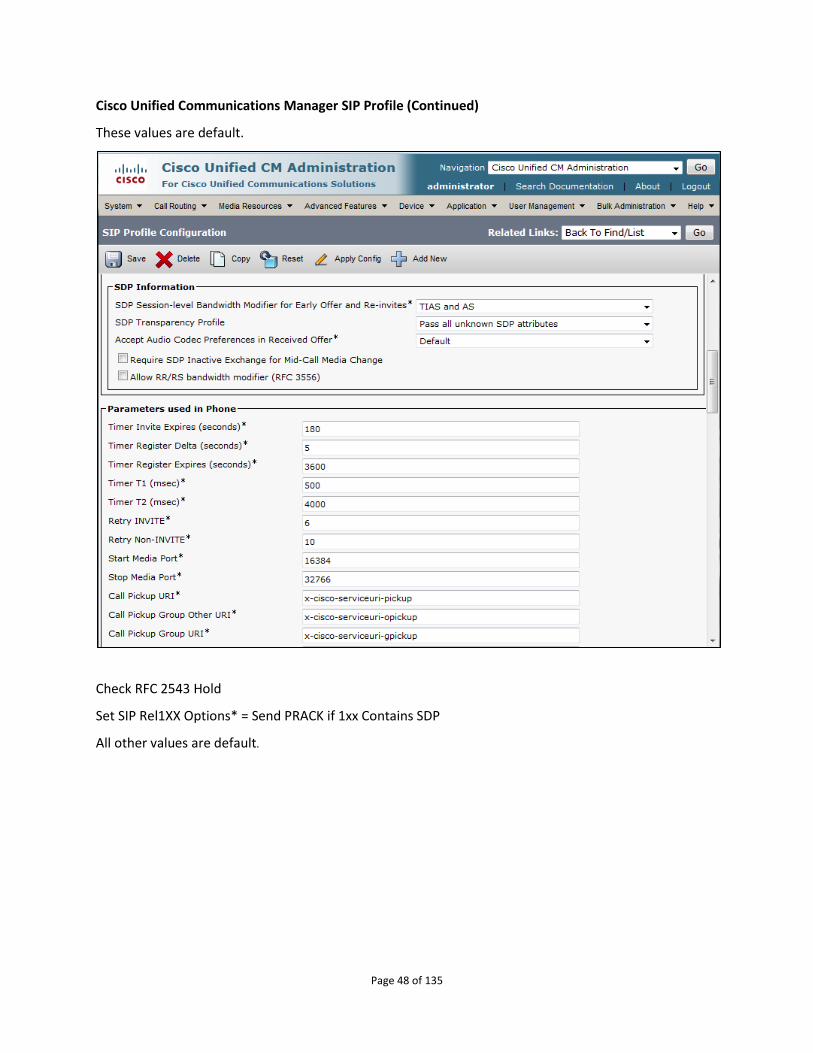
Cisco Unified Communications Manager SIP Profile (Continued)
These values are default.
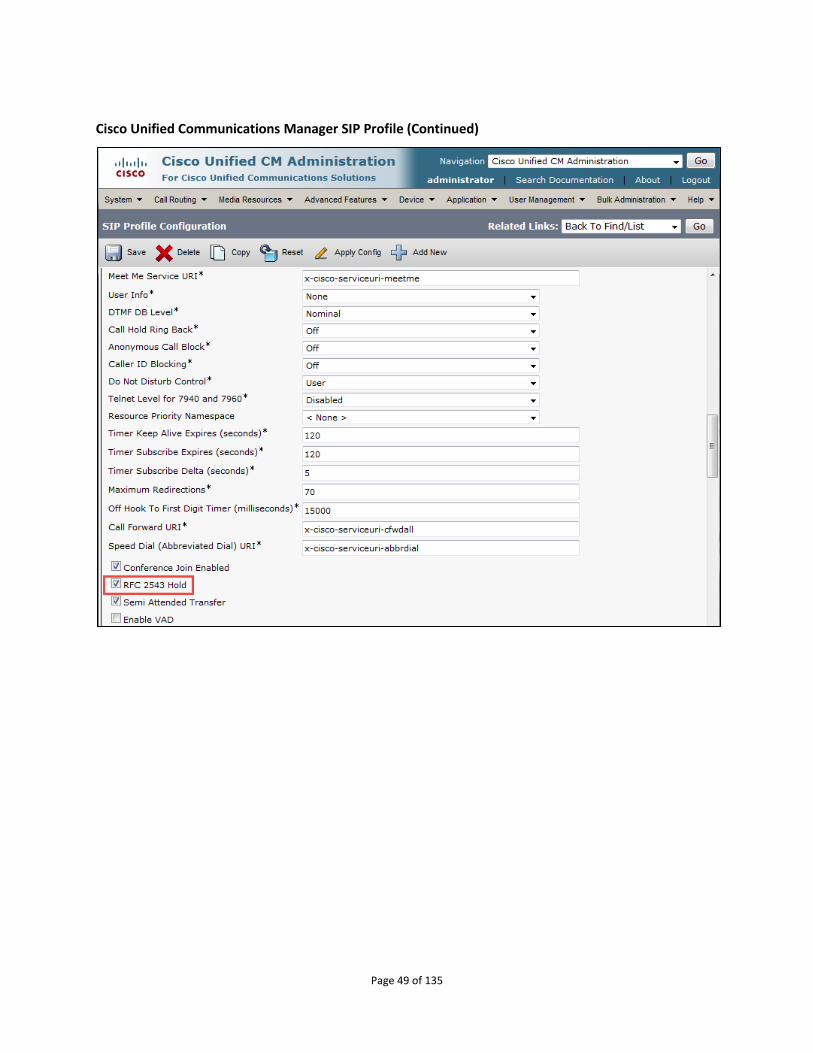
Check RFC 2543 Hold
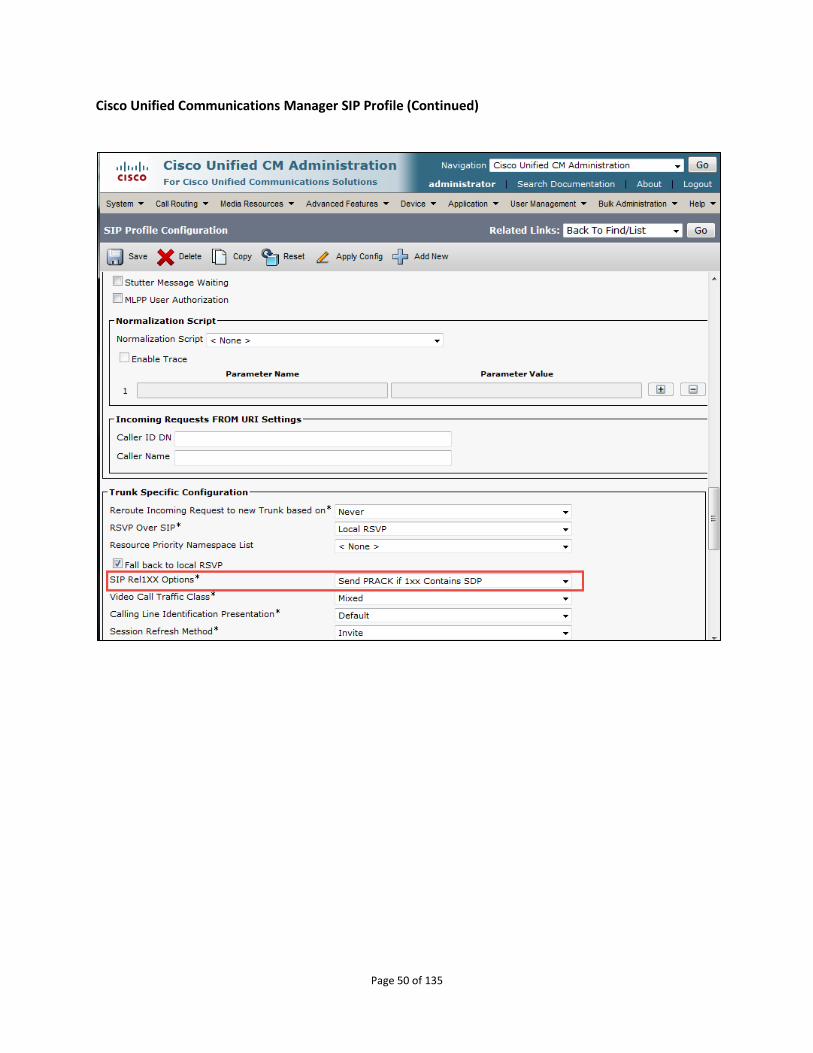
Set SIP Rel1XX Options* = Send PRACK if 1xx Contains SDP
All other values are default.
Page 49 of 135
Cisco Unified Communications Manager SIP Profile (Continued)
Page 50 of 135
Cisco Unified Communications Manager SIP Profile (Continued)
Page 51 of 135
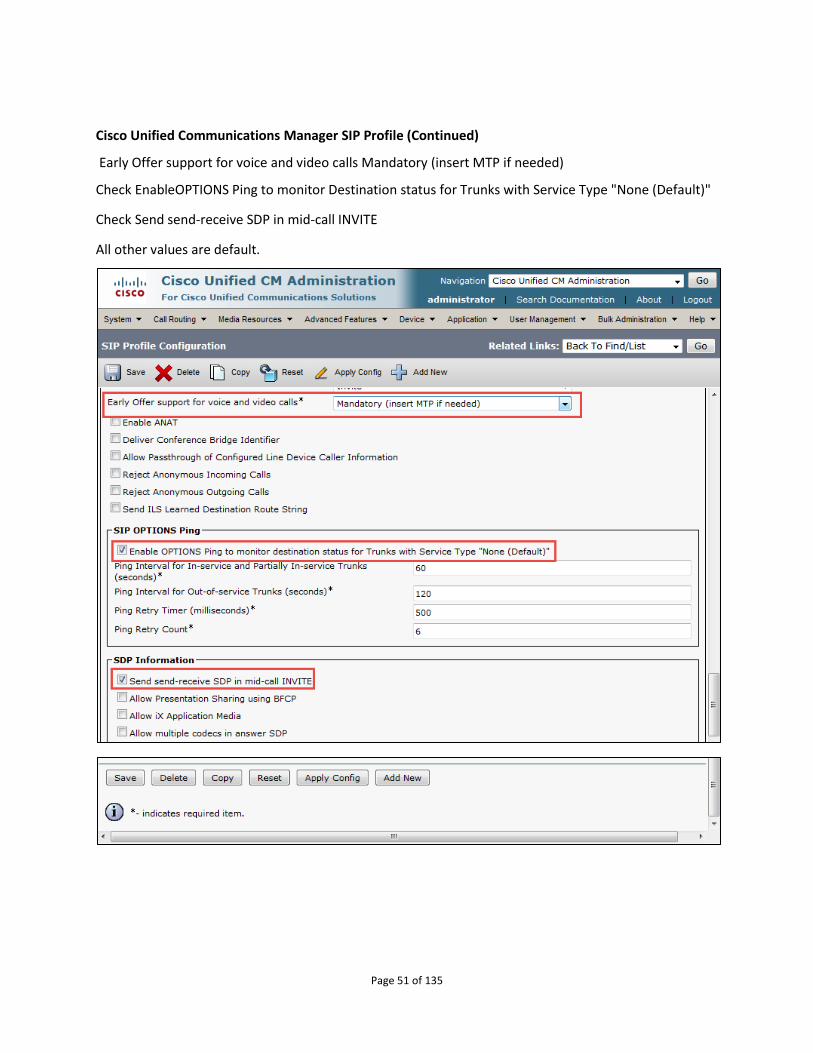
Cisco Unified Communications Manager SIP Profile (Continued)
Early Offer support for voice and video calls Mandatory (insert MTP if needed)
Check EnableOPTIONS Ping to monitor Destination status for Trunks with Service Type "None (Default)"
Check Send send-receive SDP in mid-call INVITE
All other values are default.
Page 52 of 135
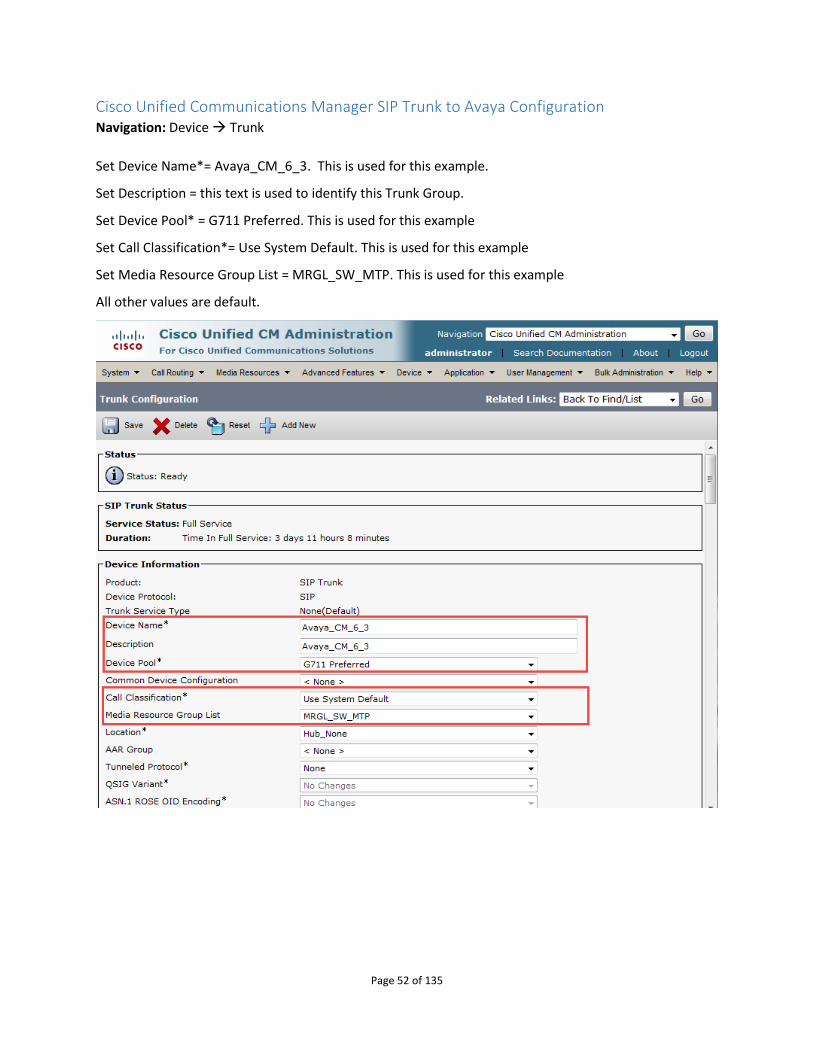
Cisco Unified Communications Manager SIP Trunk to Avaya Configuration Navigation: Device Trunk
Set Device Name*= Avaya_CM_6_3. This is used for this example.
Set Description = this text is used to identify this Trunk Group.
Set Device Pool* = G711 Preferred. This is used for this example
Set Call Classification*= Use System Default. This is used for this example
Set Media Resource Group List = MRGL_SW_MTP. This is used for this example
All other values are default.
Page 53 of 135
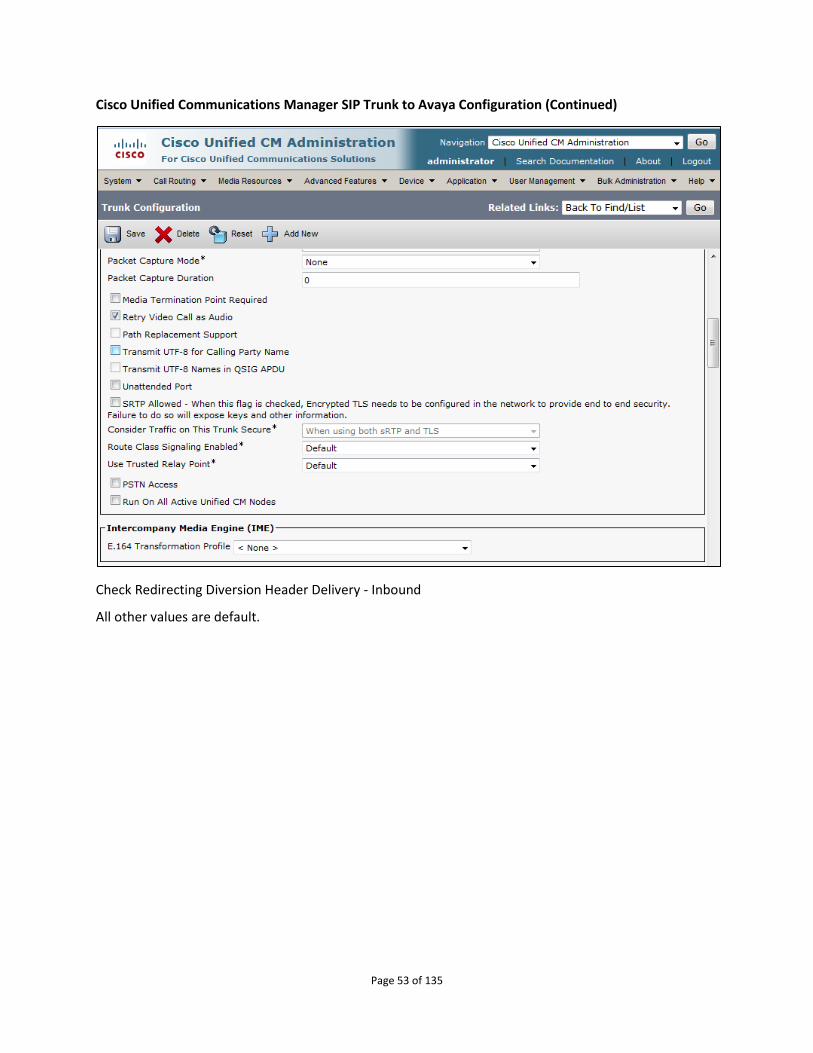
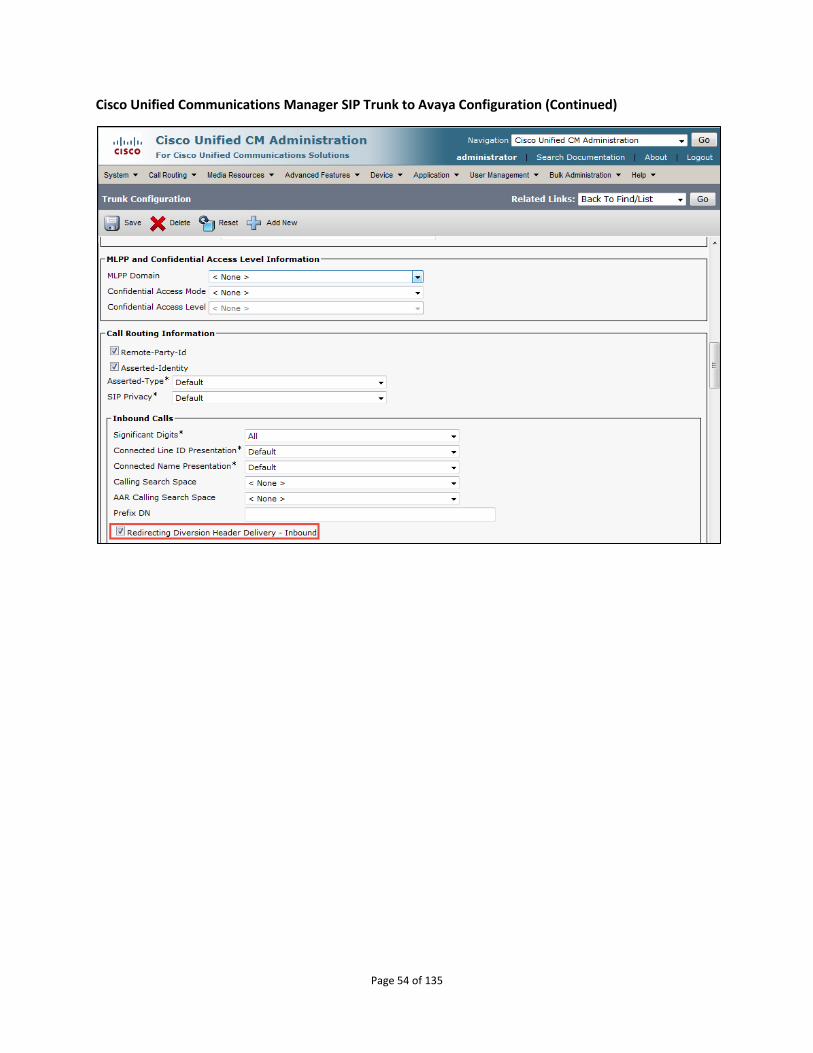
Cisco Unified Communications Manager SIP Trunk to Avaya Configuration (Continued)
Check Redirecting Diversion Header Delivery - Inbound
All other values are default.
Page 54 of 135
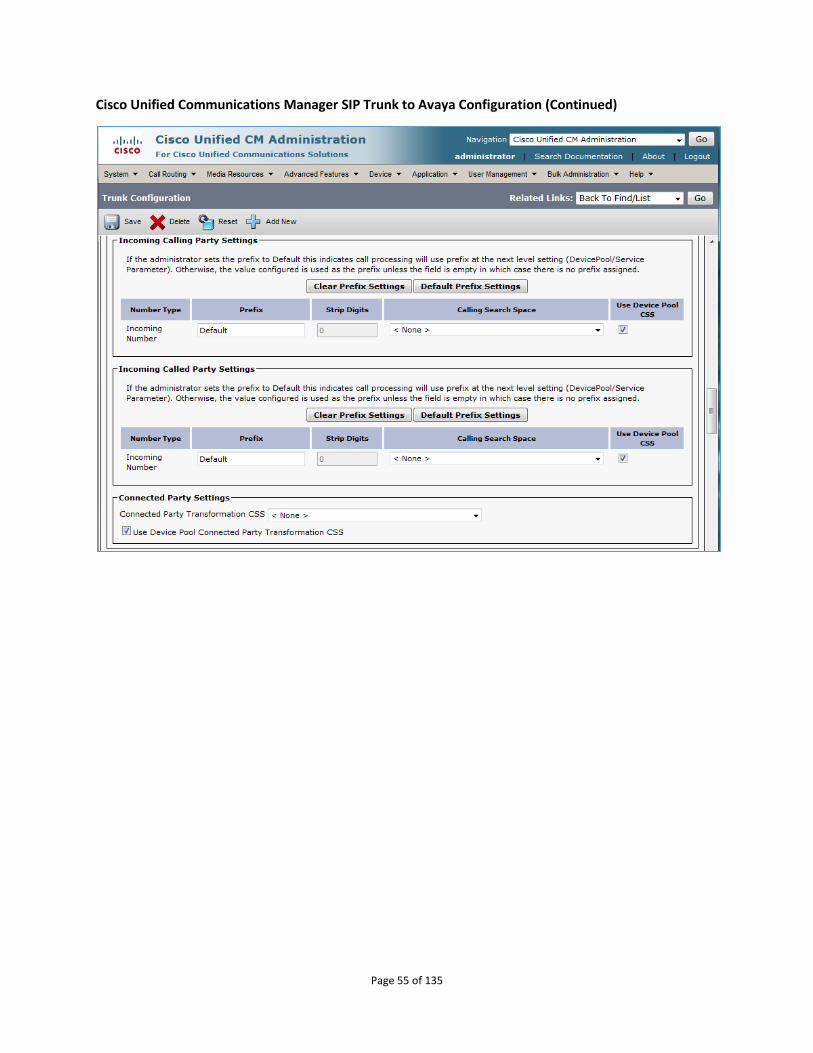
Cisco Unified Communications Manager SIP Trunk to Avaya Configuration (Continued)
Page 55 of 135
Cisco Unified Communications Manager SIP Trunk to Avaya Configuration (Continued)
Page 56 of 135
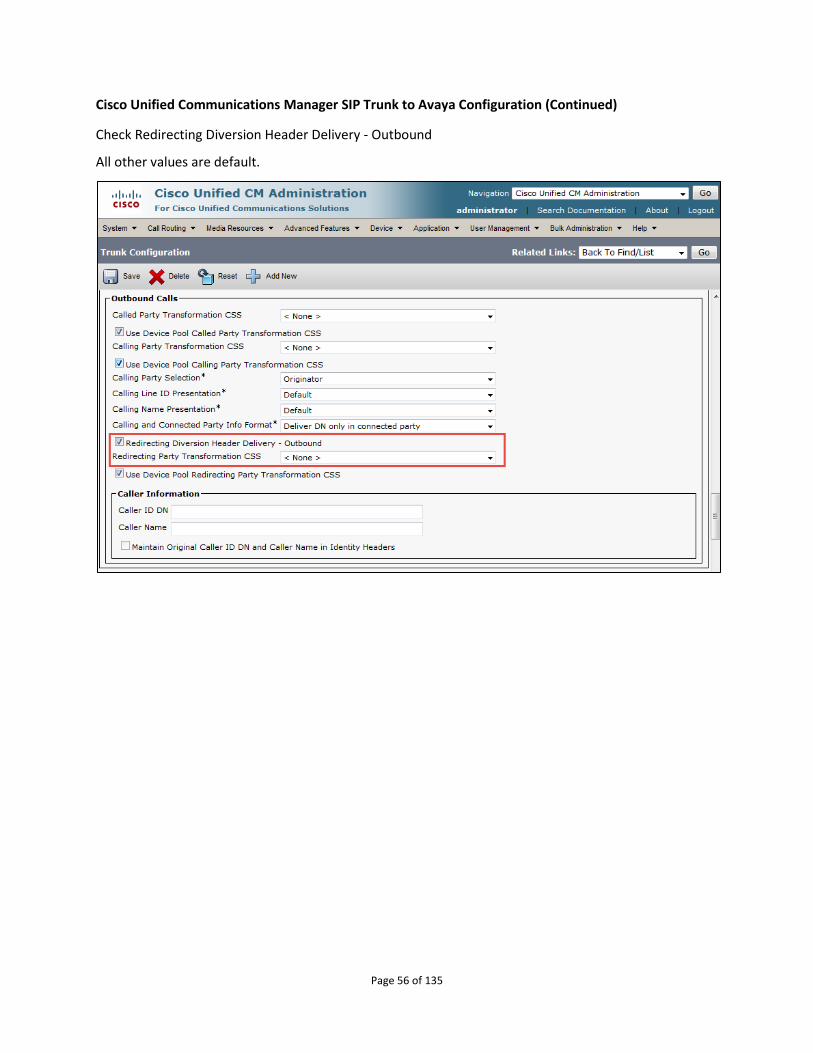
Cisco Unified Communications Manager SIP Trunk to Avaya Configuration (Continued)
Check Redirecting Diversion Header Delivery - Outbound
All other values are default.
Page 57 of 135
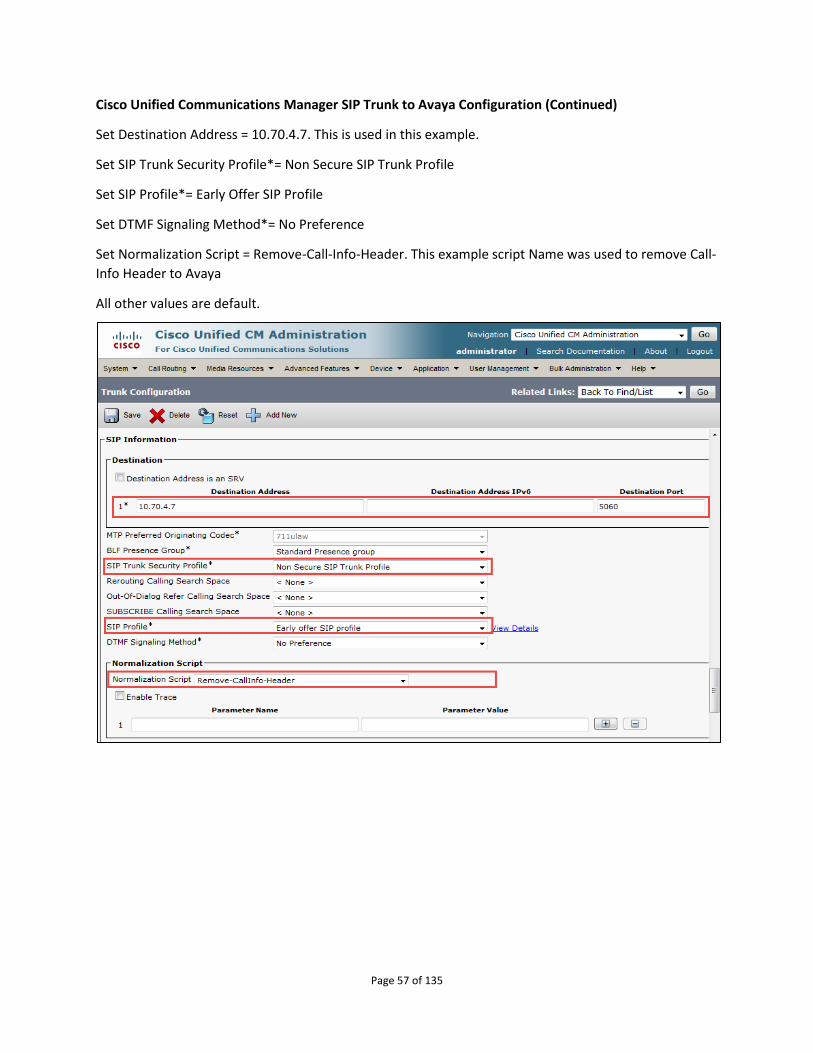
Cisco Unified Communications Manager SIP Trunk to Avaya Configuration (Continued)
Set Destination Address = 10.70.4.7. This is used in this example.
Set SIP Trunk Security Profile*= Non Secure SIP Trunk Profile
Set SIP Profile*= Early Offer SIP Profile
Set DTMF Signaling Method*= No Preference
Set Normalization Script = Remove-Call-Info-Header. This example script Name was used to remove Call-
Info Header to Avaya
All other values are default.
Page 58 of 135
Cisco Unified Communications Manager SIP Trunk to Avaya Configuration (Continued)
Page 59 of 135
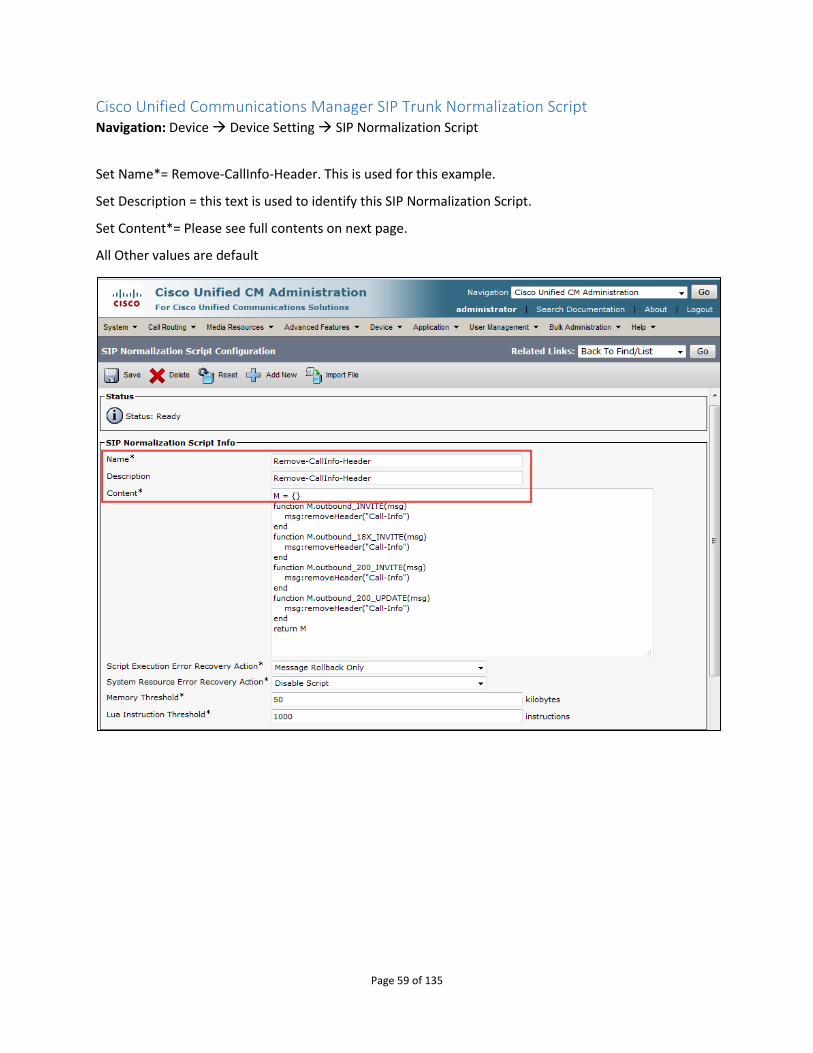
Cisco Unified Communications Manager SIP Trunk Normalization Script Navigation: Device Device Setting SIP Normalization Script
Set Name*= Remove-CallInfo-Header. This is used for this example.
Set Description = this text is used to identify this SIP Normalization Script.
Set Content*= Please see full contents on next page.
All Other values are default
Page 60 of 135
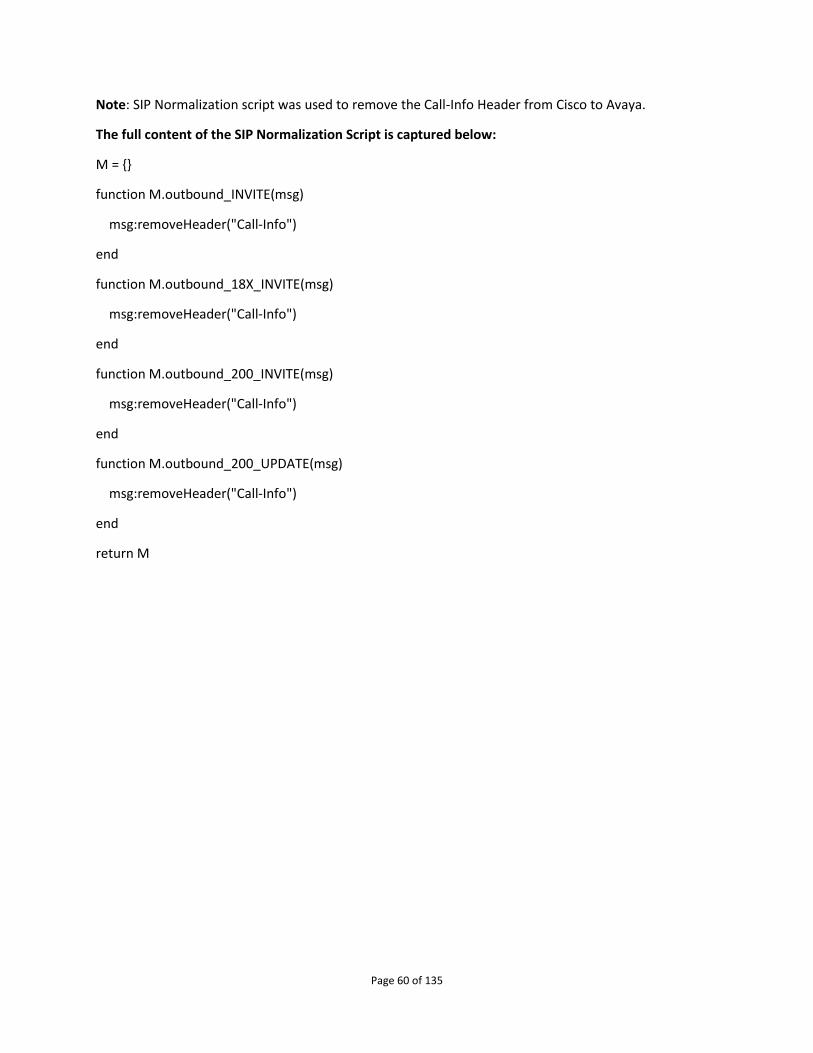
Note: SIP Normalization script was used to remove the Call-Info Header from Cisco to Avaya.
The full content of the SIP Normalization Script is captured below:
M = {}
function M.outbound_INVITE(msg)
msg:removeHeader("Call-Info")
end
function M.outbound_18X_INVITE(msg)
msg:removeHeader("Call-Info")
end
function M.outbound_200_INVITE(msg)
msg:removeHeader("Call-Info")
end
function M.outbound_200_UPDATE(msg)
msg:removeHeader("Call-Info")
end
return M
Page 61 of 135
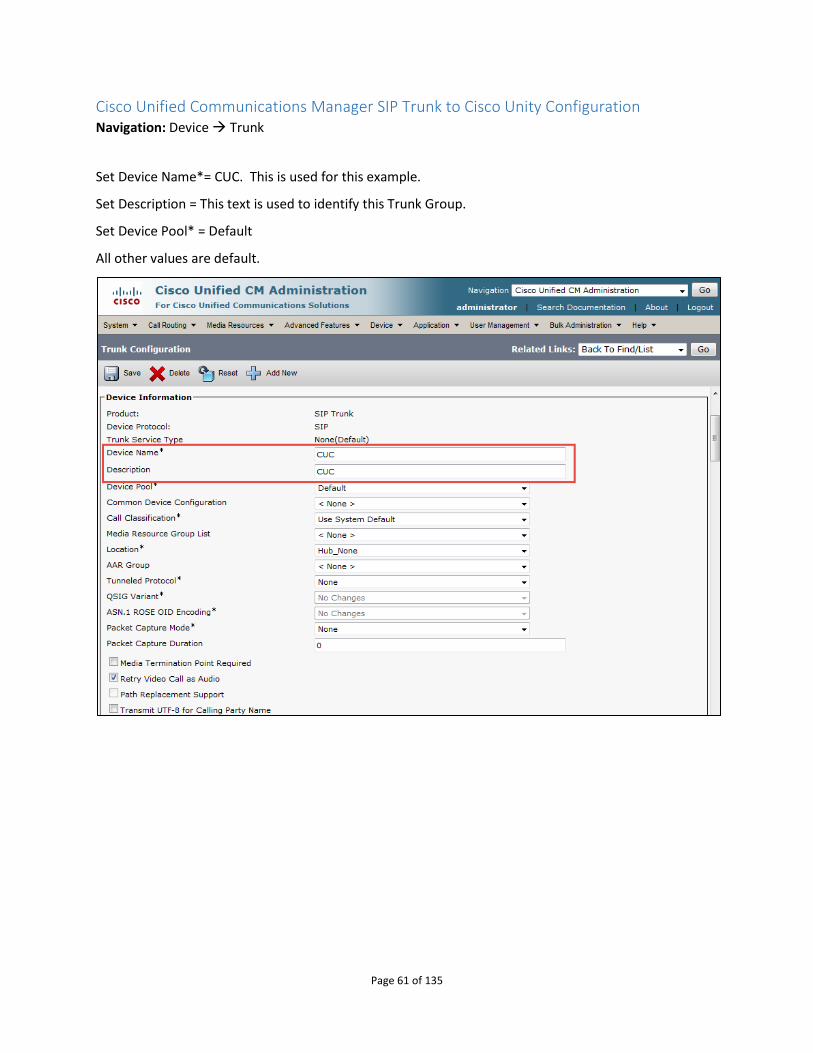
Cisco Unified Communications Manager SIP Trunk to Cisco Unity Configuration Navigation: Device Trunk
Set Device Name*= CUC. This is used for this example.
Set Description = This text is used to identify this Trunk Group.
Set Device Pool* = Default
All other values are default.
Page 62 of 135
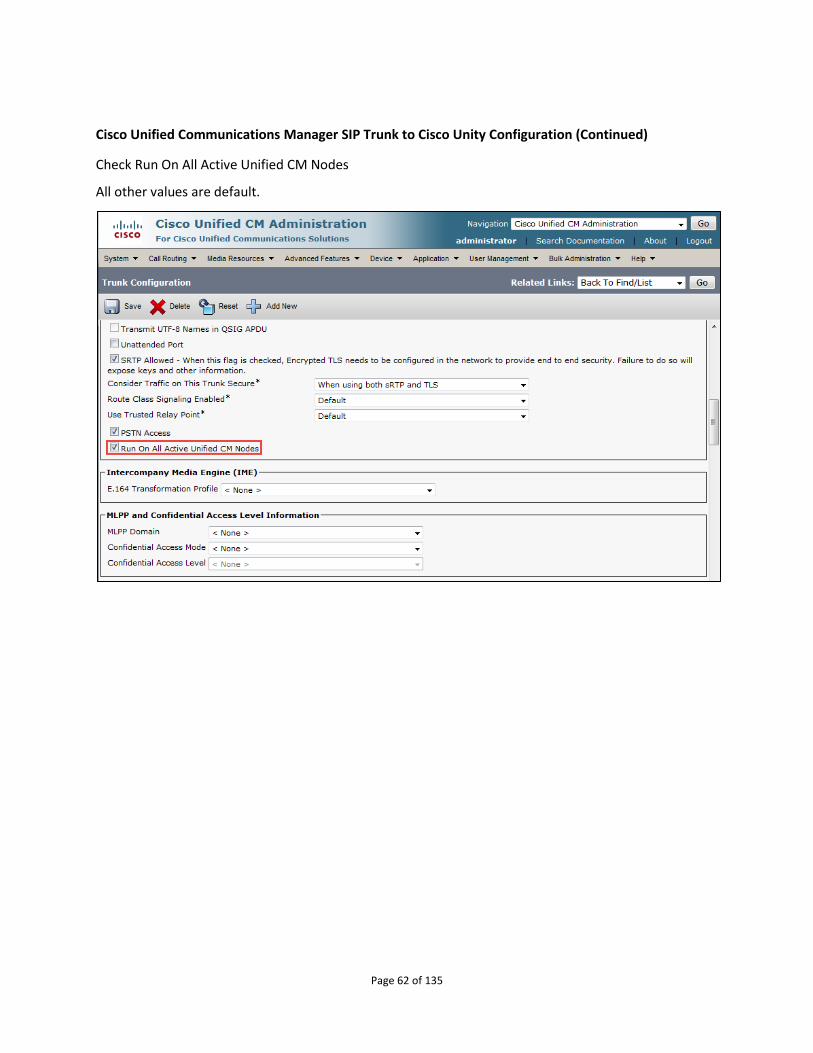
Cisco Unified Communications Manager SIP Trunk to Cisco Unity Configuration (Continued)
Check Run On All Active Unified CM Nodes
All other values are default.
Page 63 of 135
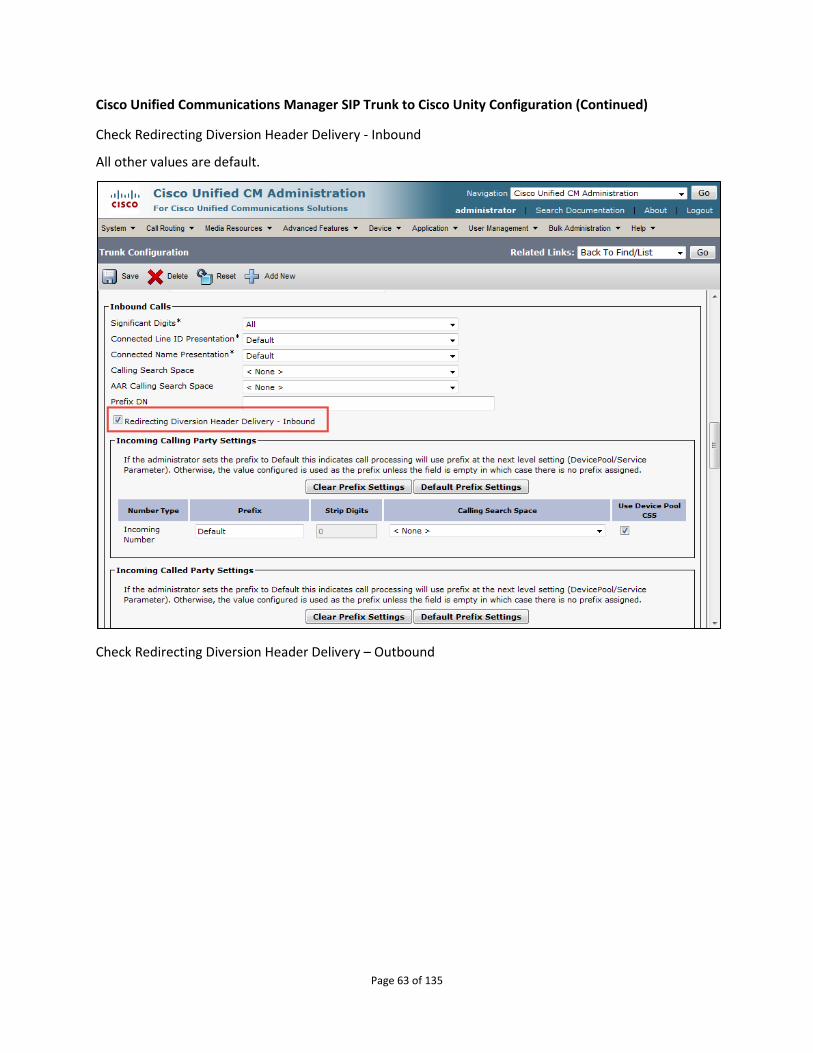
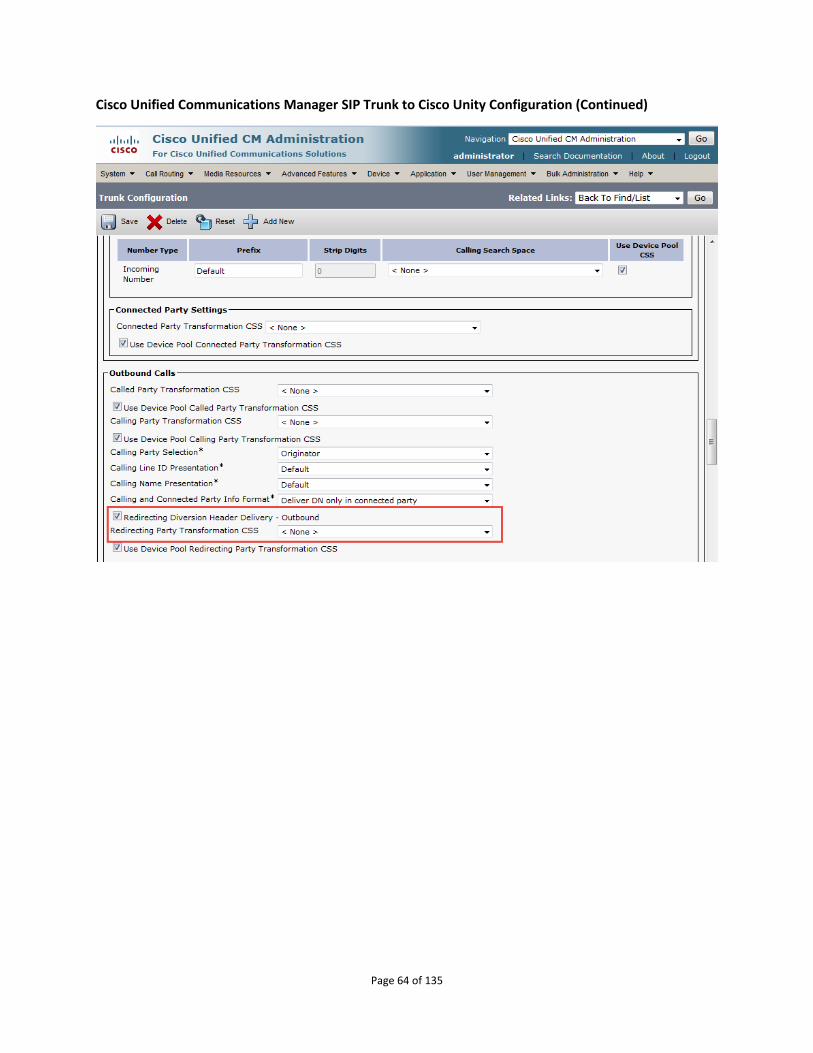
Cisco Unified Communications Manager SIP Trunk to Cisco Unity Configuration (Continued)
Check Redirecting Diversion Header Delivery - Inbound
All other values are default.
Check Redirecting Diversion Header Delivery – Outbound
Page 64 of 135
Cisco Unified Communications Manager SIP Trunk to Cisco Unity Configuration (Continued)
Page 65 of 135
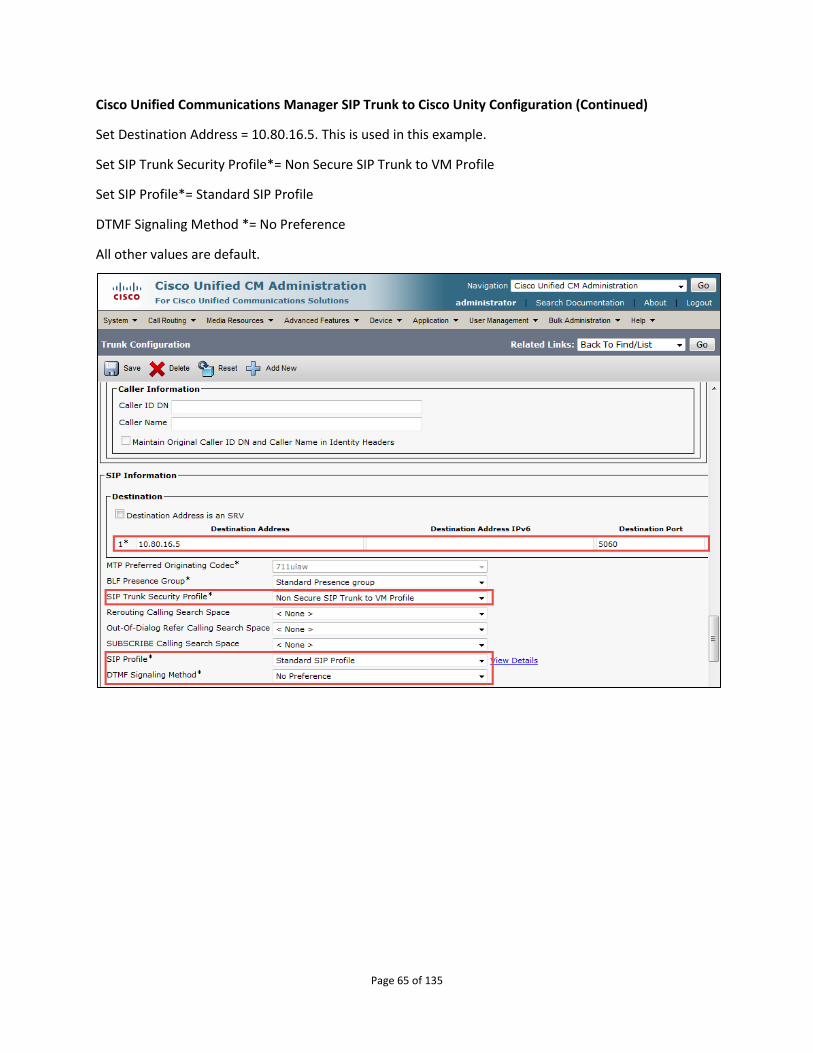
Cisco Unified Communications Manager SIP Trunk to Cisco Unity Configuration (Continued)
Set Destination Address = 10.80.16.5. This is used in this example.
Set SIP Trunk Security Profile*= Non Secure SIP Trunk to VM Profile
Set SIP Profile*= Standard SIP Profile
DTMF Signaling Method *= No Preference
All other values are default.
Page 66 of 135
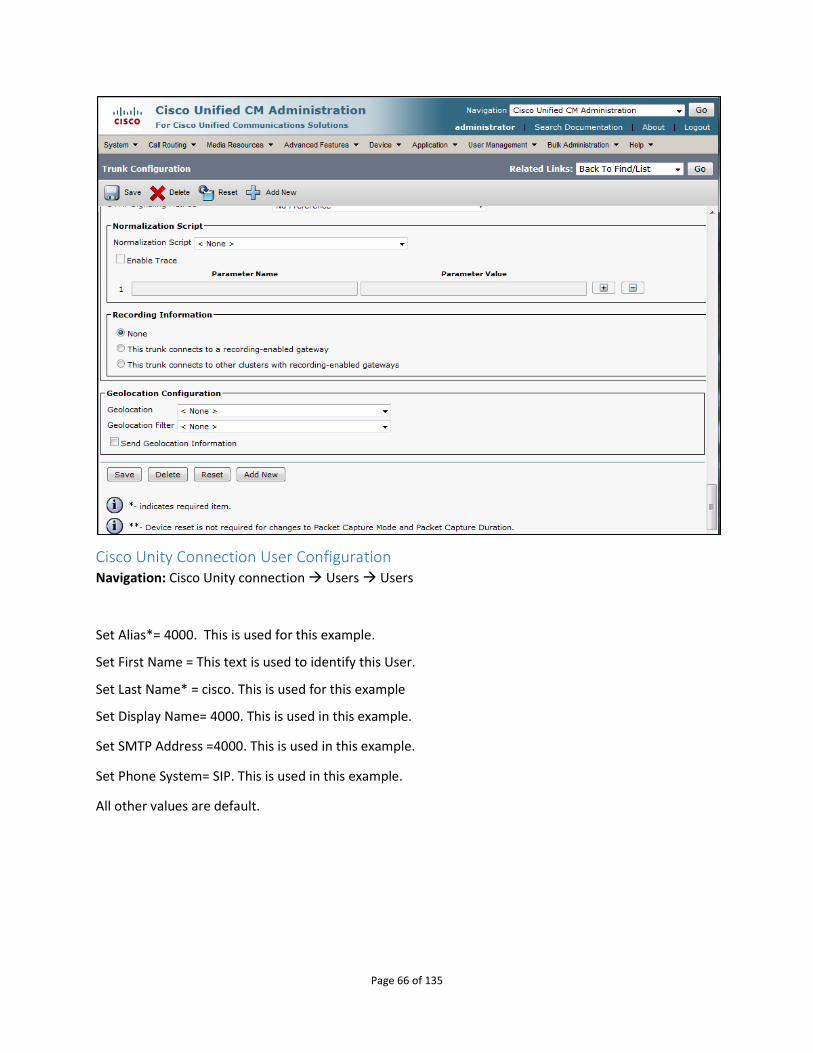
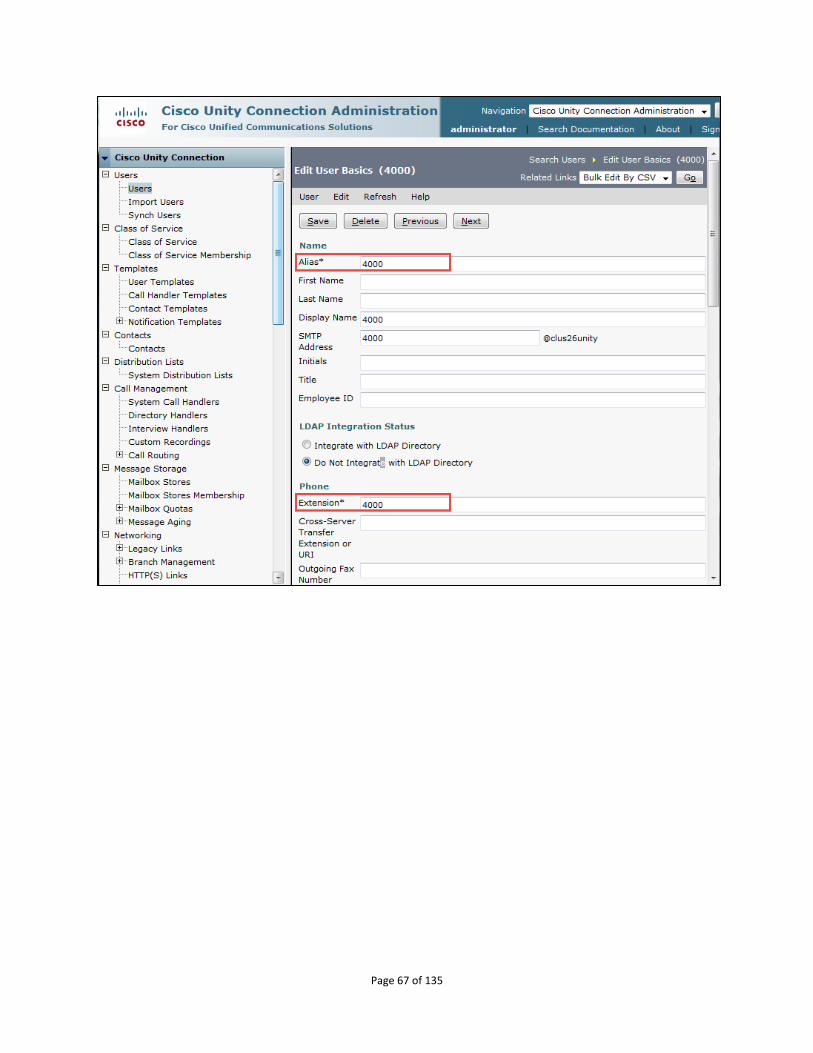
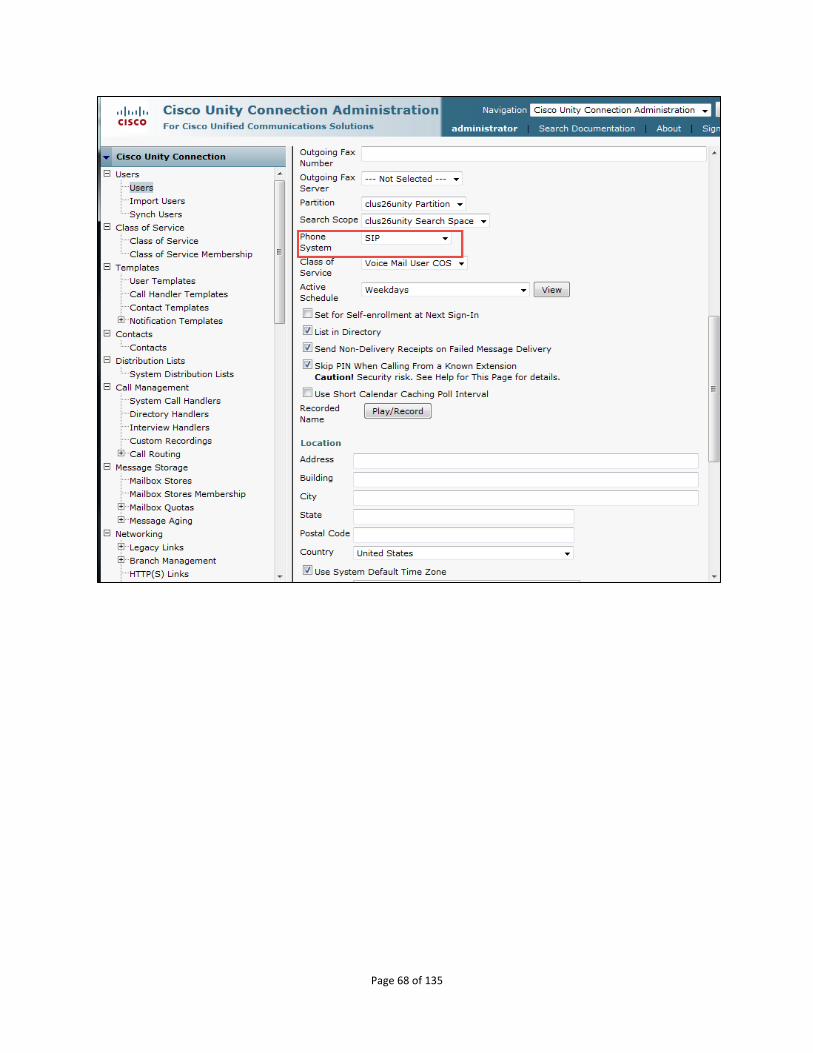
Cisco Unity Connection User Configuration Navigation: Cisco Unity connection Users Users
Set Alias*= 4000. This is used for this example.
Set First Name = This text is used to identify this User.
Set Last Name* = cisco. This is used for this example
Set Display Name= 4000. This is used in this example.
Set SMTP Address =4000. This is used in this example.
Set Phone System= SIP. This is used in this example.
All other values are default.
Page 67 of 135
Page 68 of 135
Page 69 of 135
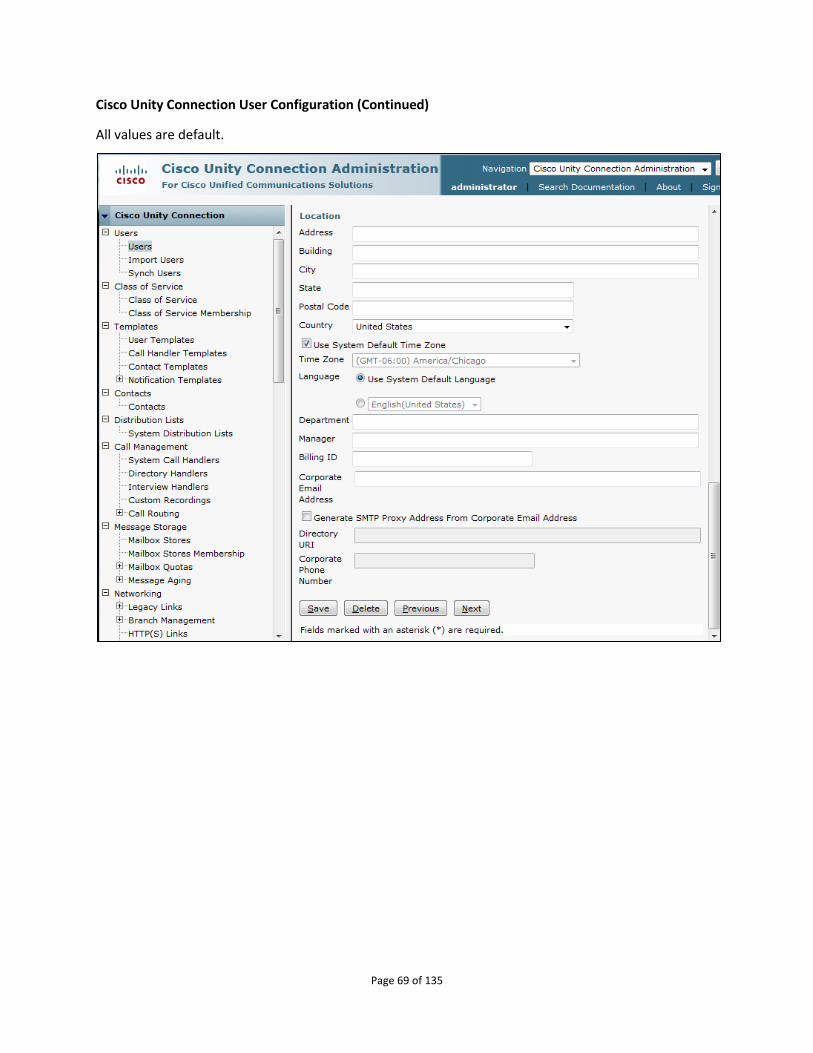
Cisco Unity Connection User Configuration (Continued)
All values are default.
Page 70 of 135
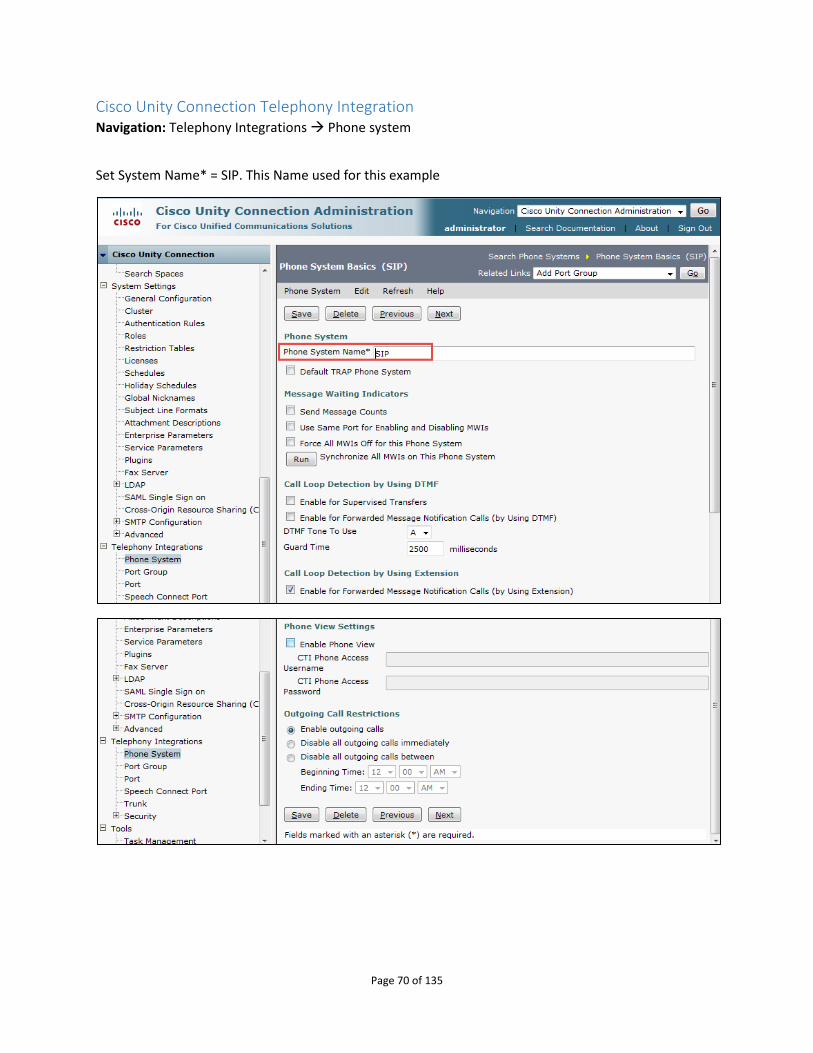
Cisco Unity Connection Telephony Integration Navigation: Telephony Integrations Phone system
Set System Name* = SIP. This Name used for this example
Page 71 of 135
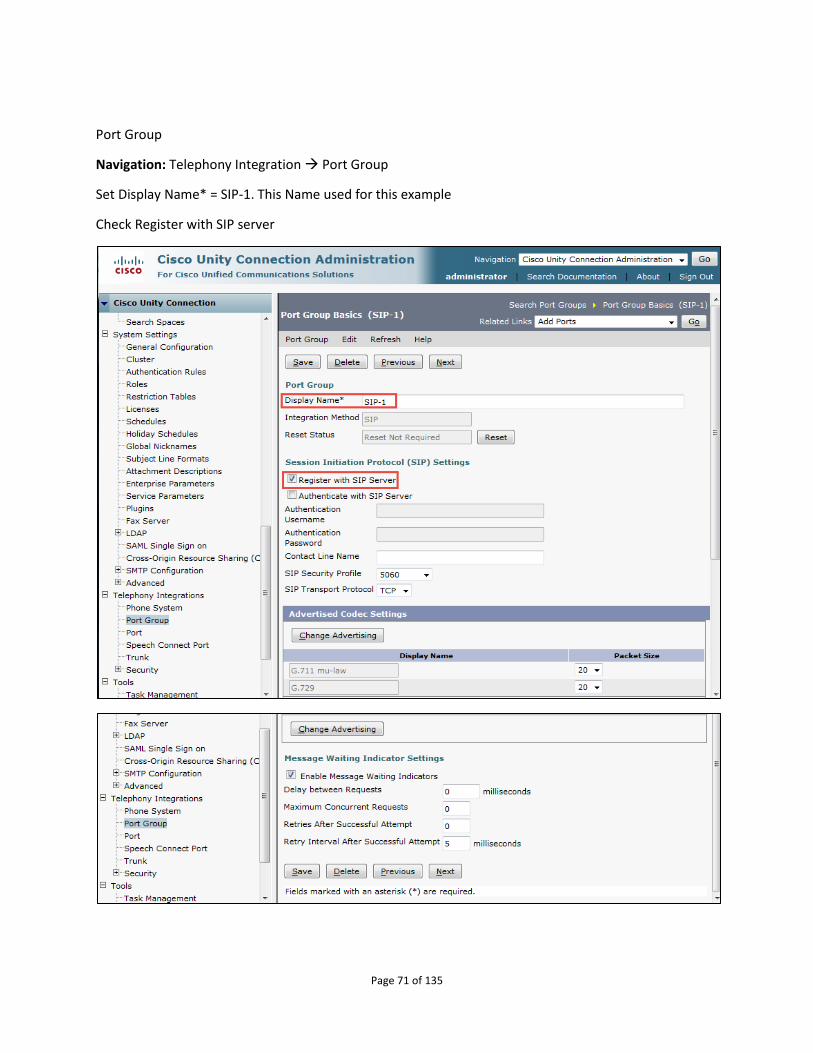
Port Group
Navigation: Telephony Integration Port Group
Set Display Name* = SIP-1. This Name used for this example
Check Register with SIP server
Page 72 of 135
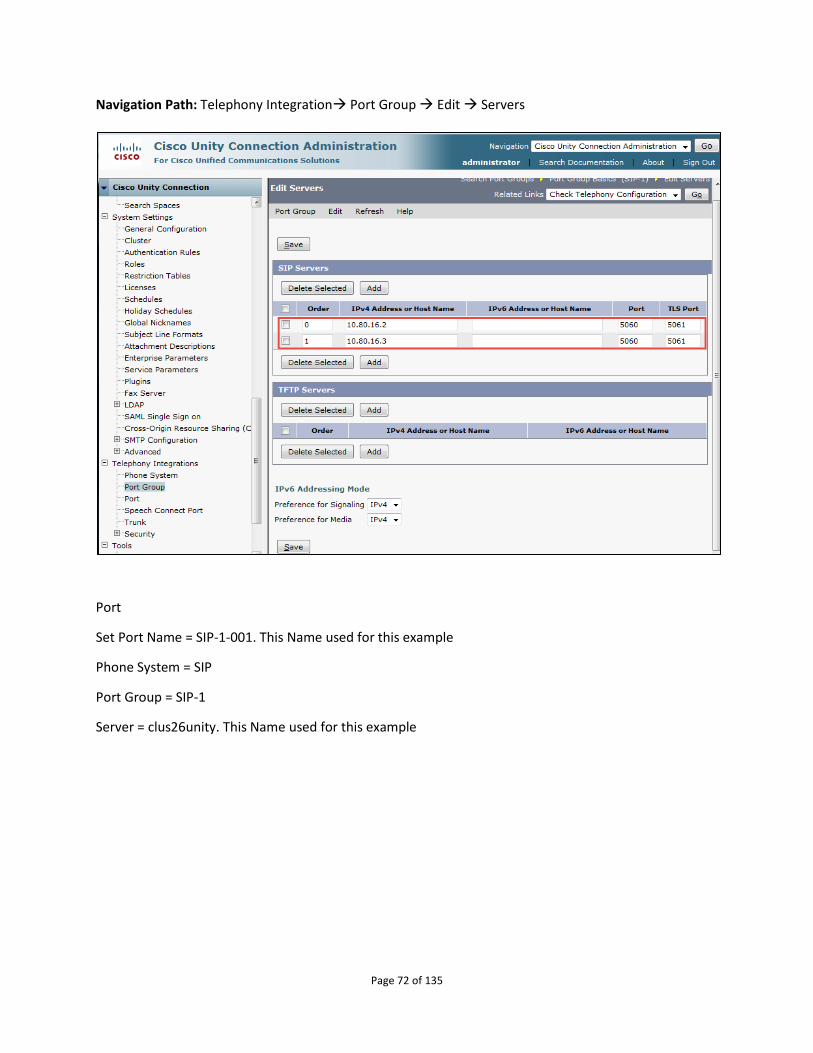
Navigation Path: Telephony Integration Port Group Edit Servers
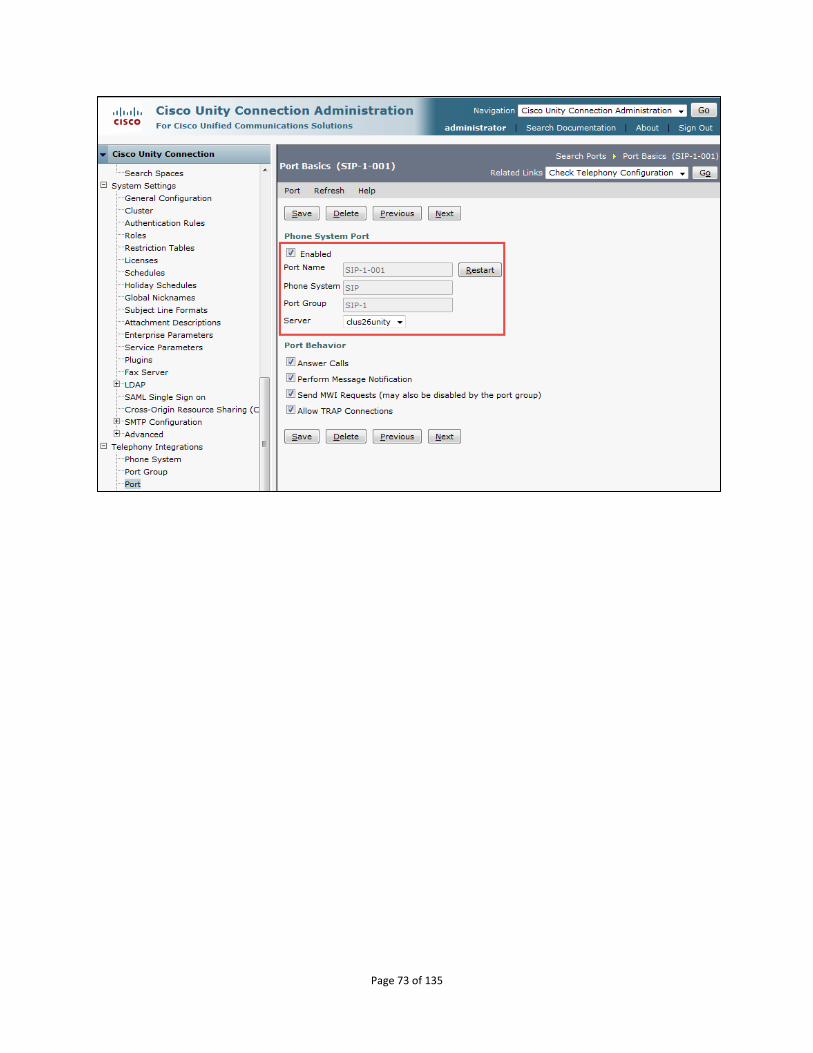
Port
Set Port Name = SIP-1-001. This Name used for this example
Phone System = SIP
Port Group = SIP-1
Server = clus26unity. This Name used for this example
Page 73 of 135
Page 74 of 135
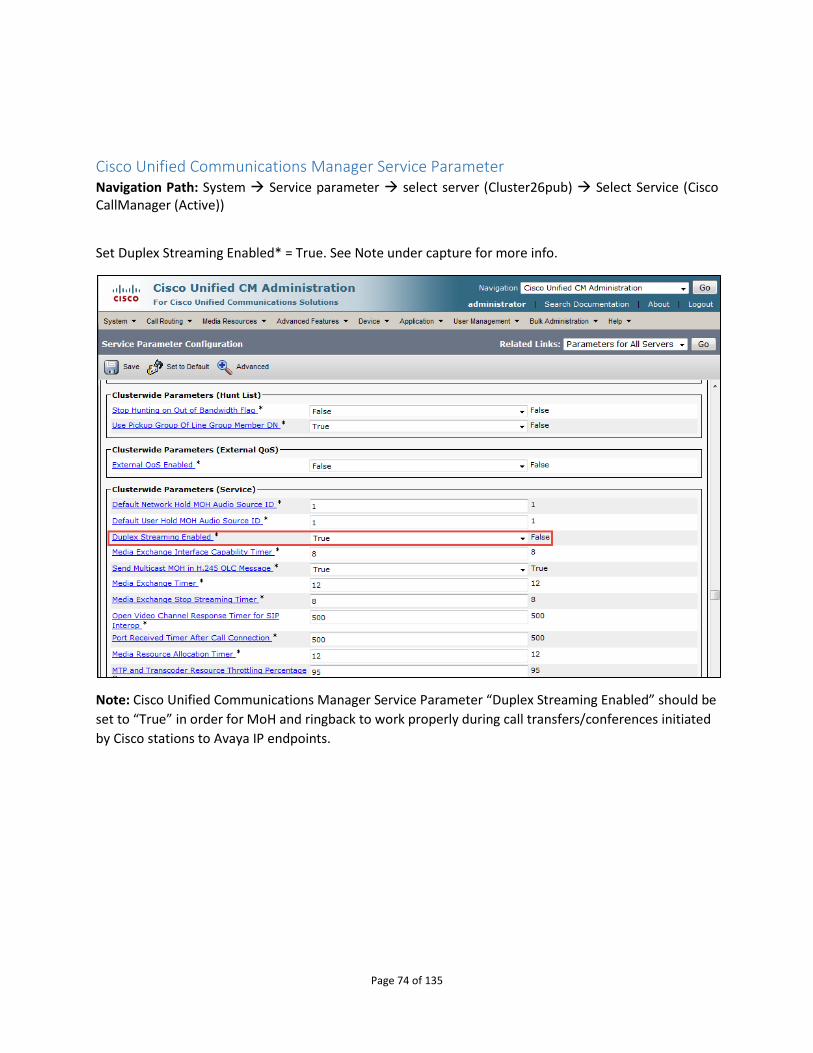
Cisco Unified Communications Manager Service Parameter Navigation Path: System Service parameter select server (Cluster26pub) Select Service (Cisco CallManager (Active))
Set Duplex Streaming Enabled* = True. See Note under capture for more info.
Note: Cisco Unified Communications Manager Service Parameter “Duplex Streaming Enabled” should be
set to “True” in order for MoH and ringback to work properly during call transfers/conferences initiated
by Cisco stations to Avaya IP endpoints.
Page 75 of 135
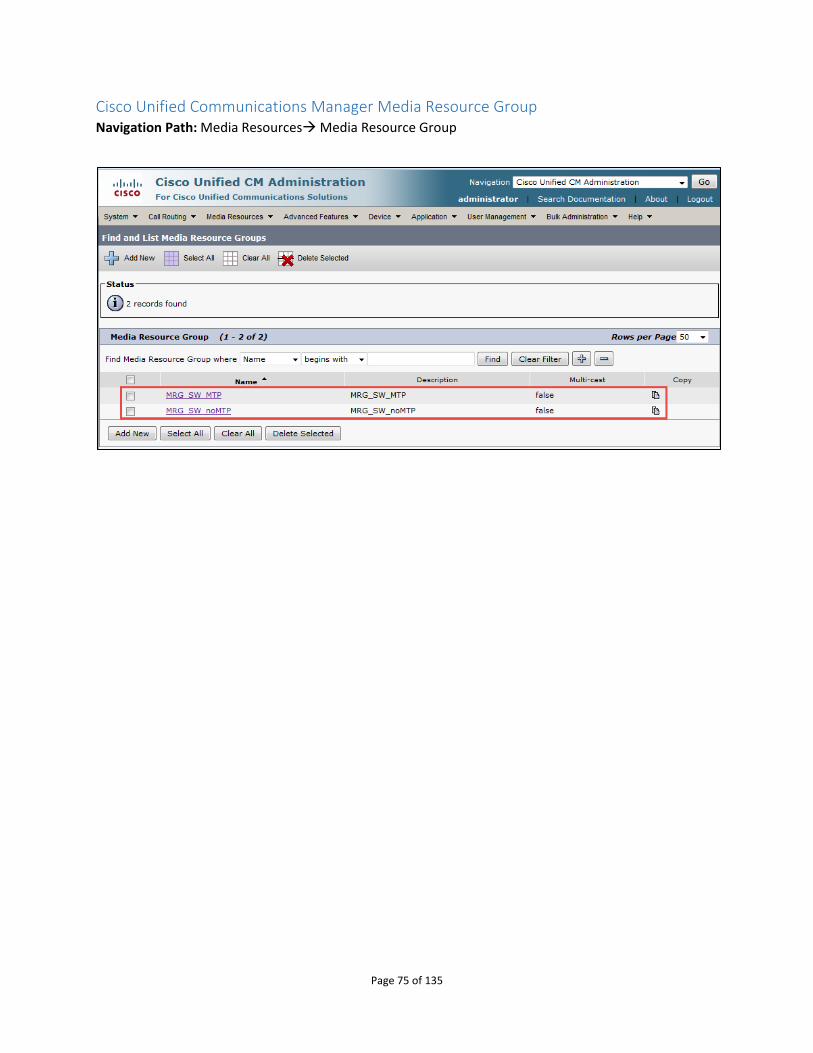
Cisco Unified Communications Manager Media Resource Group Navigation Path: Media Resources Media Resource Group
Page 76 of 135
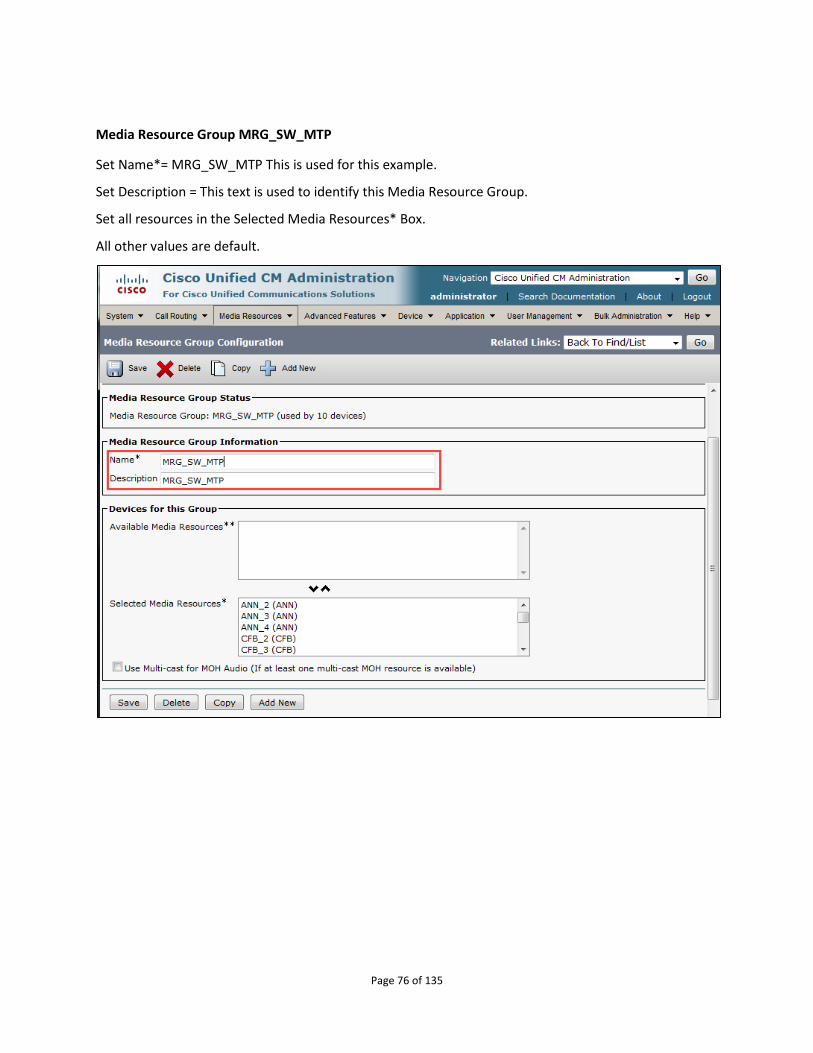
Media Resource Group MRG_SW_MTP
Set Name*= MRG_SW_MTP This is used for this example.
Set Description = This text is used to identify this Media Resource Group.
Set all resources in the Selected Media Resources* Box.
All other values are default.
Page 77 of 135
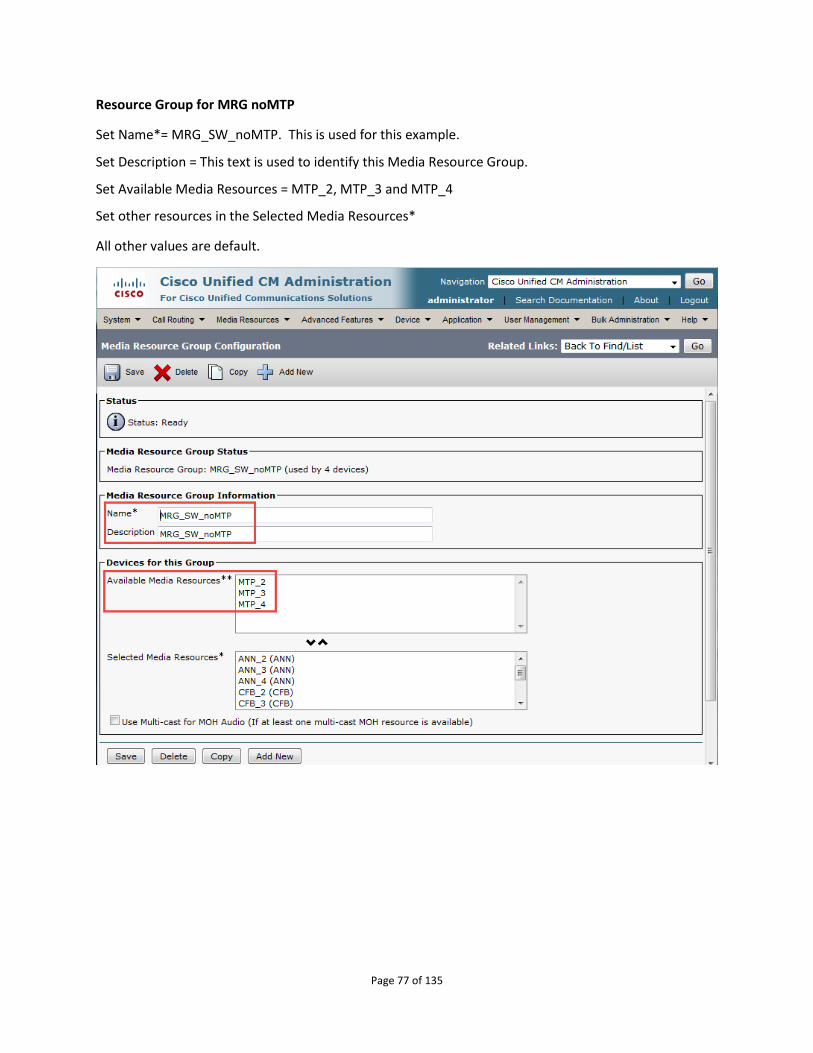
Resource Group for MRG noMTP
Set Name*= MRG_SW_noMTP. This is used for this example.
Set Description = This text is used to identify this Media Resource Group.
Set Available Media Resources = MTP_2, MTP_3 and MTP_4
Set other resources in the Selected Media Resources*
All other values are default.
Page 78 of 135
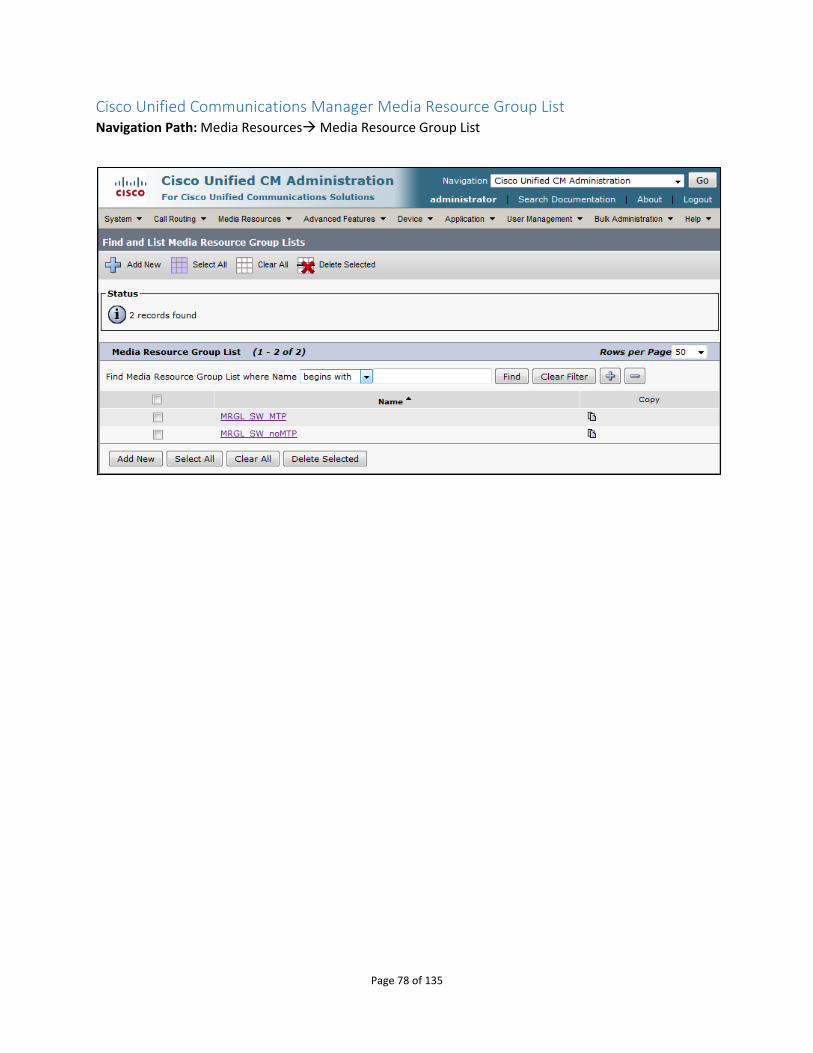
Cisco Unified Communications Manager Media Resource Group List Navigation Path: Media Resources Media Resource Group List
Page 79 of 135
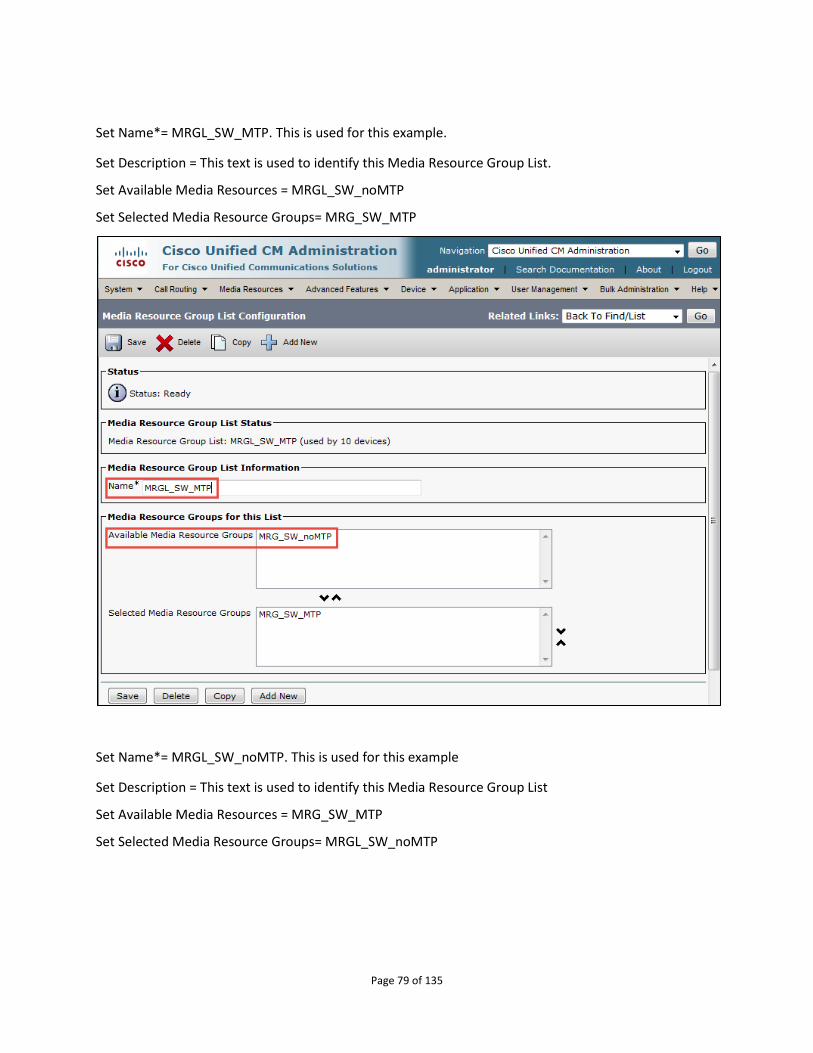
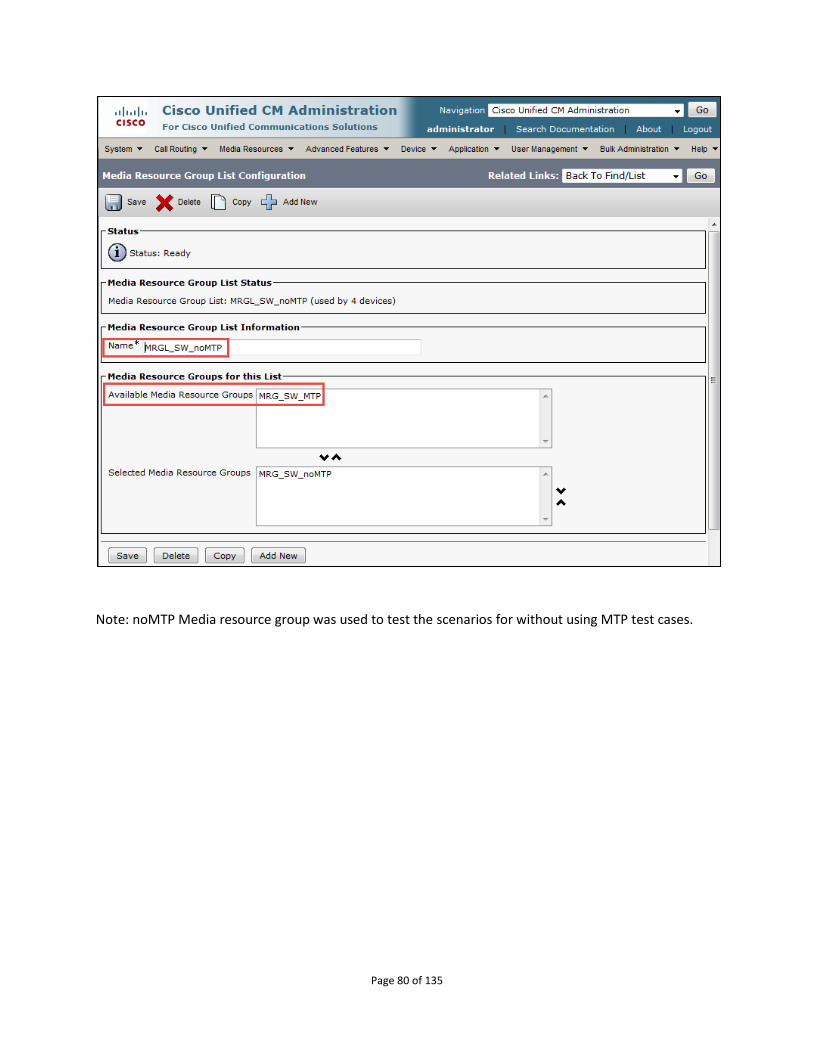
Set Name*= MRGL_SW_MTP. This is used for this example.
Set Description = This text is used to identify this Media Resource Group List.
Set Available Media Resources = MRGL_SW_noMTP
Set Selected Media Resource Groups= MRG_SW_MTP
Set Name*= MRGL_SW_noMTP. This is used for this example
Set Description = This text is used to identify this Media Resource Group List
Set Available Media Resources = MRG_SW_MTP
Set Selected Media Resource Groups= MRGL_SW_noMTP
Page 80 of 135
Note: noMTP Media resource group was used to test the scenarios for without using MTP test cases.
Page 81 of 135
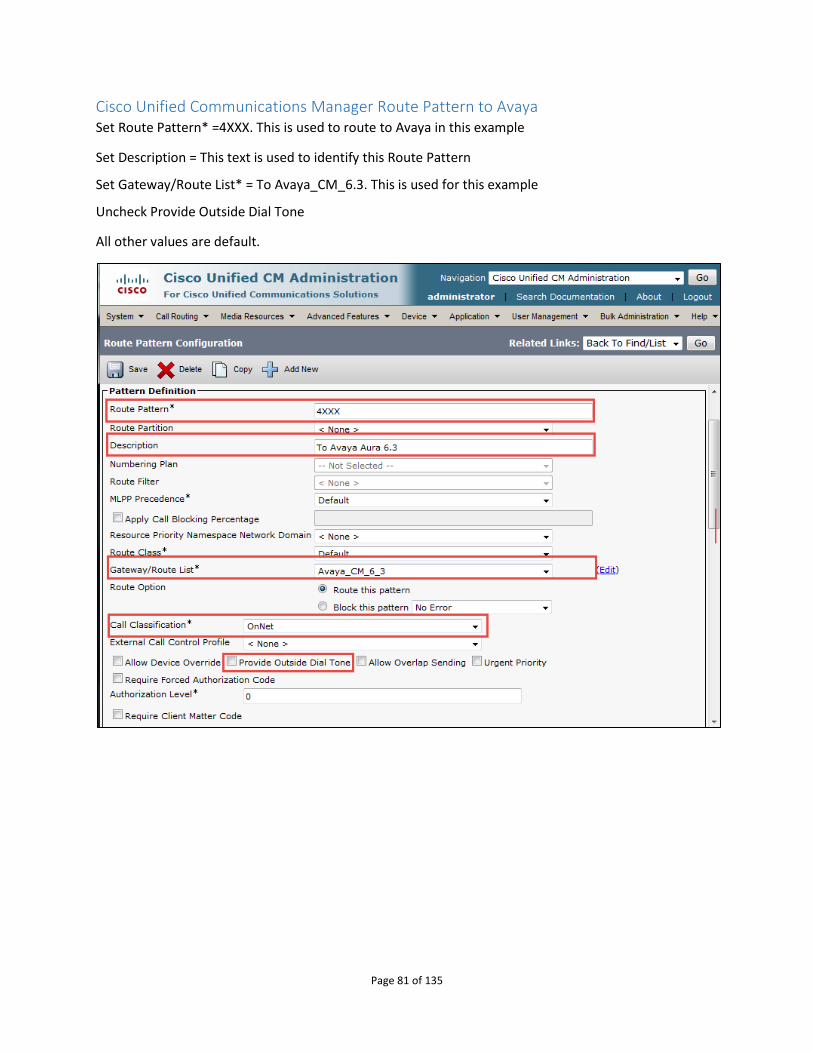
Cisco Unified Communications Manager Route Pattern to Avaya Set Route Pattern* =4XXX. This is used to route to Avaya in this example
Set Description = This text is used to identify this Route Pattern
Set Gateway/Route List* = To Avaya_CM_6.3. This is used for this example
Uncheck Provide Outside Dial Tone
All other values are default.
Page 82 of 135
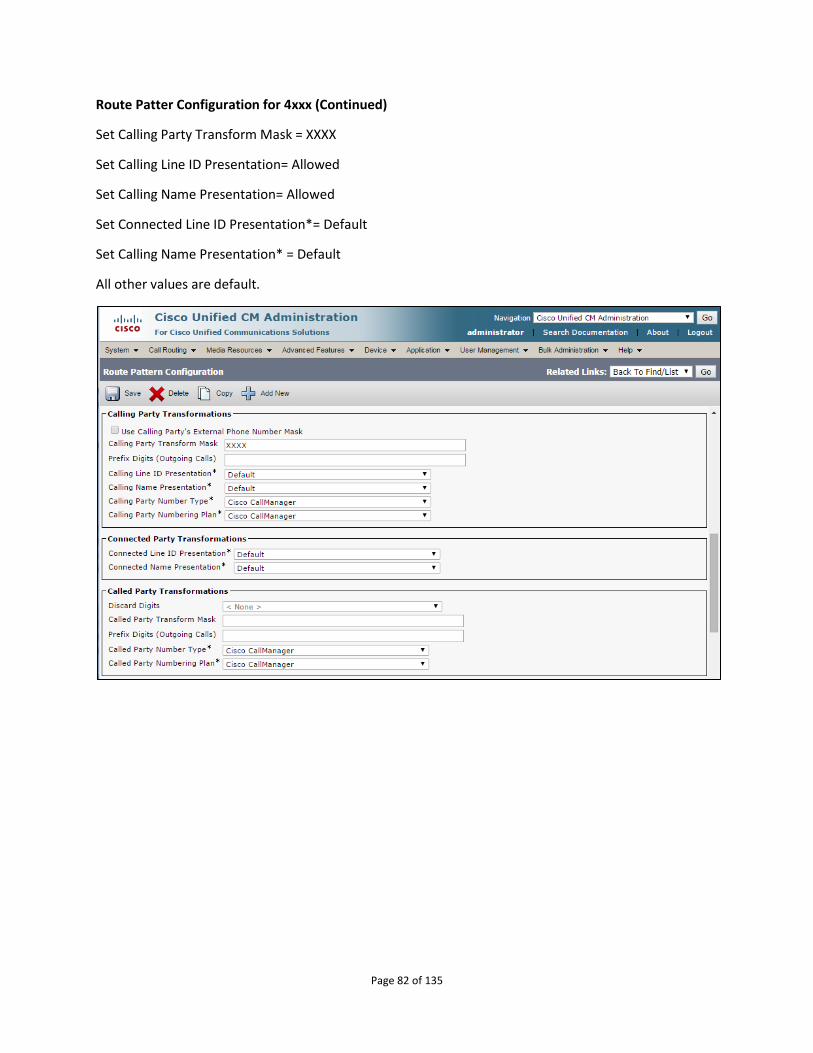
Route Patter Configuration for 4xxx (Continued)
Set Calling Party Transform Mask = XXXX
Set Calling Line ID Presentation= Allowed
Set Calling Name Presentation= Allowed
Set Connected Line ID Presentation*= Default
Set Calling Name Presentation* = Default
All other values are default.
Page 83 of 135
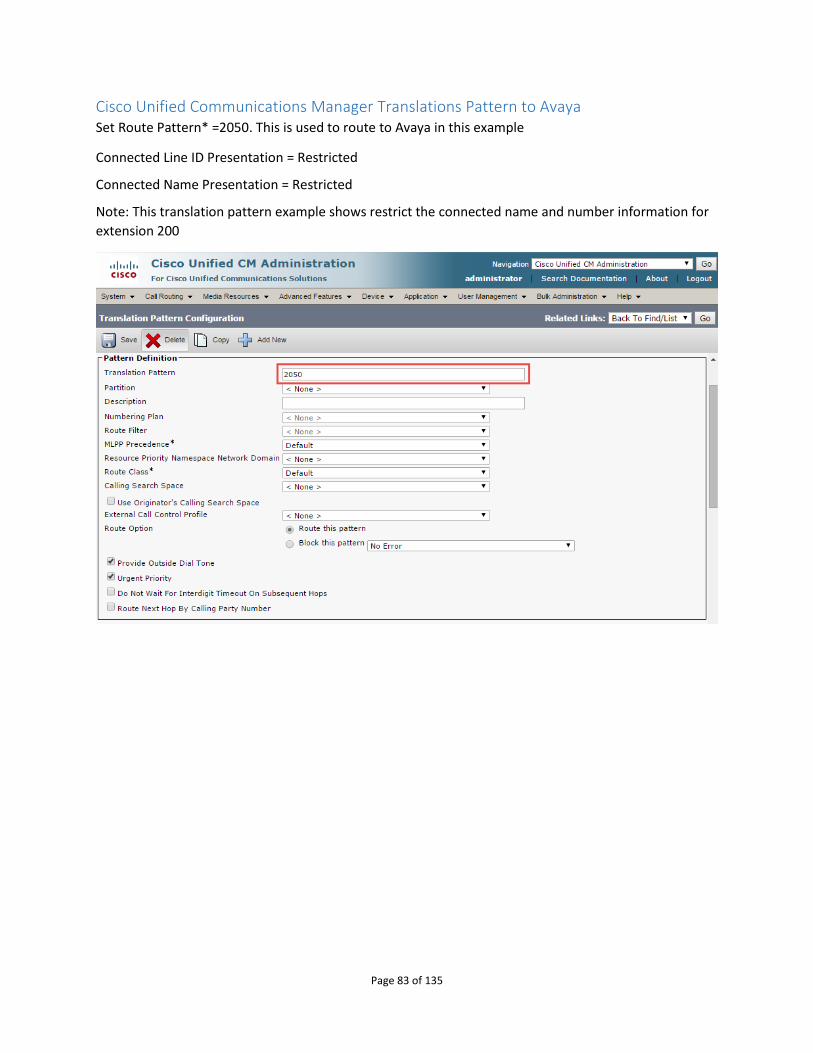
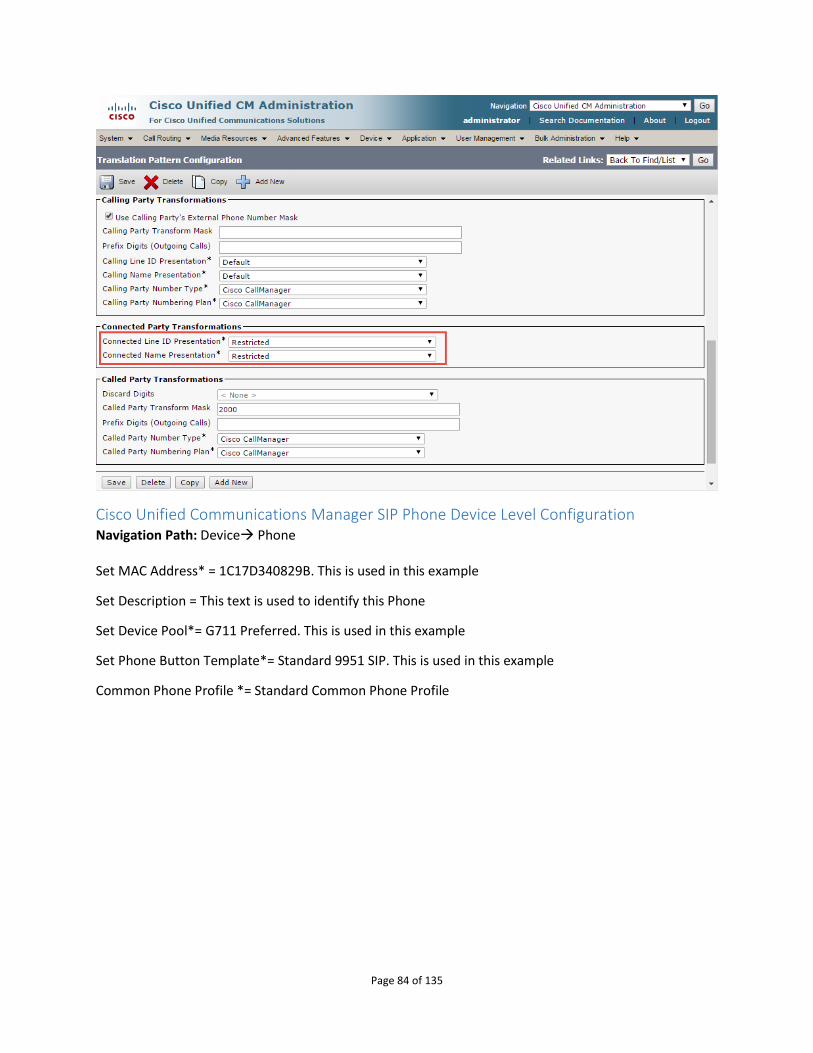
Cisco Unified Communications Manager Translations Pattern to Avaya Set Route Pattern* =2050. This is used to route to Avaya in this example
Connected Line ID Presentation = Restricted
Connected Name Presentation = Restricted
Note: This translation pattern example shows restrict the connected name and number information for
extension 200
Page 84 of 135
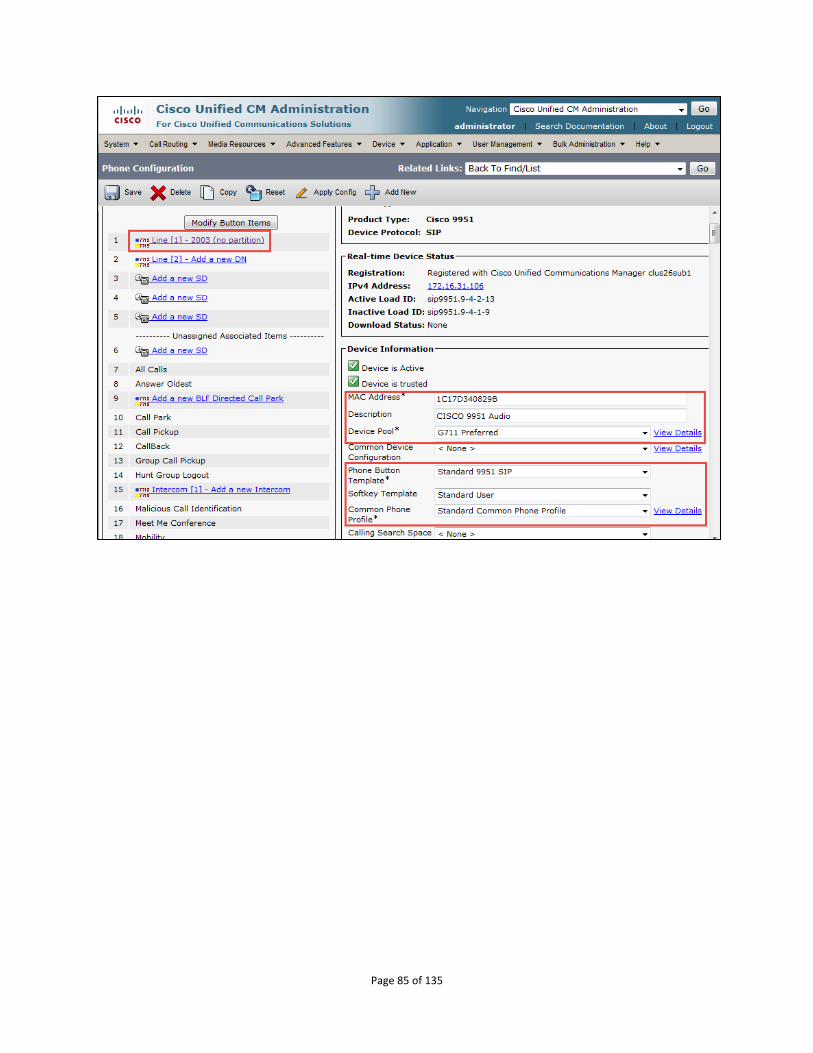
Cisco Unified Communications Manager SIP Phone Device Level Configuration Navigation Path: Device Phone Set MAC Address* = 1C17D340829B. This is used in this example
Set Description = This text is used to identify this Phone
Set Device Pool*= G711 Preferred. This is used in this example
Set Phone Button Template*= Standard 9951 SIP. This is used in this example
Common Phone Profile *= Standard Common Phone Profile
Page 85 of 135
Page 86 of 135
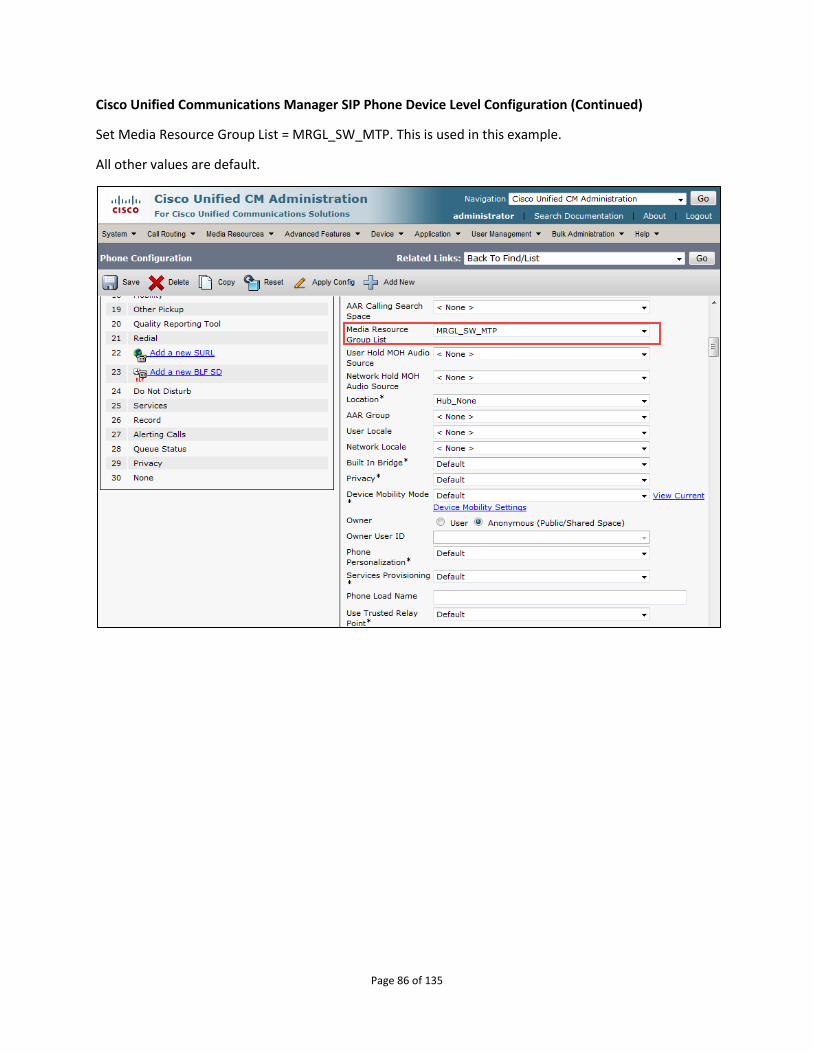
Cisco Unified Communications Manager SIP Phone Device Level Configuration (Continued)
Set Media Resource Group List = MRGL_SW_MTP. This is used in this example.
All other values are default.
Page 87 of 135
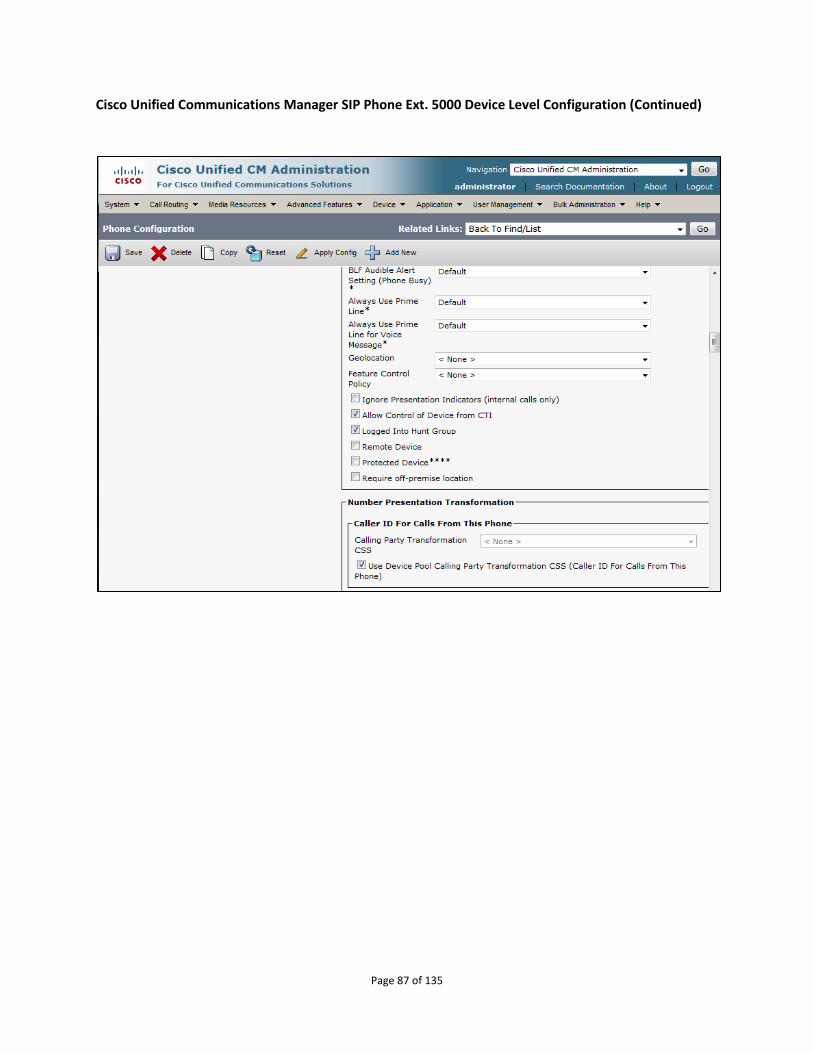
Cisco Unified Communications Manager SIP Phone Ext. 5000 Device Level Configuration (Continued)
Page 88 of 135
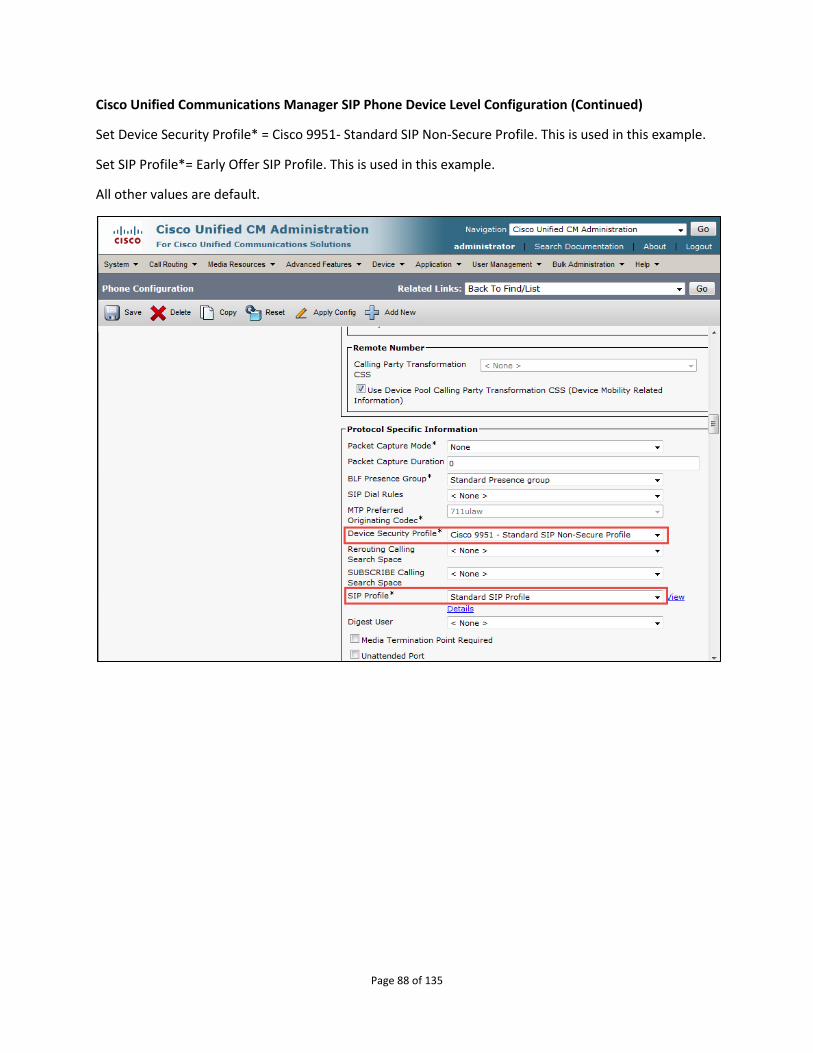
Cisco Unified Communications Manager SIP Phone Device Level Configuration (Continued)
Set Device Security Profile* = Cisco 9951- Standard SIP Non-Secure Profile. This is used in this example.
Set SIP Profile*= Early Offer SIP Profile. This is used in this example.
All other values are default.
Page 89 of 135
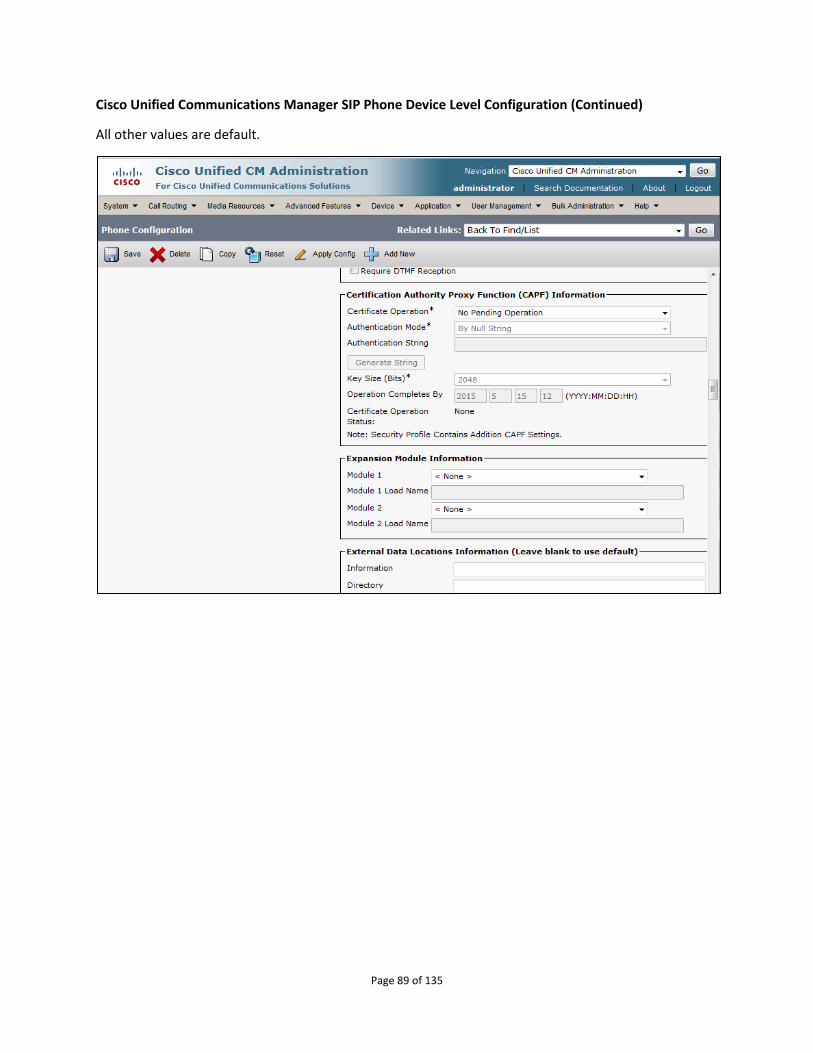
Cisco Unified Communications Manager SIP Phone Device Level Configuration (Continued)
All other values are default.
Page 90 of 135
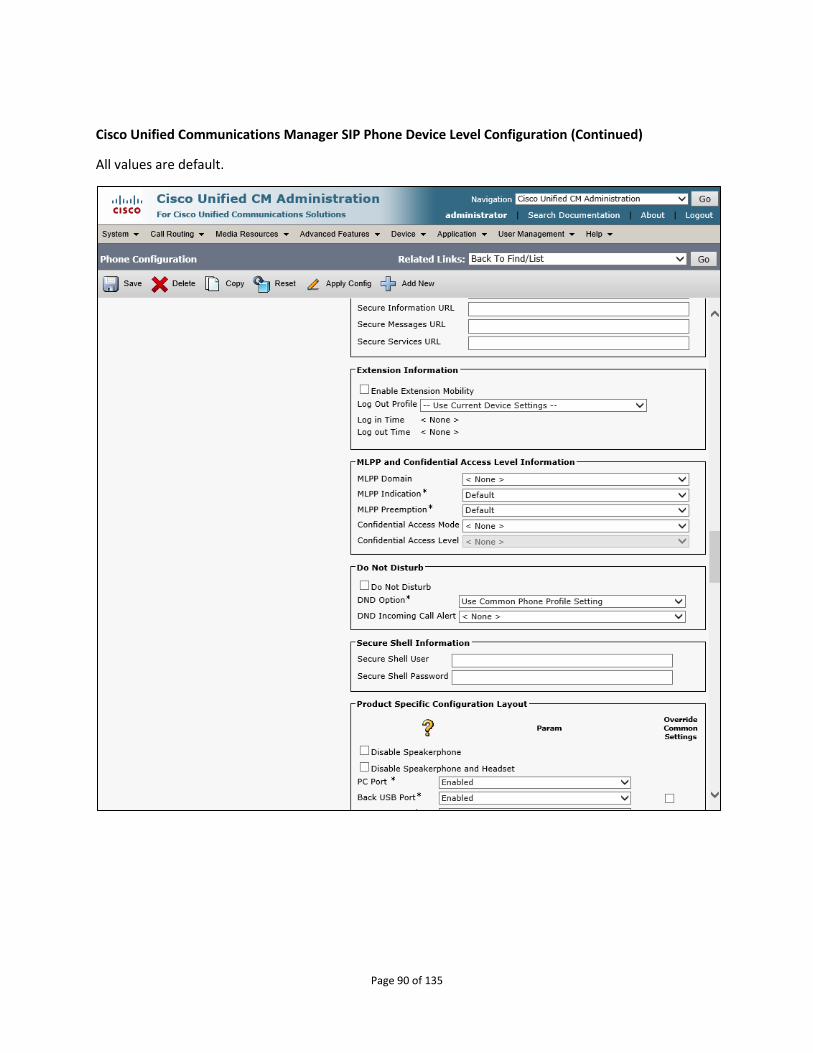
Cisco Unified Communications Manager SIP Phone Device Level Configuration (Continued)
All values are default.
Page 91 of 135
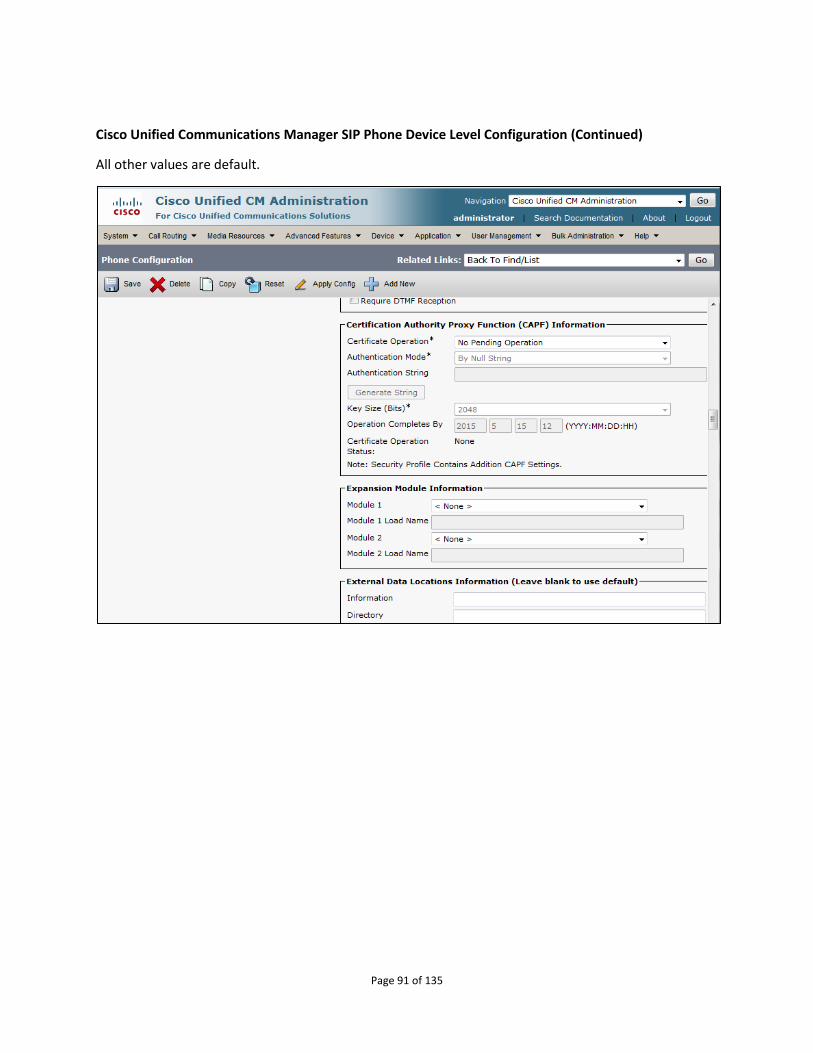
Cisco Unified Communications Manager SIP Phone Device Level Configuration (Continued)
All other values are default.
Page 92 of 135
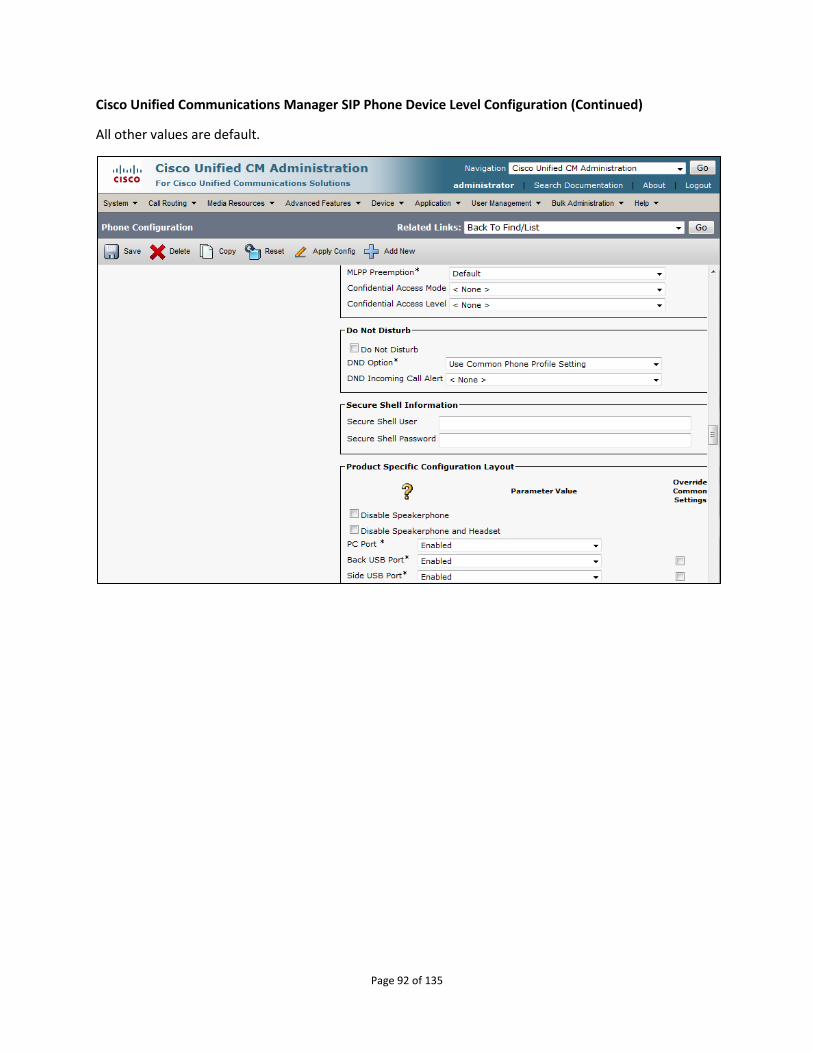
Cisco Unified Communications Manager SIP Phone Device Level Configuration (Continued)
All other values are default.
Page 93 of 135
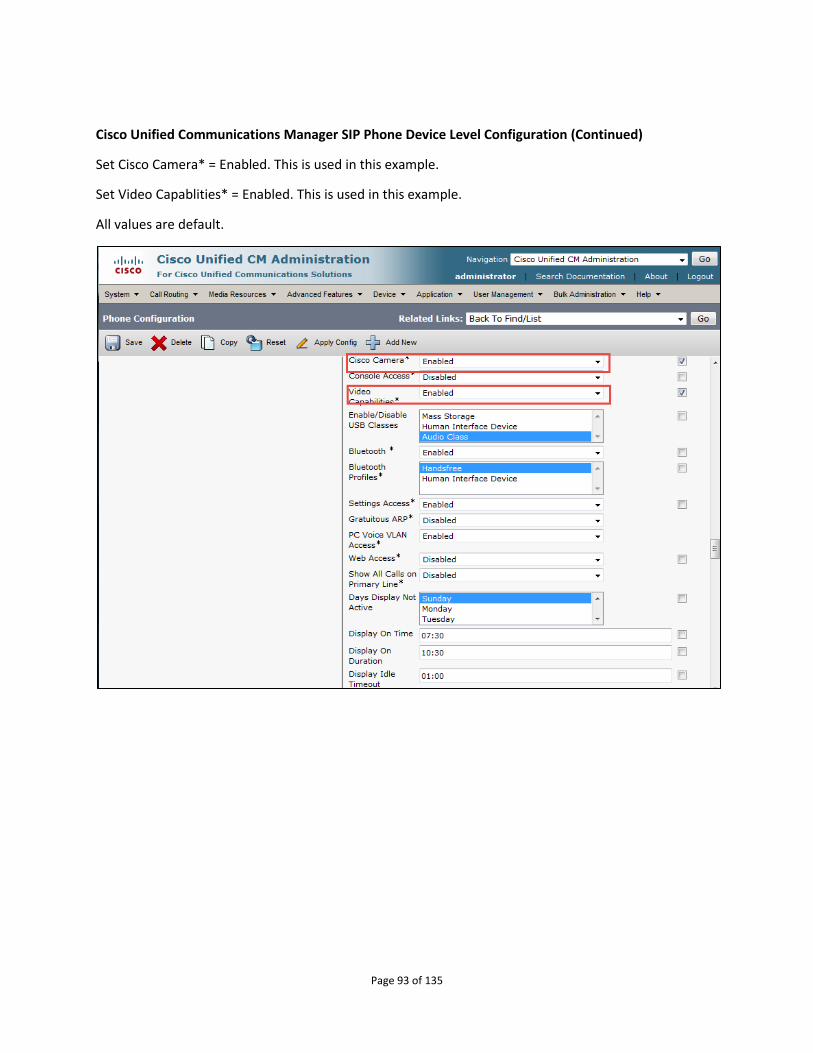
Cisco Unified Communications Manager SIP Phone Device Level Configuration (Continued)
Set Cisco Camera* = Enabled. This is used in this example.
Set Video Capablities* = Enabled. This is used in this example.
All values are default.
Page 94 of 135
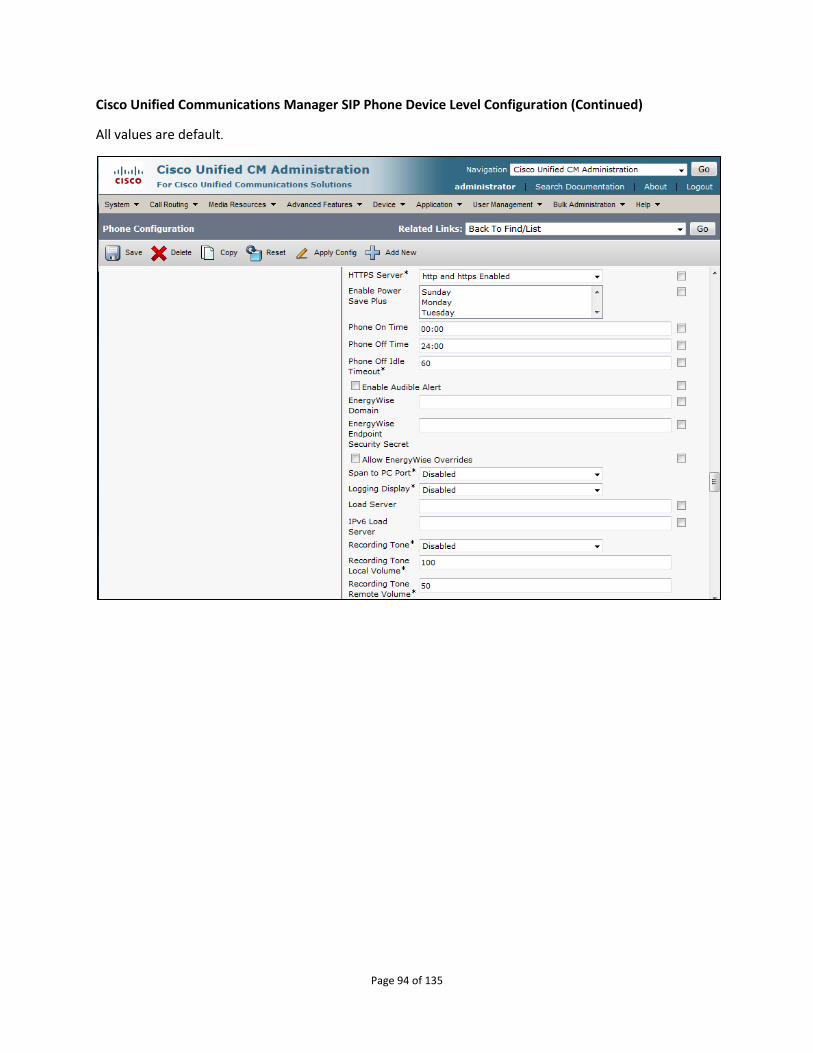
Cisco Unified Communications Manager SIP Phone Device Level Configuration (Continued)
All values are default.
Page 95 of 135
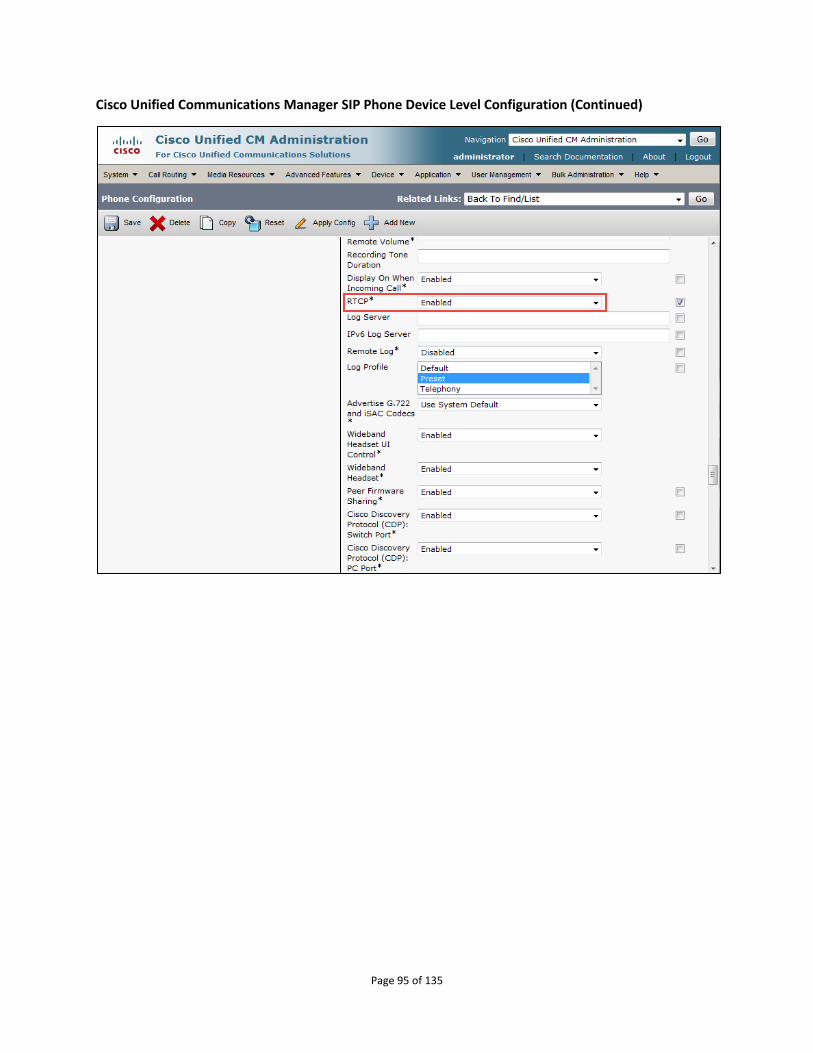
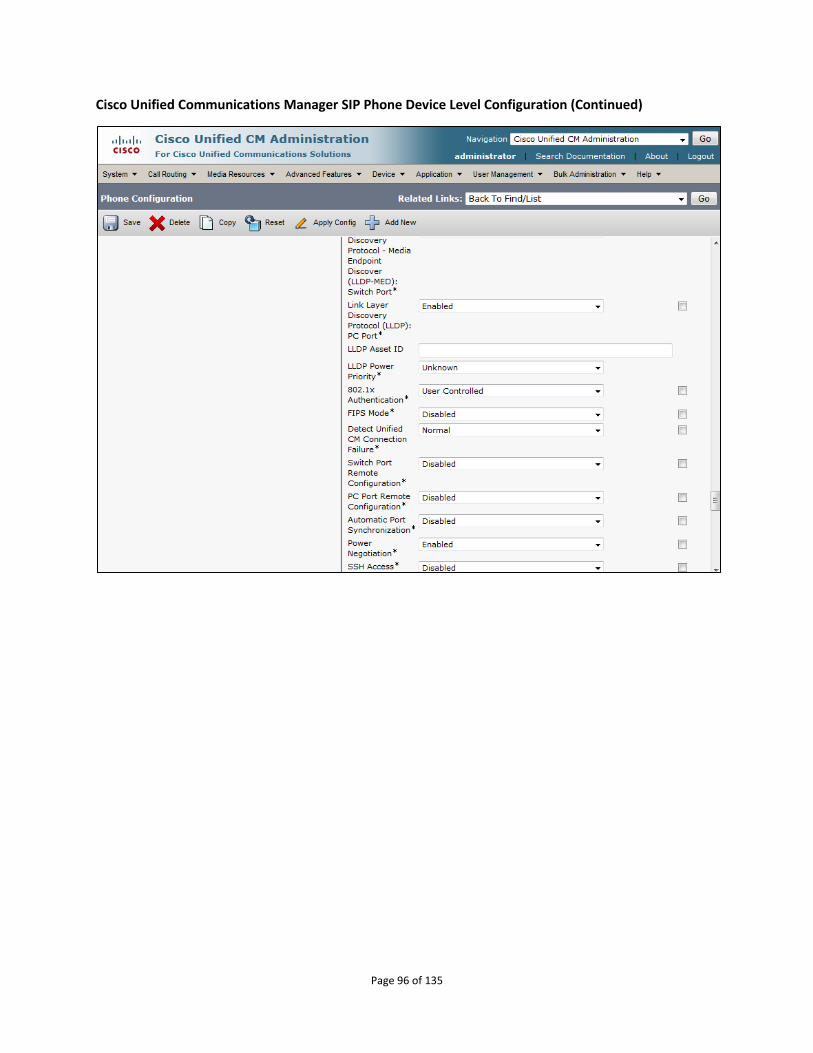
Cisco Unified Communications Manager SIP Phone Device Level Configuration (Continued)
Page 96 of 135
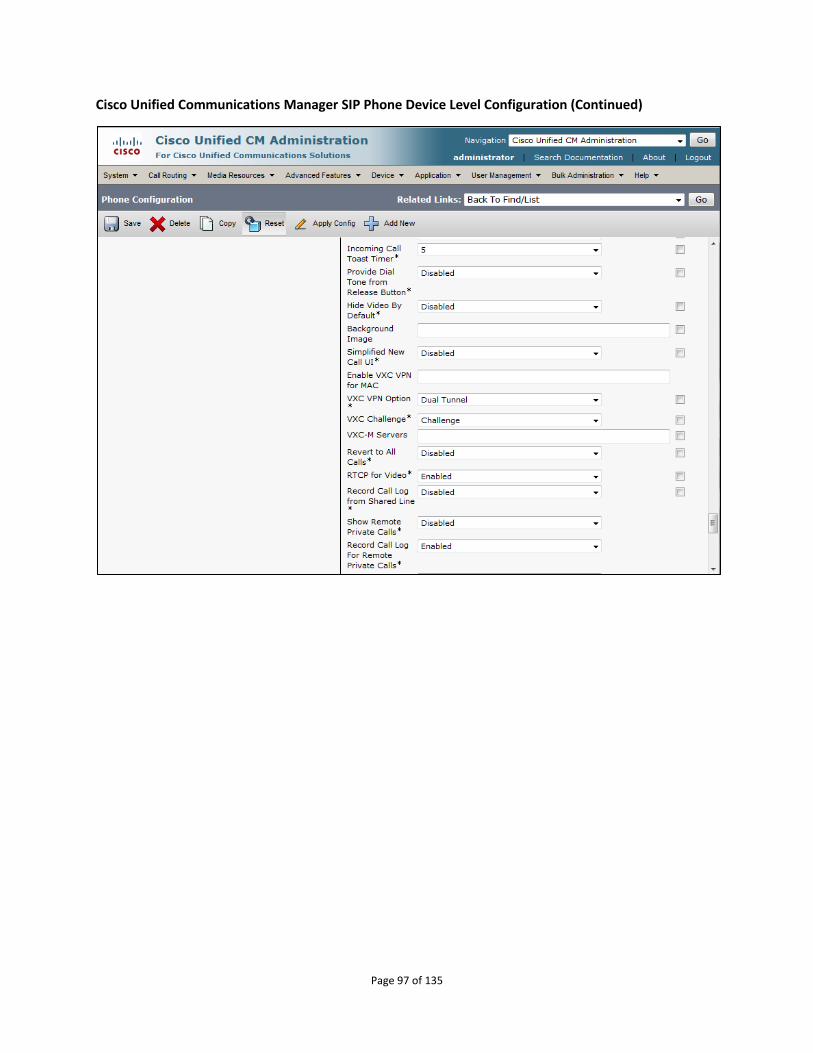
Cisco Unified Communications Manager SIP Phone Device Level Configuration (Continued)
Page 97 of 135
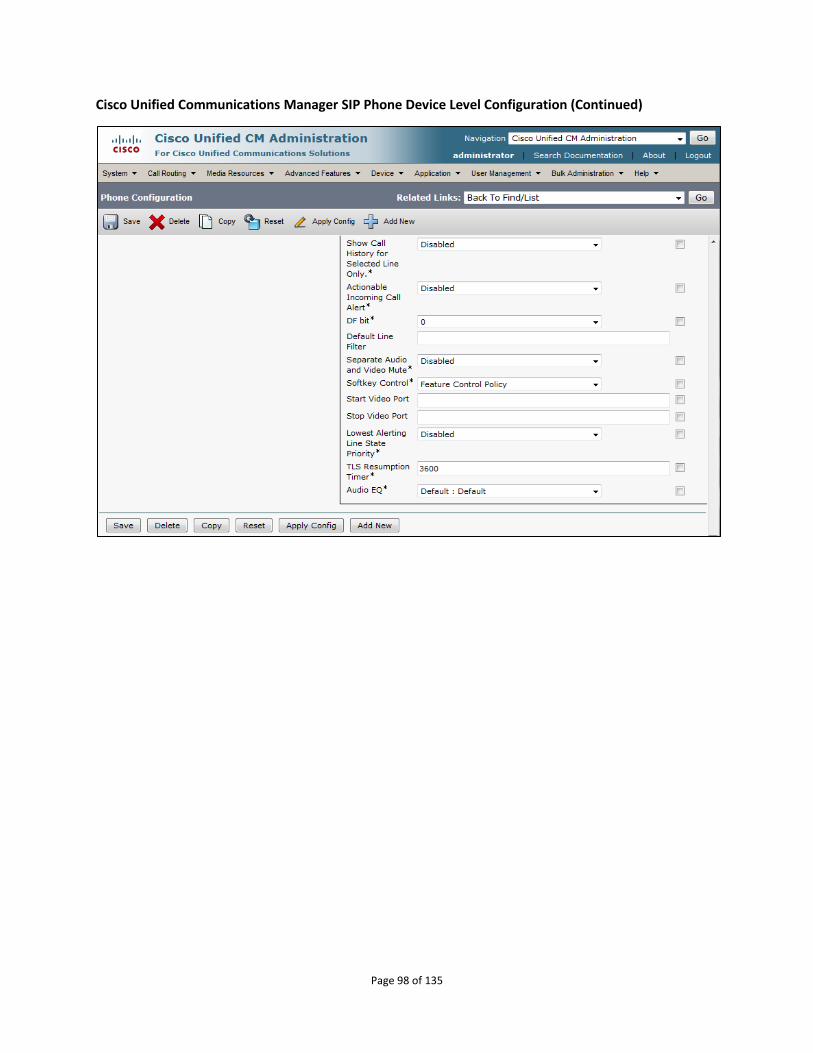
Cisco Unified Communications Manager SIP Phone Device Level Configuration (Continued)
Page 98 of 135
Cisco Unified Communications Manager SIP Phone Device Level Configuration (Continued)
Page 99 of 135
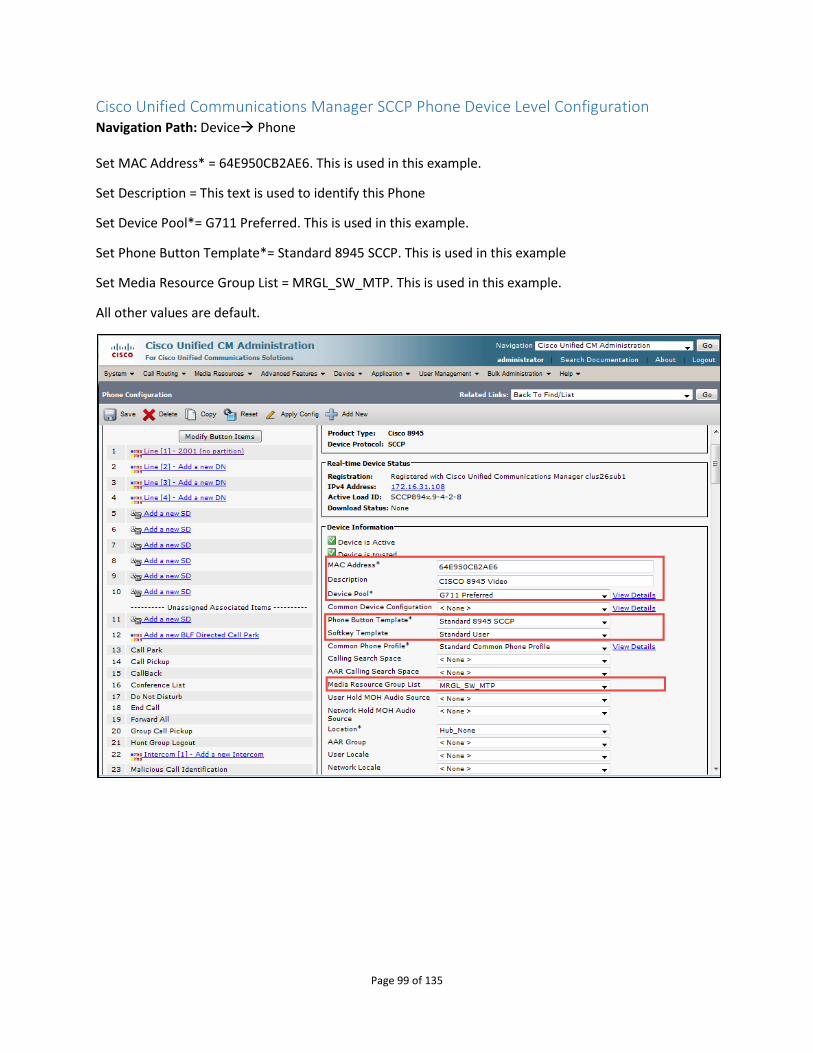
Cisco Unified Communications Manager SCCP Phone Device Level Configuration Navigation Path: Device Phone Set MAC Address* = 64E950CB2AE6. This is used in this example.
Set Description = This text is used to identify this Phone
Set Device Pool*= G711 Preferred. This is used in this example.
Set Phone Button Template*= Standard 8945 SCCP. This is used in this example
Set Media Resource Group List = MRGL_SW_MTP. This is used in this example.
All other values are default.
Page 100 of 135
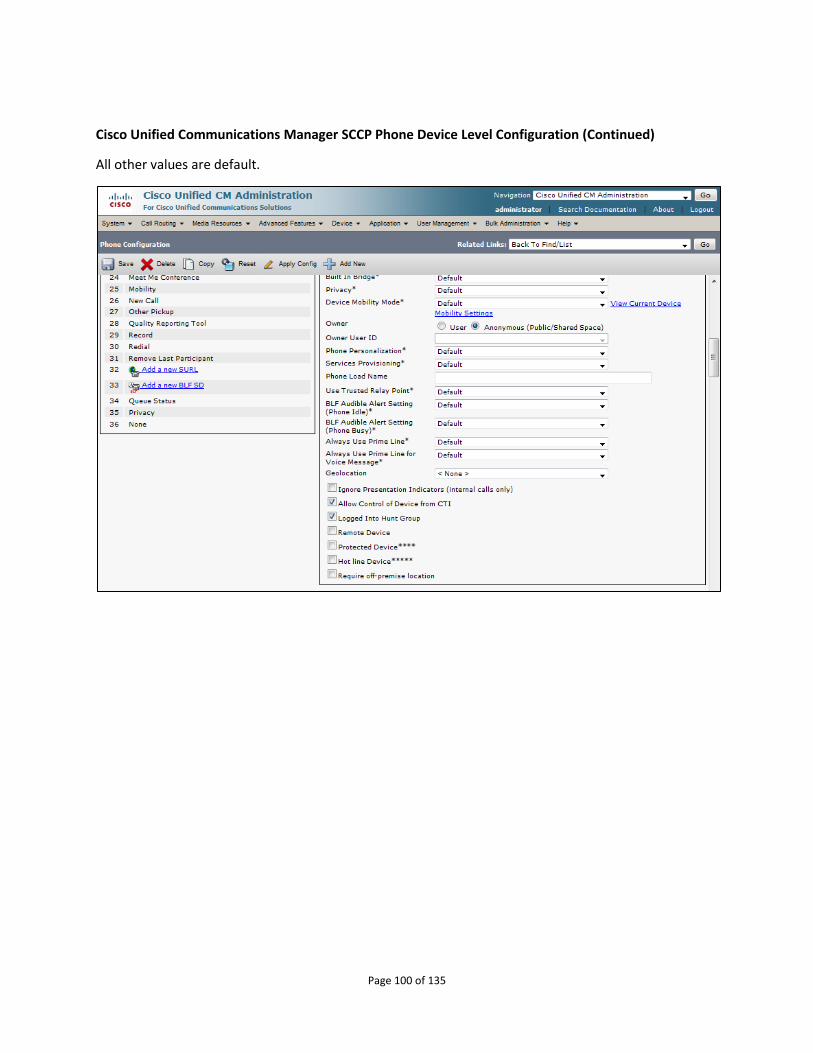
Cisco Unified Communications Manager SCCP Phone Device Level Configuration (Continued)
All other values are default.
Page 101 of 135
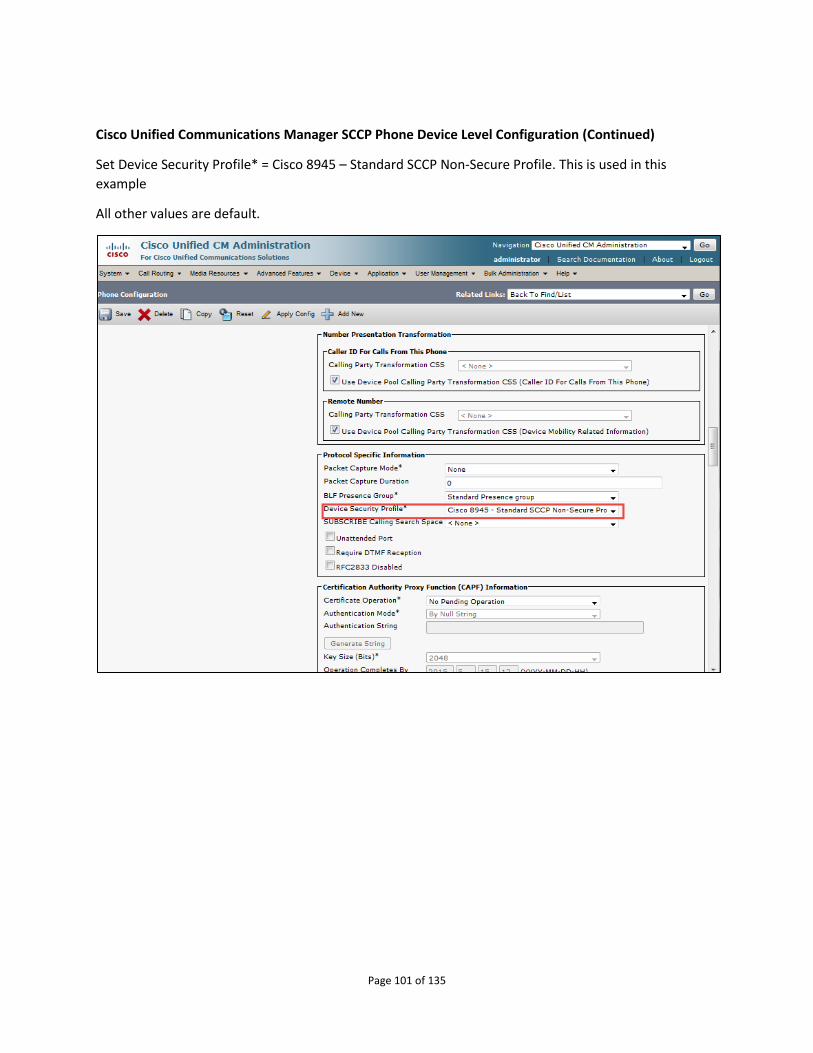
Cisco Unified Communications Manager SCCP Phone Device Level Configuration (Continued)
Set Device Security Profile* = Cisco 8945 – Standard SCCP Non-Secure Profile. This is used in this
example
All other values are default.
Page 102 of 135
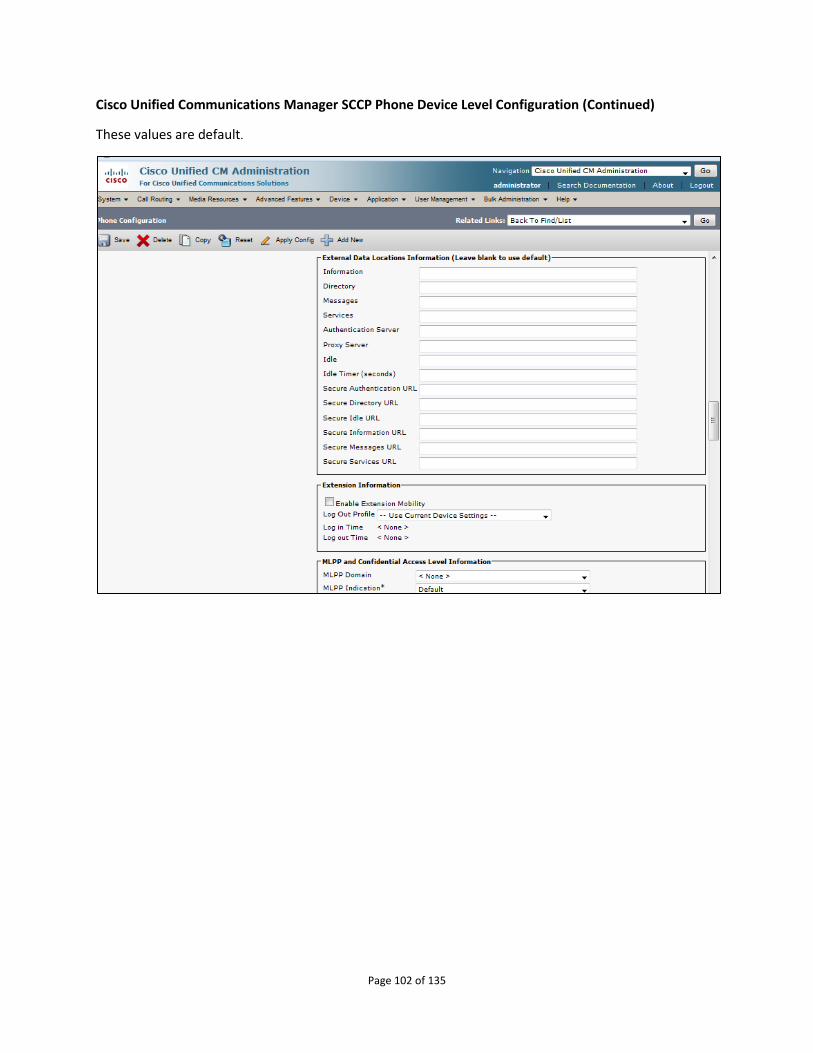
Cisco Unified Communications Manager SCCP Phone Device Level Configuration (Continued)
These values are default.
Page 103 of 135
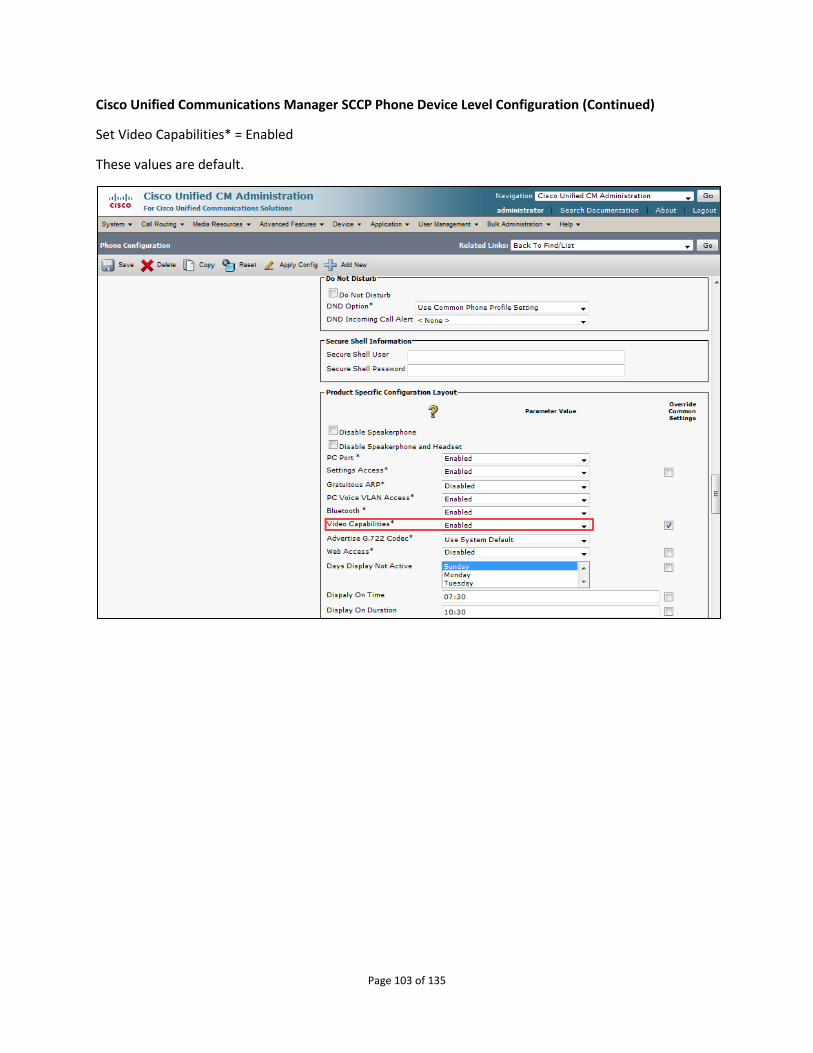
Cisco Unified Communications Manager SCCP Phone Device Level Configuration (Continued)
Set Video Capabilities* = Enabled
These values are default.
Page 104 of 135
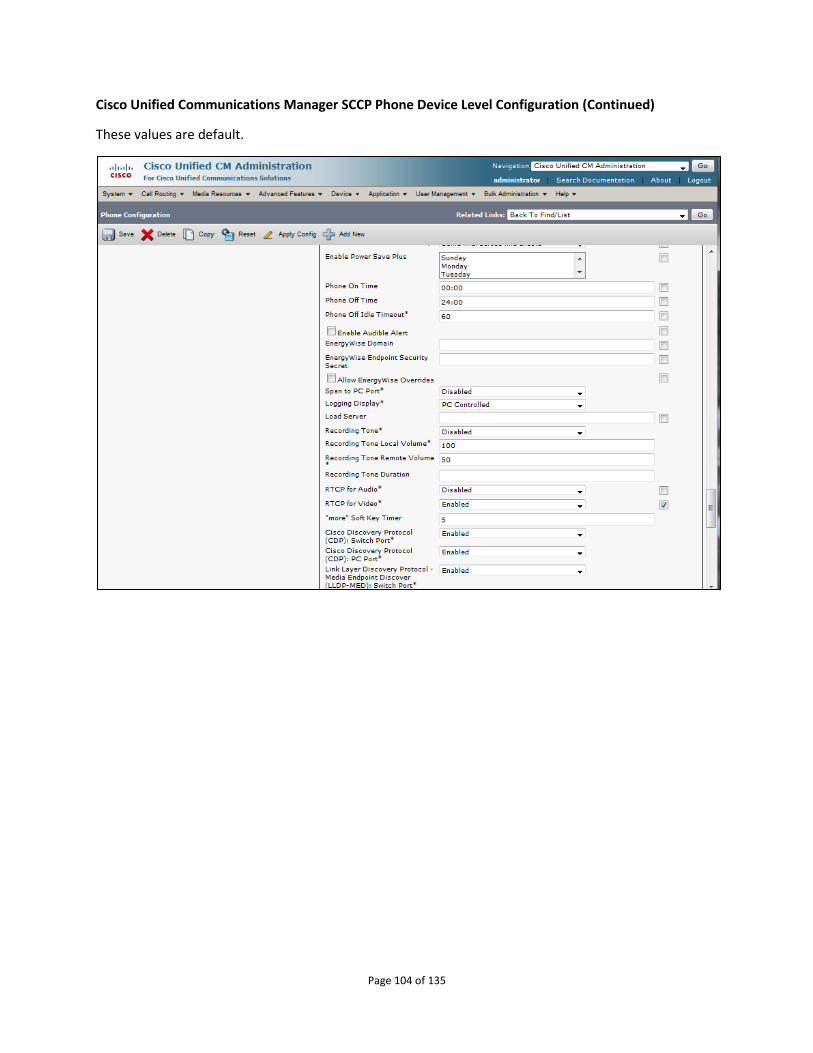
Cisco Unified Communications Manager SCCP Phone Device Level Configuration (Continued)
These values are default.
Page 105 of 135
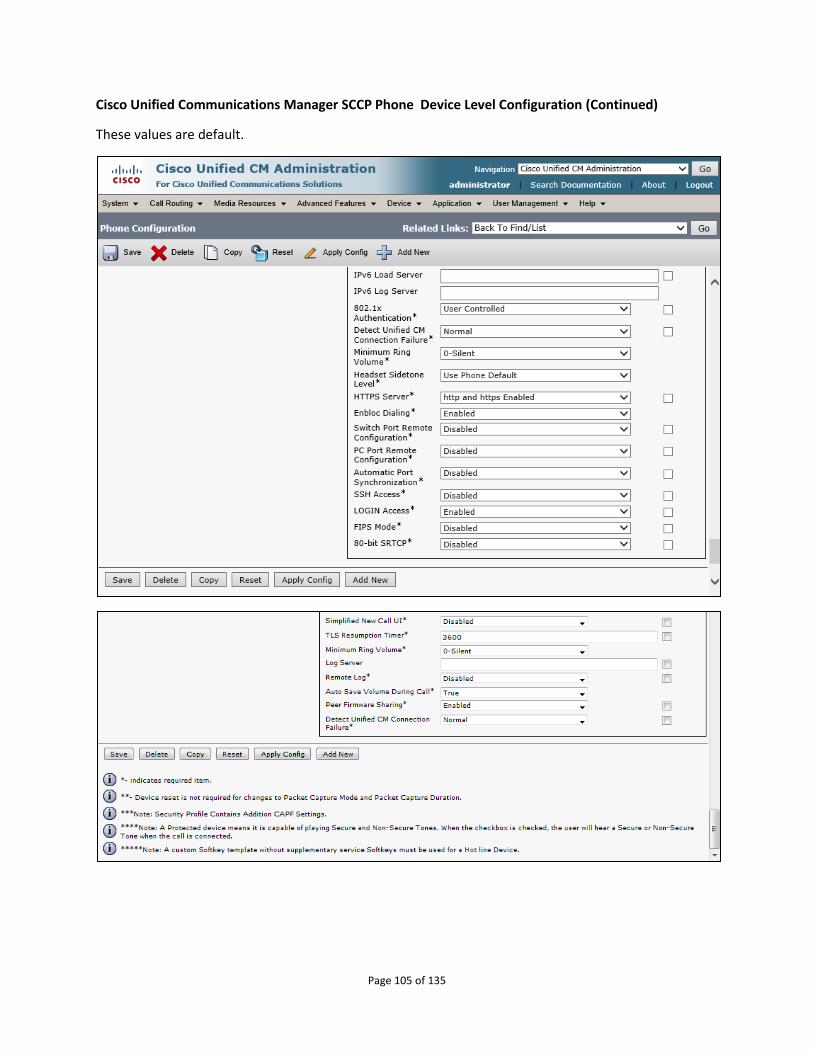
Cisco Unified Communications Manager SCCP Phone Device Level Configuration (Continued)
These values are default.
Page 106 of 135
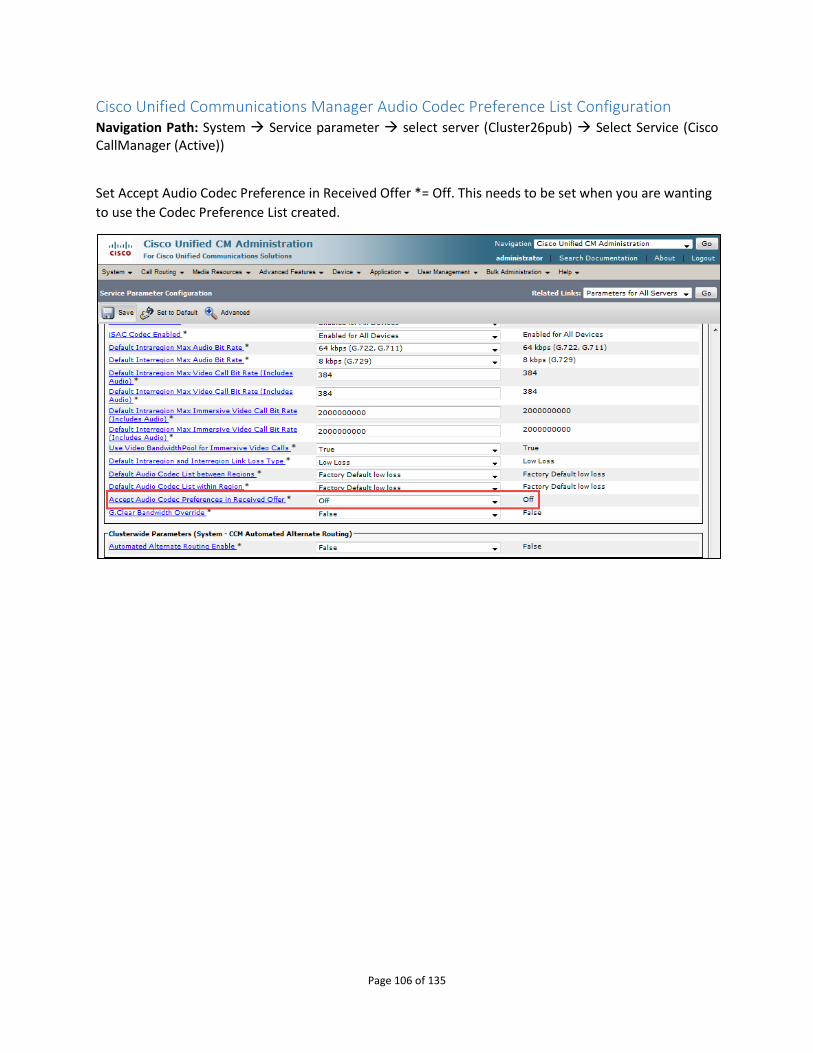
Cisco Unified Communications Manager Audio Codec Preference List Configuration Navigation Path: System Service parameter select server (Cluster26pub) Select Service (Cisco CallManager (Active))
Set Accept Audio Codec Preference in Received Offer *= Off. This needs to be set when you are wanting
to use the Codec Preference List created.
Page 107 of 135
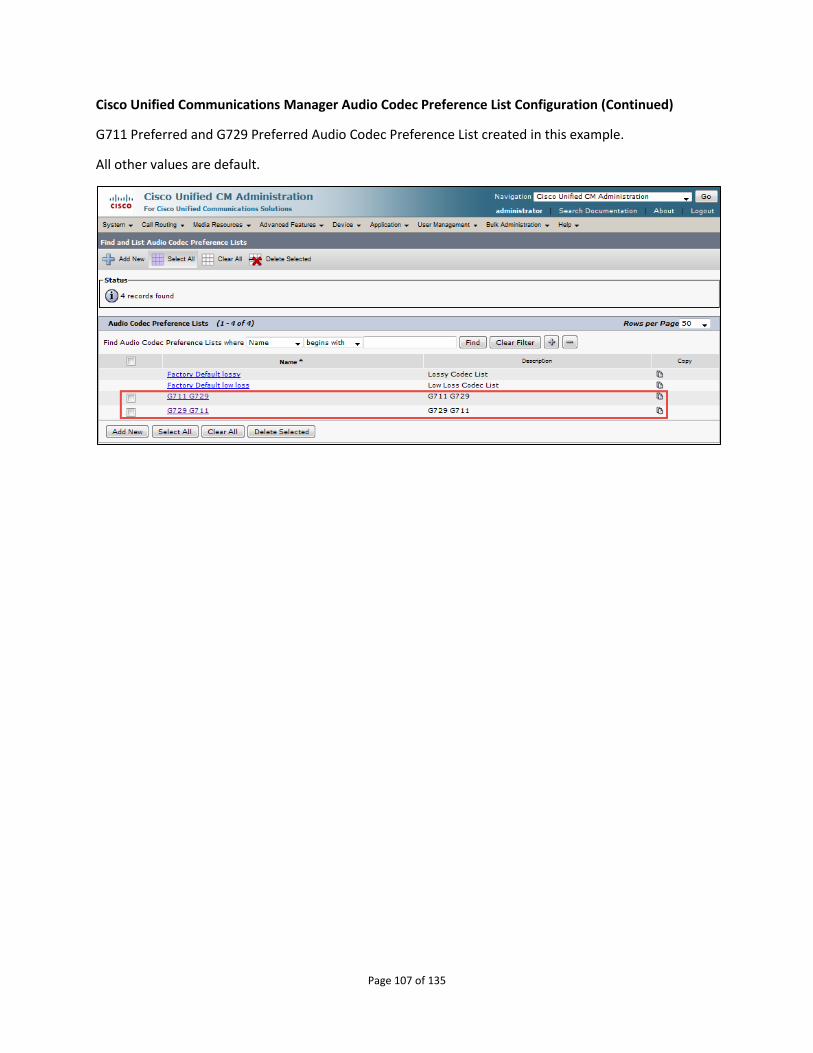
Cisco Unified Communications Manager Audio Codec Preference List Configuration (Continued)
G711 Preferred and G729 Preferred Audio Codec Preference List created in this example.
All other values are default.
Page 108 of 135
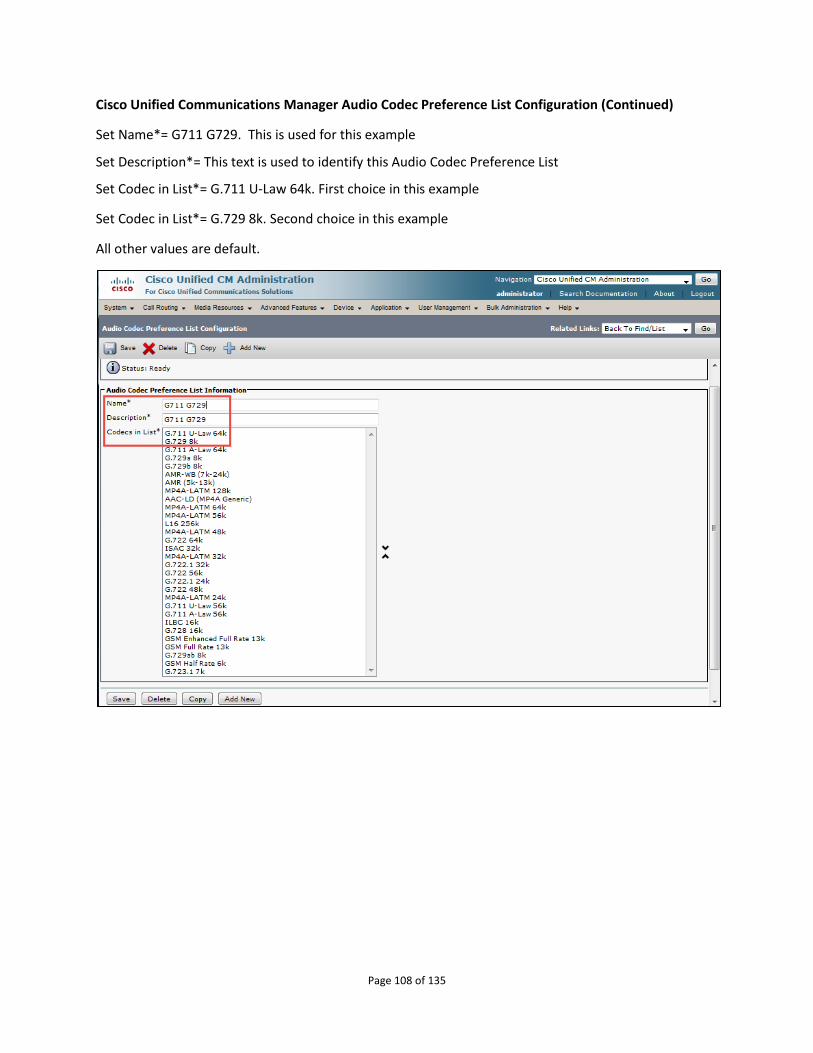
Cisco Unified Communications Manager Audio Codec Preference List Configuration (Continued)
Set Name*= G711 G729. This is used for this example
Set Description*= This text is used to identify this Audio Codec Preference List
Set Codec in List*= G.711 U-Law 64k. First choice in this example
Set Codec in List*= G.729 8k. Second choice in this example
All other values are default.
Page 109 of 135
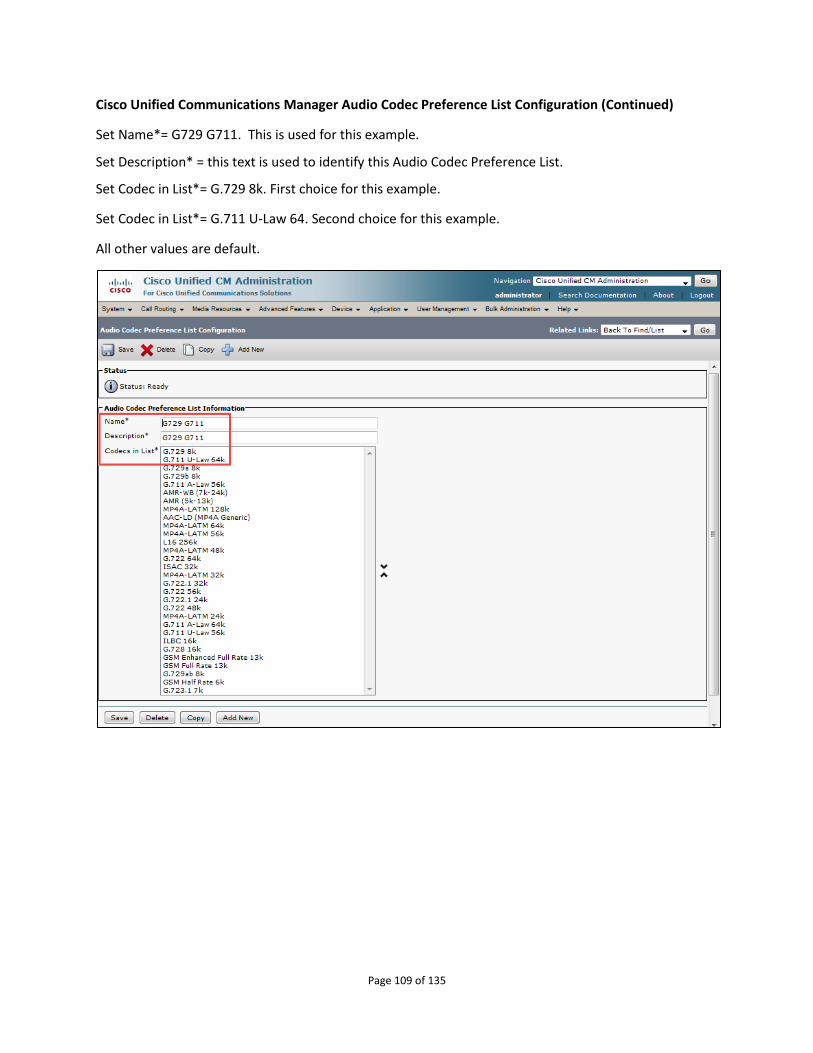
Cisco Unified Communications Manager Audio Codec Preference List Configuration (Continued)
Set Name*= G729 G711. This is used for this example.
Set Description* = this text is used to identify this Audio Codec Preference List.
Set Codec in List*= G.729 8k. First choice for this example.
Set Codec in List*= G.711 U-Law 64. Second choice for this example.
All other values are default.

Page 110 of 135
Cisco Unified Communications Manager Region Configuration Navigation Path: System Region Information Region
G711 Preferred and G729 Preferred created in this example.
All other values are default.
Page 111 of 135
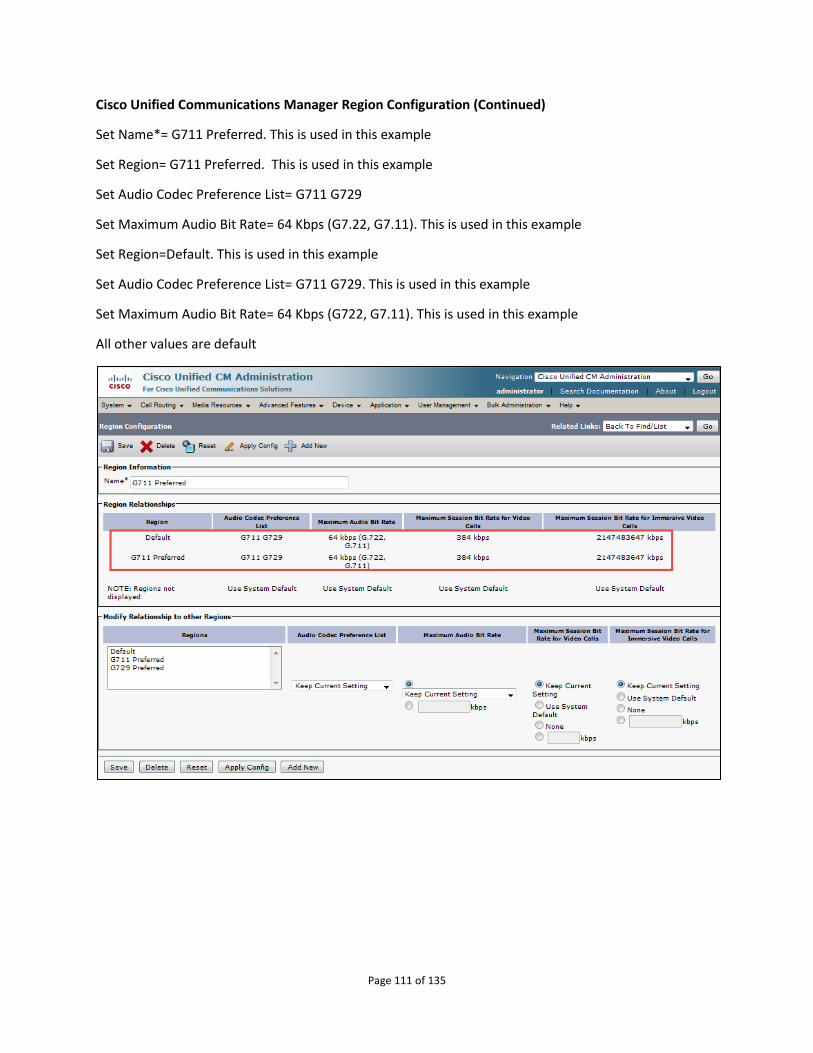
Cisco Unified Communications Manager Region Configuration (Continued)
Set Name*= G711 Preferred. This is used in this example
Set Region= G711 Preferred. This is used in this example
Set Audio Codec Preference List= G711 G729
Set Maximum Audio Bit Rate= 64 Kbps (G7.22, G7.11). This is used in this example
Set Region=Default. This is used in this example
Set Audio Codec Preference List= G711 G729. This is used in this example
Set Maximum Audio Bit Rate= 64 Kbps (G722, G7.11). This is used in this example
All other values are default
Page 112 of 135
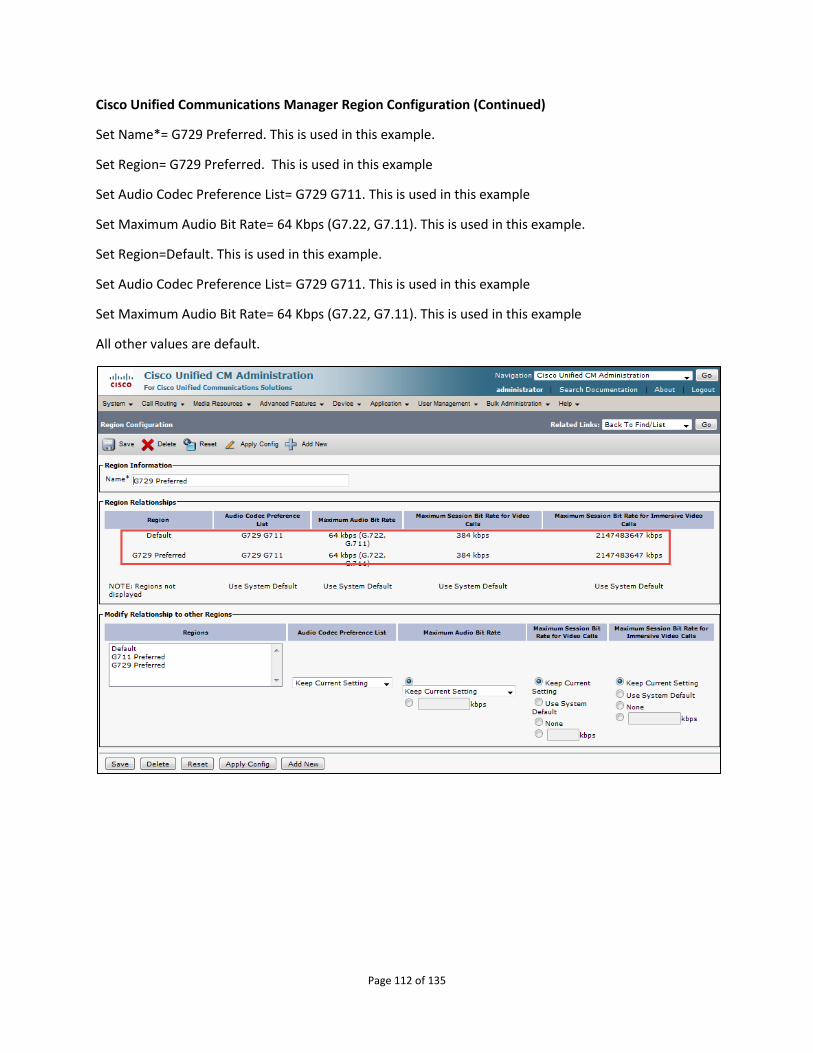
Cisco Unified Communications Manager Region Configuration (Continued)
Set Name*= G729 Preferred. This is used in this example.
Set Region= G729 Preferred. This is used in this example
Set Audio Codec Preference List= G729 G711. This is used in this example
Set Maximum Audio Bit Rate= 64 Kbps (G7.22, G7.11). This is used in this example.
Set Region=Default. This is used in this example.
Set Audio Codec Preference List= G729 G711. This is used in this example
Set Maximum Audio Bit Rate= 64 Kbps (G7.22, G7.11). This is used in this example
All other values are default.
Page 113 of 135
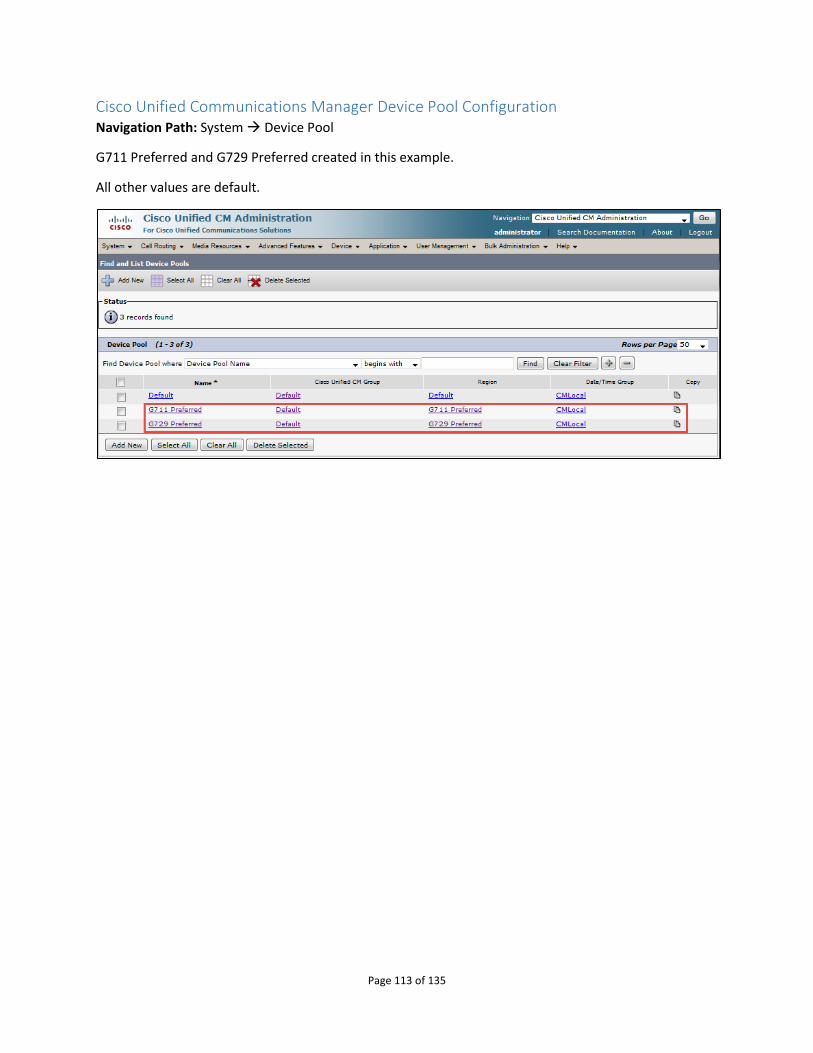
Cisco Unified Communications Manager Device Pool Configuration Navigation Path: System Device Pool
G711 Preferred and G729 Preferred created in this example.
All other values are default.
Page 114 of 135
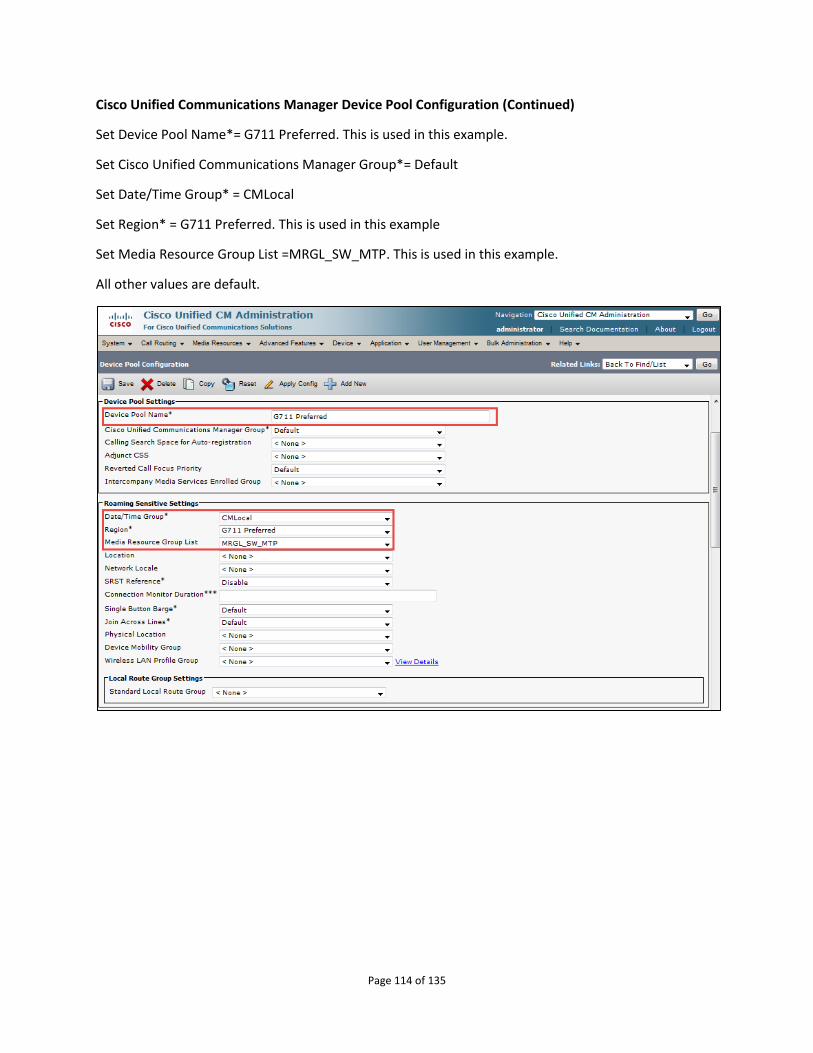
Cisco Unified Communications Manager Device Pool Configuration (Continued)
Set Device Pool Name*= G711 Preferred. This is used in this example.
Set Cisco Unified Communications Manager Group*= Default
Set Date/Time Group* = CMLocal
Set Region* = G711 Preferred. This is used in this example
Set Media Resource Group List =MRGL_SW_MTP. This is used in this example.
All other values are default.
Page 115 of 135
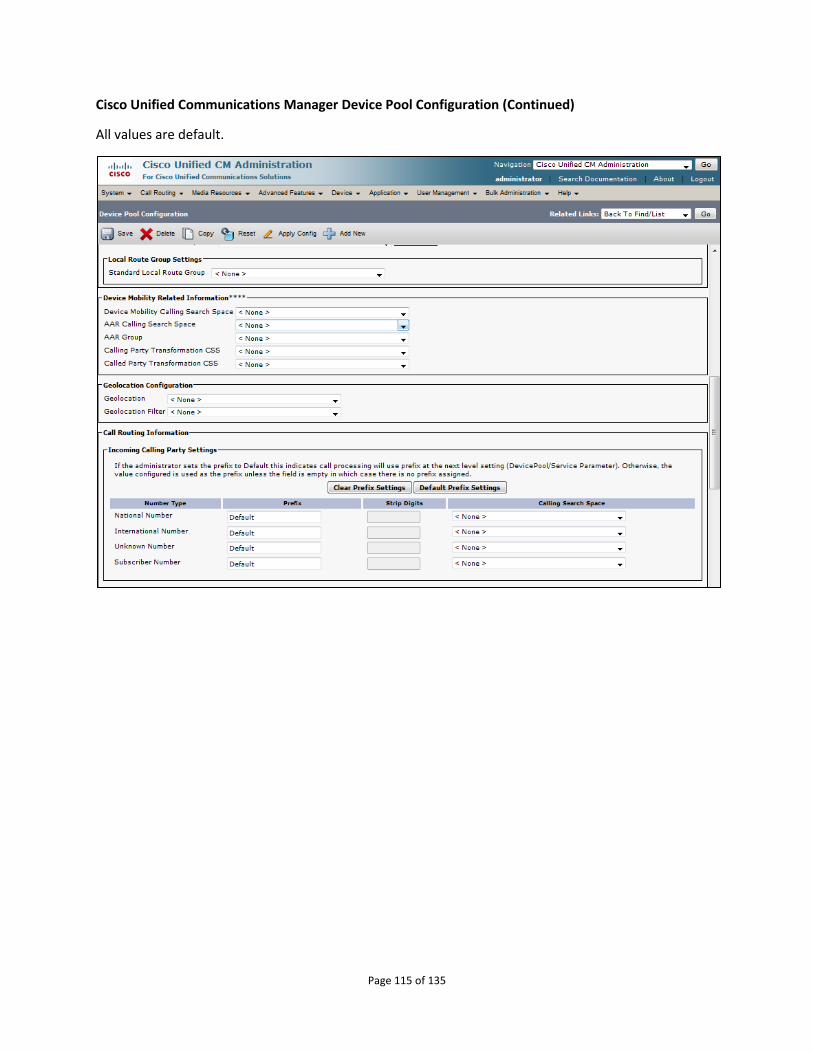
Cisco Unified Communications Manager Device Pool Configuration (Continued)
All values are default.
Page 116 of 135
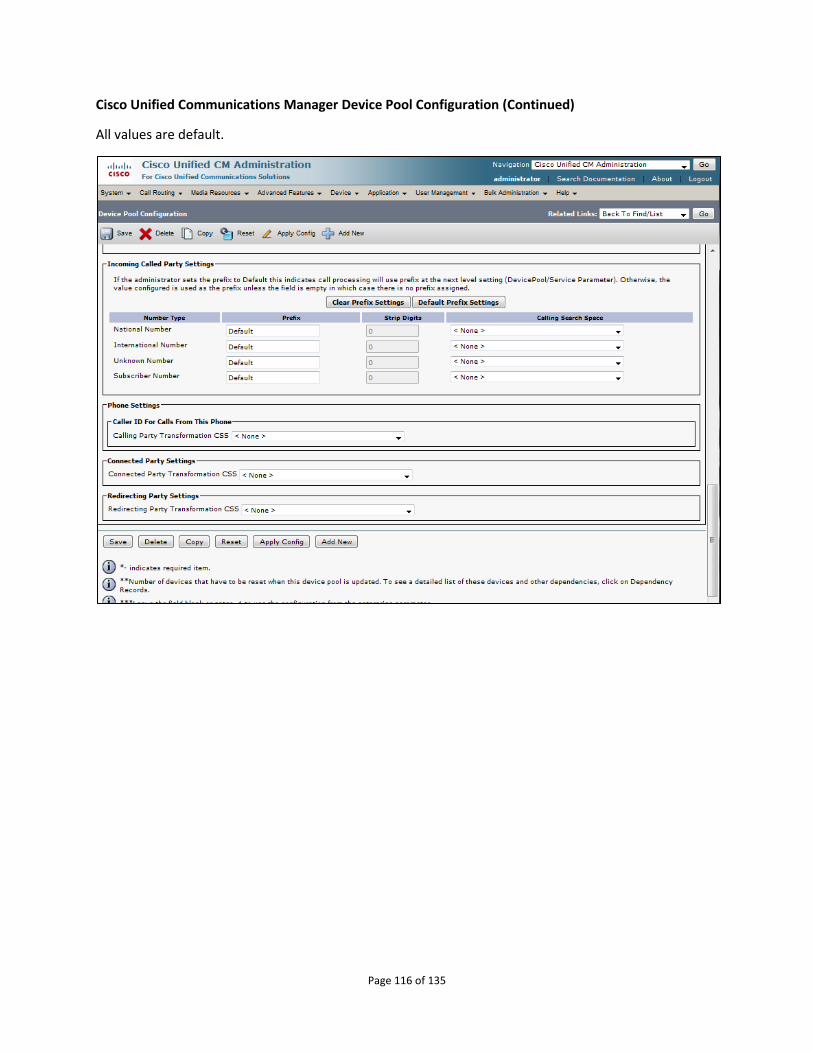
Cisco Unified Communications Manager Device Pool Configuration (Continued)
All values are default.
Page 117 of 135
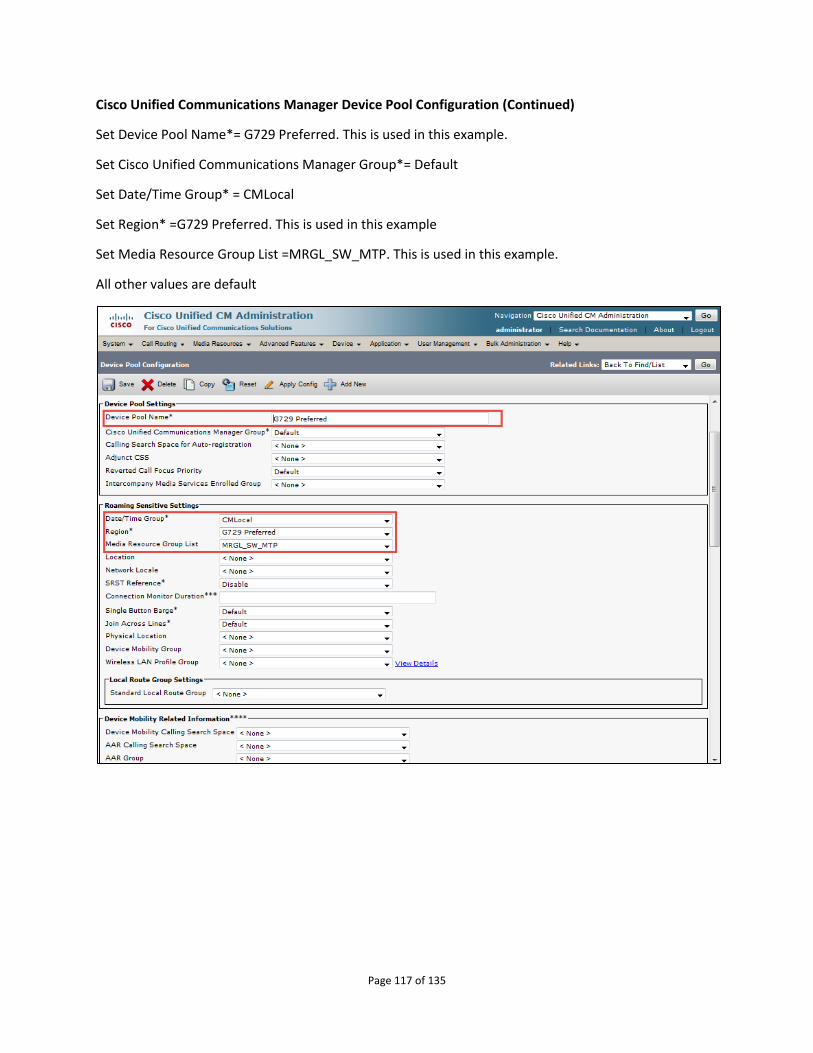
Cisco Unified Communications Manager Device Pool Configuration (Continued)
Set Device Pool Name*= G729 Preferred. This is used in this example.
Set Cisco Unified Communications Manager Group*= Default
Set Date/Time Group* = CMLocal
Set Region* =G729 Preferred. This is used in this example
Set Media Resource Group List =MRGL_SW_MTP. This is used in this example.
All other values are default
Page 118 of 135
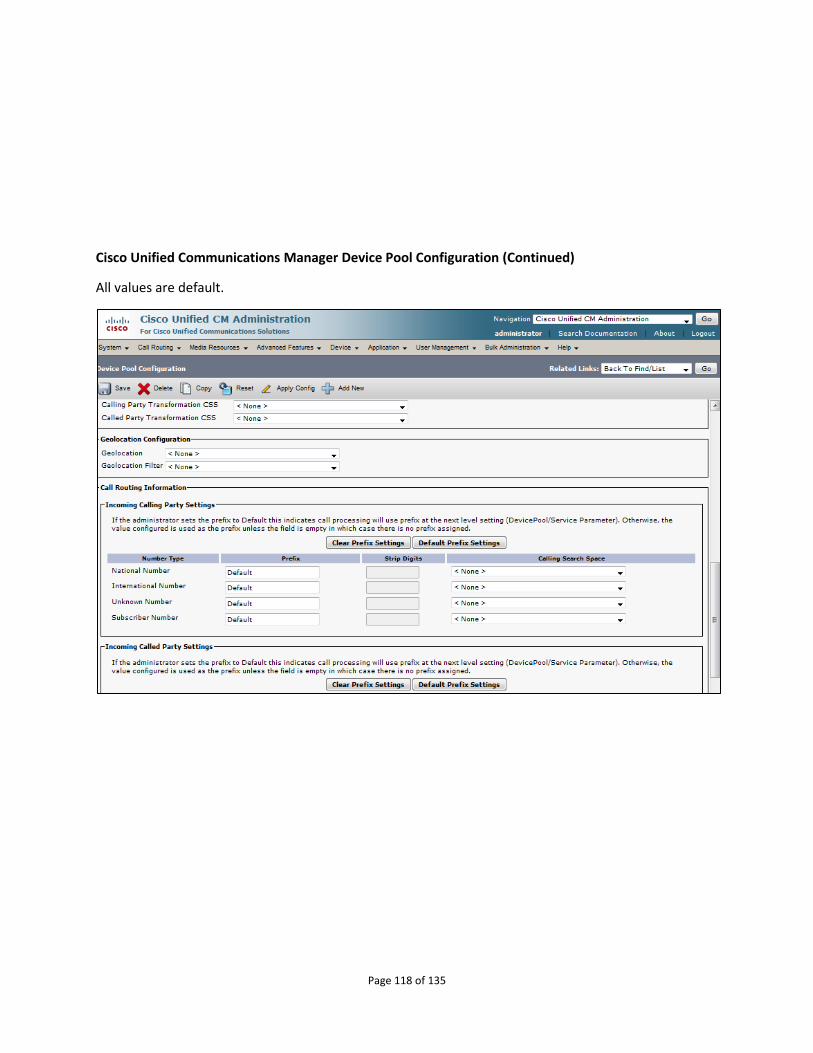
Cisco Unified Communications Manager Device Pool Configuration (Continued)
All values are default.
Page 119 of 135
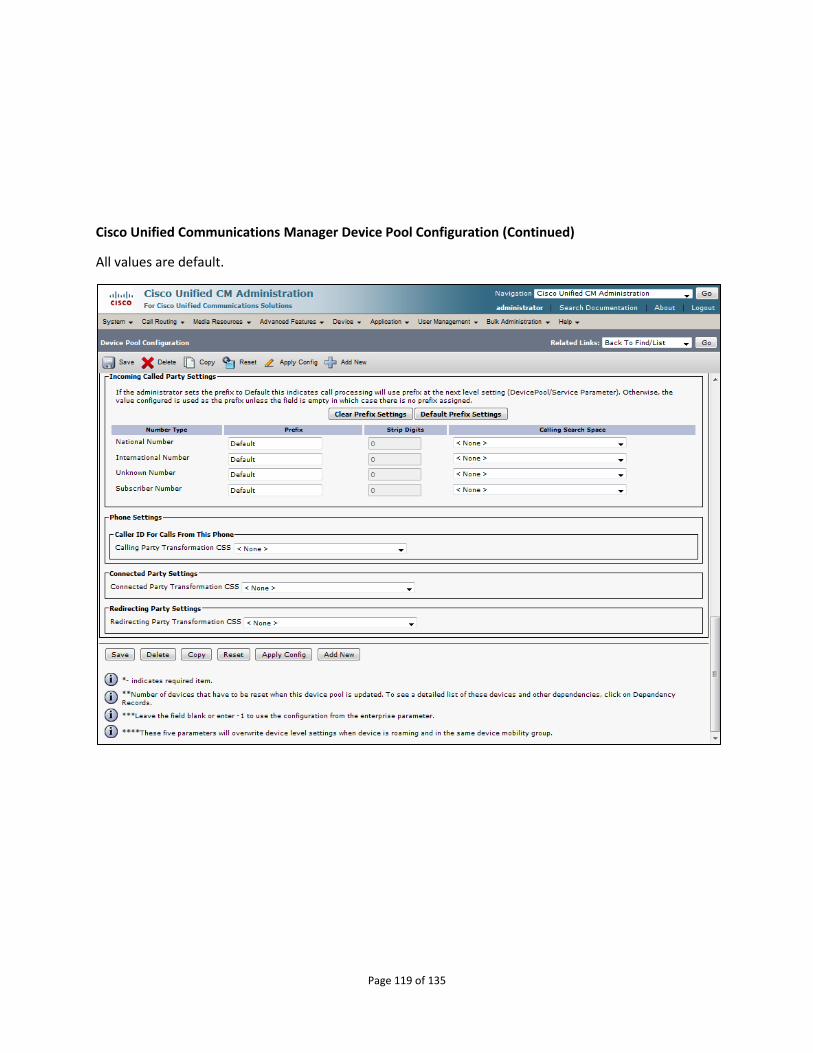
Cisco Unified Communications Manager Device Pool Configuration (Continued)
All values are default.
Page 120 of 135
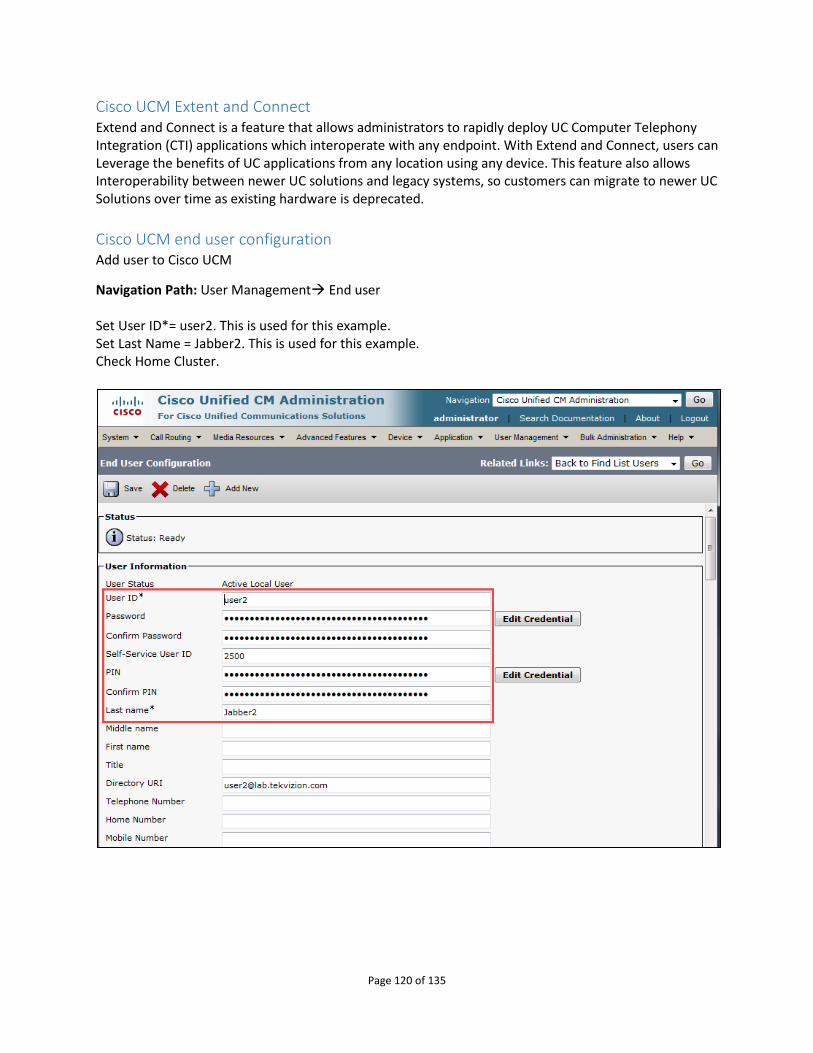
Cisco UCM Extent and Connect Extend and Connect is a feature that allows administrators to rapidly deploy UC Computer Telephony Integration (CTI) applications which interoperate with any endpoint. With Extend and Connect, users can Leverage the benefits of UC applications from any location using any device. This feature also allows Interoperability between newer UC solutions and legacy systems, so customers can migrate to newer UC Solutions over time as existing hardware is deprecated.
Cisco UCM end user configuration Add user to Cisco UCM
Navigation Path: User Management End user Set User ID*= user2. This is used for this example. Set Last Name = Jabber2. This is used for this example. Check Home Cluster.
Page 121 of 135
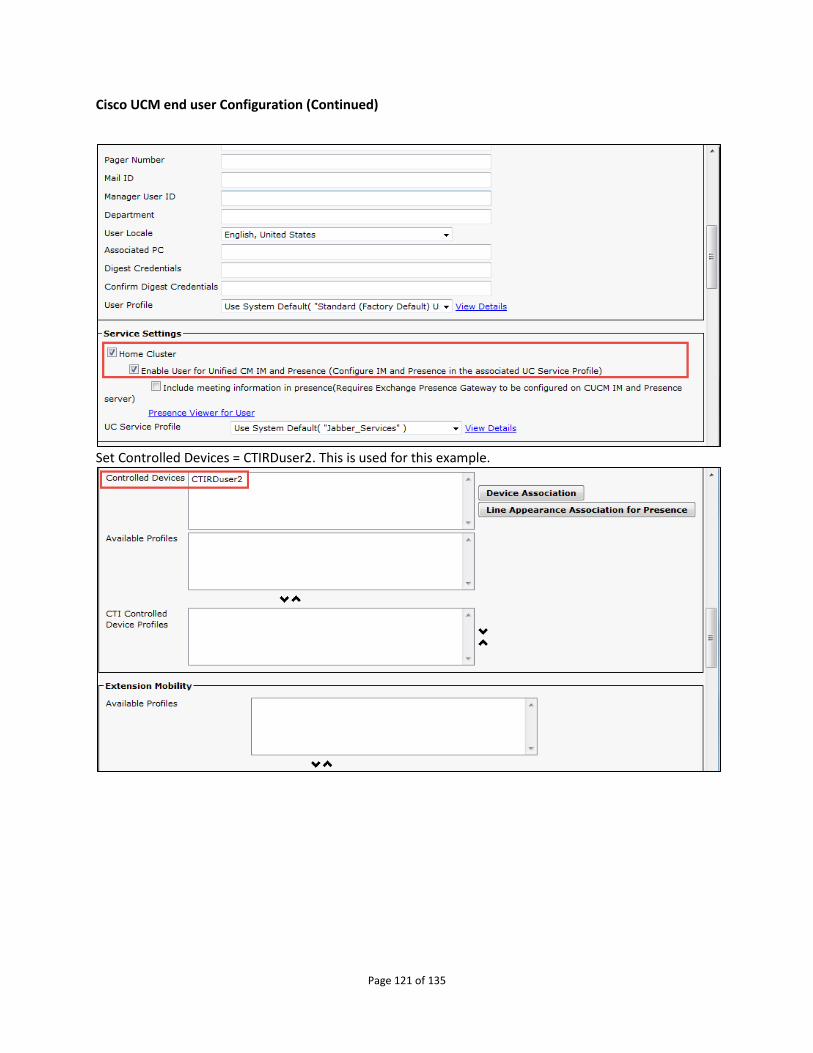
Cisco UCM end user Configuration (Continued)
Set Controlled Devices = CTIRDuser2. This is used for this example.
Page 122 of 135
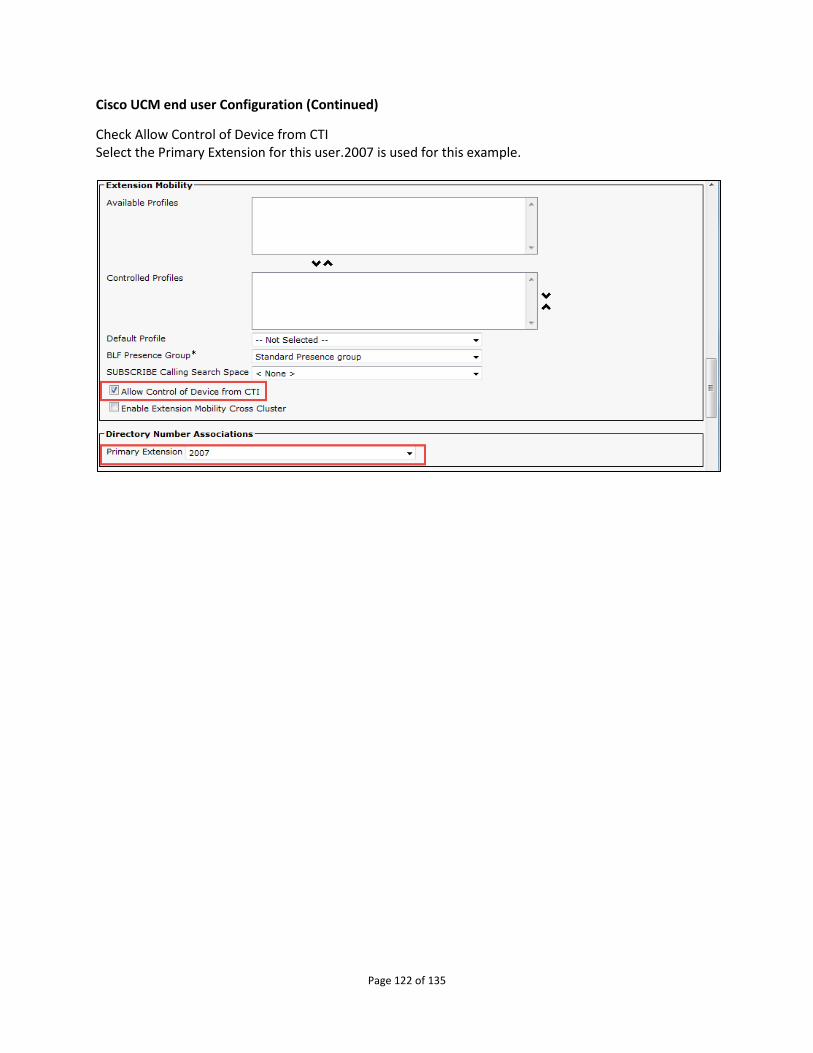
Cisco UCM end user Configuration (Continued)
Check Allow Control of Device from CTI Select the Primary Extension for this user.2007 is used for this example.

Page 123 of 135
Check EnableMobility
Add the following permissions for Standard Users: –Standard CCM End-Users –Standard CTI Enabled –Standard CCMUSER Administration
Page 124 of 135
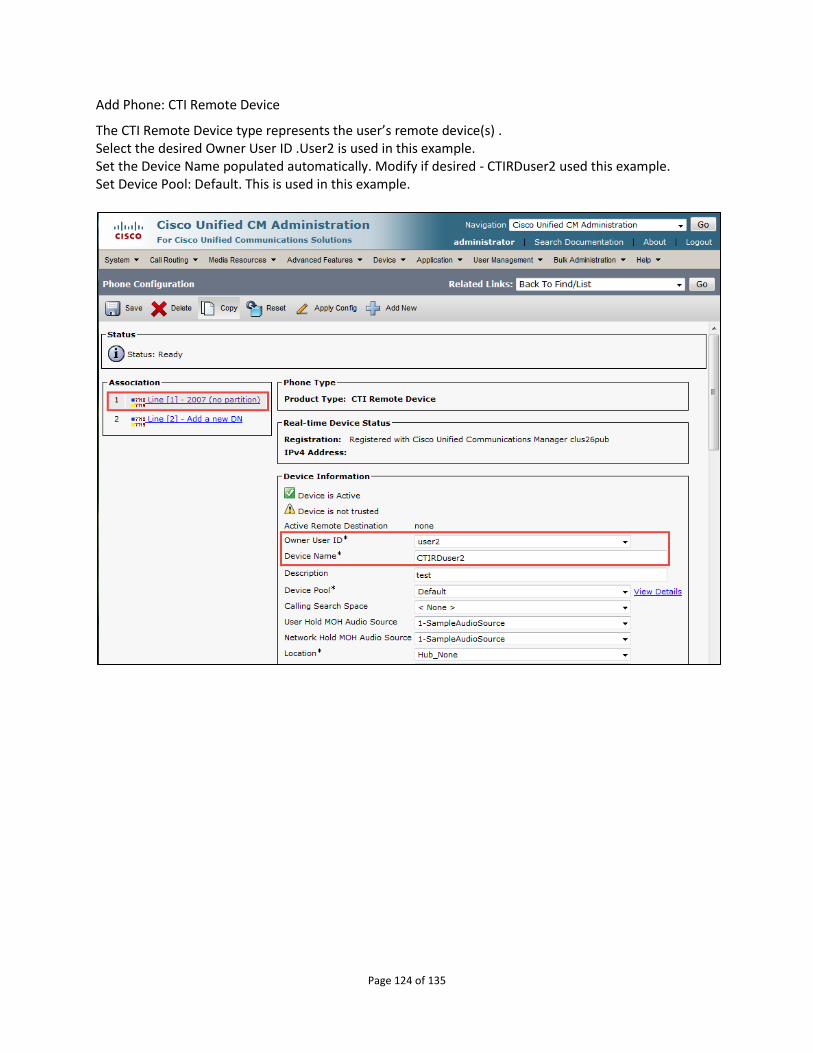
Add Phone: CTI Remote Device
The CTI Remote Device type represents the user’s remote device(s) . Select the desired Owner User ID .User2 is used in this example. Set the Device Name populated automatically. Modify if desired - CTIRDuser2 used this example. Set Device Pool: Default. This is used in this example.
Page 125 of 135
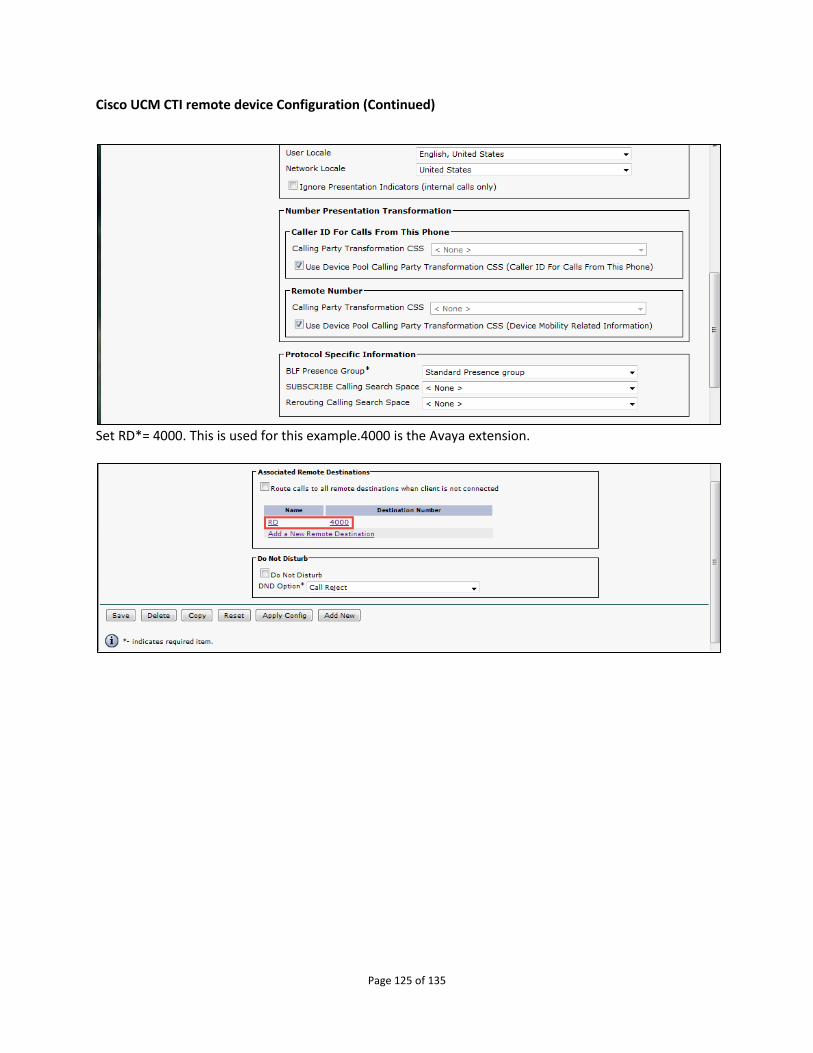
Cisco UCM CTI remote device Configuration (Continued)
Set RD*= 4000. This is used for this example.4000 is the Avaya extension.
Page 126 of 135
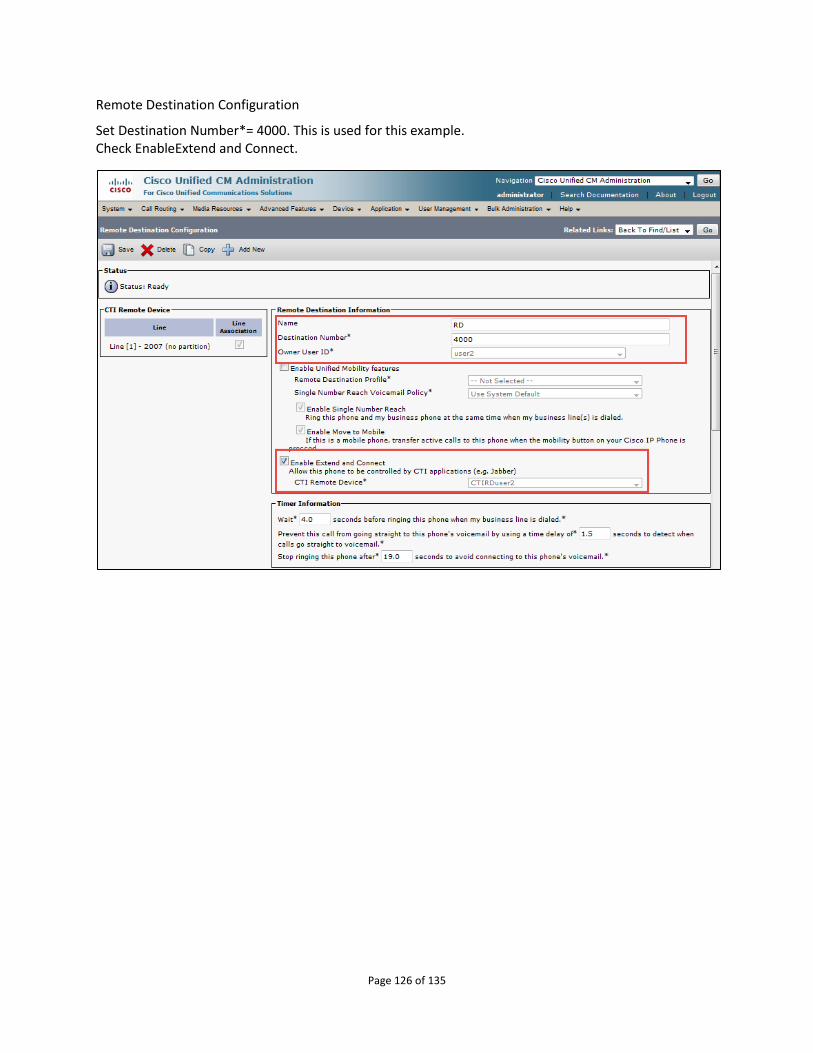
Remote Destination Configuration
Set Destination Number*= 4000. This is used for this example. Check EnableExtend and Connect.
Page 127 of 135
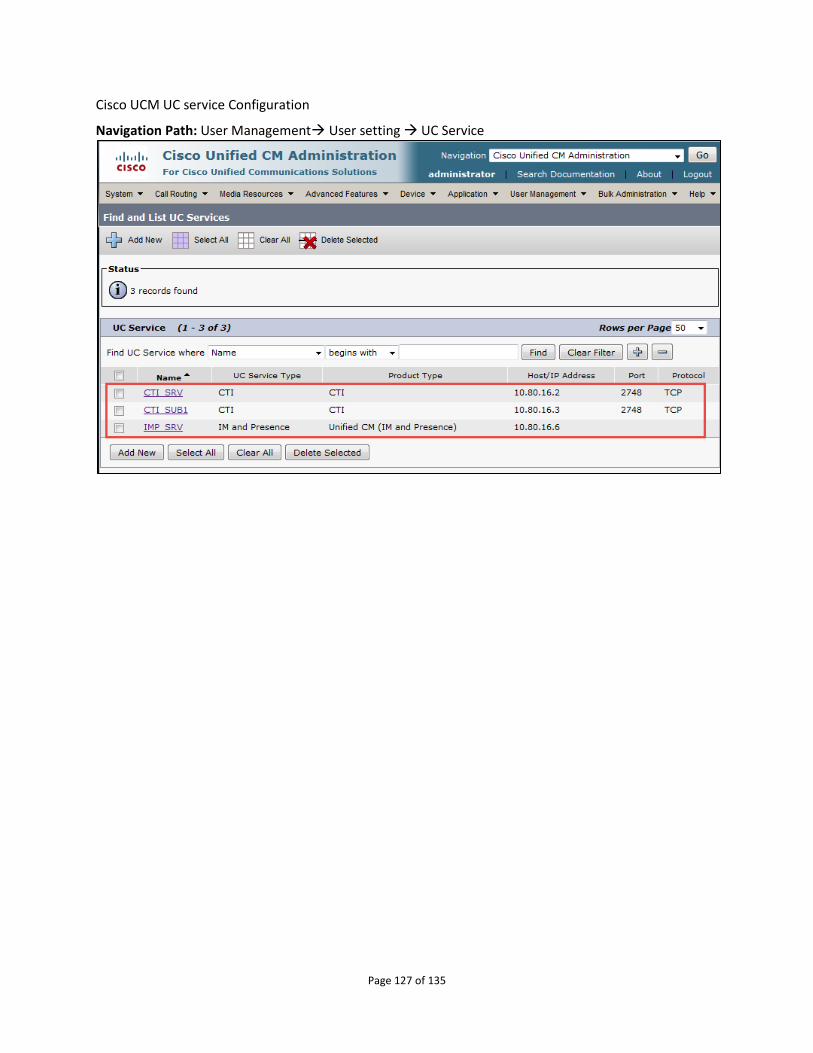
Cisco UCM UC service Configuration
Navigation Path: User Management User setting UC Service
Page 128 of 135
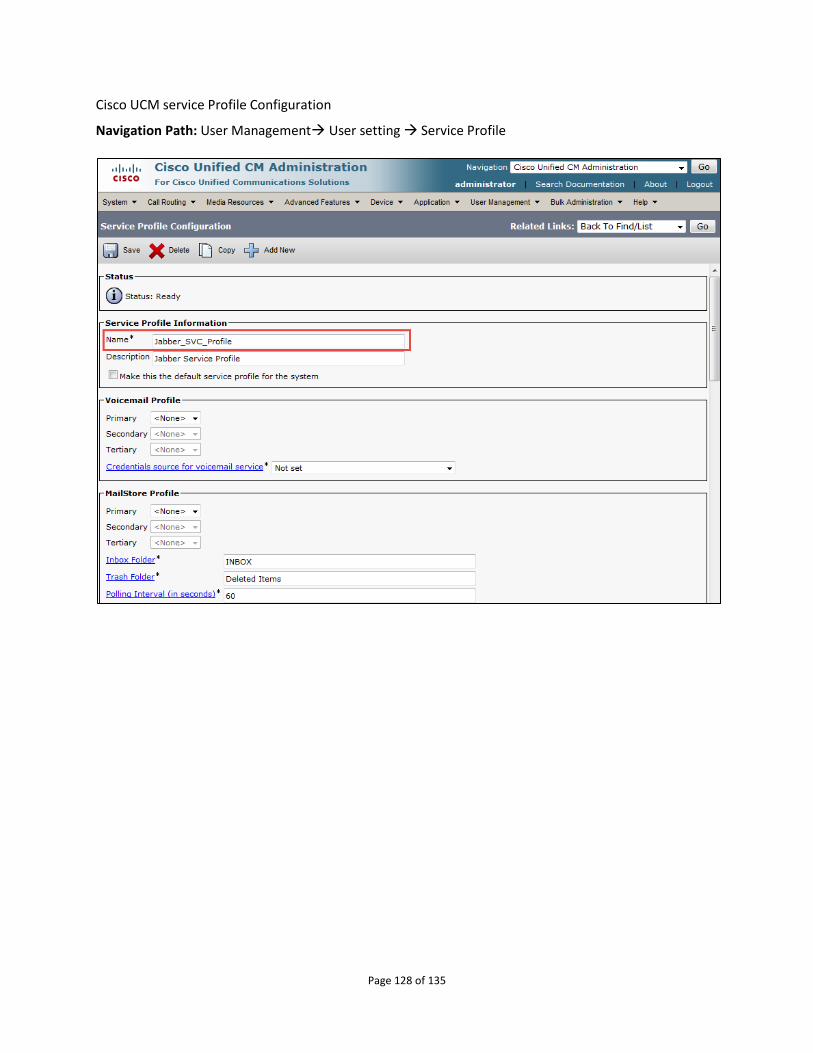
Cisco UCM service Profile Configuration
Navigation Path: User Management User setting Service Profile
Page 129 of 135
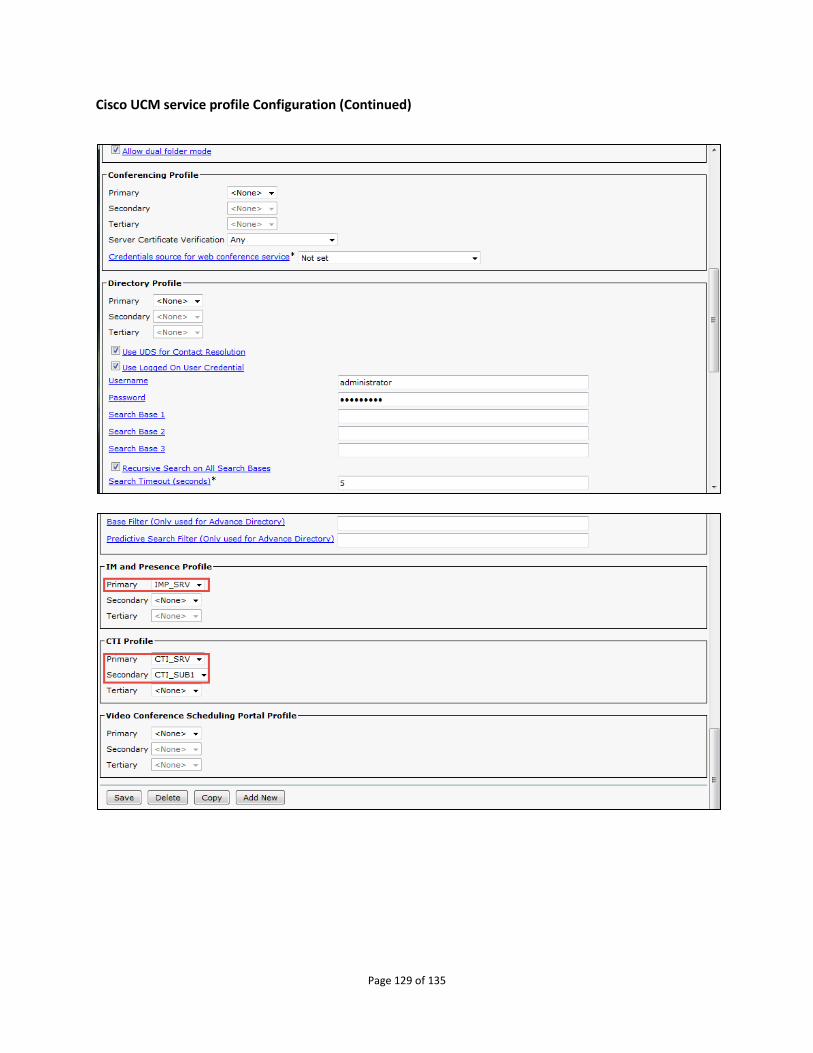
Cisco UCM service profile Configuration (Continued)

Page 130 of 135
Cisco Unified CM IM Presence – CCMCIP Profile Configuration Navigation Path: Application Legacy Clients CCMCIP Profile Set Name *: remotedesk, this is used in this example. Set Primary CCMCIP Host *: 10.80.16.2.Cisco Publisher IP. This is used in this example. Set Backup CCMCIP Host *: 10.80.16.3.Cisco Publisher IP. This is used in this example. Add Users to Profile: user2.This is used in this example.
Page 131 of 135
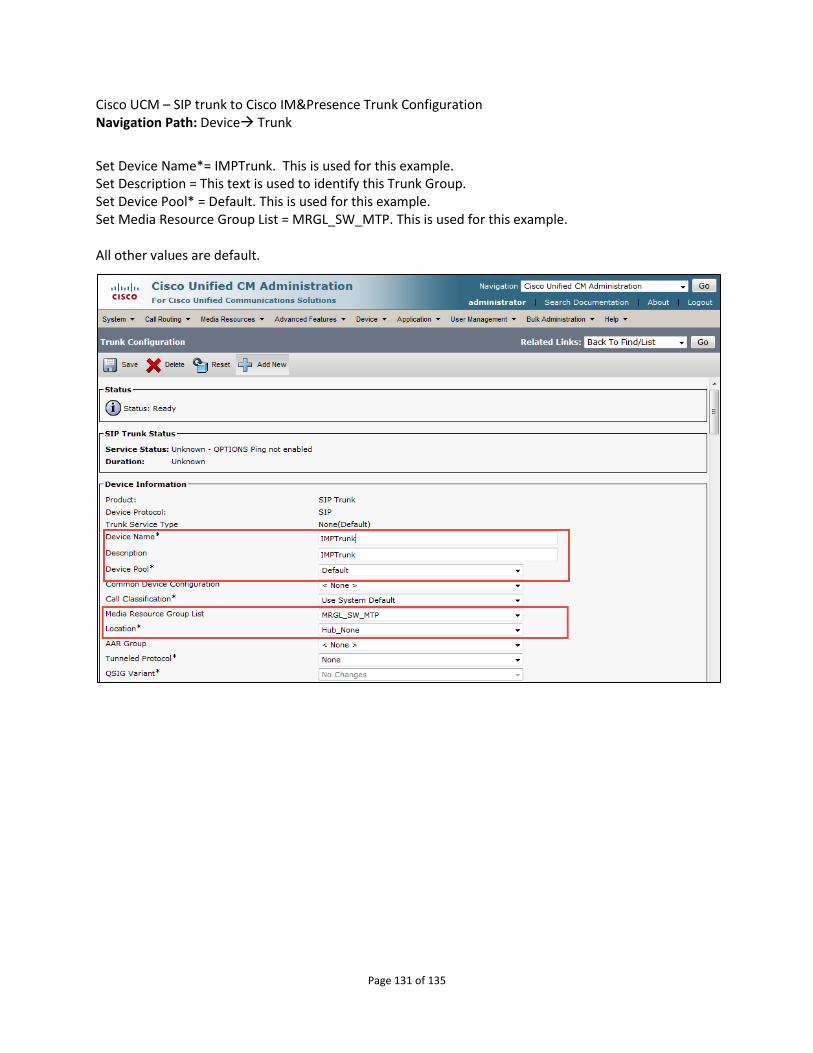
Cisco UCM – SIP trunk to Cisco IM&Presence Trunk Configuration Navigation Path: Device Trunk
Set Device Name*= IMPTrunk. This is used for this example. Set Description = This text is used to identify this Trunk Group. Set Device Pool* = Default. This is used for this example. Set Media Resource Group List = MRGL_SW_MTP. This is used for this example. All other values are default.

Page 132 of 135
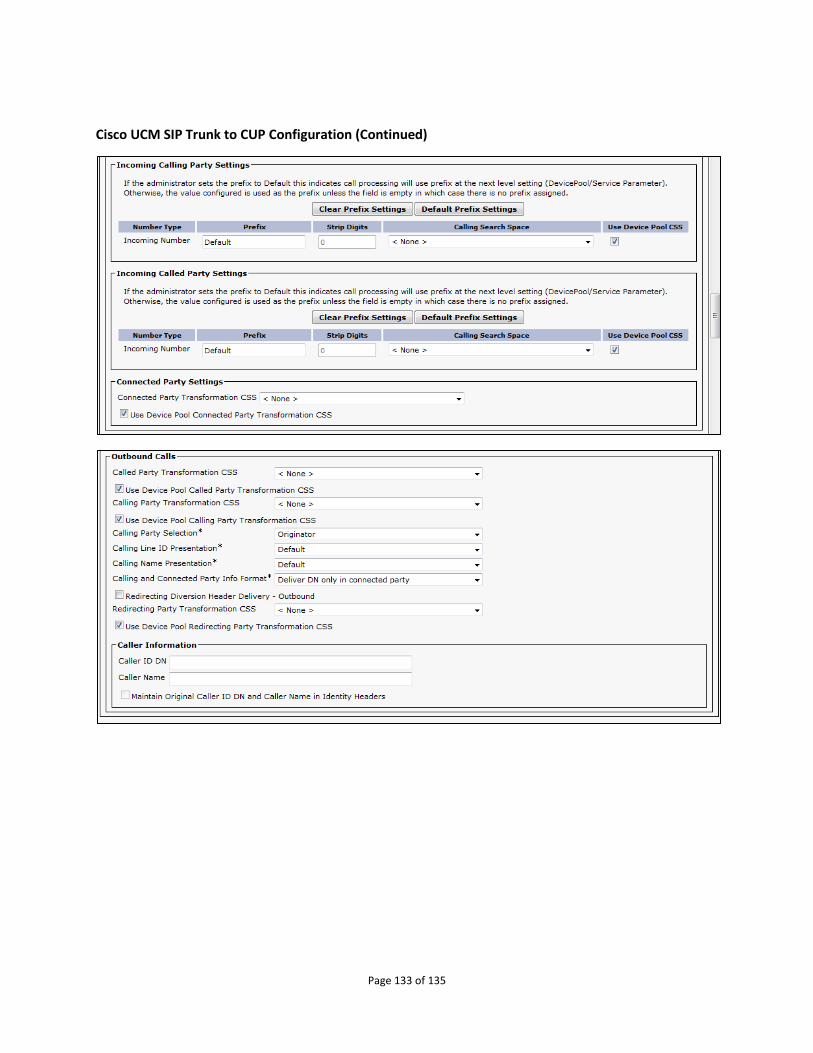
Cisco Unified Communications Manager SIP Trunk to CUP Configuration (Continued)
All other values are default.
Page 133 of 135
Cisco UCM SIP Trunk to CUP Configuration (Continued)
Page 134 of 135
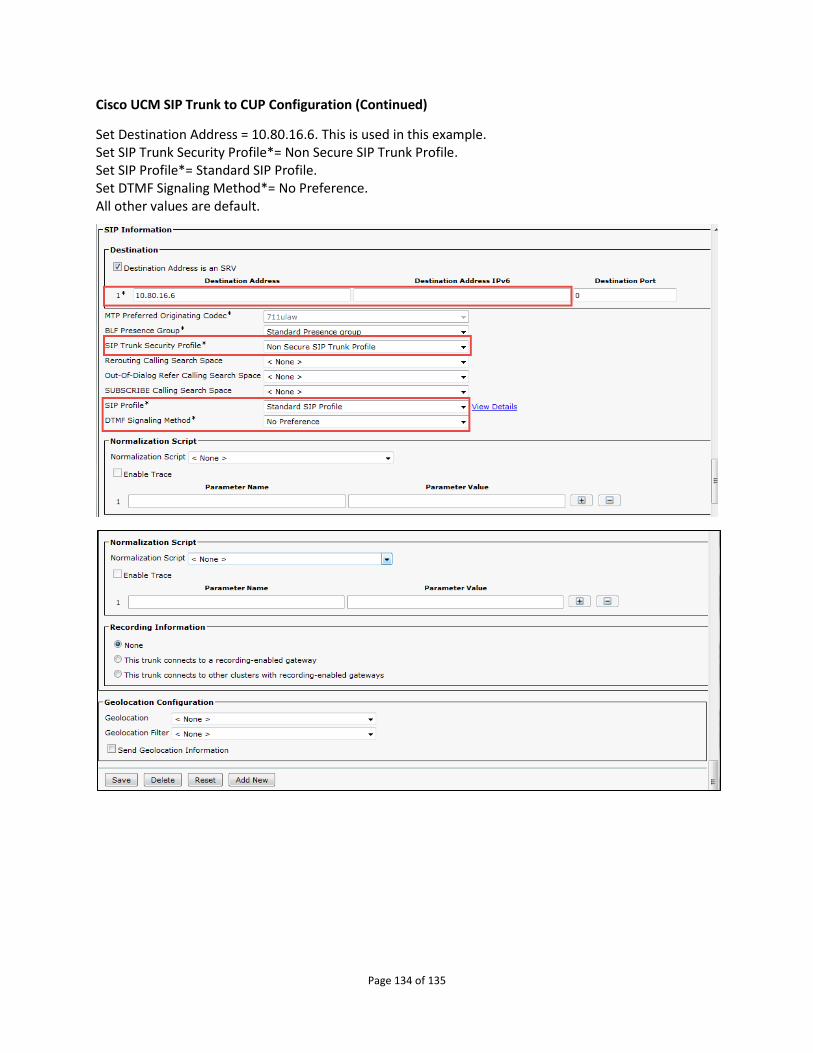
Cisco UCM SIP Trunk to CUP Configuration (Continued)
Set Destination Address = 10.80.16.6. This is used in this example. Set SIP Trunk Security Profile*= Non Secure SIP Trunk Profile. Set SIP Profile*= Standard SIP Profile. Set DTMF Signaling Method*= No Preference. All other values are default.
Page 135 of 135
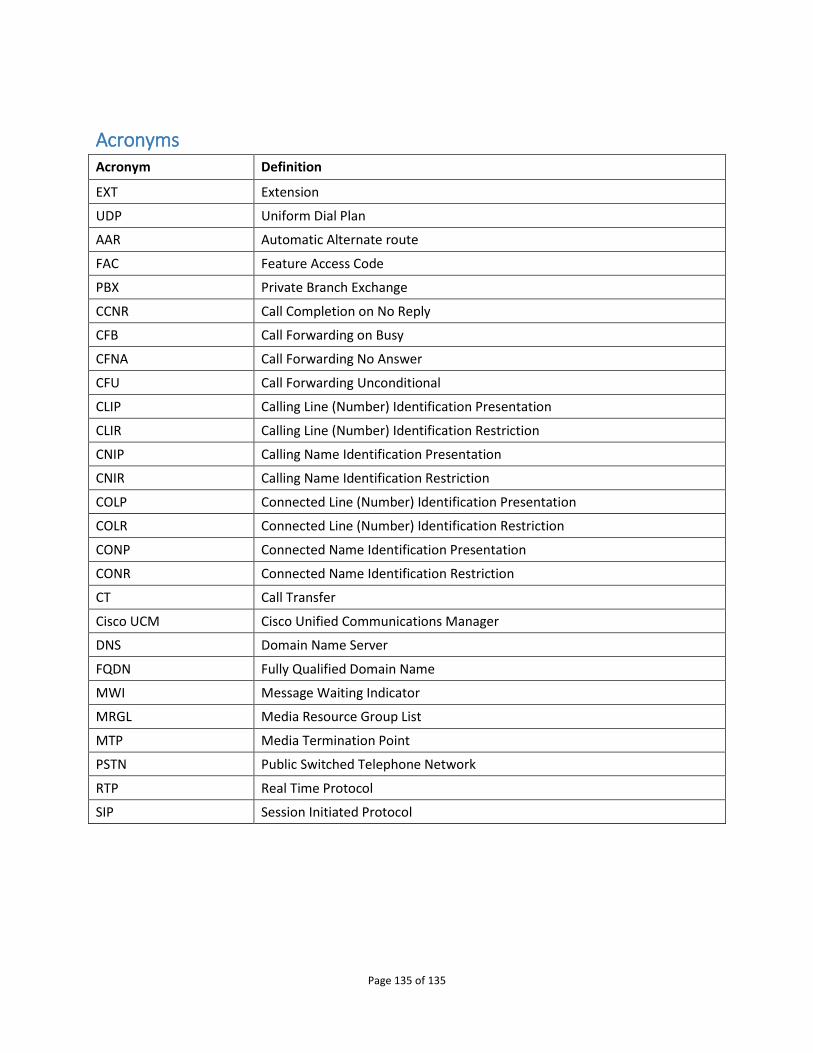
Acronyms Acronym Definition
EXT Extension
UDP Uniform Dial Plan
AAR Automatic Alternate route
FAC Feature Access Code
PBX Private Branch Exchange
CCNR Call Completion on No Reply
CFB Call Forwarding on Busy
CFNA Call Forwarding No Answer
CFU Call Forwarding Unconditional
CLIP Calling Line (Number) Identification Presentation
CLIR Calling Line (Number) Identification Restriction
CNIP Calling Name Identification Presentation
CNIR Calling Name Identification Restriction
COLP Connected Line (Number) Identification Presentation
COLR Connected Line (Number) Identification Restriction
CONP Connected Name Identification Presentation
CONR Connected Name Identification Restriction
CT Call Transfer
Cisco UCM Cisco Unified Communications Manager
DNS Domain Name Server
FQDN Fully Qualified Domain Name
MWI Message Waiting Indicator
MRGL Media Resource Group List
MTP Media Termination Point
PSTN Public Switched Telephone Network
RTP Real Time Protocol
SIP Session Initiated Protocol