Embed Size (px)
Citation preview

0
5
25
75
95
100
aw_MD100_Manual_G10_150412
2015 4 21 15:18:52

1
Music Stand Instruction Manual
12V Adaptor
Congratulations
Congratulations on your purchase of this professional electronic keyboard.
The keyboard is an easy-to-use keyboard with advanced functions especially designed for in self-learning
players and beginners, users can learn playing songs in 3 different ways. The LCD display makes it
easier for users to learn how to play songs in a more directive way.
You are recommended to study this manual carefully before using the unit.
Please make sure the package completely contains the following:
Inside This Package
The Instrument
0
5
25
75
95
100
aw_MD100_Manual_G10_150412
2015 4 21 15:18:52

2
Important Notes
Your keyboard will give you years of playing pleasure if you follow the simple rules
given below:
Location
Do not expose the unit to the following
condit ions to avoid deformation,
discoloration, or more serious damage. Direct sunlight. High temperature (near a heat source,
or in a car during the day time). Excessive humidity. Excessive dust.
Power Supply
Make sure to use the suitable AC adaptor,
and also make sure the AC outlet voltage
at your country matches the input voltage
specified on the AC adaptor s label.Turn the power switch OFF when the
instrument is not in use.An AC adaptor should be unplugged from
the AC outlet if the instrument will not be
used for an extended period of time.Unplug the AC adaptor during electric
storms.Avoid plugging the AC adaptor into the
same AC outlets as appliances with high
power consumption, such as electric
heaters or ovens. Also avoid using multi-
plug adaptors since this could reduce
sound quality, causes operation errors
and damages.
'
's
Turn Power OFF When Making Connections
To avoid damaging the instrument and
other devices to which it is connected,
turn the power switches of all related
devices OFF prior to connecting or
disconnecting cables.
Handling and Transporting
Never apply excessive force to the
controls, connectors or other parts of the
instrument.Always unplug cables by gripping the plug
firmly, but not pulling the cables.Disconnect all cables before moving the
instrument.Physical shocks caused by dropping,
bumping, or placing heavy objects on the
instrument could result in scratches or
even severe damages.
Cleaning
Clean the unit with a soft dry cloth.A slightly dampened cloth may remove
stubborn grime and dirt.Never use cleaners such as alcohol or
thinner.Avoid placing vinyl object on top of the
unit (vinyl might discolor and stick to the
surface).
Electrical Interference
This instrument contains digital circuitry
and may cause interference if it is placed
too close to radio or television receivers.
If this occurs, move the instrument
further away from the receivers.
The normal function of the product may be disturbed by Strong Electro Magnetic If so, simply reset the product to resume normal operation by following the instruction manual. In case the function could not resume, please use the product in other location.
Interference.
Caution!
0
5
25
75
95
100
aw_MD100_Manual_G10_150412
2015 4 21 15:18:52

Main Features
3
KEYBOARD
61-key touch keyboard
OPERATION
Use the Direct Select Button to select "Voices" and "Styles" more conveniently.
VOICE
138 voices in total, including 128 GM Voices, 8 Chinese Voices and 2 Percussion Voices.
STYLE
100 styles in total.
SONG
50 songs in total. Each song has its learning mode.
CHORD MODE
Both Single finger chords and Fingers chords.
CHORD DICTIONARY
Provide chord information for users.
MEMORY FEATURE
Contains 6 memory registers.
STYLE CONTROL
Sync,Start/Stop,Fill In A/Normal,Fill In B/Variation,Intro/Ending
OTHER FEATURES
Dual, Sustain, O.T.S., Record, Demo, Transpose, Octave, Pitchbend wheel, DSP, USB and etc.
NOTE:
Press and hold 【+】and【-】together and to turn the power on simultaneously;
the default setting will be loaded into the keyboard, and the memory will be lost.
0
5
25
75
95
100
aw_MD100_Manual_G10_150412
2015 4 21 15:18:53

Basic Operation.................................
Voices and Effects............................
Style Control.......................................
Connections.......................................
Trouble Shooting....................................
Specifications..........................................
4
General Guide.................................*Front Panel.................................................
*Rear Panel...................................................
*LCD Display...................................................
Preparation...................................*Power Supply...................................................
*Setting the Music Stand.................................
*Headphone Jack........................................
*AUX.OUT Jack...............................................
*Sustain Jack.........................................
*USB Jack.................................................
*Demo......................................................*Power Switch & Volume....................................
*Pitch Bend.............................................
*Octave........................................................
*Select a Voice............................................
*Dual Voice.....................................................
*Sustain...................................................
*DSP Effect..........................................
*Modulation....................................................
*Touch............................................................
*Transpose.....................................................
*Fill A/B.........................................................
*Chord Recognize....................................
*Select a Style..............................................
*Start a Style.............................................
*Stop a Style...............................................
*Tempo.......................................................
*Intro/Ending..........................................
*Accomp Volume...........................................
One Touch Setting..................................
Chord Dictionary..................................
*LESSON....................................... ....................
Song.....................................................
*USB Connection......................................................
*What is MIDI..........................................................
*MIDI Application.............................................
MIDI Function
*Appendix 4 - Chord List...........................................
*Appendix 5 - MIDI List..............................................
*Appendix 2 - Style List................................................
*Appendix 1- Voice List............................................
*Appendix 3 - Song List..........................................
Appendix..........................................
*Memory Bank.....................................................
*Memory Data............................................................
Memory................................................
*Stop Record.........................................................
*Start Record.............................................................
*Playback Record................................................
Record....................................................
Contents
9
9
10
1010
11-14
11
11-12
12
12
13
13
13
14
14
15-21151516171718191920-21
5-6
5-6
6
6
7-87
8
8-9
88-9
22
22
22
23
24
25
25-27
28-29
30-32
30
24
30
24
24
31-32
33
33
34-38
34
35
36
37
38
0
5
25
75
95
100
aw_MD100_Manual_G10_150412
2015 4 21 15:18:53

10 11
5
19
20 21 22
29
2827 2625
23 24
General Guide
Front Panel
2
1
7 8 96
17
3
4 5 12 14 1613 15
18
19
0
5
25
75
95
100
aw_MD100_Manual_G10_150412
2015 4 21 15:18:53

POWER ON/OFF
MASTER VOLUME
STYLES DIRECT SELECTED
ACCOMPANIMENT VOLUME -/+
TEMPO -/+
START/STOP
SYNC
INTRO/ENDING
FILL-IN A
FILL-IN B
AUTO BASS CHORD
CHORD DICTIONARY
LESSON
VOICE
STYLE
SONG
3
4
5
6
7
8
9
10
11
12
13
14
15
16
212
1 -/+ BUTTON
STORE
ONE TOUCH SETTING
PANEL MEMORY
M1-M6
DUAL
TOUCH
SUSTAIN
DSP
DEMO
TRANSPOSE -/+
OCTAVE -/+
RECORD
PLAY/STOP
MODULATION
PITCHBEND
17
21
19
23
25
27
26
28
22
20
24
29
31
18
30
30
31
AUTO BASS CHORD
DUAL
TOUCH
TEMPO
BEAT
VOLUEM
CHORD
STYLE/SONG/VOICE
STORE M1-M6
ONE TOUCH SETTING
CHORD DICTIONARY
LESSON 1
LESSON 2
LESSON 3
BASS CLEF
TREBLE CLEF
61 KEYBOARD
1 2 3 4 5
SUSTAIN
AUX OUT PHONESUSB
LESSON 1
LESSON 2
LESSON 3
12V
1
3
5
2
4
USB JACK
SUSTAIN JACK
AUX OUT JACK
PHONES JACK
12V JACK
910
11
12
13
1415
16
17
6
General Guide
Rear Panel
LCD Display
0
5
25
75
95
100
aw_MD100_Manual_G10_150412
2015 4 21 15:18:54

SUSTAIN
AUX OUT PHONESUSB 12V
7
Preparation
Power Supply
This electronic keyboard can be powered by the current of a standard household wall outlet (using the
specified AC adaptor) or by batteries.
Using The AC Adaptor
Make sure that only the AC adaptor specified for this electronic keyboard is used. The adaptor shall
be 12V DC output, and center positive type. Be sure to turn off the electronic keyboard before you
connect the adaptor into the AC wall outlet and the cord into the unit.
Using BatteriesAlways make sure to turn the keyboard off before inserting new batteries or replacing old ones.
To insert batteries
Open the battery compartment on the bottom of the keyboard.
Insert 6 D-size (SUM-1, R-20) batteries into the battery compartment and follow the correct polarity.
Replace the compartment cover and make sure that it locks firmly in place.
1.
2.
Low battery indications
Any of the following symptoms indicate low battery power. Replace the batteries as soon as possible
whenever any of the following occurs.
A dim and difficult-to-read LCD display.
Abnormally low speaker/headphone volume.
Distortion of the sound output.
Sudden power failure when playing at high volume.
Abnormal rhythms or demo songs are played.
Dimming of the display when playing at high volume.
Use only the specified AC adaptor. Using other types
of adaptor creates the risk of fire and electrical shock.
For safety sake, be sure to unplug the AC adaptor
from the wall outlet whenever leaving the electronic
keyboard unattended for a long time.
When inserting batteries, make sure to follow the
polarity marking.
Never use batteries of different types.
Never mix old batteries with new ones.
Replace the batteries as soon as possible after any
sign of discharge.
Always remove the batteries from the battery
compartment when the keyboard is not expected to
be used for a long period of time.
CAUTIONS!
CAUTIONS!
0
5
25
75
95
100
aw_MD100_Manual_G10_150412
2015 4 21 15:18:54

SUSTAIN
AUX OUT PHONESUSB 12V
8
Preparation
Setting Music Stand
Please set up the music stand as the instruction below:
Connections
Headphone Jack
AUX.OUT Jack
If you prefer to play with headphone for high quality personal monitoring, plug a set of stereo headphone
into the rear panel PHONES jack.
Plug a set of headphone into the PHONES jack and the speakers will be shut automatically.
1.
1.
2.
2.
The AUX. OUT jack delivers the output signal of the keyboard to an external amplifier.
Use an audio cord to plug into the AUX. OUT jack located on the rear panel; then plug the other end
of the cord into LINE IN or AUX. IN of the amplifier.
NOTE:
Never use headphones in high volume,
as it may hurt your ears.
0
5
25
75
95
100
aw_MD100_Manual_G10_150412
2015 4 21 15:18:54

SUSTAIN
AUX OUT PHONESUSB 12V
SUSTAIN
AUX OUT PHONESUSB 12V
9
Connections
NOTE:
To avoid damaging of the speakers, please
ensure that the volume has set to the mini-
mum level before connecting the power and
other devices.
Sustain Jack
USB Jack
An optional footswitch can be plugged into the SUSTAIN jack for sustain control.
The footswitch functions like the damper pedal of a piano. Press for sustain, release for normal sound.
Connect PC or other USB host devices that support USB Audio.
For devices with USB cable, after the driver is installed and initialization is finished, you can choose USB Audio
Device in the device menu of the software to transfer midi data.
1.
1.
2.
2.
To avoid damages, turn the power switches of
this keyboard and all related devices OFF if you
want to plug in or unplug between this instru-
ment with all related devices.
WARNING
0
5
25
75
95
100
aw_MD100_Manual_G10_150412
2015 4 21 15:18:54

POWER
ON
OFF
DEMO
DEMOSTART/STOP
VOLUME
10
Basic Operation
Power Switch & Volume
Demo
Turn the 【POWER】 switch on. The LCD display lights up.
There are total 50 demos. (See appendix)
Press 【DEMO】 button to play demo songs.
You can select a demo song with【 -】 / 【+】 button
The name of demo will appear on the LCD.
Press the 【DEMO】 or 【START/STOP】 button to exit from the demo mode.
1.
1.
2.
3.
Use the 【VOLUME】 control switch to adjust the volume to
your desired level.
2.
NOTE:
If the LCD display does not light up after you
turned on the keyboard, please check the
power supply.
If the keyboard is silent, that means the
volume has adjusted to its minimum level.
NOTE:
In the demo mode, all function keys except
DEMO, START/STOP, TEMPO, +/-, VOLUME,
POWER ON/OFF will be voided.
0
5
25
75
95
100
aw_MD100_Manual_G10_150412
2015 4 21 15:18:54

VOICE STYLE SONG
DUAL
11
Voices and Effects
There are 138 voices in total (See appendix), including 128 GM voices, 8 Chinese voices,
and 2 percussion voices.
Select a Voice
Dual Voice
1.
1.
2.
3.
Press 【+】/【-】 button or use the Direct Select Button to select the voice you want.
After selecting a voice, you can now play the keyboard.
Direct Select Button
Use the Direct Select Button to select a voice(among 30 voices),
2 direct voices for each button(upper & nether key)
Press VOICE button to enter voice mode .The default VOICE R1 is No:01;
LCD displays and the voice number.
【 】 " "
"VOICE 1"
NOTE:
rules:
If you press the same button, the voice will be
changed between the upper and nether key.
When the upper/nether voice is on, and then
you press another direct button, the corres-
ponding upper/nether voice will be selected.
While changing a voice, pay attention to the
This keyboard has a dual voice function. This function is capable to enhance the delicacy of your music by playing
two voices of musical instruments simultaneously; new combinations of voices and music could be created then.
When the dual function is off, the voice indicated is VOICE 1, when the dual function is on, the voice indicated is
VOICE 2.
" "
During the VOICE 1 status, press [DUAL] button to enter the dual voice function. VOICE R2 and DUAL signal
would be lightened simultaneously. The number of the dual voice will be displayed on the LCD.
Two selected voices will be overlapped at the same time.
" " " "
0
5
25
75
95
100
aw_MD100_Manual_G10_150412
2015 4 21 15:18:55

SUSTAIN
12
Voices and Effects
Press DUAL button again to turn off the dual voice function.【 】
2.
2.
3.
4.
1.
To select your desired 'voice 2',press【+】/【-】 button, or to select by the Direct Select Button.
To experience the dual voice effect, play any note on the keyboard.
NOTE:
sustain effect is stronger than the effect
by pressing the 【SUSTAIN】 button.
When you step on the 'sustain pedal', its
NOTE:
of keyboard has dual voice.
In DUAL VOICE status, only the right section
Sustain
This function helps you to get a voice with a sustained effect, while playing the keyboard.
Press 【SUSTAIN】 button to activate the sustain effect. The "SUSTAIN flag" show up on the display.
Press 【SUSTAIN】 button again to eliminate the sustain
effect. The "SUSTAIN flag" will disppear.
DSP
DSP Effect
This function allows you to perform the overall sound in a more realistic style.
The DSP effect is set to ON when keyboard power on.
Press 【DSP】 button to turn off the DSP effect.
1.
2.
Two voice will sound
at the same time.
0
5
25
75
95
100
aw_MD100_Manual_G10_150412
2015 4 21 15:18:55

33
34
33
34
13
Voices and Effects
Pitch Bend
Modulation
Touch
The pitch band wheel can be used to bend the note upwards or downwards, range between +/- 2 cent.
When the wheel is released, the note will return back to the normal status.
higher(+2)cent
lower(-2)cent
Press and hold MODULATION button. You can hear the modulation effect while playing the keyboard.
Release the button to exit the modulation effect.
【 】
NOTE:
of the keyboard has the modulation effect.
In MODULATION status, only the right section
This function allows you to turn on the dynamic level while playing the keyboard.
The LCD will display the touch value . If the touch function is disabled, there will be no touch response. " " " "
To experience the effect, play any note on the keyboard after you turn it on.
TOUCH
1.
2.
0
5
25
75
95
100
aw_MD100_Manual_G10_150412
2015 4 21 15:18:55

TRANSPOSE
TRANSPOSE
OCTAVE
OCTAVE
14
Voices and Effects
Transpose
Octave
You can change the key of the entire keyboard with the TRANSPOSE function by adjusting the
pitch in semitone steps..
Press 【TRANSPOSE +】 or 【TRANSPOSE -】 button to the Transpose setting mode.
The LCD will display the current transpose value. The default octave value is 00.
Use 【TRANSPOSE +】/【TRANSPOSE -】to adjust the value from 12 to +12 semitones.
Press 【TRANSPOSE +】 and 【TRANSPOSE -】 simultaneously to set the default value: 00.
1.
1.
2.
2.
3.
NOTE:
after entering the Transpose setting mode,
it will quit this menu automatically.
If you don't press any button for 5 seconds
NOTE:
after entering the Octave setting mode,
it will quit this menu automatically.
If you don't press any button for 5 seconds
Press 【OCTAVE +】 or 【OCTAVE -】 button to set the Octave mode.
The LCD will display the current octave value. Use 【OCTAVE +】/【OCTAVE -】to change the octave value.
This function can change the key to 1 octave up or down.
Press 【OCTAVE +】 and 【OCTAVE -】 simultaneously to set the tune value back to its default.
The default octave value is 00.
0
5
25
75
95
100
aw_MD100_Manual_G10_150412
2015 4 21 15:18:56

VOICE STYLE SONG
START/STOP SYNC INTRO/ENDING FILL-IN A FILL-IN B
15
Style Control
The keyboard has a total of 100 styles, from 1 to 100. The default style is 01.
Press 【STYLE】 button to set the keyboard to the style mode . The STYLE flag and the
style number will show up on the display.
" " " "
Select a Style
Start a Style
1.
1.
2.
3.
Press 【+】/【-】 button or use the Direct Select Button to select the voice you want.
After a style is selected, you can then play the keyboard.
Use the Direct Select Button to select your desired style
(among 24 styles), 2 direct styles for each button
(upper & nether).
Direct Select Button
NOTE:
rules:
If the same button has been pressed twice, the
style will be swapped from one to another.
When the upper/nether style is on, and you
then press another direct button, the
corresponding upper/nether style will be
selected.
While changing a style, pay attention to the
Start button:
Use START/STOP button to start the style.【 】
0
5
25
75
95
100
aw_MD100_Manual_G10_150412
2015 4 21 15:18:56

A.B.C.
LESSON 1
LESSON 2
LESSON 3
Flash simultaneously
Chord area
INTRO/ENDING
16
Style Control
2.
3.
4.
Press A.B.C button to set the A.B.C mode on. The A.B.C flag will appear on the LCD. Under this mode,
the keys below the split point are known as the CHORD area.
【 】
NOTE:
" " " "
"
"
" "
There are 2 ways to detect the chord:
single finger detect and multi fingers detect .
If a chord played has been detected in notes
more than one, it is recognized as the multi
fingers chord .
If not, single finger chord will be recognized.
A.B.C. mode
Sync Start
Intro Start
Press SYNC button. There will be 4 beats flashing simultaneously on the screen according to the current
tempo.
【 】
START/STOP SYNC INTRO/ENDING FILL-IN A FILL-IN B
NOTE:
If A.B.C. mode is off, play any key on the
keyboard to start a style.
If A.B.C. mode is on, play only the chord area
key to start a style with the Auto Bass Chord
accompaniment.
Press the 【INTRO/ENDING】button to insert an intro section before you start to play .
The intro section will be followed by the main section.
There are two main sections, "normal" and "variation". It has its own two or four-measure section.
0
5
25
75
95
100
aw_MD100_Manual_G10_150412
2015 4 21 15:18:57

INTRO/ENDING
17
Style Control
START/STOP SYNC INTRO/ENDING FILL-IN A FILL-IN B
START/STOP SYNC INTRO/ENDING FILL-IN A FILL-IN B
START/STOP SYNC INTRO/ENDING FILL-IN A FILL-IN B
Stop immediately
Use START/STOP button to start a style.【 】
Ending stop
Press the 【INTRO/ENDING】button if you
want to proceed to the ending section and then
stop.
The ending section will begin from the top of
the next measure.
Sync stop
Press the 【SYNC】button to stop playing, and
the synchronized start mode will be activated.
Stop a Style
Intro/Ending
1.
2.
3.
1.
2.
3.
This function is applicable to add in the beginning / ending of a style. Its length varies in
different styles.
When the INTRO/ENDING mode is processing, or the LCD will be flashing until
the mode finishes.
" " "NOR " "VAR " above
If you press the INTRO/ENDING button before starting a style, this key will be used as the INTRO function. 【 】
Press START/STOP or SYNC and the style will begin with a fill in intro. When a style is playing,
hit this key as an ENDING function.
【 】 【 】
START/STOP SYNC
NOTE:
After you pressed FILL-IN A and then pressed
the【INTRO/ENDING】 button, the NOR flag
will be flashing.
After you pressed FILL-IN B and then pressed
the【INTRO/ENDING】button, the VAR flag
will be flashing.
0
5
25
75
95
100
aw_MD100_Manual_G10_150412
2015 4 21 15:18:57

FILL-IN A
FILL-IN A
FILL-IN B
FILL-IN B
18
Style Control
Fill A/B
Choose the desired style and press the 【START/STOP】button.
Press the【FILL-IN A】button, the fill a-a or fill b-a will begin immediately and smoothly lead into the
"normal style". LCD will display "NOR".
Press the【FILL-IN B】button, the fill a-b or fill b-b will begin immediately and smoothly lead into the
"variation style". LCD will display "VAR".
Playing FILL IN A / FILL IN B section
In NORMAL mode, press 【FILL-IN A】 button to insert 1 measure fill in and LCD will flash out 'NOR'.
After one measure is over, NORMAL style will be returned.
In VARIATION mode, press 【FILL-IN B】 button to insert 1 measure 'VAR',
After one measure is over, VIRIATION style will be returned.
fill in and LCD will flash out
In NORMAL mode, press 【FILL-IN B】 button to insert 1 measure 'VAR'.
After one measure is over, VARIATION style will be started.
fill in and LCD will flash out
In VARIATION mode, press 【FILL-IN A】 button to insert 1 measure 'NOR' .
After one measure is over, NORMAL style will be started.
fill in and LCD will flash out
1.
2.
3.
4.
NOTE:
Press 【FILL-IN A】, when the style stops, it will be changed to the "normal section", the 'NOR' flag on the LCD
will be lightened.
Press 【FILL-IN B】, it will be changed to the "variation section", the 'VAR' flag on the LCD will be lightened.
Hold down the button when a style is playing, the FILL pattern repeats continually until you release the button.
0
5
25
75
95
100
aw_MD100_Manual_G10_150412
2015 4 21 15:18:57

ACC.VOL
ACC.VOL
ACC.VOL
TEMPO
TEMPO
19
Style Control
Tempo
Accomp Volume
Press the 【TEMPO+】 or 【TEMPO-】 button to change the tempo.
Press 【TEMPO+】 and 【TEMPO-】 simultaneously to set the tempo value back to its default one.
1.
1.
2.
3.
2.
NOTE:
will be change with the style automatically to
the default one. When a style is playing, the
tempo will not change along with the style.
Selecting a style when it stops, the tempo
Press 【ACC.VOL+】 or 【ACC.VOL-】 button to adjust the ACCOMP volume. The LCD displays the ACCOMP
volume ranges between 0 and 31.(Default ACCOMP value is 26.)
Press 【ACC.VOL+】 and 【ACC.VOL-】 buttons together to turn off the ACCOMP volume.
Press 【ACC.VOL+】 and 【ACC.VOL-】 buttons together again to turn on the ACCOMP volume.
0
5
25
75
95
100
aw_MD100_Manual_G10_150412
2015 4 21 15:18:58

20
Style Control
Chord Recognize
"A.B.C." is off the default mode " "
function, the A.B.C. flag on the LCD is lightened. The left section of the keyboard is known as the "chord area",
while playing the chord, both the bass and the chord voices phonate.
on the keyboard is . Press 【A.B.C.】 button to turn on this auto bass chord
There are 2 ways to detect the chord: "single finger detect" and "multi fingers
detect".
Single Finger
If the chord played is based on "multi fingers detect", it is recognized as the "multi fingers chord".
If not, "single finger chord" will be recognized.
A.B.C.
Multi Finger
NOTE:
on the Chord Root priority, some chords that
could be played under the Chord Dictionary
may not be recognised by A.B.C. , eg. B6、
bB6、B6(9)、bB6(9)、Baug、bBaug、
bBm6、Bm6、Adim7、bBdim7、Bdim.
Since the chord detection of A.B.C. is based
NOTE:
When A.B.C. is on, press the keys on the left
of split point. The chord will be recognized as
single finger chords.
Single finger type not only can detect single finger but also can detect multi finger. And the single finger makesit easily to play chords through only one, two or threekeys. Including major, minor, seventh, and minorseventh chord. Refer to relevant picture on the right for details.
Multi finger type only can recognize those chords have listed in the chord list, and also can be found in the dictionary function.
0
5
25
75
95
100
aw_MD100_Manual_G10_150412
2015 4 21 15:18:58

21
Style Control
Chord BasicsA chord, in music, is any harmonic set of three or more notes that is heard as if sounding simultaneously. The most frequently encountered chords are triads. A triad is a set of three notes that can be stacked in thirds. When stacked in thirds, the triad's members, from lowest pitched tone to highest, are called: the Root, the Third, and the Fifth.
Triad TypeThere are following basic triad types:
Chord InversionWe define this chord its root is not in the bass (i.e., is not the lowest note) as an inversion chord. When the root is in the bass, we call the chord: root-position chord. If we put the Third and Fifth in the root position, then it forms Inversion, we call this chord Inversion Chord. See the following major triad and its inverted chord.
Chord NameThe chord name contains two parts content: Chord root and Chord type.
Major Triad
Minor Triad
Augmented Triad
Diminished
A root with a major third added above and a perfect Fifth will consist as a Major Triad.
A root with a minor third added above and a perfect fifth will consist as a Minor Triad.
A root with a major third added above and an augmented fifth will consist as an Augmented Triad.
A root with a minor third added above and a diminished fifth will consist as a Diminished Triad.
0
5
25
75
95
100
aw_MD100_Manual_G10_150412
2015 4 21 15:18:58

STOREM3M2 M4 M5
ONE TOUCH SETTING
M1 M6
22
Memory
Memory bank
Memory Date
Press and hold STORE , press M1 (or M2 - M6 ) meanwhile. The data will be stored to the
M1 (M2-M6),LCD displays the memory number MEM 1.
【 】 【 】 【 】 【 】
Press any of the M1 - M6 button. LCD will display
MEM 1- MEM 6.
Use + / - button to select the bank you want.
【 】 【 】
【 】 【 】
VOICE DATA
VOICE:VOICE R1, VOICE R2, and VOICE LOWER;
VOICE EFFECT:TOUCH NUMBER, DSP ON/OFF, SUSTAIN, ON/OFF, TRANSPOSE VALUE, TUNE, OCTAVE.
ACCOMP DATA
STYLE NUMBER, TEMPO, BEAT, A.B.C ON/OFF, ACCOMP VOLUME, NORMAL/VARIATION STATUS.
MIXER VOLUME
VOICE R1 VOLUME, VOICE R2 VOLUME, VOICE LOWER VOLUME, DRUM VOICE, BASS VOLUME,
OC1, OC2, OC3 VOLUME.
Press + and - simultaneously, the
memory data will return to the default value.
Please note that it will clear the record data.
【 】 【 】
1.
2.
2.
1.
3.
3.
NOTE:
current memory data, the corresponding
memory flag on the LCD will flash.
If the current data is not the same as the
0
5
25
75
95
100
aw_MD100_Manual_G10_150412
2015 4 21 15:18:58

O.T.S
O.T.S
23
One Touch Setting
Press 【O.T.S】 button to turn this mode on and lighten the O.T.S. flag on the LCD.
Press any of the【M1】 ~ 【M4】 button, it will load the relative type of parameter according to the
current style. M1 and M2 store the parameters for the normal style, while M3 and M4 store the parameters
for the "variation style". The keyboard will turn the A.B.C. mode on automatically while the O.T.S. is on.
Press any of the M1-M4 buttons, which is corresponded to your desired setting.
When One Touch Setting is switched on, you can instantly recall all auto accompaniment related settings including voices selection and digital effects simply with a single touch of a button.In this function, 4 types of parameters (M1~M4) will be loaded for operating the current style.
M3M2 M4 M5ONE TOUCH SETTING
M1 M6
M3M2 M4 M5ONE TOUCH SETTING
M1 M6
1.
2.
When a style is playing, press 【O.T.S】 to turn the O.T.S mode on; it will insert a "Fill in " section automatically.
Insert "FILL-IN A'' when 【M1】or【M2】button is pressed. Insert "FILL-IN B" when【M3】or【M4】button is
pressed.
3.
Press 【O.T.S】 button again to turn off the O.T.S. Mode.4.
The parameters stored in the O.T.S. including:
VOICE R1, VOICE R2, OCTAVE(R1/R2) and VOLUME.
5.
NOTE:
recorded song, press any of the【M1】~
【M4】button, no "FILL IN" will be inserted.
While you are recording or playing back a
0
5
25
75
95
100
aw_MD100_Manual_G10_150412
2015 4 21 15:18:59
PLAY/STOPRECORD
PLAY/STOPRECORD
24
Record
Start Record
Stop Record
Playback Record
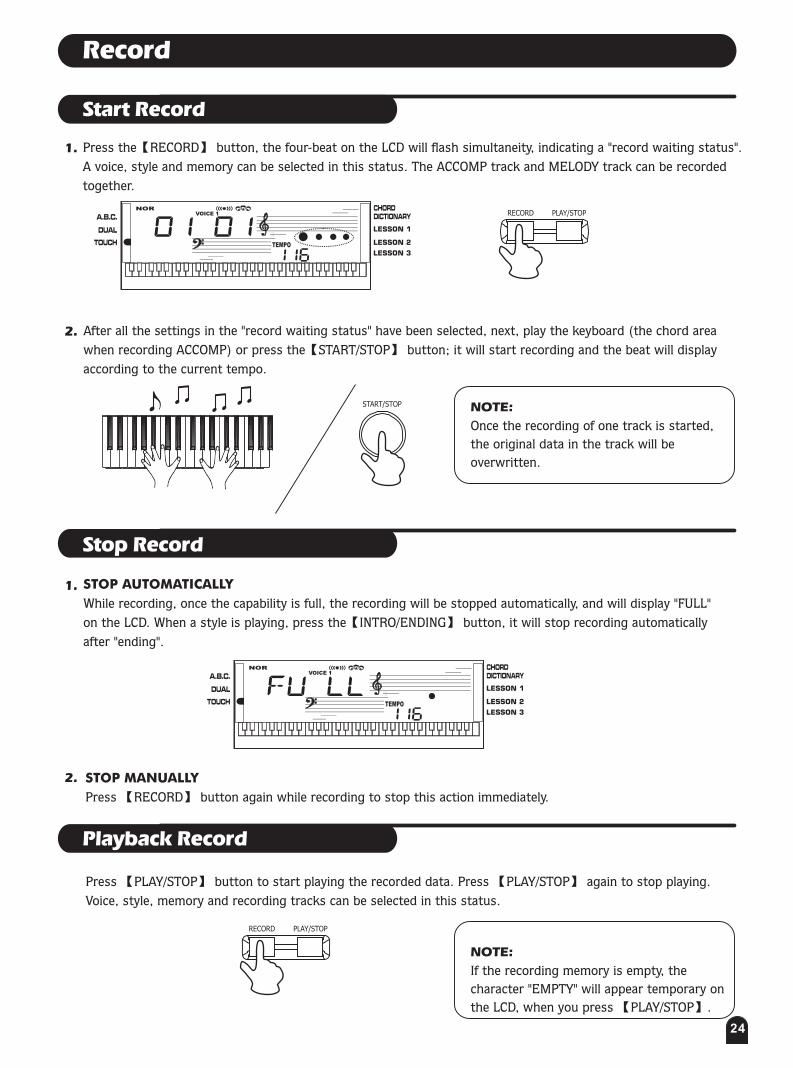
Press the【RECORD】 button, the four-beat on the LCD will flash simultaneity, indicating a record waiting status .
A voice, style and memory can be selected in this status. The ACCOMP track and MELODY track can be recorded
together.
" "
After all the settings in the "record waiting status" have been selected, next, play the keyboard (the chord area
when recording ACCOMP) or press the【START/STOP】 button; it will start recording and the beat will display
according to the current tempo.
STOP AUTOMATICALLY
While recording, once the capability is full, the recording will be stopped automatically, and will display "FULL"
on the LCD. When a style is playing, press the【INTRO/ENDING】 button, it will stop recording automatically
after "ending".
START/STOP
1.
1.
2.
2.
NOTE:
the original data in the track will be
overwritten.
Once the recording of one track is started,
NOTE:
If the recording memory is empty, the
character "EMPTY" will appear temporary on
the LCD, when you press 【PLAY/STOP】.
Press 【PLAY/STOP】 button to start playing the recorded data. Press 【PLAY/STOP】 again to stop playing.
Voice, style, memory and recording tracks can be selected in this status.
STOP MANUALLY
Press 【RECORD】 button again while recording to stop this action immediately.
0
5
25
75
95
100
aw_MD100_Manual_G10_150412
2015 4 21 15:18:59

SONG STYLE SONG
25
Song
There are 50 songs in total (see Appendix). Each song can be practised in the LESSON mode.
START/STOP the song
Press 【SONG】 button to enter the song mode , the song flag on the LCD will show up.
Then press【START/STOP】or【SONG】button, it will play the current song repeatedly.
Press 【START/STOP】or【SONG】 button again to stop playing the song, but it will not
quit the song mode.
" "
SELECT the song
Use 【+】/【-】button to select the song that you want.
Press 【LESSON】 button to enter the lesson mode There are 3 different ways to practise the songs." ".
When the song is stopped, press 【CHORD DICTIONARY】,【STYLE】,【VOICE】, 【DUAL】 or
voice/style Direct Select Button to exit the song mode.
1.
2.
3.
4.
In song mode , press the【LESSON】 button to enter the lesson mode. " "
The song mode includes LESSON 1/2/3.
Lesson
CHORDDICTIONARY LESSON
0
5
25
75
95
100
aw_MD100_Manual_G10_150412
2015 4 21 15:18:59

26
Song
Press the【LESSON】 button again to enter the lesson 2 mode, the lesson 2 flag will be lightened on the LCD.
This mode focuses on notes practising, instead of time accuracy.
Once you have played the correct note, the song will continue to play to the next note.
The 3 levels of the lessons are as follows:
LESSON 1
LESSON 2
Press 【LESSON】 button to enter the lesson 1 mode, the lesson 1 flag will be lightened on the LCD.
This mode focuses on time practising, instead of notes accuracy.
1.
2.
CHORDDICTIONARY LESSON
CHORDDICTIONARY LESSON
Press the 【START/STOP】 button, and then play the keyboard to start the LESSON.
START/STOP SYNC INTRO/ENDING FILL-IN A FILL-IN B
Press the【START/STOP】 button and start playing the keyboard with the "LESSON" function.
START/STOP SYNC INTRO/ENDING FILL-IN A FILL-IN B
0
5
25
75
95
100
aw_MD100_Manual_G10_150412
2015 4 21 15:19:00
27
Song
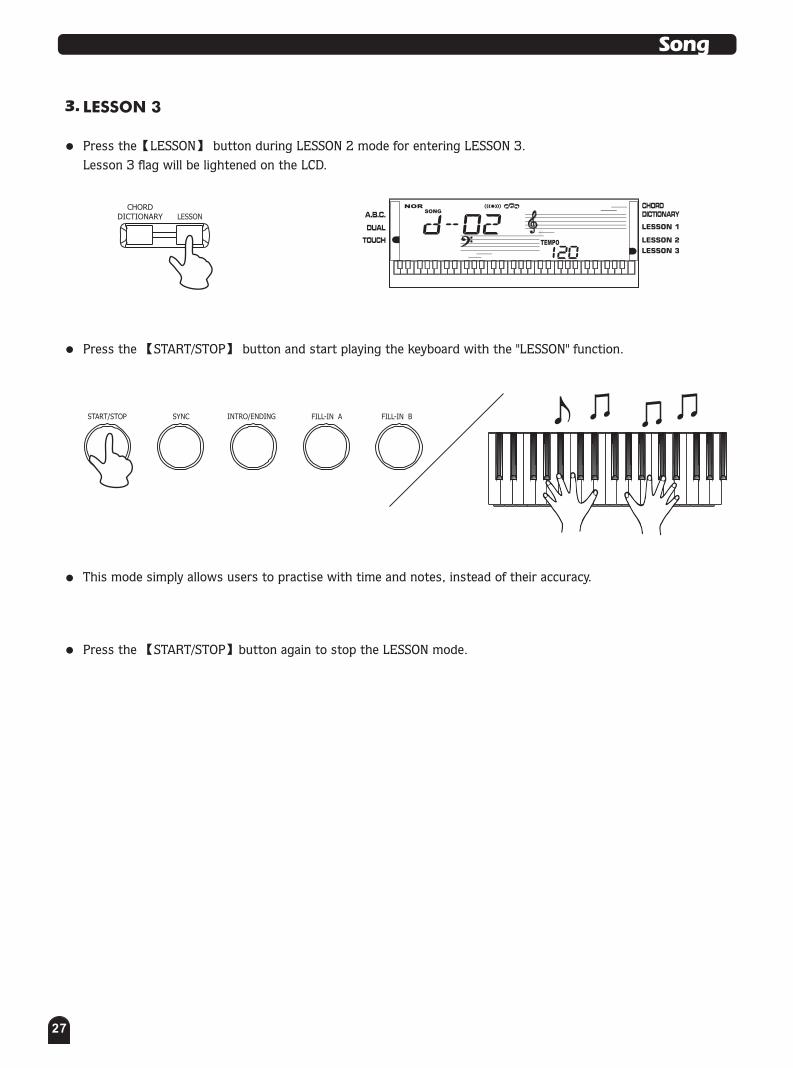
Press the【LESSON】 button during LESSON 2 mode for entering LESSON 3.
Lesson 3 flag will be lightened on the LCD.
This mode simply allows users to practise with time and notes, instead of their accuracy.
Press the 【START/STOP】button again to stop the LESSON mode.
LESSON 33.
CHORDDICTIONARY LESSON
Press the 【START/STOP】 button and start playing the keyboard with the "LESSON" function.
START/STOP SYNC INTRO/ENDING FILL-IN A FILL-IN B
0
5
25
75
95
100
aw_MD100_Manual_G10_150412
2015 4 21 15:19:00

CHORD ROOT
C
CHORD TYPE
(m7)
28
Chord Dictionary
Chord dictionary is a function which helps you to check for the chord notes.
Press 【CHORD DICTIONARY】 button to enter the DICT mode. The chord dictionary flag on the LCD will be
lightened. In this mode, the keys above "C4" are used to assign as the Chord Type, the keys above C6 are
used to assign as the Chord Root.
" "
For example , if we want to play a Cm7 CHORD. Press the C key in the section of the keyboard labeled
"CHORD ROOT". (The note does not note sound) The root note you set will be shown on the display.
" "
Press the m7
The notes you should play for the specified chord (root note and chord type) are shown in the display
as the notation and also in the keyboard diagram.
" " key in the section of the keyboard which has labeled "CHORD TYPE" (The note does not sound).
Individual notes of chord(keyboard)
Chord name (root and type)
Notation of chord
CHORDDICTIONARY LESSON
1.
2.
3.
0
5
25
75
95
100
aw_MD100_Manual_G10_150412
2015 4 21 15:19:01

29
Chord Dictionary
When the Chord Type and Chord Root are confirmed, the LCD will display the chord and its keyboard position.
A bell sound will be heard when you play it correctly.
Press 【CHORD DICTIONARY】 button again to turn off the Chord Dictionary.
Some fingerings may be recognised as different chords by A.B.C. , eg. B6、bB6、B6(9)、bB6(9)、
Baug、bBaug、bBm6、Bm6、Adim7、bBdim7、Bdim.
4.
5.
6.
7.
8.
Specify and play the chord type and the chord root that you would like to play on the keyboard as follow:
24 chords will be displayed in the dictionary mode as follows:
Chord Root :
Note Chord Root Note Chord Type
C6 C F6# F#/Gb
C6# C#/Db G6 G
D6 D A6b Ab/G#
E6b Eb/D# A6 A
E6 E B6b Bb/A#
F6 F B6 B
Note Chord type Note Chord
type
C4 M C5 7(b9)
C4# M(9) C5# 7(9)
D4 6 D5 7(#9)
E4b mM7 E5b 7(b13)
E4 M7 E5 7(13)
F4 m F5 7(#11)
F4# m(9) F5# dim7
G4 m6 G5 dim
Ab4 m7(9) A5b 7aug
A4 m7 A5 aug
B4b m7b5 B5b 7sus4
B4 7 B5 sus4
Chord Type:
CHORDDICTIONARY LESSON
0
5
25
75
95
100
aw_MD100_Manual_G10_150412
2015 4 21 15:19:01

30
MIDI Function
What is MIDI
USB Connection
MIDI stands for Musical Instrument Digital Interface
that is the standard interface between a PC and other
electronic instrument(s).
USB connection can be used for midi data transference
with computer or other USB host devices that support
USB audio device with an USB cable.
The keyboard can be connected to the PC or other USB
host device with an USB interface.
Use the keyboard as a tone generator, the data (MIDI)
recorded on the PC or other USB host devices can be
played on the keyboard.
" ",1.
System Requirements
CPU: 300 MHz or higher, Pentium 2
Memory: 64MB or more
Hard Disk: at least 2 MB of free base
OS: WINDOWS 2000/XP
1.
The Method of Connection
Connect a standard USB cable between the rear-panel
of the USB jack of the instrument and the USB jack
on your computer (USB cable sold separately).
2.
USB PrecautionsPlease observe the following precautions when conne-
cting the instrument to a computer via a USB cable.
Failure to do so can cause the instrument and/or the
computer to hang up(freeze), possibly causing
corruption or losing the data.
If the instrument or computer does hang up, turn the
power of both devices off and then turn it on again
after a few seconds.
3.
2.
3.
4.
NOTE:
While a recording is playing back and a style is
playing, you can not use the MIDI IN function,
or the song you are playing will have error
occurs for the same channel.
Activate the computer from a sleep/suspended/
standby mode before connecting the USB cable.
Connect the USB cable to the instrument and
a computer before turning the power of the
instrument on.
CAUTIONS!
0
5
25
75
95
100
aw_MD100_Manual_G10_150412
2015 4 21 15:19:01

31
MIDI Function
MIDI Application
The keyboard can control other equipments or electronic instruments.
Some equipments can be used to control the keyboard.
PC recorded data (MIDI) can be played on the keyboard.
In order to transfer songs between your computer and the keyboard you will need to install other applications.
1.
2.
3.
4.
0
5
25
75
95
100
aw_MD100_Manual_G10_150412
2015 4 21 15:19:01

32
Specifications
Trouble Shooting
LCD display
Keys
Voice
Polyphony
Style
Demo Song
Control button
Accompaniment Control
Record Function
Panel Memory
Power Supply
Connectors
Speaker
Dimension
Weight
Attachment
No matter the instrument is turned on or off, a popping sound will be temporarily produced.
There is no sound even when the keyboard is played or when a song or style is being played.
The volume is too soft.The sound quality is poor.The rhythm stops unexpectedly or not responding.The recorded data of the song is not playing correctly.The LCD display suddenly goes dark, and all panel settings are reset.
This is normal and indicates that the instrumentis receiving electrical power.
Check if any cable or headphone is connected to the PHONES jack on the rear panel. When a set of headphonesis plugged into this jack, no sound is output.
The batteries are low or dead. Replace all six batteries with completely new ones, or use the optional AC adaptor.
Problem Possible Cause and Solution
4Ω 10w x 2
970(L)x350(W)x135(H)mm
5kg(without batteries)
Adaptor, Music stand, manual
Multi-functional LCD
61 keys with Touch Response
138 Voices
64-note polyphony(max)
100 Styles
50 Demo songs
12V
Power on/off, Volume,Accomp Volume,Tempo +/-,Chord Dictionary,
Lesson, Voice, Style, Song, O.T.S. , M1-M6, Store, Start/Stop, Sync,
Intro/Ending, Fill-in A, Fill-in B, A.B.C. Record, Play/Stop, Dual, Touch,
Sustain, DSP, Demo, Transpose +/- , Octave +/-, +/-
Start/Stop, Sync, Intro/Ending, Fill-in A, Fill-in B
Record, Play/Stop
24 Memory Storage
AC Power, Headphones, Aux.Out, Sustain, USB
All specifications and appearances are subject to change without notice.
0
5
25
75
95
100
aw_MD100_Manual_G10_150412
2015 4 21 15:19:01

91
Poly Synth
92
Cho ir
93
Bowed
94
Metallic
95
Halo 96
Sweep
97
Rain
98
SoundTrk
99
Crystal
100
Atmosphr
101
Bright
102
Goblins
103
Echoes
104
Sci-Fi
105 Sitar
106 Banjo
107 Shamisen
108 Koto
109 Kalimba
110 Bag Pipe
111 Fiddle
112 Shanai
EFFECTS
ETHNIC
113 Tinkle Bell
114 Agogo
PERCUSSIVE
115
Steel Drums
116
Woodblock
117
Taiko Drum
118
Melodic Tom
119
Synth Drum
120
Reverse Cymbal
121
Gt Fret Noise
122
Breath Noise
123
Seashore
124
Bird Tweet
125
Telephone Ring
126
Helicopter
127
Applause
128
Gunshot
SOUND EFFECTS
136
137
138
132 133 134
135
CHINESE INSTRUMENT
129
Pipa
Guzheng
Yangqin
Erhu
Hi-sola
Lushen
Qudi
Xiao
130
131
Standard drum
ChinesePercussion
DRUM SET
33
45 Tremolo Strings
46 Pizzcato Strings
47 Harp
48 Timpani
49 Strings 1
50 Strings 2
51 Synth Strings 1
52 Synth Strings 2
53 Choir Aahs
54 Voice Ooh
55 Synth Voice
56 Orchestra Hit
57 Trumpet
58 Trombone
59 Tuba
60 Muted Trumpet
61 Horn
6 2 Brass Ensemble
63 Synth Brass 1
64 Synth Brass 2
65 Soprano Sax
66 Alto Sax
67 Tenor Sax
68 Baritone Sax
69 Oboe
70 English Horn
71 Bassoon
72 Clarinet
73 Piccolo
74 Flute
75 Recorder
76 Pan Flute
77 Blown Bottle
78 Shakuhachi
79 Whistle
80 Ocarina
81 Square
82 Sawtooth
83 Calliope
84 Chiff
85 Charang
86
Voice
87
Fifths
88
Bass Lead
89 Fantasia
90 Warm
STRING ENSEMBLE
BRASS
REED
PIPE
LEAD
PAD
01 Grand Piano
02 Bright Piano
03 El Grd Piano
04 Honky-Tonk Piano
05 Elec Piano 1
06 Elec Piano 2
07 Harpsichord
08 Clavi
09 Celesta
10 Glockenspiel
11 Music Box
12 Vibraphone
13 Marimba
14 Xylophone
15 Tubular Bell
16 Dulcimer
17 Drawbar Organ
18 Percussive Organ
19 Rock Organ
20 Church Organ
21 Reed Organ
22 Accordion
23 Harmonica
24 Tango Accordion
25 Nylon Guitar
26 Steel Guitar
27 Jazz Guitar
28 Clean Guitar
29 Muted Guitar
30 Overdriven Guitar
31 Distortion Guitar
32 Guitar Harmonics
33 Acoustic Bass
34 Finger Bass
35 Picked Bass
36 Fre tless Bass
37 Slap Bass 1
38 Slap Bass 2
39 Synth Bass 1
40 Synth Bass 2
41 Vio lin
42 Vio la
MALLET
NO Name
PIANO
ORGAN
GUITAR
BASS
STRINGS
43 Cello
44 Contrabass
Appendix 1- Voice List
0
5
25
75
95
100
aw_MD100_Manual_G10_150412
2015 4 21 15:19:01

Big Band Boogie
8/16BEAT
01 8 Beat 1
8 Beat 2
8 Beat 3
8 Beat 4
8 Beat 5
8 Beat Rock
8 Beat Pop
16 Beat 1
16 Beat 2
Hiphop
16 Beat Funk
Funk Pop
Fusion
Jazz Rock
Shuff le
02
03
04
05
07
08
09
10
11
12
13
14
15
16
17
18
19
21
22
23
Slow Rock 1
Rock
6/8 Rock
Rock Shuff le
4/4 Blues
Rock‘N’Roll
Hard Rock
24
25
26
27
28
29
30 Disco 1
Disco 2
Dance
House
Techno
DANCE
31
32
33
34
35
Jazz Ballad
Boogie
Big Band Ballad
36
37
38
BALLAD
Ballad 1
Slow Ballad
16 Beat Ballad
Pop Ballad
Dance Ballad
Organ Ballad
Blues Ballad
ROCK
SWING&JAZZ
06
20
Country Pop
39 Swing 1
Swing 2
Dixieland
Jazz Trio
40
R & B
41
42
43 R&B 1
R&B 2
Soul
Soul Shuff le
44
45
46
47
Country 8Beat
Country Rock
Country Shuff le
Blue Grass
Country48
49
50
51
52
Pop Bossa
Guitar Bossa
Rhumba1
Guitar Rhumba
Samba
Mambo
Salsa
Pop Cha Cha
Reggae
Pop Reggae
Bossa Nova1
Jazz Samba
53
54
55
56
57
58
59
60
61
62
63
65 Tango
Cha Cha
Beguine
Rhumba 2
Samba
Bounce
Foxtro t
Quick Step
Jive
66
67
68
69
70
71
72
73
74
75
BALL ROOM
76
TRADITIONAL
March
German March
6/8 March
COUNTRY
LATIN
64
34
Appendix 2- Style List
78
Polka
Polka Pop1
Polka Pop2
Waltz 1
Slow Waltz
Country Waltz
Jazz Waltz
Orchestra Waltz
Musette
79
80
81
82
83
84
85
86
87
88
Pianist
Ballad 2
Slow Rock 2
Bossa Nova 2
89
90
PIANIST
91
92
93
94
95
96
97
Dangdut
Keroncong
Pop Malay
Xin Jiang
Yun Nan
Nei Meng Gu
Jiang Nan
Orienta l 1
Orienta l 2
Orienta l 3
Orienta l 4
98
99
100
COUNTRY
77
0
5
25
75
95
100
aw_MD100_Manual_G10_150412
2015 4 21 15:19:01

(01~37)CLASSICAL
01
02
03
04
05
06
07
08
09
10
11
12
13
Allegro In BBK003
Chant Sans Paroles Op.40 No.6
Blue Danube Waltz
Violin Sonata In F
German Dance No.6
Sonata
Flute Sonata No.7
L'Amour
Guitar Quartet
Nocturne Op.15 No.2
Joy to The World
The Song Of Season
The Colt Is Taking A Walk
14 The light
15 Happy Landman
16 Old Black Joe
17 O’Sol e Mio
18 Long ,Long Ago
19 The Entertainer
20 Trumpet Voluntary
21 Mazurka For Piano Op.6 No.1
22 Etudes Op.10 No.3 in E Major 23 Etudes Op.10 No.11 in b E Major
24 Arioso
25 Nocturnes OP.32 No.2 in bA 26
Waltz No.2 Op.70
27
Nocturnes Op.62 No.2 in E
28
Nocturnes OP.55 NO.1 in F minor.mid
29
German Dance No.1 in D
30
German Dance No.5 in D
31
Clarinet Polka
32
Mov.2 Adagio Cello Concerto In D Op.101
33
Mov.1 Symphony No.45 In F# 34
Brahms Lullaby
35
Concerto In F Op.4 NO.5 Mov.3
36
Concerto In F Op.4 No.5 Mov.2
37
Divertissement - Pizzicato (Sylvia Ballet)
35
Appendix 3- Song List
(38~50)PIANIST
38 Bagatelle No.3
39 Wedding March
40 Turkish March
41 Four Little Swans
42 Minuet In G
43 Minuet
44 Invent - 2
45 Did You Ever See A Lassie
46 Old France
47 Old Macdonald Had A Farm
48 Moseta Dance
49 Santa Claus Is Coming To Town
50 America The Beautiful
0
5
25
75
95
100
aw_MD100_Manual_G10_150412
2015 4 21 15:19:02

36
Appendix 4- Chord List
Chord Name/[Abbreviation] Normal Voicing Chord(C) DISPLAY
Major [M] C C
Sixth [6] C6
C6
CM7 CM7
Major seventh add sharp Eleventh [M7(#11)] CM7(#11)
CM7(#11)
Major add ninth [M(9)] CM(9) CM (9)
Major seventh ninth [M7(9)] CM7(9) CM7 (9)
Sixth ninth [6 (9)] C6(9) C6(9)
Augmented [aug] Caug Caug
Minor [m] Cm Cm
Minor sixth [m6] Cm6 Cm6
Minor seventh [m7] Cm7 Cm7
Minor seventh flatted fifth [m7b5] Cm7b5 Cm7b5
Minor add ninth [m(9)] Cm(9) Cm (9)
Minor seventh ninth [m7(9)] Cm7(9) Cm7(9)
Minor seventh add eleventh [m7(11)] Cm7(11) Cm7(11)
Minor major seventh [mM7] CmM7 CmM7
Minor major seventh ninth [mM7(9)] CmM7(9) CmM7(9)
Diminished [dim] Cdim Cdim
Diminished seventh [dim7] Cdim7 Cdim7
Seventh [7] C7 C7
Seventh suspended fourth [7sus4] C7sus4 C7sus4
Seventh flatted fifth [7b5] C7b5 C7b5
Seventh ninth [7(9)] C7 (9) C7 (9)
Seventh add sharp eleventh [7(#11)] C7(#11) C7(#11)
Seventh add thirteenth [7 (13)] C7(13) C7 (13)
Seventh flatted Ninth [7(b9)] C7(b9) C7(b9)
Seventh add flatted thirteen [7(b13)] C7(b13) C7(b13)
Seventh sharp ninth [7(#9)] C7(#9) C7 (#9)
Major seventh augmented [M7aug] CM7aug CM7aug
Seventh augmented [7aug] C7aug C7aug
Suspended Fourth [sus4] Csus4Csus4
One plus tow plus five [1+2+5] C1+2+5 C
Major seventh[M7]
1-3-5
1-3-(5)-7
1-(3)-5-6
1-2-3-(5)-7
1-2-3-(5)-6
1-2-3-5
1-3-#5
1-b3-5
1-b3-5-6
1-b3-(5)-b7
1-b3-b5
1-b3-b5-6
1-3-(5)-b7
1-4-5-b7
1-3-b5-b7
1-2-3-(5)-b7
1-(2)-3-#4-5-b7 or
1-2-3-#4-(5)-b7
1-3-(5)-6-b7
1-b2-3-(5)-b7
1-3-5-b6-b7
(1)-#2-3-(5)-b7
1-3-#5-7
(1)-3-#5-b7
1-4-5
1-2-5
1-b3-b5-b7
1-2-b3-5
1-2-b3-(5)-b7
1-2-b3-4-5-(b7)
1-b3-(5)-7
1-2-b3-(5)-7
1-(2)-3-#4-5-7or 1-2-3-#4-(5)-7
0
5
25
75
95
100
aw_MD100_Manual_G10_150412
2015 4 21 15:19:02

37
Appendix 5- MIDI List
Function Transmitted Recognized Remarks
Basic Default
Channel Changed
1ch
1ch
1-16ch
1-16ch
Default
Mode
Messages
Altered
X
X
***********
3
X
X
Note
Number
True voice
0-127
***********
0...127
0...127
Velocity :
Note on
Noteoff
O 9nH,V=1-127
X
(9nH,V=0)
O
9nH,V=1-127
X (9nH,V=0; 8nH,V=0-127
After
Keys
Touch
Chs
X
X
X
X
Pitch B end
O
O
Control
0
Change
1
5
6
7
10
11
64
65
66
67
80
81
91
93
120
121
123
Bank Select
Modulation
Portamento Time
Data Entry
Volume
Pan
Expression
Sustain Pedal
Portamento ON/OFF
Sostenuto Pedal Soft Pedal Reverb Program Chorus Program
Level
Chorus Level
All Sound
Off Reset A ll C ontrollers
All Notes Off
Program
Change :
true #
O
***********
O
0...127
System Exclusive
X
O
System
:Song Position
Common
:Song Select
:
Tune
X
X
X
X
X
X
System
:Clock
Real Time
:Commands
X
X *1
X
X *1
Aux
Note:
:LOCAL ON/OFF
:All Notes Off
Messages
:Active sense
:Reset
X
X
X
X
X
X
O
O
O
O
Reverb
O
O
X
O
O
X
X
O
X
X
X
X
X
X
X
X
X
X
O
O
O
O
O
O
O
O
O
O
O
O
O
O
O
O
O
O
*1When the accompaniment is started, an FAH message is transmitted. When accompaniment is stoped, an FCH message is transmitted.When an FAH message is received, accompaniment is started. When an FCH message is received, accompaniment is stoped.
Mode 1: OMNI ON , POLY Mode 2 : OMNI ON , MONO : YESMode 3: OMNI OFF , POLY Mode 4 : OMNI OFF , MONO : NO
0
5
25
75
95
100
aw_MD100_Manual_G10_150412
2015 4 21 15:19:02