Embed Size (px)
Citation preview

Axel Remote Management Version 3
Administration Software for Axel Terminals and Office
Servers
June 2015 - Ref.: AxRM3E-12

The reproduction of this material, in part or whole, is strictly prohibited. For
additional information, please contact:
Z.A. Courtabœuf
14 Avenue du Québec
Bât. K2 - BP 728
91962 Les Ulis cedex - FRANCE
Tel.: 33 1.69.28.27.27
Fax: 33 1.69.28.82.04
Email: [email protected]
The information in this document is subject to change without notice. AXEL
assumes no responsibility for any errors that may appear in this document.
All trademarks and registered trademarks are the property of their respective
holders.
© - 2010-2015 - AXEL - All Rights Reserved.

WARNING This documentation describes the Axel administration software. It is assumed that the reader is familiar with the Axel hardware. For more information please consult the User's Manuals. (From www.axel.com)

TABLE of CONTENTS
1 - INTRODUCTION ........................................................................................... 1
2 - INSTALLATION / REMOVAL OF THE SOFTWARE ................................... 3
2.1 - PREREQUISITES ..................................................................................... 4 2.2 - UPGRADING ............................................................................................ 4 2.3 - INSTALLATION ........................................................................................ 4 2.4 - REMOVAL ................................................................................................ 9
3 - LAUNCHING THE SOFTWARE .................................................................. 10
3.1 - CHOOSE LANGUAGE ........................................................................... 11 3.2 - NAMING THE DATABASE AND SETTING ITS LOCATION ................... 12 3.3 - PASSWORD ........................................................................................... 12 3.4 - IMPORTING TERMINALS FROM AUTO-CONFIGURATION ................ 13 3.5 - WARNING MESSAGES ......................................................................... 14
3.5.1 - DHCP Server ................................................................................... 14 3.5.2 - Unknown Products ........................................................................... 14
3.6 - THE CONSOLE WINDOW ..................................................................... 14
4 - MANAGEMENT OF THE DEVICE DATABASE .......................................... 17
4.1 - THE DATABASE ..................................................................................... 18 4.1.1 - Text File Management ..................................................................... 18 4.1.2 - MS-SQL Management ..................................................................... 18 4.1.3 - Import/Export functions .................................................................... 19
4.2 - MANAGEMENT OF THE DATABASE .................................................... 19 4.2.1 - The Directories ................................................................................ 19 4.2.2 - Terminals ......................................................................................... 19
4.3 - ADDING AND MODIFYING DATABASE ENTRIES ................................ 20 4.3.1 - Automatic Detection of New terminals ............................................. 20
a) Step 1 - Check the Terminal ............................................................... 21 b) Step 2 - Set-Up an IP Address ............................................................ 22 c) Step 3 - Set-Up the Terminal ............................................................... 23
4.3.2 - Scanning for Terminals .................................................................... 23 a) Scan via SNMP ................................................................................... 24 b) Scan via Range of IP Addresses ........................................................ 25 c) Scan via IP Addresses contained in a text file .................................... 25 d) Adding terminals to the Database ....................................................... 26

4.3.3 - Adding Terminals Manually ............................................................. 27 4.3.4 - Modification ...................................................................................... 28
4.4 - IMPORT/EXPORT FUNCTIONS ............................................................ 30 4.4.1 - Exporting the Database ................................................................... 30 4.4.2 - Exporting an SQL Base to a 'Text File' Base ................................... 30 4.4.3 - Importing a 'Text File' Base to an SQL Base ................................... 31
a) Step 1 - Selecting Import File .............................................................. 31 b) Step 2 - Parsing the file ....................................................................... 32 c) Step 3 - Importing Devices .................................................................. 32
4.4.4 - Importing a Generic Database ......................................................... 33 4.4.5 - Importing "AxRM V1" Database ....................................................... 33 4.4.6 - Importing Devices Discovered with Auto-Configuration .................. 34
4.5 - REFRESHING TERMINAL DATABASE ................................................. 34 4.5.1 - SNMP Discover ............................................................................... 35 4.5.2 - Set-Up Files ..................................................................................... 35 4.5.3 - Other Options .................................................................................. 36
5 - TERMINAL ADMINISTRATION .................................................................. 37
5.1 - SELECTION OF ONE OR MORE TERMINALS ..................................... 38 5.2 - EXECUTION OF ADMINISTRATION COMMANDS ............................... 40
5.2.1 - Get Terminal Information ................................................................. 41 5.2.2 - Terminal Statistics ........................................................................... 44 5.2.3 - Get Terminal Configuration .............................................................. 46 5.2.4 - Sending a Message ......................................................................... 48 5.2.5 - Configuring the Terminal ................................................................. 48 5.2.6 - Downloading Firmware .................................................................... 50 5.2.7 - Rebooting the terminal / Resetting a Resource ............................... 51 5.2.8 - Shutting Down the Terminal ............................................................ 52 5.2.9 - Booting Up the Terminal (Wake On LAN) ....................................... 53 5.2.10 - Running command(s) from Auto-Configuration File ...................... 53 5.2.11 - Enabling/Disabling Auto-Configuration .......................................... 54
5.3 - REMOTE ACCESS TO A TERMINAL..................................................... 55 5.3.1 - Text-Only Remote Control ............................................................... 56 5.3.2 - VNC Remote Control ....................................................................... 58 5.3.3 - Interactive Set-Up ............................................................................ 58
a) Via the Telnet Protocol (AX3000 and AX4000) ................................... 58 b) Via a COM Port (AX4000 only) ........................................................... 59
5.4 - MANAGING THE TERMINAL LOCAL STORE ....................................... 60 5.4.1 - Adding an Object ............................................................................. 62 5.4.2 - Deleting an Object ........................................................................... 63 5.4.3 - Clear the Local Store ....................................................................... 63

6 - AUTO-CONFIGURATION ........................................................................... 64
6.1 - AUTO-CONFIGURATION SET-UP ........................................................ 66 6.1.1 - Use of Groups .................................................................................. 66
a) Type of model ..................................................................................... 68 b) FK Code .............................................................................................. 68 c) Range of serial numbers ..................................................................... 70 d) List of serial numbers .......................................................................... 71 e) Subnet ................................................................................................. 72
6.1.2 - Priority of the groups ........................................................................ 72 6.1.3 - Manual management of an unknown terminal ................................. 73 6.1.4 - Saving/Loading Environment File .................................................... 73 6.1.5 - Smart Firmware Analyze .................................................................. 74
6.2 - LAUNCHING THE AUTO-CONFIGURATION ........................................ 74 6.2.1 - Interactive Mode .............................................................................. 74
a) Unknown terminal ............................................................................... 75 b) Downloading firmware ......................................................................... 77 c) Sending a configuration File ................................................................ 77
6.2.2 - Service Mode ................................................................................... 78 a) Installing the service ............................................................................ 78 b) Starting the service.............................................................................. 79 c) Stopping the service ............................................................................ 80 d) Uninstalling the service ....................................................................... 80
6.3 - OVERVIEW OF ENTIRE PROCESS ...................................................... 81
7 - OTHER FUNCTIONS .................................................................................. 82
7.1 - ASSIGNMENT OF AN IP ADDRESS ...................................................... 83 7.2 - USING BOOTP TO RELOAD FIRMWARE ............................................. 85
7.2.1 - Basic Concept .................................................................................. 85 7.2.2 - Configuring the BOOTP Server ....................................................... 86 7.2.3 - Launching BOOTP to download firmware ....................................... 87 7.2.4 - Configuring the BOOTP Server (Advanced) .................................... 88
7.3 - AXRM SETTINGS ................................................................................... 88 7.3.1 - Network Parameters ........................................................................ 89 7.3.2 - General Parameters ........................................................................ 90
a) Language Selection ............................................................................. 90 b) Command Options .............................................................................. 91
7.3.3 - Default Folder Settings .................................................................... 92 7.3.4 - The Database .................................................................................. 93
a) Text-File Database .............................................................................. 93 a) MS-SQL Database .............................................................................. 94

7.3.5 - Using a password to protect AxRM ................................................. 95 7.3.6 - Remote Access................................................................................ 96
a) Remote Control ................................................................................... 96 b) Set-up via telnet or COM Port ............................................................. 97
APPENDIX ......................................................................................................... 98
A.1 - TCP/IP COMMANDS USED ................................................................... 99 A.1.1 - Flowchart ......................................................................................... 99 A.1.2 - RSH-Based Commands ................................................................ 100
A.2 - USING WITH A FIREWALL ................................................................. 101 A.3 - FORMAT OF THE TEXT-FILE DATABASE ......................................... 103 A.4 - FORMAT OF THE SQL DATABASE .................................................... 103 A.5 - REGISTRY VARIABLES ...................................................................... 104 A.6 - MANAGING DHCP TERMINALS ......................................................... 106
A.6.1 - IP Address vs DNS NAME ............................................................ 106 A.6.2 - The Windows DNS Cache ............................................................ 106
A.7 - TROUBLESHOOTING ......................................................................... 107 A.7.1 - AxRM Terminates After the Splash Screen ................................... 107 A.7.2 - AxRM Installation Problem (fraplus1.ocx and btnplus1.ocx) ......... 108 A.7.3 - SQLDMO.DLL Installation Problem ............................................... 109


Axel Remote Management V3 1
- 1 - INTRODUCTION

2 Axel Remote Management V3
This chapter introduces the main features of the AxRM software.
The AxRM software allows system administrators to manage and configure Axel
TCP/IP products remotely over a network. The Axel device is selected by its IP
address or network name. (The software can also assign an IP address to a
new terminal that has not had an IP address previously set).
AxRM creates and maintains a database of Axel devices on the network and
lets the administrator perform the following functions:
- Obtain hardware and firmware revision levels,
- Obtain Ethernet and serial line configuration,
- Obtain network and device statistics,
- Obtain set-up configuration,
- Reboot the device,
- Remotely configure the device
- Download firmware,
- Remote access: take the remote control or enter the interactive set-up.
It is also possible:
- To download firmware via BOOTP,
- To set an IP address by using the device’s MAC address.
This document covers:
- Installation / Removal of AxRM,
- Launching the software,
- Management of the device database,
- Terminal administration
- Auto-Configuration function,
- Other functions,
- Appendices.

Axel Remote Management V3 3
- 2 - INSTALLATION / REMOVAL
OF THE SOFTWARE

4 Axel Remote Management V3
This chapter gives details of installation and removal procedures.
2.1 - PREREQUISITES
AxRM is certified for Windows (NT4, 2000, 2003, 2008, 2008R2, 2012, XP,
Vista, Seven and Windows 8).
It's strongly advised to use a computer supporting at least 15bpp (32765 colors).
2.2 - UPGRADING
If AxRM V3 is already installed on the Windows machine it is imperative to
remove before loading a newer version. (See chapter 2.4).
Note: AxRM V3 and AxRM V2 can be installed on the same computer.
2.3 - INSTALLATION
To start the installation, double click on the file ‘AxRMsetup.exe’ and follow the
instructions.
Note: for Windows 7 and Windows 8, please run this installer 'as administrator'.

Axel Remote Management V3 5
The first window is a language selection box:
Click on [OK] to continue:

6 Axel Remote Management V3
To continue the installation click on [Next]. The option to enter a different
location for AxRM is offered:
Click on [Browse] to select a different location. To continue installation, click on
[Next]. The following window shows Start Menu folder where AxRM can be
installed:

Axel Remote Management V3 7
The default program group is "Axel Tools". Click on [Next] to accept and
continue the installation:
Click on [Next]. The installation summary is displayed:

8 Axel Remote Management V3
Click on [Install] to start the installation.
If the AxRM auto-configuration service is running (installed by a former AxRM
version), the service is stopped and uninstalled:
Now files are copied onto the Windows machine. Possible errors messages are:
- Error when installing fraplus1.ocx and btnplus1.ocx: see Appendix A.7.2.
- Error when installing SQLDMO.DLL: see Appendix A.7.3.
Then the AxRM auto-configuration service is re-installed and re-started:
The installation is completed:
The following programs had been copied onto the installation folder:
- Axel Remote Management

Axel Remote Management V3 9
- Axel Viewer
- Uninstall Axel Remote Management
In the event of difficulties: Depending on the configuration and the version of
Windows, it may be necessary to install extra DLL files. These can be found at
http://www.axel.com. The DLL files should be copied into the system folder.
(%SystemRoot%).
2.4 - REMOVAL
IMPORTANT: before uninstalling AxRM, stop the background auto-
configuration service. See Chapter 6.2.
To remove AxRM, select "Uninstall Axel Remote Management" in the menu
[Start]-[Programs]-[Axel Tools]-[Axel Remote Management V3]:
The following Window confirms AxRM has been successfully removed:

10 Axel Remote Management V3
- 3 - LAUNCHING THE SOFTWARE

Axel Remote Management V3 11
This chapter covers AxRM’s setup and startup operation.
Note: To facilitate reading this document will refer to the Axel device (which can
be a terminal or an Office Server) as simply the "terminal"
To launch the administration software, select [START]-[Program Files]-[Axel
tools]-[Axel Remote Management V3].
Before the main program is launched several dialog boxes will require
completing.
3.1 - CHOOSE LANGUAGE
Select the required language as prompted:
Note: the languages available depend on the ‘LNG’ files downloaded with the
AxRM zip package
The language can be changed at a later time (see chapter 7.3.1).

12 Axel Remote Management V3
3.2 - NAMING THE DATABASE AND SETTING ITS LOCATION
AxRM maintains a database of the Axel terminals. This database is presented in
the form of tree structure.
The database is given a user selected name or the default ‘Axel Network’ will be
used:
Note: the name of the database can be changed at a later date (see Chapter
4.2.1).
3.3 - PASSWORD
If the access to the AxRM is restricted the following dialog box is shown (see
chapter 7.3.5):

Axel Remote Management V3 13
Enter the password to continue.
3.4 - IMPORTING TERMINALS FROM AUTO-CONFIGURATION
The Auto-Configuration function allows terminal updates to be automatically
processed. (See Chapter 6)
This function may be independently run from AxRM. ("Service Mode”, see
Chapter 6.2.2)
Each time AxRM is run new devices recorded by the Auto-Configuration service
are checked. If new terminal descriptions are found, or the terminal descriptors
have changed, the following dialog box is displayed:
Select terminals to be added to the database.
Note: the terminal database may also be updated later. (See Chapter 4.4.4)

14 Axel Remote Management V3
3.5 - WARNING MESSAGES
3.5.1 - DHCP Server
AxRM can be configured to 'listen' for DHCP requests sent by existing and virgin
Axel terminals. If a DHCP server is already running on the Windows machine
the following message is displayed:
To resolve this conflict disable the third party DHCP/BOOTP server or modify
the AxRM settings. (See Chapter 7.3.1)
3.5.2 - Unknown Products
When AxRM is run of after terminals had been discovered, the following
message may be displayed:
This shows unknown Axel products are listed in AxRM database. This can be
met is AxRM version is older than new Axel terminals. To fix this, please
upgrade AxRM.
3.6 - THE CONSOLE WINDOW
The ‘Console Window’ is made up of the following:
- A horizontal menu providing manipulation of the database and certain
terminal functions.

Axel Remote Management V3 15
- A 12 button toolbar (short-cuts to the functions in the menus mentioned
above)
- A panel (on the left) representing the tree structure of the network
- A panel (on the right) allowing individual, multiple or groups of terminals to
be selected for access.
- A status bar (below the right panel) displaying miscellaneous information.
Example:
Actions possible on the tree structure:
- Left click: selects one or more elements of the tree structure
- Right click: shows a "contextual menu" (commands available for
execution...)
- Double-click from the left panel: editing the device characteristics.
- Double-click from the right panel: depending on the device:
- Terminal with an IP address: run the 'Get Terminal Information'
command.
- Other: editing the device characteristics.

16 Axel Remote Management V3
For more information see chapters 4.2 (management of the database) and 5.1
(selection of terminals).
The terminal list of the right panel can be sorted out by clicking the header of a
column.
☺: depending on whether a terminal or folder is selected different information is
displayed:
- A folder: terminal type (AX3000 and AX4000) is displayed.
- A single terminal (see screen shot): the location in the tree structure is
displayed. The blue arrow (on the left) allows this terminal to be retrieved
in the tree structure.
When the 'Archive Terminal Set-Ups' function is enabled (see Chapter 7.3.4), an
information bubble is displayed when the mouse moves over the terminal list.
This bubble gives a summary of the terminal configuration (if available)
The 'Display' Menu allows:
- The toolbar to be hidden.
- Some columns to the right panel to be hidden.
- Set-up bubbles to be hidden.
- Status bar to be hidden.

Axel Remote Management V3 17
- 4 - MANAGEMENT OF THE DEVICE
DATABASE

18 Axel Remote Management V3
This chapter describes the creation and the handling of the database.
The terminal database is presented in the form of tree structure. This
presentation makes it possible to logically sort the terminals into groups and to
easily locate any terminal or group of terminals on which an action is to be
performed.
4.1 - THE DATABASE
The terminal database can be handled:
- By a single file (text format)
- By MS-SQL
4.1.1 - Text File Management
The text file is called "%systemroot%\AxRM2.axd" by default. The name can be
modified (see Chapter 7.3.4).
The text file is automatically opened during the launching of the software. It is
possible during use to force re-reading of the database by selecting the
command [File]-[Read Database].
On exiting AxRM the user is prompted to save changes. At any point during the
operation of AxRM changes can be saved by selecting the following: [File]-
[Save Database].
4.1.2 - MS-SQL Management
The AxRM preferences allow the MS-SQL connection details to be given (See
Chapter 7.3.4). The SQL user must have the 'database creation' permission.

Axel Remote Management V3 19
In this situation the database is updated in real time. So there is no 'Save
database' or 'Reload database' command.
4.1.3 - Import/Export functions
Some Import/Export functions are also available, specifically a migration from a
text file database to a MS-SQL database. See Chapter 4.4.
4.2 - MANAGEMENT OF THE DATABASE
The terminal database can be logically organized by adding directories and sub-
directories to contain terminals.
4.2.1 - The Directories
The creation of a directory is carried out by the horizontal menu [Action]-[Add
folder], by the contextual menu or by the toolbar.
Below is the Icon and corresponding dialog box:
icon
Simply enter the name of the directory, which is then created in the current
database directory. The contextual menu (right click) lets a directory be created
or deleted. A directory (and its contents) can be moved by drag and drop.
Note: the root of the tree structure is regarded as a directory. It can be renamed
but not deleted or moved.
4.2.2 - Terminals
A terminal is an element in the database tree structure. The following icons
represent the following devices.
- : AX3000 Terminal

20 Axel Remote Management V3
- : Newly detected Terminal without IP address (See Chapter 4.3.1)
- : AX4000 Office Server
- : Unknown IP device (PC, printer, etc)
AxRM recognizes terminals and Office Servers by their Ethernet MAC address.
If the Ethernet address is not shown or is unknown, the device is represented by
the icon '?' and no further action is possible.
For more information on adding and editing entries see the following chapter.
It is possible to move a terminal by dragging and dropping or using the
contextual menu (click right) to delete or rename.
Note: devices with conflicting addresses are highlighted with an exclamation
mark:
- : AX3000 Terminal
- : AX4000 Office Server
- : unknown device.
4.3 - ADDING AND MODIFYING DATABASE ENTRIES
A terminal can be added manually or automatically.
4.3.1 - Automatic Detection of New terminals
AxRM can automatically detect new terminals (by default new terminals send
out DHCP requests which AxRM will detect and analyze).
Notes:
- AxRM doesn't act as a DHCP server. It only 'sees' DHCP requests sent
by Axel terminal and will not issue IP addresses.
- This feature can be disabled. (See Chapter 7.3.1)
Detected terminals are added to the AxRM database. (See red terminal icon -
Chapter 4.2.2). No commands can be performed on such terminals until they
are given an IP address. (See below.) The only information collected is the MAC
address and the terminal’s DNS name.

Axel Remote Management V3 21
A new terminal can be entirely configured from AxRM. Double-click the new
terminal icon or click the icon on the toolbar or select the option [Edit this
Device] (from the [action] horizontal menu or from the contextual menu).
Here is the icon and dialog box:
icon
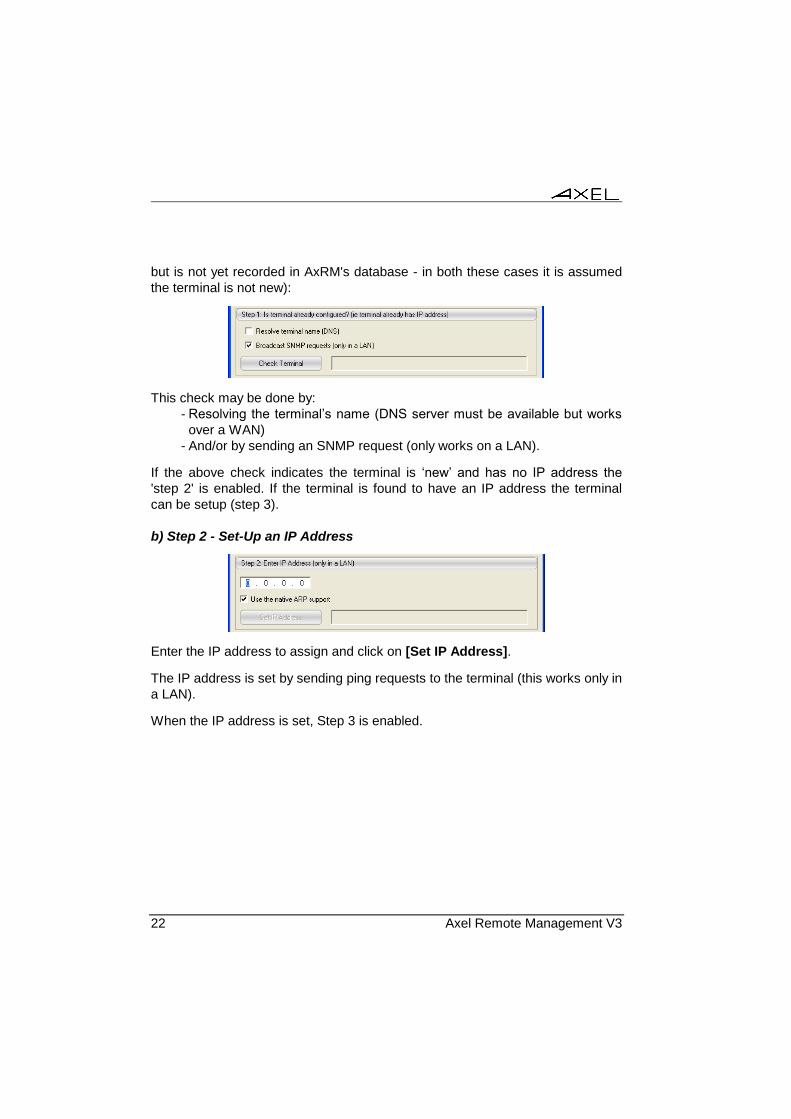
a) Step 1 - Check the Terminal
At this stage AxRM has received a DCHP request, but does not know if the
DHCP request is from a new virgin terminal or an existing terminal that is
configured to use DHCP.
This step checks to see if the terminal already has an IP address (obtained
either from a DHCP server or has previously been assigned a static IP address
22 Axel Remote Management V3
but is not yet recorded in AxRM's database - in both these cases it is assumed
the terminal is not new):
This check may be done by:
- Resolving the terminal’s name (DNS server must be available but works
over a WAN)
- And/or by sending an SNMP request (only works on a LAN).
If the above check indicates the terminal is ‘new’ and has no IP address the
'step 2' is enabled. If the terminal is found to have an IP address the terminal
can be setup (step 3).
b) Step 2 - Set-Up an IP Address
Enter the IP address to assign and click on [Set IP Address].
The IP address is set by sending ping requests to the terminal (this works only in
a LAN).
When the IP address is set, Step 3 is enabled.

Axel Remote Management V3 23
c) Step 3 - Set-Up the Terminal
This step is optional: the terminal may be configured by the usual AxRM
administration commands.
The terminal can be configured by:
- Downloading a firmware. (See Chapter 5.2.6)
- Sending an existing configuration file. (See Chapter 5.2.5)
- Entering the interactive set-up. (See Chapter 5.3.2 - a)
4.3.2 - Scanning for Terminals
The automatic scan adds all terminals found on the network to the database
The function is invoked from the horizontal menu [Action]-[Discover
Terminals] or from the toolbar.

24 Axel Remote Management V3
Here is the icon and dialog box:
icon
Three methods are available to scan the network:
- An SNMP broadcast is sent to the entire network.
- RSH and/or SNMP commands are sent to a range of IP addresses.
- RSH and/or SNMP commands are sent to IP addresses contained in a
text file.
For these methods the setting 'Retrieve name from IP" can be used to obtain the
device’s DNS name. Tick this parameter only when one DNS server is available
or the scan may take a very long time.
a) Scan via SNMP
The main benefit of SNMP is its speed. One SNMP request is sent to all the
terminals simultaneously. But this may be limited to the LAN (depends on router
configuration)

Axel Remote Management V3 25
b) Scan via Range of IP Addresses
IP addresses tested by AxRM depend on both the range and the network class:
- Class C: the beginning and the end of the range are given by byte 4.
- Class B: the beginning and the end of the range are given by byte 4. But
for each value of byte 3, AxRM tests all values of byte 4.
With this method the following actions are performed on each IP address
- Address pinged to check device presence.
- SNMP request (if enabled): obtains MAC address and firmware version.
- RSH command (if enabled): obtains MAC address and firmware version.
- In the event of problems with the RSH command the MAC address can
also be obtained from the ARP table (only for LAN).
The time taken to execute this command will be relatively long
c) Scan via IP Addresses contained in a text file
Each line of this text file can contain:
- Either an IP address,
- Or a Class-C IP addresses range. (The two IP addresses are separated
by '->'. Example: 192.168.1.21->192.168.1.30)
The actions performed for this method are the same than the previous method.

26 Axel Remote Management V3
d) Adding terminals to the Database
After the scan all terminals discovered are listed:
The status is given for each terminal:
- 'To be added': The terminal is not already entered in the database
- 'To be updated': The terminal is already entered but its details have
changed.
- 'Already there’: The terminal is recognized.
For each terminal a check box is available. Only the ticked terminals will be
added to the database.
Note: when a terminal with a dynamic IP address is discovered by the SNMP
protocol it is added to the database with its name as its unique identifier. (This
name is a DNS name).
Note about terminal with a DNS name:
This requires DDNS to be setup (Dynamic DNS) - where the terminal (or DHCP)
informs the DNS server of the DNS name of new devices. If DDNS is not used
the Axel name will not be recognized on your network and the terminal will not
be accessible.

Axel Remote Management V3 27
Before the update of the terminal database, AxRM checks if the terminal name
can be resolved. In event of failure the following box is displayed:
If 'Yes' is selected, terminals will be recorded with their IP addresses. This has a
risk in that due to the dynamic nature of DHCP, the terminal may get a different
address at some point in the future. In this situation the network will need to be
rescanned to reflect the new IP address.
For more information about the DHCP terminal management, please consult the
Appendix A.6.
4.3.3 - Adding Terminals Manually
A terminal can be added manually to the database. In this case certain
information is required.
Access to this function is by the horizontal menu [Action]-[Add device], by the
contextual menu or by the toolbar.

28 Axel Remote Management V3
Here is the icon and corresponding dialog box
icon
The following information is required:
- IP address or DNS name: (mandatory) to identify and verify the terminal
on the network with ping.
- User Friendly Name (optional)
- Identification: (mandatory for admin functions - not mandatory to enter in
database). Enter either serial number or MAC address, this is used to
identify terminal then press “Get It’ button to get details directly from the
terminal or manually enter details.
- Hardware/Firmware: this value can only be obtained by the button '?'
located on the right.
- Comment: free field for user comments.
After validation the terminal is added to the current location in the database.
4.3.4 - Modification
Terminal characteristics can be changed from the Horizontal menu [Action]-
[Edit this device], or the contextual menu or the toolbar or by double clicking
on the left panel on the terminal to be modified.

Axel Remote Management V3 29
Here is the icon and corresponding dialog box
icon
Note: for more information about this dialog box, please see the previous
chapter.
To modify the 'User Friendly Name', the 'Device Identification' or the 'Comment'
simply enter the new value.
To modify the "IP Address or DNS Name" click the [Change it] button. The
following dialog box is displayed:
Enter the new DNS name (or IP address) and click [OK] to update the
database.
If the "Update Terminal with this new ID" tick box is selected the terminal will
be updated and rebooted (confirmation will be requested). This allows the
terminal to be synchronized with the AxRM database. Enter the 'Terminal
Password' if required.

30 Axel Remote Management V3
4.4 - IMPORT/EXPORT FUNCTIONS
The Import/Export functions are available through the [File]-[Import/Export]
menu.
4.4.1 - Exporting the Database
The database can be exported as a text file compatible with Notepad, Excel, etc.
Select [File]-[Import/Export]-[Export Database]. The following dialog box is
shown:
Select the fields to be imported. Only the terminal name is mandatory.
The de-limiter can be a comma, semi colon or tab as selected.
After entering name and location for the file press [Export].
The export function is performed from the current folder of the database tree
structure (shown in the windows title bar).
4.4.2 - Exporting an SQL Base to a 'Text File' Base
The content of the SQL base can be exported to an AxRMV2 text file.
Axel Remote Management V3 31
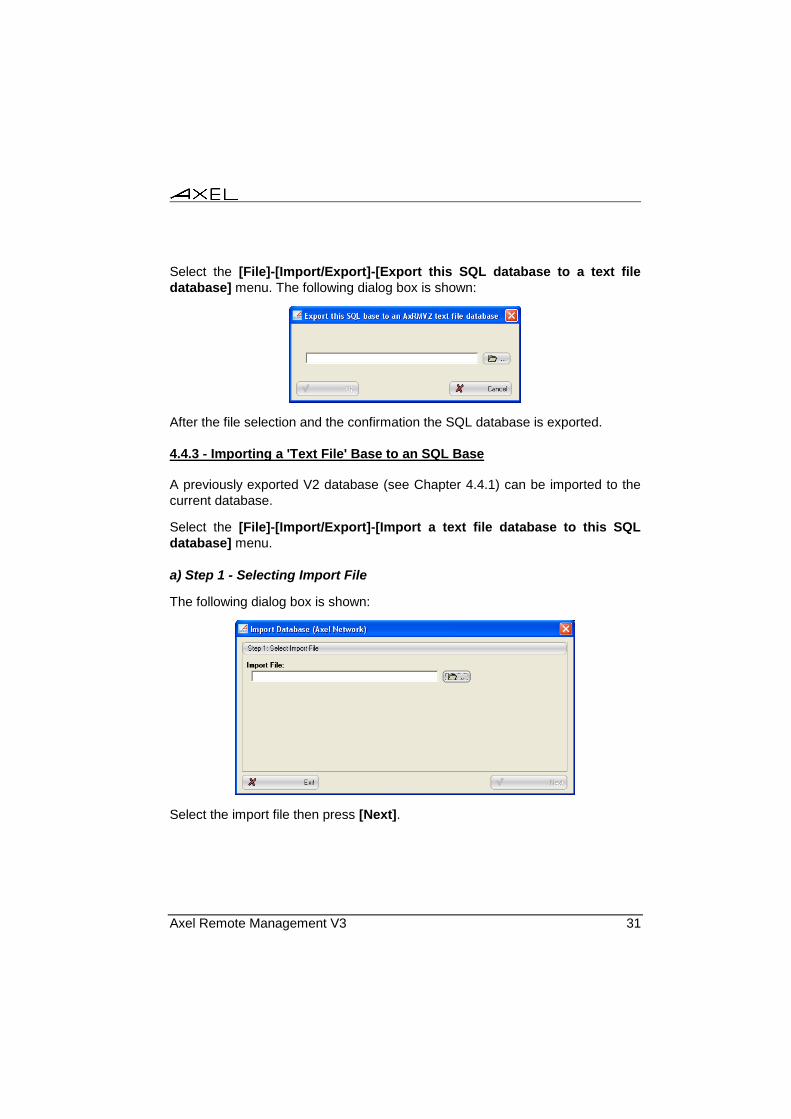
Select the [File]-[Import/Export]-[Export this SQL database to a text file
database] menu. The following dialog box is shown:
After the file selection and the confirmation the SQL database is exported.
4.4.3 - Importing a 'Text File' Base to an SQL Base
A previously exported V2 database (see Chapter 4.4.1) can be imported to the
current database.
Select the [File]-[Import/Export]-[Import a text file database to this SQL
database] menu.
a) Step 1 - Selecting Import File
The following dialog box is shown:
Select the import file then press [Next].

32 Axel Remote Management V3
b) Step 2 - Parsing the file
A new dialog box is shown where the first line of the Import file is displayed.
From this line, AxRM detects the separator and the required fields:
The fields offered by AxRM can be changed. Then press [Next].
c) Step 3 - Importing Devices
Terminals contained in the Import file are displayed:
Press [IMPORT] to start operation.
Only selected terminals are imported. AxRM determines if the terminal already
exists in the database by its MAC address:

Axel Remote Management V3 33
- New terminals: added to the database from the current folder of the
database tree structure (shown in the windows title bar). If required, sub-
folders may be created.
- Existing terminals: the update is done at the current location of this
existing terminal. (Only if "Overwrite existing terminals" is set)
A summary is displayed at the end of this operation.
4.4.4 - Importing a Generic Database
A text file (compatible with Notepad, Excel, etc) can be imported in the current
AxRM database.
Select the [[File]-[Import/Export]-[Import a Generic Database (text file)]
menu.
The operations are the same than thus described in Chapter 4.4.3
4.4.5 - Importing "AxRM V1" Database
The format of the database generated by the previous version of AxRM (V1) is
not compatible with V2.
However the V1 database can be imported and converted using the [File]-
[Import/Export]-[Import AxRM V1 Database] command. The following dialog
box is shown:
The content of the V1 database is added in to the current folder of the database
tree structure. The possible 'groups' of the V1 database are added as folders.

34 Axel Remote Management V3
4.4.6 - Importing Devices Discovered with Auto-Configuration
The Auto-configuration function allows new terminals to be discovered. When
this function is run in service mode, information about new terminals is recorded
in a special file. (See chapter 6.2.2)
To update the terminal database with this new information, use the [File]-
[Import/Export]-[Import Devices Discovered with Auto-Configuration]
command. After confirmation the importation is processed:
- New terminals are added to the current folder of the database tree
structure.
- Existing terminals are updated.
4.5 - REFRESHING TERMINAL DATABASE
This function allows entries for existing terminals' in the database to be updated:
- Terminal information (terminal name, firmware revision…) is refreshed.
- And the terminal set-up can be optionally collected.
Note: this function will not discover new terminals. Only existing terminals in the
database will be scanned.
The function is invoked from the horizontal menu [Action]-[Refresh terminal
database] or from the toolbar.

Axel Remote Management V3 35
Here is the icon and dialog box:
icon
Note: at the top of the box, the number of terminals to be scanned is given.
These terminals are also displayed in the right panel of AxRM console before
selecting the Refresh Database command.
4.5.1 - SNMP Discover
The scenario is the following: a unicast SNMP request is sent to each terminal.
If no response is received before the "SNMP response Time-out" expiration
another request is sent. Until the "Maximum number of SNMP requests" is
reached or an SNMP response is received.
The SNMP response allows terminal information to be updated: terminal name,
firmware revision and comment. This allows also the MAC Address to be
checked.
4.5.2 - Set-Up Files
With this function, terminal set-up files can also be collected. Just specify the
"Archive Folder".

36 Axel Remote Management V3
The set-up filenames are the MAC Address plus a ".txt" suffix.
4.5.3 - Other Options
The 'Log file' option allows the output of this command (messages, errors...) to
be stored.
The 'Command Execution Time' allows command to be run at a given time. If
this field is empty the command is run immediately.
Axel Remote Management V3 37
- 5 - TERMINAL ADMINISTRATION

38 Axel Remote Management V3
This chapter describes how to select one or more terminals from the database
on which to perform management operations.
The administration of a terminal or a group of terminals is composed of two
phases:
- Selection of the terminal(s)
- Selection and order of actions.
5.1 - SELECTION OF ONE OR MORE TERMINALS
Most of the management commands can be executed on one or multiple
terminals with one click.
The terminal database is displayed on two panels:
- Left panel: the tree structure itself. This tree structure is made up of
directories and terminals. In this part only one element can be selected.
- Right panel: this list contains the terminals depending on the element
selected in the left part

Axel Remote Management V3 39
Examples according to the type of element selected in the tree structure:
A single terminal is selected:
Terminal selected is shown in right field
A directory is selected:
All terminals selected are shown in field on
the right.
When a directory is selected in the left panel, it is possible to select one or more
terminals in the right panel. This selection obeys the following rules:
- <Left Click>: only the clicked terminal is selected.
- <Ctrl><Left Click>: the terminal clicked is added to those already
selected
- <Shift><Left Click>: all terminals between the current selection and
previous selection are selected.
Examples:
The command is performed on the
terminals selected
The command is performed on all the
terminals on the right

40 Axel Remote Management V3
Once selection is made use the contextual menu or toolbar buttons to choose
and carry out operations required.
5.2 - EXECUTION OF ADMINISTRATION COMMANDS
The selection of a command is carried out from the horizontal menu [Action]-
[Terminal commands], by the contextual menu or one of the toolbar buttons
Apart from the 'Get Terminal Information' command, all the other dialog boxes
of the commands are similar to the example below:
In this dialog box following items are displayed:
- "List of targets": this field shows terminals previously selected to be
operated on.
- The [Ping] button makes it possible to check the accessibility of the
selected terminals.
- The "Password" field for entering terminal password if required.
- The "Command Execution Time" allows command to be run at a given
time. If this field is empty the command is run immediately.
- The other fields are parameters specific for the command selected.

Axel Remote Management V3 41
During the execution of the command (click [Run Command]) the dialog box
shows the status of the command.
Depending on the command further information is available by pressing the
button at the bottom of the window. (I.e. above pressing ‘Display Terminal
Information’).
The various commands and associated parameters are described later.
5.2.1 - Get Terminal Information
This command displays a terminal configuration summary and the status of
connected sessions.
Note: this command is processed immediately when the dialog box is displayed.

42 Axel Remote Management V3
Below is the icon and corresponding dialog box:
icon
Note: the displayed information is obtained by running automatically three
administration commands: getting firmware revision, getting terminal
configuration (See Chapter 5.2.3) and getting terminal statistics (see Chapter
5.2.2).
The terminal configuration is shown in a tree structure. Click on '+' icons to
expand it.

Axel Remote Management V3 43
☺: for each screen session and each auxiliary port an indicator shows the
connection status (green when connected, gray when not connected). For
example:
AX3000 Thin Client AX4000 Office Server
Use the [Refresh] button to run again the 'Get Terminal Information' command.
The 'Show Command' option allows the administration commands to be
displayed on a status box.

44 Axel Remote Management V3
The [Display Set-Up and Statistics] shows dialog box where the set-up data
and the statistics data can be consulted and saved onto the disk. For example:
Within this box click the 'Information to be displayed' list to select terminal set-up
or the statistics to be displayed.
5.2.2 - Terminal Statistics
AxRM can be used to remotely access and store the terminal’s network
statistics.

Axel Remote Management V3 45
Below is the icon and corresponding dialog box:
icon
To save this information in a file, tick the "Output to a file" box and provide a
name in the field "File to store info.".
Note: the button [...] can be used to navigate to a preferred file location.
This command displays the statistics in a new window as shown below:

46 Axel Remote Management V3
In this example statistics for several terminals are displayed. (Terminals shown
in the ‘Select the Device’ window)
Click [CLOSE] or [SAVE AS...] depending if you wish to save the data or not.
5.2.3 - Get Terminal Configuration
AxRM can be used to remotely access and store the terminal’s setup
configuration.
Below is the icon and corresponding dialog box:
icon
To save this information in a file, tick the "Output to a file" box and provide a
name in the field "File to store info.".
Note: the button [...] can be used to navigate to a preferred file location.
If "Full set-up" is selected the entire setup information is obtained. If not ticked
only non default settings are obtained - making the file smaller.

Axel Remote Management V3 47
Below is an example of the setup data file of a terminal:
If multiple terminals are selected use the ‘Select the Device’ option to choose an
individual terminal.
Click [CLOSE] or [SAVE AS...] depending if you wish to save the data or not.

48 Axel Remote Management V3
5.2.4 - Sending a Message
A message can be sent to one or multiple terminals.
Below is the icon and corresponding dialog box:
icon
The 'Duration of message' sets the length of time the message is displayed. If
set to Zero the message is displayed until the user clears it.
5.2.5 - Configuring the Terminal
AxRM lets a pre-defined setup file be applied to the terminal. This setup file is
obtained beforehand from an already configured terminal (see chapter 5.2.3),
written from scratch with a text editor, or obtained from an existing terminal and
modified to suite with a text editor.
Note: for more information on the set-up file see the User's Guide.

Axel Remote Management V3 49
Below is the icon and corresponding dialog box:
icon
The name of the set-up file must be given in the "Set-up File" field.
Note: the [...] button can be used to navigate to the location of the setup file.
The "Reboot after command" box is always ticked. (The terminal will
automatically reboot after receiving the new configuration and register the new
changes.)
Note: if the terminal is password protected the password must be entered in the
"Password" field.
An enhanced dialog box is displayed if AxRM is set in this way (see Chapter
7.3.2, sub-chapter b). Additional parameters are offered by this box:

50 Axel Remote Management V3
The fields "Force new name", "Force new IP address" and "Force new netmask"
allow a 'common' set-up file to be sent to multiple terminals.
5.2.6 - Downloading Firmware
AxRM can be used to download firmware. This procedure uses an embedded
TFTP server.
Below is the icon and corresponding dialog box. (This box depends on the
selected administration protocol - See Chapter 7.3.2):
icon
"Only XML" Protocol
"XML& RSH" or "Only RSH" Protocols
The name of the firmware file must be entered in the "Firmware filename" field.
Note: the [...] button can be used to select the location of this file.

Axel Remote Management V3 51
Upgrading the firmware will result in the terminal losing its existing configuration.
By ticking the "Preserve Target Config." to original configuration will be re-
applied. The following sequence of commands is run:
- Get Terminal Configuration (saved as a temporary file)
- Download Firmware
- Send Configuration (send file generated above)
- Reboot (the device).
For the "XML & RSH" or "Only RSH" protocols:
- The AxRM software uses the TFTP protocol. The embedded TFTP server
can be used (recommended) but by unticking the "Uses native TFTP" box
it is possible to use a separate TFTP server and enter the IP address of
the TFTP server.
- If the Axel terminal and the AxRM machine are not on the same local
area network, it is imperative to complete the "Remote Router IP" field.
The address required is the IP address of the router on the side of the
Axel terminal.
Notes:
1 - If the terminal is password protected the password must be entered in
the "Password" field.
2 - The database is updated automatically if the auto-update function is
enabled. (See chapter 7.3.4)
5.2.7 - Rebooting the terminal / Resetting a Resource
AxRM allows the administrator to:
- Reboot a terminal - equivalent to power cycling the terminal.
- Re-initialize a terminal resource (screen session, serial or parallel port).

52 Axel Remote Management V3
Below is the icon and corresponding dialog box:
icon
Select the target from the "Resource to reboot":
- "The device": reboot of the complete terminal (equivalent to power cycle)
- "Session 1" to "Session 8": resets AX3000 individual session.
- "Aux1 port", "Aux2 port" or "Parallel port": resets AX3000 auxiliary port.
- "NetX port": resets AX3000 TCP Logical Port.
- "UsbX port": resets AX3000 USB Logical Port.
- "Channel 1" to "Channel 8": resets the Office Server AX4000 serial ports.
Note: if the terminal is password protected, the password must be entered in the
"Password" field.
5.2.8 - Shutting Down the Terminal
Note: this command is only available for AX3000 models 90.
Below is the icon and corresponding dialog box:
icon
Note: if the terminal is password protected, the password must be entered in the
"Password" field.

Axel Remote Management V3 53
5.2.9 - Booting Up the Terminal (Wake On LAN)
Note: this command is only available for AX3000 models 90.
Below is the icon and corresponding dialog box:
icon
Note: this command works only within a LAN.
The UDP "Wake On LAN" command (magic packet) with the terminal Ethernet
address is broadcasted.
Note: to check if the device is currently available (or not) a ping command can
be sent before the "Wake On LAN" command.
This command doesn't wait to check if the terminal is actually booted up.
5.2.10 - Running command(s) from Auto-Configuration File
AxRM can be used to launch commands issued from the auto-configuration file
(see Chapter 6).
54 Axel Remote Management V3
Below is the icon and corresponding dialog box:
icon
The name of the environment file is issued from the auto-configuration settings.
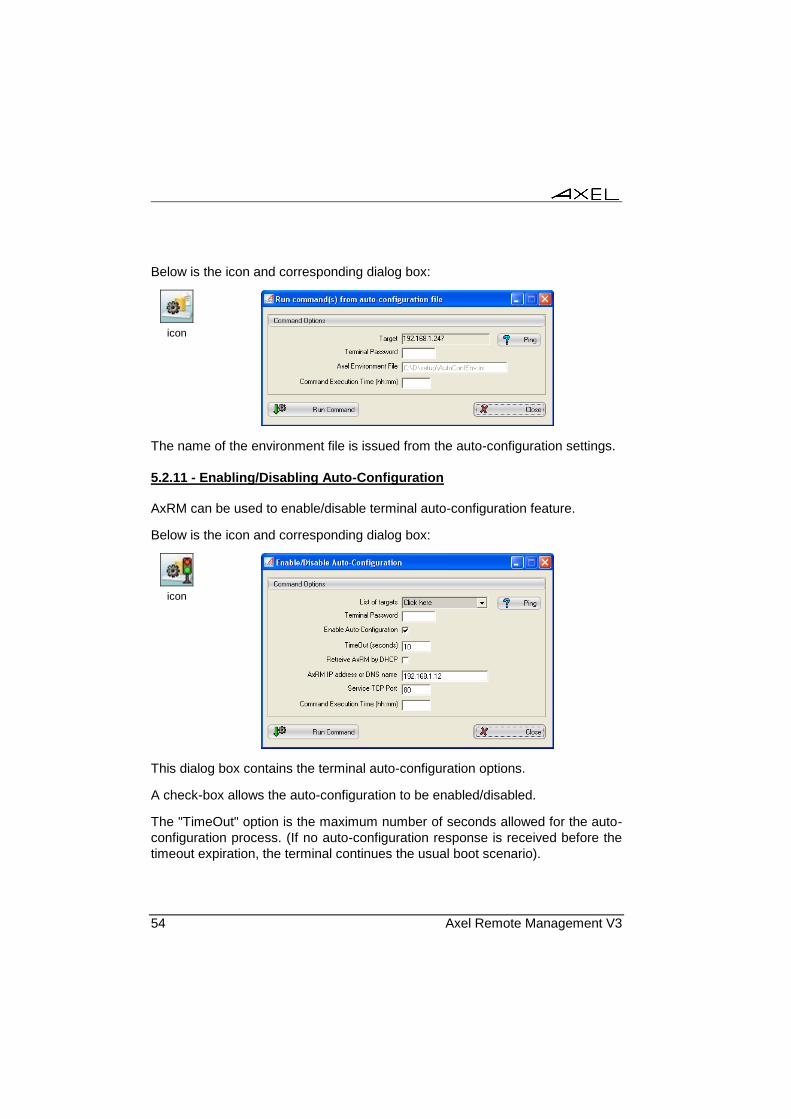
5.2.11 - Enabling/Disabling Auto-Configuration
AxRM can be used to enable/disable terminal auto-configuration feature.
Below is the icon and corresponding dialog box:
icon
This dialog box contains the terminal auto-configuration options.
A check-box allows the auto-configuration to be enabled/disabled.
The "TimeOut" option is the maximum number of seconds allowed for the auto-
configuration process. (If no auto-configuration response is received before the
timeout expiration, the terminal continues the usual boot scenario).

Axel Remote Management V3 55
Two methods allow the AxRM machine (IP address / TCP Port) to be located by
the terminal:
- Static: IP address (or DNS) name and TCP port are given.
- Dynamic: information will be given by a DHCP server.
The terminal doesn't reboot after receiving the enable/disable auto-configuration
command. This command will take effect the next time the terminal will be
rebooted.
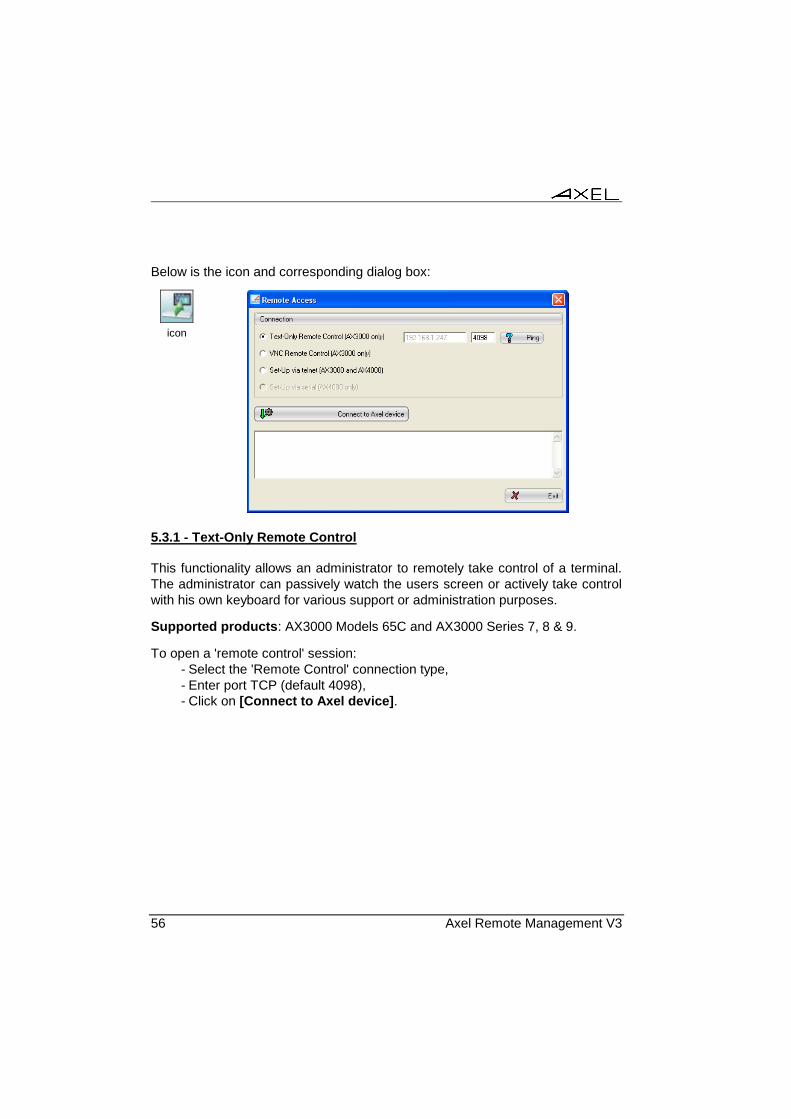
5.3 - REMOTE ACCESS TO A TERMINAL
A remote access to a terminal is either taking the control of a remote terminal
(see Chapter 5.3.1) or entering the interactive set-up of a remote terminal (see
Chapter 5.3.2).
This function is launched via the toolbar button, the contextual menu, or via
[Action]-[Terminal commands]-[Remote Access] and gives direct accesses
to the terminal over network.
☺: The remote access is also offered by a separate software (Axel Viewer)
installed in the same time than AxRM.
Only one terminal can be accessed at a time.
Note: these remote access functions can be enabled/disabled through the
terminal set-up.
56 Axel Remote Management V3
Below is the icon and corresponding dialog box:
icon
5.3.1 - Text-Only Remote Control
This functionality allows an administrator to remotely take control of a terminal.
The administrator can passively watch the users screen or actively take control
with his own keyboard for various support or administration purposes.
Supported products: AX3000 Models 65C and AX3000 Series 7, 8 & 9.
To open a 'remote control' session:
- Select the 'Remote Control' connection type,
- Enter port TCP (default 4098),
- Click on [Connect to Axel device].

Axel Remote Management V3 57
A window showing the display of the Axel terminal is opened:
The display of the terminal is displayed in real time. In addition the keystrokes
from the Windows machine are sent to the terminal. This allows a full control of
the terminal.
The buttons on the left are the terminal sessions. Click on of these buttons to
switch the session.
The [set-up] button allows the terminal set-up to be entered. This is a short cut
to <Ctrl><Alt><Esc>.
The [Ctrl-Alt-Del] button emulates this keystroke.
The [Exit] button quit the remote control window.
Only the text-mode session (5250, 3270, Unix emulation, set-up environment
set-up) can be remote controlled. If the current session is a graphical-mode
session (Windows for example) the window becomes grey and a help message
is displayed.
Access control capabilities (see the AX3000 User's Manual):
- The remote control can be password-protected.

58 Axel Remote Management V3
- An authorization from the terminal user may be requested to allow to
remote control connection.
5.3.2 - VNC Remote Control
This functionality allows an administrator to remotely take the total control of a
terminal (text and graphical modes).
Supported products: AX3000 Series 8 & 9.
To open a 'remote control' session:
- Select the 'VNC Remote Control' connection type,
- Enter port TCP (default 5900),
- Click on [Connect to Axel device].
The display of the terminal is displayed in real time. In addition the keystrokes
from the Windows machine are sent to the terminal. This allows a full control of
the terminal.
Access control capabilities (see the AX3000 User's Manual):
- The remote control can be password-protected.
- An authorization from the terminal user may be requested to allow to
remote control connection. In this case the VNC client keyboard is
disabled until the terminal user accepts the remote control.
The remote control console can be closed either by clicking the cross on the
upper right corner or by pressing an optional and customizable keystroke (see
AxRM preferences - Chapter 7.3.6).
5.3.3 - Interactive Set-Up
This functionality allows remotely entering the terminal interactive set-up.
a) Via the Telnet Protocol (AX3000 and AX4000)
Supported products: AX4000 Office Server, AX3000 Models 65C and AX3000
Series 7, 8 & 9.
To open a 'telnet set-up' session:
- Select the 'Set-up via telnet' connection type,
- Enter port TCP (default 4096),

Axel Remote Management V3 59
- Click on [Connect to Axel device].
A window showing the set-up of the Axel terminal is opened:
Note: on the terminal side, the set-up is also displayed. But to avoid conflict the
terminal keyboard is locked. The 'TELNET SETUP' label allows distinguishing
when the set-up is locally or remotely entered.
This window is automatically closed when the set-up is exited.
Note: AxRM provides a pre-tuned telnet client designed specifically to access
the terminal. It is also possible to use a generic telnet client with the correct
parameters (see chapter 7.3.6).
b) Via a COM Port (AX4000 only)
Supported products: AX4000 Office Server.
The AX4000 Office Server can also give access to the interactive set-up via a
serial connection. To open a ' serial set-up' session on a Server Office:
- Select the "Set-Up via serial",
- Select the Windows port COM used,
- Click on [Connect to Axel device].

60 Axel Remote Management V3
An "empty" window is displayed. Actuate the "Admin Mode" switch on the back
of the Server Office to enter the setup mode:
After exiting the set-up, click the cross (x) on the upper-right corner to close this
window.
5.4 - MANAGING THE TERMINAL LOCAL STORE
A local store is offered by AX3000 Thin Clients. Three types of objects can be
stored:
- TSE License: sent by a TSE server.
- Logo: a JPEG bitmap (only one logo can be stored).
- Security Certificate: PFX, PEM, P12 and CER are supported.
- TSE Printer Configuration: sent by a TSE server.
This function is launched from the toolbar button, the contextual menu or by
[Action]-[Terminal commands]-[Manage AX3000 Store].
Notes:
- The AX3000 Local Store is not available when the administration protocol
is 'RSH Only' (See AxRM Preferences - Chapter 7.3.2)

Axel Remote Management V3 61
- The AX3000 Local Store command works with a single or multiple target
terminals.
Below is the icon and corresponding dialog boxes:
icon
Only one terminal is selected
Multiple terminals are selected

62 Axel Remote Management V3
Note: when a single terminal is selected the store content can be displayed by
synchronizing, shown below:
5.4.1 - Adding an Object
To add an object, click the [Add an Object] button. A new dialog box is
displayed:
Parameters are the following:
- Object Type: "Picture" or "Certificate".
- Filename: click the 'File' icon to browse the disk.
- Clear the Store before Adding
- Clear an Existing Logo (only for the Picture type): only one logo can be
stored
- Certificate Type (only for the Certificate type): select "Personal" or
"Authority (CA)".
- Certificate Friendly Name (only for the Certificate type): this name is
displayed in the "Information" field of the local store. This allows the
certificate to be selected when needed.
- Certificate password (only for the Certificate type): this password is
required for the certificate installation. If it's not given now, it will have to
be given later from the terminal interactive set-up.

Axel Remote Management V3 63
Note: adding an object is available only for AX3000 models 80 and 85.
After confirmation, the adding command is issued to one or more terminals. The
store content is updated:
5.4.2 - Deleting an Object
Note: only available when a single terminal is selected.
To delete an object, select it on the store content and click the [Remove this
Object] button.
5.4.3 - Clear the Local Store
Note: only available when multiple terminals are selected.
Simply click the [Remove All] button.

64 Axel Remote Management V3
- 6 - AUTO-CONFIGURATION

Axel Remote Management V3 65
This chapter describes the auto-configuration function.
The auto-configuration function allows a terminal to automatically obtain a new
firmware file and/or a pre-defined configuration. This is achieved without any
human intervention at the terminal.
On AxRM side terminal groups must be created. For each group, criteria of
membership must be selected (terminal models, serial numbers...). And
operations to be done must be defined (firmware upgrade, configuration
update...).
Auto-configuration requests are sent by the terminal:
- Automatically at the very first power-on (i.e. Factory Settings),
- At each boot time (if this had been enabled in the terminal set-up).
It is necessary to configure AxRM beforehand with information of which firmware
and configuration files are to be sent to which terminals.
Note: the auto-configuration function is available only on AX3000 Models 65C,
75, 75E, 75B, 75C, 75D, 80, 80G, 80WMS and 85.

66 Axel Remote Management V3
6.1 - AUTO-CONFIGURATION SET-UP
The setup dialogue box is located in [Advanced]-[Auto-configuration]:
The TCP Port is the AxRM listens on for auto-configuration requests from
terminals. By default the value 80.
6.1.1 - Use of Groups
Terminals can be sorted into multiple groups to allow different operations to be
done:
A group is defined by:
- A name (user definable)
- A criteria of group membership:
- By type (terminal model)

Axel Remote Management V3 67
- By FK code
- By a range of serial numbers
- By list of serial numbers
- By subnet
- All terminals
- The auto-configuration type. (Why the auto-configuration request had
been sent?)
- A new terminal (factory settings)
- At each boot time
- Any
Operations to be done are:
- Using a password (optional): if terminals are password-protected.
- Sending a firmware file (optional) with a 'preserve configuration' capability
- Sending set-up file
- Disabling the auto-configuration after a configuration is sent (optional)
- Sending logo file (optional)
To create a group, click on the [Add a Group] Button. The next dialog box
differs according to the group selected.
Below are five examples of groups.

68 Axel Remote Management V3
a) Type of model
The "M85" group is associated with only a configuration file (no firmware will be
sent). The membership criterion is the type of model. In this case when auto-
configuration requests are received from an M85 the specified set-up file will be
sent back.
b) FK Code
The FK code is the embedded terminal circuit board reference. For example
M75, 75B and 75E were equipped with FK16. And M65C are equipped with
FK20.

Axel Remote Management V3 69
The "FK20" group is associated with only a firmware file (with the preserve
configuration capability enabled). The membership criterion is the FK code. In
this case when auto-configuration requests are received from an FK20 terminal
the specified firmware file will be sent back.

70 Axel Remote Management V3
c) Range of serial numbers
The "M80 Range" group is associated with a firmware file and configuration file.
The membership criterion is a range of serial numbers. In this case when auto-
configuration requests are received from a terminal within the serial number
range the specified set-up file and firmware will be sent back.

Axel Remote Management V3 71
d) List of serial numbers
The "M85 List" group is associated with a set-up file. The membership criterion
is the list of serial numbers. In this case when auto-configuration requests are
received from a terminal with a specified serial number range the specified set-
up file is be sent back.
Important: for each serial number entered in the list additional specific
parameters can be provided in the following order: name of the terminal, IP
address, network mask and router IP address. (These parameters are
separated by commas.)
This optional information allows a common configuration file to be used whilst
still being able to apply individual parameters specific to each terminal.
For example: - 1919M8500101,ax122.axel.com,192.168.1.122
Forces name and IP address - 1919M8500102,,192.168.1.123
Forces IP address

72 Axel Remote Management V3
e) Subnet
The "Subnet" group is associated with both a set-up and a logo files. The
membership criterion is a subnet:
Note: a subnet is defined by both an IP address and a number of bits
(consecutive bits in the netmask). In the example the number 11 is 255.224.0.0.
6.1.2 - Priority of the groups
When AxRM receives an auto-configuration request it determines to which
group the terminal belongs. The order of the groups is significant because a
terminal can belong to several groups.
For example serial number 1919M8500101 belongs to the group "M85" and
"M85 List".
The two buttons on the right of the list allow the priority to be ' raised' or
'lowered’. (I.e. the higher up the list the higher the priority)

Axel Remote Management V3 73
6.1.3 - Manual management of an unknown terminal
The option ‘Prompt me if a request from a non listed Axel device is received’
will, if ticked, pops up a box where the configuration parameters can be
manually entered. (An ‘unknown’ terminal is one not previously registered in
AxRM). (See chapter 6.2.1)
This function is available only when using the Interactive Mode. See Chapter
6.2.
6.1.4 - Saving/Loading Environment File
The current settings (TCP port, manual management, groups etc) are
automatically saved in an 'environment' file (.ini) when this box is exited.
These settings are automatically reloaded on startup.

74 Axel Remote Management V3
Note: the checkbox "Service Mode: Read environment file for each terminal
request" allows the settings to be modified without the need of stop and restart
the auto-configuration service.
6.1.5 - Smart Firmware Analyze
This "Service Mode: Enable smart firmware analyze" option allows a firmware to
be downloaded to a terminal only if this terminal is equipped with a different
firmware.
6.2 - LAUNCHING THE AUTO-CONFIGURATION
To launch the auto-configuration select from the main console [Advanced]-
[Axel Auto-configuration].
Two modes are available:
- Interactive mode: actions are performed and displayed in real time and
the option "unknown terminals" is supported.
- Service mode: the auto-configuration service is run as a Windows service
in the background. There is no need for the PC to be logged on. A log file
is generated to view activity.
6.2.1 - Interactive Mode
The Interactive Mode can be started under the following conditions:
- At least one group is created/selected (see chapter 6.1.1),
- The unknown terminal option is enabled (see Chapter 6.1.3).

Axel Remote Management V3 75
To start this mode, press the 'Interactive Mode' tab and click on [Run]:
The service is stopped by clicking on the same button, now named [Stop].
Note: this dialog box can only be closed after the process is stopped.
The status zone provides details of in-coming requests and subsequent actions.
a) Unknown terminal
If the terminal is unknown the behavior of AxRM depends on whether ‘activation
of manual management’ is enabled (see chapter 6.1.3).
76 Axel Remote Management V3
De-activated manual management (default)
If manual management is disabled the request is ignored and the status
message below is given:
==== Connection from 192.168.1.220 ====
MAC Address: 00:A0:34:20:00:02
No group found.
==== Operation aborted. ====
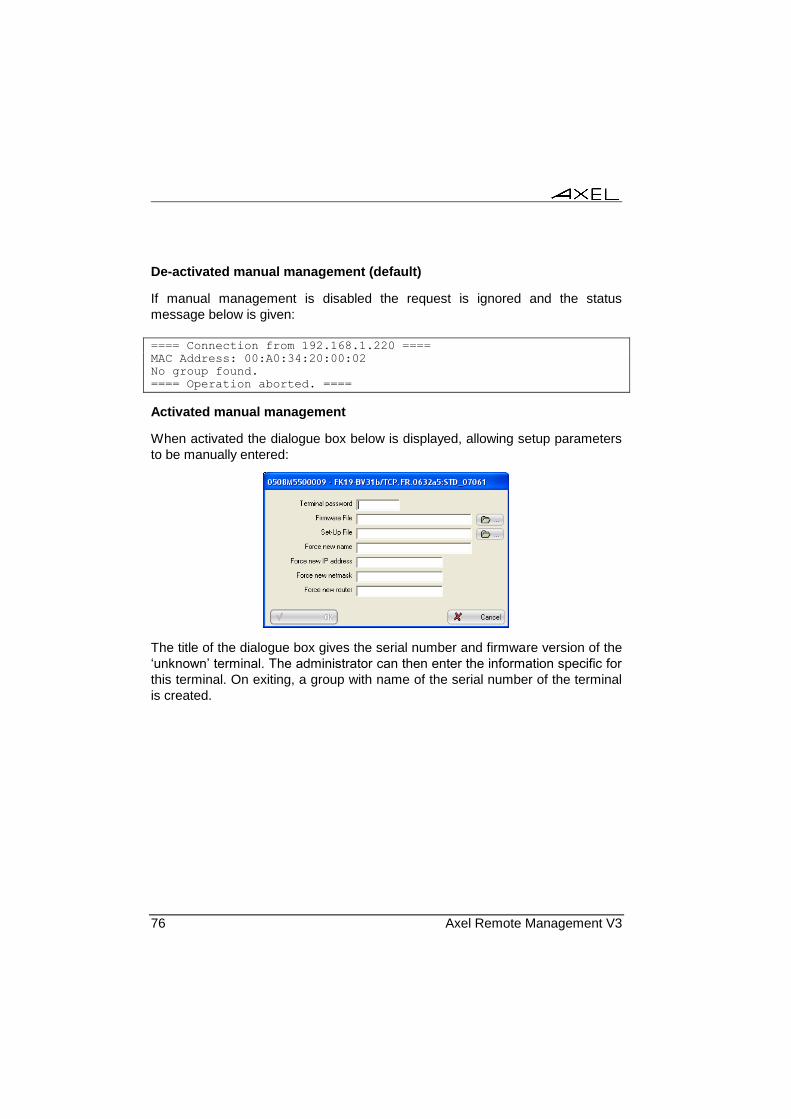
Activated manual management
When activated the dialogue box below is displayed, allowing setup parameters
to be manually entered:
The title of the dialogue box gives the serial number and firmware version of the
‘unknown’ terminal. The administrator can then enter the information specific for
this terminal. On exiting, a group with name of the serial number of the terminal
is created.
Axel Remote Management V3 77
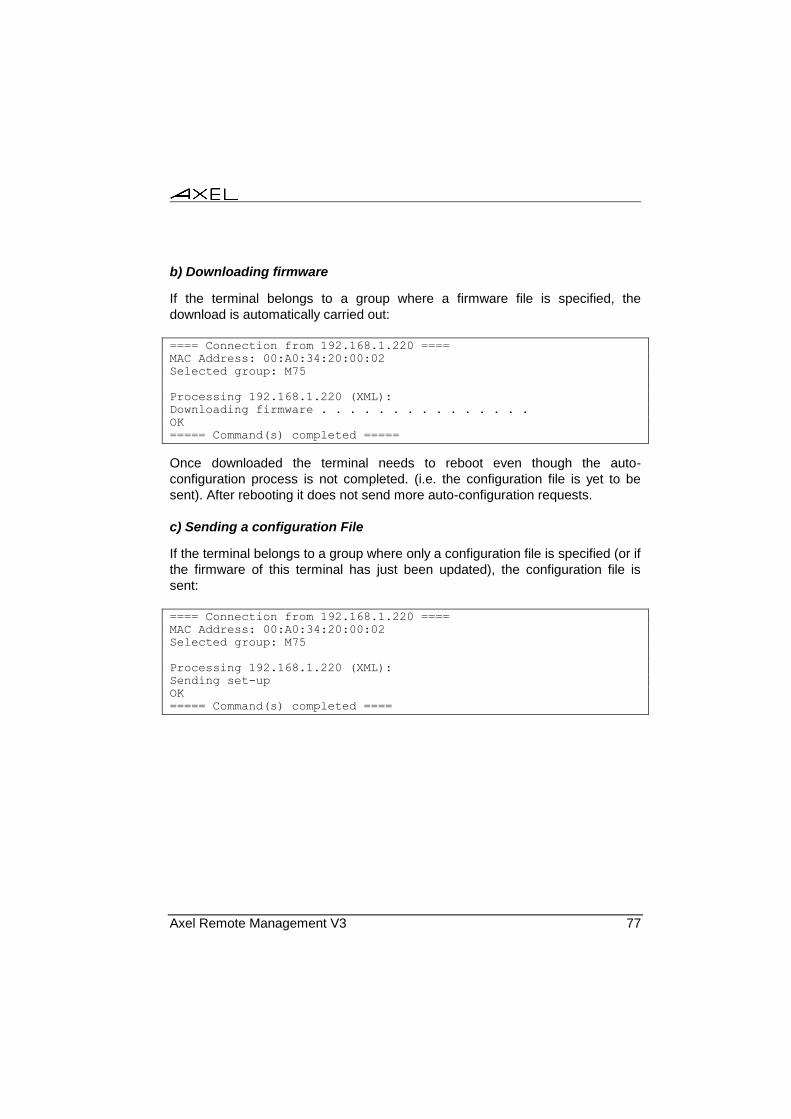
b) Downloading firmware
If the terminal belongs to a group where a firmware file is specified, the
download is automatically carried out:
==== Connection from 192.168.1.220 ====
MAC Address: 00:A0:34:20:00:02
Selected group: M75
Processing 192.168.1.220 (XML):
Downloading firmware . . . . . . . . . . . . . . .
OK
===== Command(s) completed =====
Once downloaded the terminal needs to reboot even though the auto-
configuration process is not completed. (i.e. the configuration file is yet to be
sent). After rebooting it does not send more auto-configuration requests.
c) Sending a configuration File
If the terminal belongs to a group where only a configuration file is specified (or if
the firmware of this terminal has just been updated), the configuration file is
sent:
==== Connection from 192.168.1.220 ====
MAC Address: 00:A0:34:20:00:02
Selected group: M75
Processing 192.168.1.220 (XML):
Sending set-up
OK
===== Command(s) completed ====

78 Axel Remote Management V3
When the entire process completes the terminal reboots and is ready for use.
6.2.2 - Service Mode
Select the 'Service Mode' tab:
IMPORTANT: with the service mode, no mapped network drive must be
used for file location. (A network drive is created when the user logons.
And there is no user logon with a service mode)
a) Installing the service
The first step is the service installation.
A user account is required. It can be the system account (LocalSystem) or any
user account with the administrative rights.

Axel Remote Management V3 79
A check box allows the option of auto-starting the service when the Windows
machine is booted. If this check box is not ticked, the service will have to be
manually started each time the Windows machine is booted up or when
required.
Click on [Install the service] to start the installation.
b) Starting the service
Two files are associated with this service:
- Log File: auto-configuration activity will be recorded in this file.
- Transaction File: information about devices using the auto-configuration
service is recorded in this file. This allows the AxRM Terminal Database
to be regularly updated. (See Chapters 3.4 and 4.4.4)

80 Axel Remote Management V3
Click on [Start service]. When running only the [Stop service] button is
available:
The service will remain running after exiting AxRM
Note: when starting the service an event is recorded in the Microsoft Event
Viewer. All subsequent auto-configuration events are only recorded in the log
file.
c) Stopping the service
To stop the service click on [Stop service] (i.e. to change the environment file):
d) Uninstalling the service
Uninstalling the service is only possible when the service is stopped.

Axel Remote Management V3 81
IMPORTANT: Always uninstall the service before uninstalling AxRM.
Click on [Uninstall the service]:
6.3 - OVERVIEW OF ENTIRE PROCESS
When the terminal is switched on for the very first time, the auto-configuration
function is automatically started. No human intervention is necessary.
The following happens:
- Terminal obtains an IP address by DHCP (optional).
- Terminal locates the AxRM server. (Via DHCP and DNS or by the
terminal settings)
- Terminal sends auto-configuration requests.
- New firmware file received (optional).
- New configuration file received.
For more information on the behaviour of the terminal in auto-configuration, see
the AX3000 User's Manual.

82 Axel Remote Management V3
- 7 - OTHER FUNCTIONS

Axel Remote Management V3 83
This chapter describes more operations possible with AxRM.
7.1 - ASSIGNMENT OF AN IP ADDRESS
The basic functions of AxRM require the terminal to already have a valid IP
address.
If the terminal does not have an address IP (or has an unknown address IP
factor), it is possible to re-apply a new address IP if the serial number or
Ethernet MAC address of the terminal are known.
Note: the serial number and the Ethernet address are given on the label on the
bottom of the terminal.
Important: this function is only available if:
- The terminal and the AxRM machine are on the same network (This
function does not work through routers as routers work at the IP level and
this command works at the hardware MAC address level).
- Firmware supports this function. (Firmware 0303a or higher for terminals
or 9926a or higher for the Office Servers)

84 Axel Remote Management V3
To launch this command select menu [Advanced]-[Set an IP Address to a
device]:
Step 1 - enter new IP address IP to assign to the terminal
Step 2 - identify the terminal by either serial number of Ethernet MAC address
Step 3 - run command by pressing [Set this IP Address to this Device]
About "use the native ARP support": for Windows 95 and 95 or if multiple
network interfaces are installed, it's recommended to uncheck this option (in this
case a DOS command is used to address the ARP table).

Axel Remote Management V3 85
After several seconds AxRM will confirm the command executed successfully as
below:
Important: After the new IP address the terminal is automatically rebooted.
7.2 - USING BOOTP TO RELOAD FIRMWARE
7.2.1 - Basic Concept
For certain Axel products firmware download comprises of a critical phase
where the existing firmware is erased and the new firmware has not
downloaded. If a problem occurs during this phase (i.e. network incident or
corrupt firmware file) the Axel product can be left without valid firmware. In this
situation, on booting, it follows a certain procedure.
The terminal sends out a BOOTP broadcast on the network to recover the
parameters necessary download new firmware. These parameters are: terminal
IP address, name of the firmware file and the TFTP server address.
Providing a BOOTP server is listening for such a request and that the BOOTP
server "recognizes" this product (from to its Ethernet address), the firmware is
reloaded.
86 Axel Remote Management V3
7.2.2 - Configuring the BOOTP Server
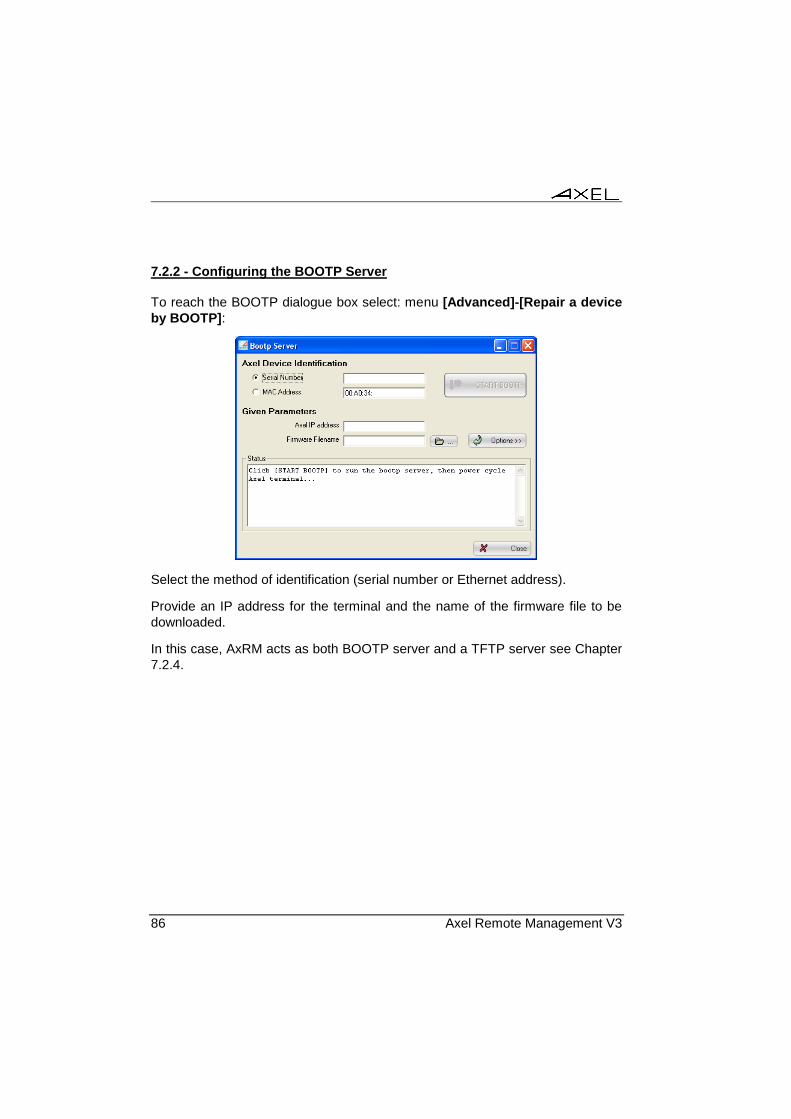
To reach the BOOTP dialogue box select: menu [Advanced]-[Repair a device
by BOOTP]:
Select the method of identification (serial number or Ethernet address).
Provide an IP address for the terminal and the name of the firmware file to be
downloaded.
In this case, AxRM acts as both BOOTP server and a TFTP server see Chapter
7.2.4.
Axel Remote Management V3 87
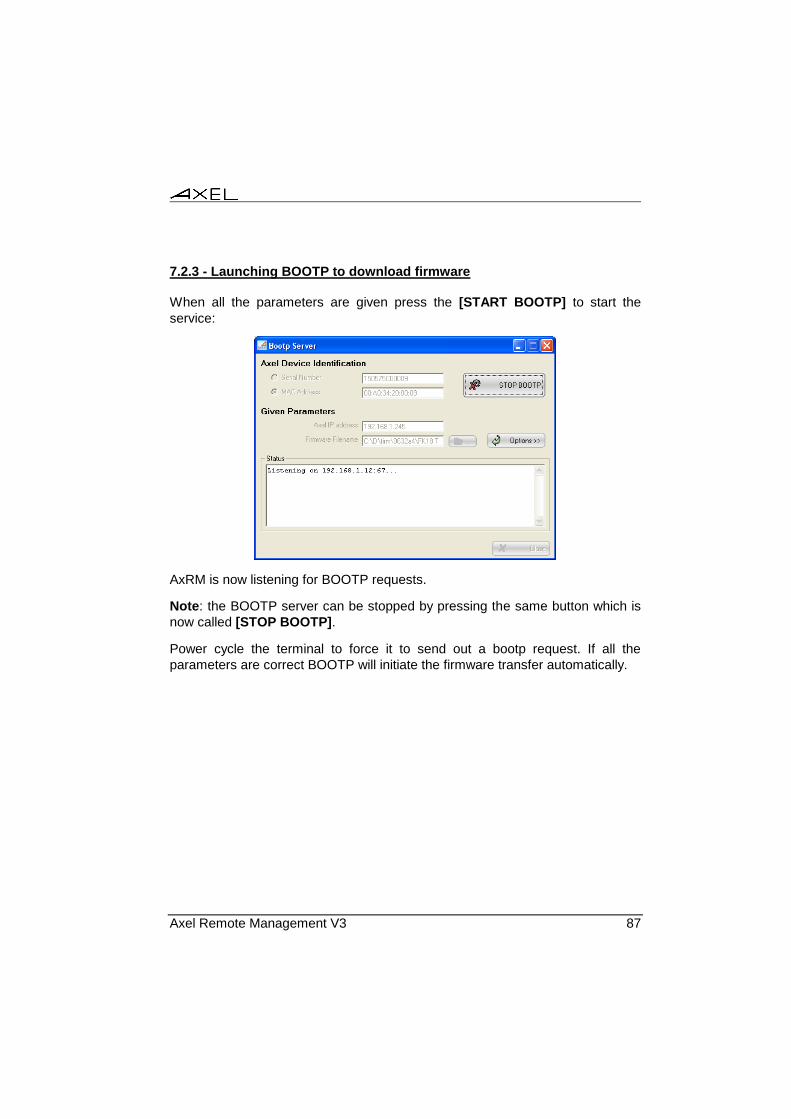
7.2.3 - Launching BOOTP to download firmware
When all the parameters are given press the [START BOOTP] to start the
service:
AxRM is now listening for BOOTP requests.
Note: the BOOTP server can be stopped by pressing the same button which is
now called [STOP BOOTP].
Power cycle the terminal to force it to send out a bootp request. If all the
parameters are correct BOOTP will initiate the firmware transfer automatically.
88 Axel Remote Management V3
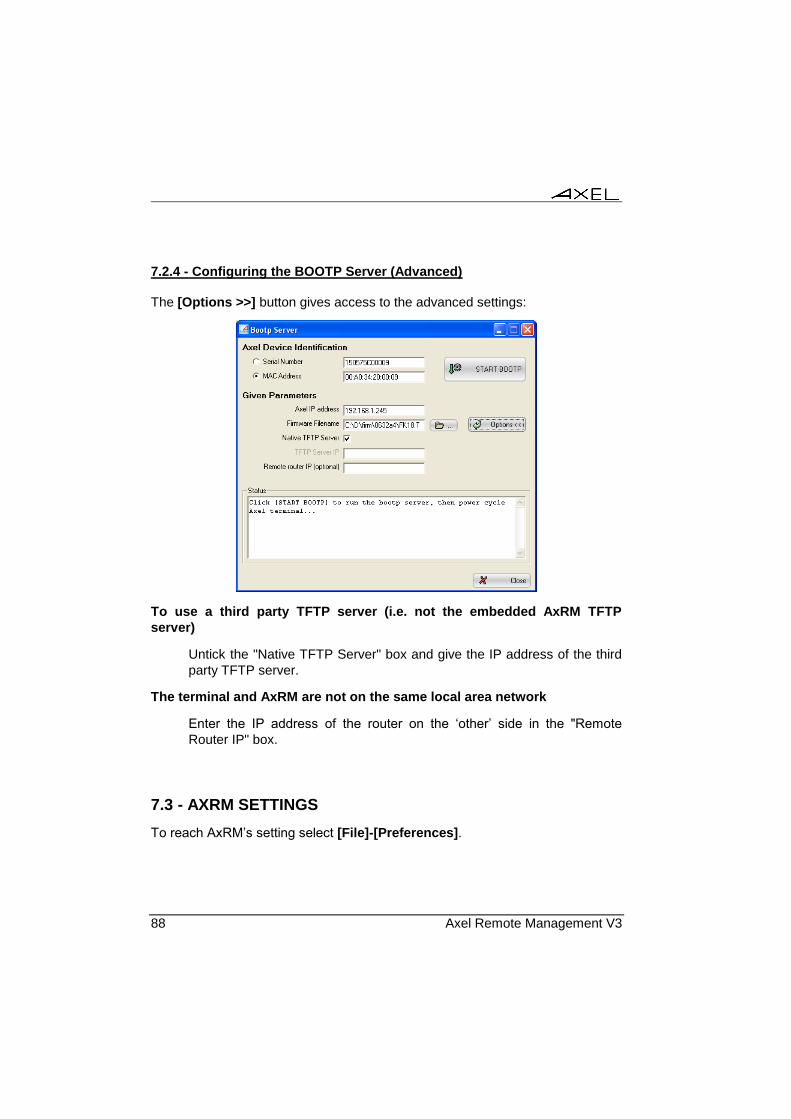
7.2.4 - Configuring the BOOTP Server (Advanced)
The [Options >>] button gives access to the advanced settings:
To use a third party TFTP server (i.e. not the embedded AxRM TFTP
server)
Untick the "Native TFTP Server" box and give the IP address of the third
party TFTP server.
The terminal and AxRM are not on the same local area network
Enter the IP address of the router on the ‘other’ side in the "Remote
Router IP" box.
7.3 - AXRM SETTINGS
To reach AxRM’s setting select [File]-[Preferences].

Axel Remote Management V3 89
7.3.1 - Network Parameters
Click on the "Network" tab for network parameters and to select language:
In order to work AxRM must know the IP address of its host Windows machine:
"Network Interface".
Note: by default the PC’s first "Network Interface" IP address is selected. If
more than one network interface is available this parameter must be modified
manually so AxRM is connected to the same NIC/LAN as the terminal network.
Each time AxRM is run, the "Network Interface" value is compared with the
current Windows IP address. If these addresses are different, the AxRM
behaviour depends on the "Prompt me when AxRM detects new/alternative
IP address" value:
- Checked: a warning message is displayed. The operator must select if
the former IP address is overwritten by the new one.
- Unchecked: the former IP address is overwritten by the new one if
"Automatically use new IP address" is checked.
Note: if the Windows IP address is given by DHCP, set AxRM to automatically
use the new IP address. This will prevent a warning message being displayed
each time AxRM is run.

90 Axel Remote Management V3
If needed change the Default "Text-only Remote Control" Port or Default
"VNC Remote Control" Port. For more information see Chapters 5.3.1 and
5.3.2.
To detect new terminals, AxRM "listens" for DHCP requests sent by Axel
terminals. The "Detect New Terminals with a Native DHCP Server" function is
enabled by default. Disable this function in event of conflict with a DHCP/BOOT
server already running on this machine (see Chapter 3.5).
DNS Cache: we strongly advise to disable the Windows DNS Cache when
DHCP terminals are used (see Appendix A.6.2). The DNS service status
(enabled/disabled) is shown. If enabled, the service can be temporarily or
definitively disabled.
7.3.2 - General Parameters
Click on the "General" tab to select language and to set-up administration
command options:
a) Language Selection
Select preferred language from list.

Axel Remote Management V3 91
b) Command Options
The "Administration Command Protocol(s)" option is:
- XML and RSH,
- Only XML,
- Only RSH.
For the XML-based commands an "XML Administration Port" must be
specified. The default value is 80. For more information see Appendix A.1.
For the RSH-based commands a local TCP port must be reserved. The "Local
RSH Port Base" is the first value used by AxRM to find a free TCP port. This
parameter can be modified in the event of a firewall preventing an RSH.
When the "SEND SETUP" box is ticked, an enhanced dialog box is available.
This enhanced box offers additional parameters (Axel IP, Axel Netmask and
Axel name) and allows a common set-up file to be used for setting up multiple
terminals.
When the "GET INFO" box is ticked, the database is automatically updated
when the "Get Terminal Info" command is run.
The "REBOOT" option allows the maximum delay for terminal reboot to be set.

92 Axel Remote Management V3
7.3.3 - Default Folder Settings
Click on the "Default Folders" tab to access/change default file locations:
Three types of folders are shown:
- Firmware Files: Firmware files,
- Set-Up Files: configuration setup files
- Info or Stat. Files: files containing info and statistics.

Axel Remote Management V3 93
7.3.4 - The Database
Click on the "Database" tab to access the database parameters:
Two database types are available: Text-File and MS-SQL. For more information
see sub-chapter a) and b).
Whatever the database type the following options are available:
- Archive Terminal Set-Ups: this function allows set-up files (received by
the Get Set-Up command) to be automatically archived in the 'Archive
Folder'. A set-up file is saved as 00-A0-34-xx-yy-zz.txt. (This is the MAC
address of the terminal.)
The default 'Archive Folder' is "%SystemRoot%\AxelSetup".
- DHCP terminals when a terminal with a dynamic IP address is
discovered (by XML or SNMP), the database is updated and the unique
identifier of this terminal is its name. (The name is a DNS name). When
this option is set the IP address is used as the unique identifier even
though it's a dynamic IP address (and can't be guaranteed as the right IP
address for this terminal).
a) Text-File Database

94 Axel Remote Management V3
The database parameters are:
- Database name (by default: %SystemRoot%\AxRM2.axd).
- Use a Database Lock File. This function prevents two AxRM utilities
working on the same database file at the same time. (To avoid database
inconsistencies or data loss) When this function is enabled, a lock file is
used. (The lock file name is the database filename ended by ".lock". The
default lock file is "%SystemRoot%\AxRM2.axd.lock").
a) MS-SQL Database
The database parameters are:
- SQL Server Location
- Authentication: username and password (this user must have 'database
creation' permission)
- Database Name.
The [SQL Connection] button allows these settings to be tested. If the database
doesn't exist it will be automatically created. For more information about the
database structure see Appendix A.4.

Axel Remote Management V3 95
7.3.5 - Using a password to protect AxRM
Click on the "Password" tab to access the password parameters:
If necessary the control of AxRM can be controlled by a password. Select
password and enter your chosen password.
The password is required the next time AxRM is launched.

96 Axel Remote Management V3
7.3.6 - Remote Access
Click on the "Remote Access" tab to access the parameters for remote access
features. (See Chapter 5.3):
a) Remote Control
The parameters are:
- Encryption: enabled by default.
- Inactivity timer: when a value is selected (from 5 to 30 minutes), the
remote control session is disconnected after the timer expiration.
- AxViewer: only use IP addresses from AxRM database: AxViewer is
separate remote control software. This option allows restricting devices
addressed by AxViewer.
- VNC: optional hotkey for exiting the viewer: to provide a quick exit of
the VNC console an hotkey can be selected.

Axel Remote Management V3 97
b) Set-up via telnet or COM Port
To enter remotely the interactive set-up, AxRM offers an embedded emulator.
We strongly advise to use this emulator. The single parameter is the font size.
To use a third party emulator, check the box "Use a Third Party Emulator" and
enter the following information:
- Emulator Command: enter the pathname and the name of the emulator.
(The [...] button allows to disk to be browsed).
- Emulator Options: enter the emulator parameters. The %host% and
%port% substitution variables allows the Axel IP address and the set-up
TCP port to be programmed.
Prerequisite of a third party emulator:
- ANSI emulation (with color support)
- TERM value: ansi
- Screen size: 80x25
- Scrolling mode disabled
Note for using the Microsoft telnet client: as the scrolling mode cannot be
disabled with this telnet client, the DOS box size must be set to 80 columns and
26 rows.
98 Axel Remote Management V3
APPENDIX

Axel Remote Management V3 99
This Appendix gives information for administrators who wish to learn more about
the abilities and internal workings of the AxRM Software.
A.1 - TCP/IP COMMANDS USED
A.1.1 - Flowchart
The following flowchart describes how an AxRM command operates:
Ping
response?
XML
response?
Running XML command Running RSH command
Processing TFTP
firmware download
YES
NO
YES YES
Command ended NO
YES
NO
NO
Command
aborted
TFTP
required?
RSH
response?

100 Axel Remote Management V3
The preferred mode for administrative commands is XML. Compared with RSH
the benefits of XML are:
- Easy firewall administration (only one outgoing TCP port)
- Firmware downloading is faster and does not require TFTP.
Note: XML commands are only supported by AX3000 M75 models equipped
with firmware level 0521b2 and higher.
A.1.2 - RSH-Based Commands
Various standard TCP/IP commands are embedded in the AxRM Software (rsh,
arp, tftp and ping). Depending on your operating system these commands may
also be included in Windows.
An RSH-based administration commands can be emulated from a DOS prompt.
The following table gives for each administration command the equivalent
generic DOS command:
Commands AxRM Commands TCP/IP
Get Terminal Information ping axname
rsh axname ax_version
Get Terminal Network Stats. ping axname
rsh axname ax_getstat
Get Terminal Configuration ping axname
For full set-up info:
rsh axname setup_get > file
For partial set-up:
rsh axname setup_get_lite > file
Reboot ping axname
rsh axname ax_reboot [passwd] [resource]

Axel Remote Management V3 101
Send Terminal Configuration ping axname
To send the set-up:
rsh axname setup_send [passwd] < file
To reboot automatically:
rsh axname ax_reboot [passwd]
Firmware Download ping axname
To obtain and save current set-up:
rsh axname setup_get > file
To download firmware:
rsh axname ax_download [passwd] [File ]
[TFTP] [Router]
To send the saved set-up:
rsh axname setup_send [passwd] < file
To reboot automatically:
rsh axname ax_reboot [passwd]
Set IP address To modify the arp table:
arp -s axname MACaddr
And to force IP address:
ping axname
Note: for more information about RSH commands supported by Axel products,
please consult the User's Manual of the terminal / Office Server.
A.2 - USING WITH A FIREWALL
The AxRM tool uses the following commands:
- PING: checking terminal availability,
- XML: running administration commands (M75 only),
- RSH: running administration commands,
- SNMP: discovering new terminals,
- TFTP: downloading firmware,
- TELNET: entering terminal set-up,
- BOOTP: "repairing" a terminal when the firmware is lost,
- WOL (Wake On LAN): booting up a terminal.

102 Axel Remote Management V3
If you have a firewall there is a high chance that some services will be blocked
by default.
There are three ways to resolve this issue.
1. Connect the terminal to a non-firewalled PC, (maybe direct with
crossover Ethernet cable) thereby avoiding the firewall.
2. Turning off the firewall for the duration of the download
3. Enabling AxRM to work through the firewall. This is covered in more
detail below.
Enabling PING
The ICMP protocol must be allowed.
Enabling XML
Enable the outgoing TCP port 80.
Enabling RSH
From the PC/Firewall, RSH requires an outgoing and an incoming port. When
'RSH' is allowed within the firewall:
- An outgoing port is enabled (514),
- A range of incoming ports starting at 1024 are enabled.
(Sometimes the 'Local RSH Port Base' default valued can be modified)
Enabling SNMP
Enable the outgoing UDP port 161.
Enabling TELNET
By default the telnet TCP port is 4096. This incoming port must be enabled.
Enabling TFTP
Enable UDP port 69 - this is the port TFTP listens to.
Enabling BOOTP
Enable UDP port 70 - this is the port TFTP listens to.
Enabling WOL
Enable the outgoing UDP port 9.

Axel Remote Management V3 103
A.3 - FORMAT OF THE TEXT-FILE DATABASE
The format of the database file must adhere to the following rules:
- The first line of the file must be "AXEL DATABASE V2.0".
- All lines beginning with # are comments and are not interpreted.
- Uncommented lines must contain the following fields (a comma is used
as separator):
- Identifier of the element's father in the tree
- Identifier of this element (Nxxx for a folder, Lxxx for a terminal)
- Name of this element
- Ethernet Address,
- IP address or DNS name,
- Firmware/Hardware revision,
- Comment.
A.4 - FORMAT OF THE SQL DATABASE
The SQL database contains two tables:
- T_LEAFS: terminal table,
- T_NODES: folder table.

104 Axel Remote Management V3
These tables are created as shown below:
CREATE TABLE T_LEAFS (
leaf_key varchar(10) NOT NULL,
leaf_parent varchar(10) NOT NULL,
leaf_name varchar(45) NOT NULL,
leaf_IP varchar(80) NOT NULL,
leaf_MAC varchar(17) NOT NULL,
leaf_FW varchar(80) NOT NULL,
leaf_comment varchar(80) NOT NULL,
PRIMARY KEY (leaf_key)
)
CREATE TABLE T_NODES (
node_key varchar(10) NOT NULL,
node_parent varchar(10) NOT NULL,
node_name varchar(45) NOT NULL,
PRIMARY KEY (node_key)
)
A.5 - REGISTRY VARIABLES
AxRM uses the Windows "registry" to store internal variables. These variables
are stored in HKEY_LOCAL_MACHINE\SOFTWARE\Axel\AxRM V2 (and
HKEY_LOCAL_MACHINE\SOFTWARE\Wow6432Node\Axel\AxRM V2 for a
64bit O.S.):
- AllowNotRebootAfterSetUp : allows the option "terminal reboot" to be
available when sending a configuration file to a terminal.
- ArchiveSetupFolder: folder for storing configuration files
- AutoConfFile: auto-configuration parameter file.
- AutoConfLogFile: auto-configuration log file.
- AxViewerList : last IP addresses used by AxViewer.
- AxViewerUseDB: allowing or not AxViewer to address terminals not
listed in the AxRM database.
- DBAutoUpdate: enabling or not the auto-update function.
- DBFile: terminal database filename.
- DBTransactionFile: new terminals recorded by the auto-conf service.
Axel Remote Management V3 105
- DBType: database type: 0=text file / 1=MS-SQL.
- DBUseAlwaysIP: force a discovered terminal to be recorded with its IP
address.
- DBUseLock: using or not a lock file for the terminal database access.
- DHCPServer: discovering new terminals.
- DiscoverIPRange: last IP address range used for the terminal discovery.
- DontNotifyChangeIP: displaying or not a warning message when the
Windows IP address had been modified.
- EnabledRSH : set to 0 will disable RSH.
- FirmwareFolder: default folder for firmware files.
- HostIP: Windows IP address.
- InfoStatFolder: default folder for information/statistics files.
- IPAutoUpdate: automatically updating (or not) HostIP when the Windows
IP address had been modified.
- LanguageFile: language filename.
- LocalRSHPort: base for finding a free RSH TCP port.
- MaxWaitForRebooted: maximum delay allowed for terminal reboot.
- MoreSendSetupInfo: enhanced dialog box for send set-up command.
- Passwd: AxRM password (encrypted).
- RemoteControlEncrypt: encryption type of the remote control session.
- RemoteControlPort: default TCP port of the remote control session.
- RemoteControlTimer: inactivity time-out of the remote control session.
- SetupFolder: default folder for set-up files.
- SQLDatabaseName: SQL database name.
- SQLPassword: password to be connected to the SQL database.
- SQLServer: SQL database location.
- SQLUsername: username to be connected to the SQL database.
- TelnetCommand: pathname and name of the emulator.
- TelnetFont: font size for the AxRM embedded emulator.
- TelnetOption: emulator parameters.
- TelnetThirdParty: using or not a third party emulator.
- UseArchiveSetup: automatic back-up of terminal configuration files.
- UseHookMenu: using or not the XP-like menu component.
- VNCControlPort: default TCP port of the VNC remote control.
- VNCExitKey: final key keycode of the 'VNC exit' keystroke.
- VNCExitModifier: modifer keycode of the 'VNC exit' keystroke.
- XMLport: TCP port for XML-based administration commands.

106 Axel Remote Management V3
A.6 - MANAGING DHCP TERMINALS
A.6.1 - IP Address vs DNS NAME
To open a connection to a terminal (i.e to remotely administrate a terminal),
AxRM must know the ID of this terminal.
When static IP addresses are used the IP address is suitable for this identifier.
However when the IP address is provided by DHCP, the IP address can't be
used as the IP address is liable to change. In this situation the ID must be the
DNS name.
Note: to be compliant with this rule, when a terminal is discovered by AxRM, the
ID associated in the AxRM database is either the IP address or the DNS name
(depending if the terminal is running DHCP or not).
When the ID is the DNS name, DDNS (Dynamic DNS) must be used. In this
scenario the DHCP server collaborates with the DNS server, updating the DNS
server with the new terminal's DNS name.
Using a DNS name allows AxRM to administrate terminals in a dynamic-IP-
addressing environment.
Care needs to be taken over the 'DNS Cache' on the machine where AxRM is
running.
A.6.2 - The Windows DNS Cache
When a TCP/IP device opens a connection in a DNS environment, the DNS
name of the destination must first be "resolved". This DNS resolution allows the
IP address to be obtained from the DNS name, allowing the connection to be
established. (This IP address can be dynamic when using a DHCP
environment).
Each time a DNS name has to be resolved a DNS request is sent to the DNS
server(s).
'DNS Cache' Overview
To reduce the number of DNS requests, a DNS cache is maintained on
Windows machines. This is an array where known associations between name

Axel Remote Management V3 107
and IP are stored. The Windows machine first searches for an entry in its DNS
cache before sending a DNS request to the server.
This causes a potential problem in the following scenario:
The terminal boots, obtains an IP address via DHCP, the DHCP server updates
the DNS server. The first time AxRM contacts this terminal it resolves the
terminal's DNS name and obtains the IP address. Connection is established,
remote commands work and the PC caches the terminal's DNS name and IP
address. When the terminal reboots it will re-contact the DHCP server to
request an IP address. This IP address may be different to the address
previously provided. Now, when the AxRM PC tries to contact the terminal, it will
first access its own DNS cache, lookup the DNS name and find the old IP
address is still associated to the DNS, and the connection with fail....
Solution:
The solution is disabling the DNS cache. Then each time a DNS name is to be
resolved a DNS request will be have to be sent.
The AxRM preferences allow the DNS cache to be disabled. See Chapter 7.3.1.
To manually disable the DNS cache enter the following command from a DOS
prompt.
net stop dnscache
Note: To disable the DNS cache permanently in Windows, use the Service
Controller tool or the Services tool to set the DNS Client service startup type to
Disabled. Note that the name of the Windows DNS Client service may also
appear as "Dnscache".
For more information consult the Microsoft knowledge base:
http://support.microsoft.com/kb/318803.
A.7 - TROUBLESHOOTING
A.7.1 - AxRM Terminates After the Splash Screen
Problem: When running AxRM the splash screen is displayed then AxRM terminates.

108 Axel Remote Management V3
Explanation: AxRM execution is aborted by the DEP module (Data Execution Prevention). The DEP module does not recognize AxRM and prevents it from running.
Solutions: Two methods can be used to fix this problem:
1. Set AxRM as a trusted software: In the control panel click on "system". On the "Advanced" tab, under Performance, click "Settings". On the "Data Execution Prevention" tab: - either select the option "Turn on DEP for essential Windows programs and services only" - or check the "Axel Remote Manager" item. Reboot the server to make this change take effect.
2. Disable the XP-like menu component in AxRM (V2.3.3 minimum) Run "regedit.exe". Got to [HKEY_LOCAL_MACHINE]-[SOFTWARE]-[Axel]-[AxRM V2] and set "UseHookMenu" to 0.
A.7.2 - AxRM Installation Problem (fraplus1.ocx and btnplus1.ocx)
During the installation of AxRM the following error messages may be seen: An error occurred while registering the file c:\windows\system32\FraPlus1.ocx An error occurred while registering the file c:\windows\system32\BtnPlus1.ocx
This error is due to an incompatibility of these components with the new Windows function 'DEP' (Data Execution Prevention)
Note: Data Execution Prevention is a set of hardware and software technologies that perform additional checks on memory to help prevent malicious code from running on a system. It's only used on some CPU processors.
To install AxRM it is necessary to restrict the function of DEP:
In the control panel click on "system". On the "Advanced" tab, under Performance, click "Settings" . On the "Data Execution Prevention" tab select the option "Turn on DEP for essential Windows programs and services only". Reboot the server to make this change take effect.
The AxRM installation will now proceed as normal.
Axel Remote Management V3 109
A.7.3 - SQLDMO.DLL Installation Problem
During AxRM V3 installation, the SSQLDMO.DLL installation may fail. This can be fixed by installing the "Microsoft SQL Server 2005 Backward Compatibility" package.
Packages can be downloading from the Microsoft site: http://www.microsoft.com/downloads/en/details.aspx?displaylang=en&FamilyID=b33d2c78-1059-4ce2-b80d-2343c099bcb4
In event of problem these packages are also available from the Axel web site: - Package X86 - Package X64
Install the package. (Ensure that 'SQL Distributed Management Objects' is selected.)


Z.A. Courtabœuf
14 Avenue du Québec
Bât. K2 - BP 728
91962 Les Ulis cedex - FRANCE
Tel.: +33 1.69.28.27.27 - Fax: +33 1.69.28.82.04 - Email: [email protected]