Embed Size (px)
Citation preview

For Research Use Only. Not for use in diagnostic procedures.
Axiom™ 2.0 Assay 96-Array FormatAutomated WorkflowSITE PREPARATION GUIDE
on the Applied Biosystems™ NIMBUS™
Catalog Number 901758Publication Number MAN0017741
Revision A.0
Manufacturer: Thermo Fisher Scientific BalticsUAB |V.A. Graiciuno 8, LT-02241 |Vilnius, Lithuania
Products:Axiom™ 2.0 Reagent Kit
Manufacturer: Affymetrix Pte Ltd |7 Gul Circle #2M-01 |Keppel Logistics Building |Singapore 629563
Products:Axiom™ Array PlatesAxiom™ myDesign™ Array Plates
The information in this guide is subject to change without notice.
DISCLAIMER: TO THE EXTENT ALLOWED BY LAW, THERMO FISHER SCIENTIFIC INC. AND/OR ITS AFFILIATE(S) WILL NOT BE LIABLE FOR SPECIAL,INCIDENTAL, INDIRECT, PUNITIVE, MULTIPLE, OR CONSEQUENTIAL DAMAGES IN CONNECTION WITH OR ARISING FROM THIS DOCUMENT,INCLUDING YOUR USE OF IT.
Revision history: Pub. No. MAN0017741
Revision Date DescriptionA.0 18 October 2018 Initial release in Thermo Fisher Scientific document control system.
Supersedes legacy Affymetrix publication number 703350.Updated to the current document template, with associated updates to trademarks, logos, licensing, andwarranty.
Important Licensing Information: These products may be covered by one or more Limited Use Label Licenses. By use of these products, you acceptthe terms and conditions of all applicable Limited Use Label Licenses.TRADEMARKS: All trademarks are the property of Thermo Fisher Scientific and its subsidiaries unless otherwise specified. Microsoft, and Excel areeither registered trademarks or trademarks of Microsoft Corporation in the United States and/or other countries. Vortex-Genie is a registeredtrademark of Scientific Industries, Inc. Jitterbug is a trademark of Boekel Scientific. Kimwipes is a trademark and brand of Kimberly-ClarkWorldwide, Inc. Eppendorf and Mastercycler are registered trademarks of Eppendorf AG. SpectraMax is a registered trademark of Molecular DevicesCorporation. Pipet-Lite and Green-Pak are trademarks of Rainin Instrument, LLC. Pipet-Aid is a registered trademark of Drummond ScientificCompany. Bio-Rad, Microseal, DNA Engine Tetrad, and Hard-Shell are registered trademarks of Bio-Rad Laboratories, Inc. Microlab, NIMBUS, CO-RE,and Hamilton are owned and/or registered by Hamilton Company in the U.S. and/or other countries. Alpillo is a trademark and brand of AlpaquaEngineering, LLC.
©2018 Thermo Fisher Scientific Inc. All rights reserved.
Contents
■ CHAPTER 1 NIMBUS™ Target PreparationInstrument configuration . . . . . . . . . . . . . . . . . . . . . . . . . . . . . . . . . . . . . . . . . . . . . . . . . 5
Pre-installation information . . . . . . . . . . . . . . . . . . . . . . . . . . . . . . . . . . . . . . . . . . . . . . . . . . . . . . 5Site selection . . . . . . . . . . . . . . . . . . . . . . . . . . . . . . . . . . . . . . . . . . . . . . . . . . . . . . . . . . . . . . . 5Inventory of components . . . . . . . . . . . . . . . . . . . . . . . . . . . . . . . . . . . . . . . . . . . . . . . . . . . . 6Computer and software methods . . . . . . . . . . . . . . . . . . . . . . . . . . . . . . . . . . . . . . . . . . . . . 6Power requirements . . . . . . . . . . . . . . . . . . . . . . . . . . . . . . . . . . . . . . . . . . . . . . . . . . . . . . . . 7
Hamilton™ equipment and software . . . . . . . . . . . . . . . . . . . . . . . . . . . . . . . . . . . . . . . . . . . . . . . 7Operation specifications . . . . . . . . . . . . . . . . . . . . . . . . . . . . . . . . . . . . . . . . . . . . . . . . . . . . . 7Components . . . . . . . . . . . . . . . . . . . . . . . . . . . . . . . . . . . . . . . . . . . . . . . . . . . . . . . . . . . . . . . 8Instrument installation and testing . . . . . . . . . . . . . . . . . . . . . . . . . . . . . . . . . . . . . . . . . . . . 9Software installation requirements . . . . . . . . . . . . . . . . . . . . . . . . . . . . . . . . . . . . . . . . . . 11Setup INHECO™ devices . . . . . . . . . . . . . . . . . . . . . . . . . . . . . . . . . . . . . . . . . . . . . . . . . . . . 11Pedestals, Thermoshake, and CPAC accessory tool kit . . . . . . . . . . . . . . . . . . . . . . . . . . 12Assemble the trash chute . . . . . . . . . . . . . . . . . . . . . . . . . . . . . . . . . . . . . . . . . . . . . . . . . . . 19Set up the Thermoshake Deep-well Plate Adapter . . . . . . . . . . . . . . . . . . . . . . . . . . . . . 22Assemble the Alpillo™ Plate Cushion . . . . . . . . . . . . . . . . . . . . . . . . . . . . . . . . . . . . . . . . . 24Assemble the CPAC tube adapter and cover . . . . . . . . . . . . . . . . . . . . . . . . . . . . . . . . . . . 25O-ring care . . . . . . . . . . . . . . . . . . . . . . . . . . . . . . . . . . . . . . . . . . . . . . . . . . . . . . . . . . . . . . . 27
■ CHAPTER 2 Assay equipment and supplies required . . . . . . . . . . . . . . . 28
Applied Biosystems™ equipment, software, reagents, and arrays required . . . . . . . . . . . . 28
Axiom™ consumables kits for the NIMBUS™ Instrument . . . . . . . . . . . . . . . . . . . . . . . . . . . . . 30
Axiom™ Starter Kit for Applied Biosystems™ NIMBUS™ . . . . . . . . . . . . . . . . . . . . . . . . . . . . . 30
Labware and accessories required . . . . . . . . . . . . . . . . . . . . . . . . . . . . . . . . . . . . . . . . . . . . . . . 31Deck accessories required . . . . . . . . . . . . . . . . . . . . . . . . . . . . . . . . . . . . . . . . . . . . . . . . . . 31Pipette tips . . . . . . . . . . . . . . . . . . . . . . . . . . . . . . . . . . . . . . . . . . . . . . . . . . . . . . . . . . . . . . . 31Labware used on the deck . . . . . . . . . . . . . . . . . . . . . . . . . . . . . . . . . . . . . . . . . . . . . . . . . . 32
Other equipment, consumables, and reagents required . . . . . . . . . . . . . . . . . . . . . . . . . . . . . 36Preamplification area . . . . . . . . . . . . . . . . . . . . . . . . . . . . . . . . . . . . . . . . . . . . . . . . . . . . . . 36Oven requirements . . . . . . . . . . . . . . . . . . . . . . . . . . . . . . . . . . . . . . . . . . . . . . . . . . . . . . . . 37Spectrophotome-ter . . . . . . . . . . . . . . . . . . . . . . . . . . . . . . . . . . . . . . . . . . . . . . . . . . . . . . . 37Thermal cyclers and protocols . . . . . . . . . . . . . . . . . . . . . . . . . . . . . . . . . . . . . . . . . . . . . . 37Shakers . . . . . . . . . . . . . . . . . . . . . . . . . . . . . . . . . . . . . . . . . . . . . . . . . . . . . . . . . . . . . . . . . . 38
Axiom™ 2.0 Assay 96-Array Format Automated Workflow Site Preparation Guide—Applied Biosystems™ NIMBUS™
Instrument3
Plate centrifuge . . . . . . . . . . . . . . . . . . . . . . . . . . . . . . . . . . . . . . . . . . . . . . . . . . . . . . . . . . . 39Other equipment, reagents, and supplies required . . . . . . . . . . . . . . . . . . . . . . . . . . . . . 40
■ APPENDIX A Safety . . . . . . . . . . . . . . . . . . . . . . . . . . . . . . . . . . . . . . . . . . . . . . . . . . . . . 42
Symbols on this instrument . . . . . . . . . . . . . . . . . . . . . . . . . . . . . . . . . . . . . . . . . . . . . . . . . . . . . 42Standard safety symbols . . . . . . . . . . . . . . . . . . . . . . . . . . . . . . . . . . . . . . . . . . . . . . . . . . . . 42Location of safety labels . . . . . . . . . . . . . . . . . . . . . . . . . . . . . . . . . . . . . . . . . . . . . . . . . . . . 44Control and connection symbols . . . . . . . . . . . . . . . . . . . . . . . . . . . . . . . . . . . . . . . . . . . . . 45Conformity symbols . . . . . . . . . . . . . . . . . . . . . . . . . . . . . . . . . . . . . . . . . . . . . . . . . . . . . . . . 45
Safety information for instruments not manufactured by Thermo Fisher Scientific . . . . . 46
Instrument safety . . . . . . . . . . . . . . . . . . . . . . . . . . . . . . . . . . . . . . . . . . . . . . . . . . . . . . . . . . . . . . 46General . . . . . . . . . . . . . . . . . . . . . . . . . . . . . . . . . . . . . . . . . . . . . . . . . . . . . . . . . . . . . . . . . . 46Physical injury . . . . . . . . . . . . . . . . . . . . . . . . . . . . . . . . . . . . . . . . . . . . . . . . . . . . . . . . . . . . 47Electrical safety . . . . . . . . . . . . . . . . . . . . . . . . . . . . . . . . . . . . . . . . . . . . . . . . . . . . . . . . . . . 48Cleaning and decontamination . . . . . . . . . . . . . . . . . . . . . . . . . . . . . . . . . . . . . . . . . . . . . . . 49Instrument component and accessory disposal . . . . . . . . . . . . . . . . . . . . . . . . . . . . . . . . 49
Safety and electromagnetic compatibility (EMC) standards . . . . . . . . . . . . . . . . . . . . . . . . . . 50Safety standards . . . . . . . . . . . . . . . . . . . . . . . . . . . . . . . . . . . . . . . . . . . . . . . . . . . . . . . . . . . 50EMC standards . . . . . . . . . . . . . . . . . . . . . . . . . . . . . . . . . . . . . . . . . . . . . . . . . . . . . . . . . . . . 51Environmental design standards . . . . . . . . . . . . . . . . . . . . . . . . . . . . . . . . . . . . . . . . . . . . . 51
Chemical safety . . . . . . . . . . . . . . . . . . . . . . . . . . . . . . . . . . . . . . . . . . . . . . . . . . . . . . . . . . . . . . . . 52
Biological hazard safety . . . . . . . . . . . . . . . . . . . . . . . . . . . . . . . . . . . . . . . . . . . . . . . . . . . . . . . . . 54
■ Documentation and support . . . . . . . . . . . . . . . . . . . . . . . . . . . . . . . . . . . . . . . . . . . . . 55
Related documentation . . . . . . . . . . . . . . . . . . . . . . . . . . . . . . . . . . . . . . . . . . . . . . . . . . . . . . . . . 55
Customer and technical support . . . . . . . . . . . . . . . . . . . . . . . . . . . . . . . . . . . . . . . . . . . . . . . . . 56
Limited product warranty . . . . . . . . . . . . . . . . . . . . . . . . . . . . . . . . . . . . . . . . . . . . . . . . . . . . . . . 56
Contents
4 Axiom™ 2.0 Assay 96-Array Format Automated Workflow Site Preparation Guide—Applied Biosystems™ NIMBUS™
Instrument
NIMBUS™ Target PreparationInstrument configuration
The Applied Biosystems™ NIMBUS™ Target Preparation Instrument is required to runthis version of the Axiom™ 2.0 Assay with the automated target preparation. Thischapter contains information specific to the setup, maintenance, and safe use of theNIMBUS™ Instrument and equipment.
Pre-installation information
IMPORTANT! Read the all the information in this chapter before unpacking ormoving the instrument.
IMPORTANT! Determine the NIMBUS™ Instrument location carefully. Moving theinstrument after installation requires recalibration.
Location considerations and requirements
• Keep the instrument away from direct sunlight, drafts, excessive vibrations, andwidely fluctuating temperatures or humidity. This requirement is especiallycritical for low volume (<10 µL) applications that require highly accurate andprecise pipetting.
• The instrument must be placed on a stable bench, table, or hood that can supportup to 200 lbs (89.6 kg) without bowing or swaying.
• The instrument must be oriented so that when facing the instrument, the wastedisposal station is on the left side of the instrument.
• Ensure that the bench/table surface is as level as possible and affords, at aminimum, the following dimensions:
– Width (front to rear) 20 inches (50.8 cm)– Length (left to right) 52.5 inches (133.4 cm)– Height 30 inches (76.2 cm)
1
Site selection
Axiom™ 2.0 Assay 96-Array Format Automated Workflow Site Preparation Guide—Applied Biosystems™ NIMBUS™
Instrument5
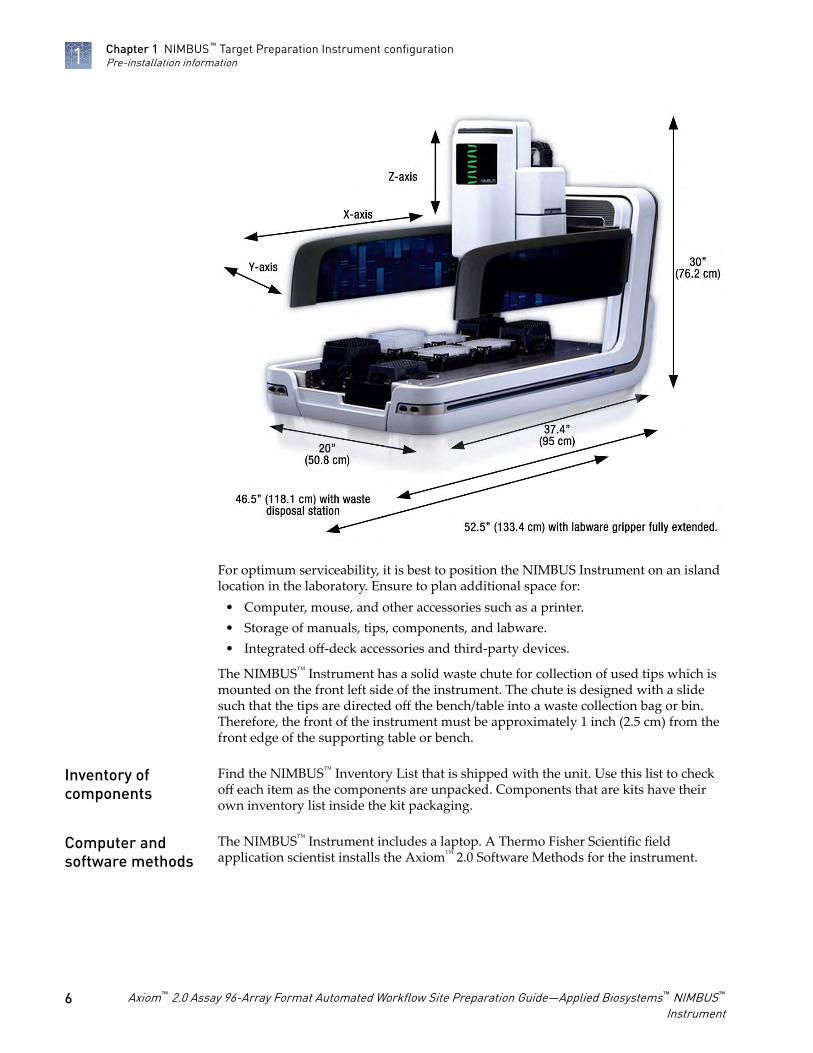
For optimum serviceability, it is best to position the NIMBUS Instrument on an islandlocation in the laboratory. Ensure to plan additional space for:
• Computer, mouse, and other accessories such as a printer.• Storage of manuals, tips, components, and labware.• Integrated off-deck accessories and third-party devices.
The NIMBUS™ Instrument has a solid waste chute for collection of used tips which ismounted on the front left side of the instrument. The chute is designed with a slidesuch that the tips are directed off the bench/table into a waste collection bag or bin.Therefore, the front of the instrument must be approximately 1 inch (2.5 cm) from thefront edge of the supporting table or bench.
Find the NIMBUS™ Inventory List that is shipped with the unit. Use this list to checkoff each item as the components are unpacked. Components that are kits have theirown inventory list inside the kit packaging.
The NIMBUS™ Instrument includes a laptop. A Thermo Fisher Scientific fieldapplication scientist installs the Axiom™ 2.0 Software Methods for the instrument.
Inventory ofcomponents
Computer andsoftware methods
Chapter 1 NIMBUS™ Target Preparation Instrument configurationPre-installation information1
6 Axiom™ 2.0 Assay 96-Array Format Automated Workflow Site Preparation Guide—Applied Biosystems™ NIMBUS™
Instrument
The input power (universal supply) is 100-24 VAC, 50–60 Hz, 5/A. The power supplyis a UL/CSA/CE-approved universal power supply with IEC connection. Internationalpower adapters must be supplied before installation.
A multi-port power strip is supplied with each instrument and can be plugged into asingle outlet. If the power strip is not used, three power outlets are required: one forthe NIMBUS™ Instrument, one for a laptop or PC, and one for the Multi TECController integration. Uninterruptible power supply (UPS) backup for both thecomputer and NIMBUS™ Instrument is recommended, but not required.
Hamilton™ equipment and software
IMPORTANT! The NIMBUS™ Target Preparation Instrument is for indoor operationand use only.
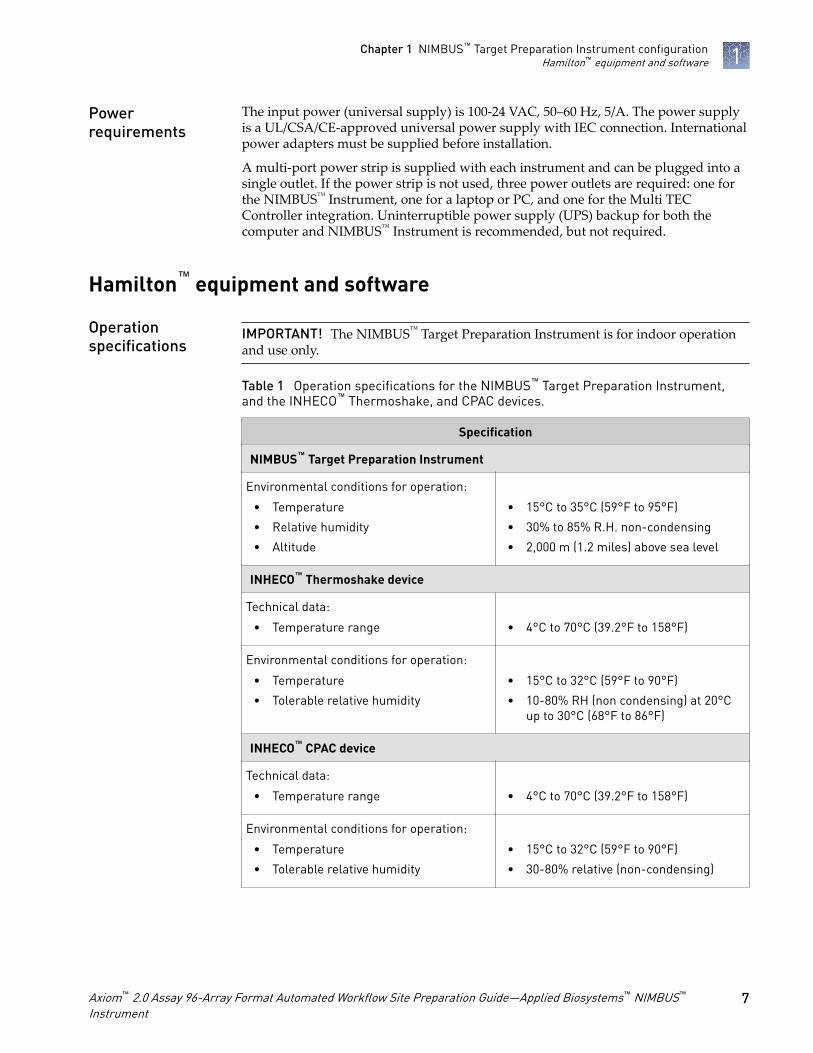
Table 1 Operation specifications for the NIMBUS™ Target Preparation Instrument,and the INHECO™ Thermoshake, and CPAC devices.
Specification
NIMBUS™ Target Preparation Instrument
Environmental conditions for operation:
• Temperature
• Relative humidity
• Altitude
• 15°C to 35°C (59°F to 95°F)
• 30% to 85% R.H. non-condensing
• 2,000 m (1.2 miles) above sea level
INHECO™ Thermoshake device
Technical data:
• Temperature range
• 4°C to 70°C (39.2°F to 158°F)
Environmental conditions for operation:
• Temperature
• Tolerable relative humidity
• 15°C to 32°C (59°F to 90°F)
• 10-80% RH (non condensing) at 20°Cup to 30°C (68°F to 86°F)
INHECO™ CPAC device
Technical data:
• Temperature range
• 4°C to 70°C (39.2°F to 158°F)
Environmental conditions for operation:
• Temperature
• Tolerable relative humidity
• 15°C to 32°C (59°F to 90°F)
• 30-80% relative (non-condensing)
Powerrequirements
Operationspecifications
Chapter 1 NIMBUS™ Target Preparation Instrument configurationHamilton™ equipment and software 1
Axiom™ 2.0 Assay 96-Array Format Automated Workflow Site Preparation Guide—Applied Biosystems™ NIMBUS™
Instrument7

WARNING! Condensate can prevent the Thermoshake and CPAC devices fromoperating properly and can damage the unit. Eliminate condensate daily, or ifneeded, especially in between heating and cooling cycles. On completion of amethod run, click Finish in the final Cleanup window for that stage to preventor minimize condensation.
The Applied Biosystems™NIMBUS™ Target Preparation Instrument (Cat. No. 00-0401)is used to run the Axiom™ 2.0 Assay with the automated target preparation. Thisworkstation includes the accessories, software, and deck configuration listed in Table 2. In addition to this workstation, the components that are listed in the nextchapter are required.
Table 2 NIMBUS™ Target Preparation Instrument components (Cat. No. 00-0401)
✓ Item
Applied Biosystems™-specific Hamilton Microlab™ NIMBUS™ 96 System:
• 96-well CO-RE™ pipetting head (1,000 µL)
• 9+2 deck, +2 position at –48 mm
• Labware Gripper Arm
Hamilton deck hardware:
• 2 FTR Pedestals: (Hamilton, Cat. No. 61054-01)
• One 1,000 µL Tip Isolator: (Hamilton, Cat. No. 64668-01)
• 2 Precision DWP Pedestals: (Hamilton, Cat. No. 66591-01)
• One 96 Tip Adapter pedestal: (Hamilton, Cat. No. 66450-01)
• 3 DWP pedestals: (Hamilton, Cat. No. 61053-01)
INHECO™ devices:
• INHECO™ Variomag Thermoshake with dock base (Hamilton, Cat. No.59151-01)
• INHECO™ CPAC with dock base (Hamilton, Cat. No. 59146-02)
• INHECO™ Tube Rack 24 x 1.5 mL (INHECO™, Cat. No. 7900029)
• INHECO™ MultiTEC (INHECO™, Cat. No. 8900030)
• INHECO™ Slot Module Board 12V (INHECO™, Cat. No. 2400128)
• INHECO™ Slot Module Board 24V (INHECO™, Cat. No. 2400125)
Components
Chapter 1 NIMBUS™ Target Preparation Instrument configurationHamilton™ equipment and software1
8 Axiom™ 2.0 Assay 96-Array Format Automated Workflow Site Preparation Guide—Applied Biosystems™ NIMBUS™
Instrument
✓ Item
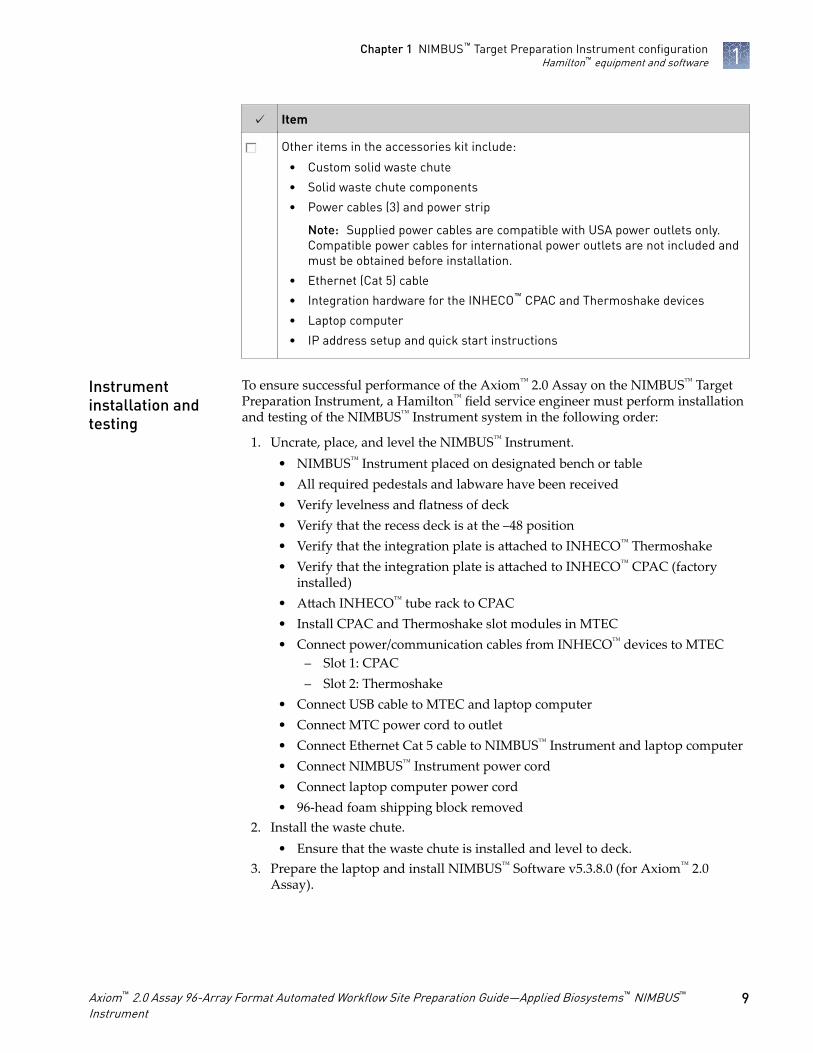
Other items in the accessories kit include:
• Custom solid waste chute
• Solid waste chute components
• Power cables (3) and power strip
Note: Supplied power cables are compatible with USA power outlets only.Compatible power cables for international power outlets are not included andmust be obtained before installation.
• Ethernet (Cat 5) cable
• Integration hardware for the INHECO™ CPAC and Thermoshake devices
• Laptop computer
• IP address setup and quick start instructions
To ensure successful performance of the Axiom™ 2.0 Assay on the NIMBUS™ TargetPreparation Instrument, a Hamilton™ field service engineer must perform installationand testing of the NIMBUS™ Instrument system in the following order:
1. Uncrate, place, and level the NIMBUS™ Instrument.• NIMBUS™ Instrument placed on designated bench or table• All required pedestals and labware have been received• Verify levelness and flatness of deck• Verify that the recess deck is at the –48 position• Verify that the integration plate is attached to INHECO™ Thermoshake• Verify that the integration plate is attached to INHECO™ CPAC (factory
installed)• Attach INHECO™ tube rack to CPAC• Install CPAC and Thermoshake slot modules in MTEC• Connect power/communication cables from INHECO™ devices to MTEC
– Slot 1: CPAC– Slot 2: Thermoshake
• Connect USB cable to MTEC and laptop computer• Connect MTC power cord to outlet• Connect Ethernet Cat 5 cable to NIMBUS™ Instrument and laptop computer• Connect NIMBUS™ Instrument power cord• Connect laptop computer power cord• 96-head foam shipping block removed
2. Install the waste chute.• Ensure that the waste chute is installed and level to deck.
3. Prepare the laptop and install NIMBUS™ Software v5.3.8.0 (for Axiom™ 2.0Assay).
Instrumentinstallation andtesting
Chapter 1 NIMBUS™ Target Preparation Instrument configurationHamilton™ equipment and software 1
Axiom™ 2.0 Assay 96-Array Format Automated Workflow Site Preparation Guide—Applied Biosystems™ NIMBUS™
Instrument9
Note: NVK can also be executed off the service engineer’s laptop, in which casethe customer's laptop can be configured with the appropriate version ofNIMBUS™ Software for the application (v5.3.8.0 Axiom™ 2.0 Assay).
• Verify that the computer has a 64-bit operating system• Language setting that is configured to English—United States• User Account Control set to "Never Notify"• Computer power setting that is changed to never sleep or hibernate• IP address set• NIMBUS™ Software installed:
– Phoenix version—4.3.0.7270– NIMBUS™ version—5.3.8.0 for Axiom™ 2.0 Assay
• Checksum validation disabled• Set values in System Configuration Editor:
– Deck Configuration "9 +2, left recess at -48 mm"– Gripper set to "Available"– Pipette Head set to "CORE—96 Head, 1 mL"
• Hamilton INHECO™ driver software installed v1.2• Allow access of HxMTecServer through Windows™ firewall if needed
4. Verify or load firmware to execute NVK.5. Perform 96 head and gripper calibration.6. Perform NVK positional and volume verifications.7. Install INHECO™ devices.8. Perform NVK INHECO™ device verifications.9. If needed, load and install the final NIMBUS™ Software and firmware.
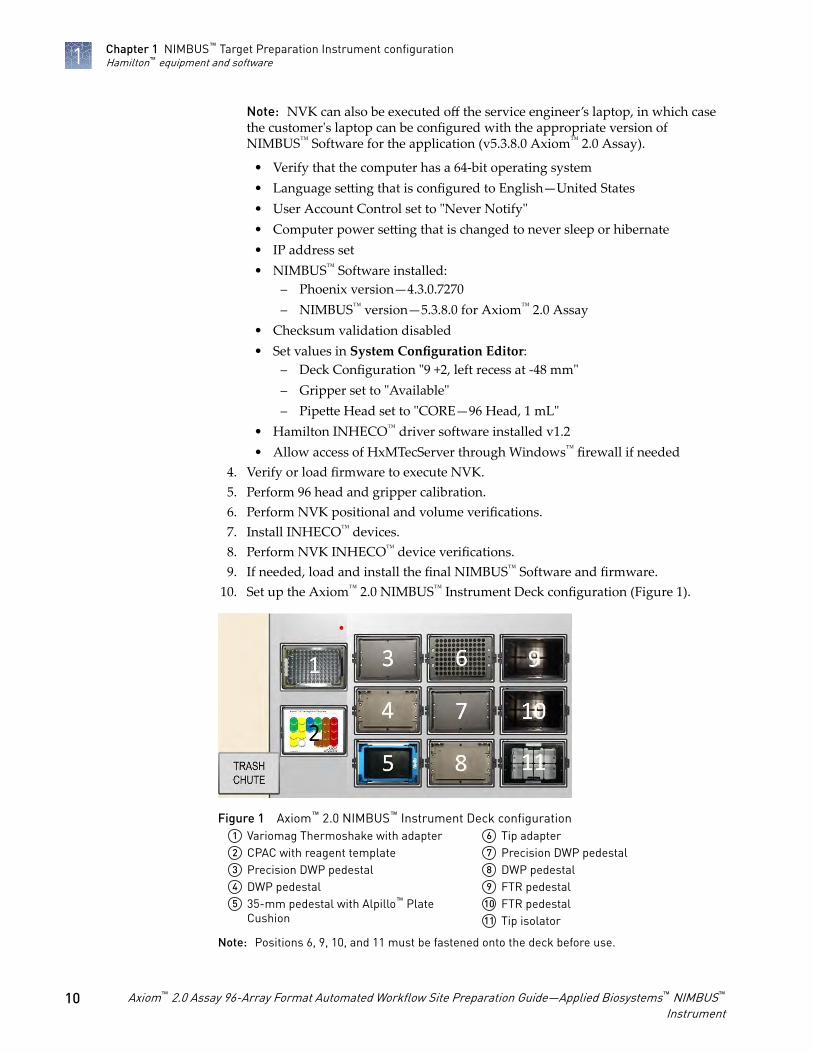
10. Set up the Axiom™ 2.0 NIMBUS™ Instrument Deck configuration (Figure 1).
Figure 1 Axiom™ 2.0 NIMBUS™ Instrument Deck configuration1 Variomag Thermoshake with adapter2 CPAC with reagent template3 Precision DWP pedestal4 DWP pedestal5 35-mm pedestal with Alpillo™ Plate
Cushion
6 Tip adapter7 Precision DWP pedestal8 DWP pedestal9 FTR pedestal
10 FTR pedestal11 Tip isolator
Note: Positions 6, 9, 10, and 11 must be fastened onto the deck before use.
Chapter 1 NIMBUS™ Target Preparation Instrument configurationHamilton™ equipment and software1
10 Axiom™ 2.0 Assay 96-Array Format Automated Workflow Site Preparation Guide—Applied Biosystems™ NIMBUS™
Instrument
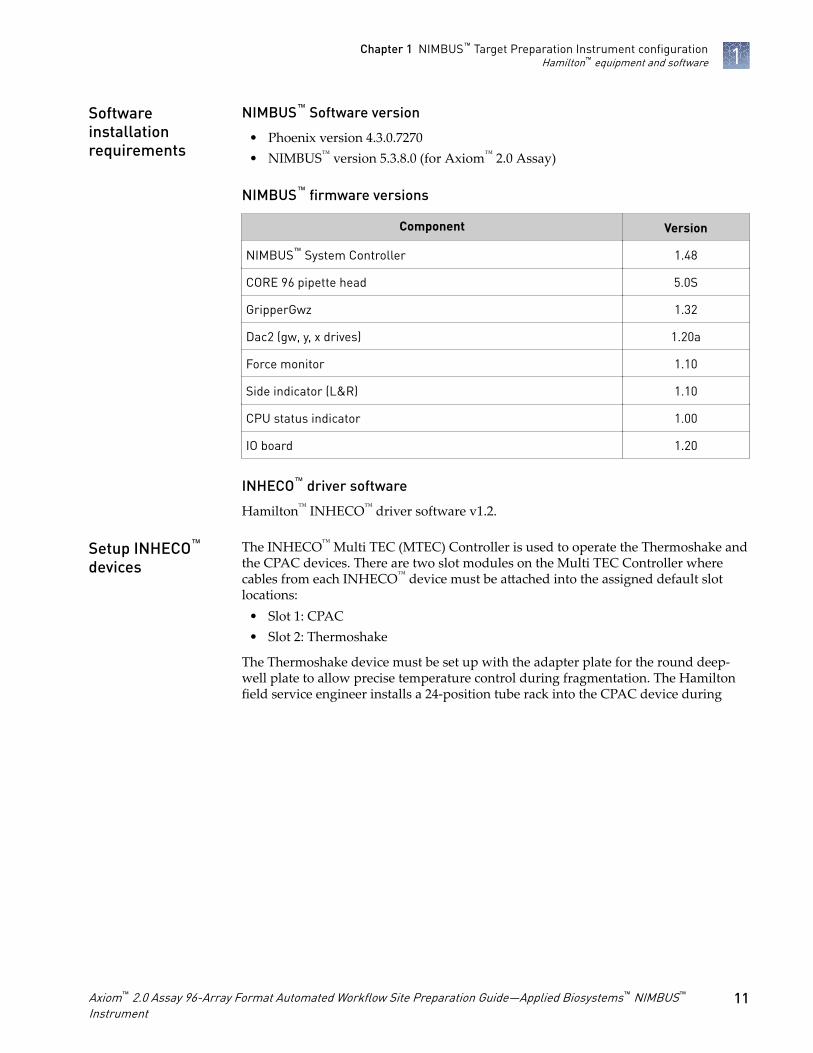
NIMBUS™ Software version
• Phoenix version 4.3.0.7270• NIMBUS™ version 5.3.8.0 (for Axiom™ 2.0 Assay)
NIMBUS™ firmware versions
Component Version
NIMBUS™ System Controller 1.48
CORE 96 pipette head 5.0S
GripperGwz 1.32
Dac2 (gw, y, x drives) 1.20a
Force monitor 1.10
Side indicator (L&R) 1.10
CPU status indicator 1.00
IO board 1.20
INHECO™ driver software
Hamilton™ INHECO™ driver software v1.2.
The INHECO™ Multi TEC (MTEC) Controller is used to operate the Thermoshake andthe CPAC devices. There are two slot modules on the Multi TEC Controller wherecables from each INHECO™ device must be attached into the assigned default slotlocations:
• Slot 1: CPAC• Slot 2: Thermoshake
The Thermoshake device must be set up with the adapter plate for the round deep-well plate to allow precise temperature control during fragmentation. The Hamiltonfield service engineer installs a 24-position tube rack into the CPAC device during
Softwareinstallationrequirements
Setup INHECO™
devices
Chapter 1 NIMBUS™ Target Preparation Instrument configurationHamilton™ equipment and software 1
Axiom™ 2.0 Assay 96-Array Format Automated Workflow Site Preparation Guide—Applied Biosystems™ NIMBUS™
Instrument11
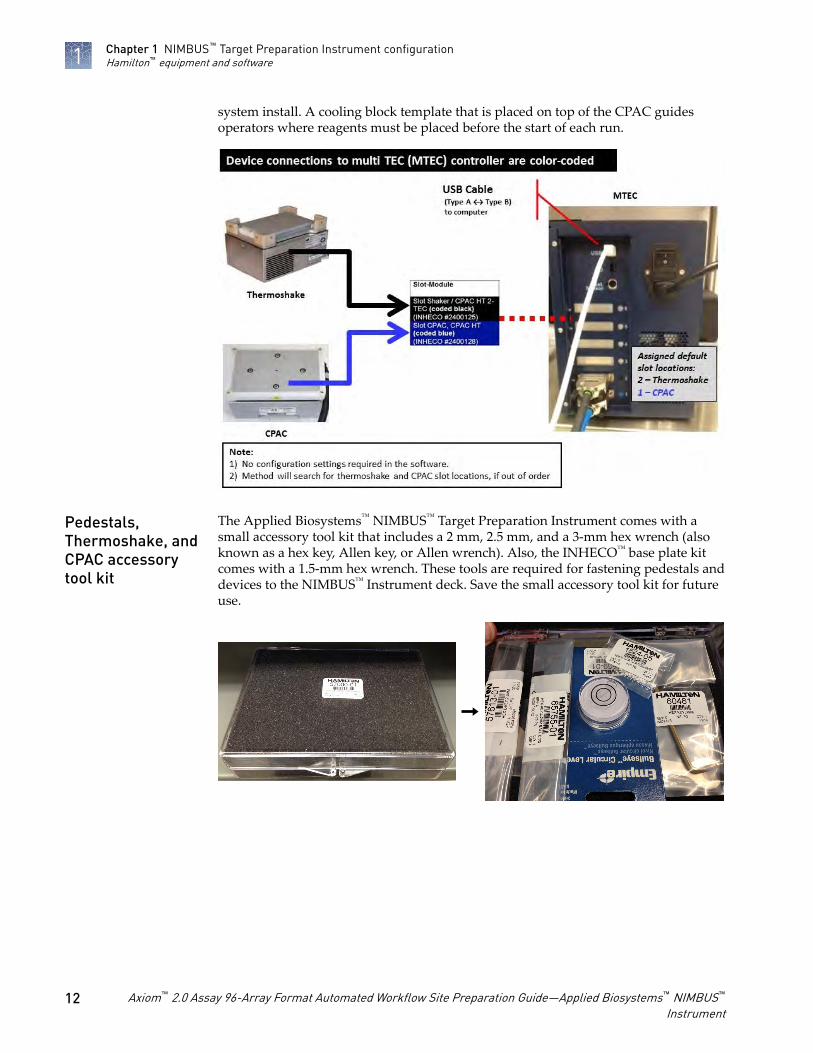
system install. A cooling block template that is placed on top of the CPAC guidesoperators where reagents must be placed before the start of each run.
The Applied Biosystems™ NIMBUS™ Target Preparation Instrument comes with asmall accessory tool kit that includes a 2 mm, 2.5 mm, and a 3-mm hex wrench (alsoknown as a hex key, Allen key, or Allen wrench). Also, the INHECO™ base plate kitcomes with a 1.5-mm hex wrench. These tools are required for fastening pedestals anddevices to the NIMBUS™ Instrument deck. Save the small accessory tool kit for futureuse.
Pedestals,Thermoshake, andCPAC accessorytool kit
Chapter 1 NIMBUS™ Target Preparation Instrument configurationHamilton™ equipment and software1
12 Axiom™ 2.0 Assay 96-Array Format Automated Workflow Site Preparation Guide—Applied Biosystems™ NIMBUS™
Instrument
Pedestals
The pedestals in deck positions 6, 9, 10, and 11 are fastened to the NIMBUS™
Instrument deck by tightening the set screws, which are on the left and right side ofeach pedestal, with a 2-mm hex wrench. When fastening the pedestals to the deck, it isbest to start with the pedestals in the back of the deck and work to the pedestals in thefront to help the ease of access to set screws.
Therefore, using a 2-mm hex wrench, follow the pedestals are placed and lockeddown in the following order:
1. Tip adapter at deck position 62. FTR pedestal at deck position 93. FTR pedestal at deck position 104. Tip isolator at deck position 11
See Figure 1 on page 10 for deck position locations. The remaining pedestals are easilypositioned by placing them on the locator pins that are on the deck.
Chapter 1 NIMBUS™ Target Preparation Instrument configurationHamilton™ equipment and software 1
Axiom™ 2.0 Assay 96-Array Format Automated Workflow Site Preparation Guide—Applied Biosystems™ NIMBUS™
Instrument13
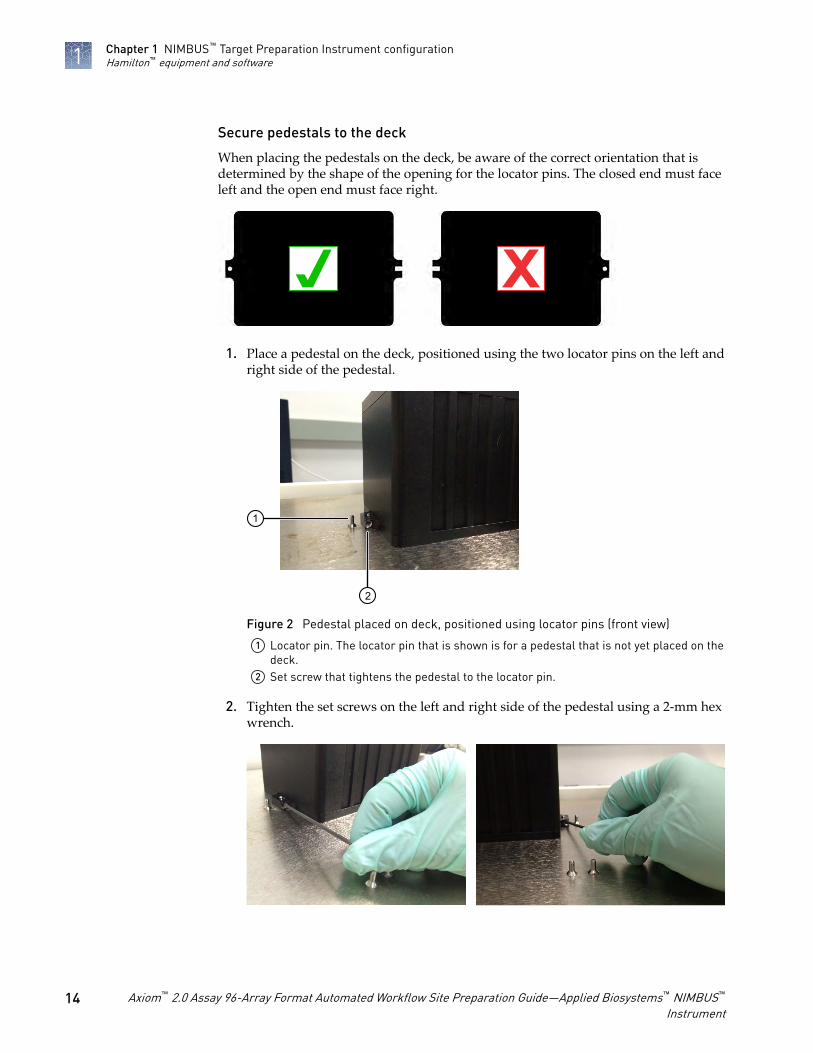
Secure pedestals to the deck
When placing the pedestals on the deck, be aware of the correct orientation that isdetermined by the shape of the opening for the locator pins. The closed end must faceleft and the open end must face right.
X1. Place a pedestal on the deck, positioned using the two locator pins on the left and
right side of the pedestal.
1
2
Figure 2 Pedestal placed on deck, positioned using locator pins (front view)
1 Locator pin. The locator pin that is shown is for a pedestal that is not yet placed on thedeck.
2 Set screw that tightens the pedestal to the locator pin.
2. Tighten the set screws on the left and right side of the pedestal using a 2-mm hexwrench.
Chapter 1 NIMBUS™ Target Preparation Instrument configurationHamilton™ equipment and software1
14 Axiom™ 2.0 Assay 96-Array Format Automated Workflow Site Preparation Guide—Applied Biosystems™ NIMBUS™
Instrument
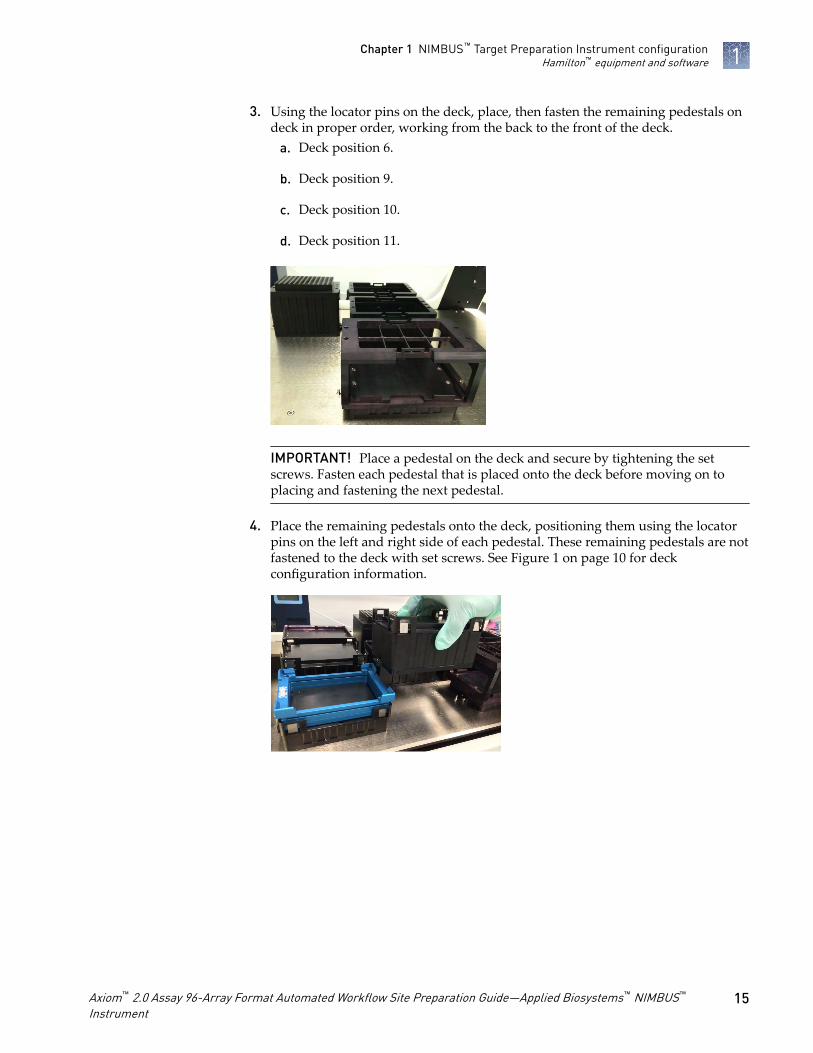
3. Using the locator pins on the deck, place, then fasten the remaining pedestals ondeck in proper order, working from the back to the front of the deck.
a. Deck position 6.
b. Deck position 9.
c. Deck position 10.
d. Deck position 11.
IMPORTANT! Place a pedestal on the deck and secure by tightening the setscrews. Fasten each pedestal that is placed onto the deck before moving on toplacing and fastening the next pedestal.
4. Place the remaining pedestals onto the deck, positioning them using the locatorpins on the left and right side of each pedestal. These remaining pedestals are notfastened to the deck with set screws. See Figure 1 on page 10 for deckconfiguration information.
Chapter 1 NIMBUS™ Target Preparation Instrument configurationHamilton™ equipment and software 1
Axiom™ 2.0 Assay 96-Array Format Automated Workflow Site Preparation Guide—Applied Biosystems™ NIMBUS™
Instrument15
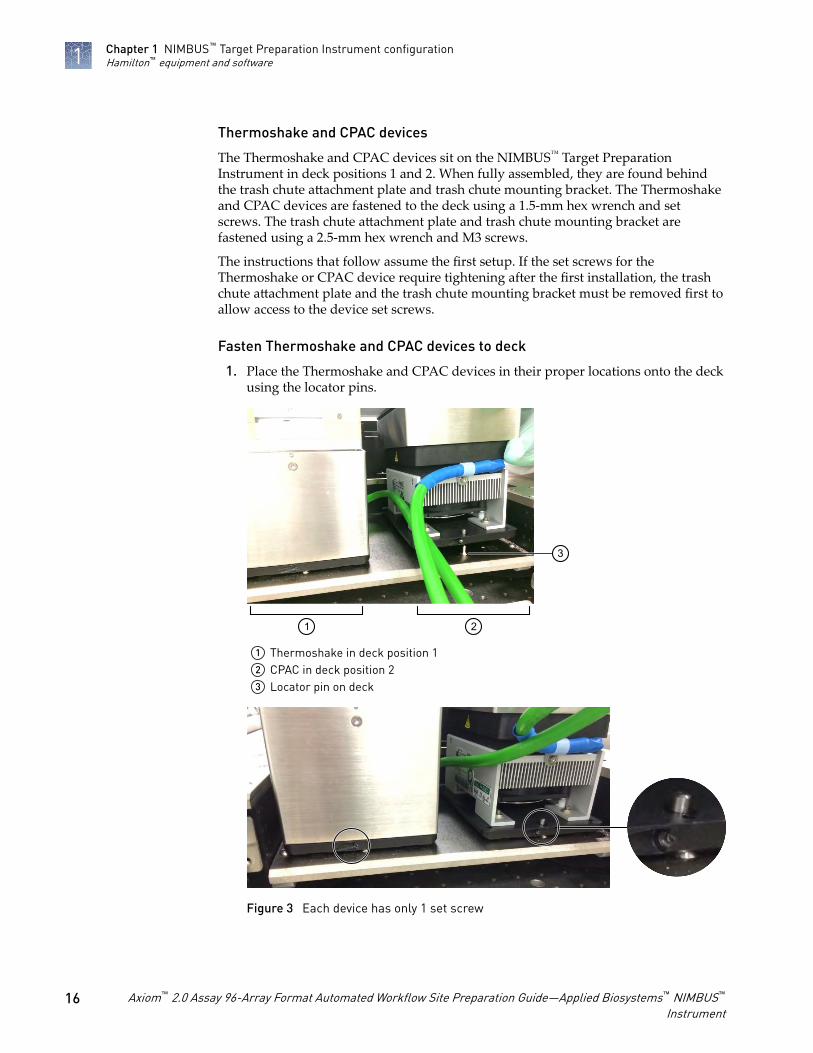
Thermoshake and CPAC devices
The Thermoshake and CPAC devices sit on the NIMBUS™ Target PreparationInstrument in deck positions 1 and 2. When fully assembled, they are found behindthe trash chute attachment plate and trash chute mounting bracket. The Thermoshakeand CPAC devices are fastened to the deck using a 1.5-mm hex wrench and setscrews. The trash chute attachment plate and trash chute mounting bracket arefastened using a 2.5-mm hex wrench and M3 screws.
The instructions that follow assume the first setup. If the set screws for theThermoshake or CPAC device require tightening after the first installation, the trashchute attachment plate and the trash chute mounting bracket must be removed first toallow access to the device set screws.
Fasten Thermoshake and CPAC devices to deck
1. Place the Thermoshake and CPAC devices in their proper locations onto the deckusing the locator pins.
3
1 2
1 Thermoshake in deck position 12 CPAC in deck position 23 Locator pin on deck
Figure 3 Each device has only 1 set screw
Chapter 1 NIMBUS™ Target Preparation Instrument configurationHamilton™ equipment and software1
16 Axiom™ 2.0 Assay 96-Array Format Automated Workflow Site Preparation Guide—Applied Biosystems™ NIMBUS™
Instrument
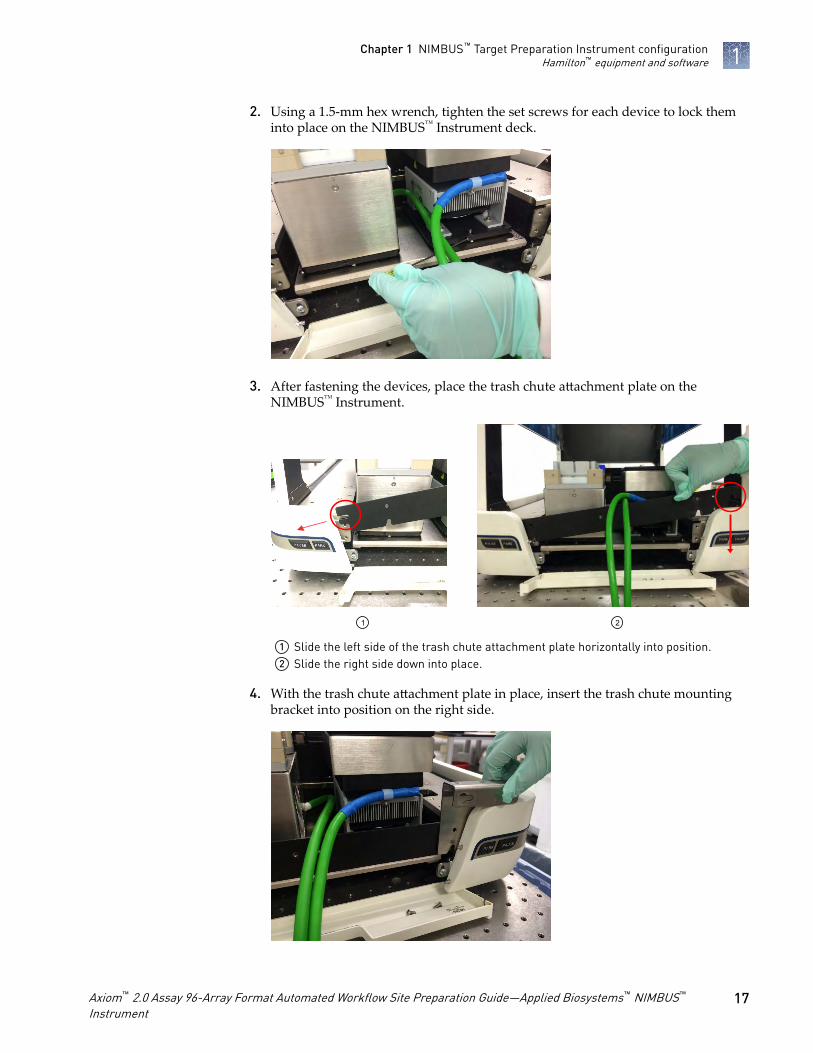
2. Using a 1.5-mm hex wrench, tighten the set screws for each device to lock theminto place on the NIMBUS™ Instrument deck.
3. After fastening the devices, place the trash chute attachment plate on theNIMBUS™ Instrument.
1 2
1 Slide the left side of the trash chute attachment plate horizontally into position.2 Slide the right side down into place.
4. With the trash chute attachment plate in place, insert the trash chute mountingbracket into position on the right side.
Chapter 1 NIMBUS™ Target Preparation Instrument configurationHamilton™ equipment and software 1
Axiom™ 2.0 Assay 96-Array Format Automated Workflow Site Preparation Guide—Applied Biosystems™ NIMBUS™
Instrument17
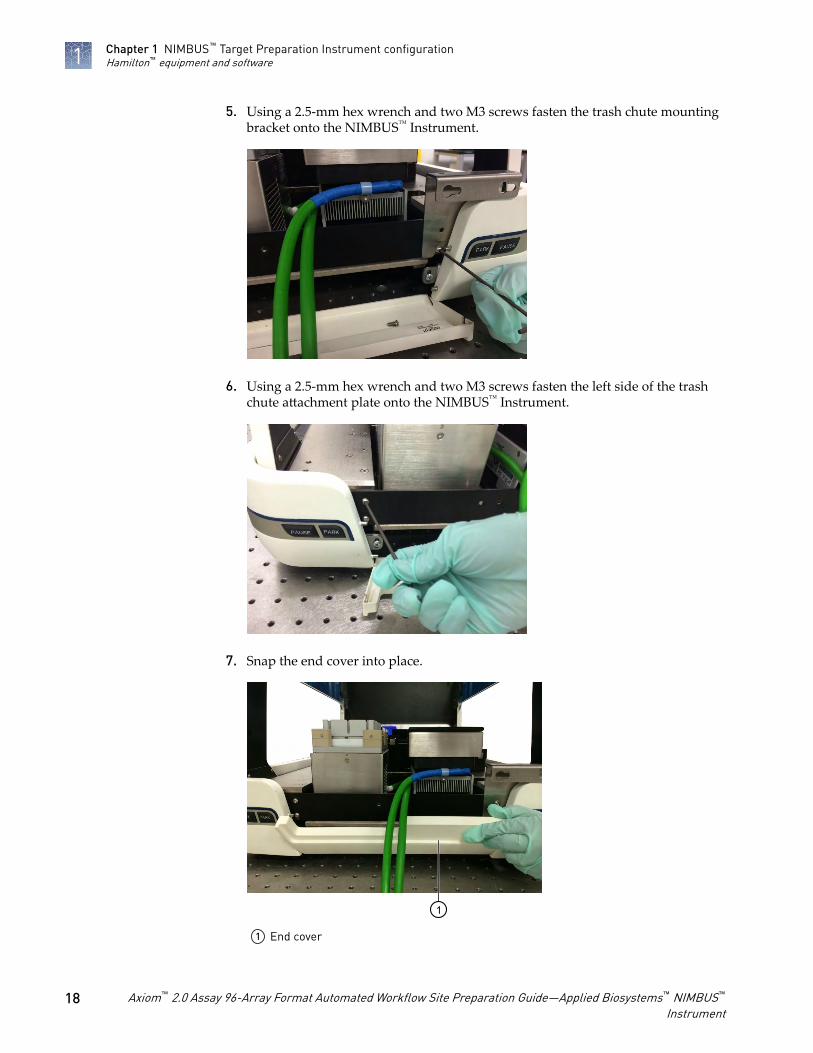
5. Using a 2.5-mm hex wrench and two M3 screws fasten the trash chute mountingbracket onto the NIMBUS™ Instrument.
6. Using a 2.5-mm hex wrench and two M3 screws fasten the left side of the trashchute attachment plate onto the NIMBUS™ Instrument.
7. Snap the end cover into place.
1
1 End cover
Chapter 1 NIMBUS™ Target Preparation Instrument configurationHamilton™ equipment and software1
18 Axiom™ 2.0 Assay 96-Array Format Automated Workflow Site Preparation Guide—Applied Biosystems™ NIMBUS™
Instrument
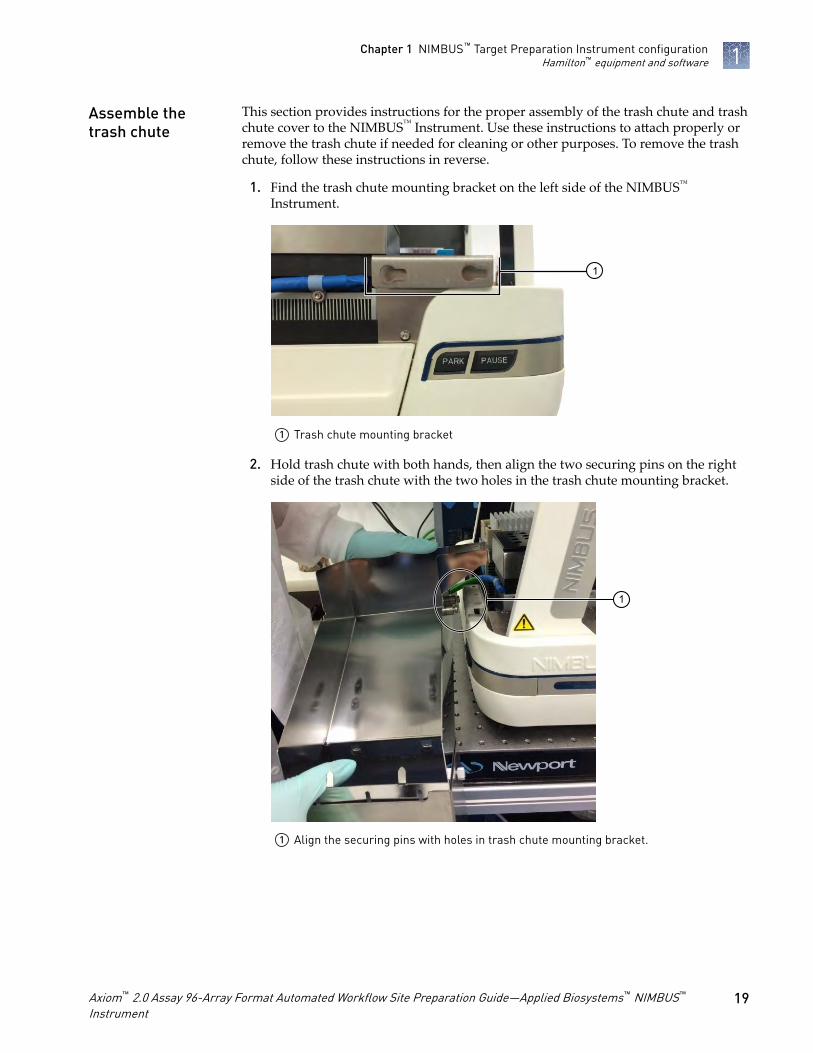
This section provides instructions for the proper assembly of the trash chute and trashchute cover to the NIMBUS™ Instrument. Use these instructions to attach properly orremove the trash chute if needed for cleaning or other purposes. To remove the trashchute, follow these instructions in reverse.
1. Find the trash chute mounting bracket on the left side of the NIMBUS™
Instrument.
1
1 Trash chute mounting bracket
2. Hold trash chute with both hands, then align the two securing pins on the rightside of the trash chute with the two holes in the trash chute mounting bracket.
1
1 Align the securing pins with holes in trash chute mounting bracket.
Assemble thetrash chute
Chapter 1 NIMBUS™ Target Preparation Instrument configurationHamilton™ equipment and software 1
Axiom™ 2.0 Assay 96-Array Format Automated Workflow Site Preparation Guide—Applied Biosystems™ NIMBUS™
Instrument19
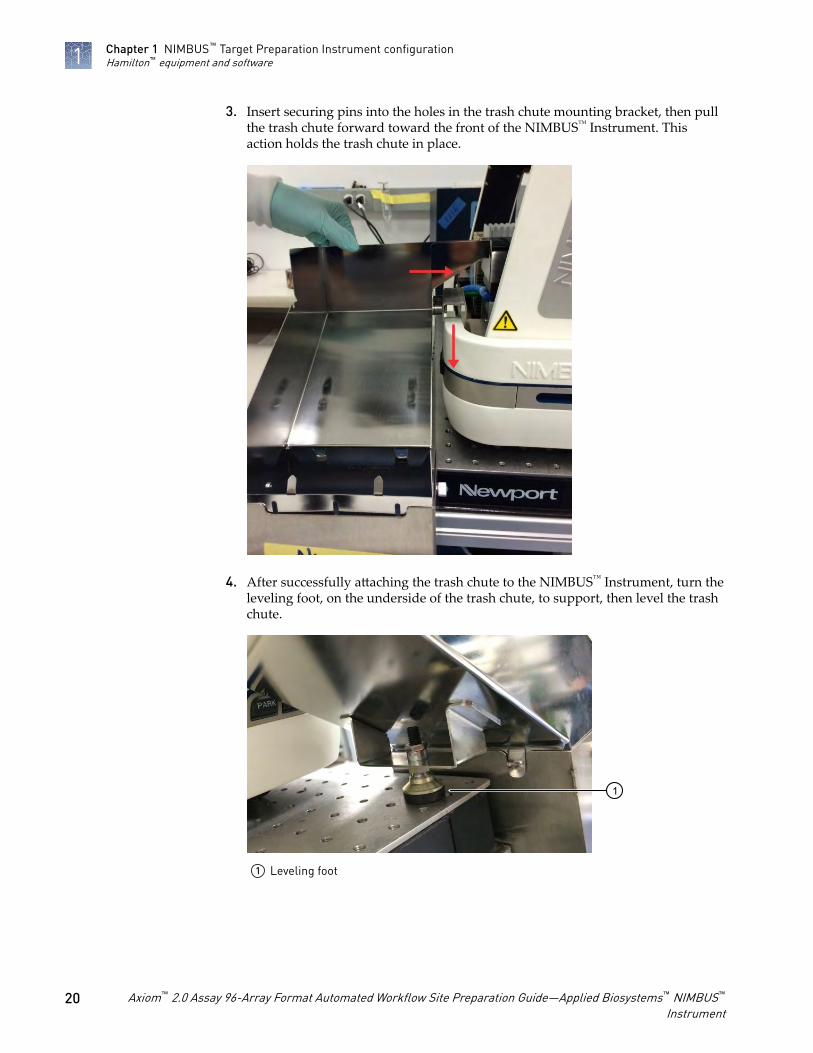
3. Insert securing pins into the holes in the trash chute mounting bracket, then pullthe trash chute forward toward the front of the NIMBUS™ Instrument. Thisaction holds the trash chute in place.
4. After successfully attaching the trash chute to the NIMBUS™ Instrument, turn theleveling foot, on the underside of the trash chute, to support, then level the trashchute.
1
1 Leveling foot
Chapter 1 NIMBUS™ Target Preparation Instrument configurationHamilton™ equipment and software1
20 Axiom™ 2.0 Assay 96-Array Format Automated Workflow Site Preparation Guide—Applied Biosystems™ NIMBUS™
Instrument
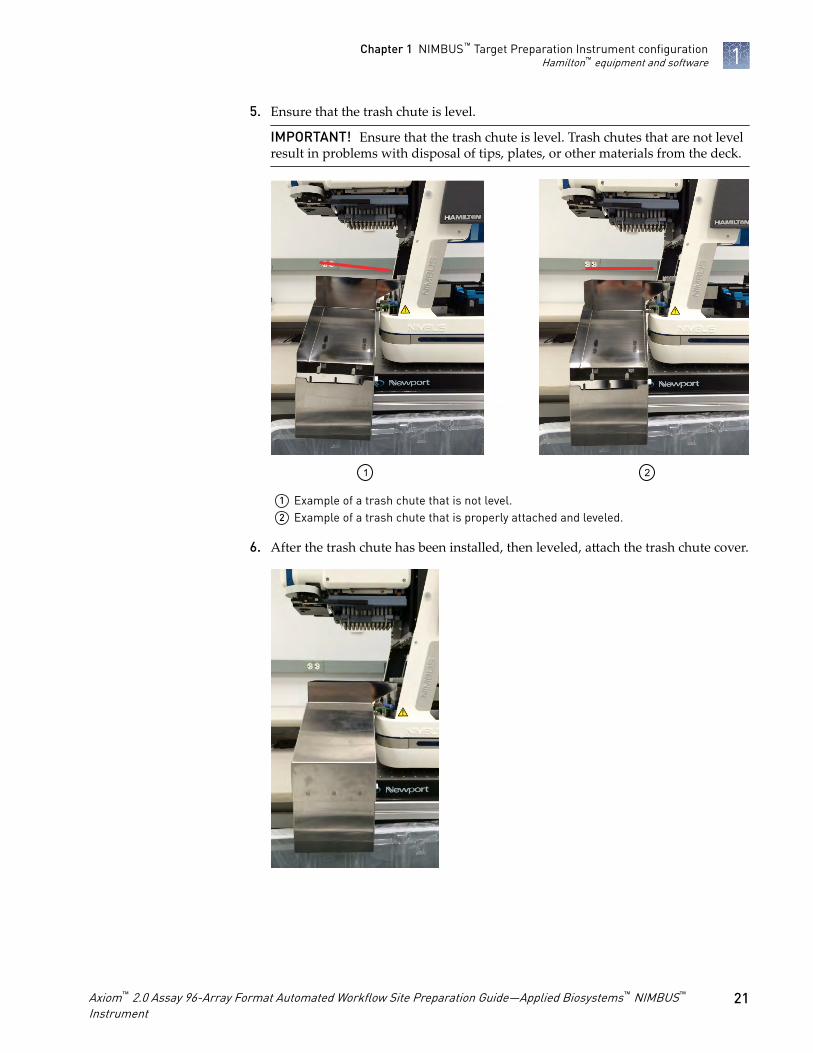
5. Ensure that the trash chute is level.
IMPORTANT! Ensure that the trash chute is level. Trash chutes that are not levelresult in problems with disposal of tips, plates, or other materials from the deck.
1 2
1 Example of a trash chute that is not level.2 Example of a trash chute that is properly attached and leveled.
6. After the trash chute has been installed, then leveled, attach the trash chute cover.
Chapter 1 NIMBUS™ Target Preparation Instrument configurationHamilton™ equipment and software 1
Axiom™ 2.0 Assay 96-Array Format Automated Workflow Site Preparation Guide—Applied Biosystems™ NIMBUS™
Instrument21
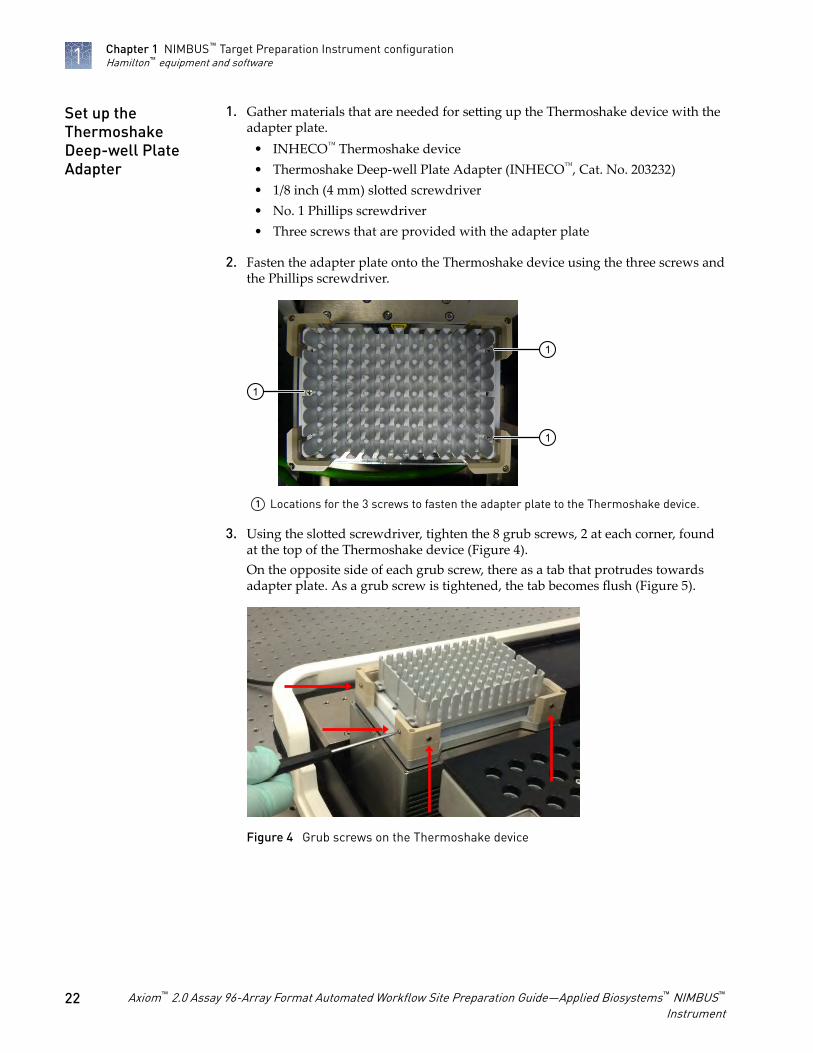
1. Gather materials that are needed for setting up the Thermoshake device with theadapter plate.
• INHECO™ Thermoshake device• Thermoshake Deep-well Plate Adapter (INHECO™, Cat. No. 203232)• 1/8 inch (4 mm) slotted screwdriver• No. 1 Phillips screwdriver• Three screws that are provided with the adapter plate
2. Fasten the adapter plate onto the Thermoshake device using the three screws andthe Phillips screwdriver.
1
1
1
1 Locations for the 3 screws to fasten the adapter plate to the Thermoshake device.
3. Using the slotted screwdriver, tighten the 8 grub screws, 2 at each corner, foundat the top of the Thermoshake device (Figure 4).On the opposite side of each grub screw, there as a tab that protrudes towardsadapter plate. As a grub screw is tightened, the tab becomes flush (Figure 5).
Figure 4 Grub screws on the Thermoshake device
Set up theThermoshakeDeep-well PlateAdapter
Chapter 1 NIMBUS™ Target Preparation Instrument configurationHamilton™ equipment and software1
22 Axiom™ 2.0 Assay 96-Array Format Automated Workflow Site Preparation Guide—Applied Biosystems™ NIMBUS™
Instrument
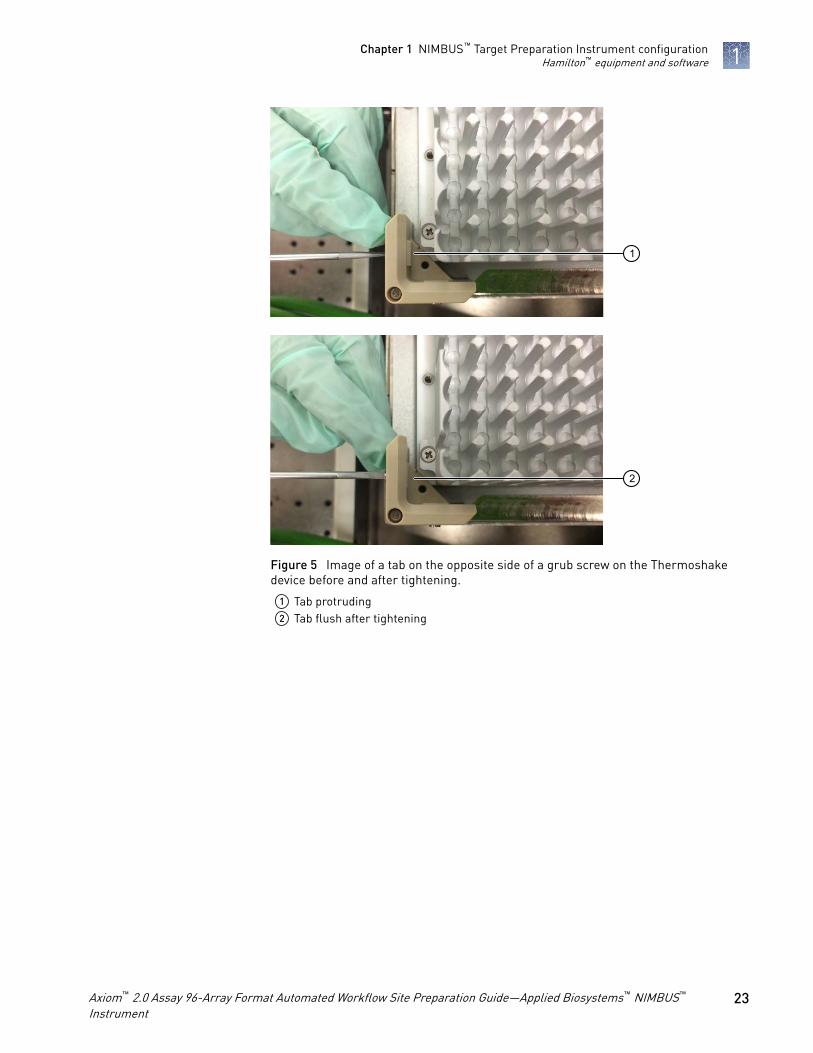
1
2
Figure 5 Image of a tab on the opposite side of a grub screw on the Thermoshakedevice before and after tightening.
1 Tab protruding2 Tab flush after tightening
Chapter 1 NIMBUS™ Target Preparation Instrument configurationHamilton™ equipment and software 1
Axiom™ 2.0 Assay 96-Array Format Automated Workflow Site Preparation Guide—Applied Biosystems™ NIMBUS™
Instrument23
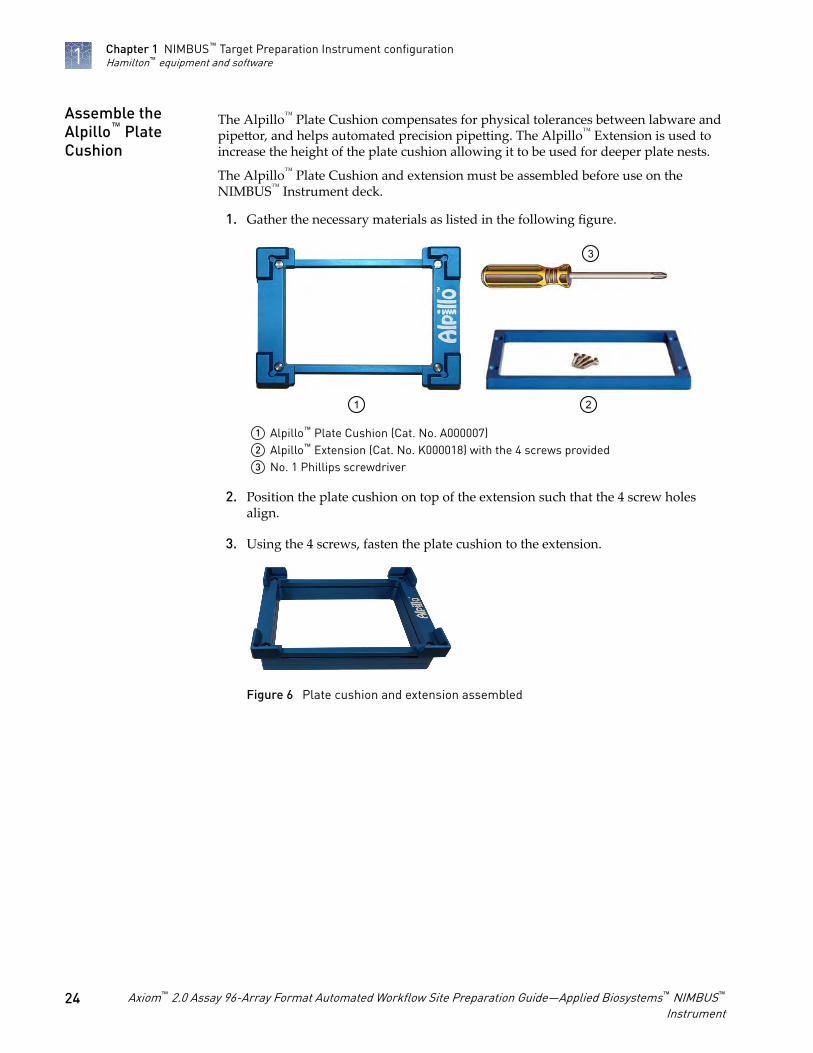
The Alpillo™ Plate Cushion compensates for physical tolerances between labware andpipettor, and helps automated precision pipetting. The Alpillo™ Extension is used toincrease the height of the plate cushion allowing it to be used for deeper plate nests.
The Alpillo™ Plate Cushion and extension must be assembled before use on theNIMBUS™ Instrument deck.
1. Gather the necessary materials as listed in the following figure.
1 2
3
1 Alpillo™ Plate Cushion (Cat. No. A000007)2 Alpillo™ Extension (Cat. No. K000018) with the 4 screws provided3 No. 1 Phillips screwdriver
2. Position the plate cushion on top of the extension such that the 4 screw holesalign.
3. Using the 4 screws, fasten the plate cushion to the extension.
Figure 6 Plate cushion and extension assembled
Assemble theAlpillo™ PlateCushion
Chapter 1 NIMBUS™ Target Preparation Instrument configurationHamilton™ equipment and software1
24 Axiom™ 2.0 Assay 96-Array Format Automated Workflow Site Preparation Guide—Applied Biosystems™ NIMBUS™
Instrument
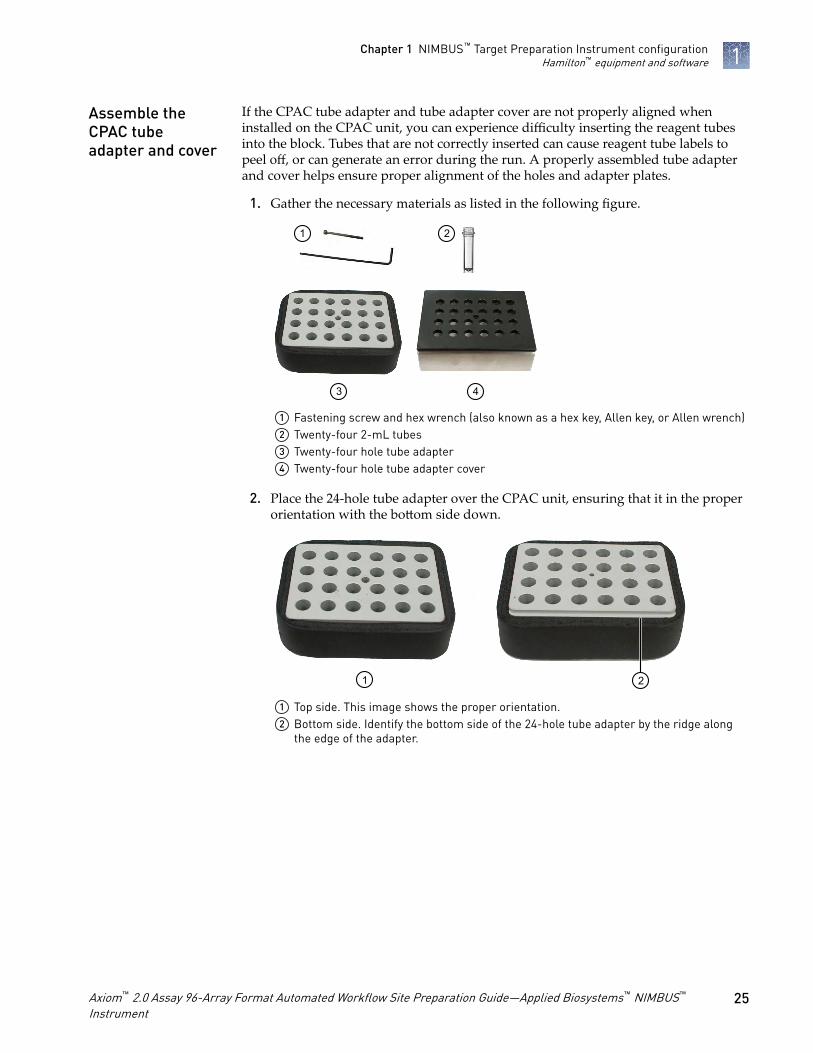
If the CPAC tube adapter and tube adapter cover are not properly aligned wheninstalled on the CPAC unit, you can experience difficulty inserting the reagent tubesinto the block. Tubes that are not correctly inserted can cause reagent tube labels topeel off, or can generate an error during the run. A properly assembled tube adapterand cover helps ensure proper alignment of the holes and adapter plates.
1. Gather the necessary materials as listed in the following figure.
3 4
1 2
1 Fastening screw and hex wrench (also known as a hex key, Allen key, or Allen wrench)2 Twenty-four 2-mL tubes3 Twenty-four hole tube adapter4 Twenty-four hole tube adapter cover
2. Place the 24-hole tube adapter over the CPAC unit, ensuring that it in the properorientation with the bottom side down.
1 2
1 Top side. This image shows the proper orientation.2 Bottom side. Identify the bottom side of the 24-hole tube adapter by the ridge along
the edge of the adapter.
Assemble theCPAC tubeadapter and cover
Chapter 1 NIMBUS™ Target Preparation Instrument configurationHamilton™ equipment and software 1
Axiom™ 2.0 Assay 96-Array Format Automated Workflow Site Preparation Guide—Applied Biosystems™ NIMBUS™
Instrument25
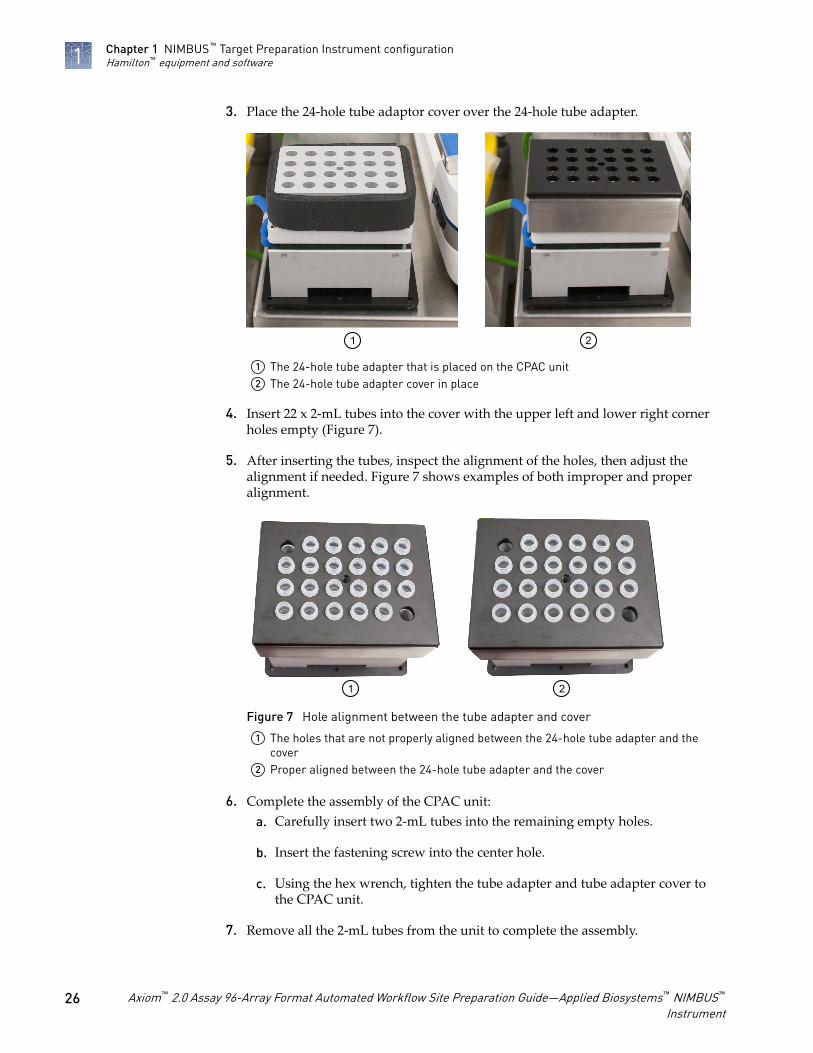
3. Place the 24-hole tube adaptor cover over the 24-hole tube adapter.
1 2
1 The 24-hole tube adapter that is placed on the CPAC unit2 The 24-hole tube adapter cover in place
4. Insert 22 x 2-mL tubes into the cover with the upper left and lower right cornerholes empty (Figure 7).
5. After inserting the tubes, inspect the alignment of the holes, then adjust thealignment if needed. Figure 7 shows examples of both improper and properalignment.
1 2
Figure 7 Hole alignment between the tube adapter and cover
1 The holes that are not properly aligned between the 24-hole tube adapter and thecover
2 Proper aligned between the 24-hole tube adapter and the cover
6. Complete the assembly of the CPAC unit:a. Carefully insert two 2-mL tubes into the remaining empty holes.
b. Insert the fastening screw into the center hole.
c. Using the hex wrench, tighten the tube adapter and tube adapter cover tothe CPAC unit.
7. Remove all the 2-mL tubes from the unit to complete the assembly.
Chapter 1 NIMBUS™ Target Preparation Instrument configurationHamilton™ equipment and software1
26 Axiom™ 2.0 Assay 96-Array Format Automated Workflow Site Preparation Guide—Applied Biosystems™ NIMBUS™
Instrument
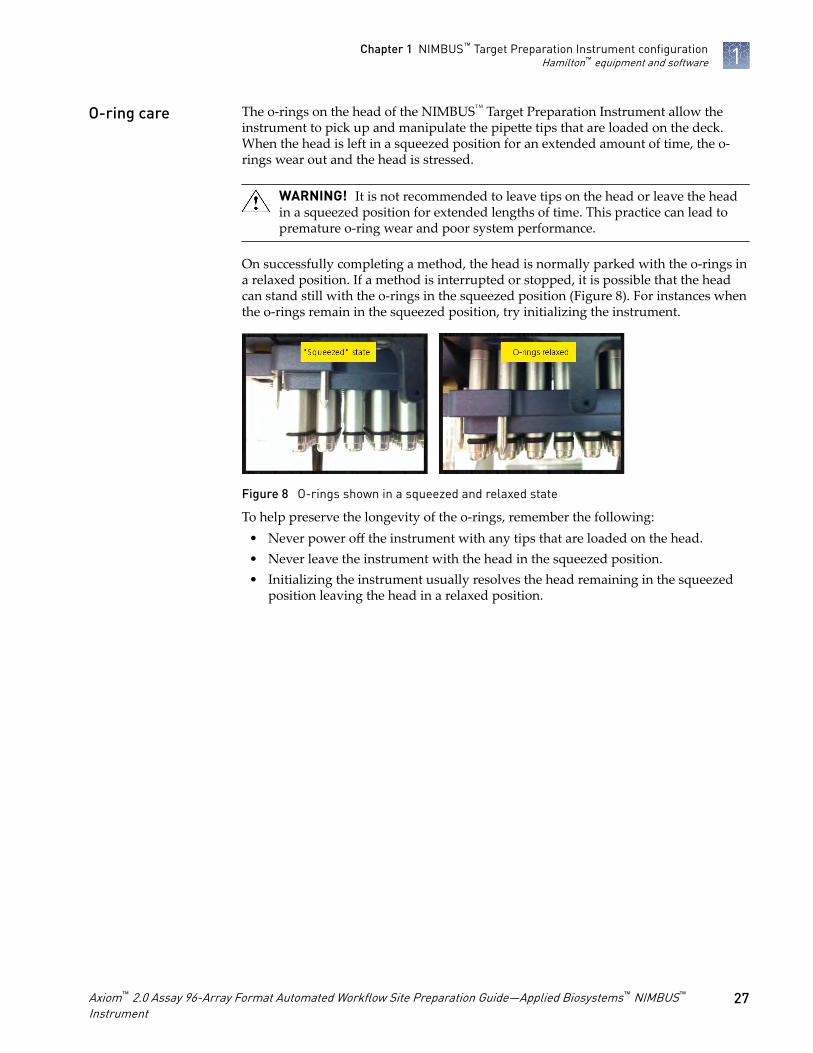
The o-rings on the head of the NIMBUS™ Target Preparation Instrument allow theinstrument to pick up and manipulate the pipette tips that are loaded on the deck.When the head is left in a squeezed position for an extended amount of time, the o-rings wear out and the head is stressed.
WARNING! It is not recommended to leave tips on the head or leave the headin a squeezed position for extended lengths of time. This practice can lead topremature o-ring wear and poor system performance.
On successfully completing a method, the head is normally parked with the o-rings ina relaxed position. If a method is interrupted or stopped, it is possible that the headcan stand still with the o-rings in the squeezed position (Figure 8). For instances whenthe o-rings remain in the squeezed position, try initializing the instrument.
Figure 8 O-rings shown in a squeezed and relaxed state
To help preserve the longevity of the o-rings, remember the following:• Never power off the instrument with any tips that are loaded on the head.• Never leave the instrument with the head in the squeezed position.• Initializing the instrument usually resolves the head remaining in the squeezed
position leaving the head in a relaxed position.
O-ring care
Chapter 1 NIMBUS™ Target Preparation Instrument configurationHamilton™ equipment and software 1
Axiom™ 2.0 Assay 96-Array Format Automated Workflow Site Preparation Guide—Applied Biosystems™ NIMBUS™
Instrument27

Assay equipment and suppliesrequired
This chapter includes the supplier and ordering information for the equipment,software, reagents, arrays, labware, and other consumables that have been validatedfor use with the Applied Biosystems™ Axiom™ 2.0 Assay 96-Array Format AutomatedWorkflow.
Applied Biosystems™ equipment, software, reagents, and arraysrequired
✓ Item Source
Equipment
GeneTitan™ Multi-Channel Instrument[1] Contact Thermo FisherScientific
Software
GeneChip™ Command Console™ (GCC) version 4.3 or later
Axiom™ Analysis Suite version 3.1 or later
Reagents
Axiom™ 2.0 Reagent Kit
Sufficient to process one 96-array format plate.
901758
Axiom™ Reference Genomic DNA 103 951957
Arrays
Axiom™ Array Plate Varies by design
Axiom™ Microbiome Array Plate (96-array format) 902904
2
28 Axiom™ 2.0 Assay 96-Array Format Automated Workflow Site Preparation Guide—Applied Biosystems™ NIMBUS™
Instrument
✓ Item Source
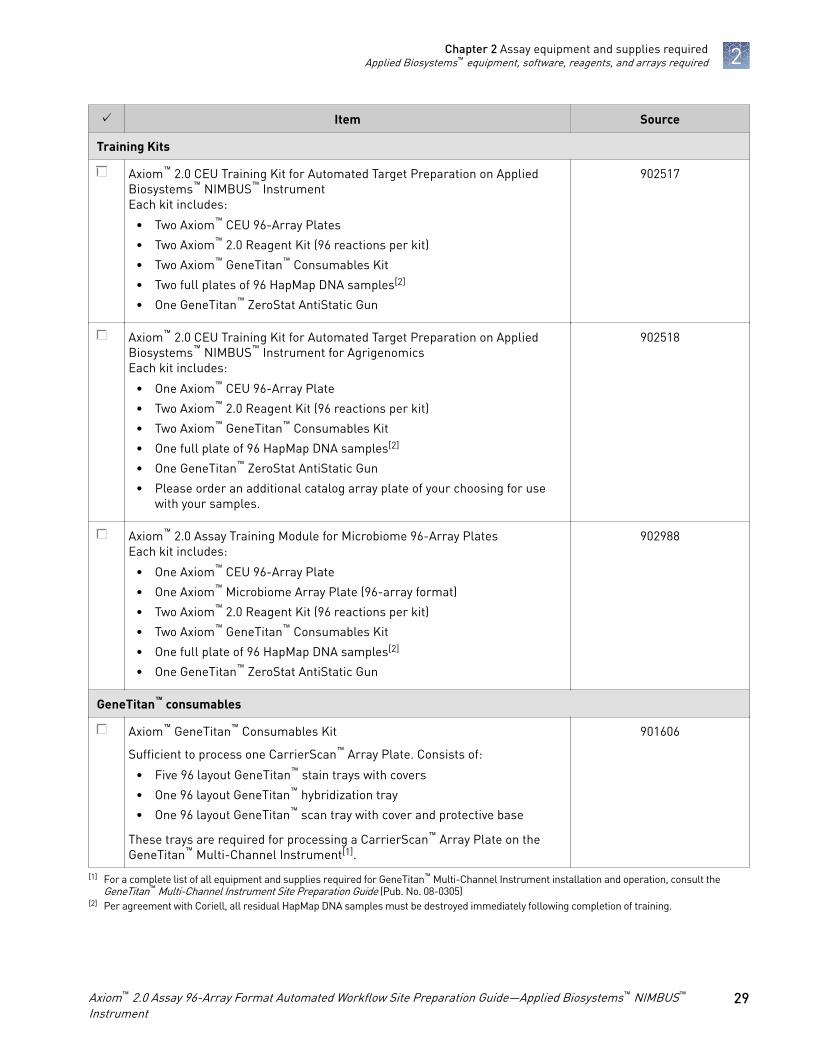
Training Kits
Axiom™ 2.0 CEU Training Kit for Automated Target Preparation on AppliedBiosystems™ NIMBUS™ InstrumentEach kit includes:
• Two Axiom™ CEU 96-Array Plates
• Two Axiom™ 2.0 Reagent Kit (96 reactions per kit)
• Two Axiom™ GeneTitan™ Consumables Kit
• Two full plates of 96 HapMap DNA samples[2]
• One GeneTitan™ ZeroStat AntiStatic Gun
902517
Axiom™ 2.0 CEU Training Kit for Automated Target Preparation on AppliedBiosystems™ NIMBUS™ Instrument for AgrigenomicsEach kit includes:
• One Axiom™ CEU 96-Array Plate
• Two Axiom™ 2.0 Reagent Kit (96 reactions per kit)
• Two Axiom™ GeneTitan™ Consumables Kit
• One full plate of 96 HapMap DNA samples[2]
• One GeneTitan™ ZeroStat AntiStatic Gun
• Please order an additional catalog array plate of your choosing for usewith your samples.
902518
Axiom™ 2.0 Assay Training Module for Microbiome 96-Array PlatesEach kit includes:
• One Axiom™ CEU 96-Array Plate
• One Axiom™ Microbiome Array Plate (96-array format)
• Two Axiom™ 2.0 Reagent Kit (96 reactions per kit)
• Two Axiom™ GeneTitan™ Consumables Kit
• One full plate of 96 HapMap DNA samples[2]
• One GeneTitan™ ZeroStat AntiStatic Gun
902988
GeneTitan™ consumables
Axiom™ GeneTitan™ Consumables Kit
Sufficient to process one CarrierScan™ Array Plate. Consists of:
• Five 96 layout GeneTitan™ stain trays with covers
• One 96 layout GeneTitan™ hybridization tray
• One 96 layout GeneTitan™ scan tray with cover and protective base
These trays are required for processing a CarrierScan™ Array Plate on theGeneTitan™ Multi-Channel Instrument[1].
901606
[1] For a complete list of all equipment and supplies required for GeneTitan™ Multi-Channel Instrument installation and operation, consult the GeneTitan™ Multi-Channel Instrument Site Preparation Guide (Pub. No. 08-0305)
[2] Per agreement with Coriell, all residual HapMap DNA samples must be destroyed immediately following completion of training.
Chapter 2 Assay equipment and supplies requiredApplied Biosystems™ equipment, software, reagents, and arrays required 2
Axiom™ 2.0 Assay 96-Array Format Automated Workflow Site Preparation Guide—Applied Biosystems™ NIMBUS™
Instrument29
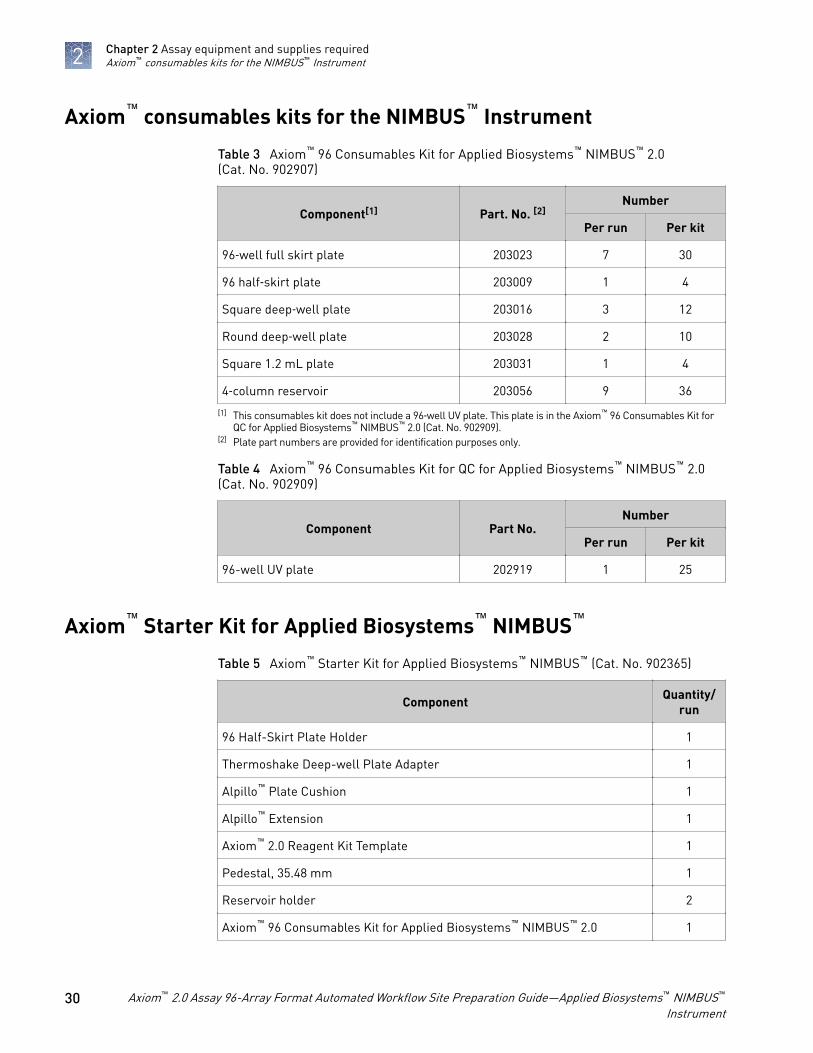
Axiom™ consumables kits for the NIMBUS™ Instrument
Table 3 Axiom™ 96 Consumables Kit for Applied Biosystems™ NIMBUS™ 2.0(Cat. No. 902907)
Component[1] Part. No. [2]Number
Per run Per kit
96‑well full skirt plate 203023 7 30
96 half‑skirt plate 203009 1 4
Square deep‑well plate 203016 3 12
Round deep‑well plate 203028 2 10
Square 1.2 mL plate 203031 1 4
4‑column reservoir 203056 9 36
[1] This consumables kit does not include a 96‑well UV plate. This plate is in the Axiom™ 96 Consumables Kit for QC for Applied Biosystems™ NIMBUS™ 2.0 (Cat. No. 902909).
[2] Plate part numbers are provided for identification purposes only.
Table 4 Axiom™ 96 Consumables Kit for QC for Applied Biosystems™ NIMBUS™ 2.0(Cat. No. 902909)
Component Part No.Number
Per run Per kit
96-well UV plate 202919 1 25
Axiom™ Starter Kit for Applied Biosystems™ NIMBUS™
Table 5 Axiom™ Starter Kit for Applied Biosystems™ NIMBUS™ (Cat. No. 902365)
Component Quantity/run
96 Half-Skirt Plate Holder 1
Thermoshake Deep-well Plate Adapter 1
Alpillo™ Plate Cushion 1
Alpillo™ Extension 1
Axiom™ 2.0 Reagent Kit Template 1
Pedestal, 35.48 mm 1
Reservoir holder 2
Axiom™ 96 Consumables Kit for Applied Biosystems™ NIMBUS™ 2.0 1
Chapter 2 Assay equipment and supplies requiredAxiom™ consumables kits for the NIMBUS™ Instrument2
30 Axiom™ 2.0 Assay 96-Array Format Automated Workflow Site Preparation Guide—Applied Biosystems™ NIMBUS™
Instrument
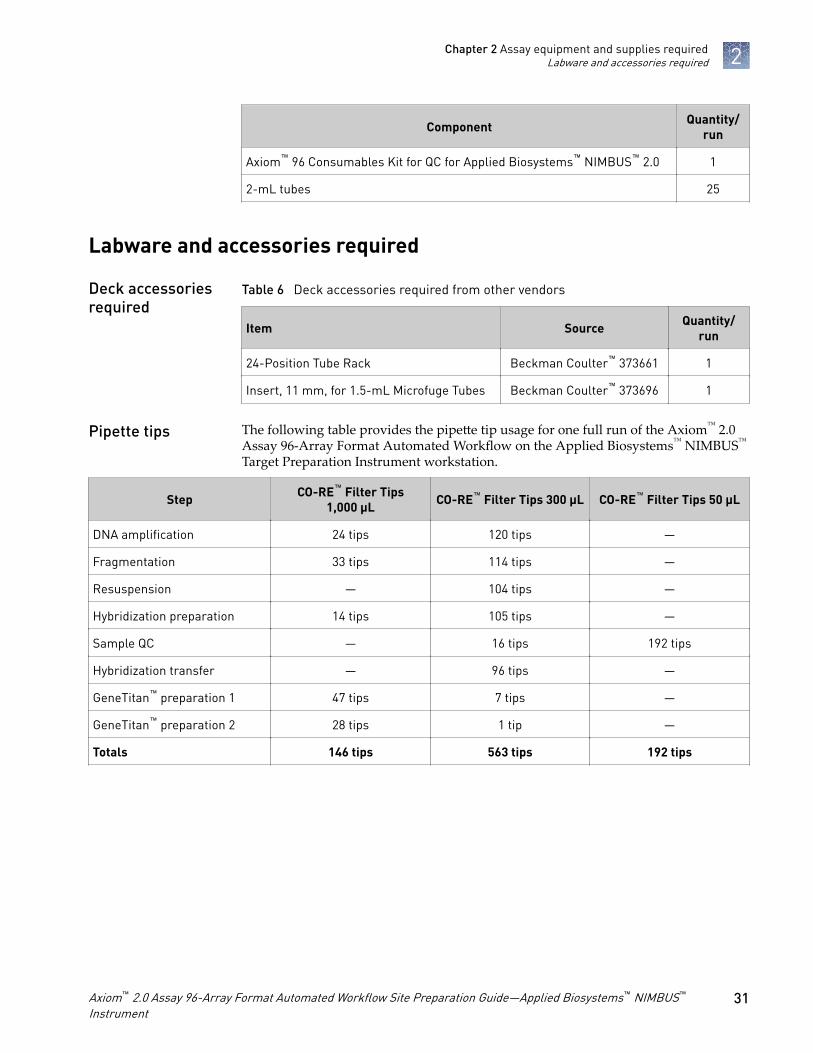
Component Quantity/run
Axiom™ 96 Consumables Kit for QC for Applied Biosystems™ NIMBUS™ 2.0 1
2-mL tubes 25
Labware and accessories required
Table 6 Deck accessories required from other vendors
Item Source Quantity/run
24-Position Tube Rack Beckman Coulter™ 373661 1
Insert, 11 mm, for 1.5-mL Microfuge Tubes Beckman Coulter™ 373696 1
The following table provides the pipette tip usage for one full run of the Axiom™ 2.0Assay 96-Array Format Automated Workflow on the Applied Biosystems™ NIMBUS™
Target Preparation Instrument workstation.
Step CO-RE™ Filter Tips1,000 µL CO-RE™ Filter Tips 300 µL CO-RE™ Filter Tips 50 µL
DNA amplification 24 tips 120 tips —
Fragmentation 33 tips 114 tips —
Resuspension — 104 tips —
Hybridization preparation 14 tips 105 tips —
Sample QC — 16 tips 192 tips
Hybridization transfer — 96 tips —
GeneTitan™ preparation 1 47 tips 7 tips —
GeneTitan™ preparation 2 28 tips 1 tip —
Totals 146 tips 563 tips 192 tips
Deck accessoriesrequired
Pipette tips
Chapter 2 Assay equipment and supplies requiredLabware and accessories required 2
Axiom™ 2.0 Assay 96-Array Format Automated Workflow Site Preparation Guide—Applied Biosystems™ NIMBUS™
Instrument31
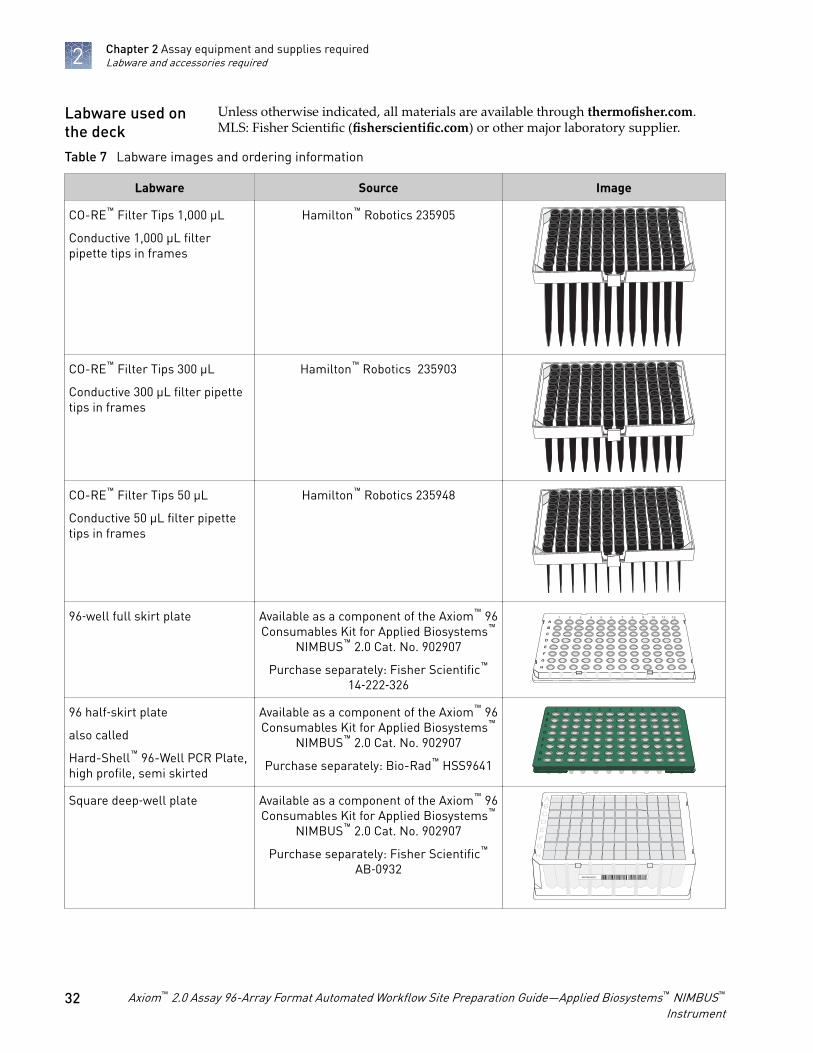
Unless otherwise indicated, all materials are available through thermofisher.com.MLS: Fisher Scientific (fisherscientific.com) or other major laboratory supplier.
Table 7 Labware images and ordering information
Labware Source Image
CO-RE™ Filter Tips 1,000 µL
Conductive 1,000 μL filterpipette tips in frames
Hamilton™ Robotics 235905
CO-RE™ Filter Tips 300 µL
Conductive 300 μL filter pipettetips in frames
Hamilton™ Robotics 235903
CO-RE™ Filter Tips 50 µL
Conductive 50 μL filter pipettetips in frames
Hamilton™ Robotics 235948
96‑well full skirt plate Available as a component of the Axiom™ 96Consumables Kit for Applied Biosystems™
NIMBUS™ 2.0 Cat. No. 902907
Purchase separately: Fisher Scientific™
14‑222‑326
96 half‑skirt plate
also called
Hard-Shell™ 96-Well PCR Plate,high profile, semi skirted
Available as a component of the Axiom™ 96Consumables Kit for Applied Biosystems™
NIMBUS™ 2.0 Cat. No. 902907
Purchase separately: Bio-Rad™ HSS9641
Square deep‑well plate Available as a component of the Axiom™ 96Consumables Kit for Applied Biosystems™
NIMBUS™ 2.0 Cat. No. 902907
Purchase separately: Fisher Scientific™
AB‑0932
Labware used onthe deck
Chapter 2 Assay equipment and supplies requiredLabware and accessories required2
32 Axiom™ 2.0 Assay 96-Array Format Automated Workflow Site Preparation Guide—Applied Biosystems™ NIMBUS™
Instrument
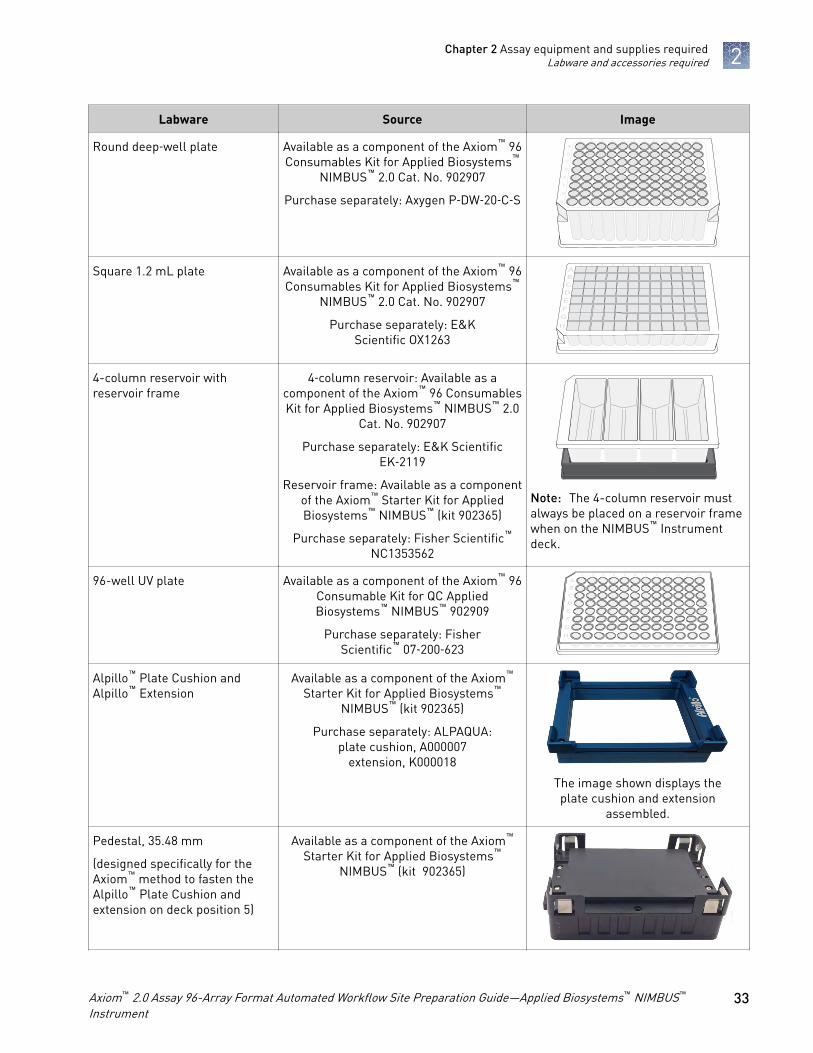
Labware Source Image
Round deep‑well plate Available as a component of the Axiom™ 96Consumables Kit for Applied Biosystems™
NIMBUS™ 2.0 Cat. No. 902907
Purchase separately: Axygen P‑DW‑20‑C‑S
Square 1.2 mL plate Available as a component of the Axiom™ 96Consumables Kit for Applied Biosystems™
NIMBUS™ 2.0 Cat. No. 902907
Purchase separately: E&KScientific OX1263
4-column reservoir withreservoir frame
4‑column reservoir: Available as acomponent of the Axiom™ 96 ConsumablesKit for Applied Biosystems™ NIMBUS™ 2.0
Cat. No. 902907
Purchase separately: E&K ScientificEK‑2119
Reservoir frame: Available as a componentof the Axiom™ Starter Kit for AppliedBiosystems™ NIMBUS™ (kit 902365)
Purchase separately: Fisher Scientific™
NC1353562
Note: The 4-column reservoir mustalways be placed on a reservoir framewhen on the NIMBUS™ Instrumentdeck.
96-well UV plate Available as a component of the Axiom™ 96Consumable Kit for QC AppliedBiosystems™ NIMBUS™ 902909
Purchase separately: FisherScientific™ 07‑200‑623
Alpillo™ Plate Cushion andAlpillo™ Extension
Available as a component of the Axiom™
Starter Kit for Applied Biosystems™
NIMBUS™ (kit 902365)
Purchase separately: ALPAQUA:plate cushion, A000007
extension, K000018
The image shown displays theplate cushion and extension
assembled.
Pedestal, 35.48 mm
(designed specifically for theAxiom™ method to fasten theAlpillo™ Plate Cushion andextension on deck position 5)
Available as a component of the Axiom™
Starter Kit for Applied Biosystems™
NIMBUS™ (kit 902365)
Chapter 2 Assay equipment and supplies requiredLabware and accessories required 2
Axiom™ 2.0 Assay 96-Array Format Automated Workflow Site Preparation Guide—Applied Biosystems™ NIMBUS™
Instrument33
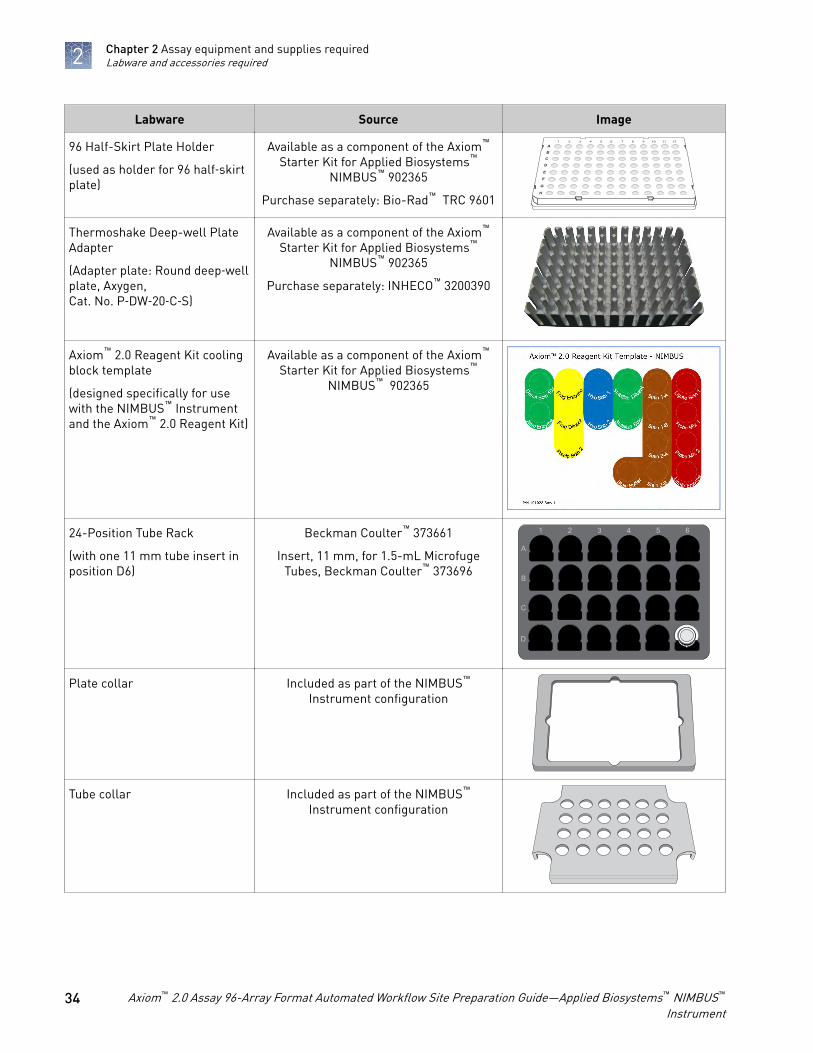
Labware Source Image
96 Half-Skirt Plate Holder
(used as holder for 96 half‑skirtplate)
Available as a component of the Axiom™
Starter Kit for Applied Biosystems™
NIMBUS™ 902365
Purchase separately: Bio-Rad™ TRC 9601
Thermoshake Deep-well PlateAdapter
(Adapter plate: Round deep‑wellplate, Axygen,Cat. No. P‑DW‑20‑C‑S)
Available as a component of the Axiom™
Starter Kit for Applied Biosystems™
NIMBUS™ 902365
Purchase separately: INHECO™ 3200390
Axiom™ 2.0 Reagent Kit coolingblock template
(designed specifically for usewith the NIMBUS™ Instrumentand the Axiom™ 2.0 Reagent Kit)
Available as a component of the Axiom™
Starter Kit for Applied Biosystems™
NIMBUS™ 902365
24-Position Tube Rack
(with one 11 mm tube insert inposition D6)
Beckman Coulter™ 373661
Insert, 11 mm, for 1.5-mL MicrofugeTubes, Beckman Coulter™ 373696
A
B
C
D
1 2 3 4 5 6
Plate collar Included as part of the NIMBUS™
Instrument configuration
Tube collar Included as part of the NIMBUS™
Instrument configuration
Chapter 2 Assay equipment and supplies requiredLabware and accessories required2
34 Axiom™ 2.0 Assay 96-Array Format Automated Workflow Site Preparation Guide—Applied Biosystems™ NIMBUS™
Instrument
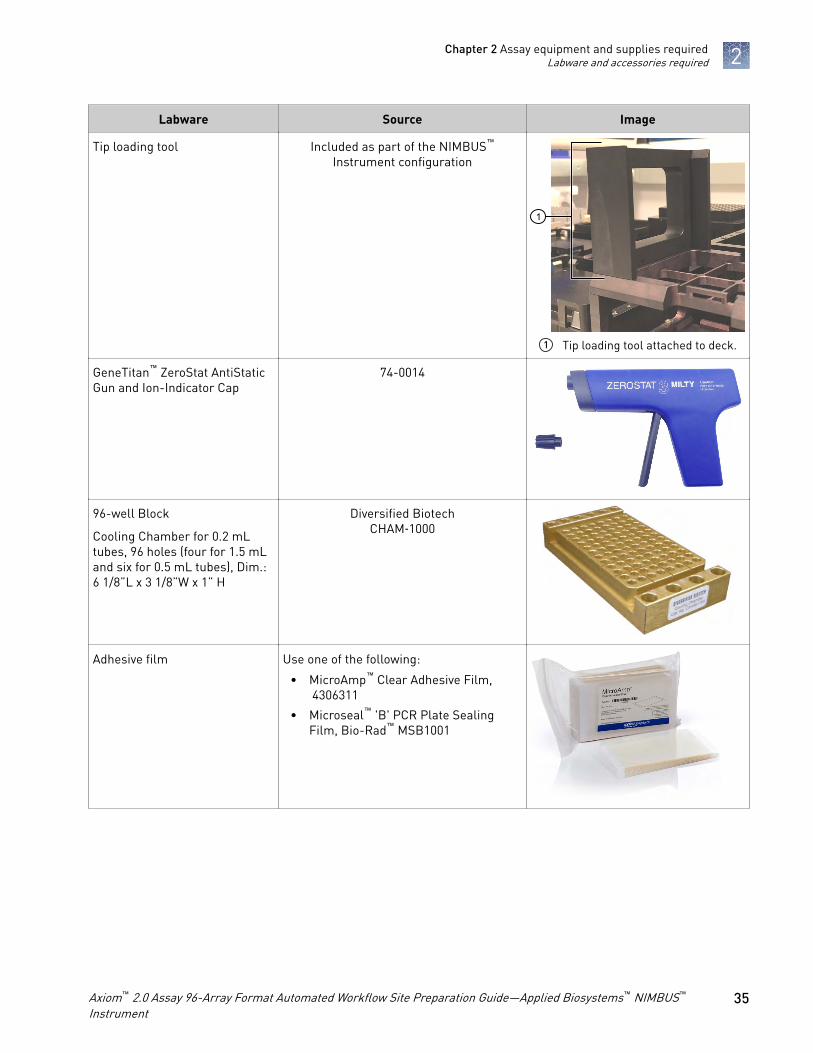
Labware Source Image
Tip loading tool Included as part of the NIMBUS™
Instrument configuration
1
1 Tip loading tool attached to deck.
GeneTitan™ ZeroStat AntiStaticGun and Ion-Indicator Cap
74-0014
96-well Block
Cooling Chamber for 0.2 mLtubes, 96 holes (four for 1.5 mLand six for 0.5 mL tubes), Dim.:6 1/8”L x 3 1/8”W x 1” H
Diversified BiotechCHAM‑1000
Adhesive film Use one of the following:
• MicroAmp™ Clear Adhesive Film, 4306311
• Microseal™ 'B' PCR Plate SealingFilm, Bio-Rad™ MSB1001
Chapter 2 Assay equipment and supplies requiredLabware and accessories required 2
Axiom™ 2.0 Assay 96-Array Format Automated Workflow Site Preparation Guide—Applied Biosystems™ NIMBUS™
Instrument35
Other equipment, consumables, and reagents required
Precautions are required when manipulating genomic DNA to avoid contaminationwith foreign DNA amplified in other reactions and procedures. It is recommendedthat genomic DNA manipulations are performed in a dedicated preamplificationroom or area separate from the main laboratory.
This preamplification area must have a dedicated set of pipettes and plasticware. If nodedicated area is available, use of a dedicated bench or a dedicated biosafety hoodand dedicated pipettes is suggested. If no dedicated bench or biosafety hood isavailable, a set of dedicated pipettes is recommended.
Preamplificationarea
Chapter 2 Assay equipment and supplies requiredOther equipment, consumables, and reagents required2
36 Axiom™ 2.0 Assay 96-Array Format Automated Workflow Site Preparation Guide—Applied Biosystems™ NIMBUS™
Instrument
We recommend using the BINDER™ ED 56 oven that is listed in the table below. Ifanother oven is used, it must be able to maintain a constant temperature of 37°C for atleast 24 hours, and have a temperature accuracy of ±1°C.
Unless otherwise indicated, all materials are available through thermofisher.com.MLS: Fisher Scientific (fisherscientific.com) or other major laboratory supplier.
✓ Item Source
Oven:
Required if processing more than 3 plates per week:
• BINDER™ ED 56 drying and heating chamber– ED056UL-120V Voltage: 120 V 1~60 Hz
– ED056-230V Voltage: 230 V 1~50/60 HzBINDER™ 9010-0334
BINDER™ 9010-0333
Optional—for low throughput of 3 or fewer array platesper week:
• GeneChip™ Hybridzation Oven 645[1]00-0331
[1] The GeneChip™ Hybridzation Oven 640 is currently not supported with the Axiom™ 2.0 Assay. However, to use it in the workflow contact your field service engineer (FSE) or Thermo Fisher Scientific Technical Support regarding the compatibility of this oven with the Axiom™ 2.0 Assay.
We recommend using one of the following spectrophotometers, or equivalent.
✓ Item Source
SpectraMax® Plus 384 Microplate Reader Molecular Devices® PLUS 384
DTX 880 Multimode Detector with genomicfilter slide
Beckman Coulter™
We have verified the performance of this assay using the thermal cyclers.• Applied Biosystems™ 2720 Thermal Cycler• Applied Biosystems™ GeneAmp™ PCR System 9700 (with gold-plated or silver
block)• Bio-Rad™ DNA Engine Tetrad™ 2 PTC-0240G• Bio-Rad™ DNA Engine™ PTC-200 Thermal Cycler
Ovenrequirements
Spectrophotome-ter
Thermal cyclersand protocols
Chapter 2 Assay equipment and supplies requiredOther equipment, consumables, and reagents required 2
Axiom™ 2.0 Assay 96-Array Format Automated Workflow Site Preparation Guide—Applied Biosystems™ NIMBUS™
Instrument37
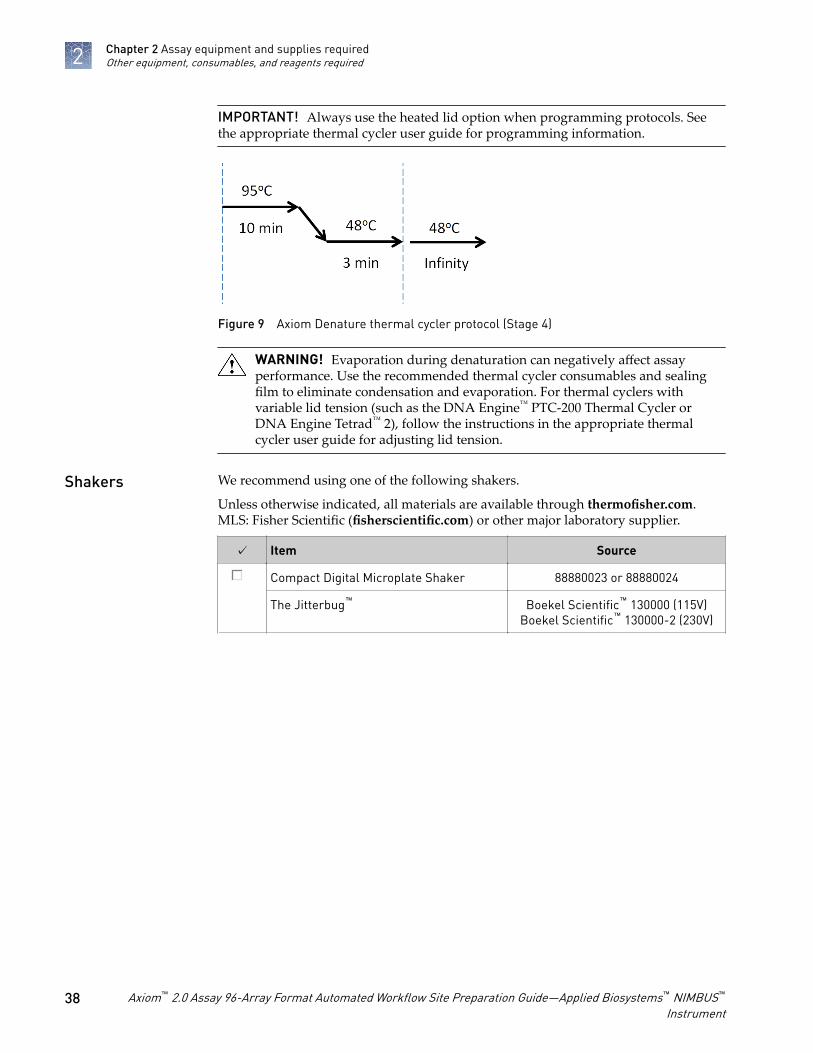
IMPORTANT! Always use the heated lid option when programming protocols. Seethe appropriate thermal cycler user guide for programming information.
Figure 9 Axiom Denature thermal cycler protocol (Stage 4)
WARNING! Evaporation during denaturation can negatively affect assayperformance. Use the recommended thermal cycler consumables and sealingfilm to eliminate condensation and evaporation. For thermal cyclers withvariable lid tension (such as the DNA Engine™ PTC-200 Thermal Cycler orDNA Engine Tetrad™ 2), follow the instructions in the appropriate thermalcycler user guide for adjusting lid tension.
We recommend using one of the following shakers.
Unless otherwise indicated, all materials are available through thermofisher.com.MLS: Fisher Scientific (fisherscientific.com) or other major laboratory supplier.
✓ Item Source
Compact Digital Microplate Shaker 88880023 or 88880024
The Jitterbug™ Boekel Scientific™ 130000 (115V)Boekel Scientific™ 130000-2 (230V)
Shakers
Chapter 2 Assay equipment and supplies requiredOther equipment, consumables, and reagents required2
38 Axiom™ 2.0 Assay 96-Array Format Automated Workflow Site Preparation Guide—Applied Biosystems™ NIMBUS™
Instrument
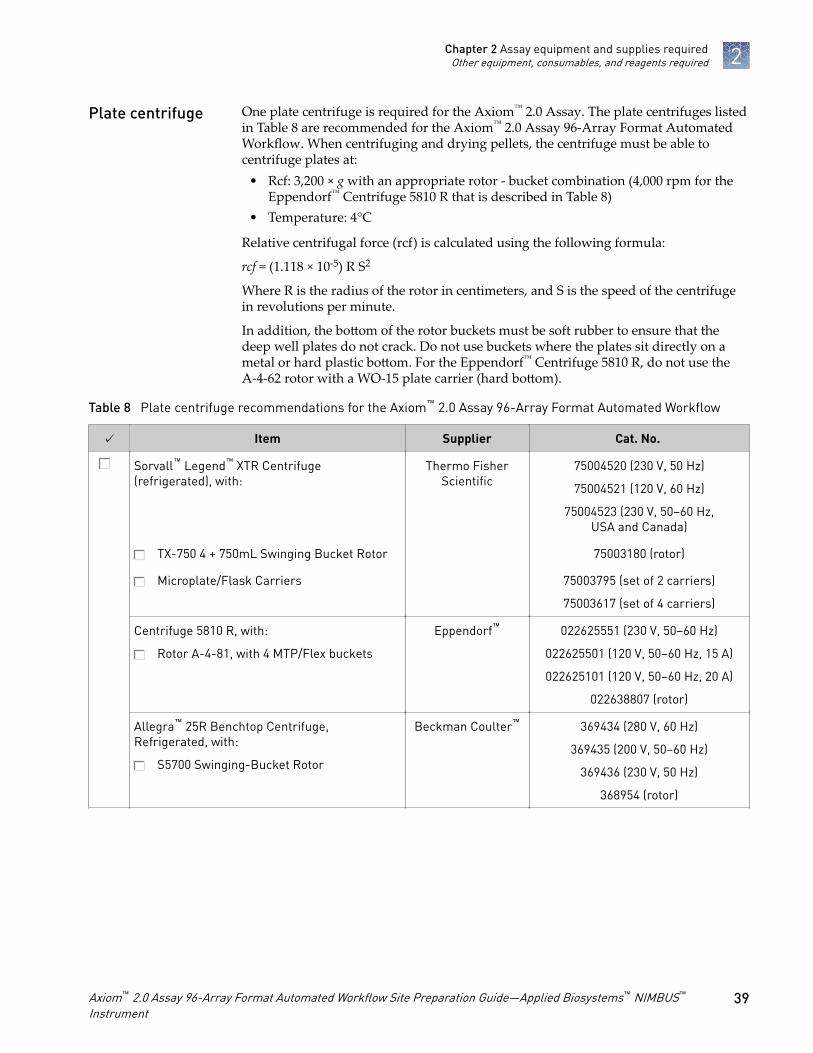
One plate centrifuge is required for the Axiom™ 2.0 Assay. The plate centrifuges listedin Table 8 are recommended for the Axiom™ 2.0 Assay 96-Array Format AutomatedWorkflow. When centrifuging and drying pellets, the centrifuge must be able tocentrifuge plates at:
• Rcf: 3,200 × g with an appropriate rotor - bucket combination (4,000 rpm for theEppendorf™ Centrifuge 5810 R that is described in Table 8)
• Temperature: 4°C
Relative centrifugal force (rcf) is calculated using the following formula:
rcf = (1.118 × 10⁻⁵) R S2
Where R is the radius of the rotor in centimeters, and S is the speed of the centrifugein revolutions per minute.
In addition, the bottom of the rotor buckets must be soft rubber to ensure that thedeep well plates do not crack. Do not use buckets where the plates sit directly on ametal or hard plastic bottom. For the Eppendorf™ Centrifuge 5810 R, do not use theA-4-62 rotor with a WO-15 plate carrier (hard bottom).
Table 8 Plate centrifuge recommendations for the Axiom™ 2.0 Assay 96-Array Format Automated Workflow
✓ Item Supplier Cat. No.
Sorvall™ Legend™ XTR Centrifuge(refrigerated), with:
Thermo FisherScientific
75004520 (230 V, 50 Hz)
75004521 (120 V, 60 Hz)
75004523 (230 V, 50–60 Hz,USA and Canada)
TX-750 4 + 750mL Swinging Bucket Rotor 75003180 (rotor)
Microplate/Flask Carriers 75003795 (set of 2 carriers)
75003617 (set of 4 carriers)
Centrifuge 5810 R, with:
Rotor A-4-81, with 4 MTP/Flex buckets
Eppendorf™ 022625551 (230 V, 50–60 Hz)
022625501 (120 V, 50–60 Hz, 15 A)
022625101 (120 V, 50–60 Hz, 20 A)
022638807 (rotor)
Allegra™ 25R Benchtop Centrifuge,Refrigerated, with:
S5700 Swinging-Bucket Rotor
Beckman Coulter™ 369434 (280 V, 60 Hz)
369435 (200 V, 50–60 Hz)
369436 (230 V, 50 Hz)
368954 (rotor)
Plate centrifuge
Chapter 2 Assay equipment and supplies requiredOther equipment, consumables, and reagents required 2
Axiom™ 2.0 Assay 96-Array Format Automated Workflow Site Preparation Guide—Applied Biosystems™ NIMBUS™
Instrument39
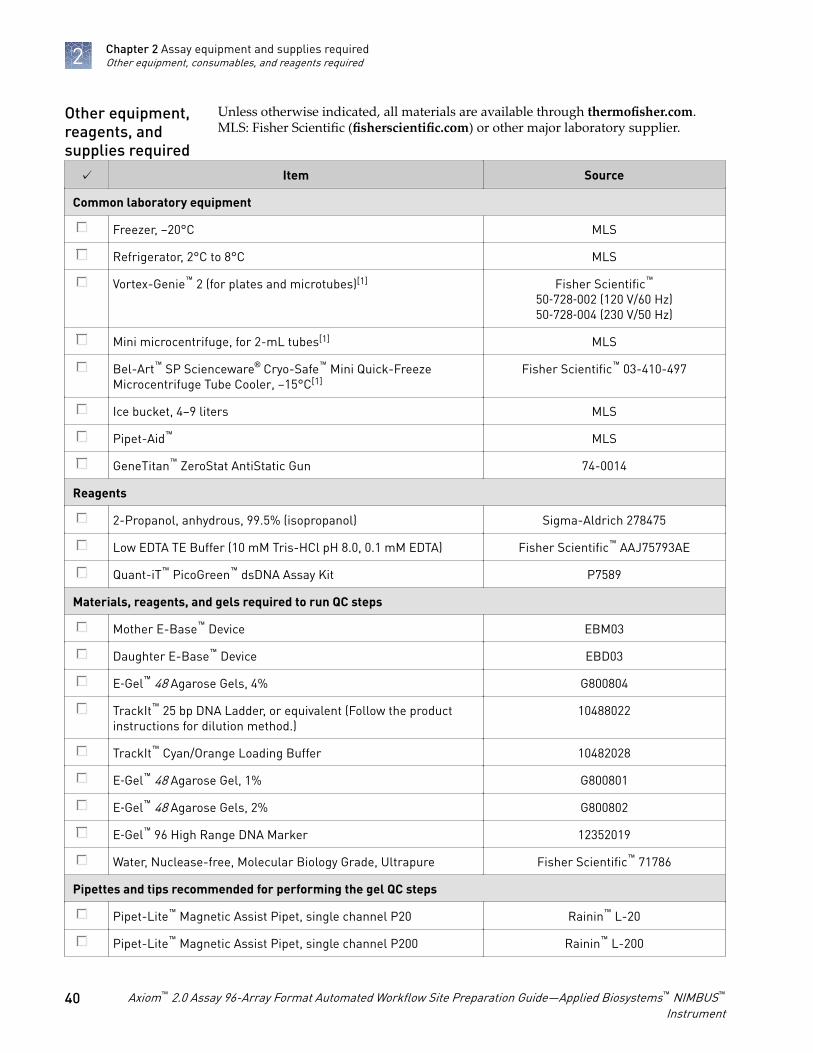
Unless otherwise indicated, all materials are available through thermofisher.com.MLS: Fisher Scientific (fisherscientific.com) or other major laboratory supplier.
✓ Item Source
Common laboratory equipment
Freezer, –20°C MLS
Refrigerator, 2°C to 8°C MLS
Vortex-Genie™ 2 (for plates and microtubes)[1] Fisher Scientific™
50‑728‑002 (120 V/60 Hz)50‑728‑004 (230 V/50 Hz)
Mini microcentrifuge, for 2-mL tubes[1] MLS
Bel-Art™ SP Scienceware® Cryo-Safe™ Mini Quick-FreezeMicrocentrifuge Tube Cooler, –15°C[1]
Fisher Scientific™ 03-410-497
Ice bucket, 4–9 liters MLS
Pipet-Aid™ MLS
GeneTitan™ ZeroStat AntiStatic Gun 74-0014
Reagents
2-Propanol, anhydrous, 99.5% (isopropanol) Sigma-Aldrich 278475
Low EDTA TE Buffer (10 mM Tris-HCl pH 8.0, 0.1 mM EDTA) Fisher Scientific™ AAJ75793AE
Quant-iT™ PicoGreen™ dsDNA Assay Kit P7589
Materials, reagents, and gels required to run QC steps
Mother E-Base™ Device EBM03
Daughter E-Base™ Device EBD03
E‑Gel™ 48 Agarose Gels, 4% G800804
TrackIt™ 25 bp DNA Ladder, or equivalent (Follow the productinstructions for dilution method.)
10488022
TrackIt™ Cyan/Orange Loading Buffer 10482028
E‑Gel™ 48 Agarose Gel, 1% G800801
E‑Gel™ 48 Agarose Gels, 2% G800802
E‑Gel™ 96 High Range DNA Marker 12352019
Water, Nuclease-free, Molecular Biology Grade, Ultrapure Fisher Scientific™ 71786
Pipettes and tips recommended for performing the gel QC steps
Pipet-Lite™ Magnetic Assist Pipet, single channel P20 Rainin™ L-20
Pipet-Lite™ Magnetic Assist Pipet, single channel P200 Rainin™ L-200
Other equipment,reagents, andsupplies required
Chapter 2 Assay equipment and supplies requiredOther equipment, consumables, and reagents required2
40 Axiom™ 2.0 Assay 96-Array Format Automated Workflow Site Preparation Guide—Applied Biosystems™ NIMBUS™
Instrument
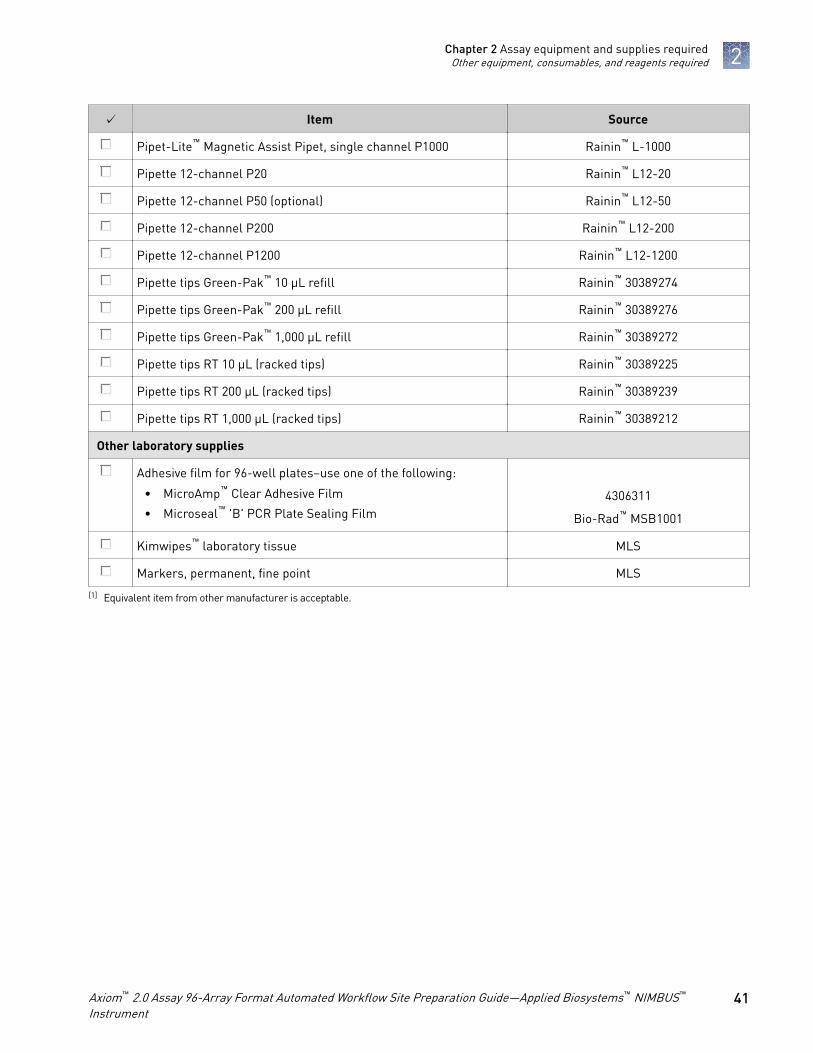
✓ Item Source
Pipet-Lite™ Magnetic Assist Pipet, single channel P1000 Rainin™ L-1000
Pipette 12-channel P20 Rainin™ L12-20
Pipette 12-channel P50 (optional) Rainin™ L12-50
Pipette 12-channel P200 Rainin™ L12-200
Pipette 12-channel P1200 Rainin™ L12-1200
Pipette tips Green-Pak™ 10 µL refill Rainin™ 30389274
Pipette tips Green-Pak™ 200 µL refill Rainin™ 30389276
Pipette tips Green-Pak™ 1,000 µL refill Rainin™ 30389272
Pipette tips RT 10 µL (racked tips) Rainin™ 30389225
Pipette tips RT 200 µL (racked tips) Rainin™ 30389239
Pipette tips RT 1,000 µL (racked tips) Rainin™ 30389212
Other laboratory supplies
Adhesive film for 96-well plates–use one of the following:
• MicroAmp™ Clear Adhesive Film
• Microseal™ 'B' PCR Plate Sealing Film
4306311
Bio-Rad™ MSB1001
Kimwipes™ laboratory tissue MLS
Markers, permanent, fine point MLS
[1] Equivalent item from other manufacturer is acceptable.
Chapter 2 Assay equipment and supplies requiredOther equipment, consumables, and reagents required 2
Axiom™ 2.0 Assay 96-Array Format Automated Workflow Site Preparation Guide—Applied Biosystems™ NIMBUS™
Instrument41
Safety
WARNING! GENERAL SAFETY. Using this product in a manner not specifiedin the user documentation may result in personal injury or damage to theinstrument or device. Ensure that anyone using this product has receivedinstructions in general safety practices for laboratories and the safetyinformation provided in this document.
· Before using an instrument or device, read and understand the safetyinformation provided in the user documentation provided by themanufacturer of the instrument or device.
· Before handling chemicals, read and understand all applicable Safety DataSheets (SDSs) and use appropriate personal protective equipment (gloves,gowns, eye protection, and so on). To obtain SDSs, see the “Documentationand Support” section in this document.
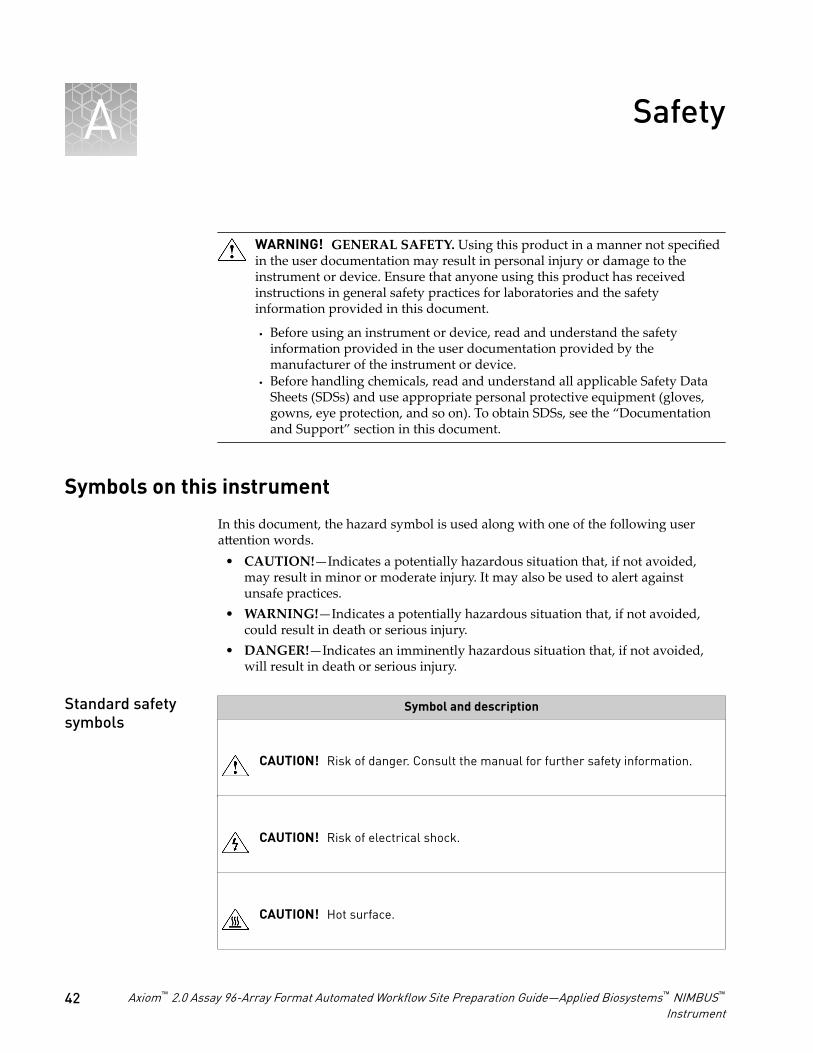
Symbols on this instrument
In this document, the hazard symbol is used along with one of the following userattention words.
• CAUTION!—Indicates a potentially hazardous situation that, if not avoided,may result in minor or moderate injury. It may also be used to alert againstunsafe practices.
• WARNING!—Indicates a potentially hazardous situation that, if not avoided,could result in death or serious injury.
• DANGER!—Indicates an imminently hazardous situation that, if not avoided,will result in death or serious injury.
Symbol and description
CAUTION! Risk of danger. Consult the manual for further safety information.
CAUTION! Risk of electrical shock.
CAUTION! Hot surface.
A
Standard safetysymbols
42 Axiom™ 2.0 Assay 96-Array Format Automated Workflow Site Preparation Guide—Applied Biosystems™ NIMBUS™
Instrument
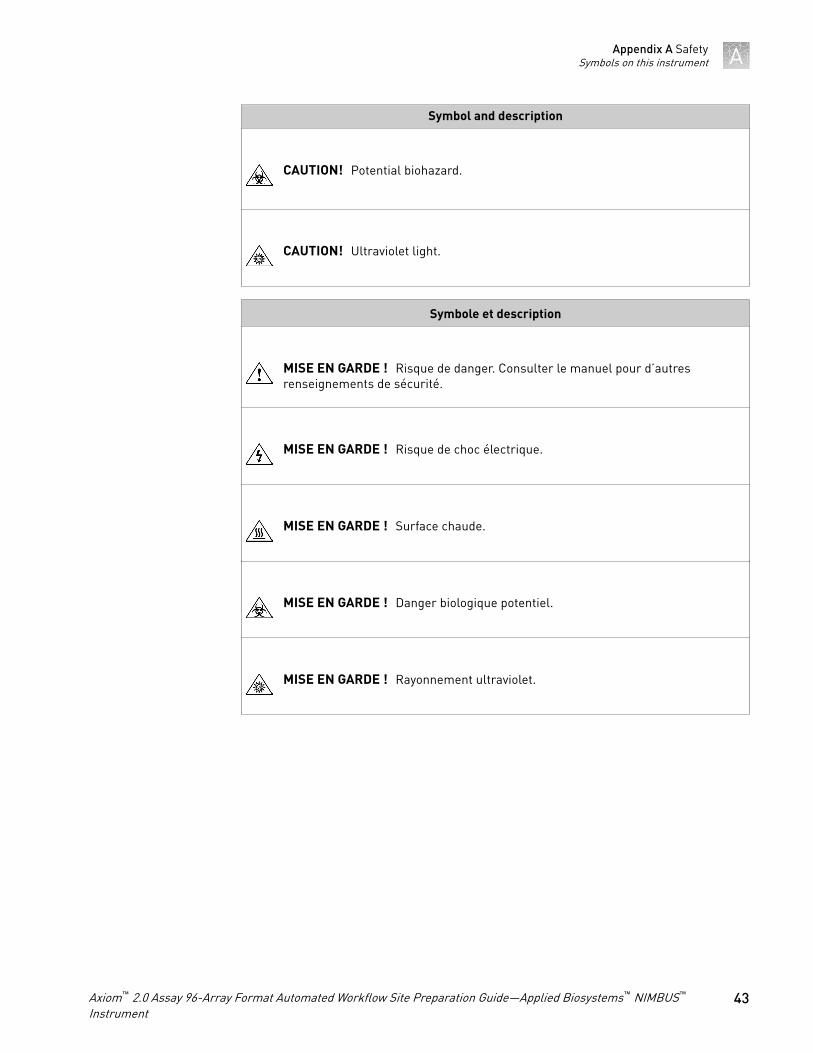
Symbol and description
CAUTION! Potential biohazard.
CAUTION! Ultraviolet light.
Symbole et description
MISE EN GARDE ! Risque de danger. Consulter le manuel pour d’autresrenseignements de sécurité.
MISE EN GARDE ! Risque de choc électrique.
MISE EN GARDE ! Surface chaude.
MISE EN GARDE ! Danger biologique potentiel.
MISE EN GARDE ! Rayonnement ultraviolet.
Appendix A SafetySymbols on this instrument A
Axiom™ 2.0 Assay 96-Array Format Automated Workflow Site Preparation Guide—Applied Biosystems™ NIMBUS™
Instrument43
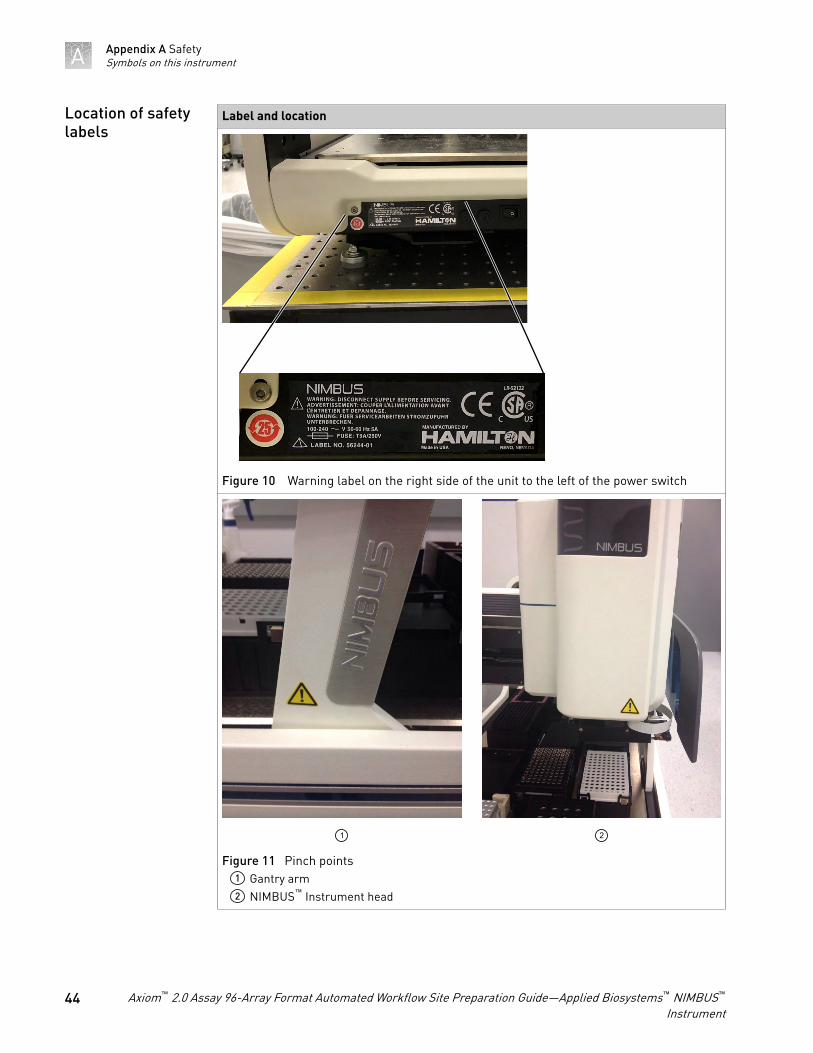
Label and location
Figure 10 Warning label on the right side of the unit to the left of the power switch
1 2
Figure 11 Pinch points1 Gantry arm2 NIMBUS™ Instrument head
Location of safetylabels
Appendix A SafetySymbols on this instrumentA
44 Axiom™ 2.0 Assay 96-Array Format Automated Workflow Site Preparation Guide—Applied Biosystems™ NIMBUS™
Instrument
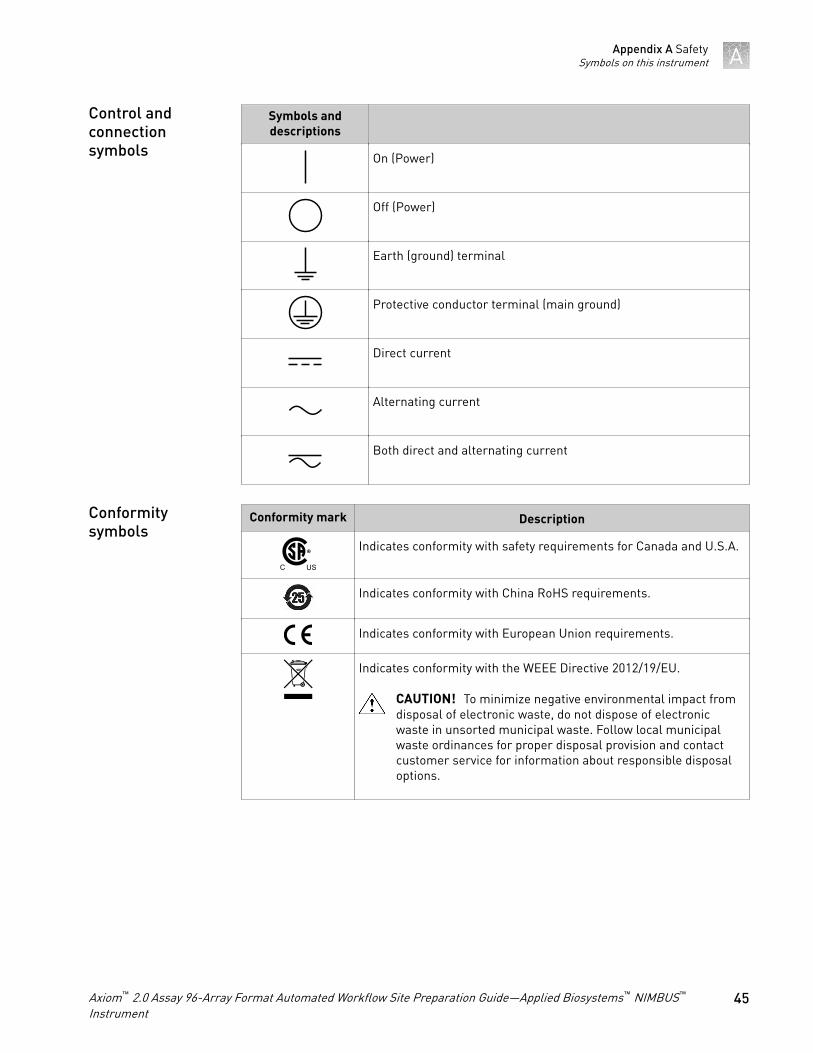
Symbols anddescriptions
On (Power)
Off (Power)
Earth (ground) terminal
Protective conductor terminal (main ground)
Direct current
Alternating current
Both direct and alternating current
Conformity mark Description
Indicates conformity with safety requirements for Canada and U.S.A.
Indicates conformity with China RoHS requirements.
Indicates conformity with European Union requirements.
Indicates conformity with the WEEE Directive 2012/19/EU.
CAUTION! To minimize negative environmental impact fromdisposal of electronic waste, do not dispose of electronicwaste in unsorted municipal waste. Follow local municipalwaste ordinances for proper disposal provision and contactcustomer service for information about responsible disposaloptions.
Control andconnectionsymbols
Conformitysymbols
Appendix A SafetySymbols on this instrument A
Axiom™ 2.0 Assay 96-Array Format Automated Workflow Site Preparation Guide—Applied Biosystems™ NIMBUS™
Instrument45
Safety information for instruments not manufactured by ThermoFisher Scientific
Some of the accessories provided as part of the instrument system are not designed orbuilt by Thermo Fisher Scientific. Consult the manufacturer's documentation for theinformation needed for the safe use of these products.
Instrument safety
CAUTION! Do not remove instrument protective covers. If you remove theprotective instrument panels or disable interlock devices, you may be exposedto serious hazards including, but not limited to, severe electrical shock, laserexposure, crushing, or chemical exposure.
CAUTION! Solvents and Pressurized fluids. Wear eye protection whenworking with any pressurized fluids. Use caution when working with anypolymeric tubing that is under pressure:
· Extinguish any nearby flames if you use flammable solvents.· Do not use polymeric tubing that has been severely stressed or kinked.· Do not use polymeric tubing with tetrahydrofuran or nitric and sulfuric
acids.· Be aware that methylene chloride and dimethyl sulfoxide cause polymeric
tubing to swell and greatly reduce the rupture pressure of the tubing.· Be aware that high solvent flow rates (~40mL/min) may cause a static charge
to build up on the surface of the tubing and electrical sparks may result.
General
Appendix A SafetySafety information for instruments not manufactured by Thermo Fisher ScientificA
46 Axiom™ 2.0 Assay 96-Array Format Automated Workflow Site Preparation Guide—Applied Biosystems™ NIMBUS™
Instrument
CAUTION! Moving and Lifting Injury. The instrument is to be moved andpositioned only by the personnel or vendor specified in the applicable sitepreparation guide. Improper lifting can cause painful and permanent backinjury.
Things to consider before lifting or moving the instrument or accessories:· Depending on the weight, moving or lifting may require two or more
persons.· If you decide to lift or move the instrument after it has been installed, do notattempt to do so without the assistance of others, the use of appropriatemoving equipment, and proper lifting techniques.
· Ensure you have a secure, comfortable grip on the instrument or accessory.· Make sure that the path from where the object is to where it is being moved
is clear of obstructions.· Do not lift an object and twist your torso at the same time. Keep your spine
in a good neutral position while lifting with your legs.· Participants should coordinate lift and move intentions with each other
before lifting and carrying.· For smaller packages, rather than lifting the object from the packing box,
carefully tilt the box on its side and hold it stationary while someone elseslides the contents out of the box.
CAUTION! Moving Parts. Moving parts can crush, pinch and cut. Keep handsclear of moving parts while operating the instrument. Disconnect power beforeservicing.
Physical injury
Appendix A SafetyInstrument safety A
Axiom™ 2.0 Assay 96-Array Format Automated Workflow Site Preparation Guide—Applied Biosystems™ NIMBUS™
Instrument47

WARNING! Fuse Installation. Before installing the instrument, verify that thefuses are properly installed and the fuse voltage matches the supply voltage.Replace fuses only with the type and rating specified for the unit. Improperfuses can damage the instrument wiring system and cause a fire.
AVERTISSEMENT ! Installation des fusibles. Avant d’installer l’instrument,vérifier que les fusibles sont correctement insérés et que leur tensioncorrespond à celle fournie par le circuit d’alimentation. Ne remplacer lesfusibles que par des modèles du type et de la puissance spécifiés pourl’appareil. L’utilisation de fusibles inadaptés peut endommager le circuitélectrique de l’instrument et provoquer un incendie.
WARNING! Voltage Selector Switch. Before installing the instrument, verifythat the voltage selector switch is set for the supply voltage. This will preventdamage to the instrument, reduce risk of fire, and enable proper operation.
AVERTISSEMENT ! Sélecteur de tension. Avant d’installer l’instrument,vérifier que le sélecteur de tension est adapté à la tension d’alimentation. Celapermet d’éviter d’endommager l’instrument, de réduire le risque d’incendie etd’assurer son bon fonctionnement.
WARNING! Ensure appropriate electrical supply. For safe operation of theinstrument:
· Plug the system into a properly grounded receptacle with adequate currentcapacity.
· Ensure the electrical supply is of suitable voltage.· Never operate the instrument with the ground disconnected. Grounding
continuity is required for safe operation of the instrument.
AVERTISSEMENT ! Veiller à utiliser une alimentation électrique appropriée.Pour garantir le fonctionnement de l’instrument en toute sécurité :
· Brancher le système sur une prise électrique correctement mise à la terre etde puissance adéquate.
· S’assurer que la tension électrique est convenable.· Ne jamais utiliser l’instrument alors que le dispositif de mise à la terre est
déconnecté. La continuité de la mise à la terre est impérative pour lefonctionnement de l’instrument en toute sécurité.
WARNING! Power Supply Line Cords. Use properly configured and approvedline cords for the power supply in your facility.
AVERTISSEMENT ! Cordons d’alimentation électrique. Utiliser des cordonsd’alimentation adaptés et approuvés pour raccorder l’instrument au circuitélectrique du site.
Electrical safety
Appendix A SafetyInstrument safetyA
48 Axiom™ 2.0 Assay 96-Array Format Automated Workflow Site Preparation Guide—Applied Biosystems™ NIMBUS™
Instrument
WARNING! Disconnecting Power. To fully disconnect power either detach orunplug the power cord, positioning the instrument such that the power cord isaccessible.
AVERTISSEMENT ! Déconnecter l’alimentation. Pour déconnecterentièrement l’alimentation, détacher ou débrancher le cordon d’alimentation.Placer l’instrument de manière à ce que le cordon d’alimentation soit accessible.
CAUTION! Cleaning and Decontamination. Use only the cleaning anddecontamination methods specified in the manufacturer's user documentation.It is the responsibility of the operator (or other responsible person) to ensurethe following requirements are met:
· No decontamination or cleaning agents are used that could cause aHAZARD as a result of a reaction with parts of the equipment or withmaterial contained in the equipment.
· The instrument is properly decontaminated a) if hazardous material isspilled onto or into the equipment, and/or b) prior to having the instrumentserviced at your facility or sending the instrument for repair, maintenance,trade-in, disposal, or termination of a loan (decontamination forms may berequested from customer service).
· Before using any cleaning or decontamination methods (except thoserecommended by the manufacturer), users should confirm with themanufacturer that the proposed method will not damage the equipment.
MISE EN GARDE ! Nettoyage et décontamination. Utiliser uniquement lesméthodes de nettoyage et de décontamination indiquées dans la documentationdu fabricant destinée aux utilisateurs. L’opérateur (ou toute autre personneresponsable) est tenu d’assurer le respect des exigences suivantes:
· Ne pas utiliser d’agents de nettoyage ou de décontamination susceptibles deréagir avec certaines parties de l’appareil ou avec les matières qu’il contientet de constituer, de ce fait, un DANGER.
· L’instrument doit être correctement décontaminé a) si des substancesdangereuses sont renversées sur ou à l’intérieur de l’équipement, et/oub) avant de le faire réviser sur site ou de l’envoyer à des fins de réparation, demaintenance, de revente, d’élimination ou à l’expiration d’une période deprêt (des informations sur les formes de décontamination peuvent êtredemandées auprès du Service clientèle).
· Avant d’utiliser une méthode de nettoyage ou de décontamination (autre quecelles recommandées par le fabricant), les utilisateurs doivent vérifier auprèsde celui-ci qu’elle ne risque pas d’endommager l’appareil.
To minimize negative environmental impact from disposal of electronic waste, do notdispose of electronic waste in unsorted municipal waste. Follow local municipal wasteordinances for proper disposal provision and contact customer service for informationabout responsible disposal options.
Cleaning anddecontamination
Instrumentcomponent andaccessorydisposal
Appendix A SafetyInstrument safety A
Axiom™ 2.0 Assay 96-Array Format Automated Workflow Site Preparation Guide—Applied Biosystems™ NIMBUS™
Instrument49
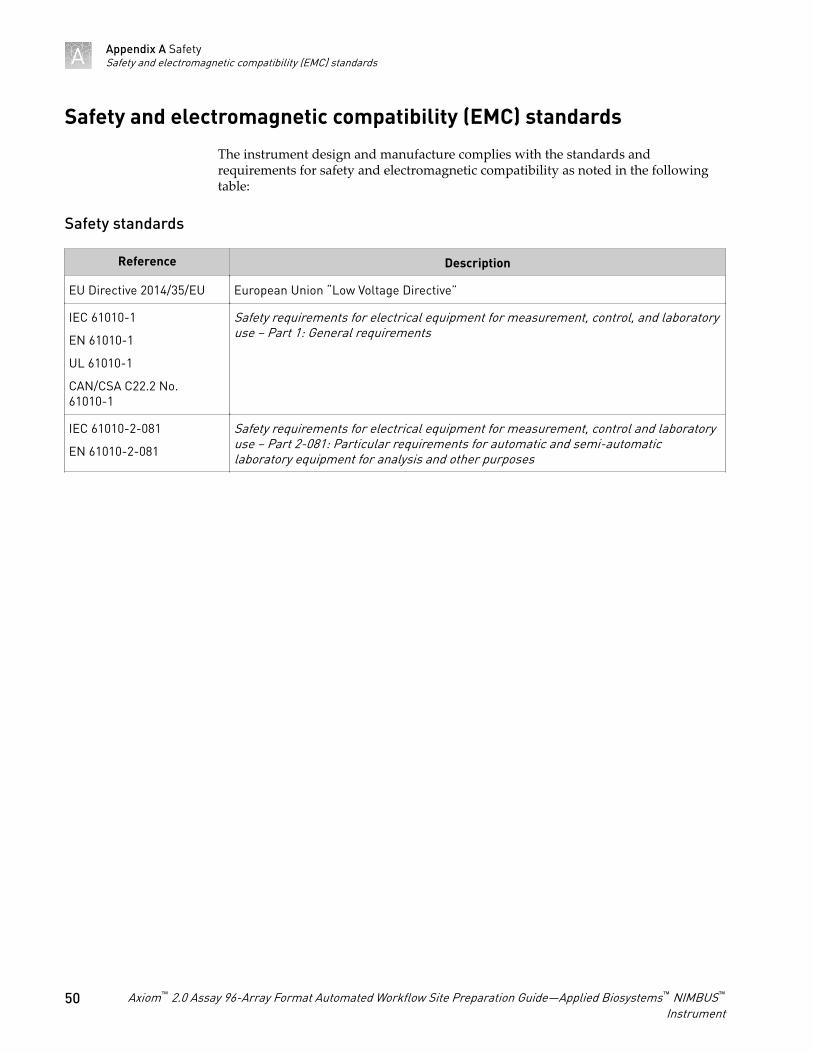
Safety and electromagnetic compatibility (EMC) standards
The instrument design and manufacture complies with the standards andrequirements for safety and electromagnetic compatibility as noted in the followingtable:
Safety standards
Reference Description
EU Directive 2014/35/EU European Union “Low Voltage Directive”
IEC 61010-1
EN 61010-1
UL 61010-1
CAN/CSA C22.2 No.61010-1
Safety requirements for electrical equipment for measurement, control, and laboratoryuse – Part 1: General requirements
IEC 61010-2-081
EN 61010-2-081
Safety requirements for electrical equipment for measurement, control and laboratoryuse – Part 2-081: Particular requirements for automatic and semi-automaticlaboratory equipment for analysis and other purposes
Appendix A SafetySafety and electromagnetic compatibility (EMC) standardsA
50 Axiom™ 2.0 Assay 96-Array Format Automated Workflow Site Preparation Guide—Applied Biosystems™ NIMBUS™
Instrument
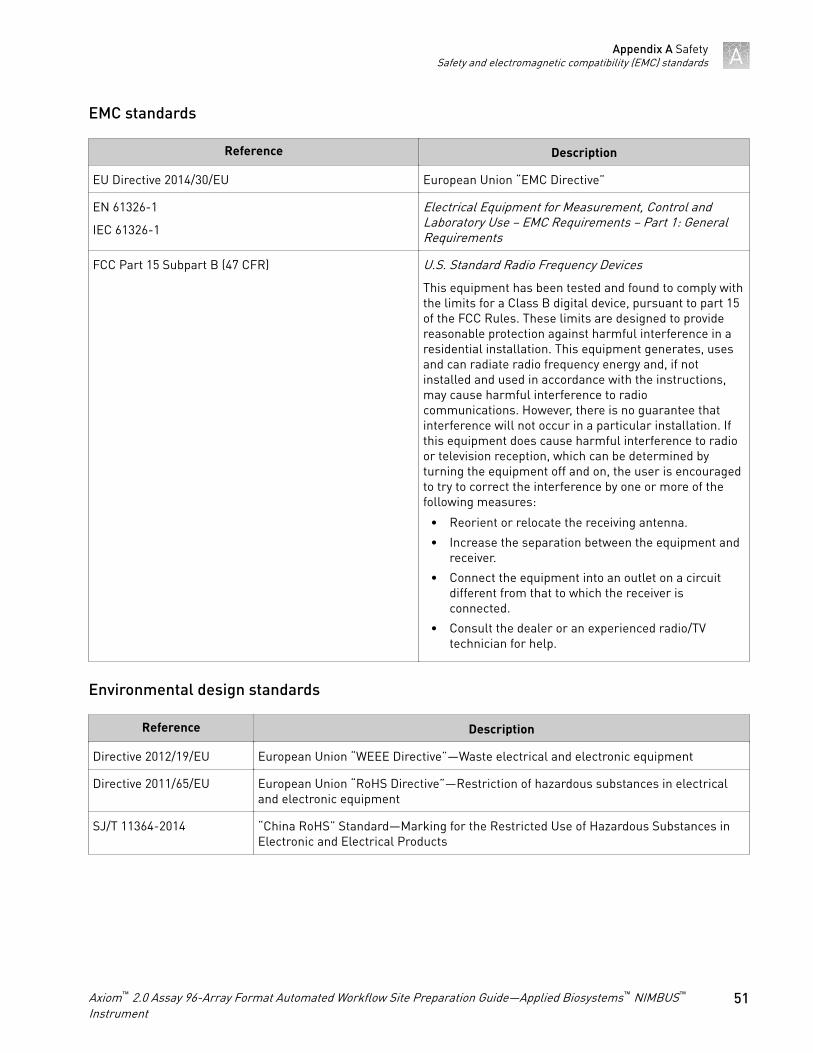
EMC standards
Reference Description
EU Directive 2014/30/EU European Union “EMC Directive”
EN 61326-1
IEC 61326-1
Electrical Equipment for Measurement, Control andLaboratory Use – EMC Requirements – Part 1: GeneralRequirements
FCC Part 15 Subpart B (47 CFR) U.S. Standard Radio Frequency Devices
This equipment has been tested and found to comply withthe limits for a Class B digital device, pursuant to part 15of the FCC Rules. These limits are designed to providereasonable protection against harmful interference in aresidential installation. This equipment generates, usesand can radiate radio frequency energy and, if notinstalled and used in accordance with the instructions,may cause harmful interference to radiocommunications. However, there is no guarantee thatinterference will not occur in a particular installation. Ifthis equipment does cause harmful interference to radioor television reception, which can be determined byturning the equipment off and on, the user is encouragedto try to correct the interference by one or more of thefollowing measures:
• Reorient or relocate the receiving antenna.
• Increase the separation between the equipment andreceiver.
• Connect the equipment into an outlet on a circuitdifferent from that to which the receiver isconnected.
• Consult the dealer or an experienced radio/TVtechnician for help.
Environmental design standards
Reference Description
Directive 2012/19/EU European Union “WEEE Directive”—Waste electrical and electronic equipment
Directive 2011/65/EU European Union “RoHS Directive”—Restriction of hazardous substances in electricaland electronic equipment
SJ/T 11364-2014 “China RoHS” Standard—Marking for the Restricted Use of Hazardous Substances inElectronic and Electrical Products
Appendix A SafetySafety and electromagnetic compatibility (EMC) standards A
Axiom™ 2.0 Assay 96-Array Format Automated Workflow Site Preparation Guide—Applied Biosystems™ NIMBUS™
Instrument51
Chemical safety
WARNING! GENERAL CHEMICAL HANDLING. To minimize hazards,ensure laboratory personnel read and practice the general safety guidelines forchemical usage, storage, and waste provided below. Consult the relevant SDSfor specific precautions and instructions:
· Read and understand the Safety Data Sheets (SDSs) provided by thechemical manufacturer before you store, handle, or work with any chemicalsor hazardous materials. To obtain SDSs, see the “Documentation andSupport” section in this document.
· Minimize contact with chemicals. Wear appropriate personal protectiveequipment when handling chemicals (for example, safety glasses, gloves, orprotective clothing).
· Minimize the inhalation of chemicals. Do not leave chemical containers open.Use only with adequate ventilation (for example, fume hood).
· Check regularly for chemical leaks or spills. If a leak or spill occurs, followthe manufacturer's cleanup procedures as recommended in the SDS.
· Handle chemical wastes in a fume hood.· Ensure use of primary and secondary waste containers. (A primary waste
container holds the immediate waste. A secondary container contains spillsor leaks from the primary container. Both containers must be compatiblewith the waste material and meet federal, state, and local requirements forcontainer storage.)
· After emptying a waste container, seal it with the cap provided.· Characterize (by analysis if necessary) the waste generated by the particular
applications, reagents, and substrates used in your laboratory.· Ensure that the waste is stored, transferred, transported, and disposed of
according to all local, state/provincial, and/or national regulations.· IMPORTANT! Radioactive or biohazardous materials may require special
handling, and disposal limitations may apply.
AVERTISSEMENT ! PRÉCAUTIONS GÉNÉRALES EN CAS DEMANIPULATION DE PRODUITS CHIMIQUES. Pour minimiser les risques,veiller à ce que le personnel du laboratoire lise attentivement et mette en œuvreles consignes de sécurité générales relatives à l’utilisation et au stockage desproduits chimiques et à la gestion des déchets qui en découlent, décrites ci-dessous. Consulter également la FDS appropriée pour connaître les précautionset instructions particulières à respecter :
· Lire et comprendre les fiches de données de sécurité (FDS) fournies par lefabricant avant de stocker, de manipuler ou d’utiliser les matériauxdangereux ou les produits chimiques. Pour obtenir les FDS, se reporter à lasection « Documentation et support » du présent document.
· Limiter les contacts avec les produits chimiques. Porter des équipements deprotection appropriés lors de la manipulation des produits chimiques (parexemple : lunettes de sûreté, gants ou vêtements de protection).
· Limiter l’inhalation des produits chimiques. Ne pas laisser les récipients deproduits chimiques ouverts. Ils ne doivent être utilisés qu’avec uneventilation adéquate (par exemple, sorbonne).
Appendix A SafetyChemical safetyA
52 Axiom™ 2.0 Assay 96-Array Format Automated Workflow Site Preparation Guide—Applied Biosystems™ NIMBUS™
Instrument
· Vérifier régulièrement l’absence de fuite ou d’écoulement des produitschimiques. En cas de fuite ou d’écoulement d’un produit, respecter lesdirectives de nettoyage du fabricant recommandées dans la FDS.
· Manipuler les déchets chimiques dans une sorbonne.· Veiller à utiliser des récipients à déchets primaire et secondaire. (Le récipient
primaire contient les déchets immédiats, le récipient secondaire contient lesfuites et les écoulements du récipient primaire. Les deux récipients doiventêtre compatibles avec les matériaux mis au rebut et conformes aux exigenceslocales, nationales et communautaires en matière de confinement desrécipients.)
· Une fois le récipient à déchets vidé, il doit être refermé hermétiquement avecle couvercle fourni.
· Caractériser (par une analyse si nécessaire) les déchets générés par lesapplications, les réactifs et les substrats particuliers utilisés dans lelaboratoire.
· Vérifier que les déchets sont convenablement stockés, transférés, transportéset éliminés en respectant toutes les réglementations locales, nationales et/oucommunautaires en vigueur.
· IMPORTANT ! Les matériaux représentant un danger biologique ouradioactif exigent parfois une manipulation spéciale, et des limitationspeuvent s’appliquer à leur élimination.
WARNING! HAZARDOUS WASTE (from instruments). Waste produced bythe instrument is potentially hazardous. Follow the guidelines noted in thepreceding General Chemical Handling warning.
WARNING! 4L Reagent and Waste Bottle Safety. Four-liter reagent and wastebottles can crack and leak. Each 4-liter bottle should be secured in a low-densitypolyethylene safety container with the cover fastened and the handles locked inthe upright position.
Appendix A SafetyChemical safety A
Axiom™ 2.0 Assay 96-Array Format Automated Workflow Site Preparation Guide—Applied Biosystems™ NIMBUS™
Instrument53
Biological hazard safety
WARNING! Potential Biohazard. Depending on the samples used on thisinstrument, the surface may be considered a biohazard. Use appropriatedecontamination methods when working with biohazards.
WARNING! BIOHAZARD. Biological samples such as tissues, body fluids,infectious agents, and blood of humans and other animals have the potential totransmit infectious diseases. Conduct all work in properly equipped facilitieswith the appropriate safety equipment (for example, physical containmentdevices). Safety equipment can also include items for personal protection, suchas gloves, coats, gowns, shoe covers, boots, respirators, face shields, safetyglasses, or goggles. Individuals should be trained according to applicableregulatory and company/ institution requirements before working withpotentially biohazardous materials. Follow all applicable local, state/provincial,and/or national regulations. The following references provide generalguidelines when handling biological samples in laboratory environment.
· U.S. Department of Health and Human Services, Biosafety in Microbiologicaland Biomedical Laboratories (BMBL), 5th Edition, HHS Publication No. (CDC)21-1112, Revised December 2009; found at:www.cdc.gov/biosafety/publications/bmbl5/BMBL.pdf
· World Health Organization, Laboratory Biosafety Manual, 3rd Edition,WHO/CDS/CSR/LYO/2004.11; found at:www.who.int/csr/resources/publications/biosafety/Biosafety7.pdf
Appendix A SafetyBiological hazard safetyA
54 Axiom™ 2.0 Assay 96-Array Format Automated Workflow Site Preparation Guide—Applied Biosystems™ NIMBUS™
Instrument
Documentation and support
Related documentation
Document Publicationnumber Description
Axiom™ 2.0 Assay 96-Array FormatAutomated Workflow User Guide—Applied Biosystems™ NIMBUS™
Instrument
MAN0017740 This document provides instruction on running theAxiom™ 2.0 Assay on 96-array format plates using anautomated workflow on the on the Applied Biosystems™
NIMBUS™ and array processing on the GeneTitan™ Multi-Channel Instrument.
Axiom™ 2.0 Assay 96-Array FormatAutomated Workflow Quick Reference—Applied Biosystems™ NIMBUS™
Instrument
MAN0017742 An abbreviated reference for the target preparation stepof the Axiom™ 2.0 Assay 96-Array Format AutomatedWorkflowon the Applied Biosystems™ NIMBUS™. Thisquick reference document is for experienced users.
Axiom™ gDNA Sample PreparationQuick Reference
MAN0017720 An abbreviated reference on preparing the genomic DNAsample.
GeneTitan™ MC Protocol for Axiom™
Array Plate Processing Quick ReferenceMAN0017718 An abbreviated reference for processing Axiom™ Array
Plates with the GeneTitan™ Multi-Channel Instrument.
GeneTitan™ Multi-Channel InstrumentUser Guide
08-0308 The GeneTitan™ Multi-Channel Instrument automatesarray processing from target hybridization to datageneration by combining a hybridization oven, fluidicsprocessing, and state-of-the art imaging device into asingle benchtop instrument. This document detailing theuse, care, and maintenance for the GeneTitan™ Multi-Channel Instrument.
GeneTitan™ Multi-Channel InstrumentSite Preparation Guide
08-0305 Provides guidance on creating and maintaining theproper environment required for the GeneTitan™ Multi-Channel Instrument.
Analysis and software
Axiom™ Genotyping Solution DataAnalysis Guide
702961 This guide provides information and instructions foranalyzing Axiom™ genotyping array data. It includes theuse of Axiom™ Analysis Suite, Applied Biosystems™
Microarray Power Tools (formerly APT) and SNPolisher™
Package to perform quality control analysis (QC) forsamples and plates, SNP filtering before downstreamanalysis, and advanced genotyping methods.
Axiom™ 2.0 Assay 96-Array Format Automated Workflow Site Preparation Guide—Applied Biosystems™ NIMBUS™
Instrument55
Document Publicationnumber Description
GeneChip™ Command Console™ (GCC)4.0 User Guide
702569 This user guide provides instructions on using GeneChip™
Command Console™ (GCC) used to control GeneChip™
instrument systems. GeneChip™ Command Console™
software provides an intuitive set of tools for instrumentcontrol and data management used in the processing ofGeneChip™ arrays.
Axiom™ Analysis Suite User Guide 703307 This user guide provides instructions on using Axiom™
Analysis Suite—a single-source software package toenable complete genotyping analysis of all Axiom™
arrays.
NIMBUS™ Target Preparation Instrument documents
Microlab NIMBUS™User Guide 62965-01 The Hamilton use guide for the NIMBUS™ Instrument.This document is shipped in the deck hardware kit.
Customer and technical support
Visit thermofisher.com/support for the latest service and support information.• Worldwide contact telephone numbers• Product support information
– Product FAQs– Software, patches, and updates– Training for many applications and instruments
• Order and web support• Product documentation
– User guides, manuals, and protocols– Certificates of Analysis– Safety Data Sheets (SDSs; also known as MSDSs)
Note: For SDSs for reagents and chemicals from other manufacturers,contact the manufacturer.
Limited product warranty
Life Technologies Corporation and/or its affiliate(s) warrant their products as set forthin the Life Technologies' General Terms and Conditions of Sale at www.thermofisher.com/us/en/home/global/terms-and-conditions.html. If you haveany questions, please contact Life Technologies at www.thermofisher.com/support.
Documentation and supportCustomer and technical support
56 Axiom™ 2.0 Assay 96-Array Format Automated Workflow Site Preparation Guide—Applied Biosystems™ NIMBUS™
Instrument


thermofisher.com/support | thermofisher.com/askaquestion
thermofisher.com
18 October 2018