Embed Size (px)
Citation preview

1
Backing Layout & Design (for Photographic and Painted Backings)
(By Greg Papalia, Photographic Images provided by JC Backings)
The process of creating a photographic or painted backing for film or television is one that often proves to be among the most challenging aspects of design for a given film or television show. The focus and goal of this class will be to provide all participants with a firm grounding in the underlying visual principals necessary to create backdrops and miniatures. Subjects to be covered are: layout and use of camera angles, understanding of image scale and lens compression, correct distances for backing placement, basic principles of lighting and rigging and how to set up either the backing shoot or what information should be provided to create a painted backdrop.
Within the scope of creating a backdrop, the Art Director often finds himself pre‐thinking and solving problems for the Cinematographer, Set Lighting, Rigging Grips, Location Dept., Production, Visual Effects, and the backing company itself. To many, the actual process of creating a finished image of the proper scale and proportion is a mystery. More often than not the details of putting together a backing are all turned over to the expertise of the company hired to produce the finished product. This usually works just fine until something goes wrong. In the event of a backing mishap, the Art Director having relied on the backing company to tell him what to do, finds that he has lost control, yet must retain responsibility for the finished product. With the cost of an individual photo backing sometimes being well over $100,000.00, this is not at all a good position to be in.
The following information and diagrams are provided as a guide and basic framework for creating a photographic or painted backing. Once the following techniques are practiced and learned, the Art director will be able to confidently guide the process through every step. In addition, the information covered below will enable the Art Director, Designer, or Illustrator to determine scale and placement of any miniature object or set piece relative to a given lens or another object.

2
Step One: Initial Check List
(Elements required before preliminary scout)
1. Stage Spotting Plan: Place backing where it will play in relation to the set. (See basic lay‐out diagram)
2. Backing height and length: Determine height and length of backing using a camera angle. If working in 1:85, 28mm is a good safe lens to use. If working in 2:35, 40mm is a good lens to use. If you know the widest lens the D.P. will be using, then use that specific lens. (See camera angle diagram) Note: When analyzing backing height, make sure to allow for possible tilt up as required. Also make sure to analyze backing height based upon the longest diagonal sight line. As well, be aware of your sightlines to the stage floor.
3. Horizon: Every photographic or painted image has an inherent horizon line and vanishing points. The horizon is one of the basic tenants of the laws of perspective and therefore the laws of photography. Standard camera horizon is 4'‐6" from the set floor. A 5'‐0" horizon is also allowable but because backings are often not hung exactly on the stage floor, 4'‐6" is recommended. If the set the backing will be seen from is on a platform, then the height of the platform has to be added to the height of the horizon. For example, if the platform height is 4'‐0" and standard horizon is 4'‐6", then the horizon for the image on the backing would be 8'‐6". NOTE: When using a rental backing the same principal applies except that the horizon is already imbedded within the image as well as a specific image scale. This should be analyzed before renting a pre‐made image and adapting it to your needs.

3
4. Day or Night: Does the scene/set require a day backing, night backing or both? Will you be using individual photo backings, one for day and one for night? Will they be the same size? Does a painted back drop suit your needs, or a single day/night photo drop?
5. Lighting: What are the conditions for lighting both as dictated by stage space ,and the kind of back drop selected? Have the gaffer and DP been consulted regarding lighting and type of back drop you intend to fabricate?
6. Rigging: What are the stage conditions for rigging? What is the maximum clear height of the stage? Is the stage floor level? Will the location of the stage's loading doors effect the rigging? Will the backing be hung from a track or dead hung? Will the track be curved or straight? (This is very important to determine before creating or selecting the image) Is the backing small enough to be rigged on sailboats?
9. Bobbinet: Will the DP hang a bobbinet in front of the backing? What color will it be, and how will this effect image color in the backing when lit? Is there proper stage space to hang a net, and how will it be hung?
STEP TWO: PRELIMINARY SCOUT
1. Initial reference photos: Before going out to shoot reference shots determine what the average camera distance is from within the set to the backing as spotted on stage. If you don't know what this distance will be you can use 10'‐0" in from the windows of the set as a good average. Using a 65‐70mm lens, have someone stand at the average camera distance away from your camera. Photograph the individual at this distance and at a 4'‐6" to 5'‐0" height to center of lens. This shot is for scale reference to be used in step three, image lay‐out. (PP)

4
Paris, Eiffel Tower shoot
Century City, CAA Shoot
After taking this shot, switch to a wider lens (20mm‐28mm) and move forward as close to the window or view as possible. Holding the camera vertically, shoot a pan or in the case of a very large backing, multiple pans. These images will be stitched together later and printed to scale, and will serve as a rough for the final backing. The scaled image will be used both in scale models, digital models and by the backing company to aid in creating the final image.
Paris, Preliminary Shot, 360 pan scaled for 1/4" model (black area at the bottom is where additional image will be needed on final shoot)
CAA Preliminary Shot, with dimensions

5
2. Scale Reference: If the information applies, measure from face of building to face of building. Also measure a feature of the building such as a door or window. These measurements will be used later to help determine image scale in the finished backing.
3. Shooting Conditions: As part of the Art Director's responsibility, conditions for shooting must be analyzed and planned for. In the case of a backing shoot, the Art director is front and center in making arrangements and setting up a prep/shooting schedule. Here are the key points to pay attention to:
A. Camera access and safety: This is most critical if you will be working up high either exposed on the roof or balcony of a building or if you have arranged for a scissor lift to be used as a shooting platform. In the case of a scissor lift, pay attention to existing power lines.
B. Access: What are the access conditions for equipment, and do you know what equipment will be required?
C. Camera positions: If multiple camera positions will be used, access and sight lines for each camera need to be analyzed.
D. Lighting: What time of day is best for a day shot? Are there any access or location issues associated with a day shoot? The same questions apply to night shooting. As well, are there any strange or horrid existing lighting conditions at night that need to be addressed before shooting? Will the location need to be formally light by the DP and Gaffer?
E. Traffic Control: Is traffic control necessary, and what are the limitations if required?
A word about scouting for a painted backing: The same principals apply in regard to the information gathered. An important thing to consider is how much perspective is inherent in the image you intend to create. The more perspective and vanishing points in the painted image, the more labor it will take to create the final drop. What the camera does automatically, must in a painted backing, be figured out and done by hand. (Sometimes there are advantages in this so it's not necessarily a disadvantage, however costs can be higher than anticipated.)

6
STEP THREE: IMAGE LAYOUT
Why is image scale important? The scale of the image on a finished backdrop, when photographed, is what will make or break the illusion you intend to create. Get it right and all parties are happy. Get it a little bit wrong and you will hear comments and get questions about why the image doesn't quite "feel right". Get it completely wrong and you may not be back tomorrow. During the process of making a backing I never leave the scale of the image entirely up to the backing company. While they are very good at figuring out what the correct scale should be based upon your location and stage space, they do not know what the shots are nor do they know the specific needs of the scene or action. You do.
On to image lay out. There are two methods for determining proper image scale in your finished backing. Both approaches are as equally valid and it does not hurt to verify one against the other. Or to check it mathematically. Approach #1 is the best and only approach when you are dealing with a view that is a vast expanse with little true scale reference. A distant view of a city skyline with few prominent features, or a natural scene looking out across tree covered mountains, are two examples.
METHOD #1: (PP)
Using the information assembled from your initial check list and preliminary scout, follow the diagram below and adjust conditions as necessary to fit your needs. Note: the angle diagram shown is not that of a specific lens, nor should it be. It is an illustration showing the angle or ratio of reduction from full size on down.
Using this formula you can either project forward from the camera position through the picture plane to the backing, or back from the real building, through the backing, to the
7
picture plane. If projecting forward, image size is determined from photos taken with a 65‐70mm lens previously taken on the preliminary scout. The reason for using a 65mm‐70mm lens is that on a 35mm camera, these lenses most closely approximate the compression ratio of the human eye. The object is to make your backing appear normal when people look at it with the naked eye. With this as a visual benchmark the compression effect of a given lens while shooting will have the same effect on the physical elements in the scene as well as the backing.
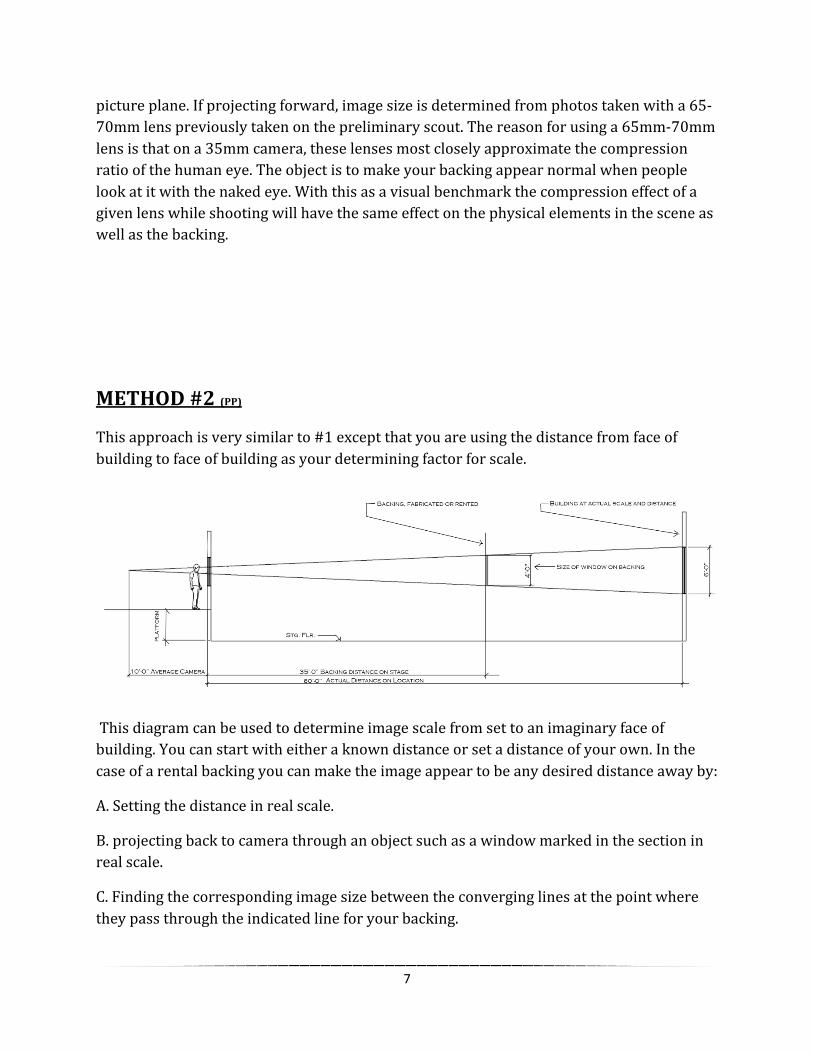
METHOD #2 (PP)
This approach is very similar to #1 except that you are using the distance from face of building to face of building as your determining factor for scale.
This diagram can be used to determine image scale from set to an imaginary face of building. You can start with either a known distance or set a distance of your own. In the case of a rental backing you can make the image appear to be any desired distance away by:
A. Setting the distance in real scale.
B. projecting back to camera through an object such as a window marked in the section in real scale.
C. Finding the corresponding image size between the converging lines at the point where they pass through the indicated line for your backing.

8
STEP FOUR: BASIC BACKING LAYOUT (PP)
There is often a great difference of opinion regarding allowable distances for backing placement and lighting. Often those differences divide down the lines of television vs. feature films. In the case of television there is often less stage space available thus acceptable distances are considered to be much closer to camera. The following diagram applies in all instances and is the truth based upon the principals of optics and set lighting, rather than what one has been forced into by space restrictions.

9
basic layout
10
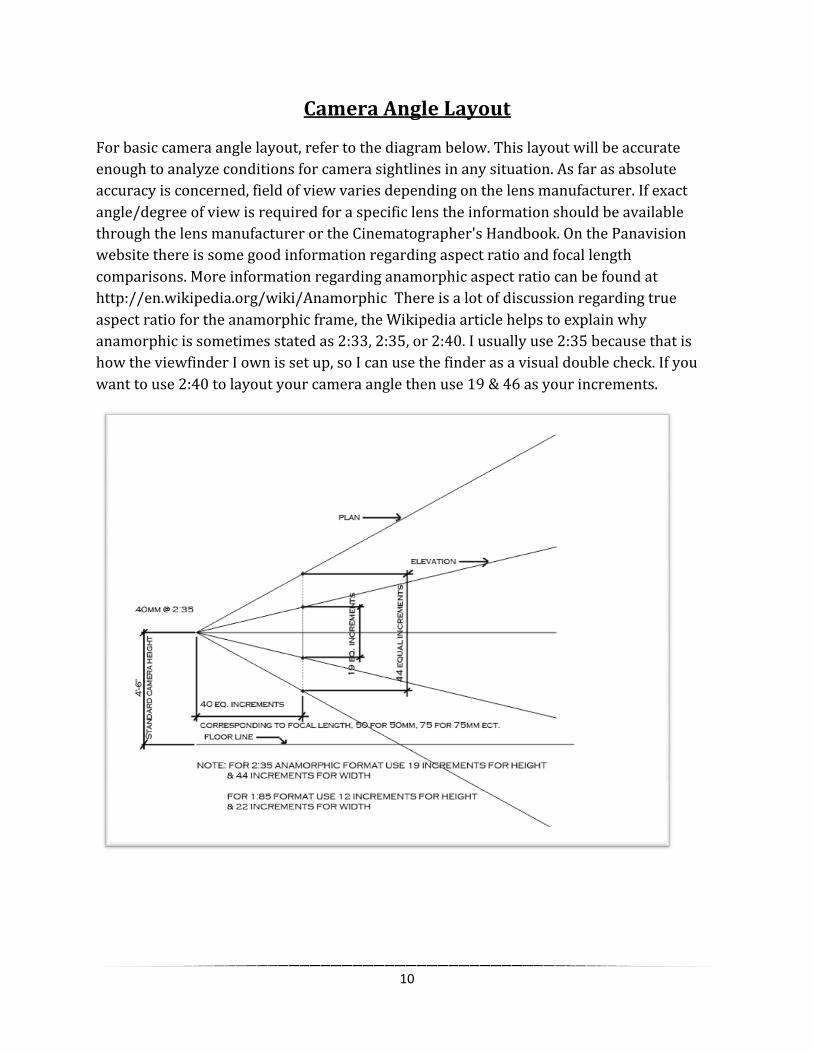
Camera Angle Layout
For basic camera angle layout, refer to the diagram below. This layout will be accurate enough to analyze conditions for camera sightlines in any situation. As far as absolute accuracy is concerned, field of view varies depending on the lens manufacturer. If exact angle/degree of view is required for a specific lens the information should be available through the lens manufacturer or the Cinematographer's Handbook. On the Panavision website there is some good information regarding aspect ratio and focal length comparisons. More information regarding anamorphic aspect ratio can be found at http://en.wikipedia.org/wiki/Anamorphic There is a lot of discussion regarding true aspect ratio for the anamorphic frame, the Wikipedia article helps to explain why anamorphic is sometimes stated as 2:33, 2:35, or 2:40. I usually use 2:35 because that is how the viewfinder I own is set up, so I can use the finder as a visual double check. If you want to use 2:40 to layout your camera angle then use 19 & 46 as your increments.