Embed Size (px)
Citation preview
Copyright © 2017 Softland
Backup4allTake full control of your backup
Backup4all User Manual
Backup4all User Manualfor Backup4all version 7
This user manual presents all the features in the Professional edition. If you ownLite, Standard or Portable, some of the features presented in this user manualmight not be available in your edition. The Professional edition includes all thefeatures. For a comparison between editions, please check the feature matrixtopic.
The information in this document is subject to change without notice. Althoughevery precaution has been taken in the preparation of this book, Softland assumesno responsibility for errors and omissions. Nor is any liability assumed for damagesresulting from the information contained herein.
This documentation contains proprietary information of Softland. All rightsreserved.
by Softland

3Contents
3
Backup4all 7 User Manual Copyright © 2017 Softland
Table of Contents
Part I Introduction 9
................................................................................................................................... 91 Product Description
................................................................................................................................... 102 System Requirements
................................................................................................................................... 103 Installation
.......................................................................................................................................................... 12Command Line Parameters
................................................................................................................................... 144 Features Summary
................................................................................................................................... 195 Feature Matrix
Part II Getting Started 26
................................................................................................................................... 261 How to Configure a New Backup
................................................................................................................................... 312 How to Run a Backup Job
................................................................................................................................... 313 How to Manage Backup Jobs
................................................................................................................................... 324 How to Restore from a Backup
................................................................................................................................... 345 How to Test a Backup
................................................................................................................................... 356 How to Password Protect a Backup
................................................................................................................................... 367 How to Schedule a Backup
................................................................................................................................... 378 How to Backup to FTP
.......................................................................................................................................................... 40Passive and Active modes
.......................................................................................................................................................... 40Connecting Through Proxy
.......................................................................................................................................................... 41Using SSL Encryption
................................................................................................................................... 429 How to Backup to SFTP
................................................................................................................................... 4410 How to Backup to Azure
................................................................................................................................... 4611 How to Backup to Amazon S3
................................................................................................................................... 4712 How to Backup to Google Drive
................................................................................................................................... 4913 How to Backup to OneDrive
................................................................................................................................... 5114 How to Backup to Box
................................................................................................................................... 5315 How to Backup to Dropbox
................................................................................................................................... 5516 How to Backup to HiDrive
................................................................................................................................... 5717 How to Backup to Hubic
................................................................................................................................... 5918 How to Backup to S3 Compatible
................................................................................................................................... 6119 How to Backup to USB or Firewire drives
................................................................................................................................... 6220 How to Send Email Notifications
................................................................................................................................... 6321 How to Configure One Touch Backup
................................................................................................................................... 6422 How to Use One Touch Backup
................................................................................................................................... 6523 How to Enable Detailed Logging

Backup4all 74
Backup4all 7 User Manual Copyright © 2017 Softland
Part III Backup Types 67
................................................................................................................................... 671 Backup Types
................................................................................................................................... 682 Smart Backup
................................................................................................................................... 703 Full Backup
................................................................................................................................... 714 Differential Backup
................................................................................................................................... 725 Incremental Backup
................................................................................................................................... 736 Mirror Backup
................................................................................................................................... 747 Backup Types in Backup4all
Part IV Backup to CD, DVD or Blu-ray 79
................................................................................................................................... 791 Backup to CD, DVD or Blu-ray
................................................................................................................................... 802 Use Built in Driver
................................................................................................................................... 803 Use Packet Writing
................................................................................................................................... 814 Writing to CD, DVD or Blu-ray disc
................................................................................................................................... 825 Other CD/DVD/Blu-ray Settings
................................................................................................................................... 836 Commands
Part V Main Window 93
................................................................................................................................... 931 Getting Started
................................................................................................................................... 942 Backup List
................................................................................................................................... 963 Manage Backup Tags
................................................................................................................................... 994 Create Shortcut
................................................................................................................................... 1045 Explore View
................................................................................................................................... 1066 Backup View
................................................................................................................................... 1097 Statistics View
................................................................................................................................... 1128 Progresss View
................................................................................................................................... 1139 Open backup
................................................................................................................................... 12710 Test
................................................................................................................................... 13011 Clean backup
................................................................................................................................... 13312 Schedulers
.......................................................................................................................................................... 136General
.......................................................................................................................................................... 137When
.......................................................................................................................................................... 143What
................................................................................................................................... 14613 Erase CD/DVD/Blu-ray
................................................................................................................................... 14714 Plugins
................................................................................................................................... 14915 Logging
................................................................................................................................... 15016 History
................................................................................................................................... 15217 Import
................................................................................................................................... 15418 System Tray
................................................................................................................................... 15619 Keyboard Shortcuts

5Contents
5
Backup4all 7 User Manual Copyright © 2017 Softland
................................................................................................................................... 15720 Check for updates
Part VI New Backup Wizard 160
................................................................................................................................... 1601 Overview
................................................................................................................................... 1602 Name your backup
................................................................................................................................... 1623 Where do you want to save your backup
.......................................................................................................................................................... 163Local
.......................................................................................................................................................... 164Network
.......................................................................................................................................................... 165FTP
.......................................................................................................................................................... 167SFTP
.......................................................................................................................................................... 169Azure
.......................................................................................................................................................... 170Amazon
.......................................................................................................................................................... 172Google Drive
.......................................................................................................................................................... 173OneDrive
.......................................................................................................................................................... 175Box
.......................................................................................................................................................... 176Dropbox
.......................................................................................................................................................... 177Hubic
.......................................................................................................................................................... 179HiDrive
.......................................................................................................................................................... 180S3 Compatible
................................................................................................................................... 1824 What do you want to backup?
................................................................................................................................... 1835 How do you want to backup?
................................................................................................................................... 1856 When do you want to backup?
Part VII Backup Properties 189
................................................................................................................................... 1891 Overview
................................................................................................................................... 1892 General
................................................................................................................................... 1913 Destination
.......................................................................................................................................................... 192Local hard drive
.......................................................................................................................................................... 193External hard drive
.......................................................................................................................................................... 194Optical
.......................................................................................................................................................... 196Removable
.......................................................................................................................................................... 198Network
.......................................................................................................................................................... 200FTP server
......................................................................................................................................................... 202Edit configuration
.......................................................................................................................................................... 205SFTP server
......................................................................................................................................................... 207Edit configuration
.......................................................................................................................................................... 210Azure
......................................................................................................................................................... 212Edit configuration
.......................................................................................................................................................... 213Amazon S3
......................................................................................................................................................... 214Edit configuration
.......................................................................................................................................................... 216Google Drive
......................................................................................................................................................... 218Edit configuration
.......................................................................................................................................................... 221OneDrive
......................................................................................................................................................... 223Edit configuration
.......................................................................................................................................................... 226Box
......................................................................................................................................................... 228Edit configuration
.......................................................................................................................................................... 231Dropbox
......................................................................................................................................................... 233Edit configuration
.......................................................................................................................................................... 236HiDrive
......................................................................................................................................................... 238Edit configuration
Backup4all 76
Backup4all 7 User Manual Copyright © 2017 Softland
.......................................................................................................................................................... 241Hubic
......................................................................................................................................................... 243Edit configuration
.......................................................................................................................................................... 245S3 Compatible
......................................................................................................................................................... 247Edit configuration
................................................................................................................................... 2494 Sources
................................................................................................................................... 2505 Filters
.......................................................................................................................................................... 251Customize
.......................................................................................................................................................... 253Filter Properties
................................................................................................................................... 2586 Type
.......................................................................................................................................................... 259Smart
.......................................................................................................................................................... 260Full
.......................................................................................................................................................... 260Differential
.......................................................................................................................................................... 261Incremental
.......................................................................................................................................................... 262Mirror
.......................................................................................................................................................... 266Storage
................................................................................................................................... 2697 Compression
................................................................................................................................... 2738 Advanced
................................................................................................................................... 2819 Email
................................................................................................................................... 28610 Scheduler
.......................................................................................................................................................... 288General
.......................................................................................................................................................... 290When
.......................................................................................................................................................... 297What
Part VIII Restore Wizard 301
................................................................................................................................... 3011 Where and how to restore
................................................................................................................................... 3032 What do you want to restore
................................................................................................................................... 3043 To what date do you want to restore
................................................................................................................................... 3064 Do you want to filter the files
................................................................................................................................... 3085 Preview the files to be restored
Part IX File Filtering 310
................................................................................................................................... 3101 Overview
................................................................................................................................... 3112 File Filter
Part X Command Line 317
................................................................................................................................... 3171 Backup
................................................................................................................................... 3192 Test
................................................................................................................................... 3203 Repair
................................................................................................................................... 3224 Restore
................................................................................................................................... 3235 Cleanup
Part XI Options 327
................................................................................................................................... 3271 General
................................................................................................................................... 3282 Preferences
................................................................................................................................... 3313 Startup and updates
7Contents
7
Backup4all 7 User Manual Copyright © 2017 Softland
................................................................................................................................... 3334 Application folders
................................................................................................................................... 3345 Backup
................................................................................................................................... 3376 Filters
................................................................................................................................... 3417 Logs and history
................................................................................................................................... 3438 CD, DVD or Blu-ray
................................................................................................................................... 3459 Online destinations
.......................................................................................................................................................... 345FTP
.......................................................................................................................................................... 350SFTP
.......................................................................................................................................................... 354Azure
.......................................................................................................................................................... 357Amazon S3
.......................................................................................................................................................... 359Google Drive
.......................................................................................................................................................... 363OneDrive
.......................................................................................................................................................... 367Box
.......................................................................................................................................................... 371Dropbox
.......................................................................................................................................................... 375HiDrive
.......................................................................................................................................................... 379Hubic
.......................................................................................................................................................... 382S3 Compatible
................................................................................................................................... 38510 Email
................................................................................................................................... 38711 Notifications
................................................................................................................................... 39012 Passwords
................................................................................................................................... 39213 Suspend
Part XII Help 395
Part XIII Licensing 397
................................................................................................................................... 3971 Free Trial
................................................................................................................................... 4002 Online Activation
................................................................................................................................... 4023 Manual Activation
................................................................................................................................... 4074 Deactivation
................................................................................................................................... 4085 Legal notices
Index 410

Introduction
Part
I

Introduction 9
Backup4all 7 User Manual Copyright © 2017 Softland
1 Introduction
1.1 Product Description
Backup4all is an award-winning backup software for Windows. Backup4all protects your valuabledata from partial or total loss by automating backup tasks, password protecting and compressing itto save storage space. Using Backup4all you can easily backup to any local, network drive, backup toFTP (with support for SSL encryption, proxy server, passive mode), SFTP, Amazon S3, Azure, Dropbox(Personal or Business), OneDrive (Personal or Business), Box, HiDrive, Hubic, backup to CD, DVD orBlu-ray disc, Google Drive, or other removable media (such as USB or Firewire drives).You can also use multiple Amazon S3 compatible clouds as backup destination: Akaza, Aruba Cloud,Caringo, CenturyLink, Cisco, Claudian, Connectia, Constant, DDN, dinCloud, Dream Objects, Dunkel, TCloud, Exoscale, Google Cloud Storage, Green Qloud, HGST, Hitachi, HostEurope, IDC Frontier,LeoNovus, Mandic, Minio, NetApp, NiftyClouds, Numergy, QNAP, Revera, Scality, Seeweb,SwiftStack, ThinkOn, Tiscali, vCloud Air, Verizon, Walrus and Zettagrid. You can also use a custom S3compatible server by entering the specific information.
Backup4all can backup open/locked files (if the files are located on local partitions on WindowsXP/2003/Vista/Windows 7/Windows 8/8.1/Windows 10) and it can perform smart, full, differential,incremental and mirror backups. When defining a backup you can also set file filters and schedulethe backup for automatic execution. Once a backup is performed, in Explore View (F2) you can see
Backup4all 710
Backup4all 7 User Manual Copyright © 2017 Softland
what files have been changed since the last backup or in Statistics View (F3) you can read thestatistics about the next backup execution. In Explore View, when you right click a file, you can usethe context menu to run standard actions associated with the file type.
In Backup4all you can manually select which files and folders to be backed up. There is also theoption to use backup plugins which will automatically pick the necesarily files for backup. There aresome predefined plugins available in application: My Documents, My Pictures, Google Chome,Internet Explorer Favorites, Mozilla FireFox Profiles, Mozilla Thunderbird, Windows Live Mail orOutlook emails and settings. Users can create their own plugins using the Plugin Creator application.
Backup4all has ZIP64 support (can create backups over 2 GB) and creates standard zip files, meaningthat you can access it with any zip compatible utility. Backup4all also allows you to encrypt yourbackup using AES encryption (128/192/256-bit).
Backup4all keeps track of file versions. You can easily restore any version of files or a whole folder.You can also filter the files to be restored by different criteria such as: type of the file, date, size orattributes.
Backup4all tests the backup files automatically to ensure the backup is safe and correctly executed(uses CRC32). You can also enable email notifications to receive an email in case of success/error/warning.
Backup4all works with any drive letter, including mapped network drives and UNC paths. It comeswith its own built-in CD/DVD/Blu-ray burning support.
Backup4all runs on Windows Server 2016/10/Server 2012/8.1/8/Server 2008/7/Server 2003/XP andoffers multi language support.
Note: One or more of the features mentioned in this chapter might not be available in your edition.The Professional edition includes all the features. For a comparison between editions, please checkfeature matrix topic.
1.2 System Requirements
To install Backup4all you need Windows Server 2016/10/Server 2012/8.1/8/Server 2008/7/Server2003/XP and at least 300 MB of free disk space. Because the application uses zip compression,additional disk space is needed for the temporary directory. The amount of free space depends onthe size of files to backup. Note: Backup4all can backup open files only if installed on Windows Server 2016/10/Server2012/8.1/8/Server 2008/7/Server 2003/XP and if the files are stored on NTFS partitions.
1.3 Installation
Install To install Backup4all on a computer you need to have administrative rights. The installation processdoes not take much time. All you need to do is to follow the instructions of the Backup4all Setup

Introduction 11
Backup4all 7 User Manual Copyright © 2017 Softland
Wizard. A reboot will be required after installing of SPTD driver.
If you have already installed an older version of Backup4all, you can install the new version on top ofthe older one, no need to uninstall it (the installer will recognize if the program is running and willask if you wish to close it in order to continue). You might need to close Backup4all manually if it isin a middle of an operation.Note: If you have version 6.x (or previous) installed, you can install version 7.x without uninstallingthe other one. Backup4all 7 will be installed and run separately, and will give you the option toimport your backup jobs and settings from the previous versions.
When you start the installation process you can select another language for the setup wizard andthe location where the application will be installed. Click on the Install Now button to start theinstallation process. On the bottom you can also read the License Agreement.
Uninstall To uninstall Backup4all, first you need to close the application. Then go to Start->Settings->Control

Backup4all 712
Backup4all 7 User Manual Copyright © 2017 Softland
Panel and select Uninstall a Program option.
1.3.1 Command Line Parameters
Installing Backup4all with command line parameters
The parameters for .msi installerBackup4all can be installed with various command line parameters that are useful when anunattended installation is needed.
Syntax
msiexec /i b4asetup.msi [switches] Switches can be any combination of the following parameters:
/INSTALL_FOLDER - Overrides the default directory name displayed on the Select DestinationLocation wizard page. A fully qualified pathname must be specified.

Introduction 13
Backup4all 7 User Manual Copyright © 2017 Softland
/INSTALL_LANGUAGE - Overrides the default installation language.
The parameters for .exe installer
/SILENT, /VERYSILENT - Instructs Setup to be silent or very silent. When Setup is silent the wizardand the background window are not displayed but the installation progress window is. When a setupis very silent this installation progress window is not displayed. Everything else is normal, so forexample error messages during installation are displayed.If a restart is necessary and the /NORESTART command isn't used (see below) and Setup is silent, itwill display a Reboot now? message box. If it's very silent it will reboot without asking.
/SUPPRESSMSGBOXES - Instructs Setup to suppress message boxes. Only has an effect whencombined with /SILENT and /VERYSILENT.
/NOCANCEL - Prevents the user from canceling during the installation process, by disabling theCancel button and ignoring clicks on the Close button. Useful along with /SILENT or /VERYSILENT.
/NORESTART - Instructs Setup not to reboot even if it's necessary.
/RESTARTEXITCODE=exit code - Specifies the custom exit code that Setup is to return when arestart is needed. Useful along with /NORESTART.
/DIR="x:\dirname" - Overrides the default directory name displayed on the Select DestinationLocation wizard page. A fully qualified pathname must be specified.
/GROUP="folder name" - Overrides the default folder name displayed on the Select Start MenuFolder wizard page.
/NOICONS - Instructs Setup to initially check the Don't create a Start Menu folder check box on theSelect Start Menu Folder wizard page.
/LANG="language" - Specifies the language to use for the installation. When a valid /LANGparameter is used, the Select Language dialog will be suppressed.
/Default - Instructs Setup to set the printer as default printer.
/NoInstallIfExists - Instructs setup to check if the same edition of Backup4all is already installed. Iffound it does not start the installation.
/NoInstallIfVersion="major version.minor version.build no"
Instructs setup to check if Backup4all is already installed. If found it checks what version is installed.If the version installed is older then the given parameter, it proceeds with installation. If the installedversion is the same or newer then the given parameter, it does not start the installation.

Backup4all 714
Backup4all 7 User Manual Copyright © 2017 Softland
The parameters for uninstall Backup4all
The uninstaller has also some parameters for silent uninstall (they have the same meaning as for theinstaller, see above for details):
/SILENT
/VERYSILENT
/SUPPRESSMSGBOXES
/NORESTART
1.4 Features Summary
Intuitive interfaceThe Getting Started window allows you to easily define/run backup jobs or restore backed up data.By switching to the Explore View, you can see all the files/folders that are in the backup job and thenew files that will be stored at the next backup execution. You can sort and search the file tree inExplore view. You can start this backup application at windows startup or minimize it to the systemtray. Backup locked or open files (XP/2003/Vista/Windows 7/Windows 2008/Windows 8/Windows8.1/Windows 10)Backup4all uses the Volume Shadow Copy service that allows you to back up local open files fromNTFS partitions in Windows XP/2003/Vista/2008 Server/Windows 8/8.1/Windows 10. Now you canbackup your emails and settings without closing Microsoft Outlook, Outlook Express or other emailclients. File and Folder FiltersPowerful file and folder filtering engine with lots of options to filter by attribute, size, date, nameand type). You can create filters using a combination of restrictions and you can define separatefilters for inclusion and exclusion. Manage multiple backup jobsThis backup software allows defining multiple backup jobs and saving them for future use. On themain application view, you have an overview of all defined backup jobs. Email notificationsYou can configure Backup4all to send custom emails after a backup finished, with success, error andwarning notifications. Environmental variables can be used in the email title and body. Additionaloptions allow you to attach the backup log file and send the email to several addresses. Pause/Resume or Stop operationThe backup operation supports pausing and resuming, so running a backup job can be interruptedand continued at a later time. There is also a Stop operation now, that when pressed will not Cancel

Introduction 15
Backup4all 7 User Manual Copyright © 2017 Softland
the backup, but instead will save everything until that point when it was pressed.
Automatic updatesBackup4all can now check for updates either manually or automatically at a scheduled date. Thisallows you to better stay in touch with the latest development of Backup4all.
Backup catalog fileBackup4all stores a summary snapshot of the file and folder information into a backup catalog file (".bkc") each time a backup is executed. This catalog is stored in a different file than the backup itselfand it allows Backup4all to keep track of the backed up files. The advantage of using a catalog isfaster backup execution. Another advantage is that you can run Backup4all together with otherbackup applications because they will not interfere with each other. Backup directly to CD/DVD/Blu-rayThis backup software comes with its own built-in CD/DVD/Blu-ray burning support. Just set thedestination on CD/DVD/Blu-ray disc and execute the backup job. However, you can use UDF format(using SPTD driver installed with Backup4all, or other products such as DirectCD or InCD) or theJoliet format. Backup4all also has the possibility to erase CD-RW/DVD-RW/Blu-ray media. FTP BackupYou can backup your files to remote locations using the FTP service (with SSL support, active/passivetransfer modes, firewall support, XCRC tests). You just have to select FTP as destination, enter theconnection details and you are ready to backup to FTP.
SFTP BackupYou can backup your files to remote locations using the SFTP service. Select SFTP as destination,enter the configurations and you are ready to backup to SFTP. Azure BackupYou can backup your files to Azure destination. Select Azure as backup destination and type theAccount name, the Key and the Container to configure the Azure destination.
Amazon S3 BackupYou can also use Amazon as backup destination. Select Amazon S3 as backup destination and typethe Access key ID, the Secret Access Key and the Bucket in order to configure the Amazon S3destination.
Google Drive BackupYou can backup your files to Google Drive destination. Select Google Drive as backup destination,choose the account and destination folder.
OneDrive BackupYou can backup your files to OneDrive destination. Select OneDrive as backup destination, choosethe account and destination folder.
Box BackupYou can backup your files to Box destination. Select Box as backup destination, choose the account
Backup4all 716
Backup4all 7 User Manual Copyright © 2017 Softland
and destination folder.
Dropbox BackupYou can backup your files to Dropbox destination. Select Dropbox as backup destination, choose theaccount and destination folder.
HiDrive BackupYou can backup your files to HiDrive destination. Select HiDrive as backup destination, choose theaccount and destination folder.
Hubic BackupYou can backup your files to Hubic destination. Select Hubic as backup destination, choose theaccount and destination folder.
S3 Compatible BackupYou can backup your files to S3 Compatible destination. Select S3 Compatible as backup destination,choose the S3 server, enter the credentials, bucket and destination folder.
Backup DestinationYou can store the backup in a local folder, on another computer in the same LAN, on media such as:CD-R, CD-RW, DVD+R, DVD-R, DVD+RW, DVD-RW, Blu-ray, Blu-ray RW, on USB drives or otherremovable media, on FTP, SFTP, Amazon, Azure, Google Drive, OneDrive, Box, Dropbox, HiDrive,Hubic or S3 Compatible.
Extra ActionsPerform extra actions before and/or after backup execution. Create shortcut for backup job/tagYou can create a "shortcut" of a backup job or backup tag to a desired location. Whenever you willdouble-click that shortcut, the backup job defined will start running. You can make it a "one clickbackup" if you place that shortcut in the Quick Launch menu. StatisticsYou can actually see the number of files that will be processed at next backup (very useful when youhave a large number of files). Other information refers to the size and date of the executed backupsand the available free space on storage destination. Play custom soundsBackup4all can play custom success/warning/error sounds at the end of the backup. File warningsFile warnings are displayed to the user during backup execution if the user chooses so. Thesewarnings are also written to the log file. Scheduled backups do not show these warnings even whenthis option is set.
New Backup WizardThis backup software provides step-by-step instructions to create a new backup job by selecting
Introduction 17
Backup4all 7 User Manual Copyright © 2017 Softland
Where, What, How and When to backup.
Easy File and Folder SelectionYou can browse a folder tree to select several files and folders as source of the backup or you caninclude or exclude them individually. Multiple files/folders can be added as Sources at once (drag-and-drop supported). Backup TypesDifferent backup types to choose from: smart backup, full backup, differential backup, incrementalbackup and mirror backup. Smart backupThis backup type was designed to automatically decide the backup type to use and the number ofversions to store, giving a backup destination, without asking you every time what to do.
Block backupThis option is useful when you have large files changed frequently (as .PST or databases). Using theblock backup option, allows you to back up only the changes inside the file, not the whole large file.
Standard Zip Compression and zip64 supportIf the zip file size is less than 2 Gbytes, Backup4all creates standard zip files. This format iscompatible with any zip utility available on the market. Unlike other backup softwares, for zip filesgreater than 2 Gbytes, Backup4all uses zip64 technology (which allows unlimited zip file size).
Backup PluginsIn Backup4all you can load plugins to backup/restore the settings of specific programs. A plugin isactually an XML file that once imported in Backup4all adds a predefined backup. For instance, abackup plugin for Mozilla FireFox, when loaded, will automatically add in the Predefined Backup listan entry for Firefox, so when defining a new backup job if that’s selected, the FireFox profiles will beadded as source for the new backup.
Customized Zip NamesYou can customize name prefixes for the zip archives, which store your backup versions. Backup4allalso supports file/folder paths longer than 260 characters (turn off file parsing).
Password ProtectionYou can protect your ZIP files by setting a password for each backup job. Besides normal passwordprotection, Backup4all also supports 128-bit, 192-bit and 256-bit AES encryption. These numbersreflect the encryption key size used to encrypt the data - a higher key strenght provides strongerencryption.
SnapshotsMirror backup type makes an exact copy of selected files and folders (copying NTFS permissions andalternate streams), including empty folders too (for an exact copy of the source). Optionally, formirror backups you can choose to zip the backed up files individually.
Disk Spanning

Backup4all 718
Backup4all 7 User Manual Copyright © 2017 Softland
Automated support for splitting your backup between many removable disks or even on the samemedia. You can specify the maximum size of the zip archives. When performing a mirror backup andusing disk spanning you can choose not to split the files. This is an useful option because you cancopy your music/movies to CD, DVD or Blu-ray disc and not have them split up when the CD, DVD orBlu-ray disc is full.
LogsThe operations performed by Backup4all are logged. This allows you to see the status of performedoperations (backup/test/cleanup/restore). A backup job/tag History view is available too (which alsolets you export the information as .csv). Command LineA command line version of this backup application is available too (that lets you run differentoperations using parameters). Restore WizardRestore backed up data step-by-step. Allows you to choose the version of files which will berestored and filter them to restore only the needed versions (file versioning applies to full,differential and incremental backups only). You can quickly restore the latest version of a file/folderas well as restoring versions of files backed up at a specific date. CompatibilityYou can restore data using any standard zip software. Backup4all gives you this way more flexibilityif you need to restore data on a different computer (if the backup was created using independentsplits, see this section on how to restore correctly using 3rd party zip software). One touch backupSome USB enclosures have a button to start the execution of an associated program. If you havesuch a device, you can configure Backup4all to execute a backup job or a backup tag when thisbutton is pressed (works only with certain USB enclosures). SummaryText description of the full setup for each backup job that allows you to easily review theinformation regarding the backup. Program securityBackup4all offers an option to lock its interface so that when it starts you will need to provide apassword in order to unlock it and be able to make changes to its settings. Test backupThe application tests the backups (using CRC32). This ensures that the files have been backed upproperly and the backup is safe. You can also test the backup integrity at a later time fromBackup4all's main menu. When backing up to removable media, after each media item written thebackup test is performed (for spanned backups). When backing up to FTP, the XCRC command canbe used (if supported by server). This speeds up the testing as Backup4all will verify the backupbased on the CRC information received from server. If a cloud destination is used as the backupdestination, the test will be made based on the CRC information and the files won't be downloaded

Introduction 19
Backup4all 7 User Manual Copyright © 2017 Softland
again after backup.
Note: One or more of the features mentioned in this chapter might not be available in your edition.The Professional edition includes all the features. For a comparison between editions, please checkfeature matrix topic.
1.5 Feature Matrix
Backup4all comes in three* editions: Lite, Standard and Professional.
Professional is the full edition with all features enabled, while Standard and Lite are the limited-functionality editions.Below you can find a comparison of the features available in each edition.*Backup4all Portable Edition is a custom version of Backup4all that works only on portable devices.
Backup Destinations
Lite Standard Professional PortableEdition
UPDATED: Cloud backups to Google Drive
NEW: Cloud backups to Hubic
NEW: Cloud backups to HiDrive
NEW: Cloud backups to 37+ S3 Compatibledestinations
UPDATED: Cloud backups to Google Drive
UPDATED: Cloud backups to Microsoft OneDrive
UPDATED: Cloud backups to Box Cloud
UPDATED: Cloud backups to Dropbox
UPDATED: Cloud backups to Amazon S3
UPDATED: Cloud backups to Azure
Backup to FTP (active/passive transfer modes)
Backup to FTPS (FTPES, FTP-SSL or FTP Secure)
Backup to SFTP (SSH File Transfer Protocol)
Backup to CD/DVD (single/dual layer)
Backup to Blu-ray/HD-DVD
Backup to external hdd (USB/Firewire)
UPDATED: Backup to network drives
Backup to removable media (USB flash drive,

Backup4all 720
Backup4all 7 User Manual Copyright © 2017 Softland
floppy)
Backup to local hard drives
Backup to ZIP drives
Can be installed only on portable USB flash drives
Interface
Lite Standard Professional PortableEdition
UPDATED: Customizable ribbon interface
Show job details in card/list mode
Navigation pane
Notification messages
Windows Explorer contextual right-click menu
Start application at Windows startup
Minimize application to system tray
Add sources with drag-drop
Explore View
Backup View
Progress View
View backup statistics
Group backup configurations using tags
Access application according to system privileges
Lock program interface with a password
Show "Getting Started" window
Show versions in Explore View
Search as-you-type for backup jobs/tags in backuplist
History window with backup/restore/test/cleanuplogs
Show available space in destination on StatisticsView
Create desktop shortcut to backup jobs andbackup tags
Predefined backups
Introduction 21
Backup4all 7 User Manual Copyright © 2017 Softland
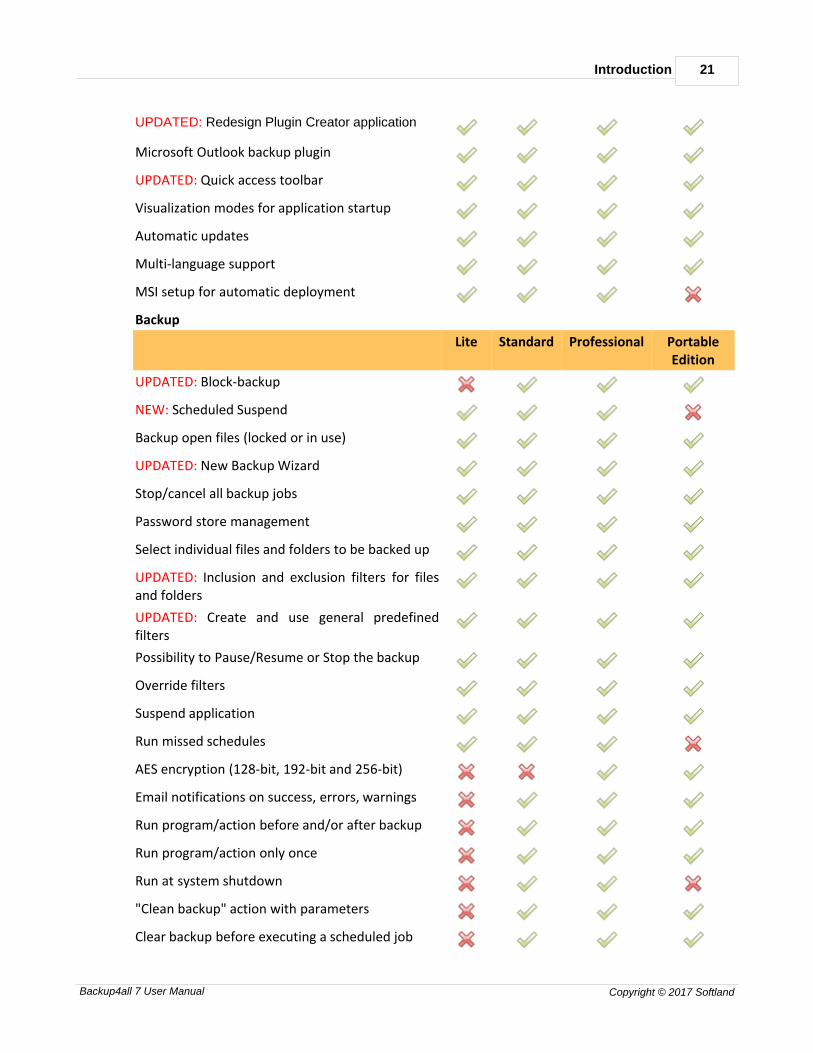
UPDATED: Redesign Plugin Creator application
Microsoft Outlook backup plugin
UPDATED: Quick access toolbar
Visualization modes for application startup
Automatic updates
Multi-language support
MSI setup for automatic deployment
Backup
Lite Standard Professional PortableEdition
UPDATED: Block-backup
NEW: Scheduled Suspend
Backup open files (locked or in use)
UPDATED: New Backup Wizard
Stop/cancel all backup jobs
Password store management
Select individual files and folders to be backed up
UPDATED: Inclusion and exclusion filters for filesand folders
UPDATED: Create and use general predefinedfilters
Possibility to Pause/Resume or Stop the backup
Override filters
Suspend application
Run missed schedules
AES encryption (128-bit, 192-bit and 256-bit)
Email notifications on success, errors, warnings
Run program/action before and/or after backup
Run program/action only once
Run at system shutdown
"Clean backup" action with parameters
Clear backup before executing a scheduled job

Backup4all 722
Backup4all 7 User Manual Copyright © 2017 Softland
Erase disc before backup
Use local catalogs
Play sound on success, warning, error
Assign volume labels for removable media
Assign label for each backup version
Set backup thread priority
One Touch Backup feature
UPDATED: Independent spanned backups
UPDATED: Back up empty folders
Delete Sources after successful backup
Create backup log
Create backup catalog file
Run backup at log on OR log off
UPDATED: Free Backup Plugins
Possibility to set memory usage for backing up
Plug-n-Backup
Browsable file and folder selection
Search file/folder in Backup view
Backup types
Lite Standard Professional PortableEdition
Smart backup
Mirror backup - without compression
Mirror backup with individual file compression(zip)
Full backup
Store multiple versions for full backup type
Differential backup
Store multiple versions for differential backup type
True incremental backup
Store multiple versions for incremental backuptype
Introduction 23
Backup4all 7 User Manual Copyright © 2017 Softland
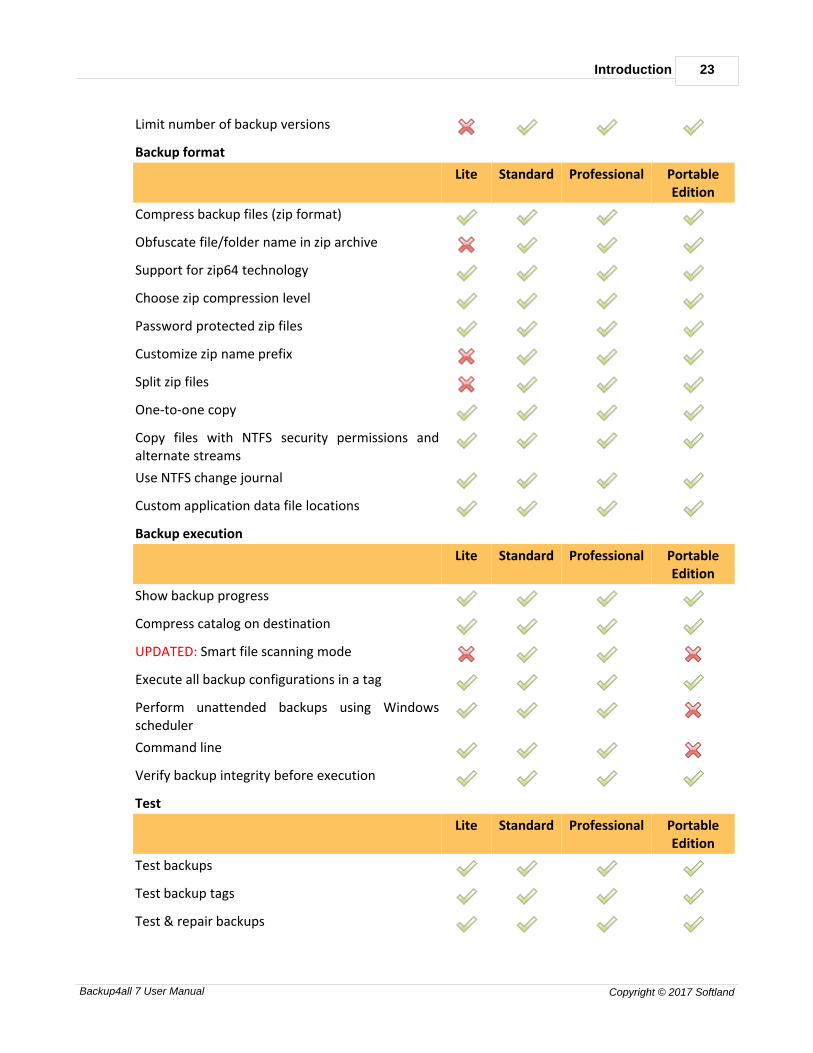
Limit number of backup versions
Backup format
Lite Standard Professional PortableEdition
Compress backup files (zip format)
Obfuscate file/folder name in zip archive
Support for zip64 technology
Choose zip compression level
Password protected zip files
Customize zip name prefix
Split zip files
One-to-one copy
Copy files with NTFS security permissions andalternate streams
Use NTFS change journal
Custom application data file locations
Backup execution
Lite Standard Professional PortableEdition
Show backup progress
Compress catalog on destination
UPDATED: Smart file scanning mode
Execute all backup configurations in a tag
Perform unattended backups using Windowsscheduler
Command line
Verify backup integrity before execution
Test
Lite Standard Professional PortableEdition
Test backups
Test backup tags
Test & repair backups
Backup4all 724
Backup4all 7 User Manual Copyright © 2017 Softland
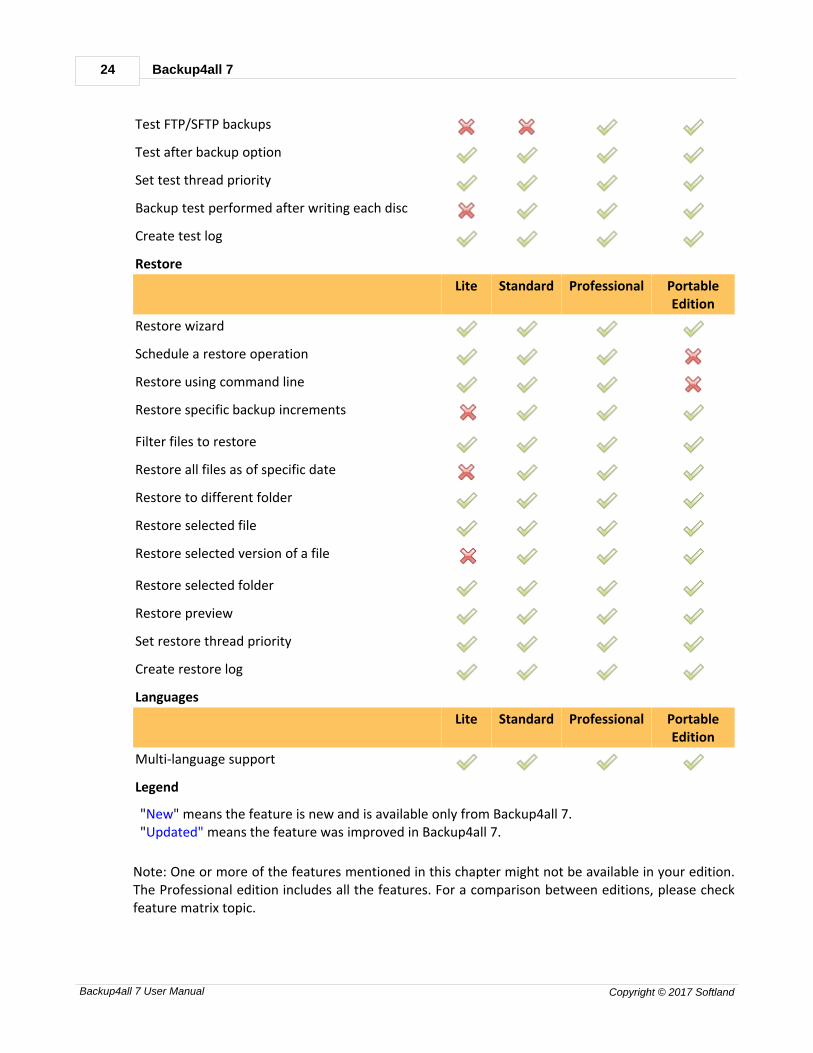
Test FTP/SFTP backups
Test after backup option
Set test thread priority
Backup test performed after writing each disc
Create test log
Restore
Lite Standard Professional PortableEdition
Restore wizard
Schedule a restore operation
Restore using command line
Restore specific backup increments
Filter files to restore
Restore all files as of specific date
Restore to different folder
Restore selected file
Restore selected version of a file
Restore selected folder
Restore preview
Set restore thread priority
Create restore log
Languages
Lite Standard Professional PortableEdition
Multi-language support
Legend
"New" means the feature is new and is available only from Backup4all 7."Updated" means the feature was improved in Backup4all 7.
Note: One or more of the features mentioned in this chapter might not be available in your edition.The Professional edition includes all the features. For a comparison between editions, please checkfeature matrix topic.

Getting Started
Part
II
Backup4all 726
Backup4all 7 User Manual Copyright © 2017 Softland
2 Getting Started
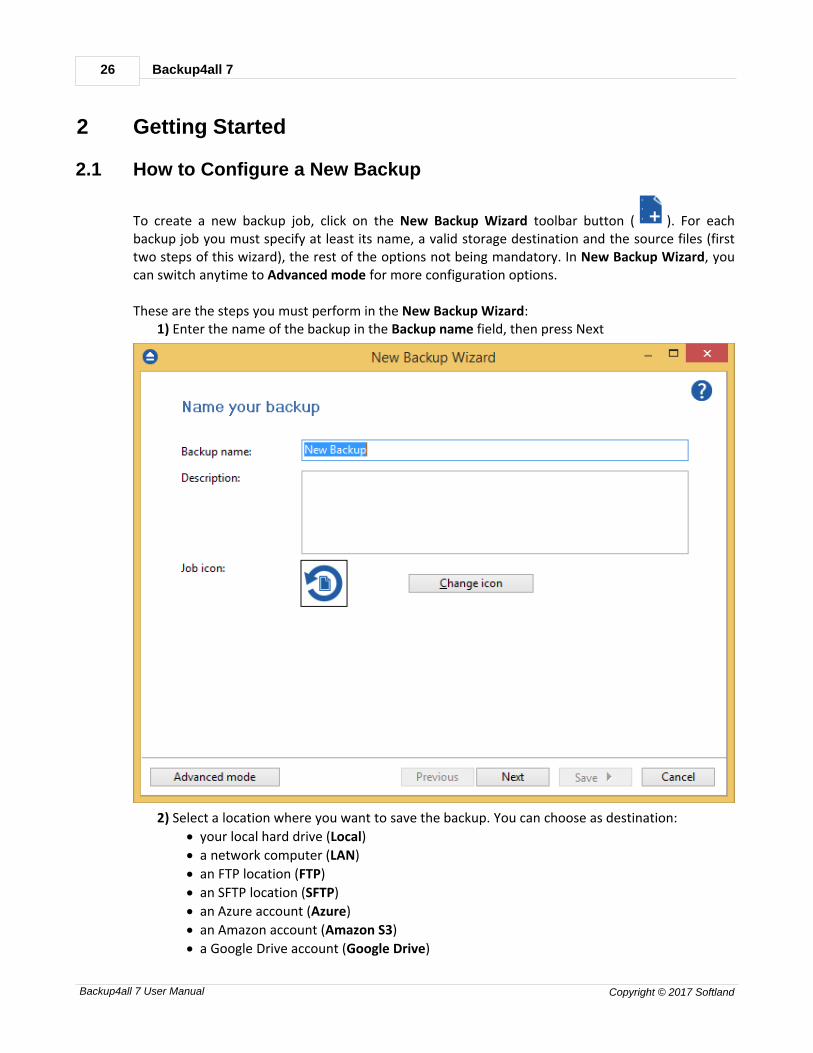
2.1 How to Configure a New Backup
To create a new backup job, click on the New Backup Wizard toolbar button ( ). For eachbackup job you must specify at least its name, a valid storage destination and the source files (firsttwo steps of this wizard), the rest of the options not being mandatory. In New Backup Wizard, youcan switch anytime to Advanced mode for more configuration options. These are the steps you must perform in the New Backup Wizard:
1) Enter the name of the backup in the Backup name field, then press Next
2) Select a location where you want to save the backup. You can choose as destination:
· your local hard drive (Local)
· a network computer (LAN)
· an FTP location (FTP)
· an SFTP location (SFTP)
· an Azure account (Azure)
· an Amazon account (Amazon S3)
· a Google Drive account (Google Drive)
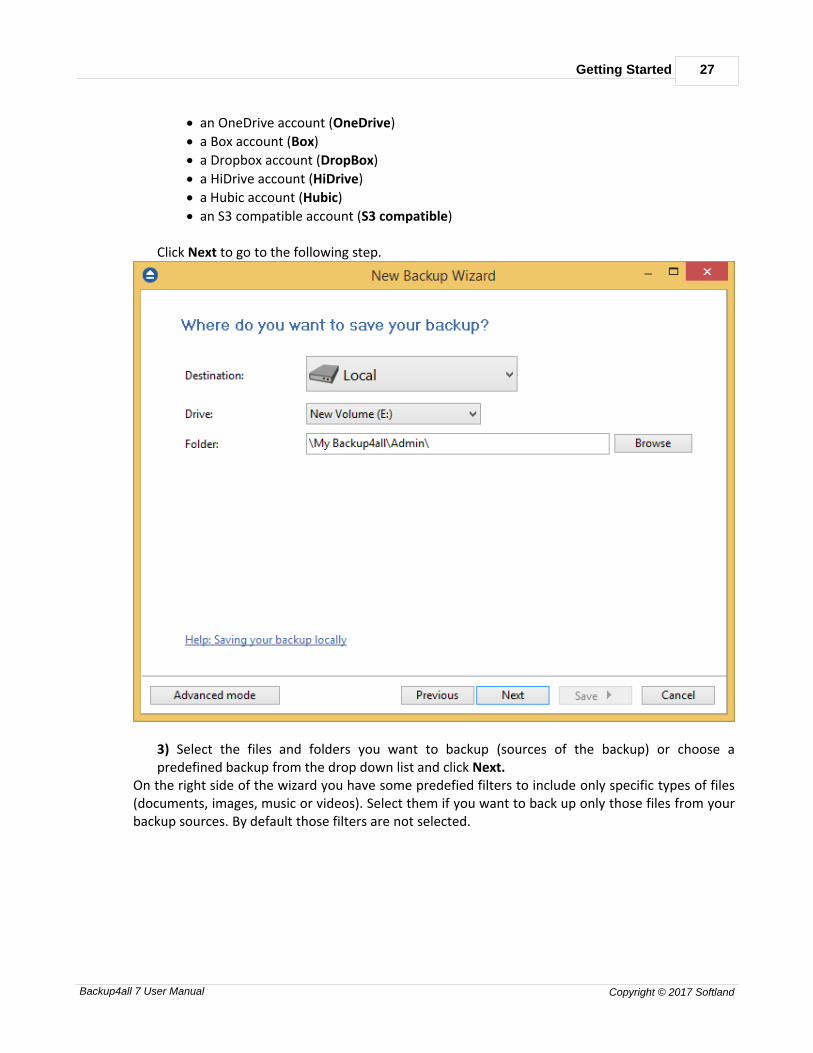
Getting Started 27
Backup4all 7 User Manual Copyright © 2017 Softland
· an OneDrive account (OneDrive)
· a Box account (Box)
· a Dropbox account (DropBox)
· a HiDrive account (HiDrive)
· a Hubic account (Hubic)
· an S3 compatible account (S3 compatible)
Click Next to go to the following step.
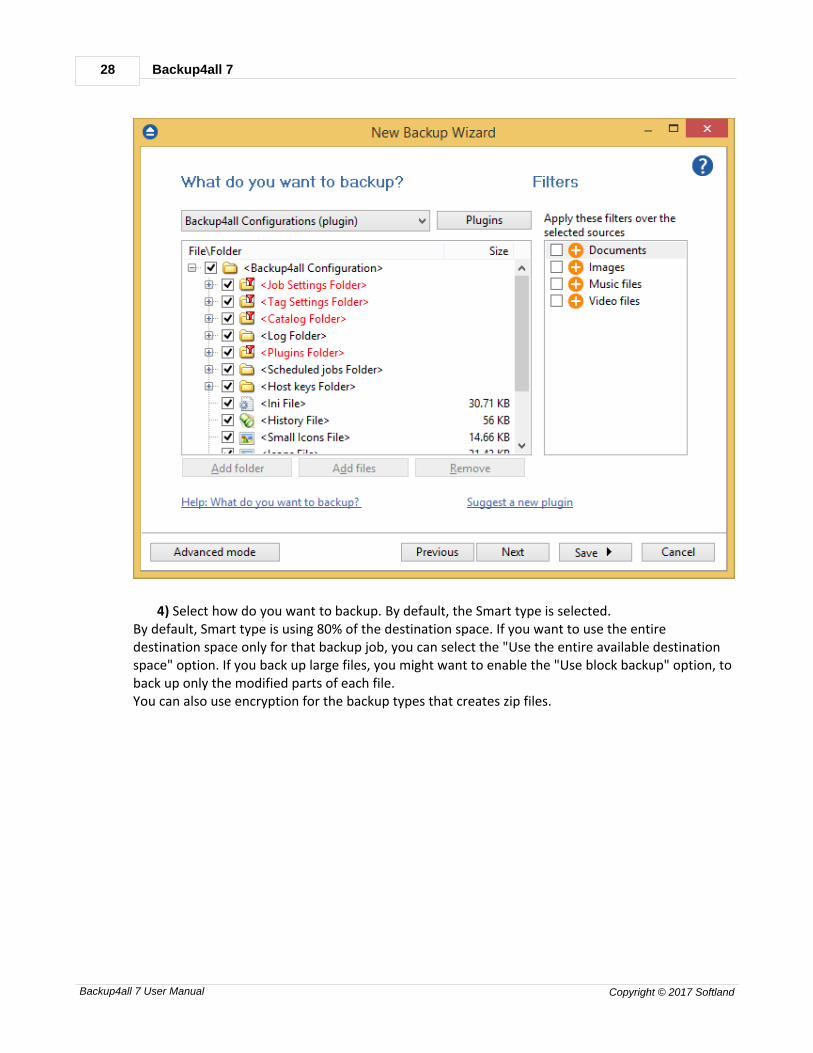
3) Select the files and folders you want to backup (sources of the backup) or choose apredefined backup from the drop down list and click Next.
On the right side of the wizard you have some predefied filters to include only specific types of files(documents, images, music or videos). Select them if you want to back up only those files from yourbackup sources. By default those filters are not selected.
Backup4all 728
Backup4all 7 User Manual Copyright © 2017 Softland
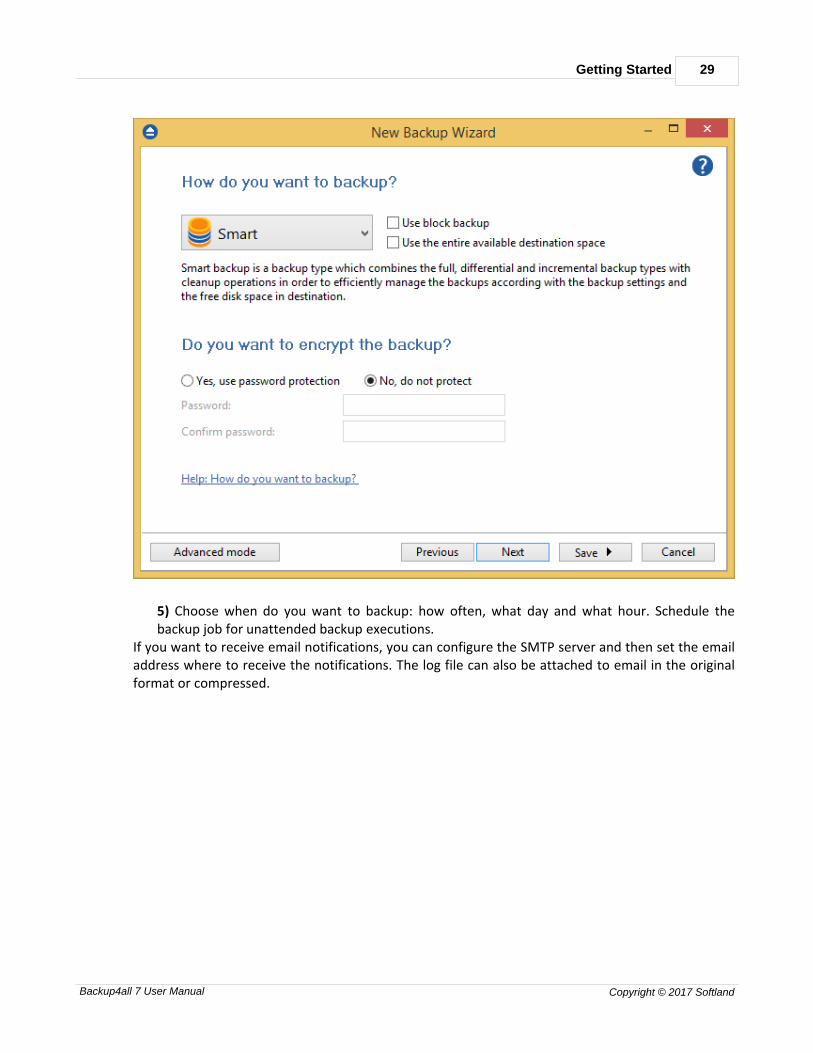
4) Select how do you want to backup. By default, the Smart type is selected. By default, Smart type is using 80% of the destination space. If you want to use the entiredestination space only for that backup job, you can select the "Use the entire available destinationspace" option. If you back up large files, you might want to enable the "Use block backup" option, toback up only the modified parts of each file.You can also use encryption for the backup types that creates zip files.
Getting Started 29
Backup4all 7 User Manual Copyright © 2017 Softland
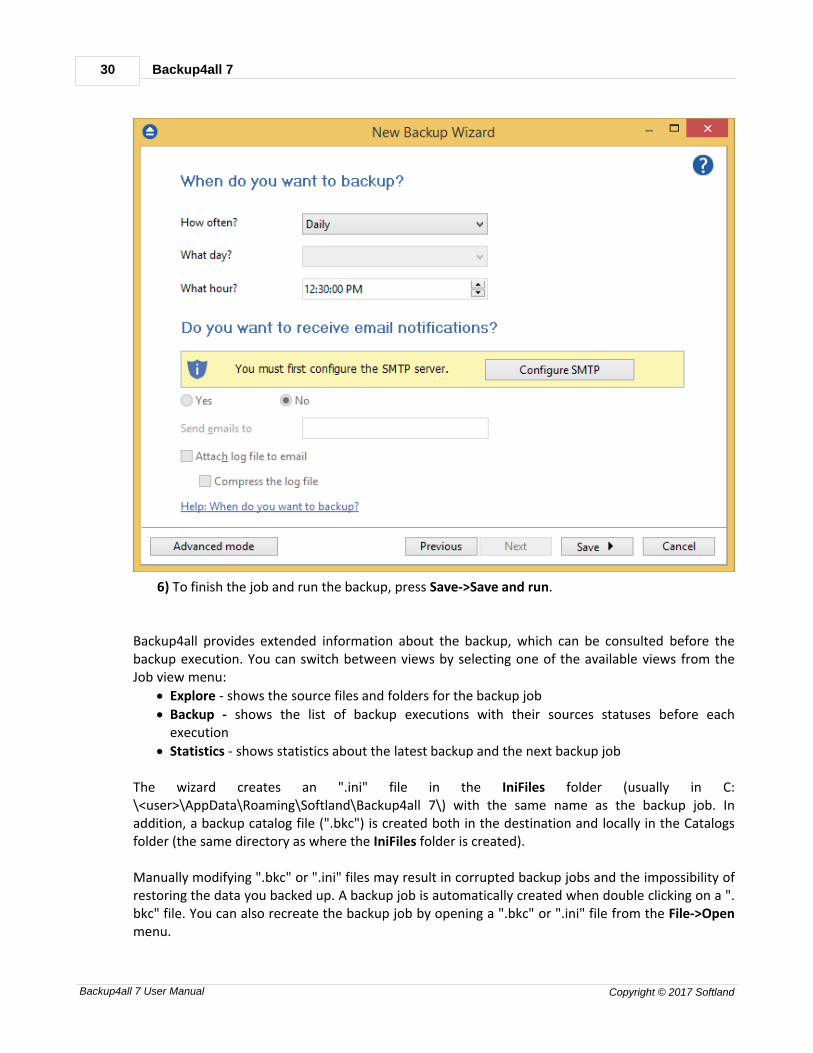
5) Choose when do you want to backup: how often, what day and what hour. Schedule thebackup job for unattended backup executions.
If you want to receive email notifications, you can configure the SMTP server and then set the emailaddress where to receive the notifications. The log file can also be attached to email in the originalformat or compressed.
Backup4all 730
Backup4all 7 User Manual Copyright © 2017 Softland
6) To finish the job and run the backup, press Save->Save and run.
Backup4all provides extended information about the backup, which can be consulted before thebackup execution. You can switch between views by selecting one of the available views from theJob view menu:
· Explore - shows the source files and folders for the backup job
· Backup - shows the list of backup executions with their sources statuses before eachexecution
· Statistics - shows statistics about the latest backup and the next backup job The wizard creates an ".ini" file in the IniFiles folder (usually in C:\<user>\AppData\Roaming\Softland\Backup4all 7\) with the same name as the backup job. Inaddition, a backup catalog file (".bkc") is created both in the destination and locally in the Catalogsfolder (the same directory as where the IniFiles folder is created). Manually modifying ".bkc" or ".ini" files may result in corrupted backup jobs and the impossibility ofrestoring the data you backed up. A backup job is automatically created when double clicking on a ".bkc" file. You can also recreate the backup job by opening a ".bkc" or ".ini" file from the File->Openmenu.
Getting Started 31
Backup4all 7 User Manual Copyright © 2017 Softland
Once the backup job is created, it will be displayed on the center column of the application's mainwindow. On the right, you will see the content of the backup job (files and folders), depending onthe chosen view (explore, backup or statistics) and on the left side you will see the tags list. Note: One or more of the features mentioned in this chapter might not be available in your edition.The Professional edition includes all the features. For a comparison between editions, please checkfeature matrix topic.
2.2 How to Run a Backup Job
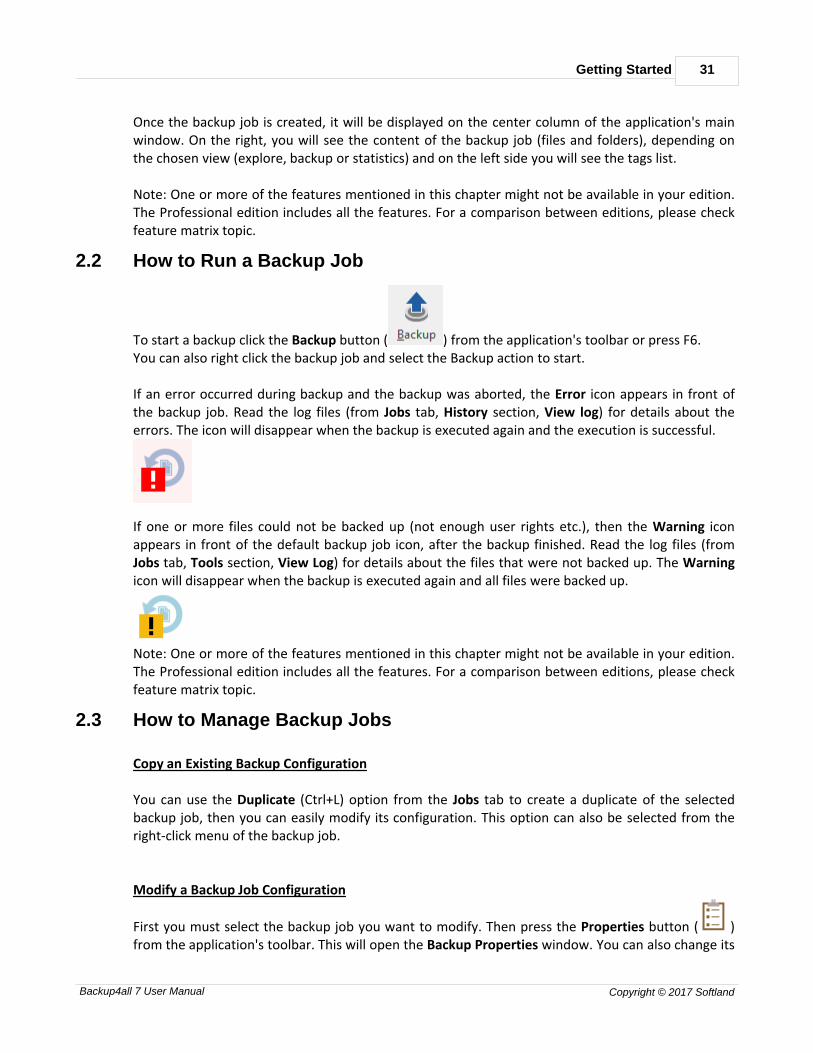
To start a backup click the Backup button ( ) from the application's toolbar or press F6.You can also right click the backup job and select the Backup action to start.
If an error occurred during backup and the backup was aborted, the Error icon appears in front ofthe backup job. Read the log files (from Jobs tab, History section, View log) for details about theerrors. The icon will disappear when the backup is executed again and the execution is successful.
If one or more files could not be backed up (not enough user rights etc.), then the Warning iconappears in front of the default backup job icon, after the backup finished. Read the log files (fromJobs tab, Tools section, View Log) for details about the files that were not backed up. The Warningicon will disappear when the backup is executed again and all files were backed up.
Note: One or more of the features mentioned in this chapter might not be available in your edition.The Professional edition includes all the features. For a comparison between editions, please checkfeature matrix topic.
2.3 How to Manage Backup Jobs
Copy an Existing Backup Configuration
You can use the Duplicate (Ctrl+L) option from the Jobs tab to create a duplicate of the selectedbackup job, then you can easily modify its configuration. This option can also be selected from theright-click menu of the backup job. Modify a Backup Job Configuration
First you must select the backup job you want to modify. Then press the Properties button ( )from the application's toolbar. This will open the Backup Properties window. You can also change its
Backup4all 732
Backup4all 7 User Manual Copyright © 2017 Softland
configuration by choosing Properties from the right-click menu of the backup job. After theProperties window is opened, select the page with the settings you want to modify. Delete a Backup Job
Select the backup job you want to delete and select Delete option from the Jobs tab. Anotherpossibility is to choose Delete (CTRL+Del) from the right-click menu of the backup job. In order toprevent mistakes, a confirmation window will appear when you select this option.Files and folders from the source and destination will not be deleted, by any of these operations.
Note: One or more of the features mentioned in this chapter might not be available in your edition.The Professional edition includes all the features. For a comparison between editions, please checkfeature matrix topic.
2.4 How to Restore from a Backup
With Backup4all you can do the following restore operations:
· restore the latest version of all files
· restore all files as they were on a specified date
· filtered restore
· restore all files from a folder
· restore the latest version of a particular file
· restore the latest version of multiple selected files
· restore any version of a particular fileTo make a full or a filtered restore start the Restore Wizard by pressing the Restore button (
) from the application's toolbar. You can restore the files in the original location or in adifferent location your choose. Alternatively, you can restore the latest version of a file, several selected files or all files from afolder by selecting the files or folder in the Explore View, right-click and select Restore LatestVersion or Restore Latest Version To...

Getting Started 33
Backup4all 7 User Manual Copyright © 2017 Softland
If you want to restore a particular file version, switch to the Explore View, select the targeted file inthe tree, right-click on a file version from the bottom list and choose Restore or Restore to...
Beside files, folder information is also added to backup, so a restore process can recreate theoriginal folder structure.
Backup4all 734
Backup4all 7 User Manual Copyright © 2017 Softland
Note: One or more of the features mentioned in this chapter might not be available in your edition.The Professional edition includes all the features. For a comparison between editions, please checkfeature matrix topic.
2.5 How to Test a Backup
With Backup4all you can:
· test one or more versions of a backup (you can select any version for testing)
· automatically test latest version of a backup at each backup job execution
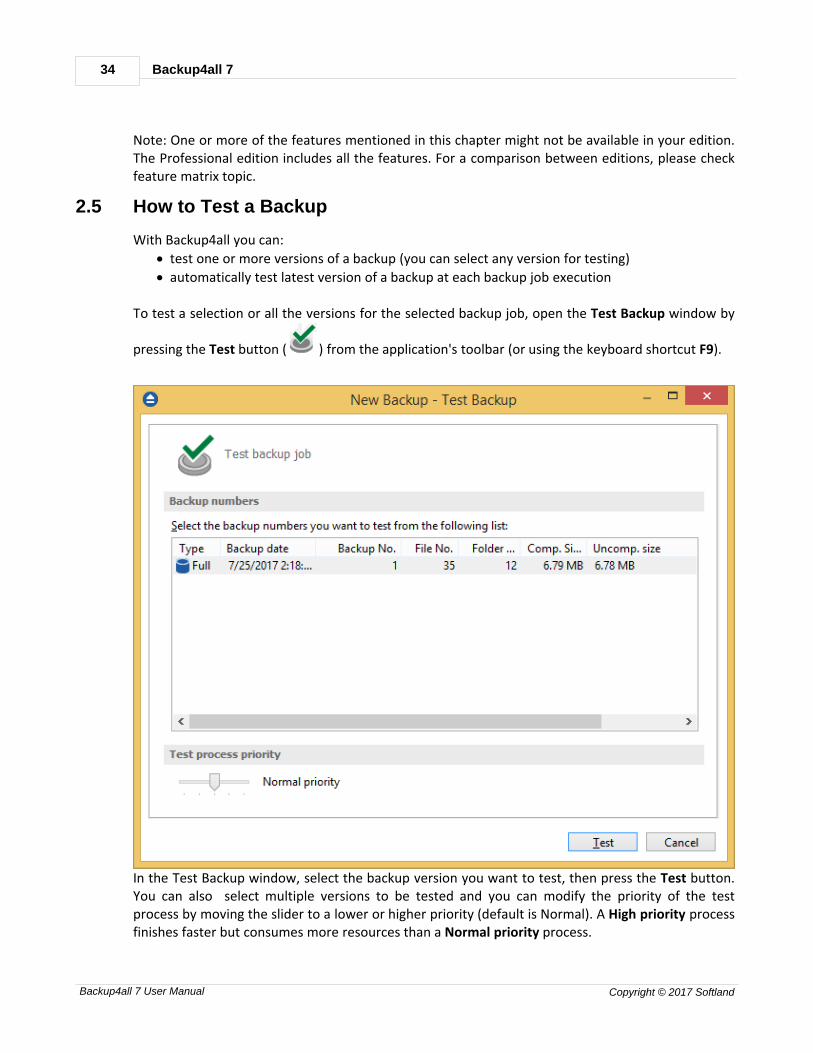
To test a selection or all the versions for the selected backup job, open the Test Backup window by
pressing the Test button ( ) from the application's toolbar (or using the keyboard shortcut F9).
In the Test Backup window, select the backup version you want to test, then press the Test button.You can also select multiple versions to be tested and you can modify the priority of the testprocess by moving the slider to a lower or higher priority (default is Normal). A High priority processfinishes faster but consumes more resources than a Normal priority process.
Getting Started 35
Backup4all 7 User Manual Copyright © 2017 Softland
You can also test a backup execution if you switch to Backup View, right-click on a version and select Test.Backup4all runs tests after every backup execution by default. To disable automatic testing of a
backup, open the Backup Properties window by pressing the Properties button ( ) from themain toolbar, select the Advanced page, then un-check Test after backup option.When an automatic backup test has failed, an Error icon will appear in front of the backup job icon.You can find the error details in the log file (Jobs ribbon tab -> Tools group -> View Log). The Erroricon will disappear the next time the backup job completes successfully.
Note: One or more of the features mentioned in this chapter might not be available in your edition.The Professional edition includes all the features. For a comparison between editions, please checkfeature matrix topic.
2.6 How to Password Protect a Backup
Passwords are used to protect your backup files from unauthorized access. Setting the Password You can enable backup encryption for a job from that job's Properties menu (Jobs ribbon ->Properties button -> Compression page). Encryption can also be set up when creating a new backupjob with the New Backup Wizard. Note that the encryption option is not available for Mirror typejobs without zip archiving. By default the No encryption option is selected.If you want to protect your backup, you can choose an encryption method (AES or Zip2).The Zip2 compatible encryption offers moderate security but is compatible with all third party zipapplications. The best choice is the AES encryption which is the new standard in ZIP protection. However AES isonly recognized by the latest versions of third party zip applications (like Winzip or PKWare).Backup4all supports AES encryption with 3 different key strengths: 128-bit, 192-bit and 256-bit.These numbers reflect the size of the encryption keys used to protect the data - the higher thenumber the stronger the encryption. All three types provide higher security than the passwordprotection method.A strong password should be at least 8 characters long and contain a combination of letters,numbers, and symbols. You should manually enter the password in the New password field and re-enter it in the Confirmnew password field to avoid typing errors.The Old password field is enabled only when the backup job already has a password. You canchange the password only if you enter the old one in this field.

Backup4all 736
Backup4all 7 User Manual Copyright © 2017 Softland
In this way only the owner of the backup is allowed to change the password.
A newly created password will only affect subsequently created zip files. Hence different backupversions of the same job may be encrypted using different passwords. Make sure that youremember all past passwords that have been used for a backup job, or you will not be able torestore older versions.
By default, Backup4all stores the passwords on the local Windows account. In this way you will notbe asked to enter the password every time you want to run or test a backup from the localcomputer. You can also protect the stored passwords using a master password or you can chose notto store any passwords. To change these settings go to File->Options->Passwords.
Changing or removing a password To change a password go to Backup Properties->Compression then click on Set Password in theEncrypt the zip files section. To set a new password you must enter the current password in the OldPassword field. To remove a password, simply select No Encryption. You will still need to providethe old password in order to make this change.If you have the Zip2 compatible encryption or AES encryption option selected, you can also removethe password by entering the Old password and leave the New password and Confirm newpassword fields empty. Using Passwords when Restoring During the restore process of backups with password protection, if you do not use the option tostore the passwords in the local Windows account, the Enter Password dialog will appear. Enter thepassword and press OK. If you do not know the password for this backup number you can:
· press Skip backup to go to the next archive - the restore may be incomplete in this case.
· press Stop restore to stop the whole process - the restore will be incomplete, because only apart of the files were restored.
Note: One or more of the features mentioned in this chapter might not be available in your edition.The Professional edition includes all the features. For a comparison between editions, please checkfeature matrix topic.
2.7 How to Schedule a Backup
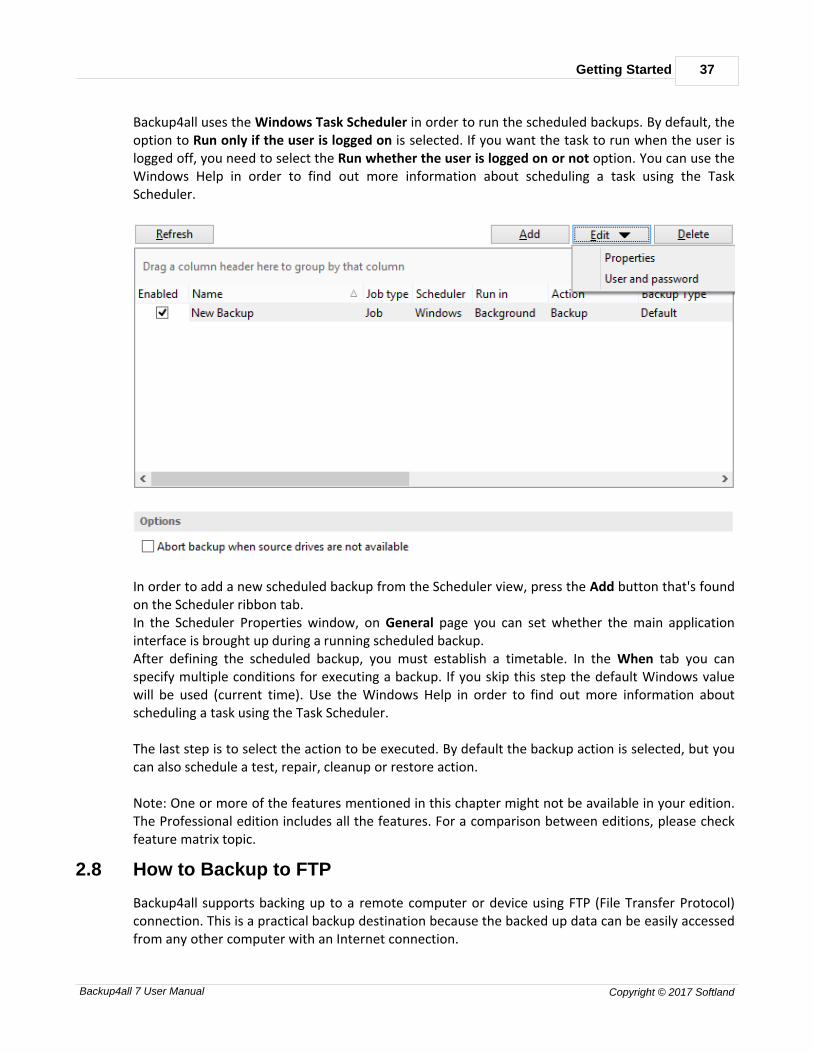
You can schedule a backup either from the Backup Properties window or from the Scheduler view.
Open the Backup Properties window by pressing the Properties button ( ) from the Jobs ribbontab then selecting the Scheduler page.Alternatively you can open the Schedulers view window bypressing the Scheduler button located at the bottom of the application interface. The difference between the two methods is that the Scheduler view displays all existing scheduledtasks whereas the Properties window only focuses on the job that is currently selected.
Getting Started 37
Backup4all 7 User Manual Copyright © 2017 Softland
Backup4all uses the Windows Task Scheduler in order to run the scheduled backups. By default, theoption to Run only if the user is logged on is selected. If you want the task to run when the user islogged off, you need to select the Run whether the user is logged on or not option. You can use theWindows Help in order to find out more information about scheduling a task using the TaskScheduler.
In order to add a new scheduled backup from the Scheduler view, press the Add button that's foundon the Scheduler ribbon tab.In the Scheduler Properties window, on General page you can set whether the main applicationinterface is brought up during a running scheduled backup.After defining the scheduled backup, you must establish a timetable. In the When tab you canspecify multiple conditions for executing a backup. If you skip this step the default Windows valuewill be used (current time). Use the Windows Help in order to find out more information aboutscheduling a task using the Task Scheduler.
The last step is to select the action to be executed. By default the backup action is selected, but youcan also schedule a test, repair, cleanup or restore action. Note: One or more of the features mentioned in this chapter might not be available in your edition.The Professional edition includes all the features. For a comparison between editions, please checkfeature matrix topic.
2.8 How to Backup to FTP
Backup4all supports backing up to a remote computer or device using FTP (File Transfer Protocol)connection. This is a practical backup destination because the backed up data can be easily accessedfrom any other computer with an Internet connection.

Backup4all 738
Backup4all 7 User Manual Copyright © 2017 Softland
Defining FTP configuration
Before using FTP as a destination for backing up, you should define a new FTP configuration usingthe File->Options->Online destinations->FTP window. Once defined, you will be able to apply thisFTP configuration to individual backup jobs.Press the Add button once in File->Options->Online destinations->FTP to add a new FTPconnection. The name New FTP configuration will appear in the list. You can enter the followingsettings for the connection:
· Configuration name - Enter here an arbitrary name for the connection.
· Server name or IP - Here you must enter the FTP server name or its IP address
· Port - Here you can change the port number, in case it is different than the default value (21).
· Destination folder - Here you can enter the destination path if different than root.
· User name - If this is a private FTP server (no anonymous access allowed) enter the user namefor your account.
· Password - In this field enter the password for the FTP server.
Some FTP servers allow anonymous access (public FTP servers). Usually, you connect to this type ofservers using "Anonymous" as your username, and your email address as your password. It is notrecommended to backup important files to public FTP servers.Also in the Online destinations page you can set the number of retry attempts and interval length
Getting Started 39
Backup4all 7 User Manual Copyright © 2017 Softland
(wait) for connecting to FTP a server. This is a global setting for all FTP connections. By default, if aFTP server cannot be reached the first time, Backup4all will attempt to connect 5 more times atintervals of 60 seconds. If all attempts fail, then the backup is aborted.Additional settings like bandwidth, SSL connection and firewall can also be configured from thispage. Once you have finished defining the connection, press the Test button to check if the FTP details youhave entered are correct. If the test was successful, The FTP connection was tested successfullymessage will be displayed. Setting the destination to FTP When defining a new backup job using the New Backup Wizard, select the FTP option in theDestination section (1st page of the wizard). If you already have a defined backup job and want tochange the destination to FTP, select that backup job, open the Properties window (Ctrl+P), go tothe Destination page and select FTP. There you can chose from existing FTP configurations or createa new connection. If you have any defined FTP configuration, you will be able select it from the drop down list (todefine a configuration go to File->Options->Online Destinations->FTP). Alternatively, you maydefine a custom configuration during the same step of the Backup Wizard.You can change the defined settings by selecting the Custom configuration option and pressing theEdit configuration button. Here you can modify the data in the fields and press OK to save. Onceyou've entered the FTP connection details, it is recommended to run a connection test by pressingthe Test button.
In case of a connection error, Backup4all will notify you with a message in the pop-up Notificationswindow. To change the number of connection retries and retry intervals go to File->Options->Onlinedestinations and select FTP. There you can edit the Retry and Wait parameters to be used for FTPconnections.
As a requirement, the FTP transfer mode used for most backup types is Binary. However, for theMirror type you may choose between Binary, ASCII, and Auto modes. The list of ASCII file types canbe found in File->Options->Online destinations->FTP.
Recommendations for backing up to FTP
1) After each change to the FTP configuration be sure to use the Test function.2) Most FTP sites have policies against hammering (repeatedly attempting to connect to anunavailable FTP server with little or no time between connection attempts). Thus they requireFTP clients to set retry times at specific intervals, commonly at least 120 seconds between eachconnection attempt. Most FTP sites can also monitor for devices that hammer, and oncedetected the server will ban access to the offending IP address, either permanently or for alimited amount of time. Therefore, when you set the retry time intervals in File->Options->Online destinations->FTP, you should use 60 seconds or more.3) If you backup important data to a remote location using FTP, encrypt the zip files for

Backup4all 740
Backup4all 7 User Manual Copyright © 2017 Softland
increased security. In this case, even if another person manages to gain unauthorized access tothe FTP, your files will still be protected.4) 4) It is faster to use XCRC when testing FTP backups (on by default).
Note: One or more of the features mentioned in this chapter might not be available in your edition.The Professional edition includes all the features. For a comparison between editions, please checkfeature matrix topic.
2.8.1 Passive and Active modes
Some FTP servers require the connection to be established in a passive mode (i.e. your computerestablishes the connection so the flow of data is set up and initiated by you).Most server companies have started using Passive FTP mode for the ir clients' convenience. UnlikeActive FTP, Passive FTP mode provides does not interfere with the client's firewall, as it does notinvolve the server accessing random ports on the client side which is generally interpreted as anattack. Backup4all is also using Passive FTP by default.
To check the connection type which is currently in use, open the FTP Configuration window, eitherby accessing File->Options->Online destinations->FTP, selecting a predefined connection andclicking on Edit, or from Properties->Destination->Edit configuration, for Jobs that use a custom FTPconfiguration. If the Use passive mode for transfers checkbox is not checked, then the connection is in Activemode. You should always test the connection after making a configuration change.
Note: One or more of the features mentioned in this chapter might not be available in your edition.The Professional edition includes all the features. For a comparison between editions, please checkfeature matrix topic.
2.8.2 Connecting Through Proxy
If you are connecting to the Internet through a proxy server, you will have to enter the connectiondetails in the FTP Configuration window in order to be able to backup to FTP. Setting Backup4all to backup to FTP using proxy
1) Go to Backup Properties->Destination->FTP->Edit configuration (or File->Options->Onlinedestinations->FTP->Edit)2) Select a Proxy Type from the available options:
· None - Sends the User name and optional Password for the FTP server as entered in theFTP window
· Send command USER - Sends the User name and optional Password defined in the proxysettings, followed immediately by the User name and optional Password for the FTPserver.
· Send command SITE - Sends the User name and optional Password defined in the proxysettings, the SITE command with the Host value, and the User name and optionalPassword for the FTP site.
Getting Started 41
Backup4all 7 User Manual Copyright © 2017 Softland
· Send command OPEN - Sends the User name and optional Password defined in theproxy settings, sends the OPEN command with the Host value, and the User name andoptional Password for the FTP site.
· USER user@firewalluser@hostname / PASS pass@firewallpass - Sends the commandUSER user@proxyuser@host, then the command PASS pwd@proxypwd, or optionallyPASS pwd.
· Transparent - Sends the User name and optional Password defined in the proxysettings, followed immediately by the FTP server User name and optional Password.
3) Enter the name or IP address for the proxy server (firewall) in the Host name or IP field. 4) Enter the port number in the Host Port field. 5) Enter the user name and password needed for this proxy connection in the User name andPassword fields. 6) Press OK and then test the connection.
Note: One or more of the features mentioned in this chapter might not be available in your edition.The Professional edition includes all the features. For a comparison between editions, please checkfeature matrix topic.
2.8.3 Using SSL Encryption
When you connect through FTP to a remote computer you send the username and password inclear, unencrypted text. Also, when you backup your files to a remote computer, the information isnot sent directly to that computer. Instead it is routed through several other computers to get there.Anyone along the route can access what you are sending, including your username and password, ifthe data is not encrypted. If an unauthorized person has access to this data, your account and theremote system you have access to, may no longer be secure. Backup4all solves this by allowing SSLencryption support when using FTP (and also AES encryption for the backed up zip files). SSL (Secure Sockets Layer) is a protocol used for transmitting private documents via the Internet.The SSL cryptographic system uses two keys to encrypt data - a public key known to everyone and aprivate or secret key known only to the recipient of the message. Backing up to FTP using SSL encryption
1) Go to Properties->Destination->FTP->Edit configuration (for a selected job) or in File->Options->Online destinations->FTP window (for predefined connections).2) From the SSL encryption level box select an option that applies to your situation:
· No SSL - the server does not require Secure Socket Layer transport
· Implicit SSL - implies that Secure Socket Layer is in use
· Only explicit SSL - allows the connection to the FTP server only if SSL is available.
· Explicit SSL, if available - When SSL is available, uses explicit security by default. Theserver allows regular FTP sessions without encryption as well as encrypted FTP sessionsusing SSL.
3) Press OK and test your connection
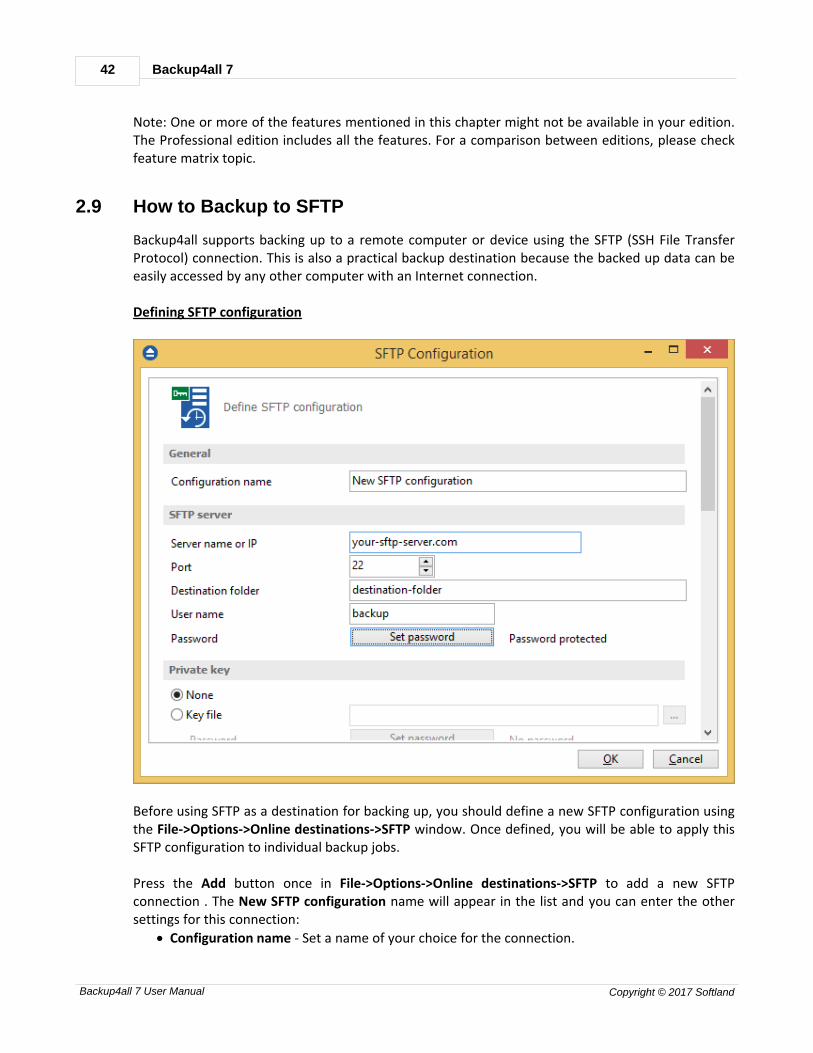
Backup4all 742
Backup4all 7 User Manual Copyright © 2017 Softland
Note: One or more of the features mentioned in this chapter might not be available in your edition.The Professional edition includes all the features. For a comparison between editions, please checkfeature matrix topic.
2.9 How to Backup to SFTP
Backup4all supports backing up to a remote computer or device using the SFTP (SSH File TransferProtocol) connection. This is also a practical backup destination because the backed up data can beeasily accessed by any other computer with an Internet connection.
Defining SFTP configuration
Before using SFTP as a destination for backing up, you should define a new SFTP configuration usingthe File->Options->Online destinations->SFTP window. Once defined, you will be able to apply thisSFTP configuration to individual backup jobs.
Press the Add button once in File->Options->Online destinations->SFTP to add a new SFTPconnection . The New SFTP configuration name will appear in the list and you can enter the othersettings for this connection:
· Configuration name - Set a name of your choice for the connection.
Getting Started 43
Backup4all 7 User Manual Copyright © 2017 Softland
· Server name or IP - In this field you have to enter the name or IP address for the SFTP server
· Port - In this field you have to enter the port number if different than the default SFTP ports(22).
· Destination folder - Here you can enter the destination path if different than root.
· User name - If this is a private SFTP server (no anonymous access allowed) enter the username for your account.
· Password - In this field enter the password for the SFTP server.
Additional settings like private key, bandwidth limitation, authentications, encryption andcompression can also be configured from this page. In the Online destinations page you can set the number of retry attempts and interval length (wait)for connecting to a SFTP server. This is a global setting for all SFTP connections. By default, if a SFTPserver cannot be reached the first time, Backup4all will attempt to connect 5 more times at intervalsof 60 seconds. If all attempts fail, then the backup is aborted. Once you have finished defining the connection, press the Test button to check if the SFTP detailsyou have entered are correct. If the test was successful, The SFTP connection was testedsuccessfully message will be displayed.
Setting the destination to SFTP When defining a new backup job using the New Backup Wizard, select the SFTP option in theDestination section (1st page of the wizard). If you already have a defined backup job and want tochange the destination to SFTP, select that backup job, open the Properties window (Ctrl+P), go tothe Destination page and select SFTP. There you can choose from existing SFTP configurations orcreate a new connection.
If you have any defined SFTP configurations, you will be able select one from the dropdown list (todefine a configuration go to File->Options->Online destinations->SFTP). Alternatively, you maydefine a custom configuration during the same step of the Backup Wizard.
Once you've entered the SFTP connection details, it is recommended to run a connection test bypressing the Test button.
In case of a connection error, Backup4all will notify you with a message in the pop-up Notificationswindow. To change the number of connection retries and retry intervals go to File->Options->Onlinedestinations->Backup and select SFTP. There you can edit the Retry and Wait parameters to beused for SFTP connections. Recommendations for backing up to SFTP
1) After each change to the SFTP configuration be sure to use the Test function.2) Most SFTP sites have policies against hammering (repeatedly attempting to connect to anunavailable SFTP server with little or no time between connection attempts). Thus they requireSFTP clients to set retry times at specific intervals, commonly at least 120 seconds between eachconnection attempt. Most SFTP sites can also monitor for devices that hammer, and oncedetected the server will ban access to the offending IP address, either permanently or for a
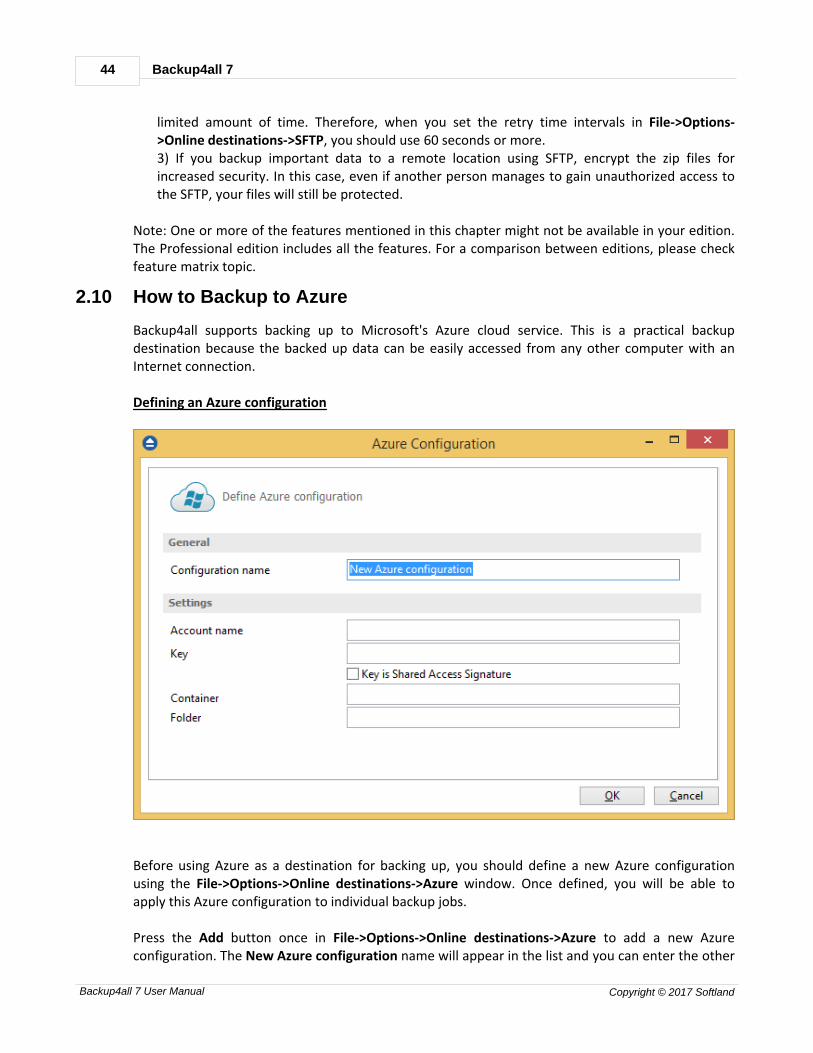
Backup4all 744
Backup4all 7 User Manual Copyright © 2017 Softland
limited amount of time. Therefore, when you set the retry time intervals in File->Options->Online destinations->SFTP, you should use 60 seconds or more.3) If you backup important data to a remote location using SFTP, encrypt the zip files forincreased security. In this case, even if another person manages to gain unauthorized access tothe SFTP, your files will still be protected.
Note: One or more of the features mentioned in this chapter might not be available in your edition.The Professional edition includes all the features. For a comparison between editions, please checkfeature matrix topic.
2.10 How to Backup to Azure
Backup4all supports backing up to Microsoft's Azure cloud service. This is a practical backupdestination because the backed up data can be easily accessed from any other computer with anInternet connection.
Defining an Azure configuration
Before using Azure as a destination for backing up, you should define a new Azure configurationusing the File->Options->Online destinations->Azure window. Once defined, you will be able toapply this Azure configuration to individual backup jobs.
Press the Add button once in File->Options->Online destinations->Azure to add a new Azureconfiguration. The New Azure configuration name will appear in the list and you can enter the other
Getting Started 45
Backup4all 7 User Manual Copyright © 2017 Softland
settings for this connection:
· Configuration name - Set the name of your choice for the connection.
· Account name - In this field you have to enter the name of the Azure account.
· Key - In this field you have to enter the key for your Azure account. If the key is a SharedAccess Signature (SAS), you must select the "Key is Shared Access Signature" option. A sharedaccess signature provides delegated access to resources in your storage account. This meansthat you can grant a client limited permissions to your blobs, queues, or tables for a specifiedperiod of time and with a specified set of permissions, without having to share your accountaccess keys.
· Container - Here you have to enter the container's name.
· Folder - If you want to use a specific folder, enter its name here.
In the Online destinations page you can set the number of retry attempts and interval length (wait)for connecting to the Azure server. This is a global setting for all Azure connections. By default, if aserver cannot be reached the first time, Backup4all will attempt to connect 5 more times at intervalsof 60 seconds. If all attempts fail, then the backup is aborted.
Once you have finished defining the connection, press the Test button to check if the Azure detailsyou have entered are correct. If the test was successful, The Azure connection was testedsuccessfully message will be displayed.
Setting the destination to Azure When defining a new backup job using the New Backup Wizard, select the Azure option in theDestination section (1st page of the wizard). If you already have a defined backup job and want tochange the destination to Azure, select that backup job, open the Properties window (Ctrl+P), go tothe Destination page and select Azure. There you can choose from existing Azure configurations orcreate a new connection.
If you have any defined Azure configurations, you will be able to select one from the dropdown list(to define a configuration go to File->Options->Online destinations->Azure). Alternatively, you maydefine a custom configuration during the same step of the Backup Wizard.
Once you've entered the Azure connection details, it is recommended to run a connection test bypressing the Test button.
Recommendations for backing up to Azure
1) After each change to the Azure configuration be sure to use the Test function.2) If you backup important data to a remote location using Azure, encrypt the zip files forincreased security. In this case, even if another person manages to gain unauthorized access toyour Azure account, your files will still be protected.
Note: One or more of the features mentioned in this chapter might not be available in your edition.The Professional edition includes all the features. For a comparison between editions, please checkfeature matrix topic.

Backup4all 746
Backup4all 7 User Manual Copyright © 2017 Softland
2.11 How to Backup to Amazon S3
Backup4all supports backing up to the Amazon S3 cloud service. This is a practical backupdestination because the backed up data can be easily accessed from any other computer with anInternet connection.
Defining an Amazon S3 configuration
Before using Amazon as a destination for backing up, you should define a new Amazon configurationusing the File->Options->Online destinations->Amazon S3 window. Once defined, you will be ableto apply this Amazon S3 configuration to individual backup jobs.
Press the Add button once in File->Options->Online destinations->Amazon S3 to add a new Amazonconnection . The New Amazon S3 configuration name will appear in the list and you can enter theother settings for this connection:
· Configuration name - Set the name of your choice for the connection.
· Access Key ID - In this field you have to enter the key for your Amazon account.
· Secret Access Key - In this field you have to enter the secret key for your account.
· Region - From the drop down list, select the region where your account is located.
· Bucket- Here you have to enter the name of the bucket, or you can create a new bucket.
· Folder - If you want to use a specific folder, enter its name here.
· Storage class - Select the storage class you want to use. You can choose between: Standard,Standard - Infrequent Access and Reduced Redundancy Storage.
Getting Started 47
Backup4all 7 User Manual Copyright © 2017 Softland
In the Online destinations page you can set the number of retry attempts and interval length (wait)for connecting to the Amazon S3 server. This is a global setting for all Amazon S3 connections. Bydefault, if a server cannot be reached the first time, Backup4all will attempt to connect 5 moretimes at intervals of 60 seconds. If all attempts fail, then the backup is aborted.
Once you have finished defining the connection, press the Test button to check if the Amazon S3details you have entered are correct. If the test was successful, The Amazon S3 connection wastested successfully message will be displayed.
Setting the destination to Amazon S3 When defining a new backup job using the New Backup Wizard, select the Amazon S3 option in theDestination section (1st page of the wizard). If you already have a defined backup job and want tochange the destination to Amazon S3, select that backup job, open the Properties window (Ctrl+P),go to the Destination page and select Amazon S3. There you can choose from existing Amazon S3configurations or create a new connection.
If you have any defined Amazon S3 configurations, you will be able select one from the dropdownlist (to define a configuration go to File->Options->Online destinations->Amazon S3). Alternatively,you may define a custom configuration during the same step of the Backup Wizard.
Once you've entered the connection details, it is recommended to run a connection test by pressingthe Test button.
Recommendations for backing up to Amazon S3 1) After each change to the Amazon S3 configuration be sure to use the Test function.2) If you backup important data to a remote location using Amazon S3, encrypt the zip files forincreased security. In this case, even if another person manages to gain unauthorized access toyour Amazon S3 account, your files will still be protected.
Note: One or more of the features mentioned in this chapter might not be available in your edition.The Professional edition includes all the features. For a comparison between editions, please checkfeature matrix topic.
2.12 How to Backup to Google Drive
Backup4all supports backing up to Google Drive. This is a very used cloud storage location as it offersa lot of disk space for free.
Defining a Google Drive configuration

Backup4all 748
Backup4all 7 User Manual Copyright © 2017 Softland
Before using Google Drive as a destination for backing up, you should define a new Google Driveconfiguration in File->Options->Online destinations->Google Drive page. Once defined, you will beable to apply this Google Drive configuration to individual backup jobs.
Press the Add button once in File->Options->Online destinations->Google Drive to add a newGoogle Drive connection . After you press Add button, the New Google Drive configuration namewill appear in the list and you can enter the other settings for this connection:
· Authentication - pressing the "Choose account" button will open an authentication page inyour default Browser application. You will need to be logged in into your Google account, thenallow Backup4all access to Google Drive.
· Folder - If you want to use a specific folder, press the Browse button to select the folder or tocreate a new one.
In the Online destinations page you can set the number of retry attempts and interval length (wait)for connecting to the Google Drive server. This is a global setting for all Google Drive connections.By default, if the server cannot be reached the first time, Backup4all will attempt to connect 5 moretimes at intervals of 60 seconds. If all attempts fail, then the backup is aborted.
Once you have finished defining the connection, press the Test button to check if the Google Drivedetails you have entered are correct. If the test was successful, The Google Drive connection wastested successfully message will be displayed.
Setting the destination to Google Drive
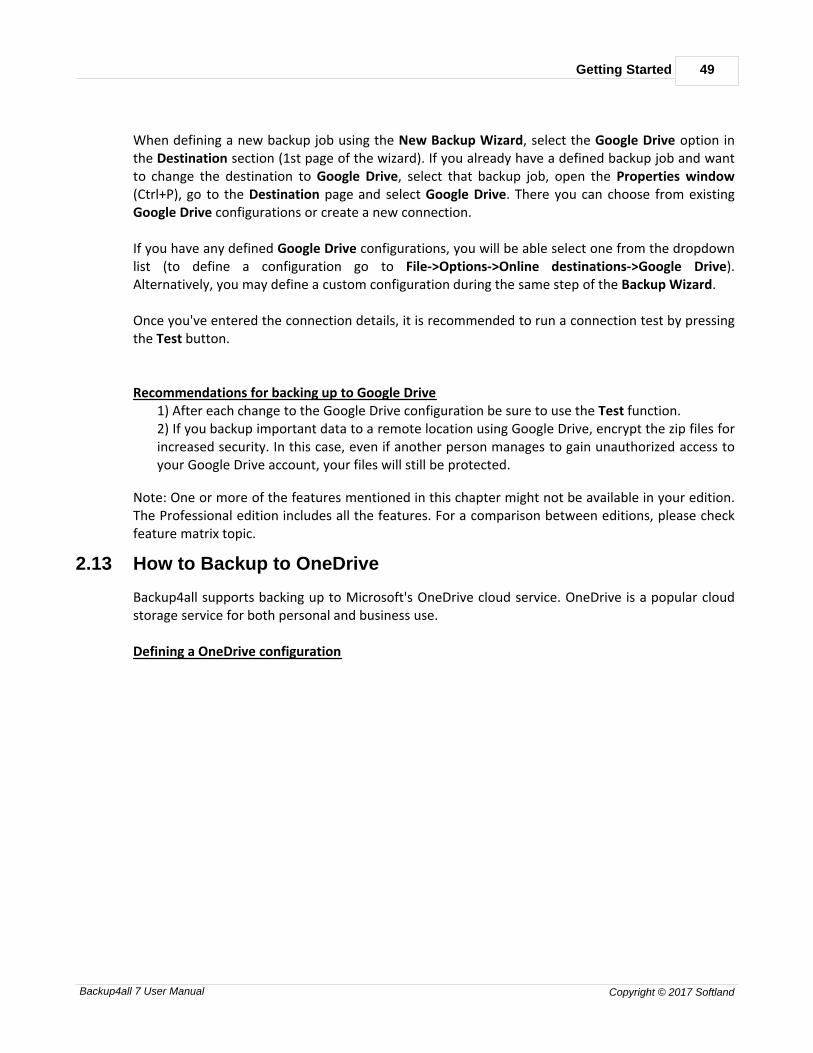
Getting Started 49
Backup4all 7 User Manual Copyright © 2017 Softland
When defining a new backup job using the New Backup Wizard, select the Google Drive option inthe Destination section (1st page of the wizard). If you already have a defined backup job and wantto change the destination to Google Drive, select that backup job, open the Properties window(Ctrl+P), go to the Destination page and select Google Drive. There you can choose from existingGoogle Drive configurations or create a new connection.
If you have any defined Google Drive configurations, you will be able select one from the dropdownlist (to define a configuration go to File->Options->Online destinations->Google Drive).Alternatively, you may define a custom configuration during the same step of the Backup Wizard.
Once you've entered the connection details, it is recommended to run a connection test by pressingthe Test button.
Recommendations for backing up to Google Drive
1) After each change to the Google Drive configuration be sure to use the Test function.2) If you backup important data to a remote location using Google Drive, encrypt the zip files forincreased security. In this case, even if another person manages to gain unauthorized access toyour Google Drive account, your files will still be protected.
Note: One or more of the features mentioned in this chapter might not be available in your edition.The Professional edition includes all the features. For a comparison between editions, please checkfeature matrix topic.
2.13 How to Backup to OneDrive
Backup4all supports backing up to Microsoft's OneDrive cloud service. OneDrive is a popular cloudstorage service for both personal and business use.
Defining a OneDrive configuration
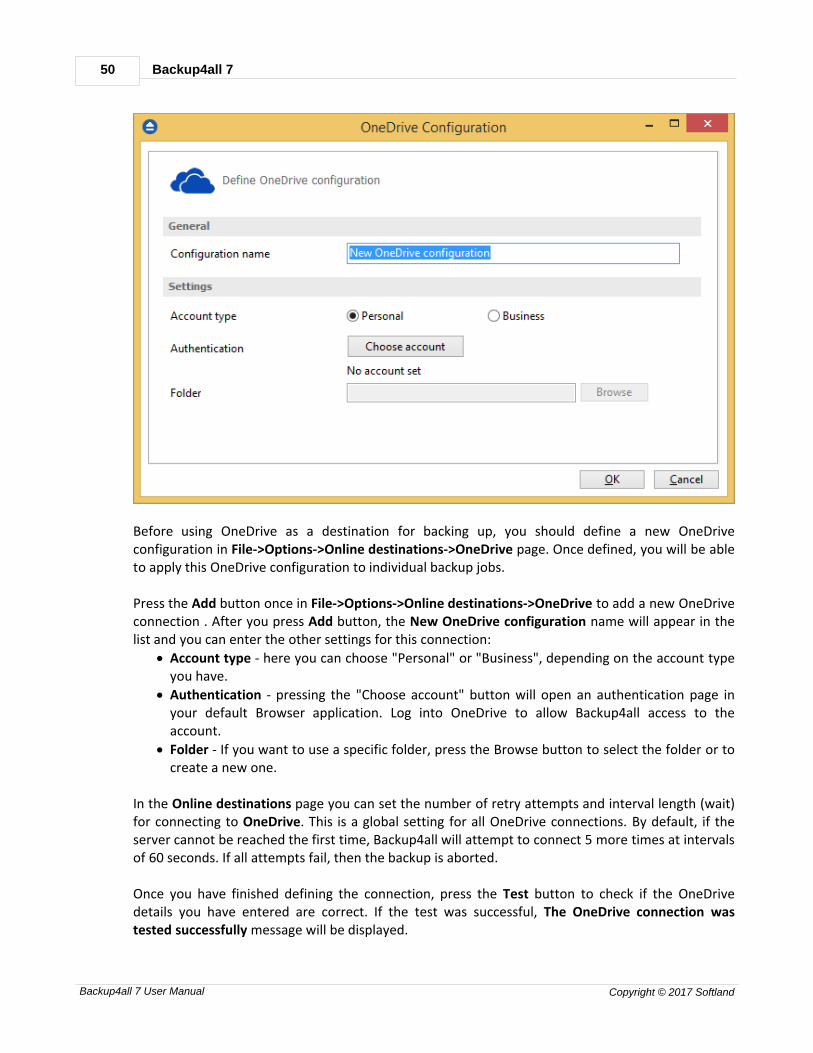
Backup4all 750
Backup4all 7 User Manual Copyright © 2017 Softland
Before using OneDrive as a destination for backing up, you should define a new OneDriveconfiguration in File->Options->Online destinations->OneDrive page. Once defined, you will be ableto apply this OneDrive configuration to individual backup jobs.
Press the Add button once in File->Options->Online destinations->OneDrive to add a new OneDriveconnection . After you press Add button, the New OneDrive configuration name will appear in thelist and you can enter the other settings for this connection:
· Account type - here you can choose "Personal" or "Business", depending on the account typeyou have.
· Authentication - pressing the "Choose account" button will open an authentication page inyour default Browser application. Log into OneDrive to allow Backup4all access to theaccount.
· Folder - If you want to use a specific folder, press the Browse button to select the folder or tocreate a new one.
In the Online destinations page you can set the number of retry attempts and interval length (wait)for connecting to OneDrive. This is a global setting for all OneDrive connections. By default, if theserver cannot be reached the first time, Backup4all will attempt to connect 5 more times at intervalsof 60 seconds. If all attempts fail, then the backup is aborted.
Once you have finished defining the connection, press the Test button to check if the OneDrivedetails you have entered are correct. If the test was successful, The OneDrive connection wastested successfully message will be displayed.

Getting Started 51
Backup4all 7 User Manual Copyright © 2017 Softland
Setting the destination to OneDrive When defining a new backup job using the New Backup Wizard, select the OneDrive option in theDestination section (1st page of the wizard). If you already have a defined backup job and want tochange the destination to OneDrive, select that backup job, open the Properties window (Ctrl+P), goto the Destination page and select OneDrive. There you can choose from existing OneDriveconfigurations or create a new connection.
If you have any defined OneDrive configurations, you will be able select one from the dropdown list(to define a configuration go to File->Options->Online destinations->OneDrive). Alternatively, youmay define a custom configuration during the same step of the Backup Wizard.
Once you've entered the connection details, it is recommended to run a connection test by pressingthe Test button.
Recommendations for backing up to OneDrive
1) After each change to the OneDrive configuration be sure to use the Test function.2) If you backup important data to a remote location using OneDrive, encrypt the zip files forincreased security. In this case, even if another person manages to gain unauthorized access toyour OneDrive account, your files will still be protected.
Note: One or more of the features mentioned in this chapter might not be available in your edition.The Professional edition includes all the features. For a comparison between editions, please checkfeature matrix topic.
2.14 How to Backup to Box
Backup4all supports backing up to Box. This is a cloud storage location and it offers enough free diskspace for normal use.
Defining a Box configuration

Backup4all 752
Backup4all 7 User Manual Copyright © 2017 Softland
Before using Box as a destination for backing up, you should define a new Box configuration in File->Options->Online destinations->Box page. Once defined, you will be able to apply this Boxconfiguration to individual backup jobs.
Press the Add button once in File->Options->Online destinations->Box to add a new Box connection. After you press Add button, the New Box configuration name will appear in the list and you canenter the other settings for this connection:
· Authentication - pressing the "Choose account" button will open an authentication page inyour default Browser application. Log into Box to allow Backup4all access to the account.
· Folder - If you want to use a specific folder, press the Browse button to select the folder or tocreate a new one.
In the Online destinations page you can set the number of retry attempts and interval length (wait)for connecting to Box. This is a global setting for all Box connections. By default, if the server cannotbe reached the first time, Backup4all will attempt to connect 5 more times at intervals of 60seconds. If all attempts fail, then the backup is aborted.
Once you have finished defining the connection, press the Test button to check if the Box details youhave entered are correct. If the test was successful, The Box connection was tested successfullymessage will be displayed.
Setting the destination to Box
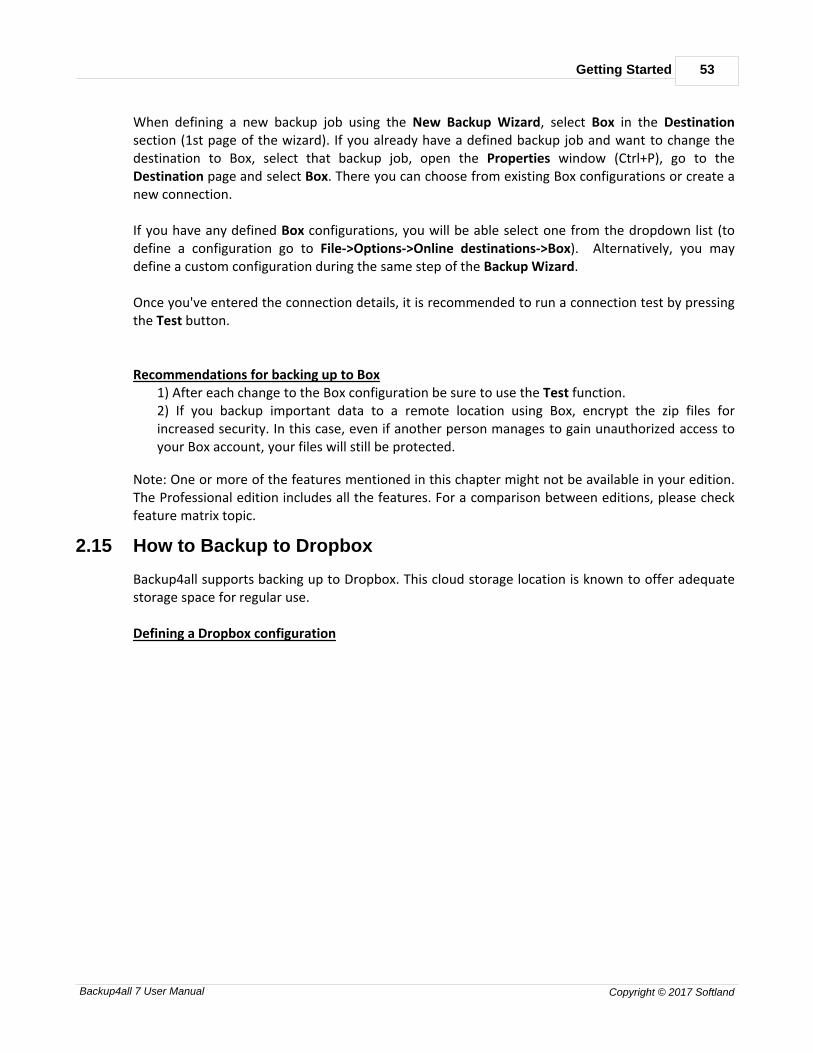
Getting Started 53
Backup4all 7 User Manual Copyright © 2017 Softland
When defining a new backup job using the New Backup Wizard, select Box in the Destinationsection (1st page of the wizard). If you already have a defined backup job and want to change thedestination to Box, select that backup job, open the Properties window (Ctrl+P), go to theDestination page and select Box. There you can choose from existing Box configurations or create anew connection.
If you have any defined Box configurations, you will be able select one from the dropdown list (todefine a configuration go to File->Options->Online destinations->Box). Alternatively, you maydefine a custom configuration during the same step of the Backup Wizard.
Once you've entered the connection details, it is recommended to run a connection test by pressingthe Test button.
Recommendations for backing up to Box
1) After each change to the Box configuration be sure to use the Test function.2) If you backup important data to a remote location using Box, encrypt the zip files forincreased security. In this case, even if another person manages to gain unauthorized access toyour Box account, your files will still be protected.
Note: One or more of the features mentioned in this chapter might not be available in your edition.The Professional edition includes all the features. For a comparison between editions, please checkfeature matrix topic.
2.15 How to Backup to Dropbox
Backup4all supports backing up to Dropbox. This cloud storage location is known to offer adequatestorage space for regular use.
Defining a Dropbox configuration
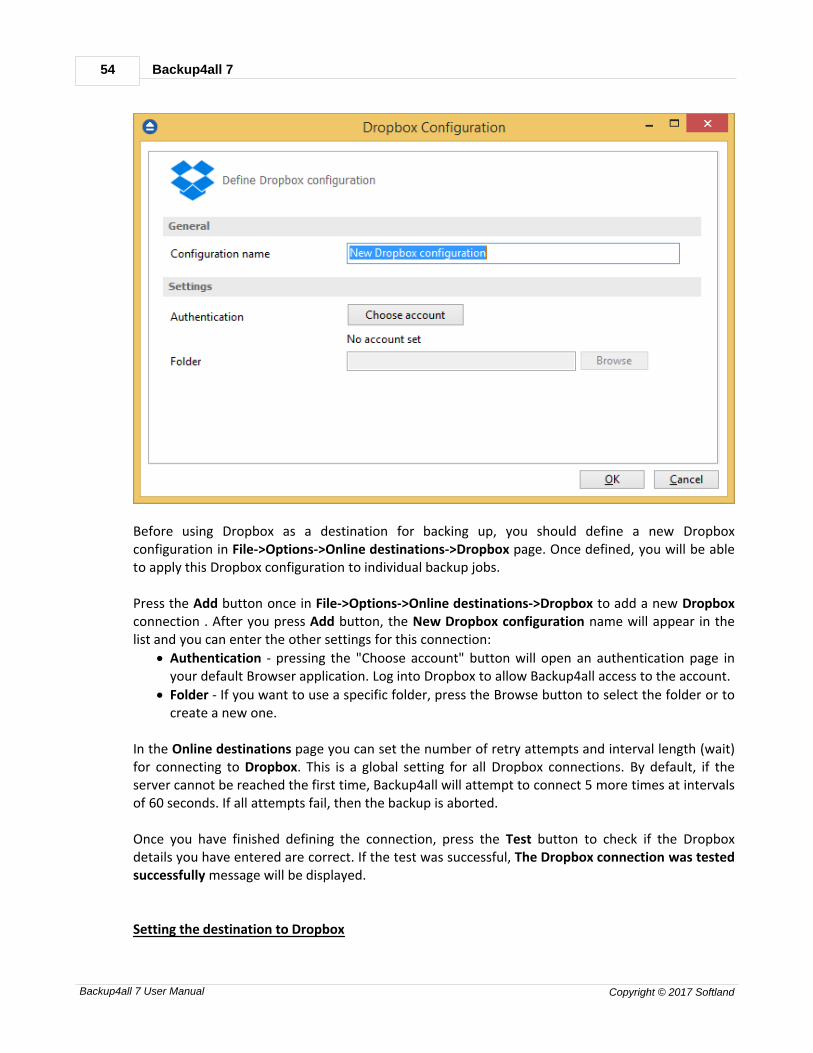
Backup4all 754
Backup4all 7 User Manual Copyright © 2017 Softland
Before using Dropbox as a destination for backing up, you should define a new Dropboxconfiguration in File->Options->Online destinations->Dropbox page. Once defined, you will be ableto apply this Dropbox configuration to individual backup jobs.
Press the Add button once in File->Options->Online destinations->Dropbox to add a new Dropboxconnection . After you press Add button, the New Dropbox configuration name will appear in thelist and you can enter the other settings for this connection:
· Authentication - pressing the "Choose account" button will open an authentication page inyour default Browser application. Log into Dropbox to allow Backup4all access to the account.
· Folder - If you want to use a specific folder, press the Browse button to select the folder or tocreate a new one.
In the Online destinations page you can set the number of retry attempts and interval length (wait)for connecting to Dropbox. This is a global setting for all Dropbox connections. By default, if theserver cannot be reached the first time, Backup4all will attempt to connect 5 more times at intervalsof 60 seconds. If all attempts fail, then the backup is aborted. Once you have finished defining the connection, press the Test button to check if the Dropboxdetails you have entered are correct. If the test was successful, The Dropbox connection was testedsuccessfully message will be displayed.
Setting the destination to Dropbox
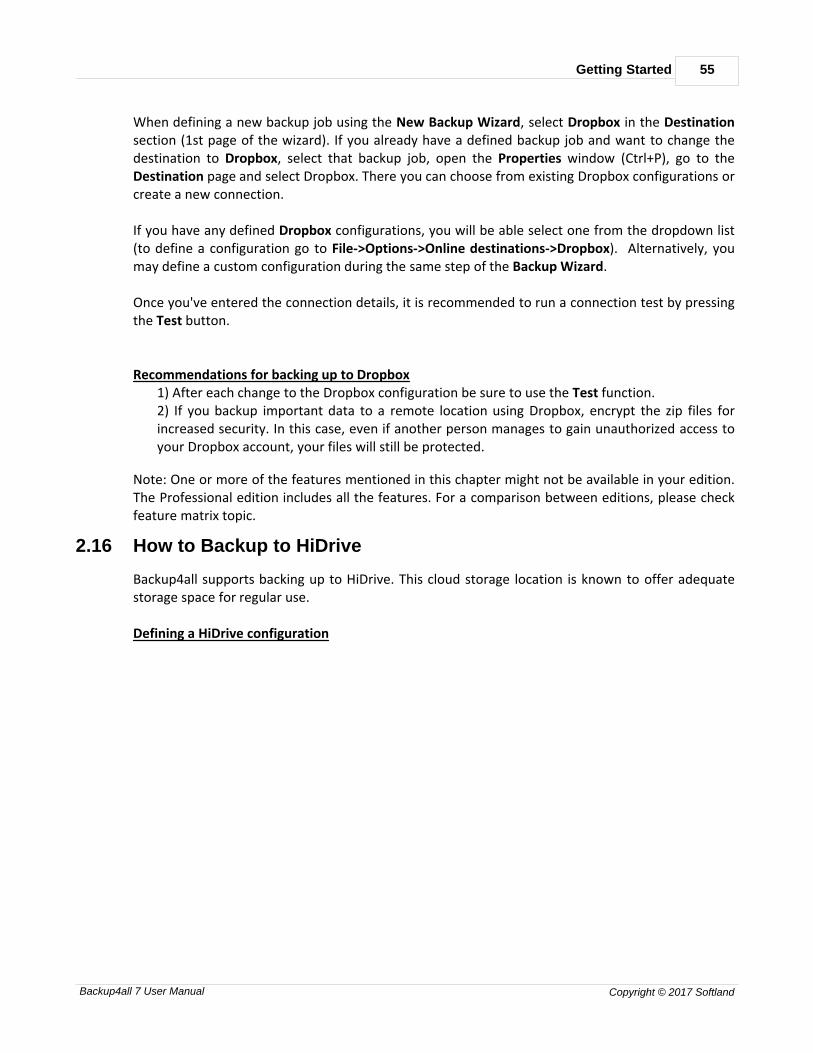
Getting Started 55
Backup4all 7 User Manual Copyright © 2017 Softland
When defining a new backup job using the New Backup Wizard, select Dropbox in the Destinationsection (1st page of the wizard). If you already have a defined backup job and want to change thedestination to Dropbox, select that backup job, open the Properties window (Ctrl+P), go to theDestination page and select Dropbox. There you can choose from existing Dropbox configurations orcreate a new connection.
If you have any defined Dropbox configurations, you will be able select one from the dropdown list(to define a configuration go to File->Options->Online destinations->Dropbox). Alternatively, youmay define a custom configuration during the same step of the Backup Wizard.
Once you've entered the connection details, it is recommended to run a connection test by pressingthe Test button.
Recommendations for backing up to Dropbox
1) After each change to the Dropbox configuration be sure to use the Test function.2) If you backup important data to a remote location using Dropbox, encrypt the zip files forincreased security. In this case, even if another person manages to gain unauthorized access toyour Dropbox account, your files will still be protected.
Note: One or more of the features mentioned in this chapter might not be available in your edition.The Professional edition includes all the features. For a comparison between editions, please checkfeature matrix topic.
2.16 How to Backup to HiDrive
Backup4all supports backing up to HiDrive. This cloud storage location is known to offer adequatestorage space for regular use.
Defining a HiDrive configuration
Backup4all 756
Backup4all 7 User Manual Copyright © 2017 Softland
Before using HiDrive as a destination for backing up, you should define a new HiDrive configurationin File->Options->Online destinations->HiDrive page. Once defined, you will be able to apply thisHiDrive configuration to individual backup jobs.
Press the Add button once in File->Options->Online destinations->HiDrive to add a new HiDriveconnection . After you press Add button, the New HiDrive configuration name will appear in the listand you can enter the other settings for this connection:
· Authentication - pressing the "Choose account" button will open an authentication page inyour default Browser application. Log into HiDrive to allow Backup4all access to the account.
· Folder - If you want to use a specific folder, press the Browse button to select the folder or tocreate a new one.
In the Online destinations page you can set the number of retry attempts and interval length (wait)for connecting to HiDrive. This is a global setting for all HiDrive connections. By default, if the servercannot be reached the first time, Backup4all will attempt to connect 5 more times at intervals of 60seconds. If all attempts fail, then the backup is aborted. Once you have finished defining the connection, press the Test button to check if the HiDrive detailsyou have entered are correct. If the test was successful, The HiDrive connection was testedsuccessfully message will be displayed.
Setting the destination to HiDrive

Getting Started 57
Backup4all 7 User Manual Copyright © 2017 Softland
When defining a new backup job using the New Backup Wizard, select HiDrive in the Destinationsection (1st page of the wizard). If you already have a defined backup job and want to change thedestination to HiDrive, select that backup job, open the Properties window (Ctrl+P), go to theDestination page and select HiDrive. There you can choose from existing HiDrive configurations orcreate a new connection.
If you have any defined HiDrive configurations, you will be able select one from the dropdown list(to define a configuration go to File->Options->Online destinations->HiDrive). Alternatively, youmay define a custom configuration during the same step of the Backup Wizard.
Once you've entered the connection details, it is recommended to run a connection test by pressingthe Test button.
Recommendations for backing up to HiDrive
1) After each change to the HiDrive configuration be sure to use the Test function.2) If you backup important data to a remote location using HiDrive, encrypt the zip files forincreased security. In this case, even if another person manages to gain unauthorized access toyour HiDrive account, your files will still be protected.
Note: One or more of the features mentioned in this chapter might not be available in your edition.The Professional edition includes all the features. For a comparison between editions, please checkfeature matrix topic.
2.17 How to Backup to Hubic
Backup4all supports backing up to Hubic. This cloud storage location is known to offer adequatestorage space for regular use.
Defining a Hubic configuration

Backup4all 758
Backup4all 7 User Manual Copyright © 2017 Softland
Before using Hubic as a destination for backing up, you should define a new Hubic configuration inFile->Options->Online destinations->Hubic page. Once defined, you will be able to apply this Hubicconfiguration to individual backup jobs.
Press the Add button once in File->Options->Online destinations->Hubic to add a new Hubicconnection . After you press Add button, the New Hubic configuration name will appear in the listand you can enter the other settings for this connection:
· Authentication - pressing the "Choose account" button will open an authentication page inyour default Browser application. Log into Hubic to allow Backup4all access to the account.
· Folder - If you want to use a specific folder, press the Browse button to select the folder or tocreate a new one.
In the Online destinations page you can set the number of retry attempts and interval length (wait)for connecting to Hubic. This is a global setting for all Hubic connections. By default, if the servercannot be reached the first time, Backup4all will attempt to connect 5 more times at intervals of 60seconds. If all attempts fail, then the backup is aborted.
Once you have finished defining the connection, press the Test button to check if the Hubic detailsyou have entered are correct. If the test was successful, The Hubic connection was testedsuccessfully message will be displayed.
Setting the destination to Hubic
Getting Started 59
Backup4all 7 User Manual Copyright © 2017 Softland
When defining a new backup job using the New Backup Wizard, select Hubic in the Destinationsection (1st page of the wizard). If you already have a defined backup job and want to change thedestination to Hubic, select that backup job, open the Properties window (Ctrl+P), go to theDestination page and select Hubic. There you can choose from existing Hubic configurations orcreate a new connection.
If you have any defined Hubic configurations, you will be able select one from the dropdown list (todefine a configuration go to File->Options->Online destinations->Hubic). Alternatively, you maydefine a custom configuration during the same step of the Backup Wizard.
Once you've entered the connection details, it is recommended to run a connection test by pressingthe Test button.In the File->Options->Online destinations->Backup window you can set the number of retries andthe time between the retries when the Hubic server is unavailable (the When destination not readysection).
Recommendations for backing up to Hubic
1) After each change to the Hubic configuration be sure to use the Test function.2) If you backup important data to a remote location using Hubic, encrypt the zip files forincreased security. In this case, even if another person manages to gain unauthorized access toyour Hubic account, your files will still be protected.
Note: One or more of the features mentioned in this chapter might not be available in your edition.The Professional edition includes all the features. For a comparison between editions, please checkfeature matrix topic.
2.18 How to Backup to S3 Compatible
Backup4all supports backing up to multiple S3 Compatible servers. These cloud backup destinationsare hosted by different companies. The backed up data can be easily accessed from any othercomputer with an Internet connection.The Amazon S3 compatible clouds that can be selected as backup destinations are as follows: Akaza,Aruba Cloud, Caringo, CenturyLink, Cisco, Cloudian, Connectria, Constant, DDN, dinCloud,DreamObjects, Dunkel, T Cloud, Exoscale, Google Cloud Storage, GreenQloud, HGST, Hitachi,HostEurope, IDC Frontier, LeoNovus, Mandic, Minio, NetApp, NiftyClouds, Numergy, QNAP, Revera,Scality, Seeweb, SwiftStack, ThinkOn, Tiscali, vCloud Air (EMC), Verizon, Walrus, and Zettagrid. Youcan also connect another compatible S3 server by manually editing the Settings.
Defining an S3 Compatible configuration

Backup4all 760
Backup4all 7 User Manual Copyright © 2017 Softland
Before using S3 Compatible as a destination for backing up, you should define a new S3 compatibleconfiguration using the File->Options->Online destinations->S3 compatible window. Once defined,you will be able to apply this S3 compatible configuration to individual backup jobs.
Press the Add button once in File->Options->Online destinations->S3 compatible to add a new S3compatible connection . The New S3 compatible configuration name will appear in the list and youcan enter the other settings for this connection:
· Configuration name - Set a name of your choice for the connection.
· S3 Server - Select one of the S3 Compatible servers from the dropdown list. Leave it oncustom if you are connecting to a different server. You can also edit the fields after selecting aserver.
· Endpoint - Type the S3 server endpoint (address:port).
· Use SSL - Check this option if the selected S3 server uses SSL encryption.
· Access Key ID - In this field you have to enter the key for your S3 compatible account.
· Secret Access Key - In this field you'll have to enter the secret key for your account.
· Signature version - Select the signature version used by the S3 Compatible server.
· Region - From the drop down list, select the region where your account is located.
· Bucket- Here you'll have to enter the name of the bucket. You can also create a new bucket atthe selected Region.
· Folder - If you want to use a specific folder, enter its name here.
Getting Started 61
Backup4all 7 User Manual Copyright © 2017 Softland
In the Online destinations page you can set the number of retry attempts and interval length (wait)for connecting to S3 server. This is a global setting for all S3 server connections. By default, if theserver cannot be reached the first time, Backup4all will attempt to connect 5 more times at intervalsof 60 seconds. If all attempts fail, then the backup is aborted.
Once you have finished defining the connection, press the Test button to check if the S3 serverdetails you have entered are correct. If the test was successful, The S3 server connection was testedsuccessfully message will be displayed.
Setting the destination to S3 server When defining a new backup job using the New Backup Wizard, select S3 Compatible in theDestination section (1st page of the wizard). If you already have a defined backup job and want tochange the destination to S3 Compatible, select that backup job, open the Properties window(Ctrl+P), go to the Destination page and select S3 Compatible. There you can choose from existingS3 Compatible configurations or create a new connection.
If you have any defined S3 Compatible configurations, you will be able select one from thedropdown list (to define a configuration go to File->Options->Online destinations->S3 Compatible). Alternatively, you may define a custom configuration during the same step of the Backup Wizard.
Once you've entered the connection details, it is recommended to run a connection test by pressingthe Test button.
Recommendations for backing up to S3 Compatible 1) After each change to the S3 Compatible configuration be sure to use the Test function.2) If you backup important data to a remote location using S3 Compatible, encrypt the zip filesfor increased security. In this case, even if another person manages to gain unauthorized accessto your S3 Compatible, your files will still be protected.
Note: One or more of the features mentioned in this chapter might not be available in your edition.The Professional edition includes all the features. For a comparison between editions, please checkfeature matrix topic.
2.19 How to Backup to USB or Firewire drives
You can backup your data to a USB or Firewire drive. These are practical backup destinations as theyallow you to store important files to external devices, increasing portability. It can be considered asan additional protection from of hardware failures and other natural disasters.
There are external USB hard drives with performance comparable to conventional hard drives.These portable drives (called enclosures) are composed of devices that connect through USB on oneside and to conventional hard drives on the other side. A hard drive is installed into the enclosureand then the enclosure is plugged into the computer, thus creating a normal USB backup device.

Backup4all 762
Backup4all 7 User Manual Copyright © 2017 Softland
Given the size of nowadays hard drives, this can be considered a mass storage device for backuppurposes.
There are external hard drives that, besides USB technology, also use Firewire as a connection port.Even though USB ports are ubiquitous, Firewire hard drives tend to have increased speeds.
Steps for backing up to USB drive with Backup4all:
1) Connect your USB device. In case of disk drives, before setting up the backup job, make surethat the USB drive is turned on and working. Usually, the enclosure has a start button and LEDsignal lights. A green or blue LED light is usually the indication that the device is running.2) Make sure your drive is formatted. If you intend to use a new/unused external hard drive,you might not be able to see it as a distinct drive in Windows Explorer after connecting it. This isbecause the drive has not yet been formatted for use. In Windows, navigate to ComputerManagement and select Disk Management. From there, you can see and format your new drive.If however, the drive is present in Windows Explorer, formatting is not required. USB Flashdrives always come pre-formatted.
· Go to Start->Settings->Control panel->System and Maintenance->AdministrativeTools->Computer Management
If you are prompted for an administrator password or confirmation, type the password orprovide confirmation.
· Under Storage click Disk Management
· To format the volume with the default settings, in the Format dialog box, click OK, andthen click OK again.
· Test to see if the drive is now recognized by going to File Explorer (a new drive lettershould appear)
3) Configure Backup4all. If the drive is recognized by Windows, it will be recognized byBackup4all too. To back up to the USB drive, you should define a backup job in Backup4all thathas the destination set to the USB drive. When defining a new backup job using the New BackupWizard, in the destination section (1st page of the wizard), select Local, then select your devicefrom the Drive list. Finally, you may type in or browse for a folder destination.
Some USB drives have a button to start the execution of an associated program. If you have such adevice you can configure Backup4all to execute a backup job or a backup tag when the button ispressed. After the USB drive is ready, go to the File->Options->Backup page of Backup4all. UnderBackup on demand, check Enable One Touch Backup support. Press Detect to check if the USB driveis compatible with the One Touch Backup feature of Backup4all. Note: One or more of the features mentioned in this chapter might not be available in your edition.The Professional edition includes all the features. For a comparison between editions, please checkfeature matrix topic.
2.20 How to Send Email Notifications
Email Notifications is a very useful feature that enables Backup4all to send an email containing thestatus of a backup job upon its completion.

Getting Started 63
Backup4all 7 User Manual Copyright © 2017 Softland
Enabling email notifications
1) Open File->Options->Email 2) Check the Enable email notifications box3) Enter the following details:
· SMTP Server - specify the name or IP address of the SMTP server used for sending themail (example: smtp.novapdf.com) in the Server name or IP field and a Port number forit (usually is 25); you can also use Secure Socket Layer when connecting to the SMTPserver.
· Email addresses - you must specify the email address used to send the email (From field)and optionally a Reply To email address
· Authentication - if the SMTP server requires authentication check the Server requiresauthentication box and enter an user name and a password.
· Dial-up connection - if you are using a dial-up connection, select a method thatBackup4all should use for sending emails: Automatically start-up (it will connect withoutuser assistance) or Manually start-up (it will require the users' assistance for enabling theconnection).
4) Click on the Send test email button from the SMTP Server section and enter the emailaddress where you want to receive the notification. Once you press OK you should receive a testemail. If you didn't receive it, you must revise the settings you configured.5) Press OK to save your settings
Sending email notifications Email notifications can be enabled individually for each backup job. To do so follow these steps:
1) Select a backup job and open the Backup Properties window (right click and select Propertiesor Ctrl+P)2) Go to the Email page and check the Send emails option.3) Type in a valid email address to which you want to receive the notifications for this job.4) Optionally you can edit the default emails sent and also to attach the backup log to the email.5) Press Save.
Note: One or more of the features mentioned in this chapter might not be available in your edition.The Professional edition includes all the features. For a comparison between editions, please checkfeature matrix topic.
2.21 How to Configure One Touch Backup
Some USB enclosures have a button to start the execution of an associated program. If you havesuch a device, you can configure Backup4all to execute a backup job or a backup tag when thisbutton is pressed. If your One Touch Backup device is not detected by Backup4all (Backup4all is notnatively compatible with the device), you could use the command line parameters to create acommand that can be associated to the One Touch button of your device.
Backup4all 764
Backup4all 7 User Manual Copyright © 2017 Softland
See this section for details. If the One Touch Backup option is enabled when the application starts and there is no backup job orbackup tag set to be executed when the One Touch button of the USB enclosure is pressed, the userwill be asked to choose one from the options displayed in the One Touch Backup dialog:
· Create a new backup job for One Touch Backup. If you select this, the New Backup Wizardwill start and you can create a new backup job to be used with the One Touch Backup feature
· Select an existing backup job or backup tag for One Touch Backup. If you select this, the File->Options->Backup page will open and you can select the backup job or tag you want to use.This option is disabled if there are no backup jobs.
· Disable this feature. This will disable the One Touch Backup feature. You can activate it againfrom the File->Options->Backup page.
If you press Cancel, Backup4all will open, but when you will press the One Touch button of the USBdevice, the same dialog will be displayed. This dialog will appear again if the backup job (executedwhen the One Touch button is pressed) was deleted.
Note: One or more of the features mentioned in this chapter might not be available in your edition.The Professional edition includes all the features. For a comparison between editions, please checkfeature matrix topic.
2.22 How to Use One Touch Backup
You enable the One Touch Backup support from File->Options->Backup page. When running for thefirst time, there will be no configured backup job to execute, so you will have to configure it asexplained in the previous section, How to Configure One Touch Backup. Once everything is configured, you will just have to push the One Touch button and the selectedbackup job or backup tag will be executed. If Backup4all is not started, it will start automatically. If it is already started, but minimized it willshow a pop-up window or the main window while backing up (depending on the settings from theOptions window). When the backup finishes, Backup4all is automatically closed if the Exit application when finishedoption is checked. If the main window of the application was already open when the One Touchbutton was pressed, the Exit application when finished option will be ignored.
Note: One or more of the features mentioned in this chapter might not be available in your edition.The Professional edition includes all the features. For a comparison between editions, please checkfeature matrix topic.

Getting Started 65
Backup4all 7 User Manual Copyright © 2017 Softland
2.23 How to Enable Detailed Logging
Backup4all allows you to log detailed information about executed operations (backup, restore ortest). This means that, besides the warnings and errors, the log file will contain detailed informationabout all files handled by the backup, restore or test process. To enable detailed logging:
1) Go to File menu and open the Options window2) Switch to the Logs and history page3) Check the Log detailed information option4) Check the Include summary in log option (this will add all the information available from theSummary view to the log file)5) Additionally, you can also limit the size of the log folder. In the Log folder section, selectRestricted to and set the maximum size that the folder is allowed to reach.6) From the Log Viewer section, you can change the program that opens the log files. From thedrop-down list select either Notepad or Wordpad. You can also browse the computer to selectanother text editor.7) From the log file extension list, you can select the extension of the generated log file: .log or .txt8) Click OK to close the window and save the changes
Note: One or more of the features mentioned in this chapter might not be available in your edition.The Professional edition includes all the features. For a comparison between editions, please checkfeature matrix topic.

Backup Types
Part
III

Backup Types 67
Backup4all 7 User Manual Copyright © 2017 Softland
3 Backup Types
3.1 Backup Types
Backup4all stores a summary snapshot of the file information into a backup catalog file (".bkc") eachtime a backup is executed. For every file backed up, the snapshot contains the file name, size andattributes as well as the date and time of creation, latest modification and latest access.
Legacy backup applications inspect each file's archive flag to identify which files have been changed. Backup4all will not interfere with any other backup software, because it does not need to read orchange the archive flags, instead it uses the catalog file to decide which files have to be backed upand which do not. implements the fundamental backup types: smart backup, full backup, differential backup,incremental backup and mirror backup. Below you can find an overview of these types.Backup4all implements the fundamental backup types: Smart, Full, Differential, Incremental, andMirror. With the exception of the Mirror type, the first time any job is executed, it will run as a FullBackup, irrespective of the job's type. Below you can find an overview of all backup types.
Smart Backup
Smart backup is the default backup type. When executed, Backup4all will decide which backup typeshould be performed: full, differential or incremental. It will also decide whether to merge or deleteolder backup versions, all in order to efficiently use the destination free space and accommodateother user options. It will try to keep as many backup versions as possible in the availabledestination space.
Full Backup
The Full Backup creates an archive out of all the folders and files that were selected to be backed up.Because the Full Backup stores all files and folders, backing up frequently will allow faster andsimpler restore operations. When you choose other backup types, restore jobs may take longer.
Differential Backup
A Differential Backup contains all the files that have been added or changed since the last FullBackup. The advantage of the Differential Backup is that it has a shorter backup time. However, ifyou perform the differential backup too many times, eventually the size of a backup archive mightgrow to be larger than the reference Full Backup archive.
Incremental Backup
An Incremental Backup stores all the files that have been added or changed since the last full,
Backup4all 768
Backup4all 7 User Manual Copyright © 2017 Softland
differential or incremental backup. Since this method doesn't back up the same exact files multipletimes, an Incremental Backup takes the least time to complete. However, during a restoreoperation, each Incremental Backup must be processed, which could result in a lengthy restore job.
Mirror Backup
A Mirror Backup is identical to a Full Backup, with the exception that the files are not compressedinto a single zip file. A Mirror Backup is most frequently used to create an exact copy of the backupdata. It has the benefit that the backup files can be readily accessed using tools like File Explorer.Using the Mirror Backup type, you can also choose to archive each individual file, preserving thefolder structure, which also allows you to use the zip compression and encryption features.Using the mirror backup type, you can also choose to zip each file individually, preserving the folderstructure. This allows you to use the zip compression and encryption features.
Block backup
You can use block backup option to copy only the modified parts of the source files. This is useful forlarge files (such as .PST or database files), as only the modified part of the file will be backed upinstead of the entire file. You can use an automatic block size or you can set the block size manually. Note: The block backup option must be enabled from the first backup execution, otherwise youwon't be able to use it on that backup job. If you already have a backup job and want to use blockbackup, you'll have to create a new backup job.
Save storage space
In Backup4all you have two options for saving storage space. To reduce the overall backup size, youcan either limit the number of file versions to be stored or limit the number of backups. When youlimit the number of backups, you can also opt to Merge backups in order to avoid exceeding the setlimit. These options can only be used for Full, Differential, and Incremental backup types.
Note: One or more of the features mentioned in this chapter might not be available in your edition.The Professional edition includes all the features. For a comparison between editions, please checkfeature matrix topic.
3.2 Smart Backup
What is the Smart Backup?
Smart Backup is a backup type that combines the full, differential and incremental backup methodsalong with cleanup operations, in order to efficiently manage the backups according to the backupsettings and the available disk space. The advantage of the Smart Backup is that you don't need toworry about the number of backups to store, which backup version to clean, and which backups tomerge, as Backup4all will take care of that. The Smart Backup type starts with a Full Backup.

Backup Types 69
Backup4all 7 User Manual Copyright © 2017 Softland
Description of the Smart Backup Type It would be ideal to make full backups all the time because they are the most extensive and are self-contained. However, the amount of time it takes to run full backups often prevents us from usingthis backup type. Full backups are often restricted to a weekly or monthly schedule. However, theincreasing speed and capacity of backup media are making it more feasible to perform these fullbackups overnight. Full backups, if you have the time to perform them, offer the best solution for data protection. Ineffect, a single backup is sufficient to completely restore all backed-up files. The algorithm takes in consideration the destination size and follows a specific configuration forselecting the backup type to be performed. The configuration dictates the following:
· Full backup - if the sizes of last differential and all incremental backups since last full/differential exceeds 80% of the full backup size.
· Differential backup - if there isn't a last differential and the size of all incremental backupssince last full exceeds 30% of the full size, a differential backup will be executed.
· Differential backup - if there is a last differential and the size of all incremental backups sincelast differential exceeds 50% of the last differential size, a new differential will be executed.
The maximum allowed size of the backups can be defined as an absolute value or as a percentage ofthe space available in the destination.
Advantages
· It automatically decides the best backup type to be executed
· The free disk space in the destination is properly managed, so you won't get any errors forrunning out of space
Disadvantages
· You cannot select how many backup/file versions to be saved
· Backup4all may create less efficient backup versions given the available space
Configuring a Smart Backup The output of the Smart Backup is a compressed zip file container. You can select the zipcompression ratio from the Compression page in Backup Properties. Backup4all can also encrypt thebackup archives. This gives you the option to protect your backed up data from being stolen andused.The following options can be used to limit the maximum space to be occupied by the backup in thedestination:
· Limit backup size to ... % of destination size (default is 80%)
· Limit backup size to ... KB/MB/GB (default is 50 GB)
Note: One or more of the features mentioned in this chapter might not be available in your edition.
Backup4all 770
Backup4all 7 User Manual Copyright © 2017 Softland
The Professional edition includes all the features. For a comparison between editions, please checkfeature matrix topic.
3.3 Full Backup
What is the Full Backup?
The Full Backup is the starting point for all backup jobs and contains all the data in the folders andfiles that are selected to be backed up. Because the Full Backup stores all files and folders, frequentbackups will result in faster and simpler restore operations. Remember that when you choose otherbackup types, restore jobs may take longer.
Description of the Full Backup Type It would be ideal to make full backups all the time because they are the most extensive and are self-contained. However, the amount of time it takes to run full backups often prevents us from usingthis backup type. Full backups are often restricted to a weekly or monthly schedule. However, theincreasing speed and capacity of backup media are making it more feasible to perform these fullbackups overnight. Full backups, if you have the time to perform them, offer the best solution for data protection. Ineffect, a single backup is sufficient to completely restore all backed-up files. Advantages
· The fastest restore time
Disadvantages
· The slowest backup time
· The storage space requirements are the highest (compared to incremental or differentialbackups)
The Full Backup Type in Backup4all When making full backups, storage space can become an issue. In Backup4all you have two optionsfor saving storage space. To reduce the overall backup size, you can either limit the number of fileversions to be stored or limit the number of backups. The output of the Full Backup is a compressedzip file container. You can select the zip compression ratio from the Compression page in BackupProperties. Backup4all can also encrypt the backup archives. This gives you the option to protectyour backed up data from being stolen and used.
Note: One or more of the features mentioned in this chapter might not be available in your edition.The Professional edition includes all the features. For a comparison between editions, please checkfeature matrix topic.
Backup Types 71
Backup4all 7 User Manual Copyright © 2017 Softland
3.4 Differential Backup
What is the Differential Backup? A Differential Backup contains all the files that have been added or changed since the last FullBackup. The advantage of the Differential Backup is that it has a shorter backup time. However, ifyou perform the differential backup too many times, eventually the size of a backup archive mightgrow to be larger than the reference Full Backup archive. Description of the Differential Backup Type There is a significant distinction between The Differential Backup and the Incremental Backup types.Although they seem similar, their usage reveals the true difference. The Differential backup only uses the last Full Backup as the reference for what to backup. Hence, itkeeps accumulating the changes until another Full backup becomes the new reference. In contrast, the Incremental Backup leaves out all changes that have already been backed up in oneway or another. So, while the Incremental backup is more efficient in terms of space, the DifferentialBackup is more reliable as a backup source. The true versatility comes in combining the twomethods to suit your needs.
Restoring a differential backup is a faster process than restoring an incremental backup because onlytwo backup container files are needed: the latest full backup and the latest differential backup. Backup4all uses the information it has recorded in its catalog file (".bkc") to determine whether afile has changed since the last full backup or not. Use differential backup if you have a reasonable amount of time to perform backups. The upside isthat only two backup container files are needed to perform a complete restore. The downside is ifyou run multiple differential backups after your full backup, you're probably including some files ineach differential backup that were already included in earlier differential backups, but haven't beenrecently modified. Advantages
· Restore is faster than restoring from incremental backup
· Backing up is faster than a full backup
· It uses less storage space than full backup
Disadvantages
· Restore is slower than restoring from full backup
· Backing up is slower than incremental backup
· It uses more storage space than incremental backup
Differential Backup Type in Backup4all
Backup4all 772
Backup4all 7 User Manual Copyright © 2017 Softland
Backup4all supports the differential backup type and offers a solution for the slow backup issue.In time, the differential can grow to a size that is equal or larger than the full version. Therefore thefollowing options can be used to trigger the creation of a new full backup:
· Automatically make full backup if the differential exceeds ...% of full backup size (default is50%)
· Automatically make full backup if the differential exceeds ... (default is 100 MB)
The system calculates the backup size for the differential backup and if the selected condition is metit performs a full backup.
Note: One or more of the features mentioned in this chapter might not be available in your edition.The Professional edition includes all the features. For a comparison between editions, please checkfeature matrix topic.
3.5 Incremental Backup
What is Incremental Backup? An Incremental Backup stores all the files that have been added or changed since the last full,differential or incremental backup. Since this method doesn't back up the same exact files multipletimes, an Incremental Backup takes the least time to complete. However, during a restoreoperation, each Incremental Backup must be processed, which could result in a lengthy restore job. Description of the Incremental Backup Type Incremental backup provides a faster method of backing up data than repeatedly running fullbackups. During an incremental backup only the files that have changed since the most recentbackup are included. That is where it gets its name: each backup is an increment since the mostrecent backup. The time it takes to execute the backup may be a fraction of the time it takes to perform a fullbackup. Backup4all uses the information recorded in its catalog file (".bkc") to determine whether afile has changed since the most recent backup. The advantage of reduced backup duration comes with a price: increased restore duration. Whenrestoring from incremental backup, you need the most recent full backup as well as everyincremental backup you've made since the last full backup. For example, if you did a full backup on Friday and incremental on Monday, Tuesday andWednesday, and the PC crashes Thursday morning, you would need all four backup container files:Friday's full backup plus the incremental backup for Monday, Tuesday and Wednesday. Bycomparison, if you had done differential backup on Monday, Tuesday and Wednesday, then torestore on Thursday morning you'd have needed Friday's full backup plus Wednesday's differentialbackup. Advantages

Backup Types 73
Backup4all 7 User Manual Copyright © 2017 Softland
· Backing up is the fastest
· It uses the least storage space
Disadvantages
· Restore is the slowest
Incremental Backup Type in Backup4all Backup4all supports incremental backup type and offers a solution for the slow restore issue.To keep the number of stored backups to a reasonable number and reduce the size of the backups,Backup4all provides three options: Yes, limit number of file versions, Yes, limit number of backupsand Merge backups. These options will perform an internal merge to keep the number of storedbackups under the selected limit.The following options can be used to trigger the creation of a new full backup:
· Automatically make full backup if all increments exceed ... % of full backup size (default is50%, not checked)
· Automatically make full backup if all increments exceed ... (default is 100 MB, not checked)
The system calculates the file sizes for the incremental and if the selected condition is met, itperforms a full backup. Note: One or more of the features mentioned in this chapter might not be available in your edition.The Professional edition includes all the features. For a comparison between editions, please checkfeature matrix topic.
3.6 Mirror Backup
What is Mirror Backup? A mirror backup is identical to a full backup, with the exception that the files and folders are notcompressed in zip files and they cannot be protected with a password. A mirror backup is mostfrequently used to create an exact copy of the backup source data. It has the benefit that thebackup files can also be readily accessed using tools like File Explorer. Description of the Mirror Backup Type A mirror backup is an exact copy of the selected folders and files at a given time. Mirror backup isthe fastest backup method because it copies files and folders to the destination without anycompression. However, the increased speed has its drawbacks: it needs larger storage space and itcannot be password protected. While the other backup types collect all the files and folders being backed up each time into a singlecompressed container file, a mirror backup keeps all the individual files separately in thedestination. That is, the destination becomes a mirror (exact copy) of the source. You can evendirectly access files in the destination without needing to use Backup4all's restore feature, because

Backup4all 774
Backup4all 7 User Manual Copyright © 2017 Softland
each file is just an exact copy of the original. One handy feature of mirror backup is Backup4all's Fast mirror option. When this option is selected,any mirror operation after the first will only copy new and modified files, making the operation veryfast. Another important feature is that users can choose to zip each file individually using the Zip the filesoption. In this case, the compression and encryption options can be used.
A mirror backup cannot keep track of different versions of files. However, Backup4all provides anoption to customize destination folder names using user-defined parameters, giving you the abilityto save each mirror backup in a different folder location. Restore using Backup4all is possible onlyfrom the latest mirror backup, but all previous mirror backups remain available in the destinationand can be accessed manually. Advantages
· The fastest backup type, especially in conjunction with the Fast mirror option
· It creates a snapshot of the selected files and folders in the destination which you can browseand access later without needing to run Backup4all
· If used with Zip the files option, a selective restore is faster than in any other backup typewith zip.
Disadvantages
· If not zipped, it needs more storage space than any other backup type
· Cannot track different versions of files Note: One or more of the features mentioned in this chapter might not be available in your edition.The Professional edition includes all the features. For a comparison between editions, please checkfeature matrix topic.
3.7 Backup Types in Backup4all
How are the Backup Types Implemented in Backup4all? Backup4all creates two main types of backups:
· Backup types with zip compression
· Mirror backup type
User can change the backup type from the Type page in Backup Properties, or from a specific typepage, by checking the box to select that type as default backup type.
Backup Types with Zip Compression Full, differential and incremental backup use zip compression to reduce the size of the storedbackup versions. To keep the number of stored zip files at a reasonable number, the applicationprovides three options in the Storage page: Yes, limit number of file versions , Yes, limit number of

Backup Types 75
Backup4all 7 User Manual Copyright © 2017 Softland
backups and Merge backups . These options either delete older stored backups or perform aninternal merge to keep the number of stored backups or file versions under the selected limit. The Yes, limit number of file versions, Yes, limit number of backups and Merge backups optionscannot be used when the backup destination is on a removable media: floppy disk, CD, DVD, Blu-raydisc etc. Customize zip name prefixTypically the name of the zip file is something like: "1_C.zip", "1_D.zip" etc. (one zip for each drive).The names of these zip files do not make much sense for the user but they can be customized bypressing the Insert tag button. Following tags are predefined:
· Backup Name (<BACKUP NAME>)
· Backup Number (<BACKUP NUMBER>)
· Backup Type (<BACKUP TYPE>)
· Backup Date (<DATE>)
· Backup Time (<TIME>)
· Backup Hour (<HOUR>)
· Backup Minute (<MINUTE>)
· Backup Second (<SECOND>)
· Backup Year (<YEAR>)
· Backup Month (<MONTH_MMM>)
· Backup Month - numeric (<MONTH_MM>)
· Backup Week (<WEEK>)
· Backup Day of Week (<DAY OF WEEK>)
· Backup Day (<DAY>)
· Backup Day of the Week (use locale) (<DAY OF WEEK LOC>)
· Backup Day of Week (name) (<DAY OF WEEK NAME>)
· Computer Name (<COMPUTER NAME>)
· User Name (<USER NAME>)
You can also add your text in the edit tag field. Use the Preview button to see how the names of thezip files will look like.Windows does not allow the following characters in the file name: / \ * ? : " < > |, so Backup4all willalso not allow them to be entered in the edit tag field.
Smart backup type
The smart backup type will perform full, differential or incremental backups, depending on thedestination free disk space or the limit size you set in Backup Properties. The smart backup type willautomatically decide which is the best action to perform by combining the backup types.
Full Backup Type
The full backup type will always backup all the files defined in the sources. Incremental and
Backup4all 776
Backup4all 7 User Manual Copyright © 2017 Softland
differential backups will create a full backup first, because they will back up the new files (all files arenew if the backup was never executed).
Differential Backup Type
For a differential backup the system will always backup the differences from the last full backup,regardless of the intermediate versions between the latest full and the current differential backup.The first execution of a differential backup is a full backup, because it backs up the new files (and allthe files are new if the backup was never executed).
Incremental Backup Type
In case of incremental backups only the new and the modified files since last backup (differential,incremental or full backup) are added to the backup. Each file can have many versions stored in thebackup files.. Backup4all can generate custom zip file names, set a size limit for zip files and encrypt them. Formore details look at the Compression page from the Backup Properties window. If a new backup job is created and the backup type is set to incremental or differential, then whenthe backup job is first run, the application will perform a full backup. This also happens when thecatalog (".bkc") file is not found in the destination folder or the Clear backup action was executedbefore backup (see the Advanced page of the Backup Properties window). Mirror Backup Type The mirror backup implementation provides some useful options to improve the backup quality. Since the mirror backup keeps only one version of each file, you can use the Create subfolder(s) indestination with following name option to copy the files to customized subfolders, thereforekeeping more versions of the files. Backup4all can only use the latest version for the Restore or Testoperations. You can restore older versions manually. If the Copy files in a subfolder option is checked, the files will be copied in a subfolder of thedestination folder (typically you will see a ".bkc" file and a folder with the same name). If the optionis not set, the files (and folder structure) will be copied directly into the destination folder. When the Fast Mirror (copy only new or modified files) option is used, Backup4all uses theinformation stored in ".bkc" files to copy only new or modified files to the destination. If this optionis not set, the system will copy all files each time the backup is executed. Using the mirror backup type, you can also choose to Zip the files. This option will zip each fileindividually, preserving the folder structure. In this case, you can use the zip compression andencryption.
Backup Types 77
Backup4all 7 User Manual Copyright © 2017 Softland
When changing the backup type between Smart, Full, Incremental or Differential the older backupsare not deleted, only the type of the next backup is changed. If the Yes, limit number of fileversions, Yes, limit number of backups and Merge backups options are used, the application willdelete or merge older backups so that the number of versions is less or equal to the specified limit.However when changing between Mirror and Smart, Full, Incremental or Differential, the olderversions are deleted.
On the Storage page, by default the Yes, limit number of file versions and the Yes, limit number ofbackups options are not enabled. This means that the system will keep all the stored backupversions. If you choose to enable the Merge backups option, when the limit is reached the systemwill perform an internal merge between the older versions keeping the number of stored backupsequal to the specified limit (the merge between zip files is necessary to keep at the latest file versionfrom each zip file to be merged).However when changing between Mirror and Smart, Full, Incremental or Differential, the olderversions are deleted.
Note: One or more of the features mentioned in this chapter might not be available in your edition.The Professional edition includes all the features. For a comparison between editions, please checkfeature matrix topic.

Backup to CD, DVD or Blu-ray
Part
IV
Backup to CD, DVD or Blu-ray 79
Backup4all 7 User Manual Copyright © 2017 Softland
4 Backup to CD, DVD or Blu-ray
4.1 Backup to CD, DVD or Blu-ray
Backing up to CD, DVD or Blu-ray media has become increasingly common due to mature technologyand cheap CD, DVD or Blu-ray burners.If you plan to do a backup to a CD, DVD or Blu-ray disc, please consider our recommendations:
· Do not use the same CD, DVD or Blu-ray disc to store consecutive backup versions. It's betterto use different CD, DVD or Blu-ray media for each backup version (change the CD, DVD orBlu-ray disc at each backup run). Use a set of CD, DVD or Blu-ray media and rotate themperiodically (e.g.: take 7 CD media, one for each week day; start with the first CD again every 7days). The reason for this is that in case the burn process fails or the CD, DVD or Blu-ray databecomes corrupted, you still have the previous backup version on a different disc.
· Rewritable CD, DVD or Blu-ray media can be burned only a limited number of times. Whenstrange errors happen you should consider that the CD, DVD or Blu-ray disc might be over-burned (worn out).
· Always test the backed up data after burning. Backup4all has a special option to automate thetest after backup and also in case you are spanning multiple CD, DVD or Blu-ray discs ,Backup4all test each CD, DVD or Blu-ray disc before writing the next one.
Backup4all makes the backup to CD, DVD or Blu-ray disc process to be easy to perform: just set thebackup destination to the CD, DVD or Blu-ray burner drive and run the backup. By default Backup4alluses its own built-in burning engine to backup to CD, DVD or Blu-ray media (you do not need thirdparty drivers or burning software to be installed). If you prefer packet writing (using third party software) you can select it in the Write methodsection. If the backup does not fit onto one CD, DVD or Blu-ray disc, Backup4all will automatically span thebackup over multiple media. Each disc is assigned a different label for future identification. Werecommend marking the CD, DVD or Blu-ray disc with this label. A few recommendations before backing up to CD, DVD and Blu-ray discs:
· Before backup execution, be sure to insert the CD, DVD or Blu-ray disc containing the latest ".bkc" file if you have the option Use local catalogs unchecked (in Backup Properties->Advanced->Backup options section, default is checked)
· On backups to hard disk, you can limit the number of stored zip backups by using the Yes, limit number of file versions, Yes, limit number of backups and Merge backups options. Theseoptions do not apply to CD, DVD or Blu-ray media, you cannot limit the number of storedbackups on removable media.
· A mirror backup copies every file matching the sources and the file filter to CD, DVD or Blu-raydisc. On a mirror backup to hard disk, files that are deleted and excluded from sources can bedeleted from destination too if you want so. This is not possible on the CD, DVD or Blu-ray disc, so deleted and excluded files are just left there as they were burned before, but the catalog(".bkc") file is updated and the restore operation will not copy these files back.
· When backing up to CD, DVD or Blu-ray discs Backup4all requires additional free space on the
Backup4all 780
Backup4all 7 User Manual Copyright © 2017 Softland
drive where the Temporary Folder is located (at least 700Mb when backing up to CDs, or4.7Gb when backing up to DVDs)
Note: One or more of the features mentioned in this chapter might not be available in your edition.The Professional edition includes all the features. For a comparison between editions, please checkfeature matrix topic.
4.2 Use Built in Driver
Backup4all does not need third party drivers or other CD, DVD or Blu-ray burning software to beinstalled (like ActiveX, ASPI, etc) to be able to burn a CD, DVD or Blu-ray. Backup4all has a built-inCD, DVD or Blu-ray burner to backup to CD, DVD or Blu-ray disc directly. Set Up Internal CD, DVD or Blu-ray Burner There are three simple steps to set up the internal CD, DVD or Blu-ray burner:
1) Open the Backup Properties window and go to the Destination page.2) Click on Optical, then select the drive letter for the CD, DVD or Blu-ray burner device youwant to use.3) In the same page, you can:
· configure the burn speed
· set the Erase disk before writing option
· switch the write method between build-in driver and UDF file system
· use a custom prefix
You can use two burners for UDF disc format: Use SCSI Pass Through Direct layer (SPTD) and Usenative Win32 interface (SPTI). This format can be used to write on CD-R/CD-RW/DVD-R/DVD+R/DVD-RW/DVD+RW/DVD-DL/HD-DVD/Blue-ray/Blu-ray DL.
Use internal CD, DVD or Blu-ray burner Typically, a backup to CD, DVD or Blu-ray disc performs additional steps shown in the status bar atthe bottom of the main window: burning, finalizing, and loading disc. During the last operation, theCD, DVD or Blu-ray disc is ejected and reloaded. After this step the backup is tested and the CD, DVDor Blu-ray disc ejected again (if these options are set).Backup4all can also perform an additional Erase CD/DVD/Blu-ray... action for appropriate media(rewritable CD, DVD or Blu-ray discs)
Note: One or more of the features mentioned in this chapter might not be available in your edition.The Professional edition includes all the features. For a comparison between editions, please checkfeature matrix topic.
4.3 Use Packet Writing
If you do not wish to use the built-in burner or your CD, DVD or Blu-ray device is not compatible, youcan use third party packet writing software.
Backup to CD, DVD or Blu-ray 81
Backup4all 7 User Manual Copyright © 2017 Softland
Packet Writing Software Packet writing software can write only to CD-RW, DVD-RW or DVD+RW if the disks are formattedusing the Universal Data Format (UDF) file system. The advantage of packet writing is that your rewritable media can be used like a floppy or zip disk(drag and drop from File Explorer is also possible). The disadvantage of using packet writing is thatCD, DVD or Blu-ray discs written with this method are recognized on other computers only if thesame third party packet writing software is installed there too. Set Up Packet Writing There are three simple steps to set up the packet writing to work with Backup4all:
1) Open New Backup Wizard or Backup Properties and go to the Destination page.2) Click on Optical, then select the drive letter for the CD, DVD or Blu-ray burner device youwant to use.3) You must select Use UDF file system. Here you can also set the Erase disk before writingoption. Press the OK button.4) If packet writing is set, you will see the following message on the Destination page: [Devicename] Writing method is UDF
Use Packet Writing Backup4all detects if the CD-RW, DVD-RW, DVD+RW or Blu-ray RW disc is UDF formatted. If the discis not UDF formatted it will show the following message: Disk in drive [drive letter] is not UDFformatted. Please insert a UDF formatted disc.
Note: One or more of the features mentioned in this chapter might not be available in your edition.The Professional edition includes all the features. For a comparison between editions, please checkfeature matrix topic.
4.4 Writing to CD, DVD or Blu-ray disc
By default, the backup catalog (.bkc) is stored both on the destination CD, DVD or Blu-ray disc andlocally. To see if the catalog will be stored locally too, select Backup Properties for a backup job, goto Advanced and see if the Use local catalogs (.bkc) option is checked.If it is unchecked the backup catalog is stored only on the destination. The recommended option isto leave it checked. When the backup process starts, Backup4all searches for the ".bkc" file locally (by default, assumingthat you didn't uncheck the option Use local catalogs), then:
· If the catalog file is found, Backup4all will make a new version for the backup job. If you wishto write the new backup version on a separate CD, DVD or Blu-ray disc (this is recommended)then you should set the Ask for a new disk before backup option.

Backup4all 782
Backup4all 7 User Manual Copyright © 2017 Softland
· If the backup catalog is not found locally (was deleted by mistake) or if the Use local catalogsoption is unchecked, Backup4all will ask for the last CD, DVD or Blu-ray disc used for thebackup. When it finds the backup catalog, Backup4all will make a new version for the files inthe backup job.
· If the catalog file is not found on the destination either, Backup4all will start with a new fullbackup
Backup4all will automatically span the backup over multiple media if the size of the backup job doesnot fit on a single CD/DVD/Blu-ray disc. For each disc Backup4all will assign a different label forfuture identification. We recommend marking the CD, DVD or Blu-ray disc with this label.When spanning multiple CD, DVD or Blu-ray discs, Backup4all will create independent zip files,meaning that if you have a backup that spans over 3 CDs and if one of the CDs becomes unreadable,you will still be able to access and recover the data on the other 2 CDs. It is recommended to always leave the Test after backup option (Backup Properties- >Advanced)checked, especially if your backup is written on CD, DVD or Blu-ray disc. In case of disk spanning,Backup4all will test your backed up data after each individual written disc. This way if one of thediscs has errors you know before the backup job is finished and you can interrupt the backupprocess in time. Note that when backing up to CD, DVD or Blu-ray disc Backup4all requires additional free space onthe drive where the Temporary Folder is located (at least 700Mb when backing up to CDs, 4.7Gbwhen backing up to DVDs or 25GB when backing up to Blu-ray discs).
Note: One or more of the features mentioned in this chapter might not be available in your edition.The Professional edition includes all the features. For a comparison between editions, please checkfeature matrix topic.
4.5 Other CD/DVD/Blu-ray Settings
The File->Options->CD, DVD or Blu-ray window contains various settings related to the burnprocess.
CD, DVD or Blu-ray
Use SCSI Pass Through Direct Layer (SPTD)Selected by default. Backup4all uses this internal burning engine to write CD, DVD, HD-DVD or Blu-ray discs. SPTD is a new method of access to storage devices and has the ability to provide directcontrol of devices without risk of compromising it by some malicious 3rd party filter drivers or other"rootkit" applications. SPTD is currently supported by all Microsoft OS newer than Windows XP. SPTD (similar to otheraccess layers) is not removed from your system after Backup4all uninstall, in order not to disruptother applications that may use it. Use native Win32 Interface (SPTI)
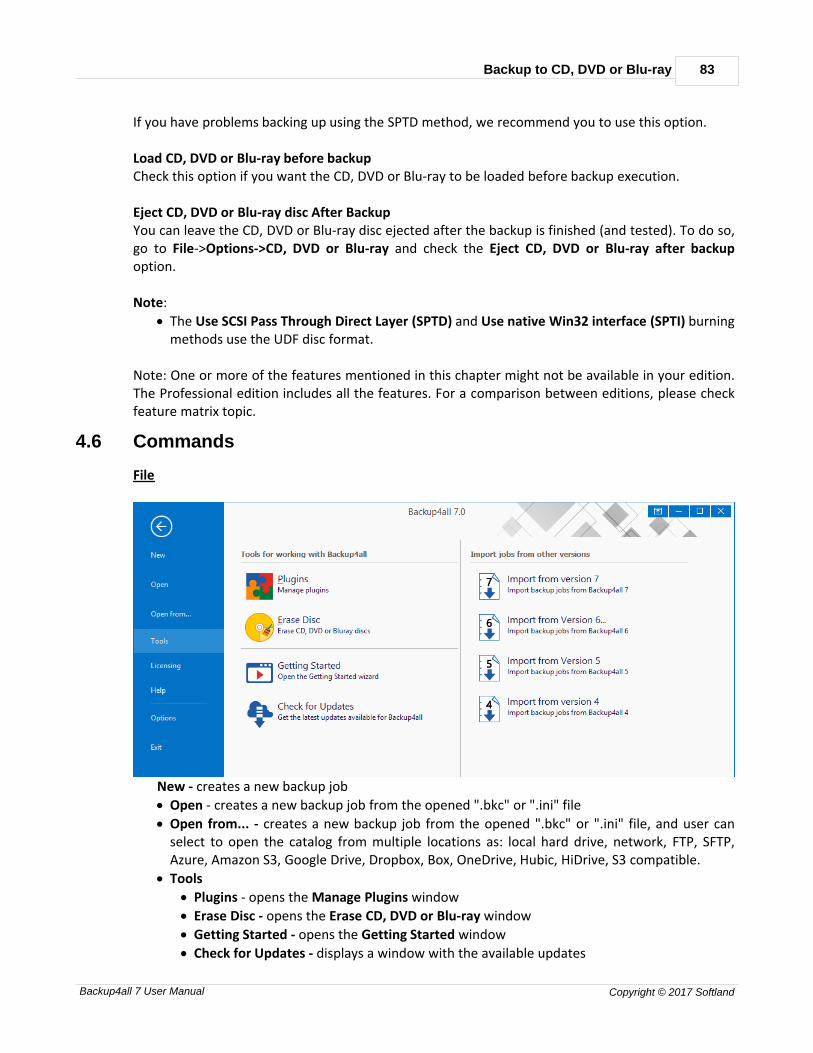
Backup to CD, DVD or Blu-ray 83
Backup4all 7 User Manual Copyright © 2017 Softland
If you have problems backing up using the SPTD method, we recommend you to use this option.
Load CD, DVD or Blu-ray before backupCheck this option if you want the CD, DVD or Blu-ray to be loaded before backup execution.
Eject CD, DVD or Blu-ray disc After BackupYou can leave the CD, DVD or Blu-ray disc ejected after the backup is finished (and tested). To do so,go to File->Options->CD, DVD or Blu-ray and check the Eject CD, DVD or Blu-ray after backupoption. Note:
· The Use SCSI Pass Through Direct Layer (SPTD) and Use native Win32 interface (SPTI) burningmethods use the UDF disc format.
Note: One or more of the features mentioned in this chapter might not be available in your edition.The Professional edition includes all the features. For a comparison between editions, please checkfeature matrix topic.
4.6 Commands
File
New - creates a new backup job
· Open - creates a new backup job from the opened ".bkc" or ".ini" file
· Open from... - creates a new backup job from the opened ".bkc" or ".ini" file, and user canselect to open the catalog from multiple locations as: local hard drive, network, FTP, SFTP,Azure, Amazon S3, Google Drive, Dropbox, Box, OneDrive, Hubic, HiDrive, S3 compatible.
· Tools
· Plugins - opens the Manage Plugins window
· Erase Disc - opens the Erase CD, DVD or Blu-ray window
· Getting Started - opens the Getting Started window
· Check for Updates - displays a window with the available updates
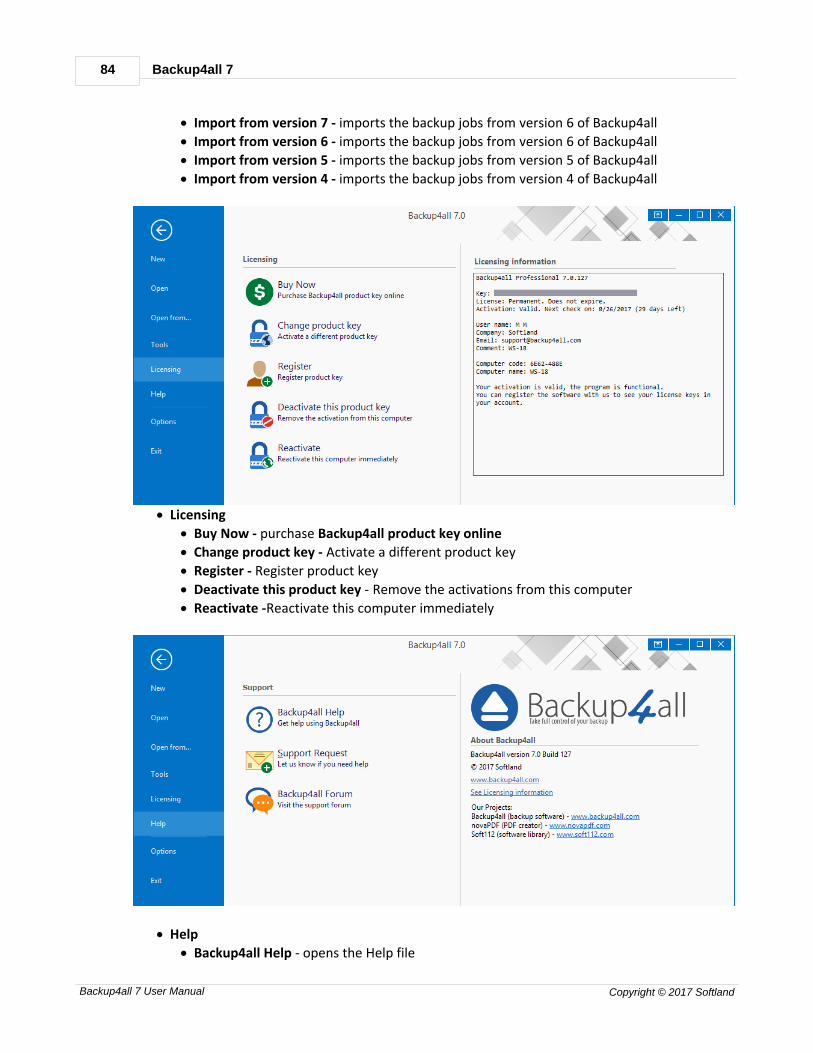
Backup4all 784
Backup4all 7 User Manual Copyright © 2017 Softland
· Import from version 7 - imports the backup jobs from version 6 of Backup4all
· Import from version 6 - imports the backup jobs from version 6 of Backup4all
· Import from version 5 - imports the backup jobs from version 5 of Backup4all
· Import from version 4 - imports the backup jobs from version 4 of Backup4all
· Licensing
· Buy Now - purchase Backup4all product key online
· Change product key - Activate a different product key
· Register - Register product key
· Deactivate this product key - Remove the activations from this computer
· Reactivate -Reactivate this computer immediately
· Help
· Backup4all Help - opens the Help file
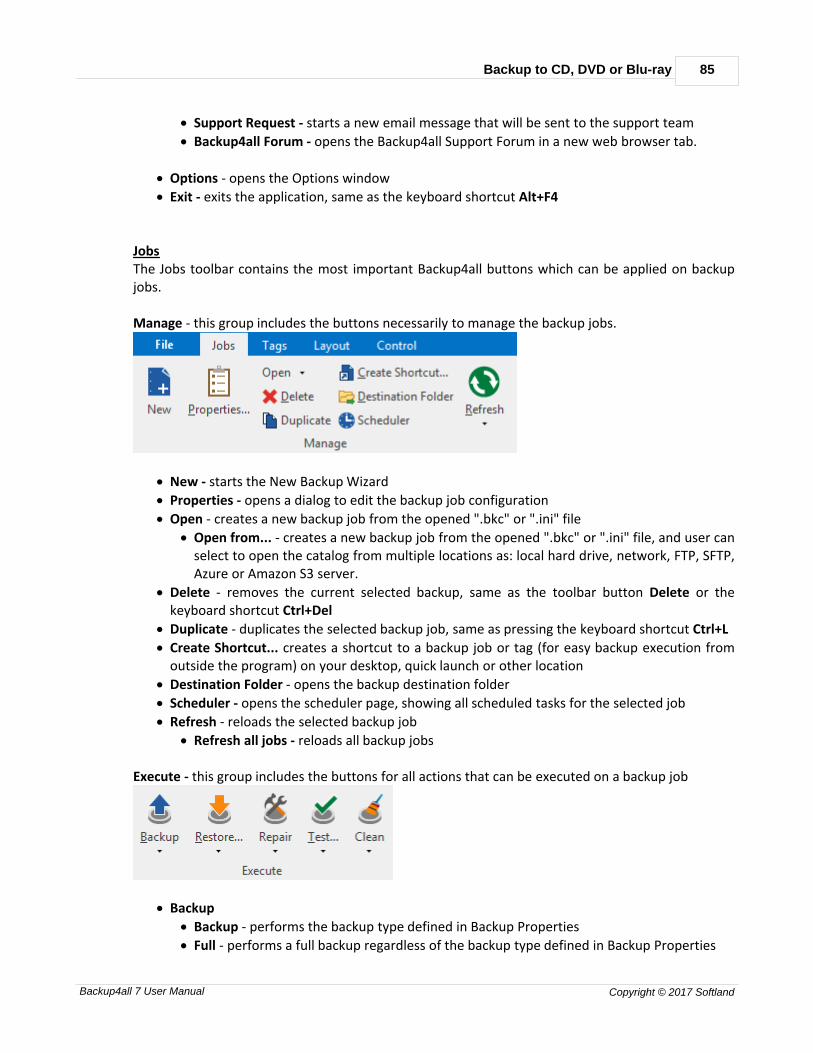
Backup to CD, DVD or Blu-ray 85
Backup4all 7 User Manual Copyright © 2017 Softland
· Support Request - starts a new email message that will be sent to the support team
· Backup4all Forum - opens the Backup4all Support Forum in a new web browser tab.
· Options - opens the Options window
· Exit - exits the application, same as the keyboard shortcut Alt+F4
JobsThe Jobs toolbar contains the most important Backup4all buttons which can be applied on backupjobs.
Manage - this group includes the buttons necessarily to manage the backup jobs.
· New - starts the New Backup Wizard
· Properties - opens a dialog to edit the backup job configuration
· Open - creates a new backup job from the opened ".bkc" or ".ini" file
· Open from... - creates a new backup job from the opened ".bkc" or ".ini" file, and user canselect to open the catalog from multiple locations as: local hard drive, network, FTP, SFTP,Azure or Amazon S3 server.
· Delete - removes the current selected backup, same as the toolbar button Delete or thekeyboard shortcut Ctrl+Del
· Duplicate - duplicates the selected backup job, same as pressing the keyboard shortcut Ctrl+L
· Create Shortcut... creates a shortcut to a backup job or tag (for easy backup execution fromoutside the program) on your desktop, quick launch or other location
· Destination Folder - opens the backup destination folder
· Scheduler - opens the scheduler page, showing all scheduled tasks for the selected job
· Refresh - reloads the selected backup job
· Refresh all jobs - reloads all backup jobs
Execute - this group includes the buttons for all actions that can be executed on a backup job
· Backup
· Backup - performs the backup type defined in Backup Properties
· Full - performs a full backup regardless of the backup type defined in Backup Properties
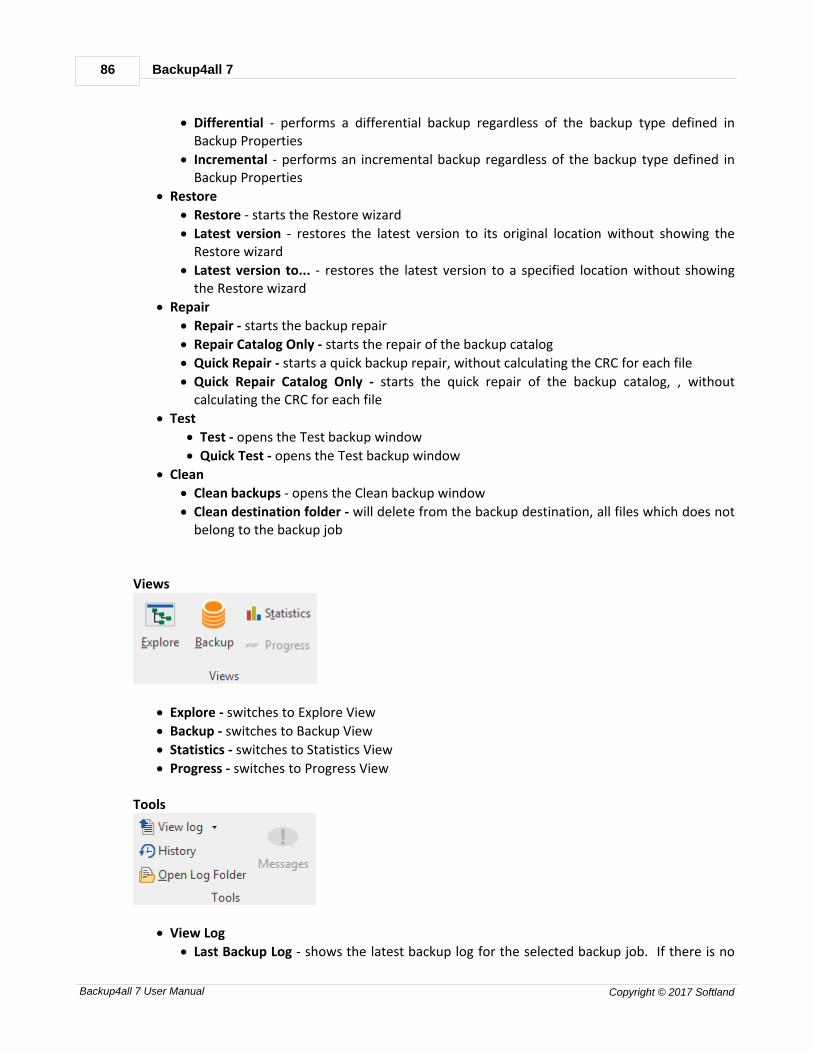
Backup4all 786
Backup4all 7 User Manual Copyright © 2017 Softland
· Differential - performs a differential backup regardless of the backup type defined inBackup Properties
· Incremental - performs an incremental backup regardless of the backup type defined inBackup Properties
· Restore
· Restore - starts the Restore wizard
· Latest version - restores the latest version to its original location without showing theRestore wizard
· Latest version to... - restores the latest version to a specified location without showingthe Restore wizard
· Repair
· Repair - starts the backup repair
· Repair Catalog Only - starts the repair of the backup catalog
· Quick Repair - starts a quick backup repair, without calculating the CRC for each file
· Quick Repair Catalog Only - starts the quick repair of the backup catalog, , withoutcalculating the CRC for each file
· Test
· Test - opens the Test backup window
· Quick Test - opens the Test backup window
· Clean
· Clean backups - opens the Clean backup window
· Clean destination folder - will delete from the backup destination, all files which does notbelong to the backup job
Views
· Explore - switches to Explore View
· Backup - switches to Backup View
· Statistics - switches to Statistics View
· Progress - switches to Progress View
Tools
· View Log
· Last Backup Log - shows the latest backup log for the selected backup job. If there is no

Backup to CD, DVD or Blu-ray 87
Backup4all 7 User Manual Copyright © 2017 Softland
log file, the menu is disabled.
· Last Restore Log - shows the latest restore log for the selected backup job. If there is nolog file, the menu is disabled.
· Last Test Log - shows the latest test log for the selected backup job. If there is no log file,the menu is disabled.
· Last Cleanup Log - shows the latest cleanup log for the selected backup job. If there is nolog file, the menu is disabled.
· Last Statistics Log - shows the latest statistics log for the selected backup job. If there isno log file, the menu is disabled.
· History - opens the history page for that job
· Open Log Folder - opens the folder where all log files are stored
· Messages - opens the application messages popup. If there are no messages, the button isdisabled.
Explore View
Files & Folders
· Restore
· Latest Latest Version - restores the latest version of the selected file/folder to its originallocation without showing the Restore wizard
· Latest Latest Version to... - restores the latest version of the selected file/folder to aspecified location without showing the Restore wizard
· Expand All - expands all folders
· Expand Subfolders - expands subfolders for the selected folder
· Collapse All - collapses all folders
· Exclude from Sources - excludes from backup sources the selected file/folder
File Versions
· Restore
· Restore Version - restore the selected file version to the original location
· Restore Version to... - restore the selected file version to a specified location
· Open - open the selected file version
· View with Notepad - open the selected file version with Notepad
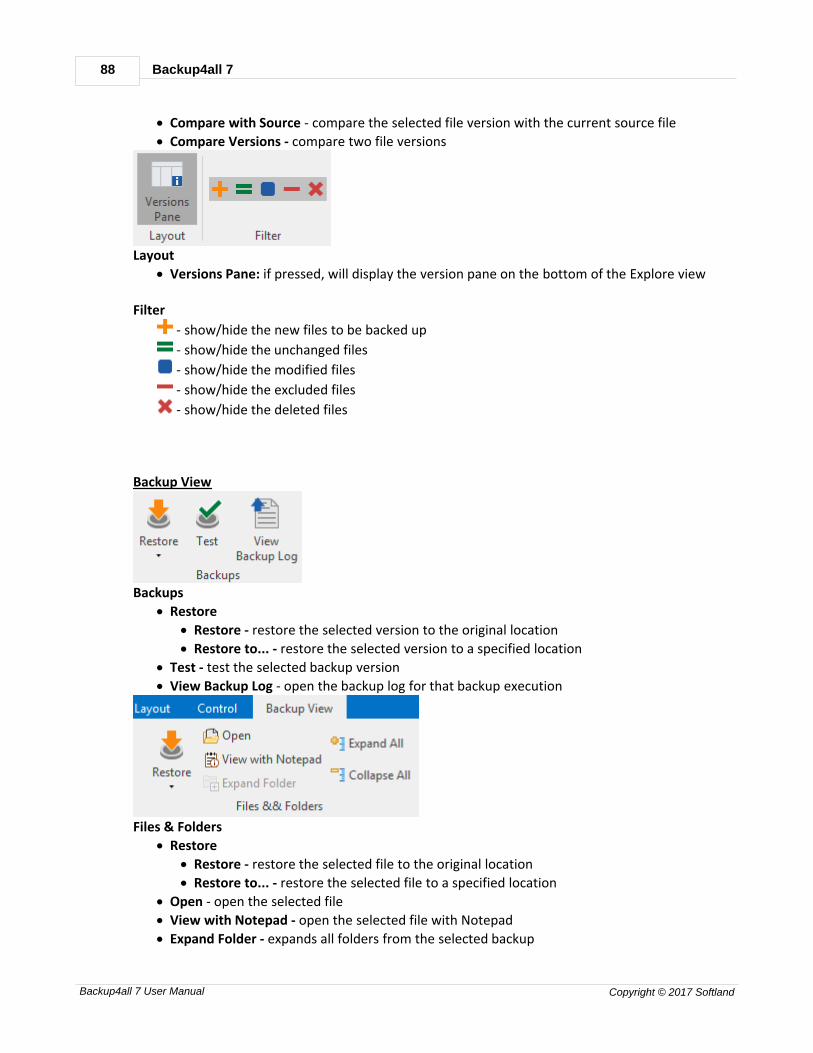
Backup4all 788
Backup4all 7 User Manual Copyright © 2017 Softland
· Compare with Source - compare the selected file version with the current source file
· Compare Versions - compare two file versions
Layout
· Versions Pane: if pressed, will display the version pane on the bottom of the Explore view
Filter
- show/hide the new files to be backed up
- show/hide the unchanged files
- show/hide the modified files
- show/hide the excluded files
- show/hide the deleted files
Backup View
Backups
· Restore
· Restore - restore the selected version to the original location
· Restore to... - restore the selected version to a specified location
· Test - test the selected backup version
· View Backup Log - open the backup log for that backup execution
Files & Folders
· Restore
· Restore - restore the selected file to the original location
· Restore to... - restore the selected file to a specified location
· Open - open the selected file
· View with Notepad - open the selected file with Notepad
· Expand Folder - expands all folders from the selected backup
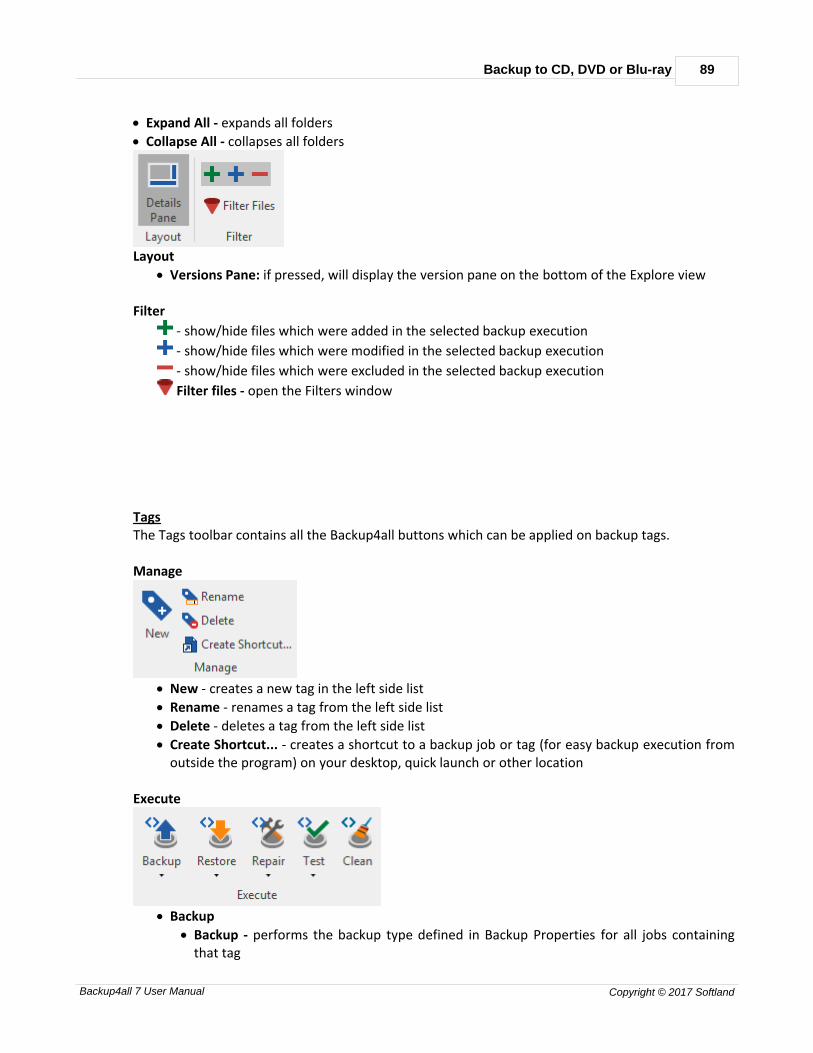
Backup to CD, DVD or Blu-ray 89
Backup4all 7 User Manual Copyright © 2017 Softland
· Expand All - expands all folders
· Collapse All - collapses all folders
Layout
· Versions Pane: if pressed, will display the version pane on the bottom of the Explore view
Filter
- show/hide files which were added in the selected backup execution
- show/hide files which were modified in the selected backup execution
- show/hide files which were excluded in the selected backup execution
Filter files - open the Filters window
TagsThe Tags toolbar contains all the Backup4all buttons which can be applied on backup tags.
Manage
· New - creates a new tag in the left side list
· Rename - renames a tag from the left side list
· Delete - deletes a tag from the left side list
· Create Shortcut... - creates a shortcut to a backup job or tag (for easy backup execution fromoutside the program) on your desktop, quick launch or other location
Execute
· Backup
· Backup - performs the backup type defined in Backup Properties for all jobs containingthat tag
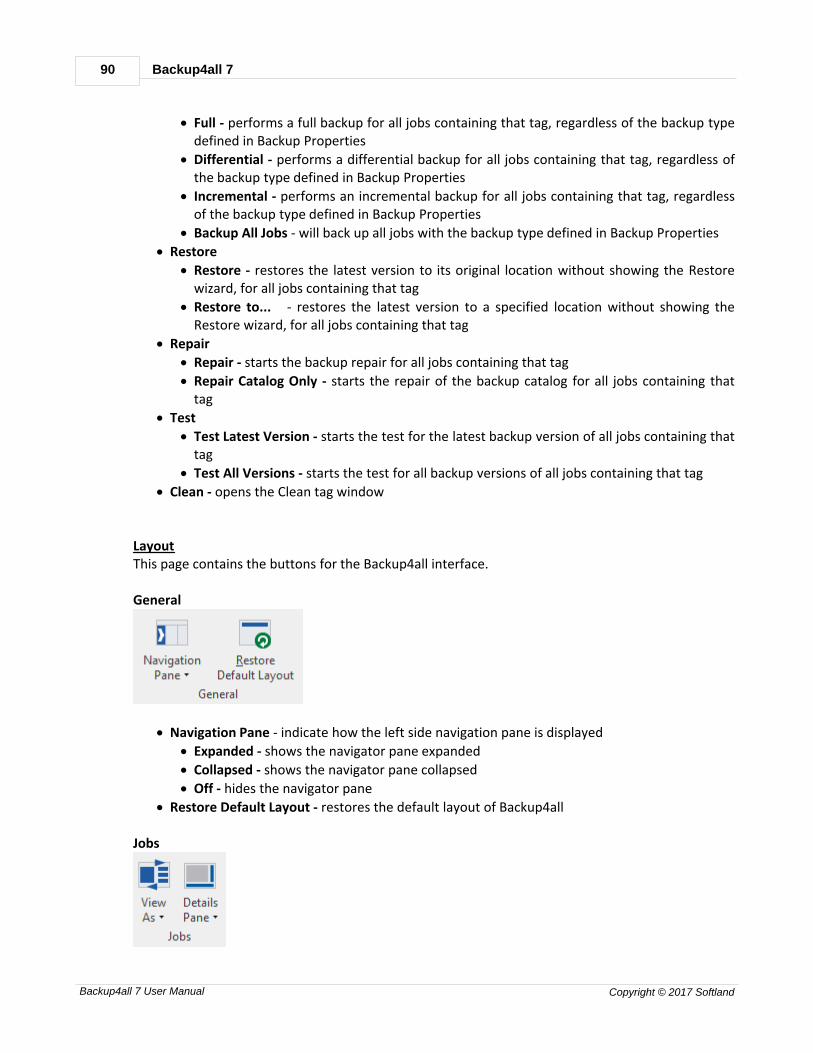
Backup4all 790
Backup4all 7 User Manual Copyright © 2017 Softland
· Full - performs a full backup for all jobs containing that tag, regardless of the backup typedefined in Backup Properties
· Differential - performs a differential backup for all jobs containing that tag, regardless ofthe backup type defined in Backup Properties
· Incremental - performs an incremental backup for all jobs containing that tag, regardlessof the backup type defined in Backup Properties
· Backup All Jobs - will back up all jobs with the backup type defined in Backup Properties
· Restore
· Restore - restores the latest version to its original location without showing the Restorewizard, for all jobs containing that tag
· Restore to... - restores the latest version to a specified location without showing theRestore wizard, for all jobs containing that tag
· Repair
· Repair - starts the backup repair for all jobs containing that tag
· Repair Catalog Only - starts the repair of the backup catalog for all jobs containing thattag
· Test
· Test Latest Version - starts the test for the latest backup version of all jobs containing thattag
· Test All Versions - starts the test for all backup versions of all jobs containing that tag
· Clean - opens the Clean tag window
LayoutThis page contains the buttons for the Backup4all interface.
General
· Navigation Pane - indicate how the left side navigation pane is displayed
· Expanded - shows the navigator pane expanded
· Collapsed - shows the navigator pane collapsed
· Off - hides the navigator pane
· Restore Default Layout - restores the default layout of Backup4all
Jobs
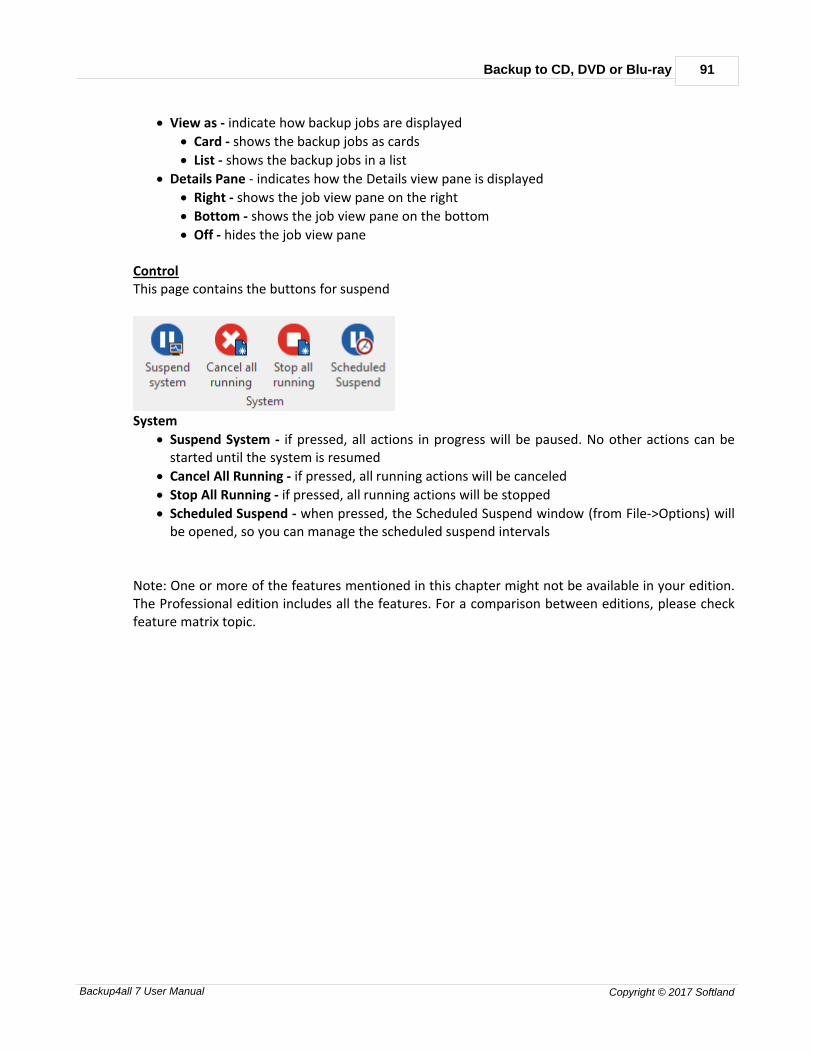
Backup to CD, DVD or Blu-ray 91
Backup4all 7 User Manual Copyright © 2017 Softland
· View as - indicate how backup jobs are displayed
· Card - shows the backup jobs as cards
· List - shows the backup jobs in a list
· Details Pane - indicates how the Details view pane is displayed
· Right - shows the job view pane on the right
· Bottom - shows the job view pane on the bottom
· Off - hides the job view pane
ControlThis page contains the buttons for suspend
System
· Suspend System - if pressed, all actions in progress will be paused. No other actions can bestarted until the system is resumed
· Cancel All Running - if pressed, all running actions will be canceled
· Stop All Running - if pressed, all running actions will be stopped
· Scheduled Suspend - when pressed, the Scheduled Suspend window (from File->Options) willbe opened, so you can manage the scheduled suspend intervals
Note: One or more of the features mentioned in this chapter might not be available in your edition.The Professional edition includes all the features. For a comparison between editions, please checkfeature matrix topic.

Main Window
Part
V
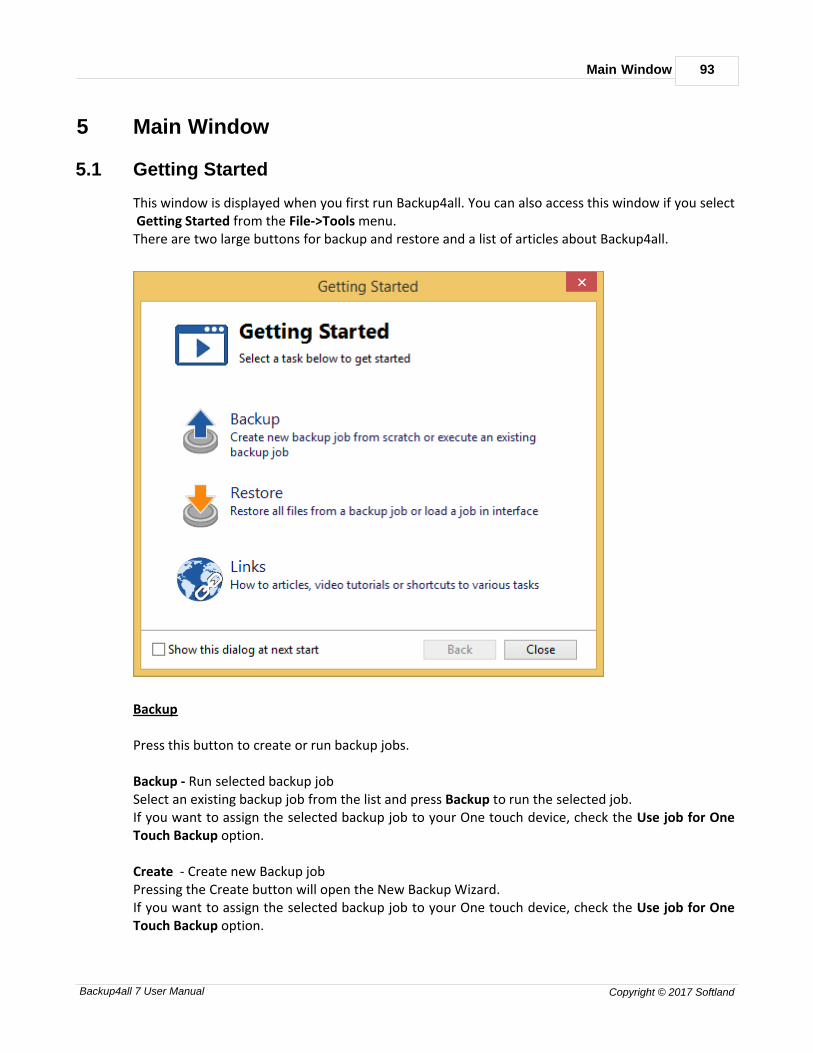
Main Window 93
Backup4all 7 User Manual Copyright © 2017 Softland
5 Main Window
5.1 Getting Started
This window is displayed when you first run Backup4all. You can also access this window if you select Getting Started from the File->Tools menu.There are two large buttons for backup and restore and a list of articles about Backup4all.
Backup
Press this button to create or run backup jobs.
Backup - Run selected backup jobSelect an existing backup job from the list and press Backup to run the selected job.If you want to assign the selected backup job to your One touch device, check the Use job for OneTouch Backup option. Create - Create new Backup jobPressing the Create button will open the New Backup Wizard.If you want to assign the selected backup job to your One touch device, check the Use job for OneTouch Backup option.

Backup4all 794
Backup4all 7 User Manual Copyright © 2017 Softland
Restore
Restore - Restore from selected backupSelect an existing backup job from the list and press Restore to open the Restore Wizard.
Open - Load backup jobsUse the Open button to recreate a backup job from the backup catalog (.bkc) or from theinitialization file (.ini).The recreated backup job will be added to the backup list.
If you don't want to show the Backup4all Startup window next time you open Backup4all, uncheckthe Show this dialog at next start option.By default this option is checked.
Links
Shows a list of the most popular articles from our knowledge base.
Note: One or more of the features mentioned in this chapter might not be available in your edition.The Professional edition includes all the features. For a comparison between editions, please checkfeature matrix topic.
5.2 Backup List
Backup list, visible in the middle column of the main window, contains all the backup jobs defined.The backup jobs can be grouped into tags, for easy handling.
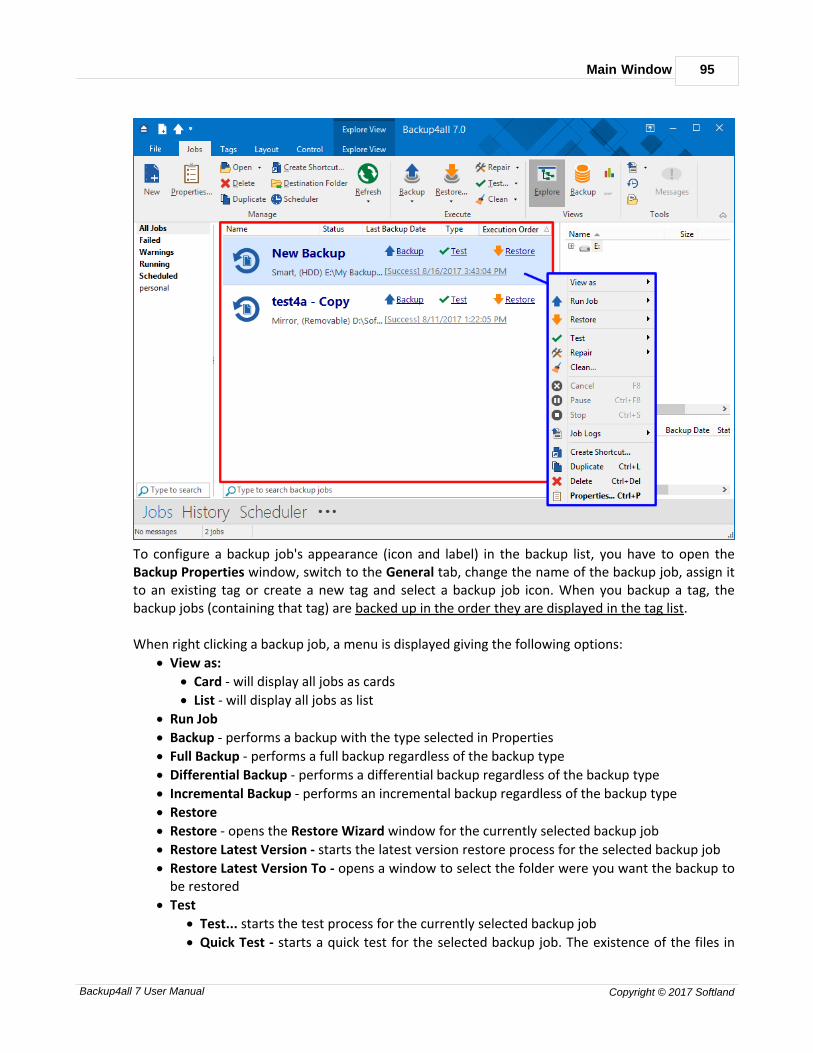
Main Window 95
Backup4all 7 User Manual Copyright © 2017 Softland
To configure a backup job's appearance (icon and label) in the backup list, you have to open theBackup Properties window, switch to the General tab, change the name of the backup job, assign itto an existing tag or create a new tag and select a backup job icon. When you backup a tag, thebackup jobs (containing that tag) are backed up in the order they are displayed in the tag list. When right clicking a backup job, a menu is displayed giving the following options:
· View as:
· Card - will display all jobs as cards
· List - will display all jobs as list
· Run Job
· Backup - performs a backup with the type selected in Properties
· Full Backup - performs a full backup regardless of the backup type
· Differential Backup - performs a differential backup regardless of the backup type
· Incremental Backup - performs an incremental backup regardless of the backup type
· Restore
· Restore - opens the Restore Wizard window for the currently selected backup job
· Restore Latest Version - starts the latest version restore process for the selected backup job
· Restore Latest Version To - opens a window to select the folder were you want the backup tobe restored
· Test
· Test... starts the test process for the currently selected backup job
· Quick Test - starts a quick test for the selected backup job. The existence of the files in
Backup4all 796
Backup4all 7 User Manual Copyright © 2017 Softland
destination is verified.
· Repair
· Repair - use this option to repair the backup job in destination and re-copy all missing orcorrupted files, based on the existing information in the backup catalog. A test will beperformed, followed by a backup to also include the missing files.
· Repair Catalog Only - use this option to remove from the backup catalog the missing orcorrupted files in destination. A test will be performed, followed by a catalog update toremove the missing files.
· Quick Repair - use this option to repair the backup job in destination and re-copy allmissing or corrupted files, based on the existing information in the backup catalog. A quicktest will be performed, followed by a backup to also include the missing files.
· Quick Repair Catalog Only - use this option to remove from the backup catalog themissing or corrupted files in destination. A quick test will be performed, followed by acatalog update to remove the missing files.
· Clean... - opens the Clean Backup window for the selected backup job
· Cancel - aborts current backup process
· Pause - pause the current backup/test/cleanup/restore process
· Stop - stops the current backup/test/cleanup/restore process
· Job Logs - lets you open and view the Last Backup Log, Last Restore Log, Last Test Log , LastCleanup Log and Last Statistics Log
· Create Shortcut... creates a shortcut to the backup job
· Duplicate - duplicates a backup job
· Delete - deletes a backup job
· Properties... opens the Backup Properties window
Backup4all can process multiple backup jobs at the same time. You can filter the backup list to seewhich backup jobs are executed at a certain time.From the left side column of the main application you can filter the backup jobs in list. You canchoose to see all jobs, only the running jobs, failed jobs or only the jobs containing a specific tag.If there are many backups listed, you can search for a backup job by typing its name in the Type tosearch box on the bottom of the Backup List.
Note: One or more of the features mentioned in this chapter might not be available in your edition.The Professional edition includes all the features. For a comparison between editions, please checkfeature matrix topic.
5.3 Manage Backup Tags
Create a new tag
1) When creating (or editing) a backup job using the New Backup Wizard in Advanced mode (orBackup Properties), press Add new tag and type a new name (that does not exist) for thebackup tag.

Main Window 97
Backup4all 7 User Manual Copyright © 2017 Softland
2) Right click on the left side list (left panel of the main window) and choose New Tag. TheCreate a new tag window will appear and you can enter the name of the tag. A new empty tagwill be created (which can be selected later from the Tags list of the New Backup Wizard orfrom the Backup Properties window).
Rename a tag
Select the backup tag from the left side list. Right click it on the backup list and choose Rename Tag.A window similar with the one for Create a new tag will appear. You can enter the new name andpress OK. The tag will be renamed and it will keep all the backup jobs it had.

Backup4all 798
Backup4all 7 User Manual Copyright © 2017 Softland
Delete a tag

Main Window 99
Backup4all 7 User Manual Copyright © 2017 Softland
Select the backup tag from the left side list. Right-click in the backup list and choose Delete Tag. Awarning message will appear before the deletion. If you choose Yes, only the backup tag will bedeleted, the backup jobs will remain in the backup list. To move backup jobs to a different backuptag, you must edit the backup job's properties and select a different tag for them or drag and dropthe job on the tag you want to be assigned.
To assign a tag to a backup job, just drag and drop the tag from the left side list of tags to thebackup job name in the main window, or open Backup Properties->General and check the tagname.
Note: One or more of the features mentioned in this chapter might not be available in your edition.The Professional edition includes all the features. For a comparison between editions, please checkfeature matrix topic.
5.4 Create Shortcut
The Create Shortcut window can be opened from the Create Shortcut... button located on the Jobstab or by right-clicking the backup job from the backup list and selecting Create Shortcut... It createsa shortcut for the backup job on a designated location and you can simply run the backup job bydouble-clicking it.
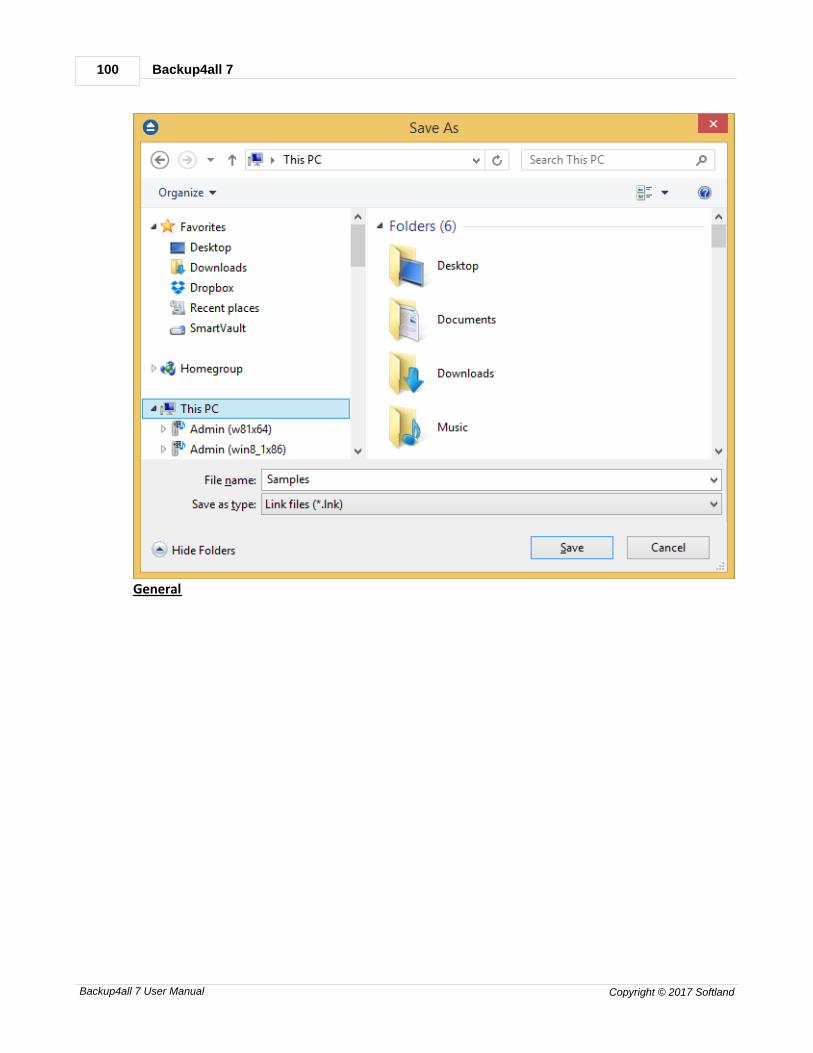
Backup4all 7100
Backup4all 7 User Manual Copyright © 2017 Softland
General
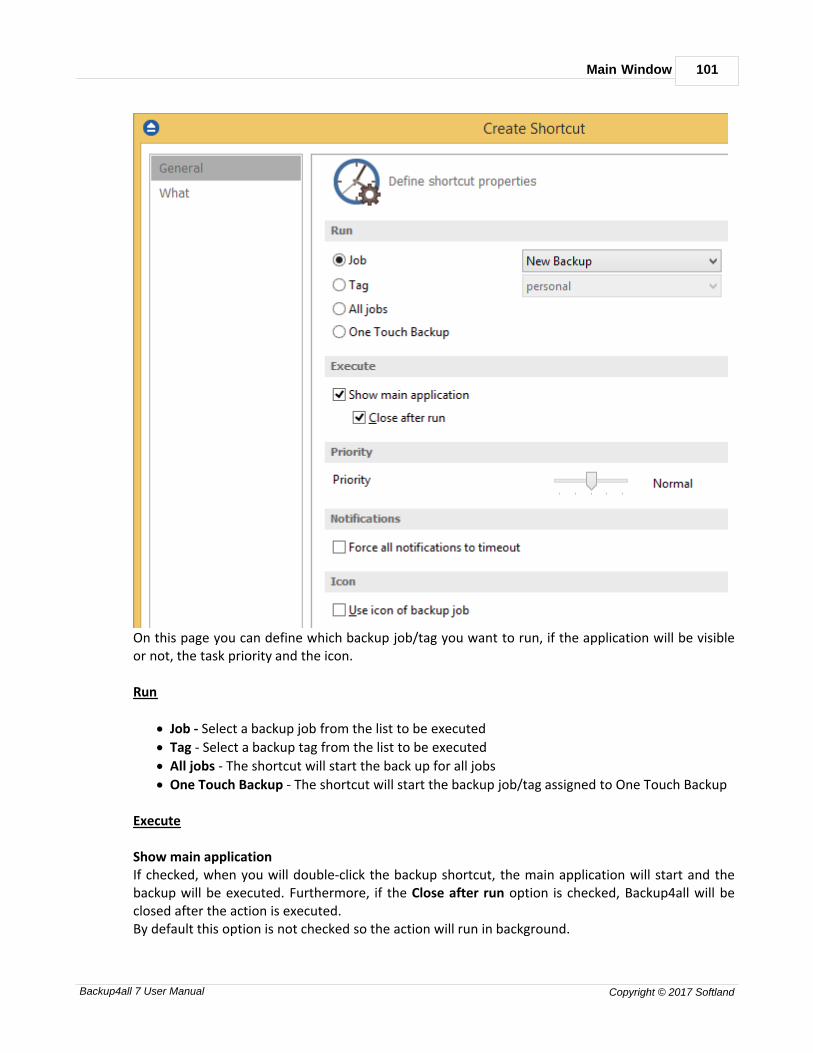
Main Window 101
Backup4all 7 User Manual Copyright © 2017 Softland
On this page you can define which backup job/tag you want to run, if the application will be visibleor not, the task priority and the icon.
Run
· Job - Select a backup job from the list to be executed
· Tag - Select a backup tag from the list to be executed
· All jobs - The shortcut will start the back up for all jobs
· One Touch Backup - The shortcut will start the backup job/tag assigned to One Touch Backup
Execute
Show main applicationIf checked, when you will double-click the backup shortcut, the main application will start and thebackup will be executed. Furthermore, if the Close after run option is checked, Backup4all will beclosed after the action is executed.By default this option is not checked so the action will run in background.
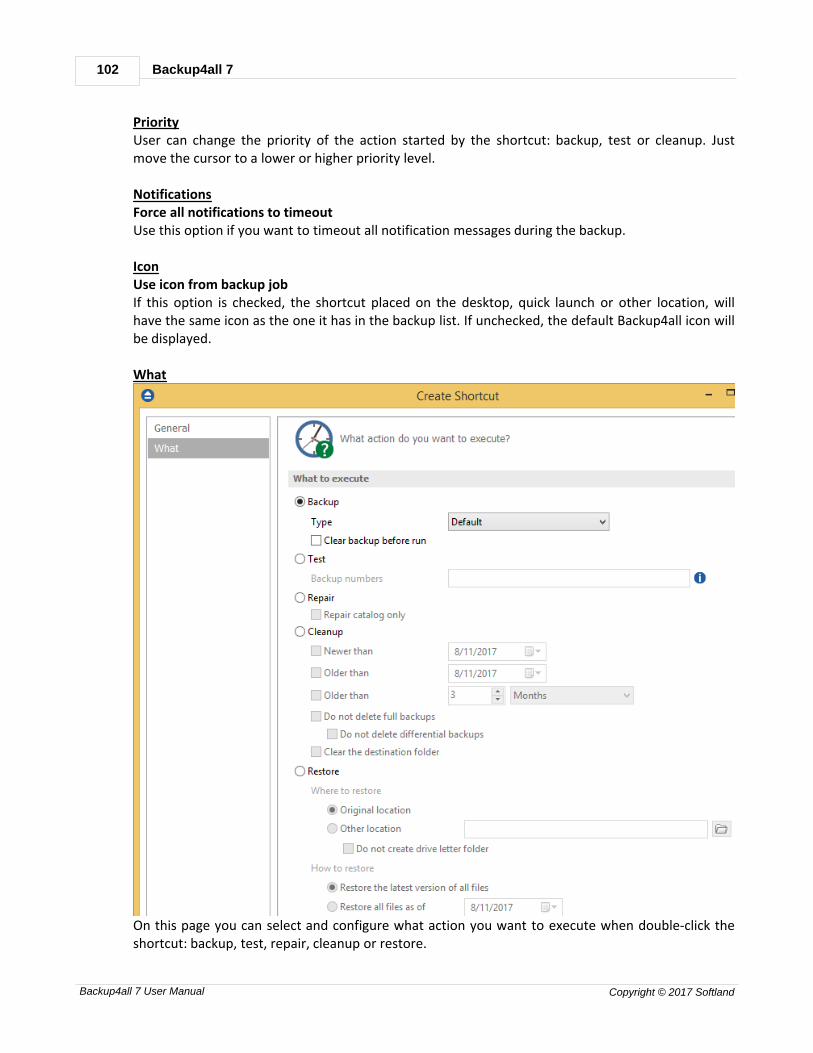
Backup4all 7102
Backup4all 7 User Manual Copyright © 2017 Softland
PriorityUser can change the priority of the action started by the shortcut: backup, test or cleanup. Justmove the cursor to a lower or higher priority level.
NotificationsForce all notifications to timeout Use this option if you want to timeout all notification messages during the backup. IconUse icon from backup jobIf this option is checked, the shortcut placed on the desktop, quick launch or other location, willhave the same icon as the one it has in the backup list. If unchecked, the default Backup4all icon willbe displayed.
What
On this page you can select and configure what action you want to execute when double-click theshortcut: backup, test, repair, cleanup or restore.
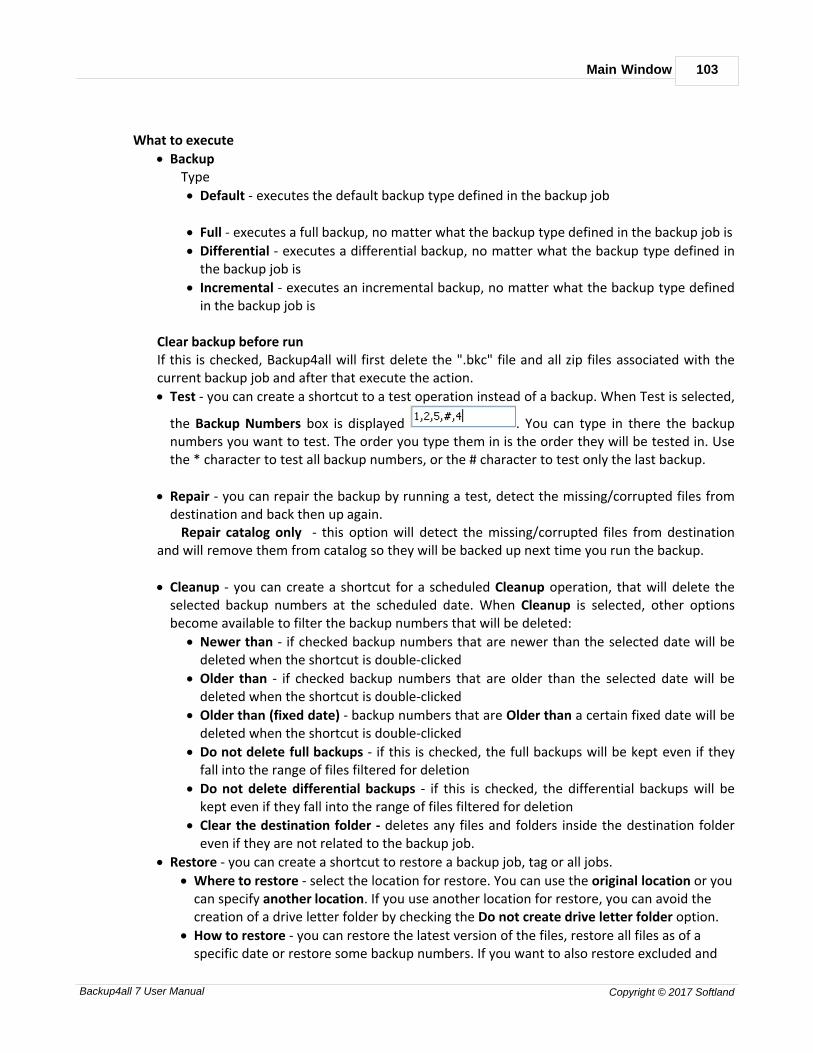
Main Window 103
Backup4all 7 User Manual Copyright © 2017 Softland
What to execute
· BackupType
· Default - executes the default backup type defined in the backup job
· Full - executes a full backup, no matter what the backup type defined in the backup job is
· Differential - executes a differential backup, no matter what the backup type defined inthe backup job is
· Incremental - executes an incremental backup, no matter what the backup type definedin the backup job is
Clear backup before runIf this is checked, Backup4all will first delete the ".bkc" file and all zip files associated with thecurrent backup job and after that execute the action.
· Test - you can create a shortcut to a test operation instead of a backup. When Test is selected,
the Backup Numbers box is displayed . You can type in there the backupnumbers you want to test. The order you type them in is the order they will be tested in. Usethe * character to test all backup numbers, or the # character to test only the last backup.
· Repair - you can repair the backup by running a test, detect the missing/corrupted files fromdestination and back then up again.
Repair catalog only - this option will detect the missing/corrupted files from destinationand will remove them from catalog so they will be backed up next time you run the backup.
· Cleanup - you can create a shortcut for a scheduled Cleanup operation, that will delete theselected backup numbers at the scheduled date. When Cleanup is selected, other optionsbecome available to filter the backup numbers that will be deleted:
· Newer than - if checked backup numbers that are newer than the selected date will bedeleted when the shortcut is double-clicked
· Older than - if checked backup numbers that are older than the selected date will bedeleted when the shortcut is double-clicked
· Older than (fixed date) - backup numbers that are Older than a certain fixed date will bedeleted when the shortcut is double-clicked
· Do not delete full backups - if this is checked, the full backups will be kept even if theyfall into the range of files filtered for deletion
· Do not delete differential backups - if this is checked, the differential backups will bekept even if they fall into the range of files filtered for deletion
· Clear the destination folder - deletes any files and folders inside the destination foldereven if they are not related to the backup job.
· Restore - you can create a shortcut to restore a backup job, tag or all jobs.
· Where to restore - select the location for restore. You can use the original location or youcan specify another location. If you use another location for restore, you can avoid thecreation of a drive letter folder by checking the Do not create drive letter folder option.
· How to restore - you can restore the latest version of the files, restore all files as of aspecific date or restore some backup numbers. If you want to also restore excluded and
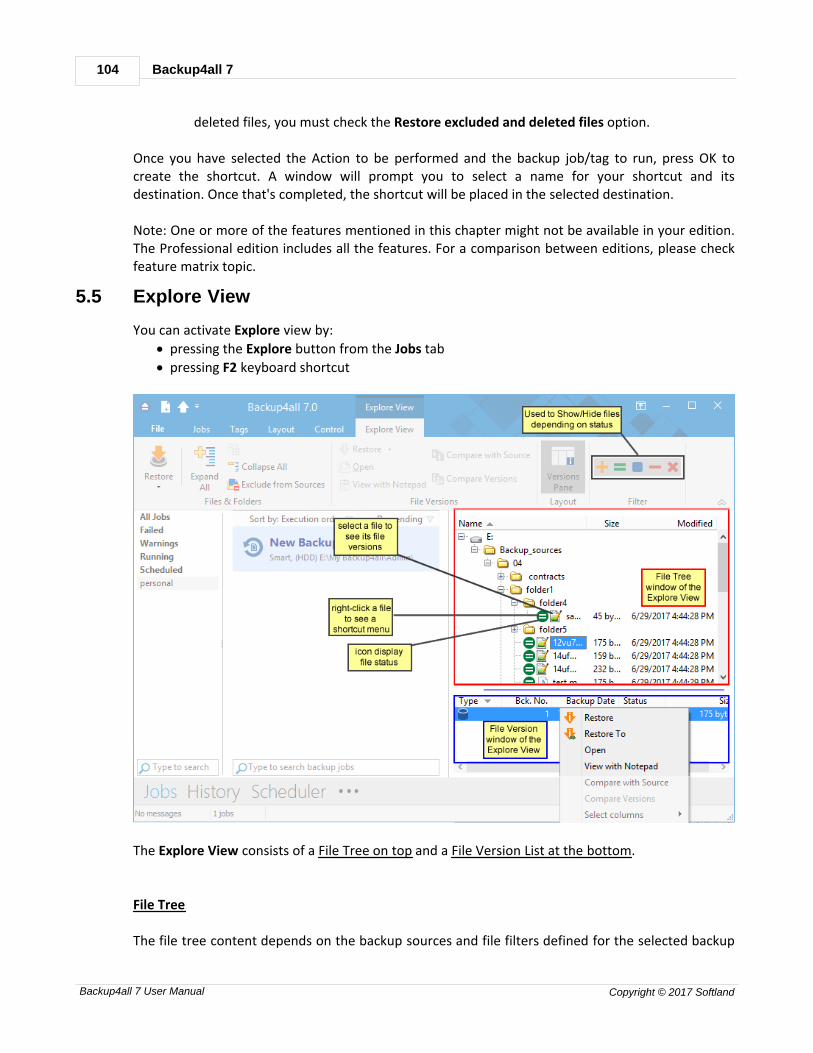
Backup4all 7104
Backup4all 7 User Manual Copyright © 2017 Softland
deleted files, you must check the Restore excluded and deleted files option.
Once you have selected the Action to be performed and the backup job/tag to run, press OK tocreate the shortcut. A window will prompt you to select a name for your shortcut and itsdestination. Once that's completed, the shortcut will be placed in the selected destination.
Note: One or more of the features mentioned in this chapter might not be available in your edition.The Professional edition includes all the features. For a comparison between editions, please checkfeature matrix topic.
5.5 Explore View
You can activate Explore view by:
· pressing the Explore button from the Jobs tab
· pressing F2 keyboard shortcut
The Explore View consists of a File Tree on top and a File Version List at the bottom.
File Tree
The file tree content depends on the backup sources and file filters defined for the selected backup
Main Window 105
Backup4all 7 User Manual Copyright © 2017 Softland
job. You can right-click on the folders and files in the tree to open the same context menu that isavailable from File Explorer if the option Show context menu from File- >Options->Preferences ischecked. If that option is unchecked, the right-click operation will display only the Restore LatestVersion and Restore Latest Version to... You can select multiple files. Be careful about handling files in the Explore view with the Show context menu option checked: allactions are performed on the hard disk and any deletion will actually remove the file from your harddisk! Beside the File Explorer context menu items, there are also two custom menu items, which enablethe restore of the last version of a file: Restore Last Version and Restore Last Version To...
If you want to exclude a file/folder from the backup sources, you can right-click that file/folder andchoose Exclude from backup sources option. This action will uncheck the file/folder in BackupProperties->Sources.
The file tree shows the last modified date, size and attributes for each file in additional columns. Thisinformation is the same as shown in File Explorer. You can sort the files by name, date, size orattributes by simply clicking on the appropriate column header. The files are sorted within theirfolders. Size, Modified and Attributes columns can be hidden if you right click on the column headerand uncheck the names of the columns that you want to remove. There are seven buttons on top of the file tree that help you show/hide files depending on theirstatus:
If pressed, files that will be added to the backup are shown in the tree. All files with this status
will have picture in front of them.
If pressed, files that have not been changed since last backup are shown in the tree. All files with
this status will have picture in front of them.
If pressed, files that have been changed since last backup are shown in the tree. All files with this
status will have picture in front of them.
If pressed, files that are already present in backup and are now excluded by new changes in file
filter are shown in the tree. All files with this status will have picture in front of them.
If pressed, files that have been deleted from hard disk are shown in the tree. All files with this
status will have picture in front of them.
If pressed, all directories in the tree will be expanded. For a large number of files and directories,this operation can take a longer time. Press the ESC key to stop the process.
If pressed, all directories in the tree will be collapsed. If you do not want to see empty folders when clicking on Expand all, check Hide empty folders onexpand all in the File->Options->Preferences window. The tree will show only folders containing atleast one file. There is an easy way to search for a file in the files and folder tree: simply start typing the file's nameand the matching file name will be selected. Only files that are visible in the tree are found, so if you
Backup4all 7106
Backup4all 7 User Manual Copyright © 2017 Softland
want to search in all files, you have to do an Expand all first.
If you want to see only the backed up files press these buttons:
For the files that will be added to the next backup press:
File Version List
If a file is selected in the tree, at the bottom of the view, you can see the list of the file's versionsfrom the backup. Information provided for each version:
· Type - Type of the Backup. Each of the backup types is represented by a descriptive icon:
Full, Incremental, Differential, Mirror
· Ver. - File version number
· Bck. No. - Number of the backup
· Backup Date - Date and time when the version was added to the backup
· Status - Status of operation performed on that file version (added, excluded...)
· Size - Size of the file version
· Modified - Date and time when the file version was last modified (at backup execution)
· Attributes - Attributes of the file version at backup execution (read-only, hidden, archive). Thiscolumn is hidden by default
· Bkc. Label - Label of the backup increment. This column is hidden by default
The file versions in the list can be sorted by clicking on the column headers. The right-click menu onthe column header provides a handy way to show/hide unnecessary columns (except the Versioncolumn which is grayed out). Backup4all provides an easy way to restore any file version. Just right-click on the file version youwant to restore and:
· choose Restore version if you want to restore the version in the original location
· choose Restore to if you want to restore the version in another location
· choose Open if you want to open/view that version of the file with the associated Windowsapplication
· choose View with Notepad if you want to open/view that version of the file with Notepad
· choose Compare with source if you want to compare the selected version with the existingsource
· choose Compare versions if you want to compare the selected versions
· choose Select columns to enable/disable the columns displayed
Note: One or more of the features mentioned in this chapter might not be available in your edition.The Professional edition includes all the features. For a comparison between editions, please checkfeature matrix topic.
5.6 Backup View
You can activate Backup view by:
· pressing the Backup button from the Jobs tab

Main Window 107
Backup4all 7 User Manual Copyright © 2017 Softland
· pressing CTRL + F2 keyboard shortcut
The Backup View consists of a Backup Version List on top and a File Tree at the bottom. Above the Backup versions list, there is a "search for files" field. Here you can type the name of thefile/folder you are looking to restore, in order to easily find its location.
Backup Version List
If a backup version is selected, at the bottom of the view, you can see the list of the files in thatbackup and their status before that backup. Information provided for each version:
· Type - Type of the Backup. Each of the backup types is represented by a descriptive icon:
Full, Incremental, Differential, Mirror
· Backup Date - Date and time when the backup was created
· Bck No. - Number of the backup
· File No. - Number of files in that backup
· Folder No. - Number of folders in that backup
· Comp. Size - Compressed size of the file version
Backup4all 7108
Backup4all 7 User Manual Copyright © 2017 Softland
· Uncomp. Size - Uncompressed size of the file version
· Label - Label of the backup increment.
The backup version list can be sorted by clicking on the column headers. The right-click menu on thecolumn header provides a handy way to show/hide unnecessary columns (except the Type columnwhich is grayed out).
Backup4all provides an easy way to restore or test a backup version. Just right-click on the backupversion and:
· choose Restore Latest Version if you want to restore the version in the original location
· choose Restore Latest Version To... if you want to restore the version in another location
· choose Test if you want to test that backup version
· choose View Backup Log if you want to open/view that log with the selected log viewer.Initially the default text editor is used.
File Tree
The file tree content depends on the files from the selected backup version. You can right-click onthe folders and files in the tree to open a menu that allows you to choose the following options:
· Restore if you want to restore the version in the original location
· Restore to... if you want to restore the version in another location
· Open if you want to open/view that version of the file with the associated Windowsapplication
· View with Notepad if you want to open/view that version of the file with Notepad
· Full expand to expand all the tree
The file tree shows the file/folder name, bck no. size, last modified date, attributes and status foreach file in additional columns. You can sort the files by simply clicking on the appropriate columnheader. The files are sorted within their folders. Except File/Folder, each column can be hidden ifyou right click on the column header and uncheck the names of the columns that you want toremove.
There are seven buttons on top of the file tree that help you show/hide files depending on theirstatus:
If pressed, files that were added to the backup as new are shown in the tree. All files with this
status will have picture in front of them.
If pressed, files that were added to the backup as modified are shown in the tree. All files with
this status will have picture in front of them.
If pressed, files that had been in backup and were excluded by new changes in file filter are
shown in the tree. All files with this status will have picture in front of them.
If pressed, all directories in the tree will be expanded. For a large number of files and directories,this operation can take a longer time. Press the ESC key to stop the process.
If pressed, all directories in the tree will be collapsed.
If pressed, the Filter window will be shown. Use this option to filter the files displayed in the tree.

Main Window 109
Backup4all 7 User Manual Copyright © 2017 Softland
Note: One or more of the features mentioned in this chapter might not be available in your edition.The Professional edition includes all the features. For a comparison between editions, please checkfeature matrix topic.
5.7 Statistics View
You can activate Statistics view by:
· pressing the Statistics button from the Jobs tab
· pressing the F3 keyboard shortcut
This view provides statistical information about the last backup performed and calculates statisticsabout the next backup, based on the current backup job configuration.
Information list: Last backup onDate and time of the last backup
Backup4all 7110
Backup4all 7 User Manual Copyright © 2017 Softland
Last backup type Shows the last backup type executed
Last backup durationShows the duration of the last backup execution Last backup sizeShows the size of the last backup (compressed) / size of all files present in backup (uncompressed) /compression percentage
Last full backup on (not displayed for mirror backup type)The date and time when the last full backup was executed. Note that the first backup is always a fullbackup, even if the backup type is set to incremental or differential.
Last full backup duration (not displayed for mirror backup type)Shows the duration of the last full backup execution Last full backup size (not displayed for mirror backup type)Shows the size of the last full backup (compressed) / size of all files present in backup(uncompressed) / compression percentage.For example 10 MB/30 MB/33% means that the size of the last full backup was 10 MB, theuncompressed size of the files backed up was 30 MB and the compression ratio was 33%. Total size of backup (not displayed for mirror backup type)Total size of the backup takes into consideration all backup increments, ".bkc" file and any foldersthat might have been created. It shows the total size after compression / without compression /compression percentage For mirror backup the compressed values are not shown, because there isno compression. Number of backupsNumber of times the backup job was executed
Last backup statusDisplays the following information:
· Last backup was successful when everything went OK
· Last backup failed when the backup was aborted due to an error
· Last backup had <X> warnings when the backup was done, but <X> files could not be backedup
· Last backup was canceled when the user canceled the backup execution
Files/folders in backupShows the number of files in the backup. The number between the brackets is for the files added atthe last backup. For full backup the number of files added to the last backup will be always the samewith the total number of files. The same for mirror backup without the Fast mirror option activated. Next scheduled backupDate and time when the backup is scheduled to be executed again

Main Window 111
Backup4all 7 User Manual Copyright © 2017 Softland
Next scheduled tag backupDate and time when the backup tag is scheduled to be executed again.
Statistics for next backup:
The Calculate Statistics for Next Backup (Ctrl+F5) button will start counting the new, modified,unchanged and excluded files since the last backup execution. The counters will be shown in thelabels below, divided into two sections: Files to backup containing the counters for the files that willbe added to the next backup, and Changes since last backup containing the counters for the fileschanged since the last backup. For a large number of files, counting can be time consuming. If youwant to stop the counting process press the Cancel button from the toolbar. Calculate Statistics forNext Backup (Ctrl+F5) uses the catalog file (".bkc"). If this catalog is on a CD, DVD or Blu-ray disc andyou enter a previous backup version, the counters will be different. Files to backup counters arecalculated depending on the backup job settings: backup type, <Clear backup> action etc. Changessince last backup counters are always the same no matter the backup job settings. Files/Folders to backupFor full and differential backup types these counters are calculated based on the changes since thelast full backup.For the incremental backup type, the counts are based on the changes since the lastbackup (differential, full or incremental). New files/foldersThe number of new files/folders that will be added to backup. For mirror backup (with the Fastmirror option unchecked), the new files/folders counter equals the total number of files/folders. Unchanged files/foldersShows the number of unchanged files/folders to be added to backup. For differential, incrementaland mirror backup with Fast mirror option unchecked, this number will always be 0.
Modified files/foldersShows the number of modified files/folders to be added to backup. For mirror backup (with the"Fast mirror" option unchecked), this number will always be 0.
Excluded files/foldersShows the number of excluded files/folders, which will be removed from the backup. Changes since last backupCounts the changes since the last backup, regardless of the backup settings New files/foldersShows the number of new files/folders since last backup. Unchanged files/foldersShows the number of unchanged files/folders since last backup.
Backup4all 7112
Backup4all 7 User Manual Copyright © 2017 Softland
Modified files/foldersShows the number of modified files/folders since last backup. Excluded files/foldersShows the number of excluded files/folders. A file/folder gets excluded because of the changes infile/folder filter or because it was deleted or moved from the backup sources. Total files/folders to backupShows the total number of files and folders that will be added to backup next time. This should bethe sum of the new, modified and unchanged file and folder counters. Total size (uncompressed) to backupShows the sum of all file sizes to be included in the backup next time it is executed. Free disk space on destinationShows the available free disk space on the destination drive.
Note: One or more of the features mentioned in this chapter might not be available in your edition.The Professional edition includes all the features. For a comparison between editions, please checkfeature matrix topic.
5.8 Progresss View
You can activate the Progress view by:
· pressing the Progress button from the Jobs tab
· pressing the CTRL+F3 keyboard shortcut
Please note Progress view is active only when the backup is running. When the backup is notrunning, that option is grayed out.When the backup is started, Backup4all will switch automatically to Progress view and after thebackup is done it will switch back to your previous view.

Main Window 113
Backup4all 7 User Manual Copyright © 2017 Softland
Action: Indicate the action in progress: Backup, Restore, Test, Clean
Operation: Indicate the operation in progress: Creating file list, Updating catalog, Testing backup etc
Current file: Displays the current file processed
On the Progress view page you can also see the file progress, file count, total progress, elapsed timeand estimate time.The Pause, Cancel and Stop buttons at the bottom of Progress view can be used for a better controlof the backup jobs. Shutdown computer when finishedIf checked, at the end of the backup/test/repair/restore execution, the computer will shutdown. It isuseful for longer backups when the user does not want to wait til the end of the process.
Note: One or more of the features mentioned in this chapter might not be available in your edition.The Professional edition includes all the features. For a comparison between editions, please checkfeature matrix topic.
5.9 Open backup
There are two ways to open a backup job in Backup4all.
· You can open the backup catalog (.bkc) or ini file using the Open command from Files menu.
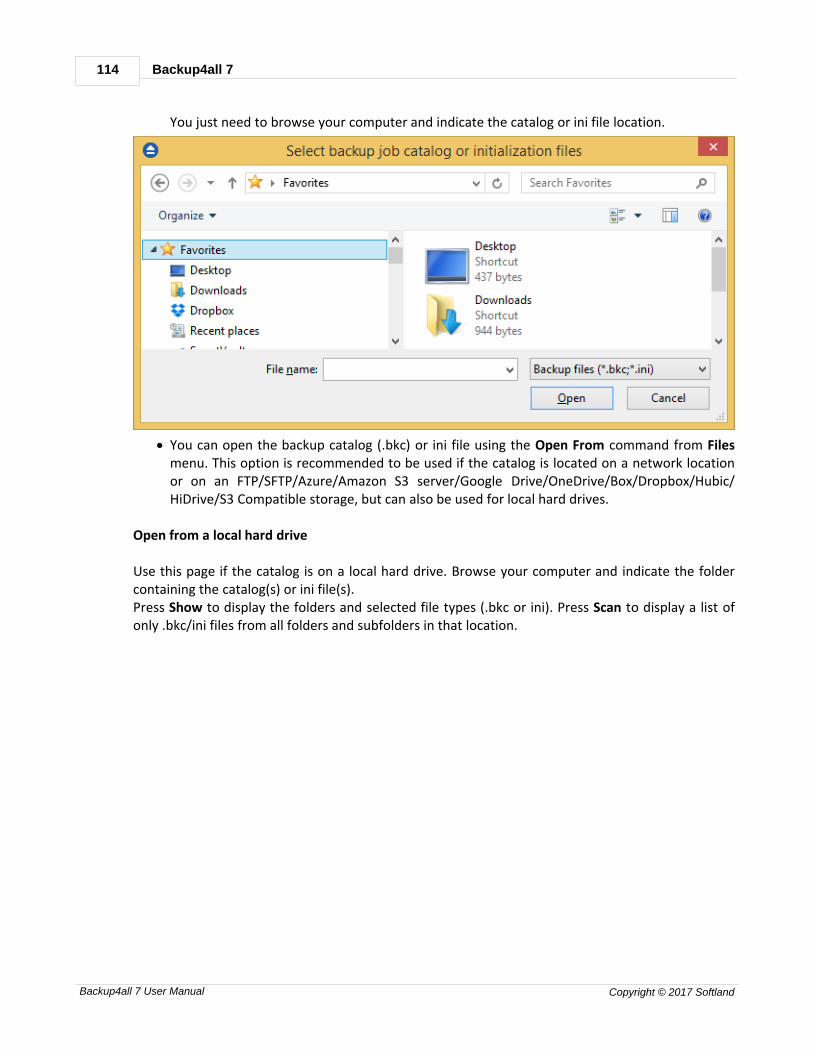
Backup4all 7114
Backup4all 7 User Manual Copyright © 2017 Softland
You just need to browse your computer and indicate the catalog or ini file location.
· You can open the backup catalog (.bkc) or ini file using the Open From command from Filesmenu. This option is recommended to be used if the catalog is located on a network locationor on an FTP/SFTP/Azure/Amazon S3 server/Google Drive/OneDrive/Box/Dropbox/Hubic/HiDrive/S3 Compatible storage, but can also be used for local hard drives.
Open from a local hard drive
Use this page if the catalog is on a local hard drive. Browse your computer and indicate the foldercontaining the catalog(s) or ini file(s). Press Show to display the folders and selected file types (.bkc or ini). Press Scan to display a list ofonly .bkc/ini files from all folders and subfolders in that location.

Main Window 115
Backup4all 7 User Manual Copyright © 2017 Softland
Open from a network drive
Use this page if the catalog is on a network drive. Select the network location and enter theusername/password if necessarily. Press Show to display the folders and selected file types (.bkc or ini). Press Scan to display a list ofonly .bkc/ini files from all folders and subfolders in that location.
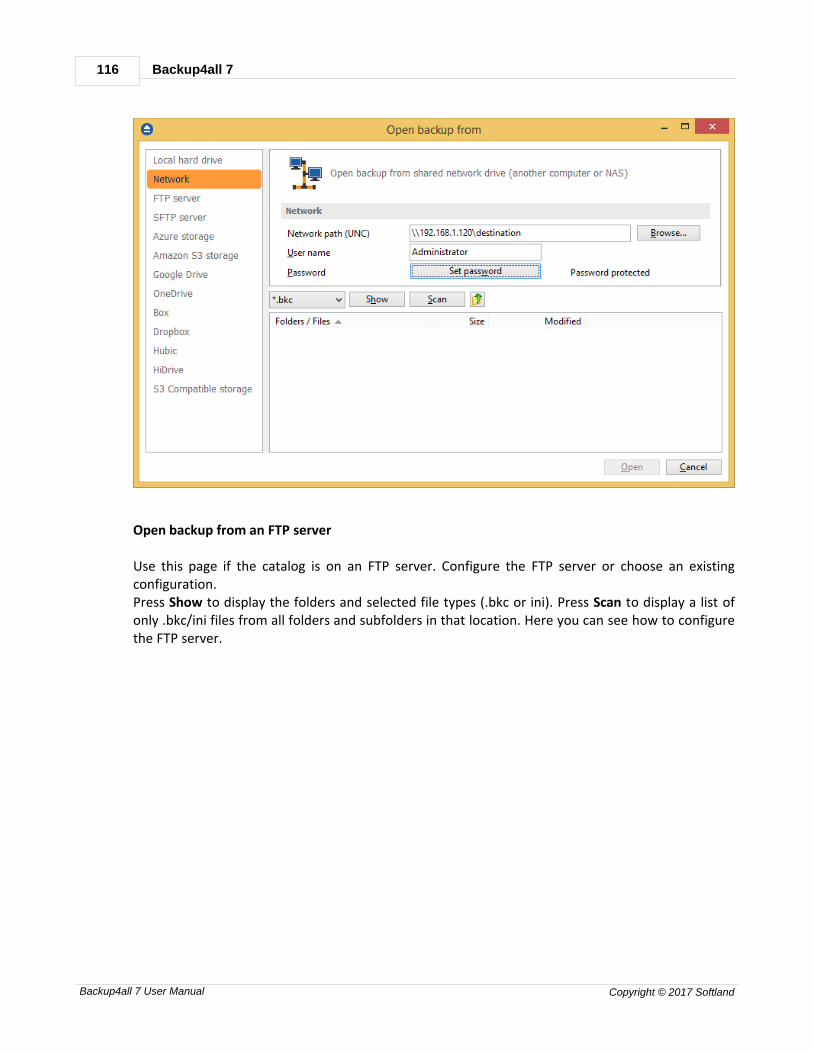
Backup4all 7116
Backup4all 7 User Manual Copyright © 2017 Softland
Open backup from an FTP server
Use this page if the catalog is on an FTP server. Configure the FTP server or choose an existingconfiguration. Press Show to display the folders and selected file types (.bkc or ini). Press Scan to display a list ofonly .bkc/ini files from all folders and subfolders in that location. Here you can see how to configurethe FTP server.
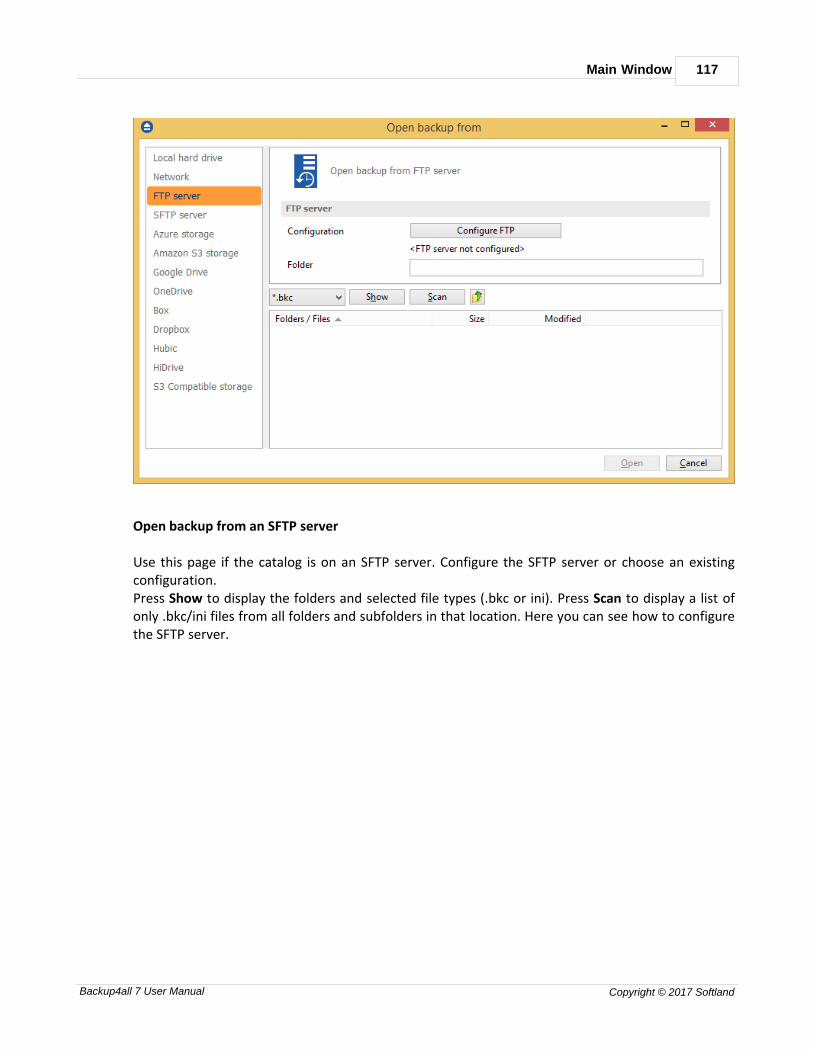
Main Window 117
Backup4all 7 User Manual Copyright © 2017 Softland
Open backup from an SFTP server
Use this page if the catalog is on an SFTP server. Configure the SFTP server or choose an existingconfiguration. Press Show to display the folders and selected file types (.bkc or ini). Press Scan to display a list ofonly .bkc/ini files from all folders and subfolders in that location. Here you can see how to configurethe SFTP server.

Backup4all 7118
Backup4all 7 User Manual Copyright © 2017 Softland
Open backup from Azure storage
Use this page if the catalog is located on Azure server. Configure Azure or choose an existingconfiguration. Press Show to display the folders and selected file types (.bkc or ini). Press Scan to display a list ofonly .bkc/ini files from all folders and subfolders in that location. Here you can see how to configureAzure.

Main Window 119
Backup4all 7 User Manual Copyright © 2017 Softland
Open backup from Amazon S3 storage
Use this page if the catalog is located on Amazon S3. Configure the Amazon S3 storage or choose anexisting configuration. Press Show to display the folders and selected file types (.bkc or ini). Press Scan to display a list ofonly .bkc/ini files from all folders and subfolders in that location. Here you can see how to configurethe Amazon S3 storage.

Backup4all 7120
Backup4all 7 User Manual Copyright © 2017 Softland
Open backup from Google Drive
Use this page if the catalog is located on Google Drive. Configure Google Drive or choose an existingconfiguration. Press Show to display the folders and selected file types (.bkc or ini). Press Scan to display a list ofonly .bkc/ini files from all folders and subfolders in that location. Here you can see how to configureGoogle Drive.
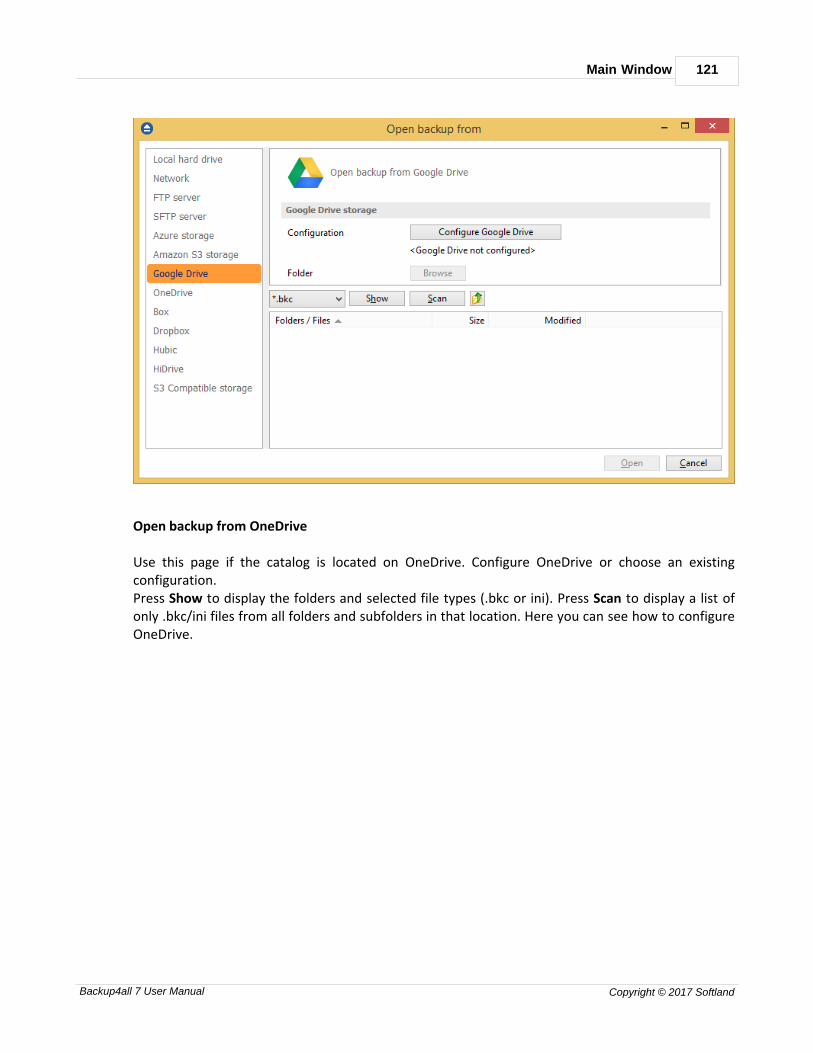
Main Window 121
Backup4all 7 User Manual Copyright © 2017 Softland
Open backup from OneDrive
Use this page if the catalog is located on OneDrive. Configure OneDrive or choose an existingconfiguration. Press Show to display the folders and selected file types (.bkc or ini). Press Scan to display a list ofonly .bkc/ini files from all folders and subfolders in that location. Here you can see how to configureOneDrive.
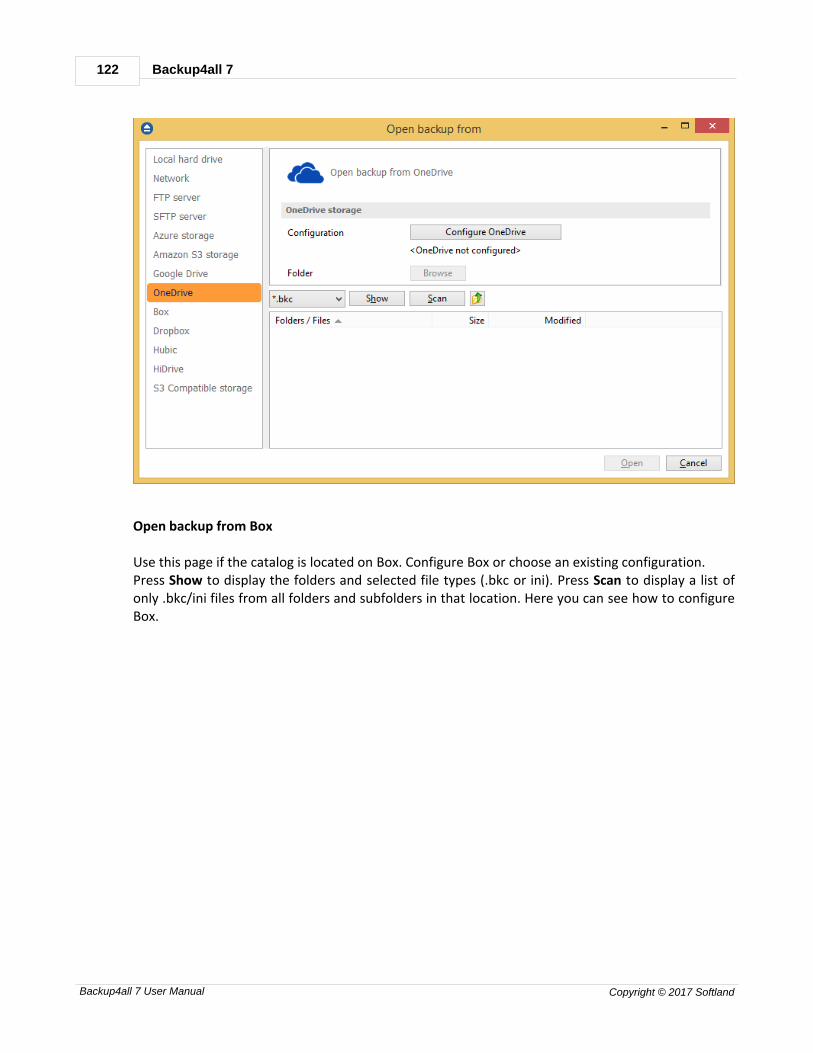
Backup4all 7122
Backup4all 7 User Manual Copyright © 2017 Softland
Open backup from Box
Use this page if the catalog is located on Box. Configure Box or choose an existing configuration. Press Show to display the folders and selected file types (.bkc or ini). Press Scan to display a list ofonly .bkc/ini files from all folders and subfolders in that location. Here you can see how to configureBox.

Main Window 123
Backup4all 7 User Manual Copyright © 2017 Softland
Open backup from Dropbox
Use this page if the catalog is located on Dropbox. Configure Dropbox or choose an existingconfiguration. Press Show to display the folders and selected file types (.bkc or ini). Press Scan to display a list ofonly .bkc/ini files from all folders and subfolders in that location. Here you can see how to configureDropbox.
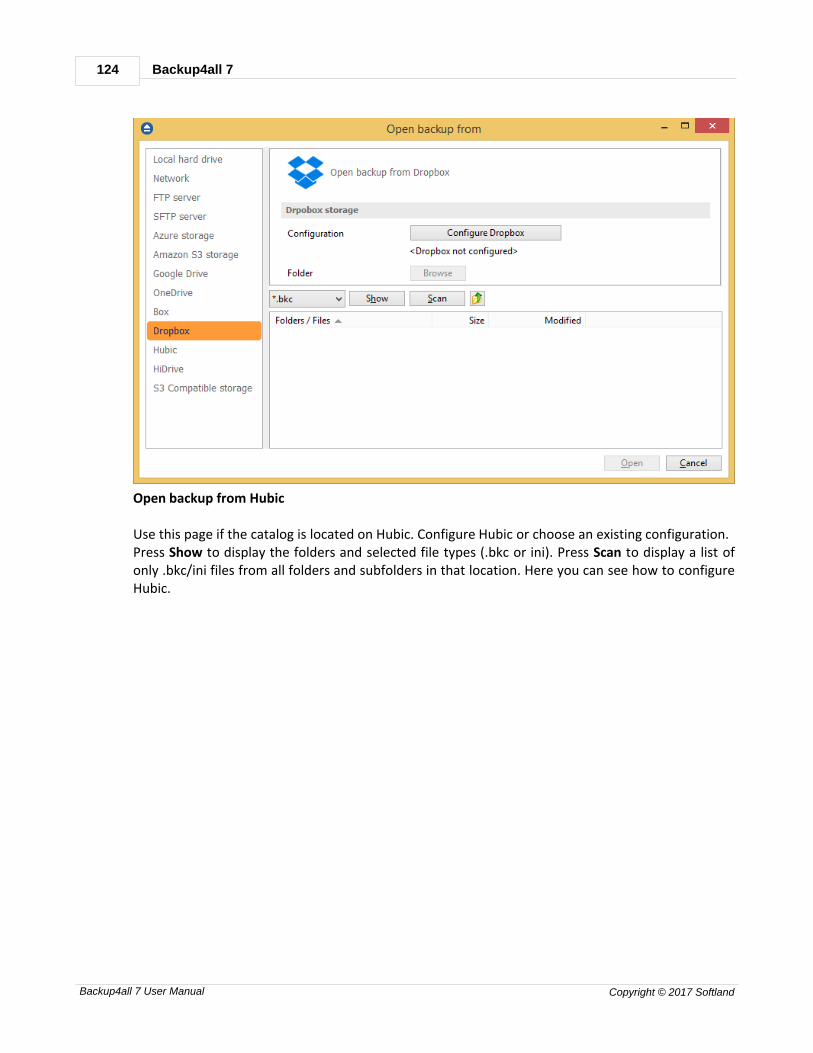
Backup4all 7124
Backup4all 7 User Manual Copyright © 2017 Softland
Open backup from Hubic
Use this page if the catalog is located on Hubic. Configure Hubic or choose an existing configuration. Press Show to display the folders and selected file types (.bkc or ini). Press Scan to display a list ofonly .bkc/ini files from all folders and subfolders in that location. Here you can see how to configureHubic.

Main Window 125
Backup4all 7 User Manual Copyright © 2017 Softland
Open backup from HiDrive
Use this page if the catalog is located on HiDrive. Configure HiDrive or choose an existingconfiguration. Press Show to display the folders and selected file types (.bkc or ini). Press Scan to display a list ofonly .bkc/ini files from all folders and subfolders in that location. Here you can see how to configureHiDrive.
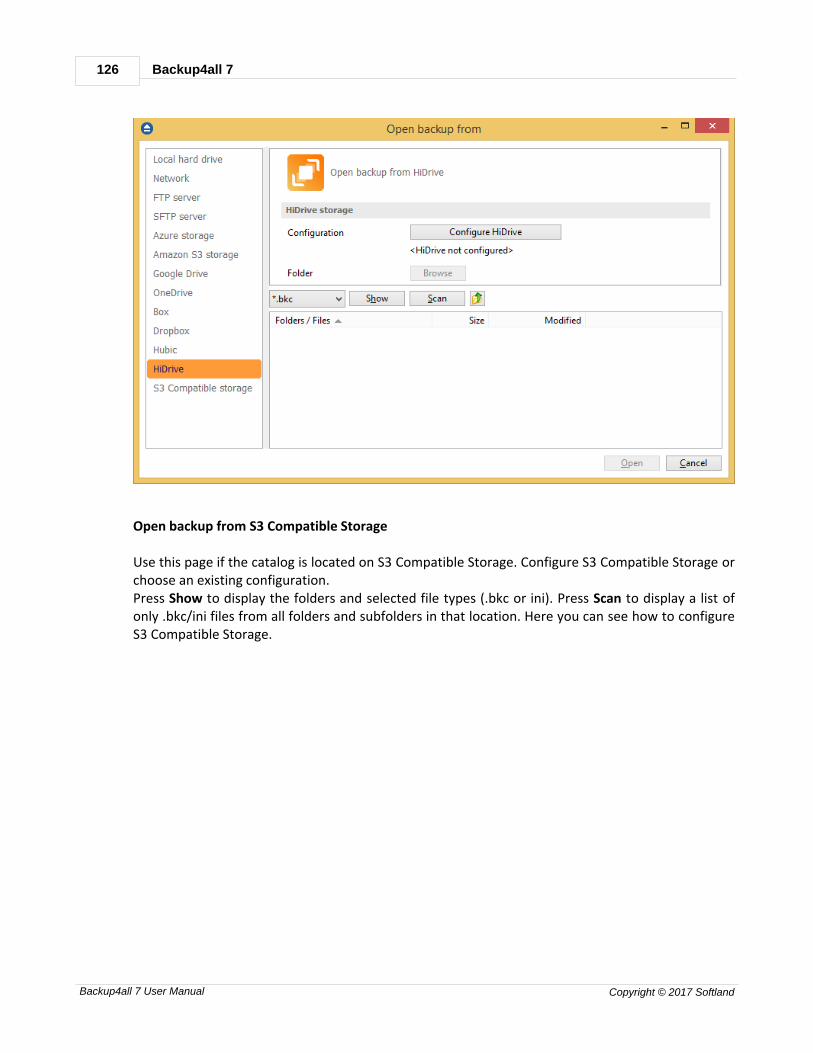
Backup4all 7126
Backup4all 7 User Manual Copyright © 2017 Softland
Open backup from S3 Compatible Storage
Use this page if the catalog is located on S3 Compatible Storage. Configure S3 Compatible Storage orchoose an existing configuration. Press Show to display the folders and selected file types (.bkc or ini). Press Scan to display a list ofonly .bkc/ini files from all folders and subfolders in that location. Here you can see how to configureS3 Compatible Storage.
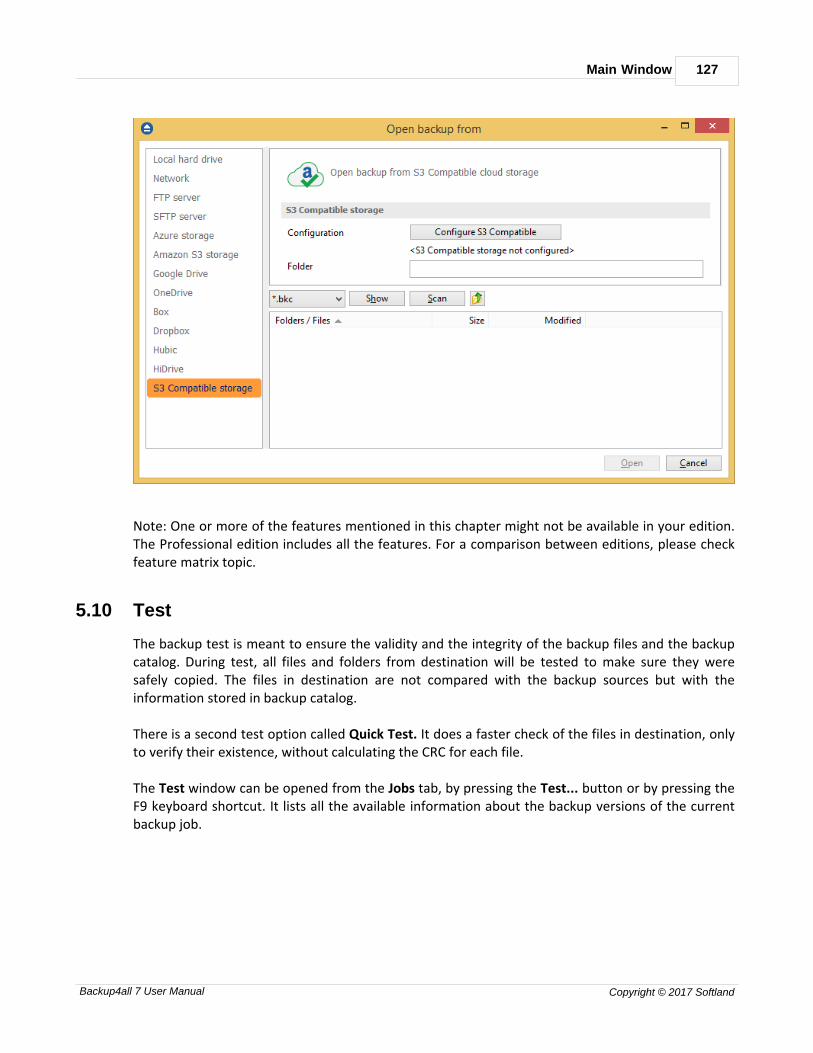
Main Window 127
Backup4all 7 User Manual Copyright © 2017 Softland
Note: One or more of the features mentioned in this chapter might not be available in your edition.The Professional edition includes all the features. For a comparison between editions, please checkfeature matrix topic.
5.10 Test
The backup test is meant to ensure the validity and the integrity of the backup files and the backupcatalog. During test, all files and folders from destination will be tested to make sure they weresafely copied. The files in destination are not compared with the backup sources but with theinformation stored in backup catalog.
There is a second test option called Quick Test. It does a faster check of the files in destination, onlyto verify their existence, without calculating the CRC for each file.
The Test window can be opened from the Jobs tab, by pressing the Test... button or by pressing theF9 keyboard shortcut. It lists all the available information about the backup versions of the currentbackup job.

Backup4all 7128
Backup4all 7 User Manual Copyright © 2017 Softland
When you open the window all the backup versions that can be tested are selected. You can select/deselect multiple backup versions you want to be tested using batch selection on that list. To definethe selection, keep the Shift key pressed and use the up and down arrow keys from your keyboardor the mouse. If you want to select multiple individual items, press and hold the Ctrl key and selectusing the mouse the items you want tested.There are several columns in the Test window that provide information for each backup version:
· Type - Type of the backup. Each of the backup types is represented by a descriptive icon:
Full, Differential, Incremental, Mirror
· Backup date - Date and time when the version was added to the backup
· Backup No. - Number of the backup
· File No. - Number of files included in that backup
· Folder No. - Number of folders included in that backup
· Comp. Size - The compressed size of the backup
· Uncomp. Size - The uncompressed size of the backup
· Label - Label of the backup increment.
The backup versions in the list can be sorted by clicking on the column headers. The right-click menuon the column header provides a handy way to show/hide unnecessary columns (except the Typecolumn which is grayed out).
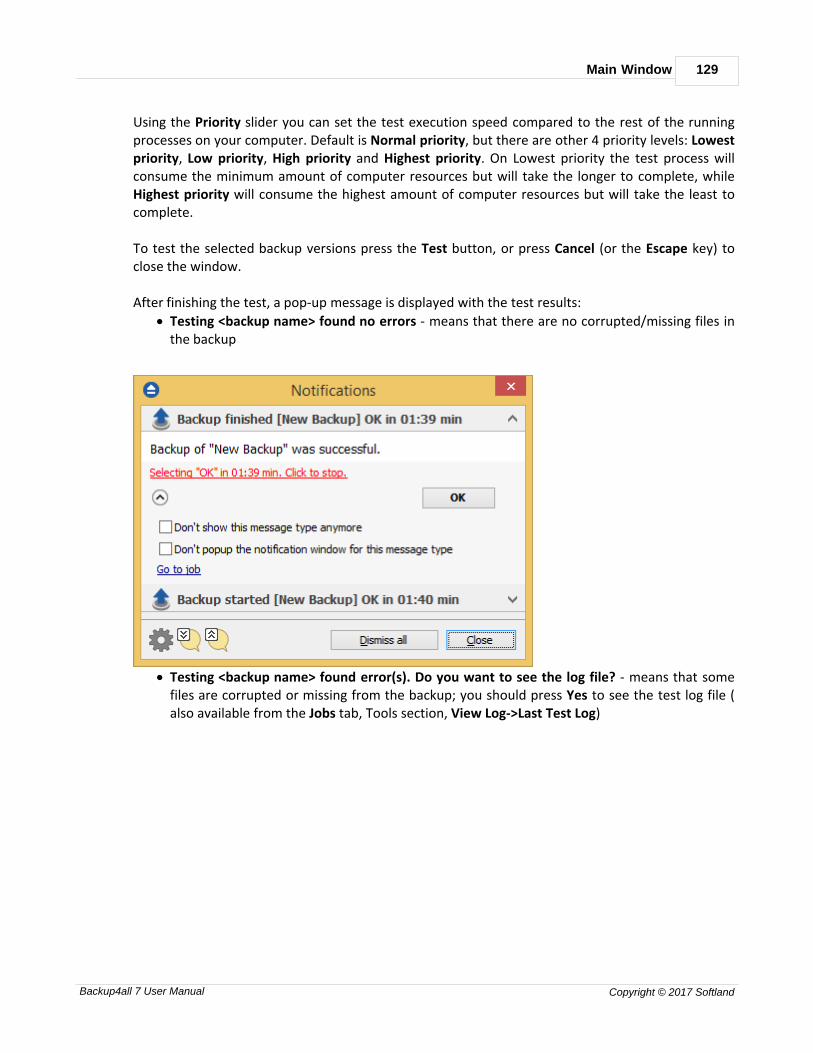
Main Window 129
Backup4all 7 User Manual Copyright © 2017 Softland
Using the Priority slider you can set the test execution speed compared to the rest of the runningprocesses on your computer. Default is Normal priority, but there are other 4 priority levels: Lowestpriority, Low priority, High priority and Highest priority. On Lowest priority the test process willconsume the minimum amount of computer resources but will take the longer to complete, whileHighest priority will consume the highest amount of computer resources but will take the least tocomplete.
To test the selected backup versions press the Test button, or press Cancel (or the Escape key) toclose the window. After finishing the test, a pop-up message is displayed with the test results:
· Testing <backup name> found no errors - means that there are no corrupted/missing files inthe backup
· Testing <backup name> found error(s). Do you want to see the log file? - means that somefiles are corrupted or missing from the backup; you should press Yes to see the test log file (also available from the Jobs tab, Tools section, View Log->Last Test Log)
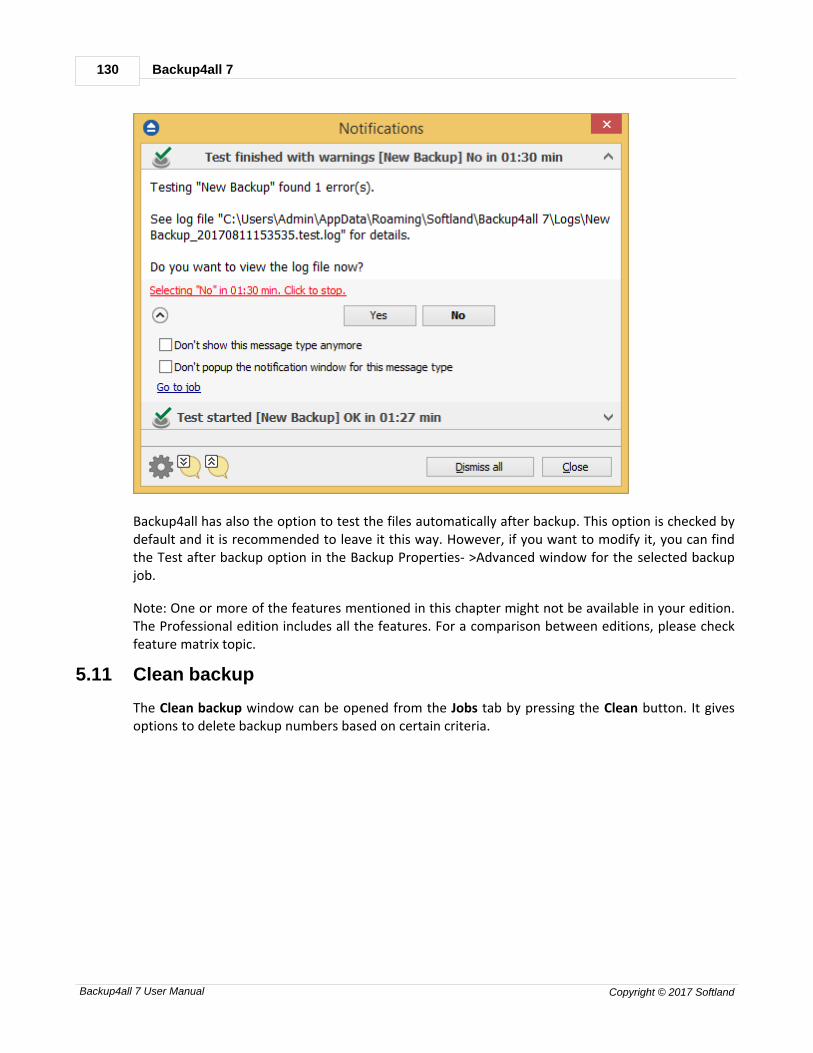
Backup4all 7130
Backup4all 7 User Manual Copyright © 2017 Softland
Backup4all has also the option to test the files automatically after backup. This option is checked bydefault and it is recommended to leave it this way. However, if you want to modify it, you can findthe Test after backup option in the Backup Properties- >Advanced window for the selected backupjob.
Note: One or more of the features mentioned in this chapter might not be available in your edition.The Professional edition includes all the features. For a comparison between editions, please checkfeature matrix topic.
5.11 Clean backup
The Clean backup window can be opened from the Jobs tab by pressing the Clean button. It givesoptions to delete backup numbers based on certain criteria.

Main Window 131
Backup4all 7 User Manual Copyright © 2017 Softland
When you open the window all the backup numbers are displayed. You can either manually checkmultiple backup numbers you want deleted or use the filter options to have them automaticallyselected if they match a certain criteria. Once you select a type of backup, if there are other backupnumbers depending on it, they will be selected too. For instance, selecting a Full Backup (markedwith red in the list) will also batch select the other incremental or differential backup numbers thatdepend on the selected full backup (to keep some of the backup numbers that depends on the fullbackup, you will have to start unselecting them in the order they were created). Please note that when you delete a certain backup number using the Clean Backup tool, all thefiles in the destination that were created for that backup number will be removed.
Backup4all 7132
Backup4all 7 User Manual Copyright © 2017 Softland
There are several columns in the Clean Backup window that provide information for each backupnumber:
· Delete - Shows if a backup number is selected for deletion. You can manually check/uncheckthe backup numbers you want deleted. Once selecting a backup number all the other backupnumbers that depend on it will also be selected.
· Type - Type of the backup. Each of the backup types is represented by a descriptive icon and
text: Full, Incremental, Differential, Mirror. Additionally, full backups are markedwith red.
· Backup No. - Number of the backup
· Backup date - Date and time when the backup was executed
· File No. - Number of files included in that backup
· Folder No. - Number of folders included in that backup
· Total size - Size of the backup
· Label - Label of the backup increment.
The backup numbers in the list can be sorted by clicking on the column headers. The right-clickmenu on the column header provides a handy way to show/hide unnecessary columns.
You can select a backup number by right-clicking it and choosing Check Selected (or uncheck it usingUncheck Selected). The right-click menu also allows selecting all backup numbers (Check all) orunselecting them (Uncheck all).
Using the Priority slider you can set the execution speed compared to the rest of the runningprocesses on your computer. Default is Normal priority, but there are other 4 priority levels: Lowestpriority, Low priority, High priority and Highest priority. On Lowest priority the process willconsume the minimum amount of computer resources but will take the longer to complete, whileHighest priority will consume the highest amount of computer resources but will take the least tocomplete.
Filter backups by date
Newer thanIf checked backup numbers that are newer than the selected date will be removed when the Cleanoperation is executed.
Older than If checked backup numbers that are older than the selected date will be removed when the Cleanoperation is executed.
Older than (fixed date)The backup numbers that are Older than a certain fixed date will be deleted when the Cleanoperation is executed.

Main Window 133
Backup4all 7 User Manual Copyright © 2017 Softland
Filter backups by type
Do not delete Full backups If this is checked, the full backups will be kept even if they fall into the range of files filtered fordeletion.
Do not delete Differential backupsIf this is checked, the differential backups will be kept even if they fall into the range of files filteredfor deletion. Note that this option is available only when Do not delete full backups is checked,because differential backups depend on full backups.
Manual selection
In this section you can manually select the backup versions you want to delete by clicking thecheckbox in front of the backup version.
Reset to filtersPressing this will ignore any manual selection done and restore the default selection based on thefilters applied.
Options
Clean the destination folderSelecting this option will also delete from the destination folder all the files and folders which arenot related to the backup job. This action will be executed in addition with the cleanup selection youmade.
Clean process priority
Using the Priority slider you can set the test execution speed compared to the rest of the runningprocesses on your computer. Default is Normal priority, but there are other 4 priority levels: Lowestpriority, Low priority, High priority and Highest priority. On Lowest priority the test process willconsume the minimum amount of computer resources but will take the longer to complete, whileHighest priority will consume the highest amount of computer resources but will take the least tocomplete.
Note: One or more of the features mentioned in this chapter might not be available in your edition.The Professional edition includes all the features. For a comparison between editions, please checkfeature matrix topic.
5.12 Schedulers
The Schedulers window can be opened from the bottom left-side column, by pressing the Schedulerbutton or by pressing the F11 keyboard shortcut. It lists all the available information about thescheduled tasks and allows you to Add, Edit, Delete and Schedule the tasks.
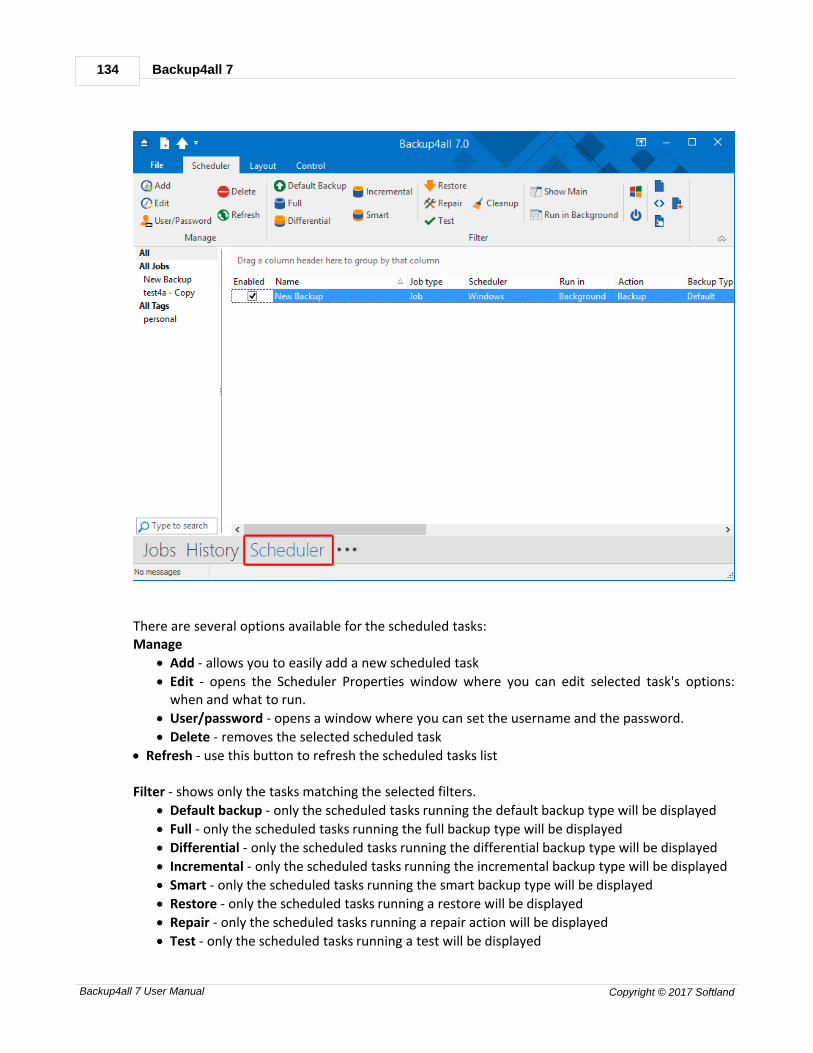
Backup4all 7134
Backup4all 7 User Manual Copyright © 2017 Softland
There are several options available for the scheduled tasks:Manage
· Add - allows you to easily add a new scheduled task
· Edit - opens the Scheduler Properties window where you can edit selected task's options:when and what to run.
· User/password - opens a window where you can set the username and the password.
· Delete - removes the selected scheduled task
· Refresh - use this button to refresh the scheduled tasks list
Filter - shows only the tasks matching the selected filters.
· Default backup - only the scheduled tasks running the default backup type will be displayed
· Full - only the scheduled tasks running the full backup type will be displayed
· Differential - only the scheduled tasks running the differential backup type will be displayed
· Incremental - only the scheduled tasks running the incremental backup type will be displayed
· Smart - only the scheduled tasks running the smart backup type will be displayed
· Restore - only the scheduled tasks running a restore will be displayed
· Repair - only the scheduled tasks running a repair action will be displayed
· Test - only the scheduled tasks running a test will be displayed
Main Window 135
Backup4all 7 User Manual Copyright © 2017 Softland
· Cleanup - only the scheduled tasks running a cleanup action will be displayed
· Show main - only the scheduled tasks running using the main application will be displayed
· Run in background - only the scheduled tasks running in background will be displayed
· Windows - only the scheduled tasks using the Windows scheduler will be displayed
· Shutdown - only the scheduled tasks running at shutdown will be displayed
· Jobs - only the scheduled tasks running jobs will be displayed
· Tags - only the scheduled tasks running tasks will be displayed
· OTB - only the scheduled tasks running One Touch Backup will be displayed
· All jobs - only the scheduled tasks configured to run All jobs will be displayed In the scheduled tasks list, you can drag any column to group the tasks by that column.
· Enabled - if the checkbox is marked then the scheduled task will run, if is unchecked it will notbe executed
· Name - displays the name of the backup job as defined in its backup properties
· Job Type - displays the type of the job: job or tag
· Scheduler - displays the scheduler used
· Run in - displays if the scheduler will be run using main application or command lineapplication
· Action - shows the type of action associated with the scheduled task (default, smart, full,differential, incremental, cleanup, test)
· Backup Type - shows the type of the backup configured to be executed
· Task file - displays the name of the task file as you can find it on your computer
· Status - displays the status of the scheduled task
· Next Run Time - calculates the date and time when the scheduled task will run next
· Last Run Time - shows the date and time when the scheduled task last ran
· Last Run Result - shows the status of the last scheduled action executed
· Schedule - shows the scheduler time and frequency
· User - shows the user name for which the job is scheduled to run
The scheduled tasks in the list can be sorted by clicking on the column headers. The right-click menuon the column header provides a handy way to show/hide unnecessary columns (except theEnabled and Name columns which are grayed out).
You can also schedule a task from the Backup Properties->Scheduler window. The differencebetween the two methods is that the Backup Properties->Scheduler window displays the scheduledtasks only for the selected backup job, while Schedulers (F11) will show you the scheduled tasks forall the backup jobs and tags. Backup4all uses the Windows Task Scheduler in order to run the scheduled tasks so you need tomake sure that the Task Scheduler service is enabled on your computer. Use the Windows Help inorder to find out more information about scheduling a task using the Task Scheduler.
Note: One or more of the features mentioned in this chapter might not be available in your edition.The Professional edition includes all the features. For a comparison between editions, please checkfeature matrix topic.
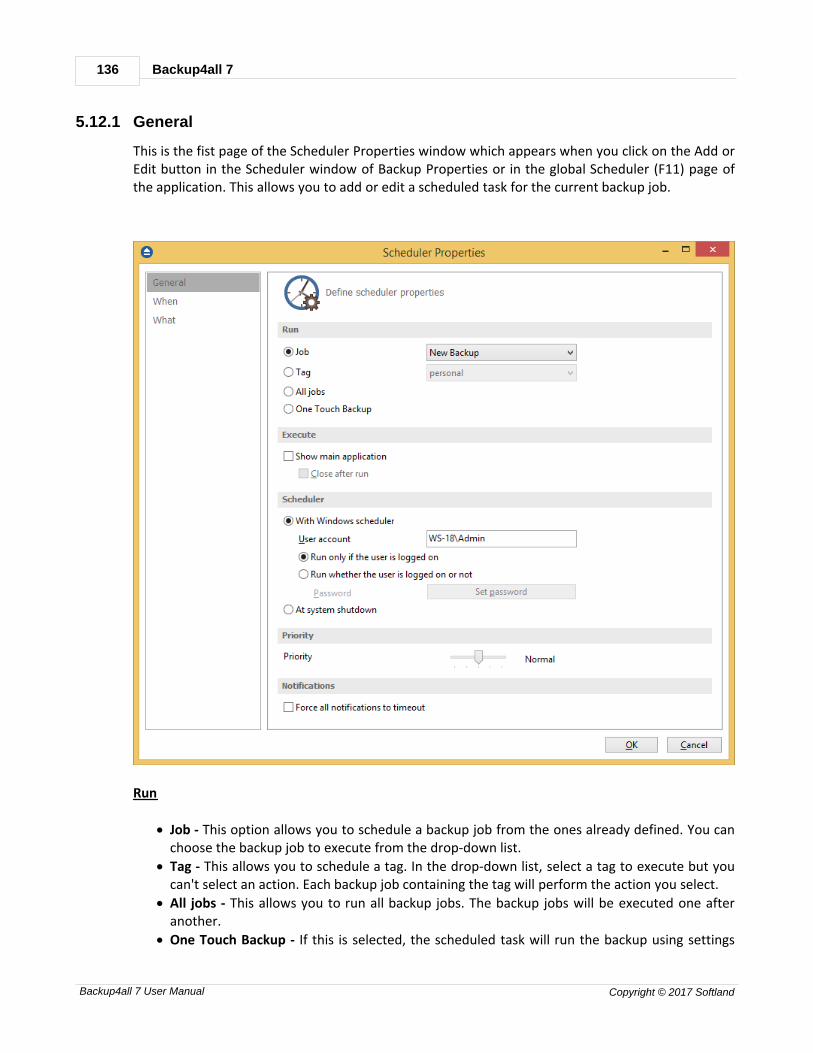
Backup4all 7136
Backup4all 7 User Manual Copyright © 2017 Softland
5.12.1 General
This is the fist page of the Scheduler Properties window which appears when you click on the Add orEdit button in the Scheduler window of Backup Properties or in the global Scheduler (F11) page ofthe application. This allows you to add or edit a scheduled task for the current backup job.
Run
· Job - This option allows you to schedule a backup job from the ones already defined. You canchoose the backup job to execute from the drop-down list.
· Tag - This allows you to schedule a tag. In the drop-down list, select a tag to execute but youcan't select an action. Each backup job containing the tag will perform the action you select.
· All jobs - This allows you to run all backup jobs. The backup jobs will be executed one afteranother.
· One Touch Backup - If this is selected, the scheduled task will run the backup using settings
Main Window 137
Backup4all 7 User Manual Copyright © 2017 Softland
from File->Options->Backup->Backup on demand. If the option Enable "One Touch Backup"support is not enabled, the scheduled task will not run.
Execute
Show main applicationUse this option if you want the main application window to be shown when the scheduled task isexecuted. By default, this option is unchecked and the scheduled tasks will run in background.
Close after runIf this option is checked, Backup4all will be closed after the task is executed.
Scheduler
With Windows scheduler
· Run only if the user is logged on - the task will run under the specified user account only ifthere is an user logged on
· Run whether the user is logged on or not - the task will run even if there is no user logged on Password - press this button to set the Windows login password for the specified user
account At system shutdown - If this is selected, the task will be executed when the shutdown command isstarted. Backup4all intercepts the shutdown message and there is no way to know if a restart or ashutdown was requested. This is why it will always shutdown your computer after the task isexecuted.
Priority
Indicates the task priority. Move the cursor to right or left in order to increase or decrease thepriority.
Notifications
Force all notifications to timeout - use this option to close all notification messages, even if they areset to never expire.
Note: One or more of the features mentioned in this chapter might not be available in your edition.The Professional edition includes all the features. For a comparison between editions, please checkfeature matrix topic.
5.12.2 When
On this page you can set when do you want to execute the scheduled task.
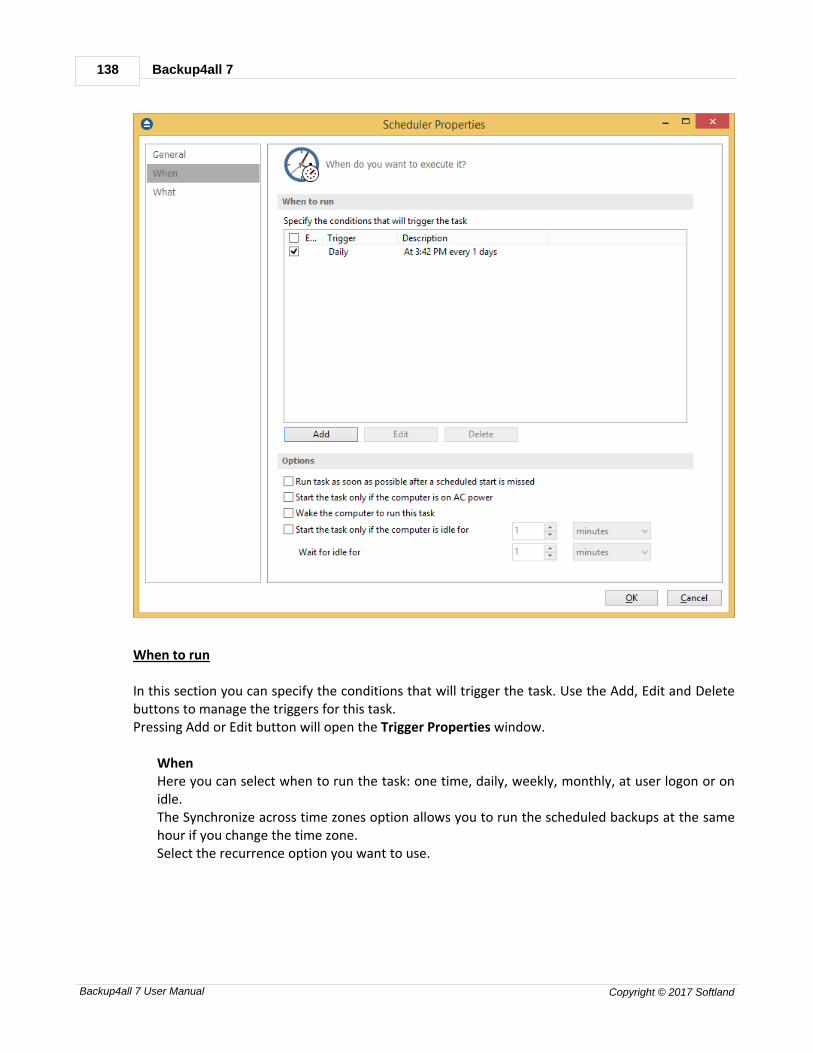
Backup4all 7138
Backup4all 7 User Manual Copyright © 2017 Softland
When to run
In this section you can specify the conditions that will trigger the task. Use the Add, Edit and Deletebuttons to manage the triggers for this task.Pressing Add or Edit button will open the Trigger Properties window.
WhenHere you can select when to run the task: one time, daily, weekly, monthly, at user logon or onidle.The Synchronize across time zones option allows you to run the scheduled backups at the samehour if you change the time zone.Select the recurrence option you want to use.
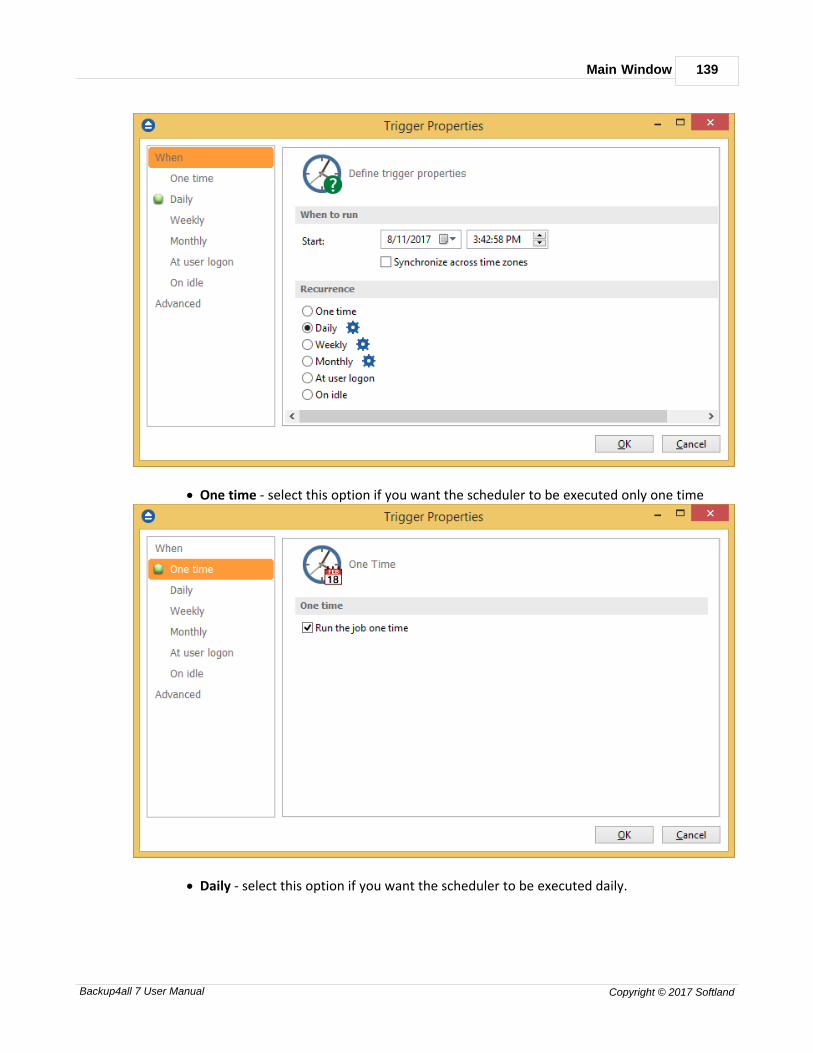
Main Window 139
Backup4all 7 User Manual Copyright © 2017 Softland
· One time - select this option if you want the scheduler to be executed only one time
· Daily - select this option if you want the scheduler to be executed daily.

Backup4all 7140
Backup4all 7 User Manual Copyright © 2017 Softland
· Weekly - select this option if you want the scheduler to be executed weekly on the daysyou select.
· Monthly - select this option if you want the scheduler to be executed monthly on themonths and days you select.
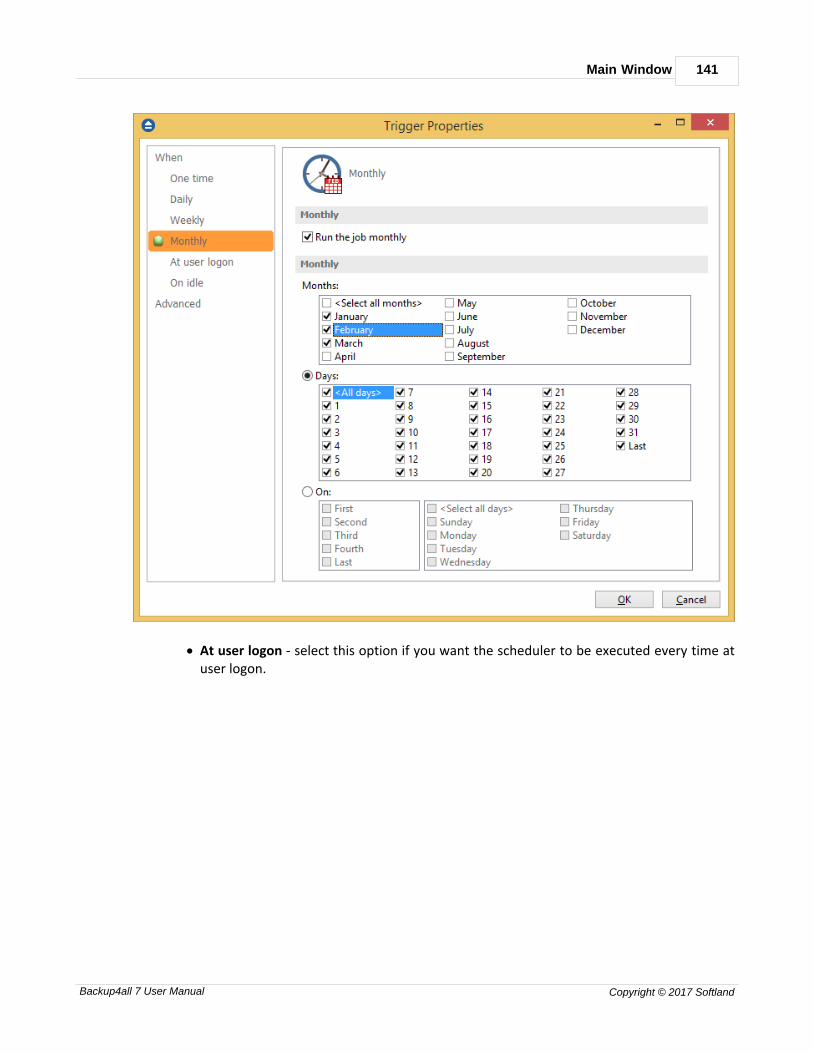
Main Window 141
Backup4all 7 User Manual Copyright © 2017 Softland
· At user logon - select this option if you want the scheduler to be executed every time atuser logon.

Backup4all 7142
Backup4all 7 User Manual Copyright © 2017 Softland
· On idle - select this option if you want the scheduler to be executed when the computeris idle.
AdvancedOn this page, you can set the expiration date and time or the repeat frequency.
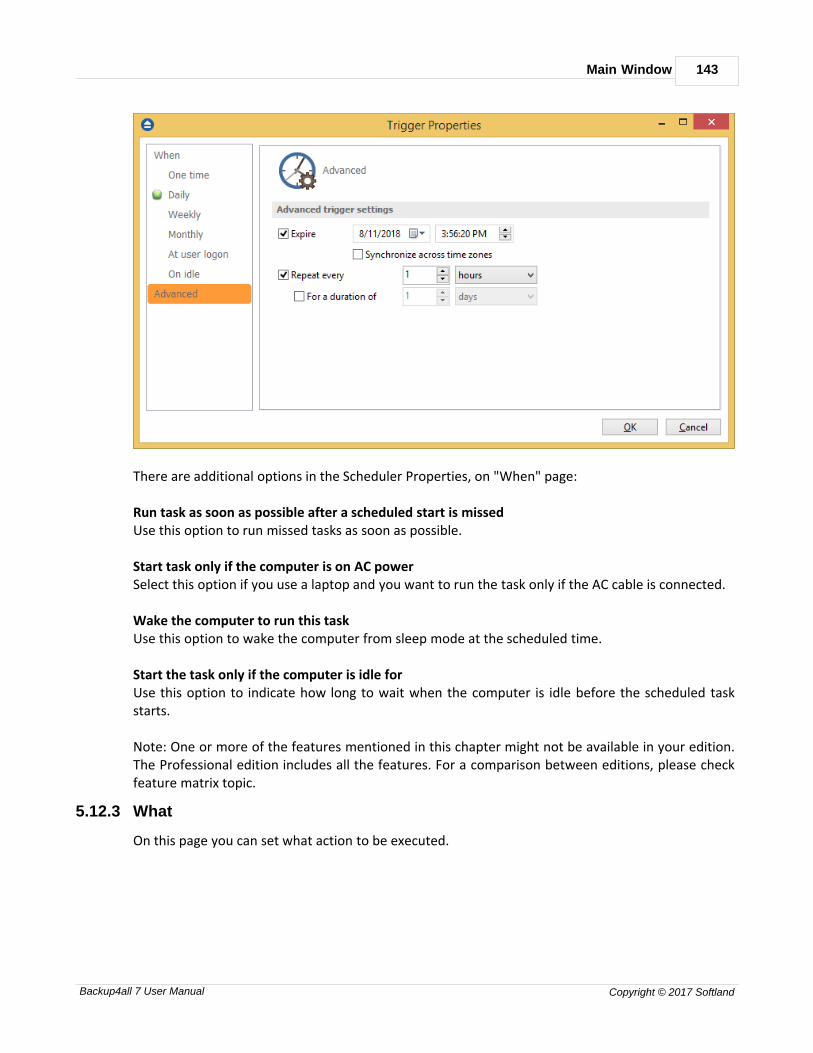
Main Window 143
Backup4all 7 User Manual Copyright © 2017 Softland
There are additional options in the Scheduler Properties, on "When" page:
Run task as soon as possible after a scheduled start is missedUse this option to run missed tasks as soon as possible.
Start task only if the computer is on AC powerSelect this option if you use a laptop and you want to run the task only if the AC cable is connected.
Wake the computer to run this taskUse this option to wake the computer from sleep mode at the scheduled time.
Start the task only if the computer is idle forUse this option to indicate how long to wait when the computer is idle before the scheduled taskstarts.
Note: One or more of the features mentioned in this chapter might not be available in your edition.The Professional edition includes all the features. For a comparison between editions, please checkfeature matrix topic.
5.12.3 What
On this page you can set what action to be executed.

Backup4all 7144
Backup4all 7 User Manual Copyright © 2017 Softland
What to execute
· BackupType
· Default - executes the default backup type defined in the backup job's properties
· Smart - executes a smart backup, no matter what the backup type defined in the backupjob is
· Full - executes a full backup, no matter what the backup type defined in the backup job is
· Differential - executes a differential backup, no matter what the backup type defined inthe backup job is
· Incremental - executes an incremental backup, no matter what the backup type definedin the backup job is
Clear backup before runIf this is checked, Backup4all will first delete the ".bkc" file and all zip files associated with the
Main Window 145
Backup4all 7 User Manual Copyright © 2017 Softland
current backup job and after that execute the scheduled backup.
Erase disk before backupThis checkbox can be selected only if the backup destination is a CD/DVD or Blu-ray drive.
· Test - you can schedule a test operation instead of a backup. When Test is selected, the
Backup Numbers box is displayed . You can type in there the backupnumbers you want to test. The order you type them in is the order they will be tested in. Usethe * character to test all backup numbers, or the # character to test only the last backup.
· Quick Test - performs a test operation for the specified backup numbers, withoutcalculating the CRC for each file. Only the existence of the source files in destination isverified.
· Repair - you can schedule a repair action to be executed. The missing or corrupted files fromdestination will be backed up again.
· Repair catalog only - if this option is checked, only the backup catalog will be repaired, themissing or corrupted files in destination will be removed from the backup catalog, so theywill be backed up again next time.
· Cleanup - at the scheduled date it deletes the selected backup numbers. When Cleanup isselected, other options become available to filter the backup numbers that will be deleted:
· Newer than - if checked backup numbers that are newer than the selected date will bedeleted when the scheduled Cleanup operation runs
· Older than - if checked backup numbers that are older than the selected date will bedeleted when the scheduled Cleanup operation runs
· Older than (fixed date) - backup numbers that are Older than a certain fixed date will bedeleted when the scheduled Cleanup operation runs
· Do not delete full backups - if this is checked, the full backups will be kept even if theyfall into the range of files filtered for deletion
· Do not delete differential backups - if this is checked, the differential backups will bekept even if they fall into the range of files filtered for deletion. Note that this option isavailable only when Do not delete full backups is checked, because differential backupsdepend on full backups.
· Clear the destination folder - Deletes files and folders that should not be in thedestination folder. Only the files mentioned in backup catalog are kept.
· Restore - select this option if you want to schedule a restore action.
· Original location - use this option to restore files in the original location
· Other location - use this option to restore files in another locationDo not create drive letter folder - if this option is checked, when restoring to anotherlocation, the drive letter folder won't be created.
· Restore the latest version of all files - use this option to restore the latest version of allfiles
· Restore all files as of - use this option to restore the files as they were on a specified date
· Restore backup numbers - use this option to restore one or more backup numbers
· Restore excluded and deleted files - if this option is checked, excluded and deleted files will

Backup4all 7146
Backup4all 7 User Manual Copyright © 2017 Softland
be also restored.
Note: One or more of the features mentioned in this chapter might not be available in your edition.The Professional edition includes all the features. For a comparison between editions, please checkfeature matrix topic.
5.13 Erase CD/DVD/Blu-ray
The Erase CD/DVD/Blu-ray window can be opened from the File->Tools->Erase disc menu item.
When the window is shown, devices capable of writing to CD, DVD or Blu-ray disc are listed in it. Thefirst device from the list is selected by default.A summary of properties is shown for each device (calculated by Backup4all's internal burner):
· Maximum read speed of device - shows the maximum reading speed of the device (kb/s)
· Maximum write speed of device - shows the maximum writing speed of the device (kb/s)
· Reading capabilities - displays a list of media the device can read from
· Writing capabilities - displays a list of media the device can write to
· Disk type - shows the type of media inserted
· Sessions on disk - number of sessions on the disk
· Disk free space - free space on disk
· Disk size - total size of disk
· Maximum read speed of media - maximum reading speed of media
Main Window 147
Backup4all 7 User Manual Copyright © 2017 Softland
· Maximum write speed of media - maximum writing speed of mediaWhen an erase is performed, the progress bar shows the percentage of the operation completed.
Options
LoadCloses the CD/DVD/Blu-ray tray. The button is enabled only when a device is selected. EjectOpens the CD/DVD/Blu-ray tray. The button is enabled only when a device is selected. Refresh listWill reload all information about the CD/DVD/Blu-ray burners.
Quick eraseErases the CD/DVD/Blu-ray disc. Additional options are available in the combo:
· Quick erase - disk appears to be empty, but the data is not physically erased (selected bydefault)
· Full erase - will physically erase all data on disk. Takes longer to perform
CloseCloses the Erase CD/DVD/Blu-ray window.
Note: One or more of the features mentioned in this chapter might not be available in your edition.The Professional edition includes all the features. For a comparison between editions, please checkfeature matrix topic.
5.14 Plugins
Backup4all includes a plugin manager that can be found in File->Tools->Plugins. The Manage Pluginswindow allows you to download, add, remove, enable or disable the Backup4all plugins.After installing a plugin, you can use it on the What do you want to backup page when creating anew backup job using the New Backup Wizard or on the Sources page using Advanced mode(Backup Properties).
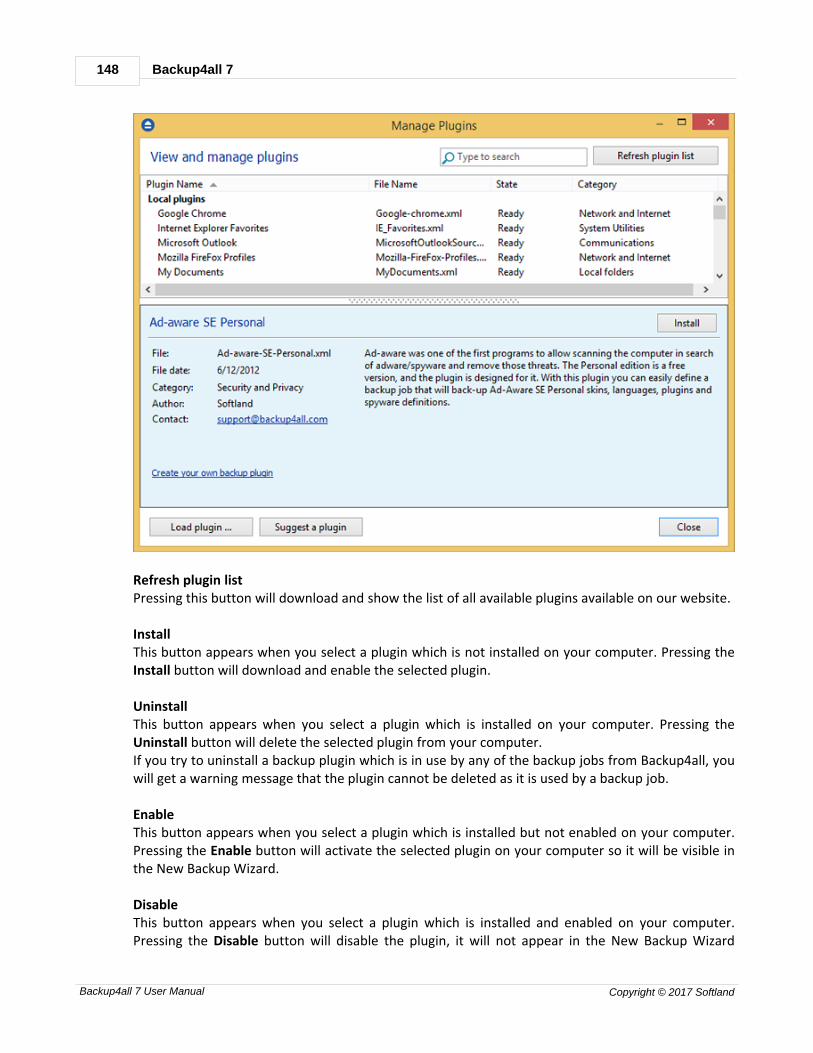
Backup4all 7148
Backup4all 7 User Manual Copyright © 2017 Softland
Refresh plugin listPressing this button will download and show the list of all available plugins available on our website.
InstallThis button appears when you select a plugin which is not installed on your computer. Pressing theInstall button will download and enable the selected plugin.
UninstallThis button appears when you select a plugin which is installed on your computer. Pressing theUninstall button will delete the selected plugin from your computer.If you try to uninstall a backup plugin which is in use by any of the backup jobs from Backup4all, youwill get a warning message that the plugin cannot be deleted as it is used by a backup job.
EnableThis button appears when you select a plugin which is installed but not enabled on your computer.Pressing the Enable button will activate the selected plugin on your computer so it will be visible inthe New Backup Wizard.
DisableThis button appears when you select a plugin which is installed and enabled on your computer.Pressing the Disable button will disable the plugin, it will not appear in the New Backup Wizard

Main Window 149
Backup4all 7 User Manual Copyright © 2017 Softland
anymore, but the plugin remains on your computer.
Load plugin ...Press this button to install a new backup plugin. You will be asked to select the plugin file location from your computer. Multiple plugin files can beselected and open.
Suggest a pluginPressing this button will open a website page in browser, were you can suggest us the plugin tocreate.
ClosePress this button to close the Manage Plugins window.
Note: One or more of the features mentioned in this chapter might not be available in your edition.The Professional edition includes all the features. For a comparison between editions, please checkfeature matrix topic.
5.15 Logging
Backup4all provides a log engine that helps you track the backup, restore, test, clean and calculatestatistics operations. It is composed of four subsystems: backup logging, restore logging, test loggingand cleanup logging. Log files are accessible from the Jobs tab, History section. For each operation the system logs:
· start time and date
· the operation
· errors or warnings
· end time and date
The File->Options->Logs and history configuration window provides additional options that you canselect to further customize the logging process.
Log Overview
Backup4all generates log files in various instances. Some logs deal with the running components(applications) of Backup4all, while others are generated every time a backup related action isperformed. These logs are generated during backup, testing, restoring, cleanup and statisticscalculation.
The format of an action related log file is as follows:
<job-name>_YYYYMMDDHHMMSS.<action>.log
<job-name> - refers to the specific job on which the action was executedYYYYMMDDHHMMSS - is the year, month, day, hour, minute and second in which this log wasgenerated

Backup4all 7150
Backup4all 7 User Manual Copyright © 2017 Softland
<action> - refers to the action (backup, restore etc.)
The easiest way to examine specific logs is to right click on a job in the Main Window, go to Job Logsand select the latest log of a certain type from the list. Alternatively, from the Jobs tab, you mayclick on Open Log Folder. This will open the log folder in Explorer. The log folder contains all the logsthat Backup4all has created. The tags in the file names are helpful for sorting the logs and findingspecific ones.
Content
Log detailed informationIf this option is enabled, the logs will contain information about every file used in the backup,restore or test process.
Include summary in logIf this option is checked, the logs will include all the text available in the Summary view.
Log folder
After a long period the application will generate a large number of log files. Since all the log files arestored in the same folder, the system has an option to limit the size of the log folder. Just selectRestricted to and choose a Size and Unit for the log folder (default is 200MB). If the log file of therunning backup job is larger than the limit, it will still be stored in the log folder. When the sameoperation will run again, the previous log file will be deleted.If you want to keep all log files no matter the size, select the Unlimited size option.
Note: One or more of the features mentioned in this chapter might not be available in your edition.The Professional edition includes all the features. For a comparison between editions, please checkfeature matrix topic.
5.16 History
The History window can be open from the left side column by pressing the History button.
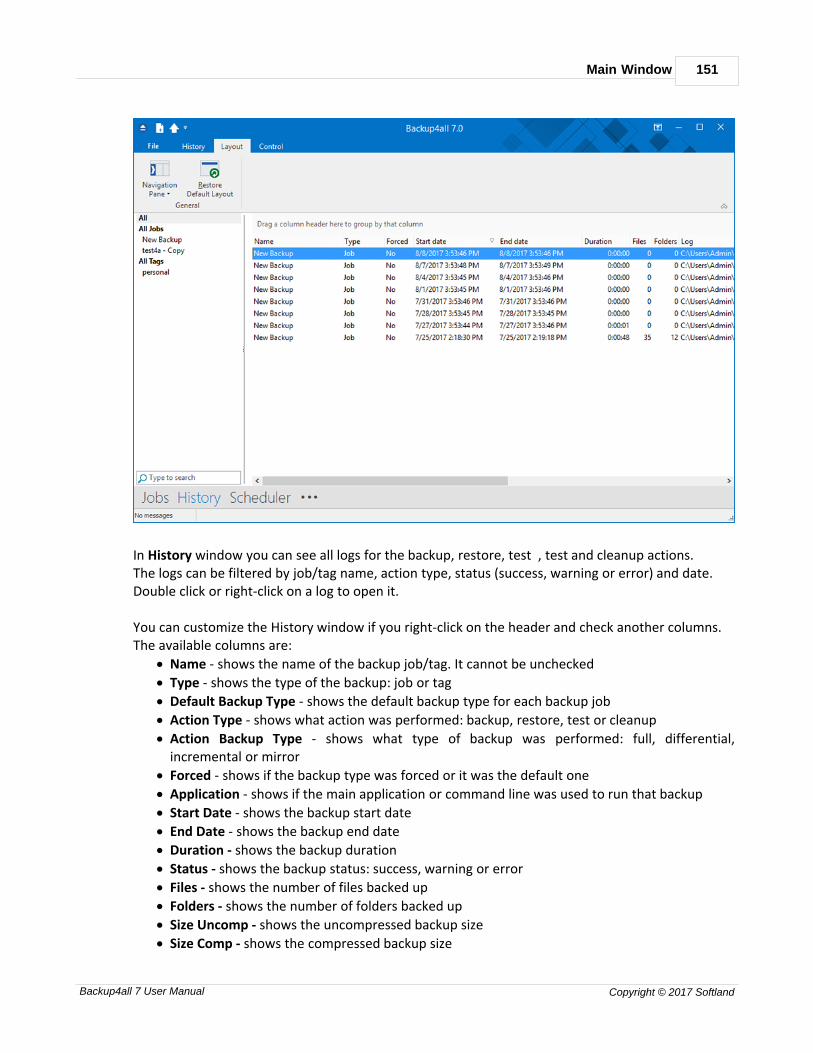
Main Window 151
Backup4all 7 User Manual Copyright © 2017 Softland
In History window you can see all logs for the backup, restore, test , test and cleanup actions.The logs can be filtered by job/tag name, action type, status (success, warning or error) and date.Double click or right-click on a log to open it.
You can customize the History window if you right-click on the header and check another columns.The available columns are:
· Name - shows the name of the backup job/tag. It cannot be unchecked
· Type - shows the type of the backup: job or tag
· Default Backup Type - shows the default backup type for each backup job
· Action Type - shows what action was performed: backup, restore, test or cleanup
· Action Backup Type - shows what type of backup was performed: full, differential,incremental or mirror
· Forced - shows if the backup type was forced or it was the default one
· Application - shows if the main application or command line was used to run that backup
· Start Date - shows the backup start date
· End Date - shows the backup end date
· Duration - shows the backup duration
· Status - shows the backup status: success, warning or error
· Files - shows the number of files backed up
· Folders - shows the number of folders backed up
· Size Uncomp - shows the uncompressed backup size
· Size Comp - shows the compressed backup size
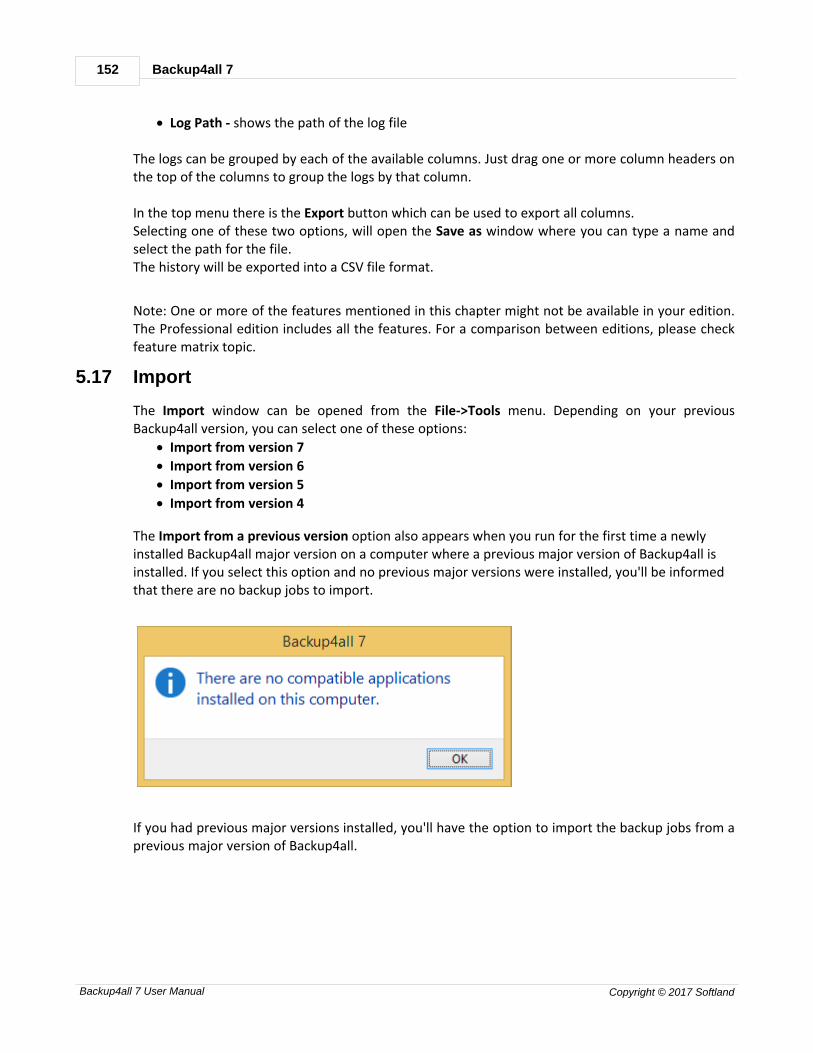
Backup4all 7152
Backup4all 7 User Manual Copyright © 2017 Softland
· Log Path - shows the path of the log file
The logs can be grouped by each of the available columns. Just drag one or more column headers onthe top of the columns to group the logs by that column.
In the top menu there is the Export button which can be used to export all columns.Selecting one of these two options, will open the Save as window where you can type a name andselect the path for the file.The history will be exported into a CSV file format.
Note: One or more of the features mentioned in this chapter might not be available in your edition.The Professional edition includes all the features. For a comparison between editions, please checkfeature matrix topic.
5.17 Import
The Import window can be opened from the File->Tools menu. Depending on your previousBackup4all version, you can select one of these options:
· Import from version 7
· Import from version 6
· Import from version 5
· Import from version 4
The Import from a previous version option also appears when you run for the first time a newlyinstalled Backup4all major version on a computer where a previous major version of Backup4all isinstalled. If you select this option and no previous major versions were installed, you'll be informedthat there are no backup jobs to import.
If you had previous major versions installed, you'll have the option to import the backup jobs from aprevious major version of Backup4all.
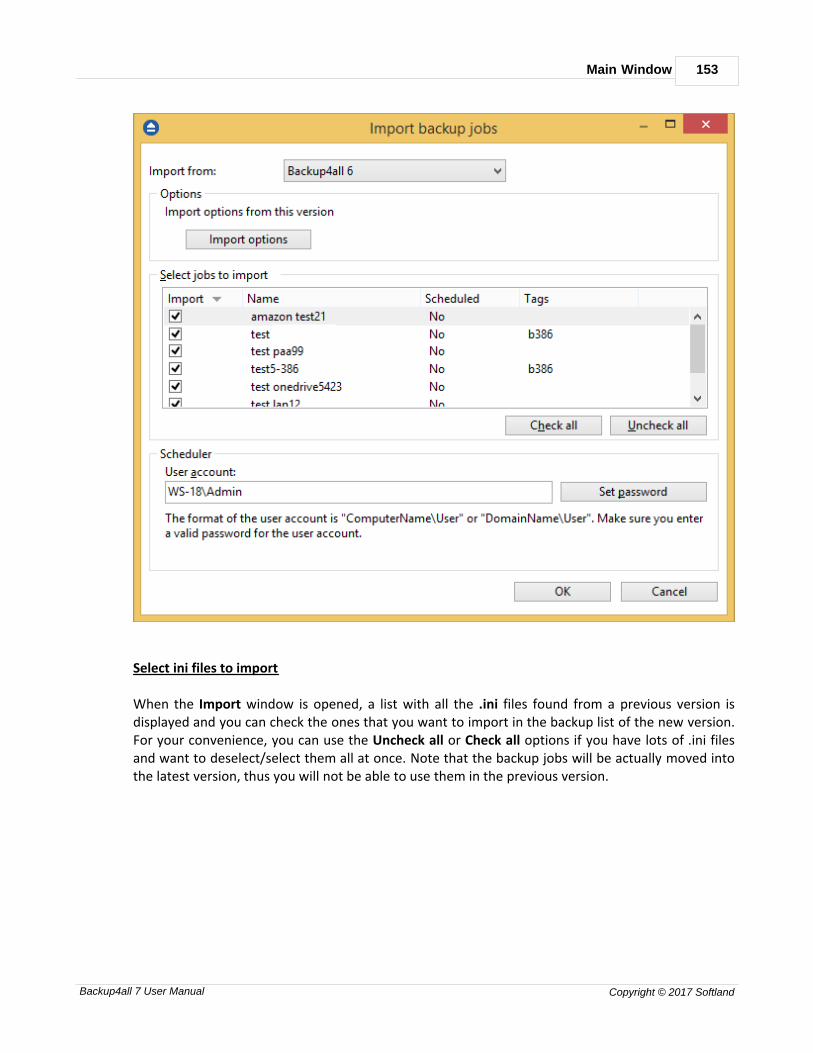
Main Window 153
Backup4all 7 User Manual Copyright © 2017 Softland
Select ini files to import
When the Import window is opened, a list with all the .ini files found from a previous version isdisplayed and you can check the ones that you want to import in the backup list of the new version.For your convenience, you can use the Uncheck all or Check all options if you have lots of .ini filesand want to deselect/select them all at once. Note that the backup jobs will be actually moved intothe latest version, thus you will not be able to use them in the previous version.

Backup4all 7154
Backup4all 7 User Manual Copyright © 2017 Softland
There are three main columns in the display list:
· Import - if the checkbox is marked, the backup job will be imported
· Name - it displays the name of the backup job as it was defined in the previous version
· Scheduled - it shows if the respective backup job was a scheduled backup or not
· Tags - shows the tag name the backup job belonged to
Note: the old backup groups will be now converted to tags in order to keep them organized. Scheduler
If the backup jobs were scheduled to run in the previous version, when importing the scheduledtasks, you will be asked to type the password for your current Windows login account in order tohave them correctly set up. Tip:
· if you want to open an .ini file of a current version instead, you can use the File->Open(Ctrl+O) option - this will recreate the backup job opened (if is not in the backup list already)
Note: One or more of the features mentioned in this chapter might not be available in your edition.The Professional edition includes all the features. For a comparison between editions, please checkfeature matrix topic.
5.18 System Tray
When is Backup4all shown in the system tray?
Backup4all icon is also shown in tray if the Show tray icon option from File->Options->Startup andupdates is checked. If this option is selected, the tray icon will remain in taskbar after you close themain interface. This way you can easily open the main interface.
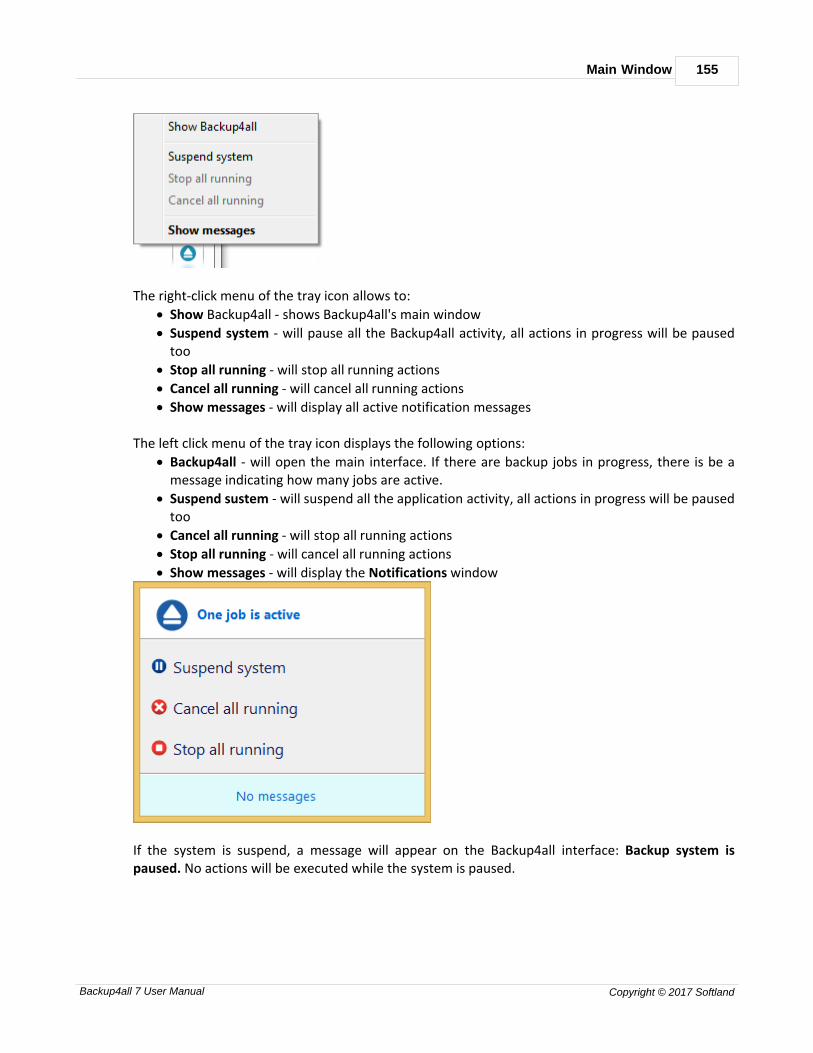
Main Window 155
Backup4all 7 User Manual Copyright © 2017 Softland
The right-click menu of the tray icon allows to:
· Show Backup4all - shows Backup4all's main window
· Suspend system - will pause all the Backup4all activity, all actions in progress will be pausedtoo
· Stop all running - will stop all running actions
· Cancel all running - will cancel all running actions
· Show messages - will display all active notification messages
The left click menu of the tray icon displays the following options:
· Backup4all - will open the main interface. If there are backup jobs in progress, there is be amessage indicating how many jobs are active.
· Suspend sustem - will suspend all the application activity, all actions in progress will be pausedtoo
· Cancel all running - will stop all running actions
· Stop all running - will cancel all running actions
· Show messages - will display the Notifications window
If the system is suspend, a message will appear on the Backup4all interface: Backup system ispaused. No actions will be executed while the system is paused.

Backup4all 7156
Backup4all 7 User Manual Copyright © 2017 Softland
Tray Icon Hint:When backups are executed, restored or tested, the tray icon is animated and the name of thebackup jobs are shown in the hint along with the current operation.
Note: One or more of the features mentioned in this chapter might not be available in your edition.The Professional edition includes all the features. For a comparison between editions, please checkfeature matrix topic.
5.19 Keyboard Shortcuts
Keyboard shortcuts configured in Backup4all:
New backup wizard - CTRL + N
Open backup - CTRL + O
Backup job properties - CTRL + P
Explore - F2
Backup - CTRL + F2
Statistics - F3
Progress
Refresh - F5
Execute backup - F6
Restore - F7
Pause - CTRL + F8

Main Window 157
Backup4all 7 User Manual Copyright © 2017 Softland
Stop - CTRL + S
Cancel - F8
Test - F9
Scheduler - F11
Show New Files - CTRL + 1
Show Unchanged Files - CTRL + 2
Show Modified Files - CTRL + 3
Show Excluded Files - CTRL + 4
Show Deleted Files - CTRL + 5
Expand All - CTRL + 6
Collapse All - CTRL + 7
Focus menu - F10 Note: One or more of the features mentioned in this chapter might not be available in your edition.The Professional edition includes all the features. For a comparison between editions, please checkfeature matrix topic.
5.20 Check for updates
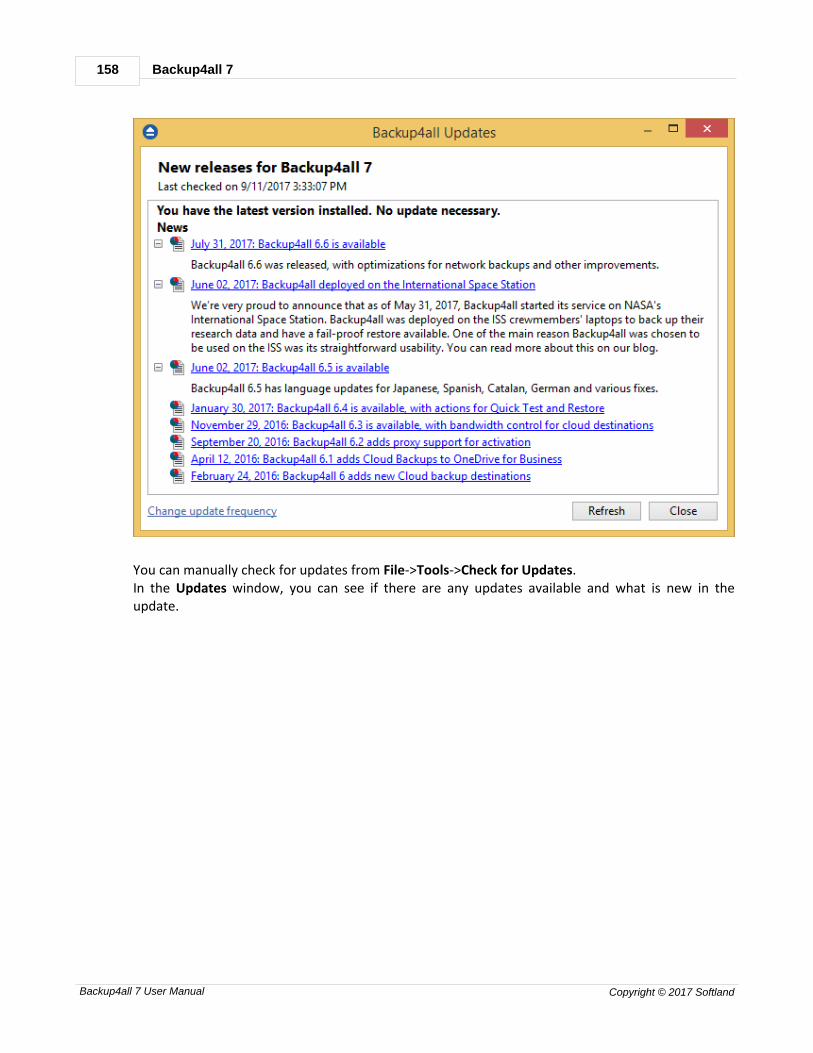
Backup4all 7158
Backup4all 7 User Manual Copyright © 2017 Softland
You can manually check for updates from File->Tools->Check for Updates. In the Updates window, you can see if there are any updates available and what is new in theupdate.
New Backup Wizard
Part
VI
Backup4all 7160
Backup4all 7 User Manual Copyright © 2017 Softland
6 New Backup Wizard
6.1 Overview
Using the New Backup Wizard you can easily create a new backup job. The steps in wizard must befollowed in the given order.
If you want to create a new backup job using advanced options, you can do that by pressing theAdvanced mode button that will open the Backup Properties window. All settings from the NewBackup Wizard are included in the Backup Properties. The New Backup Wizard will be used to create new backup jobs, if the Use New Backup Wizard tocreate backup jobs option (from the Other section in File->Options->Preferences) is checked. If thatoption is not checked, the Backup Properties will be used to create new backup jobs.
Note: One or more of the features mentioned in this chapter might not be available in your edition.The Professional edition includes all the features. For a comparison between editions, please checkfeature matrix topic.
6.2 Name your backup
In the first step of the New Backup Wizard you can configure the backup name, icon and a customdescription.
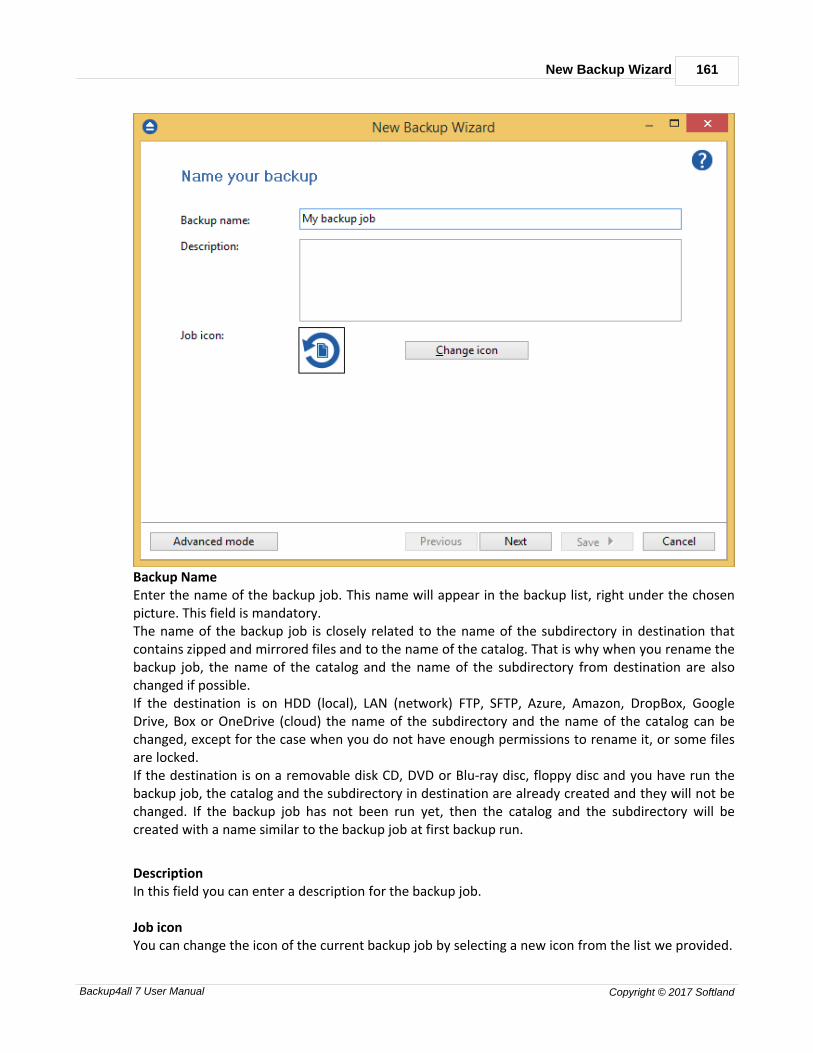
New Backup Wizard 161
Backup4all 7 User Manual Copyright © 2017 Softland
Backup Name Enter the name of the backup job. This name will appear in the backup list, right under the chosenpicture. This field is mandatory.The name of the backup job is closely related to the name of the subdirectory in destination thatcontains zipped and mirrored files and to the name of the catalog. That is why when you rename thebackup job, the name of the catalog and the name of the subdirectory from destination are alsochanged if possible.If the destination is on HDD (local), LAN (network) FTP, SFTP, Azure, Amazon, DropBox, GoogleDrive, Box or OneDrive (cloud) the name of the subdirectory and the name of the catalog can bechanged, except for the case when you do not have enough permissions to rename it, or some filesare locked.If the destination is on a removable disk CD, DVD or Blu-ray disc, floppy disc and you have run thebackup job, the catalog and the subdirectory in destination are already created and they will not bechanged. If the backup job has not been run yet, then the catalog and the subdirectory will becreated with a name similar to the backup job at first backup run.
DescriptionIn this field you can enter a description for the backup job.
Job iconYou can change the icon of the current backup job by selecting a new icon from the list we provided.
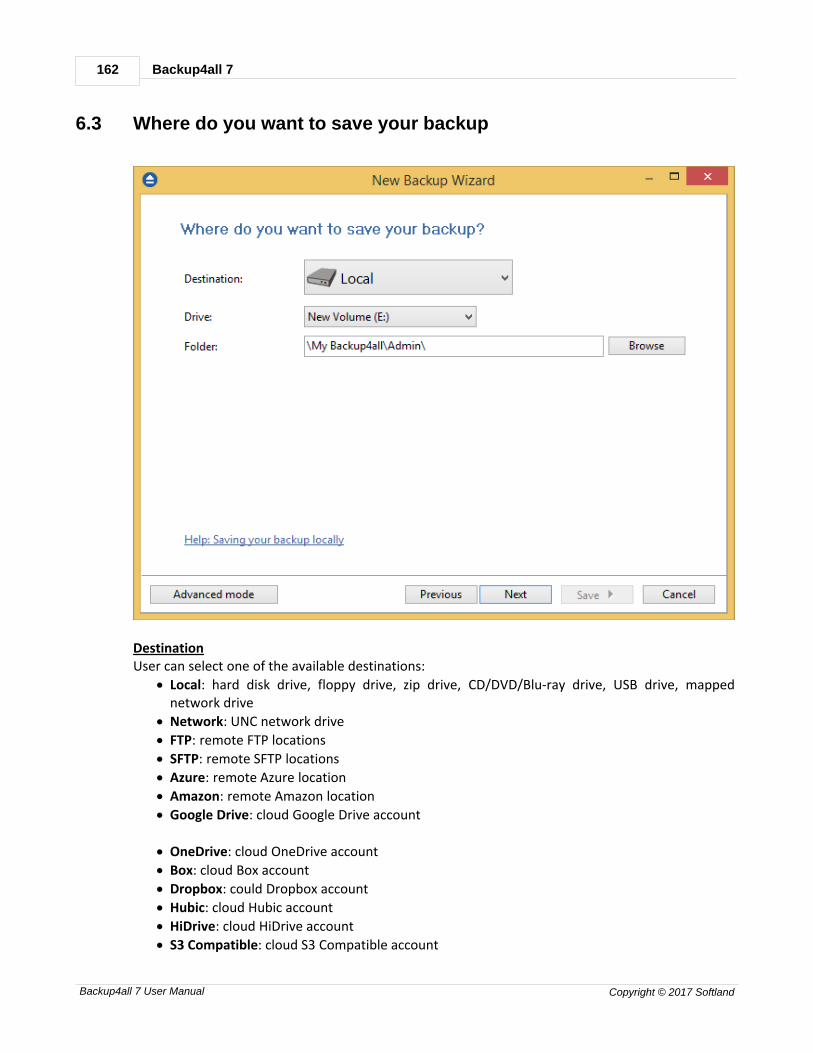
Backup4all 7162
Backup4all 7 User Manual Copyright © 2017 Softland
6.3 Where do you want to save your backup
DestinationUser can select one of the available destinations:
· Local: hard disk drive, floppy drive, zip drive, CD/DVD/Blu-ray drive, USB drive, mappednetwork drive
· Network: UNC network drive
· FTP: remote FTP locations
· SFTP: remote SFTP locations
· Azure: remote Azure location
· Amazon: remote Amazon location
· Google Drive: cloud Google Drive account
· OneDrive: cloud OneDrive account
· Box: cloud Box account
· Dropbox: could Dropbox account
· Hubic: cloud Hubic account
· HiDrive: cloud HiDrive account
· S3 Compatible: cloud S3 Compatible account
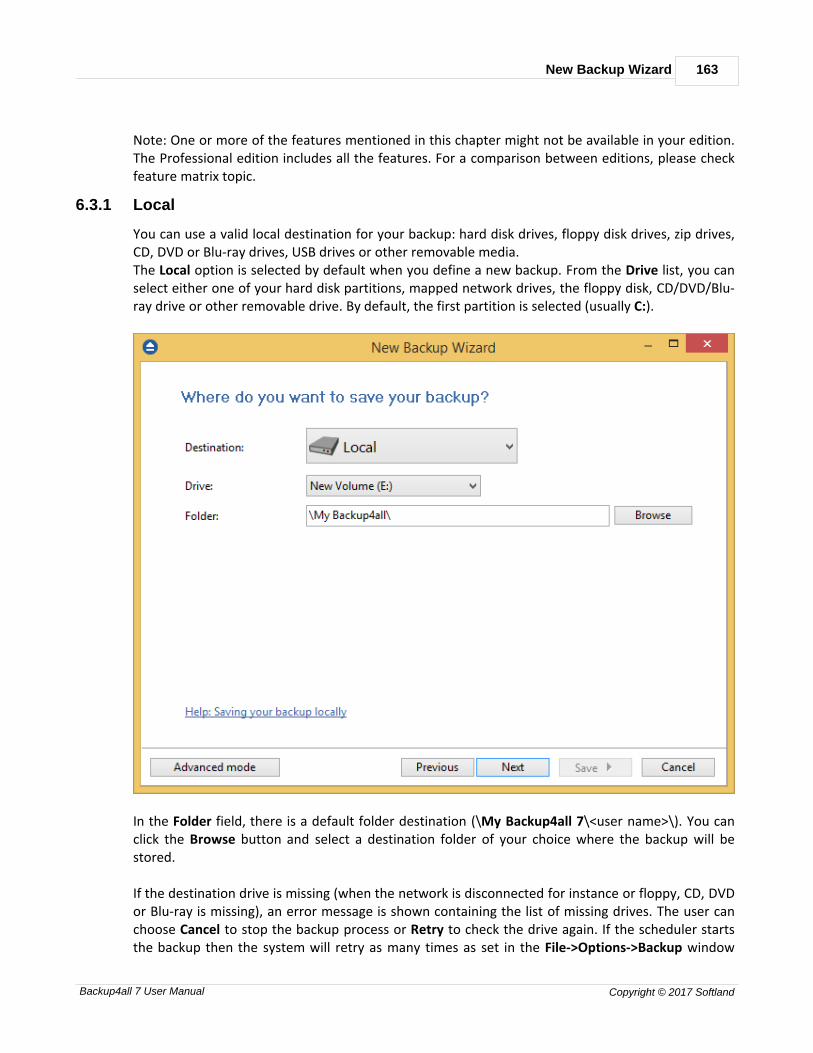
New Backup Wizard 163
Backup4all 7 User Manual Copyright © 2017 Softland
Note: One or more of the features mentioned in this chapter might not be available in your edition.The Professional edition includes all the features. For a comparison between editions, please checkfeature matrix topic.
6.3.1 Local
You can use a valid local destination for your backup: hard disk drives, floppy disk drives, zip drives,CD, DVD or Blu-ray drives, USB drives or other removable media.The Local option is selected by default when you define a new backup. From the Drive list, you canselect either one of your hard disk partitions, mapped network drives, the floppy disk, CD/DVD/Blu-ray drive or other removable drive. By default, the first partition is selected (usually C:).
In the Folder field, there is a default folder destination (\My Backup4all 7\<user name>\). You canclick the Browse button and select a destination folder of your choice where the backup will bestored.
If the destination drive is missing (when the network is disconnected for instance or floppy, CD, DVDor Blu-ray is missing), an error message is shown containing the list of missing drives. The user canchoose Cancel to stop the backup process or Retry to check the drive again. If the scheduler startsthe backup then the system will retry as many times as set in the File->Options->Backup window

Backup4all 7164
Backup4all 7 User Manual Copyright © 2017 Softland
and if still not possible to access the drive it will abort the backup process.
If an external or a removable hard drive is selected as backup destination, in New Backup Wizardnear the drive name will appear a new checkbox: Rotate disks. That option is used if you want torotate the destination drives, backing up alternatively on them. Selecting that option willautomatically disable the Use local catalogs option from Backup Properties->Advanced.
Note: One or more of the features mentioned in this chapter might not be available in your edition.The Professional edition includes all the features. For a comparison between editions, please checkfeature matrix topic.
6.3.2 Network
You can use a network destination for your backup by selecting the Network option in the Where doyou want to save your backup? section.
Click the Browse button and go through the My Network Places to select a destination where thebackup will be stored.
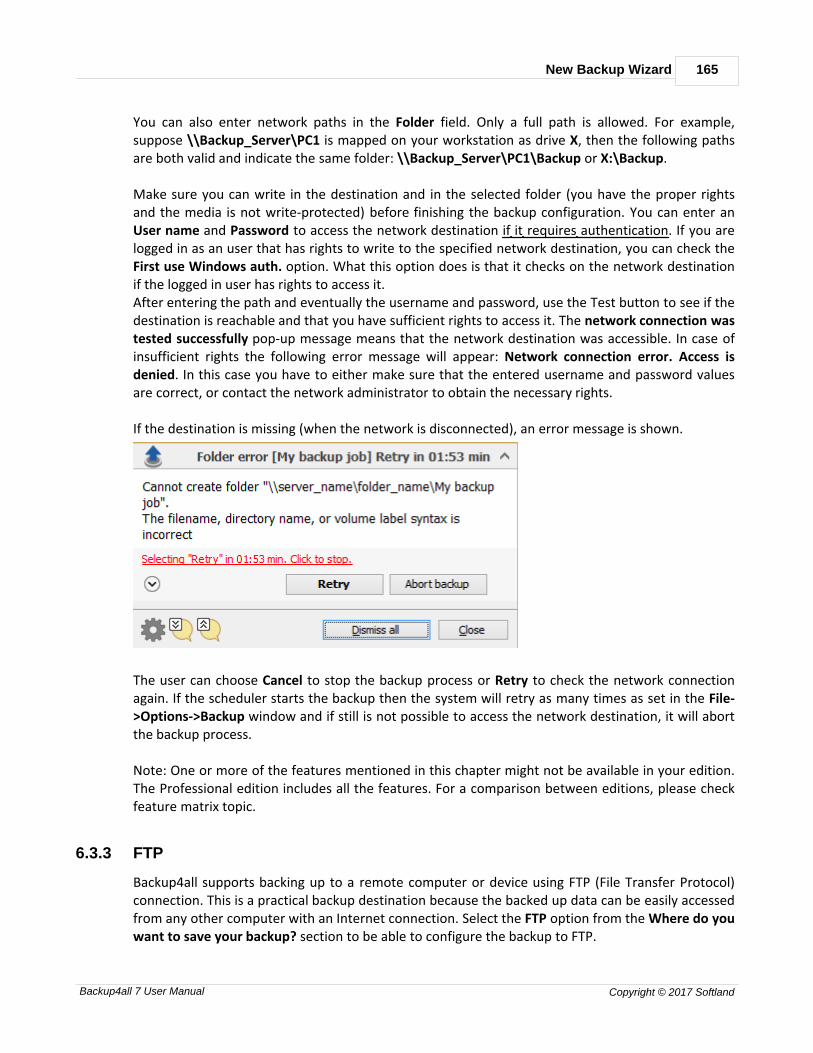
New Backup Wizard 165
Backup4all 7 User Manual Copyright © 2017 Softland
You can also enter network paths in the Folder field. Only a full path is allowed. For example,suppose \\Backup_Server\PC1 is mapped on your workstation as drive X, then the following pathsare both valid and indicate the same folder: \\Backup_Server\PC1\Backup or X:\Backup.
Make sure you can write in the destination and in the selected folder (you have the proper rightsand the media is not write-protected) before finishing the backup configuration. You can enter anUser name and Password to access the network destination if it requires authentication. If you arelogged in as an user that has rights to write to the specified network destination, you can check theFirst use Windows auth. option. What this option does is that it checks on the network destinationif the logged in user has rights to access it.After entering the path and eventually the username and password, use the Test button to see if thedestination is reachable and that you have sufficient rights to access it. The network connection wastested successfully pop-up message means that the network destination was accessible. In case ofinsufficient rights the following error message will appear: Network connection error. Access isdenied. In this case you have to either make sure that the entered username and password valuesare correct, or contact the network administrator to obtain the necessary rights.
If the destination is missing (when the network is disconnected), an error message is shown.
The user can choose Cancel to stop the backup process or Retry to check the network connectionagain. If the scheduler starts the backup then the system will retry as many times as set in the File->Options->Backup window and if still is not possible to access the network destination, it will abortthe backup process.
Note: One or more of the features mentioned in this chapter might not be available in your edition.The Professional edition includes all the features. For a comparison between editions, please checkfeature matrix topic.
6.3.3 FTP
Backup4all supports backing up to a remote computer or device using FTP (File Transfer Protocol)connection. This is a practical backup destination because the backed up data can be easily accessedfrom any other computer with an Internet connection. Select the FTP option from the Where do youwant to save your backup? section to be able to configure the backup to FTP.
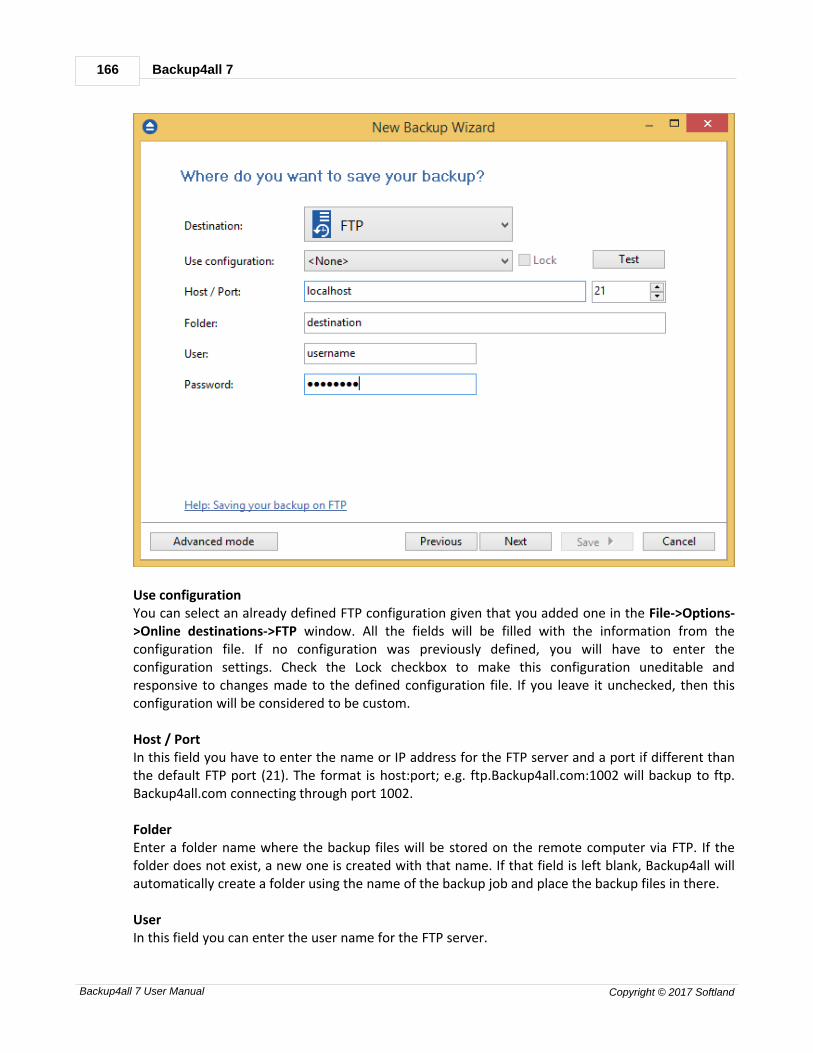
Backup4all 7166
Backup4all 7 User Manual Copyright © 2017 Softland
Use configurationYou can select an already defined FTP configuration given that you added one in the File->Options->Online destinations->FTP window. All the fields will be filled with the information from theconfiguration file. If no configuration was previously defined, you will have to enter theconfiguration settings. Check the Lock checkbox to make this configuration uneditable andresponsive to changes made to the defined configuration file. If you leave it unchecked, then thisconfiguration will be considered to be custom.
Host / PortIn this field you have to enter the name or IP address for the FTP server and a port if different thanthe default FTP port (21). The format is host:port; e.g. ftp.Backup4all.com:1002 will backup to ftp.Backup4all.com connecting through port 1002.
FolderEnter a folder name where the backup files will be stored on the remote computer via FTP. If thefolder does not exist, a new one is created with that name. If that field is left blank, Backup4all willautomatically create a folder using the name of the backup job and place the backup files in there.
UserIn this field you can enter the user name for the FTP server.
New Backup Wizard 167
Backup4all 7 User Manual Copyright © 2017 Softland
PasswordType the password used for FTP server access.
There are FTP servers that allow anonymous access (public FTP servers). You can connect to thesetypes of FTP servers using as user name Anonymous and your email address as password. It is notrecommended to backup important files to public FTP servers.
By pressing the Test button you can check to see if the settings you have entered are correct. If thetest was successful, The ftp connection was tested successfully message will be displayed.
Note: One or more of the features mentioned in this chapter might not be available in your edition.The Professional edition includes all the features. For a comparison between editions, please checkfeature matrix topic.
6.3.4 SFTP
Backup4all supports backing up to a remote computer or device using SFTP (SSH File TransferProtocol) connection. This is a practical backup destination because the backed up data can be easilyaccessed from any other computer with an Internet connection. Select the SFTP option from theWhere do you want to save your backup? section to be able to configure the backup to SFTP.

Backup4all 7168
Backup4all 7 User Manual Copyright © 2017 Softland
Use configurationYou can select an already defined SFTP configuration given that you added one in the File->Options->Online destinations->SFTP window. All the fields will be filled with the information from theconfiguration file. If no configuration was previously defined, you will have to enter theconfiguration settings. Check the Lock checkbox to make this configuration uneditable andresponsive to changes made to the defined configuration file. If you leave it unchecked, then thisconfiguration will be considered to be custom.
Host / PortIn this field you have to enter the name or IP address for the SFTP server and a port if different thanthe default SFTP port (22). The format is host:port; e.g. Backup4all.com:22 will backup toBackup4all.com connecting through port 22.
FolderEnter a folder name where the backup files will be stored on the remote computer via SFTP. If thefolder does not exist, a new one is created with that name. If that field is left blank, Backup4all willautomatically create a folder using the name of the backup job and place the backup files in there.
UserIn this field you can enter the user name for the SFTP server.
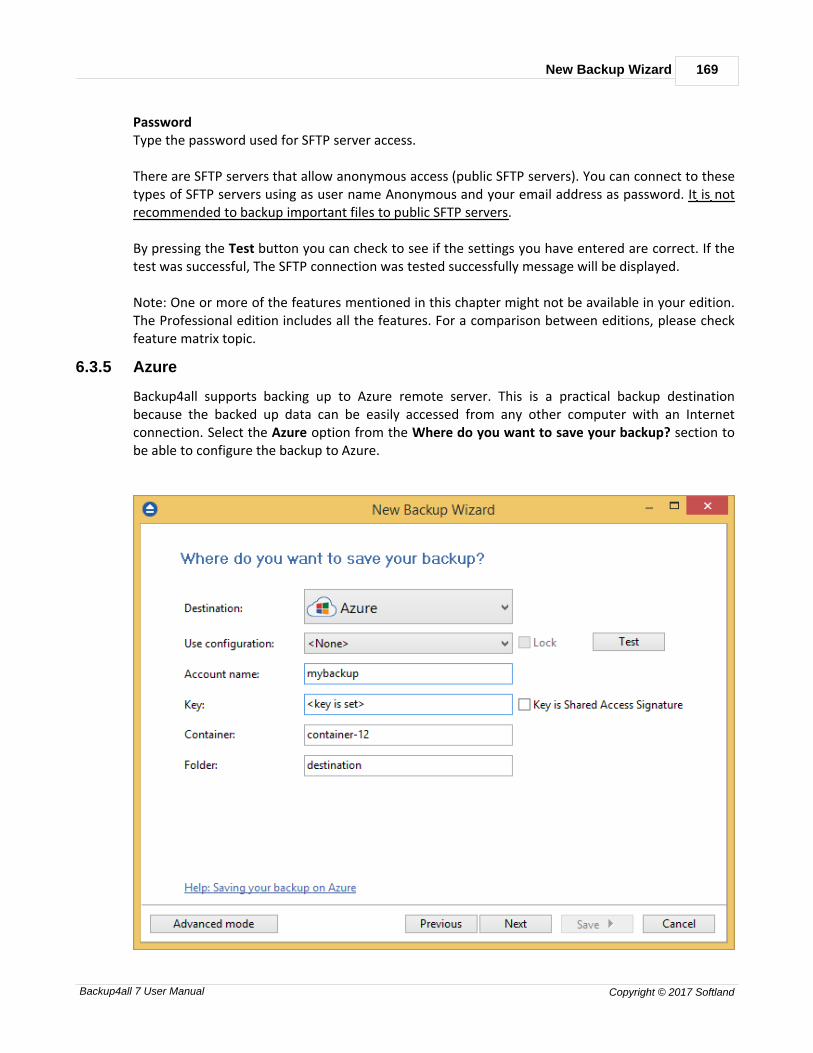
New Backup Wizard 169
Backup4all 7 User Manual Copyright © 2017 Softland
PasswordType the password used for SFTP server access.
There are SFTP servers that allow anonymous access (public SFTP servers). You can connect to thesetypes of SFTP servers using as user name Anonymous and your email address as password. It is notrecommended to backup important files to public SFTP servers.
By pressing the Test button you can check to see if the settings you have entered are correct. If thetest was successful, The SFTP connection was tested successfully message will be displayed.
Note: One or more of the features mentioned in this chapter might not be available in your edition.The Professional edition includes all the features. For a comparison between editions, please checkfeature matrix topic.
6.3.5 Azure
Backup4all supports backing up to Azure remote server. This is a practical backup destinationbecause the backed up data can be easily accessed from any other computer with an Internetconnection. Select the Azure option from the Where do you want to save your backup? section tobe able to configure the backup to Azure.

Backup4all 7170
Backup4all 7 User Manual Copyright © 2017 Softland
Use configurationYou can select an already defined Azure configuration given that you added one in the File->Options->Online destinations->Azure window. All the fields will be filled with the information fromthe configuration file. If no configuration was previously defined, you will have to enter theconfiguration settings. Check the Lock checkbox to make this configuration uneditable andresponsive to changes made to the defined configuration file. If you leave it unchecked, then thisconfiguration will be considered to be custom.
Account nameIn this field you have to enter the Azure account name.
KeyType the key for your Azure accountIf the key is Shared Access Signature, you need to also select that option.
ContainerIn this field you can type the Azure container name where the backup files will be uploaded.
FolderEnter a folder name where the backup files will be stored on the Azure server. If the folder does notexist, a new one is created with that name. If that field is left blank, Backup4all will automaticallycreate a folder using the name of the backup job and place the backup files in there.
By pressing the Test button you can check to see if the settings you have entered are correct. If thetest was successful, The Azure connection was tested successfully message will be displayed.
Note: One or more of the features mentioned in this chapter might not be available in your edition.The Professional edition includes all the features. For a comparison between editions, please checkfeature matrix topic.
6.3.6 Amazon
Backup4all supports backing up to Amazon S3. This is a practical backup destination because thebacked up data can be easily accessed from any other computer with an Internet connection. Selectthe Amazon option from the Where do you want to save your backup? section to be able toconfigure the backup to Amazon.
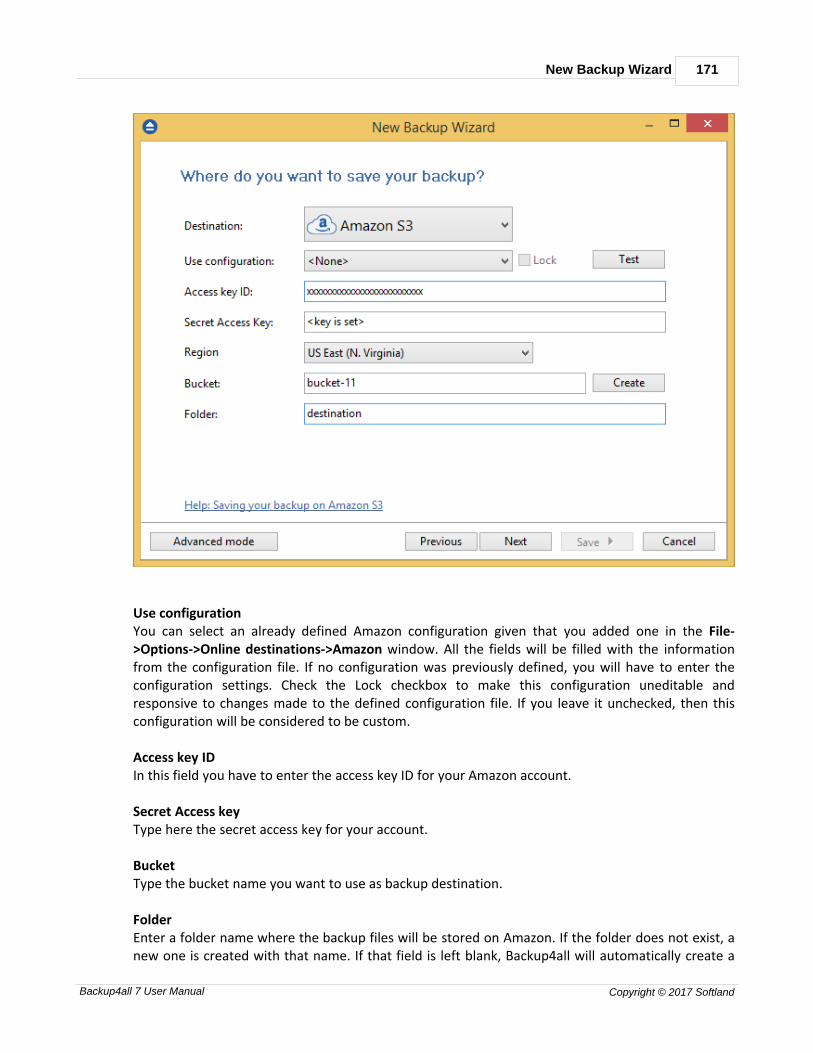
New Backup Wizard 171
Backup4all 7 User Manual Copyright © 2017 Softland
Use configurationYou can select an already defined Amazon configuration given that you added one in the File->Options->Online destinations->Amazon window. All the fields will be filled with the informationfrom the configuration file. If no configuration was previously defined, you will have to enter theconfiguration settings. Check the Lock checkbox to make this configuration uneditable andresponsive to changes made to the defined configuration file. If you leave it unchecked, then thisconfiguration will be considered to be custom.
Access key ID In this field you have to enter the access key ID for your Amazon account.
Secret Access keyType here the secret access key for your account.
BucketType the bucket name you want to use as backup destination.
FolderEnter a folder name where the backup files will be stored on Amazon. If the folder does not exist, anew one is created with that name. If that field is left blank, Backup4all will automatically create a
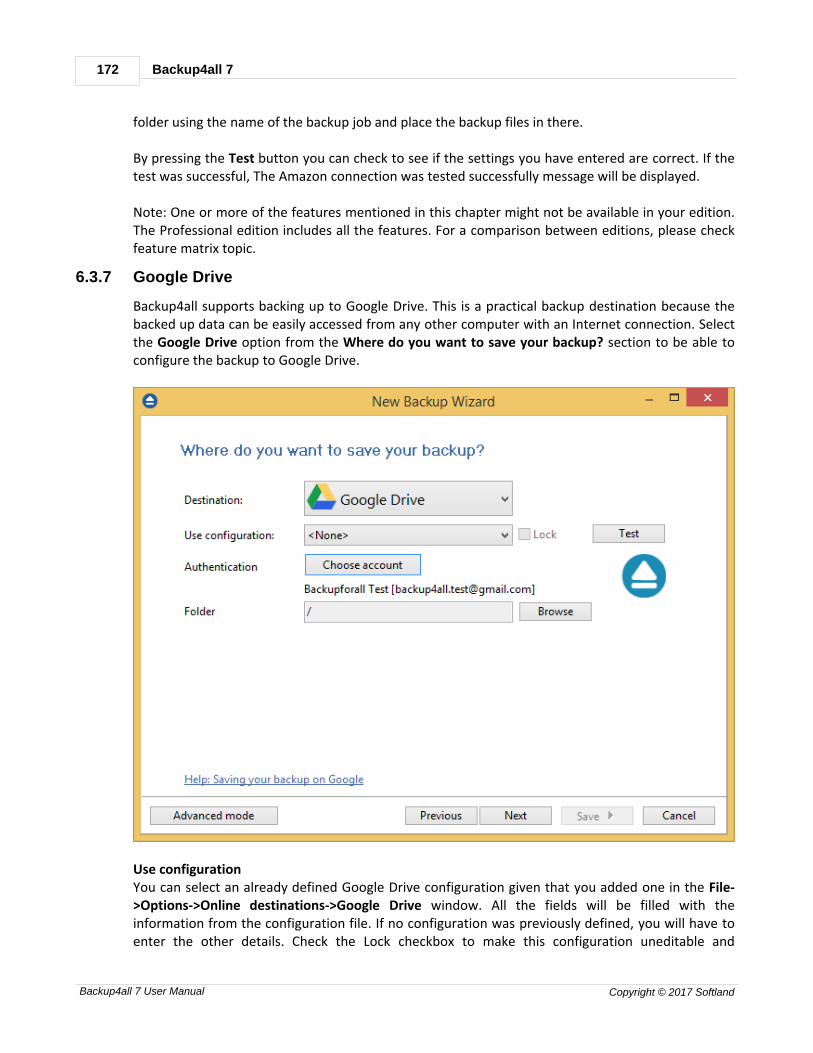
Backup4all 7172
Backup4all 7 User Manual Copyright © 2017 Softland
folder using the name of the backup job and place the backup files in there.
By pressing the Test button you can check to see if the settings you have entered are correct. If thetest was successful, The Amazon connection was tested successfully message will be displayed.
Note: One or more of the features mentioned in this chapter might not be available in your edition.The Professional edition includes all the features. For a comparison between editions, please checkfeature matrix topic.
6.3.7 Google Drive
Backup4all supports backing up to Google Drive. This is a practical backup destination because thebacked up data can be easily accessed from any other computer with an Internet connection. Selectthe Google Drive option from the Where do you want to save your backup? section to be able toconfigure the backup to Google Drive.
Use configurationYou can select an already defined Google Drive configuration given that you added one in the File->Options->Online destinations->Google Drive window. All the fields will be filled with theinformation from the configuration file. If no configuration was previously defined, you will have toenter the other details. Check the Lock checkbox to make this configuration uneditable and
New Backup Wizard 173
Backup4all 7 User Manual Copyright © 2017 Softland
responsive to changes made to the defined configuration file. If you leave it unchecked, then thisconfiguration will be considered to be custom.
Authentication - press "Choose account" button to log in to your Google Drive account. Here youneed to authorize Backup4all application to view and manage files in your Google Drive account.
Folder - In this field you have to select the folder where you want to store the backups. If no folderis selected the backup will be stored in the root of your Google Drive account.
By pressing the Test button you can check to see if the settings you have entered are correct. If thetest was successful, The Google Drive connection was tested successfully message will be displayed.
Note: One or more of the features mentioned in this chapter might not be available in your edition.The Professional edition includes all the features. For a comparison between editions, please checkfeature matrix topic.
6.3.8 OneDrive
Backup4all supports backing up to OneDrive. This is a practical backup destination because thebacked up data can be easily accessed from any other computer with an Internet connection. Selectthe OneDrive option from the Where do you want to save your backup? section to be able toconfigure the backup to OneDrive.
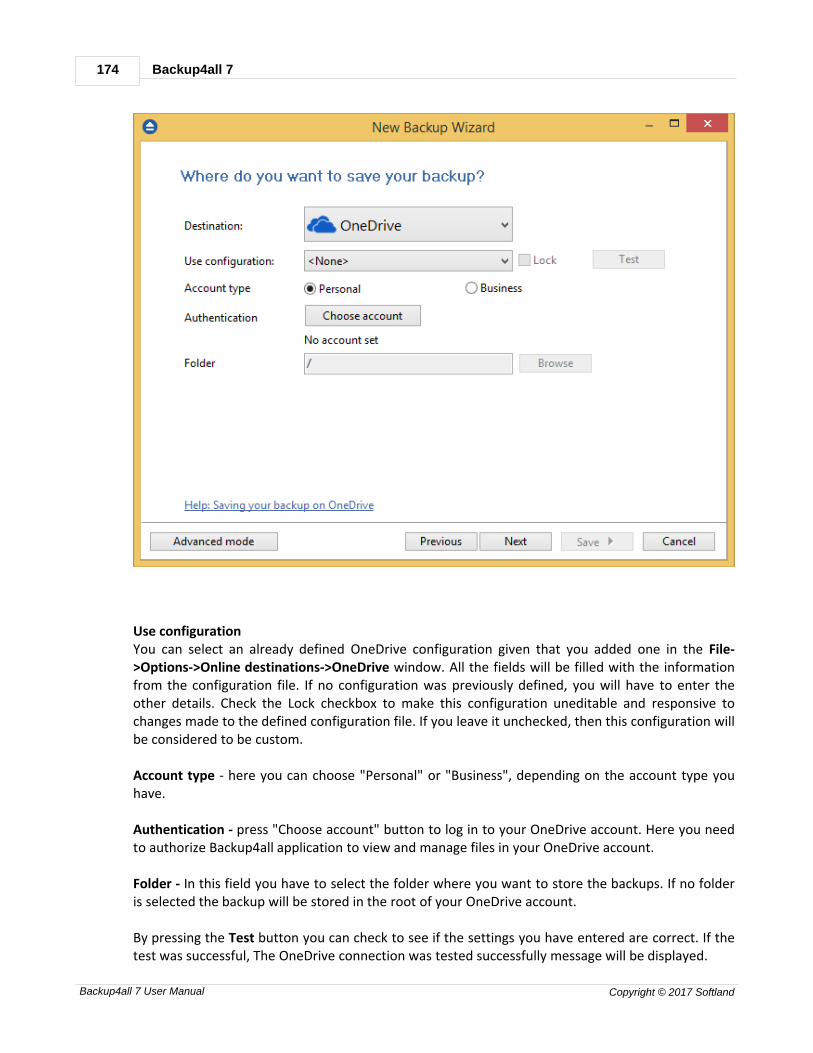
Backup4all 7174
Backup4all 7 User Manual Copyright © 2017 Softland
Use configurationYou can select an already defined OneDrive configuration given that you added one in the File->Options->Online destinations->OneDrive window. All the fields will be filled with the informationfrom the configuration file. If no configuration was previously defined, you will have to enter theother details. Check the Lock checkbox to make this configuration uneditable and responsive tochanges made to the defined configuration file. If you leave it unchecked, then this configuration willbe considered to be custom.
Account type - here you can choose "Personal" or "Business", depending on the account type youhave.
Authentication - press "Choose account" button to log in to your OneDrive account. Here you needto authorize Backup4all application to view and manage files in your OneDrive account.
Folder - In this field you have to select the folder where you want to store the backups. If no folderis selected the backup will be stored in the root of your OneDrive account.
By pressing the Test button you can check to see if the settings you have entered are correct. If thetest was successful, The OneDrive connection was tested successfully message will be displayed.

New Backup Wizard 175
Backup4all 7 User Manual Copyright © 2017 Softland
Note: One or more of the features mentioned in this chapter might not be available in your edition.The Professional edition includes all the features. For a comparison between editions, please checkfeature matrix topic.
6.3.9 Box
Backup4all supports backing up to Box. This is a practical backup destination because the backed updata can be easily accessed from any other computer with an Internet connection. Select the Boxoption from the Where do you want to save your backup? section to be able to configure thebackup to Box.
Use configurationYou can select an already defined Box configuration given that you added one in the File->Options->Online destinations->Box window. All the fields will be filled with the information from theconfiguration file. If no configuration was previously defined, you will have to enter the otherdetails. Check the Lock checkbox to make this configuration uneditable and responsive to changesmade to the defined configuration file. If you leave it unchecked, then this configuration will beconsidered to be custom.

Backup4all 7176
Backup4all 7 User Manual Copyright © 2017 Softland
Authentication - press "Choose account" button to log in to your Box account. Here you need toauthorize Backup4all application to read and write files/folders in your Box account.
Folder - In this field you have to select the folder where you want to store the backups. If no folderis selected the backup will be stored in the root of your Box account.
By pressing the Test button you can check to see if the settings you have entered are correct. If thetest was successful, The Box connection was tested successfully message will be displayed.
Note: One or more of the features mentioned in this chapter might not be available in your edition.The Professional edition includes all the features. For a comparison between editions, please checkfeature matrix topic.
6.3.10 Dropbox
Backup4all supports backing up to Dropbox. This is a practical backup destination because thebacked up data can be easily accessed from any other computer with an Internet connection. Selectthe Dropbox option from the Where do you want to save your backup? section to be able toconfigure the backup to Dropbox.
New Backup Wizard 177
Backup4all 7 User Manual Copyright © 2017 Softland
Use configurationYou can select an already defined Dropbox configuration given that you added one in the File->Options->Online destinations->Dropbox window. All the fields will be filled with the informationfrom the configuration file. If no configuration was previously defined, you will have to enter theother details. Check the Lock checkbox to make this configuration uneditable and responsive tochanges made to the defined configuration file. If you leave it unchecked, then this configuration willbe considered to be custom.
Authentication - press "Choose account" button to log in to your Dropbox account. Here you needto authorize Backup4all application to read and write files/folders in your Dropbox account.
Folder - In this field you have to select the folder where you want to store the backups. If no folderis selected the backup will be stored in the root of your Dropbox account.
By pressing the Test button you can check to see if the settings you have entered are correct. If thetest was successful, The Dropbox connection was tested successfully message will be displayed.
Note: One or more of the features mentioned in this chapter might not be available in your edition.The Professional edition includes all the features. For a comparison between editions, please checkfeature matrix topic.
6.3.11 Hubic
Backup4all supports backing up to Hubic. This is a cloud backup destination and the backed up datacan be easily accessed from any other computer with an Internet connection. Select the Hubicoption from the Where do you want to save your backup? section to be able to configure thebackup to Hubic.
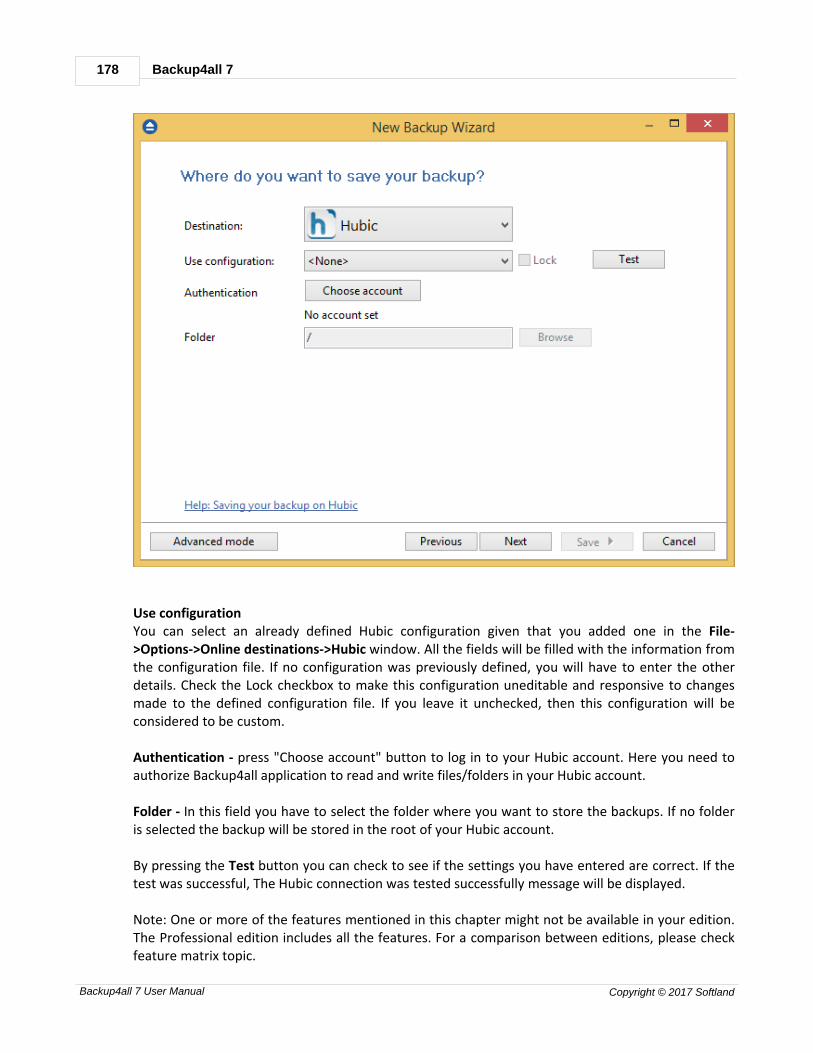
Backup4all 7178
Backup4all 7 User Manual Copyright © 2017 Softland
Use configurationYou can select an already defined Hubic configuration given that you added one in the File->Options->Online destinations->Hubic window. All the fields will be filled with the information fromthe configuration file. If no configuration was previously defined, you will have to enter the otherdetails. Check the Lock checkbox to make this configuration uneditable and responsive to changesmade to the defined configuration file. If you leave it unchecked, then this configuration will beconsidered to be custom.
Authentication - press "Choose account" button to log in to your Hubic account. Here you need toauthorize Backup4all application to read and write files/folders in your Hubic account.
Folder - In this field you have to select the folder where you want to store the backups. If no folderis selected the backup will be stored in the root of your Hubic account.
By pressing the Test button you can check to see if the settings you have entered are correct. If thetest was successful, The Hubic connection was tested successfully message will be displayed.
Note: One or more of the features mentioned in this chapter might not be available in your edition.The Professional edition includes all the features. For a comparison between editions, please checkfeature matrix topic.

New Backup Wizard 179
Backup4all 7 User Manual Copyright © 2017 Softland
6.3.12 HiDrive
Backup4all supports backing up to HiDrive. This is a practical backup destination because the backedup data can be easily accessed from any other computer with an Internet connection. Select theHiDrive option from the Where do you want to save your backup? section to be able to configurethe backup to HiDrive.
Use configurationYou can select an already defined HiDrive configuration given that you added one in the File->Options->Online destinations->HiDrive window. All the fields will be filled with the informationfrom the configuration file. If no configuration was previously defined, you will have to enter theother details. Check the Lock checkbox to make this configuration uneditable and responsive tochanges made to the defined configuration file. If you leave it unchecked, then this configuration willbe considered to be custom.
Authentication - press "Choose account" button to log in to your HiDrive account. Here you need toauthorize Backup4all application to read and write files/folders in your HiDrive account.
Folder - In this field you have to select the folder where you want to store the backups. If no folder
Backup4all 7180
Backup4all 7 User Manual Copyright © 2017 Softland
is selected the backup will be stored in the root of your HiDrive account.
By pressing the Test button you can check to see if the settings you have entered are correct. If thetest was successful, The HiDrive connection was tested successfully message will be displayed.
Note: One or more of the features mentioned in this chapter might not be available in your edition.The Professional edition includes all the features. For a comparison between editions, please checkfeature matrix topic.
6.3.13 S3 Compatible
Backup4all supports backing up to S3 Compatible. This is a practical backup destination because thebacked up data can be easily accessed from any other computer with an Internet connection. Selectthe S3 Compatible option from the Where do you want to save your backup? section to be able toconfigure the backup to S3 Compatible.
The following Amazon S3 Compatible clouds can be selected as backup destination: Akaza, ArubaCloud, Caringo, CenturyLink, Cisco, Claudian, Connectia, Constant, DDN, dinCloud, Dream Objects,Dunkel, T Cloud, Exoscale, Google Cloud Storage, Green Qloud, HGST, Hitachi, HostEurope, IDCFrontier, LeoNovus, Mandic, Minio, NetApp, NiftyClouds, Numergy, QNAP, Revera, Scality, Seeweb,SwiftStack, ThinkOn, Tiscali, vCloud Air, Verizon, Walrus and Zettagrid. You can also use a custom S3Compatible server by entering the specific information.
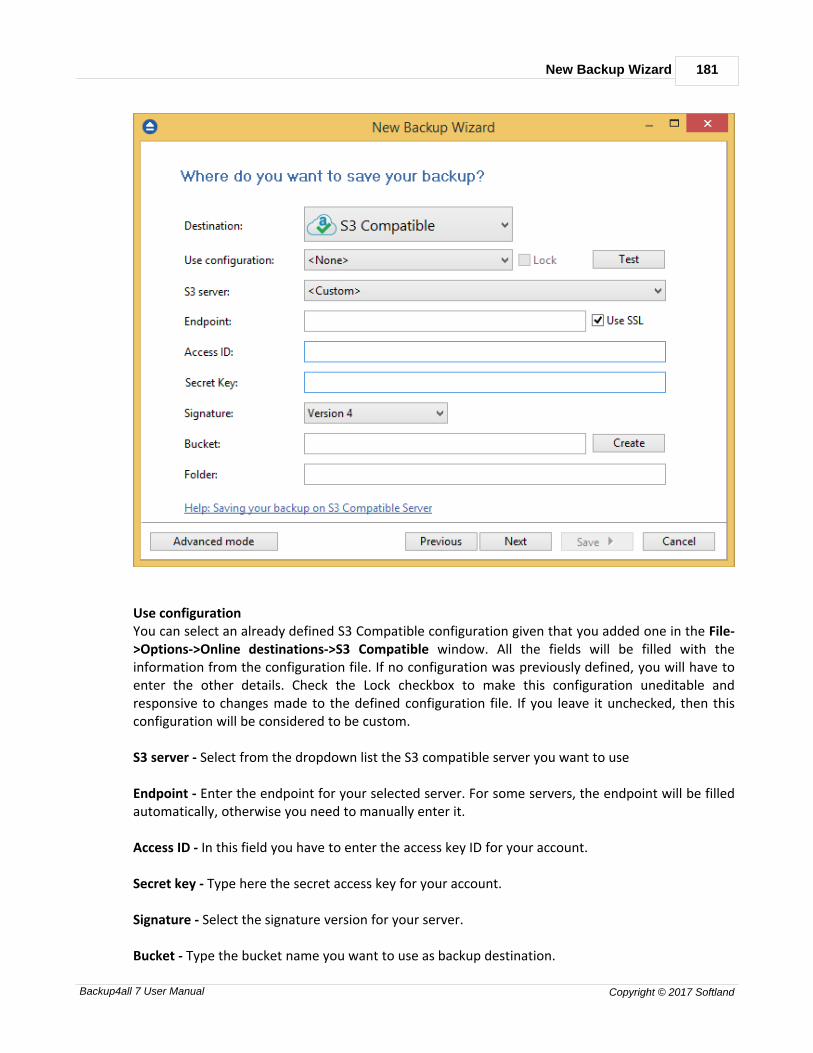
New Backup Wizard 181
Backup4all 7 User Manual Copyright © 2017 Softland
Use configurationYou can select an already defined S3 Compatible configuration given that you added one in the File->Options->Online destinations->S3 Compatible window. All the fields will be filled with theinformation from the configuration file. If no configuration was previously defined, you will have toenter the other details. Check the Lock checkbox to make this configuration uneditable andresponsive to changes made to the defined configuration file. If you leave it unchecked, then thisconfiguration will be considered to be custom.
S3 server - Select from the dropdown list the S3 compatible server you want to use
Endpoint - Enter the endpoint for your selected server. For some servers, the endpoint will be filledautomatically, otherwise you need to manually enter it.
Access ID - In this field you have to enter the access key ID for your account.
Secret key - Type here the secret access key for your account.
Signature - Select the signature version for your server.
Bucket - Type the bucket name you want to use as backup destination.

Backup4all 7182
Backup4all 7 User Manual Copyright © 2017 Softland
Folder - In this field you have to select the folder where you want to store the backups. If no folderis selected the backup will be stored in the root of your S3 Compatible account.
By pressing the Test button you can check to see if the settings you have entered are correct. If thetest was successful, The S3 Compatible connection was tested successfully message will bedisplayed.
Note: One or more of the features mentioned in this chapter might not be available in your edition.The Professional edition includes all the features. For a comparison between editions, please checkfeature matrix topic.
6.4 What do you want to backup?
In the second step of the New Backup Wizard, you must select the files and folders to be used byBackup4all for the backup.
You can:
· add a whole folder by pressing the Add folder button
· add one or several files by pressing the Add files button
New Backup Wizard 183
Backup4all 7 User Manual Copyright © 2017 Softland
· remove any file or folder by selecting it and pressing the Remove button
· exclude subdirectories and files from backup by un-checking the thickbox
You must add at least one file or directory in order to continue with the next step of the wizard.
During backup, if the source drive is missing (when the network is disconnected for instance or CD/DVD/Blu-ray is missing), a warning message is shown containing the list of missing drives. The usercan choose Abort to stop the backup process, Retry to check the drive again, Ignore to mark thesource folder as deleted and continue with the next sources. If the backup is started by thescheduler, then the system will try to access the sources for as many times as set in the File->Options->Backup window. When all retries are done with no success, the backup will abort.If you have filters defined in Tools->Options->Filters, they will be listed in the Filters list. You can usethis filters to customize the backup sources selection. All filters listed are include filters. Do notselect any filter if you want to backup all files. Filters list
In the right side of the New Backup Wizard window there is the Filters list. You can use these filtersto customize the file selection. The filters are defined in File->Options->Filters. Only the filters that have "Show filter in NewBackup Wizard" option set are shown. Filters can be of type include (backup files that match thefilter) or exclude (do not backup files that match the filter).By default, the list contains filters to exclude temporary and system files/folders such as: hiberfil.sys,pagefile.sys, System Volume Information, Temp, etc. If you don't want to use a filter from that list,simply clear (un-check) it. Clear all filters if you want to backup all files.
Tips:
· try to keep the number of checked files and folders greater than the number of uncheckedfiles and folders - backup process will run faster this way.
· you can add files/folders to the Sources window by dragging and dropping them from FileExplorer.
Note: One or more of the features mentioned in this chapter might not be available in your edition.The Professional edition includes all the features. For a comparison between editions, please checkfeature matrix topic.
6.5 How do you want to backup?
In the third step of the New Backup Wizard you can choose the backup type.
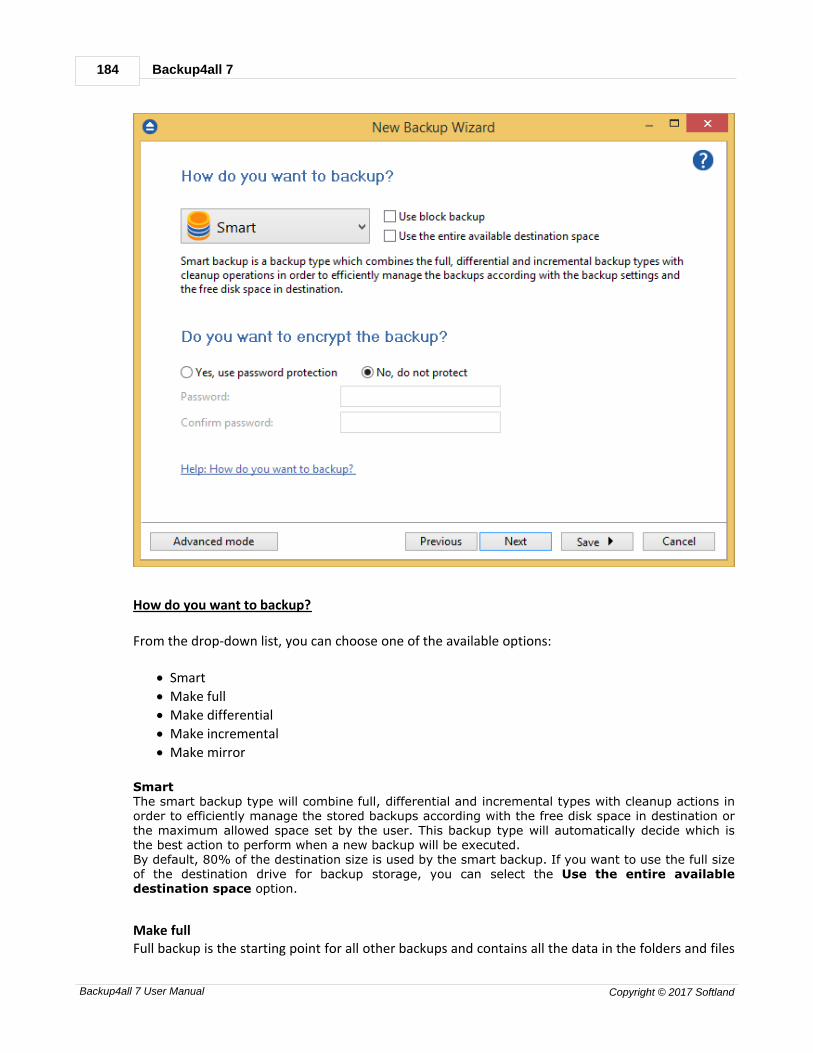
Backup4all 7184
Backup4all 7 User Manual Copyright © 2017 Softland
How do you want to backup?
From the drop-down list, you can choose one of the available options:
· Smart
· Make full
· Make differential
· Make incremental
· Make mirror SmartThe smart backup type will combine full, differential and incremental types with cleanup actions inorder to efficiently manage the stored backups according with the free disk space in destination orthe maximum allowed space set by the user. This backup type will automatically decide which isthe best action to perform when a new backup will be executed. By default, 80% of the destination size is used by the smart backup. If you want to use the full sizeof the destination drive for backup storage, you can select the Use the entire availabledestination space option.
Make fullFull backup is the starting point for all other backups and contains all the data in the folders and files

New Backup Wizard 185
Backup4all 7 User Manual Copyright © 2017 Softland
that are selected to be backed up. Because full backup stores all files and folders, frequent fullbackups result in faster and simpler restore operations. Remember that when you choose otherbackup types, restore jobs may take longer.
Make differential A differential backup contains all files that have changed since the last full backup. The advantage ofa differential backup is that it shortens restore time compared to an incremental backup. However,if you perform the differential backup too many times, the size of the differential backup might growto be larger than the baseline full backup. Make incrementalAn incremental backup stores all files that have changed since the last full, differential orincremental backup. The advantage of an incremental backup is that it takes the least time tocomplete. However, during a restore operation, each incremental backup must be processed, whichcould result in a lengthy restore job. Make mirrorA mirror backup is identical to a full backup, with the exception that the files are not compressed inzip files and they cannot be protected with a password. A mirror backup is most frequently used tocreate an exact copy of the backup data. It has the benefit that the backup files can also be readilyaccessed using tools like File Explorer.If you choose the Make mirror option, you can also check the Zip the files option to zip each fileindividually, preserving the folder structure. This allows you to use the zip compression andencryption features.
Encrypt?
Use this option if you want to add zip protection to your backups. Type the password you want touse for this backup.The default encryption used is Advanced Encryption Standard (AES), the best choice in zipprotection, but recognized only by the latest version of third party zip applications. The default sizeof the encryption key is 128 bits. If you want to configure more encryption settings or choose astronger encryption key, press the Advanced mode button.
Note: One or more of the features mentioned in this chapter might not be available in your edition.The Professional edition includes all the features. For a comparison between editions, please checkfeature matrix topic.
6.6 When do you want to backup?
On the last page of the New Backup Wizard, you can choose When to run the backup.

Backup4all 7186
Backup4all 7 User Manual Copyright © 2017 Softland
How often?From the drop-down list, you can select one of the available option:
· Manually - the backup job will be started manually by the user
· Daily - the backup job will be started daily at its scheduled time
· Weekly - the backup job will be started weekly at its scheduled time
· Monthly - the backup job will be started monthly at its scheduled time
· Shutdown - the backup job will be started at the computer shutdownBy default, the selected option is Manually.
What day?This field is activated only when the Weekly or Monthly option is selected in the How often list.If the Weekly option is selected, you can choose the day of the week when to run the backup.If the Monthly option is selected, you can choose the day number of the month when to run thebackup.
What hour?From this field, you can select the hour for the backup job to start.
Note: One or more of the features mentioned in this chapter might not be available in your edition.The Professional edition includes all the features. For a comparison between editions, please check

New Backup Wizard 187
Backup4all 7 User Manual Copyright © 2017 Softland
feature matrix topic.

Backup Properties
Part
VII

Backup Properties 189
Backup4all 7 User Manual Copyright © 2017 Softland
7 Backup Properties
7.1 Overview
The Backup Properties window can be used to create new backup jobs in the advanced mode, or toedit an existing backup job.
By default, the New Backup Wizard will be used to create new backup jobs. To use the BackupProperties when creating new jobs, uncheck the Use New Backup Wizard to create backup jobsoption from the Other section in File->Options->Preferences.
Note: One or more of the features mentioned in this chapter might not be available in your edition.The Professional edition includes all the features. For a comparison between editions, please checkfeature matrix topic.
7.2 General
The General page defines the appearance of the backup job in the backup list.
General
Backup4all 7190
Backup4all 7 User Manual Copyright © 2017 Softland
NameEnter the name of the backup job. This name will appear in the backup list, near the chosen picture.This field is mandatory.The name of the backup job is closely related to the name of the subdirectory in destination thatcontains zipped and mirrored files and to the name of the catalog. That is why when you rename thebackup job, the name of the catalog and the name of the subdirectory from destination are alsochanged if possible.If the destination is on HDD (local), LAN (network) FTP, SFTP, Azure, Amazon S3, Google Drive,OneDrive, Box or Dropbox the name of the subdirectory and the name of the catalog can be alwayschanged, except for the case when you do not have enough permission to rename or some files arelocked.If the destination is on a removable disk, CD, DVD or Blu-ray disc, floppy disc and you have run thebackup job, the catalog and the subdirectory in destination are already created and they will not bechanged. If the backup job has not been run yet, then the catalog and the subdirectory will becreated with a name similar to the backup job at first backup run. TagSelect the tag where you want the backup job to appear. If no tag is available or you want to definea new tag, just press Add new tag and type the name of the tag to create it. The new tag will beautomatically assigned to the current backup job.
DescriptionYou can write in here a text describing the backup job defined.
Icon
Press the Change Icon button to manage the backup job icons. This icon will be shown in the BackupList. You can add a new icon by clicking on the Add button. Only Windows icons (files with ".ico"extension) or bitmaps (files with ".bmp" extension) can be added to the list. To remove an icon fromthe list, you have to select it and then click on the Delete button. By default, each new backup jobicon will be the first icon from the Change Icon list.
Note: One or more of the features mentioned in this chapter might not be available in your edition.The Professional edition includes all the features. For a comparison between editions, please checkfeature matrix topic.
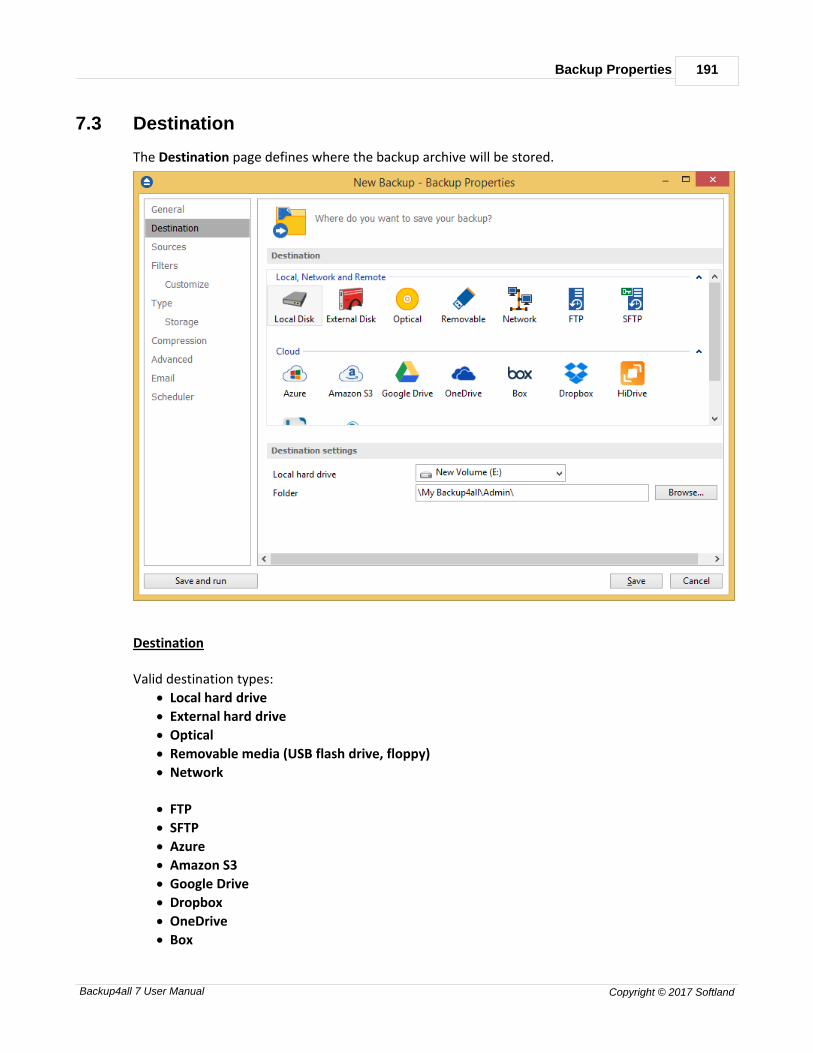
Backup Properties 191
Backup4all 7 User Manual Copyright © 2017 Softland
7.3 Destination
The Destination page defines where the backup archive will be stored.
Destination
Valid destination types:
· Local hard drive
· External hard drive
· Optical
· Removable media (USB flash drive, floppy)
· Network
· FTP
· SFTP
· Azure
· Amazon S3
· Google Drive
· Dropbox
· OneDrive
· Box
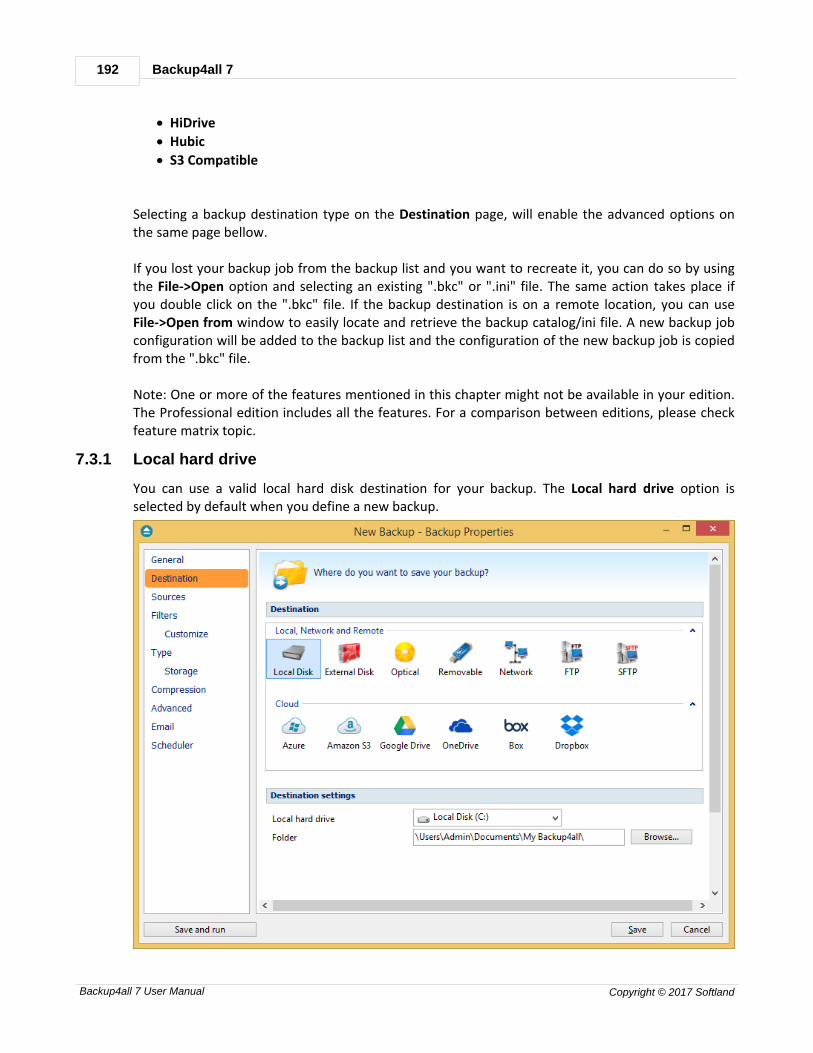
Backup4all 7192
Backup4all 7 User Manual Copyright © 2017 Softland
· HiDrive
· Hubic
· S3 Compatible
Selecting a backup destination type on the Destination page, will enable the advanced options onthe same page bellow. If you lost your backup job from the backup list and you want to recreate it, you can do so by usingthe File->Open option and selecting an existing ".bkc" or ".ini" file. The same action takes place ifyou double click on the ".bkc" file. If the backup destination is on a remote location, you can useFile->Open from window to easily locate and retrieve the backup catalog/ini file. A new backup jobconfiguration will be added to the backup list and the configuration of the new backup job is copiedfrom the ".bkc" file. Note: One or more of the features mentioned in this chapter might not be available in your edition.The Professional edition includes all the features. For a comparison between editions, please checkfeature matrix topic.
7.3.1 Local hard drive
You can use a valid local hard disk destination for your backup. The Local hard drive option isselected by default when you define a new backup.

Backup Properties 193
Backup4all 7 User Manual Copyright © 2017 Softland
Destination settings
In Local hard drive field, select the destination drive you want to be used.
In the Folder field the default path is \My Backup4all\Admin. You can click on the Browse buttonand select a location of your choice where the backup will be stored.In destination folder field, you can use Environment Variables as %Computername%, %SystemDrive%, %UserName% etc.
Note: One or more of the features mentioned in this chapter might not be available in your edition.The Professional edition includes all the features. For a comparison between editions, please checkfeature matrix topic.
7.3.2 External hard drive
You can select an external hard drive as destination for backup.
Destination settings
From the External hard drive list, you can select either an USB or a Firewire external hard drive.

Backup4all 7194
Backup4all 7 User Manual Copyright © 2017 Softland
You can type a folder name in the Folder field or you can click the Browse button to choose anotherfolder where the backup will be stored.In destination folder field, you can use Environment Variables as %Computername%, %SystemDrive%, %UserName% etc.
Lock the destination to this external hard driveWhen disconnecting and reconnecting an external drive, your computer may not assign it the samedrive letter. If the drive letter was changed, the backup might fail because Backup4all is trying tobackup to the same old drive letter which probably does not exist.Use this option if you want Backup4all to detect the external drive after its own serial number andautomatically change the backup destination according with the new drive letter.You should not check this option if you use a rotation backup scheme with two or more externalhard drives.By default, this option is not checked.
Enable disk spanningThe option is effective when there is not enough space to copy all files in the external drivedestination. If checked, the application will copy files to the destination until a file will not fit. Then itwill ask you for another drive to continue with the rest of the files. If the option is not set,Backup4all will stop when the destination drive is full. By default, this option is not checked.
Rotate disksSelect this option if you want to set up a rotation scheme. Selecting this option will disable the "Uselocal catalog" option from Backup Properties->Advanced page.
Note: One or more of the features mentioned in this chapter might not be available in your edition.The Professional edition includes all the features. For a comparison between editions, please checkfeature matrix topic.
7.3.3 Optical
You can select a CD, DVD or Blu-ray drive as destination for backup.
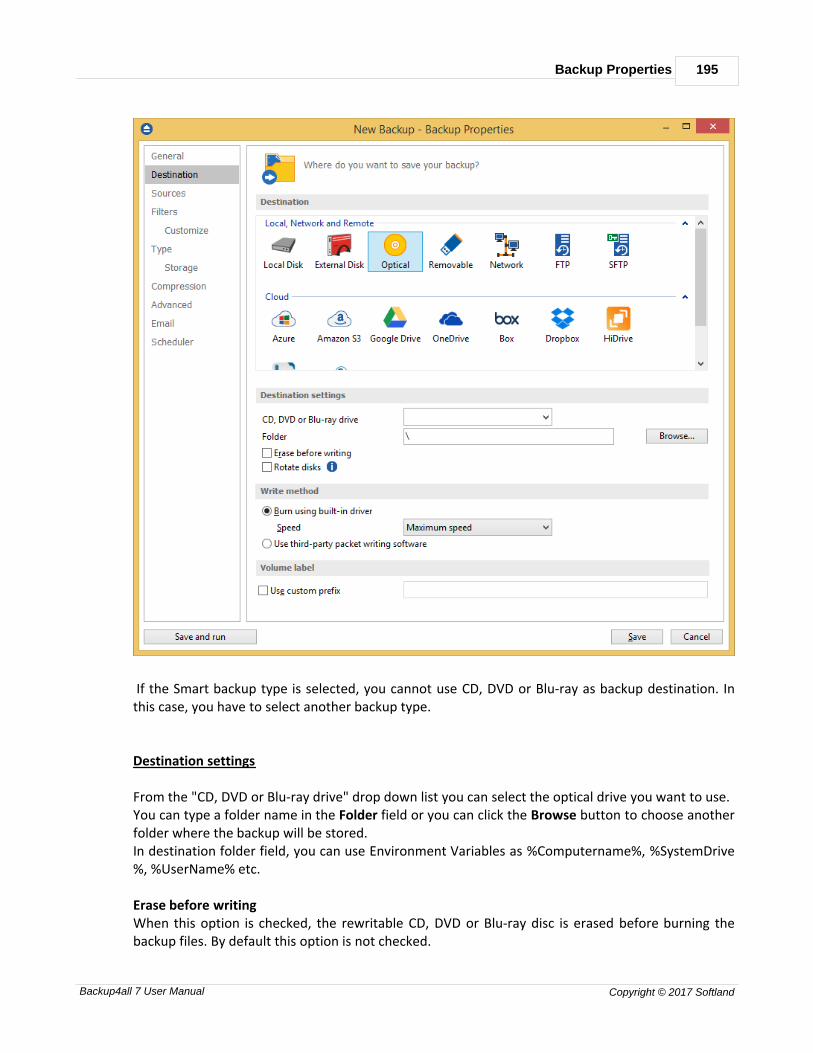
Backup Properties 195
Backup4all 7 User Manual Copyright © 2017 Softland
If the Smart backup type is selected, you cannot use CD, DVD or Blu-ray as backup destination. Inthis case, you have to select another backup type.
Destination settings
From the "CD, DVD or Blu-ray drive" drop down list you can select the optical drive you want to use.You can type a folder name in the Folder field or you can click the Browse button to choose anotherfolder where the backup will be stored.In destination folder field, you can use Environment Variables as %Computername%, %SystemDrive%, %UserName% etc.
Erase before writingWhen this option is checked, the rewritable CD, DVD or Blu-ray disc is erased before burning thebackup files. By default this option is not checked.
Backup4all 7196
Backup4all 7 User Manual Copyright © 2017 Softland
Rotate disksSelect this option if you want to set up a rotation scheme. Selecting this option will disable the "Uselocal catalog" option from Backup Properties->Advanced page.
Write method
Burn using built-in driverBackup4all has built-in burning capabilities. Depending on the option selected in CD, DVD or Blu-ray(from Tools->Options->Backup), one of the internal burners will be used to write the CD, DVD or Blu-ray disc. This option is checked by default. SpeedUse this option to specify a different speed for burning the CD, DVD or Blu-ray disc. By default thisoption is set to Maximum speed. Use third-party packet writing softwareUDF is a platform-independent file system; the same media can be written and read by anyoperating system or vendor. Each CD, DVD or Blu-ray disc must be UDF formatted before burningotherwise the backup will fail. The limitation of this type is that you must have an UDF readerinstalled on each computer you wish to use the CD, DVD or Blu-ray disc.
Volume label
Use custom prefixYou can type your own volume label prefix to customize the backups.Note: One or more of the features mentioned in this chapter might not be available in your edition.The Professional edition includes all the features. For a comparison between editions, please checkfeature matrix topic.
7.3.4 Removable
You can save your backup to a removable drive (USB flash drive, floppy etc) as destination forbackup.
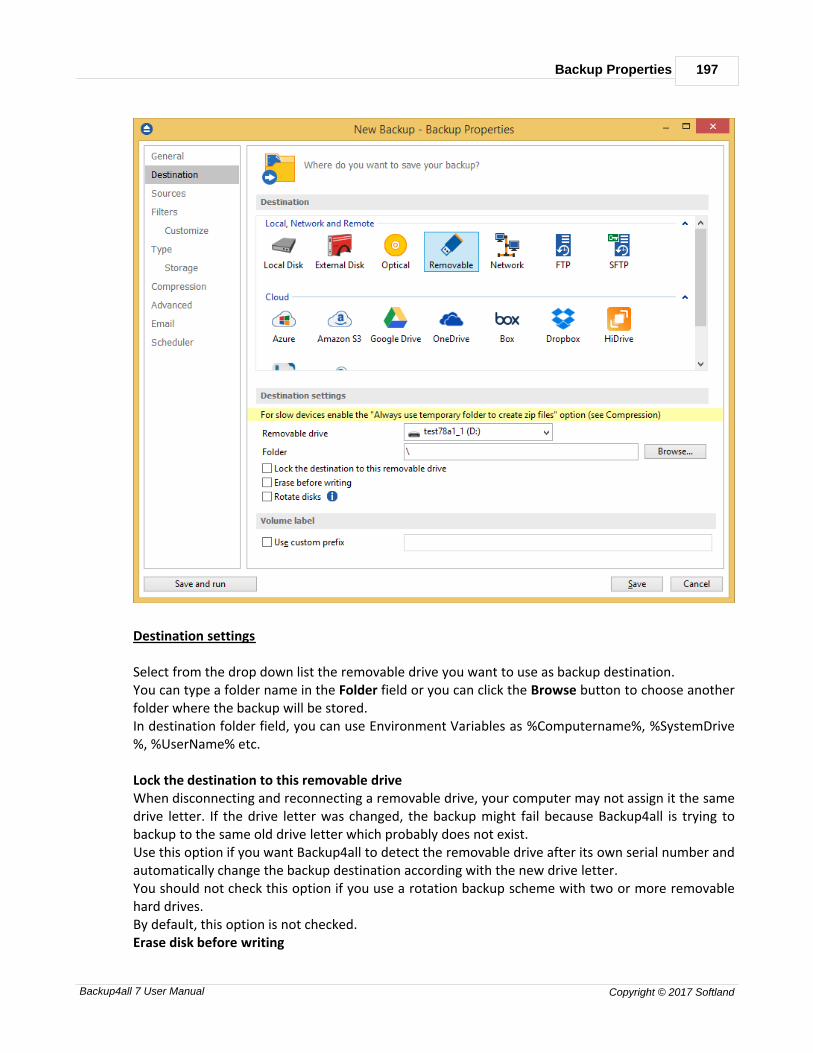
Backup Properties 197
Backup4all 7 User Manual Copyright © 2017 Softland
Destination settings
Select from the drop down list the removable drive you want to use as backup destination.You can type a folder name in the Folder field or you can click the Browse button to choose anotherfolder where the backup will be stored.In destination folder field, you can use Environment Variables as %Computername%, %SystemDrive%, %UserName% etc.
Lock the destination to this removable driveWhen disconnecting and reconnecting a removable drive, your computer may not assign it the samedrive letter. If the drive letter was changed, the backup might fail because Backup4all is trying tobackup to the same old drive letter which probably does not exist.Use this option if you want Backup4all to detect the removable drive after its own serial number andautomatically change the backup destination according with the new drive letter.You should not check this option if you use a rotation backup scheme with two or more removablehard drives.By default, this option is not checked.Erase disk before writing
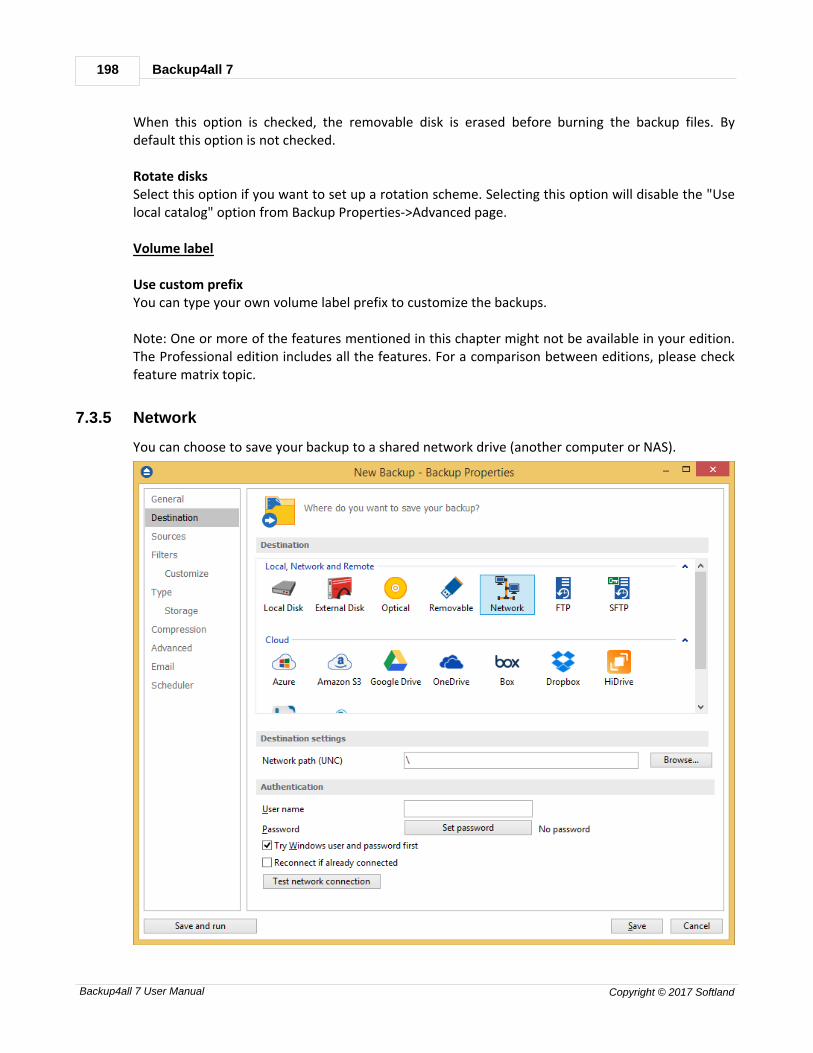
Backup4all 7198
Backup4all 7 User Manual Copyright © 2017 Softland
When this option is checked, the removable disk is erased before burning the backup files. Bydefault this option is not checked.
Rotate disksSelect this option if you want to set up a rotation scheme. Selecting this option will disable the "Uselocal catalog" option from Backup Properties->Advanced page.
Volume label
Use custom prefixYou can type your own volume label prefix to customize the backups.
Note: One or more of the features mentioned in this chapter might not be available in your edition.The Professional edition includes all the features. For a comparison between editions, please checkfeature matrix topic.
7.3.5 Network
You can choose to save your backup to a shared network drive (another computer or NAS).

Backup Properties 199
Backup4all 7 User Manual Copyright © 2017 Softland
Destination settingsClick the Browse button to open My Network Places and select a destination where the backup willbe stored.You can also enter network paths in the Network path (UNC) field. Only a full path is allowed. Forexample, suppose \\Backup_Server\PC1 is mapped on your workstation as drive X, then thefollowing paths are both valid and indicate the same folder: \\Backup_Server\PC1\Backup or X:\Backup.
Authentication
Make sure you can write in the destination and in the selected folder (you have the proper rightsand the media is not write-protected) before finishing the backup configuration. You can enter anUser name and Password to access the network destination if it requires authentication. If you arelogged in as an user that has rights to write to the specified network destination, you can check theTry Windows user and password first option. What this option does is that it checks on the networkdestination if the logged in user has rights to access it.
You can set Backup4all to disconnect and reconnect the network drive if already connected bychecking the Reconnect if already connected option. By default, this option is not checked.After entering the path and eventually the username/password, use the Test network connectionbutton to see if the destination is reachable and that you have sufficient rights to access it. Thenetwork connection was tested successfully pop-up message means that the network destinationwas accessible. In case of insufficient rights the following error message will appear: Networkconnection error. Access is denied. In this case you have to either make sure that the enteredusername/password values are correct, or contact the network administrator to obtain thenecessary rights.
If the destination is missing (when the network is disconnected), an error message is shown.

Backup4all 7200
Backup4all 7 User Manual Copyright © 2017 Softland
The user can choose Cancel to stop the backup process or Retry to check the network connectionagain. If the scheduler starts the backup then the system will retry as many times as set in the File->Options->Backup window and if still is not possible to access the network destination, it will abortthe backup process.
Note: One or more of the features mentioned in this chapter might not be available in your edition.The Professional edition includes all the features. For a comparison between editions, please checkfeature matrix topic.
7.3.6 FTP server
Backup4all supports backing up to a remote computer or device using FTP (File Transfer Protocol)connection. This is a practical backup destination because the backed up data can be easily accessedfrom any other computer with an Internet connection.
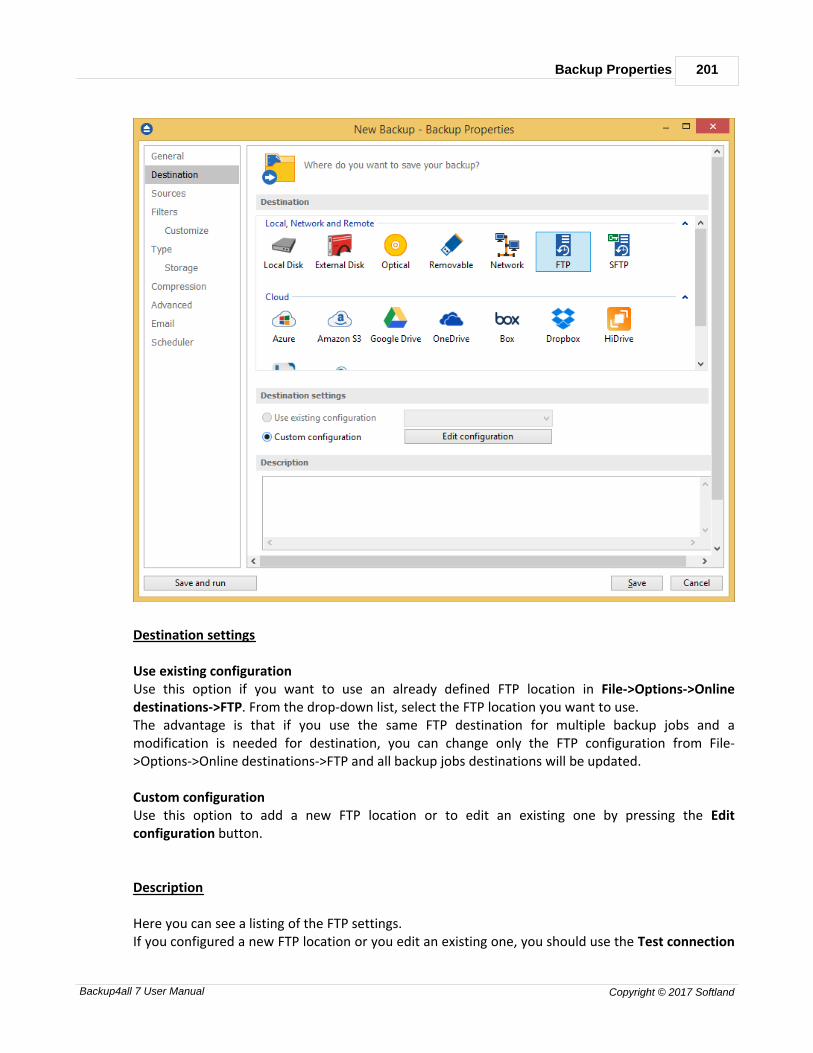
Backup Properties 201
Backup4all 7 User Manual Copyright © 2017 Softland
Destination settings
Use existing configurationUse this option if you want to use an already defined FTP location in File->Options->Onlinedestinations->FTP. From the drop-down list, select the FTP location you want to use.The advantage is that if you use the same FTP destination for multiple backup jobs and amodification is needed for destination, you can change only the FTP configuration from File->Options->Online destinations->FTP and all backup jobs destinations will be updated.
Custom configurationUse this option to add a new FTP location or to edit an existing one by pressing the Editconfiguration button.
Description
Here you can see a listing of the FTP settings.If you configured a new FTP location or you edit an existing one, you should use the Test connection

Backup4all 7202
Backup4all 7 User Manual Copyright © 2017 Softland
button to see if the FTP settings are correct. If the test was successful, The FTP connection wastested successfully message will be displayed.Once you press the OK button, Backup4all will try to connect to the FTP server to see if a backupcatalog already exists on the destination. If the FTP destination is not available, a Cannot connect tothe FTP server message is displayed in the status bar (bottom of the main window).
Note: One or more of the features mentioned in this chapter might not be available in your edition.The Professional edition includes all the features. For a comparison between editions, please checkfeature matrix topic.
7.3.6.1 Edit configuration
This window is shown when selecting Edit configuration from the Destination->FTP window.
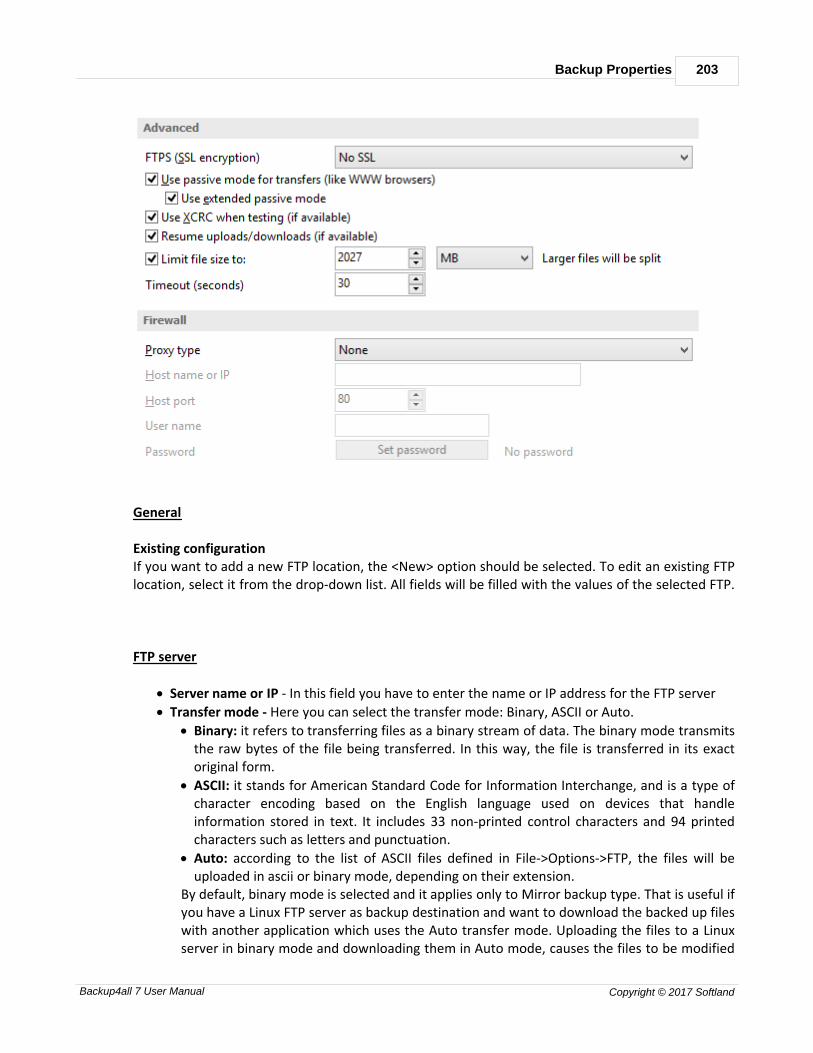
Backup Properties 203
Backup4all 7 User Manual Copyright © 2017 Softland
General
Existing configurationIf you want to add a new FTP location, the <New> option should be selected. To edit an existing FTPlocation, select it from the drop-down list. All fields will be filled with the values of the selected FTP.
FTP server
· Server name or IP - In this field you have to enter the name or IP address for the FTP server
· Transfer mode - Here you can select the transfer mode: Binary, ASCII or Auto.
· Binary: it refers to transferring files as a binary stream of data. The binary mode transmitsthe raw bytes of the file being transferred. In this way, the file is transferred in its exactoriginal form.
· ASCII: it stands for American Standard Code for Information Interchange, and is a type ofcharacter encoding based on the English language used on devices that handleinformation stored in text. It includes 33 non-printed control characters and 94 printedcharacters such as letters and punctuation.
· Auto: according to the list of ASCII files defined in File->Options->FTP, the files will beuploaded in ascii or binary mode, depending on their extension.
By default, binary mode is selected and it applies only to Mirror backup type. That is useful ifyou have a Linux FTP server as backup destination and want to download the backed up fileswith another application which uses the Auto transfer mode. Uploading the files to a Linuxserver in binary mode and downloading them in Auto mode, causes the files to be modified
Backup4all 7204
Backup4all 7 User Manual Copyright © 2017 Softland
by adding a new empty line at the end of each file.
· Port - In this field you have to enter the port number if different than the default FTP ports(21).
· Destination folder - Here you can enter the destination path if different than root.
· User name - If this is a private FTP server (no anonymous access allowed) enter the user namefor your account.
· Password - In this field enter the password for the FTP server.
Bandwidth limitation
In this section you can set different limitations for upload/download speed:
· Upload speed - if checked you can set a maximum upload speed for the FTP transfer
· Download speed - if checked you can set a maximum upload speed for the FTP transfer
Advanced
FTPS (SSL encryption) - indicates the level of Transport Layer Security (TLS) required for controlchannel and data channel connections to the FTP server:
· No SSL - the server does not require Secure Socket Layer transport
· Implicit SSL - implies that Secure Socket Layer is in use
· Only explicit SSL - allows the connection to the FTP server only if TLS is available.
· Explicit SSL, if available - when SSL is available, uses explicit security by default. The serverallows regular FTP sessions without encryption as well as encrypted FTP sessions using SSL.
Use passive mode for transfers (like WWW browsers) - each file transfer (upload or download)needs an additional connection for the data stream. Normally (in active mode), the serverestablishes this connection. In passive mode, however, the client establishes the connection. Thismay be necessary through some firewalls, which do not allow connections from outside.
Use extended passive mode - the FTP Server operates exactly the same as passive mode, however itonly transmits the port number (not broken into high and low bytes) and Backup4all is to assumethat it connects to the same IP address that was originally connected to. Use this option if thenormal passive mode connection failed.
Use XCRC when testing (if available) - if the server supports the XCRC extension Backup4all canverify that files transferred to the server have been transmitted correctly using the CRC informationreceived from the FTP server. This results in faster testing, as the files will not be downloaded toperform the CRC testing.
Resume upload/downloads (if available) - it resume the backup upload if the server supportsresume command.
Limit file size to - specify the maximum file size you want to have. Larger files will be split. Pleasenote that many FTP servers does not allow you to upload files larger than 2 GB.

Backup Properties 205
Backup4all 7 User Manual Copyright © 2017 Softland
Timeout - you can set the time interval (in seconds) that is allowed for no data transfer before thetransfer operation is interrupted and must be resumed. Default is 30 seconds.
Firewall
Proxy type - select one of the options below (supported by your firewall) if you use a proxy toconnect to the FTP:
· None - Sends the User name and optional Password for the FTP server as entered in the FTPwindow
· Send command USER - Sends the User name and optional Password defined in the proxysettings, followed immediately by the User name and optional Password for the FTP server.
· Send command SITE - Sends the User name and optional Password defined in the proxysettings, the SITE command with the Host value, and the User name and optional Passwordfor the FTP site.
· Send command OPEN - Sends the User name and optional Password defined in the proxysettings, sends the OPEN command with the Host value, and the User name and optionalPassword for the FTP site.
· USER user@firewalluser@hostname / PASS pass@firewallpass - Sends the command USERuser@proxyuser@host, then the command PASS pwd@proxypwd, or optionally PASS pwd.
· Transparent - Sends the User name and optional Password defined in the proxy settings,followed immediately by the FTP server User name and optional Password.
Host name or IP - In this field you have to enter the name or IP address for the proxy server(firewall).Host port - Type the port number if different than the default port (80).User name - This field is used to enter the proxy user name.Password - In this field you can enter the password for the specified user name.
Note: One or more of the features mentioned in this chapter might not be available in your edition.The Professional edition includes all the features. For a comparison between editions, please checkfeature matrix topic.
7.3.7 SFTP server
Backup4all supports backing up to a remote computer or device using SFTP (SSH File TransferProtocol) connection. This is a practical backup destination because the backed up data can be easilyaccessed from any other computer with an Internet connection.

Backup4all 7206
Backup4all 7 User Manual Copyright © 2017 Softland
Destination settings
Use existing configurationUse this option if you want to use an already defined SFTP location in File->Options->Onlinedestination->SFTP. From the drop-down list, select the SFTP location you want to use.The advantage is that if you use the same SFTP destination for multiple backup jobs and amodification is needed for destination, you can change only the SFTP configuration from File->Options->Online destination->SFTP and all backup jobs destinations will be updated.
Custom configurationUse this option to add a new SFTP location or to edit an existing one by pressing the Editconfiguration button.
Description
Here you can see a listing of the SFTP settings.If you configured a new SFTP location or you edit an existing one, you should use the Test
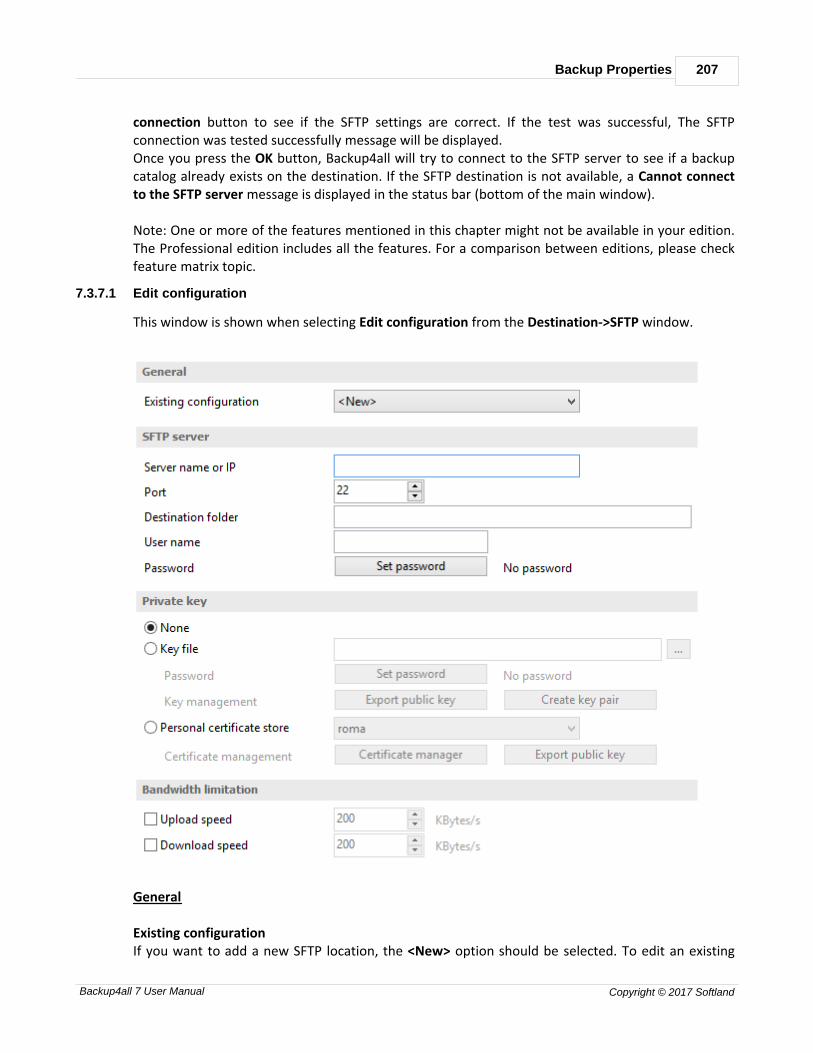
Backup Properties 207
Backup4all 7 User Manual Copyright © 2017 Softland
connection button to see if the SFTP settings are correct. If the test was successful, The SFTPconnection was tested successfully message will be displayed.Once you press the OK button, Backup4all will try to connect to the SFTP server to see if a backupcatalog already exists on the destination. If the SFTP destination is not available, a Cannot connectto the SFTP server message is displayed in the status bar (bottom of the main window).
Note: One or more of the features mentioned in this chapter might not be available in your edition.The Professional edition includes all the features. For a comparison between editions, please checkfeature matrix topic.
7.3.7.1 Edit configuration
This window is shown when selecting Edit configuration from the Destination->SFTP window.
General
Existing configurationIf you want to add a new SFTP location, the <New> option should be selected. To edit an existing
Backup4all 7208
Backup4all 7 User Manual Copyright © 2017 Softland
SFTP location, select it from the drop-down list. All fields will be filled with the values of the selectedSFTP.
SFTP server
· Server name or IP - In this field you have to enter the name or IP address for the SFTP server
· Port - In this field you have to enter the port number if different than the default SFTP ports(22).
· Destination folder - Here you can enter the destination path if different than root.
· User name - If this is a private SFTP server (no anonymous access allowed) enter the username for your account.
· Password - In this field enter the password for the SFTP server.
Private key
· None - no private key is used
· Key file - allows user to specify a key file that will be used
· Personal certificate store - allows user to import and use different certificate formats
Bandwidth limitation
In this section you can set different limitations for upload/download speed:
· Limit upload speed - if checked you can set a maximum upload speed for the SFTP transfer
· Limit download speed - if checked you can set a maximum upload speed for the SFTP transfer
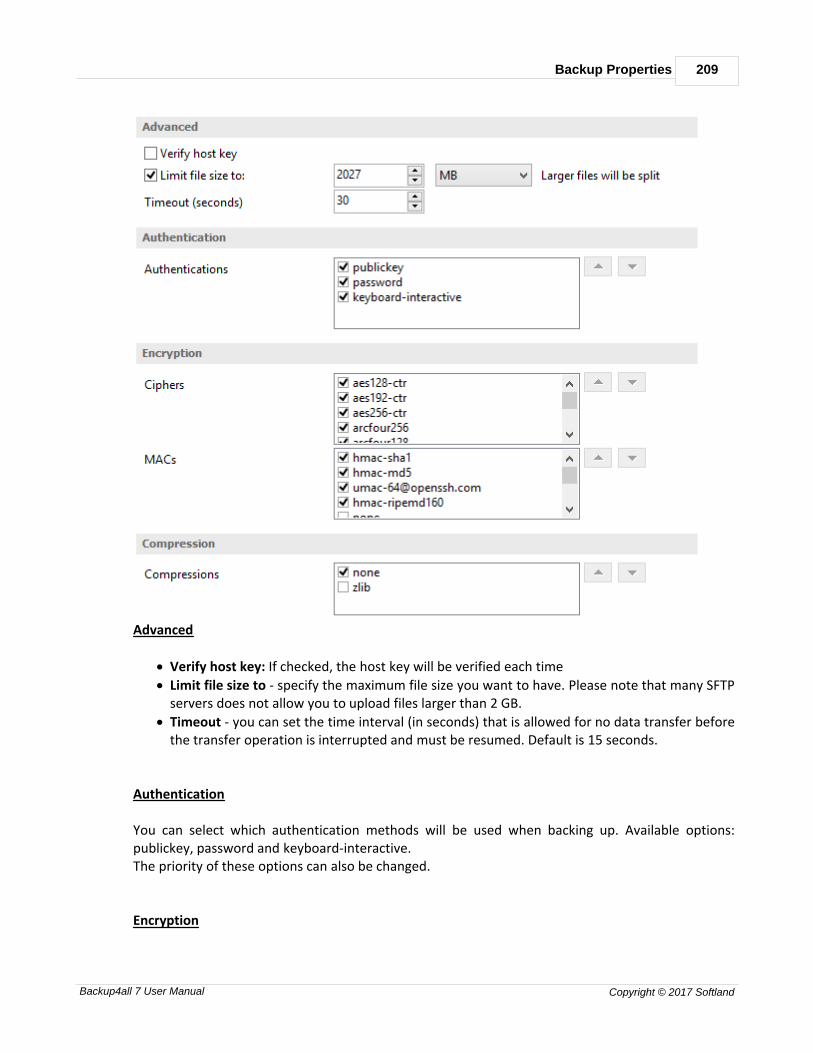
Backup Properties 209
Backup4all 7 User Manual Copyright © 2017 Softland
Advanced
· Verify host key: If checked, the host key will be verified each time
· Limit file size to - specify the maximum file size you want to have. Please note that many SFTPservers does not allow you to upload files larger than 2 GB.
· Timeout - you can set the time interval (in seconds) that is allowed for no data transfer beforethe transfer operation is interrupted and must be resumed. Default is 15 seconds.
Authentication
You can select which authentication methods will be used when backing up. Available options:publickey, password and keyboard-interactive.The priority of these options can also be changed.
Encryption

Backup4all 7210
Backup4all 7 User Manual Copyright © 2017 Softland
· Ciphers: clear or select the check boxes to specify which ciphers you want to allow forencrypting SFTP sessions. A Cipher is the algorithm(s) used for symmetric session encryption.To give a cipher a lower priority rating, select it with the mouse and then click the Downbutton.
· MACs: clear or select the check boxes to specify which MACs you want to allow for encryptingSFTP sessions. A MAC (Message Authentication Code) is the algorithm(s) used for dataintegrity verification. To give a MAC a lower priority rating, select it with the mouse, and thenclick the Down button.
Compression
SFTP supports the use of data compression to reduce the amount of data that is transmitted. Boththe client and server agree on a compression algorithm. They then compress data before sendingand decompress data when it is received.Typically, zlib compression is the compression algorithm most commonly supported in SFTP servers.No compression is set as the default, and zlib is specified as an option. If the server forces use of zlibcompression it will happen automatically
Note: One or more of the features mentioned in this chapter might not be available in your edition.The Professional edition includes all the features. For a comparison between editions, please checkfeature matrix topic.
7.3.8 Azure
Backup4all supports backing up to Azure storage. This is a practical backup destination because thebacked up data can be easily accessed from any other computer with an Internet connection.

Backup Properties 211
Backup4all 7 User Manual Copyright © 2017 Softland
Destination settings
Use existing configurationUse this option if you want to use an already defined Azure location in File->Options->Onlinedestinations->Azure. From the drop-down list, select the Azure location you want to use.The advantage is that if you use the same Azure destination for multiple backup jobs and amodification is needed for destination, you can change only the Azure configuration from File->Options->Online destinations->Azure and all backup jobs destinations will be updated.
Custom configurationUse this option to add a new Azure location or to edit an existing one by pressing the Editconfiguration button.
Description
Here you can see a listing of the Azure settings.If you configured a new Azure location or you edit an existing one, you should use the Testconnection button to see if the Azure settings are correct. If the test was successful, The Azure

Backup4all 7212
Backup4all 7 User Manual Copyright © 2017 Softland
connection was tested successfully message will be displayed.Once you press the OK button, Backup4all will try to connect to the Azure server to see if a backupcatalog already exists on the destination. If the Azure destination is not available, a Cannot connectto the Azure server message is displayed in the status bar (bottom of the main window).
Note: One or more of the features mentioned in this chapter might not be available in your edition.The Professional edition includes all the features. For a comparison between editions, please checkfeature matrix topic.
7.3.8.1 Edit configuration
This window is shown when selecting Edit configuration from the Destination->Azure window.
General
Existing configurationIf you want to add a new Azure location, the <New> option should be selected. To edit an existingAzure location, select it from the drop-down list. All fields will be filled with the values of theselected Azure configuration.
Settings
· Account name - In this field you have to enter the name of your Azure account

Backup Properties 213
Backup4all 7 User Manual Copyright © 2017 Softland
· Key - In this field you have to enter the key for your Azure accountKey is shared Access Signature - check this option if the key is shared access signature. Ashared access signature provides delegated access to resources in your storage account. Thismeans that you can grant a client limited permissions to your blobs, queues, or tables for aspecified period of time and with a specified set of permissions, without having to shareyour account access keys.
· Container - In this field you have to enter the container you want to use as destination
· Folder - In this field you have to enter the folder where you want to store the backups. If thefolder does not exist, it will be created.
Note: One or more of the features mentioned in this chapter might not be available in your edition.The Professional edition includes all the features. For a comparison between editions, please checkfeature matrix topic.
7.3.9 Amazon S3
Backup4all supports backing up to Amazon S3 storage. This is a practical backup destination becausethe backed up data can be easily accessed from any other computer with an Internet connection.
Destination

Backup4all 7214
Backup4all 7 User Manual Copyright © 2017 Softland
Use existing configurationUse this option if you want to use an already defined Amazon S3 location in File->Options->Onlinedestinations->Amazon S3. From the drop-down list, select the Amazon S3 location you want to use.The advantage is that if you use the same Amazon S3 destination for multiple backup jobs and amodification is needed for destination, you can change only the Amazon S3 configuration from File->Options->Online destinations->Amazon S3 and all backup jobs destinations will be updated.
Custom configurationUse this option to add a new Amazon S3 location or to edit an existing one by pressing the Editconfiguration button.
Description
Here you can see a listing of the Amazon S3 settings.If you configured a new Amazon S3 location or you edit an existing one, you should use the Testconnection button to see if the Amazon S3 settings are correct. If the test was successful, TheAmazon S3 connection was tested successfully message will be displayed.Once you press the OK button, Backup4all will try to connect to the Amazon S3 server to see if abackup catalog already exists on the destination. If the Amazon S3 destination is not available, aCannot connect to the Amazon S3 server message is displayed in the status bar (bottom of the mainwindow).
Note: One or more of the features mentioned in this chapter might not be available in your edition.The Professional edition includes all the features. For a comparison between editions, please checkfeature matrix topic.
7.3.9.1 Edit configuration
This window is shown when selecting Edit configuration from the Destination->Amazon S3window.
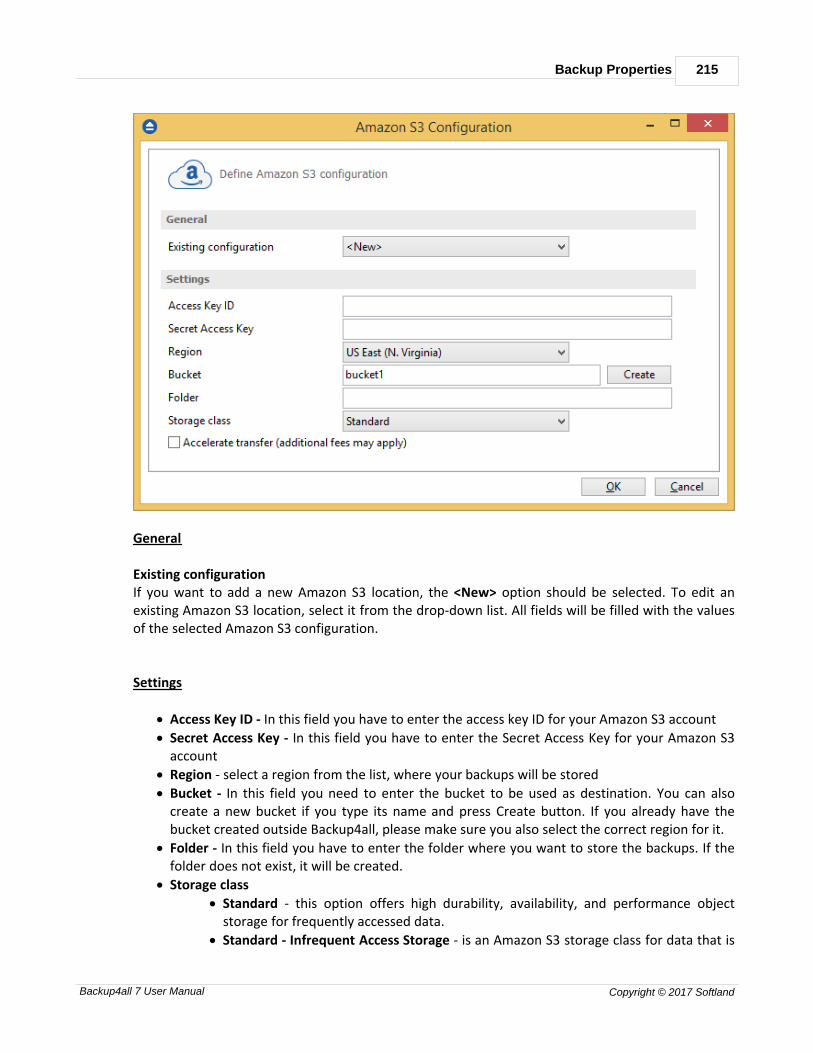
Backup Properties 215
Backup4all 7 User Manual Copyright © 2017 Softland
General
Existing configurationIf you want to add a new Amazon S3 location, the <New> option should be selected. To edit anexisting Amazon S3 location, select it from the drop-down list. All fields will be filled with the valuesof the selected Amazon S3 configuration.
Settings
· Access Key ID - In this field you have to enter the access key ID for your Amazon S3 account
· Secret Access Key - In this field you have to enter the Secret Access Key for your Amazon S3account
· Region - select a region from the list, where your backups will be stored
· Bucket - In this field you need to enter the bucket to be used as destination. You can alsocreate a new bucket if you type its name and press Create button. If you already have thebucket created outside Backup4all, please make sure you also select the correct region for it.
· Folder - In this field you have to enter the folder where you want to store the backups. If thefolder does not exist, it will be created.
· Storage class
· Standard - this option offers high durability, availability, and performance objectstorage for frequently accessed data.
· Standard - Infrequent Access Storage - is an Amazon S3 storage class for data that is
Backup4all 7216
Backup4all 7 User Manual Copyright © 2017 Softland
accessed less frequently, but requires rapid access when needed.
· Reduced redundancy (not recommended) - enables customers to store noncritical,reproducible data at lower levels of redundancy than Amazon S3’s standard storage.It provides a highly available solution for distributing or sharing content that isdurably stored elsewhere, or for storing thumbnails, transcoded media, or otherprocessed data that can be easily reproduced.
Transfer acceleration - this option enables fast, easy, and secure transfers of files over longdistances between Backup4all and the S3 bucket. Transfer Acceleration takes advantage of AmazonCloudFront’s globally distributed edge locations. As the data arrives at an edge location, data isrouted to Amazon S3 over an optimized network path. Please note it takes about 20 minutes sincethe bucket creation until the acceleration is enabled for that bucket.
Note: One or more of the features mentioned in this chapter might not be available in your edition.The Professional edition includes all the features. For a comparison between editions, please checkfeature matrix topic.
7.3.10 Google Drive
Backup4all supports backing up to Google Drive storage. This is a practical backup destinationbecause the backed up data can be easily accessed from any other computer with an Internetconnection.

Backup Properties 217
Backup4all 7 User Manual Copyright © 2017 Softland
Destination
Use existing configurationUse this option if you want to use an already defined Google Drive location in File->Options->Onlinedestinations->Google Drive. From the drop-down list, select the Google Drive location you want touse.The advantage is that if you use the same Google Drive destination for multiple backup jobs and amodification is needed for destination, you can change only the Google Drive configuration fromFile->Options->Online destinations->Google Drive and all backup jobs destinations will be updated.
Custom configurationUse this option to add a new Google Drive location or to edit an existing one by pressing the Editconfiguration button.

Backup4all 7218
Backup4all 7 User Manual Copyright © 2017 Softland
Description
Here you can see a listing of the Google Drive settings.If you configured a new Google Drive location or you edit an existing one, you should use the Testconnection button to see if the Google Drive settings are correct. If the test was successful, TheGoogle Drive connection was tested successfully message will be displayed.Once you press the OK button, Backup4all will try to connect to the Google Drive server to see if abackup catalog already exists on the destination. If the Google Drive destination is not available, aCannot connect to the Google Drive server message is displayed in the status bar (bottom of themain window).
Bandwidth limitation
This option allows you to set a limit for the upload and download speed between the working hours.If your bandwidth is important for your company and you run a long backup, you can set Backup4allto use only a limited bandwidth between the specified hours.
Download speed - here you can set the maximum download speed for backup. It will be used whentesting the files after backup.
Upload speed - here you can set the maximum upload speed for backup.
Limit only between - indicate the hours between which the specified upload/download limits will beapplied.
Note: One or more of the features mentioned in this chapter might not be available in your edition.The Professional edition includes all the features. For a comparison between editions, please checkfeature matrix topic.
7.3.10.1 Edit configuration
This window is shown when selecting Edit configuration from the Destination->Google Drivewindow.
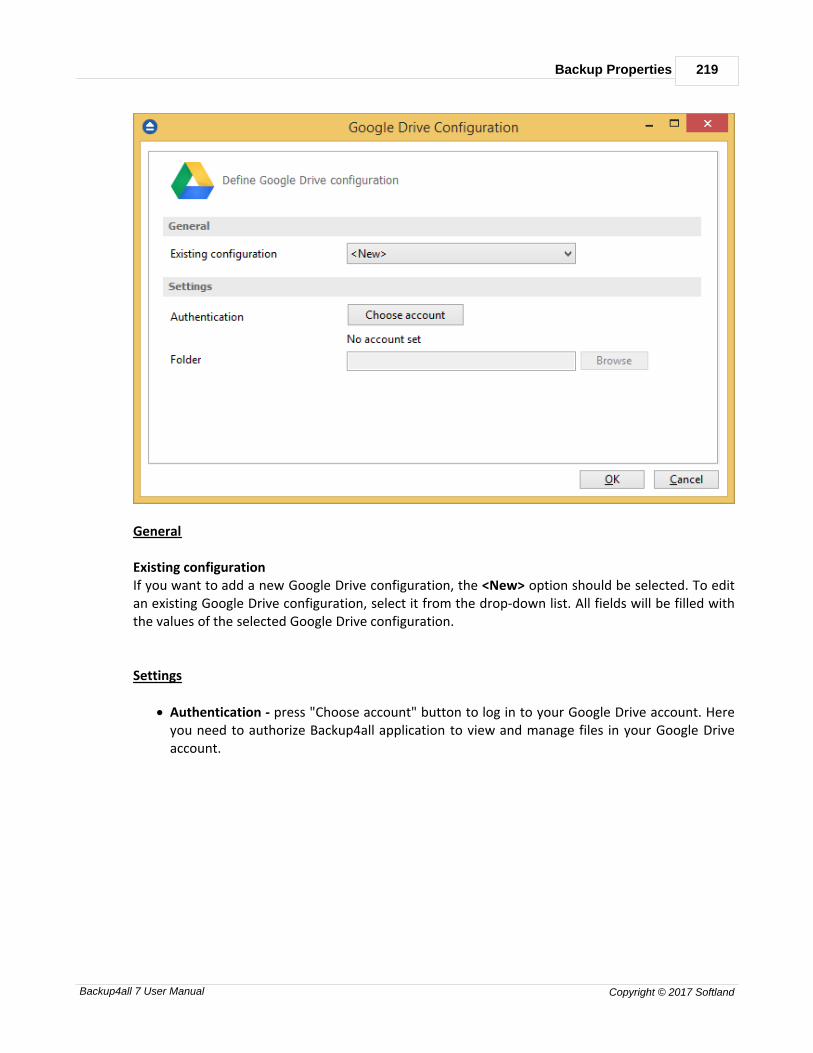
Backup Properties 219
Backup4all 7 User Manual Copyright © 2017 Softland
General
Existing configurationIf you want to add a new Google Drive configuration, the <New> option should be selected. To editan existing Google Drive configuration, select it from the drop-down list. All fields will be filled withthe values of the selected Google Drive configuration.
Settings
· Authentication - press "Choose account" button to log in to your Google Drive account. Hereyou need to authorize Backup4all application to view and manage files in your Google Driveaccount.

Backup4all 7220
Backup4all 7 User Manual Copyright © 2017 Softland
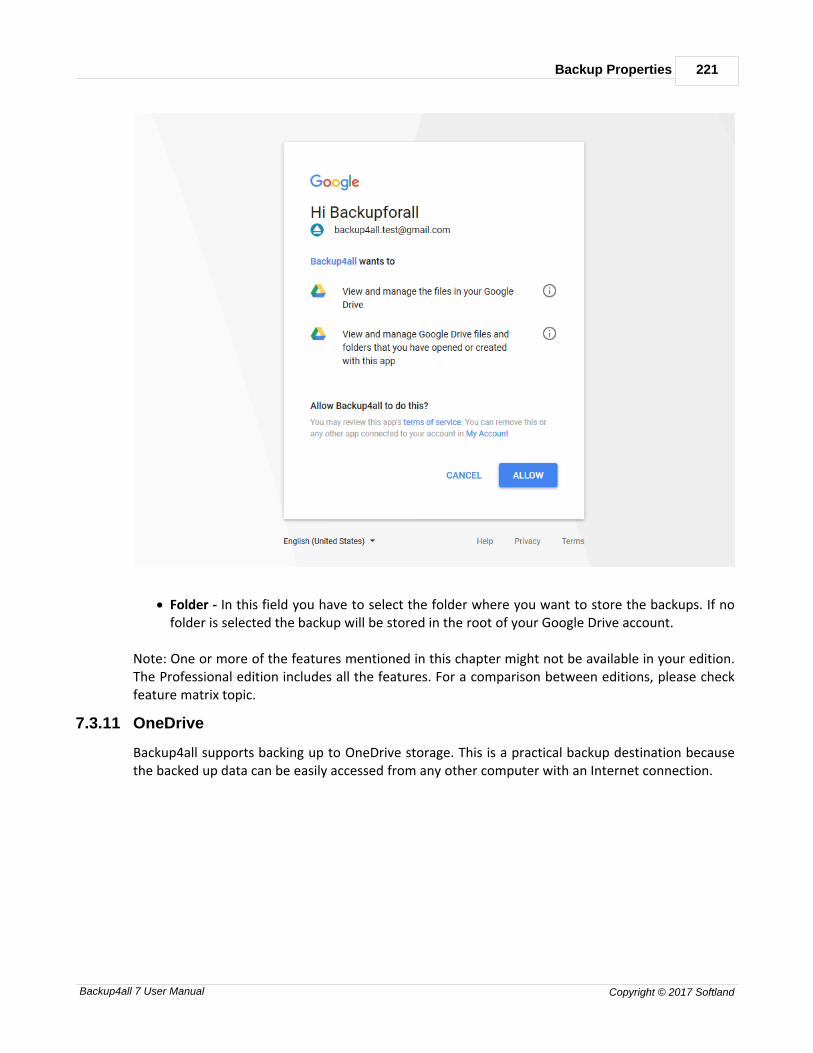
Backup Properties 221
Backup4all 7 User Manual Copyright © 2017 Softland
· Folder - In this field you have to select the folder where you want to store the backups. If nofolder is selected the backup will be stored in the root of your Google Drive account.
Note: One or more of the features mentioned in this chapter might not be available in your edition.The Professional edition includes all the features. For a comparison between editions, please checkfeature matrix topic.
7.3.11 OneDrive
Backup4all supports backing up to OneDrive storage. This is a practical backup destination becausethe backed up data can be easily accessed from any other computer with an Internet connection.

Backup4all 7222
Backup4all 7 User Manual Copyright © 2017 Softland
Destination
Use existing configurationUse this option if you want to use an already defined OneDrive location in File->Options->Onlinedestinations->OneDrive. From the drop-down list, select the OneDrive location you want to use.The advantage is that if you use the same OneDrive destination for multiple backup jobs and amodification is needed for destination, you can change only the OneDrive configuration from File->Options->Online destinations->OneDrive and all backup jobs destinations will be updated.
Custom configurationUse this option to add a new OneDrive location or to edit an existing one by pressing the Editconfiguration button.
Backup Properties 223
Backup4all 7 User Manual Copyright © 2017 Softland
Description
Here you can see a listing of the OneDrive settings.If you configured a new OneDrive location or you edit an existing one, you should use the Testconnection button to see if the OneDrive settings are correct. If the test was successful, TheOneDrive connection was tested successfully message will be displayed.Once you press the OK button, Backup4all will try to connect to the OneDrive server to see if abackup catalog already exists on the destination. If the OneDrive destination is not available, aCannot connect to the OneDrive server message is displayed in the status bar (bottom of the mainwindow).
Bandwidth limitation
This option allows you to set a limit for the upload and download speed between the working hours.If your bandwidth is important for your company and you run a long backup, you can set Backup4allto use only a limited bandwidth between the specified hours.
Download speed - here you can set the maximum download speed for backup. It will be used whentesting the files after backup.
Upload speed - here you can set the maximum upload speed for backup.
Limit only between - indicate the hours between which the specified upload/download limits will beapplied.
Note: One or more of the features mentioned in this chapter might not be available in your edition.The Professional edition includes all the features. For a comparison between editions, please checkfeature matrix topic.
7.3.11.1 Edit configuration
This window is shown when selecting Edit configuration from the Destination->OneDrive window.

Backup4all 7224
Backup4all 7 User Manual Copyright © 2017 Softland
General
Existing configurationIf you want to add a new OneDrive location, the <New> option should be selected. To edit anexisting OneDrive location, select it from the drop-down list. All fields will be filled with the values ofthe selected OneDrive configuration.
Settings
· Account type - here you can choose "Personal" or "Business", depending on the account type youhave.
· Authentication - press "Choose account" button to log in to your OneDrive account. Here youneed to authorize Backup4all application to view and manage files in your OneDrive account.

Backup Properties 225
Backup4all 7 User Manual Copyright © 2017 Softland
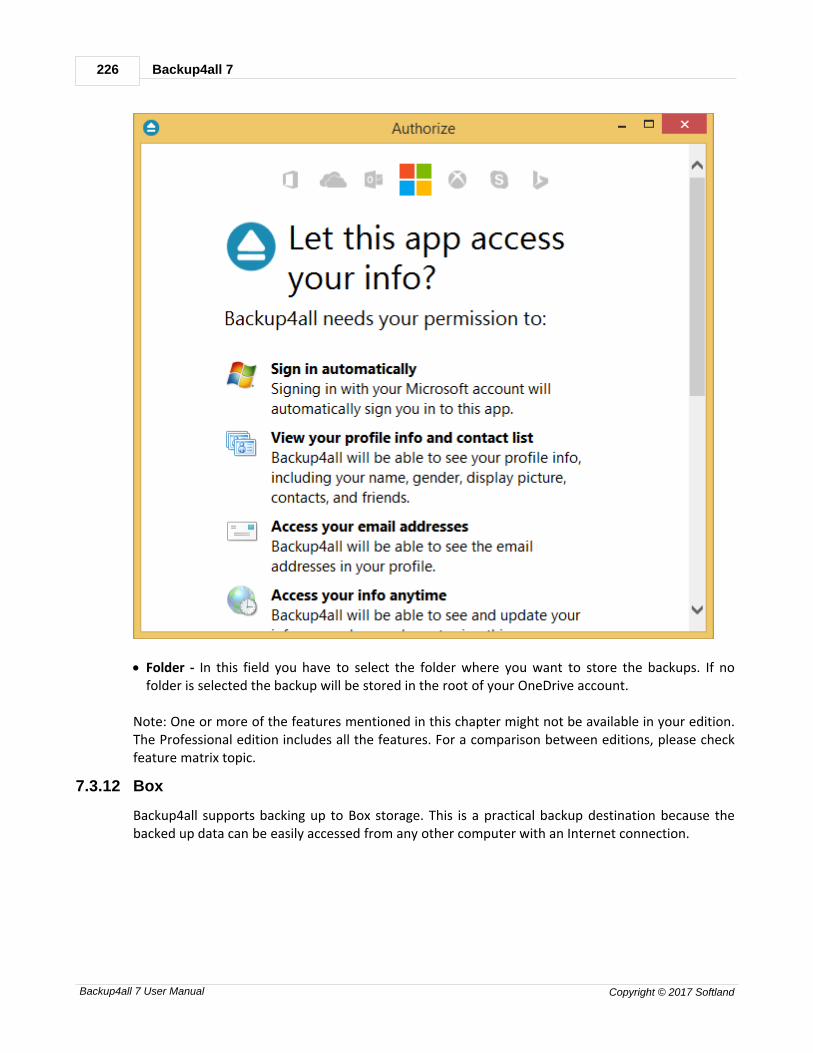
Backup4all 7226
Backup4all 7 User Manual Copyright © 2017 Softland
· Folder - In this field you have to select the folder where you want to store the backups. If nofolder is selected the backup will be stored in the root of your OneDrive account.
Note: One or more of the features mentioned in this chapter might not be available in your edition.The Professional edition includes all the features. For a comparison between editions, please checkfeature matrix topic.
7.3.12 Box
Backup4all supports backing up to Box storage. This is a practical backup destination because thebacked up data can be easily accessed from any other computer with an Internet connection.
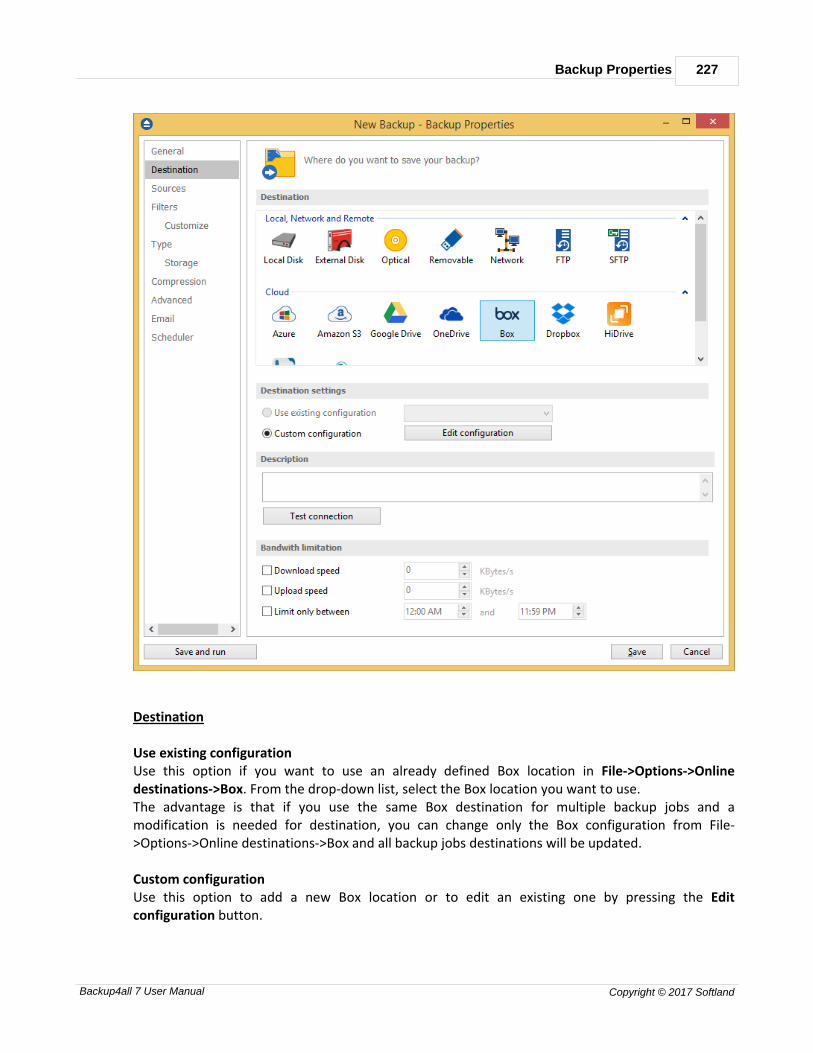
Backup Properties 227
Backup4all 7 User Manual Copyright © 2017 Softland
Destination
Use existing configurationUse this option if you want to use an already defined Box location in File->Options->Onlinedestinations->Box. From the drop-down list, select the Box location you want to use.The advantage is that if you use the same Box destination for multiple backup jobs and amodification is needed for destination, you can change only the Box configuration from File->Options->Online destinations->Box and all backup jobs destinations will be updated.
Custom configurationUse this option to add a new Box location or to edit an existing one by pressing the Editconfiguration button.

Backup4all 7228
Backup4all 7 User Manual Copyright © 2017 Softland
Description
Here you can see a listing of the Box settings.If you configured a new Box location or you edit an existing one, you should use the Test connectionbutton to see if the Box settings are correct. If the test was successful, The Box connection wastested successfully message will be displayed.Once you press the OK button, Backup4all will try to connect to the Box server to see if a backupcatalog already exists on the destination. If the Box destination is not available, a Cannot connect tothe Box server message is displayed in the status bar (bottom of the main window).
Bandwidth limitation
This option allows you to set a limit for the upload and download speed between the working hours.If your bandwidth is important for your company and you run a long backup, you can set Backup4allto use only a limited bandwidth between the specified hours.
Download speed - here you can set the maximum download speed for backup. It will be used whentesting the files after backup.
Upload speed - here you can set the maximum upload speed for backup.
Limit only between - indicate the hours between which the specified upload/download limits will beapplied.
Note: One or more of the features mentioned in this chapter might not be available in your edition.The Professional edition includes all the features. For a comparison between editions, please checkfeature matrix topic.
7.3.12.1 Edit configuration
This window is shown when selecting Edit configuration from the Destination->Box window.
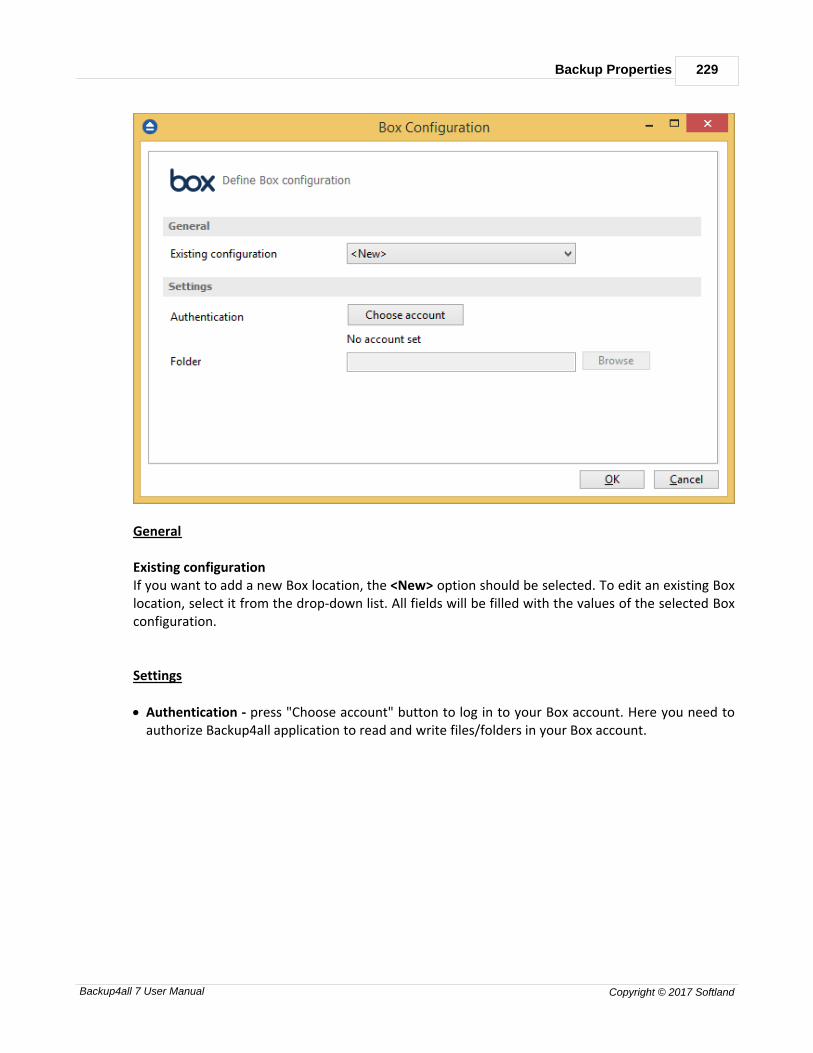
Backup Properties 229
Backup4all 7 User Manual Copyright © 2017 Softland
General
Existing configurationIf you want to add a new Box location, the <New> option should be selected. To edit an existing Boxlocation, select it from the drop-down list. All fields will be filled with the values of the selected Boxconfiguration.
Settings
· Authentication - press "Choose account" button to log in to your Box account. Here you need toauthorize Backup4all application to read and write files/folders in your Box account.

Backup4all 7230
Backup4all 7 User Manual Copyright © 2017 Softland
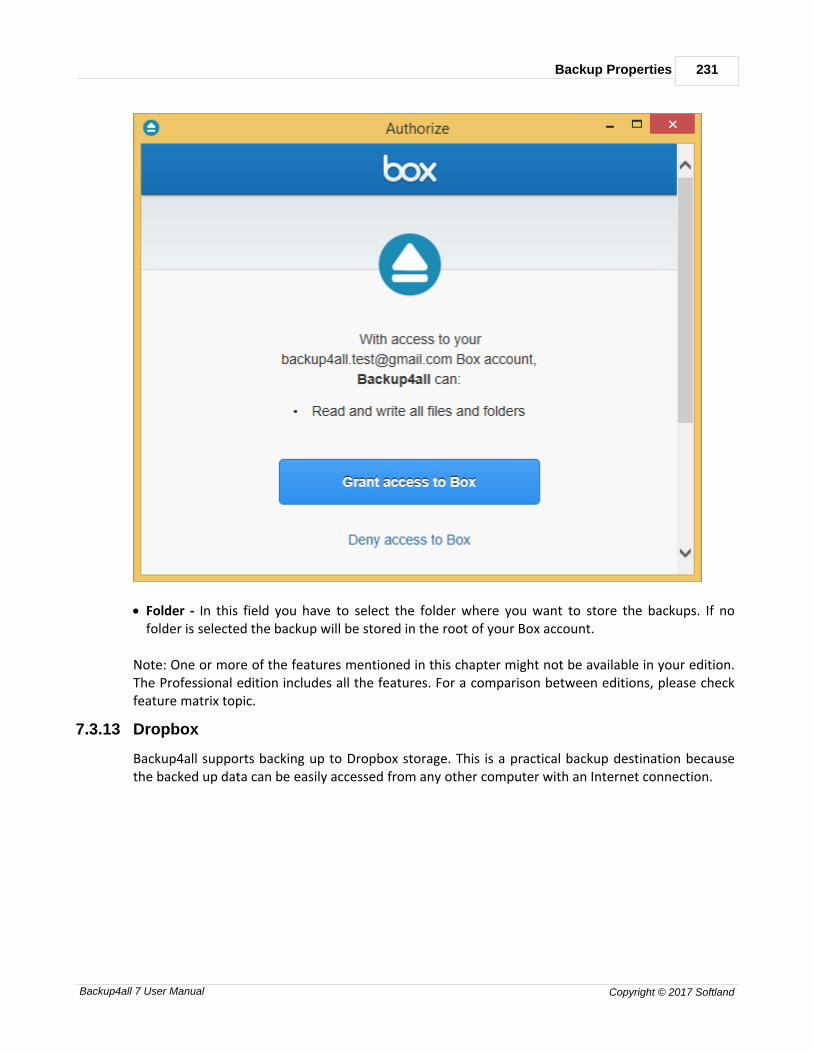
Backup Properties 231
Backup4all 7 User Manual Copyright © 2017 Softland
· Folder - In this field you have to select the folder where you want to store the backups. If nofolder is selected the backup will be stored in the root of your Box account.
Note: One or more of the features mentioned in this chapter might not be available in your edition.The Professional edition includes all the features. For a comparison between editions, please checkfeature matrix topic.
7.3.13 Dropbox
Backup4all supports backing up to Dropbox storage. This is a practical backup destination becausethe backed up data can be easily accessed from any other computer with an Internet connection.
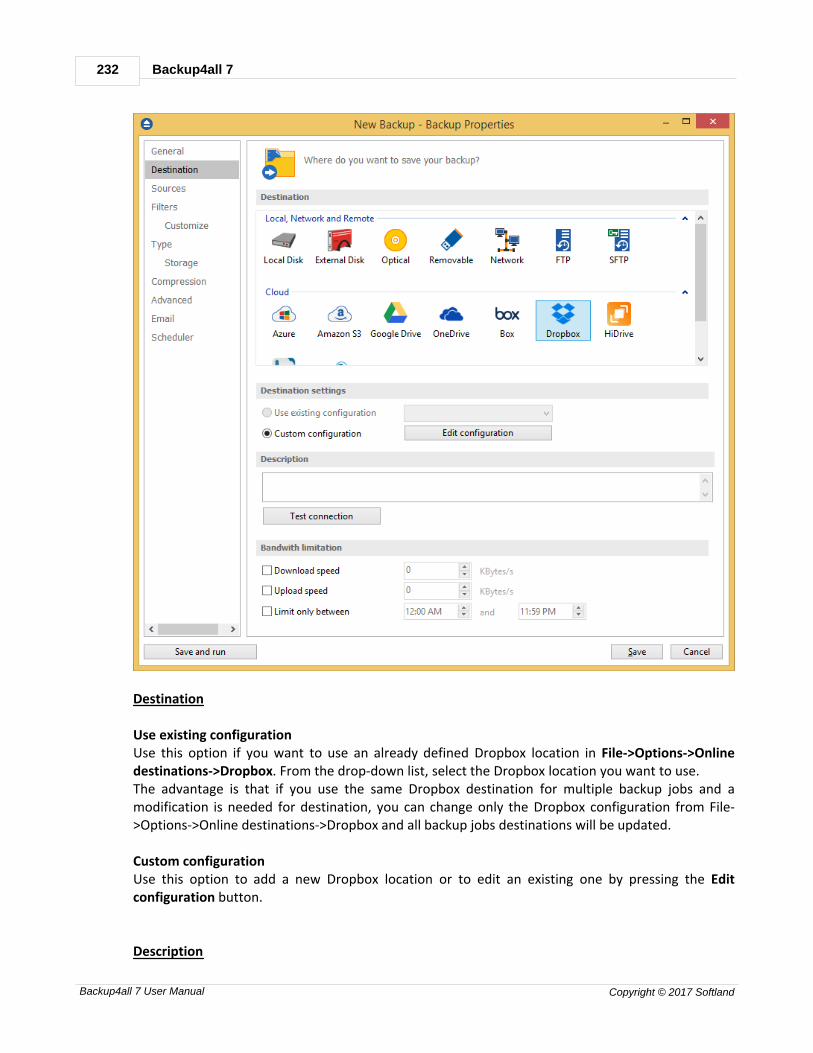
Backup4all 7232
Backup4all 7 User Manual Copyright © 2017 Softland
Destination
Use existing configurationUse this option if you want to use an already defined Dropbox location in File->Options->Onlinedestinations->Dropbox. From the drop-down list, select the Dropbox location you want to use.The advantage is that if you use the same Dropbox destination for multiple backup jobs and amodification is needed for destination, you can change only the Dropbox configuration from File->Options->Online destinations->Dropbox and all backup jobs destinations will be updated.
Custom configurationUse this option to add a new Dropbox location or to edit an existing one by pressing the Editconfiguration button.
Description
Backup Properties 233
Backup4all 7 User Manual Copyright © 2017 Softland
Here you can see a listing of the Dropbox settings.If you configured a new Dropbox location or you edit an existing one, you should use the Testconnection button to see if the Dropbox settings are correct. If the test was successful, The Dropboxconnection was tested successfully message will be displayed.Once you press the OK button, Backup4all will try to connect to the Dropbox server to see if abackup catalog already exists on the destination. If the Dropbox destination is not available, aCannot connect to the Dropbox server message is displayed in the status bar (bottom of the mainwindow).
Bandwidth limitation
This option allows you to set a limit for the upload and download speed between the working hours.If your bandwidth is important for your company and you run a long backup, you can set Backup4allto use only a limited bandwidth between the specified hours.
Download speed - here you can set the maximum download speed for backup. It will be used whentesting the files after backup.
Upload speed - here you can set the maximum upload speed for backup.
Limit only between - indicate the hours between which the specified upload/download limits will beapplied.
Note: One or more of the features mentioned in this chapter might not be available in your edition.The Professional edition includes all the features. For a comparison between editions, please checkfeature matrix topic.
7.3.13.1 Edit configuration
This window is shown when selecting Edit configuration from the Destination->Dropbox window.

Backup4all 7234
Backup4all 7 User Manual Copyright © 2017 Softland
General
Existing configurationIf you want to add a new Dropbox location, the <New> option should be selected. To edit an existingDropbox location, select it from the drop-down list. All fields will be filled with the values of theselected Dropbox configuration.
Settings
· Authentication - press "Choose account" button to log in to your Dropbox account. Here you needto authorize Backup4all application to read and write files/folders in your Dropbox account.

Backup Properties 235
Backup4all 7 User Manual Copyright © 2017 Softland
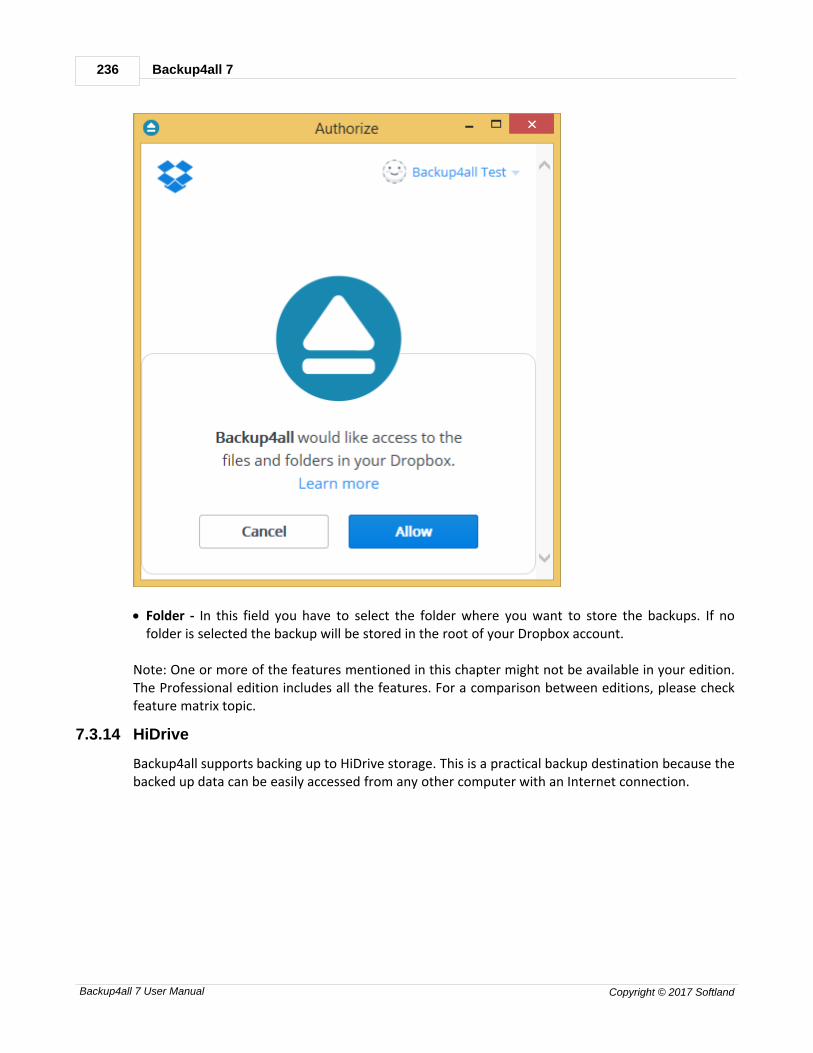
Backup4all 7236
Backup4all 7 User Manual Copyright © 2017 Softland
· Folder - In this field you have to select the folder where you want to store the backups. If nofolder is selected the backup will be stored in the root of your Dropbox account.
Note: One or more of the features mentioned in this chapter might not be available in your edition.The Professional edition includes all the features. For a comparison between editions, please checkfeature matrix topic.
7.3.14 HiDrive
Backup4all supports backing up to HiDrive storage. This is a practical backup destination because thebacked up data can be easily accessed from any other computer with an Internet connection.

Backup Properties 237
Backup4all 7 User Manual Copyright © 2017 Softland
Destination
Use existing configurationUse this option if you want to use an already defined HiDrive location in File->Options->Onlinedestinations->HiDrive. From the drop-down list, select the HiDrive location you want to use.The advantage is that if you use the same HiDrive destination for multiple backup jobs and amodification is needed for destination, you can change only the HiDrive configuration from File->Options->Online destinations->HiDrive and all backup jobs destinations will be updated.
Custom configurationUse this option to add a new HiDrive location or to edit an existing one by pressing the Editconfiguration button.
Description

Backup4all 7238
Backup4all 7 User Manual Copyright © 2017 Softland
Here you can see a listing of the HiDrive settings.If you configured a new HiDrive location or you edit an existing one, you should use the Testconnection button to see if the HiDrive settings are correct. If the test was successful, The HiDriveconnection was tested successfully message will be displayed.Once you press the OK button, Backup4all will try to connect to the HiDrive server to see if a backupcatalog already exists on the destination. If the HiDrive destination is not available, a Cannotconnect to the HiDrive server message is displayed in the status bar (bottom of the main window).
Bandwidth limitation
This option allows you to set a limit for the upload and download speed between the working hours.If your bandwidth is important for your company and you run a long backup, you can set Backup4allto use only a limited bandwidth between the specified hours.
Download speed - here you can set the maximum download speed for backup. It will be used whentesting the files after backup.
Upload speed - here you can set the maximum upload speed for backup.
Limit only between - indicate the hours between which the specified upload/download limits will beapplied.
Note: One or more of the features mentioned in this chapter might not be available in your edition.The Professional edition includes all the features. For a comparison between editions, please checkfeature matrix topic.
7.3.14.1 Edit configuration
This window is shown when selecting Edit configuration from the Destination->HiDrive window.

Backup Properties 239
Backup4all 7 User Manual Copyright © 2017 Softland
General
Existing configurationIf you want to add a new HiDrive location, the <New> option should be selected. To edit an existingHiDrive location, select it from the drop-down list. All fields will be filled with the values of theselected HiDrive configuration.
Settings
· Authentication - press "Choose account" button to log in to your HiDrive account. Here you needto authorize Backup4all application to read and write files/folders in your HiDrive account.
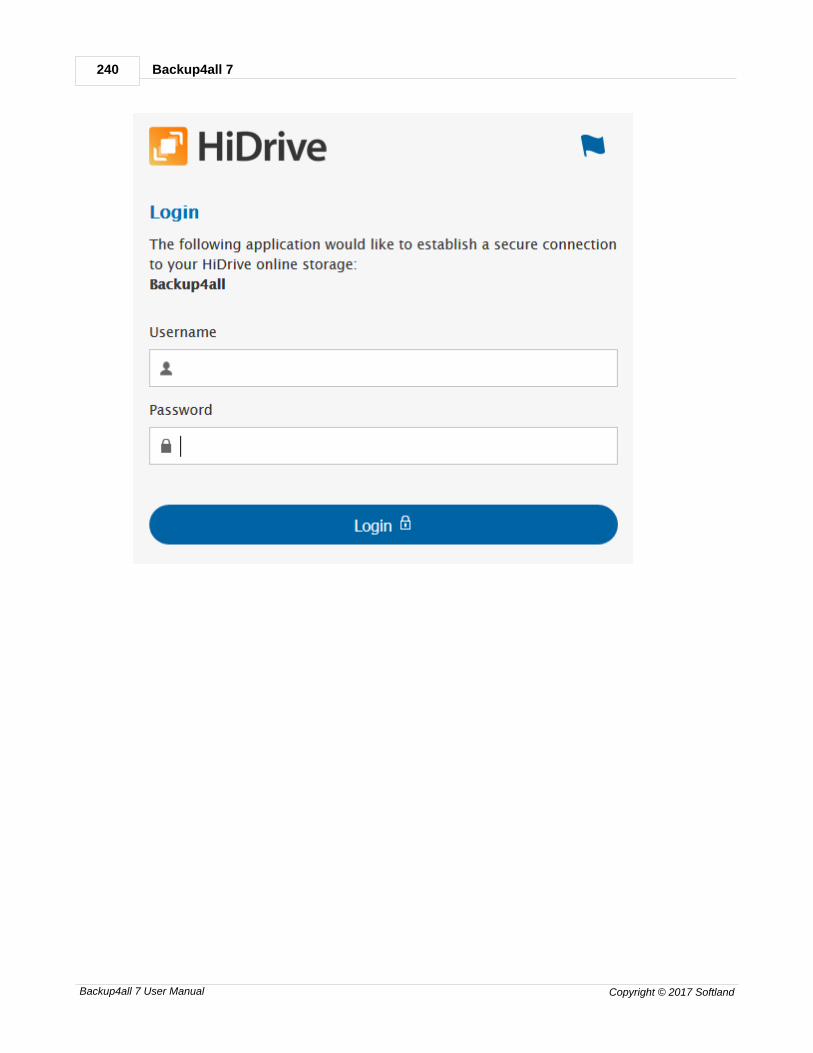
Backup4all 7240
Backup4all 7 User Manual Copyright © 2017 Softland
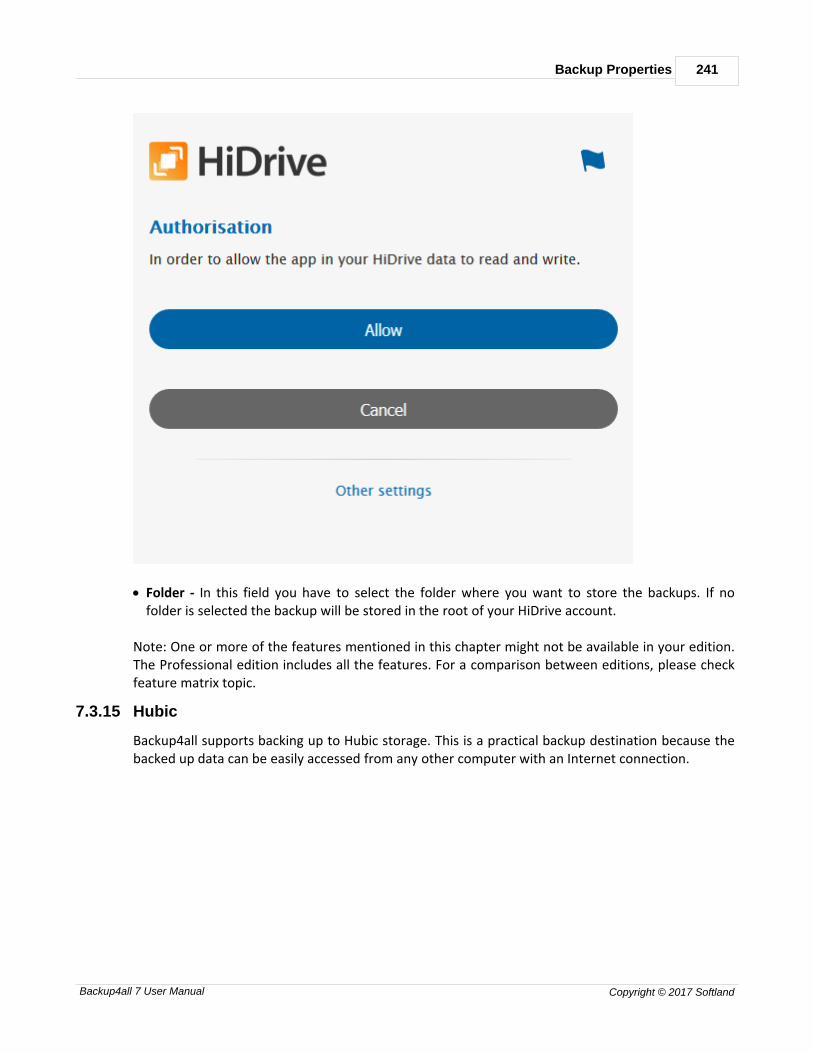
Backup Properties 241
Backup4all 7 User Manual Copyright © 2017 Softland
· Folder - In this field you have to select the folder where you want to store the backups. If nofolder is selected the backup will be stored in the root of your HiDrive account.
Note: One or more of the features mentioned in this chapter might not be available in your edition.The Professional edition includes all the features. For a comparison between editions, please checkfeature matrix topic.
7.3.15 Hubic
Backup4all supports backing up to Hubic storage. This is a practical backup destination because thebacked up data can be easily accessed from any other computer with an Internet connection.
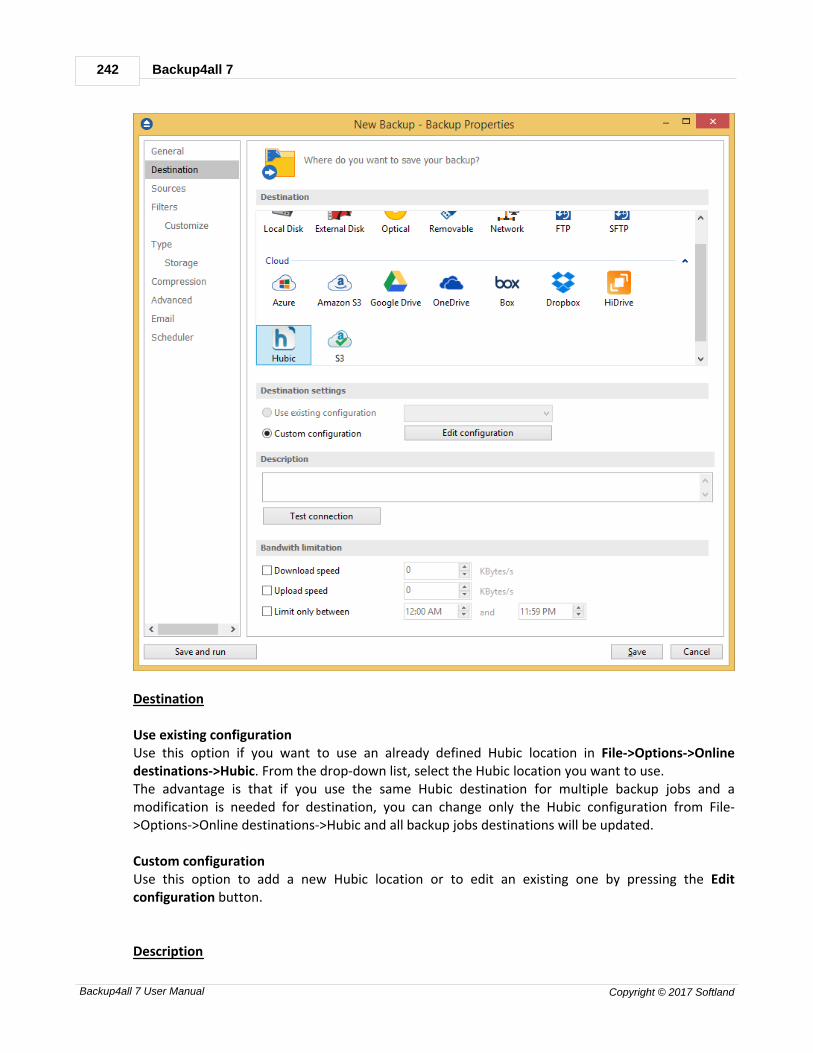
Backup4all 7242
Backup4all 7 User Manual Copyright © 2017 Softland
Destination
Use existing configurationUse this option if you want to use an already defined Hubic location in File->Options->Onlinedestinations->Hubic. From the drop-down list, select the Hubic location you want to use.The advantage is that if you use the same Hubic destination for multiple backup jobs and amodification is needed for destination, you can change only the Hubic configuration from File->Options->Online destinations->Hubic and all backup jobs destinations will be updated.
Custom configurationUse this option to add a new Hubic location or to edit an existing one by pressing the Editconfiguration button.
Description
Backup Properties 243
Backup4all 7 User Manual Copyright © 2017 Softland
Here you can see a listing of the Hubic settings.If you configured a new Hubic location or you edit an existing one, you should use the Testconnection button to see if the Hubic settings are correct. If the test was successful, The Hubicconnection was tested successfully message will be displayed.Once you press the OK button, Backup4all will try to connect to the Hubic server to see if a backupcatalog already exists on the destination. If the Hubic destination is not available, a Cannot connectto the Hubic server message is displayed in the status bar (bottom of the main window).
Bandwidth limitation
This option allows you to set a limit for the upload and download speed between the working hours.If your bandwidth is important for your company and you run a long backup, you can set Backup4allto use only a limited bandwidth between the specified hours.
Download speed - here you can set the maximum download speed for backup. It will be used whentesting the files after backup.
Upload speed - here you can set the maximum upload speed for backup.
Limit only between - indicate the hours between which the specified upload/download limits will beapplied.
Note: One or more of the features mentioned in this chapter might not be available in your edition.The Professional edition includes all the features. For a comparison between editions, please checkfeature matrix topic.
7.3.15.1 Edit configuration
This window is shown when selecting Edit configuration from the Destination->Hubic window.

Backup4all 7244
Backup4all 7 User Manual Copyright © 2017 Softland
General
Existing configurationIf you want to add a new Hubic location, the <New> option should be selected. To edit an existingHubic location, select it from the drop-down list. All fields will be filled with the values of theselected Hubic configuration.
Settings
· Authentication - press "Choose account" button to log in to your Hubic account. Here you need toauthorize Backup4all application to read and write files/folders in your Hubic account.

Backup Properties 245
Backup4all 7 User Manual Copyright © 2017 Softland
· Folder - In this field you have to select the folder where you want to store the backups. If nofolder is selected the backup will be stored in the root of your Hubic account.
Note: One or more of the features mentioned in this chapter might not be available in your edition.The Professional edition includes all the features. For a comparison between editions, please checkfeature matrix topic.
7.3.16 S3 Compatible
Backup4all supports backing up to S3 Compatible storage. This is a practical backup destinationbecause the backed up data can be easily accessed from any other computer with an Internetconnection.
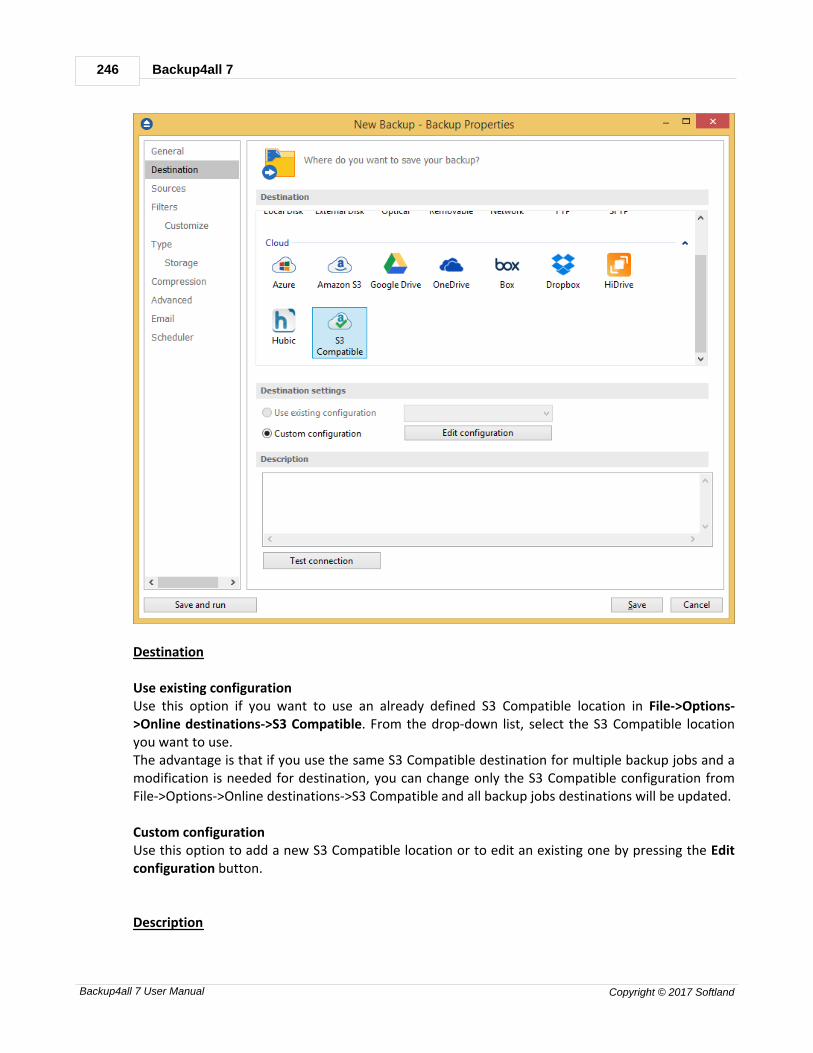
Backup4all 7246
Backup4all 7 User Manual Copyright © 2017 Softland
Destination
Use existing configurationUse this option if you want to use an already defined S3 Compatible location in File->Options->Online destinations->S3 Compatible. From the drop-down list, select the S3 Compatible locationyou want to use.The advantage is that if you use the same S3 Compatible destination for multiple backup jobs and amodification is needed for destination, you can change only the S3 Compatible configuration fromFile->Options->Online destinations->S3 Compatible and all backup jobs destinations will be updated.
Custom configurationUse this option to add a new S3 Compatible location or to edit an existing one by pressing the Editconfiguration button.
Description

Backup Properties 247
Backup4all 7 User Manual Copyright © 2017 Softland
Here you can see a listing of the S3 Compatible settings.If you configured a new S3 Compatible location or you edit an existing one, you should use the Testconnection button to see if the S3 Compatible settings are correct. If the test was successful, The S3Compatible connection was tested successfully message will be displayed.Once you press the OK button, Backup4all will try to connect to the S3 Compatible server to see if abackup catalog already exists on the destination. If the S3 Compatible destination is not available, aCannot connect to the S3 Compatible server message is displayed in the status bar (bottom of themain window).
Note: One or more of the features mentioned in this chapter might not be available in your edition.The Professional edition includes all the features. For a comparison between editions, please checkfeature matrix topic.
7.3.16.1 Edit configuration
This window is shown when selecting Edit configuration from the Destination->S3 Compatiblewindow.
General
Backup4all 7248
Backup4all 7 User Manual Copyright © 2017 Softland
Existing configurationIf you want to add a new S3 Compatible location, the <New> option should be selected. To edit anexisting S3 Compatible location, select it from the drop-down list. All fields will be filled with thevalues of the selected S3 Compatible configuration.
S3 ServerSelect one of the predefined S3 compatible servers, or define a custom one. The S3 compatbileclouds available are: Akaza, Aruba Cloud, Caringo, CenturyLink, Cisco, Claudian, Connectia, Constant,DDN, dinCloud, Dream Objects, Dunkel, T Cloud, Exoscale, Google Cloud Storage, Green Qloud,HGST, Hitachi, HostEurope, IDC Frontier, LeoNovus, Mandic, Minio, NetApp, NiftyClouds, Numergy,QNAP, Revera, Scality, Seeweb, SwiftStack, ThinkOn, Tiscali, vCloud Air, Verizon, Walrus andZettagrid.
Settings
· Endpoint - enter the server endpoint. For most of the predefined servers, the endpoint is filledautomatically. Example: s3.akaza.lk:80
· Use SSL - select this option if the server requires SSL usage
· Access Key ID - enter the access key ID as received from your server provider
· Secret Access Key - enter the secret access key as received from your server provider
· Signature version - chose the signature version used by your server
· Region - select the region where your bucket is located
· Bucket - enter the name of the existing bucket or type a new one and press the Create button.
· Folder - In this field you have to select the folder where you want to store the backups. If nofolder is selected the backup will be stored in the root of your S3 Compatible account.
Note: One or more of the features mentioned in this chapter might not be available in your edition.The Professional edition includes all the features. For a comparison between editions, please checkfeature matrix topic.

Backup Properties 249
Backup4all 7 User Manual Copyright © 2017 Softland
7.4 Sources
The Sources page defines what files and folders will be used by Backup4all for the backup.
You can:
· add a whole folder by pressing the Add folder button
· add one or several files by pressing the Add files button
· remove any file or folder by selecting it and pressing the Remove button
· exclude subdirectories and files from backup by un-checking the thickbox
· select all files and folders by pressing the Check all button
· unselect all files and folders by pressing the Uncheck all button
At least one source must be added to the backup job.If the source drive is missing (when the network is disconnected for instance or CD/DVD/Blu-ray ismissing), a warning message is shown containing the list of missing drives. The user can chooseAbort to stop the backup process, Retry to check the drive again, Ignore to mark the source folderas deleted and continue with the next sources. If the scheduler starts the backup then the system
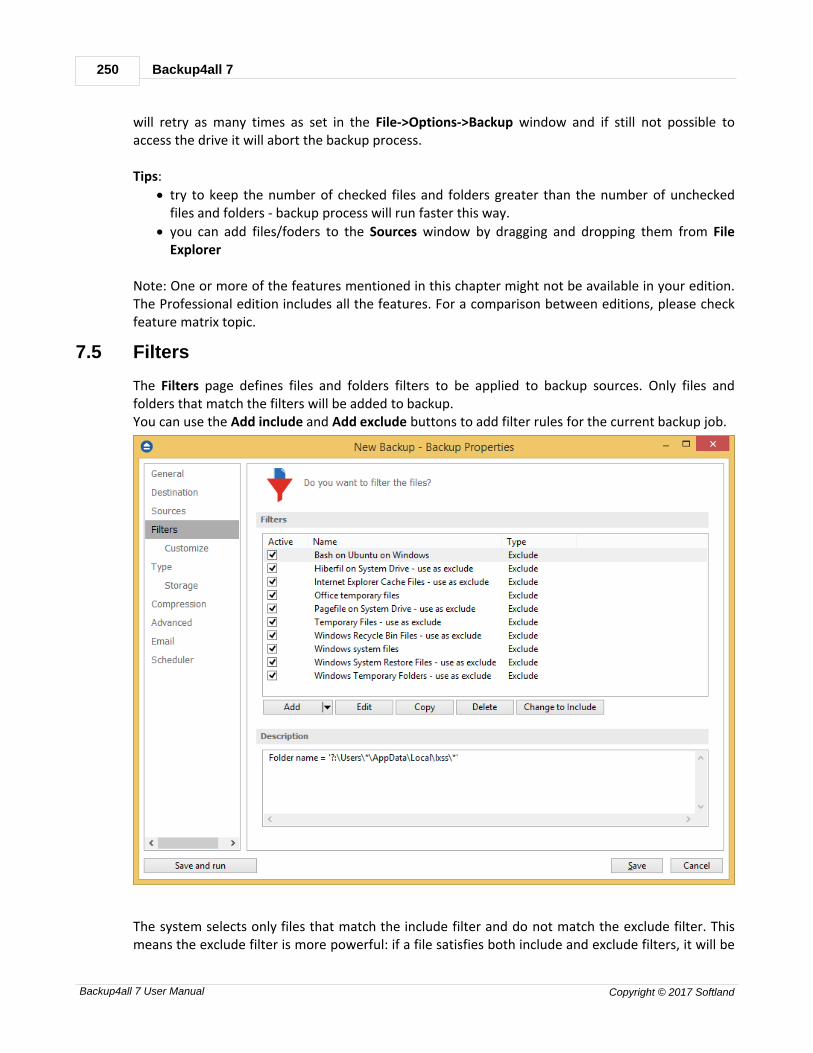
Backup4all 7250
Backup4all 7 User Manual Copyright © 2017 Softland
will retry as many times as set in the File->Options->Backup window and if still not possible toaccess the drive it will abort the backup process.
Tips:
· try to keep the number of checked files and folders greater than the number of uncheckedfiles and folders - backup process will run faster this way.
· you can add files/foders to the Sources window by dragging and dropping them from FileExplorer
Note: One or more of the features mentioned in this chapter might not be available in your edition.The Professional edition includes all the features. For a comparison between editions, please checkfeature matrix topic.
7.5 Filters
The Filters page defines files and folders filters to be applied to backup sources. Only files andfolders that match the filters will be added to backup.You can use the Add include and Add exclude buttons to add filter rules for the current backup job.
The system selects only files that match the include filter and do not match the exclude filter. Thismeans the exclude filter is more powerful: if a file satisfies both include and exclude filters, it will be

Backup Properties 251
Backup4all 7 User Manual Copyright © 2017 Softland
excluded.
Include and exclude filters are composed from filter restrictions. Two or more filter restrictions inthe include filter means that a file must satisfy at least one restriction to be included in the backup.Two or more filter restrictions in the exclude filter means that a file must satisfy any restriction to beexcluded.
All filters with the Active box checked will be used by the current backup job. To disable a filter, justuncheck the Active box.
Note:Filters on files and filters on folders must be created individually. If you use a file and a folder filtercondition in the same filter, files will be filtered only if both filter conditions were met.
Example:If you use a single filter for .jpg files and Temp folder, only the .jpg files from Temp folder will befiltered. If you use separate filters for files and folders, all .jpg files and whole Temp folder will befiltered.
You can manage filter restrictions using the buttons:
· Add include - this will open a new Filter Properties window from where you can add a newinclude restriction to the filters list.
· Add exclude - this will open a new Filter Properties window from where you can add a newexclude restriction to the filters list.
· Edit - will open the selected filter's properties window. You will be able to modify the selectedrestriction.
· Copy - this will create a copy of the selected filter.
· Delete - will remove the selected filter from the list of include or exclude filters.
· Change to include/exclude - pressing this button will change the type of filter from include toexclude or vice versa.
Note: One or more of the features mentioned in this chapter might not be available in your edition.The Professional edition includes all the features. For a comparison between editions, please checkfeature matrix topic.
7.5.1 Customize
On the Customize page you can override the main backup filter. It will show a tree with all selectedsources for the backup job.
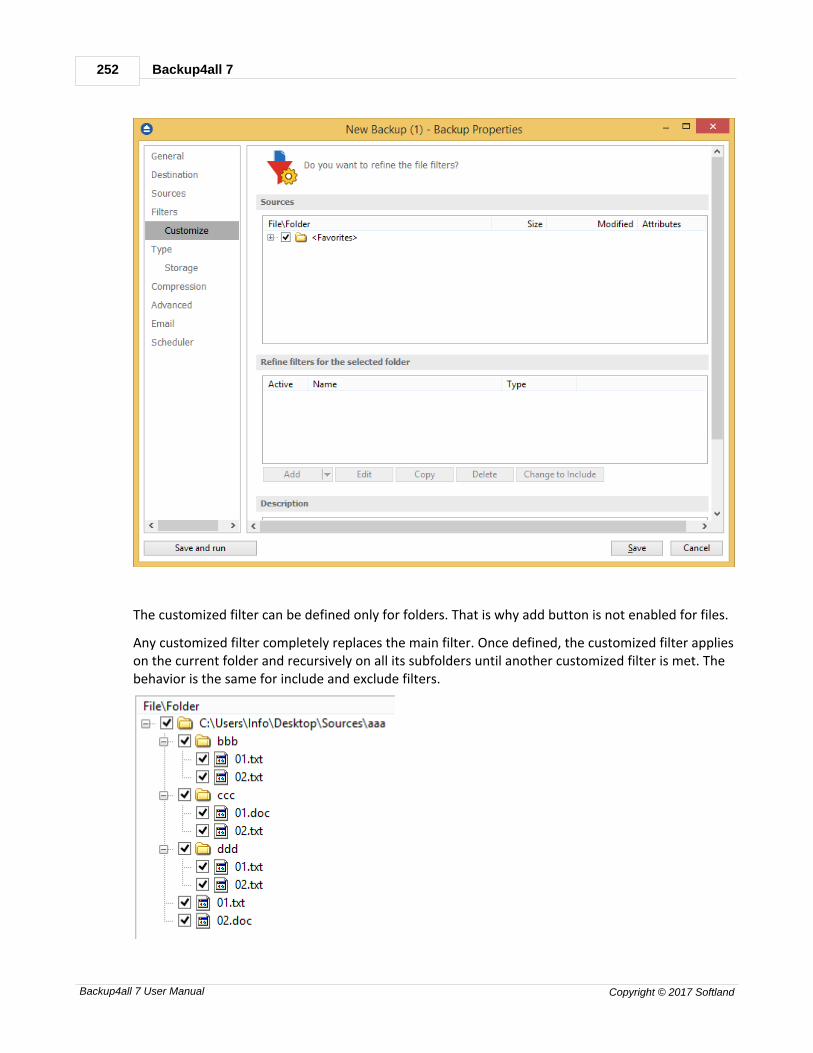
Backup4all 7252
Backup4all 7 User Manual Copyright © 2017 Softland
The customized filter can be defined only for folders. That is why add button is not enabled for files.
Any customized filter completely replaces the main filter. Once defined, the customized filter applieson the current folder and recursively on all its subfolders until another customized filter is met. Thebehavior is the same for include and exclude filters.

Backup Properties 253
Backup4all 7 User Manual Copyright © 2017 Softland
Suppose we have the folder structure in the picture above. Backup source is "D:\Backup sources". Amain filter is defined to include all .txt and .doc files. Suppose we do not want to backup .txt filesfrom "ccc" folder. For this we define a customized filter on "ccc" that includes only .doc files.
The result is that all .txt and .doc files will be included except the .txt files inside "ccc" folder as in thepicture bellow:
When a folder is selected, the Add include and Add exclude buttons from the bottom are activated(these are activated only for folders, not for individual files). That means you can replace the mainfilter with a different one. The customized filter is valid only for the selected folder and itsdescendants. Click the Add include or Add exclude button to define the customized filter. This willopen a Filter Properties window. You can define include or exclude filters in this window just as youdo in the Filter page.
All files and folders for which a customized filter is applied are shown in red color. You can Edit,Copy or Delete a customized filter by selecting the folder and clicking one of the buttons bellow. Note: One or more of the features mentioned in this chapter might not be available in your edition.The Professional edition includes all the features. For a comparison between editions, please checkfeature matrix topic.
7.5.2 Filter Properties
When you add or edit a filter, the following options will appear:

Backup4all 7254
Backup4all 7 User Manual Copyright © 2017 Softland
What do you want to do?
If the Add include or Add exclude button was pressed, the following options will be show:User can Create new filter, Create new starting from existing filter or Use existing filter. Theexisting filters are listed in the drop down list and they can be added, edit or deleted from File->Options->Filters
If the edit button was pressed, the Edit filter properties window will show the following options: Customize filter - allows you to edit the current filterReset to filter - allows you to reset the current filter to a predefined filter from the dropdownlistLock to filter - allows you to lock the current filter to a predefined filter from the dropdown list
General
In the Filter name field you can type the name of the created filter. By default, the "New filterconfiguration" name is assigned. If you use an existing filter, the name of that filter is used.
File name
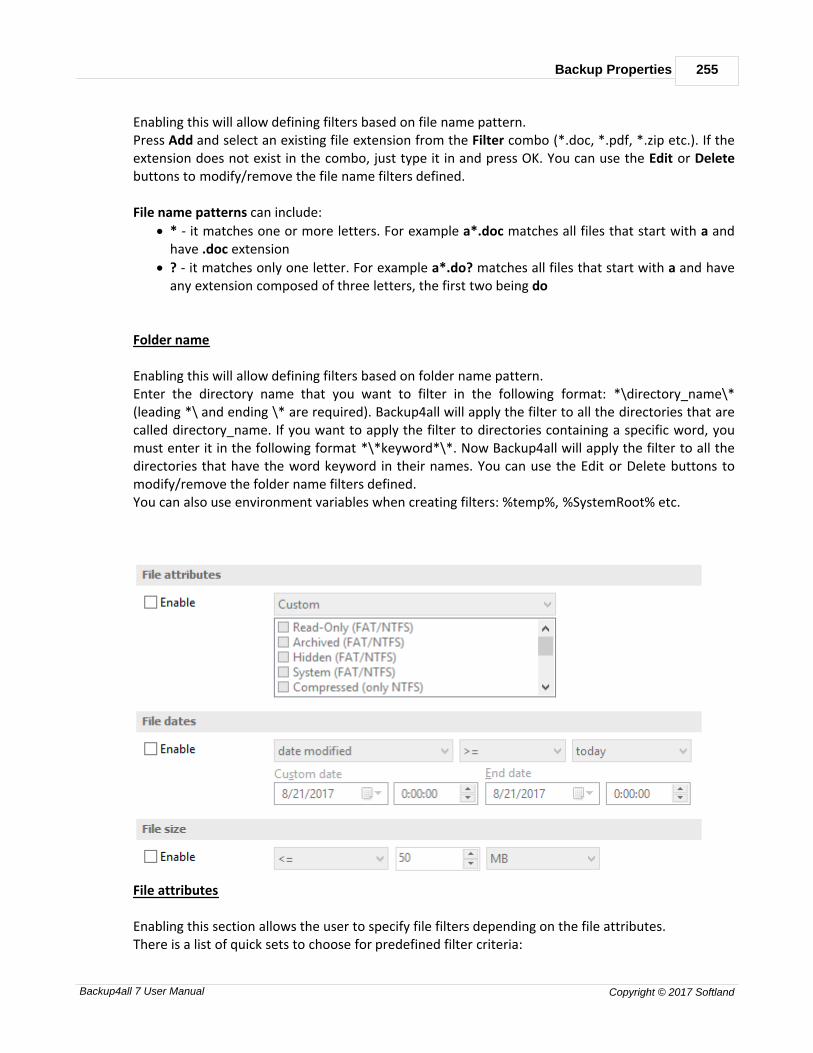
Backup Properties 255
Backup4all 7 User Manual Copyright © 2017 Softland
Enabling this will allow defining filters based on file name pattern. Press Add and select an existing file extension from the Filter combo (*.doc, *.pdf, *.zip etc.). If theextension does not exist in the combo, just type it in and press OK. You can use the Edit or Deletebuttons to modify/remove the file name filters defined. File name patterns can include:
· * - it matches one or more letters. For example a*.doc matches all files that start with a andhave .doc extension
· ? - it matches only one letter. For example a*.do? matches all files that start with a and haveany extension composed of three letters, the first two being do
Folder name
Enabling this will allow defining filters based on folder name pattern. Enter the directory name that you want to filter in the following format: *\directory_name\*(leading *\ and ending \* are required). Backup4all will apply the filter to all the directories that arecalled directory_name. If you want to apply the filter to directories containing a specific word, youmust enter it in the following format *\*keyword*\*. Now Backup4all will apply the filter to all thedirectories that have the word keyword in their names. You can use the Edit or Delete buttons tomodify/remove the folder name filters defined.You can also use environment variables when creating filters: %temp%, %SystemRoot% etc.
File attributes
Enabling this section allows the user to specify file filters depending on the file attributes.There is a list of quick sets to choose for predefined filter criteria:
Backup4all 7256
Backup4all 7 User Manual Copyright © 2017 Softland
· Custom - this is the default option and allows you to check whatever attributes you want
· None - if this is selected all the file attributes check boxes are unchecked
· FAT attributes - if this is selected, a set of File Allocation Table attributes will be used for filefiltering.
· NTFS attributes - if this is selected, a set of NTFS (New Technology File System) attributes willbe used for filtering. Note that these attributes are available only on Windows XP and above.
File attributes available for file filters:
· Read-Only - if checked files with read-only attribute will be selected
· Archived - if checked files with archived attribute will be selected
· Hidden - if checked files with hidden attribute will be selected
· System - if checked files with system attribute will be selected
· Compressed (only NTFS) - if checked files with compressed attribute will be selected
· Temporary (only NTFS) - if checked files with temporary attribute will be selected
· Encrypted (only NTFS) - if checked files with encrypted attribute will be selected
· Not indexed (only NTFS) - if checked files with "not indexed" attribute will be selected
· Offline (only NTFS) - if checked files with offline attribute will be selected
· Reparse point (only NTFS) - if checked files with reparse point attribute will be selected
· Sparse file (only NTFS) - if checked files with sparse file attribute will be selected
For example, if you want to include files with read-only and archived attributes set, you have tocheck both attributes checkboxes in a single restriction. If you want to include files with read-only or archived attributes set, you have to make two separate restrictions: one for read-only and anotherfor archived.
File dates
This section allows the user to build restrictions based on file dates and times. To enable options inthis section, check the Filter by date option.Filters in this section can be applied by selecting one of the available date filters:
· date accessed
· date and time accessed
· date modified
· date and time modified
· date created
· date and time created
You can compare these dates and times with a fixed date or a relative date: today, yesterday, oneweek ago or one month ago.Comparison operators available:
· < > date (and time) not equal to fixed or relative date
· < = date (and time) less than or equal to fixed or relative date
· > = date (and time) greater than or equal to fixed or relative date
· < date (and time) less than fixed or relative date
· > date (and time) greater than fixed or relative date
Backup Properties 257
Backup4all 7 User Manual Copyright © 2017 Softland
· in interval - date (and time) in a particular time interval between the Start date and End date
File size
This section provides the possibility to build restrictions based on the file size. To enable the optionsin this section, check the Filter by size option. You can enter a file size in the Size field and select ameasurement Unit. The filter will compare the file size on disk with the size you enter using thecomparison filters you selected:
· < > file size on disk not equal to the value in the Size field
· < = file size on disk less than or equal to the value in the Size field
· > = file size on disk greater than or equal to the value in the Size field
· < file size on disk less than the value in the Size field
· > file size on disk greater than the value in the Size field Note:Filters on files and filters on folders must be created individually. If you use a file and a folder filtercondition in the same filter, files will be filtered only if both filter conditions were met.
Examples
· If you use a single filter for .jpg files and Temp folder, only the .jpg files from Temp folder will befiltered. If you use separate filters for files and folders, all .jpg files and whole Temp folder will befiltered.
· Suppose you want to backup (or restore) all .pdf files accessed in the last month and all .doc filesmodified in the last week, but you don't want to backup (or restore) system or hidden files.
Here are the steps to define this filter starting from the default filter:1) Add a new restriction in the include filter: enable File name, add *.pdf file pattern and setdate accessed to be greater than or equal to fixed date one month ago; click OK2) Add a new restriction: add *.doc file pattern and set date and time modified to be greaterthan or equal to fixed date one week ago; click OK3) Add a new restriction: enable File attributes and the System checkbox, then click OK4) Add a new restriction: enable File attributes and the Hidden checkbox, then click OK5) For the last two restrictions, check the Use as exclude filter boxes.
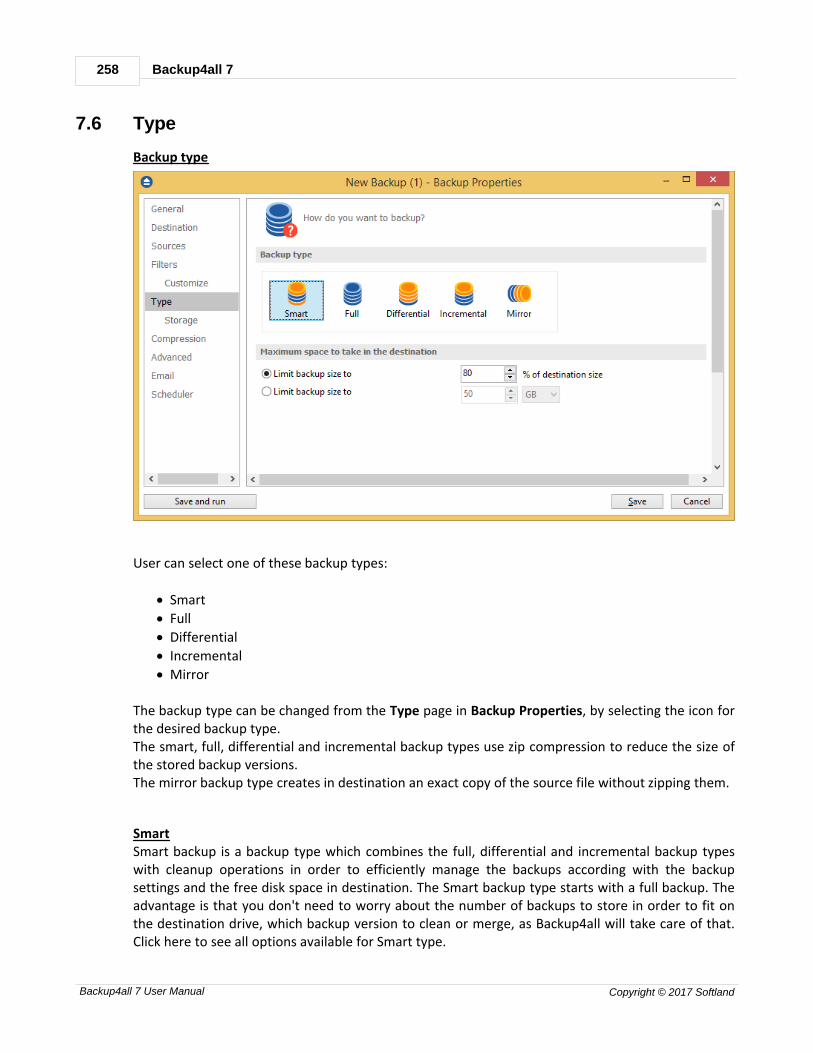
Backup4all 7258
Backup4all 7 User Manual Copyright © 2017 Softland
7.6 Type
Backup type
User can select one of these backup types:
· Smart
· Full
· Differential
· Incremental
· Mirror
The backup type can be changed from the Type page in Backup Properties, by selecting the icon forthe desired backup type.The smart, full, differential and incremental backup types use zip compression to reduce the size ofthe stored backup versions.The mirror backup type creates in destination an exact copy of the source file without zipping them.
Smart Smart backup is a backup type which combines the full, differential and incremental backup typeswith cleanup operations in order to efficiently manage the backups according with the backupsettings and the free disk space in destination. The Smart backup type starts with a full backup. Theadvantage is that you don't need to worry about the number of backups to store in order to fit onthe destination drive, which backup version to clean or merge, as Backup4all will take care of that.Click here to see all options available for Smart type.

Backup Properties 259
Backup4all 7 User Manual Copyright © 2017 Softland
Full Full backup type will create in destination a zip file with all source files and folders. There are noother options available for Full type.
Differential The Differential backup will create in destination a zip file containing all new and modified files sincethe last full backup. Click here to see all options available for Differential type.
Incremental
The Incremental backup type will create in destination a zip file containing all new and modified filessince the last backup. Click here to see all options available for Incremental type.
Mirror
The Mirror backup will create in destination an exact copy of the source files, without zipping them.Click here to see all options available for Mirror type.
Note: One or more of the features mentioned in this chapter might not be available in your edition.The Professional edition includes all the features. For a comparison between editions, please checkfeature matrix topic.
Backup Properties - Storage
7.6.1 Smart
Smart

Backup4all 7260
Backup4all 7 User Manual Copyright © 2017 Softland
Maximum space to take in the destination
In time, the disk space occupied by the backups will grow. You can select the maximum size of thedestination drive to be used for backups. You can set the limit in percents or in MB/GB. If you wantto use the entire destination drive only for backups, set the limit to 100%. By default the limit is setto 80% of the destination size.
Note: One or more of the features mentioned in this chapter might not be available in your edition.The Professional edition includes all the features. For a comparison between editions, please checkfeature matrix topic.
7.6.2 Full
Full backup is the starting point for all other backups, and contains all the data in the folders andfiles that are selected to be backed up. Because the full backup stores all files and folders, frequentfull backups result in faster and simpler restore operations. This backup type is slow on largevolumes of data, so it is recommended to be done periodically (each Week/Month) and in betweento use other backup types like Incremental or Differential. The advantage is that you only needthe result of one backup execution to make a full restore.
Note: One or more of the features mentioned in this chapter might not be available in your edition.The Professional edition includes all the features. For a comparison between editions, please checkfeature matrix topic.
7.6.3 Differential
A differential backup contains all files that have changed since the last full backup. The advantage ofa differential backup is that it shortens restore time compared to a full backup or an incremental
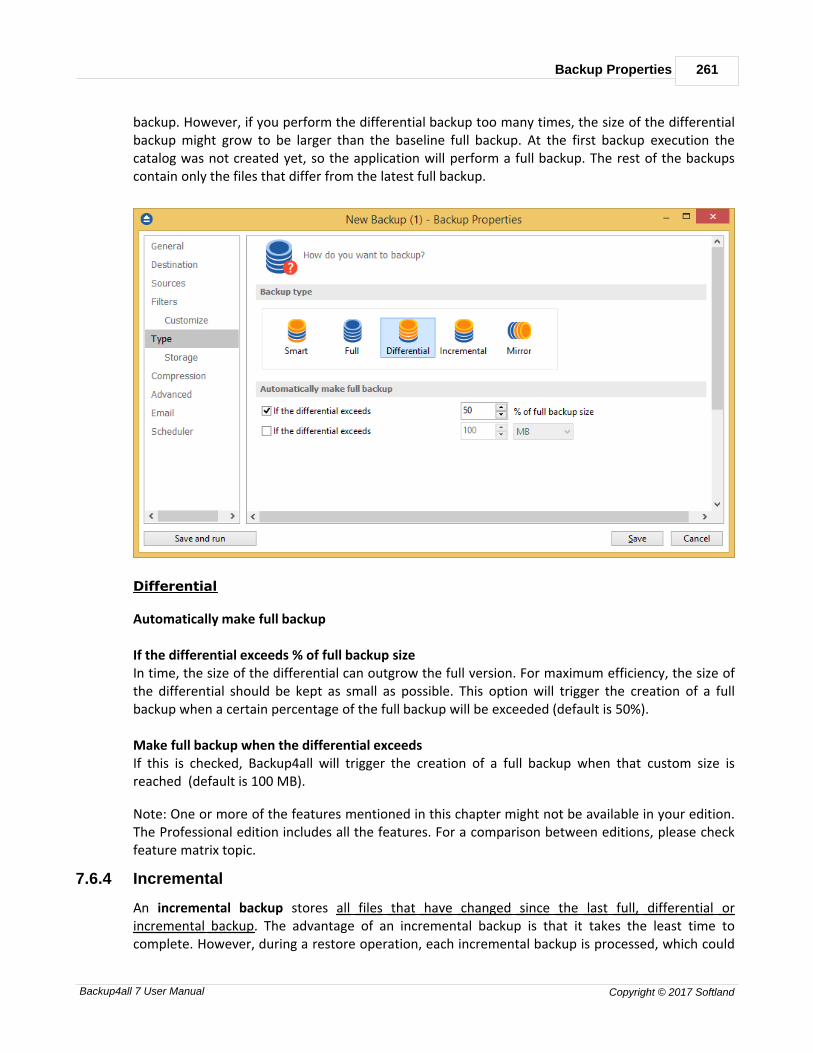
Backup Properties 261
Backup4all 7 User Manual Copyright © 2017 Softland
backup. However, if you perform the differential backup too many times, the size of the differentialbackup might grow to be larger than the baseline full backup. At the first backup execution thecatalog was not created yet, so the application will perform a full backup. The rest of the backupscontain only the files that differ from the latest full backup.
Differential
Automatically make full backup
If the differential exceeds % of full backup sizeIn time, the size of the differential can outgrow the full version. For maximum efficiency, the size ofthe differential should be kept as small as possible. This option will trigger the creation of a fullbackup when a certain percentage of the full backup will be exceeded (default is 50%).
Make full backup when the differential exceedsIf this is checked, Backup4all will trigger the creation of a full backup when that custom size isreached (default is 100 MB).
Note: One or more of the features mentioned in this chapter might not be available in your edition.The Professional edition includes all the features. For a comparison between editions, please checkfeature matrix topic.
7.6.4 Incremental
An incremental backup stores all files that have changed since the last full, differential orincremental backup. The advantage of an incremental backup is that it takes the least time tocomplete. However, during a restore operation, each incremental backup is processed, which could
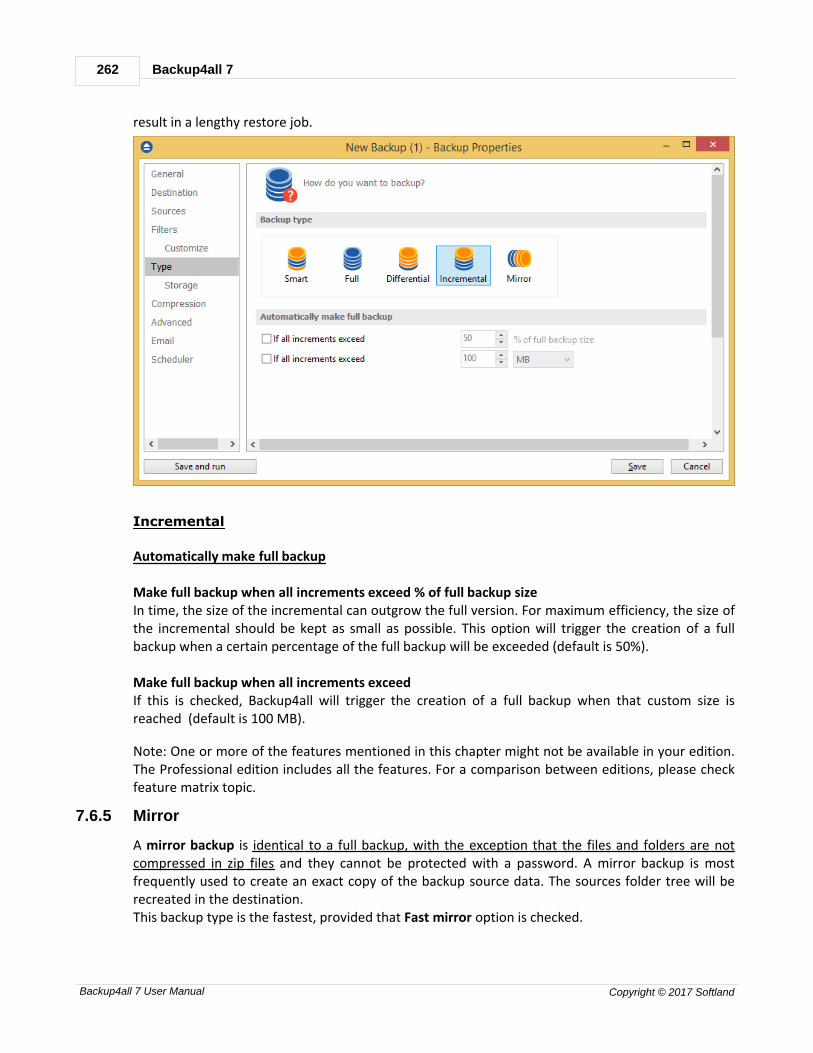
Backup4all 7262
Backup4all 7 User Manual Copyright © 2017 Softland
result in a lengthy restore job.
Incremental
Automatically make full backup
Make full backup when all increments exceed % of full backup sizeIn time, the size of the incremental can outgrow the full version. For maximum efficiency, the size ofthe incremental should be kept as small as possible. This option will trigger the creation of a fullbackup when a certain percentage of the full backup will be exceeded (default is 50%).
Make full backup when all increments exceedIf this is checked, Backup4all will trigger the creation of a full backup when that custom size isreached (default is 100 MB).
Note: One or more of the features mentioned in this chapter might not be available in your edition.The Professional edition includes all the features. For a comparison between editions, please checkfeature matrix topic.
7.6.5 Mirror
A mirror backup is identical to a full backup, with the exception that the files and folders are notcompressed in zip files and they cannot be protected with a password. A mirror backup is mostfrequently used to create an exact copy of the backup source data. The sources folder tree will berecreated in the destination.This backup type is the fastest, provided that Fast mirror option is checked.

Backup Properties 263
Backup4all 7 User Manual Copyright © 2017 Softland
Mirror
Create subfolder(s) in destination
Use this option to create a subfolder in the destination. The name of the folder can be customizedby pressing the Insert tags button. Following tags are predefined:
· Backup Name (<BACKUP NAME>)
· Backup Number (<BACKUP NUMBER>)
· Backup Type (<BACKUP TYPE>)
· Backup Date (<DATE>)
· Backup Time (<TIME>)
· Backup Hour
· Backup Minute
· Backup Second
· Backup Year (<YEAR>)
· Backup Month (<MONTH_MMM>)
· Backup Month - numeric (<MONTH_MM>)
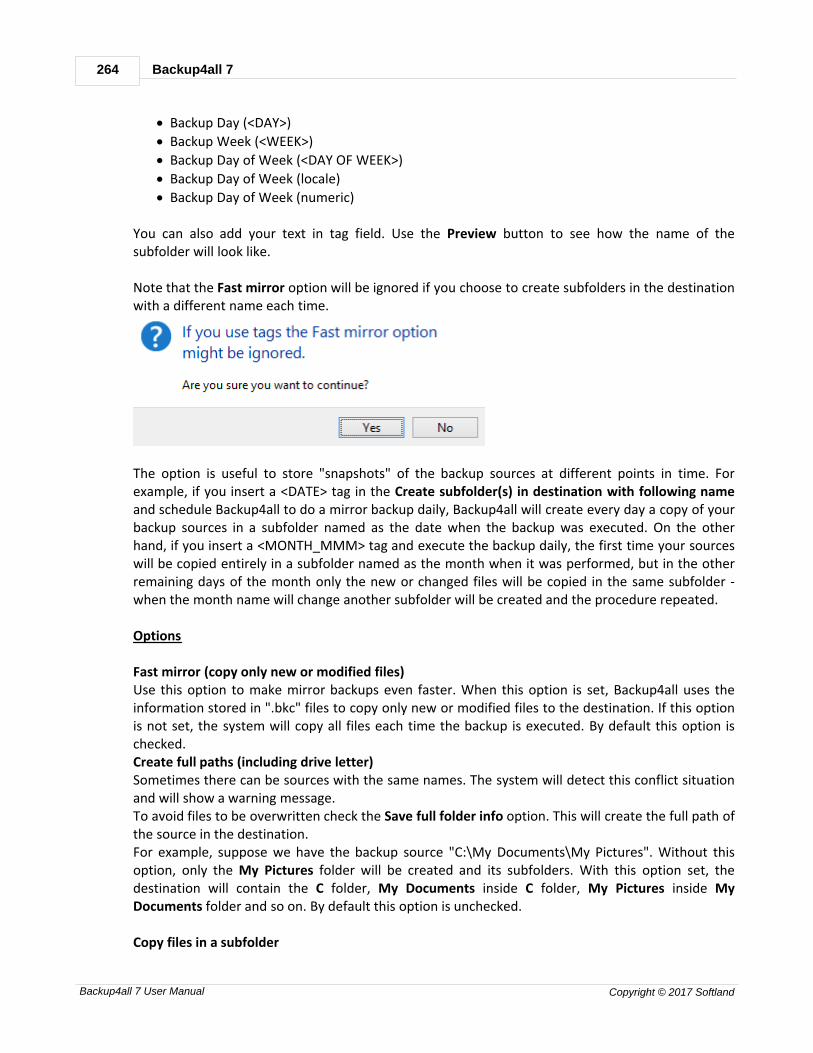
Backup4all 7264
Backup4all 7 User Manual Copyright © 2017 Softland
· Backup Day (<DAY>)
· Backup Week (<WEEK>)
· Backup Day of Week (<DAY OF WEEK>)
· Backup Day of Week (locale)
· Backup Day of Week (numeric)
You can also add your text in tag field. Use the Preview button to see how the name of thesubfolder will look like.
Note that the Fast mirror option will be ignored if you choose to create subfolders in the destinationwith a different name each time.
The option is useful to store "snapshots" of the backup sources at different points in time. Forexample, if you insert a <DATE> tag in the Create subfolder(s) in destination with following nameand schedule Backup4all to do a mirror backup daily, Backup4all will create every day a copy of yourbackup sources in a subfolder named as the date when the backup was executed. On the otherhand, if you insert a <MONTH_MMM> tag and execute the backup daily, the first time your sourceswill be copied entirely in a subfolder named as the month when it was performed, but in the otherremaining days of the month only the new or changed files will be copied in the same subfolder -when the month name will change another subfolder will be created and the procedure repeated.
Options Fast mirror (copy only new or modified files)Use this option to make mirror backups even faster. When this option is set, Backup4all uses theinformation stored in ".bkc" files to copy only new or modified files to the destination. If this optionis not set, the system will copy all files each time the backup is executed. By default this option ischecked.Create full paths (including drive letter)Sometimes there can be sources with the same names. The system will detect this conflict situationand will show a warning message.To avoid files to be overwritten check the Save full folder info option. This will create the full path ofthe source in the destination.For example, suppose we have the backup source "C:\My Documents\My Pictures". Without thisoption, only the My Pictures folder will be created and its subfolders. With this option set, thedestination will contain the C folder, My Documents inside C folder, My Pictures inside MyDocuments folder and so on. By default this option is unchecked. Copy files in a subfolder
Backup Properties 265
Backup4all 7 User Manual Copyright © 2017 Softland
If checked, the files will be copied in a subfolder of the destination folder (typically you will see a ".bkc" file and a folder with the same name). If the option is not set, the files (and folder structure)will be copied directly into the destination folder. By default this option is checked.
Remove excluded or deleted files from backupUse this option to remove from the backup the files that were deleted (or excluded) from thebackup sources. This option is not selected by default. Only if the source drive is availableUse this option to avoid removing your files from backup if the sources are not available all the time.If you don't use this option, when the source files are not reachable, Backup4all will consider themas being deleted or excluded.The deleted or excluded files will be removed from the backup. Others
Zip the filesUse this option to zip each file individually. The folder structure will be preserved, only the files willbe zipped. Copy NTFS security permissionsUse this option to copy the files NTFS security permissions. Please note the NTFS permissions can becopied only if the backup destination drive is also formatted as NTFS. If the destination is FTP/SFTP/cloud, it does not work.
Copy NTFS alternate file streamsUse this option to copy the NTFS alternate file streams Allow file splitting when spanningThe option is effective only when there is not enough space in the destination to copy all files(removable media is full, USB drive is full, etc.). If checked, the application will copy files to thedestination until a file will not fit. Then it will split that file and continue with the rest of it on thenext disk. If the option is not set, files are not split. If you are backing up media files (music, videos)you should uncheck this option so that you will not have any melody/movie split. By default thisoption is checked. Sort mirror files for optimized spanningThis option is useful when spanning the backup over multiple removable drives. If this is checked,Backup4all will sort the files by size (descending) before copying them on the removable drive. Thisway it will start with the larger files and put the smaller ones towards the end of the backup(optimizing the space used on the removable drive). By default this option is not checked. Be aware that you can restore only from the latest version of a mirror backup from the Backup4allinterface. You can restore however manually previous versions as they are accessible from any filemanager, like File Explorer.
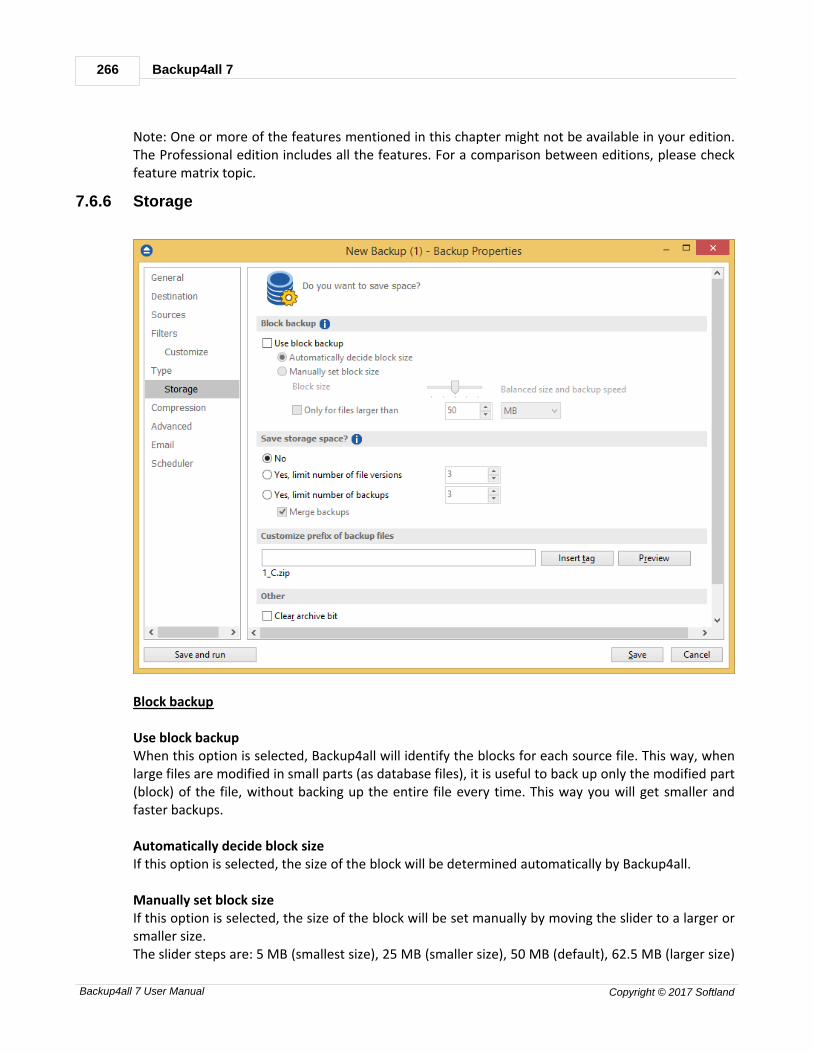
Backup4all 7266
Backup4all 7 User Manual Copyright © 2017 Softland
Note: One or more of the features mentioned in this chapter might not be available in your edition.The Professional edition includes all the features. For a comparison between editions, please checkfeature matrix topic.
7.6.6 Storage
Block backup
Use block backup When this option is selected, Backup4all will identify the blocks for each source file. This way, whenlarge files are modified in small parts (as database files), it is useful to back up only the modified part(block) of the file, without backing up the entire file every time. This way you will get smaller andfaster backups.
Automatically decide block sizeIf this option is selected, the size of the block will be determined automatically by Backup4all.
Manually set block sizeIf this option is selected, the size of the block will be set manually by moving the slider to a larger orsmaller size.The slider steps are: 5 MB (smallest size), 25 MB (smaller size), 50 MB (default), 62.5 MB (larger size)
Backup Properties 267
Backup4all 7 User Manual Copyright © 2017 Softland
and 75 MB (largest size). For files smaller than the size of a block, this feature won't be applied.
Block backup feature can be used in Backup4all only if it was enabled before the first execution ofthe backup job. That is because the blocks must be identified during the backup and used later whenthe source files are modified. If no previous blocks exists, there are no blocks to compare for laterexecutions. After the first execution of the backup job without the block backups option selected,the "Use block backup" option is disabled and cannot be enabled for that job.
Save storage space?
To keep the number of stored zip files at a reasonable number, the application provides threeoptions: Limit number of file versions, Limit number of backups and Merge backups. These optionseither delete older stored backups or perform an internal merge to keep the number of storedbackups or file versions under the selected limit.
The Limit number of file versions, Limit number of backups and Merge backups options cannot beused when the backup destination is on a removable media, CD, DVD or Blu-ray disc etc.
By default the Limit number of file versions and the Limit number of backups options are notenabled. This means that the system will keep all the stored backup versions. If you choose toenable the Merge backups option, when the limit is reached the system will perform an internalmerge between the older versions keeping the number of stored backups equal to the specified limit(the merge between zip files is necessary to keep at the latest file version from each zip file to bemerged).However when changing between Mirror and Full, Incremental or Differential, the older versions aredeleted.
The Limit number of file versions option will delete from the backups only the files that have moreversions than the maximum allowed limit, to keep the number of versions under the specified limit. The Limit number of backups option will delete the backups to maintain the maximum limit.
Customize prefix of backup files
Typically the name of the zip file is something like: "1_C.zip", "1_D.zip" etc. (one zip for each drive).The names of these zip files do not make much sense for the user but they can be customized bypressing the Insert tag button. Following tags are predefined:
· Backup Name (<BACKUP NAME>)
· Backup Number (<BACKUP NUMBER>)
· Backup Type (<BACKUP TYPE>)
· Backup Date (<DATE>)
· Backup Time (<TIME>)
· Backup Hour
· Backup Minute
· Backup Second
Backup4all 7268
Backup4all 7 User Manual Copyright © 2017 Softland
· Backup Year (<YEAR>)
· Backup Month (<MONTH_MMM>)
· Backup Month - numeric (<MONTH_MM>)
· Backup Day (<DAY>)
· Backup Week (<WEEK>)
· Backup Day of Week (<DAY OF WEEK>)
· Backup Day of Week (locale)
· Backup Day of Week (numeric)
You can also add your text in the edit tag field. Use the Preview button to see how the names of thezip files will look like.Windows does not allow the following characters in the file name: / \ * ? : " < > |Therefore Backup4all will prompt you to change these characters if present in the Customize zipname prefix field.
Other
If the Clear archive bit option is checked, the application will remove the Archive flag of the filesthat were added to the backup. By default Backup4all uses the current comparison criteria and theinformation from catalog file to detect if a file was modified or not since the last backup, which ismore accurate than using only the Archive bit (as other backup programs do). However, if you wantto backup files based only on the Archive bit attribute, you can change the comparison criteria fromthe Backup Properties->Advanced window.

Backup Properties 269
Backup4all 7 User Manual Copyright © 2017 Softland
7.7 Compression
On the Compression page, you can configure the compression and encryption settings.
Zip compression
LevelYou can set different compression levels for the backup:
· Zip without compression (Fastest) - files are just copied inside the zip archive, without anycompression
· Low compression (Fast) - select this option if the size of the zip archive is not important, butthe speed of the backup is
· Normal compression (Medium) - this is usually the best choice because it provides theoptimum rate between zip archive size and the backup speed
· Best compression (Slow) - use this compression level to reduce the zip archive size as much aspossible (the backup speed is reduced)
Use No compression or Low compression if you backup large files to speed up the backup process.
Backup4all 7270
Backup4all 7 User Manual Copyright © 2017 Softland
Use High compression when you want to create the smallest archive possible. This option takesmore time if the files included in archive are large.
Do not compress files of typeThe filter can be applied to increase the compression performance. It defines what types of files tobe stored uncompressed in the zip file. These are files that are already compressed (e.g. zip, rar,mp3 or avi) and using the zip compression on them wouldn't result in a smaller sized backup. Youcan use the already defined file types or you can add others using the Default compression filter listin File->Options->Backup. The result will be that the backup will take less time when usingcompression.
Always use temporary folder to create zip filesIf checked, the zip files are created in the temporary folder and then moved to the destinationfolder. This means that there should be enough free disk space on the drive where the temporaryfolder is located.
When backing up to removable media (CD, DVD or Blu-ray disc, floppy, zip disk, etc.) this option isignored, the zip files are always created in the temporary folder and then copied to the destination.When backing up to internal hard drives or LAN, you should uncheck this option to speed up thebackup execution. By default this option is not checked. Use alternate zipping modeIf not checked (default zipping mode), each file is compressed in blocks that are immediately addedto the final zip file. If checked (alternate zipping mode), each file is compressed in blocks in atemporary file. When the whole file is compressed in the temporary file, it is added to the final zipfile.This option has effect only when backing up to internal hard drives and LAN. In all other cases thisoption is ignored. When backing up to LAN drives, it is recommended to check this option anduncheck Always use temporary folder to create zip files option. When backing up to internal harddrives, it is recommended to uncheck both options. By default this option is not checked.
Encrypt the zip files
No encryptionThe zip files created are not protected by password for unauthorized access. Strong encryption (AES)This is the Advanced Encryption Standard, the best choice in zip protection, but recognized only bythe latest version of third party zip applications.Backup4all supports AES encryption in three different strengths:
· 128 bit (strong) - size of the encryption key is 128 bits. This provides significantly bettersecurity than standard zip 2.0 encryption.
· 192 bit (stronger) - size of the encryption key is 192 bits
· 256 bit (strongest) - size of the encryption key is 256 bits. This is the strongest encryptionmethod for zip files and it provides the best security.
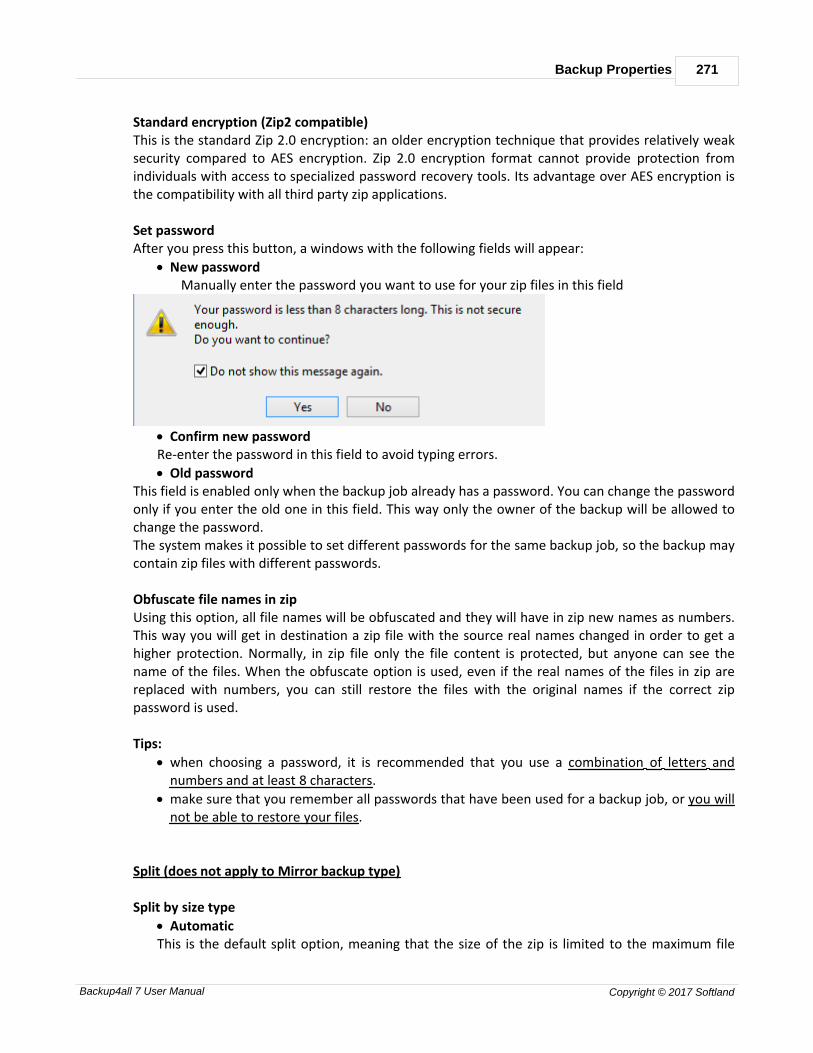
Backup Properties 271
Backup4all 7 User Manual Copyright © 2017 Softland
Standard encryption (Zip2 compatible)This is the standard Zip 2.0 encryption: an older encryption technique that provides relatively weaksecurity compared to AES encryption. Zip 2.0 encryption format cannot provide protection fromindividuals with access to specialized password recovery tools. Its advantage over AES encryption isthe compatibility with all third party zip applications.
Set passwordAfter you press this button, a windows with the following fields will appear:
· New passwordManually enter the password you want to use for your zip files in this field
· Confirm new passwordRe-enter the password in this field to avoid typing errors.
· Old passwordThis field is enabled only when the backup job already has a password. You can change the passwordonly if you enter the old one in this field. This way only the owner of the backup will be allowed tochange the password.The system makes it possible to set different passwords for the same backup job, so the backup maycontain zip files with different passwords.
Obfuscate file names in zipUsing this option, all file names will be obfuscated and they will have in zip new names as numbers.This way you will get in destination a zip file with the source real names changed in order to get ahigher protection. Normally, in zip file only the file content is protected, but anyone can see thename of the files. When the obfuscate option is used, even if the real names of the files in zip arereplaced with numbers, you can still restore the files with the original names if the correct zippassword is used. Tips:
· when choosing a password, it is recommended that you use a combination of letters andnumbers and at least 8 characters.
· make sure that you remember all passwords that have been used for a backup job, or you willnot be able to restore your files.
Split (does not apply to Mirror backup type) Split by size type
· AutomaticThis is the default split option, meaning that the size of the zip is limited to the maximum file
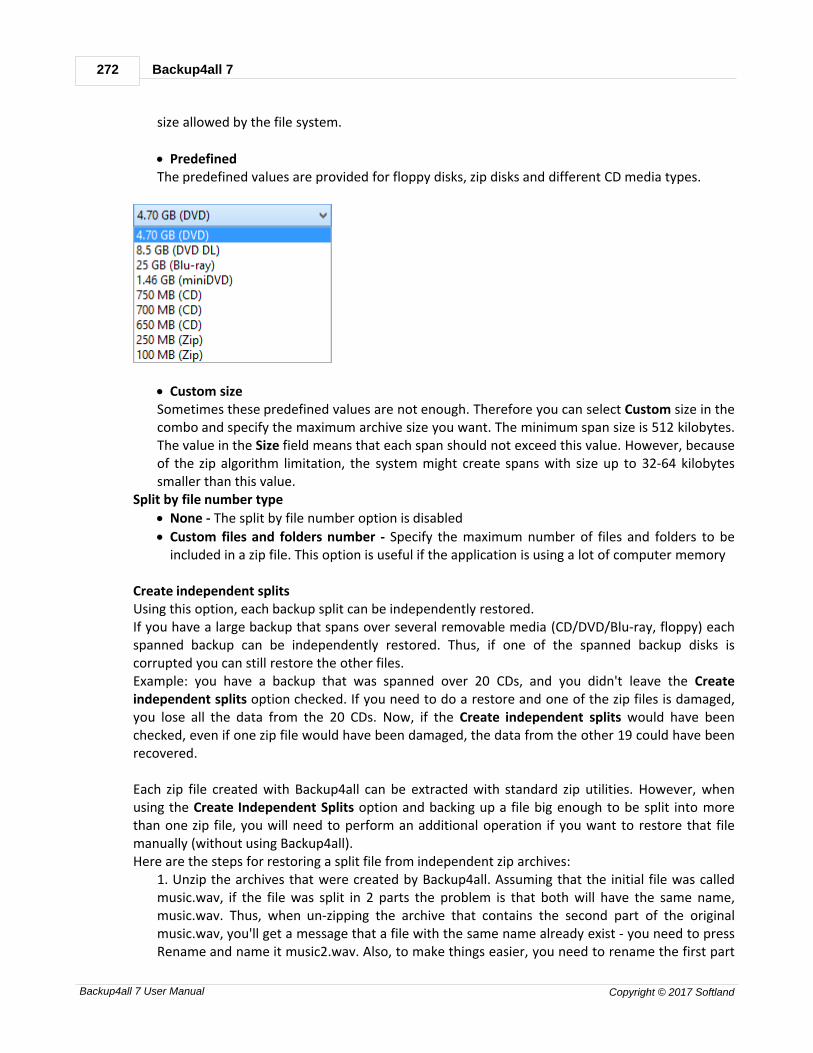
Backup4all 7272
Backup4all 7 User Manual Copyright © 2017 Softland
size allowed by the file system.
· PredefinedThe predefined values are provided for floppy disks, zip disks and different CD media types.
· Custom sizeSometimes these predefined values are not enough. Therefore you can select Custom size in thecombo and specify the maximum archive size you want. The minimum span size is 512 kilobytes.The value in the Size field means that each span should not exceed this value. However, becauseof the zip algorithm limitation, the system might create spans with size up to 32-64 kilobytessmaller than this value.
Split by file number type
· None - The split by file number option is disabled
· Custom files and folders number - Specify the maximum number of files and folders to beincluded in a zip file. This option is useful if the application is using a lot of computer memory
Create independent splitsUsing this option, each backup split can be independently restored. If you have a large backup that spans over several removable media (CD/DVD/Blu-ray, floppy) eachspanned backup can be independently restored. Thus, if one of the spanned backup disks iscorrupted you can still restore the other files.Example: you have a backup that was spanned over 20 CDs, and you didn't leave the Createindependent splits option checked. If you need to do a restore and one of the zip files is damaged,you lose all the data from the 20 CDs. Now, if the Create independent splits would have beenchecked, even if one zip file would have been damaged, the data from the other 19 could have beenrecovered.
Each zip file created with Backup4all can be extracted with standard zip utilities. However, whenusing the Create Independent Splits option and backing up a file big enough to be split into morethan one zip file, you will need to perform an additional operation if you want to restore that filemanually (without using Backup4all).Here are the steps for restoring a split file from independent zip archives:
1. Unzip the archives that were created by Backup4all. Assuming that the initial file was calledmusic.wav, if the file was split in 2 parts the problem is that both will have the same name,music.wav. Thus, when un-zipping the archive that contains the second part of the originalmusic.wav, you'll get a message that a file with the same name already exist - you need to pressRename and name it music2.wav. Also, to make things easier, you need to rename the first part
Backup Properties 273
Backup4all 7 User Manual Copyright © 2017 Softland
of the split file to music1.wav. The files you have renamed, music1.wav and music2.wav, need tobe combined so that you have the entire original file, music.wav.2. Open the Windows command prompt (Start->Run, type cmd and press Enter). Using thecommand copy (write copy/? and press Enter to see the help for this function) write copymusic1.wav /b + music2.wav /b music.wav (first two files are the sources, last file is thedestination) and press Enter. Note that you have to be in the folder where the source files are inorder for it to work.
For more information on how to manually restore the data from independently created ziparchives, visit this section. Note: One or more of the features mentioned in this chapter might not be available in your edition.The Professional edition includes all the features. For a comparison between editions, please checkfeature matrix topic.
7.8 Advanced
Options on this page affect the way a particular backup job is executed. Options that are markedwith (*) might not be available in your edition - check Feature Matrix for detailed information ondifferences between editions.
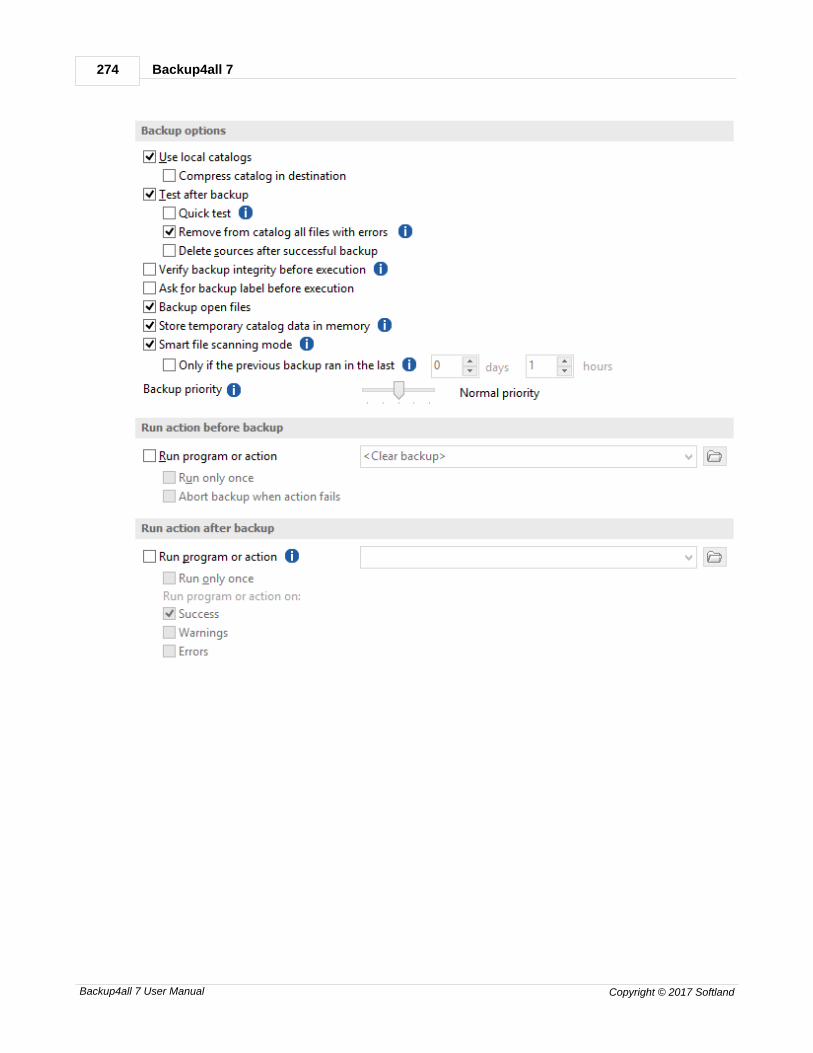
Backup4all 7274
Backup4all 7 User Manual Copyright © 2017 Softland

Backup Properties 275
Backup4all 7 User Manual Copyright © 2017 Softland
Backup optionsUse local catalogs (.bkc)If this option is checked, Backup4all will keep a local copy of the backup catalog for the currentbackup job. Keeping a local copy of the catalog is recommended in most cases, except when using abackup rotation scheme to back up to CD, DVD or Blu-ray disc, USB or external drives. Example: the option Use locals catalogs is unchecked and you are performing an incrementalbackup to DVD, but on each working day you're changing the DVD so that if one DVD fails you'll stillbe able to recover most of your files. So on Monday you insert DVD 1, Backup4all runs and performsa full backup. On Tuesday you insert DVD 2 (which is empty) and Backup4all performs a full backupthat includes all the data that's on DVD 1 plus the data that was added in between.Now, if the Use local catalogs option would have been checked, Backup4all would have executed onDVD 2 an incremental backup because of the full backup already executed on DVD 1.
Compress catalog in destinationIf this option is checked, the .bkc catalog file in destination will be compressed. This is required ifyou use the obfuscate option from the Compression page and it's also useful for large catalogs tosave the storage space and also reduces the catalog size to upload in destination.
Test after backupIf this option is set Backup4all will test the resulting backup for data integrity after every backupprocess. Only the latest backup number will be tested after the backup execution. If you wish to testother backup numbers you can do so from the Test Backup window.
Quick test

Backup4all 7276
Backup4all 7 User Manual Copyright © 2017 Softland
If this option is selected, the files in destination are tested quickly after backup, to check if theyexists and they have the correct size, without calculating the CRC for each file. It does not apply tocloud destinations and it is not as safe as the normal test.
Remove from catalog all files with errorsThis option, selected by default, is used to also repair the backup catalog during the test afterbackup. If there are files backed up with problems and the test on those files fails, they will beremoved from the backup catalog. Next time you run the backup, Backup4all will try to back upthose files again.
Delete sources after successful backupIf this option is checked the backup sources will be deleted after performing the backup. This option is disabled if the Test after backup option is not enabled.
Verify backup integrity before executionIf this option is selected, the backup catalog will be also repaired after the current backup version istested if there were files not correctly backed up or missing from the backup destination. Those fileswill be removed from the backup catalog and they will be backed up again next time the backup isexecuted.If this option is selected, the backup integrity will be verified before running the new execution.
Ask for backup label before executionIf this option is set a window will be shown and will prompt the user to enter the label description ofthe backup increment.If you do not want to give a label to the current backup, leave the edit control empty. Check theDon't label next backups if you do not want to see this window when the current backup job isexecuted in the future. This feature is particularly useful for incremental backup types, when thelabel can be seen as a milestone for all files backed up. These labels are visible on the Versions pageof the Restore Wizard and in the list of file versions in the Explore view.
Backup open filesIf checked, the application will back up open files. Please note backing up open files is possible onlyon Windows XP or higher, if the file is stored on a local NTFS hard drive and the VSS service isrunning and properly configured.
Backup Empty FoldersIf checked, the application will back up empty folders. Empty folders may result from their contentbeing completely deleted or filtered out.
Store temporary catalog data in memoryIf checked, the catalog file will be stored in RAM memory. If you receive an "Out of memory"warnings or you have a large catalog file, we recommend you to uncheck that option. If unchecked,the catalog file will be stored in a temporary file on your hard drive.
Smart file scanning modeBackup4all can use the USN journal to get a faster detection of the modified source files. The USN

Backup Properties 277
Backup4all 7 User Manual Copyright © 2017 Softland
Journal (Update Sequence Number Journal), or Change Journal, is a feature of NTFS which maintainsa record of changes made to the volume.Since version 5.4 of Backup4all, this option is activated by default for all new jobs. It can be activatedmanually for jobs created with an older version of Backup4all. This feature will scan all files changed on your computer using the NTFS journal. It is faster for largenumber of files and frequent backup executions.
The “Smart file scanning mode” option is used in all cases with the following exceptions:1. User is not an administrator and the sources are on local drives. For standard users this
option works only for external drives.2. The source drive is not NTFS formatted.3. Sources are not on local drives (ex: network drives). This option also works for local
removable NTFS drives (stick, external hard drive, removable drives)4. Backup job has relative file date filters are (ex: "older than x days"). 5. If the file/folder filter has changes since the previous backup. 6. The journal will not be used at first backup (all sources are newly added).7. The journal will not be used for full backup executions.8. The journal will not be used when a source is newly added to backup9. The journal will not be used when the source is changed by including other subfolders/files
that were previously excluded 10. Because parsing the NTFS journal can be slower in some cases than parsing the files, the
option will not be used if there are less than 200,000 files & folders in the backup. The200,000 count is calculated as sum of all files and all folders already present in backupcatalog, before the current backup execution.
Only if the previous backup wan in the last X days Y hours - use this option to restrict when the"Smart file scanning mode" option will be used. If the backup executions are rare and there aremany file changes on your computer between two consecutive backups, you should uncheck the"Smart file scanning mode" option or prevent the backup to use the large USN journal for suchcases.
Backup priorityUsing the slider you can set the backup execution priority compared to the rest of the runningprocesses on your system. Setting it to Highest priority, for instance, will determine the system toallocate most of its resources for this backup execution.
Run action before backup
Run program or actionCheck this option and select one of the predefined actions or choose a different executable file. You
can either enter directly the path to the program (has to be between quotes) or click the buttonto browse for the file. Backup4all waits until the action is finished before proceeding with the actualbackup process.
The <Clear backup> predefined action deletes the ".bkc" file and all zip files associated with the
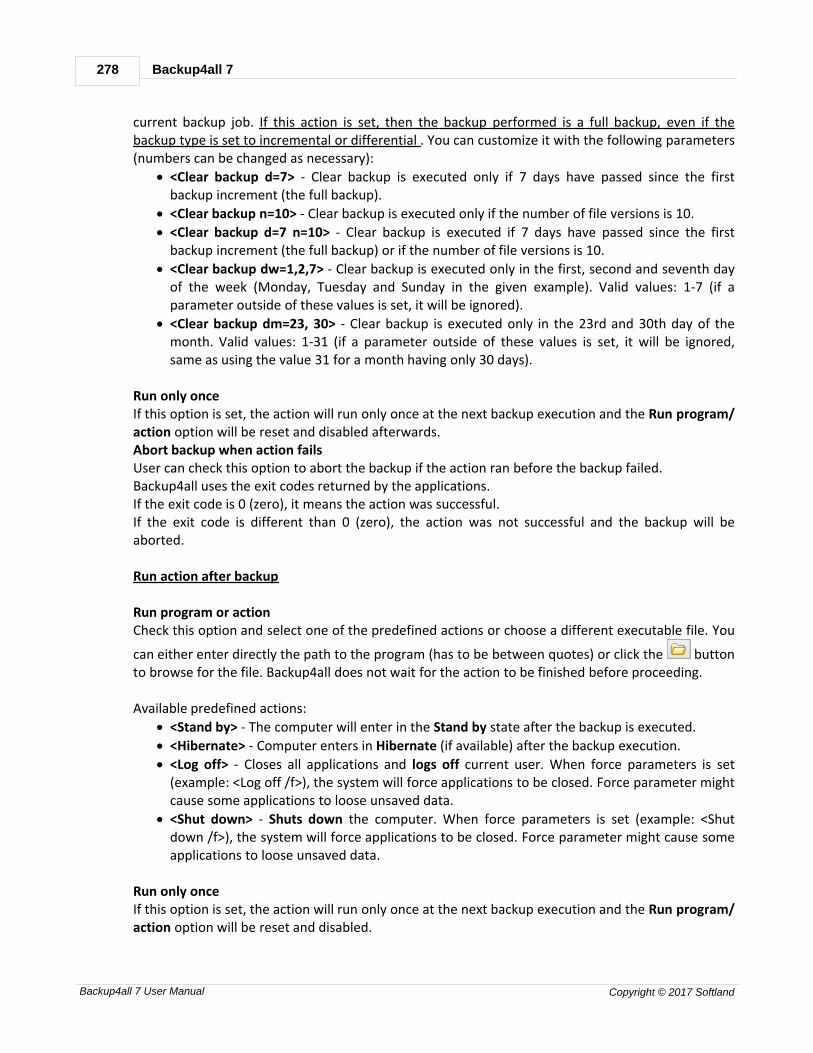
Backup4all 7278
Backup4all 7 User Manual Copyright © 2017 Softland
current backup job. If this action is set, then the backup performed is a full backup, even if thebackup type is set to incremental or differential . You can customize it with the following parameters(numbers can be changed as necessary):
· <Clear backup d=7> - Clear backup is executed only if 7 days have passed since the firstbackup increment (the full backup).
· <Clear backup n=10> - Clear backup is executed only if the number of file versions is 10.
· <Clear backup d=7 n=10> - Clear backup is executed if 7 days have passed since the firstbackup increment (the full backup) or if the number of file versions is 10.
· <Clear backup dw=1,2,7> - Clear backup is executed only in the first, second and seventh dayof the week (Monday, Tuesday and Sunday in the given example). Valid values: 1-7 (if aparameter outside of these values is set, it will be ignored).
· <Clear backup dm=23, 30> - Clear backup is executed only in the 23rd and 30th day of themonth. Valid values: 1-31 (if a parameter outside of these values is set, it will be ignored,same as using the value 31 for a month having only 30 days).
Run only onceIf this option is set, the action will run only once at the next backup execution and the Run program/action option will be reset and disabled afterwards.Abort backup when action failsUser can check this option to abort the backup if the action ran before the backup failed.Backup4all uses the exit codes returned by the applications.If the exit code is 0 (zero), it means the action was successful.If the exit code is different than 0 (zero), the action was not successful and the backup will beaborted.
Run action after backup
Run program or actionCheck this option and select one of the predefined actions or choose a different executable file. You
can either enter directly the path to the program (has to be between quotes) or click the buttonto browse for the file. Backup4all does not wait for the action to be finished before proceeding.
Available predefined actions:
· <Stand by> - The computer will enter in the Stand by state after the backup is executed.
· <Hibernate> - Computer enters in Hibernate (if available) after the backup execution.
· <Log off> - Closes all applications and logs off current user. When force parameters is set(example: <Log off /f>), the system will force applications to be closed. Force parameter mightcause some applications to loose unsaved data.
· <Shut down> - Shuts down the computer. When force parameters is set (example: <Shutdown /f>), the system will force applications to be closed. Force parameter might cause someapplications to loose unsaved data.
Run only onceIf this option is set, the action will run only once at the next backup execution and the Run program/action option will be reset and disabled.

Backup Properties 279
Backup4all 7 User Manual Copyright © 2017 Softland
Run program or action onYou can set conditions to run the action after the backup: on Success, on Warnings or on Errors. Youcan check multiple options or a single one, but at least one option must be checked.
Comparison CriteriaThis section contains special settings for advanced file comparison. You can set what properties of afile will be used when deciding if a file was modified or not. There is a list of quick sets to choose for predefined comparison criteria:
· None - if this is selected, a warning window is shown asking you to confirm if you want theDate modified criteria disabled or not. If this criterion is disabled, Backup4all will only backupfiles that have the size changed.
· Custom - this is the default option and has several important file properties and attributesselected as comparison criteria (Size, Date modified, Date created, Archived, Hidden, System,Read-Only).
· Archive attribute only - if this is selected, a warning window is shown asking you to confirm ifyou want the Date modified criteria disabled or not. If this criteria is disabled, Backup4all willonly backup files that have the archive attribute changed.
· FAT attributes - if this is selected, a set of File Allocation Table attributes will be used forcomparison
· NTFS attributes - if this is selected, a set of NTFS (New Technology File System) attributes willbe used for comparison. Note that these attributes are available only on Windows XP, andabove.
Available file properties are:
· Size - file size (it is mandatory)
· Date modified - the latest date and time when the file was modified (a warning message isdisplayed if you uncheck it)
· Date created - the date and time when the file was created
· CRC32 - the most comprehensive criteria because it calculates a checksum based on filecontents and compares it with the checksum from the backup (this slows the process)
Available file attributes are:
· Read-Only - file can be read, but not modified or deleted

Backup4all 7280
Backup4all 7 User Manual Copyright © 2017 Softland
· Archived (unavailable when the Clear archive bit option is checked from the BackupProperties->Type window) - file attribute used for backup. When a file is created, the archivebit is turned on. When a backup program copies the file, it turns off the archive attribute.
· Hidden - files marked Hidden do not normally display unless the file manager option to displaythem is selected
· System - files marked System do not normally display unless the file manager option to displaythem is selected
· Compressed (only NTFS) - file that is made generally much smaller than the original size offile. Decompression occurs automatically when the file is read. The file is compressed againwhen it is closed or saved.
· Temporary (only NTFS) - the file is being used for temporary storage.
· Encrypted (only NTFS) - file is encrypted on a NTFS volume to protect it from unauthorizedaccess
· Not indexed (only NTFS) - file not indexed by the content indexing service
· Offline (only NTFS) - content of the file is not immediately available. This attribute indicatesthat the file data has been physically moved to an offline storage.
· Reparse point (only NTFS) - reparse points are used as building blocks by Microsoft and third-parties to enhance NTFS file system behavior.
· Sparse file (only NTFS) - in a sparse file, large ranges of zeroes may not require disk allocation.Space for nonzero data will be allocated as needed as the file is written.
If you select more than one attribute, Backup4all will consider the file for backup if any of theattributes selected is changed.Legacy (use archive bit)If this is selected, Backup4all will determine which files will be backed up by verifying if the archivebit attribute is set. If the archive bit attribute for a file is not set, that file will be ignored (even if itssize was modified for instance). Our recommendation is to use the Criteria option since it's moreaccurate than using the archive bit alone. Play sounds after backup
Use this section to set sound notifications to be played when the backup is finished. There are threetypes of sound notifications depending on the backup status: success, warning and error.
Play soundsIf checked then success, warning and error sounds will be played at the end of the backup. Bydefault this option is not checked.
On successIt indicates the sound that will be played when the backup is finished with success. The default
sound is <Default beep sound>, but you can change it using the Open button . If you press the
Play button you can hear the selected sound file. To disable this sound you can select from thedrop-down box <No success sound>.
On warning
Backup Properties 281
Backup4all 7 User Manual Copyright © 2017 Softland
It indicates the sound that will be played when the backup is finished with warnings. The default
sound is <Exclamation sound>, but you can change this using the Open button . If you press the
Play button you can hear the selected sound file. To disable this sound you can select from thedrop-down box <No warning sound>.
On errorIt indicates the sound that will be played when the backup has failed because of an error. The
default sound is <Asterisk sound>, but you can change this using the Open button . If you press
the Play button you can hear the selected sound file. To disable this sound you can select fromthe drop-down box <No error sound>.
Open soundsThis button will open the standard Sounds and Multimedia Properties->Sounds window of theoperating system (that can also be opened from the Control Panel). You can use this to configure ortroubleshoot your sounds settings.
Note: One or more of the features mentioned in this chapter might not be available in your edition.The Professional edition includes all the features. For a comparison between editions, please checkfeature matrix topic.
7.9 Email
Use this section to set email notifications to be sent when the backup is finished. There are threetypes of email notifications depending on the backup status: success, warning and error emailnotifications.

Backup4all 7282
Backup4all 7 User Manual Copyright © 2017 Softland
Emails
Send emails:If checked then notification emails will be sent at the end of the backup, test or cleanup operation tothe specified email addresses (email addresses must be separated by comma to be recognized). Thisoption can be checked/unchecked only if the File->Options->Email window has the Enable emailnotification option checked.
Send emails to:Specify the email address where the notification emails will be sent. You can enter multiple emailaddresses separated by comma.
Log
Attach log file to emailIf this option is checked, the backup log file will be attached to the email.

Backup Properties 283
Backup4all 7 User Manual Copyright © 2017 Softland
Compress the log fileOption is active only if Attach log file to email option is checked. If this option is enabled, Backup4allwill zip the log file before sending it. Additionally you can encrypt the log file.
No encryptionThe zipped log file created is not protected by password for unauthorized access.
Zip(2) compatible encryptionThis is the standard Zip 2.0 encryption: an older encryption technique that provides relatively weaksecurity compared to AES encryption. Zip 2.0 encryption format cannot provide protection fromindividuals with access to specialized password recovery tools. Its advantage over AES encryption isthe compatibility with all third party zip applications.
AES encryption(*)This is the Advanced Encryption Standard, the best choice in zip protection, but recognized only bythe latest version of third party zip applications. Backup4all supports AES encryption in threedifferent strengths:
· 128 bit (strong) - size of the encryption key is 128 bits. This provides significantly bettersecurity than standard zip 2.0 encryption.
· 192 bit (stronger) - size of the encryption key is 192 bits
· 256 bit (strongest) - size of the encryption key is 256 bits. This is the strongest encryptionmethod for zipped log file and it provides the best security.
Set passwordAfter you press this button, a windows with the following fields will appear:
· New passwordManually enter the password you want to use for your zipped log file in this field. If youenter a password with less than 8 characters, a warning window will be displayed when youclick OK notifying that the password is not secure enough.
· Confirm new passwordRe-enter the password in this field to avoid typing errors.
· Old password
Backup4all 7284
Backup4all 7 User Manual Copyright © 2017 Softland
This field is enabled only when the log file encryption already has a password. You canchange the password only if you enter the old one in this field. This way only the owner willbe allowed to change the password.
Tips:
· when choosing a password, it is recommended that you use a combination of letters andnumbers and at least 8 characters.
· make sure that you remember the password used, or you will not be able to extract the logfile.
Email Messages
Use HTML format for emailsIf this option is selected, the email template used will be sent as html. This way, the notificationemails can be customized in many ways.
On successful backup sendIt indicates the email that will be sent when the backup is finished with success. The default email is
<Default email>, but you can change it using the Open button . If you press the Edit button you can modify the selected email file (except the default email). Also there is the option to choose<No email> if you don't want Backup4all to send an email if a backup was successful.
On backup with warnings sendIt indicates the email that will be sent when the backup is finished with warnings. The default email
is <Default email>, but you can change this using the Open button . If you press the Edit button
you can modify the selected email file (except the default email). Also there is the option tochoose <No email> if you don't want Backup4all to send an email if a backup was completed andthere were warnings during execution.
On backup with errors send It indicates the email that will be sent when the backup has failed because of an error. The default
email is <Default email>, but you can change this using the Open button . If you press the Edit
button you can edit the selected email file (except the default email). Also there is the option tochoose <No email> if you don't want Backup4all to send an email if there were errors during theexecution of the backup.
On successful test send It indicates the email that will be sent when the test operation is finished with success. The default
email is <Default email>, but you can change it using the Open button . If you press the Edit
button you can modify the selected email file (except the default email). Also there is the optionto select <No email> if you don't want Backup4all to send an email if a test operation wassuccessful.
Backup Properties 285
Backup4all 7 User Manual Copyright © 2017 Softland
On test with errors sendIt indicates the email that will be sent when the test operation failed because of an error. The
default email is <Default email>, but you can change this using the Open button . If you press
the Edit button you can modify the selected email file (except the default email). Also there isthe option to select <No email> if you don't want Backup4all to send an email if there were errorsduring the test operation. On successful cleanup sendIt indicates the email that will be sent when the cleanup operation is finished with success. The
default email is <Default email>, but you can change it using the Open button . If you press the
Edit button you can modify the selected email file (except the default email). Also there is theoption to select <No email> if you don't want Backup4all to send an email if the cleanup operationwas successful.
On cleanup with error sendIt indicates the email that will be sent when the cleanup operation failed because of an error. The
default email is <Default email>, but you can change this using the Open button . If you press
the Edit button you can modify the selected email file (except the default email). Also there isthe option to select <No email> if you don't want Backup4all to send an email if there were errorsduring the cleanup operation.
Customizing emails
If you want to create a customized email to be sent (on success/warning/error), the email templatewill have to include special tags that Backup4all will recognize and replace according to thedescription (note that the format of the tag must be <#tag_name>):
· <#BACKUP_NAME> - will insert the name of the executed backup job
· <#TAG_NAME> - will insert the name of the backup tag
· <#SOURCES> - will insert the sources of the executed backup
· <#DEST_DRIVE> - will insert the destination drive letter
· <#DEST_DRIVE_TYPE> - will insert the destination drive type
· <#DEST_FOLDER> - will insert the name of the destination folder
· <#DEST_CATALOG_FILE> - will insert the name of the catalog file created
· <#BACKUP_TYPE> - will insert the backup type that was performed
· <#SCHED_NEXT_EXECUTION> - will insert the next scheduled execution
· <#SCHED_NEXT_TAG_EXECUTION> - will insert the next scheduled tag execution
· <#BACKUP_START_TIME> - will insert the start time of the backup executed
· <#BACKUP_END_TIME> - will insert the end time of the backup executed
· <#TEST_START_TIME> - will insert the start time of test
· <#TEST_END_TIME> - will insert end time of test
· <#LAST_BACKUP_SIZE_COMPR> - will insert the resulted size of the last backup
· <#TOTAL_BACKUP_SIZE> - will insert the total backup size
· <#REMAINING_DISC_SPACE> - will insert the remaining space on the destination drive
Backup4all 7286
Backup4all 7 User Manual Copyright © 2017 Softland
· <#NBR_FILES_ADDED> - will insert the number of files added to the backup
· <#SIZE_FILE_ADDED> - will insert the size of the added files
· <#NBR_FILE_WARNINGS> - will insert the number of warnings
· <#NBR_ERRORS> - will insert the number of errors
· <#LAST_LOG_NAME> - will insert the name of the last log file
· <#EXCLUDED_SOURCES> - will insert the list of sources excluded
· <#TESTED_VERSIONS> - will insert the list of tested backup numbers
· <#TEST_SUMMARY> - will insert the detailed list of test backup numbers
· <#REMOVED_VERSIONS> - will insert the list of backups removed after cleanup
· <#CLEANUP_SUMMARY> - will insert the detailed list of backup numbers removed
· <#CLEANUP_START_TIME> - will insert the start time of cleanup
· <#CLEANUP_END_TIME> - will insert the end time of cleanup
· <#PROCESSED_SIZE> - will insert the total size of the files removed
For an example of tag usage, open one of the 5 default emails. The emails are stored in text formatin application's directory (i.e. "C:\Program Files\Softland\Backup4all 7\") with the followingfilenames: SuccessFullEmail.txt, WarningFullEmail.txt, ErrorFullEmail.txt for backup emails,TestSuccessFullEmail.txt and TestErrorFullEmail.txt for test emails.
The subject line of the email sent can be customized too by adding the following line at thebeginning of the customized file that will be used by Backup4all as an email: <! Subject of the email !> Here is an example of a customized email that can be sent when a cleanup operation is successful(note that the first line of this will be used as the subject line of the email):
<!Cleanup for <#BACKUP_NAME> finished successfully at <#CLEANUP_END_TIME>!>Cleanup for backup job <#BACKUP_NAME> at <#CLEANUP_START_TIME> finished successfully.See log file <#LAST_LOG_NAME> for more information.Removed backups : <#REMOVED_VERSIONS>Removed version details:<#CLEANUP_SUMMARY>----- Total removed file size : <#PROCESSED_SIZE>Free space on destination: <#REMAINING_DISC_SPACE>Cleanup started at: <#CLEANUP_START_TIME>Cleanup finished at: <#CLEANUP_END_TIME> Note: One or more of the features mentioned in this chapter might not be available in your edition.The Professional edition includes all the features. For a comparison between editions, please checkfeature matrix topic.
7.10 Scheduler
Scheduler
Scheduler lists all the available information about the scheduled tasks and allows you to Add, Edit,
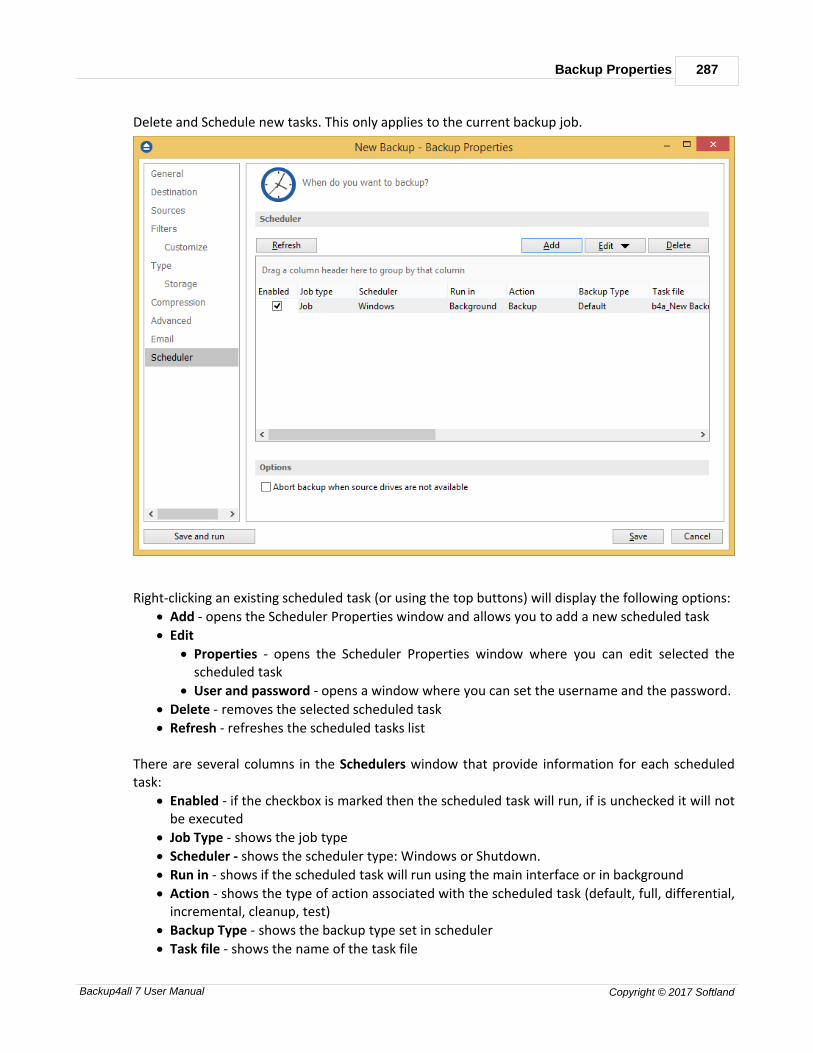
Backup Properties 287
Backup4all 7 User Manual Copyright © 2017 Softland
Delete and Schedule new tasks. This only applies to the current backup job.
Right-clicking an existing scheduled task (or using the top buttons) will display the following options:
· Add - opens the Scheduler Properties window and allows you to add a new scheduled task
· Edit
· Properties - opens the Scheduler Properties window where you can edit selected thescheduled task
· User and password - opens a window where you can set the username and the password.
· Delete - removes the selected scheduled task
· Refresh - refreshes the scheduled tasks list
There are several columns in the Schedulers window that provide information for each scheduledtask:
· Enabled - if the checkbox is marked then the scheduled task will run, if is unchecked it will notbe executed
· Job Type - shows the job type
· Scheduler - shows the scheduler type: Windows or Shutdown.
· Run in - shows if the scheduled task will run using the main interface or in background
· Action - shows the type of action associated with the scheduled task (default, full, differential,incremental, cleanup, test)
· Backup Type - shows the backup type set in scheduler
· Task file - shows the name of the task file
Backup4all 7288
Backup4all 7 User Manual Copyright © 2017 Softland
· Status - displays the status of the scheduled task
· Next Run Time - calculates the next date and time when the scheduled task will run.
· Last Run Time - shows the last date and time when the scheduled task ran.
· Schedule - shows the type of schedule selected for the task
· User - shows the user name for which the job is scheduled to run
· Last run result - shows the status of the last scheduled executed action for that job
The scheduled tasks in the list can be sorted by clicking on the column headers. The right-click menuon the column header provides a handy way to show/hide columns (except the Enabled which aregrayed out).You can also drag a column header on the above grey zone, if you want to group the scheduled tasksby that column.
Options Abort backup when source drives are not available If this option is checked the backup will be aborted when using sources from unavailable drives
Backup4all uses by default the Windows Task Scheduler in order to run the scheduled tasks so youneed to make sure that the Task Scheduler service is enabled on your computer. Use the WindowsHelp in order to find out more information about scheduling a task using the Task Scheduler.
Note: One or more of the features mentioned in this chapter might not be available in your edition.The Professional edition includes all the features. For a comparison between editions, please checkfeature matrix topic.
7.10.1 General
This is the fist page of the Scheduler Properties window which appears when you click on the Add orEdit button in the Scheduler window of Backup Properties or in the global Scheduler page of theapplication. This allows you to add or edit a scheduled task for the current backup job.
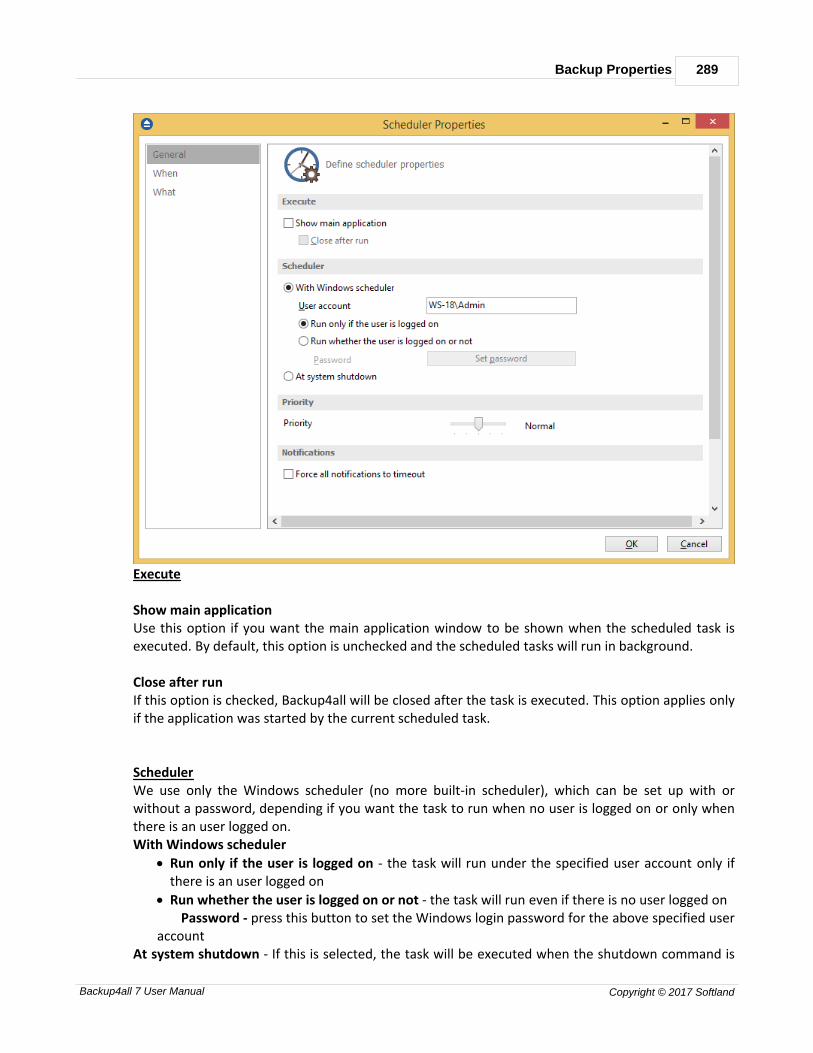
Backup Properties 289
Backup4all 7 User Manual Copyright © 2017 Softland
Execute
Show main applicationUse this option if you want the main application window to be shown when the scheduled task isexecuted. By default, this option is unchecked and the scheduled tasks will run in background.
Close after runIf this option is checked, Backup4all will be closed after the task is executed. This option applies onlyif the application was started by the current scheduled task.
SchedulerWe use only the Windows scheduler (no more built-in scheduler), which can be set up with orwithout a password, depending if you want the task to run when no user is logged on or only whenthere is an user logged on.With Windows scheduler
· Run only if the user is logged on - the task will run under the specified user account only ifthere is an user logged on
· Run whether the user is logged on or not - the task will run even if there is no user logged on Password - press this button to set the Windows login password for the above specified user
account At system shutdown - If this is selected, the task will be executed when the shutdown command is
Backup4all 7290
Backup4all 7 User Manual Copyright © 2017 Softland
started. Backup4all intercepts the shutdown message and there is no way to know if a restart or ashutdown was requested. This is why it will always shutdown your computer after the task isexecuted.
Priority
Indicates the task priority. Move the cursor to right or left in order to increase or decrease thepriority.
NotificationsForce all notifications to timeout - use this option to force all notifications to timeout. This option isuseful to continue the overnight backups when there is a message waiting for user input. Thatmessage will be closed and the backup will continue.
Note: One or more of the features mentioned in this chapter might not be available in your edition.The Professional edition includes all the features. For a comparison between editions, please checkfeature matrix topic.
7.10.2 When
On this page you can set when do you want to execute the scheduled task.

Backup Properties 291
Backup4all 7 User Manual Copyright © 2017 Softland
Run task as soon as possible after a scheduled start is missedUse this option to run missed tasks as soon as possible.
Start the task only if the computer is on AC powerIf this option is selected, the backup will be executed only if the computer is on AC power.
Wake the computer to run this taskUse this option to wake the computer from sleep mode at the scheduled time.
Start the task only if the computer is idle forUse this option to indicate how long to wait when the computer is idle before the scheduled taskstarts.
When to run
In this section you can specify the conditions that will trigger the task. Use the Add, Edit and Deletebuttons to manage the triggers for this task.
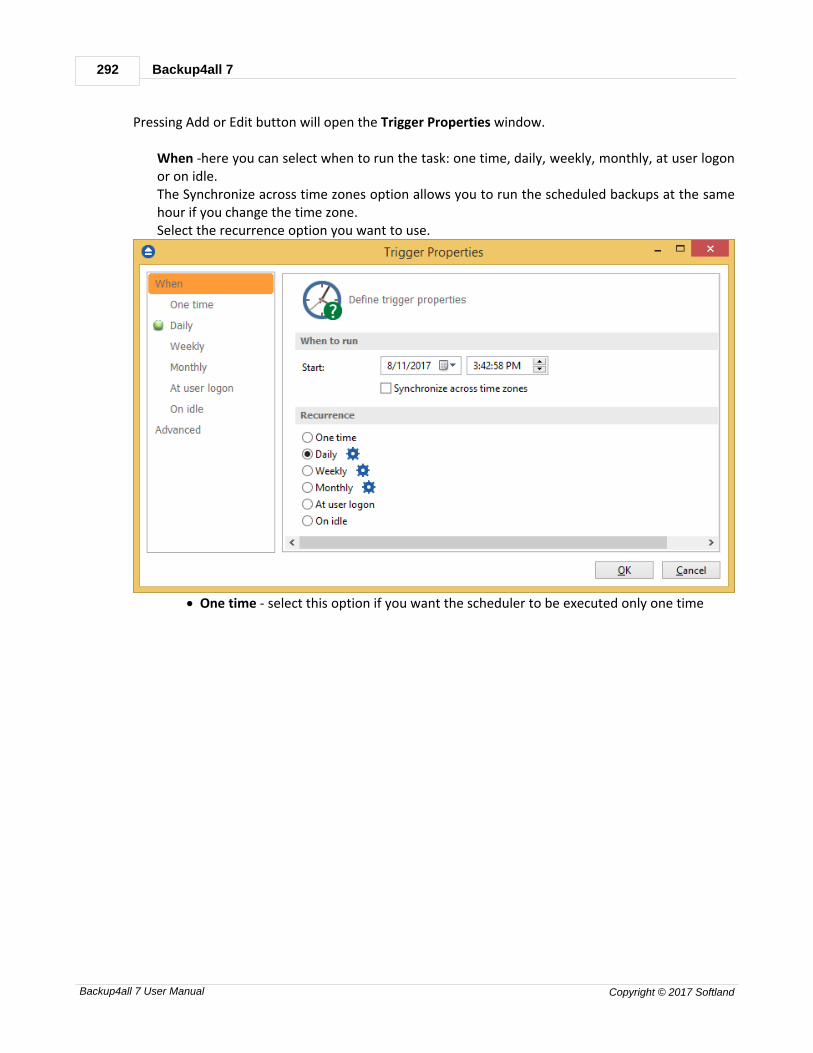
Backup4all 7292
Backup4all 7 User Manual Copyright © 2017 Softland
Pressing Add or Edit button will open the Trigger Properties window.
When -here you can select when to run the task: one time, daily, weekly, monthly, at user logonor on idle.The Synchronize across time zones option allows you to run the scheduled backups at the samehour if you change the time zone.Select the recurrence option you want to use.
· One time - select this option if you want the scheduler to be executed only one time

Backup Properties 293
Backup4all 7 User Manual Copyright © 2017 Softland
· Daily - select this option if you want the scheduler to be executed daily.
· Weekly - select this option if you want the scheduler to be executed weekly on the daysyou select.

Backup4all 7294
Backup4all 7 User Manual Copyright © 2017 Softland
· Monthly - select this option if you want the scheduler to be executed monthly on themonths and days you select.
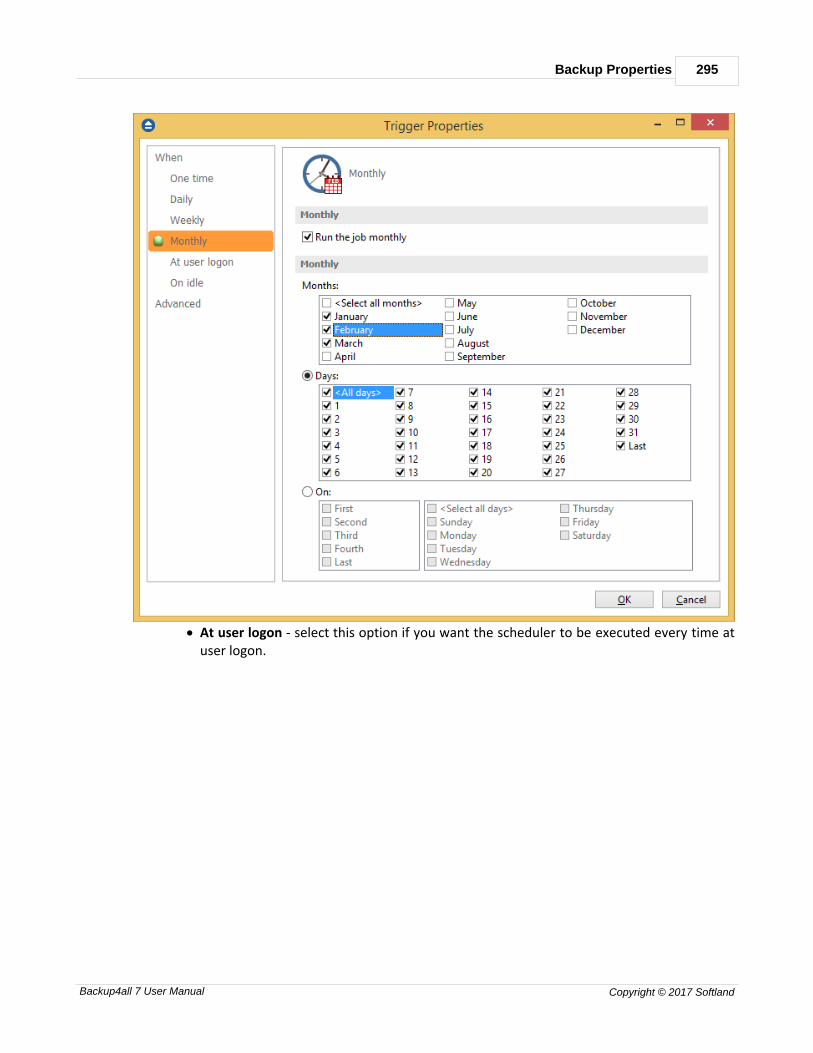
Backup Properties 295
Backup4all 7 User Manual Copyright © 2017 Softland
· At user logon - select this option if you want the scheduler to be executed every time atuser logon.

Backup4all 7296
Backup4all 7 User Manual Copyright © 2017 Softland
· On idle - select this option if you want the scheduler to be executed when the computeris idle.
AdvancedOn this page, you can set the expiration date and time or the repeat frequency.

Backup Properties 297
Backup4all 7 User Manual Copyright © 2017 Softland
Note: One or more of the features mentioned in this chapter might not be available in your edition.The Professional edition includes all the features. For a comparison between editions, please checkfeature matrix topic.
7.10.3 What
On this page you can set what action to be executed.
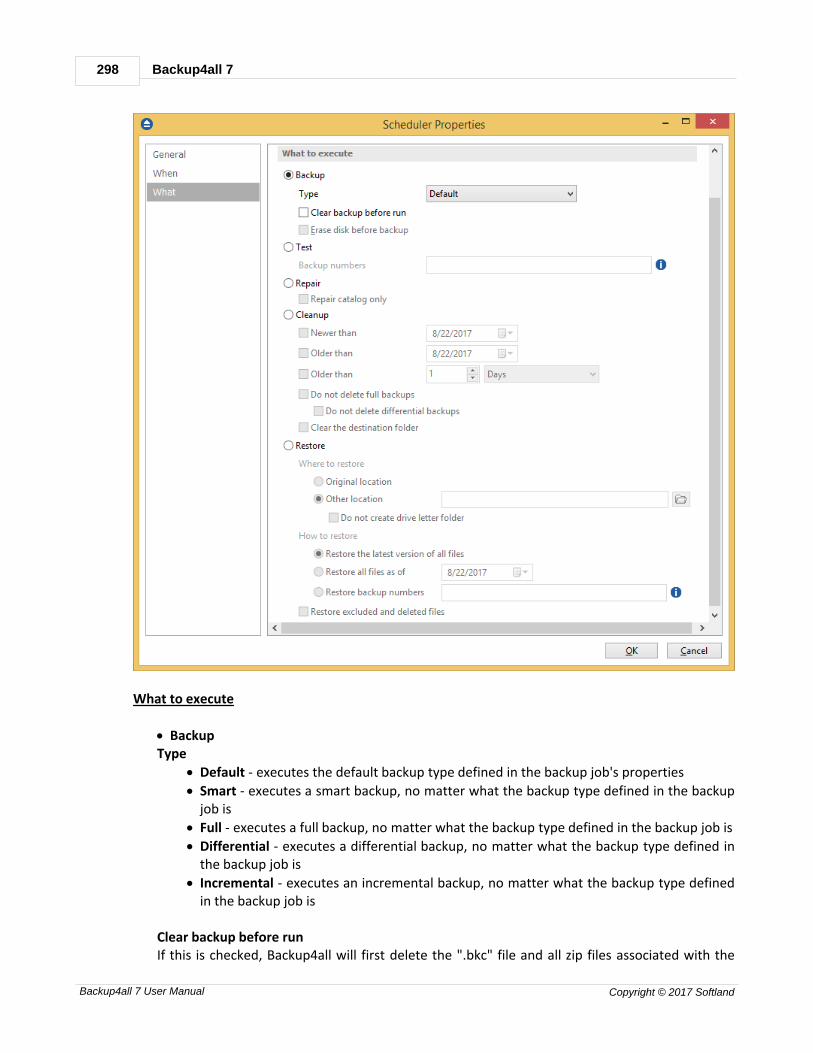
Backup4all 7298
Backup4all 7 User Manual Copyright © 2017 Softland
What to execute
· BackupType
· Default - executes the default backup type defined in the backup job's properties
· Smart - executes a smart backup, no matter what the backup type defined in the backupjob is
· Full - executes a full backup, no matter what the backup type defined in the backup job is
· Differential - executes a differential backup, no matter what the backup type defined inthe backup job is
· Incremental - executes an incremental backup, no matter what the backup type definedin the backup job is
Clear backup before runIf this is checked, Backup4all will first delete the ".bkc" file and all zip files associated with the

Backup Properties 299
Backup4all 7 User Manual Copyright © 2017 Softland
current backup job and after that execute the scheduled backup.
Erase disk before backupThis option is available only if the backup destination is a CD/DVD/Blu-ray disk. When selected,the CD/DVD/Blu-ray will be erased before the backup execution.
· Test - you can schedule a test operation instead of a backup. When Test is selected, the
Backup Numbers box is displayed . You can type in there the backupnumbers you want to test. The order you type them in is the order they will be tested in. Usethe * character to test all backup numbers, or the # character to test only the last backup.
· Repair - you can schedule a repair action to be executed. The missing or corrupted files fromdestination will be backed up again.
· Repair catalog only - if this option is checked, only the backup catalog will be repaired, themissing or corrupted files in destination will be removed from the backup catalog, so theywill be backed up again next time.
· Cleanup - at the scheduled date it deletes the selected backup numbers. When Cleanup isselected, other options become available to filter the backup numbers that will be deleted:
· Newer than - if checked backup numbers that are newer than the selected date will bedeleted when the scheduled Cleanup operation runs
· Older than - if checked backup numbers that are older than the selected date will bedeleted when the scheduled Cleanup operation runs
· Older than (fixed date) - backup numbers that are Older than a certain fixed date will bedeleted when the scheduled Cleanup operation runs
· Do not delete full backups - if this is checked, the full backups will be kept even if theyfall into the range of files filtered for deletion
· Do not delete differential backups - if this is checked, the differential backups will bekept even if they fall into the range of files filtered for deletion. Note that this option isavailable only when Do not delete full backups is checked, because differential backupsdepend on full backups.
· Clear the destination folder - Deletes files and folders that should not be in thedestination folder. Only the files mentioned in backup catalog are kept.
· Restore - select this option if you want to schedule a restore action.
· Original location - use this option to restore files in the original location
· Other location - use this option to restore files in another locationDo not create drive letter folder - if this option is checked, when restoring to anotherlocation, the drive letter folder won't be created.
· Restore the latest version - use this option to restore the latest version of all files
· Restore all files as of - use this option to restore the files as they were on a specified date
· Restore backup numbers - use this option to restore one or more backup numbersRestore excluded and deleted files - if this option is checked, excluded and deleted files will bealso restored.
Note: One or more of the features mentioned in this chapter might not be available in your edition.The Professional edition includes all the features. For a comparison between editions, please checkfeature matrix topic.

Restore Wizard
Part
VIII

Restore Wizard 301
Backup4all 7 User Manual Copyright © 2017 Softland
8 Restore Wizard
8.1 Where and how to restore
Using the Restore Wizard you can restore from a backup job. In the first step you can choose thedestination, the priority of the execution and customize the restore operation if you wish.
Where do you want to restore?
Use original locationCopies the files from the zip backup into the original location. If a file with the same name alreadyexists, a dialog will be shown prompting for an action before the restore can continue.

Backup4all 7302
Backup4all 7 User Manual Copyright © 2017 Softland
Choose another locationCopies files from the zip backup to a different folder. If selected, you can choose a different folder torestore files from the backup.
Do not create drive letter folderIf checked, Backup4all will restore the files in the designated location using the original directorystructure. If you select this option and you have files from multiple drives, some files might getoverwritten. For example, if you backed up your Users folder from your C drive, when you restore itto a different location having the Do not create drive letter folder unchecked, Backup4all will firstcreate a folder named C and in it place the Users folder. If you would have checked the Do notcreate drive letter folder option, the folder named C wouldn't have been created.
How do you want to restore?
Restore the latest version of all filesBackup4all will restore the latest version for all the files in the backup.
Restore all files as ofChoose the date to which you want to restore the files. The restored files will be exactly as theywere on the selected date.
Note: If you used the Limit number of file versions option, restoring the files as of a specified datecould not restore all your files if some of them were deleted by the file version limitation.
Choose files and restore the latest versionBackup4all will restore the latest version for all the files in the backup. You will be able to filter thefiles using the Preview page.
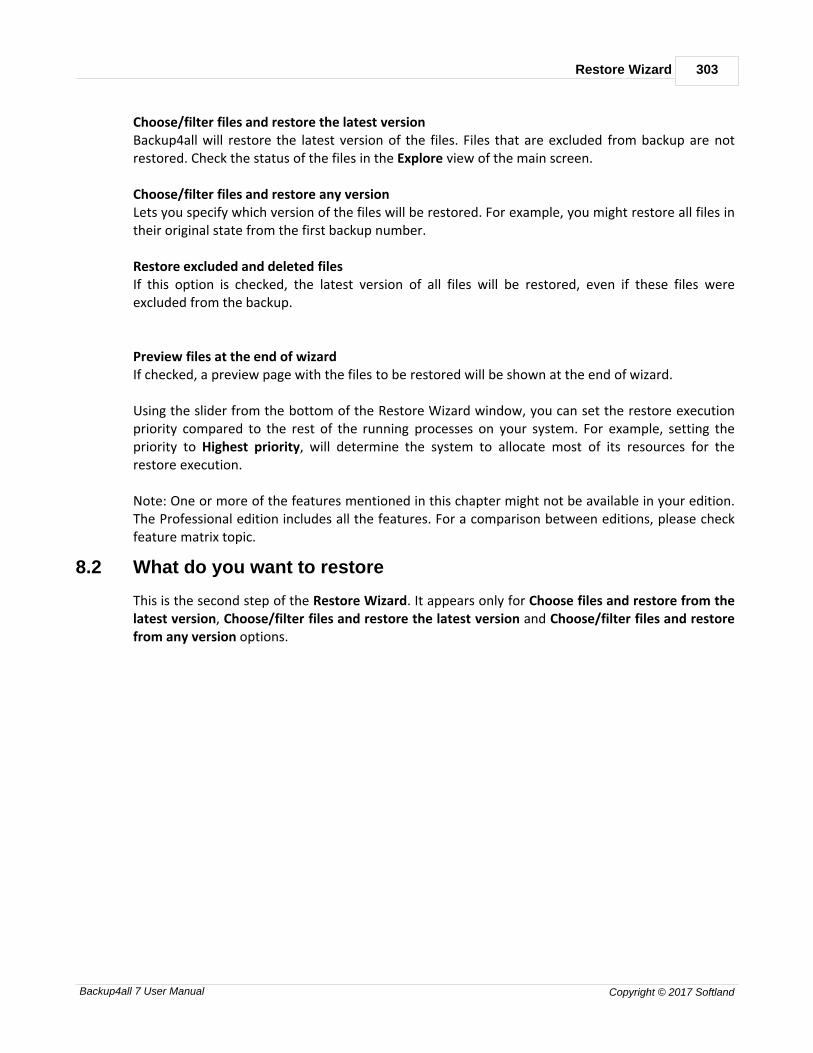
Restore Wizard 303
Backup4all 7 User Manual Copyright © 2017 Softland
Choose/filter files and restore the latest versionBackup4all will restore the latest version of the files. Files that are excluded from backup are notrestored. Check the status of the files in the Explore view of the main screen. Choose/filter files and restore any versionLets you specify which version of the files will be restored. For example, you might restore all files intheir original state from the first backup number. Restore excluded and deleted filesIf this option is checked, the latest version of all files will be restored, even if these files wereexcluded from the backup.
Preview files at the end of wizardIf checked, a preview page with the files to be restored will be shown at the end of wizard.
Using the slider from the bottom of the Restore Wizard window, you can set the restore executionpriority compared to the rest of the running processes on your system. For example, setting thepriority to Highest priority, will determine the system to allocate most of its resources for therestore execution.
Note: One or more of the features mentioned in this chapter might not be available in your edition.The Professional edition includes all the features. For a comparison between editions, please checkfeature matrix topic.
8.2 What do you want to restore
This is the second step of the Restore Wizard. It appears only for Choose files and restore from thelatest version, Choose/filter files and restore the latest version and Choose/filter files and restorefrom any version options.
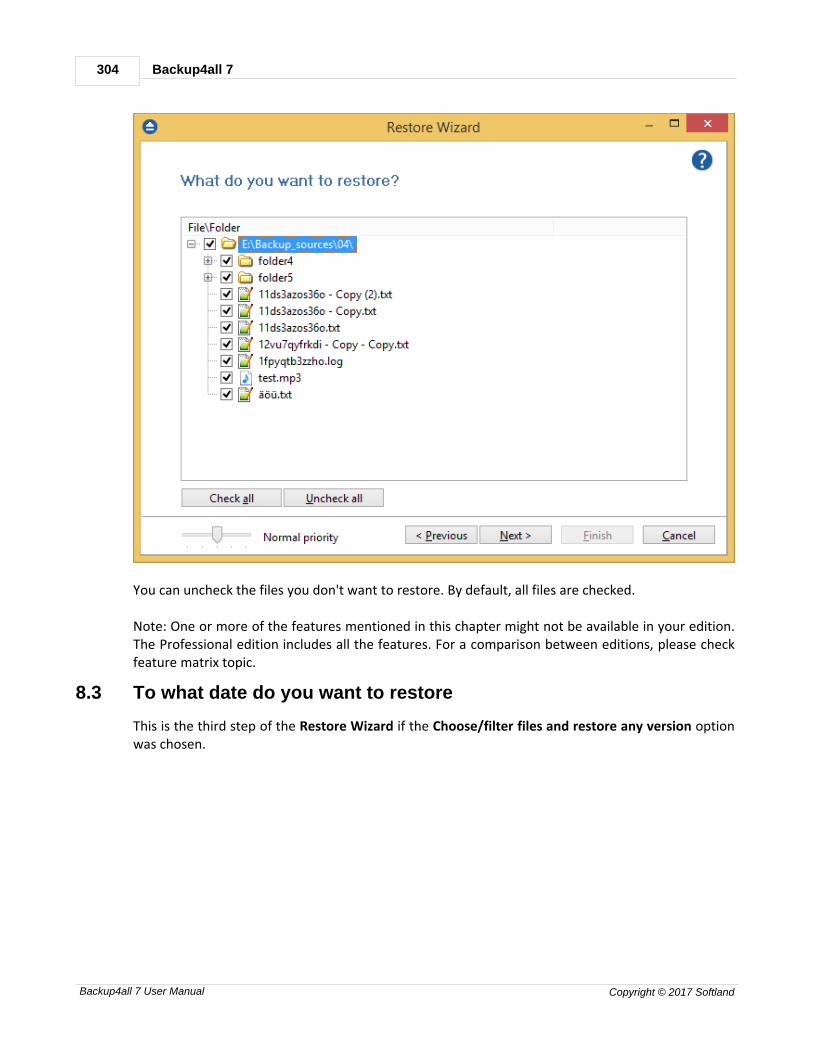
Backup4all 7304
Backup4all 7 User Manual Copyright © 2017 Softland
You can uncheck the files you don't want to restore. By default, all files are checked.
Note: One or more of the features mentioned in this chapter might not be available in your edition.The Professional edition includes all the features. For a comparison between editions, please checkfeature matrix topic.
8.3 To what date do you want to restore
This is the third step of the Restore Wizard if the Choose/filter files and restore any version optionwas chosen.
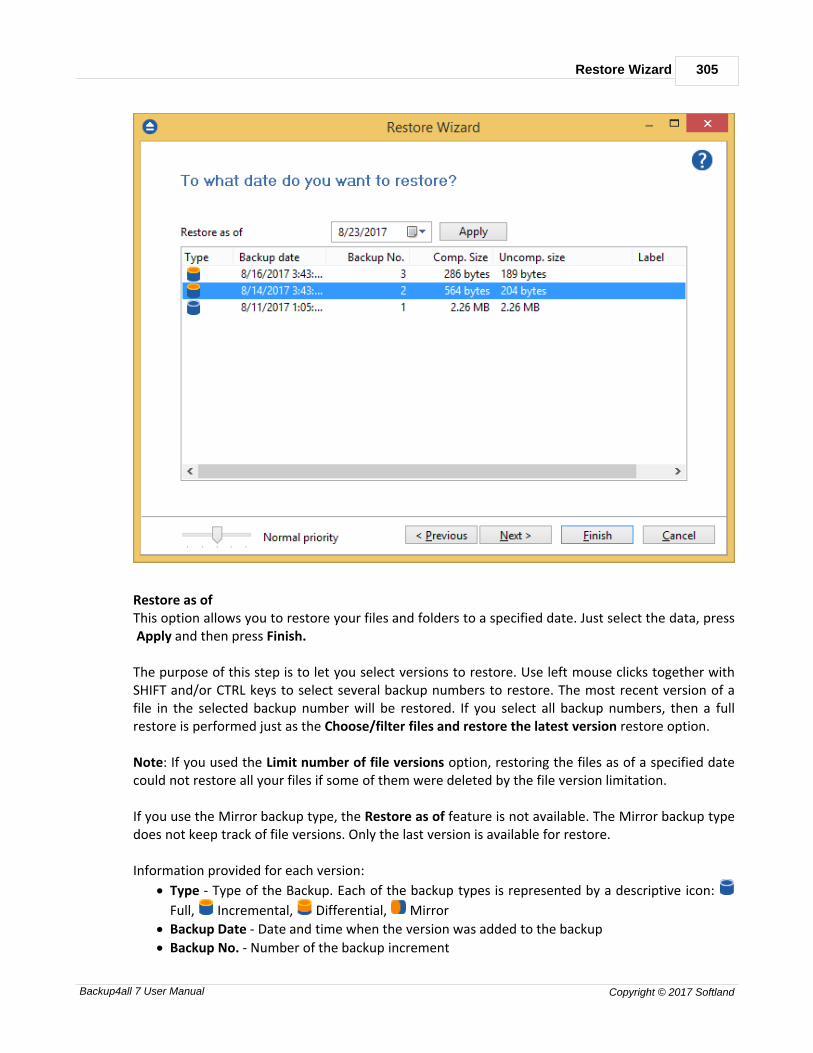
Restore Wizard 305
Backup4all 7 User Manual Copyright © 2017 Softland
Restore as ofThis option allows you to restore your files and folders to a specified date. Just select the data, press Apply and then press Finish.
The purpose of this step is to let you select versions to restore. Use left mouse clicks together withSHIFT and/or CTRL keys to select several backup numbers to restore. The most recent version of afile in the selected backup number will be restored. If you select all backup numbers, then a fullrestore is performed just as the Choose/filter files and restore the latest version restore option.
Note: If you used the Limit number of file versions option, restoring the files as of a specified datecould not restore all your files if some of them were deleted by the file version limitation.
If you use the Mirror backup type, the Restore as of feature is not available. The Mirror backup typedoes not keep track of file versions. Only the last version is available for restore. Information provided for each version:
· Type - Type of the Backup. Each of the backup types is represented by a descriptive icon:
Full, Incremental, Differential, Mirror
· Backup Date - Date and time when the version was added to the backup
· Backup No. - Number of the backup increment

Backup4all 7306
Backup4all 7 User Manual Copyright © 2017 Softland
· File No. - Number of files in the backup
· Folder No. - Number of folders in the backup
· Excluded File No. - Number of excluded files in the backup
· Excluded Folder No. - Number of excluded folders in the backup
· Comp. Size - Size of the file version (compressed)
· Uncomp. Size - Size of the file version (uncompressed)
· Label - Label of the backup number. This column is hidden by default
Note: One or more of the features mentioned in this chapter might not be available in your edition.The Professional edition includes all the features. For a comparison between editions, please checkfeature matrix topic.
8.4 Do you want to filter the files
This is the third step of the Restore Wizard for Choose/filter files and restore the latest versionrestore type. For Choose/filter files and restore any version restore type, this is the fourth step. Youcan filter the files to be restored.Its behavior is the same as the Filters page of the New Backup Wizard or the Backup Propertieswindow, except that the process is restore and not backup.
The Filters page defines files filters to be applied to files that are going to be restored. Only files andfolders that match the filters will be restored.
You can add include or exclude filters. By default all files are included in the list to be restored.

Restore Wizard 307
Backup4all 7 User Manual Copyright © 2017 Softland
The system selects only files that match the include filter and do not match the exclude filter. Thismeans the exclude filter is more powerful: if a file satisfies both include and exclude filters, it will notbe processed by the system.Include and exclude filters are composed from filter restrictions:
· two or more filter restrictions in the include filter means that a file must satisfy at least onerestriction to be restored.
· two or more filter restrictions in the exclude filter means that a file must satisfy any restrictionto be excluded.
In the Type column you can see if the filter is for include or exclude. To change the filter type, pressthe "Change to Include" or "Change to Exclude" button.
You can manage filter restrictions using the buttons:
· Add include - this will open a new window from where you can add a new restriction to thelist of include filters.
· Add exclude - this will open a new window from where you can add a new restriction to thelist of exclude filters.
· Edit - will open the same window as Add, with the selected filter's properties. You will be ableto modify the selected restriction.
· Copy - will create a copy of the selected filter.
· Delete - will delete the selected filter from the list.
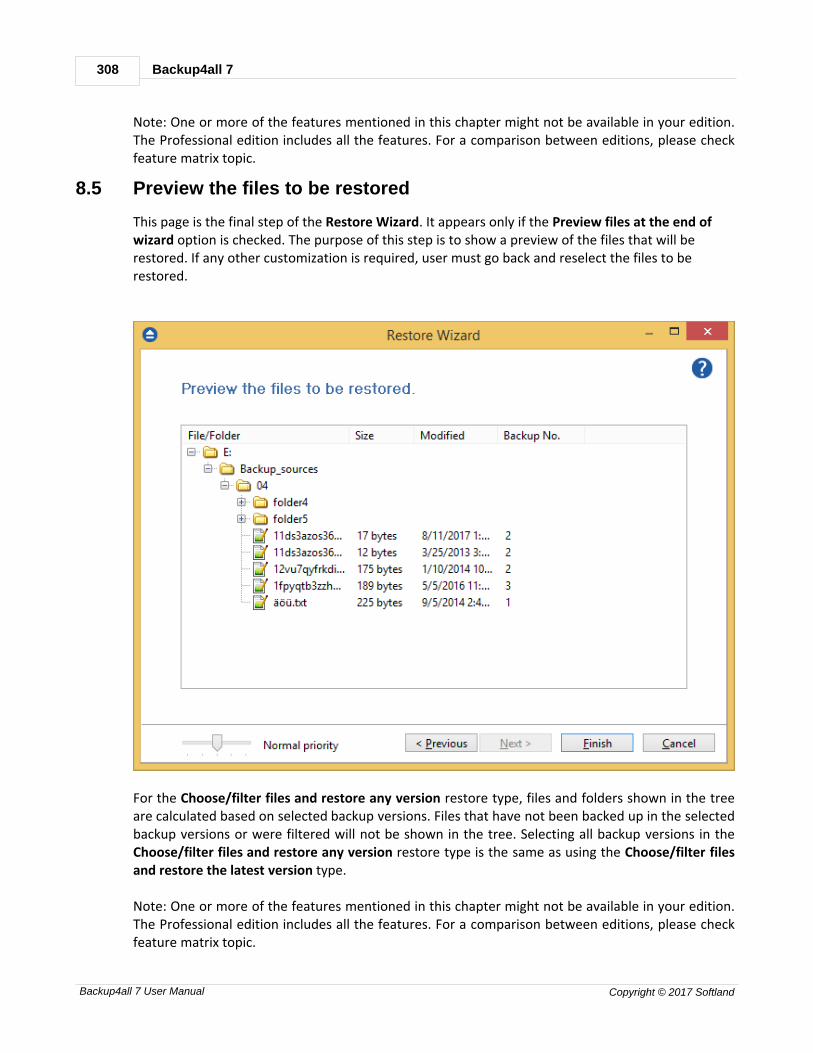
Backup4all 7308
Backup4all 7 User Manual Copyright © 2017 Softland
Note: One or more of the features mentioned in this chapter might not be available in your edition.The Professional edition includes all the features. For a comparison between editions, please checkfeature matrix topic.
8.5 Preview the files to be restored
This page is the final step of the Restore Wizard. It appears only if the Preview files at the end ofwizard option is checked. The purpose of this step is to show a preview of the files that will berestored. If any other customization is required, user must go back and reselect the files to berestored.
For the Choose/filter files and restore any version restore type, files and folders shown in the treeare calculated based on selected backup versions. Files that have not been backed up in the selectedbackup versions or were filtered will not be shown in the tree. Selecting all backup versions in theChoose/filter files and restore any version restore type is the same as using the Choose/filter filesand restore the latest version type.
Note: One or more of the features mentioned in this chapter might not be available in your edition.The Professional edition includes all the features. For a comparison between editions, please checkfeature matrix topic.

File Filtering
Part
IX

Backup4all 7310
Backup4all 7 User Manual Copyright © 2017 Softland
9 File Filtering
9.1 Overview
File filtering in Backup4all provides an intuitive way to define what files and folders to back up orrestore.
Select Folders and Files for filtering The files can be filtered when added to backup. On the "What do you want to backup" page, fromthe Backup Wizard or Backup Properties->Sources page each file and folder is shown in the treewith a checkbox in front of it. If you uncheck it, the file or folder will be excluded from the backup orrestore process.
After applying filters, each file and folder is shown in the tree with a checkbox in front of it. If youuncheck it, the file or folder will be excluded from the backup or restore process.
Filter The role of the filter is to restrict the files from the sources or destination that will participate in thebackup or restore process. The filter actually consists of two filters: the include filter and the excludefilter.
Include filter shows which files will be included in the backup or restore process. If the filter type is"Include", it means the files which match the filter will be included in backup.Exclude filter shows the files that will be excluded from the backup or restore. If the filter type is"Exclude", it means the files which match the filter will be excluded from backup.You can change the filter type from Include to Exclude or from Exclude to Include if you press the"Change to Include"/"Change to Exclude" button. If no filters are defined, then all the files andfolders from sources will be backed up or restored. Customize There are special situations when the main filter is not enough to define the files to be backed up orrestored. In this case, you can refine the filters adding individual filters for folders. The refined filterapplies to all the files and subfolders of that folder. All files and folders for which a refined filter isapplied are marked with red.To remove a refined filter, select the folder, select the filter and press the Delete button.
Note: One or more of the features mentioned in this chapter might not be available in your edition.The Professional edition includes all the features. For a comparison between editions, please checkfeature matrix topic.

File Filtering 311
Backup4all 7 User Manual Copyright © 2017 Softland
9.2 File Filter
The Edit file filter item window is shown every time a file filter restriction is added or modified. Itcan be opened by pressing the Add button from the Filters page (New Backup Wizard, BackupProperties, Restore Wizard window or Files->Options) or the Edit button (if filters are alreadydefined).
What do you want to do?
User can Create new filter, Create new starting from existing filter or Use existing filter. Theexisting filters are listed in the drop down list and they can be added, edit or deleted from File->Options->Filters
General
In the Filter name field you can type the name of the created filter. By default, the "New filterconfiguration" name is assigned. If you use an existing filter, the name of that filter is used.
File name

Backup4all 7312
Backup4all 7 User Manual Copyright © 2017 Softland
Enabling this will allow defining filters based on file name pattern. Press Add and select an existing file extension from the Filter combo (*.doc, *.pdf, *.zip etc.). If theextension does not exist in the combo, just type it in and press OK. You can use the Edit or Deletebuttons to modify/remove the file name filters defined. File name patterns can include:
· * - it matches one or more letters. For example a*.doc matches all files that start with a andhave .doc extension
· ? - it matches only one letter. For example a*.do? matches all files that start with a and haveany extension composed of three letters, the first two being do
Folder name
Enabling this will allow defining filters based on folder name pattern. Enter the directory name that you want to filter in the following format: *\directory_name\*(leading *\ and ending \* are required). Backup4all will apply the filter to all the directories that arecalled directory_name. If you want to apply the filter to directories containing a specific word, youmust enter it in the following format *\*keyword*\*. Now Backup4all will apply the filter to all thedirectories that have the word keyword in their names. You can use the Edit or Delete buttons tomodify/remove the folder name filters defined.You can also use environment variables when creating filters: %temp%, %SystemRoot% etc.
File attributes
Enabling this section allows the user to specify file filters depending on the file attributes.
File Filtering 313
Backup4all 7 User Manual Copyright © 2017 Softland
There is a list of quick sets to choose for predefined filter criteria:
· Custom - this is the default option and allows you to check whatever attributes you want
· None - if this is selected all the file attributes check boxes are unchecked
· FAT attributes - if this is selected, a set of File Allocation Table attributes will be used for filefiltering.
· NTFS attributes - if this is selected, a set of NTFS (New Technology File System) attributes willbe used for filtering. Note that these attributes are available only on Windows XP and above.
File attributes available for file filters:
· Read-Only - if checked files with read-only attribute will be selected
· Archived - if checked files with archived attribute will be selected
· Hidden - if checked files with hidden attribute will be selected
· System - if checked files with system attribute will be selected
· Compressed (only NTFS) - if checked files with compressed attribute will be selected
· Temporary (only NTFS) - if checked files with temporary attribute will be selected
· Encrypted (only NTFS) - if checked files with encrypted attribute will be selected
· Not indexed (only NTFS) - if checked files with "not indexed" attribute will be selected
· Offline (only NTFS) - if checked files with offline attribute will be selected
· Reparse point (only NTFS) - if checked files with reparse point attribute will be selected
· Sparse file (only NTFS) - if checked files with sparse file attribute will be selected
For example, if you want to include files with read-only and archived attributes set, you have tocheck both attributes checkboxes in a single restriction. If you want to include files with read-only or archived attributes set, you have to make two separate restrictions: one for read-only and anotherfor archived.
File dates
This section allows the user to build restrictions based on file dates and times. To enable options inthis section, check the Filter by date option.Filters in this section can be applied by selecting one of the available date filters:
· date accessed
· date and time accessed
· date modified
· date and time modified
· date created
· date and time created
You can compare these dates and times with a fixed date or a relative date: today, yesterday, oneweek ago or one month ago.Comparison operators available:
· < > date (and time) not equal to fixed or relative date
· < = date (and time) less than or equal to fixed or relative date
· > = date (and time) greater than or equal to fixed or relative date
· < date (and time) less than fixed or relative date
Backup4all 7314
Backup4all 7 User Manual Copyright © 2017 Softland
· > date (and time) greater than fixed or relative date
· in interval - date (and time) in a particular time interval between the Start date and End date
File size
This section provides the possibility to build restrictions based on the file size. To enable the optionsin this section, check the Filter by size option. You can enter a file size in the Size field and select ameasurement Unit. The filter will compare the file size on disk with the size you enter using thecomparison filters you selected:
· < > file size on disk not equal to the value in the Size field
· < = file size on disk less than or equal to the value in the Size field
· > = file size on disk greater than or equal to the value in the Size field
· < file size on disk less than the value in the Size field
· > file size on disk greater than the value in the Size field Note:Filters on files and filters on folders must be created individually. If you use a file and a folder filtercondition in the same filter, files will be filtered only if both filter conditions were met.
Examples
· If you use a single filter for .jpg files and Temp folder, only the .jpg files from Temp folder will befiltered. If you use separate filters for files and folders, all .jpg files and whole Temp folder will befiltered.
· Suppose you want to backup (or restore) all .pdf files accessed in the last month and all .doc filesmodified in the last week, but you don't want to backup (or restore) system or hidden files.
Here are the steps to define this filter starting from the default filter:1) Add a new restriction in the include filter: enable File name, add *.pdf file pattern and setdate accessed to be greater than or equal to fixed date one month ago; click OK2) Add a new restriction: add *.doc file pattern and set date and time modified to be greaterthan or equal to fixed date one week ago; click OK3) Add a new restriction: enable File attributes and the System checkbox, then click OK4) Add a new restriction: enable File attributes and the Hidden checkbox, then click OK5) For the last two restrictions, check the Use as exclude filter boxes.
You may create your own filters, edit predefined filters, or simply using predefined filters (as theyare set in File->Options->Filters). With the Use existing option, the filter that you select isconsidered to be locked to the predefined filter.

File Filtering 315
Backup4all 7 User Manual Copyright © 2017 Softland
By locking a filter in Backup Properties to a predefined filter (File->Options->Filters), all changes ofthe predefined filter will propagate to the job filter. This is useful when you want to use the samepredefined filter in several backup jobs. All locked job filters will be updated when the predefinedfilter is changed in Options->Filters.
Note: One or more of the features mentioned in this chapter might not be available in your edition.The Professional edition includes all the features. For a comparison between editions, please checkfeature matrix topic.
Command Line
Part
X
Command Line 317
Backup4all 7 User Manual Copyright © 2017 Softland
10 Command Line
10.1 Backup
Backup4all uses for each action a small application that runs independently from the mainapplication. They can be used to create batch files. The command line parameters for backup action are described bellow.
Backup jobs
SyntaxbBackup [{/f|/d|/i|/r}] job_name [/e][/c] [-Priority{1|2|3|4}]
Formatting legend Italic - Information that must be supplied by the user Bold - Elements that the user must type exactly as shown / - Switches are preceded by slash [] - Elements between square brackets are optional | - Vertical line separates possible choices {} - Items between braces are a set of choices from which the user must choose only one
Command line backup can have as parameters an ".ini" file (with its full path), a ".bkc" file (with itsfull path) or the name of the backup job. The ".ini" or ".bkc" file must exist in the specified path, thebackup job must be defined in Backup4all or otherwise the backup will not run.
Switches that apply to this parameter (case insensitive, preceded by "/" or "-"):
· /f - force the execution of a full backup
· /d - force the execution of a differential backup
· /i - force the execution of an incremental backup
· /r - execute the backup with its defined type in Backup Properties (this is the default behaviorwhen the backup name is specified without switches)
· /e - erase the disc(Floppy/CD/DVD/Blu-ray) before backup
· /c - deletes the .bkc file and all zip files associated with the named backup job
If the backup job to be executed has the backup type set to Mirror, then a mirror backup will beperformed and the "/f", "/d", "/i" switches will be ignored even if they are set.For the priority level you can select a value between 1-4, as 1 is the lowest priority and 4 is thehighest priority.
ExamplesTo execute a backup for My Pictures job, with the default backup type, use:
bBackup /r "My Pictures" -Priority 2To force a full backup on the backup job associated with the IE Favorites.bkc located in the "E:\Backup Destination" folder, use:
bBackup /f "E:\Backup Destination\IE Favorites..bkc" -Priority 2
Backup4all 7318
Backup4all 7 User Manual Copyright © 2017 Softland
To force an incremental backup on the My Documents backup job, use:
bBackup /i "My Documents" -Priority 2
Tags
SyntaxbTagBackup tag_name [-Priority{1|2|3|4}]
You can also have as parameter an existing tag. This tag must be defined in Backup4all, otherwisethe backup will not run.Switch to apply to this parameter (case insensitive, preceded by "/" or "-"):
For the priority level you can select a value between 1-4, as 1 is the lowest priority and 4 is thehighest priority.
Examples To execute all backup jobs from the Samples tag, use:
bTagBackup Samples -Priority 2 Backup4all returns exit codes after each task execution (backup, independent test or cleanup).As a general case, if the backup was successful, the exit code is 0, otherwise is different.Here are the possible exit codes:
· 0 : action was successful
· 1 : action has not started, parameter errors, syntax errors, other errors
· 2 : action finished with errors
· 3 : action was finished with warnings
· 4 : independent test was finished with errors
· 5 : independent test was finished with warnings
Backup job definitions (".ini" files) are saved separately for each Windows user. These files can befound in the "AppData\Softland\Backup4all 7\IniFiles" folder of your user profile (if it's not changedin the File->Options->File locations window). Backup catalogs (".bkc" files) are saved locally and inthe backup destination together with the backup files. When a backup job is executed for the firsttime, a .bkc file is created. There is only one .bkc file for each backup job. The command line application uses the same engine, same configuration files and the same log filesas the main application. It always performs an unattended backup. You can use Backup4all'sinterface to define backup jobs and backup tags which can be used later as parameters for thecommand line application. You can create a shortcut to a backup job or to a backup tag so you won't
Command Line 319
Backup4all 7 User Manual Copyright © 2017 Softland
have to use complicated paths. To create a shortcut, use the Create Shortcut menu item from theFile menu.
Note: One or more of the features mentioned in this chapter might not be available in your edition.The Professional edition includes all the features. For a comparison between editions, please checkfeature matrix topic.
10.2 Test
Backup4all uses for each action a small application that runs independently from the mainapplication. They can be used to create batch files. The command line parameters for test action are described bellow.
Backup jobs
SyntaxbTest [/t] job_name [-Priority{1|2|3|4}]
Formatting legend Italic - Information that must be supplied by the user Bold - Elements that the user must type exactly as shown / - Switches are preceded by slash [] - Elements between square brackets are optional | - Vertical line separates possible choices {} - Items between braces are a set of choices from which the user must choose only one
· /t - tests the named backup job. Supports also an additional parameter [/TN 1,2,5..20|*|#] - ifno TN is set then it will test all backup jobs same as using *; if # is used it will test only the lastbackup job (# can be used in the same time with other numbers too).
For the priority level you can select a value between 1-4, as 1 is the lowest priority and 4 is thehighest priority.
Examples:To execute a test for all backup numbers of the My Pictures backup job
bTest /t "My Pictures" /tn * -Priority 2
To execute a test for first two and last backup number of the My Pictures backup job
bTest /t "My Pictures" /tn 1,2,# -Priority 2
Tags
SyntaxbTagTest tag_name [/TN 1,2,5...20|*|#] [-Priority{1|2|3|4}]
Backup4all 7320
Backup4all 7 User Manual Copyright © 2017 Softland
You can also have as parameter an existing tag. This tag must be defined in Backup4all, otherwisethe backup will not run. Switch to apply to this parameter (case insensitive, preceded by "/" or "-"):
· /TN 1,2,5...20|*|# - if no TN is set then it will test all backup jobs same as using *; if # is usedit will test only the last backup job (# can be used in the same time with other numbers too).
For the priority level you can select a value between 1-4, as 1 is the lowest priority and 4 is thehighest priority.
Examples:To execute a test for the first backup of all jobs in Samples tag, use:
bTagTest Samples /TN 1 -Priority 2
Backup4all returns exit codes after each task execution (backup, independent test, repair, restore orcleanup).As a general case, if the action was successful, the exit code is 0, otherwise is different.Here are the possible exit codes:
· 0 : action was successful
· 1 : action has not started, parameter errors, syntax errors, other errors
· 2 : action finished with errors
· 3 : action was finished with warnings
· 4 : independent test was finished with errors
· 5 : independent test was finished with warnings
Note: One or more of the features mentioned in this chapter might not be available in your edition.The Professional edition includes all the features. For a comparison between editions, please checkfeature matrix topic.
10.3 Repair
Backup4all uses for each action a small application that runs independently from the mainapplication. They can be used to create batch files. The command line parameters for repair action are described bellow. The repair action is composedby a test action followed (or not - it depends if you want to repair only the catalog) by a backupaction.
Backup jobs
SyntaxbTest [[/T] job_name /RP /RPWB] [-Priority[{1|2|3|4}]
Formatting legend Italic - Information that must be supplied by the user Bold - Elements that the user must type exactly as shown / - Switches are preceded by slash [] - Elements between square brackets are optional

Command Line 321
Backup4all 7 User Manual Copyright © 2017 Softland
| - Vertical line separates possible choices {} - Items between braces are a set of choices from which the user must choose only one
· /t - tests the named backup job to find the problems in backup.
· /RP - repairs the backup catalog only. All files and folders in backup execution will be tested.Those not found in destination will be also removed from the backup catalog so they will bebacked up on the next backup execution.
· /RPWB - repairs the backup in destination. All files and folders added in the last backupexecution will be tested. Those not found in destination will be backed up again in order toreflect the backup catalog.
If only the catalog needs to be repaired, use only the /RP switch.For the priority level you can select a value between 1-4, as 1 is the lowest priority and 4 is thehighest priority.
Examples:To execute a repair for My Pictures backup job
bTest /t "My Pictures" /RP /RPWB -Priority 2
To execute only a catalog repair for My Pictures backup job
bTest /t "My Pictures" /RP -Priority 2
Tags
Syntax
bTagTest tag_name [/RP /RPWB] [-Priority{1|2|3|4}]
· /RP - execute the repair for the backup catalogs only. All files and folders added in the lastbackup execution will be tested. Those not found in destination will be also removed from thebackup catalog so they will be backed up on the next backup execution.
· /RPWB - execute the repair for the backups in destination. All files and folders added in thelast backup execution will be tested. Those not found in destination will be backed up again inorder to reflect the backup catalog.
For the priority level you can select a value between 1-4, as 1 is the lowest priority and 4 is thehighest priority.
Examples:To execute a repair for Samples tag
bTagTest "Samples" /RP /RPWB -Priority 2
To execute a repair for Projects tag, only the backup catalogs:
bTagTest "Projects" /RP -Priority 2

Backup4all 7322
Backup4all 7 User Manual Copyright © 2017 Softland
Backup4all returns exit codes after each task execution (backup, independent test, repair, restore orcleanup).As a general case, if the action was successful, the exit code is 0, otherwise is different.Here are the possible exit codes:
· 0 : action was successful
· 1 : action has not started, parameter errors, syntax errors, other errors
· 2 : action finished with errors
· 3 : action was finished with warnings
· 4 : independent test was finished with errors
· 5 : independent test was finished with warnings
Note: One or more of the features mentioned in this chapter might not be available in your edition.The Professional edition includes all the features. For a comparison between editions, please checkfeature matrix topic.
10.4 Restore
Backup4all uses for each action a small application that runs independently from the mainapplication. They can be used to create batch files. The command line parameters for restore action are described bellow.
Backup jobs
SyntaxbRestore [/RE] job_name [/DEST path] [/NDL] [/DATE] [/RNC] [/RDE] [-Priority[{1|2|3|4}]
Formatting legend Italic - Information that must be supplied by the user Bold - Elements that the user must type exactly as shown / - Switches are preceded by slash [] - Elements between square brackets are optional | - Vertical line separates possible choices {} - Items between braces are a set of choices from which the user must choose only one
· /RE - execute the restore for the named backup job
· /DEST - execute the restore into the specified destination. You also need to enter the path forrestore.
· /NDL - execute the restore without creating the drive letter folder
· /DATE - execute the restore of all files as of a specified date
· /RNC - execute the restore of the specified backup numbers
· /RDE - execute the restore including excluded and deleted files
Examples:To execute a restore for My Pictures backup job
bRestore /RE "My Pictures" -Priority 2
Command Line 323
Backup4all 7 User Manual Copyright © 2017 Softland
To execute a restore for My Pictures backup job to another destination as of a specified date
bRestore /RE "My Pictures" /DEST "C:\Restore" /DATE 12.30.2011 -Priority 2
Tags
SyntaxbTagRestore [/RE] tag_name [/DEST path] [/NDL] [-Priority[{1|2|3|4}] }]
· /RE - execute the restore for the named backup tag
· /DEST - execute the restore into the specified destination. You also need to enter the path forrestore.
· /NDL - execute the restore without creating the drive letter folder
For the priority level you can select a value between 1-4, as 1 is the lowest priority and 4 is thehighest priority.
Examples:To execute a restore for Samples tag in original location:
bTagRestore /RE "Samples" -Priority 2
To execute a restore for Documents backup tag to another destination without creating drive letter:
bRestore /RE "Documents" /NDL /DEST "C:\Restore" -Priority 2
Backup4all returns exit codes after each task execution (backup, independent test, repair, restore orcleanup).As a general case, if the action was successful, the exit code is 0, otherwise is different.Here are the possible exit codes:
· 0 : action was successful
· 1 : action has not started, parameter errors, syntax errors, other errors
· 2 : action finished with errors
· 3 : action was finished with warnings
· 4 : independent test was finished with errors
· 5 : independent test was finished with warnings
Note: One or more of the features mentioned in this chapter might not be available in your edition.The Professional edition includes all the features. For a comparison between editions, please checkfeature matrix topic.
10.5 Cleanup
Backup4all uses for each action a small application that runs independently from the mainapplication. They can be used to create batch files. The command line parameters for cleanup action are described bellow.
Backup4all 7324
Backup4all 7 User Manual Copyright © 2017 Softland
Backup jobs
SyntaxbCleanup [/X] job_name [-Priority[{1|2|3|4}]
Formatting legend Italic - Information that must be supplied by the user Bold - Elements that the user must type exactly as shown / - Switches are preceded by slash [] - Elements between square brackets are optional | - Vertical line separates possible choices {} - Items between braces are a set of choices from which the user must choose only one
· /x - cleans the backup. Supports additional parameters:
· [/IE mm.dd.yyyy] - clean the backups older than the specified date
· [/IS mm.dd.yyyy] - clean the backups newer then the specified date
· [/OT n /OTU {D|W|M|Y}] - n is the number of days (D), weeks (W), months (M) or years(Y)
· [/KD] - keep Differential backups
· [/KF] - keep Full backups
Examples: To clean all backup versions older than two weeks and keep the full and differential backups of theMy Pictures backup job, use:
bCleanup /X "My Pictures" /OT 2 /OTU W /KF / KD -Priority 2
Tags
SyntaxbTagCleanup [/X] tag_name [-Priority[{1|2|3|4}]
Additional parameters can be used:
· [/IE mm.dd.yyyy] - clean the backups older than the specified date
· [/IS mm.dd.yyyy] - clean the backups newer then the specified date
· [/OT n /OTU {D|W|M|Y}] - n is the number of days (D), weeks (W), months (M) or years(Y)
· [/KD] - keep Differential backups
· [/KF] - keep Full backupsThe mirror backup jobs will be ignored when running a cleanup for a tag including mirror backupjobs.
Examples: To clean all backup versions older than two weeks and keep the full and differential backups of the
Command Line 325
Backup4all 7 User Manual Copyright © 2017 Softland
Pictures tag, use:
bCleanup /X "Pictures" /OT 2 /OTU W /KF / KD -Priority 2 To execute a cleanup for Samples tag
bTagCleanup /X "Samples" /OT 2 /OTU W -Priority 2 Backup4all returns exit codes after each task execution (backup, independent test, repair, restore orcleanup).As a general case, if the action was successful, the exit code is 0, otherwise is different.Here are the possible exit codes:
· 0 : action was successful
· 1 : action has not started, parameter errors, syntax errors, other errors
· 2 : action finished with errors
· 3 : action was finished with warnings
· 4 : independent test was finished with errors
· 5 : independent test was finished with warnings
Note: One or more of the features mentioned in this chapter might not be available in your edition.The Professional edition includes all the features. For a comparison between editions, please checkfeature matrix topic.

Options
Part
XI

Options 327
Backup4all 7 User Manual Copyright © 2017 Softland
11 Options
11.1 General
The General page of the Options window (accessible from the File, Options menu item) containsgeneral settings of the program.
Use settings for
Current UserIf this is selected, the settings used in Backup4all (including backup jobs) are available only for thecurrent logged in user. This way if there are 3 people using the same computer and each logging inthrough a different account, Backup4all will have different settings and jobs for each account. Thiscan be selected upon installation too, in the Select Default Settings step. These settings are kept in afile whose location is customizable.
Backup4all 7328
Backup4all 7 User Manual Copyright © 2017 Softland
All UsersIf this is selected, the settings used in Backup4all (including backup jobs) are available for all users onthe computer where it's installed. This way if there are 3 people using the same computer and eachlogging in through a different account, Backup4all will have the same settings and jobs for eachaccount (kind of like a shared profile). This can be selected upon installation too, in the SelectDefault Settings step. These settings are kept in a file whose location is customizable.
Security Backup4all allows you to lock the program interface, using a password.Press the Set password button to add or change the password. Near this button, the security statusis displayed: "No password" or "Password protected".When opening the program's interface, if the interface is locked, you will be asked for the password.To remove the password, press the Set password button, type the old password and press OK.
Language
In the Language section you can select the language of the program interface by choosing anotherone from the drop down list. Only the languages that were installed with the program are displayed.The language of the interface changes only after the Options window is closed by pressing the OKbutton. The selected language is kept as long as you don't change it or it becomes invalid due tosoftware updates.
The text box below the Language field shows details about the selected language (like translatorname and contact information).
Proxy server
A proxy server can be configured and used to activate/deactivate Backup4all if the computer whereit is installed does not have direct access to internet.In order to use it, just select the server type: HTTPS or SOCKS, then enter the IP and port. If theserver requires authentication, enter the username and password in the corresponding fields.
Note: One or more of the features mentioned in this chapter might not be available in your edition.The Professional edition includes all the features. For a comparison between editions, please checkfeature matrix topic.
11.2 Preferences
The Preferences page of the Options window (accessible from the File, Options menu item) containssettings related to the display of the Toolbar menu.

Options 329
Backup4all 7 User Manual Copyright © 2017 Softland
ToolbarMinimize the RibbonIf checked, the ribbon menu will be minimized. By default it is not checked.
Customize Quick Access ToolbarIf pressed, the Quick Access Toolbar Customizer will open and you can add/remove buttons in theQuick Access Toolbar.
Views
Default viewThe selected view will be assigned as default to the Views button from the application toolbar. The possible views are: Explore, Backup and Statistics.
Show explorer iconsIf checked a small icon is shown for each file in the Explore view. The icon is the standard icon
Backup4all 7330
Backup4all 7 User Manual Copyright © 2017 Softland
associated with the type of the file. You will see the same icons as in File Explorer. If the Exploreview contains a large number of files, you can uncheck this option to show files faster. By defaultthis option is checked.
Hide empty folders on expand allIf checked the folders that do not show any file in the Explore view will be automatically hiddenwhen pressing the Expand All button. By default this option is not checked.
Show context menu in Explore ViewIf checked it will display the context menu when right clicking on a file or folder in the mainwindow's Explore view or the Sources page of the Backup Properties and New Backup Wizardwindows. By default this option is checked.
Measurement unit
AutoIf checked the file sizes are shown like in File Explorer. By default this option is checked.
CustomIf checked you can see all file sizes in the same unit. You can set the desired unit from the dropdown list. Possible choices are: Bytes, KB (kilobytes), MB (megabytes) or GB (gigabytes). Be advisedthat if you select GB as a unit, for files under 10MB the size will be shown as 0GB. By default thisoption is not checked.
External program
Difference viewer: Choose an application to compare the selected file version with the source file inExplore View. You can also use parameters for difference viewer application.
Other
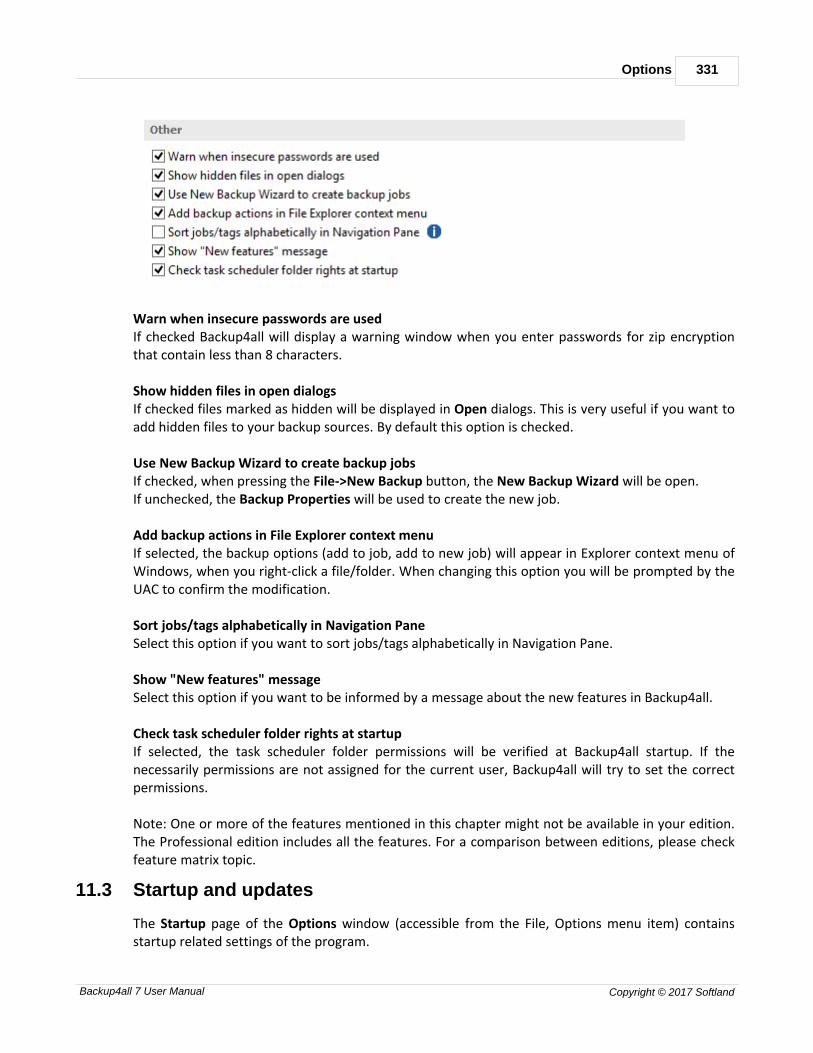
Options 331
Backup4all 7 User Manual Copyright © 2017 Softland
Warn when insecure passwords are usedIf checked Backup4all will display a warning window when you enter passwords for zip encryptionthat contain less than 8 characters. Show hidden files in open dialogsIf checked files marked as hidden will be displayed in Open dialogs. This is very useful if you want toadd hidden files to your backup sources. By default this option is checked.
Use New Backup Wizard to create backup jobsIf checked, when pressing the File->New Backup button, the New Backup Wizard will be open.If unchecked, the Backup Properties will be used to create the new job. Add backup actions in File Explorer context menuIf selected, the backup options (add to job, add to new job) will appear in Explorer context menu ofWindows, when you right-click a file/folder. When changing this option you will be prompted by theUAC to confirm the modification.
Sort jobs/tags alphabetically in Navigation PaneSelect this option if you want to sort jobs/tags alphabetically in Navigation Pane.
Show "New features" messageSelect this option if you want to be informed by a message about the new features in Backup4all.
Check task scheduler folder rights at startupIf selected, the task scheduler folder permissions will be verified at Backup4all startup. If thenecessarily permissions are not assigned for the current user, Backup4all will try to set the correctpermissions.
Note: One or more of the features mentioned in this chapter might not be available in your edition.The Professional edition includes all the features. For a comparison between editions, please checkfeature matrix topic.
11.3 Startup and updates
The Startup page of the Options window (accessible from the File, Options menu item) containsstartup related settings of the program.
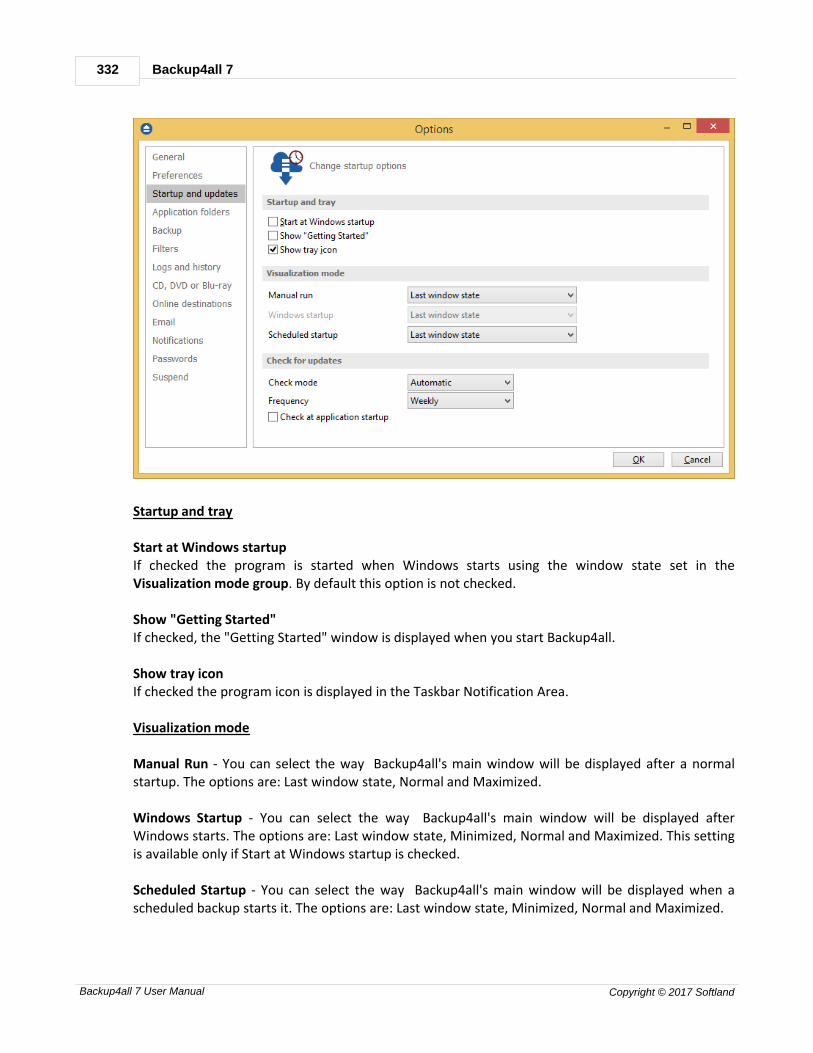
Backup4all 7332
Backup4all 7 User Manual Copyright © 2017 Softland
Startup and tray Start at Windows startupIf checked the program is started when Windows starts using the window state set in theVisualization mode group. By default this option is not checked. Show "Getting Started"If checked, the "Getting Started" window is displayed when you start Backup4all. Show tray iconIf checked the program icon is displayed in the Taskbar Notification Area.
Visualization mode
Manual Run - You can select the way Backup4all's main window will be displayed after a normalstartup. The options are: Last window state, Normal and Maximized. Windows Startup - You can select the way Backup4all's main window will be displayed afterWindows starts. The options are: Last window state, Minimized, Normal and Maximized. This settingis available only if Start at Windows startup is checked.
Scheduled Startup - You can select the way Backup4all's main window will be displayed when ascheduled backup starts it. The options are: Last window state, Minimized, Normal and Maximized.

Options 333
Backup4all 7 User Manual Copyright © 2017 Softland
Check for updates
Check modeUser can choose one of these modes:
· Manual - user will manually check for new updates. This option is selected by default.
· Reminder - the program will remind you with the selected frequency to check for newupdates
· Automatic - the program will automatically check for new updates with the selectedfrequency.
Frequency User can set the frequency for Backup4all to remind or to automatically check for new updates.
Check at application startupIf checked, the program will check for new updates at application startup. Note: One or more of the features mentioned in this chapter might not be available in your edition.The Professional edition includes all the features. For a comparison between editions, please checkfeature matrix topic.
11.4 Application folders
The Application folders page of the Options window (accessible from the File, Options menu item)contains general settings of the program.
Backup4all 7334
Backup4all 7 User Manual Copyright © 2017 Softland
Override settings folder
This is the folder where the program's settings are kept. You can use the Browse button toselect an existing folder. By default this option is set to the "AppData\Softland\Backup4all 7\" folderof your Window login account profile. Override default destination folderThis is the folder used as destination for the newly created backup jobs. The existing backup jobdestinations will not be affected if you change this option (you have to manually change the
destination for them). You can use the Browse button to select an existing folder. By defaultthis option is set to the "My Documents\MyBackup4all 7\" folder of your Window login accountprofile.
Override temporary folderThis folder is used by the compression engine to handle compressed files (.zip). Only a full path isallowed. The recommendation is to set the temporary directory on the hard disk partition with the
most free space available. You can use the Browse button to select an existing folder. By defaultthe option is set to the operating system's temporary folder. Note: One or more of the features mentioned in this chapter might not be available in your edition.The Professional edition includes all the features. For a comparison between editions, please checkfeature matrix topic.
11.5 Backup
The Backup page of the Options window (accessible from the File, Options menu item) containssettings related to the backup operations.
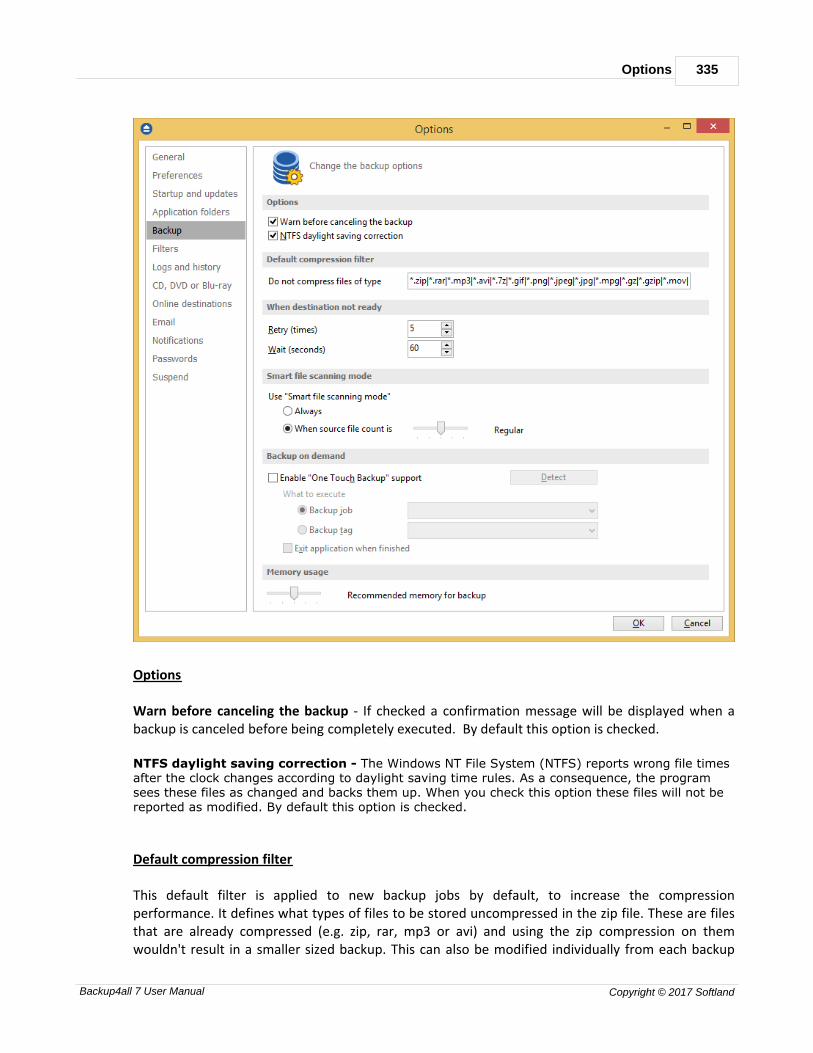
Options 335
Backup4all 7 User Manual Copyright © 2017 Softland
Options Warn before canceling the backup - If checked a confirmation message will be displayed when abackup is canceled before being completely executed. By default this option is checked.
NTFS daylight saving correction - The Windows NT File System (NTFS) reports wrong file timesafter the clock changes according to daylight saving time rules. As a consequence, the programsees these files as changed and backs them up. When you check this option these files will not bereported as modified. By default this option is checked.
Default compression filter
This default filter is applied to new backup jobs by default, to increase the compressionperformance. It defines what types of files to be stored uncompressed in the zip file. These are filesthat are already compressed (e.g. zip, rar, mp3 or avi) and using the zip compression on themwouldn't result in a smaller sized backup. This can also be modified individually from each backup
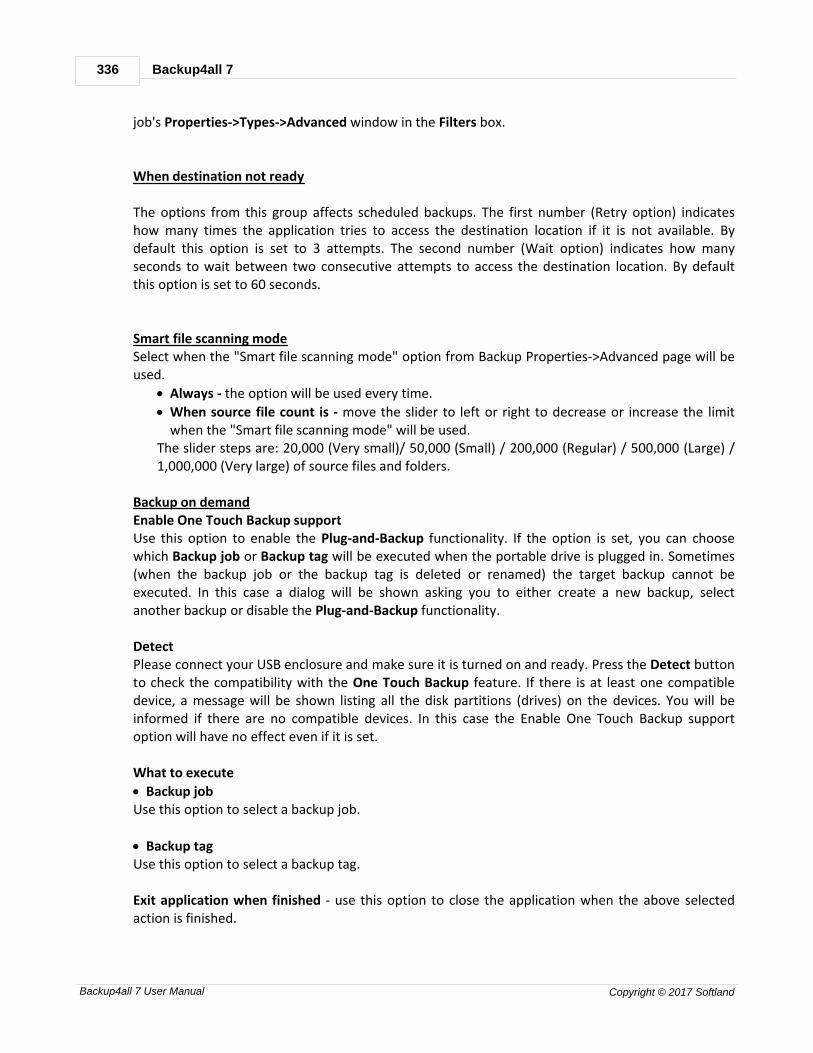
Backup4all 7336
Backup4all 7 User Manual Copyright © 2017 Softland
job's Properties->Types->Advanced window in the Filters box.
When destination not ready
The options from this group affects scheduled backups. The first number (Retry option) indicateshow many times the application tries to access the destination location if it is not available. Bydefault this option is set to 3 attempts. The second number (Wait option) indicates how manyseconds to wait between two consecutive attempts to access the destination location. By defaultthis option is set to 60 seconds.
Smart file scanning modeSelect when the "Smart file scanning mode" option from Backup Properties->Advanced page will beused.
· Always - the option will be used every time.
· When source file count is - move the slider to left or right to decrease or increase the limitwhen the "Smart file scanning mode" will be used.
The slider steps are: 20,000 (Very small)/ 50,000 (Small) / 200,000 (Regular) / 500,000 (Large) /1,000,000 (Very large) of source files and folders.
Backup on demand Enable One Touch Backup supportUse this option to enable the Plug-and-Backup functionality. If the option is set, you can choosewhich Backup job or Backup tag will be executed when the portable drive is plugged in. Sometimes(when the backup job or the backup tag is deleted or renamed) the target backup cannot beexecuted. In this case a dialog will be shown asking you to either create a new backup, selectanother backup or disable the Plug-and-Backup functionality. DetectPlease connect your USB enclosure and make sure it is turned on and ready. Press the Detect buttonto check the compatibility with the One Touch Backup feature. If there is at least one compatibledevice, a message will be shown listing all the disk partitions (drives) on the devices. You will beinformed if there are no compatible devices. In this case the Enable One Touch Backup supportoption will have no effect even if it is set.
What to execute
· Backup jobUse this option to select a backup job.
· Backup tagUse this option to select a backup tag.
Exit application when finished - use this option to close the application when the above selectedaction is finished.
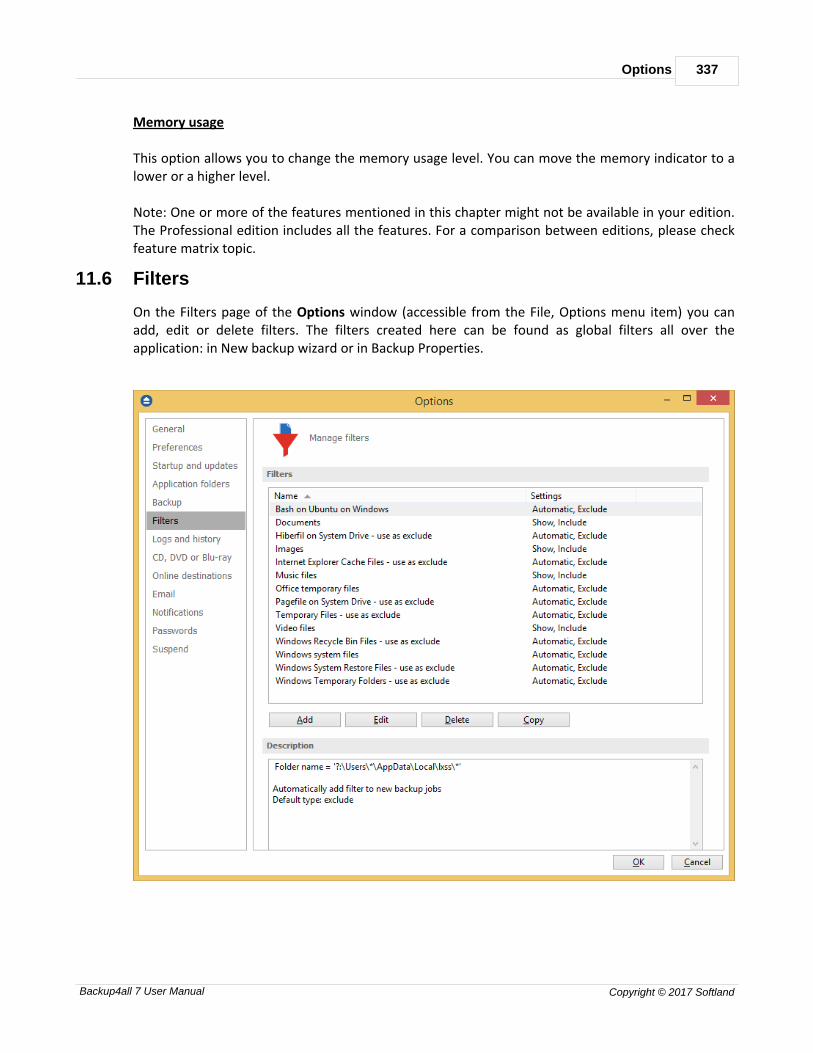
Options 337
Backup4all 7 User Manual Copyright © 2017 Softland
Memory usage
This option allows you to change the memory usage level. You can move the memory indicator to alower or a higher level. Note: One or more of the features mentioned in this chapter might not be available in your edition.The Professional edition includes all the features. For a comparison between editions, please checkfeature matrix topic.
11.6 Filters
On the Filters page of the Options window (accessible from the File, Options menu item) you canadd, edit or delete filters. The filters created here can be found as global filters all over theapplication: in New backup wizard or in Backup Properties.
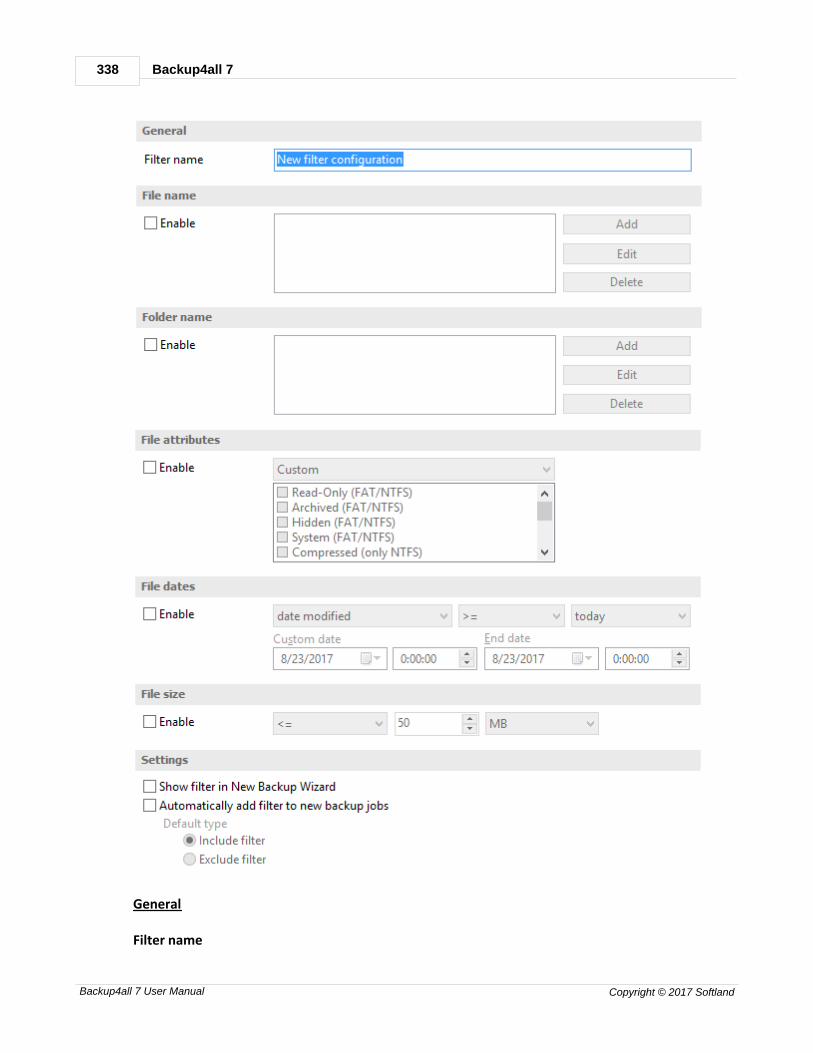
Backup4all 7338
Backup4all 7 User Manual Copyright © 2017 Softland
General
Filter name
Options 339
Backup4all 7 User Manual Copyright © 2017 Softland
Type a name for the filter to be recognized when you want to use it later.
File name
Enabling this will allow defining filters based on file name pattern.Press Add and select an existing file extension from the Filter combo (*.doc, *.pdf, *.zip etc.). If theextension does not exist in the combo, just type it in and press OK. You can use the Edit or Deletebuttons to modify/remove the file name filters defined.
File name patterns can include:
· * - it matches one or more letters. For example a*.doc matches all files that start with a andhave .doc extension
· ? - it matches only one letter. For example a*.do? matches all files that start with a and haveany extension composed of three letters, the first two being do
Folder name
Enabling this will allow defining filters based on folder name pattern.Enter the directory name that you want to filter in the following format: *\directory_name\* .Backup4all will apply the filter to all the directories that are called directory_name. If you want toapply the filter to directories containing a specific word, you must enter it in the following format*\*keyword*\*. Now Backup4all will apply the filter to all the directories that have the wordkeyword in their names. You can use the Edit or Delete buttons to modify/remove the folder namefilters defined.You can also use environment variables when creating filters: %temp%, %SystemRoot% etc.
File attributes
This section allows the user to specify file filters depending on the file attributes. To enable the filteroptions in this section you have to check the Filter by attributes option.There is a list of quick sets to choose for predefined filter criteria:
· None - if this is selected all the file attributes check boxes are unchecked
· Custom - this is the default option and allows you to check whatever attributes you want
· FAT attributes - if this is selected, a set of File Allocation Table attributes will be used for filefiltering
· NTFS attributes - if this is selected, a set of NTFS (New Technology File System) attributes willbe used for filtering. Note that these attributes are available only on Windows XP and above.
File attributes available for file filters:
· Read-Only - if checked files with read-only attribute will be selected
· Archived - if checked files with archived attribute will be selected
· Hidden - if checked files with hidden attribute will be selected
· System - if checked files with system attribute will be selected
Backup4all 7340
Backup4all 7 User Manual Copyright © 2017 Softland
· Compressed (only NTFS) - if checked files with compressed attribute will be selected
· Temporary (only NTFS) - if checked files with temporary attribute will be selected
· Encrypted (only NTFS) - if checked files with encrypted attribute will be selected
· Not indexed (only NTFS) - if checked files with "not indexed" attribute will be selected
· Offline (only NTFS) - if checked files with offline attribute will be selected
· Reparse point (only NTFS) - if checked files with reparse point attribute will be selected
· Sparse file (only NTFS) - if checked files with sparse file attribute will be selected
For example, if you want to include files with read-only and archived attributes set, you have tocheck both attributes checkboxes in a single restriction. If you want to include files with read-only or archived attributes set, you have to make two separate restrictions: one for read-only and anotherfor archived.
File dates
This section allows the user to build restrictions based on file dates and times. To enable options inthis section, check the Filter by date option.Filters in this section can be applied by selecting one of the available date filters:
· date accessed
· date and time accessed
· date modified
· date and time modified
· date created
· date and time created
You can compare these dates and times with a fixed date or a relative date: today, yesterday, oneweek ago or one month ago.Comparison operators available:
· < > date (and time) not equal to fixed or relative date
· < = date (and time) less than or equal to fixed or relative date
· > = date (and time) greater than or equal to fixed or relative date
· < date (and time) less than fixed or relative date
· > date (and time) greater than fixed or relative date
· in interval - date (and time) in a particular time interval between the Start date and End date
File size
This section provides the possibility to build restrictions based on the file size. To enable the optionsin this section, check the Filter by size option. You can enter a file size in the Size field and select ameasurement Unit. The filter will compare the file size on disk with the size you enter using thecomparison filters you selected:
· < > file size on disk not equal to the value in the Size field
· < = file size on disk less than or equal to the value in the Size field
· > = file size on disk greater than or equal to the value in the Size field
Options 341
Backup4all 7 User Manual Copyright © 2017 Softland
· < file size on disk less than the value in the Size field
· > file size on disk greater than the value in the Size field
Settings
Show filter in the New Backup WizardIf checked, the current filter can be selected from the Filters list in New Backup Wizard.
Automatically add filter to new backup jobsIf checked, the current filter will be automatically added to backup jobs you create. You can specifythe default type as: include filter or exclude filter. Using this option you can automatically exclude specific file types from your backups.
ExampleSuppose you want to backup (or restore) all .pdf files accessed in the last month and all .doc filesmodified in the last week, but you don't want to backup (or restore) system or hidden files.Here are the steps to define this filter starting from the default filter:
1) Add a new restriction in the include filter: enable File name, add *.pdf file pattern and setdate accessed to be greater than or equal to fixed date one month ago; click OK2) Add a new restriction: add *.doc file pattern and set date and time modified to be greaterthan or equal to fixed date one week ago; click OK3) Add a new restriction: enable File attributes and the System checkbox, then click OK4) Add a new restriction: enable File attributes and the Hidden checkbox, then click OK5) For the last two restrictions, check the Use as exclude filter boxes.
Note: One or more of the features mentioned in this chapter might not be available in your edition.The Professional edition includes all the features. For a comparison between editions, please checkfeature matrix topic.
11.7 Logs and history
On the Logs and history page of the Options window (accessible from the File, Options menu item)you can change log and history options.

Backup4all 7342
Backup4all 7 User Manual Copyright © 2017 Softland
Content
Log detailed informationIf checked the program will log detailed information about all files handled by the backup, restore ortest process. By default this option is not checked.
Include summary in logIf checked the logs will contain all the text available in the main window's Summary view. By defaultthis option is not checked.
Log folder
In this section you can set the size limits for the folder where the logs are stored. The path to thelogs is set on the File Locations page of the Options window.
Unlimited sizeIf checked the log folder size is not limited, and its size will increase as needed. After a long periodthe program will generate a large number of log files, so you might want to clean up the log foldermanually. By default this option is not checked.
Restricted toIf checked the log folder size is limited to the value set in the Size field below. If the log file of therunning backup job is larger than the limit, it will still be stored in the log folder. When the same
Options 343
Backup4all 7 User Manual Copyright © 2017 Softland
operation will run again, the previous log file will be deleted. By default this option is checked.
The log folder size will be less or equal then the selected value. By default this option is set to 50MB.You can set the desired unit from the drop down list. Possible choices are: Bytes, KB (kilobytes), MB(megabytes) or GB (gigabytes). By default this option is set to MB.
Log Viewer
ProgramUser can choose which program to be used when opening the log files with Backup4all. The availableoptions are: <Default text editor>, <Notepad> or <Wordpad>. User can also browse the computer tochoose another program.
Log file extensionUser can change the extension of log files. The available options are: log and txt.
History
Delete records older thanIf checked the history records older than the selected period will be deleted. The available time unitsare: Days, Weeks, Months and Years. By default, this period is set to 3 Months.
Delete corresponding log files tooThis option can be used only if the Delete records older than option is checked. This option isequivalent with: delete log files older than the period selected above. Note: One or more of the features mentioned in this chapter might not be available in your edition.The Professional edition includes all the features. For a comparison between editions, please checkfeature matrix topic.
11.8 CD, DVD or Blu-ray
The CD, DVD or Blu-ray page of the Options window (accessible from the File, Options menu item)contains the settings of the CD, DVD or Blu-ray burners.
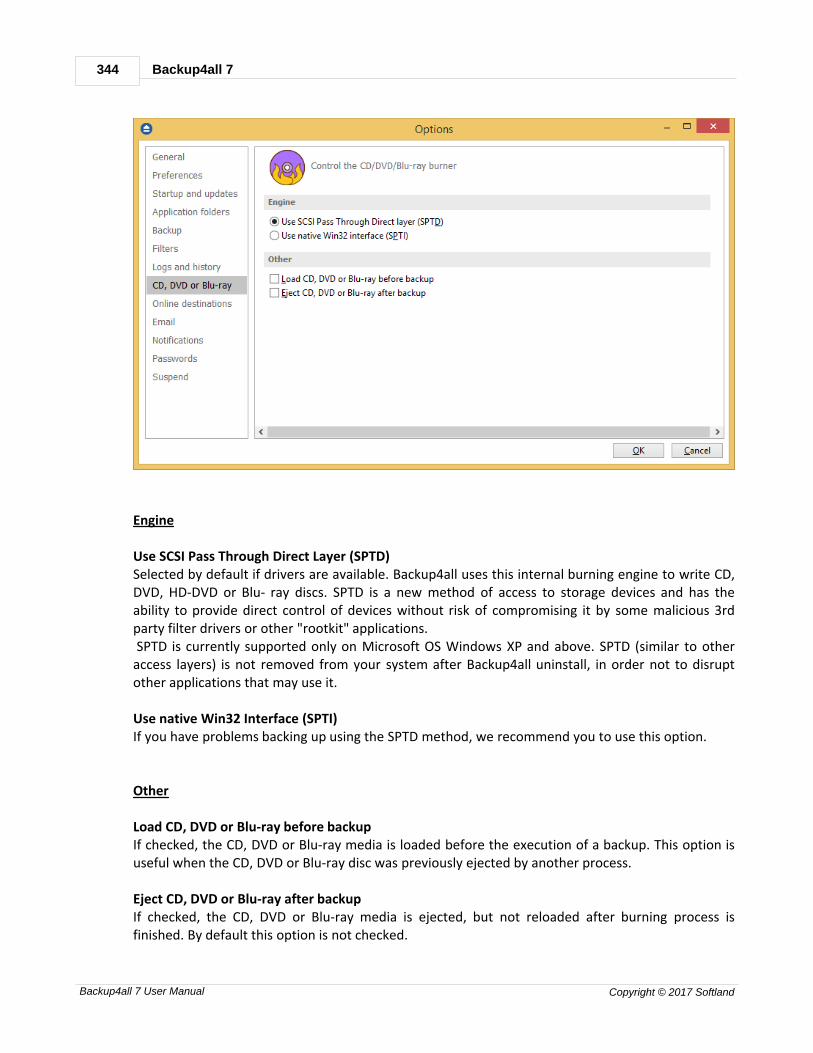
Backup4all 7344
Backup4all 7 User Manual Copyright © 2017 Softland
Engine
Use SCSI Pass Through Direct Layer (SPTD)Selected by default if drivers are available. Backup4all uses this internal burning engine to write CD,DVD, HD-DVD or Blu- ray discs. SPTD is a new method of access to storage devices and has theability to provide direct control of devices without risk of compromising it by some malicious 3rdparty filter drivers or other "rootkit" applications. SPTD is currently supported only on Microsoft OS Windows XP and above. SPTD (similar to otheraccess layers) is not removed from your system after Backup4all uninstall, in order not to disruptother applications that may use it.
Use native Win32 Interface (SPTI)If you have problems backing up using the SPTD method, we recommend you to use this option.
Other
Load CD, DVD or Blu-ray before backupIf checked, the CD, DVD or Blu-ray media is loaded before the execution of a backup. This option isuseful when the CD, DVD or Blu-ray disc was previously ejected by another process.
Eject CD, DVD or Blu-ray after backupIf checked, the CD, DVD or Blu-ray media is ejected, but not reloaded after burning process isfinished. By default this option is not checked.
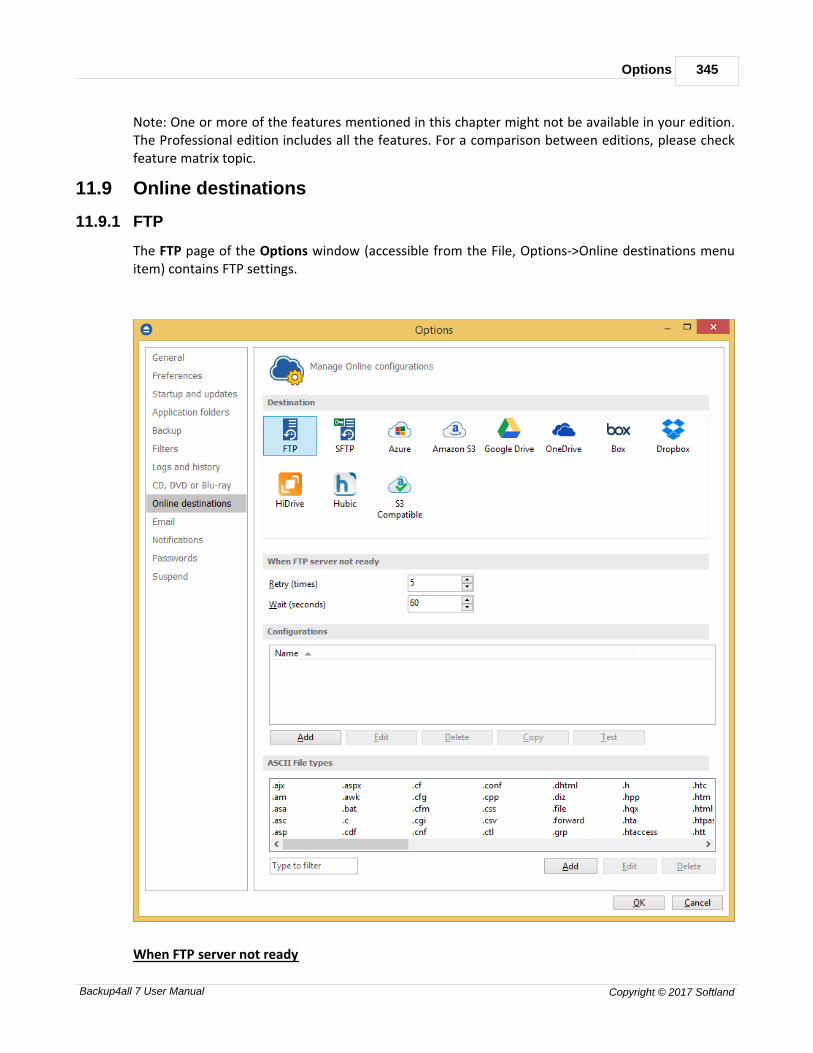
Options 345
Backup4all 7 User Manual Copyright © 2017 Softland
Note: One or more of the features mentioned in this chapter might not be available in your edition.The Professional edition includes all the features. For a comparison between editions, please checkfeature matrix topic.
11.9 Online destinations
11.9.1 FTP
The FTP page of the Options window (accessible from the File, Options->Online destinations menuitem) contains FTP settings.
When FTP server not ready
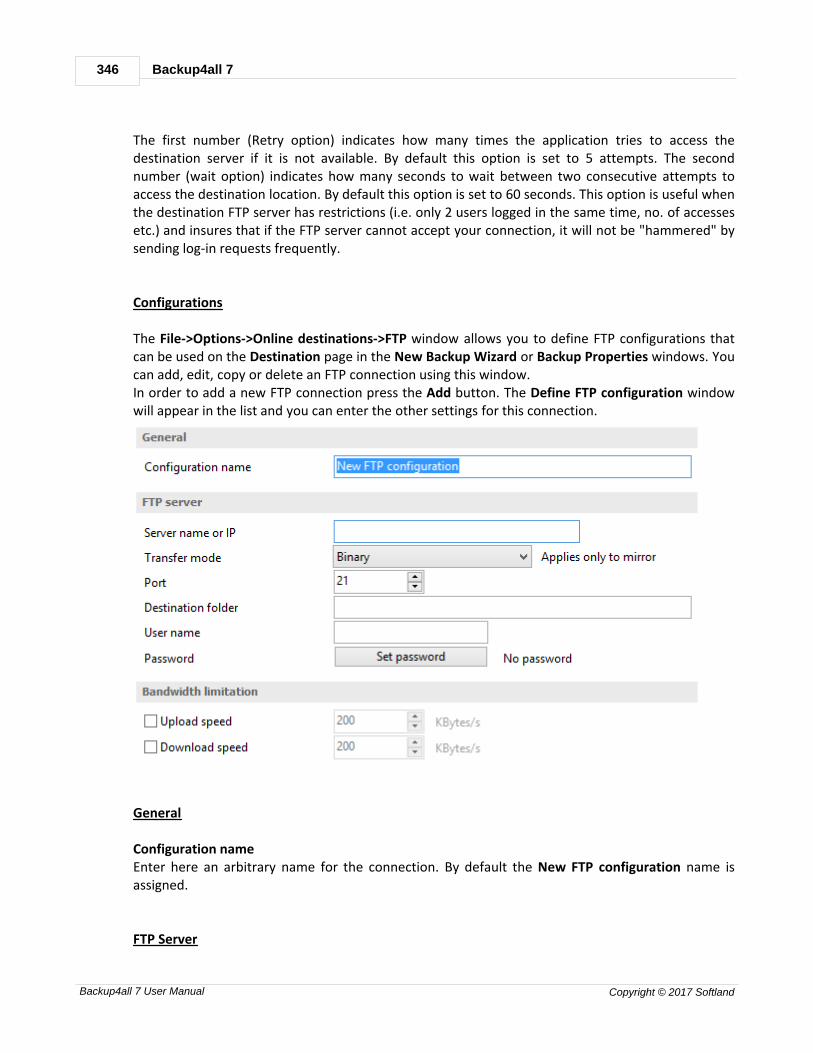
Backup4all 7346
Backup4all 7 User Manual Copyright © 2017 Softland
The first number (Retry option) indicates how many times the application tries to access thedestination server if it is not available. By default this option is set to 5 attempts. The secondnumber (wait option) indicates how many seconds to wait between two consecutive attempts toaccess the destination location. By default this option is set to 60 seconds. This option is useful whenthe destination FTP server has restrictions (i.e. only 2 users logged in the same time, no. of accessesetc.) and insures that if the FTP server cannot accept your connection, it will not be "hammered" bysending log-in requests frequently.
Configurations
The File->Options->Online destinations->FTP window allows you to define FTP configurations thatcan be used on the Destination page in the New Backup Wizard or Backup Properties windows. Youcan add, edit, copy or delete an FTP connection using this window.In order to add a new FTP connection press the Add button. The Define FTP configuration windowwill appear in the list and you can enter the other settings for this connection.
General
Configuration nameEnter here an arbitrary name for the connection. By default the New FTP configuration name isassigned.
FTP Server
Options 347
Backup4all 7 User Manual Copyright © 2017 Softland
Server name or IPIn this field you have to enter the name or IP address for the FTP server
Transfer mode - Here you can select the transfer mode: Binary, ASCII or Auto.
· Binary: it refers to transferring files as a binary stream of data. The binary mode transmits theraw bytes of the file being transferred. In this way, the file is transferred in its exact originalform.
· ASCII: it stands for American Standard Code for Information Interchange, and is a type ofcharacter encoding based on the English language used on devices that handle informationstored in text. It includes 33 non-printed control characters and 94 printed characters such asletters and punctuation.
· Auto: according to the list of ASCII files defined in File->Options->FTP, the files will beuploaded in ascii or binary mode, depending on their extension.
By default, binary mode is selected and it applies only to Mirror backup type. That is useful ifyou have a Linux FTP server as backup destination and want to download the backed up fileswith another application which uses the Auto transfer mode. Uploading the files to a Linuxserver in binary mode and downloading them in Auto mode, causes the files to be modified byadding a new empty line at the end of each file.
Port In this field you have to enter the port number if different than the default FTP ports (21).
Destination folderHere you can specify a destination folder on the remote FTP server where the backup will be stored.If the entered folder does not exist, it will be created on the server. If no destination folder is set,Backup4all will automatically create a folder using the name of the backup job.
User nameIf this is a private FTP server (no anonymous access allowed) you have to enter the user name foryour account.
PasswordIn this field you can enter the password for the FTP server. There are FTP servers that allowanonymous access (public FTP servers). You can connect to these types of FTP servers using as username Anonymous and your email address as password. It is not recommended to backup importantfiles to public FTP servers.
Bandwidth limitation
This section allows setting different limitations for upload/download speed:
· Upload speed - if checked you can set a maximum upload speed for the FTP transfer
· Download speed - if checked you can set a maximum upload speed for the FTP transfer
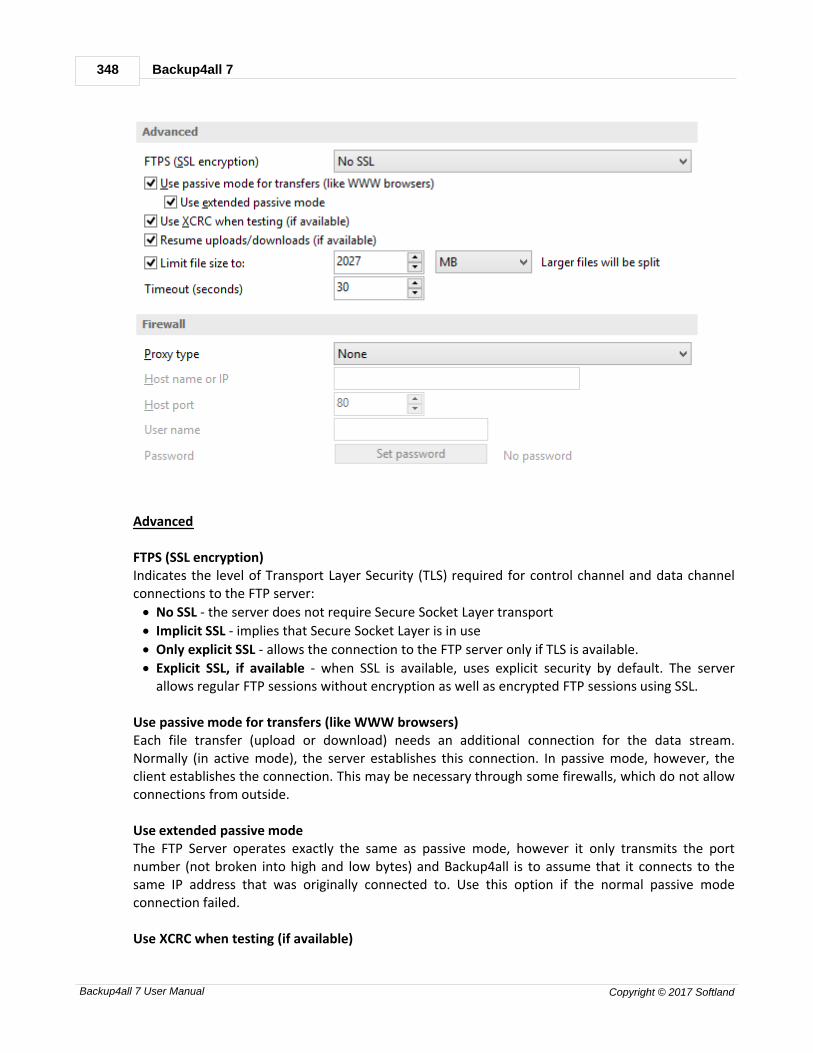
Backup4all 7348
Backup4all 7 User Manual Copyright © 2017 Softland
Advanced
FTPS (SSL encryption)Indicates the level of Transport Layer Security (TLS) required for control channel and data channelconnections to the FTP server:
· No SSL - the server does not require Secure Socket Layer transport
· Implicit SSL - implies that Secure Socket Layer is in use
· Only explicit SSL - allows the connection to the FTP server only if TLS is available.
· Explicit SSL, if available - when SSL is available, uses explicit security by default. The serverallows regular FTP sessions without encryption as well as encrypted FTP sessions using SSL.
Use passive mode for transfers (like WWW browsers)Each file transfer (upload or download) needs an additional connection for the data stream.Normally (in active mode), the server establishes this connection. In passive mode, however, theclient establishes the connection. This may be necessary through some firewalls, which do not allowconnections from outside.
Use extended passive modeThe FTP Server operates exactly the same as passive mode, however it only transmits the portnumber (not broken into high and low bytes) and Backup4all is to assume that it connects to thesame IP address that was originally connected to. Use this option if the normal passive modeconnection failed.
Use XCRC when testing (if available)
Options 349
Backup4all 7 User Manual Copyright © 2017 Softland
If the server supports the XCRC extension Backup4all can verify that files transferred to the serverhave been transmitted correctly using the CRC information received from the FTP server. This resultsin faster testing, as the files will not be downloaded to perform the CRC testing.
Resume upload/downloads (if available) - it resume the backup upload if the server supportsresume command.
Limit file size to - specify the maximum file size you want to have. Larger files will be split. Pleasenote that many FTP servers does not allow you to upload files larger than 2 GB.
Timeout (seconds)You can set the time interval (in seconds) that is allowed for no data transfer before the transferoperation is interrupted and must be resumed. Default is 30 seconds.
Firewall
Proxy type Select one of the options below (supported by your firewall) if you use a proxy to connect to theFTP:
· None - Sends the User name and optional Password for the FTP server as entered in the FTPwindow
· Send command USER - Sends the User name and optional Password defined in the proxysettings, followed immediately by the User name and optional Password for the FTP server.
· Send command SITE - Sends the User name and optional Password defined in the proxysettings, the SITE command with the Host value, and the User name and optional Passwordfor the FTP site.
· Send command OPEN - Sends the User name and optional Password defined in the proxysettings, sends the OPEN command with the Host value, and the User name and optionalPassword for the FTP site.
· USER user@firewalluser@hostname / PASS pass@firewallpass - Sends the command USERuser@proxyuser@host, then the command PASS pwd@proxypwd, or optionally PASS pwd.
· Transparent - Sends the User name and optional Password defined in the proxy settings,followed immediately by the FTP server User name and optional Password.
Host name or IP In this field you have to enter the host name or IP address for the proxy server (firewall).
Host portEnter the host port number in this field. By default, the port number is set to 80.
User nameThis field is used to enter the proxy user name.
PasswordIn this field you can enter the password for the specified user name.
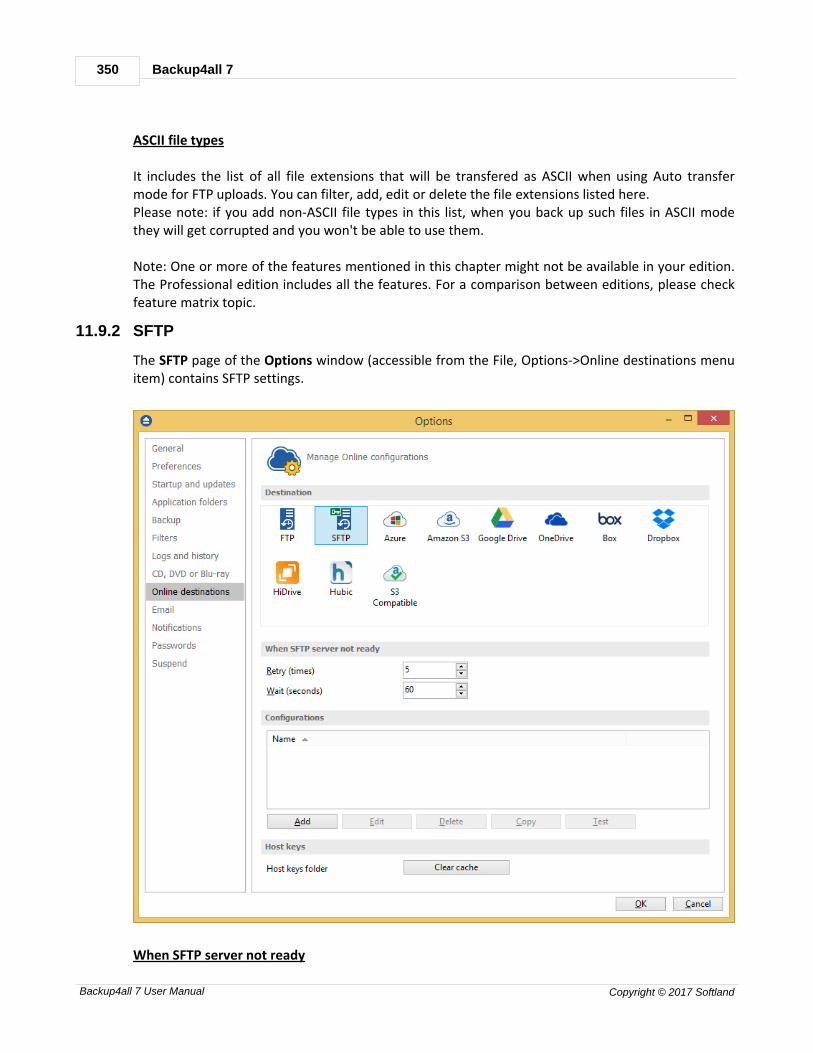
Backup4all 7350
Backup4all 7 User Manual Copyright © 2017 Softland
ASCII file types
It includes the list of all file extensions that will be transfered as ASCII when using Auto transfermode for FTP uploads. You can filter, add, edit or delete the file extensions listed here. Please note: if you add non-ASCII file types in this list, when you back up such files in ASCII modethey will get corrupted and you won't be able to use them.
Note: One or more of the features mentioned in this chapter might not be available in your edition.The Professional edition includes all the features. For a comparison between editions, please checkfeature matrix topic.
11.9.2 SFTP
The SFTP page of the Options window (accessible from the File, Options->Online destinations menuitem) contains SFTP settings.
When SFTP server not ready
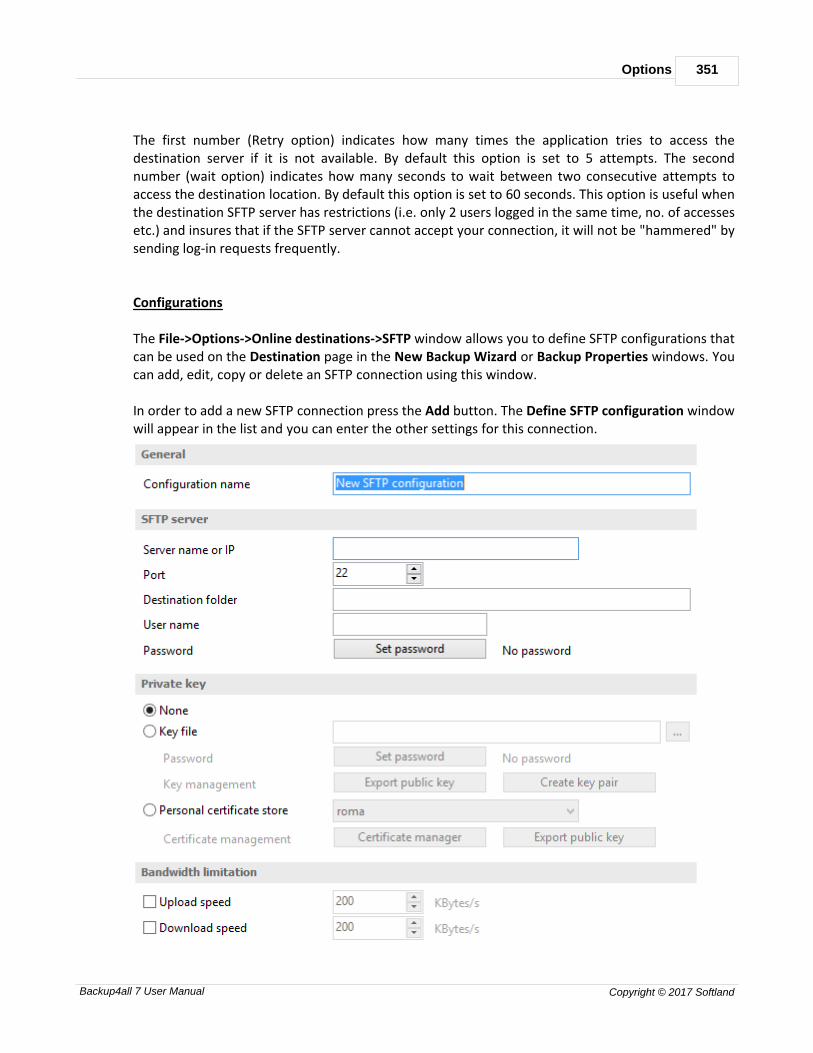
Options 351
Backup4all 7 User Manual Copyright © 2017 Softland
The first number (Retry option) indicates how many times the application tries to access thedestination server if it is not available. By default this option is set to 5 attempts. The secondnumber (wait option) indicates how many seconds to wait between two consecutive attempts toaccess the destination location. By default this option is set to 60 seconds. This option is useful whenthe destination SFTP server has restrictions (i.e. only 2 users logged in the same time, no. of accessesetc.) and insures that if the SFTP server cannot accept your connection, it will not be "hammered" bysending log-in requests frequently.
Configurations
The File->Options->Online destinations->SFTP window allows you to define SFTP configurations thatcan be used on the Destination page in the New Backup Wizard or Backup Properties windows. Youcan add, edit, copy or delete an SFTP connection using this window.
In order to add a new SFTP connection press the Add button. The Define SFTP configuration windowwill appear in the list and you can enter the other settings for this connection.

Backup4all 7352
Backup4all 7 User Manual Copyright © 2017 Softland
General
Reset to configurationIf you want to add a new SFTP location, the <New> option should be selected. To edit an existingSFTP location, select it from the drop-down list. All fields will be filled with the values of the selectedSFTP.
SFTP server
· Server name or IP - In this field you have to enter the name or IP address for the SFTP server
· Port - In this field you have to enter the port number if different than the default SFTP ports(22).
· Destination - Here you can enter the destination path if different than root.
· User name - If this is a private SFTP server (no anonymous access allowed) enter the username for your account.
· Password - In this field enter the password for the SFTP server.
Private key
· None - no private key is used
· Key file - allows user to specify a key file that will be used
· Personal certificate store - allows user to import and use different certificate formats
Bandwidth limitation
This section allows you to set different limitations for upload/download speed:
· Upload speed - if checked you can set a maximum upload speed for the SFTP transfer
· Download speed - if checked you can set a maximum upload speed for the SFTP transfer
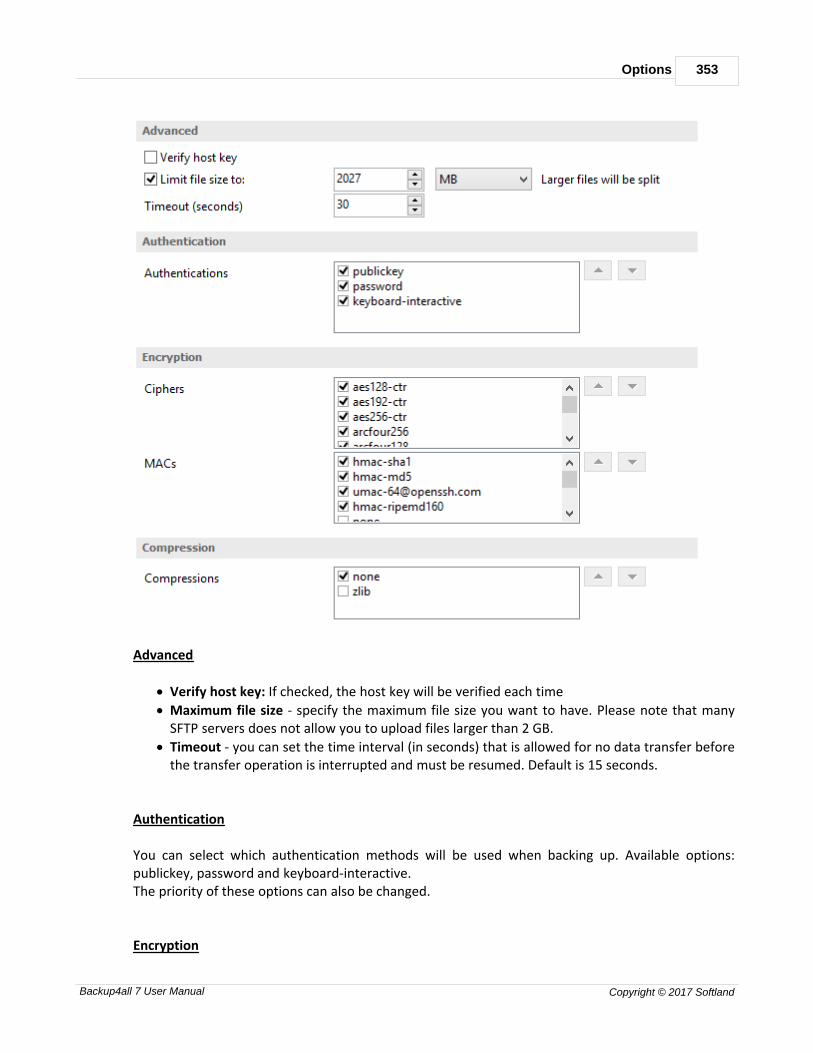
Options 353
Backup4all 7 User Manual Copyright © 2017 Softland
Advanced
· Verify host key: If checked, the host key will be verified each time
· Maximum file size - specify the maximum file size you want to have. Please note that manySFTP servers does not allow you to upload files larger than 2 GB.
· Timeout - you can set the time interval (in seconds) that is allowed for no data transfer beforethe transfer operation is interrupted and must be resumed. Default is 15 seconds.
Authentication
You can select which authentication methods will be used when backing up. Available options:publickey, password and keyboard-interactive.The priority of these options can also be changed.
Encryption
Backup4all 7354
Backup4all 7 User Manual Copyright © 2017 Softland
· Ciphers: clear or select the check boxes to specify which ciphers you want to allow forencrypting SFTP sessions. A Cipher is the algorithm(s) used for symmetric session encryption.To give a cipher a lower priority rating, select it with the mouse and then click the Downbutton.
· MACs: clear or select the check boxes to specify which MACs you want to allow for encryptingSFTP sessions. A MAC (Message Authentication Code) is the algorithm(s) used for dataintegrity verification. To give a MAC a lower priority rating, select it with the mouse, and thenclick the Down button.
Compression
SFTP supports the use of data compression to reduce the amount of data that is transmitted. Boththe client and server agree on a compression algorithm. They then compress data before sendingand decompress data when it is received.Typically, zlib compression is the compression algorithm most commonly supported in SFTP servers.No compression is set as the default, and zlib is specified as an option. If the server forces use of zlibcompression it will happen automatically.
Hot keys
Host keys folder - Clear cache - press this button if you want to delete the host keys stored in thekeys folder.
Note: One or more of the features mentioned in this chapter might not be available in your edition.The Professional edition includes all the features. For a comparison between editions, please checkfeature matrix topic.
11.9.3 Azure
The Azure page of the Options window (accessible from the File, Options->Online destinations menuitem) contains Azure settings.
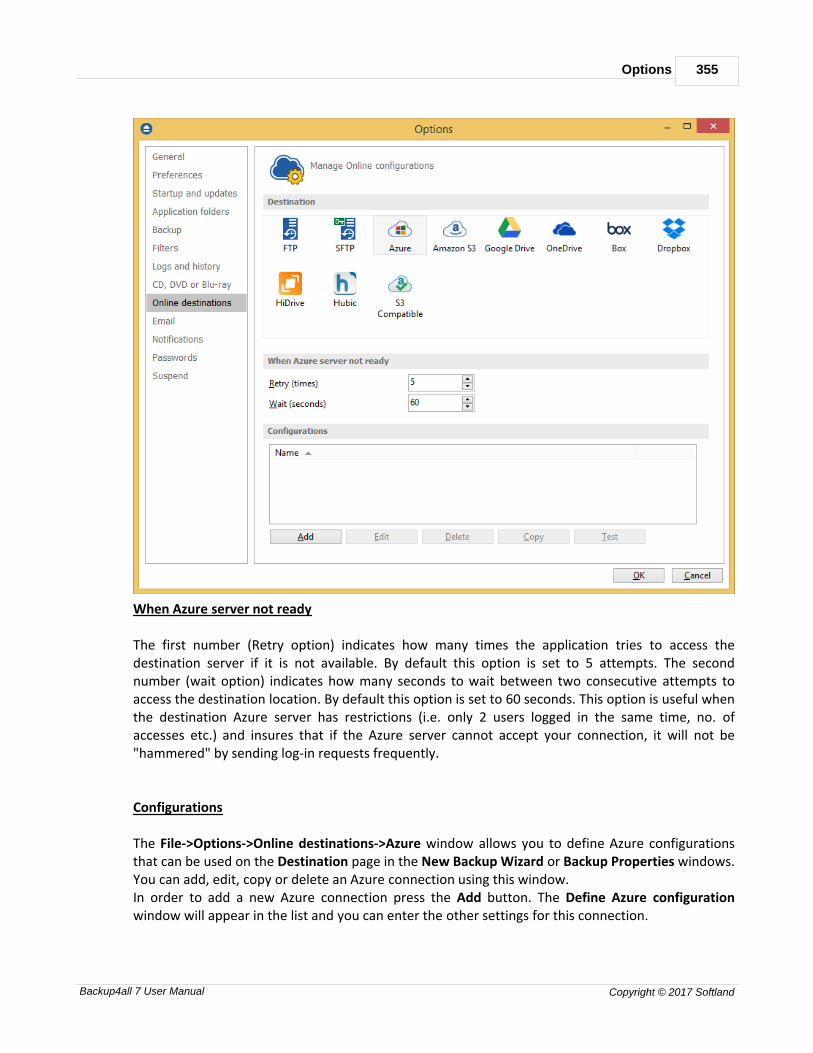
Options 355
Backup4all 7 User Manual Copyright © 2017 Softland
When Azure server not ready
The first number (Retry option) indicates how many times the application tries to access thedestination server if it is not available. By default this option is set to 5 attempts. The secondnumber (wait option) indicates how many seconds to wait between two consecutive attempts toaccess the destination location. By default this option is set to 60 seconds. This option is useful whenthe destination Azure server has restrictions (i.e. only 2 users logged in the same time, no. ofaccesses etc.) and insures that if the Azure server cannot accept your connection, it will not be"hammered" by sending log-in requests frequently.
Configurations
The File->Options->Online destinations->Azure window allows you to define Azure configurationsthat can be used on the Destination page in the New Backup Wizard or Backup Properties windows.You can add, edit, copy or delete an Azure connection using this window.In order to add a new Azure connection press the Add button. The Define Azure configurationwindow will appear in the list and you can enter the other settings for this connection.
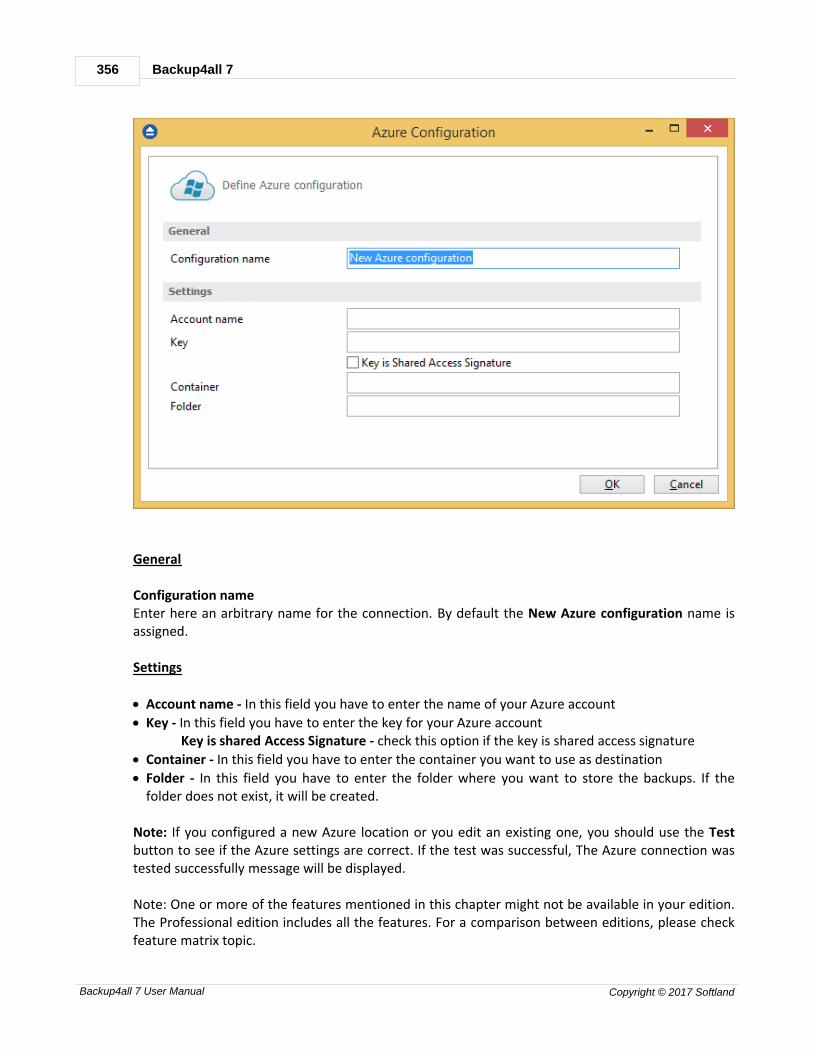
Backup4all 7356
Backup4all 7 User Manual Copyright © 2017 Softland
General
Configuration nameEnter here an arbitrary name for the connection. By default the New Azure configuration name isassigned.
Settings
· Account name - In this field you have to enter the name of your Azure account
· Key - In this field you have to enter the key for your Azure accountKey is shared Access Signature - check this option if the key is shared access signature
· Container - In this field you have to enter the container you want to use as destination
· Folder - In this field you have to enter the folder where you want to store the backups. If thefolder does not exist, it will be created.
Note: If you configured a new Azure location or you edit an existing one, you should use the Testbutton to see if the Azure settings are correct. If the test was successful, The Azure connection wastested successfully message will be displayed. Note: One or more of the features mentioned in this chapter might not be available in your edition.The Professional edition includes all the features. For a comparison between editions, please checkfeature matrix topic.

Options 357
Backup4all 7 User Manual Copyright © 2017 Softland
11.9.4 Amazon S3
The Amazon S3 page of the Options window (accessible from the File, Options->Online destinationsmenu item) contains Amazon settings.
When Amazon S3 server not ready
The first number (Retry option) indicates how many times the application tries to access thedestination server if it is not available. By default this option is set to 5 attempts. The secondnumber (wait option) indicates how many seconds to wait between two consecutive attempts toaccess the destination location. By default this option is set to 60 seconds. This option is useful whenthe destination Amazon S3 server has restrictions (i.e. only 2 users logged in the same time, no. ofaccesses etc.) and insures that if the Amazon S3 server cannot accept your connection, it will not be"hammered" by sending log-in requests frequently.
Configurations
The File->Options->Online destinations->Amazon S3 window allows you to define Amazon

Backup4all 7358
Backup4all 7 User Manual Copyright © 2017 Softland
configurations that can be used on the Destination page in the New Backup Wizard or BackupProperties windows. You can add, edit, copy or delete an Amazon S3 connection using this window.In order to add a new Amazon S3 connection press the Add button. The Define Amazon S3configuration window will appear in the list and you can enter the other settings for this connection.
General
Configuration nameEnter here an arbitrary name for the connection. By default the New Amazon S3 configurationname is assigned.
Settings
· Access Key ID - In this field you have to enter the access key ID for your Amazon S3 account
· Secret Access Key - In this field you have to enter the Secret Access Key for your Amazon S3account
· Region - select a region from the list, where your backups will be stored
· Bucket - In this field you need to enter the bucket to be used as destination. You can also create anew bucket if you type its name and press Create button. If you already have the bucket createdoutside Backup4all, please make sure you also select the correct region for it.
· Folder - In this field you have to enter the folder where you want to store the backups. If thefolder does not exist, it will be created.
· Storage class

Options 359
Backup4all 7 User Manual Copyright © 2017 Softland
· Standard - this option offers high durability, availability, and performance object storage forfrequently accessed data.
· Standard - Infrequent Access Storage - is an Amazon S3 storage class for data that isaccessed less frequently, but requires rapid access when needed.
· Reduced redundancy (not recommended) - enables customers to store noncritical,reproducible data at lower levels of redundancy than Amazon S3’s standard storage. Itprovides a highly available solution for distributing or sharing content that is durably storedelsewhere, or for storing thumbnails, transcoded media, or other processed data that can beeasily reproduced.
· Transfer acceleration - this option enables fast, easy, and secure transfers of files over longdistances between Backup4all and the S3 bucket. Transfer Acceleration takes advantage ofAmazon CloudFront’s globally distributed edge locations. As the data arrives at an edge location,data is routed to Amazon S3 over an optimized network path.
Note: If you configured a new Amazon S3 location or you edit an existing one, you should use theTest button to see if the Amazon S3 settings are correct. If the test was successful, The Amazon S3connection was tested successfully message will be displayed.
Note: One or more of the features mentioned in this chapter might not be available in your edition.The Professional edition includes all the features. For a comparison between editions, please checkfeature matrix topic.
11.9.5 Google Drive
The Google Drive page of the Options window (accessible from the File, Options->Onlinedestinations menu item) contains Google Drive settings.
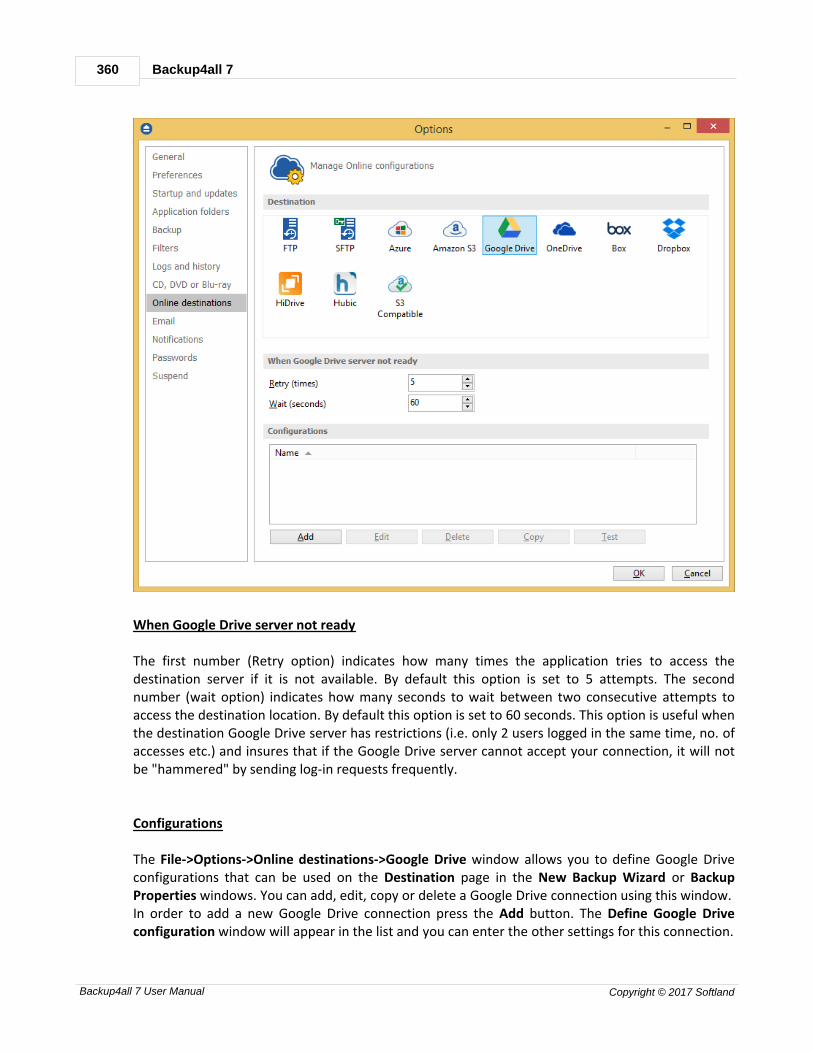
Backup4all 7360
Backup4all 7 User Manual Copyright © 2017 Softland
When Google Drive server not ready
The first number (Retry option) indicates how many times the application tries to access thedestination server if it is not available. By default this option is set to 5 attempts. The secondnumber (wait option) indicates how many seconds to wait between two consecutive attempts toaccess the destination location. By default this option is set to 60 seconds. This option is useful whenthe destination Google Drive server has restrictions (i.e. only 2 users logged in the same time, no. ofaccesses etc.) and insures that if the Google Drive server cannot accept your connection, it will notbe "hammered" by sending log-in requests frequently.
Configurations
The File->Options->Online destinations->Google Drive window allows you to define Google Driveconfigurations that can be used on the Destination page in the New Backup Wizard or BackupProperties windows. You can add, edit, copy or delete a Google Drive connection using this window.In order to add a new Google Drive connection press the Add button. The Define Google Driveconfiguration window will appear in the list and you can enter the other settings for this connection.

Options 361
Backup4all 7 User Manual Copyright © 2017 Softland
General
Configuration nameEnter here an arbitrary name for the connection. By default the New Google Drive configurationname is assigned.
Settings
· Authentication - press "Choose account" button to log in to your Google Drive account. Hereyou need to authorize Backup4all application to view and manage files in your Google Driveaccount.

Backup4all 7362
Backup4all 7 User Manual Copyright © 2017 Softland
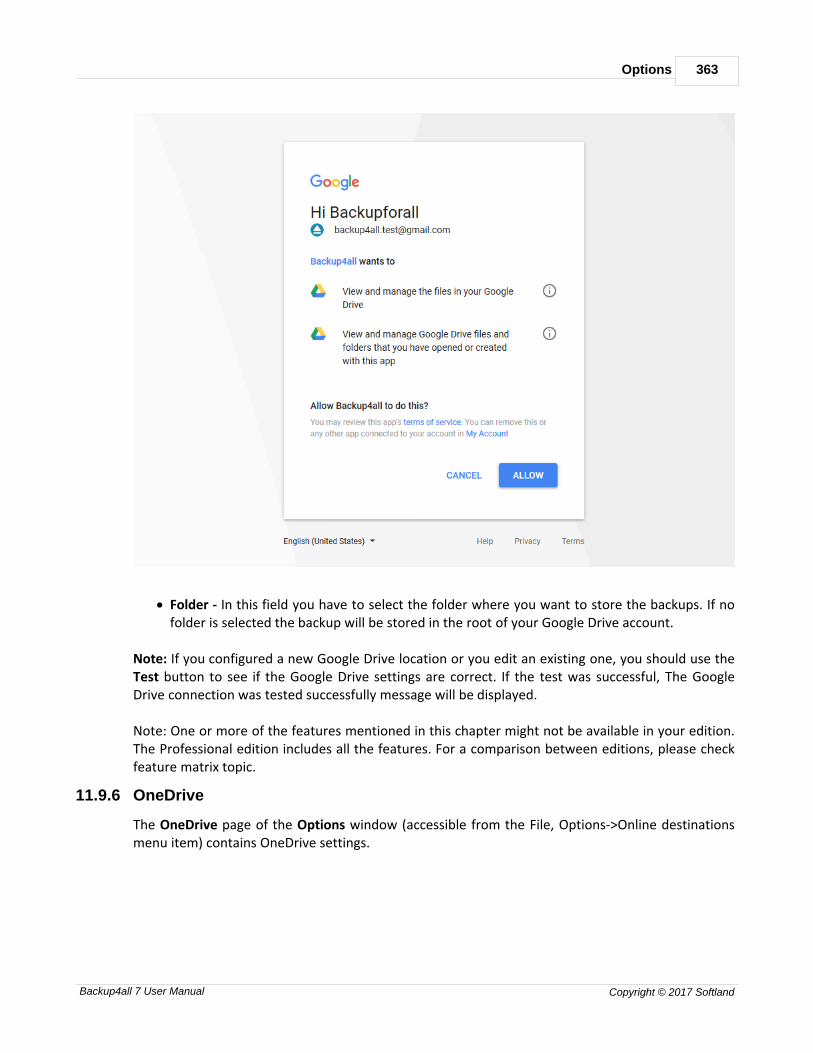
Options 363
Backup4all 7 User Manual Copyright © 2017 Softland
· Folder - In this field you have to select the folder where you want to store the backups. If nofolder is selected the backup will be stored in the root of your Google Drive account.
Note: If you configured a new Google Drive location or you edit an existing one, you should use theTest button to see if the Google Drive settings are correct. If the test was successful, The GoogleDrive connection was tested successfully message will be displayed.
Note: One or more of the features mentioned in this chapter might not be available in your edition.The Professional edition includes all the features. For a comparison between editions, please checkfeature matrix topic.
11.9.6 OneDrive
The OneDrive page of the Options window (accessible from the File, Options->Online destinationsmenu item) contains OneDrive settings.
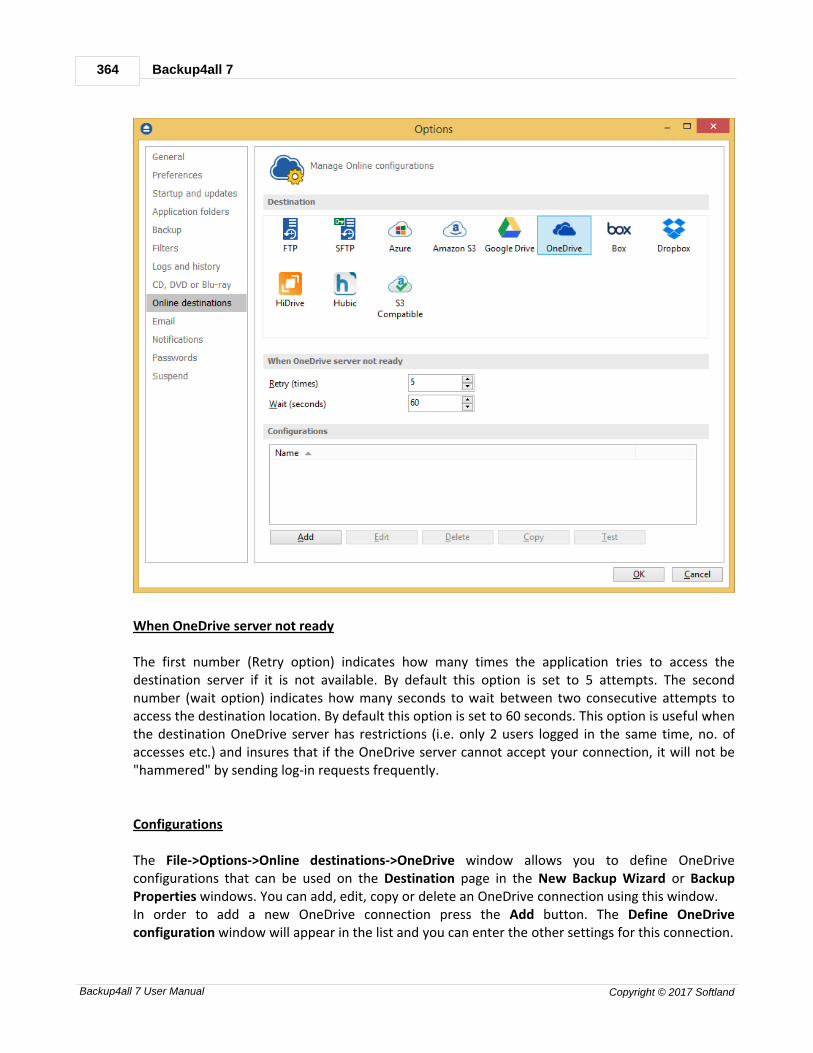
Backup4all 7364
Backup4all 7 User Manual Copyright © 2017 Softland
When OneDrive server not ready
The first number (Retry option) indicates how many times the application tries to access thedestination server if it is not available. By default this option is set to 5 attempts. The secondnumber (wait option) indicates how many seconds to wait between two consecutive attempts toaccess the destination location. By default this option is set to 60 seconds. This option is useful whenthe destination OneDrive server has restrictions (i.e. only 2 users logged in the same time, no. ofaccesses etc.) and insures that if the OneDrive server cannot accept your connection, it will not be"hammered" by sending log-in requests frequently.
Configurations
The File->Options->Online destinations->OneDrive window allows you to define OneDriveconfigurations that can be used on the Destination page in the New Backup Wizard or BackupProperties windows. You can add, edit, copy or delete an OneDrive connection using this window.In order to add a new OneDrive connection press the Add button. The Define OneDriveconfiguration window will appear in the list and you can enter the other settings for this connection.

Options 365
Backup4all 7 User Manual Copyright © 2017 Softland
General
Configuration nameEnter here an arbitrary name for the connection. By default the New OneDrive configuration nameis assigned.
Settings
· Account type - here you can choose "Personal" or "Business", depending on the account type youhave.
· Authentication - press "Choose account" button to log in to your OneDrive account. Here youneed to authorize Backup4all application to view and manage files in your OneDrive account.
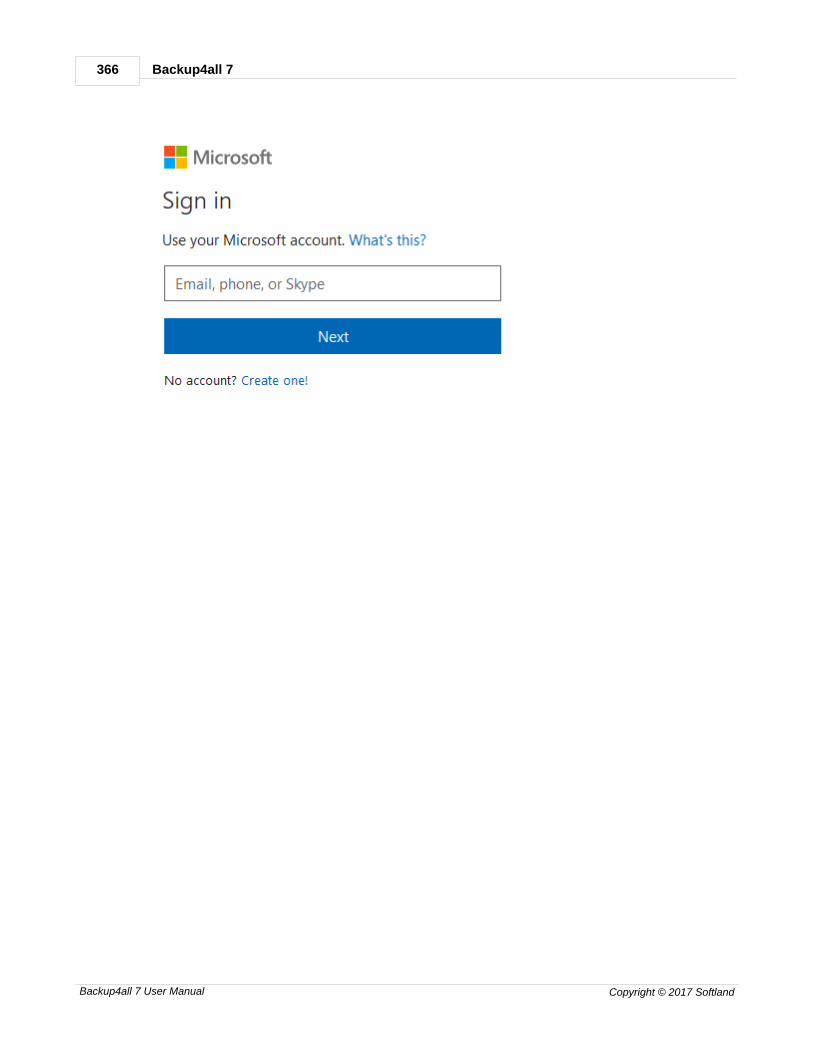
Backup4all 7366
Backup4all 7 User Manual Copyright © 2017 Softland
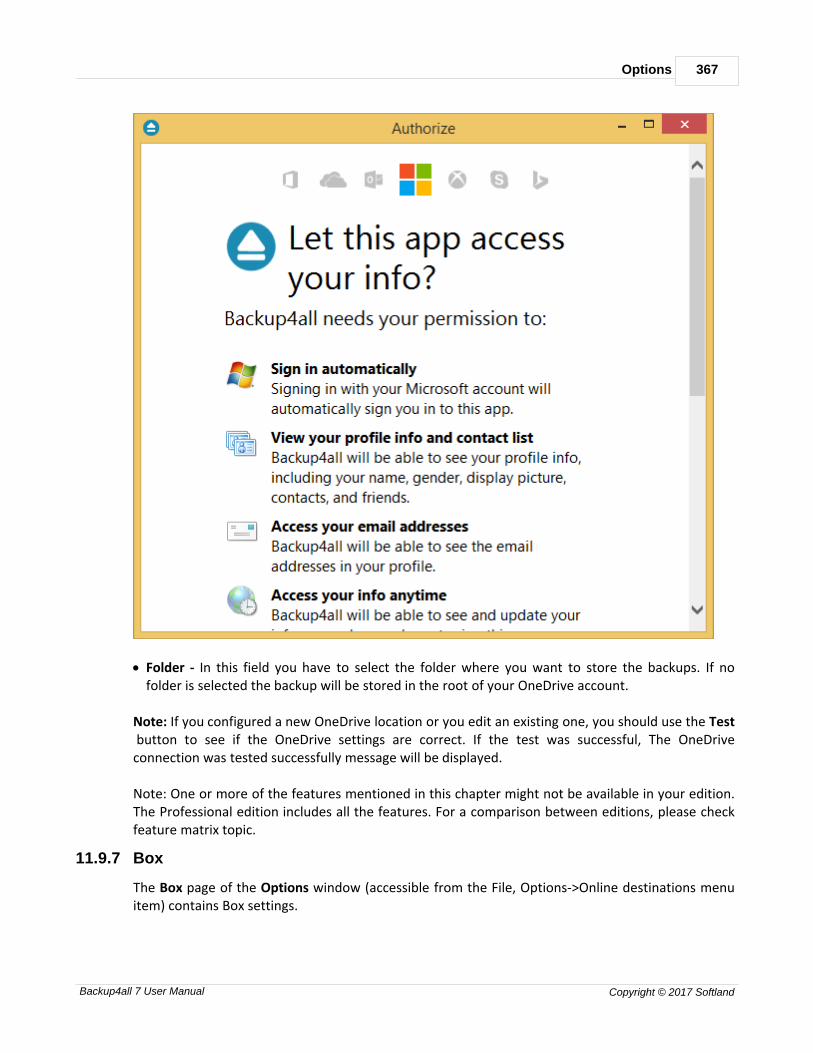
Options 367
Backup4all 7 User Manual Copyright © 2017 Softland
· Folder - In this field you have to select the folder where you want to store the backups. If nofolder is selected the backup will be stored in the root of your OneDrive account.
Note: If you configured a new OneDrive location or you edit an existing one, you should use the Test button to see if the OneDrive settings are correct. If the test was successful, The OneDriveconnection was tested successfully message will be displayed.
Note: One or more of the features mentioned in this chapter might not be available in your edition.The Professional edition includes all the features. For a comparison between editions, please checkfeature matrix topic.
11.9.7 Box
The Box page of the Options window (accessible from the File, Options->Online destinations menuitem) contains Box settings.

Backup4all 7368
Backup4all 7 User Manual Copyright © 2017 Softland
When Box server not ready
The first number (Retry option) indicates how many times the application tries to access thedestination server if it is not available. By default this option is set to 5 attempts. The secondnumber (wait option) indicates how many seconds to wait between two consecutive attempts toaccess the destination location. By default this option is set to 60 seconds. This option is useful whenthe destination Box server has restrictions (i.e. only 2 users logged in the same time, no. of accessesetc.) and insures that if the Box server cannot accept your connection, it will not be "hammered" bysending log-in requests frequently.
Configurations
The File->Options->Online destinations->Box window allows you to define Box configurations thatcan be used on the Destination page in the New Backup Wizard or Backup Properties windows. Youcan add, edit, copy or delete a Box connection using this window.In order to add a new Box connection press the Add button. The Define Box configuration windowwill appear in the list and you can enter the other settings for this connection.

Options 369
Backup4all 7 User Manual Copyright © 2017 Softland
General
Configuration nameEnter here an arbitrary name for the connection. By default the New Box configuration name isassigned.
Settings
· Authentication - press "Choose account" button to log in to your Box account. Here you need toauthorize Backup4all application to read and write files/folders in your Box account.
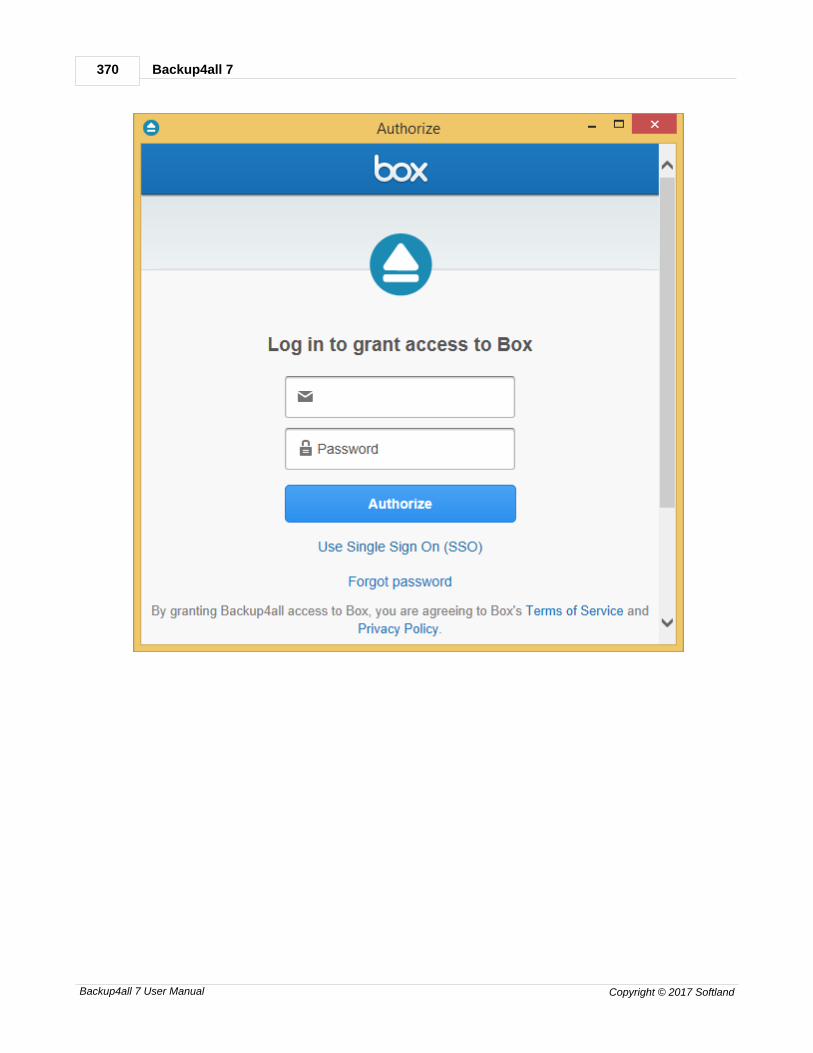
Backup4all 7370
Backup4all 7 User Manual Copyright © 2017 Softland

Options 371
Backup4all 7 User Manual Copyright © 2017 Softland
· Folder - In this field you have to select the folder where you want to store the backups. If nofolder is selected the backup will be stored in the root of your Box account.
Note: If you configured a new Box location or you edit an existing one, you should use the Testbutton to see if the Box settings are correct. If the test was successful, The Box connection wastested successfully message will be displayed.
Note: One or more of the features mentioned in this chapter might not be available in your edition.The Professional edition includes all the features. For a comparison between editions, please checkfeature matrix topic.
11.9.8 Dropbox
The Dropbox page of the Options window (accessible from the File, Options->Online destinationsmenu item) contains Dropbox settings.
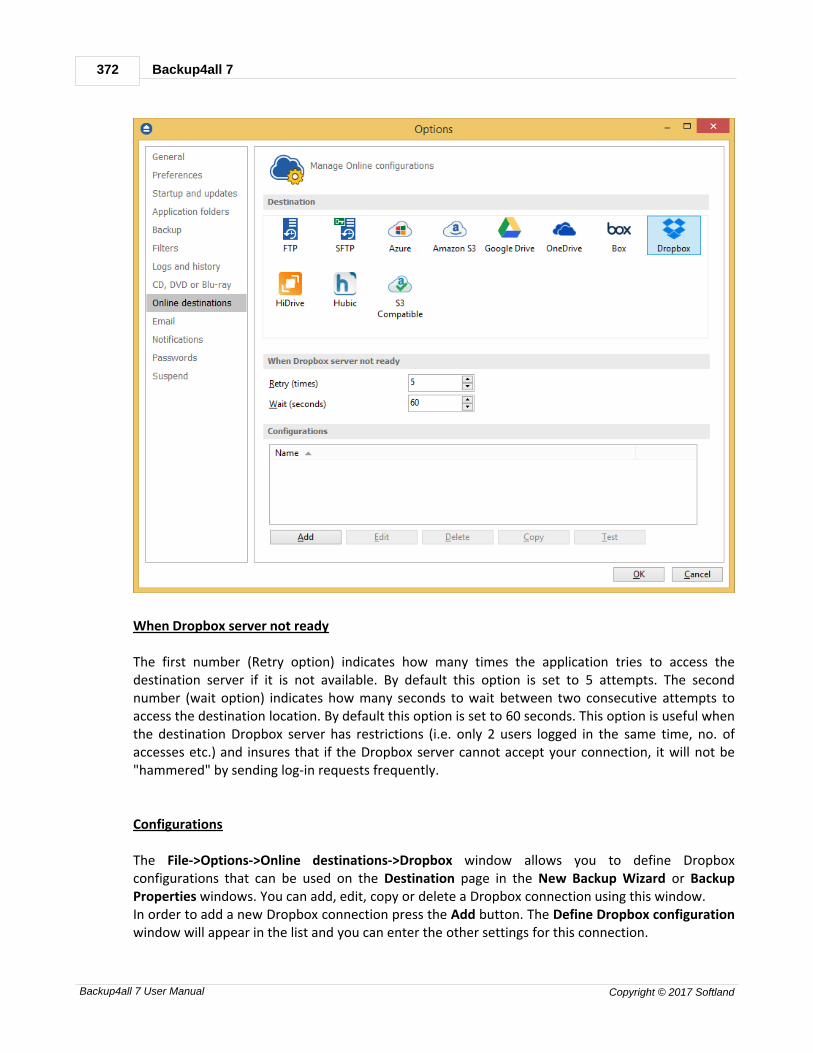
Backup4all 7372
Backup4all 7 User Manual Copyright © 2017 Softland
When Dropbox server not ready
The first number (Retry option) indicates how many times the application tries to access thedestination server if it is not available. By default this option is set to 5 attempts. The secondnumber (wait option) indicates how many seconds to wait between two consecutive attempts toaccess the destination location. By default this option is set to 60 seconds. This option is useful whenthe destination Dropbox server has restrictions (i.e. only 2 users logged in the same time, no. ofaccesses etc.) and insures that if the Dropbox server cannot accept your connection, it will not be"hammered" by sending log-in requests frequently.
Configurations
The File->Options->Online destinations->Dropbox window allows you to define Dropboxconfigurations that can be used on the Destination page in the New Backup Wizard or BackupProperties windows. You can add, edit, copy or delete a Dropbox connection using this window.In order to add a new Dropbox connection press the Add button. The Define Dropbox configurationwindow will appear in the list and you can enter the other settings for this connection.
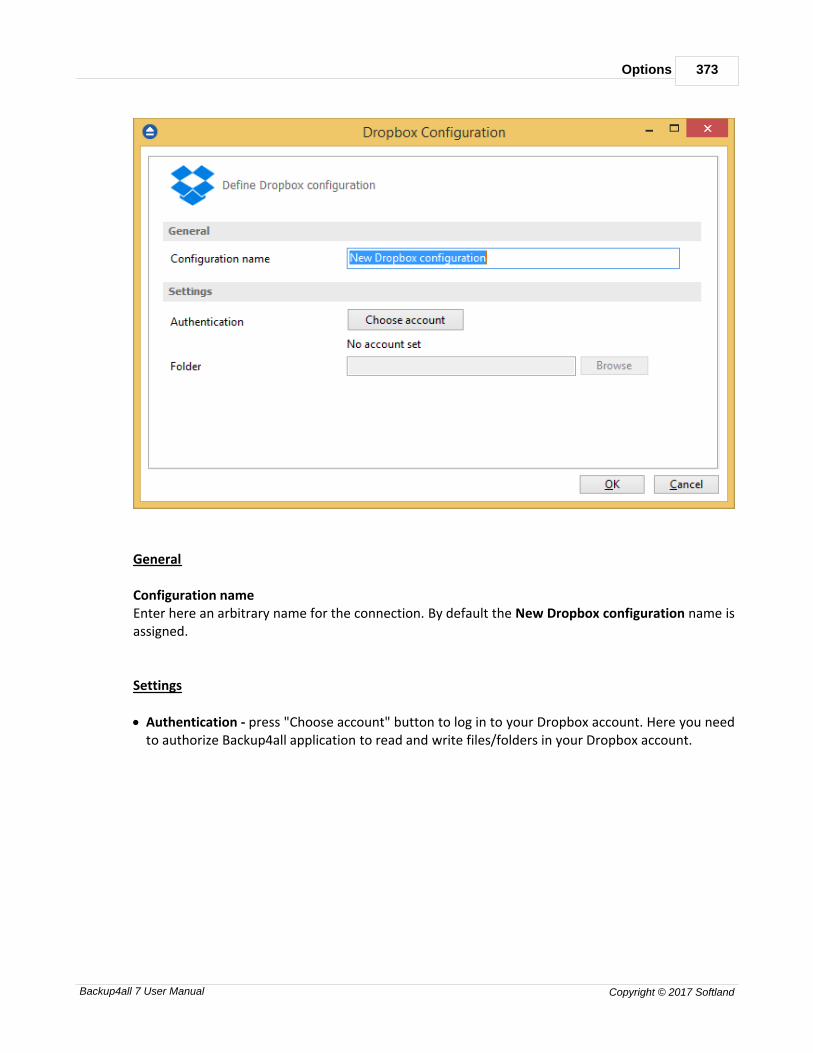
Options 373
Backup4all 7 User Manual Copyright © 2017 Softland
General
Configuration nameEnter here an arbitrary name for the connection. By default the New Dropbox configuration name isassigned.
Settings
· Authentication - press "Choose account" button to log in to your Dropbox account. Here you needto authorize Backup4all application to read and write files/folders in your Dropbox account.
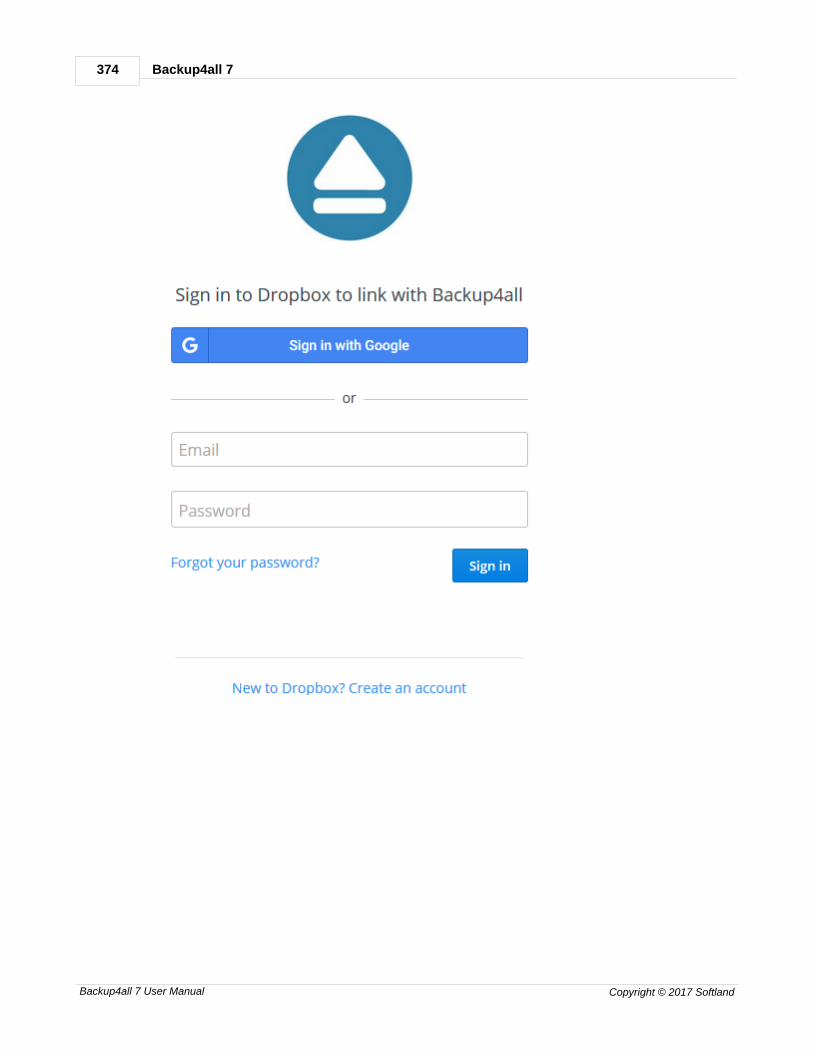
Backup4all 7374
Backup4all 7 User Manual Copyright © 2017 Softland
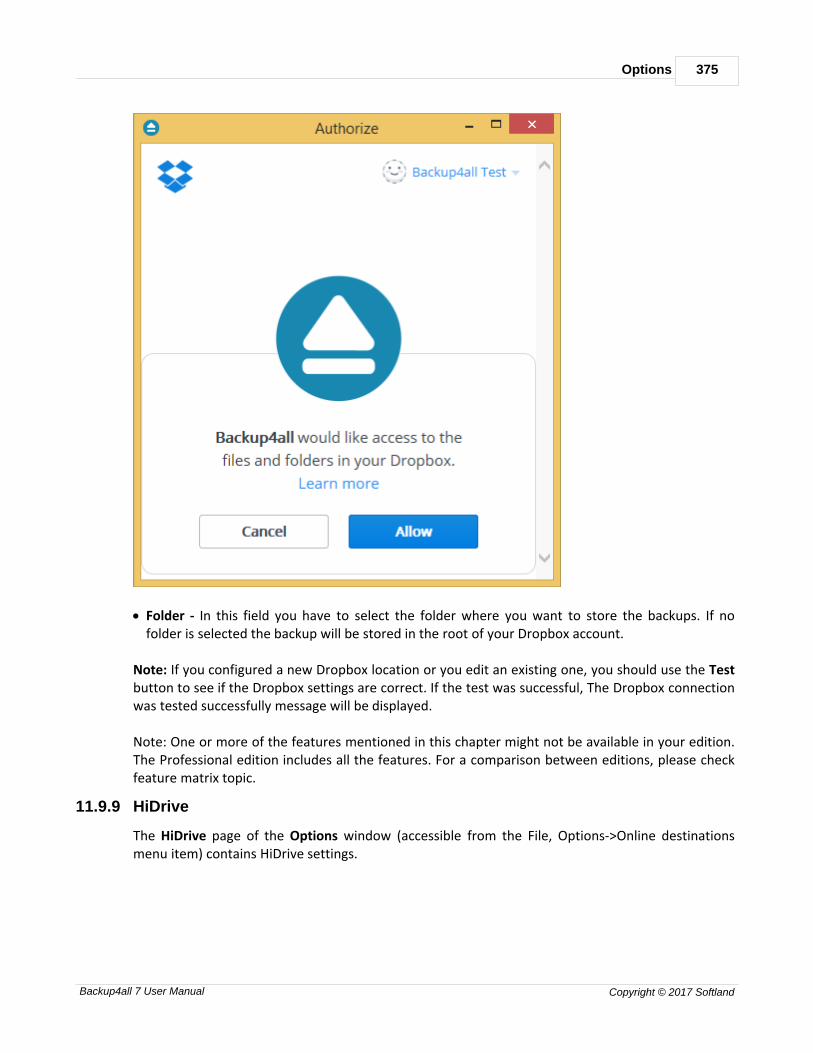
Options 375
Backup4all 7 User Manual Copyright © 2017 Softland
· Folder - In this field you have to select the folder where you want to store the backups. If nofolder is selected the backup will be stored in the root of your Dropbox account.
Note: If you configured a new Dropbox location or you edit an existing one, you should use the Testbutton to see if the Dropbox settings are correct. If the test was successful, The Dropbox connectionwas tested successfully message will be displayed.
Note: One or more of the features mentioned in this chapter might not be available in your edition.The Professional edition includes all the features. For a comparison between editions, please checkfeature matrix topic.
11.9.9 HiDrive
The HiDrive page of the Options window (accessible from the File, Options->Online destinationsmenu item) contains HiDrive settings.
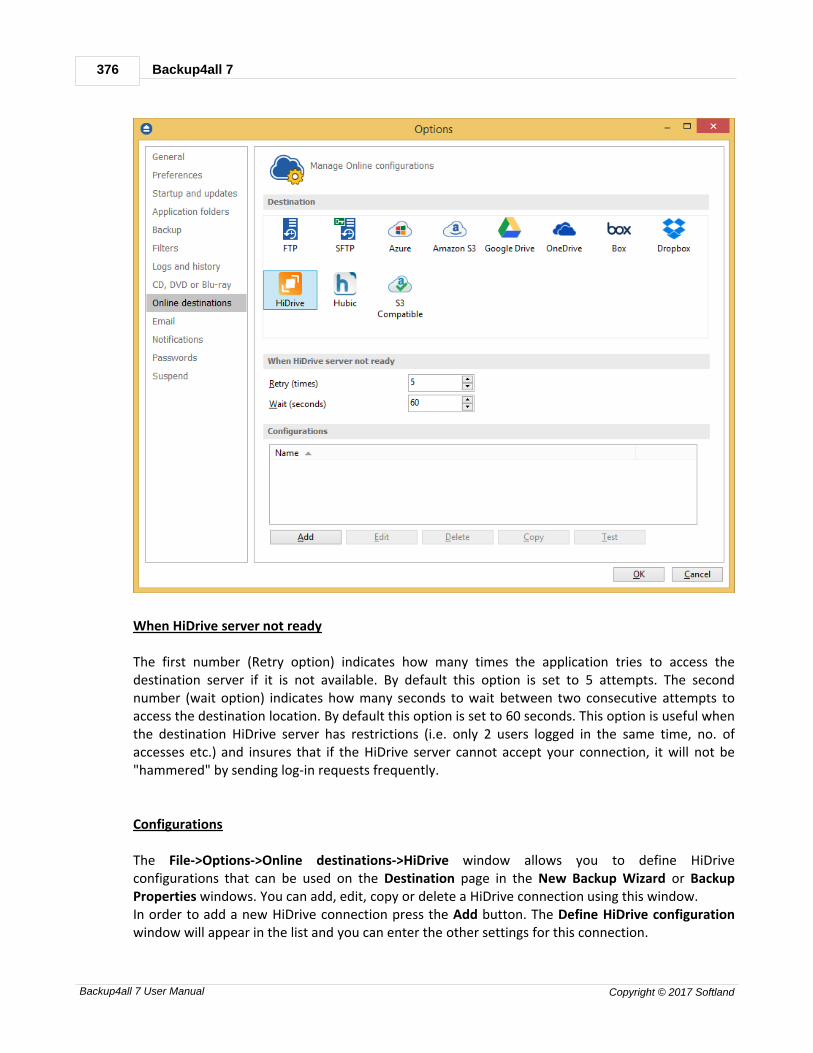
Backup4all 7376
Backup4all 7 User Manual Copyright © 2017 Softland
When HiDrive server not ready
The first number (Retry option) indicates how many times the application tries to access thedestination server if it is not available. By default this option is set to 5 attempts. The secondnumber (wait option) indicates how many seconds to wait between two consecutive attempts toaccess the destination location. By default this option is set to 60 seconds. This option is useful whenthe destination HiDrive server has restrictions (i.e. only 2 users logged in the same time, no. ofaccesses etc.) and insures that if the HiDrive server cannot accept your connection, it will not be"hammered" by sending log-in requests frequently.
Configurations
The File->Options->Online destinations->HiDrive window allows you to define HiDriveconfigurations that can be used on the Destination page in the New Backup Wizard or BackupProperties windows. You can add, edit, copy or delete a HiDrive connection using this window.In order to add a new HiDrive connection press the Add button. The Define HiDrive configurationwindow will appear in the list and you can enter the other settings for this connection.
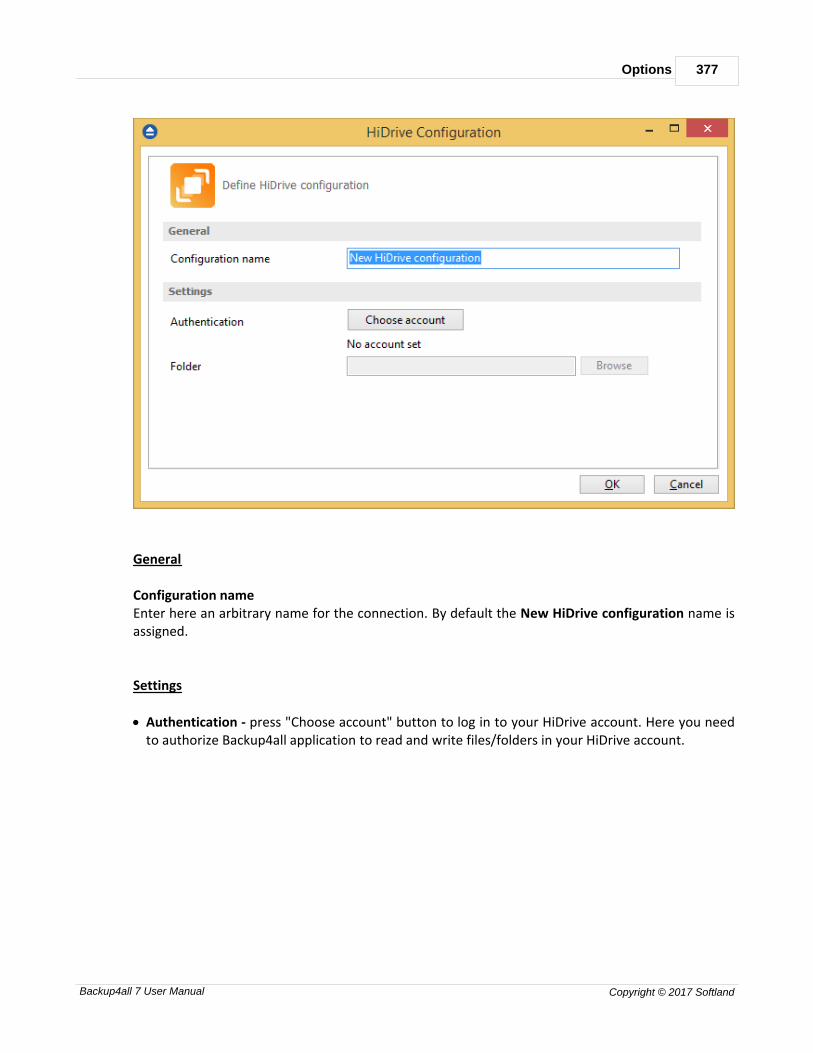
Options 377
Backup4all 7 User Manual Copyright © 2017 Softland
General
Configuration nameEnter here an arbitrary name for the connection. By default the New HiDrive configuration name isassigned.
Settings
· Authentication - press "Choose account" button to log in to your HiDrive account. Here you needto authorize Backup4all application to read and write files/folders in your HiDrive account.

Backup4all 7378
Backup4all 7 User Manual Copyright © 2017 Softland
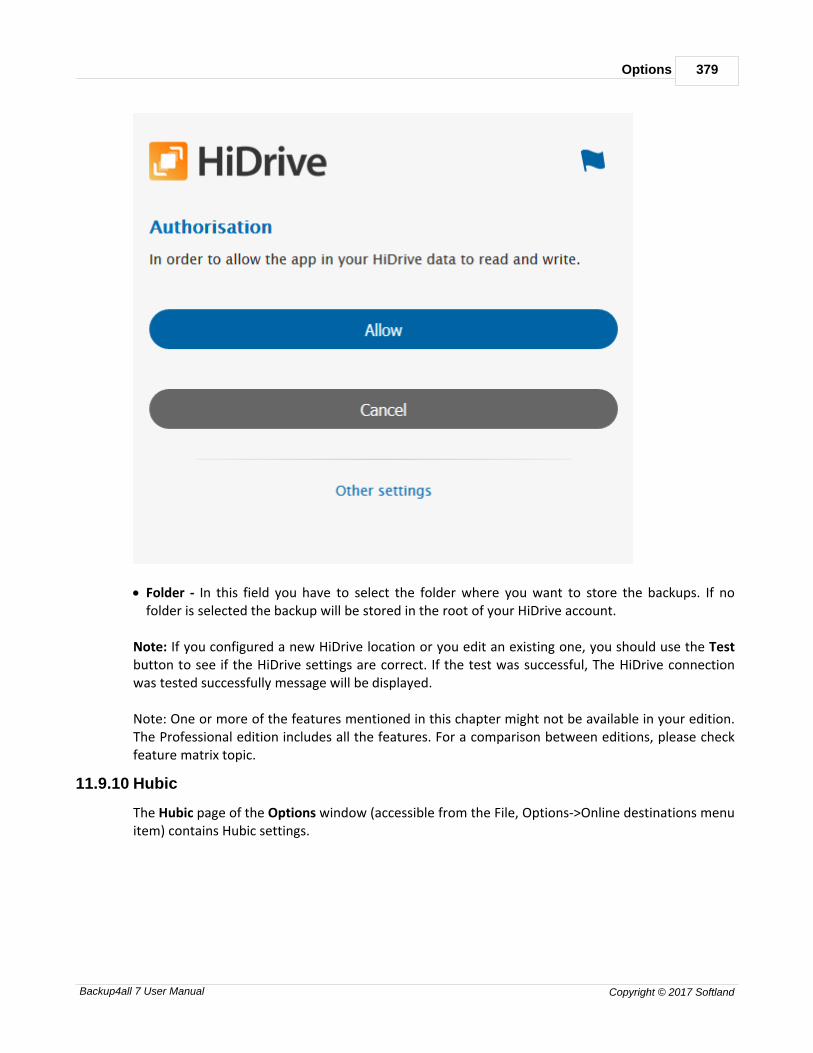
Options 379
Backup4all 7 User Manual Copyright © 2017 Softland
· Folder - In this field you have to select the folder where you want to store the backups. If nofolder is selected the backup will be stored in the root of your HiDrive account.
Note: If you configured a new HiDrive location or you edit an existing one, you should use the Testbutton to see if the HiDrive settings are correct. If the test was successful, The HiDrive connectionwas tested successfully message will be displayed.
Note: One or more of the features mentioned in this chapter might not be available in your edition.The Professional edition includes all the features. For a comparison between editions, please checkfeature matrix topic.
11.9.10 Hubic
The Hubic page of the Options window (accessible from the File, Options->Online destinations menuitem) contains Hubic settings.
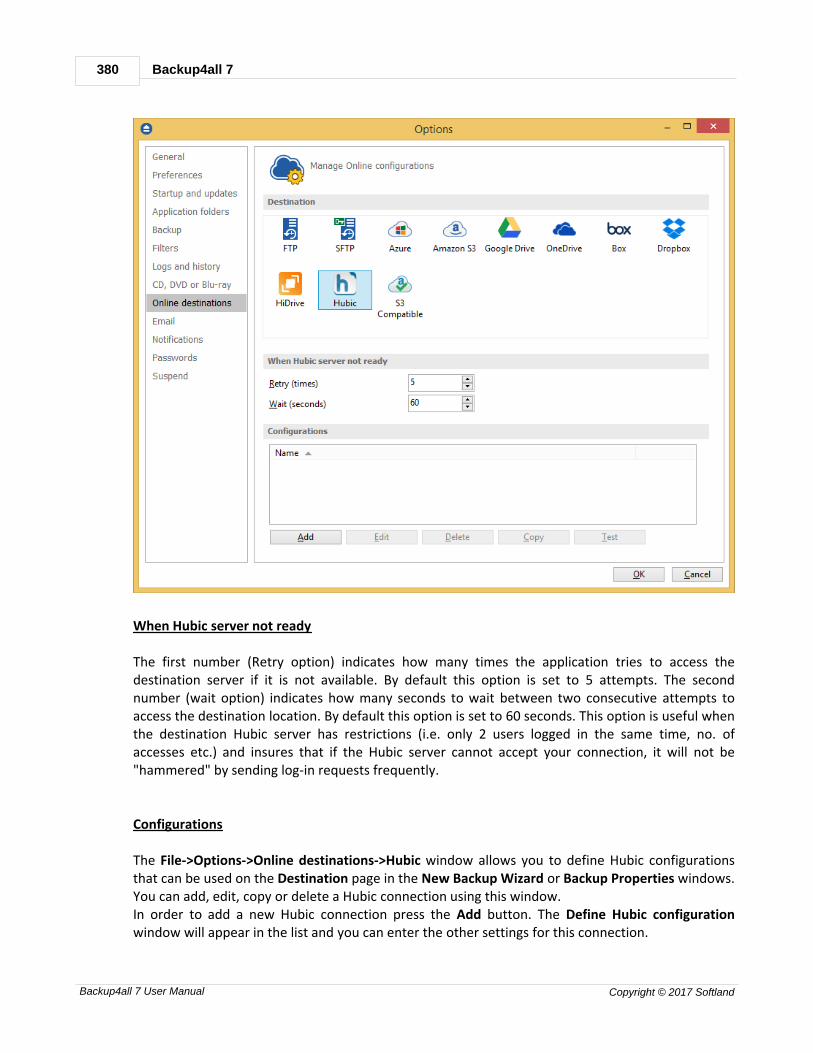
Backup4all 7380
Backup4all 7 User Manual Copyright © 2017 Softland
When Hubic server not ready
The first number (Retry option) indicates how many times the application tries to access thedestination server if it is not available. By default this option is set to 5 attempts. The secondnumber (wait option) indicates how many seconds to wait between two consecutive attempts toaccess the destination location. By default this option is set to 60 seconds. This option is useful whenthe destination Hubic server has restrictions (i.e. only 2 users logged in the same time, no. ofaccesses etc.) and insures that if the Hubic server cannot accept your connection, it will not be"hammered" by sending log-in requests frequently.
Configurations
The File->Options->Online destinations->Hubic window allows you to define Hubic configurationsthat can be used on the Destination page in the New Backup Wizard or Backup Properties windows.You can add, edit, copy or delete a Hubic connection using this window.In order to add a new Hubic connection press the Add button. The Define Hubic configurationwindow will appear in the list and you can enter the other settings for this connection.
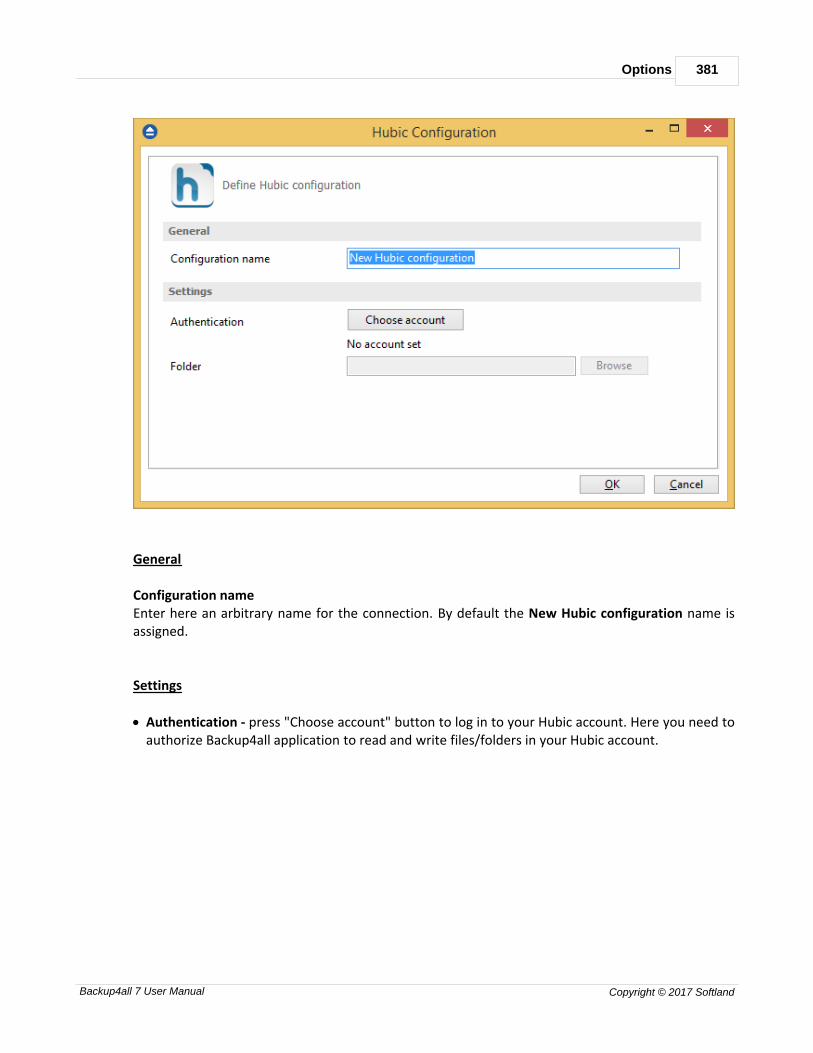
Options 381
Backup4all 7 User Manual Copyright © 2017 Softland
General
Configuration nameEnter here an arbitrary name for the connection. By default the New Hubic configuration name isassigned.
Settings
· Authentication - press "Choose account" button to log in to your Hubic account. Here you need toauthorize Backup4all application to read and write files/folders in your Hubic account.

Backup4all 7382
Backup4all 7 User Manual Copyright © 2017 Softland
· Folder - In this field you have to select the folder where you want to store the backups. If nofolder is selected the backup will be stored in the root of your Hubic account.
Note: If you configured a new Hubic location or you edit an existing one, you should use the Testbutton to see if the Hubic settings are correct. If the test was successful, The Hubic connection wastested successfully message will be displayed.
Note: One or more of the features mentioned in this chapter might not be available in your edition.The Professional edition includes all the features. For a comparison between editions, please checkfeature matrix topic.
11.9.11 S3 Compatible
The S3 Compatible page of the Options window (accessible from the File, Options->Onlinedestinations menu item) contains S3 Compatible settings.
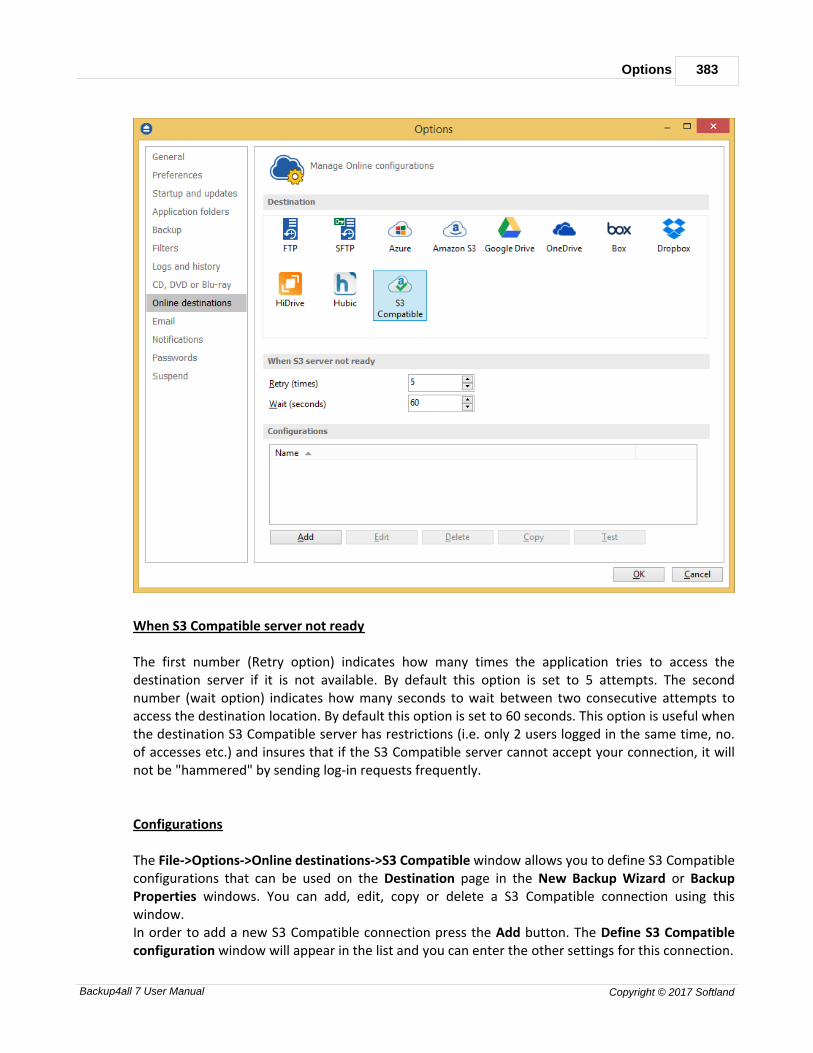
Options 383
Backup4all 7 User Manual Copyright © 2017 Softland
When S3 Compatible server not ready
The first number (Retry option) indicates how many times the application tries to access thedestination server if it is not available. By default this option is set to 5 attempts. The secondnumber (wait option) indicates how many seconds to wait between two consecutive attempts toaccess the destination location. By default this option is set to 60 seconds. This option is useful whenthe destination S3 Compatible server has restrictions (i.e. only 2 users logged in the same time, no.of accesses etc.) and insures that if the S3 Compatible server cannot accept your connection, it willnot be "hammered" by sending log-in requests frequently.
Configurations
The File->Options->Online destinations->S3 Compatible window allows you to define S3 Compatibleconfigurations that can be used on the Destination page in the New Backup Wizard or BackupProperties windows. You can add, edit, copy or delete a S3 Compatible connection using thiswindow.In order to add a new S3 Compatible connection press the Add button. The Define S3 Compatibleconfiguration window will appear in the list and you can enter the other settings for this connection.

Backup4all 7384
Backup4all 7 User Manual Copyright © 2017 Softland
General
Configuration nameEnter here an arbitrary name for the connection. By default the New S3 Compatible configurationname is assigned.
S3 ServerSelect one of the predefined S3 compatible servers, or define a custom one. The S3 compatbileclouds available are: Akaza, Aruba Cloud, Caringo, CenturyLink, Cisco, Claudian, Connectia, Constant,DDN, dinCloud, Dream Objects, Dunkel, T Cloud, Exoscale, Google Cloud Storage, Green Qloud,HGST, Hitachi, HostEurope, IDC Frontier, LeoNovus, Mandic, Minio, NetApp, NiftyClouds, Numergy,QNAP, Revera, Scality, Seeweb, SwiftStack, ThinkOn, Tiscali, vCloud Air, Verizon, Walrus andZettagrid.
Settings
· Endpoint - enter the server endpoint. For most of the predefined servers, the endpoint is filledautomatically. Example: s3.akaza.lk:80
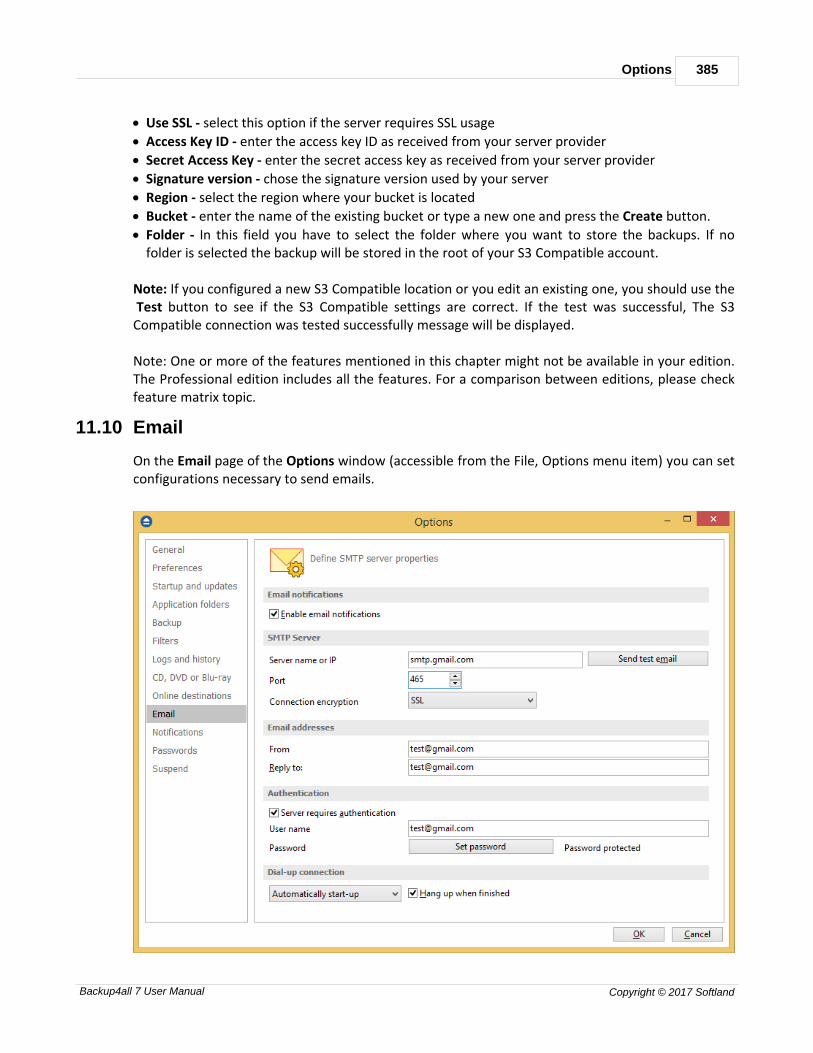
Options 385
Backup4all 7 User Manual Copyright © 2017 Softland
· Use SSL - select this option if the server requires SSL usage
· Access Key ID - enter the access key ID as received from your server provider
· Secret Access Key - enter the secret access key as received from your server provider
· Signature version - chose the signature version used by your server
· Region - select the region where your bucket is located
· Bucket - enter the name of the existing bucket or type a new one and press the Create button.
· Folder - In this field you have to select the folder where you want to store the backups. If nofolder is selected the backup will be stored in the root of your S3 Compatible account.
Note: If you configured a new S3 Compatible location or you edit an existing one, you should use the Test button to see if the S3 Compatible settings are correct. If the test was successful, The S3Compatible connection was tested successfully message will be displayed.
Note: One or more of the features mentioned in this chapter might not be available in your edition.The Professional edition includes all the features. For a comparison between editions, please checkfeature matrix topic.
11.10 Email
On the Email page of the Options window (accessible from the File, Options menu item) you can setconfigurations necessary to send emails.
Backup4all 7386
Backup4all 7 User Manual Copyright © 2017 Softland
Email notifications
Enable email notificationsIf checked the email notifications are available in the backup jobs on the Advanced\Emails page inthe backup job Properties or New Backup Wizard (accessible from the File menu). By default thisoption is not checked.
SMTP server
Server Name or IPEnter the DNS name or IP address of the SMTP server to be used to send emails (example: mail.yourdomain.com) This field is mandatory.
PortEnter the port number to be used by the SMTP server to send the emails. The default value is 25.
Connection enctyption
· None - if selected, no connection encryption will be used
· SSL - if selected the Secure Socket Layer (SSL) will be used for control channel and datachannel connections to the SMTP server.
· TLS - if selected the Transport Layer Security (TLS) will be used for control channel and datachannel connections to the SMTP server.
Send test emailPress Send Test Email if you want to test the configuration you just entered. In the box that pops-up, enter the email address where you want to receive notifications and press OK. If all the settingsare correct, a test email should arrive in your specified email account.
Email addresses FromEnter the sender's email address. If you enter a wrong email address, the email notification will notbe sent. This field is mandatory.
Reply ToOptionally you can specify a different reply email address. If no value is entered the From email willbe used.
Authentication
Server requires authenticationIf checked the SMTP server uses authentication and you will need to supply a user name and a

Options 387
Backup4all 7 User Manual Copyright © 2017 Softland
password. By default this option is not checked.
User nameEnter the user name to be used when authenticating on the SMTP server.
PasswordEnter the password to be used when authenticating on the SMTP server.
Dial-up connection
In this group you can set how the program should handle dial-up connections. The available optionsare: Do not start, Automatically start-up, Manually start-up.
Do not startIf selected email notifications are sent only if your computer is already connected to the Internet. Ifyou have a connection but you are not connected the program will not dial for you.
Automatically start-upIf selected and you are not connected to the Internet, the program attempts to make theconnection for you automatically.
Manually start-upIf selected and you are not connected to the Internet, the program asks you if it should connect. Youcan approve or deny the request.
Hang up when finishedIf checked the dial-up connection will be closed after the notification email is sent. Note: One or more of the features mentioned in this chapter might not be available in your edition.The Professional edition includes all the features. For a comparison between editions, please checkfeature matrix topic.
11.11 Notifications
On the Notifications page of the Options window (accessible from the File, Options menu item) youcan configure the expiration time for each notification message type.

Backup4all 7388
Backup4all 7 User Manual Copyright © 2017 Softland
Profiles
Active profile - Here you can select which profile to be used:
· Silent - no notifications will be displayed
· Normal - notifications will be shown for all basic actions
· Verbose - notifications will be shown for all actions
· Custom - user defined for which actions to display notifications
Here is the list of all message types:
· Action started
· Action finished with success
· Action finished with warnings
· Action paused
· Action resumed
· Action stopped
· Action canceled
· File or folder errors
· Ask for backup label
· Split mirror file confirmation

Options 389
Backup4all 7 User Manual Copyright © 2017 Softland
· SFTP host key confirmation
· Overwrite confirmation at restore
· File not found at restore
· File not found in zip at restore
· FTP destination warnings
· SFTP destination warnings
· Backup folder creation errors
· Disk prompts and warnings
· CD, DVD or Bluray destination warnings
· Delete confirmation for smart backup
· Cloud destination warnings
· Force independent split warning
· Backup source not available warning
Select a message type to modify it. Here are the options available for each message type:
· Show notification - check this option if you want to see a notification message for theselected action
· Popup noficiation - check this option if you want the message to be shown in a popupwindow. Otherwise it will be shown in the Backup4all status bar.
· Expires in - set the expiration time for the selected message type. By default is 2 minutes.
Notifications windowThe notifications window shows different messages for user. There could be informal messages oractions required.At the bottom there are 3 buttons: to show the notifications window from File->Options->Notifications, to expand all notifications and the last button to collapse all notifications.
You can also Dismiss all notifications or you can simply press Close to hide the notifications window.
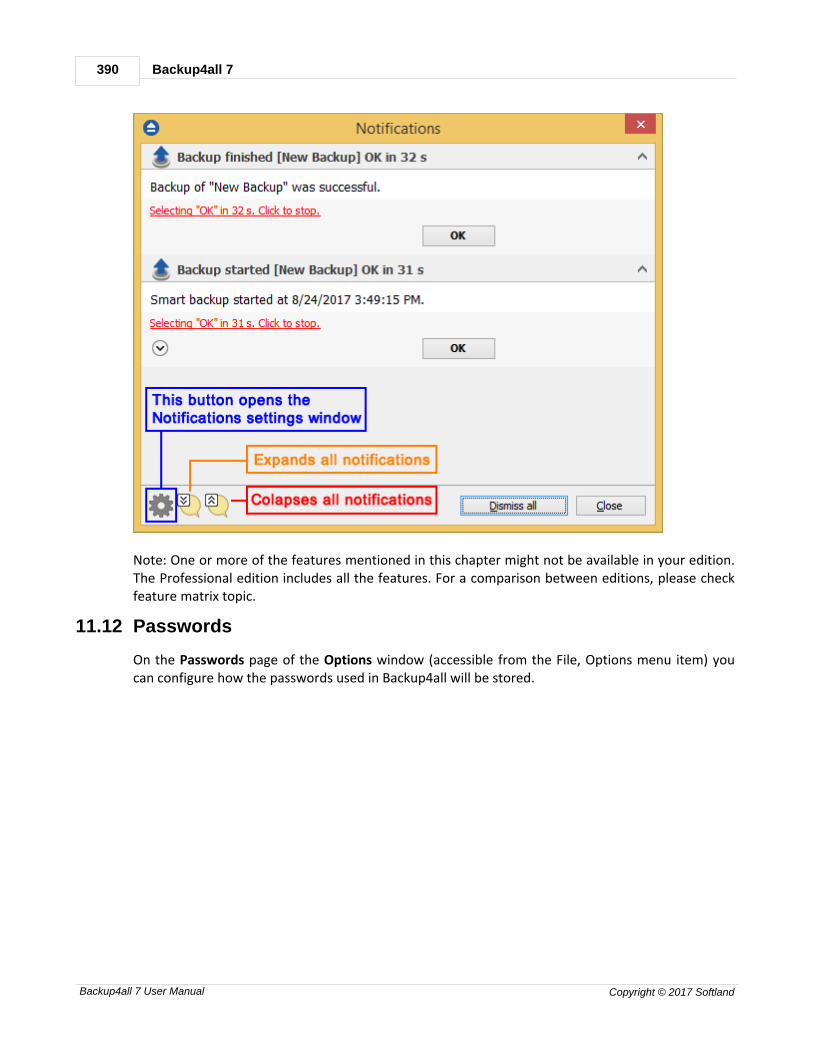
Backup4all 7390
Backup4all 7 User Manual Copyright © 2017 Softland
Note: One or more of the features mentioned in this chapter might not be available in your edition.The Professional edition includes all the features. For a comparison between editions, please checkfeature matrix topic.
11.12 Passwords
On the Passwords page of the Options window (accessible from the File, Options menu item) youcan configure how the passwords used in Backup4all will be stored.

Options 391
Backup4all 7 User Manual Copyright © 2017 Softland
Password storage
Store the password in the local Windows accountThe passwords will be stored in local configuration files and retrieved automatically when executingan action. The passwords could be retrieved if your Windows account gets compromised. Nopasswords are stored in the destination folders.
Protect the stored password using a master passwordThe passwords will be stored in local configuration files encrypted using a master password andretrieved automatically when executing an action. You will have to enter the master password onlywhen you start the application or when the first backup job starts. No passwords are stored in thedestination folder.
Do not store passwordsThe passwords will not be stored anywhere. You will have to enter the passwords everytime a jobaction starts. This is the most secure option.
Note: One or more of the features mentioned in this chapter might not be available in your edition.The Professional edition includes all the features. For a comparison between editions, please checkfeature matrix topic.
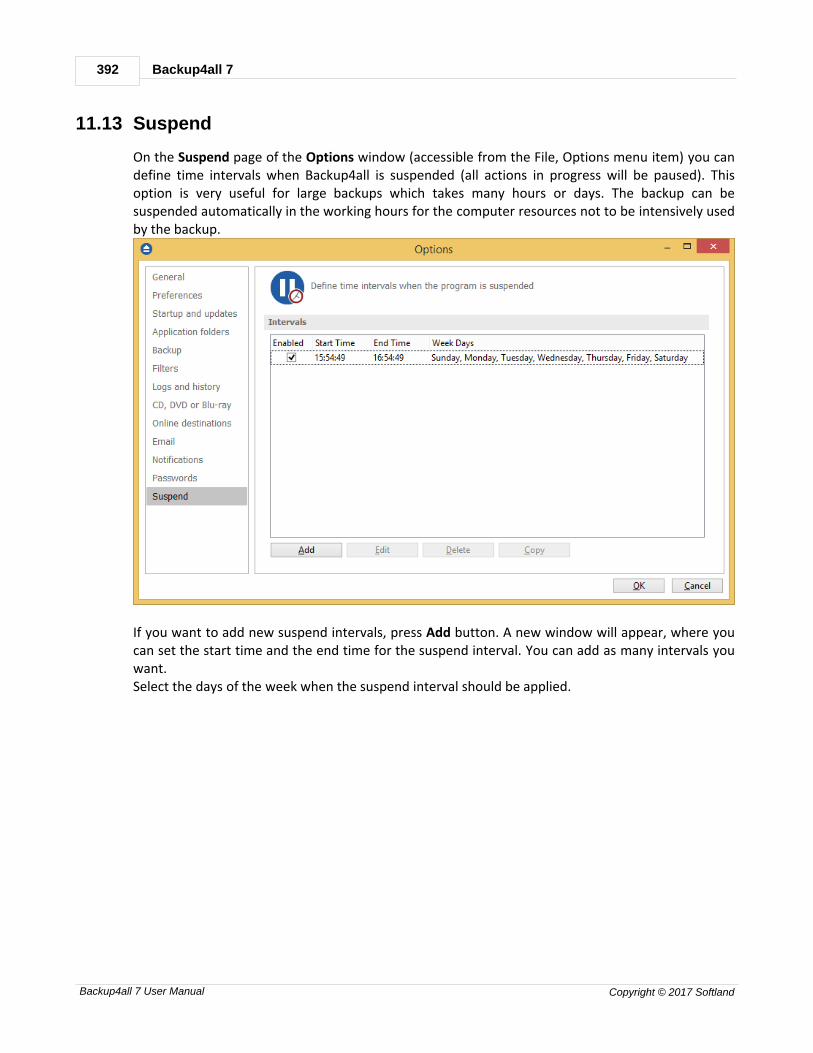
Backup4all 7392
Backup4all 7 User Manual Copyright © 2017 Softland
11.13 Suspend
On the Suspend page of the Options window (accessible from the File, Options menu item) you candefine time intervals when Backup4all is suspended (all actions in progress will be paused). Thisoption is very useful for large backups which takes many hours or days. The backup can besuspended automatically in the working hours for the computer resources not to be intensively usedby the backup.
If you want to add new suspend intervals, press Add button. A new window will appear, where youcan set the start time and the end time for the suspend interval. You can add as many intervals youwant. Select the days of the week when the suspend interval should be applied.
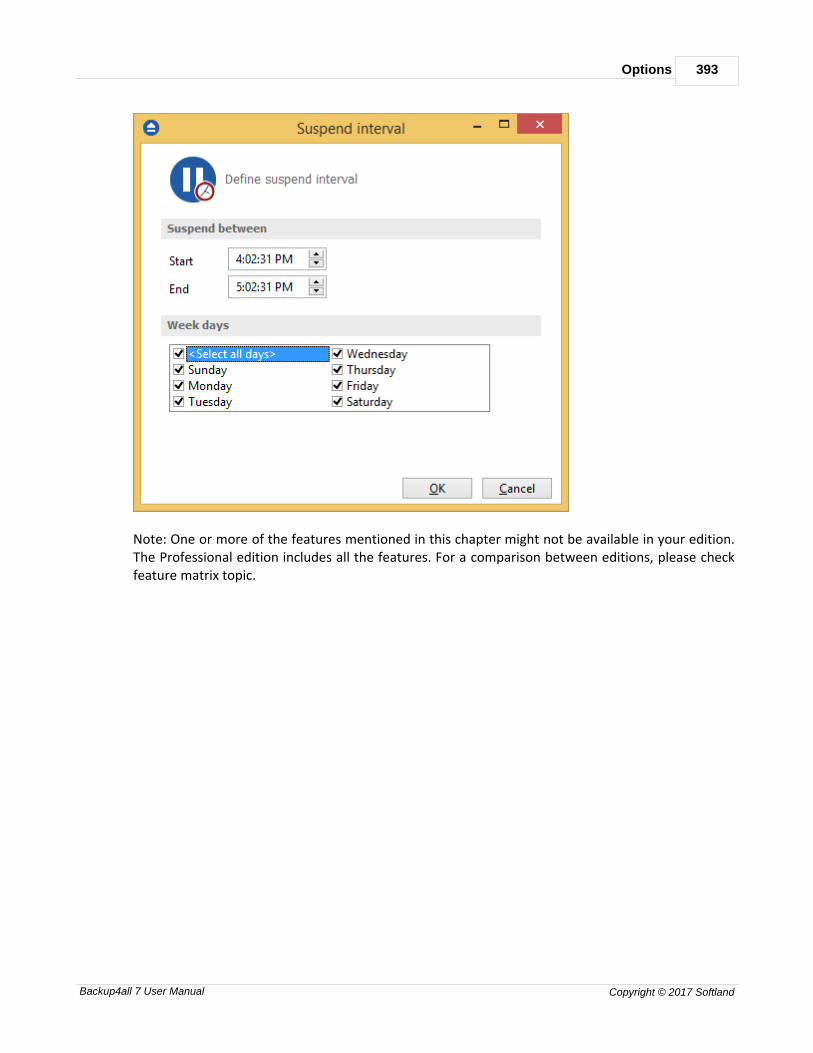
Options 393
Backup4all 7 User Manual Copyright © 2017 Softland
Note: One or more of the features mentioned in this chapter might not be available in your edition.The Professional edition includes all the features. For a comparison between editions, please checkfeature matrix topic.

Help
Part
XII

Help 395
Backup4all 7 User Manual Copyright © 2017 Softland
12 Help
The Help page from File menu of Backup4all contains information about the version and edition youhave installed.
Support
Backup4all HelpBefore asking for support, please make sure you have installed the latest version of Backup4all. Alsovisit our online Knowledgebase, as it contains valuable information and your questions mightalready be answered there. Support requestIf you can’t find an answer to your questions in our Knowledgebase, please go to Backup4all’sFile->Help menu and click on Support Request. This will open an email and it will include at thebottom some basic information we would need (application build number, operating system andregistration details).
Please include in your support request the following details:
· Exactly what did you do?
· Can you reproduce the problem again?
· If possible send us a screenshot of the error message.We might ask you for additional information, if we cannot reproduce the problem.
If you want to report bugs, feature requests or want to ask general software usage questions, youcan contact our support department.Pressing the Support Request button, starts a new email message that will be sent to the supportteam.

Licensing
Part
XIII
Licensing 397
Backup4all 7 User Manual Copyright © 2017 Softland
13 Licensing
Activation allows verifying that your copy of Backup4all is genuine and that it hasn't been used onmore computers than the number of licenses purchased. It prevents this way softwarecounterfeiting (intentional or unintentional).
Buy NowIf you don't own a product key for Backup4all and want to purchase one, click on the Buy Nowbutton. This will open the browser and allow you to buy a license. There you can select the quantityof licenses you need and finish the purchase. To test the application before purchasing it, click onthe Free trial button instead, to try it 30 days for free.The Feature Matrix section presents in detail the differences between Lite, Standard andProfessional edition.
Enter product keyAfter purchasing a Backup4all license you will receive an email that contains your Product key. Tostart using the application you'll have to validate the registration details by clicking on "Enterproduct key" and follow the activation steps, where you will be able to activate online or manually.
Change trial editionPressing this button will open the Start trial window, where you can change the edition ofBackup4all you want to try. If you change the trial edition, Backup4all will continue with theremaining number of days left.
Change product keyPress this button to open the activation window, where you can enter the new key for Backup4all.
RegisterPress this button to open our website, where you can register with the same email address used forpurchasing Backup4all. This way you will be able to see and manage all your keys and activations.
Deactivate this product keyPress this button to deactivate Backup4all. That is useful if you want to move the Backup4all licenseto another computer.
ReactivatePress this button to reactivate Backup4all immediately.
Note: One or more of the features mentioned in this chapter might not be available in your edition.The Professional edition includes all the features. For a comparison between editions, please checkfeature matrix topic.
13.1 Free Trial
Use Backup4all as trial for 30 daysBefore purchasing a license and activating it online you have the option of testing it for free. Thetrial version has the same features as the paid version and it will work for 30 days. To continue using
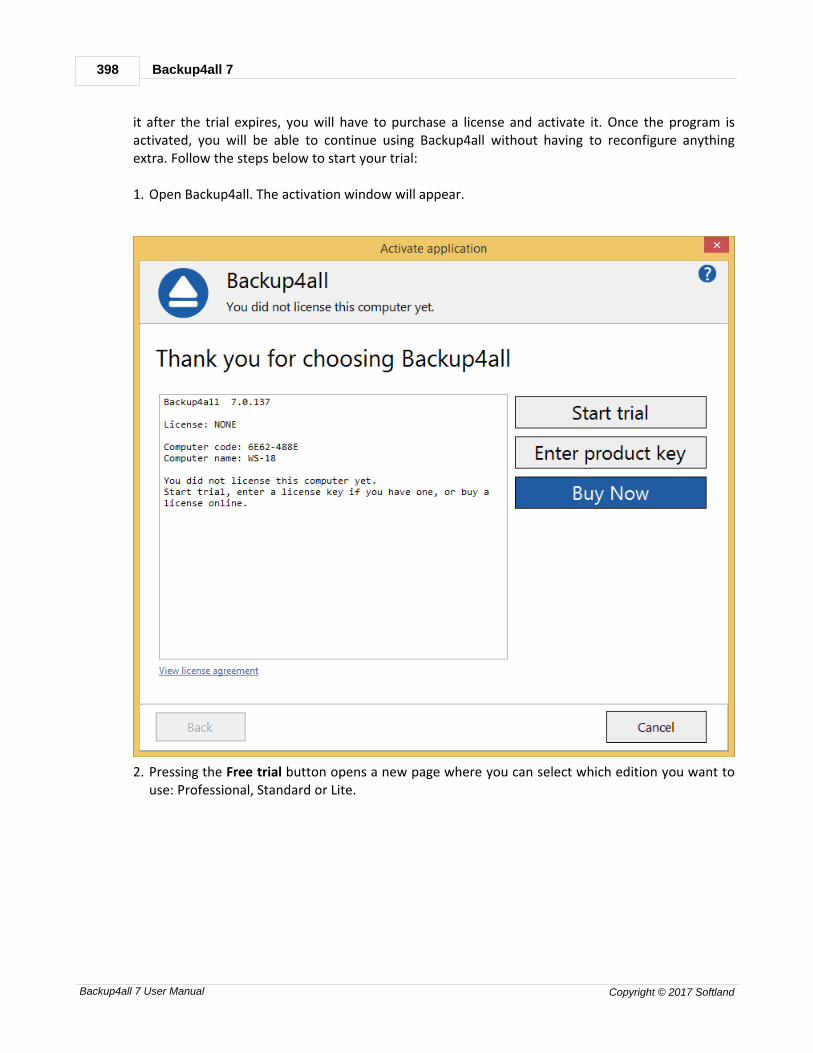
Backup4all 7398
Backup4all 7 User Manual Copyright © 2017 Softland
it after the trial expires, you will have to purchase a license and activate it. Once the program isactivated, you will be able to continue using Backup4all without having to reconfigure anythingextra. Follow the steps below to start your trial:
1. Open Backup4all. The activation window will appear.
2. Pressing the Free trial button opens a new page where you can select which edition you want touse: Professional, Standard or Lite.
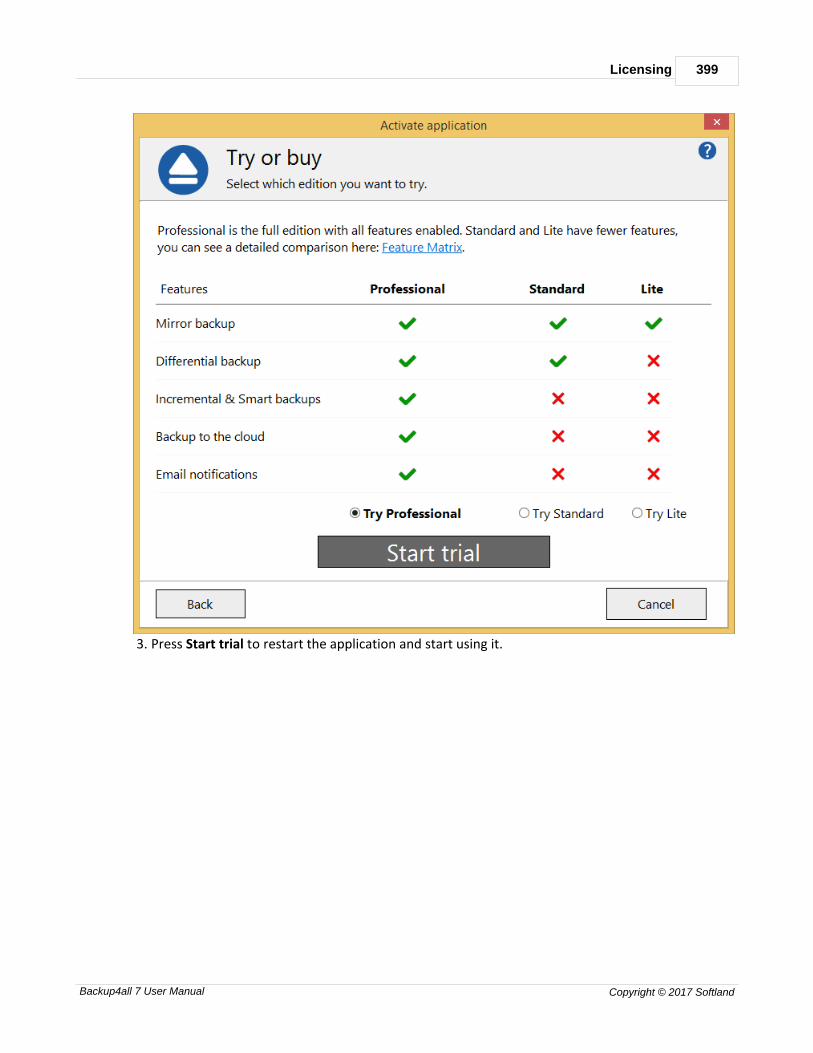
Licensing 399
Backup4all 7 User Manual Copyright © 2017 Softland
3. Press Start trial to restart the application and start using it.
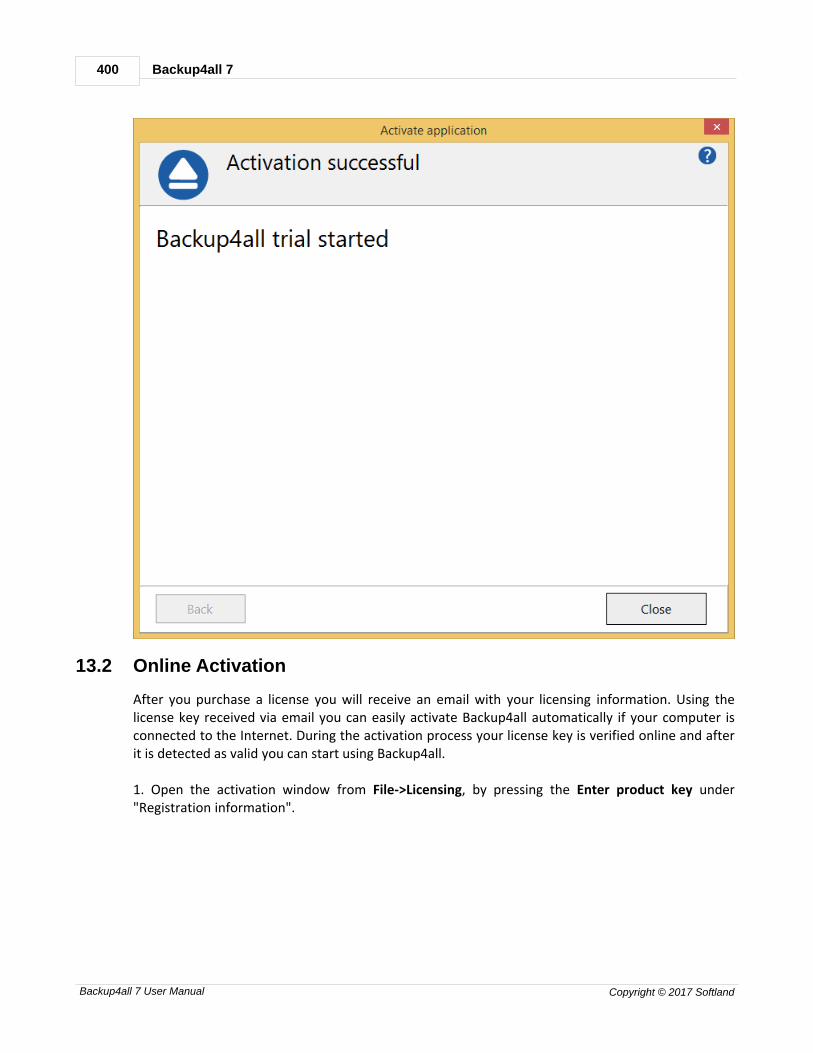
Backup4all 7400
Backup4all 7 User Manual Copyright © 2017 Softland
13.2 Online Activation
After you purchase a license you will receive an email with your licensing information. Using thelicense key received via email you can easily activate Backup4all automatically if your computer isconnected to the Internet. During the activation process your license key is verified online and afterit is detected as valid you can start using Backup4all.
1. Open the activation window from File->Licensing, by pressing the Enter product key under"Registration information".
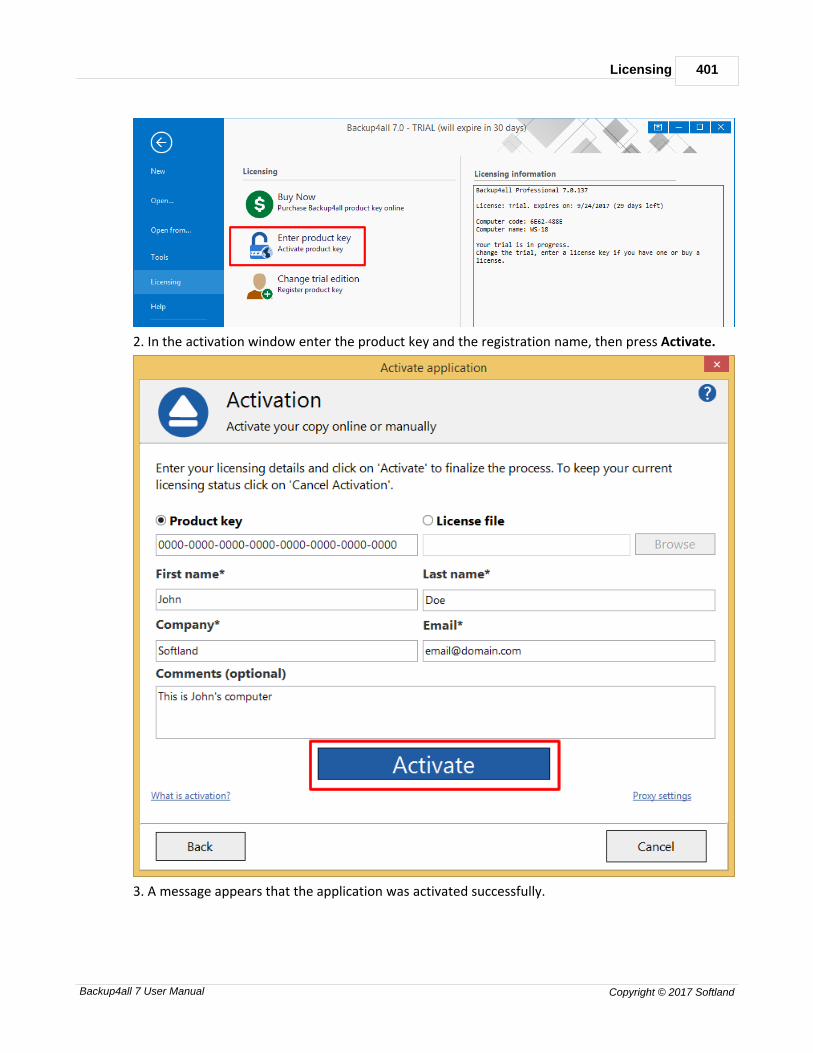
Licensing 401
Backup4all 7 User Manual Copyright © 2017 Softland
2. In the activation window enter the product key and the registration name, then press Activate.
3. A message appears that the application was activated successfully.
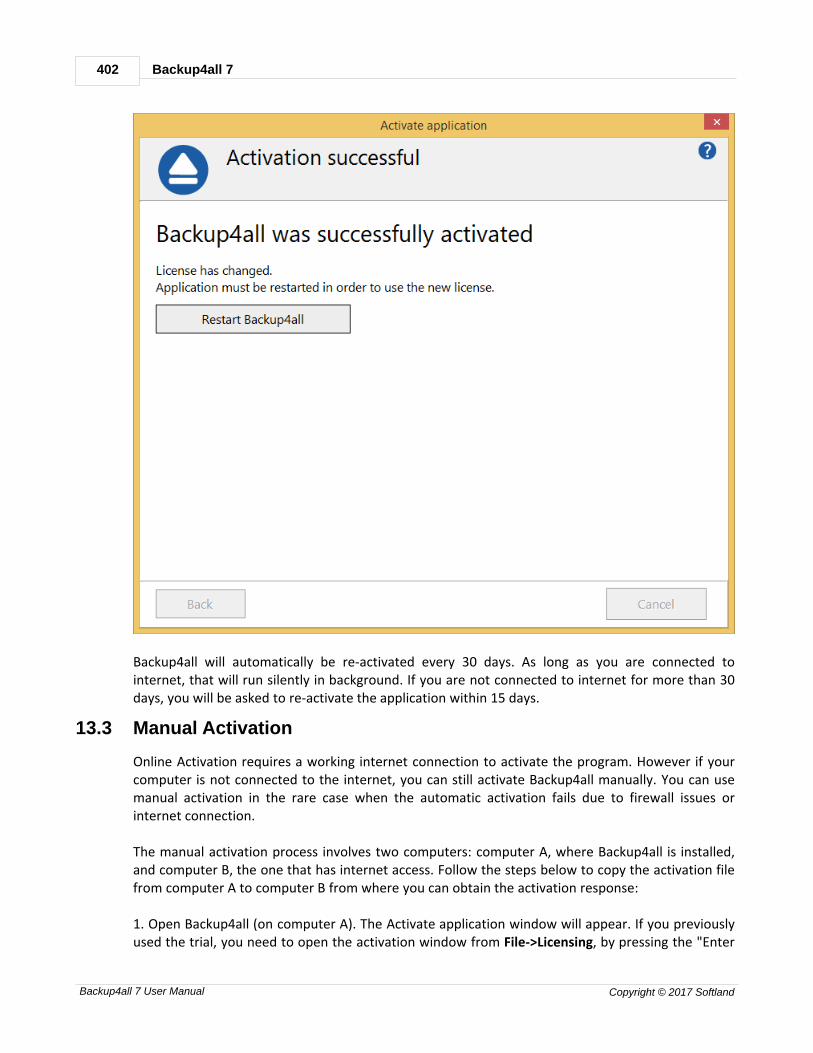
Backup4all 7402
Backup4all 7 User Manual Copyright © 2017 Softland
Backup4all will automatically be re-activated every 30 days. As long as you are connected tointernet, that will run silently in background. If you are not connected to internet for more than 30days, you will be asked to re-activate the application within 15 days.
13.3 Manual Activation
Online Activation requires a working internet connection to activate the program. However if yourcomputer is not connected to the internet, you can still activate Backup4all manually. You can usemanual activation in the rare case when the automatic activation fails due to firewall issues orinternet connection.
The manual activation process involves two computers: computer A, where Backup4all is installed,and computer B, the one that has internet access. Follow the steps below to copy the activation filefrom computer A to computer B from where you can obtain the activation response:
1. Open Backup4all (on computer A). The Activate application window will appear. If you previouslyused the trial, you need to open the activation window from File->Licensing, by pressing the "Enter

Licensing 403
Backup4all 7 User Manual Copyright © 2017 Softland
product key" button.
2. Press "Enter key" button. Copy paste or type the key, then press Activate.
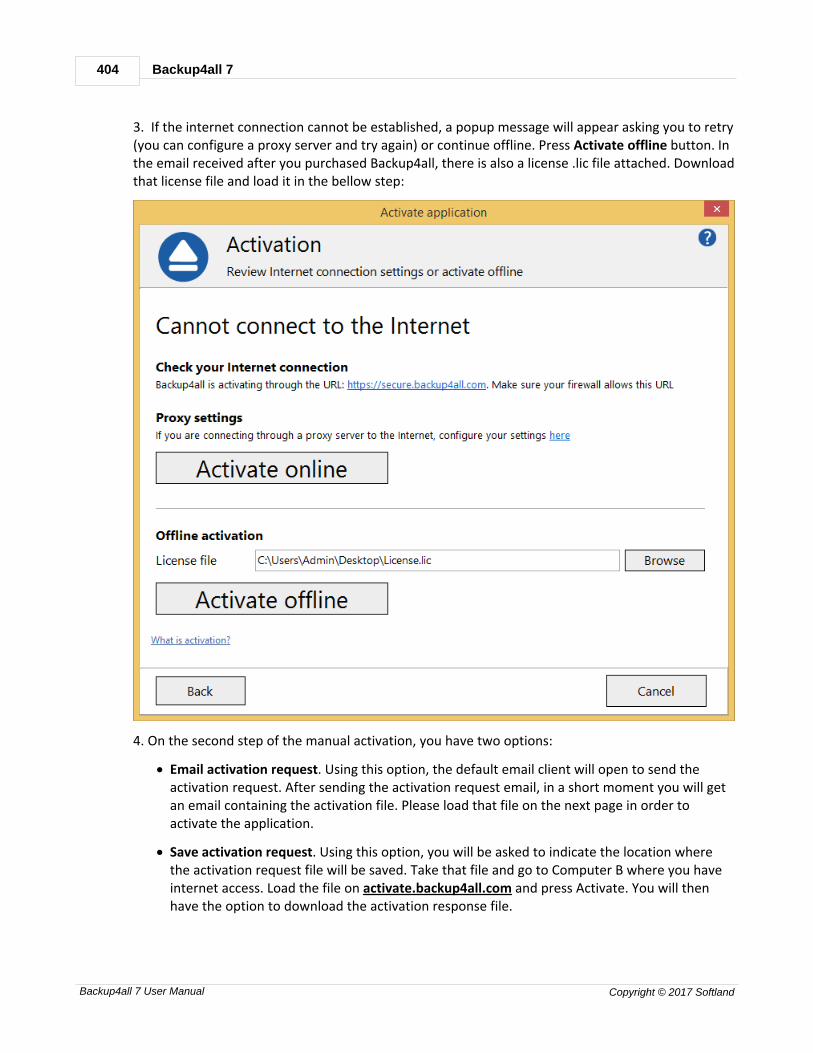
Backup4all 7404
Backup4all 7 User Manual Copyright © 2017 Softland
3. If the internet connection cannot be established, a popup message will appear asking you to retry(you can configure a proxy server and try again) or continue offline. Press Activate offline button. Inthe email received after you purchased Backup4all, there is also a license .lic file attached. Downloadthat license file and load it in the bellow step:
4. On the second step of the manual activation, you have two options:
· Email activation request. Using this option, the default email client will open to send theactivation request. After sending the activation request email, in a short moment you will getan email containing the activation file. Please load that file on the next page in order toactivate the application.
· Save activation request. Using this option, you will be asked to indicate the location wherethe activation request file will be saved. Take that file and go to Computer B where you haveinternet access. Load the file on activate.backup4all.com and press Activate. You will thenhave the option to download the activation response file.

Licensing 405
Backup4all 7 User Manual Copyright © 2017 Softland
5. In both cases you will get a activation response file that you need to load on the 3rd page of thatactivation wizard, then press Activate.
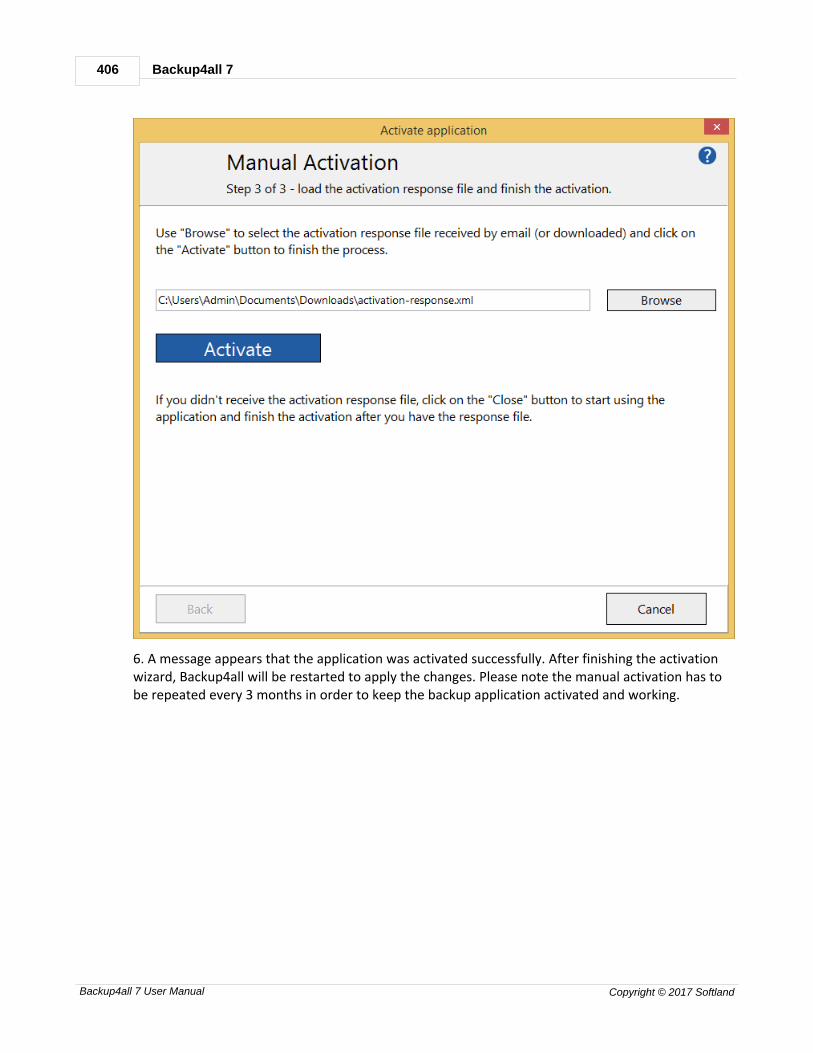
Backup4all 7406
Backup4all 7 User Manual Copyright © 2017 Softland
6. A message appears that the application was activated successfully. After finishing the activationwizard, Backup4all will be restarted to apply the changes. Please note the manual activation has tobe repeated every 3 months in order to keep the backup application activated and working.
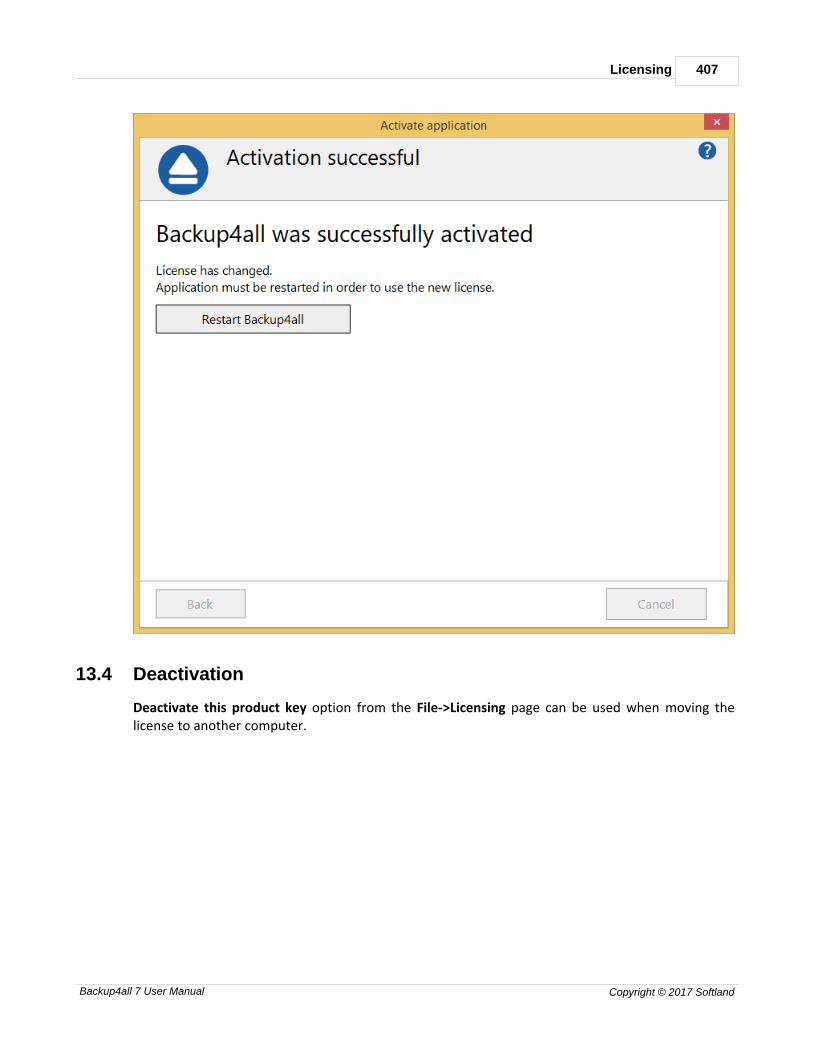
Licensing 407
Backup4all 7 User Manual Copyright © 2017 Softland
13.4 Deactivation
Deactivate this product key option from the File->Licensing page can be used when moving thelicense to another computer.

Backup4all 7408
Backup4all 7 User Manual Copyright © 2017 Softland
If you lost your registration key, please send us an email to Sales Support. You should specify yourpurchase information (purchase number and approximate date), the name (or company name) andemail address you used to buy your copy of Backup4all. We will send to you the registration keyagain. If you have questions or you experience problems related to the registration process, you can usethe Support Request button (from Help menu) under Support section to contact us. We will behappy to assist you with the registration.
Backup4all is available as Shareware - another way of saying Try before you buy. It is fully functionalfor a period of 30 days. After 30 days, the program will start only if you enter a valid registration key(OEM version users might be asked to enter their registration keys sooner). You can buy Backup4allonline if you fill out the online purchase form.
Note: One or more of the features mentioned in this chapter might not be available in your edition.The Professional edition includes all the features. For a comparison between editions, please checkfeature matrix topic.
13.5 Legal notices
This program includes software developed by the OpenSSL Project for use in the OpenSSL Toolkit.
OpenSSL License
Copyright (c) 1998-2011 The OpenSSL Project. All rights reserved. Redistribution and use in sourceand binary forms, with or without modification, are permitted provided that the followingconditionsare met:
Licensing 409
Backup4all 7 User Manual Copyright © 2017 Softland
1. Redistributions of source code must retain the above copyright notice, this list of conditions andthe following disclaimer.
2. Redistributions in binary form must reproduce the above copyright notice, this list of conditionsand the following disclaimer in the documentation and/or other materials provided with thedistribution.
3. All advertising materials mentioning features or use of this software must display the followingacknowledgment: "This product includes software developed by the OpenSSL Project for use in theOpenSSL Toolkit. (http://www.openssl.org/)"
4. The names "OpenSSL Toolkit" and "OpenSSL Project" must not be used to endorse or promoteproducts derived from this software without prior written permission. For written permission,please contact [email protected].
5. Products derived from this software may not be called "OpenSSL" nor may "OpenSSL" appear intheir names without prior written permission of the OpenSSL Project.
6. Redistributions of any form whatsoever must retain the following acknowledgment: "This productincludes software developed by the OpenSSL Project for use in the OpenSSL Toolkit (http://www.openssl.org/)"
THIS SOFTWARE IS PROVIDED BY THE OpenSSL PROJECT ``AS IS'' AND ANY EXPRESSED OR IMPLIEDWARRANTIES, INCLUDING, BUT NOT LIMITED TO, THE IMPLIED WARRANTIES OF MERCHANTABILITYAND FITNESS FOR A PARTICULAR PURPOSE ARE DISCLAIMED. IN NO EVENT SHALL THE OpenSSLPROJECT OR ITS CONTRIBUTORS BE LIABLE FOR ANY DIRECT, INDIRECT, INCIDENTAL, SPECIAL,EXEMPLARY, OR CONSEQUENTIAL DAMAGES (INCLUDING, BUT NOT LIMITED TO, PROCUREMENT OFSUBSTITUTE GOODS OR SERVICES; LOSS OF USE, DATA, OR PROFITS; OR BUSINESS INTERRUPTION)HOWEVER CAUSED AND ON ANY THEORY OF LIABILITY, WHETHER IN CONTRACT, STRICT LIABILITY,OR TORT (INCLUDING NEGLIGENCE OR OTHERWISE) ARISING IN ANY WAY OUT OF THE USE OF THISSOFTWARE, EVEN IF ADVISED OF THE POSSIBILITY OF SUCH DAMAGE.
This product includes cryptographic software written by Eric Young ([email protected]). Thisproduct includes software written by Tim Hudson ([email protected]).
Backup4all 7410
Backup4all 7 User Manual Copyright © 2017 Softland
Index- . -.bkc 79, 81
.ini 152
- A -Abort backup 286
Advanced mode 189
Amazon 170
Access Key ID 46
Bucket 46
Folder 46
Secret Access Key 46
Amazon S3 213
Application log 149
Archive bit 273
ASPI 80
Attributes 104
Automatically span 81
Azure 169, 210
Account name 44
Container 44
Folder 44
Key 44
Shared Access Signature 44
- B -Backup 83
Backup date 104
Backup list 94
Backup logs 150
Backup options
Compression filter 334
File warnings 334
Retry 334
Show success 334
Show warning 334
Wait 334
Warn 334
Backup Properties destination 191
Backup Properties overview 189
Backup properties sources 249
Backup tags
Delete tag 96
New tag 96
Rename tag 96
Backup to Amazon 46
Backup to Azure 44
Backup to Blu-ray 79
Backup to CD 79
Backup to DVD 79
Backup to FTP 37
Backup to SFTP 42
Backup to USB drives 61
backup type 183, 258
Backup types
Differential backup 67
Full backup 67
Incremental backup 67
Mirror backup 67
Backup types in Backup4all 74
Backup versions 127
Backup wizard destination 162, 163, 164, 165, 167,169, 170
Backup wizard general 189
Backup wizard name 162
Backup wizard overview 160
Backup wizard what to backup 182
Backup4all 9
Backup4all 2 152
Backup4all 3 152
Backup4all 4 152
Backup4all Configurations 189
Bandwidth limitation 202, 207, 212, 214
Blank passwords 136, 137, 143, 288, 290, 297
Blu-eay 79
Blu-ray 194
Built in 80
Built-in driver 194
Burner 80
- C -Calculate statistics 109
Cancel 83
Captions 328
Catalog 79, 81
CD 79, 194
CD drive 191
Index 411
Backup4all 7 User Manual Copyright © 2017 Softland
CD/DVD/Blu-ray options
Burning engine 343
Eject CD/DVD/Blue-ray 343
Load CD/DVD/Blue-ray 343
SPTD 343
SPTI 343
Change criteria 273
Change Icon 189
Changed files 104
Clean backup 130
Clear archive bit 258
Clear backup 136, 137, 143, 288, 290, 297
Close to tray 154
Collapse 83
Column headers 127
Command line
Silent install 12
Commands 83
Comparison criteria 273
Comparison table 19
Compression 207, 212, 214
Configure new backup 26
Configure One Touch Backup 63
Copy 83
Create a new backup 26
Create like 83
Create shortcut 99
Customize filter 251
- D -Default destination 333
Default paths 333
Delete 83
Delete group 83
Delete sources 273
Description 9
Detailed logging 65
Device name 80
Differential 67, 258
Differential backup 71, 183, 260
Disc 79
Drive letter folder 301
DVD 79, 194
- E -Eject 80, 82, 146
Email notifications
Authentication 62
Email address 62
Send test email 62
SMTP server 62
Email options
Authentication 385
Dial-up connection 385
Email addresses 385
Email notifications 385
Hang up 385
IP 385
Port 385
SMTP server 385
SSL 385
Empty directories 273
Enable detailed logging 65
Enclosures 61, 63
Encryption 207, 212, 214
AES encryption 35
Zip encryption 35
Erase CD/DVD 146
Erase disc 80, 136, 137, 143, 288, 290, 297
Exact copy 73
Exclude 310
Execute backup 31
Exit 83, 154
Expand 83
Explicit SSL 202
Explore 83
Explore View 104
External device 61
- F -Fast mirror 73, 262
Feature matrix
Lite 19
Professional 19
Standard 19
Features summary 14
File filtering 310
File locations
Backup4all 7412
Backup4all 7 User Manual Copyright © 2017 Softland
File locations
BkcFiles 333
Catalog 333
Destination 333
IniFiles 333
Initialization 333
Log 333
Temporary 333
File tree 104
File version list 104
File versions 68, 70, 71, 72
Backup number 304
Backup time 304
Label 304
Total size 304
Type 304
Files in backup 109
Filter
By attribute 311
By date 311
By name 311
By size 311
Directories 311
Files 311
Folders 311
Filter backup
Customize filter 250
Exclude files 250
Include files 250
Main filter 250
Filter restore
Customize filter 306
Exclude files 306
Include files 306
Main filter 306
Finalizing CD/DVD 80
Firewall 202
Firewire 61, 193
flash 196
floppy 196
Floppy drive 191
Folder filtering 310
FTP 162, 165, 191, 200
Hammering 37
Port number 37
Proxy server 37
Remote location 37
Retry times 37
SSL 37
XCRC 37
FTP options
Host name 345, 354, 357
Password 345, 354, 357
Port 345, 354, 357
Retry 345, 354, 357
Username 345, 354, 357
Wait 345, 354, 357
Full 67, 258
Full backup 68, 70, 183, 260
Full erase 146
- G -General options
Align caption 327
Appearance 327
Background color 327
Blank passwords 327
Captions 327
Context menu 327
Daylight saving 327
Explorer icons 327
Hidden files 327
Hide empty folders 327
Hint 327
Icon size 327
Insecure passwords 327
Measurement 327
Sort backups 327
Toolbar 327
Getting Started
Backup 93
New 93
Open 93
Restore 93
Group 189
- H -Hard disk drive 191
Hide empty folders 104
High priority 127
Highest priority 127
Hint 328
Hints 154
Index 413
Backup4all 7 User Manual Copyright © 2017 Softland
History 149, 150
- I -Icon size 328
Implicit SSL 202
Import 83, 152
Import inactive schedulers 152
Include 310
Incremental 67, 258
Incremental backup 72, 183, 261
Independent zip files 81
Installation
Install 10
License agreement 10
Setup language 10
Uninstall 10
Introduction 9
- K -Keyboard shortcuts 156
- L -Labeling 79, 273
LAN 162, 164, 191, 198
Last backup size 109
Last backup status 109
Last CD/DVD/Blu-ray 81
Legacy 273
Limit 79
Load 146
Loading CD/DVD 80
Local catalog 79, 273
Local destination 192
Local drives 162, 163, 191
Logging 65, 149
Logging options
Detailed log 341
Error logging 341
Restricted size 341
Summary log 341
Warning logging 341
Logs 150
Low priority 127
Lowest priority 127
- M -Make 83
Make differential 83
Make full 83
Make incremental 83
Manage backup jobs
Copy backup 31
Delete backup 31
Modify backup 31
Manage backup tags 96
Manage plugins 147, 182
Mapped network drive 191
Merge 79
Minimize to tray 154
Mirror 67, 258
Mirror backup 73, 183, 262
Mirror with zip 262
My Documents 189
My Pictures 189
- N -Name 189
New 83
New backup 26
New backup wizard
Advanced 26
Destination 26
Explore 26
Filters 26
General 26
Scheduler 26
Sources 26
Statistics 26
Summary 26
Type 26
New features 19
New group 83
Next scheduled backup 109
No SSL 202
Normal priority 127
Not changed 104
Notifications 62
NTFS 273
Number of backups 109

Backup4all 7414
Backup4all 7 User Manual Copyright © 2017 Softland
- O -One Touch Backup 63
Open backup 83, 113, 152
Open Backup From 113
Open files 273
OTB 63
Outlook Express 189
Override catalog 191
Override filter 250, 306, 310
- P -Packet writing software 80
Passive mode 202
Firewalls 40
Password 35
Password protect a backup 35
Portability 61
Predefined backup 147, 182, 189
Preview 308
Previous version 152
Priority slider 127
Private key 207, 212, 214
Product description 9
Progress View 112
Properties 83
Proxy
Port 40
Transparent 40
Proxy type 202
- Q -Quick erase 146
- R -Refresh 83
Refresh list 146
Reload 80
removable 196
Remove password 35
Rename group 83
Reset node 308
Reset tree 308
Restore 83
Advanced 301
Basic 301
Full 301
Restore latest version 32
Restore to 32
Restore wizard 32
Standard 301
Restore from a backup 32
Restore versions 304
Restrictions 250, 306
Run a backup job 31
Run at shutdown 136, 137, 143, 288, 290, 297
Run backup 31
Running 83
- S -Save storage space 67
Schedule 185
Add 133, 286
Close window 136, 137, 143, 288, 290, 297
Command line 136, 137, 143, 288, 290, 297
Delete 133, 286
Edit 133, 286
Hide window 136, 137, 143, 288, 290, 297
Main application 136, 137, 143, 288, 290, 297
Refresh 133
Schedule 286
Schedule a backup 36
Scheduler 83
Standalone scheduler 36
Task scheduler 36
Send email notifications 62
SFTP 167, 205
Hammering 42
Port number 42
Remote location 42
Retry times 42
SSH 42
SFTP options
Host name 350
Password 350
Port 350
Retry 350
Username 350
Wait 350
Shortcut 99
Index 415
Backup4all 7 User Manual Copyright © 2017 Softland
Show context menu 104
Show deleted 83
Show disk label message 82
Show excluded 83
Show modified 83
Show new 83
Show unchanged 83
Size 104
Smart backup 259
Snapshot 73
Sources
Abort 182, 249
Add files 182, 249
Add folder 182, 249
Ignore 182, 249
Remove 182, 249
Retry 182, 249
Spanning 79
Speed 194
SPTD 82
SPTI 82
SSH 350
SSL 345, 354, 357
Encryption 41
Explicit SSL 41
Implicit SSL 41
Layer 41
Secure 41
Sockets 41
SSL encryption level 202
Standalone scheduler 133, 136, 137, 143, 286,288, 290, 297
Start backup 31
Startup options
Windows startup 331
Statistics 83
Statistics View 109
Status 104
Summary 83, 303
System requirements 10
System tray 154
- T -Task 286
Task scheduler 133
Temporary folder 79
Test 83, 273
Test a backup 34
Test after backup 34
Test backup 34, 127
Test log 34
Timeout 202
Toolbar 83, 328
Tray icon 154
Close 331
Minimize 331
Show errors 331
Type differential 260
Type full 260
Type incremental 261
Type mirror 262
Type Smart 259
- U -UDF 80, 194
UNC network drive 191
Universal Data Format 80
usb 193, 196
USB backup
Detect device 61
Format device 61
One Touch Backup 61
Start device 61
USB drive 61, 191
Use built in driver 80
Use One Touch Backup 64
Use packet writing 80
- V -View menu 104
Visualization
Maximized 331
Window state 331
Volume Shadow Copy 273
- W -Warn before erasing 82
Windows 2000 10
Windows 2003 Server 10
Windows 98 SE 10
Windows Me 10
Backup4all 7416
Backup4all 7 User Manual Copyright © 2017 Softland
Windows NT SP6 10
Windows scheduler 136, 137, 143, 286, 288, 290,297
Windows XP 10
Wizard 160, 189
Writing to Blu-ray 81
Writing to CD 81
Writing to DVD 81
- X -XCRC 202
- Z -Zip backup 68, 70, 259, 260
Zip compression 269
Zip drive 191
Zip encryption 269