Embed Size (px)
Citation preview

Quick Reference Guide
Balance and
Transaction Reporting Published on 4/10/2019

Quick Reference Guide
Confidential Information – Fulton Bank © 2019. All rights reserved. Version 3.8 April 2019
2 of 19
Account Summary Widget
The Account Summary widget appears on the Balance and Transaction workspace. It lists the
balances of the accounts that you have permission to see. You can also access the transaction
details and account statement reports from this widget.
By default, the Account Summary widget appears on the Home Page page. You can also navigate to
it from the Reporting menu.
To view Account Summary:
1. Select Balance and Transaction Reporting from the Reporting menu.
The system displays the Balance and Transaction Reporting - Account Summary screen with the
Quick Reference Guide
Confidential Information – Fulton Bank © 2019. All rights reserved. Version 3.8 April 2019
3 of 19
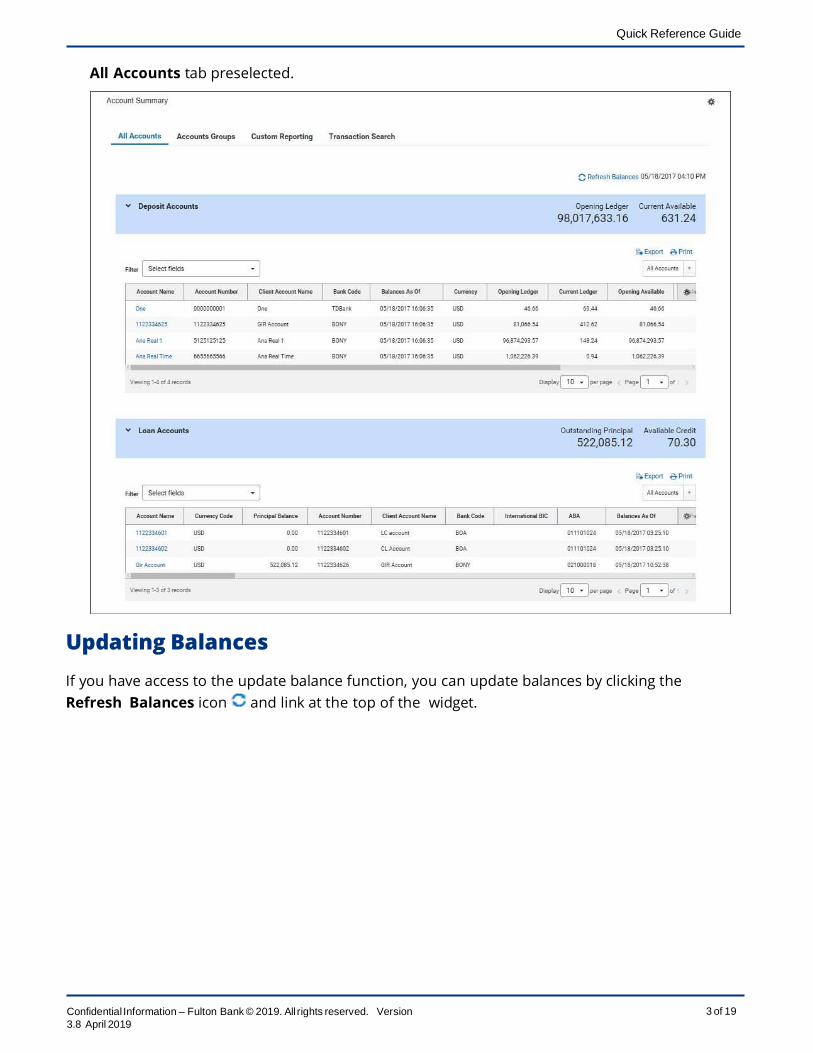
All Accounts tab preselected.
Updating Balances
If you have access to the update balance function, you can update balances by clicking the
Refresh Balances icon and link at the top of the widget.

Quick Reference Guide
Confidential Information – Fulton Bank © 2019. All rights reserved. Version 3.8 April 2019
4 of 19
Viewing Transaction Details
Click the Account Name to see transaction details.

Quick Reference Guide
Confidential Information – Fulton Bank © 2019. All rights reserved. Version 3.8 April 2019
5 of 19
l
Viewing Transaction Images
Some transactions have images associated with them, such as images of deposit slips or cleared
checks. To view images, an account must be set up by the bank administrator to permit image
viewing.
1. From the Account Summary screen, click on the account
name. The transaction details screen will appear.

Quick Reference Guide
Confidential Information – Fulton Bank © 2019. All rights reserved. Version 3.8 April 2019
6 of 19
2. Use the scroll bar to locate the Image column.
3. Click on the image icon to view the image.
Controls below the image allow you to flip or rotate it, as well as zoom in or out.
Custom Reporting
The Custom Reporting feature allows you to create and save custom reports on account or
account group information.
To use Custom Reporting:

Quick Reference Guide
Confidential Information – Fulton Bank © 2019. All rights reserved. Version 3.8 April 2019
7 of 19
1. Select Balance and Transaction Reporting from the Reporting Menu.
2. At the top of the screen, click Custom Reporting.

Quick Reference Guide
Confidential Information – Fulton Bank © 2019. All rights reserved. Version 3.8 April 2019
8 of 19
To see a report based on saved report criteria:
l At Saved Report Criteria, use the drop-down to select a saved report.
Note
If a report has been saved previously as the default, it will appear as the default choice. To
remove this choice, click Clear Default.
The report appears on screen.

Quick Reference Guide
Confidential Information – Fulton Bank © 2019. All rights reserved. Version 3.8 April 2019
9 of 19
l If you want the saved report you selected to be the default report in future, click Set As
Default.
l Click Edit in the Report Criteria section to edit the criteria. Follow the instructions under To
see a report based on new report criteria below.
To see a report based on new report criteria:
1. (optional) In the Accounts/Account Group field, use the drop-down to select whether you
want to search for accounts or account groups.
You can search for all accounts or account groups, or click in the right-hand field to see a list of
accounts/account groups that you can select from.
Note
Real-time posted accounts are not available for custom reporting.

Quick Reference Guide
Confidential Information – Fulton Bank © 2019. All rights reserved. Version 3.8 April 2019
10 of 19
2. In the Date Range field, select a range or enter a custom range using the calendar icon.
3. (optional) Use the Account Transactions View drop-down to select how you want to
view accounts: Credit/Debit Single View or Separate Credit and Debit Views.
Quick Reference Guide
Confidential Information – Fulton Bank © 2019. All rights reserved. Version 3.8 April 2019
11 of 19
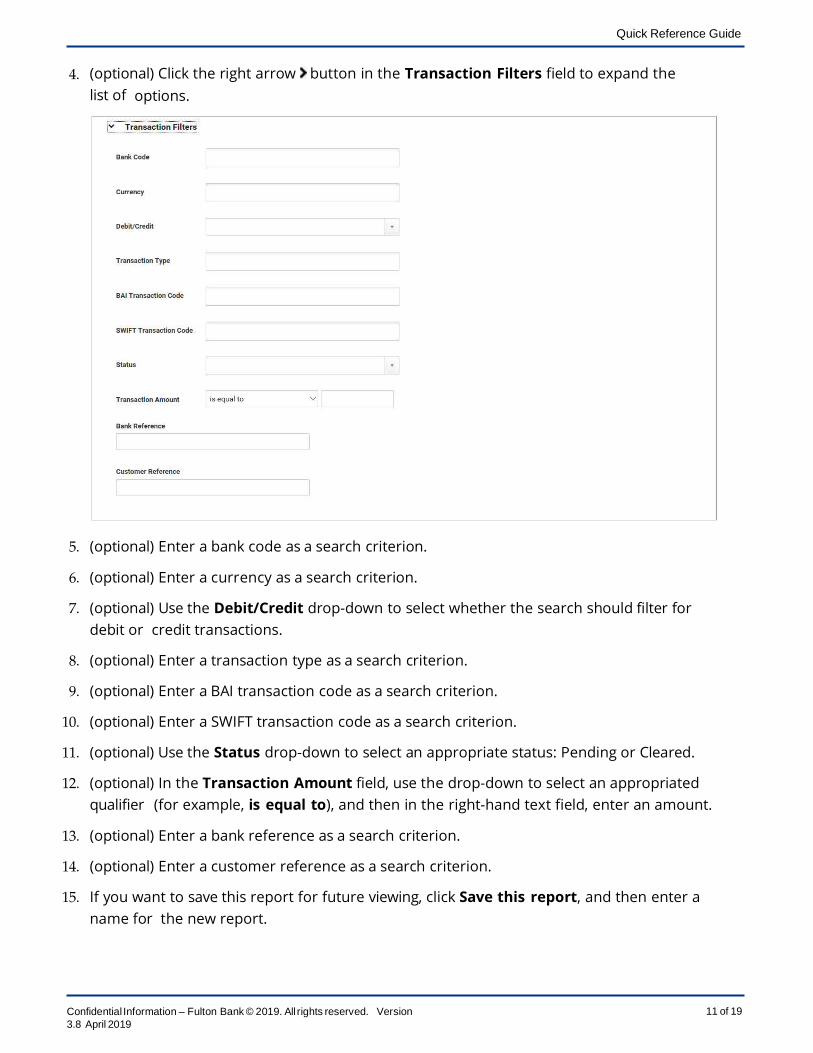
4. (optional) Click the right arrow button in the Transaction Filters field to expand the
list of options.
5. (optional) Enter a bank code as a search criterion.
6. (optional) Enter a currency as a search criterion.
7. (optional) Use the Debit/Credit drop-down to select whether the search should filter for
debit or credit transactions.
8. (optional) Enter a transaction type as a search criterion.
9. (optional) Enter a BAI transaction code as a search criterion.
10. (optional) Enter a SWIFT transaction code as a search criterion.
11. (optional) Use the Status drop-down to select an appropriate status: Pending or Cleared.
12. (optional) In the Transaction Amount field, use the drop-down to select an appropriated
qualifier (for example, is equal to), and then in the right-hand text field, enter an amount.
13. (optional) Enter a bank reference as a search criterion.
14. (optional) Enter a customer reference as a search criterion.
15. If you want to save this report for future viewing, click Save this report, and then enter a
name for the new report.

Quick Reference Guide
Confidential Information – Fulton Bank © 2019. All rights reserved. Version 3.8 April 2019
12 of 19
16. When you have finished selecting search criteria, click Submit. The results appear as a custom
report. Click Edit in the Report Criteria section to edit the criteria and create a new report
based on them.
Viewing the Custom Report
The results of a custom report request are described below.
l Export and Print buttons are displayed at the top of the report. For information on
exporting and printing data, see Exporting and Printing Balance Transaction Data.
l If any of the accounts selected returned no data, you will be notified of this. Click the down
arrow to view the accounts that returned no data.
l To see totals for the accounts that the report covers, click Show Account Totals.
Then to hide the displayed totals, click Hide Account Totals.
l For each listed account, the following information is listed:
l Opening Ledger
l Total Credits
l Total Debits
l Current Ledger

Quick Reference Guide
Confidential Information – Fulton Bank © 2019. All rights reserved. Version 3.8 April 2019
13 of 19
l To see account details, click the right arrow . It drops down the detail information for the first
and last days in the requested date range.
The section also lists any transactions for the period covered by the report. If an image is
associated with a transaction, an icon appears in the Image column. Click the icon to view the
image. For information, see Viewing Transaction Images.
Note
For real-time accounts, totals for all accounts and for individual accounts/transactions are
polled to get the most up-to-date information. You will see a revolving progress indicator to
show that accounts/transactions are in the process of being loaded.
Account Groups
The account groups feature allows you to logically organize bank accounts into groups. When you
are viewing bank account data on a list or report, you can choose to filter the data by these
groups. This feature allows you to view data for related accounts quickly and easily.
Adding Account Groups
To add an account group:

Quick Reference Guide
Confidential Information – Fulton Bank © 2019. All rights reserved. Version 3.8 April 2019
14 of 19
1. Select Balance and Transaction Reporting from the Reporting Menu.
2. At the top of the screen, click Account Groups.
3. Click Create Account Groups or Edit next to Deposit Account Groups.
4. Above the Account Groups pane, click Add Group.
5. In the New Group box enter the name of the group you want to add.
6. Select the group name from the Select Group list at the bottom of the screen.
7. In the left pane, check the accounts that you want to include in the group. Click the
Deposit Accounts indicator to show deposit accounts or Loan Accountsto show loan
accounts.
8. Click Move Selected Accounts.
9. The accounts will appear in the right pane. The accounts appear in the same order as they
will be shown on the Balance and Transaction Reporting screens.
10. When the account group appears as desired, click Save.
Viewing Account Groups
To view account groups, click Account Groups at the top left of the Balance and Transaction
Account Summary screen.
Modifying or Deleting Account Groups
To modify or delete an account group:
1. Select Balance and Transaction Reporting from the Reporting menu.
2. Select Account Groups.
3. To modify a group, select the group name from the list.
4. Add or remove accounts as needed.
5. You can delete the account group by clicking the X icon.
6. You can edit the group name by clicking the Edit icon .
7. When you have finished, click Save.
Transaction Search
The Transaction Search feature allows you to search across the accounts you have access to for
specific transactions.
To search for a transaction:

Quick Reference Guide
Confidential Information – Fulton Bank © 2019. All rights reserved. Version 3.8 April 2019
15 of 19
1. Select Balance and Transaction Reporting from the Reporting Menu.
2. At the top of the screen, click Transaction Search.
3. (optional) Do one of the following:
l To search for deposit accounts, click Deposit Accounts.
l To search for loan accounts, click Loan Accounts.

Quick Reference Guide
Confidential Information – Fulton Bank © 2019. All rights reserved. Version 3.8 April 2019
16 of 19
4. (optional) In the Accounts/Account Group field, use the drop-down to select whether you
want to search for accounts or account groups.
You can search for all accounts or account groups, or click in the right-hand field to see a list of
accounts/account groups that you can select from.

Quick Reference Guide
Confidential Information- Bollomline Technologies© 2019.All rights reserved. Version 3.8 April 2019
17 of19
5. In the Date Range field, select a range or enter a custom range using the calendar icon.
-
Account Summary
All Accounts Accounts Groups Custom Reporting
Transaction Search
Enter New Report Criteria
Deposit Accounts Loan Accounts
1 1
Account Group
•Date Range
< May 2017 > Last 7 Days Last 30 Days
Su Mo Tu We Th Fr Sa Last 60 Days
JO 2 3 4 5 Ei Last 90 Days
+4 15 16 17 18 JO Quarter to dale "/. 8 9 10 11 12 -lJ Month o date
I:l-l 22 23 24 25 26 p Year to date
Today ;}
:!S 29 30 31 2
Su
JO
"/.
+4
:l-l
:!S
Mo
.i
s 4<i
22
29
May 2017 >
Tu We Th Fr Sa
:l ;} 4 l> Ei
$ +1 411 JO 9 .io .u -l.2 -lJ
23 24 25 26 p
30 31 2 ;} Custom Range
4 5 6 7 8 9 .io
4
5 6 8 9111

Quick Reference Guide
Confidential Information - Bottomline Technologies © 2019. All rights reserved. Version 3.8 April 2019
18 of 19
6. (optional) Click the right arrow button in the Transaction Filters field to expand the
list of options.
7. (optional) Enter a bank code as a search criterion.
8. (optional) Enter a currency as a search criterion.
9. (optional) Use the Debit/Credit drop-down to select whether the search should filter for
debit or credit transactions.
10. (optional) Enter a transaction type as a search criterion.
11. (optional) Enter a BAI transaction code as a search criterion.
12. (optional) Enter a SWIFT transaction code as a search criterion.
13. (optional) Use the Status drop-down to select an appropriate status: Pending or Cleared.
14. (optional) In the Transaction Amount field, use the drop-down to select an appropriated
qualifier (for example, is equal to), and then in the right-hand text field, enter an amount.
15. (optional) Enter a bank reference as a search criterion.
16. (optional) Enter a customer reference as a search criterion.
17. When you have finished selecting search criteria, click Submit. The results of the transaction
search appear in a list. Click Edit in the Report Criteria section to edit the criteria and
conduct the search again.

Quick Reference Guide
Confidential Information - Bottomline Technologies © 2019. All rights reserved. Version 3.8 April 2019
19 of 19
Download Fields
The fields below may appear on the Export Data screen. These fields allow you to further filter the
data you would like to export.
Field Explanation
Date The date or range of dates for the data to export.
Account Details Details about the account. The default setting is blank
(optional). This results in all available accounts being
selected for export.
Account Group A name of a group of accounts you want to return data
for. The default setting is blank (optional). This results in
all available accounts being selected for export.
Debit/Credit You can export either debit or credit transactions.
Transaction Type The types of transaction data to download.
BAI Transaction
Code
The BAI code associated with the data you would like to
download.
SWIFT Transaction
code
The SWIFT code associated with the data you would
like to download.
Status/Transaction
Status
The status of the download.
Transaction
Amount
The amount of the transaction.
Bank Reference Bank reference information.
Customer
Reference
Customer reference information.