Embed Size (px)
Citation preview
Balloon BasicsBalloon Basics
balloons.com • 800-239-2000
2 FAX800-735-3528
Phone800-239-2000
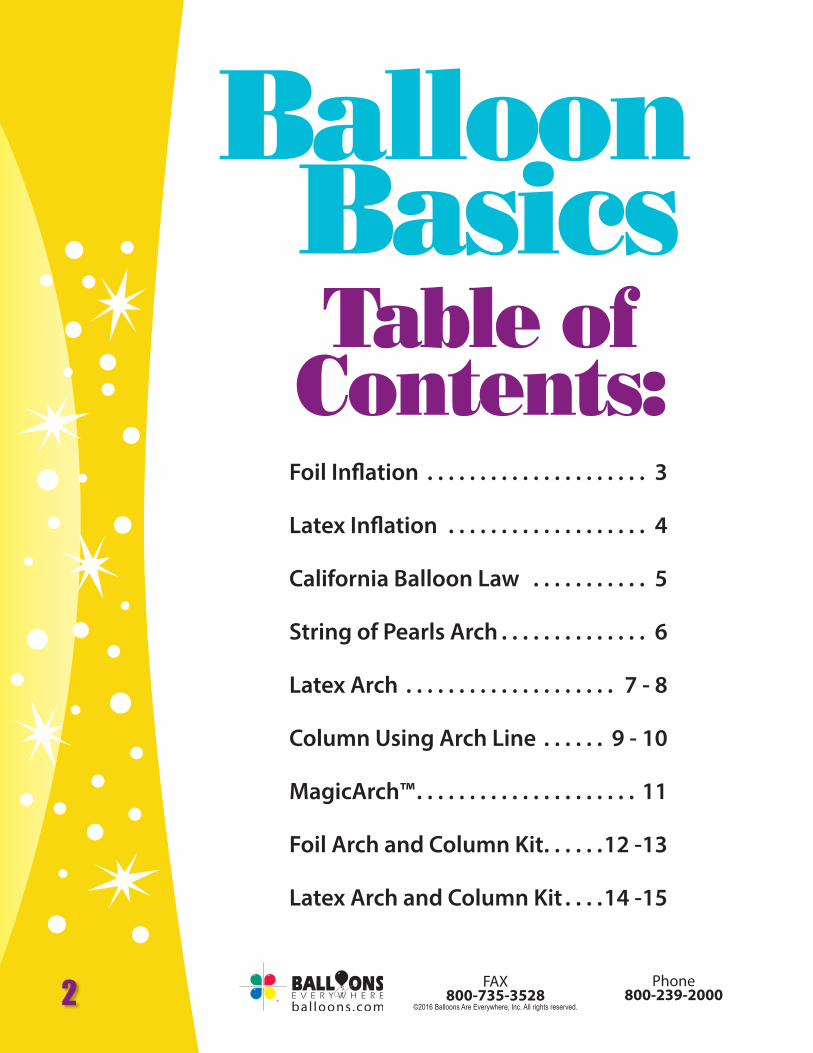
Table of Contents:
Foil Inflation . . . . . . . . . . . . . . . . . . . . . 3
Latex Inflation . . . . . . . . . . . . . . . . . . . 4
California Balloon Law . . . . . . . . . . . 5
String of Pearls Arch . . . . . . . . . . . . . . 6
Latex Arch . . . . . . . . . . . . . . . . . . . . 7 - 8
Column Using Arch Line . . . . . . 9 - 10
MagicArch™ . . . . . . . . . . . . . . . . . . . . . 11
Foil Arch and Column Kit . . . . . .12 -13
Latex Arch and Column Kit . . . .14 -15
Balloon Basics
©2016 Balloons Are Everywhere, Inc. All rights reserved.
FAX800-735-3528
Phone800-239-2000 3
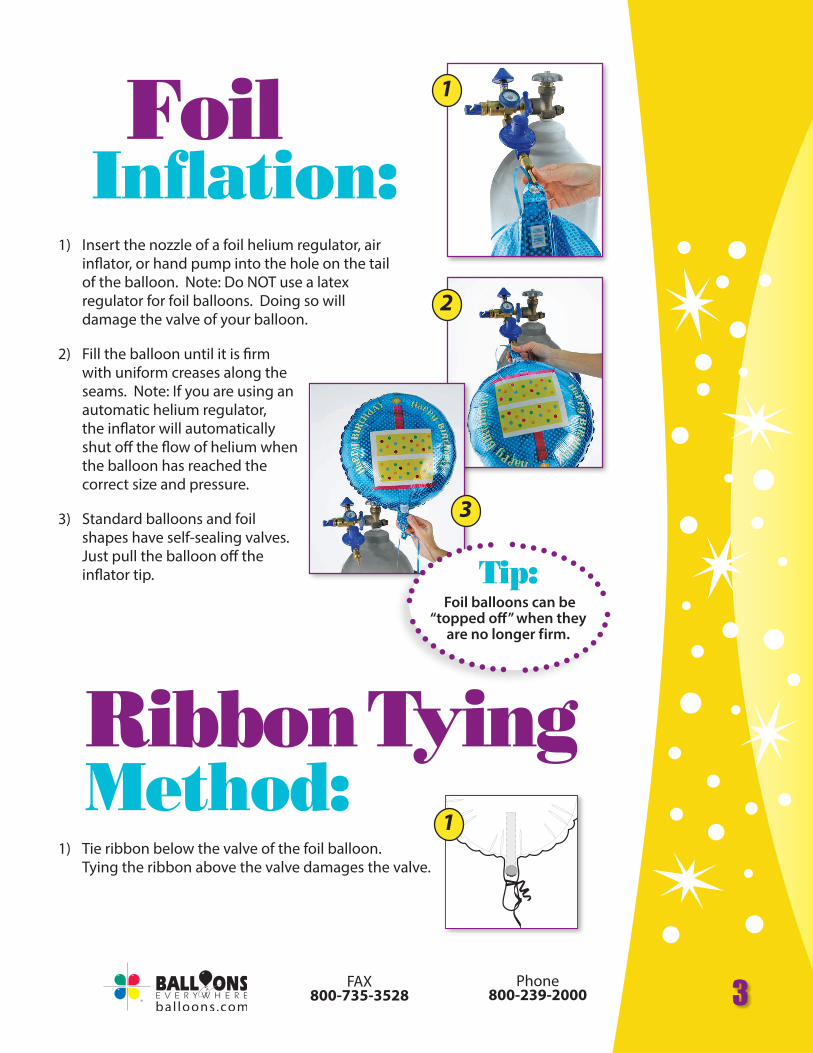
FoilInflation:
1) Insert the nozzle of a foil helium regulator, air inflator, or hand pump into the hole on the tail of the balloon. Note: Do NOT use a latex regulator for foil balloons. Doing so will damage the valve of your balloon.
2) Fill the balloon until it is firm with uniform creases along the seams. Note: If you are using an automatic helium regulator, the inflator will automatically shut off the flow of helium when the balloon has reached the correct size and pressure.
3) Standard balloons and foil shapes have self-sealing valves. Just pull the balloon off the inflator tip.
Ribbon TyingMethod:
1) Tie ribbon below the valve of the foil balloon. Tying the ribbon above the valve damages the valve.
1
1
2
3
Tip: Foil balloons can be
“topped off” when they are no longer firm .
4 FAX800-735-3528
Phone800-239-2000
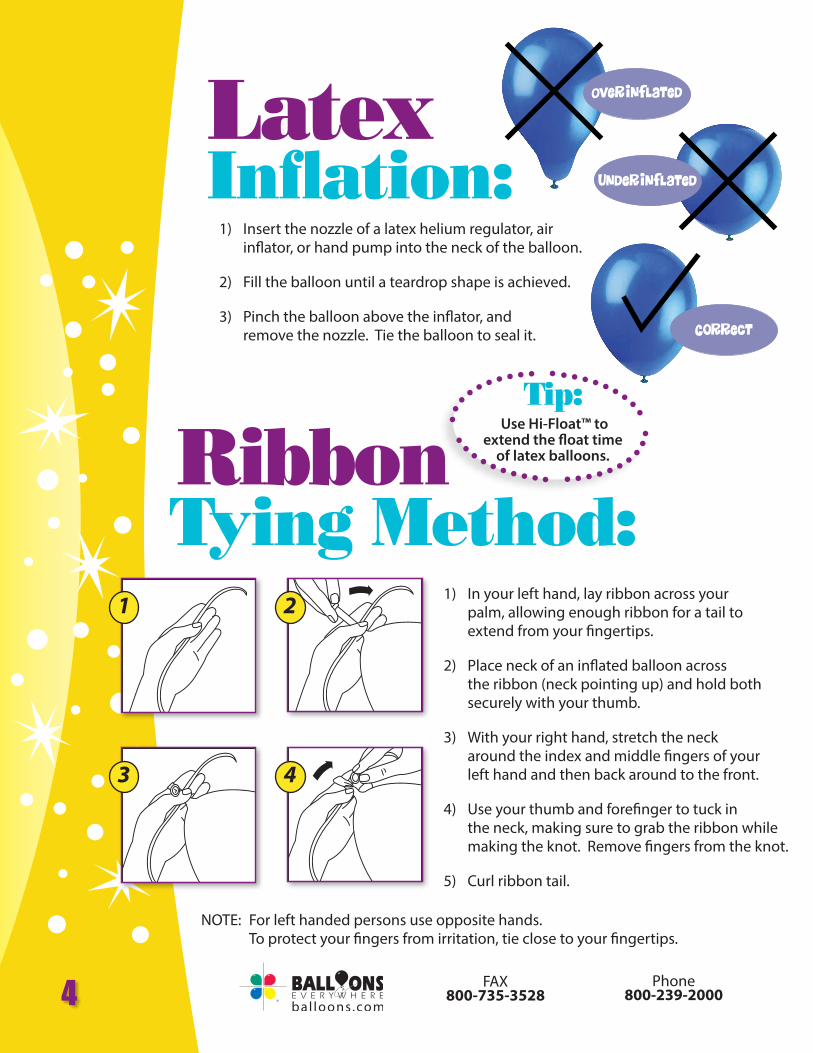
LatexInflation:
1) Insert the nozzle of a latex helium regulator, air inflator, or hand pump into the neck of the balloon.
2) Fill the balloon until a teardrop shape is achieved.
3) Pinch the balloon above the inflator, and remove the nozzle. Tie the balloon to seal it.
Overinflated
underinflated
Correct
RibbonTying Method:
1 2
3 4
1) In your left hand, lay ribbon across your palm, allowing enough ribbon for a tail to extend from your fingertips.
2) Place neck of an inflated balloon across the ribbon (neck pointing up) and hold both securely with your thumb.
3) With your right hand, stretch the neck around the index and middle fingers of your left hand and then back around to the front.
4) Use your thumb and forefinger to tuck in the neck, making sure to grab the ribbon while making the knot. Remove fingers from the knot.
5) Curl ribbon tail.
Tip: Use Hi-Float™ to
extend the float time of latex balloons .
NOTE: For left handed persons use opposite hands. To protect your fingers from irritation, tie close to your fingertips.
FAX800-735-3528
Phone800-239-2000 5
LAW & ORDERto your balloon décor!
Bring
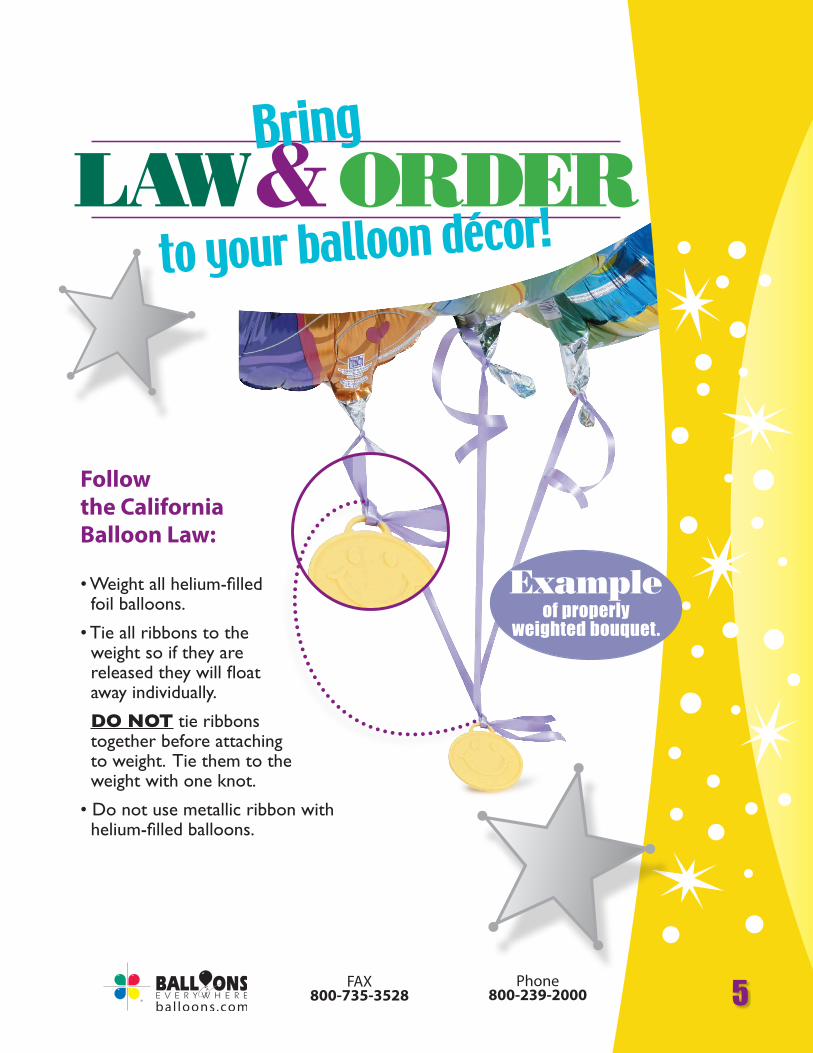
Follow the California Balloon Law:
• Weight all helium-filled foil balloons.
• Tie all ribbons to the weight so if they are released they will float away individually.
DO NOT tie ribbons together before attaching to weight. Tie them to the weight with one knot.
• Do not use metallic ribbon with helium-filled balloons.
of properly weighted bouquet.
Example

6 FAX800-735-3528
Phone800-239-2000
String of PearlsArch
Ingredients11" latex balloons50 lb. monofilament (fishing) lineHeliumProSizer™ template (11-inch size)WeightsScissors
Instructions1) Cut a piece of monofilament line to desired length and secure both ends to stationary objects, such as doorknobs or chairs. Make sure the line is tight.
2) Helium inflate one of the balloons, sizing it to the desired size with the balloon template.
3) Tie the neck of the balloon around the monofilament line. (Tying the balloon around the line allows you to adjust its position, if necessary, by wetting the line and gently sliding the balloon to the desired spot.)
4) Inflate the next balloon and tie onto the line so it gently rests against the balloon beside it. Repeat until all balloons are added.
5) Remove the line from the stationary objects and anchor by tying each end around a weight.
Use Air!instead of helium
and hang as garland!
7FAX800-735-3528
Phone800-239-2000
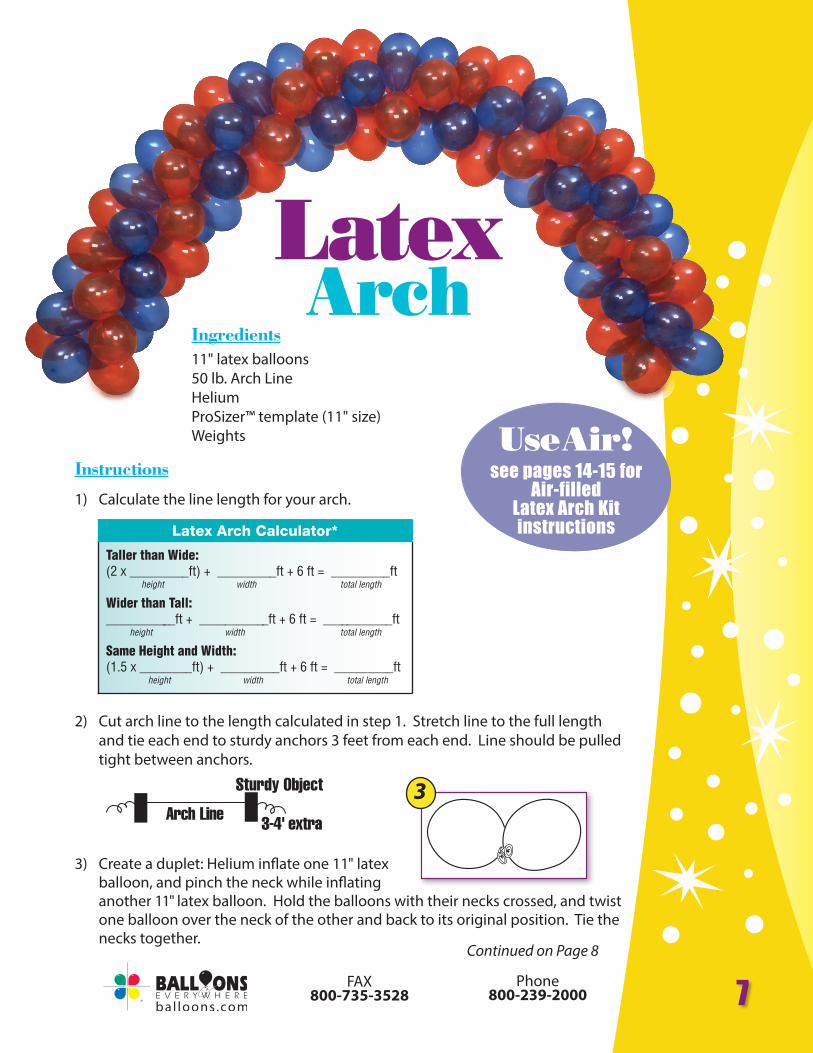
Latex Arch Calculator*
Taller than Wide:(2 x _________ft) + _________ft + 6 ft = _________ft height width total length Wider than Tall:___________ft + ___________ft + 6 ft = ___________ft height width total length Same Height and Width:(1.5 x ________ft) + _________ft + 6 ft = _________ft height width total length
LatexArch
Ingredients11" latex balloons50 lb. Arch LineHeliumProSizer™ template (11" size)Weights
Instructions
1) Calculate the line length for your arch.
2) Cut arch line to the length calculated in step 1. Stretch line to the full length and tie each end to sturdy anchors 3 feet from each end. Line should be pulled tight between anchors.
3) Create a duplet: Helium inflate one 11" latex balloon, and pinch the neck while inflating another 11" latex balloon. Hold the balloons with their necks crossed, and twist one balloon over the neck of the other and back to its original position. Tie the necks together.
Arch Line
Sturdy Object
3-4 ' extra
3
Continued on Page 8
see pages 14-15 forAir-filled
Latex Arch Kit instructions
Use Air!
8 FAX800-735-3528
Phone800-239-2000
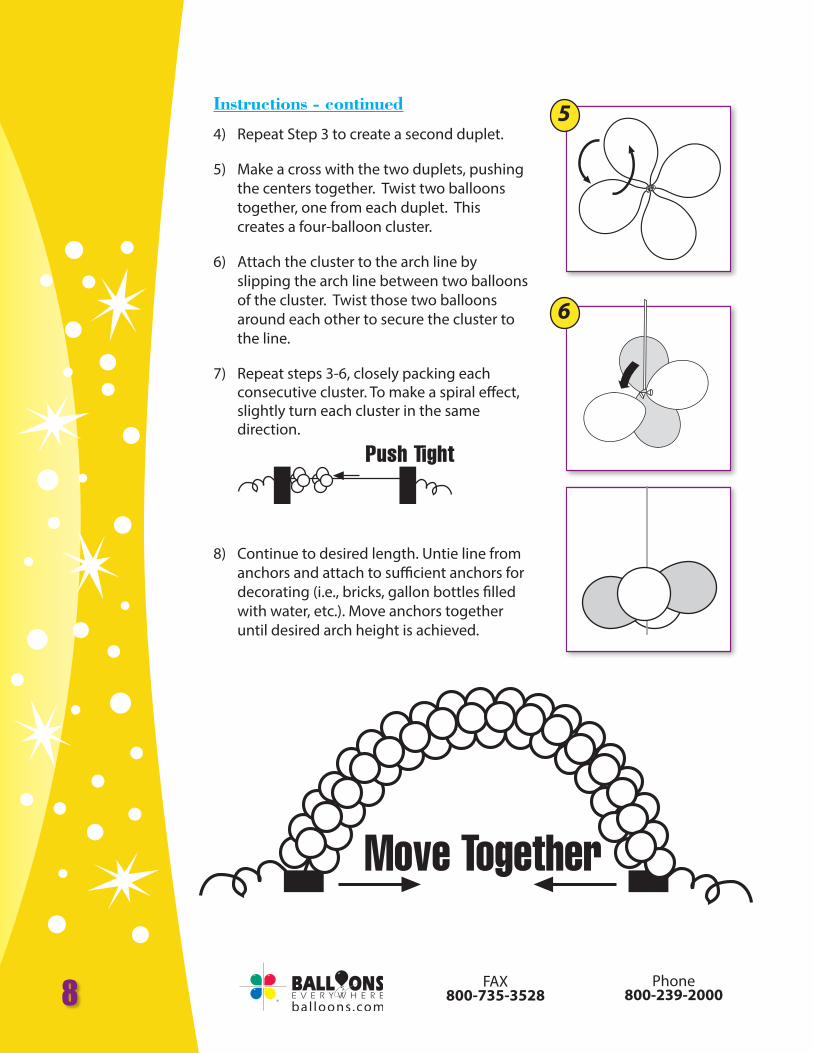
Instructions - continued
4) Repeat Step 3 to create a second duplet.
5) Make a cross with the two duplets, pushing the centers together. Twist two balloons together, one from each duplet. This creates a four-balloon cluster.
6) Attach the cluster to the arch line by slipping the arch line between two balloons of the cluster. Twist those two balloons around each other to secure the cluster to the line.
7) Repeat steps 3-6, closely packing each consecutive cluster. To make a spiral effect, slightly turn each cluster in the same direction.
8) Continue to desired length. Untie line from anchors and attach to sufficient anchors for decorating (i.e., bricks, gallon bottles filled with water, etc.). Move anchors together until desired arch height is achieved.
Push Tight
5
6
Move Together
9FAX800-735-3528
Phone800-239-2000
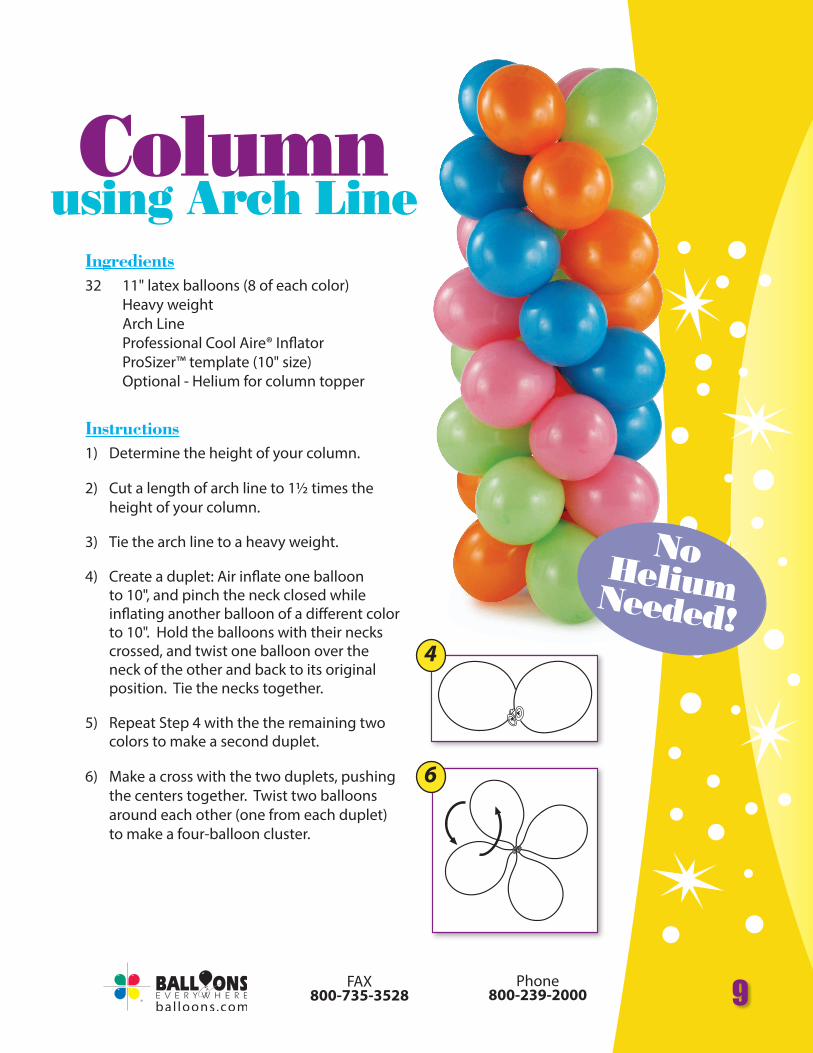
Ingredients32 11" latex balloons (8 of each color) Heavy weight Arch Line Professional Cool Aire® Inflator ProSizer™ template (10" size) Optional - Helium for column topper
Instructions1) Determine the height of your column.
2) Cut a length of arch line to 1½ times the height of your column.
3) Tie the arch line to a heavy weight.
4) Create a duplet: Air inflate one balloon to 10", and pinch the neck closed while inflating another balloon of a different color to 10". Hold the balloons with their necks crossed, and twist one balloon over the neck of the other and back to its original position. Tie the necks together.
5) Repeat Step 4 with the the remaining two colors to make a second duplet.
6) Make a cross with the two duplets, pushing the centers together. Twist two balloons around each other (one from each duplet) to make a four-balloon cluster.
Columnusing Arch Line
4
6
No Helium Needed!

10 FAX800-735-3528
Phone800-239-2000
Tip: When working
in limited space or high traffic areas, tie one end of arch line to a balloon
weight and place the spool in your pocket . Ease out the line as
needed when attaching balloons .
Instructions - continued7) Attach the cluster to the arch line by
pulling the line up through the center of the cluster, then wrapping it in a figure 8 around the center of the cluster. Push down on the balloons in the cluster so they sit flat.
8) Repeat Steps 4 - 7 to create enough clusters to reach your desired height.
7
9
9) Continue adding clusters to the arch line, rotating each cluster 45 degrees so it nests into the cluster before it. Remember to arrange balloons so that they appear to spiral.
10) For added impact, your column can be topped with a helium-filled 3' balloon, jumbo round or star foil balloon, Bubble™ or Orbz™.
11FAX800-735-3528
Phone800-239-2000
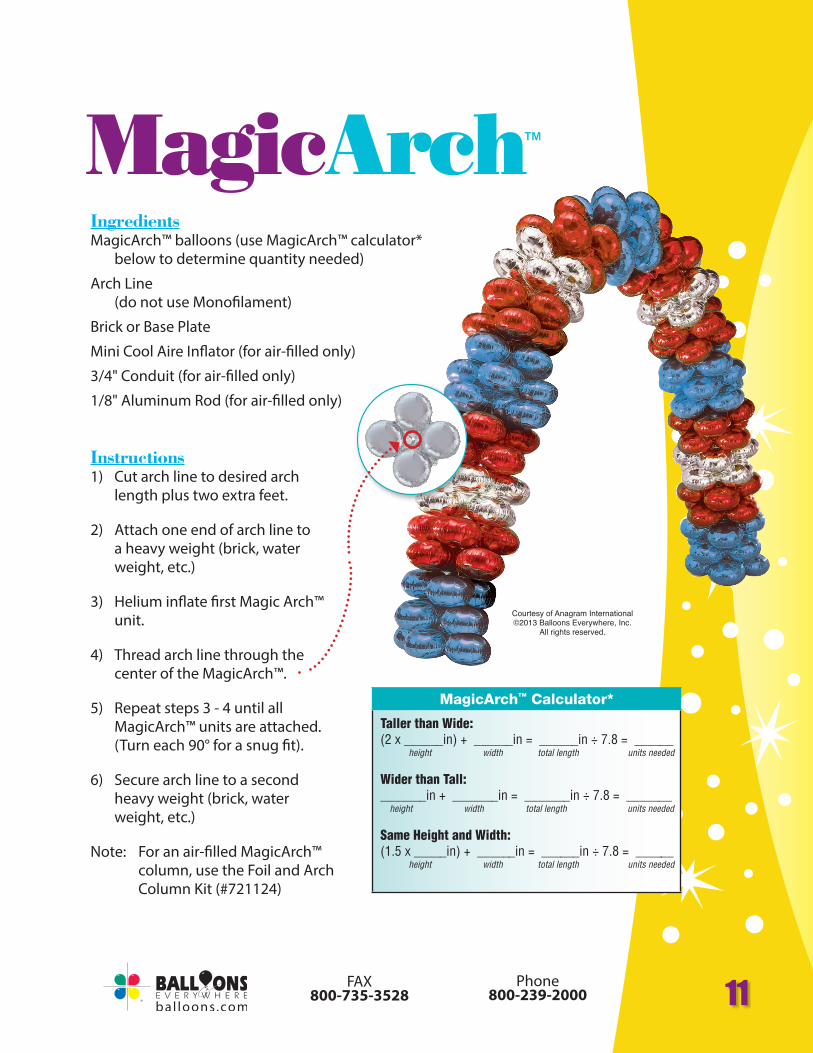
MagicArch™ Calculator*
Taller than Wide:(2 x ______in) + ______in = ______in ÷ 7.8 = ______ height width total length units needed
Wider than Tall:_______in + _______in = _______in ÷ 7.8 = _______ height width total length units needed
Same Height and Width:(1.5 x _____in) + ______in = ______in ÷ 7.8 = ______ height width total length units needed
IngredientsMagicArch™ balloons (use MagicArch™ calculator*
below to determine quantity needed)
Arch Line (do not use Monofilament)
Brick or Base Plate
Mini Cool Aire Inflator (for air-filled only)
3/4" Conduit (for air-filled only)
1/8" Aluminum Rod (for air-filled only)
Instructions1) Cut arch line to desired arch
length plus two extra feet.
2) Attach one end of arch line to a heavy weight (brick, water weight, etc.)
3) Helium inflate first Magic Arch™ unit.
4) Thread arch line through the center of the MagicArch™.
5) Repeat steps 3 - 4 until all MagicArch™ units are attached. (Turn each 90° for a snug fit).
6) Secure arch line to a second heavy weight (brick, water weight, etc.)
Note: For an air-filled MagicArch™ column, use the Foil and Arch Column Kit (#721124)
MagicArch™
Courtesy of Anagram International©2013 Balloons Everywhere, Inc.
All rights reserved.
12 FAX800-735-3528
Phone800-239-2000
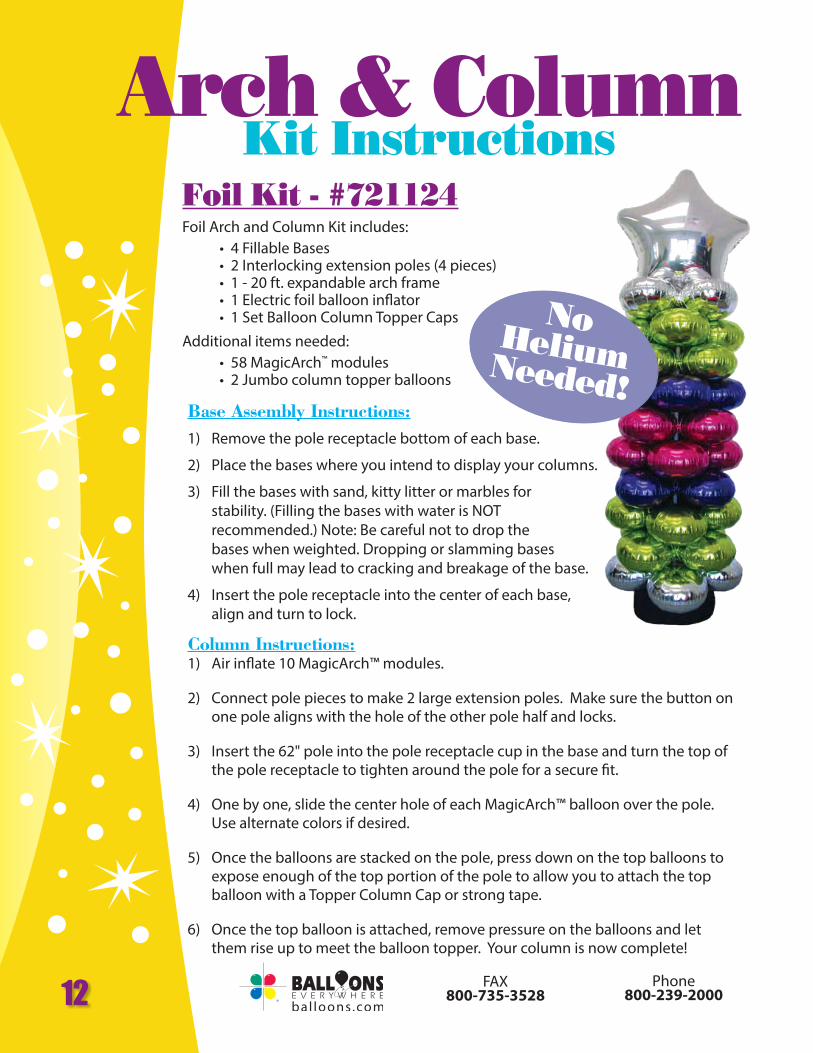
Foil Arch and Column Kit includes: • 4 Fillable Bases • 2 Interlocking extension poles (4 pieces) • 1 - 20 ft. expandable arch frame • 1 Electric foil balloon inflator • 1 Set Balloon Column Topper CapsAdditional items needed: • 58 MagicArch™ modules • 2 Jumbo column topper balloons
Foil Kit - #721124
Arch & ColumnKit Instructions
Column Instructions:1) Air inflate 10 MagicArch™ modules.
2) Connect pole pieces to make 2 large extension poles. Make sure the button on one pole aligns with the hole of the other pole half and locks.
3) Insert the 62" pole into the pole receptacle cup in the base and turn the top of the pole receptacle to tighten around the pole for a secure fit.
4) One by one, slide the center hole of each MagicArch™ balloon over the pole. Use alternate colors if desired.
5) Once the balloons are stacked on the pole, press down on the top balloons to expose enough of the top portion of the pole to allow you to attach the top balloon with a Topper Column Cap or strong tape.
6) Once the top balloon is attached, remove pressure on the balloons and let them rise up to meet the balloon topper. Your column is now complete!
Base Assembly Instructions:1) Remove the pole receptacle bottom of each base.
2) Place the bases where you intend to display your columns.
3) Fill the bases with sand, kitty litter or marbles for stability. (Filling the bases with water is NOT recommended.) Note: Be careful not to drop the bases when weighted. Dropping or slamming bases when full may lead to cracking and breakage of the base.
4) Insert the pole receptacle into the center of each base, align and turn to lock.
No Helium Needed!
13FAX800-735-3528
Phone800-239-2000
Arch Instructions:1) Air inflate 38 MagicArch™ modules.
2) Insert half of an extension pole into the pole receiver. Use the pole half that does not have the button mechanism. You will not need the upper halves of the poles for this application.
3) Turn the top of pole receptacle to tighten around the pole.
4) Place the bases where you intend to display your arch. Place them at approximately 8-10 feet apart. The closer the bases, the higher the arch.
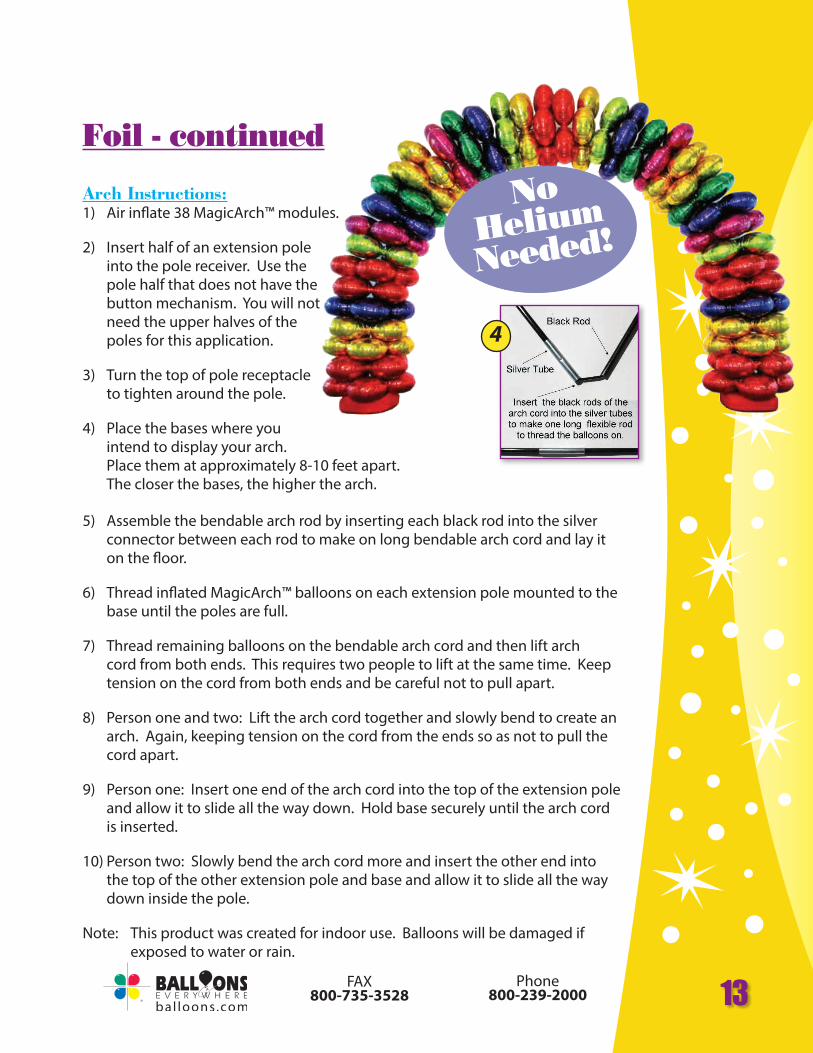
5) Assemble the bendable arch rod by inserting each black rod into the silver connector between each rod to make on long bendable arch cord and lay it on the floor.
6) Thread inflated MagicArch™ balloons on each extension pole mounted to the base until the poles are full.
7) Thread remaining balloons on the bendable arch cord and then lift arch cord from both ends. This requires two people to lift at the same time. Keep tension on the cord from both ends and be careful not to pull apart.
8) Person one and two: Lift the arch cord together and slowly bend to create an arch. Again, keeping tension on the cord from the ends so as not to pull the cord apart.
9) Person one: Insert one end of the arch cord into the top of the extension pole and allow it to slide all the way down. Hold base securely until the arch cord is inserted.
10) Person two: Slowly bend the arch cord more and insert the other end into the top of the other extension pole and base and allow it to slide all the way down inside the pole.
Note: This product was created for indoor use. Balloons will be damaged if exposed to water or rain.
Foil - continued
4
No Helium
Needed!

14 FAX800-735-3528
Phone800-239-2000
Arch & ColumnKit Instructions
Column Instructions:1) Connect both pole pieces to make 2 large extension poles. Make sure the button on one pole aligns with the hole of the other pole half and locks into place.
2) Insert the 62" pole into the pole receptacle cup in the base and turn the top of the pole receptacle to tighten around the pole for a secure fit. Do not over tighten. 3) One by one, slide a balloon ring with the 4 attached balloons over the pole. Make sure the slots on the balloon ring are facing downward. This keeps the balloons from possibly coming out of the slot.
4) Once the balloons are stacked on the pole, press down on the top balloons to expose enough of the top portion of the pole to allow you to attach the top balloon with a Column Topper Cap or strong tape.
5) Once the top balloon is attached, remove pressure on the balloons and let them rise up to meet the Column Topper Cap. Your column is now complete!
Balloon Ring Instructions:1) Inflate latex balloons using balloon air inflator. For best results, inflate each balloon to a consistent 10" diameter.
2) Insert inflated balloons into a slot in the balloon ring with the knot of the balloon on the inside of the ring. You will need four balloons for each ring. 3) If you are building a column, you will need eight balloon rings (32 balloons). For an arch, you will need 32 balloon rings, (128 balloons).
Latex Arch and Column Kit includes: • 4 Fillable Bases • 4 Interlocking extension poles (8 pieces) • 1 - 20 ft. expandable arch frame • 1 High Speed electric latex balloon inflator • 60 Balloon Rings • 1 Set Balloon Column Topper CapsAdditional items needed: • 160 - 11" latex balloons
Latex - #721132
15FAX800-735-3528
Phone800-239-2000
Arch Instructions:1) Insert half of an extension pole into the pole receiver. Use the pole half that does not have the button mechanism. You will not need the upper halves of the poles for this application.
2) Turn the top of pole receptacle to tighten around the pole. 3) Place the bases where you intend to display your arch. Place them approximately 8-10 feet apart. The closer the bases, the higher the arch.
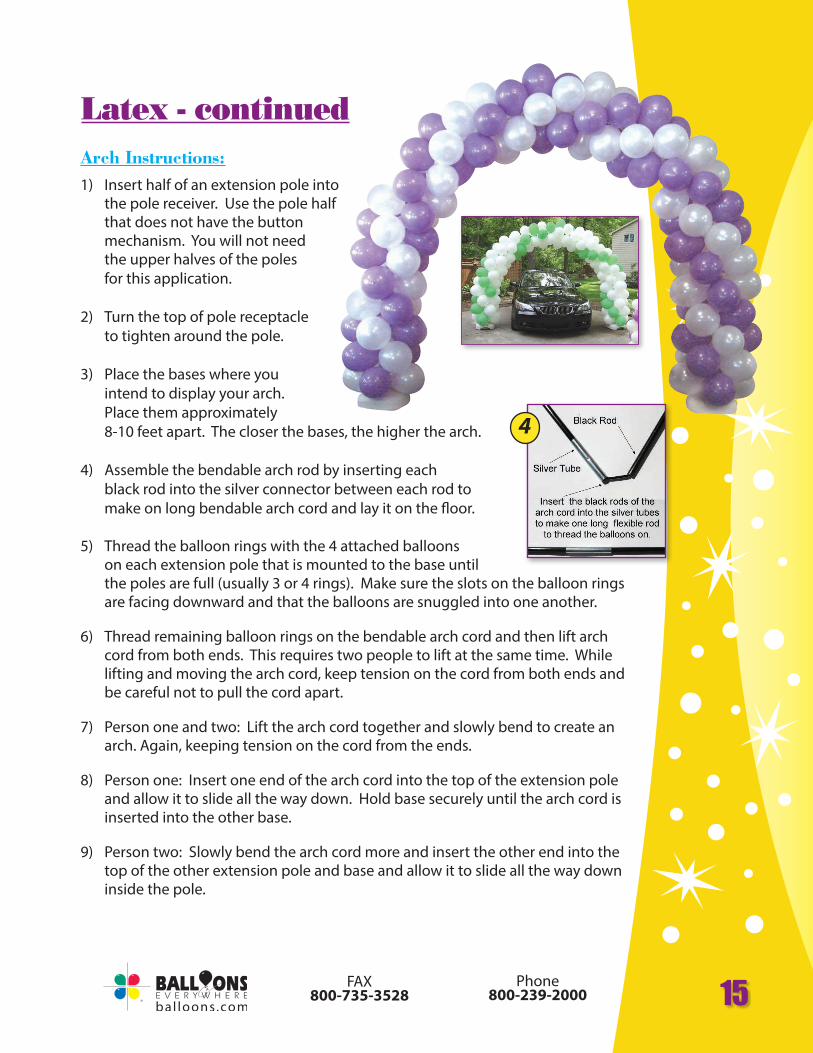
4) Assemble the bendable arch rod by inserting each black rod into the silver connector between each rod to make on long bendable arch cord and lay it on the floor.
5) Thread the balloon rings with the 4 attached balloons on each extension pole that is mounted to the base until the poles are full (usually 3 or 4 rings). Make sure the slots on the balloon rings are facing downward and that the balloons are snuggled into one another.
6) Thread remaining balloon rings on the bendable arch cord and then lift arch cord from both ends. This requires two people to lift at the same time. While lifting and moving the arch cord, keep tension on the cord from both ends and be careful not to pull the cord apart.
7) Person one and two: Lift the arch cord together and slowly bend to create an arch. Again, keeping tension on the cord from the ends.
8) Person one: Insert one end of the arch cord into the top of the extension pole and allow it to slide all the way down. Hold base securely until the arch cord is inserted into the other base.
9) Person two: Slowly bend the arch cord more and insert the other end into the top of the other extension pole and base and allow it to slide all the way down inside the pole.
Latex - continued
4

800-239-2000Monday - Friday except holidays5:00 am - 5:00 pm USA Pacific Time
Corporate Office & Distribution Center16474 Greeno RoadFairhope AL 36532-5528
Showroom & Distribution Center5733 East Shields AvenueFresno CA 93727-7822