Embed Size (px)
Citation preview
The editorial and visual content of this tutorial isproduced and published by Pierrick Le Brununder a Creative Commons, Attribution, ShareAlike license . You are entirely free to share and
publish it, in part or in whole, provided you clearly give credit to MôssieurBallon and provide a hyperlink pointing back to the original source of thecontent you used.
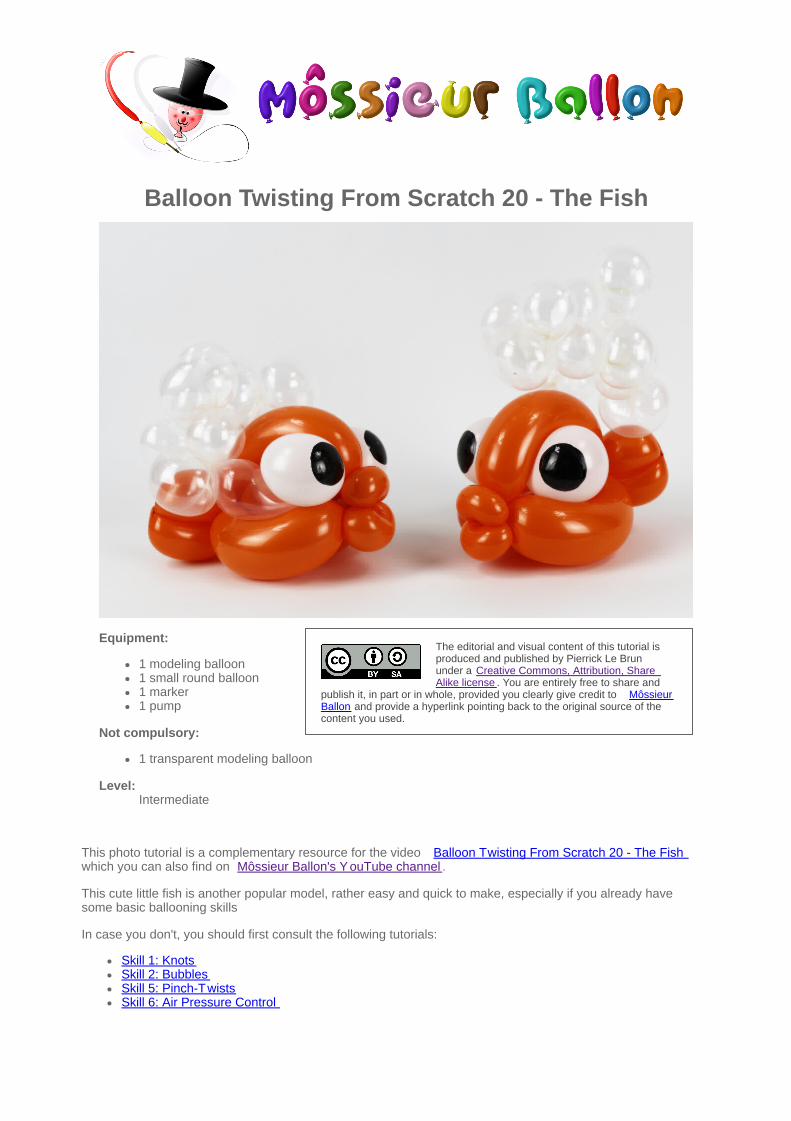
Balloon Twisting From Scratch 20 - The Fish
Equipment:
1 modeling balloon1 small round balloon1 marker1 pump
Not compulsory:
1 transparent modeling balloon
Level:Intermediate
This photo tutorial is a complementary resource for the video Balloon Twisting From Scratch 20 - The Fishwhich you can also find on Môssieur Ballon's Y ouTube channel .
This cute little fish is another popular model, rather easy and quick to make, especially if you already havesome basic ballooning skills
In case you don't, you should first consult the following tutorials:
Skill 1: KnotsSkill 2: BubblesSkill 5: Pinch-TwistsSkill 6: Air Pressure Control
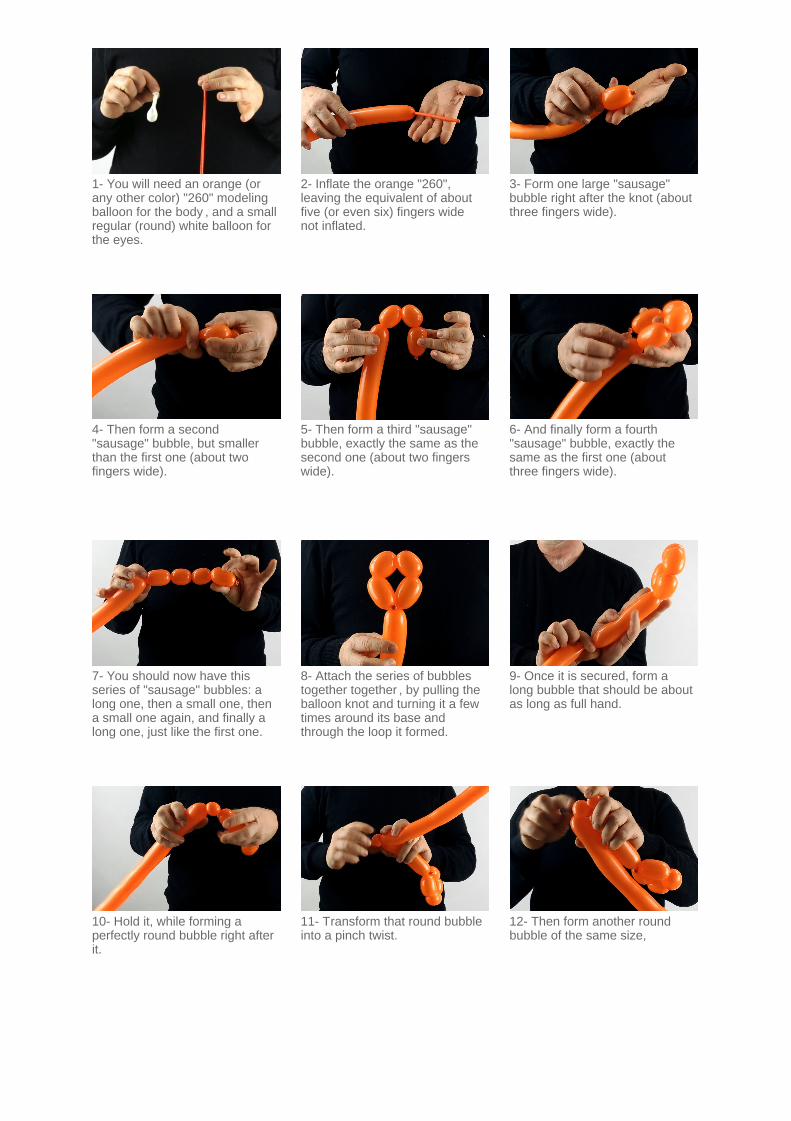
1- You will need an orange (orany other color) "260" modelingballoon for the body , and a smallregular (round) white balloon forthe eyes.
2- Inflate the orange "260",leaving the equivalent of aboutfive (or even six) fingers widenot inflated.
3- Form one large "sausage"bubble right after the knot (aboutthree fingers wide).
4- Then form a second"sausage" bubble, but smallerthan the first one (about twofingers wide).
5- Then form a third "sausage"bubble, exactly the same as thesecond one (about two fingerswide).
6- And finally form a fourth"sausage" bubble, exactly thesame as the first one (aboutthree fingers wide).
7- You should now have thisseries of "sausage" bubbles: along one, then a small one, thena small one again, and finally along one, just like the first one.
8- Attach the series of bubblestogether together , by pulling theballoon knot and turning it a fewtimes around its base andthrough the loop it formed.
9- Once it is secured, form along bubble that should be aboutas long as full hand.
10- Hold it, while forming aperfectly round bubble right afterit.
11- Transform that round bubbleinto a pinch twist.
12- Then form another roundbubble of the same size,
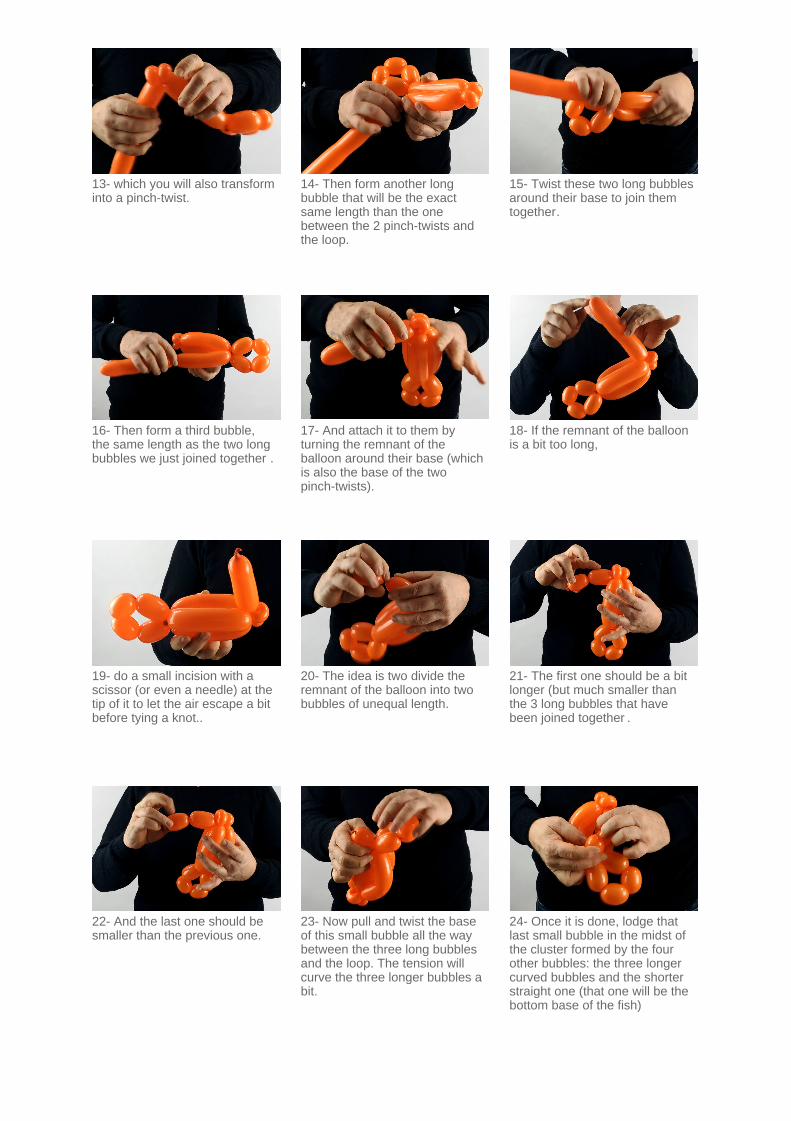
13- which you will also transforminto a pinch-twist.
14- Then form another longbubble that will be the exactsame length than the onebetween the 2 pinch-twists andthe loop.
15- Twist these two long bubblesaround their base to join themtogether.
16- Then form a third bubble,the same length as the two longbubbles we just joined together .
17- And attach it to them byturning the remnant of theballoon around their base (whichis also the base of the twopinch-twists).
18- If the remnant of the balloonis a bit too long,
19- do a small incision with ascissor (or even a needle) at thetip of it to let the air escape a bitbefore tying a knot..
20- The idea is two divide theremnant of the balloon into twobubbles of unequal length.
21- The first one should be a bitlonger (but much smaller thanthe 3 long bubbles that havebeen joined together .
22- And the last one should besmaller than the previous one.
23- Now pull and twist the baseof this small bubble all the waybetween the three long bubblesand the loop. The tension willcurve the three longer bubbles abit.
24- Once it is done, lodge thatlast small bubble in the midst ofthe cluster formed by the fourother bubbles: the three longercurved bubbles and the shorterstraight one (that one will be thebottom base of the fish)
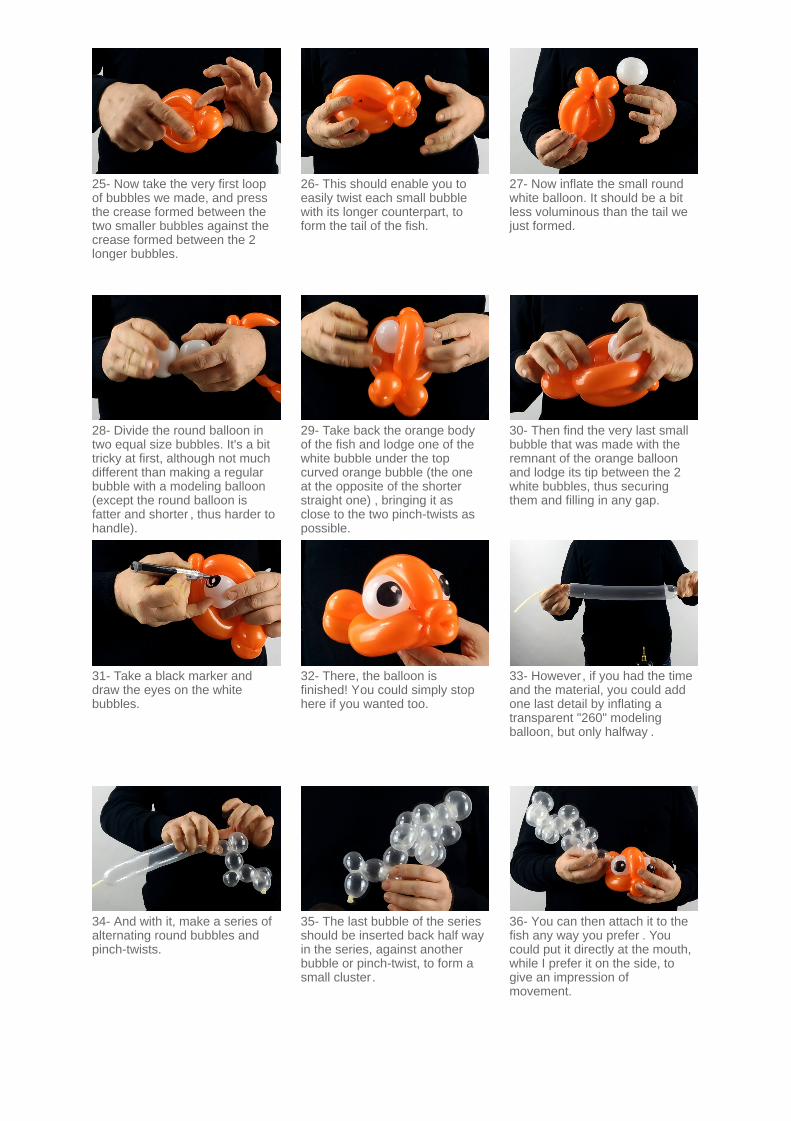
25- Now take the very first loopof bubbles we made, and pressthe crease formed between thetwo smaller bubbles against thecrease formed between the 2longer bubbles.
26- This should enable you toeasily twist each small bubblewith its longer counterpart, toform the tail of the fish.
27- Now inflate the small roundwhite balloon. It should be a bitless voluminous than the tail wejust formed.
28- Divide the round balloon intwo equal size bubbles. It's a bittricky at first, although not muchdifferent than making a regularbubble with a modeling balloon(except the round balloon isfatter and shorter , thus harder tohandle).
29- Take back the orange bodyof the fish and lodge one of thewhite bubble under the topcurved orange bubble (the oneat the opposite of the shorterstraight one) , bringing it asclose to the two pinch-twists aspossible.
30- Then find the very last smallbubble that was made with theremnant of the orange balloonand lodge its tip between the 2white bubbles, thus securingthem and filling in any gap.
31- Take a black marker anddraw the eyes on the whitebubbles.
32- There, the balloon isfinished! You could simply stophere if you wanted too.
33- However, if you had the timeand the material, you could addone last detail by inflating atransparent "260" modelingballoon, but only halfway .
34- And with it, make a series ofalternating round bubbles andpinch-twists.
35- The last bubble of the seriesshould be inserted back half wayin the series, against anotherbubble or pinch-twist, to form asmall cluster.
36- You can then attach it to thefish any way you prefer . Youcould put it directly at the mouth,while I prefer it on the side, togive an impression ofmovement.

Aren't they super cute? See you soon! For another lesson... with Môssieur Ballon!


![bedouch pierrick p02.ppt [Mode de compatibilité]](https://img.pdfslide.net/doc/110x75/62b11b7d4c6b612b8c0792f8/bedouch-pierrick-p02ppt-mode-de-compatibilit.jpg)