Embed Size (px)
Citation preview
Banner Travel and ExpenseManagement
Handbook
Release 8.5.0.5July 2012
Banner®, Colleague®, PowerCAMPUS®, Luminis® and Datatel® are trademarks of Ellucian or its affiliates and are registered in the U.S. and other countries. Ellucian, Advance, DegreeWorks, fsaATLAS, Course Signals, SmartCall, Recruiter, MOX, ILP, and WCMS are trademarks of Ellucian or its affiliates. Other names may be trademarks of their respective owners.
©2008-2012 Ellucian. All rights reserved. The unauthorized possession, use, reproduction, distribution, display or disclosure of this material or the information contained herein is prohibited.
Contains confidential and proprietary information of Ellucian and its subsidiaries. Use of these materials is limited to Ellucian licensees, and is subject to the terms and conditions of one or more written license agreements between Ellucian and the licensee in question.
In preparing and providing this publication, Ellucian is not rendering legal, accounting, or other similar professional services. Ellucian makes no claims that an institution's use of this publication or the software for which it is provided will guarantee compliance with applicable federal or state laws, rules, or regulations. Each organization should seek legal, accounting and other similar professional services from competent providers of the organization’s own choosing.
Prepared by: Ellucian4375 Fair Lakes CourtFairfax, Virginia 22033United States of America
Revision History
Publication Date Summary
July 2012 New version that supports Banner Travel and Expense Management 8.5.0.5 software.
Contents
Banner Travel and Expense Management 8.5.0.5Handbook
Chapter 1 Installation Overview. . . . . . . . . . . . . . . . . . . . . . . . . . . . . . . . . . . . . . . . . . . . . . . . 1-1
Deployment of Adobe Flex applications . . . . . . . . . . . . . . . . . . . . . . 1-1
Banner Travel and Expense Management overview . . . . . . . . . . . . . . . 1-1
Banner product dependencies . . . . . . . . . . . . . . . . . . . . . . . . . . . . 1-2
Installation roadmap . . . . . . . . . . . . . . . . . . . . . . . . . . . . . . . . . . 1-3
Hardware and software requirements . . . . . . . . . . . . . . . . . . . . . . . . 1-4
Chapter 2 Installation References . . . . . . . . . . . . . . . . . . . . . . . . . . . . . . . . . . . . . . . . . . . . . 2-1
Chapter 3 Functional Administration . . . . . . . . . . . . . . . . . . . . . . . . . . . . . . . . . . . . . . . . . . 3-1
Role administration . . . . . . . . . . . . . . . . . . . . . . . . . . . . . . . . . . . 3-1
Banner Travel and Expense Administration tab . . . . . . . . . . . . . . . . . . 3-8
Institutional Settings . . . . . . . . . . . . . . . . . . . . . . . . . . . . . . . . . . . 3-8
Currencies . . . . . . . . . . . . . . . . . . . . . . . . . . . . . . . . . . . . . . . . . 3-16
General Information. . . . . . . . . . . . . . . . . . . . . . . . . . . . . . . . . . . . 3-16
Expense Setup . . . . . . . . . . . . . . . . . . . . . . . . . . . . . . . . . . . . . . 3-17
Taxes . . . . . . . . . . . . . . . . . . . . . . . . . . . . . . . . . . . . . . . . . . . . 3-22
Advance Setup . . . . . . . . . . . . . . . . . . . . . . . . . . . . . . . . . . . . . . 3-22
Banner Travel and Expense Management Advance Control tab . . . . . . . . 3-23
Outstanding Advances . . . . . . . . . . . . . . . . . . . . . . . . . . . . . . . . . . 3-23
Recovery Transactions . . . . . . . . . . . . . . . . . . . . . . . . . . . . . . . . . . 3-24
Banner Travel and Expense Management Per Diem Administrator tab . . . . 3-25
Batch Load/Purge . . . . . . . . . . . . . . . . . . . . . . . . . . . . . . . . . . . . . 3-25
July 2012 Banner Travel and Expense Management 8.5.0.5 iiiHandbookContents
Banner Travel and Expense Management Profile Administrator tab . . . . . 3-26
Banner Travel and Expense Management Delegate Control tab . . . . . . . . 3-26
Workflow traveler review processing . . . . . . . . . . . . . . . . . . . . . . . . . . 3-26
Super Delegate . . . . . . . . . . . . . . . . . . . . . . . . . . . . . . . . . . . . . . 3-27
Banner Travel and Expense Management Profile tab . . . . . . . . . . . . . . 3-27
Profile setup . . . . . . . . . . . . . . . . . . . . . . . . . . . . . . . . . . . . . . . . 3-27
Assign Delegate. . . . . . . . . . . . . . . . . . . . . . . . . . . . . . . . . . . . . . 3-29
Banner Travel and Expense Management Expense Manager tab . . . . . . . 3-30
Authorization reports . . . . . . . . . . . . . . . . . . . . . . . . . . . . . . . . . . . 3-30
Advances . . . . . . . . . . . . . . . . . . . . . . . . . . . . . . . . . . . . . . . . . 3-30
Expense reports. . . . . . . . . . . . . . . . . . . . . . . . . . . . . . . . . . . . . . 3-32
Funding Defaults at a Report or Expense level . . . . . . . . . . . . . . . . . . . . 3-33
Available balance checking . . . . . . . . . . . . . . . . . . . . . . . . . . . . . . . 3-34
Banner Travel and Expense Management Delegate tab . . . . . . . . . . . . . 3-34
Approval processing . . . . . . . . . . . . . . . . . . . . . . . . . . . . . . . . . . 3-35
Banner Workflow approval processing . . . . . . . . . . . . . . . . . . . . . . . . . 3-35
Banner Finance approval processing. . . . . . . . . . . . . . . . . . . . . . . . . . 3-36
Integration with Banner Finance . . . . . . . . . . . . . . . . . . . . . . . . . . . 3-36
Encumbrances . . . . . . . . . . . . . . . . . . . . . . . . . . . . . . . . . . . . . . 3-36
Invoices and check processing for advances . . . . . . . . . . . . . . . . . . . . . 3-37
Invoices and check processing for expense reports . . . . . . . . . . . . . . . . . 3-38
Journal vouchers for advance recovery transactions . . . . . . . . . . . . . . . . . 3-40
Online help . . . . . . . . . . . . . . . . . . . . . . . . . . . . . . . . . . . . . . . . 3-40
Search tools . . . . . . . . . . . . . . . . . . . . . . . . . . . . . . . . . . . . . . . 3-40
Customization of the application interface . . . . . . . . . . . . . . . . . . . . . 3-41
Application workspace . . . . . . . . . . . . . . . . . . . . . . . . . . . . . . . . . 3-41
Workspace toolbar . . . . . . . . . . . . . . . . . . . . . . . . . . . . . . . . . . . . 3-41
iv Banner Travel and Expense Management 8.5.0.5 July 2012HandbookContents
Chapter 4 Integration with Banner Workflow . . . . . . . . . . . . . . . . . . . . . . . . . . . . . . . . . 4-1
Introduction to Banner Workflow for Banner Travel and Expense Management . . . . . . . . . . . . . . . . . . . . . . . . . . . . . . . . . . . . . . . 4-1
Summary of events . . . . . . . . . . . . . . . . . . . . . . . . . . . . . . . . . . . . 4-1
Business Process: TEMApproval . . . . . . . . . . . . . . . . . . . . . . . . . . 4-2
Workflow actions for approvals . . . . . . . . . . . . . . . . . . . . . . . . . . . . . 4-2
Business Events . . . . . . . . . . . . . . . . . . . . . . . . . . . . . . . . . . . . . 4-6
Context parameters . . . . . . . . . . . . . . . . . . . . . . . . . . . . . . . . . . . . 4-7
Workflow forms . . . . . . . . . . . . . . . . . . . . . . . . . . . . . . . . . . . . . . 4-11
Workflow model TEMApproval version-1. . . . . . . . . . . . . . . . . . . . . . . . 4-15
Business Components . . . . . . . . . . . . . . . . . . . . . . . . . . . . . . . . . . 4-16
FTFKWFLW package. . . . . . . . . . . . . . . . . . . . . . . . . . . . . . . . . . . 4-18
Business Process: TEReviewNotificationProcess . . . . . . . . . . . . . . . . 4-20
Workflow actions for review . . . . . . . . . . . . . . . . . . . . . . . . . . . . . . . 4-20
Business Events . . . . . . . . . . . . . . . . . . . . . . . . . . . . . . . . . . . . . 4-20
Workflow model T&E_Review_Notification version - 1 . . . . . . . . . . . . . . . . 4-22
Business Components . . . . . . . . . . . . . . . . . . . . . . . . . . . . . . . . . . 4-22
Installation of Banner Workflow for Banner Travel and Expense Management . . . . . . . . . . . . . . . . . . . . . . . . . . . . . . . . . . . . . . . 4-23
Chapter 5 Configuration of Banner Document Management Suite . . . . . . . . . . 5-1
Prerequisites . . . . . . . . . . . . . . . . . . . . . . . . . . . . . . . . . . . . . . . 5-1
Set up BDMS and Banner Travel and Expense Management in ApplicationXtender . . . . . . . . . . . . . . . . . . . . . . . . . . . . . . . . . . . 5-2
Install BDMS Garbage Collection Service . . . . . . . . . . . . . . . . . . . . . 5-6
Setting up cross-application queries for Banner . . . . . . . . . . . . . . . . . 5-6
Chapter 6 Per Diem Rules Engine . . . . . . . . . . . . . . . . . . . . . . . . . . . . . . . . . . . . . . . . . . . . . 6-1
Implementation of the Per Diem Rules Engine. . . . . . . . . . . . . . . . . . . 6-1
Install Drools Guvnor . . . . . . . . . . . . . . . . . . . . . . . . . . . . . . . . . . . 6-2
July 2012 Banner Travel and Expense Management 8.5.0.5 vHandbookContents
Set up Drools Guvnor users . . . . . . . . . . . . . . . . . . . . . . . . . . . . . . . 6-7
Test Drools Guvnor deployment . . . . . . . . . . . . . . . . . . . . . . . . . . . . . 6-10
Drools Guvnor authorization . . . . . . . . . . . . . . . . . . . . . . . . . . . . . . . 6-11
Configure an integration account for Per Diem Module rules access . . . . . . . . 6-15
Set up Per Diem Rules . . . . . . . . . . . . . . . . . . . . . . . . . . . . . . . . . . 6-16
Administer the rules repository . . . . . . . . . . . . . . . . . . . . . . . . . . . . . 6-22
Troubleshoot Per Diem Rules issues . . . . . . . . . . . . . . . . . . . . . . . . . . 6-24
Configuration the Per Diem Module . . . . . . . . . . . . . . . . . . . . . . . . . 6-25
Chapter 7 Configuration for Single Sign on (SSO) using Central Authentication Service (CAS) . . . . . . . . . . . . . . . . . . . . . . . . . . . . . . . . . . . . . . 7-1
Prerequisites . . . . . . . . . . . . . . . . . . . . . . . . . . . . . . . . . . . . . . . 7-1
Modify Banner Travel and Expense Management . . . . . . . . . . . . . . . . . 7-2
Add filters and filter URL mapping . . . . . . . . . . . . . . . . . . . . . . . . . . . 7-2
Add pre-authentication processing filters for IDM CAS Adapter configuration. . . 7-4
Define Banner Travel and Expense Management as a CAS managed service . . . . . . . . . . . . . . . . . . . . . . . . . . . . . . . . . . . . . . . . . . . 7-6
Chapter 8 Configuration and Deployment of Banner Travel and Expense Management . . . . . . . . . . . . . . . . . . . . . . . . . . . . . . . . . . . . . . . . . . . . . . 8-1
Configure Banner Travel and Expense Management EAR file (tvlexp.ear) . . 8-1
Configure the Oracle Application Server 10g and deploy the application . . 8-8
Modify the server properties . . . . . . . . . . . . . . . . . . . . . . . . . . . . . . . 8-9
Configure the Oracle Application Server 11g and deploy the application . . 8-11
Configure the application server - Oracle Fusion Middleware 11g . . . . . . . . . 8-11
Deploy TEM - Oracle Fusion Middleware 11g . . . . . . . . . . . . . . . . . . . . . 8-14
Set up Self-Service Banner (SSB) roles . . . . . . . . . . . . . . . . . . . . . . . 8-15
Configure Load-balancer. . . . . . . . . . . . . . . . . . . . . . . . . . . . . . . . 8-16
Test TVLEXP application . . . . . . . . . . . . . . . . . . . . . . . . . . . . . . . . 8-17
vi Banner Travel and Expense Management 8.5.0.5 July 2012HandbookContents
Configure Banner Workflow in Banner Travel and Expense Management . . 8-18
Configure Banner Document Management System (BDMS) in Banner Travel and Expense Management (TEM) . . . . . . . . . . . . . . . . . . . . . . 8-20
Troubleshooting . . . . . . . . . . . . . . . . . . . . . . . . . . . . . . . . . . . . . 8-21
Determine the TVLEXP application version . . . . . . . . . . . . . . . . . . . . . . 8-21
Errors when clicking the Banner Travel and Expense Management Manager button . . . . . . . . . . . . . . . . . . . . . . . . . . . . . . . . . . . . . 8-21
Debugging unsuccessful string in errors . . . . . . . . . . . . . . . . . . . . . . . . 8-22
Network time-out errors in load balanced SSL environments . . . . . . . . . . . . 8-24
Enabling DEBUG in the tvlexp.ear application . . . . . . . . . . . . . . . . . . . . 8-24
Inability to access Travel and Expense Management from Workflow using the link. . . . . . . . . . . . . . . . . . . . . . . . . . . . . . . . . . . . . . . 8-26
Set Up BEIS integration with CAS . . . . . . . . . . . . . . . . . . . . . . . . . . . 8-26
Implementing SSO connection from Luminis® Platform to Banner Travel and Expense Management . . . . . . . . . . . . . . . . . . . . . . . . . . . . . . 8-27
Appendix A Travel Advances. . . . . . . . . . . . . . . . . . . . . . . . . . . . . . . . . . . . . . . . . . . . . . . . . . . . . A-1
Advance rules . . . . . . . . . . . . . . . . . . . . . . . . . . . . . . . . . . . . . . A-1
Minimum Advance Amount . . . . . . . . . . . . . . . . . . . . . . . . . . . . . . . A-1
Maximum Advance Allowed (Percent) and Maximum Advance Allowed (Amount) . . . . . . . . . . . . . . . . . . . . . . . . . . . . . . . . . . . . A-2
Number of Open Advances Available to each traveler . . . . . . . . . . . . . . . . A-2
Maximum Amount of Open Advances per traveler . . . . . . . . . . . . . . . . . . A-3
Number of days, prior to the Trip Start Date, to Schedule the Advance for Payment . . . . . . . . . . . . . . . . . . . . . . . . . . . . . . . . . . . . . . . A-3
Number of days prior to the trip that the Advance may be requested . . . . . . . A-3
Number of days to reconcile an Advance before becoming Overdue . . . . . . . A-3
Advance status process . . . . . . . . . . . . . . . . . . . . . . . . . . . . . . . . A-4
Selection criteria of the authorization records . . . . . . . . . . . . . . . . . . . . . A-4
Advance status scheduler overview . . . . . . . . . . . . . . . . . . . . . . . . . . A-5
Run customized advance status process . . . . . . . . . . . . . . . . . . . . . . . A-7
Advance recovery . . . . . . . . . . . . . . . . . . . . . . . . . . . . . . . . . . . . A-8
July 2012 Banner Travel and Expense Management 8.5.0.5 viiHandbookContents
Appendix B Seed Data . . . . . . . . . . . . . . . . . . . . . . . . . . . . . . . . . . . . . . . . . . . . . . . . . . . . . . . . . . . . B-1
Banner Web Tailor roles . . . . . . . . . . . . . . . . . . . . . . . . . . . . . . . . B-1
Expense Format (FTTVEXFM). . . . . . . . . . . . . . . . . . . . . . . . . . . . . B-1
Institutional settings (FTTVRULE) . . . . . . . . . . . . . . . . . . . . . . . . . . B-2
Document codes set up in Banner Finance . . . . . . . . . . . . . . . . . . . . B-3
Data Validation Form (FTVSDAT) . . . . . . . . . . . . . . . . . . . . . . . . . . . . B-3
Document Code Maintenance form (FOMFSEQ) . . . . . . . . . . . . . . . . . . . B-4
Document Type Maintenance Form (FTMDTYP) . . . . . . . . . . . . . . . . . . . B-5
Data in the System Data Validation Table (FTVSDAT) . . . . . . . . . . . . . . . . B-5
Advance setup . . . . . . . . . . . . . . . . . . . . . . . . . . . . . . . . . . . . . . B-7
Appendix C Tables . . . . . . . . . . . . . . . . . . . . . . . . . . . . . . . . . . . . . . . . . . . . . . . . . . . . . . . . . . . . . . . . C-1
Appendix D Customization of Per Diem Rules . . . . . . . . . . . . . . . . . . . . . . . . . . . . . . . . . . D-1
Drools components . . . . . . . . . . . . . . . . . . . . . . . . . . . . . . . . . . . D-1
Drools rules engine . . . . . . . . . . . . . . . . . . . . . . . . . . . . . . . . . . . . D-1
Drools business rules. . . . . . . . . . . . . . . . . . . . . . . . . . . . . . . . . . . D-2
Drools Guvnor . . . . . . . . . . . . . . . . . . . . . . . . . . . . . . . . . . . . . . . D-2
Per Diem rules . . . . . . . . . . . . . . . . . . . . . . . . . . . . . . . . . . . . . . D-2
Rules flow . . . . . . . . . . . . . . . . . . . . . . . . . . . . . . . . . . . . . . . . . D-2
Per Diem Rules Domain Specific Language (DSL) . . . . . . . . . . . . . . . . . . D-4
Creating New Per Diem Rules. . . . . . . . . . . . . . . . . . . . . . . . . . . . . D-4
Components of a Per Diem rule . . . . . . . . . . . . . . . . . . . . . . . . . . . . . D-4
Per Diem DSL conventions . . . . . . . . . . . . . . . . . . . . . . . . . . . . . . . D-5
Creating a rule using the Drools Guvnor Guided Rule Editor . . . . . . . . . . . . D-8
Alternate rules authoring methods . . . . . . . . . . . . . . . . . . . . . . . . . . . D-13
Extending the Per Diem DSL . . . . . . . . . . . . . . . . . . . . . . . . . . . . . . D-14
Per Diem Rules categories . . . . . . . . . . . . . . . . . . . . . . . . . . . . . . D-14
Per Diem types . . . . . . . . . . . . . . . . . . . . . . . . . . . . . . . . . . . . . . D-14
viii Banner Travel and Expense Management 8.5.0.5 July 2012HandbookContents
Per Diem rate type. . . . . . . . . . . . . . . . . . . . . . . . . . . . . . . . . . . . D-17
Per Diem DSL terms . . . . . . . . . . . . . . . . . . . . . . . . . . . . . . . . . . D-17
Sample Per Diem rules . . . . . . . . . . . . . . . . . . . . . . . . . . . . . . . . . D-26
Java Data Structure used to interface with the Per Diem Rules . . . . . . . . D-32
Disabling Drools authentication and authorization . . . . . . . . . . . . . . . . D-38
Disable Drools Guvnor authentication . . . . . . . . . . . . . . . . . . . . . . . . . D-38
Disable Drools Guvnor authorization . . . . . . . . . . . . . . . . . . . . . . . . . . D-39
Appendix E Uploading Per Diem Rates. . . . . . . . . . . . . . . . . . . . . . . . . . . . . . . . . . . . . . . . . . E-1
Populating the templates . . . . . . . . . . . . . . . . . . . . . . . . . . . . . . . E-1
Column mapping of the Generic Template to Per Diem Allowance table . . . . . . E-2
Foreign Template column . . . . . . . . . . . . . . . . . . . . . . . . . . . . . . . . E-5
Populating the Location City or County. . . . . . . . . . . . . . . . . . . . . . . . . E-6
July 2012 Banner Travel and Expense Management 8.5.0.5 ixHandbookContents

x Banner Travel and Expense Management 8.5.0.5 July 2012HandbookContents
July 201
1 Installation Overview
Ellucian® releases a number of baseline enhancements and new solutions to the Banner® 8.x products that use a Rich Internet Application (RIA) user interface. RIAs are Web applications that have the features and functionality of traditional desktop applications. They run using a Web browser to allow users ready access. They are managed and maintained by a host application server eliminating the need to install any specialized software on user machines.
For products, such as Banner® Travel and Expense Management (TEM), Ellucian uses Adobe Flex to create the RIA applications. Adobe Flex is an open source framework for building and deploying Web applications consistently across all major, modern browsers and operating systems. In fact, the only requirement to run Flex applications is a browser installed with Adobe’s Flash Player plugin.
The following sections discuss how to deploy the Adobe Flex application for Travel and Expense and outline hardware and software dependencies for the installation, including other Ellucian product dependencies.
Deployment of Adobe Flex applications
Flex applications are deployed through an application server. With your Banner 8 products, the Oracle Application Server (OAS) is packaged that is suitable for running the Flex applications. However, since the Flex application interfaces require Java 1.6.0.7, OAS 10.1.3 is the minimum required version.
Banner 8.x installs with OAS 10.1.2 to support Oracle Forms. However, Banner Travel and Expense Management requires OAS 10.1.3. To use Banner Travel and Expense Management, you will need to run two versions of OAS, which can be run off of one server, assuming the server has adequate processing power. Consult your Oracle documentation for processing requirements.
Banner Travel and Expense Management overview
Banner Travel and Expense Management provides a comprehensive, single system of record where all associated travel and expense activity for an institution can be maintained. This product supports automation of travel expense reporting. It enables improved processes, increased employee awareness of expense policy, and stricter control over spending. While it leverages investment in Banner Finance, Banner Workflow, and Banner Document Management Suite, only Banner Finance and Workflow are required;
2 Banner Travel and Expense Management 8.5.0.5 1-1Handbook
Installation Overview
1-2
other Ellucian products are optional. The solution includes, but is not limited to the following functionality:
• Requesting of travel authorizations
• Approving travel authorization requests
• Optionally encumbering travel authorizations
• Optionally allowing advances including advance request, advance approval, automated clearing of advance when recording expenses, and recovery of excess advances
• Requesting reimbursement of travel expenses
• Approving travel reimbursement requests
• Paying reimbursements either by check or direct deposit using Banner Accounts Payable
• Acting as delegate on behalf of a traveler
• Entering expenses in different currencies on authorizations and expense reports
• Reimbursing certain travelers in a currency other than the base currency
• Processing expense report payments as bank transfer wires or drafts
• Segregating taxes for rebate processing of expense reports in Banner
• Denoting expense reports as Eligible for Rebate
• Identifying a traveler's affiliation on authorization and expense reports
• Processing Per Diem allowances
• Providing NSF checking that optionally stops the submission of a report, if budget is unavailable
• Providing super delegate capability
It is important to note that while the Banner Travel and Expense Management solution depends on Banner Finance, it does require a separate licensing agreement. It is also important to note that this enhancement is only compatible with the Banner 8.x platform. It is not compatible with Banner 7.x.
Banner product dependencies
The Banner Travel and Expense Management application works with other Ellucian products. You must upgrade to the following versions of the other products:
Banner Travel and Expense Management 8.5.0.5 July 2012HandbookInstallation Overview
July 201
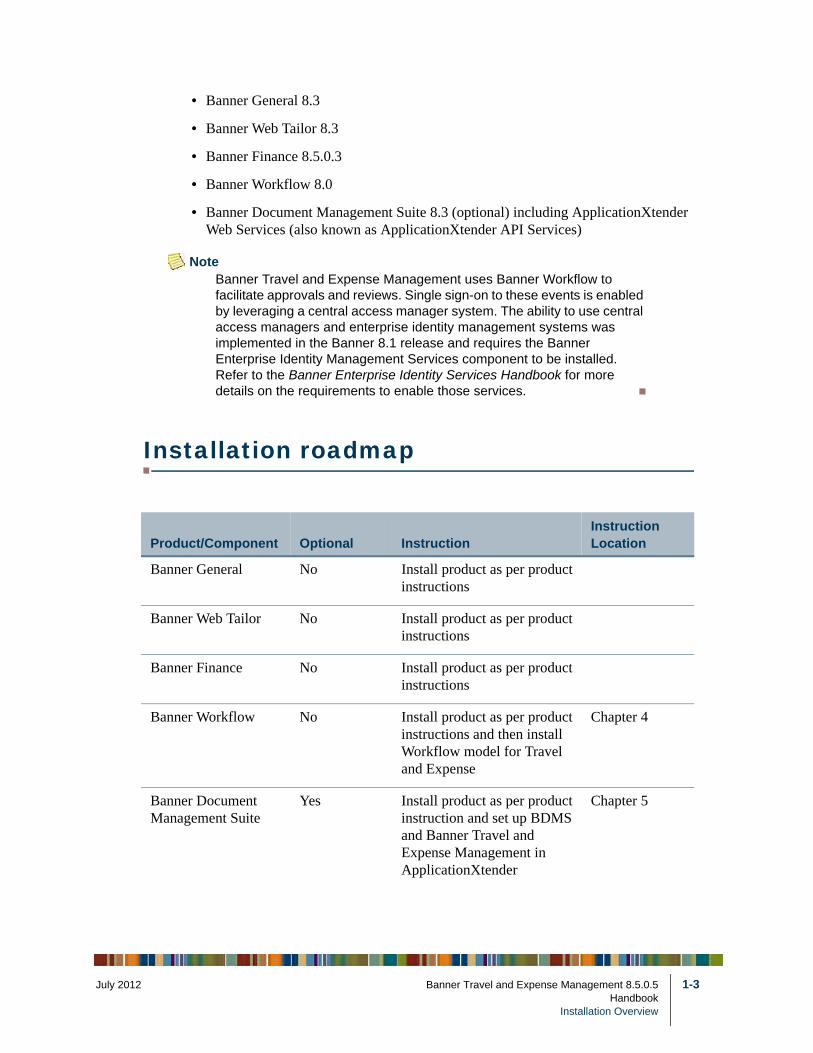
• Banner General 8.3
• Banner Web Tailor 8.3
• Banner Finance 8.5.0.3
• Banner Workflow 8.0
• Banner Document Management Suite 8.3 (optional) including ApplicationXtender Web Services (also known as ApplicationXtender API Services)
NoteBanner Travel and Expense Management uses Banner Workflow to facilitate approvals and reviews. Single sign-on to these events is enabled by leveraging a central access manager system. The ability to use central access managers and enterprise identity management systems was implemented in the Banner 8.1 release and requires the Banner Enterprise Identity Management Services component to be installed. Refer to the Banner Enterprise Identity Services Handbook for more details on the requirements to enable those services.
Installation roadmap
Product/Component Optional InstructionInstruction Location
Banner General No Install product as per product instructions
Banner Web Tailor No Install product as per product instructions
Banner Finance No Install product as per product instructions
Banner Workflow No Install product as per product instructions and then install Workflow model for Travel and Expense
Chapter 4
Banner Document Management Suite
Yes Install product as per product instruction and set up BDMS and Banner Travel and Expense Management in ApplicationXtender
Chapter 5
2 Banner Travel and Expense Management 8.5.0.5 1-3Handbook
Installation Overview

1-4
Tip*Rules Engine is optional if the Per Diem feature is not enabled.
Hardware and software requirements
Aside from the need for an additional OAS 10.x version, the hardware and software requirements for the product version updates and their related applications are identical to those for Banner 8.x. For more information on the software dependencies and technical requirements for Banner 8.x, refer to the following documents, which are available at the Ellucian Customer Support Center (http://connect.ellucian.com/customer_support).
• Banner Digital Campus Product Compatibility Matrix
• Banner 8 Unified Product Release Technical FAQs
• Banner DC Release Interdependency Matrix PDF file
Because Banner Travel and Expense Management is Web-based, end users do not need to install any specialized software on their machines. They do need to have one of the
Banner Enterprise Identity System
Yes Install product as per product instruction
Rules Engine No* Install Drools Guvnor Chapter 6
Banner Travel and Expense Management
No Upgrade to Banner Travel and Expense Management 8.5;
Configure integration with BDMS, Drools Guvnor, and BEIS as needed;
Deploy and do additional setup in Travel and Expense Administration page to integrate to Banner Workflow and BDMS; Perform this task after all other components needed for this installation have been completed.
Chapter 7
Product/Component Optional InstructionInstruction Location
Banner Travel and Expense Management 8.5.0.5 July 2012HandbookInstallation Overview
July 201
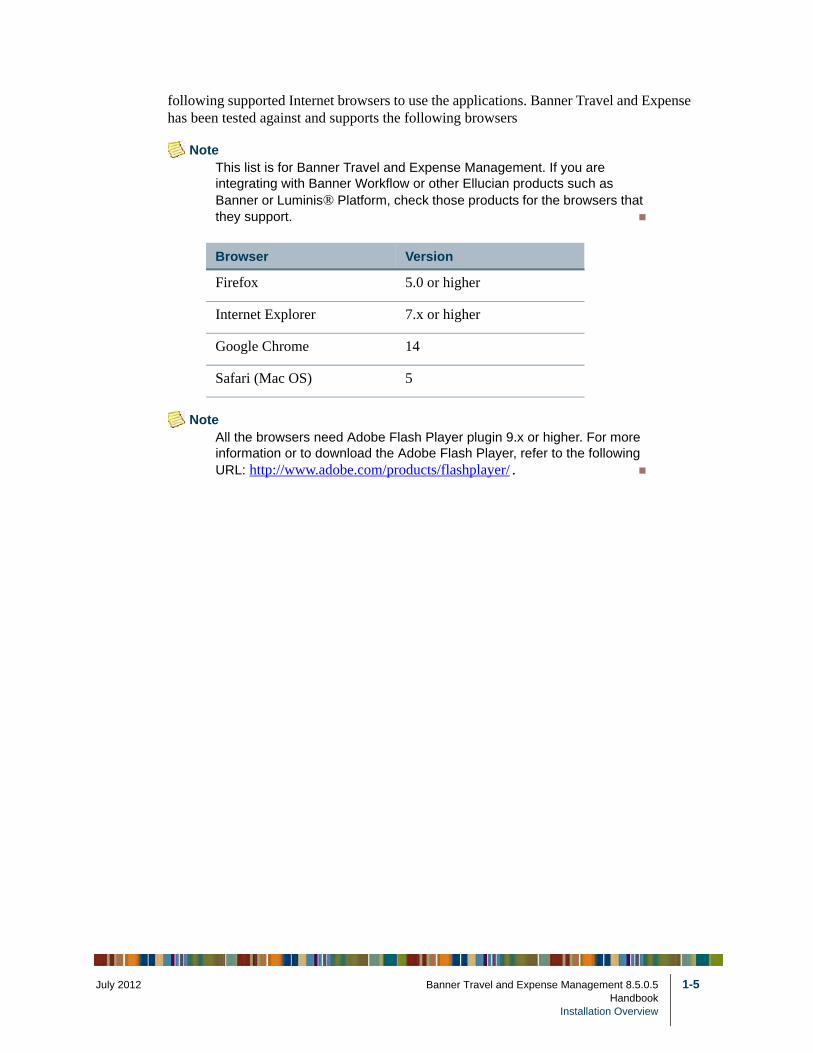
following supported Internet browsers to use the applications. Banner Travel and Expense has been tested against and supports the following browsers
NoteThis list is for Banner Travel and Expense Management. If you are integrating with Banner Workflow or other Ellucian products such as Banner or Luminis® Platform, check those products for the browsers that they support.
NoteAll the browsers need Adobe Flash Player plugin 9.x or higher. For more information or to download the Adobe Flash Player, refer to the following URL: http://www.adobe.com/products/flashplayer/.
Browser Version
Firefox 5.0 or higher
Internet Explorer 7.x or higher
Google Chrome 14
Safari (Mac OS) 5
2 Banner Travel and Expense Management 8.5.0.5 1-5Handbook
Installation Overview

1-6
Banner Travel and Expense Management 8.5.0.5 July 2012HandbookInstallation Overview
July 201
2 Installation References
This chapter provides a list of documents that can help you install and implement Banner® Travel and Expense Management. These documents are available for download from the Ellucian® Customer Support Center at http://connect.ellucian.com/.
Banner Travel and Expense Management Upgrade Guide 8.5
This document provides the procedure to install Banner Travel and Expense Management. It is designed to be used in conjunction with the following documents:
• Banner DC Release Interdependency Matrix
• Banner Media Unload Reference Guide
Banner Travel and Expense Management Release Guide 8.5
This document introduces you to the Banner Travel and Expense Management application. It provides technical information regarding the Oracle tables that are delivered with the system.
This document also provides comprehensive release information, outlines the supporting documentation, and provides insights into other dependencies.
Banner Middle Tier Implementation Guide
This document provides the procedure for the primary configuration of the Banner middle tier server depending on the products that you have licensed.
Banner Workflow Analyst/Administrator Handbook and Banner Workflow Technical Integration Guide
You must license Banner Workflow 8.0 to use the business events, custom workflow, custom form, and logic for the routing and approval components of the Banner Travel and Expense Management application.
The Workflow Approver role needs to be assigned to an approver of Travel and Expense Report documents at your institution. For information regarding the assignment of roles to Banner Workflow users, please see the Users, Roles, and Proxies chapter of the Banner Workflow Analyst/Administrator Handbook Release 8.0.
For specific information on setting up and integrating Workflow to enable the use of business events, custom workflow, and other features, for Banner Travel and Expense Management, refer to Chapter 4, “Integration with Banner Workflow”.
2 Banner Travel and Expense Management 8.5.0.5 2-1Handbook
Installation References
2-2
(Optional) Banner Document Management Suite Installation Guide 8.3
The Banner Document Management Suite (BDMS) enables you to add attachments, such as receipts and other expense-related documents for authorization or expense reporting. You can bypass the traditional paper-based expense report approval and reimbursement process. You can assign documentation, such as receipts, to the approver of the expense report.
The Banner Document Management Suite Installation Guide 8.3 provides instructions for fresh installation and upgrades. In addition, you must follow the installation instructions in the Integrating BDMS with Banner Finance Travel and Expense chapter of the Banner Document Management Suite 8.3 Installation Guide.
For specific information on setting up and integrating BDMS to add attachments for authorization and other purposes in Banner Travel and Expense Management, refer to Chapter 5, “Configuring Banner Document Management Suite”.
(Optional) Banner Enterprise Identity Services Handbook
Banner Travel and Expense Management is integrated with Banner Enterprise Identity Services for the provisioning of user information from a third-party Enterprise Identity Management System (EIMS) into Banner Travel and Expense Management. If you plan on using this feature, refer to the “Banner Travel and Expense Management Configuration” chapter of the Banner Enterprise Identity Services 8.1 Handbook for the implementation procedure. Refer to Chapter 8, “Implement Banner Enterprise Identity Services” for more information.
Banner Travel and Expense Management 8.5.0.5 July 2012HandbookInstallation References
July 201
3 Functional Administration
This chapter discusses the user roles, the administrative user interface, and other functional guidelines for using Banner® Travel and Expense Management (TEM) in the following sections:
• “Role administration” on page 3-1
• “Banner Travel and Expense Administration tab” on page 3-8
• “Banner Travel and Expense Management Advance Control tab” on page 3-23
• “Banner Travel and Expense Management Per Diem Administrator tab” on page 3-25
• “Banner Travel and Expense Management Profile Administrator tab” on page 3-26
• “Banner Travel and Expense Management Delegate Control tab” on page 3-26
• “Banner Travel and Expense Management Profile tab” on page 3-27
• “Banner Travel and Expense Management Expense Manager tab” on page 3-30
• “Banner Travel and Expense Management Delegate tab” on page 3-34
• “Approval processing” on page 3-35
• “Integration with Banner Finance” on page 3-36
• “Online help” on page 3-40
• “Search tools” on page 3-40
• “Customization of the application interface” on page 3-41
• “Application workspace” on page 3-41
Role administration
Banner Travel and Expense Management relies on the use of ten functional roles. The Banner Web Tailor User Role Validation Table (TWTVROLE) lists the valid roles that can be granted to a user or assigned to a menu item.
You use Self-Service Banner Web Tailor Administration to manage these roles. You must log in as a Web Tailor administrator to assign roles to the Banner Travel and Expense Management users. The following Banner Web Tailor roles are delivered as seed data for the TWTVROLE table for Banner Travel and Expense Management:
2 Banner Travel and Expense Management 8.5.0.5 3-1Handbook
Functional Administration
3-2
• Travel and Expense User (teuser)
• Travel and Expense Approver (teapprover)
• Travel and Expense Delegate (tedelegate)
• Travel and Expense Administrator (teadmin)
• Travel and Expense Delegate Super User (tedelegate-super)
• Travel and Expense Delegate Administrator (tedelegateadmin)
• Travel and Expense Finance Approver (tefinancialapprover)
• Travel and Expense Advance Manager (teadvanceadmin)
• Travel and Expense Profile Administrator (teprofileadmin)
• Travel and Expense Per Diem Manager (teperdiemadmin)
Refer to the “User Roles” section in the “Using Web Tailor” chapter of the Banner Web Tailor User Guide for information regarding the assignment of these roles.
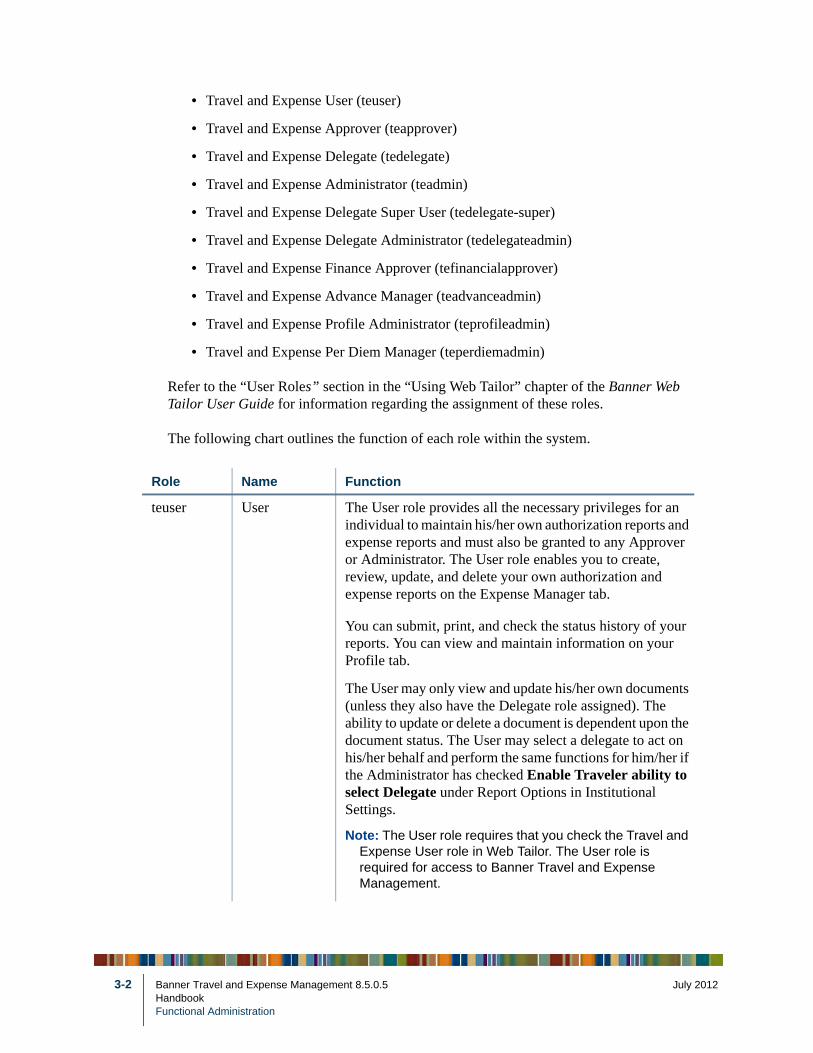
The following chart outlines the function of each role within the system.
Role Name Function
teuser User The User role provides all the necessary privileges for an individual to maintain his/her own authorization reports and expense reports and must also be granted to any Approver or Administrator. The User role enables you to create, review, update, and delete your own authorization and expense reports on the Expense Manager tab.
You can submit, print, and check the status history of your reports. You can view and maintain information on your Profile tab.
The User may only view and update his/her own documents (unless they also have the Delegate role assigned). The ability to update or delete a document is dependent upon the document status. The User may select a delegate to act on his/her behalf and perform the same functions for him/her if the Administrator has checked Enable Traveler ability to select Delegate under Report Options in Institutional Settings.
Note: The User role requires that you check the Travel and Expense User role in Web Tailor. The User role is required for access to Banner Travel and Expense Management.
Banner Travel and Expense Management 8.5.0.5 July 2012HandbookFunctional Administration
July 201
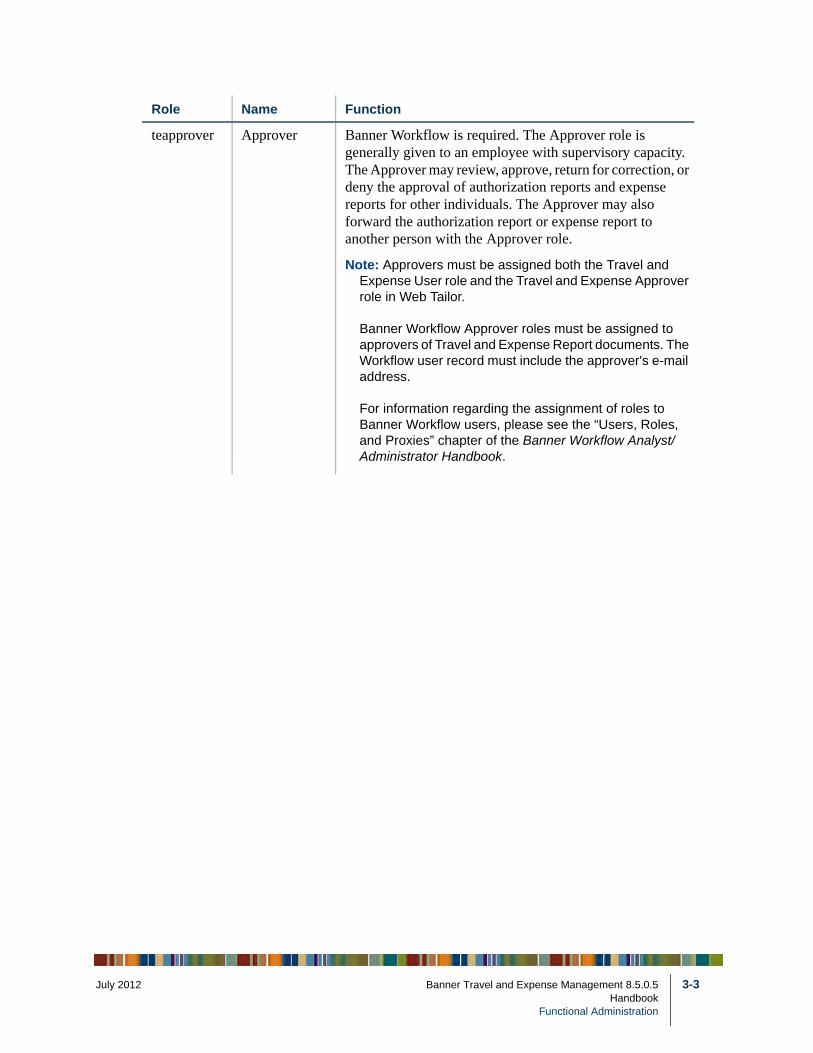
teapprover Approver Banner Workflow is required. The Approver role is generally given to an employee with supervisory capacity. The Approver may review, approve, return for correction, or deny the approval of authorization reports and expense reports for other individuals. The Approver may also forward the authorization report or expense report to another person with the Approver role.
Note: Approvers must be assigned both the Travel and Expense User role and the Travel and Expense Approver role in Web Tailor.
Banner Workflow Approver roles must be assigned to approvers of Travel and Expense Report documents. The Workflow user record must include the approver's e-mail address.
For information regarding the assignment of roles to Banner Workflow users, please see the “Users, Roles, and Proxies” chapter of the Banner Workflow Analyst/Administrator Handbook.
Role Name Function
2 Banner Travel and Expense Management 8.5.0.5 3-3Handbook
Functional Administration

3-4
teadmin Administrator The Administrator role enables you to tailor Banner Travel and Expense Management to your institution’s needs. Use the Administration tab for validation and rule information specific to your institution. The Administration tab gives the Administrator role the ability to enable specific functionality, and to set default values at the system level. The settings and defaults apply to all system users.
The Administrator maintains validation and rule information specific to the institution, payment methods, business purposes, expense groups, expense types, currency conversion, taxes and rebates, traveler affiliations, unit rates, currency, advance rules, advance recovery methods, and institutional settings.
From Institutional Settings, in Report Options, you can check or un-check the following:
• Enable authorization reports
• Encumber authorizations
• Enable per diem processing
• Enable expense reports
• Enable advances
• Enable BDMS integration
• Enable Workflow approvals
• Enable Workflow Traveler Review of Delegate entry
• Enable Traveler ability to select Delegate
• Enable error on NSF checking
• Bypass Fund Organization Security
• Bypass Finance approvals
• Calculate Taxes
• Maintain Traveler Affiliations
When a user signs into Banner Travel and Expense Management, the system evaluates the institutional settings in combination with the user’s role to determine whether it is appropriate to allow or restrict user interfaces or functionality.
Note: Administrators must be assigned both the Travel and Expense User role and the Travel and Expense Administrator role in Web Tailor, leaving the Approver role optional.
Role Name Function
Banner Travel and Expense Management 8.5.0.5 July 2012HandbookFunctional Administration
July 201
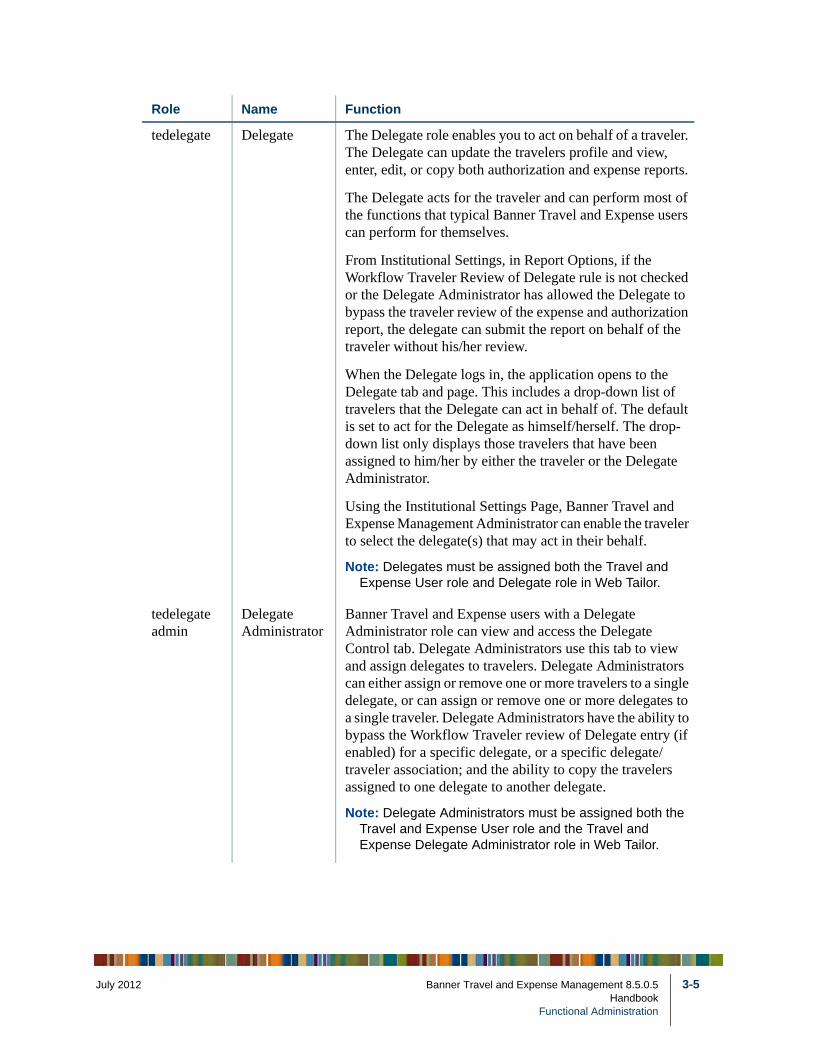
tedelegate Delegate The Delegate role enables you to act on behalf of a traveler. The Delegate can update the travelers profile and view, enter, edit, or copy both authorization and expense reports.
The Delegate acts for the traveler and can perform most of the functions that typical Banner Travel and Expense users can perform for themselves.
From Institutional Settings, in Report Options, if the Workflow Traveler Review of Delegate rule is not checked or the Delegate Administrator has allowed the Delegate to bypass the traveler review of the expense and authorization report, the delegate can submit the report on behalf of the traveler without his/her review.
When the Delegate logs in, the application opens to the Delegate tab and page. This includes a drop-down list of travelers that the Delegate can act in behalf of. The default is set to act for the Delegate as himself/herself. The drop-down list only displays those travelers that have been assigned to him/her by either the traveler or the Delegate Administrator.
Using the Institutional Settings Page, Banner Travel and Expense Management Administrator can enable the traveler to select the delegate(s) that may act in their behalf.
Note: Delegates must be assigned both the Travel and Expense User role and Delegate role in Web Tailor.
tedelegateadmin
Delegate Administrator
Banner Travel and Expense users with a Delegate Administrator role can view and access the Delegate Control tab. Delegate Administrators use this tab to view and assign delegates to travelers. Delegate Administrators can either assign or remove one or more travelers to a single delegate, or can assign or remove one or more delegates to a single traveler. Delegate Administrators have the ability to bypass the Workflow Traveler review of Delegate entry (if enabled) for a specific delegate, or a specific delegate/traveler association; and the ability to copy the travelers assigned to one delegate to another delegate.
Note: Delegate Administrators must be assigned both the Travel and Expense User role and the Travel and Expense Delegate Administrator role in Web Tailor.
Role Name Function
2 Banner Travel and Expense Management 8.5.0.5 3-5Handbook
Functional Administration
3-6
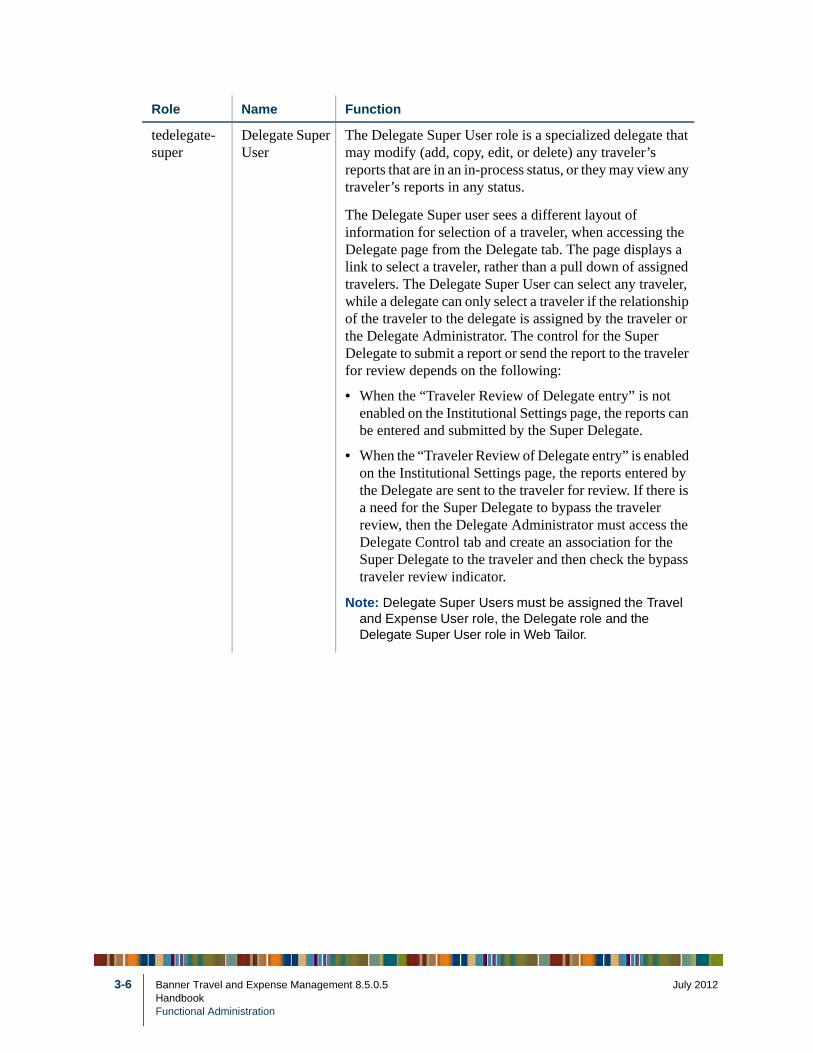
tedelegate-super
Delegate Super User
The Delegate Super User role is a specialized delegate that may modify (add, copy, edit, or delete) any traveler’s reports that are in an in-process status, or they may view any traveler’s reports in any status.
The Delegate Super user sees a different layout of information for selection of a traveler, when accessing the Delegate page from the Delegate tab. The page displays a link to select a traveler, rather than a pull down of assigned travelers. The Delegate Super User can select any traveler, while a delegate can only select a traveler if the relationship of the traveler to the delegate is assigned by the traveler or the Delegate Administrator. The control for the Super Delegate to submit a report or send the report to the traveler for review depends on the following:
• When the “Traveler Review of Delegate entry” is not enabled on the Institutional Settings page, the reports can be entered and submitted by the Super Delegate.
• When the “Traveler Review of Delegate entry” is enabled on the Institutional Settings page, the reports entered by the Delegate are sent to the traveler for review. If there is a need for the Super Delegate to bypass the traveler review, then the Delegate Administrator must access the Delegate Control tab and create an association for the Super Delegate to the traveler and then check the bypass traveler review indicator.
Note: Delegate Super Users must be assigned the Travel and Expense User role, the Delegate role and the Delegate Super User role in Web Tailor.
Role Name Function
Banner Travel and Expense Management 8.5.0.5 July 2012HandbookFunctional Administration
July 201
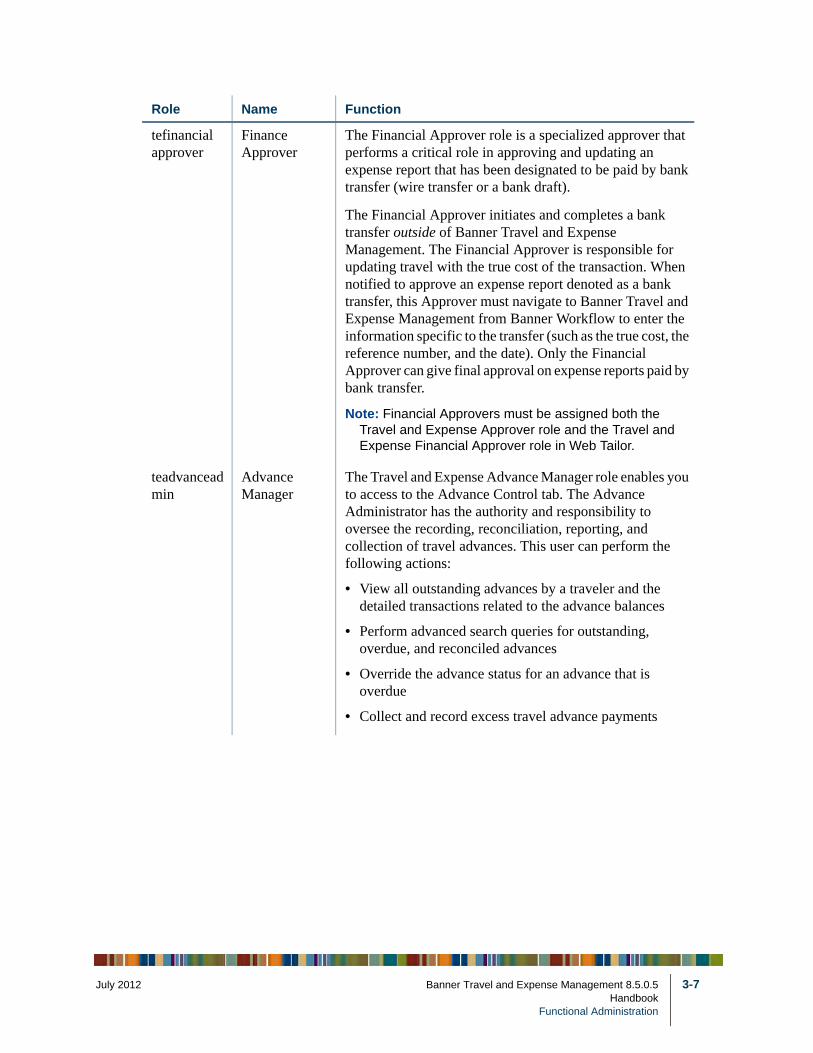
tefinancialapprover
Finance Approver
The Financial Approver role is a specialized approver that performs a critical role in approving and updating an expense report that has been designated to be paid by bank transfer (wire transfer or a bank draft).
The Financial Approver initiates and completes a bank transfer outside of Banner Travel and Expense Management. The Financial Approver is responsible for updating travel with the true cost of the transaction. When notified to approve an expense report denoted as a bank transfer, this Approver must navigate to Banner Travel and Expense Management from Banner Workflow to enter the information specific to the transfer (such as the true cost, the reference number, and the date). Only the Financial Approver can give final approval on expense reports paid by bank transfer.
Note: Financial Approvers must be assigned both the Travel and Expense Approver role and the Travel and Expense Financial Approver role in Web Tailor.
teadvanceadmin
Advance Manager
The Travel and Expense Advance Manager role enables you to access to the Advance Control tab. The Advance Administrator has the authority and responsibility to oversee the recording, reconciliation, reporting, and collection of travel advances. This user can perform the following actions:
• View all outstanding advances by a traveler and the detailed transactions related to the advance balances
• Perform advanced search queries for outstanding, overdue, and reconciled advances
• Override the advance status for an advance that is overdue
• Collect and record excess travel advance payments
Role Name Function
2 Banner Travel and Expense Management 8.5.0.5 3-7Handbook
Functional Administration

3-8
Banner Travel and Expense Administration tab
The Administrator maintains validation and rule information specific to the institution, such as: payment methods, business purposes, expense groups, currency codes, taxes and rebates, traveler affiliations, expense types, unit rates, advance rules, report types, per diem types, and institutional settings.
Refer to the Banner Travel and Expense Management Help for details concerning these tasks.
Institutional Settings
The Institutional Settings include the options outlined in the following sections.
Report Options
Enable Authorization Reports
Select the Enable Authorization Reports check box to allow a user with access to Banner Travel and Expense Management to create an authorization report. You use the authorization report to pre-authorize anticipated expenses. If you check this field, users may create, edit, and query his/her authorization reports. The authorization report includes
teperdiemadmin
Per Diem Administrator
The Per Diem Administrator role maintains per diem rates for the institution. This specialized role gives this Administrator the ability to upload per diem rate related information, as well as revise it and purge it. Using a delivered set of templates, the per diem manager massages the rate information into the template. Once completed, the templates may be uploaded, using the Per Diem Administrator tab, to Banner Travel and Expense Management. The rates are placed in the Per Diem Allowance table so that they may be retrieved by the system for per diem calculations.
teprofileadmin
Profile Administrator
The Profile Administrator role enables access and update capability to a traveler’s profile. Limitations can be imposed, at an institutional level, to restrict a traveler’s access to all or various sections of his/her profile. If those limitations are in place, this role puts the access in the hands of the profile administrator.
Role Name Function
Banner Travel and Expense Management 8.5.0.5 July 2012HandbookFunctional Administration
July 201
general information, funding defaults, itinerary, comments, attachments, and estimated expenses.
Encumber Authorizations
Select the Encumber Authorizations check box to enable Banner Travel and Expense Management to create an encumbrance transaction in Banner Finance for the reimbursable amount of a submitted and approved authorization report.
Enable Advances
Select the Enable Advances check box to enable Banner Travel and Expense Management to create a travel advance. If you select this option, a user can create an advance when an authorization is created or after an authorization has been approved. The advance contains a reference to the authorization's estimated expenses and includes a requested amount, description, comments, and remittance address. Funding for the advance is derived from advance rules defined in the Administration > Advance Setup > Advance Rules page.
Enable Expense Reports
Select the Enable Expense Reports option to allow a user with access to Banner Travel and Expense Management to create an expense report. If you select this option, a user may create, edit, and query his/her reports. The expense report includes general information, funding defaults, itinerary, comments, attachments, and expenses with associated funding.
Enable Per Diem Processing
Select the Enable Per Diem Processing option to allow per diem processing at your institution. If you select this option, you may include per diem related expense items on an authorization and expense report. The system performs the per diem rate calculation for those items.
Enable BDMS Integration
Select the Enable BDMS Integration option if the Banner Document Management Suite (BDMS) is installed and will be used by Banner Travel and Expense Management to upload and store attachments.
Enable Workflow Approvals
Select the Enable Workflow Approvals option ensuring that the following conditions are met for the successful submission of a report to the approval process:
• Banner Workflow must be installed.
• Each Banner Travel and Expense Management user must have an Approver (supervisor) and an e-mail address on the Profile tab.
2 Banner Travel and Expense Management 8.5.0.5 3-9Handbook
Functional Administration
3-10
• The approver (indicated on the user Profile tab) must also have a Profile record with his/her own Workflow ID and e-mail address. The e-mail address also needs to be on the Workflow user record.
• This information is sent to Workflow to initiate an approval workflow when the user submits the report.
Enable Workflow Traveler Review of Delegate Entry
Select the Enable Workflow Traveler Review of Delegate Entry option if you want the traveler to be able to review and submit reports that were entered or edited by a delegate or super delegate. When the delegate previews the report, the delegate sees a Traveler Review button, rather than a Submit button. When the delegate clicks the Traveler Review button, an e-mail message is sent to the traveler notifying him/her that the report is ready to be reviewed. The traveler can review and make corrections, if needed, and then submit the report. When this rule is enabled, it can be bypassed for a specific delegate/traveler association or a specific super delegate/traveler association by a delegate administrator.
When this option is selected along with the Enable advances option, the traveler needs to request an advance, if needed. The Request Advance button is not displayed for the delegate or super delegate unless the Bypass Traveler Review rule is set by the delegate administrator for the specific delegate-traveler association.
The following conditions must be met for the successful submission of a report to the workflow traveler review process.
• Banner Workflow must be installed
• Each Banner Travel and Expense Management user must have an e-mail address on his/her profile.
Enable Traveler Ability to Select Delegate
Select the Enable Traveler Ability to Select Delegate option to allow the Banner Travel and Expense Management System Administrator to enable the ability for travelers to select the delegate(s) that may act in his/her behalf.
Enable Error on NSF Checking
Select the Enable Error on NSF Checking option if you want the system to stop the traveler from submitting an authorization or an expense report, if the report is in a non-sufficient funds condition and if your control severity is set to Error.
Bypass Fund Org Security
If Banner Finance has fund and organization security turned on, you can elect to bypass fund/org security in Banner Travel and Expense Management. If you do not choose to bypass fund/org security, each travel user must be set up in Banner Finance with an Oracle user account and have permissions defined in Banner Finance, just as though he/she were
Banner Travel and Expense Management 8.5.0.5 July 2012HandbookFunctional Administration
July 201
processing directly in Banner Finance. In this instance, Banner Travel and Expense Management users will only be able to choose funding sources that contain fund/org codes for which they have either P (Post) or B (Both query and Post) permission.
The following list describes the exceptions:
1. If a delegate is entering and submitting a report for a traveler, it is the delegate's fund and organization security permission that applies and therefore an Oracle ID and fund and organization security permission is not needed for the traveler, unless the traveler will also enter and submit reports for himself/herself.
2. If a delegate enters for a traveler and then sends the report for the traveler to review, the delegate's fund and organization security permission applies when the traveler submits the report, unless the traveler adds a new expense record or attempts to change the funding on an existing expense record. In the latter case, the process will then check for the traveler's fund and organization security permission to which the following rules apply.
• For new records with default funding on the report, if the traveler does not have the appropriate fund and organization permission, for the default, he/she will not be able to save new records.
• For new records without default funding on the report, if the traveler does not have a FOMPROF record in Banner Finance she/he will not be able to access the funding page associated with the expense to add the funding. The record will save but will be in suspense as it is missing the funding record. The traveler will need to contact the delegate with fund and organization permissions to add the funding.
• For new records without default funding on the report, if the traveler does have fund and organization permissions he/she will be able to access the funding page and add funding according to his/her fund and organization security permissions.
• To change funding on existing records the traveler must have the appropriate fund and organization security permissions.
Travel advances bypass Fund/Organization security checking since the advance fund is determined by the advance rule and is not entered.
Bypass Finance Approvals
Select the Bypass Finance Approvals field to bypass the Banner Finance Approvals process. Normally in Banner Finance, transactions flagged on the System Control Form (FOASYSC) to require approval, are distributed to the appropriate approval queues by the Approvals Process (FORAPPL). The routing criteria for the Finance approval queues are based on accounting information and dollar limit levels. This Bypass Finance Approvals field turns off the Finance Approvals process for invoice transactions created by Banner Travel and Expense Management. Expense reports and advance invoices can use Travel and Expense Workflow-based approvals only or a combination of Travel and Expense
2 Banner Travel and Expense Management 8.5.0.5 3-11Handbook
Functional Administration
3-12
Workflow-based approvals and Finance Approvals. Encumbrances created from authorization reports, if any, are never routed through Banner Finance approvals.
Calculate Taxes
The Calculate Taxes option allows an institution to designate that the taxes should be segregated on Authorization and Expense reports for all travelers. When the Calculate Taxes option is enabled, tax amounts are derived from the entered receipt amount, or can be entered for each expense item.
Maintain Traveler Affiliations
The Maintain Traveler Affiliations option requires an affiliation value on each authorization or expense report. This allows you to designate the capacity for which each traveler is traveling for your institution.
If the Calculate Taxes option is enabled, the Maintain Traveler Affiliations option is also enabled. Through the affiliation, the system determines an expense report’s rebate eligibility.
Profile Options
You may restrict control of the information that travelers, or delegates for travelers, can edit on their profiles. Profile options below relate to the sections that exist on a traveler’s profile. You may select a check box to give travelers the ability to add or edit the information relating to that section in their profile. If a check box is not selected (left unchecked), a traveler or delegate may not add or update profile information. He/she may only view the information that exists. Those unchecked sections may be added or modified, on a traveler’s profile, only by a Profile Administrator.
• Enable Address or Direct Deposit
• Enable E-Mail
• Enable Approver
• Enable Work Flow Login ID
• Enable Funding
NoteThese check boxes default as checked, giving travelers full access to add or modify their profile record. To enforce profile security and limit a traveler’s access to these sections, you will need to uncheck the sections, based on your institutional preference.
Banner Travel and Expense Management 8.5.0.5 July 2012HandbookFunctional Administration
July 201
Default Options
Chart
Enter the chart of accounts Chart Code that you want to use as the default. This default is only used when you set up Expense Groups and Expense Types on the Administration tab to select and display the account code title.
Bank
Enter the default Bank Code for an expense report. Use this default when a bank code default does not exist on the funds residing on the expense report, or for the Chart code. The bank code does not display on an expense report but appears on the invoice accounting records when processed as a Banner Finance invoice. There are three types of reimbursements where Expense Reports are assigned a bank code.
Reimbursements in base currency
The system first uses the Fund (ftvfund) record bank code default. If one does not exist, it uses the Chart (ftvsdat) record bank code default. When the default for fund or chart does not exist, it uses the Institutional Settings default bank code.
To define or verify the Chart default bank code, initiate the FTMSDAT form within Banner Finance using these values:
Entity: FTCRACTGAttribute: BANK_CODEOptional Code 1: TRAVELCOA: <Site Specific>Description: Travel Bank Code Default for COA <Site Specific>Data: <Site Specific Bank Code>
Exception:
If an expense report is clearing an advance, the system derives the bank code from the Administration/Advance Setup Advance Rules page clearing bank setting. The clearing bank code is used on all expense report records that clear an advance for both advance records and expense records. This ensures that all expense records post to the same bank on an invoice to avoid the risk of excess payment or under-payment to the traveler.
Reimbursements in Supported, Non-Base Currencies
The system first uses the specified Pay By Currency as defined on the Currency (gtvcurr) record bank code default. If one does not exist, it follows the hierarchy outlined above in Reimbursements in base currency.
Reimbursements in Unsupported Currencies
The system uses the System Data Maintenance (ftvsdat) table defined bank code default.
2 Banner Travel and Expense Management 8.5.0.5 3-13Handbook
Functional Administration
3-14
To define or verify this value, initiate the FTMSDAT form within Banner Finance using these values:
Entity: FTCRACTGAttribute: BANK_CODEOptional Code 1: TRAVELDescription: Bank for Bank TransfersData: <Site Specific Bank Code>
Tax Group
The default Tax Group that you provide should be a Non-Taxable tax group such as NT. Invoices that are generated in Banner from Expense Reports will default this non-taxable tax group in different scenarios. One scenario is a situation where you choose not to calculate taxes in Banner Travel and Expense Management but you calculate taxes in Banner Finance. All Banner Travel and Expense Management invoices will be created with this non-taxable tax group. Another scenario is where you calculate taxes in Banner Travel and Expense Management, but your traveler affiliation is defined to be Ineligible for Rebate. Invoices created from those expense reports will be created with this non-taxable tax group. If advances are enabled, the records to issue or clear advances will also use this non-taxable tax group.
Default State/Province
If per diem processing is enabled, you can supply a default State or Province abbreviation or description as it exists in the Per Diem Allowance table and as it exists in the State code (STVSTAT_CODE) or Name (STVSTAT_DESC), on STVSTAT. This value is used as a data entry default on an expense report itinerary for report types that are In-State or In-Province.
Default Nation
If Per-Diem functionality is enabled, you can supply a default Nation value, as it exists in the Per Diem Allowance table and in the Nation description (STVNATN_DESC) on STVNATN. For example, if your nation code is 157 and your nation description is United States of America, you must enter United States of America in this field. This value is used as a data entry default on per diem expense report items for rate retrieval, when the Nation is not entered. However, it does not default into the itinerary like the State.
Administrator Access
Workflow Login
Enter the Banner Workflow Administrator login you use to pass to the Workflow service.
Banner Travel and Expense Management 8.5.0.5 July 2012HandbookFunctional Administration
July 201
Workflow Password
Enter the Banner Workflow Administrator password you use to pass to the Workflow service.
Workflow Host URL
Enter the host URL for the Banner Workflow system.
Travel Base URL
Enter the base URL of the Travel and Expense Management application using this format:http(s)://<TEM_server>:<port>
This value constructs the application URL appearing on email communications and workflow approver forms.
BDMS Login
If you use BDMS, enter the BDMS Administrator login that you use to pass to the BDMS service.
BDMS Password
If you use BDMS, enter the BDMS Administrator password that you use to pass to the BDMS service.
Advance Status Process
This section of the Institutional Settings page allows the Administrator to set the frequency the Advance Status Process will run. The Advance Status Process determines if travel advances are overdue. Overdue advances are those that are not reconciled within the duration prescribed within the advance rules defined for your institution.
To allow the system to evaluate advances to make this determination, populate the start date and the interval fields. The values in the seed data are displayed as the default, but can be changed.
Start Date
Enter the date to start the Advance Status process using the format of Date (DD-MON-YYYY) and Time (HH:MM:SS AM or PM).
Repeat Interval in Hours
Enter the interval in hours between 1 and 24. This hourly interval allows the system to evaluate authorizations with associated advances on a daily basis (if 24), every hour within the day (if 1), or any combination between 1 and 24.
2 Banner Travel and Expense Management 8.5.0.5 3-15Handbook
Functional Administration
3-16
This process is a Database Management System scheduler process that simulates a sleep/wake process. Running in the background, it wakes up during the interval defined to evaluate the authorization table against the advance rule. The status changes from Outstanding to Overdue based on the results. If the status of records change, the system writes a status history record to track the change. This record is displayed in the Status History page of an authorization.
The process also notifies Banner users of successful or unsuccessful runs of the process. This notification is seen through the GUAMESG form in Banner. Refer to the “Advance status process” section in Appendix A, “Travel Advances”, for more information on how to create these entries.
Currencies
Travelers can incur expenses in institution base currency and non-base currency. Some travelers may also request to be paid in a non-base currency. The Currencies page displays a list of currency codes and descriptions, the associated display order, supported currency indicator, and status.
Display order determines the order in which the currency code displays in the list of values on various pages. A supported currency is one in which the institution can process payments. If the status is Active, the Currency is available for use.
Active currency codes display in the Receipt Currency list of values on the Expense Entry page and in the Pay Currency list of values on the General information page for a delegate preparing Expense Reports on behalf of another.
NoteThe currency codes and descriptions available for use in Banner Travel and Expense Management must first be established in Banner General on the Currency Code Maintenance form (GUACURR).
General Information
You can create and maintain traveler affiliations, report types, and business purpose details to be used in travel reports using the General Information page.
Traveler Affiliation
Affiliations designate a traveler’s position in relation to his/her travel activity, such as employee or student. Affiliations are required if Taxes are on, as they determine an expense report’s eligibility for rebate processing. You can maintain traveler affiliations even if you choose not to calculate taxes in Banner Travel and Expense Management. This is helpful when you are asked to define the capacity to which the traveler is traveling for your institution for insurance or other purposes.
Banner Travel and Expense Management 8.5.0.5 July 2012HandbookFunctional Administration
July 201
Business Purpose
A business purpose defines the overall reason for the expense reimbursement. For example, you could create Recruiting Visit, Faculty Conference, Office Supplies, Monthly Expense, and Business Meeting business purposes. You can use these pre-defined business purposes when creating an authorization or expense report.
Report Types
Two report types, Travel and Non-Travel, exist to categorize the type of travel to enter on a report. You may create additional values to further categorize your travel types. Whatever value you create falls within the internal values of In-State, Out-of-State, Foreign, Travel, or Non-Travel. Report Type is a required field on every report. Edits are provided on the itinerary page to guide a traveler through the required fields, based on the report type specified.
Expense Setup
You can define and organize the expense type, expense group, payment method, per diem type, and unit rate information that is used in travel reports and used for entry, reporting, and analysis.
Expense Group
You use expense groups to organize and summarize a common group of expenses for reporting purposes, such as when you create an invoice or an encumbrance. For example, you could create a Meals expense group and assign Breakfast, Lunch, and Dinner expense types to this group. Other examples of expense groups are Transportation and Lodging.
Expense Groups are a required set up, as each Expense Type is assigned to an Expense Group. Expense Type is a required field when the user enters his/her estimated or actual expenses. When creating an Expense Group, you may enter the account code default to be used when creating Expense Types.
Expense reports created as invoices in Banner Finance are commodity level accounting documents. All expenses are grouped by expense group, and the expense group becomes the invoice commodity item. All funding within that group of expenses is summarized by chart, fund, organization, account, program, location, activity, and project, and attached to that item as an accounting sequence or sequences.
A System Required indicator is used to isolate expense groups used for internal processing for the advance functionality.
NoteSystem required codes must not be removed.
2 Banner Travel and Expense Management 8.5.0.5 3-17Handbook
Functional Administration
3-18
Expense Type
Expense types describe the common expenses that a traveler is likely to incur during a business trip. For example, you could create Hotel, Airline, Car Rental, Mileage, Tips, Breakfast, Lunch, and Dinner expense types.
Expense types are created with a format code. The available formats are actual amount, unit rate, per diem related, and variable per diem. An expense type such as airfare falls into the format of actual expense. The traveler has a receipt for which the actual amount may require reimbursement. An expense type such as mileage falls into the format of unit rate. The traveler indicates the unit (or number of miles driven) and selects a rate. The system then performs the calculation and displays the amount to the traveler. An expense type such as meals per diem falls into the format of per diem related. The traveler makes a request of the system to calculate the per diem allowance based on a number of factors that already exist on the expense report such as date, destination, day of travel, time of travel, etc. An expense type such as business meals falls into the format of variable per diem. The traveler makes a request of the system to calculate the per diem allowance based on the date, destination, percent of per diem, and the count of persons entertained.
Based on the format for the expense type, the expense type page changes to display the information that it needs for various defaults or other actions. For example, if the format is per diem related, a per diem type is required. You may also define whether the traveler may override the location or the per diem amount. If the location override is checked, the traveler may override the destination that defaults into the expense item from the itinerary. If the amount override is checked, the traveler may override the amount to a value that is less than the system calculated per diem allowance. The expense entry page does not allow an amount to be entered that exceeds the calculated per diem. Two other indicators appear to allow you to specify if this expense type should automatically default into a traveler’s report, if the traveler indicates that their report contains per diem items. These two indicators are Default on Authorization and Default on Expense Report.
You have different information to supply on your expense type if the format is variable per diem. Variable per diem expense types are those categorized for business meals or higher cost lodging. A variable expense type requires a per diem type and a percent of per diem. The system retrieves the per diem rate for the destination and date. It then multiplies that allowance by the percent of per diem to arrive at a per diem rate for that expense type. On the expense entry page, the system requires the entry of a count (number of persons entertained or hosted), which is multiplied by the per diem rate to reflect the total per diem allowance for that expense type.
An Account Code is required to create expense types. The account code defaults from the Expense Group, if provided, and may be changed. When expenses are entered on the expense page, the account code defaults into the funding source and may be changed, if needed.
The Calculate Taxes check box enables you to calculate taxes automatically for the selected expense types. The calculated tax amounts will display on the Expense Entry page. If you do not want the system to calculate tax amounts, leave this check box
Banner Travel and Expense Management 8.5.0.5 July 2012HandbookFunctional Administration
July 201
unchecked. The Entry pages will present the Tax Codes, but the values will be null for entry of tax amounts.
NoteFor travel tax institutions, per diem and variable per diem expense types should have the calculate taxes indicator checked.
You can use the Override Taxes check box to indicate whether the selected expense type allows override of calculated taxes. The check boxes are applicable only to the tax users when the Calculate Taxes check box is checked at the institutional level.
A System Required indicator is used to isolate expense types used for internal processing for the advance functionality.
NoteSystem required codes must not be removed.
Payment Method
A payment method is an institutionally-defined designation of the way in which an expense is paid. The payment method may differentiate reimbursable expenses from those already paid by the institution.
The payment methods appear in the List of Values when a user enters his/her estimated expenses on authorization reports and actual expenses on expense reports.
Payment Method is a required field on reports. You must set up at least one record for reimbursable expenses and one record for non-reimbursable expenses. Examples of reimbursable expense payment methods are cash or credit card. Examples of non-reimbursable expense payment methods are Paid by Accounts Payable or Institution Ghost card.
A System Required indicator is used to isolate payment methods used for internal processing for advance and for per diem functionality.
NoteSystem required codes must not be removed.
Unit Rate
A unit rate is an institutionally-defined cost per unit based on a specific unit of measure, such as miles or kilometers. Unit rates are further defined by an effective date range. For example, you could assign a yearly unit rate based on the U.S. Federal IRS mileage rate or a daily per diem rate based on institutional policy.
When a traveler creates an expense report with an expense based on a unit rate (the Expense Type field was defined with a format of Unit times Rate Lookup), the traveler selects a unit rate from a Rate field pull-down list, and enters the unit (for example, actual
2 Banner Travel and Expense Management 8.5.0.5 3-19Handbook
Functional Administration
3-20
miles) in the Units field. The expense report Amount field is automatically calculated based on the units entered and the selected unit rate. Unit Rates created on the Administration page and Unit Rate type expenses entered on the Expense Entry page are always displayed in base currency.
Per Diem type
A per diem type is a category of per diem that you want to track. Such types may include meals, lodging, or private accommodations, but the type can be expanded to cover a wider range. Taking into consideration the rates that you manage, you are required to define a per diem type for each rate. For example, if your institution manages per diem rates for meals but not lodging, you will need to create a meals per diem type, but not one for lodging. If you want to manage per diem for non-commercial lodging, you will need to create a per diem type for private lodging or private accommodations or whatever description best suits that type for your institution. Per Diem types satisfy two purposes: they allow you to cross-reference a type to a rate (a rate that exists in the Per Diem Allowance table), and they allow you to specify how per diem meals may be reflected to a traveler on an expense report.
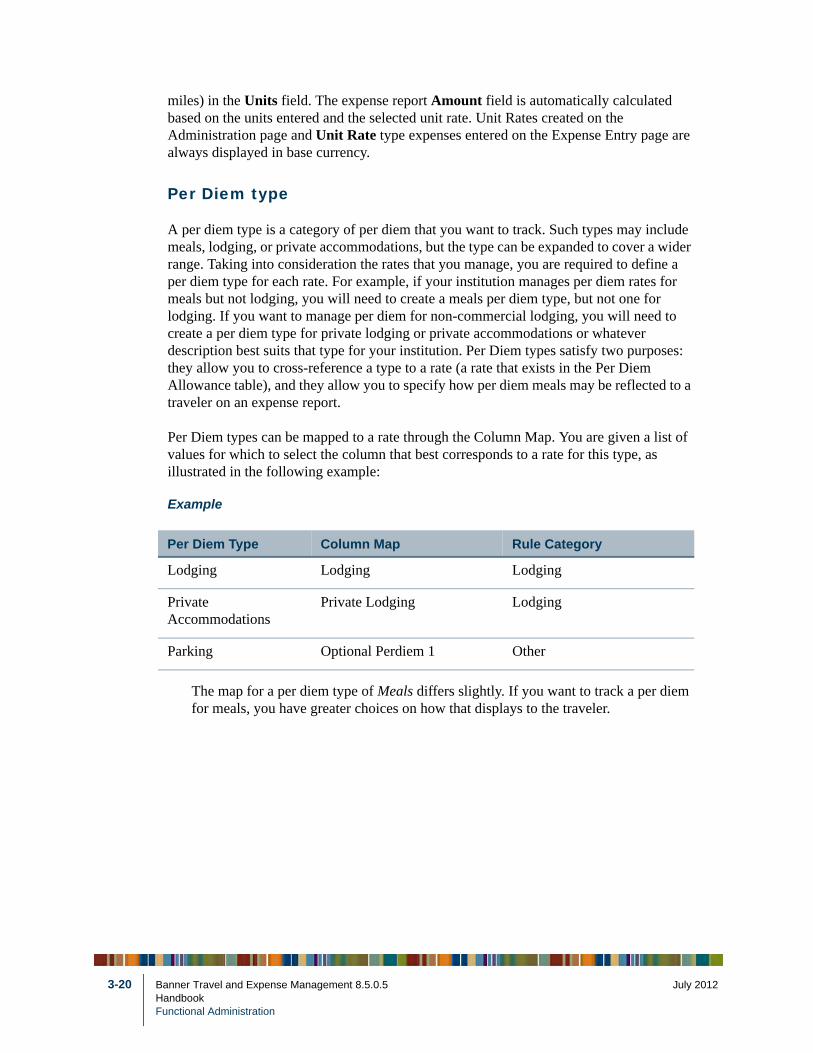
Per Diem types can be mapped to a rate through the Column Map. You are given a list of values for which to select the column that best corresponds to a rate for this type, as illustrated in the following example:
Example
The map for a per diem type of Meals differs slightly. If you want to track a per diem for meals, you have greater choices on how that displays to the traveler.
Per Diem Type Column Map Rule Category
Lodging Lodging Lodging
Private Accommodations
Private Lodging Lodging
Parking Optional Perdiem 1 Other
Banner Travel and Expense Management 8.5.0.5 July 2012HandbookFunctional Administration
July 201
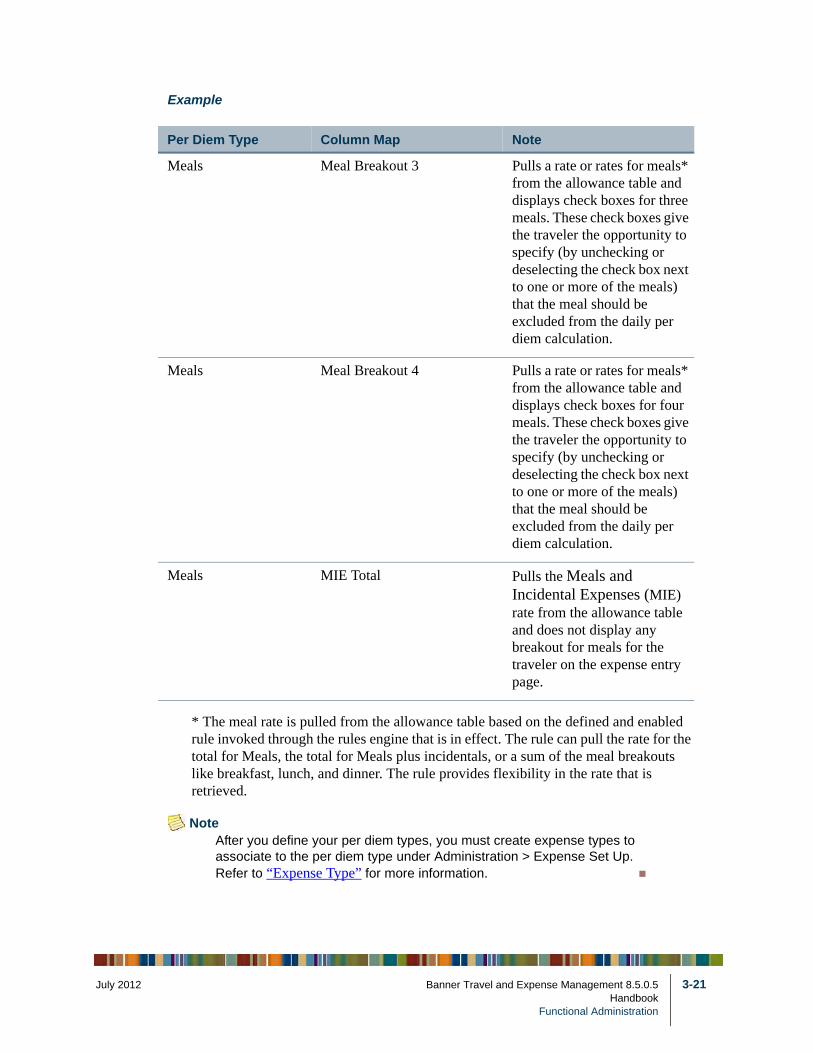
Example
* The meal rate is pulled from the allowance table based on the defined and enabled rule invoked through the rules engine that is in effect. The rule can pull the rate for the total for Meals, the total for Meals plus incidentals, or a sum of the meal breakouts like breakfast, lunch, and dinner. The rule provides flexibility in the rate that is retrieved.
NoteAfter you define your per diem types, you must create expense types to associate to the per diem type under Administration > Expense Set Up. Refer to “Expense Type” for more information.
Per Diem Type Column Map Note
Meals Meal Breakout 3 Pulls a rate or rates for meals* from the allowance table and displays check boxes for three meals. These check boxes give the traveler the opportunity to specify (by unchecking or deselecting the check box next to one or more of the meals) that the meal should be excluded from the daily per diem calculation.
Meals Meal Breakout 4 Pulls a rate or rates for meals* from the allowance table and displays check boxes for four meals. These check boxes give the traveler the opportunity to specify (by unchecking or deselecting the check box next to one or more of the meals) that the meal should be excluded from the daily per diem calculation.
Meals MIE Total Pulls the Meals and Incidental Expenses (MIE) rate from the allowance table and does not display any breakout for meals for the traveler on the expense entry page.
2 Banner Travel and Expense Management 8.5.0.5 3-21Handbook
Functional Administration
3-22
Taxes
You can define the location for tax processing and associate tax-related information for tax derivation using the Taxes administration page.
Tax Locale
Tax Locale is the value of the tax location that is used for tax processing. The Tax Locale page displays a list of the tax locale names, their description, and status. If the status is Active, the Tax Locale can be used for an expense. You can create new Tax Locales and add to this list. You can also edit or delete an existing Tax Locale.
A System Required indicator is used to isolate tax locales used for internal processing for the advance functionality.
NoteSystem required codes must not be removed.
Tax Associations
There should be a defined Tax Group for all the established Tax Locales displayed on the Tax Locale page. You can create the link between the Tax Locale and the Tax Group from the Tax Association page. To perform tax calculations on the Authorization and Expense entry pages, Banner Travel and Expenses Management uses the pre-defined Tax Groups established in Banner Finance.
Advance Setup
You can create and manage rules for travel advance processing and recovery methods to capture advance collections using the Advance Setup administration page.
Advance Rules
You can establish the necessary information for creating, recording, monitoring, and clearing advances by creating an advance rule. Your institution requires at least one rule to use the advance feature, but may require multiple rules based on campus or other needs.
Each rule requires a unique name that holds the funding information for the creation and clearing of an advance. In addition, the rule holds the funding information that may be used for recovering excess advance amounts.
The clearing bank code required on the advance rule is used on all expense report records that are clearing an advance for both the advance clearing and the expense records. This ensures that all expense records post to the same bank on an invoice to avoid the risk of excess payment or under-payment to the traveler, as multiple bank codes on an invoice can
Banner Travel and Expense Management 8.5.0.5 July 2012HandbookFunctional Administration
July 201
generate multiple checks. Verify that the code entered is valid in Banner Finance, as there is no validation of the bank code.
An advance rule stores many values for an advance, such as the minimum or maximum amount, the number of open advances allowed by traveler, or the number of days prior to a trip that an advance may be requested. Each of these values are used during the advance creation to prescribe that the overall criteria for establishing an advance is in accordance with your institutional requirements. Refer to Appendix A, “Travel Advances”, for examples of how these rules are applied.
NoteThe administrator creating an advance rule must have Fund posting access for the advance fund entered on a rule, if the Fund/Organization security is turned on in Banner Finance and is not bypassed in Banner Travel and Expense Management.
Recovery Methods
You can establish the ways in which a traveler can reimburse unused advance amounts back to the institution by creating a recovery method. Each method relates to a rule code used in Banner Finance.
Recovery methods are used by the Travel Advance Manager when recording a recovery transaction. Recovery transactions create a journal voucher in Banner Finance. Refer to Appendix A, “Travel Advances”, for examples of how to set up recovery methods.
Banner Travel and Expense Management Advance Control tab
The Advance Control tab is displayed to a Travel Advance Manager only when the advances feature is enabled for your institution. This tab allows you to query advance balances and related documents, and record the recovery of excess travel advance payments.
Outstanding Advances
As a Travel Advance Manager, you may view all outstanding advances for a traveler or all travelers and the detailed transactions to support advance balances.
2 Banner Travel and Expense Management 8.5.0.5 3-23Handbook
Functional Administration

3-24
You can perform a search based on multiple attributes, such as traveler, amount, advance funding elements, authorization, and trip dates. You can also perform advanced search queries for a status of outstanding, overdue, and reconciled advances.
NoteThis page does not perform an immediate search and is blank, by default. You must enter search values to proceed.
When the results of a search are returned, you can drill-down to an authorization's preview report to view related documents comprising an advance balance, by double-clicking a highlighted record or by selecting the report and clicking Open. You can use the More Actions options to extract and copy the results of a search into another application, such as Microsoft Excel.
Travel Advance Managers have the ability to override the status on an overdue advance. If a traveler has an overdue advance, the system prevents the traveler from requesting another advance. In this situation, the Travel Advance Manager can temporarily override the status to Outstanding, to allow the traveler to make another advance request. A status override creates a status history record for this action. The history record is viewed in the Status History page of an authorization. The Advance Status Process resets the authorization advance status back to Overdue based on the values set.
Travel Advance Managers can record a recovery transaction when a traveler needs to return advance amounts to the institution.
The submission of a recovery transaction creates a journal voucher. The document carries forward the rule class linked to the recovery method specified on the entry. The journal is immediately moved to the Banner Finance system for posting. It does not go through an approval process. Once posted, an update occurs in Banner Travel and Expense Management to record the effect of the entry on the advance outstanding balance and updates the transaction status to posted.
Recovery Transactions
The Recovery Transactions page displays a list of recovery transactions that have been entered in authorization order. You can perform a search based on multiple attributes by activity date, amount, authorization, create user ID, date, document code, Finance rule, method reference code, recovery method, reference, or traveler name.
You can use the More Actions options to extract and copy search results into another application, such as Microsoft Excel
You can also navigate to an authorization's preview to view related documents or status history.
Banner Travel and Expense Management 8.5.0.5 July 2012HandbookFunctional Administration
July 201
Banner Travel and Expense Management Per Diem Administrator tab
The Per Diem Administrator tab displays only to a Per Diem Administrator. It gives this specialized administrator control over the per diem rate information that the institution uses.
Two delivered templates are available, for foreign and non-foreign rates, to assist the per diem manager in massaging and organizing rate information by location, dates and other values. Once a template is completed, the manager may, through actions on this tab, perform an upload to take the massaged information from the template into Banner Travel and Expense Management. Please refer to Appendix E, “Uploading Per Diem Rates”, for more information on how to use the templates and for further information on the Upload process.
Batch Load/Purge
Coming in to this tab for the first time, you may see an empty grid. Once rate files have been successfully uploaded, the grid displays details about the file or files that were loaded. Uploaded files populate the Per Diem Allowance table in Banner Travel and Expense Management. It is the Per Diem Allowance table that is accessed when a per diem calculation is performed. Therefore, the system is unable to calculate a per diem unless the Per Diem Allowance table is populated through the actions of the Per Diem Administrator on this tab.
To perform an upload, select New to open the Upload window. The window will guide you through the information necessary to upload an original file or a revision file. The template must be in the format of .xls, and it must conform to the columns and the format of the columns that were delivered to you in the release. During the upload, you browse to select the file (completed template) that you want to upload. You specify an effective from and to date, a rate type from the selection available, and a default nation and a default currency from the selection available.
Once uploaded, if you have the need to delete the rate information that you previously uploaded, you may highlight the uploaded file on the grid and select an action of Delete. This will purge the records in the Per Diem Allowance table that were inserted by the process for this particular file. Please use this function with care, as you have complete control over the rate table that the system relies on for per diem processing.
2 Banner Travel and Expense Management 8.5.0.5 3-25Handbook
Functional Administration
3-26
Banner Travel and Expense Management Profile Administrator tab
A Profile Administrator may view and modify any traveler’s profile. Since profile options, within Institutional Settings, can limit a traveler’s access to his/her profile; a Profile Administrator can perform the editing that you desire. Upon access to this tab, the Profile Administrator will see his/her profile, as well as a link to allow his/her to select a traveler. Upon selection, the selected traveler’s profile displays. Access to all sections of the traveler’s profile is available to view and edit.
Banner Travel and Expense Management Delegate Control tab
A Delegate Administrator can assign travelers to a delegate. Banner Travel and Expense Management users with a Delegate Administrator role can view and access the Delegate Control tab.
Delegate Administrators use the pages on this tab to view and assign delegates to travelers. You can either assign one or more travelers to a single delegate, or you can assign one or more delegates to a single traveler.
Once you have selected a delegate, existing records are displayed in the list of travelers assigned to the delegate section. You can add new travelers or remove individual or all travelers for the selected Delegate.
You can also use the More Actions menu for additional functionality.
You can use the Assign Delegates To Traveler page to select a traveler. The existing delegate assignments are displayed. You can add or remove delegates. The Copy travelers option forwards to another delegate. The Bypass Traveler Review option can only be set on the Assign Travelers to Delegate page.
Workflow traveler review processing
If you enable the Workflow Traveler Review of Delegate option in the Institutional Settings administration page, the traveler can review and submit reports that were entered by a delegate or super delegate.
Workflow traveler review processing is available for both authorization and expense reports. When an authorization or expense report is sent for review by the delegate or super delegate, an e-mail notification is sent to alert the traveler that a report created by the Delegate needs to be reviewed. The Set Bypass Traveler Review Default to Selected Delegate option under the Delegate Control tab, controls the Bypass Traveler Review
Banner Travel and Expense Management 8.5.0.5 July 2012HandbookFunctional Administration
July 201
settings for the selected delegate. This option is only available when the Enable Workflow Traveler Review of Delegate option check box is selected in the Institutional Settings administration page.
A traveler with the user role can view the report by clicking the URL in the e-mail message or directly accessing Banner Travel and Expense Management to view the specific report and the related attachments. The traveler can make changes to the report, if required, and submit the report.
Super Delegate
A user assigned the Super Delegate role in Web Tailor can enter a report for any traveler without the Delegate to Traveler association that would need to be defined by the traveler or by the Delegate Administrator. The Super Delegate may submit a report or send a report to the traveler for review, based on the following:
• When the Traveler Review of Delegate entry is not enabled on the Institutional Settings page, the reports can be entered and submitted by the Super Delegate.
• When the Traveler Review of Delegate entry is enabled on the Institutional Settings page, the reports entered by the Delegate are sent to the traveler for review. If there is a need for the Super Delegate to bypass the traveler review, then the Delegate Administrator must access the Delegate Control tab and create an association for the Super Delegate to the traveler and then check the Bypass Traveler Review indicator.
Banner Travel and Expense Management Profile tab
The Profile tab is enabled for all Banner Travel and Expense Management users. A profile record is required for each user. Each user, assigned delegate, or profile administrator must maintain the profile record.
Profile setup
All Banner Travel and Expense Management users or assigned Delegates, Super Delegates, or Profile Administrator must evaluate their profile settings and ensure that the settings fit their needs.
In Banner Travel and Expense Management, a profile is where you set up the personal information required to process your expense report and reimburse you for the funds you have expended. This information includes your mailing address for receiving checks, the name of your bank for direct deposit of funds, your e-mail address, and the default expense funding information. This information will default into your reports and can be
2 Banner Travel and Expense Management 8.5.0.5 3-27Handbook
Functional Administration
3-28
changed, if required. You must enter the approver of your reports to ensure that workflow routes the report to the right person for approval. You must also enter your e-mail address to receive notifications about the status of your report throughout the traveler review and the workflow approval process.
If you have the role of Approver in Banner Travel and Expense Management and approve another traveler’s expense reports, you must enter your Banner Workflow login ID on your Profile. This ensures that the expense reports for which you are the approver will be routed to you via Banner Workflow for approval.
General setup
Address or Direct Deposit (required for all users that create expense reports or request advances)
Click Edit in the Address or Direct Deposit area to open the Select Address window. The window displays the active, valid addresses that are available to associate with their report profile. You cannot update address or direct deposit information on this window. The selected address in the Profile defaults into each of his/her expense reports at the time he/she creates an expense report.
Use the Address tab on the Person Identification Form - Finance (FOAIDEN) to update addresses. Use the Direct Deposit Recipient Form (GXADIRD) to maintain direct deposit information for Accounts Payable payments.
Funding Default (optional)
The Funding Default area allows funding source information to serve as the default when starting a new report. A user can override this default information when he/she adds or edits funding at the report level or at the expense line item level. The funding sources available for entry or selection must exist and be valid in Banner Finance.
Profile Default Funding Page
Funding codes assigned to default on entry of Index, Fund, or Organization codes display in the top section of the Default Funding entry page. After adding the record, the defaulted values do not display in the bottom section, only the entered value displays. When the funding records are saved, the entered values and the defaults display on the main profile page, but only the entered value is stored in the database. At a later date, if the default values assigned to an Index, Fund, or Organization are changed in Banner Finance, the newly changed values display and default into the authorization or expense report.
NoteFunding code validations are based on the system date.
Banner Travel and Expense Management 8.5.0.5 July 2012HandbookFunctional Administration
July 201
Banner Workflow setup
The following fields are required for Banner Workflow approvals and also when the Workflow Traveler Review of Delegate entry indicator is enabled on the Institutional Settings page under the Administration tab.
E-Mail (Banner Workflow requirement)
Click Edit, in the E-Mail area to open the Select E-Mail window. The window displays the active e-mail addresses that are available to associate with their profile. This e-mail address serves as contact information for the approval workflow and traveler review workflow. You cannot update the e-mail address using this window. The e-mail address he/she selects in the Profile defaults into each of his/her expense reports at the time they create an expense report.
Use the E-mail Address Form (GOAEMAL) to set up one or more e-mail addresses for any Banner ID. A user can have multiple e-mail addresses of the same e-mail address type (for example, personal and professional). The address designated as preferred on this form is the initial default in Banner Travel and Expense Management.
Approver (Banner Workflow requirement)
Click Edit in the Approver area to open the Select Approver window. The window displays the names and Banner IDs of individuals who act as Banner Workflow approvers. The approver that the user selects in the profile is notified at the time he/she submits a report.
Only Banner IDs of individuals who act as Banner Workflow approvers can be selected. The approver must have a Banner ID, the Travel and Expense approver role in Web Tailor, and must also be set up in Banner Workflow with an e-mail address.
Workflow Login ID (Banner Workflow requirement for approvers only)
If you have the role of Approver in Banner Travel and Expense Management and approve other traveler’s expense reports, you must enter your workflow login ID on your Profile. This ensures that the expense reports for which you are the approver will be routed to you via workflow for approval.
Approvers must click Edit in the Workflow Login ID area to open the Edit Workflow Login ID window. In the window they can add or edit their Workflow Login ID.
Assign Delegate
The Assign Delegate function enables you to assign a person who can act on your behalf with respect to your authorization and expense reports. You can use the Add Delegate button to add authorized delegates. Authorized delegates are those individuals assigned to the Travel and Expense Delegate role in Web Tailor.
2 Banner Travel and Expense Management 8.5.0.5 3-29Handbook
Functional Administration
3-30
Once you have assigned one or more delegates to your profile, you can later remove delegates from your profile.
The Bypass Traveler Review option displays for the traveler when the Traveler Review option is enabled but can only be set by a Delegate Administrator on the Assign Travelers to Delegate page. A delegate does not have access to the Assign Delegate page under the Profile Tab when acting for another user.
Banner Travel and Expense Management Expense Manager tab
Expense Manager is the work space for authorization reports, travel advances, and expense reports that helps you manage the expense report flow in Banner Travel and Expense Management. From this workspace, you can create and maintain all aspects of travel and expense reports. You can establish funding, add an itinerary, itemize expenses, attach electronic documents through the Banner Document Management Suite, create comments, and review the status history of the report for both authorization and expense reports. You can also use this workspace to preview and submit authorization and expense reports for approval and payment.
Authorization reports
Authorizations are trip requests or portfolios. You define the information, as you know it, for an upcoming trip. You can enter estimated expenses, itinerary dates, comments, and attachments. The authorization can be submitted or may contain the addition of a travel advance with submission.
Authorizations are encumbered in Banner, if Encumber Authorizations is enabled in the Institutional Settings administration page. The encumbrances are established based on the funding behind each expense item.
Estimated expense items on the authorization are added to their respective expense group and each expense group becomes an item on the Banner Encumbrance.
Advances
Travel advances are a component of authorizations. You can request a travel advance at the time an authorization is submitted or after the authorization is approved, if advances are enabled in the Institution Settings administration page. The process of requesting an advance starts from an authorization preview report. Clicking Request Advance from the preview report begins the process, which invokes the advance rules that have been defined.
Banner Travel and Expense Management 8.5.0.5 July 2012HandbookFunctional Administration
July 201
If travel advances are enabled and the report type is Travel, an itinerary is required on your authorization. The dates are needed to define the estimated payment date of the advance, to determine if the advance request is too close to the trip to pay the traveler, and to determine when an advance becomes overdue.
You can create an authorization where the report type is Non-Travel. In this case, an itinerary record is not required on the authorization, but you need to provide an Event start and end date on the travel advance.
Based on the chart code on the funding of an authorization's estimated expenses, the system determines what advance rules to display to a user when Request Advance is clicked.
NoteIf your authorization includes funding for multiple charts, you will not be permitted to request an advance.
If only one active advance rule exists that contains the chart code used on the authorization, the system automatically invokes that rule for the requested advance.
If multiple active advance rules exist, the system invokes a page requesting the user to select the advance rule.
Edits are invoked based on the advance rule before an advance can be requested. The edits determine the following results:
• If the traveler has any Overdue advances. If so, the request to have another advance is denied.
• If the request date is too close to the trip start date (based on the rule: Number of Days to request an advance prior to the trip start). If so, the request may be denied.
• If the trip has already started and the rule Allow advances during trip is not selected, the request may be denied.
• If the total authorization amount is less than the Minimum Advance Amount, a warning appears informing that the request will not meet the minimum amount.
• If the total authorization amount Maximum Advance% is less than the Minimum Advance Amount, a warning message appears informing that the request will not meet the minimum amount.
• If this request for a new advance brings the user over the Total Number of Open Advances per traveler, the request is denied.
• If the system date is greater than the trip end date, the request is denied.
If the traveler meets the requirements for the advance rule, the Advance Request page is displayed.
2 Banner Travel and Expense Management 8.5.0.5 3-31Handbook
Functional Administration
3-32
The traveler can review the estimated expenses from the authorization, add a description or comments, change the remittance address, review the estimated pay date, and enter a requested amount in the Advance Request page. Clicking Submit invokes multiple checks based on the advance rule to determine the following results:
• if the requested amount is equal to or greater than the Minimum Advance Amount
• if the requested amount is greater than the lesser of the two values Maximum Advance% and Maximum Advance Amount
• if the requested amount (when added to the total amount of all other open advances for this traveler) exceeds the Maximum Advance Amount by traveler
Once submitted, the advance routes to Banner Workflow for approval. Refer to Chapter 4, “Integration with Banner Workflow”, for more information on that process.
You can enter more than one advance against a single authorization only if the earlier advances are in a status of approved, ready to pay, paid, or cancelled. The advance outstanding amount is maintained at the authorization level causing any number of advances on the same authorization to be considered as one advance when determining the number of Open advances for a traveler.
When the traveler wants to cancel his/her advance request after it is submitted, the approver can deny the request if it has not yet been approved. If it has been approved, the invoice must be cancelled in Banner Finance.
NoteIf approved authorizations exist in Banner Travel and Expense Management, as you install the advance functionality, you can only enter advances for those authorizations if they contain an itinerary. Without an itinerary, an advance cannot be requested.
Expense reports
You can enter trip expenses on an Expense Report. If an authorization was previously submitted, the expense report is generated from the authorization by clicking Generate Expense Report for the selected authorization. The process generating an expense report carries forward all the information entered on the authorization to the expense report that can be modified. Once submitted, the expenses flow to Banner Finance as an invoice document. A liquidation of the authorization encumbrance also occurs. If the expense report is a final report, the encumbrance is liquidated and closed by a Journal Voucher.
Expense reports generated from an authorization with associated advance entries dynamically extract the advance amount for appropriate clearing of the advance described in the following conditions:
• If expenses are greater than the advance amounts on an authorization, the advance amount is fully cleared and reconciled once the expense report is approved and the invoice is posted in Banner Finance.
Banner Travel and Expense Management 8.5.0.5 July 2012HandbookFunctional Administration
July 201
• If expenses are equal to the advance amounts, the advance amount is fully cleared and reconciled, however, the posting of an approved expense report becomes Paid in Banner Finance (since the invoice amount is zero).
• If expenses are less than the advance amounts, the advance clearing on an expense report is equal to the amount of the expenses. The report performs a partial clearing of the advance. The advance remains outstanding until further expense reports or advance recovery transactions are performed to reconcile the advance.
Processing an expense report with advances provides additional information to the user in the side-bar and in the report preview. The side-bar displays the remaining advance inclusive of this expense report. The preview report displays a section providing the outstanding advance amount, the amount reconciled with this report, and any remaining advance amounts. This additional information displays when the expense report is in a status of in process, submitted, approved, and returned for correction.
Processing an expense report with per diem items pulls forward the calculated per diem rates from the associated authorization. If there is concern that rate changes took effect between the time of the authorization and the expense report, the traveler may highlight each record, press the Calculate Per Diem button to recalculate the rate.
If the itinerary changes from the authorization, the traveler will be prompted that his/her per diem expense items will be deleted and the traveler will need to acknowledge that action. A Recalculate button is available on the bottom of the report to request that the system recalculate any previously entered per diem items.
Funding Defaults at a Report or Expense level
Funding information existing on a traveler's profile defaults into a report when the report is created. You may change the funding, at a Report level, by accessing the Funding Default within General Information. Funding codes assigned to default on entry of Index, Fund, or Organization codes display in the top section of the Default Funding entry page. After adding the record, the defaulted values do not display in the bottom section, only the entered value displays. When the funding records are saved, the entered values and the defaults display on the main page, but only the entered value is stored in the database. At a later date, if the default values assigned to an Index, Fund, or Organization are changed in Banner Finance, the newly changed values display and default into the authorization or expense report.
Report level funding information can be changed for a particular expense item by accessing the funding link on the expense entry page. Funding codes assigned to default on entry of Index, Fund, or Organization codes display in the top section of the Default Funding entry page. After adding the record, the defaulted values do not display in the bottom section, only the entered value displays. When the funding records are saved, all funding codes, including defaulted codes, save to the database.
NoteFunding code validations are based on the report date.
2 Banner Travel and Expense Management 8.5.0.5 3-33Handbook
Functional Administration
3-34
Available balance checking
Available balance checking for the funding summary is performed at the time of the authorization and expense report preview. An Enable Error on NSF indicator is displayed on the funding summary if there are insufficient funds. This indicator is visible to users with access to the funding summary, which includes the approver, traveler, and delegate.
If the institutional setting for Enable Error on NSF is set, the system checks the control severity. If it is set to error, the system stops the user with an error when a Submit is attempted. If it is set to warning, the system allows the submission of the report. If the institutional settings for Banner Travel and Expense Management are set to encumber authorizations, an NSF condition will not display under the following conditions:
• An authorization is created and approved even if there is an NSF condition for the authorization funding. NSF is displayed on the authorization report. Subsequently, an encumbrance is generated in Banner Finance, which shows the encumbrance of funds.
• An expense report is created from the encumbered authorization and the expense report is not more than the funds encumbered to the funding source. A NSF condition will not display for the expense report, even if a budget is not in place, since the funds are already encumbered.
Banner Travel and Expense Management Delegate tab
The Delegate functionality allows a delegate to act on behalf of a traveler. The delegate can update a traveler's profile and enter both an authorization and an expense report for that traveler. A delegate must be assigned the Delegate and User roles in Banner Travel and Expense Management to be able to act on behalf of a traveler.
In addition to the typical Travel and Expense Management user activities, a Delegate or Super Delegate can bypass the traveler review of an expense or authorization report, if the administrator provides the permissions, by traveler.
If advances are enabled by the administrator for the institution, the Delegate can only request an advance for the traveler when the traveler review is bypassed. When the traveler review is not bypassed, the traveler must request the advance when he/she is reviewing the authorization report.
A Delegate can create an expense report in a different pay currency and conduct bank transfers on behalf of a traveler.
If the Delegate has the delegate role and the Super User Delegate role (it is imperative that the Super User has both roles), the Delegate may act on behalf of any traveler. The
Banner Travel and Expense Management 8.5.0.5 July 2012HandbookFunctional Administration
July 201
Delegate page displays differently for a Super User Delegate. The association of traveler and Delegate is not required; therefore, the Delegate may click to select any traveler. Once the traveler is selected, all reports are accessible to the Super User Delegate.
The Super User Delegate may require a relationship to the traveler, set on the Delegate Control tab, if Traveler Review is enabled on institutional settings and you wish to bypass the traveler review for a particular traveler.
Approval processing
Banner Finance approvals can be enabled or disabled on the Institutional Settings page. Banner Workflow approvals can be used simultaneously with Banner Finance approvals, or Banner Finance approvals can be bypassed.
Banner Workflow approval processing
Banner Workflow approval processing, as delivered by Ellucian®, is available and required for authorization reports, expense reports, and advances.
This approval processing provides for approval through Banner Workflow by the approver selected in the user 's profile.
NoteWhen an authorization, an authorization with an advance, an advance, or an expense report is submitted, an e-mail notification is sent to alert the approver that an action is pending in his/her Banner Workflow worklist. Travelers and Delegates also receive e-mail notifications for approver actions.
The approver can view information about the report pending approval in a custom workflow form, and can also access Banner Travel and Expense Management to view the specific report and the related attachments. The approver can deny approval, return the report for correction, approve, or approve and forward to an additional workflow approver. A Banner Finance encumbrance or invoice is not created until final workflow approval is achieved.
For authorization reports submitted with an advance, the information for both reports appears to the approver in one workflow event. As an approver, you can perform the following actions on a report:
• approve both reports at one time
• deny both reports at one time
• approve both reports and send to an ad hoc approver
• return the authorization for correction (this action cancels the advance)
2 Banner Travel and Expense Management 8.5.0.5 3-35Handbook
Functional Administration
3-36
• approve the authorization report while denying the advance
Banner Finance approval processing
The Banner Finance approval processing is available for invoices created from expense reports and advances, but not for encumbrances. When an expense report achieves final workflow approval, a Banner Finance Invoice is created from data in the expense report. This invoice is processed through the existing Banner Finance approval processing like other Banner Finance Invoices. If a reimbursement invoice is not approved, the status on the expense report reverts to Returned for Correction and the user can update or delete the report (if the invoice has never before been processed and posted in Banner Finance). If an advance invoice is disapproved, the status on the advance is set to Cancelled. If the invoice is approved, it is forwarded to posting and to normal approval processing in Banner Finance.
Integration with Banner Finance
Banner Finance integration includes the following components:
• Encumbrances
• Invoices and check processing for advances
• Invoices and check processing for expense reports
• Journal vouchers for advance recovery transactions
Encumbrances
Authorizations can create encumbrance entries only if Enable Authorizations and Encumber Authorizations are enabled on the Institutional Settings page.
When submitted, once final workflow approval is achieved, the encumbrance document is created in Banner Finance and goes directly to posting. Only reimbursable expenses are encumbered.
When an expense report is generated from an authorization report, the expense report is linked to the authorization and identifies the encumbrance. When a report is submitted for reimbursement from an encumbered authorization, it may be designated as the final report. Each expense report liquidates the encumbrance for the amounts reimbursed.
You can also select an authorization in the authorization reports list in the Expense Manager, click More Actions in the toolbar, and select the option to release any remaining budget encumbrance, manually.
Banner Travel and Expense Management 8.5.0.5 July 2012HandbookFunctional Administration
July 201
When final expense reports are posted or when manually releasing budget is requested, all remaining encumbrances are liquidated by a journal voucher transaction in Banner Finance. Additional expense reports can subsequently be created from the authorization, but no further encumbrance processing occurs in Banner Finance for that authorization.
Invoices and check processing for advances
Invoices are created from advance requests after the advance request has been approved by the final approver. The commodity description Advance comes from the expense group name for the system required Expense Group item = 9900. This expense group item is delivered as seed data. The accounting for the invoice is derived from the advance rule defined on the Administration > Advance Setup > Advance Rules page.
When the invoice posts in Banner Finance, the advance request transaction status is updated to Ready to Pay. The schedule payment date on the invoice is determined by the advance rule. The schedule payment date can be adjusted on the Banner Finance Payment Control Form (FAAPAYC).
When the check or direct deposit is processed in Banner Finance, the advance request document status is updated to Paid, the authorization outstanding advance amount is updated, and the advance status is set to Outstanding.
You can re-establish or cancel an advance invoice on the Banner Finance Invoice/Credit Memo Cancel Form (FAAINVD) form in compliance with the following rules:
• If an advance invoice is cancelled and not re-established, the corresponding advance is also marked cancelled in Banner Travel and Expense Management. If it is prior to the trip end date, a traveler may request another advance for the trip.
• If an advance invoice is cancelled and re-established, the advance invoice will need to be completed again in Banner Finance. This procedure is not recommended, but may be necessary in some cases.
WarningDo not change the amounts or the accounting, as it will cause an out of balance condition with Banner Travel and Expense Management. If the amounts or accounting are incorrect, cancel the invoice (do not re-establish) and ask the traveler to request a new advance.
In some cases, an advance check can be cancelled using the Banner Finance Check Cancellation Form (FAACHKS). When cancelled, the corresponding Banner Travel and Expense Management document status, advance amount, and advance statuses are updated.
An advance check can be cancelled or the payable can not be re-established in the following cases:
• When expense reports have not been created for the associated authorization.
2 Banner Travel and Expense Management 8.5.0.5 3-37Handbook
Functional Administration
3-38
• When expense report invoices have been posted for the authorization. A warning message stating that outstanding advance amounts may need to be adjusted will be displayed.
Refer to Appendix A, “Travel Advances”, for a sample of an adjustment.
An advance check cannot be cancelled or the payable re-established when there are expense reports for the associated authorization that have not been posted.
Invoices and check processing for expense reports
Invoices are created from expense reports as commodity-level accounting documents. All expenses are grouped by expense group, and the expense group becomes the encumbrance commodity item. All funding within that group of expenses is summarized by chart, fund, organization, account, program, location, activity, and project and attached to that item as an accounting sequence(s).
For example, if three expenses are submitted: Air Fare ($500), Shuttle ($50) and Rental Car ($250), each of these belong to the Transportation expense group and each has a separate account code. If the expenses are using the same funding, three sequences are created for the commodity Transportation in the Banner Finance Invoice, each with its own account code. If Shuttle and Rental Car have the same account code, one $300 sequence is created for both items under the commodity Transportation, in addition to the sequence for $500 for Air Fare.
If taxes are enabled in Banner Travel and Expense Management, invoices denoted as Rebate Eligible are created with the tax amounts segregated. Travel expense items are included as invoice items, which are organized by expense group. Each item contains the tax group assigned by Banner Travel and Expense Management, along with the applicable amounts by tax rate. Tax amounts are not recalculated, but are preserved as they are considered for full reimbursement to the traveler.
Expense Reports that are clearing an advance will also create an invoice in the following scenarios:
• If there is an amount due to the traveler, the invoice is posted with the standard Banner Finance Invoice rule codes.
• If the expenses equal the advance cleared, the invoice, when posted, is considered paid and will post to the Interfund Cash Account instead of Accounts Payable. It uses Banner Finance rule codes specifically created for Banner Travel and Expense Management.
• When the invoice posts in Banner Finance, the authorization outstanding advance amount is reduced by the amount of the advance cleared and the advance status is updated to reconciled if the advance balance is zero.
The following tables list the Banner Finance rule codes that are derived for the invoice accounting record based on the pay amount due to the traveler.
Banner Travel and Expense Management 8.5.0.5 July 2012HandbookFunctional Administration
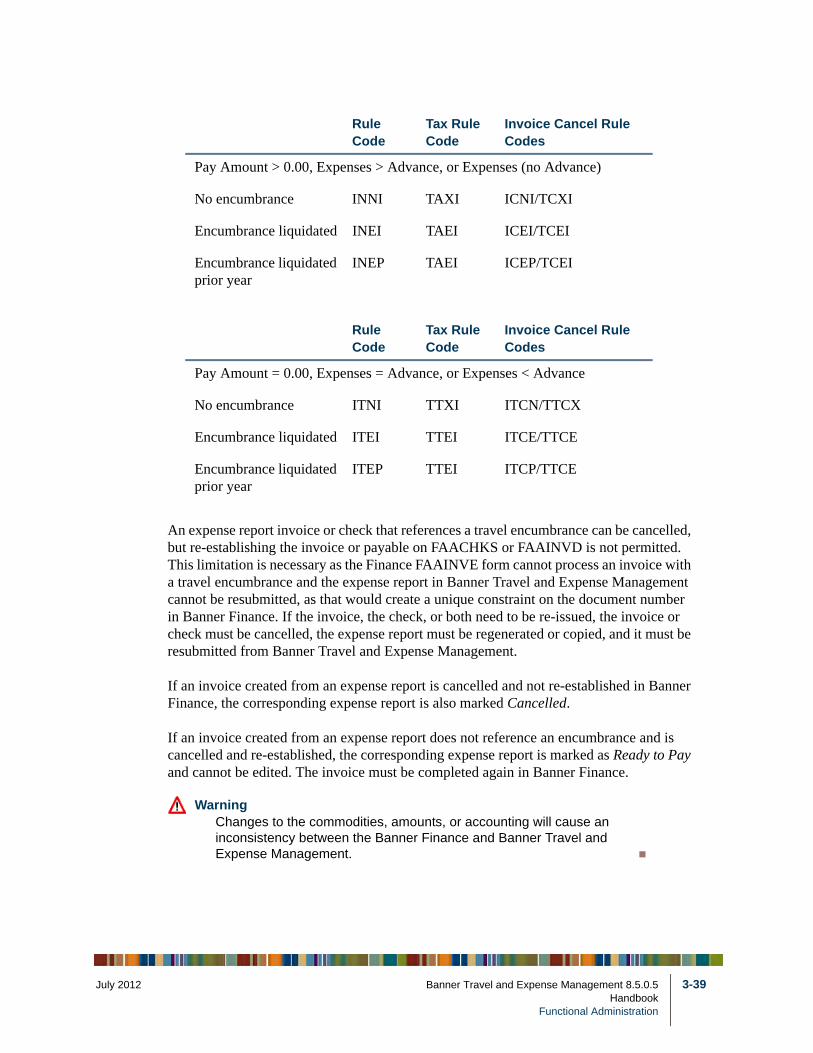
July 201
An expense report invoice or check that references a travel encumbrance can be cancelled, but re-establishing the invoice or payable on FAACHKS or FAAINVD is not permitted. This limitation is necessary as the Finance FAAINVE form cannot process an invoice with a travel encumbrance and the expense report in Banner Travel and Expense Management cannot be resubmitted, as that would create a unique constraint on the document number in Banner Finance. If the invoice, the check, or both need to be re-issued, the invoice or check must be cancelled, the expense report must be regenerated or copied, and it must be resubmitted from Banner Travel and Expense Management.
If an invoice created from an expense report is cancelled and not re-established in Banner Finance, the corresponding expense report is also marked Cancelled.
If an invoice created from an expense report does not reference an encumbrance and is cancelled and re-established, the corresponding expense report is marked as Ready to Pay and cannot be edited. The invoice must be completed again in Banner Finance.
WarningChanges to the commodities, amounts, or accounting will cause an inconsistency between the Banner Finance and Banner Travel and Expense Management.
Rule Code
Tax Rule Code
Invoice Cancel Rule Codes
Pay Amount > 0.00, Expenses > Advance, or Expenses (no Advance)
No encumbrance INNI TAXI ICNI/TCXI
Encumbrance liquidated INEI TAEI ICEI/TCEI
Encumbrance liquidated prior year
INEP TAEI ICEP/TCEI
Rule Code
Tax Rule Code
Invoice Cancel Rule Codes
Pay Amount = 0.00, Expenses = Advance, or Expenses < Advance
No encumbrance ITNI TTXI ITCN/TTCX
Encumbrance liquidated ITEI TTEI ITCE/TTCE
Encumbrance liquidated prior year
ITEP TTEI ITCP/TTCE
2 Banner Travel and Expense Management 8.5.0.5 3-39Handbook
Functional Administration
3-40
Journal vouchers for advance recovery transactions
The submission of a recovery transaction creates a journal voucher. The document carries forward the rule class linked to the recovery method specified on the entry. The journal is immediately moved to the Banner Finance system for posting. It does not go through an approval process. Once posted, an update occurs in Banner Travel and Expense Management to record the effect of the entry on the advance outstanding balance and to change the transaction status to Posted
Online help
Banner Travel and Expense Management provides online help in the following formats:
• Embedded help ( ), which consists of conceptual and task-oriented online help for the application interface.
• Suite help ( ), which is a standalone help that can be launched from the embedded help pages. It consists of conceptual, task-oriented, and detailed reference information for the application interface. You can browse through the table of contents, use the search capabilities to find a topic, and bookmark a selected help content.
Search tools
Banner Travel and Expense Management provides additional tools to help you locate and display items you need:
• Basic search - This feature works identically across all the workspaces in the application. By default, a search page presents the most common search attribute as a first option for your search, such as Search by Name. This search is not case-sensitive.
• Advanced search - You can perform an advanced search using additional attributes, unique to the content and purpose of the application page and workspace.
• Wildcard search - If you do not know how to spell a name, you can enter a partial name followed by an asterisk (*) or percent (%) symbol that are considered wildcard characters. The search returns results pertinent to the page or workspace where the wildcard search is performed.
• Code lookup - This feature is available for certain fields. This option allows you to enter values in a field, and view a list of code and descriptions that match the data you entered.
Banner Travel and Expense Management 8.5.0.5 July 2012HandbookFunctional Administration
July 201
Customization of the application interface
You can customize the application interface as follows. The changes are valid only for the current session. When you log in again, the default interface is restored.
• Sort a column - You can click the header row of certain columns to sort the column in ascending or descending order of numerical and alphabetical orders. If you click the column header again, the sort order reverses. The up or down sort arrow appears when you click the column header to indicate the sorting order.
• Re-order columns - You can change the order in which the columns appear by clicking the column and dragging to the new order. For example, if you want the First Name column to appear before the Last Name column, click the First Name Column and drag the column to the required location on the interface.
• Change the width of a column - You can click the header border of the column and drag to adjust the width.
Application workspace
You perform all your primary tasks in the application workspace of Banner Travel and Expense Management.
Workspace toolbar
The Workspace toolbar allows you to complete specific actions in Banner Travel and Expense Management. The title of the toolbar reflects the currently selected application workspace and each toolbar item applies specifically to the current workspace.
The following toolbar items are available as appropriate for the conditions of the workspace.
Navigation panel
The Navigation panel contains links to allow you to navigate to a specific workspace page. For example, the Expense Manager navigation panel allows you to navigate to Outstanding Advances, Authorization Reports, and Expense Reports pages.
Open Items panel
The Open Items panel displays the items currently open in Expense Manager for the current session. You can select any item in the Open Items panel to view in the workspace. You can maximize the Open Items window and select items to close using the Close Others, Close Selected, or Close All options.
2 Banner Travel and Expense Management 8.5.0.5 3-41Handbook
Functional Administration
3-42
Side-bar panel
The Side-bar panel displays information that supports the current application workspace. You can hide the sidebar panel if you need more room to access the workspace.
Standard menu bar description
The following toolbar menu options are available for the relevant workspace:
• New: Click to create a new item of the selected workspace type.
• Refresh: Click to display the most current data in the selected workspace.
• Open: Click to open details concerning the selected item.
• Save: Click to store any changes you have made.
• Copy: Click to create a duplicate of the selected item.
• Delete: Click to permanently remove the selected item.
• More Actions: Click to select from a list of additional tasks to perform in the selected workspace.
• Close: Click to end work on the selected item.
Banner Travel and Expense Management 8.5.0.5 July 2012HandbookFunctional Administration
July 201
4 Integration with Banner Workflow
Banner® Workflow approval processing, as delivered by Ellucian®, is available and required for authorization reports, expense reports, and advances. This chapter discusses the steps involved in Banner Workflow integration with Banner Travel and Expense Management (TEM) and the recommended usage.
Introduction to Banner Workflow for Banner Travel and Expense Management
The Banner Workflow for Banner Travel and Expense Management consists of three events:
• The TE_REVIEW event is a Web service triggered when a delegate completes a travel document on behalf of the traveler and sends it to the traveler for review from Banner Travel and Expense Management.
• The TEM_APPROVAL event is a Web service triggered when a traveler completes and submits a travel document from Banner Travel and Expense Management.
• The TEM_ADHOC_APPROVAL event is a Banner event triggered when an approver adds another approver and completes the WorkFlow approval form.
Both TEM_Approval and TE_REVIEW are associated to the workflow model TEMApproval version 1.Event.
TE_REVIEW is associated to the workflow model T&E_Review_Notification version 1.
When the traveler submits a travel request, a notification is sent to the approver. There are four different approval forms that are displayed to the approver depending on the type of document that needs to be approved. The first approver in turn can send the traveler’s request to an ad hoc approver.
Summary of events
All e-mail notifications, approval forms, and the workflow model can be customized, as outlined in the following table.
2 Banner Travel and Expense Management 8.5.0.5 4-1Handbook
Integration with Banner Workflow
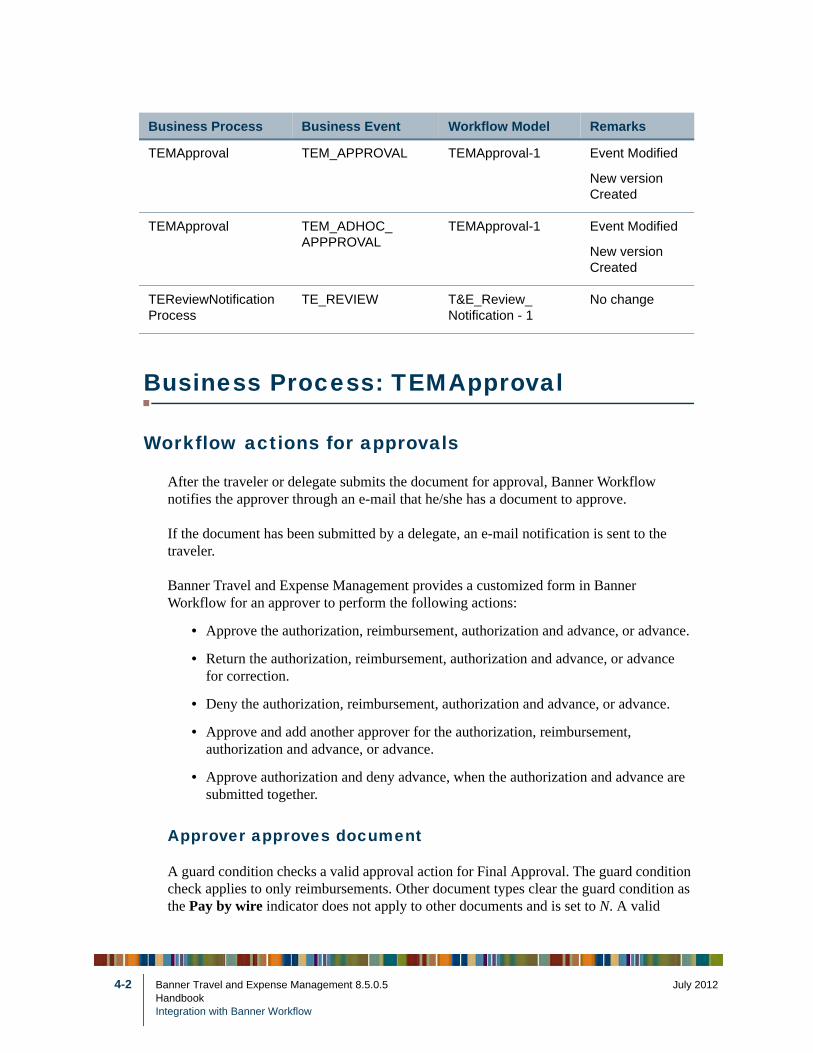
4-2
Business Process: TEMApproval
Workflow actions for approvals
After the traveler or delegate submits the document for approval, Banner Workflow notifies the approver through an e-mail that he/she has a document to approve.
If the document has been submitted by a delegate, an e-mail notification is sent to the traveler.
Banner Travel and Expense Management provides a customized form in Banner Workflow for an approver to perform the following actions:
• Approve the authorization, reimbursement, authorization and advance, or advance.
• Return the authorization, reimbursement, authorization and advance, or advance for correction.
• Deny the authorization, reimbursement, authorization and advance, or advance.
• Approve and add another approver for the authorization, reimbursement, authorization and advance, or advance.
• Approve authorization and deny advance, when the authorization and advance are submitted together.
Approver approves document
A guard condition checks a valid approval action for Final Approval. The guard condition check applies to only reimbursements. Other document types clear the guard condition as the Pay by wire indicator does not apply to other documents and is set to N. A valid
Business Process Business Event Workflow Model Remarks
TEMApproval TEM_APPROVAL TEMApproval-1 Event Modified
New version Created
TEMApproval TEM_ADHOC_APPPROVAL
TEMApproval-1 Event Modified
New version Created
TEReviewNotificationProcess
TE_REVIEW T&E_Review_Notification - 1
No change
Banner Travel and Expense Management 8.5.0.5 July 2012HandbookIntegration with Banner Workflow
July 201
approval action for Final Approval of reimbursement corresponds to one of the following conditions:
• The Pay by wire indicator is not Y.
• The Pay by wire indicator is Y, the Wire Base Amount is greater than 0, and the approver is a financial approver.
An invalid approval action for Final Approval of reimbursement corresponds to a condition where the Pay by wire indicator is Y, and the Wire Base Amount is 0.
If the approval results as Invalid, an e-mail is sent to the approver and the traveler (delegate copied, if any) from Banner Workflow stating that the approval was unsuccessful. This e-mail also states the error. The approver receives the workflow in the worklist for the same document with the error message highlighted.
When the approval is valid, an e-mail is sent to the traveler (delegate copied, if any) from Banner Workflow stating that the document is Approved.
The document status is set as Approved in Banner Travel and Expense Management.
For authorizations, an encumbrance document is created (if encumbrances are enabled). For expense reports or advances, an invoice is created. If the finance document creation fails, an e-mail is sent to the approver and the traveler.
Approver approves document with additional approvers
A guard condition checks a valid approval action for adding an approver. The guard condition check applies to only reimbursements. Other document types clear the guard condition as the Pay by wire indicator does not apply to other documents and is set to N. A valid approval action for adding an additional approver for reimbursement corresponds to one of the following conditions:
• The Pay by wire indicator is not Y.
• The Pay by wire indicator is Y, and the Wire Base Amount is equal to 0.
An invalid approval action for adding an additional approver for reimbursement corresponds to a condition where the Pay by wire indicator is Y, the Wire Base Amount is greater than 0, and the approver is a financial approver.
If the approval results as invalid, an e-mail is sent to the approver and the traveler (delegate copied, if any) from Banner Workflow stating that the approval is unsuccessful. This e-mail also states the error. The approver receives the workflow in the worklist for the same document with the error message highlighted.
When the approval is valid, the Banner Workflow login ID added for the additional approver is also validated. If it is invalid, an e-mail is sent to the approver and the traveler from workflow stating that the approval is unsuccessful. This e-mail also states the error.
2 Banner Travel and Expense Management 8.5.0.5 4-3Handbook
Integration with Banner Workflow
4-4
The approver receives the workflow in the worklist for the same document with the error message highlighted.
Once the additional approver is validated, an e-mail is sent to the traveler (delegate copied) from workflow stating that a document is approved and forwarded for additional approval.
The document status in Banner Travel and Expense Management remains Submitted until the final workflow approval is achieved.
On final approval, for authorizations an encumbrance document is created (if encumbrances are enabled). For expense reports or advances, an invoice is created, based on the validation in this section, for final approval. If the finance document creation fails, an e-mail is sent to the approver and the traveler.
Approver returns document for corrections
A guard condition checks a valid approval action for adding an approver. The guard condition check applies to only reimbursements. Other document types clear the guard condition as the Pay by wire indicator does not apply to other documents and is set to N. A valid approval action for adding an approver for reimbursement corresponds to one of the following conditions:
• The Pay by wire indicator is not Y.
• The Pay by wire indicator is Y, and the Wire Base Amount is equal to 0.
An invalid approval action for returning document for correction for reimbursement corresponds to a condition where the Pay by wire indicator is Y, the Wire Base Amount is greater than 0, and the approver is a financial approver.
A comment is required when the approver returns the document for correction. If the approver does not enter any comments, then the action becomes Invalid.
If the approval is Invalid, an e-mail is sent to the approver and the traveler (delegate copied, if any) from Banner Workflow stating that the approval is unsuccessful. This e-mail also states the error. The approver receives the workflow in the worklist for the same document with the error message highlighted. If this action is validated, an e-mail is sent to the traveler (delegate copied, if any) from Banner Workflow stating that the document was returned for correction. The document status in Banner Travel and Expense Management is set to Returned for Correction.
If the authorization and advance have been submitted together, or when the advance is submitted, the advance is cancelled when the document is returned for correction.
The traveler needs to make the appropriate revisions and re-submit the document for approval.
Banner Travel and Expense Management 8.5.0.5 July 2012HandbookIntegration with Banner Workflow
July 201
Approver denies document
A guard condition checks a valid approval action for adding an approver. The guard condition check applies to only reimbursements. Other document types clear the guard condition as the Pay by wire indicator does not apply to other documents and is set to N. A valid approval action for adding additional approver for reimbursement corresponds to one of the following conditions:
• The Pay by wire indicator is not Y.
• The Pay by wire indicator is Y, and Wire Base Amount is equal to 0.
An invalid approval action for Denial of the document for reimbursement corresponds to a condition where a the Pay by wire indicator is Y, the Wire Base Amount is greater than 0, and the approver is a financial approver.
A comment is required when the approver denies the document. If the approver does not enter any comments, then the action becomes invalid.
If the approval is Invalid, an e-mail is sent to the approver and the traveler (delegate copied, if any) from Banner Workflow, stating that the approval is unsuccessful. This e-mail also states the error. The approver receives the workflow in the worklist for the same document with the error message highlighted. If this action is validated, an e-mail is sent to the traveler (delegate copied, if any) from Banner Workflow stating the travel and expense document is denied. The document status in Banner Travel and Expense Management is set to Denied.
The traveler needs to make the appropriate revisions and re-submit the document for approval.
Approver approves authorization and denies advance
NoteThis process applies only when authorization and advance are submitted together.
A guard condition checks a valid approval action for Approve authorization and Deny Advance. The guard condition check applies to only reimbursements. Other document types clear the guard condition, as the Pay by wire indicator does not apply to other documents and is set to N.
A comment is required when the approver approves the authorization and denies the advance stating the reason. If the approver does not enter any comments, the action becomes Invalid.
An e-mail is sent to the traveler (delegate copied, if any) from Banner Workflow, stating that the travel and expense document is approved and advance is denied. The denied advance is cancelled. The document status in Banner Travel and Expense Management is set to Approved.
2 Banner Travel and Expense Management 8.5.0.5 4-5Handbook
Integration with Banner Workflow
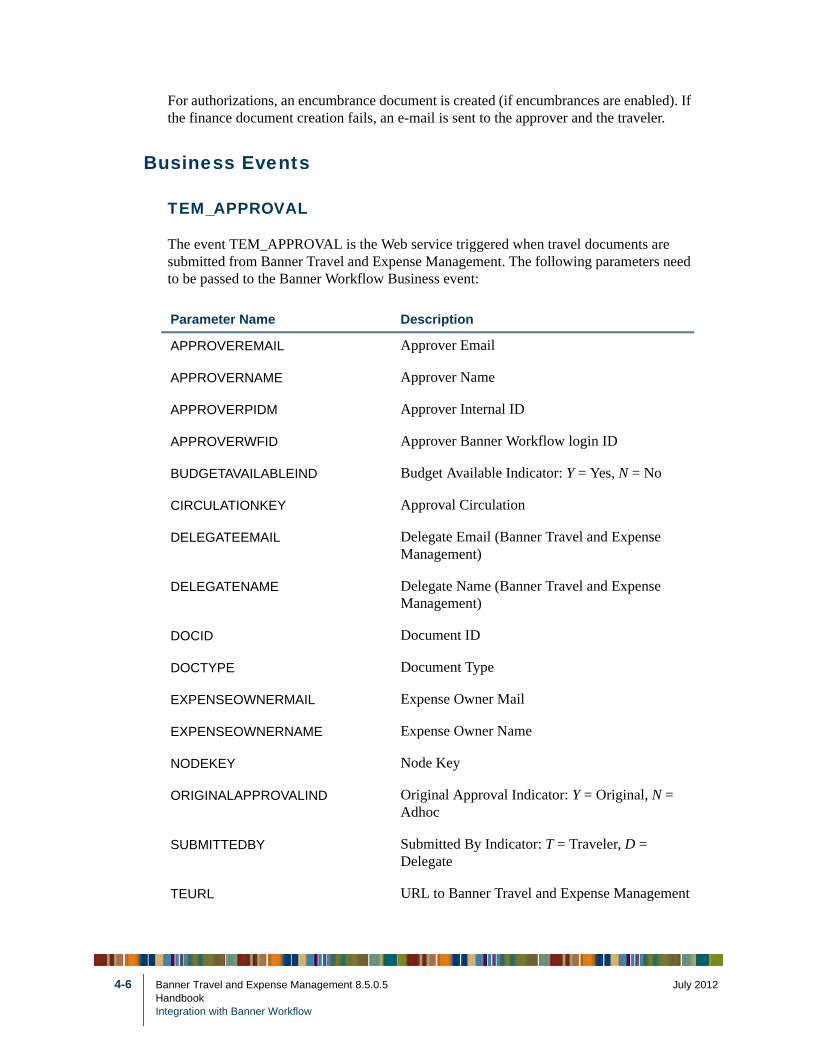
4-6
For authorizations, an encumbrance document is created (if encumbrances are enabled). If the finance document creation fails, an e-mail is sent to the approver and the traveler.
Business Events
TEM_APPROVAL
The event TEM_APPROVAL is the Web service triggered when travel documents are submitted from Banner Travel and Expense Management. The following parameters need to be passed to the Banner Workflow Business event:
Parameter Name Description
APPROVEREMAIL Approver Email
APPROVERNAME Approver Name
APPROVERPIDM Approver Internal ID
APPROVERWFID Approver Banner Workflow login ID
BUDGETAVAILABLEIND Budget Available Indicator: Y = Yes, N = No
CIRCULATIONKEY Approval Circulation
DELEGATEEMAIL Delegate Email (Banner Travel and Expense Management)
DELEGATENAME Delegate Name (Banner Travel and Expense Management)
DOCID Document ID
DOCTYPE Document Type
EXPENSEOWNERMAIL Expense Owner Mail
EXPENSEOWNERNAME Expense Owner Name
NODEKEY Node Key
ORIGINALAPPROVALIND Original Approval Indicator: Y = Original, N = Adhoc
SUBMITTEDBY Submitted By Indicator: T = Traveler, D = Delegate
TEURL URL to Banner Travel and Expense Management
Banner Travel and Expense Management 8.5.0.5 July 2012HandbookIntegration with Banner Workflow
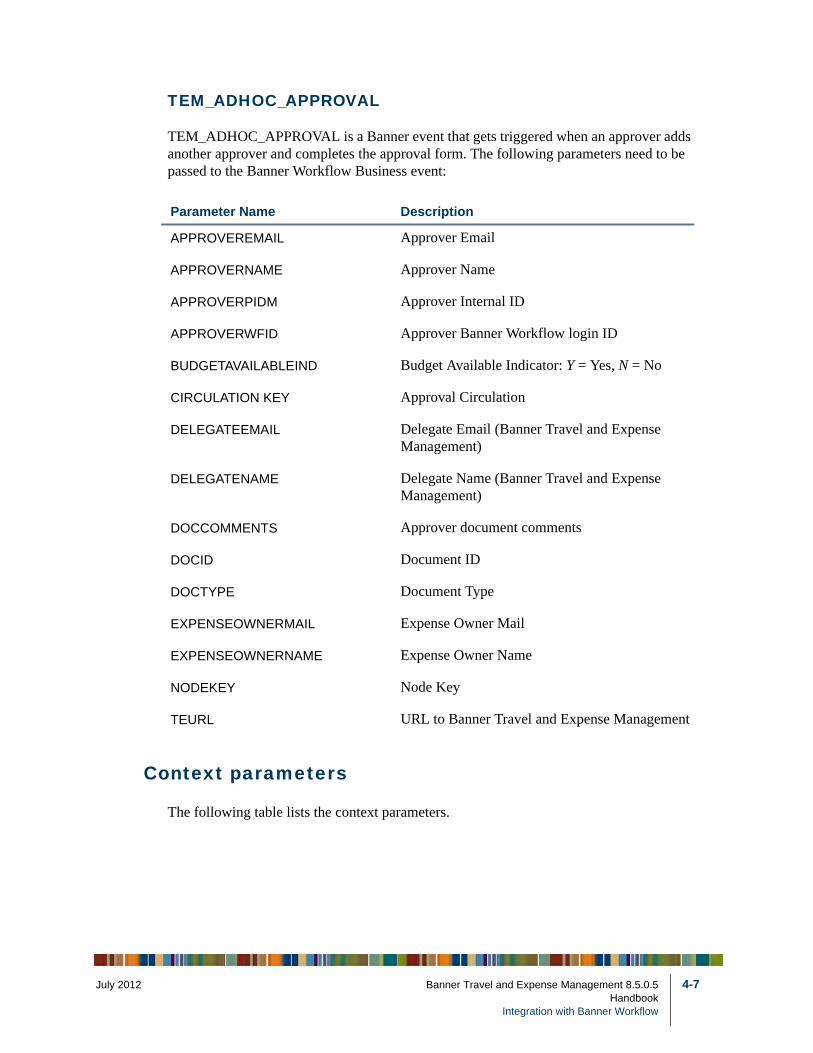
July 201
TEM_ADHOC_APPROVAL
TEM_ADHOC_APPROVAL is a Banner event that gets triggered when an approver adds another approver and completes the approval form. The following parameters need to be passed to the Banner Workflow Business event:
Context parameters
The following table lists the context parameters.
Parameter Name Description
APPROVEREMAIL Approver Email
APPROVERNAME Approver Name
APPROVERPIDM Approver Internal ID
APPROVERWFID Approver Banner Workflow login ID
BUDGETAVAILABLEIND Budget Available Indicator: Y = Yes, N = No
CIRCULATION KEY Approval Circulation
DELEGATEEMAIL Delegate Email (Banner Travel and Expense Management)
DELEGATENAME Delegate Name (Banner Travel and Expense Management)
DOCCOMMENTS Approver document comments
DOCID Document ID
DOCTYPE Document Type
EXPENSEOWNERMAIL Expense Owner Mail
EXPENSEOWNERNAME Expense Owner Name
NODEKEY Node Key
TEURL URL to Banner Travel and Expense Management
2 Banner Travel and Expense Management 8.5.0.5 4-7Handbook
Integration with Banner Workflow
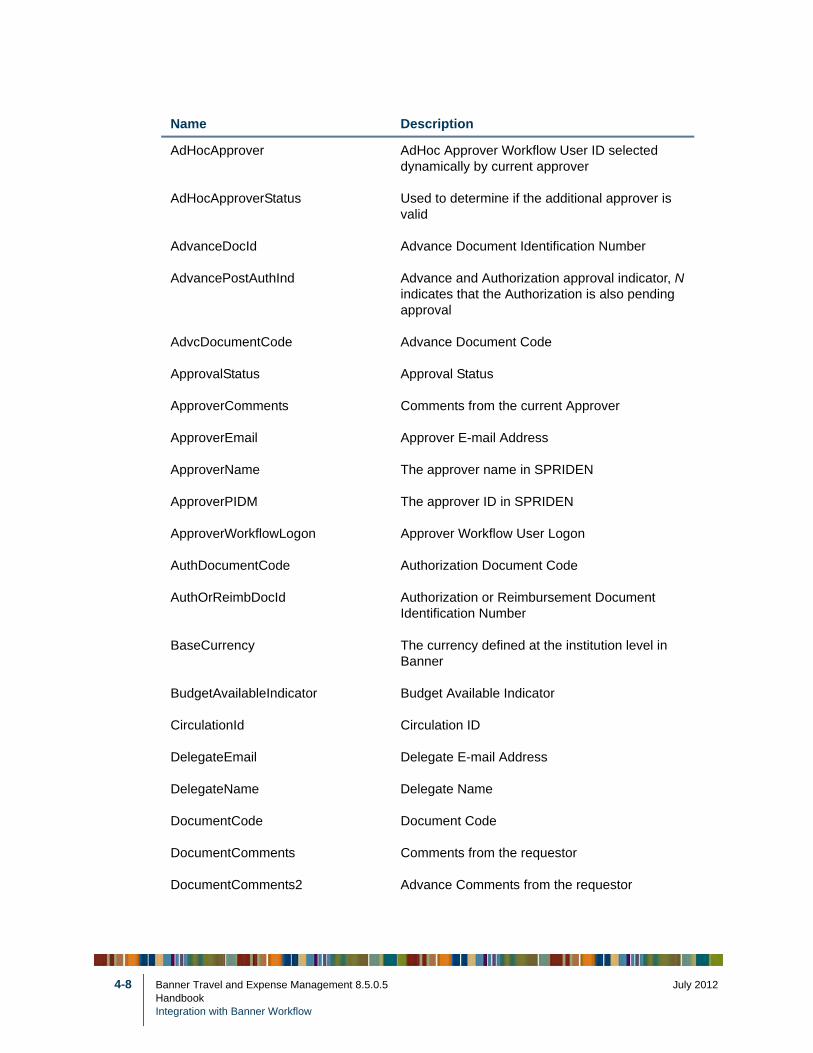
4-8
Name Description
AdHocApprover AdHoc Approver Workflow User ID selected dynamically by current approver
AdHocApproverStatus Used to determine if the additional approver is valid
AdvanceDocId Advance Document Identification Number
AdvancePostAuthInd Advance and Authorization approval indicator, N indicates that the Authorization is also pending approval
AdvcDocumentCode Advance Document Code
ApprovalStatus Approval Status
ApproverComments Comments from the current Approver
ApproverEmail Approver E-mail Address
ApproverName The approver name in SPRIDEN
ApproverPIDM The approver ID in SPRIDEN
ApproverWorkflowLogon Approver Workflow User Logon
AuthDocumentCode Authorization Document Code
AuthOrReimbDocId Authorization or Reimbursement Document Identification Number
BaseCurrency The currency defined at the institution level in Banner
BudgetAvailableIndicator Budget Available Indicator
CirculationId Circulation ID
DelegateEmail Delegate E-mail Address
DelegateName Delegate Name
DocumentCode Document Code
DocumentComments Comments from the requestor
DocumentComments2 Advance Comments from the requestor
Banner Travel and Expense Management 8.5.0.5 July 2012HandbookIntegration with Banner Workflow
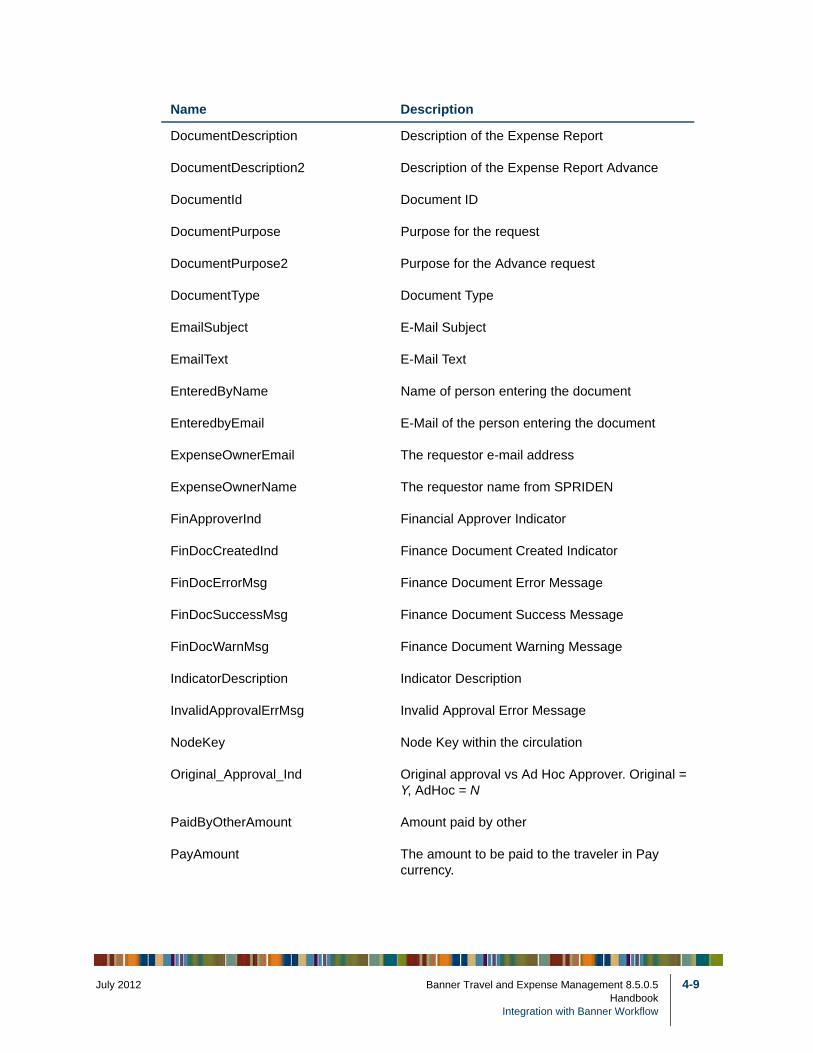
July 201
DocumentDescription Description of the Expense Report
DocumentDescription2 Description of the Expense Report Advance
DocumentId Document ID
DocumentPurpose Purpose for the request
DocumentPurpose2 Purpose for the Advance request
DocumentType Document Type
EmailSubject E-Mail Subject
EmailText E-Mail Text
EnteredByName Name of person entering the document
EnteredbyEmail E-Mail of the person entering the document
ExpenseOwnerEmail The requestor e-mail address
ExpenseOwnerName The requestor name from SPRIDEN
FinApproverInd Financial Approver Indicator
FinDocCreatedInd Finance Document Created Indicator
FinDocErrorMsg Finance Document Error Message
FinDocSuccessMsg Finance Document Success Message
FinDocWarnMsg Finance Document Warning Message
IndicatorDescription Indicator Description
InvalidApprovalErrMsg Invalid Approval Error Message
NodeKey Node Key within the circulation
Original_Approval_Ind Original approval vs Ad Hoc Approver. Original = Y, AdHoc = N
PaidByOtherAmount Amount paid by other
PayAmount The amount to be paid to the traveler in Pay currency.
Name Description
2 Banner Travel and Expense Management 8.5.0.5 4-9Handbook
Integration with Banner Workflow
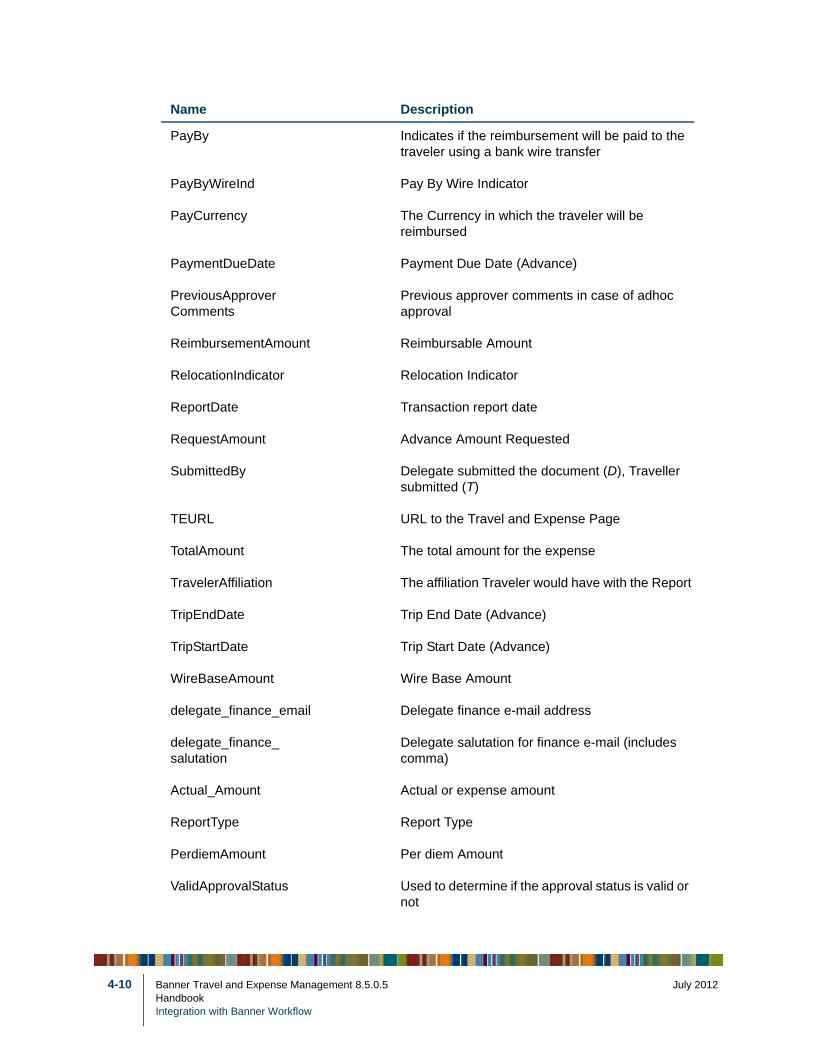
4-10
PayBy Indicates if the reimbursement will be paid to the traveler using a bank wire transfer
PayByWireInd Pay By Wire Indicator
PayCurrency The Currency in which the traveler will be reimbursed
PaymentDueDate Payment Due Date (Advance)
PreviousApproverComments
Previous approver comments in case of adhoc approval
ReimbursementAmount Reimbursable Amount
RelocationIndicator Relocation Indicator
ReportDate Transaction report date
RequestAmount Advance Amount Requested
SubmittedBy Delegate submitted the document (D), Traveller submitted (T)
TEURL URL to the Travel and Expense Page
TotalAmount The total amount for the expense
TravelerAffiliation The affiliation Traveler would have with the Report
TripEndDate Trip End Date (Advance)
TripStartDate Trip Start Date (Advance)
WireBaseAmount Wire Base Amount
delegate_finance_email Delegate finance e-mail address
delegate_finance_salutation
Delegate salutation for finance e-mail (includes comma)
Actual_Amount Actual or expense amount
ReportType Report Type
PerdiemAmount Per diem Amount
ValidApprovalStatus Used to determine if the approval status is valid or not
Name Description
Banner Travel and Expense Management 8.5.0.5 July 2012HandbookIntegration with Banner Workflow
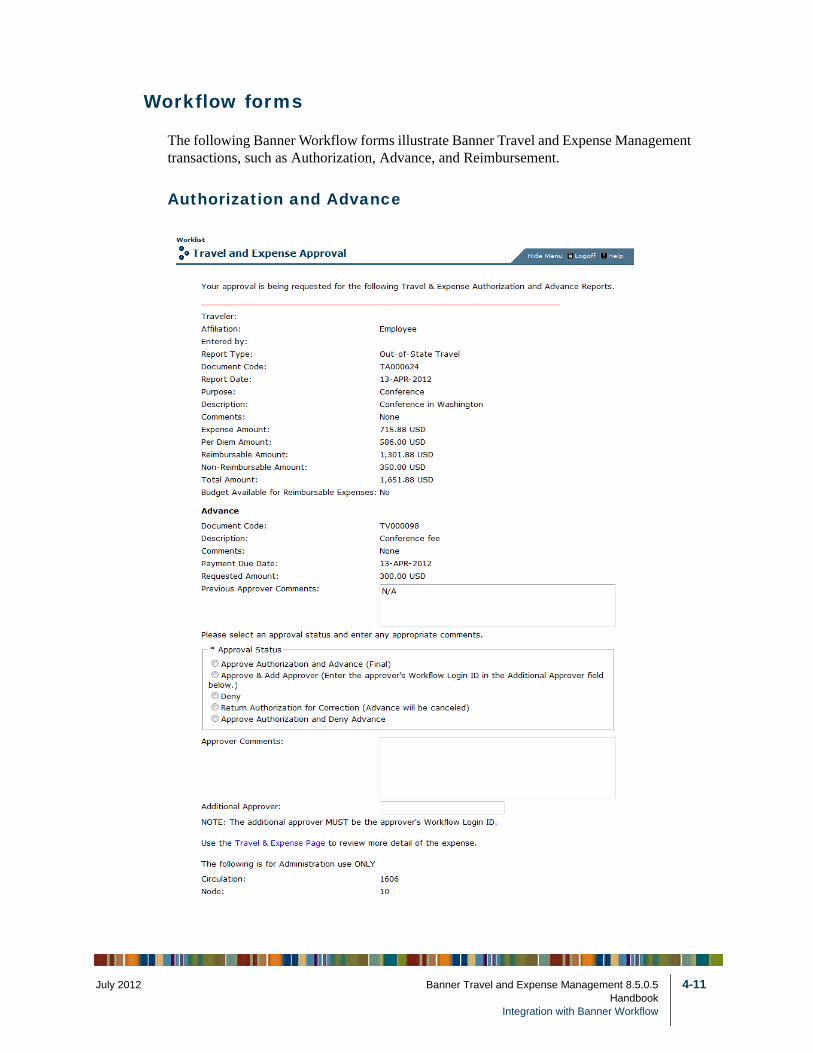
July 201
Workflow forms
The following Banner Workflow forms illustrate Banner Travel and Expense Management transactions, such as Authorization, Advance, and Reimbursement.
Authorization and Advance
2 Banner Travel and Expense Management 8.5.0.5 4-11Handbook
Integration with Banner Workflow
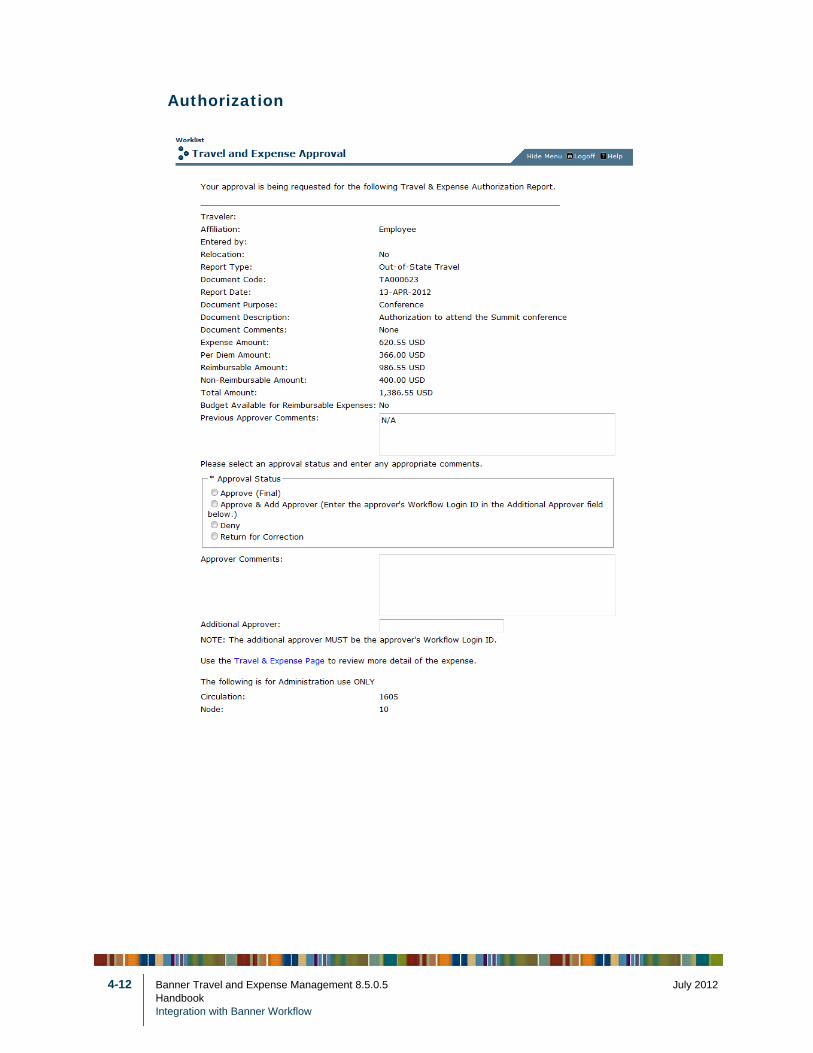
4-12
Authorization
Banner Travel and Expense Management 8.5.0.5 July 2012HandbookIntegration with Banner Workflow
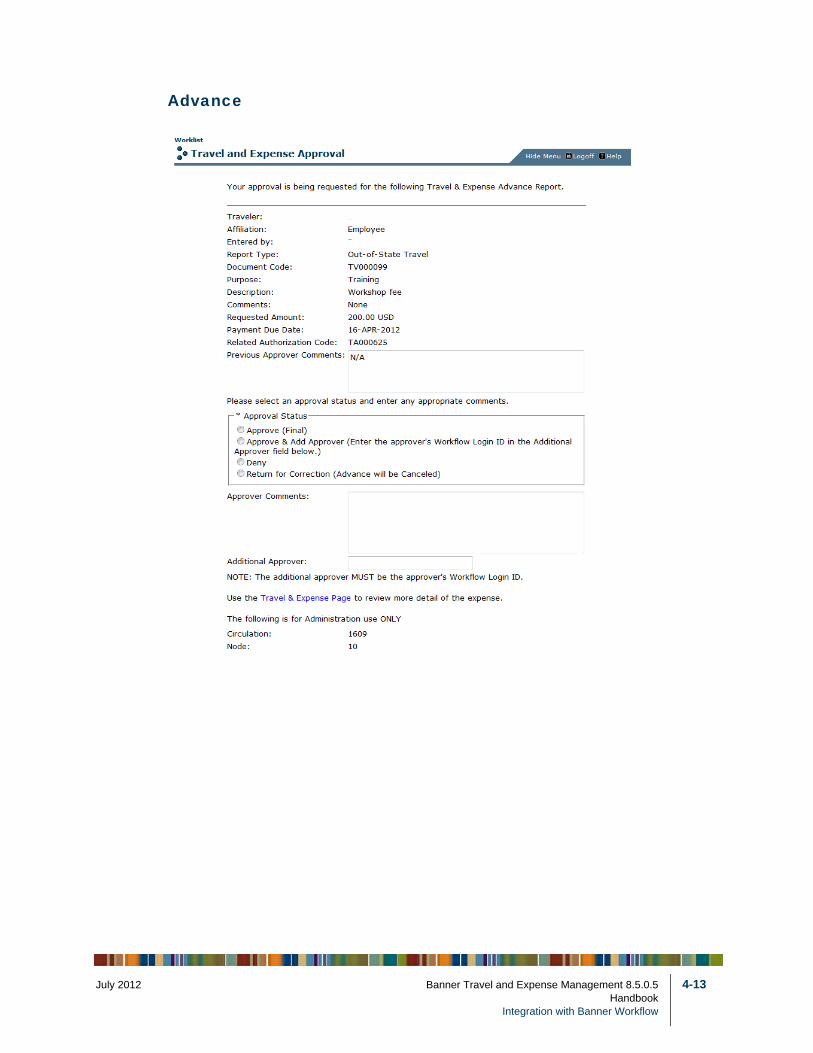
July 201
Advance
2 Banner Travel and Expense Management 8.5.0.5 4-13Handbook
Integration with Banner Workflow

4-14
Reimbursement
Banner Travel and Expense Management 8.5.0.5 July 2012HandbookIntegration with Banner Workflow
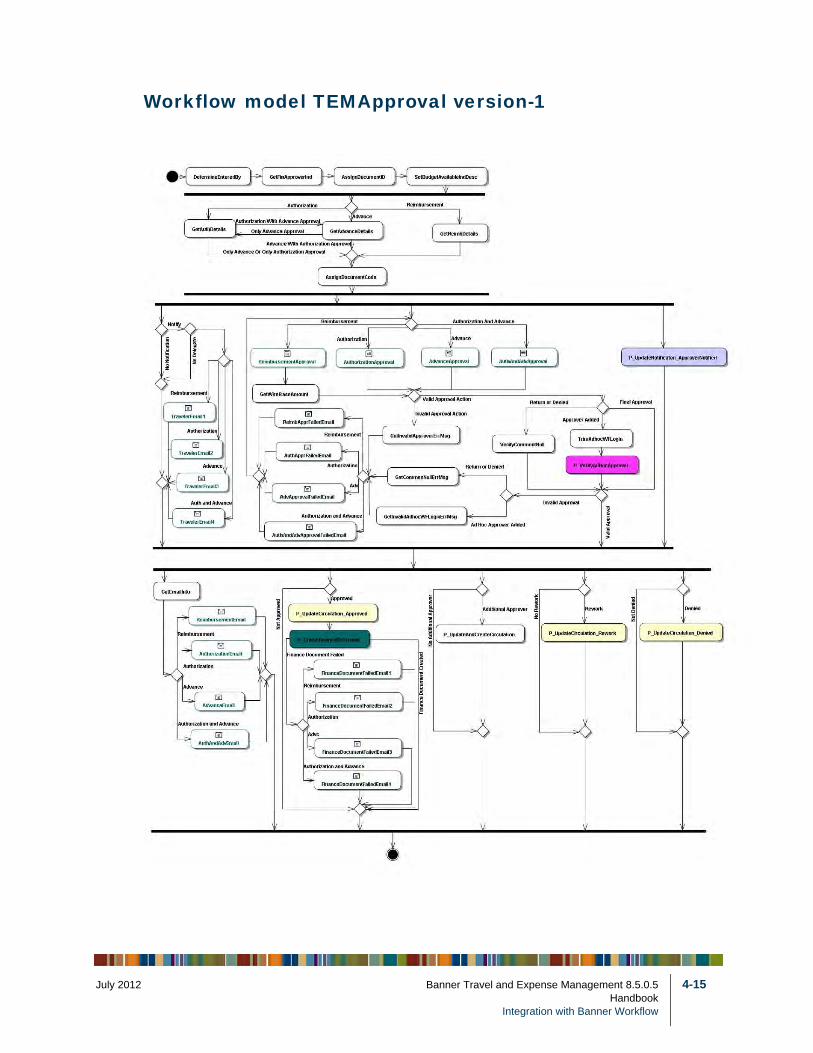
July 201
Workflow model TEMApproval version-1
2 Banner Travel and Expense Management 8.5.0.5 4-15Handbook
Integration with Banner Workflow
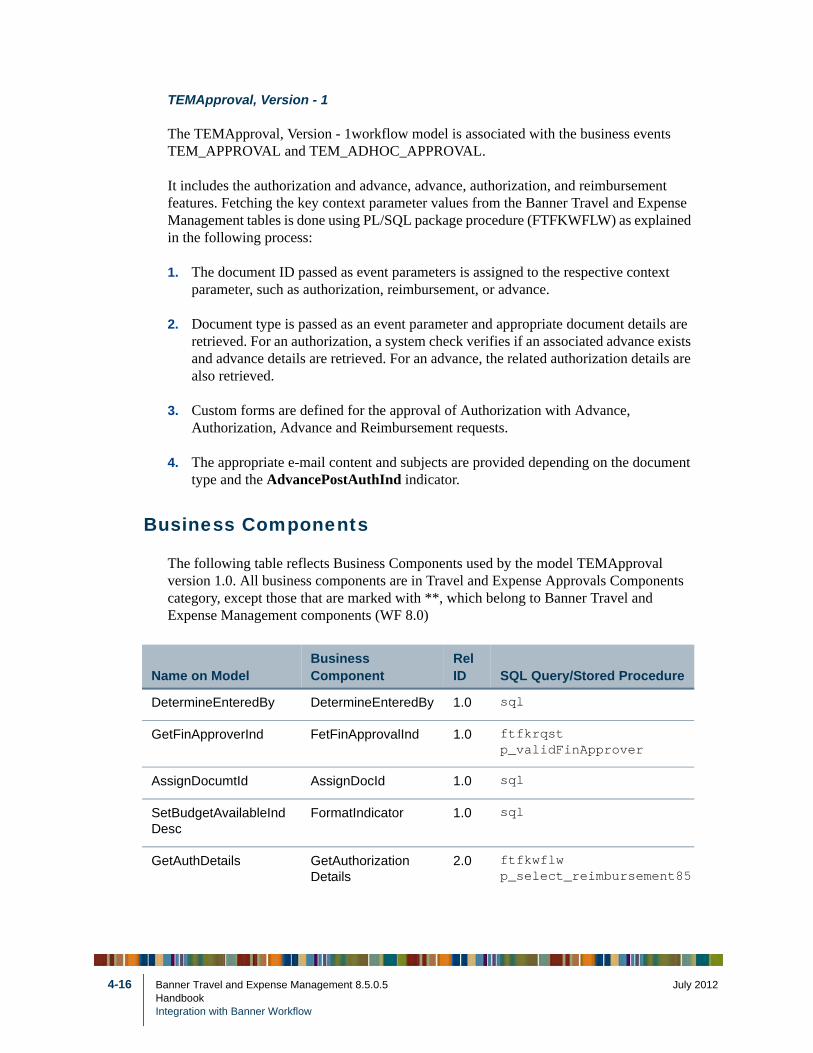
4-16
TEMApproval, Version - 1
The TEMApproval, Version - 1workflow model is associated with the business events TEM_APPROVAL and TEM_ADHOC_APPROVAL.
It includes the authorization and advance, advance, authorization, and reimbursement features. Fetching the key context parameter values from the Banner Travel and Expense Management tables is done using PL/SQL package procedure (FTFKWFLW) as explained in the following process:
1. The document ID passed as event parameters is assigned to the respective context parameter, such as authorization, reimbursement, or advance.
2. Document type is passed as an event parameter and appropriate document details are retrieved. For an authorization, a system check verifies if an associated advance exists and advance details are retrieved. For an advance, the related authorization details are also retrieved.
3. Custom forms are defined for the approval of Authorization with Advance, Authorization, Advance and Reimbursement requests.
4. The appropriate e-mail content and subjects are provided depending on the document type and the AdvancePostAuthInd indicator.
Business Components
The following table reflects Business Components used by the model TEMApproval version 1.0. All business components are in Travel and Expense Approvals Components category, except those that are marked with **, which belong to Banner Travel and Expense Management components (WF 8.0)
Name on ModelBusiness Component
Rel ID SQL Query/Stored Procedure
DetermineEnteredBy DetermineEnteredBy 1.0 sql
GetFinApproverInd FetFinApprovalInd 1.0 ftfkrqstp_validFinApprover
AssignDocumtId AssignDocId 1.0 sql
SetBudgetAvailableIndDesc
FormatIndicator 1.0 sql
GetAuthDetails GetAuthorizationDetails
2.0 ftfkwflwp_select_reimbursement85
Banner Travel and Expense Management 8.5.0.5 July 2012HandbookIntegration with Banner Workflow
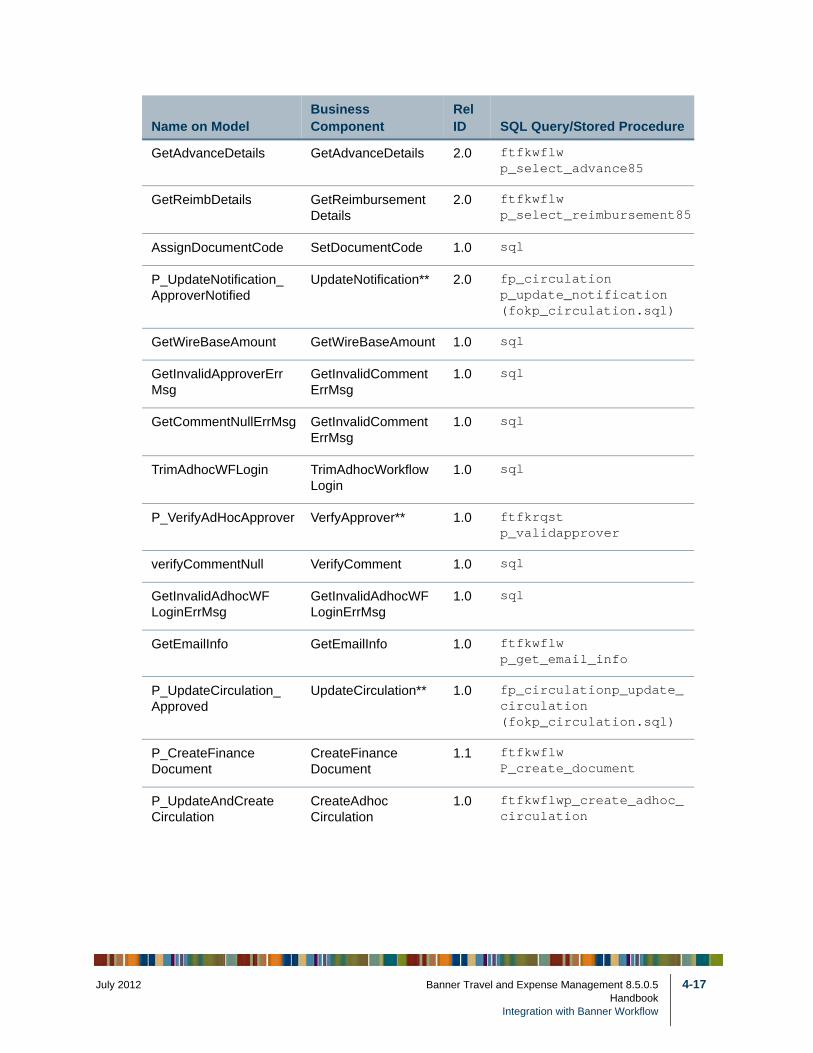
July 201
GetAdvanceDetails GetAdvanceDetails 2.0 ftfkwflwp_select_advance85
GetReimbDetails GetReimbursementDetails
2.0 ftfkwflwp_select_reimbursement85
AssignDocumentCode SetDocumentCode 1.0 sql
P_UpdateNotification_ApproverNotified
UpdateNotification** 2.0 fp_circulationp_update_notification (fokp_circulation.sql)
GetWireBaseAmount GetWireBaseAmount 1.0 sql
GetInvalidApproverErrMsg
GetInvalidCommentErrMsg
1.0 sql
GetCommentNullErrMsg GetInvalidCommentErrMsg
1.0 sql
TrimAdhocWFLogin TrimAdhocWorkflowLogin
1.0 sql
P_VerifyAdHocApprover VerfyApprover** 1.0 ftfkrqstp_validapprover
verifyCommentNull VerifyComment 1.0 sql
GetInvalidAdhocWFLoginErrMsg
GetInvalidAdhocWFLoginErrMsg
1.0 sql
GetEmailInfo GetEmailInfo 1.0 ftfkwflwp_get_email_info
P_UpdateCirculation_Approved
UpdateCirculation** 1.0 fp_circulationp_update_circulation (fokp_circulation.sql)
P_CreateFinance Document
CreateFinanceDocument
1.1 ftfkwflwP_create_document
P_UpdateAndCreateCirculation
CreateAdhocCirculation
1.0 ftfkwflwp_create_adhoc_circulation
Name on ModelBusiness Component
Rel ID SQL Query/Stored Procedure
2 Banner Travel and Expense Management 8.5.0.5 4-17Handbook
Integration with Banner Workflow

4-18
FTFKWFLW package
The FTFKWFLW package is delivered with Banner Travel and Expense Management.
The following procedure retrieves data related to authorization and advance based on the advance document ID.
PROCEDURE p_select_advance85
( p_doc_id ftrbauth.id%TYPE,p_doc_code OUT ftrbauth.doc_code%TYPE,
p_doc_comments OUT ftrbauth.user_comment%TYPE
p_doc_description OUT ftrbauth.description%TYPE,
p_doc_purpose OUT fttvpurp.name%TYPE,
p_relocation_ind OUT VARCHAR2,
p_report_type OUT fttvrpty.name%TYPE,
p_currency_code OUT fttvcurr.currency_code%TYPE,
p_traveler_affiliation OUT fttvaffl.affiliation%TYPE,
p_report_date OUT VARCHAR2,
p_total_amount OUT VARCHAR2,
p_reimb_amount OUT VARCHAR2,
p_paid_by_other_amount OUT VARCHAR2,
p_ftrbadvc_id OUT ftrbadvc.id%TYPE,
p_perdiem_amount OUT VARCHAR2,
p_actual_amount OUT VARCHAR2
)
The following procedure retrieves data related to authorization and advance based on the advance document ID.
PROCEDURE p_select_advance85
p_doc_id ftrbadvc.id%TYPE,
p_doc_code OUT ftrbadvc.doc_code%TYPE,
p_related_auth_doc_i OUT ftrbadvc.ftrbauth_id%TYPE,
p_doc_comments OUT ftrbadvc.user_comment%TYPE,
p_doc_description OUT ftrbadvc.description%TYPE,
P_UpdateCirculation_Rework
UpdateCirculation** 1.0 fp_circulationp_update_circulation (fokp_circulation.sql)
P_UpdateCirculation_Denied
UpdateCirculation** 1.0 fp_circulationp_update_circulation (fokp_circulation.sql)
Name on ModelBusiness Component
Rel ID SQL Query/Stored Procedure
Banner Travel and Expense Management 8.5.0.5 July 2012HandbookIntegration with Banner Workflow
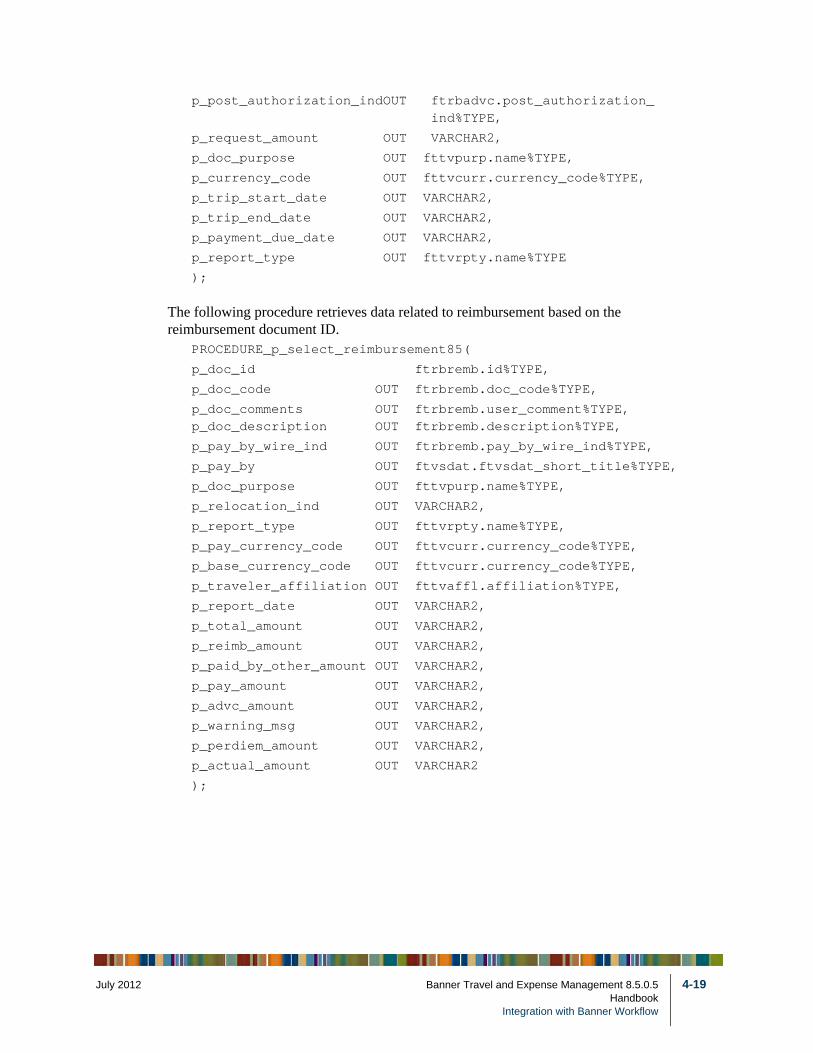
July 201
p_post_authorization_indOUT ftrbadvc.post_authorization_ind%TYPE,
p_request_amount OUT VARCHAR2,
p_doc_purpose OUT fttvpurp.name%TYPE,
p_currency_code OUT fttvcurr.currency_code%TYPE,
p_trip_start_date OUT VARCHAR2,
p_trip_end_date OUT VARCHAR2,
p_payment_due_date OUT VARCHAR2,
p_report_type OUT fttvrpty.name%TYPE
);
The following procedure retrieves data related to reimbursement based on the reimbursement document ID.
PROCEDURE_p_select_reimbursement85(
p_doc_id ftrbremb.id%TYPE,
p_doc_code OUT ftrbremb.doc_code%TYPE,
p_doc_comments OUT ftrbremb.user_comment%TYPE, p_doc_description OUT ftrbremb.description%TYPE,
p_pay_by_wire_ind OUT ftrbremb.pay_by_wire_ind%TYPE,
p_pay_by OUT ftvsdat.ftvsdat_short_title%TYPE,
p_doc_purpose OUT fttvpurp.name%TYPE,
p_relocation_ind OUT VARCHAR2,
p_report_type OUT fttvrpty.name%TYPE,
p_pay_currency_code OUT fttvcurr.currency_code%TYPE,
p_base_currency_code OUT fttvcurr.currency_code%TYPE,
p_traveler_affiliation OUT fttvaffl.affiliation%TYPE,
p_report_date OUT VARCHAR2,
p_total_amount OUT VARCHAR2,
p_reimb_amount OUT VARCHAR2,
p_paid_by_other_amount OUT VARCHAR2,
p_pay_amount OUT VARCHAR2,
p_advc_amount OUT VARCHAR2,
p_warning_msg OUT VARCHAR2,
p_perdiem_amount OUT VARCHAR2,
p_actual_amount OUT VARCHAR2
);
2 Banner Travel and Expense Management 8.5.0.5 4-19Handbook
Integration with Banner Workflow
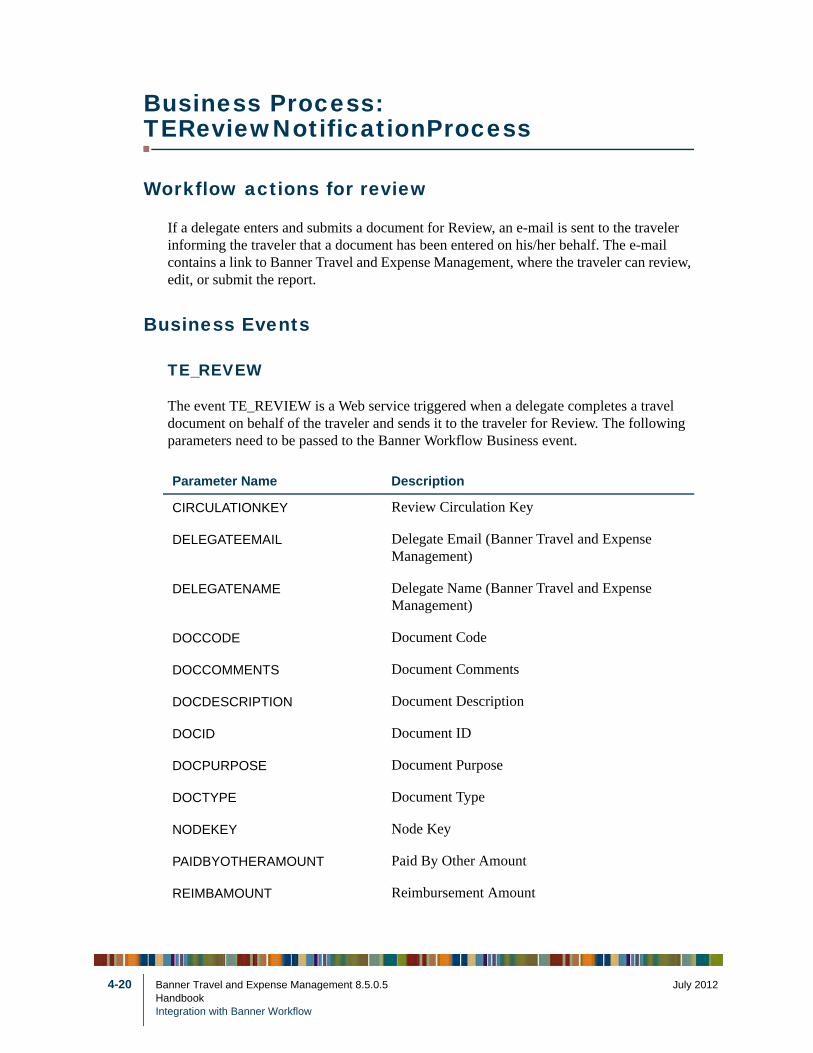
4-20
Business Process: TEReviewNotificationProcess
Workflow actions for review
If a delegate enters and submits a document for Review, an e-mail is sent to the traveler informing the traveler that a document has been entered on his/her behalf. The e-mail contains a link to Banner Travel and Expense Management, where the traveler can review, edit, or submit the report.
Business Events
TE_REVEW
The event TE_REVIEW is a Web service triggered when a delegate completes a travel document on behalf of the traveler and sends it to the traveler for Review. The following parameters need to be passed to the Banner Workflow Business event.
Parameter Name Description
CIRCULATIONKEY Review Circulation Key
DELEGATEEMAIL Delegate Email (Banner Travel and Expense Management)
DELEGATENAME Delegate Name (Banner Travel and Expense Management)
DOCCODE Document Code
DOCCOMMENTS Document Comments
DOCDESCRIPTION Document Description
DOCID Document ID
DOCPURPOSE Document Purpose
DOCTYPE Document Type
NODEKEY Node Key
PAIDBYOTHERAMOUNT Paid By Other Amount
REIMBAMOUNT Reimbursement Amount
Banner Travel and Expense Management 8.5.0.5 July 2012HandbookIntegration with Banner Workflow
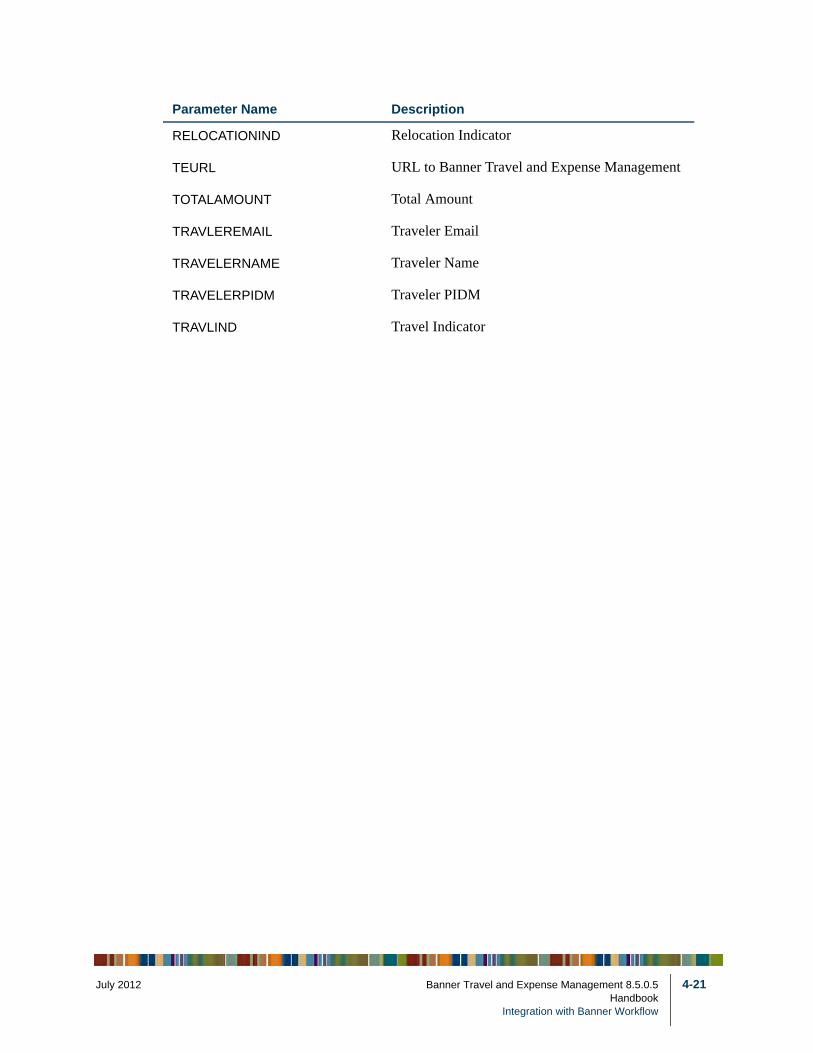
July 201
RELOCATIONIND Relocation Indicator
TEURL URL to Banner Travel and Expense Management
TOTALAMOUNT Total Amount
TRAVLEREMAIL Traveler Email
TRAVELERNAME Traveler Name
TRAVELERPIDM Traveler PIDM
TRAVLIND Travel Indicator
Parameter Name Description
2 Banner Travel and Expense Management 8.5.0.5 4-21Handbook
Integration with Banner Workflow
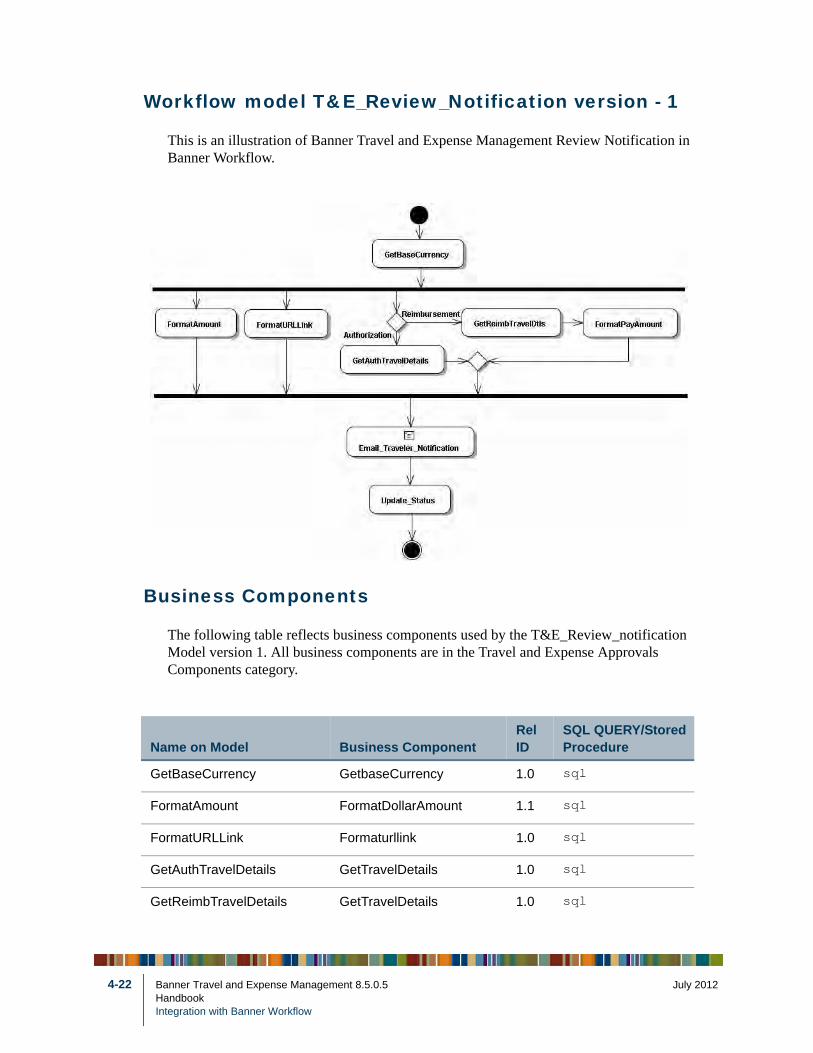
4-22
Workflow model T&E_Review_Notification version - 1
This is an illustration of Banner Travel and Expense Management Review Notification in Banner Workflow.
Business Components
The following table reflects business components used by the T&E_Review_notification Model version 1. All business components are in the Travel and Expense Approvals Components category.
Name on Model Business ComponentRel ID
SQL QUERY/Stored Procedure
GetBaseCurrency GetbaseCurrency 1.0 sql
FormatAmount FormatDollarAmount 1.1 sql
FormatURLLink Formaturllink 1.0 sql
GetAuthTravelDetails GetTravelDetails 1.0 sql
GetReimbTravelDetails GetTravelDetails 1.0 sql
Banner Travel and Expense Management 8.5.0.5 July 2012HandbookIntegration with Banner Workflow
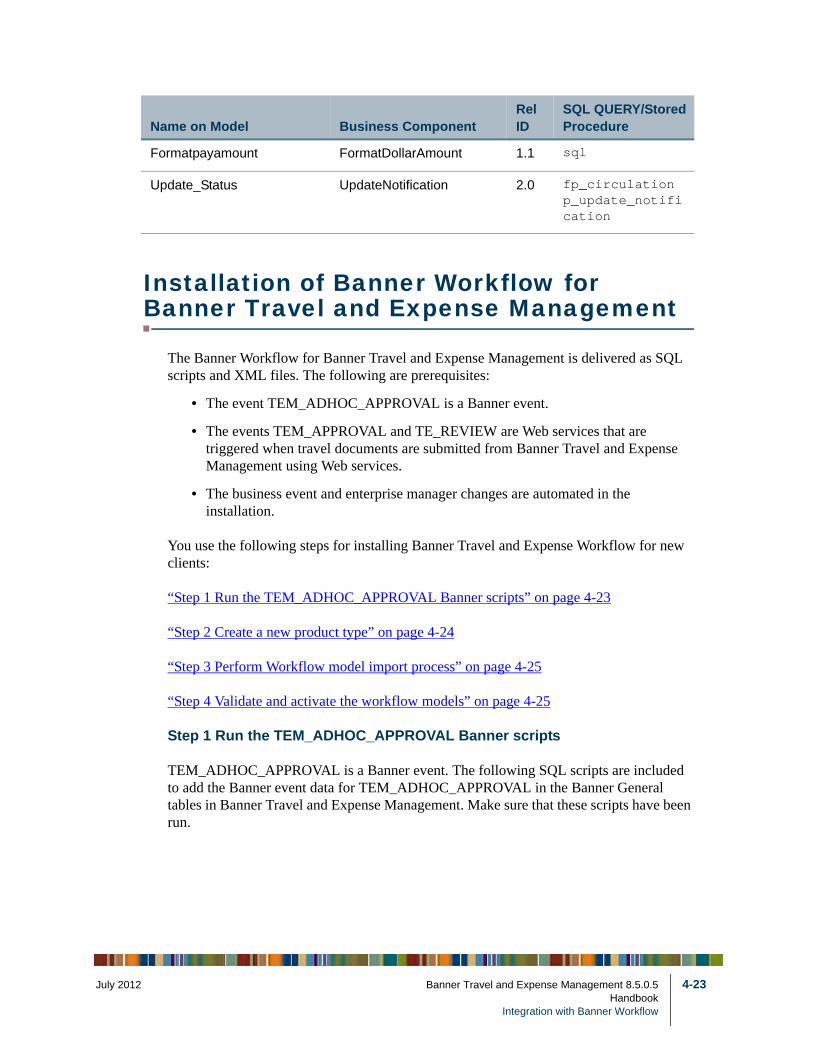
July 201
Installation of Banner Workflow for Banner Travel and Expense Management
The Banner Workflow for Banner Travel and Expense Management is delivered as SQL scripts and XML files. The following are prerequisites:
• The event TEM_ADHOC_APPROVAL is a Banner event.
• The events TEM_APPROVAL and TE_REVIEW are Web services that are triggered when travel documents are submitted from Banner Travel and Expense Management using Web services.
• The business event and enterprise manager changes are automated in the installation.
You use the following steps for installing Banner Travel and Expense Workflow for new clients:
“Step 1 Run the TEM_ADHOC_APPROVAL Banner scripts” on page 4-23
“Step 2 Create a new product type” on page 4-24
“Step 3 Perform Workflow model import process” on page 4-25
“Step 4 Validate and activate the workflow models” on page 4-25
Step 1 Run the TEM_ADHOC_APPROVAL Banner scripts
TEM_ADHOC_APPROVAL is a Banner event. The following SQL scripts are included to add the Banner event data for TEM_ADHOC_APPROVAL in the Banner General tables in Banner Travel and Expense Management. Make sure that these scripts have been run.
Formatpayamount FormatDollarAmount 1.1 sql
Update_Status UpdateNotification 2.0 fp_circulationp_update_notification
Name on Model Business ComponentRel ID
SQL QUERY/Stored Procedure
2 Banner Travel and Expense Management 8.5.0.5 4-23Handbook
Integration with Banner Workflow
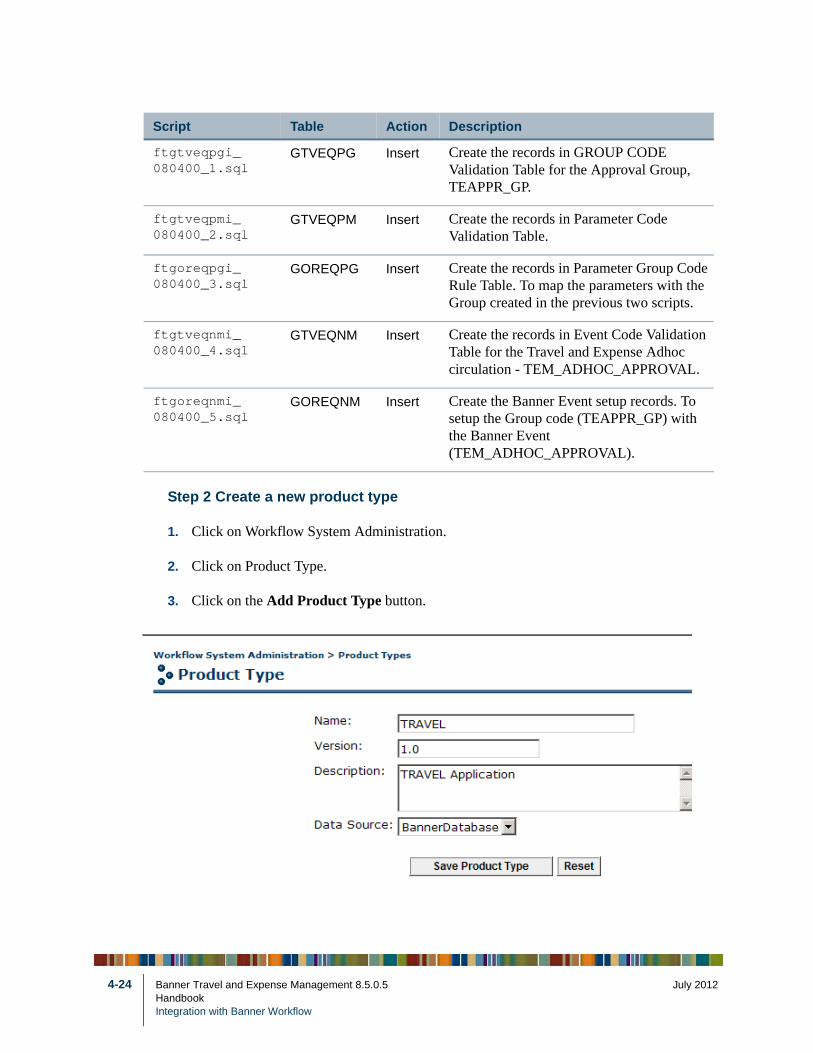
4-24
Step 2 Create a new product type
1. Click on Workflow System Administration.
2. Click on Product Type.
3. Click on the Add Product Type button.
Script Table Action Description
ftgtveqpgi_080400_1.sql
GTVEQPG Insert Create the records in GROUP CODE Validation Table for the Approval Group, TEAPPR_GP.
ftgtveqpmi_080400_2.sql
GTVEQPM Insert Create the records in Parameter Code Validation Table.
ftgoreqpgi_080400_3.sql
GOREQPG Insert Create the records in Parameter Group CodeRule Table. To map the parameters with the Group created in the previous two scripts.
ftgtveqnmi_080400_4.sql
GTVEQNM Insert Create the records in Event Code Validation Table for the Travel and Expense Adhoc circulation - TEM_ADHOC_APPROVAL.
ftgoreqnmi_080400_5.sql
GOREQNM Insert Create the Banner Event setup records. To setup the Group code (TEAPPR_GP) with the Banner Event (TEM_ADHOC_APPROVAL).
Banner Travel and Expense Management 8.5.0.5 July 2012HandbookIntegration with Banner Workflow
July 201
4. Under the Name type of TRAVEL, and select BannerDatabase as the Data Source.
5. Select Save Product Type.
Step 3 Perform Workflow model import process
For additional information on the import process, refer to the Banner Workflow Technical Integration Guide 8.0 and Banner Travel and Expense Management Upgrade Guide 8.5.
• import wfroot password te1_approval_080500.xml
• import wfroot password te2_review_080500.xml
• import wfroot password te3_eventdata_080500.xml
Step 4 Validate and activate the workflow models
NoteThe validate and activate process can be avoided if the status in Banner Workflow import XML files are changed from Test to Active.
After importing the XML files, log in to Banner Workflow with administrator privileges and perform the following steps to activate the TEMApproval, Version 1 and T&E_Review_Notification, Version 1 workflows.
TEMApproval, Version 1
1. Select Banner Workflow Modeler from the Administration menu.
This displays the Modeler window.
2. Select Find from the File menu.
The Find Workflow window is displayed
3. Enter TEMApproval in the Name field.
4. Click Search.
The search screen displays TEMApproval, Version 1.
5. Select TEMApproval, Version 1.
6. Click OK.
The TEMApproval - 1 workflow model is opened.
7. Click Validate.
The Validation: Successful with no errors message indicates that the installation is successful.
2 Banner Travel and Expense Management 8.5.0.5 4-25Handbook
Integration with Banner Workflow
4-26
8. Select Workflow > Set Status > Activate to activate TEMApproval, Version 1.
T&E_Review_Notification, Version 1
1. Select Banner Workflow Modeler from the Administration menu.
This displays the Modeler window.
2. Select Find from the File menu.
The Find Workflow window is displayed
3. Enter T&E_Review_Notification in the Name field.
4. Click Search.
The search screen displays T&E_Review_Notification, Versions 1.
5. Select T&E_Review_Notification, Version 1.
6. Click OK.
The T&E_Review_Notification - 1 workflow model is opened.
7. Click Validate.
The Validation: Successful with no errors message indicates that the installation is successful.
8. Select Workflow > Set Status > Activate to activate T&E_Review_Notification, Version 1.
Banner Travel and Expense Management 8.5.0.5 July 2012HandbookIntegration with Banner Workflow
July 201
5 Configuration of Banner Document Management Suite
The Banner® Document Management Suite (BDMS) enables you to add attachments, such as receipts and other expense-related documents, for any estimated or actual expense listed on an authorization or expense report.
Banner Travel and Expense Management leverages the ApplicationXtender Web Services (also known as ApplicationXtender or AX API Services) module in BDMS. The Web Services module is required for Luminis® Platform integration to BDMS that can be used with Banner Travel and Expense Management. If your institution does not own the Web Services module, then it would need to be licensed in addition to other BDMS components already present.
Refer to the Banner Document Management Suite Installation Guide for instructions on BDMS installation and upgrades.
Prerequisites
The following must be installed prior to completing the instructions in this chapter:
• Banner Document Management Suite 8.3 or higher
• ApplicationXtender 5.40.322
• Banner Finance 8.5.0.3 or higher
2 Banner Travel and Expense Management 8.5.0.5 5-1Handbook
Configuration of Banner Document Management Suite
5-2
Set up BDMS and Banner Travel and Expense Management in ApplicationXtender
To set up BDMS and Banner Travel and Expense Management in ApplicationXtender, perform the following steps.
1. Install ApplicationXtender Web Services 5.40 SP1 (version 5.40.322) on the BDMS ApplicationXtender server.
Refer to EMC ApplicationXtender Web Services Administrator's Guide for installation and configuration steps. When setting the User Path for AX Web Services, please specify the path in UNC path format, for example, \\server\folder
NoteWhen configuring the rendering cache folder for ApplicationXtender Rendering Server, you also need to specify the path in UNC path format, for example, \\server\folder, to make the integration work properly.
2. Extract the create_b_f_tvlexp_app.xml file from bdmssetup80200u.trz to a location using ApplicationXtender.
NoteIf you are using FTP to move your files from a non-Windows system to your Windows system, you should transfer your XML file in binary mode.
3. Create the B-F-TVLEXP application using the following steps:
3.1. If you are not using DiskXtender, open the extracted XML file in an editor and perform a search and replace operations on the XML. Search for the following text:
\\MACHINE_NAME\SHARE_NAME\
3.2. Replace the MACHINE_NAME\SHARE_NAME with the actual storage location of your application.
3.3. Access the server where ApplicationXtender is installed.
3.4. Log in to the ApplicationXtender AppGen tool as SYSOP.
3.5. Select the data source you created in an earlier step.
3.6. Select File > Import and browse to the location of the create_b_f_tvlexp_app.xml file.
Banner Travel and Expense Management 8.5.0.5 July 2012HandbookConfiguration of Banner Document Management Suite
July 201
3.7. Click Next to process the import.
You should receive a message indicating success.
NoteIf you receive a warning message, contact the Ellucian® support immediately.
3.8. Click Finish to complete the import and create the B-F-TVLEXP application.
3.9. Run the following test in SQL*Plus to detect if the correct application number has been assigned. Ensure that the ApplicationXtender AppGen tool is open during this operation.
sqlplus otgmgr/password
SELECT appid FROM otgmgr.ae_apps
WHERE appname = 'B-F-TVLEXP'
WarningIf the SELECT statement results in any value other than 494 (including null), you should NOT continue any further, but should contact the Ellucian support for assistance.
4. Confirm the file object storage configuration locations for the new application in ApplicationXtender AppGen:
4.1. In the ApplicationXtender AppGen tool, expand the Applications node to view a list of all the installed applications.
4.2. Select the B-F-TVLEXP application in the list. Information about the application is displayed.
4.3. Select PATHS.
Ensure that the values displayed are correct.
For incorrect values, enter an appropriate path manually, select a value from the list of existing values, or use the browse feature to select a drive path.
5. Create the view of the key reference table (AE_RFSCT) for the B-F-TVLEXP application.
Location of required files: bdmssetup80200u.trz
5.1. Connect to the Banner database as OTGMGR and execute the following:
start aerf494view_080100_01
The new view, AE_RF494_VIEW, is created.
2 Banner Travel and Expense Management 8.5.0.5 5-3Handbook
Configuration of Banner Document Management Suite

5-4
6. Create a Banner Travel and Expense Management user account in ApplicationXtender.
This user account will be used as a service account to connect to the ApplicationXtender Web Services from the Banner Travel and Expense Management server.
6.1. Log in to the ApplicationXtender AppGen tool as SYSOP.
6.2. Select the data source you created in an earlier step.
6.3. Right-click and select Users > New.
This launches the New User wizard displaying the contents of the User tab.
6.4. Perform the following steps in the User tab:
6.4.1. Enter a unique User Name for Banner Travel and Expense Management. For example, TEWEBSVC.
6.4.2. Enter a Full Name for the user.
6.4.3. Enter a Password for the user and Verification of the password.
6.4.4. Click Next.
6.5. Go to the Groups tab and click Next.
6.6. Perform the following steps in the Profile tab.
6.6.1. Set Application to B-F-TVLEXP.
6.6.2. Click Full Privileges.
6.6.3. Select Global Profile for the Application.
6.6.4. Under Privileges, select Allow Multiple Logins.
6.7. Click Finish.
6.8. Exit the ApplicationXtender AppGen tool.
7. Create a shared folder on the BDMS (ApplicationXtender) server.
NoteThe name of this folder should reflect the type of its content and should conform to your institution’s naming convention standards.For example, BDMSWStemp.
Banner Travel and Expense Management 8.5.0.5 July 2012HandbookConfiguration of Banner Document Management Suite
July 201
8. Map network shared folders. Depending on what platform the Oracle Application Server (OAS) is installed, follow either step 8.1 or 8.2 below:
8.1. Windows: Ensure that the user who runs Oracle Application Server has read and write access to the shared folder created in step 7. If necessary, map a drive on the OAS to the shared folder
8.2. Non-windows: Mount the following shared folders from the server where the ApplicationXtender Web Service is installed to the server where the OAS is installed:
• AxUserPath
• RenderingCache
• BDMSWStemp
These mount points should be under the same directory structure. For example, the following are the shared folders:
• \\axserver\axuserpath
• \\axserver\rscache
• \\axserver\BDMSWStemp
You’d then create the mount points under the same directory as in the following sample directories:
• /axserver/axuserpath
• /axserver/rscache
• /axserver/BDMSWStemp
NoteAll these mounted shares should have read and write access from the OAS.
NoteInformation in steps 7 and 8 is used in configuring the bdmswsclient.config file to integrate BDMS with Banner Travel and Expense Management as described in step 8 of Chapter 8, “Configuration and Deployment of Banner Travel and Expense Management”
2 Banner Travel and Expense Management 8.5.0.5 5-5Handbook
Configuration of Banner Document Management Suite
5-6
Install BDMS Garbage Collection Service
The BDMS Garbage Collection Service runs as a standard Windows service, monitors certain directories, and removes obsolete temporary files.
To install this service, install the gcsvc.zip file located at ext80200u and perform the following steps:
1. Extract the contents of gcsvc.zip to a temporary folder on the server where ApplicationXtender Web Services is installed.
2. Run Setup.exe to install the service.
NoteBy default, this component is installed to the following directory: C:\Program Files\SunGard Higher Education\BDMS Garbage Collection Service.
3. Navigate to the installation directory and run sungardhe.bdms.gcsvc.ui.exe.
4. Add directories that need to be monitored and set the RecycleTime. Both the BDMSWStemp and AxUserPath directories need to be monitored so that the temporary files can be removed promptly to save disk space.
5. The RecycleTime is in minutes. Any subfolders within the monitored directory are deleted after the RecycleTime has passed.
6. Restart the BDMS Garbage Collection Service from Windows Services control panel.
Setting up cross-application queries for Banner
Since there isn’t a Banner Finance baseline form specifically for Banner Travel and Expense Management, you must decide which Banner Finance baseline forms you want to query Banner Travel and Expense Management documents in BDMS. Once that is decided, you must set up a cross-application query for both B-F-DOCS and B-F-TVLEXP in ApplicationXtender. You would then associate that cross-application query to the Banner INB form using the BDMS Context and Parameter Rules form EXABCXT as outlined in the following procedure.
NoteB-F-DOCS (Finance Purchasing/AP) contains documents that relate to documents for B-F-TVLEXP (Finance Travel & Expense Management).
Banner Travel and Expense Management 8.5.0.5 July 2012HandbookConfiguration of Banner Document Management Suite

July 201
For each of the BDMS applications listed above:
1. Set up a cross-application query in ApplicationXtender using the procedures outlined in EMC Documentum Document Manager (or Web Access) User Guide.
NoteSince both of these applications have related documents, it is best to set up the cross-application query under both applications in ApplicationXtender.
The applications defined in the query are: B-F-DOCS and B-F-TVLEXP.
The common index field between the two applications is DOCUMENT ID.
2. Associate the cross-application query to a Banner Finance form.
NoteContext and Parameter Rules are delivered for the majority of Banner forms as part of the baseline install of BDMS.
3. Do the following to find out if the Banner Finance form you wish to use with the cross-application query is already setup in BDMS with Context and Parameter Rules:
3.1. Access the BDMS Context Determination form (EXABCXT).
3.2. Enter the form for which the rule is being created in the Form Name or Pattern field, then select Enter.
WarningThe Banner form should appear in the list of applications.
4. Do the following if the Banner Finance form is listed:
4.1. Verify that one of the applications used in the cross-application query is defined in the Application Name field in the Form Context block.
4.2. Add the cross-application query name in the Saved Query field in the Form Context block.
4.3. Save your changes.
5. If the Banner Finance form is not listed, follow the instructions in the Create New Context Rules section of this chapter.
NoteWhen setting up the new context rules, add the cross-application query name in the Saved Query field in the Form Context block.
2 Banner Travel and Expense Management 8.5.0.5 5-7Handbook
Configuration of Banner Document Management Suite

5-8
Banner Travel and Expense Management 8.5.0.5 July 2012HandbookConfiguration of Banner Document Management Suite
July 201
6 Per Diem Rules Engine
Before you can use the Travel and Expense per diem functionality, you will need to implement the Per Diem Rules Engine, which involves installing the Drools Guvnor application and then setting it up for Banner® Travel and Expense Management (TEM).
This chapter provides information and instructions for the activities you’ll need to perform.
NoteThe majority of steps and procedures in this chapter are intended to be performed once when you first implement the per diem functionality. The steps are also intended to be performed in the order they appear. It is important that you follow this order.
Implementation of the Per Diem Rules Engine
Drools Guvnor is a component of Drools. It is a Web application that provides the primary interface for Drools users to manage business rules. Guvnor uses a repository to persist rules. Guvnor provides functionality to inspect, modify, organize, and deploy rules, and to track changes made to rules.
Drools Guvnor is provided with the Banner Travel and Expense Management Per Diem module as a separate Web application. It needs to be installed and configured properly for the Per Diem module to function.
As part of the Drools Guvnor installation, Ellucian has created and delivered a standard set of per diem rules to support the Banner Travel and Expense Management Per Diem module. In most cases, these rules will provide everything you need to implement this functionality for your institution.
The standard set of per diem rules is delivered as seed data that includes the following components.
• the per diem domain model containing definitions for the per diem objects
• a Per Diem Domain Specific Language definition
• a set of per diem rules
• a Per Diem Rules Package (com.sungardhe.pdRules) that contains the above components
• a package snapshot of the rules package
2 Banner Travel and Expense Management 8.5.0.5 6-1Handbook
Per Diem Rules Engine
6-2
• a number of predefined per diem rules categories
• a number of predefined user permission mappings
After Drools Guvnor is installed as per the instructions in the following sections, you will want to examine the prepackaged rules to determine the ones you want to enable or disable. If after configuring the standard rules for use, you may need or want to create your own custom rules. For more information on the prepackaged rules refer to Appendix D, “Customization of Per Diem Rules”.
Install Drools Guvnor
To install Drools Guvnor for use with Oracle Application Sever 10.1.x, you need the following:
• Oracle Application Server (OAS) 10.1.3.x
• Java Virtual Machine (JVM). As part of the JVM, JDK 1.6 is required.
• Drools Guvnor. A Drools Guvnor application archive (.war) will be provided as part of the installation package.
Once you have the proper components set up and have obtained the Drools Guvnor installation package, use the following procedure to install it.
NoteThe rules oc4j container is where the guvnor.war file will be deployed. You can either create and use a new OC4J container to deploy guvnor.war or you can use the one previously set up to support Banner Travel and Expense Management.
1. Create Per Diem Rules Module seed data as follows:
1.1. On the OAS server, create a repository folder called guvnor_repository.
The user who starts OAS should have read/write permissions for this folder.
1.2. From the $BANNER_HOME/travel/install folder, locate and extract the contents of the guvnor_repository.zip to the guvnor_repository folder you just created.
Make sure the user who starts OAS has read/write permissions to all the files in the guvnor_repository folder by performing the extract of the .zip using the OAS user ID.
Banner Travel and Expense Management 8.5.0.5 July 2012HandbookPer Diem Rules Engine
July 201
2. Configure the guvnor.war file as follows:
2.1. Create a folder called travelRules and copy the guvnor.war file into it.
2.2. Within the travelRules folder, create a folder rulesExtract and unzip the guvnor.war file into this new folder as follows:
UNIX
jar xvf ../guvnor.war
Windows
jar xvf ..\guvnor.war
2.3. From the extracted guvnor.war, use a text editor to open the following file:
rulesExtract/WEB-INF/components.xml
2.4. Configure the rules repository location as follows:
Drools Guvnor utilizes a rules repository to maintain rules and other artifacts. By default the repository is file based and the files are created in the folder where the application server is started.
NotePlace the rules repository to a folder that is outside of application server installation directory.
2.4.1. Locate the following line:
<key>repository.root.directory</key><value>your _rules_repository_path</value>
2.4.2. If the above line is commented out, then uncomment the line.
2.4.3. Edit the location between the <value></value> elements to point to the absolute path of the guvnor_repository folder where the guvnor_repository.zip was extracted.
The value should look similar to the following, allowing for your own environmental variables.
<key>repository.root.directory</key><value>/u01/app/oracle/10gAS/10.1.3/j2ee/tvlexp_s10b80/guvnor_repository</value>
NoteUser authentication and authorization are enabled for Drools Guvnor by default in the guvnor.war file. If you want to disable either feature, please refer to the instructions in the section “Disabling Drools authentication and authorization” in Appendix D, “Customization of Per Diem Rules” before reconstructing the .war as outlined in the next step.
2 Banner Travel and Expense Management 8.5.0.5 6-3Handbook
Per Diem Rules Engine
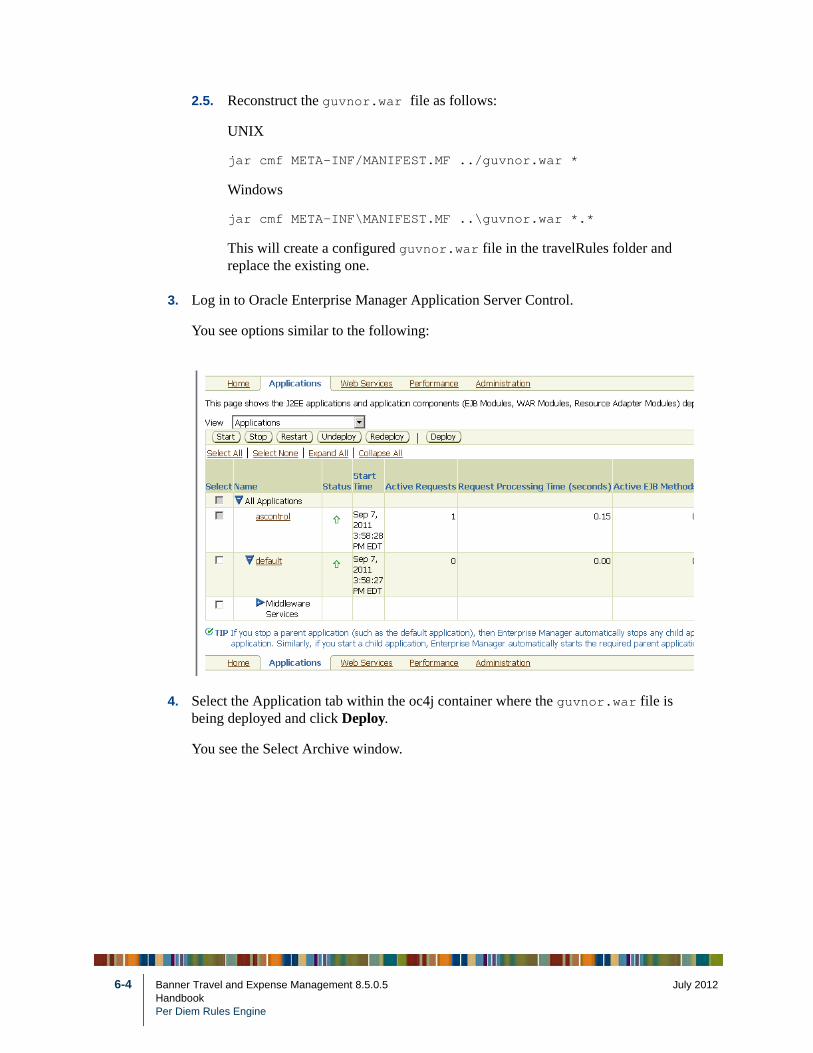
6-4
2.5. Reconstruct the guvnor.war file as follows:
UNIX
jar cmf META-INF/MANIFEST.MF ../guvnor.war *
Windows
jar cmf META-INF\MANIFEST.MF ..\guvnor.war *.*
This will create a configured guvnor.war file in the travelRules folder and replace the existing one.
3. Log in to Oracle Enterprise Manager Application Server Control.
You see options similar to the following:
4. Select the Application tab within the oc4j container where the guvnor.war file is being deployed and click Deploy.
You see the Select Archive window.
Banner Travel and Expense Management 8.5.0.5 July 2012HandbookPer Diem Rules Engine
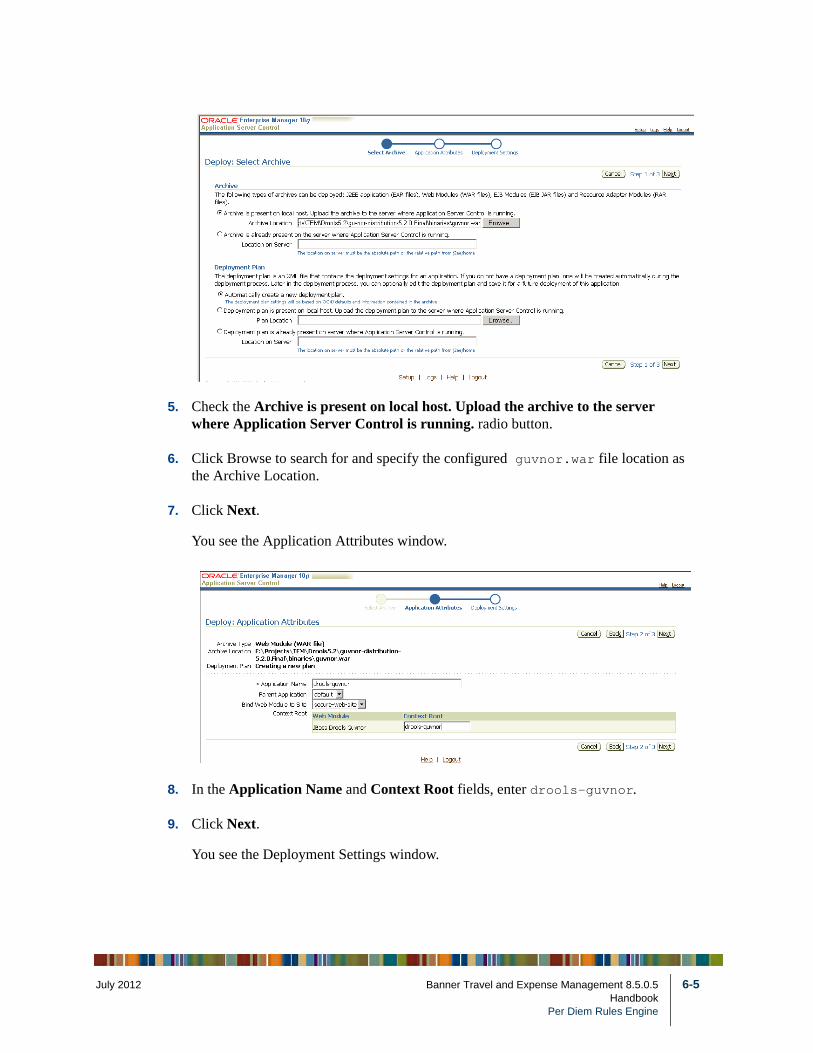
July 201
5. Check the Archive is present on local host. Upload the archive to the server where Application Server Control is running. radio button.
6. Click Browse to search for and specify the configured guvnor.war file location as the Archive Location.
7. Click Next.
You see the Application Attributes window.
8. In the Application Name and Context Root fields, enter drools-guvnor.
9. Click Next.
You see the Deployment Settings window.
2 Banner Travel and Expense Management 8.5.0.5 6-5Handbook
Per Diem Rules Engine
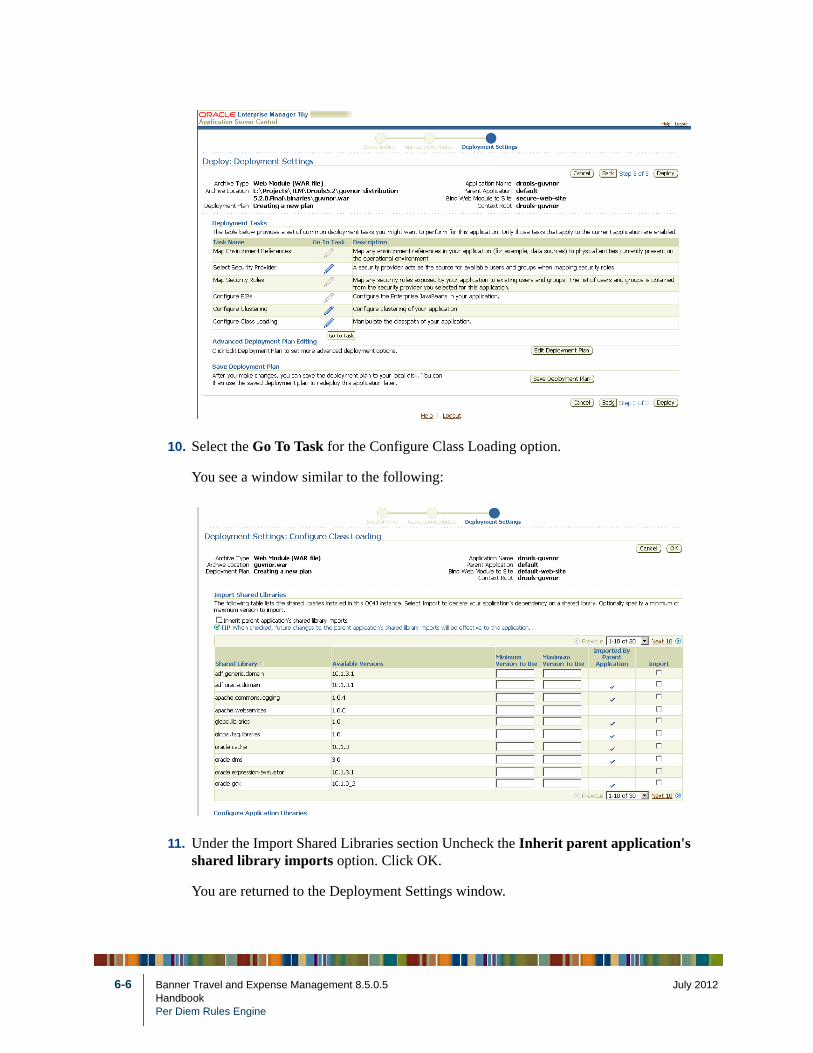
6-6
10. Select the Go To Task for the Configure Class Loading option.
You see a window similar to the following:
11. Under the Import Shared Libraries section Uncheck the Inherit parent application's shared library imports option. Click OK.
You are returned to the Deployment Settings window.
Banner Travel and Expense Management 8.5.0.5 July 2012HandbookPer Diem Rules Engine
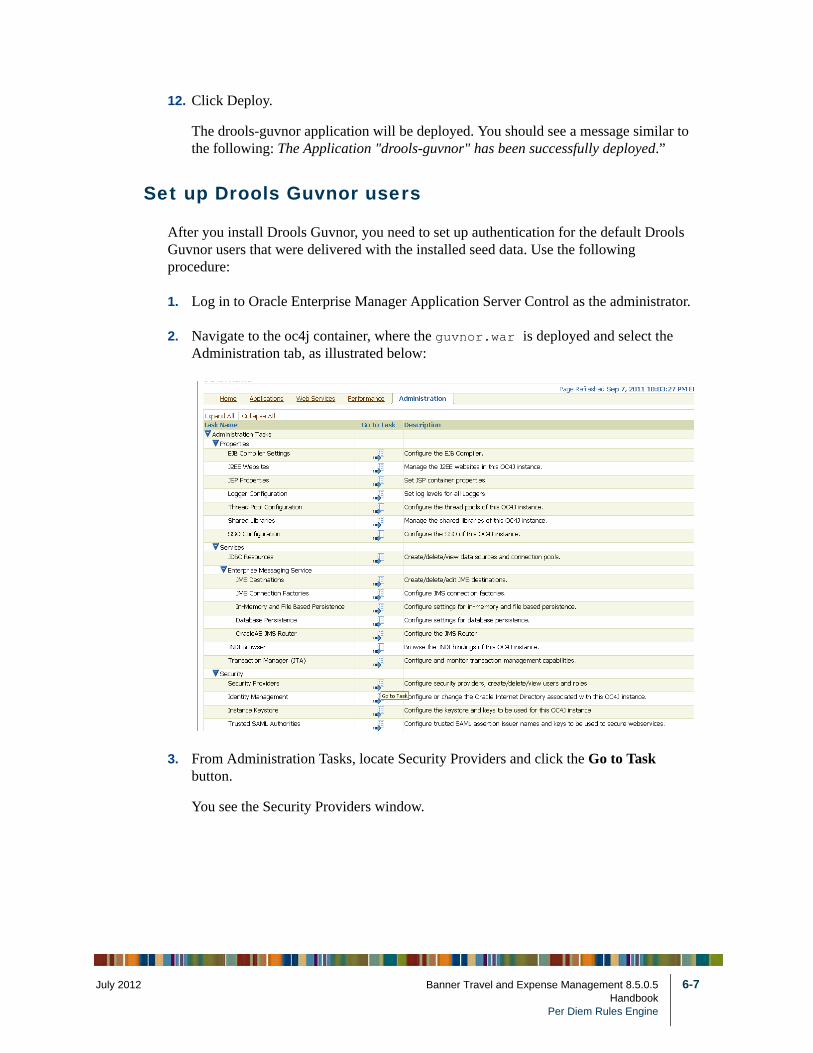
July 201
12. Click Deploy.
The drools-guvnor application will be deployed. You should see a message similar to the following: The Application "drools-guvnor" has been successfully deployed.”
Set up Drools Guvnor users
After you install Drools Guvnor, you need to set up authentication for the default Drools Guvnor users that were delivered with the installed seed data. Use the following procedure:
1. Log in to Oracle Enterprise Manager Application Server Control as the administrator.
2. Navigate to the oc4j container, where the guvnor.war is deployed and select the Administration tab, as illustrated below:
3. From Administration Tasks, locate Security Providers and click the Go to Task button.
You see the Security Providers window.
2 Banner Travel and Expense Management 8.5.0.5 6-7Handbook
Per Diem Rules Engine
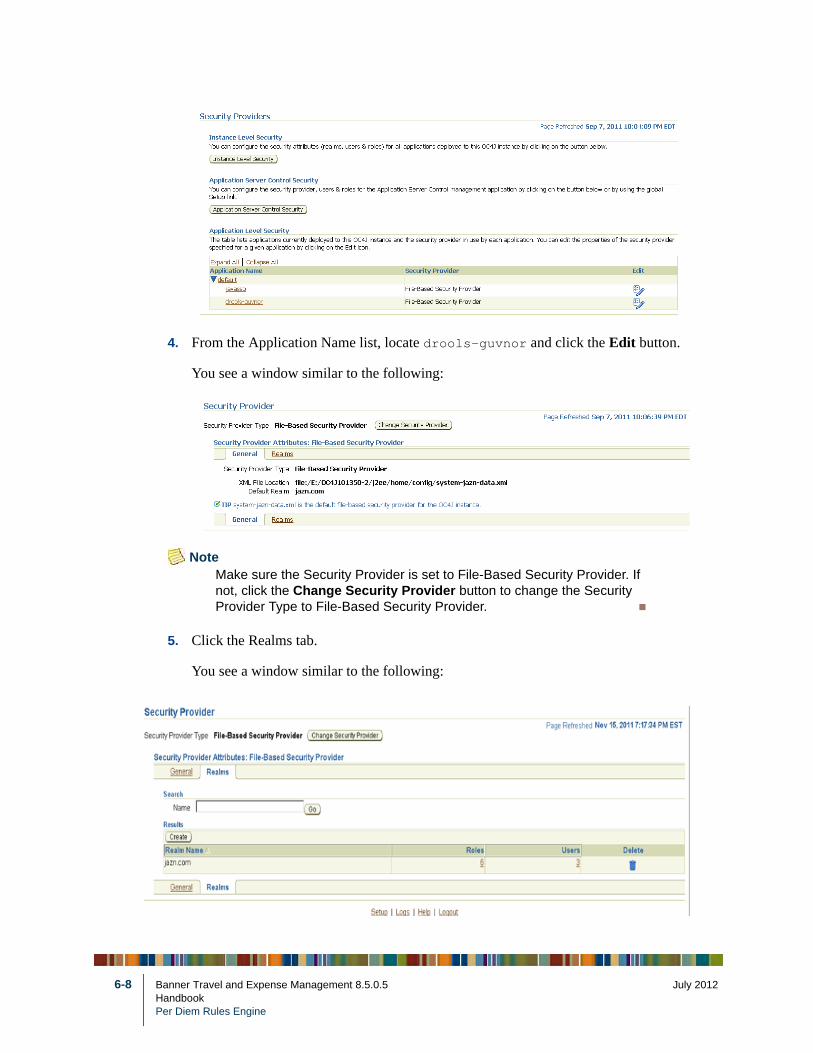
6-8
4. From the Application Name list, locate drools-guvnor and click the Edit button.
You see a window similar to the following:
NoteMake sure the Security Provider is set to File-Based Security Provider. If not, click the Change Security Provider button to change the Security Provider Type to File-Based Security Provider.
5. Click the Realms tab.
You see a window similar to the following:
Banner Travel and Expense Management 8.5.0.5 July 2012HandbookPer Diem Rules Engine
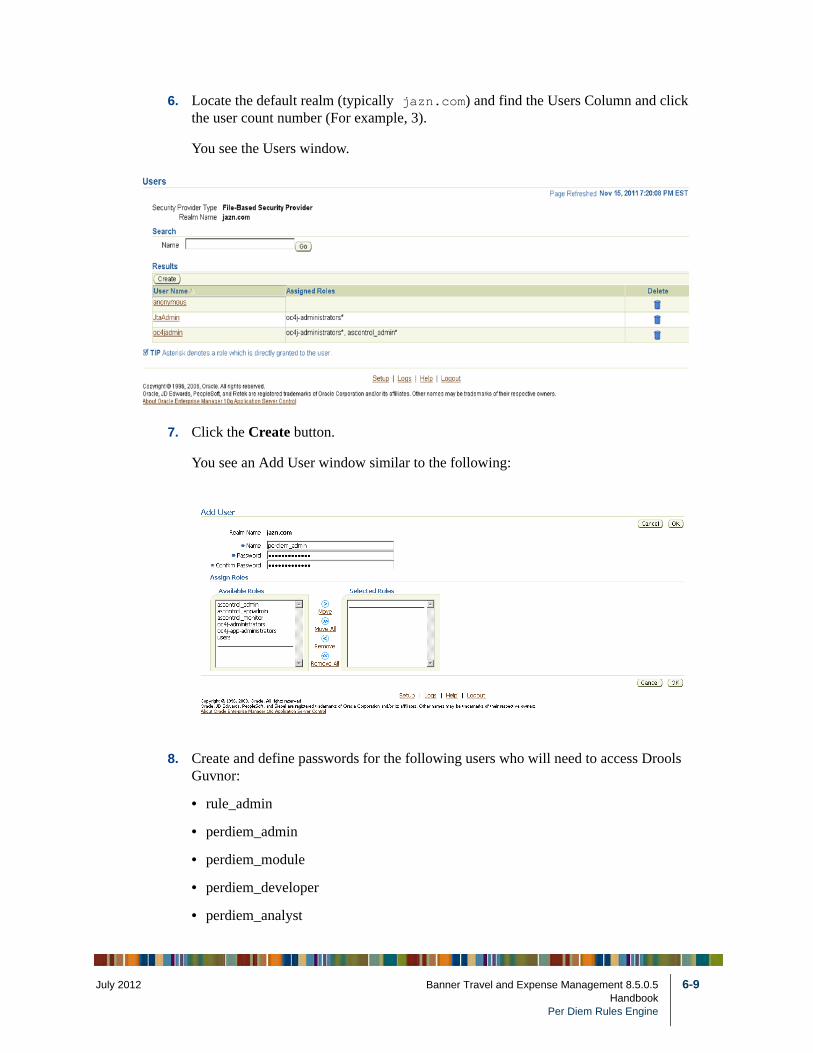
July 201
6. Locate the default realm (typically jazn.com) and find the Users Column and click the user count number (For example, 3).
You see the Users window.
7. Click the Create button.
You see an Add User window similar to the following:
8. Create and define passwords for the following users who will need to access Drools Guvnor:
• rule_admin
• perdiem_admin
• perdiem_module
• perdiem_developer
• perdiem_analyst
2 Banner Travel and Expense Management 8.5.0.5 6-9Handbook
Per Diem Rules Engine
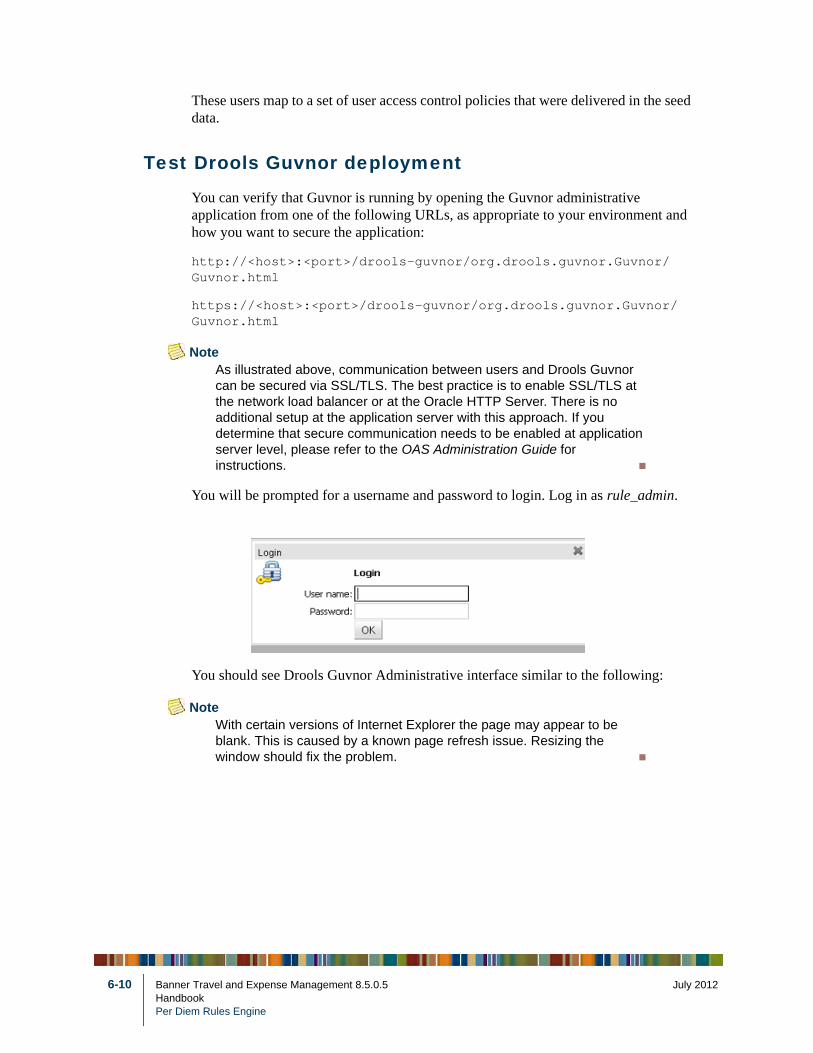
6-10
These users map to a set of user access control policies that were delivered in the seed data.
Test Drools Guvnor deployment
You can verify that Guvnor is running by opening the Guvnor administrative application from one of the following URLs, as appropriate to your environment and how you want to secure the application:
http://<host>:<port>/drools-guvnor/org.drools.guvnor.Guvnor/Guvnor.html
https://<host>:<port>/drools-guvnor/org.drools.guvnor.Guvnor/Guvnor.html
NoteAs illustrated above, communication between users and Drools Guvnor can be secured via SSL/TLS. The best practice is to enable SSL/TLS at the network load balancer or at the Oracle HTTP Server. There is no additional setup at the application server with this approach. If you determine that secure communication needs to be enabled at application server level, please refer to the OAS Administration Guide for instructions.
You will be prompted for a username and password to login. Log in as rule_admin.
You should see Drools Guvnor Administrative interface similar to the following:
NoteWith certain versions of Internet Explorer the page may appear to be blank. This is caused by a known page refresh issue. Resizing the window should fix the problem.
Banner Travel and Expense Management 8.5.0.5 July 2012HandbookPer Diem Rules Engine
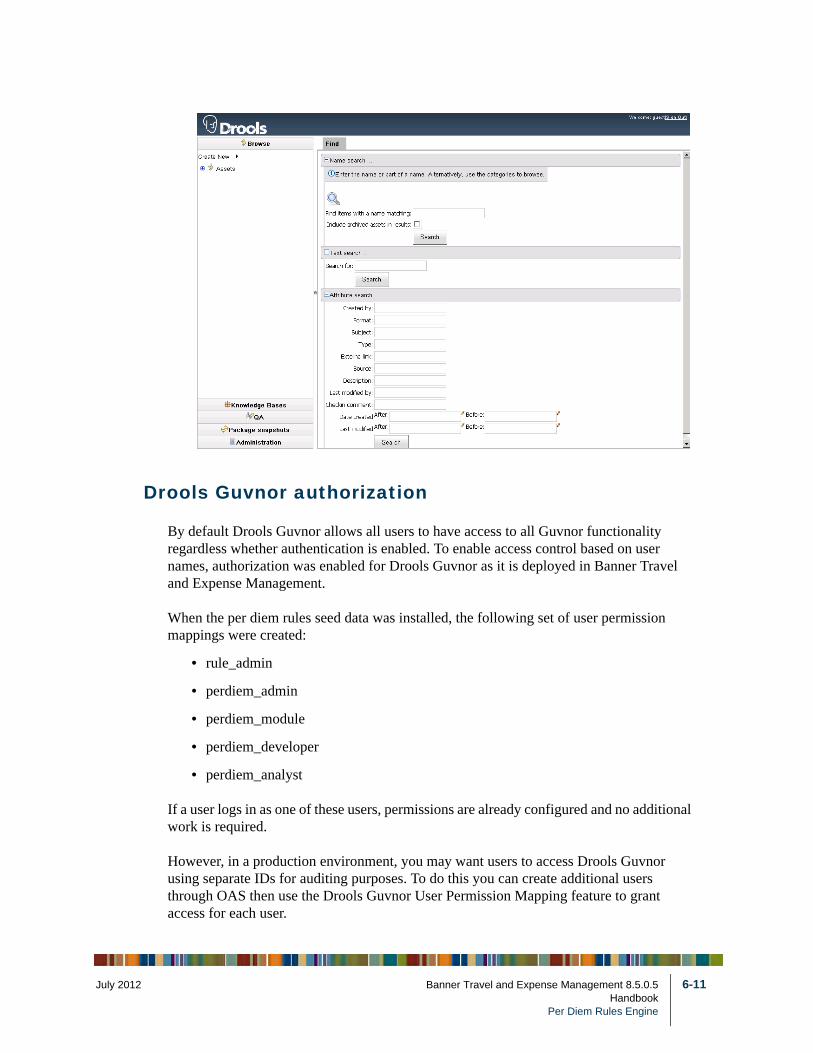
July 201
Drools Guvnor authorization
By default Drools Guvnor allows all users to have access to all Guvnor functionality regardless whether authentication is enabled. To enable access control based on user names, authorization was enabled for Drools Guvnor as it is deployed in Banner Travel and Expense Management.
When the per diem rules seed data was installed, the following set of user permission mappings were created:
• rule_admin
• perdiem_admin
• perdiem_module
• perdiem_developer
• perdiem_analyst
If a user logs in as one of these users, permissions are already configured and no additional work is required.
However, in a production environment, you may want users to access Drools Guvnor using separate IDs for auditing purposes. To do this you can create additional users through OAS then use the Drools Guvnor User Permission Mapping feature to grant access for each user.
2 Banner Travel and Expense Management 8.5.0.5 6-11Handbook
Per Diem Rules Engine
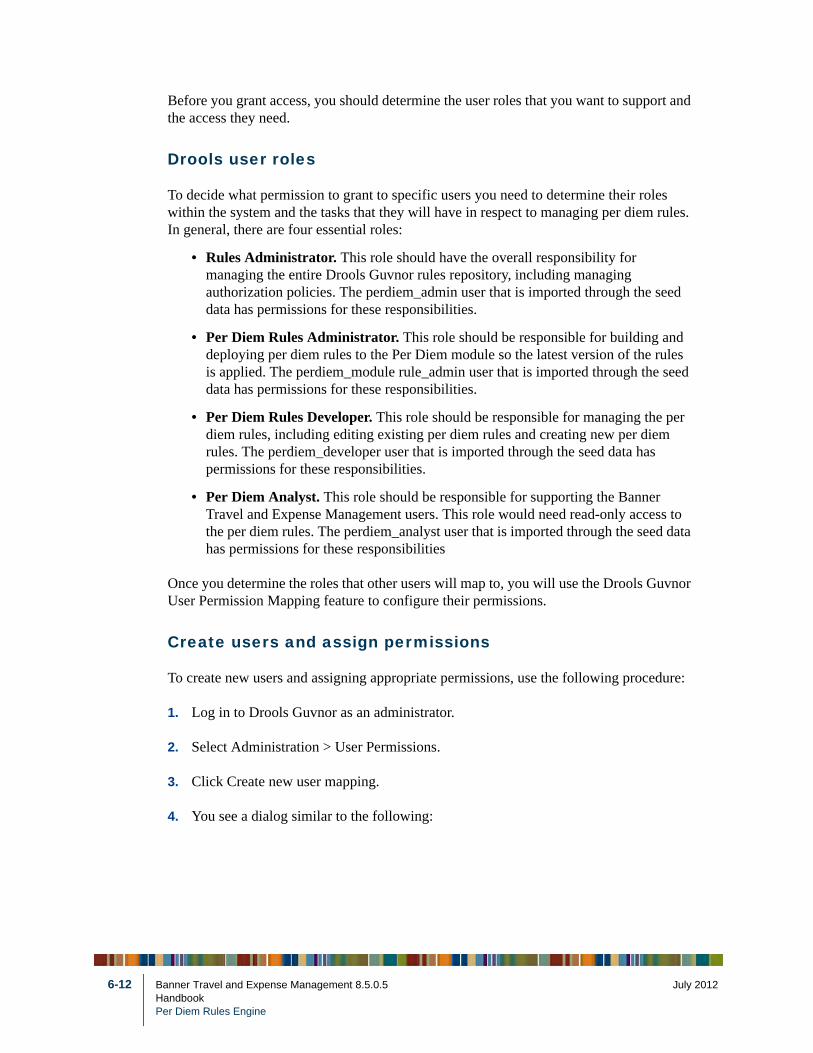
6-12
Before you grant access, you should determine the user roles that you want to support and the access they need.
Drools user roles
To decide what permission to grant to specific users you need to determine their roles within the system and the tasks that they will have in respect to managing per diem rules. In general, there are four essential roles:
• Rules Administrator. This role should have the overall responsibility for managing the entire Drools Guvnor rules repository, including managing authorization policies. The perdiem_admin user that is imported through the seed data has permissions for these responsibilities.
• Per Diem Rules Administrator. This role should be responsible for building and deploying per diem rules to the Per Diem module so the latest version of the rules is applied. The perdiem_module rule_admin user that is imported through the seed data has permissions for these responsibilities.
• Per Diem Rules Developer. This role should be responsible for managing the per diem rules, including editing existing per diem rules and creating new per diem rules. The perdiem_developer user that is imported through the seed data has permissions for these responsibilities.
• Per Diem Analyst. This role should be responsible for supporting the Banner Travel and Expense Management users. This role would need read-only access to the per diem rules. The perdiem_analyst user that is imported through the seed data has permissions for these responsibilities
Once you determine the roles that other users will map to, you will use the Drools Guvnor User Permission Mapping feature to configure their permissions.
Create users and assign permissions
To create new users and assigning appropriate permissions, use the following procedure:
1. Log in to Drools Guvnor as an administrator.
2. Select Administration > User Permissions.
3. Click Create new user mapping.
4. You see a dialog similar to the following:
Banner Travel and Expense Management 8.5.0.5 July 2012HandbookPer Diem Rules Engine
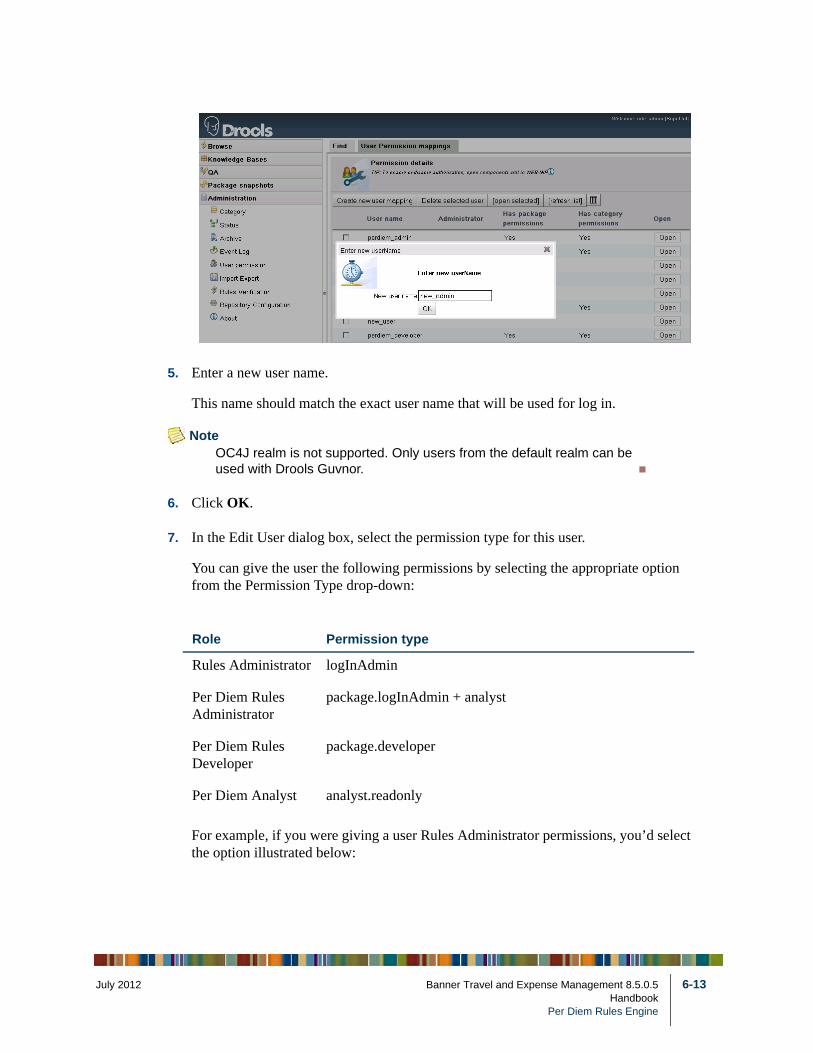
July 201
5. Enter a new user name.
This name should match the exact user name that will be used for log in.
NoteOC4J realm is not supported. Only users from the default realm can be used with Drools Guvnor.
6. Click OK.
7. In the Edit User dialog box, select the permission type for this user.
You can give the user the following permissions by selecting the appropriate option from the Permission Type drop-down:
For example, if you were giving a user Rules Administrator permissions, you’d select the option illustrated below:
Role Permission type
Rules Administrator logInAdmin
Per Diem Rules Administrator
package.logInAdmin + analyst
Per Diem Rules Developer
package.developer
Per Diem Analyst analyst.readonly
2 Banner Travel and Expense Management 8.5.0.5 6-13Handbook
Per Diem Rules Engine
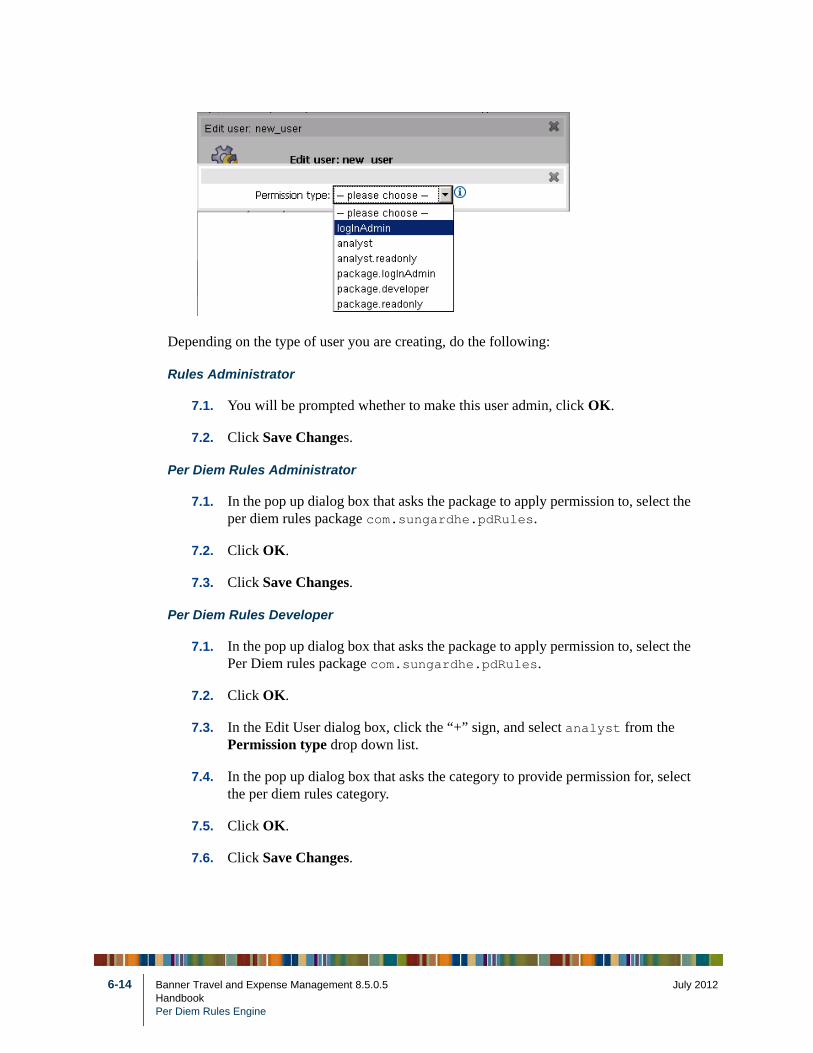
6-14
Depending on the type of user you are creating, do the following:
Rules Administrator
7.1. You will be prompted whether to make this user admin, click OK.
7.2. Click Save Changes.
Per Diem Rules Administrator
7.1. In the pop up dialog box that asks the package to apply permission to, select the per diem rules package com.sungardhe.pdRules.
7.2. Click OK.
7.3. Click Save Changes.
Per Diem Rules Developer
7.1. In the pop up dialog box that asks the package to apply permission to, select the Per Diem rules package com.sungardhe.pdRules.
7.2. Click OK.
7.3. In the Edit User dialog box, click the “+” sign, and select analyst from the Permission type drop down list.
7.4. In the pop up dialog box that asks the category to provide permission for, select the per diem rules category.
7.5. Click OK.
7.6. Click Save Changes.
Banner Travel and Expense Management 8.5.0.5 July 2012HandbookPer Diem Rules Engine
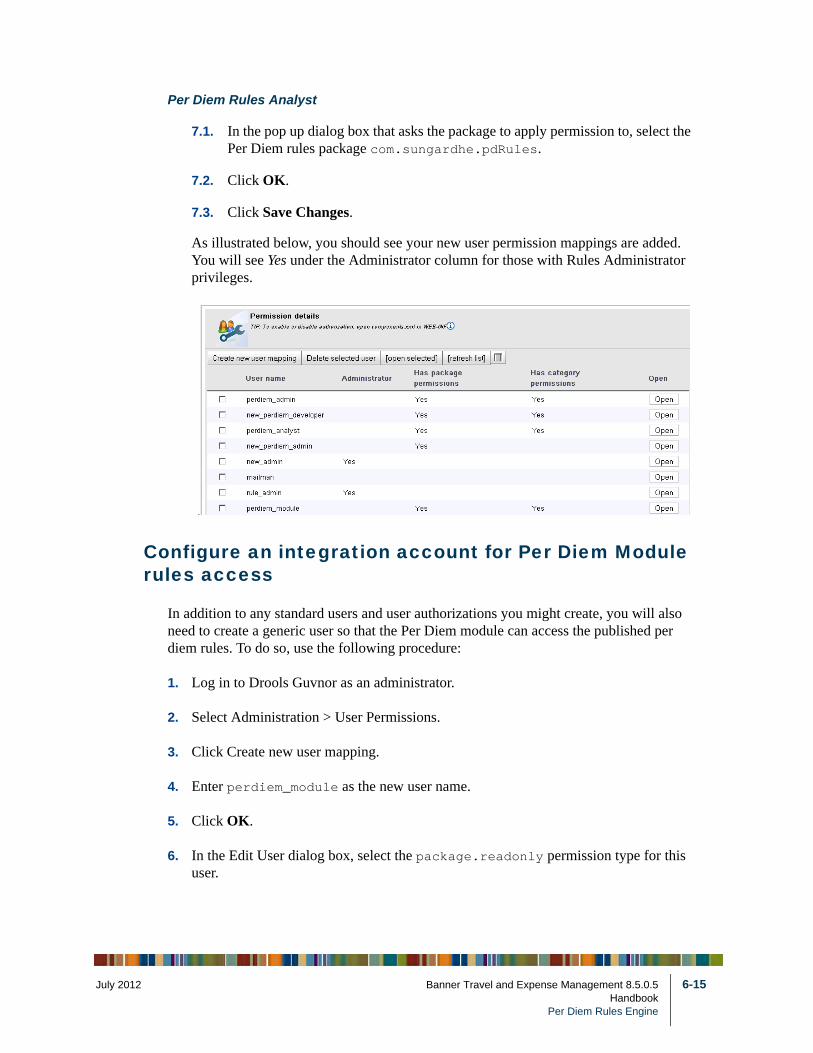
July 201
Per Diem Rules Analyst
7.1. In the pop up dialog box that asks the package to apply permission to, select the Per Diem rules package com.sungardhe.pdRules.
7.2. Click OK.
7.3. Click Save Changes.
As illustrated below, you should see your new user permission mappings are added. You will see Yes under the Administrator column for those with Rules Administrator privileges.
Configure an integration account for Per Diem Module rules access
In addition to any standard users and user authorizations you might create, you will also need to create a generic user so that the Per Diem module can access the published per diem rules. To do so, use the following procedure:
1. Log in to Drools Guvnor as an administrator.
2. Select Administration > User Permissions.
3. Click Create new user mapping.
4. Enter perdiem_module as the new user name.
5. Click OK.
6. In the Edit User dialog box, select the package.readonly permission type for this user.
2 Banner Travel and Expense Management 8.5.0.5 6-15Handbook
Per Diem Rules Engine

6-16
7. In the pop up dialog box that asks the package to apply permission to, select the Per Diem rules package com.sungardhe.pdRules.
8. Click OK.
9. Click Save Changes.
Set up Per Diem Rules
Most of the seed rules can be used as delivered; however, some rules may be in a disabled state. The per diem rules are organized into rule assets. Each asset is assigned a name that reflects the general purpose of its rules (such as Per Diem Lodging Rules).
NoteFor a comprehensive list of rule assets and the rules they contain, refer to the Appendix D, “Customization of Per Diem Rules”.
Each asset may be enabled or disabled. If an asset is disabled, then all the rules in that asset are disabled. However, the individual rules in an enabled asset can themselves be enabled or disabled based on a rule-level attribute. If the value is true (or the attribute is missing) then the rule is enabled, otherwise the rule is disabled.
After the seed data has been imported you will need to set up your per diem Rules to enable or disable them based on your institution’s travel policies. Once you enable or disable rules (either at the asset level or individually) you will need to rebuild the rules binary package and redeploy it.
The following sections provide information and procedures for these activities.
Enable or disable a rule asset
To enable or disable a rule asset you must log in to Drools Guvnor as the Per Diem Rules Developer or Per Diem Administrator role. Use the following procedure:
NoteIf you disable a rule asset, all rules that it contains will be disabled. However, you can enable or disable individual rules within an enabled asset as outlined in Enable or disable an individual rule.
1. Log in to Drools Guvnor.
2. Select the Knowledge Bases option.
Banner Travel and Expense Management 8.5.0.5 July 2012HandbookPer Diem Rules Engine
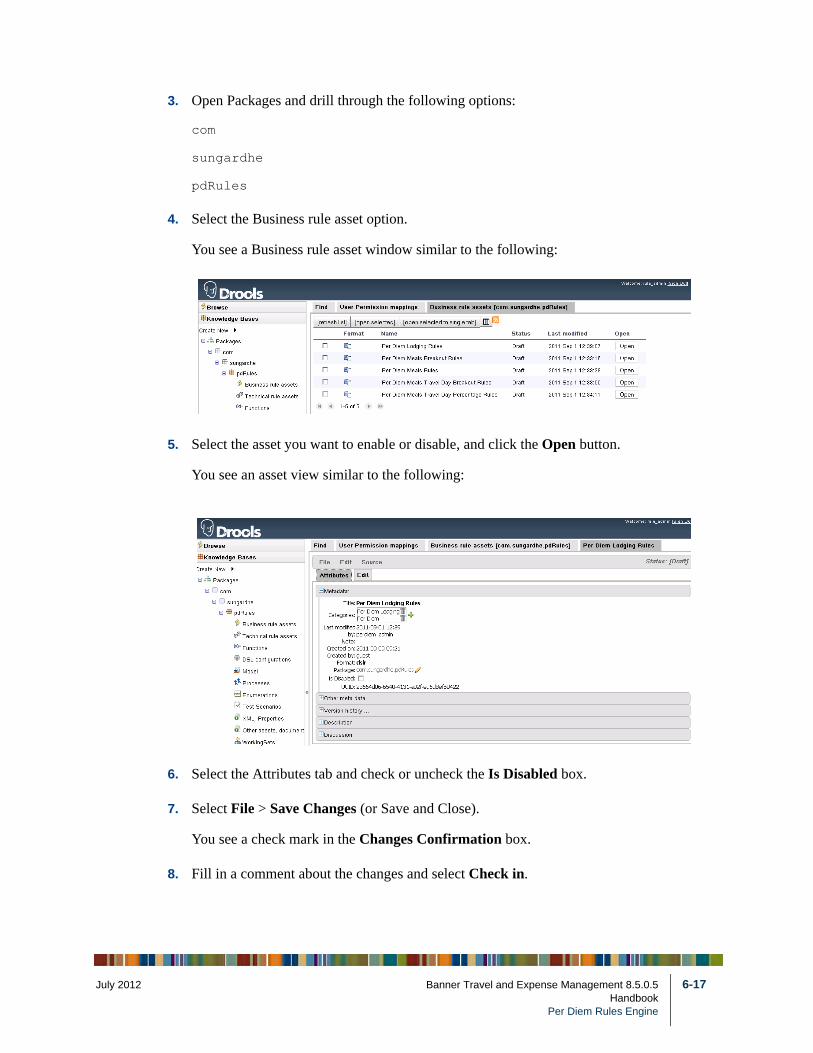
July 201
3. Open Packages and drill through the following options:
com
sungardhe
pdRules
4. Select the Business rule asset option.
You see a Business rule asset window similar to the following:
5. Select the asset you want to enable or disable, and click the Open button.
You see an asset view similar to the following:
6. Select the Attributes tab and check or uncheck the Is Disabled box.
7. Select File > Save Changes (or Save and Close).
You see a check mark in the Changes Confirmation box.
8. Fill in a comment about the changes and select Check in.
2 Banner Travel and Expense Management 8.5.0.5 6-17Handbook
Per Diem Rules Engine
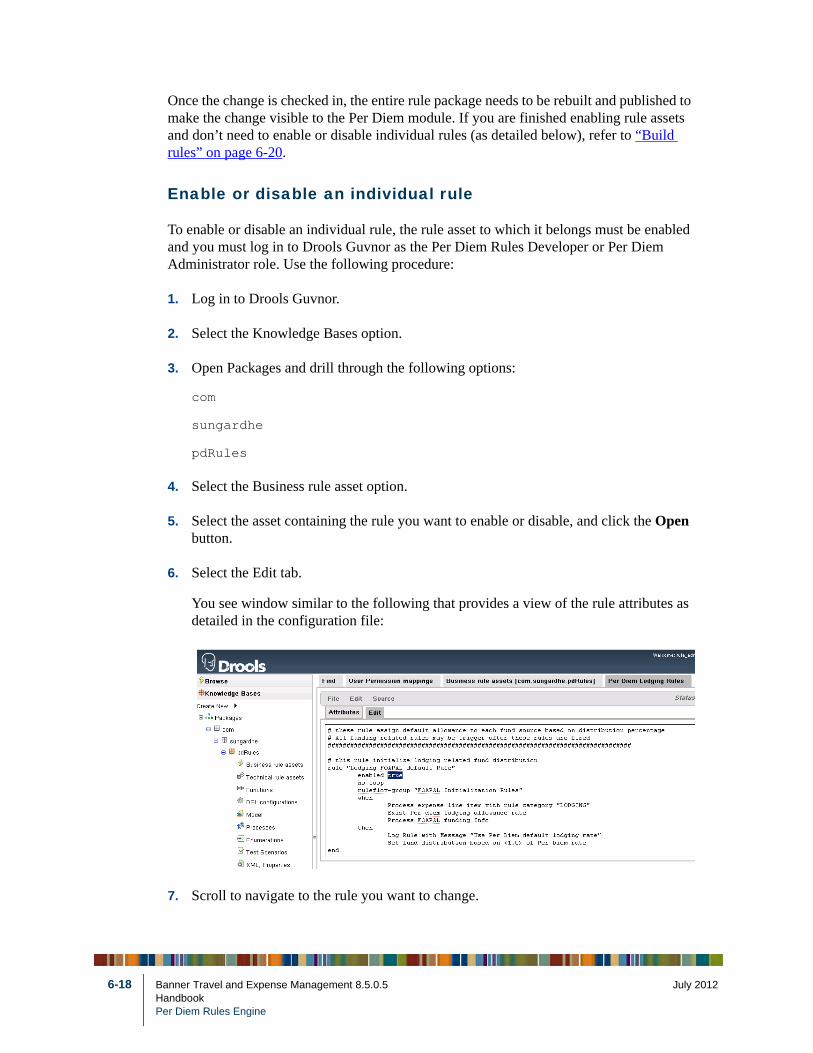
6-18
Once the change is checked in, the entire rule package needs to be rebuilt and published to make the change visible to the Per Diem module. If you are finished enabling rule assets and don’t need to enable or disable individual rules (as detailed below), refer to “Build rules” on page 6-20.
Enable or disable an individual rule
To enable or disable an individual rule, the rule asset to which it belongs must be enabled and you must log in to Drools Guvnor as the Per Diem Rules Developer or Per Diem Administrator role. Use the following procedure:
1. Log in to Drools Guvnor.
2. Select the Knowledge Bases option.
3. Open Packages and drill through the following options:
com
sungardhe
pdRules
4. Select the Business rule asset option.
5. Select the asset containing the rule you want to enable or disable, and click the Open button.
6. Select the Edit tab.
You see window similar to the following that provides a view of the rule attributes as detailed in the configuration file:
7. Scroll to navigate to the rule you want to change.
Banner Travel and Expense Management 8.5.0.5 July 2012HandbookPer Diem Rules Engine
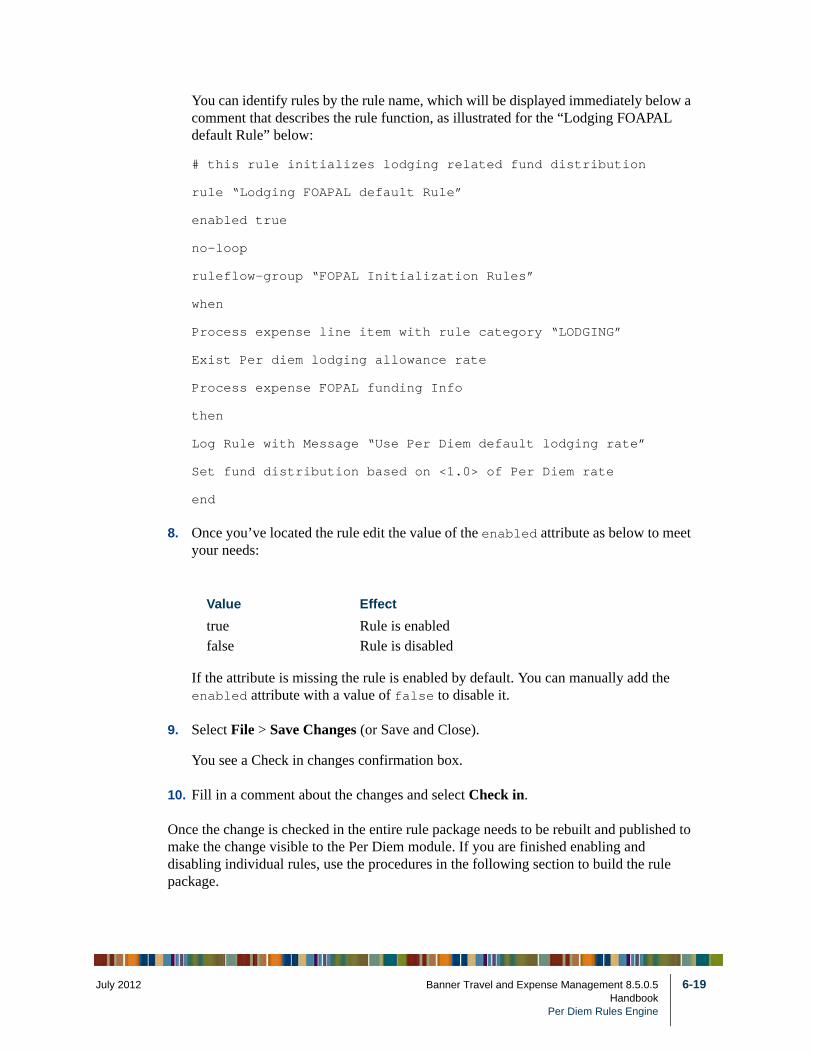
July 201
You can identify rules by the rule name, which will be displayed immediately below a comment that describes the rule function, as illustrated for the “Lodging FOAPAL default Rule” below:
# this rule initializes lodging related fund distribution
rule “Lodging FOAPAL default Rule”
enabled true
no-loop
ruleflow-group “FOPAL Initialization Rules”
when
Process expense line item with rule category “LODGING”
Exist Per diem lodging allowance rate
Process expense FOPAL funding Info
then
Log Rule with Message “Use Per Diem default lodging rate”
Set fund distribution based on <1.0> of Per Diem rate
end
8. Once you’ve located the rule edit the value of the enabled attribute as below to meet your needs:
If the attribute is missing the rule is enabled by default. You can manually add the enabled attribute with a value of false to disable it.
9. Select File > Save Changes (or Save and Close).
You see a Check in changes confirmation box.
10. Fill in a comment about the changes and select Check in.
Once the change is checked in the entire rule package needs to be rebuilt and published to make the change visible to the Per Diem module. If you are finished enabling and disabling individual rules, use the procedures in the following section to build the rule package.
Value Effect
true Rule is enabledfalse Rule is disabled
2 Banner Travel and Expense Management 8.5.0.5 6-19Handbook
Per Diem Rules Engine
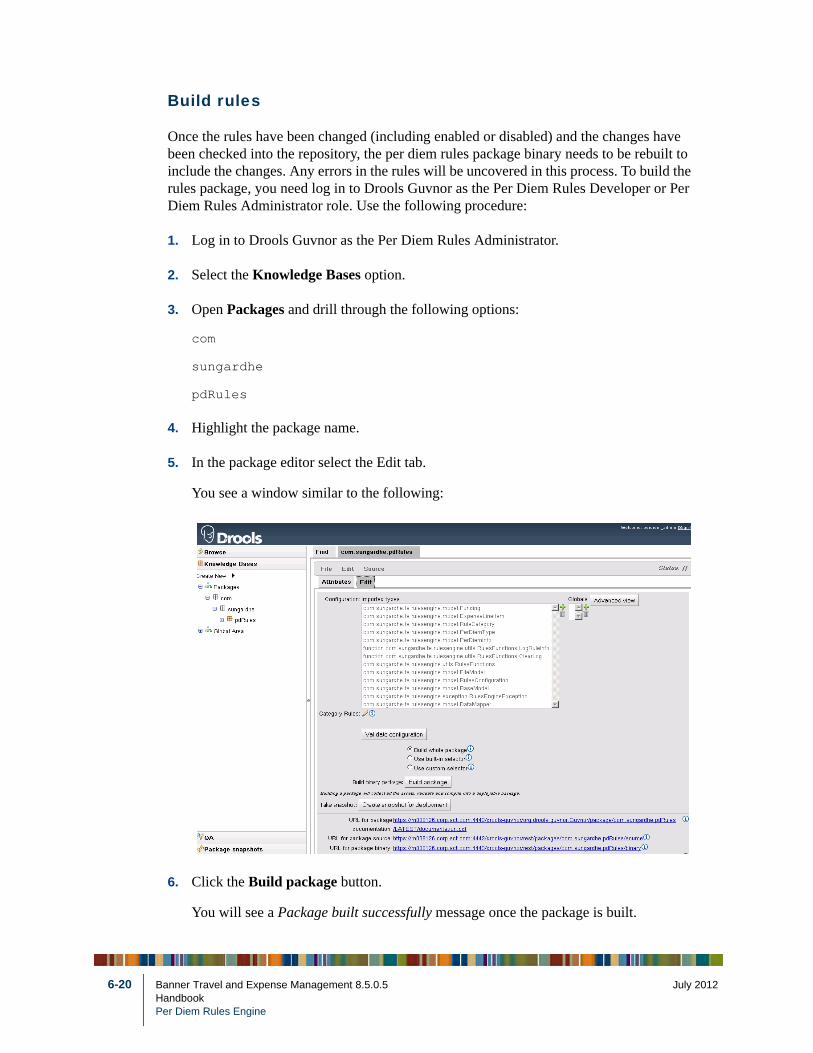
6-20
Build rules
Once the rules have been changed (including enabled or disabled) and the changes have been checked into the repository, the per diem rules package binary needs to be rebuilt to include the changes. Any errors in the rules will be uncovered in this process. To build the rules package, you need log in to Drools Guvnor as the Per Diem Rules Developer or Per Diem Rules Administrator role. Use the following procedure:
1. Log in to Drools Guvnor as the Per Diem Rules Administrator.
2. Select the Knowledge Bases option.
3. Open Packages and drill through the following options:
com
sungardhe
pdRules
4. Highlight the package name.
5. In the package editor select the Edit tab.
You see a window similar to the following:
6. Click the Build package button.
You will see a Package built successfully message once the package is built.
Banner Travel and Expense Management 8.5.0.5 July 2012HandbookPer Diem Rules Engine
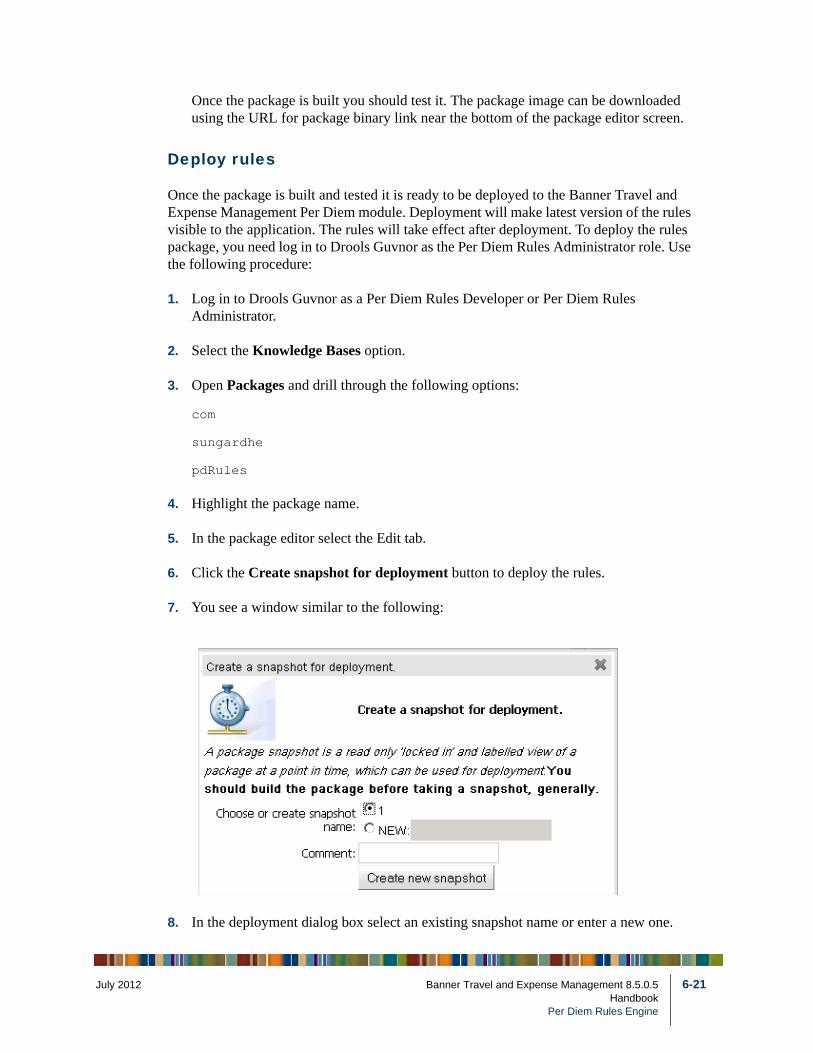
July 201
Once the package is built you should test it. The package image can be downloaded using the URL for package binary link near the bottom of the package editor screen.
Deploy rules
Once the package is built and tested it is ready to be deployed to the Banner Travel and Expense Management Per Diem module. Deployment will make latest version of the rules visible to the application. The rules will take effect after deployment. To deploy the rules package, you need log in to Drools Guvnor as the Per Diem Rules Administrator role. Use the following procedure:
1. Log in to Drools Guvnor as a Per Diem Rules Developer or Per Diem Rules Administrator.
2. Select the Knowledge Bases option.
3. Open Packages and drill through the following options:
com
sungardhe
pdRules
4. Highlight the package name.
5. In the package editor select the Edit tab.
6. Click the Create snapshot for deployment button to deploy the rules.
7. You see a window similar to the following:
8. In the deployment dialog box select an existing snapshot name or enter a new one.
2 Banner Travel and Expense Management 8.5.0.5 6-21Handbook
Per Diem Rules Engine
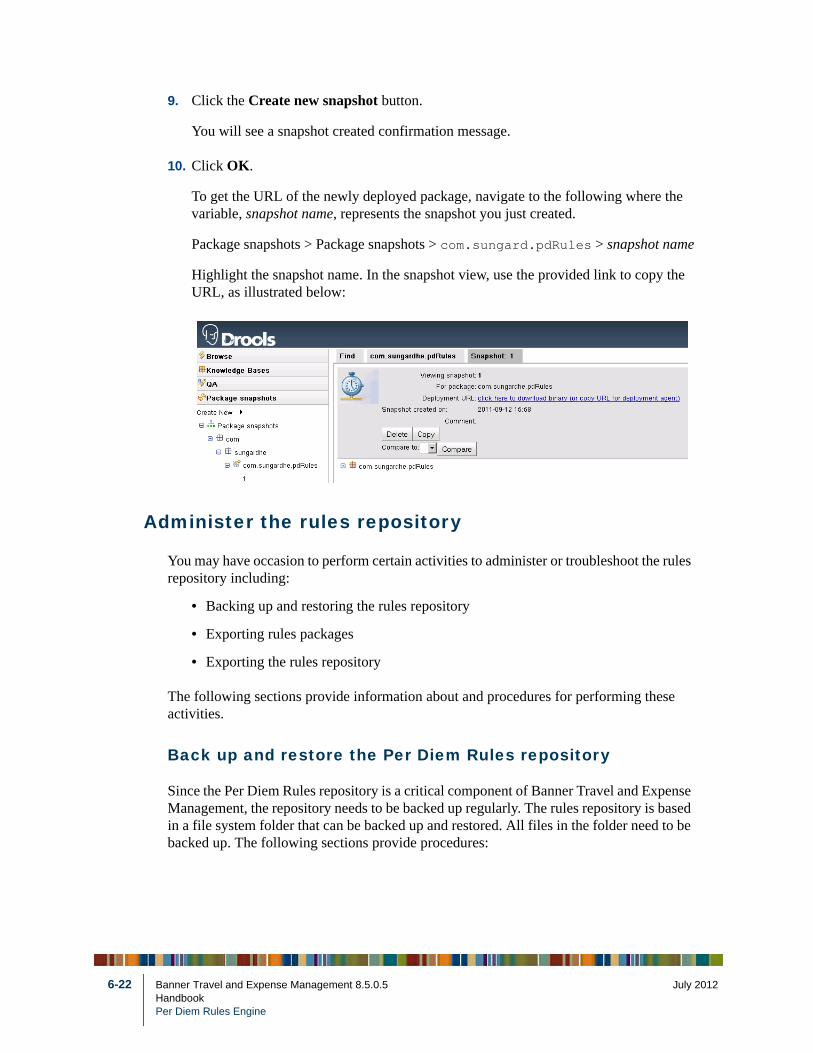
6-22
9. Click the Create new snapshot button.
You will see a snapshot created confirmation message.
10. Click OK.
To get the URL of the newly deployed package, navigate to the following where the variable, snapshot name, represents the snapshot you just created.
Package snapshots > Package snapshots > com.sungard.pdRules > snapshot name
Highlight the snapshot name. In the snapshot view, use the provided link to copy the URL, as illustrated below:
Administer the rules repository
You may have occasion to perform certain activities to administer or troubleshoot the rules repository including:
• Backing up and restoring the rules repository
• Exporting rules packages
• Exporting the rules repository
The following sections provide information about and procedures for performing these activities.
Back up and restore the Per Diem Rules repository
Since the Per Diem Rules repository is a critical component of Banner Travel and Expense Management, the repository needs to be backed up regularly. The rules repository is based in a file system folder that can be backed up and restored. All files in the folder need to be backed up. The following sections provide procedures:
Banner Travel and Expense Management 8.5.0.5 July 2012HandbookPer Diem Rules Engine
July 201
Back up the repository
You should back up the per diem repository on a regular basis. To back up the Per Diem Rules repository, use the following procedure:
1. Log in to the server where Drools Guvnor is installed as an administrative user.
2. Change to the directory where the Drools Guvnor rules repository is located.
3. Copy the contents of this directory (all subfolders and files) to the backup location.
Restore the repository
To restore the repository, use the following procedure:
1. Log in to Drools Guvnor as the Administrator.
2. Using OAS, stop Drools Guvnor.
3. Log in to the Drools Guvnor server as an administrative user.
4. Change to the directory where the Drools Guvnor rules repository is located.
5. Remove all files in the folder.
6. Copy all files from a previous backup to the folder
7. Using OAS, restart Guvnor as follows:
Export the Per Diem rules package
If you experience problems with the Per Diem module and need to work with Ellucian® Customer Support, you may be asked to export the rules source code for your deployed per diem rules and send it to a Support Analyst for analysis.
To export the source, you will need the URL to your deployed per diem rules package (refer to the section “Deploy rules” on page 6-21 for more information on the obtaining the URL). Once you have the URL, use the following procedure:
1. Open an Internet browser.
2. Enter the URL of the deployed rule package in the following format:
<rule package url>.drl
For example, you’d type something similar to the following URL:
2 Banner Travel and Expense Management 8.5.0.5 6-23Handbook
Per Diem Rules Engine
6-24
https://myschool.edu:4443/drools-guvnor/org.drools.guvnor.Guvnor/package/com.sungardhe.pdRules/1.drl
NoteThis URL is only an example. The actual URL will vary by deployment.
3. When prompted enter the appropriate user credential.
You can export the rules package using credentials for the Per Diem Rules Administrator. The downloaded source code will be in text format and have a .drl file extension.
Export the Per Diem Rules repository
If you experience problems with the Per Diem module and need to work with Ellucian Support, you may be asked to export the Per Diem Rules repository and send it to a Support Analyst for analysis.
To export the Per Diem Rules repository, use the following procedure:
1. Log in to Drools Guvnor as the Rules Administrator
2. Navigate to Administration > Import Export.
3. Click the Export button.
The exported file will be a .zip format and contain a single XML file. The XML file contains the entire Drools Guvnor repository content.
Troubleshoot Per Diem Rules issues
While there are many potential issues that may impact the setup, configuration, and performance of the Per Diem Rules engine, please be advised of the following known issues:
• When using Internet Explorer 8, the technical rules editor and package build message do not render properly.
• User authentication is based on the OC4J JAAS framework and only users belonging to the default realm can access the Drools Guvnor application.
• When a user session times out, Drools Guvnor displays the following message that is not indicative of the problem: 400 Sorry, a technical error occurred. Please contact a system administrator. You’ll need to close the message box, log out, and log in again.
Banner Travel and Expense Management 8.5.0.5 July 2012HandbookPer Diem Rules Engine

July 201
Configuration the Per Diem Module
The Per Diem module uses a set of institutionally managed per diem rules in conjunction with the standard government per diem rates for calculating the allowed per diem amount for each expense line item. The per diem rules are maintained by Drools Guvnor, which you installed and configured using the steps outlined in previous sections.
When the Per Diem module is first loaded, the per diem rules are transferred from Drools Guvnor to the Per Diem module and cached locally for per diem calculation. Periodically the Per Diem module will poll Drools Guvnor to check for changes to the deployed per diem rules. If a change is detected, the Per Diem module will download the latest per diem rules package from Drools Guvnor and update its local cache.
2 Banner Travel and Expense Management 8.5.0.5 6-25Handbook
Per Diem Rules Engine

6-26
Banner Travel and Expense Management 8.5.0.5 July 2012HandbookPer Diem Rules Engine
July 201
7 Configuration for Single Sign on (SSO) using Central Authentication Service (CAS)
Banner® Travel and Expense Management (TEM) can participate in a CAS-based single sign on environment. The CAS server in the environment must implement the bannerValidate service, a CAS extension that is available with Banner Enterprise Identity Services (BEIS).
Prerequisites
Banner Travel and Expense Management can participate in an enterprise single sign environment based on the Central Authentication Services (CAS). CAS is an enterprise single sign on (SSO) solution for Web applications.
In a CAS-based environment, a user authenticates to CAS instead of Banner Travel and Expense Management. If the authentication succeeds, CAS redirects the user back to Banner Travel and Expense Management and passes a security ticket. Banner Travel and Expense Management validates the ticket against the CAS server and then grants access to the user.
The validation service that Banner Travel and Expense Management uses to validate the CAS security ticket is bannerValidate, a CAS extension that is available with Banner Enterprise Identity Services (BEIS). The bannerValidate CAS extension is available for CAS 3.2.1.1, CAS 3.3.1, and 3.4.2.1.
You must install and configure the CAS extension before configuring Banner Travel and Expense Management for CAS. Refer to Refer to the chapter or appendix in the BEIS Handbook that details CAS installation or configuration.
Single sign-on to Banner Travel and Expense Management also requires the following .jar files that are delivered with Banner Travel and Expense Management:
commons-httpclient-3.0.1.jarcommons-logging-1.1.jarIDMCasAdapter.jarsghe_udc_identity_xmlbeans_binding.jar
2 Banner Travel and Expense Management 8.5.0.5 7-1Handbook
Configuration for Single Sign on (SSO) using Central Authentication Service (CAS)

7-2
Modify Banner Travel and Expense Management
Add filters and filter URL mapping
The following steps are used to add filters and filter URL mappings in Banner Travel and Expense Management web.xml.
• Step 1, “Add filters”
• Step 2, “Add filter URL mappings”
Step 1 Add filters
Do the following steps to add filters to web.xml. Web.xml is available in a folder called tvlexp\earExtract\warExtract\WEBINF.
1. Search for the following in web.xml:
<!-- Spring Security -->
<filter>
<filter-name>springSecurityFilterChain</filter-name>
<filter-class>org.springframework.web.filter.DelegatingFilterProxy</filter-class>
</filter>
2. Add the following filters to the location found in step 1. Replace CasServerURL and TravelURL with equivalent server URLs at your institution.
<filter>
<filter-name>CAS Authentication Filter</filter-name>
<filter-class>org.jasig.cas.client.authentication.AuthenticationFilter</filter-class>
<init-param>
<param-name>casServerLoginUrl</param-name>
<param-value>http://CasServerURL/login</param-value>
</init-param>
<init-param>
<param-name>serverName</param-name>
xbean.jarxmlsec-1.3.0.jarcas-client-core-3.1.3.jar
Banner Travel and Expense Management 8.5.0.5 July 2012HandbookConfiguration for Single Sign on (SSO) using Central Authentication Service (CAS)
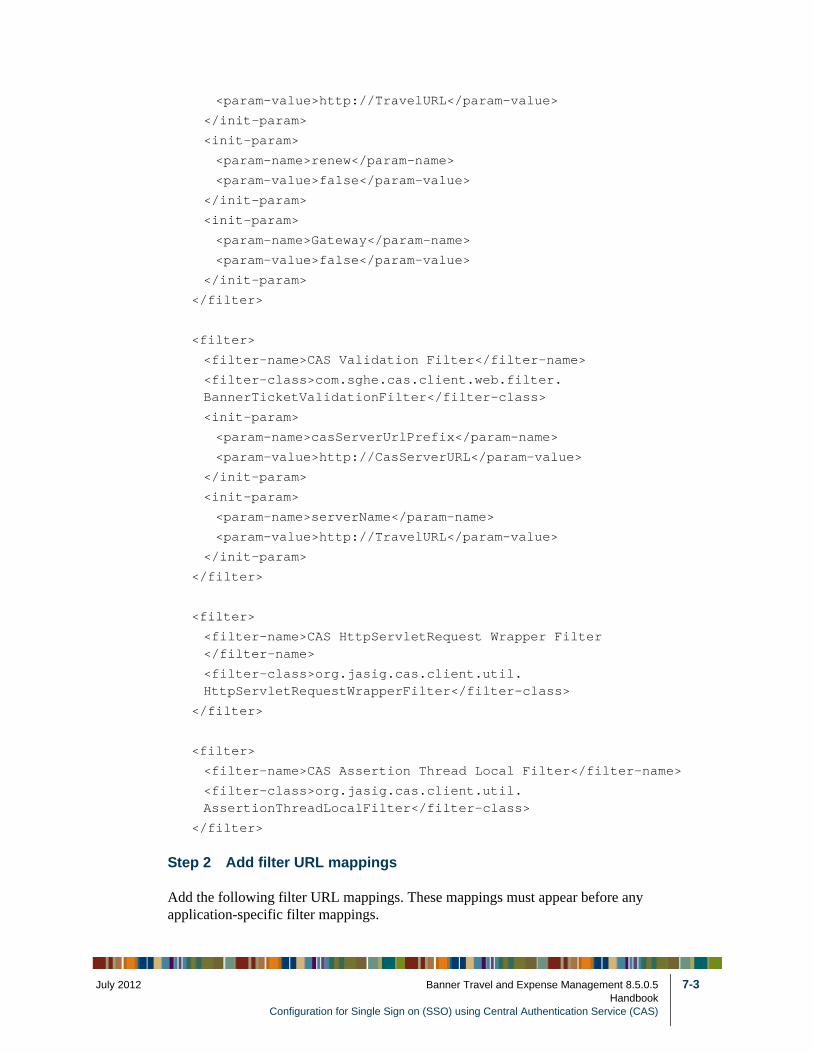
July 201
<param-value>http://TravelURL</param-value>
</init-param>
<init-param>
<param-name>renew</param-name>
<param-value>false</param-value>
</init-param>
<init-param>
<param-name>Gateway</param-name>
<param-value>false</param-value>
</init-param>
</filter>
<filter>
<filter-name>CAS Validation Filter</filter-name>
<filter-class>com.sghe.cas.client.web.filter.BannerTicketValidationFilter</filter-class>
<init-param>
<param-name>casServerUrlPrefix</param-name>
<param-value>http://CasServerURL</param-value>
</init-param>
<init-param>
<param-name>serverName</param-name>
<param-value>http://TravelURL</param-value>
</init-param>
</filter>
<filter>
<filter-name>CAS HttpServletRequest Wrapper Filter</filter-name>
<filter-class>org.jasig.cas.client.util.HttpServletRequestWrapperFilter</filter-class>
</filter>
<filter>
<filter-name>CAS Assertion Thread Local Filter</filter-name>
<filter-class>org.jasig.cas.client.util.AssertionThreadLocalFilter</filter-class>
</filter>
Step 2 Add filter URL mappings
Add the following filter URL mappings. These mappings must appear before any application-specific filter mappings.
2 Banner Travel and Expense Management 8.5.0.5 7-3Handbook
Configuration for Single Sign on (SSO) using Central Authentication Service (CAS)
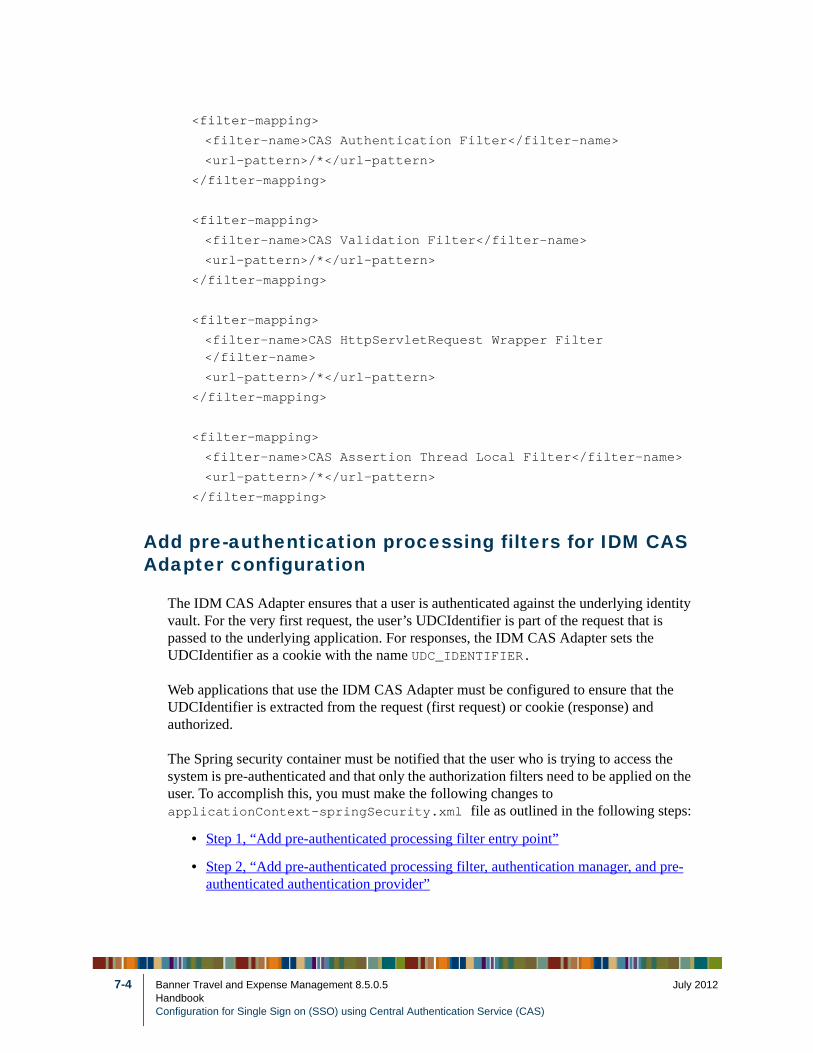
7-4
<filter-mapping>
<filter-name>CAS Authentication Filter</filter-name>
<url-pattern>/*</url-pattern>
</filter-mapping>
<filter-mapping>
<filter-name>CAS Validation Filter</filter-name>
<url-pattern>/*</url-pattern>
</filter-mapping>
<filter-mapping>
<filter-name>CAS HttpServletRequest Wrapper Filter</filter-name>
<url-pattern>/*</url-pattern>
</filter-mapping>
<filter-mapping>
<filter-name>CAS Assertion Thread Local Filter</filter-name>
<url-pattern>/*</url-pattern>
</filter-mapping>
Add pre-authentication processing filters for IDM CAS Adapter configuration
The IDM CAS Adapter ensures that a user is authenticated against the underlying identity vault. For the very first request, the user’s UDCIdentifier is part of the request that is passed to the underlying application. For responses, the IDM CAS Adapter sets the UDCIdentifier as a cookie with the name UDC_IDENTIFIER.
Web applications that use the IDM CAS Adapter must be configured to ensure that the UDCIdentifier is extracted from the request (first request) or cookie (response) and authorized.
The Spring security container must be notified that the user who is trying to access the system is pre-authenticated and that only the authorization filters need to be applied on the user. To accomplish this, you must make the following changes to applicationContext-springSecurity.xml file as outlined in the following steps:
• Step 1, “Add pre-authenticated processing filter entry point”
• Step 2, “Add pre-authenticated processing filter, authentication manager, and pre-authenticated authentication provider”
Banner Travel and Expense Management 8.5.0.5 July 2012HandbookConfiguration for Single Sign on (SSO) using Central Authentication Service (CAS)
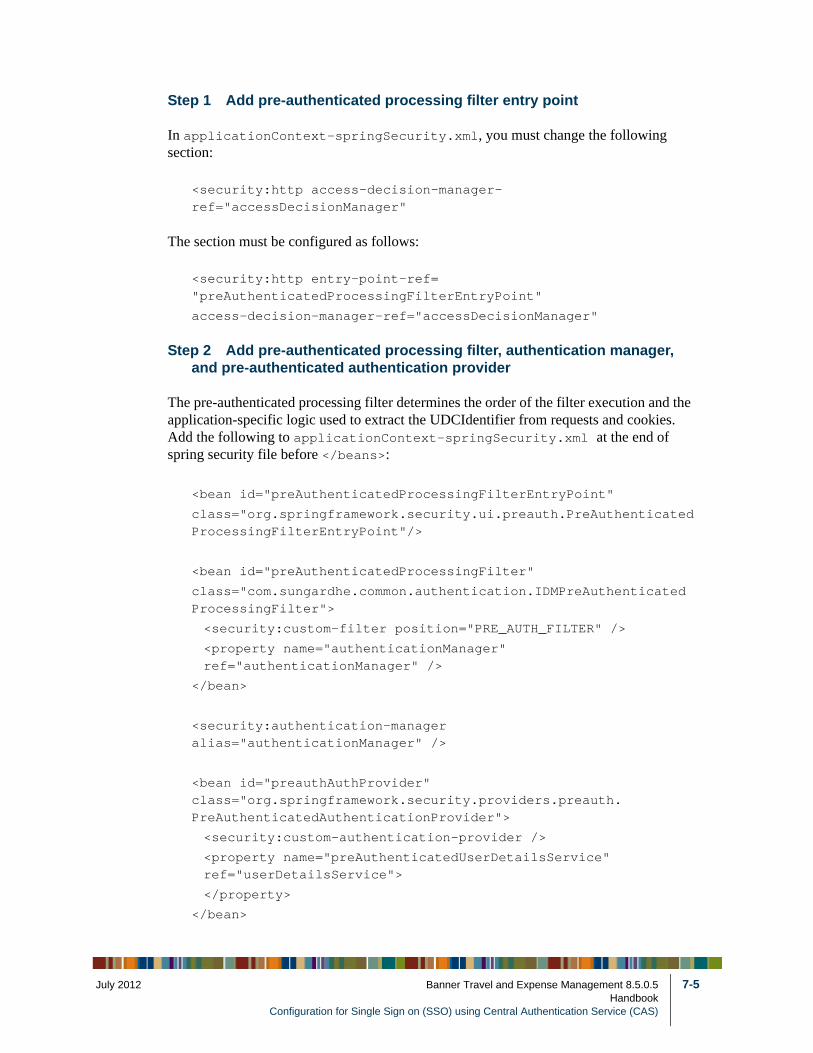
July 201
Step 1 Add pre-authenticated processing filter entry point
In applicationContext-springSecurity.xml, you must change the following section:
<security:http access-decision-manager-ref="accessDecisionManager"
The section must be configured as follows:
<security:http entry-point-ref="preAuthenticatedProcessingFilterEntryPoint"
access-decision-manager-ref="accessDecisionManager"
Step 2 Add pre-authenticated processing filter, authentication manager, and pre-authenticated authentication provider
The pre-authenticated processing filter determines the order of the filter execution and the application-specific logic used to extract the UDCIdentifier from requests and cookies. Add the following to applicationContext-springSecurity.xml at the end of spring security file before </beans>:
<bean id="preAuthenticatedProcessingFilterEntryPoint"
class="org.springframework.security.ui.preauth.PreAuthenticatedProcessingFilterEntryPoint"/>
<bean id="preAuthenticatedProcessingFilter"
class="com.sungardhe.common.authentication.IDMPreAuthenticatedProcessingFilter">
<security:custom-filter position="PRE_AUTH_FILTER" />
<property name="authenticationManager" ref="authenticationManager" />
</bean>
<security:authentication-manager alias="authenticationManager" />
<bean id="preauthAuthProvider" class="org.springframework.security.providers.preauth.PreAuthenticatedAuthenticationProvider">
<security:custom-authentication-provider />
<property name="preAuthenticatedUserDetailsService" ref="userDetailsService">
</property>
</bean>
2 Banner Travel and Expense Management 8.5.0.5 7-5Handbook
Configuration for Single Sign on (SSO) using Central Authentication Service (CAS)
7-6
<bean id="userDetailsService" class="com.sungardhe.common.authentication.IDMUserDetailsService">
<property name="dataSource" ref="dataSource"/>
</bean>
Define Banner Travel and Expense Management as a CAS managed service
Banner Travel and Expense Management must be defined as a CAS managed service in order to be protected by CAS.
Use the following steps to define the CAS managed service.
1. Open a browser and go to the CAS server management page, which is at a URL similar to the following:http(s)://<CAS server>:<port>/cas/services/manage.html
2. Enter a valid administrator user name and password (obtained from the CAS administrator). The Services Management page is displayed.
3. Click the Add New Service tab.
4. Add a new service by entering the following values
5. Click Save Changes. The CAS server is now protecting the Banner Travel and Expense Management URL.
Name Travel and Expense ManagementService URL http(s)://<TE Server>:<port>/tvlexp/tvlexp-flex/index.htmlDescription Protecting Travel and Expense Management via CASTheme Name TEThemeAttributes Select UDC_IDENTIFIER
Banner Travel and Expense Management 8.5.0.5 July 2012HandbookConfiguration for Single Sign on (SSO) using Central Authentication Service (CAS)
July 201
8 Configuration and Deployment of Banner Travel and Expense Management
Banner® Travel and Expense Management (TEM) is a Rich Internet Application (RIA). To implement it, you must install Oracle Application Server 10.1.3.x or Oracle Fusion Middleware 11.1.14 using WebLogic.
The minimum requirement for installation is the J2EE Server.
NoteIn the following sections, steps 5 through 7 are only required if you are implementing per diem processing in Banner Travel and Expense Management. Steps 5-7 should only be performed after installing and configuring Drools Guvnor as detailed in Chapter 6, “Per Diem Rules Engine”.
Configure Banner Travel and Expense Management EAR file (tvlexp.ear)
To configure the tvlexp.ear file, complete the following steps:
NoteThe tvlexp.ear files release 8.3.0.1 and later, require JDK 1.6. You can download JDK 1.6 from:http://java.sun.com/javase/downloads/widget/jdk6.jspTo update the Oracle Application Server to use JDK 1.6, follow Solution #1 in FAQ 1-7GUEKE. Oracle Doc ID 396096.1 How to Update the Default JDK Installed in Application Server 10.1.3.x.To confirm your java version, run the command java -version.
1. Create a folder called tvlexp on your Oracle Application Server and copy the tvlexp.ear and the appropriate .dat files to this new folder.
The following two bullets apply to only 10g Oracle Application Server deployment. For Oracle WebLogic, no plan file is required:
• For OAS version 10.1.3.1 or 10.1.3.3, use tvlexp_plan.dat. If the server is configured with SSL, use tvlexp_plan_ssl.dat.
2 Banner Travel and Expense Management 8.5.0.5 8-1Handbook
Configuration and Deployment of Banner Travel and Expense Management
8-2
• For OAS version 10.1.3.4 and later, use tvlexp_plan_10_1_3_4.dat. If the server is configured with SSL, use tvlexp_plan_ssl_10_1_3_4.dat.
2. Create a folder called earExtract within the tvlexp folder and Unzip the tvlexp.ear file into this new folder, earExtract.
• Windows: jar xvf ..\tvlexp.ear
• Unix: jar xvf ../tvlexp.ear
3. Create a folder called warExtract within the earExtract folder and unzip the tvlexp.war file into this new folder, warExtract.
• Windows: jar xvf ..\tvlexp.war
• Unix: jar xvf ../tvlexp.war
4. Go to the folder tvlexp\earExtract\warExtract\WEB-INF\classes and configure the datasource information in the jdbc.properties file:
The properties are illustrated below:# This file contains JDBC specific properties that are configurable by a client.
jdbc.driver=oracle.jdbc.driver.OracleDriver
jdbc.url=jdbc:oracle:thin:@<Oracle_Database_Server>:<port>:
<sid>
jdbc.user=ftaeusr
jdbc.password=<password>
jdbc.max.active=-1
jdbc.max.idle=8
jdbc.max.wait=-1
jdbc.proxy=false
If you are configuring the application pointing to a RAC database, then the jdbc_url should be configured in the following format:jdbc.url=jdbc:oracle:thin:@(DESCRIPTION=(LOAD_BALANCE=on)(ADDRESS=(PROTOCOL=TCP)(HOST=<database server
name>)(PORT=<port>))(ADDRESS=(PROTOCOL=TCP)(HOST=<database server
name>)(PORT=<port>))(CONNECT_DATA=(SERVICE_NAME=<database SID>)))
ORjdbc.url=jdbc:oracle:thin:@(DESCRIPTION=(ADDRESS_LIST=(ADDRESS=(PROTOCOL=TCP)(HOST=<database server
name>)(PORT=<port>)))(CONNECT_DATA=(SERVER=DEDICATED)(SERVICE_NAME=<database sid>)))
Banner Travel and Expense Management 8.5.0.5 July 2012HandbookConfiguration and Deployment of Banner Travel and Expense Management
July 201
You need to adjust the variables (set off in brackets and highlighted in the above example). You can also make other adjustments to suit your environmental needs. The properties are outlined below:
NoteDo not use brackets within the actual values that you set. These are used in this example to indicate variables.
5. If you are enabling the per diem feature, open the tvlexp\earExtract\warExtract\WEB-INF\classes\guvnor.properties file and configure the following properties to set up integration with Drools Guvnor.
Property Setting
jdbc.driver The jdbc driver classname.
jdbc.url The URL used to locate the database for this datasource. You must set this as appropriate to your environment.
jdbc.user The default username for the database connection.
For Banner Travel and Expense Management 8.2 or later, use the ftaeusr username.
jdbc.password The default password of the user for the database connection. You must set this.
jdbc.max.active The maximum number of active connections that can be allocated from this pool at the same time, or non-positive for no limit.
jdbc.max.idle The maximum number of active connections that can remain idle in the pool, without extra ones being released, or negative for no limit.
jdbc.max.wait The maximum number of milliseconds that the pool will wait (when there are no available connections) for a connection to be returned before throwing an exception, or -1 to wait indefinitely.
jdbc.proxy Valid values are true and false.
True indicates that Oracle connections will be proxy connections. Proxy connections will allow Oracle’s VBS and FGAC rules to be employed for the user.
False indicates that Oracle connections are exclusive for the identified user.
2 Banner Travel and Expense Management 8.5.0.5 8-3Handbook
Configuration and Deployment of Banner Travel and Expense Management
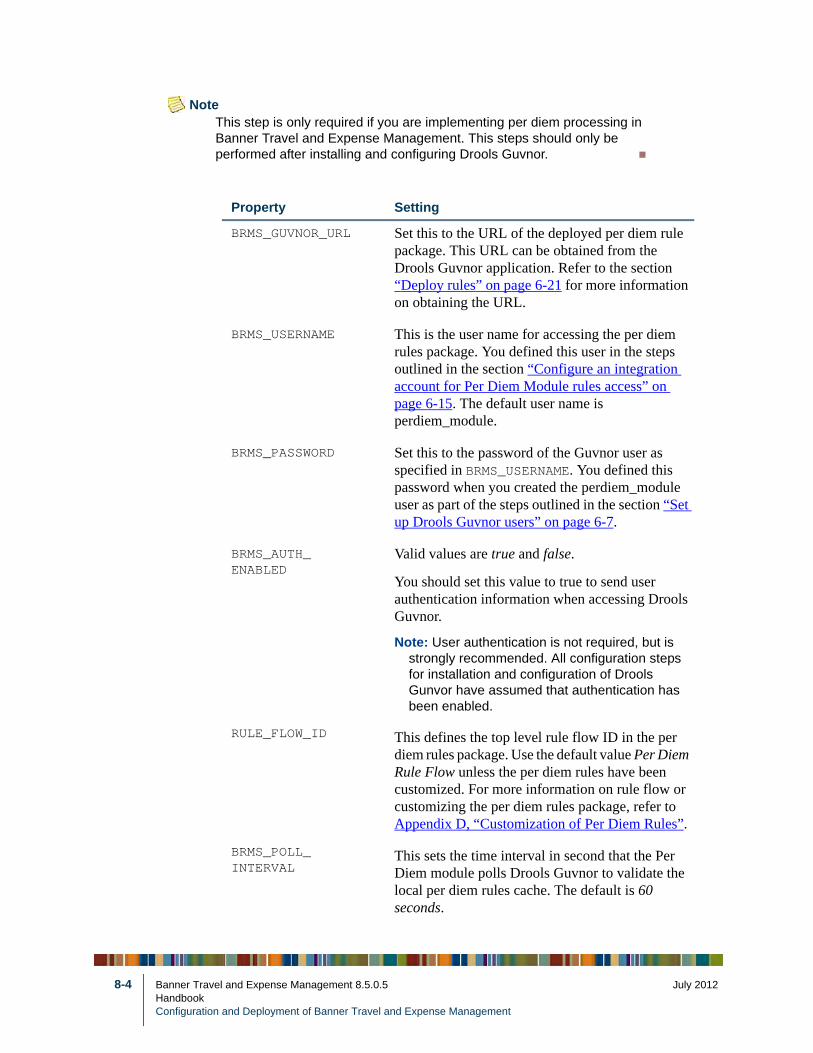
8-4
NoteThis step is only required if you are implementing per diem processing in Banner Travel and Expense Management. This steps should only be performed after installing and configuring Drools Guvnor.
Property Setting
BRMS_GUVNOR_URL Set this to the URL of the deployed per diem rule package. This URL can be obtained from the Drools Guvnor application. Refer to the section “Deploy rules” on page 6-21 for more information on obtaining the URL.
BRMS_USERNAME This is the user name for accessing the per diem rules package. You defined this user in the steps outlined in the section “Configure an integration account for Per Diem Module rules access” on page 6-15. The default user name is perdiem_module.
BRMS_PASSWORD Set this to the password of the Guvnor user as specified in BRMS_USERNAME. You defined this password when you created the perdiem_module user as part of the steps outlined in the section “Set up Drools Guvnor users” on page 6-7.
BRMS_AUTH_ENABLED
Valid values are true and false.
You should set this value to true to send user authentication information when accessing Drools Guvnor.
Note: User authentication is not required, but is strongly recommended. All configuration steps for installation and configuration of Drools Gunvor have assumed that authentication has been enabled.
RULE_FLOW_ID This defines the top level rule flow ID in the per diem rules package. Use the default value Per Diem Rule Flow unless the per diem rules have been customized. For more information on rule flow or customizing the per diem rules package, refer to Appendix D, “Customization of Per Diem Rules”.
BRMS_POLL_INTERVAL
This sets the time interval in second that the Per Diem module polls Drools Guvnor to validate the local per diem rules cache. The default is 60 seconds.
Banner Travel and Expense Management 8.5.0.5 July 2012HandbookConfiguration and Deployment of Banner Travel and Expense Management
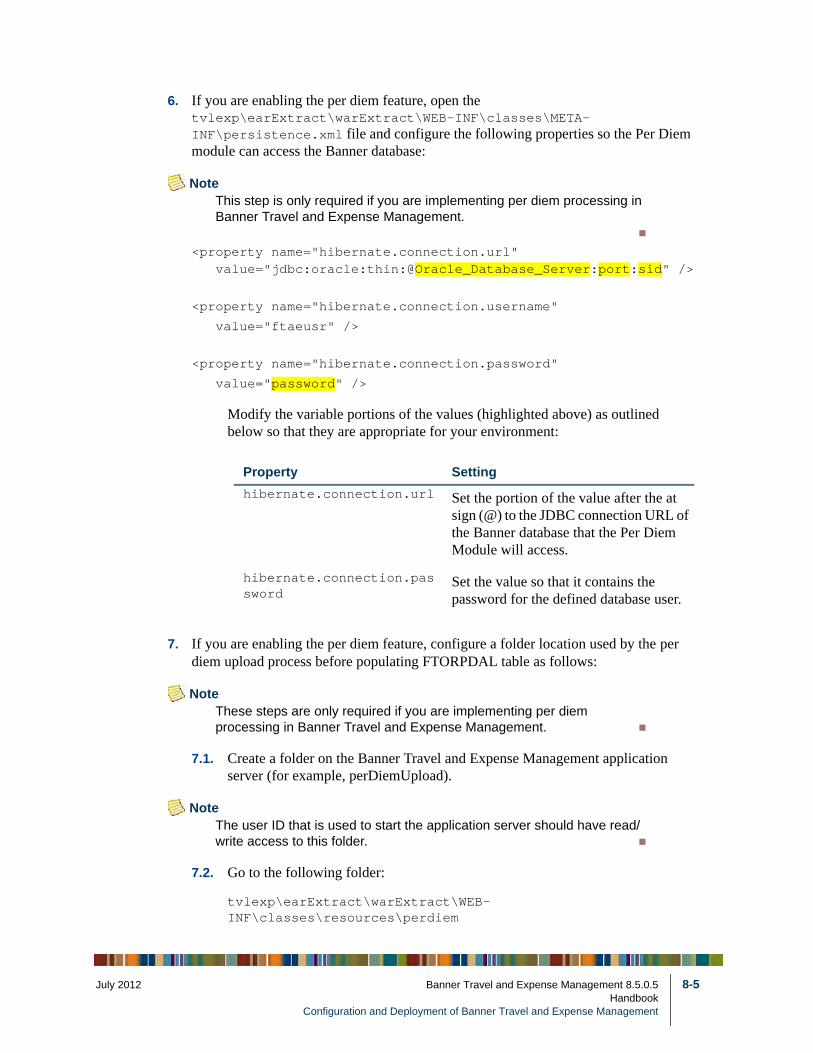
July 201
6. If you are enabling the per diem feature, open the tvlexp\earExtract\warExtract\WEB-INF\classes\META-INF\persistence.xml file and configure the following properties so the Per Diem module can access the Banner database:
NoteThis step is only required if you are implementing per diem processing in Banner Travel and Expense Management.
<property name="hibernate.connection.url" value="jdbc:oracle:thin:@Oracle_Database_Server:port:sid" />
<property name="hibernate.connection.username"
value="ftaeusr" />
<property name="hibernate.connection.password"
value="password" />
Modify the variable portions of the values (highlighted above) as outlined below so that they are appropriate for your environment:
7. If you are enabling the per diem feature, configure a folder location used by the per diem upload process before populating FTORPDAL table as follows:
NoteThese steps are only required if you are implementing per diem processing in Banner Travel and Expense Management.
7.1. Create a folder on the Banner Travel and Expense Management application server (for example, perDiemUpload).
NoteThe user ID that is used to start the application server should have read/write access to this folder.
7.2. Go to the following folder:
tvlexp\earExtract\warExtract\WEB-INF\classes\resources\perdiem
Property Setting
hibernate.connection.url Set the portion of the value after the at sign (@) to the JDBC connection URL of the Banner database that the Per Diem Module will access.
hibernate.connection.password
Set the value so that it contains the password for the defined database user.
2 Banner Travel and Expense Management 8.5.0.5 8-5Handbook
Configuration and Deployment of Banner Travel and Expense Management
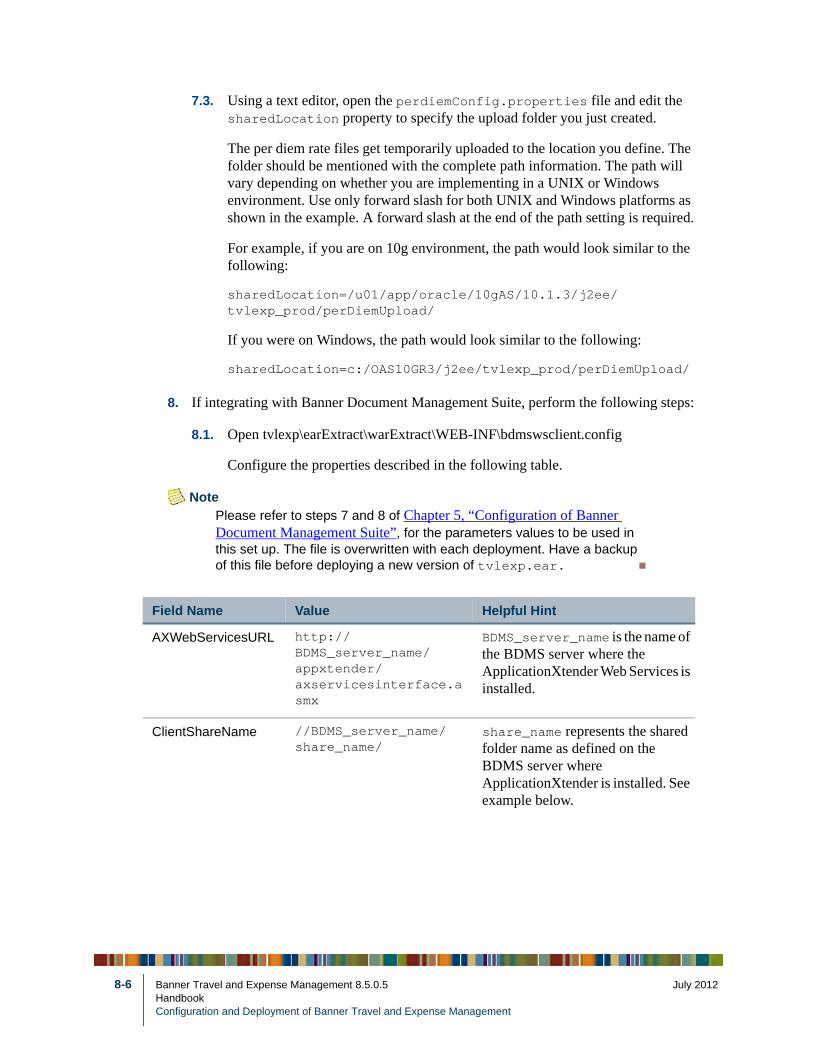
8-6
7.3. Using a text editor, open the perdiemConfig.properties file and edit the sharedLocation property to specify the upload folder you just created.
The per diem rate files get temporarily uploaded to the location you define. The folder should be mentioned with the complete path information. The path will vary depending on whether you are implementing in a UNIX or Windows environment. Use only forward slash for both UNIX and Windows platforms as shown in the example. A forward slash at the end of the path setting is required.
For example, if you are on 10g environment, the path would look similar to the following:
sharedLocation=/u01/app/oracle/10gAS/10.1.3/j2ee/tvlexp_prod/perDiemUpload/
If you were on Windows, the path would look similar to the following:
sharedLocation=c:/OAS10GR3/j2ee/tvlexp_prod/perDiemUpload/
8. If integrating with Banner Document Management Suite, perform the following steps:
8.1. Open tvlexp\earExtract\warExtract\WEB-INF\bdmswsclient.config
Configure the properties described in the following table.
NotePlease refer to steps 7 and 8 of Chapter 5, “Configuration of Banner Document Management Suite”, for the parameters values to be used in this set up. The file is overwritten with each deployment. Have a backup of this file before deploying a new version of tvlexp.ear.
Field Name Value Helpful Hint
AXWebServicesURL http://BDMS_server_name/appxtender/axservicesinterface.asmx
BDMS_server_name is the name of the BDMS server where the ApplicationXtender Web Services is installed.
ClientShareName //BDMS_server_name/share_name/
share_name represents the shared folder name as defined on the BDMS server where ApplicationXtender is installed. See example below.
Banner Travel and Expense Management 8.5.0.5 July 2012HandbookConfiguration and Deployment of Banner Travel and Expense Management
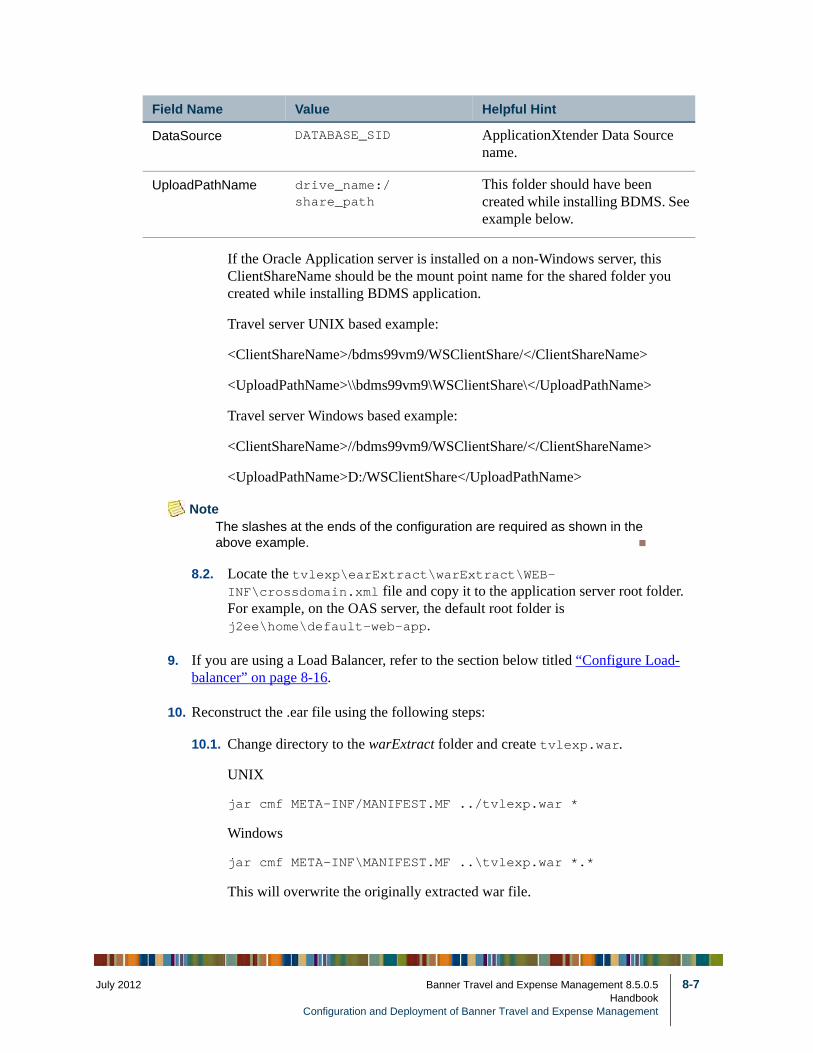
July 201
If the Oracle Application server is installed on a non-Windows server, this ClientShareName should be the mount point name for the shared folder you created while installing BDMS application.
Travel server UNIX based example:
<ClientShareName>/bdms99vm9/WSClientShare/</ClientShareName>
<UploadPathName>\\bdms99vm9\WSClientShare\</UploadPathName>
Travel server Windows based example:
<ClientShareName>//bdms99vm9/WSClientShare/</ClientShareName>
<UploadPathName>D:/WSClientShare</UploadPathName>
NoteThe slashes at the ends of the configuration are required as shown in the above example.
8.2. Locate the tvlexp\earExtract\warExtract\WEB-INF\crossdomain.xml file and copy it to the application server root folder. For example, on the OAS server, the default root folder is j2ee\home\default-web-app.
9. If you are using a Load Balancer, refer to the section below titled “Configure Load-balancer” on page 8-16.
10. Reconstruct the .ear file using the following steps:
10.1. Change directory to the warExtract folder and create tvlexp.war.
UNIX
jar cmf META-INF/MANIFEST.MF ../tvlexp.war *
Windows
jar cmf META-INF\MANIFEST.MF ..\tvlexp.war *.*
This will overwrite the originally extracted war file.
DataSource DATABASE_SID ApplicationXtender Data Source name.
UploadPathName drive_name:/share_path
This folder should have been created while installing BDMS. See example below.
Field Name Value Helpful Hint
2 Banner Travel and Expense Management 8.5.0.5 8-7Handbook
Configuration and Deployment of Banner Travel and Expense Management
8-8
10.2. Change to the earExtract folder and create the tvlexp.ear file as follows:
UNIX
jar cmf META-INF/MANIFEST.MF ../tvlexp.ear tvlexp.war META-INF
Windows
jar cmf META-INF\MANIFEST.MF ..\tvlexp.ear tvlexp.war META-INF
This will overwrite the originally extracted .ear file.
Configure the Oracle Application Server 10g and deploy the application
To configure the Oracle Application Server 10g and deploy the application, complete the following steps:
1. Access OEM on your Oracle Application Server. In most cases, OEM can be accessed using http://yourservername:8888.
2. Create a new group, if the group does not already exist.
2.1. Select Create in the Groups section of the Cluster Topology Page.
2.2. Enter Group Name: sghe_group.
2.3. Select Create.
3. Create a new instance for this application.
3.1. Expand All Application Servers.
3.2. Select your OAS installation of 10.1.3. For example: OAS_10_1_3.<yourservername>.
3.3. Select Create Instance.
3.4. Use instance name = tvlexp.
3.5. Check Add to an existing group with name sghe_group.
3.6. Check Start this instance after creation.
3.7. Select Create.
Banner Travel and Expense Management 8.5.0.5 July 2012HandbookConfiguration and Deployment of Banner Travel and Expense Management
July 201
4. Deploy the .ear file and the .dat file:
4.1. Select the new tvlexp instance.
4.2. Select the Applications tab.
4.3. Select Deploy.
4.4. In the Archive section, check Archive is present on local host. Upload the archive to the server where Application Server Control is running.
4.5. Browse for the modified .ear file.
4.6. In the Deployment Plan section, browse for the Travel and Expense plan file. Check Deployment plan is present on local host. Upload the deployment plan to the server where Application Server Control is running.
• For OAS version 10.1.3.1 or 10.1.3.3 use tvlexp_plan.dat. If the server is configured with SSL, use tvlexp_plan_ssl.dat.
• For OAS version 10.1.3.4 and later, use tvlexp_plan_10_1_3_4.dat. If the server is configured with SSL, use tvlexp_plan_ssl_10_1_3_4.dat.
4.7. Select Next. It may take some time to upload.
4.8. Select Next.
4.9. Select Deploy. It may take some time to upload.
4.10. Select Return.
Modify the server properties
After you’ve deployed the .ear file, modify the server properties with the information that follows. The .ear file created by the installer must be deployed to an OAS R3 (10.1.3.x) instance. The .ear file should be deployed to a new instance that has no other application deployed to it.
1. Access the server properties as follows:
1.1. Under Cluster Topology > Application Server: OAS 10.1.3 server name, select the tvlexp instance.
1.2. Select the Administration tab.
1.3. Locate Server Properties and Select the Go To Task button.
2. Change the following settings in Start-parameters: Java Options Maximum heap size = 1024MInitial heap size = 512M
2 Banner Travel and Expense Management 8.5.0.5 8-9Handbook
Configuration and Deployment of Banner Travel and Expense Management
8-10
You should configure the instance with a minimum of 1 gigabyte as the maximum amount of memory. This parameter may need to be increased depending upon the size of your institution.
3. The max perm size should be set to at least 512M by adding the following under Start-parameters: Java Options of the Server Properties for the OC4J instance'-XX:MaxPermSize=512M'
4. Add the following option to the Start-parameters: Java Options of the Server Properties for the OC4J instance:-Doc4j.jmx.security.proxy.off=true
5. Under the Start-parameters: OC4J options, add the option -userThreads if it is not already present.
6. The Apache TIMEOUT parameter in the httpd.conf defaults to 5 minutes. This parameter may need to be increased depending upon the size of your institution.
7. Restart the tvlexp OC4J Instance from the Cluster Topology page.
7.1. Expand Application Server: OAS 10.1.3 server name.
7.2. Check the box for tvlexp instance.
7.3. Click Restart.
7.4. Click Yes.
(Restart may take some time.)
8. The TEM application can be accessed through the Oracle HTTP Server. This allows you to advertise a URL hosted via Oracle HTTP Server, which then routes requests to the application server where TEM is deployed. TEM can be launched using either of the following URLs:
https://<OHS server name>:4443/tvlexp/tvlexp-flex/index.html
http://<OHS server name>:7777/tvlexp/tvlexp-flex/index.html
NotePort 4443 and 7777 are configured at the OHS server and it redirects the request to the application deployed at the OC4J
Banner Travel and Expense Management 8.5.0.5 July 2012HandbookConfiguration and Deployment of Banner Travel and Expense Management
July 201
Configure the Oracle Application Server 11g and deploy the application
You must meet the following prerequisites before configuring Oracle WebLogic (Oracle Fusion Middleware 11g):
• Oracle WebLogic must be installed. If not, see the Oracle Website to download and install Oracle WebLogic.
• The minimum requirements are Oracle Fusion Middleware 11.1.1.4 using WebLogic 10.3.4.
• Both Oracle WebLogic node manager and admin server must be started.
Configure the application server - Oracle Fusion Middleware 11g
To configure the application server, complete the following steps:
Step 1 Create an Oracle WebLogic machine
NoteIf you previously created an Oracle WebLogic machine definition you can skip this step.
Use the following steps to create an Oracle WebLogic machine.
1. Access the admin server:
http://server:7001/console
2. Click Lock & Edit in the Change Center frame.
3. In the Domain Structure frame, expand Environment to view the list of environments.
4. Click Machines.
5. Click New.
6. Enter a machine name in the Name field.
7. Click OK.
8. Click Activate Changes in the Change Center frame.
2 Banner Travel and Expense Management 8.5.0.5 8-11Handbook
Configuration and Deployment of Banner Travel and Expense Management
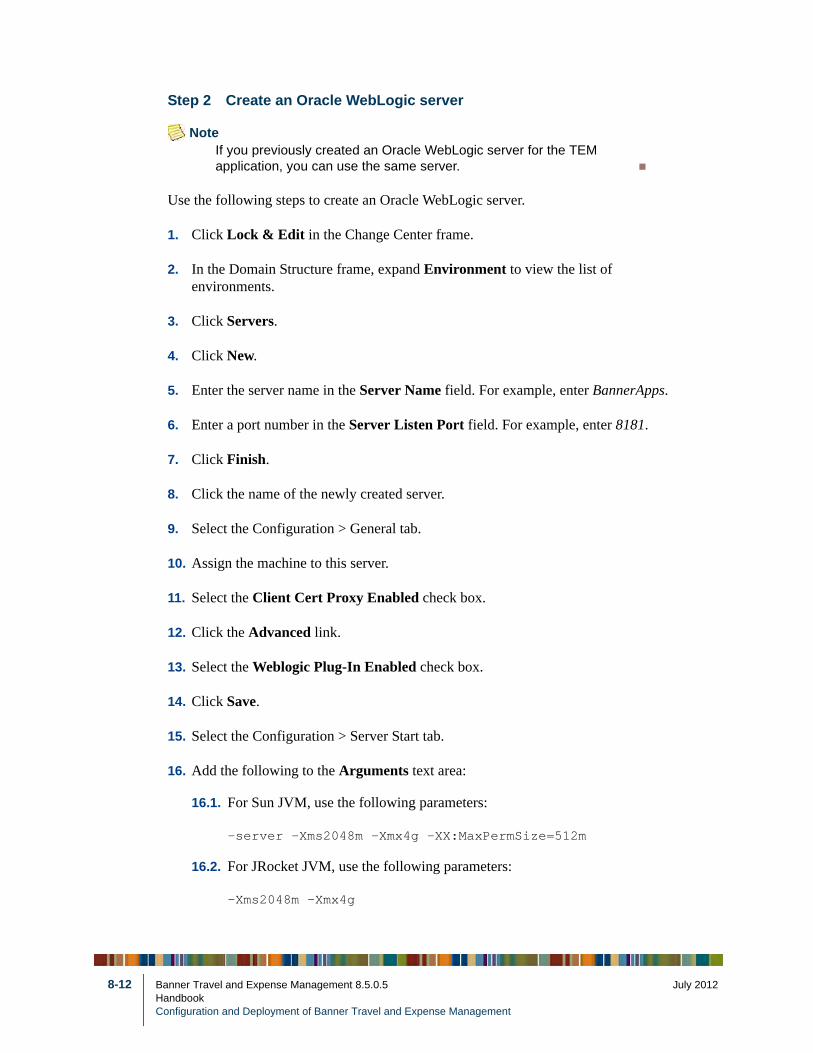
8-12
Step 2 Create an Oracle WebLogic server
NoteIf you previously created an Oracle WebLogic server for the TEM application, you can use the same server.
Use the following steps to create an Oracle WebLogic server.
1. Click Lock & Edit in the Change Center frame.
2. In the Domain Structure frame, expand Environment to view the list of environments.
3. Click Servers.
4. Click New.
5. Enter the server name in the Server Name field. For example, enter BannerApps.
6. Enter a port number in the Server Listen Port field. For example, enter 8181.
7. Click Finish.
8. Click the name of the newly created server.
9. Select the Configuration > General tab.
10. Assign the machine to this server.
11. Select the Client Cert Proxy Enabled check box.
12. Click the Advanced link.
13. Select the Weblogic Plug-In Enabled check box.
14. Click Save.
15. Select the Configuration > Server Start tab.
16. Add the following to the Arguments text area:
16.1. For Sun JVM, use the following parameters:
-server -Xms2048m -Xmx4g -XX:MaxPermSize=512m
16.2. For JRocket JVM, use the following parameters:
-Xms2048m -Xmx4g
Banner Travel and Expense Management 8.5.0.5 July 2012HandbookConfiguration and Deployment of Banner Travel and Expense Management
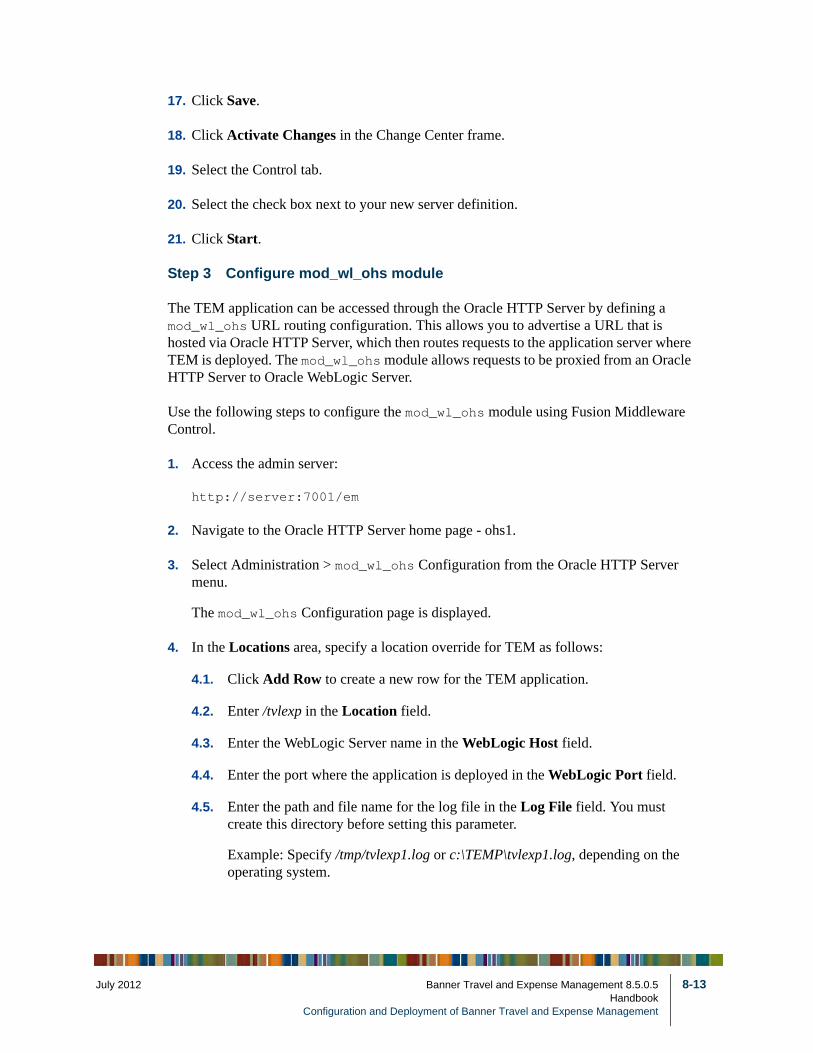
July 201
17. Click Save.
18. Click Activate Changes in the Change Center frame.
19. Select the Control tab.
20. Select the check box next to your new server definition.
21. Click Start.
Step 3 Configure mod_wl_ohs module
The TEM application can be accessed through the Oracle HTTP Server by defining a mod_wl_ohs URL routing configuration. This allows you to advertise a URL that is hosted via Oracle HTTP Server, which then routes requests to the application server where TEM is deployed. The mod_wl_ohs module allows requests to be proxied from an Oracle HTTP Server to Oracle WebLogic Server.
Use the following steps to configure the mod_wl_ohs module using Fusion Middleware Control.
1. Access the admin server:
http://server:7001/em
2. Navigate to the Oracle HTTP Server home page - ohs1.
3. Select Administration > mod_wl_ohs Configuration from the Oracle HTTP Server menu.
The mod_wl_ohs Configuration page is displayed.
4. In the Locations area, specify a location override for TEM as follows:
4.1. Click Add Row to create a new row for the TEM application.
4.2. Enter /tvlexp in the Location field.
4.3. Enter the WebLogic Server name in the WebLogic Host field.
4.4. Enter the port where the application is deployed in the WebLogic Port field.
4.5. Enter the path and file name for the log file in the Log File field. You must create this directory before setting this parameter.
Example: Specify /tmp/tvlexp1.log or c:\TEMP\tvlexp1.log, depending on the operating system.
2 Banner Travel and Expense Management 8.5.0.5 8-13Handbook
Configuration and Deployment of Banner Travel and Expense Management

8-14
4.6. Specify the type of logging performed for debugging operations in the Debug field.
For TEM, specify ERR in the Debug field.
Debugging information is written to the /tmp/wlproxy.log file on UNIX systems and to the c:\TEMP\wlproxy.log file on Windows systems.
4.6.1. Override this location and file name by setting the Log File parameter to a different directory and file.
4.6.2. Ensure that the tmp or TEMP directory has write permission assigned to the user who is logged in to the server.
5. Review the settings:
5.1. If the settings are correct, click Apply to apply the changes.
5.2. If the settings are incorrect or if you decide to not apply the changes, click Revert to return to the original settings.
6. Restart the Oracle HTTP Server by navigating to ohs1, Control, Restart.
The mod_wl_ohs module configuration is saved and is shown on the mod_wl_ohs Configuration page.
Deploy TEM - Oracle Fusion Middleware 11g
Use the following steps to deploy and start the TEM application in Oracle WebLogic server (Oracle Fusion Middleware 11g).
NoteYou must access the Oracle WebLogic server before you start to deploy the application.
1. Access the administration console:
http://server:7001/console
2. Click Deployments in the Domain Structure frame.
3. Click Lock & Edit in the Change Center frame.
4. Click Install.
5. Select the tvlexp.ear file for deployment. This file must already be configured, and must be uploaded to a location on the Oracle WebLogic application server.
6. Click Next.
Banner Travel and Expense Management 8.5.0.5 July 2012HandbookConfiguration and Deployment of Banner Travel and Expense Management
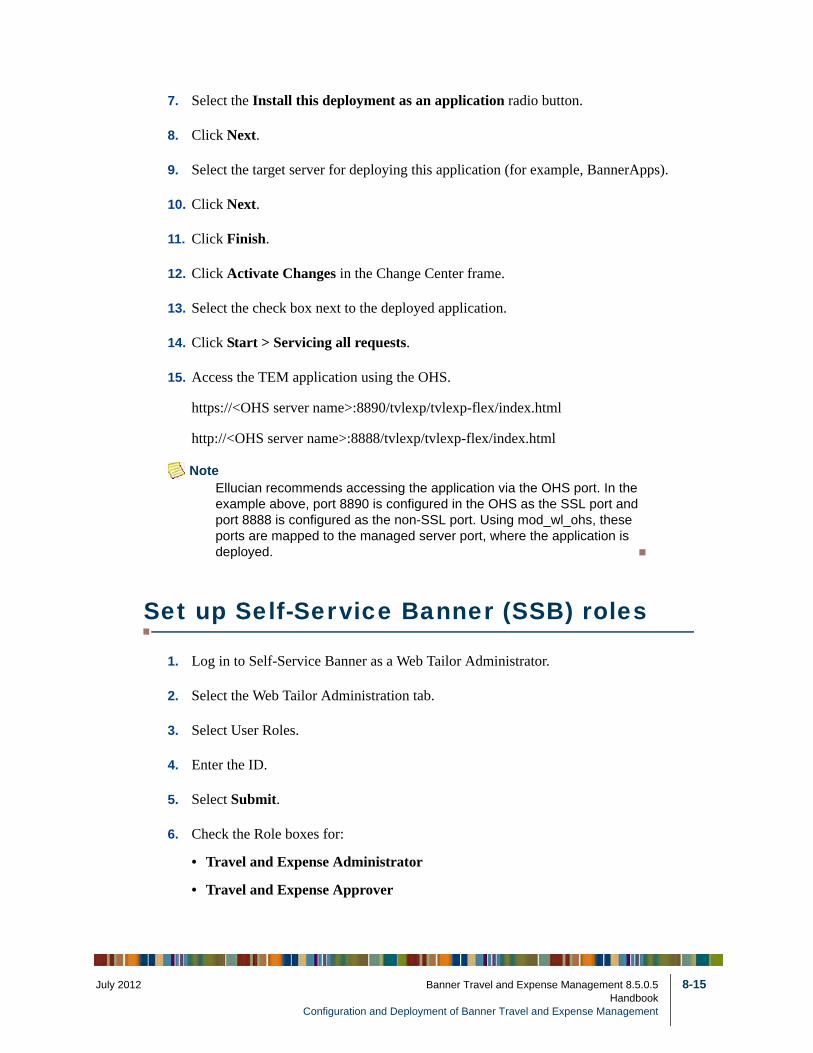
July 201
7. Select the Install this deployment as an application radio button.
8. Click Next.
9. Select the target server for deploying this application (for example, BannerApps).
10. Click Next.
11. Click Finish.
12. Click Activate Changes in the Change Center frame.
13. Select the check box next to the deployed application.
14. Click Start > Servicing all requests.
15. Access the TEM application using the OHS.
https://<OHS server name>:8890/tvlexp/tvlexp-flex/index.html
http://<OHS server name>:8888/tvlexp/tvlexp-flex/index.html
NoteEllucian recommends accessing the application via the OHS port. In the example above, port 8890 is configured in the OHS as the SSL port and port 8888 is configured as the non-SSL port. Using mod_wl_ohs, these ports are mapped to the managed server port, where the application is deployed.
Set up Self-Service Banner (SSB) roles
1. Log in to Self-Service Banner as a Web Tailor Administrator.
2. Select the Web Tailor Administration tab.
3. Select User Roles.
4. Enter the ID.
5. Select Submit.
6. Check the Role boxes for:
• Travel and Expense Administrator
• Travel and Expense Approver
2 Banner Travel and Expense Management 8.5.0.5 8-15Handbook
Configuration and Deployment of Banner Travel and Expense Management
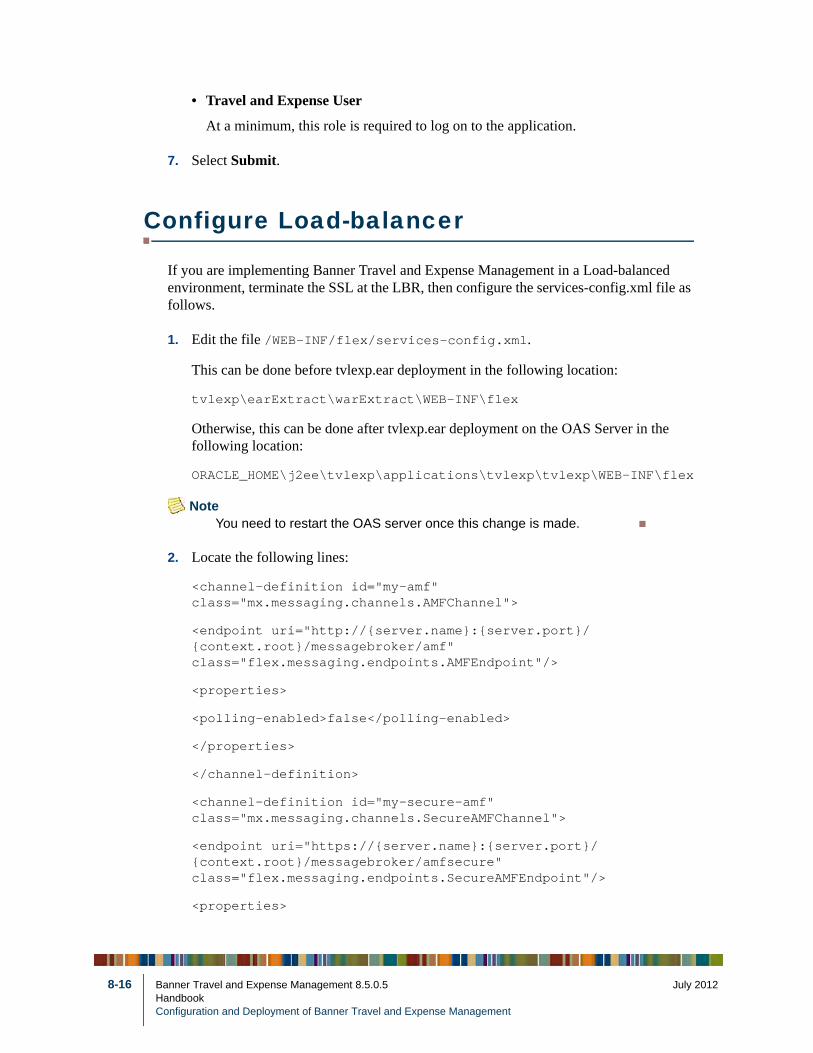
8-16
• Travel and Expense User
At a minimum, this role is required to log on to the application.
7. Select Submit.
Configure Load-balancer
If you are implementing Banner Travel and Expense Management in a Load-balanced environment, terminate the SSL at the LBR, then configure the services-config.xml file as follows.
1. Edit the file /WEB-INF/flex/services-config.xml.
This can be done before tvlexp.ear deployment in the following location:
tvlexp\earExtract\warExtract\WEB-INF\flex
Otherwise, this can be done after tvlexp.ear deployment on the OAS Server in the following location:
ORACLE_HOME\j2ee\tvlexp\applications\tvlexp\tvlexp\WEB-INF\flex
NoteYou need to restart the OAS server once this change is made.
2. Locate the following lines:
<channel-definition id="my-amf" class="mx.messaging.channels.AMFChannel">
<endpoint uri="http://{server.name}:{server.port}/{context.root}/messagebroker/amf" class="flex.messaging.endpoints.AMFEndpoint"/>
<properties>
<polling-enabled>false</polling-enabled>
</properties>
</channel-definition>
<channel-definition id="my-secure-amf" class="mx.messaging.channels.SecureAMFChannel">
<endpoint uri="https://{server.name}:{server.port}/{context.root}/messagebroker/amfsecure" class="flex.messaging.endpoints.SecureAMFEndpoint"/>
<properties>
Banner Travel and Expense Management 8.5.0.5 July 2012HandbookConfiguration and Deployment of Banner Travel and Expense Management
July 201
<add-no-cache-headers>false</add-no-cache-headers>
</properties>
</channel-definition>
3. Change these lines to the following:
<channel-definition id="my-amf" class="mx.messaging.channels.AMFChannel">
<endpoint uri="http://{server.name}:{server.port}/{context.root}/messagebroker/amfsecure" class="flex.messaging.endpoints.AMFEndpoint"/>
<properties>
<polling-enabled>false</polling-enabled>
<add-no-cache-headers>false</add-no-cache-headers>
</properties>
</channel-definition>
<channel-definition id="my-secure-amf" class="mx.messaging.channels.SecureAMFChannel">
<endpoint uri="https://{server.name}:{server.port}/{context.root}/messagebroker/amfsecure_" class="flex.messaging.endpoints.SecureAMFEndpoint"/>
<properties>
<add-no-cache-headers>false</add-no-cache-headers>
</properties>
</channel-definition>
4. Enable the Redirect Rewrite option in the http profile for the virtual server.
NoteIn other load balancers, it may be Reply Rewriting instead of Redirect Rewrite.
Test TVLEXP application
1. Install Adobe Flash player version 9.0.16.0 or higher into the browser of a test PC. You can obtain Flash Player from the following URL:http://download-official.com/flash/
2 Banner Travel and Expense Management 8.5.0.5 8-17Handbook
Configuration and Deployment of Banner Travel and Expense Management
8-18
2. Test the TVLEXP Application directly. Open the URL.
http://<server_name>:8890/tvlexp/tvlexp-flex/index.html
You should see the following:
Welcome
Sign into Travel and Expense Reporting
3. Enter your User Name and Password. (Log in with a valid SSB Login and PIN.)
User name: 11111111
Password: 111111
4. Select Sign In.
Configure Banner Workflow in Banner Travel and Expense Management
You need to enable Approvals in Banner Travel and Expense Management and configure the access to Banner Workflow after installing the Workflow model in your environment to be able to submit expense reports to Banner Workflow.
1. Log in to Banner Travel and Expense Management as an administrator.
2. Go to the Administration tab.
3. Select Institutional Settings.
4. Under Report Options, select the Enable Workflow Approvals check box. You see the Administrator Access window.
5. In the Administrator Access window, enter the following details:
Banner Travel and Expense Management 8.5.0.5 July 2012HandbookConfiguration and Deployment of Banner Travel and Expense Management
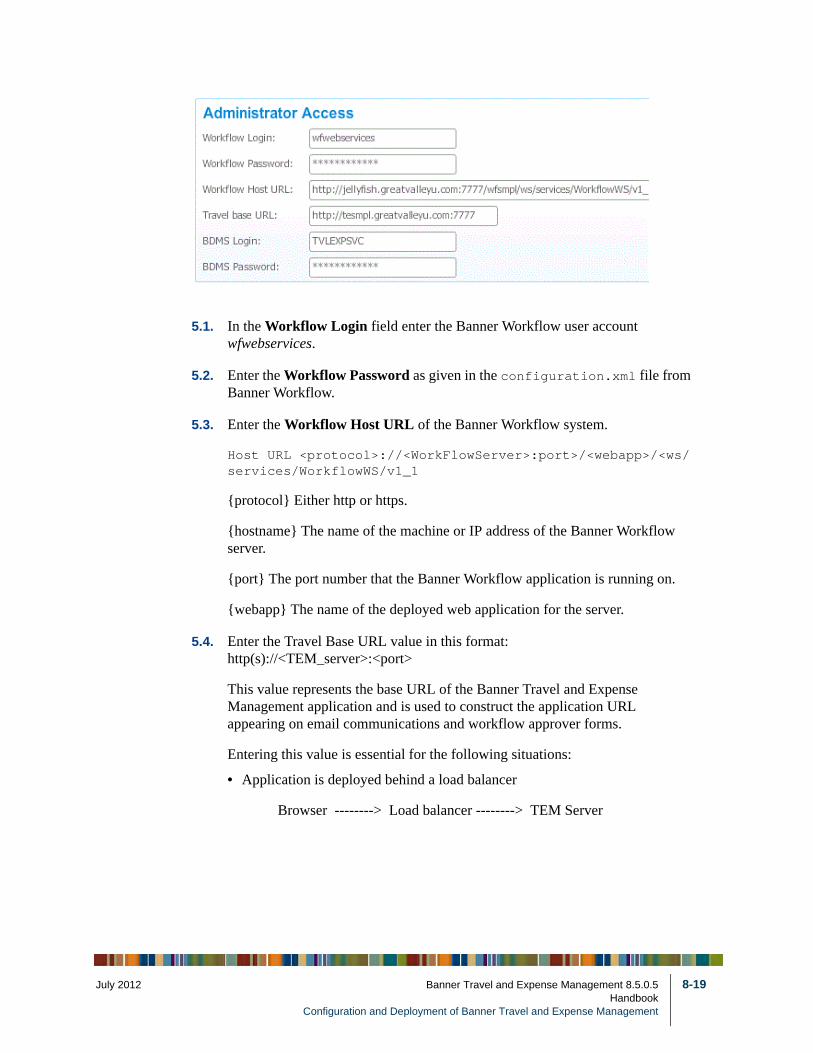
July 201
5.1. In the Workflow Login field enter the Banner Workflow user account wfwebservices.
5.2. Enter the Workflow Password as given in the configuration.xml file from Banner Workflow.
5.3. Enter the Workflow Host URL of the Banner Workflow system.
Host URL <protocol>://<WorkFlowServer>:port>/<webapp>/<ws/services/WorkflowWS/v1_1
{protocol} Either http or https.
{hostname} The name of the machine or IP address of the Banner Workflow server.
{port} The port number that the Banner Workflow application is running on.
{webapp} The name of the deployed web application for the server.
5.4. Enter the Travel Base URL value in this format: http(s)://<TEM_server>:<port>
This value represents the base URL of the Banner Travel and Expense Management application and is used to construct the application URL appearing on email communications and workflow approver forms.
Entering this value is essential for the following situations:
• Application is deployed behind a load balancer
Browser --------> Load balancer --------> TEM Server
2 Banner Travel and Expense Management 8.5.0.5 8-19Handbook
Configuration and Deployment of Banner Travel and Expense Management
8-20
• Reverse proxy server will route requests to the application server where the application is deployed
Browser --------> Oracle HTTP Server --------> TEM Weblogic Server
Supplying this value is essential if your configuration uses an intermediary server. This value ensures that workflow approvers or travelers can directly gain access to Travel and Expense Management (from their Workflow or email systems). If this value is left null and your configuration supports this structure, your users’ access to TEM will be inhibited.
6. Select Save.
7. Log out from Banner Travel and Expense Management.
Configure Banner Document Management System (BDMS) in Banner Travel and Expense Management (TEM)
To enable BDMS, perform the following steps.
1. Log in to Banner Travel and Expense Management as an administrator.
2. Go to the Administration tab.
3. Select Institutional Settings.
4. Under Report Options, select the Enable BDMS integration check box.
5. In the Administrator Access window, screen illustrated below, enter the following details:
Banner Travel and Expense Management 8.5.0.5 July 2012HandbookConfiguration and Deployment of Banner Travel and Expense Management
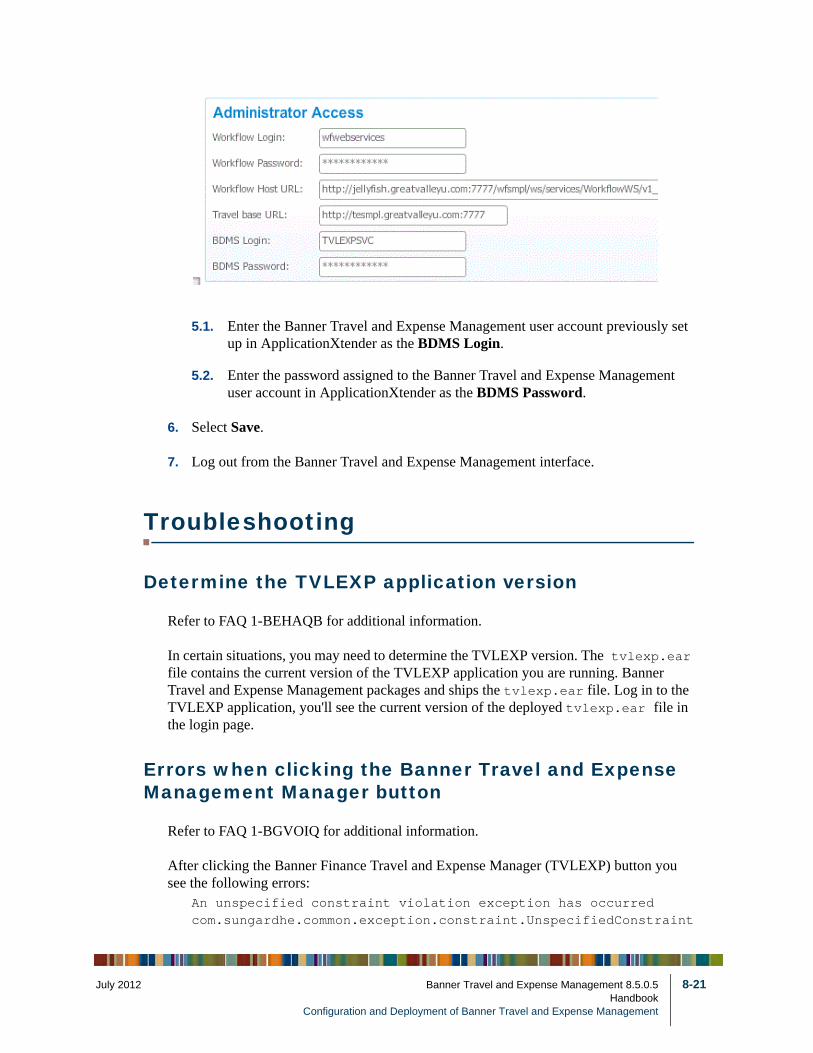
July 201
5.1. Enter the Banner Travel and Expense Management user account previously set up in ApplicationXtender as the BDMS Login.
5.2. Enter the password assigned to the Banner Travel and Expense Management user account in ApplicationXtender as the BDMS Password.
6. Select Save.
7. Log out from the Banner Travel and Expense Management interface.
Troubleshooting
Determine the TVLEXP application version
Refer to FAQ 1-BEHAQB for additional information.
In certain situations, you may need to determine the TVLEXP version. The tvlexp.ear file contains the current version of the TVLEXP application you are running. Banner Travel and Expense Management packages and ships the tvlexp.ear file. Log in to the TVLEXP application, you'll see the current version of the deployed tvlexp.ear file in the login page.
Errors when clicking the Banner Travel and Expense Management Manager button
Refer to FAQ 1-BGVOIQ for additional information.
After clicking the Banner Finance Travel and Expense Manager (TVLEXP) button you see the following errors:
An unspecified constraint violation exception has occurred com.sungardhe.common.exception.constraint.UnspecifiedConstraint
2 Banner Travel and Expense Management 8.5.0.5 8-21Handbook
Configuration and Deployment of Banner Travel and Expense Management
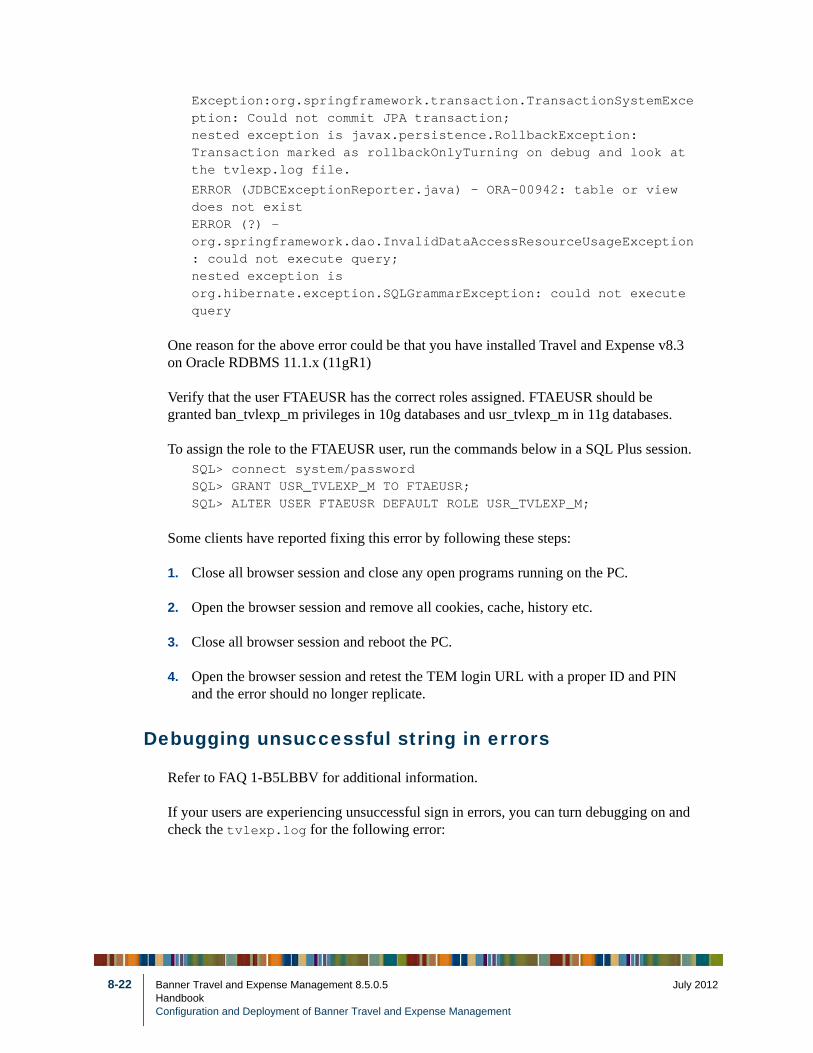
8-22
Exception:org.springframework.transaction.TransactionSystemException: Could not commit JPA transaction; nested exception is javax.persistence.RollbackException: Transaction marked as rollbackOnlyTurning on debug and look at the tvlexp.log file.
ERROR (JDBCExceptionReporter.java) - ORA-00942: table or view does not existERROR (?) - org.springframework.dao.InvalidDataAccessResourceUsageException: could not execute query; nested exception is org.hibernate.exception.SQLGrammarException: could not execute query
One reason for the above error could be that you have installed Travel and Expense v8.3 on Oracle RDBMS 11.1.x (11gR1)
Verify that the user FTAEUSR has the correct roles assigned. FTAEUSR should be granted ban_tvlexp_m privileges in 10g databases and usr_tvlexp_m in 11g databases.
To assign the role to the FTAEUSR user, run the commands below in a SQL Plus session.SQL> connect system/passwordSQL> GRANT USR_TVLEXP_M TO FTAEUSR;SQL> ALTER USER FTAEUSR DEFAULT ROLE USR_TVLEXP_M;
Some clients have reported fixing this error by following these steps:
1. Close all browser session and close any open programs running on the PC.
2. Open the browser session and remove all cookies, cache, history etc.
3. Close all browser session and reboot the PC.
4. Open the browser session and retest the TEM login URL with a proper ID and PIN and the error should no longer replicate.
Debugging unsuccessful string in errors
Refer to FAQ 1-B5LBBV for additional information.
If your users are experiencing unsuccessful sign in errors, you can turn debugging on and check the tvlexp.log for the following error:
Banner Travel and Expense Management 8.5.0.5 July 2012HandbookConfiguration and Deployment of Banner Travel and Expense Management
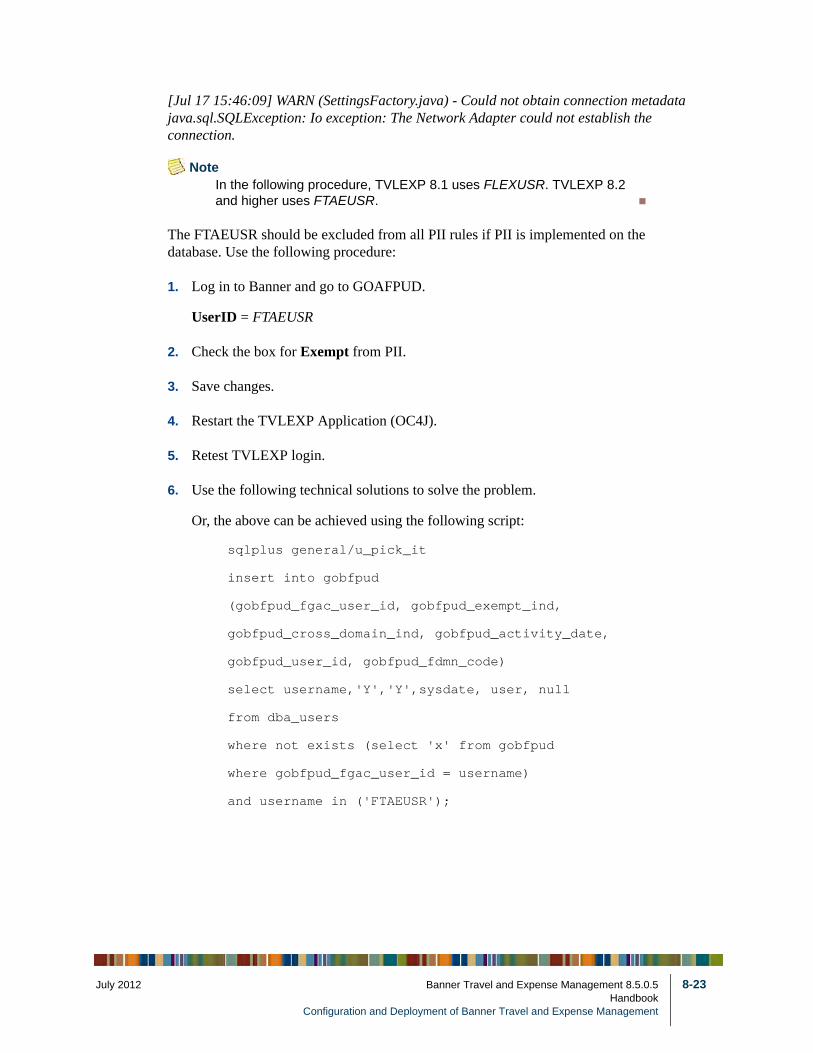
July 201
[Jul 17 15:46:09] WARN (SettingsFactory.java) - Could not obtain connection metadatajava.sql.SQLException: Io exception: The Network Adapter could not establish the connection.
NoteIn the following procedure, TVLEXP 8.1 uses FLEXUSR. TVLEXP 8.2 and higher uses FTAEUSR.
The FTAEUSR should be excluded from all PII rules if PII is implemented on the database. Use the following procedure:
1. Log in to Banner and go to GOAFPUD.
UserID = FTAEUSR
2. Check the box for Exempt from PII.
3. Save changes.
4. Restart the TVLEXP Application (OC4J).
5. Retest TVLEXP login.
6. Use the following technical solutions to solve the problem.
Or, the above can be achieved using the following script:
sqlplus general/u_pick_it
insert into gobfpud
(gobfpud_fgac_user_id, gobfpud_exempt_ind,
gobfpud_cross_domain_ind, gobfpud_activity_date,
gobfpud_user_id, gobfpud_fdmn_code)
select username,'Y','Y',sysdate, user, null
from dba_users
where not exists (select 'x' from gobfpud
where gobfpud_fgac_user_id = username)
and username in ('FTAEUSR');
2 Banner Travel and Expense Management 8.5.0.5 8-23Handbook
Configuration and Deployment of Banner Travel and Expense Management
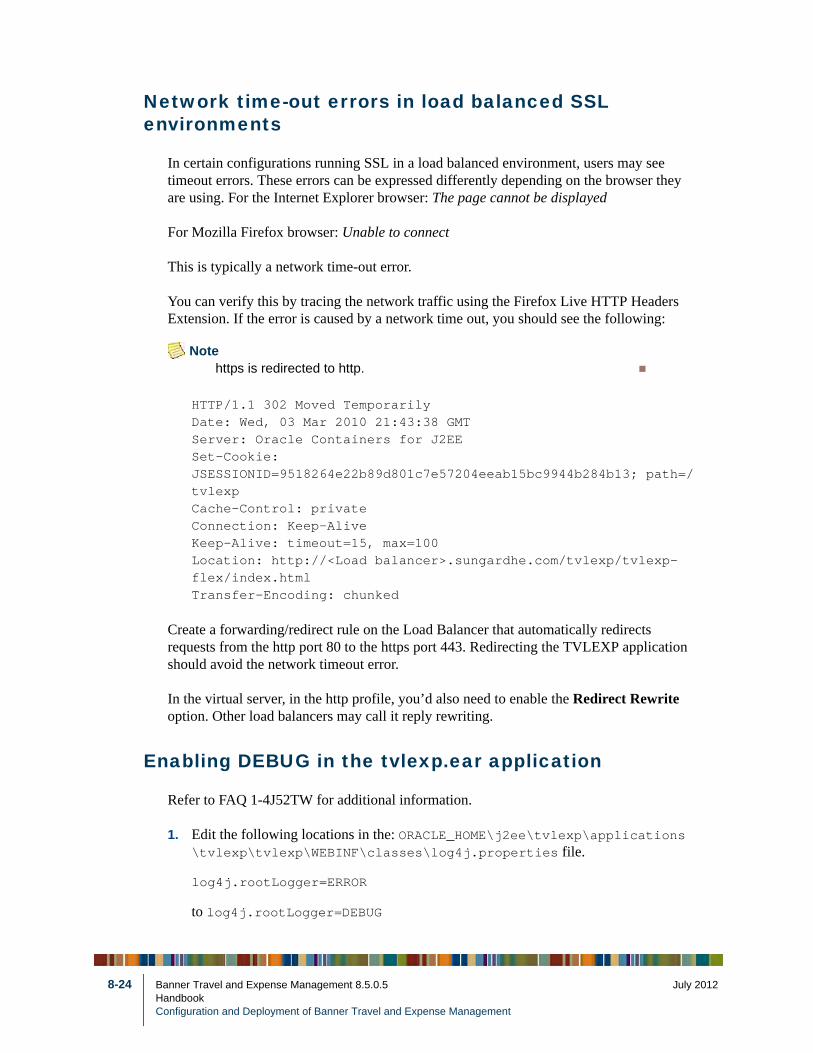
8-24
Network time-out errors in load balanced SSL environments
In certain configurations running SSL in a load balanced environment, users may see timeout errors. These errors can be expressed differently depending on the browser they are using. For the Internet Explorer browser: The page cannot be displayed
For Mozilla Firefox browser: Unable to connect
This is typically a network time-out error.
You can verify this by tracing the network traffic using the Firefox Live HTTP Headers Extension. If the error is caused by a network time out, you should see the following:
Notehttps is redirected to http.
HTTP/1.1 302 Moved TemporarilyDate: Wed, 03 Mar 2010 21:43:38 GMTServer: Oracle Containers for J2EESet-Cookie: JSESSIONID=9518264e22b89d801c7e57204eeab15bc9944b284b13; path=/tvlexpCache-Control: privateConnection: Keep-AliveKeep-Alive: timeout=15, max=100Location: http://<Load balancer>.sungardhe.com/tvlexp/tvlexp-flex/index.htmlTransfer-Encoding: chunked
Create a forwarding/redirect rule on the Load Balancer that automatically redirects requests from the http port 80 to the https port 443. Redirecting the TVLEXP application should avoid the network timeout error.
In the virtual server, in the http profile, you’d also need to enable the Redirect Rewrite option. Other load balancers may call it reply rewriting.
Enabling DEBUG in the tvlexp.ear application
Refer to FAQ 1-4J52TW for additional information.
1. Edit the following locations in the: ORACLE_HOME\j2ee\tvlexp\applications\tvlexp\tvlexp\WEBINF\classes\log4j.properties file.
log4j.rootLogger=ERROR
to log4j.rootLogger=DEBUG
Banner Travel and Expense Management 8.5.0.5 July 2012HandbookConfiguration and Deployment of Banner Travel and Expense Management
July 201
2. Save the changes.
3. Ensure that the Dlog4j.configuratorClass flag is not set.
4. Select the tvlexp OC4J Instance from Cluster Topology > Application Server:
5. Select the Administration tab.
6. Locate Server Properties and select the Go To Task button.
7. From the Start-parameters: Java Options section select delete for the following row if it exists.
Dlog4j.configuratorClass=com.sungardhe.framework.logging.DBLoggingConfigurat
OR
8. If it doesn’t exist, select Apply Changes.
9. Restart the OC4J application on OEM Console.
10. Review the DEBUG log file in the following default location:
ORACLE_HOME\j2ee\home\tvlexp.log
11. Review the following additional log file locations as needed:
ORACLE_HOME\opmn\logs\
TipYou can change the location or name adjusting the following line in the log4j.properties file: log4j.appender.file.File=tvlexp.log
The location is relative to ORACLE_HOME\j2ee.
For example, log4j.appender.file.File=../tvlexp/log/tvlexp.log will place the file in:ORACLE_HOME\j2ee\tvlexp\log\tvlexp.log.
You can turn on additional debugging for other modules as needed in thelog4j.properties. For example, change
### HIBERNATE LOGGING ###
log4j.logger.org.hibernate=error
to### HIBERNATE LOGGING ###
log4j.logger.org.hibernate=DEBUG
You will get more details in the tvlexp.log file.
2 Banner Travel and Expense Management 8.5.0.5 8-25Handbook
Configuration and Deployment of Banner Travel and Expense Management
8-26
Inability to access Travel and Expense Management from Workflow using the link
You may not have the Travel Base URL populated on Institutional Settings. Based on some configurations where an intermediate server is used, this URL value is required. Please contact your administrator to populate the Travel Base URL following the instructions in “Configure Banner Workflow in Banner Travel and Expense Management”.
Set Up BEIS integration with CAS
Refer to FAQ 1-9KD4TYfor additional information.
• tvlexp - Travel and Expense Management
• BEIS - Banner Enterprise Identity Services
• CAS - Central Authentication Service (http://www.jasig.org/cas)
Prerequisite: Obtain the following two files for the setup.
• web.xml
• applicationContext-springsecurity.xml
1. Back up your existing files and copy the following two files to the OAS 10.1.3.x server location where tvlexp is installed:
cp web.xml $ORACLE_HOME/j2ee/tvlexp/applications/tvlexp/tvlexp/WEB-INF/web.xml
cp applicationContext-springsecurity.xml $ORACLE_HOME/j2ee/tvlexp/applications/tvlexp/tvlexp/WEB-INF/classes/applicationContext-springsecurity.xml
2. Edit/Modify the web.xml file.
3. Replace yourcasserver with CAS server URL being used.
4. Replace yourteserver with Banner Travel and Expense Management URL being used.
5. Restart your OAS Server.
Implementing SSO connection from Luminis® Platform to Banner Travel and Expense Management
Refer to FAQ 1-8JUWRB for additional information.
Banner Travel and Expense Management 8.5.0.5 July 2012HandbookConfiguration and Deployment of Banner Travel and Expense Management
July 201
You can use the cpipconnector with the following files to define SSO between Luminis Platform and Banner Travel and Expense Management:
• pickup.html
• te.properties
• te.xml
After you adjust these files to configure an SSO connection, you would add links to Banner Travel and Expense Management in the Luminis Platform system. Use the procedures in the following sections to configure SSO, and then insert and test links.
NoteBefore proceeding, you need to know the un-encrypted Banner pin values, for example: GORPAUD_PIN (8.x) or GOBTPAC_PIN (7.x). You can find added details on pin encryption in - FAQ 1-42RLMK - Banner 8 GOBTPAC_PIN encryption enhancement - *PINRESET.
WarningThis solution does not work for if you have fully encrypted the pin in Banner 8.x on GOBTPAC_PIN and GORPAUD_PIN.
1. Access the pickup.html file from a Luminis Platform server using the direct URL, for example, or copy the pickup.html file into the OAS_HOME\j2ee\home\default-web-app directory.
http://TEServer:Port/pickup.html
2. Test access to the pickup.html file.
If the Normal Banner Travel and Expense Management login URL is
http://rocoram2.sct.com:8890/tvlexp/tvlexp-flex/
The pickup.html file access will be
http://rocoram2.sct.com:8890/pickup.html
The Title of Page is Cookie Pickup, and the rest of the page is blank.
3. Modify the attached te.properties and te.xml files to point to the Travel and Expense server.
NoteThe files are part of FAQ 1-42RLMK. See that FAQ for additional steps/information.
3.1. Replace http://TEServer:Port with your server and port information.
2 Banner Travel and Expense Management 8.5.0.5 8-27Handbook
Configuration and Deployment of Banner Travel and Expense Management
8-28
3.1.1. Modify the te.properties file to locate to the Travel and Expense server by replacing the two strings, TEServer:Port, with the actual hostname and port of the Travel and Expense server.
3.1.2. Modify the te.xml file to locate to the Travel and Expense server by replacing the three strings, TEServer:Port, with the actual hostname and port of the Travel and Expense server.
For example, http://banner_test.udc.edu:8890
3.2. Enter valid values for the following te.license.key property in te.properties file.
te.license.key = <Your License Key>
TipFor a valid Luminis GCF connector CPIP license key value contact your Ellucian® account consultant. If you don’t have a current license key, leave the default values and continue implementation.
3.3. Copy the te.properties and te.xml files to the
<LuminisInstall Directory>\webapps\cpipconnector\WEB-INF\config
4. To add te.properties to the property.files field modify the cipconnector.properties file under format with code font<LuminisInstall Directory>\webapps\cpipconnector\WEB-INF\config
For example, assume you had the following property setting:property.files = comexp.properties,messengerexpress.properties
To add the te.properties file so that it is read by the cpipconnector, you'd adjust it as follows:property.files = comexp.properties,messengerexpress.properties,te.properties
5. As an Administrator on the Luminis Server (cpadmin) run the following commands. Be sure to replace the LuminisServer variable (offset in brackets below) with the FQDN of your Luminis Platform server:
configman -s es.te.autosync false
configman -s es.te.configURL http://<LuminisServer>:8008/cpipconnector/te/GetConfigVersion2
configman -s es.te.configattempts 60
configman -s es.te.configsleeptime 10000
configman -s es.te.shortcircuitlogin false
6. From the Luminis server run the following:
Banner Travel and Expense Management 8.5.0.5 July 2012HandbookConfiguration and Deployment of Banner Travel and Expense Management
July 201
configman -g es.systems
This results in a list of Single Sign-On systems already implemented.
7. Append Travel and Expense to this list using the following command:
configman -s es.systems " <Systems you got from the above command> te "
For example your command might look like the following:
configman -s es.systems "sct cal comexp sctinb sctssb wx te"
8. From the Luminis server run the following:cptool set user <luminis User> ExternalAccount="te|<T&E User>|<T&E password>
NoteThis needs to be set for each user that is going to use Banner Travel and Expense from Luminis Platform.
For example you might replace the variables with a command similar to the following:cptool set user testssb8 ExternalAccount="te|111111111|111111"
In the example above, the elements of the command correspond to the following::Luminis Login = testssb8Banner ID = 111111111PIN = 111111
9. Restart the Luminis Platform system by using the following commands:stopcp -a
startcp
Adding a Travel and Expense Single-Sign On test link in Luminis Platform
1. Log in to Luminis Platform as the Administrator.
2. Select the Portal Admin link.
3. Select the Manage Targeted Content Channels link.
4. Select Add New Channel.
5. Select the New Channel link to edit the channel.
6. Change Channel Name to a name you prefer, for example, TE SSO.
7. Change Channel Title to a title you prefer, for example, TE SSO.
2 Banner Travel and Expense Management 8.5.0.5 8-29Handbook
Configuration and Deployment of Banner Travel and Expense Management
8-30
8. Under the Channel Categories section, highlight the category where you want to place the channel, for example, Miscellaneous.
9. Select Save Attributes.
10. Select Add New Section.
11. Select the New Section link to edit the section.
12. Set the Section Status to Active.
13. Set the Section Title to a name you prefer, for example, TE SSO.
14. Leave the Section Options boxes unchecked.
15. Select the Free Form Text/HTML Type option for the Sub Section.
16. Select Go.
17. Select the New Sub Section link to edit the subsection.
18. Set the Sub Section Title to a name you prefer, for example, TE SSO.
19. Select an appropriate Start Date and End Date.
20. Select the Content uses HTML under Content.
21. Set the URL to the TE SSO URL, using the following format:
<A Href="{TE SSO URL}" TARGET="_blank">{Link Text}</A>
The following illustrates how the URL might look:<A Href="http://slcsup19.sct.com/cp/ip/login?sys=te&url=http://rocoram2.sct.com:8890/tvlexp/tvlexp-flex/index.html" TARGET="_blank">TE SSO</A>
For example:http://rocoram2.sct.com:8890/tvlexp/tvlexp-flex/index.html
In the example URL above, the{TE SSO URL} value is:
http://<Luminis>:Port/cp/ip/login?sys=te&url=http%3A%2F%2F<TEServer>%3A<port>%2Ftvlexp%2Ftvlexp-flex%2Findex.html
Where<Luminis>:<Port> = Luminis server and port<TEServer> = Travel and Expenses Server<port> = Travel and expenses port
Banner Travel and Expense Management 8.5.0.5 July 2012HandbookConfiguration and Deployment of Banner Travel and Expense Management
July 201
In Luminis 4.1 example:
From step 21 above, a text editor displays, similar to Microsoft Word.
Select the Source button in upper right corner of the editor toolbar, then paste the URL details below.
<p><a target="blank" href="{INB SSO URL}">{Link Text}</a></p>
For example:
<p><a target="_blank" href="http://slcsup19.sct.com/cp/ip/login?sys=te&url=http://rocoram2.sct.com:8890/tvlexp/tvlexp-flex/index.html">TE SSO</a></p>
22. Select Continue.
23. Select Save Changes
24. Select Done.
25. Select Done.
26. Select logout.
Test the Travel and Expense Single-Sign On Link
After you have inserted the links, you will want to test them. Use the following procedure:
1. Log in to the Luminis Platform as the user you defined previously when configuring the cpipconnector.
2. Select Content/Layout.
3. Select Add Channel (in desired location).
4. Select Category = Application.
5. Select GO.
6. Select Subcategory = Miscellaneous.
7. Select GO.
8. Select TE SSO.
9. Select Add Channel.
10. Select back to All Users Sample tab
2 Banner Travel and Expense Management 8.5.0.5 8-31Handbook
Configuration and Deployment of Banner Travel and Expense Management
8-32
11. Select the new TE SSO link from your chosen location. A browser window appears with a URL that displays the following:
https://slcsup19.sct.com/cp/ip/login?sys=te&url=http://rocoram2.sct.com:8890/tvlexp/tvlexp-flex/index.html
this URL should redirect to:
http://rocoram2.sct.com:8890/tvlexp/tvlexp-flex/index.html
TipThis should display Banner Travel and Expense Management without prompting for a login.
Possible Errors that may occur
When you select the TE SSO link from Luminis Platform, a browser window appears that displays the following error that something has failed in the configuration settings:
External System Error CPIP Notification: Unsupported OID serviceIf you need assistance, contact your system administrator
To debug the configuration, run the command:configman -g es.te.*
You’ll get a return similar to the following:[cpadmin@slcsup19 config]$ configman -g es.te.*
es.te.autosync=false
es.te.configURL=http://slcsup19.sct.com/cpipconnector/te/GetConfigVersion2
es.te.configattempts=60
es.te.configsleeptime=10000
es.te.shortcircuitlogin=false
If the port on the URL is missing? This should be sure to set it (typically it is port 8008).
To reset the port, run this command:
configman -s es.te.configURL http://slcsup19.sct.com:8008/cpipconnector/te/GetConfigVersion2
Restart the Luminis Platform as follows:
stopcp -a
startcp
12. Test the Travel and Expense Single-Sign On Link again.
Banner Travel and Expense Management 8.5.0.5 July 2012HandbookConfiguration and Deployment of Banner Travel and Expense Management
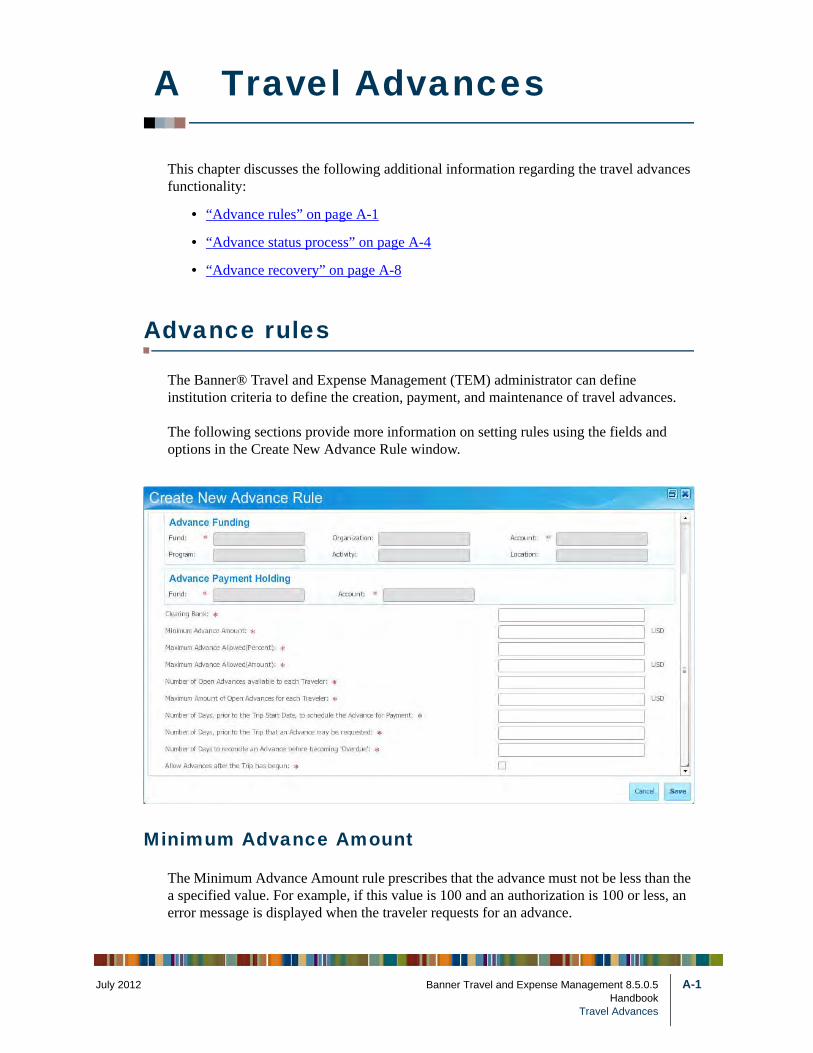
July 201
A Travel Advances
This chapter discusses the following additional information regarding the travel advances functionality:
• “Advance rules” on page A-1
• “Advance status process” on page A-4
• “Advance recovery” on page A-8
Advance rules
The Banner® Travel and Expense Management (TEM) administrator can define institution criteria to define the creation, payment, and maintenance of travel advances.
The following sections provide more information on setting rules using the fields and options in the Create New Advance Rule window.
Minimum Advance Amount
The Minimum Advance Amount rule prescribes that the advance must not be less than the a specified value. For example, if this value is 100 and an authorization is 100 or less, an error message is displayed when the traveler requests for an advance.
2 Banner Travel and Expense Management 8.5.0.5 A-1Handbook
Travel Advances
A-2
If an authorization is greater than 100, the system verifies with the Maximum Advance Allowed (Percent) value set in the institution’s rules. It compares the percentage and the authorization amount to ensure that the advance value is 100 or more.
If the authorization amount is 110, which is greater than the minimum amount of 100, but the Maximum Advance Allowed (Percent) is 80%, the resulting value is 80% * 110 = 88. Since the advance can only be lesser of the two values, 80% of the authorization amount does not meet the minimum value of 100, an error message is displayed to the traveler.
Maximum Advance Allowed (Percent) and Maximum Advance Allowed (Amount)
If an authorization is entered for 5,000, the system determines what the maximum allowed advance is by taking the lesser of the percent amount multiplied by the authorization amount and the advance allowed amount value. In this case, 80% * 5,000 = 4,000
The system displays an error message to the traveler for an advance request amount greater than 4,000.
This amount is considered for an authorization. The max amount is calculated such that the sum of advances for an authorization does not exceed the maximum amount as an authorization may have more than one advance associated with it.
Number of Open Advances Available to each traveler
All open advances are considered at a trip level as the advance outstanding amount and status are maintained at the authorization level.
Consider the following samples:
• If an authorization, TA000004, has an advance associated with it in a Submitted, Approved, Ready to Pay, Paid - outstanding, or Paid-Overdue status, it is considered as an open advance.
• If an authorization, TA000011, has an advance associated with it in a Reconciled or Cancelled state, it is not considered as an open advance.
• If an authorization, TA000011, has a second advance associated with it in a Ready to Pay status, it is considered as two open advances.
• If an authorization, TA000011, has a third advance associated with it in a Submitted status, it is considered as two open advances.
• If an authorization, TA000020, has an advance associated with it in a Paid status, it is considered as three open advances.
If another advance is requested, the system will raise an error.
Banner Travel and Expense Management 8.5.0.5 July 2012HandbookTravel Advances
July 201
Maximum Amount of Open Advances per traveler
This rule evaluates the amount of all advances in a status of Submitted, Approved, Ready to Pay, Paid (Outstanding), or Paid (Overdue) status. If a newly requested advance brings the threshold over the rule value (10000), an error is raised.
Number of days, prior to the Trip Start Date, to Schedule the Advance for Payment
This rule determines the payment due date on the invoice created in Banner Finance
The system compares the system date to the trip start date. Consider the following samples:
• If the system date is 01-November and the trip start date is 20-November, the system takes the rule value (10 days) and subtracts it from the trip start to determine the estimated pay date of 10-November.
• If the system date is 12-November and the trip start date is 20-November, the system takes the rule value (10 days) and subtracts it from the trip start. Since the calculated date is before the system date, the system determines the estimated pay date of 12-November.
Number of days prior to the trip that the Advance may be requested
This rule controls an institution's ability to provide payment within a reasonable time-frame before the trip begins. Consider the following samples:
• If the system date is 19-November, the trip start is 20-November, and the requested number of days is 1, the system allows the advance request.
• If the system date is the start date of the trip, the system verifies against the Allow advances after the trip has begun rule. If this rule is enabled, the request is allowed. If it is disabled, an error is raised.
Number of days to reconcile an Advance before becoming Overdue
This rule specifies the number of days that a traveler has, after the trip end date, to reconcile their report and repay outstanding advance amounts, if any.
The system tracks and identifies overdue advances using the Advance Status Process in the Institutional Settings page. You can specify the date that this process begins and the interval at which it reads the tables to perform the process. The process searches the authorization table for those authorizations that are in an Outstanding status and finds the
2 Banner Travel and Expense Management 8.5.0.5 A-3Handbook
Travel Advances
A-4
advance rule(s) used to create the advance. It adds the value specified for Number of days to reconcile to the trip end date to arrive at a date that is the last day to reconcile.
The process compares the last day to reconcile to the system date. If the system date is less than or equal to this date, the process does not take any action. If the system date is greater than the last day to reconcile, it updates the status from Outstanding to Overdue and creates a status history entry to record that an action was taken by the process.
If you want notification for the successful run of the process, unsuccessful run, or both, you can create a record in the system data table (FTMSDAT) and specify the user ID in the data field. Refer to the “Advance status process” on page A-4 section for more information.
Allow Advances after the trip has begun
Select this check box to enable the rule to allow advance requests to be entered during the trip or event start and end dates.
NoteAdvance requests are not allowed after the trip or event end date.
Advance status process
The advance status process uses the Oracle DBMS_SCHEDULER that creates a job (TVLEXP_ADVANCE_STATUS_JOB) to automatically update the advance status in the authorization table.
Selection criteria of the authorization records
The authorization records are selected based on the following criteria:
1. All authorization records with advance status of O (outstanding) are selected.
2. The trip end date from the last paid advance document for each authorization is selected and added to DAYS_POST_TRIP_OVERDUE for the advance rule. This is the number of days, after the end date of the trip, that an advance becomes overdue, if not reconciled.
3. If the system date is greater than the calculated advance reconciliation date, this authorization record is selected for updating the advance status from Outstanding to Overdue.
Banner Travel and Expense Management 8.5.0.5 July 2012HandbookTravel Advances
July 201
Advance status scheduler overview
The TVLEXP_ADVANCE_STATUS_JOB job, with the default value settings, will be created during an upgrade.
To change the default settings and recreate the job, refer to the following sections:
• “Pre-requisites” on page A-5
• “Set scheduler privileges” on page A-6
• “Create and enable the scheduler job” on page A-7
Pre-requisites
Ensure that the following criterion are met before creating the scheduled job for advance status process:
• The travel advances feature is enabled in the Institutional Settings. By default, it is enabled.
• The job start date and repeat interval are defined in the Institutional Settings. The format for the start date is DD-MON-YYYY HH:MM:SS AM or PM. Enter the interval in hours starting from 1. Recommended setting ranges from 1 to 24. The default values have been provided as seed data. The start time of 30-AUG-2010 12:00:00 AM with a repeat interval as 24 hours has been provided as default seed data.
• Set the Banner user ID on FTMSDAT if success or failure notification is required after each job run. Success or failure notification can be viewed in the Banner General Message form GUAMESG.
NoteThe Banner user ID setting can be changed even after creating the job.
Perform the following steps to view the success or failure notifications.
1. Set up the Banner ID in the FTMSDAT (table - FTVSDAT) to receive success notification as follows:Entity: FTRBAUTH
Attribute: ADV_SCHEDULER_SUCCESS_UPDATE
Optional Code 1: TRAVEL
Optional Code 2: 1 <Site Specific sequential numbers as needed >
Description: Banner ID for Success Message
Data: <Banner user ID to which the success message is to be delivered>
2 Banner Travel and Expense Management 8.5.0.5 A-5Handbook
Travel Advances
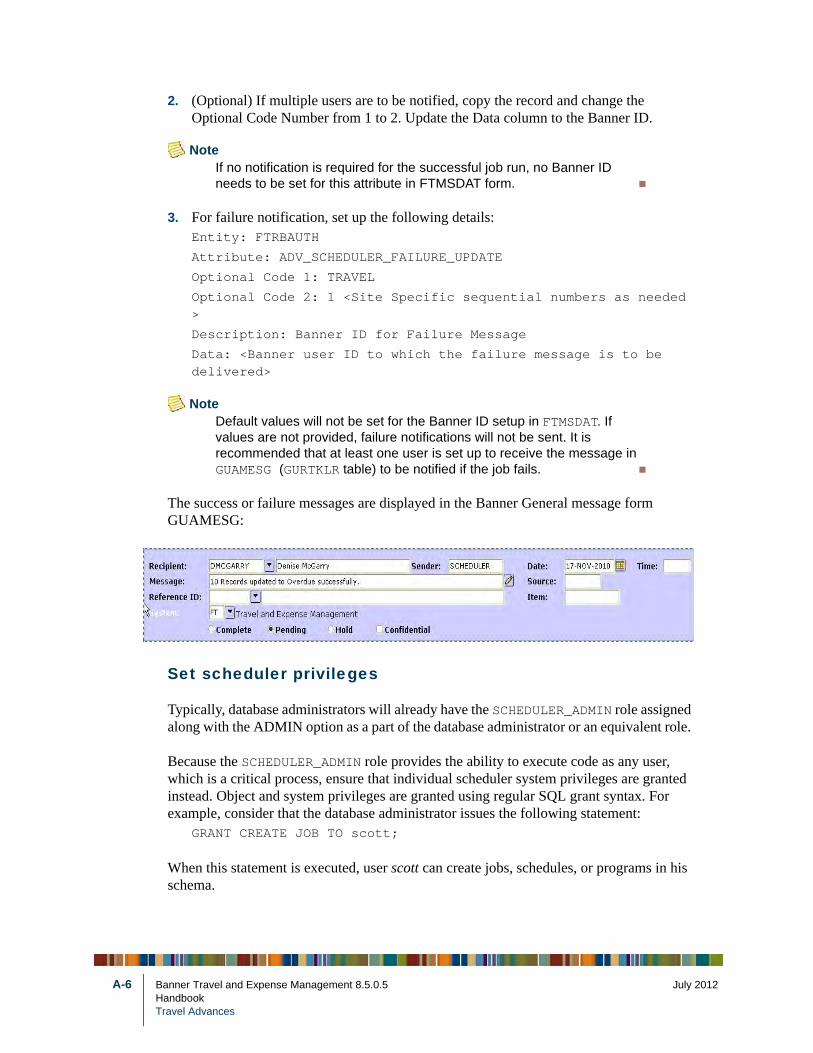
A-6
2. (Optional) If multiple users are to be notified, copy the record and change the Optional Code Number from 1 to 2. Update the Data column to the Banner ID.
NoteIf no notification is required for the successful job run, no Banner ID needs to be set for this attribute in FTMSDAT form.
3. For failure notification, set up the following details:Entity: FTRBAUTH
Attribute: ADV_SCHEDULER_FAILURE_UPDATE
Optional Code 1: TRAVEL
Optional Code 2: 1 <Site Specific sequential numbers as needed >
Description: Banner ID for Failure Message
Data: <Banner user ID to which the failure message is to be delivered>
NoteDefault values will not be set for the Banner ID setup in FTMSDAT. If values are not provided, failure notifications will not be sent. It is recommended that at least one user is set up to receive the message in GUAMESG (GURTKLR table) to be notified if the job fails.
The success or failure messages are displayed in the Banner General message form GUAMESG:
Set scheduler privileges
Typically, database administrators will already have the SCHEDULER_ADMIN role assigned along with the ADMIN option as a part of the database administrator or an equivalent role.
Because the SCHEDULER_ADMIN role provides the ability to execute code as any user, which is a critical process, ensure that individual scheduler system privileges are granted instead. Object and system privileges are granted using regular SQL grant syntax. For example, consider that the database administrator issues the following statement:
GRANT CREATE JOB TO scott;
When this statement is executed, user scott can create jobs, schedules, or programs in his schema.
Banner Travel and Expense Management 8.5.0.5 July 2012HandbookTravel Advances
July 201
Create and enable the scheduler job
If TVLEXP_ADVANCE_STATUS_JOB has already been created as part of the upgrade, execute the following script to remove the job before recreating it.
BEGIN
DBMS_SCHEDULER.DROP_JOB ('TVLEXP_ADVANCE_STATUS_JOB');
END;
Run the ftob_advance_sch.sql file to create and enable the TVLEXP_ADVANCE_STATUS_JOB job. Ensure that your profile has the CREATE JOB role.
Every time the job is run, the appropriate authorization records with advance status of Outstanding are fetched from FTRBAUTH and updated to Overdue. If the appropriate Banner IDs are set for the success and failure update, the status can be viewed from Banner in the Banner General message form GUAMESG.
Every successful run displays a message with the updated records count.
Every unsuccessful run displays an error message and the corresponding authorization doc code, if applicable.
Run customized advance status process
This job is based on a stored procedure, which selects and updates the advance status in FTRBAUTH. The package used is ftfkjobs.sql.
To use tools other than the DBMS_SCHEDULER, the tool must be able to call the following stored procedure:
ftfkjobs.p_update_ftrbauth_advc_status;
To update the FTRBAUTH advance status to D, the procedure involves fetching appropriate system data from FTVSDAT and handling exception and successful updates, by passing appropriate message to GURTKLR in Banner General.
ftfkjobs.p_get_rule_default(p_rule_key fttvrule.rule_key%TYPE, p_value_out OUT fttvrule.default_value%TYPE);
To fetch the start date and repeat interval from the institutional settings (FTTVRULE), the following procedures are involved:
ftfkjobs.p_get_rule_default('ADV_PROCESS_START_DATE',lv_start_date);
ftfkjobs.p_get_rule_default('ADV_PROCESS_INTERVAL',lv_repeat_interval);
2 Banner Travel and Expense Management 8.5.0.5 A-7Handbook
Travel Advances
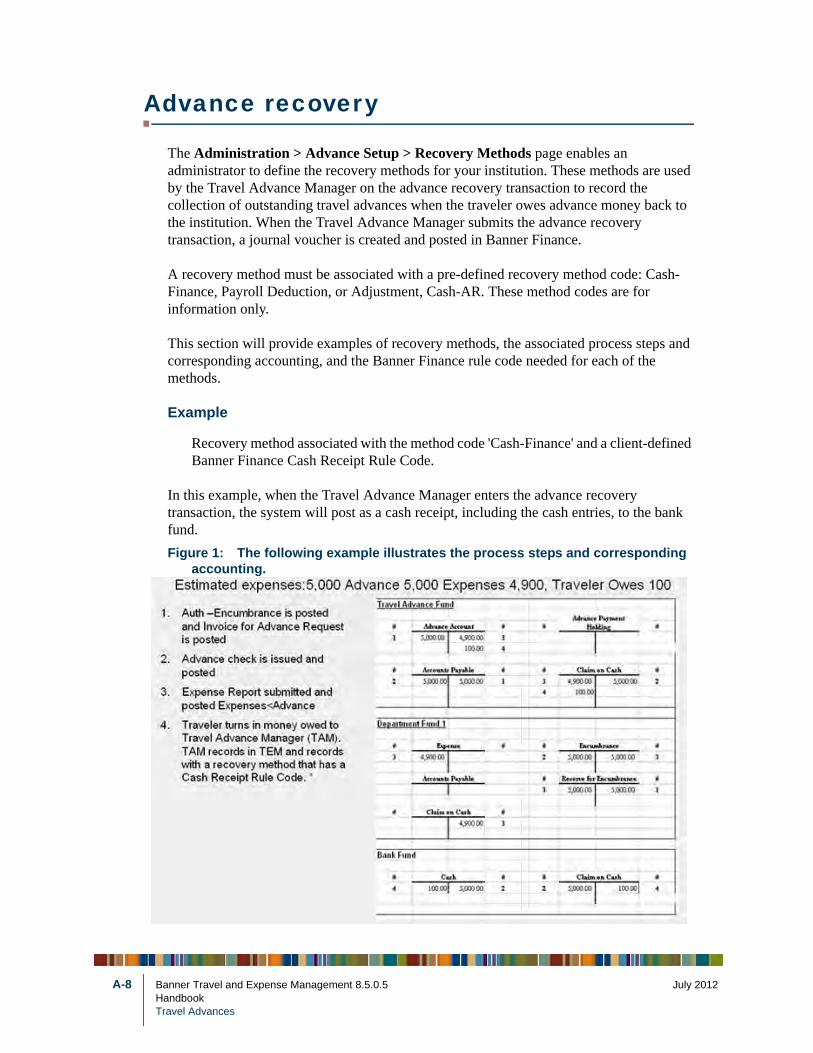
A-8
Advance recovery
The Administration > Advance Setup > Recovery Methods page enables an administrator to define the recovery methods for your institution. These methods are used by the Travel Advance Manager on the advance recovery transaction to record the collection of outstanding travel advances when the traveler owes advance money back to the institution. When the Travel Advance Manager submits the advance recovery transaction, a journal voucher is created and posted in Banner Finance.
A recovery method must be associated with a pre-defined recovery method code: Cash-Finance, Payroll Deduction, or Adjustment, Cash-AR. These method codes are for information only.
This section will provide examples of recovery methods, the associated process steps and corresponding accounting, and the Banner Finance rule code needed for each of the methods.
Example
Recovery method associated with the method code 'Cash-Finance' and a client-defined Banner Finance Cash Receipt Rule Code.
In this example, when the Travel Advance Manager enters the advance recovery transaction, the system will post as a cash receipt, including the cash entries, to the bank fund.
Figure 1: The following example illustrates the process steps and corresponding accounting.
Banner Travel and Expense Management 8.5.0.5 July 2012HandbookTravel Advances
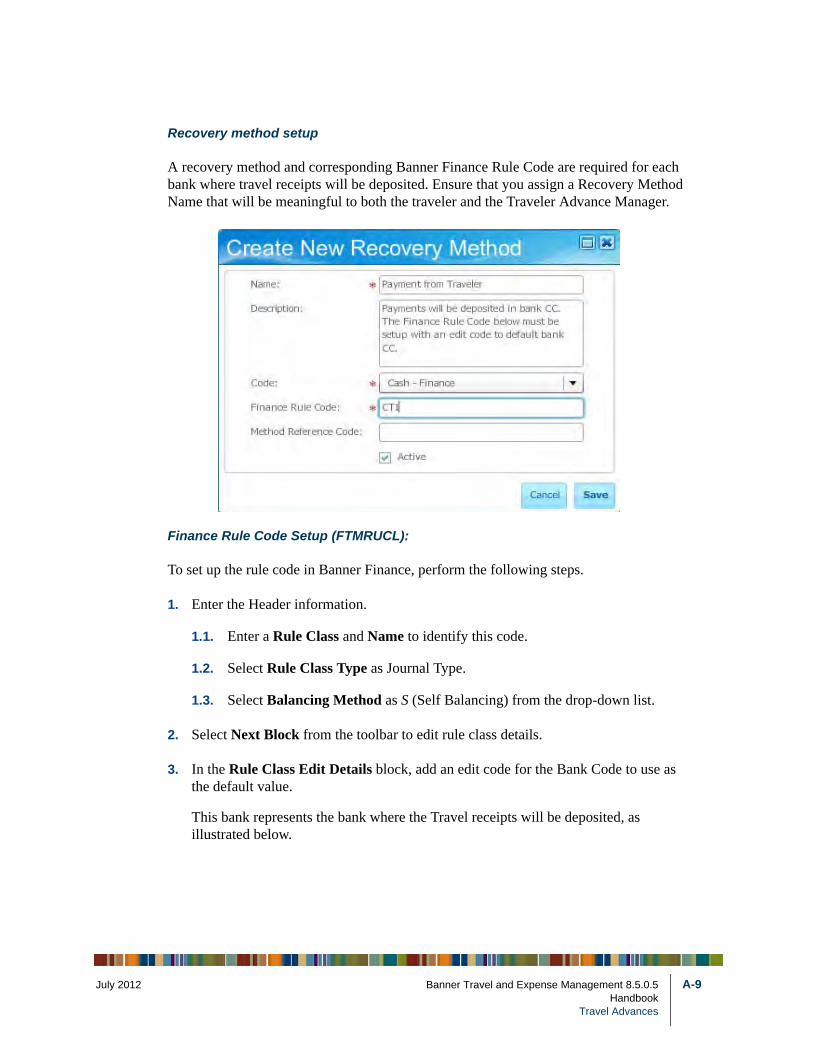
July 201
Recovery method setup
A recovery method and corresponding Banner Finance Rule Code are required for each bank where travel receipts will be deposited. Ensure that you assign a Recovery Method Name that will be meaningful to both the traveler and the Traveler Advance Manager.
Finance Rule Code Setup (FTMRUCL):
To set up the rule code in Banner Finance, perform the following steps.
1. Enter the Header information.
1.1. Enter a Rule Class and Name to identify this code.
1.2. Select Rule Class Type as Journal Type.
1.3. Select Balancing Method as S (Self Balancing) from the drop-down list.
2. Select Next Block from the toolbar to edit rule class details.
3. In the Rule Class Edit Details block, add an edit code for the Bank Code to use as the default value.
This bank represents the bank where the Travel receipts will be deposited, as illustrated below.
2 Banner Travel and Expense Management 8.5.0.5 A-9Handbook
Travel Advances
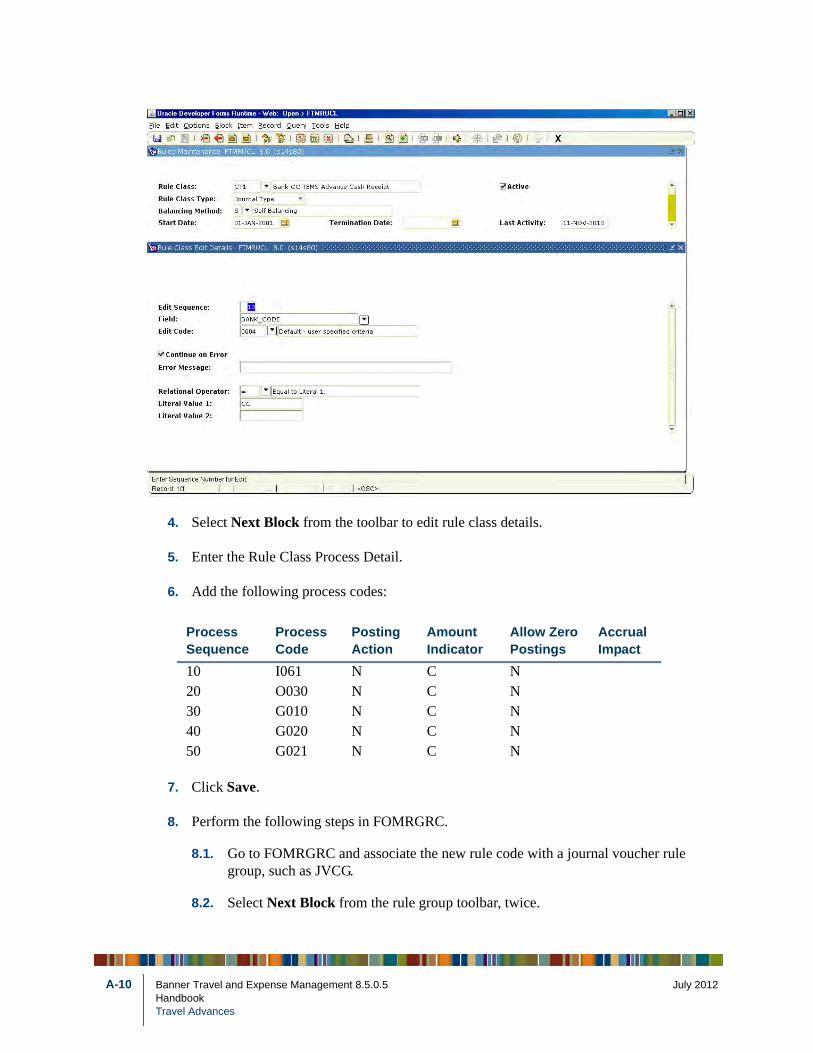
A-10
4. Select Next Block from the toolbar to edit rule class details.
5. Enter the Rule Class Process Detail.
6. Add the following process codes:
7. Click Save.
8. Perform the following steps in FOMRGRC.
8.1. Go to FOMRGRC and associate the new rule code with a journal voucher rule group, such as JVCG.
8.2. Select Next Block from the rule group toolbar, twice.
Process Sequence
Process Code
Posting Action
Amount Indicator
Allow Zero Postings
Accrual Impact
10 I061 N C N20 O030 N C N30 G010 N C N40 G020 N C N50 G021 N C N
Banner Travel and Expense Management 8.5.0.5 July 2012HandbookTravel Advances
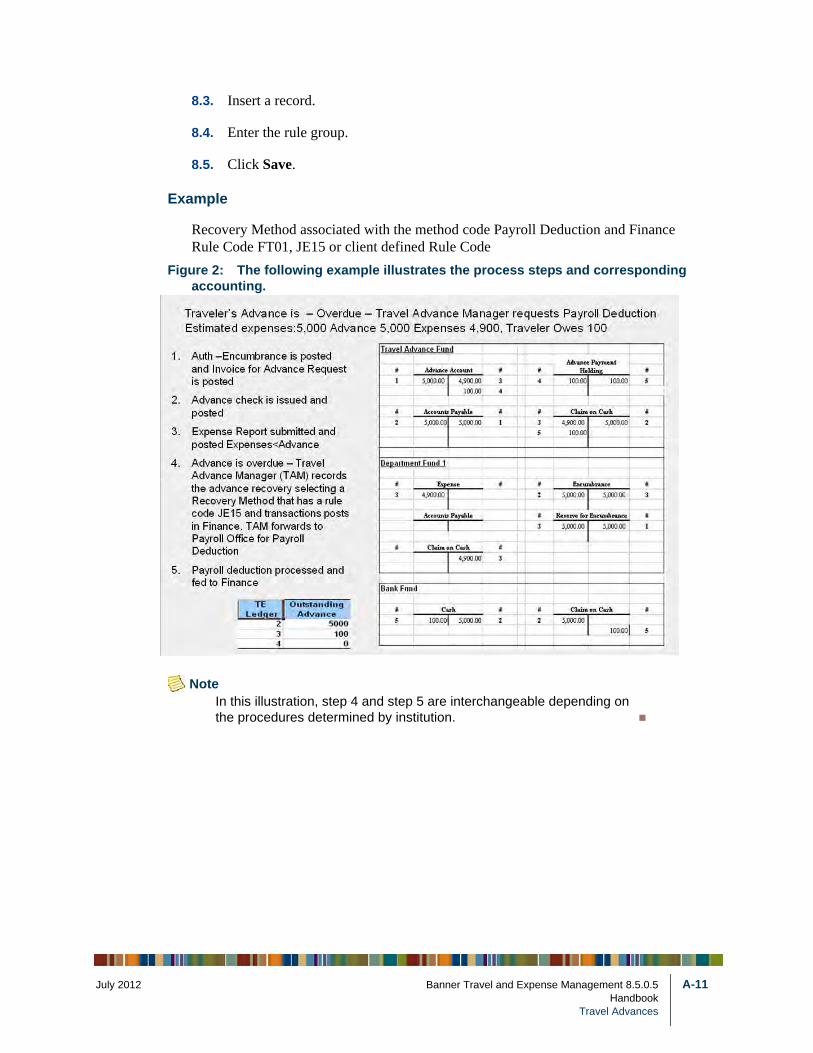
July 201
8.3. Insert a record.
8.4. Enter the rule group.
8.5. Click Save.
Example
Recovery Method associated with the method code Payroll Deduction and Finance Rule Code FT01, JE15 or client defined Rule Code
Figure 2: The following example illustrates the process steps and corresponding accounting.
NoteIn this illustration, step 4 and step 5 are interchangeable depending on the procedures determined by institution.
2 Banner Travel and Expense Management 8.5.0.5 A-11Handbook
Travel Advances
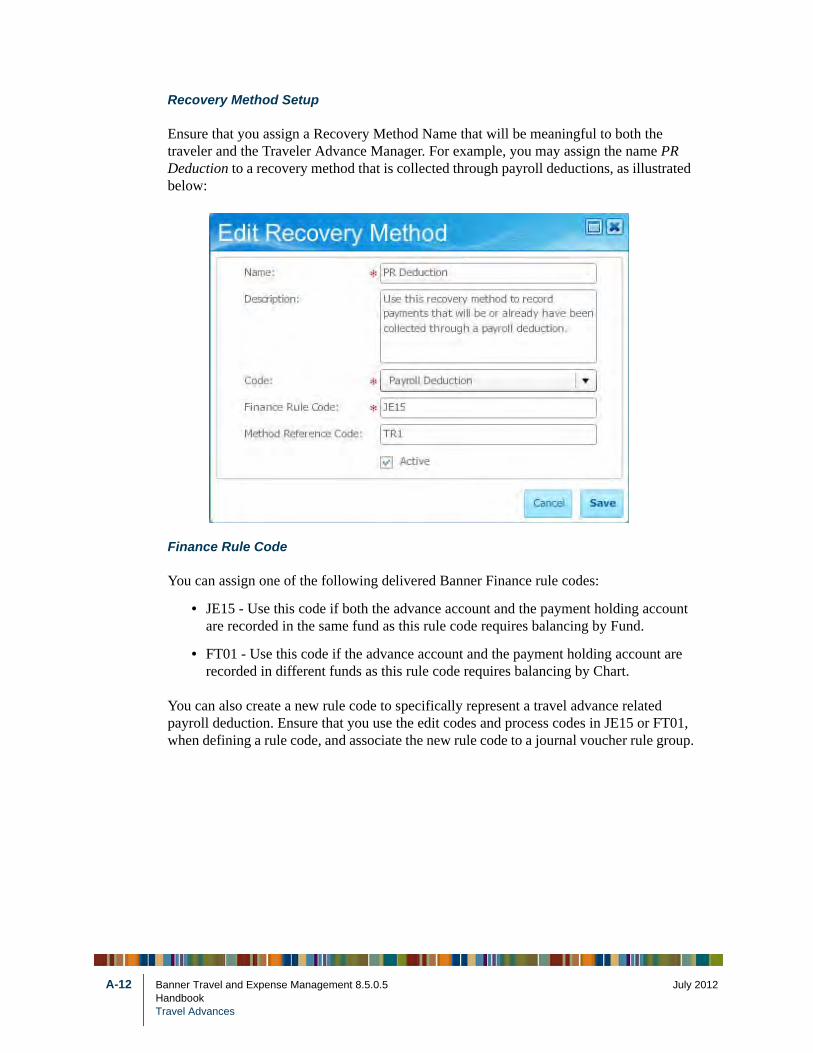
A-12
Recovery Method Setup
Ensure that you assign a Recovery Method Name that will be meaningful to both the traveler and the Traveler Advance Manager. For example, you may assign the name PR Deduction to a recovery method that is collected through payroll deductions, as illustrated below:
Finance Rule Code
You can assign one of the following delivered Banner Finance rule codes:
• JE15 - Use this code if both the advance account and the payment holding account are recorded in the same fund as this rule code requires balancing by Fund.
• FT01 - Use this code if the advance account and the payment holding account are recorded in different funds as this rule code requires balancing by Chart.
You can also create a new rule code to specifically represent a travel advance related payroll deduction. Ensure that you use the edit codes and process codes in JE15 or FT01, when defining a rule code, and associate the new rule code to a journal voucher rule group.
Banner Travel and Expense Management 8.5.0.5 July 2012HandbookTravel Advances
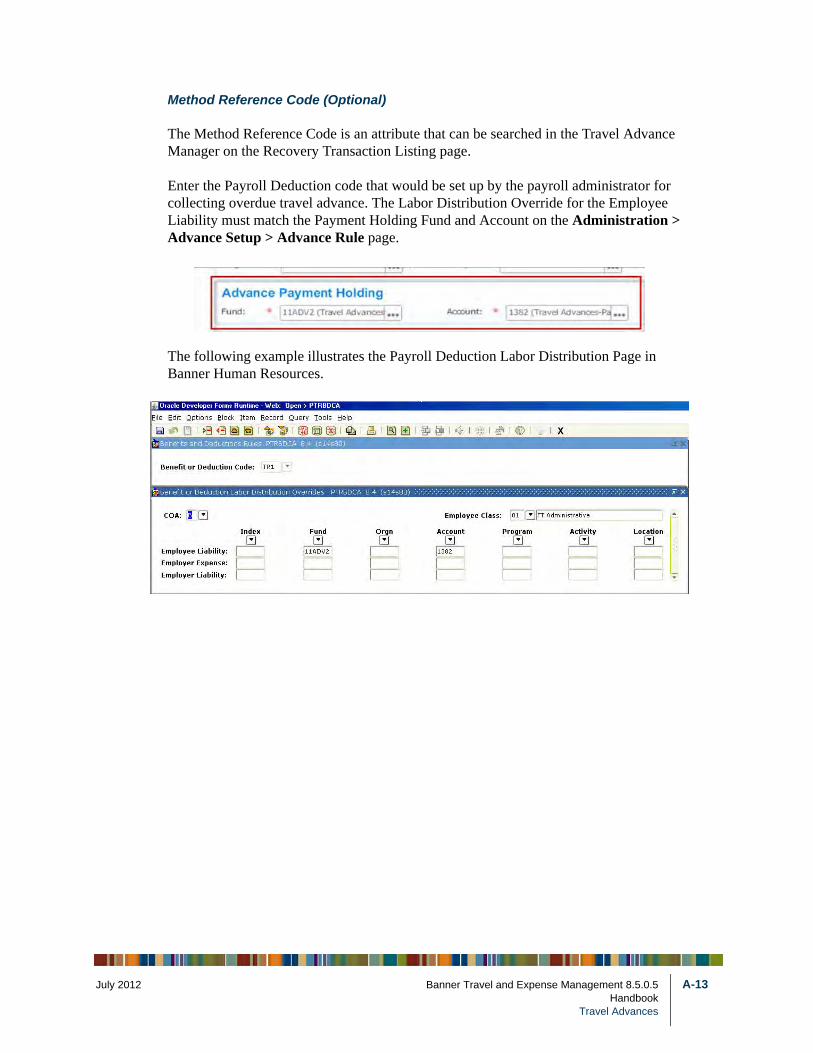
July 201
Method Reference Code (Optional)
The Method Reference Code is an attribute that can be searched in the Travel Advance Manager on the Recovery Transaction Listing page.
Enter the Payroll Deduction code that would be set up by the payroll administrator for collecting overdue travel advance. The Labor Distribution Override for the Employee Liability must match the Payment Holding Fund and Account on the Administration > Advance Setup > Advance Rule page.
The following example illustrates the Payroll Deduction Labor Distribution Page in Banner Human Resources.
2 Banner Travel and Expense Management 8.5.0.5 A-13Handbook
Travel Advances
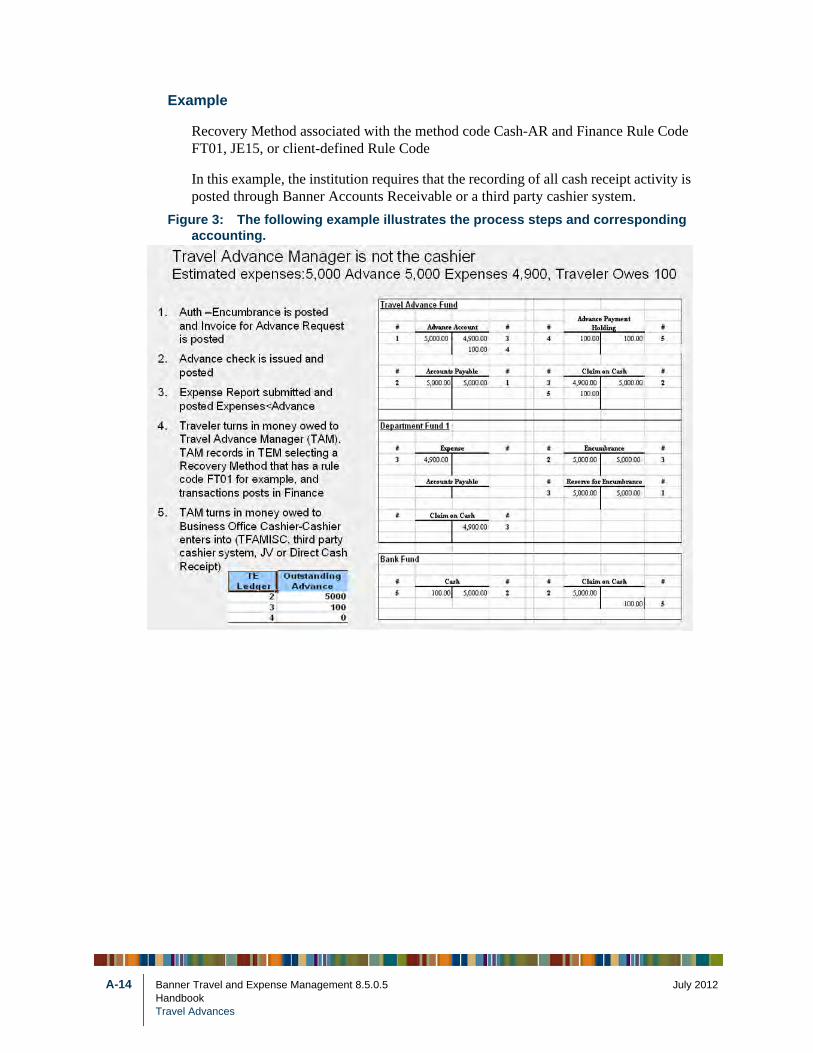
A-14
Example
Recovery Method associated with the method code Cash-AR and Finance Rule Code FT01, JE15, or client-defined Rule Code
In this example, the institution requires that the recording of all cash receipt activity is posted through Banner Accounts Receivable or a third party cashier system.
Figure 3: The following example illustrates the process steps and corresponding accounting.
Banner Travel and Expense Management 8.5.0.5 July 2012HandbookTravel Advances
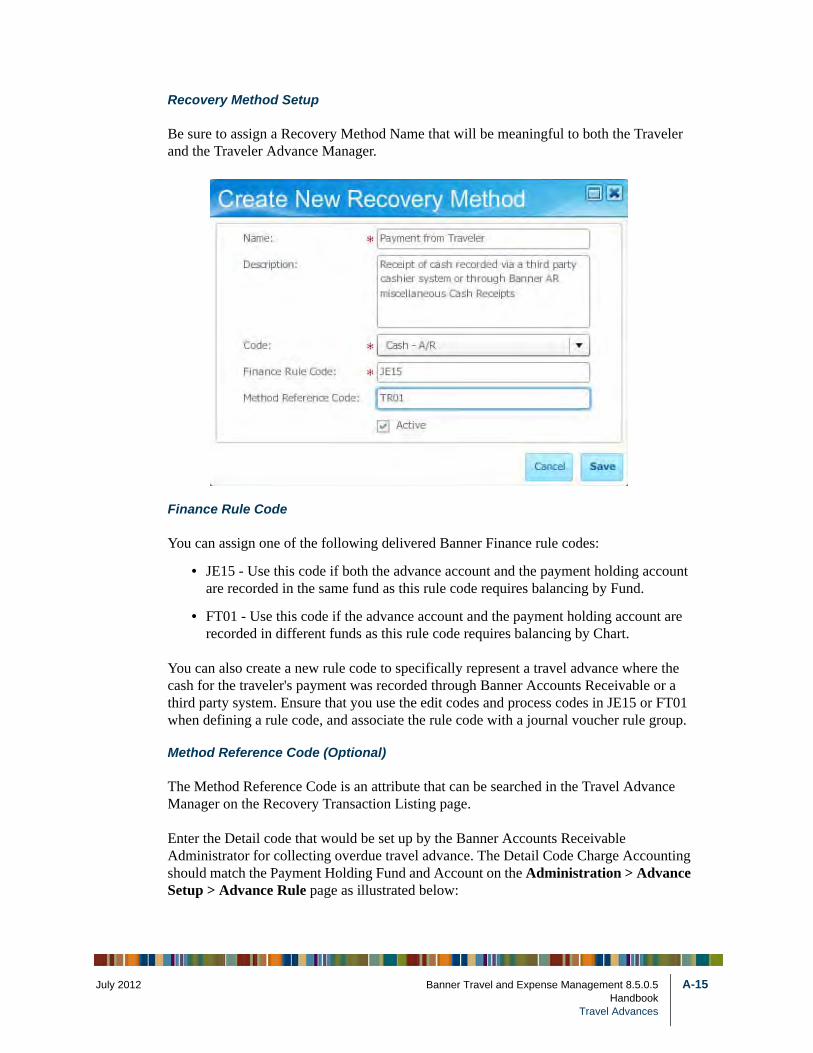
July 201
Recovery Method Setup
Be sure to assign a Recovery Method Name that will be meaningful to both the Traveler and the Traveler Advance Manager.
Finance Rule Code
You can assign one of the following delivered Banner Finance rule codes:
• JE15 - Use this code if both the advance account and the payment holding account are recorded in the same fund as this rule code requires balancing by Fund.
• FT01 - Use this code if the advance account and the payment holding account are recorded in different funds as this rule code requires balancing by Chart.
You can also create a new rule code to specifically represent a travel advance where the cash for the traveler's payment was recorded through Banner Accounts Receivable or a third party system. Ensure that you use the edit codes and process codes in JE15 or FT01 when defining a rule code, and associate the rule code with a journal voucher rule group.
Method Reference Code (Optional)
The Method Reference Code is an attribute that can be searched in the Travel Advance Manager on the Recovery Transaction Listing page.
Enter the Detail code that would be set up by the Banner Accounts Receivable Administrator for collecting overdue travel advance. The Detail Code Charge Accounting should match the Payment Holding Fund and Account on the Administration > Advance Setup > Advance Rule page as illustrated below:
2 Banner Travel and Expense Management 8.5.0.5 A-15Handbook
Travel Advances
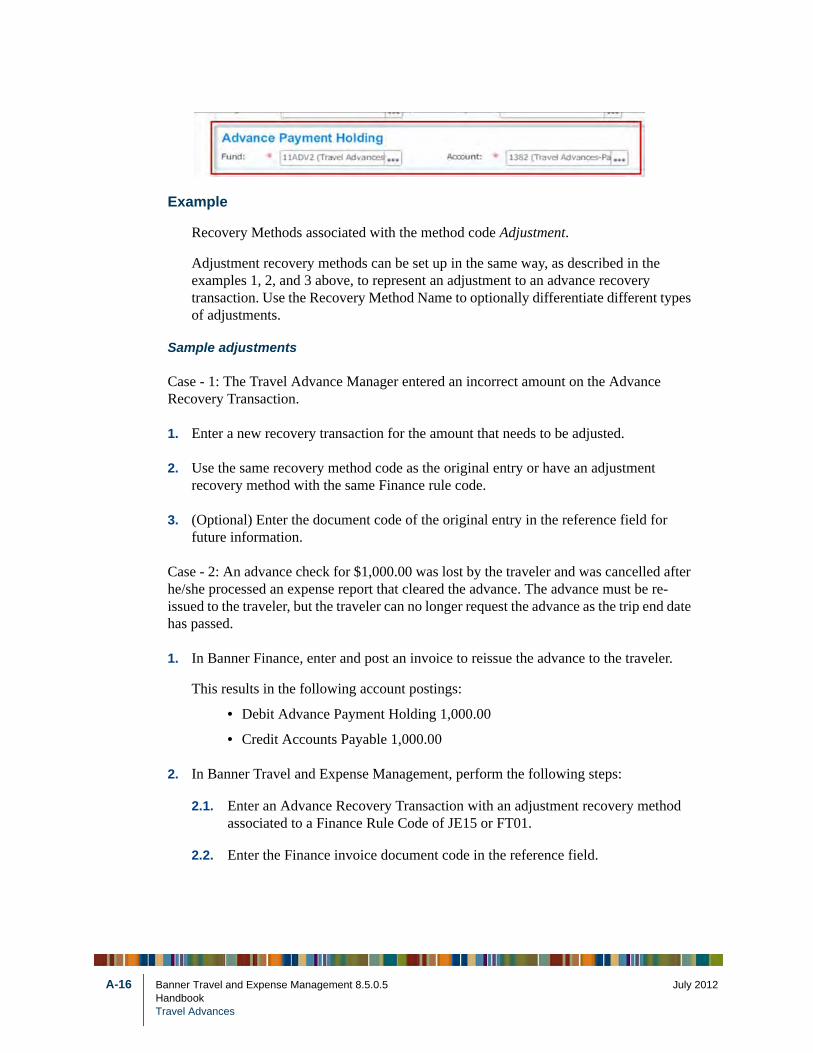
A-16
Example
Recovery Methods associated with the method code Adjustment.
Adjustment recovery methods can be set up in the same way, as described in the examples 1, 2, and 3 above, to represent an adjustment to an advance recovery transaction. Use the Recovery Method Name to optionally differentiate different types of adjustments.
Sample adjustments
Case - 1: The Travel Advance Manager entered an incorrect amount on the Advance Recovery Transaction.
1. Enter a new recovery transaction for the amount that needs to be adjusted.
2. Use the same recovery method code as the original entry or have an adjustment recovery method with the same Finance rule code.
3. (Optional) Enter the document code of the original entry in the reference field for future information.
Case - 2: An advance check for $1,000.00 was lost by the traveler and was cancelled after he/she processed an expense report that cleared the advance. The advance must be re-issued to the traveler, but the traveler can no longer request the advance as the trip end date has passed.
1. In Banner Finance, enter and post an invoice to reissue the advance to the traveler.
This results in the following account postings:
• Debit Advance Payment Holding 1,000.00
• Credit Accounts Payable 1,000.00
2. In Banner Travel and Expense Management, perform the following steps:
2.1. Enter an Advance Recovery Transaction with an adjustment recovery method associated to a Finance Rule Code of JE15 or FT01.
2.2. Enter the Finance invoice document code in the reference field.
Banner Travel and Expense Management 8.5.0.5 July 2012HandbookTravel Advances
July 201
2.3. Enter the amount as -1,000.00.
This results in the following account postings:
Debit Advance 1000.00
Credit Advance Payment Holding 1,000.00
2 Banner Travel and Expense Management 8.5.0.5 A-17Handbook
Travel Advances

A-18
Banner Travel and Expense Management 8.5.0.5 July 2012HandbookTravel Advances
July 201
B Seed Data
The following user roles, settings, and seed data are delivered with the Banner® Travel and Expense Management (TEM).
Banner Web Tailor roles
The following Banner Web Tailor Roles are delivered as seed data:
• Travel and Expense Administrator
• Travel and Expense Approver
• Travel and Expense User
• Travel and Expense Delegate
• Travel and Expense Delegate Administrator
• Travel and Expense Financial Approver
• Travel and Expense Advance Manager
• Travel and Expense Delegate Super User
• Travel and Expense Per Diem Administrator
• Travel and Expense Profile Administrator
• Travel and Expense Per Diem Administrator
Expense Format (FTTVEXFM)
The following Expense Formats are delivered as seed data and cannot be updated by the administrator. The expense formats are required when creating an Expense Type. Expense Format controls which fields display on the Expense Entry page when an expense is selected for entry.
Actual Amount as Entered
Displays fields used to enter an actual amount. Expense Types defined with this format are displayed in the Date, Expense Type, Description, Amount (data enterable), Provider, Location, and Paid By fields on the Expense Entry page.
2 Banner Travel and Expense Management 8.5.0.5 B-1HandbookSeed Data
B-2
Unit times Rate Lookup
Displays fields used to calculate an amount based on selected Rate and number of Units entered. Expense Types defined with this format are displayed in the Date, Expense Type, Description, Amount (calculated based on Unit Rate times Units), Unit Rate, and Units fields on the Expense Entry page.
Per Diem related expense
Displays fields used to calculate a Per Diem based on date, traveler destination, rule, and other factors. Expense Types defined with this format are displayed in the Date, Expense Type, Location, Description, Per Diem Amount, and Amount fields.
Variable Per Diem related expense
Displays fields used to calculate a Per Diem that involves either a count of people or a percent of the standard Per Diem rate. A variable Per Diem is based on date, traveler destination, percent, and count. Expense Types defined with this format are displayed in the Date, Expense Type, Location, Description, Count, Per Diem Amount, and Amount fields.
Institutional settings (FTTVRULE)
The Administration tab is visible to individuals with the Travel and Expense Administrator role. The Institutional Settings page options use the following settings.
Report Options
The following report options are pre-set as indicated:
• Enable authorization reports = Yes
• Encumber authorizations = Yes
• Enable advances = No
• Enable expense reports = Yes
• Enable Per Diem processing = No
• Enable BDMS integration = No
• Enable Workflow approvals = Yes
• Enable Workflow Traveler Review of Delegate entry = No
• Enable Traveler ability to select Delegate = Yes
• Enable error on NSF checking = No
• Bypass Fund Organization Security = Yes
Banner Travel and Expense Management 8.5.0.5 July 2012HandbookSeed Data
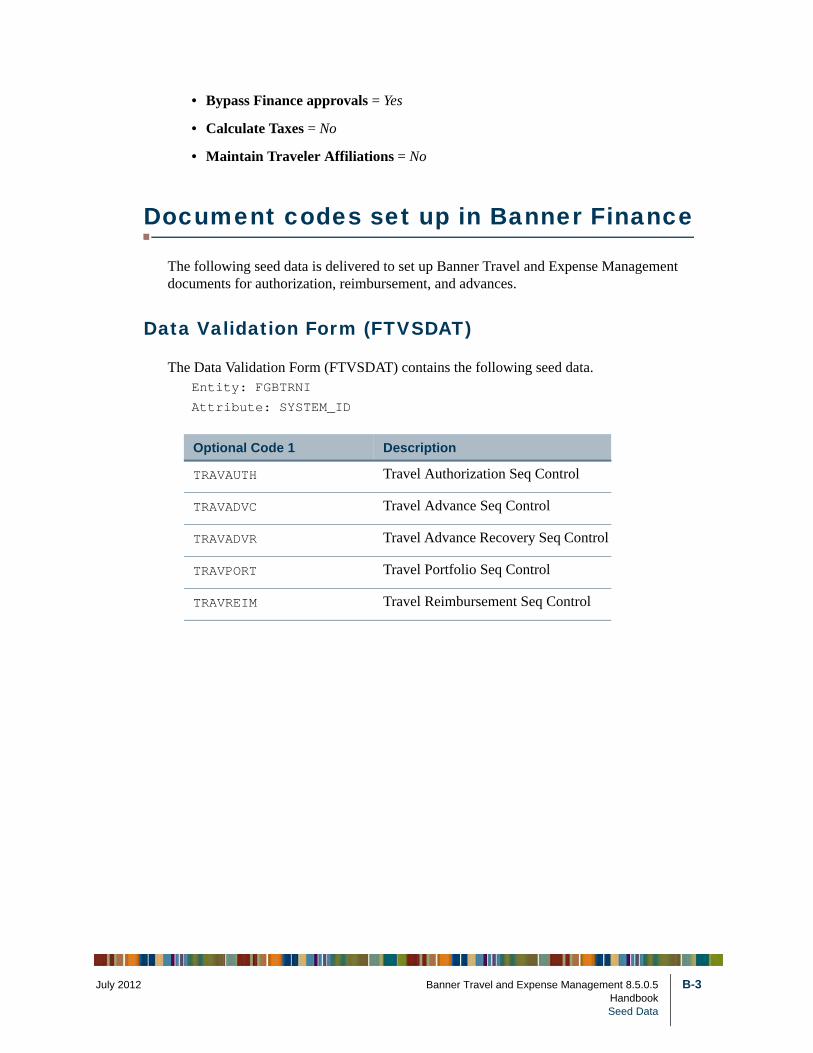
July 201
• Bypass Finance approvals = Yes
• Calculate Taxes = No
• Maintain Traveler Affiliations = No
Document codes set up in Banner Finance
The following seed data is delivered to set up Banner Travel and Expense Management documents for authorization, reimbursement, and advances.
Data Validation Form (FTVSDAT)
The Data Validation Form (FTVSDAT) contains the following seed data.Entity: FGBTRNI
Attribute: SYSTEM_ID
Optional Code 1 Description
TRAVAUTH Travel Authorization Seq Control
TRAVADVC Travel Advance Seq Control
TRAVADVR Travel Advance Recovery Seq Control
TRAVPORT Travel Portfolio Seq Control
TRAVREIM Travel Reimbursement Seq Control
2 Banner Travel and Expense Management 8.5.0.5 B-3HandbookSeed Data
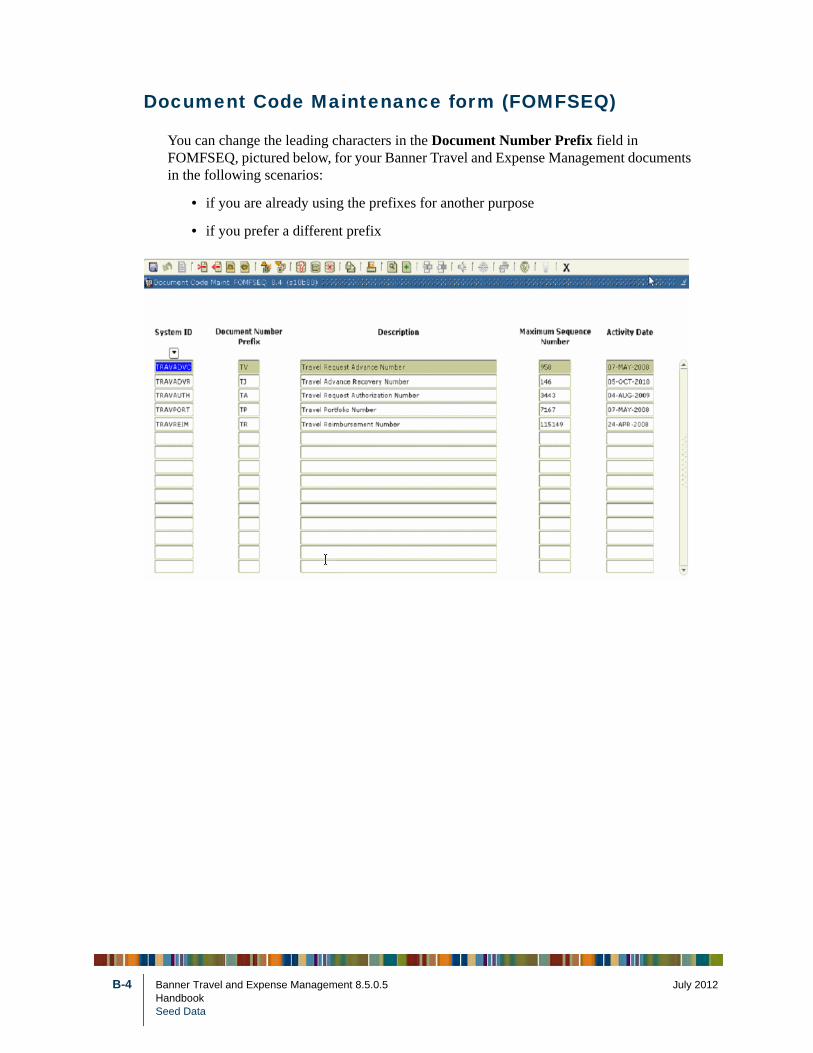
B-4
Document Code Maintenance form (FOMFSEQ)
You can change the leading characters in the Document Number Prefix field in FOMFSEQ, pictured below, for your Banner Travel and Expense Management documents in the following scenarios:
• if you are already using the prefixes for another purpose
• if you prefer a different prefix
Banner Travel and Expense Management 8.5.0.5 July 2012HandbookSeed Data
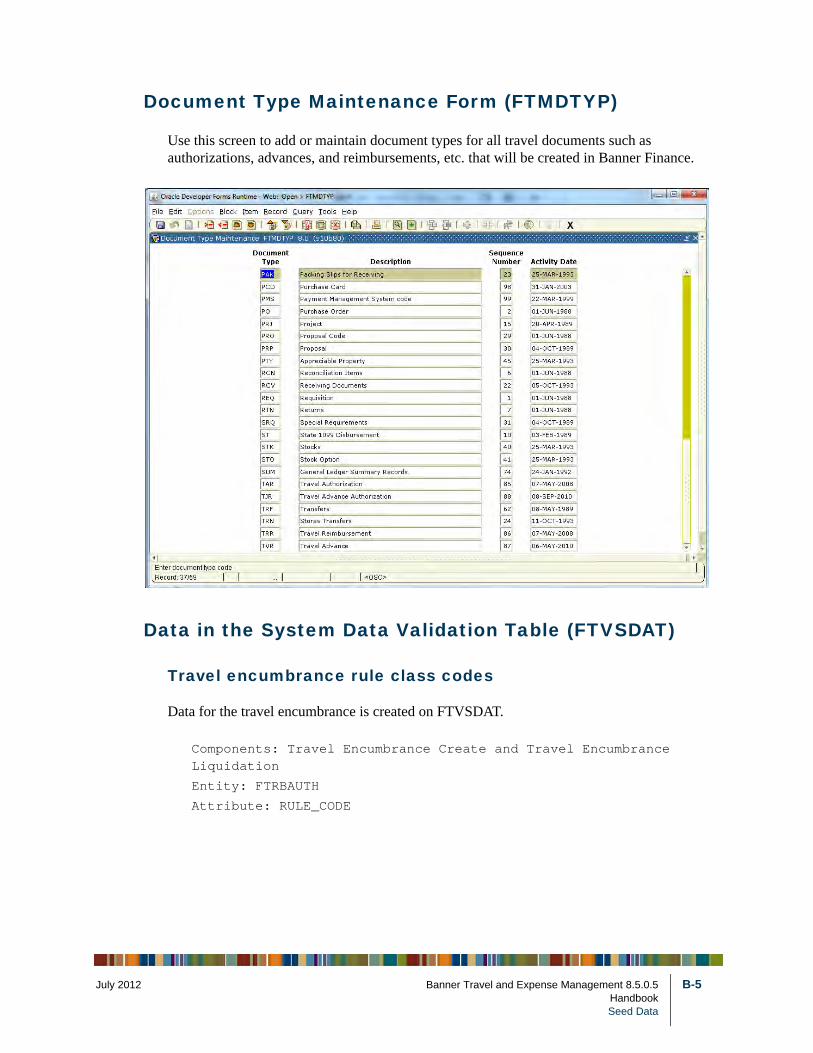
July 201
Document Type Maintenance Form (FTMDTYP)
Use this screen to add or maintain document types for all travel documents such as authorizations, advances, and reimbursements, etc. that will be created in Banner Finance.
Data in the System Data Validation Table (FTVSDAT)
Travel encumbrance rule class codes
Data for the travel encumbrance is created on FTVSDAT.
Components: Travel Encumbrance Create and Travel Encumbrance Liquidation
Entity: FTRBAUTH
Attribute: RULE_CODE
2 Banner Travel and Expense Management 8.5.0.5 B-5HandbookSeed Data
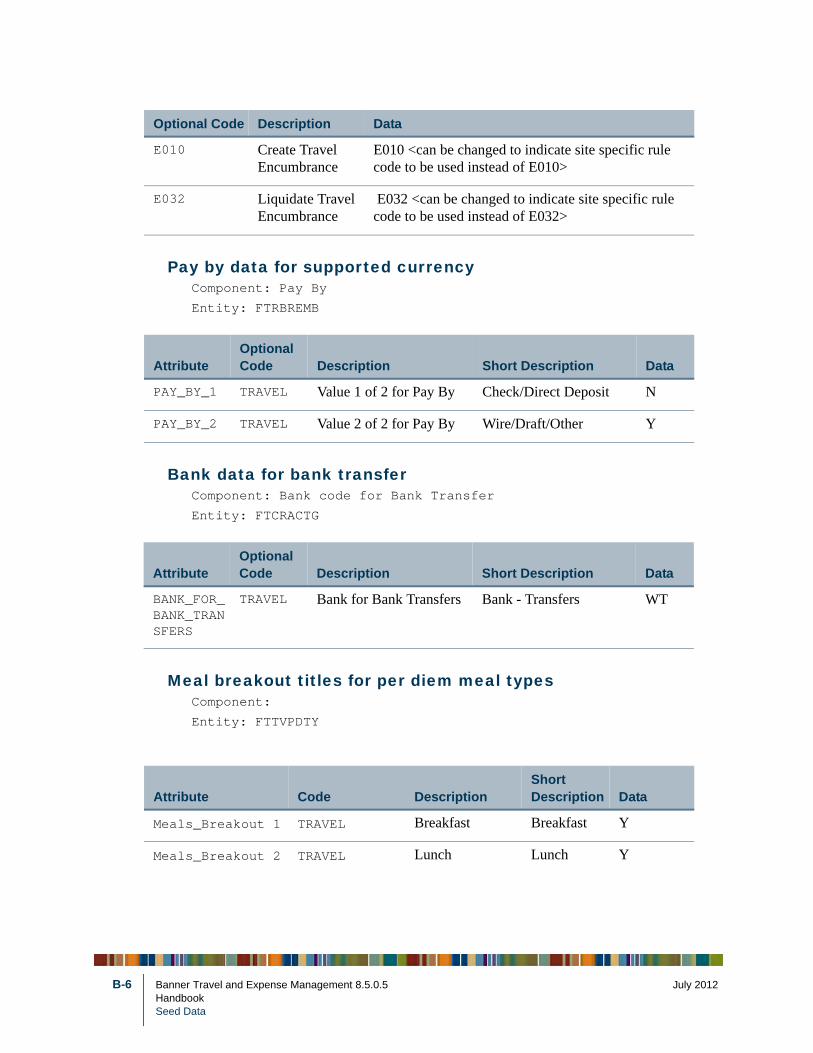
B-6
Pay by data for supported currencyComponent: Pay By
Entity: FTRBREMB
Bank data for bank transferComponent: Bank code for Bank Transfer
Entity: FTCRACTG
Meal breakout titles for per diem meal typesComponent:
Entity: FTTVPDTY
Optional Code Description Data
E010 Create Travel Encumbrance
E010 <can be changed to indicate site specific rule code to be used instead of E010>
E032 Liquidate Travel Encumbrance
E032 <can be changed to indicate site specific rule code to be used instead of E032>
AttributeOptional Code Description Short Description Data
PAY_BY_1 TRAVEL Value 1 of 2 for Pay By Check/Direct Deposit N
PAY_BY_2 TRAVEL Value 2 of 2 for Pay By Wire/Draft/Other Y
AttributeOptional Code Description Short Description Data
BANK_FOR_BANK_TRANSFERS
TRAVEL Bank for Bank Transfers Bank - Transfers WT
Attribute Code DescriptionShort Description Data
Meals_Breakout 1 TRAVEL Breakfast Breakfast Y
Meals_Breakout 2 TRAVEL Lunch Lunch Y
Banner Travel and Expense Management 8.5.0.5 July 2012HandbookSeed Data
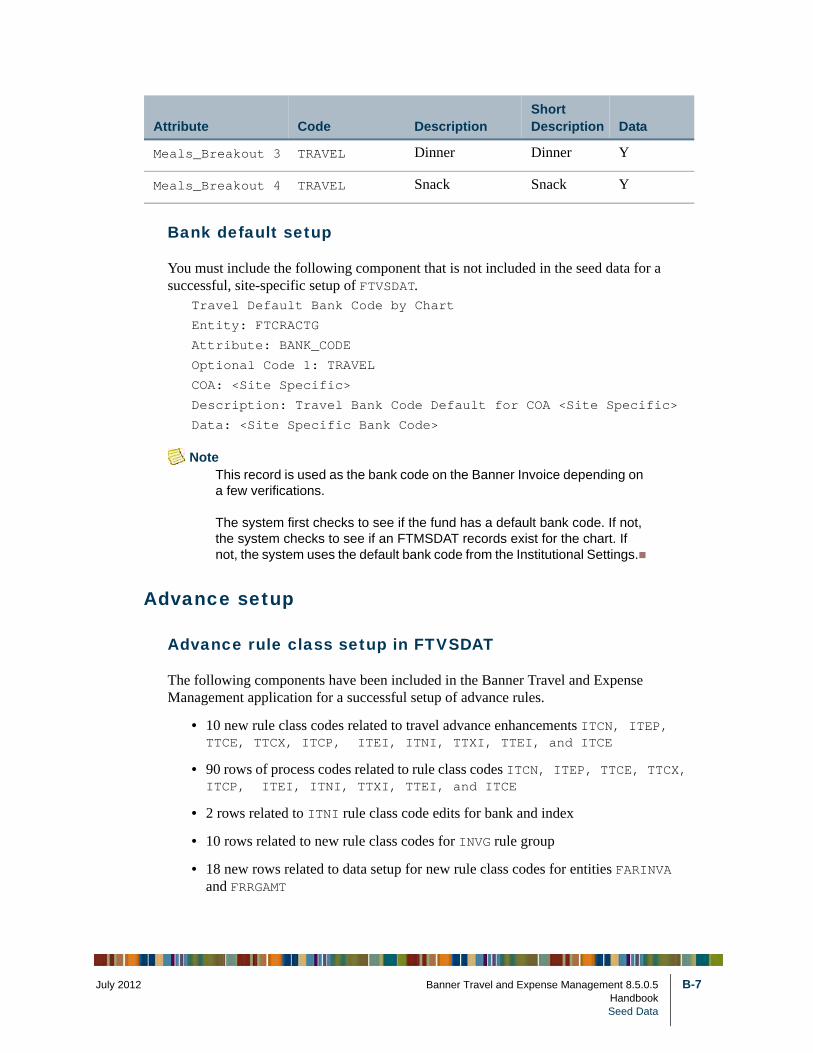
July 201
Bank default setup
You must include the following component that is not included in the seed data for a successful, site-specific setup of FTVSDAT.
Travel Default Bank Code by Chart
Entity: FTCRACTG
Attribute: BANK_CODE
Optional Code 1: TRAVEL
COA: <Site Specific>
Description: Travel Bank Code Default for COA <Site Specific>
Data: <Site Specific Bank Code>
NoteThis record is used as the bank code on the Banner Invoice depending on a few verifications.
The system first checks to see if the fund has a default bank code. If not, the system checks to see if an FTMSDAT records exist for the chart. If not, the system uses the default bank code from the Institutional Settings.
Advance setup
Advance rule class setup in FTVSDAT
The following components have been included in the Banner Travel and Expense Management application for a successful setup of advance rules.
• 10 new rule class codes related to travel advance enhancements ITCN, ITEP, TTCE, TTCX, ITCP, ITEI, ITNI, TTXI, TTEI, and ITCE
• 90 rows of process codes related to rule class codes ITCN, ITEP, TTCE, TTCX, ITCP, ITEI, ITNI, TTXI, TTEI, and ITCE
• 2 rows related to ITNI rule class code edits for bank and index
• 10 rows related to new rule class codes for INVG rule group
• 18 new rows related to data setup for new rule class codes for entities FARINVA and FRRGAMT
Meals_Breakout 3 TRAVEL Dinner Dinner Y
Meals_Breakout 4 TRAVEL Snack Snack Y
Attribute Code DescriptionShort Description Data
2 Banner Travel and Expense Management 8.5.0.5 B-7HandbookSeed Data
B-8
Advance administration
The following components have been included in the Banner Travel and Expense Management application for advance administration setup:
system required expense group item 9900
system required expense type code 9900ADVC
system required payment method code 9900PAYM
system required tax locale 9900ADVC
Advance status process setup
Advance status process in FTVSDAT
The following components have been included in the Banner Travel and Expense Management application for the Database Management System scheduler setup:
PROCESS_VALUE
. Scheduler start time ADV_PROCESS_START_DATE with a default of 30-AUG-2010 12:00:00 AM
. Scheduler interval in hours ADV_PROCESS_INTERVAL with a default of 24
Banner Travel and Expense Management 8.5.0.5 July 2012HandbookSeed Data
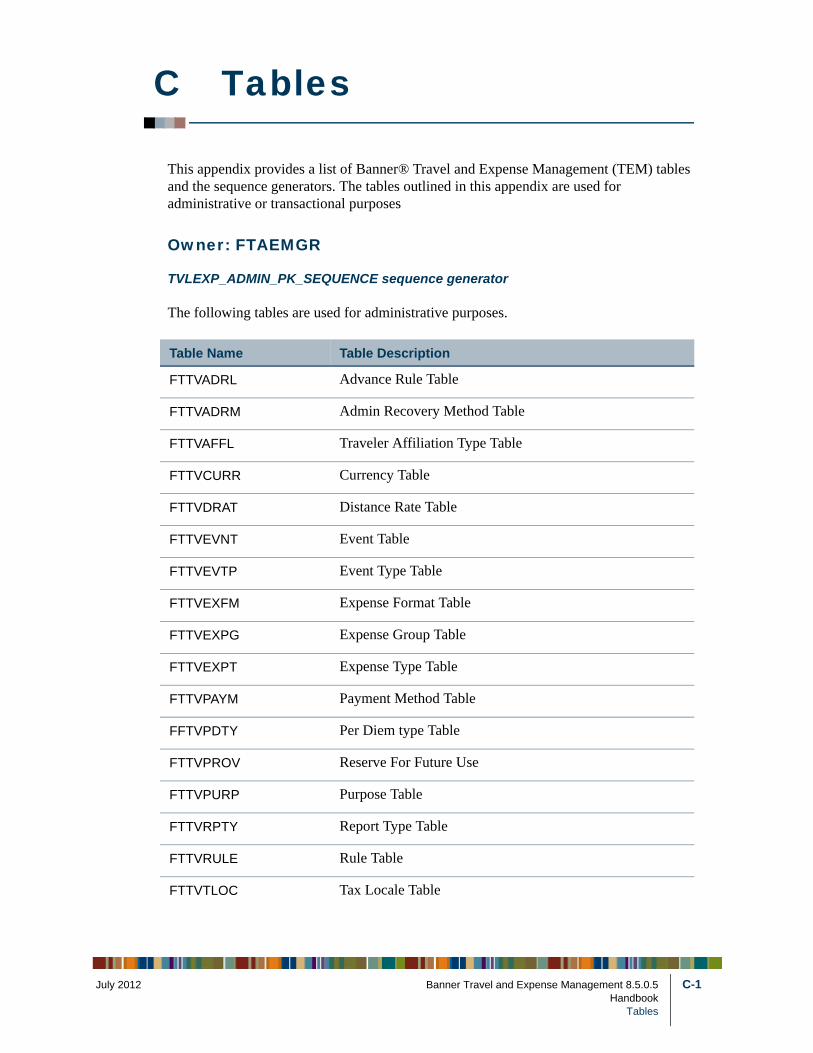
July 201
C Tables
This appendix provides a list of Banner® Travel and Expense Management (TEM) tables and the sequence generators. The tables outlined in this appendix are used for administrative or transactional purposes
Owner: FTAEMGR
TVLEXP_ADMIN_PK_SEQUENCE sequence generator
The following tables are used for administrative purposes.
Table Name Table Description
FTTVADRL Advance Rule Table
FTTVADRM Admin Recovery Method Table
FTTVAFFL Traveler Affiliation Type Table
FTTVCURR Currency Table
FTTVDRAT Distance Rate Table
FTTVEVNT Event Table
FTTVEVTP Event Type Table
FTTVEXFM Expense Format Table
FTTVEXPG Expense Group Table
FTTVEXPT Expense Type Table
FTTVPAYM Payment Method Table
FFTVPDTY Per Diem type Table
FTTVPROV Reserve For Future Use
FTTVPURP Purpose Table
FTTVRPTY Report Type Table
FTTVRULE Rule Table
FTTVTLOC Tax Locale Table
2 Banner Travel and Expense Management 8.5.0.5 C-1Handbook
Tables
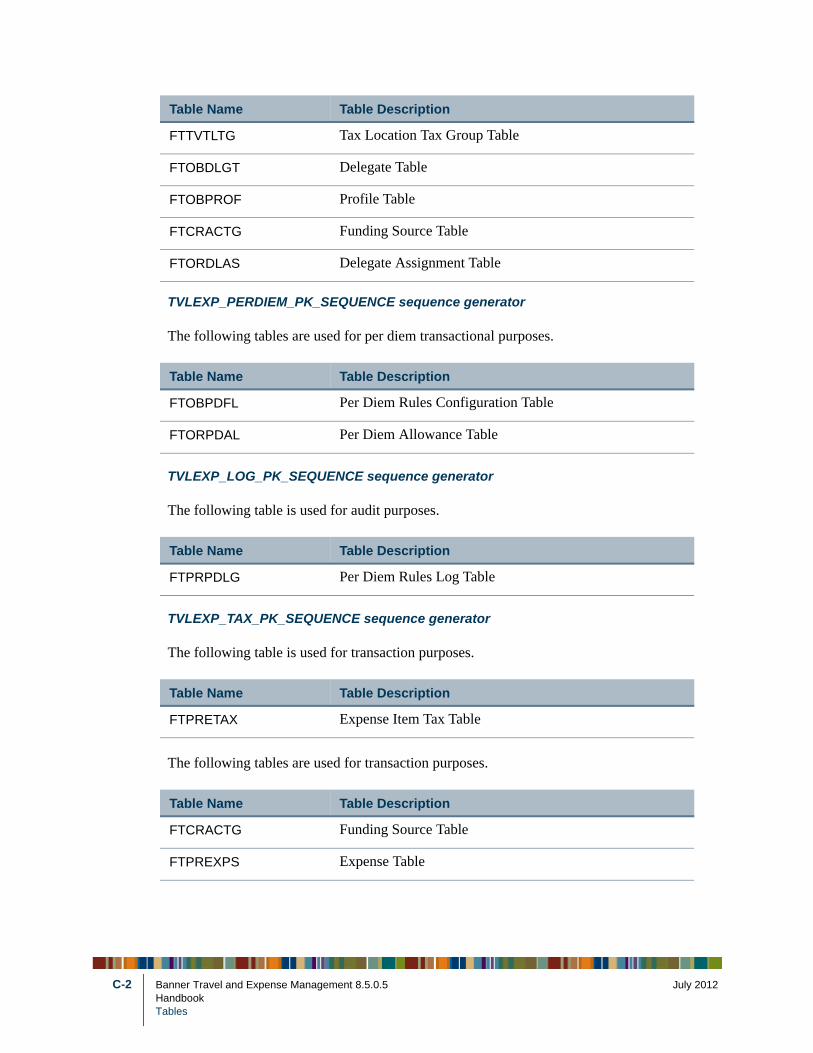
C-2
TVLEXP_PERDIEM_PK_SEQUENCE sequence generator
The following tables are used for per diem transactional purposes.
TVLEXP_LOG_PK_SEQUENCE sequence generator
The following table is used for audit purposes.
TVLEXP_TAX_PK_SEQUENCE sequence generator
The following table is used for transaction purposes.
The following tables are used for transaction purposes.
FTTVTLTG Tax Location Tax Group Table
FTOBDLGT Delegate Table
FTOBPROF Profile Table
FTCRACTG Funding Source Table
FTORDLAS Delegate Assignment Table
Table Name Table Description
FTOBPDFL Per Diem Rules Configuration Table
FTORPDAL Per Diem Allowance Table
Table Name Table Description
FTPRPDLG Per Diem Rules Log Table
Table Name Table Description
FTPRETAX Expense Item Tax Table
Table Name Table Description
FTCRACTG Funding Source Table
FTPREXPS Expense Table
Table Name Table Description
Banner Travel and Expense Management 8.5.0.5 July 2012HandbookTables
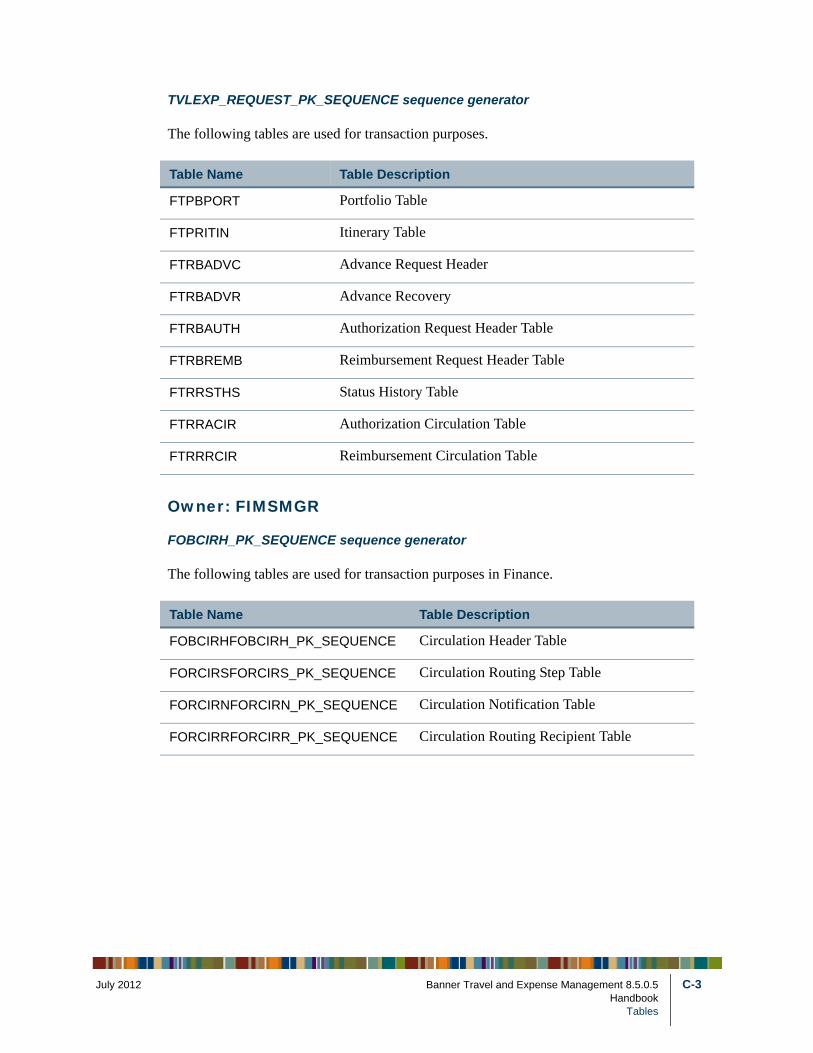
July 201
TVLEXP_REQUEST_PK_SEQUENCE sequence generator
The following tables are used for transaction purposes.
Owner: FIMSMGR
FOBCIRH_PK_SEQUENCE sequence generator
The following tables are used for transaction purposes in Finance.
Table Name Table Description
FTPBPORT Portfolio Table
FTPRITIN Itinerary Table
FTRBADVC Advance Request Header
FTRBADVR Advance Recovery
FTRBAUTH Authorization Request Header Table
FTRBREMB Reimbursement Request Header Table
FTRRSTHS Status History Table
FTRRACIR Authorization Circulation Table
FTRRRCIR Reimbursement Circulation Table
Table Name Table Description
FOBCIRHFOBCIRH_PK_SEQUENCE Circulation Header Table
FORCIRSFORCIRS_PK_SEQUENCE Circulation Routing Step Table
FORCIRNFORCIRN_PK_SEQUENCE Circulation Notification Table
FORCIRRFORCIRR_PK_SEQUENCE Circulation Routing Recipient Table
2 Banner Travel and Expense Management 8.5.0.5 C-3Handbook
Tables

C-4
Banner Travel and Expense Management 8.5.0.5 July 2012HandbookTables
July 201
D Customization of Per Diem Rules
This appendix describes the standard business rules used by the Banner® Travel and Expense Management (TEM) Per Diem module. It also provides important details about rule structures and various rules components (such as Drools) used by the Per Diem module that you will need to understand to create or customize rules for your environment. The appendix illustrates a general process to modify existing rules or developing new rules using common examples. The intended audiences are business users with some technical understanding of the Per Diem module.
Before working with Drools Guvnor to adjust or create rules as outlined in this chapter, you should first obtain and review the following resources:
• Drools Guvnor Manual
http://docs.jboss.org/drools/release/5.2.0.Final/drools-guvnor-docs/html/index.html
• Drools Expert Manual
http://docs.jboss.org/drools/release/5.2.0.Final/drools-expert-docs/html/index.html
NoteThese links are subject to change by the open source project community. If links are no longer valid, please consult the Drools main documentation page for updates.
Drools components
To work with rules, you need to understand the Drools rules engine, Drools business rules, and Drools Guvnor.
Drools rules engine
Drools (also called JBoss Rules) is a Business Rules Management technology. The Banner Travel and Expense Management Per Diem module uses Drools to manage institution specific rules that customize the default per diem business logic to reflect an institution’s per diem policy.
2 Banner Travel and Expense Management 8.5.0.5 D-1Handbook
Customization of Per Diem Rules
D-2
Drools business rules
Business rules in Drools are manifested as “Drools rules.” Drools rules are typically coded in a Drools proprietary, general purpose rules language that requires technical knowledge of the Java language, and domain knowledge.
Drools also supports the use of Domain Specific Language (DSL) as a layer on top of the native rules language. A Per Diem DSL has been developed to give business users access to the per diem rules (refer to the next section for more details on the DSL).
Drools Guvnor
Drools Guvnor is a component of Drools. It is a Web-based application that provides the primary interface for users to manage business rules. Drools Guvnor uses a repository to persist rules. Drools Guvnor provides functionality to inspect, modify, organize, deploy, and track changes made to the rules. Drools Guvnor is provided with Per Diem module.
Per Diem rules
The per diem rules package consists of a top level rules flow, a Per Diem Domain Specific Language (DSL) Definition, and a number of per diem rules assets. A rule asset comprises one or more related rules. For example a rule asset called Per Diem Lodging Rules may contain all the rules for handling lodging expense types.
Rules flow
A rule flow sets the order for rules to be evaluated and invoked. Each per diem rule must be associated with a rule flow group (controlled by the ruleflow-group attribute). The per diem rule flow will invoke rules in the rule flow group in order illustrated below:
Banner Travel and Expense Management 8.5.0.5 July 2012HandbookCustomization of Per Diem Rules
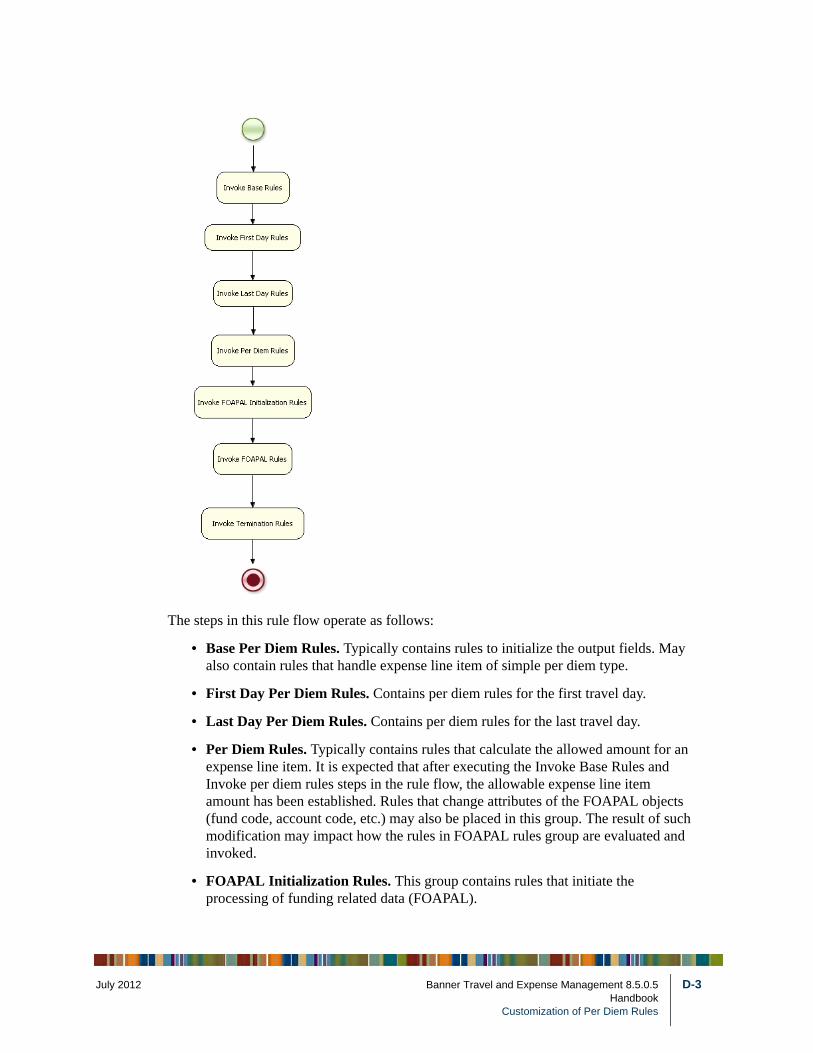
July 201
The steps in this rule flow operate as follows:
• Base Per Diem Rules. Typically contains rules to initialize the output fields. May also contain rules that handle expense line item of simple per diem type.
• First Day Per Diem Rules. Contains per diem rules for the first travel day.
• Last Day Per Diem Rules. Contains per diem rules for the last travel day.
• Per Diem Rules. Typically contains rules that calculate the allowed amount for an expense line item. It is expected that after executing the Invoke Base Rules and Invoke per diem rules steps in the rule flow, the allowable expense line item amount has been established. Rules that change attributes of the FOAPAL objects (fund code, account code, etc.) may also be placed in this group. The result of such modification may impact how the rules in FOAPAL rules group are evaluated and invoked.
• FOAPAL Initialization Rules. This group contains rules that initiate the processing of funding related data (FOAPAL).
2 Banner Travel and Expense Management 8.5.0.5 D-3Handbook
Customization of Per Diem Rules
D-4
• FOAPAL Rules. This group contains rules that regulate how expense will be distributed to different funding sources. Fund specific rules that override the per diem rules also reside in this group.
• Termination Rules. This group contains rules that will get executed after all other rule groups have been invoked.
Each rule flow has a unique ID. The per diem rule flow ID is Per Diem Rule Flow. You can customize this rule flow if the default is not suitable for your needs.
Per Diem Rules Domain Specific Language (DSL)
A DSL is provided to help business users manage the per diem rules. Most sample per diem rules are written using the DSL so they can be easily understood. When used in combination with the Guvnor Guided Rules Editor, a DSL is also useful in modifying existing rules and constructing new rules.
The Per Diem DSL can be extended to support additional per diem use cases, but, the DSL should only be modified in a way that existing sample rules provided by Ellucian® are still valid. Modifying the Per Diem DSL requires in-depth knowledge of the Per Diem module and the Drools Rules Language.
Creating New Per Diem Rules
The following sections provide information and procedures for creating new per diem rules in Drools Guvnor using the Per Diem DSL and the Guvnor Guided Rules Editor.
NoteThe Per Diem module ships with a set of sample rules. Most of these rules can be used “as is” although they may be in a disabled state. During initial set up, some of these rules may need to be enabled based on your institution’s travel policy. Please refer to Chapter 6, “Per Diem Rules Engine” for information on how to enable or disable rule assets in Drools Guvnor.
Components of a Per Diem rule
A per diem rule contains the following components:
• A rule name. The name must be unique within the scope of all the per diem rules.
• Rule attributes. The following attributes are mandatory
• enabled. This allows the rule to be individually enabled or disabled.
• no-loop. This prevents a rule from being triggered recursively.
Banner Travel and Expense Management 8.5.0.5 July 2012HandbookCustomization of Per Diem Rules
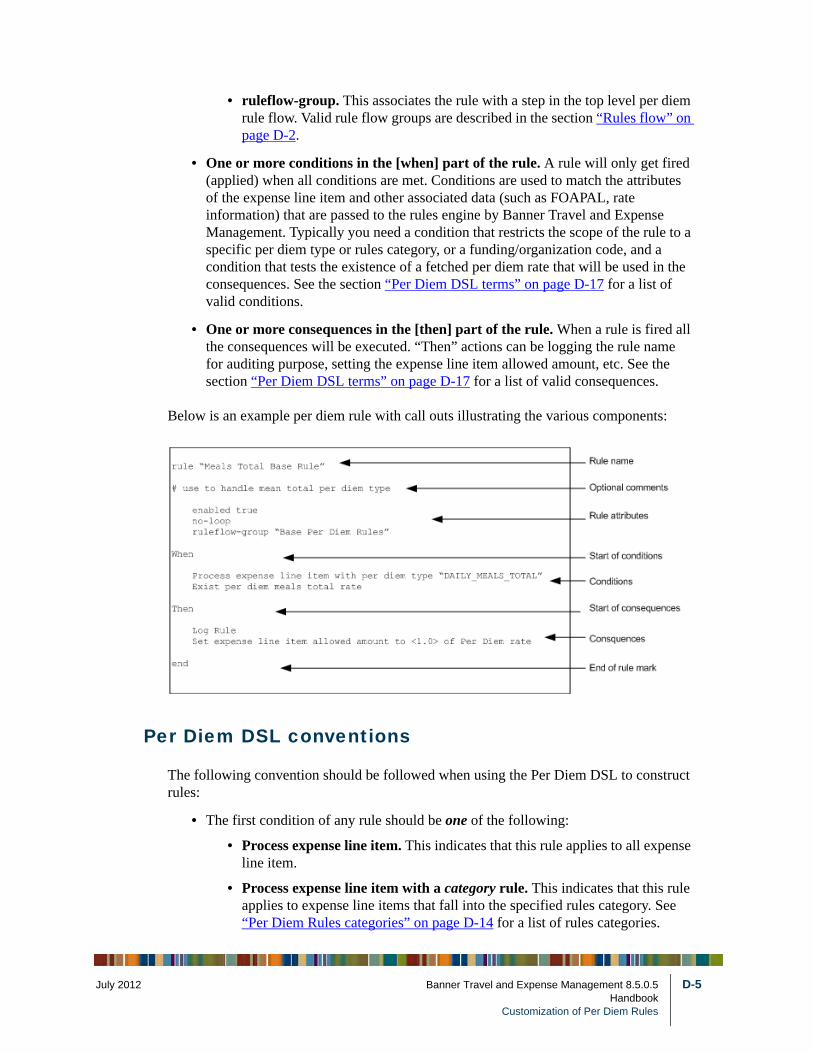
July 201
• ruleflow-group. This associates the rule with a step in the top level per diem rule flow. Valid rule flow groups are described in the section “Rules flow” on page D-2.
• One or more conditions in the [when] part of the rule. A rule will only get fired (applied) when all conditions are met. Conditions are used to match the attributes of the expense line item and other associated data (such as FOAPAL, rate information) that are passed to the rules engine by Banner Travel and Expense Management. Typically you need a condition that restricts the scope of the rule to a specific per diem type or rules category, or a funding/organization code, and a condition that tests the existence of a fetched per diem rate that will be used in the consequences. See the section “Per Diem DSL terms” on page D-17 for a list of valid conditions.
• One or more consequences in the [then] part of the rule. When a rule is fired all the consequences will be executed. “Then” actions can be logging the rule name for auditing purpose, setting the expense line item allowed amount, etc. See the section “Per Diem DSL terms” on page D-17 for a list of valid consequences.
Below is an example per diem rule with call outs illustrating the various components:
Per Diem DSL conventions
The following convention should be followed when using the Per Diem DSL to construct rules:
• The first condition of any rule should be one of the following:
• Process expense line item. This indicates that this rule applies to all expense line item.
• Process expense line item with a category rule. This indicates that this rule applies to expense line items that fall into the specified rules category. See “Per Diem Rules categories” on page D-14 for a list of rules categories.
2 Banner Travel and Expense Management 8.5.0.5 D-5Handbook
Customization of Per Diem Rules
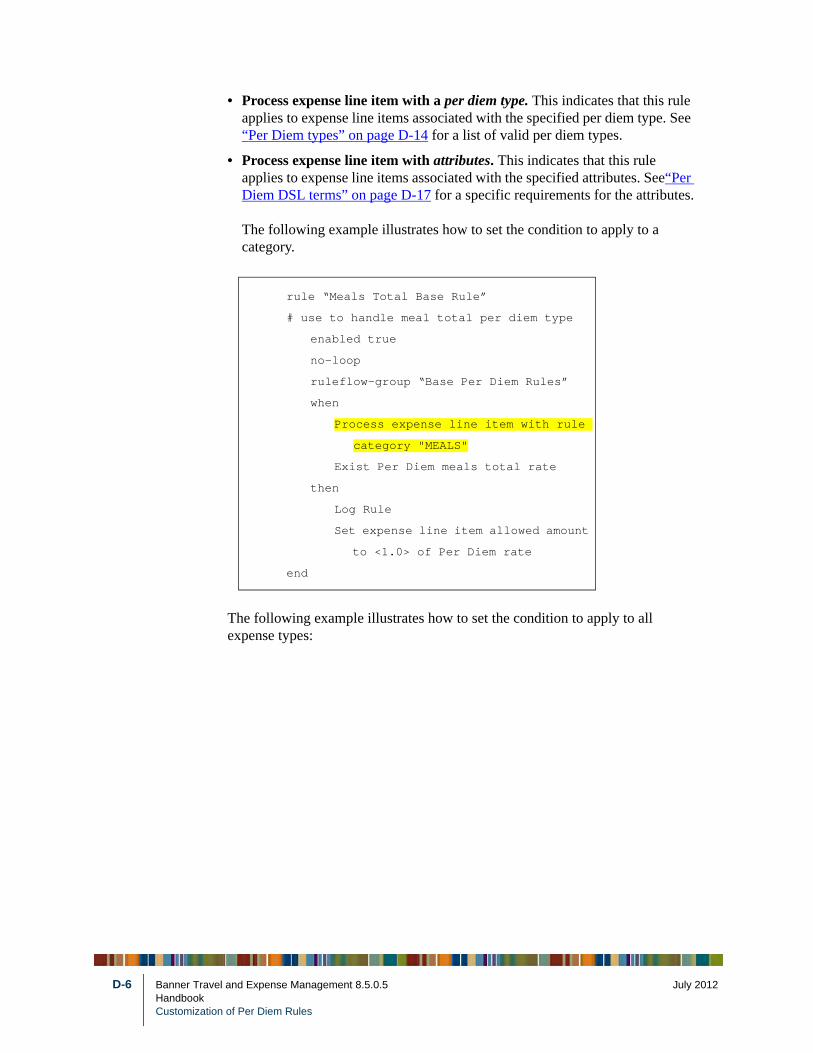
D-6
• Process expense line item with a per diem type. This indicates that this rule applies to expense line items associated with the specified per diem type. See “Per Diem types” on page D-14 for a list of valid per diem types.
• Process expense line item with attributes. This indicates that this rule applies to expense line items associated with the specified attributes. See“Per Diem DSL terms” on page D-17 for a specific requirements for the attributes.
The following example illustrates how to set the condition to apply to a category.
The following example illustrates how to set the condition to apply to all expense types:
rule “Meals Total Base Rule”
# use to handle meal total per diem type
enabled true
no-loop
ruleflow-group “Base Per Diem Rules”
when
Process expense line item with rule
category "MEALS"
Exist Per Diem meals total rate
then
Log Rule
Set expense line item allowed amount
to <1.0> of Per Diem rate
end
Banner Travel and Expense Management 8.5.0.5 July 2012HandbookCustomization of Per Diem Rules
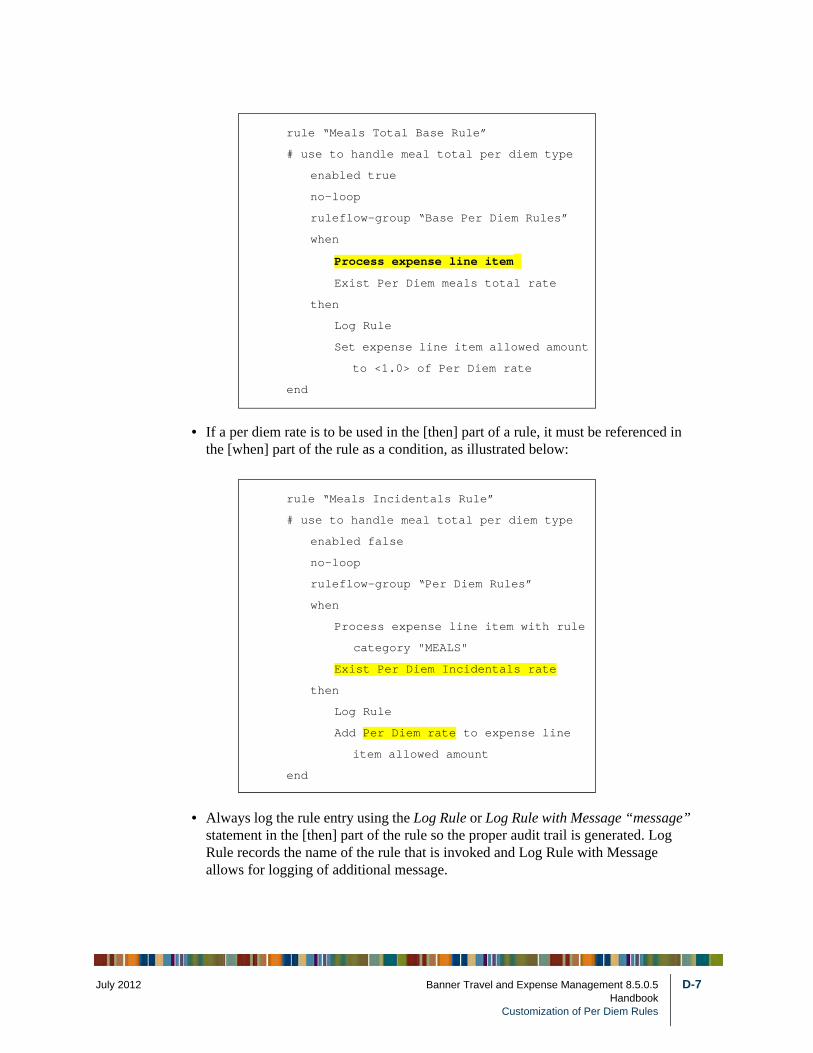
July 201
• If a per diem rate is to be used in the [then] part of a rule, it must be referenced in the [when] part of the rule as a condition, as illustrated below:
• Always log the rule entry using the Log Rule or Log Rule with Message “message” statement in the [then] part of the rule so the proper audit trail is generated. Log Rule records the name of the rule that is invoked and Log Rule with Message allows for logging of additional message.
rule “Meals Total Base Rule”
# use to handle meal total per diem type
enabled true
no-loop
ruleflow-group “Base Per Diem Rules”
when
Process expense line item
Exist Per Diem meals total rate
then
Log Rule
Set expense line item allowed amount
to <1.0> of Per Diem rate
end
rule “Meals Incidentals Rule”
# use to handle meal total per diem type
enabled false
no-loop
ruleflow-group “Per Diem Rules”
when
Process expense line item with rule
category "MEALS"
Exist Per Diem Incidentals rate
then
Log Rule
Add Per Diem rate to expense line
item allowed amount
end
2 Banner Travel and Expense Management 8.5.0.5 D-7Handbook
Customization of Per Diem Rules
D-8
• Each new rule added must have a unique rule name in the entire per diem rule package. A good way to achieve this is to create rule names starting with your institution’s initial.
• Each rule must have the following rule level attributes:
• enabled. This allows the rule to be individually enabled or disabled.
• no-loop. This prevents a rule from being triggered recursively.
• ruleflow-group. This associates the rule with a step in the top level per diem rule flow. Valid rule flow groups are described in the section “Rules flow” on page D-2.
Creating a rule using the Drools Guvnor Guided Rule Editor
Drools Guvnor provides a Guided Rule Editor that can be used in conjunction with the Per Diem DSL to assist in rule authoring. To use the Guided Rule Editor use the following procedure.
1. Log in to Drools Guvnor as a Per Diem Rules Developer.
2. Select the Knowledge Bases option.
3. Open Packages and drill through the following options:
com
sungardhe
pdRules
You see options similar to the following:
Banner Travel and Expense Management 8.5.0.5 July 2012HandbookCustomization of Per Diem Rules
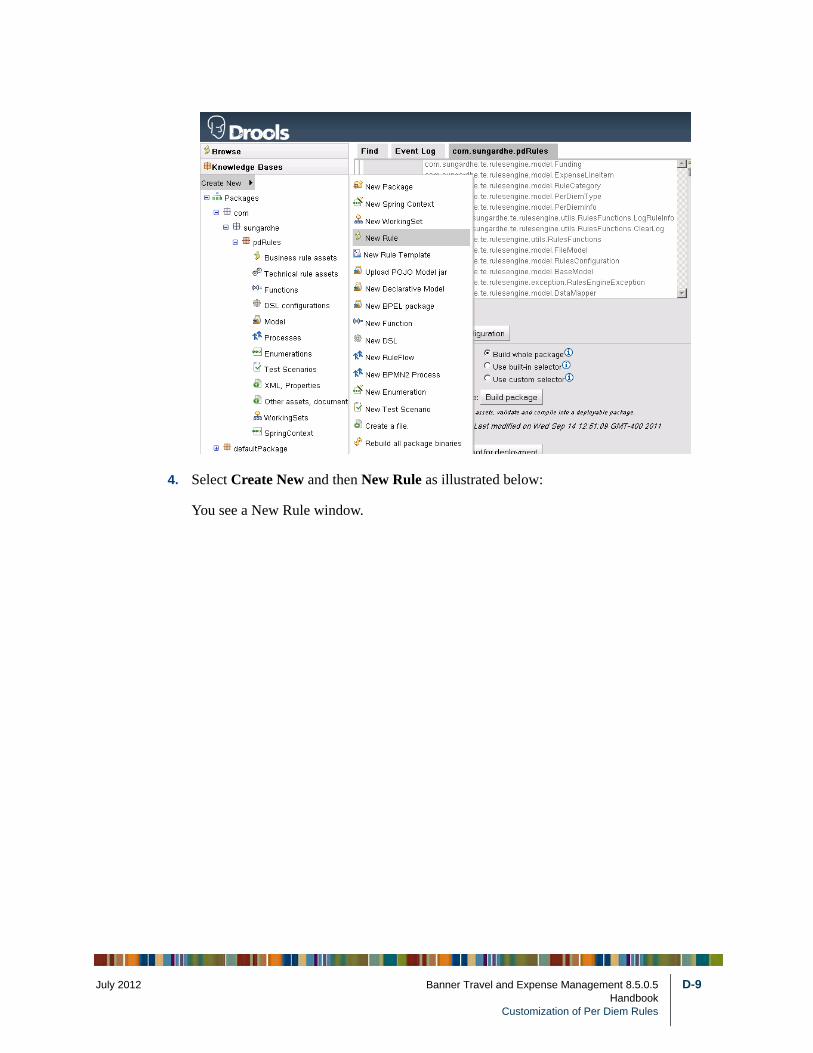
July 201
4. Select Create New and then New Rule as illustrated below:
You see a New Rule window.
2 Banner Travel and Expense Management 8.5.0.5 D-9Handbook
Customization of Per Diem Rules
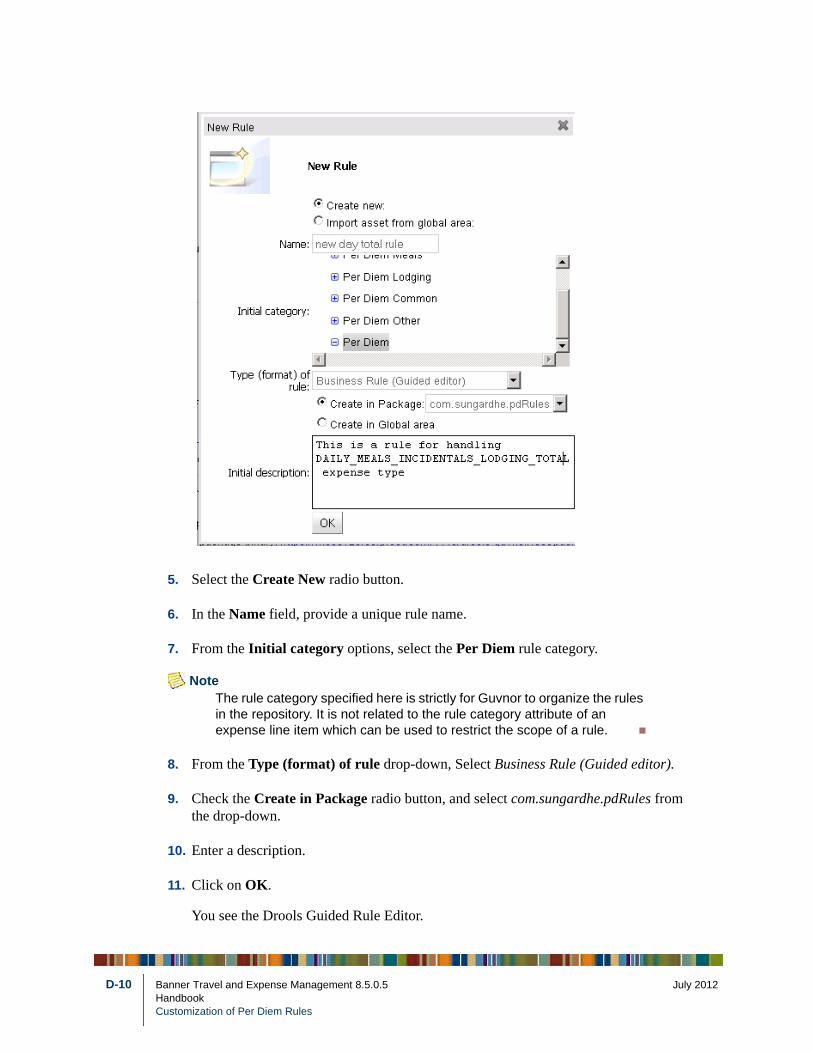
D-10
5. Select the Create New radio button.
6. In the Name field, provide a unique rule name.
7. From the Initial category options, select the Per Diem rule category.
NoteThe rule category specified here is strictly for Guvnor to organize the rules in the repository. It is not related to the rule category attribute of an expense line item which can be used to restrict the scope of a rule.
8. From the Type (format) of rule drop-down, Select Business Rule (Guided editor).
9. Check the Create in Package radio button, and select com.sungardhe.pdRules from the drop-down.
10. Enter a description.
11. Click on OK.
You see the Drools Guided Rule Editor.
Banner Travel and Expense Management 8.5.0.5 July 2012HandbookCustomization of Per Diem Rules
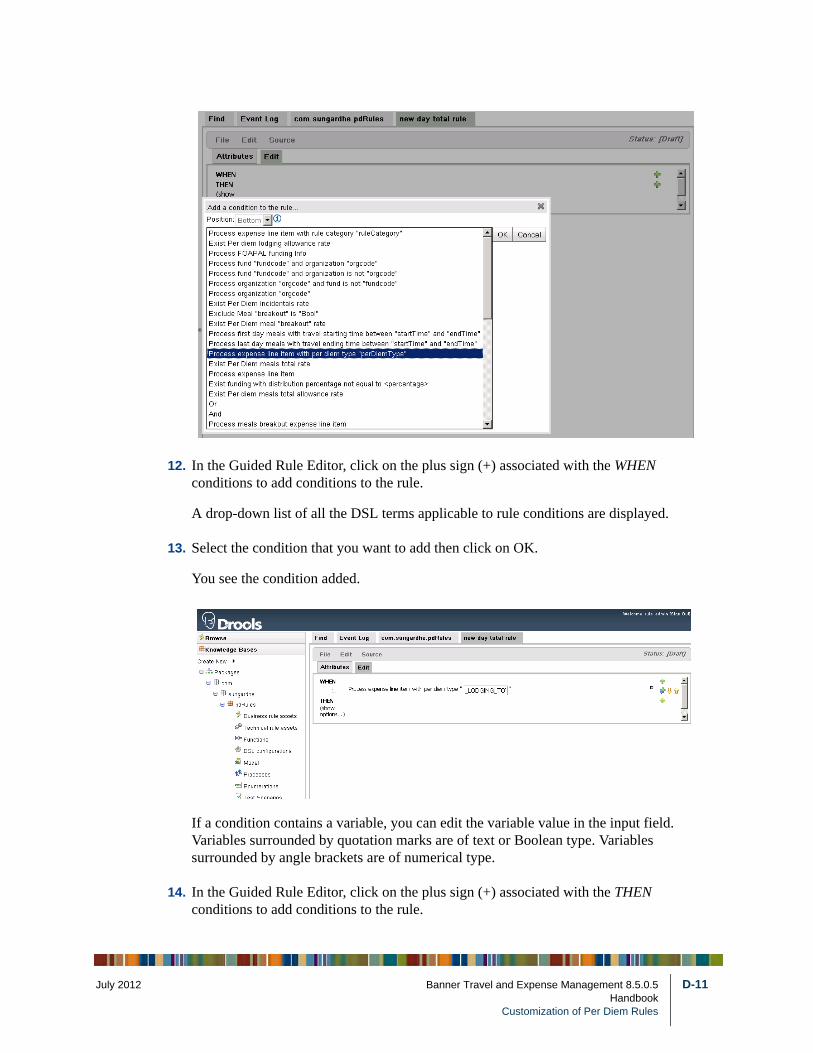
July 201
12. In the Guided Rule Editor, click on the plus sign (+) associated with the WHEN conditions to add conditions to the rule.
A drop-down list of all the DSL terms applicable to rule conditions are displayed.
13. Select the condition that you want to add then click on OK.
You see the condition added.
If a condition contains a variable, you can edit the variable value in the input field. Variables surrounded by quotation marks are of text or Boolean type. Variables surrounded by angle brackets are of numerical type.
14. In the Guided Rule Editor, click on the plus sign (+) associated with the THEN conditions to add conditions to the rule.
2 Banner Travel and Expense Management 8.5.0.5 D-11Handbook
Customization of Per Diem Rules
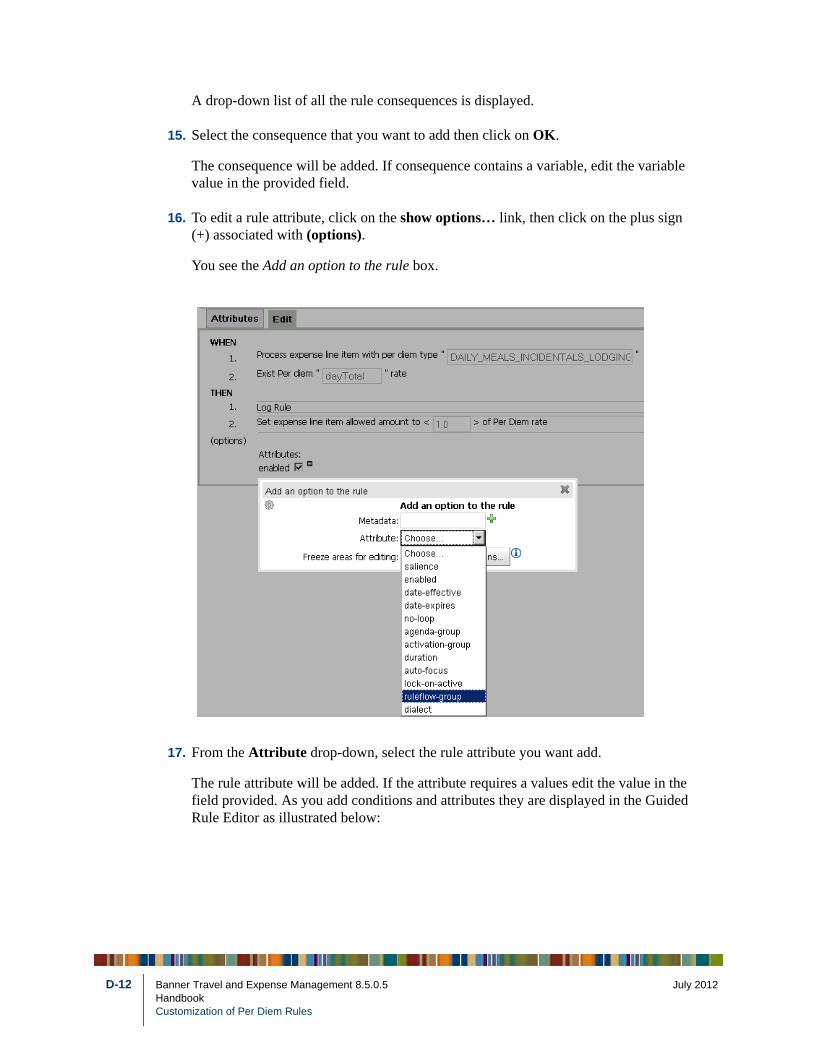
D-12
A drop-down list of all the rule consequences is displayed.
15. Select the consequence that you want to add then click on OK.
The consequence will be added. If consequence contains a variable, edit the variable value in the provided field.
16. To edit a rule attribute, click on the show options… link, then click on the plus sign (+) associated with (options).
You see the Add an option to the rule box.
17. From the Attribute drop-down, select the rule attribute you want add.
The rule attribute will be added. If the attribute requires a values edit the value in the field provided. As you add conditions and attributes they are displayed in the Guided Rule Editor as illustrated below:
Banner Travel and Expense Management 8.5.0.5 July 2012HandbookCustomization of Per Diem Rules
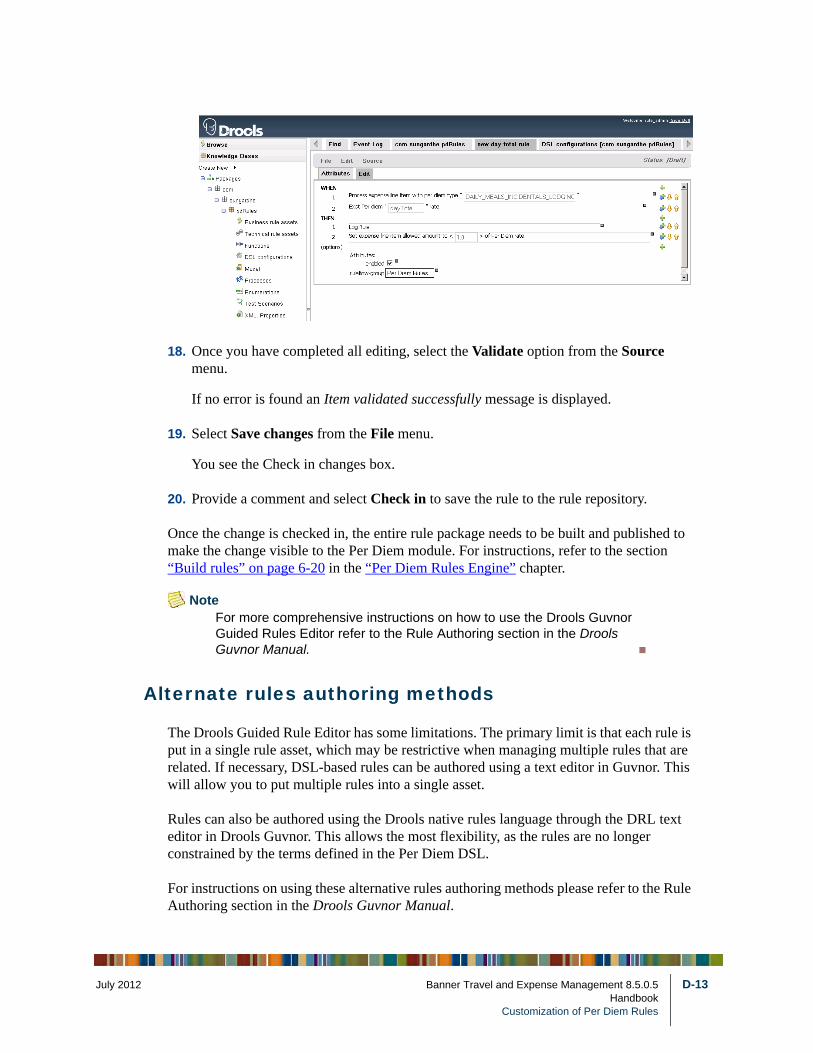
July 201
18. Once you have completed all editing, select the Validate option from the Source menu.
If no error is found an Item validated successfully message is displayed.
19. Select Save changes from the File menu.
You see the Check in changes box.
20. Provide a comment and select Check in to save the rule to the rule repository.
Once the change is checked in, the entire rule package needs to be built and published to make the change visible to the Per Diem module. For instructions, refer to the section “Build rules” on page 6-20 in the “Per Diem Rules Engine” chapter.
NoteFor more comprehensive instructions on how to use the Drools Guvnor Guided Rules Editor refer to the Rule Authoring section in the Drools Guvnor Manual.
Alternate rules authoring methods
The Drools Guided Rule Editor has some limitations. The primary limit is that each rule is put in a single rule asset, which may be restrictive when managing multiple rules that are related. If necessary, DSL-based rules can be authored using a text editor in Guvnor. This will allow you to put multiple rules into a single asset.
Rules can also be authored using the Drools native rules language through the DRL text editor in Drools Guvnor. This allows the most flexibility, as the rules are no longer constrained by the terms defined in the Per Diem DSL.
For instructions on using these alternative rules authoring methods please refer to the Rule Authoring section in the Drools Guvnor Manual.
2 Banner Travel and Expense Management 8.5.0.5 D-13Handbook
Customization of Per Diem Rules
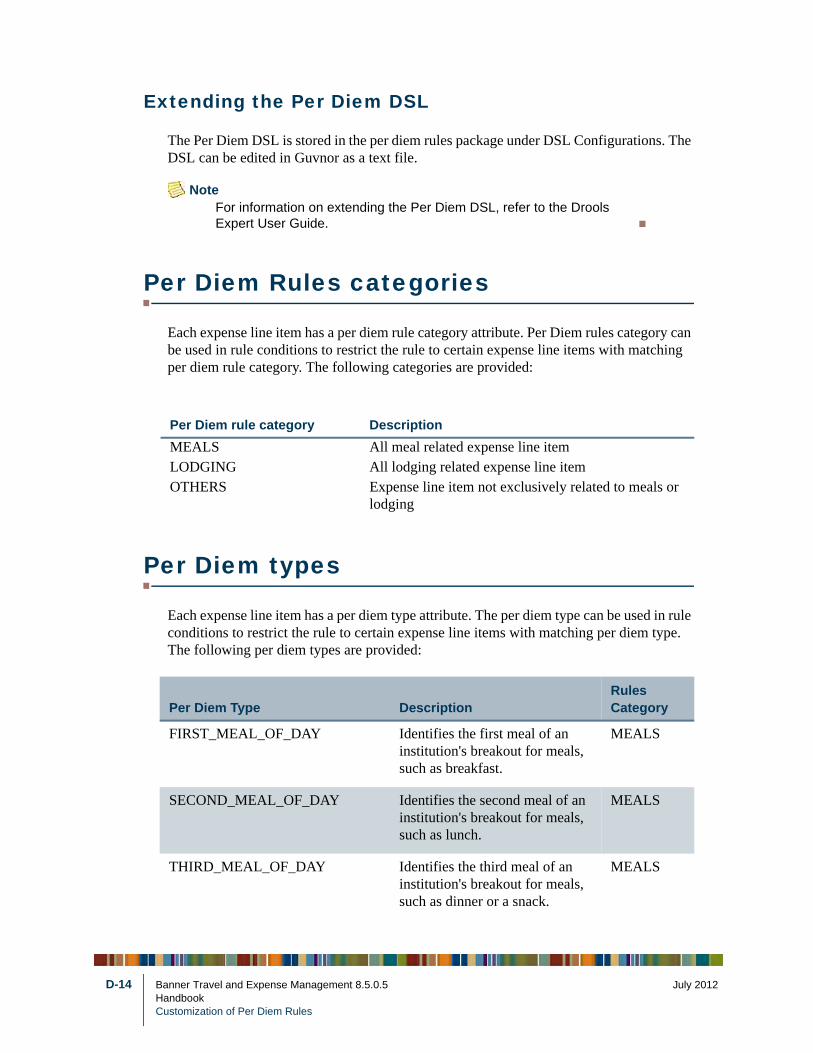
D-14
Extending the Per Diem DSL
The Per Diem DSL is stored in the per diem rules package under DSL Configurations. The DSL can be edited in Guvnor as a text file.
NoteFor information on extending the Per Diem DSL, refer to the Drools Expert User Guide.
Per Diem Rules categories
Each expense line item has a per diem rule category attribute. Per Diem rules category can be used in rule conditions to restrict the rule to certain expense line items with matching per diem rule category. The following categories are provided:
Per Diem types
Each expense line item has a per diem type attribute. The per diem type can be used in rule conditions to restrict the rule to certain expense line items with matching per diem type. The following per diem types are provided:
Per Diem rule category Description
MEALS All meal related expense line itemLODGING All lodging related expense line itemOTHERS Expense line item not exclusively related to meals or
lodging
Per Diem Type DescriptionRules Category
FIRST_MEAL_OF_DAY Identifies the first meal of an institution's breakout for meals, such as breakfast.
MEALS
SECOND_MEAL_OF_DAY Identifies the second meal of an institution's breakout for meals, such as lunch.
MEALS
THIRD_MEAL_OF_DAY Identifies the third meal of an institution's breakout for meals, such as dinner or a snack.
MEALS
Banner Travel and Expense Management 8.5.0.5 July 2012HandbookCustomization of Per Diem Rules
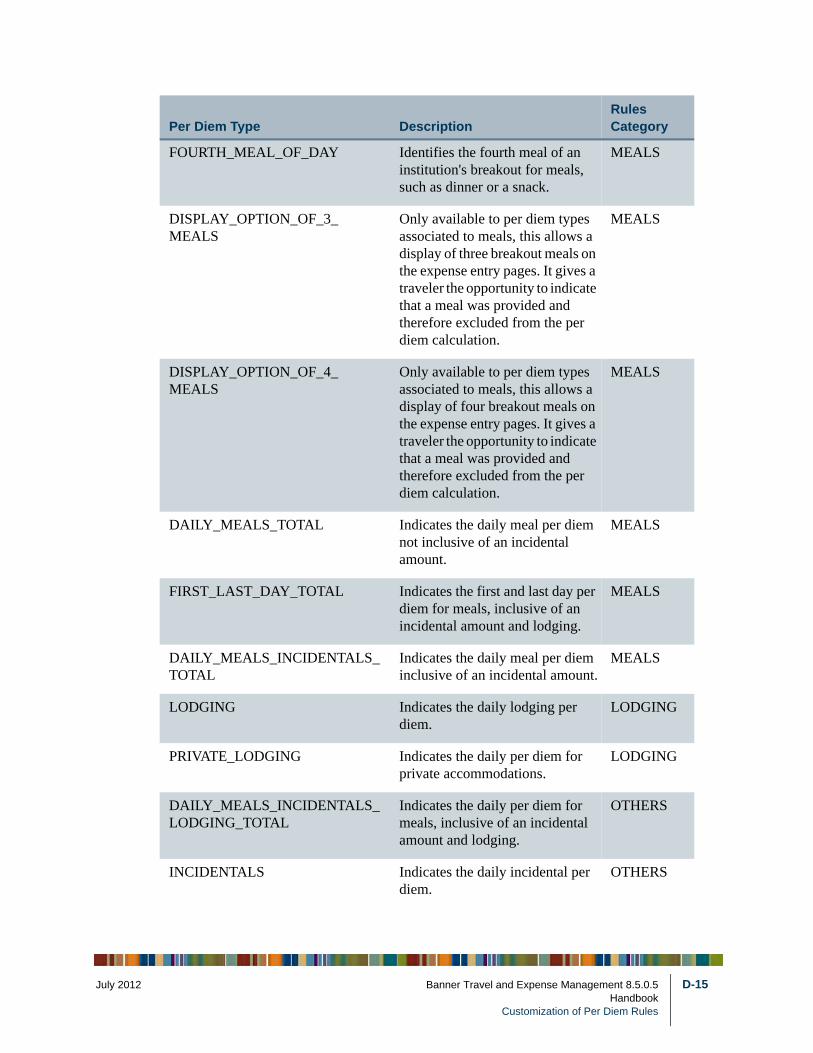
July 201
FOURTH_MEAL_OF_DAY Identifies the fourth meal of an institution's breakout for meals, such as dinner or a snack.
MEALS
DISPLAY_OPTION_OF_3_MEALS
Only available to per diem types associated to meals, this allows a display of three breakout meals on the expense entry pages. It gives a traveler the opportunity to indicate that a meal was provided and therefore excluded from the per diem calculation.
MEALS
DISPLAY_OPTION_OF_4_MEALS
Only available to per diem types associated to meals, this allows a display of four breakout meals on the expense entry pages. It gives a traveler the opportunity to indicate that a meal was provided and therefore excluded from the per diem calculation.
MEALS
DAILY_MEALS_TOTAL Indicates the daily meal per diem not inclusive of an incidental amount.
MEALS
FIRST_LAST_DAY_TOTAL Indicates the first and last day per diem for meals, inclusive of an incidental amount and lodging.
MEALS
DAILY_MEALS_INCIDENTALS_TOTAL
Indicates the daily meal per diem inclusive of an incidental amount.
MEALS
LODGING Indicates the daily lodging per diem.
LODGING
PRIVATE_LODGING Indicates the daily per diem for private accommodations.
LODGING
DAILY_MEALS_INCIDENTALS_LODGING_TOTAL
Indicates the daily per diem for meals, inclusive of an incidental amount and lodging.
OTHERS
INCIDENTALS Indicates the daily incidental per diem.
OTHERS
Per Diem Type DescriptionRules Category
2 Banner Travel and Expense Management 8.5.0.5 D-15Handbook
Customization of Per Diem Rules
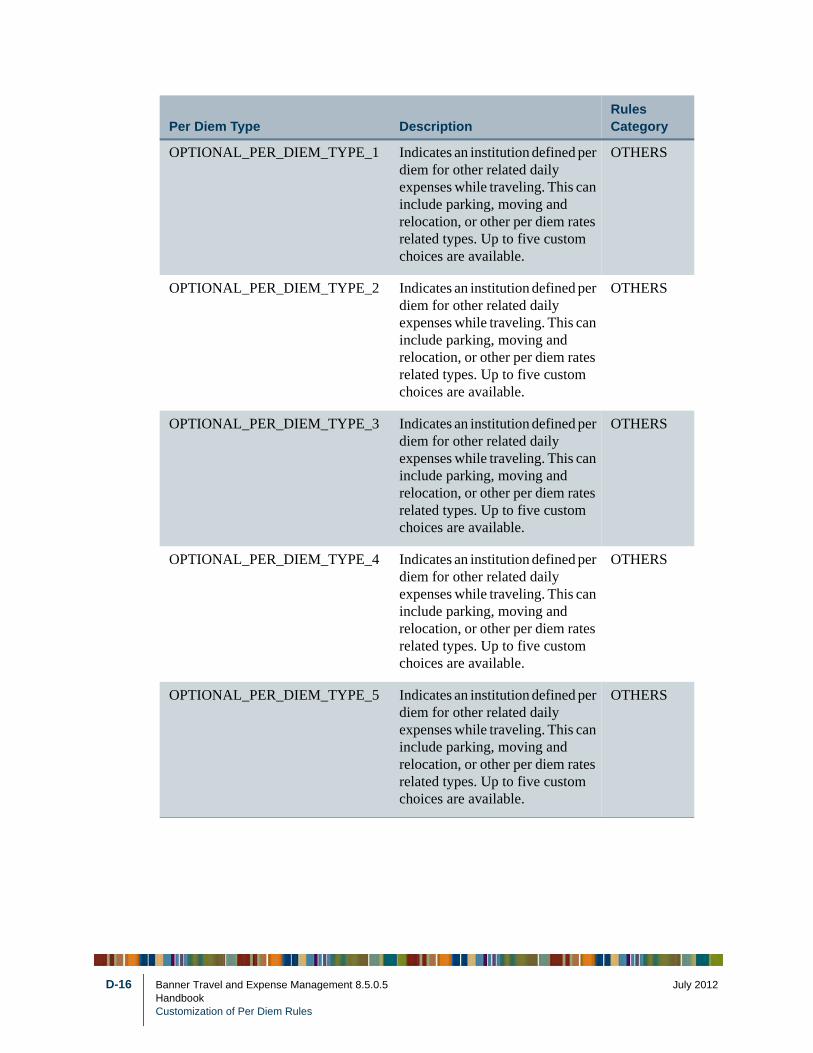
D-16
OPTIONAL_PER_DIEM_TYPE_1 Indicates an institution defined per diem for other related daily expenses while traveling. This can include parking, moving and relocation, or other per diem rates related types. Up to five custom choices are available.
OTHERS
OPTIONAL_PER_DIEM_TYPE_2 Indicates an institution defined per diem for other related daily expenses while traveling. This can include parking, moving and relocation, or other per diem rates related types. Up to five custom choices are available.
OTHERS
OPTIONAL_PER_DIEM_TYPE_3 Indicates an institution defined per diem for other related daily expenses while traveling. This can include parking, moving and relocation, or other per diem rates related types. Up to five custom choices are available.
OTHERS
OPTIONAL_PER_DIEM_TYPE_4 Indicates an institution defined per diem for other related daily expenses while traveling. This can include parking, moving and relocation, or other per diem rates related types. Up to five custom choices are available.
OTHERS
OPTIONAL_PER_DIEM_TYPE_5 Indicates an institution defined per diem for other related daily expenses while traveling. This can include parking, moving and relocation, or other per diem rates related types. Up to five custom choices are available.
OTHERS
Per Diem Type DescriptionRules Category
Banner Travel and Expense Management 8.5.0.5 July 2012HandbookCustomization of Per Diem Rules
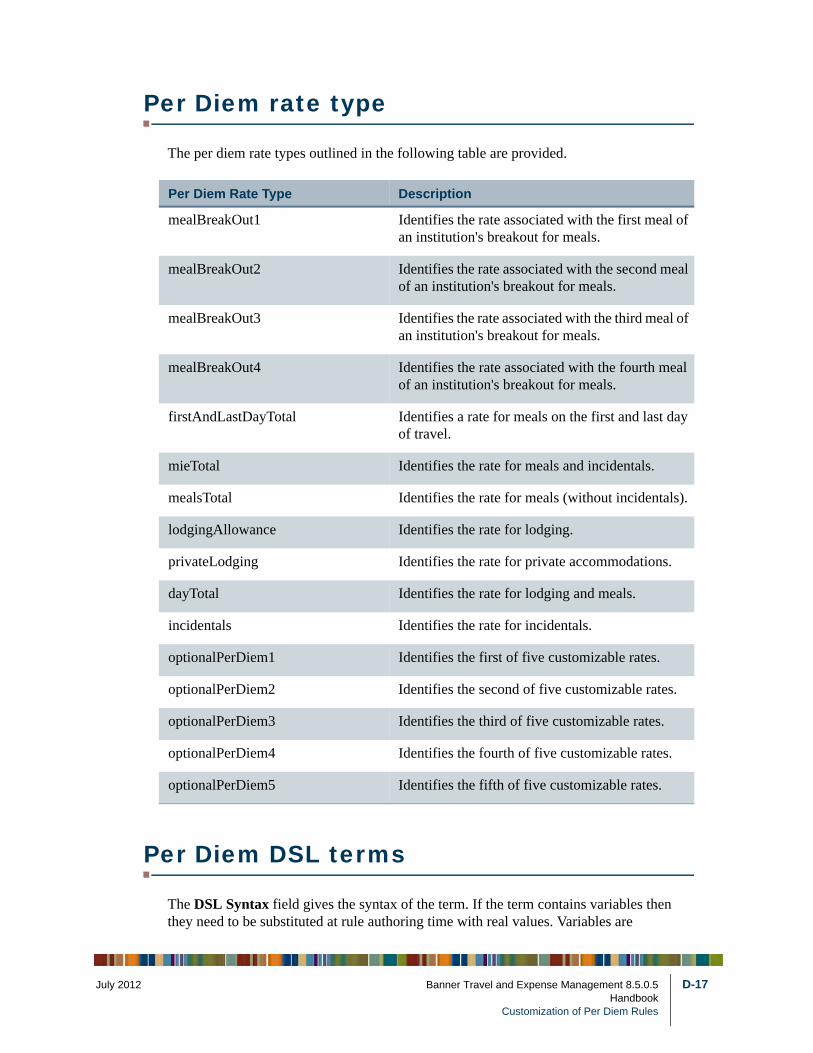
July 201
Per Diem rate type
The per diem rate types outlined in the following table are provided.
Per Diem DSL terms
The DSL Syntax field gives the syntax of the term. If the term contains variables then they need to be substituted at rule authoring time with real values. Variables are
Per Diem Rate Type Description
mealBreakOut1 Identifies the rate associated with the first meal of an institution's breakout for meals.
mealBreakOut2 Identifies the rate associated with the second meal of an institution's breakout for meals.
mealBreakOut3 Identifies the rate associated with the third meal of an institution's breakout for meals.
mealBreakOut4 Identifies the rate associated with the fourth meal of an institution's breakout for meals.
firstAndLastDayTotal Identifies a rate for meals on the first and last day of travel.
mieTotal Identifies the rate for meals and incidentals.
mealsTotal Identifies the rate for meals (without incidentals).
lodgingAllowance Identifies the rate for lodging.
privateLodging Identifies the rate for private accommodations.
dayTotal Identifies the rate for lodging and meals.
incidentals Identifies the rate for incidentals.
optionalPerDiem1 Identifies the first of five customizable rates.
optionalPerDiem2 Identifies the second of five customizable rates.
optionalPerDiem3 Identifies the third of five customizable rates.
optionalPerDiem4 Identifies the fourth of five customizable rates.
optionalPerDiem5 Identifies the fifth of five customizable rates.
2 Banner Travel and Expense Management 8.5.0.5 D-17Handbook
Customization of Per Diem Rules
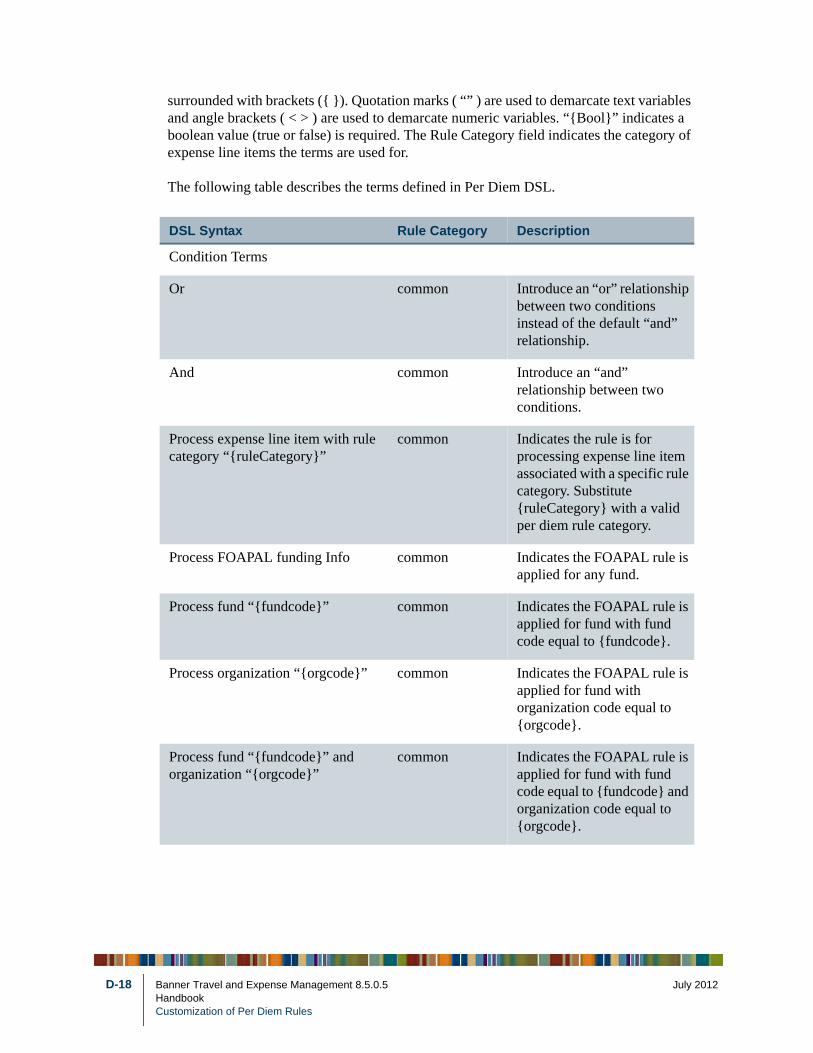
D-18
surrounded with brackets ({ }). Quotation marks ( “” ) are used to demarcate text variables and angle brackets ( < > ) are used to demarcate numeric variables. “{Bool}” indicates a boolean value (true or false) is required. The Rule Category field indicates the category of expense line items the terms are used for.
The following table describes the terms defined in Per Diem DSL.
DSL Syntax Rule Category Description
Condition Terms
Or common Introduce an “or” relationship between two conditions instead of the default “and” relationship.
And common Introduce an “and” relationship between two conditions.
Process expense line item with rule category “{ruleCategory}”
common Indicates the rule is for processing expense line item associated with a specific rule category. Substitute {ruleCategory} with a valid per diem rule category.
Process FOAPAL funding Info common Indicates the FOAPAL rule is applied for any fund.
Process fund “{fundcode}” common Indicates the FOAPAL rule is applied for fund with fund code equal to {fundcode}.
Process organization “{orgcode}” common Indicates the FOAPAL rule is applied for fund with organization code equal to {orgcode}.
Process fund “{fundcode}” and organization “{orgcode}”
common Indicates the FOAPAL rule is applied for fund with fund code equal to {fundcode} and organization code equal to {orgcode}.
Banner Travel and Expense Management 8.5.0.5 July 2012HandbookCustomization of Per Diem Rules
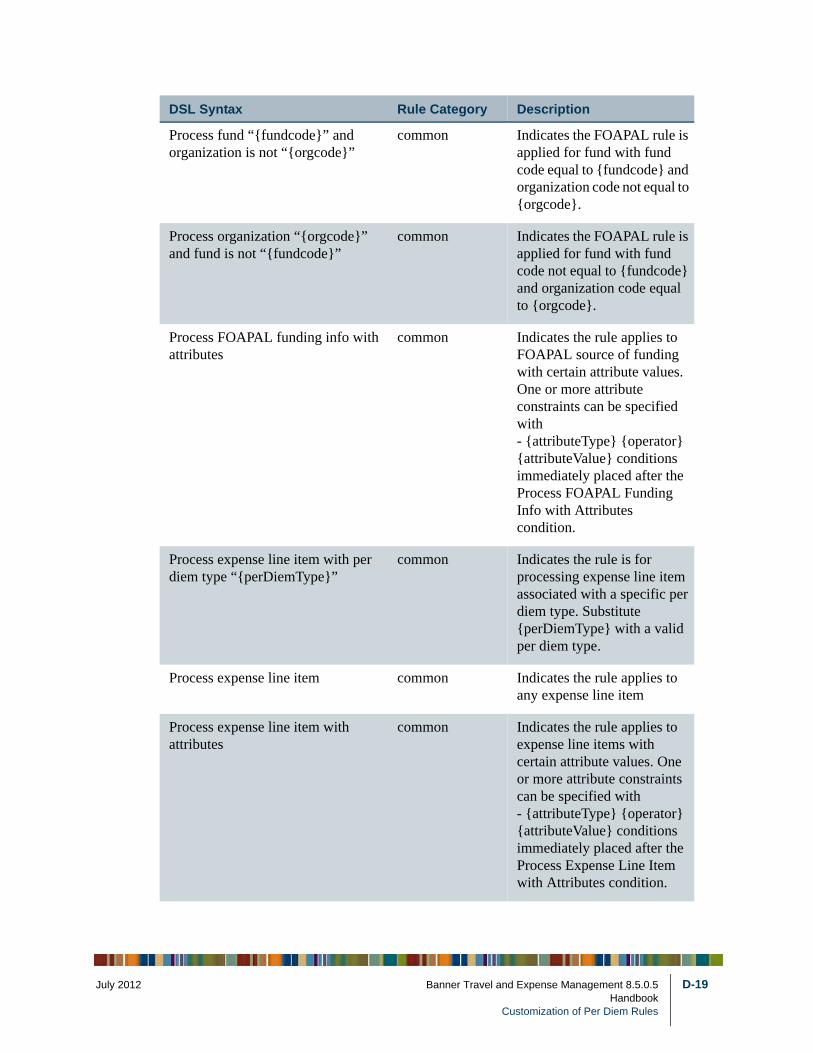
July 201
Process fund “{fundcode}” and organization is not “{orgcode}”
common Indicates the FOAPAL rule is applied for fund with fund code equal to {fundcode} and organization code not equal to {orgcode}.
Process organization “{orgcode}” and fund is not “{fundcode}”
common Indicates the FOAPAL rule is applied for fund with fund code not equal to {fundcode} and organization code equal to {orgcode}.
Process FOAPAL funding info with attributes
common Indicates the rule applies to FOAPAL source of funding with certain attribute values. One or more attribute constraints can be specified with- {attributeType} {operator} {attributeValue} conditions immediately placed after the Process FOAPAL Funding Info with Attributes condition.
Process expense line item with per diem type “{perDiemType}”
common Indicates the rule is for processing expense line item associated with a specific per diem type. Substitute {perDiemType} with a valid per diem type.
Process expense line item common Indicates the rule applies to any expense line item
Process expense line item with attributes
common Indicates the rule applies to expense line items with certain attribute values. One or more attribute constraints can be specified with- {attributeType} {operator} {attributeValue} conditions immediately placed after the Process Expense Line Item with Attributes condition.
DSL Syntax Rule Category Description
2 Banner Travel and Expense Management 8.5.0.5 D-19Handbook
Customization of Per Diem Rules
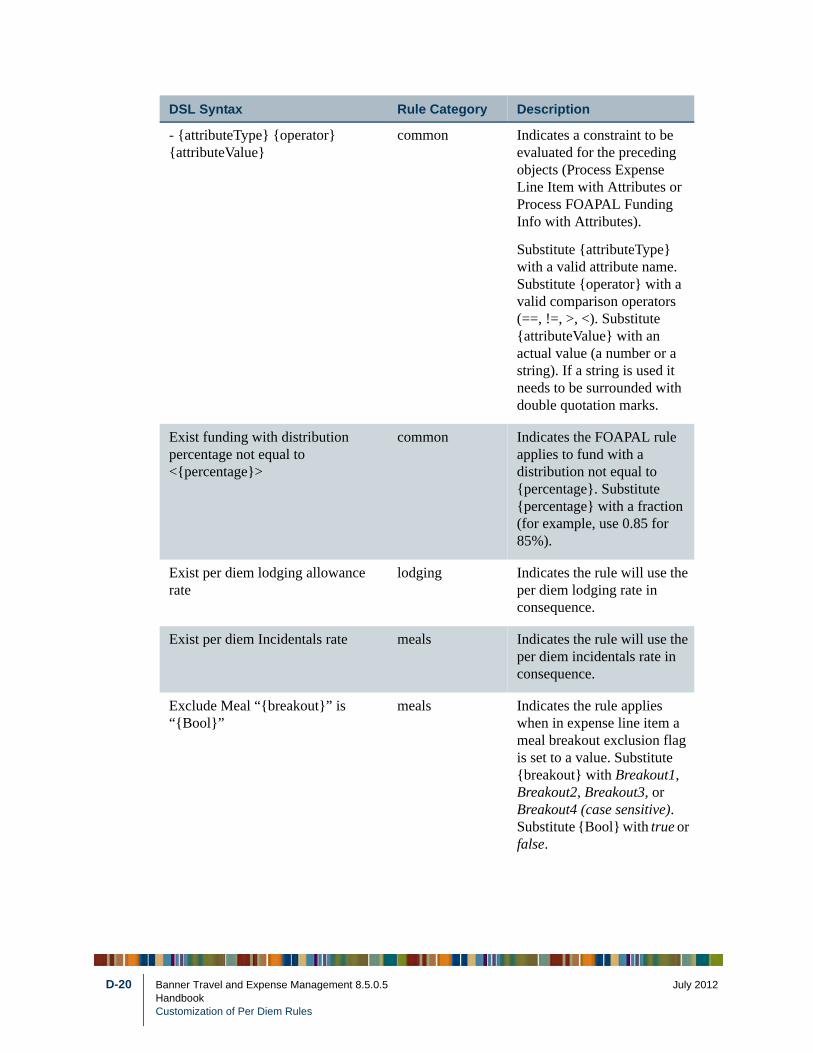
D-20
- {attributeType} {operator} {attributeValue}
common Indicates a constraint to be evaluated for the preceding objects (Process Expense Line Item with Attributes or Process FOAPAL Funding Info with Attributes).
Substitute {attributeType} with a valid attribute name. Substitute {operator} with a valid comparison operators (==, !=, >, <). Substitute {attributeValue} with an actual value (a number or a string). If a string is used it needs to be surrounded with double quotation marks.
Exist funding with distribution percentage not equal to <{percentage}>
common Indicates the FOAPAL rule applies to fund with a distribution not equal to {percentage}. Substitute {percentage} with a fraction (for example, use 0.85 for 85%).
Exist per diem lodging allowance rate
lodging Indicates the rule will use the per diem lodging rate in consequence.
Exist per diem Incidentals rate meals Indicates the rule will use the per diem incidentals rate in consequence.
Exclude Meal “{breakout}” is “{Bool}”
meals Indicates the rule applies when in expense line item a meal breakout exclusion flag is set to a value. Substitute {breakout} with Breakout1, Breakout2, Breakout3, or Breakout4 (case sensitive). Substitute {Bool} with true or false.
DSL Syntax Rule Category Description
Banner Travel and Expense Management 8.5.0.5 July 2012HandbookCustomization of Per Diem Rules

July 201
Exist Per Diem meal “{breakout}” rate
meals Indicates the rule will use the per diem meal breakout rate in consequence. Substitute {breakout} with BreakOut1, BreakOut2, BreakOut13, or BreakOut4 (case sensitive).
Process first day meals with travel starting time between “{startTime}” and “{endTime}”
meals Indicates the rule applies to meals expense line item for first travel day and the travel start time is between {startTime} and {endTime}. Substitute {startTime} and {endTime} with time of day in the format of hh:mm using military time. hh is between 0 and 24. mm is between 0 and 59. hh:mm cannot exceed 24:00.
Process last day meals with travel ending time between “{startTime}” and “{endTime}”
meals Indicates the rule applies to meals expense line item for last travel day and the travel end time is between {startTime} and {endTime}. Substitute {startTime} and {endTime} with time of day in the format of hh:mm using military time. hh is between 0 and 24. mm is between 0 and 59. hh:mm cannot exceed 24:00.
Exist per diem meals total rate meals Indicates the rule will use the per diem meals total rate in consequence.
Exist per diem MIE total rate meals Indicates the rule will use the per diem MIE total rate in consequence.
DSL Syntax Rule Category Description
2 Banner Travel and Expense Management 8.5.0.5 D-21Handbook
Customization of Per Diem Rules
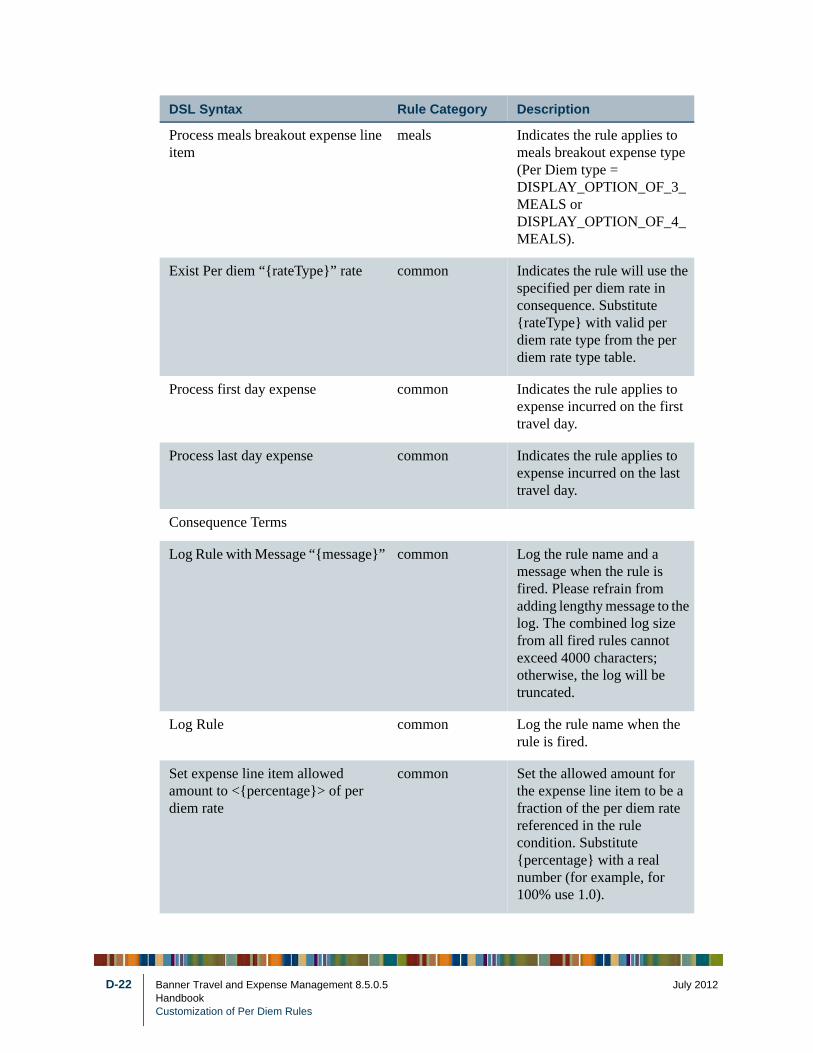
D-22
Process meals breakout expense line item
meals Indicates the rule applies to meals breakout expense type (Per Diem type = DISPLAY_OPTION_OF_3_MEALS or DISPLAY_OPTION_OF_4_MEALS).
Exist Per diem “{rateType}” rate common Indicates the rule will use the specified per diem rate in consequence. Substitute {rateType} with valid per diem rate type from the per diem rate type table.
Process first day expense common Indicates the rule applies to expense incurred on the first travel day.
Process last day expense common Indicates the rule applies to expense incurred on the last travel day.
Consequence Terms
Log Rule with Message “{message}” common Log the rule name and a message when the rule is fired. Please refrain from adding lengthy message to the log. The combined log size from all fired rules cannot exceed 4000 characters; otherwise, the log will be truncated.
Log Rule common Log the rule name when the rule is fired.
Set expense line item allowed amount to <{percentage}> of per diem rate
common Set the allowed amount for the expense line item to be a fraction of the per diem rate referenced in the rule condition. Substitute {percentage} with a real number (for example, for 100% use 1.0).
DSL Syntax Rule Category Description
Banner Travel and Expense Management 8.5.0.5 July 2012HandbookCustomization of Per Diem Rules
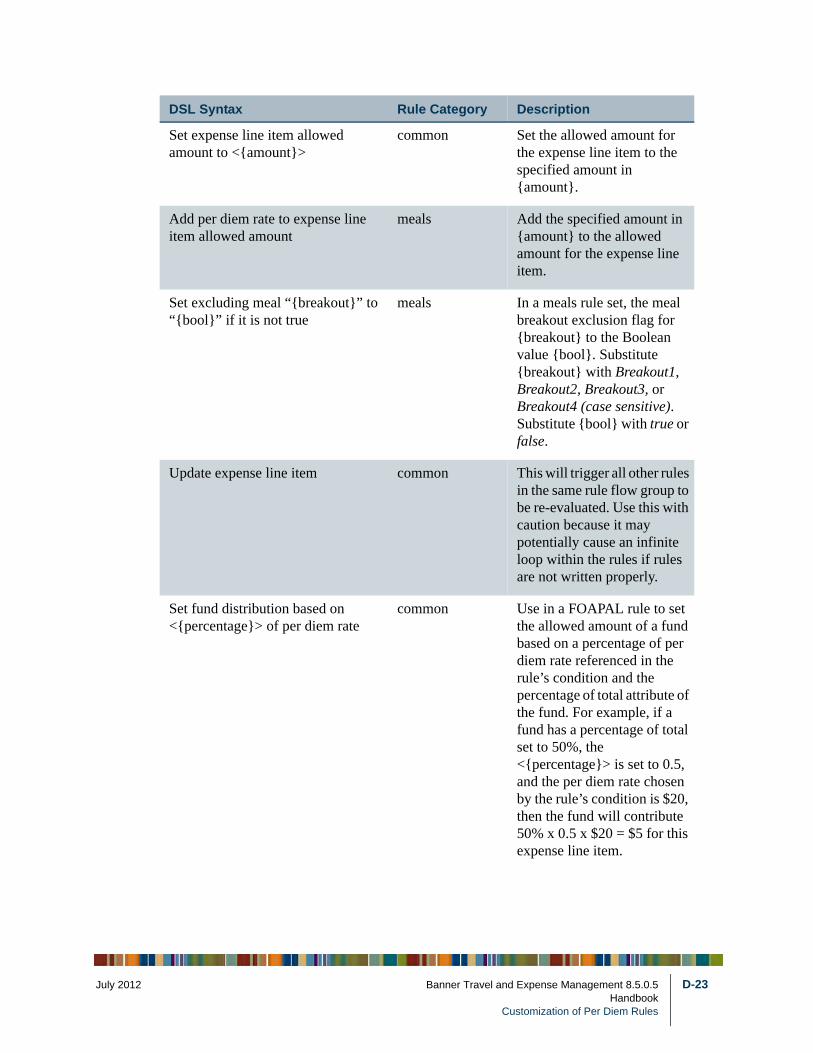
July 201
Set expense line item allowed amount to <{amount}>
common Set the allowed amount for the expense line item to the specified amount in {amount}.
Add per diem rate to expense line item allowed amount
meals Add the specified amount in {amount} to the allowed amount for the expense line item.
Set excluding meal “{breakout}” to “{bool}” if it is not true
meals In a meals rule set, the meal breakout exclusion flag for {breakout} to the Boolean value {bool}. Substitute {breakout} with Breakout1, Breakout2, Breakout3, or Breakout4 (case sensitive). Substitute {bool} with true or false.
Update expense line item common This will trigger all other rules in the same rule flow group to be re-evaluated. Use this with caution because it may potentially cause an infinite loop within the rules if rules are not written properly.
Set fund distribution based on <{percentage}> of per diem rate
common Use in a FOAPAL rule to set the allowed amount of a fund based on a percentage of per diem rate referenced in the rule’s condition and the percentage of total attribute of the fund. For example, if a fund has a percentage of total set to 50%, the <{percentage}> is set to 0.5, and the per diem rate chosen by the rule’s condition is $20, then the fund will contribute 50% x 0.5 x $20 = $5 for this expense line item.
DSL Syntax Rule Category Description
2 Banner Travel and Expense Management 8.5.0.5 D-23Handbook
Customization of Per Diem Rules
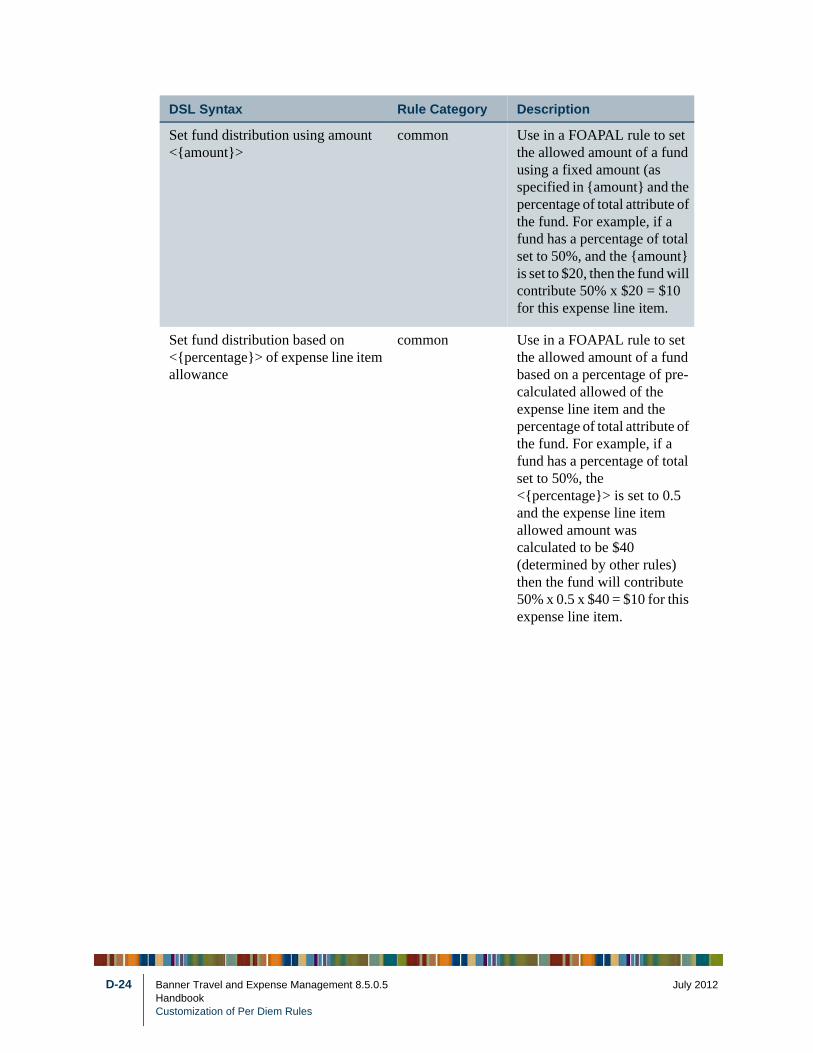
D-24
Set fund distribution using amount <{amount}>
common Use in a FOAPAL rule to set the allowed amount of a fund using a fixed amount (as specified in {amount} and the percentage of total attribute of the fund. For example, if a fund has a percentage of total set to 50%, and the {amount} is set to $20, then the fund will contribute 50% x $20 = $10 for this expense line item.
Set fund distribution based on <{percentage}> of expense line item allowance
common Use in a FOAPAL rule to set the allowed amount of a fund based on a percentage of pre-calculated allowed of the expense line item and the percentage of total attribute of the fund. For example, if a fund has a percentage of total set to 50%, the <{percentage}> is set to 0.5 and the expense line item allowed amount was calculated to be $40 (determined by other rules) then the fund will contribute 50% x 0.5 x $40 = $10 for this expense line item.
DSL Syntax Rule Category Description
Banner Travel and Expense Management 8.5.0.5 July 2012HandbookCustomization of Per Diem Rules
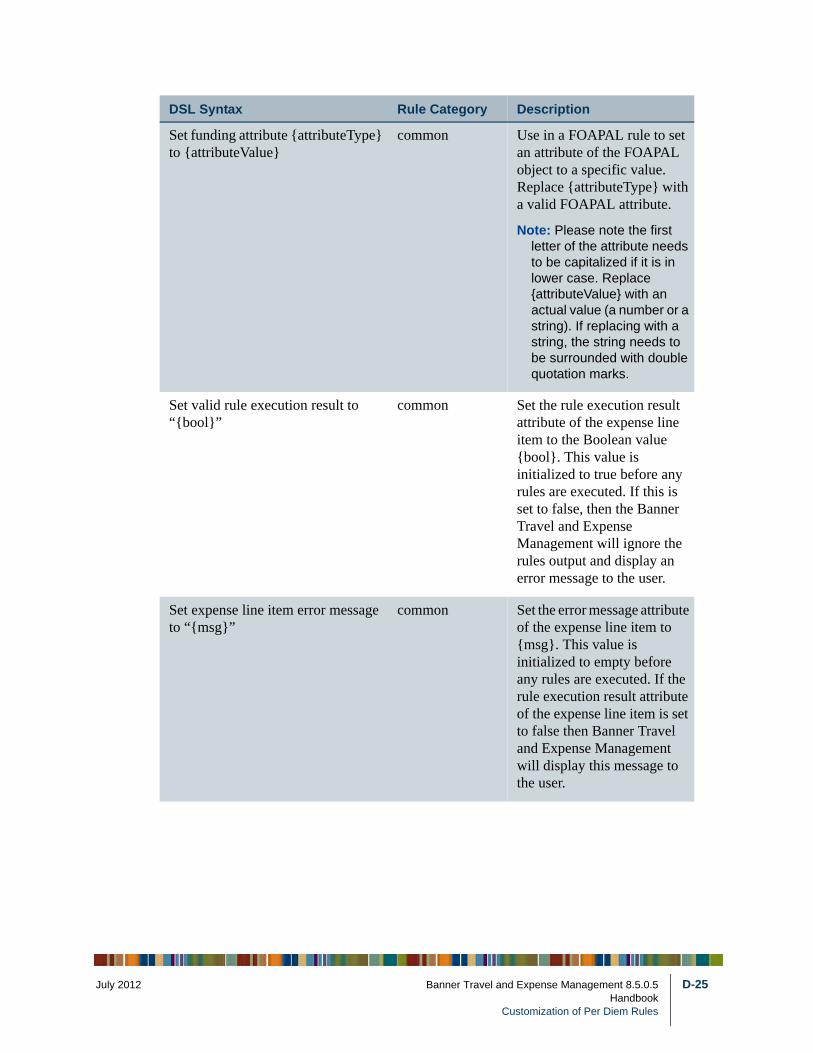
July 201
Set funding attribute {attributeType} to {attributeValue}
common Use in a FOAPAL rule to set an attribute of the FOAPAL object to a specific value. Replace {attributeType} with a valid FOAPAL attribute.
Note: Please note the first letter of the attribute needs to be capitalized if it is in lower case. Replace {attributeValue} with an actual value (a number or a string). If replacing with a string, the string needs to be surrounded with double quotation marks.
Set valid rule execution result to “{bool}”
common Set the rule execution result attribute of the expense line item to the Boolean value {bool}. This value is initialized to true before any rules are executed. If this is set to false, then the Banner Travel and Expense Management will ignore the rules output and display an error message to the user.
Set expense line item error message to “{msg}”
common Set the error message attribute of the expense line item to {msg}. This value is initialized to empty before any rules are executed. If the rule execution result attribute of the expense line item is set to false then Banner Travel and Expense Management will display this message to the user.
DSL Syntax Rule Category Description
2 Banner Travel and Expense Management 8.5.0.5 D-25Handbook
Customization of Per Diem Rules
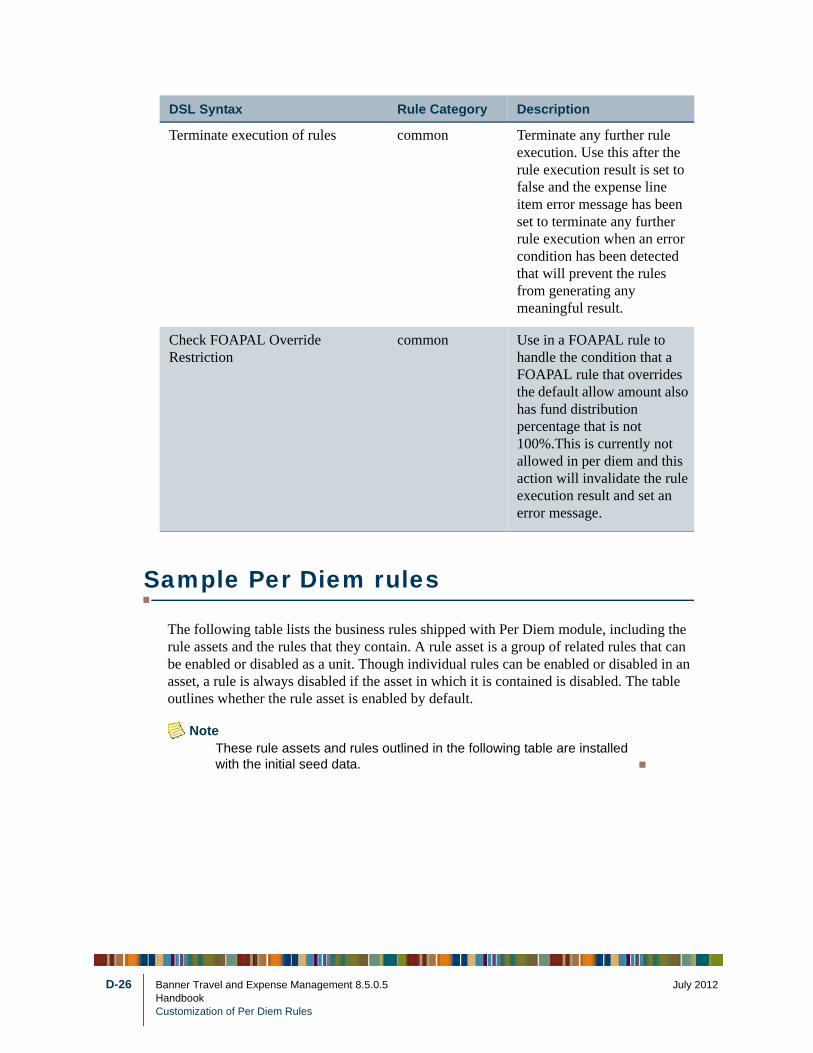
D-26
Sample Per Diem rules
The following table lists the business rules shipped with Per Diem module, including the rule assets and the rules that they contain. A rule asset is a group of related rules that can be enabled or disabled as a unit. Though individual rules can be enabled or disabled in an asset, a rule is always disabled if the asset in which it is contained is disabled. The table outlines whether the rule asset is enabled by default.
NoteThese rule assets and rules outlined in the following table are installed with the initial seed data.
Terminate execution of rules common Terminate any further rule execution. Use this after the rule execution result is set to false and the expense line item error message has been set to terminate any further rule execution when an error condition has been detected that will prevent the rules from generating any meaningful result.
Check FOAPAL Override Restriction
common Use in a FOAPAL rule to handle the condition that a FOAPAL rule that overrides the default allow amount also has fund distribution percentage that is not 100%.This is currently not allowed in per diem and this action will invalidate the rule execution result and set an error message.
DSL Syntax Rule Category Description
Banner Travel and Expense Management 8.5.0.5 July 2012HandbookCustomization of Per Diem Rules
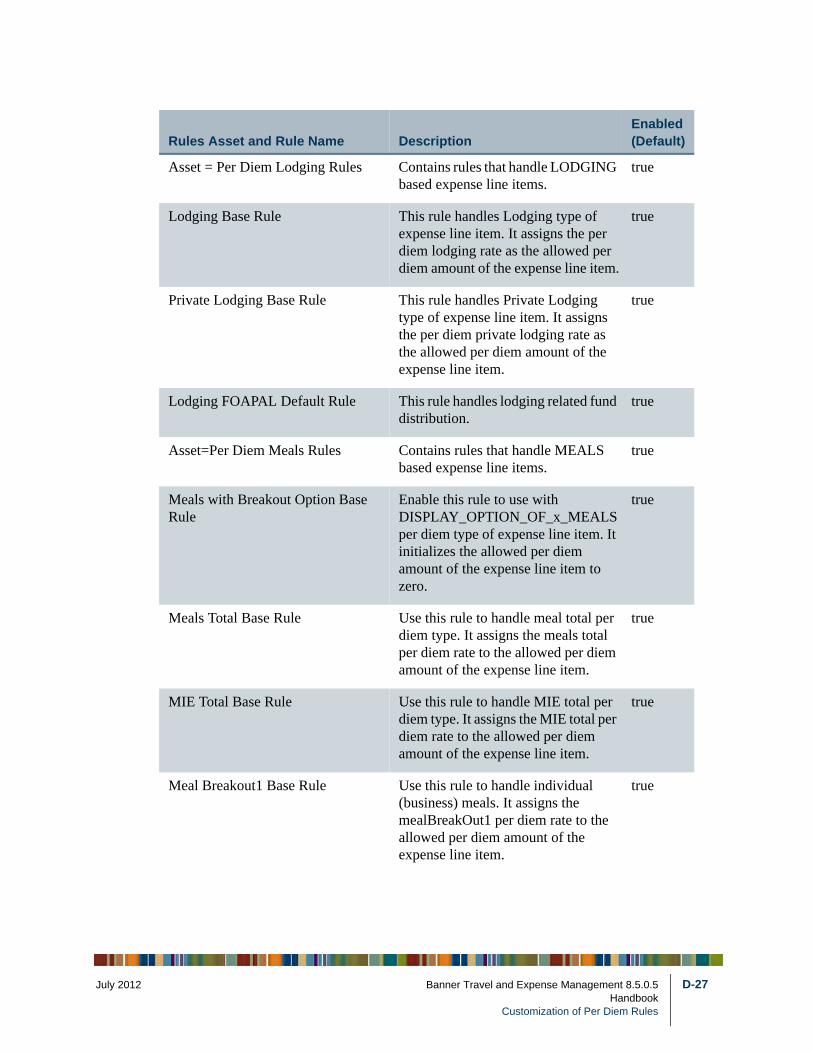
July 201
Rules Asset and Rule Name DescriptionEnabled (Default)
Asset = Per Diem Lodging Rules Contains rules that handle LODGING based expense line items.
true
Lodging Base Rule This rule handles Lodging type of expense line item. It assigns the per diem lodging rate as the allowed per diem amount of the expense line item.
true
Private Lodging Base Rule This rule handles Private Lodging type of expense line item. It assigns the per diem private lodging rate as the allowed per diem amount of the expense line item.
true
Lodging FOAPAL Default Rule This rule handles lodging related fund distribution.
true
Asset=Per Diem Meals Rules Contains rules that handle MEALS based expense line items.
true
Meals with Breakout Option Base Rule
Enable this rule to use with DISPLAY_OPTION_OF_x_MEALS per diem type of expense line item. It initializes the allowed per diem amount of the expense line item to zero.
true
Meals Total Base Rule Use this rule to handle meal total per diem type. It assigns the meals total per diem rate to the allowed per diem amount of the expense line item.
true
MIE Total Base Rule Use this rule to handle MIE total per diem type. It assigns the MIE total per diem rate to the allowed per diem amount of the expense line item.
true
Meal Breakout1 Base Rule Use this rule to handle individual (business) meals. It assigns the mealBreakOut1 per diem rate to the allowed per diem amount of the expense line item.
true
2 Banner Travel and Expense Management 8.5.0.5 D-27Handbook
Customization of Per Diem Rules
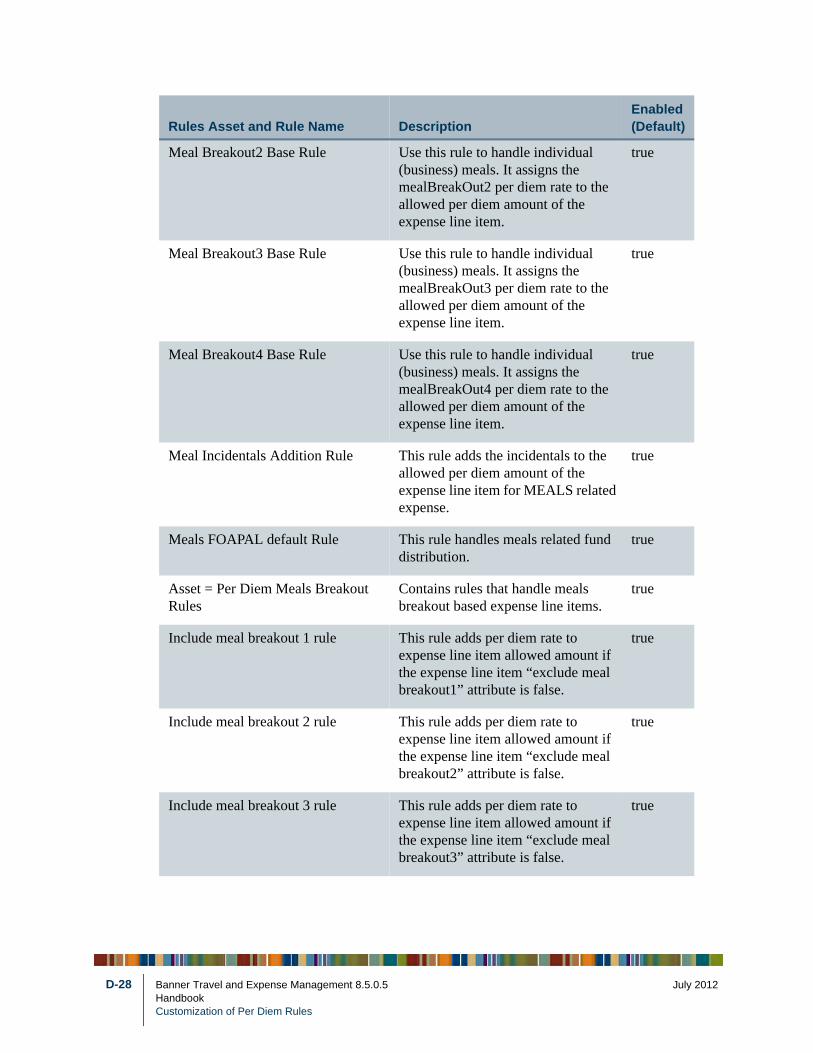
D-28
Meal Breakout2 Base Rule Use this rule to handle individual (business) meals. It assigns the mealBreakOut2 per diem rate to the allowed per diem amount of the expense line item.
true
Meal Breakout3 Base Rule Use this rule to handle individual (business) meals. It assigns the mealBreakOut3 per diem rate to the allowed per diem amount of the expense line item.
true
Meal Breakout4 Base Rule Use this rule to handle individual (business) meals. It assigns the mealBreakOut4 per diem rate to the allowed per diem amount of the expense line item.
true
Meal Incidentals Addition Rule This rule adds the incidentals to the allowed per diem amount of the expense line item for MEALS related expense.
true
Meals FOAPAL default Rule This rule handles meals related fund distribution.
true
Asset = Per Diem Meals Breakout Rules
Contains rules that handle meals breakout based expense line items.
true
Include meal breakout 1 rule This rule adds per diem rate to expense line item allowed amount if the expense line item “exclude meal breakout1” attribute is false.
true
Include meal breakout 2 rule This rule adds per diem rate to expense line item allowed amount if the expense line item “exclude meal breakout2” attribute is false.
true
Include meal breakout 3 rule This rule adds per diem rate to expense line item allowed amount if the expense line item “exclude meal breakout3” attribute is false.
true
Rules Asset and Rule Name DescriptionEnabled (Default)
Banner Travel and Expense Management 8.5.0.5 July 2012HandbookCustomization of Per Diem Rules

July 201
Include meal breakout 4 rule This rule adds per diem rate to expense line item allowed amount if the expense line item “exclude meal breakout4” attribute is false.
true
Asset = Per Diem Meals Travel Day Breakout Rules
Contains rules that handle first and/or last travel day meals breakout based expense line items.
true
First Travel Day Departure Meal Breakout rule 1
Used for the first travel day meal expense if the travel starting time is between 0:01 and 6:00, then include meal breakout 1, meal breakout2, and meal breakout3 in the allowed per diem amount of the expense line item.
true
First Travel Day Departure Meal Breakout rule 2
Used for the first travel day meal expense if the travel starting time is between 6:01 and 12:00, then include meal breakout2 and meal breakout 3 in the allowed per diem amount of the expense line item.
true
First Travel Day Departure Meal Breakout rule 3
Used for the first travel day meal expense if the travel starting time is between 12:01 and 18:00, then include meal breakout 3 in the allowed per diem amount of the expense line item.
true
First Travel Day Departure Meal Breakout rule 4
Used for the first travel day meal expense if the travel starting time is between 18:01 and 24:00, then exclude all meals from the allowed per diem amount of the expense line item.
true
Last Travel Day Departure Meal Breakout rule 1
Used for the last travel day meal expense if the travel ending time is between 0:01 and 6:00, then exclude all meals from the allowed per diem amount of the expense line item.
true
Rules Asset and Rule Name DescriptionEnabled (Default)
2 Banner Travel and Expense Management 8.5.0.5 D-29Handbook
Customization of Per Diem Rules
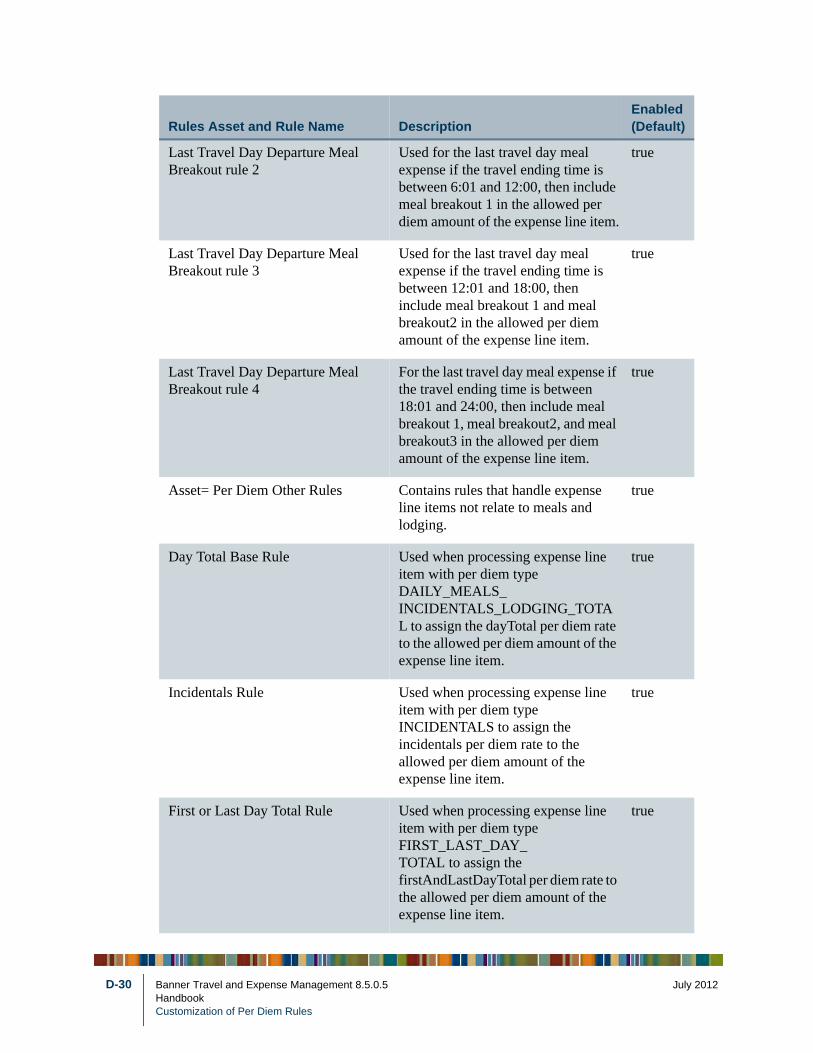
D-30
Last Travel Day Departure Meal Breakout rule 2
Used for the last travel day meal expense if the travel ending time is between 6:01 and 12:00, then include meal breakout 1 in the allowed per diem amount of the expense line item.
true
Last Travel Day Departure Meal Breakout rule 3
Used for the last travel day meal expense if the travel ending time is between 12:01 and 18:00, then include meal breakout 1 and meal breakout2 in the allowed per diem amount of the expense line item.
true
Last Travel Day Departure Meal Breakout rule 4
For the last travel day meal expense if the travel ending time is between 18:01 and 24:00, then include meal breakout 1, meal breakout2, and meal breakout3 in the allowed per diem amount of the expense line item.
true
Asset= Per Diem Other Rules Contains rules that handle expense line items not relate to meals and lodging.
true
Day Total Base Rule Used when processing expense line item with per diem type DAILY_MEALS_INCIDENTALS_LODGING_TOTAL to assign the dayTotal per diem rate to the allowed per diem amount of the expense line item.
true
Incidentals Rule Used when processing expense line item with per diem type INCIDENTALS to assign the incidentals per diem rate to the allowed per diem amount of the expense line item.
true
First or Last Day Total Rule Used when processing expense line item with per diem type FIRST_LAST_DAY_TOTAL to assign the firstAndLastDayTotal per diem rate to the allowed per diem amount of the expense line item.
true
Rules Asset and Rule Name DescriptionEnabled (Default)
Banner Travel and Expense Management 8.5.0.5 July 2012HandbookCustomization of Per Diem Rules
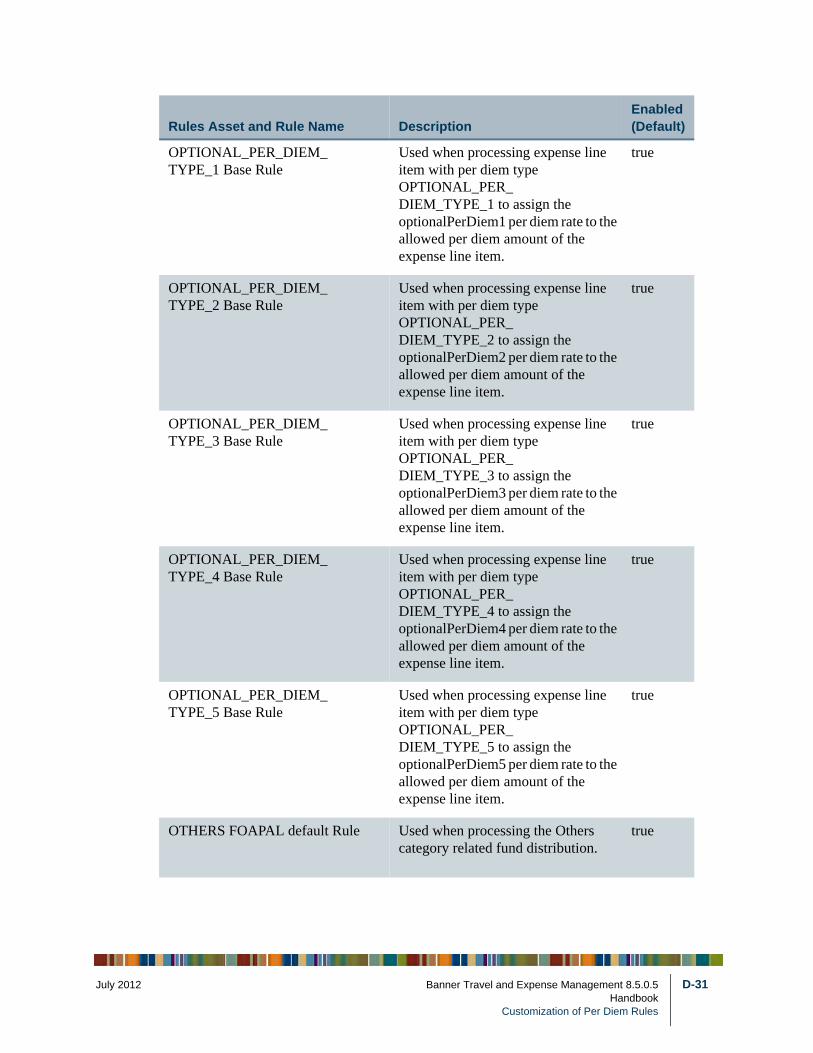
July 201
OPTIONAL_PER_DIEM_TYPE_1 Base Rule
Used when processing expense line item with per diem type OPTIONAL_PER_DIEM_TYPE_1 to assign the optionalPerDiem1 per diem rate to the allowed per diem amount of the expense line item.
true
OPTIONAL_PER_DIEM_TYPE_2 Base Rule
Used when processing expense line item with per diem type OPTIONAL_PER_DIEM_TYPE_2 to assign the optionalPerDiem2 per diem rate to the allowed per diem amount of the expense line item.
true
OPTIONAL_PER_DIEM_TYPE_3 Base Rule
Used when processing expense line item with per diem type OPTIONAL_PER_DIEM_TYPE_3 to assign the optionalPerDiem3 per diem rate to the allowed per diem amount of the expense line item.
true
OPTIONAL_PER_DIEM_TYPE_4 Base Rule
Used when processing expense line item with per diem type OPTIONAL_PER_DIEM_TYPE_4 to assign the optionalPerDiem4 per diem rate to the allowed per diem amount of the expense line item.
true
OPTIONAL_PER_DIEM_TYPE_5 Base Rule
Used when processing expense line item with per diem type OPTIONAL_PER_DIEM_TYPE_5 to assign the optionalPerDiem5 per diem rate to the allowed per diem amount of the expense line item.
true
OTHERS FOAPAL default Rule Used when processing the Others category related fund distribution.
true
Rules Asset and Rule Name DescriptionEnabled (Default)
2 Banner Travel and Expense Management 8.5.0.5 D-31Handbook
Customization of Per Diem Rules
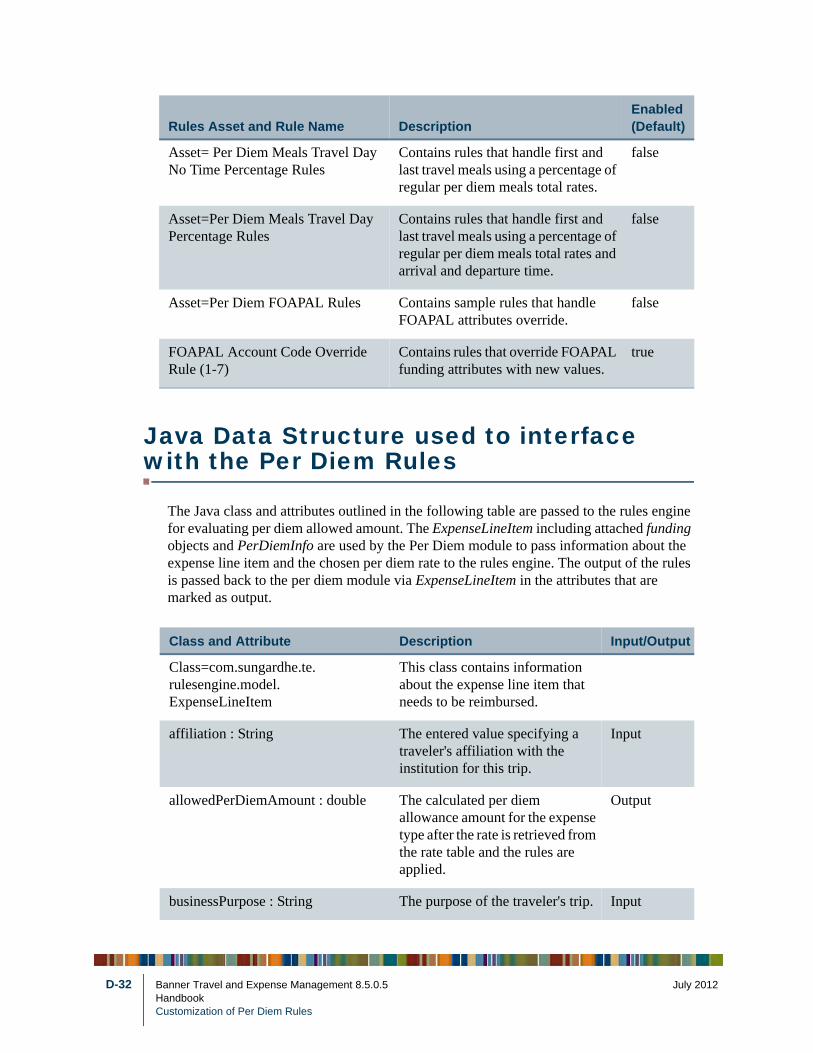
D-32
Java Data Structure used to interface with the Per Diem Rules
The Java class and attributes outlined in the following table are passed to the rules engine for evaluating per diem allowed amount. The ExpenseLineItem including attached funding objects and PerDiemInfo are used by the Per Diem module to pass information about the expense line item and the chosen per diem rate to the rules engine. The output of the rules is passed back to the per diem module via ExpenseLineItem in the attributes that are marked as output.
Asset= Per Diem Meals Travel Day No Time Percentage Rules
Contains rules that handle first and last travel meals using a percentage of regular per diem meals total rates.
false
Asset=Per Diem Meals Travel Day Percentage Rules
Contains rules that handle first and last travel meals using a percentage of regular per diem meals total rates and arrival and departure time.
false
Asset=Per Diem FOAPAL Rules Contains sample rules that handle FOAPAL attributes override.
false
FOAPAL Account Code Override Rule (1-7)
Contains rules that override FOAPAL funding attributes with new values.
true
Class and Attribute Description Input/Output
Class=com.sungardhe.te.rulesengine.model.ExpenseLineItem
This class contains information about the expense line item that needs to be reimbursed.
affiliation : String The entered value specifying a traveler's affiliation with the institution for this trip.
Input
allowedPerDiemAmount : double The calculated per diem allowance amount for the expense type after the rate is retrieved from the rate table and the rules are applied.
Output
businessPurpose : String The purpose of the traveler's trip. Input
Rules Asset and Rule Name DescriptionEnabled (Default)
Banner Travel and Expense Management 8.5.0.5 July 2012HandbookCustomization of Per Diem Rules
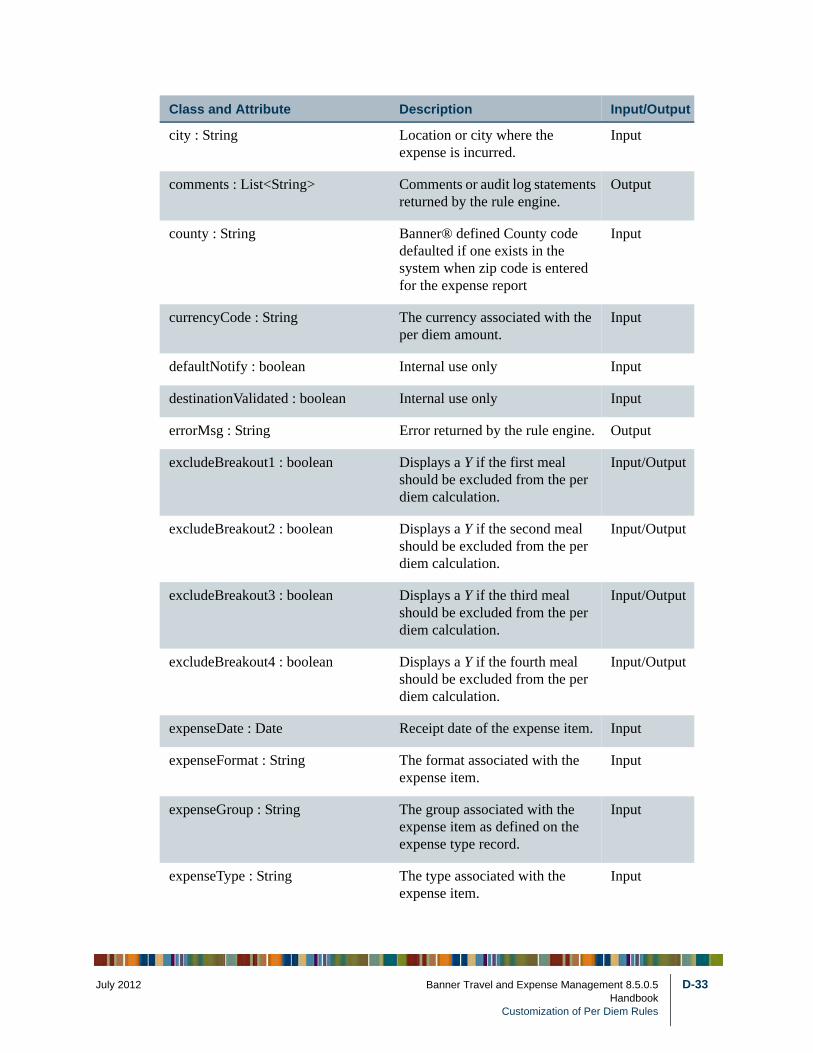
July 201
city : String Location or city where the expense is incurred.
Input
comments : List<String> Comments or audit log statements returned by the rule engine.
Output
county : String Banner® defined County code defaulted if one exists in the system when zip code is entered for the expense report
Input
currencyCode : String The currency associated with the per diem amount.
Input
defaultNotify : boolean Internal use only Input
destinationValidated : boolean Internal use only Input
errorMsg : String Error returned by the rule engine. Output
excludeBreakout1 : boolean Displays a Y if the first meal should be excluded from the per diem calculation.
Input/Output
excludeBreakout2 : boolean Displays a Y if the second meal should be excluded from the per diem calculation.
Input/Output
excludeBreakout3 : boolean Displays a Y if the third meal should be excluded from the per diem calculation.
Input/Output
excludeBreakout4 : boolean Displays a Y if the fourth meal should be excluded from the per diem calculation.
Input/Output
expenseDate : Date Receipt date of the expense item. Input
expenseFormat : String The format associated with the expense item.
Input
expenseGroup : String The group associated with the expense item as defined on the expense type record.
Input
expenseType : String The type associated with the expense item.
Input
Class and Attribute Description Input/Output
2 Banner Travel and Expense Management 8.5.0.5 D-33Handbook
Customization of Per Diem Rules
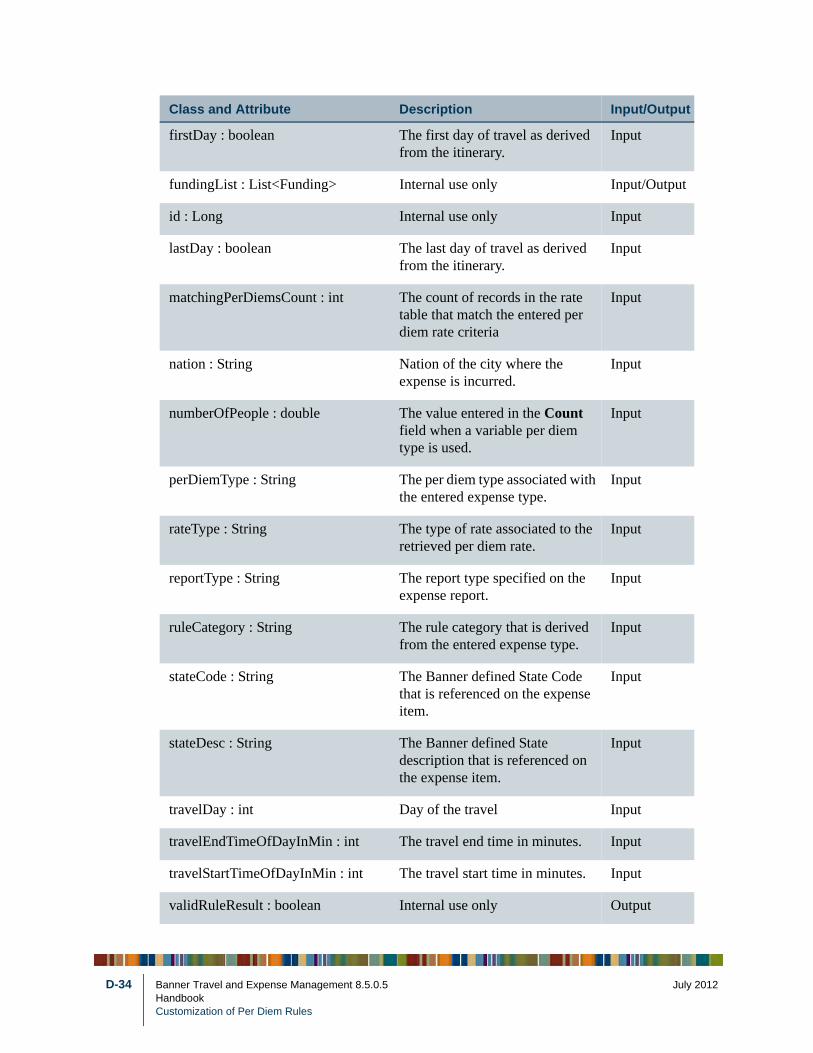
D-34
firstDay : boolean The first day of travel as derived from the itinerary.
Input
fundingList : List<Funding> Internal use only Input/Output
id : Long Internal use only Input
lastDay : boolean The last day of travel as derived from the itinerary.
Input
matchingPerDiemsCount : int The count of records in the rate table that match the entered per diem rate criteria
Input
nation : String Nation of the city where the expense is incurred.
Input
numberOfPeople : double The value entered in the Count field when a variable per diem type is used.
Input
perDiemType : String The per diem type associated with the entered expense type.
Input
rateType : String The type of rate associated to the retrieved per diem rate.
Input
reportType : String The report type specified on the expense report.
Input
ruleCategory : String The rule category that is derived from the entered expense type.
Input
stateCode : String The Banner defined State Code that is referenced on the expense item.
Input
stateDesc : String The Banner defined State description that is referenced on the expense item.
Input
travelDay : int Day of the travel Input
travelEndTimeOfDayInMin : int The travel end time in minutes. Input
travelStartTimeOfDayInMin : int The travel start time in minutes. Input
validRuleResult : boolean Internal use only Output
Class and Attribute Description Input/Output
Banner Travel and Expense Management 8.5.0.5 July 2012HandbookCustomization of Per Diem Rules
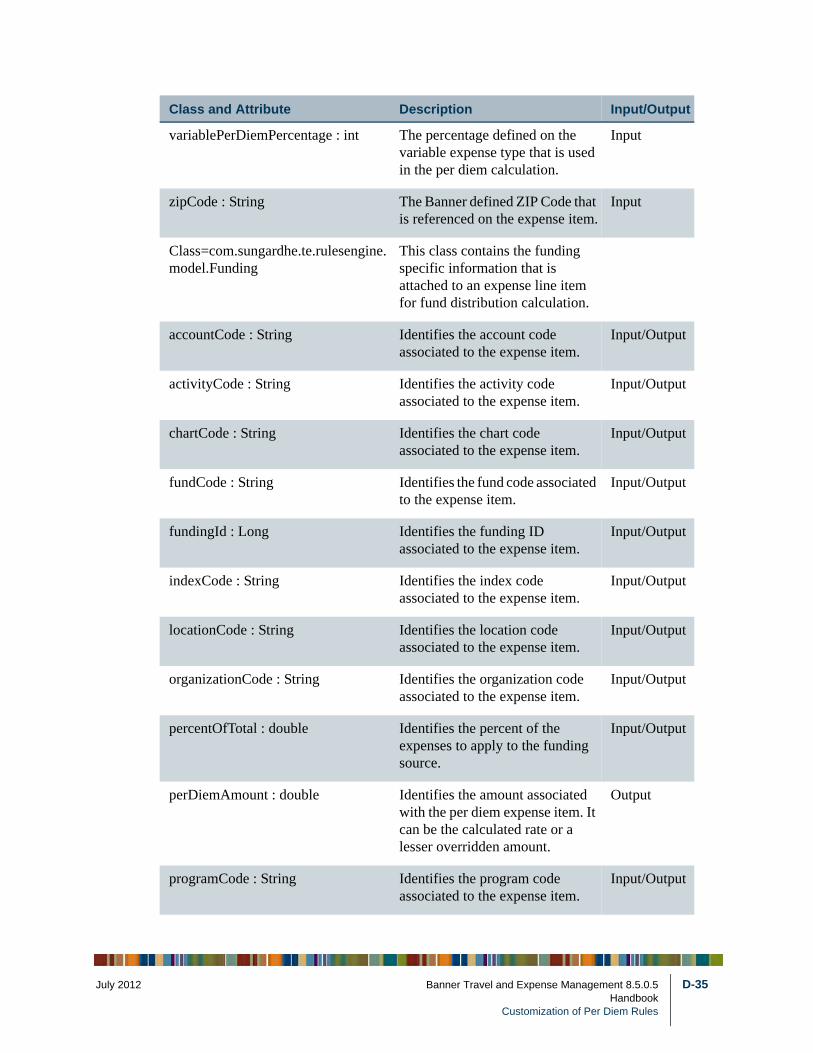
July 201
variablePerDiemPercentage : int The percentage defined on the variable expense type that is used in the per diem calculation.
Input
zipCode : String The Banner defined ZIP Code that is referenced on the expense item.
Input
Class=com.sungardhe.te.rulesengine.model.Funding
This class contains the funding specific information that is attached to an expense line item for fund distribution calculation.
accountCode : String Identifies the account code associated to the expense item.
Input/Output
activityCode : String Identifies the activity code associated to the expense item.
Input/Output
chartCode : String Identifies the chart code associated to the expense item.
Input/Output
fundCode : String Identifies the fund code associated to the expense item.
Input/Output
fundingId : Long Identifies the funding ID associated to the expense item.
Input/Output
indexCode : String Identifies the index code associated to the expense item.
Input/Output
locationCode : String Identifies the location code associated to the expense item.
Input/Output
organizationCode : String Identifies the organization code associated to the expense item.
Input/Output
percentOfTotal : double Identifies the percent of the expenses to apply to the funding source.
Input/Output
perDiemAmount : double Identifies the amount associated with the per diem expense item. It can be the calculated rate or a lesser overridden amount.
Output
programCode : String Identifies the program code associated to the expense item.
Input/Output
Class and Attribute Description Input/Output
2 Banner Travel and Expense Management 8.5.0.5 D-35Handbook
Customization of Per Diem Rules
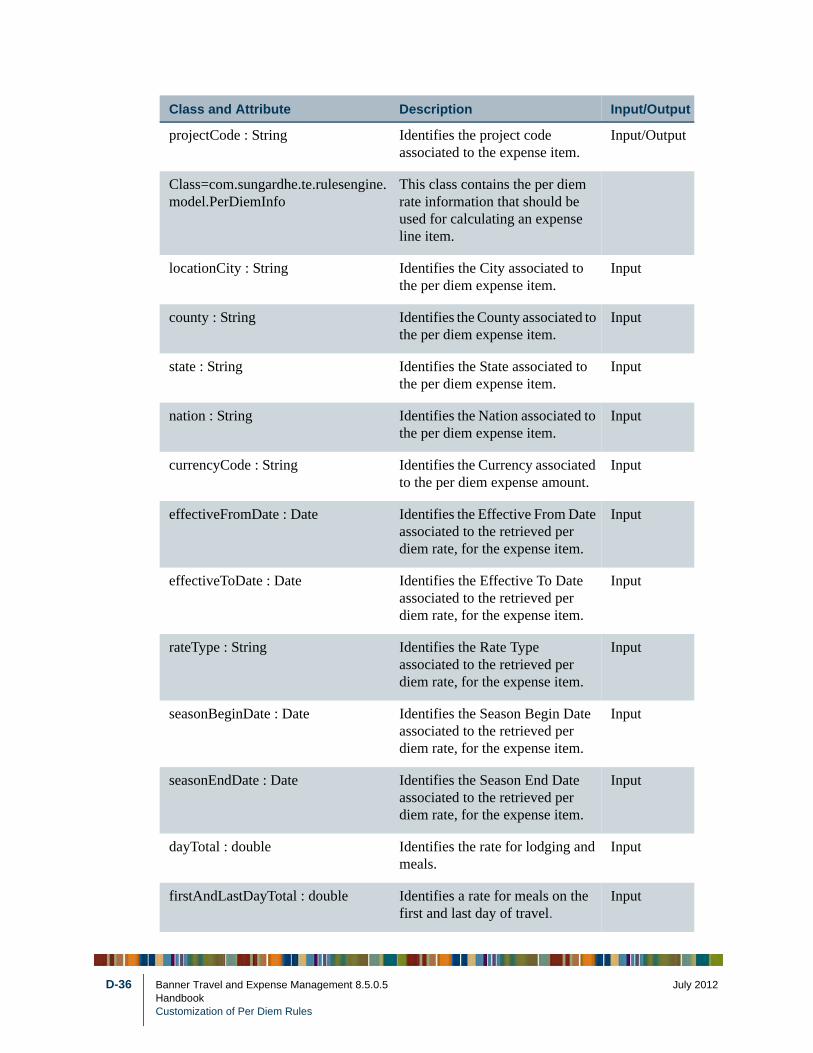
D-36
projectCode : String Identifies the project code associated to the expense item.
Input/Output
Class=com.sungardhe.te.rulesengine.model.PerDiemInfo
This class contains the per diem rate information that should be used for calculating an expense line item.
locationCity : String Identifies the City associated to the per diem expense item.
Input
county : String Identifies the County associated to the per diem expense item.
Input
state : String Identifies the State associated to the per diem expense item.
Input
nation : String Identifies the Nation associated to the per diem expense item.
Input
currencyCode : String Identifies the Currency associated to the per diem expense amount.
Input
effectiveFromDate : Date Identifies the Effective From Date associated to the retrieved per diem rate, for the expense item.
Input
effectiveToDate : Date Identifies the Effective To Date associated to the retrieved per diem rate, for the expense item.
Input
rateType : String Identifies the Rate Type associated to the retrieved per diem rate, for the expense item.
Input
seasonBeginDate : Date Identifies the Season Begin Date associated to the retrieved per diem rate, for the expense item.
Input
seasonEndDate : Date Identifies the Season End Date associated to the retrieved per diem rate, for the expense item.
Input
dayTotal : double Identifies the rate for lodging and meals.
Input
firstAndLastDayTotal : double Identifies a rate for meals on the first and last day of travel.
Input
Class and Attribute Description Input/Output
Banner Travel and Expense Management 8.5.0.5 July 2012HandbookCustomization of Per Diem Rules

July 201
incidentals : double Identifies the rate for incidentals. Input
lodgingAllowance : double Identifies the rate for lodging. Input
mealBreakOut1 : double Identifies the rate associated with the first meal of an institution's breakout for meals.
Input
mealBreakOut2 : double Identifies the rate associated with the second meal of an institution's breakout for meals.
Input
mealBreakOut3 : double Identifies the rate associated with the third meal of an institution's breakout for meals.
Input
mealBreakOut4 : double Identifies the rate associated with the fourth meal of an institution's breakout for meals.
Input
mealsTotal : double Identifies the rate for meals (without incidentals).
Input
mieTotal : double Identifies the rate for meals and incidentals
Input
optionalPerDiem1 : double Identifies the first of five customizable rates.
Input
optionalPerDiem2 : double Identifies the second of five customizable rates.
Input
optionalPerDiem3 : double Identifies the third of five customizable rates.
Input
optionalPerDiem4 : double Identifies the fourth of five customizable rates.
Input
optionalPerDiem5 : double Identifies the fifth of five customizable rates.
Input
privateLodging : double Identifies the rate for private accommodations.
Input
Class and Attribute Description Input/Output
2 Banner Travel and Expense Management 8.5.0.5 D-37Handbook
Customization of Per Diem Rules
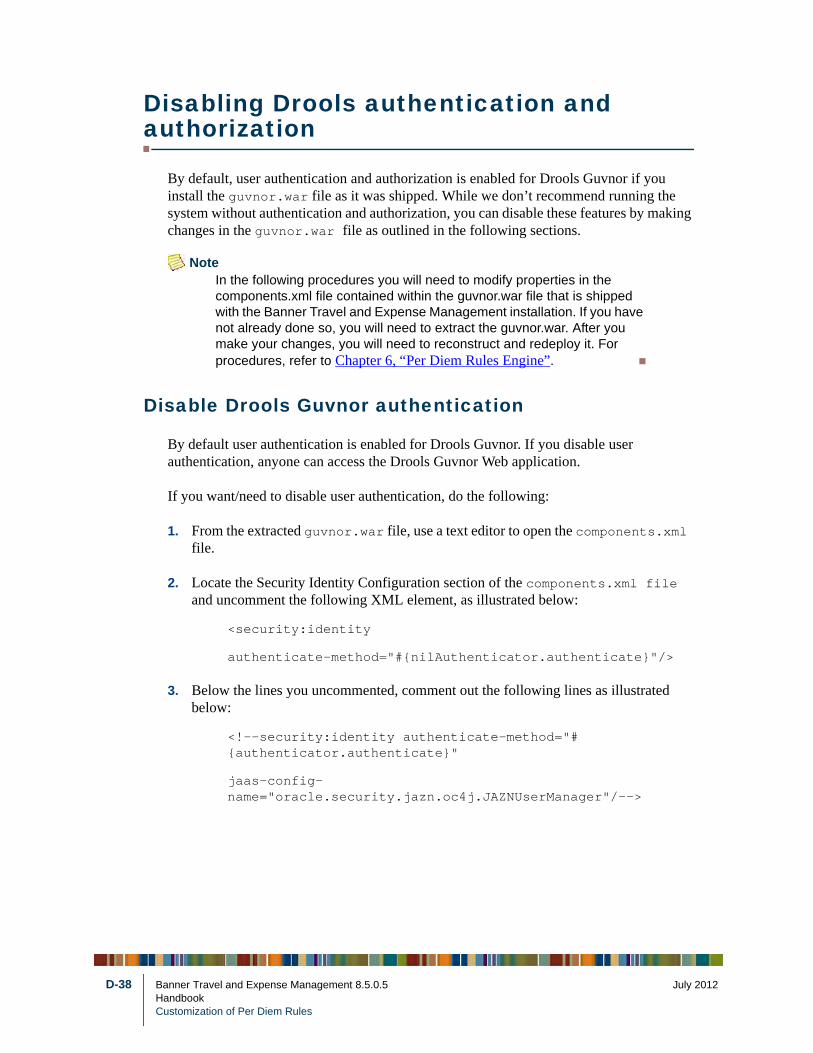
D-38
Disabling Drools authentication and authorization
By default, user authentication and authorization is enabled for Drools Guvnor if you install the guvnor.war file as it was shipped. While we don’t recommend running the system without authentication and authorization, you can disable these features by making changes in the guvnor.war file as outlined in the following sections.
NoteIn the following procedures you will need to modify properties in the components.xml file contained within the guvnor.war file that is shipped with the Banner Travel and Expense Management installation. If you have not already done so, you will need to extract the guvnor.war. After you make your changes, you will need to reconstruct and redeploy it. For procedures, refer to Chapter 6, “Per Diem Rules Engine”.
Disable Drools Guvnor authentication
By default user authentication is enabled for Drools Guvnor. If you disable user authentication, anyone can access the Drools Guvnor Web application.
If you want/need to disable user authentication, do the following:
1. From the extracted guvnor.war file, use a text editor to open the components.xml file.
2. Locate the Security Identity Configuration section of the components.xml file and uncomment the following XML element, as illustrated below:
<security:identity
authenticate-method="#{nilAuthenticator.authenticate}"/>
3. Below the lines you uncommented, comment out the following lines as illustrated below:
<!--security:identity authenticate-method="#{authenticator.authenticate}"
jaas-config-name="oracle.security.jazn.oc4j.JAZNUserManager"/-->
Banner Travel and Expense Management 8.5.0.5 July 2012HandbookCustomization of Per Diem Rules
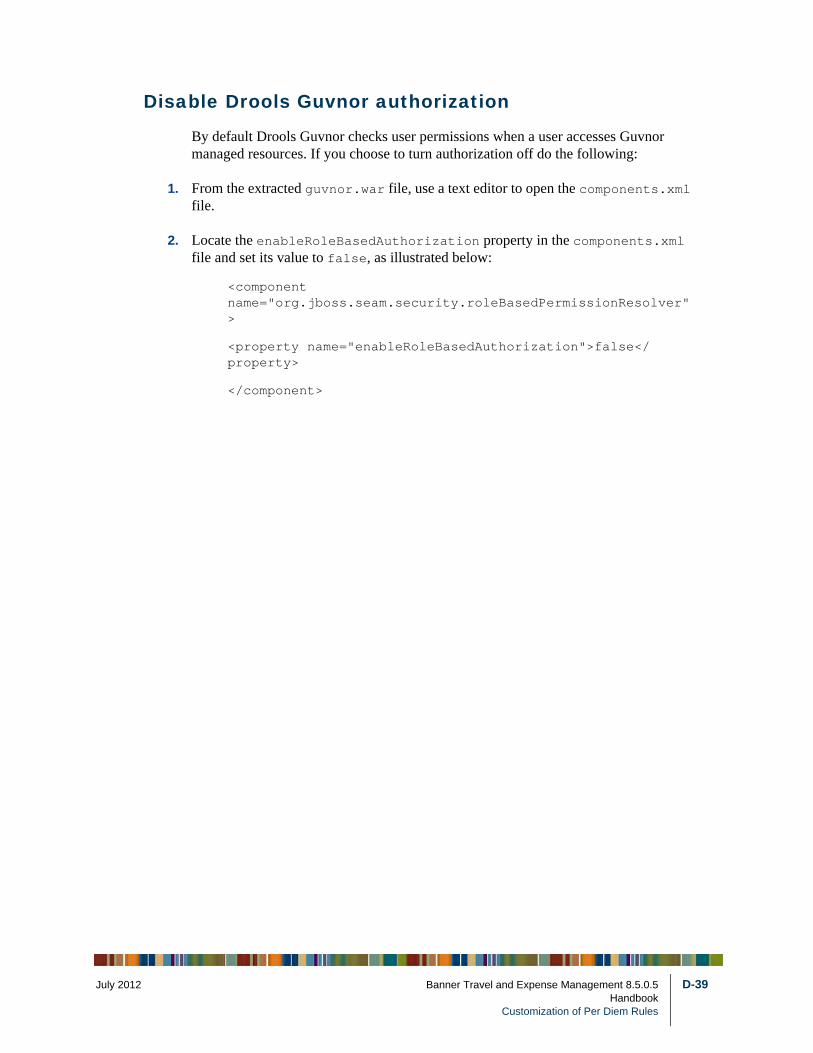
July 201
Disable Drools Guvnor authorization
By default Drools Guvnor checks user permissions when a user accesses Guvnor managed resources. If you choose to turn authorization off do the following:
1. From the extracted guvnor.war file, use a text editor to open the components.xml file.
2. Locate the enableRoleBasedAuthorization property in the components.xml file and set its value to false, as illustrated below:
<component name="org.jboss.seam.security.roleBasedPermissionResolver">
<property name="enableRoleBasedAuthorization">false</property>
</component>
2 Banner Travel and Expense Management 8.5.0.5 D-39Handbook
Customization of Per Diem Rules

D-40
Banner Travel and Expense Management 8.5.0.5 July 2012HandbookCustomization of Per Diem Rules
July 201
E Uploading Per Diem Rates
Per Diem processing is dependent on the rates that exist in the Per Diem Allowance table (FTORPDAL) and the rules that are enabled in the rules engine. One of the first steps required to use Per Diem processing is to populate one or both of the following delivered templates that are provided for your use:
• Generic (travel80500generic_template.xls)
• Foreign (travel80500foreign_template.xls)
The templates are input to the upload process that a Per Diem Administrator prepares to populate the Per Diem Allowance table.
Generic Template (travel80500generic_template.xls)
The Generic Template allows you to capture rates based on location (City, County, State, Province, Nation) and dates (effective and season). The template is based on rate information that many of you use from Federal, State, or Provincial sources.
Foreign Template (travel80500foreign_template.xls)
The Foreign Template allows you to capture foreign rates based on location and dates. The only difference is that the foreign template does not carry a breakout of meal rates, like the Generic template. For example, it will not carry the per diem allowance for breakfast or lunch. However, if your foreign rates do carry a value for meals, you may use the generic template for both foreign and non-foreign rates. You do need to upload the file with a non-foreign rate type, if that’s the case.
NoteYou must use the templates as delivered and should not change the format of any columns such as date. Do not rearrange the columns or delete any worksheets within the template, and do not change any of the worksheet names.
Populating the templates
The templates allow you to copy information from the downloadable Excel spreadsheets from GSA and other sources. You may copy the Primary destination into the template’s
2 Banner Travel and Expense Management 8.5.0.5 E-1Handbook
Uploading Per Diem Rates
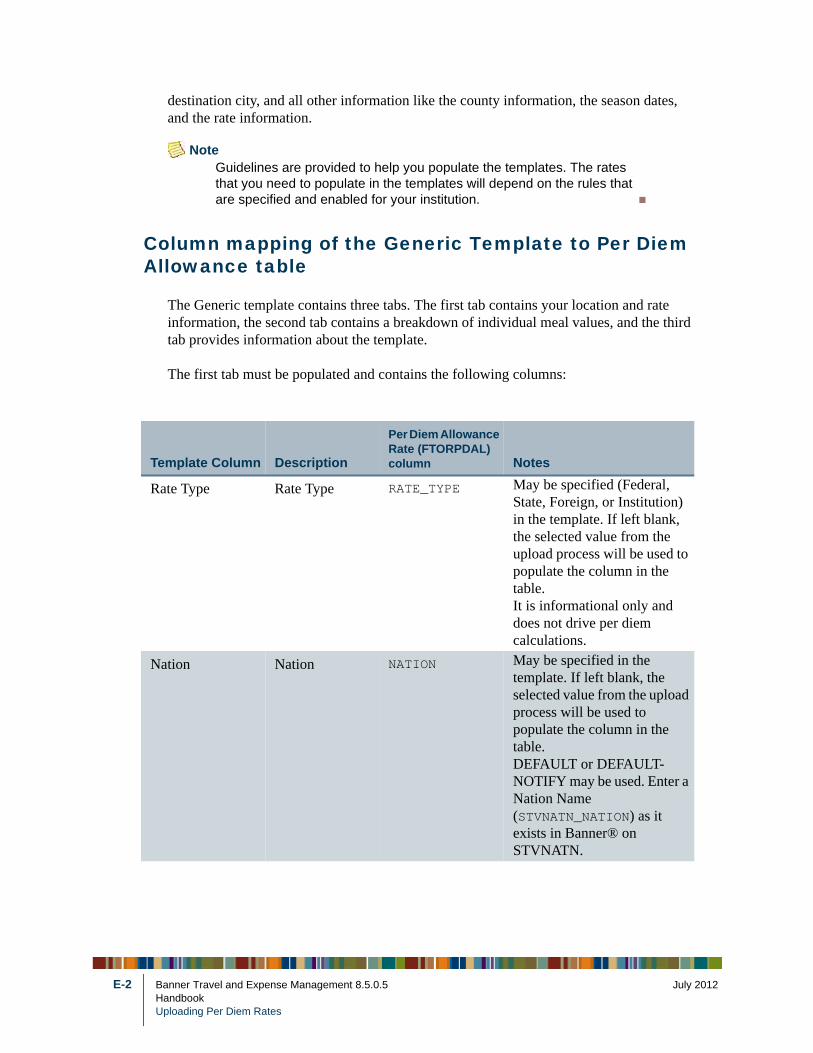
E-2
destination city, and all other information like the county information, the season dates, and the rate information.
NoteGuidelines are provided to help you populate the templates. The rates that you need to populate in the templates will depend on the rules that are specified and enabled for your institution.
Column mapping of the Generic Template to Per Diem Allowance table
The Generic template contains three tabs. The first tab contains your location and rate information, the second tab contains a breakdown of individual meal values, and the third tab provides information about the template.
The first tab must be populated and contains the following columns:
Template Column Description
Per Diem Allowance Rate (FTORPDAL) column Notes
Rate Type Rate Type RATE_TYPE May be specified (Federal, State, Foreign, or Institution) in the template. If left blank, the selected value from the upload process will be used to populate the column in the table.It is informational only and does not drive per diem calculations.
Nation Nation NATION May be specified in the template. If left blank, the selected value from the upload process will be used to populate the column in the table.DEFAULT or DEFAULT-NOTIFY may be used. Enter a Nation Name (STVNATN_NATION) as it exists in Banner® on STVNATN.
Banner Travel and Expense Management 8.5.0.5 July 2012HandbookUploading Per Diem Rates

July 201
State State STATE DEFAULT or DEFAULT-NOTIFY may be used. Enter a State code (STVSTAT_CODE) or Name (STVSTAT_DESC) as it exists in Banner on STVSTAT.
Location City City or location (primary destination) of travel - required
LOCATION_CITY
DEFAULT or DEFAULT-NOTIFY may be used;
Multiple values can be entered using a space, slash, space ( / ) format between values, for example Boston / Cambridge.
County County - optional COUNTY See examples below for additional information.
Season Begin Date Start of a season rate - optional
SEASON_BEGIN_DATE
Format is DD-MON-YYYY
Season End Date End of a season rate - optional
SEASON_END_DATE
Format is DD-MON-YYYY
Lodging Rate for Lodging LODGING Enter the per diem rate for lodging, if applicable.
MIE Total Rate for Meals & Incidentals*
MIE_TOTAL Enter the per diem rate for meals and incidentals, if applicable.
Day Total Rate for Lodging and M&IE
DAY_TOTAL Enter the per diem rate for lodging, if applicable.
Meal Breakout 1 Rate for meal 1, such as breakfast*
MEAL_BREAKOUT_1
Required if you want meal exclusions (Per Diem Type of Display Option 3 or 4) or variable per diems to be calculated. **
Meal Breakout 2 Rate for meal 2, such as lunch*
MEAL_BREAKOUT_2
Required if you want meal exclusions (Per Diem Type of Display Option 3 or 4) or variable per diems to be calculated. **
Template Column Description
Per Diem Allowance Rate (FTORPDAL) column Notes
2 Banner Travel and Expense Management 8.5.0.5 E-3Handbook
Uploading Per Diem Rates
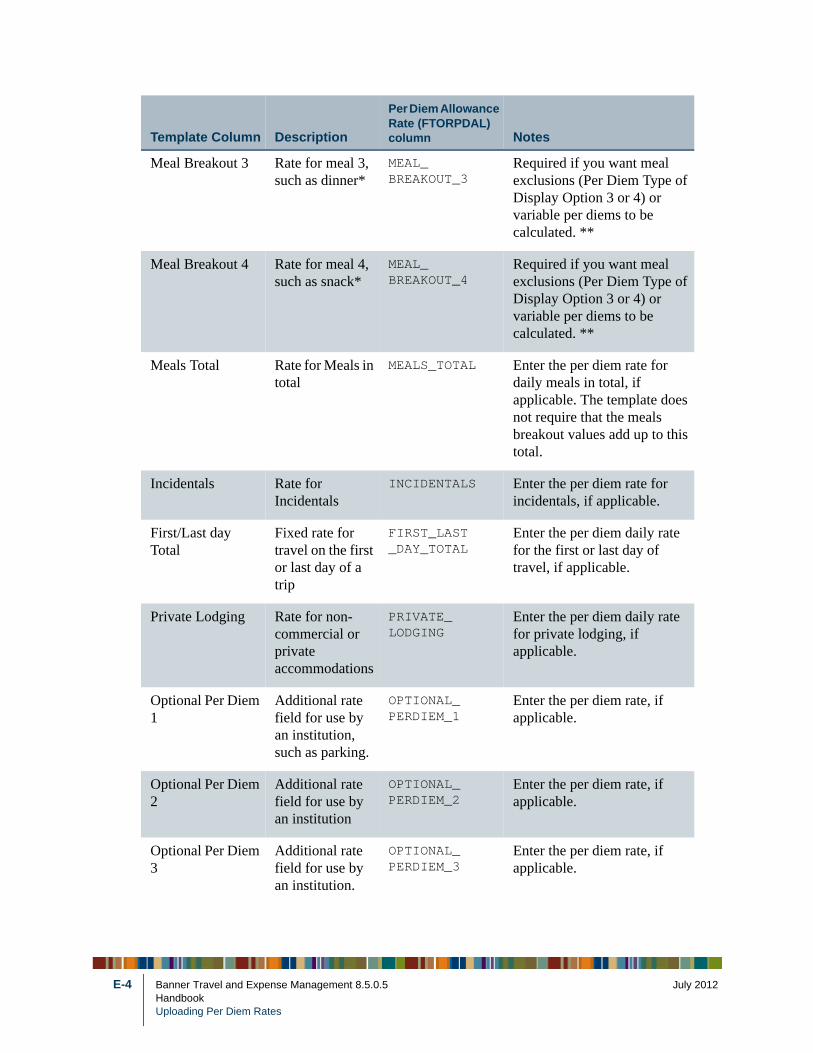
E-4
Meal Breakout 3 Rate for meal 3, such as dinner*
MEAL_BREAKOUT_3
Required if you want meal exclusions (Per Diem Type of Display Option 3 or 4) or variable per diems to be calculated. **
Meal Breakout 4 Rate for meal 4, such as snack*
MEAL_BREAKOUT_4
Required if you want meal exclusions (Per Diem Type of Display Option 3 or 4) or variable per diems to be calculated. **
Meals Total Rate for Meals in total
MEALS_TOTAL Enter the per diem rate for daily meals in total, if applicable. The template does not require that the meals breakout values add up to this total.
Incidentals Rate for Incidentals
INCIDENTALS Enter the per diem rate for incidentals, if applicable.
First/Last day Total
Fixed rate for travel on the first or last day of a trip
FIRST_LAST_DAY_TOTAL
Enter the per diem daily rate for the first or last day of travel, if applicable.
Private Lodging Rate for non-commercial or private accommodations
PRIVATE_ LODGING
Enter the per diem daily rate for private lodging, if applicable.
Optional Per Diem 1
Additional rate field for use by an institution, such as parking.
OPTIONAL_PERDIEM_1
Enter the per diem rate, if applicable.
Optional Per Diem 2
Additional rate field for use by an institution
OPTIONAL_PERDIEM_2
Enter the per diem rate, if applicable.
Optional Per Diem 3
Additional rate field for use by an institution.
OPTIONAL_PERDIEM_3
Enter the per diem rate, if applicable.
Template Column Description
Per Diem Allowance Rate (FTORPDAL) column Notes
Banner Travel and Expense Management 8.5.0.5 July 2012HandbookUploading Per Diem Rates
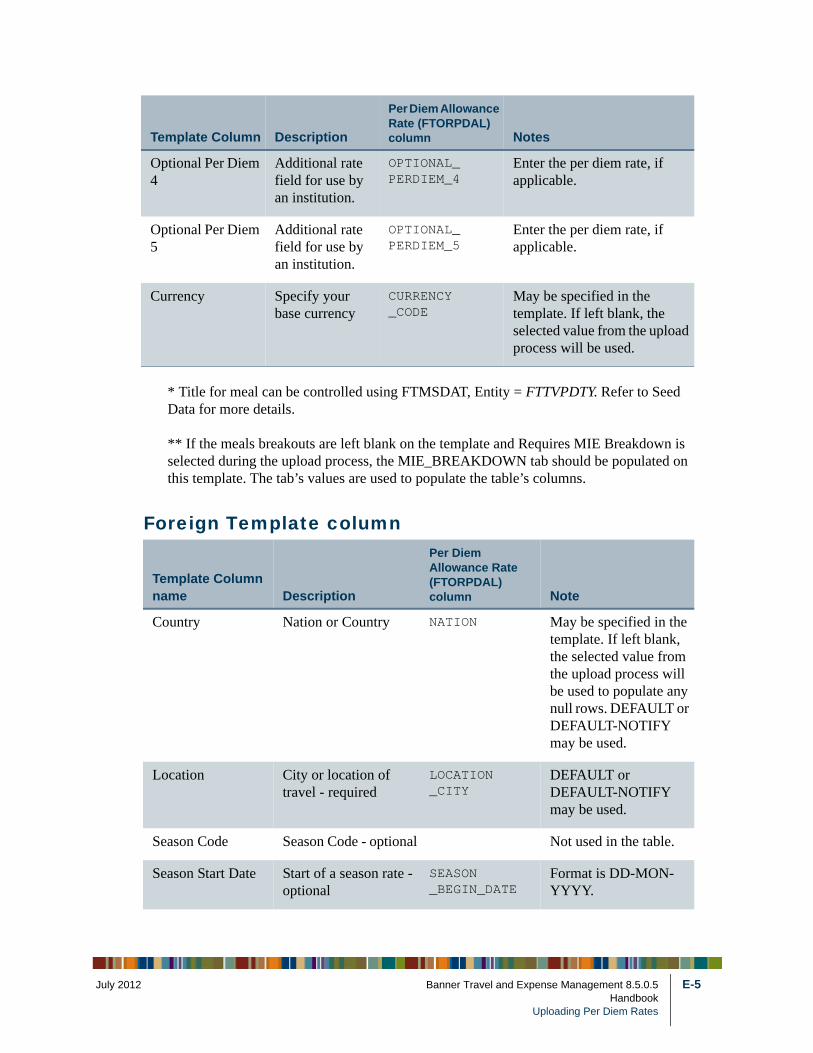
July 201
* Title for meal can be controlled using FTMSDAT, Entity = FTTVPDTY. Refer to Seed Data for more details.
** If the meals breakouts are left blank on the template and Requires MIE Breakdown is selected during the upload process, the MIE_BREAKDOWN tab should be populated on this template. The tab’s values are used to populate the table’s columns.
Foreign Template column
Optional Per Diem 4
Additional rate field for use by an institution.
OPTIONAL_PERDIEM_4
Enter the per diem rate, if applicable.
Optional Per Diem 5
Additional rate field for use by an institution.
OPTIONAL_PERDIEM_5
Enter the per diem rate, if applicable.
Currency Specify your base currency
CURRENCY_CODE
May be specified in the template. If left blank, the selected value from the upload process will be used.
Template Column Description
Per Diem Allowance Rate (FTORPDAL) column Notes
Template Column name Description
Per Diem Allowance Rate (FTORPDAL) column Note
Country Nation or Country NATION May be specified in the template. If left blank, the selected value from the upload process will be used to populate any null rows. DEFAULT or DEFAULT-NOTIFY may be used.
Location City or location of travel - required
LOCATION_CITY
DEFAULT or DEFAULT-NOTIFY may be used.
Season Code Season Code - optional Not used in the table.
Season Start Date Start of a season rate - optional
SEASON_BEGIN_DATE
Format is DD-MON-YYYY.
2 Banner Travel and Expense Management 8.5.0.5 E-5Handbook
Uploading Per Diem Rates
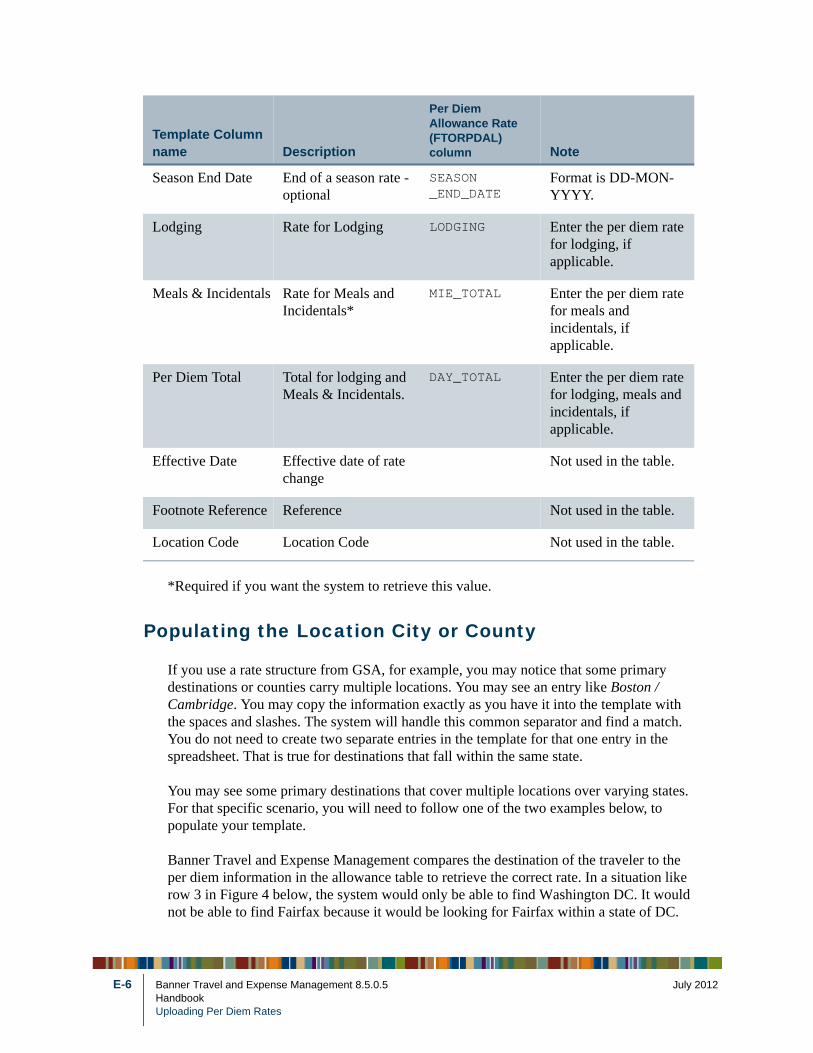
E-6
*Required if you want the system to retrieve this value.
Populating the Location City or County
If you use a rate structure from GSA, for example, you may notice that some primary destinations or counties carry multiple locations. You may see an entry like Boston / Cambridge. You may copy the information exactly as you have it into the template with the spaces and slashes. The system will handle this common separator and find a match. You do not need to create two separate entries in the template for that one entry in the spreadsheet. That is true for destinations that fall within the same state.
You may see some primary destinations that cover multiple locations over varying states. For that specific scenario, you will need to follow one of the two examples below, to populate your template.
Banner Travel and Expense Management compares the destination of the traveler to the per diem information in the allowance table to retrieve the correct rate. In a situation like row 3 in Figure 4 below, the system would only be able to find Washington DC. It would not be able to find Fairfax because it would be looking for Fairfax within a state of DC.
Season End Date End of a season rate - optional
SEASON_END_DATE
Format is DD-MON-YYYY.
Lodging Rate for Lodging LODGING Enter the per diem rate for lodging, if applicable.
Meals & Incidentals Rate for Meals and Incidentals*
MIE_TOTAL Enter the per diem rate for meals and incidentals, if applicable.
Per Diem Total Total for lodging and Meals & Incidentals.
DAY_TOTAL Enter the per diem rate for lodging, meals and incidentals, if applicable.
Effective Date Effective date of rate change
Not used in the table.
Footnote Reference Reference Not used in the table.
Location Code Location Code Not used in the table.
Template Column name Description
Per Diem Allowance Rate (FTORPDAL) column Note
Banner Travel and Expense Management 8.5.0.5 July 2012HandbookUploading Per Diem Rates
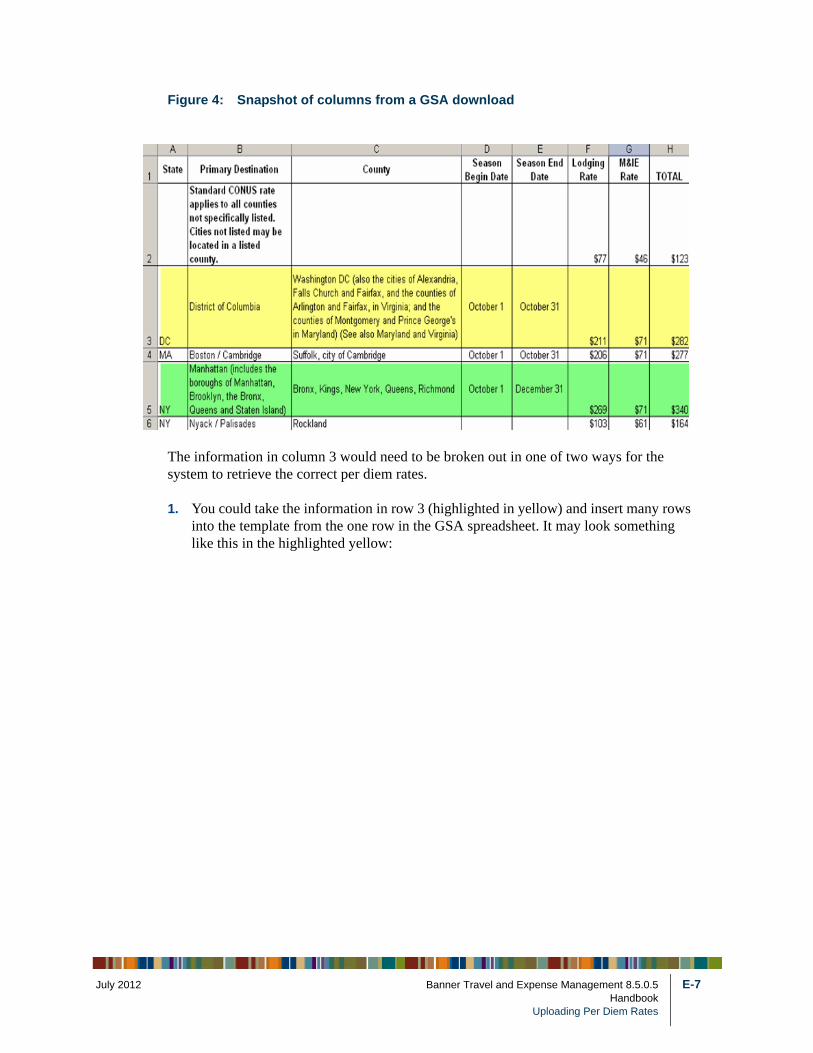
July 201
Figure 4: Snapshot of columns from a GSA download
The information in column 3 would need to be broken out in one of two ways for the system to retrieve the correct per diem rates.
1. You could take the information in row 3 (highlighted in yellow) and insert many rows into the template from the one row in the GSA spreadsheet. It may look something like this in the highlighted yellow:
2 Banner Travel and Expense Management 8.5.0.5 E-7Handbook
Uploading Per Diem Rates
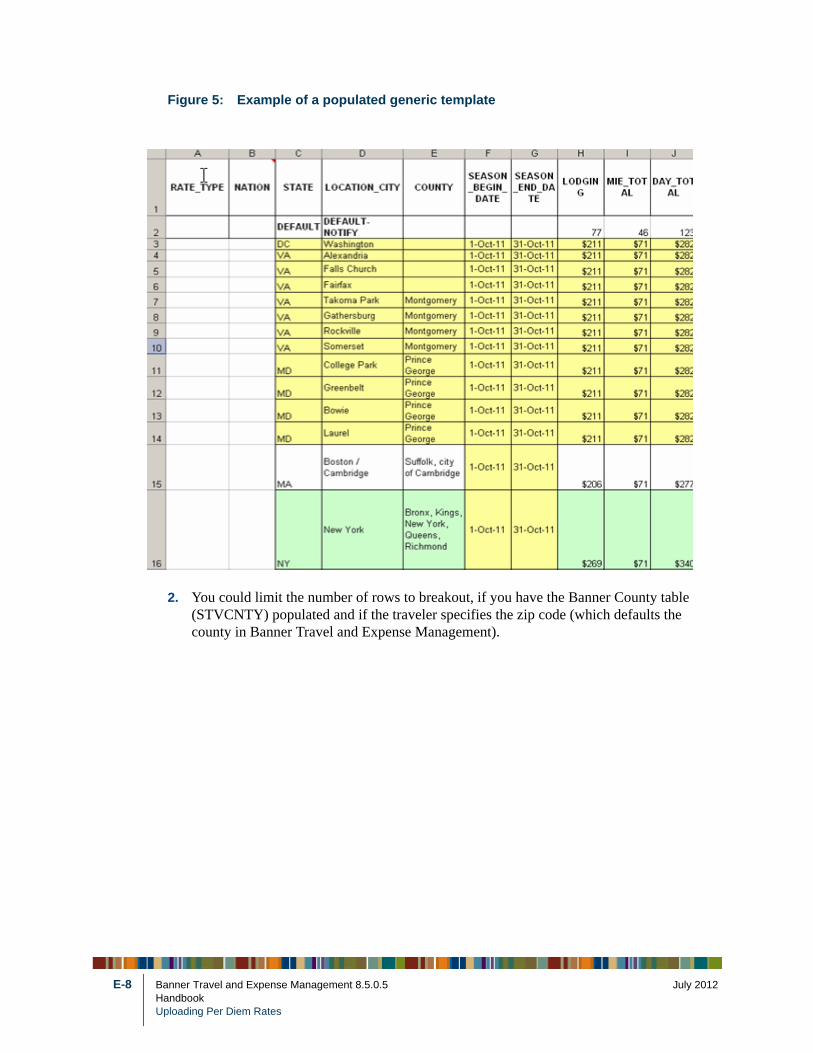
E-8
Figure 5: Example of a populated generic template
2. You could limit the number of rows to breakout, if you have the Banner County table (STVCNTY) populated and if the traveler specifies the zip code (which defaults the county in Banner Travel and Expense Management).
Banner Travel and Expense Management 8.5.0.5 July 2012HandbookUploading Per Diem Rates
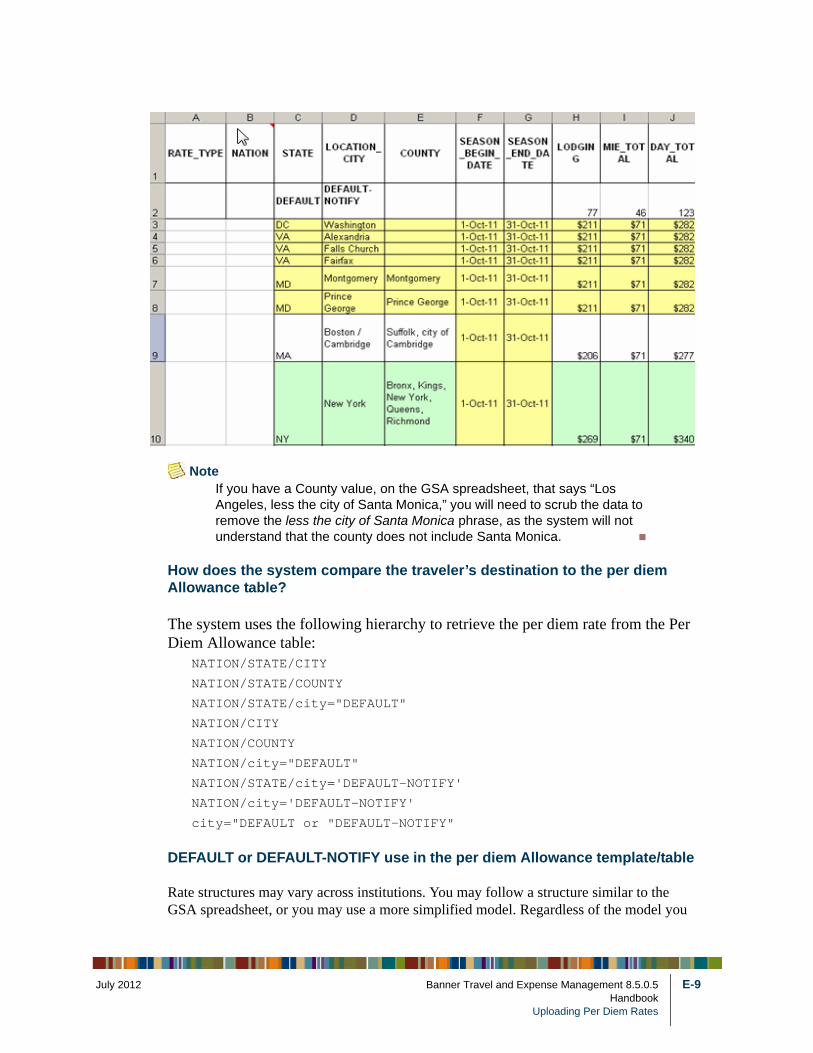
July 201
NoteIf you have a County value, on the GSA spreadsheet, that says “Los Angeles, less the city of Santa Monica,” you will need to scrub the data to remove the less the city of Santa Monica phrase, as the system will not understand that the county does not include Santa Monica.
How does the system compare the traveler’s destination to the per diem Allowance table?
The system uses the following hierarchy to retrieve the per diem rate from the Per Diem Allowance table:
NATION/STATE/CITY
NATION/STATE/COUNTY
NATION/STATE/city="DEFAULT"
NATION/CITY
NATION/COUNTY
NATION/city="DEFAULT"
NATION/STATE/city='DEFAULT-NOTIFY'
NATION/city='DEFAULT-NOTIFY'
city="DEFAULT or "DEFAULT-NOTIFY"
DEFAULT or DEFAULT-NOTIFY use in the per diem Allowance template/table
Rate structures may vary across institutions. You may follow a structure similar to the GSA spreadsheet, or you may use a more simplified model. Regardless of the model you
2 Banner Travel and Expense Management 8.5.0.5 E-9Handbook
Uploading Per Diem Rates
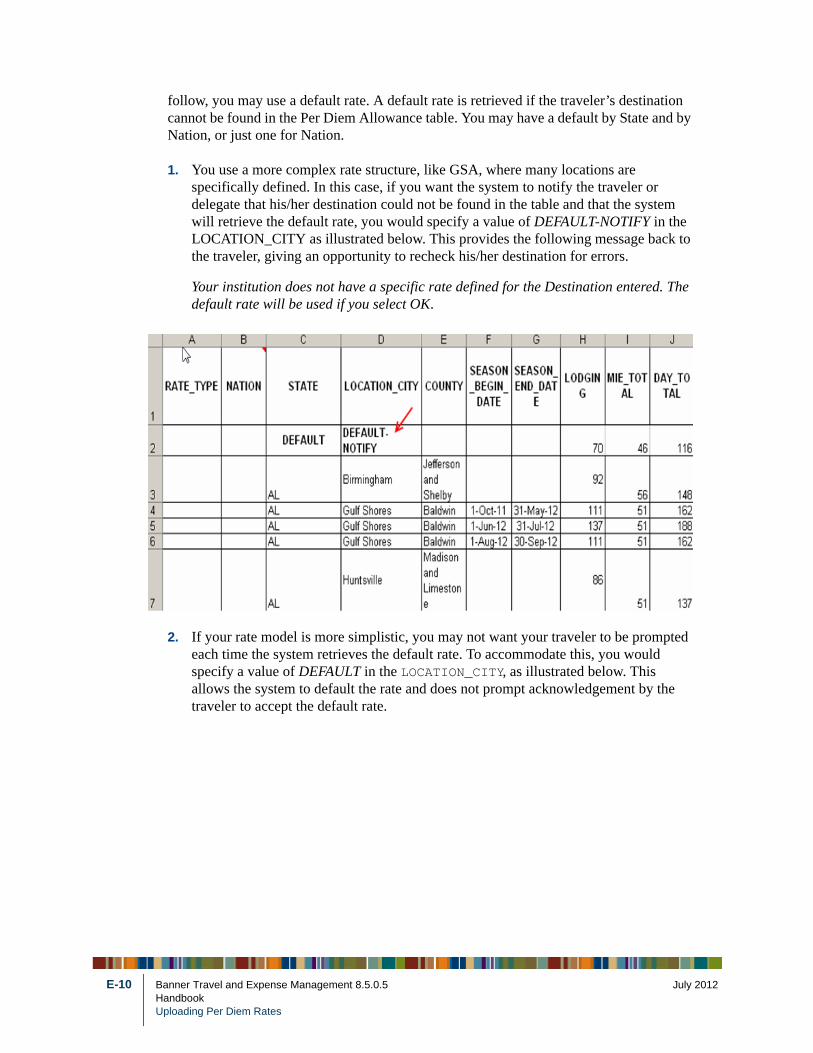
E-10
follow, you may use a default rate. A default rate is retrieved if the traveler’s destination cannot be found in the Per Diem Allowance table. You may have a default by State and by Nation, or just one for Nation.
1. You use a more complex rate structure, like GSA, where many locations are specifically defined. In this case, if you want the system to notify the traveler or delegate that his/her destination could not be found in the table and that the system will retrieve the default rate, you would specify a value of DEFAULT-NOTIFY in the LOCATION_CITY as illustrated below. This provides the following message back to the traveler, giving an opportunity to recheck his/her destination for errors.
Your institution does not have a specific rate defined for the Destination entered. The default rate will be used if you select OK.
2. If your rate model is more simplistic, you may not want your traveler to be prompted each time the system retrieves the default rate. To accommodate this, you would specify a value of DEFAULT in the LOCATION_CITY, as illustrated below. This allows the system to default the rate and does not prompt acknowledgement by the traveler to accept the default rate.
Banner Travel and Expense Management 8.5.0.5 July 2012HandbookUploading Per Diem Rates

July 201
Using the example in step 2 above, the system would retrieve the following row, based on the destination entered and assuming we have a default Nation on institutional settings of United States of America:
Populate the Per Diem Allowance table from the template
The template information is uploaded to the table through the Banner Travel and Expense Management System. Users with the role of Per Diem Administrator can see an additional tab when they log in to Banner Travel and Expense. Selecting the Per Diem Administrator tab and selecting New. This opens a window that allows you to browse files from your desktop to find your template that has been saved with your specific institution destinations and rates.
After browsing to attach the correct spreadsheet that has a format of .xls you enter dates for which these rates are effective. You will also select a rate type and provide a default value for Nation and Currency. The values for nation and currency are used only if the values are left null in the template. Be sure to use the nation and currency descriptions, in your template, as they exist for these codes in their respective STVSTAT and STVNATN tables in Banner. Please refer to Chapter 3, “Functional Administration”, for additional information on the upload process.
To City To State To Nation Row Retrieved
Birmingham AL 3
Mobile AL 4
Topeka KS 5
Tokyo Japan 6
Rome Italy 2
Montreal Canada 2
2 Banner Travel and Expense Management 8.5.0.5 E-11Handbook
Uploading Per Diem Rates
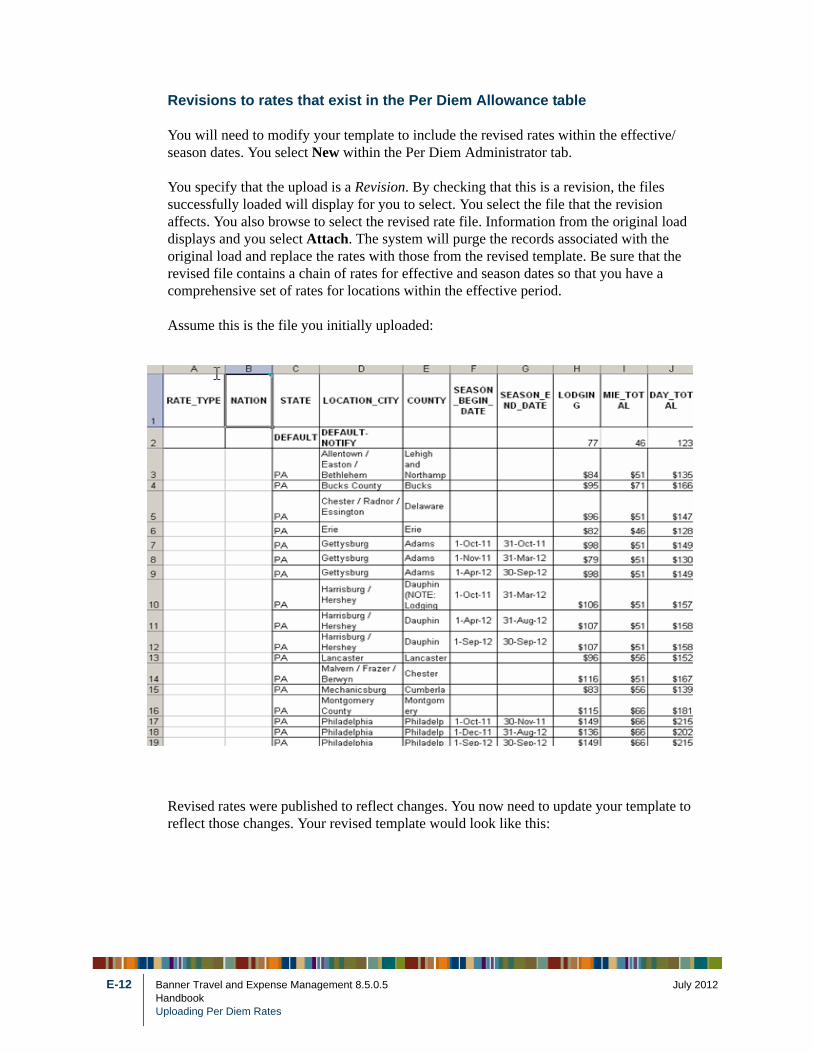
E-12
Revisions to rates that exist in the Per Diem Allowance table
You will need to modify your template to include the revised rates within the effective/season dates. You select New within the Per Diem Administrator tab.
You specify that the upload is a Revision. By checking that this is a revision, the files successfully loaded will display for you to select. You select the file that the revision affects. You also browse to select the revised rate file. Information from the original load displays and you select Attach. The system will purge the records associated with the original load and replace the rates with those from the revised template. Be sure that the revised file contains a chain of rates for effective and season dates so that you have a comprehensive set of rates for locations within the effective period.
Assume this is the file you initially uploaded:
Revised rates were published to reflect changes. You now need to update your template to reflect those changes. Your revised template would look like this:
Banner Travel and Expense Management 8.5.0.5 July 2012HandbookUploading Per Diem Rates
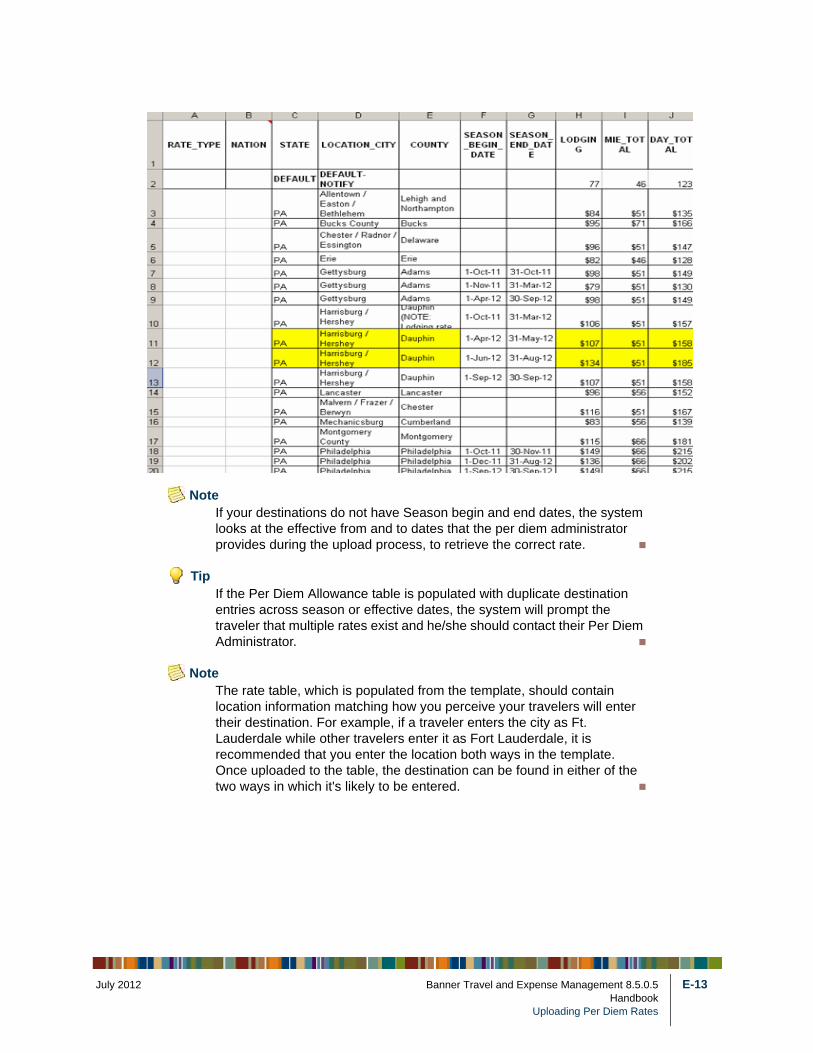
July 201
NoteIf your destinations do not have Season begin and end dates, the system looks at the effective from and to dates that the per diem administrator provides during the upload process, to retrieve the correct rate.
TipIf the Per Diem Allowance table is populated with duplicate destination entries across season or effective dates, the system will prompt the traveler that multiple rates exist and he/she should contact their Per Diem Administrator.
NoteThe rate table, which is populated from the template, should contain location information matching how you perceive your travelers will enter their destination. For example, if a traveler enters the city as Ft. Lauderdale while other travelers enter it as Fort Lauderdale, it is recommended that you enter the location both ways in the template. Once uploaded to the table, the destination can be found in either of the two ways in which it's likely to be entered.
2 Banner Travel and Expense Management 8.5.0.5 E-13Handbook
Uploading Per Diem Rates

E-14
Banner Travel and Expense Management 8.5.0.5 July 2012HandbookUploading Per Diem Rates