Embed Size (px)
Citation preview

1
Barn-Style Greenhouse Dimensions
MATERIALS AND TOOLS
Shopping List:
Materials for 32" stud walls -
3 - 2x4 @ 10 feet long - use on back wall 5 - 2x4 @ 12 feet long - use on sides/ridgepole DO NOT CUT) 32 - 2x4 @ 8 feet long
http://mygreenhouseplans.com

2
11 - 12 foot long x 26" wide standard corrugated plastic greenhouse panels 1 - 8 foot long x 26" wide standard corrugated plastic greenhouse panel (use on door side) 3 - 12 foot long tin panels (use on sides and back) 1 - 8 foot long tin panel (use on front) Tin screws 28 - 4' long ribbing strips L flashing (optional for the corners) You'll need either metal gussets for the trusses or to cut plywood ones from 1/2" plywood. We used scrap plywood from the Momplex need about 1/2 a sheet.
- Will make door in later plan
3 inch screws
wood glue
Tools:
measuring tape
square
pencil
hammer
safety glasses
hearing protection
drill
circular saw
compound miter saw
level
countersink drill bit
CUT LIST
Cut List:
Cut list is in plan at each step
GENERAL INSTRUCTIONS
Please read through the entire plan and all comments before beginning this project. It is also advisable to review the Getting Started Section. Take all necessary precautions to build safely and smartly. Work on a clean level surface, free of imperfections or debris. Always use straight boards. Check for square after each step. Always predrill holes before attaching with screws. Use glue with finish nails for a stronger hold. Wipe excess glue off bare wood for stained projects, as dried glue will not take stain. Be safe, have fun, and ask for help if you need it. Good luck!
http://mygreenhouseplans.com
3
STEP 1
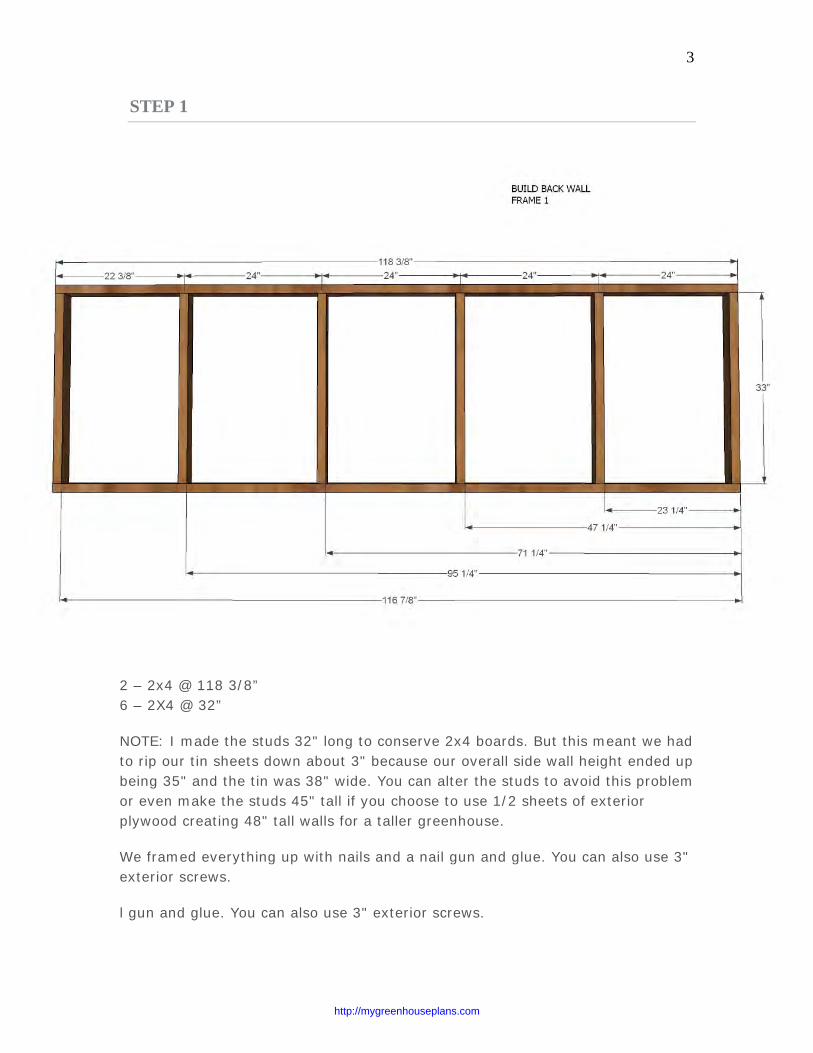
2 – 2x4 @ 118 3/8” 6 – 2X4 @ 32”
NOTE: I made the studs 32" long to conserve 2x4 boards. But this meant we had to rip our tin sheets down about 3" because our overall side wall height ended up being 35" and the tin was 38" wide. You can alter the studs to avoid this problem or even make the studs 45" tall if you choose to use 1/2 sheets of exterior plywood creating 48" tall walls for a taller greenhouse.
We framed everything up with nails and a nail gun and glue. You can also use 3" exterior screws.
l gun and glue. You can also use 3" exterior screws.
http://mygreenhouseplans.com

4
STEP 2
4 – 2X4 @ 144” 14 – 2X4 @ 32”
Same is true again of the stud lengths.
http://mygreenhouseplans.com

5
STEP 3
4 – 2X4 @ 32” 4 – 2X4 @ 42 ½” 2 – 2X4 @ 81 ½” 1 – 2X4 @ 33 3/8”
Note: If you later the stud length, you will need to then alter the door framing studs to the exact difference.
http://mygreenhouseplans.com

6
STEP 4
We actually put the tin on the side panels first to save some time and work. The panels are just screwed together as shown here.
http://mygreenhouseplans.com

7
STEP 5
4 – 2X4 @ 48” (BOTH ENDS CUT AT 22 ½ DEGREES, ENDS NOT PARALLEL) 2 – 2X4 @ 39 5/8” (LONGEST POINT MEASUREMENT, ONE END CUT AT 22 ½ DEGREES OFF SQUARE) 2 – 2X4 @ 48 1/2” (LONGEST POINT MEASUREMENT, ONE END CUT AT 22 ½ DEGREES OFF SQUARE) 2 – 2X4 @ 42 1/4” (LONGEST POINT MEASUREMENT, ONE END CUT AT 22 ½ DEGREES OFF SQUARE)
http://mygreenhouseplans.com

8
2 – 2X4 @ 7 3/8” (TOP CUT TO DOGEARED POINT MEASUREMENT, TOP END CUT AT 22 ½ DEGREES OFF SQUARE)
We layed the truss out on the garage floor and everything worked out perfectly. We used scrap 1/2" plywood to create gussets but you can also buy metal gussets for the joints. Gussets are simply plywood pieces cut to cover joints and then screwed on with glue. We use 3-4 screws per board covered by the gusset per gusset, with normally gussets on each side of the joint.
Since we knew the end trusses would get the panels applied, we opted to only put gussets on the insides.
We attached the front truss to front wall with screws through undersides.
http://mygreenhouseplans.com

9
STEP 6
4 – 2X4 @ 48” (BOTH ENDS CUT AT 22 ½ DEGREES, ENDS NOT PARALLEL) 1 – 2X4 @ 117 7/8” (BOTH ENDS CUT AT 22 1/2" DEGREES, ENDS NOT PARALLEL) 1 – 2X4 @ 55 3/8 (TOP CUT TO DOGEARED POINT, 22 ½ DEGREES) 2 – 2X4 @ 55 ¼” (TOP CUT TO DOGREARED POINT, BOTTOM CUT 45 DEGREES OFF SQUARE, END CLIPPED)
The back truss is built same as front. See next step for close up of the center cuts ...
http://mygreenhouseplans.com
10
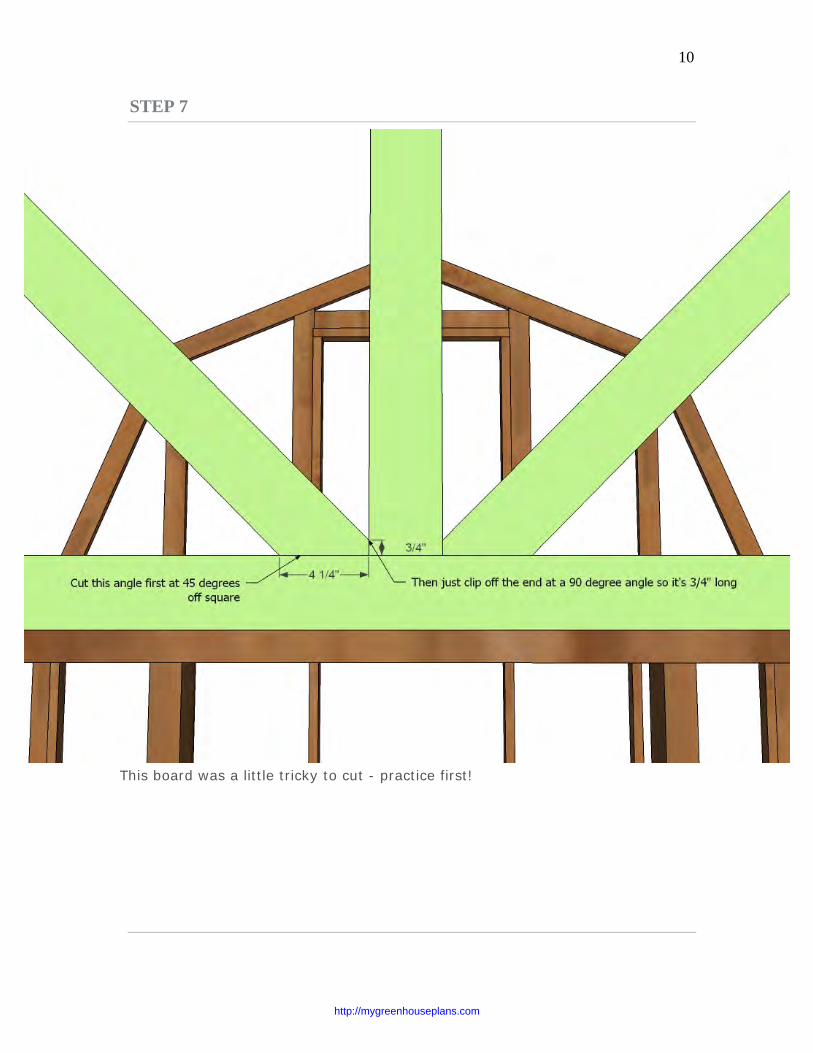
STEP 7
This board was a little tricky to cut - practice first!
http://mygreenhouseplans.com

11
STEP 8
1 – 2X4 @ 141”
NOTE: If you use gussets - we used 1/2" plywood - this will affect your ridgepole length.
TIP: I learned this from the Ram. Take your ridgepole BEFORE attaching to trusses and set it on the side wall. Then just mark all of the side wall stud locations on the ridgepole. Do this on both sides of the ridgepole. Then screw the ridgepole up in place. It will be marked now for the common rafters!
http://mygreenhouseplans.com

12
The ridgepole actually sits down from the end truss peak about 1/4". This is shown in the diagram as well.
STEP 9
10 2X4 @ 48” (BOTH ENDS CUT AT 22 ½ DEGREES ENDS NOT PARALLEL)
10 2X4 @ 47 1/4” (BOTH ENDS CUT AT 22 ½ DEGREES ENDS NOT PARALLEL) - shorter rafters go up to meet the ridgepole. I marked all shorter rafters to avoid confusion.
http://mygreenhouseplans.com

13
For the common rafters of this barn style greenhouse, we ended up using plywood gussets to save money. After cutting quite a few, I figured out how to cut gussets the super quick and easy way - got gusset cutting down to less than a minute each.
STEP 10
The plan will get you through the framing. At this point, you could use plastic paper, lexan glass panels, you name it to seal the frame in. We used the corrugated plastic panels detailed earlier for installation.
IMPORTANT: If you do not use panels you will need some sort of lateral support to keep the greenhouse from swaying side to side. Try 12 foot long 2x4s.
Good luck! We'll be building the door in the next few days and adding plans as well.
http://mygreenhouseplans.com

14
FINISHING INSTRUCTIONS
Preparation Instructions:
Fill all holes with wood filler and let dry. Apply additional coats of wood filler as needed. When wood
filler is completely dry, sand the project in the direction of the wood grain with 120 grit sandpaper.
Vacuum sanded project to remove sanding residue. Remove all sanding residue on work surfaces as
well. Wipe project clean with damp cloth. It is always recommended to apply a test coat on a hidden
area or scrap piece to ensure color evenness and adhesion. Use primer or wood conditioner as needed.
http://mygreenhouseplans.com