Embed Size (px)
Citation preview
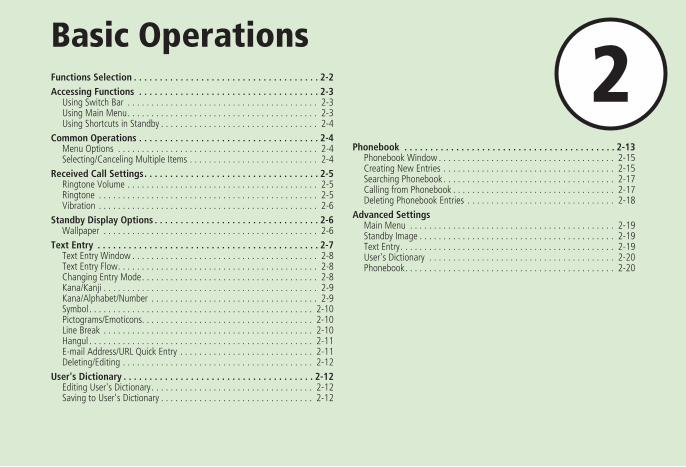
2Basic OperationsFunctions Selection . . . . . . . . . . . . . . . . . . . . . . . . . . . . . . . . . . . . 2-2Accessing Functions . . . . . . . . . . . . . . . . . . . . . . . . . . . . . . . . . . . 2-3
Using Switch Bar . . . . . . . . . . . . . . . . . . . . . . . . . . . . . . . . . . . . . . . . 2-3Using Main Menu . . . . . . . . . . . . . . . . . . . . . . . . . . . . . . . . . . . . . . . . 2-3Using Shortcuts in Standby . . . . . . . . . . . . . . . . . . . . . . . . . . . . . . . . . 2-4
Common Operations . . . . . . . . . . . . . . . . . . . . . . . . . . . . . . . . . . . 2-4Menu Options . . . . . . . . . . . . . . . . . . . . . . . . . . . . . . . . . . . . . . . . . . 2-4Selecting/Canceling Multiple Items . . . . . . . . . . . . . . . . . . . . . . . . . . . 2-4
Received Call Settings . . . . . . . . . . . . . . . . . . . . . . . . . . . . . . . . . . 2-5Ringtone Volume . . . . . . . . . . . . . . . . . . . . . . . . . . . . . . . . . . . . . . . . 2-5Ringtone . . . . . . . . . . . . . . . . . . . . . . . . . . . . . . . . . . . . . . . . . . . . . . 2-5Vibration . . . . . . . . . . . . . . . . . . . . . . . . . . . . . . . . . . . . . . . . . . . . . . 2-6
Standby Display Options . . . . . . . . . . . . . . . . . . . . . . . . . . . . . . . . 2-6Wallpaper . . . . . . . . . . . . . . . . . . . . . . . . . . . . . . . . . . . . . . . . . . . . . 2-6
Text Entry . . . . . . . . . . . . . . . . . . . . . . . . . . . . . . . . . . . . . . . . . . . 2-7Text Entry Window . . . . . . . . . . . . . . . . . . . . . . . . . . . . . . . . . . . . . . . 2-8Text Entry Flow . . . . . . . . . . . . . . . . . . . . . . . . . . . . . . . . . . . . . . . . . . 2-8Changing Entry Mode . . . . . . . . . . . . . . . . . . . . . . . . . . . . . . . . . . . . . 2-8Kana/Kanji . . . . . . . . . . . . . . . . . . . . . . . . . . . . . . . . . . . . . . . . . . . . . 2-9Kana/Alphabet/Number . . . . . . . . . . . . . . . . . . . . . . . . . . . . . . . . . . . 2-9Symbol . . . . . . . . . . . . . . . . . . . . . . . . . . . . . . . . . . . . . . . . . . . . . . . 2-10Pictograms/Emoticons. . . . . . . . . . . . . . . . . . . . . . . . . . . . . . . . . . . . 2-10Line Break . . . . . . . . . . . . . . . . . . . . . . . . . . . . . . . . . . . . . . . . . . . . 2-10Hangul . . . . . . . . . . . . . . . . . . . . . . . . . . . . . . . . . . . . . . . . . . . . . . . 2-11E-mail Address/URL Quick Entry . . . . . . . . . . . . . . . . . . . . . . . . . . . . 2-11Deleting/Editing . . . . . . . . . . . . . . . . . . . . . . . . . . . . . . . . . . . . . . . . 2-12
User's Dictionary . . . . . . . . . . . . . . . . . . . . . . . . . . . . . . . . . . . . . 2-12Editing User's Dictionary . . . . . . . . . . . . . . . . . . . . . . . . . . . . . . . . . . 2-12Saving to User's Dictionary . . . . . . . . . . . . . . . . . . . . . . . . . . . . . . . . 2-12
Phonebook . . . . . . . . . . . . . . . . . . . . . . . . . . . . . . . . . . . . . . . . . 2-13Phonebook Window . . . . . . . . . . . . . . . . . . . . . . . . . . . . . . . . . . . . . 2-15Creating New Entries . . . . . . . . . . . . . . . . . . . . . . . . . . . . . . . . . . . . 2-15Searching Phonebook . . . . . . . . . . . . . . . . . . . . . . . . . . . . . . . . . . . . 2-17Calling from Phonebook . . . . . . . . . . . . . . . . . . . . . . . . . . . . . . . . . . 2-17Deleting Phonebook Entries . . . . . . . . . . . . . . . . . . . . . . . . . . . . . . . 2-18
Advanced SettingsMain Menu . . . . . . . . . . . . . . . . . . . . . . . . . . . . . . . . . . . . . . . . . . . 2-19Standby Image . . . . . . . . . . . . . . . . . . . . . . . . . . . . . . . . . . . . . . . . . 2-19Text Entry . . . . . . . . . . . . . . . . . . . . . . . . . . . . . . . . . . . . . . . . . . . . . 2-19User's Dictionary . . . . . . . . . . . . . . . . . . . . . . . . . . . . . . . . . . . . . . . 2-20Phonebook . . . . . . . . . . . . . . . . . . . . . . . . . . . . . . . . . . . . . . . . . . . . 2-20
2-2
Basic Operation
2
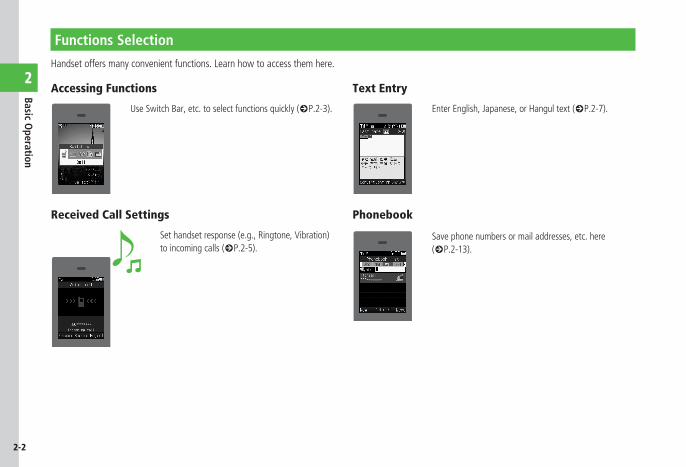
Functions Selection
Handset offers many convenient functions. Learn how to access them here.
Accessing Functions
Use Switch Bar, etc. to select functions quickly (fP.2-3).
Text Entry
Received Call Settings
Set handset response (e.g., Ringtone, Vibration) to incoming calls (fP.2-5).
Enter English, Japanese, or Hangul text (fP.2-7).
Phonebook
Save phone numbers or mail addresses, etc. here (fP.2-13).
2-3
Basic Operation
2
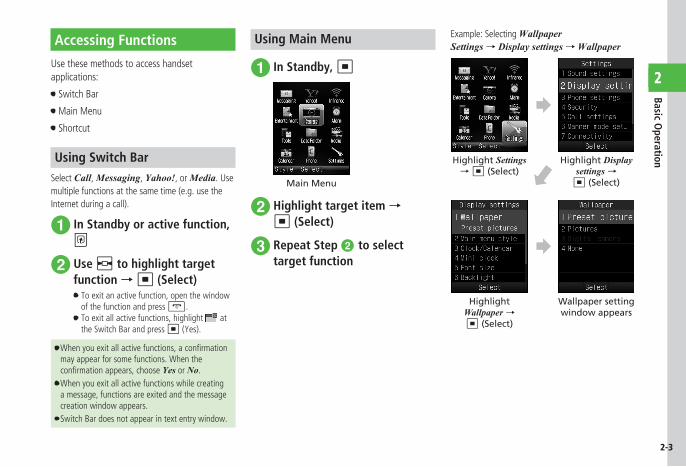
Accessing Functions
Use these methods to access handset applications:
・Switch Bar
・Main Menu
・Shortcut
Using Switch BarSelect Call, Messaging, Yahoo!, or Media. Use multiple functions at the same time (e.g. use the Internet during a call).
a In Standby or active function, i
b Use s to highlight target function → c (Select)・ To exit an active function, open the window
of the function and press y.・ To exit all active functions, highlight at
the Switch Bar and press c (Yes).
・Whenyouexitallactivefunctions,aconfirmationmay appear for some functions. When the confirmationappears,chooseYes or No.・ When you exit all active functions while creating
a message, functions are exited and the message creation window appears.・ Switch Bar does not appear in text entry window.
Using Main Menu
a In Standby, c
Main Menu
b Highlight target item → c (Select)
c Repeat Step b to select target function
Example: Selecting WallpaperSettings → Display settings → Wallpaper
Highlight Settings → c(Select)
Highlight Display settings →
c(Select)
Highlight Wallpaper → c(Select)
Wallpapersettingwindow appears
2-4
Basic Operation
2
・ Press x to return to the previous operation step.・ Press y to exit menu. Handset returns to
Standby. If multiple functions are active, active window appears.・ Press y to cancel menu. Handset returns to
Standby or previous window. In some menus, a confirmationappears.・ Speed Dial numbers appear in item or list window.
Press corresponding Keypad key to select an item.
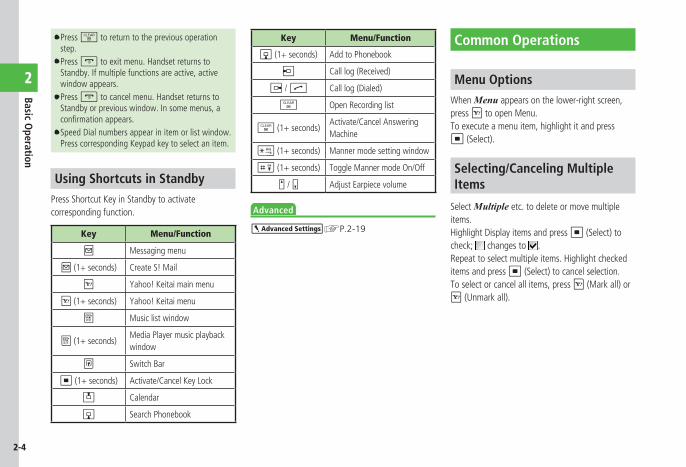
Using Shortcuts in StandbyPress Shortcut Key in Standby to activate corresponding function.
Key Menu/Function
w Messaging menu
w (1+ seconds) Create S! Mail
o Yahoo! Keitai main menu
o (1+ seconds) Yahoo! Keitai menu
e Music list window
e (1+ seconds)Media Player music playback window
i Switch Bar
c (1+ seconds) Activate/Cancel Key Lock
u Calendar
d Search Phonebook
Key Menu/Function
d (1+ seconds) Add to Phonebook
l Call log (Received)
r / t Call log (Dialed)
x Open Recording list
x (1+ seconds)Activate/Cancel Answering Machine
* (1+ seconds) Manner mode setting window
# (1+ seconds) Toggle Manner mode On/Off
n / b Adjust Earpiece volume
Advanced
brP.2-19
Common Operations
Menu OptionsWhen Menu appears on the lower-right screen, press o to open Menu.To execute a menu item, highlight it and press c (Select).
Selecting/Canceling Multiple Items
Select Multiple etc. to delete or move multiple items.Highlight Display items and press c (Select) to check; changes to . Repeat to select multiple items. Highlight checked items and press c (Select) to cancel selection.To select or cancel all items, press o (Mark all) or o (Unmark all).
2-5
Basic Operation
2
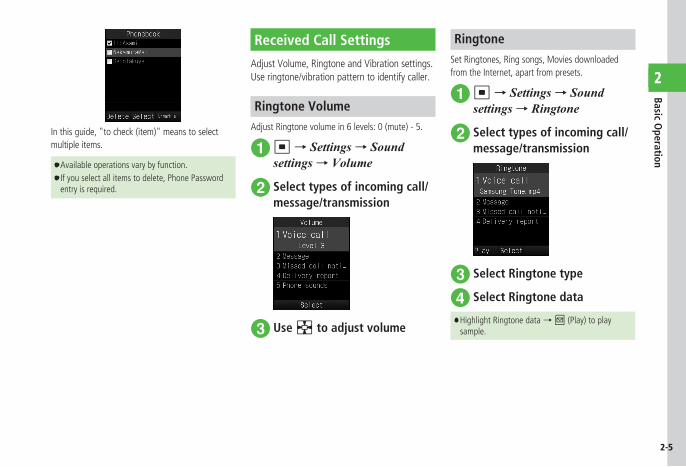
In this guide, "to check (item)" means to select multiple items.
・ Available operations vary by function.・ If you select all items to delete, Phone Password
entry is required.
Received Call Settings
Adjust Volume, Ringtone and Vibration settings.Use ringtone/vibration pattern to identify caller.
Ringtone VolumeAdjust Ringtone volume in 6 levels: 0 (mute) - 5.
a c → Settings → Sound settings → Volume
b Select types of incoming call/message/transmission
c Use a to adjust volume
RingtoneSet Ringtones, Ring songs, Movies downloaded from the Internet, apart from presets.
a c → Settings → Sound settings → Ringtone
b Select types of incoming call/message/transmission
c Select Ringtone type
d Select Ringtone data
・ Highlight Ringtone data → w (Play) to play sample.
2-6
Basic Operation
2
VibrationSelect Vibration Pattern from six options: Off, and Pattern 1 to Pattern 5.
a c → Settings → Sound settings → Vibration
b Select types of incoming call/message/transmission
c Select vibration■ To cancel Vibration
Off■ To select a Vibration Pattern
Pattern 1 to Pattern 5
・ Highlight Vibration Pattern → w (Play) to play sample.
Advanced
s
● Adjust Volume (rP.13-11)
● Set Ringtone for Voice Call (rP.13-11)
● Set Ringtone other than Voice Call (rP.13-11)
● Set Ringtone Duration other than Voice Call (rP.13-11)
● Search Machi-Uta™ (rP.13-11)
● Set Machi-Uta™ (rP.13-11)
● Activate/cancel Machi-Uta™ (rP.13-11)
● View Machi-Uta™ explanation (rP.13-11)
● Set Vibration (rP.13-11)
Standby Display Options
Set Pictures, etc. as Wallpaper in Standby.
WallpaperSet still image, etc. to appear in Standby. Alternatively, set Wallpaper to None.
a c → Settings → Display settings → Wallpaper
b Set Wallpaper■ To set an image in Data Folder
Select a file location → Select a file → c (Set)
■ To set noneNone
2-7
Basic Operation
2
Advanced
brP.2-19
s
● Change Wallpaper (rP.13-12)
● Change Main Menu settings (rP.13-12)
● Set Standby Display appearance (rP.13-12)
● Set time display in Standby (rP.13-12)
● Adjust Display brightness (rP.13-12)
● Set Dialing window font type (rP.13-13)
● Set Dialing window font size (rP.13-13)
● Set Dialing window font color (rP.13-13)
● Set Dialing window background color (rP.13-13)
● Set Operator name (rP.13-13)
● Change user interface language (rP.13-14)
● Set Time zone updating (rP.13-14)
● Change Home time zone (rP.13-14)
● Activate or cancel Daylight savings time adjustment (rP.13-14)
● Set time (rP.13-14)
● Set AM/PM (when Time format is set to 12H) (rP.13-14)
● Set date (rP.13-14)
● Change Time format (rP.13-14)
● Change Date format (rP.13-14)
Text Entry
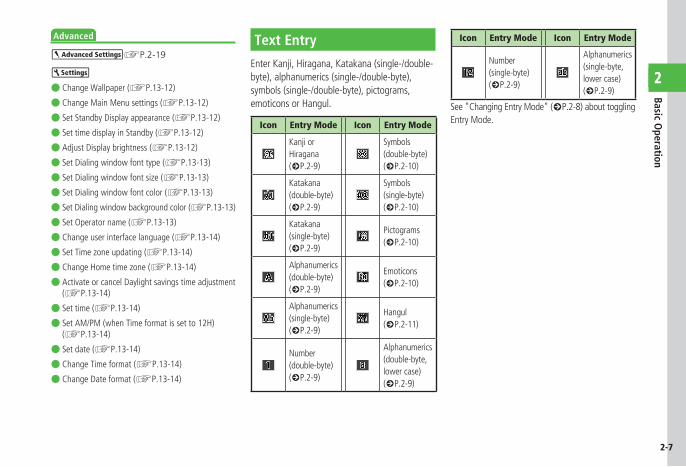
Enter Kanji, Hiragana, Katakana (single-/double-byte), alphanumerics (single-/double-byte), symbols (single-/double-byte), pictograms, emoticons or Hangul.
Icon Entry Mode Icon Entry Mode
Kanji or Hiragana (fP.2-9)
Symbols (double-byte) (fP.2-10)
Katakana (double-byte) (fP.2-9)
Symbols (single-byte) (fP.2-10)
Katakana (single-byte) (fP.2-9)
Pictograms (fP.2-10)
Alphanumerics (double-byte) (fP.2-9)
Emoticons (fP.2-10)
Alphanumerics (single-byte) (fP.2-9)
Hangul (fP.2-11)
Number (double-byte) (fP.2-9)
Alphanumerics (double-byte, lower case) (fP.2-9)
Icon Entry Mode Icon Entry Mode
Number (single-byte) (fP.2-9)
Alphanumerics (single-byte, lower case) (fP.2-9)
See "Changing Entry Mode" (fP.2-8) about toggling Entry Mode.
2-8
Basic Operation
2
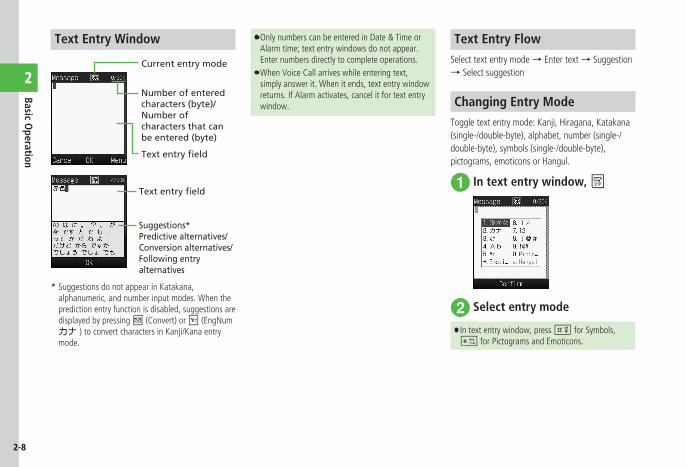
Text Entry Window
Current entry mode
Text entry field
Number of entered characters (byte)/Number of characters that can be entered (byte)
Text entry field
Suggestions*Predictive alternatives/Conversion alternatives/Following entryalternatives
* Suggestions do not appear in Katakana, alphanumeric, and number input modes. When the prediction entry function is disabled, suggestions are displayed by pressing w (Convert) or o (EngNumカナ ) to convert characters in Kanji/Kana entry mode.
・ Only numbers can be entered in Date & Time or Alarm time; text entry windows do not appear. Enter numbers directly to complete operations.・ When Voice Call arrives while entering text,
simply answer it. When it ends, text entry window returns. If Alarm activates, cancel it for text entry window.
Text Entry FlowSelect text entry mode → Enter text → Suggestion → Select suggestion
Changing Entry ModeToggle text entry mode: Kanji, Hiragana, Katakana (single-/double-byte), alphabet, number (single-/double-byte), symbols (single-/double-byte), pictograms, emoticons or Hangul.
a In text entry window, e
b Select entry mode
・ In text entry window, press # for Symbols, * for Pictograms and Emoticons.
.
2-9
Basic Operation
2
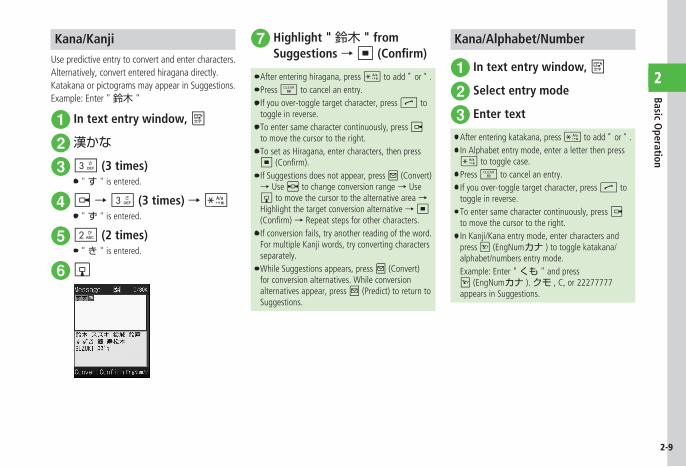
Kana/KanjiUse predictive entry to convert and enter characters. Alternatively, convert entered hiragana directly. Katakana or pictograms may appear in Suggestions.Example: Enter "鈴木 "
a In text entry window, e
b 漢かな
c 3 (3 times)・ "す " is entered.
d r → 3 (3 times) → *・ "ず " is entered.
e 2 (2 times)・ "き " is entered.
f d
g Highlight "鈴木 " from Suggestions → c (Confirm)
・ After entering hiragana, press * to add ゙or .゚・ Press x to cancel an entry.・ If you over-toggle target character, press t to
toggle in reverse.・ To enter same character continuously, press r
to move the cursor to the right.・ To set as Hiragana, enter characters, then press
c(Confirm).・ If Suggestions does not appear, press w (Convert) → Use s to change conversion range → Use d to move the cursor to the alternative area → Highlight the target conversion alternative → c (Confirm)→ Repeat steps for other characters.・ If conversion fails, try another reading of the word.
For multiple Kanji words, try converting characters separately.・ While Suggestions appears, press w (Convert)
for conversion alternatives. While conversion alternatives appear, press w (Predict) to return to Suggestions.
Kana/Alphabet/Number
a In text entry window, e
b Select entry mode
c Enter text
・ After entering katakana, press * to add ゙or .゚・ In Alphabet entry mode, enter a letter then press
* to toggle case.・ Press x to cancel an entry.・ If you over-toggle target character, press t to
toggle in reverse.・ To enter same character continuously, press r
to move the cursor to the right.・ In Kanji/Kana entry mode, enter characters and
press o (EngNumカナ ) to toggle katakana/alphabet/numbers entry mode.
Example: Enter "くも " and press o (EngNumカナ ). クモ , C, or 22277777 appears in Suggestions.
2-10
Basic Operation
2
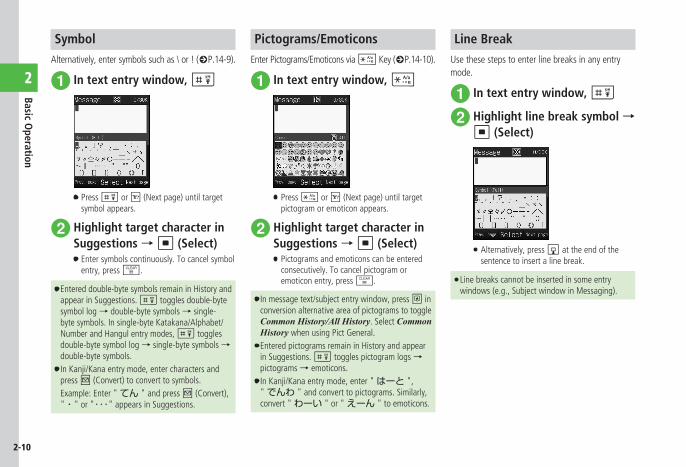
SymbolAlternatively, enter symbols such as \ or ! (fP.14-9).
a In text entry window, #
・ Press # or o (Next page) until target symbol appears.
b Highlight target character in Suggestions → c (Select)・ Enter symbols continuously. To cancel symbol
entry, press x.
・ Entered double-byte symbols remain in History and appear in Suggestions. # toggles double-byte symbol log → double-byte symbols → single-byte symbols. In single-byte Katakana/Alphabet/Number and Hangul entry modes, # toggles double-byte symbol log → single-byte symbols → double-byte symbols.・ In Kanji/Kana entry mode, enter characters and
press w (Convert) to convert to symbols. Example: Enter "てん " and press w (Convert),
"・" or "・・・" appears in Suggestions.
Pictograms/EmoticonsEnter Pictograms/Emoticons via * Key (fP.14-10).
a In text entry window, *
・ Press * or o (Next page) until target pictogram or emoticon appears.
b Highlight target character in Suggestions → c (Select)・ Pictograms and emoticons can be entered
consecutively. To cancel pictogram or emoticon entry, press x.
・ In message text/subject entry window, press i in conversion alternative area of pictograms to toggle Common History/All History. Select Common History when using Pict General.・ Entered pictograms remain in History and appear
in Suggestions. # toggles pictogram logs → pictograms → emoticons.・ In Kanji/Kana entry mode, enter "はーと ",
"でんわ " and convert to pictograms. Similarly, convert "わーい " or "えーん " to emoticons.
Line BreakUse these steps to enter line breaks in any entry mode.
a In text entry window, #
b Highlight line break symbol → c (Select)
・ Alternatively, press d at the end of the sentence to insert a line break.
・ Line breaks cannot be inserted in some entry windows (e.g., Subject window in Messaging).
2-11
Basic Operation
2
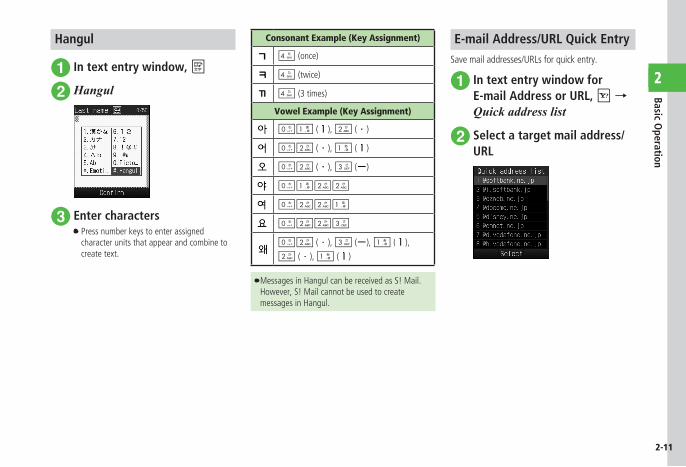
Hangul
a In text entry window, e
b Hangul
c Enter characters・ Press number keys to enter assigned
character units that appear and combine to create text.
Consonant Example (Key Assignment)
4 (once)
4 (twice)
4 (3 times)
Vowel Example (Key Assignment)
01 ( ), 2 ( )
02 ( ), 1 ( )
02 ( ), 3 ( )
0122
0221
0223
02 ( ), 3 ( ), 1 ( ),
2 ( ), 1 ( )
・ Messages in Hangul can be received as S! Mail. However, S! Mail cannot be used to create messages in Hangul.
E-mail Address/URL Quick EntrySave mail addresses/URLs for quick entry.
a In text entry window for E-mail Address or URL, o → Quick address list
b Select a target mail address/URL
2-12
Basic Operation
2
Deleting/Editing
a Use a to move cursor to character to delete, and x
・ When a space is highlighted, the character before cursor is deleted.・ To delete all characters after cursor, press x for
1+ seconds. If there is no character after cursor, all characters are deleted. ・ Press y for text entry window exit confirmation.
Advanced
brP.2-19
● Specifying Range to Copy/Cut
● Pasting Copied or Cut Text
● Undoing Text Entry
● Jump to Top/End
● Setting Prediction Entry or Learning Function
s
● Change font size in text entry window (rP.13-12)
● Reset entry history to default (rP.13-15)
User's Dictionary
Save frequently used words/phrases of up to 20 characters; entries appear in Suggestions when Reading is entered.
Editing User's Dictionary
a c → Settings → Phone settings → User's dictionary → New entry
b Select Word field → Enter word or phrase
c Select Reading field → Enter reading
d w (Save)
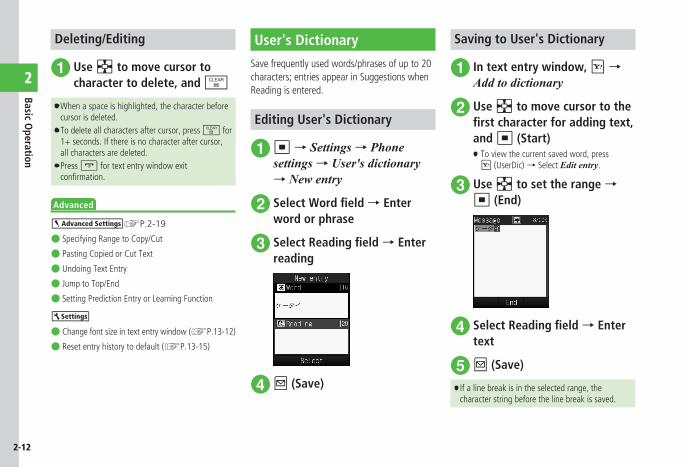
Saving to User's Dictionary
a In text entry window, o → Add to dictionary
b Use a to move cursor to the first character for adding text, and c (Start)・ To view the current saved word, press
o (UserDic) → Select Edit entry.
c Use a to set the range → c (End)
d Select Reading field → Enter text
e w (Save)
・ If a line break is in the selected range, the character string before the line break is saved.
2-13
Basic Operation
2
Advanced
brP.2-20
● Deleting Entries from User's Dictionary
s
● Save entries to User's Dictionary (rP.13-14)
● Edit User's Dictionary entries (rP.13-15)
● Delete User's Dictionary entries (rP.13-15)
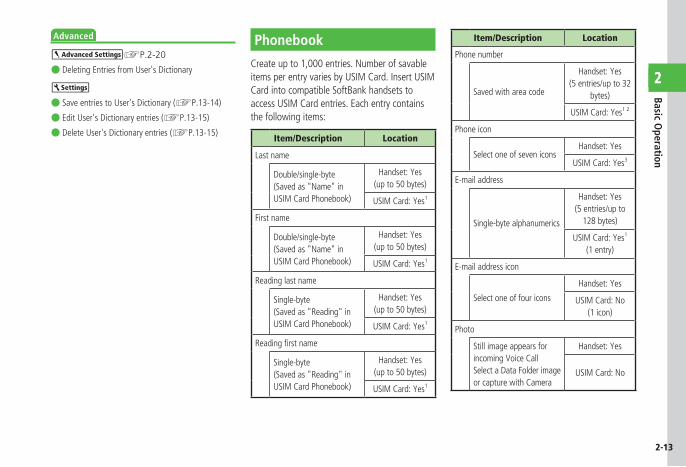
Phonebook
Create up to 1,000 entries. Number of savable items per entry varies by USIM Card. Insert USIM Card into compatible SoftBank handsets to access USIM Card entries. Each entry contains the following items:
Item/Description Location
Last name
Double/single-byte (Saved as "Name" in USIM Card Phonebook)
Handset: Yes (up to 50 bytes)
USIM Card: Yes1
First name
Double/single-byte (Saved as "Name" in USIM Card Phonebook)
Handset: Yes (up to 50 bytes)
USIM Card: Yes1
Reading last name
Single-byte (Saved as "Reading" in USIM Card Phonebook)
Handset: Yes (up to 50 bytes)
USIM Card: Yes1
Readingfirstname
Single-byte (Saved as "Reading" in USIM Card Phonebook)
Handset: Yes (up to 50 bytes)
USIM Card: Yes1
Item/Description Location
Phone number
Saved with area code
Handset: Yes (5 entries/up to 32
bytes)
USIM Card: Yes1 2
Phone icon
Select one of seven iconsHandset: Yes
USIM Card: Yes3
E-mail address
Single-byte alphanumerics
Handset: Yes (5 entries/up to
128 bytes)
USIM Card: Yes1 (1 entry)
E-mail address icon
Select one of four icons
Handset: Yes
USIM Card: No (1 icon)
Photo
Still image appears for incoming Voice CallSelect a Data Folder image or capture with Camera
Handset: Yes
USIM Card: No

2-14
Basic Operation
2
Item/Description Location
Ringtone
Voice Call/MessagesSelectable from Data Folder
Handset: Yes
USIM Card: No
Vibration
Set vibration for Voice Call/Messages
Handset: Yes
USIM Card: No
Group
Select from original 21 groups including "No group"
Handset: Yes
USIM Card: Yes2
Secret mode
On/OffHandset: Yes
USIM Card: No
Birthday
Date of birthHandset: Yes
USIM Card: No
Blood type
Select one of four typesHandset: Yes
USIM Card: No
Hobby
Up to 100 bytesHandset: Yes
USIM Card: No
Item/Description Location
Company
Enter up to 64 bytesHandset: Yes
USIM Card: No
Job title
Enter up to 64 bytesHandset: Yes
USIM Card: No
Address
Post code (40 bytes), Country (64 bytes), Province, City, Street and Additional information (128 bytes)
Handset: Yes (2 entries)
USIM Card: No
Address icon
Select one of two iconsHandset: Yes
USIM Card: No
Homepage
Enter up to 1,024 bytes
Handset: Yes (2 entries)
USIM Card: No
Homepage icon
Select one of three iconsHandset: Yes
USIM Card: No
Item/Description Location
Memo
Enter up to 512 bytesHandset: Yes
USIM Card: No
1 Number of savable characters varies by USIM Card.2 Number of savable items varies by USIM Card.3 Savable icon types vary by USIM Card.
・ If a different USIM Card (with saved entries) is inserted, copy saved USIM entries to handset confirmationappearswhenhandsetisfirstpowered on. Choose Yes to copy entries.
Note
・ Protect Important InformationPhonebook entries may be lost/altered if battery is removed or left uncharged for an extended period; accidents/malfunctions may also affect entries . Back-up entries and store separately . SoftBank Mobile is not liable for damage from lost information .
2-15
Basic Operation
2
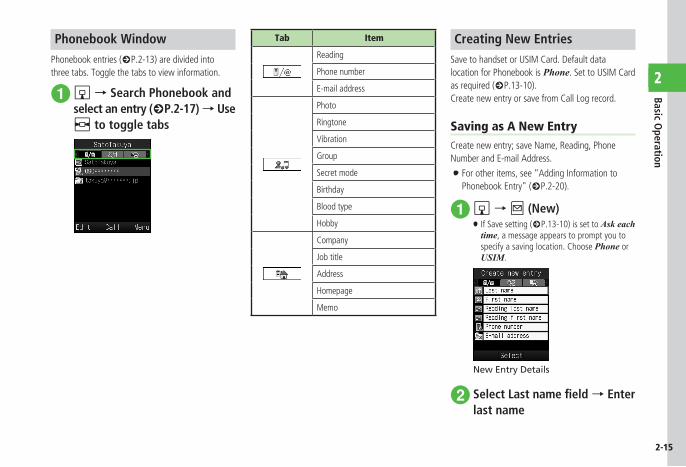
Phonebook WindowPhonebook entries (fP.2-13) are divided into three tabs. Toggle the tabs to view information.
a d → Search Phonebook and select an entry (fP.2-17) → Use s to toggle tabs
Tab Item
Reading
Phone number
E-mail address
Photo
Ringtone
Vibration
Group
Secret mode
Birthday
Blood type
Hobby
Company
Job title
Address
Homepage
Memo
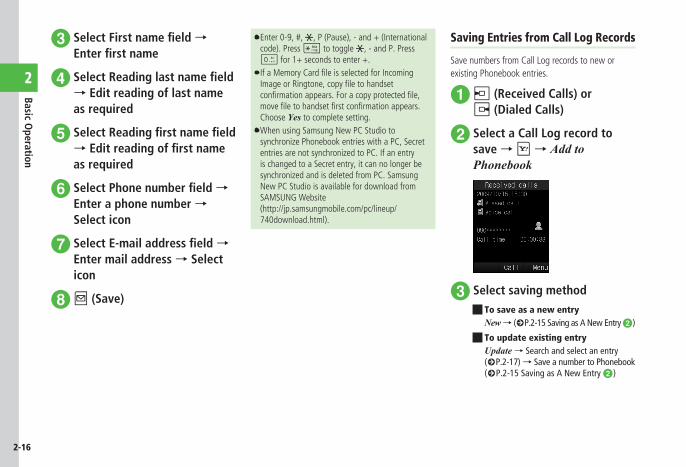
Creating New EntriesSave to handset or USIM Card. Default data location for Phonebook is Phone. Set to USIM Card as required (fP.13-10).Create new entry or save from Call Log record.
Saving as A New EntryCreate new entry; save Name, Reading, Phone Number and E-mail Address.
・ For other items, see "Adding Information to Phonebook Entry" (fP.2-20).
a d → w (New)・ If Save setting (fP.13-10) is set to Ask each
time, a message appears to prompt you to specify a saving location. Choose Phone or USIM.
New Entry Details
b Select Last name field → Enter last name
2-16
Basic Operation
2
c Select First name field → Enter first name
d Select Reading last name field → Edit reading of last name as required
e Select Reading first name field → Edit reading of first name as required
f Select Phone number field → Enter a phone number → Select icon
g Select E-mail address field → Enter mail address → Select icon
h w (Save)
・ Enter 0-9, #, , P (Pause), - and + (International code). Press * to toggle , - and P. Press 0 for 1+ seconds to enter +.・IfaMemoryCardfileisselectedforIncomingImageorRingtone,copyfiletohandsetconfirmationappears.Foracopyprotectedfile,movefiletohandsetfirstconfirmationappears.Choose Yes to complete setting.・ When using Samsung New PC Studio to
synchronize Phonebook entries with a PC, Secret entries are not synchronized to PC. If an entry is changed to a Secret entry, it can no longer be synchronized and is deleted from PC. Samsung New PC Studio is available for download from SAMSUNG Website (http://jp.samsungmobile.com/pc/lineup/ 740download.html).
Saving Entries from Call Log Records
Save numbers from Call Log records to new or existing Phonebook entries.
a l (Received Calls) or r (Dialed Calls)
b Select a Call Log record to save → o → Add to Phonebook
c Select saving method■ To save as a new entry
New → (fP .2-15 Saving as A New Entry b)
■ To update existing entryUpdate → Search and select an entry (fP .2-17) → Save a number to Phonebook (fP .2-15 Saving as A New Entry b)
2-17
Basic Operation
2
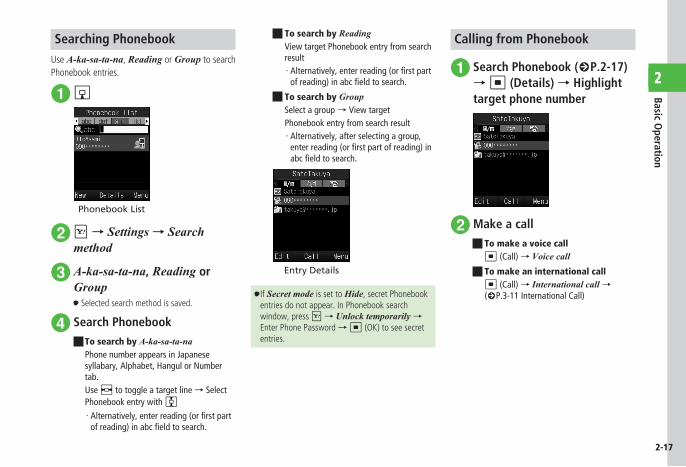
Searching PhonebookUse A-ka-sa-ta-na, Reading or Group to search Phonebook entries.
a d
Phonebook List
b o → Settings → Search method
c A-ka-sa-ta-na, Reading or Group・ Selected search method is saved.
d Search Phonebook■ To search by A-ka-sa-ta-na
Phone number appears in Japanese syllabary, Alphabet, Hangul or Number tab .Use s to toggle a target line → Select Phonebook entry with j
・ Alternatively, enter reading (or first part of reading) in abc field to search.
■ To search by ReadingView target Phonebook entry from search result・ Alternatively, enter reading (or first part
of reading) in abc field to search.
■ To search by GroupSelect a group → View targetPhonebook entry from search result・ Alternatively, after selecting a group,
enter reading (or first part of reading) in abc field to search.
Entry Details
・ If Secret mode is set to Hide, secret Phonebook entries do not appear. In Phonebook search window, press o → Unlock temporarily → Enter Phone Password → c (OK) to see secret entries.
Calling from Phonebook
a Search Phonebook (fP.2-17) → c (Details) → Highlight target phone number
b Make a call■ To make a voice call
c (Call) → Voice call■ To make an international call
c (Call) → International call → (fP .3-11 International Call)
2-18
Basic Operation
2
・ Alternatively, highlight target Phonebook entry in Phonebook list → o → Call → Voice call or International call to make a call. When entry contains multiple numbers, the phone number set to Voice call of Default number (fP.2-23) (if notset,thefirstphonenumber)isdialed.Ifphonenumber selection window appears (Voice call in Default number is set to Not assigned), select a phone number.・ Calling via Simple Search When Simple search (fP.13-15) is set to On,
press a key to use its assigned character to search for a Phonebook entry with matching Reading. When assigned character and Reading match, corresponding name and phone number appear. Highlight a phone number → t or c (Select) → Press c (Call) to make a voice call.・ Calling via Phone Number Search Enter four digits to search for entry beginning or
ending with those digits. Entry name and phone number appear. Highlight a phone number → t or c (Select) → Press c (Call) to make a voice call.
Deleting Phonebook Entries
a d
b Delete entries■ To delete an item
Highlight an entry to delete → o → Delete → Selected → Yes
■ To delete multiple itemso → Delete → Multiple → Check Phonebook entries to delete → w (Delete) → Yes
■ To delete all itemsDelete all Phonebook entries in Phone or USIM Card at once .o → Delete → All → Enter Phone Password → c (OK) → Yes
・ Alternatively, in Entry Details window, o → Delete → Yes.
Advanced
brP.2-20
● Creating Message from Phonebook
● Creating New Group (USIM Card)
● Adding Member to Group
● Removing Member from Group
● Viewing USIM Card Service Number
● Showing or Hiding Caller ID
● Adding Phonebook Entry to Speed Dial
● Sending Phonebook as vFile
● Creating and Saving vFiles
● Copying Entries between Phone & USIM
● Canceling Phonebook Secret Mode Temporarily
● Checking Memory Status
● Copy Item
● Setting Default Phone Number or Mail Address
● Enter and Save Phone Number
● Renaming Group
s
● Select Phonebook Save Location (rP.13-10)
● Change Phonebook preference (Phone/USIM) (rP.13-10)
● Change Search Method (rP.13-10)
● Backup Phonebook entries (rP.13-10)
● Change Phonebook font size (rP.13-10)
● Activate or cancel Simple Search (rP.13-15)
2-19
Basic Operation
2
Advanced SettingsbMain Menu
Setting Main Menu Stylec → w (Style) → Select a style → Select color to set with s
・ Change menu appearance.
Standby Image
Rotating Still Imagesc → Settings → Display settings → Wallpaper →Selectafilelocation→Selectafile→ w (Rotate) → c (Set)
・ To restore the default, press o (Reset).
Text Entry
Entering Date/TimeIn text entry window, select Kanji/Kana entry mode and enter Hiragana with Keypad → o (EngNumカナ ) → Highlight entry in Suggestions for date and/or time → c(Confirm)
Toggling Double-byte and Single-byte SymbolsIn text entry window, while double-/single-byte symbol Suggestions appear, #
Specifying Range to Copy/CutIn text entry window, o → Copy or Cut → Move the cursor with atothefirstcharacterto copy/cut and press c (Start) → Specify range with a → c (End)
・ To copy or cut all text in text entry window, press o (All).
・ Copied or cut text remains even after powering off.
Pasting Copied or Cut TextIn text entry window, move cursor with a to the position to paste → o → Paste

2-20
Basic Operation
2
Undoing Text EntryIn text entry window, o → Undo・ In Kanji/Kana entry mode, undo operations
immediately after performing Cut, Paste or Delete. Alternatively, undo Conversion.
Jump to Top/EndIn text entry window, o → Cursor position → Select an item
Setting Prediction Entry or Learning FunctionIn text entry window, o → Conversion
■ To activate or cancel the prediction entry functionPrediction on or Prediction off
■ To activate or cancel the learning functionLearning on or Learning off
■ To reset entry logReset learning → Enter Phone Password → c (OK) → Yes
■ To reset logs of pictograms or symbolsClear history
User's Dictionary
Deleting Entries from User's Dictionaryc → Settings → Phone settings → User's dictionary → Edit entry
■ To delete an itemHighlight User's Dictionary entry → o → Delete
■ To delete all itemso → Delete all → Enter Phone Password → c (OK) → Yes
Phonebook
Adding Information to Phonebook Entryd → w (New)
■ To save GroupUse s to switch to → Select Group field→ Select a group → w (Save)
■ To set Secret modeUse s to switch to → Select Secret mode-…field→ Select an item → w (Save)
■ To save BirthdayUse s to switch to → Select Birthday field→ Enter a birthday → w (Save)
■ To save Blood typeUse s to switch to → Select Blood type field→ Select a blood type → w (Save)
■ To save HobbyUse s to switch to → Select Hobby field→ Enter text → w (Save)
■ To save CompanyUse s to switch to → Select Company field→ Enter company name → w (Save)
■ To save Job titleUse s to switch to → Select Job title field→ Enter job title → w (Save)
2-21
Basic Operation
2
■ To save AddressUse s to switch to → Select Address field→SelectZipcodefield→ Enter postal code →SelectCountryfield→ Enter country name → SelectProvincefield→ Enter province name → SelectCityfield→ Enter city name → Select Street field→ Enter street name → Select Additional informationfield→ Enter additional information → w (OK) → Select an icon → w (Save)
■ To save URLUse s to switch to → Select Homepage field→ Enter URL → Select an icon → w (Save)
■ To save MemoUse s to switch to → Select Memo field→ Enter text → w (Save)
・ Items other than Group are unavailable in USIM Card Phonebook.
Setting Incoming Image to Phonebook Entryd → w (New) → Use s to switch to
→SelectPhotofield
■ To set from saved still imagePictures →Selectafile→ w (Save)
・WithMemoryCardinserted,selectafilefromPictures or Digital camera folder.
■ To set by capturing still imageTake photo → Capture still image → c ( )
■ To cancel set Incoming ImageOff → w (Save)
・ IfaMemoryCardfileissetasIncomingImage,copyfiletohandsetfirstconfirmationappears.Iffileiscopyprotected,movefiletohandsetfirstconfirmationappears.ChooseYes to complete setting.
Setting Ringtone to Phonebook Entryd → w (New) → Use s to switch to
→SelectRingtonefield
■ To set Ringtone for Voice CallVoice call →Selectafilelocation→ Highlight a file→ w (Play) → o (Select) → w (Done) → w (Save)
■ To set Ringtone for MessageMessages → Assign tone →Selectafilelocation →Highlightafile→ w (Play) → o (Select) → w (Done) → w (Done) → w (Save)
■ To set Ringtone Duration for MessageMessages → Duration → Enter time → w (Done) → w (Done) → w (Save)
・ IfaMemoryCardfileissetasRingtone,copyfiletohandsetfirstconfirmationappears.Iffileiscopyprotected,movefiletohandsetfirstconfirmationappears. Choose Yes to complete setting.
Setting Vibration to Phonebook Entryd → w (New) → Use s to switch to
→SelectVibrationfield→ Select a ringtone type → highlight a vibration pattern → w (Play) → c (Select) → w (Done) → w (Save)
Creating Message from Phonebookd → Highlight a Phonebook entry to create a message → o → Create message → S! Mail or SMS → (fP.4-4 S! Mail e, P.4-7 SMS e)
Creating New Group (USIM Card)d → o → New group → Select Group name field→ Enter a group name → w (Save)
・ Set search method to Group (fP.2-17) and open USIM Phonebook to create new group (fP.2-22).
Adding Member to Groupd → Select a group to add a member → o → Add member → Check a member to add → w (Add)
・ Set search method to Group to add (fP.2-17).
Removing Member from Groupd → Select a group to delete a member → o → Remove member → Check a member to delete → w (Remove)
・ Set search method to Group to operate (fP.2-17).
・ Removed member is not deleted from Phonebook.
2-22
Basic Operation
2
Showing or Hiding Caller IDd → Highlight a Phonebook entry to make a call → o → Hide/Show my ID
■ To follow the settings of caller ID notification serviceNone → t or c (Call)
■ To show a phone numberShow my ID → t or c (Call)
■ To hide a phone numberHide my ID → t or c (Call)
Adding Phonebook Entry to Speed Diald → Search Phonebook and select an entry (fP.2-17) → o → Add to Speed dial → Select a phonenumberfieldtosave
Sending Phonebook as vFiled → Search and select a Phonebook entry to send (fP.2-17) → o → Send
■ To send via messageVia message → (fP.4-4 S! Mail b)
■ To send via InfraredVia infrared (fP.12-3)
Creating and Saving vFilesd → Search Phonebook and select an entry (fP.2-17) → o → Save to Data Folder → Phone or Memory card → Yes・ TosaveafiletoMemory card, insert Memory
Card.
Copying Entries between Phone & USIMd → Highlight an entry to copy → o → Copy to USIM or Copy to Phone
■ To copy an itemSelected → Yes・ To copy 1 item from Details, press c (Details)
in List → Press o and operate.
■ To copy multiple itemsMultiple → Check Phonebook entries → w (Copy) → Yes
■ To copy Phonebook stored in both handset and USIM Card at onceAll → Yes
Specifying Phonebook Entry Saving Destinationd → o → Settings → Save settings → Select an item
Toggling Phonebook View between USIM & Phoned → o → Settings → Change view → Select an item
・ Change remains even if handset is powered off.
Canceling Phonebook Secret Mode Temporarilyd → o → Unlock temporarily → Enter Phone Password → c (OK)
・ If Secret mode is set to Hide, Secret entries appear for current session only.
Viewing USIM Card Service Numberd → o → Service number
・ The item Service number may not appear for some USIM Card.
Checking Memory Statusd → o → Memory Status・ To delete contents of current item, press w
(Delete) (fP.11-13 Deleting Registered/Saved Data).
Copy Itemd → Search Phonebook and select entry (fP.2-17) → Highlight an item to copy → o → Copy item
2-23
Basic Operation
2
Setting Default Phone Number or Mail Addressd → Search for a Phonebook entry to set and select it (fP.2-17) → o → Set default number → Voice call or Messages → Select phone number or mail address → w (Save)
・ To leave default phone number or mail address undefined,highlightitemandpresso (Reset) to set to Not assigned.
・ Set default phone number only for handset Phonebook.
Opening Website from Phonebookd → Search Phonebook entries with Homepage saved and select an entry (fP.2-17) → Highlight a homepage address to connect → c (Connect)
Editing Phonebookd → Search Phonebook and select entry (fP.2-17) → w (Edit) → (fP.2-15 Saving as A New Entry b)
・ To edit secret Phonebook entry, set Secret mode to Show.
Enter and Save Phone NumberEnter phone number → o → Add to Phonebook
■ To save new entryNew → (fP.2-15 Saving as A New Entry b)
■ To update entryUpdate → Search Phonebook and select entry (fP.2-17) → Enter each item (fP.2-15 Saving as A New Entry b)
・ Alternatively, during a call, o → select Add to Phonebook.
・ Only Name, Reading, E-mail address, and Group can be entered in USIM Card entries.
Changing Group Settingsc → Phone → Group settings → Select a group to set
■ To set incoming imageSelectGroupimagefield→Selectafilelocation→Selectafile→ w (Save)
■ To set ringtone for Voice callSelectRingtonefield→ Voice call →Selectafilelocation →Highlightafile→ w (Play) → o (Select) → w (Done) → w (Save)
■ To set ringtone for MessageSelectRingtonefield→ Messages → Assign tone →Selectafilelocation→Highlightafile→ w (Play) → o (Select) → w (Done) → w (Done) → w (Save)
■ To set ringtone duration for MessageSelectRingtonefield→ Messages → Duration → Enter time → w (Done) → w (Done) → w (Save)
2-24
Basic Operation
2
■ To set VibrationSelectVibrationfield→ Select a ringtone type → Highlight a vibration pattern → w (Play) → c (Select) → w (Done) → w (Save)
・ To cancel set image or vibration and save the entry,highlightImage/Vibrationfield→ Press o (Reset) → w (Save).
・ To cancel set ringtone and save the entry, select Ringtonefield→ Highlight item to reset → Press o (Reset) → w (Save). To cancel all ringtones, highlightRingtonefield→ Press o (Reset) → w (Save).
・ Set only for handset group.
・ Images and ringtones set for individual Phonebook entries take priority over Group settings.
Renaming Groupc → Phone → Group settings → o → View from phone group or View from USIM group → Select a group to edit → Select Group namefield→ Enter a group name → w (Save)
・ When Change view (fP.2-22) is set to Phone, View from USIM group appears; when USIM, View from phone group appears.

![USIM Card14-2 Weather Indicators 14-18 …broadband.mb.softbank.jp/mb/support/3G/product/841sh/pdf/...Kanji (Hiragana) [Double-byte] Katakana [Double & Single-byte] Alphanumerics [Double](https://img.pdfslide.net/doc/110x75/5fa32bd958356e37b3654383/usim-card14-2-weather-indicators-14-18-kanji-hiragana-double-byte-katakana.jpg)