Embed Size (px)
Citation preview

Bb Quick Start for Interactive Tools
• Overview • Discussion Boards • Blogs • Journal • Collaboration (Chat) • Groups • LTI Tools (Learning Tools Interoperability) • Support, Help, & Resources • Media Guidelines Overview Using Bb Interactive Tools can allow students to interact with each other and/or their instructor for collaboration, reflection, and discussion. Studies have shown that student interaction with peers and the instructor is vital to success in an online course. Inter active tools that can be used in Bb include: Discussion Boards, Blog, Journal, Wiki, Groups, Chat (Collaboration), and Basic LTI Tools.
Discussion Boards Discussion Boards can be used for online class discussion on course topics to support student understanding, Question and Answer Forums, and foster the exchange of ideas. All course shells have a content folder (link) for Discussions as one of the default folders. The Discussion Board page lists the discussion boards for the class, the number of forums, participants, and posts. Click on the “Discussion Board” link to access the forums. Discussion Boards can be created from the content folder, or from the Course Management Menu (under Course Tools).
Click the “Create Forum” icon from the content folder (or from the Discussions page under Course Tools)
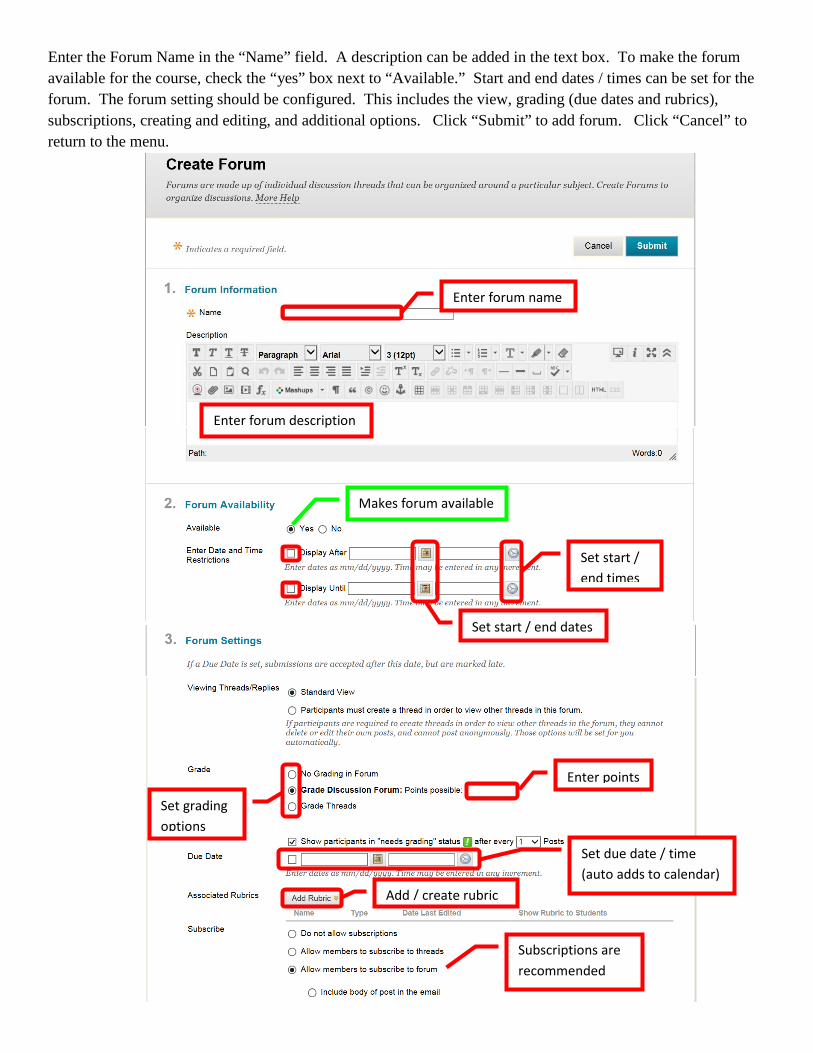
Enter the Forum Name in the “Name” field. A description can be added in the text box. To make the forum available for the course, check the “yes” box next to “Available.” Start and end dates / times can be set for the forum. The forum setting should be configured. This includes the view, grading (due dates and rubrics), subscriptions, creating and editing, and additional options. Click “Submit” to add forum. Click “Cancel” to return to the menu.
Enter forum name
Enter forum description
Makes forum available
Set start / end times
Set start / end dates
Set grading options
Enter points
Set due date / time (auto adds to calendar)
Add / create rubric
Subscriptions are recommended
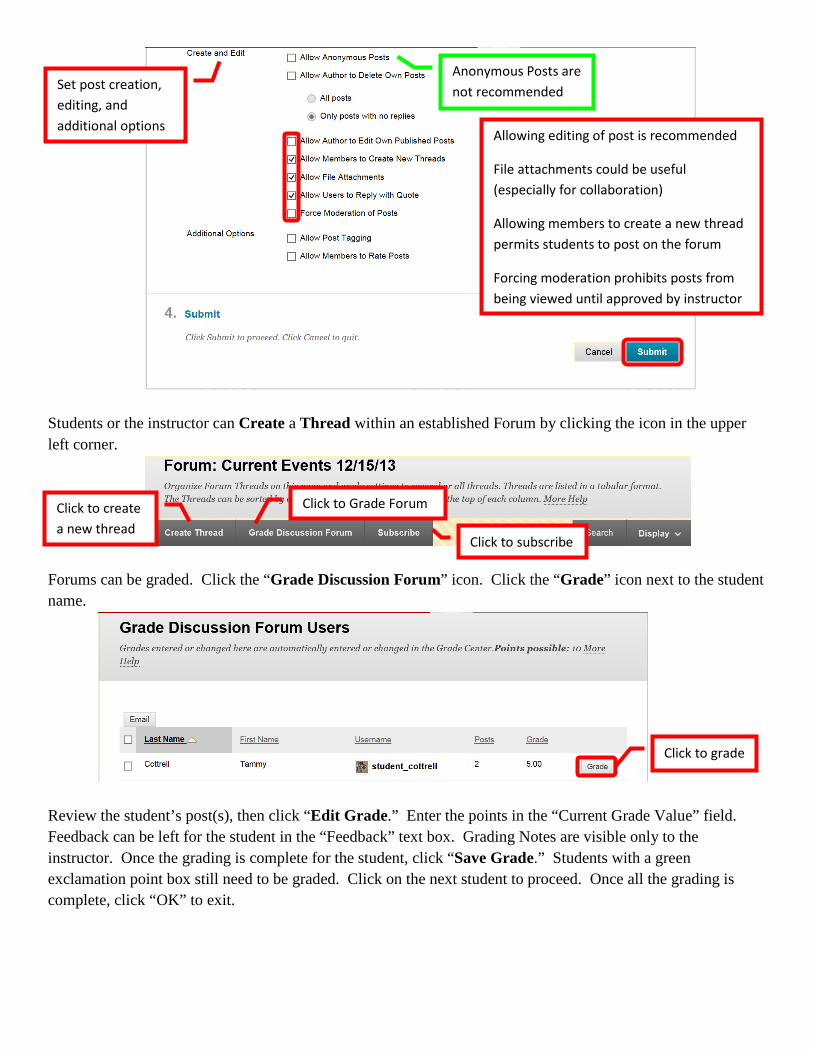
Students or the instructor can Create a Thread within an established Forum by clicking the icon in the upper left corner.
Forums can be graded. Click the “Grade Discussion Forum” icon. Click the “Grade” icon next to the student name.
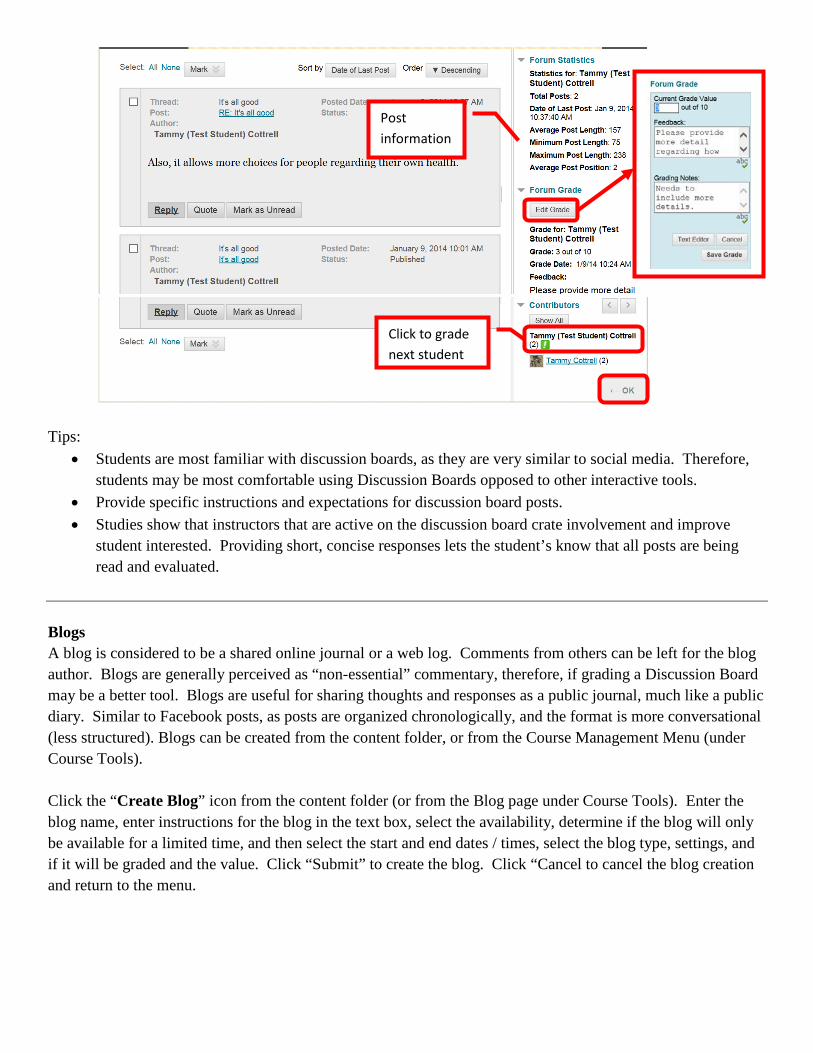
Review the student’s post(s), then click “Edit Grade.” Enter the points in the “Current Grade Value” field. Feedback can be left for the student in the “Feedback” text box. Grading Notes are visible only to the instructor. Once the grading is complete for the student, click “Save Grade.” Students with a green exclamation point box still need to be graded. Click on the next student to proceed. Once all the grading is complete, click “OK” to exit.
Set post creation, editing, and additional options
Anonymous Posts are not recommended
Allowing editing of post is recommended
File attachments could be useful (especially for collaboration)
Allowing members to create a new thread permits students to post on the forum
Forcing moderation prohibits posts from being viewed until approved by instructor
Click to create a new thread
Click to Grade Forum
Click to subscribe
Click to grade
Tips:
• Students are most familiar with discussion boards, as they are very similar to social media. Therefore, students may be most comfortable using Discussion Boards opposed to other interactive tools.
• Provide specific instructions and expectations for discussion board posts. • Studies show that instructors that are active on the discussion board crate involvement and improve
student interested. Providing short, concise responses lets the student’s know that all posts are being read and evaluated.
Blogs A blog is considered to be a shared online journal or a web log. Comments from others can be left for the blog author. Blogs are generally perceived as “non-essential” commentary, therefore, if grading a Discussion Board may be a better tool. Blogs are useful for sharing thoughts and responses as a public journal, much like a public diary. Similar to Facebook posts, as posts are organized chronologically, and the format is more conversational (less structured). Blogs can be created from the content folder, or from the Course Management Menu (under Course Tools).
Click the “Create Blog” icon from the content folder (or from the Blog page under Course Tools). Enter the blog name, enter instructions for the blog in the text box, select the availability, determine if the blog will only be available for a limited time, and then select the start and end dates / times, select the blog type, settings, and if it will be graded and the value. Click “Submit” to create the blog. Click “Cancel to cancel the blog creation and return to the menu.
Click to grade next student
Post information
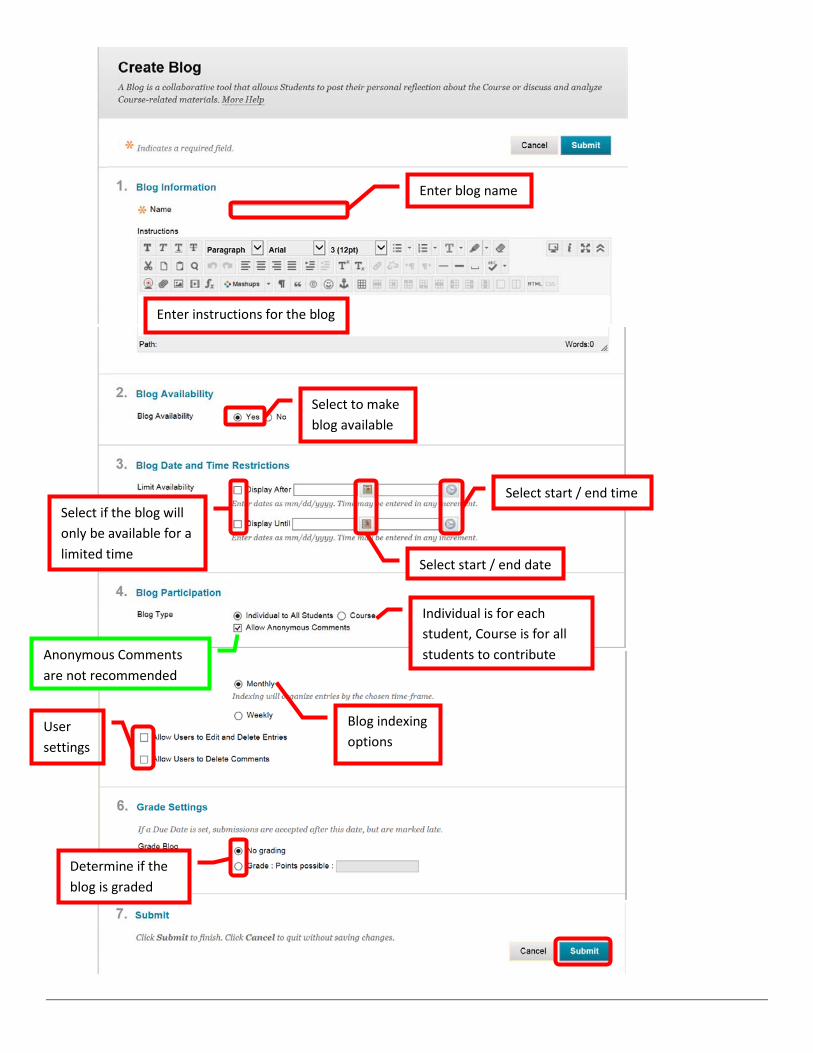
Enter blog name
Enter instructions for the blog
Select to make blog available
Select if the blog will only be available for a limited time
Select start / end time
Select start / end date
Individual is for each student, Course is for all students to contribute Anonymous Comments
are not recommended
User settings
Blog indexing options
Determine if the blog is graded
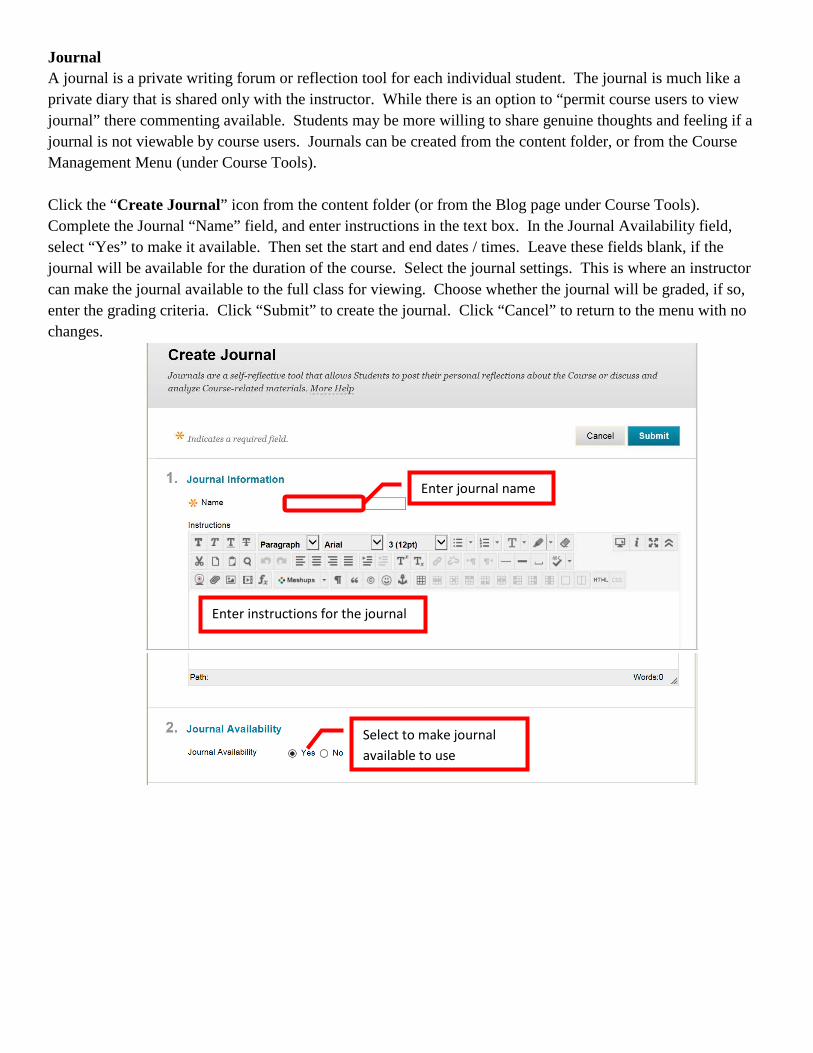
Journal A journal is a private writing forum or reflection tool for each individual student. The journal is much like a private diary that is shared only with the instructor. While there is an option to “permit course users to view journal” there commenting available. Students may be more willing to share genuine thoughts and feeling if a journal is not viewable by course users. Journals can be created from the content folder, or from the Course Management Menu (under Course Tools). Click the “Create Journal” icon from the content folder (or from the Blog page under Course Tools). Complete the Journal “Name” field, and enter instructions in the text box. In the Journal Availability field, select “Yes” to make it available. Then set the start and end dates / times. Leave these fields blank, if the journal will be available for the duration of the course. Select the journal settings. This is where an instructor can make the journal available to the full class for viewing. Choose whether the journal will be graded, if so, enter the grading criteria. Click “Submit” to create the journal. Click “Cancel” to return to the menu with no changes.
Enter journal name
Enter instructions for the journal
Select to make journal available to use
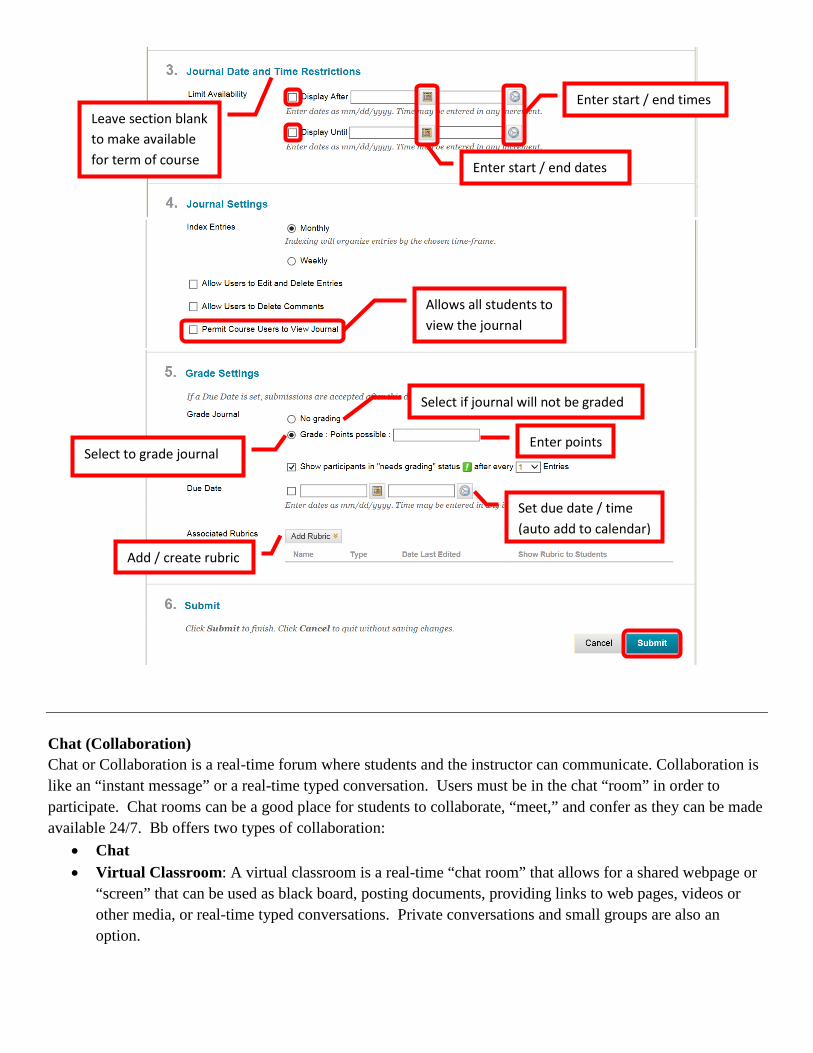
Chat (Collaboration) Chat or Collaboration is a real-time forum where students and the instructor can communicate. Collaboration is like an “instant message” or a real-time typed conversation. Users must be in the chat “room” in order to participate. Chat rooms can be a good place for students to collaborate, “meet,” and confer as they can be made available 24/7. Bb offers two types of collaboration:
• Chat • Virtual Classroom: A virtual classroom is a real-time “chat room” that allows for a shared webpage or
“screen” that can be used as black board, posting documents, providing links to web pages, videos or other media, or real-time typed conversations. Private conversations and small groups are also an option.
Leave section blank to make available for term of course
Enter start / end times
Enter start / end dates
Allows all students to view the journal
Select if journal will not be graded
Select to grade journal Enter points
Set due date / time (auto add to calendar)
Add / create rubric

Collaborations can be created from the content folder, or from the Course Management Menu (under Course Tools). From the Collaborations menu, select either one of the default links (Lecture Hall: Virtual Classroom or Office Hours: Chat) or “Create Collaboration Session” icon to create a new session. Complete the fields for “Session Name,” and enter the dates of availability (start / end date) for the session. Ensure that the session is available and that the “Yes” box is selected. Select the collaboration tool (chat or virtual classroom) from the pull down menu. Click “Submit” to create the collaboration. Click “Cancel” to cancel the creation of the collaboration session.
Collaborations require a Java plug-in. Students may be prompted to install the plug-in when accessing a collaboration. Most technical difficulties with collaborations are because the Java plug-in is not installed. Groups Groups allow students to collaborate as directed by the instructor. Groups can be useful for collaborative projects, assignments or presentations. Instructors can select the course tools available to the group, such as file exchange, blog, discussion board, Email, collaboration, etc. Groups can either be a Single Group or a Group Set (multiple groups set up for the same purpose such as a group project or presentation). Groups can be Self-
Enter session name
Select the available dates / times
Select to make available
Choose collaboration type
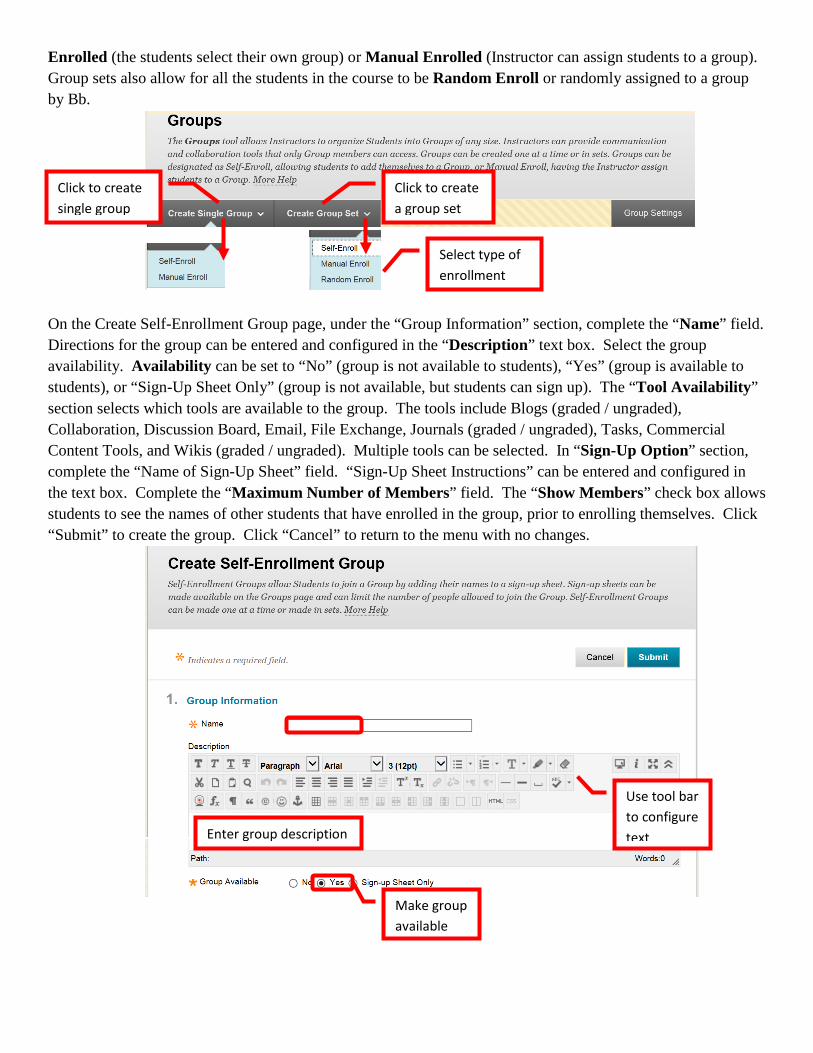
Enrolled (the students select their own group) or Manual Enrolled (Instructor can assign students to a group). Group sets also allow for all the students in the course to be Random Enroll or randomly assigned to a group by Bb.
On the Create Self-Enrollment Group page, under the “Group Information” section, complete the “Name” field. Directions for the group can be entered and configured in the “Description” text box. Select the group availability. Availability can be set to “No” (group is not available to students), “Yes” (group is available to students), or “Sign-Up Sheet Only” (group is not available, but students can sign up). The “Tool Availability” section selects which tools are available to the group. The tools include Blogs (graded / ungraded), Collaboration, Discussion Board, Email, File Exchange, Journals (graded / ungraded), Tasks, Commercial Content Tools, and Wikis (graded / ungraded). Multiple tools can be selected. In “Sign-Up Option” section, complete the “Name of Sign-Up Sheet” field. “Sign-Up Sheet Instructions” can be entered and configured in the text box. Complete the “Maximum Number of Members” field. The “Show Members” check box allows students to see the names of other students that have enrolled in the group, prior to enrolling themselves. Click “Submit” to create the group. Click “Cancel” to return to the menu with no changes.
Click to create single group
Click to create a group set
Select type of enrollment
Enter group description
Make group available
Use tool bar to configure text
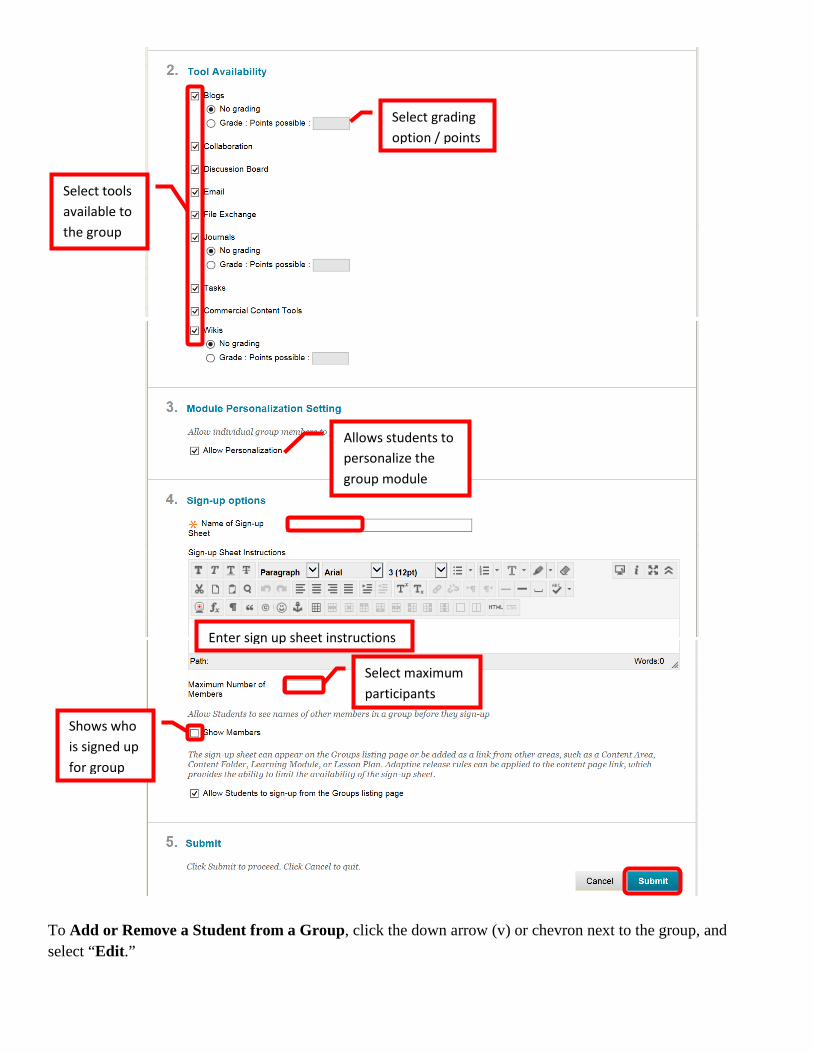
To Add or Remove a Student from a Group, click the down arrow (v) or chevron next to the group, and select “Edit.”
Select tools available to the group
Select grading option / points
Enter sign up sheet instructions
Select maximum participants
Shows who is signed up for group
Allows students to personalize the group module
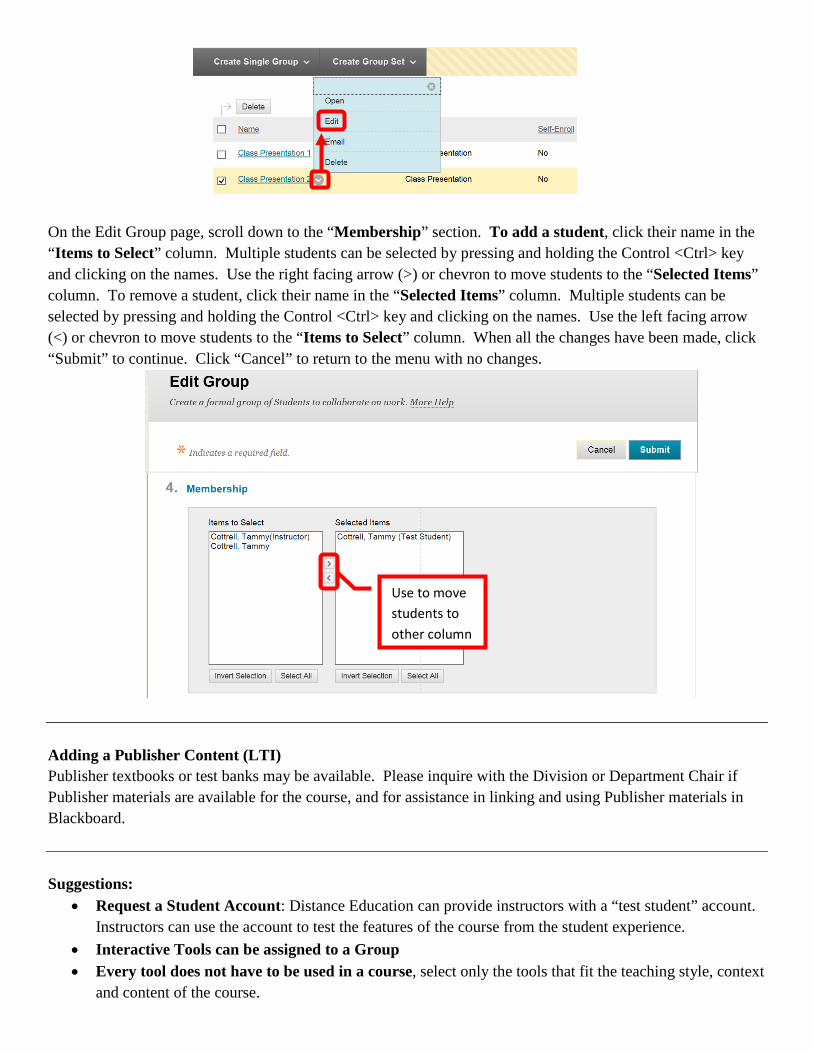
On the Edit Group page, scroll down to the “Membership” section. To add a student, click their name in the “Items to Select” column. Multiple students can be selected by pressing and holding the Control <Ctrl> key and clicking on the names. Use the right facing arrow (>) or chevron to move students to the “Selected Items” column. To remove a student, click their name in the “Selected Items” column. Multiple students can be selected by pressing and holding the Control <Ctrl> key and clicking on the names. Use the left facing arrow (<) or chevron to move students to the “Items to Select” column. When all the changes have been made, click “Submit” to continue. Click “Cancel” to return to the menu with no changes.
Adding a Publisher Content (LTI) Publisher textbooks or test banks may be available. Please inquire with the Division or Department Chair if Publisher materials are available for the course, and for assistance in linking and using Publisher materials in Blackboard.
Suggestions:
• Request a Student Account: Distance Education can provide instructors with a “test student” account. Instructors can use the account to test the features of the course from the student experience.
• Interactive Tools can be assigned to a Group • Every tool does not have to be used in a course, select only the tools that fit the teaching style, context
and content of the course.
Use to move students to other column
Help, Support and Resources On Blackboard: • From the Institution Home Page, find the “Blackboard Help” module. Click the link for “Blackboard
Tutorials and Help.” o A new page will open to the Blackboard On Demand Learning Center. Browse or search
for specific topics within the learning center. Short videos and written instructions are available for many topics.
o Distance Education also provides resources on the Blackboard Institution Home page. Locate the “Distance Education Support” module. Click on the appropriate link.
o All instructors have access to the Faculty Information Site in Blackboard. On the Institutions Home Page, find the “My Courses” module. Click on “Facilty Information Site…”.
o The Faculty Information Site contains resources for faculty using Blackboard for instruction. Explore the contents from the menu on the left side. Click “Faculty Resources” to access the resource folder.
o Blackboard Help is also available from the Course. Click the down arrow (v) or chevron next to “Help” in the Course Management menu. Click “Blackboard Help For Instructors.”
o A new page will open for the Official Blackboard Help site. Browse the Table of Contents or search for a topic or key words.
o From the Course Management Menu, select “Help”. Click “Video Tutorials.” o This will open a new page accessing the Blackboard On Demand Learning Center. Browse
or search for specific topics within the learning center. Short videos and written instructions are available for many topics.
Blackboard Online Help, Support and Resources
• Visit the Distance Education Website at www.sac.edu/disted for Blackboard information, help, support and resources.
Distance Education Office The Distance Education Office supports faculty and students in all areas of online learning and instruction. Contact or stop by the Distance Education Office at: EEmmaaiill:: ssaacc__ddiisstteedd@@ssaacc..eedduu PPhhoonnee:: ((771144)) 556644--66772255 SSaannttaa AAnnaa CCoolllleeggee CCeessaarr CChhaavveezz BBuuiillddiinngg,, RRoooomm AA--110011 11553300 WW.. 1177tthh SSttrreeeett
SSaannttaa AAnnaa,, CCaalliiffoorrnniiaa 9922770066
Distance Education Faulty Blackboard Guide by Santa Ana College Distance Education is licensed under a Creative Commons Attribution 4.0 License
BBllaacckkbbooaarrdd MMeeddiiaa GGuuiiddeelliinneess,, TTiippss,, aanndd TTrriicckkss Here are some recommendations, tips and tricks to help make multimedia content easier for students to access and view in Blackboard:
• A Student’s internet connections can affect the time and ability to open and view media files. For example a broadband connection can open a 10MB file in about 1 minute, while a 56K modem connection (there are still some out there) would take about 30 minutes downloading the same file.
• AAuuddiioo: files should not exceed 5MB. Wave (.wav) files are usually too large to be used in Blackbaord. MP3 files or other “compressed” formats are a better choice. Audio files must have a transcript.
• IImmaaggeess: files should not exceed 500k (the average should be 60k-100k). JPEG (.jpeg) and GIF (.gif) are recommended formats. Blackboard recommends an image size of 150 x 150 pixels and 480 x 80 pixels for banners. Larger images may require the student to scroll to view the entire image. Images pixel size can be adjust on the Image Creation page. Images must contain a description or tag.
• PPoowweerr PPooiinntt: slide shows should be limited to 10mb. To help keep the file small, use “compressed” images in the presentation. A PDF version of the presentation should be made available as an alternate format. 3 slides per page on a PDF is a common size.
• VViiddeeoo: files should not exceed 100MB. It is recommended to only add video directly to Blackboard when absolutely necessary. Links to external sites containing videos (e.g. NBCLearn, CNN, etc.) are preferred. Common video file types are Quicktime (.mov), Windows Media Viewer (.wmv), MP4 (.mp4), and Flash Video (.swf or .flv). Flash video is designed specifically for web delivery and is usually the preferred file type. Audio-video Interleave (.avi) files are not recommended as it is not suited for web delivery. Videos must be close captioned.
• AADDAA CCoommpplliiaannccee: Remember that all content media must comply with ADA guidelines. ADA guidelines can be found in the Faculty Information Site on Blackboard or by contacting DSPS on campus. DSPS can also provide compatibility consulting for the course. Contact DSPS at (714) 564-6295 for more information or assistance.
• AAddddiittiioonnaall RReessoouurrcceess: Educational Multimedia Services can provide assistance with all media (video, images, audio, etc.) and captioning. Contact Joe Pacino at [email protected] or (714) 564-6723.