Embed Size (px)
Citation preview

BUSINESS DEVELOPMENT SUITE
MOBILE INSTALLATION GUIDE Version 14R2

2
COPYRIGHT INFORMATION
© 2015 Thomson Reuters Elite. All rights reserved. Proprietary and confidential information of Thomson Reuters Elite. Disclosure, use or reproduction without the written authorization of Thomson Reuters Elite is prohibited.
The Thomson Reuters Elite product names used throughout are registered trademarks and belong to Thomson Reuters Elite. All other trademarks and registered trademarks are the property of their respective owners.

iii
TABLE OF CONTENTS
ABOUT THIS DOCUMENT ............................................................................................................. 1
INSTALLATION PRE-REQUISITES ............................................................................................... 2 Required Server Setup Options ................................................................................................. 3 Application Server Software Requirements ............................................................................... 3
MOBILE ARCHITECTURE OVERVIEW ......................................................................................... 5
INSTALLING BUSINESS DEVELOPMENT SUITE MOBILE ......................................................... 6 Install the Thomson Reuters Elite Site ...................................................................................... 6
Verify the Installation ........................................................................................................... 8 Install and Set Up the Elite Website Package ........................................................................... 9
Install the Root Website .................................................................................................... 10 Install the Elite Integration Framework .................................................................................... 16
Install the Framework Package ......................................................................................... 18 Verify Framework Request Service .................................................................................. 25
Install the Mobile Gateway Services ...................................................................................... 26 Install the Mobile Gateway Pacakage ............................................................................... 26 Verify the Mobile Gateway Service ................................................................................... 31 Define your Law Firm for Elite Mobile ............................................................................... 32 Set Up Your Firm’s Users ................................................................................................. 35
ELITE MOBILE CONFIGURATION CHANGES ........................................................................... 37 Change the web config settings ........................................................................................ 37
INSTALL ELITE MOBILE APP ON IPAD ..................................................................................... 38 Open the App on Your iPad ..................................................................................................... 40

1
ABOUT THIS DOCUMENT This guide is a straight-forward walkthrough to install all required components for BDS Mobile Gateway and the Server setup.
The table below shows what changes have been made to this document, when they were made, and who made them.
VERSION DATE UPDATED BY COMMENT
1.0 01/15/2015 Original Publication

2
INSTALLATION PRE-REQUISITES Note: Before you begin, verify that your firm has the correct licensing to install and use Business Development Suite Mobile. Your firm’s contract with Thomson Reuters Elite is the authoritative document regarding site licensing.
Recommended Configuration
Database Server
Application Server
x64 architecture or compatible
dual-core 1.5 GHz processor
16 GB RAM40 GB of available
hard disk space
x64 architecture or compatible
dual-core 1.5 GHz processor
16 GB RAM80 GB of available
hard disk space
Standalone Server(Application and
Database)
x64 architecture or compatible
dual-core 1.5 GHz processor
16 GB RAM80 GB of available
hard disk space
Minimum Configuration
Physical Host Virtual / Physical
Installing Business Development Suite Mobile requires at minimum a virtual/physical host that meets these requirements:
• One standalone server that houses both the application and the database
• 64-bit architecture or compatible dual-core 1.5 GHz processor
• 16 GB RAM
• 80 GB available hard disk space
The recommended configuration is a physical host composed of two servers:
SERVER PURPOSE SERVER REQUIREMENTS
Application • 64-bit architecture or compatible dual-core 1.5 GHz processor • 16 GB RAM • 40 GB available hard disk space
Database • 64-bit architecture or compatible dual-core 1.5 GHz processor • 16 GB RAM • 80 GB available hard disk space

MOBILE INSTALLATION GUIDE REQUIRED SERVER SETUP OPTIONS
3
REQUIRED SERVER SETUP OPTIONS
The platform is ideally installed upon a Windows Server with the Web Server Role (Internet Information Server (IIS) version 7.x - preferred 7.5).
The items below are required options, which must be to be selected in addition to the default settings included in the installation of Windows Server 2008 R2 Web Edition. Ensure the Server Roles listed below are added to the Windows Server Installation.
SETUP OPTION REQUIRED SETTINGS
Server Roles Web Server (IIS)
Common HTTP Features
Minimum requirements in IIS: • Static Content • Default Document • Directory Browse (this setting is optional) • HTTP Errors • HTTP Redirection
Application Development
• ASP.NET (will auto-select required roles) • .NET Extensibility • ISAPI Extensions • ISAPI Filters
Security • Basic Authentication • Windows Authentication (if providing Windows Domain Login
STS) • Digest Authentication (if providing Windows Domain Login STS—
useful if installed inside your domain) • Request Filtering
Performance • Static Content Compression • Dynamic Content Compression (optional based on available CPU
but utilization is highly recommended for remote connections)
APPLICATION SERVER SOFTWARE REQUIREMENTS
Install the following on your application server:
• Microsoft .NET Framework 4.5.
Download this from: http://www.microsoft.com/en-us/download/details.aspx?id=30653.
• ASP.NET
After downloading Microsoft .NET Framework, run the ASP.NET IIS registration tool:
1. Open the command prompt by running as administrator.
2. Navigate to the folder C:\Windows\Microsoft.NET\Framework64\v4.0.30319.
3. Run this command: aspnet_regiis.exe –i.

MOBILE INSTALLATION GUIDE APPLICATION SERVER SOFTWARE REQUIREMENTS
4
• If you are using SQL Server 2008 R2 SP1, you need to apply the following installs on the application server:
o SQL 2012 System CLR Types
Navigate to the toolsprerequisites folder and run SQLSysClrTypes.msi.
o SQL 2012 Report Viewer
Navigate to the toolsprerequisites folder and run ReportViewer.msi.
Note: You do NOT need to install these SQL Server prerequisites if you are running SQL Server 2012 or higher.
• Business Development Suite 14R2 or higher.

5
MOBILE ARCHITECTURE OVERVIEW Below is a graphical overview of the Business Development Suite Mobile architecture.
See the Business Development Suite Product System Requirements, version 14R2, for suggested mobile server layouts in relation to its placement inside or outside the firm’s firewall.

6
INSTALLING BUSINESS DEVELOPMENT SUITE MOBILE
INSTALL THE THOMSON REUTERS ELITE SITE
To install the Thomson Reuters Elite site, follow the steps below.
1. Copy setup.exe in the ISO image into a local folder, such as C:\BDSMobileInstaller. Your folder should look like this:
2. Run setup.exe. Click Yes on the confirmation pop-up[MG1].
MOBILE INSTALLATION GUIDE INSTALL THE THOMSON REUTERS ELITE SITE
7
3. Follow the instructions on the Configuration ToolInstaller wizard.
There should be no text prompts, etc.
4. After setup.exe finishes, the InstallShield Wizard Completed message is displayed:
5. Click Finish.

MOBILE INSTALLATION GUIDE INSTALL THE THOMSON REUTERS ELITE SITE
8
Navigate to C:\Program Files\Elite to view your folder structure, which should look similar to the one shown below.
VERIFY THE INSTALLATION
After the installation is finished, use the shortcut icon on the desktop to open the Elite Configuration Tool. Here is the initial view:

MOBILE INSTALLATION GUIDE INSTALL AND SET UP THE ELITE WEBSITE PACKAGE
9
Click File to view the About Thomson Reuters Elite Configuration Tool page. You can also exit the application from this page.
INSTALL AND SET UP THE ELITE WEBSITE PACKAGE
After you open the application for the first time, click the Install tab to view the available package categories.
The available categories are:
• Website Packages within this section will install a full website into IIS.
• Web Application These packages install a web app into a pre-installed website.
• Standalone These packages have no web dependencies and can be installed on their own.

MOBILE INSTALLATION GUIDE INSTALL AND SET UP THE ELITE WEBSITE PACKAGE
10
INSTALL THE ROOT WEBSITE
To install a web application, a root website must be available.
1. Click Website on the Install tab to display the packages in that category.
2. Click the EliteWebSite package to see the available package versions.
3. Click the 1.0 package, then click Install.
4. On the Browse For Folder pop-up, click Make New Folder and:
a. Create a C:\Elite folder
b. Create a subfolder of C:Elite called C:\Elite\EliteWebSite.
c. Click C:\Elite\EliteWebSite, then click OK.

MOBILE INSTALLATION GUIDE INSTALL AND SET UP THE ELITE WEBSITE PACKAGE
11
5. Complete the initial page of the wizard by providing the website address, name, and the login details for the App Pool as shown below.
6. Click Next to create or select your SSL certificate.

MOBILE INSTALLATION GUIDE INSTALL AND SET UP THE ELITE WEBSITE PACKAGE
12
If you do not have a certificate available, see the “Create a Self-Signed Certificate” section below to create a certificate, then return to this point in the procedure.
7. Click Choose SSL Certificate to view available certificates[MG2].
8. Select a certificate or accept the certificate shown by clicking OK. The certificate details are displayed.
9. Click Finish to complete the installation and configuration of the EliteWebSite package.

MOBILE INSTALLATION GUIDE INSTALL AND SET UP THE ELITE WEBSITE PACKAGE
13
After the package installation is finished, a Success message is displayed and details are shown in the output box at the bottom of the window.
Browse to https://localhost/default.html to display the website.

MOBILE INSTALLATION GUIDE INSTALL AND SET UP THE ELITE WEBSITE PACKAGE
14
CREATE A SELF-SIGNED CERTIFICATE
1. Navigate to IIS Manager.
2. Click the Server (IIS).
3. Double-click the Server Certificates icon on the right to display the Server Certificates page.
4. Click Create Self-Signed Certificate in the Actions menu on the right (or right-click and select the option from the context menu).

MOBILE INSTALLATION GUIDE INSTALL AND SET UP THE ELITE WEBSITE PACKAGE
15
5. Add a name for the certificate on the Specify Friendly Name page and click OK to create the certificate.
The new certificate is now listed on the Server Certificates page.

MOBILE INSTALLATION GUIDE INSTALL THE ELITE INTEGRATION FRAMEWORK
16
INSTALL THE ELITE INTEGRATION FRAMEWORK
Before installing the Elite Integration Framework package, you need to add http bindings to the Elite website.
1. Go to IIS Manager and find the Elite site.
2. Right-click Elite and select Edit Bindings.
3. The Site Bindings page should look similar to this:

MOBILE INSTALLATION GUIDE INSTALL THE ELITE INTEGRATION FRAMEWORK
17
4. Click Add and add an http binding with a different port (8080, for example).
5. Click OK on the Add Site Binding page to add your http binding to the site.
6. Click Close and exit IIS Manager.

MOBILE INSTALLATION GUIDE INSTALL THE ELITE INTEGRATION FRAMEWORK
18
INSTALL THE FRAMEWORK PACKAGE
The main Framework package is in the Web Application category so return to the Install tab of the Configuration Tool:
1. Click Web Application to display the available packages.
2. Click 1.0 under Q Framework.
3. Click Install to display the Browse For Folder pop-up.
4. Click Make New Folder and add a folder named QFramework under the Elite folder.

MOBILE INSTALLATION GUIDE INSTALL THE ELITE INTEGRATION FRAMEWORK
19
5. Select the Framework folder, then click OK.
6. If there are multiple websites installed on the system, you are prompted to select the site on which to install the application. Select Elite.
7. Select c:\Elite\QFramework as the folder to extract the files to.
8. Use the Windows Prerequisites page to verify that the necessary Windows roles and features are installed. Depending on whether you have a server or desktop operating system, this check may be automatic or manual.
• If you are on a server operating system, you can perform an automated check.
a. Click Check to automatically perform the validation on the current server setup.

MOBILE INSTALLATION GUIDE INSTALL THE ELITE INTEGRATION FRAMEWORK
20
You can follow the progress of the validation check.
b. After the check finishes, if there are any necessary roles or features that are not installed, click Install to install the missing components. If the button is not available, contact your local server administrator.
• If you are on a desktop operating system, the automated check cannot be carried out. You must manually verify that the appropriate roles and features are installed.

MOBILE INSTALLATION GUIDE INSTALL THE ELITE INTEGRATION FRAMEWORK
21
9. After you finish verifying the Windows roles and features, complete the Q Main Web Application page.
FIELD DESCRIPTION
Address The Alias used within IIS for the application.
App Pool Name The App Pool you want to run the application in. If a pool already exists, the application is added to that pool by default. No other app pool is created.
App Pool Identity The credentials to run the application under. Note: If you use an existing App Pool, the identity for that pool and all its applications will be changed to this identity.

MOBILE INSTALLATION GUIDE INSTALL THE ELITE INTEGRATION FRAMEWORK
22
10. Click Next to display the Framework and Designer Settings page. The default values in the Q Install Directory and Storage Root fields should be accepted in most installations.
11. Click Next to display the Select Initial Configuration page.

MOBILE INSTALLATION GUIDE INSTALL THE ELITE INTEGRATION FRAMEWORK
23
Click Import and, on the Browse for Folder pop-up, navigate to the BDS folder under CustomConfig:
Note: Be sure to select the BDS folder itself, not the CustomConfig folder. The custom dlls are in the lib and Shared folders as shown above. If you select CustomConfig, the installation will not complete successfully.
MOBILE INSTALLATION GUIDE INSTALL THE ELITE INTEGRATION FRAMEWORK
24
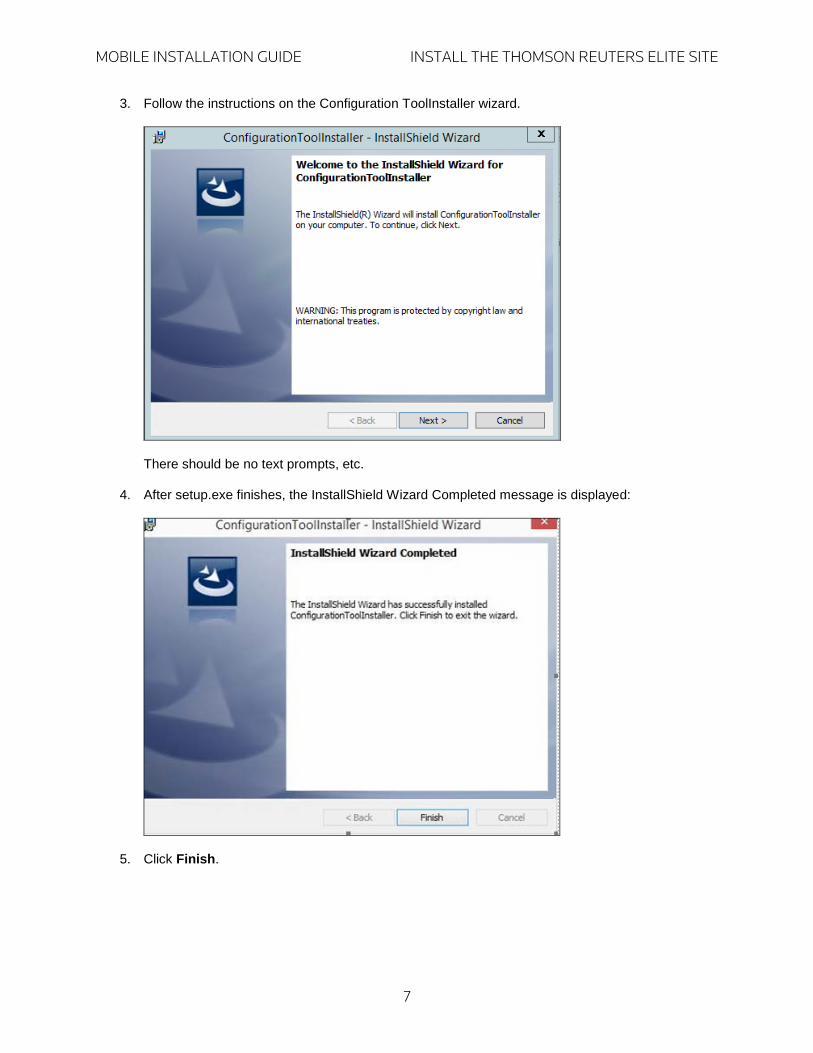
12. Click Next to display the Framework Encryption Settings page, which lets you configure the unique Salt and Password values for communication with the adapters.
You can add the values manually or click the GUID button on the right to set a unique GUID value. Click Finish to complete this process.
The installer carries out the relevant tasks to install and configure the package and displays a Success prompt after a successful completion.

MOBILE INSTALLATION GUIDE INSTALL THE ELITE INTEGRATION FRAMEWORK
25
VERIFY FRAMEWORK REQUEST SERVICE
Go to IIS Elite Site Framework application windows Right click Request.svc and select Browse.
Check in the browser the request service is up and running:

MOBILE INSTALLATION GUIDE INSTALL THE MOBILE GATEWAY SERVICES
26
INSTALL THE MOBILE GATEWAY SERVICES
INSTALL THE MOBILE GATEWAY PACAKAGE
To install the Mobile Services package, return to the Install tab of the Configuration Tool and select Web Application to display the available packages:
1. Click the version of the Mobile Services package that you want to install, then click Install at the bottom of the page.
Note: If there are multiple websites installed on the system, a prompt requests you to select the site where you want to install the application.
MOBILE INSTALLATION GUIDE INSTALL THE MOBILE GATEWAY SERVICES
27
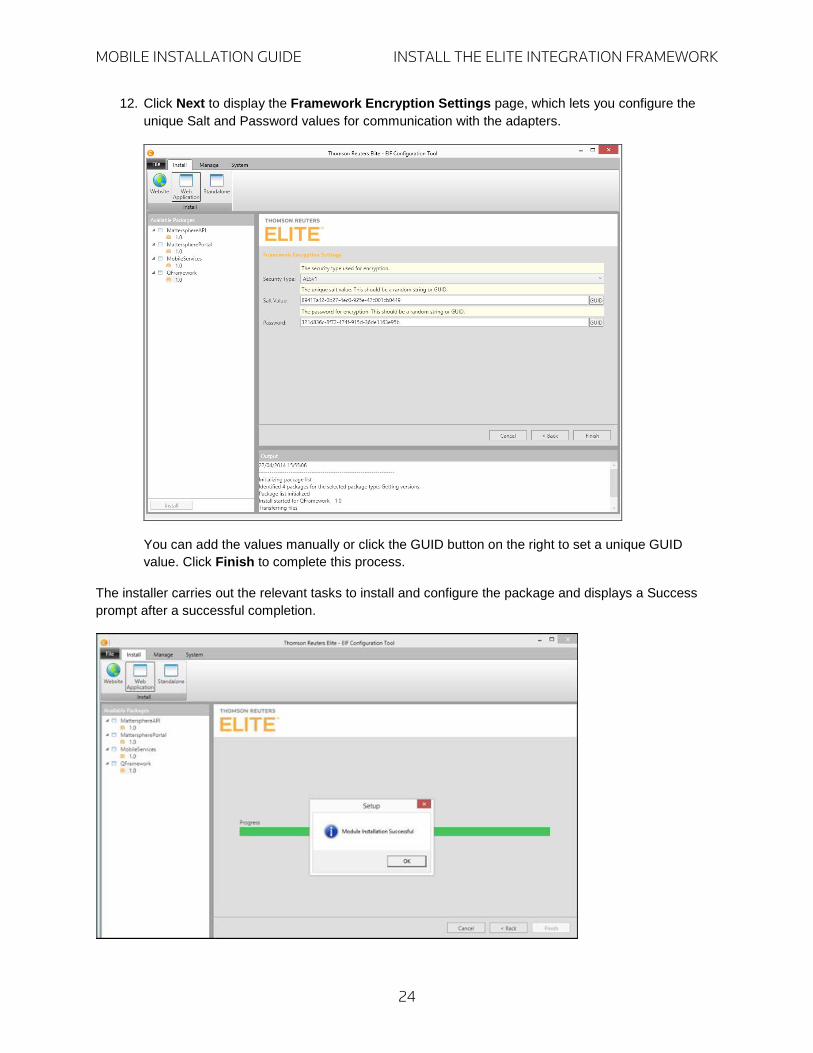
2. In response to the next prompt, select a folder to extract the package files to.
Note: If the installer finds multiple zip files containing the package files, you are prompted to select the correct zip file for the installation.
3. Complete the IIS Web Application Settings page.
FIELD DESCRIPTION
Address The Alias used within IIS for the application.

MOBILE INSTALLATION GUIDE INSTALL THE MOBILE GATEWAY SERVICES
28
FIELD DESCRIPTION
App Pool Name The App Pool you want to run the application from. If a pool already exists, the application is added to that pool by default. No other app pool is created.
App Pool Identity The credentials to run the application under. Note: If you use an existing App Pool, the identity for that pool and all its applications will be changed to this identity.
4. Click Next to display the Mobile Framework Settings page.
You may optionally add a description for the Authentication, then add values for the Authentication Mode, Pin Complexity, and Pin Timeout. Finally, get the Security Key value from the Discovery Gateway and add it here.

MOBILE INSTALLATION GUIDE INSTALL THE MOBILE GATEWAY SERVICES
29
5. Go to IIS and:
a. Open the list of Application Pools and verify the identity of the Elite, MobileServices, and QFramework app pools.
b. Change the authentication of QFramework.
MOBILE INSTALLATION GUIDE INSTALL THE MOBILE GATEWAY SERVICES
30
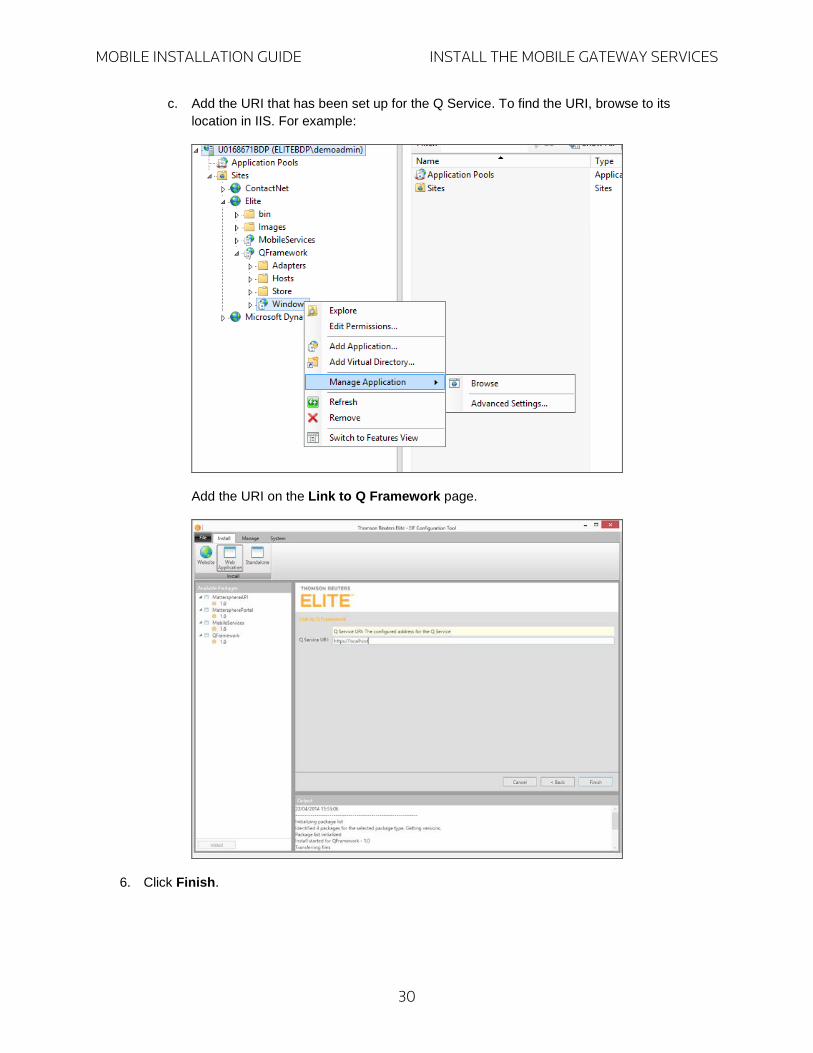
c. Add the URI that has been set up for the Q Service. To find the URI, browse to its location in IIS. For example:
Add the URI on the Link to Q Framework page.
6. Click Finish.

MOBILE INSTALLATION GUIDE INSTALL THE MOBILE GATEWAY SERVICES
31
The installer carries out the relevant tasks to install and configure the package and displays a Success prompt after a successful completion.
VERIFY THE MOBILE GATEWAY SERVICE
Go to IIS Elite MobileService. Right-click MobileFrameworkGateway.svc and select Browse.

MOBILE INSTALLATION GUIDE INSTALL THE MOBILE GATEWAY SERVICES
32
Check in the browser that the request service is up and running:
DEFINE YOUR LAW FIRM FOR ELITE MOBILE
Open your browser, navigate to https://services.elite.com/QuantumMobile/ and use the Elite Mobile admin credentials to log in.

MOBILE INSTALLATION GUIDE INSTALL THE MOBILE GATEWAY SERVICES
33
After logging in, click Home in the top right to display all the sites.
1. Click Create New and complete the fields as shown below.
• Substitute your organization’s name for testmobile.
• In the URL field, type https://localhost/mobileservices/MobileFrameworkGateway.svc, replacing localhost with your machine IP.
• Click Save.
2. Click Details for the law firm you just created.
The Law Firm Details Page is displayed.

MOBILE INSTALLATION GUIDE INSTALL THE MOBILE GATEWAY SERVICES
34
3. Click Display in the Installation Security Number Column and copy the Security Number.
4. Open the web.config file in C:\Elite\mobileservices (or wherever mobileservices is installed), and:
• Look for <add key=”SecurityKey” value=””
• Replace the preexisting value with the Security Number you just copied.
Note: Verify there are no leading/trailing spaces with the Security Number. Leading or trailing spaces will cause the application to fail!
• Save the file.
5. Return to the Law firm Details page. In the Law Firm Administrators section, click Create New.
6. Create a new admin user with a username and password. We will use this in the next step to log in to the firm.
7. Log off as the administrator.

MOBILE INSTALLATION GUIDE INSTALL THE MOBILE GATEWAY SERVICES
35
SET UP YOUR FIRM’S USERS
1. Log in as the Law Firm Administrator you created in steps 5-6 above.
After you log in, this screen is displayed:

MOBILE INSTALLATION GUIDE INSTALL THE MOBILE GATEWAY SERVICES
36
2. Verify the Auto Accept Request checkbox is selected.
3. Click Users.
4. On the Manage Users page, click Create New.
5. Create multiple users with email addresses. Be sure each email address is in the law firm’s domain (lawfirmname.com). In our example, the email address would be testmobile.com.

MOBILE INSTALLATION GUIDE INSTALL THE MOBILE GATEWAY SERVICES
37
ELITE MOBILE CONFIGURATION CHANGES
CHANGE THE WEB CONFIG SETTINGS
After installation, if you do not want to use SSL services, modify the web.config and service URI as shown below.
• Modify the web.config in the MobileServices endpoint as follows:
<webHttpBinding> <binding transferMode="Streamed"> <security mode="None" /> </binding>
</webHttpBinding> <basicHttpBinding>
<binding transferMode="Streamed"> <security mode="None" /> </binding> </basicHttpBinding>
<serviceBehaviors>
<behavior> <!-- To avoid disclosing metadata information, set the value below
to false and remove the metadata endpoint above before deployment --> <serviceMetadata httpGetEnabled="true" httpsGetEnabled="false" /> <!-- To receive exception details in faults for debugging purposes, set the value below to true. Set to false before deployment
to avoid disclosing exception information -->
<serviceDebug includeExceptionDetailInFaults="true" />
</behavior>
</serviceBehaviors>
• Update the serviceUri so it has no SSL and add the location of the Store to the storage root:
<requests hostingType="Proxy" serviceUri="http://localhost:8080/Framework/Windows/" /> <storage root="C:\Elite\framework\Store" />

38
INSTALL ELITE MOBILE APP ON IPAD 1. Tap the App Store icon on your iPad to open the App Store.
2. In the App Store, tap the search textbox on the top right corner. Use the keyboard to type elite mobile in the search box, then tap Search.

MOBILE INSTALLATION GUIDE INSTALL THE MOBILE GATEWAY SERVICES
39
The keyboard disappears as your search results, including the Elite Mobile app, display.
3. Tap Free next to Elite Mobile to start downloading the app.
After the download finishes, click Open.

MOBILE INSTALLATION GUIDE OPEN THE APP ON YOUR IPAD
40
4. Press the Home button on the iPad and find the Elite Mobile app.
OPEN THE APP ON YOUR IPAD
Now that the app is installed on your iPad, open the app.
1. Add an authorized email address where requested, on the first screen.
Add users on the Law Firm’s admin site.

MOBILE INSTALLATION GUIDE OPEN THE APP ON YOUR IPAD
41
2. Add the BDS user’s Windows authentication name (in the domain\username format) and password on the sign-in screen:
3. Finally, type a PIN on the Security PIN keypad that is displayed. For now, type 1111 as the PIN.

MOBILE INSTALLATION GUIDE OPEN THE APP ON YOUR IPAD
42
The app should now display, as shown below, on your iPad: