Embed Size (px)
Citation preview

6610 NE 181st Street, Suite #1, Kenmore, WA 98028 www.northshoredentalacademy.com425.408.9400
CLASS SYLLABUS
45Copyright © 2018
DAY 8READ CHAPTER 44 Dental Liners, Bases and Bonding Systems (p.750-765) Key Terms: Desiccate, Etchant (Etch), Eugenol, Obliterate, Sedative, Smear Layer Recall Questions: 1, 2, 3, 9, 12, 13, 14, and 15
READ CHAPTER 45 Dental Cements (p.766-778) Key Terms: Exothermic Reaction, Luting, Provisional, Retard, Spatulate Recall Questions: 2, 3, 4, 5, 8, 9 and 10
READ CHAPTER 46 Impression Materials (p.779-799) Key Terms: Alginate, Base, Catalyst, Centric, Extrude, Occlusal Registration, Viscosity Recall Questions: 1, 2, 3, 4, 5, 6, 7, 9, 17, 19, 20 and 23
READ CHAPTER 47 Laboratory Materials and Procedures (p.800-820) No Key Terms No Recall Questions
READ CHAPTER 50 Fixed Prosthodontics (p.854-873) Key Terms: Abutment, Bevel, Cast Post, Fixed Bridge, Full Crown. Gingival Retraction, Inlay, Onlay, Porcelain Fused to Metal (PFM), Pontic, Shade Guide, Unit, Veneer Recall Questions: 1, 3, 4, 8, 9, 10, 12, 13, 16, 17 and 19
READ CHAPTER 51 Provisional Coverage (p.874-883) Key Terms: Custom Provisional, Polycarbonate, Pre-Formed, Provisional Recall Questions: 1 through 10
READ CHAPTER 52 Removable Prosthodontics (p.884-899) Key Terms: Edentulous, Framework, Full Denture, Mastication, Partial Denture (RPD), Relining, Tori, Tuberosities Recall Questions:1, 3, 6, 16 and 19
READ CHAPTER 53 Dental Implants (p.900-909) No Key Terms No Recall Questions
READ CHAPTER 54 Endodontics (p.910-926) No Key Terms No Recall Questions
READ CHAPTER 56 Oral Maxillofacial Surgery (p.953-975) No Key Terms No Recall Questions
BE PREPAREDFOR NEXT WEEK’S TEST: - Key terms and know your recall questions
- Restorative materials, know resins, bases, liners and cements
- Impression materials
- Knowledged of composite, crown and bridge steps
- X-ray mount diagram
- Know your instruments and functions along with your knowledge of a slowspeed handpiece and highspeed handpiece
- Review restorative and perio charting
- Good things come to those who study
Subject to change
46Copyright © 2018
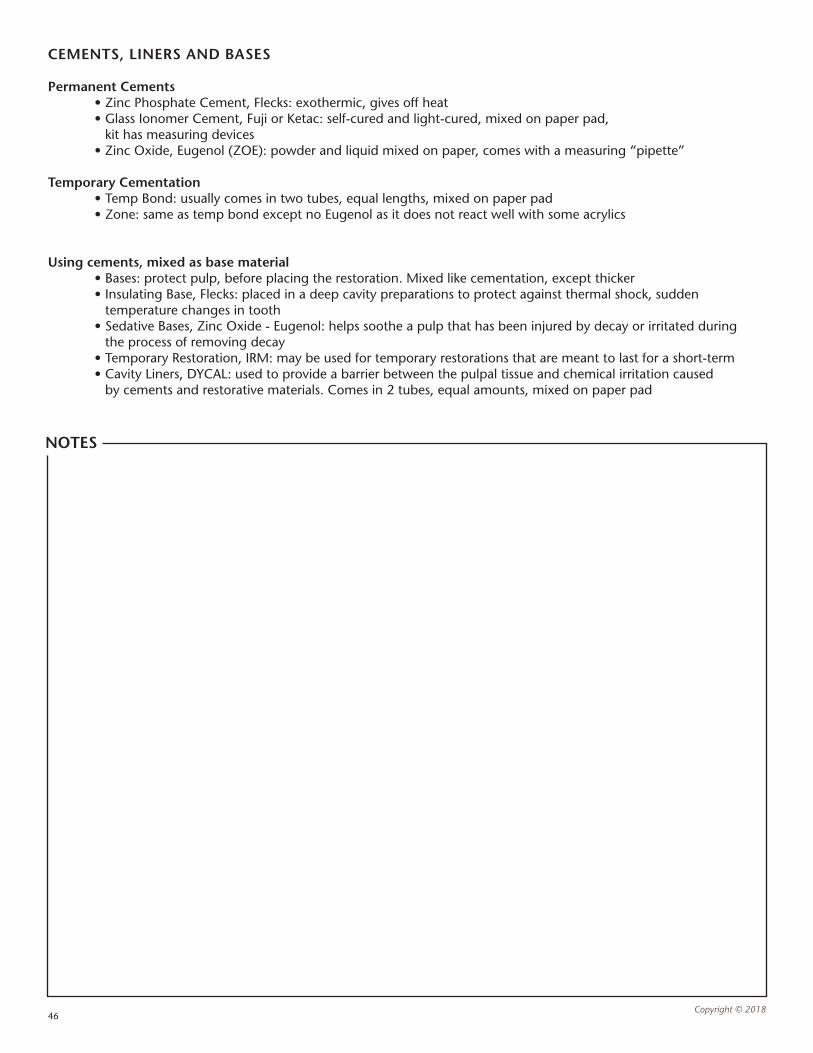
CEMENTS, LINERS AND BASES
Permanent Cements • Zinc Phosphate Cement, Flecks: exothermic, gives off heat • Glass Ionomer Cement, Fuji or Ketac: self-cured and light-cured, mixed on paper pad, kit has measuring devices • Zinc Oxide, Eugenol (ZOE): powder and liquid mixed on paper, comes with a measuring “pipette”
Temporary Cementation • Temp Bond: usually comes in two tubes, equal lengths, mixed on paper pad • Zone: same as temp bond except no Eugenol as it does not react well with some acrylics
Using cements, mixed as base material • Bases: protect pulp, before placing the restoration. Mixed like cementation, except thicker • Insulating Base, Flecks: placed in a deep cavity preparations to protect against thermal shock, sudden temperature changes in tooth • Sedative Bases, Zinc Oxide - Eugenol: helps soothe a pulp that has been injured by decay or irritated during the process of removing decay • Temporary Restoration, IRM: may be used for temporary restorations that are meant to last for a short-term • Cavity Liners, DYCAL: used to provide a barrier between the pulpal tissue and chemical irritation caused by cements and restorative materials. Comes in 2 tubes, equal amounts, mixed on paper pad
NOTES
47Copyright © 2018
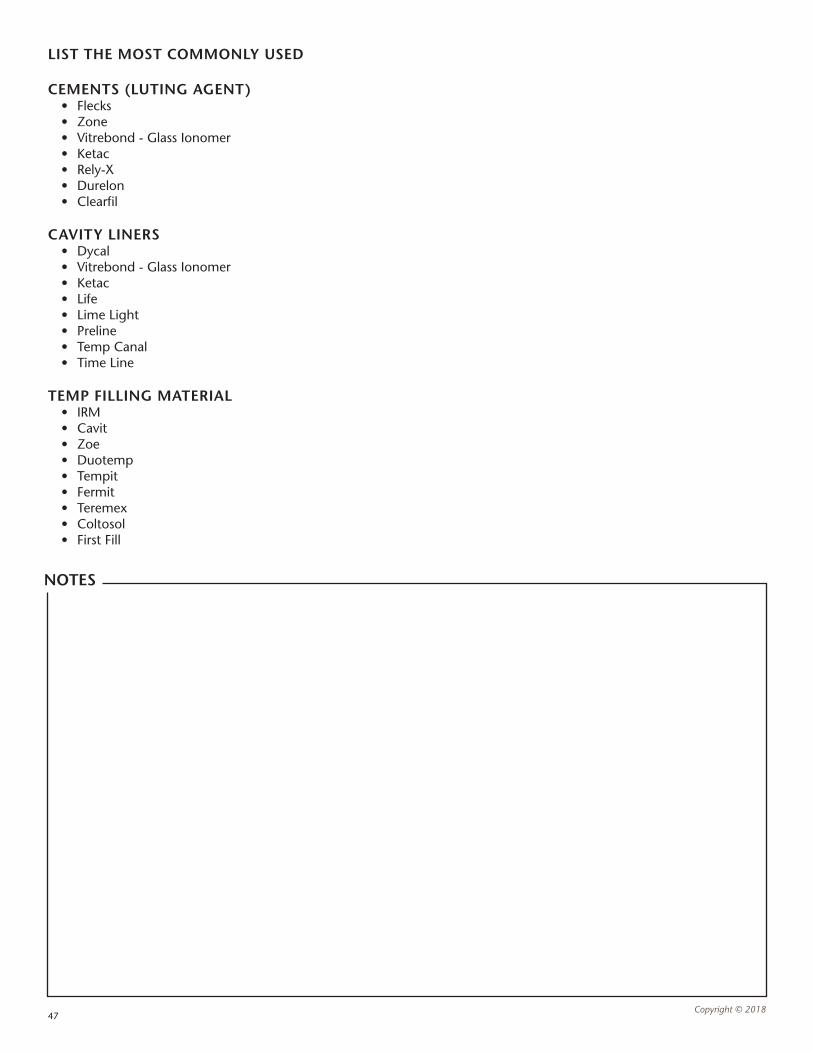
LIST THE MOST COMMONLY USED
CEMENTS (LUTING AGENT) • Flecks • Zone • Vitrebond - Glass Ionomer • Ketac • Rely-X • Durelon • Clearfil
CAVITY LINERS • Dycal • Vitrebond - Glass Ionomer • Ketac • Life • Lime Light • Preline • Temp Canal • Time Line
TEMP FILLING MATERIAL • IRM • Cavit • Zoe • Duotemp • Tempit • Fermit • Teremex • Coltosol • First Fill
NOTES
48Copyright © 2018
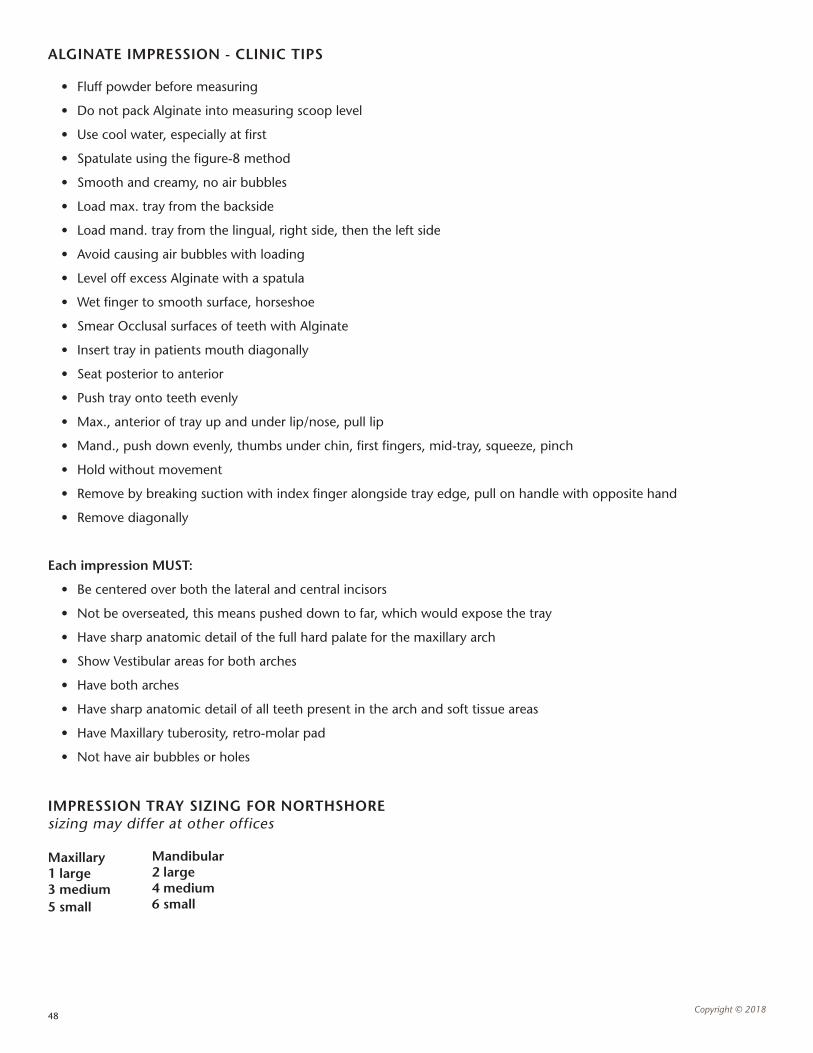
ALGINATE IMPRESSION - CLINIC TIPS
• Fluff powder before measuring
• Do not pack Alginate into measuring scoop level
• Use cool water, especially at first
• Spatulate using the figure-8 method
• Smooth and creamy, no air bubbles
• Load max. tray from the backside
• Load mand. tray from the lingual, right side, then the left side
• Avoid causing air bubbles with loading
• Level off excess Alginate with a spatula
• Wet finger to smooth surface, horseshoe
• Smear Occlusal surfaces of teeth with Alginate
• Insert tray in patients mouth diagonally
• Seat posterior to anterior
• Push tray onto teeth evenly
• Max., anterior of tray up and under lip/nose, pull lip
• Mand., push down evenly, thumbs under chin, first fingers, mid-tray, squeeze, pinch
• Hold without movement
• Remove by breaking suction with index finger alongside tray edge, pull on handle with opposite hand
• Remove diagonally
Each impression MUST:
• Be centered over both the lateral and central incisors
• Not be overseated, this means pushed down to far, which would expose the tray
• Have sharp anatomic detail of the full hard palate for the maxillary arch
• Show Vestibular areas for both arches
• Have both arches
• Have sharp anatomic detail of all teeth present in the arch and soft tissue areas
• Have Maxillary tuberosity, retro-molar pad
• Not have air bubbles or holes
IMPRESSION TRAY SIZING FOR NORTHSHOREsizing may differ at other offices
Maxillary1 large3 medium5 small
Mandibular2 large4 medium6 small
49Copyright © 2018
IMPRESSION REVIEW
Maxillary
1. Air pockets on tooth and gingival surfaces. Possible Causes: Water remaining in the impression during the pour-up Air pockets in the plaster mix itself due to it being too thick or too thin Over or under vibrating the plasters mix during the pour-up procedure
2. Overhang on the distal of the 2nd molar. Possible Causes: The tray used was too short Plaster had filled a void in the impression
3. Small amounts of excessive plaster on the teeth and gingival tissue. Possible Causes: Small voids in the impression itself Excessive water remaining in the impression itself
4. Overhang blocking tooth or gingival surfaces. Possible Causes: Base material flowed over the edge of the tray Inadequate vestibular roll on impression
Mandibular
1. Air pockets on tooth and gingival surfaces. Possible Causes: Water remaining in the impression during the pour-up Air pockets in the plaster mix itself due to it being too thick or too thin Over or under vibrating the plasters mix during the pour-up procedure
2. Inadequate impression of the retro-molar pad. Possible Causes: The impression tray used was too short Excessive water remaining in the impression during the pour-up procedure
3. Small amounts of excessive plaster on the teeth and gingival tissue. Possible Causes: Small voids in the impression itself Excessive water remaining in the impression itself
4. Broken Mandibular model. Possible Causes: A tray that was locked onto the model due to an excess of stone flowing over the edge of the tray because the mixture is too thin Excessive pressure when using the lab knife to separate the tray from the model
5. Overhang blocking tooth or gingival surfaces. Possible Causes: Base material flowed over the edge of the tray
50Copyright © 2018
RECOMMENDATIONS
1. When taking the impression, be sure to try the tray in patients mouth before mixing any material checking to confirm the there is adequate space behind the last tooth of the arch so that he distal surface can be clearly seen when the model is poured up.
2. Fill any voids in the impression with either more Alginate or play dough prior to pouring up the model to avoid small amounts of excess on study models. If there are still some small spots of excess plaster or stone, they can usually be removed gently with the tip of an instrument.
3. Before starting to pour-up the impression, make sure that you blow the excess water from the impression with an air/water syringe.
4. When seating the tray in the patient’s mouth, be sure to have the patient make an “ohhhh” sound and motion with their mouth so you have an adequate vestibular roll on the impression. IF the patient is unable to make this sound and movement, get the same result by gently pulling the patient’s lips around the excessive impression material. If you still do not have an adequate vestibular roll to prevent an overhang, you can create an artificial ledge by adding a line of play dough or rope wax to keep back any excess plaster or stone being used to create a base for the model.
5. When mixing the plaster to pour up the impression, be careful that the initial mix is not so thick that it cannot be “walked” around the impression and not so thin that it is visibly watery.
6. Once the model has been poured up, you can use a spatula to smooth off the top of the base as well as remove any excess material from the sides of the tray. A paper towel wrapped carefully around the edges will also help keep the material in places as well as making sure the mix for the base is not overly thin.
NOTES
51Copyright © 2018
IMPRESSION TRAY SIZING AT NORTHSHORE DENTAL ASSISTING ACADEMY This information can differ depending on the office
Maxillary1 Large3 Medium5 Small
Mandibular2 Large4 Medium6 Small
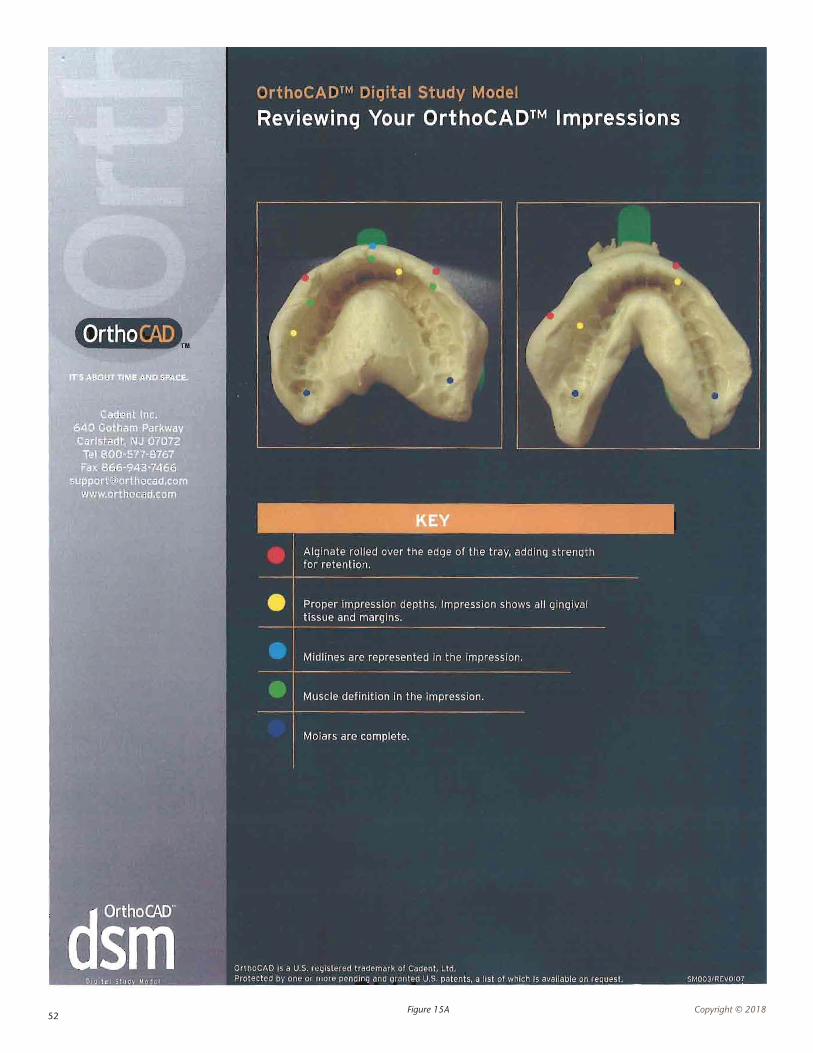
52Copyright © 2018Figure 15A
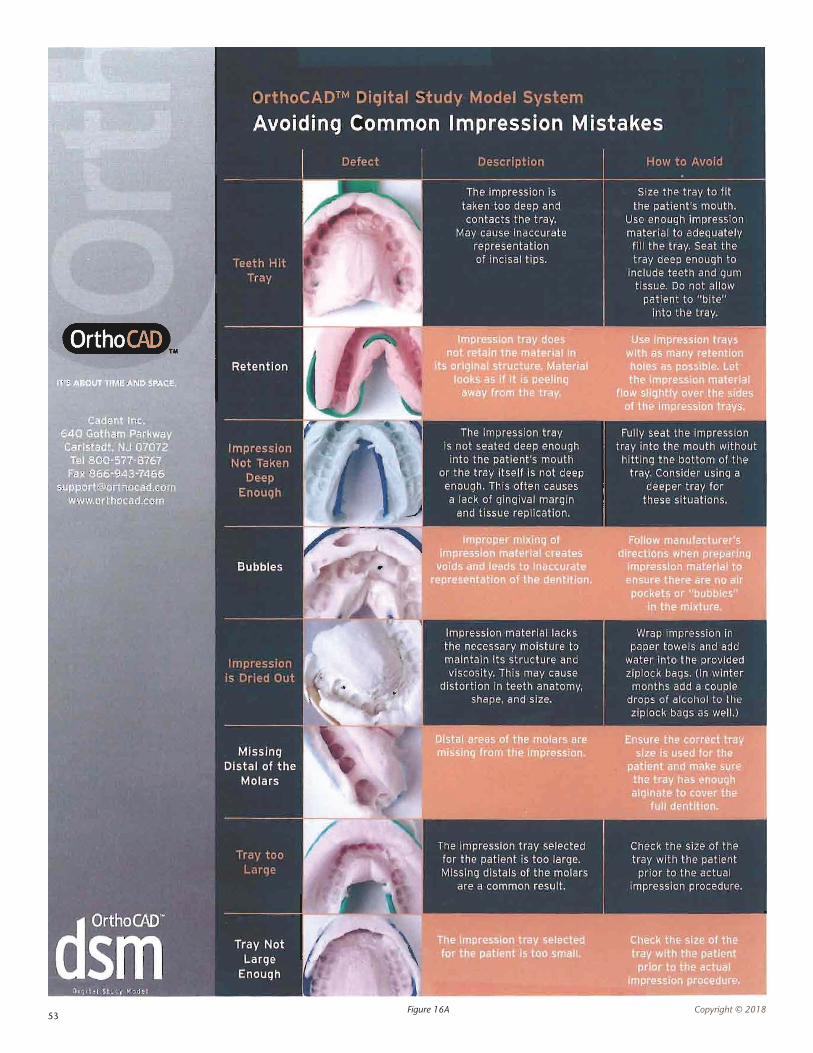
53Copyright © 2018Figure 16A
54Copyright © 2018
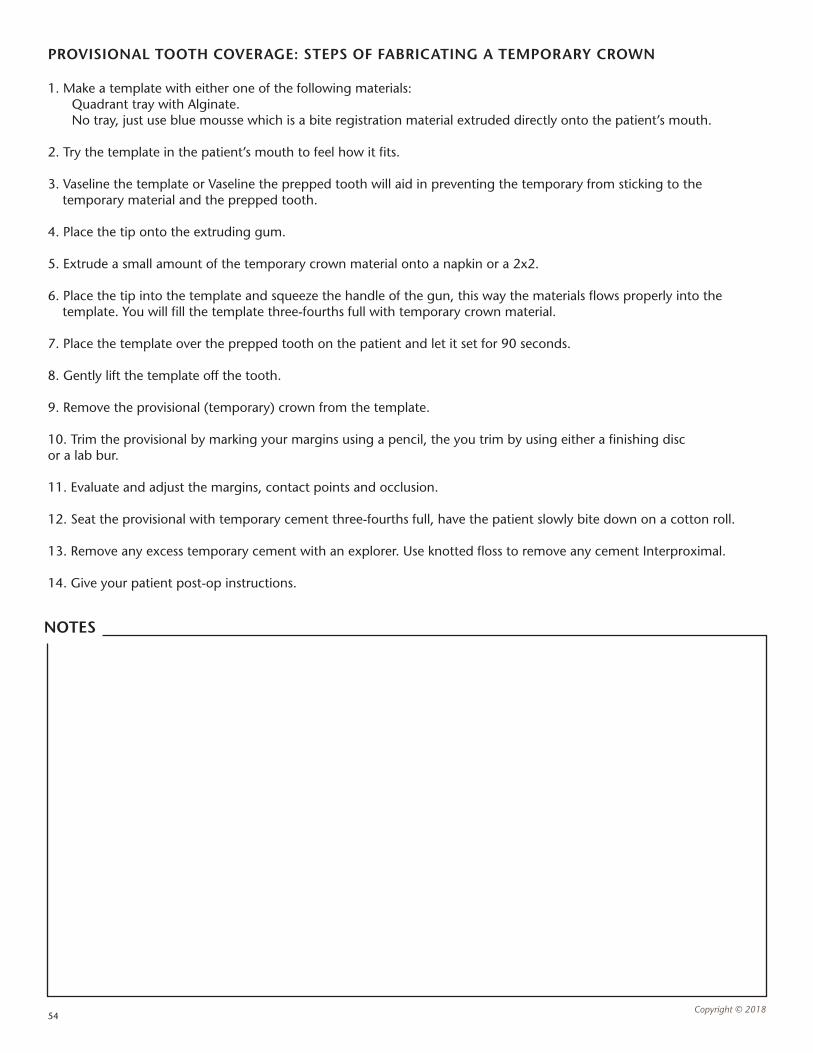
PROVISIONAL TOOTH COVERAGE: STEPS OF FABRICATING A TEMPORARY CROWN
1. Make a template with either one of the following materials: Quadrant tray with Alginate. No tray, just use blue mousse which is a bite registration material extruded directly onto the patient’s mouth.
2. Try the template in the patient’s mouth to feel how it fits.
3. Vaseline the template or Vaseline the prepped tooth will aid in preventing the temporary from sticking to the temporary material and the prepped tooth.
4. Place the tip onto the extruding gum.
5. Extrude a small amount of the temporary crown material onto a napkin or a 2x2.
6. Place the tip into the template and squeeze the handle of the gun, this way the materials flows properly into the template. You will fill the template three-fourths full with temporary crown material.
7. Place the template over the prepped tooth on the patient and let it set for 90 seconds.
8. Gently lift the template off the tooth.
9. Remove the provisional (temporary) crown from the template.
10. Trim the provisional by marking your margins using a pencil, the you trim by using either a finishing disc or a lab bur.
11. Evaluate and adjust the margins, contact points and occlusion.
12. Seat the provisional with temporary cement three-fourths full, have the patient slowly bite down on a cotton roll.
13. Remove any excess temporary cement with an explorer. Use knotted floss to remove any cement Interproximal.
14. Give your patient post-op instructions.
NOTES
55Copyright © 2018
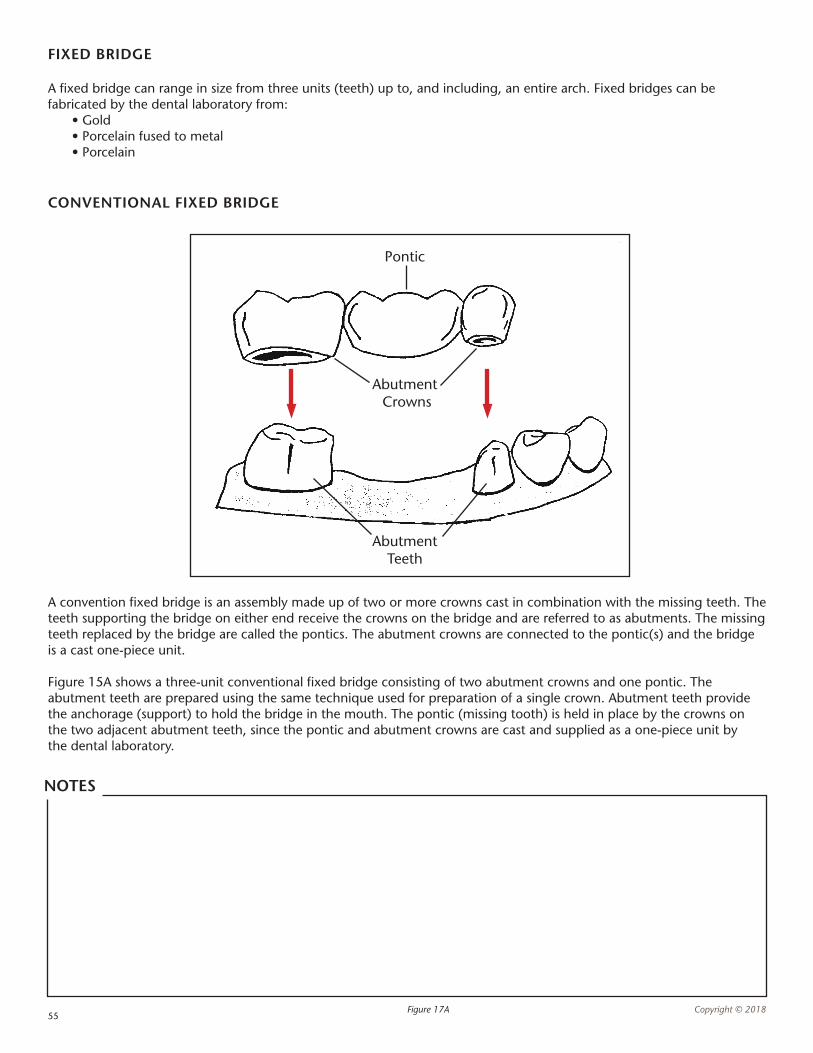
CONVENTIONAL FIXED BRIDGE
A convention fixed bridge is an assembly made up of two or more crowns cast in combination with the missing teeth. The teeth supporting the bridge on either end receive the crowns on the bridge and are referred to as abutments. The missing teeth replaced by the bridge are called the pontics. The abutment crowns are connected to the pontic(s) and the bridge is a cast one-piece unit.
Figure 15A shows a three-unit conventional fixed bridge consisting of two abutment crowns and one pontic. The abutment teeth are prepared using the same technique used for preparation of a single crown. Abutment teeth provide the anchorage (support) to hold the bridge in the mouth. The pontic (missing tooth) is held in place by the crowns on the two adjacent abutment teeth, since the pontic and abutment crowns are cast and supplied as a one-piece unit by the dental laboratory.
FIXED BRIDGE
A fixed bridge can range in size from three units (teeth) up to, and including, an entire arch. Fixed bridges can be fabricated by the dental laboratory from: • Gold • Porcelain fused to metal • Porcelain
Figure 17A
Pontic
Abutment Crowns
Abutment Teeth
NOTES
56Copyright © 2018
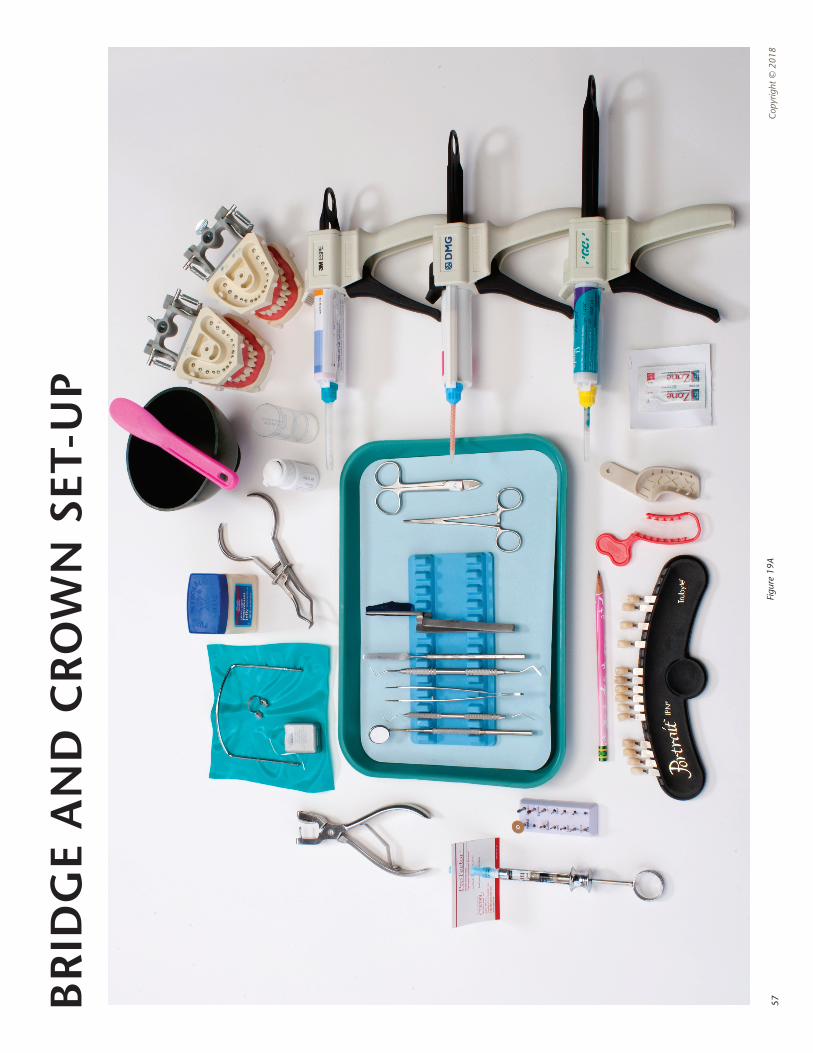
CROWN PREPARATION AND PROCEDURE SET-UP
The exact instruments used may vary from dentist to dentist, but a crown preparation procedure set-up will include the following:
n Dental explorer
n Cotton pliers
n Mouth mirror
n Syringe loaded with a needle and local anesthetic
n Gingival retraction cord
n Impression material
n Impression tray(s)
n Mixing pad and spatula
n Cotton rolls or Dri-Angles®
n Temporary crown materials
n Temporary cement
n Gauze
n Articulating paper
n Dental floss
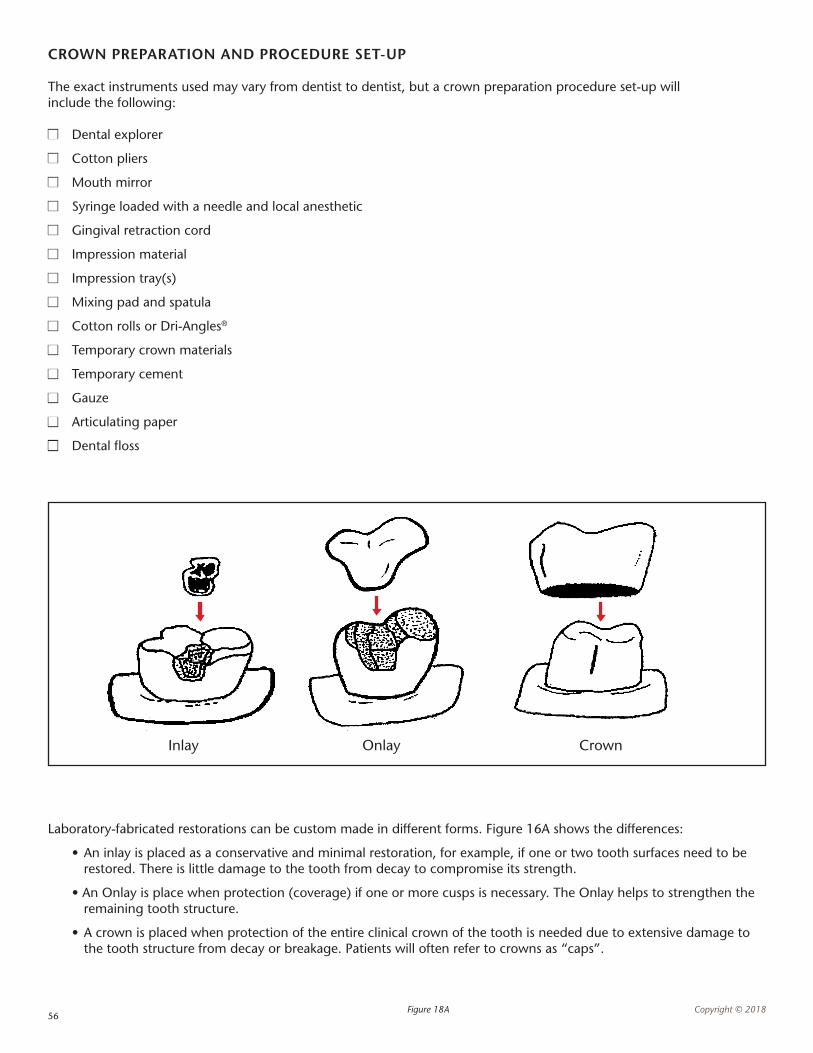
Laboratory-fabricated restorations can be custom made in different forms. Figure 16A shows the differences:
• An inlay is placed as a conservative and minimal restoration, for example, if one or two tooth surfaces need to be restored. There is little damage to the tooth from decay to compromise its strength.
• An Onlay is place when protection (coverage) if one or more cusps is necessary. The Onlay helps to strengthen the remaining tooth structure.
• A crown is placed when protection of the entire clinical crown of the tooth is needed due to extensive damage to the tooth structure from decay or breakage. Patients will often refer to crowns as “caps”.
Figure 18A
Inlay Onlay Crown
57C
opyr
ight
© 2
018
BR
IDG
E A
ND
CR
OW
N S
ET-U
P
Figu
re 1
9A
58Copyright © 2018
RESTORATIVE DENTISTRY - CROWN AND BRIDGE RESTORATIONS
Cast Restorations: known as crown and bridge restorations, designed to restore damaged teeth and replace missing teeth.
Types of Cast Restorations: • Inlay: covers inside part of the Occlusal and proximal surfaces, no cusps involved. • Onlay: covers all or most of the Occlusal and proximal surfaces, one or more cusps involved. • Crown: also know as full crown. It completely covers the anatomic crown of individual teeth to restore to its original contour and function. • Porcelain Jacket: very thin shell covered by layers of porcelain to math the shape and shading of a natural tooth. Used on anterior teeth and are esthetically pleasing, however, they lack the strength for use on posterior teeth. • Fixed Bridges: a cast restoration that replaces one or more missing adjacent teeth in the same arch. It is referred to as “fixed” because it is cemented in place and cannot be removed from the teeth or mouth. • Veneers: thin layer of tooth-colored material that is bonded or cement to the prepared too surface, usually used to improve appearance of facial or anterior teeth.
Fixed Bridges are Described by Three Components: • Abutments: natural teeth that server to support the replacement tooth or teeth, located usually at either end of the bridge. • Pontics: the artificial tooth that replaces the missing tooth. There is one Pontic for each missing tooth. • Units: the number of pontics and abutments. For example, a three unit bridge consists of two abutments and one Pontic.
NOTES

59Copyright © 2018
DENTAL IMPLANTS
What are dental implants?An implant is a hollow titanium screw, surgically placed into the jaw bone, that a tooth or multiple teeth can be built upon.
How do they work?The implant is not recognized as foreign by the body and will be untreated into the bone (the bone will grow into it). Once integrated, the implants is solid as bone and can support a tooth.
How longs does that take?For a Maxillary arch, 6 months of surgical healing. Mandibular arch, 3 months of surgical healing. One to four weeks of healing after a soft-tissue un-covery.
Who can get them?Patients for whom rehabilitation will confer long term benefit to the patients and will produce superior result to other alternative treatments such as bridges an dentures.
Who should NOT get them?Patients compromised by elective surgery or infections such as heart failure, mitral stenosis, uncontrolled diabetes, blood dyscrasisas, etc. Someone that cannot maintain high standards of oral hygiene. Patients with uncertain bone integration (recent irradiation of the jaws). Heavy smokers, decreased resistance to infection and diminished oral healing.
How much do they cost?Surgical placement varies, depends on bone grafting, soft tissue grafting, sinus lifting, etc.
Abutment:
Crown:
IMPLANT PARTS
Implant Fixture: the part of the implant that is surgically place in to the jaw bone.
Healing Cap: a cap placed on the implant to protect the top of the implant after it has been uncovered (exposed through the gingival tissue). The healing cap helps shape the gum tissue while it is healing, before the abutment and crown are placed.
Implant Abutment: the part of the implant that connects the fixture to the crown (usually held in place with a torque tightened screw).
Loading: the term used when an abutment and crown (tooth) are placed on the implant fixture.
Immediate Loading: when an abutment and crown (tooth) are placed on the implant fixture on the same day the fixture is placed (surgery day). Pros and cons are the relation of vital structures. NOTES
60Copyright © 2018
UNDERSTANDING ORAL SURGERY
Oral and Maxillofacial Surgery: diagnosis and surgical treatment diseases, injuries and defects of the oral and Maxillofacial regions.
Specialized Needs: Patient record, current medical history, radiographs, pain control methods to be used. Signed consent indicating the patient understand the procedure and is aware of possible complications.
Oral Surgery Instrumentation: instruments are designed to separate the tooth from the socket, retraction, loosen, elevate the tooth from the socket. They must be heat sterilized.
COMMONLY USED INSTRUMENTS
Straight Elevators: primary use its to loosen and lift the tooth from the socket. Common elevators are the straight, apex and cryer. Each comes in small and large referring to he tip of the instrument.
Extraction Forceps: used to rock the tooth so the tooth can be removed from the alveolar bone, after they have been loosened with the elevator. Many shapes and sizes designed to grasp teeth with different crown shapes, root configurations and locations in the mouth.
Universal Forceps: Maxillary, 150. Mandibular, 151.
Surgical Curette: double-ended scooped-shaped. Used to debride extraction socket.
Rongeur: used to trim sharp projections in the alveolar bone, common used after multiple extractions.
Root Tip Picks: used to retrieve the tip of a root that has fractured off in the socket.
Bone Files: has large cutting grooves, used to smooth the surface of the bone after the rongeur has between used.
Scalpel/Bard Parker: surgical blade attache dot a handler is used to make precise incisions into soft-tissue.
Hemostat: has beaks (both curved and straight) with serrations and a locking mechanism on the handle that makes it useful for grasping and holding an object or tissue.
Needle Holder: resembles hemostat, but has a smaller straight (only beaks, locking mechanism, holds suture needle firmly.
Suture Scissors: heavier, straight or curved blades used to cut sutures.
Periosteal Elevators: used to reflect tissue from the bone.
Retractors: usually know as “Minnesota Retractor” used to retract cheeks and soft-tissue.
Tissue Forceps: resemble tweezers, they have serrated tips to grasp tissue.
Sutures: used to close the surgical site, usually silk. Common size is 4/0, 18 inches long.
Surgical Suction Tip: small in diameter, long, usually curved, both disposable and autoclavable.
Surgical Scissors: fine, straight or curved blades, used to cut tissue.
61Copyright © 2018
SURGICAL TERMINOLOGY
Impacted Tooth: one that had not erupted normally due to coverage by the bone and/or tissue.
Bony Impaction: a tooth whose eruption is blocked by both the bone and the tissue.
Soft Tissue Impaction: a tooth whose eruption is blocked only by gingival tissue.
Alveolar Bone: the part of the jaw bone in which the roots of the teeth are embedded.
Alveolar Socket: the cavity left in the alveolar bone where the roots of the tooth was held in position.
Edentulous: having lost all natural teeth.
Alveolplasty: surgically contouring the remaining bone and soft tissue to properly contour the edentulous ridge.
Impacted Tooth: one that had not erupted normally due to coverage by bone and/or tissue.
Bony Impaction: a tooth whose eruption is blocked by both bone and tissue.
Soft Tissue Impaction: a tooth whose eruption is blocked only by gingival tissue.
Dry Socket (Alveolitis): a very painful condition that usually occurs 2 to 4 days after the removal of a tooth. Possible causes can be inadequate blood supply, infection, trauma, or dislodging a clot.
Hemostatic: pertaining to the control of bleeding.
Hemodent: a product commonly used to stop minor bleeding.
Surgicell: a product of mesh like material placed on a wound to stop minor bleeding.
Silver Nitrate Sticks: matchstick-like in appearance, dabbed onto wound for minor bleeding.
NOTES
62Copyright © 2018
CONTROL OF BLEEDING
Immediately after an extraction, the Doctor you assist will place a 2x2 gauze pad folded over the socket, (extraction site), to control bleeding and to promote a clot formation for the healing process. The pack must stay in place to control the bleeding. The assistant will give the a patient a list of postoperative, (after surgery), instructions:
• Keep the pack in place for at least another 30 minutes. If the pack is removed to soon, it could disturb the clot formation and may increase bleeding
• If the bleeding continues and does not stop, call the dental office
• Do not disturb the clot with your tongue or by rinsing your mouth vigorously
• Restrict strenuous work or physical activity for that day.
CONTROL OF SWELLING
After extensive surgery, expected swelling can be controlled with cold packs and the following Post-Op instructions:
• If recommended by the Dentist, take ibuprofen before and after surgery to help prevent and control swelling
• During the first 24 hours, place a cold pack on a 20 minute on/off cycle
• After the first 24 hours, apply external heat to the area of the face to enhance circulation in the tissues and to promote healing
• After the first 24 hours, being gently rising your mouth with a warm saline solution (salt water) every 2 hours to promote healing
Once a tooth has been extracted, healing begins immediately, with the blood forming a clot. The clot is important because it protects the wound and will later replaced by granulation tissue and ultimately bone failure of the healing process can result in Alveolitis, (dry socket).
NOTES
63Copyright © 2018
CROWN PREP AND/OR BRIDGE STEPS AND INSTRUMENTS (The Cord Packing instrument is used during this procedure, there are also two ways to take the final impression)
NOTE: Always check the patient health history
Procedure Instruments
1. Assistant will hand to the Doctor. Mirror and explorer
2A. Assistant applies topical. 2x2, cotton swab and topical anesthetic
2B. Doctor will anesthetize. Anesthetic syringe, carpule, needle, needle shield (NOTE: when grabbing a needle, remember for Maxillary - blue, Mandibular - yellow. Also, look at the patient’s health history for which type of carpule you will use. Should you use a vasoconstrictor?)
3. Assistant will pick the shade. Shade guide
4. Assistant will make a template before the Doctor preps the tooth. Alginate, poly vinyl or bite registration material
5. Assistant places rubber dam. Rubber dam setup
6A. Doctor will prep the tooth. High-speed hand-piece, slow-speed hand-piece and burs
6B. Doctor will evaluate for buildups, pins or posts. Buildup materials, pins and posts
7. Doctor or assistant will remove rubber dam. Rubber dam forceps and rubber dam scissors
8. Doctor or assistant will place retraction cord around Cord packing instrument and retraction cord prepped tooth. Wait approximately 5 to 10 minutes for the Note only take as much retraction cord as you can fit cord to retract the tissue from the tooth. around your finger once, start on the buccal surface of the tooth with both ends meeting)9. Doctor will remove the retraction cord. Mirror and cotton pliers
All in One Final Impression Procedure
10. Assistant will hand the Doctor light body impression material. Triple tray, light body impression material and Doctor will place light body impression material around the heavy body impression material area of the prepped tooth. The assistant will load both sides of the triple tray with heavy body impression material and then instruct the patient to bite down for approximately 5 minutes.
11. Assistant will remove the impression for the Doctor Lab prescription to evaluate. Assistant will then prepare the Impression for the lab to pick up.
12. Assistant will fabricate a temporary crown. Temporary crown material, pencil and hemostats
13. Assistant or the Doctor will adjust the occlusion Articulating ribbon, forceps, hemostats, or a if necessary. slowspeed, burs or polishing discs
14. Assistant will seat the temporary crown with temporary cement. Spatula, temporary cement and a mixing pad
*Please note that there is another way to do a final impression and that is a 3-step procedure (NOTE: you will not be tested on these steps this is just for you to understand that there are a couple of different ways to get the same result):
Assistant takes separate impression of the opposing arch. Alginate impression of the opposing arch
Assistant takes bite registration. Blue mousse or poly vinyl material
Assistant will hand the Doctor light body impression material. Full mouth tray, light body impression material Doctor will place the light body impression material around and heavy body impression material and the area of the prepped tooth. The assistant will load a full appropriate trays (NOTE: tips are color coded to match mouth tray with heavy body impression material and hand impression material) to Dr. to place into the patients mouth then either the Doctor or the Assistant will hold the impression in the patients mouth for approximately 4 minutes.
Post-Op Instructions:
- Be careful while you are numb - Pull out to the side while flossing - Avoid food and drink while you are numb - Avoid sticky or crunchy foods while healing
NOTE: Write chart notes