Embed Size (px)
DESCRIPTION
beamer tutorial
Citation preview

A Beamer Quickstart

Table of ContentsA Beamer Quickstart..........................................................................................................................................1
Contents...............................................................................................................................................................2
1 Prologue...........................................................................................................................................................4How to read this Quickstart.....................................................................................................................4Acknowledgment.....................................................................................................................................4
2 What is new.....................................................................................................................................................6
3 A bare-bones sample.......................................................................................................................................7
4 Compiling into pdf..........................................................................................................................................9
5 A complete presentation...............................................................................................................................10
6 Themes...........................................................................................................................................................12Standard Beamer themes........................................................................................................................13Inner and outer themes, etc....................................................................................................................14
7 Customizing themes......................................................................................................................................157.1 The structure color..........................................................................................................................157.2 Specifying RGB colors...................................................................................................................167.3 Direct use of the structure color......................................................................................................177.4 Changing the itemization markers..................................................................................................177.5 Rounded boxes and shadows..........................................................................................................187.6 Getting rid of the navigation icons..................................................................................................197.7 Adding an informative footline.......................................................................................................20
8 UMBC themes...............................................................................................................................................23The umbc1 theme...................................................................................................................................23The umbc2 theme...................................................................................................................................23The umbc3 theme...................................................................................................................................24The umbc4 theme...................................................................................................................................25Customizing the umbc themes...............................................................................................................25
9 The UMBC footline.......................................................................................................................................27Redefining the footline..........................................................................................................................28Dynamic footlines..................................................................................................................................28
10 The UMBC tribullet markers....................................................................................................................29
11 UMBC boxes................................................................................................................................................31
12 The title page...............................................................................................................................................34Titlepage elements.................................................................................................................................35
About the [plain] qualifier...............................................................................................................36
A Beamer Quickstart
i

Table of Contents13 Including graphics......................................................................................................................................37
Converting graphics...............................................................................................................................37eps to pdf.........................................................................................................................................38All other conversions.......................................................................................................................38
14 Overlays.......................................................................................................................................................39
15 Navigating with hyperlinks........................................................................................................................41Returning to the calling page.................................................................................................................42
16 Theorems and such.....................................................................................................................................44
17 Splitting a slide into columns.....................................................................................................................47Vertical alignment..................................................................................................................................48Vertical alignment with images.............................................................................................................49
18 Vertical alignment within slides................................................................................................................53Vertical alignment in individual slides..................................................................................................53Vertical alignment for the entire document...........................................................................................55
19 The default font size....................................................................................................................................56
20 The default text color..................................................................................................................................57
21 The structure font and font themes...........................................................................................................58Font themes............................................................................................................................................61
22 Shrinking to make things fit.......................................................................................................................64
23 Changing margin widths............................................................................................................................65
24 All about colors...........................................................................................................................................66Named colors from the dvips package...................................................................................................66Named colors from the SVG package...................................................................................................67Blending colors......................................................................................................................................69Defining your own colors......................................................................................................................69
25 Colored text, highlights and boxes............................................................................................................71
26 Setting a slide's background......................................................................................................................73Setting the background to a solid color..................................................................................................73Gradient colors in the background.........................................................................................................74Grid superimposed on background........................................................................................................74An image for a background....................................................................................................................75
27 Acrobat Reader usage.................................................................................................................................78Acrobat Reader usage under Linux........................................................................................................78Acrobat Reader usage on other systems................................................................................................78
A Beamer Quickstart
ii

Table of Contents28 Xpdf usage...................................................................................................................................................79
Running Xpdf inside a window.............................................................................................................79Running Xpdf in the full-screen mode...................................................................................................80Advanced usage.....................................................................................................................................80Where to get Xpdf..................................................................................................................................80
29 Beamer on the Web.....................................................................................................................................82Beamer's home on the web....................................................................................................................82Screenshots............................................................................................................................................82A very brief introduction.......................................................................................................................82Advanced tutorials.................................................................................................................................82
30 A gallery of Beamer slides..........................................................................................................................83
31 Complete set of Beamer themes.................................................................................................................95Beamer theme AnnArbor.......................................................................................................................95
Beamer theme Antibes....................................................................................................................95Beamer theme Bergen.....................................................................................................................96Beamer theme Berkeley..................................................................................................................96Beamer theme Berlin.......................................................................................................................96Beamer theme Boadilla...................................................................................................................96Beamer theme CambridgeUS..........................................................................................................97Beamer theme Copenhagen.............................................................................................................97Beamer theme Darmstadt................................................................................................................97Beamer theme Dresden...................................................................................................................97Beamer theme Frankfurt..................................................................................................................98Beamer theme Goettingen...............................................................................................................98Beamer theme Hannover.................................................................................................................98Beamer theme Ilmenau....................................................................................................................98Beamer theme JuanLesPins.............................................................................................................99Beamer theme Luebeck...................................................................................................................99Beamer theme Madrid.....................................................................................................................99Beamer theme Malmoe...................................................................................................................99Beamer theme Marburg.................................................................................................................100Beamer theme Montpellier............................................................................................................100Beamer theme PaloAlto.................................................................................................................100Beamer theme Pittsburgh..............................................................................................................100Beamer theme Rochester...............................................................................................................101Beamer theme Singapore...............................................................................................................101Beamer theme Szeged...................................................................................................................101Beamer theme Warsaw..................................................................................................................101Beamer theme boxes.....................................................................................................................102Beamer theme default....................................................................................................................102
Index.................................................................................................................................................................103
A Beamer Quickstart
iii
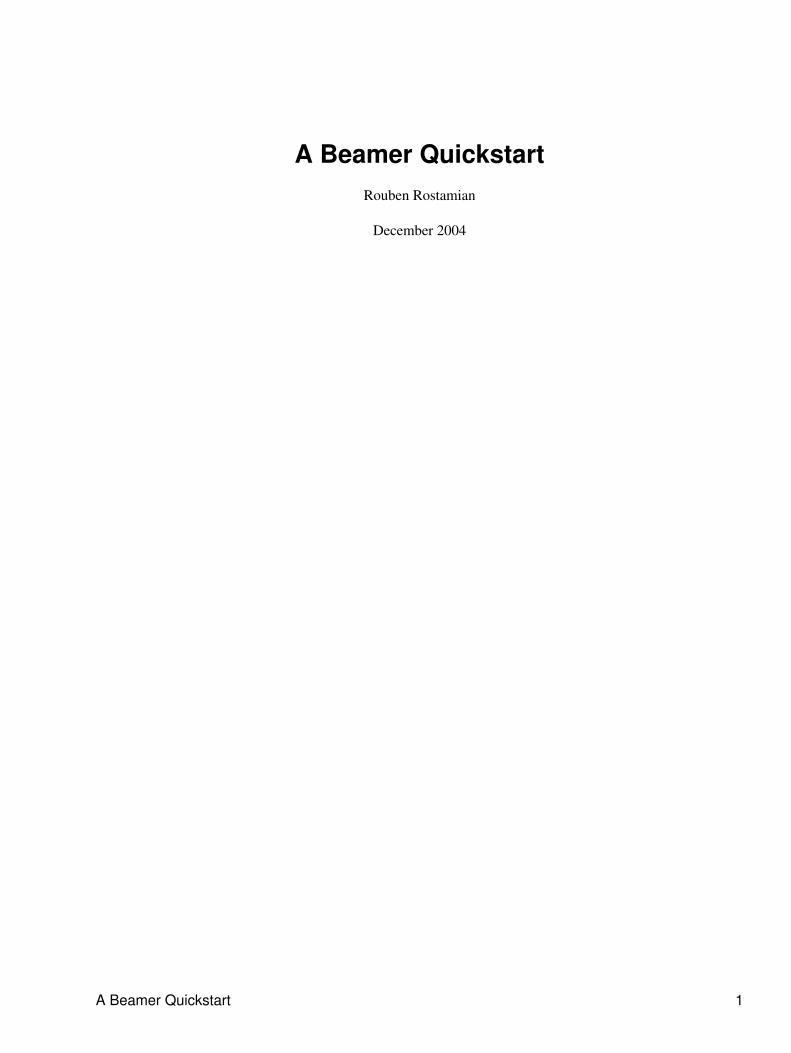
A Beamer QuickstartRouben Rostamian
December 2004
A Beamer Quickstart 1

Contents
Prologue1 Prologue2 What is newGetting started3 A bare-bones sample4 Compiling into pdf5 A complete presentationThemes6 Themes7 Customizing themes7.1 The structure color7.2 Specifying RGB colors7.3 Direct use of the structure color7.4 Changing the itemization markers7.5 Rounded boxes and shadows7.6 Getting rid of the navigation icons7.7 Adding an informative footline8 UMBC themes9 The UMBC footline10 The UMBC tribullet markers11 UMBC boxesBits and Pieces12 The title page13 Including graphics14 Overlays15 Navigating with hyperlinks16 Theorems and such17 Splitting a slide into columns18 Vertical alignment within slides19 The default font size20 The default text color21 The structure font and font themes22 Shrinking to make things fit23 Changing margin widths24 All about colors25 Colored text, highlights and boxes26 Setting a slide's backgroundEpilogue27 Acrobat Reader usage28 Xpdf usage29 Beamer on the WebGallery30 A gallery of Beamer slides31 Complete set of Beamer themes
[contents] [index] [previous] [next]
Contents 2

Last modified: Sat, May 5, 2007, 6:20 PM EDTHTML conversion by TeX2page 2004-09-11
[contents] [index] [previous] [next]
A Beamer Quickstart
Contents 3

1 PrologueBeamer is a LaTeX documentclass for producing slides. The default output is a pdf file which is suitable foron-screen viewing.
The aim of this document is to get you started quickly with Beamer. It gives you enough of the basics to letyou begin using Beamer in a productive way. I have avoided calling this a "Tutorial" because a tutorialimplies a certain thoroughness which this limited presentation lacks.
Beamer's manual is over 200 printed pages. When you feel the need to go beyond the basics, you shouldconsider reading the manual. There is more to Beamer than what appears here.
These pages were created in December 2004. The information herein is based on version 3.01 of Beamer. SeeBeamer on the Web for references and web resources.
The Gallery page shows a sampler of slides produced by Beamer.
I have written this Quickstart primarily for the use of graduate students in the Department of Mathematics andStatistics at UMBC. I have assumed throughout, without elaboration, that the underlying operating system isLinux or something unix-like, because that's what we have in the department.
I have also assumed throughout that you know the ins and outs of LaTeX; this is certainly not a LaTeXtutorial.
LaTeX and Beamer are platform-independent, therefore examples and advice given here should carry over toother platforms, in principle. The specifics of compilation and execution may vary; you will have to consultwith your local TeXnician if you need help with these.
How to read this Quickstart
If you are completely new to Beamer, I suggest that you begin at the beginning, that is, at A bare-bonessample. Examine the file small.tex presented there to get a feel about Beamer's syntax. Then read thesubsequent section where you are told how to compile a Beamer source file into pdf.
Then download small.tex and compile and view the result. Verify that what you see corresponds to what Ihave shown in A bare-bones sample.
Then begin experimenting with small.tex to see if you can create slides the way you want them. If there arethings that you feel you should be able to do but you don't know how, then look through the Table of Contentsor the Index. Chances are that you will find there what you are looking for.
Acknowledgment
The document you are reading was written in LaTeX then converted to HTML using Dorai Sitaram'sTeX2page utility.
1 Prologue 4

I have modified TeX2page in certain places to suit my needs. My apologies to Dorai Sitaram for havingabused/misused his program.
Rouben RostamianDepartment of Mathematics and StatisticsUniversity of Maryland, Baltimore CountyBaltimore, MD 21250, USA
[contents] [index] [previous] [next]
[contents] [index] [previous] [next]
A Beamer Quickstart
Acknowledgment 5

2 What is newIn this section I will attempt to maintain a history of changes to this website.2005-03-06
Added new theme, umbc3. Inserted samples in UMBC themes and Gallery. Updated beamer-umbc.tgzaccordingly.
2005-11-03Added reference to Norm Matloff's site in Beamer on the Web.
2006-05-13Changed "background" to "background canvas" in section An image for a background.
2007-05-05Added section Complete set of Beamer themes.
[contents] [index] [previous] [next]
[contents] [index] [previous] [next]
2 What is new 6

3 A bare-bones sampleThe basic structure of a Beamer input file is pretty simple. Consider the file small.tex, the content of which isshown below:
% small.tex\documentclass{beamer}\usetheme{default}\begin{document}
\begin{frame} \frametitle{A sample slide}
A displayed formula:
\[ \int_{-\infty}^\infty e^{-x^2} \, dx = \sqrt{\pi}\]
An itemized list:
\begin{itemize} \item itemized item 1 \item itemized item 2 \item itemized item 3\end{itemize}
\begin{theorem} In a right triangle, the square of hypotenuse equals the sum of squares of two other sides.\end{theorem}
\end{frame}
\end{document}
The input file above produces the following slide:
3 A bare-bones sample 7

Remark: In Beamer, a frame is what you would normally call a "slide". The image shown above is therealization of a single "frame". In what follows, I use the terms "frame" and "slide" interchangeably.1
The \begin{frame}...\end{frame} block may be repeated any number of times to produce asequence of slides.
Remark: The \frametitle{...} command puts a title on the slide. Although its use is optional, it isonly in very rare cases where omitting a slide title would make sense.
1 In Beamer, a "slide" and a "frame" are technical terms with distinct meanings. However it is of no profit tothe casual user to fret over the distinction.
[contents] [index] [previous] [next]
[contents] [index] [previous] [next]
A Beamer Quickstart
3 A bare-bones sample 8

4 Compiling into pdfTo compile the previous section's LaTeX source file, small.tex, into a pdf file for on-screen viewing, do:
pdflatex small.tex
This will run the source file small.tex through pdflatex and, if all's well, produce a file named small.pdf.
The resulting file may be viewed with a pdf viewer. The most common pdf viewer is Adobe's Acrobat Readerwhich is available for free for use on essentially any computer platform.
An alternative is Glyph & Cog, LLC's Xpdf which runs under the X Window System on unix, vms, and os/2.
See Acrobat Reader usage and Xpdf usage pages for usage tips for these viewers.
[contents] [index] [previous] [next]
[contents] [index] [previous] [next]
4 Compiling into pdf 9

5 A complete presentationThe file hfc.tgz contains the source of slides for an hour-long talk that I gave in the department some time ago.You may find it useful as an example of a real-life Beamer presentation.
Download the compressed archive hfc.tgz and unpack it. On unix-like systems you will probably unpack thearchive by executing the command:
tar xfz hfc.tgz
This will expand the archive into a directory named hfc.2 That directory will contain about 20 files, most beingimages, and one Beamer source file named hfc.tex.
To compile, change to the hfc directory, then do:
pdflatex hfc.tex pdflatex hfc.tex
This will create the presentation file hfc.pdf.
Two passes of pdflatex are needed to let LaTeX determine the presentation's total page count, otherwisepage numbers in footlines may be wrong.
2 After expanding the archive, the file hfc.tgz is no more needed. You may remove it, rm hfc.tgz, to savedisk space.
5 A complete presentation 10

[contents] [index] [previous] [next]
[contents] [index] [previous] [next]
A Beamer Quickstart
5 A complete presentation 11

6 Themes
The overall appearance of a Beamer slide may be altered drastically by applying a Beamer theme to the slide.
To illustrate the effects of various themes, I will use the file sample.tex which is a slightly modified version ofthe previous small.tex.
Here is what the preamble of sample.tex and the resulting slide look like:
\documentclass{beamer} \usetheme{default}
The line \usetheme{default} loads Beamer's default theme. If we replace that line with:\usetheme{Boadilla}, we will obtain the Boadilla theme which looks like this:
\documentclass{beamer} \usetheme{Boadilla}
6 Themes 12

Compare this with the previous slide and note the drastic changes, including the added frame around thetheorem, the 3D rounded markers for itemized and enumerated lists, and the footline that includes date andslide number, among other things.
Standard Beamer themes
Beamer comes with a large selection of themes. Themes are named after various cities, such as Boadilla,Madrid, Copenhagen, and Singapore, where Beamer's author and his collaborators have given Beamerpresentations.
In UMBC's Department of Mathematics and Statistics computer network, the Beamer themes are located inthe directory:
/usr/local/share/texmf/tex/latex/beamer/themes/theme/
In my opinion, the following themes are more interesting than others. I have provided sample images in theGallery. You can find a complete set of images of all Beamer themes in Jason Gorski's page referenced inBeamer on the Web.
default• Boadilla• Madrid• Pittsburgh• Rochester [ works best as \usetheme[height=7mm]{Rochester} ]• Copenhagen• Warsaw• Singapore• Malmoe•
Experiment to see which one is more to your liking.
A Beamer Quickstart
Standard Beamer themes 13

Inner and outer themes, etc.
Beamer themes which are named after cities, such as Boadilla and Pittsburgh, are complete themes in thesense that they control just about every aspect of a slide's appearance. Think of this as major themes. Thesethemes are invoked with the \usetheme command, as in \usetheme{Pittsburgh}.
Beamer also provides what may be thought of as minor themes. These control somewhat narrowly definedaspects of a slide's appearance. You may invoke one or more of these minor themes in conjunction with amajor theme to alter/modify the major theme's characteristics.
Beamer's "minor themes" fall into 4 categories:outer themes
control a slide's decorations, such as text and graphics that appear in a slide's header and footersections. For example, \useoutertheme{shadow} adds a 3-D shadow to some header elements.
See Adding an informative footline and The UMBC footline for examples of \useoutertheme.inner themes
control a slide's inner area, such as markers/bullets for itemization lists and boxes placed aroundtheorems. For example, \useinnertheme{rounded} gives a rounded and 3-D look totheorem-containing boxes and itemization markers.
See The UMBC tribullet markers and UMBC boxes for examples of \useinnertheme.font themes
control font shapes and sizes of various elements of a slide show. For example,\usefonttheme{serif} changes the document's fonts to serif. (The default is sans-serif.)
See The structure font and font themes for examples of \usefonttheme.color themes
control the colors of title, frametitle, itemization bullets, and many other elements of a slide show. Forexample, \usecolorheme{albatross} changes the Beamer's default colors in quite a drasticway.
See The structure color and Specifying RGB colors for examples of \usecolorheme.
On department's machines, you will find the style files corresponding to Beamer's themes in the directories:
/usr/local/share/texmf/tex/latex/beamer/themes/theme/ % the major themes /usr/local/share/texmf/tex/latex/beamer/themes/inner/ % inner themes /usr/local/share/texmf/tex/latex/beamer/themes/outer/ % outer themes /usr/local/share/texmf/tex/latex/beamer/themes/color/ % color themes /usr/local/share/texmf/tex/latex/beamer/themes/font/ % font themes
[contents] [index] [previous] [next]
[contents] [index] [previous] [next]
A Beamer Quickstart
Inner and outer themes, etc. 14

7 Customizing themesThere are a great number of ways in which you can fine-tune the general appearance of a Beamer theme. HereI will describe a few ideas which you may find useful.
Throughout this section, I use the Beamer theme Rochester. You may apply these ideas to any other Beamertheme.
I will start with the plain Rochester theme, and gradually add various options to show their cumulative effect.You don't have to use all the options at once. Pick the ones that suit your needs.
Remark: The option [height=7mm] (see samples below) specifies the thickness of the horizontal stripethat runs along a Rochester slide's top edge. Please note that this option is specific to Rochester. It does notapply to other themes.
7.1 The structure color
Most colored parts of a Beamer slide are drawn in an abstract color named the structure. You can change theoverall color of a Beamer presentation by changing the structure.
The default structure in the Rochester theme corresponds to a certain shade of blue as you can see here:
\documentclass{beamer} \usetheme[height=7mm]{Rochester}
Let's change Rochester's structure to Brown:
7 Customizing themes 15

\documentclass[xcolor=dvipsnames]{beamer} \usecolortheme[named=Brown]{structure}\usetheme[height=7mm]{Rochester}
The slide changes to:
Remark: Note how the structure affects many items, including bullets and navigation icons.
Remark: The color "Brown" is one of a large number of color names defined in the file:
/usr/share/texmf/tex/latex/graphics/dvipsnam.def
The xcolor=dvipsnames option to \documentclass brings these color names into Beamer. See Allabout colors for details.
Experiment with various colors to find one that fits best with your style.
7.2 Specifying RGB colors
Should you find the set of colors defined in dvipsnam.def too limited, you may define your own colors byspecifying their RGB components. Each RGB component should be in the 0-255 range.
For instance, with RGB={205,173,0} we get a dark shade of gold:
\documentclass{beamer} \usecolortheme[RGB={205,173,0}]{structure}\usetheme[height=7mm]{Rochester}
A Beamer Quickstart
7.1 The structure color 16

Remark: On the Department of Mathematics and Statistics machines, the command xcolorsel brings up avery nice tool that shows you a large number of color patches and their RGB components.
Remark: RGB components may be given either as integers in the 0-255 range or as fractional numbers in the0.00-1.00 range. To specify the latter, use the lowercase version of the rgb option, as in:rgb={0.2264,0.1561,0.0000}.
7.3 Direct use of the structure color
The command \textcolor{red}{a colored text} produces a colored text. Here, the text's color,red, is hard-coded into our LaTeX source therefore the color is always red -- it's static.
A more interesting dynamic effect is achieved by using the command \structure{a colored text}.The given text will be colored according to the structure color. When you change the structure color, say fromblue to gold, the text's color will change accordingly.
See the section A complete presentation for a sample presentation in which I use the \structure{...}command to produce colored text in several places.
7.4 Changing the itemization markers
The Rochester theme uses square markers for itemized and enumerated lists. The command\setbeamertemplate{items}[ball] changes the markers to simulated 3-dimensional balls, asshown the the following code and the corresponding output:
A Beamer Quickstart
7.2 Specifying RGB colors 17

\documentclass[xcolor=dvipsnames]{beamer} \usecolortheme[named=Plum]{structure} \usetheme[height=7mm]{Rochester} \setbeamertemplate{items}[ball]
Possible options to \setbeamertemplate{items} are:ball:
3-dimensional ballscircle:
2-dimensional (flat) circlesrectangle:
rectanglesdefault:
triangles
7.5 Rounded boxes and shadows
To add rounded corners and a shadow to the box that surrounds the theorem in the sample slides shown above,do:
\documentclass[xcolor=dvipsnames]{beamer} \usecolortheme[named=OliveGreen]{structure} \usetheme[height=7mm]{Rochester} \setbeamertemplate{items}[ball] \setbeamertemplate{blocks}[rounded][shadow=true]
A Beamer Quickstart
7.4 Changing the itemization markers 18

To get rounded corners but no shadows, set [shadow=false].
7.6 Getting rid of the navigation icons
Most Beamer themes put a row of navigation icons on slides. (See the little marks along the bottom edge ofthe slide shown above.) I consider these pretty useless and distracting. To disable the drawing of navigationicons, add the command: \setbeamertemplate{navigation symbols}{} to your document, as in:
\documentclass[xcolor=dvipsnames]{beamer} \usecolortheme[named=Apricot]{structure} \usetheme[height=7mm]{Rochester} \setbeamertemplate{items}[ball] \setbeamertemplate{blocks}[rounded][shadow=true] \setbeamertemplate{navigation symbols}{}
A Beamer Quickstart
7.5 Rounded boxes and shadows 19

OK, good, they are gone!
7.7 Adding an informative footline
A footline is a narrow strip along the bottom edge of a slide that shows the name of the author, the title of thepresentation, slide number, and other useful information.
Beamer themes Boadilla and Madrid provide such a footline by default. Other themes don't. However it ispossible to add a footline to any theme by using the \useoutertheme{infolines} command, as in:
\documentclass[xcolor=dvipsnames]{beamer} \usecolortheme[named=Apricot]{structure} \useoutertheme{infolines}\usetheme[height=7mm]{Rochester} \setbeamertemplate{items}[ball] \setbeamertemplate{blocks}[rounded][shadow=true] \setbeamertemplate{navigation symbols}{} \author{Rouben Rostamian} \title{Beamer tutorial} \institute{UMBC}
A Beamer Quickstart
7.6 Getting rid of the navigation icons 20

Remark: It is a Beamer idiosyncrasy (a polite way of saying a bug) that \useoutertheme{infolines}must come before \usetheme[height=7mm]{Rochester}. If you reverse the order, the slide's titlewill be cut off.
Remark: Most of the footline information is culled from the data provided in the preable, such as \author,\title, etc.
I have written an alternative footline theme called umbcfootline. You will find the details of umbcfootline inThe UMBC footline. Here is what it looks like:
\documentclass[xcolor=dvipsnames]{beamer} \usecolortheme[named=Apricot]{structure} \usetheme[height=7mm]{Rochester} \setbeamertemplate{items}[ball] \setbeamertemplate{blocks}[rounded][shadow=true] %\setbeamertemplate{navigation symbols}{} % see Remark below \useoutertheme{umbcfootline}\author{Rouben Rostamian} \title{Beamer tutorial} \institute{UMBC}
A Beamer Quickstart
7.7 Adding an informative footline 21
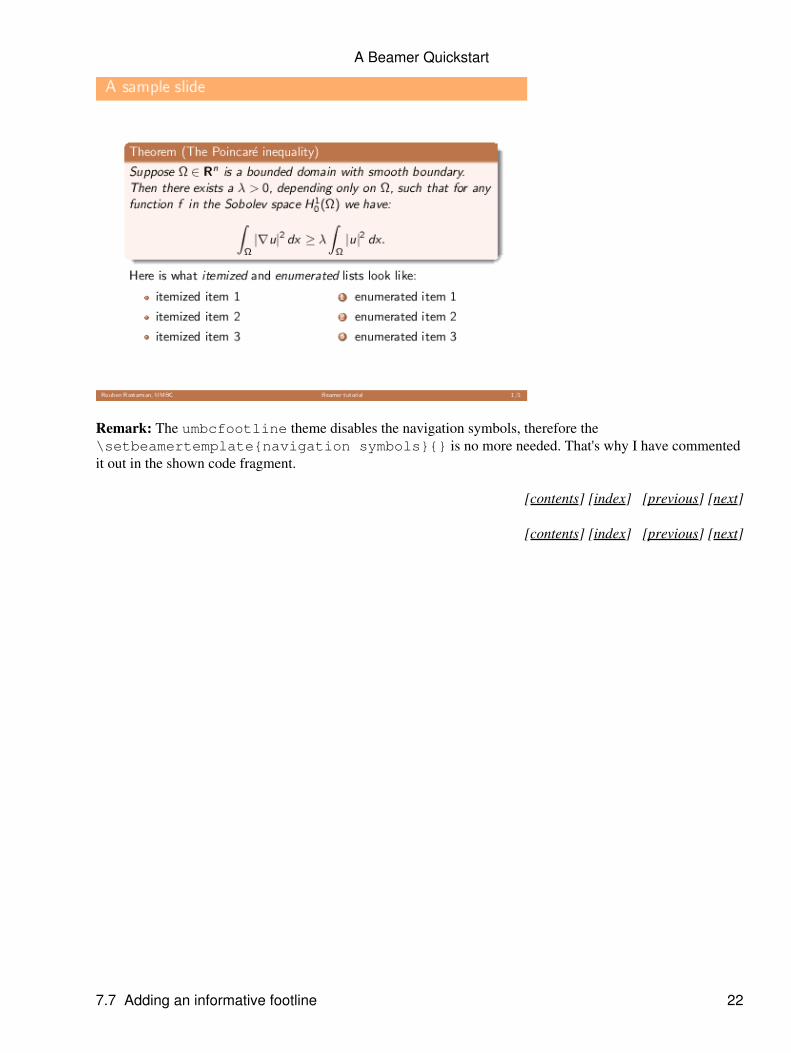
Remark: The umbcfootline theme disables the navigation symbols, therefore the\setbeamertemplate{navigation symbols}{} is no more needed. That's why I have commentedit out in the shown code fragment.
[contents] [index] [previous] [next]
[contents] [index] [previous] [next]
A Beamer Quickstart
7.7 Adding an informative footline 22

8 UMBC themesI have created four themes which you may use just like any other Beamer theme.3 These are named: umbc1,umbc2, umbc3 and umbc4.
The umbc1 theme
\documentclass{beamer} \usetheme{umbc1}
The umbc2 theme
This is a slight variation on Beamer 3.01's Singapore theme or Beamer 2.21's Classic theme.
\documentclass{beamer} \usetheme{umbc2}
8 UMBC themes 23

The umbc3 theme
This is inspired by a PowerPoint theme.
\documentclass{beamer} \usetheme{umbc3}
A Beamer Quickstart
The umbc2 theme 24

The umbc4 theme
This is inspired by a well-known PowerPoint theme.
\documentclass{beamer} \usetheme{umbc4}
Customizing the umbc themes
Beamer customization options described in Customizing themes apply to UMBC themes as well. For instance,here is what umbc2 looks like in the RawSienna color and centered title in italics:
\documentclass[xcolor=dvipsnames]{beamer} \usetheme{umbc2} \usecolortheme[named=RawSienna]{structure} \setbeamerfont{frametitle}{family=\rmfamily,shape=\itshape} \setbeamertemplate{frametitle}[default][center]
A Beamer Quickstart
The umbc4 theme 25

Remark: If you have a department account, you don't need to do anything special to use the UMBC themes --they are already installed. If you don't have a department account, you may download the UMBC themecollection beamer-umbc.tgz and install alongside Beamer's own theme files. Here is the beamer-umbc.readmefile from that collection.
3 UMBC themes do not provide navigation bars. I haven't mentioned navigation bars in these notes because Idon't like them. In my opinion, navigation bars are distracting and unnecessary. Sectioning commands areignored in UMBC themes but \tableofcontents still works.
[contents] [index] [previous] [next]
[contents] [index] [previous] [next]
A Beamer Quickstart
Customizing the umbc themes 26

9 The UMBC footlineThe Beamer outer theme umbcfootline puts footer information along the bottom edges of slides. The defaultfootline looks like this:
where n is the sequence number of this frame and N is the total number of frames.
The fields Author, Institute, Title and Subtitle are filled with the data supplied by the \author,\institute, \title and \subtitle commands. Short versions of these entries are used, if provided,otherwise long versions are used. See Titlepage elements for the meanings of "long" and "short" fields.
You invoke the umbcfootline theme by putting the following in your document's preamble:
\useoutertheme{umbcfootline}
In the following example, I have added a umbcfootline to Beamer's default theme:
\documentclass{beamer} \usetheme{default} \useoutertheme{umbcfootline}\author{Rouben Rostamian} \title{Beamer tutorial} \institute{UMBC}
UMBC themes umbc1, umbc2 and umbc4 include umbcfootline by default, therefore there is no need toinvoke umbcfootline explicitly with these themes.
9 The UMBC footline 27

Redefining the footline
You may override the default contents of a umbcfootline with the \setfootline command. For instance,to change the footline to:
put the following in the preamble:
\useoutertheme{umbcfootline} \setfootline{\insertshortinstitute, \insertshortdate \hfill slide \insertframenumber/\inserttotalframenumber}
Items that you can \insert... in a footline, are:
\insertshortauthor• \insertshortinstitute• \insertshorttitle• \insertshortsubtitle• \insertshortdate• \insertframenumber• \inserttotalframenumber•
If you use \insertshortauthor and if "short author" is not provided, then "long author" is substitutedfor it. Same applies to the other \insertshort... fields. See Titlepage elements for the meanings of"long" and "short" fields.
If you really want to insert the long versions of the requested field, use \insertauthor,\inserttitle, etc.
Dynamic footlines
To change the footline of an individual slide, put a \setfootline{...} command just before the slide's\begin{frame}. This will change the footline of this and all subsequent slides.
To limit the change only to one slide, limit the scope of the \setfootline by enclosing it in braces, as in:
{ % brace limits \setfootline's scope \setfootline{...} \begin{frame} ... \end{frame} } % brace limits \setfootline's scope
[contents] [index] [previous] [next]
[contents] [index] [previous] [next]
A Beamer Quickstart
Redefining the footline 28
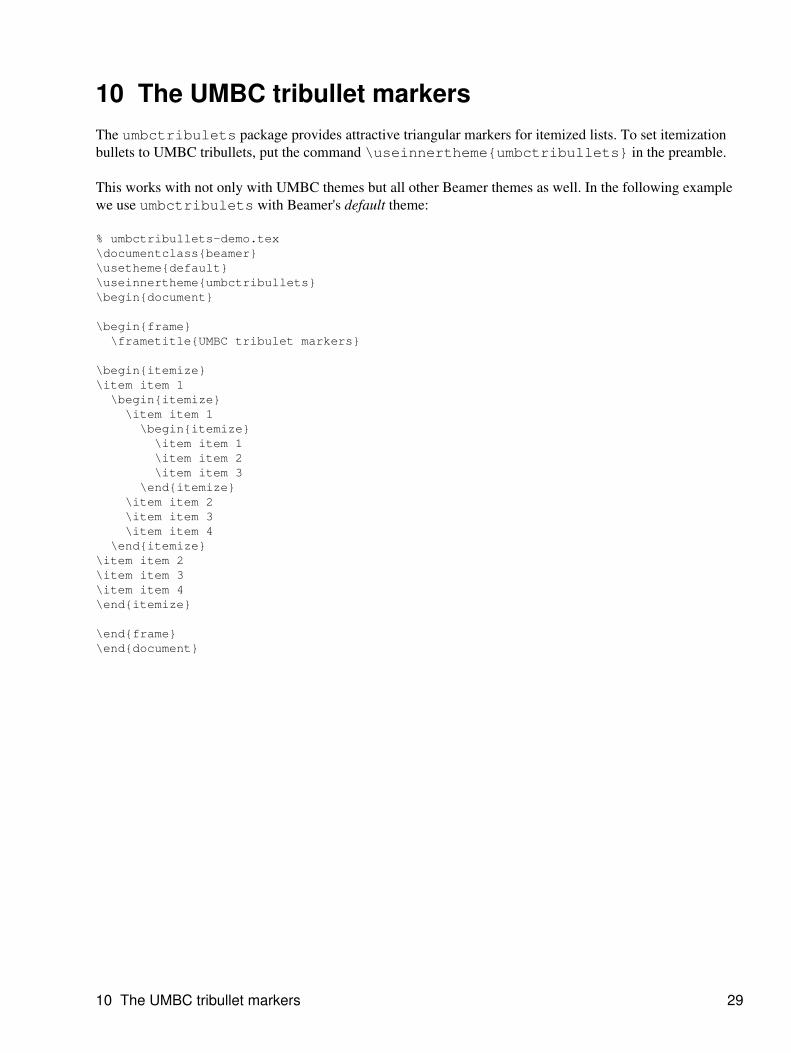
10 The UMBC tribullet markersThe umbctribulets package provides attractive triangular markers for itemized lists. To set itemizationbullets to UMBC tribullets, put the command \useinnertheme{umbctribullets} in the preamble.
This works with not only with UMBC themes but all other Beamer themes as well. In the following examplewe use umbctribulets with Beamer's default theme:
% umbctribullets-demo.tex\documentclass{beamer}\usetheme{default}\useinnertheme{umbctribullets}\begin{document}
\begin{frame} \frametitle{UMBC tribulet markers}
\begin{itemize}\item item 1 \begin{itemize} \item item 1 \begin{itemize} \item item 1 \item item 2 \item item 3 \end{itemize} \item item 2 \item item 3 \item item 4 \end{itemize}\item item 2\item item 3\item item 4\end{itemize}
\end{frame}\end{document}
10 The UMBC tribullet markers 29

The default colors may be changed using the command \umbctribulletscolors command which takesthree arguments, corresponding to nesting level of the markers. (Tribullet markers are not available beyondthree nesting levels.) As an example:
\umbctribulletscolors{purple}{violet}{brown}
The default tribullet colors are defined as:
\umbctribulletscolors{red}{blue}{orange!40!yellow}
For the meaning of orange!40!yellow see Blending Colors.
[contents] [index] [previous] [next]
[contents] [index] [previous] [next]
A Beamer Quickstart
10 The UMBC tribullet markers 30

11 UMBC boxesThe package umbcboxes helps you display text and equations in fancy boxes with rounded corners andshadows like those shown in the following samples.
The package umbcboxes defines two environments: displaybox and onlinebox.
11 UMBC boxes 31

The displaybox environments is meant to be used with displayed math, however anything else can be boxedwith it as well, as the examples below illustrate.
The onlinebox is meant to be used within the running text.
These environment don't attempt to guess the widths of the desired boxes -- you are expected to specify theirwidths, typically after some trial and error. This is not such a bad thing; finding an aesthetically pleasing boxsize is not a job for a computer.
You can get a flavor of the usage of these environments from these fragments.
Displayed math:
\begin{displaybox}{5cm} % width of the box is 5cm \[ \cos^2 x + \sin^2 x = 1 \] \end{displaybox}
Online material:
The important formula, \begin{inlinebox}{3cm} $\cos^2 x + \sin^2 x = 1$ \end{inlinebox} occurs very frequently in mathematics.
In specifying box widths, it is useful to have in mind that the overall size of a Beamer slide is128mm x 96mm.
The background color of the boxes is set to structure!15!bg by default. (See The structure color and Allabout colors for the meaning of this.) The default color may not be particularly exciting in general, therefore itis likely that you will want to change it to something more interesting. The \setbeamercolor commandin the illustration below shows how.
Here is the complete code that produced the two slides shown at the top of this page.
% umbcboxes-demos.tex\documentclass{beamer}\usetheme{umbc4}\useinnertheme{umbcboxes}\setbeamercolor{umbcboxes}{bg=violet!15,fg=black} % redefine box color!\begin{document}
\begin{frame} \frametitle{Fancy boxes}
The \textsl{displaybox} envrionment is suitable for boxingdisplayed mathematics:\begin{displaybox}{4cm}\[ \sum_{n=1}^\infty \frac{1}{n^2} = \frac{\pi^2}{6}\]\end{displaybox}\bigskip
The body of the environment can be anything. For example:\begin{displaybox}{5cm}
A Beamer Quickstart
11 UMBC boxes 32

This is a test.\end{displaybox}\bigskip
Centered text may look better:\begin{displaybox}{5cm}\centerline{This is a test.}\end{displaybox}
\end{frame}
\begin{frame} \frametitle{Fancy boxes (continued)}
The \textsl{onlinebox} environment is similar to \textsl{displaybox},but it puts the boxed material within the current line\begin{onlinebox}{2cm} like this.\end{onlinebox}Box contents are automatically centered.\bigskip
The body of an \textsl{onlinebox} may contain mathematics. As in this\begin{onlinebox}{3cm}$\sum_{n=1}^\infty \frac{1}{n^2} = \frac{\pi^2}{6}$\end{onlinebox} example.\bigskip
To get display-style mathematics\begin{onlinebox}{3cm}$\displaystyle \sum_{n=1}^\infty \frac{1}{n^2} = \frac{\pi^2}{6}$\end{onlinebox}add the \textsl{$\backslash$displaystyle} command to your formula.
\end{frame}
\end{document}
[contents] [index] [previous] [next]
[contents] [index] [previous] [next]
A Beamer Quickstart
11 UMBC boxes 33

12 The title pageBeamer provides an easy way to make a title page for your presentation. The following source code defines atitlepage and a regular slide.
% titlepage-demo.tex\documentclass{beamer}\usetheme{umbc4}
% items enclosed in square brackets are optional; explanation below\title[A short proof]{A short proof of Fermat's Last Theorem}\subtitle[Errors]{Estimation of numerical errors}\author[R. Rostamian]{Rouben Rostamian}\institute[UMBC]{ Department of Mathematics and Statistics\\ University of Maryland, Baltimore County\\ Baltimore, Maryland 21250\\[1ex] \texttt{[email protected]}}\date[November 2004]{November 26, 2004}
\begin{document}
%--- the titlepage frame -------------------------%\begin{frame}[plain] \titlepage\end{frame}
%--- the presentation begin here -----------------%\begin{frame} \frametitle{Overview}
Overview of the material.\end{frame}
\end{document}
Here are the results:
12 The title page 34
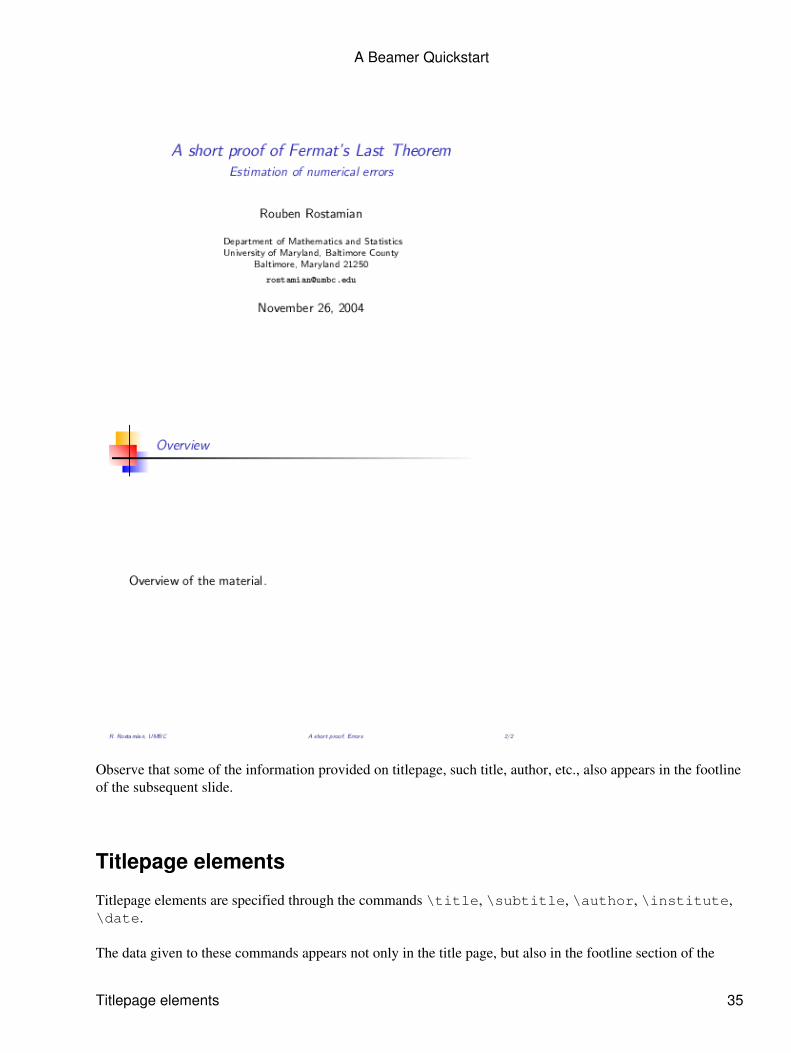
Observe that some of the information provided on titlepage, such title, author, etc., also appears in the footlineof the subsequent slide.
Titlepage elements
Titlepage elements are specified through the commands \title, \subtitle, \author, \institute,\date.
The data given to these commands appears not only in the title page, but also in the footline section of the
A Beamer Quickstart
Titlepage elements 35

subsequent slides (see the image above.)
Each titlepage element can be specified using a single argument, as in:
\title{University of Maryland, Baltimore County}
or using two arguments, as in:
\title[UMBC]{University of Maryland, Baltimore County}.
The optional argument, UMBC (in square brackets) is the short form of the institute's name.
The long forms of titlepage elements are used on the title page. The short forms of titlepage elements are usedin the footers of the subsequent slides.
Please note that if a short form is not provided, then the long form will be used in the footers. If long formsare too long, then footers may get garbled.
About the [plain] qualifier
In the sample source code shown above, note the [plain] qualifier in the line
\begin{frame}[plain]
that generates the titlepage.
Without that qualifier, the title page would have been drawn with header and footer decorations, like all otherslides. The [plain] qualifier suppresses the drawing of these decorations. Compare the two images shownon top of this page.
Judge for yourself if showing such decorations is appropriate for a title page.
In general, the [plain] qualifier may be used on any frame to suppress the drawing of frame decorations onthat frame.
[contents] [index] [previous] [next]
[contents] [index] [previous] [next]
A Beamer Quickstart
About the [plain] qualifier 36

13 Including graphicsBeamer recognizes images in any of the pdf, png and jpg formats. (Note that PostScript is not among these.)
The following sample we include three pictures side-by-side in a slide.
% graphics.tex \documentclass{beamer} \usetheme{Copenhagen} \begin{document}
\begin{frame} \frametitle{Graphics}
Here we include three images, one each of PDF, PNG, and JPG types.
\begin{center} \includegraphics[width=0.3\textwidth]{image1.pdf} \includegraphics[width=0.3\textwidth]{image2.png} \includegraphics[width=0.3\textwidth]{image3.jpg} \end{center}
\end{frame}
\end{document}
Here is the result:
Converting graphics
13 Including graphics 37

When you create an image with the intention of including it in a Beamer document, it is best if you save it inone of the pdf, png or jpg formats that are recognizable by Beamer.4 This is sometimes not possible. Forinstance, you may have downloaded the image from somewhere and it is in the gif format.
The department's computer facilities provide a large number of utilities for converting and modifyinggraphical images.
eps to pdf
To convert an Encapsulated PostScript image to pdf, do:
epstopdf filename.eps
This will produce a file named filename.pdf.5
All other conversions
The general-purpose convert6 command converts from any graphics format to any other graphics format.For instance, to convert a gif file to the png format, do:
convert filename.gif filename.png
Similarly, to convert a tiff file to jpg, do:
convert filename.tiff filename.jpg
In fact, we can have convert take over the job of epstopdf as well, as in:
convert filename.eps filename.pdf
however in my experience epstopdf produces better results.
4 The png format works best for line drawings, such as graphs of functions in 2D. The jpg format works bestwith gradually varying shades, such as the photograph of a person's face.
5 The epstopdf utility is a perl script that calls ghostscript to do the actual conversion. In manyLinux distributions it is bundled with the main TeX/LaTeX package.
6 The convert utility is a part of ImageMagick suite of graphics manipulation utilities.
[contents] [index] [previous] [next]
[contents] [index] [previous] [next]
A Beamer Quickstart
Converting graphics 38

14 OverlaysProbably the most interesting effect achieved by Beamer is overlays, which gives the appearance ofincremental exposure of a given slide.
Achieving the overlay effect in Beamer is quite simple -- just insert a \pause command anywhere you wantto pause the display.
For instance, to expose an itemized list one-item-at-a-time, do:
\documentclass{beamer} \usetheme{default} \begin{document}
\begin{frame} \frametitle{Outline of the talk}
\begin{itemize} \item Introduction \pause
\item Statement of the main theorem \pause
\item Technical lemmata \pause
\item Proof of the main theorem \pause
\item Conclusions \end{itemize}
\end{frame}
\end{document}
When this file is compiled into the pdf format and displayed with a pdf viewer, such as the Acrobat Reader,the items are exposed one-at-a-time as you page forward through the document in the usual way.
The use of the \pause command is not restricted to itemized lists; you may use it anywhere in a slide. Forexample:
\documentclass{beamer} \usetheme{Malmoe} \begin{document}
\begin{frame} \frametitle{Fermat's Last Theorem}
In this talk I will give a very elementary proof of the theorem. I am surprised that no one else has thought of this before. \medskip
\pause
Fermat's Last Theorem says that the equation \[ x^2 + y^2 = z^2 \]
14 Overlays 39

has no solution in the set of natural numbers. \medskip
\pause
This is not true. After a lengthy calculation on the department's Linux machines, I have verified that within the numerical accuracy of the Pentium-4 processor, we have: \[ 5000^2 + 12000^2 = 13000^2 \]
\end{frame}
\end{document}
A pdf viewer will expose the resulting file one paragraph at a time. The fully exposed slide looks like this:
[contents] [index] [previous] [next]
[contents] [index] [previous] [next]
A Beamer Quickstart
14 Overlays 40

15 Navigating with hyperlinksDuring a live slide presentation, it is sometimes necessary to jump several slides back to remind the audienceof a formula or a picture. You don't want to page through 17 slides to go to that particular slide and backthrough 17 slides to return to where you were.
Hyperlinks in a pdf file enable you to jump from one slide to any other slide with one mouse click.
The following input file defines two slides. You should imagine that these are among a large number of slideswhich are not shown here to save space.
One slide is identified by the label=intro tag on its \begin{frame} command. This is our target slide.
The other slide contains the code \hyperlink{intro}{here}. The word "here" will appear in red in thepdf viewer. When you click on "here", the viewer will jump to the frame labeled intro.
Remark: Actually, what I wrote above is not exactly true. By default, hyperlinks are shown in the normal textcolor thus are not distinguishable from surrounding text. The red color of hyperlinks is prescribed in thehypersetup command as shown in the sample code below.
Alternatively, a hyperlink may be drawn as a "beamer button". For instance, to make a button with the text"here" on it, we do: \hyperlink{intro}{\beamerbutton{here}}. Four different button styles areavailable:
These buttons were made using:
\beamerbutton{here} \beamergotobutton{here} \beamerskipbutton{here} \beamerreturnbutton{here}
They only look different; they all do the same thing. Use the one that fits your need.
OK, here a complete LaTeX file that illustrates these concepts:
% hyperlinks.tex \documentclass{beamer} \usetheme{default} \hypersetup{colorlinks=true,linkcolor=red} \begin{document}
%--- frame --------------------------------------------------% \begin{frame}[label=intro] \frametitle{Introduction}
The contents of the slide here
\end{frame}
15 Navigating with hyperlinks 41
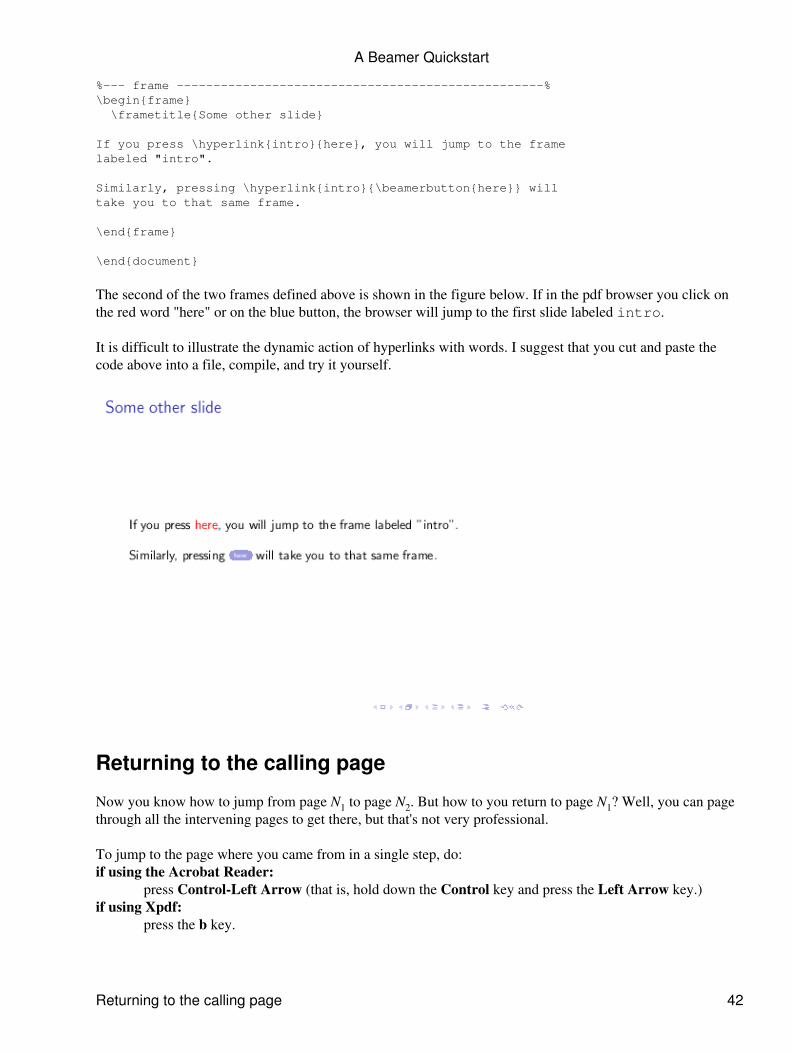
%--- frame --------------------------------------------------% \begin{frame} \frametitle{Some other slide}
If you press \hyperlink{intro}{here}, you will jump to the frame labeled "intro".
Similarly, pressing \hyperlink{intro}{\beamerbutton{here}} will take you to that same frame.
\end{frame}
\end{document}
The second of the two frames defined above is shown in the figure below. If in the pdf browser you click onthe red word "here" or on the blue button, the browser will jump to the first slide labeled intro.
It is difficult to illustrate the dynamic action of hyperlinks with words. I suggest that you cut and paste thecode above into a file, compile, and try it yourself.
Returning to the calling page
Now you know how to jump from page N1 to page N2. But how to you return to page N1? Well, you can pagethrough all the intervening pages to get there, but that's not very professional.
To jump to the page where you came from in a single step, do:if using the Acrobat Reader:
press Control-Left Arrow (that is, hold down the Control key and press the Left Arrow key.)if using Xpdf:
press the b key.
A Beamer Quickstart
Returning to the calling page 42

Remark: Yet another way to return to the calling page would be by adding another hyperlink that works inthe opposite way. Thus you put a hyperlink in page N1 that takes you to page N2, and put a hyperlink in pageN2 that takes you to page N1. This trick is somewhat difficult to use in practice. Suppose that you have animportant formula on page N1. You want to put links in pages N2 and N3 and N4, each of which takes you topage N1. But once in page N1, it could be confusing as to which of the pages N2 or N3 or N4 you are supposedto return to. The pdf viewer methods described above do not have this problem.
[contents] [index] [previous] [next]
[contents] [index] [previous] [next]
A Beamer Quickstart
Returning to the calling page 43

16 Theorems and suchIn Beamer the following LaTeX environments are predefined:
theorem• corollary• definition• example• proof•
The Beamer theme controls how this environments are rendered. Here is an example:
% theorems-demo-1.tex\documentclass{beamer}\usetheme{Singapore}\begin{document}
\begin{frame} \frametitle{Theorems and such}
\begin{definition}A triangle that has a right angle is calleda \emph{right triangle}.\end{definition}
\begin{theorem} In a right triangle, the square of hypotenuse equals the sum of squares of two other sides.\end{theorem}
\begin{proof} We leave the proof as an exercise to our astute reader. We also suggest that the reader generalize the proof to non-Euclidean geometries.\end{proof}
\end{frame}\end{document}
16 Theorems and such 44

If we change the theme to \usetheme{Boadilla}, the slide changes to:
These environments are actually defined in the amsmath package which is loaded automatically intoBeamer. Therefore the extensive amsmath facilities are available for customizing them. See thedocumentation in amsthdoc.dvi that comes with the AMS LaTeX extension packages.7
A Beamer Quickstart
16 Theorems and such 45

The standard LaTeX \newtheorem command may be used to extend the available theorem-likeenvironments. For instance, if you put:
\newtheorem{proposition}{Proposition}
in the preamble, then you can say:
\begin{proposition} ... \end{proposition}
7 On the department's machine, this file is located in the directory:
/usr/share/texmf/doc/latex/amscls/
You can view the file using the command:
xdvi /usr/share/texmf/doc/latex/amscls/amsthdoc.dvi &
[contents] [index] [previous] [next]
[contents] [index] [previous] [next]
A Beamer Quickstart
16 Theorems and such 46

17 Splitting a slide into columnsBeamer's columns environment provides an easy way to split a slide vertically into columns. This isparticularly useful in positioning figures in a slide or creating multi-column itemized lists.
The following example shows how.
% columns-demo1.tex\documentclass{beamer}\usetheme{Singapore}\begin{document}
\begin{frame} \frametitle{Splitting a slide into columns}
The line you are reading goes all the way across the slide.From the left margin to the right margin. Now we are goingthe split the slide into two columns.\bigskip
\begin{columns} \begin{column}{0.5\textwidth} Here is the first column. We put an itemized list in it. \begin{itemize} \item This is an item \item This is another item \item Yet another item \end{itemize} \end{column}
\begin{column}{0.3\textwidth} Here is the second column. We will put a picture in it. \centerline{\includegraphics[width=0.7\textwidth]{image2.png}} \end{column}\end{columns}\bigskip
The line you are reading goes all the way across the slide.From the left margin to the right margin.
\end{frame}
\end{document}
The input file above produces the following slide:
17 Splitting a slide into columns 47

Remark: To split a slide into three or more columns, add any number of\begin{column}...\end{column} as needed. Just make sure that the sum of their widths does notexceed the slide width, that is \textwidth.
Remark: Within each column, the variable \textwidth is redefined to refer to that column's width. Forinstance, in the sample shown above, the width of image is set to 0.7\textwidth which means 0.7 timesthe width of the column containing the image.
Remark: I find it easier giving widths of columns in terms of fractions of \textwidth. If you wish,however, you may specify absolute widths, such as: \begin{column}{30mm}. For this, you should knowthat the overall size of a Beamer slide is 128mm x 96mm.
Vertical alignment
Observe that in the sample slide shown above, the vertical mid-points of the two columns are horizontallyaligned. We say the columns are center-aligned, for short.
The option [t] to the columns environment, as in to the \begin{columns}[t], causes the columns to betop-aligned.
Other options are [b] for bottom-alignment and [c] for center-alignment (which is the default).
In the following example the columns are top-aligned:
% columns-demo2.tex\documentclass{beamer}\usetheme{Singapore}\begin{document}
\begin{frame}
A Beamer Quickstart
Vertical alignment 48

\frametitle{Splitting a slide into columns}
The line you are reading goes all the way across the slide.From the left margin to the right margin. Now we are goingthe split the slide into two columns.\bigskip
\begin{columns}[t] \begin{column}{0.5\textwidth} Here is the first column. We put an itemized list in it. \begin{itemize} \item This is an item \item This is another item \item Yet another item \end{itemize} \end{column}
\begin{column}{0.3\textwidth} Here is the second column. We will put a picture in it. \centerline{\includegraphics[width=0.7\textwidth]{image2.png}} \end{column}\end{columns}\bigskip
The line you are reading goes all the way across the slide.From the left margin to the right margin.
\end{frame}
\end{document}
Vertical alignment with images
Sometimes you may find out that the option [t] for top-alignment gives unexpected results. The followingexample shows one such case. The only difference between this and the previous example is that I have
A Beamer Quickstart
Vertical alignment with images 49

interchanged the image and text in the second column.
% columns-demo3.tex\documentclass{beamer}\usetheme{Singapore}\begin{document}
\begin{frame} \frametitle{Splitting a slide into columns}
The line you are reading goes all the way across the slide.From the left margin to the right margin. Now we are goingthe split the slide into two columns.\bigskip
\begin{columns}[t] \begin{column}{0.5\textwidth} Here is the first column. We put an itemized list in it. \begin{itemize} \item This is an item \item This is another item \item Yet another item \end{itemize} \end{column}
\begin{column}{0.3\textwidth} \centerline{\includegraphics[width=0.7\textwidth]{image2.png}} Here is the second column. We will put a picture in it. \end{column}\end{columns}\bigskip
The line you are reading goes all the way across the slide.From the left margin to the right margin.
\end{frame}
\end{document}
A Beamer Quickstart
Vertical alignment with images 50

As you see, the columns are not top-aligned at all!
What is happening here is that the bottom of the image is being taken as the image's reference point.Therefore the bottom of the image is being aligned with the top of the first column. This is not what we want!
We want the top of the image to be taken as the reference point, so that the top of the image is aligned withthe top of the first column. To achieve this, Beamer provides the [T] alignment option. The followingexample shows the result.
% columns-demo4.tex\documentclass{beamer}\usetheme{Singapore}\begin{document}
\begin{frame} \frametitle{Splitting a slide into columns}
The line you are reading goes all the way across the slide.From the left margin to the right margin. Now we are goingthe split the slide into two columns.\bigskip
\begin{columns}[T] \begin{column}{0.5\textwidth} Here is the first column. We put an itemized list in it. \begin{itemize} \item This is an item \item This is another item \item Yet another item \end{itemize} \end{column}
\begin{column}{0.3\textwidth} \centerline{\includegraphics[width=0.7\textwidth]{image2.png}} Here is the second column. We will put a picture in it. \end{column}
A Beamer Quickstart
Vertical alignment with images 51

\end{columns}\bigskip
The line you are reading goes all the way across the slide.From the left margin to the right margin.
\end{frame}
\end{document}
[contents] [index] [previous] [next]
[contents] [index] [previous] [next]
A Beamer Quickstart
Vertical alignment with images 52

18 Vertical alignment within slides
Vertical alignment in individual slides
The contents of Beamer slides are vertically centered within slides. This is particularly noticeable if there isvery little material in the slide.
The options t, c or b to \begin{frame} cause the contents of the slide to be aligned with the top, centeror bottom of the slide, respectively. The default option is c.
The following example illustrate this:
\documentclass{beamer} \usetheme{Singapore} \begin{document}
\begin{frame}[t] \frametitle{Top alingment}
This is the contents of the slide.
\end{frame} \end{document}
\documentclass{beamer} \usetheme{Singapore} \begin{document}
\begin{frame}[c] % [c] is the default \frametitle{Center alingment (default)}
18 Vertical alignment within slides 53

This is the contents of the slide.
\end{frame} \end{document}
\documentclass{beamer} \usetheme{Singapore} \begin{document}
\begin{frame}[b] \frametitle{Bottom alingment}
This is the contents of the slide.
\end{frame} \end{document}
A Beamer Quickstart
Vertical alignment in individual slides 54

Vertical alignment for the entire document
You may set the vertical alignment policy for the entire doucment by giving one of the options t or b to the\documentclass. For instance:
\documentclass[t]{beamer}
will cause the contents of all slides to be top-aligned. You can override this for individual slides by using thec or b options with \begin{frame}.
[contents] [index] [previous] [next]
[contents] [index] [previous] [next]
A Beamer Quickstart
Vertical alignment for the entire document 55

19 The default font sizeBeamer's default font size is 11 points. It is possible to set the default font size to any of 8, 9, 10, 11,12, 14, 17, 20 on the \documentclass line. For instance, to set the default font to 14 points, do:
\documentclass[14pt]{beamer}
[contents] [index] [previous] [next]
[contents] [index] [previous] [next]
19 The default font size 56

20 The default text colorBeamer's normal text is black on white background. The following command in the preamble changes allnormal text to purple:
\setbeamercolor{normal text}{fg=purple}
The fg in command above sets normal text's foreground color. It is also possible to set the normal text'sbackground color. The background color of a slide is inherited from the normal text's background, thereforechanging the normal text's background color amounts to changing the slide's background color. See Settingthe background to a solid color for an illustration.
Remark: Normal text is the text in the main body of a slide. A slide's header and footer are not normal text.The colors of those elements are controlled by the structure color. For instance, the following commandchanges slide titles (and several other things) to purple:
\setbeamercolor{structure}{fg=purple}
See the sections An image for a background and The structure color for illustrations.
[contents] [index] [previous] [next]
[contents] [index] [previous] [next]
20 The default text color 57

21 The structure font and font themesBeamer's structure font determines the font for rendering a presentation's structural elements such as headersand footers and some titlepage entries.
The default structure font for most themes is a medium-weight, upright, sans-serif font. Here is the themeumbc2 rendered with Beamer's default structure font:
\documentclass[14pt]{beamer} \usetheme{umbc2}
Let's change the structure font to italics. Note the changes in the titlepage and headers and footers of theslides.
\documentclass[14pt]{beamer} \setbeamerfont{structure}{family=\rmfamily,shape=\itshape} \usetheme{umbc2}
21 The structure font and font themes 58

Here are a few more examples.
Slanted structure font:
\documentclass[14pt]{beamer} \setbeamerfont{structure}{shape=\itshape} \usetheme{umbc2}
Bold structure font:
\documentclass[14pt]{beamer} \setbeamerfont{structure}{series=\bfseries} \usetheme{umbc2}
A Beamer Quickstart
21 The structure font and font themes 59

Bold and italic structure font:
\documentclass[14pt]{beamer} \setbeamerfont{structure}{family=\rmfamily,series=\bfseries,shape=\itshape} \usetheme{umbc2}
A Beamer Quickstart
21 The structure font and font themes 60

Font themes
Beamer offers a predefined set of font options which affect not only the structural elements, but the normaltext and mathematics. I will give only a few illustrations here. For a complete description of Beamer fontthemes you should read Beamer's documentation.
The font theme serif changes all document fonts to serif. This includes structure elements as well as normaltext and (most of) mathematics.
\documentclass[14pt]{beamer} \usefonttheme{serif} \usetheme{umbc2}
As you see, \sin and \cos are still set in sans-serif. This appears to be a Beamer bug.
The option stillsansseriftext exempts the normal text from changing to serif:
\documentclass[14pt]{beamer} \usefonttheme[stillsansseriftext]{serif} \usetheme{umbc2}
A Beamer Quickstart
Font themes 61

The option stillsansserifmath exempts mathematics from changing to serif:
\documentclass[14pt]{beamer} \usefonttheme[stillsansseriftext,stillsansserifmath]{serif} \usetheme{umbc2}
The font theme structuresmallcapsserif changes many document elements to the smallcap font:
\documentclass[14pt]{beamer}
A Beamer Quickstart
Font themes 62

\usefonttheme{structuresmallcapsserif} \usetheme{umbc2}
[contents] [index] [previous] [next]
[contents] [index] [previous] [next]
A Beamer Quickstart
Font themes 63

22 Shrinking to make things fitTo squeeze a little extra material into a Beamer slide, you may specify a shrink-factor for that slide, as in:
\begin{frame}[shrink=5] ... \end{frame}
This will scale down the contents of the slide by at least 5 percent, and more if needed, so that the contents fitcompletely within the slide.
For best results, you should specify a shrink factor as close to the needed amount as possible. If your specifiedvalue is inadequate, Beamer will issue a warning to let you know. Adjust the shrink factor so that the warninggoes away. Otherwise the slide's horizontal spacing will not be optimal.
You should not abuse this feature -- a small amount of shrinkage may go unnoticed, but too much shrinkagecan be visually unpleasant.
Instead of shrinking a slide, consider rewriting its contents or perhaps splitting it into two slides.
[contents] [index] [previous] [next]
[contents] [index] [previous] [next]
22 Shrinking to make things fit 64

23 Changing margin widthsThe size of a Beamer slide is 128mm by 96mm. These dimensions are fixed and should not be changed.
It is permissible, however, to change the widths of the left and right margins. These are set to 1cm by default.
In the example below, we change the widths of the left and right margins to 6mm and 2mm, respectively.
\setbeamersize{text margin left=6mm} \setbeamersize{text margin right=2mm}
It is possible to combine the two command into one:
\setbeamersize{text margin left=6mm, text margin right=2mm}
[contents] [index] [previous] [next]
[contents] [index] [previous] [next]
23 Changing margin widths 65

24 All about colorsBeamer handles colors with the help of an external facility called xcolor8. Beamer loads xcolor bydefault; you don't need to load it explicitly. This makes the following named colors available:
Named colors from the dvips package
Xcolor can read an extended set of color names from the file
/usr/share/texmf/tex/latex/graphics/dvipsnam.defTo make this extended set available to Beamer, invoke Beamer as:
\documentclass[xcolor=dvipsnames]{beamer}
Here is what the extended color set looks like:
24 All about colors 66

Named colors from the SVG package
Xcolor can read an even a larger set of color names from the file9
/usr/local/share/texmf/tex/latex/xcolor/svgnam.defTo make this extended set available to Beamer, invoke Beamer as:
\documentclass[xcolor=svgnames]{beamer}
Here is what the SVG color set looks like:
A Beamer Quickstart
Named colors from the dvips package 67

A Beamer Quickstart
Named colors from the SVG package 68

A few of the SVG names are duplicates: Aqua = Cyan, Fuchsia = Magenta, Gray = Grey, DarkGray =DarkGrey, LightGray = LightGrey, SlateGray = SlateGrey, DarkSlateGray = DarkSlateGrey, LightSlateGray= LightSlateGrey, DimGray = DimGrey.
Blending colors
The xcolor package provides a means to mix any set of colors in desired proportions, just as you would mixcolors in a paint store.
We specify a mix consisting of n percent from color A and (100-n) percent from color B as A!n!B. Theexpression A!n!B may be used wherever a color name is expected in Beamer. The expression A!n is ashorthand for A!n!white. Here are a few samples. (Read each row from left to right.)
See the xcolor documentation for more details.10
Defining your own colors
In addition to the mechanisms described in the previous sections, you may define colors using the\definecolor command, as documented in the LaTeX manual and made available by loading the colorpackage.11
You specify a color by giving its RGB (Red Green Blue) components as decimal fractions in the interval 0 to1 to \definecolor, as in:
\definecolor{mygold}{rgb}{0.85, 0.60, 0.00}
Then "mygold" may be used as any other color in LaTeX or Beamer. For instance:
This sentence is printed in "mygold".This sentence is printed in "green!15!mygold".
See Colored text, highlights and boxes on how to use colors in your Beamer documents.
8 Xcolor's author is Uwe Kern. See http://www.ukern.de/tex/xcolor.html.
A Beamer Quickstart
Blending colors 69

9 The file svgnam.def is distributed with xcolor.
10 On the department's machine you may view the documentation by doing:
gv /usr/local/share/texmf/doc/latex/xcolor/xcolor.PS &
11 The color package is loaded by Beamer by default. You don't need to load it separately.
[contents] [index] [previous] [next]
[contents] [index] [previous] [next]
A Beamer Quickstart
Defining your own colors 70

25 Colored text, highlights and boxesColored text in Beamer is produced using the standard LaTeX \textcolor command, as in:
\textcolor{blue}{This text is in blue}
Remark: The command \structure{This is a colored text} may be used to draw thespecified text in the presentation's structure color. See Direct use of the structure color for details.
Text background color is set using the \colorbox command:
\colorbox{yellow}{This text is highlighted in yellow}
You may combine various color and font elements to achieve interesting results. For example:
\colorbox{yellow}{ \textcolor{red}{ \textbf{ Bold text in red, highlighted in yellow } } }
To enclose text in a bordered box:
\fcolorbox{red}{yellow}{A yellow box with red border}
The border's thickness is controled by the LaTeX variable \fboxrule. Let's set the border's thickness to4 points:
\setlength{\fboxrule}{4pt} \fcolorbox{red}{white}{A white box with a red border of thickness 4 points}
The separation between the border and the enclosed object is controled by the LaTeX variable \fboxsep.Let's set the separation to zero:
\setlength{\fboxrule}{4pt} \setlength{\fboxsep}{0pt}
25 Colored text, highlights and boxes 71

\fcolorbox{red}{white}{A white box with a red border and separation of 0 points}
Also see UMBC boxes for fancier boxes that may contain text or math.
[contents] [index] [previous] [next]
[contents] [index] [previous] [next]
A Beamer Quickstart
25 Colored text, highlights and boxes 72

26 Setting a slide's backgroundThe background color of a Beamer slide is white by default. In the following example I will describe a fewways to change the default background.
Setting the background to a solid color
This example shows how to set the background to a light shade of pink:
% backgrounds-demo1.tex\documentclass{beamer}\usetheme{default}\setbeamercolor{normal text}{bg=red!12}\begin{document}
\begin{frame} \frametitle{Setting the background color}
\[ \sum_{n=1}^\infty \frac{1}{n^2} = \frac{\pi^2}{6}\]
\end{frame}
\end{document}
See the section Blending Colors for the meaning of the color specification red!12.
26 Setting a slide's background 73

Gradient colors in the background
Gradually shaded backgrounds are possible as well. In the following example, the background varies fromlight red at the bottom to light yellow at the top.
% backgrounds-demo2.tex\documentclass{beamer}\usetheme{default}\setbeamertemplate{background canvas}[vertical shading][bottom=red!20,top=yellow!30]\begin{document}
\begin{frame} \frametitle{Setting the background color}
\[ \sum_{n=1}^\infty \frac{1}{n^2} = \frac{\pi^2}{6}\]
\end{frame}
\end{document}
Grid superimposed on background
An interesting effect may be achieved by superimposing a grid on the background:
% backgrounds-demo3.tex\documentclass{beamer}\usetheme{default}\setbeamertemplate{background canvas}[vertical shading][bottom=red!20,top=yellow!30]\setbeamertemplate{background}[grid][step=5mm,color=blue]\begin{document}
\begin{frame}
A Beamer Quickstart
Gradient colors in the background 74

\frametitle{Setting the background color}
\[ \sum_{n=1}^\infty \frac{1}{n^2} = \frac{\pi^2}{6}\]
\end{frame}
\end{document}
An image for a background
The following example shows how to fill the background of a Beamer slide with the scaled version of animage using the command:12
\setbeamertemplate{background canvas}{...}
Note how I have changed the structure color and the default font color to achieve a reasonable contrastbetween text and background.
% backgrounds-demo4.tex\documentclass[12pt]{beamer}\usetheme{default}\setbeamercolor{structure}{fg=green!30}\setbeamercolor{normal text}{fg=green!30}\setbeamertemplate{background canvas}{\includegraphics [width=\paperwidth,height=\paperheight]{alps.jpg}}\begin{document}
\begin{frame}[t] \frametitle{Skiing in the Alps}
\begin{itemize}
A Beamer Quickstart
Grid superimposed on background 75

\item Check equipment \item Wear warm clothes \item Pack first-aid kit \item Good luck!\end{itemize}
\end{frame}
\end{document}
Remark: The image file alps.jpg is not a part of Beamer; you need to supply an image of your own.
Remark: The aspect ratio of a Beamerslide is 4:3 therefore it's best if your background image has the sameaspect ratio. Otherwise your image will be distorted when it's stretched to cover the slide from edge to edge.
Remark: To limit the background setting to a single slide, enclose the\setbeamertemplate{background canvas}{...} command in braces, as in:
{ % brace to limit the scope of \setbeamertemplate \setbeamertemplate{navigation symbols}{} % optionally hide naviation buttons \setbeamertemplate{background canvas}{\includegraphics [width=\paperwidth,height=\paperheight]{alps.jpg}} \begin{frame}[plain] ... \end{frame} } % closing brace
The [plain] option to \begin{frame} suppresses the drawing of any decorations that may beassociated with the current theme.
Remark: Fancy background colors, shading and pictures may make your slides look pretty but they may alsobe distracting. Use your judgement to see if such devices are appropriate for your presentation.
A Beamer Quickstart
An image for a background 76

12 I am indebted to Syed Irfan for correcting an earlier version of this document where I had "background"instead of "background canvas" in several places in this section.
[contents] [index] [previous] [next]
[contents] [index] [previous] [next]
A Beamer Quickstart
An image for a background 77

27 Acrobat Reader usage
Acrobat Reader usage under Linux
To use the Acrobat Reader to display the pdf file small.pdf on on your computer screen, do:
acroread small.pdf
On startup, the Acrobat Reader probably will display your slides in a small window for previewing.
To expand the slide to fill the entire screen, press Control-L.• To get out of the full-screen mode, press Control-L again.•
Once in the full-screen mode, navigate among your slides using the following key bindings:
Next slide Right ArrowPrevious slide Left ArrowLast slide Control-Shift-PageDownFirst slide Control-Shift-PageUpPrevious viewed slide Control-Left ArrowQuit Control-QThe "Previous viewed slide" requires some explanation.
Suppose that you jump to the last slide by Control-Shift-PageDown. Then Control-Left Arrow willreturn you to the slide from which you jumped, because that is the "Previous viewed slide".
Additionally, in Navigating with hyperlinks we will see how to make out-of-sequence jumps from one slide toanother, using hyperlinks. There, too, the Control-Left Arrow will be used to return to the "Previous viewedslide".
Remark: A very readable documentation of Acrobat Reader's features is available in its on-line help,accessible through the Help button on Acrobat Reader's menu bar.
Acrobat Reader usage on other systems
Acrobat Reader's key bindings may vary, depending on the operating systems.
I have not much experience with anything other than Linux therefore I cannot provide useful advice for othersystems. Nevertheless, I have been told that under Windows the key for "Previous viewed slide" isAlt-Left Arrow. You may want to make note of that.
[contents] [index] [previous] [next]
[contents] [index] [previous] [next]
27 Acrobat Reader usage 78
28 Xpdf usageXpdf is a pretty good alternative to Adobe's Acrobat Reader. It has at least two advantages over AcrobatReader:
It is particularly lightweight -- it starts up noticeably faster -- therefore repeated invocations are prettypainless.
•
It can re-load the current document. This is very useful during the development of Beamer slides. Youcan start up Xpdf on your document and put it in the background. Then as you edit your source fileand update the resulting pdf file, you can update the display by typing "r" key in the Xpdf window.No need to exit and restart.
•
Xpdf's disadvantages are:
It is limited to platforms with the X Window System, It is does not run on Microsoft Windows.Therefore it is not as widely available as Adobe's Acrobat Reader. You just can't expect to walk up toa computer in a conference and expect to find Xpdf installed on it.
•
It is not possible to toggle between window mode and the full-screen mode in Xpdf. For full-screenmode, you need to start Xpdf with the -fullscreen option. See below for details.
•
There are some rough edges, literally, in certain elements displayed by Xpdf. Generally Adobe'sAcrobat Reader produces a nicer looking output.
•
For these reasons, I use Xpdf while building a presentation and use the Acrobat Reader for presenting myslides to an audience.
Running Xpdf inside a window
To display the file small.pdf, do:
xpdf small.pdf
Navigate among your slides using the following key bindings:
Next slide n or SpaceBar orPageDown
Previous slide p or BackSpace orPageUp
Last slide Control-EndFirst slide Control-HomePrevious viewed slide bRe-load file rQuit q
Remark: The "Previous viewed slide" was explained in the Acrobat Reader usage.
Remark: To get a complete list of Xpdf's key binding, click the question-mark button that appears alongXpdf window's bottom edge.
28 Xpdf usage 79
Running Xpdf in the full-screen mode
To display the file small.pdf in the full-screen mode, do:
xpdf -fullscreen small.pdf
Navigate among the slides with the same key binding that were described in the previous paragraph.
Advanced usage
Start up Xpdf with a command like "xpdf small.pdf" then resize the window using whatever hooks yourwindow manager provides.
You will find out that the contents of the window remain at the original size -- they do not resize along withthe window.
To tell Xpdf to resize the contents along with the window, invoke it as:
xpdf -z page small.pdf
This is pretty handy while you are developing your slides: you can use your window manager's "maximize"function to toggle between normal and maximized states to get a better view of the slides.
I see no reason for not using the -z page flag all of the time. Therefore I have aliased xpdf to "xpdf -zpage" and I recommend that you do it too. How you define an alias depends on the unix shell that you use.At UMBC's Department of Mathematics and Statistics we use tcsh. Therefore edit the file .cshrc in yourhome directory and add the following line to it:
alias xpdf xpdf -z page
While you are editing your .cshrc, you might as well add the following lines:
alias xpdff xpdf -fullscreen complete xpdff 'n/*/f:*.{pdf,PDF}/'
The first of these lines sets xpdff to be a an alias for "pdf -fullscreen", therefore you can now start afull-screen presentation by typing "xpdff small.pdf".
The second line tells tcsh that the newly created xpdff command expects files names ending in pdf orPDF. This is used when you hit the TAB key to complete a file name on the command line.
Where to get Xpdf
Xpdf is bundled with most Linux distributions. If for some reason you need to download, compile and installthe package yourself, you can get the source from: http://www.foolabs.com/xpdf/.
[contents] [index] [previous] [next]
A Beamer Quickstart
Running Xpdf in the full-screen mode 80
[contents] [index] [previous] [next]
A Beamer Quickstart
Where to get Xpdf 81

29 Beamer on the Web
Beamer's home on the web
Beamer's author is Till Tantau. Beamer's home page on the Web is at:
http://latex-beamer.sourceforge.net/where you can find several substantive examples plus downloading and installation instructions.
Screenshots
Jason Gorski has created a very nice set of Beamer screenshots in:
http://www.csd.uwo.ca/gradstudents/jgorski/personal/beamerthemes/It shows the complete set of Beamer themes, without customization.
A very brief introduction
Norm Matloff at UC Davis has produced a very brief introduction to Beamer. This may be useful if you wantto get started in a hurry.
http://heather.cs.ucdavis.edu/ matloff/beamer.html
Advanced tutorials
Ki-Joo Kim has created two very nice tutorials that demonstrate many advanced features of Beamer. You canfind these tutorials, named beamer_guide.pdf and beamer_pstricks.pdf in:
http://www.geocities.com/kijoo2000/beamer.html
[contents] [index] [previous] [next]
[contents] [index] [previous] [next]
29 Beamer on the Web 82

30 A gallery of Beamer slidesIn this page I have included samples of slides produced by Beamer. The contents of these slides are identicalto that of the file sample.tex. Only the controlling commands in the preamble are changed. Above each slide Ihave shown the complete preamble material that has gone into making that slide.
\documentclass{beamer} \usetheme{default}
\documentclass{beamer} \usetheme{default} \useoutertheme{umbcfootline} \useinnertheme{umbctribullets}
30 A gallery of Beamer slides 83
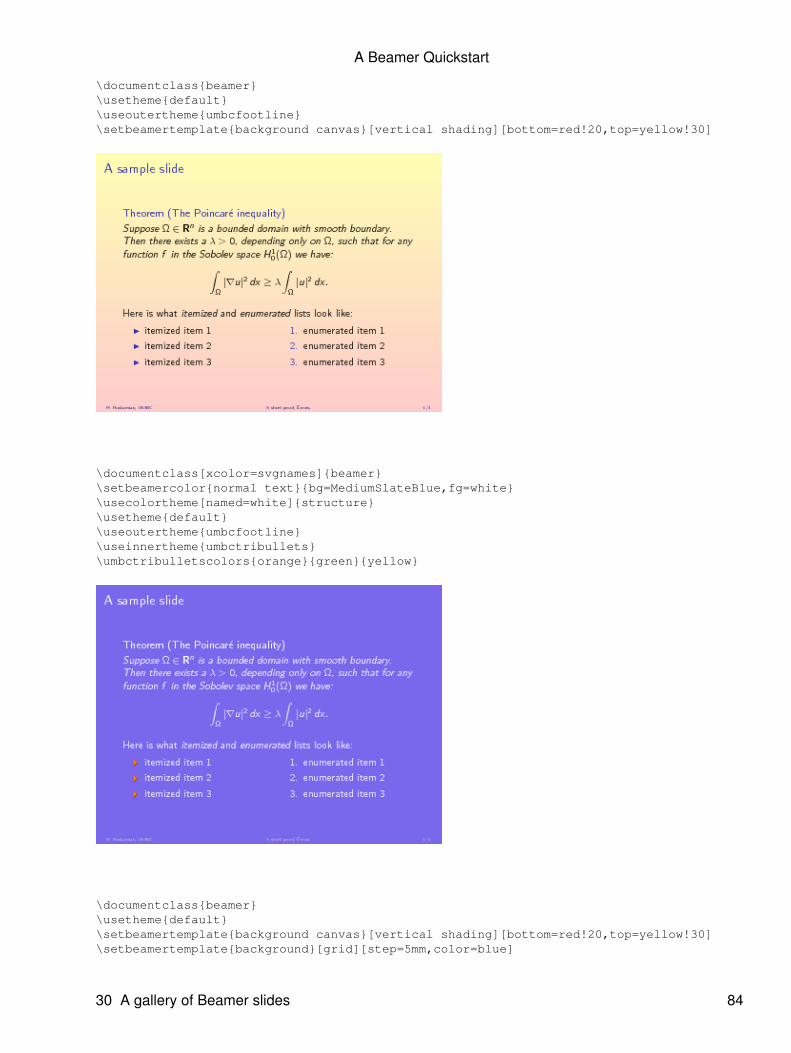
\documentclass{beamer} \usetheme{default} \useoutertheme{umbcfootline} \setbeamertemplate{background canvas}[vertical shading][bottom=red!20,top=yellow!30]
\documentclass[xcolor=svgnames]{beamer} \setbeamercolor{normal text}{bg=MediumSlateBlue,fg=white} \usecolortheme[named=white]{structure} \usetheme{default} \useoutertheme{umbcfootline} \useinnertheme{umbctribullets} \umbctribulletscolors{orange}{green}{yellow}
\documentclass{beamer} \usetheme{default} \setbeamertemplate{background canvas}[vertical shading][bottom=red!20,top=yellow!30] \setbeamertemplate{background}[grid][step=5mm,color=blue]
A Beamer Quickstart
30 A gallery of Beamer slides 84

\documentclass[12pt]{beamer} \usetheme{default} \setbeamercolor{structure}{fg=cyan!70} \setbeamercolor{normal text}{fg=cyan!70} % Note: sunset.jpg is not a part of beamer; you need to supply an image of your own. \setbeamertemplate{background}{\includegraphics[width=\paperwidth]{sunset.jpg}}
\documentclass{beamer} \usetheme{Boadilla}
A Beamer Quickstart
30 A gallery of Beamer slides 85

\documentclass[xcolor=dvipsnames]{beamer} \usecolortheme[named=Maroon]{structure} \usetheme{Boadilla}
\documentclass{beamer} \usetheme{Madrid}
A Beamer Quickstart
30 A gallery of Beamer slides 86

\documentclass[xcolor=dvipsnames]{beamer} \setbeamercolor{structure}{fg=OliveGreen!50!black} \usetheme{Madrid}
\documentclass{beamer} \usetheme{Pittsburgh}
A Beamer Quickstart
30 A gallery of Beamer slides 87

\documentclass{beamer} \usetheme[height=7mm]{Rochester}
\documentclass[xcolor=dvipsnames]{beamer} \usecolortheme[named=OliveGreen]{structure} \usetheme[height=7mm]{Rochester} \setbeamertemplate{items}[ball] \setbeamertemplate{blocks}[rounded][shadow=true] \useoutertheme{umbcfootline}
A Beamer Quickstart
30 A gallery of Beamer slides 88

\documentclass{beamer} \usetheme{Copenhagen}
\documentclass{beamer} \usetheme{Warsaw}
A Beamer Quickstart
30 A gallery of Beamer slides 89

\documentclass{beamer} \usetheme{Singapore}
\documentclass{beamer} \usetheme{Malmoe}
A Beamer Quickstart
30 A gallery of Beamer slides 90
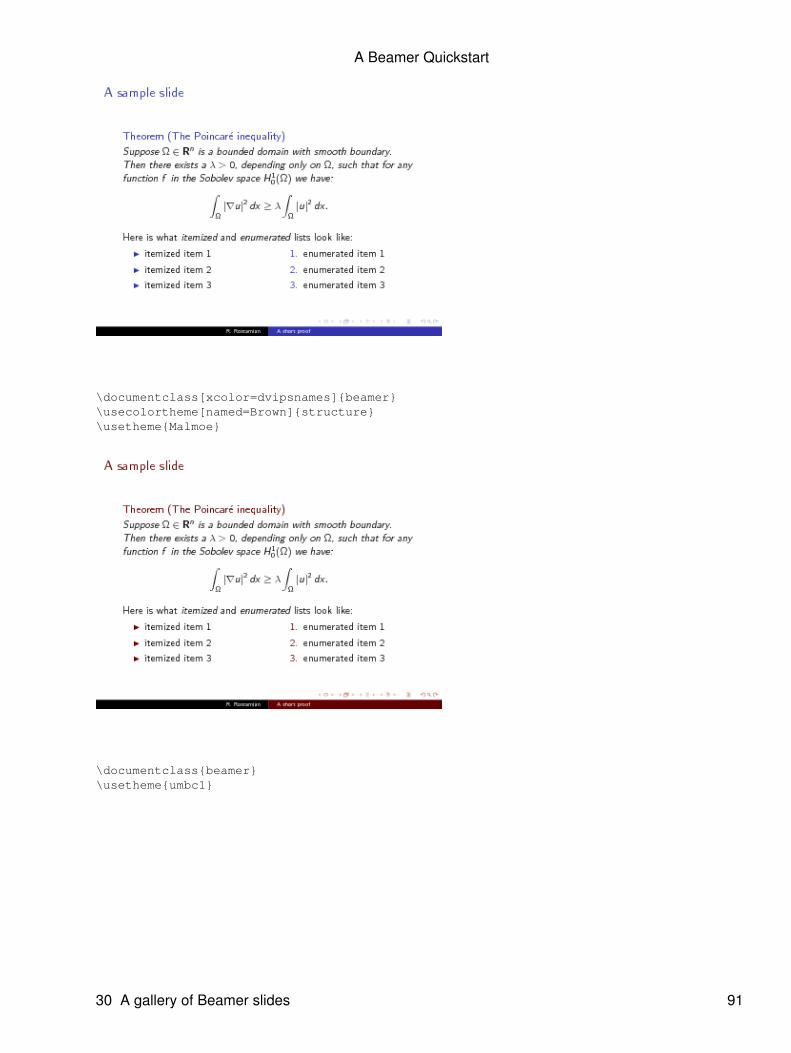
\documentclass[xcolor=dvipsnames]{beamer} \usecolortheme[named=Brown]{structure} \usetheme{Malmoe}
\documentclass{beamer} \usetheme{umbc1}
A Beamer Quickstart
30 A gallery of Beamer slides 91

\documentclass[xcolor=dvipsnames]{beamer} \usecolortheme[named=Sepia]{structure} \usetheme{umbc1}
\documentclass{beamer} \usetheme{umbc2}
A Beamer Quickstart
30 A gallery of Beamer slides 92

\documentclass{beamer} \usecolortheme[named=violet]{structure} \usetheme{umbc2}
\documentclass{beamer} \usetheme{umbc3}
A Beamer Quickstart
30 A gallery of Beamer slides 93

\documentclass{beamer} \usetheme{umbc4}
[contents] [index] [previous] [next]
[contents] [index] [previous] [next]
A Beamer Quickstart
30 A gallery of Beamer slides 94

31 Complete set of Beamer themesThis page contains samples corresponding to every theme distributed with version 3.06 of Beamer. Eachtheme is represented as a pair of images—one titlepage and one ordinary slide. The idea of such a web pagecame from an old website of Jason Gorski. That website no more exists, hence this replacement.
The samples were generated according to the following template:
\documentclass{beamer}\usetheme{@THEME} % name of theme substututed here\begin{document}\title{Beamer Sample for @THEME}\subtitle{Based on Beamer version 3.06}\author{Rouben Rostamian}\institute[UMBC]{Department of Mathematics and Statistics\UMBC}\date{\today}
\begin{frame}[plain] \titlepage\end{frame}
\begin{frame} \frametitle{Introduction} ...\end{frame}\end{document}
Click on any image to see a larger version of it.
Beamer theme AnnArbor
Beamer theme Antibes
31 Complete set of Beamer themes 95

Beamer theme Bergen
Beamer theme Berkeley
Beamer theme Berlin
Beamer theme Boadilla
A Beamer Quickstart
Beamer theme Bergen 96

Beamer theme CambridgeUS
Beamer theme Copenhagen
Beamer theme Darmstadt
Beamer theme Dresden
A Beamer Quickstart
Beamer theme CambridgeUS 97

Beamer theme Frankfurt
Beamer theme Goettingen
Beamer theme Hannover
Beamer theme Ilmenau
A Beamer Quickstart
Beamer theme Frankfurt 98

Beamer theme JuanLesPins
Beamer theme Luebeck
Beamer theme Madrid
Beamer theme Malmoe
A Beamer Quickstart
Beamer theme JuanLesPins 99

Beamer theme Marburg
Beamer theme Montpellier
Beamer theme PaloAlto
Beamer theme Pittsburgh
A Beamer Quickstart
Beamer theme Marburg 100

Beamer theme Rochester
Beamer theme Singapore
Beamer theme Szeged
Beamer theme Warsaw
A Beamer Quickstart
Beamer theme Rochester 101

Beamer theme boxes
Beamer theme default
[contents] [index] [previous] [next]
[contents] [index] [previous] [next]
A Beamer Quickstart
Beamer theme boxes 102

Index
Adobe's Acrobat Reader key bindings
background color, gradual shading, grid pattern, imagebare-bones example, small.texbeamer on the webboxed textbug in fontthemebug in infolinesbullets: ball, circle, rectangle, triangle
color selector tool: xcolorselcolor, normal text\colorboxcolored textcolors blending defining with RGB components named colors: beamer's defaults extended set from the dvips package extended set from the svg package the xcolor packagecolumns environmentcompiling into pdfconvert
dimensions of a beamer slidedisplaybox environment, see UMBC add-ons to Beamerdownloaing hfc.tgz
epstopdf
\fboxrule\fboxsep\fcolorboxfonts sizes themesfootline, see UMBC add-ons to Beamer the infolines theme
Index 103

umbc footlineframe, same as slide
gallery demos standard themesgraphics format conversion including images in slides
height option in the Rochester themehfc.tgzhighlighted texthyperlinks buttons returning to calling page
ImageMagick, see convert\includegraphicsitemization markers: ball, circle, rectangle, triangle
long example
margins, customizing widths
navigating with hyperlinksnavigation icons, getting rid of
onlinebox environment, see UMBC add-ons to Beameroverlays
pausepdflatex
rounded boxes and shadows
shrink to make things fitslide, same as framesmall.texstructure color coloring text with the \structure command
A Beamer Quickstart
Index 104

specifying RGB colors specifying rgb colors
tar commandtex2pagetext color\textcolorthemes customizing directory inner, outer more interestingtheorems and related environemnts: definition, corollary, theorem, example, prooftitle page author, title, subtitle, institute, date short author, short title, etc. the plain option
UMBC add-ons to Beamer downloading tribullets, an inner theme for triangular itemization markers umbc1, umbc2, umbc3, umbc4: basic beamer themes umbc1, umbc2, umbc4: basic beamer themes customizing umbcboxes, an inner theme for boxed text/math umbcfootline, an outer theme for slide footlines changing per slide customizingunpacking a tar archive
vertical alignment within slides
xcolor packagexcolorselxpdf aliases for unix full-screen mode key bindings
[contents] [index] [previous] [next]
A Beamer Quickstart
Index 105