Embed Size (px)
DESCRIPTION
guides on bean sprouting
Citation preview

Copyright © Llewelyn Lipi. All rights reserved. www.advancedfarm.com
1
BEAN SPROUT CULTIVATION MANUAL
GUIDELINES FOR CULTIVATING MUNG BEAN SPROUT
By Llewelyn Lipi
B.Sc. Plant Technology, UMS

Copyright © Llewelyn Lipi. All rights reserved. www.advancedfarm.com
2
First edition: April 2012
Thank you for downloading to our ‘Bean Sprout Cultivation Manual - Guidelines for Cultivating Mung Bean Sprout’ at www.advancedfarm.com. When you are reading this document, we assume that you have obtained this document through legal channel. If this document is not obtained through our website, please do inform us.
The information contained within this/these document(s) are solely advisory, and should not be
substituted for legal, financial or other professional advice. Any and all decisions and actions must be done through the advice and counsel of a qualified attorney, agent, financial advisor, CPA, or other professional. We cannot be held responsible for actions you may take without proper advice. You should not rely on this information as absolute.
You are responsible for understanding the information. You should not rely on this information as
absolute. If you do act upon the suggestions contained in this document, you are responsible for yourself and your actions. If you rely on the information on these pages, you are responsible for ensuring by independent verification its accuracy or completeness.
The information contained in these pages does not constitute legal advice. No claims, promises or
guarantees about the accuracy, completeness, or adequacy of the information contained in these pages are made. As legal advice must be tailored to the specific circumstances of each case, and laws are constantly changing, nothing provided herein should be used as a substitute for the advice of competent counsel. You are encouraged to show this document to your legal advisor so that s/he can make adjustments to the document, as necessary, before implementing it or using it.
All content Copyright © Llewelyn Lipi. All Rights reserved. www.advancedfarm.com is the internet domain name under which this document is legally obtained.
This work is licensed under the Creative Commons Attribution-NonCommercial-ShareAlike 3.0 Unported License. To view a copy of this license, visit http://creativecommons.org/licenses/by-nc-sa/3.0/ or send a letter to Creative Commons, 444 Castro Street, Suite 900, Mountain View, California, 94041, USA.
Prices are: FREE Donation: pay through Paypal to [email protected]
This document has not been formally edited.

Copyright © Llewelyn Lipi. All rights reserved. www.advancedfarm.com
3
TABLE OF CONTENT
Contents Page 1.0 INTRODUCTION 4
1.1 Document Scopes and How to Use This Document 4 1.2 General Remarks About Bean Sprouting 4 1.3 Food Safety and Good Agricultural Practices 4
2.0 BEAN SPROUTING 5 2.1 Step 1: Pre-soak 5 2.2 Step 2: Soaking 6 2.3 Step 3: Transfer To Growing Chamber 6 2.4 Step 3: Watering 7 2.5 Step 4: Harvesting 7 2.6 Step 5: Postharvest 9
3.0 GROWING UNIT SETUP AND INSTALLATION 10 3.1 Step 1: Installing Growing Chamber 11
3.1.1. Inlet Installation 11 a. Micro Tube Installation 11 b. Micro Mister Installation 12
3.1.2. Outlet Installation 13 3.1.3. Airway Installation 14
3.2 Step 2: Installing Supply and Distribution Line 15 3.2.1. Supply Line Installation 15 3.2.2. Distribution Line Installation 16
3.3 Step 3: Installing Control Unit 16 3.4 Step 4: Operation Setup 17
4.0 Appendix 18 4.1 References 18

Copyright © Llewelyn Lipi. All rights reserved. www.advancedfarm.com
4
1.0 INTRODUCTION
1.1 Document Scopes and How To Use This Document This document covers general bean sprouting practices and setting up production unit without the use of additive chemical, hormone or pesticide. Bean used for the purpose of this publication is mung bean or Vigna Radiata. The method of growing this bean sprout can be considered as organic. Certification of organic bean sprout however is subject to your country standard. This document is divided into 2 major sections. A general step-by-step guide on cultivating bean sprout is covered in Section 2: Bean Sprouting. Technical guideline to setup and install your bean sprout production unit is covered in Section 3: Growing Unit Setup and Installation. The rest of additional information is covered in the appendix. 1.2 General Remarks About Bean Sprouting
Bean sprouting is among the fastest and easiest form of plant cultivation while at the same time offer us with highly nutritious food. Although bean sprouting has been practiced since 5,000 years ago, the simple basic concept of seed germination still apply today with significant improvement in production efficiency to meet economic demand. As we are becoming more dependent on others to produce our own food, the cost of obtaining food resource at higher cost is inevitable even for a simple bean sprout. Let us take a proactive approach by improving our knowledge in bean sprouting.
KNOW YOUR FOOD, PRODUCE AND EAT YOUR OWN FOOD!
1.3 Food Safety and Good Agricultural Practices
There are numerous and continuous debates on the toxicity and benefits of phytic acid which present on bean bran. Regardless the issues, as for rules of thumb, beans should be soaked 3-12 hours before placed into growing chamber. You should also pick thoroughly and discard any broken, moldy, discolored or disfigured seeds. In particular, try to remove black, dark brown or green color moldy seeds. In commercial venture, this step is usually redundant. Poor hygienic practices in the production of sprouts have raised multiple issues on food safety. The best and well documented guide on food safety for bean sprout is Code of Practice for the Hygienic Production of Sprouted Seeds which is available from Canadian Food Inspection Agency website. Unofficial extraction of this document can be downloaded for FREE from our download section.

Copyright © Llewelyn Lipi. All rights reserved. www.advancedfarm.com
5
2.0 BEAN SPROUTING Here’s the timeline for the production of bean sprout using our manual:
By right, your bean sprout should be ready for harvesting within 2.5 days or less. 2.1 Step 1: Pre-soak
a. Remove any unwanted object from your mung bean stock including taking extra precautions mentioned in 1.3 (Food Safety and Good Agricultural Practices);
b. Weight in you mung bean according to your need. 100gm raw bean will produce roughly 500gm-600gm bean sprout.

Copyright © Llewelyn Lipi. All rights reserved. www.advancedfarm.com
6
2.2 Step 2: Soaking
a. Pour the mung bean into a container (any container as long it is potable and clean) which can hold up to at least 7 times the volume of the mung bean.
b. Keep the mung beans soaked in the container for 6-12 hours; c. For food safety precaution, you can cover the container with muslin cloth or other similar
materials just to make sure no cockroaches, rats or other pest contaminate your mung bean; d. After period of soaking time out, transfer the mung bean to growing chamber. You can also refer
to supporting document - Factors Affecting Bean Sprouting from our download section for additional information.

Copyright © Llewelyn Lipi. All rights reserved. www.advancedfarm.com
7
2.3 Step 3: Transfer To Growing Chamber
a. Make sure you have prepared 2 plastic vegetable crates (round-shape with diameter smaller than the base of growing chamber) for this purpose;
b. The first crate is put up-side down inside the growing chamber, the second crate is to be put on top of the first crate and facing upward;
c. Pour and distribute bean evenly on the top crate; d. Close the growing chamber lid and you’re ready for the next step. 2.4 Step 4: Watering
No Description Watering schedule 1st watering 2nd watering
1 Watering period 5 minutes 1 minutes 2 Interval Every 90 minutes
a. Refer to above table for watering schedule; b. 1st watering refers to the first 24 hours start after you transfer your bean to growing chamber; c. 2nd watering refers to the following 24 hours after 1st watering; d. Make sure to adjust your water timer accordingly. However, watering 5 minutes every 3 hours for
the whole period can also be used.

Copyright © Llewelyn Lipi. All rights reserved. www.advancedfarm.com
8
2.5 Step 5: Harvesting

Copyright © Llewelyn Lipi. All rights reserved. www.advancedfarm.com
9
a. Bean sprout should be harvested not more than 60 hours (counted from initial soaking process in 2.2) or before the emergence of primary leaf or whichever comes first;
b. Turn off main control valve; c. Remove cover lid; d. Gently reach the bottom of the growing chamber using your hands and grab the top-crate; e. Pull up the top-crate out of the growing chamber; f. Trim the excess root using your kitchen knife; g. Pour the sprout in a container of water; h. Remove sprout that still attached to the crate by pulling it using bare hand; i. Gently, shake the sprout in the water to separate bran from the sprout. Heavier bran will either
sink to the bottom or float on water; j. Once the bran and sprout separated, remove bean sprout from the water and put it in a crate; k. Manually, remove the excess root. Commercial producers will run this sprout on root-separator
machine.

Copyright © Llewelyn Lipi. All rights reserved. www.advancedfarm.com
10
2.6 Step 6: Postharvest
a. For the purpose of own consumption, put bean sprout in an empty container then pour in 1-2 tablespoon of kitchen salt for every 500gm of sprout;
b. Fill in the container to immerse the sprout to its full volume with tap water to dissolve the salt; c. Put in a refrigerator, sprout can stay fresh for up to 3-4 days; d. For commercial practice, water should be properly drained to allow the sprout dry. There is no
need to use kitchen salt. The sprout is then ready for packing.

Copyright © Llewelyn Lipi. All rights reserved. www.advancedfarm.com
11
3.0 GROWING UNIT INSTALLATION AND SET UP 3.1 Step 1: Installing Growing Chamber
The above diagram illustrates the general layout of our production unit which will be used as references in this document.

Copyright © Llewelyn Lipi. All rights reserved. www.advancedfarm.com
12
3.1.1. Inlet Installation
a. Micro Tube Installation
a. Using a drill/knife, make a hole from the growing chamber lid holder right through the lid; b. The hole should be the same diameter as the 1.0 mm micro tube and positioned at the center of
the cover lid; c. Get the micro tube go through the hole; d. Pull the micro tube inward to 10-15 cm into the down-side of the cover lid.

Copyright © Llewelyn Lipi. All rights reserved. www.advancedfarm.com
13
b. Micro Mister Installation
a. Micro mister use in this document consists of 2 components: i) Micro mister head; and ii) Micro mister body;
b. Micro mister body should be modified by cutting the base flat to enable the micro mister stick on the down-side of cover lid. Should you have rigid riser, there is no need for the micro mister body;
c. Modified the single barb nipple so that it can fit into the micro mister body; d. Fit /plug nipple into the micro mister body inlet; e. Stick the micro mister body permanently using permanent glue on the surface on cover lid (down-
side). It should be 2-5 cm from the hole made for micro tube (cover lid center); f. Connect the micro tube and nipple; g. To minimize leaking, you can also apply silicone glue at the joint/connecting part.

Copyright © Llewelyn Lipi. All rights reserved. www.advancedfarm.com
14
3.1.2. Outlet Installation
a. Using a drill/knife, make a hole for waste water disposal. The hole that you make should have the same diameter as the tap connector and positioned 10-15 cm from ground surface;
b. Center of the hole should be 5-7cm from ground level; c. Insert the inner side on the tap connector (bushing) from inside of the growing chamber; d. Insert the fitting from the outer side of the growing chamber; e. To minimize leaking, you can also apply silicone glue at the base of inner tap before tighten the
fitting.

Copyright © Llewelyn Lipi. All rights reserved. www.advancedfarm.com
15
3.1.3. Airway Installation
a. Airway should be drilled on the vertical part of the growing chamber; b. Using drill/knife, make a hole on each opposite side just below the growing chamber handle; c. Cut wire mesh/mosquito netting with shape and dimension bigger than the airways you bore; d. Glued the mesh on the outer side of the airways using either double side tape/permanent or
silicone glue. The mesh will prevent unwanted pest entering you growing chamber.

Copyright © Llewelyn Lipi. All rights reserved. www.advancedfarm.com
16
3.2 Step 2: Installing Supply and Distribution Line
3.2.1 Supply Line Installation
a. Turn off your main water source; b. Cut of the nearest pipeline to your sprouting site; c. Reconnect the main pipeline using Tee so that you can reconnect the existing pipe line while
having another extra line for your bean sprouting; d. Connect your Tee with 20 mm HDPE pipe. The length of your HDPE pipe depends on your
preference/sprouting site setting; e. Install 20 mm stopcock in between your HDPE pipe for emergency supply line cut off; f. You will need to connect the end of your HDPE pipe to control unit at 3.3;

Copyright © Llewelyn Lipi. All rights reserved. www.advancedfarm.com
17
3.2.2 Distribution Line Installation
a. Right after the control unit, install another HDPE pipe; b. Install a stopend at the end of your HDPE pipe; c. In between your HDPE pipe, pierced the pipe with hole punch and fit in nipple at the hole; d. Connect the nipple to micro tube which will run to your micro mister in 3.1.1.a. 3.3 Step 3: Installing Control Unit
a. Please refer to the Production Unit Layout at 3.1 to assist your installation procedures; b. After installation in 3.2.1 (Supply line installation), make sure to fit in the water timer with the right
flow direction; c. Outflow should be directed to distribution line at 3.2.2.
Copyright © Llewelyn Lipi. All rights reserved. www.advancedfarm.com
18
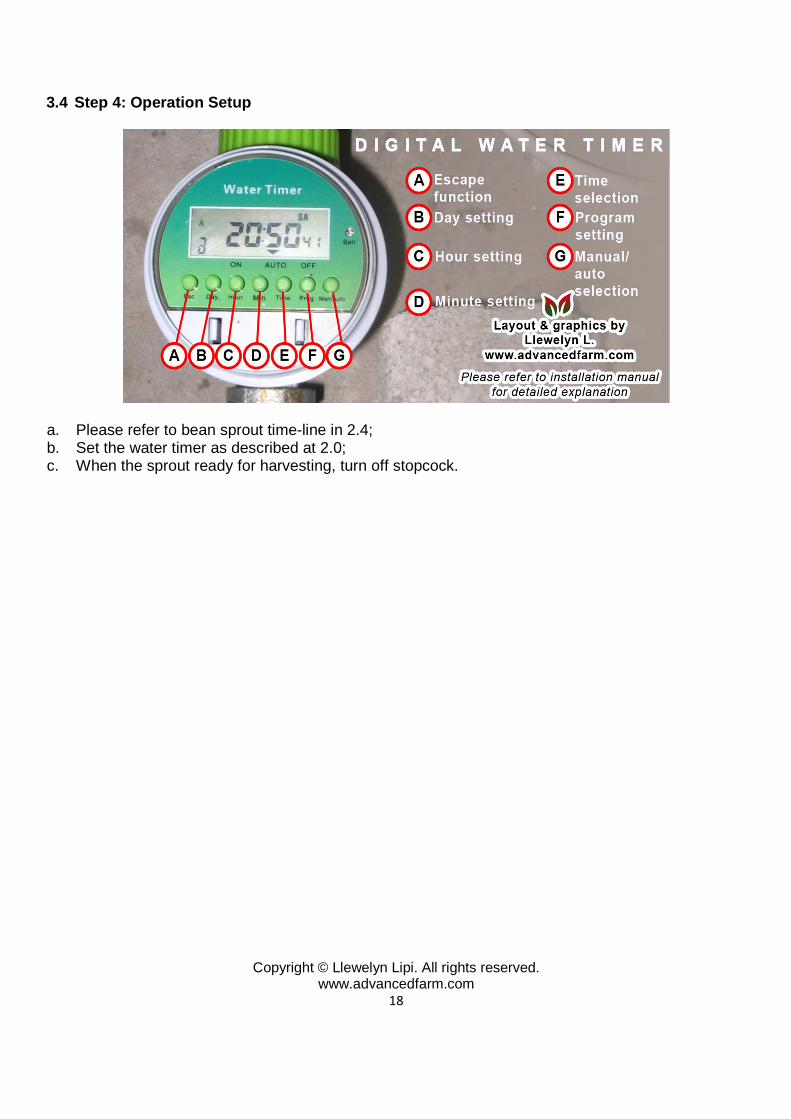
3.4 Step 4: Operation Setup
a. Please refer to bean sprout time-line in 2.4; b. Set the water timer as described at 2.0; c. When the sprout ready for harvesting, turn off stopcock.

Copyright © Llewelyn Lipi. All rights reserved. www.advancedfarm.com
19
4.0 APPENDIX
4.1 References 1. Controlled Growth of Mung Bean Sprout. Bonner J.F. United States Patent # 4,519,163. 1985. 2. Growing Seed Sprout at Home. Suslow T.V, Harris L.J. University of California. Publication 8151. 3. Sprout Production in California. Schrader W.L. University of California. Publication 8060. 4. Effective Heat Treatment Techniques for Control of Mung Bean Sprout Rot, Incorporable into
Commercial Mass Production. Lee J.H., Han K. S, et. al. Plant Pathology Journal 23(3):174-179 (2007)