Embed Size (px)
Citation preview
0
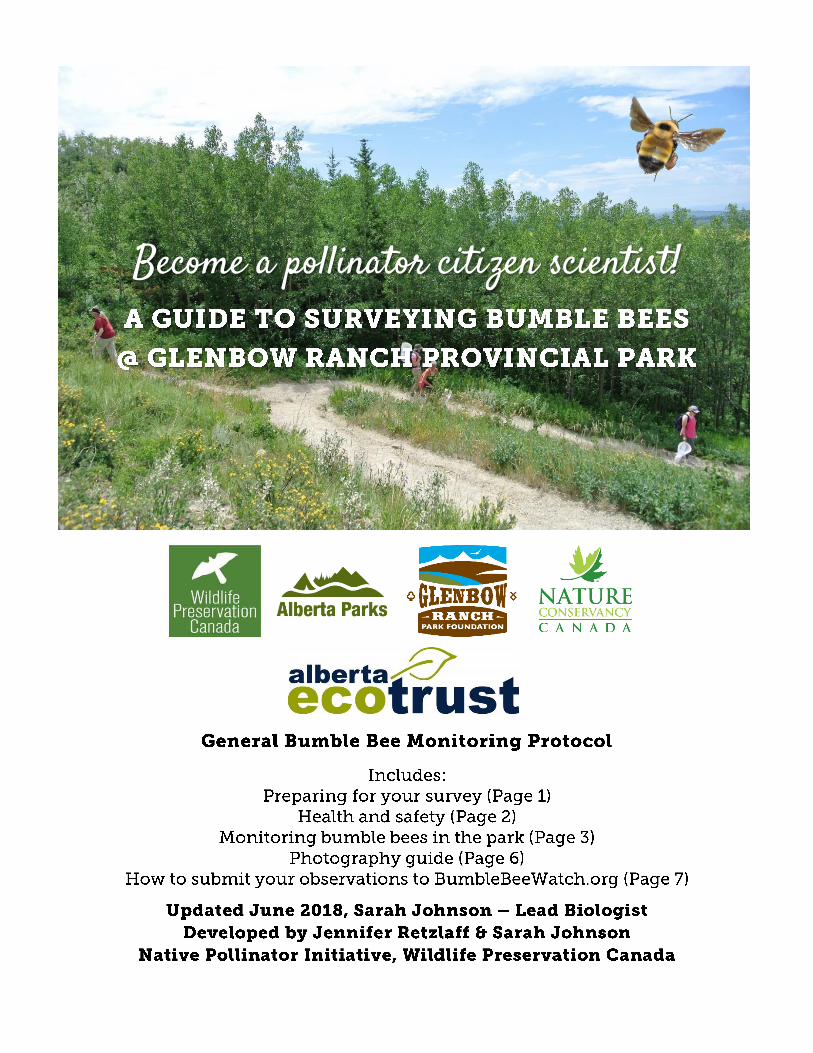
Become a pollinator citizen scientist!
1
• You will be able to access multiple resources here, including:
• Signing up for survey slots at Glenbow Ranch Provincial Park
• Signing in and out for your survey on the day-of
• All scheduled educational events at the park led by Wildlife Preservation Canada
• Digital copies of all educational material provided in training sessions
• Links to our social media accounts for sharing your bumble bee stories
• Within your selected week, choose a day where weather is optimal: temperature above 15 degrees Celsius,
chance of rain below 30%, and trying to avoid coming out on an exceptionally windy day or during very high
temperatures (30+ degrees Celsius).
• If possible, try to visit the park between 8:30 am and 4:30 pm.
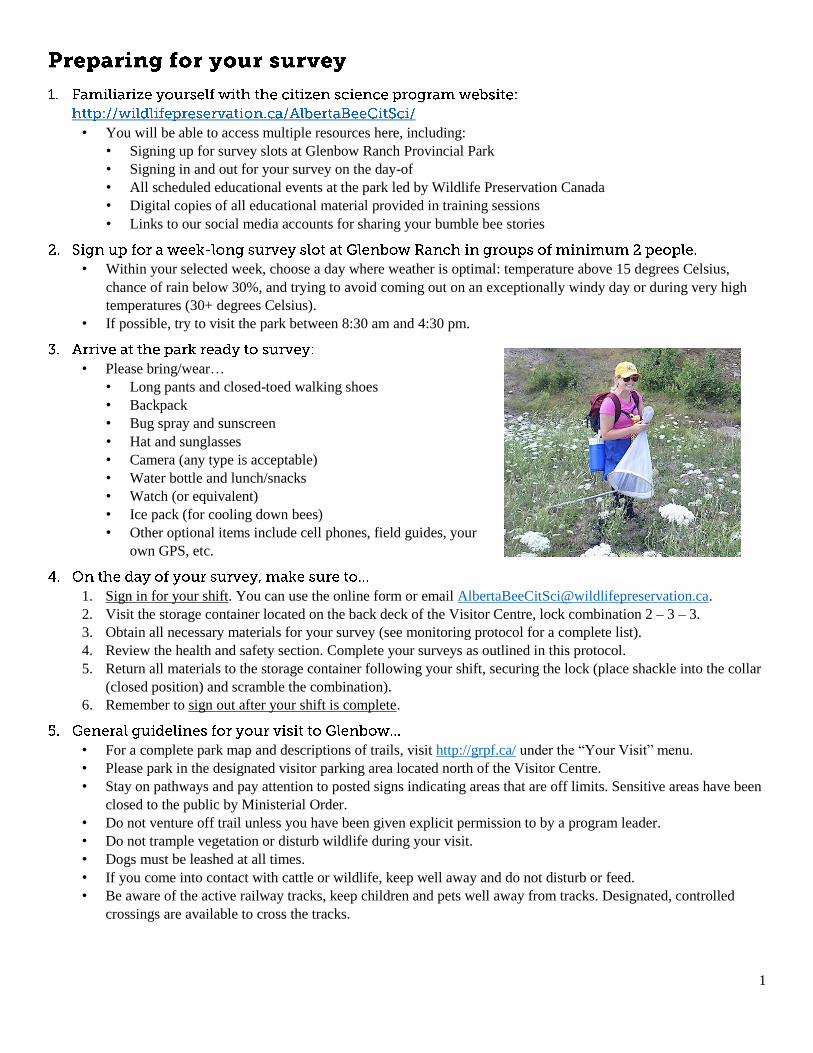
• Please bring/wear…
• Long pants and closed-toed walking shoes
• Backpack
• Bug spray and sunscreen
• Hat and sunglasses
• Camera (any type is acceptable)
• Water bottle and lunch/snacks
• Watch (or equivalent)
• Ice pack (for cooling down bees)
• Other optional items include cell phones, field guides, your
own GPS, etc.
1. Sign in for your shift. You can use the online form or email [email protected].
2. Visit the storage container located on the back deck of the Visitor Centre, lock combination 2 – 3 – 3.
3. Obtain all necessary materials for your survey (see monitoring protocol for a complete list).
4. Review the health and safety section. Complete your surveys as outlined in this protocol.
5. Return all materials to the storage container following your shift, securing the lock (place shackle into the collar
(closed position) and scramble the combination).
6. Remember to sign out after your shift is complete.
• For a complete park map and descriptions of trails, visit http://grpf.ca/ under the “Your Visit” menu.
• Please park in the designated visitor parking area located north of the Visitor Centre.
• Stay on pathways and pay attention to posted signs indicating areas that are off limits. Sensitive areas have been
closed to the public by Ministerial Order.
• Do not venture off trail unless you have been given explicit permission to by a program leader.
• Do not trample vegetation or disturb wildlife during your visit.
• Dogs must be leashed at all times.
• If you come into contact with cattle or wildlife, keep well away and do not disturb or feed.
• Be aware of the active railway tracks, keep children and pets well away from tracks. Designated, controlled
crossings are available to cross the tracks.

2
Your personal safety is paramount – if you are ever unsure of any of the program protocols, exercise caution and never do
something that you are uncomfortable with. Know your limitations, and stick to them.
On-site ANY emergency situation Any time Call 911 immediately
Non-emergency situation 8:30 am to 4:30 pm Sarah Parker (Mon-Fri)
Executive Director, GRPF
403-708-7039
Karen Anderson (Mon-Fri)
Park Ecologist Kananaskis, AEP
403-869-3980
Trevor Thome (Mon-Fri 6:30-3)
GRPP Park Maintenance, AEP
403-818-2135
Off-site Non-emergency situation Any time Sarah Johnson
Lead Pollinator Biologist, WPC
519-766-8366
ALWAYS work in groups of minimum 2 people, unless given special clearance by a program leader.
ONLY work during daylight hours. If possible, volunteer shifts between 8:30-4:30 are preferable.
ALWAYS sign in and sign out for each shift.
ALWAYS carry a working cellphone or radio – if you do not have access to one of these, please notify a program
leader before signing up for any survey shifts.
ALWAYS carry a first aid kit – there are kits in the program materials lock box.
Always STRICTLY follow the procedures for safely catching and handling bees as covered in your hands-on
training session and photographically summarized in this protocol.
Do NOT directly handle bees (nets, vial transfers) if you are allergic to stings. If you have never been stung
before, it is strongly advised that you avoid directly handling bees.
Carry first aid kid with Benadryl at all times. Call 911 for any suspected allergic reaction and follow the directions
of the 911 operator.
Wear light, layered clothing and apply sunscreen – even during overcast days.
Carry an excess of water (minimum 1L) at all times while at the park and bring plenty of snacks.
Always wear appropriate footwear – close-toed shoes with a good grip are best.
Be very careful while travelling on park paths – it is easy to get distracted while chasing after bees, but make sure
that you pay attention to any unevenness or rocks on the ground to avoid tripping injuries.
For all encounters, give wildlife as much space as possible – peaceful co-existence is the best solution. Report any
wildlife encounters to a program leader ASAP.
Coyotes: If a coyote comes close, DO NOT RUN! Yell/stomp feet/toss sticks or rocks. Make yourself look as big
as possible; Bears: Usually enter the park by mistake, rare. Usually will vacate quickly if you are making noise.
Keep a comfortable distance, be friendly. Answer any questions as best you can, provide education. If you
experience an uncomfortable encounter, report to a program leader immediately.
3
1. Net
2. Bag of vials for your route
3. Cooler bag
4. Clip board with:
a. Route map, protocol
b. ID materials, data sheets
c. Citizen science business cards (in case other visitors ask you what you’re up to)
5. Hi-visibility vest for identification as a volunteer while surveying in the park
6. GPS (if all are not in use by other citizen scientists) or smart phone for marking lat/long of survey locations
7. Pen/pencil/sharpie for writing down data and labelling each vial’s “Bee ID”
Please also bring your own icepack or bag of ice for cooling down bees for your bee photo shoots! If you forget
an ice pack and there are staff at the Visitor Centre, you can ask them for an ice pack from their freezer.
Try to actively survey for a minimum of 1 hour to a maximum of 4 hours. Survey length will depend on the route that you
have chosen, and how many bees that you encounter.
Route 1: Tiger
Lily Loop
0.4 km 1.4 km Moderate: 3 hills moderate
to steep, short hike, close to
parking lot
Shortest loop with views of
bumble bee boxes at trail side.
Dirt trail.
Route 2: West
Loop
0.8 km 3.3 km Low: 6 hills moderate to
steep, no paved trail access
from parking lot, long hike
Bowbend Trail runs parallel to the
CPR mainline. Connect from
Bowbend trail to Badger Bowl via
Bowl Link. Includes paved, dirt,
and gravel trails.
Route 3: Central
Loop
Starts at Visitor
Centre
4.2 km High: 3 moderate hills,
paved trail access from
parking lot, option to do
short to long hike
Northern portion is very flat,
while to the south ventures down
toward the river valley. Includes
paved, dirt, and gravel trails.
NOTE: Western bumble bee
sighted here in 2017!
Route 4: Bow
River Loop
2.3 km 4.8 km Low to Moderate: Long
descent to get to loop, no
hills within survey loop,
long but not a difficult hike
Once at the trail head the loop
itself has very little elevation
change. Dirt trail.
NOTE: Western bumble bee
sighted here in 2014 and 2017!
6. During your survey, do not leave the marked pathways denoted by your route map.
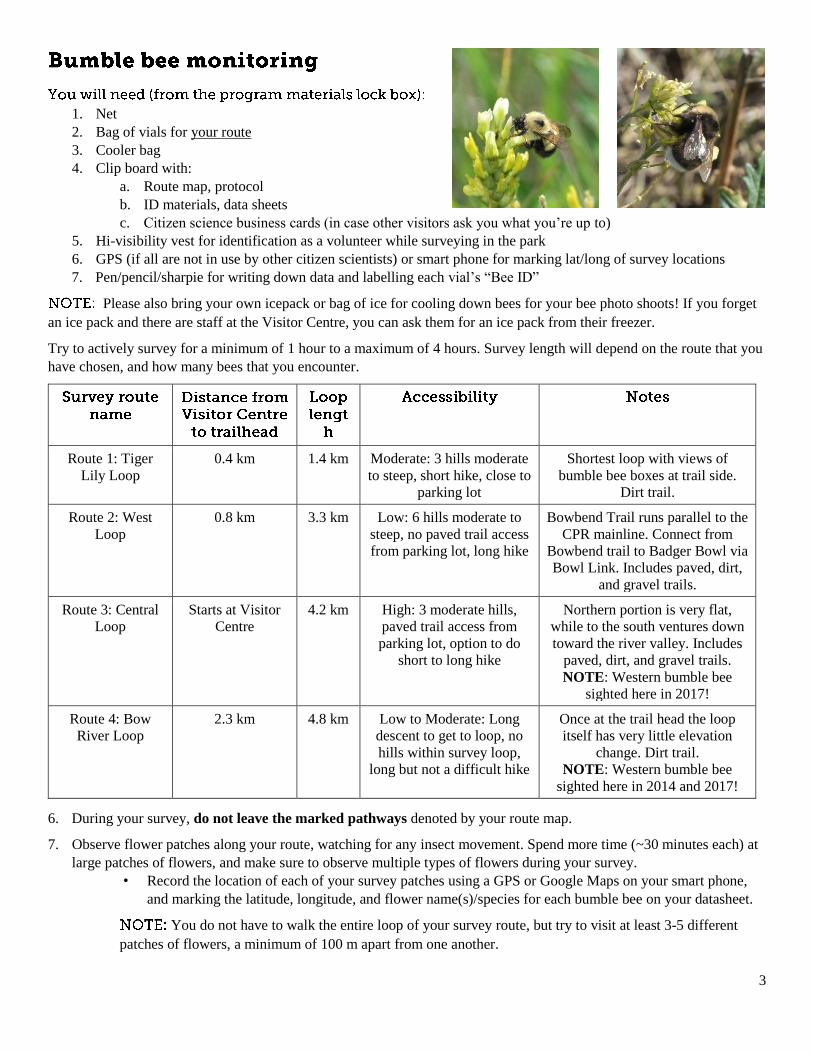
7. Observe flower patches along your route, watching for any insect movement. Spend more time (~30 minutes each) at
large patches of flowers, and make sure to observe multiple types of flowers during your survey.
• Record the location of each of your survey patches using a GPS or Google Maps on your smart phone,
and marking the latitude, longitude, and flower name(s)/species for each bumble bee on your datasheet.
You do not have to walk the entire loop of your survey route, but try to visit at least 3-5 different
patches of flowers, a minimum of 100 m apart from one another.
4
8. Keep an eye out for bees resting on leaves/flowers, flying by, or dead on the trail as well.
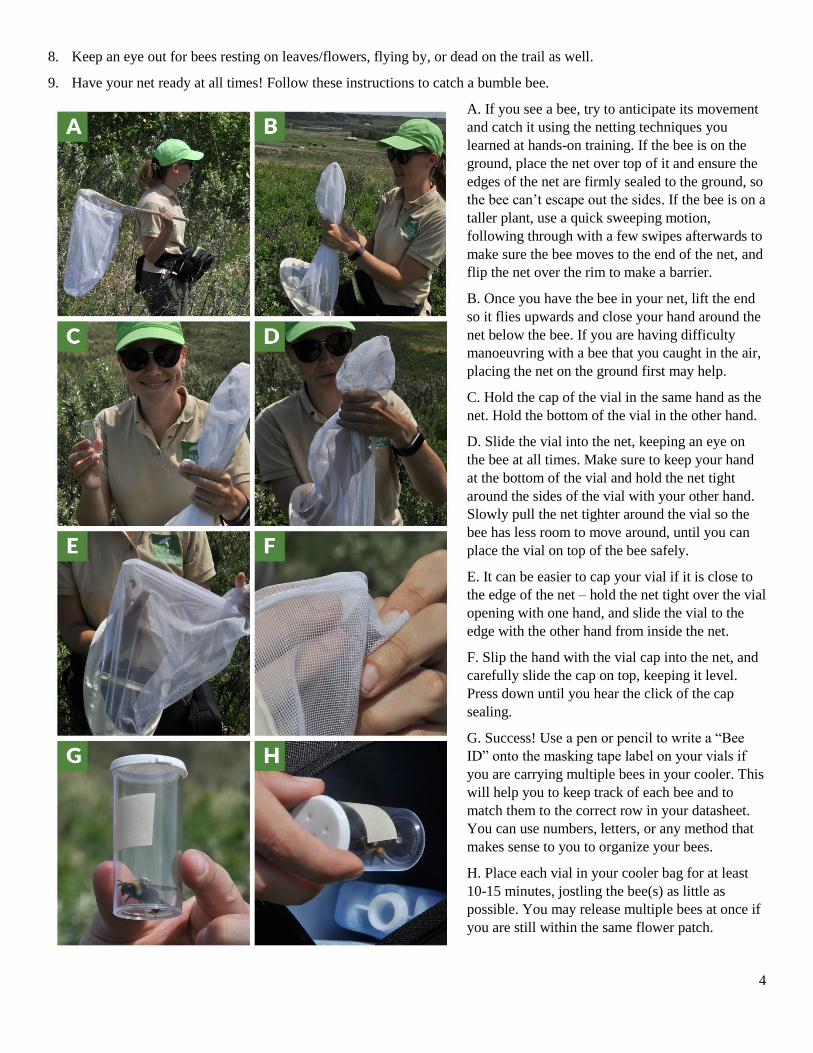
9. Have your net ready at all times! Follow these instructions to catch a bumble bee.
A. If you see a bee, try to anticipate its movement
and catch it using the netting techniques you
learned at hands-on training. If the bee is on the
ground, place the net over top of it and ensure the
edges of the net are firmly sealed to the ground, so
the bee can’t escape out the sides. If the bee is on a
taller plant, use a quick sweeping motion,
following through with a few swipes afterwards to
make sure the bee moves to the end of the net, and
flip the net over the rim to make a barrier.
B. Once you have the bee in your net, lift the end
so it flies upwards and close your hand around the
net below the bee. If you are having difficulty
manoeuvring with a bee that you caught in the air,
placing the net on the ground first may help.
C. Hold the cap of the vial in the same hand as the
net. Hold the bottom of the vial in the other hand.
D. Slide the vial into the net, keeping an eye on
the bee at all times. Make sure to keep your hand
at the bottom of the vial and hold the net tight
around the sides of the vial with your other hand.
Slowly pull the net tighter around the vial so the
bee has less room to move around, until you can
place the vial on top of the bee safely.
E. It can be easier to cap your vial if it is close to
the edge of the net – hold the net tight over the vial
opening with one hand, and slide the vial to the
edge with the other hand from inside the net.
F. Slip the hand with the vial cap into the net, and
carefully slide the cap on top, keeping it level.
Press down until you hear the click of the cap
sealing.
G. Success! Use a pen or pencil to write a “Bee
ID” onto the masking tape label on your vials if
you are carrying multiple bees in your cooler. This
will help you to keep track of each bee and to
match them to the correct row in your datasheet.
You can use numbers, letters, or any method that
makes sense to you to organize your bees.
H. Place each vial in your cooler bag for at least
10-15 minutes, jostling the bee(s) as little as
possible. You may release multiple bees at once if
you are still within the same flower patch.
5
10. Record other information on your data sheet while waiting for the bee(s) to cool down! Temperature from a weather
forecast/weather app is acceptable.
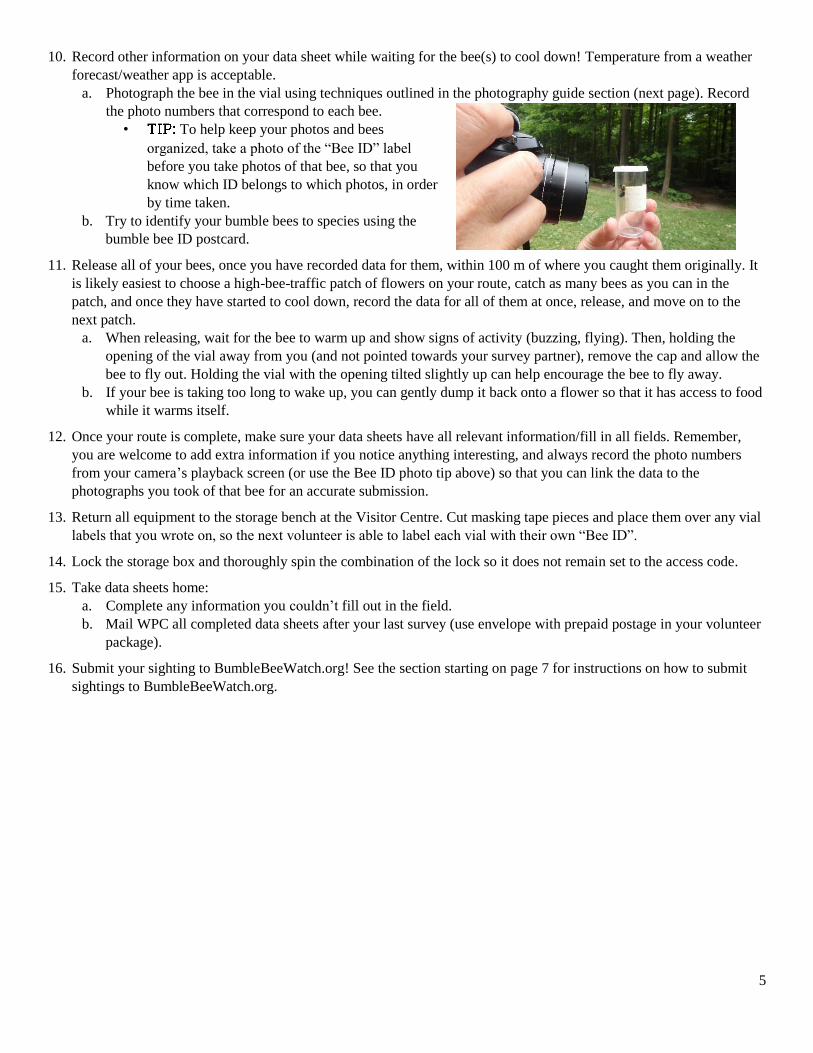
a. Photograph the bee in the vial using techniques outlined in the photography guide section (next page). Record
the photo numbers that correspond to each bee.
• To help keep your photos and bees
organized, take a photo of the “Bee ID” label
before you take photos of that bee, so that you
know which ID belongs to which photos, in order
by time taken.
b. Try to identify your bumble bees to species using the
bumble bee ID postcard.
11. Release all of your bees, once you have recorded data for them, within 100 m of where you caught them originally. It
is likely easiest to choose a high-bee-traffic patch of flowers on your route, catch as many bees as you can in the
patch, and once they have started to cool down, record the data for all of them at once, release, and move on to the
next patch.
a. When releasing, wait for the bee to warm up and show signs of activity (buzzing, flying). Then, holding the
opening of the vial away from you (and not pointed towards your survey partner), remove the cap and allow the
bee to fly out. Holding the vial with the opening tilted slightly up can help encourage the bee to fly away.
b. If your bee is taking too long to wake up, you can gently dump it back onto a flower so that it has access to food
while it warms itself.
12. Once your route is complete, make sure your data sheets have all relevant information/fill in all fields. Remember,
you are welcome to add extra information if you notice anything interesting, and always record the photo numbers
from your camera’s playback screen (or use the Bee ID photo tip above) so that you can link the data to the
photographs you took of that bee for an accurate submission.
13. Return all equipment to the storage bench at the Visitor Centre. Cut masking tape pieces and place them over any vial
labels that you wrote on, so the next volunteer is able to label each vial with their own “Bee ID”.
14. Lock the storage box and thoroughly spin the combination of the lock so it does not remain set to the access code.
15. Take data sheets home:
a. Complete any information you couldn’t fill out in the field.
b. Mail WPC all completed data sheets after your last survey (use envelope with prepaid postage in your volunteer
package).
16. Submit your sighting to BumbleBeeWatch.org! See the section starting on page 7 for instructions on how to submit
sightings to BumbleBeeWatch.org.
6
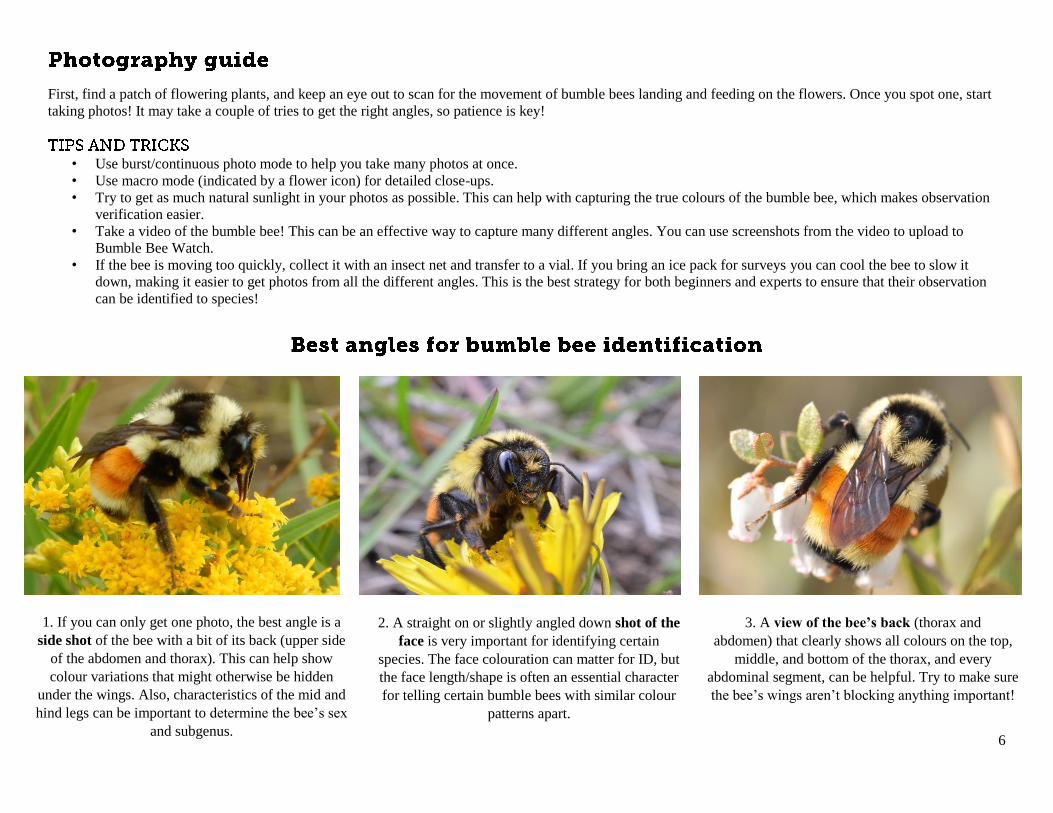
First, find a patch of flowering plants, and keep an eye out to scan for the movement of bumble bees landing and feeding on the flowers. Once you spot one, start
taking photos! It may take a couple of tries to get the right angles, so patience is key!
• Use burst/continuous photo mode to help you take many photos at once.
• Use macro mode (indicated by a flower icon) for detailed close-ups.
• Try to get as much natural sunlight in your photos as possible. This can help with capturing the true colours of the bumble bee, which makes observation
verification easier.
• Take a video of the bumble bee! This can be an effective way to capture many different angles. You can use screenshots from the video to upload to
Bumble Bee Watch.
• If the bee is moving too quickly, collect it with an insect net and transfer to a vial. If you bring an ice pack for surveys you can cool the bee to slow it
down, making it easier to get photos from all the different angles. This is the best strategy for both beginners and experts to ensure that their observation
can be identified to species!
1. If you can only get one photo, the best angle is a
side shot of the bee with a bit of its back (upper side
of the abdomen and thorax). This can help show
colour variations that might otherwise be hidden
under the wings. Also, characteristics of the mid and
hind legs can be important to determine the bee’s sex
and subgenus.
2. A straight on or slightly angled down shot of the
face is very important for identifying certain
species. The face colouration can matter for ID, but
the face length/shape is often an essential character
for telling certain bumble bees with similar colour
patterns apart.
3. A view of the bee’s back (thorax and
abdomen) that clearly shows all colours on the top,
middle, and bottom of the thorax, and every
abdominal segment, can be helpful. Try to make sure
the bee’s wings aren’t blocking anything important!
7
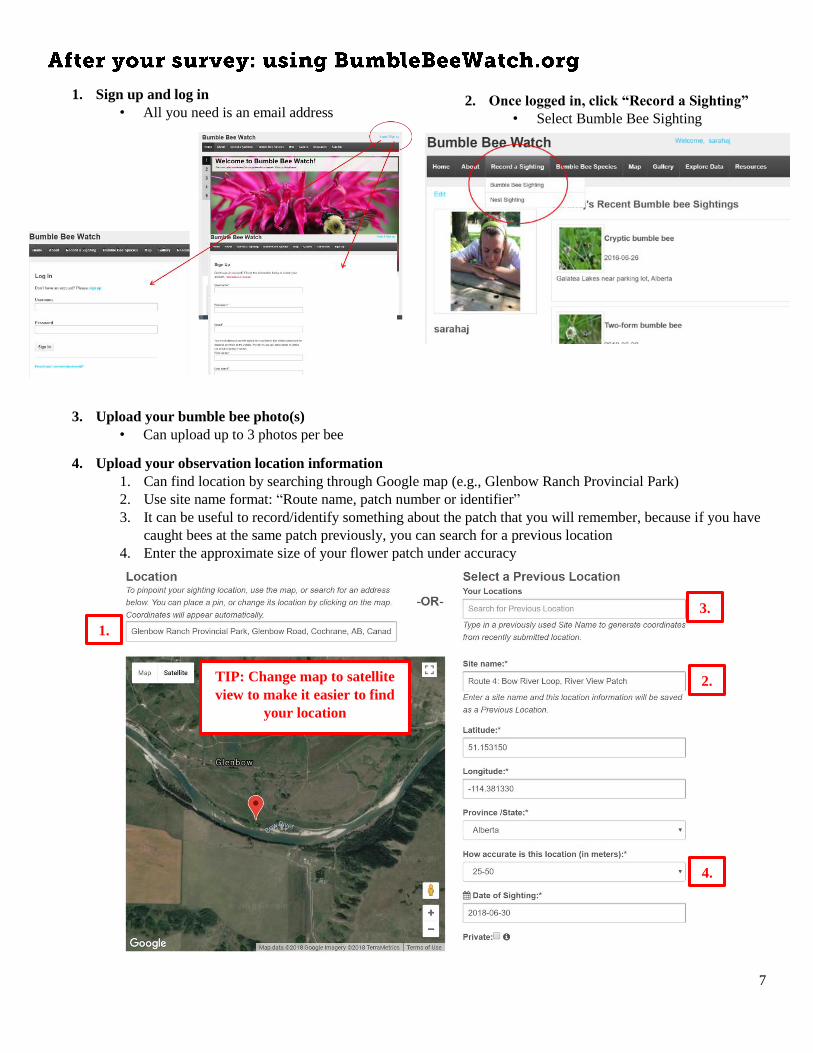
1. Sign up and log in
• All you need is an email address
3. Upload your bumble bee photo(s)
• Can upload up to 3 photos per bee
4. Upload your observation location information
1. Can find location by searching through Google map (e.g., Glenbow Ranch Provincial Park)
2. Use site name format: “Route name, patch number or identifier”
3. It can be useful to record/identify something about the patch that you will remember, because if you have
caught bees at the same patch previously, you can search for a previous location
4. Enter the approximate size of your flower patch under accuracy
2. Once logged in, click “Record a Sighting”
• Select Bumble Bee Sighting
TIP: Change map to satellite
view to make it easier to find
your location
1.
2.
3.
4.
8
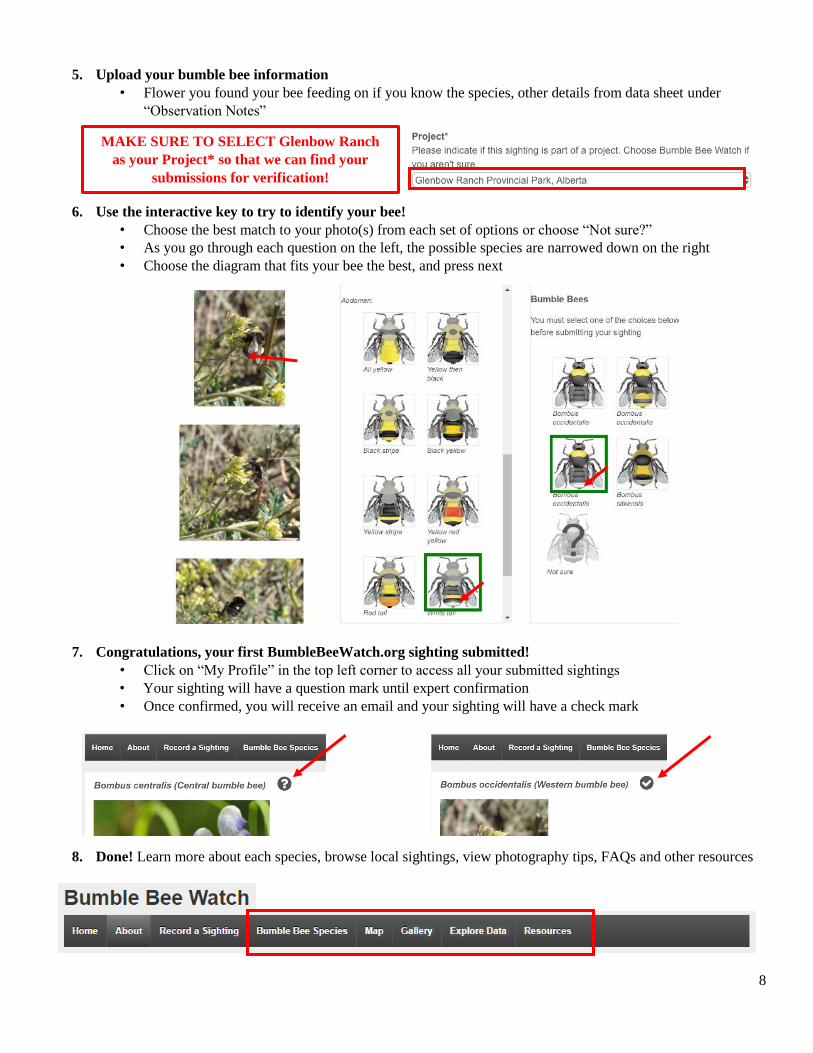
5. Upload your bumble bee information
• Flower you found your bee feeding on if you know the species, other details from data sheet under
“Observation Notes”
6. Use the interactive key to try to identify your bee!
• Choose the best match to your photo(s) from each set of options or choose “Not sure?”
• As you go through each question on the left, the possible species are narrowed down on the right
• Choose the diagram that fits your bee the best, and press next
7. Congratulations, your first BumbleBeeWatch.org sighting submitted!
• Click on “My Profile” in the top left corner to access all your submitted sightings
• Your sighting will have a question mark until expert confirmation
• Once confirmed, you will receive an email and your sighting will have a check mark
8. Done! Learn more about each species, browse local sightings, view photography tips, FAQs and other resources
MAKE SURE TO SELECT Glenbow Ranch
as your Project* so that we can find your
submissions for verification!

9
This project began in 2017 and is led by Wildlife Preservation Canada. Your contributions to bumble bee citizen science
have been made possible through funding from Alberta Ecotrust and TD Friends of the Environment Foundation, and
support from Alberta Environment and Parks, Glenbow Ranch Park Foundation, Nature Conservancy of Canada, and
Mount Royal University. A big thank you to all contributing partners!


![Harnessing Data with the Citizen Scientist · web browser search on citizen science and [subject area] will yield results. • Available books include: • Landgraf, G. (2013). Citizen](https://img.pdfslide.net/doc/110x75/5ed6e715df0eda5e752aee80/harnessing-data-with-the-citizen-scientist-web-browser-search-on-citizen-science.jpg)