Embed Size (px)
Citation preview
2/15/2005 1 Un-Braced Bending 8:42 PM Greg Amidon & Dave Morton www.DIESELCREW.com
Un-Braced Bending Greg Amidon and Dave Morton
Why do I bend metal? I have often been asked this and usually sheepishly reply, "I know, it is a stupid hobby". The truth is it is a great hobby. The old-time strongman bent 60D nails as a proof of their strength. Your average Joe off the street will look at a bent 60D with amazement. I don't bend metal to impress anyone. I look at it as a personal challenge. There is metal out there laughing at me, and someday I will slap it down. This metal is cold and hard, it takes someone with physical and mental toughness to do some damage to it. In weightlifting your best effort is a memory that you can write down. In steel bending you get a souvenir in the shape of a "U" that always takes you back to that brief moment where you first felt it move. That split second where there is a barely perceptible movement that tells you that it can be done. The exhilaration of the bar yielding to your force. I was given a bent Red nail before I could bend one myself, and I would feel it and stare at it in awe. What kind of man could ever move this bar with flesh and bone? What sacrifices did he have to make to bend this steel? It takes great determination and grit to be able to do it. I decided then that I would not stop until this seemingly unmovable object would bow to my will. I bend metal because I can. I bend metal because it is a challenge. I
2/15/2005 2 Un-Braced Bending 8:42 PM Greg Amidon & Dave Morton www.DIESELCREW.com
bend metal because the thought of having a straight piece of steel laugh at me pisses me off. I like many others, take pride in the fact that I bend things that should not bend. I destroy things at will and take no prisoners. The joy of hitting a new personal record (PR) is followed quickly by the thought of what is next. Unfortunately there is always something thicker, something shorter, and something harder. Welcome to hell, what we benders refer to as the addiction.
Preparing to bend This is the most overlooked step. Most people try to bend for their max on the first day. This is a very easy way to get hurt. Bend some easy stock for high volume to hone in your form and prepare yourself for bending. Experiment with using slightly different hand positions and angle to determine where you are strongest. Sledgehammer levering is a great way to improve your wrist strength. You should lever all directions to build up your overall wrist strength. You should pay particular attention on levering to the front if you are an overhand bender, and to the rear if you are an underhand bender. Get an 8 pound sledgehammer from a home improvement store. One thing I will promise, if you bend, you will get hurt. It is only a matter of degree. If you only tear your hands up from time to time, consider yourself lucky. Going for a PR bend and having the bar slip is dangerous, and it can hurt you. Don’t shortchange yourself with excuses not to strengthen your wrists. In the long run you will bend near injury free and get bigger steel.
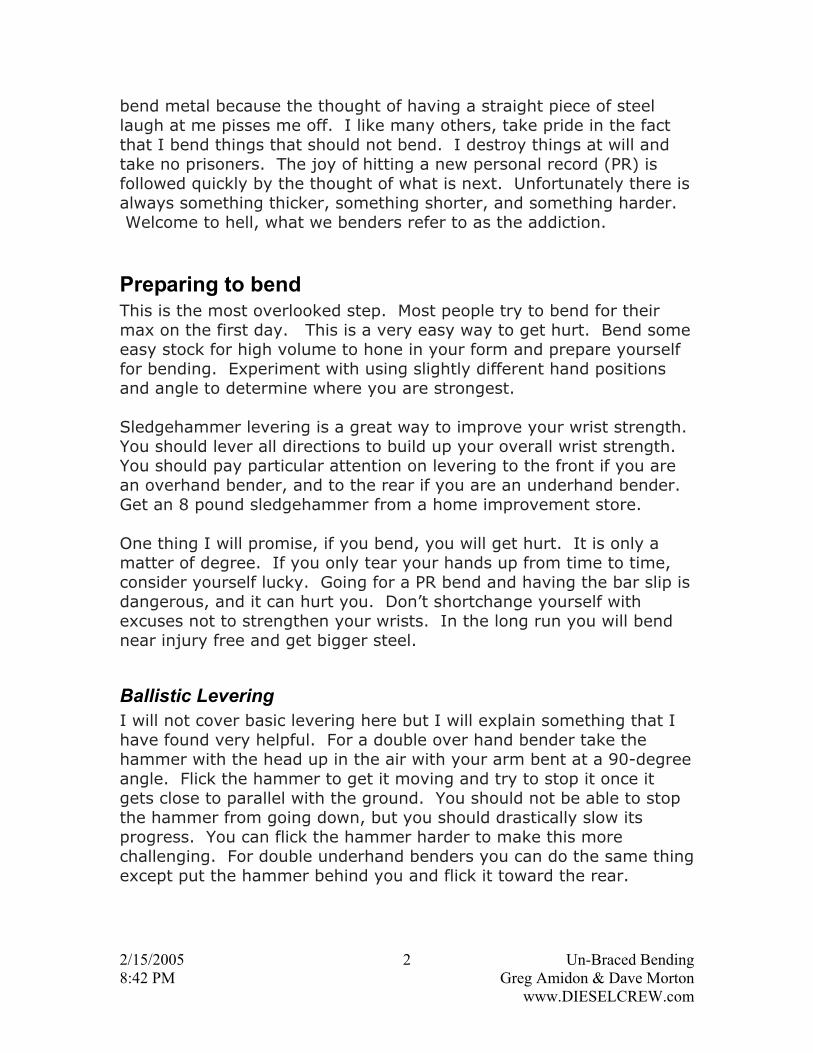
Ballistic Levering I will not cover basic levering here but I will explain something that I have found very helpful. For a double over hand bender take the hammer with the head up in the air with your arm bent at a 90-degree angle. Flick the hammer to get it moving and try to stop it once it gets close to parallel with the ground. You should not be able to stop the hammer from going down, but you should drastically slow its progress. You can flick the hammer harder to make this more challenging. For double underhand benders you can do the same thing except put the hammer behind you and flick it toward the rear.
2/15/2005 3 Un-Braced Bending 8:42 PM Greg Amidon & Dave Morton www.DIESELCREW.com
Starting position Flipping forward Attempt to stop it
Starting position Flipping down, try to stop it Finished
Volume Take a bar that you can do easily and experiment with them. Change your hand position, angle you are bending, height you hold the nail when you start, etc and see where you feel the strongest. This is almost always a position where your arms elbows and wrists are in a line and no big angles away from your body. Find where you are powerful and practice that form until you can do it repeatedly without breaking form. Remember to maintain form even when the bar size changes. People move up in bar size or decrease bar length before they have their form down. They change their form when the bar is different; an example is a 6" versus a 7" bar. You have to get your form down and you have to be confident and consistent.

2/15/2005 4 Un-Braced Bending 8:42 PM Greg Amidon & Dave Morton www.DIESELCREW.com
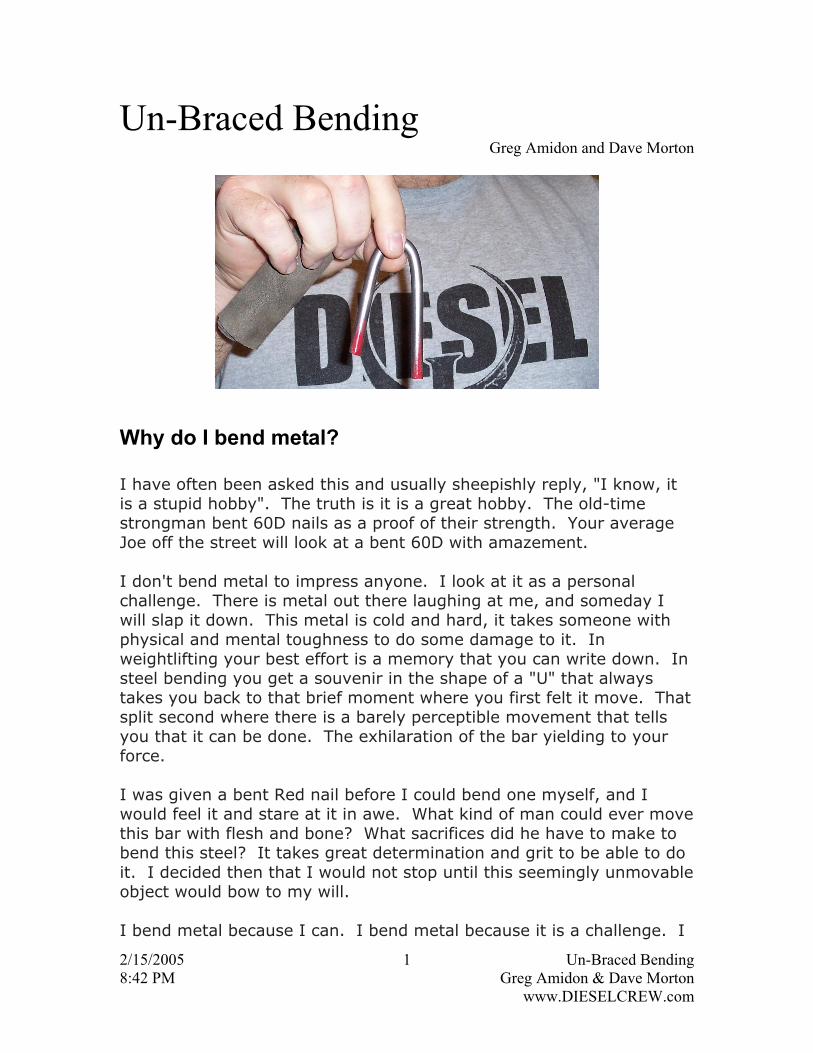
Wrapping When you are going to bend a nail, any give in the wraps will serve as a shock absorber and reduce the force you apply to the nail. It is like trying to hammer a nail in with a pillow over it. When you wrap something it should be VERY tight. The force you generate should be applied to the nail through the wrap with as little give as possible. I like to use a little less wrapping material so I can feel the nail through the wraps, this hurts a little more on tough bends. Your hands will adapt over time, if you start out with too much padding you will have a much harder time later adjusting. Materials to Use Puncture resistance is critical, shop rags will puncture and it is only a matter of time until you find that out the hard way. Ballistic nylon and Cordura are excellent for puncture resistance but have much less of a padding effect for your hands. The IronMind pads are cordura. Leather has good puncture resistance but much more padding for your hand. I like suede leather that is less than 3/32" thick. This material can be rolled very tightly and will conform to nail and bolt heads. Typical wrap dimensions for leather are 4"x10.5". If IronMind certification is your goal, Practice with cordura.
IM Pad IM Pad Folded Leather Wrapping the Nail For the IronMind pads fold each pad into 3rds creating a 4"x12" wrap. Chalk the end where the nail will sit. Once the IronMind pad is 4"x12" and chalked the procedure for wrapping is identical to wrapping leather.
2/15/2005 5 Un-Braced Bending 8:42 PM Greg Amidon & Dave Morton www.DIESELCREW.com
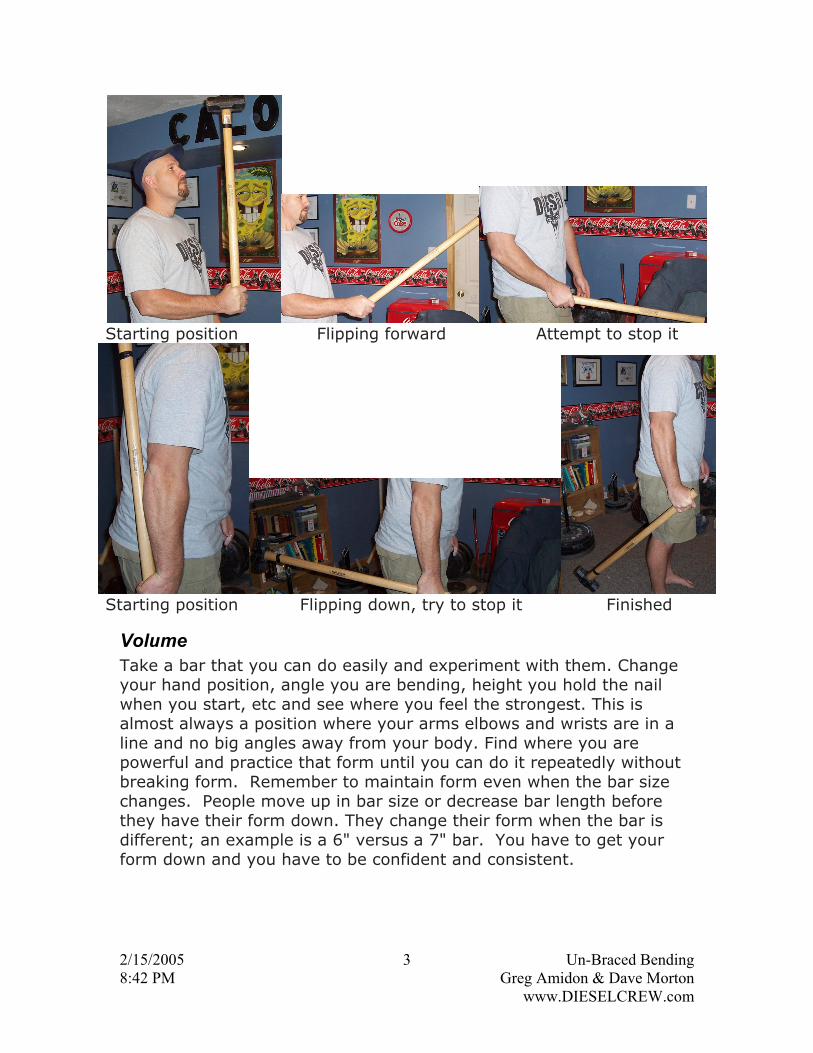
Place the nail halfway in the wrap for double overhand and halfway on the nail for double underhand.
Example: A Red Nail (7") should be in the wrap at least 2" for double overhand, and 3.5" for double underhand or reverse style bending.
Double Overhand Double Underhand IM Pad
Roll the nail up in the material making sure to pull the material tight and keep it as straight as possible. The final roll should be extremely tight to the nail. I often put a rubber band over the wrap to hold it in place.
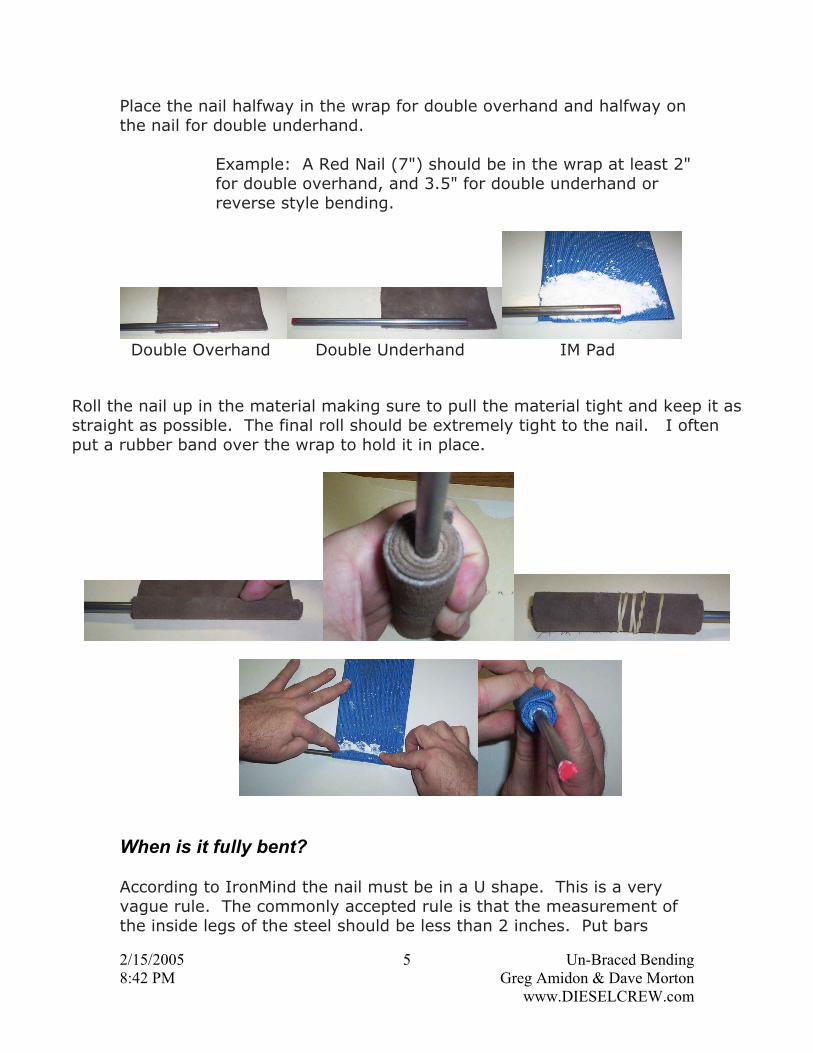
When is it fully bent? According to IronMind the nail must be in a U shape. This is a very vague rule. The commonly accepted rule is that the measurement of the inside legs of the steel should be less than 2 inches. Put bars
2/15/2005 6 Un-Braced Bending 8:42 PM Greg Amidon & Dave Morton www.DIESELCREW.com
below 2" and you will never have an issue. In some contests the bar bent the closest or fastest may be the tiebreaker between 2 bars of equal size.
Measured Centered Bends Measured Off Center Bends
Notice that on the off-centered bends you measure as if the nail was the length of the shorter leg. Bolts are measured from the edge of the bolt head.
Bending Form
Bar Position The bend will begin with a wrapped bar that you position in your hand. Throughout the bend the position of the end of the bar is critical. You always want the bar in a position in your hand where you have some “meat”, areas like the thumb pad and heal of your hand are good areas to let the bar rest. When you are applying a lot of force into the nail the combination of the wrapping material and your own natural padding makes bending the metal bearable. Consistency of form will put the bar into the same place in your hand and allow your body to adapt and thicken the skin and reduce the pain felt in that area. Progressing too quickly from easier bars to harder bar may not give your body enough time to adapt and injuries are the usual result. Common injuries from improper bar position are blisters, tears, and bone bruises.
Double overhand Grasp the bar in your hand so that at least two to two and a half fingers are on the bar and the bar is ending on your thumb pad. Double overhand is hardest on your index finger and middle finger. The bar is bent over these fingers.
2/15/2005 7 Un-Braced Bending 8:42 PM Greg Amidon & Dave Morton www.DIESELCREW.com
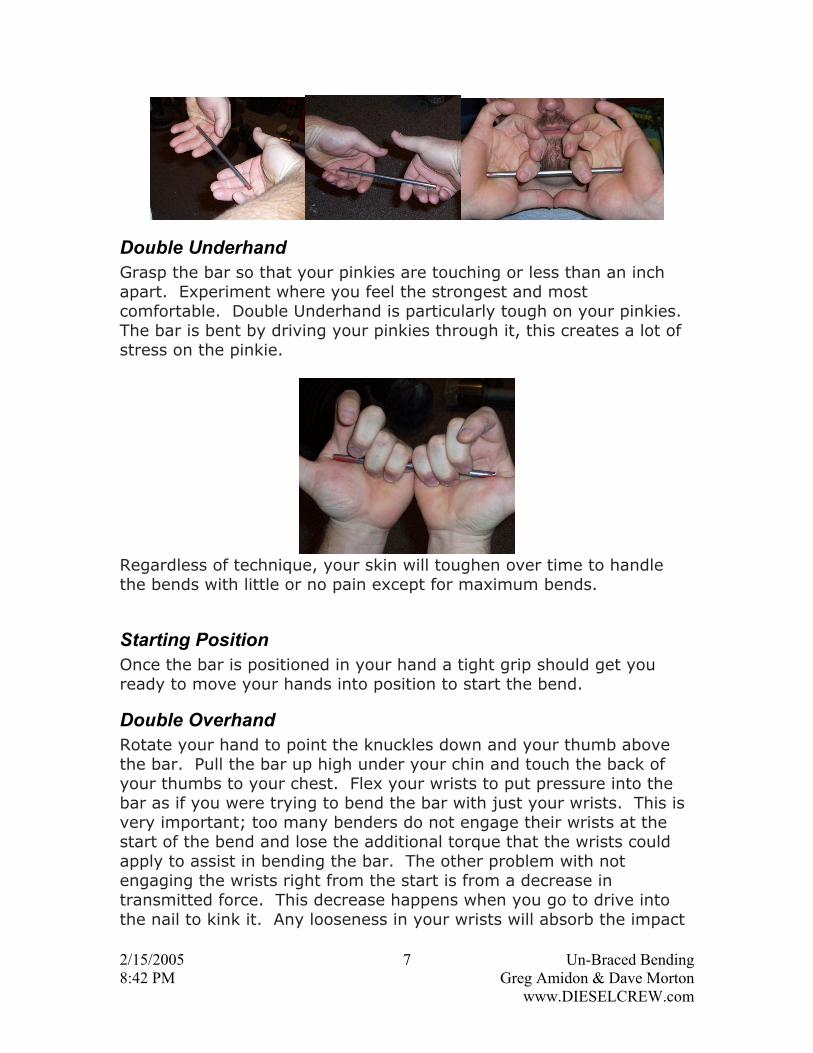
Double Underhand Grasp the bar so that your pinkies are touching or less than an inch apart. Experiment where you feel the strongest and most comfortable. Double Underhand is particularly tough on your pinkies. The bar is bent by driving your pinkies through it, this creates a lot of stress on the pinkie.
Regardless of technique, your skin will toughen over time to handle the bends with little or no pain except for maximum bends.
Starting Position Once the bar is positioned in your hand a tight grip should get you ready to move your hands into position to start the bend.
Double Overhand Rotate your hand to point the knuckles down and your thumb above the bar. Pull the bar up high under your chin and touch the back of your thumbs to your chest. Flex your wrists to put pressure into the bar as if you were trying to bend the bar with just your wrists. This is very important; too many benders do not engage their wrists at the start of the bend and lose the additional torque that the wrists could apply to assist in bending the bar. The other problem with not engaging the wrists right from the start is from a decrease in transmitted force. This decrease happens when you go to drive into the nail to kink it. Any looseness in your wrists will absorb the impact
2/15/2005 8 Un-Braced Bending 8:42 PM Greg Amidon & Dave Morton www.DIESELCREW.com
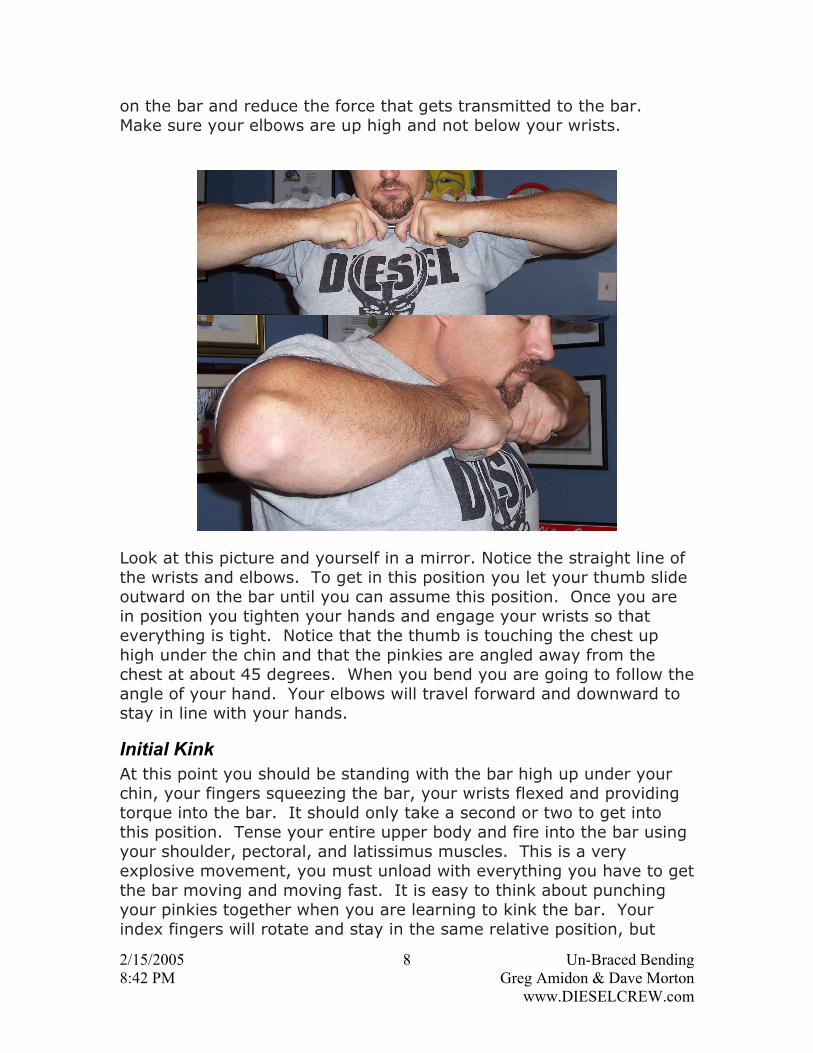
on the bar and reduce the force that gets transmitted to the bar. Make sure your elbows are up high and not below your wrists.
Look at this picture and yourself in a mirror. Notice the straight line of the wrists and elbows. To get in this position you let your thumb slide outward on the bar until you can assume this position. Once you are in position you tighten your hands and engage your wrists so that everything is tight. Notice that the thumb is touching the chest up high under the chin and that the pinkies are angled away from the chest at about 45 degrees. When you bend you are going to follow the angle of your hand. Your elbows will travel forward and downward to stay in line with your hands.
Initial Kink At this point you should be standing with the bar high up under your chin, your fingers squeezing the bar, your wrists flexed and providing torque into the bar. It should only take a second or two to get into this position. Tense your entire upper body and fire into the bar using your shoulder, pectoral, and latissimus muscles. This is a very explosive movement, you must unload with everything you have to get the bar moving and moving fast. It is easy to think about punching your pinkies together when you are learning to kink the bar. Your index fingers will rotate and stay in the same relative position, but
2/15/2005 9 Un-Braced Bending 8:42 PM Greg Amidon & Dave Morton www.DIESELCREW.com
your pinkies will rotate down and if done correctly they will be touching. Do not underestimate how much force you will need to apply to get the bar moving, instead of trying to get the pinkies to touch, imagine bending the bar to completion with one explosive hit. It is a good sign if your pinkies crash into each other with tremendous force. It is a good sign for two reasons:
1) You exploded into the nail and did not hold back. 2) You are ready to move up to a tougher bar.
Common problems with this phase of the bend are incorrect angle of the bend, and hesitation.
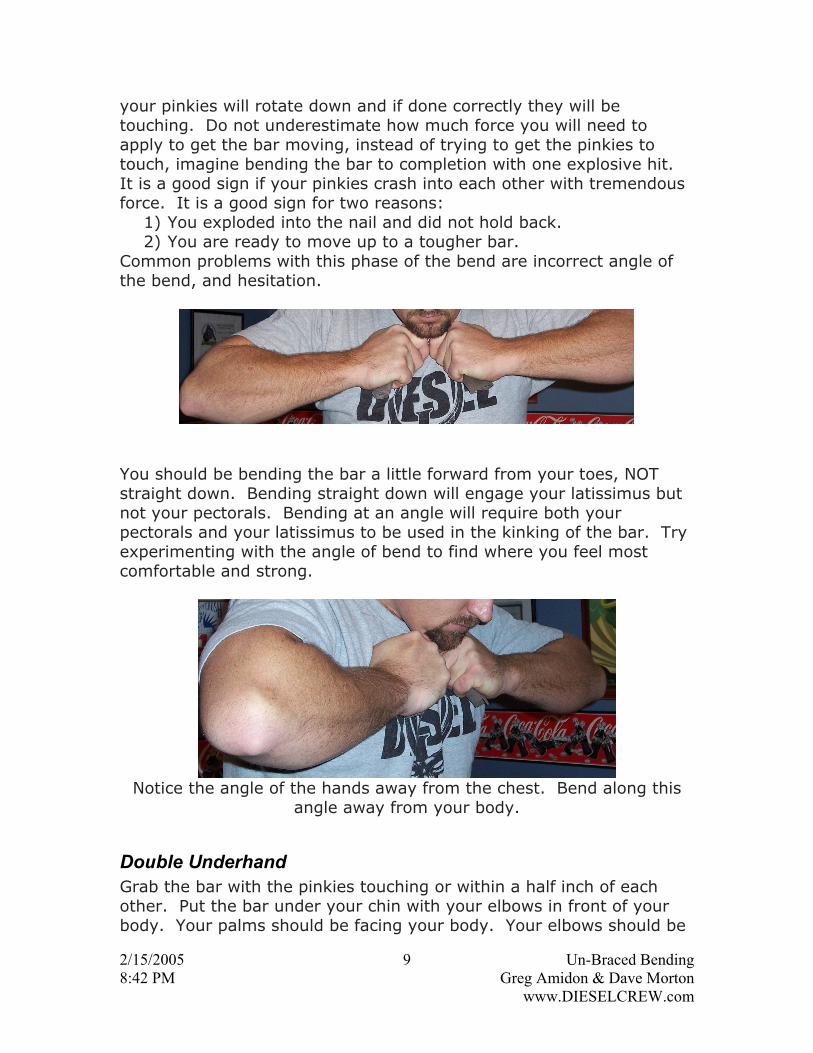
You should be bending the bar a little forward from your toes, NOT straight down. Bending straight down will engage your latissimus but not your pectorals. Bending at an angle will require both your pectorals and your latissimus to be used in the kinking of the bar. Try experimenting with the angle of bend to find where you feel most comfortable and strong.
Notice the angle of the hands away from the chest. Bend along this
angle away from your body.
Double Underhand Grab the bar with the pinkies touching or within a half inch of each other. Put the bar under your chin with your elbows in front of your body. Your palms should be facing your body. Your elbows should be
2/15/2005 10 Un-Braced Bending 8:42 PM Greg Amidon & Dave Morton www.DIESELCREW.com
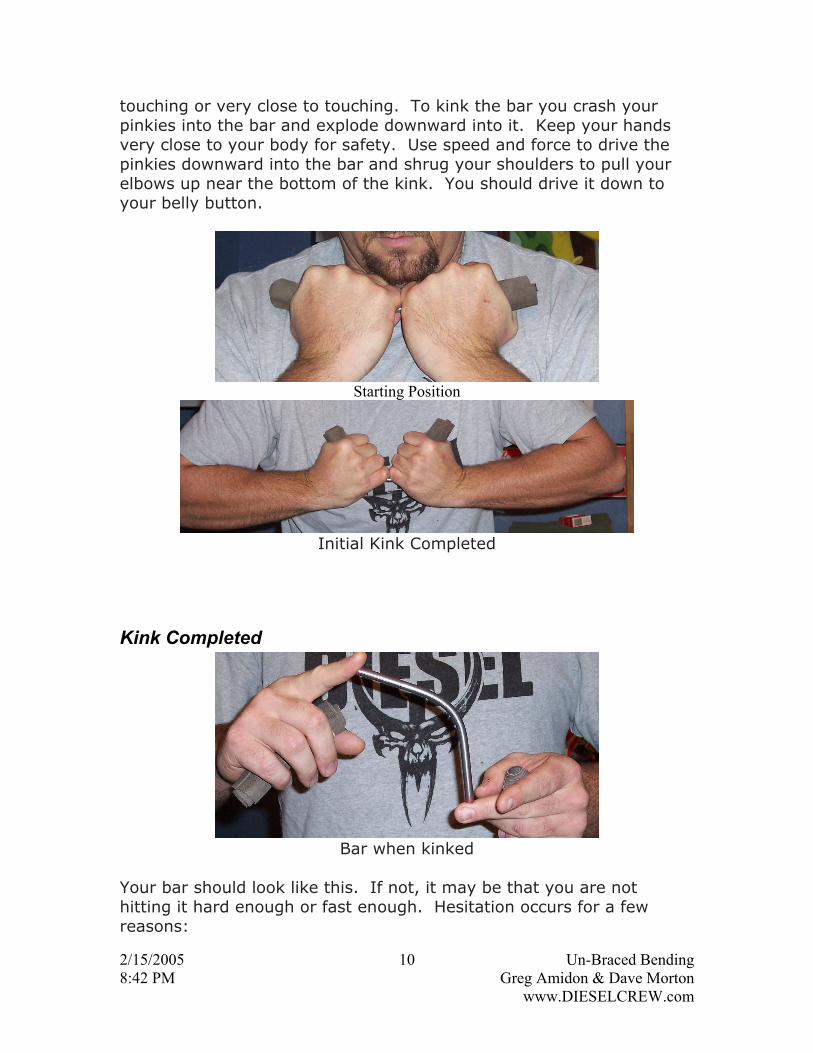
touching or very close to touching. To kink the bar you crash your pinkies into the bar and explode downward into it. Keep your hands very close to your body for safety. Use speed and force to drive the pinkies downward into the bar and shrug your shoulders to pull your elbows up near the bottom of the kink. You should drive it down to your belly button.
Starting Position
Initial Kink Completed
Kink Completed
Bar when kinked
Your bar should look like this. If not, it may be that you are not hitting it hard enough or fast enough. Hesitation occurs for a few reasons:
2/15/2005 11 Un-Braced Bending 8:42 PM Greg Amidon & Dave Morton www.DIESELCREW.com
1) Fear of crashing your pinkies. (Double Overhand) 2) Fear of hurting your pinkies. (Double Underhand) 3) Fear the bar will hurt you.
This is normal so don’t think it isn’t something you need to deal with. This is not something that should be ignored. It is very difficult to go after a bar you never done before and unload on it. The problem is it is very difficult to bend at your maximum potential if you are not unloading on the bar. This catch-22 situation can be resolved by moving up slowly as your strength progresses, giving you confidence that you can get the next level bar. The repetitions will give you confidence in your form and your body so that you can learn to trust that you can explode into the metal, and only the metal will suffer for it. Get MAD! That bar will laugh at you if you push into it like a schoolgirl and try to bend it. Don’t be ridiculed by a piece of metal, DESTOY that steel and move on to the next victim.
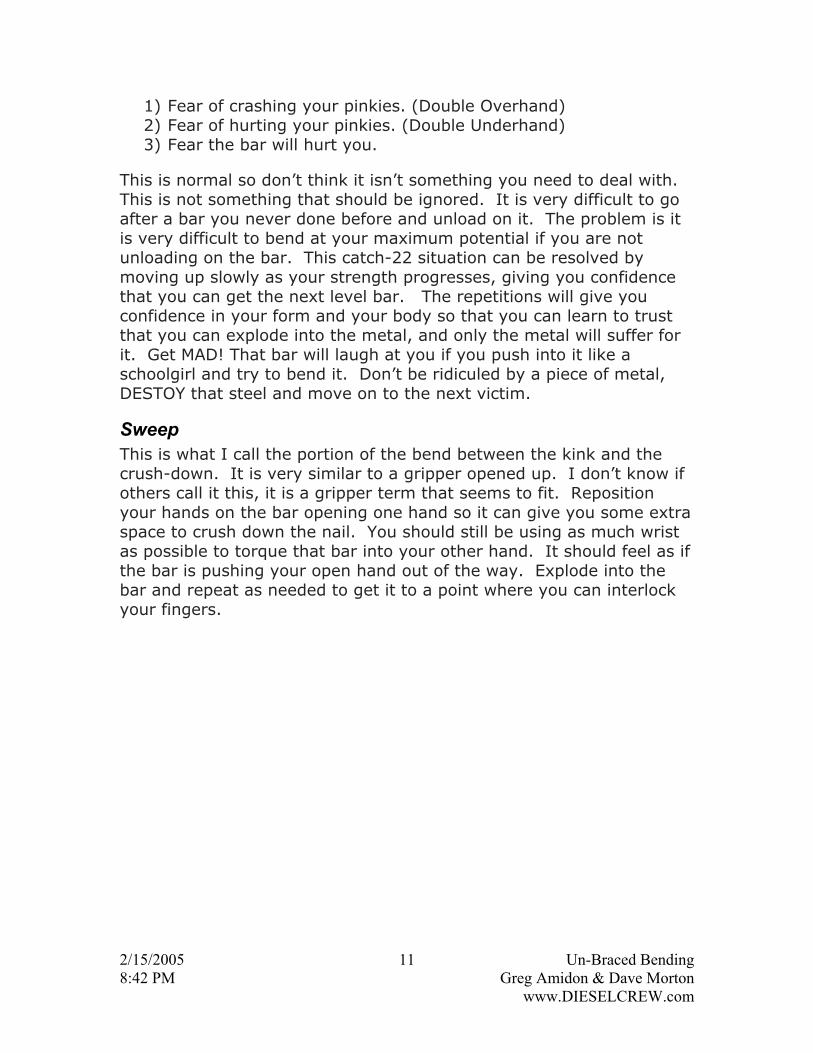
Sweep This is what I call the portion of the bend between the kink and the crush-down. It is very similar to a gripper opened up. I don’t know if others call it this, it is a gripper term that seems to fit. Reposition your hands on the bar opening one hand so it can give you some extra space to crush down the nail. You should still be using as much wrist as possible to torque that bar into your other hand. It should feel as if the bar is pushing your open hand out of the way. Explode into the bar and repeat as needed to get it to a point where you can interlock your fingers.
2/15/2005 12 Un-Braced Bending 8:42 PM Greg Amidon & Dave Morton www.DIESELCREW.com
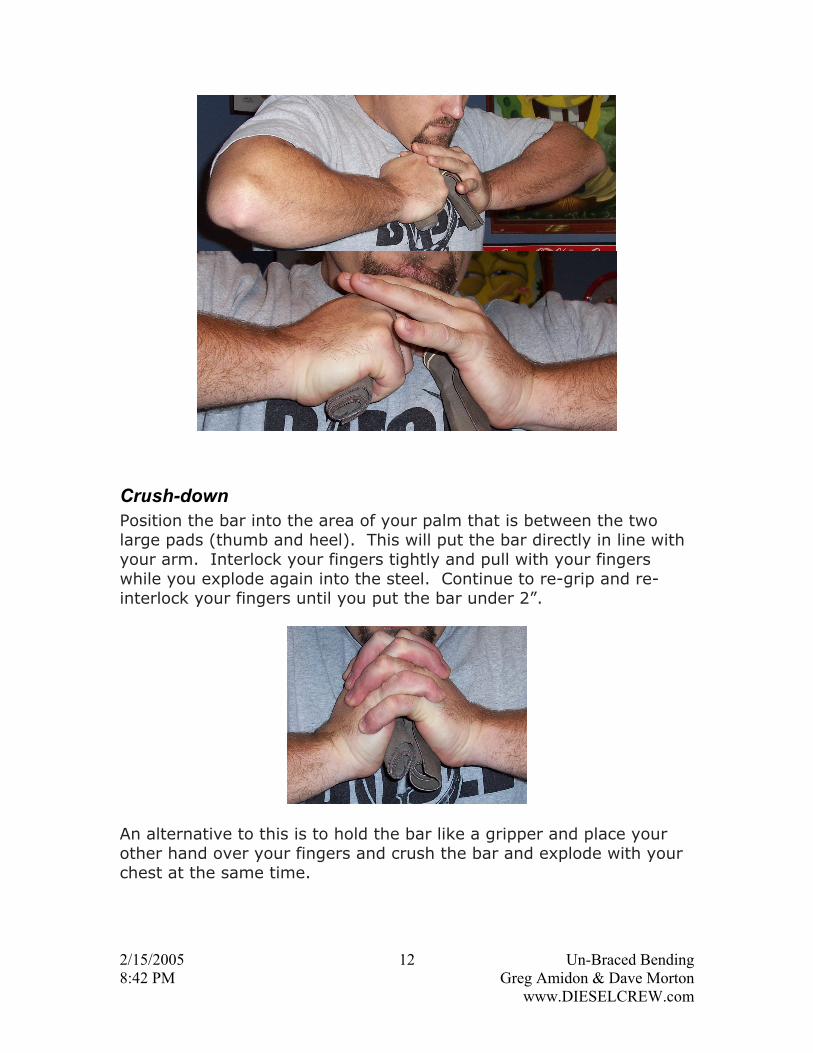
Crush-down Position the bar into the area of your palm that is between the two large pads (thumb and heel). This will put the bar directly in line with your arm. Interlock your fingers tightly and pull with your fingers while you explode again into the steel. Continue to re-grip and re-interlock your fingers until you put the bar under 2”.
An alternative to this is to hold the bar like a gripper and place your other hand over your fingers and crush the bar and explode with your chest at the same time.

2/15/2005 13 Un-Braced Bending 8:42 PM Greg Amidon & Dave Morton www.DIESELCREW.com
Speed As soon as the bar starts to move it begins to heat up. This heating makes the bar a little easier to bend. The faster you move a bar, and the more fluid you are transitioning between the phases of bending will decrease the difficulty of the crush-down. When you stop and wait a few seconds, the bar begins to cool and set. It is much more difficult to restart the bar after it sets. Practice your form, practice the transition from one phase of the bend to the next and practice your speed. SPEED KILLS.
Some point to remember when you go to bend: 1) Get your wrists ready to bend with high volume easy bars and sledge levering. Do not try to bend for your max on the first day. You should concentrate on levering to the front if you are an overhand bender, and to the rear if you are an underhand bender. You should lever all directions to build up your overall wrist strength. 2) Take a bar that you can do pretty easily and experiment with them. Change your hand position, angle you are bending, height you hold the nail when you start, etc and see where you feel the strongest. This is almost always a position where your arms elbows and wrists are in a line and no big angles away from your body. Find where you are strong and then start step 3. 3) Practice, practice, practice. People move up bars before they have their form down. They change their form when the bar is different (example 6" vs. 7" bars) you got to have your form down and you have to be confident in your form. 4) Become explosive. This is the most important thing in my opinion.
2/15/2005 14 Un-Braced Bending 8:42 PM Greg Amidon & Dave Morton www.DIESELCREW.com
Practice with a bar you can get pretty easy and EXPLODE into it. Practice hitting the bar harder and harder until you feel like you will bend it to completion in a one second hit. 5) Overcome your fear. You have to learn to unload into it without fear. This sounds funny to new benders, but overcoming your natural fear is a very important mental aspect of bending. Taking a bar and unloading on it is very difficult if you are worrying about tearing your muscles from the bone or breaking your wrist. The reality is in order to get a "True" max attempt you must be exploding into the bar. Most people I see starting off start generating force into the bar and then increasing it, then quitting when they don’t feel movement. This is never going to get you to bend at your peak. 6) Find someone to look at your form who knows what he is doing and see if they can help you out. 7) Cheat kink a bar to varying degrees and work on finishing them. Continue to work yourself back to a straight bar. This is a great way to de-mystify the piece of steel. Some times when you look at a bar you figure it cannot be bent. By bending pieces that are already bent you learn that you can bend it. I don’t care if you are under or overhand, Dave Morton is one of the most explosive benders I have seen. I have watched him underhand reds and he just unloads into them.
Steel Progression 3/16" round Cold Rolled Steel 3/16" square steel 60D Timber Ties 1/4" Hot Rolled Steel ¼”x 6” Grade 2 bolts IronMind Yellow Nails 1/4" Zinc Plated Stock IronMind Blue Nails 60D Nails Grade 5 bolts Grade 8 bolts IM Red Nails 6.5" Red FBBC 7” 5/16” CRS (Bastard) FBBC 6.5” 5/16” CRS (Big Bastard) 6" Red FBBC 6” 5/16” CRS (Huge Bastard) 5" Red 5/16"x7" Grade 5 bolt
2/15/2005 15 Un-Braced Bending 8:42 PM Greg Amidon & Dave Morton www.DIESELCREW.com
FBBC 5.5” 5/16” CRS (Grand Bastard) 4.5" Red 5/16"x6.5" Grade 5 bolt FBBC 5” 5/16” CRS (Magnificent Bastard) 5/16"x6" Grade 5 bolt This is a best guess from several benders as to the progression. Remember that some benders are more suited for certain length bars and they find those easier than others. Steel also varies and some sources will give you steel that does not follow this order. Best bet is to try it and start cutting it shorter and shorter. Generally speaking when you get under 6” you are ready to take the next step up. For graded bolts a 5” grade 5 is fairly close to the 6” grade 8 in strength. Even though graded bolts are measured against a standard they still vary from vendor to vendor. Take a look at the bent bars when you are done with them. The harder the steel the more "V" shaped the bend is. If the bend is a looping "U" it is because it was softer steel. Best "V" shaped bars I have is the Grade9.
Training techniques
Sample Beginner Routine (first 2 months) Day 1 Warm up on easy stock 15-20 easy bends - Work on perfecting your form. Work on SPEED. Sledge Levers Front and Rear Crush downs on a gripper. Work for heavy singles use biggest gripper you can get 5-10 singles out of. Day 2 (3 days later) Warm up on easy stock 5-10 medium bends - Work on perfecting your form. Work on SPEED. Sledge Levers Front and Rear Crush downs on a gripper. Work for lighter singles use biggest gripper you can get 10-20 singles out of. Keep the volume high, concentrate on form and speed.
2/15/2005 16 Un-Braced Bending 8:42 PM Greg Amidon & Dave Morton www.DIESELCREW.com
Sample Routine After 2 Months Day 1 Warm up on easy stock 5-10 bends. (Work up to a very difficult bend and then fall back to finish out 10 tough but not maximal bends) Sledge Levers Front and Rear Crush downs on a gripper. Work for heavy singles use biggest gripper you can get 1-5 singles out of. You should work to be able to get reps on an IronMind #4 gripper. Day 2 (3 days later) Warm up on easy stock 10-15 bends approximately 70-80% of your max. Work on perfecting your form. Work on SPEED. Sledge Levers Front and Rear Crush downs on a gripper. Work for lighter singles use biggest gripper you can get 10-20 singles out of. As you progress and feel confident try for a PR every 3rd or 4th workout on the day 1. Only do enough bends prior to the max attempt to get warmed up, do not wear yourself out. Some people do two or three bars to warm up some do one or two. Vary the intensity from week to week and push yourself to do more bars or tougher bars each week.